
Узнайте о полезных функциях, методах их использования и примерах настроек. При настройке камеры пользуйтесь учебными материалами.
- Подготовка и основные операции
- Функции камеры и указания
Подготовка и основные операции
Подготовка камеры
Основные операции
Фотосъемка
Видеосъемка
Функции камеры и указания
Видеосъемка
Съемка видеоблогов
Увеличение
Автопортрет
Функции, доступные для сенсорных операций
Автофокусировка на точке прикосновения
[Сенсорный затвор]
(Фотосъемка)
Указание положения, в котором нужно выполнять фокусировку с помощью сенсорных операций
[Сенсорный фокус]
(Фотосъемка)
(Видеосъемка)
Использование сенсорных операций для выбора объекта, который необходимо отслеживать
[Сенсорн. отслежив.]
(Фотосъемка)
(Видеосъемка)
Фокусировка (фотосъемка)
Соединения по Bluetooth
Sony ZV-E10
Help Guide
Interchangeable Lens Digital Camera
ZV-E10
Looking for valuable information, such as essential points on shooting (Tutorials)
This website introduces convenient functions, ways of usage, and setting examples. Refer to the
website when you set up your camera. (Another window will open.)
ZV-E10 lens compatibility information
This website provides the lens compatibility information. (Another window will open.)
How to use the “Help Guide”
Names of parts/Basic operations
Identifying parts
Basic operations
Using the control wheel
Using MENU items
Assigning frequently used functions to buttons (Custom Key)
Using Fn (Function) button (Function menu)
How to use the keyboard
Icons and indicators
List of icons on the monitor
Switching the screen display (while shooting/during playback)
DISP Button
Preparing the camera
Checking the camera and the supplied items
E PZ 16–50mm F3.5–5.6 OSS (Power zoom)
Charging the battery pack
Inserting/removing the battery pack
Charging the battery pack while it is inserted in the camera
View the manual for the Sony ZV-E10 here, for free. This manual comes under the category photo cameras and has been rated by 6 people with an average of a 9.1. This manual is available in the following languages: English. Do you have a question about the Sony ZV-E10 or do you need help?
Ask your question here
Index
- LA-EA3/LA-EA5 Mount Adaptor
- LA-EA4 Mount Adaptor
- 4K Output Select (movie)
- HDMI Settings: 24p/60p Output (movie) (Only for 1080 60p compatible models)
- HDMI Settings: 24p/60p Output (movie) (Only for 1080 60p compatible models)
- 4K Output Select (movie)
Product Images (13)

Sony ZV-E10 specifications
Below you will find the product specifications and the manual specifications of the Sony ZV-E10.
The Sony ZV-E10 is a mirrorless interchangeable lens camera. It has a megapixel count of approximately 24.2 MP, and a total megapixel count of 25 MP. The camera’s sensor type is CMOS, and it has a maximum image resolution of 6000 x 4000 pixels. The supported still image resolutions are L: 6000 x 4000 (24 M), M: 4240 x 2832 (12 M), and S: 3008 x 2000 (6.0 M).
The Sony ZV-E10 camera is capable of producing high-quality images in a range of aspect ratios, including 1:1, 3:2, 4:3, and 16:9. The camera’s image sensor size is 23.5 x 15.6 mm, and it supports both JPEG and RAW image formats.
One drawback of the Sony ZV-E10 camera is the lack of an image stabilizer, which may make it more challenging for users to capture clear shots in certain conditions. However, it does offer an 8 x digital zoom, which may come in handy for some users.
Overall, the Sony ZV-E10 is a solid choice for those in need of a mirrorless interchangeable lens camera with a high megapixel count and versatile aspect ratio support. Its reliable construction and durable materials make it a long-lasting option for photographers looking to invest in a new camera.
General
| Brand | Sony |
| Model | ZV-E10 | ILCZV-E10/B |
| Product | photo camera |
| EAN | 5013493418318 |
| Language | English |
| Filetype | User manual (PDF), Installation Guide (PDF), Quickstart Guide (PDF), Datasheet (PDF) |
Picture quality
| Camera type | MILC Body |
| Megapixel (approx.) | 24.2 MP |
| Total megapixels | 25 MP |
| Image sensor size | — « |
| Sensor type | CMOS |
| Maximum image resolution | 6000 x 4000 pixels |
| Still image resolution(s) | L: 6000 x 4000 (24 M), M: 4240 x 2832 (12 M), S: 3008 x 2000 (6.0 M)\nL: 5328 x 4000 (21 M), M: 3776 x 2832 (11 M), S: 2656 x 2000 (5.3 M)\nL: 6000 x 3376 (20 M), M: 4240 x 2400 (10 M), S: 3008 x 1688 (5.1 M)\nL: 4000 x 4000 (16 M), M: 2832 x 2832 (8.0 M), S: 2000 x 2000 (4.0 M) |
| Image stabilizer | No |
| Supported aspect ratios | 1:1, 3:2, 4:3, 16:9 |
| Image sensor size (W x H) | 23.5 x 15.6 mm |
| Sensor format | Advanced Photo System type-C (APS-C) |
| Image formats supported | JPEG, RAW |
Lens system
| Digital zoom | 8 x |
| Optical zoom | — x |
Design
Camera
| Scene modes | — |
| Shooting modes | Aperture priority, Auto, Lens priority, Manual, Program, Scene |
| Photo effects | Black&White, Sepia |
| Self-timer delay | 2, 5,10 s |
| Contrast adjustment | Yes |
| Brightness adjustment | Yes |
| Saturation adjustment | Yes |
| Camera playback | Single image, Slide show |
| Tripod mounting supported | Yes |
| White balance | Auto, Cloudy, Daylight, Flash, Fluorescent, Manual, Shade, Underwater |
Display
| Display | TFT |
| Touchscreen | Yes |
| Display diagonal | 3 « |
| Display diagonal (metric) | 7.5 cm |
| Display resolution | 921600 dot |
| Flip-out screen | Yes |
| Vari-angle LCD display | Yes |
Ports & interfaces
| PictBridge | No |
| USB version | 2.0 |
| USB connector | USB Type-C |
| HDMI | Yes |
| Headphone outputs | 1 |
| Headphone connectivity | 3.5 mm |
Network
| Bluetooth | Yes |
| Bluetooth version | 4.1 |
| Near Field Communication (NFC) | — |
| Wi-Fi | — |
Focusing
| Auto focusing (AF) modes | — |
| Focus | — |
| Focus adjustment | Auto/Manual |
| Auto Focus (AF) points | 425 |
| Auto Focus (AF) points selection | Auto |
Memory
| Compatible memory cards | MS Micro (M2), MS PRO Duo, MS Pro-HG Duo, MicroSD (TransFlash), MicroSDHC, MicroSDXC, SD, SDHC, SDXC |
| Memory slots | 1 |
Audio
| Built-in microphone | Yes |
| Built-in speaker(s) | Yes |
| Audio system | Mono |
Video
| Video recording | Yes |
| Maximum video resolution | 3840 x 2160 pixels |
| HD type | 4K Ultra HD |
| Video resolutions | 3840 x 2160,1920 x 1080 pixels |
| Analog signal format system | NTSC, PAL |
| Video formats supported | XAVC S |
Flash
| Flash sync-speed | 1/160 s |
| Flash modes | Auto, Flash off, Flash on, Pre-flash, Slow synchronization |
| Flash exposure lock | Yes |
| Pre-flash | Yes |
| Flash exposure correction | ±3EV (1/2; 1/3 EV step) |
Weight & dimensions
| Width | 115.2 mm |
| Depth | 44.8 mm |
| Height | 64.2 mm |
| Weight | 343 g |
Operational conditions
| Operating temperature (T-T) | 0 — 40 °C |
Battery
| Battery life (CIPA standard) | 440 shots |
| Battery technology | — |
| Number of batteries supported | 1 |
| Battery type | NP-FW50 |
Exposure
| ISO sensitivity (min) | 100 |
| ISO sensitivity (max) | 320000 |
| ISO sensitivity | 100,200,400,800,1600,3200,6400,32000 |
| Light exposure modes | Auto, Manual |
| Light exposure control | Program AE |
| Light exposure correction | ± 5EV (1/2EV; 1/3EV step) |
| Light metering | Centre-weighted, Evaluative (Multi-pattern), Matrix, Spot |
| Auto Exposure (AE) lock | Yes |
Shutter
| Fastest camera shutter speed | 1/4000 s |
| Slowest camera shutter speed | 30 s |
| Camera shutter type | Electronic, Mechanical |
show more
Frequently Asked Questions
Can’t find the answer to your question in the manual? You may find the answer to your question in the FAQs about the Sony ZV-E10 below.
How can I customize the function buttons on the Sony ZV-E10?
To customize the function buttons on your Sony ZV-E10, access the menu by pressing the Menu button on the back of the camera. Then, navigate to the Custom Key Settings option and choose the desired function button you wish to customize. From there, you can assign different functions or settings to each button according to your preferences.
How do I change the shooting mode on the {camera}?
To change the shooting mode on your Sony ZV-E10, simply press the Mode button located on the top of the camera and use the control wheel to scroll through the available options until you find the desired shooting mode.
How can I adjust the exposure settings on the photo camera?
To manually adjust the exposure settings on your Sony ZV-E10, press the Exposure Compensation button located on the top of the camera. Then, use the control wheel to adjust the exposure by moving it to the left for darker exposure or to the right for brighter exposure.
How can I change the autofocus mode on the Sony ZV-E10?
To change the autofocus mode on your {cameraBrand} {cameraModel}, press the Focus Mode button located on the back of the camera. Then, use the control wheel to select the desired autofocus mode, such as Single AF for static subjects or Continuous AF for moving subjects.
How do I adjust the white balance settings on the Sony {camera_model}?
To adjust the white balance settings on your Sony ZV-E10, press the White Balance button located on the back of the camera. Then, use the control wheel to select the appropriate white balance preset, such as Daylight, Cloudy, or Tungsten, based on the lighting conditions you are shooting in.
Does the Sony {model} have image stabilization?
No, the Sony ZV-E10 does not have image stabilization. This means that users may need to rely on a steady hand or external tools to capture blur-free images.
What aspect ratios are supported by the Sony ZV-E10?
The Sony ZV-E10 supports aspect ratios of 1:1, 3:2, 4:3, and 16:9. This provides users with flexibility in choosing the desired framing and composition for their photos.
Can the Sony {model} shoot in RAW image format?
Yes, the Sony ZV-E10 supports shooting in RAW image format. This allows users to capture uncompressed and high-quality images, giving them more flexibility for post-processing and editing.
What is the maximum image resolution of the Sony {camera} ZV-E10?
The maximum image resolution of the Sony ZV-E10 is 6000 x 4000 pixels. This high resolution enables users to capture detailed and sharp photographs, suitable for printing and enlarging.
Does the Sony {camera_model} offer various shooting modes?
Yes, the Sony ZV-E10 offers multiple shooting modes including Aperture priority, Auto, Lens priority, Manual, Program, and Scene. This grants users the ability to adapt to different shooting conditions and preferences, enhancing their photographic experience.
What is the weight of the Sony ZV-E10?
The Sony ZV-E10 has a weight of 343 g.
What is the height of the Sony ZV-E10?
The Sony ZV-E10 has a height of 64.2 mm.
What is the width of the Sony ZV-E10?
The Sony ZV-E10 has a width of 115.2 mm.
What is the depth of the Sony ZV-E10?
The Sony ZV-E10 has a depth of 44.8 mm.
What is the screen size of the Sony ZV-E10?
The screen size of the Sony ZV-E10 is 3 «.
Is the manual of the Sony ZV-E10 available in English?
Yes, the manual of the Sony ZV-E10 is available in English .
Is your question not listed? Ask your question here
ZV-E10
5-028-028—11(1)
C:\Users\gotanda\Desktop\5028028111_RKSG GB_Thailand\5028028111ZVE10AP2\01GB.indd
DTP data saved: 2021/03/10 17:52
PDF file created: 2021/03/10 17:55
Inserting the battery pack (supplied)/memory card
(sold separately) into the camera
Open the battery/memory card cover, and insert the battery pack and a memory
card into the camera. Then, close the cover.
Memory card
Battery pack
Lock lever Ensure the notched
corner faces correctly.
Battery pack
Make sure that the battery pack is facing in the correct direction, and insert it while
pressing the battery lock lever.
Memory card
Insert the memory card with the notched corner facing as illustrated.
This camera is compatible with SD memory cards and Memory Stick media. For
details on the compatible memory cards, refer to the “Help Guide.”
When you use a memory card with this camera for the first time, format the card
using the camera in order to stabilize the performance of the memory card.
Note
• Formatting erases all data, including protected images and registered settings
(M1 to M4). Once erased, this data cannot be restored. Save valuable data to a
computer, etc. before formatting.
Charging the battery pack
1 Turn the power off.
If the camera is turned on, the battery pack will not be charged.
2 Connect the camera with the battery pack
inserted to the AC Adaptor (supplied)
using the USB cable (supplied), and
connect the AC Adaptor to the wall outlet
(wall socket).
The charge lamp will light up when charging
starts. When the charge lamp turns off,
charging is completed.
Charge lamp
Attaching a lens
Mounting indexes
1 Remove the body cap from the camera and the rear lens cap from the
rear of the lens.
2 Mount the lens by aligning the two white index marks (mounting
indexes) on the lens and camera.
3 While pushing the lens lightly toward the camera, turn the lens slowly
in the direction of the arrow until it clicks into the locked position.
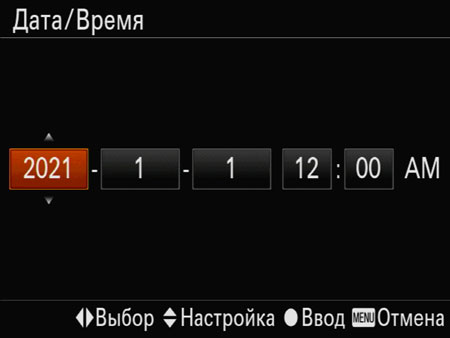
Setting the language and the clock
ON/OFF (Power) switch
Control wheel
Select items : /////
Confirm : Center button
1 Set the ON/OFF (Power) switch to “ON” to turn on the camera.
2 Select the desired language and then press the center of the control
wheel.
3 Make sure that [Enter] is selected on the screen and then press the
center button.
4 Select the desired geographic location and then press the center
button.
5 Set [Daylight Savings], [Date/Time], and [Date Format], and then select
[Enter] and press the center button.
If you want to reconfigure the date/time or the area setting at a later point,
select MENU (Setup) [Date/Time Setup] or [Area Setting].
Shooting
Shooting movies
1 Press the Still/Movie/S&Q button to select
the movie recording mode.
Each time you press the button, the shooting
mode switches in the order of still image
shooting mode, movie recording mode, and
slow-motion/quick-motion shooting mode.
2 Press the MENU button and
select (Camera Settings2)
[Shoot Mode] the desired
shooting mode.
MOVIE (Movie)
button
MENU button
Still/Movie/S&Q
button
3 Press the MOVIE (Movie) button to start recording.
4 Press the MOVIE (Movie) button again to stop recording.
Hint
• The start/stop movie recording function is assigned to the MOVIE (Movie) button
in the default settings. Even without switching shooting modes in Step 1, you
can start movie recording from still image shooting mode by pressing the MOVIE
(Movie) button.
Using the wind screen (supplied)
Use the wind screen to reduce wind noise picked
up by the internal microphone when recording a
movie.
Attach the wind screen to the Multi Interface
Shoe.
Wind screen
Multi Interface Shoe
Shooting still images
1 Press the Still/Movie/S&Q button to select
the still image shooting mode.
Each time you press the button, the shooting
mode switches in the order of still image
shooting mode, movie recording mode, and
slow-motion/quick-motion shooting mode.
2 Press the MENU button and select
(Camera Settings1)
[Shoot Mode] the desired shooting
mode.
3 Press the shutter button halfway down
to focus.
4 Press the shutter button all the way
down.
Shutter button
Still/Movie/S&Q
button
MENU button
Interchangeable Lens Digital Camera
Startup Guide
5-028-028—11(1)
E-mount
ZV-E10
©2021 Sony Corporation Printed in Thailand
Looking for valuable information, such as essential points
on shooting
This website introduces convenient functions, ways of usage, and setting
examples.
Refer to the website when you set up your camera.
Preparations
Checking the supplied items
The number in parentheses indicates the number of pieces.
• Camera (1)
• AC Adaptor (1)
The type of the AC Adaptor may differ
depending on the country/region.
• Power cord (mains lead) (1)*
(supplied in some countries/regions)
* Multiple power cords may be
supplied with this equipment. Use the
appropriate one that matches your
country/region. See “Notes on use.”
• Rechargeable battery pack NP-FW50
(1)
• USB Type-C® cable (USB 2.0) (1)
• Wind screen (1) (attached to the wind
screen adaptor)
• Wind screen adaptor (1)
• Shoulder strap (1)
• Body cap (1)*
* Only for the ZV-E10
• Startup Guide (this manual) (1)
• Reference Guide (1)
Identifying parts
For details on identifying parts, refer to the following Help Guide URL:
https://rd1.sony.net/help/ilc/2070_parts/h_zz/
About the manual for this camera
This guide describes the necessary preparations to start using the
product, basic operations, etc. For details, refer to the “Help Guide”
(web manual).
https://rd1.sony.net/help/ilc/2070/h_zz/
“Help Guide” (Web manual)
ZV-E10 Help Guide
Tutorials
https://www.sony.net/tutorial/zv/e10/
ZV-E10
5-028-028—11(1)
C:\Users\gotanda\Desktop\5028028111_RKSG GB_Thailand\5028028111ZVE10AP2\01GB.indd
DTP data saved: 2021/03/10 17:52
PDF file created: 2021/03/10 17:55
Power Cord
For the customers in the UK, Ireland, Malta, Cyprus and Saudi Arabia
Use the power cord (A).
For safety reasons, the power cord (B) is not intended for above countries/regions and shall
therefore not be used there.
For the customers in other EU countries/regions
Use the power cord (B).
(A) (B)
For Customers in the U.S.A.
For question regarding your product or for the Sony Service Center nearest you, call 1-800-222-
SONY (7669) .
Supplier’s Declaration of Conformity
Trade Name : SONY
Model : WW356015
Responsible Party : Sony Electronics Inc.
Address : 16535 Via Esprillo, San Diego, CA 92127 U.S.A.
Telephone Number : 858-942-2230
This device complies with part 15 of the FCC rules. Operation is subject to the following two
conditions: (1) This device may not cause harmful interference, and (2) this device must accept
any interference received, including interference that may cause undesired operation.
Specifications
Camera
[System]
Camera Type:
Interchangeable Lens Digital Camera
Lens: Sony E-mount lens
[Image sensor]
Image format: APS-C size (23.5 mm ×
15.6mm), CMOS image sensor
Effective pixel number of camera:
Approx. 24200000 pixels
Total pixel number of camera:
Approx. 25000000 pixels
[Monitor]
7.5 cm (3.0 type) TFT drive, touch panel
[General]
Rated input: 7.2V , 2.0W
Operating temperature:
0 to 40 °C (32 to 104 °F)
Storage temperature:
–20 to 55 °C (–4 to 131 °F)
Dimensions (W/H/D) (Approx.):
115.2 × 64.2 × 44.8 mm
4 5/8 × 2 5/8 × 1 13/16 in.
Mass (Approx.):
343 g (12.1 oz) (including battery pack,
SD Card)
[Wireless LAN]
Supported format: IEEE 802.11 b/g/n
Frequency band: 2.4 GHz
Security: WEP/WPA-PSK/WPA2-PSK
Connection method:
Wi-Fi Protected Setup™ (WPS)/Manual
Access method: Infrastructure mode
AC Adaptor AC-UUD12/AC-UUE12
Rated input:
100 — 240V , 50/60Hz, 0.2A
Rated output: 5V , 1.5A
Rechargeable battery pack
NP-FW50
Rated voltage: 7.2V
Maximum charge voltage: DC 8.4 V
Maximum charge current: 1.02 A
Design and specifications are subject to
change without notice.
Trademarks
• XAVC S and are registered trademarks of Sony Corporation.
• USB Type-C® and USB-C® are registered trademarks of USB Implementers Forum.
• Wi-Fi, the Wi-Fi logo and Wi-Fi Protected Setup are registered trademarks or trademarks of the
Wi-Fi Alliance.
• QR Code is a trademark of Denso Wave Inc.
• In addition, system and product names used in this manual are, in general, trademarks or
registered trademarks of their respective developers or manufacturers. However, the ™ or
marks may not be used in all cases in this manual.
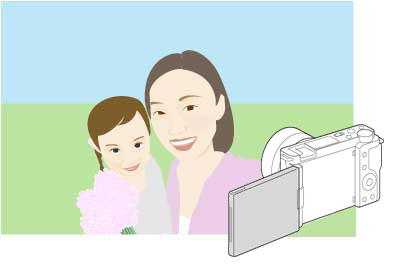
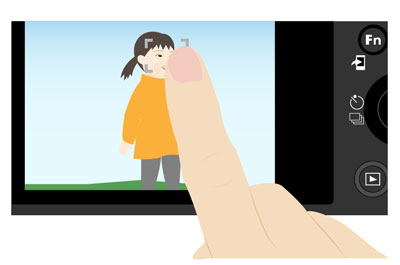
Viewing
1 Press the (Playback) button to switch
to the playback mode.
(Playback) button
Control wheel
2 Select an image with the control wheel.
You can move to the previous image/next
image by pressing the left/right side of the
control wheel.
To start playing back a movie, press the
center button on the control wheel.
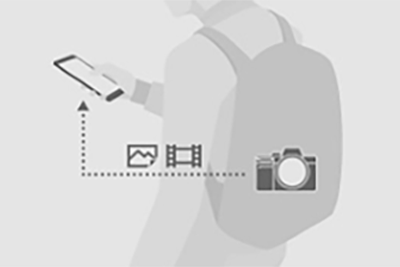
Transferring images to a
smartphone
You can transfer images to a smartphone by connecting the camera and a
smartphone via Wi-Fi.
1 : Install Imaging Edge Mobile on your smartphone.
To connect the camera and your smartphone, Imaging Edge Mobile is required.
Install Imaging Edge Mobile to your smartphone in advance.
If Imaging Edge Mobile is already installed on your smartphone, be sure to
update it to the latest version.
https://www.sony.net/iem/
2 : Press the (Playback) button to switch to playback mode.
Then press the Fn/ (Function/Send to Smartphone) button, and select
images to transfer to the smartphone.
3 Use the QR Code to connect the camera and your smartphone.
: Launch Imaging Edge Mobile on your smartphone, and select
[Connect with a new camera].
: Scan the QR Code displayed
on the camera while the
[Connect using the camera QR Code]
screen is displayed on the smartphone.
The camera and your smartphone will be
connected, and images will be transferred.
When transferring images after the initial transfer, select the camera to be
connected from the displayed camera list in Step 3- above.
If you want to select images to transfer on the smartphone, or use the remote
shooting function via smartphone, perform the following procedure.
Select MENU (Network) [Smartphone Connect] [ Connection] on the
camera.
Then, launch Imaging Edge Mobile on your smartphone and connect the camera
and your smartphone as described in Step 3 above.
Refer to the following support sites for information on how to transfer images:
https://www.sony.net/dics/iem22/
• For details on other connection methods, types of images that can be transferred,
or how to use the smartphone as a remote commander to operate the camera,
refer to the “Help Guide.”
• The Wi-Fi functions introduced in this manual are not guaranteed to operate on
all smartphones or tablets.
• The Wi-Fi functions of this camera are not available when connected to a public
wireless LAN.
Editing movies on a smartphone
You can edit recorded movies by installing the Movie Edit add-on to your
smartphone.
For details on installation and use, refer to the following URL:
https://www.sony.net/mead/
Managing and editing images
on a computer
By connecting the camera to a computer using a USB cable or inserting the
camera’s memory card into the computer, you can import recorded images to the
computer.
You can perform remote shooting from a computer, and adjust or develop
RAW images recorded with the camera by using the software suite
Imaging Edge Desktop.
For details on the computer software, refer to the following URL.
https://www.sony.net/disoft/
Notes on use
Refer to “Precautions“ in the “Help Guide” as well.
Notes on handling the product
• This camera is designed to be dust-and moisture-resistant, but is not waterproof or dust-proof.
• Do not leave the lens exposed to a strong light source such as sunlight. Because of the lens’s
condensing function, doing so may cause smoke, fire, or a malfunction inside the camera body
or the lens.
• If sunlight or other strong light enters the camera through the lens, it may focus inside the
camera and cause smoke or fire. Attach the lens cap when storing the camera. When shooting
with backlighting, keep the sun sufficiently far away from the angle of view. Even if it is slightly
away from the angle of view, smoke or fire may still occur.
• Do not directly expose the lens to beams such as laser beams. That may damage the image
sensor and cause the camera to malfunction.
• Do not look at sunlight or a strong light source through the lens when it is detached. This may
result in unrecoverable damage to the eyes or cause a malfunction.
• This camera (including accessories) has magnet(s) which may interfere with pacemakers,
programmable shunt valves for hydrocephalus treatment, or other medical devices. Do not
place this camera close to persons who use such medical devices. Consult your doctor before
using this camera if you use any such medical device.
• This camera is equipped with a magnetic sensor. If the camera is placed too close to a magnet
or a device with an internal magnet, the lens may activate. Take care not to place the camera
near any magnetic devices.
• Increase the volume gradually. Sudden loud noises can damage your ears. Be especially careful
when listening to headphones.
• Do not leave the camera, the supplied accessories, or memory cards within the reach of infants.
They may be accidentally swallowed. If this occurs, consult a doctor immediately.
Notes on the monitor
• The monitor is manufactured using extremely high-precision technology, and over 99.99% of
the pixels are operational for effective use. However, there may be some small black dots and/
or bright dots (white, red, blue or green in color) that constantly appear on the monitor. These
are imperfections due to the manufacturing process and do not affect the recorded images in
any way.
• If the monitor is damaged, stop using the camera immediately. The damaged parts may harm
your hands, face, etc.
Notes on continuous shooting
During continuous shooting, the monitor may flash between the shooting screen and a black
screen. If you keep watching the screen in this situation, you may experience uncomfortable
symptoms such as feeling of unwellness. If you experience uncomfortable symptoms, stop using
the camera, and consult your doctor as necessary.
Notes on recording for long periods of time or recording 4K movies
• The camera body and battery may become warm with use – this is normal.
• If the same part of your skin touches the camera for a long period of time while using the
camera, even if the camera does not feel hot to you, it may cause symptoms of a low-
temperature burn such as redness or blistering. Pay special attention in the following situations
and use a tripod, etc.
— When using the camera in a high temperature environment
— When someone with poor circulation or impaired skin sensation uses the camera
— When using the camera with [Auto Power OFF Temp.] set to [High]
Notes on using a tripod
Use a tripod with a screw less than 5.5 mm (7/32 inches) long. Otherwise, you cannot firmly
secure the camera, and damage to the camera may occur.
Sony lenses/accessories
Using this unit with products from other manufacturers may affect its performance, leading to
accidents or malfunction.
Warning on copyrights
Television programs, films, videotapes, and other materials may be copyrighted. Unauthorized
recording of such materials may be contrary to the provisions of the copyright laws.
Notes on location information
If you upload and share an image tagged with a location, you may accidentally reveal the
information to a third party. To prevent third parties from obtaining your location information, set
[Location Info. Link Set.] to [Off] before shooting images.
Notes on discarding or transferring this product to others
Before discarding or transferring this product to others, be sure to perform the following
operation to protect private information.
• Select [Setting Reset] [Initialize].
Notes on discarding or transferring a memory card to others
Executing [Format] or [Delete] on the camera or a computer may not completely delete the data
on the memory card. Before transferring a memory card to others, we recommend that you
delete the data completely using data deletion software. When discarding a memory card, we
recommend that you physically destroy it.
Note on network functions
When you use network functions, unintended third parties on the network may access the
camera, depending on the usage environment. For example, unauthorized access to the camera
may occur in network environments to which another network device is connected or can
connect without permission. Sony bears no responsibility for any loss or damage caused by
connecting to such network environments.
How to turn off wireless network functions (Wi-Fi, etc.) temporarily
When you board an airplane, etc., you can turn off all wireless network functions temporarily
using [Airplane Mode].
Additional information on this product and answers to frequently asked questions can be
found at our Customer Support Website.
Sony ZV-E10 Startup Guide
Startup Guide
2 pages
en
Startup Guide
2 pages
en
Sony ZV-E10 Specification
The Sony ZV-E10 is a compact mirrorless camera designed primarily for vloggers and content creators, offering a combination of advanced video capabilities and user-friendly features. It is equipped with a 24.2-megapixel APS-C Exmor CMOS sensor, delivering high-resolution images and exceptional low-light performance. The camera supports 4K video recording at up to 30fps and Full HD recording at up to 120fps, allowing for versatile content creation. It features Sony’s Fast Hybrid Autofocus system with 425 phase-detection and contrast-detection points, ensuring precise and rapid focus acquisition. The Real-time Eye Autofocus and Real-time Tracking technologies enhance subject tracking, making it ideal for dynamic shooting scenarios.
The ZV-E10 includes a vari-angle LCD touchscreen, facilitating easy framing and monitoring for self-recording. It offers an intuitive user interface tailored for video creators, with dedicated buttons for common functions such as background defocus and product showcase mode. The camera is equipped with a directional 3-capsule microphone and includes a wind screen, ensuring high-quality audio capture. Connectivity options include a USB-C port, micro HDMI, and a 3.5mm headphone and microphone jack, providing flexibility for external accessories and live streaming.
With a lightweight body, the ZV-E10 is highly portable, making it suitable for on-the-go shooting. It supports interchangeable E-mount lenses, expanding creative possibilities for users. The battery life allows for extended shooting sessions, and the camera can be powered via USB for continuous operation. Overall, the Sony ZV-E10 combines professional-level features with ease of use, catering to the needs of modern content creators seeking high-quality video and audio performance in a compact form factor.
Sony ZV-E10 F.A.Q.
To set up the Sony ZV-E10 for vlogging, attach a compatible lens and ensure the camera is set to video mode. Use the flip-out screen to frame yourself. Adjust the settings for stabilization, and consider using an external microphone for better audio quality.
If the Sony ZV-E10 won’t power on, first check if the battery is charged and properly inserted. If using an AC adapter, ensure it’s connected securely. Try removing the battery and memory card, then reinsert them. If the issue persists, consider contacting Sony support.
To transfer photos to your smartphone, use the Imaging Edge Mobile app. Enable Wi-Fi on the camera, connect your smartphone to the camera’s network, and follow the app’s instructions to transfer images.
Clean the lens using a soft microfiber cloth. For tougher spots, use a lens cleaning solution sparingly. Avoid touching the lens with your fingers and always use the lens cap when the camera is not in use.
Download the latest firmware from the Sony support website. Connect the camera to your computer using a USB cable and follow the instructions provided with the firmware download to complete the update process.
Ensure the camera is not exposed to direct sunlight or high temperatures. Limit continuous recording time and allow the camera to cool between sessions. If overheating continues, reduce the video resolution or frame rate.
To achieve a blurred background, use a lens with a wide aperture (low f-number) and position your subject away from the background. Adjust the aperture setting in the camera to its widest setting to enhance the effect.
Check if the lens is set to autofocus mode. Clean the lens and camera contacts gently with a dry cloth. Ensure the camera settings are configured correctly for the shooting environment. If problems persist, reset the camera settings to default.
Access the camera’s menu, navigate to the shooting settings, and select ‘Drive Mode.’ Choose ‘Continuous Shooting’ to enable the feature, which allows multiple shots to be taken in quick succession.
Yes, you can use an external microphone with the Sony ZV-E10. Connect the microphone to the camera’s microphone input jack. Ensure the microphone is securely attached and adjust the audio settings in the menu if necessary.