
English Reference Manual
VL3X

Safety information 1
Important safety instructions 2
EMC / EMI 4
Explanation of graphic symbols 5
Before you begin 6
About this manual 7
Getting support 8
VoiceSupport 9
Please register your VL3X 10
Introduction 11
Welcome! 12
Concepts 13
Top panel overview 18
Footswitches overview 21
Back panel inputs and outputs 27
VL3X overview 30
Setting up 31
Diagram legend 32
Diagrams 33
Quick troubleshooting tips 38
Getting to know VL3X 39
Amazing Grace 40
A guided tour 41
There’s no place like Home 42
Using the Control knob 43
Using the Arrow buttons 44
What is a Preset? 45
Using Steps 46
Using Preset Genres and Favorites 47
What is NaturalPlay? 48
Using Global Key/Scale 49
Setting Key/Scale manually 50
Let’s try Harmony! 51
Using the HIT footswitch 52
Using individual effects 53
Change a button from Latched to
Momentary mode 54
Remapping a footswitch 55
Talk/Tuner Mode 57
Guitar Effects 58
Editing HIT 59
Using ALL HIT 60
HIT– Dynamic vs. Snapshot 61
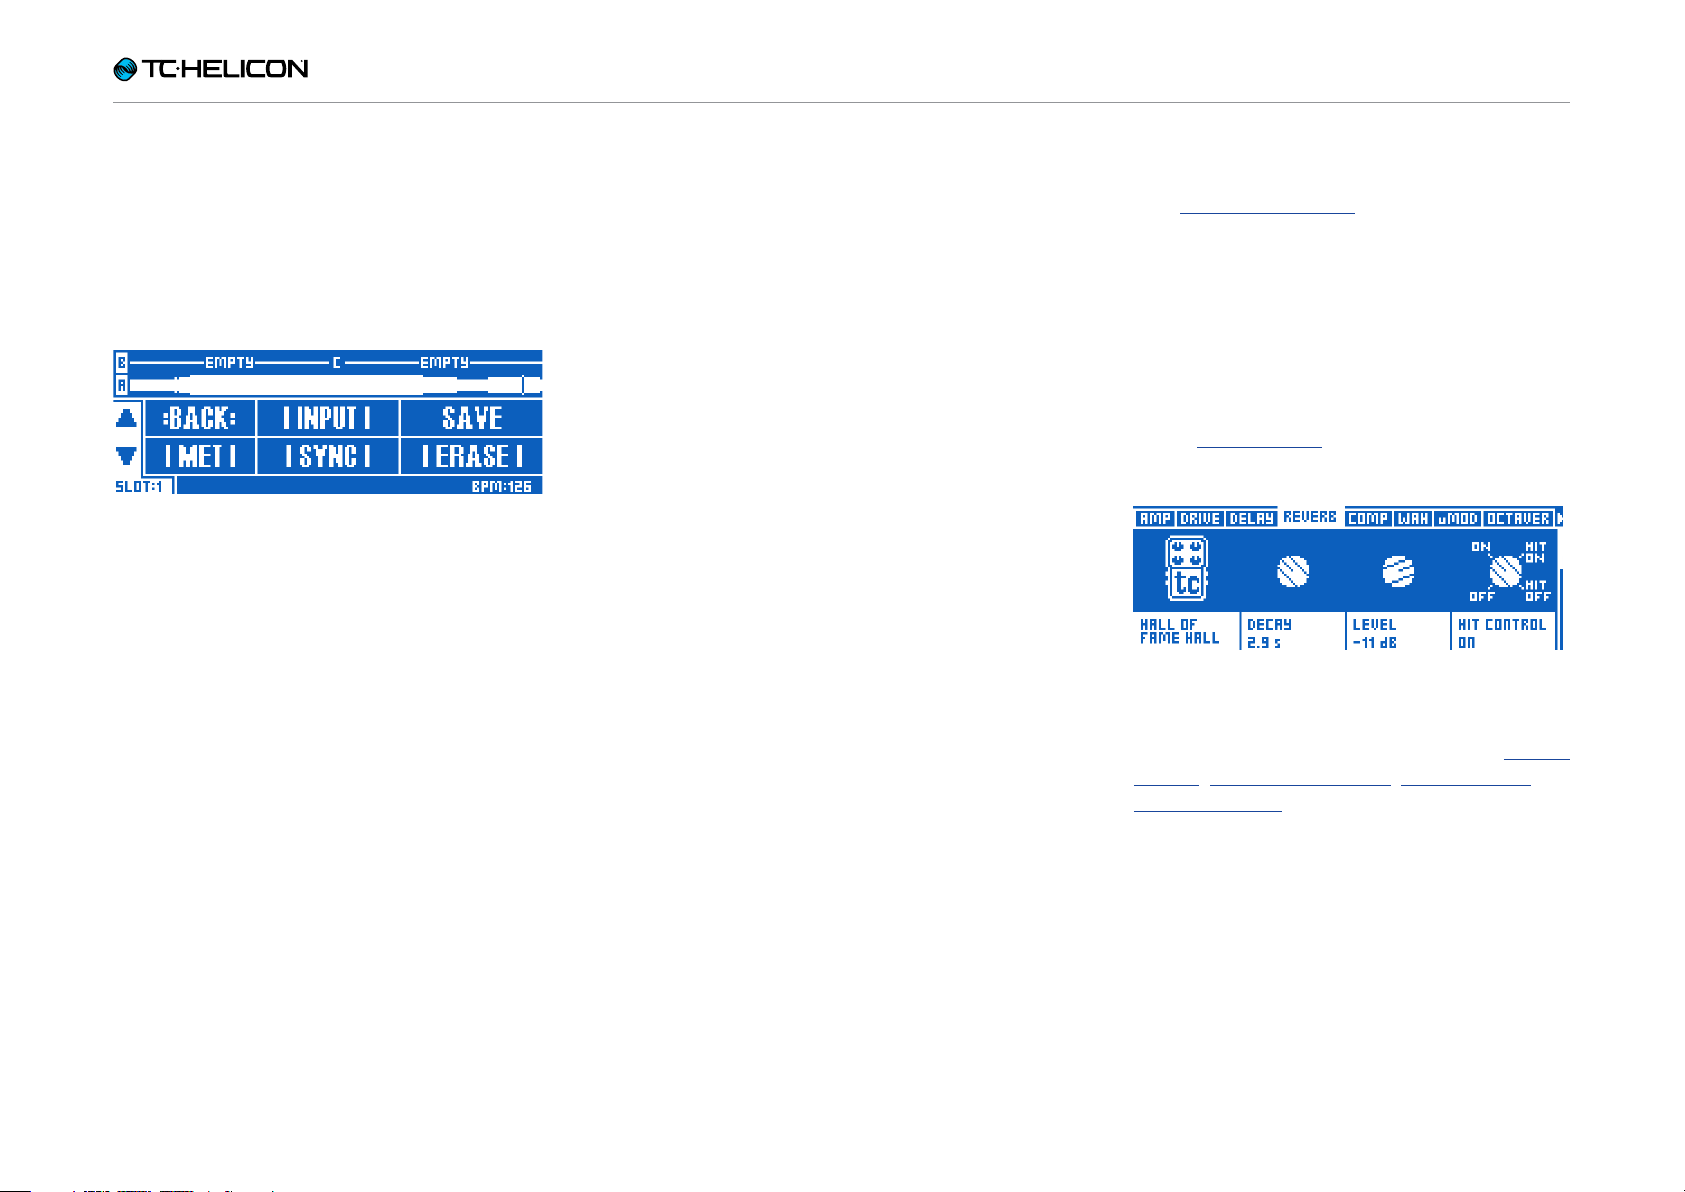
Storing Presets 63
Tapping tempo 65
Using Global Tempo 66
Editing an Effect 67
Defining and using Global Effects 69
MIDI Sync 72
Backing Track Import 73
Backing Tracks 76
Backing Track Sequence Recording
(Automation) 80
Importing and Exporting Performances 83
Direct to USB Recording 84
Using the Mix Controls 85
Tips and tricks for working with layers
and effects 87
Mic Control and Footswitch tabs:
Remapping footswitches 88
Exp. Pedal tab: Getting the most out
of your expression pedal 89
Editing the Vocal Layer 91
Introduction 92
Harmony effect block / tab 93
Double effect block / tab 95
Vocal Delay effect block / tab 96
Vocal Reverb effect block / tab 98
HardTune effect block / tab 100
Synth effect block / tab 102
Transducer effect block / tab 103
Vocal µMod effect block / tab 104
Choir effect block / tab 105
Vocal Rhythmic effect block / tab 106
Stutter effect block / tab 107
Vocal Buttonmap tab 108
Editing the Guitar Layer 110
Int r o duc t i on 111
Amp effect block / tab 112
Drive effect block / tab 114
Guitar Delay effect block / tab 115
Guitar Reverb effect block / tab 116
Comp(ression) effect block / tab 117
Wah (Wah-Wah) effect block / tab 118
µMod effect block / tab 119
Octaver effect block / tab 120
Guitar Rhythmic effect block / tab 121
Guitar Buttonmap block / tab 122
The Looper 123
Introduction 124
Loop button parameters 125
Basic loop concepts and terms 128
Entering and exiting Loop mode 129
Your first loop 130
The Utility menu 134
Loop limits 139
Loop Management 140
Loop Triggers 142
Looping and MIDI Sync 144
Product VL3X
Product (firmware) version 2.0.00 Build 311
Document Reference manual
Document version / date 2015-05-12
VL3X – Reference manual (updated 2015-05-12) a

Se tup 145
Introduction 146
Input tab 147
Output tab 151
Guitar tab 153
MIDI tab 155
Tone tab 159
System tab 165
Mic Control and Footswitch tabs 169
Mic Control tab 170
Footswitch tab 172
Pedal Calibration tab 177
Product info tab 178
Appendix 179
MIDI CC List 180
System Maintenance/Factory Reset 181
Technical Specifications 182
VL3X – Reference manual (updated 2015-05-12) b

Safety information
Safety information
VL3X – Reference manual (updated 2015-05-12) 1

Safety information
Important safety instructions
1. Read these instructions.
2. Keep these instructions.
3. Heed all warnings.
4. Follow all instructions.
5. Do not use this apparatus near water.
6. Clean only with a dry cloth.
7. Do not block any ventilation openings. Install in accordance with the manufacturer’s
instructions.
8. Do not install near any heat sources such
as radiators, heat registers, stoves, or other apparatus (including amplifiers) that produce heat.
9. Do not defeat the safety purpose of the polarized or grounding-type plug. A polarized
plug has two blades with one wider than
the other. A grounding-type plug has two
blades and a third grounding prong. The
wide blade or the third prong is provided for
your safety. If the provided plug does not fit
into your outlet, consult an electrician for
replacement of the obsolete outlet.
10. Protect the power cord from being walked
on or pinched, particularly at plugs, convenience receptacles, and the point where
they exit from the apparatus.
11. Only use attachments/accessories specified by the manufacturer.
12. Use only with a cart, stand, tripod,
bracket, or table specified by the
manufacturer, or sold with the apparatus. When a cart is used, use
caution when moving the cart/apparatus
combination to avoid injury from tip-over.
13. Unplug this apparatus during lightning
storms or when unused for long periods
of time.
14. Refer all servicing to qualified service personnel. Servicing is required when the apparatus has been damaged in any way,
such as power-supply cord or plug is damaged, liquid has been spilled or objects
have fallen into the apparatus, the apparatus has been exposed to rain or moisture,
does not operate normally, or has been
dropped.
Caution
You are cautioned that any change or modifications not expressly approved in this manual
could void your authority to operate this equipment.
VL3X – Reference manual (updated 2015-05-12) 2

Safety information
Service
► All service must be performed by qualified
personnel.
► There are no user-serviceable parts inside.
Warning
► To reduce the risk of fire or electric shock, do
not expose this apparatus to rain or moisture
and objects filled with liquids, such as vases,
should not be placed on this apparatus.
► This apparatus must be earthed.
► Use a three wire grounding type line cord like
the one supplied with the product.
► Be advised that different operating voltages
require the use of different types of line cord
and attachment plugs.
► Check the voltage in your area and use the
correct type.
Voltage Line plug according to standard
110 to 125V UL817 and CSA C22.2 no42.
220 to 230V CEE7 page VII, SR section 107-
2-D1 / IEC83 page C4.
► This equipment should be installed near the
socket outlet and disconnection of the device
should be easily accessible.
► To completely disconnect from AC mains, dis-
connect the power supply cord from the AC
receptacle.
► The mains plug of the power supply shall re-
main readily operable.
► Do not install this device in a confined space.
► For use at an altitude of 2000m or lower.
► Do not open the unit – risk of electric shock
inside.
VL3X – Reference manual (updated 2015-05-12) 3

EMC / EMI
Safety information
Electromagnetic compatibility /
Electromagnetic interference
This equipment has been tested and found to
comply with the limits for a Class B digital device, pursuant to part 15 of the FCC rules.
These limits are designed to provide reasonable
protection against harmful interference in residential installations. This equipment generates,
uses and can radiate radio frequency energy
and, if not installed and used in accordance with
the instructions, may cause harmful interference
to radio communications. However, there is no
guarantee that interference will not occur in a
particular installation.
If this equipment does cause harmful interference to radio or television reception, which can
be determined by turning the equipment off and
on, the user is encouraged to try to correct the
interference by one or more of the following
measures:
For customers in Canada
This Class B digital apparatus complies with Canadian ICES-003.
Cet appareil numérique de la classe B est
conforme à la norme NMB-003 du Canada.
► Reorient or relocate the receiving antenna.
► Increase the separation between the equip-
ment and receiver.
► Connect the equipment into an outlet on a cir-
cuit different from that to which the receiver is
connected.
► Consult the dealer or an experienced ra-
dio / TV technician for help.
VL3X – Reference manual (updated 2015-05-12) 4

Safety information
Explanation of graphic symbols
The lightning bolt triangle is used to
alert the user to the presence of uninsulated “dangerous voltages” within
the unit’s chassis that may be of sufficient magnitude to constitute a risk of
electric shock to humans.
The exclamation point triangle is used
to alert the user to presence of important operating and service instructions
in the literature accompanying the
product.
VL3X – Reference manual (updated 2015-05-12) 5

Before you begin
Before you begin
VL3X – Reference manual (updated 2015-05-12) 6

Before you begin
About this manual
This reference manual will help you learn understanding and operating your VL3X.
You can download the most current version of
this reference manual from:
tc-helicon.com/support/manuals/
To get the most from this reference manual,
please read it from start to finish, or you may
miss important information.
VL3X – Reference manual (updated 2015-05-12) 7

Before you begin
Getting support
If you still have questions about the product after reading this reference manual, please get in
touch with TC-Helicon Support:
tc-helicon.com/support/product/
VL3X – Reference manual (updated 2015-05-12) 8

Before you begin
VoiceSupport
VoiceSupport is the application that allows you
to fully unlock the potential of your TC-Helicon
product and stay in touch with the latest news,
tips and tricks.
VoiceSupport key features include:
► Professionally authored preset libraries
► Direct access to product manuals
► Drag & drop Preset management
► Customizable content about your products
► Firmware upgrades
► Account management
► Access to TC-Helicon support
You can download VoiceSupport for Microsoft
Windows and Mac OS X from:
tc-helicon.com/products/voicesupport/
VL3X – Reference manual (updated 2015-05-12) 9

Before you begin
Please register your VL3X
To register your VL3X using the VoiceSupport
software, launch VoiceSupport and click on the
ACCOUNT button.
You can also go to
account.tc-helicon.com
Registration of your product is NOT required to
use VoiceSupport, download presets, update
firmware or contact support.
VL3X – Reference manual (updated 2015-05-12) 10

Introduction
Introduction
VL3X – Reference manual (updated 2015-05-12) 11

Introduction
Welcome!
Thank you for purchasing VoiceLive 3 Extreme –
or as we affectionately call it: VL3X.
Like the original VoiceLive 3, VL3X brings you
a wide array of vocal and guitar effects, plus a
great multi-track looper.
But, you bought the Extreme – so what’s NEW?
In a word… well, four words: Backing Tracks and
Automation.
See “Backing Tracks” and “Backing Track Sequence Recording (Automation)”.
As you discovered in the Quick Start Guide (the
short manual that came in the box), VL3X is easy
to use at the top level but offers unpre cedented
depth in both control and editing. We recommend you treat your VL3X like any other new
instrument and dedicate some time to learning
how to use it.
Yes, that means RTFM!
Read the… full manual.
VL3X – Reference manual (updated 2015-05-12) 12
Concepts
Introduction
Before we dive into the countless features of
VL3X, let’s establish some basic terms and concepts.
Layers & footswitch mapping
VL3X is built on the fundamental concept of “layers”. From a design perspective, there are thee
Layers to work with:
► Vocal
► Guitar
► Looping / Backing Track
You may switch between Layers using the Layer
footswitch, which we will discuss in more detail
later in the manual.
our massively popular VoiceLive 2 unit: “I love
it – but I want the ‘X’ footswitch to be where the
‘Y’ footswitch is”.
We also recognize that Layers and remappable footswitches can be a bit daunting to learn.
This is why we have designed the system to be
consistent and straightforward. Once you have
learned how to remap one footswitch, you know
how to remap them all.
Essentially, when you tap the Layer footswitch,
the effects associated with the six effect
footswitches (labeled µMod, Delay, Reverb, HIT,
Double/Comp, Harmony/Drive) will change from
vocal effects to guitar effects or looping/backing
track controls.
You can even remap footswitches within a Lay-
er or from one Layer to another. This approach
solves one of the most common requests from
VL3X – Reference manual (updated 2015-05-12) 13
Introduction
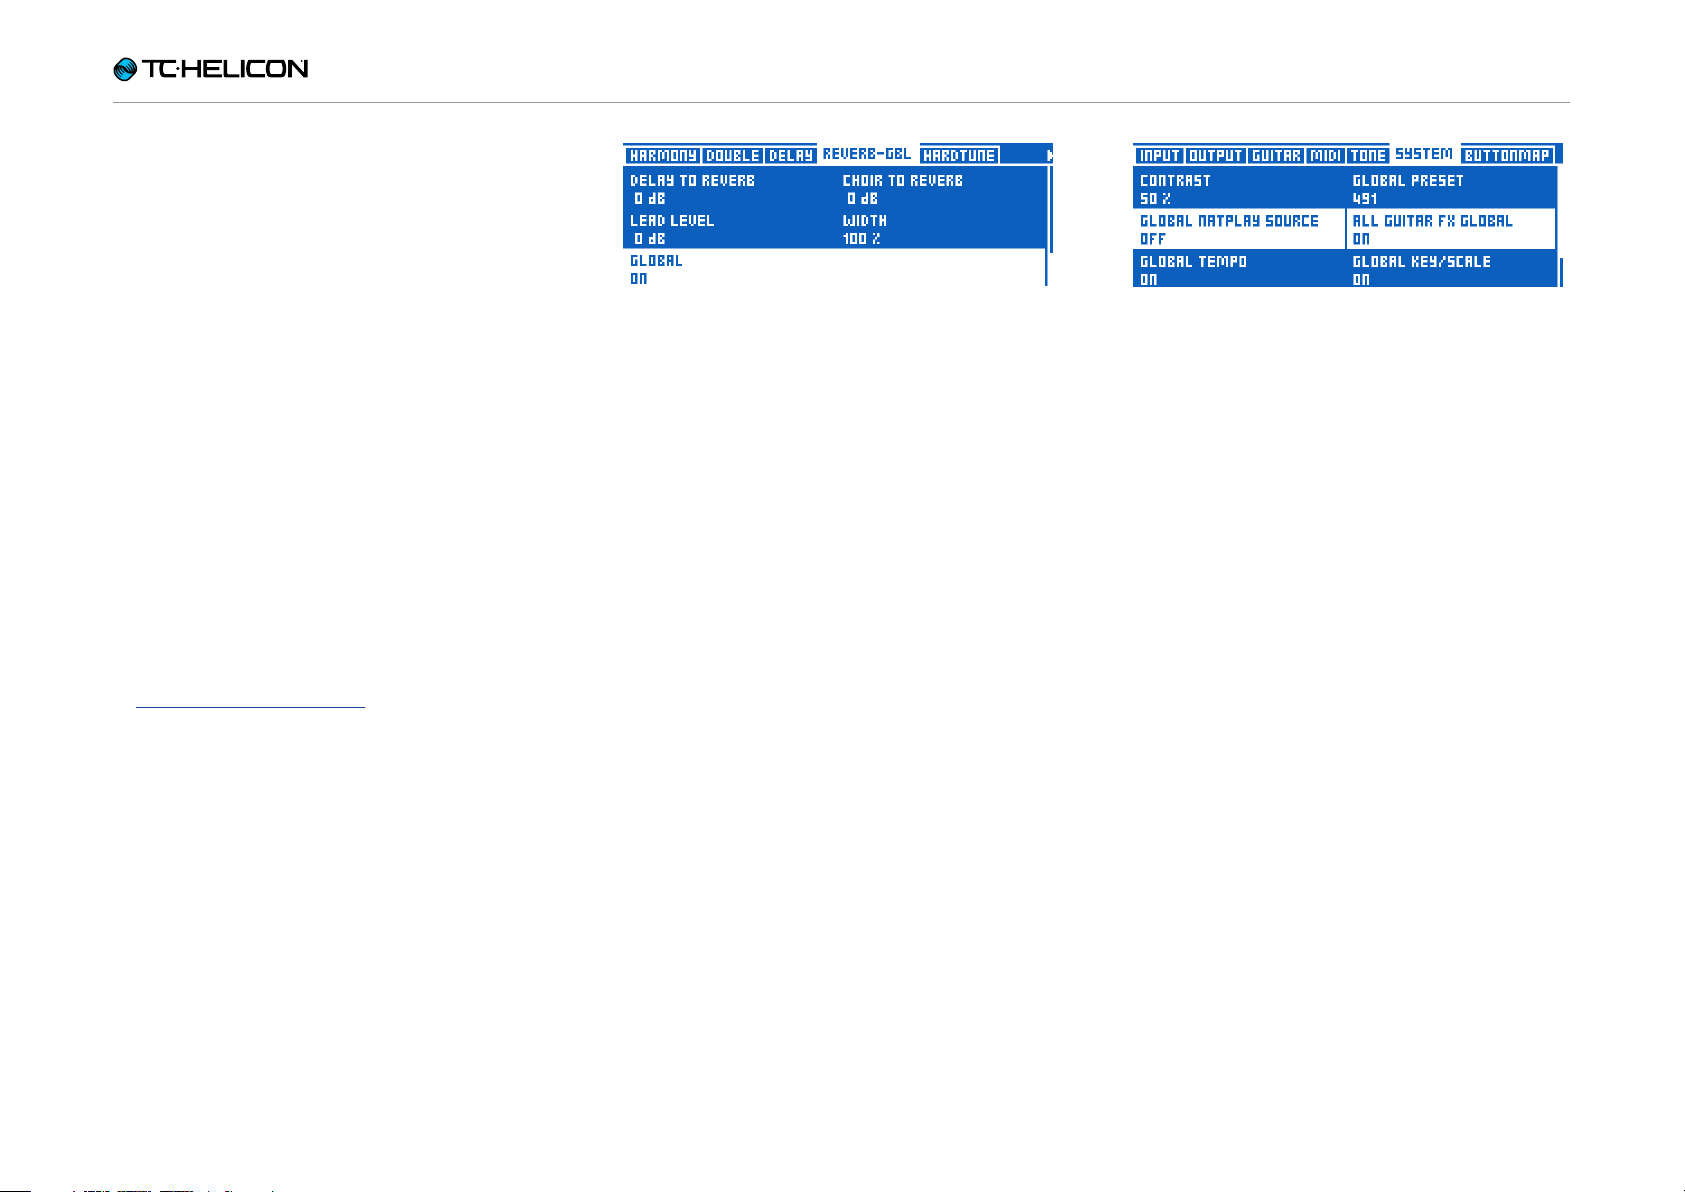
Global Effects
Another common request from TC-Helicon users
has been for “global effects”. VL3X allows you to
define a specific Preset as the “Global” Preset.
This defines all of the effects and parameters
within that Preset and allows them to be easily
applied to other Presets.
Setting Global to on links an effect to the
settings defined in the Global Preset
Set All Guitar FX Global to “On” to use the
same guitar effect in all Presets
What does that mean for you? Easier, quicker Preset creation and access to consistent
sounds!
Here is an example:
“I want to use this great reverb on a whole bunch
of Presets. How do I do that?”
► First, edit the guitar reverb on your Global Pre-
set (by default, this is Preset no. 491). Editing
guitar settings is explained in greater detail in
“Editing the Guitar Layer”.
► Then go to each Preset where you would like
to use the same Reverb, go to the Reverb
settings and change the Global parameter to
“On”.
Done! This Preset will now use the Reverb settings from the Global Preset.
Global effects are available for each and every
effect in the Vocal and Guitar Layers. There are
endless possibilities for Global effects handling,
but here are a couple we think you might like:
Use the same guitar effects
across all Presets
This essentially turns VL3X’s Guitar Layer into a
series of stomp-boxes that you only need to set
up once.
“How do I do that?”
► Simply edit ANY Preset until all of the guitar
effects and footswitch assignments are how
you like them.
► Enter the Setup menu and navigate to the Sys-
tem tab using the horizontal Arrow buttons.
► Dial the Control knob until the line saying “All
Guitar FX Global: Off” is highlighted.
► Turn Mix knob 3 or Mix knob 4 under the dis-
play until “Off” changes to “On”.
Done! Every Preset will now have the same
guitar sounds.
Make sure a particular effect
always sounds the same
Want a certain Delay available in every Preset?
No problem.
► Just edit the Global Preset’s Delay setting.
► Go to each Preset where you would like to use
the same Delay, go to the Delay settings and
change the Global parameter to “On”.
Always use the same guitar amp model,
but have everything else change
► Easy! Adjust the Global Preset’s Amp setting
the way you want it.
► Go to each Preset where you would like to use
the same Amp, go to the Amp settings and
change the Global parameter to “On”.
Updating Global settings
The Global system is “opt in”. This means each
Preset carries its own individual settings until
you change an effect to Global. Once that happens, the current Preset and Global Preset settings become shared.
Once you have changed an effect to Global ON, any edits you make within that Pre-
VL3X – Reference manual (updated 2015-05-12) 14
Introduction
set affect the Global settings as well. This
means you don’t have to bounce back and forth
between the Global and current Preset to make
changes to Global effects.
It also means that you need to be aware of the
above, so you don’t accidentally edit a Global
setting, thinking you are only editing the current
Preset. With great power comes great responsibility!
For more information, see “Defining and using
Global Effects”.
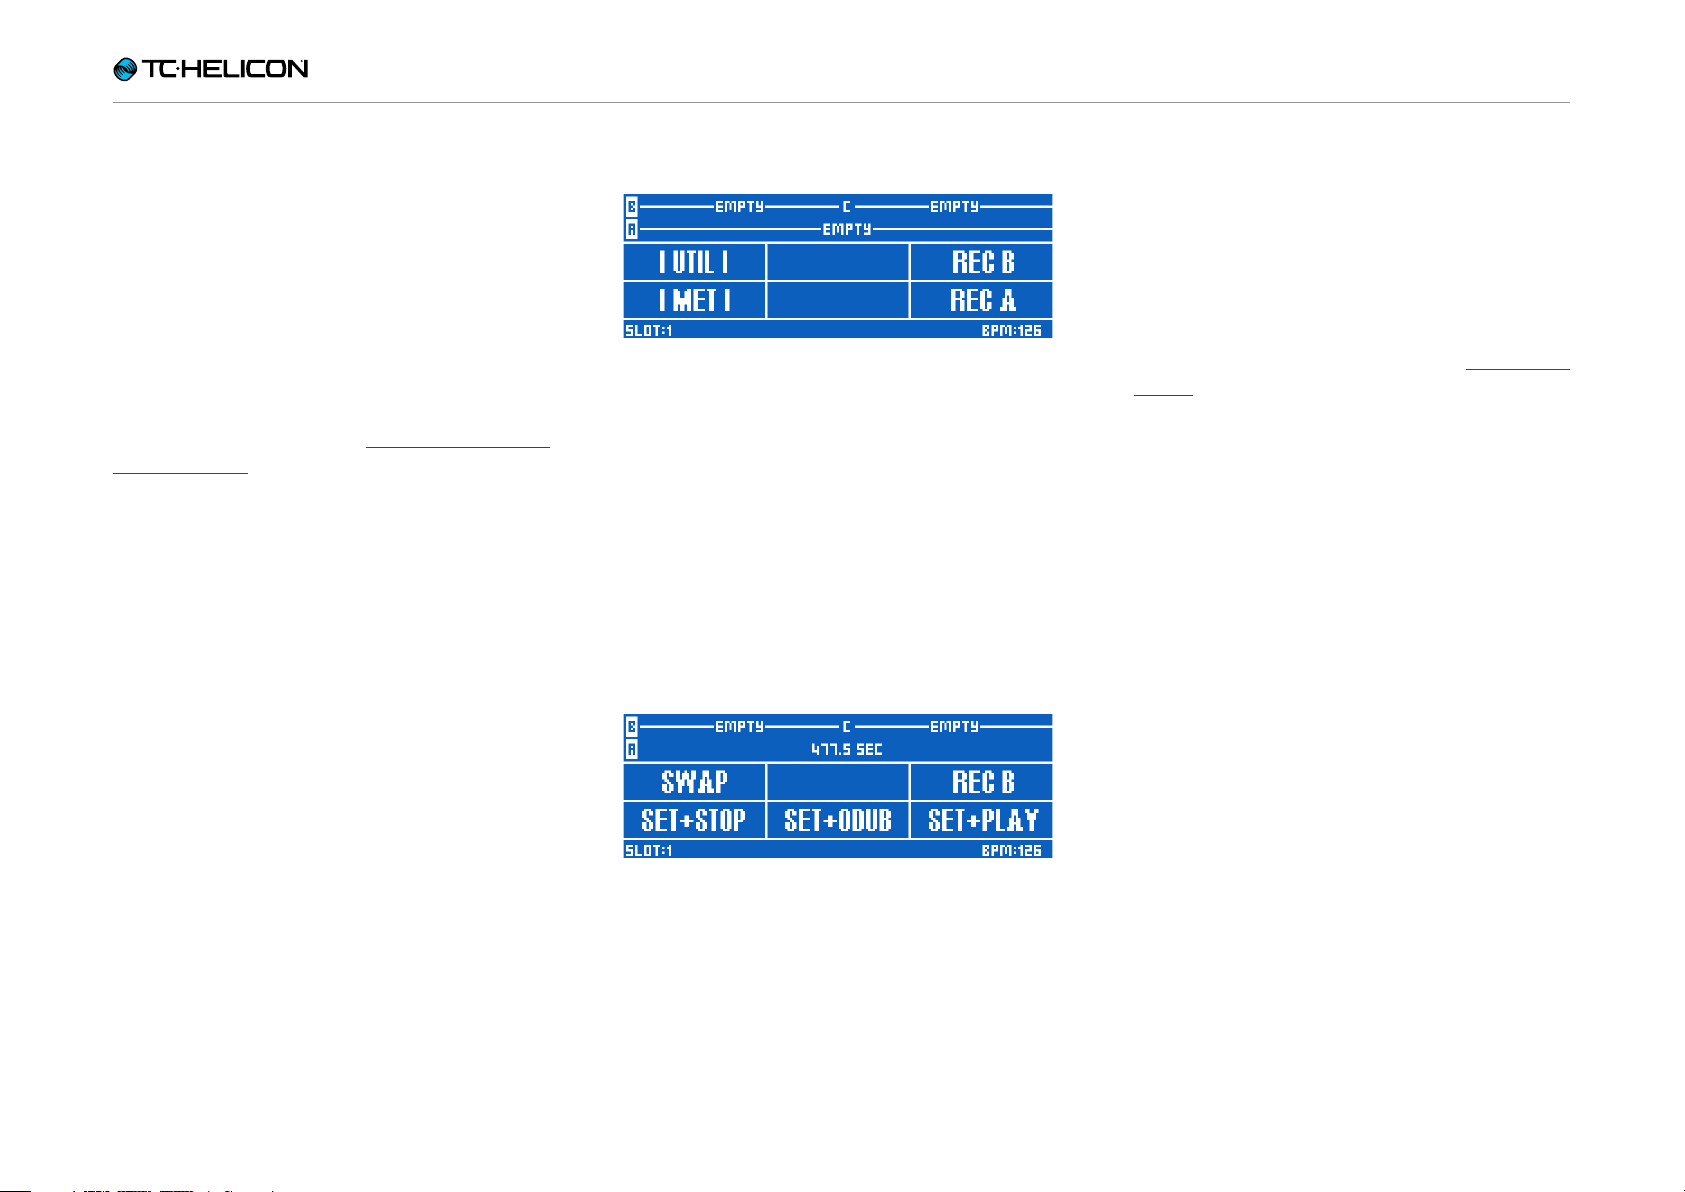
Multi-track looper
Looper – Main view
Having access to multiple, independent loops allows for a lot of flexibility and functionality when
looping. Our multi-track looper has some really
amazing performance features that will help you
to make great loops.
The Swap feature allows you to record two loops
and alternate between them with the push of a
footswitch. This is particularly useful for recording different “sections” of a song, (like a verse
and chorus) and quickly moving between them.
box” segment in order for there to be “enough”
to play your guitar part over. Now, you can record unequal length phrases!
Record your 1 bar “beat box” on one loop Track,
then record your 8 bar guitar section on another.
There are a few different Sync modes in the
Looper – so be sure to read the “The Utility
menu” to familiarize yourself with the way they
affect your loops.
Looper – Swap feature
Loop length no longer matters. In some loop-
ers, your longest loop track will dictate the length
of all others, which can be a big hassle. Imagine
a “beat box” style rhythm that is 1 bar long and a
guitar progression that is 8 bars long. In the past,
you would have to record 8 bars of the “beat
VL3X – Reference manual (updated 2015-05-12) 15
Introduction
Store loops
Those of you who have jumped on board with
looping have likely made a really, really good
loop in the past – only to see it vanish into thin
air when you power off the device. VL3X allows
you to store your creations right in the box!
Loop Utility menu with Save function
Not only can you store your loops – you can
assign a stored loop to a Preset. This, in our
opinion, is a game changer.
Imagine recording a really cool ambient loop,
synced to the tempo of your song, while you are
at home – and then fire it off at your gig. If the
band is using a click track, everything will line up
perfectly with what you are playing, including all
of your time-based vocal and guitar effects!
Backing Tracks and Automation
VL3X’s killer new feature is its ability to import
Backing Tracks, assign them to a Preset and
then record your effect changes throughout the
song. When you hit the stage, your carefully designed performance can be presented to your
audience, keeping your eyes up and feet free to
better deliver a compelling performance.
No more “tap dancing” on the effects buttons.
No more external track player. Just a great performance where you can concentrate on what
you do best, playing music.
Complete guitar effects
With VoiceLive Play GTX, we introduced our first
“complete” guitar effects suite. Previously, we
had provided Chorus, Reverb, EQ and Compression blocks. VoiceLive Play GTX added Amp/
Distortion and Delay to the options, greatly expanding the sound possibilities for guitar players.
VL3X takes that ball and runs with it. In fact, it
pulls a Forrest Gump and runs straight out of the
stadium and across the country!
Guitar effects in VL3X
The guitar effects in VL3X come from some of TC
Electronic’s most successful effects, like Corona
Chorus, Hall of Fame Reverb, Vortex Flanger and
Flashback Delay!
This storage ability removes a lot of the repetitive
nature of building loops live in front of an audience. Sure, it’s neat the first time you see someone build a loop live, but then it gets a bit boring.
It often takes a while to get all of the “bits” of the
loop recorded. You can do that work in advance
and then add to things in real-time during performance.
VL3X – Reference manual (updated 2015-05-12) 16
When you couple those beautiful effects with
great amp modeling, Drive/Boost, Compression,
Rhythm/Tremolo, Wah-wah and Octave Down,
you can truly manipulate your guitar and vocal
sounds as a cohesive unit.
Imagine your time-based vocal and guitar effects
being perfectly in sync, without having to set up
complex timing systems or tapping tempo on
multiple devices. Everything just lines up!

Introduction
Advanced monitoring
More and more people are jumping into the In
Ear Monitor (IEM) pool. It’s a great thing to do –
but it can often require a fairly complex setup.
VL3X offers two features that make custom monitor mixing really easy for you.
Monitor IN
Using the Monitor IN XLR connection, you can
bring a “monitor or cue” mix into your VL3X,
blending it with your own vocal, guitar and loop
sounds. The incoming monitor IN does not get
passed back out of the unit – so you can rest assured that it won’t cause feedback.
Headphone Mix
VL3X’s headphone mix is independent of the
output mix – allowing you to hear “what you
want” in your headphones or IEMs, without affecting what comes from the main outputs.
This monitoring capability can literally eliminate
the need for expensive belt packs, transmitters,
secondary mixers and other gear required for a
custom IEM solution. Using our included Guitar/
Headphone cable, you only use one cable to
connect your guitar and headphones/IEM’s to
the unit!
Headphone Mix
VL3X – Reference manual (updated 2015-05-12) 17

Introduction
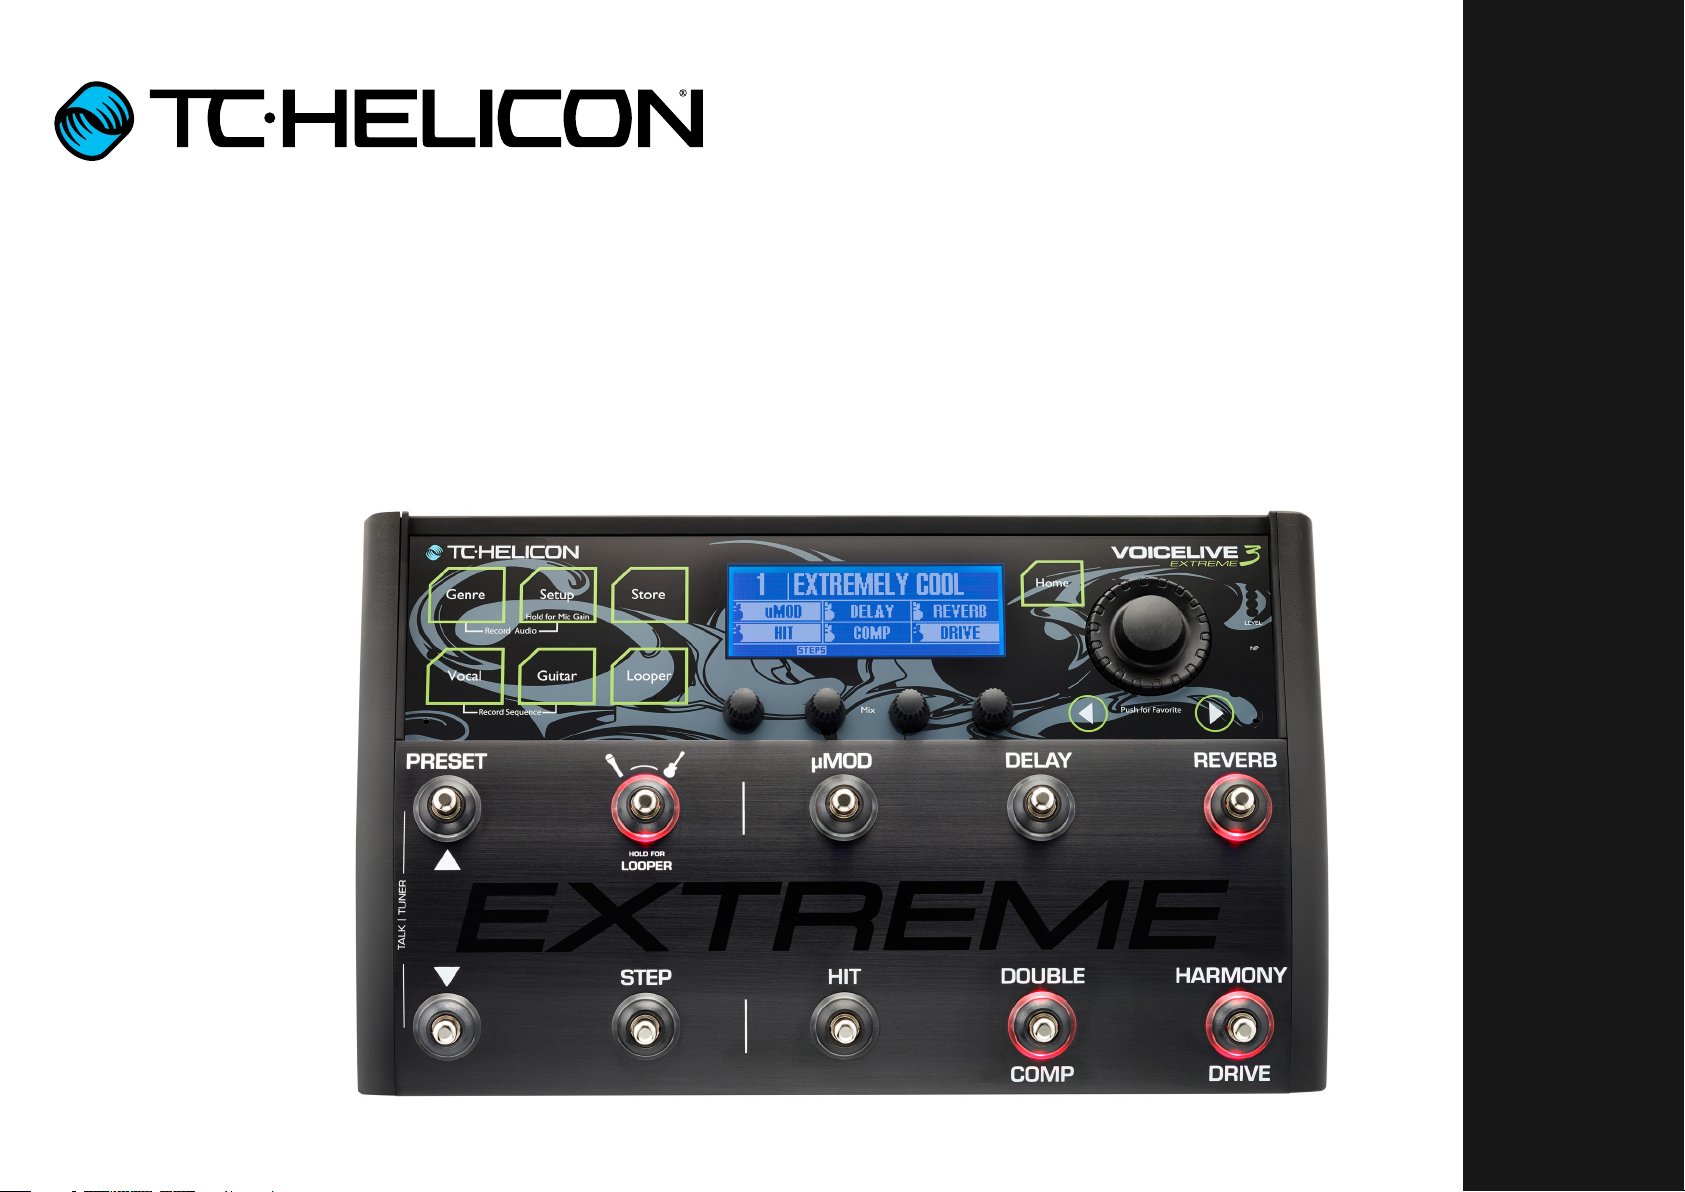
Top panel overview
Click or tap on an interface element to jump directly to its description.
Record Audio
Record Sequence
VL3X – Reference manual (updated 2015-05-12) 18
Push for Favorite
Introduction
Below is a brief description of the top panel controls and buttons. Full functionality for each will
be described in more detail later.
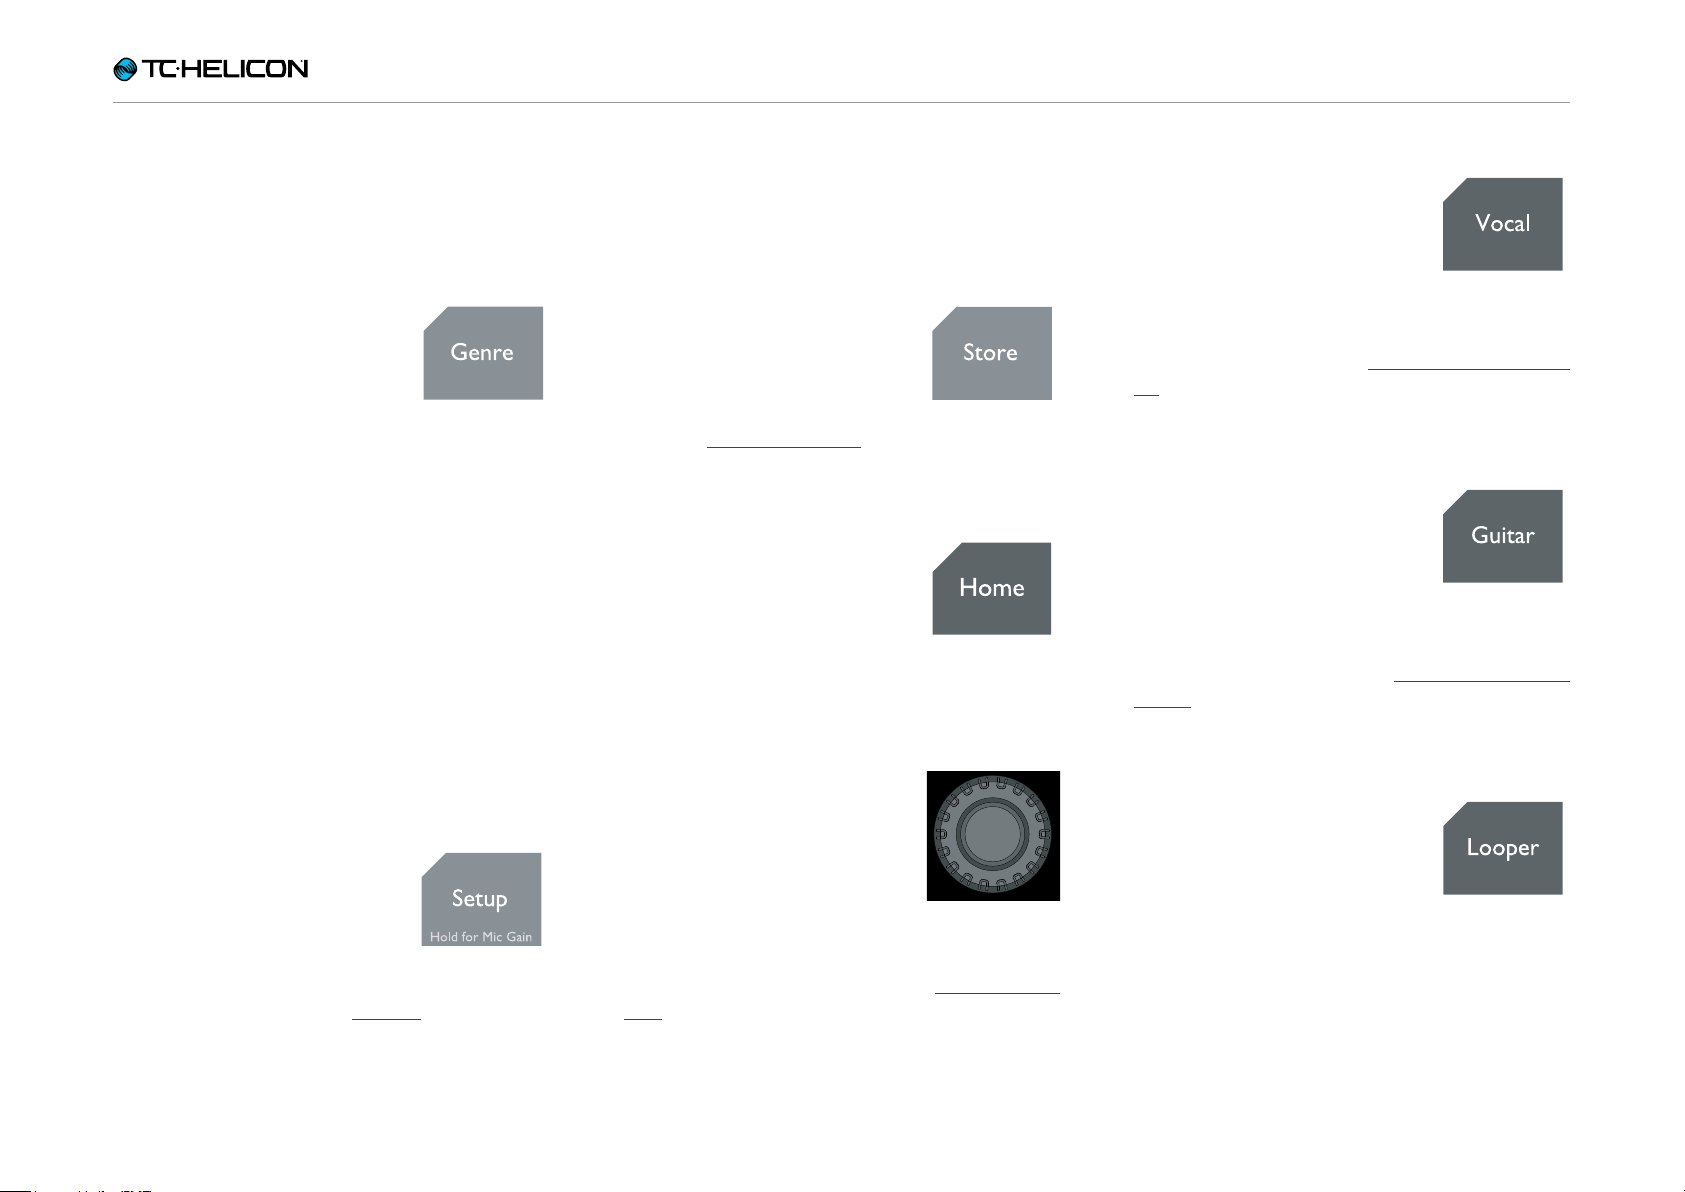
Genre button
Use the Genre button to find
Presets based on their musical genre or featured effects.
For example, you may want to
restrict the Presets “visible” to you in VL3X to
those that are defined as “Rock” or “Country”
in nature.
Use the knob right under the genre indicator to
select the desired Genre (e.g. “Rock”), and press
the Genre button again. When browsing Presets, you will only see Presets assigned to this
Genre, and the name of the selected Genre will
be shown in the lower left corner of the display.
To remove the filter, tap the Genre button, set
Genre to “All” and tap the Genre button again
Setup button
Press the Setup button to access all system setup settings,
including Input, Output, MIDI,
Tone, Guitar and more.
For more information, see “Setup”.
Press and hold the Setup button to enter the
automated microphone and guitar gain setting
mode.
Store button
Use the Store button to store
Presets. Tap once to activate
the store procedure. Tap again
to confirm. For more information, see “Storing Presets”.
Home button
Use the Home button to return
to the “top level” interface. The
screen will show the number of
the current Preset and any effects associated with the current Layer.
Control knob
Use the Control knob to move
through Presets and scrolls up/
down when in an edit screen.
When the “Home” screen is
shown, you can press the Control knob to add
or remove the current Preset from the Favorite
genre. For more information, see “Using Favorites”.
Vocal button
Use the Vocal button to enter
the Vocal edit screens. This is
where you can make changes
to the vocal effects for the current Preset.
For more information, see “Editing the Vocal Layer”.
Guitar button
Use the Guitar button to enter
the Guitar edit screens. This is
where you can make changes
to any of the guitar effects for
the current Preset.
For more information, see “Editing the Guitar
Layer”.
Looper button
Use the Looper button to enter
the Loop and Backing Tracks
options screen. Here you can
control several general Loop
options.
When you’re in the Vocal or Guitar layer and have
a Loop playing, the small red LED next to the
Looper button will flash. This gives a visual indication that a loop is running.
VL3X – Reference manual (updated 2015-05-12) 19
Introduction
For more information, see “Loop button parameters”.
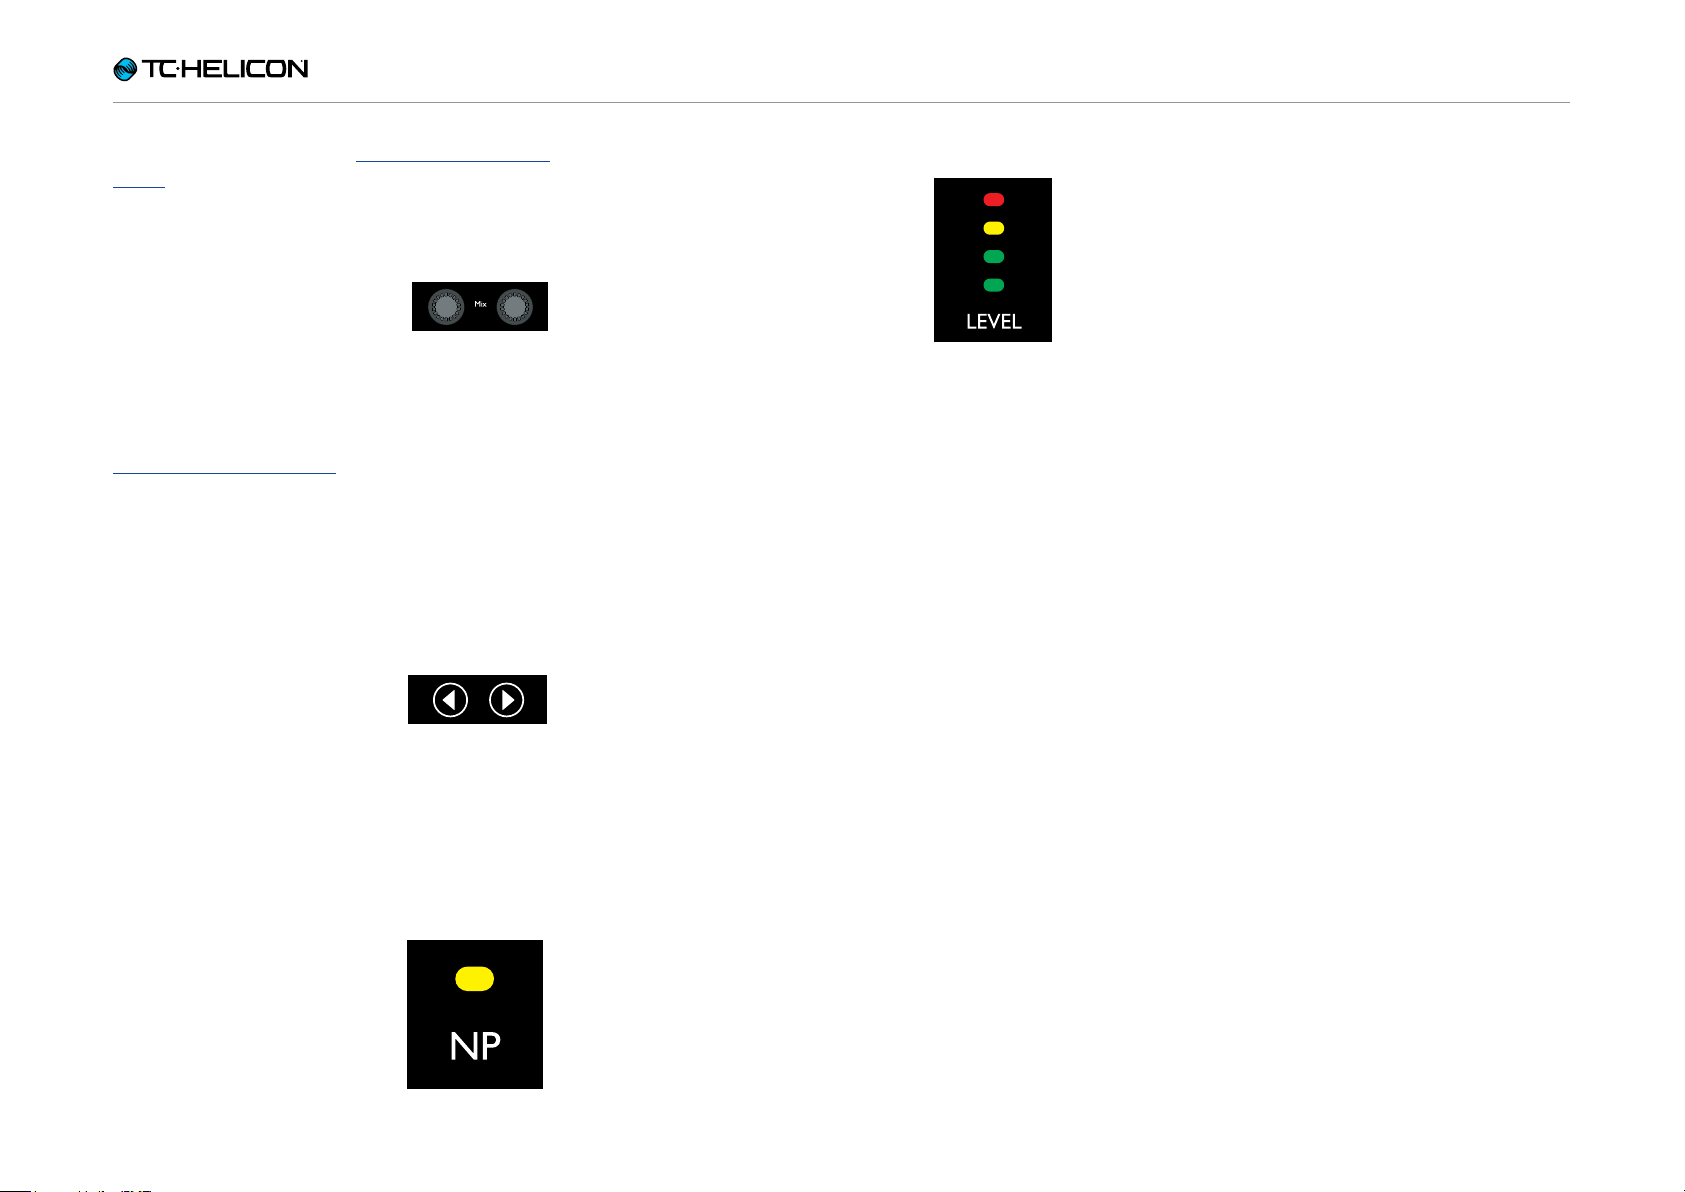
Mix knobs
From the Home screen, turning any mix knob enters the
Mix screens (Main, Headphones and Effects).
For more information on the Mix screens, see
“Using the Mix Controls”.
Within an Edit page, the mix knobs adjust parameter settings. Each mix knob controls the parameter shown right above it in the display.
Arrow buttons
When you are on the Home
screen, you can use the Arrow buttons to move through
Presets.
Level LEDs
Read the level LEDs as follows:
► If you play your guitar with-
out singing, the LEDs show
your guitar level.
► If you sing and don’t play
guitar, the LEDs show your
vocal level.
► If you play and sing, the LEDs show a com-
bined level.
When you are on an Edit screen, use the Arrow
buttons to move between tabs.
NP LED
The NP LED lights when NaturalPlay (chord) information
is received via Guitar, MIDI,
Aux, Looper or RoomSense.
VL3X – Reference manual (updated 2015-05-12) 20
Introduction
Footswitches overview
Click or tap on an interface element to jump directly to its description.
VL3X – Reference manual (updated 2015-05-12) 21
Introduction
Below is a description of the footswitches on
VL3X. Some switches will be discussed in more
detail later in the manual.
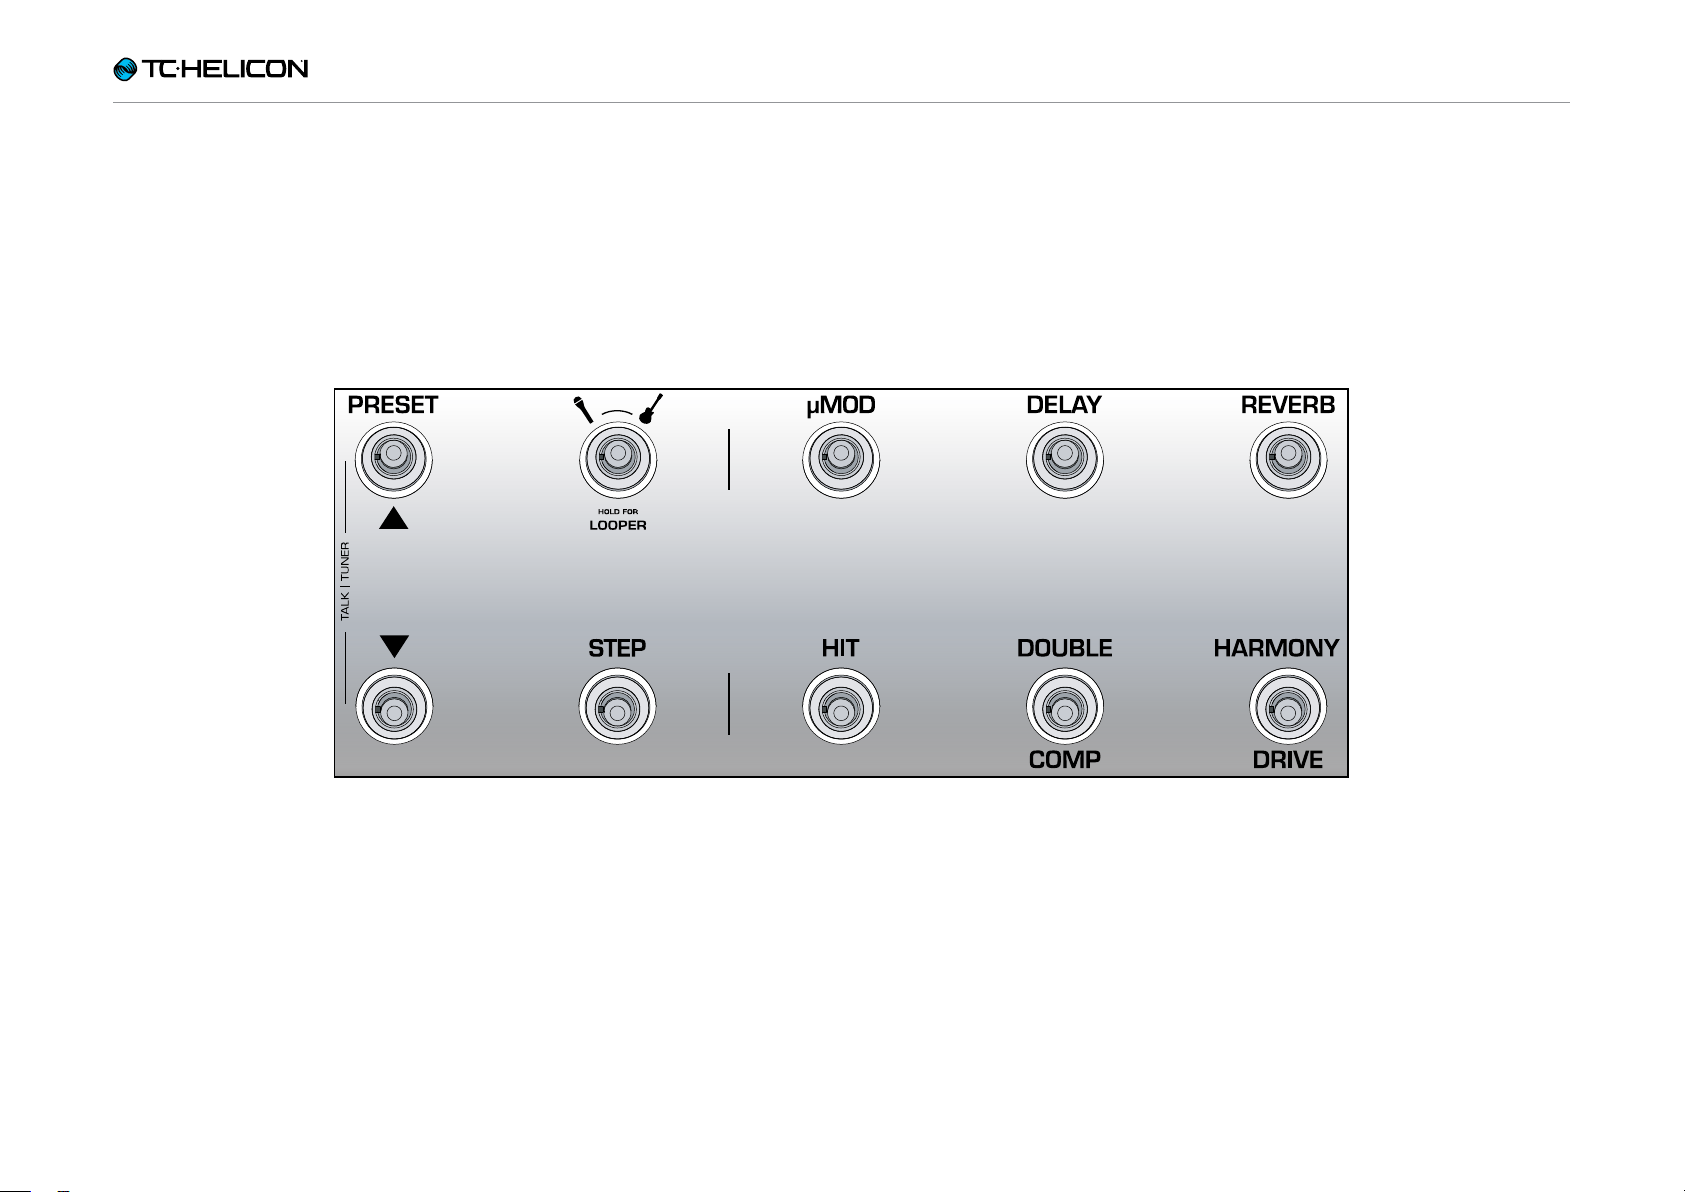
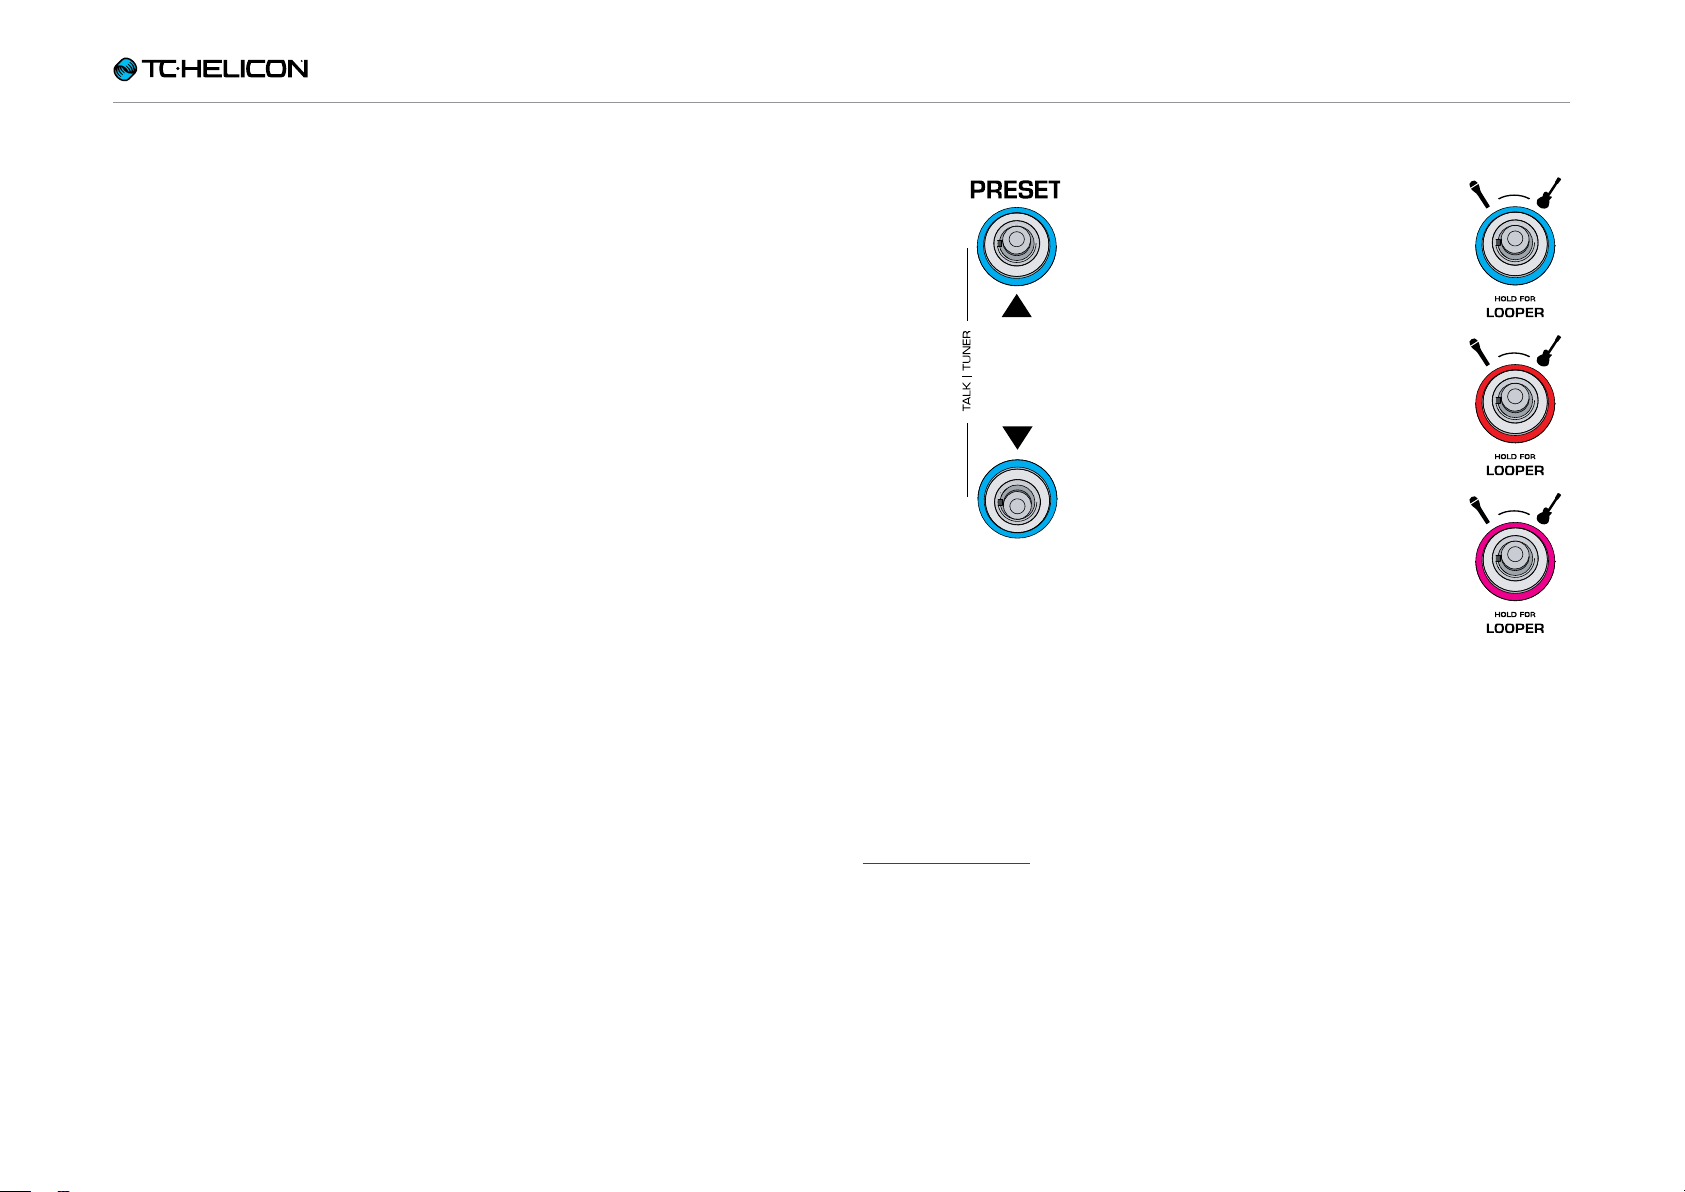
Preset up / Preset down footswitches
► Tap the Preset Up/Preset Down
footswitches to move through
Presets.
► Hold the Preset Up/Preset
Down footswitches to quickly
scroll through Presets.
► Tap both footswitches simul-
taneously to enter Talk/Tuner
mode.
About Talk/Tuner mode
Talk/Tuner mode mutes guitar output, activates the guitar tuner and
bypasses all vocal effects so you
can speak to your audience.
You can still tap the Preset Up and Down Preset
buttons while in Talk/Tuner mode to change presets. This is great for changing presets while addressing the audience to queue sounds for your
next song.
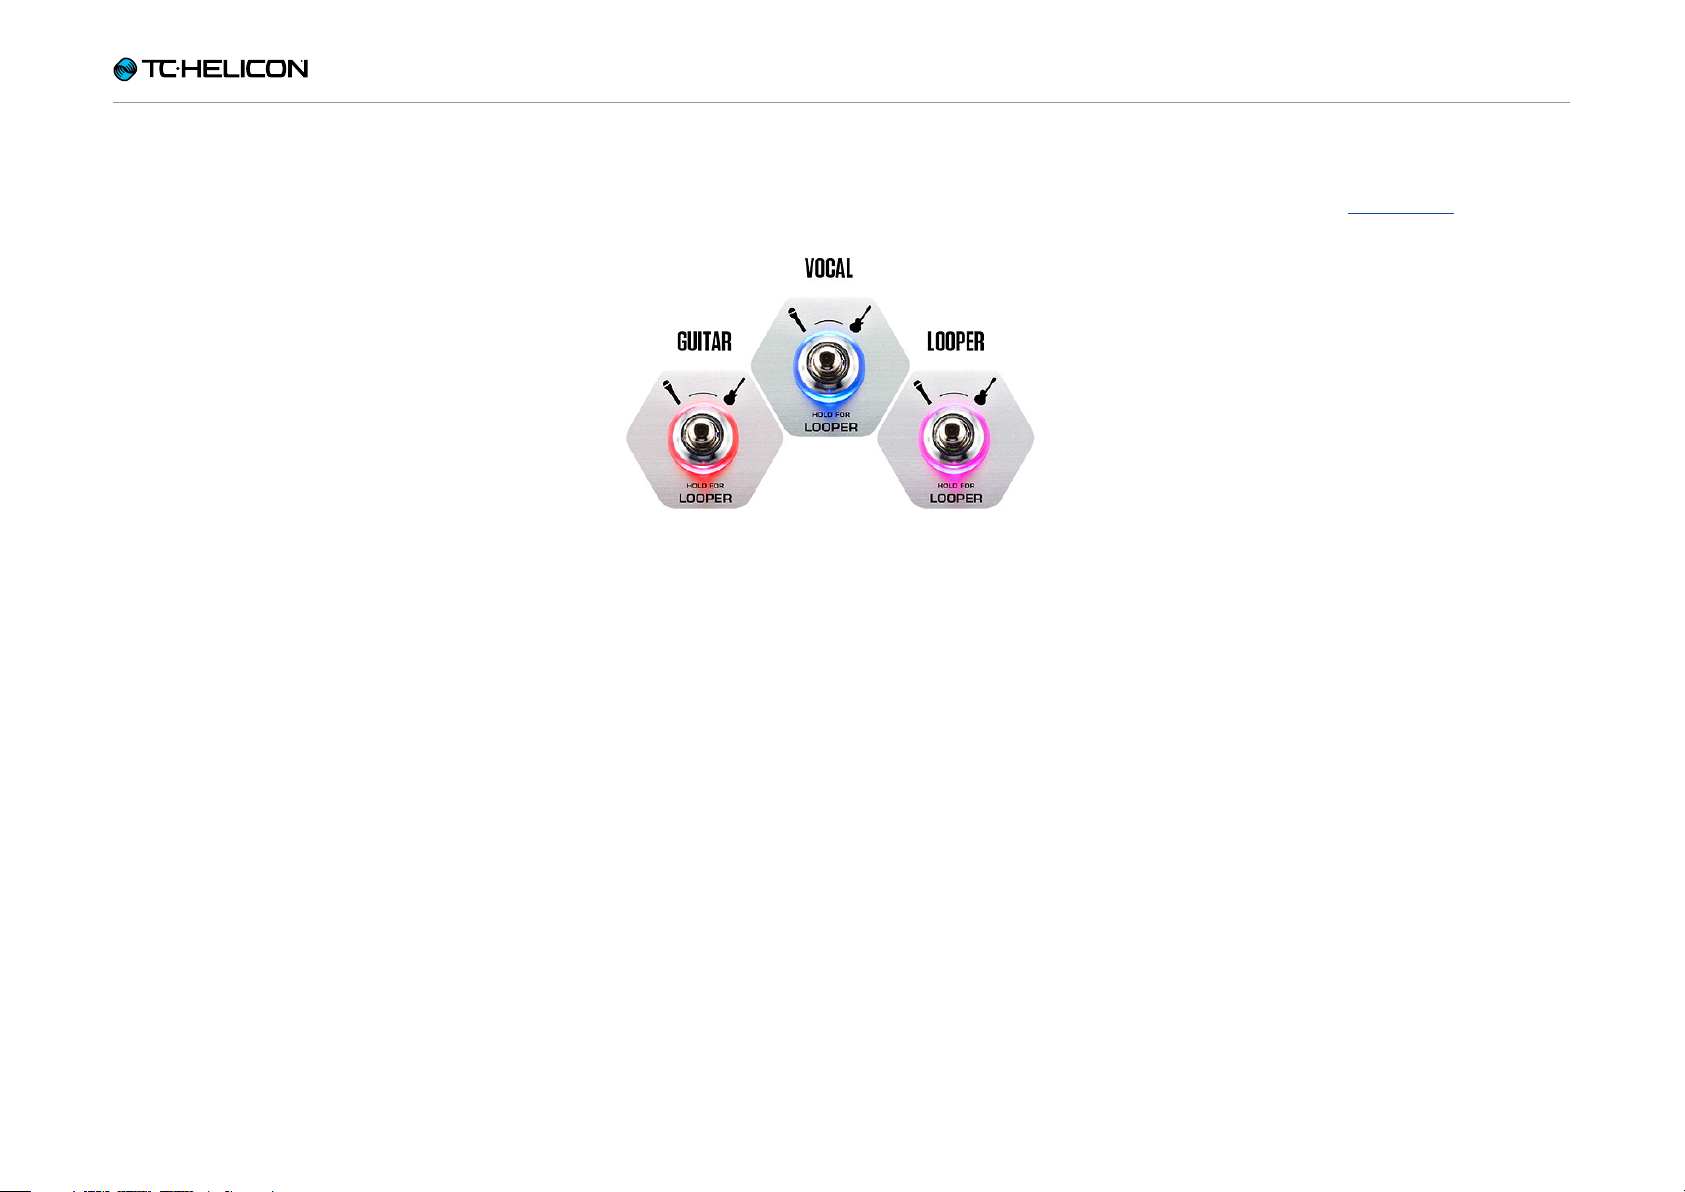
Layer footswitch
To switch between the Vocal and
Guitar effects layers, tap the Layer footswitch.
► Vocal Layer active: Layer
footswitch LED lights blue.
► Guitar Layer active: Layer
footswitch LED lights red.
To access the Loop Layer, hold
the Layer footswitch.
► Loop/Backing Track Layer
active: Layer footswitch LED
lights purple.
To return from the Loop or Backing Track Layer to the previously active Layer (Vocal or Guitar),
hold the Layer footswitch.
To exit Talk/Tuner, press any button other than
Preset Up or Preset Down.
For more information, see “Talk/Tuner Mode”.
VL3X – Reference manual (updated 2015-05-12) 22
Introduction
Here are a couple of examples showing how the
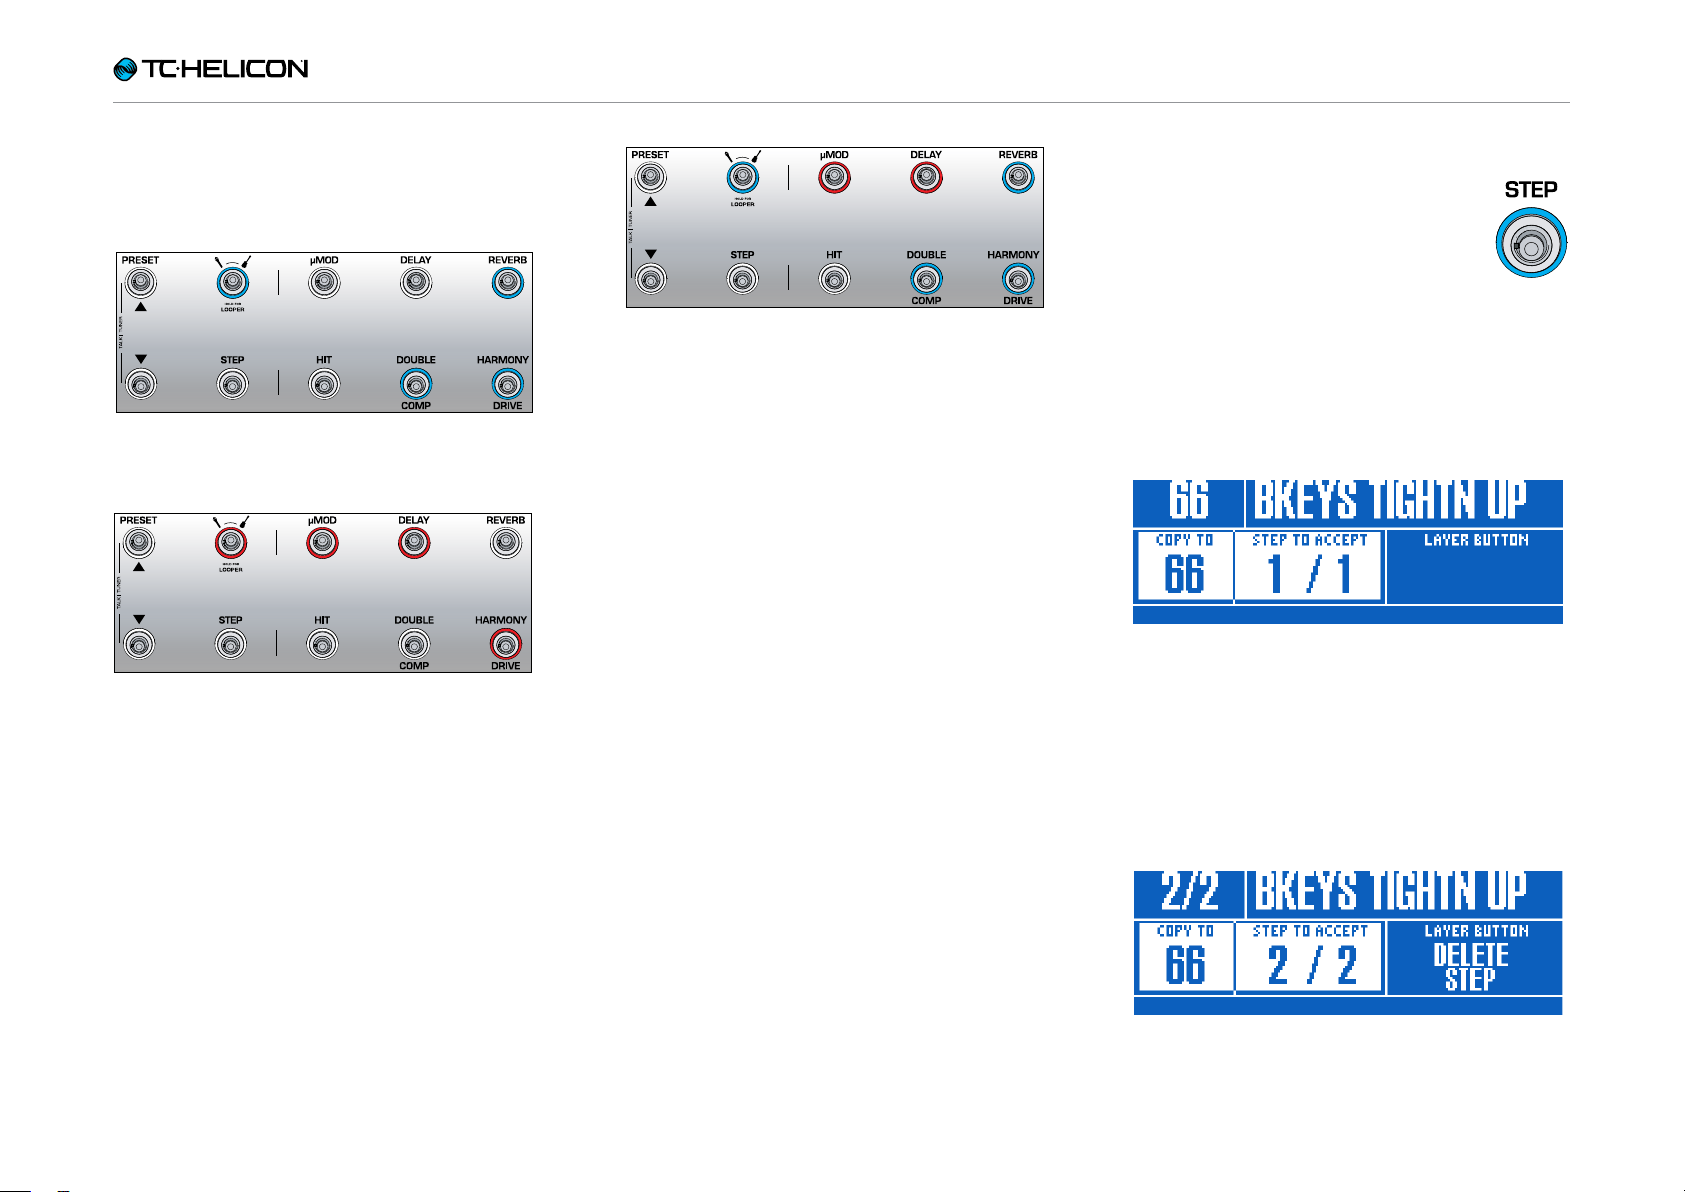
effects footswitches might look when each Layer is active:
Vocal Layer with Reverb, Double and Harmony
activated.
Guitar Layer with µMod (let’s say it’s Flanger for
this example), Delay and Drive activated. If you
were previously on the Vocal Layer, you would
tap the Layer footswitch to move to the Guitar
Layer, changing the footswitch LED color from
blue to red.
Vocal Layer with some guitar effects remapped
to vocal effect footswitches. You may find that
you would like to “hang out” on a particular
Layer (Vocal or Guitar) and have access to a key
effect or effects from another Layer. Remapping
footswitches allows you do to just that. This is
best referred to as a “mixed Layer”. This is a
more advanced operational mode that we will
cover later.
Step footswitch
► To move to the next Step with-
in the current Preset (e.g. from
1 to 2), tap the Step footswitch.
Not all Presets have Steps.
► To move to the previous Step in the current
Preset (e.g. from 2 to 1), tap the Preset Down
footswitch.
► To enter the Step management screen, hold
the Step footswitch.
Step management
Step management
You can use the current Preset or a different Preset as a Step.
If you are using the current Preset, make sure
that it sounds the way you want it to before you
enter Step management.
Adding a Step to a Preset
VL3X – Reference manual (updated 2015-05-12) 23

Introduction
If it is a different Preset, enter Step management
and then use the Preset Up and Preset Down
footswitches to locate the Preset you would like
to add as a Step.
Adding a different Preset as a Step
► To accept changes, tap the Step footswitch.
► To delete the current step, tap the Layer
footswitch.
► To cancel, press the Home button.
The Step footswitch can be globally reassigned
to several different functions – such as Tap Tempo, HIT, Set Key, any Vocal or Guitar effect and
more. We have found that remapping Step to
enter/leave the Looper can be incredibly useful
in performance, when you need quick access in
and out.
µMod footswitch
Tap the µMod footswitch to turn the
micro-modulation (µMod) effect on
or off.
The µMod block encompasses effects such as
Chorus, Flange, Detune and Rotor.
This effect can be configured and used separately for the Vocal and Guitar layer. For more
information, see “Editing the Vocal Layer” and
“Editing the Guitar Layer”.
Delay footswitch
Tap the Delay footswitch to turn the
Delay effect (also known as echo) on
or off.
The Delay block encompasses effects such as ¼
Note, Multi-Tap and Ping Pong.
This effect can be configured and used separately for the Vocal and Guitar layer. For more
information, see “Editing the Vocal Layer” and
“Editing the Guitar Layer”.
Tempo tapping
► To access tempo tapping, hold the Delay
footswitch.
► Tap the footswitch in time with your song.
A few taps are enough.
► When you are happy with the tempo, stop
tapping.
For more information about Steps, see “Using
Steps”.
VL3X – Reference manual (updated 2015-05-12) 24
Introduction
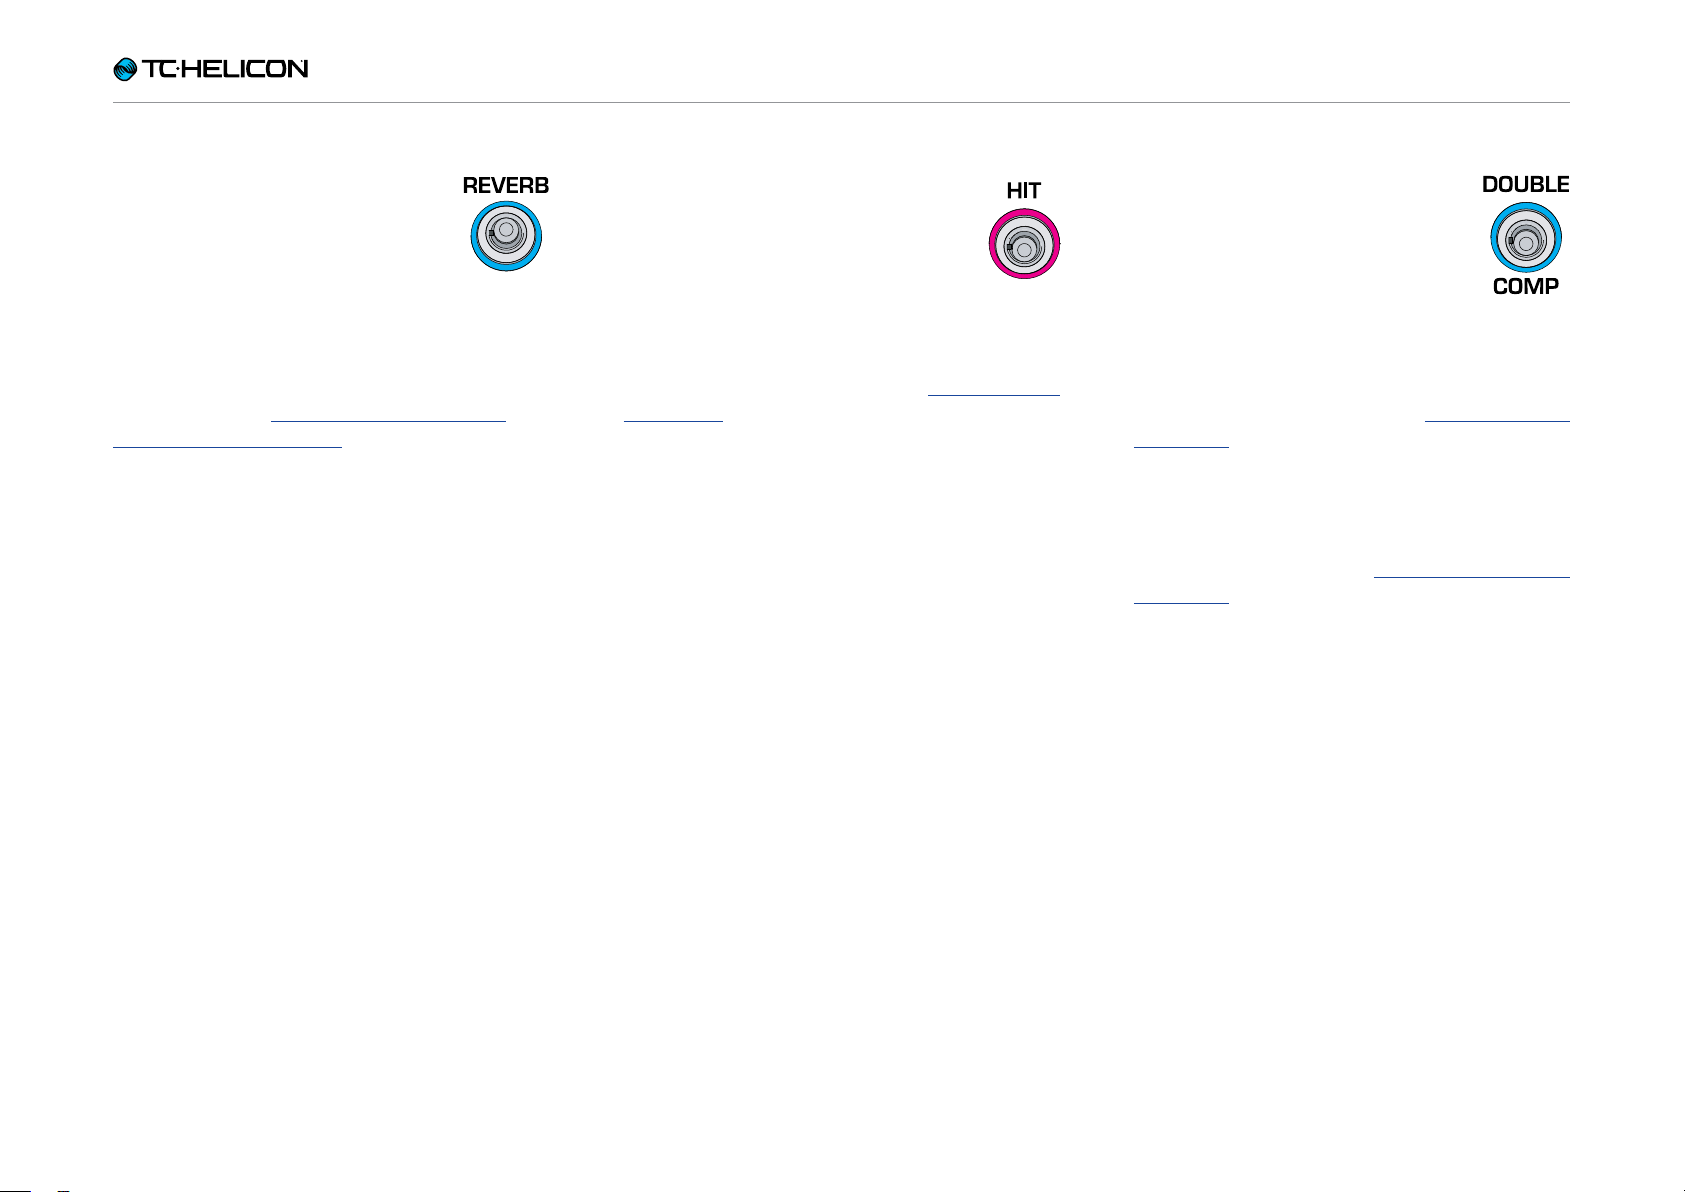
Reverb footswitch
Tap the Reverb footswitch to turn
the Reverb effect on or off.
The Reverb block encompasses effects such as Hall, Club, Room and Plate.
This effect can be configured and used separately for the Vocal and Guitar layer. For more
information, see “Editing the Vocal Layer” and
“Editing the Guitar Layer”.
HIT footswitch
Tap the HIT footswitch to activate or
deactivate HIT. HIT can control:
► Vocal HIT (blue)
► Guitar HIT (red)
► All HIT (purple)
HIT is covered in greater detail in “Using the HIT
footswitch”.
Double/Comp footswitch
On the Vocal Layer, tap the Double/
Comp footswitch to turn the Double
effect on or off.
Double encompasses effects such
as 1 Voice Tight, 2 Voices Wide and 4 Voices
Wide.
For more information, see “Double effect
block / t ab”.
On the Guitar Layer, tap the Double/Comp
footswitch to turn the Compressor on or off.
For more information, see “Comp(ression) effect
block / t ab”.
VL3X – Reference manual (updated 2015-05-12) 25

Introduction
Harmony/Drive footswitch
On the Vocal Layer, tap the Harmony/Drive footswitch to turn
the Harmony effect on or off.
Harmony encompasses effects
such as High (3rd up), Low (4th below) and Low &
Lower (4th below and 6th below).
For more information, see “Harmony effect
block / t ab”.
On the Guitar Layer, tap the Harmony/Drive
footswitch to turn the Drive effect on or off.
Drive encompasses effects such as Boost, Boost
& Drive and Drive.
For more information, see “Drive effect
block / t ab”.
VL3X – Reference manual (updated 2015-05-12) 26

Introduction
Back panel inputs and outputs
VL3X offers extremely robust input and output
routing. Using the Monitor IN/THRU and dedicated Guitar outputs effectively, you can greatly
reduce the amount of gear you need to take to a
performance.
VL3X – Reference manual (updated 2015-05-12) 27
Loading…
Руководство пользователя на русском языке для продукта TC-Helicon VoiceLive 3, формат A4, переплёт пластиковая пружина, обложки пластиковые, 82 страницы.
-
Бесплатно
При покупке от 3000 руб
-
Телефон
8 (495) 000-00-01
-
100% безопасно
Оплата при получении
-
Горячие предложения
Скидки до 50%
- Описание
- Спецификация
- Производитель
Руководство пользователя на русском языке для продукта TC-Helicon VoiceLive 3.
Спецификация:
Оригинальное руководство пользователя на русском языке.
Формат листа A4.
Плотность бумаги 80 гр/м2.
Цвет печати — монохромный.
Обложки — пластиковые 2 шт.
Переплёт — пластиковая пружина.
Общее количество страниц 82 (41 лист).
* это печатное руководство пользователя мы прилагаем бесплатно к одноимённому продукту, покупаемому клиентами в нашем магазине.
Информация о технических характеристиках, комплекте поставки, стране производителе и внешнем виде
товара носит справочный характер и основан на самой последней информации, доступной на момент публикации.
Содержание
- Руководства процессора эффектов Tc helicon VOICELIVE 3
- Вокальный процессор TC HELICON VoiceLive 3
- Основные особенности вокального\гитарного процессора VoiceLive 3
- Особенности конструкции и управления процессора VoiceLive 3
- Полноценный процессор эффектов для акустической и электрогитары
- Богатые возможности работы с вокалом
- Встроенный лупер на 45 минут профессиональной записи
- Возможности взаимодействия с самыми разными источниками и устройствами
- Технические характеристики вокального процессора TC Helicon VoiceLive 3
- форум вокалистов
- музыкальные инструменты
- форум текстовиков
- форум барабанщиков
- Инструкция и руководство для TC Electronic voicelive на русском
- VoiceLive Гармонизация .
- Инструкция по технике безопасности
- Содержание ПРЕДИСЛОВИЕ РЕДАКТИРОВАНИЕ ОБЩИХ ПАРА.
- Предисловие
Руководства процессора эффектов Tc helicon VOICELIVE 3
На данной странице вы можете скачать руководства Tc helicon VOICELIVE 3. Мы предлагаем вам ознакомиться с руководством пользователя, инструкцией по сервисному обслуживанию и ремонту.
Также здесь вы найдете список заказных номеров на комплектующие Tc helicon VOICELIVE 3.
Все файлы предоставляются исключительно в ознакомительных целях. И не являютя руководством по ремонту, а направлены лишь на то чтобы помочь вам более детально ознакомиться с принципом построения устройства.
Содержимое представленных здесь руководств требуют от вас знания технического английского языка.
Если вы собираетесь скачать руководство по сервисному обслуживанию Tc helicon VOICELIVE 3, иными словами сервис мануал, вы дожны обладать хотя бы минимальными познаниями в области электроники и пониманием базовых принципов работы электромеханических устройств.
Для просмотра руководств вам понадобится Adobe Acrobat Reader версии 9 и выше либо другая программа для просмотра pdf файлов.
В связи с популярностью информации представленной на сайте и ее бесплатного предоставления конечному пользователю, убедительная просьба использовать специальные программные продукты для многопотокового скачивания файлов.
Руководства для Tc helicon VOICELIVE 3
- Руководство пользователя (User manual)
- Руководство по сервисному обслуживанию (Service manual)
- Руководство по ремонту (Repair manual)
- Перечень комплектующих (PartList)
Источник
Вокальный процессор TC HELICON VoiceLive 3
Заказ до 4000 ₽ — 300 ₽
По тарифам СДЭК
Или иной транспортной компании
Доставка товара до транспортной
компании БЕСПЛАТНО
Компания TC HELICON представляет новейший флагманский вокальный и одновременно гитарный процессор эффектов TC-Helicon VoiceLive 3. Представленная модель является продолжателем обновленной версией популярного вокального процессора VoiceLive 2. Кроме уже известных возможностей, вокальный\гитарный процессор эффектов VoiceLive 3 получил богатейший набор возможностей для живого выступления и студийной записи. Представленный в 2014 году VoiceLive 3 стал весьма достойным продолжением популярной серии вокальных процессоров VoiceLive.
Новая модель вокального\гитарного процессора VoiceLive 3 была разработана, чтобы предложить вокалистам совершенно новые уровни профессионального и персонального контроля над вокалом и эффектами непосредственно во время выступления. Процессор предлагает высококачественную аппаратную обработку звукового сигнала следующего поколения. Программный блок оборудован самыми разнообразными вокальными эффектами, предоставляя исполнителям 11 блоков независимых эффектов обработки. Процессор оснащен набором из 500 заводских пресетов и обширной базой из более чем тысяча пресетов для свободного скачивания на сайте производителя. База эффектов охватывает более 180 разнообразных стилей. Если Вы желаете купить вокальный процессор, TC-Helicon VoiceLive 3 предлагает богатый набор функций и профессионального звучания от одного из самых известных производителей в мире!
Основные особенности вокального\гитарного процессора VoiceLive 3
— Максимально современный дизайн и оригинальная конструкция процессора разработана лучшими инженерами компании TC-Helicon.
— Обновленная модель VoiceLive 3 включает в себя совершенно новые режимы Harmony – Fixed, Pedal и Mixed режим, позволяющие расширить Ваши музыкальные возможности.
— Уникальная система подлинного Vocoder с Robot и Polyphonic synth режимами голосового управления, позволяющие вокалистам использовать свой голос как настоящий музыкальный инструмент.
— Возможности автоматического повышения вокального звучания с уникальной функцией Adaptive Tone.
— Усовершенствованный набор профессиональных вокальных эффектов среди которых Harmony, Doubling, Reverb, Echo, Flanger, HardTune, Choir, Chopper и многие другие.
— Обновлены практически все вокальные\гитарные эффекты, пространственные эффекты и фильтры задержки.
— Новая, расширенная библиотека стилей HardTune с высочайшим качеством звучания удвоения и более реалистичными гармониями.
— Вокальный\гитарный процессор VoiceLive 3 оборудован встроенным лупером (Loop) на 45 минут полноценной записи.
— Порядка 500(т) заводских пресетов для самых разных сфер применения.
— Открытая база пресетов в сети интернет с возможностью скачивания профессиональных и пользовательских пресетов эффектов.
— Легкое управление и загрузка новых пресетов в процессор при помощи бесплатного программного обеспечения VoiceSupport (приложение от TC-Helicon).
Особенности конструкции и управления процессора VoiceLive 3
Электроника процессора VoiceLive 3 имеет совершенно новую, уникальную платформу, полностью переработанную для создания абсолютно нового устройства. Процессор
3iC имеет три полностью независимых процессорных ядра, работающих независимо с вокалом, гитарой и петлями (Loop). Для более удобного управления процессор эффектов оборудован ножными стальными кнопками и ёмкостными сенсорными кнопками (Easy touch) на передней панели устройства. Дополнительный кнопочный регулятор дает возможность при нажатии
Быстрого выбора и настроек фиксированных функций и пресетов эффектов. Каждая из кнопок ножного управления имеет многоцветную LED-подсветку, что способствует более удобному визуальному контролю за выбранными функциями. Пусть пользователей не пугает наличие множества органов управления и органов настройки. Управление процессором достаточно простое и понятное даже самому неискушенному пользователю!
Полноценный процессор эффектов для акустической и электрогитары
В дополнение к богатому набору вокальных эффектов, процессор VoiceLive 3 предлагает действительно обширный выбор из самых разных гитарных эффектов и гитарных педалей (stomp box). Каждый гитарный эффект разработан в компании TC Electronic, унаследовав все самое лучшее от известной линейки гитарных педалей TonePrint. В то же время интегрированный гитарный процессор имеет разные пресеты звучания для электроакустической гитары.
Среди оригинальных и известных гитарных педалей есть такие популярные модели как Flashback Delay, Corona Chorus, Hall of Fame Reverb и Vortex Flanger. Кроме этих популярных моделей процессор предлагает богатый набор совершенно новых эффектов, например популярный эффект Talk Box, Bass, Chopper, Drive и Wah. Так же доступен богатый выбор моделей классических британских и американских гитарных усилителей для электрогитары.
Богатые возможности работы с вокалом
Вокальный процессор предлагает максимально богатый набор возможностей обработки вокала. Обновленный блок эффектов для вокала имеет интуитивно понятные элементы управления каждым из компонентов эффекта, что ранее не было возможным. Эффекты Harmony Modes для создания гармонического звучания трех типов — Pedal, Fixed и Mixed. Эффекты Shifter Range (Harmony/Hardtune, +/- 3 октавы), NaturalPlay, Polyphonic Vocal Synth, Vocoder и Multi-note, Doubling Improvements, 1/2 Note Delay Division, обновленные фильтры Delay, Choir FX Block, Rhythmic FX Block, Reverb и многие другие эффекты.
Встроенный лупер на 45 минут профессиональной записи
Кроме гитарного и вокального процессора эффектов, напольный процессор VoiceLive 3 оборудован высококачественным фразовым лупером (phrase looper). Лупер может служить в качестве идеального инструмента для создания и записи своей музыки и песен. В общей сумме лупер предлагает 45 минут качественной звукозаписи во внутреннюю память процессора.
При помощи функции loop jam можно записывать и воспроизводить свои минусовые партии для выступлений перед публикой. Специальная функция LoopAssist предлагает воспользоваться многоцелевым метрономом и квантованием, чтобы помочь в качественной синхронизации записанных и воспроизводимых петель. Функция авто-расширения длины шлейфа облегчит создание длинных петель (лупов) без дополнительной необходимости настройки синхронизации.
Возможности взаимодействия с самыми разными источниками и устройствами
Секция коммутации на задней панели процессора предлагает предельно богатые возможности для подключения и взаимодействия с самыми разными устройствами. Так 4(х)-канальный стерео выход для вокала и гитары (4 Channel Stereo Out — Vocal + Guitar) отлично подойдет для записи вокала в стерео режиме с отдельной партией гитары. Guitar THRU позволяет отправлять необработанный сигнал гитары напрямую при этом используя цепь вокальных эффектов процессора. Кроме этого вокальный\гитарный процессор TC Helicon Voicelive 3 предлагает воспользоваться разъёмами коммутации Input (Aux/Mon), Guitar Output, Monitor IN/THRU, дополнительными разъёмами для напольных контроллеров Switch-3 и Expression Pedal (x 2) и многими другими.
Технические характеристики вокального процессора TC Helicon VoiceLive 3
-Тип устройства : вокальный процессор.
-Серия : VoiceLive.
-Спецификация : вокал, электрогитара, электроакустическая гитара.
-Исполнение : напольный процессор.
-Материал корпуса : анодированный алюминий.
-Отделка ручек : прорезиненные ручки.
-Подсветка кнопок и органов управления : LED-светодиоды (трехцветная подсветка).
-Дисплей : Blue STN LCD, размер – 192 x 64.
-Элементы управления : сенсорные емкостные элементы управления.
Основная спецификация :
— Заводские и пользовательские пресеты : 500 ячеек.
— Заводские предустановки : 250 пресетов.
— Общая память : память на 500 пресетов
— Количество ячеек в каждом банке пресетов : по 10 ячеек.
— Ножные контроллеры управления : 10 стальных кнопок.
— Кнопки предустановок : 6 предустановленных кнопок (включение/отключение FX блоков эффектов).
— Возможности полного редактирования эффектов : есть.
— Редактирование жанров, стилей и категорий : есть.
Спецификация эффектов :
— Основные типы вокальных эффектов : µMod, Echo & Delay, Reverb, Harmony, Double, Transducer, Rhythmic, HardTune & Correction, Choir, Stutter, Vocoder, Adaptive Tone и др.
— Основные типы эффектов для гитары : Amp Modeling, Drive, Delay, Reverb, Compression, Resonant Filter, Wah, Mod (Flange, Chorus, De-tune), Shifter, Rhythmic/Tremolo, Talkbox.
Спецификация лупера (Multi-track looper) :
— Многодорожечная запись : есть.
— Общее кол-во записанный треков : 10 x 3 петли.
— Общее время записи : 45 минут.
— Функции воспроизведения последнего трека : есть.
— Запись, отмена записи последнего трека, редактирование : есть.
Аналоговые входы (Analog Inputs) :
— Вокальный микрофон (MIC) :
— Разъёмы : Combo Balanced XLR\Balanced 1\4 Jack.
— Входной импеданс (Balanced) : 3.08 kOhm.
— Уровень входного сигнала (Mic) : от -52 dBu до +7 dBu.
— Уровень входного сигнала (Line Input) : от -40 dBu до +19 dBu.
— Система фантомного питания : + 48 V.
— A\D преобразование : 24-битное, 128-кратная передискретизация, 110 дБ SNR А-взвешенный.
— Инструментальный вход (GUITAR).
— Тип разъёма : 1\4 Jack.
— Входной импеданс (Balanced) : 1 MOhm.
— Уровень входного сигнала : от — 2 dBU до 14 dBu.
— SNR : > 108 dB.
— A\D преобразование : 24-битное, 128-кратная передискретизация, 110 дБ SNR А-взвешенный.
— MONITOR :
— Тип разъёма : XLR (Balanced).
— Входной импеданс : 25 kOhm (Balanced).
— Уровень входного сигнала : + 16 dBu.
— Вход AUX :
— Разьемы : 1\8 stereo mini jack.
— Уровень входного сигнала : + 2 dBu.
Аналоговые выходы (Analog Outputs) :
— Вокальный микрофон (MIC) :
— Тип разъёма : XLR (balanced).
— Выходной импеданс (Balanced/Unbalanced) : 300/150 Ohm.
— Выходной диапазон (0 dBFS) : Line Out : + 14 дБ, Mic Level : — 2dBu.
— Динамический диапазон (>109 дБ) : от 20 Гц до 20 кГц.
— Частотный диапазон (+0/-0.3 дБ) : от 20 Гц до 20 кГц.
— А\D конвертирование : 24-битное, 128-кратная передискретизация, 115 дБ SNR, А-взвешенный.
— Гитара (Guitar Outputs) :
— Разъемы : 1\4 Jack.
— Выходное сопротивление (балансное/небалансное) : 442/221 ом.
— Выходной диапазон (0 dBFS) : Line Out : + 14 дБ, Mic Level : — 2dBu.
— Динамический диапазон (>101 дБ) : от 20 Гц до 20 кГц.
— А\D конвертирование : 24-битное, 128-кратная передискретизация, 106 дБ SNR, А-взвешенный.
— Наушники (Headphones) :
— Разъем : 1\8 стерео мини-джек.
— Сопротивление : 50 Ом.
— Выходной диапазон : +14 дБ (max).
— Сквозной канал (Guitar THRU) :
— Разъем : 1\4 Jack.
— Выходное сопротивление (Bal/UnBal) : 270/540 ом.
— Мониторный выход (Monitor Thru) :
— Тип подключения : прямое подключение к монитору.
— Разъем : сбалансированный XLR.
— Подключение дополнительных контроллеров :
— USB порт : USB, Mini-B.
— MIDI In/Out : 5-Контактный DIN.
— Педали : 1\4 Jack.
— Управляющий микрофон : TC-Helicon MP-75 микрофон или Sennheiser E 835 FX.
В комплекте поставки :
— Адаптер питания.
— USB-кабель.
— Краткое руководство пользователя.
— Комбинированный кабель Instr\Phones.
Эксплуатационные требования :
— Рабочая температура : 0 C до 50 C.
— Температура хранения : от -30 C до 70 C.
— Влажность (Макс.) : 90 проц. без конденсации.
Питание процессора :
— Внешний блок питания : от 100 до 240 В переменного тока, 50-60 Гц (автовыбор).
— Потребляемая мощность : Страна-производитель: ТАИЛАНД
Ваш отзыв: Примечание: HTML разметка не поддерживается! Используйте обычный текст.
Оценка: Плохо Хорошо
Введите код, указанный на картинке:
Источник
форум вокалистов
музыкальные инструменты
форум текстовиков
форум барабанщиков
- рок
- тяжелая музыка
- фанк-джаз-фьюжн-блюз
- инди и другая музыка
- альтернатива и панк
- акустика и фолк
- академическая музыка
- рэп и хип-хоп
- эксперимент. музыка
- популярная музыка
- электроника и DJ
- Питер: куплю-продам
- Питер: тусовка
- Питер: поиск музыкантов
- Украина: куплю-продам
- Украина: общение
- shamray-shop.ru — Самый Гитарный магазин
- Guitarplanet.ru — Магазин для гитаристов и гитарных мастеров!
- Барахолка.РФ — бесплатные объявления России
- Поздравление в стихах
Данный форум не предназначен для поиска вокалистов !
Для этого есть специальный форум ПОИСК ГРУППЫ / МУЗЫКАНТОВ
—> Фотогалерея вокалистов на MUSICFORUMS.RU
.. so I went and watched a nice 12-minute review of its interface
and functions on YouTube (their web site being irritating and
uninformative, to my taste). VERY nice.
.. but then some of the commenters complained about the unit’s
limitations «especially in the loop department» — and suggested
that ABLETON LIVE is a more powerful alternative.
А так, покрутить настройки — всегда не лишнее. Подумать, какой общий алгоритм хочется («Hall», «Room» и тд), а там уж поиграться с пре-дилеем в настойках, длину хвоста длиннее/короче сделать.
+ Когда хотят больше объёма сделать, при этом не мутить звук большим кол-во ревера чаще таки останавливаются на стандартной связке «чутка ревера + немного дилея», получается чище.
.. а для меня самым интересным было не присутствие эффектов (всегда дерьмо,
когда из коробки — но они в этом процессоре редактируются по вашему желанию)
.. но интеграция с микрофоном и возможность использовать его
как звуковую карту для компьютера (если я верно понял) ПЛЮС
возможность его делать loops
ТО ЕСТЬ:
начинаем петь «а-ума- па-рум-а», затем оставив это на петле
подпеваем ‘пам-парам’, уже два, и оставив на петле тут же
поём соло.
ТО ЕСТЬ можно прямо на ходу одним-двумя солистами сделать столько шума
одними голосами, сколько если инструментами делать потребовало бы человек
5-6.
Мне сильно нравится идея такого выступления — выходит человек и запевает за
четеверых, творя музыку прямо на глазах у изумленной публики.
Вот тут можно поподробнее — возникает еще одна тема для разговора.
Как я вижу по объявлениям «купи-продай» на этом же сайте, 90% музыкального
населения использует микрофоны, получившие заслуженную кличку «жестяная
банка» — за их замечательный звук. То есть динамические Shure и динамические
других компаний (sennheiser, beyerdynamic, etc etc etc) которые могут стоить
раз в 10 больше, но по характеристикам 1:1 та же жестяная банка
Жестяной банкой Shure делает холм на 3-10 килогерцах — нет такой нечистоты
или такого песка, щелчка слюны, который он бы не усилил в несколько раз
по сравнению с жизнью.
И во-вторых, жестяной банкой его делает обрыв вниз со 150 герц. Практически 100%
других производителей микрофонов даже если их микрофоны лучше повторяют
обрыв специальным переключателем.
В результате из голоса исчезает «тело».
ДРУГИМИ СЛОВАМИ эта дрянь еще как-то может проходить для женских голосов,
но она НАМЕРЕННО КАСТРИРУЕТ звучание мужских.
Ну и если приладить такие микрофоны к инструментам (а это тоже делают повсеместно),
то мы получим еще ряд жестяных банок в сопровождении.
Источник
Инструкция и руководство для
TC Electronic voicelive на русском
56 страниц подробных инструкций и пользовательских руководств по эксплуатации
VoiceLive Play video manual — Part 1
TC Helicon VoiceLive Play часть 1 НА РУССКОМ—NICKBROKE PRODUCTION
TC Electronic Voicelive Play demo and tour
mmag.ru: Вокальный процессор tc helicon voicelive play — видео обзор и демо
Обзор вокального процессора TC Helicon Voice live play
TC Electronic Voice Live Vocal Effects FX Processor
Обзор TC Helicon Voice Live 1
TC Helicon VoiceLive Play GTX — Demo by Christine Havrilla at Guitar Showcase
VoiceLive Гармонизация .
Гармонизация | Коррекция | Эффекты
Руководство по эксплуатации
Инструкция по технике безопасности
ИНСТРУКЦИЯ ПО ТЕХНИКЕ БЕЗОПАСНОСТИ
Пожалуйста, прочтите, сохраните и следуйте данной инструкции до того, как подключите
устройство. С полным вниманием отнеситесь к рекомендациям и предупреждениям.
Данный символ, вне зависимости от того, где он изображен, предупреждает о
наличии опасных напряжений внутри прибора.
Данный символ, вне зависимости от того, где он изображен, предупреждает о
необходимости обращения к Руководству по эксплуатации (техническому
обслуживанию) и/или сопровождающей литературе. Внимательно изучите данное
Руководство!
— Во избежание поражения электротоком не снимайте кожух (заднюю стенку) прибора.
Внутри корпуса отсутствуют какие-либо регулировки, доступные пользователю.
Обслуживание изделия должно осуществляться квалифицированным специалистом.
—
Во избежание поражения электротоком не подвергайте аппарат воздействию дождя или
Аппарат должен быть заземлен.
Убедитесь в соответствии рабочего напряжения устройства напряжению в сети.
При установке в рэковой стойке сверху и снизу должно оставаться пространство для
должной вентиляции.
Не устанавливайте рядом с нагревательными приборами!
Протирайте поверхность от пыли только сухой тряпочкой.
При транспортировке не надейтесь на передние винты, укрепите устройство в стойке и
сзади тоже!
При длительном бездействии или при крутых перепадах напряжения в электросети
обязательно отключите устройство из розетки.
Содержание ПРЕДИСЛОВИЕ РЕДАКТИРОВАНИЕ ОБЩИХ ПАРА.
ПРЕДИСЛОВИЕ
РЕДАКТИРОВАНИЕ ОБЩИХ ПАРАМЕТРОВ
Меню редактирования параметров входа-выхода 37
Меню редактирования утилит
РЕЖИМ ПЕСНИ (SONG MODE)
ЖК-дисплей в режиме песни
БЫСТРЫЙ СТАРТ
ЖК-дисплей в режиме редактирования Song Edit 45
Как добыть звук из VoiceLive
Функции редактирования песни
Концертное применение VoiceLive
Пресетный режим (Preset Mode)
Режим песни (Song Mode)
ГАРМОНИЯ И СТРОЙ
Функция Harmone Hold
Настройка пресетов типа Scale
Основные концепции редактирования
Нотный режим (Notes Mode)
ПРИМЕРЫ ИСПОЛЬЗОВАНИЯ
На концерте с гитарой
Диатоническая и хроматическая гаммы
На концерте с MIDI-клавиатурой
РАБОТА С ПРЕСЕТАМИ
ТАБЛИЦЫ ФУНКЦИЙ НОЖНЫХ ПЕДАЛЕЙ
Функции в пресетном (Preset) режиме
Функции в режиме песни (Song)
Архивация и восстановление данных по MIDI
Установка гловабльного эффекта
Сохранение в памяти
ТЕХНИЧЕСКИЕ ХАРАКТЕРИСТИКИ
ПРЕСЕТНЫЙ РЕЖИМ (PRESET MODE)
Режим прямого доступа к пресетам
Режим пресетных голосов
МЕНЮ РЕДАКТИРОВАНИЯ ПРЕСЕТОВ
Меню редактирования голосов 22
Меню редактирования гармонизации 26
Меню редактирования «уплотнения» голоса 28
Меню редактирования эффектов
Меню редактирования высотной коррекции 33
Специальные меню редактирования 35
Предисловие
Предисловие
Благодарим Вас за покупку VoiceLive – процессора гармонизации, коррекции и эффектов,
созданного командой TC-Helicon специально для гастрольных поездок. В этот прибор
вложено
технические
специалисты TC-Helicon
консультировались с ведущими музыкантами в стремлении сделать VoiceLive
инструментом, способным максимально улучшить качество и возможности сценического
вокала. Аналоговый и цифровой тракты разработаны по тем же стандартам, что и наши
студийные процессоры. Однако в каждом аспекте VoiceLive – начиная от алгоритма
лимитирования VOS™ до инструментального входа – учтены специфические требования
концертных выступлений. Мы надеемся, что VoiceLive понравится Вам и Вашим
поклонникам!
Мы регулярно обновляем руководства по эксплуатации и различные материалы по поддержке
пользователей. Самую свежую информацию Вы всегда можете найти на нашем сайте
Функциональные особенности процессора:
• Микрофонный предусилитель студийного качества (на основе микросхемы Burr Brown INA163) с
лимитером VOS™ и источником фантомного питания 48 В;
• Технология обработки вокала, основанная на VoiceWorks и включающая:
∗ наиболее естественно звучащая вокальная гармонизация, выполняемая при помощи
запатентованной технологии TC-Helicon
— алгоритм HybridShift, создание гармонических голосов
— тонкая вокальная ньюансировка при помощи алгоритмов FlexTime™, Human-
Modeled Vibrato, Inflection, Pitch randomization, Portamento и Gender
— четыре режима управления для подчинения вокальному голосоведению и/или
MIDI
— два переключаемых режима темперации
— алгоритм HarmonyHold™, фиксация интервалов в целях создания более
интересной гармонической фразировки
∗ автоматическая коррекция высоты тона в соответствии с фабричными и
пользовательскими гаммами (ладами)
∗ «уплотнение» ведущего голоса
∗ 3-полосный эквалайзер TC-Electronic, обрезной НЧ-фильтр и компрессор/гейт
∗ Реверберация и задержка TC-Electronic
• Восемь ножных переключателей с плавным ходом
• Четыре ручки и один энкодер для редактирования пресетов
• MIDI-управление всеми параметрами через СС и SYSEX
• Микрофонный выход (pass-thru) для подачи сигнала на FOH-пульт в зале
• Инструментальный вход на реверберацию/задержку
• 24-битовая гармоническая обработка
• Цифровые входы/выходы S/PDIF
Данное руководство поможет Вам разобраться в многочисленных функциях VoiceLive и возможностях
их использования. Кроме того, на нашем сайте можно получить дополнительную поддержку, найти
различные примеры применения и ознакомиться с другими приборами компании TC-Helicon.
Источник
Хорошее руководство по эксплуатации
Законодательство обязывает продавца передать покупателю, вместе с товаром, руководство по эксплуатации TC Helicon VoiceLive 3 Extreme. Отсутствие инструкции либо неправильная информация, переданная потребителю, составляют основание для рекламации в связи с несоответствием устройства с договором. В законодательстве допускается предоставлении руководства в другой, чем бумажная форме, что, в последнее время, часто используется, предоставляя графическую или электронную форму инструкции TC Helicon VoiceLive 3 Extreme или обучающее видео для пользователей. Условием остается четкая и понятная форма.
Что такое руководство?
Слово происходит от латинского «instructio», тоесть привести в порядок. Следовательно в инструкции TC Helicon VoiceLive 3 Extreme можно найти описание этапов поведения. Цель инструкции заключается в облегчении запуска, использования оборудования либо выполнения определенной деятельности. Инструкция является набором информации о предмете/услуге, подсказкой.
К сожалению немного пользователей находит время для чтения инструкций TC Helicon VoiceLive 3 Extreme, и хорошая инструкция позволяет не только узнать ряд дополнительных функций приобретенного устройства, но и позволяет избежать возникновения большинства поломок.
Из чего должно состоять идеальное руководство по эксплуатации?
Прежде всего в инструкции TC Helicon VoiceLive 3 Extreme должна находится:
— информация относительно технических данных устройства TC Helicon VoiceLive 3 Extreme
— название производителя и год производства оборудования TC Helicon VoiceLive 3 Extreme
— правила обслуживания, настройки и ухода за оборудованием TC Helicon VoiceLive 3 Extreme
— знаки безопасности и сертификаты, подтверждающие соответствие стандартам
Почему мы не читаем инструкций?
Как правило из-за нехватки времени и уверенности в отдельных функциональностях приобретенных устройств. К сожалению само подсоединение и запуск TC Helicon VoiceLive 3 Extreme это слишком мало. Инструкция заключает ряд отдельных указаний, касающихся функциональности, принципов безопасности, способов ухода (даже то, какие средства стоит использовать), возможных поломок TC Helicon VoiceLive 3 Extreme и способов решения проблем, возникающих во время использования. И наконец то, в инструкции можно найти адресные данные сайта TC Helicon, в случае отсутствия эффективности предлагаемых решений. Сейчас очень большой популярностью пользуются инструкции в форме интересных анимаций или видео материалов, которое лучше, чем брошюра воспринимаются пользователем. Такой вид инструкции позволяет пользователю просмотреть весь фильм, не пропуская спецификацию и сложные технические описания TC Helicon VoiceLive 3 Extreme, как это часто бывает в случае бумажной версии.
Почему стоит читать инструкции?
Прежде всего здесь мы найдем ответы касательно конструкции, возможностей устройства TC Helicon VoiceLive 3 Extreme, использования отдельных аксессуаров и ряд информации, позволяющей вполне использовать все функции и упрощения.
После удачной покупки оборудования/устройства стоит посвятить несколько минут для ознакомления с каждой частью инструкции TC Helicon VoiceLive 3 Extreme. Сейчас их старательно готовят или переводят, чтобы они были не только понятными для пользователя, но и чтобы выполняли свою основную информационно-поддерживающую функцию.
-
Page 1
English quick guide Kurzanleitung auf Deutsch Manual de puesta en marcha en español Guide rapide en Français Guida rapida in Italiano VOICELIVE 3 EXTREME… -
Page 3
Getting started – English quick guide Erste Schritte – Kurzanleitung auf Deutsch Puesta en marcha – manual de puesta en marcha en español Prise en main – Guide rapide en Français Per cominciare – Guida rapida in Italiano… -
Page 5: Table Of Contents
Important safety instructions Caution Service Warning EMC / EMI Explanation of graphic symbols Before you begin About the VoiceLive 3 Extreme quick guide Getting support VoiceSupport Legend Introduction In the box VoiceLive 3 Extreme key features Making connections Inputs Outputs 1. Vocals and guitar using guitar/headphone cable 2.
-
Page 6
VoiceLive 3 Extreme Getting started – English quick guide VoiceLive 3 Extreme… -
Page 7: Important Safety Instructions
Important safety instructions Caution Important safety instructions You are cautioned that any change or modifi- cations not expressly approved in this manual 1. Read these instructions. could void your authority to operate this equip- 2. Keep these instructions. ment. 3. Heed all warnings. Service 4.
-
Page 8: Emc / Emi
Important safety instructions EMC / EMI Explanation of graphic symbols Electromagnetic compatibility / Electromagnetic interference The lightning bolt triangle is used to This equipment has been tested and found to alert the user to the presence of unin- comply with the limits for a Class B digital de- sulated “dangerous voltages”…
-
Page 9: Before You Begin
This quick guide will help you learn understand- VoiceSupport is the application that allows you ing and operating your VoiceLive 3 Extreme. to fully unlock the potential of your TC-Helicon product and stay in touch with the latest news, You can download the most current version of tips and tricks.
-
Page 10: Legend
Before you begin Please note that we do not account for other in- Diagrams puts or instruments in these diagrams – so you won’t see pictures of drums (4) etc. When a set- up example includes a connection to your guitar amp, we do not show that amp being miked and sent through the PA (which often is the case) –…
-
Page 11: Introduction
– 1 VoiceLive 3 Extreme vocal processor your sound. VoiceLive 3 Extreme brings versa- – 1 power adaptor tile backing track and performance automation – 1 USB cable to the party, giving you unprecedented creative –…
-
Page 12: Voicelive 3 Extreme Key Features
For easy verse / chorus / bridge style looping. – Onboard loop storage Backing Track Player/Automation – Import your favorite backing tracks – Record your button presses – Perform for your audience without having to touch VoiceLive 3 Extreme at all! VoiceLive 3 Extreme…
-
Page 13: Making Connections
Making connections Making connections SWITCH-3 Inputs 1. Connect the supplied power adapter to the ! Do you have a condenser, MP-75 or e835FX 12 V DC jack of your VoiceLive 3 Extreme and microphone? When the unit is powered up plug the adapter into a wall outlet. Do not (there’s a few more steps before that hap- power up your VoiceLive 3 Extreme yet.
-
Page 14: Vocals And Guitar Using Guitar/Headphone Cable
Making connections 1. Vocals and guitar using guitar/headphone cable This setup utilizes the included guitar/headphone cable, which is perfect for personal monitoring in any setup. You will see that the two smaller ends of the cable are different. One end has a male headphone jack beside the guitar jack.
-
Page 15: Stereo Vocal And Stereo Guitar (2 Channels)
Making connections 2. Stereo vocal and stereo guitar (2 channels) This is a very common setup for both live per- formances with a stereo PA (double-check that the venue PA system is actually in stereo!) or for basic 2 channel recording. Getting started –…
-
Page 16: Stereo Vocals And Stereo Guitar (4 Channels)
Making connections 3. Stereo vocals and stereo guitar (4 channels) VoiceLive 3 Extreme features “jack sensing” on several inputs and outputs. With this connection setup, all guitar signals are removed from the XLR signal path when ¼” Guitar OUT connec- tions are made.
-
Page 17: Mono Vocals And Mono Guitar (Dual Mono Mode)
Making connections 4. Mono vocals and mono guitar (dual mono mode) If you are not using a guitar amplifier, this is a common connection setup for most live venues, since the PA is typically in mono. It also allows a sound tech to control the overall balance be- tween your vocals and guitar.
-
Page 18: Stereo Vocals And Guitar Amplifier
Making connections 5. Stereo vocals and guitar amplifier Keep in mind that your guitar amp may be miked and come out through the PA. That part of the signal flow isn’t shown in this setup example. Guitar output is automatically muted in the XLR signal path when a 1/4”…
-
Page 19: Mono Vocals And Guitar Amplifier
Making connections 6. Mono vocals and guitar amplifier Keep in mind that your guitar amp may be miked and come out through the PA. That part of the signal flow isn’t shown in this setup example. Guitar output is automatically muted in the XLR signal path when a 1/4”…
-
Page 20: Stereo Vocals And Midi Keyboard
Making connections 7. Stereo vocals and MIDI keyboard VoiceLive 3 Extreme is not a synthesizer and cannot convert MIDI note messages to audio. The MIDI connection is only used for NaturalPlay chord detection and other control data. You will still need to connect your keyboard to the PA or an amplifier for it to be heard! VoiceLive 3 Extreme…
-
Page 21: Let’s Get Going
Let’s get going! connected to. When the clip indicator on your Let’s get going! mixer lights up, reduce input gain/trim slightly. Make all connections as seen in “Making con- nections” (page 7). Before you power up VoiceLive 3 Extreme, make sure that the amplifier or PA it is connected to is muted or turned all the way down! For additional information on input trim, please refer to your PA or mixer’s instruction manual.
-
Page 22: Voicelive 3 Extreme For Acoustic Guitar Players
If you have a nice effects setup for your acous- tic guitar that you want to use for all your songs, In the VoiceLive 3 Extreme reference manual, press SETUP, go to the SYSTEM tab and set ALL you will find full details on how to import your GUITAR FX GLOBAL to ON.
-
Page 23: Are We There Yet
– adapt audio signal routings to your needs – mix audio signals – set up MIDI controls – … and much more! You can download the VoiceLive 3 Extreme ref- erence manual from tc-helicon.com/products/ voicelive-3-extreme/support/ Getting started – English quick guide…
-
Page 24: Technical Specifications
Output impedance 300/150 Ohm Weight 5 lb. (2.3 kg) balanced/unbalanced Warranty Output range @ 0 dBFS Line Level: +14 dBu; Mic See www.tc-helicon.com/support for warranty Level: -2 dBu information. Dynamic range >109 dB, 20 Hz to 20 kHz Frequency response +0/-0.3 dB, 20 Hz to 20 kHz D to A conversion 24 Bit, 128 x oversampling bitstream, 115 dB SNR…
-
Page 25
Getting started – English quick guide… -
Page 27
Wichtige Sicherheitshinweise Achtung Wartung Warnung Elektromagnetische Verträglichkeit / EMI Erläuterung der grafischen Symbole Bevor es losgeht Über die Kurzanleitung zum VoiceLive 3 Extreme Wie Sie technische Unterstützung erhalten VoiceSupport Erläuterung der Symbole Einleitung Im Lieferumfang enthalten VoiceLive 3 Extreme – die wichtigsten Features Verbindungen herstellen Eingänge Ausgänge… -
Page 28
VoiceLive 3 Extreme Erste Schritte – Kurzanleitung auf Deutsch VoiceLive 3 Extreme… -
Page 29: Wichtige Sicherheitshinweise
Wichtige Sicherheitshinweise 14. Alle Wartungsarbeiten müssen von hierfür Wichtige Sicherheitshinweise qualifizierten Servicemitarbeitern durch- geführt werden. Eine Wartung ist erforder- 1. Bitte lesen Sie diese Anweisungen. lich, wenn das Gerät selbst oder dessen 2. Bitte bewahren Sie diese Anweisungen auf. Netzkabel beschädigt wurde, Flüssigkeiten 3.
-
Page 30: Elektromagnetische Verträglichkeit / Emi
Wichtige Sicherheitshinweise Für Kunden in Kanada – Um das Gerät vollständig vom Stromnetz zu trennen, müssen Sie den Netzstecker des Dieses digitale Gerät der Klasse B entspricht Gerätes aus der Steckdose ziehen. den kanadischen Bestimmungen für Interferenz – Der Netzstecker des Gerätes sollte jederzeit verursachende Geräte ICES-003.
-
Page 31: Bevor Es Losgeht
Ihnen sonst möglicherweise interessante – Direkter Zugriff auf Bedienungsanleitungen Funktionen entgehen. – Benachrichtigungen über Software-Updates – halten Sie Ihre TC-Helicon-Produkte stets auf dem neuesten Stand. Laden Sie das Referenzhandbuch – Presetverwaltung per Drag & Drop zum VoiceLive 3 Extreme herunter! –…
-
Page 32: Erläuterung Der Symbole
Bevor es losgeht dasselbe hören (5); es können aber auch ver- Anschlussdiagramme schiedene Signale sein. Andere Eingänge oder Instrumente werden in diesen Anschlussbeispielen nicht berücksich- tigt – Sie werden hier also zum Beispiel keine Drumsets sehen (4). Wenn Ihr Setup einen Gi- tarrenamp umfasst und Sie das Signal von die- sem Gitarrenamp mit einem Mikrofon abnehmen und an die PA leiten (ein durchaus übliches Ver-…
-
Page 33: Einleitung
Extreme entschieden haben! Im Lieferumfang enthalten Ihr neuer Vocal / Guitar / Loop Processor von Die Verpackung des VoiceLive 3 Extreme sollte TC-Helicon ist ein wirklich außergewöhnliches die folgenden Gegenstände enthalten: Stück Technik. Mit buchstäblich Tausenden von Effektkombinationen und zahlreichen flexiblen –…
-
Page 34: Voicelive 3 Extreme — Die Wichtigsten Features
/ Chorus / Bridge beim Loopen. – Integrierter Loop-Speicher Playback-Player/Automatisierung – Importieren Sie Ihre Lieblingssongs, um dazu zu spielen – Zeichnen Sie das Drücken von Tasten auf – Spielen Sie für Ihr Publikum, ohne die Tasten des VoiceLive 3 Extreme zu bedienen! VoiceLive 3 Extreme…
-
Page 35: Verbindungen Herstellen
Verbindungen herstellen Verbindungen herstellen SWITCH-3 Eingänge ! Verwenden Sie ein Kondensatormikrofon, 1. Schließen Sie das mit dem VoiceLive 3 Extre- ein MP-75 oder ein e835FX? Nachdem Sie me gelieferte 12 Volt-Netzteil an das VoiceLi- Ihr VoiceLive 3 Extreme eingeschaltet haben ve 3 Extreme an und stecken Sie den Netzteil (noch nicht –…
-
Page 36: Vocals Und Gitarre Mit Kombiniertem Gitarren-/Kopfhörerkabel
Verbindungen herstellen 1. Vocals und Gitarre mit kombiniertem Gitarren-/Kopfhörerkabel Bei dieser Variante kommt das kombinierte Gi- tarren-/Kopfhörerkabel zum Einsatz, das Sie mit Ihrem VoiceLive 3 Extreme erhalten haben. Es eignet sich hervorragend, um in jeder Situ- ation Ihren eigenen Monitormix zu erstellen. Sie werden feststellen, dass sich die beiden kleine- ren Stecker an diesem Kabel voneinander un- terscheiden.
-
Page 37: Vocals (Stereo) Und Gitarre (Stereo) — 2 Kanäle
Verbindungen herstellen 2. Vocals (stereo) und Gitarre (stereo) – 2 Kanäle Dies ist ein gängiges Setup für Liveauftritte mit einer Stereo-PA (bitte prüfen Sie zunächst, ob die am Auftrittsort installierte PA tatsächlich ste- reo ist!). Es kann aber auch für einfache Aufnah- men auf zwei Spuren verwendet werden.
-
Page 38: Vocals (Stereo) Und Gitarre (Stereo) — 4 Kanäle
Verbindungen herstellen 3. Vocals (stereo) und Gitarre (stereo) – 4 Kanäle Das VoiceLive 3 Extreme kann an allen Ein- und Ausgängen die verwendeten Stecker identifi- zieren („Jack sensing“). Bei diesem Setup wer- den alle Gitarrensignale aus dem XLR-Signal- weg entfernt, sobald Sie 6,3 mm-Klinkenkabel an die GUITAR-Buchsen im OUTPUTS-Bereich anschließen.
-
Page 39: Vocals (Mono) Und Gitarre (Mono) — „Dual Mono»-Modus
Verbindungen herstellen 4. Vocals (mono) und Gitarre (mono) – „Dual Mono“-Modus Wenn Sie keinen Gitarrenverstärker verwenden, ist dies das am besten geeignete Setup für die meisten Live-Situationen, da die PA üblicherwei- se mono ist. Bei diesem Setup kann ein Tontech- niker die Balance zwischen Gesang und Gitarre für Sie regeln.
-
Page 40: Vocals (Stereo) Und Gitarrenverstärker
Verbindungen herstellen 5. Vocals (stereo) und Gitarrenverstärker Denken Sie daran, dass Ihr Gitarrenverstärker möglicherweise mit einem Mikrofon abgenom- men wird und dessen Signal dann über die PA zu hören ist. Dieser Teil des Signalwegs wird in diesem Diagramm nicht dargestellt. Bei diesem Setup werden alle Gitarrensignale aus dem XLR-Signalweg entfernt, sobald Sie 6,3 …
-
Page 41: Vocals (Mono) Und Gitarrenverstärker
Verbindungen herstellen 6. Vocals (mono) und Gitarrenverstärker Denken Sie daran, dass Ihr Gitarrenverstärker möglicherweise mit einem Mikrofon abgenom- men wird und dessen Signal dann über die PA zu hören ist. Dieser Teil des Signalwegs wird in diesem Diagramm nicht dargestellt. Bei diesem Setup werden alle Gitarrensignale aus dem XLR-Signalweg entfernt, sobald Sie 6,3 …
-
Page 42: Vocals (Stereo) Und Midi-Keyboard
Verbindungen herstellen 7. Vocals (stereo) und MIDI-Keyboard Bitte beachten Sie, dass das VoiceLive 3 Extre- me kein Synthesizer ist – es kann keine MIDI-No- tennachrichten in ein Audiosignal umwandeln. Die MIDI-Verbindung wird nur dazu verwendet, Akkorde zur Steuerung der Harmoniestimmen (die von der NaturalPlay-Funktion erkannt wer- den) sowie weitere Steuerdaten zu übermitteln.
-
Page 43: Los Geht’s
Los geht’s! Sie dazu den Anweisungen, die sich auf der Un- Los geht’s! terseite des VoiceLive 3 Extreme befinden. Eingangsempfindlichkeit Nehmen Sie alle Verbindungen so vor, wie es im am Mischpult einstellen Abschnitt „Verbindungen herstellen“ (page 29) beschrieben wird. Während Sie so laut wie möglich singen und auf Ihrer Gitarre spielen, drehen Sie bitte langsam Bevor Sie das VoiceLive 3 Extreme einschalten, die Gain-/Trim-Regler der Mischpultkanäle auf,…
-
Page 44: Sounds Entdecken
Songs verwenden möchten, drücken Sie die Taste SETUP, wechseln Sie zur Registerkarte SYSTEM und stellen Sie dort den Parameter ALL Im Referenzhandbuch zum VoiceLive 3 Extreme GUITAR FX GLOBAL auf ON. Damit werden die erfahren Sie, wie Sie Ihre eigene Playbacks im- Gitarreneffekte „gesperrt“, so dass sie sich beim…
-
Page 45: Sind Wir Schon Da
– die Durchleitung der Audiosignale (Routing) Ihren Bedürfnissen anpassen, – Audiosignale mischen, – die MIDI-Steuerung einrichten – … und viele weitere Funktionen nutzen kön- nen! Referenz- Sie können das VoiceLive 3 Extreme handbuch hier herunterladen: tc-helicon.com/products/ voicelive-3-extreme/support/ Erste Schritte – Kurzanleitung auf Deutsch…
-
Page 46: Technische Daten
Gewicht 5 lb. (2,3 kg) Frequenzgang +0/-0,3 dB, 20 Hz bis 20 kHz Garantie D/A-Wandlung 24 Bit, 128faches Garantieinformationen finden Sie unter Oversampling Bitstream, 115 www.tc-helicon.com/support dB Störabstand A-gewichtet Gitarrenausgang 6,3 mm Klinke (Tip-Ring- Sleeve) Ausgangsimpedanz 442 / 221 Ohm symmetrisch / asymmetrisch…
-
Page 47
Erste Schritte – Kurzanleitung auf Deutsch… -
Page 49
Instrucciones importantes de seguridad Atención Reparaciones Precaución EMC / EMI Explicación de los símbolos gráficos Pasos previos Acerca de este manual de puesta en marcha del VoiceLive 3 Extreme Soporte técnico VoiceSupport Leyendas Introducción Elementos incluidos Características del VoiceLive 3 Extreme Conexiones Entradas Salidas 1. -
Page 50
VoiceLive 3 Extreme Puesta en marcha – manual de puesta en marcha en español VoiceLive 3 Extreme… -
Page 51: Instrucciones Importantes De Seguridad
Instrucciones importantes de seguridad Instrucciones importantes de de alimentación o el enchufe, si se ha seguridad derramado algún líquido o introducido algún objeto dentro del aparato, si el 1. Lea completamente estas instrucciones. aparato ha quedado expuesto a la lluvia, si 2.
-
Page 52: Emc / Emi
– Solicitar ayuda a su distribuidor o a un técnico especialista en radio/TV. Para los usuarios de Canadá Este aparato digital de clase B cumple con la norma canadiense ICES-003. Cet appareil numérique de la classe B est conforme à la norme NMB-003 du Canada. VoiceLive 3 Extreme…
-
Page 53: Pasos Previos
TC-Helicon: tc-helicon.com/support/ Puesta en marcha – manual de puesta en marcha en español…
-
Page 54: Leyendas
Tenga en cuenta que no tenemos en cuenta en estos diagramas otras entradas o instrumentos – por lo que no verá gráficos de batería, etc (4). Cuando un ejemplo de configuración incluya una conexión a su amplificador de guitarra, no VoiceLive 3 Extreme…
-
Page 55: Introducción
– 1 procesador vocal VoiceLive 3 Extreme le permite personalizar totalmente su sonido. – 1 adaptador de corriente El VoiceLive 3 Extreme le ofrece versátiles – 1 cable USB funciones de pista de acompañamiento y – 1 cable de guitarra/auriculares automatización de ajustes de interpretación, lo…
-
Page 56: Características Del Voicelive 3 Extreme
– Importe sus pistas de acompañamiento preferidas – Registre y automatice sus ajustes de botones y controles – ¡Podrá realizar toda su interpretación completa sin tener que tocar el VoiceLive 3 Extreme para nada! VoiceLive 3 Extreme…
-
Page 57: Conexiones
Conexiones Conexiones SWITCH-3 Entradas ! ¿Tiene un micrófono condensador, MP- 1. Conecte el adaptador de corriente incluido a 75 o e835FX? Cuando encienda la unidad la toma 12 V DC de su VoiceLive 3 Extreme y a (quedan muy pocos pasos para que lo haga), una salida de corriente alterna por el otro lado.
-
Page 58: Voces Y Guitarra Usando Cable De Guitarra/Auriculares
Conecte estas clavijas a las tomas GUITAR IN y HEADPHONE. En el otro extremo encontrará una clavija para su guitarra y una toma hembra para sus monitores intraurales/auriculares. VoiceLive 3 Extreme…
-
Page 59: Voz Stereo Y Guitarra Stereo (2 Canales)
Conexiones 2. Voz stereo y guitarra stereo (2 canales) Esta es una configuración muy habitual para actuaciones en directo con un PA stereo (¡compruebe que el sistema PA de directo sea realmente stereo!) o para una grabación básica de 2 canales. Puesta en marcha –…
-
Page 60: Voz Stereo Y Guitarra Stereo (4 Canales)
Guitar OUT de 6,3 mm. Esto le permite disponer de canales stereo independientes para su voz y su guitarra. Esta resulta una configuración perfecta para la conexión a un interface audio de 4 canales. VoiceLive 3 Extreme…
-
Page 61: Voz Mono Y Guitarra Mono (Modo Mono Dual)
Conexiones 4. Voz mono y guitarra mono (modo mono dual) Si no está usando un amplificador de guitarra, esta resulta una configuración perfecta para la mayoría de actuaciones en directo, dado que los sistemas PA habitualmente son mono. También permite realizar una prueba de sonido para controlar el balance global entre su voz y la guitarra.
-
Page 62: Voz Stereo Y Amplificador De Guitarra
PA. Esa parte del flujo de señal no aparece en este ejemplo de configuración. Cuando realice una conexión en la toma Guitar Out de 6,3 mm automáticamente será anulada la salida de guitarra en la ruta de señal XLR. VoiceLive 3 Extreme…
-
Page 63: Voz Mono Y Amplificador De Guitarra
Conexiones 6. Voz mono y amplificador de guitarra Recuerde que puede colocar un micro delante de su amplificador de guitarra y hacer que su salida sea emitida a través del PA. Esa parte del flujo de señal no aparece en este ejemplo de configuración.
-
Page 64: Voz Stereo Y Teclado Midi
MIDI en audio. La conexión MIDI se utiliza únicamente para la detección de acordes NaturalPlay y para otros datos de control. ¡Seguirá siendo necesario conectar su teclado al sistema PA o amplificador para poder escucharlo! VoiceLive 3 Extreme…
-
Page 65: Vamos Allá
¡Vamos allá! Ajuste de ganancia de ¡Vamos allá! entrada en su mezclador Cuando esté cantando y tocando al volumen más Realice las conexiones necesarias tal como alto, suba lentamente los mandos de ganancia/ hemos indicado en “Conexiones” (page 51). retoque de entrada de los canales de mezclador a los que esté…
-
Page 66: Explore Los Sonidos
¡Conviértalo en un HIT! A la hora de escuchar los presets, asegúrese de pulsar el botón HIT. HIT le permite añadir (o eliminar) varios efectos a su voz y/o guitarra con solo pulsar un botón. VoiceLive 3 Extreme…
-
Page 67: Todavía Estamos Aquí
– adaptar los ruteos de señal audio a sus necesidades – mezclar señales audio – configurar los controles MIDI – … ¡y muchas más cosas! Puede descargarse el manual de referencia VoiceLive 3 Extreme desde tc-helicon.com/products/ voicelive-3-extreme/support/ Puesta en marcha – manual de puesta en marcha en español…
-
Page 68: Especificaciones Técnicas
Dimensiones 230x100x180 mm (9”x4”x7”) Respuesta de +0/-0.3 dB, 20 Hz a 20 kHz Peso 2.3 kg (5 lb.) frecuencia Garantía Conversión D-A 24 bits, sobremuestreo 128x, Ven en la web www.tc-helicon.com/support la 115 dB RSR medición A información relativa a la garantía. VoiceLive 3 Extreme…
-
Page 69
Puesta en marcha – manual de puesta en marcha en español… -
Page 71
Consignes de sécurité importantes Avertissement Service Attention danger! EMC / EMI Explication des symboles graphiques Avant de démarrer A propos du guide rapide pour VoiceLive 3 Extreme Obtenir du support VoiceSupport Légende Introduction Dans la boîte Fonctions clés du VoiceLive 3 Extreme Branchements Entrées Sorties… -
Page 72
VoiceLive 3 Extreme Prise en main – Guide rapide en Français VoiceLive 3 Extreme… -
Page 73: Consignes De Sécurité Importantes
Consignes de sécurité importantes pluie ou à l’humidité, l’appareil mon tre des Consignes de sécurité signes de dysfonctionnement ou est tombé importantes Avertissement Toute modification apportée à l’appareil et qui 1. Lisez ces instructions. n’est pas expressément préconisée dans ce ma- 2.
-
Page 74: Emc / Emi
Consignes de sécurité importantes EMC / EMI Explication des symboles graphiques Compatibilité électromagnétique / Interférence électromagnétique Le symbole de l’éclair fléché dans un triangle équilatéral sert à alerter l’utili- Cet appareil a passé avec succès les tests re- sateur de la présence à l’intérieur de latifs aux équipements numériques de classe B l’appareil de tensions non isolées sus- (section 15 des réglementations fédérales amé-…
-
Page 75: Avant De Démarrer
VoiceSupport est l’application qui vous permet tionnement de votre VoiceLive 3 Extreme. d’exploiter pleinement le potentiel de votre pro- duit TC-Helicon, et de rester en contact avec Vous pouvez télécharger la version la plus ré- les dernières informations, ainsi que les trucs et cente de ce guide rapide depuis astuces.
-
Page 76: Légende
Avant de démarrer rez pas d’images de batteries etc. (4). Quand Diagrammes un exemple de configuration comprend une connexion à votre ampli guitare, nous ne mon- trons pas l’ampli repris par un micro vers la so- norisation (ce qui est souvent le cas) – nous vous montrons juste comment connecter VoiceLive 3 Extreme dans une configuration particulière.
-
Page 77: Introduction
– 1 processeur de voix VoiceLive 3 Extreme vous pouvez complètement personnaliser votre – 1 adaptateur d’alimentation son. VoiceLive 3 Extreme rajoute l’automation – 1 câble USB de performance ainsi que des pistes d’accom- – 1 câble guitare/casque pagnement et vous permet un contrôle créatif…
-
Page 78: Fonctions Clés Du Voicelive 3 Extreme
Pour un looping dans le style couplet / re- frain / pont. – Stockage de loop Lecteur de pistes d’accompagnement et automation – Importez vos pistes d’accompagnement fa- vorites – Enregistrez vos commandes au pied – Produisez-vous devant votre auditoire sans toucher le VoiceLive 3 Extreme VoiceLive 3 Extreme…
-
Page 79: Branchements
Branchements Branchements SWITCH-3 Entrées ! Si vous avez un microphone à condensateur, 1. Connectez l’adaptateur d’alimentation fourni à un MP-75 ou un e835FX, vous devrez activer l’entrée 12 V DC de votre VoiceLive 3 Extreme l’alimentation fantôme à l’allumage de l’appa- et branchez l’adaptateur à…
-
Page 80: Voix Et Guitare Avec Le Câble Guitare/Casque
Branchements 1. Voix et guitare avec le câble guitare/casque Cette configuration utilise le câble guitare/ casque inclus, ce qui est parfait pour le monito- ring personnel dans n’importe quelle configura- tion. Vous noterez que les deux plus petites ex- trémités du câble sont différentes. Une extrémi- té…
-
Page 81: Voix Et Guitare En Stéréo (2 Canaux)
Branchements 2. Voix et guitare en stéréo (2 canaux) C’est une méthode de branchement très com- mune pour le live avec une sono en stéréo (vé- rifiez que le système de sonorisation de la salle est réellement en stéréo!) Ou pour un enregistre- ment de base 2 canaux.
-
Page 82: Voix Et Guitare En Stéréo (4 Canaux)
Branchements 3. Voix et guitare en stéréo (4 canaux) VoiceLive 3 Extreme offre une fonction de «dé- tection de jack» sur plusieurs entrées et sorties. Avec ce type de branchement, tous les signaux de guitare sont supprimées du trajet de signal des sorties XLR, lorsque les sorties ¼”…
-
Page 83: Voix Et Guitare En Mono (Mode Dual Mono)
Branchements 4. Voix et guitare en mono (mode dual mono) Si vous n’utilisez pas d’ampli guitare, c’est un mode de connexion commun pour la majorité des salles de concert, car la sono est générale- ment en mono. Il permet également à l’ingénieur du son de contrôler l’équilibre global entre vos voix et la guitare.
-
Page 84: Voix En Stéréo Et Ampli Guitare
Branchements 5. Voix en stéréo et ampli guitare Souvenez-vous que votre ampli guitare peut être repris par un micro et ressortir sur la sono. Cette partie du chemin de signal n’est pas représentée dans cet exemple de branchement La sortie guitare est automatiquement coupée du chemin de signal XLR lorsque la sortie 1/4”…
-
Page 85: Voix En Mono Et Ampli Guitare
Branchements 6. Voix en mono et ampli guitare Souvenez-vous que votre ampli guitare peut être repris par un micro et ressortir sur la sono. Cette partie du chemin de signal n’est pas représentée dans cet exemple de branchement La sortie guitare est automatiquement coupée du chemin de signal XLR lorsque la sortie 1/4”…
-
Page 86: Voix En Stéréo Et Clavier Midi
Branchements 7. Voix en stéréo et clavier MIDI VoiceLive 3 Extreme n’est pas un synthétiseur et ne peut pas convertir des messages de notes MIDI en audio. La connexion MIDI est utilisée uniquement pour la détection d’accords par la fonction NaturalPlay ainsi que d’autres données de commande.
-
Page 87: Démarrons
Démarrons! Réglage du gain d’entrée Démarrons! sur votre mixer Tout en chantant et en jouant à votre volume Effectuez toutes vos connexions comme dé- le plus élevé, montez lentement le gain d’en- crites dans les pages «Branchements» (page trée /boutons de trim des canaux de la table de 73).
-
Page 88: Explorez Les Sons
Démarrons! Explorez les sons HIT vous permet, d’une seule pression de swit- La meilleure façon de se faire une idée du poten- ch, d’ajouter (ou de supprimer) des effets multi- tiel de votre VoiceLive 3 Extreme est de parcourir ples pour les voix et / ou la guitare. Il peut être les presets.
-
Page 89
– Adaptez le routing du signal audio selon vos besoins – Mixez les signaux audio – Réglez les contrôles MIDI – … Et davantage encore! Vous pouvez télécharger le manuel de référence du VoiceLive 3 Extreme sur tc-helicon.com/products/ voicelive-3-extreme/support/ Prise en main – Guide rapide en Français… -
Page 90: Spécifications Techniques
300/150 Ohm Poids 5 lb. (2.3 kg) métrique/asymétrique Garantie Plage de sortie@ 0 Niveau Ligne: +14 dBu; Ni- Voir www.tc-helicon.com/support pour les informa- dBFS veau Mic: -2 dBu tions sur la garantie Plage Dynamique >109 dB, 20 Hz à 20 kHz Réponse en fréquence +0/-0.3 dB, 20 Hz à 20 kHz…
-
Page 91
Prise en main – Guide rapide en Français… -
Page 93
Importanti norme di sicurezza Cautela Assistenza Attenzione EMC / EMI Spiegazione dei simboli grafici Prima di cominciare Note sulla guida rapida di VoiceLive 3 Extreme Supporto VoiceSupport Legenda Introduzione Nella scatola VoiceLive 3 Extreme – caratteristiche chiave Effettuare i collegamenti Ingressi Uscite 1. -
Page 94
VoiceLive 3 Extreme Per cominciare – Guida rapida in Italiano VoiceLive 3 Extreme… -
Page 95: Importanti Norme Di Sicurezza
Importanti norme di sicurezza di corrente o presa danneggiata, del liqui- Importanti norme di sicurezza do o degli oggetti sono caduti all’interno dell’unità, l’unità è stata esposta all’umidità 1. Leggere queste istruzioni. o alla pioggia, l’unità non funziona corret- 2. Conservare queste istruzioni. tamente oppure è…
-
Page 96: Emc / Emi
Importanti norme di sicurezza Spiegazione dei simboli grafici – Utilizzare ad un’altitudine non superiore ai 2000 m. Il simbolo del lampo con la punta a – Non aprire l’unità – rischio di scossa elettrica freccia all’interno di un triangolo equi- all’interno. latero avverte l’utente della presenza di un “voltaggio pericoloso”…
-
Page 97: Prima Di Cominciare
Se dopo aver letto questa guida e il manuale di riferimento avessi ulteriori domande riguardanti ! Nota: la registrazione del prodotto NON costi- il prodotto, entra in contatto con il TC-Helicon tuisce un requisito per l’utilizzo di VoiceSup- Support: port, ne per scaricare i preset e gli aggiorna- menti del firmware o per contattare il supporto tc-helicon.com/support/…
-
Page 98: Legenda
Prima di cominciare streremo questa unità amp microfonata e quindi Diagrammi inviata al sistema PA (come tuttavia spesso può verificarsi) – bensì, mostreremo solo come col- legare VoiceLive 3 Extreme in quel particolare setup. Questo significa che la sezione relativa a “ciò…
-
Page 99: Introduzione
– 1 processore vocale VoiceLive 3 Extreme trai personalizzare completamente il tuo suono. – 1 alimentatore VoiceLive 3 Extreme apporta capacità quali le – 1 cavo USB funzioni di esecuzione di tracce d’accompagna- – 1 cavo chitarra/cuffie mento (o Backing Track) e di automazione, per –…
-
Page 100: Voicelive 3 Extreme — Caratteristiche Chiave
– Memorizzazione on-board del loop Esecuzione di tracce d’accompagnamento e automazione – Importa le tue tracce d’accompagnamento preferite – Registra le tue azioni di pressione dei pulsan- – Esibisciti di fronte al tuo pubblico senza mai dover toccare VoiceLive 3 Extreme! VoiceLive 3 Extreme…
-
Page 101: Effettuare I Collegamenti
Effettuare i collegamenti Effettuare i collegamenti SWITCH-3 Ingressi ! Possiedi un microfono a condensatore, un 1. Collega l’alimentatore fornito in dotazione MP-75 o un e835FX? All’attivazione dell’unità all’ingresso 12 V DC dell’unità VoiceLive 3 Ex- (mancano ancora pochi passaggi in questa treme e alla presa di corrente.
-
Page 102: Voce E Chitarra Usando Il Cavo Per Chitarra/Cuffie
Effettuare i collegamenti 1. Voce e chitarra usando il cavo per chitarra/cuffie Questa configurazione utilizza il cavo per chitar- ra/cuffie fornito in dotazione, il quale risulta per- fetto per il monitoraggio personale in qualsiasi setup. È possibile notare che le due estremità più…
-
Page 103: Voce Stereo E Chitarra Stereo (2 Canali)
Effettuare i collegamenti 2. Voce stereo e chitarra stereo (2 canali) Questo è un setup molto comune sia per le per- formance dal vivo, in presenza di un sistema PA stereo (occorre verificare che il sistema presente nel luogo dell’esibizione sia effettivamente ste- reo!), sia per una sessione di registrazione con un sistema di base a 2 canali.
-
Page 104: Voce Stereo E Chitarra Stereo (4 Canali)
Effettuare i collegamenti 3. Voce stereo e chitarra stereo (4 canali) Diversi ingressi e uscite di VoiceLive 3 Extreme sono dotati di connettori con capacità di rileva- zione automatica. In questo setup, tutti i segna- li di chitarra vengono rimossi dal percorso del segnale XLR nel momento in cui si utilizzano le uscite jack da ¼”…
-
Page 105: Voce Mono E Chitarra Mono (Modalità Dual Mono)
Effettuare i collegamenti 4. Voce mono e chitarra mono (modalità dual mono) Se non intendi utilizzare un amplificatore per chi- tarra, questa è un configurazione comune per la maggior parte delle luoghi per eventi dal vivo, dato che il sistema PA è normalmente in mono. Inoltre, permette al tecnico del suono di control- lare il bilanciamento generale tra voce e chitarra.
-
Page 106: Voce Stereo E Amplificatore Per Chitarra
Effettuare i collegamenti 5. Voce stereo e amplificatore per chitarra Occorre tenere conto che l’amplificatore per chi- tarra può essere anche microfonato e inviato al sistema PA. Questa parte del segnale non è illu- strata in questo esempio di setup. Quando si collega l’uscita Guitar OUT con con- nettore jack da 1/4”, il segnale di chitarra viene automaticamente disattivato dal percorso del…
-
Page 107: Voce Mono E Amplificatore Per Chitarra
Effettuare i collegamenti 6. Voce mono e amplificatore per chitarra Occorre tenere conto che l’amplificatore per chi- tarra può essere anche microfonato e inviato al sistema PA. Questa parte del segnale non è illu- strata in questo esempio di setup. Quando si collega l’uscita Guitar OUT con con- nettore jack da 1/4”, il segnale di chitarra viene automaticamente disattivato dal percorso del…
-
Page 108: Voce Stereo E Tastiera Midi
Effettuare i collegamenti 7. Voce stereo e tastiera MIDI VoiceLive 3 Extreme non è un sintetizzatore e non può convertire i messaggi di note MIDI in materiale audio. La connessione MIDI è utile unicamente per la rilevazione NaturalPlay degli accordi e altri dati di controllo. Per ascoltare il suono della tastiera occorrerà…
-
Page 109: Cominciamo
! Il boot di sistema impiegherà pochi secondi – te video del “Craig’s Corner” postato nel canale è quindi normale che nel frattempo il display YouTube di TC-Helicon, in cui è spiegato come appaia vuoto per qualche istante. configurare il mixer: youtube.com/watch?v=q-…
-
Page 110: Esplorare Le Sonorità
Cominciamo! Esplorare le sonorità La funzione HIT permette di aggiungere (o rimuo- Il miglior modo per farsi un idea del potenziale vere) molteplici effetti per il segnale vocale e/o di di VoiceLive 3 Extreme consiste nello scorrere chitarra con la singola pressione di un tasto. Può e provare i factory preset, i quali mettono a di- essere utilizzata come una flessibile funzionalità…
-
Page 111: Siamo Arrivati
– adattare il routing del segnale alle tue neces- sità – miscelare i segnali audio – configurare i controlli MIDI – …e molto altro! È possibile scaricare il manuale di riferimento VoiceLive 3 Extreme dalla pagina web: tc-helicon.com/products/ voicelive-3-extreme/support/ Per cominciare – Guida rapida in Italiano…
-
Page 112: Specifiche Tecniche
Gamma dinamica >109 dB, da 20 Hz a 20 kHz Per informazioni sulla garanzia, visita il sito Risposta in frequenza +0/-0.3 dB, 20 Hz to 20 kHz www.tc-helicon.com/support. Conversione D/A 24 Bit, 128 x oversampling bitstream, SNR 110 dB pesatura-A Connettori uscita Guitar Jack TRS da 1/4”…
-
Page 113
Per cominciare – Guida rapida in Italiano… -
Page 118
Prod. No. E60542311…
Инструкция по быстрому началу работы … — Music Tribe
Нажмите SETUP для выхода. Эти инструкции также напечатаны на нижней части вашего VoiceLive 3 Extreme. Выходы. В зависимости от того, какую …
Index of /media/PLM/data/docs/P0DEG
- PDF Viewer
- Universal Document Viewer
- Google Docs View
- Google Drive View
- Download Document [pdf]Not Your Device? Search For Manuals / Datasheets:
File Info : application/pdf, 8 Pages, 7.31MB
Document
VOICELIVE 3 EXTREME QSG RU
VOICELIVE 3 EXTREME
          , ,

2 VOICELIVE 3 EXTREME


   ,  ,   ,       .         6,3 TS-.            .
        ,     . ,     .
            .    ,     .       .
                ,          .       , , .
        .         ,      .       .
1.   . 2.   . 3.   . 4.     . 5.        . 6.     . 7.    .      -. 8.      ,   ,       (   ).

9.             .       .          .          .         ,    .
10.    ,      ,            .     ,   ,              .
11.            .
12.             ,     .
13.        .
14.   , , ,   ,        .      ,         .
15.             .
16.           .      (,      ),        ,         ,        .
17.   :     ,         ,     WEEE (2012/19/EU)     .                 ().                 -   ,

  .    ,           .       ,       , ,     ,          .

          . ,    ,        .        .  MUSIC TRIBE     ,   - ,   ,    .        .   MUSIC TRIBE     .        MUSIC TRIBE      MUSIC TRIBE      .       .            ,  ,    ,         ,      MUSIC TRIBE GLOBAL BRANDS LTD.
  . © 2019 Music Tribe Global Brands Ltd. Trident Chambers, Wickhams Cay, P.O. Box 146, Road Town, Tortola, British Virgin Islands


     3

   VoiceLive 3 Extreme
          VoiceLive 3 Extreme.          : tc-helicon.com/products/ voicelive-3-extreme/        ,      ,      .
     VoiceLive 3 Extreme!
 ,       ,    !    ,        VoiceLive 3 Extreme,         .           VoiceLive 3 Extreme      : tc-helicon.com/products/ voicelive-3-extreme/support/

                ,     TC-Helicon: tc-helicon.com/support/
VoiceSupport
VoiceSupport -  ,         TC-Helicon      ,   .   VoiceSupport   : ·     ·       ·    -         ·    ·      · VoiceCouncil       ·   ·   ·   .    VoiceSupport  Microsoft Windows  Mac OS X : tc-helicon.com/products/voicesupport/
,  VoiceLive 3 Extreme
  VoiceLive 3 Extreme     VoiceSupport,  VoiceSupport    ACCOUNT.
 ,         VoiceSupport,  ,       .

4 VOICELIVE 3 EXTREME


(1)

(2)

VOICELIVE 3
(5)

(3)

P.A

(5)

(4)

        ,    ,        «»(. 6).   ,       ,   :
·  ,   VoiceLive 3 Extreme (,   ),          (1).
· «»  (, )         (2).
·      ,        VoiceLive 3 Extreme.
·      ,        / PA.     ,  « »     «  »         DAW.
   ,        VoiceLive 3 Extreme   PA,   (5),    .
 ,            -       (4)  . .           ,   ,        PA (   ) -    ,   VoiceLive 3 Extreme   .  ,    «  »        ,    ,       .


         :


P.A.


XLR  TRS 6,3 -  TS() 6,3-  3,5-

     5


    VoiceLive 3 Extreme!
   Vocal, Guitar  Loop -   .             . VoiceLive 3 Extreme        ,     ,       .
VoiceLive 3 Extreme    ,  ,      /    -   «  »  ,      .   ,      ,    !
  VoiceLive 3 Extreme    :
· 1 VoiceLive 3 Extreme
· 1
· 1 USB-
· 1    /
·  .
    , ,    .        .      ,      .
  ,   ,             .
  VoiceLive 3 Extreme
   ,       VoiceLive 3 Extreme!
·
· Adaptive Tone
· EQ
· Compression
· De-ess
· Reverb
· Delay (Echo)
· Double
· Harmony
· Choir

· Vocoder / Talk Box / Vocal Synth · Rhythmic · Mod (pronounced "micro mod"): Flanger / Chorus / Detune · Transducer · HardTune · Whammy

· Amp Simulation · Reverb · Delay · Mod: Flanger / Chorus / Detune · Drive · Compressor · Rhythm / Tremolo · Wah Wah · Octave Down

· Loop Assist TM  · -Swap Mode
     verse / chorus / bridge. ·

·     ·      ·    ,
 VoiceLive 3 Extreme !

·   :
·  ,     · HIT :     ,
  . ·   :
    . ·    :
       / .

6 VOICELIVE 3 EXTREME


     7
1.        /

(4)
(1)
OR

(2)

(3)

(6)

(7)

(5)


(1)       12     VoiceLive 3Extreme      .    VoiceLive 3 Extreme.
(2)     MIC / LINE    XLR.
(3)     GUITAR IN   Tip "   (TS) ¼"-6,3 (..   ).
(4)  MP3-     AUX    1/8"-3,5 .
(5)  - MIDI     MIDI IN    MIDI.
(6)  Switch-3   FOOTSWITCH   ¼"-6,3     (TRS) (,   Switch-3).
(7)      EXPRESSION.


   ,     ,   .        .
        ,     .

     MP-75  e835FX?    (      ),    Phantom Power.    ,   SETUP     INPUT   <  >    .   Mic Type     Condenser.  SETUP  .         VoiceLive 3 Extreme.

OR

VOICELIVE 3

P.A

       / ,         .  ,      .           .     GUITAR IN  HEADPHONE.            - .
2. -  - (2 )

OR

VOICELIVE 3

P.A

   ,       PA ( ,   PA      !),     2- .

8 VOICELIVE 3 EXTREME
3. -  - (4 )

5. -

     9

OR VOICELIVE 3

LR P.A

VoiceLive 3 Extreme   « »     .            XLR,   ¼"- 6,3      - Guitar OUT.     -     .       4- .
4. -  -   dual mono

OR

VOICELIVE 3

P.A

  ,           .          .        XLR      ¼"- 6,3 .
6. -

OR

VOICELIVE 3

P.A

     ,        ,  PA     .            .       «Setup / Output».

OR

VOICELIVE 3

P.A

  ,             PA.          .       XLR      ¼" - 6,4 .

10 VOICELIVE 3 EXTREME
7. -  MIDI-

     11

 !
  ,     «» (. 6).   VoiceLive 3 Extreme ,    ,    ,    !   POWER    .

 !
  ,        VoiceLive 3 Extreme!    VoiceLive 3 Extreme     0  «Unity»,    ,  .

   ,  ,        .

            -      «Setup».

       PA /  (    ,     ).

VOICELIVE 3

P.A

VoiceLive 3 Extreme       MIDI-  . MIDI-      NaturalPlay    .           ,   .

  !

     .   ,         .    Auto Gain   .         .      MP-75  e835FX,    . ,      VoiceLive 3 Extreme.

              /   ,    VoiceLive 3 Extreme.
      ,     / .

     ,   ,    .          ,   ,    "Craig's Corner":
youtube.com/watch?v=VlN1RJ4gcAo

     VoiceLive 3 Extreme -   .       ,       ,   .


 ,       -              .
      , ,       PA  .     ,    «Craig's Corner»,   : youtube.com/watch?v=qq0AOtafIjs

12 VOICELIVE 3 EXTREME

VoiceLive 3 Extreme
VoiceLive 3 Extreme    ,  ,   ,       ,  -.   ,    ,             ...           ,        ,  SETUP,    SYSTEM   ALL GUITAR FX GLOBAL  ON.  «»  ,       .
  !
   ,    HIT.
HIT   ( )     ,   /     .       «A / B»     ,  «». , HIT       ,     ,         .   - HIT       .   HIT    .

   ?
 ,     ...    , ,  ,      ,       VoiceLive 3 Extreme, -       !     ,     ,       VoiceLive 3 Extreme.   ,  ... ·  ,    «» ·   ·      ·    ·     ·     ·     ·    ·     ·        ·  - ·    MIDI · ...   !    VoiceLive 3 Extreme   : tc-helicon.com/products/ voicelive-3-extreme/support/


·      Preset 10: «Amazing Grace».  ,   REVERB    «TRACK».
·  «TRACK»,     «Amazing Grace»     ( ,   ,    ).   (   ,  )  ().
·  ,    /      .
    VoiceLive 3 Extreme      ,     ),   ,     .


     13


             rg= 150 ohm
SNR
 D  A
          SNR
 D  A
        Aux  Aux   Aux


 D  A


 D  A


  XLR /   TRS ¼"-6,3-
3.08
-52 dBu  +7 dBu
-40 dBu  +19 dBu
-127 dBu
>100       24-, 128-    , SNR110  - 1/4"- 6,3 TS  1  -2 dBU  14 dBu />108  24-, 128-    , SNR110  -  XLR
25
+16 dBu
1/8"- 3,5    +2 dBu
 XLR
300/150   /
: +14 dBu;   -2 dBu >109 , 20   20  +0/-0.3 dB, 20   20  24-, 128-    , SNR 115  - 1/4"- 6,3  TRS
442/221   /
: +14 dBu;   -2 dBu >101 , 20   20  24-,128-    , SNR 110  -
1/8"-3,5-   , 50 , +14 dBu
1/4"-6,3- TRS
270/540   /


 XLR


USB

mini--B, USB-A

MIDI

IN/OUT 5- DIN

Pedal

1/4"-6,3- TRS


100-240   , 50-60  ()

  < 14 W


 EN 55103-1: 2009, EN 55103-2:

EMC

2009, FCC CFR 47  15B  ICES-003: 2004

4- .


    IEC 65, EN 60065, UL6500  CSA IEC 65, EN 60065, UL6500  CSA


32° F  122° F (0° C  +50°)


-22° F  167° F (-30° C  +70°)


. 90%


350 x 76 x 261


2.3 kg


 www.tc-helicon.com/support for warranty information.
Adobe PDF Library 9.9 Adobe InDesign CS5 (7.0)