
Welcome to the V380 Pro Camera Manual—your guide to mastering your new camera. This article will help you unlock the full potential of your device, giving you the confidence to use it effectively. We’ll also introduce the top 5 V380 Pro Surveillance Camera Manufacturers known for quality and innovation.
By the end of this guide, you’ll be equipped to set up, operate, and maintain your V380 Pro camera with ease. Whether you’re a tech novice or an experienced user, this guide will make your security setup simpler and safer.
You’ll learn everything from setup to advanced features, troubleshooting, and key manufacturers. Let’s dive in!
Getting Started with Your V380 Pro Camera
Unboxing your V380 Pro camera is the first step in an exciting journey. This section will guide you through everything you need to get started with ease, using insights from a trusted security camera manufacturer.
1. Unboxing and Package Contents
When you receive your V380 Pro, make sure to check the package contents. Inside, you should find the camera, power adapter, mounting bracket, screws, and the V380 Pro Camera Manual. Verify that all components are present before proceeding.

2. V380 Pro Camera Manual: Initial Setup Guide
- Powering on the camera: Connect the camera to a power source using the provided adapter. Wait for the indicator light to turn on, signaling that your camera is ready for setup.
- Connecting to Wi-Fi: Follow the instructions in the V380 Pro Camera Manual to connect your camera to your home Wi-Fi network. Ensure your Wi-Fi is stable and within range for optimal performance.
- Downloading and installing the V380 Pro app: Head to the App Store or Google Play Store to download the V380 Pro app. Once installed, create an account and log in to link your camera with your mobile device.
V380 Pro Camera Manual: Key Features and Functions
Discover the powerful features packed into your V380 Pro camera, designed by a leading security camera manufacturer, to enhance your surveillance capabilities.
1. Live View and Remote Monitoring
Access live footage anytime, anywhere with remote monitoring via the V380 Pro app. Stay connected to your home or business 24/7, offering peace of mind.
2. Two-Way Audio Communication
The built-in microphone and speaker allow for seamless two-way audio communication. Speak directly to family members or visitors, adding a layer of interaction to your security setup.
3. Night Vision Capabilities
Experience clear video quality even in low-light conditions, thanks to the camera’s advanced night vision technology. Protect your property around the clock.
4. Motion Detection and Alerts
Receive instant alerts on your smartphone whenever motion is detected. Customize sensitivity levels to reduce false alarms and stay informed of any activity.

Advanced Settings in the V380 Pro Camera Manual
Explore the advanced settings in the V380 Pro Camera Manual to ensure your camera functions at its best. These features, developed by a leading security camera supplier, allow you to customize your security setup, providing flexibility and control over your surveillance system.
1. Configuring Recording Options
- Continuous Recording: Continuous recording captures footage 24/7, ensuring no moment is missed. This setting is ideal for high-traffic areas, providing a complete history of events. While it uses more storage space, it is invaluable for reviewing critical footage.
- Motion-Triggered Recording: Motion-triggered recording optimizes storage by capturing video only when motion is detected. It’s perfect for low-activity areas, reducing unnecessary footage and focusing on relevant events. Adjust the sensitivity to suit different environments.
2. Cloud Storage Integration
With cloud storage integration, you can securely store footage offsite, accessible through the V380 Pro app. This ensures your recordings are safe even if the camera is compromised. Choose a plan that balances cost and storage needs, allowing you to access your footage from anywhere.

3. Multiple Device Management
Manage multiple cameras easily using the V380 Pro app. This feature lets you synchronize and control several cameras from a single device, streamlining your security operations. Whether at home or work, ensure all areas are covered efficiently.
Troubleshooting Common Issues Using the V380 Pro Camera Manual
Even the best devices can encounter issues, but most problems are easy to solve with the right guidance. Here’s how to troubleshoot common problems with your V380 Pro camera to keep it running smoothly.
1. Connection Problems
If you experience connectivity issues, first check your Wi-Fi network for stability. Ensure the camera is within range of the router. Try restarting both the router and camera to refresh the connection. Also, verify that the Wi-Fi credentials in the V380 Pro app are correct.
2. Video Quality Issues
For poor video quality, check your internet speed to ensure it meets the requirements for streaming. Adjust the camera’s resolution in the V380 Pro app to suit your bandwidth. Ensure the camera lens is clean and unobstructed, and consider the lighting conditions in the camera’s location.
3. Audio Difficulties
If you have audio difficulties, ensure the camera’s microphone and speaker are unobstructed. Check the audio settings in the app and adjust the volumes if needed. Ensure your camera firmware is up-to-date to benefit from any improvements or bug fixes.
Security and Privacy Features of the V380 Pro Camera
Security is crucial in any surveillance system, and the V380 Pro camera includes robust features to protect your data. These features are designed to meet the high standards expected from top security camera manufacturers.
1. Encryption Protocols
The camera uses advanced encryption to keep your data safe. This ensures that all video footage and data remain secure from unauthorized access, preventing anyone without the correct decryption key from viewing your information.
2. User Access Management
Control access to your camera with user access management. You can grant permissions only to trusted individuals, deciding who can view live feeds and manage settings. Regularly updating user permissions enhances security.
3. Firmware Updates for Enhanced Security
Firmware updates are vital for maintaining security. Enable automatic updates to receive the latest improvements and patches, protecting your camera against new threats. These updates also enhance performance and functionality, ensuring your camera operates optimally.
Recommended V380 Pro Surveillance Camera Manufacturers
Choosing the right surveillance camera manufacturer can make all the difference. Here are the top five manufacturers to consider:
1. Wuhan Morntrip Supply Chain Company
Morntrip is a name that resonates strongly within the security camera industry. As a leading surveillance camera manufacturer, they specialize in developing high-quality surveillance cameras that integrate seamlessly with the V380 Pro software. Their cameras are known for their durability and advanced features like night vision and motion detection, making them a go-to choice for both businesses and homeowners.
They’re not just another security camera manufacturer; they’re innovators. With a focus on user-friendly designs, Morntrip ensures that even the most tech-averse individuals can set up and operate their cameras with ease. And their customer service? Top-notch. You can expect prompt, reliable support whenever you need it.
.jpg)
2. Shenzhen VStarcam Technology Co., Ltd.
VStarcam is a well-known security camera manufacturer in China, offering a wide range of cameras that work with V380 Pro software. They are recognized for their innovative designs and reliable performance. VStarcam cameras provide features like remote viewing, HD video, and night vision, catering to both home and business users.
Their commitment to quality and affordability makes VStarcam a preferred choice for customers worldwide. As a surveillance camera manufacturer, they offer solutions that are easy to install and use, ensuring a hassle-free experience for users.
3. Shenzhen Foscam Intelligent Technology Co., Ltd.
Foscam is a respected name in the security camera manufacturer industry, known for its high-quality surveillance products. Their cameras integrate seamlessly with V380 Pro, offering features such as motion detection, two-way audio, and high-definition video.
Foscam’s dedication to technology and security ensures that its products meet the needs of both residential and commercial clients. With competitive pricing and excellent customer support, Foscam stands out as a top surveillance camera manufacturer.
4. Shenzhen Anran Security Technology Co., Ltd.
Anran Security is a prominent cctv camera manufacturer offering reliable and affordable cameras compatible with V380 Pro software. Known for their robust construction and user-friendly features, Anran cameras are ideal for both indoor and outdoor use.
Their focus on quality and customer satisfaction has earned them a reputation as a trusted security camera supplier. Anran provides a range of products suitable for different security needs, ensuring comprehensive protection for your premises.
5. Guangzhou Juan Intelligent Tech Joint Stock Co., Ltd.
Juan Intelligent Tech is a dynamic surveillance camera manufacturer specializing in innovative security solutions. Their V380 Pro-compatible cameras feature cutting-edge technology, such as smart detection and remote access, to enhance security systems.
As a leading security camera manufacturer, Juan Intelligent Tech offers high-quality products that combine performance with affordability. Their commitment to continuous improvement and customer service makes them a reliable choice for surveillance needs.
Conclusion
In this comprehensive V380 Pro Camera Manual, we’ve covered everything from initial setup to advanced features and troubleshooting. You now have the tools to maximize the capabilities of your V380 Pro camera, enhancing the security of your space.
If you have custom product requests for your business, feel free to contact us at info@icseecam.com. We’re here to help you find the right solutions and support your security needs.
Подключение
способ №1
Важно! Некоторые позиции в описании и на скриншотах могут отличаться от ваших, так как разработчик выпустил разную вариацию программы на iOS / Android. В данной инструкции подключался именно iPhone, но в целом, принцип подключения одинаков.
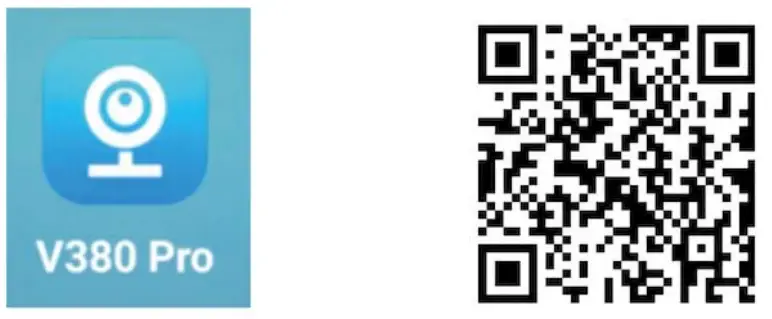
1. Скачайте приложение v380 или v380 pro с Play Market / App Store(разница между версиями – v380 pro поддерживает 4G камеры, в то время как v380 – нет), либо просканируйте QR-код в книжечке в комплекте.


2.Запустите приложение (во всех всплывающих окнах выбирайте «разрешить») и зарегистрируйтесь с помощью электронной почты (это необязательно и можно сделать позже).
>
3.Подключите камеру к сети, в течение минуты камера создаст свою Wi-fi сеть, к которой вам нужно будет подключиться в настройках Wi-Fi (название сети будет MV*******)
4.Заходите в приложение v380 или V380 pro, камера появится на начальном экране. Задайте пароль (лучше сложный).
5.В данный момент Вы подключены к камере напрямую (через её Wi-fi сеть). Чтобы привязать её к роутеру, нажмите на шестерёнку -> «Заменить сеть оборудования» -> «Режим Wi-FI станции» -> выберете Вашу сеть.
Если появилась надпись «Интернет в интернете» , значит Вы сделали всё правильно и теперь можете смотреть прямую трансляцию с Вашей камеры через смартфон.
6.Готово! Режим записи, датчик движения, качество изображение и многое другое Вы можете настроить в приложении V380 / V380 pro.
Способ №2
В случае, если камера не появилась в приложении автоматически, добавьте её вручную.
1.Подключите камеру в розетку, через некоторое время появится сеть с названием MV*******( если в течение двух минут не появилась – зажмите кнопку сброса на камере, пока не прозвучит соответствующее голосовое оповещение).
2.Зайдите в приложение V380 / V380 PRO, нажмите на «+» -> «WiFi камера» -> «Следующий шаг» -> Выберите первую строчку, далее «Следующий шаг» -> Выбираете Вашу Домашнюю сеть ( пароль должен быть точен, если есть заглавные буквы, не забывайте их прописывать).
3.Если пароль указан верно, камера подключится к Вашему роутеру.Теперь вы можете находиться в любой точке мира и просматривать видео в прямом эфире и получать уведомления о движении внутри помещения.
Содержание: скрывать
- 1 Скачать приложение
- 2 Сброс камеры до заводских настроек
- 3 Сканирование QR-кода для настройки сети
- 4 Выбор Wi-Fi сети
- 5 Настройка по QR коду
- 6 Добавление завершено
- 7 Настройка точки доступа
- 8 Для Android
- 9 Для iOS
- 10 Видеонаблюдение в реальном времени
- Воспроизведение записанного видео
- 12 Запись видео на SD-карте
- 13 >Настройки камеры
- 14 Документация
- FAQ Вопросы-ответы
Скачать приложение
Чтобы скачать приложение «V380 Pro», просто отсканируйте QR-код камерой вашего смартфона. Если это не сработает, вы можете найти приложение в магазине приложений (Google Play или App Store)
Сброс камеры до заводских настроек
- Включите камеру.
- Удерживайте кнопку сброса несколько секунд, пока камера не покажет «Сброс к заводским настройкам».
(!) Важно помнить, что местоположение кнопки сброса может отличаться у разных моделей камер.
Сканирование QR-кода для настройки сети
Прежде чем добавить камеру, убедитесь, что ваш телефон подключен к Wi-Fi сети.
1. Откройте приложение «V380 Pro», которое вы скачали.
2. Зарегистрируйтесь и войдите в свою учетную запись.
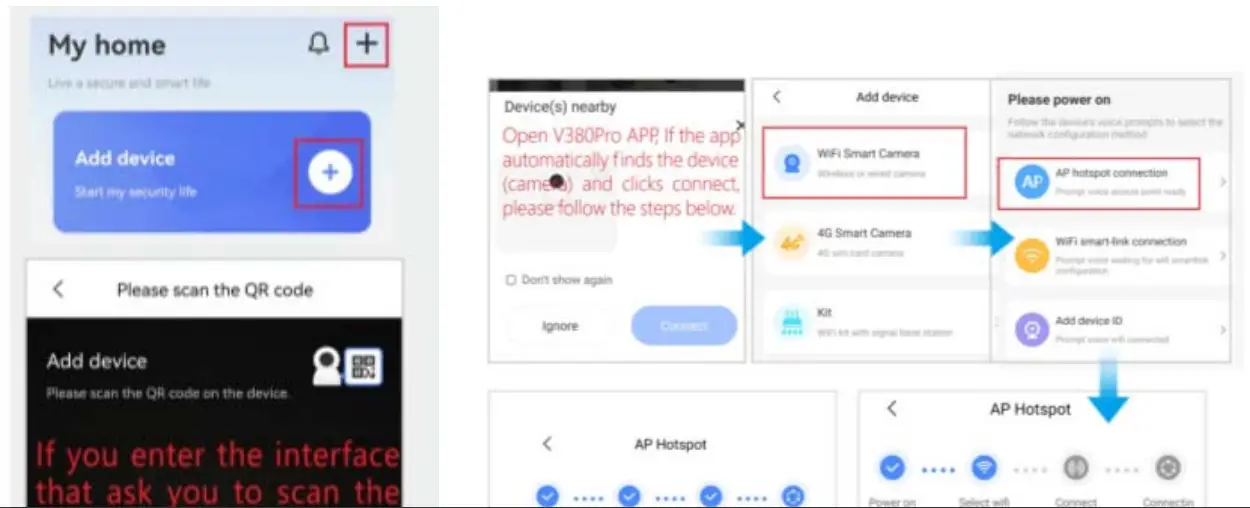
3. На главной странице нажмите на значок «+».
4. Сканируйте QR-код с помощью камеры вашего телефона.
(!) Обратите внимание: Панорамные камеры с лампами не поддерживают сканирование QR-кода для добавления камеры. Вам нужно выбрать режим подключения к точке доступа (AP) для настройки камеры. Внешний вид приложения может отличаться от показанного на изображениях, поэтому ориентируйтесь на актуальный интерфейс.
Отсканируйте этот QR-код, чтобы посмотреть видео-инструкции по камере видеонаблюдения V380 Pro на русском языке.
Если QR-код на вашей камере поврежден, используйте этот QR-код для настройки сети.
Выбор Wi-Fi сети
1. Сначала подключите свой мобильный телефон к Wi-Fi сети на частоте 2,4ГГц.
2. Убедитесь, что соединение установлено правильно и введите пароль от сети.
Камера видеонаблюдения V380 Pro не поддерживает подключение к роутерам на частоте 5ГГц. Название вашей сети не должно содержать специальных символов, и она должна быть защищена паролем.
Настройка по QR коду
1. В приложении будет сгенерирован QR-код.
2. Используйте свою камеру для сканирования этого QR-кода.
3. Когда камера успешно распознает QR-код, вы увидите сообщение «Конфигурация получена». В приложении нажмите «Я слышу звуковой сигнал», чтобы подтвердить.
4. После успешного подключения появится сообщение «Wi-Fi подключен».
Камера видеонаблюдения V380 Pro инструкция на русском
Добавление завершено
1. Приложение автоматически подключит камеру.
2. После успешного подключения к сети вы можете задать теги и имя для камеры.
Камера видеонаблюдения V380 Pro инструкция на русском
….
Настройка точки доступа
1. Если вы не можете найти QR-код на устройстве, нажмите «Не можете найти QR-код на устройстве?».
2. Выберите «Умная камера Wi-Fi» -> «Подключение к точке доступа».
Камера видеонаблюдения V380 Pro инструкция на русском
Сначала подключите свой телефон к Wi-Fi сети.
Для Android
1. Выберите Wi-Fi сеть и введите пароль.
2. Нажмите «Подключить к точке доступа AP» и подключитесь к точке доступа устройства (MV+ID).
3. После возврата в приложение устройство автоматически подключится к Wi-Fi.
Камера видеонаблюдения V380 Pro инструкция на русском
(!) Примечание
Вы найдете соответствующий идентификатор на корпусе устройства, который соответствует имени точки доступа.
Для iOS
1. Введите пароль от Wi-Fi. (Если вы хотите подключиться к другому Wi-Fi, подключите свой мобильный телефон к необходимому Wi-Fi и вернитесь в приложение для обновления).
2. Нажмите «Подключить к точке доступа AP» и подключитесь к точке доступа устройства (MV+ID).
3. После возврата в приложение устройство автоматически подключится к Wi-Fi.
Камера видеонаблюдения V380 Pro инструкция на русском
Видеонаблюдение в реальном времени
Выберите камеру из списка добавленных устройств для просмотра изображения в реальном времени.
Камера видеонаблюдения V380 Pro инструкция на русском
Воспроизведение записанного видео
После подключения камеры откройте интерфейс предварительного просмотра в реальном времени в приложении и нажмите кнопку «Replay» на панели инструментов.
Камера видеонаблюдения V380 Pro инструкция на русском
Запись видео на SD-карте
Перед установкой карты Micro SD выключите камеру, а после установки снова включите ее.
Обычная камера поддерживает карты TF до 128Гб.
• Форматируйте карты объемом до 32Гб как «FAT32».
• Форматируйте карты объемом 64Гб и выше как «exFAT».
Настройки камеры
В списке устройств нажмите на «Настройки записи».
1. Настройки записи
• Непрерывная запись: камера будет записывать постоянно во время работы.
• Запись по событию: запись начнется только при срабатывании сигнала тревоги.
• Запись звука: камера будет записывать звук во время записи.
2. Качество видео
• Вы можете настроить качество видео на HD или SD.
Вопрос-ответ
- Как подключить камеру к Wi-Fi сети?
- Для подключения камеры к Wi-Fi сети на 2,4 ГГц, сначала загрузите приложение V380 Pro на свой смартфон, зарегистрируйтесь и выполните вход. Затем следуйте инструкциям в приложении для добавления камеры: выберите опцию добавления нового устройства, отсканируйте QR-код на камере или сгенерируйте QR-код в приложении, сканируйте его с помощью камеры, введите пароль от вашей Wi-Fi сети и завершите настройку.
- Может ли камера записывать видео на SD-карту?
- Да, камера поддерживает запись видео на Micro SD-карту до 128 ГБ. Перед установкой карты необходимо выключить камеру, вставить карту и затем включить камеру. Рекомендуется форматировать карту в зависимости от ее объема: до 32 ГБ — в формате FAT32, от 64 ГБ и выше — в формате exFAT.
- Как настроить функцию записи на камере V380 WiFi Pro?
- В приложении V380 Pro перейдите в настройки камеры, выберите раздел «Настройки записи». Вы можете выбрать между непрерывной записью (когда запись происходит постоянно во время работы камеры), записью по событию (когда запись начинается при срабатывании тревоги) и записью звука (когда камера записывает аудио во время видеозаписи).
- Как просматривать видео в реальном времени с помощью камеры?
- Чтобы просмотреть изображение в реальном времени, откройте приложение V380 Pro, выберите добавленную камеру из списка устройств и нажмите на нее. Вы перейдете в режим просмотра, где сможете наблюдать текущее видео с камеры.
- Что делать, если не может подключиться к Wi-Fi сети?
- Если камера не может подключиться к Wi-Fi, в первую очередь убедитесь, что пароль Wi-Fi сети введен правильно. Также проверьте, что ваш маршрутизатор работает на частоте 2,4 ГГц, так как камера не поддерживает 5 ГГц. Убедитесь, что имя Wi-Fi сети не содержит специальных символов и не скрыто. Если проблема сохраняется, попробуйте перезагрузить камеру, проверьте настройки безопасности маршрутизатора (например, фаервол, черный список и т.д.) и убедитесь, что устройство имеет доступ в Интернет через маршрутизатор для удаленного просмотра.
Videos: Камера v380 WiFi Pro

Внимание! Камера работает только с приложением своего производителя!
Не нужно пытаться подключить камеру к другому приложению!
Для подключения камеры необходимо скачать приложение указанное на коробке и в описании на мобильное устройство через «AppStore» или «Google Play» (предпочтительно) или отсканировав QR-код на коробке. Необходима регистрация!
С помощью идущего в комплекте адаптера питания подключите камеру к сети. ВАЖНО! Дождитесь сообщения камеры «wait to be configured».
При первом запуске программы появится меню: Выбираете пункт «Войти», затем «Зарегистрировать» и, следуя пошаговой инструкции, создайте свой аккаунт. Для получения кода активации аккаунта нужно будет указать e-mail. Далее появится основное меню программы, где будет располагаться список камер.
Для добавления камеры в программу нужно расположить мобильное устройство рядом с камерой и нажать «+» в правом верхнем углу экрана и нажать «развернуть» Затем выбрать пункт «добавить по WiFi». Далее, в соответствии с сообщением на экране нажать «Следующий шаг» Далее подтвердить выбранную WiFi сеть, в которой планируется эксплуатация камеры. Выберите нужную WiFi сеть и введите пароль доступа к данной сети.
Откроется радар с цифровым обозначением. В случае успешной конфигурации камеры появится предложение задать пароль. Далее — назначаете сложный пароль к камере, название камеры (при необходимости). После этого камера появится в списке.
Для того, чтобы в той же сети добавить ту же камеру на другое мобильное устройство, устанавливаете программу, выбирайте на нѐм пункт «Добавить камеру в LAN» (с красной меткой): Чтобы добавить камеру на мобильное устройство НЕ находящееся в одной сети с камерой, необходимо в списке устройств камеру, кликнуть на «Добавить по ID» и вставить ссылку, заранее скопированную в буфер в поле ID (ссылку отправляет владелец камеры — администратор) и нажать «Добавить камеру» ВАЖНО! При необходимости подключится к другой сети Wi-Fi, нужно нажать и удерживать кнопку «Reset» до тех пор, пока не услышите «wait to be configured» и далее повторить настройку в соответствии с инструкцией.
Пример подключения камеры в приложении V380 pro
Приложение просит зарегистрировать аккаунт. Регистрируемся по адресу электронной почты, регион выбираем «Европа». Если не видите в почте сообщения с 6-значным кодом, проверьте папку «Спам».
После входа нажимаем «+» для добавления камеры. Игнорируем открывшийся сканер и нажимаем синюю клавишу посреди экрана, далее прописываем камеру:
Выбираем: «Подключение к точке доступа»
Прописываем доступ к вашей WiFi сети (имя сети и пароль)
Нажимаем «Подключить точку доступа» и ищем в списке сеть с MV + серийный номер камеры
На этом примере: MV51284527
После выбора сети MV получаем уведомление о подключении
Здесь камера говорит, что производится подключение, просто ждём
Выбираем имя подключения или пишем своё
При первом нажатии на окно изображения с камеры вас попросят установить пароль на неё
Нажимаем на открывшееся окно и получаем картинку с камеры. Далее переходим к настройкам в меню
Пример подключения камеры в приложении TSCloud
Приложение просит зарегистрировать аккаунт. Регистрируемся по адресу электронной почты, регион выбираем «Россия». Если не видите в почте сообщения с 6-значным кодом, проверьте папку «Спам».
После входа нажимаем «+» для добавления камеры. Игнорируем открывшийся сканер и нажимаем синюю клавишу посреди экрана, далее прописываем камеру:
Выбираем: «Wi-Fi соединение с помощью Soft-AP»
Камера должна быть включена и издавать звуковой сигнал. Переходим далее.
Нажимаем «Перейти к настройкам»
Находим точку доступа с именем начинающимся на TSC, кликаем на неё
Предоставляем доступ к сети, вводим пароль от Wi-Fi
Здесь камера говорит, что производится подключение, просто ждём
Выбираем имя подключения или пишем своё
После нажатия ОК попадаем в интерфейс управления камерой
Проверяем управление и выполняем пользовательские настройки
Выбираем: «Интеллектуальная видеокамера»
Выбираем: «Отсканируйте код, чтобы добавить»
Ставим галочку «Устройство включено» и нажимаем «Следующий шаг»
Необходимо выбрать вашу Wi-Fi сеть и прописать пароль доступа к ней.
(!) Важно! Должна быть выбрана сеть в диапазоне 4G. В сетях 5G камера не работает
Получаете на экране смартфона QR-код с настройками доступа в вашу сеть
Необходимо считать код объективом камеры с расстояния 15-20 см. Сообщение «Connecting to the server» говорит о том, что код считан успешно и происходит подключение камеры. Нужно немного подождать
Подключение завершено. Нужно ввести имя подключения и нажать «Начать просмотр»
Нажав на изображение с камеры, попадаем в консоль управления. PTZ управление производится нажатием на синий круг внизу. Открывается панель как на фото.
Пример подключения камеры в приложении YI IoT
Для добавления камеры нажимаем +
Выбираем: «Соединение Wi-Fi», слышим из камеры двухтональный сигнал «динь-дон»
Ставим галочку «Я слышал последовательность» и нажимаем «Следующий шаг»
Необходимо выбрать вашу Wi-Fi сеть и прописать пароль доступа к ней.
(!) Важно! Должна быть выбрана сеть в диапазоне 4G. В сетях 5G камера не работает
Получаете на экране смартфона QR-код с настройками доступа в вашу сеть
Необходимо считать код объективом камеры с расстояния 15-20 см. Сообщение «Connecting to the server» говорит о том, что код считан успешно и происходит подключение камеры. После этого нажимаем «Следующий»
Подключение завершено. Нужно ввести имя подключения и нажать «Закончить». Далее, если не планируете использовать платное облачное хранилище нажмите «Приступить к использованию камеры»
Нажав на изображение с камеры, попадаем в консоль управления. PTZ управление производится нажатием на круг-манипулятор внизу. Открывается панель как на фото.
Cameras
V380 Pro 2.4G WiFi Surveillance
Camera Instructions
Tips
- Quick guide of settings, please read III. Quick Settings.
- It is recommended to read this manual carefully before using it, especially the red characters.
Features
- Monitoring
You can view real-time monitoring while you are away. - Alarm
When a moving object is detected within the recording range, the camera will start recording and send an alarm through the APP on the mobile device. - IR-CUT
The smart IR-CUT function will automatically sense changes in the surrounding environment and turn on/off night vision. No need and no support for manual settings. - TF Storage
If you insert a TF card, the camera will automatically save the surveillance video. 8GB memory allows two days of recording, and 128GB memory allows up to a month of recording. - Loop Recording
When the memory is full, the latest recording file will automatically overwrite the oldest. - Cloud Storage
If you worry about your camera being stolen or the files in the TF card is damaged, you can use paid cloud storage. (Provided and charged by a third party) - AI Body Shape Recognition
The alarm is activated only when there is human activity to facility alarming accuracy. (Reducing false alarms caused by wind, cars, animals, etc. Provided and charged by a third party)
Read Before Use
- You do not need to insert a TF card to use, butthevideocannotbesavedinthecameraorplayedback,if you want to store surveillance video, you can buy cloud storage or insert a TF card.
- The camera supports 8-128G C10 TF card, please format the TF card before use. (* This operation will delete all the data inside the TF card)
- To make the camera the smallest, the camera does not have a built-in battery, please connect it to a power bank or household power supply before using it. Normal use requires 5V/1A voltage, maximum supports 5V/2A.
- The camera only supports a 2.4G Wi-Fi connection, and not supports 5G Wi-Fi.
- To ensure good signal transmission, during the setup process camera should be close to the mobile phone and wireless router.
- Do not cover or wrap the camera while using, as this will affect the normal heat dissipation. The camera needs to continuously transmit signals to connect to the internet, so temperature rise is normal. The camera has undergone a long-term aging test before leaving the factory to ensure good performance.
- If there are exceptions in the setup process, you can reset the camera and try again.
- Once successfully connected, no need to set it up again unless you change the Wi-Fi connection or reset the camera.
- Time will be synchronized to local time automatically and there is no need to set it.
- Do not use this device for illegal purposes.
Quick Settings(no need for camera QR code)
- Two ways to download the V380Pro APP
When installing the APP, need to authorize related permissions, especially:
- Allow Location Access: Faster matching server to achieve a faster and more stable connection.
- Local Network: The phone can be based on WIFI and the camera’s hotspot connection to quickly add the camera account.
* If the hotspot has been connected, refresh and the device is found, usually because no one turned on the permission.
2、Short-range Mode
(point-to-point connection of camera and mobile phone)
Connect Power Supply
Connect the power supply, and wait about one minute until the camera indicator turns red.
* If there are exceptions in this process, please reset the camera.
Phone Settings
Unlock your phone — Tap “Setting” —

“WLAN”
① Find the Wi-Fi signal beginning with MVandtap it.
② And wait until the Wi-Fi symbol appears.
Open App V380 Pro
After login, swipe down from the top of the interface to refresh, until found the device.
* If there are exceptions, please check the previous steps.
This user name and password is different from the V380 APP account because APP can add unlimited cameras, each camera should have a separate user name and password.
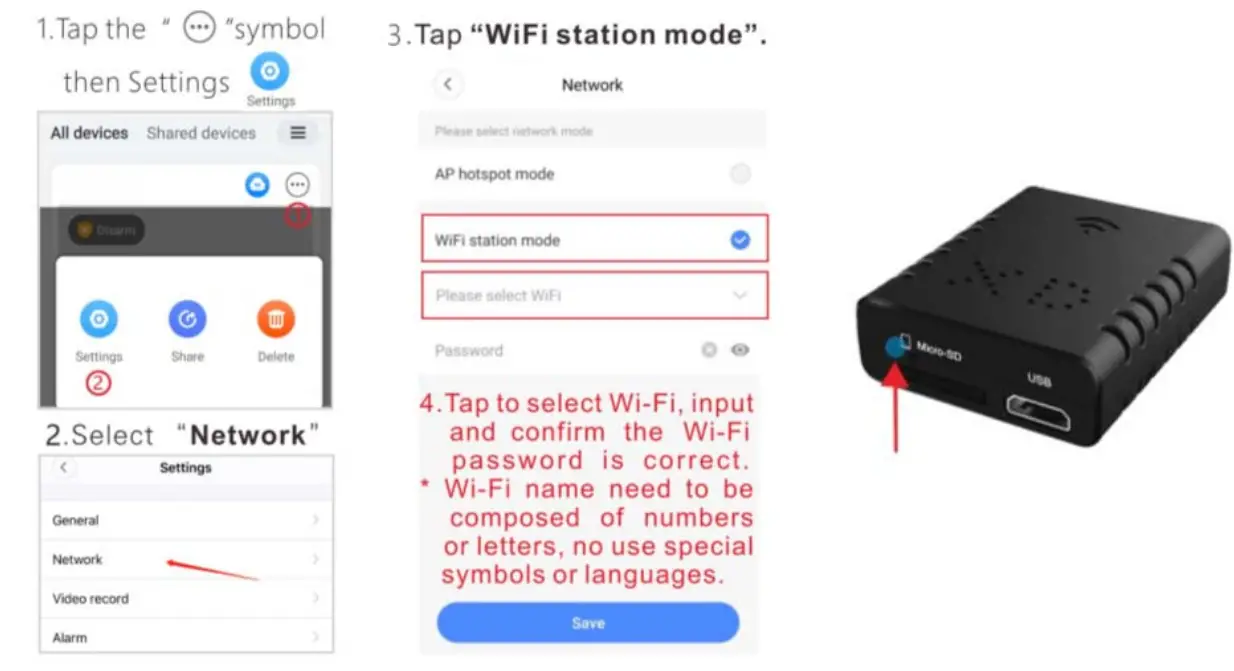
① See the page8: Tap“WiFistationmode”
②Point-to-point connection done.
RemoteMode
(Achieve remote monitoring by connecting to the router Wi-Fi)
*To ensure signal stability, the distance between the camera and the router should not exceed 10m.

4、Tap to select Wi-Fi, input and confirm the Wi-Fi password is correct.
*Wi-Fi names need to be composed of numbers or letters, with no use of special symbols or languages.
5、TapSave, the camera blue light is flashing, indicating that the camera is connecting to the WI-FI network.
Whenthe blue light is on, indicating that the camera has successfully connected to the WI-FI network. Congratulation! You can remotely monitor now.
* If the light turns red, it means that the connection has failed. Please check the WIFI name and password, and make sure the camera can receive a strong and stable-FI signal.
Alternative methods of connecting remote mode
FAQ:
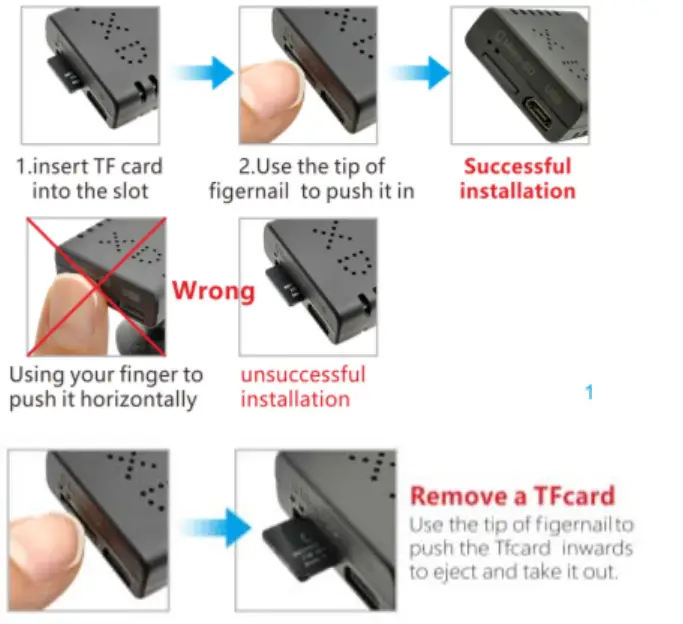
Q: How to insert or remove a TF card?
A: insert the TF card in the correct direction and push it into the slot. If you hear a click, it means the insertion is successful. To remove the TF card, push it inwards to eject and take it out.
Q: How to reset the camera?
A: Power on, insert a needle or a toothpick into the reset hole and press the button inside (about 3 seconds) until the red and blue indicators turn on at the same time to complete the reset operation.
*After reset, the device will be restored to factory settings. The connection needs to be set up again.
Q: V380 Pro account and cloud storage?
A: One V380 Pro account can be connected to an unlimited number of cameras, but one camera only supports one cloud storage.
Q: I have set up remote monitoring. Why the APP appears offline when I go out?
A: When the network is switched or disconnected and reconnected on the mobile phone, the App will disconnect from the camera and display offline. Please swipe down to refresh the devices in the App or restart the App.
Q: Why the remote monitoring is not smooth?
A: Please ensure that the network signal at the installation location is working well and ensure the camera can receive strong and stable WiFi signals.
Q: How to save the video?
A: You can save the video content on the memory card. If cloud storage is enabled, you can save the video to cloud storage.
Q: How to play the video?
A: The video stored on the TF card can be viewed on the computer through the card reader, or directly through the V380 Pro APP, The video stored on the cloud storage can be directly downloaded and viewed through the V380 Pro APP.
Q: Why the video cannot be saved on the memory card?
A: The camera supports an 8-128GB C10 TF card. Format the card or change a new TF card then try again.
Q: What should I do if I forget the password?
A: The only way is to reset the camera
This device complies with part 15 of the FCC Rules. Operation is subject to the following two conditions: (1) This device may not cause harmful interference, and (2) this device must accept any interference received, including interference that may cause undesired operation.
Any changes or modifications not expressly approved by the party responsible for compliance could void the user’s authority to operate the equipment.
Note: This equipment has been tested and found to comply with the limits for a Class B digital device, pursuant to part 15 of the FCC Rules. These limits are designed to provide reasonable protection against harmful interference in a residential installation. This equipment generates uses and can radiate radio frequency energy and, if not installed and used in accordance with the instructions, may cause harmful interference to radio communications. However, there is no guarantee that interference will not occur in a particular installation. If this equipment does cause harmful interference to radio or television reception, which can be determined by turning the equipment off and on, the user is encouraged to try to correct the interference by one or more of the following measures:
- Reorient or relocate the receiving antenna.
- Increase the separation between the equipment and receiver.
- Connect the equipment into an outlet on a circuit different from that to which the receiver is connected.
- Consult the dealer or an experienced radio/TV technician for help.
This equipment complies with FCC radiation exposure limits set forth for an uncontrolled environment. This equipment should be installed and operated with a minimum distance of 20cm between the radiator & your body.