
Русский
- Bedienungsanleitung TP-LINK RE450
- TP-LINK RE450 User Manual
- Manual Usuario TP-LINK RE450
- Mode d’emploi TP-LINK RE450
- Istruzioni TP-LINK RE450
- инструкция TP-LINK RE450
- TP-LINK RE450の取扱説明書
- Handleiding TP-LINK RE450
- Manual de uso TP-LINK RE450
Вам нужна инструкция? Мы поможем Вам ее найти и сэкономить Ваше время.
- 41 stron
- 2.62 mb
Изделие TP-LINK RE450, а также другие, которыми Вы пользуетесь ежедневно, наверняка вы получили в комплекте с инструкцией обслуживания. Из опыта наших пользователей мы знаем, что большинство из Вас не уделили этому особого внимания. Большая часть инструкций, сразу же после покупки попадает в корзину для мусора вместе с коробкой — это ошибка. Ознакомьтесь с информацией, касающейся инструкции TP-LINK RE450, которая поможет Вам в будущем сэкономить нервы и избежать головной боли.
Важная подсказка — не забывайте хотя бы раз прочитать инструкцию TP-LINK RE450
Если вы не хотите каждый раз читать информационные брошюры, касающиеся, тех или TP-LINK RE450 иных изделий, достаточно, прочитать их раз — сразу же после покупки устройства. Вы получите основное знания, касающиеся поддержания изделия TP-LINK RE450 в хорошем эксплуатационном состоянии, так, чтобы без проблем достигнуть его планируемого цикла работы. Затем инструкцию можно отложить на полку и вернуться к ней только в случае, если вы не уверены, правильно ли проводится техобслуживание изделия. Правильный уход является необходимым элементом Вашего удовольствия TP-LINK RE450.
Раз в году пересмотрите шкафчик, в котором держите инструкции для всех устройств, — выбросите те, которыми вы уже не пользуетесься. Это поможет Вам сохранять порядок в своей домашней базе инструкций обслуживания.
Summary of Contents for TP-LINK RE450
Что находится в инструкции TP-LINK RE450? Почему стоит ее прочитать?
- Гарантия и подробности, касающиеся техобслуживания изделия
Хорошей идеей будет прикрепить чек к странице инструкции. Если что-то плохое случится во время использования TP-LINK RE450, у вас будет комплект документов, необходимый для гарантийного ремонта. В этой части инструкции вы найдете информацию об авторизованных сервисных центрахTP-LINK RE450 а также, как самостоятельно правильно ухаживать за оборудованием — так, чтобы не потерять гарантийных прав. - Указания по монтажу и Setup
Не терять нервов и времени на самостоятельную попытку установки и первого запуска изделия. Воспользуйтесь рекомендациями производителя TP-LINK RE450 чтобы правильно запустить изделие, без лишнего риска повреждения оборудования. - Информация, касающаяся дополнительных запчастей (входящих в комплект а также являющихся опцией)
Пересматривая эту часть документа вы сможете проверить, доставлен ли ваш TP-LINK RE450 с полним комплектом аксессуаров. Вы также сможете узнать, какие дополнительные запчасти или аксессуары для TP-LINK RE450 Вы сможете найти и докупить к своему устройству. - Troubleshooting
Самые частые проблемы, касающиеся TP-LINK RE450 и методы их решения. Это очень полезная часть руководства по обслуживанию — она позволит Вам сэкономить много времени на поиск решений. 90% проблем с TP-LINK RE450 повторяется у многих пользователей. - Требования, касающиеся питания и энергетический класс
Информация, касающаяся количества потребляемой энергии, а также рекомендации, касающиеся установки и питания TP-LINK RE450. Прочитайте, чтобы оптимально пользоваться TP-LINK RE450 и не использовать большего количества ресурсов, нежели это необходимо для правильной работы изделия. - Специальные функции TP-LINK RE450
Здесь вы можешь узнать, как персонализировать изделие TP-LINK RE450. Вы узнаете, какие дополнительные функции могут помочь Вам удобно использовать продукт TP-LINK RE450 а также, какие функции Вашего устройства оптимальны для выполнения конкретной деятельности.
Как видите в инструкции вы найдете информацию, которая реально поможет Вам в использовании Вашего изделия. Стоит с ней ознакомиться, чтобы избежать разочарований, возникающих из более короткого, нежели предусматривалось, периода исправности изделия TP-LINK RE450. Если все же вы не хотите копить инструкции в своем доме, наш сайт поможет Вам в этом — вы должны найти у нас руководство по обслуживанию большинства из своих устройств, а также TP-LINK RE450.
Комментарии (0)
Скачать
REV1.1.0 1910011934
RE450
User Guide
AC1750 Wi-Fi Range Extender
Содержание
- TP-Link RE450: двухдиапазонный усилитель беспроводного сигнала класса 802.11AC
- Технические характеристики и внешний вид
- Аппаратные характеристики TP-Link RE450
- Подключение, управление и настройка
- Результаты тестирования скорости и силы сигнала
- Достоинства и недостатки TP-Link RE450. Общее впечатление от использования
- Настройка TP-LINK RE450 и прошивка Wi-Fi роутера на русском языке
- Скачать прошивку для маршрутизатора
- Видео-инструкция как настроить TP-LINK RE450
- TP-Link | Усилитель Wi-Fi сигнала RE450
TP-Link RE450: двухдиапазонный усилитель беспроводного сигнала класса 802.11AC
Обитатели больших квартир, домов или офисов не понаслышке знают, как трудно найти место для роутера, чтобы сигнал Wi-Fi покрывал всё помещение. Куда его ни поставь – всё равно остаются «глухие» зоны. С этой напастью можно бороться двумя способами: таскать роутер за собой, спотыкаясь о провода, или приобрести репитер (повторитель, усилитель) беспроводного сигнала, такой, как TP-Link RE450, и забыть о проблеме на несколько лет.
TP-Link RE450, которому посвящен сегодняшний обзор, – это миниатюрный девайс, способный увеличить зону покрытия Wi-Fi до размеров футбольного поля! В отличие от многих подобных устройств, он работает сразу в двух частотных диапазонах и поддерживает скорость передачи до 1,75 Гбит/сек.
Технические характеристики и внешний вид
Репитер TP-Link RE450 умеет «находить общий язык» с широкополосными маршрутизаторами любых марок и моделей. Кроме того, он поможет найти место в квартире, где лучше всего его расположить. В зависимости от силы сигнала светодиодный индикатор на передней панели устройства меняет цвет. Красный указывает на то, что девайс находится слишком далеко от маршрутизатора, лиловый – слишком близко, а синий – на оптимальном расстоянии.
Упакован TP-Link RE450 красиво. В стиле “Apple”…
Собран TP-Link RE450 очень качественно
Аппарат настолько компактен, что помещается на ладони. Размерами он напоминает 6-дюймовый смартфон, но несколько толще, и весит, по ощущениям, примерно столько же. На передней стороне его корпуса находится кнопка «RE» (Range Extender) – для сопряжения с роутером. Рядом – индикаторы питания (Power), частот и уровня сигнала. Последний окружает кнопку «RE» кольцом.
Сбоку расположены кнопки включения питания и отключения лампочек. На другой стороне – разъем Ethernet
На задней панели находится вилка, которая вставляется в розетку бытовой электросети. На правой боковой стороне размещен гигабитный порт для подключения сетевого кабеля, на левой – кнопки «Power» и «Reset». Сзади, справа и слева находятся 3 короткие выдвижные антенны. Стенки корпуса – задняя и боковые, имеют перфорацию для охлаждения внутренних компонентов.
Аппаратные характеристики TP-Link RE450
- Диапазоны частот беспроводной связи – 2,4 ГГц и 5 ГГц (по одному каналу на прием и передачу).
- Стандарт Wi-Fi – 802.11ac (+ поддержка более ранних стандартов 802.11a/b/g/n).
- Мощность приемопередатчиков сигнала – 20 dBm (2,4 ГГц) и 20 dBm (5 ГГц).
- Скорость LAN (Ethernet) порта – 1000 Мбит/сек.
- Скорость приема/передачи Wi-Fi: канал 5 ГГц – 1300 Мбит/сек, канал 2,4 ГГц – 450 Мбит/сек.
- Максимальная скорость соединения – 1750 Мбит/сек.
- Зона покрытия – 1000 кв. метров.
- Режимы работы – репитер, точка доступа.
- Антенны – 3 штуки, несъемные.
- Блок питания – внутренний.
- Способы питания – электросеть 220 В.
- Энергопотребление – 9 Вт.
- Диапазон рабочих температур – 0-30 °C.
- Материал корпуса – глянцевый белый пластик.
- Габариты– 163*76*67 мм.
В комплектацию устройства входит патч-корд (сетевой кабель), гарантийный талон и руководства пользователя.
В комплектацию входит само устройство, патч-корд, гарантийный талон и инструкции пользователя
Подключение, управление и настройка
Сопряжение TP-Link RE450 с маршрутизатором выполняется всего парой нажатий – сначала кнопки «RE» на самом девайсе, потом – «WPS» на роутере. Технология WPS, напомню, служит для быстрого переноса настроек беспроводной сети между устройствами.
Управление TP-Link RE450 выполняется через веб-интерфейс (который открывается в любом браузере) или мобильное приложение «TP-LINK Tether». Скачать последнее для iOS и Android можно прямо с сайта производителя. Перед использованием «Tether» разработчики рекомендуют обновить прошивку репитера до новейшей версии. Как это сделать, читайте ниже – в описании функций и настроек.
Чтобы войти в веб-интерфейс RE450, вводим в адресную строку любого браузера «http://tplinkrepeater.net» (без кавычек) и нажимаем кнопку перехода. Далее используем стандартные логин и пароль «admin» и «admin». После первого входа в административную панель система предложит изменить логин и пароль. Сделайте это обязательно, дабы обезопасить устройство от несанкционированного подключения.
Следом вы окажетесь в разделе быстрых настроек – «Quick Setup», где вам будет предложено выбрать регион проживания, часовой пояс и ввести пароль для доступа к беспроводным сетям вашего роутера (2,4 ГГц и 5 ГГц). Если роутер работает в одном диапазоне, настройки второго будут недоступны.
Основные опции RE450 находятся в разделе «Settings». На первой вкладке – «Status», отображена структура сети. Ниже – информация о SSID, каналах, адресах и прочих деталях подключения.
На вкладке «Region» находится впадающее меню, в котором пользователь должен указать свое местопребывания. Этот же параметр есть в разделе быстрых настроек.
Вкладка «Wireless» (беспроводная сеть) содержит 2 подраздела: «Connect to Network» (подключение к сети) и «Extended Network» (расширенные сетевые настройки).
В первом подразделе задаются пароли для каждого частотного диапазона и способы защитного шифрования трафика: WPA, WPA2, WEP или ничего (no security).
Во втором – можно включить либо выключить один из диапазонов, а также задействовать или отключить «SSID broadcast» – вещание SSID (имени сети) в эфир.
Если вам непонятно назначение той или иной функции, щелкните по значку вопроса в правом верхнем углу. За ним скрывается справка по каждому элементу раздела.
На вкладке «Network» содержатся остальные сетевые настройки: IP-адрес девайса, адрес интернет-шлюза, параметры DHCP, DNS, список клиентов DHCP, список зарезервированных адресов для устройств и т. д.
Вкладка «Advanced Settings» содержит 3 дополнительных подраздела:
- «PowerShedule» – здесь настаивается расписание автоматического отключения репитера по дням недели. Используется с целью энергосбережения.
- «Wi-FiCoverage» – в этом подразделе можно определить радиус действия Wi-Fi – большой, маленький или средний.
- «AccessControl» хранит установленные администратором политики доступа для подключаемых устройств – черные и белые списки.
Последняя вкладка – «System Tools» (системные инструменты), содержит больше всего дополнительных разделов. В их числе:
- «TimeSettings» – настройки часового пояса и параметры перехода на летнее/зимнее время.
- «LEDcontrol» – таймер перевода световых индикаторов репитера в ночной режим (используют, если аппарат размещен в спальне и подсветка мешает отдыхать).
- «Firmwareupgrade» – раздел обновления программного обеспечения. Перед выполнением этой операции загрузите свежую прошивку RE450 с сайта TP-Link и сохраните на компьютер. Далее нажмите кнопку «Browse» для закачки обновления на устройство и кликните «Upgrade».
- «BackupandRestore» – инструменты резервного копирования и восстановления настроек аппарата. Как ими пользоваться, думаю, понятно. Для создания бекапа текущих параметров нажимаем одноименную кнопку и указываем место сохранения файла. Для восстановления – загружаем резервную копию и жмем «Restore». Опция «FactoryDefaultRestore» сбрасывает параметры на первоначальные и удаляет все пользовательские данные.
- «Adminaccount» предназначен для изменения логина и пароля администратора устройства.
- «Systemlog» хранит журналы событий.
Последняя версия прошивки (от 09.03.2016) – мультиязычная, поддерживает 22 национальных языка, включая русский. Помимо нее для загрузки доступны более ранние англоязычные версии.
Результаты тестирования скорости и силы сигнала
Пробивная способность TP-Link RE450 на поверку оказалась близкой к заявленной. Тестирование проводилось в офисном помещении площадью около 240 кв. метров. Репитер был установлен в одном кабинете с роутером (оптимальное месторасположение первого мы определили по индикатору – он светился синим). Там же мы подключили его к стационарному ПК посредством патч-корда из комплекта. Другой тестовый компьютер находился в удаленном помещении через 5 бетонных стен и принимал сигнал Wi-Fi.
Максимальную быстроту соединения, как и ожидалось, показала проводная связь. Скорость LAN-порта в реальных условиях достигала 330 Мбит/сек, что весьма и весьма неплохо.
На втором месте – 5-герцовый канал Вайфай. Максимальная скорость приема/передачи по нему составила целых 175 Мбит/сек. Это тоже неудивительно, ведь рабочая частота 5 ГГц сегодня используется малым количеством девайсов.
Самую низкую скорость показал диапазон 2,4 ГГц – 110 Мбит/сек. Впрочем, тоже вполне приемлемый уровень, учитывая, насколько сильно загружен и зашумлен этот канал в офисных центрах.
Уровень сигнала на той и другой частоте оставался стабильным весь рабочий день. Обрывов связи замечено не было.
Так выглядит TP-Link RE450 в действии
Достоинства и недостатки TP-Link RE450. Общее впечатление от использования
В целом, с возложенными задачами RE450 справляется достойно. Пары роутер+репитер вполне хватает для создания устойчивого покрытия Wi-Fi большой квартиры, частного 1-2 этажного дома или среднего по площади офиса.
Сильные стороны аппарата:
- Приличная скорость передачи как по проводному, так и по беспроводным каналам связи.
- Работа на частоте 5 ГГц.
- Большая зона покрытия.
- Автоматическое определение подходящего места размещения.
- Легкость управления и настройки.
- Моноблочное исполнение в сочетании с компактностью – аппарат легко переносится с места на место, включается прямо в розетку, не портит интерьер лишними проводами.
- Отдельные версии прошивки не позволяют использовать репитер в качестве точки доступа.
- Наличие только одного LAN-порта, что ограничивает подключение к сети устройств, которые не поддерживают беспроводное соединение.
- Цена. Средняя стоимость девайса в российских магазинах составляет 4900 рублей (на сентябрь 2016). За эту или чуть большую сумму можно купить приличный роутер с мощным усилителем Wi-Fi и обходиться одним устройством вместо двух.
TP-LINK RE450 предназначен для тех, кто уже имеет функциональный, но недостаточно «дальнобойный» маршрутизатор и не планирует в ближайшее время его менять. Поддержка репитером новейшего стандарта беспроводной связи 802.11ac с частотным диапазоном 5 ГГц, гигабитный Ethernet-порт и высокая скорость приема/передачи обещают радикально избавить обитателей квартир с толстыми бетонными стенами от Wi-Fi-непроницаемых зон лет примерно на 5, пока на рынке не появится что-то совершенно новое и еще более быстрое.
Источник
Настройка TP-LINK RE450 и прошивка Wi-Fi роутера на русском языке
Дать ссылку друзьям:
На данной странице вы узнаете как подключить Wi-Fi маршрутизатор к компьютеру, а также сможете найти инструкцию по настройке на русском языке. Сотрудники нашего информационного портала ежедневно обновляют официальные прошивки для той или иной модели устройства.
Пошаговая настройка роутера TP-LINK RE450 для Ростелеком, Билайн и других интернет провайдеров займет у Вас несколько минут и после этого вы сможете наслаждаться всеми достоинствами Wi-Fi точки доступа ТП-Линк.
Если вы хотите получить последнюю версию официальной прошивки и инструкцию по подключению VPN или PPPOE и настройка IPTV телевидения для этого устройства на русском языке на ваш Email, то вам следует оставить полный, развернутый отзыв о той или иной модели Вай-Фай устройства.
Скачать прошивку для маршрутизатора
Чтобы скачать прошивку для TP-LINK RE450 вам достаточно внимательно ознакомиться со страницей, на которой вы сейчас находитесь. Не забывайте оставлять свои отзывы (форма для добавления отзывов находится в нижней части страницы). Если вас не затруднит, то вы можете поделиться ссылкой на прошивку со своими друзьями. Также, если вы не нашли ответ на свой вопрос, то вы можете задать его воспользовавшись формой в нижней части сайта.
У нас вы найдете последние версии драйверов для беспроводных устройств. Чтобы скачать новый драйвер, вам необходимо перейти по ссылке «Скачать прошивку», которая расположена чуть ниже.
| Российские интернет провайдеры | Украинские интернет провайдеры |
|
|
Видео-инструкция как настроить TP-LINK RE450
Источник
TP-Link | Усилитель Wi-Fi сигнала RE450
Усилитель Wi-Fi сигнала TP-Link RE450 — это расширение сигнала Wi-Fi вашего дома (офиса) и обеспечение высокоскоростной производительности покрытия сети на частоте 2,4 ГГц со скоростью до 450 Мбит/с и на частоте 5 ГГц со скоростью до 1300 Мбит/с
Правильно ли расположен дома ваш Wi-Fi роутер? Ну то есть расположен ли по всем правилам, для стабильной, скоростной и качественной раздачи интернет сигнала по Wi-Fi . Одно из самых основных правил, которые советуют все — это
«Если вы хотите одинаковую раздачу Wi-Fi сигнала по всей площади квартиры — расположите роутер по центру квартиры»
Замечательное правило, но оно далеко не всегда осуществимо. В силу ряда причин. 99% роутеров, в разных квартирах, которые я видел, расположены в коридоре. То есть они расположены там, куда приходит кабель интернета из подъезда. И конечно моя квартира не стала исключением из правил. Мой роутер (скоростной, современный, обладающий двумя диапазонами раздачи сигнала) расположен в коридоре и в самом дальнем конце квартиры, его сигнала не всегда хватает. Стабильных «трех делений» на смартфоне нет. А хочется. И выход есть. Этот выход очень простой, эффективный, не требующий дополнительных затрат в виде новой проводки кабелей и что не менее важно — этот выход экономически доступен для всех.
Усилитель Wi-Fi сигнала TP-Link RE450 позволит вам качественно улучшит ваш интернет сигнал именно в том месте квартиры (или офиса) где это необходимо. Он быстро настраивается, имеет несколько режимов работы и не буду скрывать, этот фактор хоть и не самый важный, но выглядит данный гаджет потрясающе красиво.
Всегда приятно обладать новым гаджетом. И конечно же приятно, когда знакомство с вашей новой техникой начинается с красивой упаковки.
У усилителя TP-Link RE450 очень приятная, красиво оформленная, с техническими иллюстрациями упаковка.
Внутри упаковки все детали тоже на высоте. Отдельный отсек для устройства, отдельный конвертик для документации. Чертовски приятно видеть такое внимание к деталям, ты начинаешь знакомится с устройством и уже с первых минут знакомства тебя не разочаровывает даже упаковка.
Комплектация простая, хотя трудно что-то добавить сюда, — это документация и сам усилитель.
Внешний вид устройства чем-то напоминает смартфон. И по габаритам и примерно по весу.
На передней панели большая, круглая кнопка функции Range Extender и 3 светодиода режимов работы устройства.
На задней панели решетки вентиляции и вилка розетки.
С боковых торцов устройство имеет две кнопки (питание, отключение светодиодов), кнопку сброса настроек и LAN разъём.
Все 3 антенны устройства могут складываться, в рабочем состоянии их нужно раздвинуть. Все антенны являются двухдиапазонными для сигналов по частотам 2,4 ГГц и 5 ГГц .
Тут сразу нужно понять вот что, TP-Link RE450 имеет встроенную розетку, плюс раздвижные антенны — все эти факторы приводят к тому, что вам лучше заранее определиться с местом установки усилителя. Может сложиться такая ситуация, что усилитель будет перекрывать соседние розетки на удлинителе.
Самый оптимальный вариант — это выделить для усилителя отдельную розетку.
Даже если вы первый раз устанавливаете и настраиваете такое устройство, у вас не должно возникнут проблем по ее настройке. Она простая и полностью автоматическая. При этом существует несколько режимов настройки данного усилителя и вы можете выбрать оптимальный режим сами.
Первый режим настройки
Этот режим самый простой и быстрый. Если ваш роутер обладает функцией WPS , то вы нажимаете на нем данную кнопку, а на усилителе нажимаете большую круглую кнопку «Range Extender» .
Устройства автоматически между собой соединяются и усилитель начинает раздавать сигнал от роутера в двух диапазонов частот.
Второй режим настройки
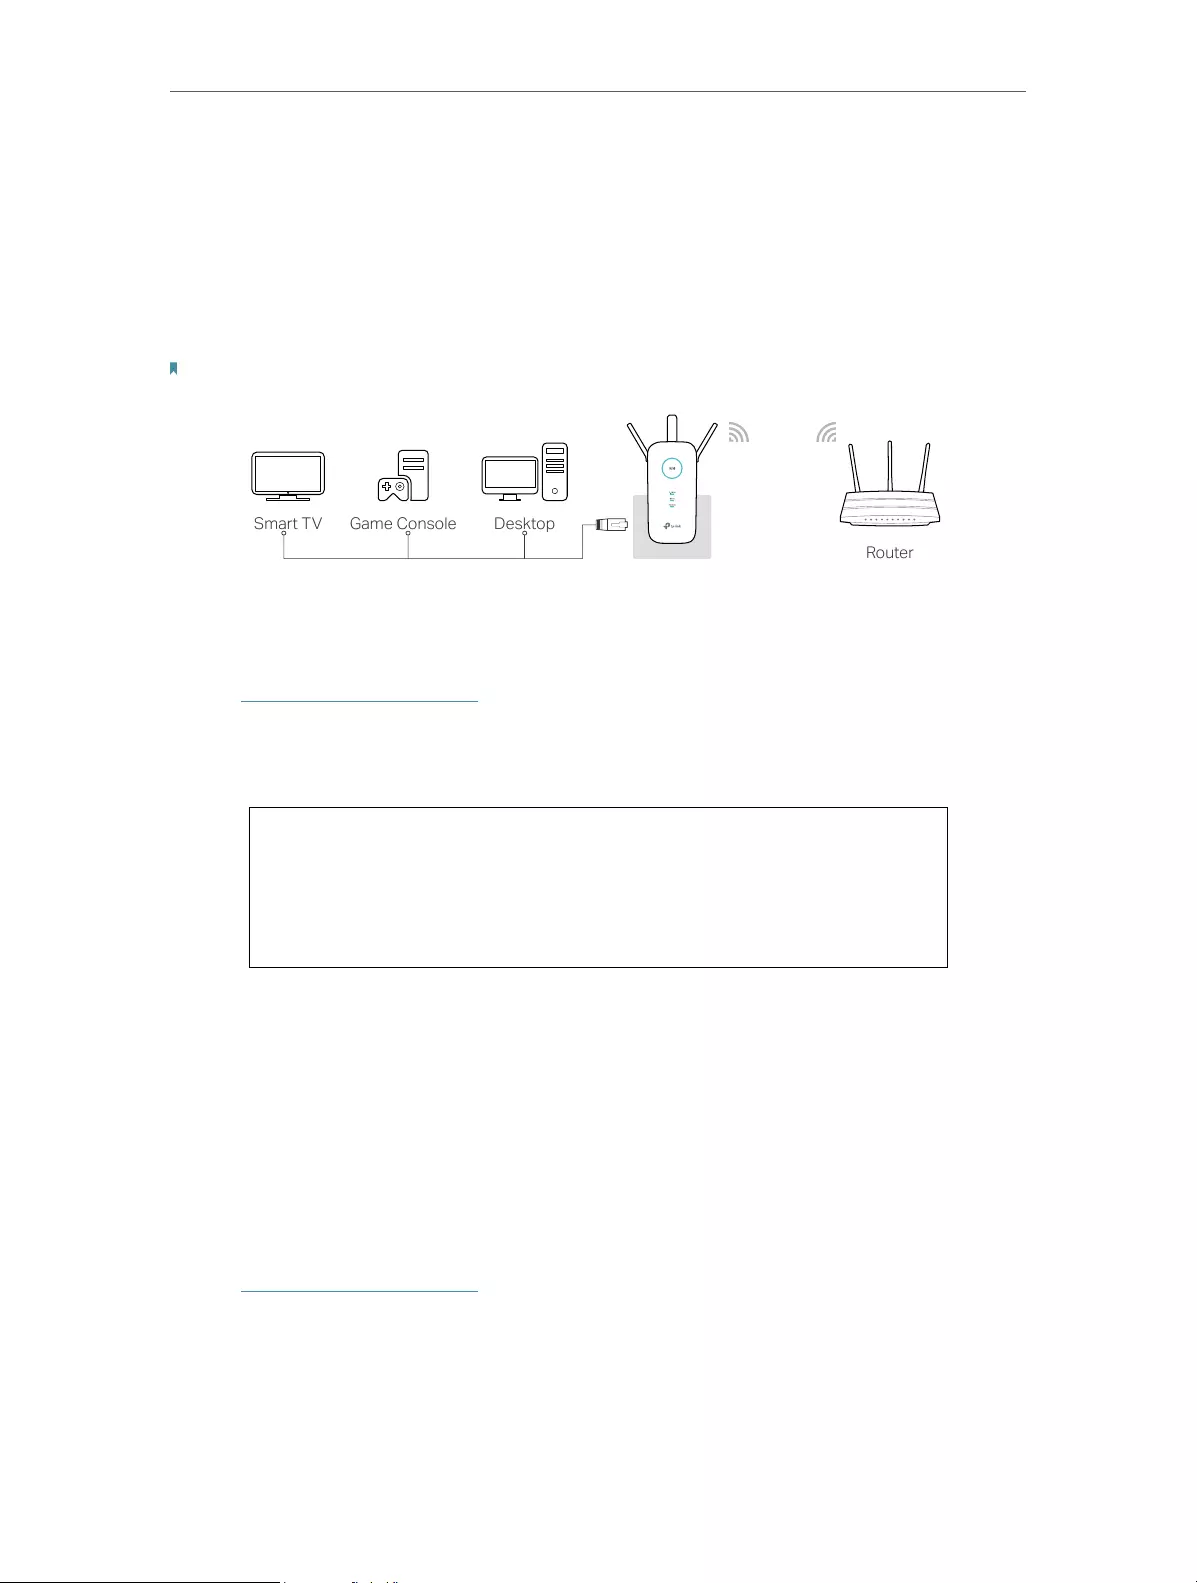
Второй способ — это соединить ваш персональный компьютер или ноутбук по LAN проводу, ПК получит гигабитное Ethernet соединение и можно производить настройки усилителя по ip-адресу через браузер.
При этом, данным способом можно пользоваться и для соединения по LAN проводу и для других устройств. Например для SMART TV и для игровых консолей. Данные устройства получат стабильное гигабитное соединение, а площадь вокруг усиленный сигнал Wi-Fi для других устройств.
Третий режим настройки
Третий способ настройки самый интересный и технически полный. Нужно скачать приложение TP-Link Tether на смартфон платформы Android или iOs .
Настройка и подключение усилителя занимает считанные минуты. При этом приложение TP-Link Tether очень удобное и красиво сделанное. В нем есть все нужные настройки, например можно даже настроить время отключения светодиодов усилителя, чтобы они не мешали вам ночью!
Раньше, когда я видел обзоры таких устройств, я думал, что — это просто игрушка, как можно усилитель сигнал Wi-Fi каким-то простым усилителем? Оказывается действительно можно! Причем можно не просто его усилить, а именно сделать его комфортным для использования даже в той области квартиры (или офиса) где раньше сигнал всегда был слабым. Простой пример — это соединение SMART TV и усилителя TP-Link RE450 даёт потрясающие результаты! Без проблем и зависаний можно даже смотреть ролики формата 4K .
А вот собственно и сами скорости, измеренные в той области, где раньше было слабое соединение, а теперь стабильные «3 деления» на смартфоне и быстрый Wi-Fi .
Итог простой, одобряют все, даже котики 🙂
Источник
На чтение6 мин
Опубликовано
Обновлено
Безопасный и стабильный Wi-Fi-сигнал — одно из основных условий комфортного пребывания в интернете. Но что делать, если ваш роутер не позволяет получить доступ к сети в некоторых углах дома или офиса? Одним из решений этой проблемы может быть установка Wi-Fi-репитера. Одним из наиболее популярных репитеров на рынке является TP-Link RE450.
TP-Link RE450 — это мощный двухдиапазонный Wi-Fi-репитер, который способен усилить сигнал и увеличить покрытие вашей Wi-Fi-сети. Запуск и настройка репитера может показаться сложным, но на самом деле это довольно просто. В этой статье мы расскажем о подробной инструкции по настройке TP-Link RE450.
Первым шагом в настройке репитера является подключение его к вашему роутеру. Для этого используйте кабель Ethernet, чтобы подключить один конец к роутеру, а другой к порту Ethernet на задней панели репитера. Убедитесь, что репитер подключен к источнику питания и находится в зоне приема Wi-Fi-сигнала вашего роутера.
Требования для настройки TP-Link RE450
Для успешной настройки TP-Link RE450 необходимо убедиться, что у вас имеются следующие требования:
- Роутер с рабочей сетью Wi-Fi
- Доступ к интернету для закачки необходимого программного обеспечения
- Устройство (компьютер, планшет или смартфон) с браузером для административного доступа к настройкам
- Кабель Ethernet для подключения TP-Link RE450 к вашему устройству для удобного настройки
- Точка доступа, к которой вы хотите подключиться, должна работать на частоте 2,4 ГГц или 5 ГГц
- Правильное питание для TP-Link RE450
Убедитесь, что все указанные требования выполнены, прежде чем приступить к настройке устройства TP-Link RE450.
Модель TP-Link RE450
TP-Link RE450 имеет компактный дизайн, который позволяет легко разместить его в любом месте. Устройство оснащено двумя внешними антеннами, которые обеспечивают более стабильное соединение и повышенную производительность.
Модель RE450 поддерживает стандарты беспроводной связи 802.11ac и 802.11n, что обеспечивает быструю скорость передачи данных до 1750 Мбит/с. С помощью этого устройства можно без проблем стримить видео высокого разрешения, играть в онлайн-игры и скачивать файлы.
TP-Link RE450 имеет два порта Ethernet, которые позволяют подключить устройства по проводной сети, такие как игровые консоли или телевизоры. Это удобно, если вы хотите использовать более стабильное и быстрое подключение.
Установка и настройка TP-Link RE450 очень просты. Устройство поддерживает функцию однокнопочной настройки (WPS), что позволяет быстро и легко подключить его к вашему существующему Wi-Fi роутеру. Также вы можете использовать мобильное приложение Tether для настройки устройства с помощью смартфона.
TP-Link RE450 предлагает не только расширение покрытия Wi-Fi, но и функцию точки доступа. Если у вас есть только проводное подключение к интернету, вы можете использовать RE450, чтобы создать беспроводную сеть Wi-Fi.
Суммируя, модель TP-Link RE450 — это удобное и простое в использовании устройство, которое позволяет улучшить сигнал Wi-Fi и расширить покрытие в вашем доме или офисе.
Роутер с поддержкой Wi-Fi
Одним из популярных роутеров с поддержкой Wi-Fi на рынке является TP-Link RE450. Это устройство обладает высокой мощностью и дальностью действия сигнала, что позволяет охватить всю домашнюю территорию и обеспечить стабильное подключение к интернету.
Настройка роутера TP-Link RE450 осуществляется с помощью специального приложения или через веб-интерфейс. Процесс настройки включает в себя следующие шаги:
- Подключите роутер к электрической сети и подключите его к модему с помощью сетевого кабеля.
- Подключите компьютер или другое устройство к роутеру с помощью кабеля Ethernet или через беспроводное соединение Wi-Fi.
- Откройте браузер и введите IP-адрес роутера в адресной строке. По умолчанию это 192.168.0.1.
- Войдите в веб-интерфейс роутера, используя учетные данные по умолчанию (обычно указаны на наклейке на задней панели роутера).
- Пройдите по мастеру настройки, выбрав нужную языковую версию и следуя инструкциям на экране.
- Настройте желаемые параметры Wi-Fi сети, такие как имя сети (SSID) и пароль.
- Сохраните настройки и перезапустите роутер.
После завершения настройки роутера TP-Link RE450 вы сможете наслаждаться быстрым и стабильным подключением к интернету через беспроводную сеть Wi-Fi. Роутер также обладает функциями усиления сигнала и расширения зоны покрытия Wi-Fi, что позволяет использовать его для создания мощной и надежной домашней сети.
Подключение через кабель
Для подключения TP-Link RE450 через кабель выполните следующие шаги:
- Подключите один конец Ethernet-кабеля к порту Ethernet на задней панели TP-Link RE450.
- Подключите другой конец Ethernet-кабеля к порту Ethernet на вашем роутере или модеме.
- Убедитесь, что оба устройства включены.
- Дождитесь, пока индикатор сигнала TP-Link RE450 загорится белым цветом, что указывает на успешное подключение через кабель.
После установки подключения через кабель, TP-Link RE450 будет готов к использованию и будет расширять сетевой сигнал в пределах своего диапазона действия.
Подготовка к настройке TP-Link RE450
Шаг 1: Распакуйте устройство и проверьте на наличие всех комплектующих. Убедитесь, что в комплекте есть сам адаптер RE450, Ethernet-кабель, руководство пользователя и блок питания.
Шаг 2: Разместите устройство TP-Link RE450 в месте, где оно будет наиболее эффективно работать и покрывать все нужные зоны вашего дома или офиса.
Шаг 3: Подключите адаптер RE450 к розетке питания, используя блок питания, который поставляется в комплекте.
Шаг 4: Подключите один конец Ethernet-кабеля к порту Ethernet на вашем маршрутизаторе и другой конец к порту Ethernet на адаптере RE450, чтобы установить физическое соединение между ними.
Шаг 5: Дождитесь, пока индикаторы ламп на RE450 начнут гореть стабильно, что указывает на успешное подключение.
Шаг 6: Готово! Теперь у вас есть готовое физическое соединение и вы готовы к началу процесса настройки TP-Link RE450.
Размещение устройства
Перед настройкой TP-Link RE450 важно выбрать оптимальное место для его размещения. Верное местоположение обеспечит лучшую производительность и устранит проблемы с сигналом Wi-Fi. Вот несколько рекомендаций по размещению вашего устройства:
- Расположите репитер вблизи маршрутизатора. Идеально, чтобы между ними не было преград, таких как стены или мебель.
- Убедитесь, что репитер находится в зоне достаточного сигнала Wi-Fi маршрутизатора. Для этого можно провести простой тест на месте предполагаемого размещения.
- Размещайте репитер на таком расстоянии от места, где вам нужен сильный сигнал Wi-Fi, чтобы действие устройства было максимально эффективным.
- Избегайте размещения репитера вблизи других электронных устройств, которые могут вызывать помехи на его работу.
- При выборе места для репитера учитывайте его физические возможности, как расстояние от розетки и длину шнура питания.
Следуя этим рекомендациям, вы сможете разместить TP-Link RE450 в оптимальном месте и настроить его для получения лучшего сигнала Wi-Fi.
Подключение к роутеру
Для настройки TP-Link RE450 необходимо сначала подключить его к роутеру:
1. Подключите один конец кабеля Ethernet к порту Ethernet на TP-Link RE450 и другой конец к порту LAN на вашем роутере.
2. Включите TP-Link RE450, нажав кнопку питания на задней панели устройства.
3. Дождитесь, пока индикатор сигнала станет синим, что указывает на успешное подключение к существующей Wi-Fi сети.
После этого можно приступить к настройке TP-Link RE450 с помощью веб-интерфейса.
Включение устройства
Шаг 1: Подключите адаптер питания к порту питания на задней панели TP-Link RE450.
Шаг 2: Вставьте другой конец адаптера питания в розетку и убедитесь, что устройство получает питание.
Шаг 3: Настройте переключатель включения / выключения устройства в положение «Включено».
Шаг 4: Дождитесь, пока индикатор питания на передней панели устройства перестанет мигать и стабилизируется, что обычно занимает около 1 минуты.
Настройка TP-Link RE450 через веб-интерфейс
- Включите TP-Link RE450 и подключите его к источнику питания.
- Подключите компьютер или ноутбук к Wi-Fi сети RE450 или напрямую к устройству с помощью кабеля Ethernet.
- Откройте любой веб-браузер на компьютере или ноутбуке.
- Введите IP-адрес устройства (по умолчанию 192.168.0.254) в адресной строке браузера и нажмите Enter.
- Появится окно авторизации. Введите имя пользователя и пароль администратора (по умолчанию оба поля пустые) и нажмите Login.
- После успешной авторизации откроется веб-интерфейс TP-Link RE450.
- Выберите язык интерфейса, если необходимо.
- Следуйте инструкциям по настройке сети Wi-Fi:
Настройка в режиме Range Extender:
- В левом меню выберите «Range Extender» и нажмите «Start».
- Выберите сеть Wi-Fi, которую вы хотите расширить, и нажмите «Next». Введите пароль Wi-Fi сети, если требуется.
- Выберите имя для новой расширенной Wi-Fi сети и настройте пароль для нее.
- Нажмите «Finish» для завершения.
Настройка в режиме Access Point:
- В левом меню выберите «Access Point» и нажмите «Start».
- Настройте параметры сети, включая имя и пароль Wi-Fi, а также IP-адрес и маску подсети.
- Нажмите «Next» и убедитесь, что все настройки указаны правильно.
- Нажмите «Finish» для завершения.
Настройка в режиме Client:
- В левом меню выберите «Client» и нажмите «Start».
- Выберите сеть Wi-Fi, к которой вы хотите подключиться, и введите пароль, если требуется.
- Настройте параметры сети, включая IP-адрес и маску подсети.
- Нажмите «Finish» для завершения.
После завершения настройки, TP-Link RE450 будет готов к работе. Проверьте подключение к Wi-Fi сети и убедитесь, что всё функционирует правильно.
Displayed below is the user manual for RE450 by TP-Link which is a product in the Network Extenders category.
This manual has pages.

User Guide
AC1750 Wi-Fi Range Extender
RE450
REV2.1.0 1910012322

Contents
About This Guide ……………………………………………………………………………………………1
Chapter 1. Get to Know About Your Extender . . . . . . . . . . . . . . . . . . . . . . . . .2
1. 1. Product Overview. . . . . . . . . . . . . . . . . . . . . . . . . . . . . . . . . . . . . . . . . . . . . . . . . . . . . . . . . . . . 3
1. 2. Appearance . . . . . . . . . . . . . . . . . . . . . . . . . . . . . . . . . . . . . . . . . . . . . . . . . . . . . . . . . . . . . . . . . 3
1. 2. 1. LED Explanation. . . . . . . . . . . . . . . . . . . . . . . . . . . . . . . . . . . . . . . . . . . . . . . . . . . . . . . 4
1. 2. 2. Port and Button Description . . . . . . . . . . . . . . . . . . . . . . . . . . . . . . . . . . . . . . . . . . . 4
Chapter 2. Set Up Internet Connection . . . . . . . . . . . . . . . . . . . . . . . . . . . . . . .5
2. 1. Quick Setup . . . . . . . . . . . . . . . . . . . . . . . . . . . . . . . . . . . . . . . . . . . . . . . . . . . . . . . . . . . . . . . . . 6
2. 1. 1. Method One: Via the WPS Button . . . . . . . . . . . . . . . . . . . . . . . . . . . . . . . . . . . . . . 6
2. 1. 2. Method Two: Via a Web Browser . . . . . . . . . . . . . . . . . . . . . . . . . . . . . . . . . . . . . . . 7
2. 1. 3. Method Three: Via the TP-Link Tether App . . . . . . . . . . . . . . . . . . . . . . . . . . . . 11
2. 2. Position Your Extender. . . . . . . . . . . . . . . . . . . . . . . . . . . . . . . . . . . . . . . . . . . . . . . . . . . . . . 12
Chapter 3. Customize Your Network . . . . . . . . . . . . . . . . . . . . . . . . . . . . . . . . 13
3. 1. Check Internet Status. . . . . . . . . . . . . . . . . . . . . . . . . . . . . . . . . . . . . . . . . . . . . . . . . . . . . . . 14
3. 2. Configure Wireless Network . . . . . . . . . . . . . . . . . . . . . . . . . . . . . . . . . . . . . . . . . . . . . . . . 14
3. 3. Change LAN Settings . . . . . . . . . . . . . . . . . . . . . . . . . . . . . . . . . . . . . . . . . . . . . . . . . . . . . . . 16
3. 4. Specify DHCP Server Settings . . . . . . . . . . . . . . . . . . . . . . . . . . . . . . . . . . . . . . . . . . . . . . 17
3. 5. Adjust Wi-Fi Coverage . . . . . . . . . . . . . . . . . . . . . . . . . . . . . . . . . . . . . . . . . . . . . . . . . . . . . . 18
3. 6. Set Access Control . . . . . . . . . . . . . . . . . . . . . . . . . . . . . . . . . . . . . . . . . . . . . . . . . . . . . . . . . 18
Chapter 4. More Features of Your Extender. . . . . . . . . . . . . . . . . . . . . . . . . 21
4. 1. Use Your Extender as a Wireless Adapter. . . . . . . . . . . . . . . . . . . . . . . . . . . . . . . . . . . . 22
4. 2. Transform Your Existing Wired Network to a Wireless One . . . . . . . . . . . . . . . . . . . 22
4. 2. 1. To Set Up the Extender as an Access Point . . . . . . . . . . . . . . . . . . . . . . . . . . . 22
4. 2. 2. To Connect Your Wireless Devices to the Extender via WPS. . . . . . . . . . . 24
Chapter 5. Manage Your Extender . . . . . . . . . . . . . . . . . . . . . . . . . . . . . . . . . 26
5. 1. Set Up System Time . . . . . . . . . . . . . . . . . . . . . . . . . . . . . . . . . . . . . . . . . . . . . . . . . . . . . . . . 27
5. 2. Control LEDs . . . . . . . . . . . . . . . . . . . . . . . . . . . . . . . . . . . . . . . . . . . . . . . . . . . . . . . . . . . . . . . 27
5. 3. Power Schedule . . . . . . . . . . . . . . . . . . . . . . . . . . . . . . . . . . . . . . . . . . . . . . . . . . . . . . . . . . . . 28
5. 4. Upgrade the Firmware . . . . . . . . . . . . . . . . . . . . . . . . . . . . . . . . . . . . . . . . . . . . . . . . . . . . . . 29
5. 5. Backup and Restore Configuration Settings . . . . . . . . . . . . . . . . . . . . . . . . . . . . . . . . . 29
5. 6. Change Login Password . . . . . . . . . . . . . . . . . . . . . . . . . . . . . . . . . . . . . . . . . . . . . . . . . . . . 30
5. 7. System Log. . . . . . . . . . . . . . . . . . . . . . . . . . . . . . . . . . . . . . . . . . . . . . . . . . . . . . . . . . . . . . . . . 31
FAQ ………………………………………………………………………………………………………………..32

1
About This Guide
This guide is a complement to Quick Installation Guide. The Quick Installation Guide
provides instructions for quick internet setup, while this guide contains details of each
function and demonstrates how to configure them.
When using this guide, please notice that features of the extender may vary slightly
depending on the model and software version you have, and on your location, language,
and internet service provider. All screenshots, images, parameters and descriptions
documented in this guide are used for demonstration only.
Conventions
In this guide the following conventions are used:
Convention Description
Underlined Underlined words or phrases are hyperlinks. You can click to redirect to a website or a
specific section.
Teal Contents to be emphasized and texts on the web page are in teal, including the menus,
items, buttons, and so on.
>
The menu structures to show the path to load the corresponding page. For example,
Advanced > Wireless > MAC Filtering means the MAC Filtering function page is under the
Wireless menu that is located in the Advanced tab.
Note: Ignoring this type of note might result in a malfunction or damage to the device.
Tips: Indicates important information that helps you make better use of your device.
symbols on the web
page
• click to edit the corresponding entry.
• click to delete the corresponding entry.
More Info
The latest software, management app and utility are available from the Download
Center at www.tp-link.com/support.
The Quick Installation Guide can be found where you find this guide or inside the
package of the range extender.
Specifications can be found on the product page at http://www.tp-link.com.
A Technical Support Forum is provided for you to discuss our products at
http://forum.tp-link.com.
Our Technical Support contact information can be found at Contact Technical Support
page at www.tp-link.com/support.

Chapter 1
Get to Know About Your
Extender
This chapter introduces what the extender can do and its appearance.
It contains the following sections:
• Product Overview
• Appearance

3
Chapter 1 Get to Know About Your Extender
1. 1. Product Overview
Bring Dead Zones Back to Life
Tired of Wi-Fi “dead zones”? The TP-Link extender is connected to your router
wirelessly, strengthening its signal and expanding its coverage into areas that could not
otherwise be reached. The device also reduces signal interference to ensure reliable
Wi-Fi coverage throughout your home or office.
Easy Installation & Quick Position
The extender works with any standard wireless router. Instantly connect the extender
to a router by pressing the router’s WPS button (if available) followed by the extender’s
RE/WPS button. Alternatively, follow the Quick Setup instructions on the extender’s
web management page.
Once the extender is connected to a router, you can relocate it to your preferred location
with no further configuration required. The intelligent signal light can help to find the
best location.
Easy Management with the TP-Link Tether App
Tether provides a simple, intuitive way to access and manage your extender with your
smart devices.
1. 2. Appearance
4
Chapter 1 Get to Know About Your Extender
1. 2. 1. LED Explanation
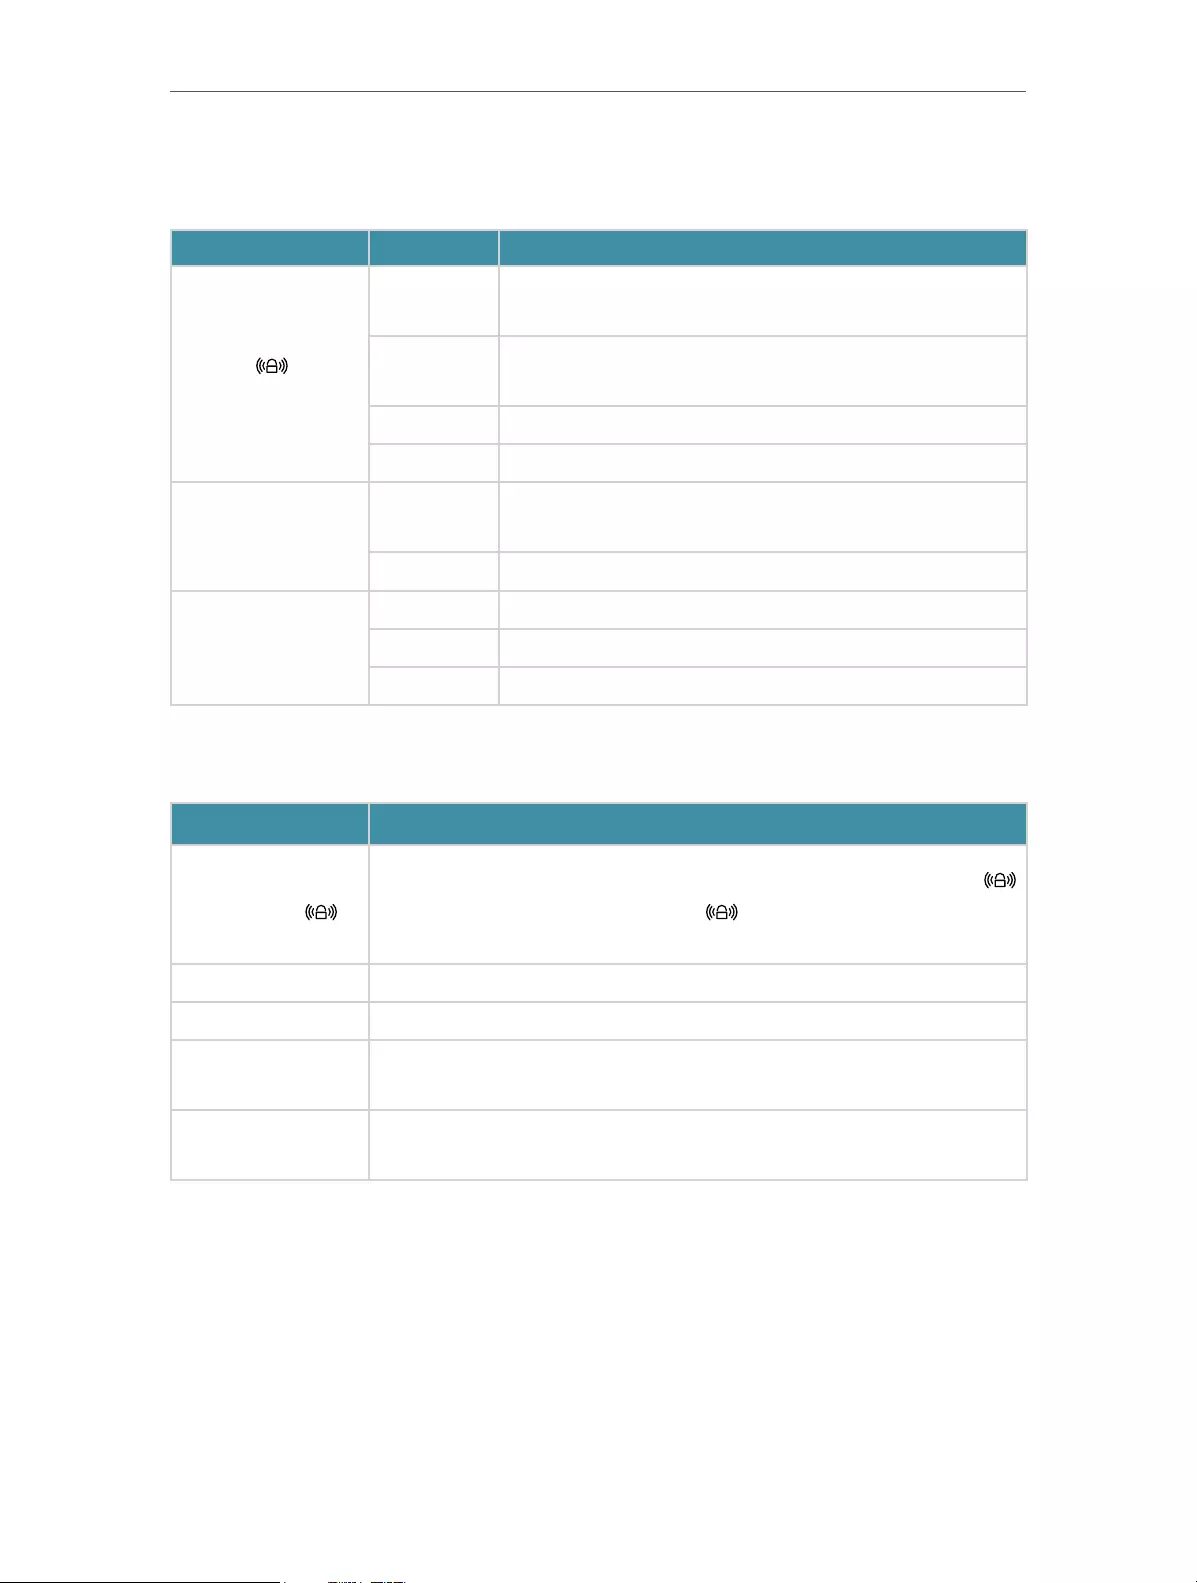
You can check the extender’s working status by following the LED Explanation table.
Name Status Indication
(Signal)
Solid blue The extender is connected to your router’s wireless network
and is in a suitable location.
Solid red The extender is experiencing poor signal strength. Try
relocating it closer to your router.
Flashing WPS connection is being established.
Off No wireless connection is established.
2.4GHz/5GHz
On The extender is connected to the 2.4GHz/5GHz wireless
network of your host router.
Off No wireless connection has been established.
POWER
On The extender is on.
Flashing The extender is starting up or firmware is being upgraded.
Off The extender is off.
1. 2. 2. Port and Button Description
Ports or Buttons Description
WPS Button
Press the WPS button on your host router, and immediately press the
button on the extender. The Signal LED of the extender should change to
solid blue, indicating successful WPS connection.
Power Button Press the Power button to turn on or off the extender.
LED Button Press the LED button to turn on or off all the LEDs.
Reset (Hole) Use a pin to press and hold the Reset button until all the LEDs turn on
momentarily to reset the extender.
Ethernet Port Connect your Ethernet—only device to the Ethernet port of the extender to join
the Wi-Fi network.

Chapter 2
Set Up Internet Connection
This chapter informs you how to boost your host wireless coverage. Please follow the
step-by-step instructions to set up the internet connection.
It contains the following sections:
• Quick Setup
• Position Your Extender
6
Chapter 2 Set Up Internet Connection
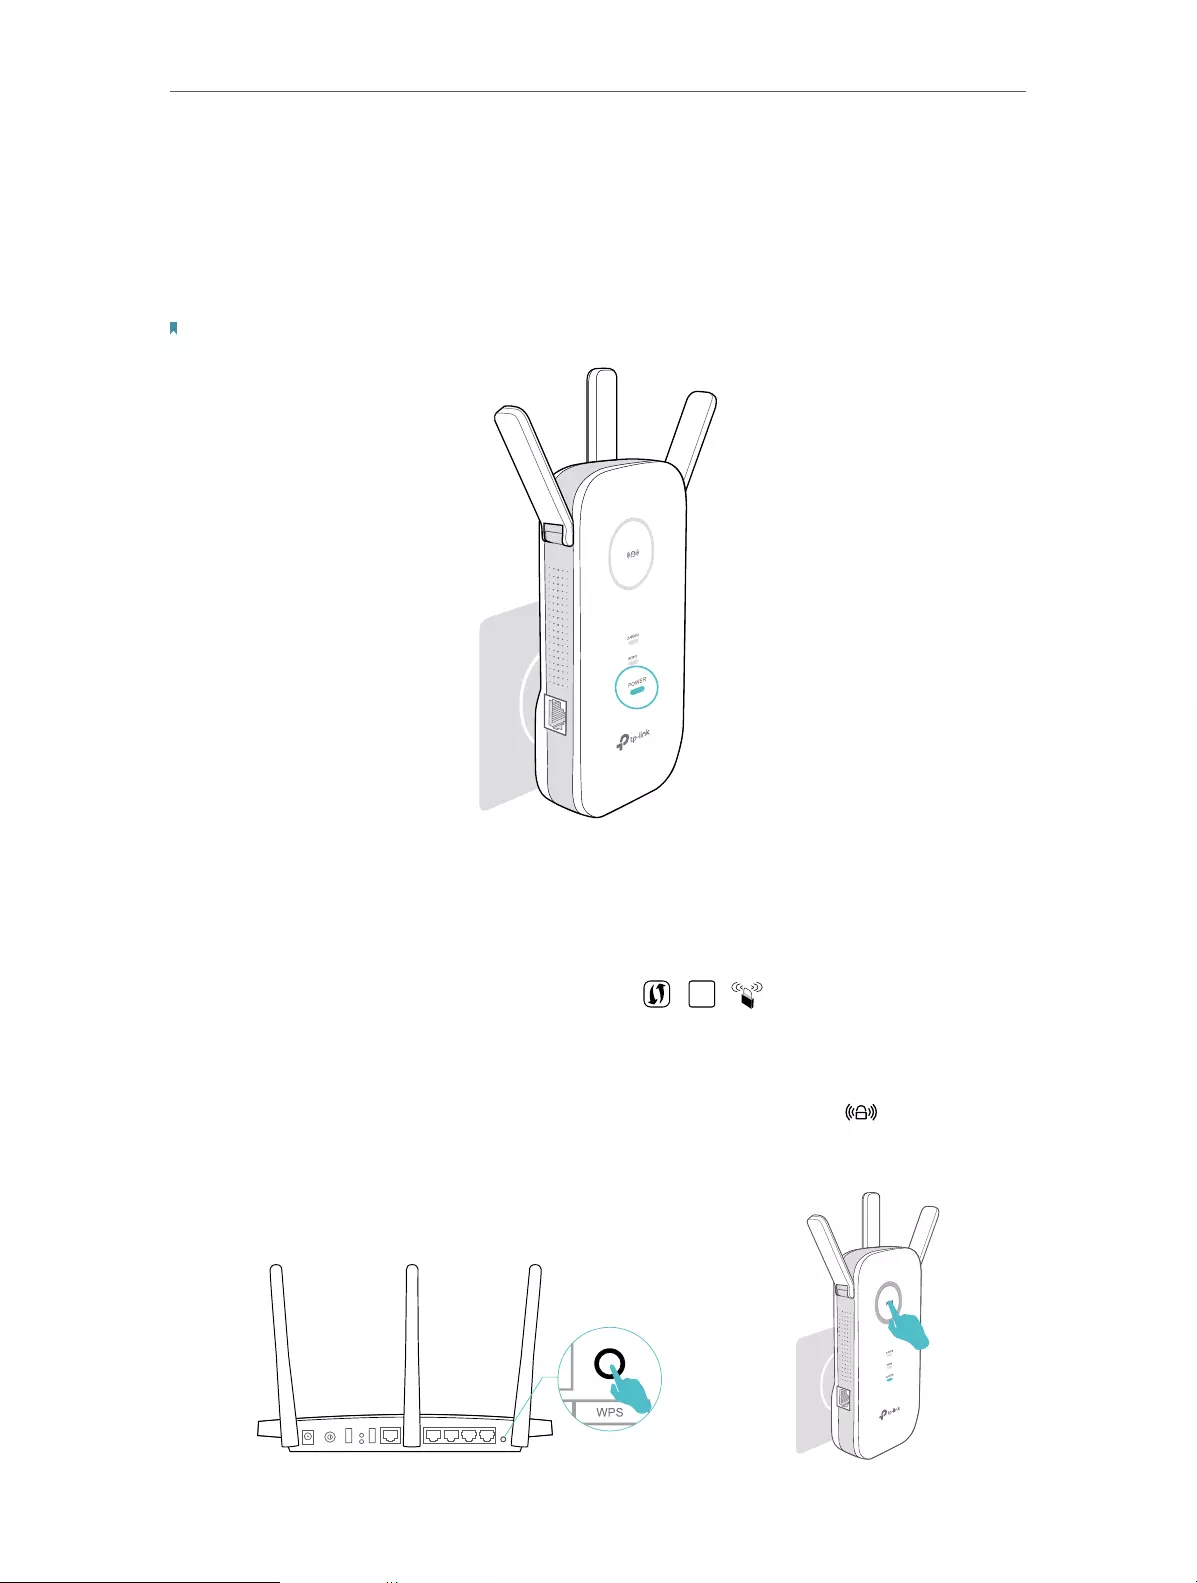
2. 1. Quick Setup
Power on
Plug the extender into an electrical outlet next to your host router, and then wait until
the POWER LED is solid on.
Note: For safety, we suggest that you plug the extender in upright directions as shown below.
Connect to the host network
There are three ways to connect to the host network: via the WPS button, via a web
browser or via the TP-Link Tether app. Using the WPS button is the easiest way to
extend your host network. We recommend you to use this way if your router has a WPS
button. The button might look like one of these: | | .
2. 1. 1. Method One: Via the WPS Button
1. Press the WPS button on your host router, and then press the button on the
extender within 2 minutes.
WPS

7
Chapter 2 Set Up Internet Connection
Tips:
• Some ISP gateways disable the WPS function by default. If the WPS connection fails, please refer to
Method Two: Via a Web Browser.
• For more information about using WPS button on your host router, please refer to the router
manufacturer’s user guide.
2. Wait until the Signal LED changes to solid blue, which indicates that the WPS
connection is successful. If it doesn’t, please refer to Method Two: Via a Web Browser.
3. If you are connecting the extender to a dual-band router but only the 2.4GHz or 5GHz
LED is on, repeat Step 1 and 2 to connect to the other band.
4. Enjoy! Connect to the extended network and enjoy the internet. Both extended
networks share the same SSIDs (network names) and passwords as those of your
host networks.
Tips: Since the performance of the extended networks will be affected by the distance between the
extender and the host router, we recommend that you relocate your extender by referring to Position
Your Extender.
2. 1. 2. Method Two: Via a Web Browser
1. Connect your computer to the extender’s wireless network.
Tips: Before connecting, please find the SSID (network name) on the label of the extender.
• For Windows Users
1 ) Unplug the Ethernet cable from your computer (if any).
2 ) Click the Wi-Fi icon on the taskbar and connect to the extender’s wireless
network: TP-Link_Extender_2.4GHz or TP-Link_Extender_5GHz.
onnections are available
Wireless Network
onnection
TP-Link_Extender_2.4GHz
TP-Link_Extender_5GHz
Connect automatically Connect
√
• For Mac OS X Users
1 ) Unplug the Ethernet cable from your computer (if any).
2 ) Click the Wi-Fi icon in the top right corner of the screen, and connect to the
extender’s network: TP-Link_Extender_2.4GHz or TP-Link_Extender_5GHz.

8
Chapter 2 Set Up Internet Connection
Wi-Fi: On
Tu rn Wi-Fi O
TP-Link_Extender_5GHz
Join Other Network...
Create Network...
Open Network Preferences…
TP-Link_Extender_2.4GHz
2. Follow the instructions of the Quick Setup wizard to connect the extender to your
host router.
1 ) Launch a web browser, enter http://tplinkrepeater.net or http://192.168.0.254
in the address field, and then create a password for future login attempts, and
click Start.
Tips: If the login window does not appear, please refer to FAQ.
2 ) Select your host router’s 2.4GHz SSID (network name), enter its password (NOT
the password you just created for management), and click Next.
3 ) Select your host router’s 5GHz SSID (network name), enter its password (NOT
the password you just created for management), and click Next.

9
Chapter 2 Set Up Internet Connection
Tips:
If your host router does not support 5GHz wireless network, please click Skip to continue.
4 ) Either keep the default SSIDs (network names) or customize them for the
extended networks, and then click Next.
5 ) Verify your wireless settings and click Save. The corresponding LED(s) (2.4GHz
or 5GHz) should turn on.

10
Chapter 2 Set Up Internet Connection
6 ) Enjoy! Connect to the extended network and enjoy the internet. Both extended
networks share the same wireless passwords as those of your host networks,
but may have different network names if you have customized the SSIDs during
the configuration.
11
Chapter 2 Set Up Internet Connection
Tips: Since the performance of the extended network will be affected by the distance between the
extender and the host router, we highly recommend you to relocate your extender referring to Position
Your Extender.
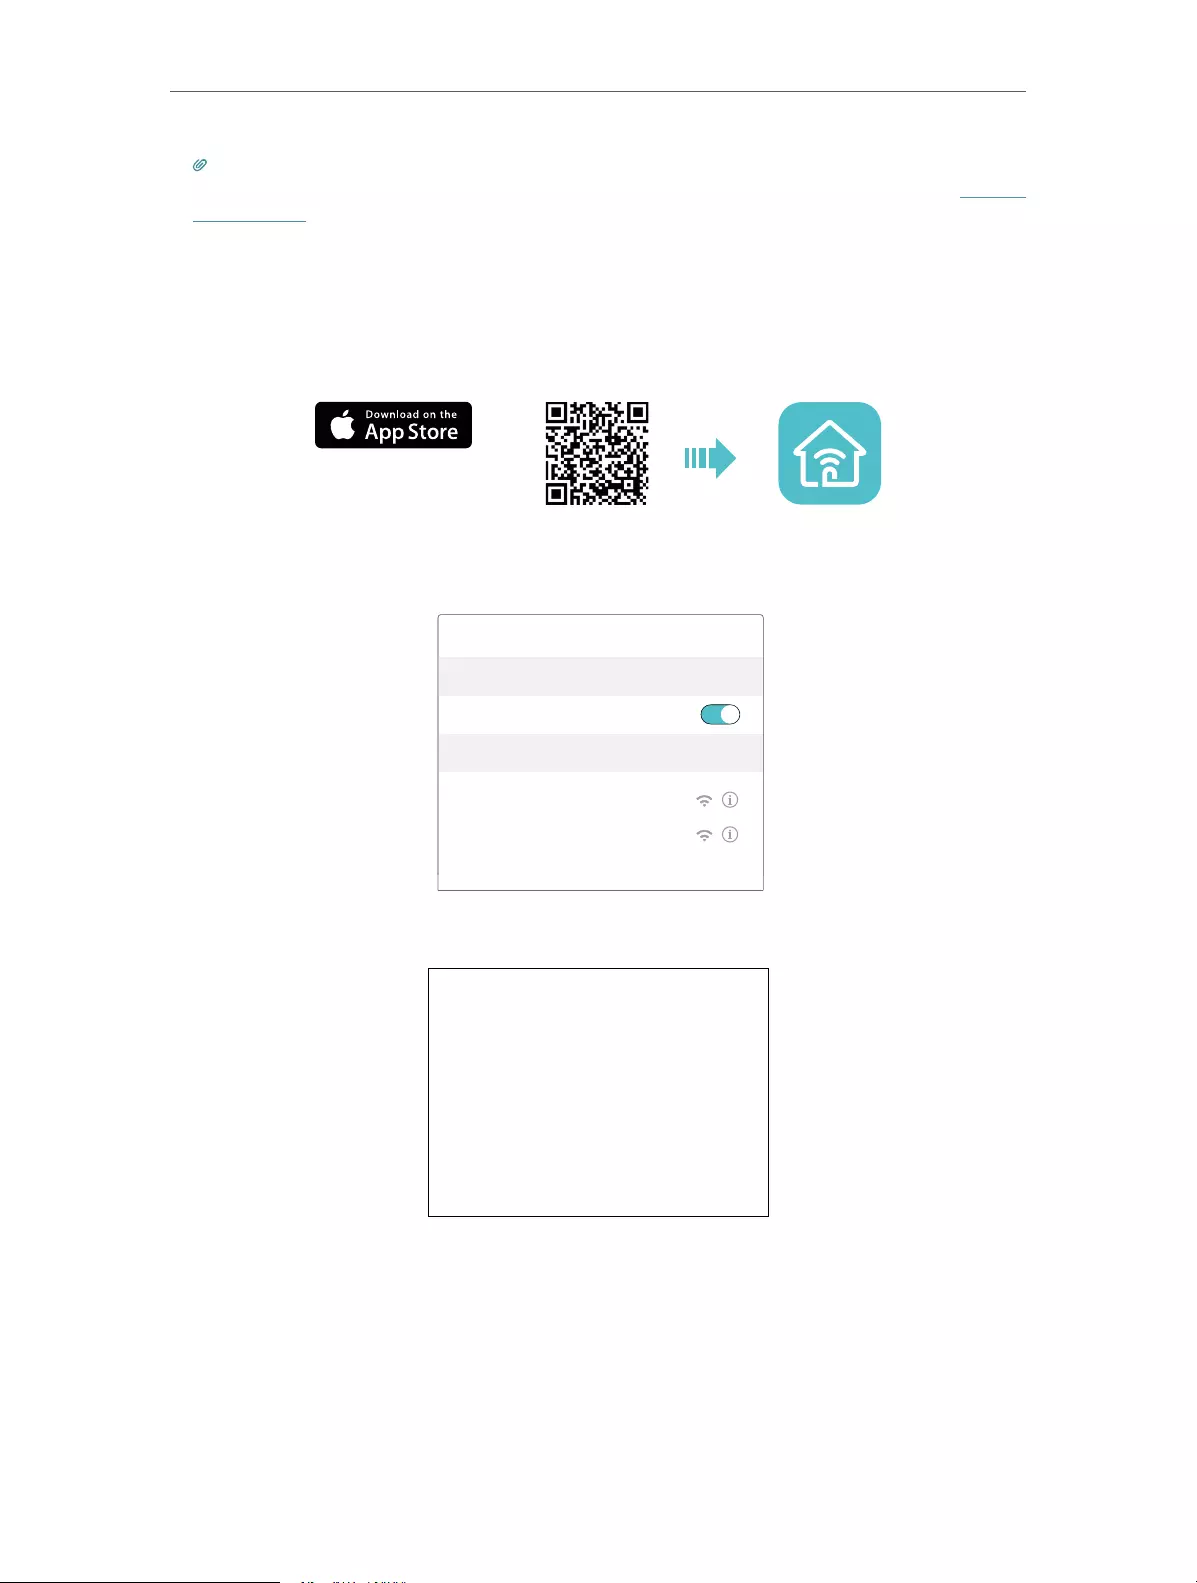
2. 1. 3. Method Three: Via the TP-Link Tether App
1. Launch the Apple App Store or Google Play Store and search TP-Link Tether or simply
scan the QR code to download and install the app.
OR
2. Go to Wi-Fi Settings and connect your device to the extender’s wireless network:
TP-Link_Extender_2.4GHz or TP-Link_Extender_5GHz.
Wi-Fi
Wi-Fi
CHOOSE A NETWORK…
Other…
< Settings
TP-Link_Extender_2.4GHz
TP-Link_Extender_5GHz
3. Launch Tether and select your extender from the Local Device list.
4. Create a password for future logins and click Create.

12
Chapter 2 Set Up Internet Connection
5. Follow the on-screen instructions to complete the configuration.
Tips: You can manage your extender via Tether, such as controlling LEDs, sharing passwords of your
networks and blocking devices.
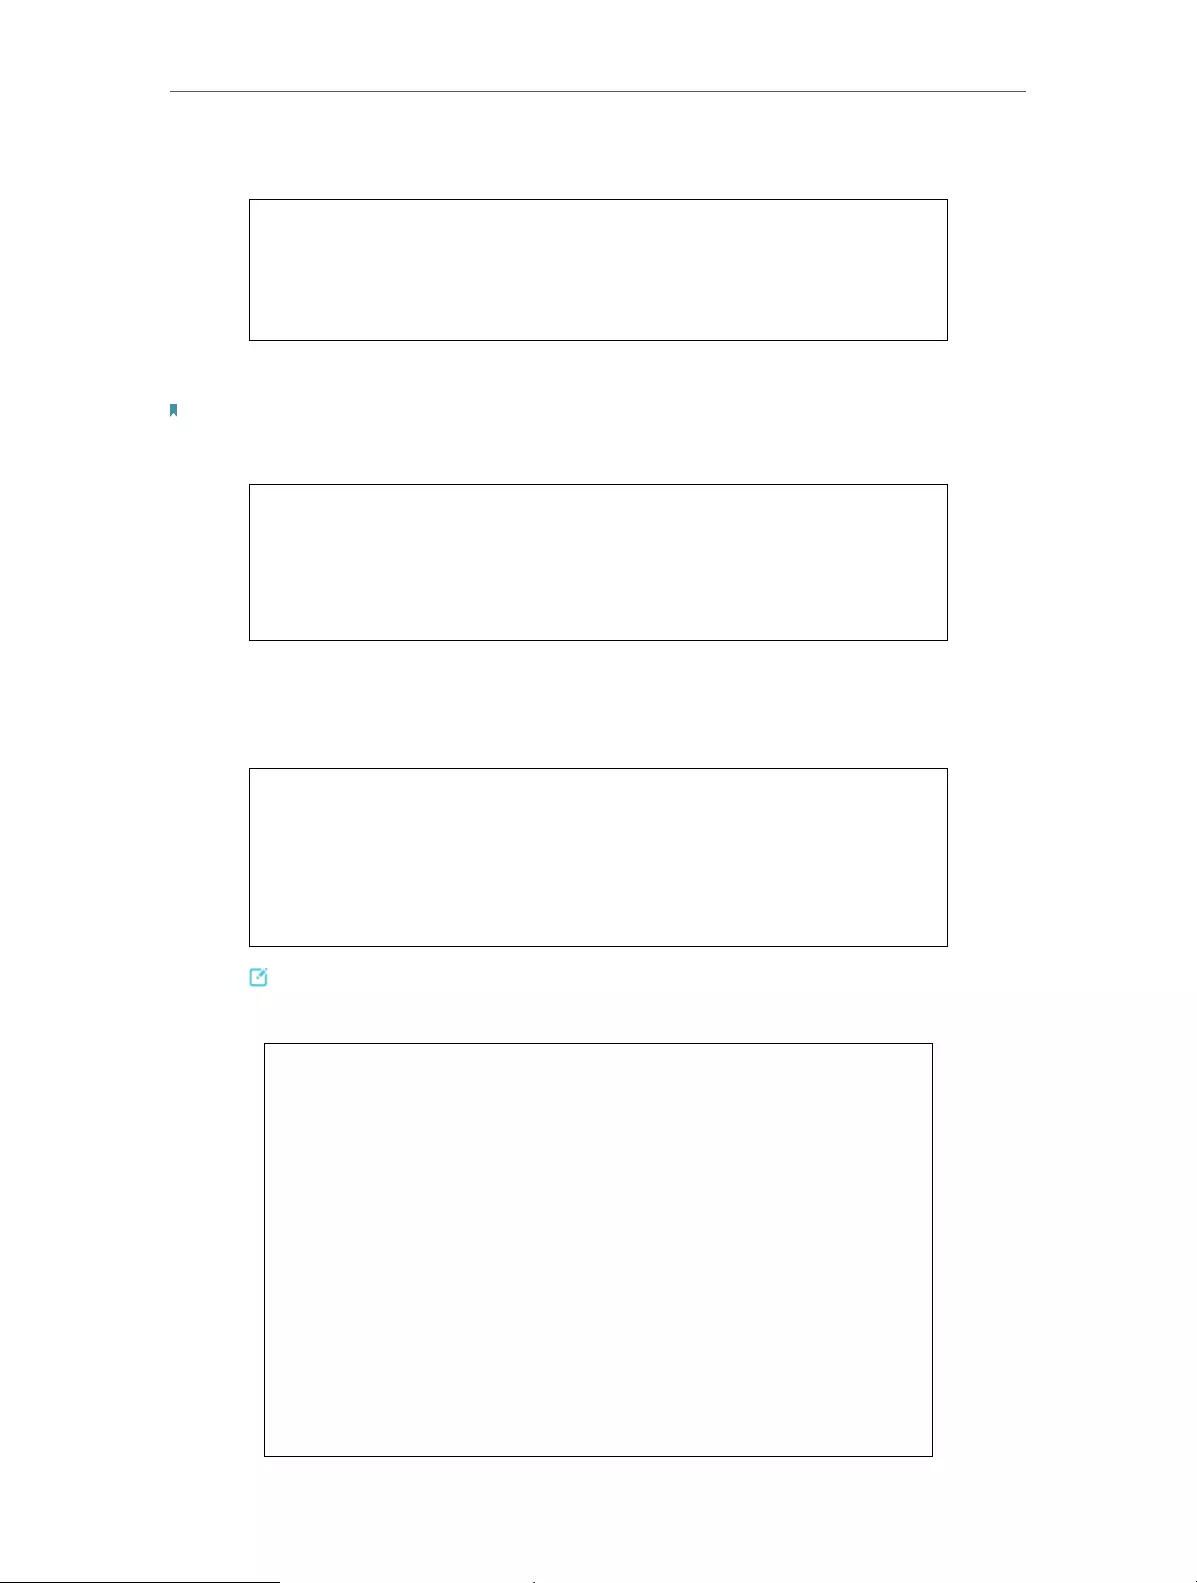
2. 2. Position Your Extender
Please follow the instructions below to achieve optimal performance of the extender.
1. Plug the extender into an electrical outlet between your host router and the Wi-Fi
“dead“ zone. The location you choose must be within the range of your existing host
network.
2. Wait until the Signal LED is lit and solid blue. If not, relocate it closer to the host
router to achieve better signal quality.
Ideal extender PlacementRouter Device
Red
Too far away
Blue
Ideal location
Extended NetworkHost Network
Tips: To minimize signal interference, please choose a location which is far away from Bluetooth
devices and other household electronic devices, such as cordless phones, microwave ovens and baby
monitors.

Chapter 3
Customize Your Network
This chapter guides you on how to configure network settings that are available for this
extender.
It contains the following sections:
• Check Internet Status
• Configure Wireless Network
• Change LAN Settings
• Specify DHCP Server Settings
• Adjust Wi-Fi Coverage
• Set Access Control

14
Chapter 3 Customize Your Network
3. 1. Check Internet Status
You can view the internet status of your extender to check whether you have successfully
set up the extended network(s).
1. Visit http://tplinkrepeater.net, and log in with the password you set for the extender.
2. Go to Settings > Status to view the internet status of your extender.
• The extender is functioning normally.
• The extender is not connected to the host networks. Please go to Settings >
Wireless > Connect to Network to check the passwords of the host networks. If
the problem still exists, please refer to the FAQ section.
• The extender is connected to the host network, but is not transmitting data. Please
check your router’s internet connection.
• The extender is connected to the router abnormally. Please go to Settings >
Network and try setting your extender to obtain an IP address automatically.
Click the Internet/Router/Range Extender/Clients icon to view corresponding
information.
3. 2. Configure Wireless Network
If you want to extend another host network after Quick Setup, you can refer to this
section. Moreover, you can change the wireless settings for your extended networks.

15
Chapter 3 Customize Your Network
Visit http://tplinkrepeater.net, and log in with the password you set for the extender.
Note:
Here we take the configuration of the 2.4GHz network as an example. If the 5GHz network is available on
your extender, please refer to the instructions to set your 5GHz network.
¾To extend another host network:
1. Go to Settings > Wireless > Connect to Network.
2. Enable Connect to 2.4GHz Network and click Wireless Scanner to find all available
networks.
3. Select the 2.4GHz host network you want to extend.
Note:
If the network you want to extend is on but not listed, please try the following steps.
• Move the extender closer to your router, and click Rescan in the top-right corner of the list.
• You can manually enter the SSID (network name) and password of the network you want to extend, and
click Save.
4. Once a host network is selected, the SSID and security type will be automatically
filled in. If the selected network is encrypted, enter the password in the Password
field.
5. Click Save.
¾To enable or disable the extended network:
1. Go to Settings > Wireless > Extended Network.

16
Chapter 3 Customize Your Network
2. Extended networks are enabled by default. If you want to disable the wireless function
of a certain band, just clear the Enable checkbox. In this case, all the wireless settings
of this band will be invalid.
3. Click Save.
¾To change the wireless network name (SSID):
1. Go to Settings > Wireless > Extended Network.
2. Create a new SSID in Extended 2.4GHz SSID or click Copy Host SSID. The value is
case-sensitive.
3. Click Save.
Note: If you have changed the wireless settings via a wireless device, you will be disconnected after the
settings are applied. Please write down the new SSID for future use.
¾To hide the SSID of the extended network:
1. Go to Settings > Wireless > Extended Network.
2. Select Hide SSID broadcast, and the corresponding SSID will not be displayed when
wireless devices scan for local wireless networks. Devices must join the network
manually in order to connect.
3. Click Save.
3. 3. Change LAN Settings
The extender is preset with a default LAN IP 192.168.0.254, with which you can log in to
the web management page. The LAN IP address, together with the Subnet Mask, also
defines the subnet that the connected devices are on. If the IP address conflicts with
another device on your local network or your network requires a specific IP subnet, you
can change it.
1. Visit http://tplinkrepeater.net, and log in with the password you set for the extender.
2. Go to Settings > Network.
3. Select Use the following IP address.
4. Enter a new IP address as needed and leave the Subnet Mask as the default settings
and enter the gateway that is in the same subnet as the IP address. The gateway is
usually the LAN IP address of your extender.

17
Chapter 3 Customize Your Network
5. Click Save.
3. 4. Specify DHCP Server Settings
By default, the DHCP (Dynamic Host Configuration Protocol) Server is enabled and the
extender acts as a DHCP server; it dynamically assigns TCP/IP parameters to client
devices from the IP Address Pool. You can change the settings of the DHCP Server if
necessary.
1. Visit http://tplinkrepeater.net, and log in with the password you set for the extender.
2. Go to Settings > Network.
¾To specify the IP address that the extender assigns:
1. Select Auto (recommended) or On to enable the DHCP Server.
2. Enter the starting and ending IP addresses in the IP Address Pool.
3. Enter other parameters if the ISP requires them. The Default Gateway is automatically
filled in and is the same as the LAN IP address of the extender.
4. Click Save.

18
Chapter 3 Customize Your Network
¾To view the DHCP Client List:
You can view the information of the DHCP clients connected to the extender in the
DHCP Client List.
3. 5. Adjust Wi-Fi Coverage
You can set the extender’s Wi-Fi coverage depending on how large you want your Wi-Fi
area to be.
1. Visit http://tplinkrepeater.net and log in with the password you set for the extender.
2. Go to Settings > Advanced Settings > Wi-Fi Coverage.
3. Select Min, Mid or Max to adjust your Wi-Fi coverage of the extender.
4. Click Save.
3. 6. Set Access Control
Access Control allows you to permit or block specific devices from accessing the
internet for a specific period.
1. Visit http://tplinkrepeater.net and log in with the password you set for the extender.
2. Go to Settings > Advanced Settings > Access Control.
19
Chapter 3 Customize Your Network
3. Enable Access Control.
¾To block specific device(s):
Note: Devices connected to the extender via an Ethernet cable cannot be blocked.
1. Select Blacklist and click Save.
2. Select the device to be blocked in the Online Devices table by ticking the
corresponding checkbox.
3. Click Block and the selected device(s) will be added to the Devices in Blacklist table.
4. Click in the Devices in Blacklist table to set the Effective Time for a certain entry
as needed.

20
Chapter 3 Customize Your Network
5. Click OK.
¾To permit specific device(s):
1. Select Whitelist and click Save.
2. Click Add in the Devices in Whitelist table. Enter the Device Name and MAC Address.
And you can set the Effective Time for a certain entry as needed.
3. Click OK.

Chapter 4
More Features of Your
Extender
This chapter explains how to use the extender as a wireless adapter and as an access
point.
It contains the following sections:
• Use Your Extender as a Wireless Adapter
• Transform Your Existing Wired Network to a Wireless One
22
Chapter 4 More Features of Your Extender
4. 1. Use Your Extender as a Wireless Adapter
The extender can be used as a wireless adapter to connect any wired-only device, such
as a Blu-ray player, game console, DVR, or smart TV, to your wireless network.
After configuration, you can connect an Ethernet-enabled device to the extender via an
Ethernet cable.
Note: Extenders that have no Ethernet port do not support this feature.
By default, the Ethernet port of the extender is connected to the 5GHz wireless netwok.
¾To change the connected wireless frequency:
1. Visit http://tplinkrepeater.net, and log in with the password you set for the extender.
2. Go to Settings > Network.
3. Select 2.4GHz or 5GHz and click Save.
4. 2. Transform Your Existing Wired Network to a
Wireless One
The extender can work as an access point, transforming your existing wired network to
a wireless one.
4. 2. 1. To Set Up the Extender as an Access Point
1. Visit http://tplinkrepeater.net, and log in with the password you set for the extender.
2. Click Mode in the top right corner of the page. Select Access Point and click Save.
The extender will reboot and switch to Access Point mode.

23
Chapter 4 More Features of Your Extender
3. After rebooting, connect the extender to your modem or wired router via an Ethernet
cable.
4. Visit http://tplinkrepeater.net, and log in with the password you set for the extender.
5. Go to Quick Setup to configure your extender.
1 ) Configure your wireless settings and click Next.
2 ) Confirm the information and click Finish. Now, you can enjoy Wi-Fi.

24
Chapter 4 More Features of Your Extender
4. 2. 2. To Connect Your Wireless Devices to the Extender via WPS
Wi-Fi Protected Setup (WPS) provides an easier way to set up a secure Wi-Fi connection.
Wireless devices that support WPS, including Android phones, tablets and most USB
network cards, can be connected to your extender through this method (not supported
by iOS devices).
1. Visit http://tplinkrepeater.net, and log in with the password you set for the extender.
2. Go to Settings > Wireless > WPS.
3. Enable WPS.
4. Connect via WPS:
• AP’s PIN: Enable AP’s PIN and enter the PIN on your device. You can click Generate
to get a new PIN or click Default to restore the PIN to its factory one.
• Push Button (Recommended): Click Connect and push the WPS button on the
client device.

25
Chapter 4 More Features of Your Extender
• PIN code: Enter the client’s PIN, and click Connect.

Chapter 5
Manage Your Extender
This chapter presents how to manage and maintain your extender.
It contains the following sections:
• Set Up System Time
• Control LEDs
• Power Schedule
• Upgrade the Firmware
• Backup and Restore Configuration Settings
• Change Login Password
• System Log

27
Chapter 5 Manage Your Extender
5. 1. Set Up System Time
The System Time of the extender will be used for time-based functions such as the
Power Schedule function. If you have enabled the Daylight Saving Time feature, the
system time will be sychronized with the daylight saving time you configure.
1. Visit http://tplinkrepeater.net, and log in with the password you set for the extender.
2. Go to Settings > System Tools > Time Settings.
¾To get system time:
1. Select your local Time Zone from the drop-down list.
2. Click Save.
¾To set up Daylight Saving Time:
1. Select Enable Daylight Saving Time.
2. Select the Start and End date and time of the daylight saving time at your local time
zone.
3. Click Save.
5. 2. Control LEDs
The LEDs of the extender indicate its activities and status. You can enable the Night
Mode feature to specify a time period during which the LEDs are off.
1. Visit http://tplinkrepeater.net, and log in with the password you set for the extender.

28
Chapter 5 Manage Your Extender
2. Go to Settings > System Tools > LED Control.
¾To specify a time period when LEDs are off:
1. Select Night Mode.
2. Specify a time period in the LED Off Time field, and the LEDs will be off during this
period.
3. Click Save.
5. 3. Power Schedule
The Power Schdule feature allows you to specify a time period during which the
extender is off.
1. Visit http://tplinkrepeater.net, and log in with the password you set for the extender.
2. Go to Settings > Advanced Settings > Power Schedule.
¾To specify a time period when the extender is off:
1. Select Enable Power Schedule.
2. Specify a time period in the Power-Off Time field and days in the Day(s) field, and the
extender will be off during this period.

29
Chapter 5 Manage Your Extender
3. Click Save.
5. 4. Upgrade the Firmware
TP-Link is committed to improving product features, giving you a better network
experience. You can download the latest firmware file from the Support page at our
website www.tp-link.com and upgrade the extender to the latest firmware version.
Note:
• Make sure the latest firmware file is matched with the hardware version (as shown in the download
section of the Support page).
• Make sure that you have a stable connection between the extender and your computer. It is NOT
recommended to upgrade the firmware wirelessly.
• Backup your extender configuration.
• Do NOT power off the extender during the firmware upgrade.
1. Download the latest firmware file for the extender from our website
www.tp-link.com.
2. Visit http://tplinkrepeater.net, and log in with the password you set for the extender.
3. Go to Settings > System Tools > Firmware Upgrade.
4. Click Browse to locate the downloaded new firmware file, and then click Upgrade.
5. Wait a few minutes for the firmware upgrade to complete and the extender to reboot.
5. 5. Backup and Restore Configuration Settings
The configuration settings are stored as a configuration file in the extender. You can
backup the configuration file and restore the extender to the previous settings from the
backup file when needed. Moreover, if necessary, you can erase the current settings
and reset the extender to the default factory settings.
1. Visit http://tplinkrepeater.net, and log in with the password you set for the extender.
2. Go to Settings > System Tools > Backup & Restore.
¾To backup configuration settings:
Click Backup to save a copy of the current settings to your local computer. A ‘.bin’ file of
the current settings will be stored on your computer.

30
Chapter 5 Manage Your Extender
¾To restore configuration settings:
1. Click Browse to locate the backup configuration file stored on your computer, and
click Restore.
2. Wait a few minutes for the restore and reboot.
Note: During the restore process, do not power off or reset the extender.
¾To reset the extender to factory default settings:
1. Click Factory Restore to reset the extender.
2. Wait a few minutes for the reset and reboot.
Note:
• During the reset process, do not power off or reset the extender.
• We strongly recommend you backup the current configuration settings before resetting the extender.
5. 6. Change Login Password
The account management feature allows you to change your login password of the
management webpage.
1. Visit http://tplinkrepeater.net, and log in with the password you set for the extender.
2. Go to Settings > System Tools > Admin Account.
3. Enter the old password, then the new password twice (both case-sensitive) and click
Save.

31
Chapter 5 Manage Your Extender
4. Use the new password for future logins.
5. 7. System Log
If the extender is not working normally, you can save the system log and send it to our
technical support team.
1. Visit http://tplinkrepeater.net, and log in with the password you set for the extender.
2. Go to Settings > System Tools > System Log.
¾To save the system log locally:
1. Choose the type and level of the system log as needed.
2. Click Save Log to save the system logs to a local disk.

32
FAQ
Q1. How do I reset the extender to its factory default settings?
• With the extender powered on, use a pin to press the Reset button until all the LEDs
turn on momentarily and then release the button.
• Log in to the extender’s web management page. Go to System Tools > Restore &
Backup and click Factory Restore.
Q2. What should I do if I forget my login password?
Refer to FAQ > Q1 to reset the extender, and create a password to log in.
Note: The extender must be reconfigured after a reset to access the internet. Please note down your
login password for future use.
Q3. What should I do if I forget my wireless password?
The factory default wireless password is printed on the label of the extender.
If the password has been altered, please connect your computer to the extender using
an Ethernet cable and follow the steps below:
1. Visit http://tplinkrepeater.net, and log in with the password you set for the extender.
2. Go to Settings > Wireless > Wireless Settings to retrieve or reset your wireless
password.
Q4. What should I do if I cannot access the web management page?
This can happen for a variety of reasons. Please try the following to log in again.
• If your computer is wirelessly connected, make sure that you have connected to the
extender’s SSID.
• If your computer is connected via an Ethernet cable, please make sure that the
connection is stable.
• Make sure your computer is set to obtain an IP address and DNS server address
automatically.
• Verify that http://tplinkrepeater.net or http://192.168.0.254 is correctly entered in the
web browser and press Enter.
• Use the IP address to access the extender. The default IP is 192.168.0.254. If the
extender is connected to the router, you should go to your router’s DHCP client list to
obtain the extender’s current IP address.
• Reset the extender and try again.
Q5. I have enabled wireless MAC filter, wireless access control, or access
control list (ACL) on my router. What should I do before configuring

33
the extender?
When a device connects through the extender to your router, the MAC address of the
device shown on the router is translated to another MAC address. If your router’s MAC
filter, wireless access control, or ACL is enabled, the devices connected to the extender
cannot get an IP address from the extender and cannot access the internet.
To solve this problem, please follow the steps below:
1. Log in to your router and disable the MAC filter, wireless access control or ACL.
Note: For more information about how to disable your router’s MAC filter, wireless access control or ACL,
please refer to your router’s user guide.
2. Power on your extender, and run the Quick Setup to configure your extender.
3. Connect all of your devices to the extended network, and make sure the router’s Link
LED remains lit.
4. On your router, add all the Online Devices’ MAC addresses to your router’s MAC filter
table.
5. Enable the router’s MAC filter, wireless access control, or ACL to complete the
configuration.

34
COPYRIGHT & TRADEMARKS
Specifications are subject to change without notice. is a registered trademark
of TP-Link Technologies Co., Ltd. Other brands and product names are trademarks or
registered trademarks of their respective holders.
No part of the specifications may be reproduced in any form or by any means or used
to make any derivative such as translation, transformation, or adaptation without
permission from TP-Link Technologies Co., Ltd. Copyright © 2017 TP-Link Technologies
Co., Ltd. All rights reserved.

35
FCC STATEMENT
This equipment has been tested and found to comply with the limits for a Class B digital
device, pursuant to part 15 of the FCC Rules. These limits are designed to provide
reasonable protection against harmful interference in a residential installation. This
equipment generates, uses and can radiate radio frequency energy and, if not installed
and used in accordance with the instructions, may cause harmful interference to radio
communications. However, there is no guarantee that interference will not occur in a
particular installation. If this equipment does cause harmful interference to radio or
television reception, which can be determined by turning the equipment off and on, the
user is encouraged to try to correct the interference by one or more of the following
measures:
• Reorient or relocate the receiving antenna.
• Increase the separation between the equipment and receiver.
• Connect the equipment into an outlet on a circuit different from that to which the
receiver is connected.
• Consult the dealer or an experienced radio/ TV technician for help.
This device complies with part 15 of the FCC Rules. Operation is subject to the following
two conditions:
1. This device may not cause harmful interference.
2. This device must accept any interference received, including interference that may
cause undesired operation.
Any changes or modifications not expressly approved by the party responsible for
compliance could void the user’s authority to operate the equipment.
Note: The manufacturer is not responsible for any radio or TV interference caused by
unauthorized modifications to this equipment. Such modifications could void the user’s
authority to operate the equipment.
FCC RF Radiation Exposure Statement:
This equipment complies with FCC RF radiation exposure limits set forth for an
uncontrolled environment. This device and its antenna must not be co-located or
operating in conjunction with any other antenna or transmitter.
“To comply with FCC RF exposure compliance requirements, this grant is applicable to
only Mobile Configurations. The antennas used for this transmitter must be installed to
provide a separation distance of at least 20 cm from all persons and must not be co-
located or operating in conjunction with any other antenna or transmitter.”
CE Mark Warning

36
This is a class B product. In a domestic environment, this product may cause radio
interference, in which case the user may be required to take adequate measures.
OPERATING FREQUENCY(the maximum transmitted power)
2412MHz—2472MHz(20dBm)
5180MHz—5240MHz(23dBm)
5260MHz—5320MHz(23dBm)
5500MHz—5700MHz(30dBm)
EU declaration of conformity
TP-Link hereby declares that the device is in compliance with the essential requirements
and other relevant provisions of directives 2014/53/EU, 2009/125/EC and 2011/65/EU.
The original EU declaration of conformity may be found at http://www.tp-link.com/en/ce
RF Exposure Information
This device meets the EU requirements (2014/53/EU Article 3.1a) on the limitation of
exposure of the general public to electromagnetic fields by way of health protection.
The device complies with RF specifications when the device used at 20 cm from your
body.
Restricted to indoor use.
Canadian Compliance Statement
This device complies with Industry Canada license-exempt RSSs. Operation is subject
to the following two conditions:
1. This device may not cause interference, and
2. This device must accept any interference, including interference that may cause
undesired operation of the device.
Le présent appareil est conforme aux CNR d’Industrie Canada applicables aux appareils
radio exempts de licence. L’exploitation est autorisée aux deux conditions suivantes :
1. l’appareil ne doit pas produire de brouillage;
2. l’utilisateur de l’appareil doit accepter tout brouillage radioélectrique subi, meme si le
brouillage est susceptible d’en compromettre le fonctionnement.
Caution:
The device for operation in the band 5150–5250 MHz is only for indoor use to reduce
the potential for harmful interference to co-channel mobile satellite systems;
The high-power radars are allocated as primary users (i.e. priority users) of the bands
5250-5350 MHz and 5650-5850 MHz and that these radars could cause interference
and/or damage to LE-LAN devices.

37
DFS (Dynamic Frequency Selection) products that operate in the bands 5250- 5350
MHz, 5470-5600MHz, and 5650-5725MHz.
Avertissement:
Le dispositif fonctionnant dans la bande 5150-5250 MHz est réservé uniquement pour
une utilisation à l’intérieur afin de réduire les risques de brouillage préjudiciable aux
systèmes de satellites mobiles utilisant les mêmes canaux.
En outre, les utilisateurs devraient aussi être avisés que les utilisateurs de radars de
haute puissance sont désignés utilisateurs principaux (c.-à-d., qu’ils ont la priorité) pour
les bandes 5250-5350 MHz et 5650-5850 MHz et que ces radars pourraient causer du
brouillage et/ou des dommages aux dispositifs LAN-EL.
Radiation Exposure Statement:
This equipment complies with IC radiation exposure limits set forth for an uncontrolled
environment. This equipment should be installed and operated with minimum distance
20cm between the radiator & your body.
Déclaration d’exposition aux radiations:
Cet équipement est conforme aux limites d’exposition aux rayonnements IC établies
pour un environnement non contrôlé. Cet équipement doit être installé et utilisé avec
un minimum de 20 cm de distance entre la source de rayonnement et votre corps.
Industry Canada Statement
CAN ICES-3 (B)/NMB-3(B)
Korea Warning Statements
당해 무선설비는 운용중 전파혼신 가능성이 있음.
NCC Notice
注意!
依據 低功率電波輻射性電機管理辦法
第十二條 經型式認證合格之低功率射頻電機,非經許可,公司、商號或使用者均不得擅
自變更頻率、加大功率或變更原設計之特性或功能。
第十四條 低功率射頻電機之使用不得影響飛航安全及干擾合法通信;經發現有干擾現象
時,應立即停用,並改善至無干擾時方得繼續使用。前項合法通信,指依電信規定作業
之無線電信。低功率射頻電機需忍受合法通信或工業、科學以及醫療用電波輻射性電機
設備之干擾。
於5.25GHz至5.35GHz區域內操作之無線設備的警告聲明
工作頻率5.250~5.350GHz該頻段限於室內使用。

38
BSMI Notice
安全諮詢及注意事項
• 請使用原裝電源供應器或只能按照本產品注明的電源類型使用本產品。
• 清潔本產品之前請先拔掉電源線。請勿使用液體、噴霧清潔劑或濕布進行清潔。
• 注意防潮,請勿將水或其他液體潑灑到本產品上。
• 插槽與開口供通風使用,以確保本產品的操作可靠並防止過熱,請勿堵塞或覆蓋
開口。
• 請勿將本產品置放於靠近熱源的地方。除非有正常的通風,否則不可放在密閉位
置中。
• 請不要私自打開機殼,不要嘗試自行維修本產品,請由授權的專業人士進行此項
工作。
限用物質含有情況標示聲明書
產品元件名稱
限用物質及其化學符號
鉛
Pb
鎘
Cd
汞
Hg
六價鉻
CrVI
多溴聯苯
PBB
多溴二苯醚
PBDE
PCB ○ ○ ○ ○ ○ ○
外殼 ○ ○ ○ ○ ○ ○
電源供應板 −○ ○ ○ ○ ○
備考1. 超出0.1 wt %” 及 “超出0.01 wt %” 系指限用物質之百分比含量超
出百分比含量基準值。
備考2.“○”系指該項限用物質之百分比含量未超出百分比含量基準值。
備考3.“ − “ 系指該項限用物質為排除項目。
Продукт сертифіковано згідно с правилами системи УкрСЕПРО на відповідність
вимогам нормативних документів та вимогам, що передбачені чинними
законодавчими актами України.
Safety Information
• Keep the device away from water, fire, humidity or hot environments.
• Do not attempt to disassemble, repair, or modify the device.
• The socket—outlet shall be installed near the equipment and shall be easily accessible
• Do not use the device where wireless devices are not allowed.
39
Please read and follow the above safety information when operating the device. We
cannot guarantee that no accidents or damage will occur due to improper use of the
device. Please use this product with care and operate at your own risk.
This product can be used in the following countries:
AT BE BG CH CY CZ DE DK
EE EL EF FI FR HR HU IE
IS IT LI LT LU LV MT NL
NO PL PT RO SE SI SK UK
Explanations of the symbols on the product label
Symbol Explanation
Class II equipment
AC voltage
Protection earth
Indoor use only
RECYCLING
This product bears the selective sorting symbol for Waste electrical and electronic
equipment (WEEE). This means that this product must be handled pursuant to European
directive 2012/19/EU in order to be recycled or dismantled to minimize its impact on
the environment.
User has the choice to give his product to a competent recycling organization or to the
retailer when he buys a new electrical or electronic equipment.