
About This Guide
This guide is a complement to Quick Installation Guide. The Quick Installation Guide provides instructions for quick internet setup, while this guide contains details of each function and demonstrates how to configure them.
Features available in this range extender may vary by model and software version. Range extender availability may also vary by region or ISP. All images, steps, and descriptions in this guide are only examples and may not reflect your actual range extender experience.
Conventions
In this guide the following conventions are used:
|
Convention |
Description |
|
Underlined |
Underlined words or phrases are hyperlinks. You can click to redirect to a website or a specific section. |
|
Teal |
Contents to be emphasized and texts on the web page are in teal, including the menus, items, buttons, and so on. |
|
> |
The menu structures to show the path to load the corresponding page. For example, Advanced > Wireless > MAC Filtering means the MAC Filtering function page is under the Wireless menu that is located in the Advanced tab. |
|
Note: |
Ignoring this type of note might result in a malfunction or damage to the device. |
|
Tips: |
Indicates important information that helps you make better use of your device. |
More Info
The latest software, management app and utility are available from Download Center at https://www.tp-link.com/support/.
The Quick Installation Guide can be found where you find this guide or inside the package of the extender.
Specifications can be found on the product page at https://www.tp-link.com.
TP-Link Community is provided for you to discuss our products and share knowledge at https://community.tp-link.com.
Our Technical Support contact information can be found at the Contact Technical Support page at https://www.tp-link.com/support/.
Speed/Coverage Disclaimer
Maximum wireless signal rates are the physical rates derived from IEEE Standard 802.11 specifications. Actual wireless data throughput and wireless coverage are not guaranteed and will vary as a result of 1) environmental factors, including building materials, physical objects, and obstacles, 2) network conditions, including local interference, volume and density of traffic, product location, network complexity, and network overhead, and 3) client limitations, including rated performance, location, connection quality, and client condition.

Quick Installation Guide
Connections are available
Wireless Network Connection
My Devices
Local Device
REXXX
XX-X X-XX-X X-XX-X X
Range Extender
1
Power On
Plug the extender into a power outlet next to your router. Wait until its
Power LED turns solid on.
Next to
©2019 TP-Link
7106508497 REV1.1.1
Need setup videos?
Scan the QR code, or visit
https://www.tp-link.com/support/setup-video/
and search for the setup video of your model.
*Images may dier from actual product.
2
Set Up
Method 1: Via the Tether App
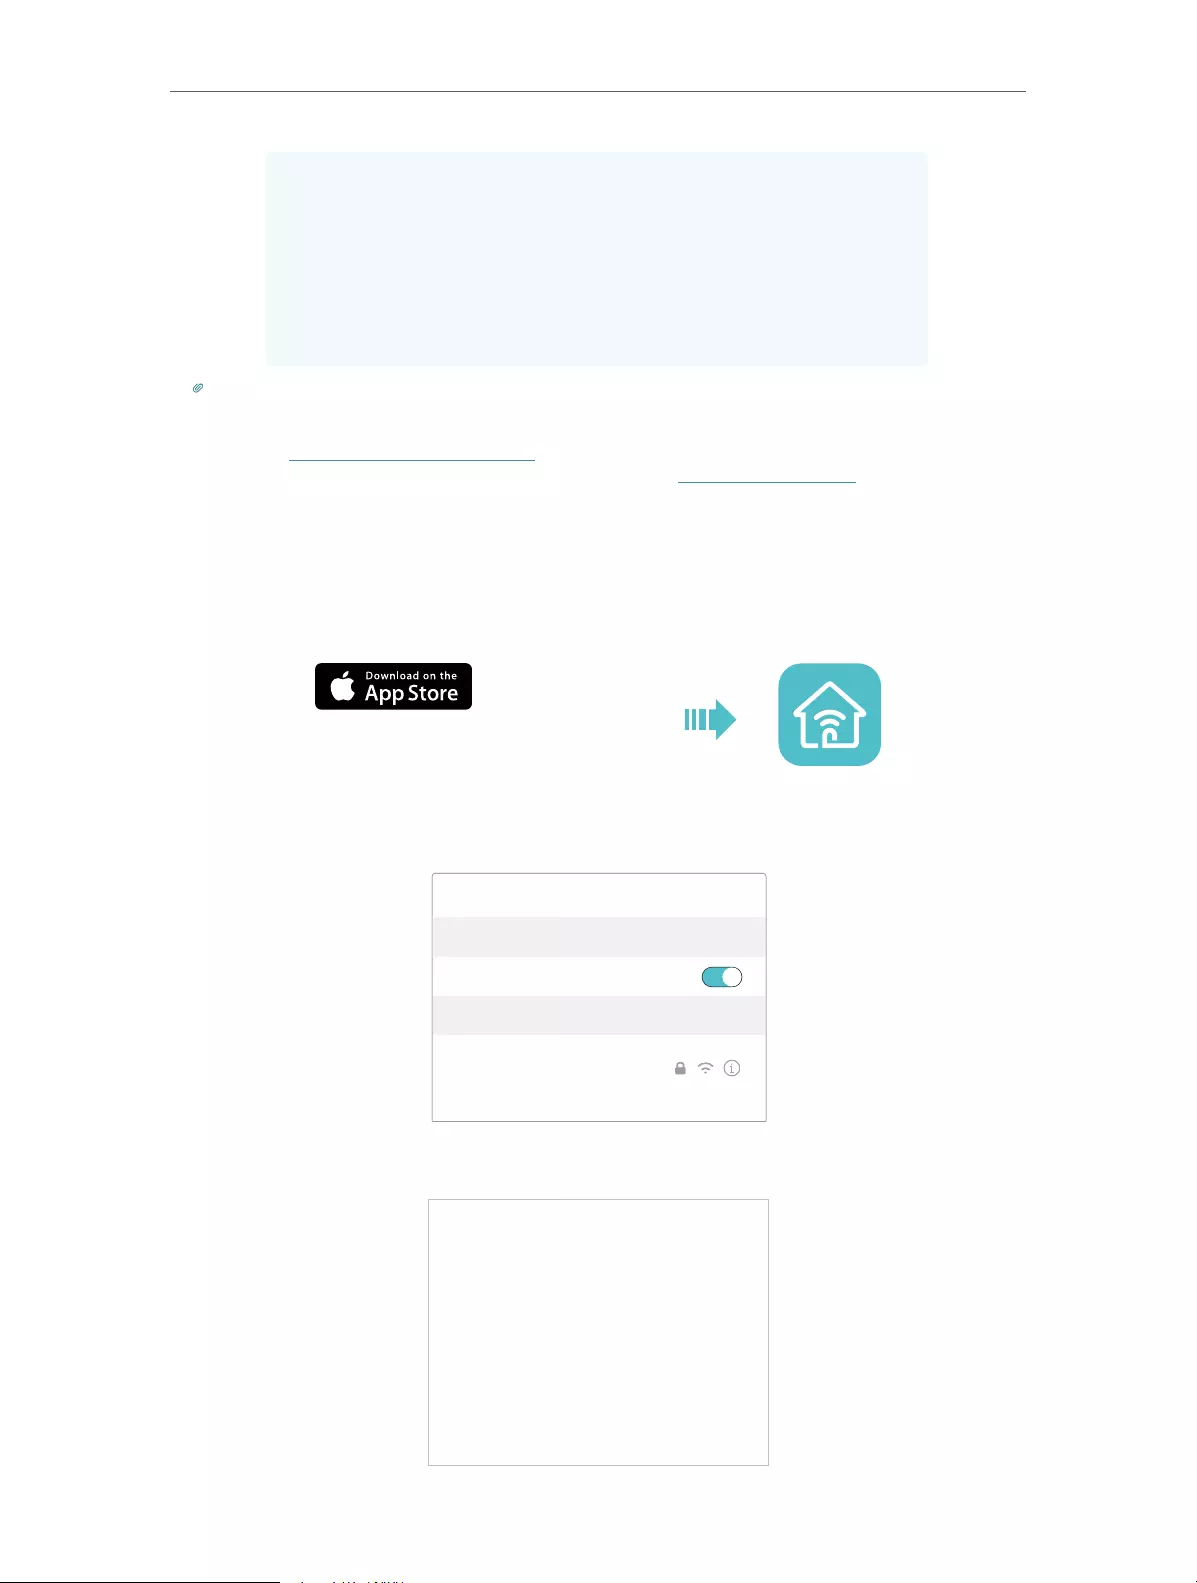
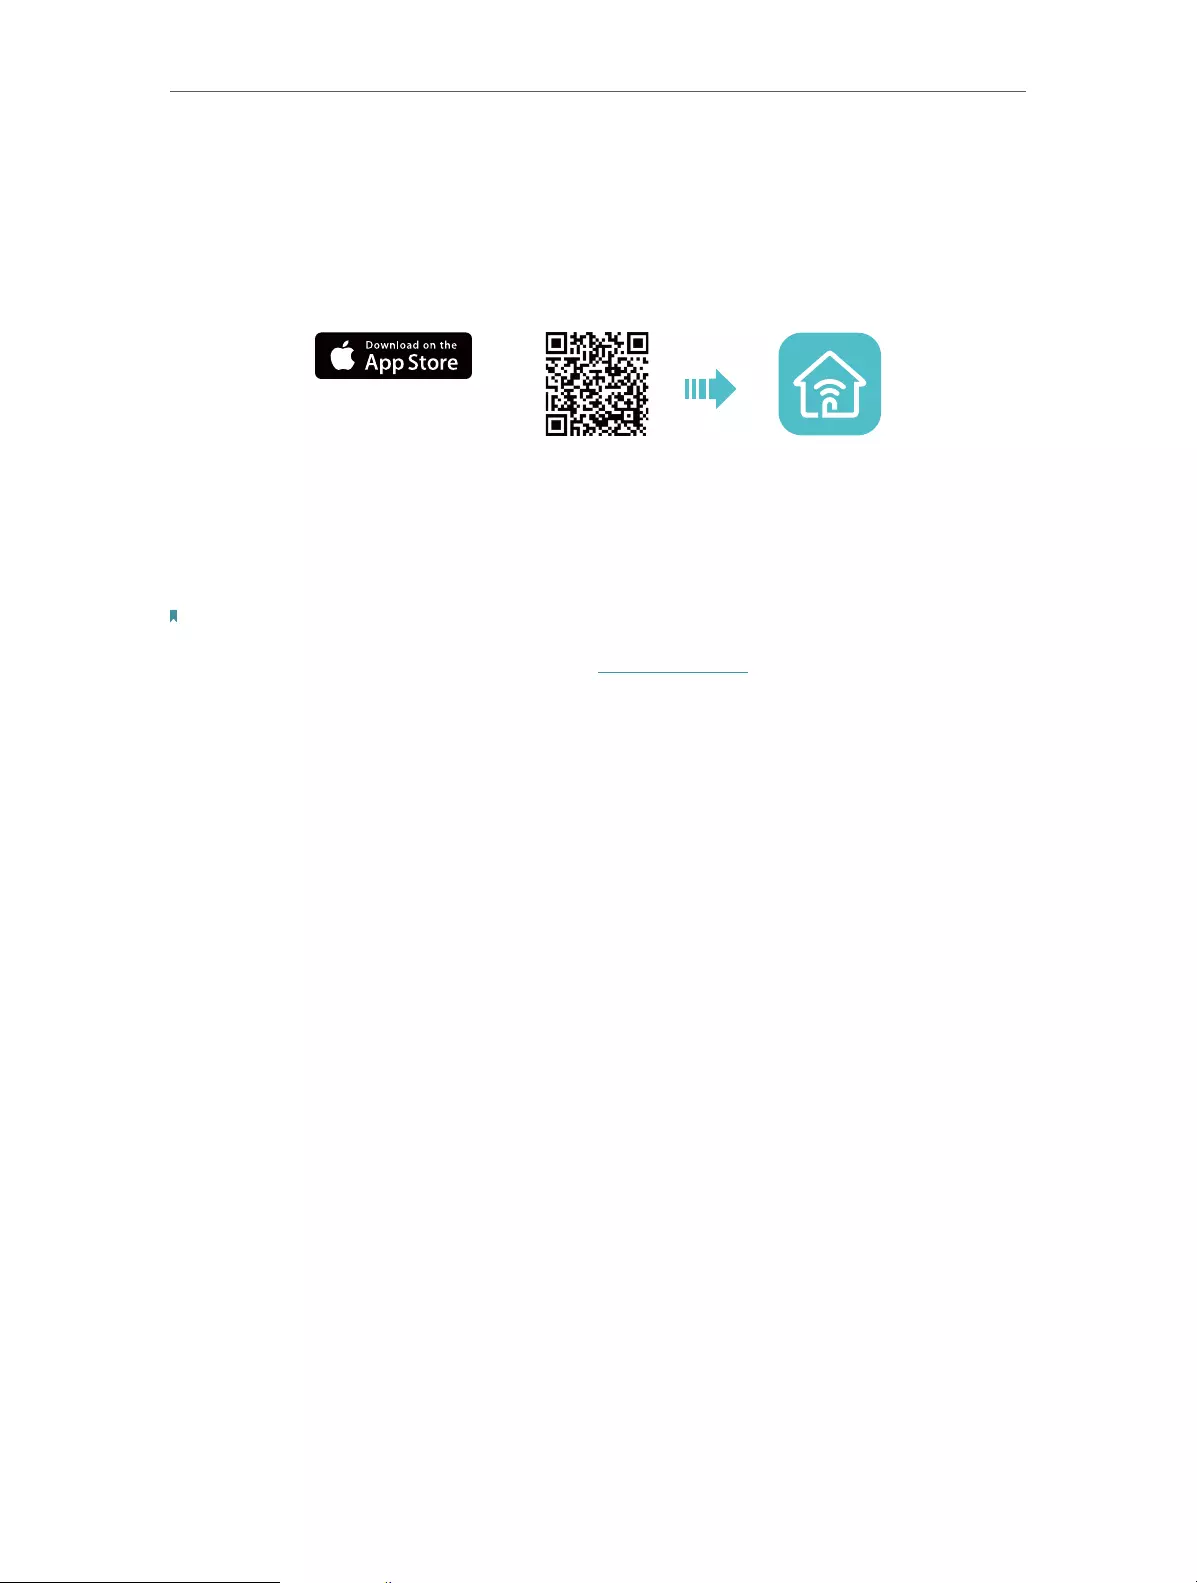
1. Get the up-to-date Tether app.
or
Scan for Tether Tether
2. Connect your smartphone to the extender’s
network TP-Link_Extender.
Wi-Fi
< Settings
Wi-Fi
CHOOSE A NETWORK…
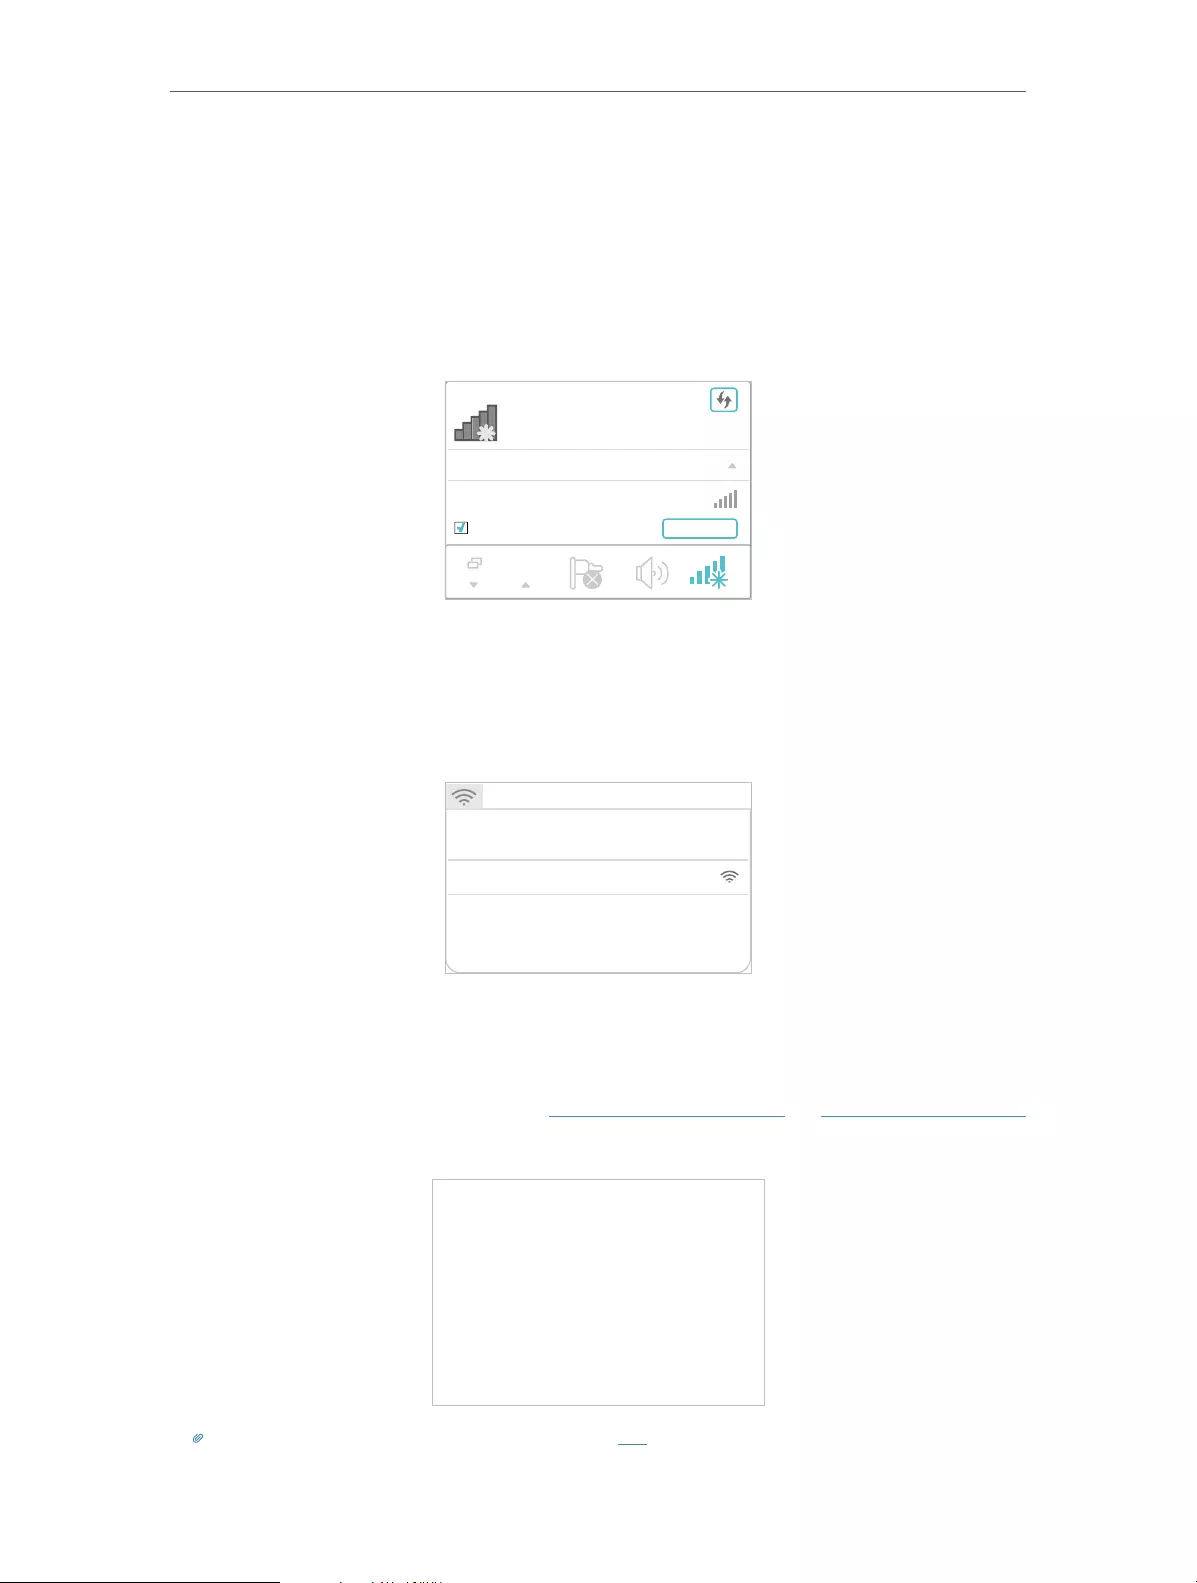
Method 2: Via a Web Browser
1. Connect your computer or smartphone to the
extender’s network TP-Link_Extender. If you are
using a computer, unplug the Ethernet cable if any.
TP-Link_Extender
√
Connect automatically Connect
2. Launch a web browser, and enter
http://tplinkrepeater.net or http://192.168.0.254
in the address bar. Create a password to log in.
Note: If the login window does not appear, refer to FAQ > Q1.
Solid On
Method 3: Via the WPS Button
1. Press the WPS button on your router.
The WPS button might
look like one of these:
2. Within 2 minutes, press the WPS button on the
extender for 1 second. The LED should change
from blinking to solid on, indicating successful
connection.
Note: If the LED does not turn solid on, try again or use Method 1
or 2.
3. Launch the Tether app, and select your extender.
Create a password to log in.
4. Follow app instructions to complete the setup.
The LED should turn solid on, indicating
successful connection to your router.
Note: If the LED does not turn solid on, refer to FAQ > Q2.
Solid On
3
Relocate
http://tplinkrepeater.net
Create Password
Low Middle High
Conrm Password
Start
3. Follow web instructions to complete the setup.
The LED should turn solid on, indicating
successful connection to your router.
Note: If the LED does not turn solid on, refer to FAQ > Q2.
Solid On
Blinking Solid On
3. If the extender connects to a dual band router,
repeat steps 1 and 2 above to connect to the
other band.
Solid On
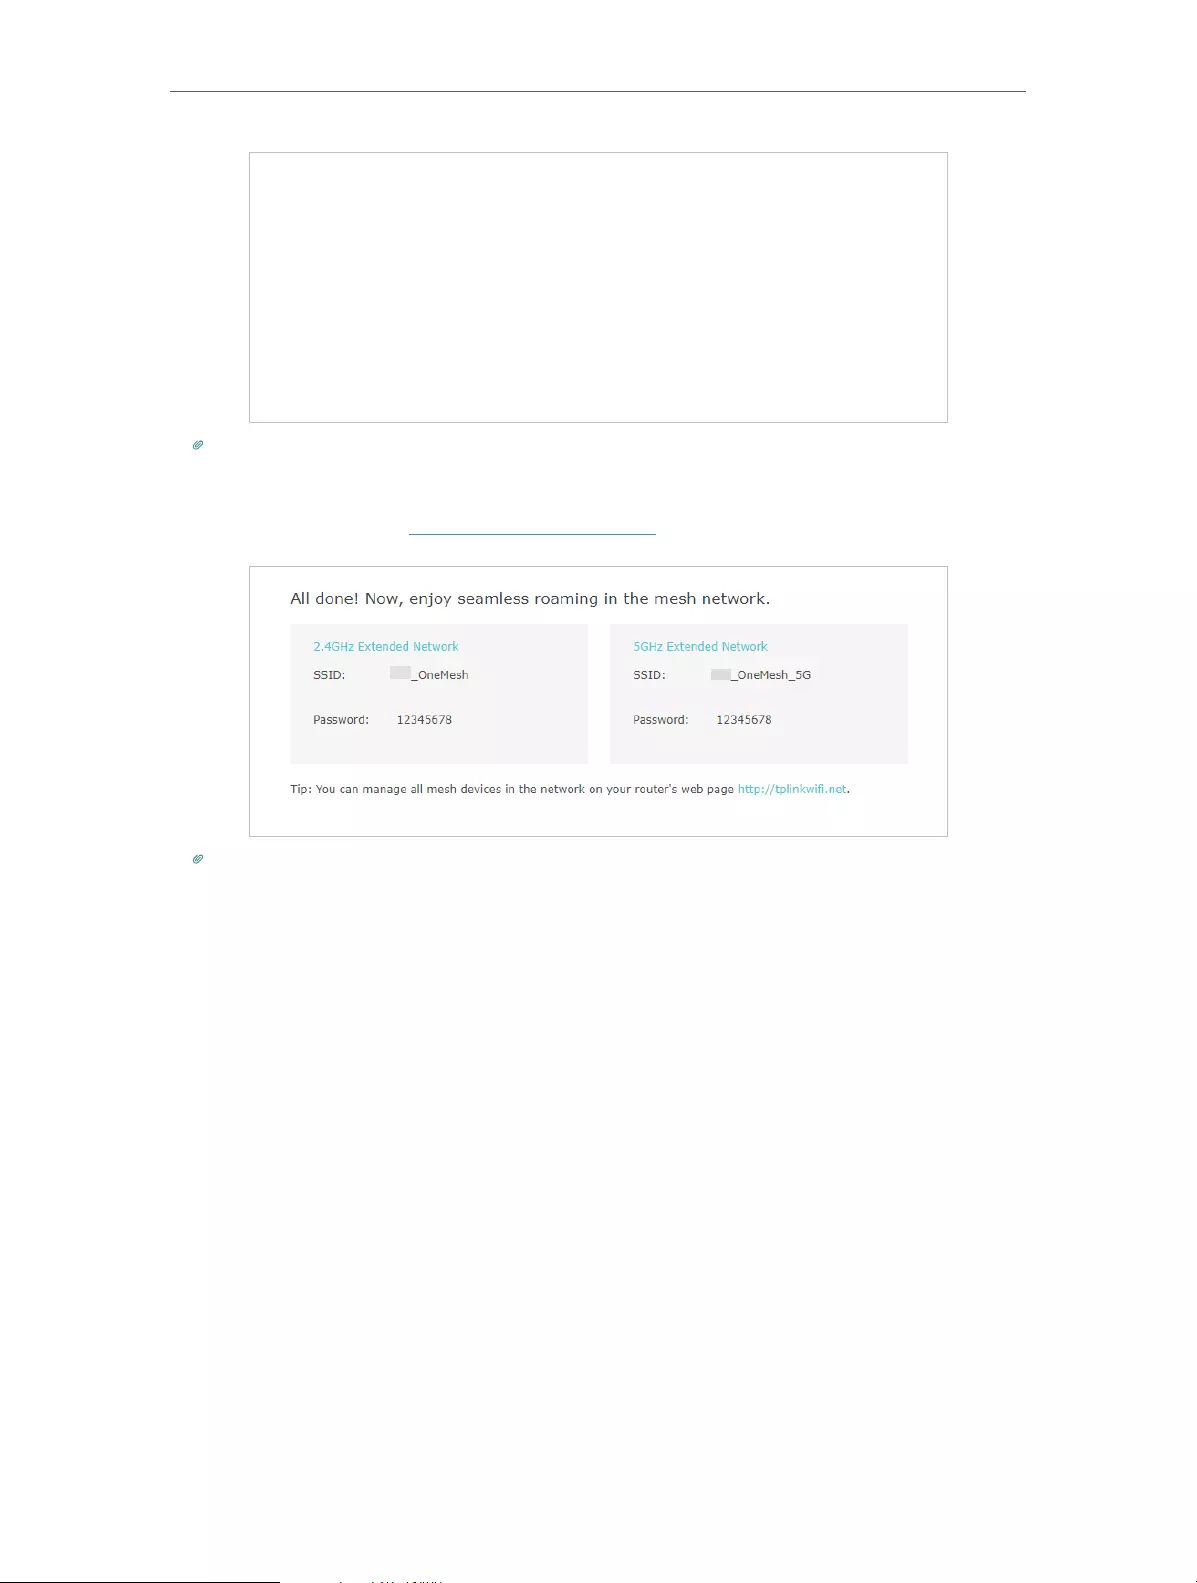
Extended Network Names:
Router’s network name with
Passwords:
Same as your router
Note:
If you want to change the extended network
names, refer to Manage the Extender on the back
page.
_EXT
at the end
If you cannot find the network names with _EXT in
your Wi-Fi network list, this means that the
extender has been connected to a OneMesh router
and automatically copied its Wi-Fi settings. See
back for more information.
1. Plug in the extender about halfway between your router and the Wi-Fi dead
zone. The location you choose must be within the range of your router.
2. Wait for about 2 minutes until the LED turns solid green. If it doesn’t,
relocate the extender closer to the router to achieve better signal quality.
Tip: For more intuitive location assistant, access extender settings via the Tether app and go to Tools > Location Assistant.
Enjoy the internet!
Green: Suitable location
Red: Too far from router
Router Devices
Halfway

Manage the Extender
After setup, you can manage the extender via any of the methods below.
Note: If your extender and router use the same network name, Method 1 is recommended.
LED Explanation
Method 1: Via the Tether App
1. Connect your smartphone to the extender‘s or router’s network.
2. Launch the Tether app, select your extender, and log in.
3. Manage the extender as needed.
Method 2: Via a Web Browser
1. Connect your computer or smartphone to the extender’s network. If you are
using a computer, unplug the Ethernet cable if any.
2. Launch a web browser, enter http://tplinkrepeater.net in the address bar, and
log in.
Note: If the login window does not appear, refer to FAQ > Q1.
3. Manage the extender as needed.
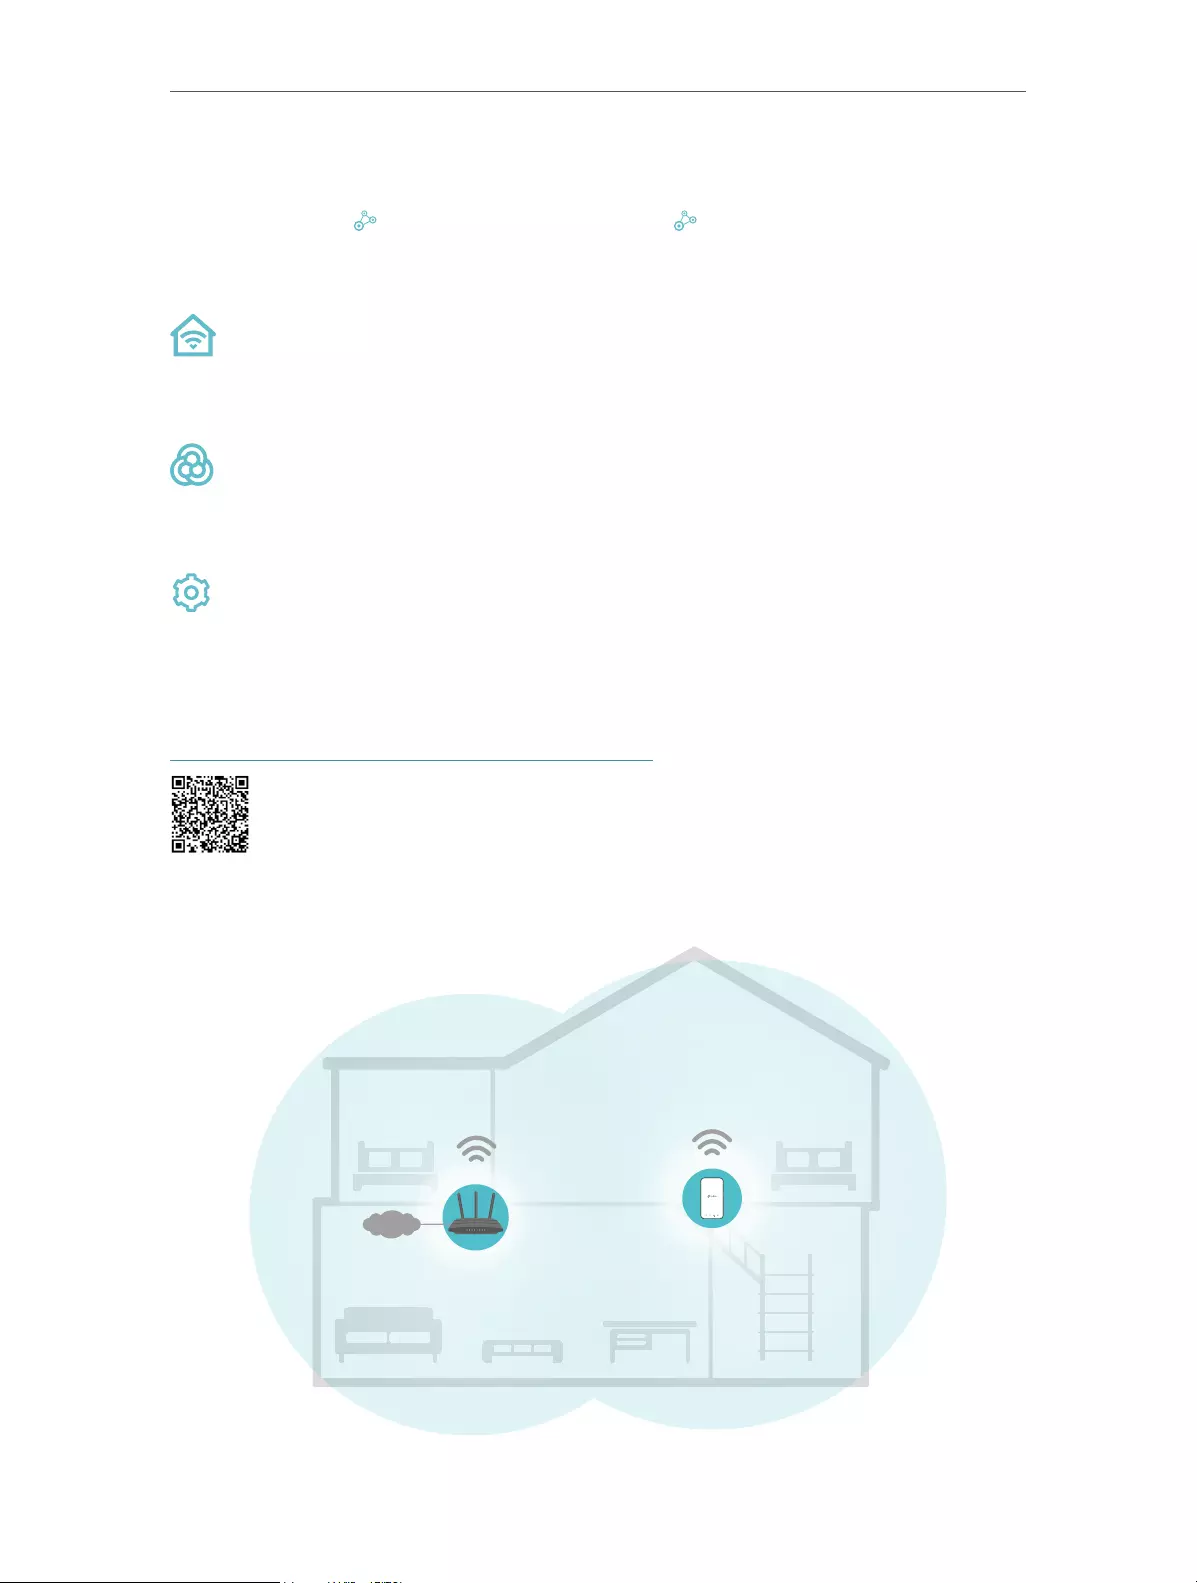
OneMeshTM with Seamless Roaming
TP-Link OneMesh router and extenders work together to form one unied Wi-Fi
network. Walk through your home and stay connected with the fastest possible
speeds thanks to OneMesh’s seamless coverage.
Unied Wi-Fi Network
Router and extenders share the same wireless settings, including network name, password,
access control settings and more.
5GHz
2.4GHz
Signal
Ethernet
Power
WPS
LED Status Indication (For Range Extender Mode)
5GHz
On/O
2.4GHz On/O
Solid green
The extender is connected or not connected to the
5GHz wireless network of your host router.
The extender is connected or not connected to the
2.4GHz wireless network of your host router.
The extender is connected to your router’s wireless
network and is in a suitable location.
(Signal)
Solid red
The extender is experiencing poor signal strength.
Try relocating it closer to your router.
(Ethernet)
O
On/O
No wireless connection is established.
The Ethernet port is connected or not connected
to a powered-on device.
Seamless Roaming
Devices automatically switch between your router and extenders as you move through your
home for the fastest possible speeds.
Easy Setup and Management
Set up a OneMesh network with a push of WPS buttons. Manage all network devices on the
Tether app or at your router’s web management page.
To check full list of TP-Link OneMesh devices, scan the QR code,
or visit https://www.tp-link.com/One-Mesh/compatibility.
Q1. What should I do if I cannot access the extender’s web
management page?
Make sure your computer or smartphone has connected to the extender’s
network, and not that of your router. If your router and extender share the same
network name, connect your computer to the extender via an Ethernet cable, or
use the Tether app.
If you are using a computer, make sure it is set to obtain an IP address and DNS
server address automatically.
Verify that http://tplinkrepeater.net or http://192.168.0.254 is correctly entered
in the web browser and press Enter. Note that http://192.168.0.254 applies only
for extenders with factory default settings.
Use another web browser and try again.
Reboot or reset the extender and try again.
If you are still having problems, contact our technical support.
The extender is on or o.
The system is starting up or rmware is being
upgraded.
WPS connection is established.
WPS connection
is in progress
WPS connection has been established for more
(Power)
(WPS)
On/O
Blinking
On
Blinking
O
than 5 minutes or WPS connection failed.
Q3. How do I reset the extender?
With the extender powered on, use a pin to press the RESET button for 1
second. The extender will reboot.
.
Q2. What should I do if the LED doesn’t turn solid on after
completing setup via the Tether app or web browser?
You may have entered incorrect Wi-Fi passwords for your host networks during
the conguration. Check the passwords and try again.
Make sure the extender is close to your router, preferably within 16 feet, and
away from large electrical appliances.
If you have enabled wireless MAC ltering, wireless access control, or access
control list (ACL) on your router, disable them rst, then follow any method on the
front page to complete the conguration.
Try setting up via the WPS button.
Reset the extender and go through the conguration again.
If you are still having problems, contact our technical support.
For technical support, the user guide and other information, please
visit https://www.tp-link.com/support/, or simply scan the QR code.
Safety Information
Keep the device away from water, re, humidity or hot environments.
Do not attempt to disassemble, repair, or modify the device.
Do not use the device where wireless devices are not allowed.
The socket-outlet shall be installed near the equipment and shall be easily accessible.
Please read and follow the above safety information when operating the device. We cannot
guarantee that no accidents or damage will occur due to improper use of the device.
Please use this product with care and operate at your own risk.
TP-Link hereby declares that the device is in compliance with the essential requirements and other relevant
provisions of directives 2014/53/EU, 2009/125/EC, 2011/65/EU and (EU) 2015/863. The original EU declaration of
conformity may be found at https://www.tp-link.com/en/ce.

REV3.1.0 1910012621
AC750 Wi-Fi Range Extender
User Guide

Contents
About This Guide . . . . . . . . . . . . . . . . . . . . . . . . . . . . . . . . . . . . . . . . . . . . . . . . . . . . .1
Chapter 1. Get to Know About Your Extender . . . . . . . . . . . . . . . . . . . . . . . . .2
1. 1. Product Overview. . . . . . . . . . . . . . . . . . . . . . . . . . . . . . . . . . . . . . . . . . . . . . . . . . . . . . . . . . . . 3
1. 2. Appearance . . . . . . . . . . . . . . . . . . . . . . . . . . . . . . . . . . . . . . . . . . . . . . . . . . . . . . . . . . . . . . . . . 3
1. 2. 1. LED Explanation. . . . . . . . . . . . . . . . . . . . . . . . . . . . . . . . . . . . . . . . . . . . . . . . . . . . . . . 4
1. 2. 2. Port and Button Description . . . . . . . . . . . . . . . . . . . . . . . . . . . . . . . . . . . . . . . . . . . 4
Chapter 2. Set Up Internet Connection . . . . . . . . . . . . . . . . . . . . . . . . . . . . . . .5
2. 1. Power On the Extender . . . . . . . . . . . . . . . . . . . . . . . . . . . . . . . . . . . . . . . . . . . . . . . . . . . . . . 6
2. 2. Set Up the Extender . . . . . . . . . . . . . . . . . . . . . . . . . . . . . . . . . . . . . . . . . . . . . . . . . . . . . . . . . 6
2. 2. 1. Method 1: Via the WPS Button . . . . . . . . . . . . . . . . . . . . . . . . . . . . . . . . . . . . . . . . . 6
2. 2. 2. Method 2: Via the TP-Link Tether App. . . . . . . . . . . . . . . . . . . . . . . . . . . . . . . . . . 8
2. 2. 3. Method 3: Via a Web Browser. . . . . . . . . . . . . . . . . . . . . . . . . . . . . . . . . . . . . . . . . . 9
Chapter 3. OneMesh with Seamless Roaming . . . . . . . . . . . . . . . . . . . . . . 14
3. 1. What‘s a OneMesh Network. . . . . . . . . . . . . . . . . . . . . . . . . . . . . . . . . . . . . . . . . . . . . . . . . 15
3. 2. How to Set Up a OneMesh Network . . . . . . . . . . . . . . . . . . . . . . . . . . . . . . . . . . . . . . . . . 16
3. 2. 1. Method 1: Via the TP-Link Tether App. . . . . . . . . . . . . . . . . . . . . . . . . . . . . . . . . 16
3. 2. 2. Method 2: Via a Web Browser. . . . . . . . . . . . . . . . . . . . . . . . . . . . . . . . . . . . . . . . . 16
3. 3. Remove Extender from OneMesh Network . . . . . . . . . . . . . . . . . . . . . . . . . . . . . . . . . . 17
3. 3. 1. Method 1: Via the TP-Link Tether App. . . . . . . . . . . . . . . . . . . . . . . . . . . . . . . . . 17
3. 3. 2. Method 2: Via a Web Browser. . . . . . . . . . . . . . . . . . . . . . . . . . . . . . . . . . . . . . . . . 19
Chapter 4. TP-Link Cloud Service . . . . . . . . . . . . . . . . . . . . . . . . . . . . . . . . . . 20
4. 1. Register a TP-Link ID. . . . . . . . . . . . . . . . . . . . . . . . . . . . . . . . . . . . . . . . . . . . . . . . . . . . . . . . 21
4. 2. Change Your TP-Link ID Information. . . . . . . . . . . . . . . . . . . . . . . . . . . . . . . . . . . . . . . . . 21
4. 3. Manage the User TP-Link IDs . . . . . . . . . . . . . . . . . . . . . . . . . . . . . . . . . . . . . . . . . . . . . . . 22
4. 3. 1. Add TP-Link ID to Manage the Extender . . . . . . . . . . . . . . . . . . . . . . . . . . . . . . 23
4. 3. 2. Remove TP-Link ID(s) from Managing the Extender . . . . . . . . . . . . . . . . . . . 23
4. 4. Manage the Extender via the TP-Link Tether App . . . . . . . . . . . . . . . . . . . . . . . . . . . . 24
Chapter 5. Customize Your Network . . . . . . . . . . . . . . . . . . . . . . . . . . . . . . . . 25
5. 1. Check Internet Status. . . . . . . . . . . . . . . . . . . . . . . . . . . . . . . . . . . . . . . . . . . . . . . . . . . . . . . 26
5. 2. Configure Wireless Network . . . . . . . . . . . . . . . . . . . . . . . . . . . . . . . . . . . . . . . . . . . . . . . . 27
5. 3. Change LAN Settings . . . . . . . . . . . . . . . . . . . . . . . . . . . . . . . . . . . . . . . . . . . . . . . . . . . . . . . 28
5. 4. Adjust Wi-Fi Coverage . . . . . . . . . . . . . . . . . . . . . . . . . . . . . . . . . . . . . . . . . . . . . . . . . . . . . . 29
5. 5. Set Access Control . . . . . . . . . . . . . . . . . . . . . . . . . . . . . . . . . . . . . . . . . . . . . . . . . . . . . . . . . 30
5. 6. Set High Speed Mode. . . . . . . . . . . . . . . . . . . . . . . . . . . . . . . . . . . . . . . . . . . . . . . . . . . . . . . 32

Chapter 6. More Features of Your Extender. . . . . . . . . . . . . . . . . . . . . . . . . 34
6. 1. Use Your Extender as a Wireless Adapter. . . . . . . . . . . . . . . . . . . . . . . . . . . . . . . . . . . . 35
6. 2. Transform Your Existing Wired Network to a Wireless One . . . . . . . . . . . . . . . . . . . 35
6. 2. 1. To Set Up the Extender as an Access Point . . . . . . . . . . . . . . . . . . . . . . . . . . . 35
6. 2. 2. To Connect Your Wireless Devices to the Extender via WPS. . . . . . . . . . . 37
Chapter 7. Manage Your Extender . . . . . . . . . . . . . . . . . . . . . . . . . . . . . . . . . . 38
7. 1. Set System Time . . . . . . . . . . . . . . . . . . . . . . . . . . . . . . . . . . . . . . . . . . . . . . . . . . . . . . . . . . . 39
7. 2. Control LEDs . . . . . . . . . . . . . . . . . . . . . . . . . . . . . . . . . . . . . . . . . . . . . . . . . . . . . . . . . . . . . . . 39
7. 3. Set Power Schedule . . . . . . . . . . . . . . . . . . . . . . . . . . . . . . . . . . . . . . . . . . . . . . . . . . . . . . . . 40
7. 4. Upgrade the Firmware . . . . . . . . . . . . . . . . . . . . . . . . . . . . . . . . . . . . . . . . . . . . . . . . . . . . . . 41
7. 5. Backup and Restore Configuration Settings . . . . . . . . . . . . . . . . . . . . . . . . . . . . . . . . . 42
7. 6. Change Login Password . . . . . . . . . . . . . . . . . . . . . . . . . . . . . . . . . . . . . . . . . . . . . . . . . . . . 43
7. 7. Check System Log . . . . . . . . . . . . . . . . . . . . . . . . . . . . . . . . . . . . . . . . . . . . . . . . . . . . . . . . . 44
FAQ . . . . . . . . . . . . . . . . . . . . . . . . . . . . . . . . . . . . . . . . . . . . . . . . . . . . . . . . . . . . . . . . . 45
1
About This Guide
This guide is a complement to Quick Installation Guide. The Quick Installation Guide
provides instructions for quick internet setup, while this guide contains details of each
function and demonstrates how to configure them.
Note: Features available in Range Extender may vary by model and software version. Range Extender availability may
also vary by region or ISP. All images, steps, and descriptions in this guide are only examples and may not reflect your
actual Range Extender experience.
Conventions
In this guide the following conventions are used:
Convention Description
Underline Underlined words or phrases are hyperlinks. You can click to redirect to a
website or a specific section.
Teal Contents to be emphasized and texts on the web page are in teal, including the
menus, items, buttons and so on.
>
The menu structures to show the path to load the corresponding page.
For example, Advanced > Wireless > MAC Filtering means the MAC Filtering
function page is under the Wireless menu that is located in the Advanced tab.
Note: Ignoring this type of note might result in a malfunction or damage to the device.
Tips: Indicates important information that helps you make better use of your device.
More Info
The latest software, management app and utility are available from Download Center at
https://www.tp-link.com/support/.
The Quick Installation Guide can be found where you find this guide or inside the
package of the extender.
Specifications can be found on the product page at https://www.tp-link.com.
A community is provided for you to discuss our products at https://community.tp-link.com.
Our Technical Support contact information can be found at the Contact Technical
Support page at https://www.tp-link.com/support/.
Speed/Coverage Disclaimer
Maximum wireless signal rates are the physical rates derived from IEEE Standard
802.11 specifications. Actual wireless data throughput and wireless coverage per
ft2 are not guaranteed and will vary as a result of 1) environmental factors, including
building materials, physical objects, and obstacles, 2) network conditions, including
local interference, volume and density of traffic, product location, network complexity,
and network overhead, and 3) client limitations, including rated performance, location,
connection quality, and client condition.

Chapter 1
Get to Know About Your
Extender
This chapter introduces what the extender can do and its appearance.
It contains the following sections:
• Product Overview
• Appearance

3
Chapter 1 Get to Know About Your Extender
1. 1. Product Overview
Bring Dead Zones Back to Life
Tired of Wi-Fi “dead zones”? The TP-Link extender is connected to your router
wirelessly, strengthening its signal and expanding its coverage into areas that could not
otherwise be reached. The device also reduces signal interference to ensure reliable
Wi-Fi coverage throughout your home or office.
Easy Installation & Quick Position
The extender works with any standard wireless router. Instantly connect the extender
to a router by pressing the router’s WPS button (if available) followed by the extender’s
WPS button. Alternatively, follow the Quick Setup instructions on the extender’s web
management page.
Once the extender is connected to a router, you can relocate it to your preferred location
with no further configuration required. The intelligent signal light can help to find the
best location.
Easy Management with the TP-Link Tether App
Tether provides a simple, intuitive way to access and manage your extender with your
smart devices.
1. 2. Appearance
4
Chapter 1 Get to Know About Your Extender
1. 2. 1. LED Explanation
You can check the extender’s working status by following the LED Explanation table.
Name Status Indication
5GHz On/Off The extender is connected or not connected to the 5GHz
wireless network of your host router.
2.4GHz On/Off The extender is connected or not connected to the
2.4GHz wireless network of your host router.
(Signal)
Solid green The extender is connected to your router’s wireless
network and is in a suitable location.
Solid red The extender is experiencing poor signal strength. Try
relocating it closer to your host router.
Off No wireless connection is established.
(Ethernet) On/Off The Ethernet port is connected or not connected to a
powered-on device.
(Power)
On/Off The extender is on or off.
Blinking The system is starting up or firmware is being upgraded.
(WPS)
On WPS connection is established.
Blinking WPS connection is in progress.
Off WPS connection has been established for more than 5
minutes or WPS connection failed.
1. 2. 2. Port and Button Description
Ports or Buttons Description
(WPS Button)
Press the WPS button on your host router, and immediately press on
the extender for 1 second. The LED of the extender should change
to solid on, indicating successful WPS connection.
RESET (Hole) Use a pin to press the button for 1 second to reset the extender.
Ethernet Port Connect your device to the Ethernet port of the extender via an
Ethernet cable to join the Wi-Fi network.

Chapter 2
Set Up Internet Connection
This chapter introduces how to boost your host wireless coverage. Please follow the
step-by-step instructions to set up the internet connection.
It contains the following sections:
• Power On the Extender
• Set Up the Extender
6
Chapter 2 Set Up Internet Connection
2. 1. Power On the Extender
Plug the extender into an electrical outlet next to your router, and then wait until the
Power LED turns solid on.
Note:
1. For safety, only plug the extender in upright direction as shown below.
2. The operating temperature should be between 0°C and 40°C.
On
2. 2. Set Up the Extender
There are three ways to set up the extender: via the WPS button, via the TP-Link Tether
app, or via a web browser.
2. 2. 1. Method 1: Via the WPS Button
Use this way if your router has a WPS button. The button might look like one of these:
.
1. Press the WPS button on your host router, and then press the WPS button on the
extender for 1 second within 2 minutes.
Note:
For more information about using WPS button on your host router, please refer to the router manufacturer’s user
guide.
2. Wait until the WPS LED changes to solid on, and wait until the signal LED turns
solid on, which indicates that the WPS connection is successful.
Note:
7
Chapter 2 Set Up Internet Connection
If the LED does not turn solid on, try again or refer to Method 2: Via the TP-Link Tether App or Method 3: Via a Web
Browser.
Solid On
3. (Optional) If the extender connects to a dual band router, repeat steps 1 and 2 above
to connect to the other band.
Note:
1. For some early firmware versions, the extender share the same network name as your router.
2. If you want to customize the extended network name, refer to Configure Wireless Network.
4. Relocate your extender for optimal Wi-Fi coverage and performance.
1 ) Plug in the extender about halfway between your router and the Wi-Fi dead zone.
The location you choose must be within the range of your router.
2 ) Wait for about 2 minutes until the Signal LED turns solid green. If it doesn’t,
relocate the extender closer to the router to achieve better signal quality.
Router Devices
Halfway
Suitable location
Too far from router
No connection
Tips:
To minimize signal interference, please choose a location which is far away from Bluetooth devices and other
household electronic devices, such as cordless phones, microwave ovens and baby monitors.
5. Enjoy! Connect to the extended network and enjoy the internet.
8
Chapter 2 Set Up Internet Connection
Extended Network Names:
Router’s network name with
_EXT
at the end
Passwords:
Same as your router
Tips:
1. If you cannot find the network names with _EXT in your Wi-Fi network list, this means that the extender has
been connected to a OneMesh router and automatically copied its wireless settings. For more information,
refer to OneMesh with Seamless Roaming.
2. If you want to customize the extended network name, refer to Customize Your Network.
2. 2. 2. Method 2: Via the TP-Link Tether App
1. Launch the Apple App Store or Google Play Store and search TP-Link Tether or simply
scan the QR code to download and install the app.
OR
2. Go to Wi-Fi Settings and connect your device to the extender’s wireless network:
TP-Link_Extender.
Wi-Fi
Wi-Fi
TP-Link_Extender
CHOOSE A NETWORK…
Other…
< Settings
3. Launch Tether and select your extender from the Local Device list.

9
Chapter 2 Set Up Internet Connection
4. Create a password to log in.
5. Follow app instructions to set up and relocate your extender.
6. (Optional) Enable Join OneMesh to copy the router’s wireless settings for seamless
roaming. For more information about OneMesh, refer to OneMesh with Seamless
Roaming.
Tips:
It is recommended to enable Smart Connect on your host router to enjoy a seamless connection between dual-band
networks. With Smart Connect enabled, your host router’s 2.4GHz and 5GHz share the same SSID (network name) and
password. Refer to your host router’s user guide to enable Smart Connect.
7. Relocate your extender and follow app instructions to enjoy the extended network.
Tips:
For more intuitive location assistant, access extender settings via Tether and go to Tools > Location Assistant. You
can also manage your extender via Tether, such as controlling LEDs, sharing passwords of your networks and blocking
devices.
2. 2. 3. Method 3: Via a Web Browser
Note:
Features of the extender may vary slightly depending on the firmware version you have.
10
Chapter 2 Set Up Internet Connection
1. Connect your computer to the extender via your Ethernet cable, or connect wirelessly
as follows:
• For Windows Users
3 ) Unplug the Ethernet cable from your computer (if any).
4 ) Click the Wi-Fi icon on the taskbar and connect to the extender’s wireless
network: TP-Link_Extender.
onnections are available
Wireless Network
onnection
TP-Link_Extender
Connect automatically Connect
√
• For Mac OS X Users
1 ) Unplug the Ethernet cable from your computer (if any).
2 ) Click the Wi-Fi icon in the top right corner of the screen, and connect to the
extender’s network: TP-Link_Extender.
Wi-Fi: On
Tu rn Wi-Fi O
Join Other Network...
Create Network...
Open Network Preferences…
TP-Link_Extender
2. Follow the instructions of the Quick Setup Wizard to connect the extender to your
host router.
1 ) Launch a web browser, enter http://tplinkrepeater.net or http://192.168.0.254
in the address bar, and then create a password to log in.
Tips: If the login window does not appear, please refer to FAQ.

11
Chapter 2 Set Up Internet Connection
2 ) Select your host router’s 2.4GHz SSID (network name), enter its password (NOT
the password you just created for management), and click Next.
3 ) Select your host router’s 5GHz SSID (network name), enter its password (NOT
the password you just created for management), and click Next.
Tips: If your host router does not support 5GHz wireless network, please click Skip to continue.
4 ) Confirm your host network password.
5 ) Either keep the default SSIDs (network names) or customize them for the
extended networks, and then click Next.

12
Chapter 2 Set Up Internet Connection
Tips:
If you connect the extender to a TP-Link OneMesh router, the extender will automatically join the router’s OneMesh
network and copy the router’s wireless settings. For more information, refer to OneMesh with Seamless Roaming.
6 ) Follow web instructions to relocate your extender for optimal Wi-Fi coverage
and performance, and then click Done.
7 ) Enjoy! Connect to the extended network and enjoy the internet.
13
Chapter 2 Set Up Internet Connection
Tips:
If you connect the extender to a TP-Link OneMesh router and a success screen as below appears at the end of the
setup, the extender has successfully joined the router’s OneMesh network and copied the router’s wireless settings.
For more information, refer to OneMesh with Seamless Roaming.
Tips:
It is recommended to enable Smart Connect on your host router to enjoy a seamless connection between dual-band
networks. With Smart Connect enabled, your host router’s 2.4GHz and 5GHz share the same SSID (network name)
and password. Refer to your host router’s user guide to enable Smart Connect.

Chapter 3
OneMesh with Seamless
Roaming
This chapter introduces the TP-Link OneMeshTM feature.
It contains the following sections:
• What‘s a OneMesh Network
• How to Set Up a OneMesh Network
• Remove Extender from OneMesh Network
15
Chapter 3 OneMesh with Seamless Roaming
3. 1. What‘s a OneMesh Network
TP-Link OneMesh router and TP-Link OneMesh extenders work together to form
one unified Wi-Fi network. Walk through your home and stay connected with the fastest
possible speeds thanks to OneMesh’s seamless coverage.
Unified Wi-Fi Network
Router and extenders share the same wireless settings, including network name,
password, access control settings and more.
Seamless Roaming
Devices automatically switch between your router and extenders as you move
through your home for the fastest possible speeds.
Easy Setup and Management
Set up a OneMesh network with a push of WPS buttons. Manage all network devices
on the Tether app or at your router’s web management page.
To check full list of TP-Link OneMesh devices, scan the QR code, or visit
https://www.tp-link.com/One-Mesh/compatibility.
Unified OneMesh Network
INT E R NET
SAME
Network Name & Password
for seamless roaming

16
Chapter 3 OneMesh with Seamless Roaming
3. 2. How to Set Up a OneMesh Network
Once the extender is connected to a TP-Link OneMesh router via web browser or WPS
button, the extender will automatically join the router’s OneMesh network and copy
the router’s wireless settings. You can manually join a OneMesh network during the
configuration via the TP-Link Tether app. For more information about setting up the
extender with OneMesh network, refer to Set Up the Extender.
If you have already set up the extender before without joining the OneMesh network,
choose one of the methods below to set up a OneMesh network:
Note:
Before setting up a OneMesh network, it is recommended to enable Smart Connect on your host router to enjoy a
seamless connection between dual-band networks.
3. 2. 1. Method 1: Via the TP-Link Tether App
1. Launch Tether and select the extender you want to join the OneMesh network.
2. Go to Tools > OneMesh and enable OneMesh.
Tip:
If your host router does not support OneMesh, you need to reselect a host network first. Go to Tools > Host Network and
click Reselect Host Network, and then follow the app instructions to complete the configuration.
3. Follow the app instructions to join the OneMesh network.
3. 2. 2. Method 2: Via a Web Browser
1. Visit http://tplinkrepeater.net, and log in with the password you set for the extender.

17
Chapter 3 OneMesh with Seamless Roaming
2. Go to Settings > OneMesh and enable Join OneMesh.
Tip:
If your host router does not support OneMesh, you need to reselect a host network first. Go to Settings > Wireless >
Connect to Network and follow the instructions to complete the configuration.
3. Follow the web instructions to join the OneMesh network. After that, you can view all
the devices in OneMesh network in Basic > OneMesh on the web management page
of your host router.
3. 3. Remove Extender from OneMesh Network
If you want to remove the extender from the OneMesh network, follow the steps below:
3. 3. 1. Method 1: Via the TP-Link Tether App
1. Launch Tether and select the extender you want to remove from the OneMesh
network.

18
Chapter 3 OneMesh with Seamless Roaming
2. Go to Tools > OneMesh and disable OneMesh.
Or
1. Launch Tether and select your host router of the OneMesh network.
2. Go to Tools > OneMesh and select the extender you want to remove from the
OneMesh network.
3. Click Remove Device.

19
Chapter 3 OneMesh with Seamless Roaming
3. 3. 2. Method 2: Via a Web Browser
1. Visit http://tplinkrepeater.net, and log in with the password you set for the extender.
2. Go to Settings > OneMesh and disable Join OneMesh.

Chapter 4
TP-Link Cloud Service
TP-Link Cloud service provides a better way to manage your cloud devices. Log in to
your cloud device with a TP-Link ID, and you can easily monitor and manage your home
network when you are out and about via the Tether app on your smartphone or tablet.
To ensure that your cloud device stays new and gets better over time, the TP-Link
Cloud will notify you when an important firmware upgrade is avaliable. Surely you can
also manage multiple TP-Link Cloud devices with a single TP-Link ID.
This chapter introduces how to register a new TP-Link ID, bind or unbind TP-Link IDs
to manage your cloud device, and the Tether app with which you can manage your
home network no matter where you may find yourself.
It contains the following sections:
• Register a TP-Link ID
• Change Your TP-Link ID Information
• Manage the User TP-Link IDs
• Manage the Extender via the TP-Link Tether App

21
Chapter 4 TP-Link Cloud Service
4. 1. Register a TP-Link ID
When you log in after initial setup, the web page will ask whether you need TP-Link
Cloud service. You can also access the TP-Link Cloud settings as follows:
1. Visit http://tplinkrepeater.net, and log in with the password you set for the extender.
2. Go to Settings > TP-Link Cloud.
3. Click Register Now and follow the instructions to register a TP-Link ID.
4. After activating your TP-Link ID, come back to the TP-Link Cloud page to log in. The
TP-Link ID used to log in to the extender for the first time will be automatically bound
as an Admin.
Notes:
• To learn more about the Admin and User TP-Link ID, refer to Manage the User TP-Link IDs.
• Once you have registered a TP-Link ID on the web management page, you can only register another TP-Link ID via the
Tether APP. Please refer to Manage the Extender via the TP-Link Tether App to install the app and register a new one.
• If you want to unbind the admin TP-Link ID from your extender, please go to Settings > TP-Link Cloud, an click Unbind
in the Device Information section.
4. 2. Change Your TP-Link ID Information
Follow the steps below to change your email address and password of your TP-Link ID
as needed.
1. Visit http://tplinkrepeater.net, and log in with your TP-Link ID.
2. Go to Settings > TP-Link Cloud, and focus on the Account Information section.
• To change your email address:
1. Click behind the Email.
2. Enter the password of your TP-Link ID, then a new email address. And click Save.

22
Chapter 4 TP-Link Cloud Service
• To change your password:
1. Click behind the Password.
2. Enter the current password, then a new password twice. And click Save.
4. 3. Manage the User TP-Link IDs
The TP-Link ID used to log in to the extender for the first time will be automatically
bound as the Admin account. An admin account can add or remove other TP-Link IDs to
or from the same extender as Users. All accounts can monitor and manage the extender
locally or remotely, but user accounts cannot:
• Reset the extender to its factory default settings either on the web management page
or in the Tether app.

23
Chapter 4 TP-Link Cloud Service
• Add/remove other TP-Link IDs to/from the extender.
4. 3. 1. Add TP-Link ID to Manage the Extender
1. Visit http://tplinkrepeater.net, and log in with your TP-Link ID.
2. Go to Settings > TP-Link Cloud, and focus on the Bound Accounts section.
3. Click , enter another TP-Link ID as needed and click Save.
Note:
If you need another TP-Link ID, please register a new one via the Tether app. Please refer to Manage the Extender via the
TP-Link Tether App to install the app and register a new TP-Link ID.
4. The new TP-Link ID will be displayed in the Bound Accounts table as a User.
4. 3. 2. Remove TP-Link ID(s) from Managing the Extender
1. Visit http://tplinkrepeater.net, and log in with your TP-Link ID.
2. Go to Settings > TP-Link Cloud, and focus on the Bound Accounts section.
3. Tick the checkbox(es) of the TP-Link ID(s) you want to remove and click Unbind.
24
Chapter 4 TP-Link Cloud Service
4. 4. Manage the Extender via the TP-Link Tether App
The Tether app runs on iOS and Android devices, such as smartphones and tablets.
1. Launch the Apple App Store or Google Play store and search “TP-Link Tether” or
simply scan the QR code to download and install the app.
OR
2. Connect your device to the extender’s or host router’s wireless network.
3. Launch the Tether app, select the model of your extender and log in with your TP-Link
ID or the password your set for the extender.
4. Manage your extender as needed.
Note:
If you need to remotely access your extender from your smart devices, you need:
• Log in with your TP-Link ID. If you don’t have one, refer to Register a TP-Link ID.
• Make sure your smartphone or tablet can access the internet with cellular data or a Wi-Fi network.

Chapter 5
Customize Your Network
This chapter guides you on how to configure network settings that are available for this
extender.
It contains the following sections:
• Check Internet Status
• Configure Wireless Network
• Change LAN Settings
• Adjust Wi-Fi Coverage
• Set Access Control
• Set High Speed Mode

26
Chapter 5 Customize Your Network
5. 1. Check Internet Status
You can view the internet status of your extender to check whether you have
successfully set up the extended network(s).
1. Visit http://tplinkrepeater.net, and log in with the password you set for the extender.
2. Go to Settings > Status to view the internet status of your extender.
Tips: Click the icon of the Internet/Router/Range Extender/Clients to view the corresponding information.
• The extender runs normally.
• The extender fails to connect to the host networks. Please go to Settings >
Wireless > Connect to Network to check whether the host network passwords
are correct. If the problem still exists, relocate the extender closer to the router
to achieve better signal quality.
• The extender is connected to the host networks, but is not transmitting data.
Please check the internet connection of your router.
• The extender is connected to the router abnormally. Please go to Settings >
Network and try setting your extender to obtain an IP address automatically.

27
Chapter 5 Customize Your Network
5. 2. Configure Wireless Network
If you want to extend another host network after Quick Setup, you can refer to this
section. Moreover, you can change the wireless settings for your extended networks.
Visit http://tplinkrepeater.net, and log in with the password you set for the extender.
• To extend another host network:
1. Go to Settings > Wireless > Connect to Network.
2. Enable Connect to 2.4GHz Network and click Wireless Scanner to find all available
networks.
3. Select the 2.4GHz host network you want to extend.
Note:
If the network you want to extend is on but not listed, please try the following steps.
· Move the extender closer to your router, and click Rescan in the top-right corner of the list.
· You can manually enter the SSID (network name) and password of the network you want to extend, and click Save.
4. Once a host network is selected, the SSID and security type will be automatically
filled in. If the selected network is encrypted, enter the password in the Password
field.
5. Click Save.
• To enable or disable the extended network:
1. Go to Settings > Wireless > Extended Network.

28
Chapter 5 Customize Your Network
2. Extended networks are enabled by default. If you want to disable the wireless function
of a certain band, just clear the Enable checkbox. In this case, all the wireless settings
of this band will be invalid.
3. Click Save.
• To change the wireless network name (SSID):
1. Go to Settings > Wireless > Extended Network.
2. Create a new SSID in Extended 2.4GHz SSID or click Copy Host SSID. The value is
case-sensitive.
3. Click Save.
Note:
If you have changed the wireless settings via a wireless device, you will be disconnected after the settings are applied.
Please write down the new SSID for future use.
• To hide the SSID of the extended network:
1. Go to Settings > Wireless > Extended Network.
2. Select Hide SSID broadcast, and the corresponding SSID will not be displayed when
wireless devices scan for local wireless networks. You need to manually enter the
SSID to join the network.
3. Click Save.
5. 3. Change LAN Settings
The extender is preset with a default LAN IP 192.168.0.254, with which you can log in to
the web management page. The LAN IP address, together with the Subnet Mask, also
defines the subnet that the connected devices are on. If the IP address conflicts with
another device on your local network or your network requires a specific IP subnet, you
can change it.
1. Visit http://tplinkrepeater.net, and log in with the password you set for the extender.
2. Go to Settings > Network.
3. Select Use the following IP address.
4. Enter a new IP Address as needed and leave the Subnet Mask as the default settings
5. Enter the Default Gateway that is in the same subnet as the IP Address. The gateway
is usually the LAN IP address of your extender.
6. Leave the Primary DNS and Secondary DNS addresses as the default settings.

29
Chapter 5 Customize Your Network
7. Click Save.
5. 4. Adjust Wi-Fi Coverage
You can set the extender’s Wi-Fi coverage depending on how large you want your Wi-Fi
area to be.
1. Visit http://tplinkrepeater.net and log in with the password you set for the extender.
2. Go to Settings > Advanced Settings > Wi-Fi Coverage.
3. Select your desired Wi-Fi coverage level for the extender.
4. Click Save.

30
Chapter 5 Customize Your Network
5. 5. Set Access Control
Access Control allows you to permit or block specific devices from accessing the
internet for a specific period.
Note:
Access Control is not available when your range extender is in a OneMesh network, where it automatically synchronizes
network settings from your host router.
1. Visit http://tplinkrepeater.net and log in with the password you set for the extender.
2. Go to Settings > Advanced Settings > Access Control.
3. Enable Access Control.
• To block specific device(s):
Note:
Devices connected to the extender via an Ethernet cable cannot be blocked.
1. Select Blacklist and click Save.
2. Select the device to be blocked in the Online Devices table by ticking the
corresponding checkbox.
3. Click Block and the selected device(s) will be added to the Devices in Blacklist table.
4. Click in the Devices in Blacklist table to set the Effective Time for a certain entry
as needed.

31
Chapter 5 Customize Your Network
5. Click Save.
• To permit specific device(s):
1. Select Whitelist and click Save.
2. Click Add in the Devices in Whitelist table. Enter the Device Name and MAC Address.
And you can set the Effective Time for a certain entry as needed.
3. Click Save.

32
Chapter 5 Customize Your Network
5. 6. Set High Speed Mode
The High Speed feature switches off one of the wireless bands to leave one high-
performance, super-fast network, ideal for HD streaming and gaming applications.
If most of your devices are connected to one wireless band, this feature can increase
the overall performance of your wireless network.
Note:
Before enabling this feature, make sure that your extender is in Range Extender mode and not in a OneMesh network,
and then go to Settings > Wireless > Extended Network to check that the 2.4GHz and 5GHz bands are both enabled.
Additionally, if you are going to disable the 2.4GHz network, it’s recommended to first make sure all your wireless devices
support 5GHz network connection.
1. Visit http://tplinkrepeater.net and log in with the password you set for the extender.
2. Go to Settings > Advanced Settings > High Speed.
3. Enable High Speed Mode.
4. Select a high speed mode as needed.
• Select the Auto mode. The extender will decide which band the high-speed
network will work on based on its wireless connection to your host router. The
other band will be disabled.
• Select the Manual mode and choose to transmit 2.4GHz band or 5GHz band only.

33
Chapter 5 Customize Your Network
5. Click Save.

Chapter 6
More Features of Your
Extender
This chapter explains how to use the extender as a wireless adapter and as an
access point .
It contains the following sections:
• Use Your Extender as a Wireless Adapter
• Transform Your Existing Wired Network to a Wireless One

35
Chapter 6 More Features of Your Extender
6. 1. Use Your Extender as a Wireless Adapter
The extender can be used as a wireless adapter to connect any wired-only device, such
as a Blu-ray player, game console, DVR, or smart TV, to your wireless network.
After configuration, you can connect an Ethernet—enabled device to the extender via an
Ethernet cable.
Note:
Extenders that have no Ethernet port do not support this feature.
Router
6. 2. Transform Your Existing Wired Network to a
Wireless One
The extender can work as an access point, transforming your existing wired network to
a wireless one.
6. 2. 1. To Set Up the Extender as an Access Point
1. Visit http://tplinkrepeater.net, and log in with the password you set for the extender.
2. Click Mode in the top right corner of the page. Select Access Point and click Save.
The extender will reboot and switch to Access Point mode.
3. After rebooting, connect the extender to your modem or wired router via an Ethernet
cable.
4. Visit http://tplinkrepeater.net, and log in with the password you set for the extender.

36
Chapter 6 More Features of Your Extender
5. Go to Quick Setup to configure your wireless settings and click Next.
6. Confirm the information and click Finish.
7. Connect to the extended network SSID (network name) and enjoy Wi-Fi.

37
Chapter 6 More Features of Your Extender
6. 2. 2. To Connect Your Wireless Devices to the Extender via WPS
Wi-Fi Protected Setup (WPS) provides an easier way to set up a secure Wi-Fi connection.
Wireless devices that support WPS, including Android phones, tablets, and most USB
network cards, can be connected to your extender through this method (not supported
by iOS devices).
1. Visit http://tplinkrepeater.net, and log in with the password you set for the extender.
2. Go to Settings > Wireless > WPS.
3. Enable WPS.
4. Connect via WPS:
• AP’s PIN: Enable AP’s PIN and enter the PIN on your device. You can click
Generate to get a new PIN or click Default to restore the PIN to its factory one.
• Push Button (Recommended): Click Connect and push the WPS button on the
client device.
• PIN code: Enter the client’s PIN, and click Connect.

Chapter 7
Manage Your Extender
This chapter presents how to manage and maintain your extender.
It includes the following sections:
• Set System Time
• Control LEDs
• Set Power Schedule
• Upgrade the Firmware
• Backup and Restore Configuration Settings
• Change Login Password
• Check System Log

39
Chapter 7 Manage Your Extender
7. 1. Set System Time
The System Time of the extender will be used for time-based function such as the
Power Schedule function. If you have enabled the Daylight Saving Time feature, the
system time will be synchronized with the daylight saving time you configure.
1. Visit http://tplinkrepeater.net, and log in with the password you set for the extender.
2. Go to Settings > System Tools > Time Settings.
• To get system time:
1. Select your local Time Zone from the drop-down list.
2. Click Save.
• To set up Daylight Saving Time:
1. Select Enable Daylight Saving Time.
2. Select the Start and End date and time of the daylight saving time at your local time
zone.
3. Click Save.
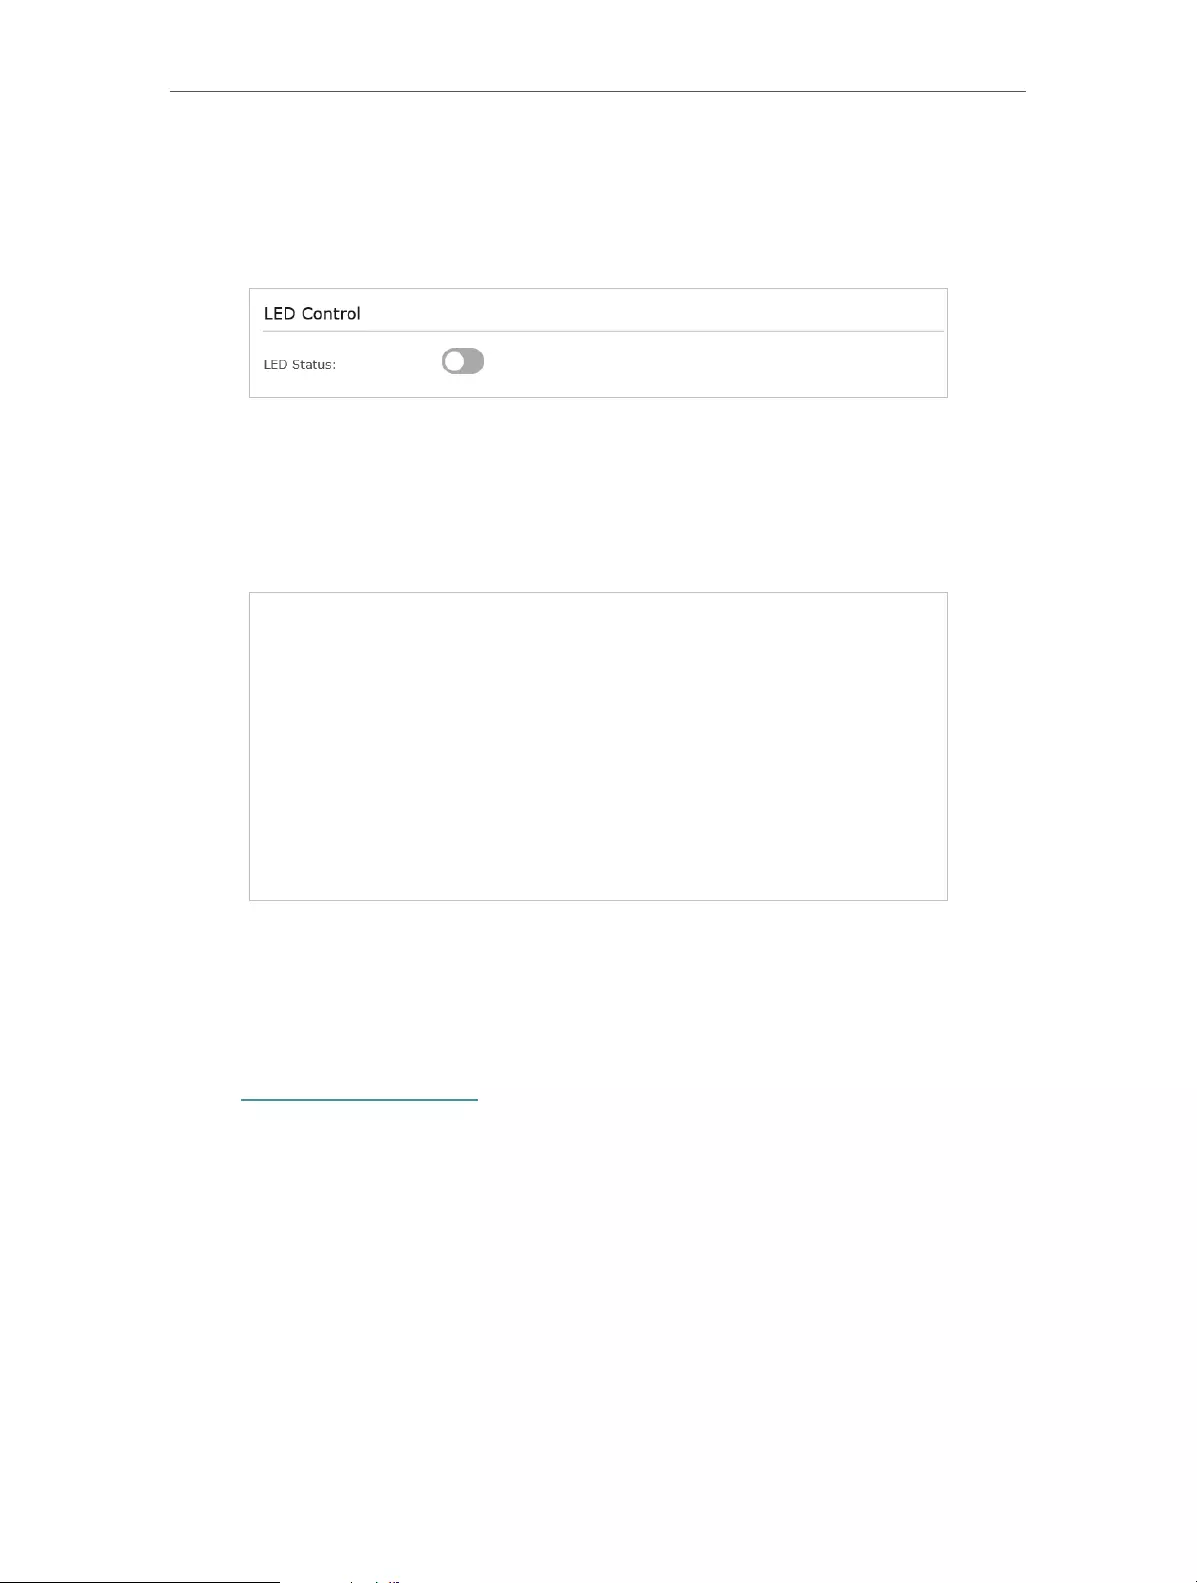
7. 2. Control LEDs
The LEDs of the extender indicate its activities and status. You can turn off LEDs when
you don’t need them.
1. Visit http://tplinkrepeater.net, and log in with the password you set for the extender.
40
Chapter 7 Manage Your Extender
2. Go to Settings > System Tools > LED Control.
• To turn off the LEDs:
Disable LED Status.
• To specify a time period when LEDs are off:
1. Enable Night Mode.
2. Specify the LED off time period.
3. Click Save.
7. 3. Set Power Schedule
The Power Schedule feature allows you to specify a time period during which the
extender is off.
1. Visit http://tplinkrepeater.net, and log in with the password you set for the extender.
2. Go to Settings > Advanced Settings > Power Schedule.
• To specify a time period when the extender is off:
1. Click Add.
2. Specify the power off time period and repetitive days.

41
Chapter 7 Manage Your Extender
3. Click Save.
7. 4. Upgrade the Firmware
TP-Link is committed to improving product features, giving you a better network
experience. You can download the latest firmware file from Download Center at
https://www.tp-link.com/support/ and upgrade the extender to the latest firmware
version.
Note:
• Make sure the latest firmware file is matched with the hardware version (as shown in the download
section of the Support page).
• Make sure that you have a stable connection between the extender and your computer. It is NOT
recommended to upgrade the firmware wirelessly.
• Backup your extender configuration.
• Do NOT power off the extender during the firmware upgrade.
1. Download the latest firmware file for the extender from our website
https://www.tp-link.com.
2. Visit http://tplinkrepeater.net, and log in with the password you set for the extender.
3. Go to Settings > System Tools > Firmware Upgrade.
4. Click Browse to locate the downloaded new firmware file, and then click Upgrade.

42
Chapter 7 Manage Your Extender
5. Wait a few minutes for the firmware upgrade to complete and the extender to reboot.
7. 5. Backup and Restore Configuration Settings
The configuration settings are stored as a configuration file in the extender. You can
backup the configuration file and restore the extender to the previous settings from the
backup file when needed. Moreover, if necessary, you can erase the current settings
and reset the extender to the default factory settings.
1. Visit http://tplinkrepeater.net, and log in with the password you set for the extender.
2. Go to Settings > System Tools > Backup & Restore.
• To backup configuration settings:
Click Backup to save a copy of the current settings to your local computer. A ‘.bin’ file of
the current settings will be stored on your computer.
• To restore previous settings from a saved file:
Click Browse to locate the backup configuration file stored on your computer, and click
Restore.
Note: During the restore process, do not power off or reset the extender.
• To restore configuration settings:
In Factory Default Restore, click Restore to restore all configuration settings to default
values, except your login and cloud account information.
Note: During the restore process, do not power off or reset the extender.
43
Chapter 7 Manage Your Extender
• To reset the extender to factory default settings:
Click Factory Restore to reset the extender.
Note:
1. During the reset process, do not power off or reset the extender.
2. We strongly recommend you backup the current configuration settings before resetting the extender.
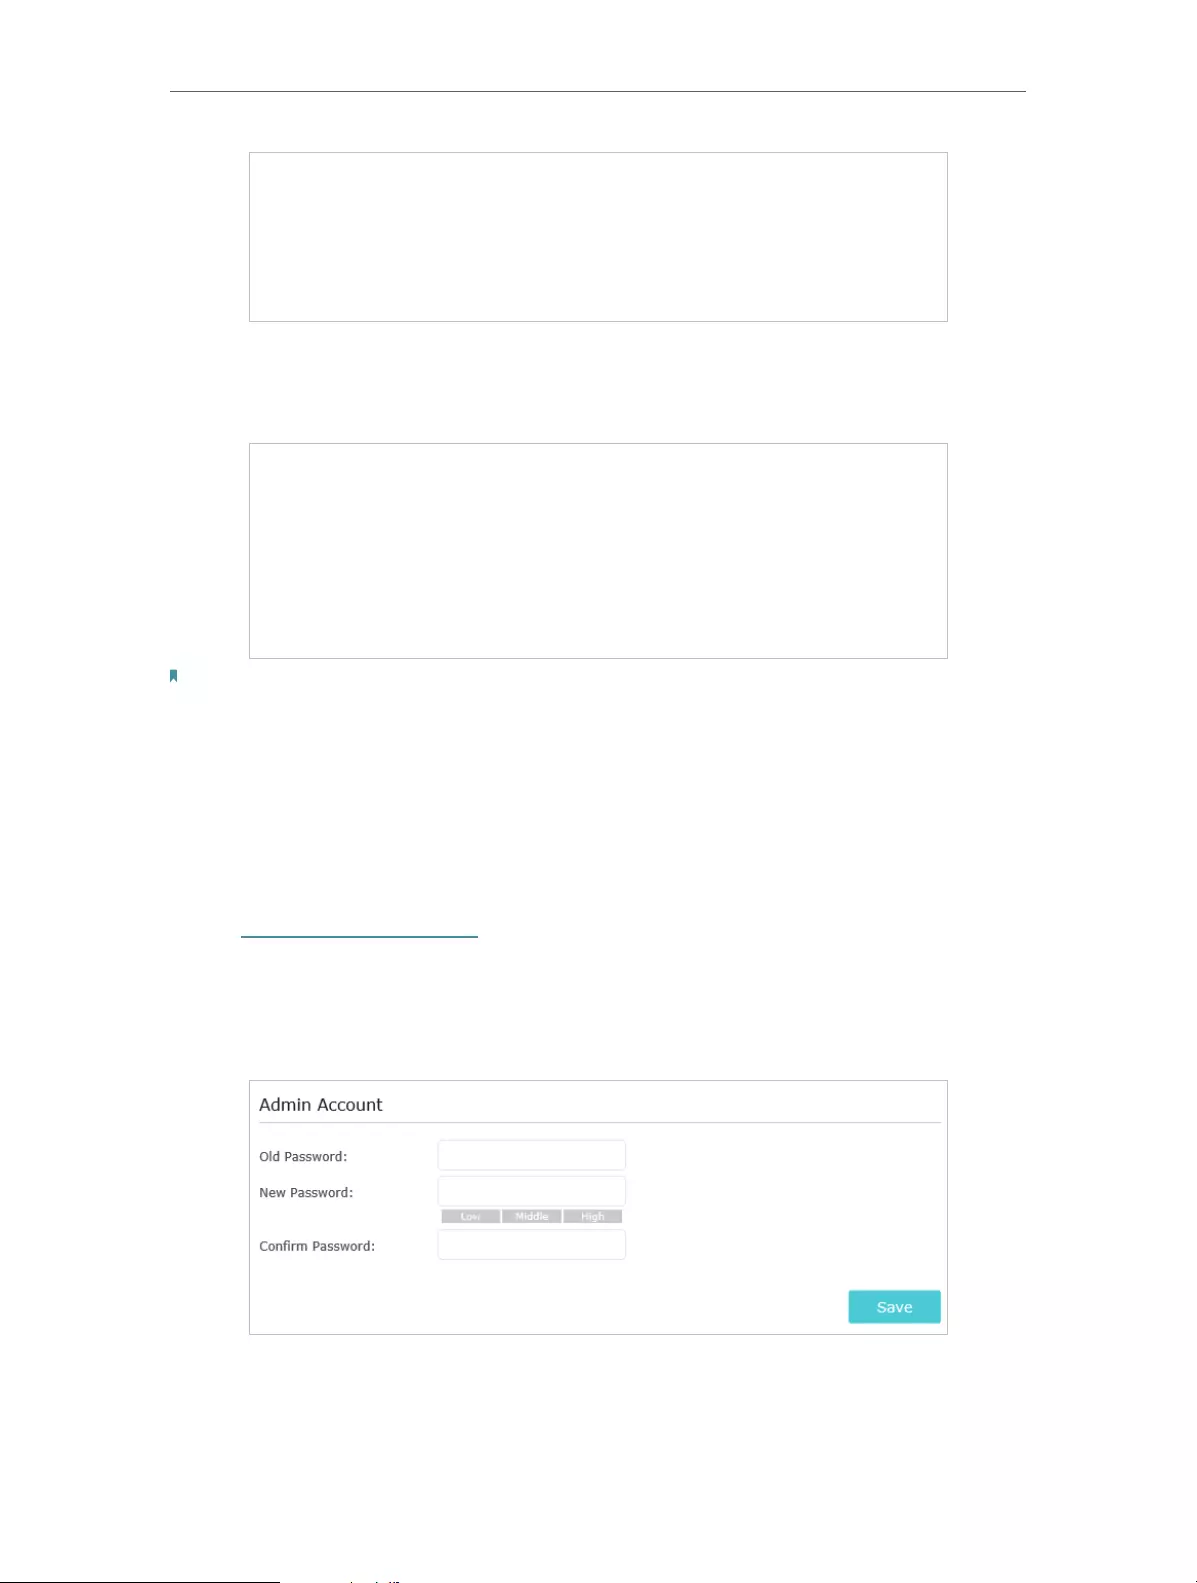
7. 6. Change Login Password
The account management feature allows you to change your login username and
password of the web management webpage.
1. Visit http://tplinkrepeater.net, and log in with the password you set for the extender.
2. Go to Settings > System Tools > Admin Account.
3. Enter the old password. Then enter the new password twice (case-sensitive) and
click Save. Then you can use the new password for future logins.

44
Chapter 7 Manage Your Extender
7. 7. Check System Log
If the extender is not working properly, you can save the system log and send it to our
technical support team.
1. Visit http://tplinkrepeater.net, and log in with the password you set for the extender.
2. Go to Settings > System Tools > System Log.
• To save the system log locally:
1. Choose the type and level of the system log as needed.
2. Click Save Log to save the system logs to a local disk.

45
FAQ
Q1. How to reset the extender to its factory default settings?
• With the extender powered on, use a pin to press the RESET button for 1 second. The
extender will reboot.
• Log in to the extender’s web management page. Go to Settings > System Tools >
Backup & Restore and click Factory Restore.
Q2. What should I do if I forget my login password?
Refer to FAQ > Q1 to reset the extender, and then visit http://tplinkrepeater.net to create
a new login password.
Note: The extender must be reconfigured after a reset to access the internet. Please note down your login password
for future logins.
Q3. What should I do if I forget my wireless password?
In Range Extender mode, the extender shares the same wireless passwords as those
of your host networks.
In Access Point mode, please connect your computer to the extender using an Ethernet
cable and follow the steps below:
1. Visit http://tplinkrepeater.net, and log in with the password you set for the extender.
2. Go to Settings > Wireless > Wireless Settings to retrieve or reset your wireless
password.
Q4. What should I do if I can’t access the web management page?
This can happen for a variety of reasons. Please try the methods below to log in again.
• If your computer is wirelessly connected, make sure that you have connected to the
extender’s SSID.
• If your computer is connected via an Ethernet cable, please make sure that the
connection is stable.
• Make sure your computer is set to obtain an IP address and DNS server address
automatically.
• Verify that http://tplinkrepeater.net is correctly entered in the web browser and press
Enter.
• Use the IP address to access the extender. The default IP is 192.168.0.254. If the
extender is connected to the router, you should go to your router’s DHCP client list to
obtain the extender’s current IP address.
• Reset the extender and try again.

46
Q5. I have enabled wireless MAC filter, wireless access control, or access
control list (ACL) on my router. What should I do before configuring
the extender?
When a device connects through the extender to your router, the MAC address of the
device shown on the router is translated to another MAC address. If your router’s MAC
filter, wireless access control, or ACL is enabled, the devices connected to the extender
cannot get an IP address from the extender and cannot access the Internet.
To solve this problem, please follow the steps below:
1. Log in to your router and disable the MAC filter, wireless access control or ACL.
Note: For more information about how to disable your router’s MAC filter, wireless access control or ACL, please refer
to your router’s user guide.
2. Power on your extender, and run the Quick Setup to configure your extender.
3. Connect all of your devices to the extended network.
4. On your router, add all the Online Devices’ MAC addresses to your router’s MAC filter
table.
5. Enable the router’s MAC filter, wireless access control, or ACL to complete the
configuration.

47
COPYRIGHT & TRADEMARKS
Specifications are subject to change without notice. is a registered trademark
of TP-Link Technologies Co., Ltd. Other brands and product names are trademarks or
registered trademarks of their respective holders.
No part of the specifications may be reproduced in any form or by any means or used
to make any derivative such as translation, transformation, or adaptation without
permission from TP-Link Technologies Co., Ltd. Copyright © 2019 TP-Link Technologies
Co., Ltd. All rights reserved.

48
FCC compliance information statement
Product Name: AC750 Wi-Fi Range Extender
Model Number: RE200 / RE220
Responsible Party:
TP-Link USA Corporation, d/b/a TP-Link North America, Inc.
Address: 145 South State College Blvd. Suite 400, Brea, CA 92821
Website: http://www.tp-link.com/us/
Tel: +1 626 333 0234
Fax: +1 909 527 6803
E-mail: sales.usa@tp-link.com
This equipment has been tested and found to comply with the limits for a Class B digital
device, pursuant to part 15 of the FCC Rules. These limits are designed to provide
reasonable protection against harmful interference in a residential installation. This
equipment generates, uses and can radiate radio frequency energy and, if not installed
and used in accordance with the instructions, may cause harmful interference to radio
communications. However, there is no guarantee that interference will not occur in a
particular installation. If this equipment does cause harmful interference to radio or
television reception, which can be determined by turning the equipment off and on, the
user is encouraged to try to correct the interference by one or more of the following
measures:
• Reorient or relocate the receiving antenna.
• Increase the separation between the equipment and receiver.
• Connect the equipment into an outlet on a circuit different from that to which the
receiver is connected.
• Consult the dealer or an experienced radio/ TV technician for help.
This device complies with part 15 of the FCC Rules. Operation is subject to the following
two conditions:
1. This device may not cause harmful interference.
2. This device must accept any interference received, including interference that may
cause undesired operation.
Any changes or modifications not expressly approved by the party responsible for
compliance could void the user’s authority to operate the equipment.
Note: The manufacturer is not responsible for any radio or TV interference caused by
unauthorized modifications to this equipment. Such modifications could void the user’s
authority to operate the equipment.

49
FCC RF Radiation Exposure Statement:
This equipment complies with FCC RF radiation exposure limits set forth for an
uncontrolled environment. This device and its antenna must not be co-located or
operating in conjunction with any other antenna or transmitter.
“To comply with FCC RF exposure compliance requirements, this grant is applicable to
only Mobile Configurations. The antennas used for this transmitter must be installed to
provide a separation distance of at least 20 cm from all persons and must not be co—
located or operating in conjunction with any other antenna or transmitter.”
This device is restricted in indoor environment only.
We, TP-Link USA Corporation, has determined that the equipment shown as above
has been shown to comply with the applicable technical standards, FCC part 15. There
is no unauthorized change is made in the equipment and the equipment is properly
maintained and operated.
Issue Date: 2019-09-03

50
CE Mark Warning
This is a class B product. In a domestic environment, this product may cause radio
interference, in which case the user may be required to take adequate measures.
OPERATING FREQUENCY (the maximum transmitted power)
2400 MHz -2483.5 MHz (20dBm)
5150 MHz -5250 MHz (23dBm)
5250 MHz -5350 MHz (23dBm)
5470 MHz -5725 MHz (23dBm)
EU Declaration of Conformity
TP-Link hereby declares that the device is in compliance with the essential requirements
and other relevant provisions of directives 2014/53/EU, 2009/125/EC, 2011/65/EU and
(EU) 2015/863.
The original EU declaration of conformity may be found at http://www.tp-link.com/en/ce
RF Exposure Information
This device meets the EU requirements (2014/53/EU Article 3.1a) on the limitation of
exposure of the general public to electromagnetic fields by way of health protection.
The device complies with RF specifications when the device used at 20 cm from your
body.
Attention: This device may only be used indoors in all EU member states and EFTA
countries.
Canadian Compliance Statement
This device contains licence-exempt transmitter(s)/receiver(s) that comply with
Innovation, Science and Economic Development Canada’s licence-exempt RSS(s).
Operation is subject to the following two conditions:
1. This device may not cause interference.
2. This device must accept any interference, including interference that may cause
undesired operation of the device.

51
L’émetteur/récepteur exempt de licence contenu dans le présent appareil est conforme
aux CNR d’Innovation, Sciences et Développement économique Canada applicables
aux appareils radio exempts de licence. L’exploitation est autorisée aux deux conditions
suivantes :
1. L’appareil ne doit pas produire de brouillage;
2. L’appareil doit accepter tout brouillage radioélectrique subi, même si le brouillage est
susceptible d’en compromettre le fonctionnement.
Caution:
1. The device for operation in the band 5150–5250 MHz is only for indoor use to reduce
the potential for harmful interference to co-channel mobile satellite systems;
The high-power radars are allocated as primary users (i.e. priority users) of the bands
5250-5350 MHz and 5650-5850 MHz and that these radars could cause interference
and/or damage to LE-LAN devices.
DFS (Dynamic Frequency Selection) products that operate in the bands 5250- 5350
MHz, 5470-5600MHz, and 5650-5725MHz.
Avertissement:
1. Le dispositif fonctionnant dans la bande 5150-5250 MHz est réservé uniquement
pour une utilisation à l’intérieur afin de réduire les risques de brouillage préjudiciable
aux systèmes de satellites mobiles utilisant les mêmes canaux;
En outre, les utilisateurs devraient aussi être avisés que les utilisateurs de radars de
haute puissance sont désignés utilisateurs principaux (c.-à-d., qu’ils ont la priorité) pour
les bandes 5250-5350 MHz et 5650-5850 MHz et que ces radars pourraient causer du
brouillage et/ou des dommages aux dispositifs LAN-EL.
Les produits utilisant la technique d’atténuation DFS (sélection dynamique des
fréquences) sur les bandes 5250- 5350 MHz, 5470-5600MHz et 5650-5725MHz.
Radiation Exposure Statement:
This equipment complies with IC radiation exposure limits set forth for an uncontrolled
environment. This equipment should be installed and operated with minimum distance
20cm between the radiator & your body.
Déclaration d’exposition aux radiations:
Cet équipement est conforme aux limites d’exposition aux rayonnements IC établies
pour un environnement non contrôlé. Cet équipement doit être installé et utilisé avec
un minimum de 20 cm de distance entre la source de rayonnement et votre corps.
Industry Canada Statement
CAN ICES-3 (B)/NMB-3(B)
Korea Warning Statements
당해 무선설비는 운용중 전파혼신 가능성이 있음.

52
NCC Notice & BSMI Notice
注意!
依據 低功率電波輻射性電機管理辦法
第十二條 經型式認證合格之低功率射頻電機,非經許可,公司、商號或使用者均不得擅
自變更頻率、加大功率或變更原設計之特性或功能。
第十四條 低功率射頻電機之使用不得影響飛航安全及干擾合法通信;經發現有干擾現象
時,應立即停用,並改善至無干擾時方得繼續使用。前項合法通信,指依電信規定作業
之無線電信。低功率射頻電機需忍受合法通信或工業、科學以及醫療用電波輻射性電機
設備之干擾。
4.7.9.1應避免影響附近雷達系統之操作。
4.7.9.2高增益指向性天線只得應用於固定式點對點系統。
安全諮詢及注意事項
• 請使用原裝電源供應器或只能按照本產品注明的電源類型使用本產品。
• 清潔本產品之前請先拔掉電源線。請勿使用液體、噴霧清潔劑或濕布進行清潔。
• 注意防潮,請勿將水或其他液體潑灑到本產品上。
• 插槽與開口供通風使用,以確保本產品的操作可靠並防止過熱,請勿堵塞或覆蓋
開口。
• 請勿將本產品置放於靠近熱源的地方。除非有正常的通風,否則不可放在密閉位
置中。
• 請不要私自打開機殼,不要嘗試自行維修本產品,請由授權的專業人士進行此項
工作。
限用物質含有情況標示聲明書
產品元件名
稱
限用物質及其化學符號
鉛
Pb
鎘
Cd
汞
Hg
六價鉻
CrVI
多溴聯苯
PBB
多溴二苯醚
PBDE
PCB ○ ○ ○ ○ ○ ○
外殼 ○ ○ ○ ○ ○ ○
電源供應板 − ○ ○ ○ ○ ○
備考1. «超出0.1 wt %» 及 «超出0.01 wt %» 系指限用物質之百分比含量超出百分比含量
基準值。
備考2. «○»系指該項限用物質之百分比含量未超出百分比含量基準值。
備考3. » − » 系指該項限用物質為排除項目。
53
Продукт сертифіковано згідно с правилами системи УкрСЕПРО на відповідність
вимогам нормативних документів та вимогам, що передбачені чинними
законодавчими актами України.
Safety Information
• Keep the device away from water, fire, humidity or hot environments.
• Do not attempt to disassemble, repair, or modify the device.
• Do not use the device where wireless devices are not allowed.
• The socket-outlet shall be installed near the equipment and shall be easily accessible.
Please read and follow the above safety information when operating the device. We
cannot guarantee that no accidents or damage will occur due to improper use of the
device. Please use this product with care and operate at your own risk.
Explanations of the symbols on the product label
Symbol Explanation
Class II equipment
AC voltage
Indoor use only
RECYCLING
This product bears the selective sorting symbol for Waste electrical and electronic equipment
(WEEE). This means that this product must be handled pursuant to European directive 2012/19/
EU in order to be recycled or dismantled to minimize its impact on the environment.
User has the choice to give his product to a competent recycling organization or to the retailer
when he buys a new electrical or electronic equipment.
Protection earth
tp-link RE220 V1 User’s Guide
tp-link RE220 Specification
The TP-Link RE220 is a compact Wi-Fi range extender designed to enhance network coverage and eliminate dead zones in residential and small office environments. It supports dual-band Wi-Fi with speeds of up to 750 Mbps, using the 2.4 GHz band to deliver 300 Mbps and the 5 GHz band to provide 433 Mbps. The device is compatible with any standard router or gateway, allowing for seamless integration into existing networks. It features a sleek, plug-in design that makes installation simple and unobtrusive, fitting into any power outlet.
The RE220 is equipped with a smart signal indicator to help users find the optimal placement location for the most effective coverage extension. It also includes a Fast Ethernet port that allows the extender to function as a wireless adapter, connecting wired devices like gaming consoles or smart TVs to the Wi-Fi network. The TP-Link Tether app offers a user-friendly interface for setup and management, providing control over network settings from any Android or iOS device.
Security is ensured with support for WPA/WPA2 wireless encryption standards, safeguarding the network against unauthorized access. The device also supports AP Mode, enabling it to create a new Wi-Fi access point from a wired connection. Its compact design and performance capabilities make the TP-Link RE220 a versatile solution for enhancing wireless coverage and improving network reliability in various settings.
tp-link RE220 F.A.Q.
To set up the TP-Link RE220, plug it into an outlet near your router. Press the WPS button on your router and then on the RE220. Wait for the LED to turn solid, indicating a successful connection.
Ensure the extender is within range of your router. Check if the router’s Wi-Fi is working. Restart both devices and try reconnecting. Consider resetting the extender and setting it up again.
Press and hold the Reset button on the side of the RE220 for about 8 seconds until the LED blinks. Release the button to reset the device to factory settings.
Yes, the TP-Link RE220 is compatible with any router, as long as the router supports WPS or manual setup via a web interface.
Log into the TP-Link web interface, navigate to the Firmware Upgrade section, and follow the instructions to upload the latest firmware file downloaded from the TP-Link website.
Place the RE220 halfway between your router and the area where you need better Wi-Fi coverage, ensuring it’s within the router’s range and away from obstructions.
Log into the extender’s web interface and navigate to the Wireless Settings. Here, you can change the SSID and password to your preference.
A blinking red LED indicates a weak connection to the router. Try moving the extender closer to the router to improve the connection.
On your device, search for available Wi-Fi networks and select the RE220’s network name. Enter the password if prompted to connect.
Yes, you can connect a wired device to the RE220 using an Ethernet cable. This allows the device to access the extended network.
Устраните мёртвые зоны Wi-Fi во всём доме
AC750 Усилитель Wi-Fi сигнала
RE220
Усиление Wi-Fi в мёртвых зонах
Установите RE220 между роутером и клиентскими устройствами, чтобы увеличить площадь покрытия Wi-Fi и избавиться от мёртвых зон. Два диапазона обеспечат общую пропускную способность до 750 Мбит/с на площади до 300 м², а также подходящий канал для просмотра потокового HD‑видео, онлайн-игр и прочих требовательных задач.
Без труда расширьте зону покрытия нажатием кнопки
Текущий роутер
Два диапазона для большого количества устройств
Wi-Fi стандарт AC позволяет создавать более скоростные и надёжные Wi‑Fi подключения во всём доме и достигать скорости Wi-Fi до 750 Мбит/с. Диапазоны 2,4 ГГц и 5 ГГц позволяют подключить к Wi‑Fi до 32 устройств, благодаря чему на всех подключённых устройствах будет стабильное соединение.
2,4 ГГц
300 Мбит/с
5 ГГц
433 Мбит/с
- Телефон
- Планшет
- Ноутбук
- Умные лампы
- Умные розетки
750 Мбит/с
ДО 32 УСТРОЙСТВ
ПРОПУСКНАЯ СПОСОБНОСТЬ ДО 150 % ВЫШЕ, ЧЕМ У УСТРОЙСТВ N300
Простая установка в два шага
Шаг 1: нажмите кнопку WPS на роутере и на RE220, чтобы подключить усилитель к сети либо подключите усилитель через приложение Tether или веб‑интерфейс, если на роутере нет WPS.
Шаг 2: разместите усилитель в месте с оптимальным Wi‑Fi покрытием, руководствуясь умным индикатором.
Шаг 1
Шаг 2
- Мощный сигнал
- Слабый сигнал
Точка доступа и Wi-Fi адаптер
Порт Ethernet RE220 позволит без труда преобразовать проводное интернет-подключение в беспроводную точку доступа. Также он может работать в качестве Wi‑Fi адаптера для подключения проводных устройств.
- Игровая консоль
- ПК
- ТВ
Порт Ethernet
Для подключения проводных устройств к Wi-Fi сети
Точка доступа
Режим высокой скорости для
максимальной производительности
Режим высокой скорости использует одну выделенную Wi-Fi частоту в качестве транзитного соединения (Backhaul), а другую — в качестве точки доступа для увеличения пропускной способности в расширенной Wi-Fi сети.
100 %
Увеличенная скорость
Универсальная совместимость
RE220 совместим с любым уже имеющимся Wi-Fi роутером или точкой доступа, благодаря чему расширить Wi-Fi сеть и улучшить её сигнал не составит никакого труда.
Работает с любым Wi-Fi роутером или точкой доступа
Управление с помощью приложения Tether
Настройте и управляйте Wi-Fi сетью с помощью приложения TP-Link Tether прямо со смартфона (Android, iOS).
EasyMesh — Wi‑Fi во всём доме
Технология EasyMesh позволит создать единую Mesh‑сеть во всём доме из устройств разных производителей — перемещения по дому в поисках стабильного подключения навсегда останутся в прошлом◇.
Подробнее
-
Устройства EasyMesh
(Роутер + Усилитель) -
Обычные устройства
(Роутер + Усилитель)
-
Никаких мёртвых зон
Устранит зоны Wi‑Fi со слабым сигналом во всём доме
-
Умный роуминг
Непрерывное подключение при перемещении по дому
-
Одно имя сети
Больше никакой путаницы при выборе Wi‑Fi сети
Need setup videos?
Scan the QR code, or visit https://www.tp-link.com/support/setup-video/ and search for the setup video of your model.
*Images may differ from actual product
Power On
Plug the extender into a power outlet next to your router. Wait until its Power LED turns solid on.
Set Up
Method 1: Via the Tether App
- Get the up-to-date Tether app.
or
- Connect your smartphone to the extender’s network TP-Link_Extender.
- Launch the Tether app, and select your extender. Create a password to log in.
- Follow app instructions to complete the setup. The LED should turn solid on, indicating successful connection to your router.
Note: If the LED does not turn solid on, refer to FAQ > Q2.
Method 2: Via a Web Browser
- Connect your computer or smartphone to the extender’s network TP-Link_Extender. If you are using a computer, unplug the Ethernet cable if any.
- Launch a web browser, and enter http://tplinkrepeater.net or http://192.168.0.254 in the address bar. Create a password to log in.
Note: If the login window does not appear, refer to FAQ > Q1. - Follow web instructions to complete the setup. The LED should turn solid on, indicating successful connection to your router.
Note: If the LED does not turn solid on, refer to FAQ > Q2.
Method 3: Via the WPS Button
- Press the WPS button on your router.
- Within 2 minutes, press the WPS button on the extender for 1 second. The LED should change from blinking to solid on, indicating successful connection.
Note: If the LED does not turn solid on, try again or use Method 1 or 2. - If the extender connects to a dual band router, repeat steps 1 and 2 above to connect to the other band.
Extended Network Names: Router’s network name with _EXT at the end
Passwords: Same as your router
Note: If you want to change the extended network names, refer to Manage the Extender on the back page.
If you cannot find the network names with _EXT in your Wi-Fi network list, this means that the extender has been connected to a OneMesh router and automatically copied its Wi-Fi settings. See back for more information.
Relocate
- Plug in the extender about halfway between your router and the Wi-Fi dead zone. The location you choose must be within the range of your router.
- Wait for about 2 minutes until the LED turns solid green. If it doesn’t, relocate the extender closer to the router to achieve better signal quality.
Tip: For more intuitive location assistant, access extender settings via the Tether app and go to Tools > Location Assistant.
Enjoy the internet!
Manage the Extender
After setup, you can manage the extender via any of the methods below.
Note: If your extender and router use the same network name, Method 1 is recommended.
Method 1: Via the Tether App
- Connect your smartphone to the extender’s or router’s network.
- Launch the Tether app, select your extender, and log in.
- Manage the extender as needed.
Method 2: Via a Web Browser
- Connect your computer or smartphone to the extender’s network. If you are using a computer, unplug the Ethernet cable if any.
- Launch a web browser, enter http://tplinkrepeater.net in the address bar, and log in.
Note: If the login window does not appear, refer to FAQ > Q1. - Manage the extender as needed.
OneMeshTM with Seamless Roaming
TP-Link OneMesh router and extenders work together to form one unified Wi-Fi network. Walk through your home and stay connected with the fastest possible speeds thanks to OneMesh’s seamless coverage.
Unified Wi-Fi Network
Router and extenders share the same wireless settings, including network name, password, access control settings and more.
Seamless Roaming
Devices automatically switch between your router and extenders as you move through your home for the fastest possible speeds.
Easy Setup and Management
Set up a OneMesh network with a push of WPS buttons. Manage all network devices on the Tether app or at your router’s web management page.
To check full list of TP-Link OneMesh devices, scan the QR code, or visit https://www.tp-link.com/One-Mesh/compatibility.
LED Explanation
| LED | Status | Indication (For Range Extender Mode) |
| 5GHz | On/Off | The extender is connected or not connected to the 5GHz wireless network of your host router. |
| 2.4GHz | On/Off | The extender is connected or not connected to the 2.4GHz wireless network of your host router. |
| (Signal) | Solid green | The extender is connected to your router’s wireless network and is in a suitable location. |
| Solid red | The extender is experiencing poor signal strength. Try relocating it closer to your router. | |
| Off | No wireless connection is established. | |
| (Ethernet) | On/Off | The Ethernet port is connected or not connected to a powered-on device. |
| (Power) | On/Off | The extender is on or off. |
| Blinking | The system is starting up or firmware is being upgraded. | |
| (WPS) | On | WPS connection is established. |
| Blinking | WPS connection is in progress. | |
| Off | WPS connection has been established for more than 5 minutes or WPS connection failed. |
FAQ (Frequently Asked Questions)
Q1. What should I do if I cannot access the extender’s web management page?
- Make sure your computer or smartphone has connected to the extender’s network, and not that of your router. If your router and extender share the same network name, connect your computer to the extender via an Ethernet cable, or use the Tether app.
- If you are using a computer, make sure it is set to obtain an IP address and DNS server address automatically.
- Verify that http://tplinkrepeater.net or http://192.168.0.254 is correctly entered in the web browser and press Enter. Note that http://192.168.0.254 applies only for extenders with factory default settings.
- Use another web browser and try again.
- Reboot or reset the extender and try again.
If you are still having problems, contact our technical support.
Q2. What should I do if the LED doesn’t turn solid on after completing setup via the Tether app or web browser?
- You may have entered incorrect Wi-Fi passwords for your host networks during the configuration. Check the passwords and try again.
- Make sure the extender is close to your router, preferably within 16 feet, and away from large electrical appliances.
- If you have enabled wireless MAC filtering, wireless access control, or access control list (ACL) on your router, disable them first, then follow any method on the front page to complete the configuration.
- Try setting up via the WPS button.
- Reset the extender and go through the configuration again.
If you are still having problems, contact our technical support.
Q3. How do I reset the extender?
- With the extender powered on, use a pin to press the RESET button for 1 second. The extender will reboot.
Safety Information
- Keep the device away from water, fire, humidity or hot environments.
- Do not attempt to disassemble, repair, or modify the device.
- Do not use the device where wireless devices are not allowed.
- The socket-outlet shall be installed near the equipment and shall be easily accessible.
Please read and follow the above safety information when operating the device. We cannot guarantee that no accidents or damage will occur due to improper use of the device. Please use this product with care and operate at your own risk.
TP-Link hereby declares that the device is in compliance with the essential requirements and other relevant provisions of directives 2014/53/EU, 2009/125/EC, 2011/65/EU and (EU) 2015/863. The original EU declaration of conformity may be found at https://www.tp-link.com/en/ce.
For technical support, the user guide and other information, please visit https://www.tp-link.com/support/, or simply scan the QR code.
Here you can download full pdf version of manual, it may contain additional safety instructions, warranty information, FCC rules, etc.
перейти к содержанию
Расширитель диапазона tp-link RE220
Нужны видео для настройки?
Отсканируйте QR-код или посетите https://www.tp-link.com/support/setup-video/ и найдите установочное видео для вашей модели.
* Изображения могут отличаться от реального продукта.
ИНСТРУКЦИЯ ПО УСТАНОВКЕ
Включение
Подключите повторитель к розетке рядом с роутером. Подождите, пока индикатор питания не загорится.

- Метод 1: через приложение Tether
- Получите последнюю версию приложения Tether.

- Подключите смартфон к сети TP-Link_Extender повторителя.
- Запустите приложение Tether и выберите свой повторитель.
Придумайте пароль для входа в систему. - Следуйте инструкциям приложения, чтобы завершить настройку.
Цена на Светодиод должен гореть постоянно, указывая на успешное подключение к маршрутизатору.
Примечание: Если светодиод не горит постоянно, см. FAQ> Q2.
- Получите последнюю версию приложения Tether.
- Метод 2: через Web Браузер
- Подключите свой компьютер или смартфон к сети повторителя TP-Link_Extender. Если вы используете компьютер, отсоедините кабель Ethernet, если он есть.

- Запустить web браузер и введите http://tplinkrepeater.net or http://192.168.0.254 в адресной строке. Придумайте пароль для входа в систему.
Примечание: Если окно входа в систему не появляется, см. FAQ> Q1.
- Подписаться web инструкции по завершению настройки.
Цена на Светодиод должен гореть постоянно, указывая на успешное подключение к маршрутизатору.
Примечание: Если светодиод не горит постоянно, см. FAQ> Q2.
- Подключите свой компьютер или смартфон к сети повторителя TP-Link_Extender. Если вы используете компьютер, отсоедините кабель Ethernet, если он есть.
- Метод 3: с помощью кнопки WPS
- Нажмите кнопку WPS на роутере.

- В течение 2 минут нажмите кнопку WPS на повторителе и удерживайте ее в течение 1 секунды. В Светодиод должен перестать мигать и начать постоянно гореть, указывая на успешное подключение.
Примечание: Если светодиод не загорается, попробуйте еще раз или воспользуйтесь методом 1 или 2.
- Если повторитель подключается к двухдиапазонному маршрутизатору, повторите шаги 1 и 2 выше, чтобы подключиться к другому диапазону.
- Расширенные сетевые имена:
Сетевое имя маршрутизатора с _EXT в конце - Пароли:
То же, что и ваш роутер
Примечание: Если вы хотите изменить расширенные сетевые имена, обратитесь к разделу «Управление повторителем» на последней странице.
Если вы не можете найти имена сетей с _EXT в своем списке сетей Wi-Fi, это означает, что повторитель был подключен к маршрутизатору OneMesh и автоматически скопировал его настройки Wi-Fi. Смотрите назад для получения дополнительной информации.
- Расширенные сетевые имена:
- Нажмите кнопку WPS на роутере.


переезд
- Подключите повторитель примерно на полпути между маршрутизатором и мертвой зоной Wi-Fi. Выбранное вами местоположение должно находиться в пределах досягаемости вашего маршрутизатора.
- Подождите около 2 минут, пока светодиод не загорится зеленым цветом. Если это не так, переместите повторитель ближе к маршрутизатору, чтобы улучшить качество сигнала.
Наконечник: Чтобы получить более интуитивно понятный помощник по определению местоположения, откройте настройки повторителя через приложение Tether и выберите «Инструменты»> «Ассистент определения местоположения».
Наслаждайтесь интернетом!

Управление повторителем
После настройки вы можете управлять повторителем любым из следующих способов.
Примечание: Если ваш повторитель и маршрутизатор используют одно и то же сетевое имя, рекомендуется метод 1.
- Метод 1: через приложение Tether
- Подключите смартфон к сети повторителя или роутера.
- Запустите приложение Tether, выберите повторитель и войдите в систему.
- При необходимости управляйте повторителем.
- Метод 2: через Web Браузер
- Подключите компьютер или смартфон к сети повторителя. Если вы используете компьютер, отключите кабель Ethernet, если он есть.
- Запустить web браузер, введите http://tplinkrepeater.net в адресной строке и авторизуйтесь.
Примечание: Если окно входа в систему не появляется, см. FAQ> Q1. - При необходимости управляйте повторителем.
OneMeshTM с бесшовным роумингом
Маршрутизатор TP-Link OneMesh и повторители работают вместе, образуя единую сеть Wi-Fi. Гуляйте по дому и оставайтесь на связи с максимально возможной скоростью благодаря бесшовному покрытию OneMesh.
Чтобы просмотреть полный список устройств TP-Link OneMesh, отсканируйте QR-код или посетите https://www.tp-link.com/One-Mesh/compatibility.
Светодиод Пояснение


FAQ
- Q1.Что делать, если я не могу получить доступ к повторителю? web страница управления?
- Убедитесь, что ваш компьютер или смартфон подключен к сети повторителя, а не маршрутизатора. Если ваш маршрутизатор и повторитель используют одно и то же сетевое имя, подключите компьютер к повторителю с помощью кабеля Ethernet или используйте приложение Tether.
- Если вы используете компьютер, убедитесь, что он настроен на автоматическое получение IP-адреса и адреса DNS-сервера.
- Подтвердите это http://tplinkrepeater.net or http://192.168.0.254 правильно введен в web браузер и нажмите Enter. Обратите внимание, что http://192.168.0.254 применяется только для повторителей с заводскими настройками по умолчанию.
- Использовать другой web браузер и попробуйте еще раз.
- Перезагрузите или перезагрузите повторитель и попробуйте еще раз.
- Если проблема не исчезла, обратитесь в нашу службу технической поддержки.
- Q2. Что делать, если после завершения настройки через приложение Tether или светодиодный индикатор не загорается. web браузер?
- Возможно, вы ввели неправильные пароли Wi-Fi для своих хост-сетей во время настройки. Проверьте пароли и попробуйте еще раз.
- Убедитесь, что повторитель находится близко к маршрутизатору, предпочтительно в пределах 16 футов, и вдали от крупных электроприборов.
- Если вы включили фильтрацию MAC-адресов беспроводной сети, управление беспроводным доступом или список управления доступом (ACL) на своем маршрутизаторе, сначала отключите их, а затем следуйте любому методу на первой странице, чтобы завершить настройку.
- Попробуйте настроить через кнопку WPS.
- Перезагрузите повторитель и снова выполните настройку.
- Если проблема не исчезла, обратитесь в нашу службу технической поддержки.
- Как сбросить повторитель?
- При включенном повторителе с помощью булавки нажмите кнопку RESET и удерживайте ее в течение 1 секунды. Повторитель перезагрузится.
Информация по технике безопасности
- Держите устройство подальше от воды, огня, влажности или жарких сред.
- Не пытайтесь разбирать, ремонтировать или модифицировать устройство.
- Не используйте устройство там, где использование беспроводных устройств запрещено.
- Розетка должна быть установлена рядом с оборудованием и быть легко доступной.
Пожалуйста, прочтите и соблюдайте приведенную выше информацию по безопасности при работе с устройством. Мы не можем гарантировать отсутствие несчастных случаев или повреждений из-за неправильного использования устройства.
Пожалуйста, используйте этот продукт осторожно и действуйте на свой страх и риск.
TP-Link настоящим заявляет, что устройство соответствует основным требованиям и другим соответствующим положениям директив 2014/53 / EU, 2009/125 / EC, 2011/65 / EU и (EU) 2015/863. Оригинал декларации соответствия ЕС можно найти по адресу https://www.tp-link.com/en/ce
КОНТАКТ
Для получения технической поддержки, руководства пользователя и другой информации посетите https://www.tp-link.com/support/или просто отсканируйте QR-код.
Документы / Ресурсы
Рекомендации
инструкцияTP-Link RE220

Wi-Fi Range Extender
Quick
Installation
Guide
© 2021 TP-Link 7106509128 REV3.1.1
For technical support, replacement services, user
guides, and other information, please visit
https://www.tp-link.com/support, or simply scan
the QR code.
*Images may dier from actual products.
Посмотреть инструкция для TP-Link RE220 бесплатно. Руководство относится к категории wi-fi ретрансляторы, 6 человек(а) дали ему среднюю оценку 7.1. Руководство доступно на следующих языках: русский, английский. У вас есть вопрос о TP-Link RE220 или вам нужна помощь? Задайте свой вопрос здесь
- 7106508766-封面封底
- 导出
TP-Link RE220 — это сетевой репитер WiFi со способностью передачи данных 433 Mbit/s и Ethernet LAN скоростью передачи данных 10, 100 Mbit/s. Он соответствует стандартам сетевого оборудования IEEE 802.11ac, IEEE 802.11b, IEEE 802.11g, IEEE 802.11n. Устройство оснащено тремя внутренними антеннами и является WiFi-совместимым. Репитер имеет кнопку reset для сброса и функцию автоматической настройки.
Репитер имеет ширину 110 мм, глубину 66 мм и высоту 75 мм. Питание составляет 6,5 Вт. Несмотря на то, что этот изделие имеет внутренние антенны, что может дать отличный сигнал, оно не поддерживает многие современные WiFi-технологии, такие как MU-MIMO.
TP-Link RE220 помогает расширить зону покрытия WiFi даже в самых труднодоступных уголках дома или офиса. Он представляет собой надежный и эффективный способ увеличить покрытие сети в зонах с низкой пропускной способностью.
Главная
| TP-Link | |
| RE220 | RE220 V2 | |
| wi-fi ретранслятор | |
| 0845973099732, 6935364053437, 6935364099732 | |
| русский, английский | |
| Руководство пользователя (PDF) |
Производительность
| Скорость передачи данных | 433 Мбит/с |
| Тип | Сетевой повторитель |
| Скорость передачи данных Ethernet LAN | 10, 100 Мбит/с |
| Поддерживаемые операционные системы Windows | Windows 10, Windows 2000, Windows 7, Windows 8, Windows 98SE, Windows NT, Windows Vista, Windows XP |
| Совместимость с Mac | Да |
| Поддерживаемые операционные системы Mac | Да |
| Поддерживаемые операционные системы Linux | Да |
| WPS кнопки | Да |
| Максимальное расстояние передачи | — m |
| Обновляемое встроенное ПО | Да |
Сеть
| Стандарты сети | IEEE 802.11ac, IEEE 802.11b, IEEE 802.11g, IEEE 802.11n |
| Свивка кабеля | 10/100Base-T(X) |
| Wi-Fi | Да |
| Wi-Fi стандартов | 802.11a, 802.11b, 802.11g, Wi-Fi 4 (802.11n), Wi-Fi 5 (802.11ac) |
| Wi-Fi диапазоны | Двухдиапазонный (2,4Ггц/5Ггц) |
| Алгоритмы шифрования данных | 64-bit WEP, 128-bit WEP, 152-bit WEP, WPA-PSK, WPA2-PSK |
| Скорость Wi-Fi (макс) | 433 Мбит/с |
Дизайн
| Кнопка сброса установок | Да |
| Цвет товара | Белый |
| Сертификация | CE, FCC |
| Светодиодные индикаторы | Да |
Энергопитание
| Потребляемая мощность (в обычном режиме) | 6.5 W |
| Входящее напряжение сети | 100 — 240 V |
| Частота входящего переменного тока | 50 — 60 Hz |
Вес и размеры
| Ширина | 110 mm |
| Глубина | 66 mm |
| Высота | 75 mm |
Антена
| Количество антенн | 3 |
| Тип антенны | Внутренний |
Технические характеристики
| Сертификаты устойчивого развития | RoHS |
Содержимое упаковки
| Краткая инструкция пользователя | Да |
Условия эксплуатации
| Диапазон температур при эксплуатации | 0 — 40 °C |
| Диапазон температур при хранении | -40 — 70 °C |
| Диапазон относительной влажности при эксплуатации | 10 — 90 % |
| Диапазон относительной влажности при хранении | 5 — 90 % |
Порты и интерфейсы
| Количество портов Ethernet LAN ( RJ-45) | 1 |
Данные об упаковке
| Глубина упаковки | 101.5 mm |
| Ширина упаковки | 156.5 mm |
| Высота упаковки | 89 mm |
| Масса брутто | 190 g |
Логистические данные
| Код гармонизированной системы описания (HS) | 85176990 |
показать больше
Не можете найти ответ на свой вопрос в руководстве? Вы можете найти ответ на свой вопрос ниже, в разделе часто задаваемых вопросов о TP-Link RE220.
В чем разница между роутером и модемом?
Модем обеспечивает подключение к Интернету через интернет-провайдера. Затем маршрутизатор распределяет через Интернет сигнал на подключенные к маршрутизатору устройства.
От чего зависит скорость загрузки в Интернете?
Скорость загрузки в Интернете зависит от вашего типа соединения. Если ваша скорость составляет 25 Мб/сек, это означает, что теоретически скорость загрузки будет составлять 25 Мб/сек.
Вредно ли Wi-Fi-излучение?
Wi-Fi — радиочастотный сигнал в виде неионизирующего излучения. Это излучение не может повредить клетки и ткани и, следовательно, не наносит вреда здоровью.
Какие сертификаты TP-Link RE220 имеет?
TP-Link RE220 имеет следующие сертификаты: CE, FCC.
Какая высота TP-Link RE220?
TP-Link RE220 имеет высоту 75 mm.
Какая ширина TP-Link RE220?
TP-Link RE220 имеет ширину 110 mm.
Какая толщина TP-Link RE220?
TP-Link RE220 имеет толщину 66 mm.
Инструкция TP-Link RE220 доступно в русский?
Да, руководствоTP-Link RE220 доступно врусский .
Не нашли свой вопрос? Задайте свой вопрос здесь
TP-Link RE220 — это универсальное устройство, которое позволяет расширить зону покрытия Wi-Fi сигнала дома или в офисе. Репитер может быть использован как точка доступа или репитер, позволяющий улучшить скорость и качество Wi-Fi соединения. В этой статье мы предоставим вам подробную пошаговую инструкцию по настройке репитера TP-Link RE220.
Первым шагом является подключение репитера к вашей основной Wi-Fi сети. Для этого вставьте репитер в электрическую розетку вблизи вашего маршрутизатора. Дождитесь, пока индикатор на репитере перестанет мигать и стабилизируется. Затем подключите компьютер или устройство к репитеру с использованием Wi-Fi или сетевого кабеля.
Далее, откройте веб-браузер и введите IP-адрес репитера в адресной строке. Обычно адресом является http://tplinkrepeater.net. Введите имя пользователя и пароль, которые указаны на задней панели репитера. Если у вас возникнут проблемы с входом на веб-интерфейс, попробуйте воспользоваться стандартным именем пользователя и паролем «admin».
Содержание
- Шаги настройки репитера TP-Link RE220
- Подключение репитера к сети
- Вход в настройки репитера
- Настройка репитера для усиления сигнала
Настройка репитера TP-Link RE220 несложна и выполняется в несколько шагов:
- Распакуйте репитер и найдите кабель Ethernet в комплекте. Подключите репитер к ближайшему электрическому розетку.
- Подключите Ethernet-кабель одним концом к компьютеру, а другим концом к Ethernet-порту на репитере. Убедитесь, что светодиодный индикатор подключения Ethernet горит зеленым цветом.
- Откройте веб-браузер на вашем компьютере и введите «tplinkrepeater.net» в адресной строке. Нажмите Enter.
- В появившемся окне введите admin для имени пользователя и admin для пароля. Нажмите Войти.
- Выберите режим работы репитера. В данном случае, выберите Wireless Range Extender Mode.
- Найдите доступную Wi-Fi-сеть и нажмите кнопку Connect. Введите пароль для подключения к сети и нажмите Next.
- Введите новое имя для репитера или оставьте поле пустым для сохранения текущего имени. Нажмите Next.
- Настройте пароль для административного доступа к репитеру. Введите новый пароль дважды и нажмите Next.
- Подключитесь к вновь созданной Wi-Fi-сети, используя новое имя и пароль. Нажмите Finish, чтобы завершить настройку.
После завершения настройки репитера TP-Link RE220, вы сможете использовать его для расширения покрытия Wi-Fi сигнала вашей сети.
Подключение репитера к сети
Для начала убедитесь, что ваш роутер и репитер находятся включены и находятся недалеко друг от друга.
1. Подключите репитер к электропитанию и дождитесь, пока индикаторы начнут мигать.
2. Подключите компьютер или ноутбук к репитеру с помощью кабеля Ethernet или беспроводного подключения.
3. Откройте веб-браузер и введите в адресной строке IP-адрес репитера (192.168.0.1 или tplinkrepeater.net).
4. При необходимости введите имя пользователя и пароль по умолчанию (обычно это «admin» и «admin»).
5. В меню настройки репитера найдите опцию «Quick Setup» (Быстрая настройка) или «Setup Wizard» (Мастер настройки) и нажмите на нее.
6. Следуйте инструкциям мастера настройки для выбора вашей беспроводной сети и ввода пароля. Обычно необходимо выбрать сеть, к которой вы хотите подключить репитер, и ввести пароль для доступа к этой сети.
7. Нажмите кнопку «Сохранить» или «Применить», чтобы завершить настройку репитера.
Теперь ваш репитер должен быть успешно подключен к вашей беспроводной сети. Проверьте соединение, подключився к беспроводной сети с помощью вашего компьютера или ноутбука.
Вход в настройки репитера
Для начала настройки репитера TP-Link RE220 вам необходимо установить его в рабочее положение:
- Подключите репитер к электрической сети и дождитесь, пока индикатор питания станет зеленым.
- Поместите репитер в зоне действия вашего основного маршрутизатора Wi-Fi.
- Убедитесь, что на вашем устройстве (например, ноутбуке или смартфоне) включен Wi-Fi и подключите его к сети с именем «TP-Link_Extender». Пароль для подключения указан на самом устройстве (обычно на его нижней или задней части).
Когда вы успешно подключитесь к Wi-Fi сети репитера, следуйте приведенным ниже инструкциям для входа в его настройки:
- Откройте веб-браузер на вашем устройстве.
- Введите в адресной строке следующий IP-адрес репитера: 192.168.0.254 (это адрес по умолчанию).
- Нажмите клавишу «Enter» на клавиатуре или кнопку «Go» в браузере.
Вас должна встретить страница авторизации с запросом логина и пароля. Введите логин и пароль (по умолчанию для репитера TP-Link RE220 это «admin» в обоих полях) и нажмите кнопку «Войти».
Теперь вы находитесь в настройках репитера и готовы к дальнейшей настройке и улучшению сигнала Wi-Fi.
Настройка репитера для усиления сигнала
Для увеличения сигнала Wi-Fi роутера и расширения покрытия сети внутри помещения, можно использовать репитер TP-Link RE220. Настройка репитера несложна и может быть выполнена в несколько простых шагов.
1. Подключите репитер к электрической сети и дождитесь, пока индикатор питания станет зеленым.
2. На компьютере или мобильном устройстве подключитесь к Wi-Fi сети, которую вы хотите расширить.
3. Откройте веб-браузер и введите адрес «http://tplinkrepeater.net» или «http://192.168.0.254», затем нажмите Enter.
4. Введите имя пользователя и пароль для доступа к панели управления репитера. Если вы не установили новые учетные данные, можно использовать административный логин и пароль по умолчанию, указанные в документации к устройству.
5. В меню управления выберите опцию «Quick Setup» или «Быстрая настройка».
6. Вам будет предложено выбрать режим работы репитера. Если вы хотите расширить беспроводную сеть, выберите «Range Extender Mode» или «Режим репитера».
7. Репитер автоматически проведет сканирование доступных беспроводных сетей и покажет список. Выберите ту, которую вы хотите расширить, и нажмите «Next» или «Далее».
8. Введите пароль для выбранной сети и нажмите «Next» или «Далее».
9. Репитер настроит подключение к основной Wi-Fi сети и создаст новое имя и пароль для расширенной сети. Вы можете оставить их или изменить на свое усмотрение.
10. Чтобы завершить настройку, нажмите «Finish» или «Готово». Репитер перезагрузится и будет готов к использованию.
Теперь ваш репитер TP-Link RE220 настроен для усиления сигнала Wi-Fi сети. Вы можете расположить его в удобном для вас месте, чтобы получить максимальное покрытие и усиление сигнала.