
Просмотр
Доступно к просмотру 18 страниц. Рекомендуем вам скачать файл инструкции, поскольку онлайн просмотр документа может сильно отличаться от оригинала.
-
Radio with alarm
Радиоприёмник с
будильником
TF-1566U
Instruction manual
Руководство по эксплуатации
-
Instruction manual
Dear customer!
Thank you for purchasing our product. For safety, it is strongly
recommended to read this manual carefully before connecting, operating
and/or adjusting the product and keep the manual for reference in future.
1   2 3 4 5 6     7
8                 9 10 11 12    13              8
Description
1. Function switch         6. TIME SET/MEM-UP/12H/24H button
7. USB port
2. ALARM.SET/MEM-DN button
3.   /TUN- button          8. Speakers
9. AUX IN jack
4.   /MEMO/USB/SD button   10. Memory card slot
5.   /TUN+ button
11. VOLUME regulator
12. DC IN 5V power input
13. FM antenna
Not indicated: battery compartment (back panel), additional battery terminal
(back panel), LED display (front panel)
2
-
Instruction manual
Remote controller          Utilization of the product
1                          If you want to dispose of this
product, do not mix it with general
2                 7      household waste. There is a
separate collection system for used
8      electronic products in accordance
3                        with legislation that requires proper
9      treatment, recovery and recycling.
4                 10        Please contact your local
11     authorities for the correct method
5                        of disposal. By doing so, you
will ensure that your disposed
product undergoes the necessary
treatment, recovery and recycling
and thus prevent potential negative
effects on the environment and
6                        human health.
Important safeguards
•  The instruction manual
1.   /PLAY/PAUSE button    contains important operating and
2.   /TUNING button        maintenance instructions. For your
3. USB/SD button           safety, it is necessary to refer the
4. CLOCK button            manual. Keep the manual for use
5. SNOOZE button           in future.
6. Number buttons            •  Do not hit or drop the unit.
7.   /TUNING button          •  Do not expose the unit to
8. MUTE button             vibration, direct sunlight, too high
9. REPEAT button           or low temperature or humidity.
10. ALARM button             •  If you are not going to use the
11. MEMORY button          unit within a long period of time,
remove the batteries to avoid their
leakage.
•  Do not disassemble the unit
yourselves. Refer servicing to
qualified service personnel.
3
3
- 1
- 2
- 3
- 4
- 18
Radio with alarm
Радиоприёмник с
будильником
TF-1566U
Instruction manual
Руководство по эксплуатации
Instruction manual
Dear customer!
Thank you for purchasing our product. For safety, it is strongly
recommended to read this manual carefully before connecting, operating
and/or adjusting the product and keep the manual for reference in future.
1 2 3 4 5 6 7
8 9 10 11 12 13 8
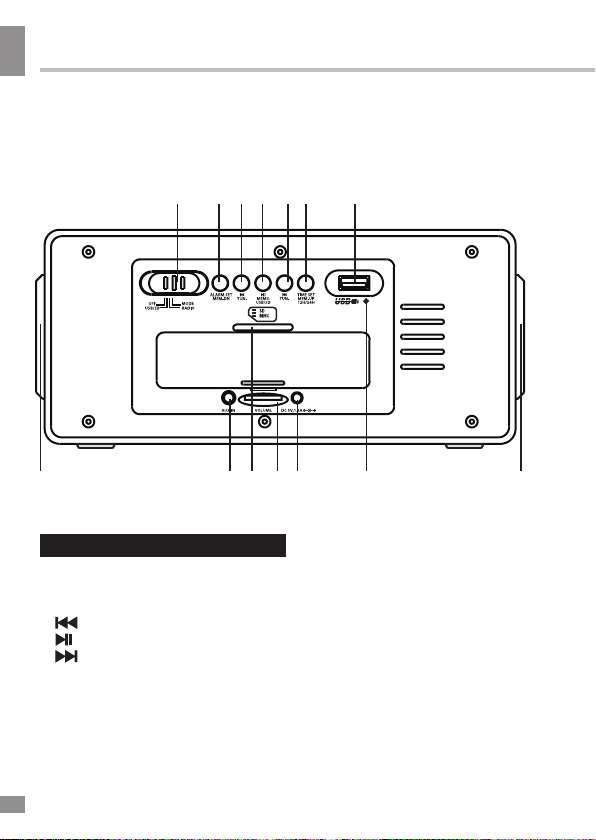
Description
1. Function switch
2. ALARM.SET/MEM-DN button
3. /TUN- button
4. /MEMO/USB/SD button
5. /TUN+ button
Not indicated: battery compartment (back panel), additional battery terminal
(back panel), LED display (front panel)
6. TIME SET/MEM-UP/12H/24H button
7. USB port
8. Speakers
9. AUX IN jack
10. Memory card slot
11. VOLUME regulator
12. DC IN 5V power input
13. FM antenna
2

Instruction manual
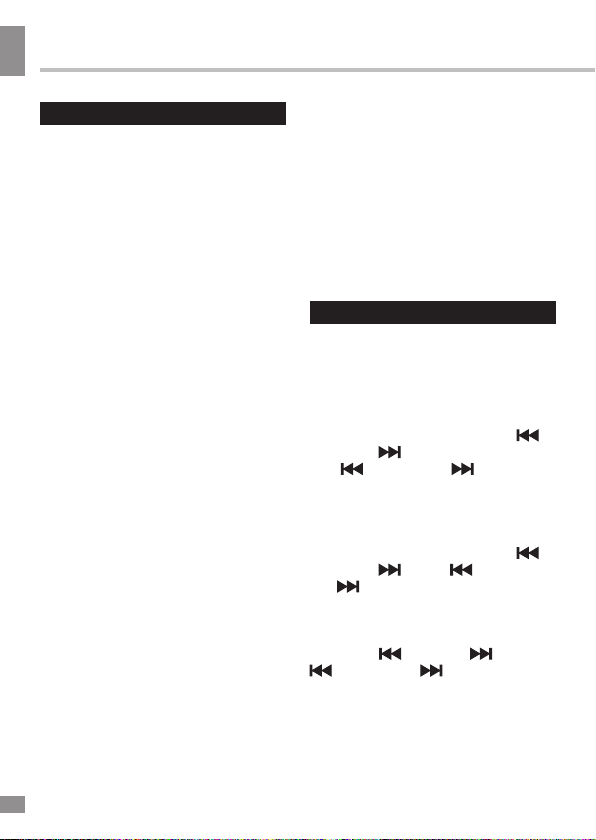
Remote controller
1
2
3
4
5
6
1. /PLAY/PAUSE button
2. /TUNING button
3. USB/SD button
4. CLOCK button
5. SNOOZE button
6. Number buttons
7. /TUNING button
8. MUTE button
9. REPEAT button
10. ALARM button
11. MEMORY button
Utilization of the product
If you want to dispose of this
product, do not mix it with general
7
8
9
10
11
household waste. There is a
separate collection system for used
electronic products in accordance
with legislation that requires proper
treatment, recovery and recycling.
Please contact your local
authorities for the correct method
of disposal. By doing so, you
will ensure that your disposed
product undergoes the necessary
treatment, recovery and recycling
and thus prevent potential negative
effects on the environment and
human health.
Important safeguards
• The instruction manual
contains important operating and
maintenance instructions. For your
safety, it is necessary to refer the
manual. Keep the manual for use
in future.
• Do not hit or drop the unit.
• Do not expose the unit to
vibration, direct sunlight, too high
or low temperature or humidity.
• If you are not going to use the
unit within a long period of time,
remove the batteries to avoid their
leakage.
• Do not disassemble the unit
yourselves. Refer servicing to
qualified service personnel.
3
3
Instruction manual
Power supply
Battery operation
• Open the battery compartment
cover. Insert 4 x AAA batteries (not
included). Please observe correct
battery polarities or the unit will not
work. Close the battery compartment
cover.
• When the batteries are exhausted,
they should be replaced.
• Do not use new and old batteries
together. Do not recharge or heat the
batteries. Uncharged batteries are not
a reason for addressing to a repair
service.
• Disconnect power cord from the
socket, when the unit is on battery
supply. Battery power is automatically
disconnected when the power cord is
connected to a power socket.
AC adaptor power
• Plug the supplied AC/DC power
adaptor into the power input on the back
of the unit. Connect the power cord to
the AC household main outlet. Make
sure the voltage is compatible.
• Always remember to disconnect
the power cord from the main supply
before disconnecting it from the unit.
• Disconnect the power cord from
the mains when not in use.
Additional power
• Insert 2 batteries AG13 into the
additional battery terminal. This is
additional power supply intended
for maintenance of clock and alarm
settings. Without the additional power
you will need to set the clock and alarm
anew after each interruption of power
supply.
• When the batteries are exhausted
they should be replaced. New batteries
should be aquired by user. Replace
the batteries only with batteries of the
same type.
Setting the clock
Set the function switch to MODE
position. Press and hold CLOCK
button on the RC (TIME SET/MEMUP/12H/24H button on the unit) until
the digits flash. Press repeatedly
/TUN- and /TUN+ buttons on the
unit ( /TUNING and /TUNING
buttons on the RC) to set 12-hour or
24-hour clock display mode. Press
CLOCK (TIME SET/MEM-UP/12H/24H)
button to go to hour setting, hour
digits will flash. Press repeatedly
/TUN- and /TUN+ ( /TUNING
and /TUNING) buttons to set hours.
Press CLOCK (TIME SET/MEMUP/12H/24H) button to go to minute
setting, minute digits will flash. Press
repeatedly /TUN- and /TUN+ (
/TUNING and /TUNING) buttons
to set minutes. Press CLOCK (TIME
SET/MEM-UP/12H/24H) button to
confirm clock setting.
4
4
Instruction manual
Radio operation
• Set the function switch to RADIO
position; the current radio frequency
will be displayed for several seconds,
then clock will be displayed.
• Press repeatedly /TUN- and
/TUN+ buttons on the unit ( /
TUNING and /TUNING buttons
on the RC) to change the current
frequency downwards or upwards by
100 KHz.
• Press and hold /TUN- and
/TUN+ ( /TUNING and /TUNING)
buttons to search the nearest strong
signal station downwards or upwards
automatically.
• Press MEMORY button on the
RC ( /MEMO/USB/SD button on the
unit); C01 will blink. Press repeatedly
TIME SET/MEM-UP/12H/24H or
ALARM.SET/MEM-DN buttons on the
unit to select the position number for
the current frequency. Press MEMORY
( /MEMO/USB/SD) button to save the
frequency in the position (1~30).
• Press and hold MEMORY ( /
MEMO/USB/SD) button; it will start
scanning from the lowest frequency
and automatically save all available
stations in positions (up to 30).
• When stations are saved in the
memory, press repeatedly TIME SET/
MEM-UP/12H/24H or ALARM.SET/
MEM-DN buttons on the unit or number
buttons on the RC to select saved
stations.
• In radio mode, press SNOOZE
button; the display will show the current
frequency for 10 seconds, then return
to clock.
• Rotate VOLUME regulator to
adjust the sound volume level. Press
MUTE button on the RC to switch off
the sound; the digits on the display
will blink. Press MUTE button again to
enable the sound.
• Extend the FM antenna for a
better signal reception.
Alarm operation
Setting the alarm
• Set the function switch to MODE
position.
• Press and hold ALARM button on
the RC (ALARM.SET/MEM-DN button
on the unit) until the digits flash. AL1
indicator will be blinking showing that
the 1st alarm is being set.
• Press repeatedly /TUN- and
/TUN+ buttons on the unit ( /
TUNING and /TUNING buttons on
the RC) to set hours of the 1st alarm
(AL1). Press ALARM (ALARM.SET/
MEM-DN) button to save hours; minute
digits will flash. Press repeatedly /
TUN- and /TUN+ ( /TUNING and
/TUNING) buttons to set hours of
the 1st alarm. Press ALARM (ALARM.
SET/MEM-DN) button to save minutes;
the unit is in the signal sound selection
5
5
Instruction manual
mode. Press repeatedly /TUN- and
/TUN+ ( /TUNING and /
TUNING) buttons to set USB/SD (USB
and SD indicators blinks), radio (FM
indicator blinks) or buzzer (no indicator
blinks) as the sound signal of the 1st
alarm.
• Press ALARM (ALARM.SET/
MEM-DN) button to save the settings
of the 1st alarm. AL2 indicator will be
blinking showing that the 2st alarm is
being set.
• Press repeatedly /TUN- and
/TUN+ buttons on the unit ( /
TUNING and /TUNING buttons
on the RC) to set hours of the 2nd
alarm (AL2). Press ALARM button
(ALARM.SET/MEM-DN button) to
save hours; minute digits will flash.
Press repeatedly /TUN- and /
TUN+ ( /TUNING and /TUNING)
buttons to set hours of the 2nd alarm.
Press ALARM (ALARM.SET/MEM-DN)
button to save minutes; the unit is in
the signal sound selection mode. Press
repeatedly /TUN- and /TUN+ (
/TUNING and /TUNING) buttons
to set USB/SD (USB and SD indicators
blinks), radio (FM indicator blinks)
or buzzer (no indicator blinks) as the
sound signal of the 2nd alarm.
• Press ALARM button (ALARM.
SET/MEM-DN button) to save the
settings of the 2nd alarm.
General operations
• In any mode, press repeatedly
ALARM button (ALARM.SET/MEM-DN
button) to check settings of 1st and 2nd
alarms.
• Make sure that the function switch
is in MODE position and AL1 and/or
AL2 indicators are on, otherwise the
alarm will not work. To switch off the
alarm mode, press ALARM.SET/MEMDN button or SNOOZE on the RC; AL1/
AL2 indicators will be off.
Repeat the operations again to
switch on the alarm mode.
• Do not select USB/SD as alarm
signal if USB or memory card is not
connected, otherwise the alarm will not
work.
• If you want to select radio as
alarm signal, switch to the needed
station first.
Snooze control — for Remote
• When the alarm is on, press
SNOOZE button once, after 9 minutes
the alarm will be on again. This
operation can be repeated several
times.
• When the alarm is on, press
ALARM button (ALARM.SET/MEM-DN
button) or set the function switch to
another position to stop the alarm.
• When the alarm is on, if you don’t
press ALARM button (ALARM.SET/
MEM-DN button), it will stop after 90
minutes.
6
6
Loading…
Перейти к контенту
Радиоприемники Telefunken
- Размер инструкции: 1.31 Мб
- Формат файла: pdf
Если вы потеряли инструкцию от радиоприемника Telefunken TF-1566U, можете скачать файл для просмотра на компьютере или печати.
Инструкция для радиоприемника Telefunken TF-1566U на русском языке. В руководстве описаны возможности и полезные функции, а также правила эксплуатации. Перед использованием внимательно ознакомьтесь с инструкцией.
Чтобы не читать всю инструкцию вы можете выполнить поиск по содержимому внутри инструкции и быстро найти необходимую информацию. Рекомендации по использованию помогут увеличить срок службы радиоприемника Telefunken TF-1566U. Если у вас появилась проблема, то найдите раздел с описанием неисправностей и способами их решения. В нем указаны типичные поломки и способы их решения.
Установка времени
Установите переключатель режи-
мов в положение MODE. Нажмите и
удерживайте кнопку CLOCK на ПДУ
(кнопку TIME SET/MEM-UP/12H/24H
на устройстве), цифры на дисплее
начнут мигать. Нажимайте кнопки
/TUN- и
/TUN+ на устройстве
(кнопки
/TUNING и
на ПДУ), чтобы выбрать 12-часовой
или 24-часовой режим отображения
часов. Нажмите кнопку CLOCK
(TIME SET/MEM-UP/12H/24H) для
перехода к установке часов; цифры,
означающие часы, будут мигать.
Нажимайте кнопки
TUN+ (
/TUNING и
чтобы установить часы. Нажмите
кнопку (TIME SET/MEM-UP/12H/24H)
для перехода к установке минут;
цифры, означающие минуты, будут
мигать. Нажимайте кнопки
TUN- и
/TUN+ (
TUNING), чтобы установить минуты.
Нажмите кнопку CLOCK (TIME SET/
MEM-UP/12H/24H), чтобы подтвер-
дить установку часов.
Операции с радио
• Установите переключатель
режимов в положение RADIO; на
дисплее в течение нескольких
секунд будет отображаться текущая
радиочастота, затем дисплей пере-
Руководство по эксплуатации
/TUNING
/TUN- и
/
/TUNING),
/
/TUNING и
/
ключится на отображение часов.
• Нажимайте кнопки
/TUN+ на устройстве (кнопки
/TUNING и
/TUNING на ПДУ) для
пошагового изменения текущей
радиочастоты на 100 КГц вниз или
вверх по диапазону.
• Нажмите и удерживайте кнопку
/TUN- и
/TUN+ (
и
/TUNING) для автоматическо-
го поиска ближайшей доступной
радиостанции с сильным сигналом
вниз или вверх по диапазону.
• Нажмите кнопку MEMORY на
ПДУ (кнопку
/MEMO/USB/SD
на устройстве); на дисплее будет
мигать надпись C01. Нажимайте
кнопки TIME SET/MEM-UP/12H/24H и
ALARM.SET/MEM-DN на устройстве,
чтобы выбрать номер позиции памя-
ти, на которой вы хотите сохранить
текущую частоту. Нажмите кнопку
MEMORY (
/MEMO/USB/SD), чтобы
сохранить станцию под выбранным
номером (от 1 до 30).
• Нажмите и удерживайте кнопку
MEMORY (
/MEMO/USB/SD);
устройство автоматически выполнит
поиск всех доступных радиостанций
начиная с нижней частоты диапазо-
на и сохранит найденные станции в
памяти под номерами от 1 до 30.
• Когда нужные станции со-
хранены в памяти устройства, их
выбор осуществляется нажатием
кнопок TIME SET/MEM-UP/12H/24H и
ALARM.SET/MEM-DN на устройстве
или нажатием кнопок с цифрами
на ПДУ.
/TUN- и
/TUNING
13
Telefunken TF-1566U
Руководство по эксплуатации
10
Уважаемый покупатель!
Благодарим Вас за покупку нашего изделия. Чтобы понять, как пра-
вильно и безопасно пользоваться Вашей моделью изделия, рекомен-
дуется тщательно изучить настоящее руководство перед включением,
регулировкой и эксплуатацией изделия. Сохраняйте руководство для
использования в будущем.
Описание
1. Переключатель режимов
2. Кнопка ALARM.SET/MEM-DN
3. Кнопка /TUN-
4. Кнопка /MEMO/USB/SD
5. Кнопка /TUN+
6. Кнопка TIME SET/MEM-
UP/12H/24H
7. USB-порт
8. Динамики
9. Линейный вход
8 9 10 11 12 13 8
1 2 3 4 5 6 7
10. Разъем для карты памяти
11. Регулятор VOLUME
12. Разъем питания (DC IN 5V)
13. FM-антенна
Не показано на рисунке:
отсек для батарей (на задней
панели), терминал для батарей
дополнительного питания (на задней
панели), ЖК-дисплей (на передней
панели)
Инструкция
Посмотреть инструкция для Telefunken TF-1566U бесплатно. Руководство относится к категории радиочасы, 1 человек(а) дали ему среднюю оценку 7.3. Руководство доступно на следующих языках: русский, английский. У вас есть вопрос о Telefunken TF-1566U или вам нужна помощь?
Задайте свой вопрос здесь
Изображения продукта (1)
Ниже вы найдете технические характеристики изделия и руководства по эксплуатации Telefunken TF-1566U.
Главная
| Бренд | Telefunken |
| Модель | TF-1566U |
| Изделие | радиочасы |
| Язык | русский, английский |
| Тип файла | Руководство пользователя (PDF) |
Часто задаваемые вопросы
Не можете найти ответ на свой вопрос в руководстве? Вы можете найти ответ на свой вопрос ниже, в разделе часто задаваемых вопросов о Telefunken TF-1566U.
Что такое Bluetooth?
Bluetooth — это способ обмена данными по беспроводной сети между электронными устройствами с помощью радиоволн. Расстояние между двумя устройствами обменивающимися данными в большинстве случаев составляет не более десяти метров.
В чем разница между FM и AM?
FM означает «частотная модуляция», AM — «амплитудная модуляция». Основная разница между FM- и AM-радиостанциями состоит в качестве звука.
Инструкция Telefunken TF-1566U доступно в русский?
Да, руководствоTelefunken TF-1566U доступно врусский .
Не нашли свой вопрос? Задайте свой вопрос здесь