
-
Consumer services
>
-
User manual, instruction for use
>
-
Linen Care
>
-
Steam generator
>
User manual and frequently asked questions Express anti-calc
Extra powerful and easy to use
Boasting strong steam powerful enough to remove creases from any fabric, the Tefal Express Anti-Calc steam generator iron produces fast and dependable results, with a new removable calc collector for easy maintenance and performance that’s built to last. This high-efficiency steam station features the No-Setting system to ensure safe ironing sessions with no risk of burning, while advanced soleplate technology provides flawless glide.
Reference : SV8054E0
Frequent questions
Choose a board that is height-adjustable to adjust it to your height. It should be steady and robust so that you can place the ironing appliance on it.
The board should be perforated to allow the steam to pass through the fibres of the fabric to soften it and make ironing easier. The ironing board cover should also be suitable to allow the flow of steam through.
To avoid damaging the soleplate, follow this advice:
• Always place your iron on its heel rest or its base (depending on model).
• Avoid ironing over abrasive items (buttons, zip fastenings, etc.).
• Never clean your iron’s soleplate with abrasive or metallic pads.
Shiny marks can appear on some fabrics, especially on dark coloured fabrics. We would advise ironing dark clothes inside out and using the correct temperature.
If ironing mixed-fibre fabrics, set the temperature for the most fragile fibre.
Important: The iron takes longer to cool down than to heat up. We recommend that you start with fabrics to be ironed at a low temperature.
• Untreated tap water:
Your appliance has been designed to use untreated tap water.
If your water is very hard, mix 50% untreated tap water and 50% distilled water.
• Types of water not to use:
Heat concentrates the elements contained in water during evaporation. The types of water listed below may contain organic waste, mineral or chemical elements that can cause spitting, brown staining or premature wear of the appliance:
— water from clothes dryers
— scented or softened water
— water from refrigerators, batteries, air conditioners
— rain water
— boiled, filtered or bottled water
In order to ensure the best performance from your iron, these types of water should not be used for ironing.
The steam is more or less significant depending on the temperature setting of the iron. We advise you to use steam occasionally when the temperature is set low on the iron, otherwise drops of water could appear on your laundry.
Before cleaning, ensure that the appliance is unplugged and that the soleplate and iron rest plate are cold.
Do not use any detergents or descaling products to clean the soleplate or base unit. Never hold the iron or its base unit under tap water.
• Cleaning the base unit:
Clean the plastic parts from time to time with a soft, slightly damp cloth.
• Cleaning the scale collector:
Wait until the appliance has been switched off for at least 1 hour.
Remove the scale collector by lifting and rotating the flap a quarter turn.
Rinse the scale collector under the tap and put it back on the iron.
• Self-cleaning of the soleplate (depending on model):
When the anti-calc indicator blinks, perform the steps described in this video.
It is normal. Your iron generates a lot of steam; this steam is condensing on the board. Some waterdrops could appeared underneath the ironing board and fall on the flooring.
• You are using chemical descaling products or additives in the water. You should never put these products in the water tank. If this is the case, contact an approved service centre.
• Your washing has not been rinsed sufficiently or you are ironing a new item of clothing before washing it. Ensure that you have rinsed your clothes thoroughly in order to to remove soap deposits or chemicals from new garments which could stick to the iron.
• Your iron is too hot, see our recommendations on temperature control settings in your product manual.
• You are using starch. Only spray starch on the reverse of the fabric to be ironed.
Some laundry starches and synthetic fibres may stick to the surface of the iron. Please clean the Iron’s surface.
The internal parts may make metallic noises with the change in temperature. There is nothing wrong with it.
After following the instructions in the user manual for starting the appliance, make sure that your electrical socket is working by plugging another appliance. If it still does not work, do not try to dismantle or repair the appliance yourself, instead, take it to an approved repair centre
Do not use your appliance. To avoid any danger, have it replaced by an approved repair centre.
No, it is normal to have noise and vibration when the steam is activated. The use of steam triggers the functioning of an electric pump.
If the temperature of your iron is adjustable (depending on the model), use steam occasionally when the temperature is set low on the iron.
The temperature is set too low on your iron, it does not allow you to have steam.
Yes, this is quite normal. The water flow allows the cleaning of the soleplate interior.
The self-cleaning operation of the soleplate has to be performed. Refer to the chapter «Maintenance and cleaning», «How to descale my steam generator?».
Yes, this is quite normal. The self-cleaning operation causes the electric pump to operate.
No. The two cables are separately insulated; they are protected and rigorously checked. However, if you notice that the cable is damaged, have it repaired by an approved repair centre.
This system prevents the soleplate from clogging. Its active coating eliminates fibres and impurities that often become stuck to the plate and end up reducing its glide.
Your appliance contains valuable materials which can be recovered or recycled. Leave it at a local civic waste collection point.
Please go to the “Accessories” section of the website to easily find whatever you need for your product.
Find more detailed information in the Guarantee section of this website.
If you believe that one part is missing, please call Consumer Services Center and we will help you find a suitable solution.
F
NL
D
GB
I
E
P
DK
S
FIN
N
GR
TR
PL
CZ
SK
H
RUS
UA
HR
RO
SLO
EST
LT
LV
EXPRESS ANTI-CALC
EXPRESS TURBO
ANTI-CALC
www.tefal.com

1*
10*
19c
19a
19e
19d
18
19
19b
2
3
4
5
6
7
8
9
11
12
13
14
15
16
17
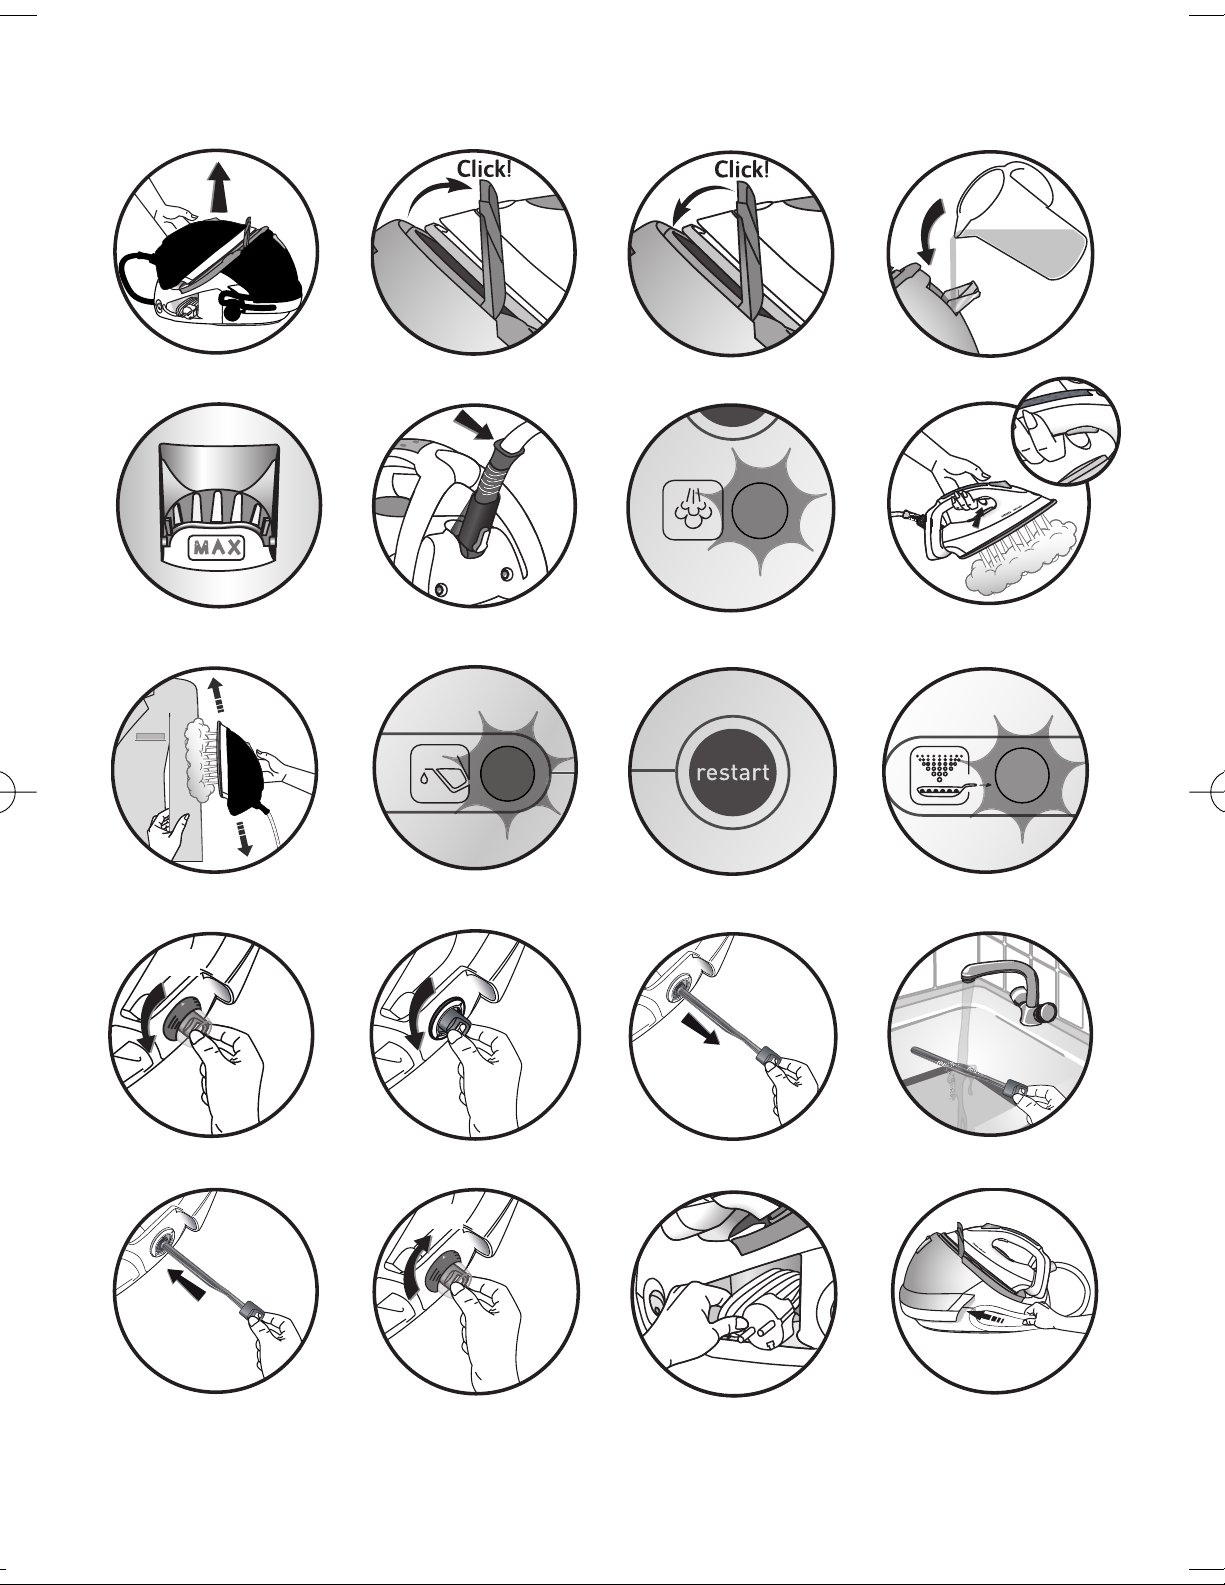
fig. 1 fig. 2
fig. 3
fig. 7fig. 6
fig. 5
fig. 13
fig. 10
fig. 14
fig. 11
fig. 15
fig. 19fig. 18fig. 17
fig. 9
fig. 4
fig. 8
fig. 12
fig. 16
fig. 20

19
F
NL
D
GB
I
E
P
DK
S
FIN
N
GR
TR
PL
CZ
SK
H
RUS
UA
HR
RO
SLO
EST
LT
LV
Important recommendations
Safety instructions
• Please read these instructions carefully before first use. This product has been designed for domestic use only. Any commercial use,
inappropriateuseorfailuretocomplywiththeinstructions,themanufactureracceptsnoresponsibilityandtheguaranteewillnotapply.
• For your safety, this appliance conforms to the applicable standards and regulations (Low Voltage, Electomagnetic Compatibility,
EnvironmentalDirectives, asapplicable…).
• Yoursteamgenerator is an electrical appliance: it must be used in normal conditions of use. It is only designed for domestic use.
• Your generator is fitted with2 safety systems:
— a pressure releasevalve which,in theeventof a malfunction, releases any excess steam;
— a thermalfuse topreventtheappliance from overheating.
• Always plug in your steam generator:
— anelectricalinstallationwithvoltagebetween 220Vand 240V.
— anearthed socket.
Connectingto thewrong voltage may cause irreparable damage totheappliance and will invalidate yourguarantee.
Ifyou are using a mainsextension lead, ensure thatit is correctly rated (10A) with anearth,andisfullyextended.
• Completely unwind the power cord from its storage spacebefore connectingto an earthed socket.
• Iftheelectricpowercordortheiron-unitisdamaged,itmustbereplacedbyanApprovedServiceCentreinordertopreventanydanger.
• Do notunplugthe applianceby pullingon thecord.
Always unplugyour appliance:
— before filling the watertank orrinsing thecollector,
— before cleaning yourgenerator,
— after each use.
• Theappliance mustbe used and placedon a flat,stable,heat-resistantsurface.When you placetheironon the ironrest, make sure
thatthe surface on which you place itis stable.
• Thisapplianceis not intended for use by persons (including children) with reducedphysical, sensoryor mentalcapabilities, orlack of
experience and knowledge, unless they have been given supervision or instruction concerning use of the appliance by a person
responsiblefor their safety.
• Childrenshould be supervised to ensure that they do not playwiththe appliance.
• Never leavethe appliance unattended :
— when itis connected to the mains,
— untilit hascooled down (around1 hour).
• The soleplate and generator iron-restcanbecome very hot and cause burns: nevertouch these parts.
Never touch theelectriccords withthe soleplate of the iron.
• Your appliance gives offsteamwhichcancauseburns.Handleyouriron carefully,particularly when using the vertical steamfunction.
Never direct the steam towards personsor animals.
• Always wait before rinsing the collector until thesteam generatorhas cooleddown and has been unpluggedfor at least 2 hours
before unscrewing the collector.
• While rinsingout the boiler, never fillit directly under the tap.
• If youloseor damage the boiler rinse cap, have itreplacedby anapproved Service Centre.
• Do not immerse your steam generator in water or any other liquid. Donot rinse it under a running tap.
• The appliance must not be used if it has fallen to the floor, shows evidence of damage, leaks or fails to function correctly. Never
dismantleyourappliance. To avoid anydanger, have itinspected inan approved service centre.
• This appliance has been designed for domestic use only. Any commercial use, inappropriate use or failure to comply with the
instructions,themanufacturer accepts no responsibilityand the guarantee willnot apply.
1. Comfort handle (depending on model)
2. Steam control button
3. Irontemperature adjustmentbutton
4. Ironthermostatlight
5. Easycord system
6. Ironrest
7. Illuminated on / off switch
8. Powercord storage space
9. Power cord
10.Turbo button (depending on model)
11.Lock-System hoop
12. Water tank filler cover
13. Water tank
14. Steam generator boiler (in the base unit)
15. Iron-basesteam cord
16. Slide storage place for thesteam cord
17. Scale collector cover
18.Scalecollector
19. Control panel
a — Restart button
b — “Water tank empty” light
c — “Steam ready” light
d — “Anti-calc” indicator
e — Steam output control dial
Description
Locking system for retaining the iron on the base — Lock-system
Your steamgeneratorisfitted witha ring toholdthe iron onto thebase with a locked position for
easy transport and storage — fig.1:
• Locking — fig.2
• Unlocking — fig.3

20
To transport your steam generator using thehandle of the iron :
— place the iron inpositionon thehousingplate onthe steamgeneratorand fold theringoverthe
iron until it locks intoposition(you will heara “click”) — fig.2.
— Holdthe ironby the handle to transport your steam generator — fig.1.
What water may be used ?
• Your iron has been designed to operate using untreated tap water.
• Heat concentrates the elements contained in water during evaporation. The types of water
listedbelowcontainorganicwaste or mineral elements that cancause spitting,brownstaining
or premature wear of the appliance: water from clothes dryers, scented or softened water,
water from refrigerators, batteries or air conditioners, pure distilled or demineralised water or
rain water should not be used in youriron. Also do not use boiled, filtered or bottled water.
Ifyourwater is very hard (check
with your local water authority)
itis possibleto mixuntreated
tap water with store-bought
distilled ordemineralised water
inthefollowing proportions:
50% untreatedtap water,50%
distilled ordemineralised water.
Preparation
Filling the water tank
• Place the steam generator on a stable, horizontal and heat-resistant surface.
• Ensure that your steam generator is unplugged and that the soleplate and the iron rest have
cooled down.
• Openthe water tank filler cover — fig.4.
• Pour in untreated tap water up to the max mark — fig.5.
• Close the water tankfiller cover.
• Your iron is equipped with an extension cord system to prevent the cord from dragging over
thelaundry andcreasingitagainwhen ironing.
• Take thesteam cord out of its housing and unwind itcompletely.
• Remove the tie to release the cord outlet.
• Press the Eject button — fig.6and the Easycord system extends automatically.
• When the cord outlet tips, the Easycord system extends automatically without you having to
press theEjectbutton.
Using the Easycord system
Operating the control panel
• Green light flashes: the boiler heats up. — fig.7.
• Green light on: the steam is ready — fig.7.
• Red light “water tank” on:the water tank is empty — fig.10.
• The orange “anti-calc” indicator flashes — fig.12: you need to rinse the scale collector.
Switch on the steam generator
• Completely unwind the power cord and thesteam cord from its storage space.
• Lowerthe retaining hoop (depending on model) to unlock the safety catch — fig.3.
• Plug your steamgenerator into a mains socket with an earth pin”.
• Press on the on / off switch. The green light (located on the control panel) flashes and the
boiler heatsup— fig.7.
When the green “steam ready” light stops flashing (after 2 minutes approximately), the
appliance isready.
The first time the appliance is
used, there may be some
fumes and smell but this is
not harmful. They will not
affect use and will disappear
rapidly.
Steam ironing
• Placetheiron’stemperaturecontrolslideaccording tothetype offabrictobeironed (seetablebelow).
• The thermostat light comes on. Be careful ! The steam generator is ready when the thermostat
light goes out andwhen thegreen “steam ready”lightstays on.
• Adjust the steamoutput controldial (located on the controlpanel).
• While ironing, the light on top of the iron and the steam ready light turn on and off, as the
temperature adjusts without interrupting ironing.
• To obtain steam, press on the steam control button under the iron handle and keep it pressed fig.8. The steam will stop whenyou releasethe button.
• When starting, and regularly while it is being used, your steam generator’s electric pump injects
water intothe boiler. It makes a noise but this isquitenormal. You mayalso hear a clicking noise
which is thesteam valve opening. Again this is normal.
• Always spray starch onto the reverse side of the fabricto be ironed.
Use
Do not place the iron on a
metal support.When
taking a break from
ironing, always place
the iron on the iron rest
plate of the unit. It is
equipped with non-slip
pads and has been
designed to withstand
high temperatures.
Always use the Easycord
system for enhanced
comfort of use.
Ironing Boards:
Due to the powerful steam
output, a mesh type ironing
board must be used to allow
any excess steam to escape
and to avoid steam venting.
21
F
NL
D
GB
I
E
P
DK
S
FIN
N
GR
TR
PL
CZ
SK
H
RUS
UA
HR
RO
SLO
EST
LT
LV
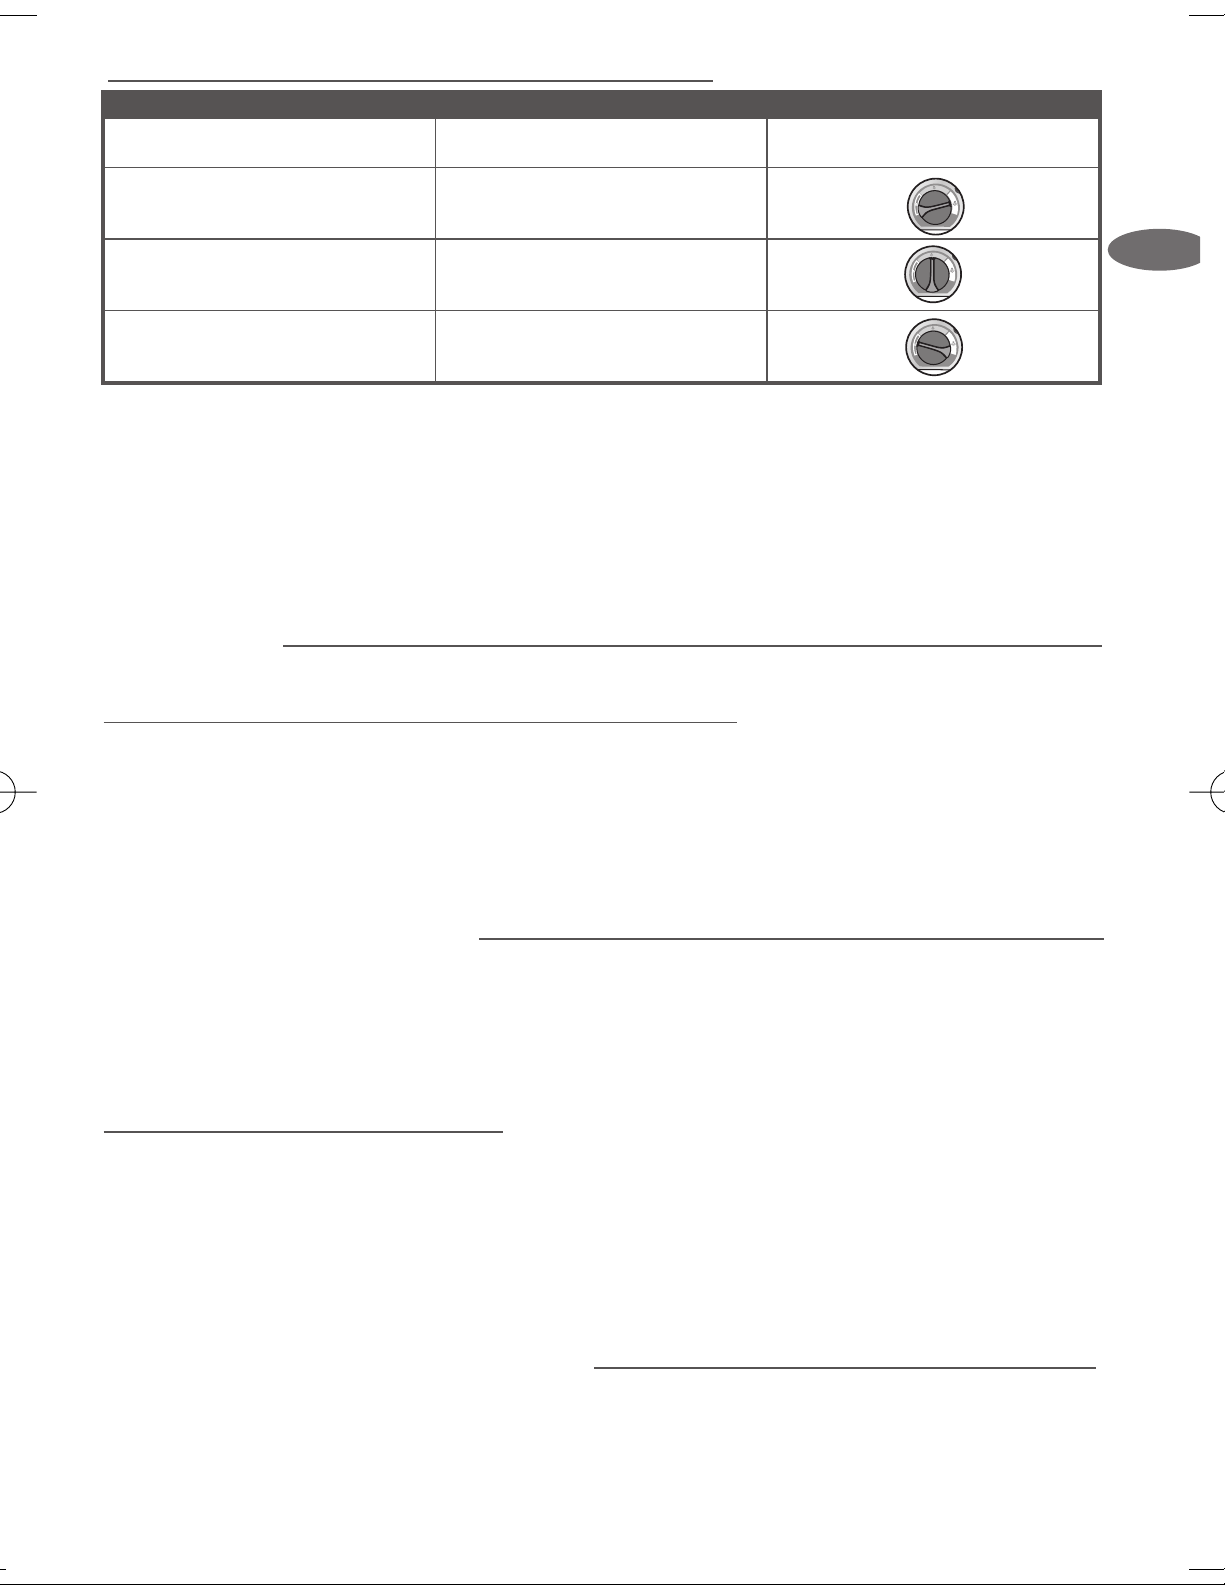
Setting the temperature
• Iron temperature setting:
— Start with the fabrics to be ironed at a low temperature (•) and finish with those which need
highertemperatures (••• or Max).
— Mixed fibre fabric: set the ironing temperature to the setting for the most delicate fabric.
— Woollen garments:pressrepeatedly on the steam controlbutton — fig.8 to obtain short bursts
of steam,without placing the iron on thegarment itself.
• Steam output setting:
— Thick fabric: increase the steam setting.
— At a low temperature: setthe steam output control dial to the lowposition.
Dry ironing
• Do not press the steam control button under the iron handle.
TYPE OF FABRICS
SETTING TEMPERATURE
CONTROL
SETTING STEAMOUTPUT CONTROLDIAL
Linen,cotton
•••
Silk, Wool
••
Synthetics
(polyester, acetate, acrylic, polyamide)
•
SETTING THE TEMPERATURE AND STEAM OUTPUT ACCORDING TO TYPE OF FABRIC TO BE IRONED:
To prime thesteam circuit,
either before using the iron for
the first time, or ifyouhave not
used the steam function for a
few minutes, press thesteam
control button several times in a
row, holdingthe iron awayfrom
your clothes
— fig.8. This will
enable any cold water to be
ejected from thesteam circuit.
Maintenance and cleaning
Cleaning your steam generator
• Do not use detergent or descaling products for cleaningthe soleplate base-unit.
• Never hold the iron or the base unitunderthe tap.
• Empty and rinse the removable water tank.
• Clean the plastic parts of the applianceoccasionally witha soft cloth.
Tip: for easy, non-aggressive
cleaning of the sole plate of your
iron, use a damp sponge to clean
the sole plate while it is still warm.
Vertical steam ironing
• Set theiron temperature controlslideand thesteam output control dial (locatedonthe control
panel)tothe MAX position.
• Hang the garment on a coathanger and hold thefabric slightly taut with one hand.
As steam is very hot : never attempt to remove creases from a garment while it is being
worn, always hang garments on a coat hanger.
• Holding the iron in a vertical position — fig.8, tilted slightly forwards, press repeatedly on the
steam control button (underneath theironhandle) moving the iron fromtop to bottom — fig.9.
Refilling the water tank
• Whenthe red “tank empty” indicatorlightturns on, thereis nomoresteam— fig.10.Thewatertankisempty.
• Unplug the steam generator. Open the tank filler flap — fig.4.
Fill the water tank up without exceeding the MAX level — fig.5.
• Close the water tank filler cover.
• Plug in the steam generator. Press the “Restart” button — fig.11, on the control panel to continue
ironing. When the green indicatorremains lit, the steamisready.
TURBO Function (according to model)
• Press the Turbocontrol 2 or 3 times when you needextra steam:
— for ironingthicker fabrics,
— for gettingrid of creases,
— for powerful vertical steaming.
Use the Turbo function with care as its exceptional steam power can cause burns.
Recommendations : for
fabrics other than linen or
cotton, hold the iron a few
centimetres from the
garment to avoid burning
the fabric.
22
Easy descaling of your steam generator:
To extendthe life of your steamgeneratorand avoid scale onyourironing, yoursteam generator
is equipped with a built-inscale collector. This valve,locatedinthe tank,
automatically removes the scale that forms inside.
Operation:
• Anorange“anti-scale” lightlocated on thecontrol panel startsblinkingtotellyou that theanti-
scale valveneedsrinsing — fig.12.
Important: This operation must not be carried out unless the steam generator has
been unplugged for at least two hours and has cooled down completely.
To carry out this operation, the steam generator must be close to a sink as water may
come out of the tank when it is opened.
• Once the steamgenerator has cooled down completely,remove thescalecollectorcover— fig.13.
• Unscrew the anti-scalevalve andremoveit fromthehousing;it containsthe scalethathas built
up in thetank— fig.14 and fig.15.
• To clean the valve properly, just rinse it under running water to remove the scale it contains —
fig.16.
• Put the valve back into its housing and screw it in completely to keep it watertight — fig.17.
• Refit the scale collector cover — fig. 18.
The next time you use your iron, press the “restart” button on the control panel to turn
off the orange “anti-scale” light.
Do not use any descaling
substances (vinegar,
industrial descaling
products, etc.) when rinsing
the anti-scale valve :
they could damage it.
Before emptying your steam
generator, it must always be
left to cool for 2 hours to
avoid any risks of scalding.
Storing the steam generator
• Press the illuminated on/offswitch and unplug the generator.
• Place the irononthe housingplate on the steam generator.
• Raise the retaining hoopover the iron until it locks into place (audible click) — fig.2.
• Your iron is then safely retained on its base. Warning: do not touch thesoleplate while still hot.
• Slot the extension cord outlet in the notch (depending on model). Take the end of the cord support and
press to returnthe flexible partinto the base.
• Store the steam cord in its slide storage place — fig.19. Take it, fold it in two so as to make a loop. Put the
end of this loop in the slide storage place then push gently until you see the end on the other side of the
slide storage place — fig.20.
• Leave the steam generator to cool for at least one hour before putting it away if it is to be stored in a
cupboard or confinedspace.
• You can store thesteam generator in completesafety.
PROBLEMS CAUSES SOLUTIONS
The steam generator does not switch on
or the iron indicator and ON/OFF
indicatordonot switch on.
Theappliance is not switched on.
Check that your appliance is correctly
plugged in and press the illuminated
on/off switch.
Water runs out of the holes in the
soleplate.
Water has condensed in the pipes because
youareusing steamforthefirsttimeoryou
have not used itfor some time.
Press on the steam control button away
from your ironing board until the iron
produces steam.
Thesoleplate is not hot enough.
Decrease the steam output while ironing
atlow temperature (steamoutput control
dial on the control panel). Wait for the
thermostat light to go out before
activating the steam control button.
Your thermostat is faulty: the iron is not
hotenough.
Contact an ApprovedService Centre.
Water streaks appear on the linen.
Your ironing board cover is soaked with
water as it is not suited to the power of a
steam generator.
Check that your ironing board is suitable
(See page20).
Problems with your steam generator?
23
F
NL
D
GB
I
E
P
DK
S
FIN
N
GR
TR
PL
CZ
SK
H
RUS
UA
HR
RO
SLO
EST
LT
LV
PROBLEMS CAUSES SOLUTIONS
White streaks come through the holes in
thesoleplate.
Your generator tank is ejecting scale as it
hasnot beendescaled regularly.
Rinse the collector (see § descaling your
steam generator).
Brown streaks come through the holes in
thesoleplate and stainthe linen.
You are using chemical descaling agents
or additives in the water for ironing.
Never add this type of product in the
water tank or in the boiler (see page 5 for
what water may be used). Contact an
Approved Service Centre.
Fabric fibres have accumulated in the
holes of thesoleplate and are burning.
Clean the soleplate with a non-metallic
sponge.
The soleplate is dirty or brown and may
stain the linen.
Your linen is not rinsed sufficiently or you
have ironed a new garment before
washing it.
Ensure linen is rinsed thoroughly to remove
any soap deposits or chemicals on new
garmentswhichmaybesuckedupbytheiron.
You are ironing at too high a temperature. See ourrecommendations regarding
temperature control setting.
You are using starch. Always spray starch on the reverse side of
thefabric to be ironed.
There is no steam or there is little steam. Thewater tankis empty (red light on). Fill the water tank.
The steam output control dial is set at
minimum.
Increase the steam output(controldial on
thecontrol panel).
The soleplate temperature is set to the
maximum.
The steam generator operates normally
butthesteamisveryhotand dry,and hard
to see.
Steam comes out around thecollector. Thecollector is not tightenedcorrectly. Tighten the collector.
Thecollector sealisdamaged. Contact an ApprovedService Centre.
Theappliance is faulty. Do not use the steam generator and
contact an Approved Service Centre.
Thered “water tank empty” light is on. The water tankisempty. Fill the water tank.
Steam or water escapes under the
appliance.
Therinseplug seal is damaged. Do not use the steam generator and
contact an Approved Service Centre.
The“anticalc” indicator is lit. You have not pressed the “Restart” button. Press the “Restart” button on the control
panel.
Environment protection first !
If you have any product problems or queries pleasecontactour Customer Relations Team first for expert help
and advice
Your appliance contains valuable materials which canbe recovered or recycled.
Leave it at a local civic waste collection point.
If youhave any problems or queries please call our Customer Relations team first for expert help and advice:
0845 602 1454 — UK
(01) 677 4003 — Ireland
or consult our website — www.tefal.co.uk

39
F
NL
D
GB
I
E
P
DK
S
FIN
N
GR
TR
PL
CZ
SK
H
RUS
UA
HR
RO
SLO
EST
LT
LV
Vigtige informationer
Sikkerhedsregler
• Læs brugsanvisningen omhyggeligt igennem før apparatet tages i brug første gang; TEFAL påtager sig intet ansvar for skader,
deropstår ved forkert brug.
• Dette apparats sikkerhed er i overensstemmelse med gældende tekniske forskrifter og standarder (elektromagnetisk
kompatibilitet, lavspænding, miljøbeskyttelse).
• Dampgeneratoreneret elektriskapparat: Denskalbruges undernormalebrugsbetingelser.Den erudelukkende beregnettil brug
i en almindelighusholdning.
• Det er forsynet med 2 sikkerhedssystemer:
— en ventil, som forhindrer overtryk vedatlede overskydende damp ud i tilfælde af funktionsforstyrrelser.
— en varmesikring, som forhinder overopvarmning.
• Tilslut altid dampgeneratoren:
— en el-installationmed en spænding på mellem 220 og 240 V.
— Tilslut kun dampgeneratoren til en ekstrabeskyttet el-installation.
-Forkerte tilslutninger kanforårsage uoprettelige skader på apparatet og annullerer garantien.
Hvis der benyttes forlængerledning, skal det undersøges, om den er to-polet (10 A),ogomden er ekstrabeskyttet.
• Træk el-ledningen helt ud før stikket sættes i en ekstrabeskyttet stikkontakt.
• Hvis el-ledningenellerledningen mellem strygejernet og basen erbeskadiget, er det strengt nødvendigt at få den udskiftetaf
et autoriseret serviceværkstedaf TEFAL for at undgå enhver fare.
• Tag ikkeapparatets stikudved at trække i ledningen.
Trækaltidstikket ud af stikkontakten:
— før vandbeholderen fyldes op eller før kalk-opsamleren skylles,
— Inden apparatet gøres rent.
— Hver gang apparatet har været i brug.
• Apparatet skal bruges og placeres på en stabil flade. Når strygejernet stilles på sin sokkel, skal man sikresig, at soklen er anbragt
på en stabil flade.
• Dette apparat er ikke beregnet til at blive brugt af personer (herunder børn) hvis fysiske, sensoriske eller mentale evner er
svækkedeellerpersoner medmanglende erfaringellerkendskab, medmindre deer under opsyn ellerhar modtagetforudgående
instruktioner om brugen af apparatet af en person, der er ansvarlig for deressikkerhed.
• Børn skal være under opsyn for atsikre, at de ikke leger med apparatet.
• Gå aldrig fra dampgeneratoren:
— når dener tilsluttet strøm,
— så længe den ikke er kølet helt af(ca. 1 time).
• Strygesålenogsoklenkannåop påmeget højetemperaturer,derkan forårsageforbrændinger. Rørderforikkeveddem,nårdeervarme.
Lad aldrig strygejernetssål røre ved el-ledningerne.
• Strygejernet udsender damp, der kan forårsageforbrændinger. Strygejernet skal håndteres forsigtigt, og specielt hvis der stryges
i lodret position. Ret aldrig dampen mod personer eller dyr.
• Vent altid til dampgeneratoren er helt kølet af (stikket skal være trukket ud af stikkontakten i mindst 2 timer), inden
udtømningsproppen skrues af kedlen.
• Vent altid indtil dampgeneratorener kølet af ogstikkethar været taget ud i over 2 timer,før kalk-opsamleren skrues afog skylles.
• Hvisproppentilkedlenbliver væk ellerødelægges,skal den udskiftesmedennyfraenautoriseretserviceforretninganbefaletafTEFAL.
• Dyp aldrig dampgeneratoren ned i vand eller enhver andenvæske. Skyl den aldrig under rindende vand.
• Brug ikke apparatet,hvis det harværettabt pågulvetellerharsynligebeskadigelser, hvisdetlækkerellervisertegnpåfunktionsforstyrrelser.
Prøv aldrig selv atskilleapparatetad: Få det undersøgt i etautoriseret serviceværkstedafTEFALforatundgå enhverfare.
1. Komforthåndtag (afhængigafmodel)
2. Dampknap
3. Strygejernetstemperaturvælger
4. Termostat lampe
5. Easy Cord systemet
6. Sokkel til strygejernet
7. Pilot lampe tænd/sluk knap
8. Kammer til opbevaringafel-ledning
9. Ledning
10. Turbotast (afhængig af model)
11. Buetil at fastholde strygejernet på basen(Lock-System)
12. Påfyldningshul
13. Vandbeholder
14. Kedel(indei basen)
15. Ledning mellemstrygejernet og basen
16. Skinnetil opbevaringsplads
17. Skjuler til kalk-opsamler
18. Kalk-opsamler
19. Kontrolpanelet
a — RESTART” knap
b — Vandbeholderen er tom
c — Dampgeneratoren klar lampe
d — “Anti-kalk” kontrollampe
e — Knap til indstilling af dampmængden
Apparatbeskrivelse
System til at låse strygejernet fast på soklen (Lock-system)
Dampgeneratoren erudstyretmed enbøjle tilat fastholde strygejernet på basenfor at gøre transportogopbevaringlettere— fig.1:
• Lås — fig.2.
• Lås op — fig.3.
Loading…
-
Tefal UK : innovative leader in kitchen and home appliances
>
-
Consumer services
>
-
Instructions for use
>
-
Linen Care
>
-
Steam generator
>
User manual and frequently asked questions Pro Express Turbo Anti-calc
Ironing becomes a pleasure!
A very powerful and extremely well-equipped generator for maximum comfort and a professional finish.
Exclusive: Anti-limescale collector
It collects the limescale in the tank to extend the lifespan of your steam generator
Added comfort:
— large 1.8L removable tank with handle
— cord winder
— Ultracord system
Reference : GV8360G0
Frequent questions
Choose a board that is height-adjustable to adjust it to your height. It should be steady and robust so that you can place the ironing appliance on it.
The board should be perforated to allow the steam to pass through the fibres of the fabric to soften it and make ironing easier. The ironing board cover should also be suitable to allow the flow of steam through.
• Untreated tap water:
Your appliance has been designed to use untreated tap water.
If your water is very hard, mix 50% untreated tap water and 50% distilled water.
• Types of water not to use:
Heat concentrates the elements contained in water during evaporation. The types of water listed below may contain organic waste, mineral or chemical elements that can cause spitting, brown staining or premature wear of the appliance:
— water from clothes dryers
— scented or softened water
— water from refrigerators, batteries, air conditioners
— rain water
— boiled, filtered or bottled water
In order to ensure the best performance from your iron, these types of water should not be used for ironing.
This function allows you to iron fabrics in situ or on a hanger.
To do this, set the iron temperature button to the maximum position.
• Leave the item on a hanger and gently pull the fabric with one hand.
• Press the steam control button intermittently and move the iron from top to bottom.
As the steam produced is very hot, it softens the fibres and removes creases.
Note: Never use the vertical steam function on an item being worn by anyone.
Yes this is because the steam is generated in a separate area away from the soleplate of the iron. This allows you to obtain steam on the lowest heat setting, e.g. silks. However, when the iron temperature control is set to the lowest setting you must also set the steam output control dial (depending on the model) to the low position, otherwise water droplets may appear in the steam.
To avoid damaging the soleplate, follow this advice:
• Always place your iron on its heel rest or its base (depending on model).
• Avoid ironing over abrasive items (buttons, zip fastenings, etc.).
• Never clean your iron’s soleplate with abrasive or metallic pads.
Shiny marks can appear on some fabrics, especially on dark coloured fabrics. We would advise ironing dark clothes inside out and using the correct temperature.
If ironing mixed-fibre fabrics, set the temperature for the most fragile fibre.
Important: The iron takes longer to cool down than to heat up. We recommend that you start with fabrics to be ironed at a low temperature.
Before any maintenance, make sure that the appliance is unplugged and that the soleplate, boiler and iron rest have cooled down (at least 2 hours after ironing).
Do not use any maintenance or descaling product to clean the soleplate or the base unit. Never hold the iron or its base unit under a running tap.
Cleaning the base unit:
• Wipe the plastic parts from time to time using a slightly damp soft cloth.
Maintaining the boiler (once a month):
• Please note: To prolong your boiler’s efficiency and avoid scale deposits, you must rinse the boiler every 10 uses (around once a month).
• Check that the generator is cool and has been unplugged for more than 2 hours.
• Slowly loosen the boiler cap. If your generator boiler has an anti-calc rod, take this out and rinse it under the tap before placing it back in the boiler.
• Use a jug to fill the boiler with tap water until it is 3/4 full.
• Shake the base unit gently for a few seconds then empty it completely over the sink.
• For best results, we recommend that you perform this operation once again.
If you live in a hard water area, do this more often. Most of all, do not use any descaling products to clean the boiler as they could damage it.
Descaling operation is not needed for the steam generator, nevertheless, you could rinse the boiler every 10 uses (refer to user manual).
Never use any descaling agent or vinegar when rinsing the boiler: they could damage it.
• Models with scale collector: Rinse the scale collector under water. The next time you use your generator, press the «restart» button to turn off the orange «Anti-calc» light (depending on model).
• Models without scale collector: Rinse the boiler. The next time you use your generator, press the «restart» button to turn off the orange «Anti-calc» light (depending on model).
• The Durillium soleplate:
Regularly clean the soleplate with a damp, non metallic washing up pad. For easier, non-corrosive cleaning of your iron’s soleplate, use a damp sponge on the soleplate while it is still warm.
If cleaning dirt off is an issue, use the stick which is made specifically for cleaning the Durillium soleplates.
• The stainless soleplate:
Clean the soleplate of your iron when it is cool with a damp cloth or a non-abrasive sponge.
• The autoclean soleplate:
It is recommended that you use a soft damp cloth on the warm soleplate, in order not to damage the surface.
Warning: The use of iron cleaner will cause damage to your soleplate’s autoclean coating.
No. When starting or using the steam generator you may hear a pumping or vibrating noise along with a clicking sound. This is completely normal and is just the pump injecting water into the boiler or the steam valve opening.
After rinsing the boiler, you need to press and hold the restart button for about 3 seconds to stop the light flashing.
The anti-scale valve plug may be tightened incorrectly or the seal on the inside of the cap has perished.
Yes. However, if you notice that the steam cord is damaged, have it repaired by an authorised service partner.
Place the iron’s temperature control to the type of fabric to be ironed and set the steam output to match (If the setting temperature control is on Synthetics, the setting steam control must be on MIN).
It is normal. Your iron generates a lot of steam; this steam is condensing on the board. Some waterdrops could appeared underneath the ironing board and fall on the flooring.
If the boiler does not operate or the red light on the control panel comes on even though there is still water left in the tank, we suggest you check the water tank is not empty. You can also check the removable water tank (depending on model) is pressed down firmly in place and press the restart button located on the control panel. Also the steam output control dial may be set at minimum (depending on Model); therefore turn the dial up to increase the steam.
If your red water light is flashing there is no water in the water tank or the tank is not fully or firmly pushed down.
This can be due to:
• Trying to use steam before the iron is hot enough. Depending on the model of generator, when ironing on a low temperature, decrease the steam output by adjusting the steam output dial on the control panel. Wait for the iron temperature control light to go out before ironing.
• The water may also have condensed in the pipes because you are using steam for the first time or you have not used it for some time. In which case hold the iron away from the ironing board and press the steam control button until it produces steam.
• Over-use of the turbo steam function can cool down the iron soleplate. In this case stop using the turbo steam function and allow the iron temperature control light to come on and go off again before using this function again.
• The boiler may be too full. Do not fill it right to the top.
The generator’s safety mechanism has activated. You need to get the generator checked by an authorised service agent.
• You are using chemical descaling products or additives in the water. You should never put these products in the water tank. If this is the case, contact an approved service centre.
• Your washing has not been rinsed sufficiently or you are ironing a new item of clothing before washing it. Ensure that you have rinsed your clothes thoroughly in order to to remove soap deposits or chemicals from new garments which could stick to the iron.
• Your iron is too hot, see our recommendations on temperature control settings in your product manual.
• You are using starch. Only spray starch on the reverse of the fabric to be ironed.
Some laundry starches and synthetic fibres may stick to the surface of the iron. Please clean the Iron’s surface.
The internal parts may make metallic noises with the change in temperature. There is nothing wrong with it.
Yes, this is normal. This is due to the flow of cold water into the boiler that contains hot water.
After following the instructions in the user manual for starting the appliance, make sure that your electrical socket is working by plugging another appliance. If it still does not work, do not try to dismantle or repair the appliance yourself, instead, take it to an approved repair centre
Do not use your appliance. To avoid any danger, have it replaced by an approved repair centre.
These functions means that your steam generator is fitted with an electronic regulation which offers you the perfect temperature and steam combination allowing you to iron all your ironable fabrics without risk and without having to sort them.
No. The pressure is at a relatively low level.
Your appliance has two safety systems:
• a valve avoids any excess pressure and, in the event of malfunction of the appliance, allows the surplus steam to escape ;
• a thermal fuse to avoid any overheating.
A steam generator is the most powerful iron that generates vast amounts of powerful steam in a separate boiler unit and pumps that steam constantly and consistently through the iron’s soleplate straight into the clothes. The benefit is that this halves your ironing time and produces fantastic ironing finishes. A steam station is similar to an ordinary iron but has a larger water tank. The water is pumped up to the iron and the steam is generated in the iron not a separate boiler unit. The steam output is constant but not as powerful as a steam generator.
The formation of lime scale is avoided because the water is not in direct contact with the heating element, which is located outside the tank. However, the tank should be rinsed after 10 uses to avoid lime scale deposits.
No. The two cables are separately insulated; they are protected and rigorously checked. However, if you notice that the cable is damaged, have it repaired by an approved repair centre.
The «ECO» function allows you to reduce energy consumption. This means that less electricity is used and therefore slightly less steam is generated.
This system prevents the soleplate from clogging. Its active coating eliminates fibres and impurities that often become stuck to the plate and end up reducing its glide.
Your appliance contains valuable materials which can be recovered or recycled. Leave it at a local civic waste collection point.
Please go to the “Accessories” section of the website to easily find whatever you need for your product.
Find more detailed information in the Guarantee section of this website.
If you believe that one part is missing, please call Consumer Services Center and we will help you find a suitable solution.
www.tefal.com
D
F
NL
PRO EXPRESS
ANTI-CALC
I
E
GR
P
DK
FIN
S
GB
RU
UA
TR
RO
SK
H
CZ
HR
BG
Notice Tefal 21L — 1800111437 30/01/08 15:17 Page 1

2
16
8
14
17
1
2
3
4
6
5
7
11
12
15
19
19c
19b
19a
19e
19d
19f
19g
18
9
13
10
Notice Tefal 21L — 1800111437 30/01/08 15:17 Page 2
45°
2
1
45°
2
1
1/4
1/4
MA
X
fig. 1
fig. 2
fig. 3
fig. 7
fig. 6
fig. 5
fig. 13
fig. 10
fig. 14
fig. 11
fig. 15
fig. 19
fig. 18
fig. 17
fig. 21
fig. 22
fig. 9
fig. 4
fig. 8
fig. 12
fig. 16
fig. 20
Clic!
fig. 23
fig. 24
fig. 25
Notice Tefal 21L — 1800111437 30/01/08 15:17 Page 3

125
Важные рекомендации
Правила техники безопасности
•
Перед эксплуатацией Вашего прибора внимательно прочтите руководство: при нарушении правил,
изложенных в настоящем руководстве по эксплуатации, фирма освобождается от любой
ответственности.
•
В целях Вашей безопасности, данный прибор соответствует действующим стандартам и нормативным
актам (Директивы по низкому напряжению, электромагнитной совместимости, окружающей среде… ).
•
Ваш парогенератор является электроприбором: он должен использоваться в стандартных условиях
эксплуатации. Он предназначен исключительно для домашнего пользования.
•
Он оснащен двойной системой безопасности:
— клапан, предотвращающий повышенное давление, который в случае неверного функционирования
позволяет избежать избыточной подачи пара;
— плавкий предохранитель для предотвращения перегрева.
•
Всегда подключайте Ваш парогенератор:
— к электрическим устройствам напряжением от 220 до 240 В.
Любая ошибка при подключении может привести к необратимой поломке и отказу в гарантийном
ремонте;
— к электрической розетке с заземлением.
Если Вы используете удлинитель, убедитесь, что его розетка двухполюсная I0А с заземляющим
проводом.
•
Полностью размотайте электрический шнур, прежде чем включить его в электрическую розетку с
заземлением.
•
Если шнур электропитания или паровой шланг поврежден, необходимо произвести его замену в
авторизованном Центре сервисного обслуживания во избежание опасности.
•
Не выключайте прибор, потянув его за шнур.
Всегда выключайте Ваш прибор:
— прежде, чем наполнить резервуар для воды или ополоснуть паронагреватель;
— прежде, чем произвести его очистку;
— после каждого использования.
•
Прибор следует использовать и устанавливать на устойчивой поверхности. Когда Вы устанавливаете
утюг на подставку, убедитесь, что поверхность, на которую Вы ее поставили, устойчива.
•
Данный электроприбор не должен использоваться лицами (в том числе детьми) с ограниченными
физическими, сенсорными или умственными возможностями, а также людьми, не имеющих
соответсвующеего опыта или необходимых знаний.Указанные лица могут использовать данное
устройство только под наблюдением или после получения инструкций по его эксплкатации от лиц,
отвечающих за их безопасонсть. Следите за тем, чтобы дети не играли с устройством.
•
Никогда не оставляйте прибор без присмотра:
— когда он включен в сеть электропитания;
— пока он не остынет приблизительно в течение 1 часа.
•
Подошва Вашего утюга и подставка на корпусе могут нагреваться до очень высоких температур и могут
вызвать ожоги: не прикасайтесь к ним.
Не допускайте соприкосновения электрического шнура с горячей подошвой утюга.
•
Ваш прибор образует пар, который может вызвать ожоги. Осторожно обращайтесь с утюгом, особенно
при вертикальном отпаривании. Никогда не направляйте пар в сторону людей или животных.
•
Прежде чем опорожнить паронагреватель, необходимо дождаться, пока парогенератор остынет и будет
выключен в течение 2 часов, чтобы открутить пробку паронагревателя.
•
Внимание: падение предохранительной пробки паронагревателя или сильный удар могут привести к
нарушению работы клапана. В этом случае необходимо произвести замену пробки паронагревателя в
авторизованном Центре сервисного обслуживания.
•
Во время ополаскивания паронагревателя, никогда не наполняйте его непосредственно под краном.
•
В случае утери или повреждения пробки паронагревателя, замените ее в авторизованном Центре
сервисного обслуживания.
•
Никогда не погружайте парогенератор в воду или в любую другую жидкость. Никогда не подставляйте
его под кран с водой.
•
Прибор не должен использоваться, если он падал, если имеются видимые повреждения, в случае
утечки или сбоев в работе. Никогда не разбирайте Ваш прибор: его необходимо доставить для осмотра
в авторизованный Сервисный центр во избежание опасности.
RU
Notice Tefal 21L — 1800111437 30/01/08 15:18 Page 125

Описание, Какую воду использовать, Наполнение паронагревателя
Подготовка, Система «ultracord, В зависимости от модели) Чат поддержки
- Изображение
- Текст
126
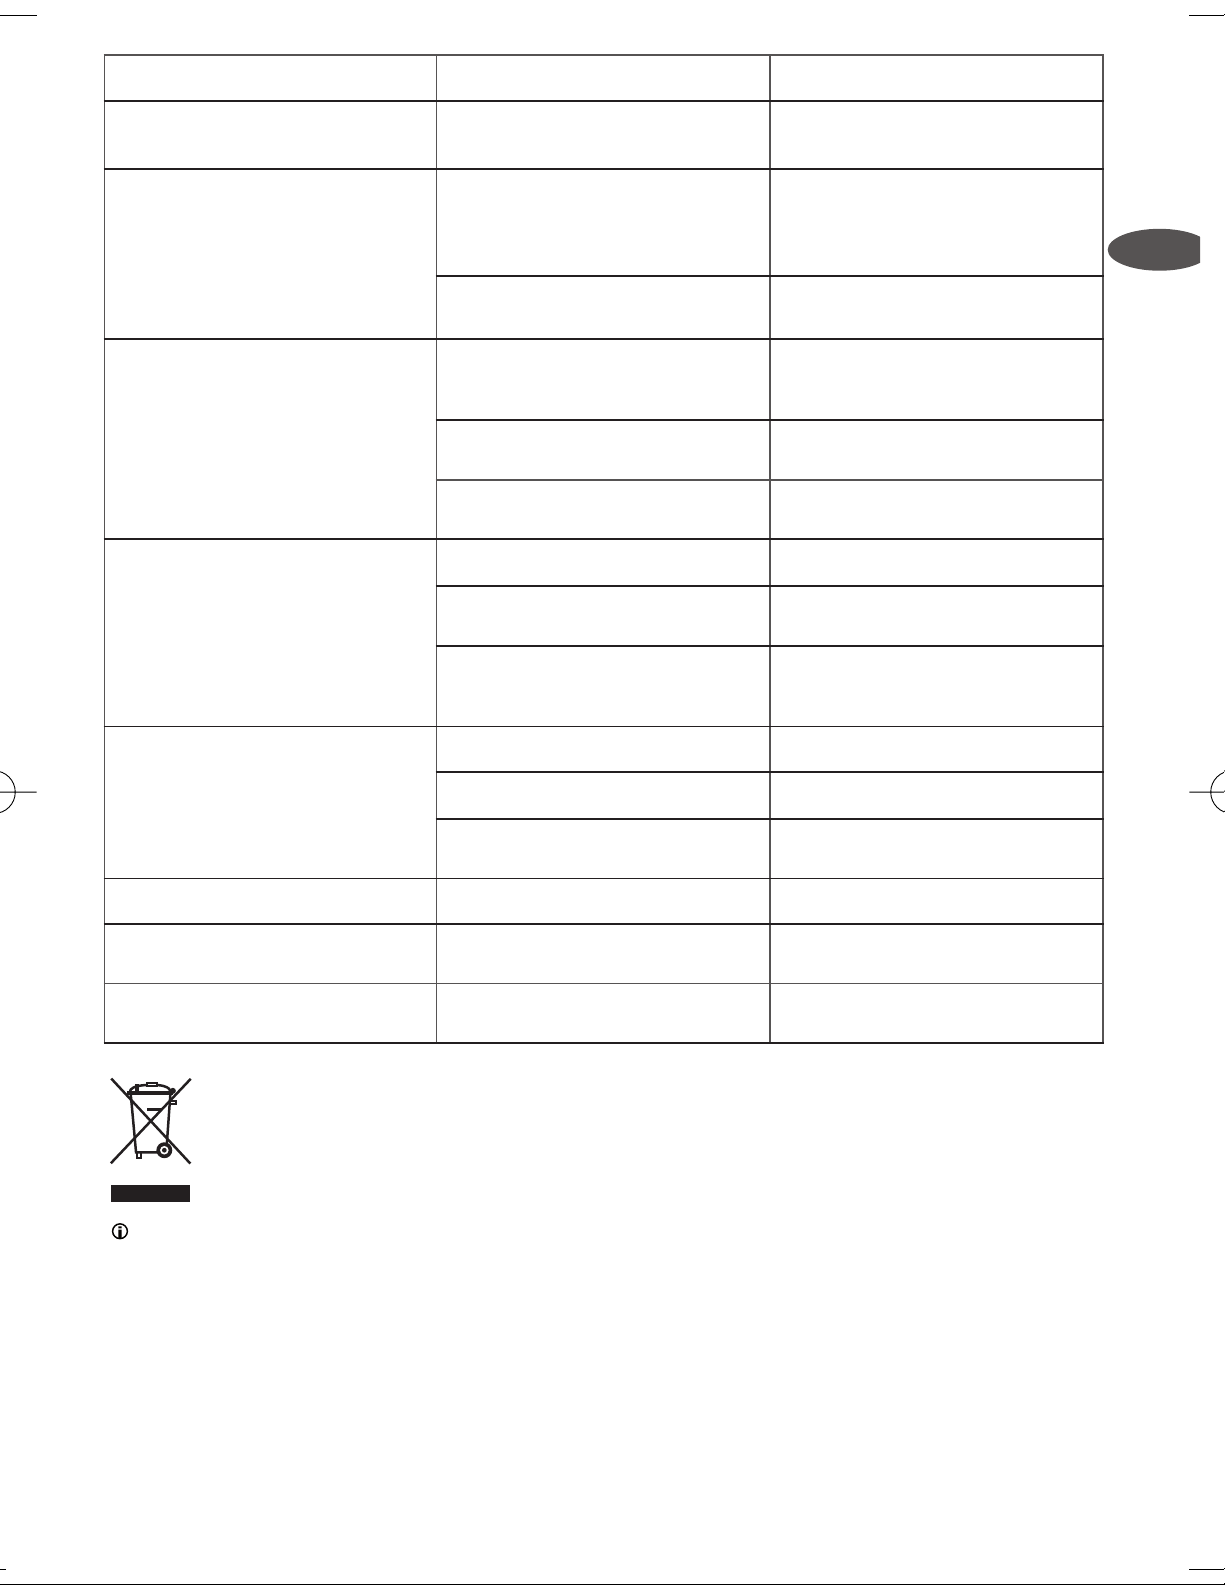
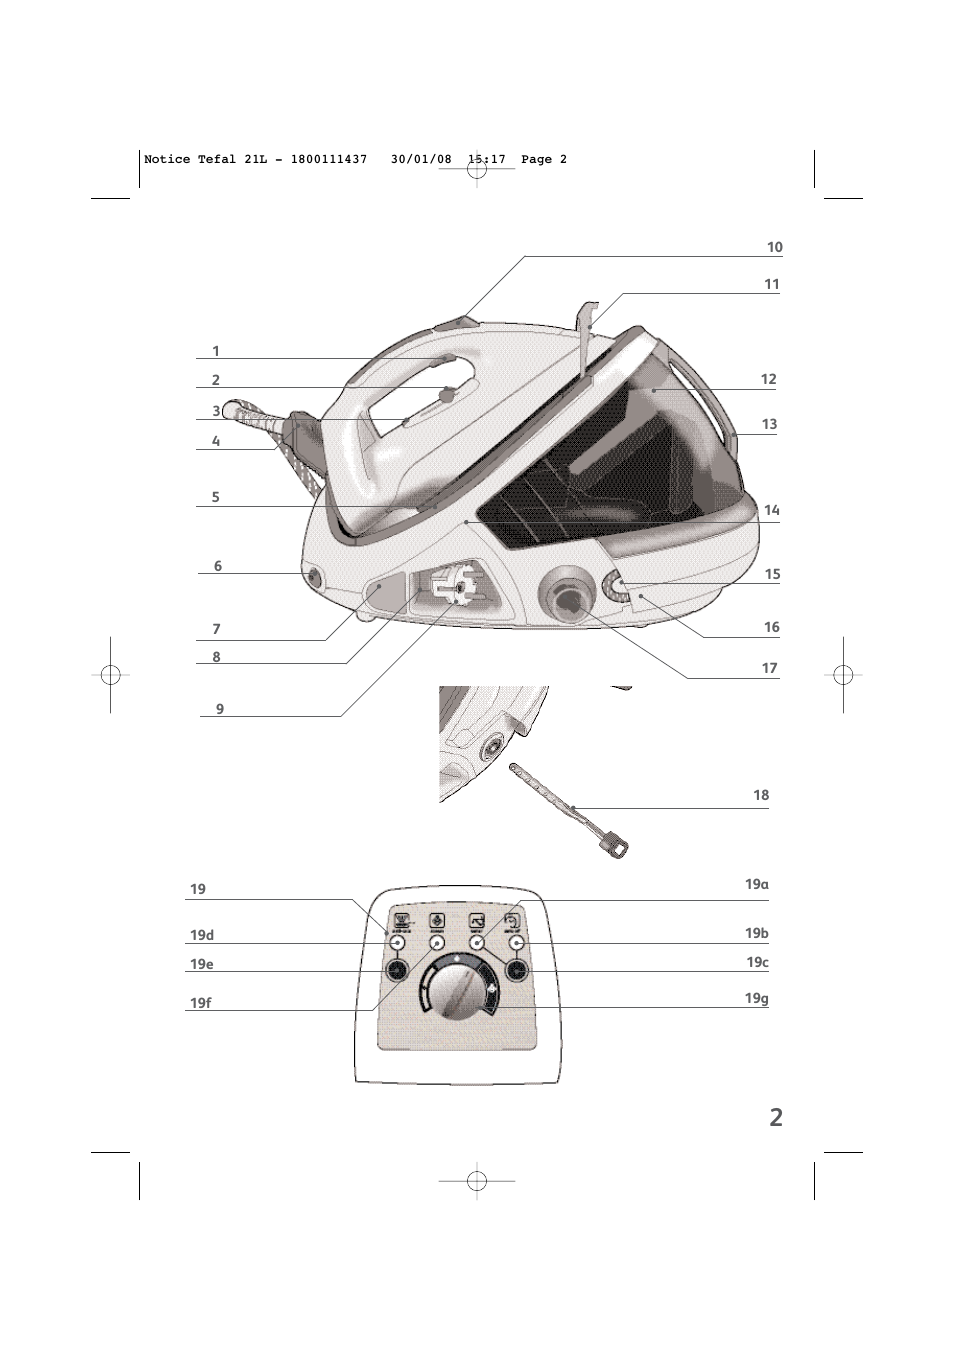
Описание
1.
Кнопка включения пара
2.
Ползунковый регулятор температуры нагревания
утюга
3.
Индикатор утюга
4.
Система «Ultracord» (в зависимости от модели)
5.
Площадка для утюга
6.
Загорающийся переключатель вкл/выкл O/I
7.
Кнопка для наматывания шнура питания
(в
зависимости от модели)
8.
Место для хранения шнура питания
9.
Электрический шнур
10.
Кнопка режима «Turbo»
(в зависимости от модели)
11.
Скоба для крепления утюга к корпусу (в зависимости
от модели)
12.
Съемная емкость для воды 1,8 l
1
3.
Ручка для снятия и установки съемного резервуара
для воды
14.
Нагреватель (внутри корпуса)
15.
Шнур для подачи пара
16.
Канал для хранения шнура для
подачи пара
17.
Крышка отделения для установки
приспособления для сбора накипи
18.
Приспособление для сбора накипи
19.
Панель управления
a. Красный индикатор «Съемная
емкость для воды пуста»
b. Красный индикатор
«автоотключение»
c. Кнопка «Restart» для повторного
включения
d. Красный индикатор
“anti-calc”
e. Кнопка
“Reset”
f. Зеленый индикатор «Прибор готов
к работе»
g. Регулятор подачи пара
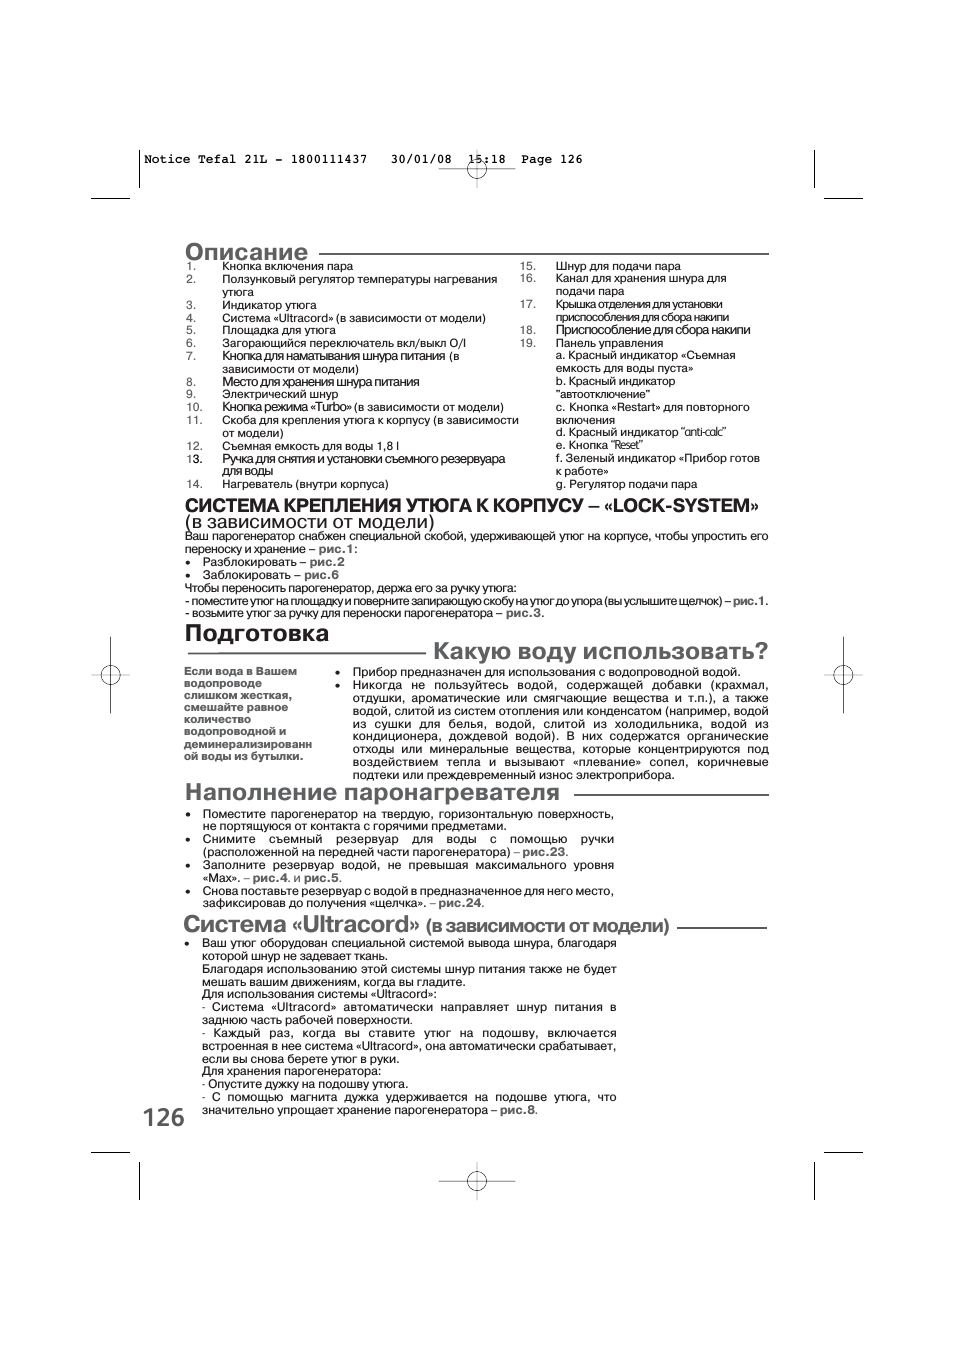
СИСТЕМА КРЕПЛЕНИЯ УТЮГА К КОРПУСУ – «LOCK-SYSTEM»
(в зависимости от модели)
Ваш парогенератор снабжен специальной скобой, удерживающей утюг на корпусе, чтобы упростить его
переноску и хранение –
рис.1
:
•
Разблокировать –
рис.2
•
Заблокировать –
рис.6
Чтобы переносить парогенератор, держа его за ручку утюга:
— поместите утюг на площадку и поверните запирающую скобу на утюг до упора (вы услышите щелчок) –
рис.1
.
— возьмите утюг за ручку для переноски парогенератора –
рис.3
.
Какую воду использовать?
•
Прибор предназначен для использования с водопроводной водой.
•
Никогда не пользуйтесь водой, содержащей добавки (крахмал,
отдушки, ароматические или смягчающие вещества и т.п.), а также
водой, слитой из систем отопления или конденсатом (например, водой
из сушки для белья, водой, слитой из холодильника, водой из
кондиционера, дождевой водой). В них содержатся органические
отходы или минеральные вещества, которые концентрируются под
воздействием тепла и вызывают «плевание» сопел, коричневые
подтеки или преждевременный износ электроприбора.
Наполнение паронагревателя
• Поместите парогенератор на твердую, горизонтальную поверхность,
не портящуюся от контакта с горячими предметами.
• Снимите съемный резервуар для воды с помощью ручки
(расположенной на передней части парогенератора)
– рис.23.
• Заполните резервуар водой, не превышая максимального уровня
«Max».
– рис.4. и рис.5.
• Снова поставьте резервуар с водой в предназначенное для него место,
зафиксировав до получения «щелчка».
– рис.24.
Подготовка
Если вода в Вашем
водопроводе
слишком жесткая,
смешайте равное
количество
водопроводной и
деминерализированн
ой воды из бутылки.
•
Ваш утюг оборудован специальной системой вывода шнура, благодаря
которой шнур не задевает ткань.
Благодаря использованию этой системы шнур питания также не будет
мешать вашим движениям, когда вы гладите.
Для использования системы «Ultracord»:
— Система «Ultracord» автоматически направляет шнур питания в
заднюю часть рабочей поверхности.
— Каждый раз, когда вы ставите утюг на подошву, включается
встроенная в нее система «Ultracord», она автоматически срабатывает,
если вы снова берете утюг в руки.
Для хранения парогенератора:
— Опустите дужку на подошву утюга.
— С помощью магнита дужка удерживается на подошве утюга, что
значительно упрощает хранение парогенератора –
рис.8.
Система «Ultracord»
(в зависимости от модели)
Notice Tefal 21L — 1800111437 30/01/08 15:18 Page 126
Включите ваш парогенератор, Применение глажение с отпариванием, Установите температуру и мощность подачи пара
Страница 6 Чат поддержки
- Изображение
- Текст
127
RU
ВКЛЮЧИТЕ ВАШ ПАРОГЕНЕРАТОР
•
Полностью размотайте электрический шнур и вытяните шнур для подачи пара
из его ниши.
•
Поверните блокировочную скобу вперед, чтобы отсоединить утюг. –
рис.3
(в зависимости от модели).
•
Включайте Ваш парогенератор в электрическую розетку с заземлением.
•
Нажмите на переключатель вкл/выкл, расположенный на корпусе:
зеленый индикатор на панели управления замигает, и нагреватель начнет
нагреваться –
рис.7
.
•
Примерно через 2 минуты светодиод перестанет мигать. Это означает, что пар
готов к работе.
Применение
Глажение с отпариванием
•
Установите ползунок регулятора температуры утюга на требуемый тип
ткани (см. прилагаемую таблицу).
•
Загорится световой индикатор утюга. Внимание: прибор готов к работе,
когда индикатор утюга погаснет, а зеленый индикатор на панели
управления будет гореть постоянно.
•
Отрегулируйте подачу пара (с помощью регулятора, расположенного на
панели управления.
•
Во время глажения индикатор, расположенный на утюге, и индикатор
готовности пара могут загораться или гаснуть, в зависимости от
необходимости дополнительного нагрева. Это не влияет на возможность
использования прибора.
•
Для получения пара нажмите кнопку подачи пара на ручке утюга –
рис.8
.
При отпускании кнопки подача пара прекращается.
•
Примерно через минуту, и периодически во время пользования,
электронасос, установленный в Вашем приборе, будет подавать воду в
нагреватель. Производимый им шум не является неисправностью.
•
Если вы используете крахмал, распыляйте его с той стороны ткани,
которую не будете проглаживать.
При первом
использовании может
появиться безвредный
дым или запах. Эти
явления никак не
повлияют на работу
прибора и быстро
прекратятся.
Не ставьте утюг на
металлическую
подставку — вы можете
его повредить. Ставьте
утюг на площадку на
корпусе: она имеет
противоскользящее
покрытие и может
выдерживать
значительную
температуру.
Установите температуру и мощность
подачи пара
Кип ткани
Нстановка температуры
утюга с помощью ползунка
Положение регулятора
подачи пара
Лен
Хлопок
•••
Шерсть
Шелк, Вискоза
••
Синтетика
Полиэстер, Ацетат,
Акрил, Полиамид
•
РЕГУЛИРОВКА ТЕМПЕРАТУРЫ В ЗАВИСИМОСТИ ОТ ТИПА ПРОГЛАЖИВАЕМОЙ ТКАНИ
:
В случае возникновения сомнений относительно типа ткани одежды, которую вы
собираетесь гладить, смотрите информацию на этикетке.
Notice Tefal 21L — 1800111437 30/01/08 15:18 Page 127

128
Разглаживайте вертикально
•
Установите регулятор температуры утюга и регулятор расхода пара (в
зависимости от модели) на максимальное положение.
•
Повесьте одежду на плечики и слегка натяните ткань рукой.
Образуемый пар очень горячий, ни в коем случае не разглаживайте
одежду на человеке, а только лишь на плечиках.
•
Нажимайте на регулятор подачи пара
– рис.8
с перерывами, выполняя
движение сверху вниз
– рис.9
.
Наполнение резервуара для воды
•
Если загорается красный индикатор “Емкость для воды пуста”
– рис.10
это значит, что вода в резервуаре закончилась, образование пара
невозможно.
1.Снимите съемный резервуар для воды с помощью ручки
(расположенной на передней части парогенератора) и заполните
резервуар водой, не превышая максимального уровня.
2. Снова поставьте резервуар с водой в предназначенное для него место,
зафиксировав пока не услышите щелчок.
3. Подключите парогенератор к сети. Для повторного включения нажмите
расположенную на панели управления кнопку «restart» и продолжайте
гладить
– рис.11
.
Функция «TURBO»
(в зависимости от модели)
•
Нажмите 2-3 раза в импульсном режиме на кнопку «turbo» для получения
одномоментного увеличения мощности подачи пара:
— для того чтобы погладить более толстые ткани,
— для устранения лишних складок,
— для усиленного вертикального отпаривания.
Соблюдайте меры предосторожности при использовании функции
«turbo», т.к. повышенная мощность подаваемого пара может привести к
ожогам.
• Установка температуры утюга с помощью ползунка :
— Рекомендуется начинать глажку с тканей, требующих более низкой
температуры (•), переходя затем к тканям, выдерживающим более
высокую температуру (••• или Max).
— Если вы гладите смешанную ткань, отрегулируйте температуру утюга для
самой деликатной ткани.
— При глажении шерстяных вещей проведите над ними утюгом, не ставя
его на ткань, и периодически нажимайте на кнопку подачи пара. Это
позволит вам избежать эффекта лоснящейся ткани.
• Установка регулятора подачи пара
:
— При глажении плотных тканей увеличьте подачу пара
– рис.8
.
— Если вы гладите при низкой температуре, установите подачу пара на
минимум.
• Сухое глажение:
—
Не нажимайте на регулятор подачи пара.
При первом
использовании или если
вы несколько минут не
пользовались паром:
несколько раз подряд
нажмите кнопку подачи
пара, направив утюг в
сторону от белья. Это
позволит удалить
холодную воду из
системы
парообразования
.
При глажении тканей,
кроме льняных и
хлопковых,
удерживайте утюг в
нескольких
сантиметрах, чтобы не
спалить ткань.
Notice Tefal 21L — 1800111437 30/01/08 15:18 Page 128

129
RU
Техническое обслуживание и очистка
Чистка Вашего парогенератора
•
Не применяйте никаких средств бытовой химии или средств для удаления
накипи для очистки подошвы или корпуса.
•
Никогда не подставляйте утюг или его корпус под кран с водой.
•
Производите очистку подошвы регулярно при помощи не металлической
губки. При сильном загрязнении подошвы протрите ее влажной тканью
(пока подошва еще теплая).
•
Время от времени производите очистку пластмассовых частей при помощи
мягкой, слегка влажной ткани.
Рекомендация: Для
облегчения чистки
подошвы утюга, а
также для
соблюдения более
щадящего режима,
очищайте еще
теплую подошву с
помощью влажной
губки.
Удобное удаление накипи из парогенератора:
Для увеличения срока годности парогенератора вашего утюга и
предотвращения оседания накипи, парогенератор оборудован
встроенным приспособлением для сбора накипи. Расположенное в
резервуаре для воды, это приспособление автоматически собирает
накипь, которая образуется в парогенераторе.
Принцип действия:
•
Световой индикатор оранжевого цвета “anti-calc” начинает мигать на
панели управления, информируя вас о необходимости промыть
приспособление для сбора накипи
— рис.13
Внимание: эту процедуру следует проводить только в том
случае, если парогенератор отключен от сети не менее чем в
течение двух часов, и если он полностью остыл.. Для проведения
этой процедуры следует поставить парогенератор около мойки,
т.к. во время открывания из резервуара может вытекать вода.
•
Как только парогенератор полностью остыл, снимите крышку с
отделения для приспособления для сбора накипи
— рис.16
•
Полностью выкрутите приспособление и выньте его из отделения, на
приспособлении находится накипь, которая образовалась в
резервуаре для воды
— рис.17 и рис.18.
•
Для очистки от накипи достаточно просто промыть приспособление
под краном
— рис.19.
•
Поставьте приспособление в предназначенное для этого место,
хорошо закрутите, чтобы обеспечить герметичность системы
— рис.20.
•
Установите заглушку пробки на место: метка, расположенная на
заглушке пробки, должна быть расположена напротив метки,
нанесенной на корпусе
Во время последующего использования нажмите на кнопку
“reset”, расположенную на панели управления, для того чтобы
световой индикатор оранжевого цвета “anti-calc” погас.
Не используйте
вещества, удаляющие
накипь (уксус,
вещества, удаляющие
накипь,
промышленного
производства…), для
того чтобы сполоснуть
парогенератор: их
использование может
привести к
повреждению
парогенератора.
Прежде чем приступить
к очистке
парогенератора вашего
утюга, во избежание
риска получения
ожогов в обязательном
порядке дайте ему
полностью остыть в
течение не менее 2
часов.
Система “auto off”
•
В целях вашей безопасности парогенератор оборудован системой
“auto off”, которая переводит утюг в режим ожидания в том случае,
если прибор не используется в течение 8 минут, или, если вы забыли о
нем.
•
Световой индикатор красного цвета начинает мигать на панели
управления, информируя вас о том, что в приборе включен режим
ожидания.
— рис.15.
•
Для включения парогенератора:
— Нажмите на кнопку “Restart”.
— Подождите, пока световой индикатор кнопки “vapeur prРte” (пар
готов) перестанет мигать, после чего вы можете снова возобновить
глажение.
•
Если вы не используете кнопку «пар» в течение как минимум 8 минут, в
целях вашей безопасности система «автоотключение»отключает
парогенератор вашего утюга.
Notice Tefal 21L — 1800111437 30/01/08 15:18 Page 129

130
Хранение парогенератора
•
Поставьте утюг на корпус парогенератора.
•
Переведите в необходимое положение выключатель пуск/останов и
отключите прибор от электросети.
•
Поверните запирающую скобу утюга до упора (Вы услышите щелчок) –
рис.2
. Таким образом, Ваш утюг будет безопасно закреплен на корпусе.
Уберите электрический шнур в отсек для хранения
•
Храните шнур для подачи пара шнур для подачи пара в предназначенном
для этого канале. Сложите шнур в два раза, чтобы образовалась петля.
Положите конец петли в канал для хранения ,затем аккуратно тащите до тех
пор, пока не увидите конец с другой стороны канала.
– рис.20
.
• Опустите систему «ultracord» на подошву утюга
—
рис.8
.
•
Дайте остыть парогенератору прежде, чем убрать его.
•
Вы можете благополучно убрать Ваш парогенератор в место его хранения.
Неисправность Вашего парогенератора
Неисправности
Вероятные причины
Устранение
неисправностей
Парогенератор не включается.
Индикатор утюга и
загорающийся переключатель
вкл/выкл не горят.
Электроприбор не находится под
напряжением.
Включена система “auto off”
Убедитесь, что электроприбор
правильно подключен к сети, и
нажмите на загорающийся
переключатель вкл/выкл,
расположенный в боковой части
корпуса.
Нажмите на кнопку “restart”
Вода вытекает из отверстий
подошвы.
Обратитесь в авторизованный
Сервисный центр.
Вы используете пар, в то время
как Ваш утюг не достаточно
горячий.
Проверьте настройку термостата
и расхода пара (в зависимости от
модели).
Вода конденсируется в трубках,
так как Вы используете пар
первый раз или Вы не
использовали его в течение
некоторого времени.
Нажимайте на регулятор подачи
пара в стороне от гладильной
доски до тех пор, пока утюг не
станет выбрасывать пар.
На белье появляются следы
воды.
Чехол гладильной доски
перенасыщен водой, так как он
не подходит для работы с
мощным парогенератором
Убедитесь, что вы гладите на
подходящей поверхности.
Белые потеки появляются из
отверстий подошвы.
Ваш паронагреватель
выбрасывает накипь, поскольку
он не ополаскивается регулярно.
Промойте приспособление для
сбора накипи (смотри § “удалите
накипь в парогенераторе”).
Коричневые потеки появляются
из отверстий подошвы и пачкают
белье.
Вы применяете химические
средства для очистки от накипи
или воду с добавками.
Никогда не добавляйте никаких
средств в паронагреватель (см. §
какую воду использовать).
Notice Tefal 21L — 1800111437 30/01/08 15:18 Page 130

131
Неисправности
Вероятные причины
Устранение
неисправностей
Подошва загрязнена или
коричневого цвета и может
испачкать белье.
Вы устанавливаете слишком
высокую температуру.
Обратитесь к нашим
рекомендациям по регулировке
температуры.
Вы недостаточно сполоснули
белье или Вы гладите новую
одежду до стирки.
Убедитесь в том, что Вы хорошо
прополоскали белье, чтобы
удалить вероятные остатки мыла
или химических средств с новой
одежды.
Вы используете крахмал.
Всегда распыляйте крахмал с
обратной стороны ткани, которую
гладите.
Недостаточная подача или
отсутствие пара.
В паронагревателе нет воды.
Наполните водой
паронагреватель.
Паронагреватель еще не находится
в состоянии готовности.
После включения, подождите 8
минут или пока не загорится
световой индикатор готовности
пара (в зависимости от модели).
Температура подошвы утюга
нагрелась до максимума.
Парогенератор работает, но пар
слишком горячий и сухой, как
следствие, менее видимый.
Пробка пропускает пар.
Пробка плохо закручена.
Плотнее закрутите пробку.
Уплотнитель пробки поврежден.
Не используйте больше
парогенератор и обратитесь в
авторизованный Сервисный центр.
Прибор неисправен.
Не используйте больше
парогенератор и обратитесь в
авторизованный Сервисный центр.
Зажегся красный индикатор
“Емкость для воды пуста”.
Вы не нажали на кнопку
«Restart» для повторного
включения.
Для повторного включения
нажмите на кнопку «Restart»,
расположенную на панели
управления.
Пар выходит снизу прибора.
Прибор поврежден.
Больше не пользуйтесь
парогенератором и свяжитесь с
авторизованным сервисным
центром.
В случае невозможности установить причину неисправности, обратитесь в авторизованный
Центр сервисного обслуживания.
Не забывайте об охране окружающей среды!
При изготовлении прибора были использованы различные ценные и подлежащие повторной
переработке материалы.
По окончании срока годности направьте их в пункт сбора вторсырья или хотя бы в
соответствующий сервисный центр, которые обеспечат их правильную обработку.
Notice Tefal 21L — 1800111437 30/01/08 15:18 Page 131

03:42
Обзор парогенератора Tefal Pro Express Ultimate GV9581
13:49
ГЛАЖКА И ОБЗОР УТЮГА/ПАРОГЕНЕРАТОРА
11:43
КАК УХАЖИВАТЬ ЗА ОДЕЖДОЙ. ПАРОГЕНЕРАТОР
13:38
Парогенератор Tefal GV8932 ОБЗОР
02:50
Обзор парогенератора с бойлером Tefal Pro Express GV7850E0 от эксперта «М.Видео»
04:15
Tefal GV 8330 Dampfgenerator Pro Express
01:54
Льет воду: Парогенератор с бойлером Tefal Pro Express Care GV9070E0 (GV9070 E0 GV9060 GV9080)
02:42
Чистка парогенератора от накипи
Нажмите на кнопку для помощи