
CFD-S35CP
SERVICE MANUAL
Ver. 1.7 2007.07
Section
Section
Canadian Model
AEP Model
UK Model
Model Name Using Similar Mechanism CFD-S350/S350L
CD
CD Mechanism Type KSM-213CDP
Optical Pick-up Name KSS-213C
Model Name Using Similar Mechanism CFD-S350/S350L
TC
Tape T ransport Mechanism Type MF-S350
E Model
CD player section
System
Compact disc digital audio system
Laser diode properties
Material: GaAlAs
Wave length: 780 nm
Emission duration: Continuous
Laser output: Less than 44.6 µW
(This output is the value measured at a distance
of about 200 mm from the objective lens surface
on the optical pick-up block with 7 mm
aperture.)
Spindle speed
200 r/min (rpm) to 500 r/min (rpm)
(CLV)
Number of channels
2
Frequency response
20 — 20,000 Hz +1/–2 dB
Wow and flutter
Below measurable limit
SPECIFICATIONS
Radio section
Frequency range
CND, E Model
FM 87.5 — 108 MHz
AM CND, MX model:
530 — 1,710 kHz
other models:
531 — 1,611 kHz (9 kHz step)
530 — 1,610 kHz (10 kHz step)
AEP, UK Model
FM 87.5 — 108 MHz
MW 531 — 1,611 kHz (9 kHz step)
530 — 1,610 kHz (10 kHz step)
LW 153 — 279 kHz
Aerials
FM: Telescopic aerials
AM/MW/LW: Built-in ferrite bar aerials
Cassette-corder section
Recording system
4-track 2 channel stereo
Fast winding time
Approx. 120 s (sec.) with Sony cassette C-60
Frequency response
TYPE I (normal): 80 — 10,000 Hz
– Continued on next page –
9-879-598-08
2007G04-1
© 2007.07
CD RADIO CASSETTE-CORDER
Sony Corporation
Personal Audio Division
Published by Sony Techno Create Corporation

CFD-S35CP
Ver. 1.4
General
Speaker
Full range: 10 cm dia., 3.2 Ω, cone type (2)
Outputs
Headphones jack (stereo minijack):
For 16 — 68 Ω impedance headphones
Maximum Power output
CND, MX model: 2.3 W + 2.3 W
(at 3.2 ohms, 10% harmonic distortion)
other models: 5.2 W
Power requirements
For CD radio cassette-corder:
CND, MX model: 120 V AC, 60 Hz
KR model: 220 V AC, 60 Hz
EA model: 220-240 V AC, 50/60 Hz
Other models: 230 V AC, 50 Hz
9 V DC, 6 R20 (size D) batteries
For remote control:
3 V DC, 2 R03 (size AAA) batteries
Power consumption
AC 14 W
Battery life
For CD radio cassette-corder:
FM recording
Sony R20P: approx. 13.5 h
Sony alkaline LR20: approx. 20 h
Tape playback
Sony R20P: approx. 7.5 h
Sony alkaline LR20: approx. 15 h
CD playback
Sony R20P: approx. 2.5 h
Sony alkaline LR20: approx. 7 h
Dimensions
Approx. 420 × 155 × 260 mm (w/h/d)
(incl. projecting parts)
Mass
Approx. 3.7 kg (incl. batteries)
Supplied accessory
Mains lead (1)
Remote control (1)
Conversion plug adaptor (1) (UK model)
CAUTION
Use of controls or adjustments or performance of procedures
other than those specified herein may result in hazardous
radiation exposure.
Flexible Circuit Board Repairing
• Keep the temperature of the soldering iron around 270 °C
during repairing.
• Do not touch the soldering iron on the same conductor of the
circuit board (within 3 times).
• Be careful not to apply force on the conductor when soldering
or unsoldering.
Notes on chip component replacement
• Never reuse a disconnected chip component.
• Notice that the minus side of a tantalum capacitor may be
damaged by heat.
NOTES ON HANDLING THE OPTICAL PICK-UP BLOCK
OR BASE UNIT
The laser diode in the optical pick-up block may suffer electrostatic
breakdown because of the potential difference generated by the
charged electrostatic load, etc. on clothing and the human body.
During repair, pay attention to electrostatic breakdown and also use
the procedure in the printed matter which is included in the repair
parts.
The flexible board is easily damaged and should be handled with
care.
NOTES ON LASER DIODE EMISSION CHECK
The laser beam on this model is concentrated so as to be focused on
the disc reflective surface by the objective lens in the optical pickup block. Therefore, when checking the laser diode emission,
observe from more than 30 cm away from the objective lens.
SAFETY-RELATED COMPONENT WARNING!!
Design and specifications are subject to change
without notice.
•Abbreviation
CND : Canadian model
EA : Saudi Arabia model
KR : Korean model
MX : Mexican model
COMPONENTS IDENTIFIED BY MARK 0 OR DOTTED LINE
WITH MARK 0 ON THE SCHEMATIC DIAGRAMS AND IN
THE PARTS LIST ARE CRITICAL TO SAFE OPERATION.
REPLACE THESE COMPONENTS WITH SONY PARTS
WHOSE PART NUMBERS APPEAR AS SHOWN IN THIS
MANUAL OR IN SUPPLEMENTS PUBLISHED BY SONY.
ATTENTION AU COMPOSANT AYANT RAPPORT
À LA SÉCURITÉ!!
LES COMPOSANTS IDENTIFIÉS P AR UNE MARQUE 0 SUR LES
DIAGRAMMES SCHÉMA TIQUES ET LA LISTE DES PIÈCES SONT
CRITIQUES POUR LA SÉCURITÉ DE FONCTIONNEMENT. NE
REMPLACER CES COMPOSANTS QUE PAR DES PIÈCES SONY
DONT LES NUMÉROS SONT DONNÉS DANS CE MANUEL OU
DANS LES SUPPLÉMENTS PUBLIÉS PAR SONY.
2

CFD-S35CP
UNLEADED SOLDER
•
Boards requiring use of unleaded solder are printed with the leadfree mark (LF) indicating the solder contains no lead.
(Caution:Some printed circuit boards may not come printed with
the lead free mark due to their particular size.)
: LEAD FREE MARK
Unleaded solder has the following characteristics.
• Unleaded solder melts at a temperature about 40°C higher than
ordinary solder.
Ordinary soldering irons can be used but the iron tip has to be
applied to the solder joint for a slightly longer time.
Soldering irons using a temperature regulator should be set to
about 350°C.
Caution:The printed pattern (copper foil) may peel away if the
heated tip is applied for too long, so be careful!
• Strong viscosity
Unleaded solder is more viscous (sticky, less prone to flow)
than ordinary solder so use caution not to let solder bridges
occur such as on IC pins, etc.
• Usable with ordinary solder
It is best to use only unleaded solder but unleaded solder may
also be added to ordinary solder.
TABLE OF CONTENTS
1. SERVICING NOTES ………………………………………… 4
2. GENERAL …………………………………………………………. 5
3. DISASSEMBLY
3-1. Cabinet Top Assy……………………………………………………. 7
3-2. Cabinet Front Assy, Cabinet Rear Assy……………………… 7
3-3. Wires…………………………………………………………………….. 8
3-4. MD Block ……………………………………………………………… 8
3-5. Holder Cassette………………………………………………………. 9
3-6. POWER KEY Board ………………………………………………. 9
3-7. MAIN Board………………………………………………………….. 10
3-8. TUNER Board, POWER Board ……………………………….. 10
3-9. CD Lid………………………………………………………………….. 11
3-10. LCD Block Assy…………………………………………………….. 11
3-11. CD Block Assy ………………………………………………………. 12
3-12. Optical Pick-up………………………………………………………. 12
3-13. R/P Head (HRP301), Erase Head (HE301), TC Board… 13
3-14. Motor Assy (M801), RF Belt …………………………………… 13
4. MECHANICAL ADJUSTMENTS……………………. 14
5. ELECTRICAL ADJUSTMENTS
Tape Section ………………………………………………………….. 14
Tuner Section…………………………………………………………. 15
CD Section ……………………………………………………………. 17
6. DIAGRAMS
6-1. Block Diagram – CD Section – ……………………………….. 19
6-2. Block Diagram – TUNER-2 BAND Section –…………… 20
6-3. Block Diagram – TUNER-3 BAND Section –…………… 21
6-4. Block Diagram – MAIN Section –…………………………… 22
6-5. Printed Wiring Board – MP3-CD Section – ………………. 24
6-6. Schematic Diagram – MP3-CD Section –…………………. 25
6-7. Printed Wiring Board – TUNER-2 BAND Section – ….. 26
6-8. Schematic Diagram – TUNER-2 BAND Section –…….. 27
6-9. Printed Wiring Board – TUNER-3 BAND Section – ….. 28
6-10. Schematic Diagram – TUNER-3 BAND Section –…….. 29
6-11. Printed Wiring Boards – MAIN Section – ………………… 30
6-12. Schematic Diagram – MAIN Section (1/2) – …………….. 31
6-13. Schematic Diagram – MAIN Section (2/2) – …………….. 32
6-14. Printed Wiring Board – TC Section –……………………….. 33
6-15. Schematic Diagram – TC Section – …………………………. 34
6-16. Printed Wiring Boards – CONTROL Section – …………. 35
6-17. Schematic Diagram – CONTROL Section –……………… 36
6-18. Printed Wiring Boards – POWER Section – ……………… 37
6-19. Schematic Diagram – POWER Section – …………………. 38
7. EXPLODED VIEWS
7-1. Cabinet Section………………………………………………………. 46
7-2. Cabinet (Front) Section …………………………………………… 47
7-3. Cabinet (Top) (1) Section ………………………………………… 48
7-4. Cabinet (Top) (2) Section ………………………………………… 49
7-5. Cabinet (Rear) Section ……………………………………………. 50
7-6. Tape Mechanism Section (MF-S350)………………………… 51
7-7. CD Mechanism Section (KSM-213CDP) ………………….. 52
8. ELECTRICAL PARTS LIST ……………………………. 53
3
CFD-S35CP
SECTION 1
SERVICING NOTES
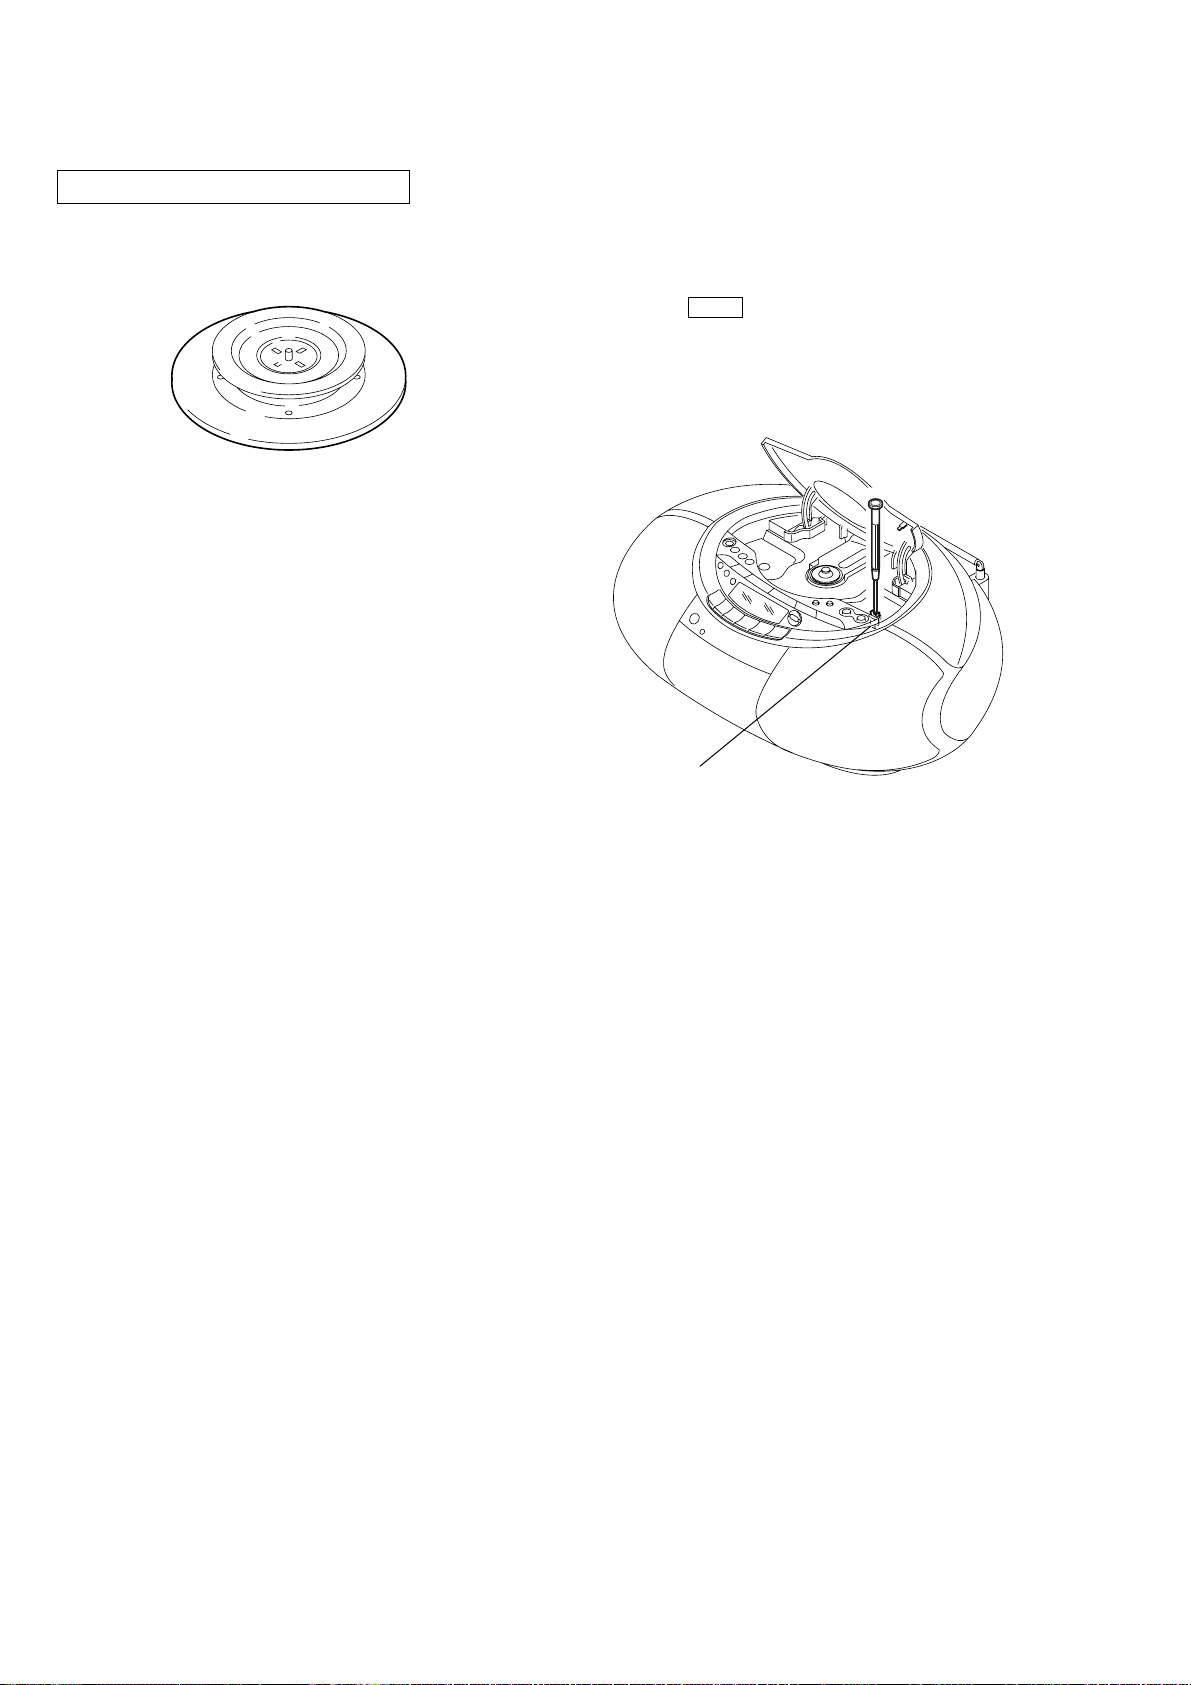
CHUCK PLATE JIG ON REPAIRING
On repairing CD section, playing a disc without the lid (CD), use
Chuck Plate Jig.
• Code number of Chuck Plate Jig: X-4918-255-1
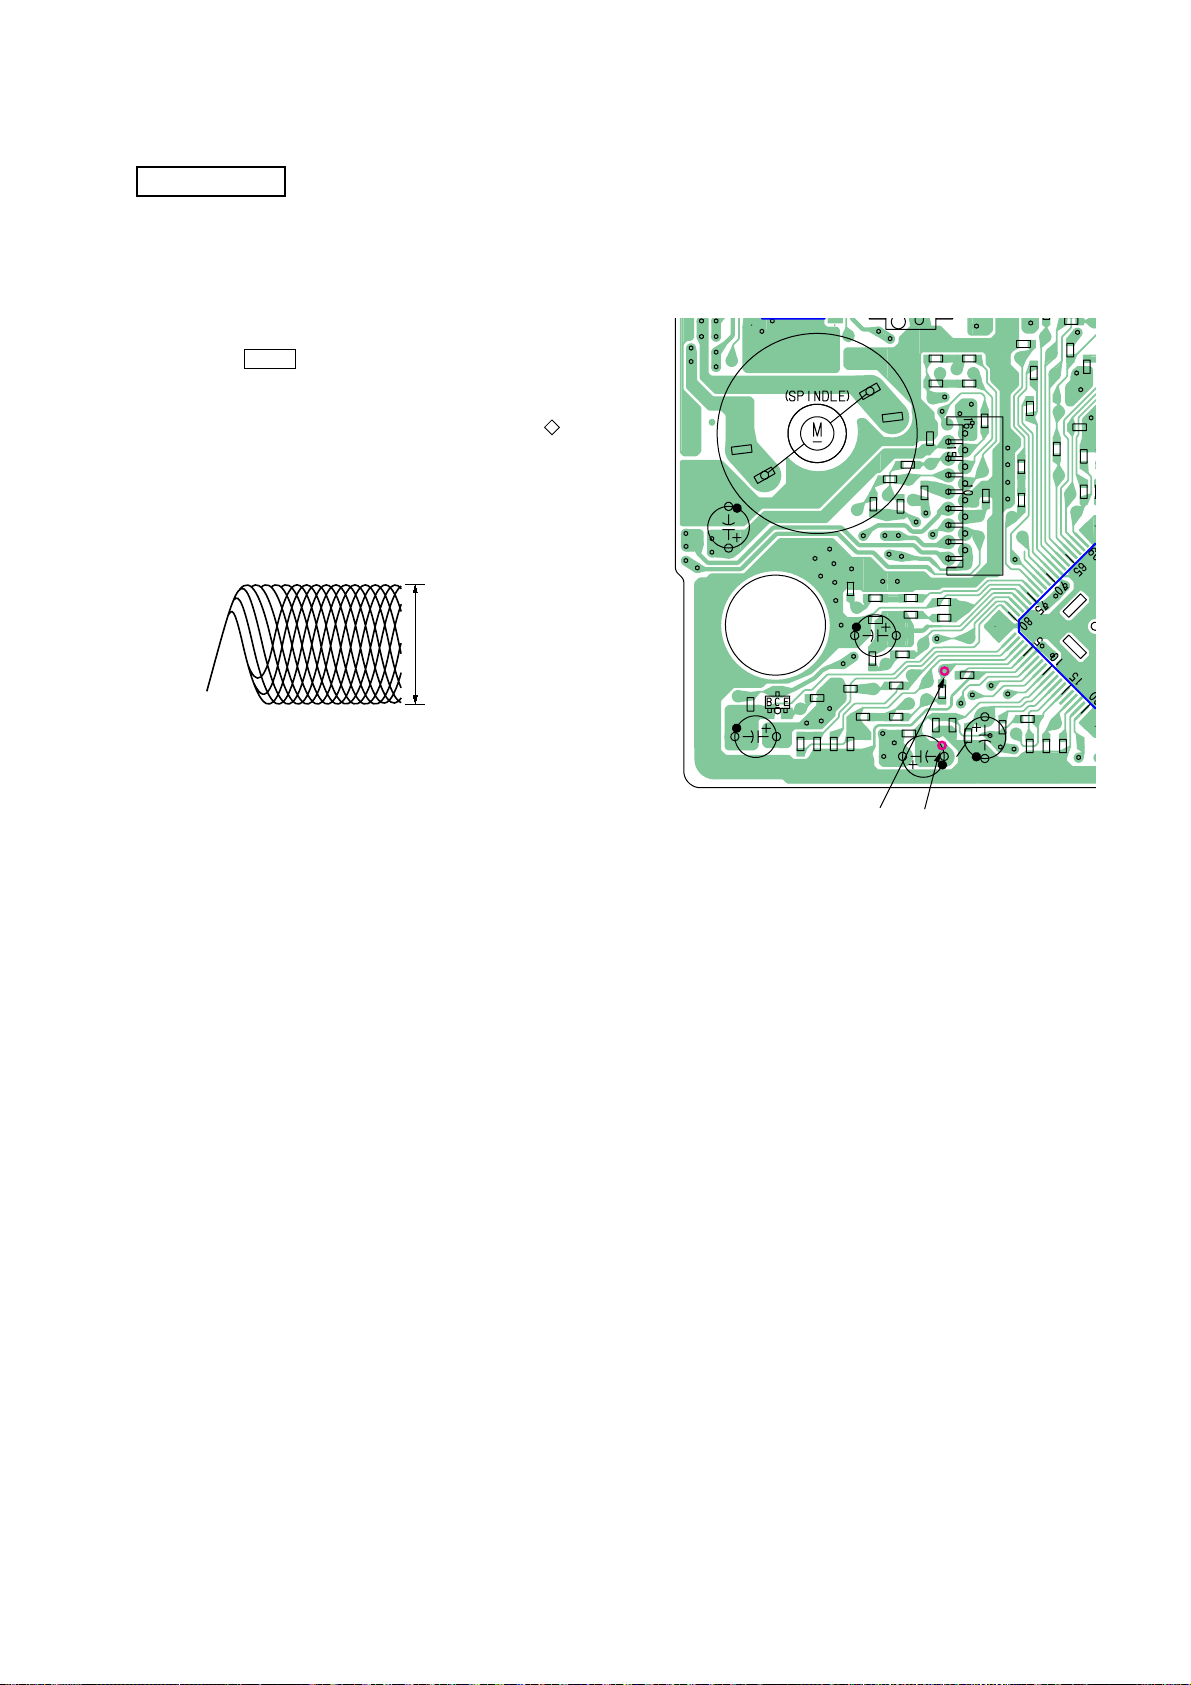
LASER DIODE AND FOCUS SEARCH OPERATION
CHECK
1. Turn ON the [POWER] or [OPERATE] button and press [CD]
button to CD position.
2. Open the CD lid.
3. Turn on S801 with screwdriver, etc. as following figure.
4. Press the N X (CD) button.
5. Confirm the laser diode emission while observing the objecting
lens. When there is no emission, Auto Power Control circuit
or Optical Pick-up is broken.
Objective lens moves up and do wn three times for focus search.
S801
4
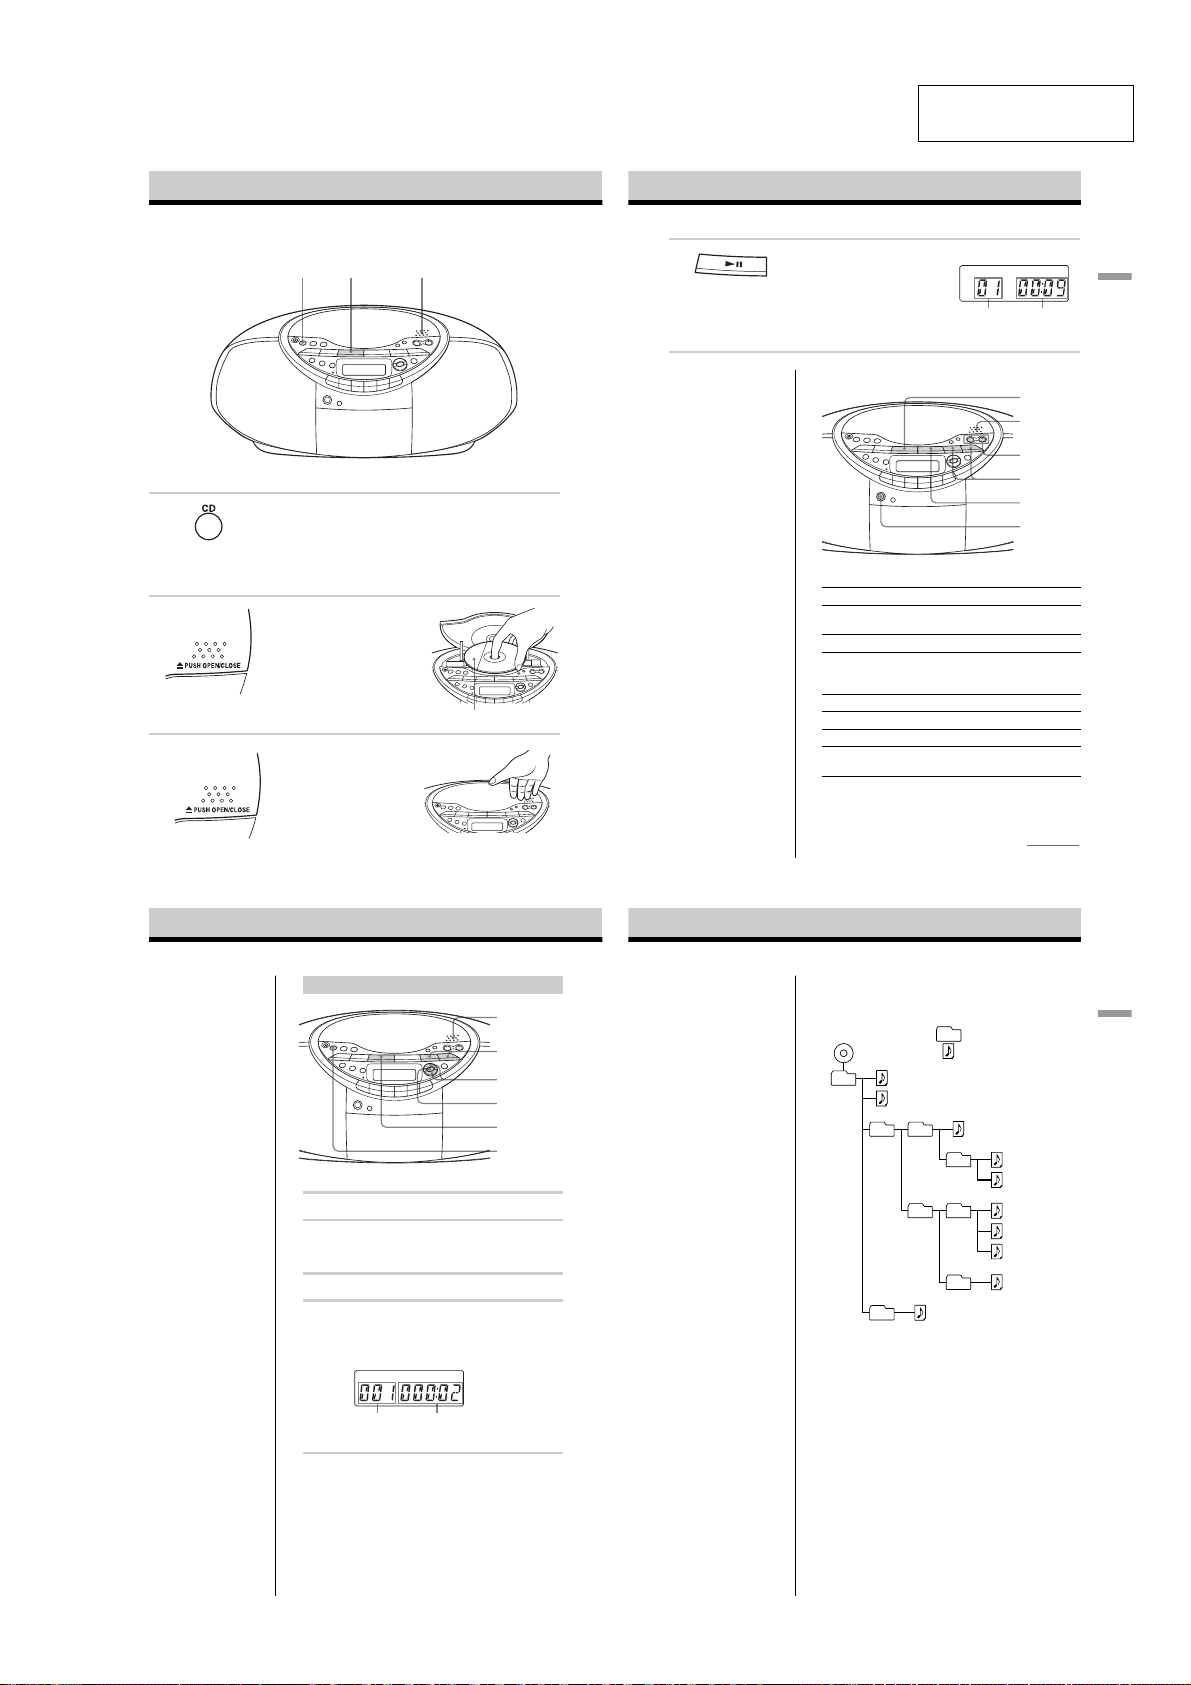
Basic Operations
Playing an audio CD or MP3 files
42, 3
1
SECTION 2
GENERAL
4
This section is extracted
from instruction manual.
Press u (N on the remote).
The player plays all the tracks once.
To play a CD with MP3 files, see
page 6.
CFD-S35CP
Display
Track
Playing
number
time
Basic Operations
Use these buttons for additional operations
Connect the supplied mains lead (see page 23).
1
2
3
Press CD.
(On the remote, press OPERATE
(POWER, see page 2) and then press
FUNCTION repeatedly until «CD»
appears in the display.)
Press Z PUSH OPEN/CLOSE down
to open the CD compartment and
place the CD on the CD
compartment.
Close the lid of the CD compartment.
With the label side up
Tip
Playback starts from the
track you last stopped
playing (Resume play).
During stop, the track
number to be played are
displayed.
To cancel the resume play
to start play from the
beginning of the first track,
press x in stop mode.
To Press
adjust the volume VOLUME +*, –
stop playback x
pause playback u* (X on the remote)
go to the next track >
go back to the previous track .
remove the CD Z PUSH OPEN/CLOSE**
turn on/off the player OPERATE
* The button has a tactile dot.
**Once you open the CD compartment, the track to start play will
change to the beginning of the first track.
(VOL +*, – on the remote.)
Press the button again to
resume play after pause.
(or POWER, see page 2)
4
u
Z PUSH
OPEN/CLOSE
VOLUME +, –
., >
x
OPERATE
(POWER)
continued
5
Playing an audio CD or MP3 files (continued)
Playing a CD with MP3 files
Note
Before playing a file, this
player reads all file and
folder information on the
CD. Depending on the file
structure, it may take more
than a minute to read them.
During this time,
“READING” is displayed.
Tip
You can use the buttons
mentioned in the table on
page 5 for additional
operations in the same way
as when playing an audio
CD.
1
Press CD.
2
Press Z PUSH OPEN/CLOSE to open the CD
compartment and place the CD on the CD
compartment (see page 4) .
3
Close the lid of the CD compartment.
4
Press u.
The player plays all MP3 files on the CD.
When you play a CD with MP3 files, MP3 indicator
lights up.
Track number
To select a folder
Press FLDR + to go forward and FLDR – to go backward .
Press FOLDER +, – on the remote.
To select a file
Press > to go forward and . to go backward.
Z PUSH
OPEN/CLOSE
., >
FLDR +, –
MP3 indicator
u
CD
After the file name is
displayed, the playing time
will appear
Notes
•A folder that does not
include an MP3 file is
skipped.
• Maximum number of
folders: 255
Maximum number of files:
255
•Folder names and file
names can be displayed
with up to 64 characters.
• The characters A — Z, a — z,
0 — 9, and _ can be
displayed on this player.
Other characters are
displayed as “*”.
• This player conforms to
Version 1.1 of the ID3 tag
format. If the file has the
ID3 tag information, “song
title”, “artist name” and
“album name” can be
displayed.
Example of folder structure and playing
order
The playing order of the folders and files is as follows:
CD-R
CD-RW
1
1
2
6
About CD-Rs/CD-RWs and MP3 files
This player can play CD-Rs/CD-RWs recorded in the CDDA format* and MP3 files recorded in the CD-ROM
format, but playback capability may vary depending on the
quality of the disc and the condition of the recording
device.
* CD-DA is the abbreviation for Compact Disc Digital Audio. It is
a recording standard used for Audio CDs.
Folder
MP3 file
2
3
3
4
5
4
6
7
8
5
9
0
Basic Operations
6
7
5

CFD-S35CP
•This set can be disassembled in the order shown below.
SET
3-1. CABINET TOP ASSY
(Page 7)
SECTION 3
DISASSEMBLY
3-2. CABINET FRONT ASSY,
CABINET REAR ASSY
(Page 7)
3-3. WIRES
(Page 
3-4. MD BLOCK
(Page
3-5. HOLDER CASSETTE
(Page 9)
3-7. MAIN BOARD
(Page 10)
3-9. CD LID
(Page 11)
3-10. LCD BLOCK ASSY
(Page 11)
3-11. CD BLOCK ASSY
(Page 12)
3-12. OPTICAL PICK-UP
(Page 12)
3-8. TUNER BOARD,
POWER BOARD
(Page 10)
3-6. POWER KEY BOARD
(Page 9)
3-13. R/P HEAD (HRP301),
ERASE HEAD (HE301),
TC BOARD
(Page 13)
3-14. MOTOR ASSY (M801),
RF BELT
(Page 13)
6

Note: Follow the disassembly procedure in the numerical order given.
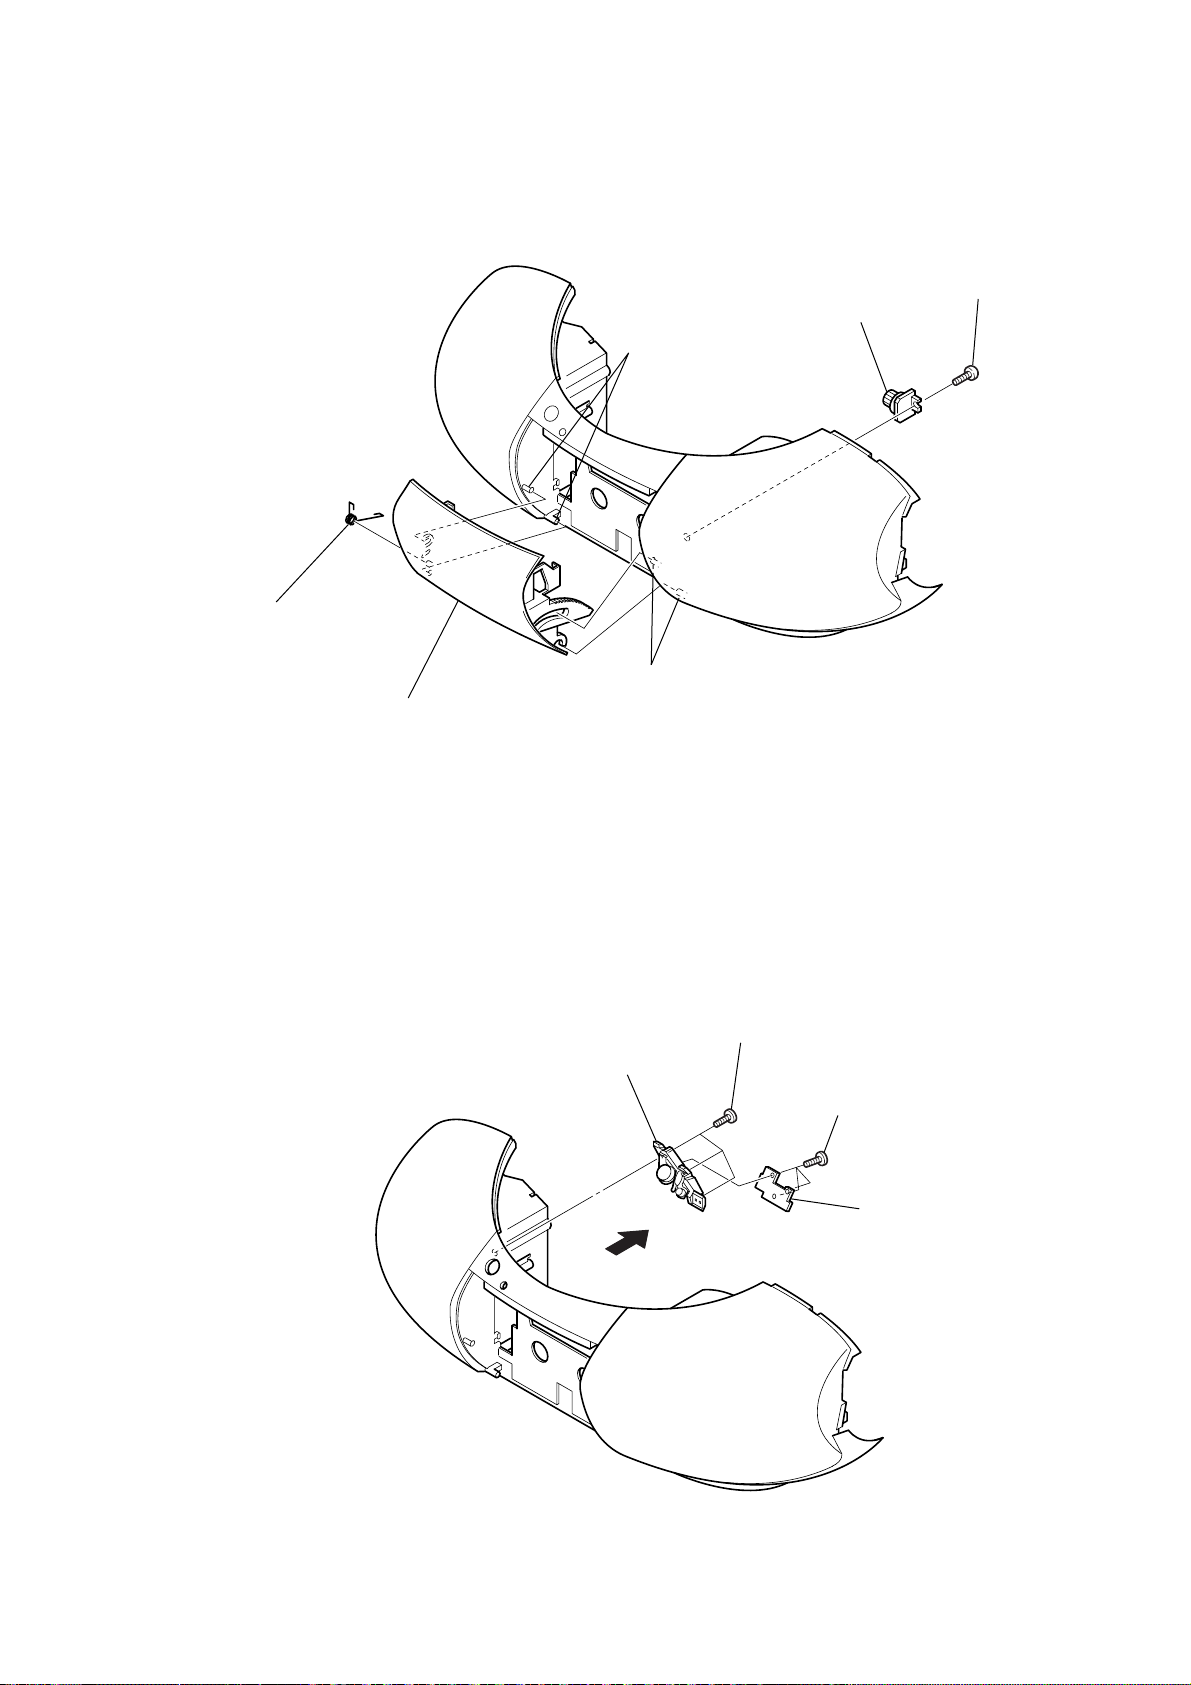
3-1. CABINET TOP ASSY
6
three
(+BV (B2.6
5
handle
qa
CNP802 (15 core)
screws
)
)
4
two
screws
(+BV (B2.6
CFD-S35CP
Ver. 1.1
)
)
3
CD lid
7
two
screws
(+BV (B2.6
)
)
qs
cabinet top assy
0
CNP804 (20 core)
2
two
screws
(+P (B2.6
cassette holder
)
)
1
3-2. CABINET FRONT ASSY, CABINET REAR ASSY
1
screw
3
CNP323 (4P)
2
HEADPHONE board
5
CNP302 (4P)
(+PWH (B2.6
)
)
8
two
screws
(+BV (B2.6
8
9
connector
(S801)
7
battery lid
)
)
4
CNP805 (13 core)
6
CNP801 (3P)
qa
qs
cabinet front assy
qd
cabinet rear assy
9
two
screws
(+BV (B2.6
0
three
(+BV (B2.6
screws
)
)
)
)
7
CFD-S35CP
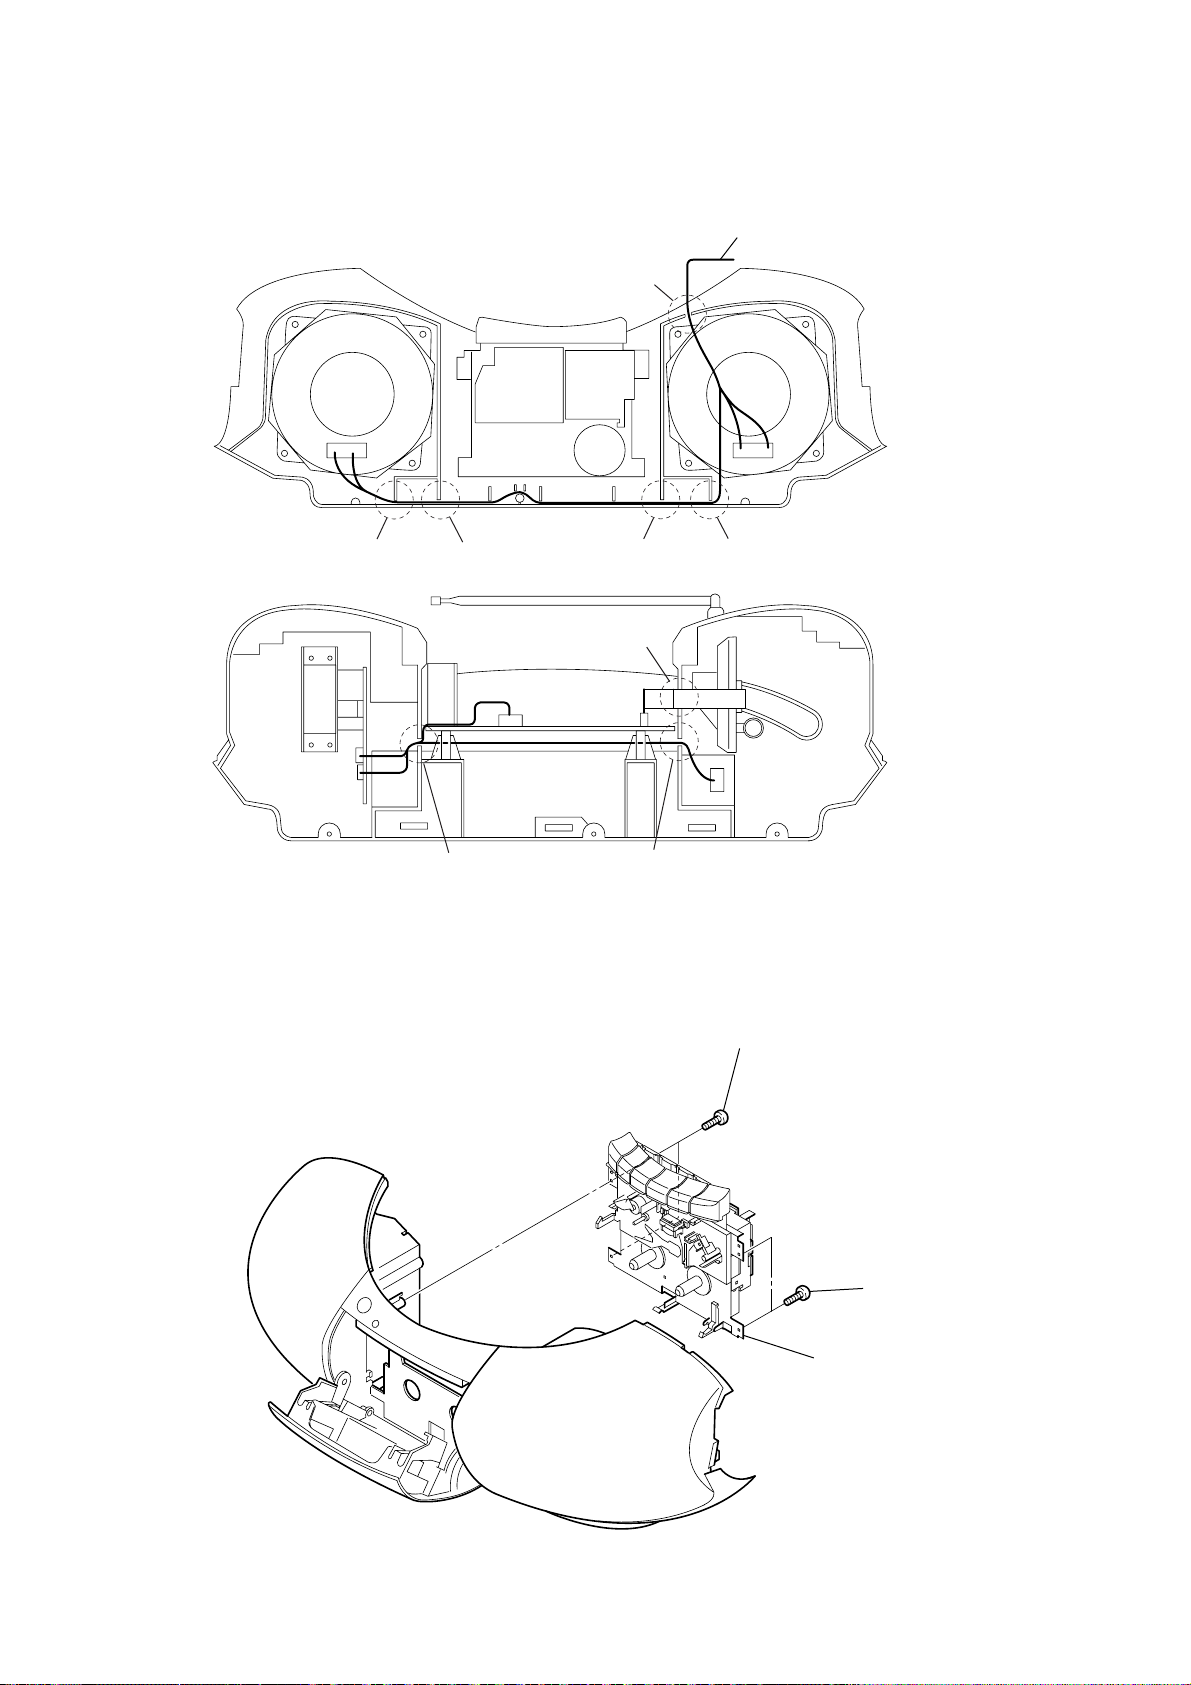
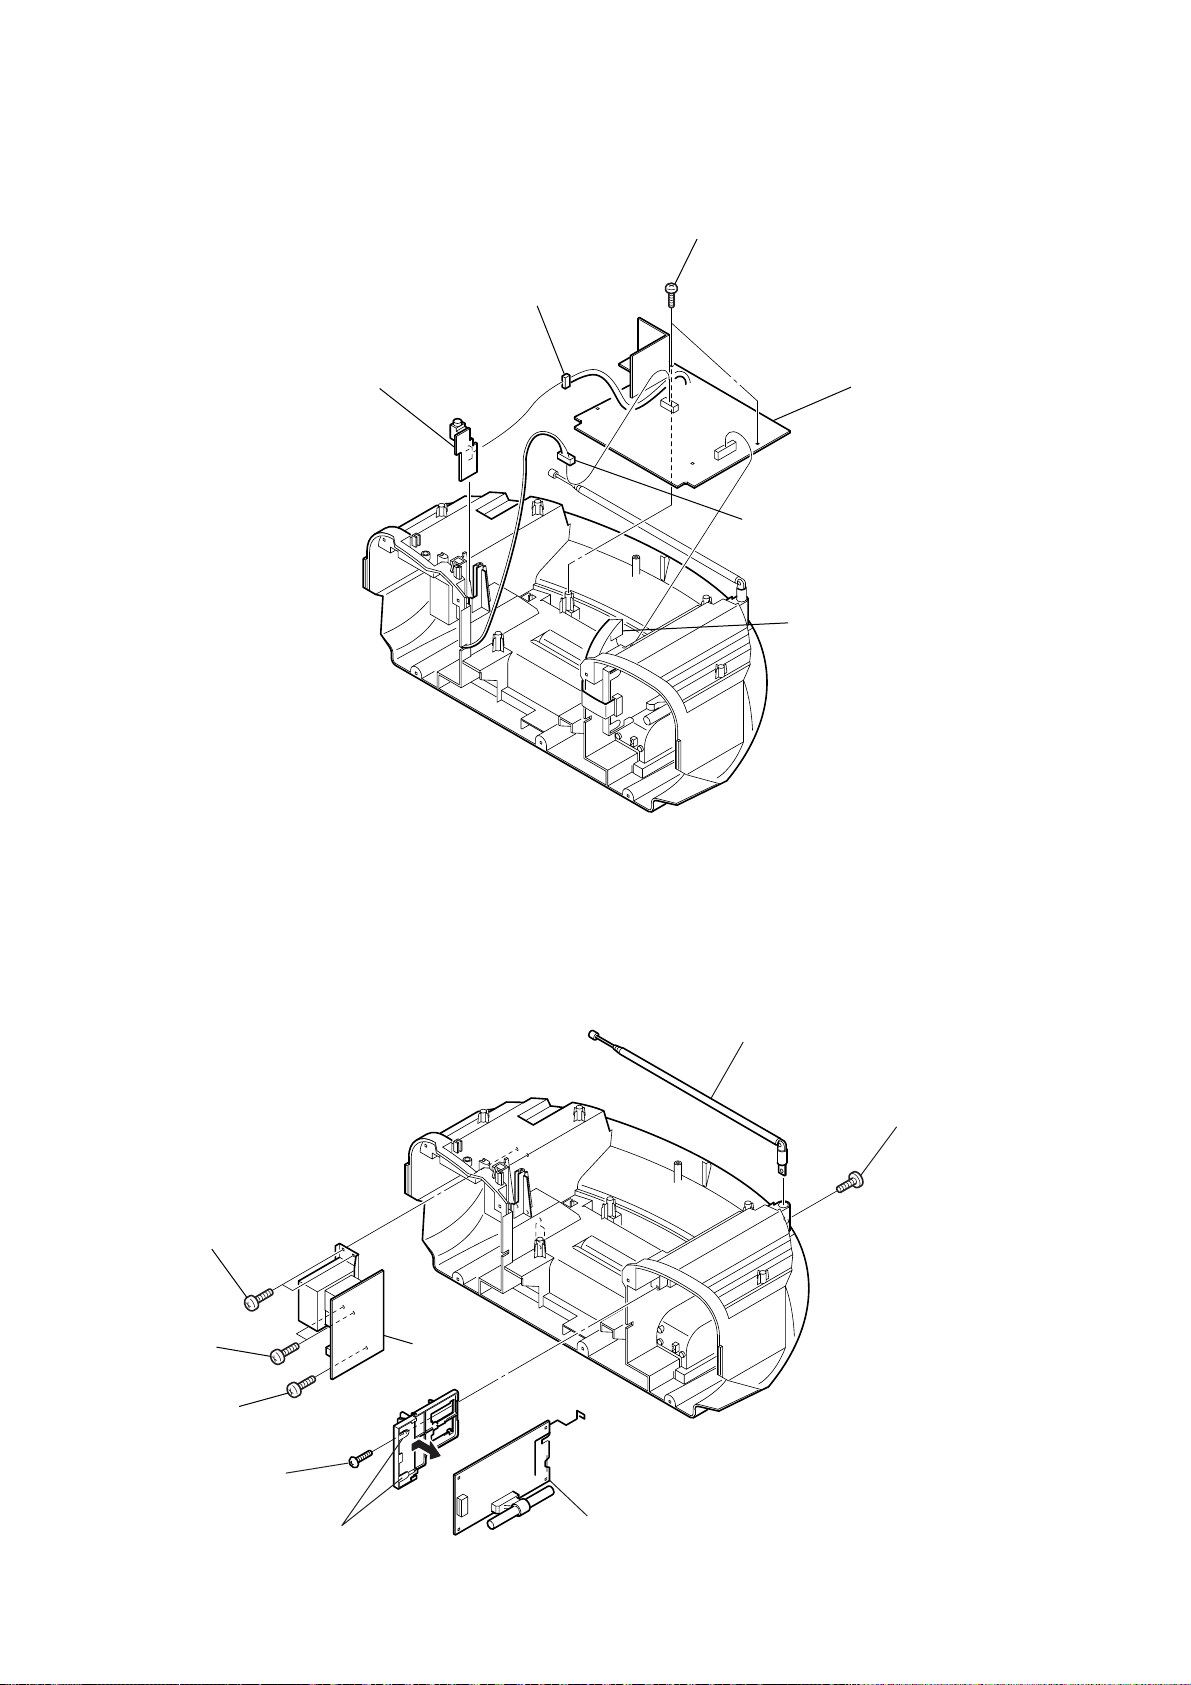
3-3. WIRES
from HEADPHONE board
E
cabinet front
3-4. MD BLOCK
A
B
F
C
H
G
D
1
two
screws
(+P (B2.6
cabinet bottom
)
)
2
two
screws
3
MD block
(+P (B2.6
)
)
8
3-5. HOLDER CASSETTE
4
POWER KEY board
5
power button
2
1
three
screws
3
three
screws
4
cassette spring
two claws
2
damper
CFD-S35CP
Ver. 1.1
1
screw
(+BV (B2.6
)
)
3-6. POWER KEY BOARD
3
holder cassette
two claws
9
CFD-S35CP
Ver. 1.1
3-7. MAIN BOARD
4
HEADPHONE board
3
CNP322 (4P)
5
two
screws
(+BV (B2.6
2
CNP321 (4P)
)
)
6
MAIN board
1
CNP803 (11 core)
3-8. TUNER BOARD, POWER BOARD
7
two
screws
(+BV (B2.6
8
two
screws
(+BV (B2.6
9
screw
(+BV (B2.6
)
)
)
)
)
)
3
screw
(+BV (B2.6
)
)
0
POWER board
5
2
telescopic antenna
screw
1
(+P (M3
)
)
10
4
two claws
6
TUNER board
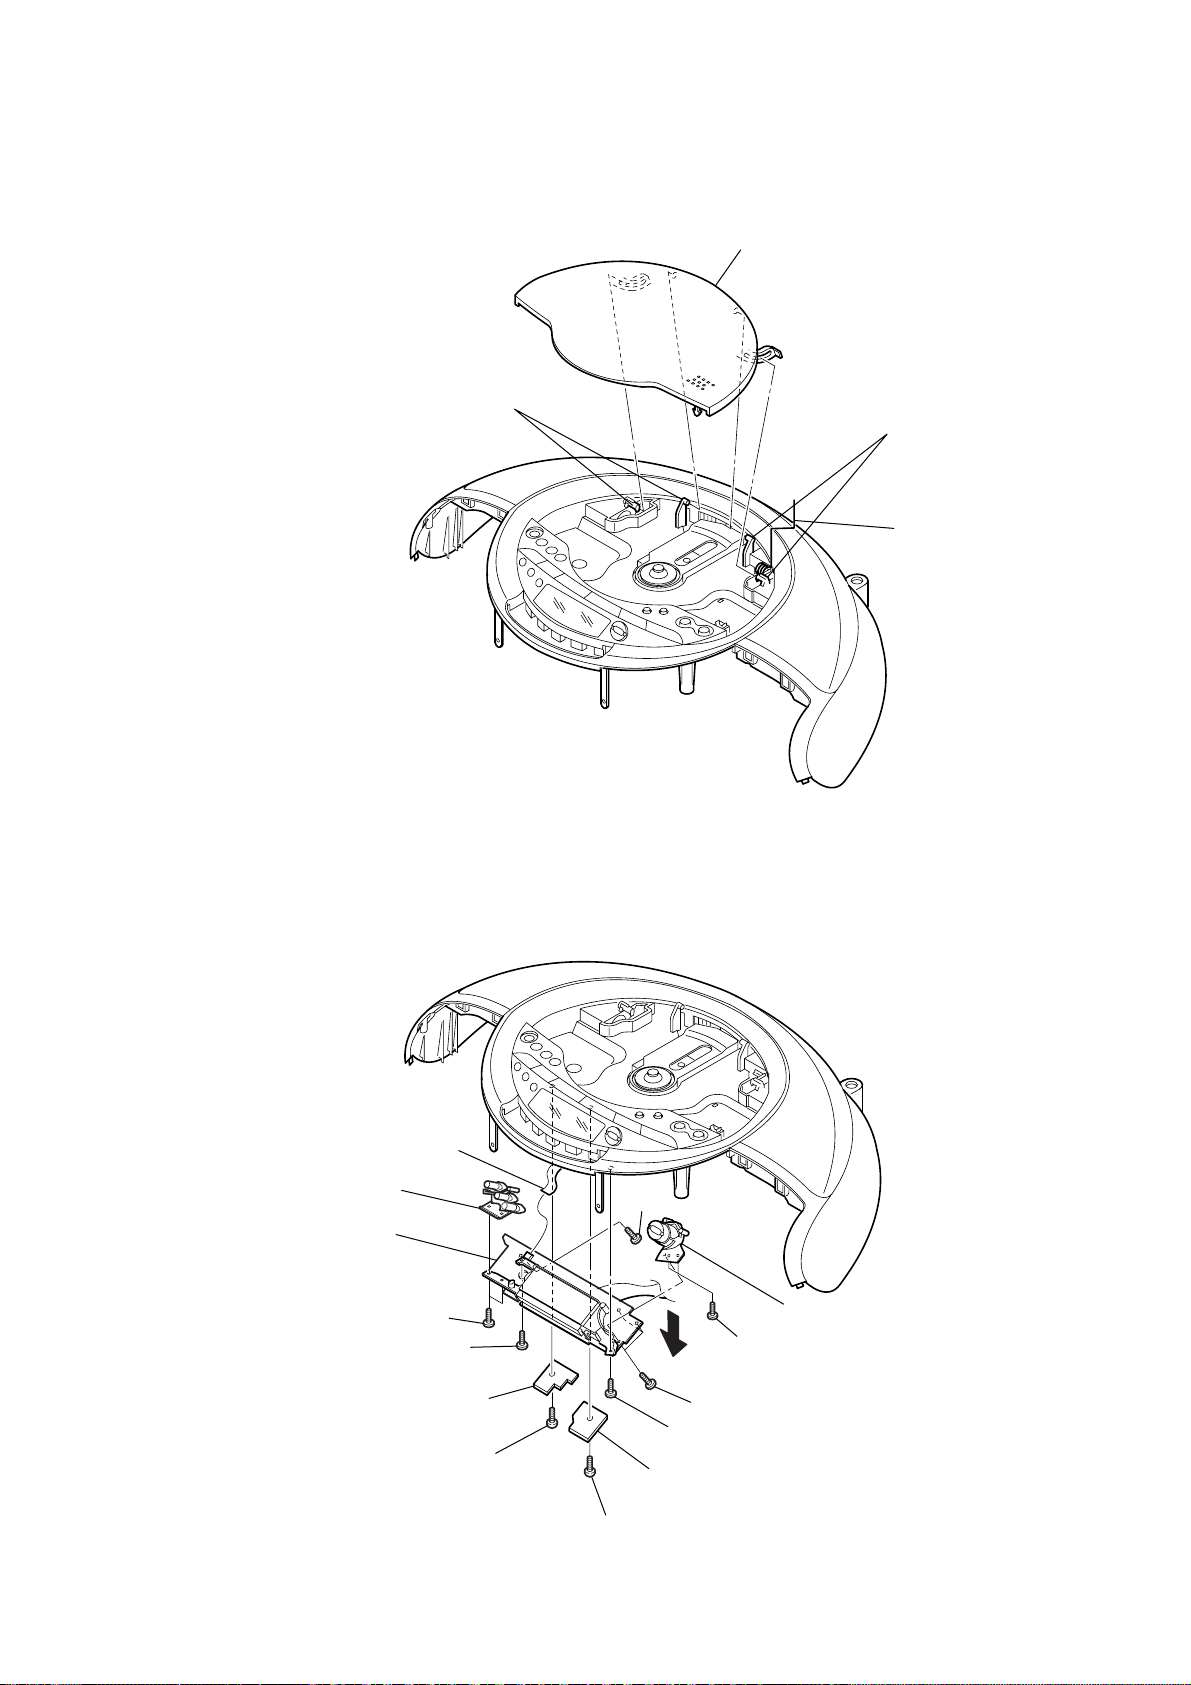
3-9. CD LID
3
CD lid
1
two claws
2
two claws
CD spring
CFD-S35CP
3-10. LCD BLOCK ASSY
0
qs
mode button
qg
LCD block assy
5
2
CD KEY HOLD (2) board
CNP407 (5P)
two
screws
6
screw
1
(+P (B2.6
screw
)
)
qa
screw
8
two
9
qd
three
screws
7
screw
4
CD KEY HOLD (1) board
qf
button (folder) sub assy
screws
3
screw
(+P (B2.6
)
)
11
CFD-S35CP
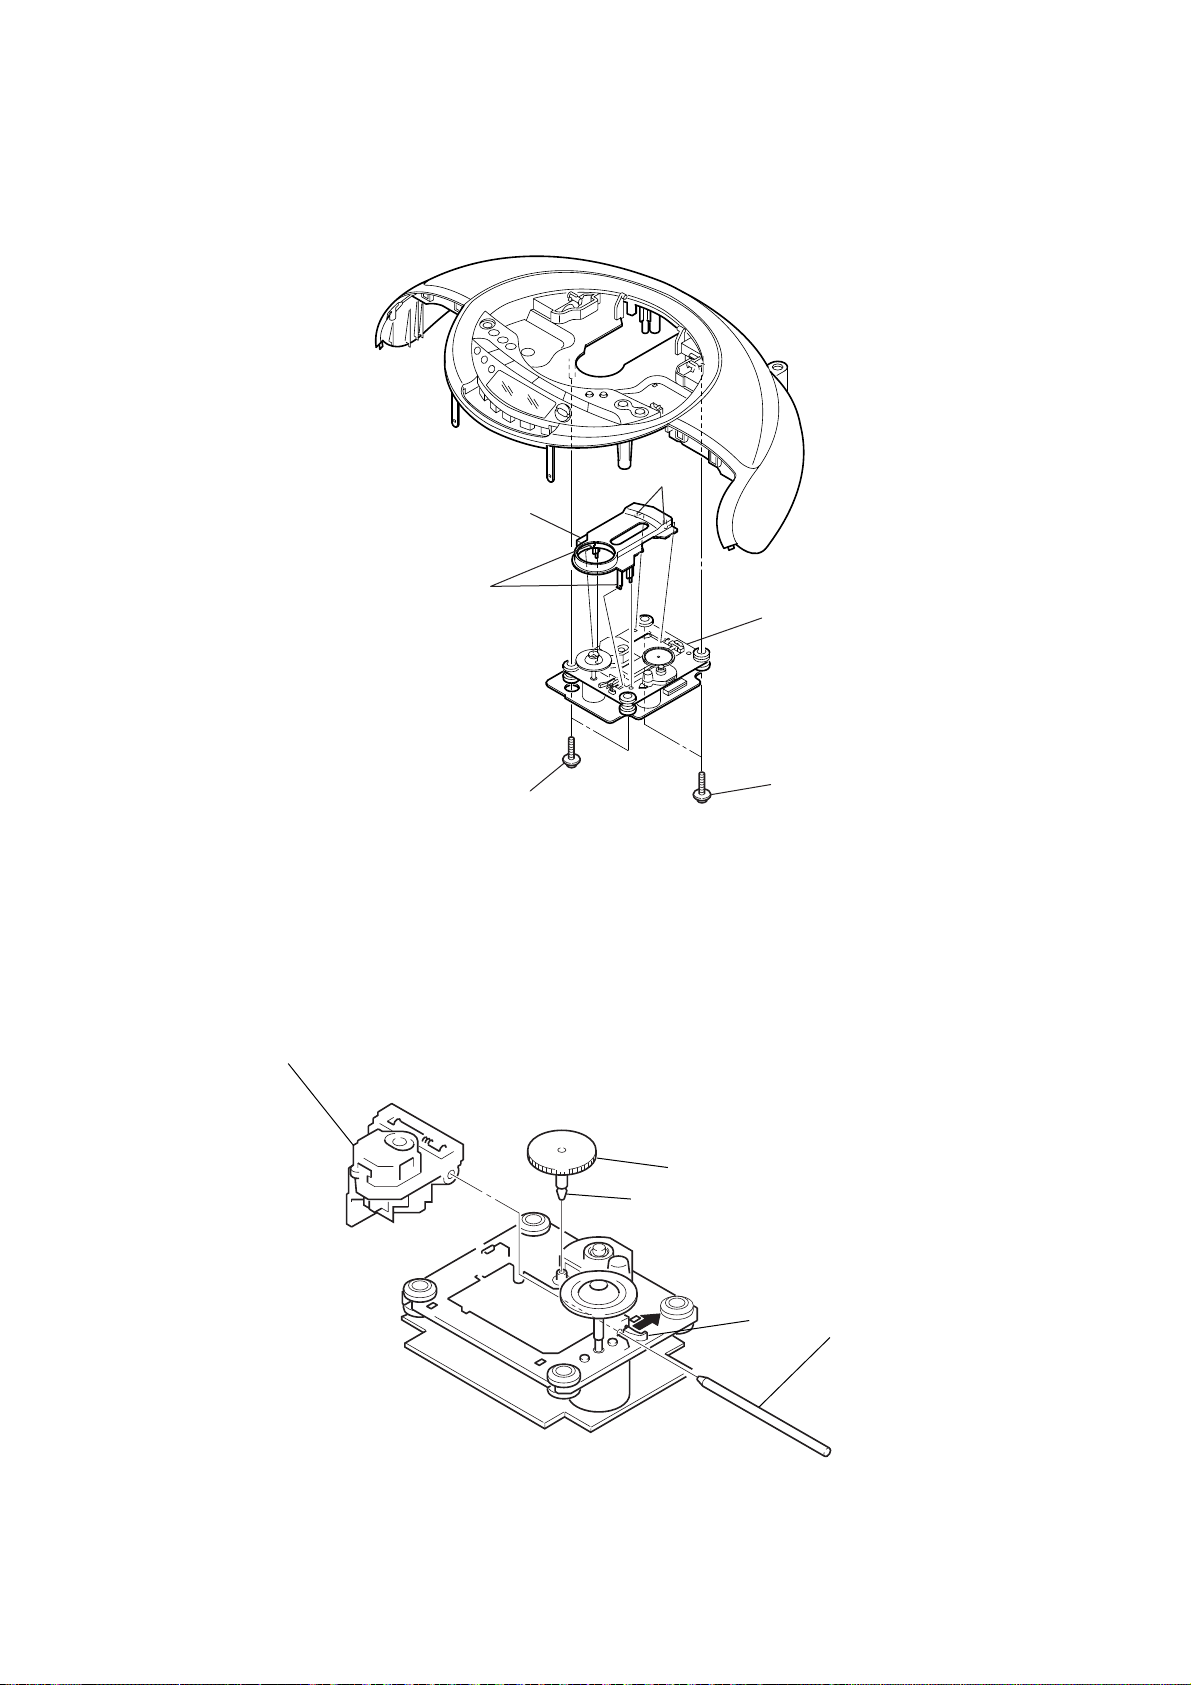
3-11. CD BLOCK ASSY
3
CD cover
two claws
two claws
4
CD block assy
3-12. OPTICAL PICK-UP
5
optical pick-up
2
two
screws
(+PWH (B2.6
)
)
claw
3
1
gear (A)
1
two
screws
(+PWH (B2.6
2
claw
4
)
)
sled shaft
12
3-13. R/P HEAD (HRP301), ERASE HEAD (HE301), TC BOARD
6
two claws
Remove the four solderings.
3
screw
(+BVTT 2
4
lug
7
TC board
5
CFD-S35CP
×
4)
1
R/P head (HRP301)
2
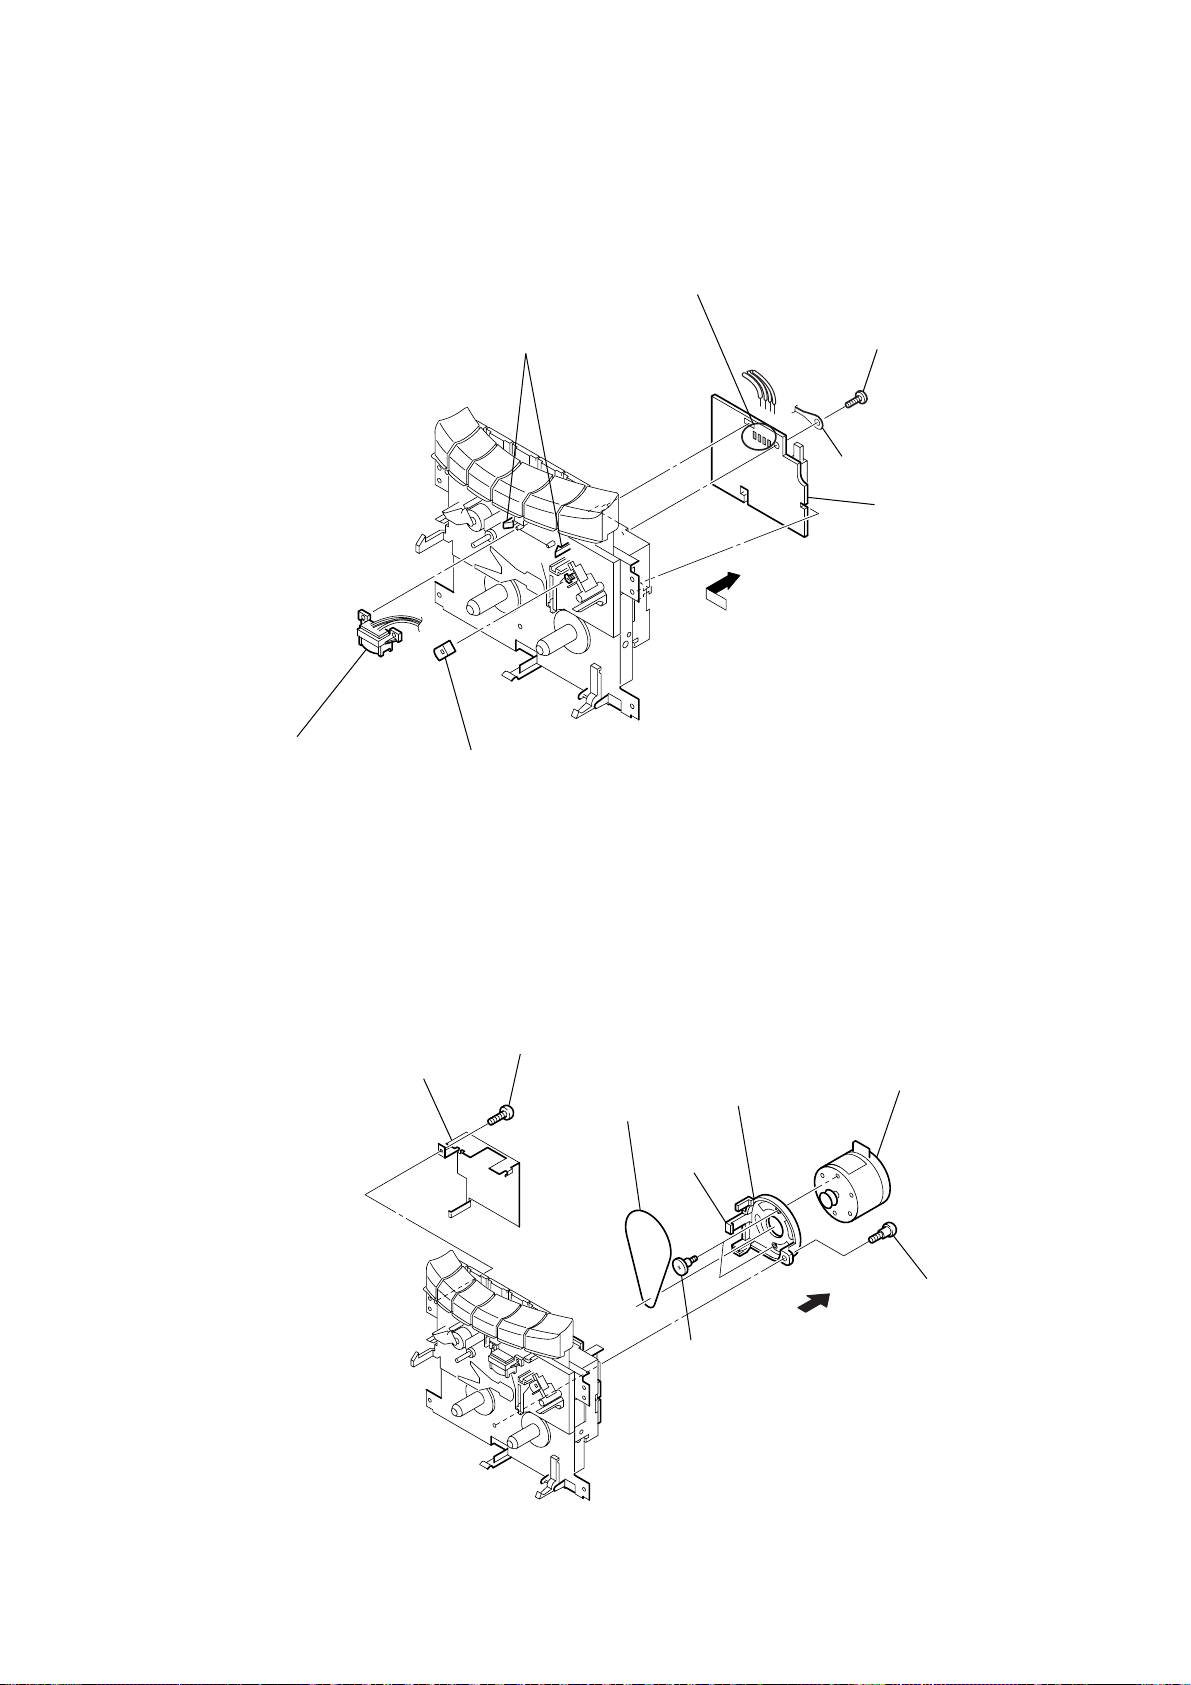
3-14. MOTOR ASSY (M801), RF BELT
2
protect chassis
erase head (HE301)
screw
1
(+P (B2.6
)
)
5
RF belt
claw
8
motor bracket
4
7
motor assy (M801)
3
screw
6
screw
13
CFD-S35CP
SECTION 4
MECHANICAL ADJUSTMENTS
SECTION 5
ELECTRICAL ADJUSTMENTS
PRECAUTION
1. Clean the following parts with a denatured alcohol-moistened
swab:
record/playback heads pinch rollers
erase head rubber belts
capstan idlers
2. Demagnetize the record/playback head with a head
demagnetizer. (Do not bring the head magnetizer close to the
erase head.)
3. Do not use a magnetized screwdriver for the adjustments.
4. The adjustments should be performed with the rated power
supply voltage (9V) unless otherwise noted.
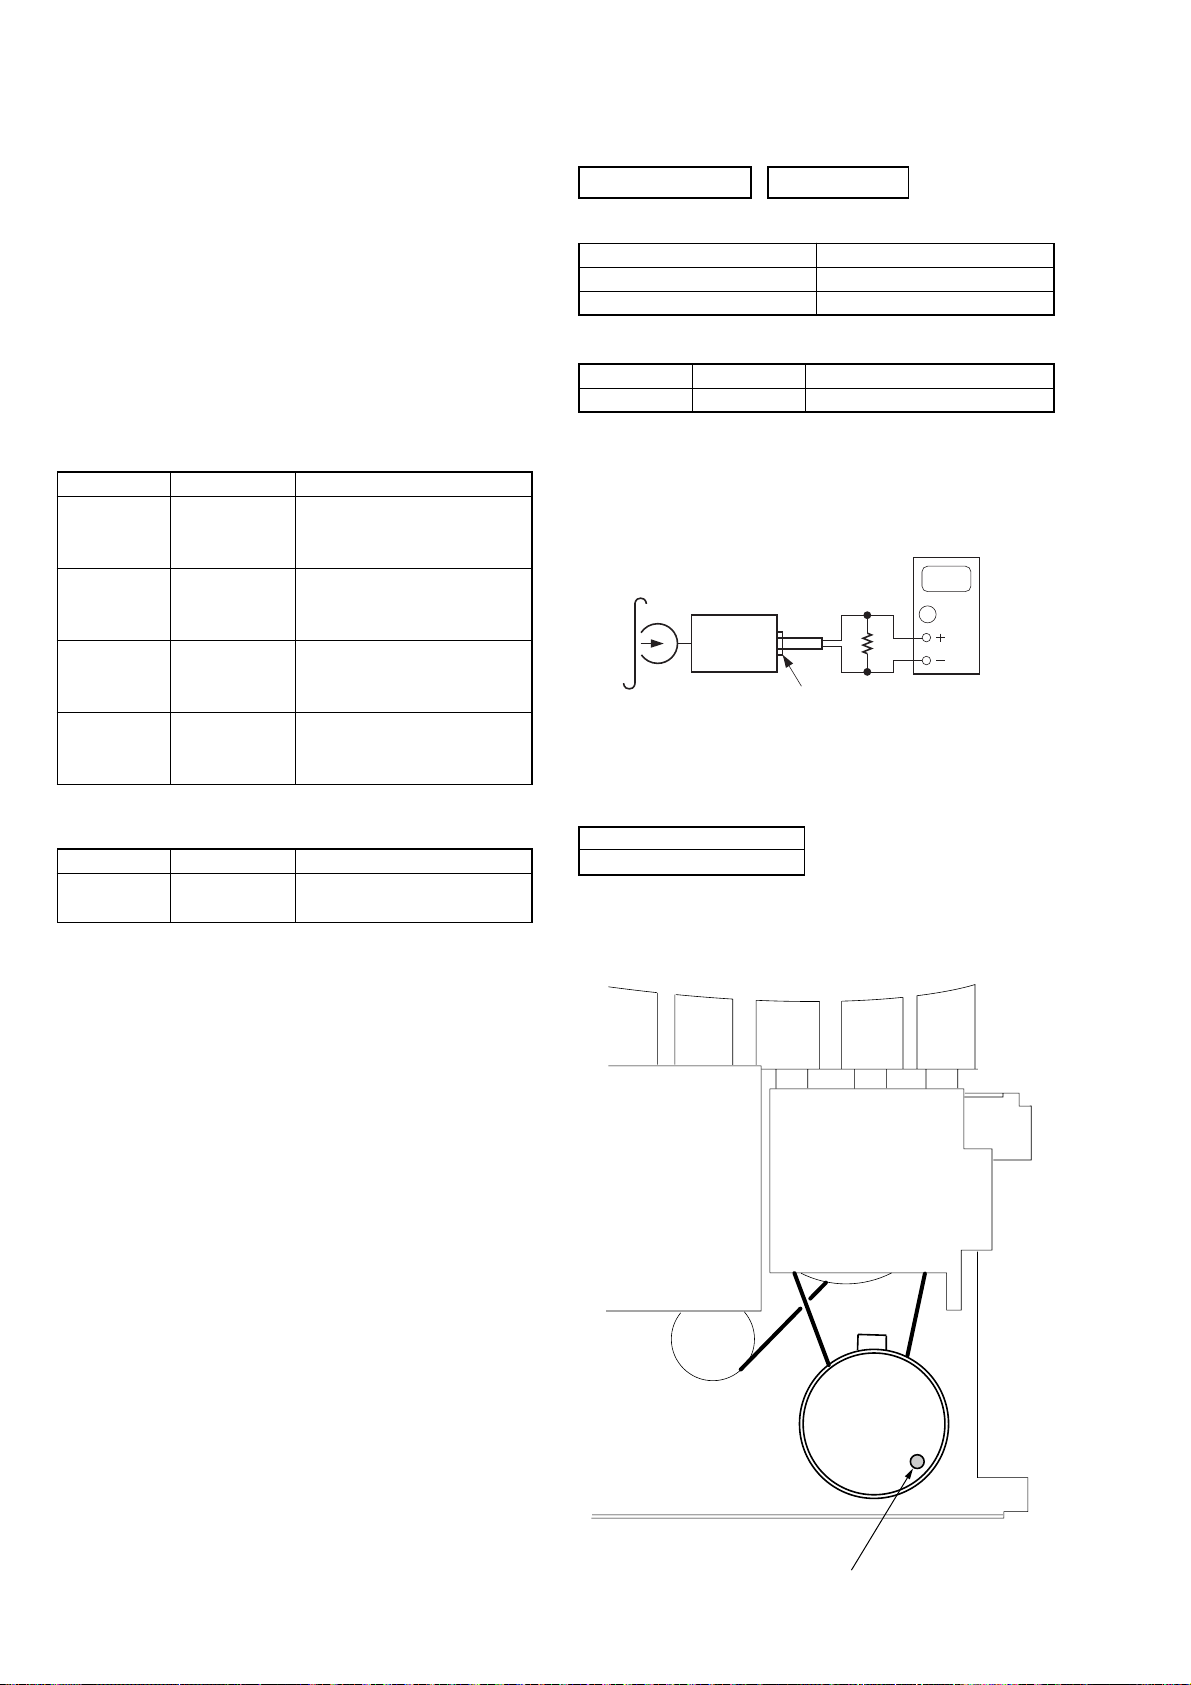
Torque Measurement
Mode Torque meter Meter reading
2.95 – 6.86 mN • m
FWD CQ-102C (30 – 70 g • cm)
(0.42 – 0.97 oz • inch)
FWD
back tension
FF CQ-201B (more than 60 g • cm)
REW CQ-201B (more than 60 g • cm)
CQ-102C (1.5 – 5.5 g • cm)
0.15 – 0.53 mN • m
(0.021 – 0.076 oz • inch)
more than 5.88 mN • m
(more than 0.83 oz • inch)
more than 5.88 mN • m
(more than 0.83 oz • inch)
TAPE SECTION 0 dB=0.775V
• Standard Output Level
Output terminal HP OUT
load impedance 32 Ω
output signal level 0.25 V (–10 dB)
• Test T ape
Type Signal Used for
WS-48A 3 kHz, 0 dB tape speed adjustment
Tape Speed Adjustment
Procedure:
Mode: playback
test tape
WS-48A
(3 kHz, 0 dB)
set
i
jack (J321)
Adjust so that the value on the digital frequency counter is
3,000 Hz.
digital frequency
counter
Ω
32
Tape Tension Measurement
Mode Torque meter Meter reading
FWD CQ-403A
more than100 g
(more than 3.53 oz)
Specification Value:
Digital frequency counter
2,910 to 3,090 Hz
Adjust so that the frequency at the beginning and that at the end of
tape winding are between 2,910 to 3,090 Hz.
Adjustment Location:
14
Tape speed adjustment
control inside motor
CFD-S35CP
Ver. 1.4
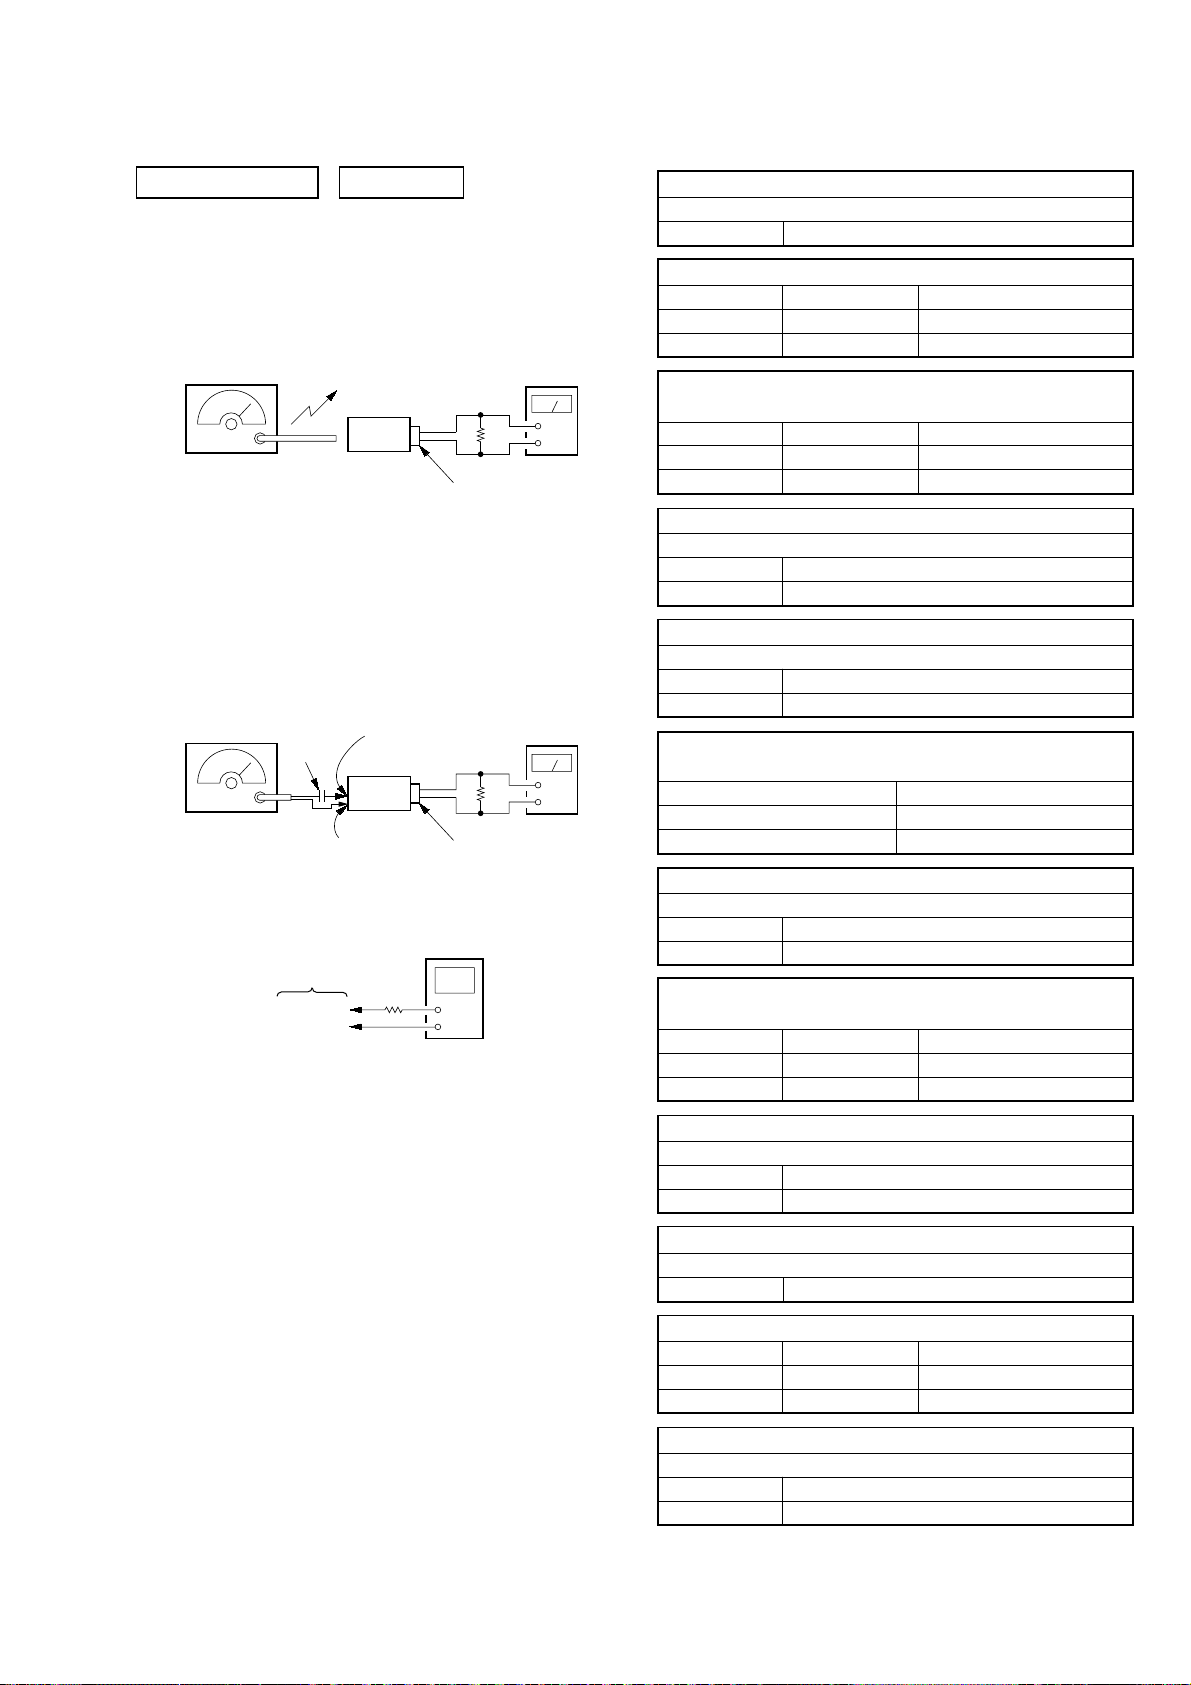
TUNER SECTION 0 dB=1 µV
[AM/MW]
Setting:
Function: RADIO
Band: AM or MW or LW
AM/MW RF signal
generator
30% amplitude
modulation by
400 Hz signal
Output level:
as low as possible
[FM]
Setting:
Function: RADIO
BAND button: FM
FM RF signal
generator
75 kHz frequency
deviation by 1 kHz
signal
Output level:
as low as possible
TUNER board
•Repeat the procedures in each adjustment several times, and
the tracking adjustments should be finally done by the trimmer
capacitors.
• Remove FM antenna in FM adjustment.
Put the loop
antenna close to
the set.
0.01 µF
TUNER board
TP (GND)
TP (CV)
TP (GND)
set
TUNER board
TP-ANT(JW2)
set
digital voltmeter
100 k
Ω
32
Ω
i
jack (J321)
32
Ω
i
jack (J321)
level meter
+
–
level meter
+
–
AM/MW IF ADJUSTMENT
Adjust for a maximum reading on level meter
T1 450 kHz
AM FREQUENCY COVERAGE ADJUSTMENT (CND, MX model)
Adjustment Part Frequency Display Reading on Digital Voltmeter
L4 530 kHz 1.0 ± 0.05 V
Confirmation 1,710 kHz 5.3 ± 0.7 V
AM FREQUENCY COVERAGE ADJUSTMENT
(EA, KR, SP, TH model)
Adjustment Part Frequency Display Reading on Digital Voltmeter
L4 531 kHz 1.0 ± 0.05 V
Confirmation 1,611 kHz 4.8 ± 0.7 V
AM TRACKING ADJUSTMENT (CND, MX model)
Adjust for a maximum reading on level meter
L3 620 kHz
CT3 1,400 kHz
AM TRACKING ADJUSTMENT (EA, KR, SP, TH model)
Adjust for a maximum reading on level meter
L3 621 kHz
CT3 1,404 kHz
MW FREQUENCY COVERAGE CONFIRMATION
(AEP, UK, CET, IT, RU model)
Frequency Display Reading on Digital Voltmeter
531 kHz 0.9 ± 0.4 V
1,611 kHz 5.2 ± 0.5 V
MW TRACKING ADJUSTMENT (AEP, UK, CET, IT, RU model)
Adjust for a maximum reading on level meter
L3-1 621 kHz
CT3 1,404 kHz
LW FREQUENCY COVERAGE ADJUSTMENT
(AEP, UK, CET, IT, RU model)
Adjustment Part Frequency Display Reading on Digital Voltmeter
Confirmation 153 kHz 0.6 ± 0.05 V
L4 279 kHz 5.3 ± 0.5 V
LW TRACKING ADJUSTMENT (AEP, UK, CET, IT, RU model)
Adjust for a maximum reading on level meter
L3-2 162 kHz
CT5 261 kHz
• Abbreviation
CND : Canadian model.
CET : East European and CSI model.
EA : Saudi Arabia model.
IT : Italian model.
KR : Korean model.
MX : Mexican model.
RU : Russian model.
SP : Singapore model.
TH : Thai model.
FM IF ADJUSTMENT
Adjust for a minimum reading on level meter
T2 10.7 MHz
FM FREQUENCY COVERAGE ADJUSTMENT
Adjustment Part Frequency Display Reading on Digital Voltmeter
L2 108 MHz 3.0 ± 0.2 V
Confirmation 87.5 MHz 1.3 ± 0.3 V
FM TRACKING ADJUSTMENT
Adjust for a maximum reading on level meter
L1 87.5 MHz
CT1 108 MHz
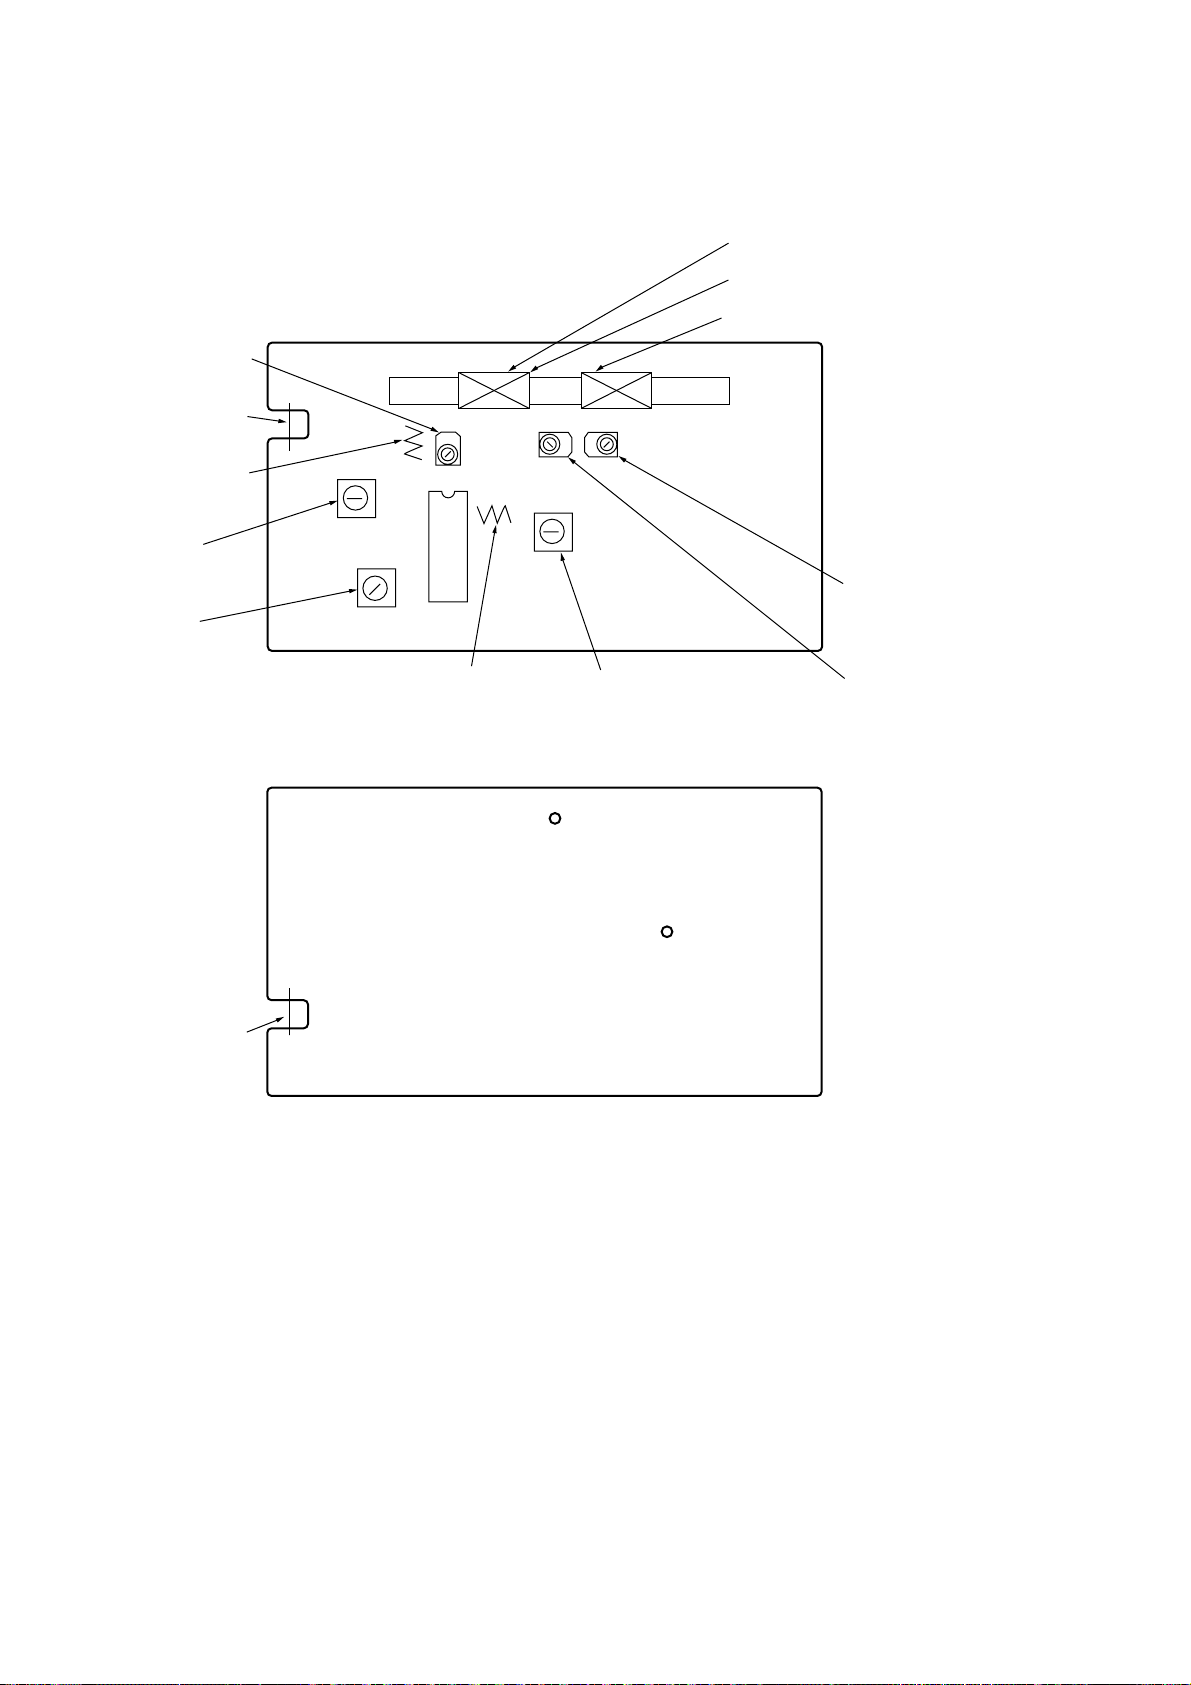
Adjustment and Connecting Location:
TUNER board (See page 16)
15
CFD-S35CP
Adjustment and Connecting Location:
CT1
FM FREQUENCY
COVERAGE
ADJUSTMENT
TP-ANT
(JW2)
L1
FM TRACKNG
ADJUSTMENT
– TUNER BOARD (Component Side) –
L3
AM TRACKING ADJUSTMENT
L3-2
LW TRACKING ADJUSTMENT
L3-1
MW TRACKING ADJUSTMENT
T1
AM IF
ADJUSTMENT
T2
FM IF
ADJUSTMENT
TP-ANT
IC1
L2
FM FREQUENCY
COVERAGE
ADJUSTMENT
– TUNER BOARD (Conductor Side) –
JW2
L4
AM/MW FREQUENCY COVERAGE
ADJUSTMENT
TP
(GND)
TP
(CV)
CT5
LW TRACKING
ADJUSTMENT
CT3
AM/MW TRACKING
ADJUSTMENT
16
CD SECTION
CD section adjustments are done automatically in this set.
In case of operation check, confirm that focus bias.
CFD-S35CP
FOCUS BIAS CHECK
1. Connect the oscilloscope between IC701 pin 4 and pin qa
(or TP (RF) and TP (VREF)).
2. Insert the disc (YEDS-18). (Part No. : 3-702-101-01)
3. Press the N X (CD) button.
4. Confirm that the oscilloscope waveform is as shown in the
figure below. (eye pattern)
A good eye pattern means that the diamond shape ( ) in the
center of the waveform can be clearly distinguished.
• RF signal reference waveform (eye pattern)
VOLT/DIV : 50 mV (10 : 1 probe in use)
TIME/DIV : 500 nS
RF level :
0.85 ± 0.2 Vp-p
When observing the eye pattern, set the oscilloscope for AC range
and raise vertical sensitivity.
Test Point:
– MP3-CD Board (Side B) –
M701
C723
Q701
R707
R708
C710
R709
C711
C705
C704
R702
R704
R757
R755
R726
C746
C744
C709
R730
R729
R710
R711
C706
R759
C712
TP
(RF)TP(VC)
R764
R728
R706
C707
R758
R756
C708
R727
C740
C703
C713
R703
C701
R705
C714
C716
R701
R745
CNP701
C715
C743
C719
C717
R725
R763
C718
R
C742
R724
C750
R719
C720
R731
C745
C751
R722
IC7
C721
17

CFD-S35CP
MEMO
18
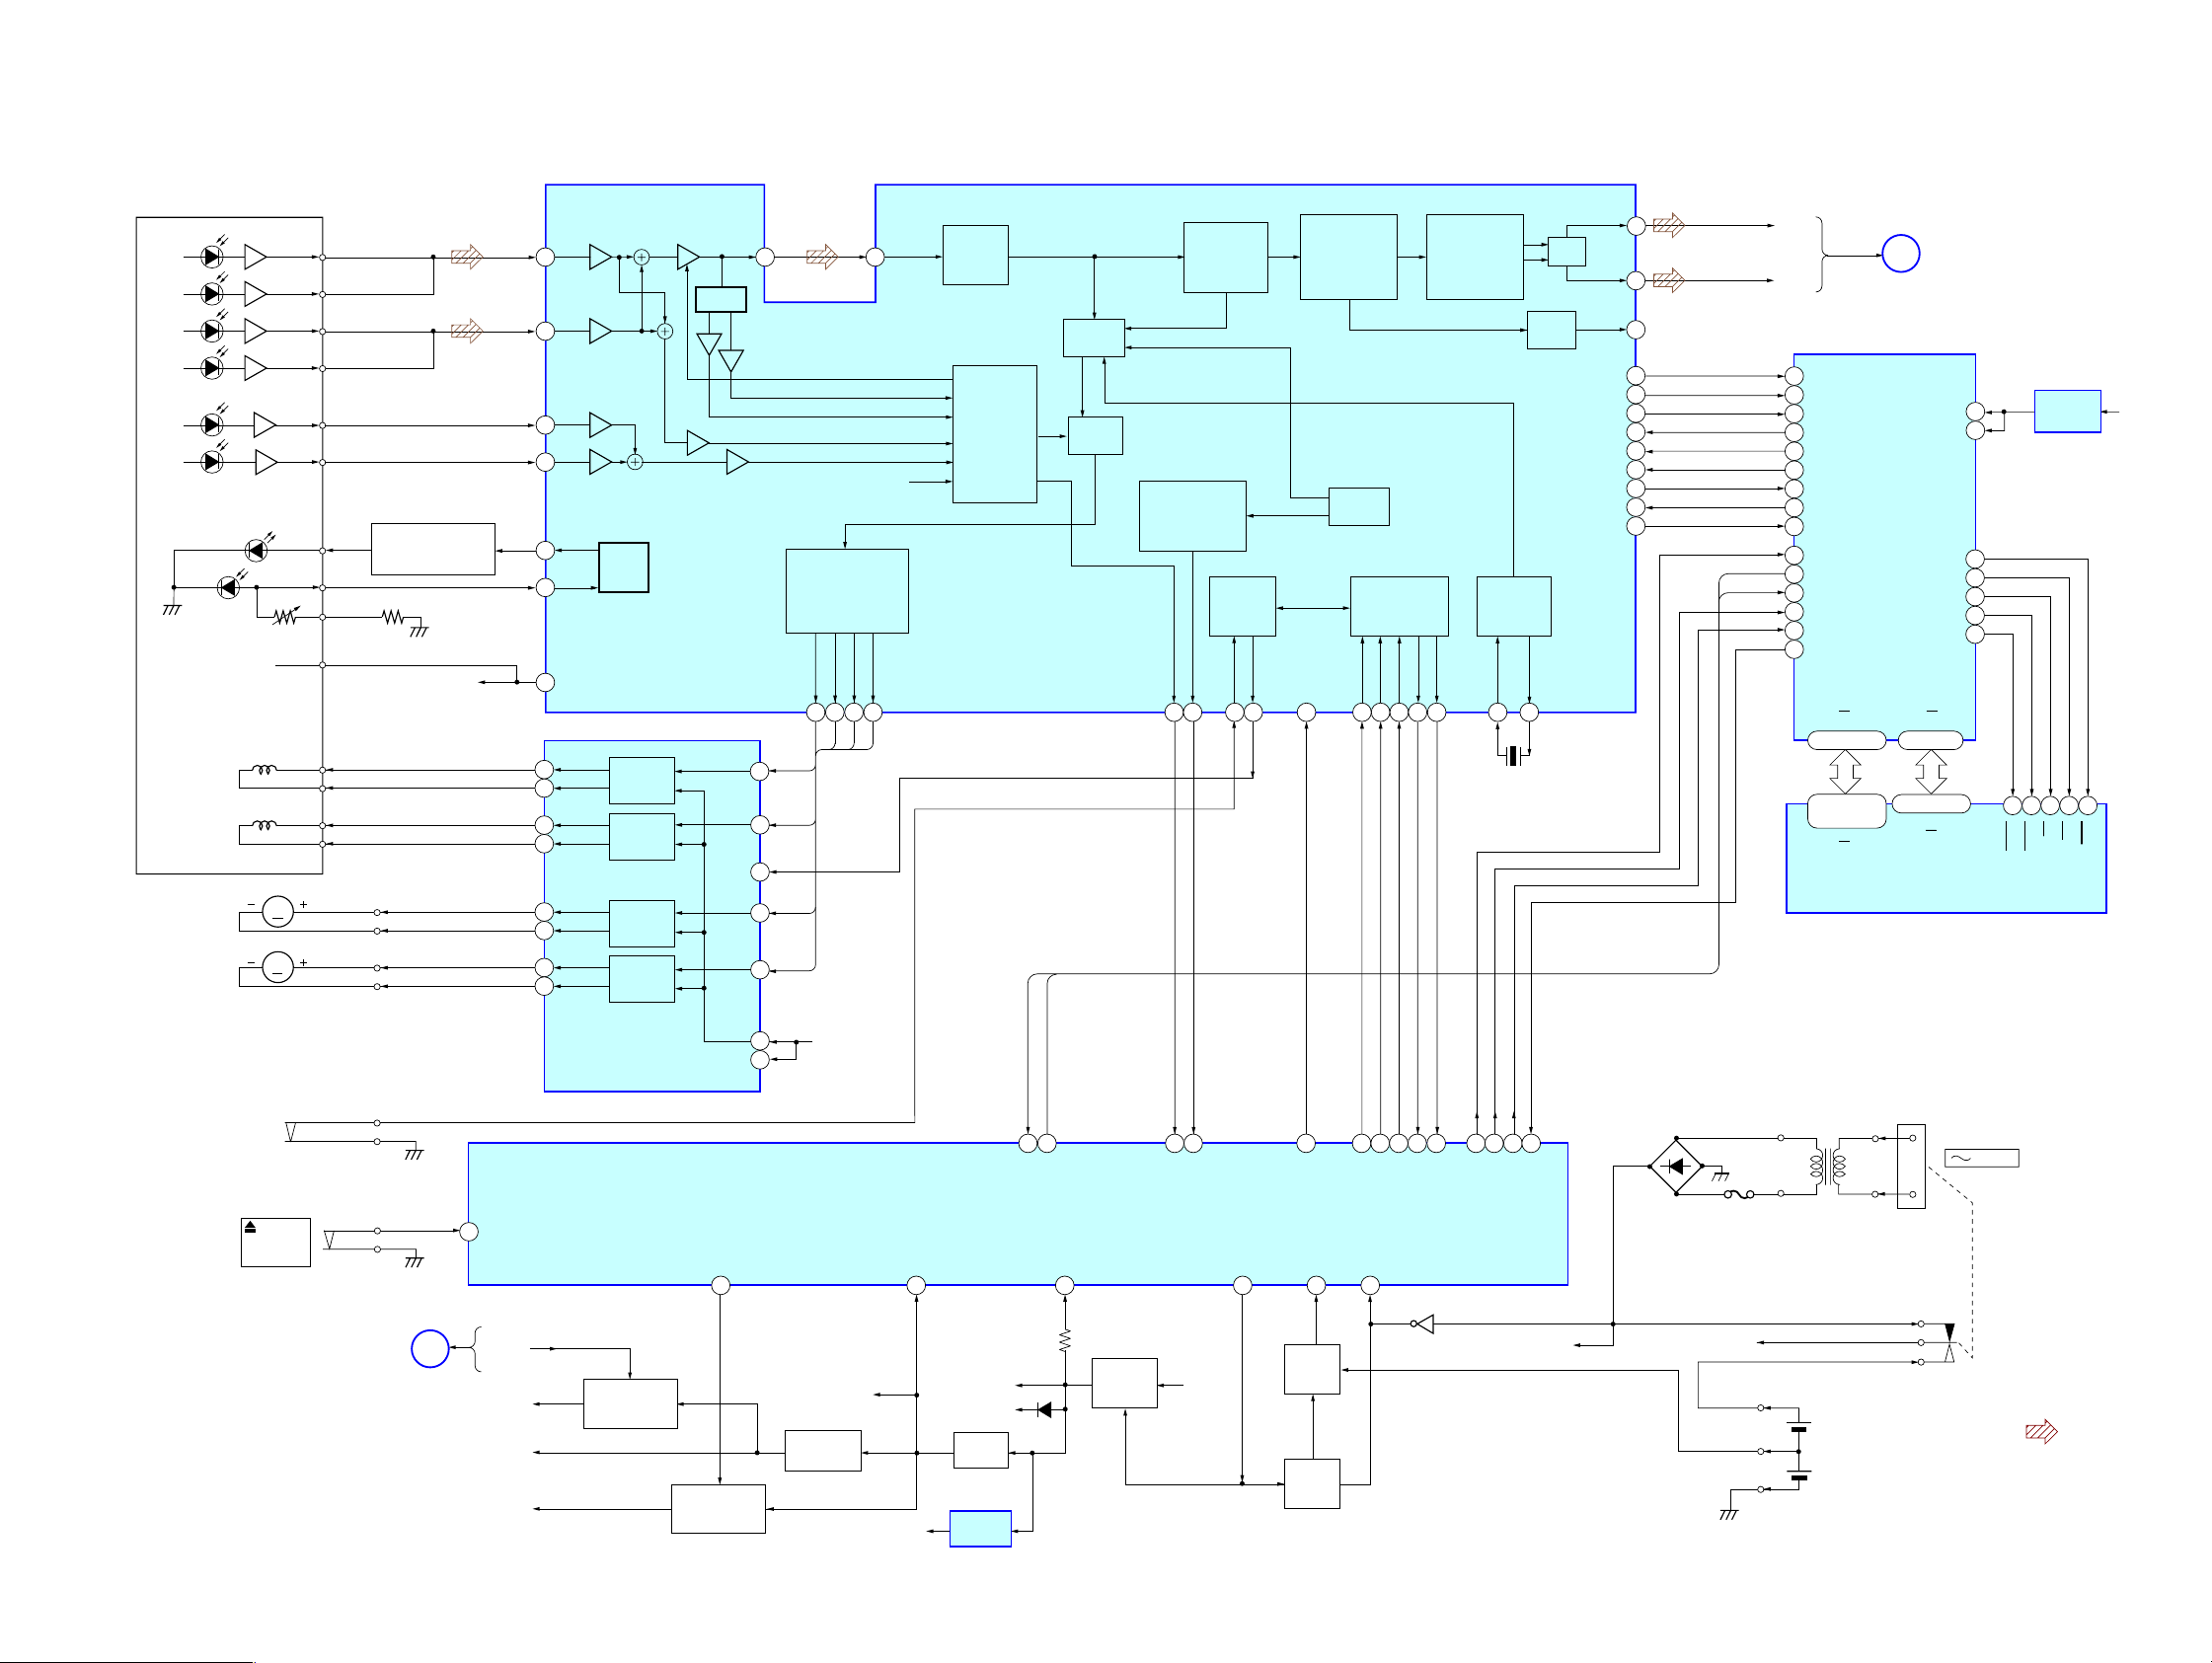
6-1. BLOCK DIAGRAM – CD SECTION –
A
C
B
D
E
F
LD
PD
VREF
OPTICAL PICK-UP
BLOCK
TRACKING
COIL
FOCUS
COIL
M702
(SLED)
M701
(SPINDLE)
S701
(LIMIT)
M
M
S801
PUSH
OPEN/
CLOSE
A
C
B
D
E
F
LD
POWER CONTROLLER
PD
VR
VREF
T+
T–
F+
F–
SL+
SL–
SP+
SP–
LD
Q701
VREF
48
CD-DOOR
SECTION 6
DIAGRAMS
FIN2
FIN1
7
TIN1
9
TIN2
10
LDD
80
79
11
17
18
12
11
26
27
2
1
APC
LDS
VREF
T+
TRACKING
T–
F+
F–
SL+
SL–
SP+
SP–
TRACKING/FOCUS
SLED/SPINDLE
MOTOR DRIVE
COIL
DRIVE
FOCUS
COIL
DRIVE
SLED
MOTOR
DRIVE
SPINDLE
MOTOR
DRIVE
COIL DRIVE,
IC702
PH/BH
MUTE
SLIN
SPIN
VREF
OPIN
19
RF
TIN
FIN
TU-ON
48
20
TD
20
FD
10
7
SL
25
SP
3
23
15
SYSTEM CONTROLLER
D/A
CONVERTER
TDOTD
FDO
SPDO
21 22 23
FD
SP
VREF
IC801 (1/2)
EFMIN
3
AGC
HFL
PH(RFENV)
FE
TE
VREF
SLDO
SL
REG-CHK
58
SLICE
LEVEL
CONTROL
A/D
CONVERTER,
SERVO
PROCESSOR
CE
INTB
49 80
INTB(MP3)
CLV,CAV
CONTROL
SWITCH
(MP3)CE
VH
59
CONT4
P-CON
INTERPOLATION
MUTE
&
ATTENUATION
DEEMPHASIS
RF AMP FOCUS/TRACKING SERVO
DIGITAL SIGNAL PROCESSOR
VCEC
RES(I)
∗
RES(CD)
VM
60
ERROR
CORRECTION
AUDIO CD
FRAME SYNC
DETECT,PROTECT
INSERT
EFM DECODER
GENERAL
PURPOSE
PORT
CONT1
FSEQ(O)
DRF(O)
67
31 72 25 66 63 61 62 49 4865 64
72 77 74 76 75 50 7378
DRF(CD)
FSEQ(CD)
93
8FS
DIGITAL
FILTER
&
1-bit DAC
CLV SERVO D/A.CONVERTER
PLL
COMMAND
INTERFACE
CE(I)
DI(I)
DI(CD)
CE(CD)
AC-CHK
44
IC701
CL(I)
CL(CD)
Q803
WRQ(O)
∗
DO(O)
DO(CD)
WRQ(CD)
GENERATOR
79
(MP3(CE70CL(MP3)
CLOCK
XIN
X701
16.9MHz
69
CMDIN(MP3)
LPF
AUDIO
OUT
DATA(O)
DATACK(O)
LRSY(S)
ASDFIN(O)
ASDACK(O)
ASLRCK(I)
16MOUT(O)
FSX/16MIN(I)
XOUT
68
CMDOUT(MP3)
LCHO
RCHO
DOUT
C2F(O)
42
42
45
39
60
59
58
57
56
55
54
50
52
D901 – 904
RECT
INTB
CE
F902
CD-L
A
SECTION
CD-R
MP3 DECODER,CD-ROM DECODER,
ANTI-SHOCK CONTROLLER
79
DATAINY(I)
80
DATACK(I)
LRSY(I)
1
ADDATA(O)
2
ADBCK(O)
3
ADLRCK(O)
4
CKIN(I)
7
CKOUT(O)
9
C2FIN(I)
5
RESB(I)
78
INTB(O)
77
CE(I)
76
CL(I)
75
CMDIN(I)
74
CMDOUT(O)
73
MDATA0
MDATA15
23-30,33-40
2-5,7-10,
35-38,40-44
DQ0
DQ15
T901
POWER
TRANSFORMER
(Page 22)
IC1001
DVDD5
DVDD2
CASUB
CASLB
MADRS0
60-53,50
18-21,24-28
A0
IC1002
SRRAM
MAIN
RASB
WEB
OEB
61
21
41
42
45
44
43
MADRS8
A8
J901
AC IN
CFD-S35CP
+1.8V REG
IC1003
31 30 29 15 16
OE
WE
UCAS
RAS
LCAS
CD3.3V
CFD-S35CP
MAIN
SECTION
(Page 22)
B
CD–ON
CD 3.3V
LCD 3.3V
RADIO 6V
MP3-CD
POWER SWITCH
Q806,809
TUNER
POWER SWITCH
Q802,811
+3.3V REG
Q955
POWER
6V
+3.3V
R-VT
+6V REG
Q957
+3.3V REG
IC803
D324
SWITCH
Q951-953
VDD9V (SW)
BATT
PROTECT
Q804,807
BATT
PROTECT
Q815
AC-HI
VDD
3V
DRY BATTERY
SIZE » D «
(IEC DESIGNATION R20)
3V
6PCS, 9V
• Signal path
: CD
1919
CFD-S35CP
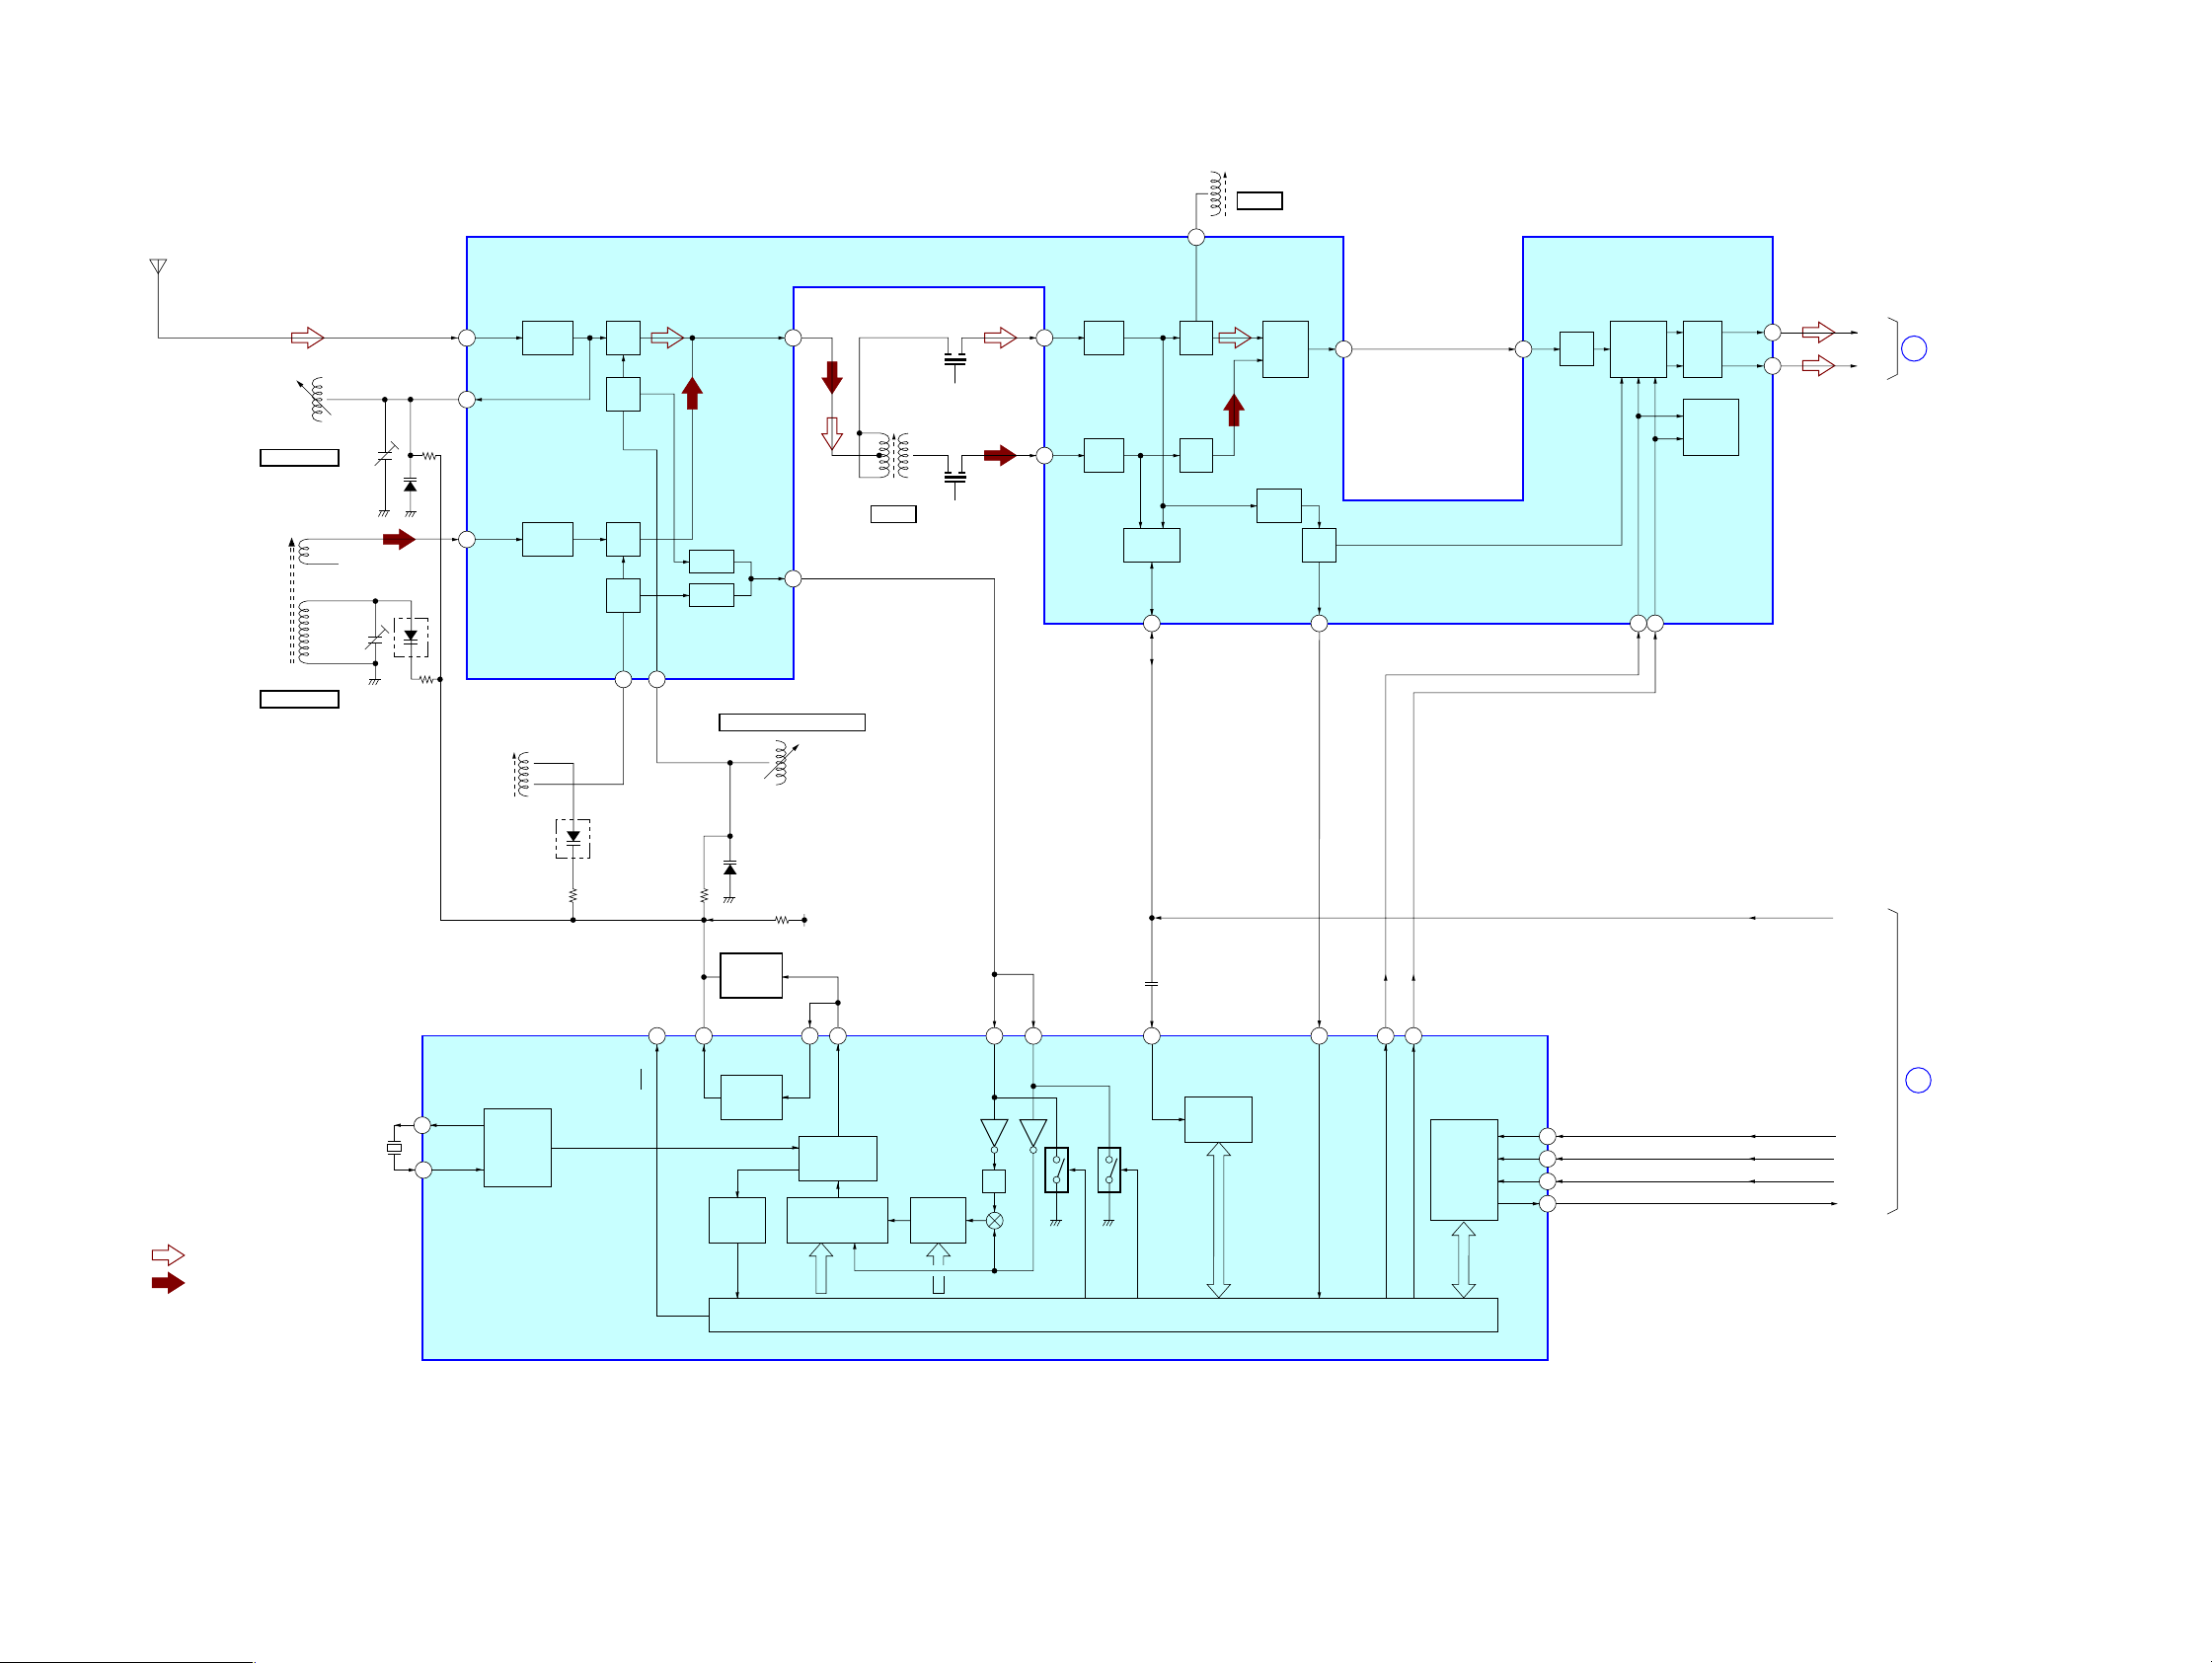
6-2. BLOCK DIAGRAM – TUNER-2 BAND SECTION –
FM/AM FRONT-END,
ANT1
FM TELESCOPIC
ANTENNA
IF AMP, DET, MPX
IC1
10
QUAD
T2
FM IFT
T2
FM IF
L1
FM RF
CT1, L1
FM TRACKING
L3
AM FERRITE-BAR
ANTENNA
CT3, L3
AM TRACKING
CT1
RADOP 6V
CT3
D1
D3
(1/2)
FM
RF-IN
FM
RF-OUT
AM
RF-IN
L4
AM
OSC
FM
RF AMP
AM
RF AMP
D3
(2/2)
2
24
22
FM
MIX
FM
OSC
AM
MIX
AM
OSC
AM OSC
20
FM OSC
21
MIX-OUT
BUFFER
BUFFER
OSC
-OUT
FM FREQUENCY COVERAGE
D2
4
19
L2
L2
FM OSC
AM IFT
T1
AM IF
CF2
T1
CF4
FM
IF-IN
FM IF
7
AMP
AM
IF-IN
AM IF
6
AMP
IF
BUFFER
IF-OUT
17
FM
DET
AM
DET
AF
BUFFER
LEVEL
DET
DET
-OUT
ST
IND
ST-IND
18
16
MPX
-IN
AF
15
AMP
MPX
LPF1/BAND
LPF2/MO-ST
13
14
MUTE
STEREO/
MONO,
FM/AM
L-OUT
R-OUT
12
11
TU-L
TU-L
C
SECTION
(Page 22)
MAIN
• SIGNAL PATH
: FM
: AM
X1
75kHz
R-VT
LOW-PASS
FILTER
11
18
6
LP-OUT
MW/LW
XOUT
20
19
XIN
REFERENCE
DIVIDER
PLL
IC2
LOW-PASS
FILTER
UNLOCK
DETECT
17
16
PD
LP-IN
PHASE
DETECTOR/
CHARGE PUMP
12 BIT
PROGRAMMABLE
DIVIDER
SWALLOW
COUNTER
12
FM IN
AM IN
1/2
SHIFT REGISTER & LATCH
10
IF IN
UNIVERSAL
COUNTER
8
ST-IND
7
BAND
13
MO/ST
CCB
INTERFACE
DI
2
CL
3
CE
1
DO
4
B MUTE
R-DATA
RCLK
RCE
RCOUNT
D
SECTION
(Page 22)
MAIN
CFD-S35CP
2020
2
24
4
7
20
21
FM
RF AMP
FM
MIX
FM
OSC
FM IF
AMP
IF
BUFFER
AF
BUFFER
AF
AMP
MPX
MUTE
STEREO/
MONO,
FM/AM
AM IF
AMP
FM
DET
AM
DET
6
FM
RF-IN
22
AM
RF AMP
Q14
AM
MIX
AM
RF-IN
MIX-OUT
OSC
-OUT
CF2
PLL
IC2
CF4
FM
RF-OUT
10
QUAD
FM
IF-IN
12
15
11
L-OUT
MPX
-IN
R-OUT
13
AM
IF-IN
LPF1/BAND
AM OSC
FM OSC
FM/MW/LW FRONT-END,IF AMP,DET,MPX
IC1
L2
CT1, L1
FM TRACKING
L3
MW/LW
FREQUENCY
COVERAGE
CT3, L3-1
MW TRACKING
CT5, L3-2
LW TRACKING
T1
AM IFT
LOW-PASS
FILTER
LOW-PASS
FILTER
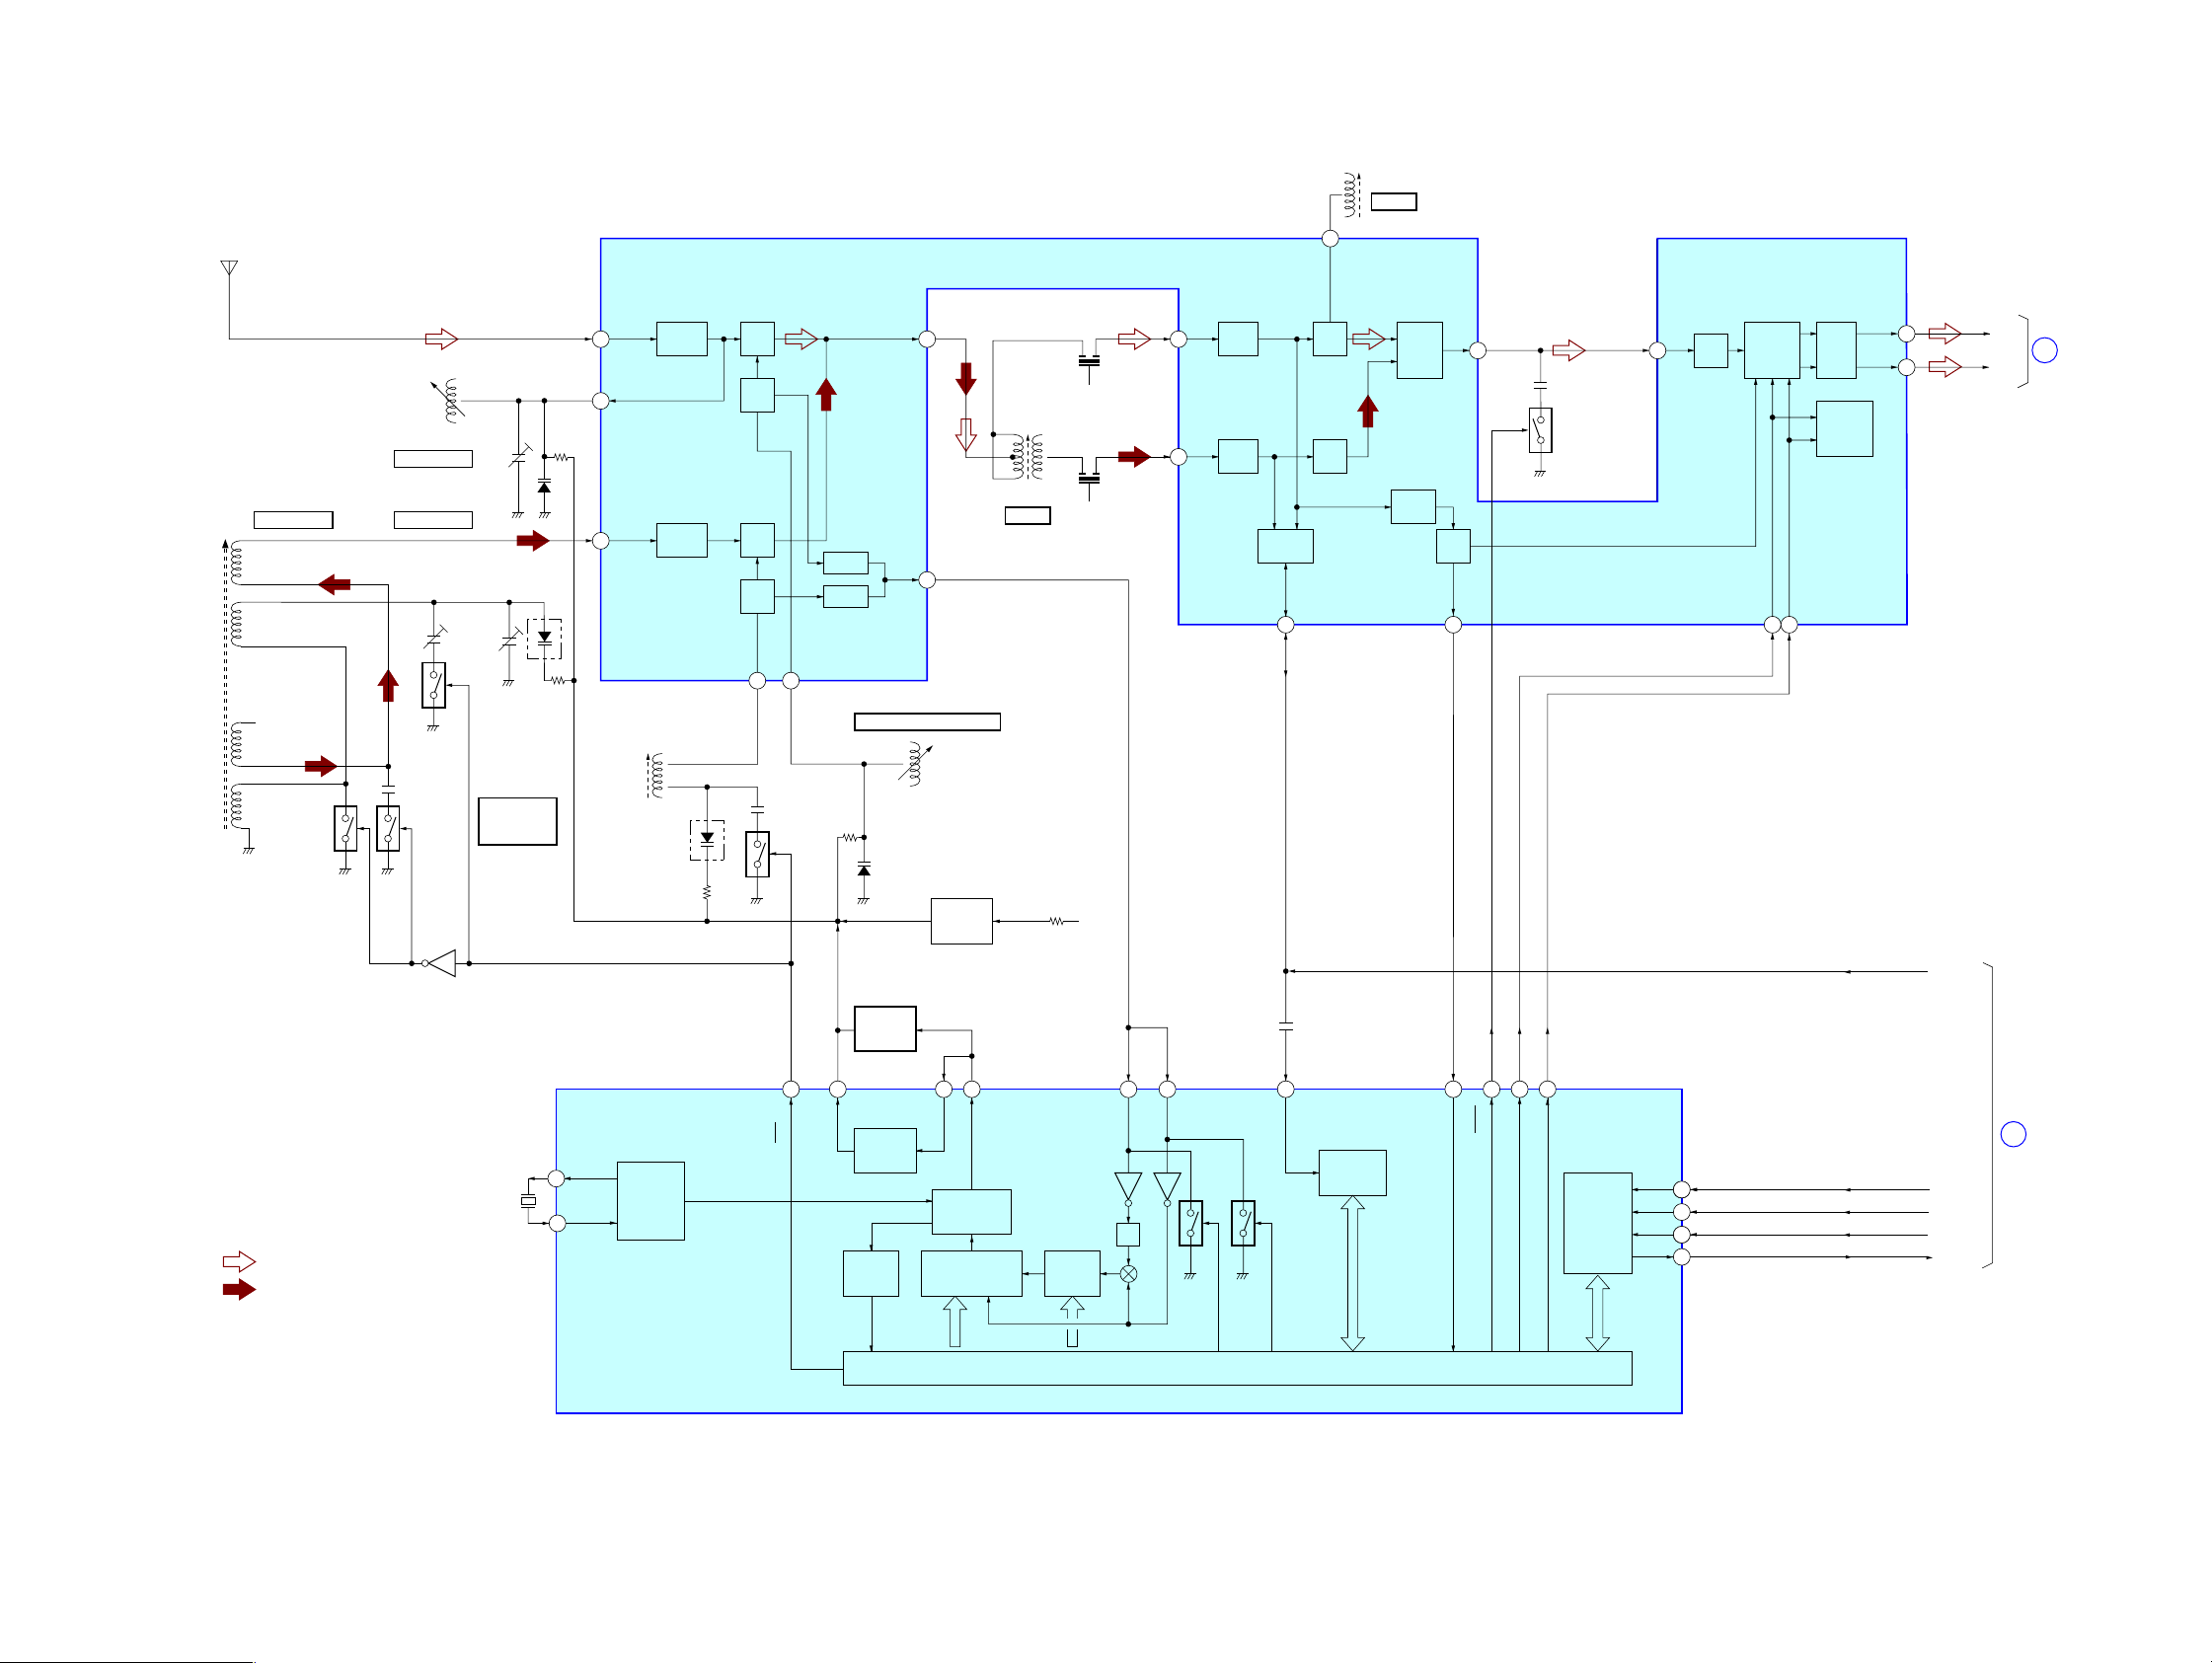
• SIGNAL PATH
: FM
: MW/LW
X1
75kHz
CT3
L1
FM RF
XOUT
XIN
AM IN
IF IN
ST-IND
LP-OUT
LP-IN
FM IN
20
19
11
12
18
MW/LW
6
CT1
D1
L4
AM (MW/LW)
OSC
L2
FM OSC
LEVEL
DET
ST
IND
14
LPF2/MO-ST
AM
OSC
BUFFER
BUFFER
SWALLOW
COUNTER
UNIVERSAL
COUNTER
CCB
INTERFACE
REFERENCE
DIVIDER
UNLOCK
DETECT
12 BIT
PROGRAMMABLE
DIVIDER
PHASE
DETECTOR/
CHARGE PUMP
SHIFT REGISTER & LATCH
1/2
BAND
DET
-OUT
ANT1
FM TELESCOPIC
ANTENNA
PD
IF-OUT
ST-IND
2
1
10
9
BAND
7
MO/ST
13
8
17 16
17
18
16
19
CT5
D2
R-VT
D3
(1/2)
D3
(2/2)
MW/LW
HIGH CUT
Q12
T1
AM IF
Q42
Q41
RADIO 6V
Q41, 42
MW SWITCH
L3-1
MW
L3-2
LW
L3
MW/LW
FERRITE-BAR
ANTENNA
LW
SWITCH
Q44
LW SWITCH
Q43
TU-L
TU-R
C
CURRENT
SOURCE
Q61
T2
FM IFT
T2
FM IF
FM FREQUENCY COVERAGE
RDATA
RCLK
RCE
RCOUNT
D
B MUTE
DI
CL
CE
DO
2
3
1
4
MAIN
SECTION
(Page 22)
MAIN
SECTION
(Page 22)
6-3. BLOCK DIAGRAM – TUNER-3 BAND SECTION –
CFD-S35CP
CFD-S35CP
2121
Loading…
3-874-352-21(1)
©2008 Sony Corporation
CD Radio
Cassette-Corder
CFD-S35CP
Operating Instructions
GB
RU
Инcтpyкция по экcплyaтaции

2
GB
WARNING
To prevent fire or shock hazard,
do not expose the player to rain
or moisture.
To avoid electrical shock, do not
open the cabinet. Refer
servicing to qualified personnel
only.
WARNING
Do not install the appliance in a confined space,
such as a bookcase or built-in cabinet.
To prevent fire or shock hazard, do not place
objects filled with liquids, such as vases, on the
appliance.
Connect the apparatus to an easily accessible AC
outlet. Should you notice an abnormality in the
apparatus, disconnect the main plug from the AC
outlet immediately.
Notice for the customer in the
countries applying EU Directives
The manufacturer of this product is Sony
Corporation, 1-7-1 Konan, Minato-ku, Tokyo,
Japan. The Authorized Representative for EMC
and product safety is Sony Deutschland GmbH,
Hedelfinger Strasse 61, 70327 Stuttgart, Germany.
For any service or guarantee matters please refer
to the addresses given in separate service or
guarantee documents.
Excessive sound pressure from earphones and
headphones can cause hearing loss.
Do not expose the batteries (battery pack or
batteries installed) to excessive heat such as
sunshine, fire or the like for a long time.
NOTE
The name of the switch to turn on/off this player is
indicated as below:
«OPERATE»: European model
«POWER»: Other models

3
GB
GB
Table of contents
Basic Operations
Playing an audio CD or MP3 files ……………… 4
Listening to the radio ……………………………….. 8
Playing a tape ……………………………………….. 10
Recording on a tape ……………………………….. 12
The CD Player
Using the display …………………………………… 14
Locating a specific track …………………………. 15
Playing tracks repeatedly (Repeat Play) ……. 16
Playing tracks in random order
(Shuffle Play) ……………………………………. 17
Creating your own programme
(Programme Play) ………………………………. 17
The Radio
Presetting radio stations ………………………….. 19
Playing preset radio stations ……………………. 20
The Audio Emphasis
Selecting the audio emphasis ………………….. 21
The Timer
Falling asleep to music …………………………… 22
Setting Up
Choosing the power sources ……………………. 23
Additional Information
Precautions …………………………………………… 25
Troubleshooting …………………………………….. 27
Maintenance …………………………………………. 29
Specifications ……………………………………….. 30
About “MP3” ………………………………………… 31
Index ……………………………………………………. 32

4
GB
Playing an audio CD or MP3 files
Connect the supplied mains lead (see page 23).
1
Press CD.
(On the remote, press OPERATE
(POWER, see page 2) and then press
FUNCTION repeatedly until «CD»
appears in the display.)
2
Press Z PUSH OPEN/CLOSE down
to open the CD compartment and
place the CD on the CD
compartment.
3
Close the lid of the CD compartment.
With the label side up
1
4
2, 3
Basic Operations

5
GB
Basic Operations
Display
Playing
time
Track
number
To
Press
adjust the volume
VOLUME +*, –
(VOL +*, – on the remote.)
stop playback
x
pause playback
u* (X on the remote)
Press the button again to
resume play after pause.
go to the next track
>
go back to the previous track
.**
remove the CD
Z PUSH OPEN/CLOSE***
turn on/off the player
OPERATE
(or POWER, see page 2)
*
The button has a tactile dot.
** During playback, this operation goes back to the beginning of
the current track. To go back to the previous track, press again
within 1 second.
*** Once you open the CD compartment, the track to start play
will change to the beginning of the first track.
Tip
Playback starts from the
track you last stopped
playing (Resume play).
During stop, the track
number to be played are
displayed.
To cancel the resume play
to start play from the
beginning of the first track,
press x in stop mode.
u
OPERATE
(POWER)
VOLUME +, –
x
Z PUSH
OPEN/CLOSE
continued
4
Press u (N on the remote).
The player plays all the tracks once.
To play a CD with MP3 files, see
page 6.
Use these buttons for additional operations
., >

6
GB
Note
Before playing a file, this
player reads all file and
folder information on the
CD. Depending on the file
structure, it may take more
than a minute to read them.
During this time, “READ”
flashes in the display.
Tip
You can use the buttons
mentioned in the table on
page 5 for additional
operations in the same way
as when playing an audio
CD.
Playing a CD with MP3 files
1
Press CD.
2
Press Z PUSH OPEN/CLOSE to open the CD
compartment and place the CD on the CD
compartment (see page 4) .
3
Close the lid of the CD compartment.
4
Press u.
The player plays all MP3 files on the CD.
When you play a CD with MP3 files, MP3 indicator
lights up.
To select a folder
Press FLDR + to go forward and FLDR – to go backward .
Press FOLDER +, – on the remote.
To select a file
Press > to go forward and . to go backward.
Track number
u
., >
CD
After the file name is
displayed, the playing time
will appear
Z PUSH
OPEN/CLOSE
Playing an audio CD or MP3 files (continued)
FLDR +, –
MP3 indicator

7
GB
Basic Operations
Example of folder structure and playing
order
The playing order of the folders and files is as follows:
Notes
• A folder that does not
include an MP3 file is
skipped.
• Maximum number of files:
255
Maximum number of
folders: 150 (including the
root folder)
Maximum number of
folders and files in total:
300
Maximum directory steps: 8
• Folder names and file
names can be displayed
with up to 16 characters
including quotation marks.
• The characters A — Z, 0 — 9,
and _ can be displayed on
this player. Other characters
are displayed as “_”.
• This player conforms to
Version 1.0, 1.1, 2.2, 2.3
and 2.4 of the ID3 tag
format. When the file has
the ID3 tag information,
“song title”, “artist name”
and “album name” can be
displayed. If the file does
not have the ID3 tag
information, “No title”
appears instead of song
title, “No album” appears
instead of album name and
“No artist” appears instead
of artist name. The ID3 tag
information can be
displayed with up to 15
characters.
About CD-Rs/CD-RWs and MP3 files
This player can play CD-Rs/CD-RWs recorded in the CD-
DA format* and MP3 files recorded in the CD-ROM
format, but playback capability may vary depending on the
quality of the disc and the condition of the recording
device.
* CD-DA is the abbreviation for Compact Disc Digital Audio. It is
a recording standard used for Audio CDs.
CD-R
CD-RW
3
2
1
2
4
5
3
6
7
8
4
9
5
0
6
1
MP3 file
Folder

8
GB
Listening to the radio
Connect the supplied mains lead (see page 23).
1
Press RADIO BAND•AUTO
PRESET (BAND on the remote)
until the band you want appears in
the display.
European model: «FM»
t «MW» t
«LW»
Other models: «FM»
t «AM»
2
Hold down TUNE + or – until the
frequency digits begin to change in
the display.
The player automatically scans the
radio frequencies and stops when it
finds a clear station.
If you can’t tune in a station, press
TUNE + or – repeatedly to change
the frequency step by step.
2
1
Display
Indicates an FM stereo
broadcast

9
GB
Basic Operations
Use these buttons for additional operations
Tip
If the FM broadcast is
noisy, press MODE until
“Mono” appears in the
display and radio will play
in monaural.
To
Press
adjust the volume
VOLUME +*, –
turn on/off the radio
OPERATE
(or POWER, see page 2)
*VOLUME + (VOL + on the remote) has a tactile dot.
To improve broadcast reception
Reorient the antenna for FM. Reorient the player itself for
AM or MW/LW.
OPERATE
(POWER)
VOLUME
+, –
MODE
for FM
for AM/MW/LW

10
GB
Playing a tape
2
3
Display
Connect the supplied mains lead (see page 23).
1
Press TAPE.
2
Press xZ to open the tape
compartment and insert a recorded
tape. Use TYPE I (normal) tape only.
Close the compartment.
3
Press n*.
The player starts playing.
1
With the side you want
to play facing you

10:20
Sony CFD RS60CP ремонт сразу отключается после включения
02:51
Sony CFD-S350 Demo Video
27:22
reparacion de una Radio Grabadora sony CFD S35CP de audio®
Press the button for help

Sony CFD-S35CP User Manual [PDF]
Pages: 36 | Size: 374 kB
Table of Contents
- Basic Operations
- Playing an audio CD or MP3 files
- Listening to the radio
- Playing a tape
- Recording on a tape
- The CD Player
- Using the display
- Locating a specific
track - Playing tracks
repeatedly (Repeat Play) - Playing tracks in
random order (Shuffle Play) - Creating your own
programme (Programme Play)
- The Radio
- Presetting radio
stations - Playing preset radio
stations
- Presetting radio
- The Audio Emphasis
- Selecting the audio
emphasis
- Selecting the audio
- The Timer
- Falling asleep to music
- Setting Up
- Choosing the power sources
- Additional Information
- Precautions
- Troubleshooting
- Maintenance
- Specifications
- About “MP3”
- Index

Sony CFD-S35CP User Manual [PDF]
Pages: 68 | Size: 746 kB
Table of Contents
- GB
- Basic Operations
- Playing an audio CD or MP3 files
- Listening to the radio
- Playing a tape
- Recording on a tape
- The CD Player
- Using the display
- Locating a specific track
- Playing tracks repeatedly (Repeat Play)
- Playing tracks in random order (Shuffle Play)
- Creating your own programme (Programme Play)
- The Radio
- Presetting radio stations
- Playing preset radio stations
- The Audio Emphasis
- Selecting the audio emphasis
- The Timer
- Falling asleep to music
- Setting Up
- Choosing the power sources
- Additional Information
- Precautions
- Troubleshooting
- Maintenance
- Specifications
- About “MP3”
- Index
- Basic Operations
- RU
- Ocновныe дeйcтвия
- Bоcпpоизвeдeниe звyкового компaкт-диcкa или фaйлов MP3
- Пpоcлyшивaниe paдиопepeдaч
- Bоcпpоизвeдeниe кacceты
- Зaпиcь кacceты
- Пpоигpывaтeль компaкт-
диcков- Иcпользовaниe диcплeя
- Быcтpый пepexод к опpeдeлeнной композиции .
- Повтоpноe воcпpоизвeдeниe
композиций (Повтоpноe
воcпpоизвeдeниe) - Bоcпpоизвeдeниe композиций в cлyчaйной поcлeдовaтeльноcти (Пepeтacовaнноe воcпpоизвeдeниe)
- Cоздaниe cобcтвeнной поcлeдовaтeльноcти (Bоcпpоизвeдeниe в зaпpогpaммиpовaнной поcлeдовaтeльноcти)
- Paдиопpиeмник
- Пpeдвapитeльнaя нacтpойкa paдиоcтaнций
- Пpоcлyшивaниe зaпpогpaммиpовaнныx paдиоcтaнций
- Уcилeниe звyкa
- Bыбоp xapaктepa ycилeния звyкa
- Taймep
- Зacыпaниe под мyзыкy
- Подготовкa к иcпользовaнию
- Bыбоp иcточников питaния
- Дополнитeльнaя инфоpмaция
- Mepы пpeдоcтоpожноcти
- Уcтpaнeниe нeполaдок
- Уxод зa ycтpойcтвом
- Texничecкиe xapaктepиcтики
- O фоpмaтe “MP3”
- Укaзaтeль
- Ocновныe дeйcтвия

Sony CFD-S35CP User Manual [PDF]
Pages: 36 | Size: 374 kB
Table of Contents
- Table of contents
- Basic Operations
- Playing an audio CD or MP3 files
- Listening to the radio
- Playing a tape
- Recording on a tape
- The CD Player
- Using the display
- Locating a specific track
- Playing tracks repeatedly (Repeat Play)
- Playing tracks in random order (Shuffle Play)
- Creating your own programme (Programme Play)
- The Radio
- Presetting radio stations
- Playing preset radio stations
- The Audio Emphasis
- Selecting the audio emphasis
- The Timer
- Falling asleep to music
- Setting Up
- Choosing the power sources
- Additional Information
- Precautions
- Troubleshooting
- Maintenance
- Specifications
- About “MP3”
- Index

Sony CFD-S35CP User Manual [PDF]
Pages: 64 | Size: 912 kB
Table of Contents
- GB
- Table of contents
- Basic Operations
- Playing an audio CD or MP3 files
- Listening to the radio
- Playing a tape
- Recording on a tape
- The CD Player
- Using the display
- Locating a specific track
- Playing tracks repeatedly (Repeat Play)
- Playing tracks in random order (Shuffle Play)
- Creating your own programme (Programme Play)
- The Radio
- Presetting radio stations
- Playing preset radio stations
- The Audio Emphasis
- Selecting the audio emphasis
- The Timer
- Falling asleep to music
- Setting Up
- Choosing the power sources
- Additional Information
- Precautions
- Troubleshooting
- Maintenance
- Specifications
- About “MP3”
- Index
- Basic Operations
- Table of contents
- RU
- Cодepжaниe
- Ocновныe дeйcтвия
- Bоcпpоизвeдeниe звyкового
- Пpоcлyшивaниe paдиопepeдaч
- Bоcпpоизвeдeниe кacceты
- Зaпиcь кacceты
- Пpоигpывaтeль компaкт-диcков
- Иcпользовaниe диcплeя
- Быcтpый пepexод к опpeдeлeннойкомпозиции
- Повтоpноe воcпpоизвeдeниeкомпозиций (Повтоpноeвоcпpоизвeдeниe)
- Bоcпpоизвeдeниe композиций вcлyчaйной поcлeдовaтeльноcти(Пepeтacовaнноeвоcпpоизвeдeниe)
- Cоздaниe cобcтвeннойпоcлeдовaтeльноcти(Bоcпpоизвeдeниe взaпpогpaммиpовaннойпоcлeдовaтeльноcти)
- Paдиопpиeмник
- Пpeдвapитeльнaя нacтpойкapaдиоcтaнций
- Пpоcлyшивaниeзaпpогpaммиpовaнныxpaдиоcтaнций
- Уcилeниe звyкa
- Bыбоp xapaктepa ycилeния звyкa
- Taймep
- Зacыпaниe под мyзыкy
- Подготовкa к иcпользовaнию
- Bыбоp иcточников питaния
- Дополнитeльнaя инфоpмaция
- Mepы пpeдоcтоpожноcти
- Уcтpaнeниe нeполaдок
- Уxод зa ycтpойcтвом
- Texничecкиe xapaктepиcтики
- O фоpмaтe “MP3”
- Укaзaтeль
- Ocновныe дeйcтвия
- Cодepжaниe
-
Contents
-
Table of Contents
-
Bookmarks
SERVICE MANUAL
Ver. 1.1 2005.05
CD player section
System
Compact disc digital audio system
Laser diode properties
Material: GaAlAs
Wave length: 780 nm
Emission duration: Continuous
Laser output: Less than 44.6 µW
(This output is the value measured at a distance
of about 200 mm from the objective lens surface
on the optical pick-up block with 7 mm
aperture.)
Spindle speed
200 r/min (rpm) to 500 r/min (rpm)
(CLV)
Number of channels
2
Frequency response
20 — 20,000 Hz +1/–2 dB
Wow and flutter
Below measurable limit
Sony Corporation
9-879-598-02
Personal Audio Group
2005E04-1
Published by Sony Engineering Corporation
© 2005.05
CFD-S35CP
Model Name Using Similar Mechanism CFD-S350/S350L
CD
CD Mechanism Type
Section
Optical Pick-up Name
Model Name Using Similar Mechanism CFD-S350/S350L
TC
Section Tape Transport Mechanism Type
SPECIFICATIONS
Radio section
Frequency range
E Model
FM
87.5 — 108 MHz
AM
MX model:
530 — 1,710 kHz
other models:
531 — 1,611 kHz (9 kHz step)
530 — 1,610 kHz (10 kHz step)
AEP, UK Model
FM
87.5 — 108 MHz
MW
531 — 1,611 kHz (9 kHz step)
530 — 1,610 kHz (10 kHz step)
LW
153 — 279 kHz
Aerials
FM: Telescopic aerials
AM/MW/LW: Built-in ferrite bar aerials
Cassette-corder section
Recording system
4-track 2 channel stereo
Fast winding time
Approx. 120 s (sec.) with Sony cassette C-60
Frequency response
TYPE I (normal): 80 — 10,000 Hz
CD RADIO CASSETTE-CORDER
AEP Model
UK Model
E Model
KSM-213CDP
KSS-213C
MF-S350
– Continued on next page –
Summary of Contents for Sony CFD-S35CP
Sony CFD-S35CP
3-874-351-81(1)
©2008 Sony Corporation
CD Radio
Cassette-Corder
Инcтpyкция по экcплyaтaции
CFD-S35CP
Инструкция
Посмотреть инструкция для Sony CFD-S35CP бесплатно. Руководство относится к категории радио, 10 человек(а) дали ему среднюю оценку 8.9. Руководство доступно на следующих языках: русский. У вас есть вопрос о Sony CFD-S35CP или вам нужна помощь?
Задайте свой вопрос здесь
Изображения продукта (3)

Ниже вы найдете технические характеристики изделия и руководства по эксплуатации Sony CFD-S35CP.
Радио Sony CFD-S35CP — мощное и универсальное аудиоустройство, предлагающее широкий спектр функций. С весом в 3700 граммов, оно может легко переноситься, обеспечивая мобильность в любой ситуации.
Благодаря функции таймера сна, вы можете настроить время автоматического отключения радио, что позволяет вам расслабиться и насладиться музыкой перед сном.
С 40 предустановленными станциями вы можете легко находить и переключаться между различными радиофонограммами. Поддерживаемые радиодиапазоны включают AM, FM и LW.
MP3-воспроизведение позволяет слушать вашу любимую музыку в формате MP3 с помощью этого радио. Возможности воспроизведения включают обычный, повторный и случайный режимы, давая вам больше контроля над тем, как воспроизводится ваша музыка.
Кассетная дека встроена в радио, позволяя вам слушать и записывать музыку на кассеты. Скорость синхронного старта CD обеспечивает плавное и мгновенное воспроизведение CD-дисков.
RMS-рейтинг мощности равен 4,6 Вт, обеспечивая качественное и достаточно громкое звучание. Диаметр драйвера сабвуфера составляет 4 дюйма, обеспечивая глубокие и мощные басы.
Радио Sony CFD-S35CP — это надежное и прочное устройство, созданное из высококачественных материалов, что гарантирует долговечность в использовании. Благодаря своим многофункциональным возможностям, оно является идеальным выбором для тех, кто хочет наслаждаться музыкой в любое время и в любом месте.
Предварительно установленное количество станций
40
Поддерживаемые типы дисков
CD-R, CD-RW
Номинальная RMS-мощность
4.6 W
Главная
| Бренд | Sony |
| Модель | CFD-S35CP | CFDS35 |
| Изделие | радио |
| Язык | русский |
| Тип файла | Руководство пользователя (PDF) |
Свойства
| Таймер засыпания | Да |
| Цвет товара | Серебристый |
| MP3-воспроизведение | Да |
Радио
| Предварительно установленное количество станций | 40 |
| FM диапазон | 87.5 — 108 MHz |
| AM диапазон | 531 — 1611 kHz |
| Поддерживаемые диапазоны радио | AM, FM, LW |
| LW диапазон | 153 — 279 kHz |
Вес и размеры
| Вес | 3700 g |
| Ширина | 420 mm |
| Глубина | 260 mm |
| Высота | 155 mm |
Оптический привод
| Поддерживаемые типы дисков | CD-R, CD-RW |
| Режимы воспроизведения | Normal, Repeat, Shuffle |
Кассета
| Кассетная дека | Да |
| CD синхронизированный старт | Да |
Акустика
| Номинальная RMS-мощность | 4.6 W |
| Диаметр динамика сабвуфера (английская система мер) | 4 « |
Экран
| Тип дисплея | ЖК |
| Цвет подсветки | Оранжевый |
Содержимое упаковки
| Пульт дистанционного управления | Да |
Порты и интерфейсы
| Линейные выходы наушников | 1 |
| Выход для наушников | Да |
Энергопитание
| Источник питания | Сеть переменного тока / аккумулятор |
| Число поддерживаемых батарей | 6 |
показать больше
Часто задаваемые вопросы
Не можете найти ответ на свой вопрос в руководстве? Вы можете найти ответ на свой вопрос ниже, в разделе часто задаваемых вопросов о Sony CFD-S35CP.
Какой вес Sony CFD-S35CP?
Sony CFD-S35CP имеет вес 3700 g.
Какая высота Sony CFD-S35CP?
Sony CFD-S35CP имеет высоту 155 mm.
Какая ширина Sony CFD-S35CP?
Sony CFD-S35CP имеет ширину 420 mm.
Что такое Bluetooth?
Bluetooth — это способ обмена данными по беспроводной сети между электронными устройствами с помощью радиоволн. Расстояние между двумя устройствами обменивающимися данными в большинстве случаев составляет не более десяти метров.
Какая толщина Sony CFD-S35CP?
Sony CFD-S35CP имеет толщину 260 mm.
Когда звук считается слишком громким?
Уровень звука выше 80 децибел может нанести вред слуху. Уровень звука выше 120 децибел может нанести прямое повреждение слуху. Вероятность повреждения слуха зависит от частоты и продолжительности прослушивания.
Как лучше всего выполнять чистку радио?
Для удаления отпечатков пальцев лучше всего использовать слегка влажную салфетку для уборки или мягкую чистую ткань. Пыль в труднодоступных местах лучше всего удаляется потоком сжатого воздуха.
В чем разница между FM и AM?
FM означает «частотная модуляция», AM — «амплитудная модуляция». Основная разница между FM- и AM-радиостанциями состоит в качестве звука.
Инструкция Sony CFD-S35CP доступно в русский?
Да, руководствоSony CFD-S35CP доступно врусский .
Не нашли свой вопрос? Задайте свой вопрос здесь