
There are instructions on how to use the SN Write Tool to write or fix the IMEI number on any mobile device running on the MediaTek chipset.
Note: The SN Write Tool is strictly made for devices with MediaTek Chipsets. It will NOT work on devices with Qualcomm, SpreadTrum, UniSoc, Broadcom, or any other chipset other than MediaTek.
Write IMEI on a MediaTek device using the SN Write Tool
- Download and install the MediaTek Driver on your Windows computer. If MediaTek drivers are already installed on the computer, then skip this step.
- Download and extract the SN Write Tool on your computer. After extracting, you will be able to see the following files:
- Open “SN_Writer.exe” to Launch the tool.
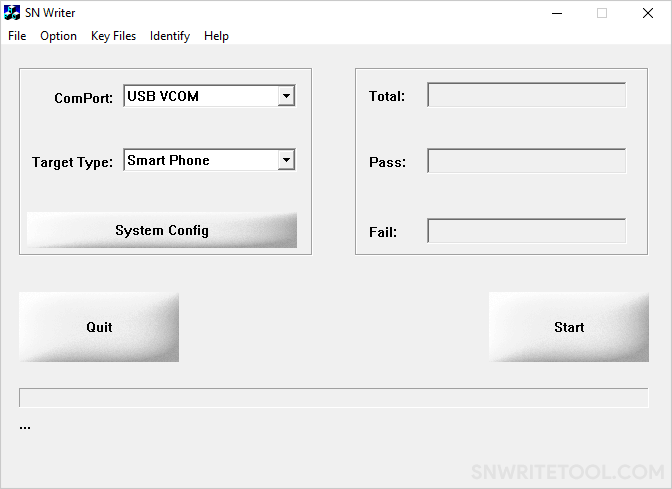
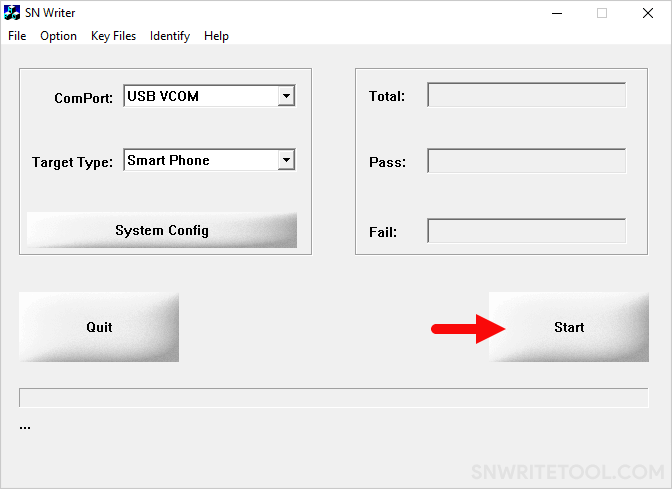
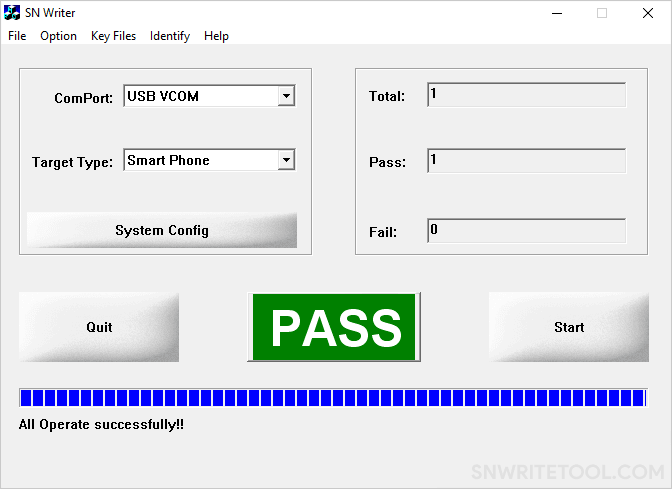
- Once the tool is launched, you will see the following screen:
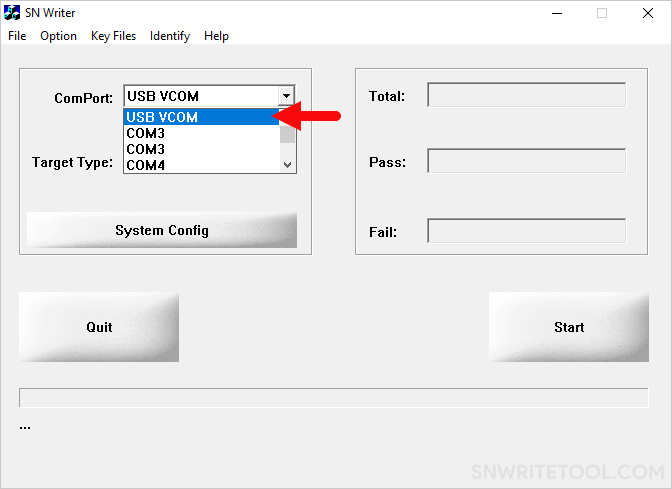
- Click on the “ComPort” dropdown menu and select the “USB VCOM” option.
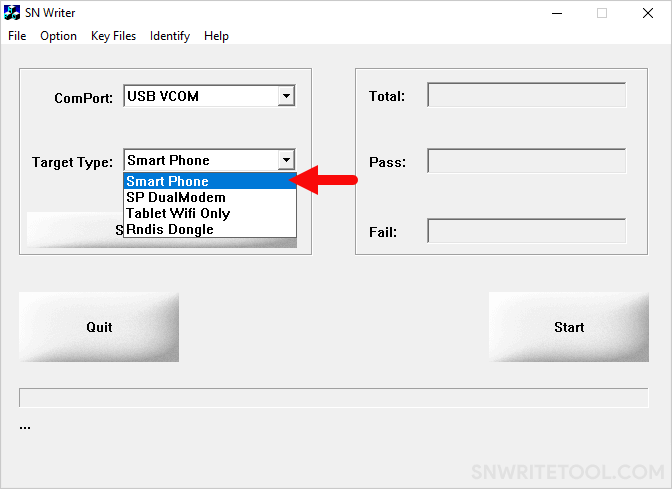
- Click on the “Target Type” dropdown menu and select the “Smart Phone” option if you wish to write IMEI on a smartphone. Alternatively, if you want to write IMEI on a feature phone, select the “Feature Phone” option.
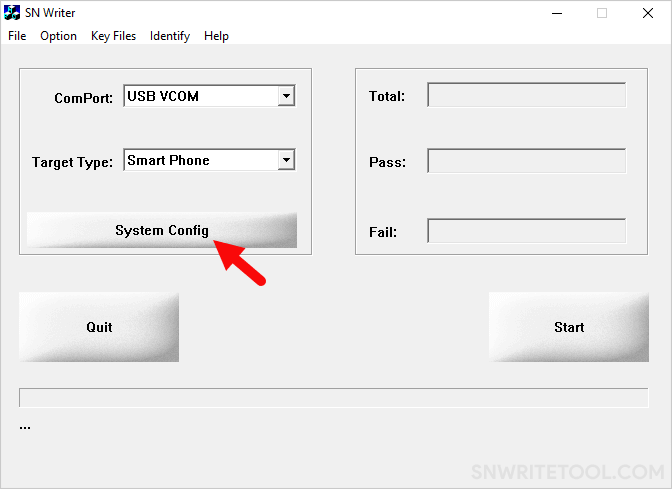
- Click on the “System Config” button.
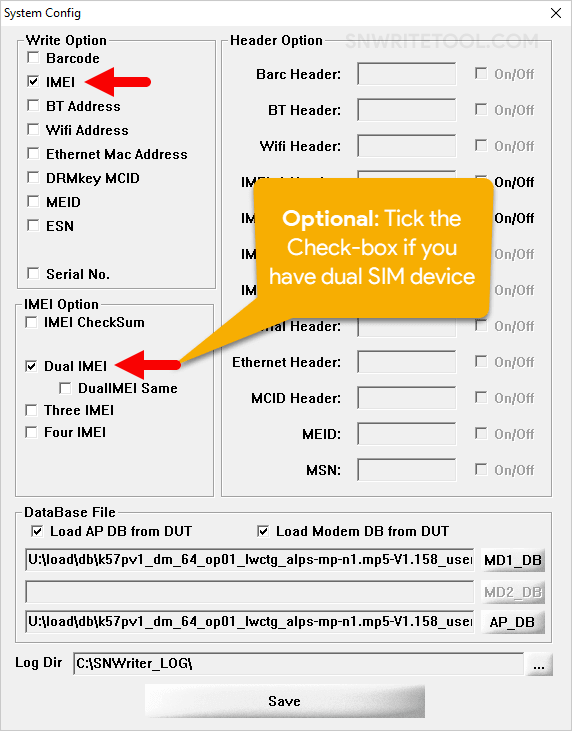
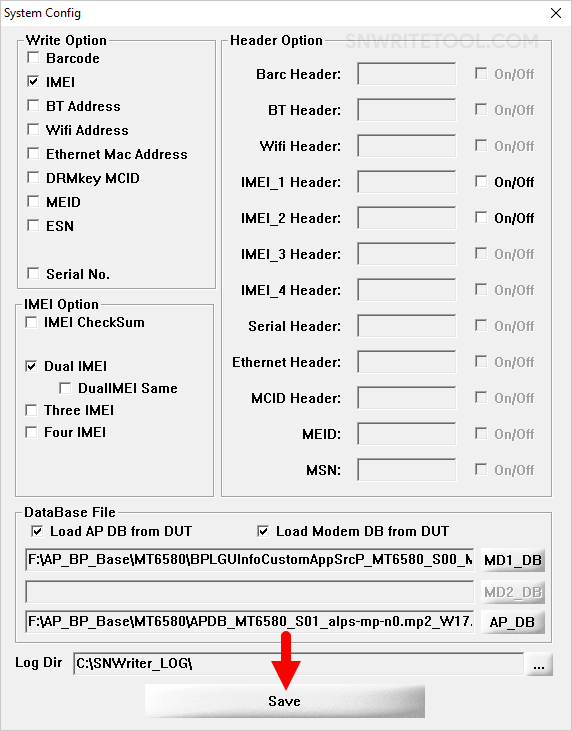
- Once the “System Config” dialog box is launched, tick the “IMEI” checkbox in the “Write Option” section. If your device has a dual-SIM feature, then tick the “Dual IMEI” checkbox under the “IMEI Option” section.
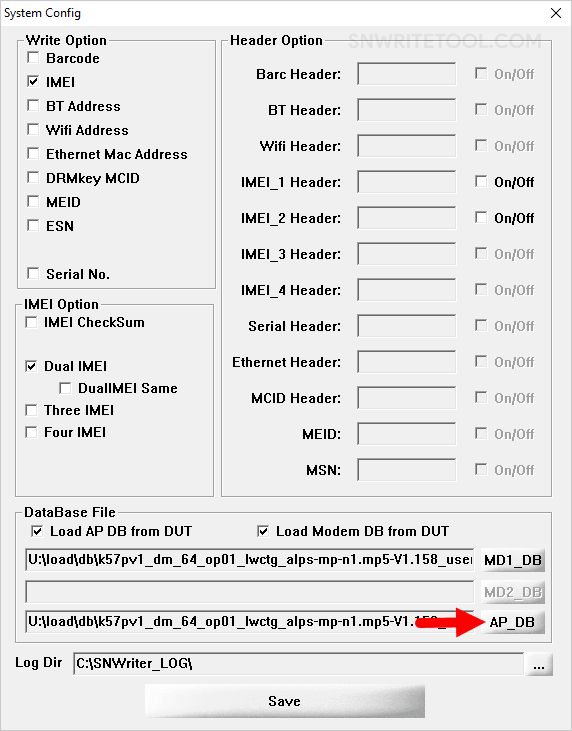
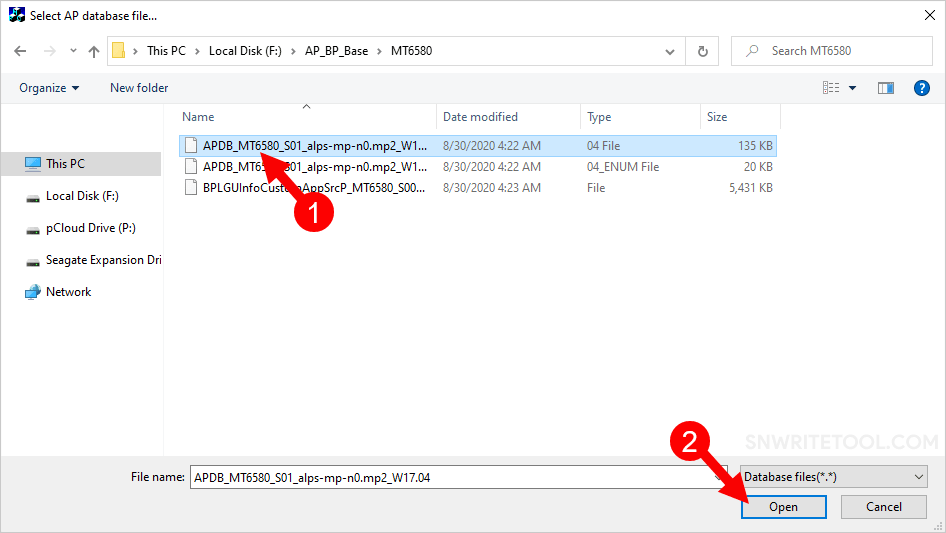
- Under the “Database File Option,” click on the “AP_DB” button and locate the AP file of your device. You can find this file either within your device’s stock firmware or in the “AB BP base” folder.
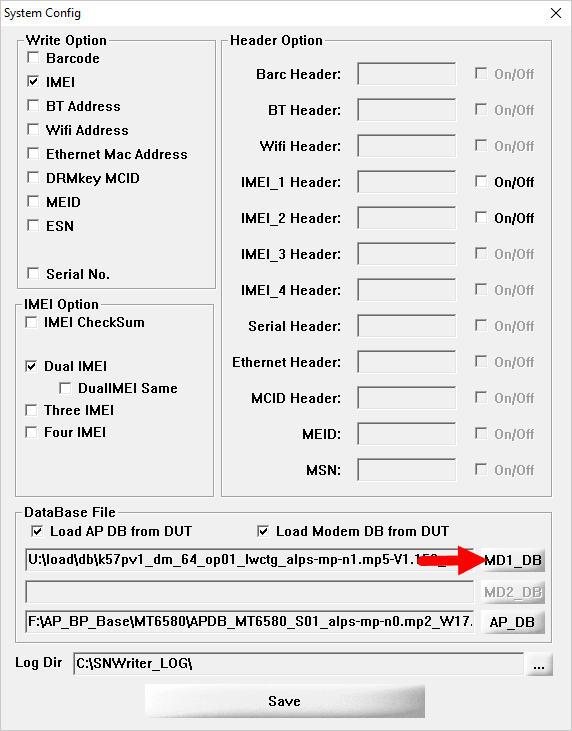
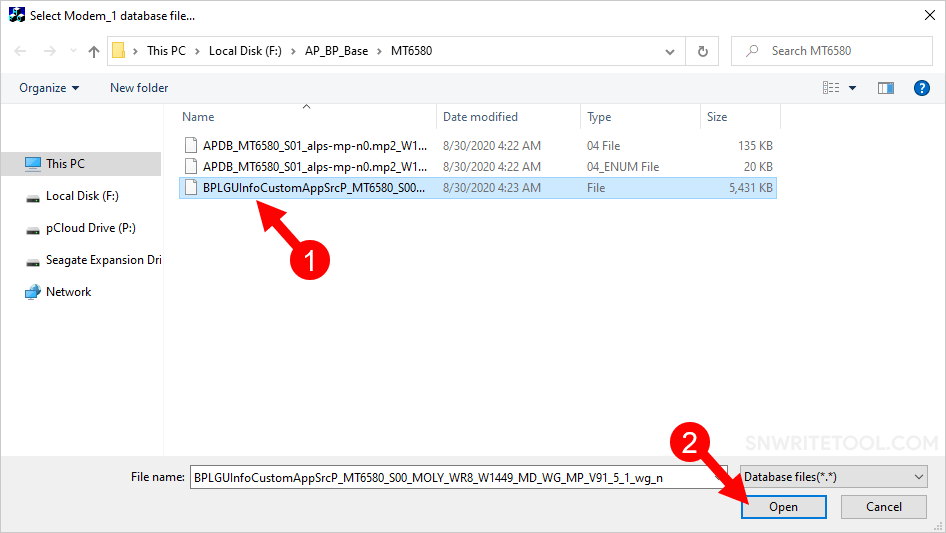
- Click on the “MD1_DB” button and locate the BP file of your device. You can find this file either within your device’s stock firmware or in the “AB BP base” folder.
- Click on the “Save” button.
- Click on the “Start” button.
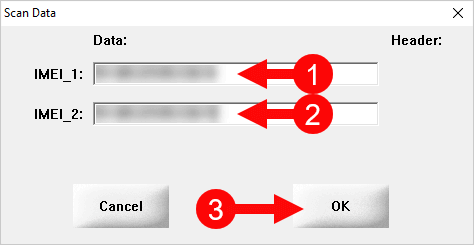
- Under the “Scan Data Write/Input” section, enter the values for “IMEI_1” and “IMEI_2,” then click on the “OK” button.
- Power off your device and remove the battery, only if the battery is removable. Then, connect the device to the computer using the USB cable.
- Once the tool detects the device, it will automatically write/flash the IMEI number onto the device. After the IMEI writing is completed, you will see a “Green Pass” message displayed on the tool.
Congratulations! Now, restart your device. Once the device has restarted, verify your IMEI by dialing *#06#. This action will confirm whether the IMEI write process was successfully completed.
Readme Once:
[*] Caution: Flashing an auto-generated IMEI is illegal and may result in serious consequences for you. Therefore, exercise caution when undertaking such actions.
[*] Download latest version of SN Write Tool: If you are looking for the latest version of SN Write Tool, then head over to the SN Write Tool page.
[*] SP Flash Tool: If you want to download the SP Flash Tool to flash or install scatter firmware, then head over to SP Flash Tool page.
[*] MediaTek Driver: If you want to download the Official MediaTek USB Driver, then head over to the MediaTek Driver Page.
SN Writer or SN Write tool enables you to write Bardcode, IMEI, Bluetooth / Wi-Fi Address, Ethernet Mac Address, DRMkey MCID and Serial No. to your Mediatek (MTK) Android phone. Having null IMEI, unknown Baseband, or invalid WiFi or Bluetooth addresses could disrupt radio communication e.g. the device being unable to detect network signal or make calls.
Follow the steps below to write Bardcode, IMEI, Bluetooth / Wi-Fi Address, Ethernet Mac Address, DRMkey MCID and Serial Number using SN Writer
So they’re temporary fixes. Its not like they’re not effective but they just disappear once you do a factory reset. Now, the advantage of using SN Write tool is that you have a permanent fix in the sense that even if you do a factory reset, your IMEI still remains and your WiFi / MAC address, 0x10 is gone for good even if you do a factory reset. That is one advantage you have when you use SN Write tool or SN Writer Now, the downside is that you need to have the MD1DB & APDB files for the phone you’re trying to fix and these files are located in the firmware for that phone so unless you have a firmware with those two files in them you will not be able to use SN Write tool.
So you’ll need those two files for SN Write tool that is why I said its kind of a downside but with the other methods, you do not need any file just the phone and you’re good to go. Before you can use SN write tool, you need to have your drivers installed so i’ll be showing you how to install drivers for Feature phones and Mediatek Android (smart) phones. Ideally, I should not be taking you through this guide of installing drivers but just to give you a start to finish approach, I will just take a few minutes out to put you through that. Alright! So for Feature phones, what you have to do is download the drivers. You can check the SN Write tool guide at the Forum.
You’ll find the link to download these drivers. You just open the folder and double-click InstallDriver Now, for the MTK USB VCOM drivers, you need to disable driver signature verification if you’re using a Windows 8 or 10 PC. We already dropped a guide at the Forum and you can check our YouTube channel for the guide on how to disable signature verification on a Windows 8 or 10 PC so you do not encounter any error during the Mediatek VCOM driver installation. If you’re using a Windows 7 PC you do not need to do that. Its disabled by default. There’s no setting that will block your driver installation by default on a Windows 7 PC but for Windows 8 and 10, you need to disable that.
Now, the reason is that this Mediatek USB VCOM driver you’re looking at is an unsigned driver. Windows 8 and 10 tend to block the installation of unsigned drivers unless you disable that check you understand? So that’s what you’re trying to do on a Windows 8 and 10 PC. Alright! So I’ll get down to the installation of Mediatek USB VCOM drivers and you’ll want to open Device Manager. For that you tap the Windows button and type device manager Alright! Once in device manager, what you’ll want to do is to select any item on the list then you click on Action — Add legacy hardware — Next — Install the hardware that I manually select from a list — Next — Next — click on Have Disk.
Now, you click on the Browse button and navigate to the location of the USB VCOM drivers. You open Mediatek USB VCOM drivers — Drivers — USB VCOM Driver Now, if you’re using a Windows 7, 8 or 10 PC, you select the Win7 folder but for Vista & XP, select the ones above. This would work for Windows 7,8 & 10 so you just open that. Now, you need to select the right one for your PC’s architecture. If you’re using a 32 bit PC, you’ll want to select this. If you’re using 64 bit, select this. Now, to check which your PC is, you right-click on Computer — Properties. Mine is a 64 bit PC so I’ll go ahead and select the 64 bit version and click on Open and click on OK.
As you can see, this driver is not digitally signed. Click on Next — Next and wait for installation to begin. You’ll get this prompt warning you that the driver you’re about to install is not digitally signed Do you want to go ahead with installing it? I’ll click on Install this driver even though its not digitally signed. The idea behind the digital signature is to ensure you’re not installing a harmful driver. This is still installing and in a few seconds, I should be getting a message confirming that installation was successful. Alright! The following hardware was installed. Mediatek DA USB VCOM Port. You click Finish.
To verify, I just come down to (Device Manager). I can see my Mediatek DA USB VCOM Port. Now, don’t be alarmed by these Yellow triangles. The reason why you’re seeing these is that the drivers you’ve installed are not signed drivers. Its just like a warning. Windows is telling you «These drivers are not signed. It doesn’t mean they will not work but they just might not work because we cannot verify that they’re original or from an authentic source». So that is why you’re having Yellow triangle. I doesn’t mean it will not work. Alright! So we get down to using SN Write tool proper. Now, you would want to open the SN Write tool folder.
In SN Write tool, you right-click SN Write and run as Administrator. You might just double-click but but the reason why I prefer to run as Admin is that you might run into permission issues so its best you just run as Admin if you can. Under ComPort, you have USB VCOM (I already installed that) Under Target Type, you select Feature Phone, Smart Phone or any on the list (depending on yours) I’m using a Tecno M3 here so mine is a smartphone. Next you click on System Config Now, at this point, you now want to decide what you intend to write. If you intend to write your IMEI, Bluetooth, WiFi / MAC address and the reset, its at this point you decide.
Lets say I want to write IMEI. I just click on the IMEI button (box) Don’t forget that it is illegal to change your IMEI in certain countries so ensure you’re not breaking any law. Under IMEI Option, you select the appropriate option depending on how many SIM slots your phone has. For most MTK phones, its dual SIM so I tick Dual IMEI. Since IMEI 1 & 2 won’t be the same, I don’t need to tick this (DualIMEI Same). I’m just OK with IMEI — Dual IMEI. So for MD1 you click on this (MD1_DB) and you open the firmware folder where the MD1 & APDB files are.
Now, for the MD1_DB file, its going to look something like this; BPLGU….. so you select that and click on Open Now, for the APDB file, you open the firmware folder also. The file will have APDB in the name as you can see. You highlight that and click Open. So, I’m good to go for writing my IMEI, I click on Save. You’ll find yourself back on the home screen of SN Writer so you click on Start Now, at this point, you insert IMEI 1 & IMEI 2 then click on OK So at this point, you switch off the phone, still with battery inside, then you connect it to the PC via a USB cord.
Don’t forget, you’re not supposed to hold down any button. Your phone might come up, you might see the boot animation. That is because SN Writer is trying to boot the phone into Meta Mode. So do not interrupt, just sit back and watch writing happen Alright! So I have the PASS. That means write was successful for the IMEI Now, lets say I want to write WiFi or MAC address. All I’ll have to do is tick WiFi Address. The MD1 and APDB files are already loaded. You can reload them just to be sure.
So I click on Save. Next I click on Start. Now, for the WiFi address, If you check a valid WiFi address, you’ll see that they’re often separated by a colon. So you’ll find your WiFi address looking something like this bc:b3:08:cb:c0:f6 . Lets say this is my WiFi address. What you’re going to enter in SN Write tool is the same thing only that you remove the colon. Then click OK. At this point, you connect the phone to the PC while switched off but with battery inside without holding any button. It’ll go into Meta Mode then we have a PASS.
Its going to be the same procedure if you’re going with Barcode, Bluetooth address and the rest. So that’s basically how to use SN Write tool
MediaTek started its processors business in 2003. First, they came with MT6205 gsm processors and now they are one of the most prominent Android Smartphone processor vendors. MediaTek, the only brand, provided processors for low-budget Android phones at a lower price. Many Chinese and Indian brands are using MediaTek chipsets on their device like Xiaomi, Lenovo, Doogee, Elephone, Coolpad, Micromax, etc. The processor brand provided many tools for Feature Phones and Android Smartphones like a Smartphone flash tool for flashing MediaTek processor phones. In this post, we will share the Latest SN Write Tool for Repair MediaTek IMEI, BT Address, WIFI Address, and other NV data.
MediaTek SN Write Tool helps you to repair your device’s IMEI, Bluetooth Address, WIFI Address, and other NV data if it’s corrupted after flashing firmware. The tool also can back up/restore NV data, so you can upgrade your phone firmware without any tension. Not just that you can change your device IMEI using this tool but it’s illegal so you have to change it at your own risk. Here we have shared the SN Write Tool old to the new version Download link and a guide on how to use it. The tool supports All old and new MediaTek devices.
SN Write Tool Features:
Repair IMEI – With this tool, you can repair MediaTek processor-based devices, The tool supports Android Smartphones, Feature Phones, MTK Modems, Routers, and Tablets.
Repair Wifi & BT Address – Not just Repair IMEI the tool also can Repair Wifi and Bluetooth MAC Address if you’re getting any NVRAM error on connecting to Bluetooth or Wifi.
Backup & Restore – You can backup MediaTek device NV data before flashing, and after flashing firmware, you can restore the NV data. or you can simply back up the data from another device.
Easy interface – The Tool has a simple interface that allows users to easily repair MediaTek device NV data.
Support Windows platforms – The Download Tools supports the Windows platform up to Windows 10, as well as Windows 8.1, Windows 8, Windows 7, and Windows XP. And the tool will run on the 32- and 64-bit operating systems.
Supported Devices:-
All MediaTek old and new Features and Android Phones.
Prerequisites:-
- First, charge your device for interrupting flashing.
- For backup device apps, Messages, Contacts, Gallery you can use Dr.Fone – Recover (Android) for that.
- MTK Driver must be installed on your PC because this tool will use MTK preloader mode to repair IMEI.
- Download the tool and read the guide.
Download the Latest SN Write Tool
So here is the MediaTek SN Write Tool v2.1504.00 download link which supports Feature and Android MTK phones, We have uploaded the old to the new version of the tool. The tool requires Net Framework to run the program so install the runtime if you get any error by running this app.
| Version | Download Link |
|---|---|
| SN_Write_tool_v2.1504 | SN_Write_tool_v2.1504.00.rar |
| SN_Writer_Tool_v1.2020 | SN_Writer_Tool_v1.2020.0.0.zip |
| SN_Write_Tool_v1.1924 | SN_Write_Tool_v1.1924.0.0.rar |
| SN_Write_Tool_v1.1916 | SN_Write_Tool_v1.1916.0.0.zip |
| SN_Write_Tool_v2.1416 | SN_Write_Tool_v2.1416.00.zip |
| SN_Write_tool_v1.0_1620 | SN_Write_tool_v1.0_1620.00.rar |
How to Repair MTK IMEI with SN Write Tool
1. Make sure you have installed the MTK Preloader driver on your PC to use the tool. and download the firmware or DB file for your phone.
2. Download the latest SN Write Tool zip file and unzip it.
3. Now run SN_Writer.exe as Administrator from the SN tool folder.

4. Now select USB VCOM under the ComPort option.

5. Under Target Type, select your type of MTK device.

6. Now Click on System Config to configure the tool.
7. If you want to repair IMEI then tick IMEI under Write Option. Under IMEI Option, tick the Dual IMEI option. For the rest like Bluetooth Address, Wi-Fi, and Address, tick this option if you want to repair BT, Wifi Mac address.

8. Now browse the 2 DB file under MD1_DB usually named BPLGUInfoCustomAppSrcP_MT65** and AP_DB usually named like APDB_MT65** browses them one by one from the firmware folder.

9. Now click save and in the SN Write tool Home screen Click on Start.
10. Write the two IMEI numbers and press ok.

11. Switch off your Phone or MTK device and connect with the USB cable, Some android devices hold the Volume Up + Down button and connect the USB cable.
12. IMEI will write in a few seconds, Once you see the green PASS prompt. You can now disconnect the phone and reboot your device in normal mode.

More Tool:
- Download MTK FRP Tool to Reset/Bypass/Remove FRP
- Download TPS Xiaomi Tool to Unlock/Disable/Remove Mi Account
- GSM Aladdin V2 1.42 Full Version Without Box
For more tools and Android updates Don’t forget to join our telegram group for more wallpapers, Themes, and Ringtones Update – https://getdev.me/telegramdev.
You should upgrade or use an alternative browser.
-
#1
Disclaimer:
/*
*Your Warranty is now void.
*Neither me nor the developers of tools are responsible.
*You are doing this at your own risk and will
*solely be responsible if something happens to the device.
*Make sure you only use the original “IMEI_1, IMEI_2,
*WiFi/Bluetooth Address, Serial Number” that came with your phone.
*/
Note:
Although, I have tried to keep this guide as simple as possible, I am assuming that you have already flashed Stock ROM using this thread/guide:
https://xdaforums.com/k8-note/how-to/lenovo-k8-note-xt1902-3-fix-dead-hard-t3791839
Which also means the required drivers i.e. “MTK (USB DA COM, Preloader USB VCOM, USB Port, USB VCOM) Driver” and “Lenovo USB Driver” in the thread mentioned above are also installed.
Requirements:
- Lenovo K8 Note with Stock ROM.
- Original IMEI_1, IMEI_2, WiFi/Bluetooth Mac Address, Serial Number. (Find on Phone’s box)
- SN Write Tool (Download)
- Database Files
- ADB Tools (Inside SN_Write_Tool\Android)
- Basic ADB know-how.
- And a PC. (obviously)
USB Debugging:
Before we proceed, make sure “USB Debugging” is enabled on phone:
- Navigate to, Settings > System > About Phone > Build Number (Tap 7 times) to enable “Developer Options”.
- Now, Enable “USB Debugging” in Settings > System > Developer Options.
Flashing Procedure:
- Extract SN Write. (For Example, Location: “E:\ SN_Write_Tool_v1.1916.00”)
- Open SN Write Tool (SN_Writer.exe).
- Make sure all the Preliminary steps mentioned in below sections have been performed – Obtaining DB files, Configuring SN Write Tool, Understanding Barcode.
- Switch off the phone, while keeping the cable unplugged
- Click “Start”.
- Enter Original IMEI_1, IMEI_2, WiFi/Bluetooth Mac Address, Barcode and press “Ok”
- Connect your phone.
- Now your phone will automatically boot in Meta Mode.
- Wait for the Process to finish.
- Now you will see “Pass” message if everything completes successfully.
- Now it will again ask to enter the details. Click “Cancel”
- The phone will now switch off. Then boot it manually.
- That’s it. Your phone is now back to normal. Now, you can see Serial No. in adb too.
Obtaining Database(DB) files:
In order to restore everything we need 2 Database files, which can be obtained by following the procedure below:
- Extract SN_Write Tool. (For Example, Location: “E:\ SN_Write_Tool_v1.1916.00”)
- Navigate to “Android” folder inside SN_Write_Tool folder.
- Keep Shift Key Pressed and Right Click inside the folder. Select “Open Command / PowerShell window here”.
- Type
- You will receive a prompt on your phone. Select “Ok”. The device will appear in the list. (Something like “0123456 device”)
- Now, type these commands:
adb pull /vendor/etc/mddb Database adb pull /system/etc/apdb Database - Now, navigate to “E:\ SN_Write_Tool_v1.1916.00\Android\Database”. There will be around 23 Files. We only Need 2 files from that.
- APDB_MT6797_S01_alps-trunk-o0.tk_W19.10 (Approx. size 145kb)
- MDDB_InfoCustomAppSrcP_MT6797_S00_MANNING_O_Vxx_x_ulwctg_n.EDB (Approx. size 59mb)
Note: Name and size may slightly vary depending upon your firmware.
- Copy the above two files to some other destination (optional).
Note: If you are using PowerShell then, instead of “adb” type “./adb”
Configuring SN Writer Tool:
-
- Open “SN_Writer.exe” inside “E:\ SN_Write_Tool_v1.1916.00”.
- Now Click “System Config”.
- Check “Dual IMEI” (Do not check “Dual IMEI Same” under that).
- In Write options select Barcode, IMEI, BT Address, WiFi Address. (If you don’t have WiFi/BT Address then don’t check/select them).
- Check “Load AP DP from DUT” and “Load Modem DB from DUT”.
- Click “MD1_DB” and select the file that you pulled using ADB i.e.
“MDDB_InfoCustomAppSrcP_MT6797_S00_MANNING_O_Vxx_x_ulwctg_n.EDB” - Click “AP_DB” and select the file that you pulled using ADB i.e.
“APDB_MT6797_S01_alps-trunk-o0.tk_W19.10” - Now click “Save”.
Understanding Barcode:
It took me lots n lots of trial & error and googling before finding the correct (probably) Barcode format that we need to use in SN Writer. Trust me, it was not an easy task. Below are three iterations of barcode, use any:
First Iteration (recommended):
or
Second Iteration (recommended 2):
or
Third Iteration:
“AB1D1112IN 0123456789012 XYZ1223W”
As you can see in the Screenshot attached in this post, “Lenovo Help” app recognizes the device as it is meant to be recognized.
WiFi/Bluetooth Mac Address:
Though, it is not a big deal if you lost WiFi/Bluetooth Mac Addresses. They will still work fine even without it.
If you didn’t backup nvram before or didn’t note down WiFi/Bluetooth Mac address then you can’t get it back. But, if you did TWRP backup of nvram then you can restore it and get back both the original Mac addresses.
FAQs:
SN Writer not booting phone into Meta Mode automatically.
Do I need to be on Stock ROM?
Attachments
Last edited:
-
#2
- Update post.
- Added one more iteration of barcode.
- Added more Screenshots.
- Correct minor typos.
Last edited:
-
#3
I managed to get apdb files but when i try your command to get mddb i get that error
adb: error: failed to copy ‘/etc/mddb’ to ‘Database\mddb’: read failed: Is a directory
any help?
and how to know if my bluetooth or wifi mac address is missing and where to find them because nothing of that is written on the phone box
Last edited:
-
#4
thanks alot man
I managed to get apdb files but when i try your command to get mddb i get that error
adb: error: failed to copy ‘/etc/mddb’ to ‘Database\mddb’: read failed: Is a directory
any help?
and how to know if my bluetooth or wifi mac address is missing and where to find them because nothing of that is written on the phone box
Edit: Solved
Android will automatically generate Wi-Fi / Bluetooth address if not found. No need to worry about that. Thats why I I have mentioned in the post that it will still work fine even without it.
Last edited:
-
#5
———- Post added at 01:03 PM ———- Previous post was at 01:00 PM ———-
thanks alot man
I managed to get apdb files but when i try your command to get mddb i get that error
adb: error: failed to copy ‘/etc/mddb’ to ‘Database\mddb’: read failed: Is a directory
any help?
and how to know if my bluetooth or wifi mac address is missing and where to find them because nothing of that is written on the phone box
instead of «adb pull /etc/mddb» use «adb pull /vendor/etc/mddb»
-
#6
You mentioned wrong paths, /etc/apdb is fine but /etc/mddb doesn’t exist(empty folder was created in latest update but still no contents in it). mddb is under /vendor/etc/mddb. Just to avoid confusion and even to make this guide suitable for users who pull the file from TWRP make the /etc/apdb to /system/etc/apdb———- Post added at 01:03 PM ———- Previous post was at 01:00 PM ———-
instead of «adb pull /etc/mddb» use «adb pull /vendor/etc/mddb»
thanks a lot guys
u two just made my day
and M.A.P u r a life saver i cant thank you enough for ur work on treble for k8 note and ur help here
-
#7
You mentioned wrong paths, /etc/apdb is fine but /etc/mddb doesn’t exist(empty folder was created in latest update but still no contents in it). mddb is under /vendor/etc/mddb. Just to avoid confusion and even to make this guide suitable for users who pull the file from TWRP make the /etc/apdb to /system/etc/apdb
Done. Thanks for suggestion.
-
#8
but noticed that the serial written on phone box is 12 Character long not just 8 and sn writer did write 8 only not the whole 12
is that correct??
-
#9
i did write the serial, check warranty and its good
but noticed that the serial written on phone box is 12 Character long not just 8 and sn writer did write 8 only not the whole 12
is that correct??
May I see the image of your box. PM me the image.
Last edited:
-
#11
thanks a lot guys
u two just made my day
and M.A.P u r a life saver i cant thank you enough for ur work on treble for k8 note and ur help here
Your welcome, I’m always ready to help
-
#12
-
#13
Hi, with the help of your guide, i have recovered my phone. But the problem is still same as it restarts repeatedly,sometimes it worked for 1 day but then again rewstarting. Is there any permanent solution for this?
Show your phone to a technician. It may be due to battery or some other reason.
-
- Sep 26, 2017
-
- 1
-
- 0
-
- 27
-
-
Medak
-
#14
-
#15
Hi,
I was wondering how did you find the correct Barcode format? I have spent 2 days trying with different combinations and I still have not succeeded in restoring the serial number in my Oukitel WP7. It still gives me the generic serial number 123456789ABCDEF.
Last edited:
-
#16
Hi,I was wondering how did you find the correct Barcode format? I have spent 2 days trying with different combinations and I still have not succeeded in restoring the serial number in my Oukitel WP7. It still gives me the generic serial number 123456789ABCDEF.
Did some Trial and Error to figure out correct (probably) barcode format. In addition to this, you’ll also need specific database files for your phone in order restore it.
-
#17
Did some Trial and Error to figure out correct (probably) barcode format. In addition to this, you’ll also need specific database files for your phone in order restore it.
Man this thing is driving me crazy. I have tried every single combinations and did so many googling and there are not a lot of information about this. The other problem is that the Oukitel WP7 does not have a Product Number written on the box or on the back of the device, there is only a serial number and a barcode with 13 numbers under it. I even tried the FCC ID that is written at the top. I have been spending few days trying. I think the only way to know the correct format is to ask someone who has the same device to view it using Maui Meta by viewing the hex format or exporting the NVRAM to an ini file. I doubt anyone would help me with this though. I have the database files from the stock image. Anyways thanks man
-
#18
Man this thing is driving me crazy. I have tried every single combinations and did so many googling and there are not a lot of information about this. The other problem is that the Oukitel WP7 does not have a Product Number written on the box or on the back of the device, there is only a serial number and a barcode with 13 numbers under it. I even tried the FCC ID that is written at the top. I have been spending few days trying. I think the only way to know the correct format is to ask someone who has the same device to view it using Maui Meta by viewing the hex format or exporting the NVRAM to an ini file. I doubt anyone would help me with this though. I have the database files from the stock image. Anyways thanks man
That would be better.
There is no need for Part No. or Barcode (both can be replaced with spaces). The only thing required is Serial No.
-
#19
That would be better.There is no need for Part No. or Barcode (both can be replaced with spaces). The only thing required is Serial No.
I tried that as well with so many different ways and with spaces and without. I guess the length also matters. I even filled all 63 characters to see if anything changed in settings but it still showed the generic serial number. I am starting to wonder if sn tool is writing the data in the correct location. I am sure I am using the correct database files because I got them from the factory image from the official website and I am able to write the IMEIs correctly.
I am thinking now to go through the serial number which is 16 characters from left to right. Each time I add a space on the left and no spaces after the serial so first try would be only the serial then a 1 space before it then two spaces before it until I reach the 63 characters. This is like 50 restarts and if that does not work I will try in a same manner but this time full up spaces after the serial and do the same by adding one space on the left each time so first try would be the serial number and the remaining will be spaces up to 63 characters the second time will be one space before the serial and remaining spaces after it up to 63 and so one. I know it’s crazy but if all that does not work I am not sure what else to do.
-
#20
This happened to me with this dangerous spflash tool. WIPED everything. I followed this guide , It PASSES without any errors but doesnt write anything to my phone. Box has a code bar like this 6 970502 270581 then MEID code of 14 characters , than IMEI1 code and a IMEI2 code and finaly a S/N code of 15 characters.
As i said it PASS but doesnt show IMEI, version base band , bluetooth address, Serial number ,
Thank you very much spflash tool. Had to get another phone.
Phone is a MEDIATEK mt6763T.
Only thing that i dont understand from guide is how to enter Serial number in sn writer. Did it many ways. 33 characters and 64 characters with spaces.
If anyone has any idea , please show me the way. thx.
Similar threads
SN Write Tool has become the best write or IMEI flashing tool that helps you MediaTek android mobile or tablet, You will upgrade the single or multiple IMEI flash any MediaTekchipset android system with computer.
So sn write station tool allows you to use a Multi imei flash option available (up to 4 imei) and configure the SN firmware file upgrade of your device in few clicks without battery.
This tool also allows you to Barcode, BT-Address, Wifi-Address, Wifi-EPPCopy, Mac-Address, DRMkey-MCID option and flash or remove IMEI lock optionon your mediatek chipset devices.
If you ever were already searching for the SN Write flash tool for your mediatek-mtkchipset devices, then these pages might be extremely helpful to you actually. Here the easy download SN Write flash tool and mtk driver for the latest version.
SN Write Tool Download
Utility Software and Tools of 2025
Instructions
This is a small tool that allows you to perform various-tasks, including root your devices, creating flash scatter file for your mediatek devices. it also supports various all MTK chipset. Rooting, flashing IMEI may void your devices warranty.
Create scatter file User Guide
Step 1 – Download SN Write.rar
Step 2 – Enable USB debugging.
Step 3 – download and Install the PDANet USB ADB VCOM driver or MTK driver.
Step 4 – Extract and run the latest version of SN Write.EXE.
Step 5 – Your phone should be power off and remove bettary. Connect the USB cable to your PC.
Step 6 – Click ‘blocks map’.
Step 7 – Click ‘create scatter file’. Navigate to where you want to save it. Save it in a place where you won’t lose it.* Others Tools: If you are searching for the Rockchip devices flash tool, then download rockchip batch tool and Mediatek devices flash tool then sp flash tool download here.
!! Important !!
IMEI Changing, Editing or repairing is illegal!!
If you want to repair IMEI of any handset, then please contact authorized service centers.Credits: Mediatek inc.