

Operation, Parts
RTX5000 & RTX5500
Texture Sprayers
For water-Based Materials Only.
Models: RTX5000PI, RTX5000PX, RTX5500PI & RTX5500PX
100 psi (6.9 bar, 0.69 MPa) Maximum Working Pressure
Important Safety Instructions
Read all warnings and instructions in this manual and related manuals.
Be familiar with the controls and the proper usage of the equipment.
Save these instructions.
Related Manuals
Gun – 3A3373
3A3265B
EN
Use only genuine Graco replacement parts.
The use of non-Graco replacement parts may void warranty.

Contents
Contents
Models . . . . . . . . . . . . . . . . . . . . . . . . . . . . . . . . . . . . . . . . . . . . . . . . . . . . . . . . . . . . . . . 3
Warnings . . . . . . . . . . . . . . . . . . . . . . . . . . . . . . . . . . . . . . . . . . . . . . . . . . . . . . . . . . . . . 4
Component Identification . . . . . . . . . . . . . . . . . . . . . . . . . . . . . . . . . . . . . . . . . . . . . . . . 7
Preparation . . . . . . . . . . . . . . . . . . . . . . . . . . . . . . . . . . . . . . . . . . . . . . . . . . . . . . . . . . . 8
Pressure Relief Procedure . . . . . . . . . . . . . . . . . . . . . . . . . . . . . . . . . . . . . . . . . . . . . 8
Grounding . . . . . . . . . . . . . . . . . . . . . . . . . . . . . . . . . . . . . . . . . . . . . . . . . . . . . . . . . 8
Power Switch . . . . . . . . . . . . . . . . . . . . . . . . . . . . . . . . . . . . . . . . . . . . . . . . . . . . . . . 8
Extension Cords . . . . . . . . . . . . . . . . . . . . . . . . . . . . . . . . . . . . . . . . . . . . . . . . . . . . 8
Generator Requirements . . . . . . . . . . . . . . . . . . . . . . . . . . . . . . . . . . . . . . . . . . . . . . 8
SoftStart/Smart Start™ System . . . . . . . . . . . . . . . . . . . . . . . . . . . . . . . . . . . . . . . . . 9
Setup . . . . . . . . . . . . . . . . . . . . . . . . . . . . . . . . . . . . . . . . . . . . . . . . . . . . . . . . . . . . . . . 10
Material Hopper . . . . . . . . . . . . . . . . . . . . . . . . . . . . . . . . . . . . . . . . . . . . . . . . . . . . 11
Mixing Material . . . . . . . . . . . . . . . . . . . . . . . . . . . . . . . . . . . . . . . . . . . . . . . . . . . . . 11
Operation . . . . . . . . . . . . . . . . . . . . . . . . . . . . . . . . . . . . . . . . . . . . . . . . . . . . . . . . . . . . 13
Wetting Hose . . . . . . . . . . . . . . . . . . . . . . . . . . . . . . . . . . . . . . . . . . . . . . . . . . . . . . 13
System Priming . . . . . . . . . . . . . . . . . . . . . . . . . . . . . . . . . . . . . . . . . . . . . . . . . . . . 13
Texture Spraying . . . . . . . . . . . . . . . . . . . . . . . . . . . . . . . . . . . . . . . . . . . . . . . . . . . 14
Recommended Nozzle & Disc Selection Charts . . . . . . . . . . . . . . . . . . . . . . . . . . . 15
Adjusting the System . . . . . . . . . . . . . . . . . . . . . . . . . . . . . . . . . . . . . . . . . . . . . . . . 16
Shutdown and Cleanup . . . . . . . . . . . . . . . . . . . . . . . . . . . . . . . . . . . . . . . . . . . . . . . . 18
Gun . . . . . . . . . . . . . . . . . . . . . . . . . . . . . . . . . . . . . . . . . . . . . . . . . . . . . . . . . . . . . 19
Clean Material Hopper . . . . . . . . . . . . . . . . . . . . . . . . . . . . . . . . . . . . . . . . . . . . . . . 19
Maintenance . . . . . . . . . . . . . . . . . . . . . . . . . . . . . . . . . . . . . . . . . . . . . . . . . . . . . . . . . 20
Texture Hoses . . . . . . . . . . . . . . . . . . . . . . . . . . . . . . . . . . . . . . . . . . . . . . . . . . . . . 20
Tips . . . . . . . . . . . . . . . . . . . . . . . . . . . . . . . . . . . . . . . . . . . . . . . . . . . . . . . . . . . . . 20
Troubleshooting . . . . . . . . . . . . . . . . . . . . . . . . . . . . . . . . . . . . . . . . . . . . . . . . . . . . . . 21
RTX5000, RTX5500 Sprayer Parts . . . . . . . . . . . . . . . . . . . . . . . . . . . . . . . . . . . . . . . . 24
RTX5000, RTX5500 Sprayer (continued) . . . . . . . . . . . . . . . . . . . . . . . . . . . . . . . . 25
RTX5000, RTX5500 Sprayer (continued) . . . . . . . . . . . . . . . . . . . . . . . . . . . . . . . . 26
RTX5000, RTX5500 Sprayer Parts List . . . . . . . . . . . . . . . . . . . . . . . . . . . . . . . . . . 27
Compressor Assembly Parts . . . . . . . . . . . . . . . . . . . . . . . . . . . . . . . . . . . . . . . . . . . . 29
Compressor Parts List . . . . . . . . . . . . . . . . . . . . . . . . . . . . . . . . . . . . . . . . . . . . . . . 30
Wiring Diagrams . . . . . . . . . . . . . . . . . . . . . . . . . . . . . . . . . . . . . . . . . . . . . . . . . . . . . . 31
120V . . . . . . . . . . . . . . . . . . . . . . . . . . . . . . . . . . . . . . . . . . . . . . . . . . . . . . . . . . . . 31
230V . . . . . . . . . . . . . . . . . . . . . . . . . . . . . . . . . . . . . . . . . . . . . . . . . . . . . . . . . . . . 32
Technical Specifications . . . . . . . . . . . . . . . . . . . . . . . . . . . . . . . . . . . . . . . . . . . . . . . 33
Graco Standard Warranty . . . . . . . . . . . . . . . . . . . . . . . . . . . . . . . . . . . . . . . . . . . . . . 35
Graco Information . . . . . . . . . . . . . . . . . . . . . . . . . . . . . . . . . . . . . . . . . . . . . . . . . . . . . 36
2 3A3265B

Models
110474
Certified to
CAN/CSA
C22.2 No. 68
Conforms to
UL 1450
VAC Model
RTX5000pi 17H575
120
USA
240
USA
120
USA
230 Europe
Multi
RTX5000pi Rental 17H576
RTX5000pi Rental HD 17K302
RTX5000px 17H579
RTX5500px 17H581
RTX5000pi 17L288
RTX5000pi Rental 17L289
RTX5000px 17L292
RTX5500pi 17H577
RTX5500px 17H580
Models
230
LA
Asia
3A3265B 3
RTX5500pi 17H578
RTX5500px 17K680

Warnings
Warnings
The following warnings are for the setup, use, grounding, maintenance, and repair of this
equipment. The exclamation point symbol alerts you to a general warning and the hazard
symbols refer to procedure-specific risks. When these symbols appear in the body of this
manual or on warning labels, refer back to these Warnings. Product-specific hazard symbols
and warnings not covered in this section may appear throughout the body of this manual
where applicable.
GROUNDING
This product must be grounded. In the event of an electrical short circuit, grounding reduces
the risk of electric shock by providing an escape wire for the electric current. This product is
equipped with a cord having a grounding wire with an appropriate grounding plug. The plug
must be plugged into an outlet that is properly installed and grounded in accordance with all
local codes and ordinances.
• Improper installation of the grounding plug is able to result in a risk of electric
shock.
• When repair or replacement of the cord or plug is required, do not connect the
grounding wire to either flat blade terminal.
• The wire with insulation having an outer surface that is green with or without
yellow stripes is the grounding wire.
• Check with a qualified electrician or serviceman when the grounding instructions
are not completely understood, or when in doubt as to whether the product is
properly grounded.
• Do not modify the plug provided; if it does not fit the outlet, have the proper outlet
installed by a qualified electrician.
• This product is for use on a nominal 120V or 230V circuit and has a grounding
plug similar to the plugs illustrated below.
• Only connect the product to an outlet having the same configuration as the plug.
• Do not use an adapter with this product.
Extension Cords:
• Use only a 3-wire extension cord that has a grounding plug and a grounding
receptacle that accepts the plug on the product.
• Make sure your extension cord is not damaged. If an extension cord is necessary
use 12 AWG (2.5mm
2
) minimum to carry the current that the product draws.
• An undersized cord results in a drop in line voltage and loss of power and
overheating.
4 3A3265B

Warnings
FIRE AND EXPLOSION HAZARD
Flammable fumes, such as solvent and paint fumes, in work area can ignite or
explode. To help prevent fire and explosion:
• Do not spray or clean with flammable materials. Use water-based materials only.
• Use equipment only in well ventilated area.
• Sprayer generates sparks. When flammable liquids are used near the sprayer,
keep sprayer at least 20 feet (6.1 meters) away from explosive vapors.
• Keep work area free of debris, including solvent, rags and gasoline.
• Ground all equipment in the work area. See Grounding instructions.
• Keep a working fire extinguisher in the work area.
EQUIPMENT MISUSE HAZARD
Misuse can cause death or serious injury.
• Always wear appropriate gloves, eye protection, and a respirator or mask when
painting.
• Do not operate or spray near children. Keep children away from equipment at all
times.
• Do not overreach or stand on an unstable support. Keep effective footing and
balance at all times.
• Stay alert and watch what you are doing.
• Do not operate the unit when fatigued or under the influence of drugs or alcohol.
• Do not kink or over-bend the material or air hose.
• Do not expose the hose to temperatures or to pressures in excess of those
specified by Graco.
• Do not use the hose as a strength member to pull or lift the equipment.
• Do not alter or modify equipment. Alterations or modifications may void agency
approvals and create safety hazards.
• Make sure all equipment is rated and approved for the environment in which you
are using it.
BURN HAZARD
Equipment surfaces and fluid that is heated can become very hot during operation.
To avoid severe burns:
• Do not touch hot fluid or equipment.
ELECTRIC SHOCK HAZARD
This equipment must be grounded. Improper grounding, setup, or usage of the
system can cause electric shock.
• Turn off and disconnect power cord before servicing equipment.
• Connect only to grounded electrical outlets.
• Use only 3-wire extension cords.
• Ensure ground prongs are intact on power and extension cords.
• Do not expose to rain. Store indoors.
3A3265B 5

Warnings
PRESSURIZED EQUIPMENT HAZARD
Fluid from the equipment, leaks, or ruptured components can splash in the eyes or
on skin and cause serious injury.
• Follow the Pressure Relief Procedure when you stop spraying/dispensing and
before cleaning, checking, or servicing equipment.
• Tighten all fluid connections before operating the equipment.
• Check hoses, tubes, and couplings daily. Replace worn or damaged parts
immediately.
MOVING PARTS HAZARD
Moving parts can pinch, cut, or amputate fingers and other body parts.
• Keep clear of moving parts.
• Do not operate equipment with protective guards or covers removed.
• Pressurized equipment can start without warning. Before checking, moving, or
servicing equipment, follow the Pressure Relief Procedure and disconnect all
power sources.
PLASTIC PARTS CLEANING SOLVENT HAZARD
Many solvents can degrade plastic parts and cause them to fail, which could cause
serious injury or property damage.
• Use only compatible water-based solvents to clean plastic structural or
pressure-containing parts.
• See Technical Data in this and all other equipment instruction manuals. Read
fluid and solvent manufacturer’s Safety Data Sheet (SDS) and
recommendations.
PERSONAL PROTECTIVE EQUIPMENT
Wear appropriate protective equipment when in the work area to help prevent serious injury,
including eye injury, hearing loss, inhalation of toxic fumes, and burns. This protective
equipment includes but is not limited to:
• Protective eyewear, and hearing protection.
• Respirators, protective clothing, and gloves as recommended by the fluid and
solvent manufacturer.
CALIFORNIA PROPOSITION 65
This product contains a chemical known to the State of California to cause cancer, birth defects
or other reproductive harm. Wash hands after handling.
6 3A3265B

Component Identification
U
T
A
K
B
R
C
G
H
F
E
D
M
L
P
ti27922a
N
J
W
Y
Component Identification
L
A
ON/OFF Switch
B
Tool Box
C
Material Hopper
D
Hopper Connect/Disconnect
E
RotoFlex™ II Pump
F
Pump Hose Outlet
G
Handle
H
Air Hose Outlet
J
Auxiliary Air Hose Inlet (px models
only
K
Fluid Flow Regulator and Pressure
Gauge
Gun Nozzle
M
Gun
N
Burp Guard
P
Prime Valve
R
Power Cord
T
Hose — 25-ft (7.6 m)
U
Material Thickness Gauge
V
Cleaning (Sponge) Ball
W
ProGuard
Y
Air control valve
Model/Serial Tag (Not shown, located
on bottom of unit.)
3A3265B 7
Preparation
Preparation
Pressure Relief Procedure
Follow the Pressure Relief
Procedure whenever you see this
symbol.
This equipment stays pressurized until
pressure is manually relieved. To help
prevent serious injury from pressurized
fluid or splashed fluid follow the Pressure
Relief Procedure whenever sprayer is
stopped and before sprayer is cleaned or
checked, and before equipment is
serviced.
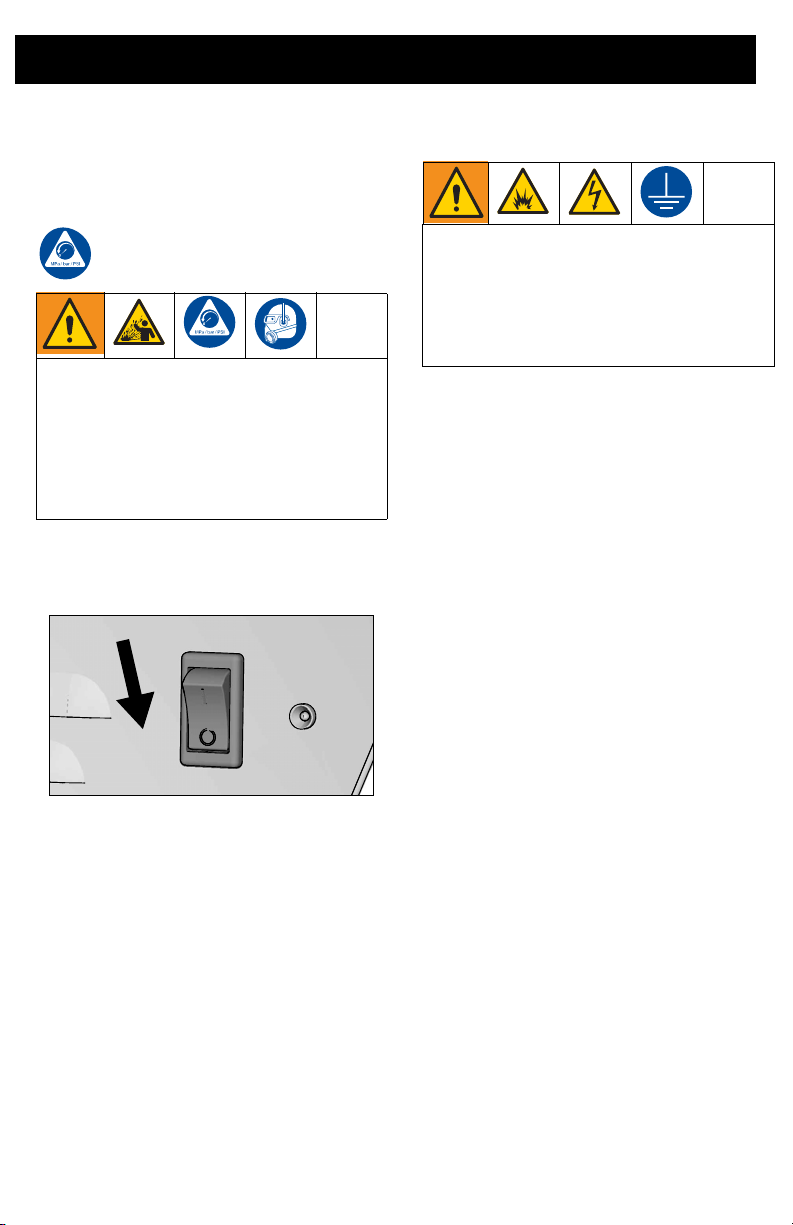
1. Turn ON/OFF switch to the OFF
position. Wait 7 seconds for power to
dissipate.
2. Unplug sprayer.
3. Turn fluid regulator all the way down.
4. Aim gun into hopper or waste bucket and
trigger the gun until all air and material
pressure is relieved.
Grounding
The equipment must be grounded to
reduce the risk of static sparking and
electric shock. An electric or static spark
can cause fumes to ignite or explode. An
improper ground can cause electric shock.
A good ground provides an escape wire for
the electric current.
This sprayer includes a ground wire with an
appropriate ground contact. The plug must
be plugged into an outlet that is properly
installed and grounded in accordance with all
local codes and ordinances.
Do not modify the plug provided; if it does not
fit the outlet, have the proper outlet installed
by a qualified electrician.
Power Switch
A selector switch on the sprayer allows you
to operate the sprayer on either a 10A/240V
15A120V or 16A/240V or 20A120V circuit.
120V Sprayers
Select 15A or 20A depending on your circuit
rating.
240V Sprayers
Select 10A or 16A depending on your circuit
rating.
Extension Cords
Use an extension cord with an undamaged
ground contact. If an extension cord is
necessary, use a 3-wire, 12 AWG (2.5 mm
minimum.
NOTE: Lighter gauge or longer extension
cords may reduce sprayer performance.
2
)
Generator Requirements
7500 W (7.5 kW) minimum.
8 3A3265B

Preparation
Hose Size and Length
The system comes with a 25 ft (7.6m) long
hose set consisting of a material hose 1 in. or
1.25 in. I.D. and a 3/8 in. I.D. air hose.
SoftStart/Smart Start™
System
“Soft Start” vs. “Smart Start”
•
“Smart” refers to the function where the
motor starts and stops when the trigger
is pulled and released. This keeps the
sprayer at full operating pressure and
allows the sprayer to spray immediately
when the gun is triggered.
• “Soft” refers to the function where the
sprayer slowly starts the pump. This
prevents a large “splotch” of material
from being discharged from the gun
when trigger is pulled after the sprayer
has sat idle for a period of time.
Soft Start
The Soft Start System is controlled by motor
power and an air cylinder. When pressurized,
the air cylinder pushes the rollers into the
peristaltic pump pushing material through the
pump. When the motor shuts off, a solenoid
valve relieves the pressure in the air cylinder
causing the rollers to disengage from the
peristaltic pump. When the motor starts again
there is a time delay while the air cylinders
charge and move the rollers into the pump
this is the “Soft Start”.
Smart Start
The Smart Start System is controlled by
compressed air in the tanks and lines. When
gun is triggered, air flows through the lines
and opens a flow switch. There is also
another pressure switch that senses when
the compressed air system is at operating
pressure. This second pressure switch
allows the sprayer to start immediately when
the sprayer is turned ON charging the
compressed air system to full pressure. This
method keeps the compressed air system at
operating pressure if there is a small air leak
in the system.
3A3265B 9
Setup
Setup
NOTICE
•
Do not store sprayer under pressure.
• Do not allow material to dry inside
pump, hoses, gun or spray system. This
may cause pump to fail.
When unpacking sprayer for the first time or
after long term storage perform setup
procedure.
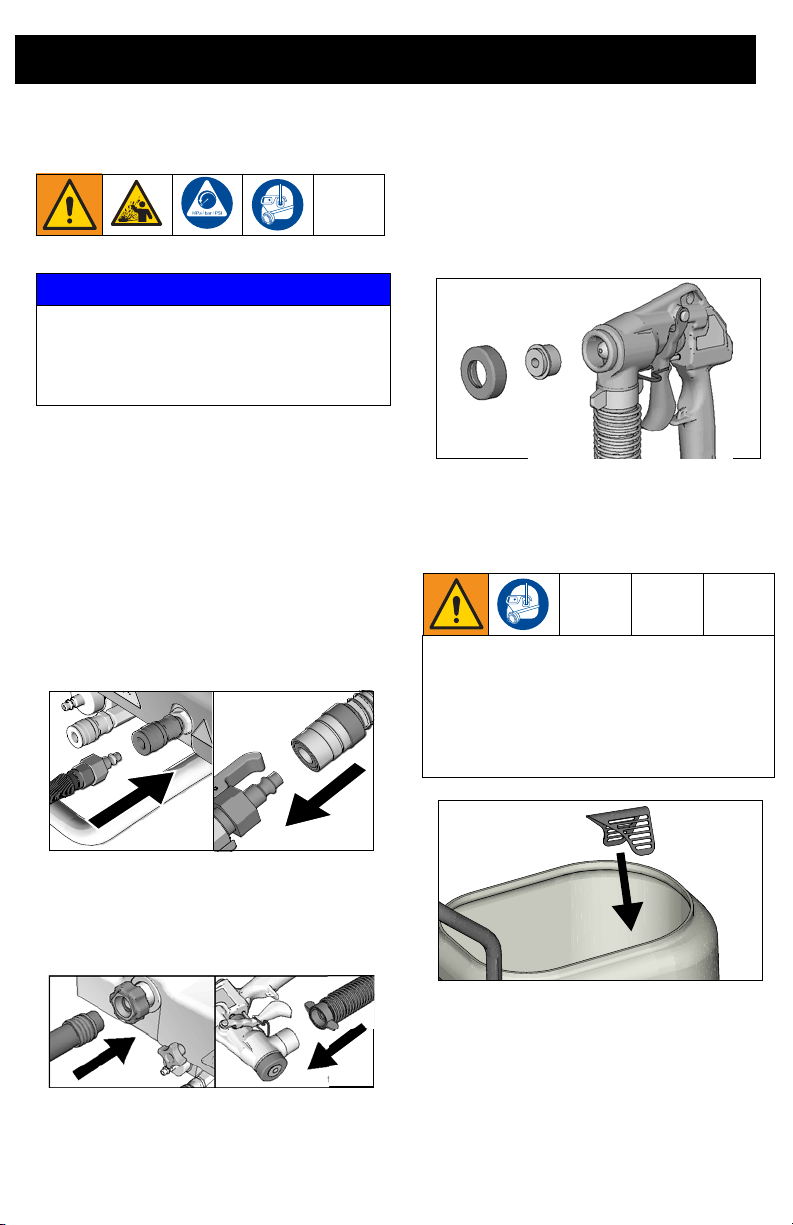
1. Connect one end of air hose to sprayer
air outlet quick connect and to gun air
inlet quick connect.
When auxiliary air is used connect one
end of air hose to lower sprayer air outlet
quick connect and to gun air inlet quick
connect. Connect auxiliary air source to
male coupler on sprayer.
3. Install spray nozzle. See
Recommended Nozzle & Disc
Selection Charts, page 15. Pulling
trigger when installing nozzle makes
assembly easier.
ti27960a
4. Plug power cord into a properly
grounded outlet.
5. Make sure burp guard is installed.
Before adding material to the hopper,
install the burp guard. When only a small
amount of material remains in the hopper,
the burp guard prevents material from
shooting out when the unit is turned off.
This material could splash in the operator’s
eyes or on skin, or into the air.
ti27955a
2. Connect one end of material hose to
material outlet and the other end to gun
material inlet. Firmly tighten
connections.
ti27398a
10 3A3265B
Setup
ti2496b
40 lb.
TEXTURE MIX
5 GAL
Material Hopper
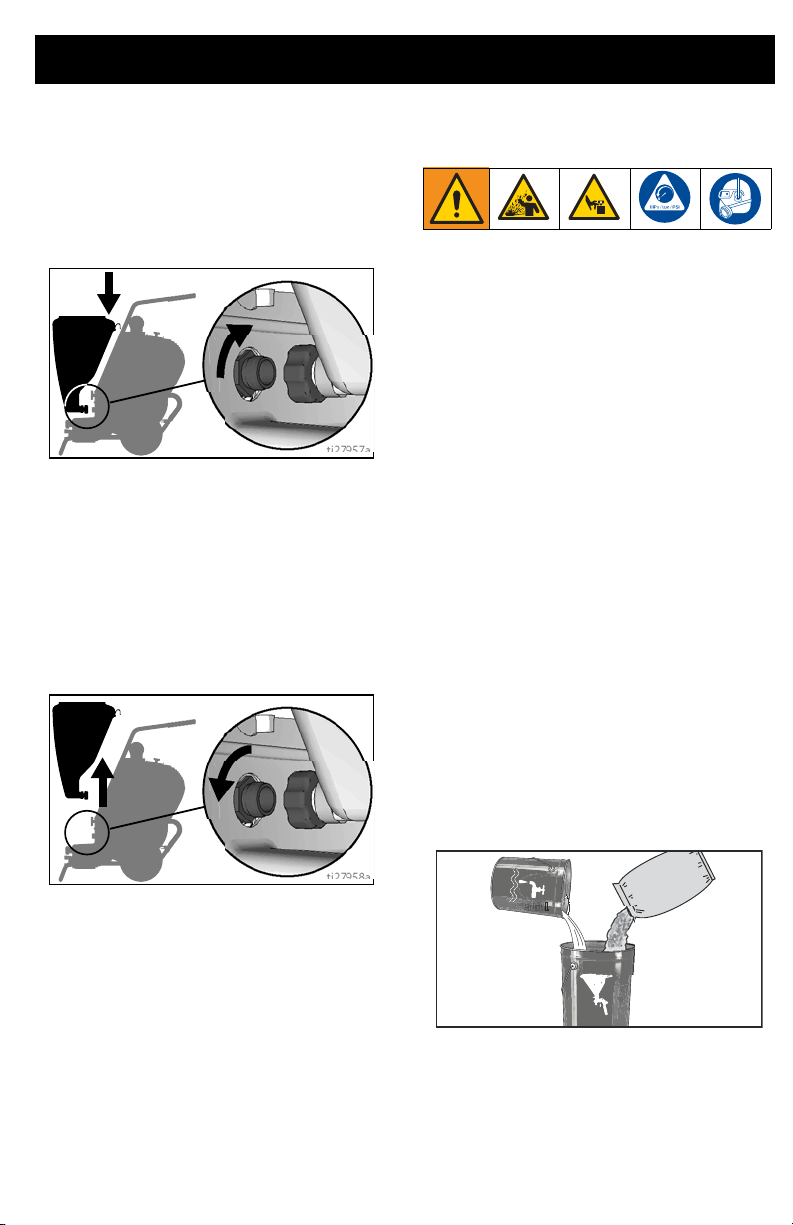
Install Hopper
1. Position hopper outlet over fitting as far
as it will go.
2. Hand tighten fitting.
Remove Hopper
Material hopper can be removed for easy
cleaning.
1. Loosen outlet fitting. Fittings are handtightened and should not require tools
to loosen.
Mixing Material
NOTE: Correct material mixture is essential.
The pump will not operate if the mixture is too
thick. Use water-based materials only.
• Mix the material in a separate container
before pouring it into hopper.
• Use Material Thickness Gauge to
determine if mixture is thin enough to
spray.
• The Material Thickness Gauge will only
determine if the material is thin enough
to pass through the pump. For some
applications or for higher speed
spraying, your mixture may need to be
thinner.
• If thicker materials are desired, test
pumping performance first. Then spray a
test pattern.
• For best results, do not use partial bags
of material.
1. Mix the material and water in a
separate container.
Dry Mix — 40 lb (18 kg) bag
Carefully mix texture material and water
according to manufacturer instructions
on bag.
2. Lift material hopper straight up, off the
unit.
3A3265B 11
Loading…
Электрические распылители текстурированных покрытий
по запросу
Система RTX 5500 Pro серии Interior (для внутренних работ) является оптимальным решением для специалистов, желающих сократить продолжительность проведения работ среднего — большого объема.
Данное профессиональное оборудование специально разработано для увеличения производительности. С его помощью Вы можете быть уверены в том, что процесс нанесения материала на рабочей площадке происходит максимально эффективно.
Распылители RTX 5500 Pro серии Exterior (для наружных работ) предназначены для выполнения наружных работ любого объема.
Идеальное решение для проведения отделочных работ в жилых и коммерческих зданиях, требующих наличия компактного, но мощного распылителя, позволяющего работать с широким спектром текстурных материалов.
Характеристики RTX 5500PI и RTX 5500PX.
- Бункер сверхбольшой вместимости
- Вмещает до 57 литров (15 галлонов) материала, позволяя сократить время, затрачиваемое на дозаправку бункера.
- Бесщеточный двигатель постоянного тока MaxPower на 240 В
- Обеспечивает беспроблемное использование длинных удлинителей при меньшем количестве проблем с автоматическим выключателем.
- Полностью закрытая, охлаждаемая вентилятором конструкция защищает двигатель от пыли, грязи и другого мусора.
- Бесщеточная конструкция означает, что вам никогда не придется заменять щетки.
- Работа в высокопроизводительном режиме при 16 А или установка значения 10 А для работ с ограниченным электропитанием.
- Система SmartStart
- Инновационная система автоматически запускает насос и компрессор, когда пусковой курок пистолета нажат, и отключает их при его отпускании.
- Обеспечивает плавный запуск, предотвращая выпуск струй материала, что может повлиять на качество отделки.
- Снижает уровень шума и вибрации.
- Продлевает срок службы насоса и компрессора.
- Наконечники и переходник WideTex (упрочненный на модели px)
- Позволяет выполнять распыление с единообразным факелом распыла.
- Получение одинаковой формы распыла с меньшей регулировкой подачи материала и давления.
- Повышает производительность более чем на 20 %.
- Сверхпрочный алюминиевый пистолет с пусковым курком и со встроенным селекторным переключателем заправки
- Прочная алюминиевая конструкция.
- Увеличенные проходы для подачи жидкости и воздуха.
- Позволяет переводить устройство в режим заправки на пистолете.
- Насос RotoFlex HD
- Оснащен инновационным стропом в оплетке, который обеспечивает дополнительную поддержку для трубки насоса RotoFlex.
- Пропускная способность 21 л/мин (5,5 галл/мин) позволяет сократить время выполнения работ – доказано в условиях эксплуатации!
- Двухцилиндровый высокопроизводительный воздушный компрессор
- Высокопроизводительная конструкция позволяет подавать на 33 % больше воздуха при необходимости тонкой отделки.
- Конструкция, не требующая технического обслуживания.
- Выбрасывает материалы на большее расстояние.
- Работает при более низких оборотах для увеличения срока службы.
- Пропускная способность 0,26 м³/мин (9,1 куб. футов/мин) при давлении 1,4 бар (20 фунтов на кв. дюйм).
- Шланг подачи материала и воздуха 2,5 см (3,2 см на модели px) в связке
- Оба шланга прочно соединены друг с другом для простоты эксплуатации.
- Обладают повышенной гибкостью.
- Секция насоса FlexChange
- Система замены насоса без использования инструментов – теперь проще, чем когда-либо!
- Установка запасного насоса RotoFlex за считанные секунды.
- Устранение дорогостоящих простоев на месте эксплуатации.
- Настраиваемый регулятор потока материала
- Установите в верхнее положение для распыления более густых материалов.
- Установите в нижнее положение для снижения скорости потока и максимального контроля.
- Легко считываемый манометр.
Комплектация устройства.
- Шланг подачи материала 2,5 см x 7,6 м (3,2 см на RTX 5500px).
- Шланг подачи воздуха 9,5 мм x 7,6 м.
- Сверхпрочный текстурный пистолет.
- Круглые сопла 3 мм, 4 мм, 6 мм, 8 мм, 10 мм, 12 мм.
- Переходник WideTex с наконечниками 4 мм, 6 мм, 8 мм, 10 мм, 12 мм, XL W (упрочненный на RTX 5500px).
Брошюра RTX 5500
ДоставкаС этим товаром покупают
Доставка в другие города и регионы осуществляется силами транспортных компаний по предварительной договорённости с покупателем.
Document Download |
‹
›
Graco RTX5500 Manual Online:
4.1,
774
votes
Graco RTX5500 User Manual
Graco RTX5500 User Guide
Graco RTX5500 Online Manual
Text of Graco RTX5500 User Guide:
More Instructions:
|
Graco RTX5500 Operation, parts
|
DOWNLOAD |
Related Products and Documents (Paint Sprayer):
-
Graco 232630 Paint Sprayer Instruction & repair manual
232630
graco/232630.pdf, 26 -
Graco GRACO OR PRO TI1681A Paint Sprayer Instructions-parts list manual
GRACO OR PRO TI1681A
graco/graco-or-pro-ti1681a.pdf, 70 -
Graco 231-353 Paint Sprayer Instructions-parts list manual
231-353
graco/231-353.pdf, 36 -
Graco PRO AA4000 Paint Sprayer Instructions manual
PRO AA4000
graco/pro-aa4000.pdf, 32 -
Graco Pail Mount Packages Paint Sprayer Instructions and parts list
Pail Mount Packages
graco/pail-mount-packages.pdf, 22 -
Graco Edge 256855 Paint Sprayer Important safety instructions manual
Edge 256855
graco/edge-256855.pdf, 8 -
Graco 2500 psi Paint Sprayer Instructions-parts list manual
2500 psi
graco/2500-psi.pdf, 16 -
Graco 231421 Paint Sprayer Instructions-parts list manual
231421
graco/231421.pdf, 32
Comparable Devices:
| # | Manufacturer | Model | Document Type | File | Updated | Pages | Size |
|---|---|---|---|---|---|---|---|
| 1 | JRC | JQX-30 A | Brochure | jrc/jqx-30-a-79S.pdf | 21 Feb 2024 | 2 | |
| 2 | Philips | HP6362/00 | Specifications | philips/hp6362-00-M2X.pdf | 18 Sep 2023 | 2 | 0.29 Mb |
| 3 | Wagan | Classic Lantern | Operation & user’s manual | wagan/classic-lantern-MC4.pdf | 04 Aug 2024 | 16 | |
| 4 | Woombikes | Woom series | Owner’s manual | woombikes/woom-series-5CB.pdf | 28 Jul 2024 | 12 | |
| 5 | Extron electronics | DSC HD-HD 4K A | Setup manual | extron-electronics/dsc-hd-hd-4k-a-T2M.pdf | 17 Apr 2025 | 4 | |
| 6 | Craftsman | 38819 | Owner’s manual | craftsman/38819-1AU.pdf | 16 Jan 2025 | 44 | 6.16 Mb |
Similar Resources:
Paint Sprayer Instructions:
-
Epson Projector EMP-S4
Operation & user’s manual for Epson EMP-S4 Projector
EMP-S4, 77
-
Marantz Amplifier PM-14mkII
Marantz PM-14mkII User Manual (Operation & user’s manual), @G1IQ28
PM-14mkII, 14
-
Kramer DVD Player VM-2UHD
Kramer Product User Guide: VM-2UHD PDF Operation & user’s manual — 7613IB
VM-2UHD, 33
-
Sony Network Card PCWA-C300S — Wireless Lan Pc Card
PCWA-C300S — Wireless Lan Pc Card (Network Card ePDF User Guide, #513U4E)
PCWA-C300S — Wireless Lan Pc Card, 146
-
Philips Flat Panel TV 42PF3331
User Manual: Philips 42PF3331 (V68N87, Upd.Fri 12.2024)
42PF3331, 3
-
Zhumell Telescope Dobsonian
Zhumell Telescope Owner’s manual (File: zhumell-dobsonian-telescope-36, 22/02/2025)
Dobsonian, 36
-
Check-line Measuring Instruments CTM2
User Manual: Check-line CTM2 (2I4262, Upd.Wednesday 05-02-2025)
CTM2, 36
-
Atlantis IP Camera NetCamera 510A-B
Atlantis Product Manual: NetCamera 510A-B PDF Manual — PYY1W3
NetCamera 510A-B, 54
-
Cortelco Telephone Colleague 2210
Manual: Cortelco Colleague 2210 (EZN28S, Upd.Sun 03.2025)
Colleague 2210, 28
-
WIKA Controller CPC8000
#T71S7Z: CPC8000 Controller Operating instructions manual
CPC8000, 114
-
Bissell Vacuum Cleaner PowerForce® Bagless Vacuum
#ZJ5CKQ PowerForce® Bagless Vacuum: Bissell Vacuum Cleaner Owner Documentation
PowerForce® Bagless Vacuum, 16
-
Autostart Car Alarm AS-2400 TW-FM
Car Alarm #86H5C6
AS-2400 TW-FM, 4
Comments, Questions and Opinions:
Graco RTX5500 Paint Sprayer PDF User Guides and Manuals for Free Download: Found (2) Manuals for Graco RTX5500 Device Model (Operation, Parts, Installation Manual)
The Graco RTX5500 is a noteworthy addition to the lineup of airless paint sprayers that promises efficiency, reliability, and precision. Designed for both professionals and ambitious DIY enthusiasts, the RTX5500 stands out with its robust features and user-friendly design. In this review, we’ll explore the key aspects of this machine that make it suitable for a range of painting tasks.
One of the first things to appreciate about the Graco RTX5500 is its powerful motor. Capable of delivering up to 55% more power than its predecessors, it allows for faster application of paint, which translates to time savings on larger projects. The machine can handle materials of various viscosities, from thin stains to thick paints, making it versatile for different jobs.
Another significant advantage of the RTX5500 is its adjustable pressure control. Users can fine-tune the spray pressure according to the specific requirements of their project, ensuring optimal coverage without over-spraying or wasting paint. This feature also allows for a smoother finish, which is especially important for professional finishes.
The design of the Graco RTX5500 emphasizes ease of use. The sprayer comes equipped with a lightweight frame, making it portable and easy to maneuver. Additionally, the setup process is straightforward and does not require extensive prior knowledge or experience with paint sprayers. Users can quickly switch between jobs, enhancing productivity.
Maintenance is often a concern for users of paint sprayers, but Graco has designed the RTX5500 with this in mind. The machine features a self-cleaning system that simplifies the cleanup process significantly. After use, switching to the cleaning mode enables users to flush out paint and maintain the sprayer efficiently, prolonging its lifespan.
When it comes to performance, the RTX5500 excels in delivering consistent results. The advanced spray technology ensures even coverage, and users can expect fewer drips and overspray compared to other brands. This makes it particularly beneficial for projects requiring detail and precision, such as fences, cabinets, or exterior walls.
- Pros:
- Powerful motor for faster paint application.
- Adjustable pressure control for customized use.
- Lightweight and portable design.
- Self-cleaning feature for easy maintenance.
- Excellent spray technology for a smooth finish.
While the Graco RTX5500 offers numerous advantages, it is worth mentioning a few considerations. Some users may find that switching between different paint types requires additional cleaning time to prevent clogs. Moreover, although the sprayer is lightweight, it may require some practice to master the adjustment of pressure settings for the best results.
In conclusion, the Graco RTX5500 stands out as a high-quality, efficient paint sprayer that is suitable for a wide range of users. Its combination of power, portability, and precision makes it a great investment for anyone looking to achieve professional-grade results without the hassle. Whether you are a seasoned contractor or a home improvement enthusiast, the RTX5500 will certainly enhance your painting experience.
FAQ: Types of Manuals and Their Contents
Graco RTX5500 Manuals come in various types, each serving a specific purpose to help users effectively operate and maintain their devices. Here are the common types of Graco RTX5500 User Guides and the information they typically include:
- User Manuals: Provide comprehensive instructions on how to use the device, including setup, features, and operation. They often include troubleshooting tips, safety information, and maintenance guidelines.
- Service Instructions: Designed for technicians and repair professionals, these manuals offer detailed information on diagnosing and repairing issues with the device. They include schematics, parts lists, and step-by-step repair procedures.
- Installation Guides: Focus on the installation process of the device, providing detailed instructions and diagrams for proper setup. They are essential for ensuring the device is installed correctly and safely.
- Maintenance Manuals: Provide guidance on routine maintenance tasks to keep the device in optimal condition. They cover cleaning procedures, part replacements, and regular servicing tips.
- Quick Start Guides: Offer a concise overview of the essential steps needed to get the device up and running quickly. They are ideal for users who need immediate assistance with basic setup and operation.
Each type of Graco RTX5500 instruction is designed to address specific needs, ensuring users have the necessary information to use, maintain, and repair their devices effectively.
Related Instructions for Graco RTX5500:
1
DutyMax EH 230DI
Operation manual User Manual: Graco DutyMax EH 230DI (12MMWI, Upd.Thu 10.2024)
52
87
21
2
Totbloc
Owner’s manual User Guide: Graco Totbloc (U2S2MW, Upd.Wednesday 09-10-2024)
12
24
5
3
13785-7-00
Owner’s manual Graco Stroller Owner’s manual (File: graco-13785-7-00-operation-user-s-manual-66, 26th Dec 2024)
66
1403
323
4
FieldLazer R300
Operation FieldLazer R300 (Construction Equipment ePDF Manual, #SN74R6)
42
1194
227
8
190ES
Brochure User Manual: Graco 190ES (TE7141, Upd.23/02/2025)
4
675
142
9
ToughTek S340e
38
478
72
10
Dyna-Star HP
Manual PDF User Guide (@5RL3UQ), Graco Dyna-Star HP Water Pump (Thu 03.2025)
9
1327
200
Paint Sprayer Devices by Other Brands:
|
Graco 309296F Operation Manual Graco 309296F User Manual (Operation manual), @559AH8 OPERATION/FONCTIONNEMENT/ 24 Dec 2024 | 46 |
|
|
C.A. Technologies Panther 100G Product Information PDF User Guide (@N3J823), C.A. Technologies Panther 100G Paint Sprayer (Monday 16-12-2024) CONVENTIONAL AIR CAP AND FLUID NOZZLE CHART 16 Dec 2024 | 4 |
|
|
Toro Multi Pro 41118 Operator’s Manual Toro Paint Sprayer Operator’s manual (File: toro-multi-pro-41118-operator-s-manual-12, 17/05/2025) Form No. 3393-261 Rev B 17 May 2025 | 12 |
|
|
SATA SATAjet 3000 A HVLP Operating Instructions Manual SATAjet 3000 A HVLP Operating instructions manual — VWF68D 3* 03 Mar 2025 | 10 |
Categories:
Farm Equipment
Drums
Baby & toddler car seats
Heat Pump Accessories
Media Converter
Pressure sprayer