
интернет:настройка_роутера_trendnet
Содержание
Настройка роутера Trendnet TEW-432BRP
Подключение роутера
Подключаем роутер к розетке питания, затем берем комплектный патчкорд
и вставляем его в любой разъем, помеченный как «LAN 1,2,3 или 4 (блок портов помечен желтым цветом)» с обратной стороны роутера, другой конец подсоединяем в сетевую карту Вашего компьютера. Кабель провайдера подсоединяем в разъем «INTERNET» помечен на роутере синим цветом.
Настройка сетевого соединения на компьютере
Настройка роутера:
Открываем любой браузер и в адресной строке набираем: 192.168.10.1

В появившемся окне авторизации на web-интерфейсе роутера нужно ввести логин и пароль из инструкции (зачастую, логин и пароль один и тот же — admin).
После прохождения авторизации мы попадаем «внутрь» Wi-Fi роутера — можно приступать к настройке.
Для протокола подключения Dynamic IP, необходимо зайти в раздел «Main», подраздел «WAN», выбрать в меню «Connection Type» (протокол подключения) «DHCP Client or Fixed IP» и нажать кнопку «Clone MAC Address».
Далее, необходимо поставить точку напротив надписи «Obtain IP Automatically». Главное — не забыть нажать кнопку «Apply».

В некоторых населенных пунктах используется ручной ввод сетевых реквизитов. Для этого необходимо выбрать тип подключения “Использовать следующий ip адрес / Статический IP / Static IP / или похожие варианты” и заполнить все необходимые поля.
Настройка беспроводной сети
Wi-Fi сеть настраивается в разделе «Wireless».
Необходимо ввести уникальное имя Wi-Fi сети на английской раскладке. К данной сети будут подключаться ноутбуки, нетбуки и прочие мобильные устройства.

Далее, необходимо зайти в меню «Wireless», вкладка «Security» и выбрать один из типов шифрования данных, передаваемых по Wi-Fi. Желательно использовать типы шифрования WPA или WPA2.
В поля «Passphrase» и «Confirm passphrase» необходимо ввести пароль для подключения к Wi-Fi сети, созданной роутером. Он должен быть от 8 до 64 символов в длину. Пароль должен вводится на английской раскладке клавиатуры (желательно использовать цифры и символы помимо букв). Для того, чтобы в последствии подключиться к этой Wi-Fi сети, потребуется ввести этот пароль.

P.S. Внимательно смотрите на скриншоты в инструкции, на них показана рабочая конфигурация для нашей сети, т.е. 100% с такими настройками Ваш роутер будет работать.
Краткая инструкция по подключению к Wi-Fi
В правом нижнем углу (возле индикатора времени и даты) есть индикатор Wi-Fi соединения

Жмем по нему левой кнопкой мыши и видим список доступных сетей

Выбираем из них ту, которую Вы создали и нажимаем «Подключение»
Спустя некоторое время появится окно с просьбой ввести пароль

Вводим пароль в поле «Ключ сети» и дублируем его в поле «Подтверждение ключа»
Далее нажимаем кнопку «Подключить»
Некоторое время Ваш компьютер будет получать IP адрес от роутера и, вуаля, Вы подключены к Wi-Fi соединению
интернет/настройка_роутера_trendnet.txt · Последние изменения: 2025/02/24 09:10 — admin

Regulatory notes and statements
Wireless LAN, Health and Authorization for use
Radio frequency electromagnetic energy is emitted from Wireless LAN devices.
The energy levels of these emissions however are far much less than the
electromagnetic energy emissions from wireless devices like for example mobile
phones. Wireless LAN devices are safe for use frequency safety standards and
recommendations. The use of Wireless LAN devices may be restricted in some
situations or environments for example:
·On board of airplanes, or
·In an explosive environment, or
·In case the interference risk to other devices or services is perceived or identified
as harmful
In case the policy regarding the use of Wireless LAN devices in specific
organizations or environments (e.g. airports, hospitals, chemical/oil/gas industrial
plants, private buildings etc.) is not clear, please ask for authorization to use these
devices prior to operating the equipment.
Regulatory Information/disclaimers
Installation and use of this Wireless LAN device must be in strict accordance with
the instructions included in the user documentation provided with the product. Any
changes or modifications made to this device that are not expressly approved by the
manufacturer may void the user’s authority to operate the equipment. The
Manufacturer is not responsible for any radio or television interference caused by
unauthorized modification of this device, of the substitution or attachment.
Manufacturer and its authorized resellers or distributors will assume no liability for
any damage or violation of government regulations arising from failing to comply
with these guidelines.
USA-FCC (Federal Communications Commission) statement
This device complies with Part 15 of FCC Rules.
Operation is subject to the following two conditions:
1. This device may not cause interference, and
2. This device must accept any interference, including interference that may cause
undesired operation of this device.
FCC Radio Frequency Exposure statement
This Wireless LAN radio device has been evaluated under FCC Bulletin OET 65
and found compliant to the requirements as set forth in CFR 47 Sections 2.1091,
2.1093, and 15.247 (b) (4) addressing RF Exposure from radio frequency devices.
i

The radiated output power of this Wireless LAN device is far below the FCC radio
frequency exposure limits. Nevertheless, this device shall be used in such a manner
that the potential for human contact during normal operation is minimized.
When nearby persons has to be kept to ensure RF exposure compliance, in order to
comply with RF exposure limits established in the ANSI C95.1 standards, the
distance between the antennas and the user should not be less than 20 cm.
FCC Interference Statement
This equipment has been tested and found to comply with the limits for a Class B
digital device, pursuant to Part 15 of the FCC Rules. These limits are designed to
provide reasonable protection against harmful interference in a residential
installation.
This equipment generates, uses, and can radiate radio frequency energy. If not
installed and used in accordance with the instructions, it may cause harmful
interference to radio communications.
However, there is no guarantee that interference will not occur in a particular
installation. If this equipment does cause harmful interference to radio or television
reception, which can be determined by turning the equipment off and on, the user is
encouraged to try and correct the interference by one or more of the following
measures:
1. Reorient or relocate the receiving antenna.
2. Increase the distance between the equipment and the receiver.
3. Connect the equipment to an outlet on a circuit different from that to which the
receiver is connected.
4. Consult the dealer or an experienced radio/TV technician for help.
Export restrictions
This product or software contains encryption code that may not be exported or
transferred from the US of Canada without an approved US Department of
Commerce export license.
Safety Information
Your device contains a low power transmitter. When device is transmitted it sends
out radio frequency (RF) signal.
CAUTION: To maintain compliance with FCC’s RF exposure guidelines, this
equipment should be installed and operated with minimum distance 20cm between
the radiator and your body. Use on the supplied antenna. Unauthorized antenna,
modification, or attachments could damage the transmitter and may violate FCC
regulations.
ii

The antenna(s) used for this transmitter must be installed to provide a separation
distance of at least 20 cm from all persons and must not be co-located or operating
in conjunction with any other antenna or transmitter.
CE Mark Warning
This is a Class B product. In a domestic environment, this product may cause radio
interference, in which case the user may be required to take adequate measures.
Protection requirements for health and safety – Article 3.1a
Testing for electric safety according to EN 60950 has been conducted. These are
considered relevant and sufficient.
Protection requirements for electromagnetic compatibility – Article
3.1b
Testing for electromagnetic compatibility according to EN 301 489-1, EN 301 48917 and EN 55024 has been conducted. These are considered relevant and sufficient.
Effective use of the radio spectrum – Article 3.2
Testing for radio test suites according to EN 300 328-2 has been conducted. These
are considered relevant and sufficient.
CE in which Countries where the product may be used freely:
Germany, UK, Italy, Spain, Belgium, Netherlands, Portugal, Greece, Ireland,
Denmark, Luxembourg, Austria, Finland, Sweden, Norway and Iceland.
France: except the channel 10 through 13, law prohibits the use of other channels.
iii

TABLE OF CONTENT
A
BOUT THIS GUIDE
Purpose……………………………………………………………………………………………………. 1
Overview of this User’s Guide……………………………………………………………………. 1
I
NTRODUCTION
Applications:…………………………………………………………………………………………….. 2
Features: ………………………………………………………………………………………………….. 3
U
NPACKING AND SETUP
Unpacking ……………………………………………………………………………………………….. 4
Setup……………………………………………………………………………………………………….. 4
H
ARDWARE INSTALLATION
Front Panel ………………………………………………………………………………………………. 5
Rear Panel………………………………………………………………………………………………… 6
Hardware connections……………………………………………………………………………….. 6
Connect the Router using LAN…………………………………………………………………. 7
…………………………………………………………………………………….. 1
…………………………………………………………………………………………… 2
……………………………………………………………………………….. 4
…………………………………………………………………………… 5
Connect the Router using Wireless LAN……………………………………………………. 7
Check the installation………………………………………………………………………………. 8
PC
NETWORK
TCP/IP S
ETTING
…………………………………………………………………….. 9
Windows 95/98/ME…………………………………………………………………………………… 9
Windows 2000………………………………………………………………………………………… 10
Windows XP…………………………………………………………………………………………… 11
IRELESS BROADBAND ROUTER CONFIGURATION
W
……………………………………….. 12
Login to the Wireless Broadband Router through WLAN…………………………….. 12
Login to the Wireless Broadband Router through LAN………………………………… 12
Using the Web Browser……………………………………………………………………………. 12
Quick Setup……………………………………………………………………………………………. 13
Advance Setup………………………………………………………………………………………… 21
2.1 LAN Setting……………………………………………………………………………………. 21
2.1.1 LAN & DHCP Server…………………………………………………………………. 21
2.1.2 WAN………………………………………………………………………………………… 22
2.1.3 Password…………………………………………………………………………………… 23
2.1.4 Time…………………………………………………………………………………………. 24
2.2 Wireless………………………………………………………………………………………….. 25
iv

2.2.1 Basic………………………………………………………………………………………… 25
2.2.2 Authentication …………………………………………………………………………… 26
2.2.3 Advanced………………………………………………………………………………….. 28
2.3 Status……………………………………………………………………………………………… 29
2.3.1 Device Information…………………………………………………………………….. 29
2.3.2 Log…………………………………………………………………………………………… 30
2.3.3 Log Setting ……………………………………………………………………………….. 32
2.3.4 Statistic…………………………………………………………………………………….. 33
2.3.5 Wireless……………………………………………………………………………………. 34
2.4 Routing…………………………………………………………………………………………… 35
2.4.1 Static………………………………………………………………………………………… 35
2.4.2 Dynamic …………………………………………………………………………………… 36
2.4.3 Routing Table……………………………………………………………………………. 37
2.5 Access ……………………………………………………………………………………………. 38
2.5.1 MAC Filters………………………………………………………………………………. 38
2.5.2 Protocol Filter……………………………………………………………………………. 39
2.5.3 IP Filter…………………………………………………………………………………….. 39
2.5.4 Virtual Server ……………………………………………………………………………. 41
2.5.5 Special AP………………………………………………………………………………… 42
2.5.6 DMZ………………………………………………………………………………………… 44
2.5.7 Firewall Rule…………………………………………………………………………….. 45
2.6 Management……………………………………………………………………………………. 47
2.6.1 Remote Management………………………………………………………………….. 47
2.7 Tools ……………………………………………………………………………………………… 48
2.7.1 Reset………………………………………………………………………………………… 48
ECHNICAL SPECIFICATIONS
T
……………………………………………………………………… 52
v

ABOUT THIS GUIDE
Congratulations on your purchase of this IEEE 802.11g Wireless Broadband Router.
This integrated access device combines Internet gateway functions with wireless
LAN and Fast Ethernet switch. It provides a complete solution for Internet surfing
and office resources sharing, and it is easy to configure and operate for every users.
Purpose
This manual discusses how to install the IEEE 802.11g Wireless Broadband Router.
Overview of this User’s Guide
Introduction. Describes the Wireless Broadband Router and its features.
Unpacking and Setup. Helps you get started with the basic installation of the
Wireless Router.
Identifying External Components. Describes the front panel, rear panel and LED
indicators of the Wireless Router.
Connecting the Router. Tells how you can connect the Wireless Router to your
xDSL/Cable Modem.
Technical Specifications. Lists the technical (general, physical and environmental,
performance and Routers settings) specifications of the Wireless Broadband Router.
1

INTRODUCTION
With the explosive growth of the Internet, accessing information and services at
any time, day or night has become a standard requirement for most people. The era
of the standalone PC is waning. Networking technology is moving out of the
exclusive domain of corporations and into homes with at least two computers.
This integrated access device combines Internet gateway functions with wireless
LAN and Fast Ethernet switch. Designed for the business and home, it saves you
the cost of installing a separate modem and ISP line for each computer, while
providing ready connection for the users, with or without the network wires.
Broadband network access is also gaining ground. However, allowing more than
two computers to access the Internet at the same time means less affordable, higher
costs. Thus, there is a need to share one legal IP address over a single Internet
connection to link the home with the Internet.
The scarcity of IP addresses and using a shared Internet connection through an
Internet sharing device can solve high network access costs. All linked computers
can make full use of broadband capabilities over such a device.
This device not only comes equipped with a wide range of features, but also can be
installed and configured right out of the box. This device supports a simple local
area network and Internet access share, offering great cost savings.
The local area network connects up home computers while also allowing any of the
computers to access the Internet, share resources, or play online games—the basis
of the family computing lifestyle.
Applications:
Broadband Internet access:
Several computers can share one high-speed broadband connection through
wireless or wired (WLAN, LAN and WAN-Internet).
Resource sharing:
Share resources such as printers, scanners and other peripherals.
File sharing:
Exchange data, messages, and distribute files thus making good use of hard disk
space.
Online gaming:
Through the local area network, online gaming and e-commerce services can be
easily setup.
Firewall:
A built-in firewall function — for security and anti-hack system.
2

Features:
Wi-Fi Compliant with IEEE 802.11g and 802.11b Devices
Built-in 4 x 10/100Mbps Auto-MDIX LAN Ports
Built-in 1 x 10/100Mbps Auto-MDIX WAN Port (Internet)
Supports Cable/DSL Modems with Dynamic IP, Static IP, PPPoE, or PPTP
Connection Types
DHCP Server Feature Allocates up to 253 Client IP Addresses
Supports 64/128-bit Wired Equivalent Privacy (WEP)
Supports WPA, WPA-PSK, TKIP/AES and 802.1X for Advance Security
Supports MAC Address, Protocol Filters and UPnP (Universal Plug & Play)
Traffic Control with Virtual Server, Virtual PC mapping and DMZ
Provides Additional Security with SPI / NAT firewall and Attack Alert via
emails
Provides Additional Security of Enable/Disable SSID, Password Protection
Supports Static and Dynamic Routing
Flash Memory for Firmware Upgrade, Save/Restore Settings, and Traffic
Log
Compliant with Windows 95/98/NT/2000/XP, Linux and Mac OS
Easy Management via Web Browser (HTTP) and Remote Management
Range for Indoor of 30 ~ 50 meters (depends on the environment)
Range for Outdoor of 50 ~ 200 meters (depends on the environment)
3

UNPACKING AND SETUP
This chapter provides unpacking and setup information for the Wireless Broadband
Router.
Unpacking
Open the box of the Wireless Broadband Router and carefully unpack it. The box
should contain the following items:
TEW-432BRP Wireless Router
Multi-Language QIG
CD-ROM (User’s Guide)
External Power Adapter
If any item is found missing or damaged, please contact your local reseller for
replacement.
Setup
The setup of the Wireless Broadband Router can be performed properly using the
following methods:
The power outlet should be within 1.82 meters (6 feet) of the Broadband Router.
Visually inspect the DC power jack and make sure that it is fully secured to the
power adapter.
Make sure that there is proper heat dissipation from and adequate ventilation
around the Broadband Router. Do not place heavy objects on the Broadband
Router.
Fix the direction of the antennas. Try to place the Wireless Router in a position
that can best cover your wireless network. Normally, the higher you place the
antenna, the better the performance will be. The antenna’s position enhances the
receiving sensitivity.
4

HARDWARE INSTALLATION
Front Panel
The figure below shows the front panel of the Wireless Broadband Router.
TEW-432BRP Front Panel
POWER
This indicator lights green when the hub is receives power, otherwise it is off.
SYSTEM
This indicator blinks green means the Internet Broadband Router is working
successful. Otherwise, this indicator always on or off means the function of the
Internet Broadband Router is fail.
WAN (Link/ACT)
The indicators light green when the WAN port was connected to an xDSL/Cable
modem successfully.
The indicators blink green while the WAN port was transmitting or receiving data
on the xDSL/Cable modem.
WLAN (ACT)
This indicator lights green when there are wireless devices connected and
transmitting data to the Wireless Router.
LAN (Link/ACT)
These indicators light green when the LAN ports were connected successfully.
These indicators blink green while the LAN ports were transmitting data.
5
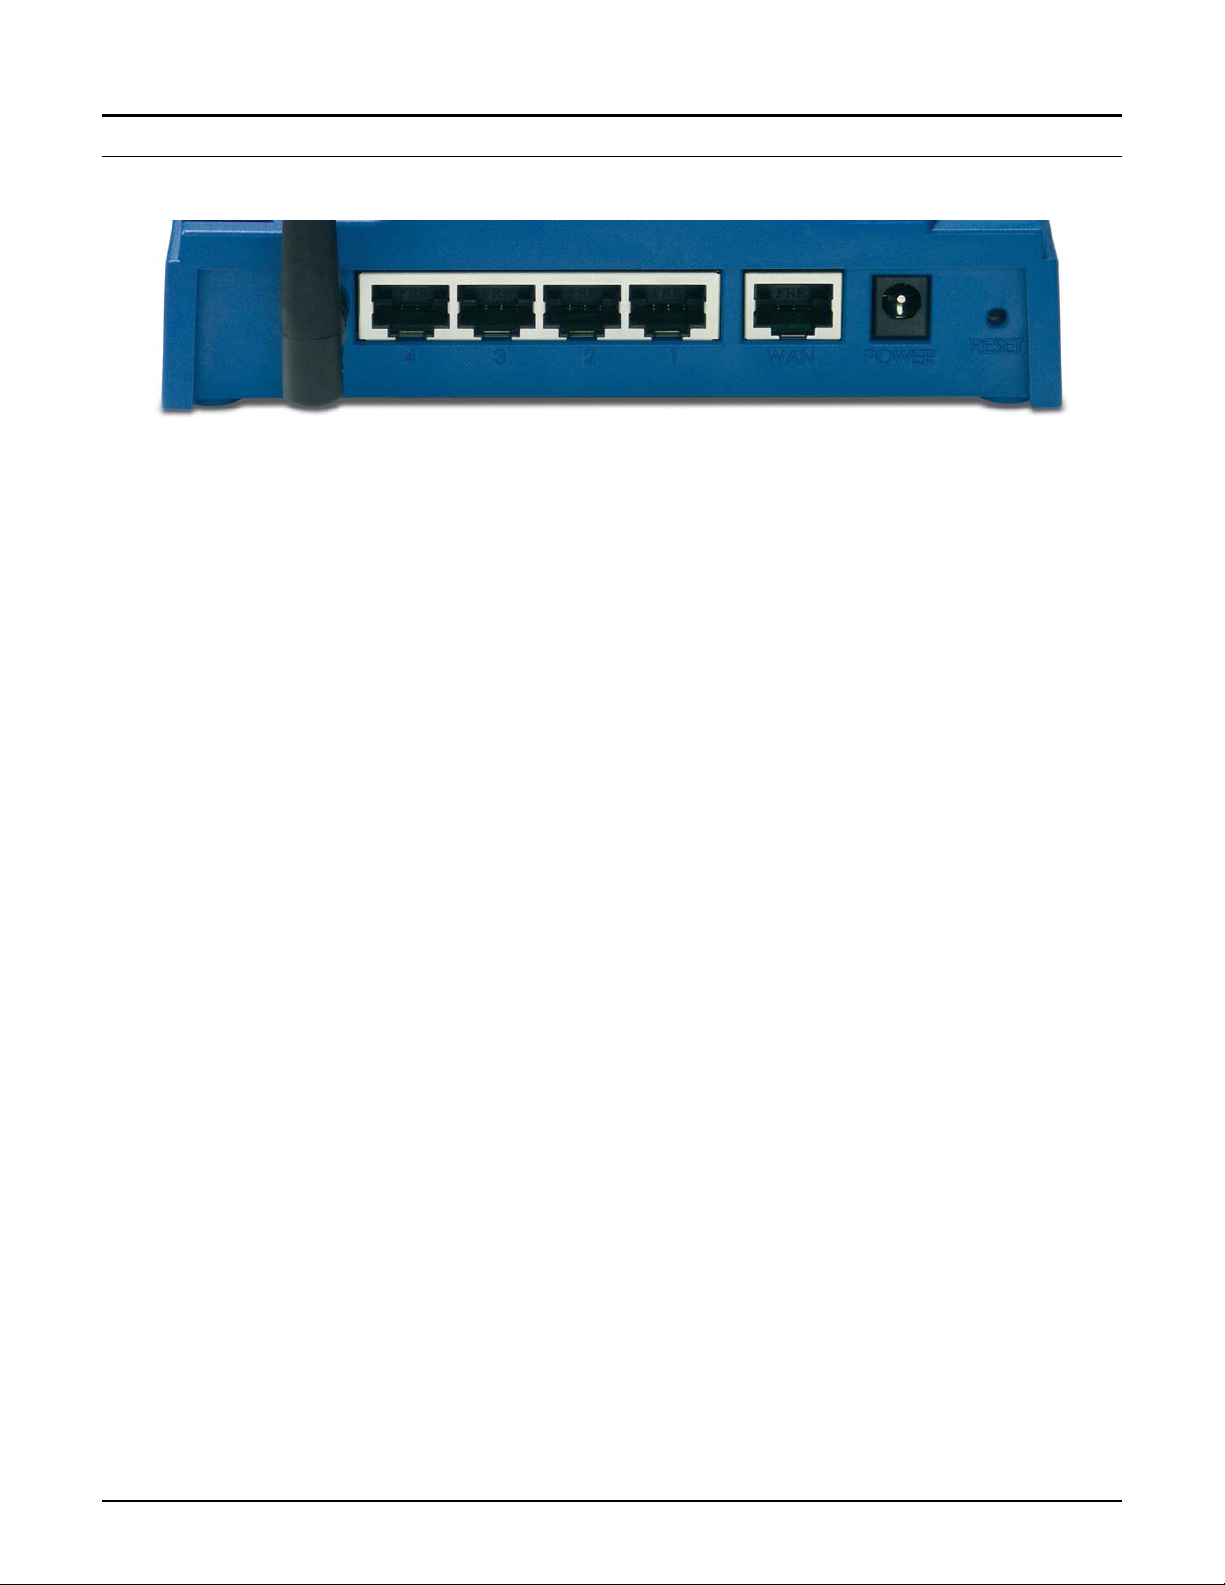
Rear Panel
The figure below shows the rear panel of the Wireless Broadband Router.
TEW-432BRP Rear Panel
Antenna
There are one 2 dBi Gain Antenna in the rear panel for wireless connection.
LAN (1-4)
Four RJ-45 10/100Mbps Auto-MDIX ports for connecting to either 10Mbps or
100Mbps Ethernet connections.
WAN
In the four port broadband router, there is an RJ-45 10/100Mbps Auto-MDIX port
for the WAN that will fit the xDSL/Cable modem’s specification need.
DC IN
Plug the power adapter to this power jack
RESET
Use a pin-shape item to push to reset this device to factory default settings. It will
be useful too when the manager forgot the password to login, but the setting will be
back to default setting.
6
Hardware connections
Connect the Router using LAN
1. Plug in one end of the network cable to the WAN port of the Wireless Internet
Broadband Router.
2. Plug in the other end of the network cable to the Ethernet port of the xDSL or
Cable modem.
3. Use another network cable to connect to the Ethernet card on the computer
system; the other end of the cable connects to the LAN port of the Internet
Broadband Router. Since the Wireless Broadband Router has four ports, you can
connect up to four computers directly to the unit. There you do not have to buy a
switch to connect these computers since one Internet Broadband Router
functions both as a connection-sharing unit and as a switch.
Connect the Router using Wireless LAN
1. Plug in one end of the RJ45 network cable to the xDSL/Cable Modem.
2. Plug in the other end of the RJ45 network cable to the Wireless Internet
Broadband Router WAN port.
7

Check the installation
The control LEDs of the Wireless Internet Broadband Router are clearly visible and
the status of the network link can be seen instantly:
1. With the power source on, once the device is connected to the broadband modem,
the Power, CPU, LAN, WLAN and WAN port link LEDs of the Internet
Broadband Router will light up indicating a normal status.
2. While the WAN is link up to the ADSL/Cable modem, the WAN port’s
Link/ACT LED will light up.
3. While the LAN is link up to the computer system, the LAN port’s Link/ACT
LED will light up.
8
PC NETWORK TCP/IP SETTING
The network TCP/IP settings differ based on the computer’s operating system
(Win95/98/ME/NT/2000/XP) and are as follows.
Windows 95/98/ME
1. Click on the “Network neighborhood” icon found on the desktop.
2. Click the right mouse button and a context menu will be show.
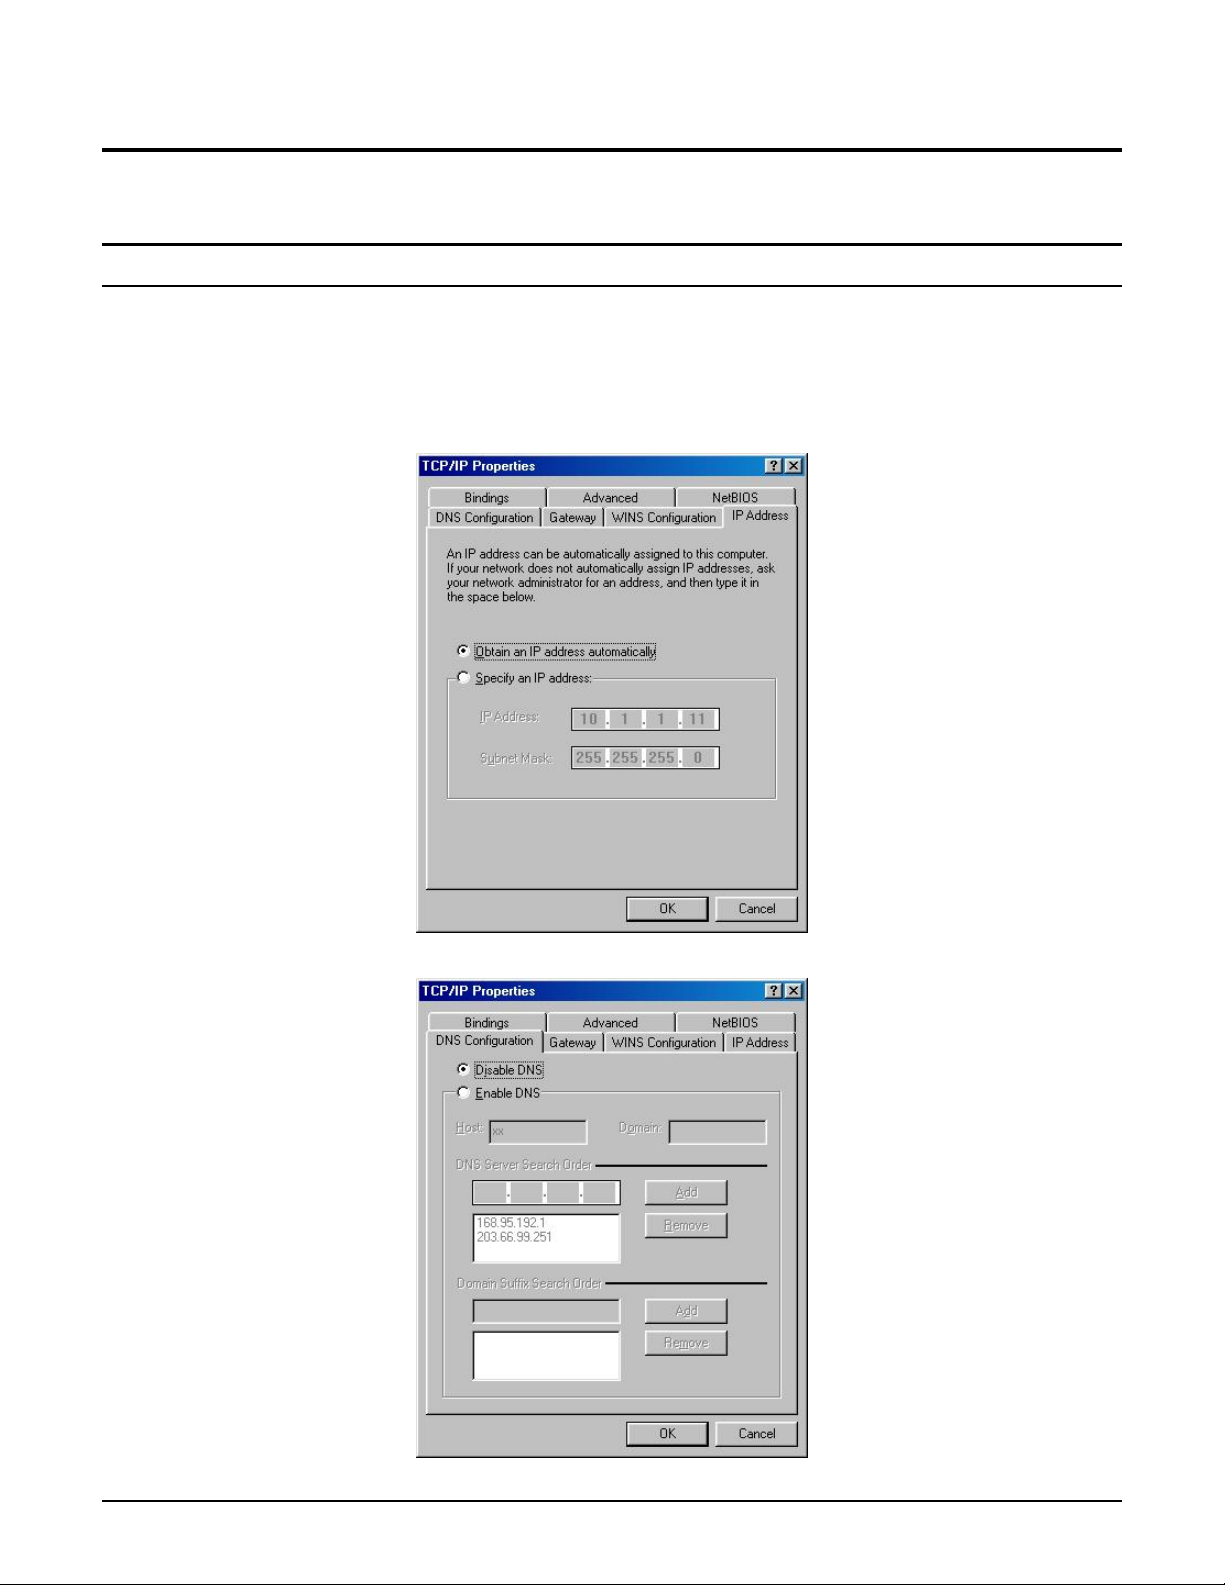
3. Select “Properties” to enter the TCP/IP setting screen.
4. Select “Obtain an IP address automatically” on the “IP address” field.
5. Select “Disable DNS” in the “DNS” field.
9
6. Select “None” for the “Gateway address” field.
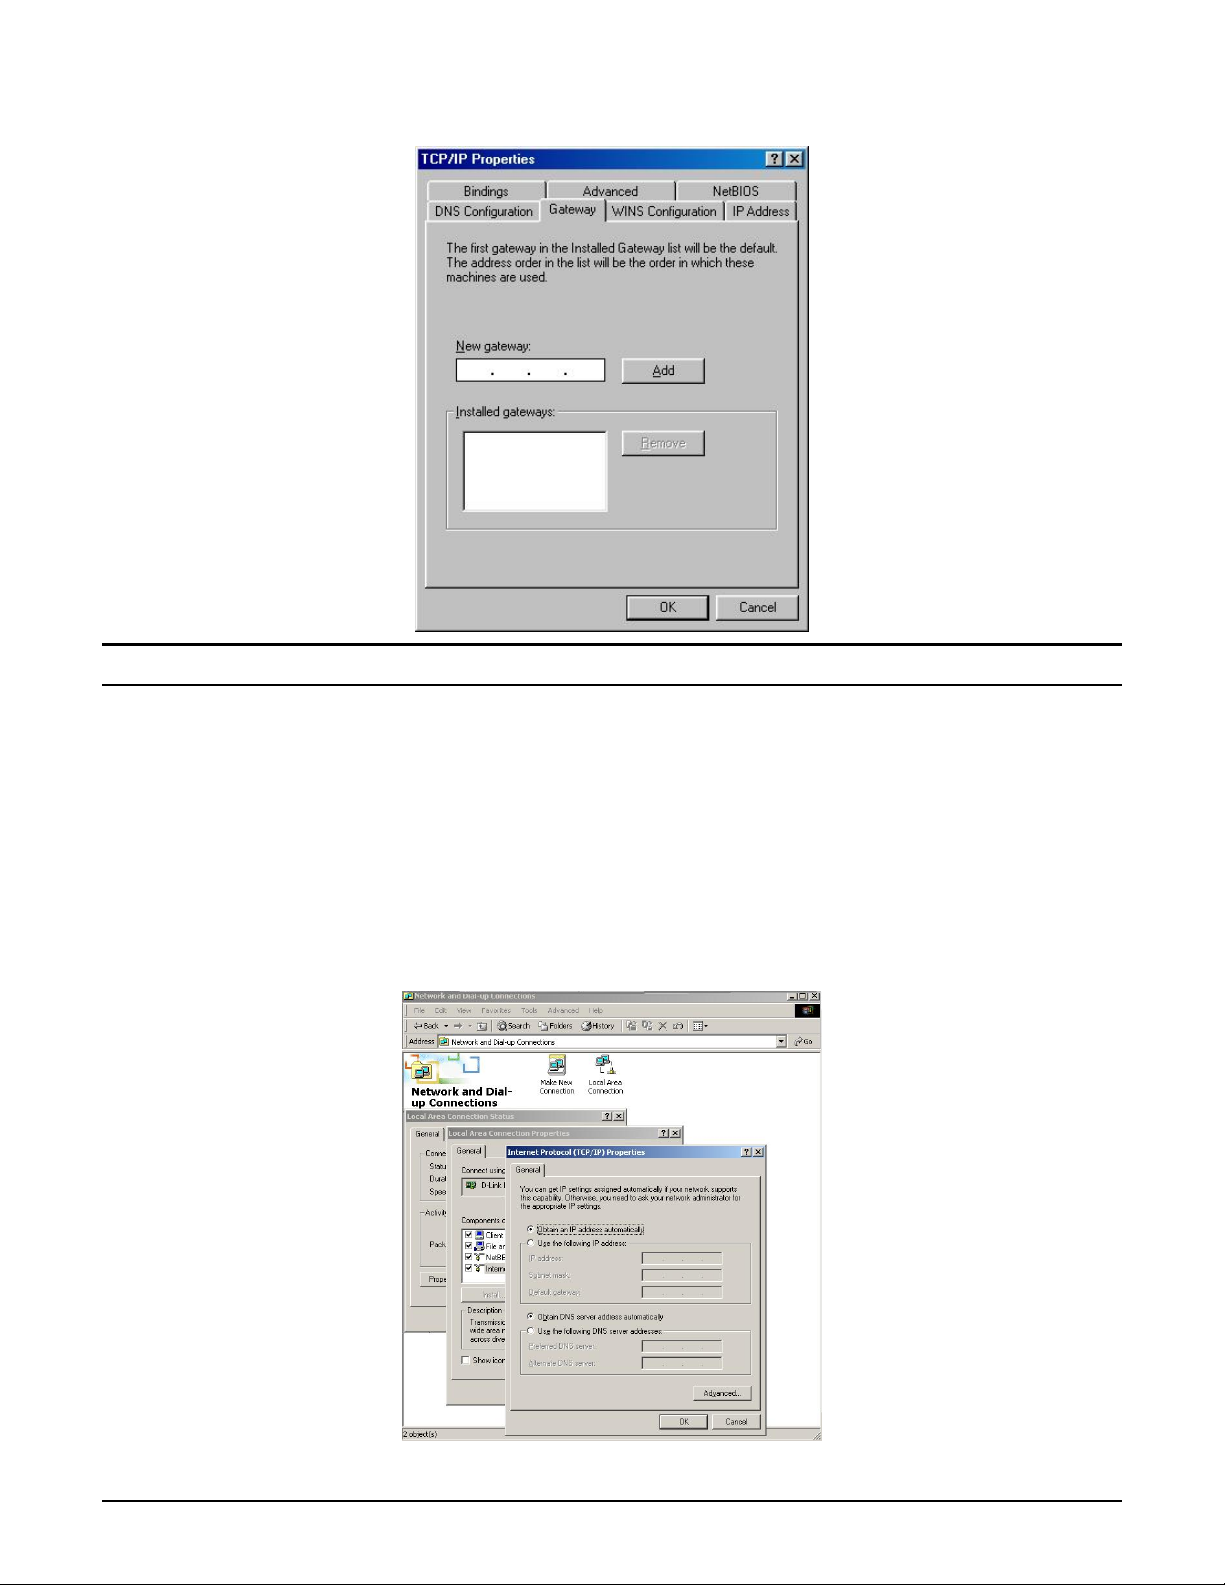
Windows 2000
Double click on the “My computer” icon on the desktop. When “My computer”
window opens, open the “Control panel” and then open the “Network dialup
connection” applet. Double click on the “Local area network connection” icon.
Select “Properties” to enter the TCP/IP setting window.
1. In the “Local area network status” window, click on “Properties.”
2. In the “Local area network connection” window, first select TCP/IP setting
and then select “Properties.”
3. Set both “IP address” and “DNS” to Automatic configuration.
10

Windows XP
Point the cursor and click the right button on the “My Network Place” icon.
Select “properties” to enter the TCP/IP setting window.
1. Set “IP address” to “Obtain an IP address automatically.”
2. Set “DNS” to “Obtain DNS server address automatically.”
11
WIRELESS BROADBAND ROUTER CONFIGURATION
First make sure that the network connections are functioning normally.
This Wireless Broadband Router can be configured using Internet Explorer 4.0 or
newer web browser versions.
Login to the Wireless Broadband Router through WLAN
Before configuring the Wireless Broadband Router through WLAN, make sure that
the SSID, Channel and the WEP is set properly.
The default setting of the Wireless Broadband Router that you will use:
SSID: default
Channel: 6
Security: disable
Login to the Wireless Broadband Router through LAN
Before you configure this device, note that when the Wireless Broadband Router is
configured through an Ethernet connection, make sure the host PC must be set on
the IP subnetwork that can be accessed by the xDSL/Cable modem. For example,
when the default network address of the xDSL/Cable modem Ethernet interface is
192.168.1.x, then the host PC should be set at 192.168.1.xxx (where xxx is a
number between 2 and 254), and the default subnet mask is 255.255.255.0.
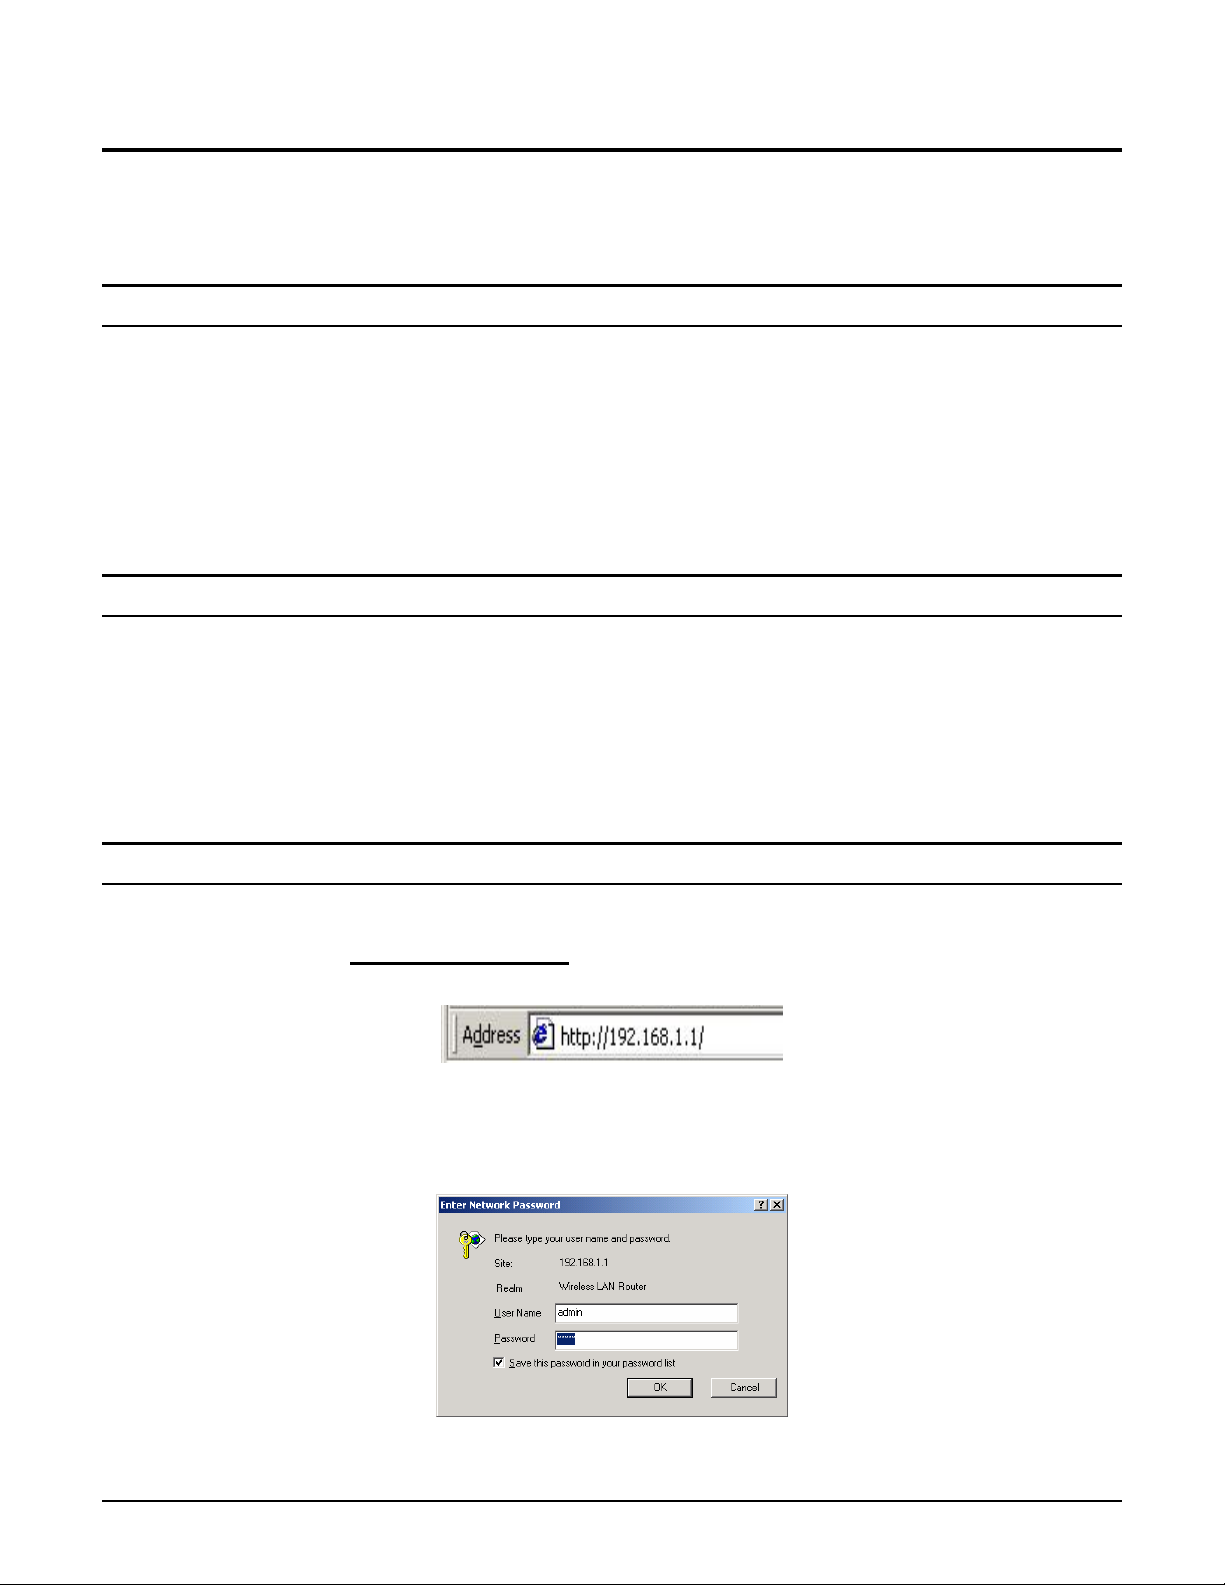
Using the Web Browser
1. Open Internet Explorer 4.0 or above Internet browser.
2. Enter IP address http://192.168.1.1
(the factory-default IP address setting) to the
URL web address location.
3. When the following dialog box appears, enter the user name and password to
login to the main configuration window, the default username and password is
“admin”.
Note: If needed to set a password, then refer to the Main Page Password Setting.
12
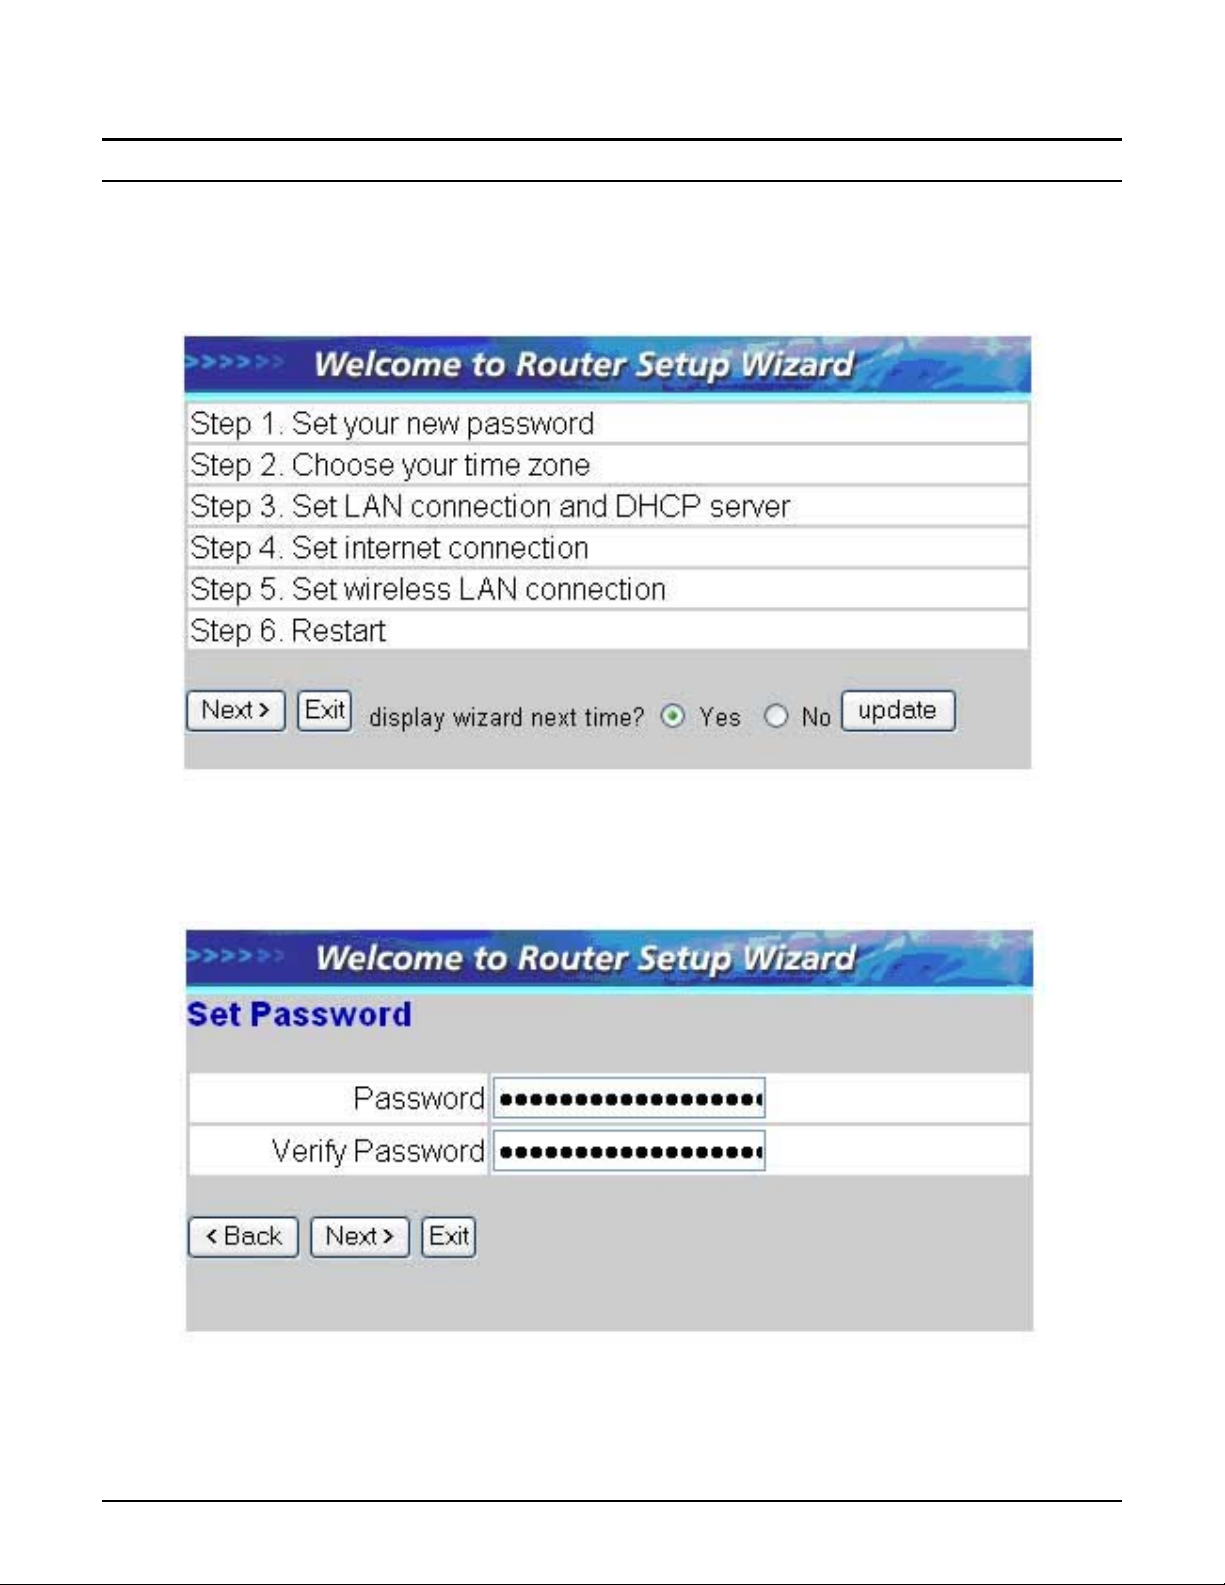
Quick Setup
Setup wizard is provided as the part of the web configuration utility. User can
simply follow the step-by-step process to get the wireless router configuration
ready to run in 6 easy steps by clicking on the “Wizard” button on the function
menu. The following screen will appear. Please click “Next” to continue.
Step 1: Set up new Password
User can change the password and then click “Next” to continue.
13
Loading…
Manual
View the manual for the TRENDnet TEW-432BRP here, for free. This user manual comes under the category routers and has been rated by 1 people with an average of a 8.9. This manual is available in the following languages: English. Do you have a question about the TRENDnet TEW-432BRP?
Ask your question here
TRENDnet TEW-432BRP specifications
Below you will find the product specifications and the manual specifications of the TRENDnet TEW-432BRP.
Wi-Fi standards
802.11b, 802.11g
WLAN data transfer rates supported
1, 2,5.5, 6,9, 11, 12, 18, 24, 36, 48, 54 Mbit/s
Ethernet LAN (RJ-45) ports
4
Supported network protocols
TCP/IP, NAT, PPPoE/PPTP/L2TP, HTTP
General
| Brand | TRENDnet |
| Model | TEW-432BRP | TEW-432BRP |
| Product | router |
| EAN | 0710931502602 |
| Language | English |
| Filetype | Manual (PDF) |
Network
| Ethernet LAN | Yes |
| Ethernet LAN data rates | 10, 100 Mbit/s |
| Cabling technology | 10/100Base-T(X) |
| Full duplex | Yes |
| Networking standards | IEEE 802.11b, IEEE 802.11g, IEEE 802.3, IEEE 802.3ab, IEEE 802.3u |
| Receiver sensitivity | 11Mbps 8% PER @ -82 dBm\n54Mbps 10% PER @ -65 dBm |
| Ethernet LAN interface type | Fast Ethernet |
Wireless LAN features
| Wi-Fi standards | 802.11b, 802.11g |
| Maximum indoor range | 50 m |
| Maximum outdoor range | 200 m |
| Modulation | CCK, DBPSK, DQPSK, OFDM |
| Channels quantity | 13 channels |
| Top Wi-Fi standard | 802.11g |
Other features
| WLAN data transfer rates supported | 1, 2,5.5, 6,9, 11, 12, 18, 24, 36, 48, 54 Mbit/s |
| Frequency band | 2.4 GHz |
| Input current | 1 A |
| Rack mounting | No |
| Outdoor range | 30 — 50m |
| Indoor range | 50 — 200m |
| Frequency range | 2.412 — 2.484 GHz |
| Dimensions (WxDxH) | 155 x 110 x 30 mm |
| Power supply type | 7.5V DC |
| xDSL connection | No |
| Mobile network connection | No |
Ports & interfaces
| Ethernet LAN (RJ-45) ports | 4 |
| DC-in jack | Yes |
Protocols
| Supported network protocols | TCP/IP, NAT, PPPoE/PPTP/L2TP, HTTP |
| DHCP client | Yes |
| DHCP server | Yes |
| Universal Plug and Play (UPnP) | Yes |
Antenna
| Antenna design | External |
| Antenna connector type | RP-SMA |
| Antenna gain level (max) | 2 dBi |
| Antennas quantity | 1 |
Management features
Security
| Security algorithms | 128-bit WEP, 64-bit WEP, WPA, WPA-PSK, WPA2, WPA2-PSK |
| MAC address filtering | Yes |
| Filtering | Yes |
| Network address translation (NAT) | Yes |
| Stateful Packet Inspection (SPI) | Yes |
Certificates
Operational conditions
| Operating temperature (T-T) | 0 — 40 °C |
| Storage temperature (T-T) | -10 — 70 °C |
Weight & dimensions
| Width | 155 mm |
| Depth | 110 mm |
| Height | 30 mm |
| Weight | 226 g |
Design
| LED indicators | LAN, WAN, WLAN |
| Product colour | Blue |
Mobile network
WAN connection
show more
Frequently asked questions
Can’t find the answer to your question in the manual? You may find the answer to your question in the FAQs about the TRENDnet TEW-432BRP below.
What is the weight of the TRENDnet TEW-432BRP?
The TRENDnet TEW-432BRP has a weight of 226 g.
What is the height of the TRENDnet TEW-432BRP?
The TRENDnet TEW-432BRP has a height of 30 mm.
What is the width of the TRENDnet TEW-432BRP?
The TRENDnet TEW-432BRP has a width of 155 mm.
What is the depth of the TRENDnet TEW-432BRP?
The TRENDnet TEW-432BRP has a depth of 110 mm.
What certifications does the TRENDnet TEW-432BRP have?
The TRENDnet TEW-432BRP has the following certifications: FCC, CE.
What does the download speed on the internet depend on?
The download speed on the internet depends on the type of connection you have. If you have a 25 Mb/s connection this means that theoretically you should be able to download 25 MB per second.
What is the difference between a router and a modem?
A modem provides the internet connection via the internet provider. A router then distributes the Internet signal to the devices connected to the router.
Is WIFI radiation harmful?
WIFI is a radio frequency signal in the form of non-ionising radiation. This radiation cannot damage cells and tissues and is therefore not harmful to human health.
What is the frequency range of the TRENDnet TEW-432BRP?
The frequency range is 2.412 — 2.484 GHz.
Is the manual of the TRENDnet TEW-432BRP available in English?
Yes, the manual of the TRENDnet TEW-432BRP is available in English .
Is your question not listed? Ask your question here
Благодарим за обращение! Наши специалисты, работающие на it аутсорсинге, часто сталкивались к задачами настройки различных wi-fi роутеров и готовы поделиться с вами своим опытом!
1. Предварительная настройка компьютера.
Прежде чем начать настраивать Wi-Fi роутер, необходимо проверить настройки сетевой карты в компьютере. Для этого: В Windows XP: Нажать последовательно: «Пуск» → «Панель управления» → «Переключиться к классическому виду → «Сетевые подключения».
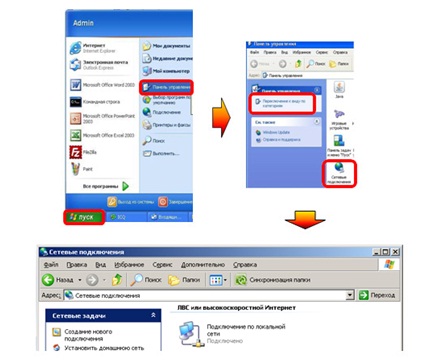
Правой клавишей мышки кликнуть по ярлыку «Подключение по локальной сети», в появившемся меню выбрать «Свойства». В окне, которое появится, выбираем протокол TCP/IP v4, нажимаем справа кнопку «Свойства», появится еще одно окно.
В появившемся окне отмечаем пункт «Получить IP-адрес автоматически» и нажимаем «ОК» во всех открывшихся окнах в обратном порядке. В Windows Vista / 7: Нажать последовательно: «Пуск» → «Панель управления» → «Классический вид → «Центр управления сетями и общим доступом» → «Управление сетевыми подключениями».

Правой клавишей мышки кликнуть по ярлыку «Подключение по локальной сети», в появившемся меню выбрать «Свойства». В окне, которое появится, выбираем протокол TCP/IP v4, нажимаем справа кнопку «Свойства», появится еще одно окно.
В появившемся окне отмечаем пункт «Получить IP-адрес автоматически» и «Получить адрес DNS-сервера автоматически», нажимаем «ОК» во всех открывшихся окнах в обратном порядке.
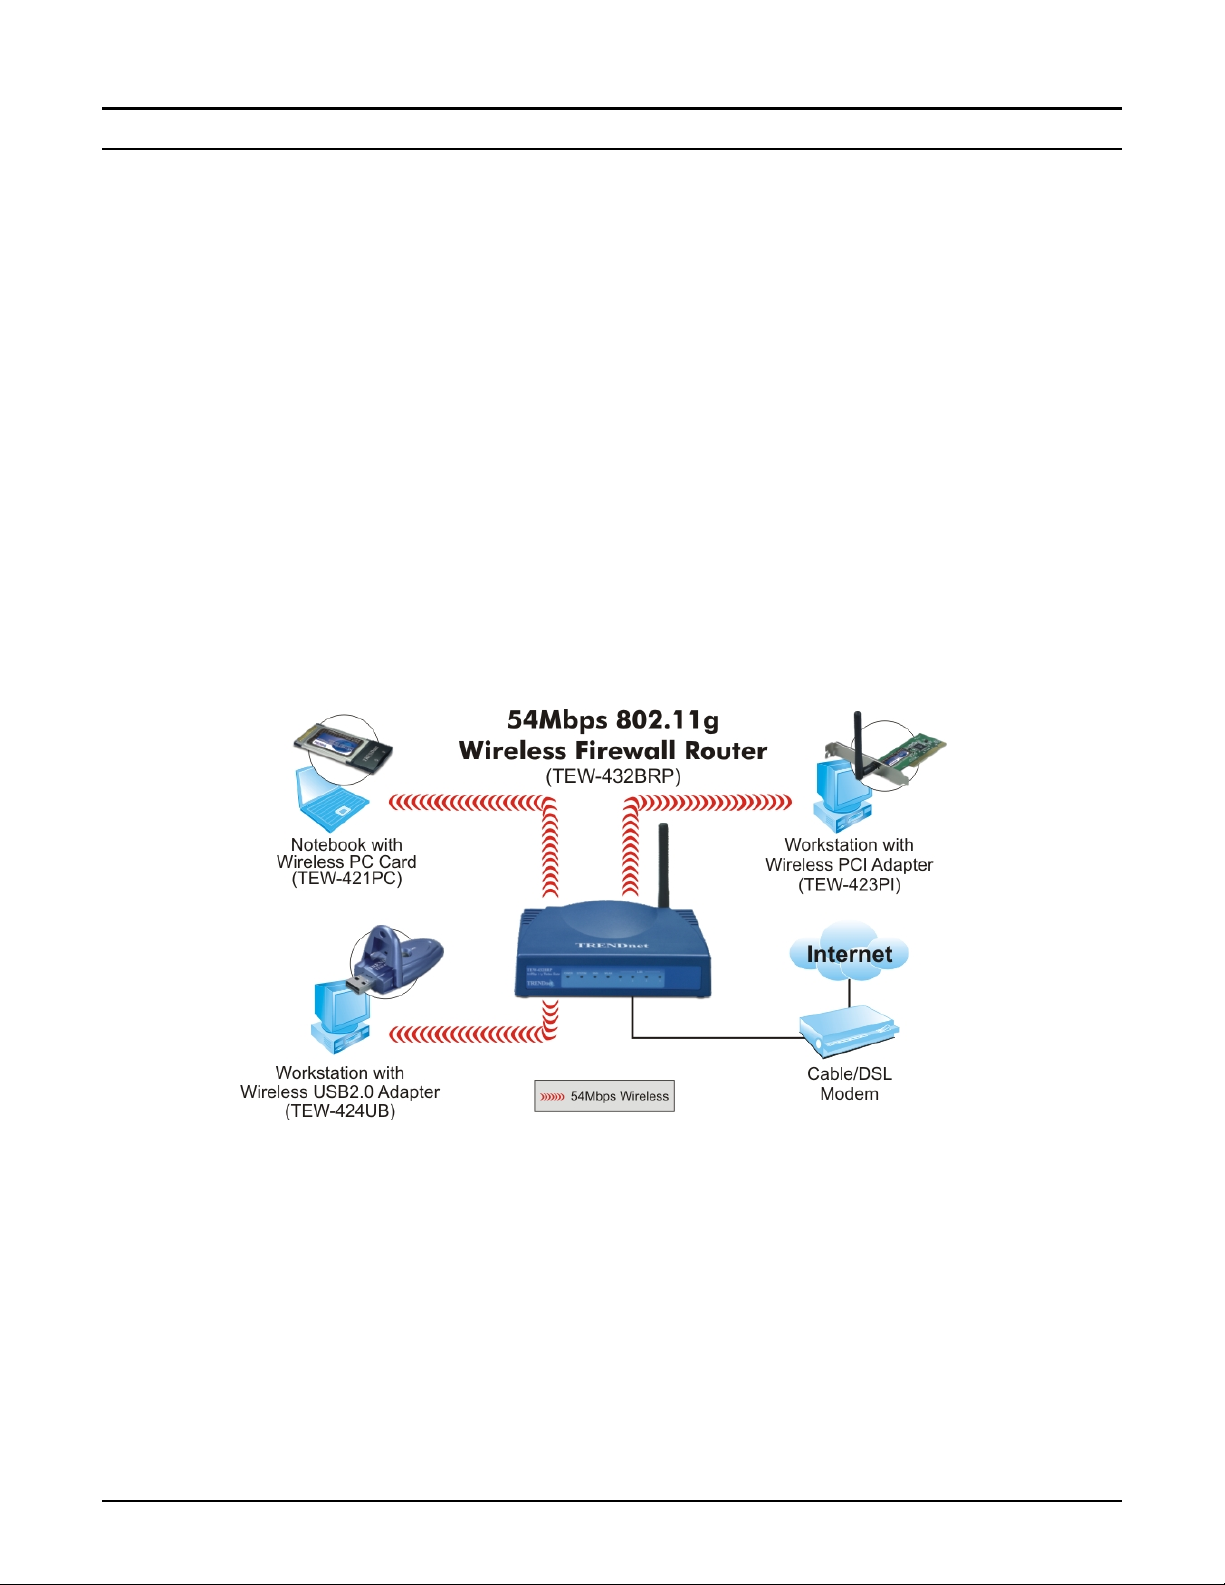
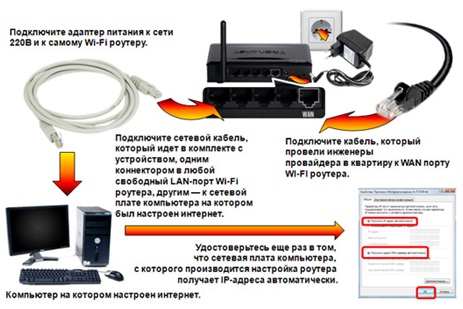
2. Подключение маршрутизатора.
Для подключения роутера следует использовать схему правильного подключения, приведенную ниже:
3. Сброс роутера к заводским (изначальным) настройкам.
Перед началом настройки нужно сбросить роутер аппаратно к заводским настройкам. Сброс осуществляется с помощью кнопки «Reset» на задней панели. Кнопка «утоплена» в корпус, и ее нужно нажимать тонким предметом и удерживать в течение 15 секунд. Такое расположение и время нажатия предусмотрены для предотвращения случайного нажатия. Во время сброса роутер нельзя отключать от сети питания. После сброса маршрутизатор уйдет на перезагрузку (от 30 до 200 сек, зависимо от модели).
4. Настройка сети Wi-Fi.
Заводской IP-адрес маршрутизатора TEW-432BRP следующий: 192.168.10.1 Этот адрес нужно ввести непосредственно в адресную строку браузера (оптимально – Internet Explorer версии не ниже 6) и нажать «Enter».

В окне ввода логина и пароля веб-интерфейса роутера необходимо ввести стандартный заводской логин и пароль (логин: admin, пароль: admin).
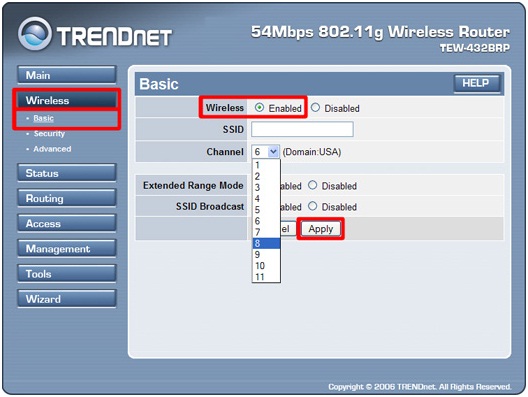
После авторизации открывается полный веб-интерфейс роутера, где можно приступать непосредственно к настройке. Настройка Wi-Fi проводится в разделе «Wireless». Сперва нужно ввести имя Wi-Fi сети (SSID) обязательно латиницей. Именно эту сеть потом нужно будет выбирать при подключении ноутбуков и мобильных устройств. Канал задается вручную в поле «Channel». Нежелательно использовать каналы 1,6,11,12 и 13
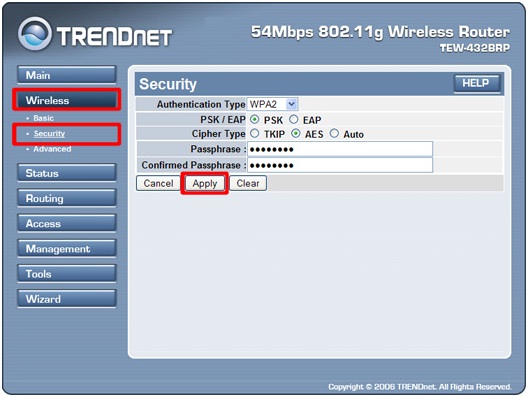
Дальше заходим в пункт меню «Wireless» на вкладку «Security» и выбираем тип шифрования данных, которые передаются по беспроводной сети. Желательно выбрать тип WPA или WPA2.
В поля ввода «Passphrase» и «Confirm passphrase» вводим пароль на доступ новой беспроводной сети. Длина пароля должна составлять от 8 до 64 символов. Пароль должен состоять только из латинских символов и цифр. Желательно для повышения безопасности использовать и то и другое. Этот пароль нужно будет вводить на мобильных устройствах при подключении к беспроводной сети.
5. Смена пароля администратора роутера.
Чтобы изменить пароль на доступ к настройкам роутера заходим в меню «Main» на вкладку «Password».
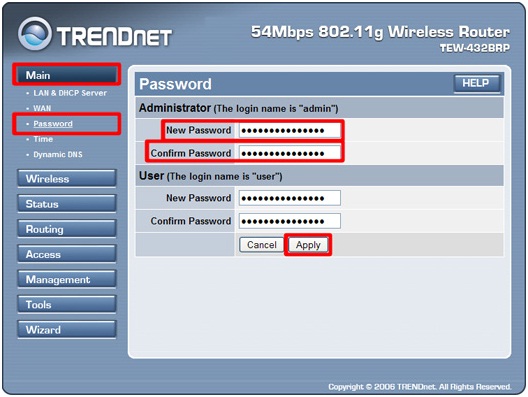
В поле ввода «New Password» вводим новый пароль и повторяем его в поле «Confirm Password», нажимаем кнопку «Apply».
Крайне желательно хорошо запомнить введенные пароли. Если не уверены – запишите и спрячьте, хотя это и не самый безопасный подход. Если пароль будет утрачен, то всю процедуру настройки нужно будет провести заново.
Вот и все! Желаем удачной работы!