
-
Страница 1
Thank you, and congratulations on your choice of the Roland XV-2020. Copyright © 2002 ROLAND CORPORATION All rights reserved. No part of this publication may be reproduced in any form without the written permission of ROLAND CORPORATION. Before using this unit, carefully read the sections entitled: “IMPORTANT SAFETY INSTRUCTIONS” (p. 2), “US[…]
-
Страница 2
2 To resize thickness, move all items on the front cover and center registration marks to left or right. This product complies with the requirements of European Directive 89/336/EEC. For EU Countries For Canada This Class B digital apparatus meets all requirements of the Canadian Interference-Causing Equipment Regulations. Cet appareil numérique d[…]
-
Страница 3
3 USING THE UNIT SAFELY 001 • Before using this unit, make sure to read the instructions below, and the Owner’s Manual. ……………………………………………………………………………………………. 002d • Do not open or perform any internal modifica- tions on the unit or its AC adaptor. (The only exception would b[…]
-
Страница 4
4 012b • Immediately turn the power off, remove the AC adaptor from the outlet, and request servicing by your retailer, the nearest Roland Service Center, or an authorized Roland distributor, as listed on the “Information” page when: • The AC adaptor, the power-supply cord, or the plug has been damaged; or • Objects have fallen into, or l[…]
-
Страница 5
5 IMPORTANT NOTES 291a In addition to the items listed under “USING THE UNIT SAFELY” on p. 3 , please read and observe the following: Power Supply 301 • Do not use this unit on the same power circuit with any device that will generate line noise (such as an electric motor or variable lighting system). 302 • The AC adaptor will begin to gene[…]
-
Страница 6
6 Contents IMPORTANT NOTES …………………………………………………………………………………….. 5 Features ………………………………………………………………………………………………………. 8 Front and Rear Panel ……………………………………………………………..[…]
-
Страница 7
7 Contents Adjusting Effect Settings …………………………………………………………………………………………………………………………. 75 Saving Performances You Create …………………………………………………………………………………………………………….. 75 Using the […]
-
Страница 8
8 Features 64-Voice Polyphony and 16-Part Multitimbrality The XV-2020 is a 16-part multitimbral sound generator that produces up to 64 simultaneous polyphonic voices. It provides ample polyphony, even with Patches containing multiple Tones. Create Amazingly Expressive Tones With Patches combining four tones using stereo waves, stereo four-wave rhyt[…]
-
Страница 9
9 Front and Rear Panel Front Panel fig.00-01 1. USB Connector Use this for connecting a computer to the XV-2020 using a USB cable (p. 13). 2. PHONES Jack This is the jack for connecting headphones (sold separately). * Use headphones with an impedance of 8 to 150 Ohms. 3. VOLUME Knob This adjusts the volume level for the OUTPUT jack and the PHONES j[…]
-
Страница 10
10 Getting Ready to Play Attaching the Rubber Feet If you will not be using the separately available RAD-50 rack-mount adaptor, attach the rubber feet that were supplied with the XV-2020, as shown in the figure. Use the small holes on the bottom as a guide for positioning the rubber feet when attaching them. fig.00-03e Installing on the Rack-Mount […]
-
Страница 11
11 Getting Ready to Play Getting Ready to Play Connecting to MIDI Devices and Audio Equipment The XV-2020 is not equipped with an internal amp or speakers. To hear sound, you will need to connect it to a keyboard amp or audio system, or connect headphones. Refer to the following figure when connecting the XV-2020 with external devices. fig.00-05e 1[…]
-
Страница 12
12 Getting Ready to Play Turning the Power On/Off Turning On the Power * Once the connections have been completed (p. 11), turn on power to your various devices in the order specified. By turning on devices in the wrong order, you risk causing malfunction and/or damage to speakers and other devices. 1. Before turning on the power, confirm the follo[…]
-
Страница 13
13 For Those Using a Computer For Those Using a Computer If you are using music software running on a computer, you can use the computer to operate the XV-2020’s controls. Not only can you create and play back song data, you can also have Tones switch automatically. What’s more, you can use the included XV Editor software to create Tones using […]
-
Страница 14
14 For Those Using a Computer Windows XP users 1. With the XV-2020 disconnected, start up Windows. Disconnect all USB cables except for a USB keyboard and USB mouse (if used). 2. Open the System Properties dialog box. 1. Click the Windows Start menu, and from the menu, select Control Panel . 2. In “Pick a category,” click “Performance and Mai[…]
-
Страница 15
15 For Those Using a Computer For Those Using a Computer fig.2-3_40 9. In the dialog box that appears, input the following into the “Open” field, and click [OK] . E:Win2000XV-2020SETUPINF.EXE * The drive name “E:” may be different for your system. Specify the drive name of your CD-ROM drive. fig.2-4_30 10. The SetupInf dialog box will ap[…]
-
Страница 16
16 For Those Using a Computer fig.2-8_30 15. Make sure that the “Model” field indicates “ROLAND XV-2020,” and click [Next] . Driver installation will begin. fig.2-9_35 16. The Insert Disk dialog box will appear. Click [OK] . fig.2-10_35 17. The Files Needed dialog box will appear. In the “Copy files from” area, type “E:Win2000XV-202[…]
-
Страница 17
17 For Those Using a Computer For Those Using a Computer Windows 2000 users 1. With the XV-2020 disconnected, start up Windows. Disconnect all USB cables except for a USB keyboard and USB mouse (if used). 2. Log on to Windows as a user with administrative privileges (such as Administrator). 3. Open the System Properties dialog box. Click the Window[…]
-
Страница 18
18 For Those Using a Computer fig.2-13_55 5. Make sure that “File signature verification” is set to “Ignore.” If it is set to “Ignore” , simply click [OK] . If it is not set to “Ignore” , make a note of the current setting ( “Warn” or “Block” ). Then change the setting to “Ignore” and click [OK] . 6. Close the System Pro[…]
-
Страница 19
19 For Those Using a Computer For Those Using a Computer fig.2-18_50 15. The Files Needed dialog box will appear. In the “Copy files from” area, type “E:Win2000XV-2020” and click [OK] . * The drive name “E:” may be different for your system. Specify the drive name of your CD-ROM drive. fig.2-17b_40 16. The “Found New Hardware Wizard[…]
-
Страница 20
20 For Those Using a Computer Windows Me/98 users 1. With the XV-2020 disconnected, start up Windows. Disconnect all USB cables except for a USB keyboard and USB mouse (if used). 2. Exit all currently running software (applications). Also close any open windows. If you are using virus checking or similar software, be sure to exit it as well. 3. Pre[…]
-
Страница 21
21 For Those Using a Computer For Those Using a Computer 7. Connect the XV-2020. 1. With the XV-2020’s power switch turned off, connect it to the AC adaptor. 2. Plug the AC adaptor into an AC power outlet. 3. Use the USB cable to connect the XV-2020 to your computer. 8. Set the XV-2020’s power switch to the ON position. fig.2-20_40 9. If you ar[…]
-
Страница 22
22 For Those Using a Computer 3. Click the Audio tab. fig.2-28_40 4. For MIDI music playback , click the located at the right of [Preferred device] (or in Windows XP, [Default device] ), and select the ROLAND XV-2020 . 5. Click OK to complete the settings. Windows 98 users 1. Open Control Panel . Click the Windows Start button, and from the menu th[…]
-
Страница 23
23 For Those Using a Computer For Those Using a Computer Enabling background services In Windows XP, perform these settings to make MIDI processing occur more smoothly. These settings are unavailable in Windows 2000/Me/98. 1. Click the Windows start button, and from the menu that appears, select Control Panel . 2. In “Pick a category,” click ?[…]
-
Страница 24
24 For Those Using a Computer Installing & Setup the Driver (Macintosh) The following items are required for connections and installation. Please have the following items ready. • XV-2020 • AC adaptor • USB cable • XV Editor CD-ROM 1. Turn off the power of the Macintosh and all peripheral devices connected to the Macintosh. 2. With the […]
-
Страница 25
25 For Those Using a Computer For Those Using a Computer Installing the XV-2020 driver (OMS) Use the following procedure to install the XV-2020 driver. The included XV-2020 OMS driver is an add-on module for using the XV-2020 with OMS. In order for you to use it, OMS must already be installed on the hard disk from which you started up . If you woul[…]
-
Страница 26
26 For Those Using a Computer fig.3-2_35 5. If a message like the following is displayed, click [Continue] . The other currently running applications will exit, and installation will continue. 6. A dialog box will indicate Installation completed . Click [Restart] to restart your Macintosh. 7. Use the USB cable to connect the XV-2020 to your compute[…]
-
Страница 27
27 For Those Using a Computer For Those Using a Computer fig.oms-08.e_60 5. The “OMS Driver Search” dialog box appears. Click [Search] . fig.oms-09.e_65 6. After the search has been completed, make sure that “Roland XV-2020” is listed in the “OMS Driver Setup” dialog box, and click [OK] . fig.oms-10.e_65 7. After making sure that the XV[…]
-
Страница 28
28 For Those Using a Computer Installing the XV-2020 driver (FreeMIDI) Use the following procedure to install the XV-2020 driver. The included XV-2020 FreeMIDI driver is an add-on module for using the XV-2020 with FreeMIDI. In order to use it, FreeMIDI must be installed on the hard disk from which you started up . * Exit all applications before you[…]
-
Страница 29
29 For Those Using a Computer For Those Using a Computer FreeMIDI settings 1. Use the USB cable to connect the XV-2020 and your Macintosh. fig.USB-02.e * If using a computer that is not equipped with a USB connector, refer to p. 30. fig.fm-03.e.eps_50 2. Open the “FreeMIDI Applications” folder, and double-click the “FreeMIDI Setup” icon. 3.[…]
-
Страница 30
30 For Those Using a Computer Connecting with MIDI Connectors A MIDI interface is required for making MIDI connections with a computer. The MIDI interface is connected to the computer, and two MIDI cables connect the MIDI connectors of the MIDI interface to the XV-2020’s MIDI connectors. fig.MIDI-01.e Installing the Included Editor Software To he[…]
-
Страница 31
31 About Patches and Performances On the XV-2020, sounds are organized according to units called Tones , Patches , Rhythm Sets , and Performances . This section describes the relationship between a Patch and a Performance. What is a Patch? The type of sound most commonly played on the XV-2020 is called a Patch . A Patch is a combination of Tones , […]
-
Страница 32
32 <MEMO>[…]
-
Страница 33
33 Quick Start Quick Start[…]
-
Страница 34
34 Playing Sounds The XV-2020 comes with a rich palette of onboard sounds, called Patches . Let’s listen to some Patches in Patch mode. Playing Patches (Phrase Preview) Even when there’s no MIDI keyboard or sequencer connected, the XV-2020 allows you to audition sounds. 1. Press [VALUE] to make the PATCH indicator lights up. fig.01-01 2. Press […]
-
Страница 35
35 Playing Sounds Playing Sounds Matching MIDI Channels In order for the XV-2020 to respond to MIDI data sent by an external MIDI device, both devices must be set to use the same MIDI channel or channels. Here, in Patch mode, let’s set both devices so that they use MIDI Channel 1. fig.01-03 1. Set the send channel of the MIDI keyboard to “1.”[…]
-
Страница 36
36 Playing Sounds fig.01-06e Procedure fig.01-07 1. Press [VALUE] to make the PATCH indicator lights up. Press the knob several times, until the PATCH indicator lights up. 2. Turn [CATEGORY/BANK] to choose the bank (USER, PST-A/B/C/D, GM, EXP-A/B) 3. Turn [VALUE] to choose a Patch. * You can listen to the selected patch sound by holding down [VOLUM[…]
-
Страница 37
37 Playing Sounds Playing Sounds Choosing Patches by Category On the XV-2020, Patches are grouped into categories , such as “piano” and “guitar.” You can easily change to the category you like and select Patches with the [CATEGORY/BANK] knob. Procedure fig.01-09 1. Press [VALUE], so the PATCH indicator lights up Press [VALUE] several times,[…]
-
Страница 38
38 Playing Sounds Choosing a Performance The collected assignment of Patches or Rhythm Sets to the XV-2020’s sixteen Parts is referred to as a “Performance.” fig.00-10e Selecting Performances and Parts 1. Press [VALUE], so the PERFORM indicator lights up. *O nly the PERFORM indicator should be lit. 2. Turn [VALUE] to choose the Performance. 3[…]
-
Страница 39
39 Playing Sounds Playing Sounds Switching the Mode (Patch, Performance) The XV-2020’s parameters are organized into ten different modes. You can easily switch modes using the [VALUE] knob or [VOLUME] knob. fig.01-13e * Rotating [PART] while in Performance Play mode switches you to Performance Part Play mode. * The Patch, Performance, or Rhythm S[…]
-
Страница 40
40 Playing Sounds Using an External MIDI Device to Select Patches and Change Other Settings Selecting Patches and Rhythm Sets You can change Patches – including the Patches in each Part of a Performance – and Rhythm Sets on the XV-2020 via MIDI Part. In this example, after setting the send channel for the external MIDI device and the XV-2020’[…]
-
Страница 41
41 Playing Sounds Playing Sounds Selecting Performances To switch Performances, after matching the send channel for the external MIDI device with the XV-2020’s Performance Control channel (p. 94), send the Bank Select number and Program Change messages. Upon execution of Factory Reset, Performance Ctrl-Ch is set to “16.” Here, set the externa[…]
-
Страница 42
42 <MEMO>[…]
-
Страница 43
43 Advanced Use Advanced Use Using the XV Editor software included with the XV-2020 together with your computer gives you more control in editing parameters, and even greater freedom in creating sounds. You cannot edit every parameter using the XV-2020 alone. For details regarding the parameters that you can edit using only this device, refer to th[…]
-
Страница 44
44 Creating a Patch How a Patch Is Organized The type of sound most commonly played on the XV-2020 is called a Patch . Each Patch can contain up to four Tones. fig.1-01.e You can turn the Tones in a Patch on or off. Only Tones that are turned on are heard when you play the Patch. (p. 45) You can also set the structure of a Patch to specify how Tone[…]
-
Страница 45
45 Creating a Patch Creating a Patch LFO (Low Frequency Oscillator) Use the LFO to create cyclical changes—or cyclical “modulation”—in a Tone. Each Tone has two LFOs. An LFO can be applied to the Tone’s pitch settings, TVF (filter), and TVA (volume). When an LFO is applied to pitch, a vibrato effect is produced. When an LFO is applied to […]
-
Страница 46
46 Creating a Patch Patch Parameter Tone-Related Settings PATCH COMMON (Settings Common to the Entire Patch) Parameter Value Description TONE SWITCH OFF, ON Here’s how to turn on the Tones that you want to hear in a Patch. You can also use the on/off tech- nique described in this section to audition an individual Tone by turning off all the other[…]
-
Страница 47
47 Creating a Patch Creating a Patch ANALOG FEEL (Analog Feel Depth) 0–127 Specifies the depth of Analog Feel that is applied to the Patch. Traditional ana- log synthesizers often exhibited a degree of instability in their tuning. The XV- 2020’s Analog Feel feature can simulate this characteristic. CLOCK SOURCE (Patch Clock Source) PATCH, SYSTE[…]
-
Страница 48
48 Creating a Patch PATCH STRUCTURE PORTAMENTO START PITCH, NOTE Portamento begins anew if you press another key during a pitch movement. This setting specifies how the new portamento starts. PITCH: The pitch begins changing immediately to the new note’s pitch when its key is pressed. NOTE: The pitch begins changing to the new note’s pitch only[…]
-
Страница 49
49 Creating a Patch Creating a Patch PATCH & VELOCITY KEY RANGE PATCH VELOCITY RANGE * Parameters that can be set independently for each Tone are indicated by “#.” PATCH KEY RANGE * Parameters that can be set independently for each Tone are indicated by “#.” Parameter Value Description VELOCITY CONTROL (TMT Velocity Control) OFF, ON, RA[…]
-
Страница 50
50 Creating a Patch MATRIX CTRL (Patch Matrix Control) This selects the parameters to be controlled by Matrix Control Source 1–4 and the Sens settings, as well as the specific Tones whose parameters you wish to control. Up to four destination parameters can be selected for each controller and controlled simultaneously. * Parameters that can be se[…]
-
Страница 51
51 Creating a Patch Creating a Patch PATCH SCALE TUNE One set of Scale Tune settings can be created in Patch mode. * The selected scale applies to MIDI messages received from an external MIDI device as well as to local sound generation. More Advanced Editing of Tones You can edit the Tones in a Patch with a tremendous degree of detail. Editable par[…]
-
Страница 52
52 Creating a Patch Tips for Choosing a Waveform Because the XV-2020 is designed to create highly realistic sounds, the success of the editing process depends to a large degree on the PCM waveforms upon which Tones are based. Therefore, if you try to create a sound that’s totally different from the waveform(s) you’re working with, the desired r[…]
-
Страница 53
53 Creating a Patch Creating a Patch PATCH WG (Patch Wave Group) This set of parameters allows you to select the PCM waveform that serves as the basis for the currently selected Tone, apply effects to the waveform, and control its pitch. Parameter Value Description WAVE GROUP (Wave Group) INT, EXP-A, EXP-B Chooses the desired waveform’s group. IN[…]
-
Страница 54
54 Creating a Patch FXM ON (Wave FXM Switch) OFF, ON Sets whether FXM will be used (ON) or not (OFF). [FXM (Frequency Cross Modulation)] FXM uses a specified waveform to apply frequency modula- tion to the currently selected waveform, creating complex overtones. This can be useful when creating wilder sounds or sound effects. TEMPO SYNC (Wave Tempo[…]
-
Страница 55
55 Creating a Patch Creating a Patch PATCH LFO (Applying Vibrato or Tremolo) The LFO (Low Frequency Oscillator) can alter various Tone settings in a back-and-forth, cyclic manner. Each Tone has two LFOs, and each can apply the desired amount of repetitive change to the Tone’s Pitch, TVF cutoff frequency, TVA Level and TVA Pan settings. This can b[…]
-
Страница 56
56 Creating a Patch Parameter Value Description LFO1(2) WAVEFORM (LFO Waveform) SIN, TRI, SAW-UP, SAW-DW, SQR, RND, BEND-UP, BEND-DW, TRP, S&H, CHS Chooses the waveform the LFO is to use. SIN: sine wave, TRI: triangle wave, SAW-UP: sawtooth wave, SAW-DW: sawtooth wave (negative polarity), SQR: square wave, RND: random wave, BEND-UP: Once the at[…]
-
Страница 57
57 Creating a Patch Creating a Patch * Noise may result from making the LFO PAN DEPTH too deep. To prevent noise, you can either lower the value for the PAN DEPTH, or lower the LFO Rate. PATCH TVF (Changing the Brightness with a Filter) The settings for the TVF (Time Variant Filter) allow you to change a Tone’s timbral content by altering its bri[…]
-
Страница 58
58 Creating a Patch RES (Resonance) 0–127 Increases the level of the cutoff frequency itself to add a popular classic synth char- acter to the sound. Excessively high settings can produce oscillation, causing the sound to distort. RES VEL SENS (TVF resonance velocity sensitivity) -63–+63 Use this parameter when you want velocity to affect the a[…]
-
Страница 59
59 Creating a Patch Creating a Patch PATCH TVA (Changing the Volume) The TVA (Time Variant Amplifier) controls volume changes to the Tone, as well as its stereo positioning. ENV VEL CURVE (TVF envelope velocity curve) FIXED, 1–7 This selects one of seven velocity curves that determine how velocity will affect the depth of the TVF Envelope. When s[…]
-
Страница 60
60 Creating a Patch PAN (Tone Pan) L64–63R Specifies the stereo position of the Tone. L64 places the Tone hard left, 0 puts it dead- center and 63R pans it hard right. * The overall panning of the entire Patch is set by the Patch Pan parameter (PATCH COM- MON p. 46), shifting the Tone Pan values of its individual Tones leftward or rightward by th[…]
-
Страница 61
61 Creating a Patch Creating a Patch PATCH MFX (Patch Multi-Effects) PATCH CHORUS PATCH REVERB Adjusting Effect Settings Refer to Multi-Effects Parameters (p. 82). Saving Patches You Create Refer to Saving a Sound You Create (p. 92). Parameter Description TYPE (Multi-Effects Type) Refer to p. 80. SEND LEVEL DRY (Multi-Effects Dry Send Level) SEND L[…]
-
Страница 62
62 Creating a Rhythm Set How Percussion Instruments Are Organized A Rhythm Set is a collection of Rhythm Tones, each of which represents a percussion instrument played on a single key. An instrument consists of the following four elements. fig.2-01.e WG (Wave Generator) This specifies the PCM waveform (or “wave”) that forms the basis of the Rhy[…]
-
Страница 63
63 Creating a Rhythm Set Creating a Rhythm Set Rhythm Set Parameters RHYTHM COMMON (Settings Common to the Entire Rhythm Set) Setting up Individual Rhythm Tones Parameters that can be set for each of the percussion instruments (Rhythm Tones) in Rhythm Sets are organized into the Parameter Groups listed below. • EFFECTS : Patch/Rhythm Set Mode Set[…]
-
Страница 64
64 Creating a Rhythm Set Rhythm Parameter RHYTHM KEY VELOCITY RANGE * Parameters that can be set independently for each Waveform are indicated by “#.” RHYTHM KEY WMT (Wave Mix Table) With the XV-2020, up to four stereo Waves can be assigned to a single Rhythm Tone. You can select the way tones sound according to the force with which the keys ar[…]
-
Страница 65
65 Creating a Rhythm Set Creating a Rhythm Set RHYTHM KEY PITCH (Changing Pitch) RANDOM PAN# (Wave random pan switch) OFF, ON Use this setting to cause the waveform’s panning to change randomly each time a key is pressed (ON) or not (OFF). The range of the panning change is set by the Tone Ran- dom Pan Depth setting (TVA p. 68). ALT PAN# (Wave al[…]
-
Страница 66
66 Creating a Rhythm Set RHYTHM KEY TVF (Modifying the Brightness of a Sound with a Filter) The settings for the TVF (Time Variant Filter) allow you to change a Rhythm Tone’s timbral content by altering its brightness or thickness. Parameter Value Description FILTER TYPE (Filter type) OFF, LPF, BPF, HPF, PKG, LPF2, LPF3 This selects a filter type[…]
-
Страница 67
67 Creating a Rhythm Set Creating a Rhythm Set RHYTHM KEY TVA (Making the Volume Change) The TVA (Time Variant Amplifier) controls the Rhythm Tone’s volume changes and stereo positioning. VEL CURVE (TVF cutoff velocity curve) FIXED, 1–7 This selects one of seven curves that determine how keyboard playing dynamics (veloc- ity) influence the Rhyt[…]
-
Страница 68
68 Creating a Rhythm Set RHYTHM CONTROL (Other Settings) VEL SENS (TVA level velocity sensitivity) -63–+63 Use this setting when you want keyboard touch (velocity) to affect the Rhythm Tone volume. Set this to a positive value to have the changes in tone volume increase the more forcefully the keys are played; to make the Rhythm Tone play more so[…]
-
Страница 69
69 Creating a Rhythm Set Creating a Rhythm Set RHYTHM MFX (Rhythm Multi-Effects) RHYTHM CHORUS RHYTHM REVERB Adjusting Effect Settings Refer to Patch/Rhythm Set Mode Settings (p. 77). Saving Rhythm Sets You Create Refer to Saving a Sound You Create (p. 92). ENV MODE (Rhythm tone envelope mode) NO-SUS, SUSTAIN When a loop-type waveform is selected, […]
-
Страница 70
70 Creating a Performance How a Performance Is Organized In the XV-2020’s Performance mode, you can play and control up to 16 instrument sounds at the same time, including Patches and/or Rhythm Sets. Such a set of sounds, as well as an effect setup, can be saved as a “Performance.” Each Performance is comprised of 16 “Parts,” each of whic[…]
-
Страница 71
71 Creating a Performance Creating a Performance Using the XV-2020 as a Multitimbral Sound Module In Performance mode, you can use the XV-2020 as a 16-part multitimbral sound module. Let’s try choosing some Parts and their sounds, and then play the multiple Parts together as a Performance. The basic steps for doing this include: • Choosing the […]
-
Страница 72
72 Creating a Performance SOLO (Solo Part Select) Refer to the Performance Common column Parameter Value Description TYPE (Part Type) PAT, RHY Select the type of sound the Part plays. GROUP (Part Group) USER, PR-A–D, GM, EXP-A, EXP-B Chooses the group (Bank) to which the desired Patch or Rhythm Set belongs. * It is not possible to choose EXP-A, E[…]
-
Страница 73
73 Creating a Performance Creating a Performance SEND LEVEL DRY (Part Output Level) Refer to p. 78. SEND LEVEL CHO (Part Chorus Send Level) SEND LEVEL REV (Part Reverb Send Level) OUTPUT ASGN (Part Output Assign) OUTPUT SELECT (Part Output MFX Select) Parameter Value Description VOICE RESERVE 0–63, FULL Specifies the number of voices that reserve[…]
-
Страница 74
74 Creating a Performance PERFORM MIDI SETTING (Establishing a Part’s MIDI Settings) * Parameters that can be set independently for each Tone are indicated by “#.” * Parameters that can be set independently for each MIDI channel are indicated by “+.” Parameter Value Description RCV CHANNEL# (Receive Channel) 1–16 Sets the MIDI channel t[…]
-
Страница 75
75 Creating a Performance Creating a Performance PART SCALE TUNE One set of Scale Tune settings can be created in Performance mode. * The selected scale applies to MIDI messages received from an external MIDI device as well as to local sound generation. PERFORM MFX (Performance Multi-effects) PERFORM CHORUS (Performance Chorus) PERFORM REVERB (Perf[…]
-
Страница 76
76 Using the XV-2020 Effects This chapter explains how effects are applied in Patch/Rhythm Set mode or Performance mode. * For information about the application of effects in GM mode, refer to “ Making Effects Settings in GM Mode (EFFECTS) (p. 97).” Effect Types The XV-2020 has the following four onboard effect processors, and settings can be m[…]
-
Страница 77
77 Using the XV-2020 Effects Using the XV-2020 Effects Patch/Rhythm Set Mode Settings Only one Multi-effect, Chorus, or Reverb effect can be set for each Patch or Rhythm Set. You cannot apply differing types of Multi-effects, Chorus, or Reverb to each of the Tones or Rhythm Tones comprising the Patch or Rhythm Set. Basic Process of Making Effects S[…]
-
Страница 78
78 Using the XV-2020 Effects PATCH/RHYTHM KEY TVA • When the Output Assign parameter (p. 46)/(p. 63) is set to anything but TONE, the setting made here has no effect. • When outputting in mono, the Pan setting is disabled. • Chorus and Reverb are output in mono at all times. When the STRUCTURE (PATCH:COMMON) parameter has a setting of Type 2?[…]
-
Страница 79
79 Using the XV-2020 Effects Using the XV-2020 Effects 6. Making Chorus Settings (-> p. 80) Select the Chorus type to be used, and set each of the parameters for the selected Chorus. 7. Setting the Output Destination and Volume for the Sounds Passing Through the Chorus (-> p. 80) Select the output jack and set the output level (volume) of the[…]
-
Страница 80
80 Using the XV-2020 Effects Multi-Effects Parameter PATCH/RHYTHM MFX, PERFORM MFX (Multi-Effects Settings) PATCH/PERFORMANCE CHORUS (Chorus Settings) PATCH/PERFORMANCE REVERB (Reverb Settings) Parameter Value Description TYPE (Multi-Effects Type) 00 (THROUGH) –40 Use this parameter to select from among the 40 available Multi-effects. * For detai[…]
-
Страница 81
81 Using the XV-2020 Effects Using the XV-2020 Effects PATCH/RHYTHM/PERFORM CHORUS (Chorus Parameters) PATCH/RHYTHM/PERFORM REVERB (Reverb Parameters) These settings allow you to select the desired type of reverb and its characteristics. Parameter Value Description RATE 0.05–10.00 Hz Frequency of modulation DEPTH 0–127 Depth of modulation PRE-D[…]
-
Страница 82
82 Using the XV-2020 Effects Multi-Effects Parameters The multi-effects feature 90 different kinds of effects. Some of the effects consist of two or more different effects connected in series or in parallel. Parameters marked with a sharp “#” can be simultaneously controlled using the selected controller. 1: STEREO EQ (p. 82) 2: OVERDRIVE (p. 8[…]
-
Страница 83
83 Using the XV-2020 Effects Using the XV-2020 Effects 4: PHASER Adds a phase-shifted sound to the original sound, producing a swirling modulation that creates spaciousness and depth. fig.02-004m 5: SPECTRUM This is a type of filter that modifies the timbre by boosting or cutting the level of specific frequencies. It is similar to an equalizer, but[…]
-
Страница 84
84 Using the XV-2020 Effects 9: COMPRESSOR Flattens out high levels and boosts low levels, smoothing out fluctuations in volume. fig.02-009m 10: LIMITER Compresses signals that exceed a specified volume level, preventing distortion from occurring. fig.02-010m 11: HEXA-CHORUS Uses a six-phase chorus (six layers of chorused sound) to give richness an[…]
-
Страница 85
85 Using the XV-2020 Effects Using the XV-2020 Effects 13: SPACE-D This is a multiple chorus that applies two-phase modulation in stereo. It creates no audible modulation, yet produces a transparent chorus effect. fig.02-013m 14: STEREO CHORUS This is a stereo chorus. A filter is provided so that you can adjust the timbre of the chorused sound. fig[…]
-
Страница 86
86 Using the XV-2020 Effects 17: STEREO DELAY This is a stereo delay. When Mode is NORMAL: fig.02-017am When Mode is CROSS: fig.02-017bm 18: MODULATION DELAY Adds modulation to the delayed sound, producing an effect similar to a flanger. When Mode is NORMAL: fig.02-018am When Mode is CROSS: fig.02-018bm Parameter Value Description Delay L 0.0-500.0[…]
-
Страница 87
87 Using the XV-2020 Effects Using the XV-2020 Effects 19: TRIPLE TAP DELAY Produces three delay sounds; center, left and right. fig.02-019m 20: QUADRUPLE TAP DELAY This effect has four delays. fig.02-020am fig.02-020bm Stereo location of each delay 21: TIME CONTROL DELAY This effect allows you to use a specified controller — the controller selec[…]
-
Страница 88
88 Using the XV-2020 Effects 23: FB PITCH SHIFTER This allows the pitch-shifted sound to be fed back into the effect. fig.02-023m 24: REVERB Adds reverberation to the sound, simulating an acoustic space. fig.02-024m 25: GATED REVERB This is a special type of reverb in which the reverb is cut off without being allowed to decay naturally. fig.02-025m[…]
-
Страница 89
89 Using the XV-2020 Effects Using the XV-2020 Effects 27: OVERDRIVE -> FLANGER fig.02-027m 28: OVERDRIVE -> DELAY fig.02-028m 29: DISTORTION -> CHORUS The parameters are essentially the same as in “26: OD -> CHORUS,” with the exception of the following two. OD Drive -> Dist Drive, OD Pan -> Dist Pan fig.02-029m 30: DISTORTION[…]
-
Страница 90
90 Using the XV-2020 Effects 33: ENHANCER -> FLANGER fig.02-033m 34: ENHANCER -> DELAY fig.02-034m 35: CHORUS -> DELAY fig.02-035m 36: FLANGER -> DELAY fig.02-036m Parameter Value Description Enhancer Sens # 0-127 Sensitivity of the enhancer Enhancer Mix 0-127 Level of the overtones generated by the enhancer Flg Rate 0.05-10.00 Hz Frequ[…]
-
Страница 91
91 Using the XV-2020 Effects Using the XV-2020 Effects 37: CHORUS -> FLANGER fig.02-037m 38: CHORUS/DELAY The parameters are the same as for “35: CHORUS -> DELAY.” However, the Delay Balance parameter adjusts the volume balance between the direct sound and the delay sound. fig.02-038m 39: FLANGER/DELAY The parameters are the same as for ?[…]
-
Страница 92
92 Saving a Sound You Create Saving Edits to the XV-2020’s Internal Memory (WRITE) If you turn the power off or select another Patch, Rhythm Set, or Performance after you have modified a Patch, Rhythm Set or Performance, the changes you have made will be lost. If you wish to preserve the data, store it into the XV-2020’s USER memory. Saving a P[…]
-
Страница 93
93 Saving a Sound You Create Saving a Sound You Create Transmitting Sound Settings (XFER) The act of transmitting Patch, Performance, Rhythm Set or System data to an external MIDI device is called a “ Bulk Dump .” You can perform a bulk dump when two XV-2020s are connected to each other, or when you wish to store Patch, Performance, Rhythm Set […]
-
Страница 94
94 Establishing Settings for an Entire XV-2020 (SYSTEM COMMON) SYSTEM COMMON Parameter Value Description MASTER LEVEL 0–127 Adjusts the volume of the entire XV-2020. MASTER TUNE 415.3–466.2 Hz Adjusts the overall tuning of the XV-2020. The setting is expressed as the fre- quency played by the A4 key. PATCH REMAIN (Patch Remain Switch) OFF, ON T[…]
-
Страница 95
95 Other Settings Other Settings Making USB-Related Settings * With these parameters, changes in the settings are not reflected until the power is turned off and then on again. Furthermore, only the XV-2020 can be used to make the settings. * With these parameters, changes in the settings are not reflected until the power is turned off and then on […]
-
Страница 96
96 Using the XV-2020 as a General MIDI Sound Module The XV-2020 features a GM mode–a convenient way to play back or create GM score data (music files for General MIDI sound module). You’re able to play back commercial GM score data releases and even modify various parameter settings for enhanced musical expression. Entering GM Mode Basically GM[…]
-
Страница 97
97 Using the XV-2020 as a General MIDI Sound Module Using the XV-2020 as a General MIDI Sound Module Making Effects Settings in GM Mode (EFFECTS) In GM mode, a GM-exclusive Chorus and Reverb can be used. Chorus and Reverb can be set independently. • Chorus: Adds depth and spaciousness to the sound. • Reverb: Adds the reverberation characteristi[…]
-
Страница 98
98 Using the XV-2020 as a General MIDI Sound Module Making Settings for Each Part Here you can select the GM Patch/Rhythm Set assigned to each Part, and set the volume, pan, and pitch of each Part. Parameter Value Description LEVEL (Part Level) 0–127 Adjusts the volume of an individual Part. This setting’s main purpose is to adjust the vol- ume[…]
-
Страница 99
99 Examples of Applications Using the XV-2020 Examples of Applications Using the XV-2020 This section provides clear, concrete examples describing how the included XV Editor is used with the XV-2020. Controlling the XV-2020 in real time Using an External MIDI Device External MIDI controllers – modulation lever, foot switch, expression pedal, etc.[…]
-
Страница 100
100 Examples of Applications Using the XV-2020 Matrix Control Select the controllers you want to use to control a specific Tone parameter. Four control sources are assigned to each Patch. SOURCE 1–4 (MATRIX CONTROL1–4 SOURCE) Assign one of the following controllers to Control Source 1–4. If you wish to use a controller that applies to all Pat[…]
-
Страница 101
101 Examples of Applications Using the XV-2020 Examples of Applications Using the XV-2020 5. Click [DETAIL] for SYSTEM COMMON, then set [CLOCK SOURCE] to [INT]. * When the System Clock Source parameter is set to MIDI or USB, you can synchronize the LFO cycle to an external device. 6. If [TEMPO] (System Tempo) changes, the LFO Rate changes along wit[…]
-
Страница 102
102 Examples of Applications Using the XV-2020 Making a Tone’s Delay Time Match the System Tempo 1. Click [PATCH]. 2. Click the for [PATCH NAME] to select the Patch to be used. fig.08-01.eps_50 fig.08-02.eps_50 3. Click [DETAIL] for PATCH COMMON, then set [CLOCK SOURCE] to [SYSTEM]. fig.08-06a.eps_50 fig.08-06b 4. Click [DETAIL] for [PATCH WG], t[…]
-
Страница 103
103 Examples of Applications Using the XV-2020 Examples of Applications Using the XV-2020 6. Click [DETAIL] for SYSTEM COMMON, then set [CLOCK SOURCE] to [INT]. fig.08-08a.eps_50 fig.08-08b * When the System Clock Source parameter is set to MIDI or USB, you can synchronize the LFO cycle to an external device. 7. When [TEMPO] (System Tempo) changes,[…]
-
Страница 104
104 Examples of Applications Using the XV-2020 Remotely Changing Pitch (p. 141) • Coarse: Controller number 100 (value is 0), Controller number 101 (value is 2), Controller number 6 (value is 16–112) • Fine: Controller number 100 (value is 0), Controller number 101 (value is 1), Controller number 6 (value is 32–96), Controller number 38 (va[…]
-
Страница 105
105 Appendix Appendix[…]
-
Страница 106
106 Installing a Wave Expansion Board Two Wave Expansion Boards (SRX series; sold separately) can be installed in the XV-2020. Waveform data, patches and rhythm sets are stored on the Wave Expansion Board, so you can increase the number of available sounds by installing the board in the XV-2020. Installing a Wave Expansion Board increases the patch[…]
-
Страница 107
107 Installing a Wave Expansion Board Installing a Wave Expansion Board Check to make sure the board has been installed properly 1. Press the POWER switch on the XV-2020 to switch on the power. 2. Press [VALUE] to make the PATCH indicator lights up. fig.1-04 * When you have a Wave Expansion Board installed, “roland XV- 2020” is displayed when y[…]
-
Страница 108
108 Installation de la carte d’extension Wave (French language for Canadian Safety Standard) Deux cartes d’expansion Wave (série SRX; vendues séparément) peuvent être installées dans le XV-2020. Les données Waveform, les retouches et les groupes de rythme sont stockés sur la carte d’expansion Wave; vous pouvez donc augmenter le n[…]
-
Страница 109
109 Installation de la carte d’extension Wave Installation de la carte d’extension Wave Assurez-vous que la carte a été bien installée 1. Appuyez sur le commutateur du XV-2020 pour l’allumer. 2. Appuyez sur [PATCH] pour que les lampes témoins PATCH s’allument. fig.1-04 Lorsqu’une carte d’expansion Wave est installée et […]
-
Страница 110
110 Troubleshooting If an unexpected problem occurs while using the XV-2020, read this chapter first. It contains numerous tips for resolving problems. * If a message appears during operation, consult the following section Error Messages (p. 116). Problems when using the XV-2020 No sound • Is the VOLUME lowered? Check the VOLUME knob, and the vol[…]
-
Страница 111
111 Troubleshooting Troubleshooting Even if the send level to each effect is above 0, effects will not apply if the MFX Output Level, Chorus Level, and Reverb Level are set to 0. Check each setting. (p. 80) If Output Assign is set to PAT (PATCH) for each Part of the Performance, the sound will be output according to the Output Assign settings of th[…]
-
Страница 112
112 Troubleshooting • Is there sufficient free space on your hard disk? Delete unneeded files to increase the amount of free space. After deleting the unneeded files, empty the recycling bin. • Is the XV-2020 connected correctly? Make sure that the USB connector of your computer is connected to the XV-2020 by a USB cable. Check this, and if you[…]
-
Страница 113
113 Troubleshooting Troubleshooting An “Unknown driver found” dialog box appears, and you are unable to install the driver ”Find new hardware wizard” does not execute automatically ”Find new hardware wizard” ends before the process is completed • It may take about 15 seconds (or more) after the USB cable is connected for the XV-2020 t[…]
-
Страница 114
114 Troubleshooting Windows XP/2000 displays a “Digital signature was not found” dialog box • Did you make “Driver signature settings”? In order to install/re-install the driver, you must make the settings described in “ Driver Signing .” (Windows XP -> p. 14, Windows 2000 -> p. 17) Device Manager shows “?”, “!”, or “U[…]
-
Страница 115
115 Troubleshooting Troubleshooting • Are you running multiple applications? If multiple applications are running simultaneously, an error message may be displayed. If this occurs, click [ OK ] and exit the other applications. Even if an application window is closed, it is still running if it appears in the taskbar. Be sure to exit unneeded appli[…]
-
Страница 116
116 Error Messages An error message appears in the display when an error in operation occurs, or if an operation cannot be processed correctly. When this occurs, continue by following the instructions indicated in the error message. Display Situation Action There is a problem with the MIDI cable con- nected to the XV-2020’s MIDI IN connector or w[…]
-
Страница 117
117 List of Parameters That Can Be Affected Using the XV-2020 List of Parameters That Can Be Affected Using the XV-2020 Switching modes SYSTEM parameter PATCH parameter PERFORMANCE parameter Mode Page Procedure Patch Play Mode p. 35 Press [VALUE] to make the PATCH indicator lights up. Performance Part Play Mode p. 38 Press [VALUE] to make the PATCH[…]
-
Страница 118
118 List of Parameters That Can Be Affected Using the XV-2020 RHYTHM parameter GM parameter UTILITY parameter Others Parameter Page Procedure LEVEL p. 63 Press [VALUE] to make the RHYTHM indicator lights up. -> While holding down [VOLUME], press [VALUE]. -> Turn [CATEGORY/BANK] to choose the parameter you want to set. -> Turn [VALUE] to se[…]
-
Страница 119
119 XV Editor Screens XV Editor Screens – Page to Turn to for Info on a Parameter PATCH MODE fig.00-11 1 : p. 44 2 : p. 92 3 : p. 76 4 : p. 45 5 : p. 48 6 : p. 49 7 : p. 50 8 : p. 50 9 : p. 51 10 : p. 94 11 : p. 46 12 : p. 53 13 : p. 55 14 : p. 57 15 : p. 59 16 : p. 45 RHYTHM MODE fig.00-12 1 : p. 62 2 : p. 92 3 : p. 76 4 : p. 45 5 : p. 64 6 : p.[…]
-
Страница 120
120 XV Editor Screens – Page to Turn to for Info on a Parameter PERFORMANCE MODE fig.00-13 1 : p. 70 2 : p. 92 3 : p. 78 4 : p. 45 5 : p. 71 6 : p. 71 7 : p. 74 8 : p. 75 9 : p. 94 10 : p. 71 11 : p. 45 1 23 4 5 6 78 9 10 11[…]
-
Страница 121
121 Waveform List Waveform List No. Wave Name 1 StGrand pA L 2 StGrand pA R 3 StGrand pB L 4 StGrand pB R 5 StGrand pC L 6 StGrand pC R 7 StGrand fA L 8 StGrand fA R 9 StGrand fB L 10 StGrand fB R 11 StGrand fC L 12 StGrand fC R 13 Ac Piano2 pA 14 Ac Piano2 pB 15 Ac Piano2 pC 16 Ac Piano2 fA 17 Ac Piano2 fB 18 Ac Piano2 fC 19 Ac Piano1 A 20 Ac Pian[…]
-
Страница 122
122 Waveform List No. Wave Name 376 Trumpet 1A 377 Trumpet 1B 378 Trumpet 1C 379 Trumpet 2A 380 Trumpet 2B 381 Trumpet 2C 382 HarmonMute1A 383 HarmonMute1B 384 HarmonMute1C 385 Trombone 1 386 Trombone 2 A 387 Trombone 2 B 388 Trombone 2 C 389 Tuba A 390 Tuba B 391 Tuba C 392 French 1A 393 French 1C 394 F.Horns A 395 F.Horns B 396 F.Horns C 397 Viol[…]
-
Страница 123
123 Waveform List Waveform List No. Wave Name 751 Rock Tom M f 752 Rock Tom H f 753 Rock Flm L1 754 Rock Flm L2 755 Rock Flm M 756 Rock Flm H 757 Jazz Tom L p 758 Jazz Tom M p 759 Jazz Tom H p 760 Jazz Tom L f 761 Jazz Tom M f 762 Jazz Tom H f 763 Jazz Flm L 764 Jazz Flm M 765 Jazz Flm H 766 Maple Tom 1 767 Maple Tom 2 768 Maple Tom 3 769 Maple Tom[…]
-
Страница 124
124 Patch List USER No. Name Category Category No. Voice Key Assign 1 Grand XV PNO PIANO 1 4 POLY 2 LFO Trance PLS SYN/PAD 67 8 POLY 3 808 SynBass SBS GTR/BS 56 3 MONO 4 106 Strings BPD SYN/PAD 143 5 POLY 5 Soft Lead SLD SYN/PAD 32 3 POLY 6 XV Strings STR OCH/BRS 1 3 POLY 7 SmoothRhodes EP PIANO 36 4 POLY 8 OSC Sync2020 HLD SYN/PAD 10 1 MONO 9 Suga[…]
-
Страница 125
125 Patch List Patch List Preset-A No. Name Category Category No. Voice Key Assign 1 Grand XV PNO PIANO1 4 POLY 2 RockPiano Ch PNO 23 POLY 3 Contemplate PNO 32 POLY 4 Hall Grand PNO 42 POLY 5 64voicePiano PNO 51 POLY 6 Power Grand PNO 63 POLY 7 E.Grand PNO 71 POLY 8 RD-1000 PNO 83 POLY 9 MIDIed Grand PNO 93 POLY 10 SparklePiano PNO 10 6 POLY 11 War[…]
-
Страница 126
126 Patch List Preset-B No. Name Category Category No. Voice Key Assign 1 Rezodrive DGT GTR/BS34 2 MONO 2 Hurtin’Tubes DGT 35 3 POLY 3 R&R Chunk DGT 36 4 POLY 4 Power Trip DGT 37 2 POLY 5 Pick Bass BS 38 1 MONO 6 Hip Bass BS 39 2 POLY 7 Homey Bass BS 40 2 MONO 8 Tap Bass BS 41 1 POLY 9 Pop Bass BS 42 1 POLY 10 TremCho Bs BS 43 2 POLY 11 Nylon[…]
-
Страница 127
127 Patch List Patch List Preset-C No. Name Category Category No. Voice Key Assign 1 Voyager Brs BRS OCH/BRS69 5 POLY 23 Osc Brass SBR 70 3 POLY 3 Poly Brass SBR 71 3 POLY 4 Brass It! SBR 72 4 POLY 5 Archimede SBR 73 3 POLY 6 Breathy Brs SBR 74 3 POLY 7 Triumph Brs SBR 75 3 POLY 8 P5 Polymod SBR 76 2 POLY 9 FatSynBrass SBR 77 4 POLY 10 True ANALOG […]
-
Страница 128
128 Patch List Preset-D No. Name Category Category No. Voice Key Assign 1 Dark Side FX SYN/PAD109 8 POLY 2 Dunes FX 110 4 POLY 3 The Beast FX 111 6 POLY 4 Ocean Floor FX 112 1 POLY 5 Cyber Space FX 113 3 POLY 6 Nexus FX 114 8 POLY 7 ForestMoon FX 115 8 POLY 8 Planet Meta FX 116 7 POLY 9 Predator 2 FX 117 8 POLY 10 Flashback FX 118 4 POLY 11 JUNO Ke[…]
-
Страница 129
129 Patch List Patch List GM (General MIDI) No. Name Voice LSB PC 001 Piano 1 4 0 1 002 Piano 1w 2 1 003 European Pf 1 2 004 Piano 2 4 0 2 005 Piano 2w 1 1 006 Piano 3 1 0 3 007 Piano 3w 1 1 008 Honky-tonk 2 0 4 009 Honky-tonk 2 2 1 010 E.Piano 1 2 0 5 011 St.Soft EP 2 1 012 FM+SA EP 2 2 013 Wurly 2 3 014 E.Piano 2 2 0 6 015 Detuned EP 2 2 1 016 St[…]
-
Страница 130
130 100 101 103 102 28 29 31 33 35 30 32 34 39 40 41 43 45 47 42 44 46 36 38 37 87 88 84 86 85 51 52 53 55 57 59 54 56 58 48 50 49 63 64 65 67 69 71 66 68 70 60 62 61 75 76 77 79 81 83 78 80 82 72 74 73 C2 C3 C4 C5 C6 96 89 91 93 95 90 92 94 C7 98 97 Note No. 99 Rhythm Set List User Group 001 R&B Kit Dance Kick Dry Kick R&B SN Roll Hybrid K[…]
-
Страница 131
131 Rhythm Set List Rhythm Set List 100 101 103 102 28 29 31 33 35 30 32 34 39 40 41 43 45 47 42 44 46 36 38 37 87 88 84 86 85 51 52 53 55 57 59 54 56 58 48 50 49 63 64 65 67 69 71 66 68 70 60 62 61 75 76 77 79 81 83 78 80 82 72 74 73 C2 C3 C4 C5 C6 96 89 91 93 95 90 92 94 C7 98 97 Note No. 99 Preset A Group 001 R&B Kit Dance Kick Dry Kick R&am[…]
-
Страница 132
132 Rhythm Set List 100 101 103 102 28 29 31 33 35 30 32 34 39 40 41 43 45 47 42 44 46 36 38 37 87 88 84 86 85 51 52 53 55 57 59 54 56 58 48 50 49 63 64 65 67 69 71 66 68 70 60 62 61 75 76 77 79 81 83 78 80 82 72 74 73 C2 C3 C4 C5 C6 96 89 91 93 95 90 92 94 C7 98 97 Note No. 99 Preset B Group 001 XV Rock Kit Dance Kick Round Kick Rock Roll Jazz Kic[…]
-
Страница 133
133 Rhythm Set List Rhythm Set List 28 29 31 33 35 30 32 34 39 40 41 43 45 47 42 44 46 36 38 37 87 88 84 86 85 51 52 53 55 57 59 54 56 58 48 50 49 63 64 65 67 69 71 66 68 70 60 62 61 75 76 77 79 81 83 78 80 82 72 74 73 C2 C3 C4 C5 C6 Note No. 27 GM (GM2 Group) 001 (PC: 1) GM2 STANDARD High-Q Slap ScratchPush ScratchPull Sticks SquareClick Mtrnm.Cli[…]
-
Страница 134
134 Rhythm Set List 28 29 31 33 35 30 32 34 39 40 41 43 45 47 42 44 46 36 38 37 87 88 84 86 85 51 52 53 55 57 59 54 56 58 48 50 49 63 64 65 67 69 71 66 68 70 60 62 61 75 76 77 79 81 83 78 80 82 72 74 73 C2 C3 C4 C5 C6 Note No. 27 GM (GM2 Group) 007 (PC: 41) GM2 BRUSH High-Q Slap ScratchPush ScratchPull Sticks SquareClick Mtrnm.Click Mtrnm. Bell Jaz[…]
-
Страница 135
135 Performance List Demo Song List Performance List USER Preset-A Preset-B No. Name 001 BigSweepStak 002 Suger Bell 003 R&B Kit 004 Trance Split 005 My Orchestra 006 Road2Glass 007 Analog Stack 008 Flying Keys 009 House Kit 010 Soaring 2020 011 Seven Hills 012 TeknoSplit 1 013 Nirvana 2020 014 StChorusStak 015 Bell Stack 016 Trance Fair 017 Ag[…]
-
Страница 136
136 MIDI Implementation Model: XV-2020 Date: 2002.6.4 Version: 1.00 1. Receive data ■ Channel Voice Messages * Not received in Performance mode when the Receive Switch parameter (Performance Part) is OFF. ● Note off Status 2nd byte 3rd byte 8nH kkH vvH 9nH kkH 00H n = MIDI channel number: 0H — FH (ch.1 — 16) kk = note number: 00H — 7FH (0 — 127[…]
-
Страница 137
137 MIDI Implementation MIDI Implementation ❍ Hold 1 (Controller number 64) Status 2nd byte 3rd byte BnH 40H vvH n = MIDI channel number: 0H — FH (ch.1 — 16) vv = Control value: 00H — 7FH (0 — 127) 0-63 = OFF, 64-127 = ON * Not received when Tone Receive Hold-1 parameter (Patch Tone or Rhythm Tone) is OFF. * Not received in Performance mode when […]
-
Страница 138
138 MIDI Implementation ❍ Portamento control (Controller number 84) Status 2nd byte 3rd byte BnH 54H kkH n = MIDI channel number: 0H — FH (ch.1 — 16) kk = source note number: 00H — 7FH (0 — 127) *A Note-on received immediately after a Portamento Control message will change continuously in pitch, starting from the pitch of the Source Note Number. […]
-
Страница 139
139 MIDI Implementation MIDI Implementation ■ Channel Mode Messages * Not received in Performance mode when the Receive Switch parameter (Performance Part) is OFF. ● All Sounds Off (Controller number 120) Status 2nd byte 3rd byte BnH 78H 00H n = MIDI channel number: 0H — FH (ch.1 — 16) *W hen this message is received, all notes currently soundi[…]
-
Страница 140
140 MIDI Implementation ■ System Realtime Message ● Timing Clock Status F8H ● Active Sensing Status FEH *W hen Active Sensing is received, the unit will begin monitoring the intervals of all further messages. While monitoring, if the interval between messages exceeds 420 ms, the same processing will be carried out as when All Sounds Off, All […]
-
Страница 141
141 MIDI Implementation MIDI Implementation ● Universal Realtime System Exclusive Messages ❍ Master Volume Status Data byte Status F0H 7FH, 7FH, 04H, 01H, llH, mmH F7H Byte Explanation F0H Exclusive status 7FH ID number (universal realtime message) 7FH Device ID (Broadcast) 04H Sub ID#1 (Device Control) 01H Sub ID#2 (Master Volume) llH Master V[…]
-
Страница 142
142 MIDI Implementation ❍ Chorus Parameters Status Data byte Status F0H 7FH, 7FH, 04H, 05H, 01H, 01H, F7H 01H, 01H, 02H, ppH, vvH Byte Explanation F0H Exclusive status 7FH ID number (universal realtime message) 7FH Device ID (Broadcast) 04H Sub ID#1 (Device Control) 05H Sub ID#2 (Global Parameter Control) 01H Slot path length 01H Parameter ID wid[…]
-
Страница 143
143 MIDI Implementation MIDI Implementation ● Data Transmission This instrument can use exclusive messages to exchange many varieties of internal settings with other devices. The model ID of the exclusive messages used by this instrument is 00H 10H. ❍ Data Request 1RQ1 (11H) This message requests the other device to transmit data. The address a[…]
-
Страница 144
144 MIDI Implementation 2. Data Transmission ■ Channel Voice Messages When execute the Data Transfer, following Control Changes and Program Change will transmit. ● Control Change ❍ Bank Select (Controller number 0, 32) Status 2nd byte 3rd byte BnH 00H mmH BnH 20H llH n = MIDI channel number: 0H — FH (ch.1 — 16) mm, ll = Bank number: 00 00H — […]
-
Страница 145
145 MIDI Implementation MIDI Implementation ❍ Vibrato Rate (Controller number 76) Status 2nd byte 3rd byte BnH 4CH vvH n = MIDI channel number: 0H — FH (ch.1 — 16) vv = Vibrato Rate value (relative change): 00H — 40H — 7FH (-64 — 0 — +63) ❍ Vibrato Depth (Controller number 77) Status 2nd byte 3rd byte BnH 4DH vvH n = MIDI channel number: 0H — F[…]
-
Страница 146
146 MIDI Implementation ■ System Exclusive Messages Universal Non-realtime System Exclusive Message and Data Set 1 (DT1) are the only System Exclusive messages transmitted by the XV-2020. ● Universal Non-realtime System Exclusive Message ❍ Identity Reply Message Receiving Identity Request Message, the XV-2020 send this message. Status Data by[…]
-
Страница 147
147 MIDI Implementation MIDI Implementation | 00 03 | 0aaa aaaa | (reserved) | |—————————————+———————————+————————————————————————————————————————————————————| | 00 04 | 0aaa aaaa | Performance Bank[…]
-
Страница 148
148 MIDI Implementation |# 00 19 | 0000 aaaa | | | | 0000 bbbb | | | | 0000 cccc | | | | 0000 dddd | MFX Parameter 3 (12768 — 52768) | | | | —20000 — +20000 | |# 00 1D | 0000 aaaa | | | | 0000 bbbb | | | | 0000 cccc | | | | 0000 dddd | MFX Parameter 4 (12768 — 52768) | | | | —20000 — +20000 | |# 00 21 | 0000 aaaa | | | | 0000 bbbb | | |[…]
-
Страница 149
149 MIDI Implementation MIDI Implementation | | 0000 bbbb | | | | 0000 cccc | | | | 0000 dddd | Reverb Parameter 7 (12768 — 52768) | | | | —20000 — +20000 | |# 00 1F | 0000 aaaa | | | | 0000 bbbb | | | | 0000 cccc | | | | 0000 dddd | Reverb Parameter 8 (12768 — 52768) | | | | —20000 — +20000 | |# 00 23 | 0000 aaaa | | | | 0000 bbbb | | […]
-
Страница 150
150 MIDI Implementation | 00 1B | 0000 000a | Portamento Type (0 — 1) | | | | RATE, TIME | | 00 1C | 0000 000a | Portamento Start (0 — 1) | | | | PITCH, NOTE | | 00 1D | 0aaa aaaa | Portamento Time (0 — 127) | | 00 1E | 0000 000a | Patch Clock Source (0 — 1) | | | | PATCH, SYSTEM | |# 00 1F | 0000 aaaa | | | | 0000 bbbb | Patch Tempo (20 ?[…]
-
Страница 151
151 MIDI Implementation MIDI Implementation | 00 09 | 0aaa aaaa | MFX Control 3 Source (0 — 101) | | | | OFF, CC01 — CC31, CC33 — CC95, | | | | BEND, AFT, SYS1 — SYS4 | | 00 0A | 0aaa aaaa | MFX Control 3 Sens (1 — 127) | | | | —63 — +63 | | 00 0B | 0aaa aaaa | MFX Control 4 Source (0 — 101) | | | | OFF, CC01 — CC31, CC33 — CC95[…]
-
Страница 152
152 MIDI Implementation | | 0000 cccc | | | | 0000 dddd | Reverb Parameter 1 (12768 — 52768) | | | | —20000 — +20000 | |# 00 07 | 0000 aaaa | | | | 0000 bbbb | | | | 0000 cccc | | | | 0000 dddd | Reverb Parameter 2 (12768 — 52768) | | | | —20000 — +20000 | |# 00 0B | 0000 aaaa | | | | 0000 bbbb | | | | 0000 cccc | | | | 0000 dddd | Reve[…]
-
Страница 153
153 MIDI Implementation MIDI Implementation | | 0000 dddd | Wave Group ID (0 — 16384) | | | | OFF, 1 — 16384 | |# 00 2C | 0000 aaaa | | | | 0000 bbbb | | | | 0000 cccc | | | | 0000 dddd | Wave Number L (Mono) (0 — 16384) | | | | OFF, 1 — 16384 | |# 00 30 | 0000 aaaa | | | | 0000 bbbb | | | | 0000 cccc | | | | 0000 dddd | Wave Number R (0 ?[…]
-
Страница 154
154 MIDI Implementation | | 0000 bbbb | | | | 0000 cccc | | | | 0000 dddd | MFX Parameter 5 (12768 — 52768) | | | | —20000 — +20000 | |# 00 25 | 0000 aaaa | | | | 0000 bbbb | | | | 0000 cccc | | | | 0000 dddd | MFX Parameter 6 (12768 — 52768) | | | | —20000 — +20000 | |# 00 29 | 0000 aaaa | | | | 0000 bbbb | | | | 0000 cccc | | | | 0000[…]
-
Страница 155
155 MIDI Implementation MIDI Implementation | | 0000 cccc | | | | 0000 dddd | Reverb Parameter 9 (12768 — 52768) | | | | —20000 — +20000 | |# 00 27 | 0000 aaaa | | | | 0000 bbbb | | | | 0000 cccc | | | | 0000 dddd | Reverb Parameter 10 (12768 — 52768) | | | | —20000 — +20000 | |# 00 2B | 0000 aaaa | | | | 0000 bbbb | | | | 0000 cccc | |[…]
-
Страница 156
156 MIDI Implementation | 00 78 | 0000 000a | WMT4 Wave Switch (0 — 1) | | | | OFF, ON | | 00 79 | 0000 00aa | WMT4 Wave Group Type (0 — 3) | | | | INT, SR—JV80, SRX, SAMPLE<*> | |# 00 7A | 0000 aaaa | | | | 0000 bbbb | | | | 0000 cccc | | | | 0000 dddd | WMT4 Wave Group ID (0 — 16384) | | | | OFF, 1 — 16384 | |# 00 7E | 0000 aaaa |[…]
-
Страница 157
157 MIDI Implementation MIDI Implementation | 40 1x 23 | 0000 000a | Rx. Bank Select<*> (0 — 1) | | | | OFF, ON | | 40 1x 24 | 0000 000a | Rx. Bank Select LSB<*> (0 — 1) | | | | OFF, ON | |—————————————+———————————+———————————————————————?[…]
-
Страница 158
158 MIDI Implementation ■ Decimal and Hexadecimal Table (An “H” is appended to the end of numbers in hexadecimal notation.) In MIDI documentation, data values and addresses/sizes of Exclusive messages, etc. are expressed as hexadecimal values for each 7 bits. The following table shows how these correspond to decimal numbers. +—————?[…]
-
Страница 159
159 MIDI Implementation MIDI Implementation ■ Example of an Exclusive Message and Calculating a Checksum Roland Exclusive messages (RQ1, DT1) are transmitted with a checksum at the end (before F7) to make sure that the message was correctly received. The value of the checksum is determined by the address and data (or size) of the transmitted Excl[…]
-
Страница 160
160 MIDI Implementation ■ The Scale Tune Feature (address: 40 1x 40) The scale Tune feature allows you to finely adjust the individual pitch of the notes from C through B. Though the settings are made while working with one octave, the fine adjustments will affect all octaves. By making the appropriate Scale Tune settings, you can obtain a comple[…]
-
Страница 161
Function… Basic Channel Mode Note Number : Velocity After Touch Pitch Bend Control Change Program Change System Exclusive System Common System Real Time Aux Messages Notes Transmitted Recognized Remarks Default Changed Default Messages Altered True Voice Note On Note Off Key’s Channel’s 0, 32 1 2 4 5 6, 38 7 8 10 11 64 65 66 67 68 69 71[…]
-
Страница 162
162 Specifications XV-2020: 64-Voice Sound Module (conforms to General MIDI 2 System) Parts 16 Maximum Polyphony 64 voices Wave Memory 64 M Bytes (16-bit linear equivalent) Waveforms: 1083 Expansion Slot Wave Expansion Board SRX Series: 2 slots Preset Memory Patches: 512 (128 x 4 banks) + 256 (General MIDI 2 Patches) Rhythm Sets: 8 (4 x 2 banks) + […]
-
Страница 163
163 INDEX Numerics 2 VOICE PITCH SHIFTER …………………………………….. 87 A Analog Feel Depth ………………………………………………… 47 Assign type ……………………………………………………………. 68 AUTO WAH …………………………………………………………. 83 B bank …….[…]
-
Страница 164
164 INDEX O OCTAVE SHIFT ……………………………………………………. 46 OFFSET ……………………………………………………………. 47, 73 OMS ………………………………………………………………………. 25 Output Assign part …………………………………………………………[…]
-
Страница 165
165 INDEX INDEX T TIME CONTROL DELAY ……………………………………… 87 Time Variant Amplifier ……………………………………. 44, 62 Time Variant Filter …………………………………………… 44, 62 TMT ………………………………………………………………………. 49 Tone Alternate Pan De[…]
-
Страница 166
I n f ormat i on When you need repair service, call your nearest Roland Service Center or authorized Roland distributor in your country as shown below. As of December 1, 2002 (Roland) ARGENTINA Instrumentos Musicales S.A. Av.Santa Fe 2055 (1123) Buenos Aires ARGENTINA TEL: (011) 4508-2700 BRAZIL Roland Brasil Ltda Rua San Jose, 780 Sala B Parque In[…]
-
Страница 167
2 To resize thickness, move all items on the front cover and center registration marks to left or right. This product complies with the requirements of European Directive 89/336/EEC. For EU Countries For Canada This Class B digital apparatus meets all requirements of the Canadian Interference-Causing Equipment Regulations. Cet appareil numérique d[…]
-
Страница 168
Thank you, and congratulations on your choice of the Roland XV-2020. Copyright © 2002 ROLAND CORPORATION All rights reserved. No part of this publication may be reproduced in any form without the written permission of ROLAND CORPORATION. Before using this unit, carefully read the sections entitled: “IMPORTANT SAFETY INSTRUCTIONS” (p. 2), “US[…]
-
Страница 169
3 Performance List / USER Preset-A Preset-B No. Name 001 BigSweepStak 002 Suger Bell 003 R&B Kit 004 Trance Split 005 My Orchestra 006 Road2Glass 007 Analog Stack 008 Flying Keys 009 House Kit 010 Soaring 2020 011 Seven Hills 012 TeknoSplit 1 013 Nirvana 2020 014 StChorusStak 015 Bell Stack 016 Trance Fair 017 AggressiveXV 018 Techno Kit 019 Ph[…]
Before using this unit, carefully read the sections entitled: “IMPORTANT SAFETY
INSTRUCTIONS” (p. 2), “USING THE UNIT SAFELY” (p. 3), and “IMPORTANT NOTES” (p.
5). These sections provide important information concerning the proper operation of the
unit. Additionally, in order to feel assured that you have gained a good grasp of every
feature provided by your new unit, Owner’s Manual should be read in its entirety. The
manual should be saved and kept on hand as a convenient reference.
Listening to the Demo Songs
fig.Cover
1. Turn [CATEGORY/BANK] to choose DEMO.
“ALL” flashes on the display.
2. Turn [VALUE] to choose the song you want to hear.
3. Press [VALUE].
The display shows “PLy” and Demo Play starts.
4. Press [VALUE] once more to stop the Performance.
* No data for the music that is played will be output from MIDI OUT.
* MIDI messages received from external instruments are ignored while the Demo Play screen is displayed.
* All rights reserved. Unauthorized use of this material for purposes other than private, personal enjoyment is
a violation of applicable laws.
OWNER’S MANUAL
Thank you, and congratulations on your choice of the Roland XV-2020.
Copyright © 2002 ROLAND CORPORATION
All rights reserved. No part of this publication may be reproduced in any form without the
written permission of ROLAND CORPORATION.
2, 3, 4 1

For the U.K.
IMPORTANT: THE WIRES IN THIS MAINS LEAD ARE COLOURED IN ACCORDANCE WITH THE FOLLOWING CODE.
2
BLUE:
BROWN:
As the colours of the wires in the mains lead of this apparatus may not correspond with the coloured markings identifying
the terminals in your plug, proceed as follows:
The wire which is coloured BLUE must be connected to the terminal which is marked with the letter N or coloured BLACK.
The wire which is coloured BROWN must be connected to the terminal which is marked with the letter L or coloured RED.
Under no circumstances must either of the above wires be connected to the earth terminal of a three pin plug.
NEUTRAL
LIVE
USING THE UNIT SAFELY
Used for instructions intended to alert
the user to the risk of death or severe
injury should the unit be used
improperly.
Used for instructions intended to alert
the user to the risk of injury or material
damage should the unit be used
improperly.
* Material damage refers to damage or
other adverse effects caused with
respect to the home and all its
furnishings, as well to domestic
animals or pets.
001
• Before using this unit, make sure to read the
instructions below, and the Owner’s Manual.
…………………………………………………………………………………………….
002d
• Do not open or perform any internal modifications on the unit or its AC adaptor. (The only
exception would be where this manual provides
specific instructions which should be followed in
order to put in place user-installable options; see
p. 12.)
…………………………………………………………………………………………….
003
• Do not attempt to repair the unit, or replace parts
within it (except when this manual provides
specific instructions directing you to do so). Refer
all servicing to your retailer, the nearest Roland
Service Center, or an authorized Roland
distributor, as listed on the “Information” page.
…………………………………………………………………………………………….
004
• Never use or store the unit in places that are:
• Subject to temperature extremes (e.g., direct
sunlight in an enclosed vehicle, near a heating
duct, on top of heat-generating equipment); or
are
• Damp (e.g., baths, washrooms, on wet floors);
or are
• Humid; or are
• Exposed to rain; or are
• Dusty; or are
• Subject to high levels of vibration.
…………………………………………………………………………………………….
005
• This unit should be used only with a rack or stand
that is recommended by Roland.
…………………………………………………………………………………………….
The symbol alerts the user to important instructions
or warnings.The specific meaning of the symbol is
determined by the design contained within the
triangle. In the case of the symbol at left, it is used for
general cautions, warnings, or alerts to danger.
The symbol alerts the user to items that must never
be carried out (are forbidden). The specific thing that
must not be done is indicated by the design contained
within the circle. In the case of the symbol at left, it
means that the unit must never be disassembled.
The ● symbol alerts the user to things that must be
carried out. The specific thing that must be done is
indicated by the design contained within the circle. In
the case of the symbol at left, it means that the powercord plug must be unplugged from the outlet.
006
• When using the unit with a rack or stand recommended by Roland, the rack or stand must be
carefully placed so it is level and sure to remain
stable. If not using a rack or stand, you still need
to make sure that any location you choose for
placing the unit provides a level surface that will
properly support the unit, and keep it from
wobbling.
…………………………………………………………………………………………….
008c
• Be sure to use only the AC adaptor supplied with
the unit. Also, make sure the line voltage at the
installation matches the input voltage specified on
the AC adaptor’s body. Other AC adaptors may
use a different polarity, or be designed for a
different voltage, so their use could result in
damage, malfunction, or electric shock.
…………………………………………………………………………………………….
009
• Do not excessively twist or bend the power cord,
nor place heavy objects on it. Doing so can
damage the cord, producing severed elements and
short circuits. Damaged cords are fire and shock
hazards!
…………………………………………………………………………………………….
010
• This unit, either alone or in combination with an
amplifier and headphones or speakers, may be
capable of producing sound levels that could
cause permanent hearing loss. Do not operate for
a long period of time at a high volume level, or at
a level that is uncomfortable. If you experience
any hearing loss or ringing in the ears, you should
immediately stop using the unit, and consult an
audiologist.
…………………………………………………………………………………………….
011
• Do not allow any objects (e.g., flammable material,
coins, pins); or liquids of any kind (water, soft
drinks, etc.) to penetrate the unit.
3
012b
• Immediately turn the power off, remove the AC
adaptor from the outlet, and request servicing by
your retailer, the nearest Roland Service Center, or
an authorized Roland distributor, as listed on the
“Information” page when:
• The AC adaptor, the power-supply cord, or the
plug has been damaged; or
• Objects have fallen into, or liquid has been
spilled onto the unit; or
• The unit has been exposed to rain (or otherwise
has become wet); or
• The unit does not appear to operate normally or
exhibits a marked change in performance.
…………………………………………………………………………………………….
013
• In households with small children, an adult
should provide supervision until the child is
capable of following all the rules essential for the
safe operation of the unit.
…………………………………………………………………………………………….
014
• Protect the unit from strong impact.
(Do not drop it!)
…………………………………………………………………………………………….
015
• Do not force the unit’s power-supply cord to share
an outlet with an unreasonable number of other
devices. Be especially careful when using
extension cords—the total power used by all
devices you have connected to the extension
cord’s outlet must never exceed the power rating
(watts/amperes) for the extension cord. Excessive
loads can cause the insulation on the cord to heat
up and eventually melt through.
…………………………………………………………………………………………….
016
• Before using the unit in a foreign country, consult
with your retailer, the nearest Roland Service
Center, or an authorized Roland distributor, as
listed on the “Information” page.
…………………………………………………………………………………………….
022b
• Always turn the unit off and unplug the AC
adaptor before attempting installation of the
circuit board (SRX series; p. 12).
…………………………………………………………………………………………….
023
• DO NOT play a CD-ROM disc on a conventional
audio CD player. The resulting sound may be of a
level that could cause permanent hearing loss.
Damage to speakers or other system components
may result.
\\
101b
• The unit and the AC adaptor should be located so
their location or position does not interfere with
their proper ventilation.
…………………………………………………………………………………………….
102d
• Always grasp only the output plug or the body of
the AC adaptor when plugging into, or
unplugging from, this unit or an outlet.
…………………………………………………………………………………………….
103b
• Whenever the unit is to remain unused for an
extended period of time, disconnect the AC
adaptor.
…………………………………………………………………………………………….
104
• Try to prevent cords and cables from becoming
entangled. Also, all cords and cables should be
placed so they are out of the reach of children.
…………………………………………………………………………………………….
106
• Never climb on top of, nor place heavy objects on
the unit.
…………………………………………………………………………………………….
107d
• Never handle the AC adaptor body, or its output
plugs, with wet hands when plugging into, or
unplugging from, an outlet or this unit.
…………………………………………………………………………………………….
108b
• Before moving the unit, disconnect the AC
adaptor and all cords coming from external
devices.
…………………………………………………………………………………………….
108c
• Disconnect all cords coming from external devices
before moving the unit.
…………………………………………………………………………………………….
109b
• Before cleaning the unit, turn off the power and
unplug the AC adaptor from the outlet (p. 12).
…………………………………………………………………………………………….
110b
• Whenever you suspect the possibility of lightning
in your area, disconnect the AC adaptor from the
outlet.
…………………………………………………………………………………………….
115a
• Install only the specified circuit board(s) (SRX
series). Remove only the specified screws (p. 106).
…………………………………………………………………………………………….
118
• Should you remove screws and rubber feet, make
sure to put them in a safe place out of children’s
reach, so there is no chance of them being
swallowed accidentally.
…………………………………………………………………………………………….
204
* Microsoft and Windows are registered trademarks of
Microsoft Corporation.
206c
* Windows® 98 is known officially as: “Microsoft®
Windows® 98 operating system.”
206e
* Screen shots in this documents are reprinted with
permission from Microsoft Corporation.
206f
* Windows® 2000 is known officially as: “Microsoft®
Windows® 2000 operating system.”
206g
* Windows® Me is known officially as: “Microsoft®
Windows® Millennium Edition operating system.”
207
* Apple and Macintosh are registered trademark of Apple
Computer, Inc.
209
* MacOS is a trademark of Apple Computer, Inc.
220
* All product names mentioned in this document are trade-
marks or registered trademarks of their respective owners.
231
* OMS is a registered trademark of Opcode Systems, Inc.
232
* FreeMIDI is a trademark of Mark of the Unicorn, Inc.
4
IMPORTANT NOTES
291a
In addition to the items listed under “USING THE UNIT SAFELY” on p. 3 , please read and observe the following:
Power Supply
301
• Do not use this unit on the same power circuit with any device
that will generate line noise (such as an electric motor or variable
lighting system).
302
• The AC adaptor will begin to generate heat after long hours of
consecutive use. This is normal, and is not a cause for concern.
307
• Before connecting this unit to other devices, turn off the power to
all units. This will help prevent malfunctions and/or damage to
speakers or other devices.
Placement
351
• Using the unit near power amplifiers (or other equipment
containing large power transformers) may induce hum. To
alleviate the problem, change the orientation of this unit; or move
it farther away from the source of interference.
352a
• This device may interfere with radio and television reception. Do
not use this device in the vicinity of such receivers.
352b
• Noise may be produced if wireless communications devices, such
as cell phones, are operated in the vicinity of this unit. Such noise
could occur when receiving or initiating a call, or while
conversing. Should you experience such problems, you should
relocate such wireless devices so they are at a greater distance
from this unit, or switch them off.
355
• To avoid possible breakdown, do not use the unit in a wet area,
such as an area exposed to rain or other moisture.
556
• When connecting / disconnecting all cables, grasp the connector
itself—never pull on the cable. This way you will avoid causing
shorts, or damage to the cable’s internal elements.
558a
• To avoid disturbing your neighbors, try to keep the unit’s volume
at reasonable levels. You may prefer to use headphones, so you
do not need to be concerned about those around you (especially
when it is late at night).
559a
• When you need to transport the unit, package it in the box
(including padding) that it came in, if possible. Otherwise, you
will need to use equivalent packaging materials.
924
• To prevent the inadvertent disruption of power to your unit
(should the plug be pulled out accidentally), and to avoid
applying undue stress to the AC adaptor jack, anchor the power
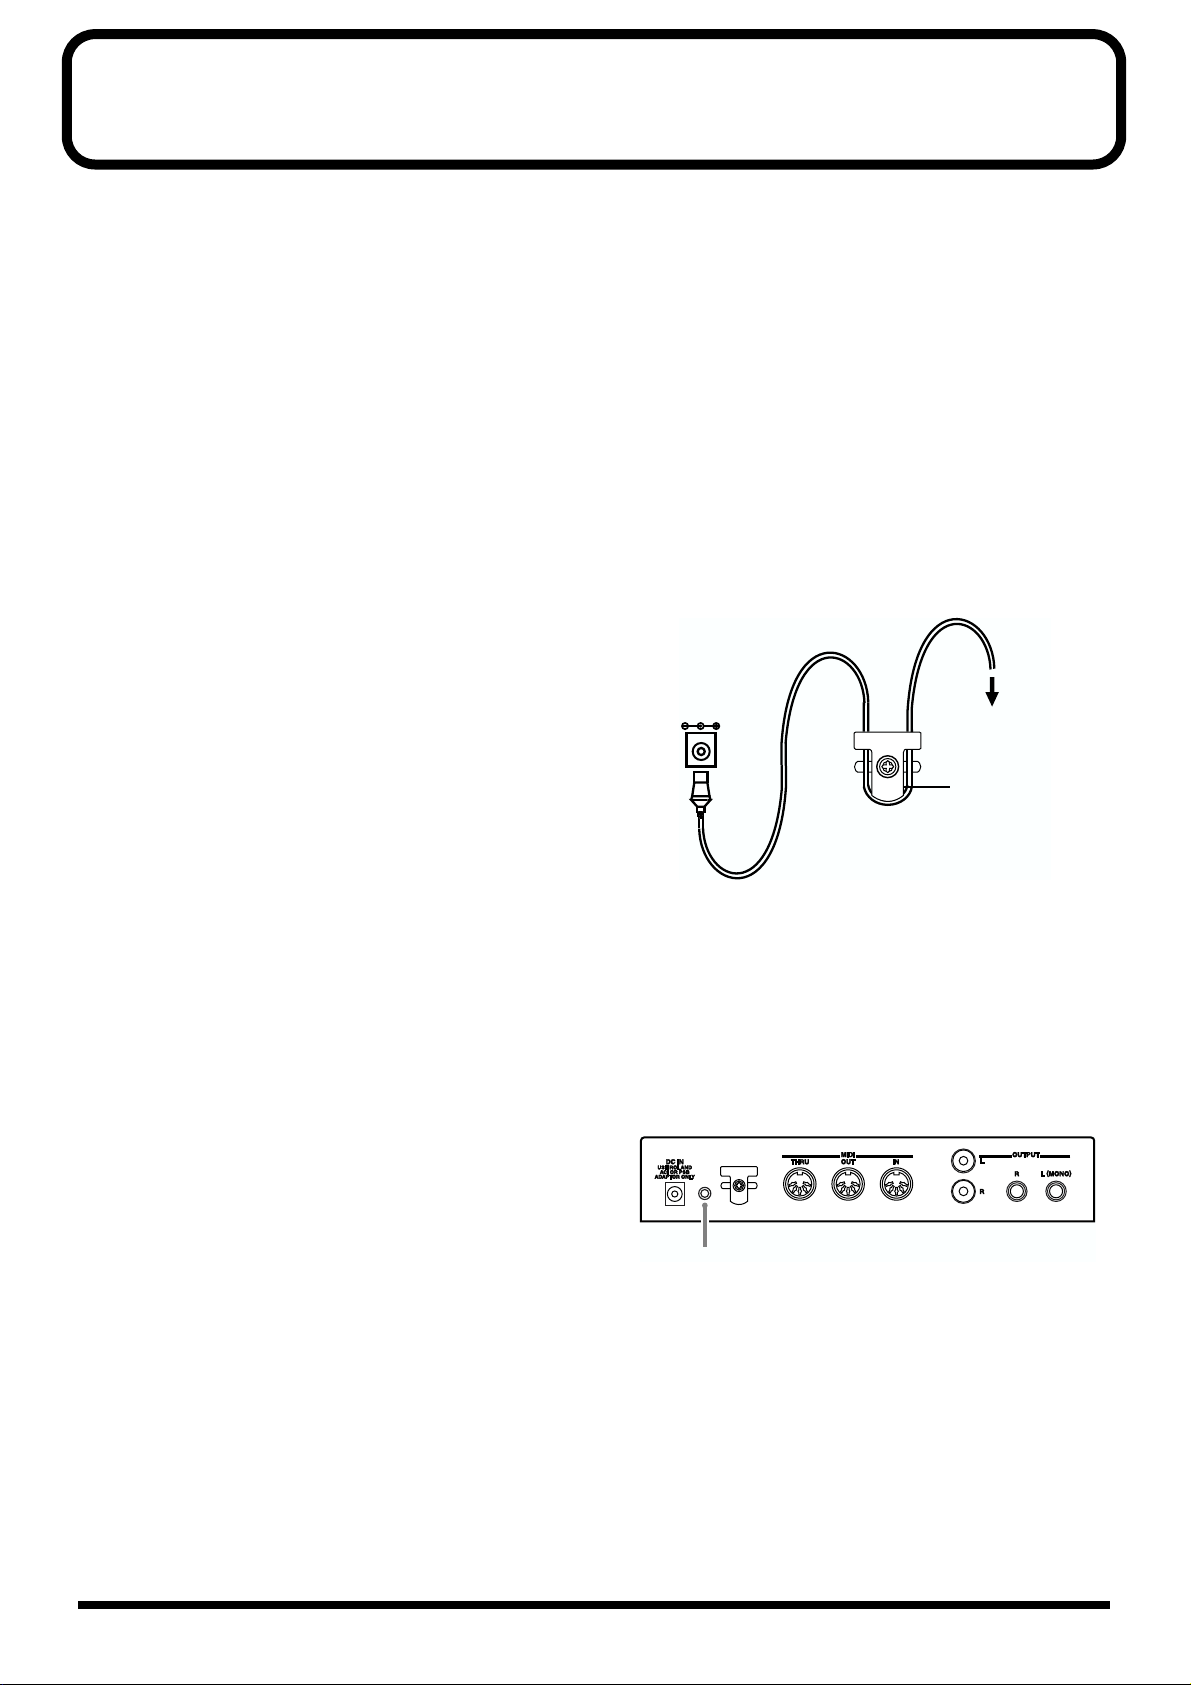
cord using the cord hook, as shown in the illustration.
To the Power Outlet
Cord Hook
The cord of
the supplied AC Adaptor
Maintenance
401a
• For everyday cleaning wipe the unit with a soft, dry cloth or one
that has been slightly dampened with water. To remove stubborn
dirt, use a cloth impregnated with a mild, non-abrasive detergent.
Afterwards, be sure to wipe the unit thoroughly with a soft, dry
cloth.
402
• Never use benzine, thinners, alcohol or solvents of any kind, to
avoid the possibility of discoloration and/or deformation.
Handling CD-ROMs
801
• Avoid touching or scratching the shiny underside (encoded
surface) of the disc. Damaged or dirty CD-ROM discs may not be
read properly. Keep your discs clean using a commercially
available CD cleaner.
Additional Precautions
551
• Please be aware that the contents of memory can be irretrievably
lost as a result of a malfunction, or the improper operation of the
unit. To protect yourself against the risk of loosing important
data, we recommend that you periodically save a backup copy of
important data you have stored in the unit’s memory in another
MIDI device (e.g., a sequencer).
552
• Unfortunately, it may be impossible to restore the contents of
data that was stored in another MIDI device (e.g., a sequencer)
once it has been lost. Roland Corporation assumes no liability
concerning such loss of data.
553
• Use a reasonable amount of care when using the unit’s buttons,
sliders, or other controls; and when using its jacks and
connectors. Rough handling can lead to malfunctions.
927
• In some cases, depending on the environment in which the unit is
installed, the surface of the panel may sometimes feel rough and
grainy. This is due to an infinitesimal electrical charge, which is
absolutely harmless. However, if you are concerned about this,
connect the ground terminal (see figure) with an external ground.
When the unit is grounded, a slight hum may occur, depending
on the particulars of your installation. If you are unsure of the
connection method, contact the nearest Roland Service Center, or
an authorized Roland distributor, as listed on the “Information”
page.
Ground T erminal
Unsuitable places for connection
— Water pipes (may result in shock or electrocution)
— Gas pipes (may result in fire or explosion)
— Telephone-line ground or lightning rod (may be dangerous in
the event of lightning)
5

Contents
IMPORTANT NOTES ……………………………………………………………………………………..5
Features……………………………………………………………………………………………………….8
Front and Rear Panel…………………………………………………………………………………….9
Getting Ready to Play………………………………………………………………………………….10
Attaching the Rubber Feet ………………………………………………………………………………………………………………………. 10
Installing on the Rack-Mount Adaptor ……………………………………………………………………………………………………. 10
Connecting to MIDI Devices and Audio Equipment ……………………………………………………………………………….. 11
Turning the Power On/Off ……………………………………………………………………………………………………………………… 12
Restoring the Factory Settings (Factory Reset) ………………………………………………………………………………………… 12
For Those Using a Computer……………………………………………………………………….13
Installing & Setup the Driver (Windows) ………………………………………………………………………………………………… 13
Settings and checking ……………………………………………………………………………………………………………………………… 21
Installing & Setup the Driver (Macintosh) ………………………………………………………………………………………………. 24
Connecting with MIDI Connectors …………………………………………………………………………………………………………. 30
Installing the Included Editor Software …………………………………………………………………………………………………… 30
About Patches and Performances………………………………………………………………..31
Quick Start ………………………………………………………………….. 33
Playing Sounds…………………………………………………………………………………………..34
Playing Patches (Phrase Preview) ……………………………………………………………………………………………………………. 34
Playing a Patch on the XV-2020 from an External MIDI Device (MIDI Keyboard) ………………………………….. 34
Choosing Patches ……………………………………………………………………………………………………………………………………. 35
Choosing Patches by Category ………………………………………………………………………………………………………………… 37
Choosing a Performance …………………………………………………………………………………………………………………………. 38
Switching the Mode (Patch, Performance) ………………………………………………………………………………………………. 39
Using an External MIDI Device to Select Patches and Change Other Settings …………………………………………. 40
Advanced Use ………………………………………………………………. 43
Creating a Patch………………………………………………………………………………………….44
How a Patch Is Organized………………………………………………………………………………………………………………………. 44
Tips for Creating a Patch…………………………………………………………………………………………………………………………. 45
Choosing the Tones That Sound (Tone On/Off) ……………………………………………………………………………………… 45
Confirming Tones …………………………………………………………………………………………………………………………………… 45
Patch Parameter ………………………………………………………………………………………………………………………………………. 46
More Advanced Editing of Tones ……………………………………………………………………………………………………………. 51
Tips for Choosing a Waveform……………………………………………………………………………………………………………….. 52
Adjusting Effect Settings …………………………………………………………………………………………………………………………. 61
Saving Patches You Create ……………………………………………………………………………………………………………………… 61
Creating a Rhythm Set…………………………………………………………………………………62
How Percussion Instruments Are Organized ………………………………………………………………………………………….. 62
Choosing the Tones That Sound (Tone On/Off) ……………………………………………………………………………………… 62
Confirming Tones …………………………………………………………………………………………………………………………………… 62
Rhythm Set Parameters …………………………………………………………………………………………………………………………… 63
Setting up Individual Rhythm Tones ………………………………………………………………………………………………………. 63
Tips for Choosing Rhythm Tone Waveforms………………………………………………………………………………………….. 63
Rhythm Parameter ………………………………………………………………………………………………………………………………….. 64
Adjusting Effect Settings…………………………………………………………………………………………………………………………. 69
Saving Rhythm Sets You Create ……………………………………………………………………………………………………………… 69
Creating a Performance……………………………………………………………………………….70
How a Performance Is Organized …………………………………………………………………………………………………………… 70
Basic Ways to Use Performances …………………………………………………………………………………………………………….. 70
Switching Parts……………………………………………………………………………………………………………………………………….. 71
Turning a Tone On or Off ……………………………………………………………………………………………………………………….. 71
Confirming Tones …………………………………………………………………………………………………………………………………… 71
Performance Parameters…………………………………………………………………………………………………………………………. 71
6

Contents
Adjusting Effect Settings …………………………………………………………………………………………………………………………. 75
Saving Performances You Create …………………………………………………………………………………………………………….. 75
Using the XV-2020 Effects……………………………………………………………………………76
Turning Effects On/Off …………………………………………………………………………………………………………………………… 76
Patch/Rhythm Set Mode Settings …………………………………………………………………………………………………………… 77
Performance Mode Settings …………………………………………………………………………………………………………………….. 78
Multi-Effects Parameter ………………………………………………………………………………………………………………………….. 80
Multi-Effects Parameters………………………………………………………………………………………………………………………….. 82
Saving a Sound You Create…………………………………………………………………………92
Saving Edits to the XV-2020’s Internal Memory (WRITE)………………………………………………………………………… 92
Initializing a Sound (INITIALIZE) …………………………………………………………………………………………………………… 92
Transmitting Sound Settings (XFER) ……………………………………………………………………………………………………….. 93
Establishing Settings for an Entire XV-2020 (SYSTEM COMMON) …………………94
Other Settings …………………………………………………………………………………………….95
Making USB-Related Settings ………………………………………………………………………………………………………………….. 95
Checking the Program Version ……………………………………………………………………………………………………………….. 95
Using the XV-2020 as a General MIDI Sound Module…………………………………….96
Entering GM Mode …………………………………………………………………………………………………………………………………. 96
Initializing the Sound Generator for General MIDI System Basic Settings ………………………………………………. 96
Playing Back a GM Score ………………………………………………………………………………………………………………………… 96
Making Effects Settings in GM Mode (EFFECTS) ……………………………………………………………………………………. 97
Making Settings for Each Part …………………………………………………………………………………………………………………. 98
Examples of Applications Using the XV-2020……………………………………………….99
Controlling the XV-2020 in real time Using an External MIDI Device ……………………………………………………… 99
Applications for Patches ………………………………………………………………………………………………………………………… 100
Changing Part Settings from an External MIDI Device ………………………………………………………………………….. 103
Appendix ………………………………………………………………….. 105
Installing a Wave Expansion Board ……………………………………………………………106
Installation de la carte d’extension Wave
(French language for Canadian Safety Standard)………………………………………..108
Troubleshooting………………………………………………………………………………………..110
Problems when using the XV-2020 ………………………………………………………………………………………………………… 110
Problems related to the USB driver……………………………………………………………………………………………………….. 111
Error Messages…………………………………………………………………………………………116
List of Parameters That Can Be Affected Using the XV-2020……………………….117
XV Editor Screens – Page to Turn to for Info on a Parameter………………………119
Waveform List …………………………………………………………………………………………..121
Patch List………………………………………………………………………………………………….124
Rhythm Set List…………………………………………………………………………………………130
Performance List……………………………………………………………………………………….135
Demo Song List…………………………………………………………………………………………135
MIDI Implementation………………………………………………………………………………….136
Specifications……………………………………………………………………………………………162
INDEX……………………………………………………………………………………………………….163
7

Features
64-Voice Polyphony and 16-Part Multitimbrality
The XV-2020 is a 16-part multitimbral sound generator that produces up to 64
simultaneous polyphonic voices. It provides ample polyphony, even with Patches
containing multiple Tones.
Create Amazingly Expressive Tones
With Patches combining four tones using stereo waves, stereo four-wave rhythm
tones, and more, you can create even more advanced and complex Patches.
XV-5080/5050 Wave Data Included
With 512 preset Patches and 256 GM2 Patches, you get a total of 768 internal Patches.
The XV-2020 also comes equipped with 40 different types of Multi-Effects (MFX).
Accepts SRX Series Wave Expansion Boards
You can install up to two SRX Series Wave Expansion Boards, allowing you to create
sounds built on large volumes of wave data.
Equipped with a USB Connector
The XV-2020 has a USB connector on its front panel, so that you can easily connect
your computer.
Supports General MIDI system Level 2
The XV-2020 provides a mode compatible with General MIDI System Level 2, the
standard format for desktop music (DTM) systems. The upwardly compatible
General MIDI 2 standards pick up where the original General MIDI standard left off,
offering enhanced expressive capabilities and even greater compatibility. You can
play back commercially available General MIDI-compatible song data.
Easy-to-understand, Easy-to-use Operations and
Other Useful Features
You can use the CATEGORY/BANK knob to choose sounds by category.
There is a Phrase Preview that lets you audition patches through phrases, using just
the XV-2020.
Editing Software Included
The XV Editor software allows you to edit the XV-2020’s Patches, Rhythms, and
Performances on your computer. You can assign parameters to knobs and sliders for
intuitive operation as you freely create sounds with your computer.
8
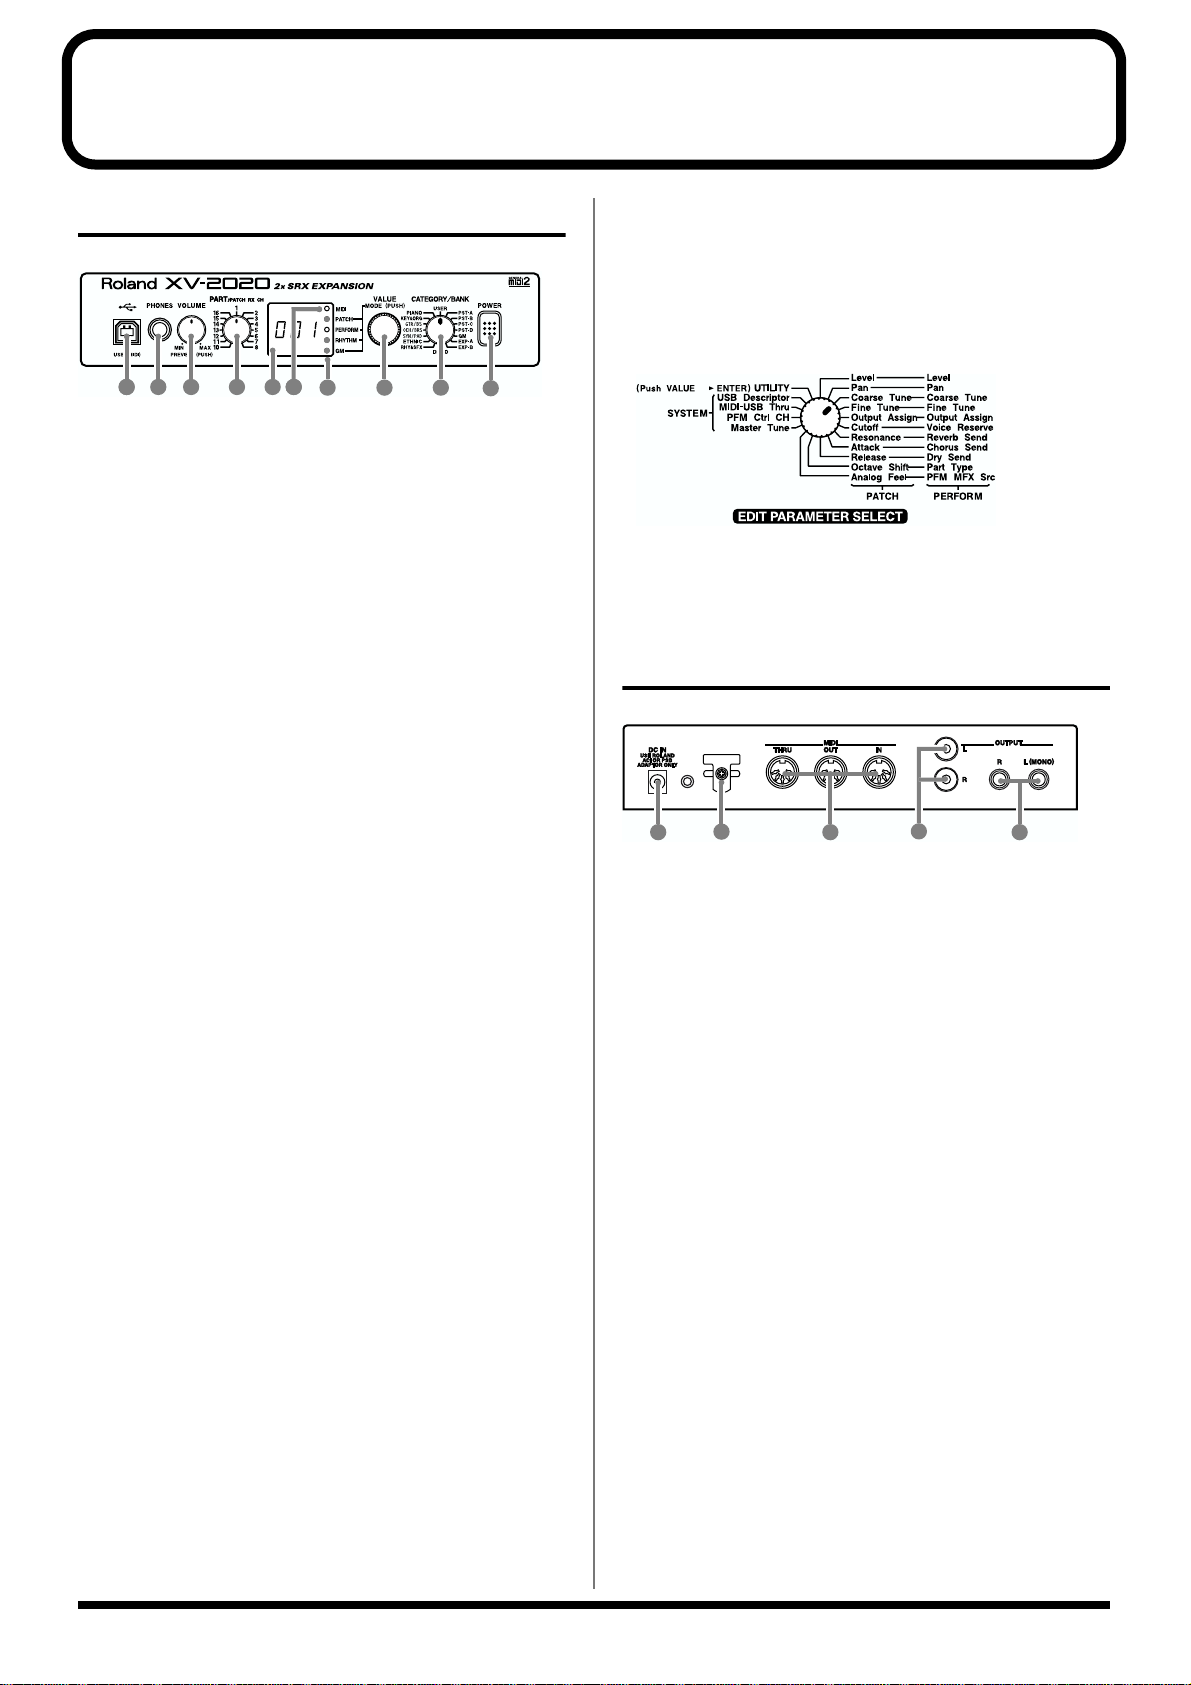
Front and Rear Panel
Front Panel
fig.00-01
2 3 4 66
11
1. USB Connector
Use this for connecting a computer to the XV-2020 using a USB cable
(p. 13).
2. PHONES Jack
This is the jack for connecting headphones (sold separately).
* Use headphones with an impedance of 8 to 150 Ohms.
3. VOLUME Knob
This adjusts the volume level for the OUTPUT jack and the PHONES
jack. You can also check out a sound using the XV-2020 alone by
pressing the VOLUME knob (
34). When in a mode other than the Patch mode, pressing the
VALUE knob while holding down the VOLUME knob switches you
to the Edit mode.
5
7 8 9
Playing Patches (Phrase Preview)
10
p.
9. CATEGORY/BANK Knob
Used to switch the sound selection range.
In the Edit mode, it is used to select the parameter to be set. For more
information about the CATEGORY/BANK knob’s functions in Edit
mode, refer to the EDIT PARAMETER SELECT chart on the XV2020’s top panel.
fig.00-01a
10. POWER Switch
Pressed to switch the power on and off.
Rear Panel
fig.00-02
4. PART Knob
In the Patch mode, it changes the receive channel. In the
Performance mode or the GM mode, it selects the Part to which
settings are to be applied.
5. Display
Displays a variety of information about the operation being
performed.
6. MIDI Indicator
Lights up when MIDI messages are received.
7. MODE Indicators
The indicator for the currently active mode lights up.
8. VALUE Knob
This changes the setting values for parameters. Turning the knob
rapidly makes the value change in larger increments. Pressing the
knob switches the mode. Pressing the VALUE knob while holding
down the VOLUME knob switches you to the Edit mode.
1 3 4
2
4
1. AC Adaptor Jack
Accepts connection of the supplied AC adaptor.
2. Cord Hook
To prevent the inadvertent disruption of power to your unit (should
the plug be pulled out accidentally), and to avoid applying undue
stress to the AC adaptor jack, anchor the power cord using the cord
hook.
3. MIDI Connectors (IN, OUT, THRU)
These connectors are used to connect the XV-2020 with other devices
for sending and receiving MIDI messages.
MIDI IN: This receives information from other MIDI
instruments.
MIDI OUT: This sends information from the XV-2020.
MIDI THRU: This sends out, unaltered, information received from
MIDI IN.
4. OUTPUT Jacks (L (MONO), R)
These are for stereo (L/R) output of audio signals to an amp or a
mixer. For monaural output, connect to the left (L) jack.
Two types of jacks are provided for the OUTPUT jacks, 1/4” phone
jacks (L (MONO), R) and RCA phono jacks (L, R).
9

Getting Ready to Play
Attaching the Rubber Feet
If you will not be using the separately available RAD-50 rack-mount adaptor, attach
the rubber feet that were supplied with the XV-2020, as shown in the figure. Use the
small holes on the bottom as a guide for positioning the rubber feet when attaching
them.
fig.00-03e
T
H
R
U
O
U
T
M
ID
I
IN
A
D
A
P
U
T
S
O
E
A
R
C
B
O
O
IN
S
N
1
S
LY
2
B
V
R
5
A
0
0
m
A
J
V
-1
0
1
0
affix the supplied rubber feet onto the bottom of the unit
Installing on the Rack-Mount Adaptor
When installing on the rack-mount adaptor (RAD-50; sold separately), use the screw
(M4 x  included with the rack-mount adaptor.
fig.00-04e
Screw (M4 x
When mounting the unit
using the rack-mount
adaptor, install it onto the
rack-mount adaptor
without attaching the
rubber feet.
10
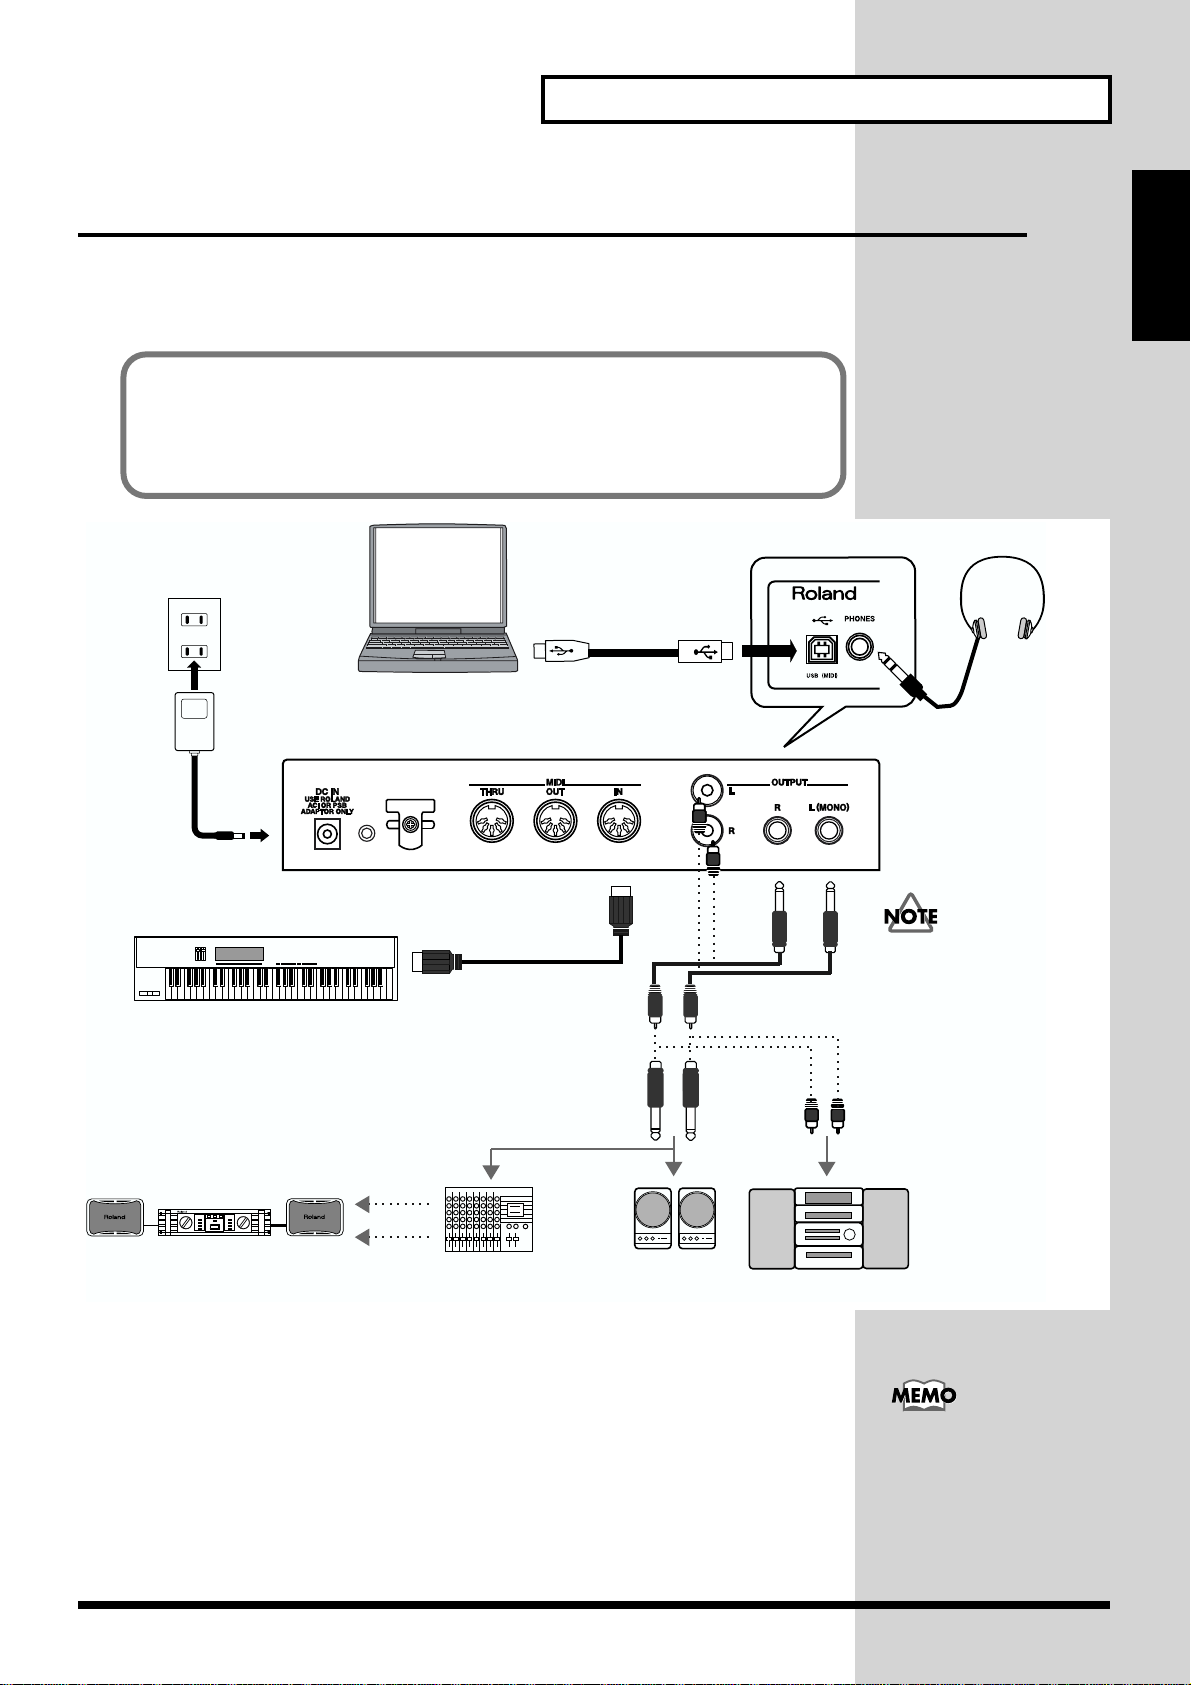
Getting Ready to Play
Connecting to MIDI Devices and Audio Equipment
The XV-2020 is not equipped with an internal amp or speakers. To hear sound, you
will need to connect it to a keyboard amp or audio system, or connect headphones.
Refer to the following figure when connecting the XV-2020 with external devices.
If using the XV-2020 with a computer, also refer to the following pages.
• USB connection (Windows) -> p. 13
• USB connection (Macintosh) -> p. 24
• Connection with MIDI cable -> p. 30
fig.00-05e
Getting Ready to Play
Headphones
AC adaptor
DC IN
MIDI keyboard
MIDI sequencer etc.
Computer
MIDI OUT
USB cable
MIDI IN
To prevent malfunction
and/or damage to speakers
or other devices, always
turn down the volume, and
turn off the power on all
devices before making any
connections.
Power amp
Mixer etc.
Monitor speakers
(powered)
Stereo set etc.
1. Before making any connections, confirm that power to all devices has
been turned off.
2. Connect the included AC adaptor to the AC adaptor jack and plug the
adaptor into a power outlet.
3. Connect audio and MIDI cables as shown in the diagram. If
connecting headphones, plug the headphones into the PHONES jack.
We recommend using a
stereo connection in order
to get the maximum
performance from the XV2020, but for monaural use,
make the connection to the
L (MONO) OUTPUT jack.
11

Getting Ready to Play
Turning the Power On/Off
Turning On the Power
* Once the connections have been completed (p. 11), turn on power to your various devices in
the order specified. By turning on devices in the wrong order, you risk causing malfunction
and/or damage to speakers and other devices.
1. Before turning on the power, confirm the following.
• Are all devices connected properly?
• Are the volume levels on the XV-2020 and any amp or mixer that is connected
turned down to the lowest settings?
2. Press XV-2020’s [POWER] to turn on the power.
3. Turn on the power to connected external devices.
Turning Off the Power
1. Before turning off the power, confirm the following.
• Are the volume levels on the XV-2020 and any amp or mixer that is connected
turned down to the lowest settings?
•Have you saved your data, including data for any sounds you have created? (p. 92)
This unit is equipped with
a protection circuit. A brief
interval (a few seconds)
after power up is required
efore the unit will operate
normally.
2. Turn off the power to connected external devices.
3. Press XV-2020’s [POWER] to turn off the power.
Restoring the Factory Settings (Factory Reset)
When using the XV-2020 for the first time, start by returning the settings to their
factory defaults so that the XV-2020 operates as described in the procedures in the
owner’s manual.
This returns all settings stored in memory in the XV-2020 to the values they had
when the unit was shipped from the factory.
fig.00-06
1
1, 3, 4, 5
1. While holding down [VOLUME], press [VALUE].
The indication in the display begins flashing, and the mode changes.
2. Turn [CATEGORY/BANK] to choose PIANO (UTILITY).
2
If there is important data
you’ve created that’s stored
in memory, all such data is
discarded, and everything
is returned to the factory
defaults when a Factory
Reset is performed. If you
have data that you want to
keep, choose [Save SVD
File…] from the File menu
in XV Editor (included with
the XV-2020). Alternatively,
you could use an external
MIDI device to send a
message requesting all data
(p. 143).
3. Rotate [VALUE] until “Fct” appears in the display.
4. Press [VALUE]; “Sur” flashes in the display, and a confirmation
screen appears.
5. Press [VALUE] once more to execute the factory reset.
* To cancel the procedure, while holding down [VOLUME] and pressing [VALUE].
You cannot carry out this
procedure when “DEMO”
is selected with the
[CATEGORY/BANK]
knob.
12
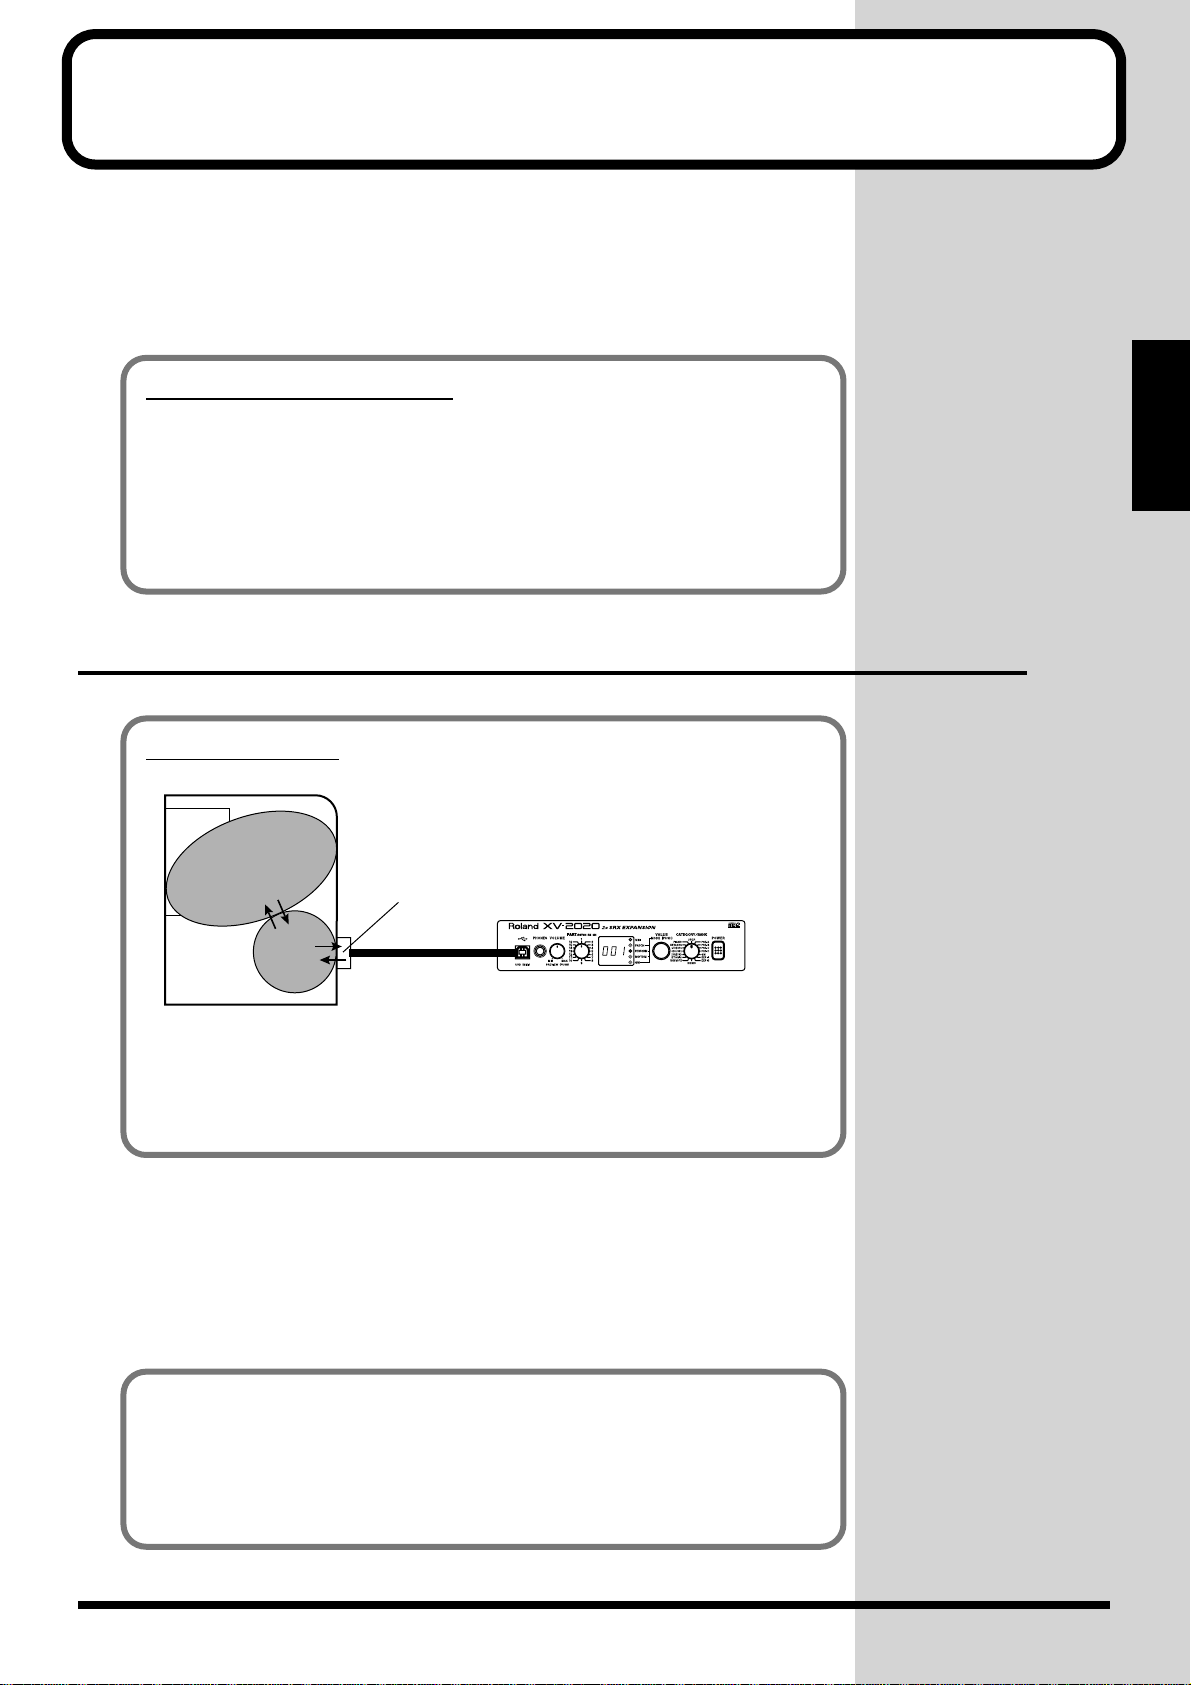
For Those Using a Computer
If you are using music software running on a computer, you can use the computer
to operate the XV-2020’s controls. Not only can you create and play back song data,
you can also have Tones switch automatically.
What’s more, you can use the included XV Editor software to create Tones using the
computer.
Which type of connection?
You can either use the USB cable, or use the MIDI cable to make a MIDI connection.
Depending on the type of connection you are using, install the appropriate driver
and make the appropriate settings.
• USB connection (Windows) -> p. 13
• USB connection (Macintosh) -> p. 24
• Connecting with MIDI cables -> p. 30
Installing & Setup the Driver (Windows)
Computer
For Those Using a
What is a driver?
fig.USB-00.e
Application
USB port
Driver
Computer
A “driver” is software that transfers data between the XV-2020 and application
software running on your computer, when your computer and the XV-2020 are
connected by a USB cable. The driver sends data from your application to the XV2020, and from the XV-2020 to your application.
The following items are required for connections and installation. Please have the
following items ready.
• XV-2020
• AC adaptor
• USB cable
• XV Editor CD-ROM
USB cable
XV-2020
The installation procedure will differ depending on your system.
Please proceed to one of the following sections, depending on the system you use.
• Windows XP users p. 14
• Windows 2000 users p. 17
• Windows Me/98 users p. 20
13

For Those Using a Computer
Windows XP users
1. With the XV-2020 disconnected, start up Windows.
Disconnect all USB cables except for a USB keyboard and USB mouse (if used).
2. Open the System Properties dialog box.
1. Click the Windows Start menu, and from the menu, select Control Panel.
2. In “Pick a category,” click “Performance and Maintenance.”
3. In “or pick a Control Panel icon,” click the System icon.
fig.2-1_50
3. Open the Driver Signing Options
dialog box.
Click the Hardware tab, and then click
[Driver Signing].
If you are using Windows
XP Professional, you must
log on using a user name
with an administrative
account type (e.g.,
Administrator). For details
on user accounts, please
consult the system
administrator of your
computer.
Depending on how your
system is set up, the
System icon may be
displayed directly in the
Control Panel (the Classic
display). In this case,
double-click the System
icon.
fig.2-2_45
4. Make sure that “What action do you
want Windows to take?” is set to
“Ignore.”
If it is set to “Ignore”, simply click [OK].
If it is not set to “Ignore”, make a note of
the current setting (“Warn” or
“Block”). Then change the setting to
“Ignore” and click [OK]
5. Close the System Properties dialog
box.
Click [OK].
6. Exit all currently running software (applications).
Also close any open windows. If you are using virus checking or similar software, be
sure to exit it as well.
7. Prepare the CD-ROM.
Insert the CD-ROM into the CD-ROM drive of your computer.
8. Open the “Run…” dialog box.
Click the Windows start button. From the menu that appears, select “Run…”
If you changed “What
action do you want
Windows to take?” in step
4, you must restore the
previous setting after you
have installed the driver.
(p. 17)
In this manual, the location
of folders and files is given
in terms of the file path,
using \ as the delimiter.
For example,
XV-2020\SETUPINF.EXE
indicates the
SETUPINF.EXE file found
in the XV-2020 folder.
14
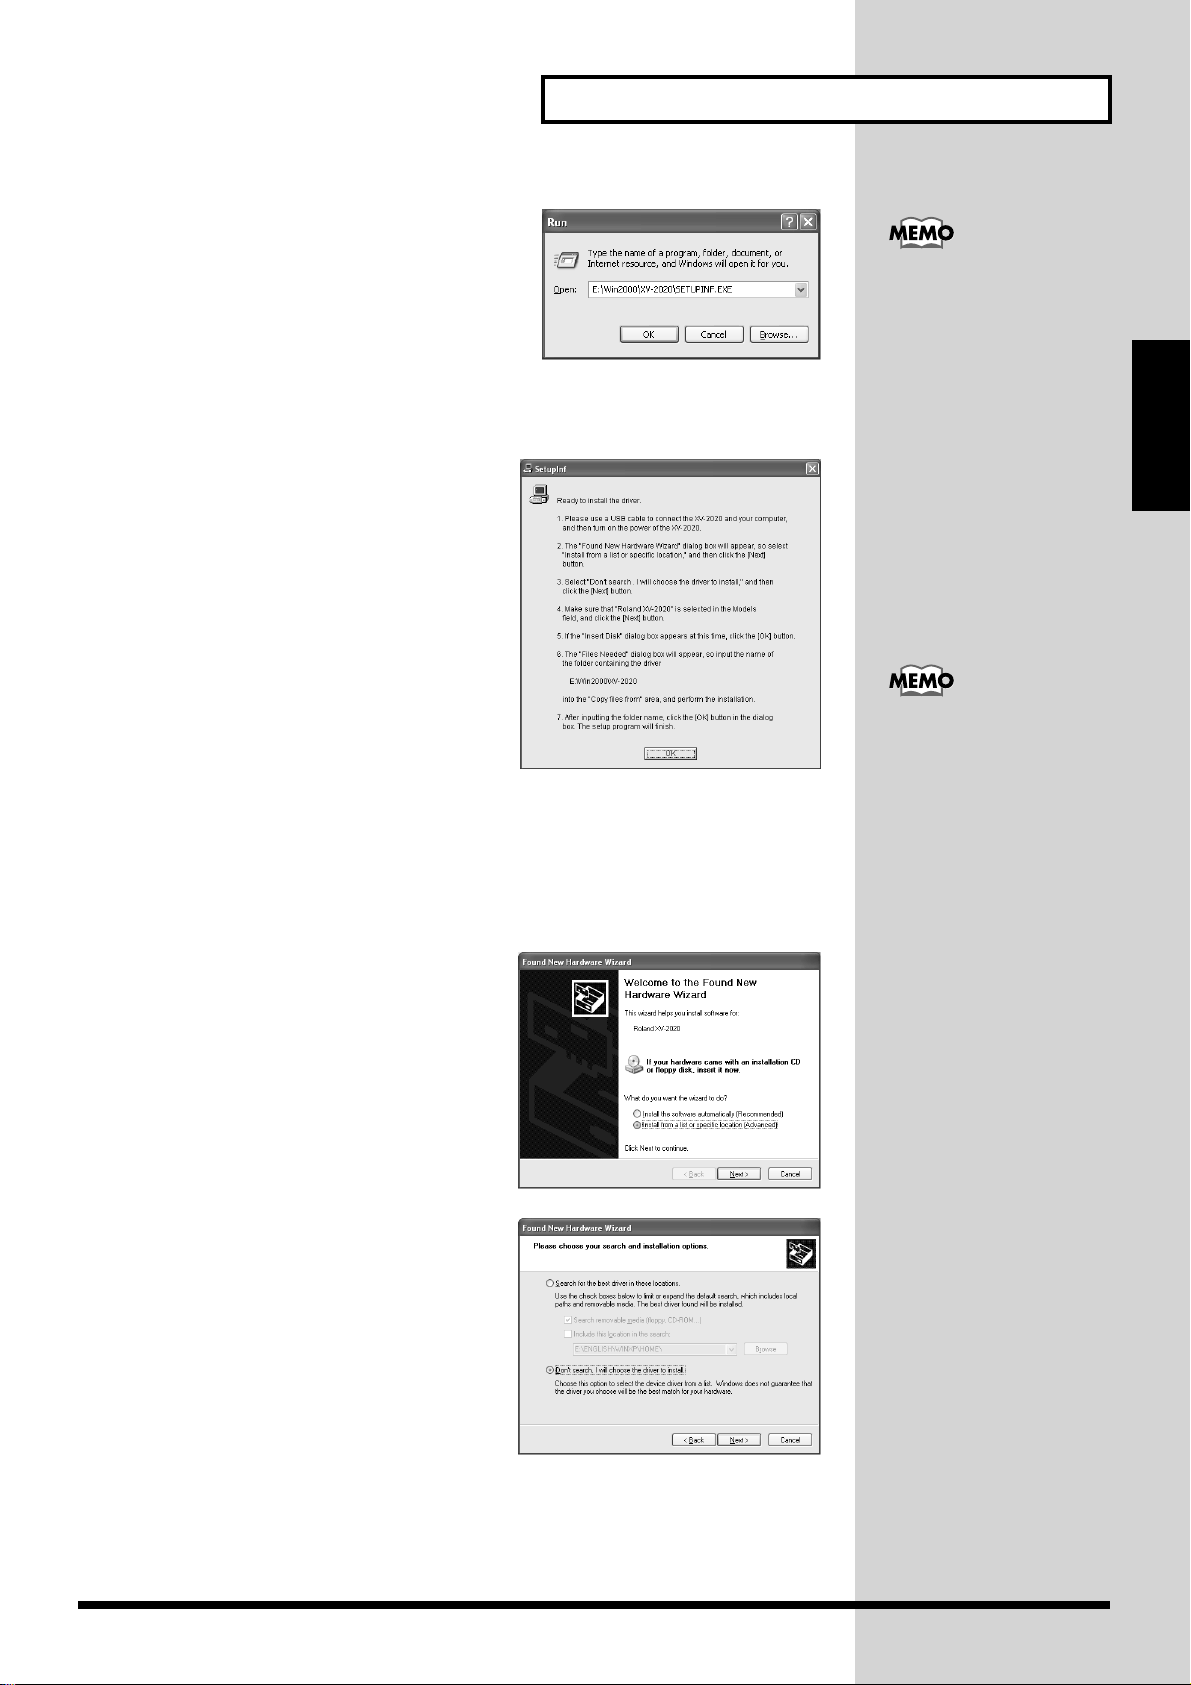
fig.2-3_40
9. In the dialog box that appears, input the
following into the “Open” field, and click
[OK].
E:\Win2000\XV-2020\SETUPINF.EXE
* The drive name “E:” may be different for
your system. Specify the drive name of your
CD-ROM drive.
For Those Using a Computer
If a message of “The driver
is already installed”
appears, you can connect
the XV-2020 to your
computer and use it.
fig.2-4_30
10.The SetupInf dialog box will appear.
You are now ready to install the driver.
* Do not click [OK] at this time.
11.Connect the XV-2020.
1. With the XV-2020’s power switch
turned off, connect it to the AC
adaptor.
2. Plug the AC adaptor into an AC power
outlet.
3. Use the USB cable to connect the XV-
2020 to your computer.
12.Set the XV-2020’s power switch to the ON position.
Near the task bar, your computer will indicate “Found New Hardware.” Please
wait.
fig.2-6_30
13.The Found New Hardware wizard will
appear.
Make sure that the screen indicates
“ROLAND XV-2020,” select “Install from
a list or specific location (Advanced),”
and click [Next].
Computer
For Those Using a
This unit is equipped with
protection circuit. A brief
interval (a few seconds)
after power up is required
efore the unit will operate
normally.
fig.2-7_30
14.The screen will indicate “Please choose
your search and installation options.”
Select “Don’t search. I will choose the
driver to install,” and click [Next].
15
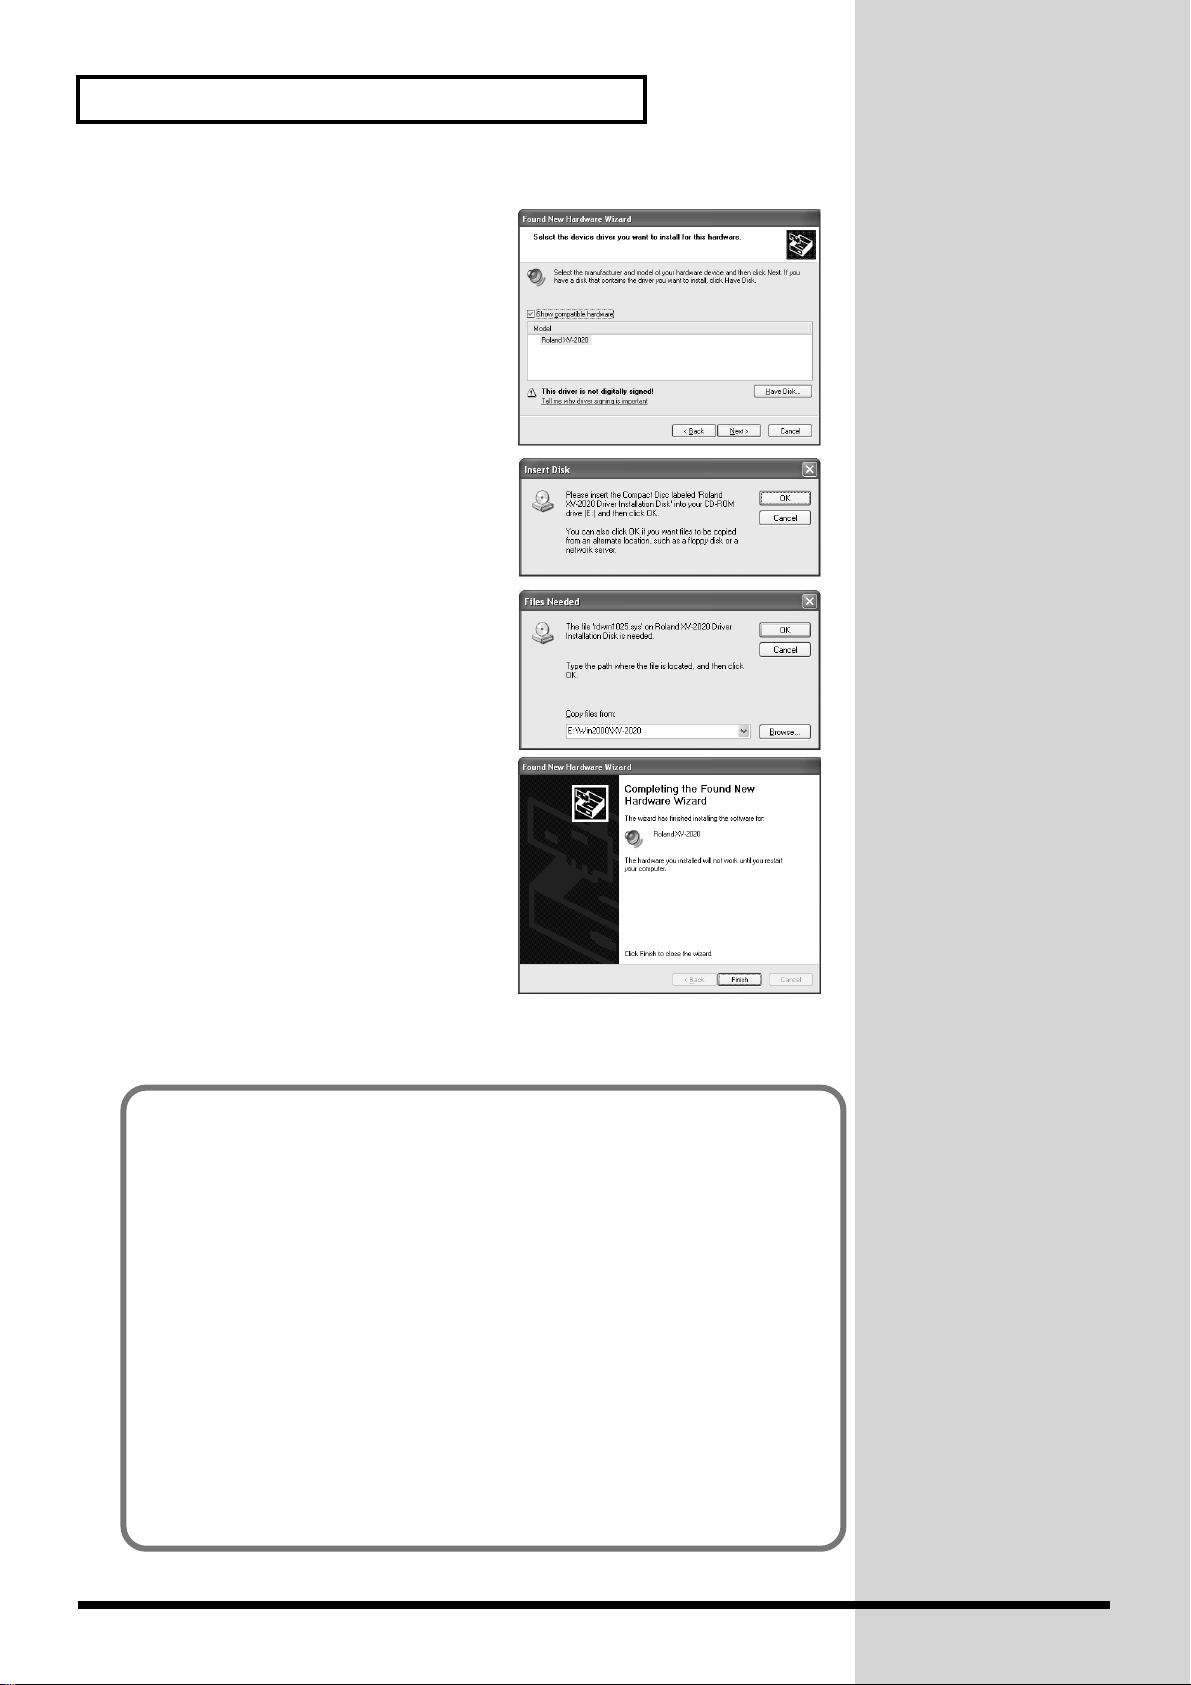
For Those Using a Computer
fig.2-8_30
15.Make sure that the “Model” field indicates
“ROLAND XV-2020,” and click [Next].
Driver installation will begin.
fig.2-9_35
16.The Insert Disk dialog box will appear.
Click [OK].
fig.2-10_35
17. The Files Needed dialog box will appear.
In the “Copy files from” area, type
“E:\Win2000\XV-2020” and click [OK].
fig.2-11_30
18.The Found New Hardware wizard will
appear.
Make sure that the display indicates
“ROLAND XV-2020,” and click [Finish].
Wait until “Found New Hardware”
appears near the taskbar.
19.Restart Windows.
When driver installation has been
completed, the System Setting Change dialog box will appear. Click [Yes].
If you changed “What action do you want Windows to take?”
If you changed the What action do you want Windows to take? setting in step 4,
restore the original setting after Windows restarts.
1. If you are using Windows XP Professional, log on to Windows using the user
name of an administrative account (e.g., Administrator).
2. Click the Windows start menu, and from the menu, select Control Panel.
3. In “Pick a category,” click “Performance and Maintenance.”
16
4. In “or pick a Control Panel icon,” click the System icon. The System
Properties dialog box will appear.
5. Click the Hardware tab, and then click [Driver Signing]. The Driver Signing
Options dialog box will appear.
6. Return the What action do you want Windows to take? setting to the original
setting (either “Warn” or “Block”), and click [OK].
7. Click [OK]. The System properties dialog box will close.
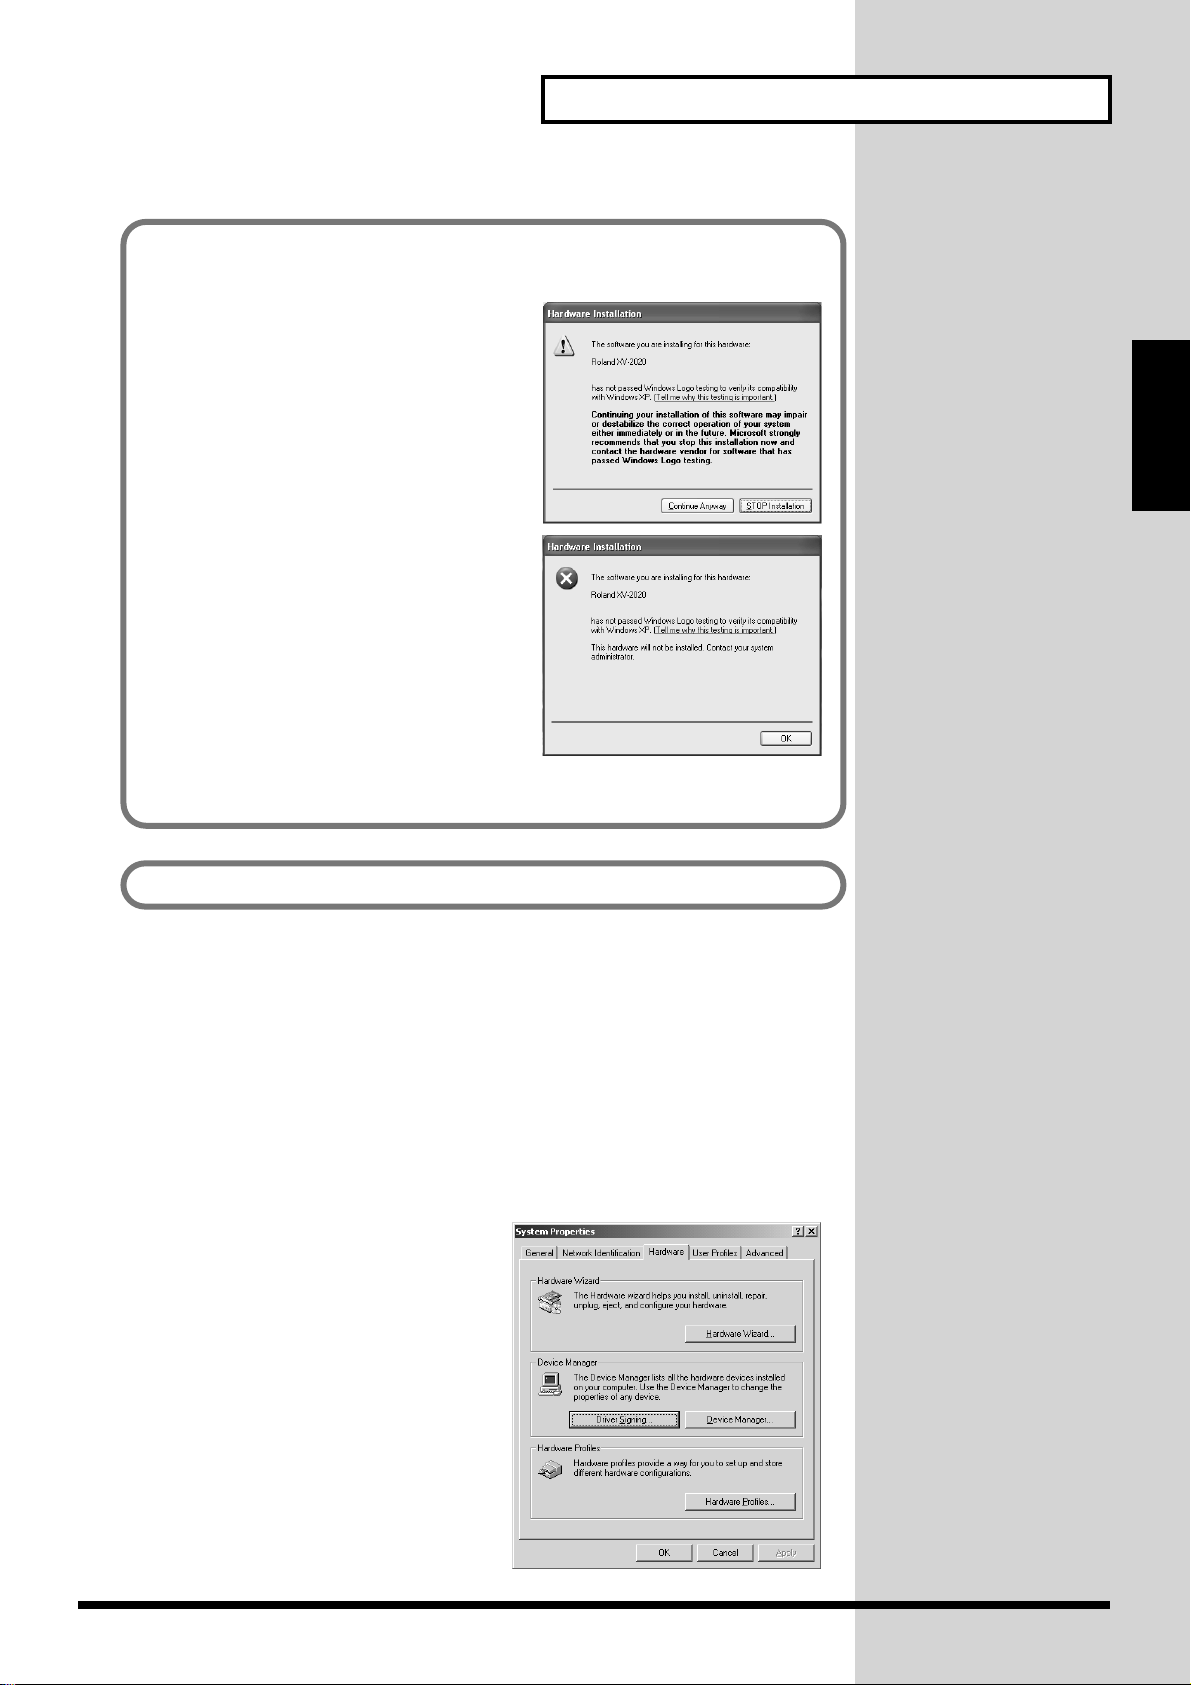
For Those Using a Computer
If in step 4 the “What action do you want Windows to take?” setting was not set
to “Ignore”, a “Digital signature not found” dialog box will appear.
fig.2-5_35
If “What action do you want Windows to
take?” is set to “Warn,”
1. Click [Continue Anyway].
2. Continue the installation.
fig.2-5a_35
If “What action do you want Windows to
take?” is set to “Block”
1. Click [OK].
2. When the “Found New Hardware
Wizard” appears, click [Finish].
3. Perform the installation as described in
the “Troubleshooting” section on
Device Manager shows “?”, “!”, or “USB Composite Device” (p. 114).
Next, you need to make the driver settings. -> Settings and checking (p. 21)
Windows 2000 users
1. With the XV-2020 disconnected, start up Windows.
Disconnect all USB cables except for a USB keyboard and USB mouse (if used).
Computer
For Those Using a
2. Log on to Windows as a user with administrative privileges (such as
Administrator).
3. Open the System Properties dialog box.
Click the Windows Start button, and from the menu that appears, select Settings |
Control Panel. In Control Panel, double-click the System icon.
fig.2-12_50
4. Open the Driver Signing Options dialog
box.
Click the Hardware tab, and then click
[Driver Signing].
17
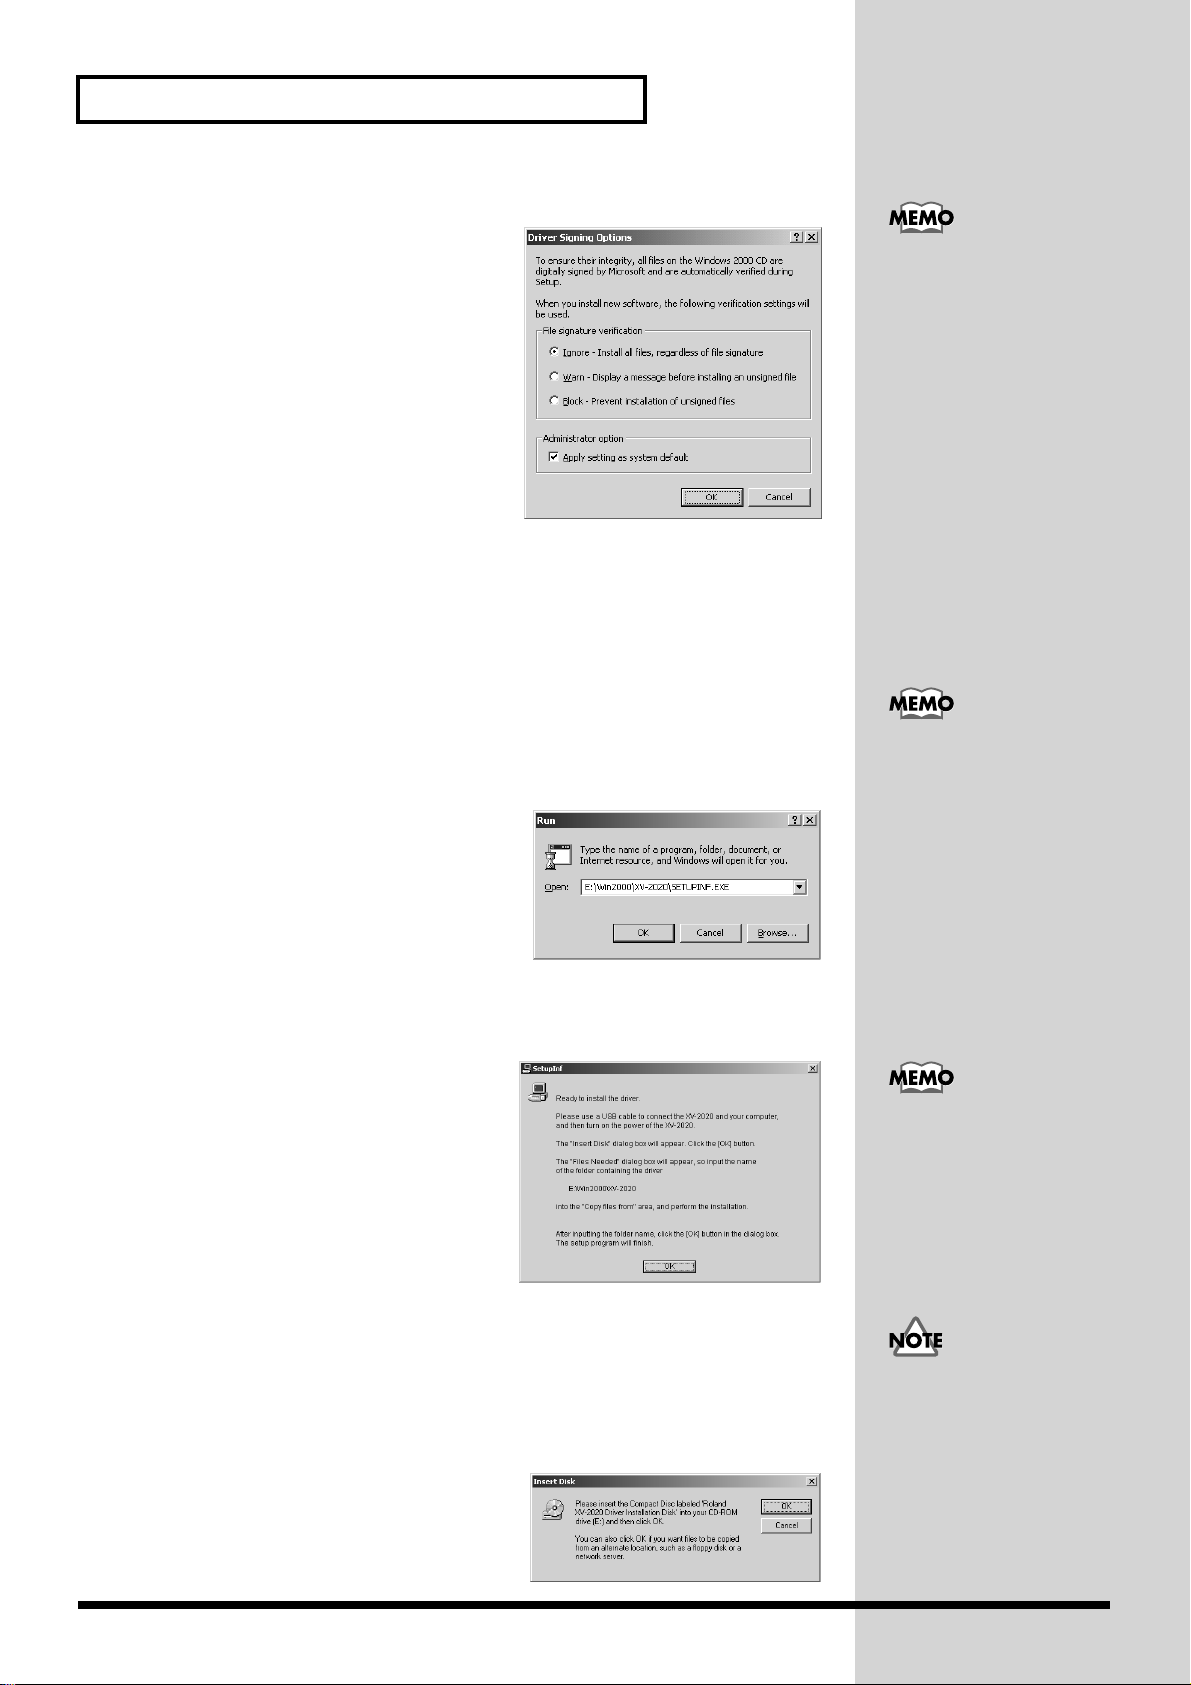
For Those Using a Computer
fig.2-13_55
5. Make sure that “File signature
verification” is set to “Ignore.”
If it is set to “Ignore”, simply click [OK].
If it is not set to “Ignore”, make a note of the
current setting (“Warn” or “Block”). Then
change the setting to “Ignore” and click
[OK].
6. Close the System Properties dialog box.
Click [OK].
7. Exit all currently running software
(applications).
Also close any open windows. If you are using virus checking or similar software, be
sure to exit it as well.
8. Prepare the CD-ROM.
Insert the CD-ROM into the CD-ROM drive of your computer.
If you changed the “File
signature verification”
setting in step 5, restore the
original setting after
Windows restarts. (p. 19)
9. Open the “Run…” dialog box.
Click the Windows Start button. From the menu that appears, select “Run…”
fig.2-14_55
10.In the dialog box that appears, input the
following into the “Open” field, and click
[OK].
E:\Win2000\XV-2020\SETUPINF.EXE
* The drive name “E:” may be different for
your system. Specify the drive name of your
CD-ROM drive.
fig.2-15_40
11.The SETUPINF dialog box will appear.
You are now ready to install the driver.
* Do not click [OK] at this time.
12.Connect the XV-2020.
1.With the XV-2020’s power switch
turned off, connect it to the AC
adaptor.
2.Plug the AC adaptor into an AC power
outlet.
3.Use the USB cable to connect the XV-2020 to your computer.
13.Set the XV-2020’s power switch to the ON position.
fig.2-17_45
14.The Insert Disk dialog box will appear.
Click [OK].
In this manual, the location
of folders and files is given
in terms of the file path,
using \ as the delimiter.
For example,
XV-2020\SETUPINF.EXE
indicates the
SETUPINF.EXE file found
in the XV-2020 folder.
This unit is equipped with
protection circuit. A brief
interval (a few seconds)
after power up is required
efore the unit will operate
normally.
If the Insert disk dialog box
does not appear, please
read The The “Insert Disk”
dialog box does not
appear (p. 114)
18
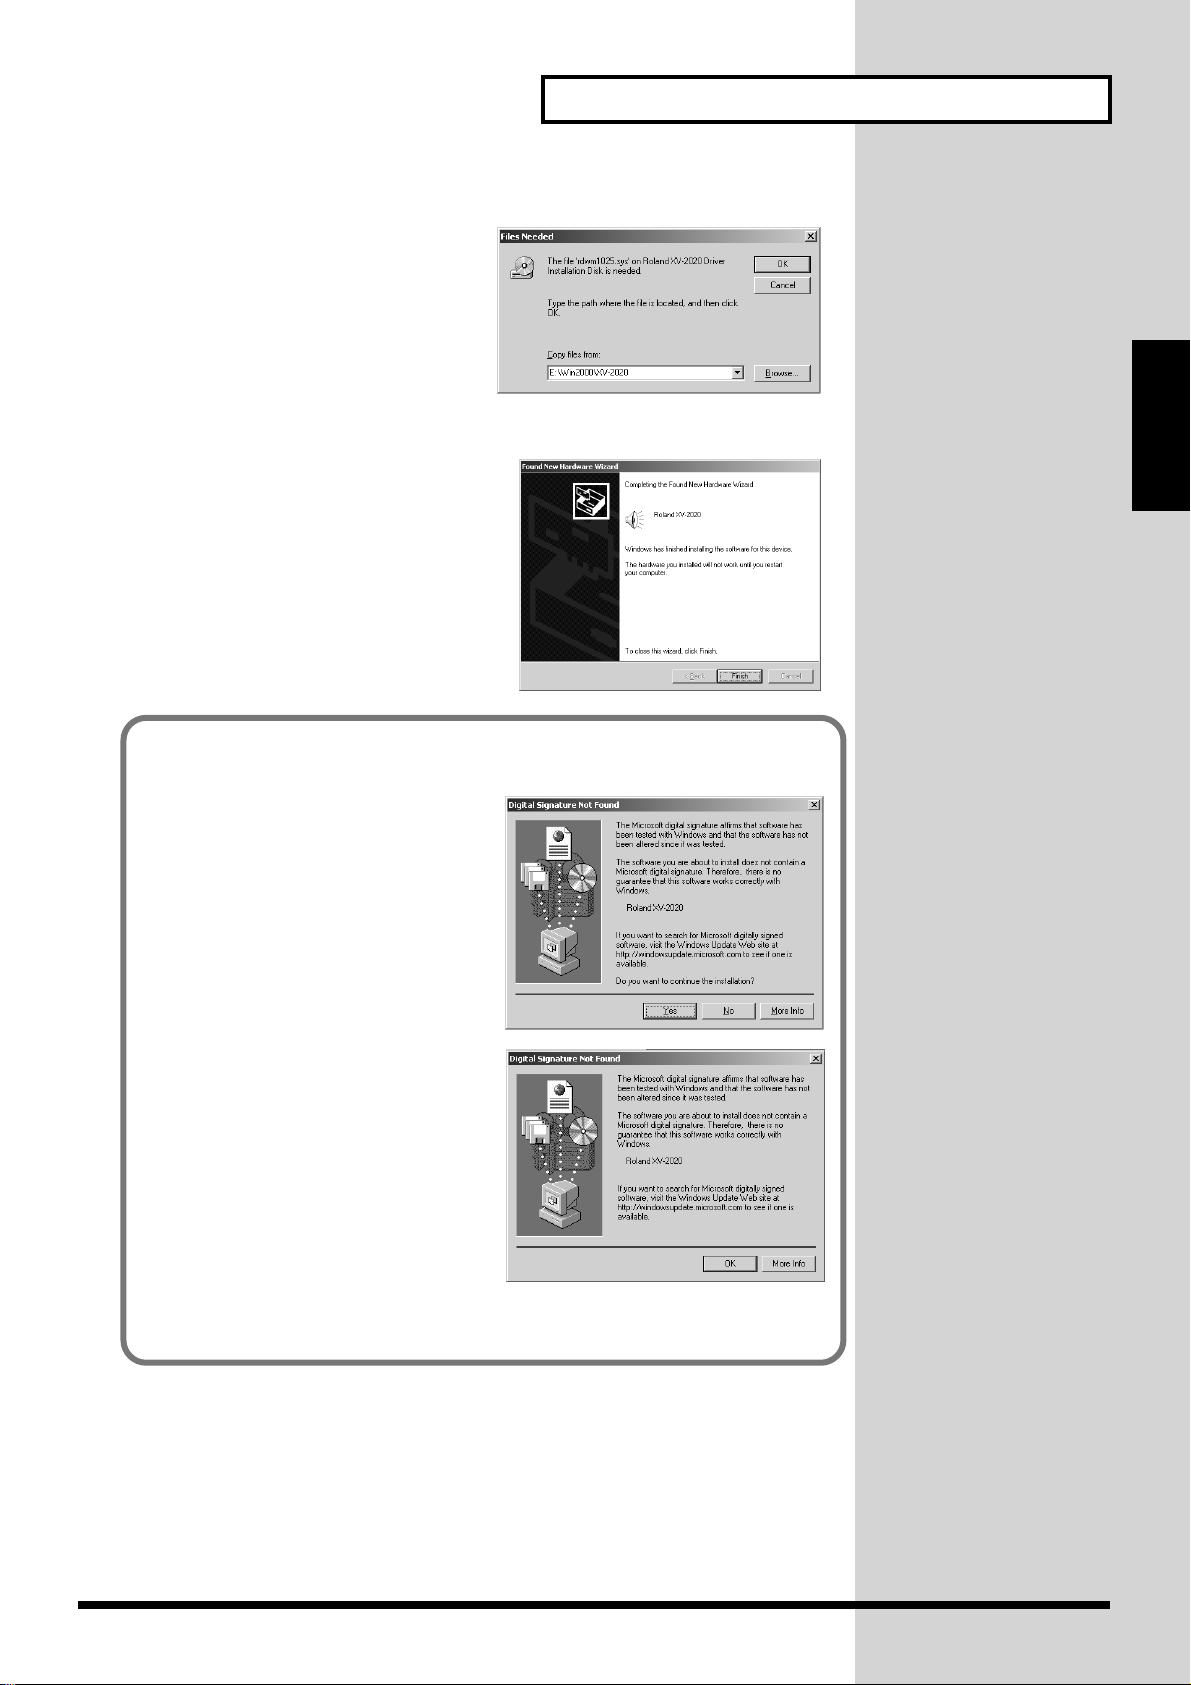
fig.2-18_50
15.The Files Needed dialog box will
appear.
In the “Copy files from” area, type
“E:\Win2000\XV-2020” and click [OK].
* The drive name “E:” may be different
for your system. Specify the drive name
of your CD-ROM drive.
fig.2-17b_40
16.The “Found New Hardware Wizard” may
be displayed.
Verify that “ROLAND XV-2020” is
displayed, and click [Finish].
17.Restart Windows.
The System Settings Change dialog box
may appear. Click [Yes]. Windows will
restart automatically.
For Those Using a Computer
Computer
For Those Using a
If in step 5 the “File signature verification” setting was not set to “Ignore”, a
“Digital signature not found” dialog box will appear.
fig.2-16_40
If “File signature verification” is set to
“Warn,”
1. Click [Yes].
2. Continue the installation.
fig.2-16a_40
If “File signature verification” is set to
“Block”
1. Click [OK].
2. When the “New hardware
detection wizard” appears, click
[Finish].
3. Perform the installation as described
in the “Troubleshooting” section on
Device Manager shows “?”, “!”, or
“USB Composite Device” (p. 114).
19
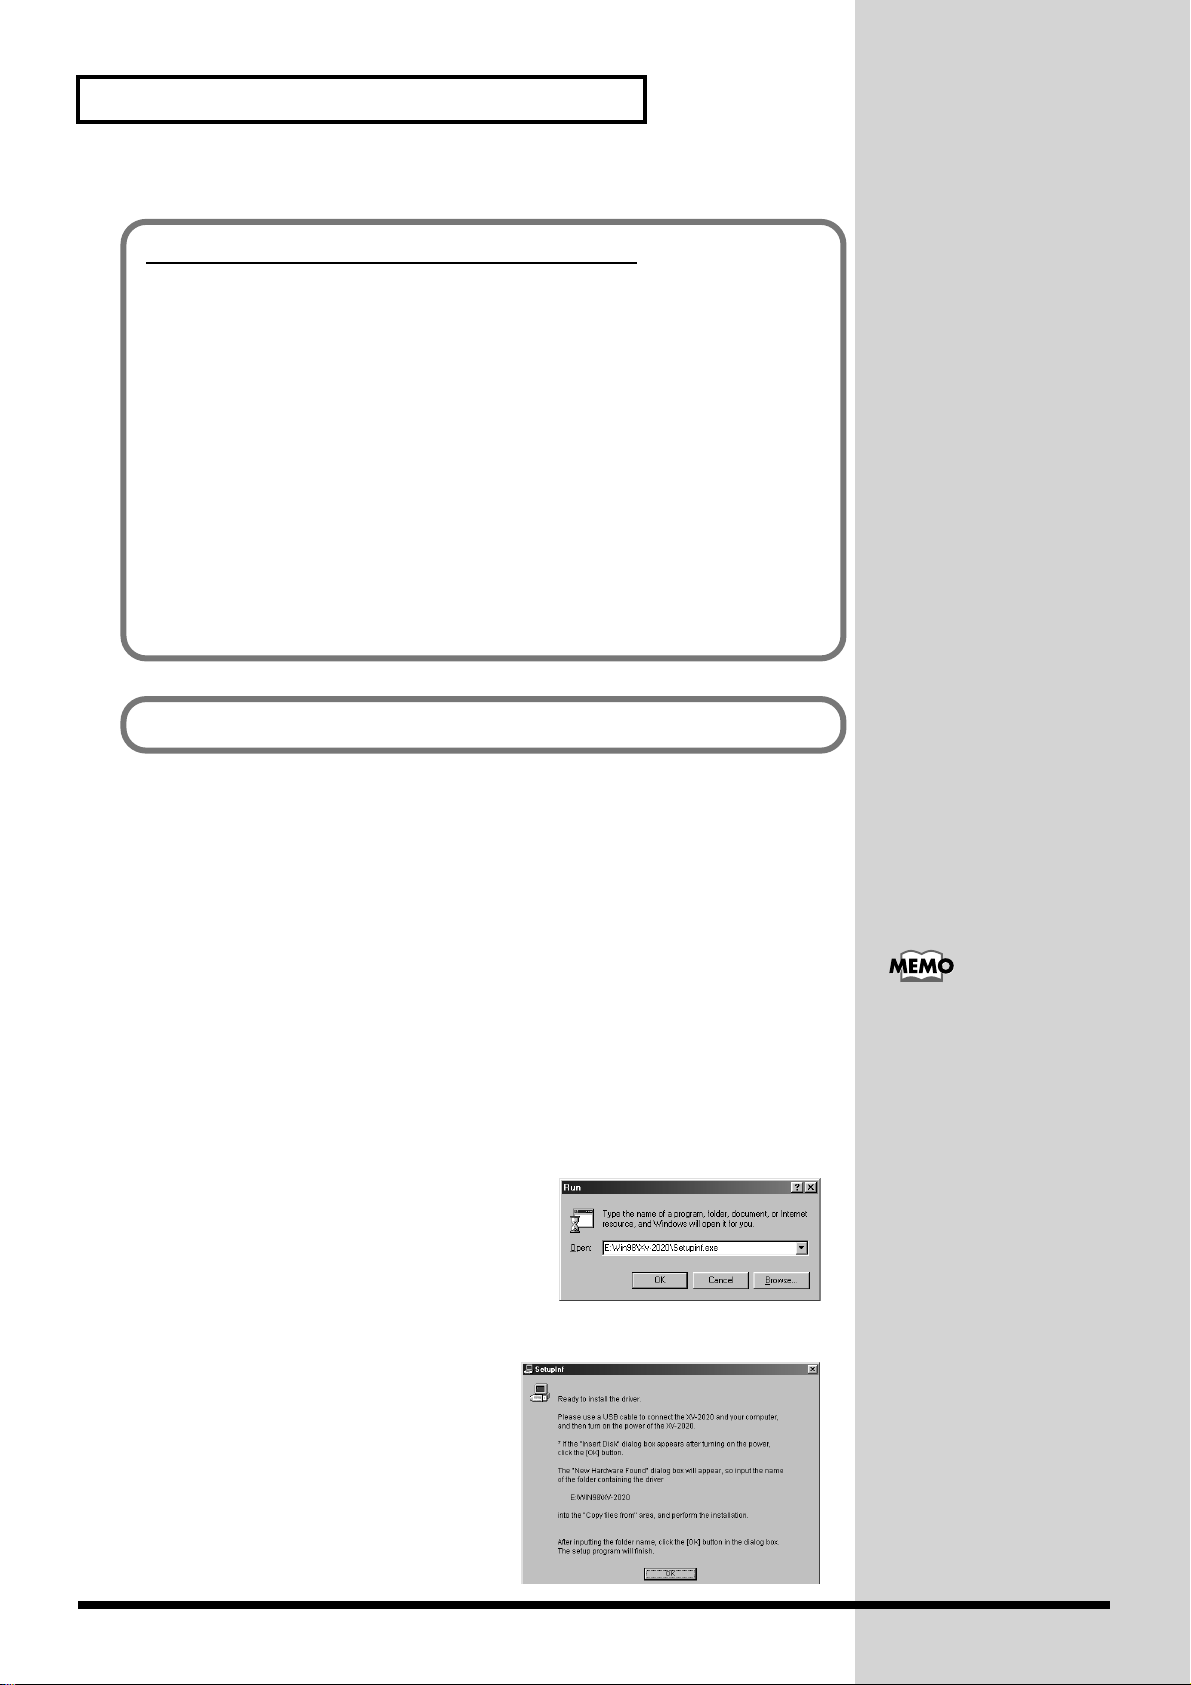
For Those Using a Computer
If you changed “File signature verification”
If you changed the “File signature verification” setting in step 5, restore the
original setting after Windows restarts.
1. After Windows restarts, log in to Windows as a user with administrative
privileges, (such as Administrator).
2. In the Windows desktop, right-click the My Computer icon, and from the
menu that appears, select Properties. The System Properties dialog box will
appear.
3. Click the Hardware tab, and then click [Driver signature]. The Driver Signing
Options dialog box will appear.
4. Return the “File signature verification” setting to the original setting (either
“Warn” or “Block”), and click [OK].
5. Click [OK]. The System properties dialog box will close.
Next, you need to make the driver settings. -> Settings and checking (p. 21)
Windows Me/98 users
1. With the XV-2020 disconnected, start up Windows.
Disconnect all USB cables except for a USB keyboard and USB mouse (if used).
2. Exit all currently running software (applications).
Also close any open windows. If you are using virus checking or similar software, be
sure to exit it as well.
3. Prepare the CD-ROM.
Insert the CD-ROM into the CD-ROM drive of your computer.
4. Open the “Run…” dialog box.
Click the Windows Start button.
From the menu that appears, select “Run…”
fig.2-19a_50
5. In the dialog box that appears, input the
following into the “Open” field, and click [OK].
E:\Win98\XV-2020\SETUPINF.EXE
In this manual, the location
of folders and files is given
in terms of the file path,
using \ as the delimiter.
For example,
Win98\SETUPINF.EXE
indicates the
SETUPINF.EXE file found
in the Win98 folder.
* The drive name “E:” may be different for your
system. Specify the drive name of your CD-ROM drive.
fig.2-19_40
6. The SETUPINF dialog box will appear.
You are now ready to install the driver.
* Do not click [OK] at this time.
20
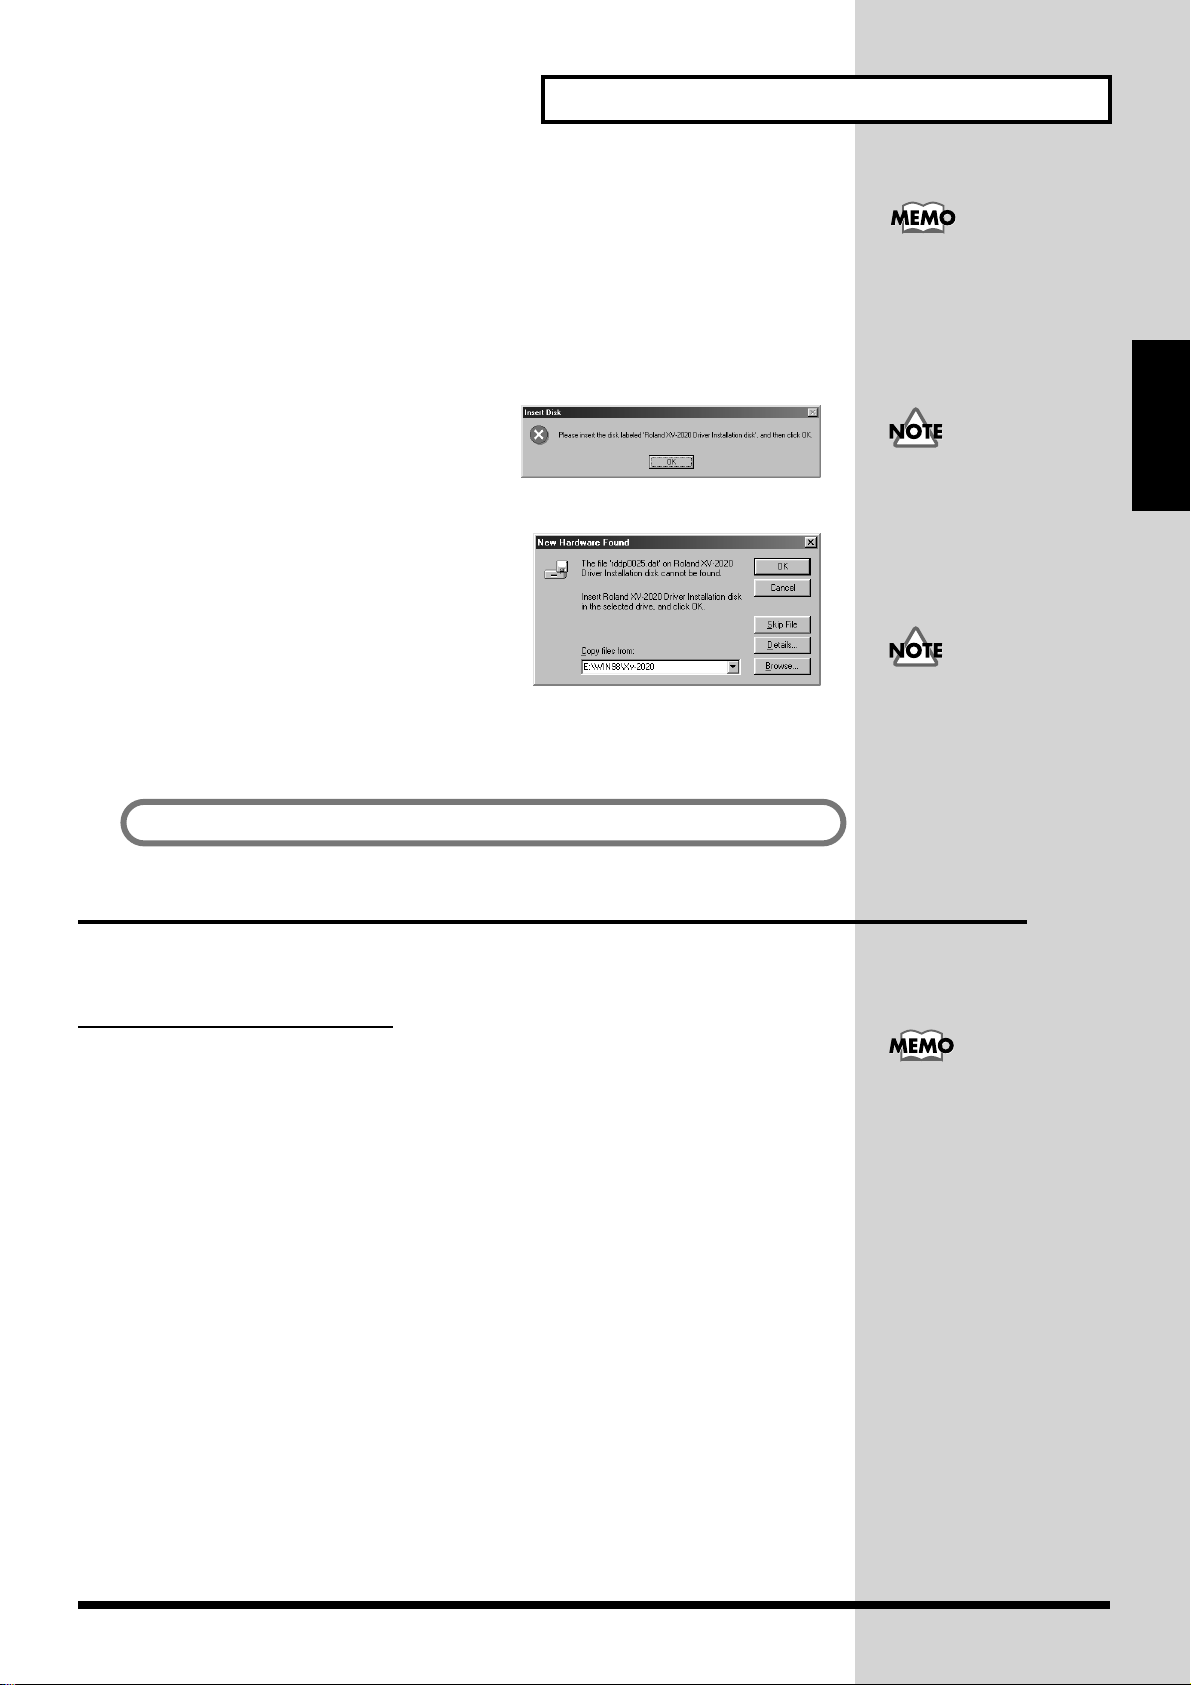
7. Connect the XV-2020.
1. With the XV-2020’s power switch turned off, connect it to the AC adaptor.
2. Plug the AC adaptor into an AC power outlet.
3. Use the USB cable to connect the XV-2020 to your computer.
8. Set the XV-2020’s power switch to the ON position.
fig.2-20_40
9. If you are using Windows 98, an Insert
Disk dialog box will appear.
Click [OK].
fig.2-21a_50
10.The New Hardware Found dialog box will
appear.
In the “Copy files from” area, type
“E:\Win98\XV-2020” and click [OK].
11.Once the driver has been installed, New
Hardware Found dialog box will close.
In the SETUPINF dialog box, click [OK]. The SETUPINF dialog box will close.
Next, you need to make the driver settings. -> Settings and checking (p. 21)
For Those Using a Computer
This unit is equipped with
a protection circuit. A brief
interval (a few seconds)
after power up is required
efore the unit will operate
normally.
If you are using Windows
98 and the Insert Disk
dialog box dose not appear,
please read The “Insert
Disk” dialog box does not
appear (p. 114).
If the New Hardware
Found dialog box does not
appear, re-install the driver
using the same procedure
as described in The “Insert
Disk” dialog box does not
appear (p. 114).
Computer
For Those Using a
Settings and checking
Specifying the Output Destination for MIDI Data
Windows XP/2000/Me users
1. Open Control Panel.
Click the Windows Start button, and from the menu that appears, select Settings |
Control Panel.
• Windows XP
Click the Windows start button, and from the menu that appears, select Control
Panel.
2. Open the Sounds and Multimedia Properties dialog box (or in Windows XP,
Sounds and Audio Devices Properties).
• Windows 2000/Me
In Control Panel, double-click the Sounds and Multimedia icon to open the
“Sounds and Multimedia Properties” dialog box.
• Windows XP
In “Pick a category,” click “Sound, Speech, and Audio Devices.” Next, in “or
pick a Control Panel icon,” click the sounds and Audio Devices icon.
Depending on how your
system is set up, the
Sounds and Audio
Devices icon may be
displayed directly in the
Control Panel (the Classic
display). In this case,
double-click the Sounds
and Audio Devices icon.
21
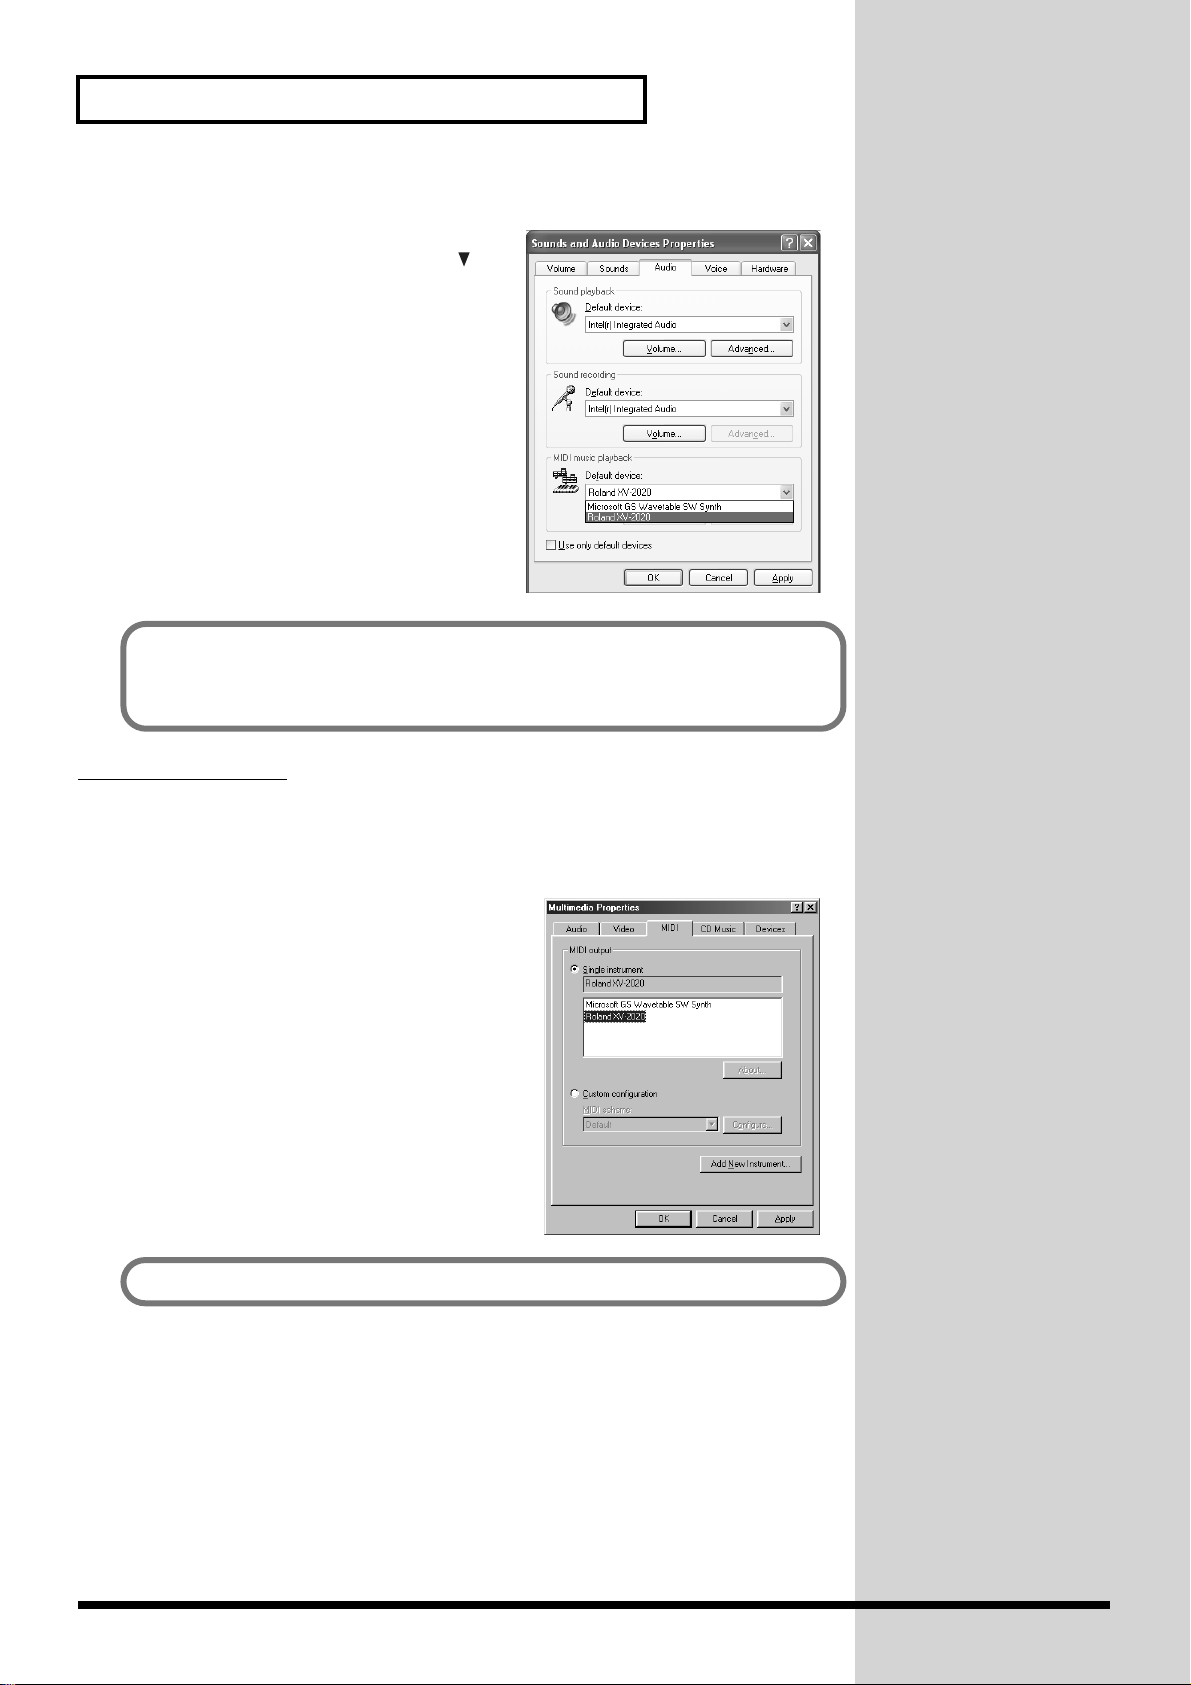
For Those Using a Computer
3. Click the Audio tab.
fig.2-28_40
4. For MIDI music playback, click the
located at the right of [Preferred device]
(or in Windows XP, [Default device]), and
select the ROLAND XV-2020.
5. Click OK to complete the settings.
Proceed to the following page.
• Windows XP users -> Enabling background services (p. 23)
• Windows 2000/Me users -> The settings are completed.
Windows 98 users
1. Open Control Panel.
Click the Windows Start button, and from the menu that appears, select Settings |
Control Panel.
fig.2-29_50
2. Open the Multimedia Properties dialog box.
In Control Panel, double-click the
Multimedia icon to open the “Multimedia
Properties” dialog box.
3. Click the MIDI tab.
4. Set “MIDI output.”
Select [Single instrument], and choose the
ROLAND XV-2020.
5. Click OK to complete the settings.
The settings are completed.
22
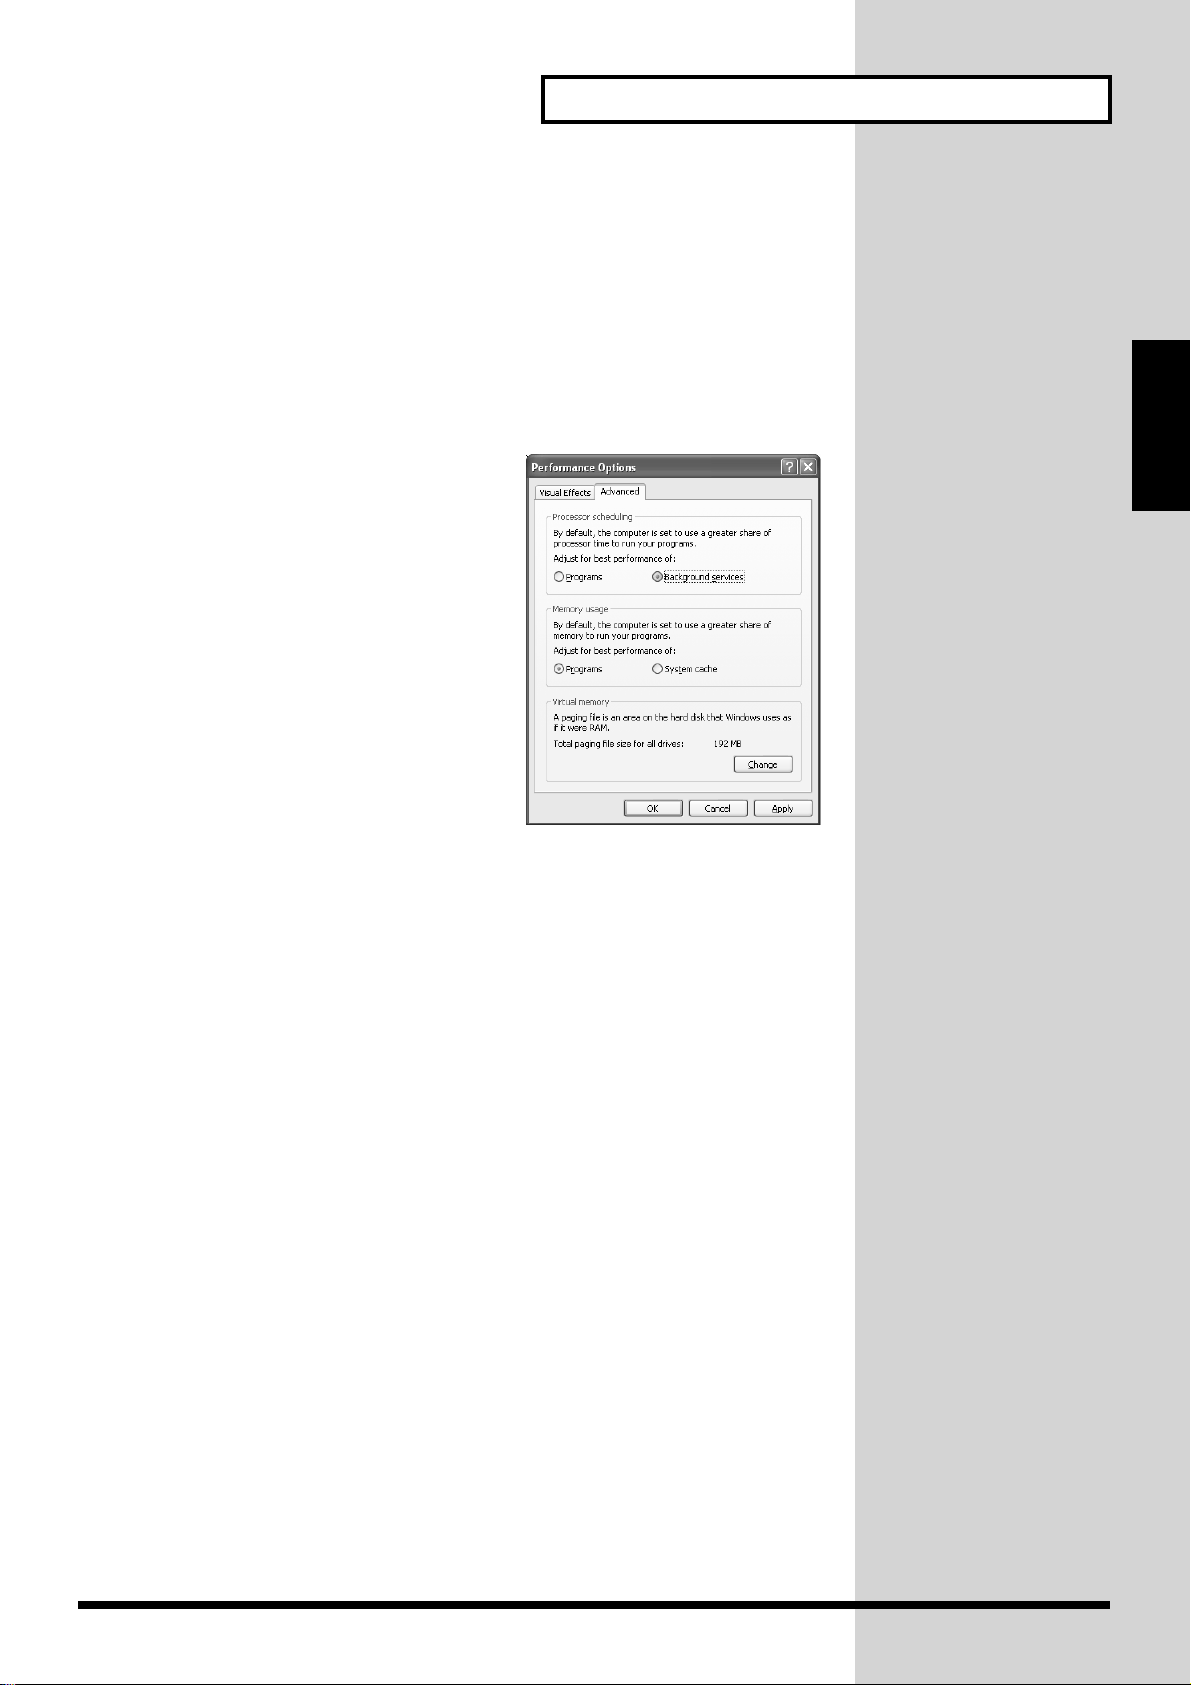
Enabling background services
In Windows XP, perform these settings to make MIDI processing occur more
smoothly. These settings are unavailable in Windows 2000/Me/98.
1. Click the Windows start button, and from the menu that appears, select Control
Panel.
2. In “Pick a category,” click “Performance and Maintenance.”
3. In “or pick a Control Panel icon,” click the System icon.
fig.2-30_40
4. Click the Advanced tab.
5. At the right of the Performance field, click
[Settings]. The Performance Options
dialog box will appear.
6. Click the Advanced tab.
7. In the Processor Scheduling field, select
“Background services,” and click [OK].
For Those Using a Computer
Computer
For Those Using a
8. In the System Properties dialog box, click
[OK].
The System Properties dialog box will
close.
Deleting the USB MIDI Driver
If you were not able to install the XV-2020 driver according to the procedure, or if
you are unable to use the XV-2020 even after installing the driver, you must delete
the driver.
After deleting the driver, use the procedure described in “Installing & Setup the
Driver (Windows) (p. 13)” to re-install the driver.
For details on how to delete the driver, refer to the explanation provided in the online manual within the XV Editor CD-ROM.
• Windows XP/2000 users
In the XV Editor CD-ROM folder Win2000, open the README_E.HTM file and read
“To uninstall.”
• Windows 98 / Me users
In the XV Editor CD-ROM folder Win98, open the README_E.HTM file and read
“To uninstall.”
23

For Those Using a Computer
Installing & Setup the Driver (Macintosh)
What is a driver?
fig.USB-00.e
Application
USB port
Driver
Computer
A “driver” is software that transfers data between the XV-2020 and application
software running on your computer, when your computer and the XV-2020 are
connected by a USB cable. The driver sends data from your application to the XV2020, and from the XV-2020 to your application.
The following items are required for connections and installation. Please have the
following items ready.
• XV-2020
• AC adaptor
• USB cable
• XV Editor CD-ROM
USB cable
XV-2020
1. Turn off the power of the Macintosh and all peripheral devices connected to the
Macintosh.
2. With the XV-2020’s power switch turned off, connect it to the AC adaptor.
3. Plug the AC adaptor into an AC power outlet.
4. Use the USB cable to connect the XV-2020 to your computer.
5. Turn on the peripheral devices connected to the Macintosh, except for the XV-2020.
Then turn on the power of the Macintosh itself.
* Do not turn on the power of the XV-2020 at this time.
24
For Those Using a Computer
If the power of the XV-2020 is turned on, a message like the following will appear
when the Macintosh is started up. Perform the steps described below as appropriate
for the message that is displayed.
If the screen indicates:
“Driver required for USB device `unknown device’ is not available. Search for
driver on the Internet?”
-> click [Cancel].
If the screen indicates:
“Software required for using device `unknown device’ cannot be found. Please
refer to the manual included with the device, and install the necessary
software.”
-> click [OK].
Computer
For Those Using a
Use either OMS or FreeMIDI as the MIDI driver.
• If you are using OMS (p. 25)
• If you are using FreeMIDI (p. 28)
* Either OMS or FreeMIDI must be installed in your Macintosh, as appropriate for
the sequencer software you are using.
* Install OMS if using the XV Editor software included with the unit.
Installing the XV-2020 driver (OMS)
Use the following procedure to install the XV-2020 driver.
The included XV-2020 OMS driver is an add-on module for using the XV-2020 with
OMS. In order for you to use it, OMS must already be installed on the hard disk
from which you started up.
If you would like to learn more about OMS, refer to OMS_2.3_Mac.pdf (online
manual) in the OMS2.3.8 folder within the OMS folder of the CD-ROM.
* Disconnect the XV-2020 from the Macintosh before you perform the installation.
1. Exit all currently running software (applications).
If you are using a virus checker or similar software, be sure to exit this as well.
OMS can be found in the
OMS2.3.8 folder within the
OMS folder of the CD-
ROM.
About detailed information
for OMS, refer to the
Owner’s Manual of OMS.
2. Prepare the CD-ROM.
Insert the CD-ROM into the CD-ROM drive.
fig.3-1_40
3. Double-click the OMS-E icon (found in the XV-2020 folder — XV Driver E
folder of the CD-ROM) to start up the installer.
4. Verify the installation location, and click [Install].
You will need the Adobe
Acrobat Reader in order to
view OMS_2.3_Mac.pdf.
The latest version of Adobe
Acrobat Reader can be
downloaded from the
Adobe website.
http://www.adobe.com
(This URL may change
without notice.)
25
For Those Using a Computer
fig.3-2_35
5. If a message like the following is displayed,
click [Continue].
The other currently running applications will
exit, and installation will continue.
6. A dialog box will indicate Installation completed.
Click [Restart] to restart your Macintosh.
7. Use the USB cable to connect the XV-2020 to your computer.
1. With the XV-2020’s power switch turned off, connect it to the AC adaptor.
2. Plug the AC adaptor into an AC power outlet.
3. Use the USB cable to connect the XV-2020 to your computer.
8. Set the XV-2020’s power switch to the ON position.
OMS settings
1. Use the USB cable to connect the XV-2020 and your Macintosh.
fig.USB-02.e
Computer
USB cable
This unit is equipped with
a protection circuit. A brief
interval (a few seconds)
after power up is required
efore the unit will operate
normally.
To prevent malfunction
and/or damage to speakers
or other devices, always
turn down the volume, and
turn off the power on all
devices before making any
connections.
fig.oms-05_50
2. Double-click the “OMS Setup” icon.
fig.oms-06.e_70
3. If the “Apple Talk” dialog box appears,
click [Turn It Off].
Then, in the dialog box that appears next,
click [OK].
fig.oms-07.e_75
4. The “Create a New Studio setup” dialog
box appears.
Click [OK].
XV-2020
If you are using the XV2020 with a sequencer, do
not disconnect the MIDI
cable connected to the XV2020 while a song is
playing back.
If the “Create a New
Studio setup” dialog box
does not appear, click [New
Studio setup] in the [File]
menu.
26
fig.oms-08.e_60
5. The “OMS Driver Search” dialog box
appears.
Click [Search].
fig.oms-09.e_65
6. After the search has been completed,
make sure that “Roland XV-2020” is
listed in the “OMS Driver Setup” dialog
box, and click [OK].
fig.oms-10.e_65
7. After making sure that the XV-2020 is
listed in the “OMS MIDI Device Setup”
dialog box, click the check box for XV2020, and click [OK].
For Those Using a Computer
Computer
For Those Using a
fig.oms-14.e_70
8. Change the name of the keyboard icon to
“Port 1” or any other names except “XV-
2020.”
fig.oms-11.e_70
9. The “Save” dialog box appears.
Input the desired file name, and click
[Save].
fig.oms-12.e_75
10.Select [Test Studio] in the [Studio Menu] and check it in
order to verify whether sound is produced.
11.In the “My Studio Setup Window,” click the keyboard
icon.
When you move the mouse pointer near the keyboard
icon, the pointer will change to the shape of an eighth
note. Verify that you can hear sound from your XV-2020.
12.After you have finished the above check, exit OMS Setup.
This completes driver settings.
This completes connections for the XV-2020 and Macintosh, and installation of the
MIDI driver. Now, MIDI data can be input and output (recorded and played).
27
For Those Using a Computer
Installing the XV-2020 driver (FreeMIDI)
Use the following procedure to install the XV-2020 driver. The included XV-2020
FreeMIDI driver is an add-on module for using the XV-2020 with FreeMIDI. In order
to use it, FreeMIDI must be installed on the hard disk from which you started up.
* Exit all applications before you begin installing the driver.
* Install OMS if using the XV Editor software included with the unit.
* The XV-2020 FreeMIDI Driver included on the disc is provided as an additional
module that allows the XV-2020 to be used with FreeMIDI. In order to use it,
FreeMIDI must already be installed on the start-up hard disk.
* Disconnect the XV-2020 from the Macintosh before beginning the installation.
1. Exit all currently running software (applications).
If you are using a virus checker or similar software, be sure to exit this as well.
2. Prepare the CD-ROM.
Insert the CD-ROM into the CD-ROM drive.
fig.3-3_50
3. Double-click the FM-E icon (found in the XV-2020 folder — XV Driver E
folder of the CD-ROM) to start up the installer.
4. Verify the installation location, and click [Install].
fig.3-2_40
5. If a message like the following is
displayed, click [Continue].
The other currently running applications
will exit, and installation will continue.
6. A dialog box will indicate Installation
completed. Click [Restart] to restart your Macintosh.
7. Use the USB cable to connect the XV-2020 to your computer.
1. With the XV-2020’s power switch turned off, connect it to the AC adaptor.
2. Plug the AC adaptor into an AC power outlet.
3. Use the USB cable to connect the XV-2020 to your computer.
8. Switch ON the XV-2020’s Power switch.
This unit is equipped with
a protection circuit. A brief
interval (a few seconds)
after power up is required
efore the unit will operate
normally.
28
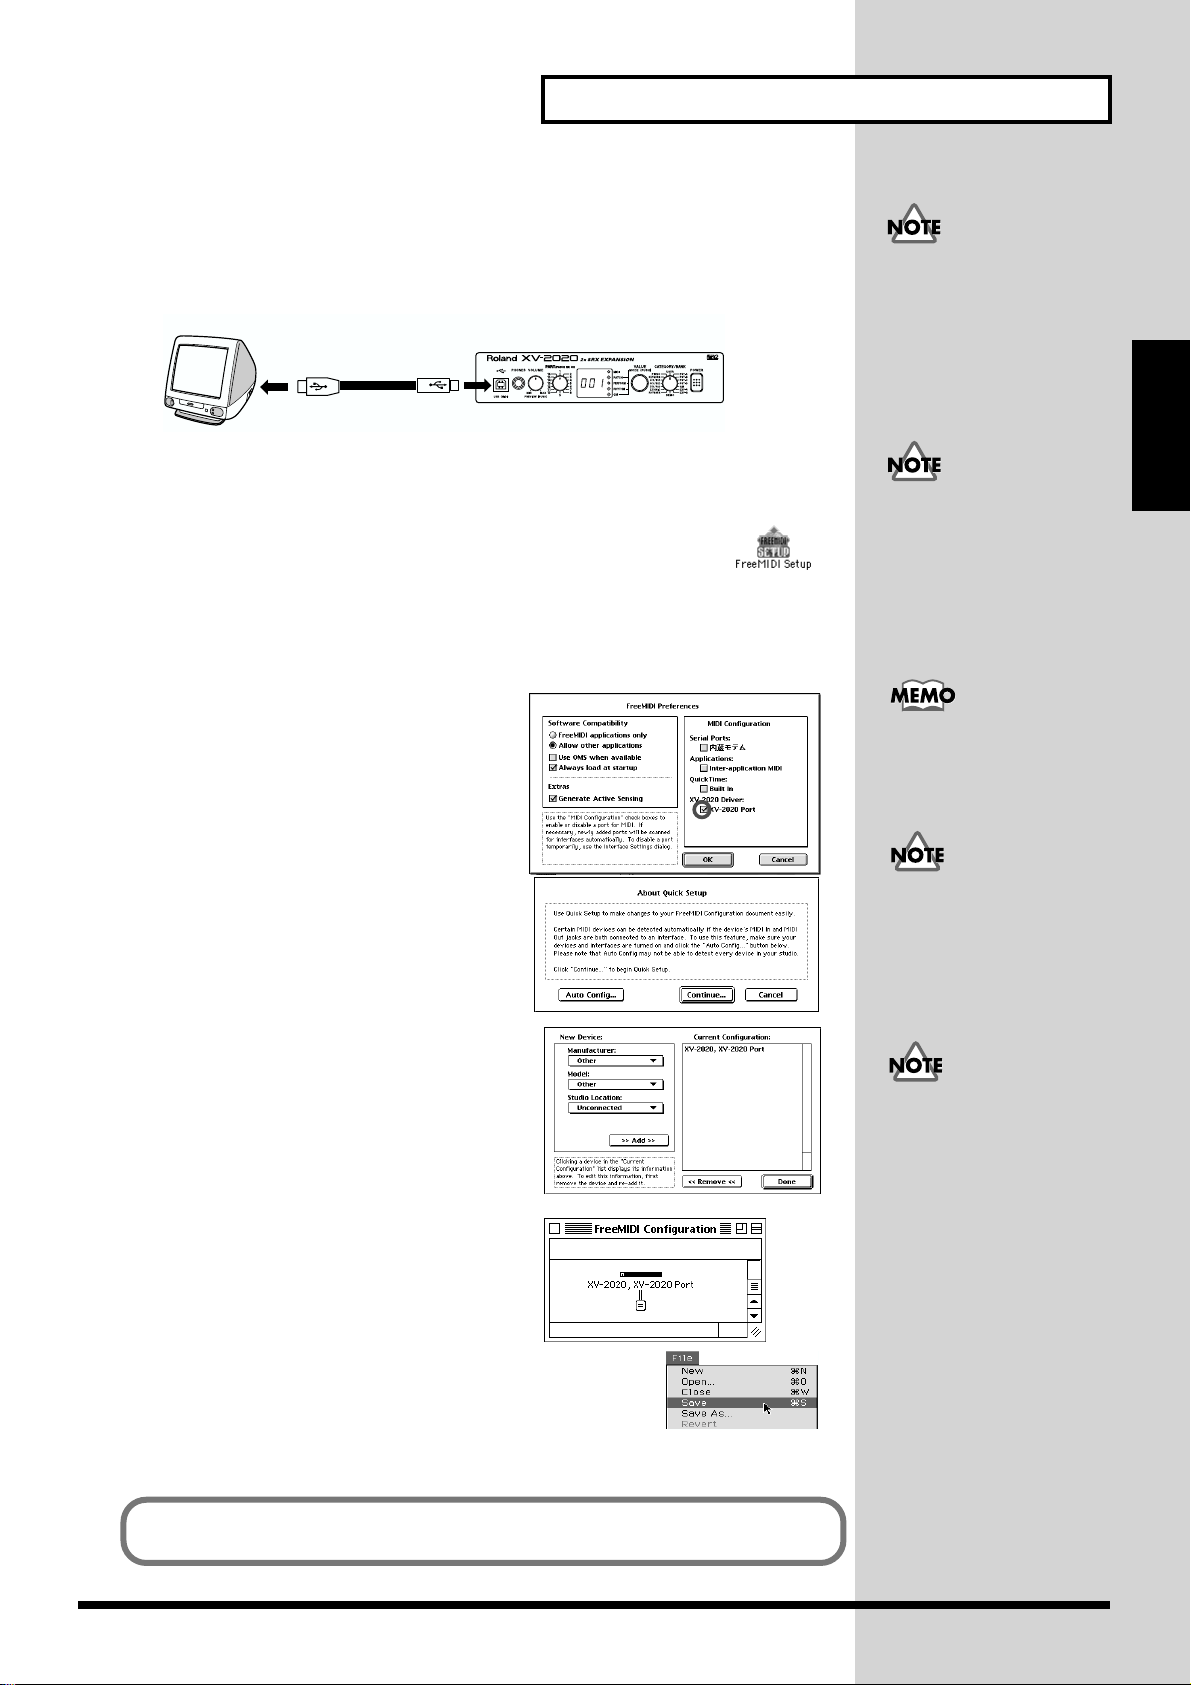
FreeMIDI settings
1. Use the USB cable to connect the XV-2020 and your Macintosh.
fig.USB-02.e
Computer
USB cable
XV-2020
* If using a computer that is not equipped with a USB connector, refer to p. 30.
fig.fm-03.e.eps_50
2. Open the “FreeMIDI Applications” folder, and double-click the
“FreeMIDI Setup” icon.
3. The first time FreeMIDI is started up, a “Welcome to FreeMIDI!” dialog box will
appear. Click [Continue].
If this is the second or later time, select “FreeMIDI Preferences” from the File menu.
For Those Using a Computer
To prevent malfunction
and/or damage to speakers
or other devices, always
turn down the volume, and
turn off the power on all
devices before making any
connections.
Computer
For Those Using a
If you are using the XV2020 with a sequencer, do
not disconnect the MIDI
cable connected to the XV2020 while a song is
playing back.
fig.fm-04_60
4. In the “FreeMIDI Preferences” dialog box,
check “XV-2020 Port” which is located
below XV-2020 Driver in MIDI
Configuration, and click [OK].
fig.fm-05_65
5. The About Quick Setup dialog box appears.
Click [Continue].
fig.fm-06_60
6. In the dialog box that appears, select the “XV-
2020” in “Studio Location,” and click
[>>Add>>].
fig.fm-07.e.eps_70
7. When settings are complete, click [Done].
A setting window like the following appears.
There will be a version
number following
“FreeMIDI Setup” as the
actual icon name.
If the dialog box does not
show “XV-2020 Driver,”
check whether the XV-2020
is connected correctly, and
start up FreeMIDI Setup
once again.
If the “About Quick
Setup” dialog box is not
displayed, select “Quick
Setup…” from the
“Configuration” menu.
fig.fm-08_70
8. From the File menu, select [Save], and save your settings.
This completes connections for the XV-2020 and Macintosh, and installation of the
MIDI driver. Now, MIDI data can be input and output (recorded and played).
29
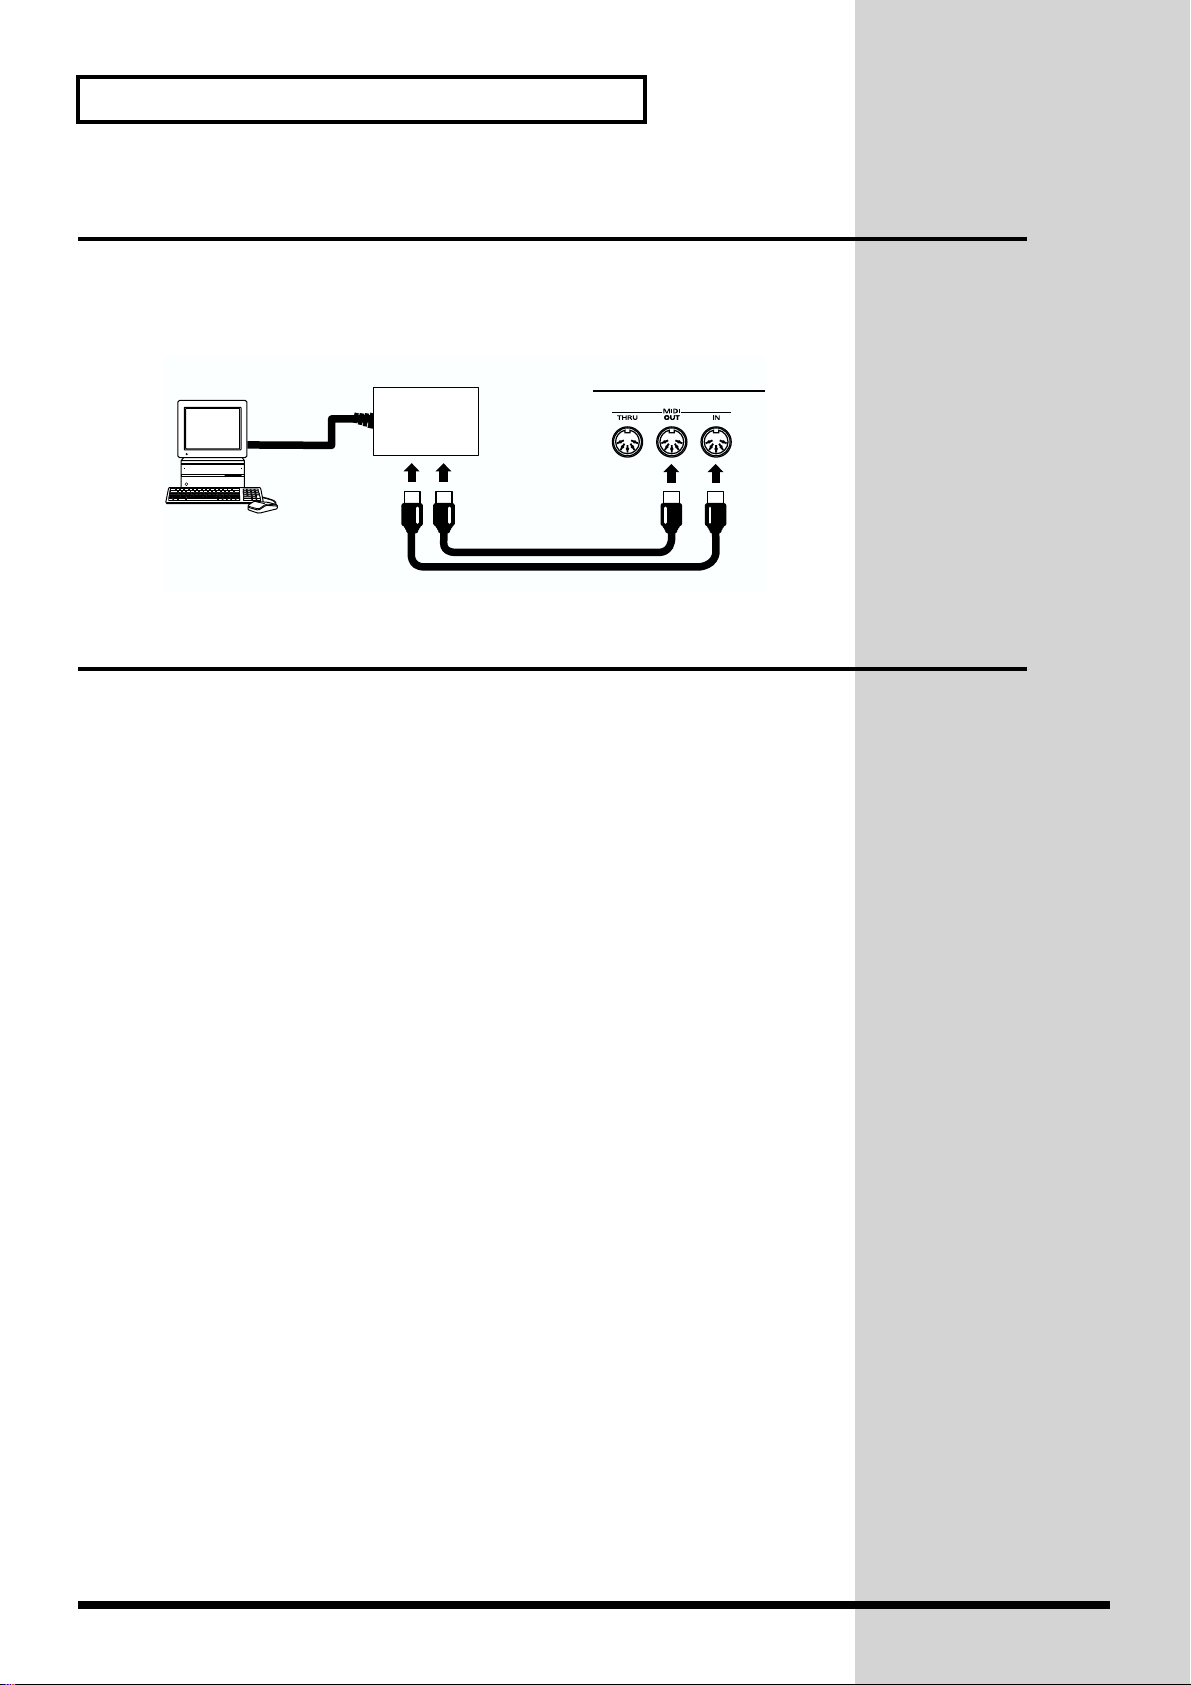
For Those Using a Computer
Connecting with MIDI Connectors
A MIDI interface is required for making MIDI connections with a computer. The
MIDI interface is connected to the computer, and two MIDI cables connect the MIDI
connectors of the MIDI interface to the XV-2020’s MIDI connectors.
fig.MIDI-01.e
Computer without
a USB connector
MIDI
Interface
Macintosh IIci
MIDI INMIDI OUT
MIDI cable
XV-2020 rear panel
Installing the Included Editor Software
To help you get more out of your XV-2020, it comes with XV Editor software. Use XV
Editor to freely create your own original sounds.
Detailed instructions on installing the software can be found in the online manual
contained on the XV Editor CD-ROM.
• Windows users
In the XV Editor CD-ROM, open the Readme_E.txt.
• Macintosh users
In the XV Editor CD-ROM, open the ReadMe.
30
Loading…
- Publication date
-
2002
- Topics
- poly, aaaa, midi, oooo, parameter, patch, settings, tone, rhythm, bbbb, oaaa aaaa, daaa aaaa, oooo oooo, midi channel, dddd mfx, send level, oooo bbbb, dialog box, rhythm set, byte bnh
- Collection
- synthmanuals-roland; synthmanuals; manuals; additional_collections; manuals_roland
- Language
- English
- Item Size
- 96.5M
Owner’s manual for the Roland XV-2020 synthesizer. Using the Unit Safely, Important Notes, Features, Front and Rear Panel, Getting Ready to Play, For Those Using a Computer, About Patches and Performance, Quick Start (Playing Sounds), Advanced Use (Creating a Patch, Creating a Rhythm Set, Creating a Performance, Using the XV-2020 Effects, Saving a Sound You Create, Establishing Settings for an Entire XV-2020 (SYSTEM COMMON), Other Settings, Using the XV-2020 as a General MIDI Sound Module, Examples of Applications Using the XV-2020), Appendix (Installing a Wave Expansion Board, Troubleshooting, Error Messages, List of Parameters, XV Editor Screens, Waveform List, Patch List, Rhythm Set List, Performance List, Demo Song List, MIDI Implementation, Specifications, Index). Roland Corporation, 2002.
- Addeddate
- 2011-10-19 19:06:06
- Collection_added
- manuals_roland
- Identifier
- synthmanual-roland-xv-2020-owners-manual
- Identifier-ark
- ark:/13960/t1sf3rv04
- Ocr
- ABBYY FineReader 8.0
- Ppi
- 300
- Year
-
2002
comment
Reviews
There are no reviews yet. Be the first one to
write a review.
-
Page 1: Roland XV-2020
Thank you, and congratulations on your choice of the Roland XV-2020. Copyright © 2002 ROLAND CORPORATION All rights reserved. No part of this publication may be reproduced in any form without the written permission of ROLAND CORPORATION. Before using this unit, carefully read the sections entitled: “IMPORTANT SAFETY INSTRUCTIONS” (p. 2), “US[…]
-
Page 2: Roland XV-2020
2 To resize thickness, move all items on the front cover and center registration marks to left or right. This product complies with the requirements of European Directive 89/336/EEC. For EU Countries For Canada This Class B digital apparatus meets all requirements of the Canadian Interference-Causing Equipment Regulations. Cet appareil numérique d[…]
-
Page 3: Roland XV-2020
3 USING THE UNIT SAFELY 001 • Before using this unit, make sure to read the instructions below, and the Owner’s Manual. ……………………………………………………………………………………………. 002d • Do not open or perform any internal modifica- tions on the unit or its AC adaptor. (The only exception would b[…]
-
Page 4: Roland XV-2020
4 012b • Immediately turn the power off, remove the AC adaptor from the outlet, and request servicing by your retailer, the nearest Roland Service Center, or an authorized Roland distributor, as listed on the “Information” page when: • The AC adaptor, the power-supply cord, or the plug has been damaged; or • Objects have fallen into, or l[…]
-
Page 5: Roland XV-2020
5 IMPORTANT NOTES 291a In addition to the items listed under “USING THE UNIT SAFELY” on p. 3 , please read and observe the following: Power Supply 301 • Do not use this unit on the same power circuit with any device that will generate line noise (such as an electric motor or variable lighting system). 302 • The AC adaptor will begin to gene[…]
-
Page 6: Roland XV-2020
6 Contents IMPORTANT NOTES …………………………………………………………………………………….. 5 Features ………………………………………………………………………………………………………. 8 Front and Rear Panel ……………………………………………………………..[…]
-
Page 7: Roland XV-2020
7 Contents Adjusting Effect Settings …………………………………………………………………………………………………………………………. 75 Saving Performances You Create …………………………………………………………………………………………………………….. 75 Using the […]
-
Page 8: Roland XV-2020
8 Features 64-Voice Polyphony and 16-Part Multitimbrality The XV-2020 is a 16-part multitimbral sound generator that produces up to 64 simultaneous polyphonic voices. It provides ample polyphony, even with Patches containing multiple Tones. Create Amazingly Expressive Tones With Patches combining four tones using stereo waves, stereo four-wave rhyt[…]
-
Page 9: Roland XV-2020
9 Front and Rear Panel Front Panel fig.00-01 1. USB Connector Use this for connecting a computer to the XV-2020 using a USB cable (p. 13). 2. PHONES Jack This is the jack for connecting headphones (sold separately). * Use headphones with an impedance of 8 to 150 Ohms. 3. VOLUME Knob This adjusts the volume level for the OUTPUT jack and the PHONES j[…]
-
Page 10: Roland XV-2020
10 Getting Ready to Play Attaching the Rubber Feet If you will not be using the separately available RAD-50 rack-mount adaptor, attach the rubber feet that were supplied with the XV-2020, as shown in the figure. Use the small holes on the bottom as a guide for positioning the rubber feet when attaching them. fig.00-03e Installing on the Rack-Mount […]
-
Page 11: Roland XV-2020
11 Getting Ready to Play Getting Ready to Play Connecting to MIDI Devices and Audio Equipment The XV-2020 is not equipped with an internal amp or speakers. To hear sound, you will need to connect it to a keyboard amp or audio system, or connect headphones. Refer to the following figure when connecting the XV-2020 with external devices. fig.00-05e 1[…]
-
Page 12: Roland XV-2020
12 Getting Ready to Play Turning the Power On/Off Turning On the Power * Once the connections have been completed (p. 11), turn on power to your various devices in the order specified. By turning on devices in the wrong order, you risk causing malfunction and/or damage to speakers and other devices. 1. Before turning on the power, confirm the follo[…]
-
Page 13: Roland XV-2020
13 For Those Using a Computer For Those Using a Computer If you are using music software running on a computer, you can use the computer to operate the XV-2020’s controls. Not only can you create and play back song data, you can also have Tones switch automatically. What’s more, you can use the included XV Editor software to create Tones using […]
-
Page 14: Roland XV-2020
14 For Those Using a Computer Windows XP users 1. With the XV-2020 disconnected, start up Windows. Disconnect all USB cables except for a USB keyboard and USB mouse (if used). 2. Open the System Properties dialog box. 1. Click the Windows Start menu, and from the menu, select Control Panel . 2. In “Pick a category,” click “Performance and Mai[…]
-
Page 15: Roland XV-2020
15 For Those Using a Computer For Those Using a Computer fig.2-3_40 9. In the dialog box that appears, input the following into the “Open” field, and click [OK] . E:Win2000XV-2020SETUPINF.EXE * The drive name “E:” may be different for your system. Specify the drive name of your CD-ROM drive. fig.2-4_30 10. The SetupInf dialog box will ap[…]
-
Page 16: Roland XV-2020
16 For Those Using a Computer fig.2-8_30 15. Make sure that the “Model” field indicates “ROLAND XV-2020,” and click [Next] . Driver installation will begin. fig.2-9_35 16. The Insert Disk dialog box will appear. Click [OK] . fig.2-10_35 17. The Files Needed dialog box will appear. In the “Copy files from” area, type “E:Win2000XV-202[…]
-
Page 17: Roland XV-2020
17 For Those Using a Computer For Those Using a Computer Windows 2000 users 1. With the XV-2020 disconnected, start up Windows. Disconnect all USB cables except for a USB keyboard and USB mouse (if used). 2. Log on to Windows as a user with administrative privileges (such as Administrator). 3. Open the System Properties dialog box. Click the Window[…]
-
Page 18: Roland XV-2020
18 For Those Using a Computer fig.2-13_55 5. Make sure that “File signature verification” is set to “Ignore.” If it is set to “Ignore” , simply click [OK] . If it is not set to “Ignore” , make a note of the current setting ( “Warn” or “Block” ). Then change the setting to “Ignore” and click [OK] . 6. Close the System Pro[…]
-
Page 19: Roland XV-2020
19 For Those Using a Computer For Those Using a Computer fig.2-18_50 15. The Files Needed dialog box will appear. In the “Copy files from” area, type “E:Win2000XV-2020” and click [OK] . * The drive name “E:” may be different for your system. Specify the drive name of your CD-ROM drive. fig.2-17b_40 16. The “Found New Hardware Wizard[…]
-
Page 20: Roland XV-2020
20 For Those Using a Computer Windows Me/98 users 1. With the XV-2020 disconnected, start up Windows. Disconnect all USB cables except for a USB keyboard and USB mouse (if used). 2. Exit all currently running software (applications). Also close any open windows. If you are using virus checking or similar software, be sure to exit it as well. 3. Pre[…]
-
Page 21: Roland XV-2020
21 For Those Using a Computer For Those Using a Computer 7. Connect the XV-2020. 1. With the XV-2020’s power switch turned off, connect it to the AC adaptor. 2. Plug the AC adaptor into an AC power outlet. 3. Use the USB cable to connect the XV-2020 to your computer. 8. Set the XV-2020’s power switch to the ON position. fig.2-20_40 9. If you ar[…]
-
Page 22: Roland XV-2020
22 For Those Using a Computer 3. Click the Audio tab. fig.2-28_40 4. For MIDI music playback , click the located at the right of [Preferred device] (or in Windows XP, [Default device] ), and select the ROLAND XV-2020 . 5. Click OK to complete the settings. Windows 98 users 1. Open Control Panel . Click the Windows Start button, and from the menu th[…]
-
Page 23: Roland XV-2020
23 For Those Using a Computer For Those Using a Computer Enabling background services In Windows XP, perform these settings to make MIDI processing occur more smoothly. These settings are unavailable in Windows 2000/Me/98. 1. Click the Windows start button, and from the menu that appears, select Control Panel . 2. In “Pick a category,” click ?[…]
-
Page 24: Roland XV-2020
24 For Those Using a Computer Installing & Setup the Driver (Macintosh) The following items are required for connections and installation. Please have the following items ready. • XV-2020 • AC adaptor • USB cable • XV Editor CD-ROM 1. Turn off the power of the Macintosh and all peripheral devices connected to the Macintosh. 2. With the […]
-
Page 25: Roland XV-2020
25 For Those Using a Computer For Those Using a Computer Installing the XV-2020 driver (OMS) Use the following procedure to install the XV-2020 driver. The included XV-2020 OMS driver is an add-on module for using the XV-2020 with OMS. In order for you to use it, OMS must already be installed on the hard disk from which you started up . If you woul[…]
-
Page 26: Roland XV-2020
26 For Those Using a Computer fig.3-2_35 5. If a message like the following is displayed, click [Continue] . The other currently running applications will exit, and installation will continue. 6. A dialog box will indicate Installation completed . Click [Restart] to restart your Macintosh. 7. Use the USB cable to connect the XV-2020 to your compute[…]
-
Page 27: Roland XV-2020
27 For Those Using a Computer For Those Using a Computer fig.oms-08.e_60 5. The “OMS Driver Search” dialog box appears. Click [Search] . fig.oms-09.e_65 6. After the search has been completed, make sure that “Roland XV-2020” is listed in the “OMS Driver Setup” dialog box, and click [OK] . fig.oms-10.e_65 7. After making sure that the XV[…]
-
Page 28: Roland XV-2020
28 For Those Using a Computer Installing the XV-2020 driver (FreeMIDI) Use the following procedure to install the XV-2020 driver. The included XV-2020 FreeMIDI driver is an add-on module for using the XV-2020 with FreeMIDI. In order to use it, FreeMIDI must be installed on the hard disk from which you started up . * Exit all applications before you[…]
-
Page 29: Roland XV-2020
29 For Those Using a Computer For Those Using a Computer FreeMIDI settings 1. Use the USB cable to connect the XV-2020 and your Macintosh. fig.USB-02.e * If using a computer that is not equipped with a USB connector, refer to p. 30. fig.fm-03.e.eps_50 2. Open the “FreeMIDI Applications” folder, and double-click the “FreeMIDI Setup” icon. 3.[…]
-
Page 30: Roland XV-2020
30 For Those Using a Computer Connecting with MIDI Connectors A MIDI interface is required for making MIDI connections with a computer. The MIDI interface is connected to the computer, and two MIDI cables connect the MIDI connectors of the MIDI interface to the XV-2020’s MIDI connectors. fig.MIDI-01.e Installing the Included Editor Software To he[…]
-
Page 31: Roland XV-2020
31 About Patches and Performances On the XV-2020, sounds are organized according to units called Tones , Patches , Rhythm Sets , and Performances . This section describes the relationship between a Patch and a Performance. What is a Patch? The type of sound most commonly played on the XV-2020 is called a Patch . A Patch is a combination of Tones , […]
-
Page 32: Roland XV-2020
32 <MEMO>[…]
-
Page 33: Roland XV-2020
33 Quick Start Quick Start[…]
-
Page 34: Roland XV-2020
34 Playing Sounds The XV-2020 comes with a rich palette of onboard sounds, called Patches . Let’s listen to some Patches in Patch mode. Playing Patches (Phrase Preview) Even when there’s no MIDI keyboard or sequencer connected, the XV-2020 allows you to audition sounds. 1. Press [VALUE] to make the PATCH indicator lights up. fig.01-01 2. Press […]
-
Page 35: Roland XV-2020
35 Playing Sounds Playing Sounds Matching MIDI Channels In order for the XV-2020 to respond to MIDI data sent by an external MIDI device, both devices must be set to use the same MIDI channel or channels. Here, in Patch mode, let’s set both devices so that they use MIDI Channel 1. fig.01-03 1. Set the send channel of the MIDI keyboard to “1.”[…]
-
Page 36: Roland XV-2020
36 Playing Sounds fig.01-06e Procedure fig.01-07 1. Press [VALUE] to make the PATCH indicator lights up. Press the knob several times, until the PATCH indicator lights up. 2. Turn [CATEGORY/BANK] to choose the bank (USER, PST-A/B/C/D, GM, EXP-A/B) 3. Turn [VALUE] to choose a Patch. * You can listen to the selected patch sound by holding down [VOLUM[…]
-
Page 37: Roland XV-2020
37 Playing Sounds Playing Sounds Choosing Patches by Category On the XV-2020, Patches are grouped into categories , such as “piano” and “guitar.” You can easily change to the category you like and select Patches with the [CATEGORY/BANK] knob. Procedure fig.01-09 1. Press [VALUE], so the PATCH indicator lights up Press [VALUE] several times,[…]
-
Page 38: Roland XV-2020
38 Playing Sounds Choosing a Performance The collected assignment of Patches or Rhythm Sets to the XV-2020’s sixteen Parts is referred to as a “Performance.” fig.00-10e Selecting Performances and Parts 1. Press [VALUE], so the PERFORM indicator lights up. *O nly the PERFORM indicator should be lit. 2. Turn [VALUE] to choose the Performance. 3[…]
-
Page 39: Roland XV-2020
39 Playing Sounds Playing Sounds Switching the Mode (Patch, Performance) The XV-2020’s parameters are organized into ten different modes. You can easily switch modes using the [VALUE] knob or [VOLUME] knob. fig.01-13e * Rotating [PART] while in Performance Play mode switches you to Performance Part Play mode. * The Patch, Performance, or Rhythm S[…]
-
Page 40: Roland XV-2020
40 Playing Sounds Using an External MIDI Device to Select Patches and Change Other Settings Selecting Patches and Rhythm Sets You can change Patches – including the Patches in each Part of a Performance – and Rhythm Sets on the XV-2020 via MIDI Part. In this example, after setting the send channel for the external MIDI device and the XV-2020’[…]
-
Page 41: Roland XV-2020
41 Playing Sounds Playing Sounds Selecting Performances To switch Performances, after matching the send channel for the external MIDI device with the XV-2020’s Performance Control channel (p. 94), send the Bank Select number and Program Change messages. Upon execution of Factory Reset, Performance Ctrl-Ch is set to “16.” Here, set the externa[…]
-
Page 42: Roland XV-2020
42 <MEMO>[…]
-
Page 43: Roland XV-2020
43 Advanced Use Advanced Use Using the XV Editor software included with the XV-2020 together with your computer gives you more control in editing parameters, and even greater freedom in creating sounds. You cannot edit every parameter using the XV-2020 alone. For details regarding the parameters that you can edit using only this device, refer to th[…]
-
Page 44: Roland XV-2020
44 Creating a Patch How a Patch Is Organized The type of sound most commonly played on the XV-2020 is called a Patch . Each Patch can contain up to four Tones. fig.1-01.e You can turn the Tones in a Patch on or off. Only Tones that are turned on are heard when you play the Patch. (p. 45) You can also set the structure of a Patch to specify how Tone[…]
-
Page 45: Roland XV-2020
45 Creating a Patch Creating a Patch LFO (Low Frequency Oscillator) Use the LFO to create cyclical changes—or cyclical “modulation”—in a Tone. Each Tone has two LFOs. An LFO can be applied to the Tone’s pitch settings, TVF (filter), and TVA (volume). When an LFO is applied to pitch, a vibrato effect is produced. When an LFO is applied to […]
-
Page 46: Roland XV-2020
46 Creating a Patch Patch Parameter Tone-Related Settings PATCH COMMON (Settings Common to the Entire Patch) Parameter Value Description TONE SWITCH OFF, ON Here’s how to turn on the Tones that you want to hear in a Patch. You can also use the on/off tech- nique described in this section to audition an individual Tone by turning off all the other[…]
-
Page 47: Roland XV-2020
47 Creating a Patch Creating a Patch ANALOG FEEL (Analog Feel Depth) 0–127 Specifies the depth of Analog Feel that is applied to the Patch. Traditional ana- log synthesizers often exhibited a degree of instability in their tuning. The XV- 2020’s Analog Feel feature can simulate this characteristic. CLOCK SOURCE (Patch Clock Source) PATCH, SYSTE[…]
-
Page 48: Roland XV-2020
48 Creating a Patch PATCH STRUCTURE PORTAMENTO START PITCH, NOTE Portamento begins anew if you press another key during a pitch movement. This setting specifies how the new portamento starts. PITCH: The pitch begins changing immediately to the new note’s pitch when its key is pressed. NOTE: The pitch begins changing to the new note’s pitch only[…]
-
Page 49: Roland XV-2020
49 Creating a Patch Creating a Patch PATCH & VELOCITY KEY RANGE PATCH VELOCITY RANGE * Parameters that can be set independently for each Tone are indicated by “#.” PATCH KEY RANGE * Parameters that can be set independently for each Tone are indicated by “#.” Parameter Value Description VELOCITY CONTROL (TMT Velocity Control) OFF, ON, RA[…]
-
Page 50: Roland XV-2020
50 Creating a Patch MATRIX CTRL (Patch Matrix Control) This selects the parameters to be controlled by Matrix Control Source 1–4 and the Sens settings, as well as the specific Tones whose parameters you wish to control. Up to four destination parameters can be selected for each controller and controlled simultaneously. * Parameters that can be se[…]
-
Page 51: Roland XV-2020
51 Creating a Patch Creating a Patch PATCH SCALE TUNE One set of Scale Tune settings can be created in Patch mode. * The selected scale applies to MIDI messages received from an external MIDI device as well as to local sound generation. More Advanced Editing of Tones You can edit the Tones in a Patch with a tremendous degree of detail. Editable par[…]
-
Page 52: Roland XV-2020
52 Creating a Patch Tips for Choosing a Waveform Because the XV-2020 is designed to create highly realistic sounds, the success of the editing process depends to a large degree on the PCM waveforms upon which Tones are based. Therefore, if you try to create a sound that’s totally different from the waveform(s) you’re working with, the desired r[…]
-
Page 53: Roland XV-2020
53 Creating a Patch Creating a Patch PATCH WG (Patch Wave Group) This set of parameters allows you to select the PCM waveform that serves as the basis for the currently selected Tone, apply effects to the waveform, and control its pitch. Parameter Value Description WAVE GROUP (Wave Group) INT, EXP-A, EXP-B Chooses the desired waveform’s group. IN[…]
-
Page 54: Roland XV-2020
54 Creating a Patch FXM ON (Wave FXM Switch) OFF, ON Sets whether FXM will be used (ON) or not (OFF). [FXM (Frequency Cross Modulation)] FXM uses a specified waveform to apply frequency modula- tion to the currently selected waveform, creating complex overtones. This can be useful when creating wilder sounds or sound effects. TEMPO SYNC (Wave Tempo[…]
-
Page 55: Roland XV-2020
55 Creating a Patch Creating a Patch PATCH LFO (Applying Vibrato or Tremolo) The LFO (Low Frequency Oscillator) can alter various Tone settings in a back-and-forth, cyclic manner. Each Tone has two LFOs, and each can apply the desired amount of repetitive change to the Tone’s Pitch, TVF cutoff frequency, TVA Level and TVA Pan settings. This can b[…]
-
Page 56: Roland XV-2020
56 Creating a Patch Parameter Value Description LFO1(2) WAVEFORM (LFO Waveform) SIN, TRI, SAW-UP, SAW-DW, SQR, RND, BEND-UP, BEND-DW, TRP, S&H, CHS Chooses the waveform the LFO is to use. SIN: sine wave, TRI: triangle wave, SAW-UP: sawtooth wave, SAW-DW: sawtooth wave (negative polarity), SQR: square wave, RND: random wave, BEND-UP: Once the at[…]
-
Page 57: Roland XV-2020
57 Creating a Patch Creating a Patch * Noise may result from making the LFO PAN DEPTH too deep. To prevent noise, you can either lower the value for the PAN DEPTH, or lower the LFO Rate. PATCH TVF (Changing the Brightness with a Filter) The settings for the TVF (Time Variant Filter) allow you to change a Tone’s timbral content by altering its bri[…]
-
Page 58: Roland XV-2020
58 Creating a Patch RES (Resonance) 0–127 Increases the level of the cutoff frequency itself to add a popular classic synth char- acter to the sound. Excessively high settings can produce oscillation, causing the sound to distort. RES VEL SENS (TVF resonance velocity sensitivity) -63–+63 Use this parameter when you want velocity to affect the a[…]
-
Page 59: Roland XV-2020
59 Creating a Patch Creating a Patch PATCH TVA (Changing the Volume) The TVA (Time Variant Amplifier) controls volume changes to the Tone, as well as its stereo positioning. ENV VEL CURVE (TVF envelope velocity curve) FIXED, 1–7 This selects one of seven velocity curves that determine how velocity will affect the depth of the TVF Envelope. When s[…]
-
Page 60: Roland XV-2020
60 Creating a Patch PAN (Tone Pan) L64–63R Specifies the stereo position of the Tone. L64 places the Tone hard left, 0 puts it dead- center and 63R pans it hard right. * The overall panning of the entire Patch is set by the Patch Pan parameter (PATCH COM- MON p. 46), shifting the Tone Pan values of its individual Tones leftward or rightward by th[…]
-
Page 61: Roland XV-2020
61 Creating a Patch Creating a Patch PATCH MFX (Patch Multi-Effects) PATCH CHORUS PATCH REVERB Adjusting Effect Settings Refer to Multi-Effects Parameters (p. 82). Saving Patches You Create Refer to Saving a Sound You Create (p. 92). Parameter Description TYPE (Multi-Effects Type) Refer to p. 80. SEND LEVEL DRY (Multi-Effects Dry Send Level) SEND L[…]
-
Page 62: Roland XV-2020
62 Creating a Rhythm Set How Percussion Instruments Are Organized A Rhythm Set is a collection of Rhythm Tones, each of which represents a percussion instrument played on a single key. An instrument consists of the following four elements. fig.2-01.e WG (Wave Generator) This specifies the PCM waveform (or “wave”) that forms the basis of the Rhy[…]
-
Page 63: Roland XV-2020
63 Creating a Rhythm Set Creating a Rhythm Set Rhythm Set Parameters RHYTHM COMMON (Settings Common to the Entire Rhythm Set) Setting up Individual Rhythm Tones Parameters that can be set for each of the percussion instruments (Rhythm Tones) in Rhythm Sets are organized into the Parameter Groups listed below. • EFFECTS : Patch/Rhythm Set Mode Set[…]
-
Page 64: Roland XV-2020
64 Creating a Rhythm Set Rhythm Parameter RHYTHM KEY VELOCITY RANGE * Parameters that can be set independently for each Waveform are indicated by “#.” RHYTHM KEY WMT (Wave Mix Table) With the XV-2020, up to four stereo Waves can be assigned to a single Rhythm Tone. You can select the way tones sound according to the force with which the keys ar[…]
-
Page 65: Roland XV-2020
65 Creating a Rhythm Set Creating a Rhythm Set RHYTHM KEY PITCH (Changing Pitch) RANDOM PAN# (Wave random pan switch) OFF, ON Use this setting to cause the waveform’s panning to change randomly each time a key is pressed (ON) or not (OFF). The range of the panning change is set by the Tone Ran- dom Pan Depth setting (TVA p. 68). ALT PAN# (Wave al[…]
-
Page 66: Roland XV-2020
66 Creating a Rhythm Set RHYTHM KEY TVF (Modifying the Brightness of a Sound with a Filter) The settings for the TVF (Time Variant Filter) allow you to change a Rhythm Tone’s timbral content by altering its brightness or thickness. Parameter Value Description FILTER TYPE (Filter type) OFF, LPF, BPF, HPF, PKG, LPF2, LPF3 This selects a filter type[…]
-
Page 67: Roland XV-2020
67 Creating a Rhythm Set Creating a Rhythm Set RHYTHM KEY TVA (Making the Volume Change) The TVA (Time Variant Amplifier) controls the Rhythm Tone’s volume changes and stereo positioning. VEL CURVE (TVF cutoff velocity curve) FIXED, 1–7 This selects one of seven curves that determine how keyboard playing dynamics (veloc- ity) influence the Rhyt[…]
-
Page 68: Roland XV-2020
68 Creating a Rhythm Set RHYTHM CONTROL (Other Settings) VEL SENS (TVA level velocity sensitivity) -63–+63 Use this setting when you want keyboard touch (velocity) to affect the Rhythm Tone volume. Set this to a positive value to have the changes in tone volume increase the more forcefully the keys are played; to make the Rhythm Tone play more so[…]
-
Page 69: Roland XV-2020
69 Creating a Rhythm Set Creating a Rhythm Set RHYTHM MFX (Rhythm Multi-Effects) RHYTHM CHORUS RHYTHM REVERB Adjusting Effect Settings Refer to Patch/Rhythm Set Mode Settings (p. 77). Saving Rhythm Sets You Create Refer to Saving a Sound You Create (p. 92). ENV MODE (Rhythm tone envelope mode) NO-SUS, SUSTAIN When a loop-type waveform is selected, […]
-
Page 70: Roland XV-2020
70 Creating a Performance How a Performance Is Organized In the XV-2020’s Performance mode, you can play and control up to 16 instrument sounds at the same time, including Patches and/or Rhythm Sets. Such a set of sounds, as well as an effect setup, can be saved as a “Performance.” Each Performance is comprised of 16 “Parts,” each of whic[…]
-
Page 71: Roland XV-2020
71 Creating a Performance Creating a Performance Using the XV-2020 as a Multitimbral Sound Module In Performance mode, you can use the XV-2020 as a 16-part multitimbral sound module. Let’s try choosing some Parts and their sounds, and then play the multiple Parts together as a Performance. The basic steps for doing this include: • Choosing the […]
-
Page 72: Roland XV-2020
72 Creating a Performance SOLO (Solo Part Select) Refer to the Performance Common column Parameter Value Description TYPE (Part Type) PAT, RHY Select the type of sound the Part plays. GROUP (Part Group) USER, PR-A–D, GM, EXP-A, EXP-B Chooses the group (Bank) to which the desired Patch or Rhythm Set belongs. * It is not possible to choose EXP-A, E[…]
-
Page 73: Roland XV-2020
73 Creating a Performance Creating a Performance SEND LEVEL DRY (Part Output Level) Refer to p. 78. SEND LEVEL CHO (Part Chorus Send Level) SEND LEVEL REV (Part Reverb Send Level) OUTPUT ASGN (Part Output Assign) OUTPUT SELECT (Part Output MFX Select) Parameter Value Description VOICE RESERVE 0–63, FULL Specifies the number of voices that reserve[…]
-
Page 74: Roland XV-2020
74 Creating a Performance PERFORM MIDI SETTING (Establishing a Part’s MIDI Settings) * Parameters that can be set independently for each Tone are indicated by “#.” * Parameters that can be set independently for each MIDI channel are indicated by “+.” Parameter Value Description RCV CHANNEL# (Receive Channel) 1–16 Sets the MIDI channel t[…]
-
Page 75: Roland XV-2020
75 Creating a Performance Creating a Performance PART SCALE TUNE One set of Scale Tune settings can be created in Performance mode. * The selected scale applies to MIDI messages received from an external MIDI device as well as to local sound generation. PERFORM MFX (Performance Multi-effects) PERFORM CHORUS (Performance Chorus) PERFORM REVERB (Perf[…]
-
Page 76: Roland XV-2020
76 Using the XV-2020 Effects This chapter explains how effects are applied in Patch/Rhythm Set mode or Performance mode. * For information about the application of effects in GM mode, refer to “ Making Effects Settings in GM Mode (EFFECTS) (p. 97).” Effect Types The XV-2020 has the following four onboard effect processors, and settings can be m[…]
-
Page 77: Roland XV-2020
77 Using the XV-2020 Effects Using the XV-2020 Effects Patch/Rhythm Set Mode Settings Only one Multi-effect, Chorus, or Reverb effect can be set for each Patch or Rhythm Set. You cannot apply differing types of Multi-effects, Chorus, or Reverb to each of the Tones or Rhythm Tones comprising the Patch or Rhythm Set. Basic Process of Making Effects S[…]
-
Page 78: Roland XV-2020
78 Using the XV-2020 Effects PATCH/RHYTHM KEY TVA • When the Output Assign parameter (p. 46)/(p. 63) is set to anything but TONE, the setting made here has no effect. • When outputting in mono, the Pan setting is disabled. • Chorus and Reverb are output in mono at all times. When the STRUCTURE (PATCH:COMMON) parameter has a setting of Type 2?[…]
-
Page 79: Roland XV-2020
79 Using the XV-2020 Effects Using the XV-2020 Effects 6. Making Chorus Settings (-> p. 80) Select the Chorus type to be used, and set each of the parameters for the selected Chorus. 7. Setting the Output Destination and Volume for the Sounds Passing Through the Chorus (-> p. 80) Select the output jack and set the output level (volume) of the[…]
-
Page 80: Roland XV-2020
80 Using the XV-2020 Effects Multi-Effects Parameter PATCH/RHYTHM MFX, PERFORM MFX (Multi-Effects Settings) PATCH/PERFORMANCE CHORUS (Chorus Settings) PATCH/PERFORMANCE REVERB (Reverb Settings) Parameter Value Description TYPE (Multi-Effects Type) 00 (THROUGH) –40 Use this parameter to select from among the 40 available Multi-effects. * For detai[…]
-
Page 81: Roland XV-2020
81 Using the XV-2020 Effects Using the XV-2020 Effects PATCH/RHYTHM/PERFORM CHORUS (Chorus Parameters) PATCH/RHYTHM/PERFORM REVERB (Reverb Parameters) These settings allow you to select the desired type of reverb and its characteristics. Parameter Value Description RATE 0.05–10.00 Hz Frequency of modulation DEPTH 0–127 Depth of modulation PRE-D[…]
-
Page 82: Roland XV-2020
82 Using the XV-2020 Effects Multi-Effects Parameters The multi-effects feature 90 different kinds of effects. Some of the effects consist of two or more different effects connected in series or in parallel. Parameters marked with a sharp “#” can be simultaneously controlled using the selected controller. 1: STEREO EQ (p. 82) 2: OVERDRIVE (p. 8[…]
-
Page 83: Roland XV-2020
83 Using the XV-2020 Effects Using the XV-2020 Effects 4: PHASER Adds a phase-shifted sound to the original sound, producing a swirling modulation that creates spaciousness and depth. fig.02-004m 5: SPECTRUM This is a type of filter that modifies the timbre by boosting or cutting the level of specific frequencies. It is similar to an equalizer, but[…]
-
Page 84: Roland XV-2020
84 Using the XV-2020 Effects 9: COMPRESSOR Flattens out high levels and boosts low levels, smoothing out fluctuations in volume. fig.02-009m 10: LIMITER Compresses signals that exceed a specified volume level, preventing distortion from occurring. fig.02-010m 11: HEXA-CHORUS Uses a six-phase chorus (six layers of chorused sound) to give richness an[…]
-
Page 85: Roland XV-2020
85 Using the XV-2020 Effects Using the XV-2020 Effects 13: SPACE-D This is a multiple chorus that applies two-phase modulation in stereo. It creates no audible modulation, yet produces a transparent chorus effect. fig.02-013m 14: STEREO CHORUS This is a stereo chorus. A filter is provided so that you can adjust the timbre of the chorused sound. fig[…]
-
Page 86: Roland XV-2020
86 Using the XV-2020 Effects 17: STEREO DELAY This is a stereo delay. When Mode is NORMAL: fig.02-017am When Mode is CROSS: fig.02-017bm 18: MODULATION DELAY Adds modulation to the delayed sound, producing an effect similar to a flanger. When Mode is NORMAL: fig.02-018am When Mode is CROSS: fig.02-018bm Parameter Value Description Delay L 0.0-500.0[…]
-
Page 87: Roland XV-2020
87 Using the XV-2020 Effects Using the XV-2020 Effects 19: TRIPLE TAP DELAY Produces three delay sounds; center, left and right. fig.02-019m 20: QUADRUPLE TAP DELAY This effect has four delays. fig.02-020am fig.02-020bm Stereo location of each delay 21: TIME CONTROL DELAY This effect allows you to use a specified controller — the controller selec[…]
-
Page 88: Roland XV-2020
88 Using the XV-2020 Effects 23: FB PITCH SHIFTER This allows the pitch-shifted sound to be fed back into the effect. fig.02-023m 24: REVERB Adds reverberation to the sound, simulating an acoustic space. fig.02-024m 25: GATED REVERB This is a special type of reverb in which the reverb is cut off without being allowed to decay naturally. fig.02-025m[…]
-
Page 89: Roland XV-2020
89 Using the XV-2020 Effects Using the XV-2020 Effects 27: OVERDRIVE -> FLANGER fig.02-027m 28: OVERDRIVE -> DELAY fig.02-028m 29: DISTORTION -> CHORUS The parameters are essentially the same as in “26: OD -> CHORUS,” with the exception of the following two. OD Drive -> Dist Drive, OD Pan -> Dist Pan fig.02-029m 30: DISTORTION[…]
-
Page 90: Roland XV-2020
90 Using the XV-2020 Effects 33: ENHANCER -> FLANGER fig.02-033m 34: ENHANCER -> DELAY fig.02-034m 35: CHORUS -> DELAY fig.02-035m 36: FLANGER -> DELAY fig.02-036m Parameter Value Description Enhancer Sens # 0-127 Sensitivity of the enhancer Enhancer Mix 0-127 Level of the overtones generated by the enhancer Flg Rate 0.05-10.00 Hz Frequ[…]
-
Page 91: Roland XV-2020
91 Using the XV-2020 Effects Using the XV-2020 Effects 37: CHORUS -> FLANGER fig.02-037m 38: CHORUS/DELAY The parameters are the same as for “35: CHORUS -> DELAY.” However, the Delay Balance parameter adjusts the volume balance between the direct sound and the delay sound. fig.02-038m 39: FLANGER/DELAY The parameters are the same as for ?[…]
-
Page 92: Roland XV-2020
92 Saving a Sound You Create Saving Edits to the XV-2020’s Internal Memory (WRITE) If you turn the power off or select another Patch, Rhythm Set, or Performance after you have modified a Patch, Rhythm Set or Performance, the changes you have made will be lost. If you wish to preserve the data, store it into the XV-2020’s USER memory. Saving a P[…]
-
Page 93: Roland XV-2020
93 Saving a Sound You Create Saving a Sound You Create Transmitting Sound Settings (XFER) The act of transmitting Patch, Performance, Rhythm Set or System data to an external MIDI device is called a “ Bulk Dump .” You can perform a bulk dump when two XV-2020s are connected to each other, or when you wish to store Patch, Performance, Rhythm Set […]
-
Page 94: Roland XV-2020
94 Establishing Settings for an Entire XV-2020 (SYSTEM COMMON) SYSTEM COMMON Parameter Value Description MASTER LEVEL 0–127 Adjusts the volume of the entire XV-2020. MASTER TUNE 415.3–466.2 Hz Adjusts the overall tuning of the XV-2020. The setting is expressed as the fre- quency played by the A4 key. PATCH REMAIN (Patch Remain Switch) OFF, ON T[…]
-
Page 95: Roland XV-2020
95 Other Settings Other Settings Making USB-Related Settings * With these parameters, changes in the settings are not reflected until the power is turned off and then on again. Furthermore, only the XV-2020 can be used to make the settings. * With these parameters, changes in the settings are not reflected until the power is turned off and then on […]
-
Page 96: Roland XV-2020
96 Using the XV-2020 as a General MIDI Sound Module The XV-2020 features a GM mode–a convenient way to play back or create GM score data (music files for General MIDI sound module). You’re able to play back commercial GM score data releases and even modify various parameter settings for enhanced musical expression. Entering GM Mode Basically GM[…]
-
Page 97: Roland XV-2020
97 Using the XV-2020 as a General MIDI Sound Module Using the XV-2020 as a General MIDI Sound Module Making Effects Settings in GM Mode (EFFECTS) In GM mode, a GM-exclusive Chorus and Reverb can be used. Chorus and Reverb can be set independently. • Chorus: Adds depth and spaciousness to the sound. • Reverb: Adds the reverberation characteristi[…]
-
Page 98: Roland XV-2020
98 Using the XV-2020 as a General MIDI Sound Module Making Settings for Each Part Here you can select the GM Patch/Rhythm Set assigned to each Part, and set the volume, pan, and pitch of each Part. Parameter Value Description LEVEL (Part Level) 0–127 Adjusts the volume of an individual Part. This setting’s main purpose is to adjust the vol- ume[…]
-
Page 99: Roland XV-2020
99 Examples of Applications Using the XV-2020 Examples of Applications Using the XV-2020 This section provides clear, concrete examples describing how the included XV Editor is used with the XV-2020. Controlling the XV-2020 in real time Using an External MIDI Device External MIDI controllers – modulation lever, foot switch, expression pedal, etc.[…]
-
Page 100: Roland XV-2020
100 Examples of Applications Using the XV-2020 Matrix Control Select the controllers you want to use to control a specific Tone parameter. Four control sources are assigned to each Patch. SOURCE 1–4 (MATRIX CONTROL1–4 SOURCE) Assign one of the following controllers to Control Source 1–4. If you wish to use a controller that applies to all Pat[…]
-
Page 101: Roland XV-2020
101 Examples of Applications Using the XV-2020 Examples of Applications Using the XV-2020 5. Click [DETAIL] for SYSTEM COMMON, then set [CLOCK SOURCE] to [INT]. * When the System Clock Source parameter is set to MIDI or USB, you can synchronize the LFO cycle to an external device. 6. If [TEMPO] (System Tempo) changes, the LFO Rate changes along wit[…]
-
Page 102: Roland XV-2020
102 Examples of Applications Using the XV-2020 Making a Tone’s Delay Time Match the System Tempo 1. Click [PATCH]. 2. Click the for [PATCH NAME] to select the Patch to be used. fig.08-01.eps_50 fig.08-02.eps_50 3. Click [DETAIL] for PATCH COMMON, then set [CLOCK SOURCE] to [SYSTEM]. fig.08-06a.eps_50 fig.08-06b 4. Click [DETAIL] for [PATCH WG], t[…]
-
Page 103: Roland XV-2020
103 Examples of Applications Using the XV-2020 Examples of Applications Using the XV-2020 6. Click [DETAIL] for SYSTEM COMMON, then set [CLOCK SOURCE] to [INT]. fig.08-08a.eps_50 fig.08-08b * When the System Clock Source parameter is set to MIDI or USB, you can synchronize the LFO cycle to an external device. 7. When [TEMPO] (System Tempo) changes,[…]
-
Page 104: Roland XV-2020
104 Examples of Applications Using the XV-2020 Remotely Changing Pitch (p. 141) • Coarse: Controller number 100 (value is 0), Controller number 101 (value is 2), Controller number 6 (value is 16–112) • Fine: Controller number 100 (value is 0), Controller number 101 (value is 1), Controller number 6 (value is 32–96), Controller number 38 (va[…]
-
Page 105: Roland XV-2020
105 Appendix Appendix[…]
-
Page 106: Roland XV-2020
106 Installing a Wave Expansion Board Two Wave Expansion Boards (SRX series; sold separately) can be installed in the XV-2020. Waveform data, patches and rhythm sets are stored on the Wave Expansion Board, so you can increase the number of available sounds by installing the board in the XV-2020. Installing a Wave Expansion Board increases the patch[…]
-
Page 107: Roland XV-2020
107 Installing a Wave Expansion Board Installing a Wave Expansion Board Check to make sure the board has been installed properly 1. Press the POWER switch on the XV-2020 to switch on the power. 2. Press [VALUE] to make the PATCH indicator lights up. fig.1-04 * When you have a Wave Expansion Board installed, “roland XV- 2020” is displayed when y[…]
-
Page 108: Roland XV-2020
108 Installation de la carte d’extension Wave (French language for Canadian Safety Standard) Deux cartes d’expansion Wave (série SRX; vendues séparément) peuvent être installées dans le XV-2020. Les données Waveform, les retouches et les groupes de rythme sont stockés sur la carte d’expansion Wave; vous pouvez donc augmenter le n[…]
-
Page 109: Roland XV-2020
109 Installation de la carte d’extension Wave Installation de la carte d’extension Wave Assurez-vous que la carte a été bien installée 1. Appuyez sur le commutateur du XV-2020 pour l’allumer. 2. Appuyez sur [PATCH] pour que les lampes témoins PATCH s’allument. fig.1-04 Lorsqu’une carte d’expansion Wave est installée et […]
-
Page 110: Roland XV-2020
110 Troubleshooting If an unexpected problem occurs while using the XV-2020, read this chapter first. It contains numerous tips for resolving problems. * If a message appears during operation, consult the following section Error Messages (p. 116). Problems when using the XV-2020 No sound • Is the VOLUME lowered? Check the VOLUME knob, and the vol[…]
-
Page 111: Roland XV-2020
111 Troubleshooting Troubleshooting Even if the send level to each effect is above 0, effects will not apply if the MFX Output Level, Chorus Level, and Reverb Level are set to 0. Check each setting. (p. 80) If Output Assign is set to PAT (PATCH) for each Part of the Performance, the sound will be output according to the Output Assign settings of th[…]
-
Page 112: Roland XV-2020
112 Troubleshooting • Is there sufficient free space on your hard disk? Delete unneeded files to increase the amount of free space. After deleting the unneeded files, empty the recycling bin. • Is the XV-2020 connected correctly? Make sure that the USB connector of your computer is connected to the XV-2020 by a USB cable. Check this, and if you[…]
-
Page 113: Roland XV-2020
113 Troubleshooting Troubleshooting An “Unknown driver found” dialog box appears, and you are unable to install the driver ”Find new hardware wizard” does not execute automatically ”Find new hardware wizard” ends before the process is completed • It may take about 15 seconds (or more) after the USB cable is connected for the XV-2020 t[…]
-
Page 114: Roland XV-2020
114 Troubleshooting Windows XP/2000 displays a “Digital signature was not found” dialog box • Did you make “Driver signature settings”? In order to install/re-install the driver, you must make the settings described in “ Driver Signing .” (Windows XP -> p. 14, Windows 2000 -> p. 17) Device Manager shows “?”, “!”, or “U[…]
-
Page 115: Roland XV-2020
115 Troubleshooting Troubleshooting • Are you running multiple applications? If multiple applications are running simultaneously, an error message may be displayed. If this occurs, click [ OK ] and exit the other applications. Even if an application window is closed, it is still running if it appears in the taskbar. Be sure to exit unneeded appli[…]
-
Page 116: Roland XV-2020
116 Error Messages An error message appears in the display when an error in operation occurs, or if an operation cannot be processed correctly. When this occurs, continue by following the instructions indicated in the error message. Display Situation Action There is a problem with the MIDI cable con- nected to the XV-2020’s MIDI IN connector or w[…]
-
Page 117: Roland XV-2020
117 List of Parameters That Can Be Affected Using the XV-2020 List of Parameters That Can Be Affected Using the XV-2020 Switching modes SYSTEM parameter PATCH parameter PERFORMANCE parameter Mode Page Procedure Patch Play Mode p. 35 Press [VALUE] to make the PATCH indicator lights up. Performance Part Play Mode p. 38 Press [VALUE] to make the PATCH[…]
-
Page 118: Roland XV-2020
118 List of Parameters That Can Be Affected Using the XV-2020 RHYTHM parameter GM parameter UTILITY parameter Others Parameter Page Procedure LEVEL p. 63 Press [VALUE] to make the RHYTHM indicator lights up. -> While holding down [VOLUME], press [VALUE]. -> Turn [CATEGORY/BANK] to choose the parameter you want to set. -> Turn [VALUE] to se[…]
-
Page 119: Roland XV-2020
119 XV Editor Screens XV Editor Screens – Page to Turn to for Info on a Parameter PATCH MODE fig.00-11 1 : p. 44 2 : p. 92 3 : p. 76 4 : p. 45 5 : p. 48 6 : p. 49 7 : p. 50 8 : p. 50 9 : p. 51 10 : p. 94 11 : p. 46 12 : p. 53 13 : p. 55 14 : p. 57 15 : p. 59 16 : p. 45 RHYTHM MODE fig.00-12 1 : p. 62 2 : p. 92 3 : p. 76 4 : p. 45 5 : p. 64 6 : p.[…]
-
Page 120: Roland XV-2020
120 XV Editor Screens – Page to Turn to for Info on a Parameter PERFORMANCE MODE fig.00-13 1 : p. 70 2 : p. 92 3 : p. 78 4 : p. 45 5 : p. 71 6 : p. 71 7 : p. 74 8 : p. 75 9 : p. 94 10 : p. 71 11 : p. 45 1 23 4 5 6 78 9 10 11[…]
-
Page 121: Roland XV-2020
121 Waveform List Waveform List No. Wave Name 1 StGrand pA L 2 StGrand pA R 3 StGrand pB L 4 StGrand pB R 5 StGrand pC L 6 StGrand pC R 7 StGrand fA L 8 StGrand fA R 9 StGrand fB L 10 StGrand fB R 11 StGrand fC L 12 StGrand fC R 13 Ac Piano2 pA 14 Ac Piano2 pB 15 Ac Piano2 pC 16 Ac Piano2 fA 17 Ac Piano2 fB 18 Ac Piano2 fC 19 Ac Piano1 A 20 Ac Pian[…]
-
Page 122: Roland XV-2020
122 Waveform List No. Wave Name 376 Trumpet 1A 377 Trumpet 1B 378 Trumpet 1C 379 Trumpet 2A 380 Trumpet 2B 381 Trumpet 2C 382 HarmonMute1A 383 HarmonMute1B 384 HarmonMute1C 385 Trombone 1 386 Trombone 2 A 387 Trombone 2 B 388 Trombone 2 C 389 Tuba A 390 Tuba B 391 Tuba C 392 French 1A 393 French 1C 394 F.Horns A 395 F.Horns B 396 F.Horns C 397 Viol[…]
-
Page 123: Roland XV-2020
123 Waveform List Waveform List No. Wave Name 751 Rock Tom M f 752 Rock Tom H f 753 Rock Flm L1 754 Rock Flm L2 755 Rock Flm M 756 Rock Flm H 757 Jazz Tom L p 758 Jazz Tom M p 759 Jazz Tom H p 760 Jazz Tom L f 761 Jazz Tom M f 762 Jazz Tom H f 763 Jazz Flm L 764 Jazz Flm M 765 Jazz Flm H 766 Maple Tom 1 767 Maple Tom 2 768 Maple Tom 3 769 Maple Tom[…]
-
Page 124: Roland XV-2020
124 Patch List USER No. Name Category Category No. Voice Key Assign 1 Grand XV PNO PIANO 1 4 POLY 2 LFO Trance PLS SYN/PAD 67 8 POLY 3 808 SynBass SBS GTR/BS 56 3 MONO 4 106 Strings BPD SYN/PAD 143 5 POLY 5 Soft Lead SLD SYN/PAD 32 3 POLY 6 XV Strings STR OCH/BRS 1 3 POLY 7 SmoothRhodes EP PIANO 36 4 POLY 8 OSC Sync2020 HLD SYN/PAD 10 1 MONO 9 Suga[…]
-
Page 125: Roland XV-2020
125 Patch List Patch List Preset-A No. Name Category Category No. Voice Key Assign 1 Grand XV PNO PIANO1 4 POLY 2 RockPiano Ch PNO 23 POLY 3 Contemplate PNO 32 POLY 4 Hall Grand PNO 42 POLY 5 64voicePiano PNO 51 POLY 6 Power Grand PNO 63 POLY 7 E.Grand PNO 71 POLY 8 RD-1000 PNO 83 POLY 9 MIDIed Grand PNO 93 POLY 10 SparklePiano PNO 10 6 POLY 11 War[…]
-
Page 126: Roland XV-2020
126 Patch List Preset-B No. Name Category Category No. Voice Key Assign 1 Rezodrive DGT GTR/BS34 2 MONO 2 Hurtin’Tubes DGT 35 3 POLY 3 R&R Chunk DGT 36 4 POLY 4 Power Trip DGT 37 2 POLY 5 Pick Bass BS 38 1 MONO 6 Hip Bass BS 39 2 POLY 7 Homey Bass BS 40 2 MONO 8 Tap Bass BS 41 1 POLY 9 Pop Bass BS 42 1 POLY 10 TremCho Bs BS 43 2 POLY 11 Nylon[…]
-
Page 127: Roland XV-2020
127 Patch List Patch List Preset-C No. Name Category Category No. Voice Key Assign 1 Voyager Brs BRS OCH/BRS69 5 POLY 23 Osc Brass SBR 70 3 POLY 3 Poly Brass SBR 71 3 POLY 4 Brass It! SBR 72 4 POLY 5 Archimede SBR 73 3 POLY 6 Breathy Brs SBR 74 3 POLY 7 Triumph Brs SBR 75 3 POLY 8 P5 Polymod SBR 76 2 POLY 9 FatSynBrass SBR 77 4 POLY 10 True ANALOG […]
-
Page 128: Roland XV-2020
128 Patch List Preset-D No. Name Category Category No. Voice Key Assign 1 Dark Side FX SYN/PAD109 8 POLY 2 Dunes FX 110 4 POLY 3 The Beast FX 111 6 POLY 4 Ocean Floor FX 112 1 POLY 5 Cyber Space FX 113 3 POLY 6 Nexus FX 114 8 POLY 7 ForestMoon FX 115 8 POLY 8 Planet Meta FX 116 7 POLY 9 Predator 2 FX 117 8 POLY 10 Flashback FX 118 4 POLY 11 JUNO Ke[…]
-
Page 129: Roland XV-2020
129 Patch List Patch List GM (General MIDI) No. Name Voice LSB PC 001 Piano 1 4 0 1 002 Piano 1w 2 1 003 European Pf 1 2 004 Piano 2 4 0 2 005 Piano 2w 1 1 006 Piano 3 1 0 3 007 Piano 3w 1 1 008 Honky-tonk 2 0 4 009 Honky-tonk 2 2 1 010 E.Piano 1 2 0 5 011 St.Soft EP 2 1 012 FM+SA EP 2 2 013 Wurly 2 3 014 E.Piano 2 2 0 6 015 Detuned EP 2 2 1 016 St[…]
-
Page 130: Roland XV-2020
130 100 101 103 102 28 29 31 33 35 30 32 34 39 40 41 43 45 47 42 44 46 36 38 37 87 88 84 86 85 51 52 53 55 57 59 54 56 58 48 50 49 63 64 65 67 69 71 66 68 70 60 62 61 75 76 77 79 81 83 78 80 82 72 74 73 C2 C3 C4 C5 C6 96 89 91 93 95 90 92 94 C7 98 97 Note No. 99 Rhythm Set List User Group 001 R&B Kit Dance Kick Dry Kick R&B SN Roll Hybrid K[…]
-
Page 131: Roland XV-2020
131 Rhythm Set List Rhythm Set List 100 101 103 102 28 29 31 33 35 30 32 34 39 40 41 43 45 47 42 44 46 36 38 37 87 88 84 86 85 51 52 53 55 57 59 54 56 58 48 50 49 63 64 65 67 69 71 66 68 70 60 62 61 75 76 77 79 81 83 78 80 82 72 74 73 C2 C3 C4 C5 C6 96 89 91 93 95 90 92 94 C7 98 97 Note No. 99 Preset A Group 001 R&B Kit Dance Kick Dry Kick R&am[…]
-
Page 132: Roland XV-2020
132 Rhythm Set List 100 101 103 102 28 29 31 33 35 30 32 34 39 40 41 43 45 47 42 44 46 36 38 37 87 88 84 86 85 51 52 53 55 57 59 54 56 58 48 50 49 63 64 65 67 69 71 66 68 70 60 62 61 75 76 77 79 81 83 78 80 82 72 74 73 C2 C3 C4 C5 C6 96 89 91 93 95 90 92 94 C7 98 97 Note No. 99 Preset B Group 001 XV Rock Kit Dance Kick Round Kick Rock Roll Jazz Kic[…]
-
Page 133: Roland XV-2020
133 Rhythm Set List Rhythm Set List 28 29 31 33 35 30 32 34 39 40 41 43 45 47 42 44 46 36 38 37 87 88 84 86 85 51 52 53 55 57 59 54 56 58 48 50 49 63 64 65 67 69 71 66 68 70 60 62 61 75 76 77 79 81 83 78 80 82 72 74 73 C2 C3 C4 C5 C6 Note No. 27 GM (GM2 Group) 001 (PC: 1) GM2 STANDARD High-Q Slap ScratchPush ScratchPull Sticks SquareClick Mtrnm.Cli[…]
-
Page 134: Roland XV-2020
134 Rhythm Set List 28 29 31 33 35 30 32 34 39 40 41 43 45 47 42 44 46 36 38 37 87 88 84 86 85 51 52 53 55 57 59 54 56 58 48 50 49 63 64 65 67 69 71 66 68 70 60 62 61 75 76 77 79 81 83 78 80 82 72 74 73 C2 C3 C4 C5 C6 Note No. 27 GM (GM2 Group) 007 (PC: 41) GM2 BRUSH High-Q Slap ScratchPush ScratchPull Sticks SquareClick Mtrnm.Click Mtrnm. Bell Jaz[…]
-
Page 135: Roland XV-2020
135 Performance List Demo Song List Performance List USER Preset-A Preset-B No. Name 001 BigSweepStak 002 Suger Bell 003 R&B Kit 004 Trance Split 005 My Orchestra 006 Road2Glass 007 Analog Stack 008 Flying Keys 009 House Kit 010 Soaring 2020 011 Seven Hills 012 TeknoSplit 1 013 Nirvana 2020 014 StChorusStak 015 Bell Stack 016 Trance Fair 017 Ag[…]
-
Page 136: Roland XV-2020
136 MIDI Implementation Model: XV-2020 Date: 2002.6.4 Version: 1.00 1. Receive data ■ Channel Voice Messages * Not received in Performance mode when the Receive Switch parameter (Performance Part) is OFF. ● Note off Status 2nd byte 3rd byte 8nH kkH vvH 9nH kkH 00H n = MIDI channel number: 0H — FH (ch.1 — 16) kk = note number: 00H — 7FH (0 — 127[…]
-
Page 137: Roland XV-2020
137 MIDI Implementation MIDI Implementation ❍ Hold 1 (Controller number 64) Status 2nd byte 3rd byte BnH 40H vvH n = MIDI channel number: 0H — FH (ch.1 — 16) vv = Control value: 00H — 7FH (0 — 127) 0-63 = OFF, 64-127 = ON * Not received when Tone Receive Hold-1 parameter (Patch Tone or Rhythm Tone) is OFF. * Not received in Performance mode when […]
-
Page 138: Roland XV-2020
138 MIDI Implementation ❍ Portamento control (Controller number 84) Status 2nd byte 3rd byte BnH 54H kkH n = MIDI channel number: 0H — FH (ch.1 — 16) kk = source note number: 00H — 7FH (0 — 127) *A Note-on received immediately after a Portamento Control message will change continuously in pitch, starting from the pitch of the Source Note Number. […]
-
Page 139: Roland XV-2020
139 MIDI Implementation MIDI Implementation ■ Channel Mode Messages * Not received in Performance mode when the Receive Switch parameter (Performance Part) is OFF. ● All Sounds Off (Controller number 120) Status 2nd byte 3rd byte BnH 78H 00H n = MIDI channel number: 0H — FH (ch.1 — 16) *W hen this message is received, all notes currently soundi[…]
-
Page 140: Roland XV-2020
140 MIDI Implementation ■ System Realtime Message ● Timing Clock Status F8H ● Active Sensing Status FEH *W hen Active Sensing is received, the unit will begin monitoring the intervals of all further messages. While monitoring, if the interval between messages exceeds 420 ms, the same processing will be carried out as when All Sounds Off, All […]
-
Page 141: Roland XV-2020
141 MIDI Implementation MIDI Implementation ● Universal Realtime System Exclusive Messages ❍ Master Volume Status Data byte Status F0H 7FH, 7FH, 04H, 01H, llH, mmH F7H Byte Explanation F0H Exclusive status 7FH ID number (universal realtime message) 7FH Device ID (Broadcast) 04H Sub ID#1 (Device Control) 01H Sub ID#2 (Master Volume) llH Master V[…]
-
Page 142: Roland XV-2020
142 MIDI Implementation ❍ Chorus Parameters Status Data byte Status F0H 7FH, 7FH, 04H, 05H, 01H, 01H, F7H 01H, 01H, 02H, ppH, vvH Byte Explanation F0H Exclusive status 7FH ID number (universal realtime message) 7FH Device ID (Broadcast) 04H Sub ID#1 (Device Control) 05H Sub ID#2 (Global Parameter Control) 01H Slot path length 01H Parameter ID wid[…]
-
Page 143: Roland XV-2020
143 MIDI Implementation MIDI Implementation ● Data Transmission This instrument can use exclusive messages to exchange many varieties of internal settings with other devices. The model ID of the exclusive messages used by this instrument is 00H 10H. ❍ Data Request 1RQ1 (11H) This message requests the other device to transmit data. The address a[…]
-
Page 144: Roland XV-2020
144 MIDI Implementation 2. Data Transmission ■ Channel Voice Messages When execute the Data Transfer, following Control Changes and Program Change will transmit. ● Control Change ❍ Bank Select (Controller number 0, 32) Status 2nd byte 3rd byte BnH 00H mmH BnH 20H llH n = MIDI channel number: 0H — FH (ch.1 — 16) mm, ll = Bank number: 00 00H — […]
-
Page 145: Roland XV-2020
145 MIDI Implementation MIDI Implementation ❍ Vibrato Rate (Controller number 76) Status 2nd byte 3rd byte BnH 4CH vvH n = MIDI channel number: 0H — FH (ch.1 — 16) vv = Vibrato Rate value (relative change): 00H — 40H — 7FH (-64 — 0 — +63) ❍ Vibrato Depth (Controller number 77) Status 2nd byte 3rd byte BnH 4DH vvH n = MIDI channel number: 0H — F[…]
-
Page 146: Roland XV-2020
146 MIDI Implementation ■ System Exclusive Messages Universal Non-realtime System Exclusive Message and Data Set 1 (DT1) are the only System Exclusive messages transmitted by the XV-2020. ● Universal Non-realtime System Exclusive Message ❍ Identity Reply Message Receiving Identity Request Message, the XV-2020 send this message. Status Data by[…]
-
Page 147: Roland XV-2020
147 MIDI Implementation MIDI Implementation | 00 03 | 0aaa aaaa | (reserved) | |—————————————+———————————+————————————————————————————————————————————————————| | 00 04 | 0aaa aaaa | Performance Bank[…]
-
Page 148: Roland XV-2020
148 MIDI Implementation |# 00 19 | 0000 aaaa | | | | 0000 bbbb | | | | 0000 cccc | | | | 0000 dddd | MFX Parameter 3 (12768 — 52768) | | | | —20000 — +20000 | |# 00 1D | 0000 aaaa | | | | 0000 bbbb | | | | 0000 cccc | | | | 0000 dddd | MFX Parameter 4 (12768 — 52768) | | | | —20000 — +20000 | |# 00 21 | 0000 aaaa | | | | 0000 bbbb | | |[…]
-
Page 149: Roland XV-2020
149 MIDI Implementation MIDI Implementation | | 0000 bbbb | | | | 0000 cccc | | | | 0000 dddd | Reverb Parameter 7 (12768 — 52768) | | | | —20000 — +20000 | |# 00 1F | 0000 aaaa | | | | 0000 bbbb | | | | 0000 cccc | | | | 0000 dddd | Reverb Parameter 8 (12768 — 52768) | | | | —20000 — +20000 | |# 00 23 | 0000 aaaa | | | | 0000 bbbb | | […]
-
Page 150: Roland XV-2020
150 MIDI Implementation | 00 1B | 0000 000a | Portamento Type (0 — 1) | | | | RATE, TIME | | 00 1C | 0000 000a | Portamento Start (0 — 1) | | | | PITCH, NOTE | | 00 1D | 0aaa aaaa | Portamento Time (0 — 127) | | 00 1E | 0000 000a | Patch Clock Source (0 — 1) | | | | PATCH, SYSTEM | |# 00 1F | 0000 aaaa | | | | 0000 bbbb | Patch Tempo (20 ?[…]
-
Page 151: Roland XV-2020
151 MIDI Implementation MIDI Implementation | 00 09 | 0aaa aaaa | MFX Control 3 Source (0 — 101) | | | | OFF, CC01 — CC31, CC33 — CC95, | | | | BEND, AFT, SYS1 — SYS4 | | 00 0A | 0aaa aaaa | MFX Control 3 Sens (1 — 127) | | | | —63 — +63 | | 00 0B | 0aaa aaaa | MFX Control 4 Source (0 — 101) | | | | OFF, CC01 — CC31, CC33 — CC95[…]
-
Page 152: Roland XV-2020
152 MIDI Implementation | | 0000 cccc | | | | 0000 dddd | Reverb Parameter 1 (12768 — 52768) | | | | —20000 — +20000 | |# 00 07 | 0000 aaaa | | | | 0000 bbbb | | | | 0000 cccc | | | | 0000 dddd | Reverb Parameter 2 (12768 — 52768) | | | | —20000 — +20000 | |# 00 0B | 0000 aaaa | | | | 0000 bbbb | | | | 0000 cccc | | | | 0000 dddd | Reve[…]
-
Page 153: Roland XV-2020
153 MIDI Implementation MIDI Implementation | | 0000 dddd | Wave Group ID (0 — 16384) | | | | OFF, 1 — 16384 | |# 00 2C | 0000 aaaa | | | | 0000 bbbb | | | | 0000 cccc | | | | 0000 dddd | Wave Number L (Mono) (0 — 16384) | | | | OFF, 1 — 16384 | |# 00 30 | 0000 aaaa | | | | 0000 bbbb | | | | 0000 cccc | | | | 0000 dddd | Wave Number R (0 ?[…]
-
Page 154: Roland XV-2020
154 MIDI Implementation | | 0000 bbbb | | | | 0000 cccc | | | | 0000 dddd | MFX Parameter 5 (12768 — 52768) | | | | —20000 — +20000 | |# 00 25 | 0000 aaaa | | | | 0000 bbbb | | | | 0000 cccc | | | | 0000 dddd | MFX Parameter 6 (12768 — 52768) | | | | —20000 — +20000 | |# 00 29 | 0000 aaaa | | | | 0000 bbbb | | | | 0000 cccc | | | | 0000[…]
-
Page 155: Roland XV-2020
155 MIDI Implementation MIDI Implementation | | 0000 cccc | | | | 0000 dddd | Reverb Parameter 9 (12768 — 52768) | | | | —20000 — +20000 | |# 00 27 | 0000 aaaa | | | | 0000 bbbb | | | | 0000 cccc | | | | 0000 dddd | Reverb Parameter 10 (12768 — 52768) | | | | —20000 — +20000 | |# 00 2B | 0000 aaaa | | | | 0000 bbbb | | | | 0000 cccc | |[…]
-
Page 156: Roland XV-2020
156 MIDI Implementation | 00 78 | 0000 000a | WMT4 Wave Switch (0 — 1) | | | | OFF, ON | | 00 79 | 0000 00aa | WMT4 Wave Group Type (0 — 3) | | | | INT, SR—JV80, SRX, SAMPLE<*> | |# 00 7A | 0000 aaaa | | | | 0000 bbbb | | | | 0000 cccc | | | | 0000 dddd | WMT4 Wave Group ID (0 — 16384) | | | | OFF, 1 — 16384 | |# 00 7E | 0000 aaaa |[…]
-
Page 157: Roland XV-2020
157 MIDI Implementation MIDI Implementation | 40 1x 23 | 0000 000a | Rx. Bank Select<*> (0 — 1) | | | | OFF, ON | | 40 1x 24 | 0000 000a | Rx. Bank Select LSB<*> (0 — 1) | | | | OFF, ON | |—————————————+———————————+———————————————————————?[…]
-
Page 158: Roland XV-2020
158 MIDI Implementation ■ Decimal and Hexadecimal Table (An “H” is appended to the end of numbers in hexadecimal notation.) In MIDI documentation, data values and addresses/sizes of Exclusive messages, etc. are expressed as hexadecimal values for each 7 bits. The following table shows how these correspond to decimal numbers. +—————?[…]
-
Page 159: Roland XV-2020
159 MIDI Implementation MIDI Implementation ■ Example of an Exclusive Message and Calculating a Checksum Roland Exclusive messages (RQ1, DT1) are transmitted with a checksum at the end (before F7) to make sure that the message was correctly received. The value of the checksum is determined by the address and data (or size) of the transmitted Excl[…]
-
Page 160: Roland XV-2020
160 MIDI Implementation ■ The Scale Tune Feature (address: 40 1x 40) The scale Tune feature allows you to finely adjust the individual pitch of the notes from C through B. Though the settings are made while working with one octave, the fine adjustments will affect all octaves. By making the appropriate Scale Tune settings, you can obtain a comple[…]
-
Page 161: Roland XV-2020
Function… Basic Channel Mode Note Number : Velocity After Touch Pitch Bend Control Change Program Change System Exclusive System Common System Real Time Aux Messages Notes Transmitted Recognized Remarks Default Changed Default Messages Altered True Voice Note On Note Off Key’s Channel’s 0, 32 1 2 4 5 6, 38 7 8 10 11 64 65 66 67 68 69 71[…]
-
Page 162: Roland XV-2020
162 Specifications XV-2020: 64-Voice Sound Module (conforms to General MIDI 2 System) Parts 16 Maximum Polyphony 64 voices Wave Memory 64 M Bytes (16-bit linear equivalent) Waveforms: 1083 Expansion Slot Wave Expansion Board SRX Series: 2 slots Preset Memory Patches: 512 (128 x 4 banks) + 256 (General MIDI 2 Patches) Rhythm Sets: 8 (4 x 2 banks) + […]
-
Page 163: Roland XV-2020
163 INDEX Numerics 2 VOICE PITCH SHIFTER …………………………………….. 87 A Analog Feel Depth ………………………………………………… 47 Assign type ……………………………………………………………. 68 AUTO WAH …………………………………………………………. 83 B bank …….[…]
-
Page 164: Roland XV-2020
164 INDEX O OCTAVE SHIFT ……………………………………………………. 46 OFFSET ……………………………………………………………. 47, 73 OMS ………………………………………………………………………. 25 Output Assign part …………………………………………………………[…]
-
Page 165: Roland XV-2020
165 INDEX INDEX T TIME CONTROL DELAY ……………………………………… 87 Time Variant Amplifier ……………………………………. 44, 62 Time Variant Filter …………………………………………… 44, 62 TMT ………………………………………………………………………. 49 Tone Alternate Pan De[…]
-
Page 166: Roland XV-2020
I n f ormat i on When you need repair service, call your nearest Roland Service Center or authorized Roland distributor in your country as shown below. As of December 1, 2002 (Roland) ARGENTINA Instrumentos Musicales S.A. Av.Santa Fe 2055 (1123) Buenos Aires ARGENTINA TEL: (011) 4508-2700 BRAZIL Roland Brasil Ltda Rua San Jose, 780 Sala B Parque In[…]
-
Page 167: Roland XV-2020
2 To resize thickness, move all items on the front cover and center registration marks to left or right. This product complies with the requirements of European Directive 89/336/EEC. For EU Countries For Canada This Class B digital apparatus meets all requirements of the Canadian Interference-Causing Equipment Regulations. Cet appareil numérique d[…]
-
Page 168: Roland XV-2020
Thank you, and congratulations on your choice of the Roland XV-2020. Copyright © 2002 ROLAND CORPORATION All rights reserved. No part of this publication may be reproduced in any form without the written permission of ROLAND CORPORATION. Before using this unit, carefully read the sections entitled: “IMPORTANT SAFETY INSTRUCTIONS” (p. 2), “US[…]
-
Page 169: Roland XV-2020
3 Performance List / USER Preset-A Preset-B No. Name 001 BigSweepStak 002 Suger Bell 003 R&B Kit 004 Trance Split 005 My Orchestra 006 Road2Glass 007 Analog Stack 008 Flying Keys 009 House Kit 010 Soaring 2020 011 Seven Hills 012 TeknoSplit 1 013 Nirvana 2020 014 StChorusStak 015 Bell Stack 016 Trance Fair 017 AggressiveXV 018 Techno Kit 019 Ph[…]
Thank you, and congratulations on your choice of the Roland XV-2020.
Copyright © 2002 ROLAND CORPORATION
All rights reserved. No part of this publication may be reproduced in any form without the
written permission of ROLAND CORPORATION.
Before using this unit, carefully read the sections entitled: “IMPORTANT SAFETY
INSTRUCTIONS” (p. 2), “USING THE UNIT SAFELY” (p. 3), and “IMPORTANT NOTES” (p.
5). These sections provide important information concerning the proper operation of the
unit. Additionally, in order to feel assured that you have gained a good grasp of every
feature provided by your new unit, Owner’s Manual should be read in its entirety. The
manual should be saved and kept on hand as a convenient reference.
Listening to the Demo Songs
fig.Cover
1.
Turn [CATEGORY/BANK] to choose DEMO.
“ALL” flashes on the display.
2.
Turn [VALUE] to choose the song you want to hear.
3.
Press [VALUE].
The display shows “PLy” and Demo Play starts.
4.
Press [VALUE] once more to stop the Performance.
* No data for the music that is played will be output from MIDI OUT.
* MIDI messages received from external instruments are ignored while the Demo Play screen is displayed.
* All rights reserved. Unauthorized use of this material for purposes other than private, personal enjoyment is
a violation of applicable laws.
2, 3, 4
1
Owner’s Manual
03011445 ’03-03-A3-21N
OWNER’S MANUAL
To resize thickness, move all items on the front cover
and center registration marks to left or right