
Owner’s Manual
Read the supplied booklet “Safety Brochure” before using the unit.
EN

CONTENTS
BEFORE USING THE UNIT 5
Accessories…………………………………………………………………………………… 5
How to use this manual…………………………………………………………………. 5
Remote control……………………………………………………………………………… 5
Insert the batteries………………………………………………………………………………………………………………………………………………. 5
Operating range of the remote control…………………………………………………………………………………………………………… 5
FEATURES 6
What you can do with the unit……………………………………………………….. 6
Part names and functions………………………………………………………………. 9
Front panel…………………………………………………………………………………………………………………………………………………………… 9
Front display (indicators)…………………………………………………………………………………………………………………………………. 10
Rear panel…………………………………………………………………………………………………………………………………………………………… 11
Remote control………………………………………………………………………………………………………………………………………………….. 12
PREPARATIONS 13
1 Placing speakers……………………………………………………………………. 14
Typical speaker layouts……………………………………………………………………………………………………………………………………. 15
Other speaker layouts………………………………………………………………………………………………………………………………………. 16
Setting the speaker impedance……………………………………………………………………………………………………………………… 17
2 Connecting speakers……………………………………………………………… 18
Connecting speaker cables……………………………………………………………………………………………………………………………… 19
Connecting the subwoofer (with built-in amplifier)……………………………………………………………………………………. 19
Connecting front speakers that support bi-amp connections………………………………………………………………….. 19
Connecting Zone B speakers…………………………………………………………………………………………………………………………… 19
3 Connecting a TV/playback devices………………………………………….. 20
Input/output jacks and cables………………………………………………………………………………………………………………………… 20
Connecting a TV………………………………………………………………………………………………………………………………………………… 21
Connecting video devices (such as BD/DVD players)…………………………………………………………………………………. 22
Connecting audio devices (such as CD players)…………………………………………………………………………………………… 24
Connecting to the jack on the front panel……………………………………………………………………………………………………. 24
4 Connecting the radio antennas………………………………………………. 25
FM/AM antennas (RX-V481)…………………………………………………………………………………………………………………………….. 25
DAB/FM antenna (RX-V481D)………………………………………………………………………………………………………………………….. 25
5 Preparing for connecting to a network……………………………………. 26
Connecting a network cable…………………………………………………………………………………………………………………………… 26
Preparing a wireless antenna………………………………………………………………………………………………………………………….. 26
6 Connecting the power cable…………………………………………………… 27
7 Selecting an on-screen menu language…………………………………… 28
8 Optimizing the speaker settings automatically (YPAO)……………. 29
Error messages………………………………………………………………………………………………………………………………………………….. 31
Warning messages……………………………………………………………………………………………………………………………………………. 32
9 Connecting to a network wirelessly………………………………………… 33
Selecting the connection method………………………………………………………………………………………………………………….. 33
Connecting the unit to a wireless network…………………………………………………………………………………………………… 34
Connecting a mobile device to the unit directly (Wireless Direct)……………………………………………………………. 39
10 Setting the MusicCast…………………………………………………………….. 41
MusicCast CONTROLLER………………………………………………………………………………………………………………………………….. 41
Adding the unit to the MusicCast network…………………………………………………………………………………………………… 41
PLAYBACK 42
Basic playback procedure……………………………………………………………. 42
Enjoying playback…………………………………………………………………………………………………………………………………………….. 42
Switching information on the front display………………………………………………………………………………………………….. 43
Selecting the input source and favorite settings with one touch
(SCENE)………………………………………………………………………………………. 44
Selecting a registered scene……………………………………………………………………………………………………………………………. 44
Registering a scene…………………………………………………………………………………………………………………………………………… 44
2
En

Selecting the sound mode…………………………………………………………… 45
Enjoying stereoscopic sound fields (CINEMA DSP 3D)……………………………………………………………………………….. 46
Enjoying unprocessed playback…………………………………………………………………………………………………………………….. 48
Enjoying pure high fidelity sound (direct playback)……………………………………………………………………………………. 49
Enhancing the bass (Extra Bass)……………………………………………………………………………………………………………………… 49
Playing back digitally compressed formats (such as MP3, etc.) with enriched sound (Compressed
Music Enhancer)
Listening to FM/AM radio (RX-V481)
Setting the frequency steps…………………………………………………………………………………………………………………………….. 50
Selecting a frequency for reception………………………………………………………………………………………………………………. 50
Registering favorite radio stations (presets)…………………………………………………………………………………………………. 51
Radio Data System tuning……………………………………………………………………………………………………………………………….. 54
Listening to DAB radio (RX-V481D)………………………………………………. 55
Preparing the DAB tuning……………………………………………………………………………………………………………………………….. 55
Selecting a DAB radio station for reception………………………………………………………………………………………………….. 56
Registering favorite DAB radio stations (presets)………………………………………………………………………………………… 57
Displaying the DAB information…………………………………………………………………………………………………………………….. 58
Checking reception strength of each DAB channel label…………………………………………………………………………… 59
Listening to FM radio (RX-V481D)………………………………………………… 60
Selecting a frequency for reception………………………………………………………………………………………………………………. 60
Registering favorite FM radio stations (presets)…………………………………………………………………………………………… 60
Radio Data System tuning……………………………………………………………………………………………………………………………….. 63
Playing back music stored on a Bluetooth® device………………………… 64
Playback Bluetooth® device music on the unit…………………………………………………………………………………………….. 64
Enjoying audio using Bluetooth® speakers/headphones…………………………………………………………………………… 65
Playing back music with AirPlay…………………………………………………… 66
Playback of iTunes/iPod music contents………………………………………………………………………………………………………. 66
Playing back music stored on a USB storage device………………………. 68
Connecting a USB storage device………………………………………………………………………………………………………………….. 68
Playback of USB storage device contents……………………………………………………………………………………………………… 68
Playing back music stored on media servers (PCs/NAS)…………………. 71
Media sharing setup…………………………………………………………………………………………………………………………………………. 71
Playback of PC music contents……………………………………………………………………………………………………………………….. 72
Listening to Internet radio…………………………………………………………… 74
Playback of Internet radio……………………………………………………………………………………………………………………………….. 74
Registering favorite Internet radio stations (bookmarks)…………………………………………………………………………… 76
………………………………………………………………………………………………………………………………………………… 49
…………………………………………….. 50
Playing back more high-quality sounds with bi-amp connections
…………………………………………………………………………………………………… 77
Connecting front speakers that support bi-amp connections………………………………………………………………….. 77
Playing back music in multiple rooms………………………………………….. 78
Connecting Zone B speakers…………………………………………………………………………………………………………………………… 78
Operating the Zone B……………………………………………………………………………………………………………………………………….. 79
Useful functions………………………………………………………………………….. 81
Registering favorite items (shortcut)……………………………………………………………………………………………………………… 81
Configuring playback settings for different playback sources
(Option menu)…………………………………………………………………………….. 83
Option menu items…………………………………………………………………………………………………………………………………………… 83
CONFIGURATIONS 87
Configuring various functions (Setup Menu)………………………………… 87
Setup menu items…………………………………………………………………………………………………………………………………………….. 88
Speaker……………………………………………………………………………………………………………………………………………………………….. 90
HDMI……………………………………………………………………………………………………………………………………………………………………. 93
Sound………………………………………………………………………………………………………………………………………………………………….. 95
ECO……………………………………………………………………………………………………………………………………………………………………… 98
Function……………………………………………………………………………………………………………………………………………………………… 99
Network……………………………………………………………………………………………………………………………………………………………. 102
Bluetooth…………………………………………………………………………………………………………………………………………………………. 104
Language…………………………………………………………………………………………………………………………………………………………. 105
Configuring the system settings (ADVANCED SETUP menu)………… 106
ADVANCED SETUP menu items……………………………………………………………………………………………………………………. 106
Changing the speaker impedance setting (SP IMP.)…………………………………………………………………………………. 106
Selecting the remote control ID (REMOTE ID)……………………………………………………………………………………………. 107
Changing the FM/AM tuning frequency setting (TU)……………………………………………………………………………….. 107
Switching the video signal type (TV FORMAT)…………………………………………………………………………………………… 107
Selecting the HDMI 4K signal format (4K MODE)………………………………………………………………………………………. 107
Restoring the default settings (INIT)…………………………………………………………………………………………………………….. 108
Updating the firmware (UPDATE)………………………………………………………………………………………………………………… 108
Checking the firmware version (VERSION)………………………………………………………………………………………………….. 108
Updating the unit’s firmware via the network…………………………….. 109
3
En

APPENDIX 110
Frequently asked questions………………………………………………………. 110
Troubleshooting……………………………………………………………………….. 112
First, check the following:……………………………………………………………………………………………………………………………… 112
Power, system and remote control………………………………………………………………………………………………………………. 112
Audio………………………………………………………………………………………………………………………………………………………………… 113
Video…………………………………………………………………………………………………………………………………………………………………. 115
FM/AM radio (AM radio feature is available only on RX-V481)………………………………………………………………… 116
DAB radio (RX-V481D)……………………………………………………………………………………………………………………………………. 116
USB and network…………………………………………………………………………………………………………………………………………….. 117
Bluetooth®……………………………………………………………………………………………………………………………………………………….. 118
Error indications on the front display…………………………………………. 119
Glossary……………………………………………………………………………………. 120
Audio information………………………………………………………………………………………………………………………………………….. 120
HDMI and video information………………………………………………………………………………………………………………………… 121
Network information……………………………………………………………………………………………………………………………………… 121
Yamaha technologies…………………………………………………………………………………………………………………………………….. 121
Supported devices and file formats……………………………………………. 122
Supported devices………………………………………………………………………………………………………………………………………….. 122
File formats………………………………………………………………………………………………………………………………………………………. 123
Video signal flow………………………………………………………………………. 123
Information on HDMI………………………………………………………………… 124
HDMI Control…………………………………………………………………………………………………………………………………………………… 124
Audio Return Channel (ARC)…………………………………………………………………………………………………………………………. 126
HDMI signal compatibility…………………………………………………………………………………………………………………………….. 126
Trademarks………………………………………………………………………………. 127
Specifications……………………………………………………………………………. 128
4
En
BEFORE USING THE UNIT
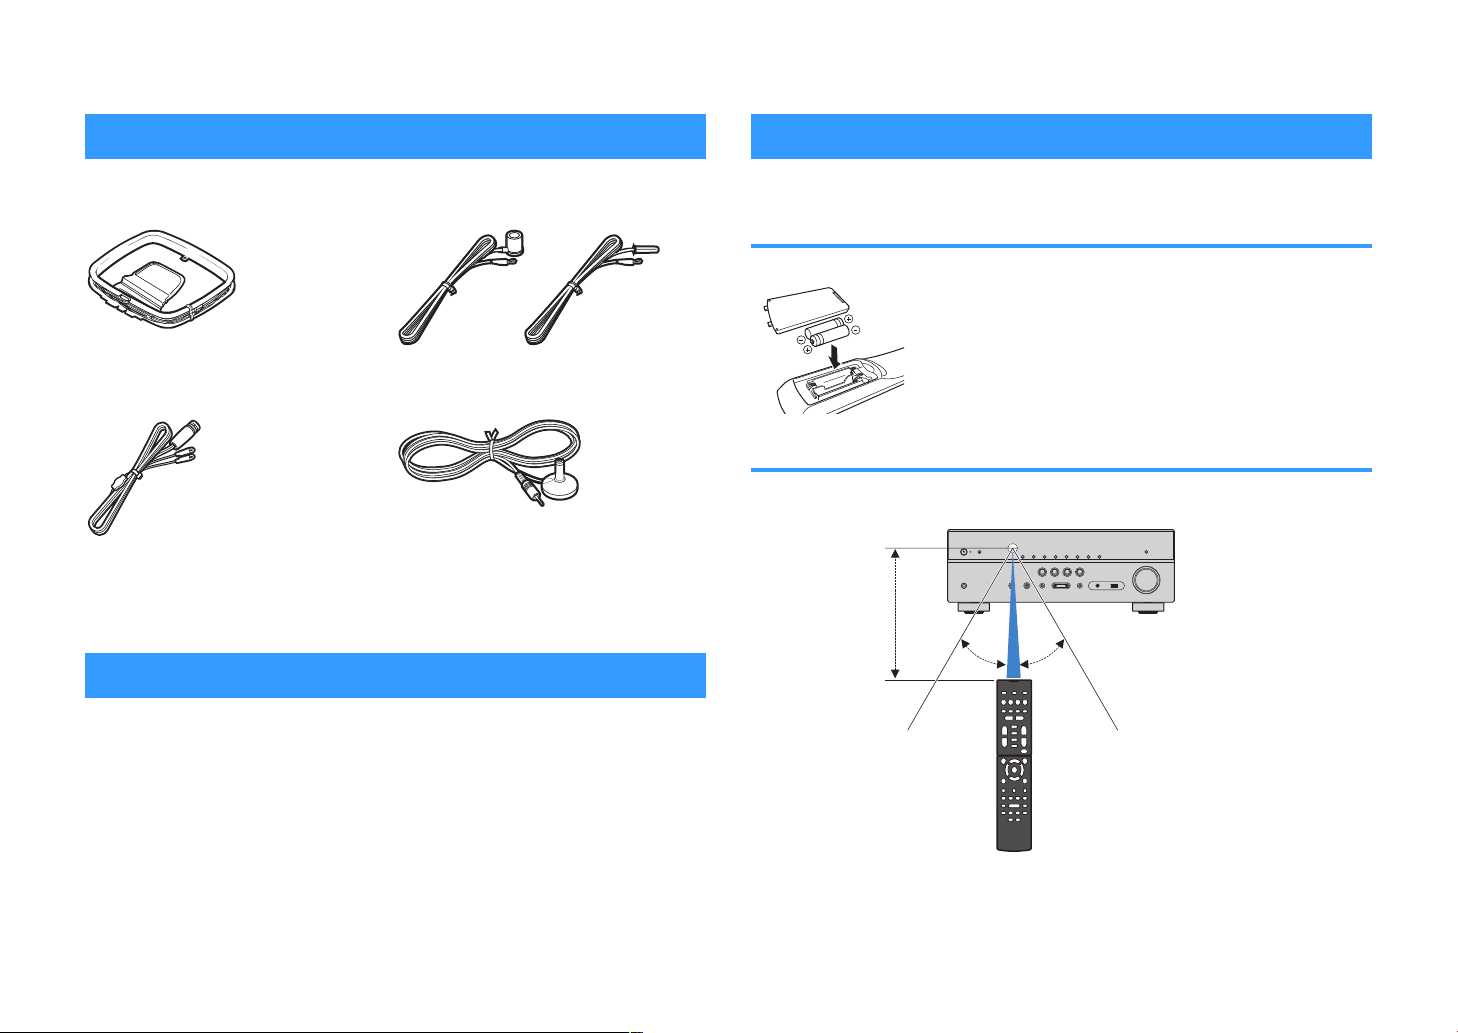
Within 6 m (20 ft)
30° 30°
Accessories
Remote control
Check that the following accessories are supplied with the product.
£ AM antenna (RX-V481) £ FM antenna (RX-V481)
* One of the above is supplied depending on
the region of purchase.
£ DAB/FM antenna (
£ Remote control
£ Batteries (AAA, R03, UM-4) (x2)
RX-V481D) £
YPAO microphone
£ CD-ROM (Owner’s Manual)
Easy Setup Guide
£
£ Safety Brochure
£ MusicCast Setup Guide
How to use this manual
• The illustrations of the main unit used in this manual are of the RX-V481 (U.S.A.
model), unless otherwise specified.
• Some features are not available in certain regions.
• Due to product improvements, specifications and appearance are subject to
change without notice.
• This manual explains operations using the supplied remote control.
Notice:
Indicates precautions for use to avoid the possibility of malfunction/damage to the unit.
Note:
Indicates instructions and supplementary explanations for optimum use.
The supplied remote control is used as follows.
Insert the batteries
Insert the batteries the right way round.
Operating range of the remote control
Point the remote control at the remote control sensor on the unit and remain within the
operating range shown below.
5
En

FEATURES
What you can do with the unit
The unit is equipped with full of useful functions.
Supports 2- to 5.1-channel
speaker system
You can enjoy your favorite acoustic spaces in various
styles.
YPAO automatically optimizes the speaker
settings to suit your room.
• “Optimizing the speaker settings automatically
(YPAO)” (p.29)
CINEMA DSP allows you to create stereo or
multichannel sounds with the sound fields
like actual movie theaters and concert halls in
your own room.
•
“Enjoying stereoscopic sound fields (CINEMA DSP
3D)” (p.46)
You can enjoy compressed music with
enhanced sound (Compressed Music
Enhancer).
• “Playing back digitally compressed formats (such as
MP3, etc.) with enriched sound (Compressed Music
Enhancer)” (p.49)
Change the input source and
favorite settings with one touch
(SCENE)
The SCENE function allows you to select the input
source and settings registered to the corresponding
scene, such as sound program and Compressed
Music Enhancer on/off, with just one touch.
• “Selecting the input source and favorite settings with
one touch (SCENE)”
4K Ultra HD signal and HDCP 2.2
(p.
44)
supported
You can enjoy the high definition video quality of 4K
with HDCP 2.2 that complies with the latest copyright
protection.
• “Selecting the HDMI 4K signal format (4K
MODE)” (p.107)
Wide variety of supported
content via network
When the unit is connected to a network by
establishing a wired or wireless connection, you can
enjoy various contents via network on the unit.
You can select a wired or wireless connection
to a network.
• “Preparing for connecting to a network” (p.26)
• “Connecting to a network wirelessly” (p.33)
You can play back music files stored on your
PC or DLNA-compatible NAS on the unit.
• “Playing back music stored on media servers (PCs/
NAS)” (p.
You can listen to Internet radio stations from
all over the world.
• “Listening to Internet radio” (p.74)
The AirPlay function allows you to play back
iTunes or iPhone/iPad/iPod touch music on
the unit via network.
• “Playing back music with AirPlay” (p.66)
71
)
The Zone A/B function allows you to playback
an input source in the room where the unit is
installed (Zone A) and in another room (Zone
B).
• “Playing back music in multiple rooms” (p.78)
6
En

The ECO mode (power saving
function) allows you to create an
eco-friendly home theater system
When the ECO mode is enabled, you can reduce the
unit’s power consumption.
• “ECO Mode” (p.98)
Sequential operation of a TV, AV
receiver, and BD/DVD player
(HDMI Control)
When the unit is connected to an HDMI Controlcompatible TV and BD/DVD player with each HDMI
cable, you can control the unit (such as power and
volume) and BD/DVD player with TV remote control
operations.
• “HDMI Control” (p.124)
Supports Bluetooth® devices
You can play back music stored on a Bluetooth device.
• “Playing back music stored on a Bluetooth
device” (p.64)
Supports USB storage devices
You can play back music stored on a USB storage
device.
• “Playing back music stored on a USB storage
device” (p.
68)
®
Connecting various devices
A number of HDMI jacks and various input/output jacks
on the unit allow you to connect video devices (such as
BD/DVD players), audio devices (such as CD players),
game consoles, portable audio player, and other
devices.
• “Connecting a TV/playback devices” (p.20)
Playing back TV audio in
surround sound with a single
HDMI cable connection (Audio
Return Channel: ARC)
When using an ARC -compatible TV, you only need one
HDMI cable to enable video output to the TV, audio
input from the TV, and the transmission of HDMI Control
signals.
• “Connecting a TV” (p.21)
Creating 3-dimensional sound
fields
The Virtual Presence Speaker (VPS) function allows you
to create a 3-dimensional sound field that spreads up
and deep in your own room (CINEMA DSP 3D).
• “Enjoying stereoscopic sound fields (CINEMA DSP
3D)” (p.46)
Surround playback with 5
speakers placed in front
You can enjoy the surround sound even when the
surround speakers are placed in front.
• “Enjoying surround sound with 5 speakers placed in
front (Virtual CINEMA FRONT)” (p.47)
Enjoying pure high fidelity sound
When the direct playback mode is enabled, the unit
plays back the selected source with the least circuitry,
which lets you to enjoy Hi-Fi sound quality.
• “Enjoying pure high fidelity sound (direct
playback)” (p.49)
Enhanced bass reproduction
Extra Bass allows you to enjoy enhanced bass
reproduction that does not depend on the speakers
used.
• “Enhancing the bass (Extra Bass)” (p.49)
Listening to FM/AM radio (RXV481)
The unit is equipped with a built-in FM/AM tuner. You
can register up to 40 favorite radio stations as presets.
• “Listening to FM/AM radio (RX-V481)” (p.50)
7
En

Listening to DAB/FM radio (RXV481D)
The unit is equipped with a built-in DAB/FM tuner. DAB
(Digital Audio Broadcasting) uses digital signals for
clearer sound and more stable reception compared to
analog signals. You can register up to 40 favorite radio
stations as presets.
• “Listening to DAB radio (RX-V481D)” (p.55)
• “Listening to FM radio (RX-V481D)” (p.60)
Easy operation with a TV screen
You can operate the USB storage device, view
information, or easily configure the settings using the
on-screen menu.
Auto Rename function
The unit automatically creates input source names
according to the HDMI-compatible devices connected,
and displays the respective input source names on the
front display.
• “Input Rename” (p.99)
Home Audio Network with
MusicCast
The unit supports the MusicCast feature that allows you
to link a MusicCast compatible device to another
device in a different room and play them back
simultaneously, or control all MusicCast compatible
devices with the dedicated application “MusicCast
CONTROLLER”.
• “Setting the MusicCast” (p.41)
Useful applications
The useful application for connections and operations
of the unit is as follows.
Application for tablets “AV SETUP
n
GUIDE”
AV SETUP GUIDE is an application that assists
you with cable connections between AV Receiver
and source devices as well as AV Receiver
This app guides you through the various settings
such as speaker connections, TV and source
device connections and assigning the power
amp.
Functions:
1) Connection support guide
– Speaker connection
– TV/source devices connection
2) Setup support guide
– Automatic network setup of HDMI, power amp
assign, etc.
– Various setup assistance with illustrations.
– YPAO setting guidance
3) View Owner’s Manual
* This application is for tablets only.
For details, search for “AV SETUP GUIDE” on the App
Store or Google Play™.
setup.
Application for smartphone /
n
tablets “AV CONTROLLER”
AV CONTROLLER is an application that assists
you with various operations of AV Receiver
without the remote control. This app allows you
not only to control the unit’s power and volume
but also to select the input source and start/stop
playback, as shown below.
Functions:
• Power on/off
Volume up/down
•
• Mute
• Music Play
• Input Selection
• DSP Mode Selection
• SCENE selection
• Blu-ray player fundamental control
• Seamless control between the Yamaha AV Receiver
and Blu-ray player
• Demo mode — Explains how to use this app
For details, search for “AV CONTROLLER” on the App
Store or Google Play.
8
En
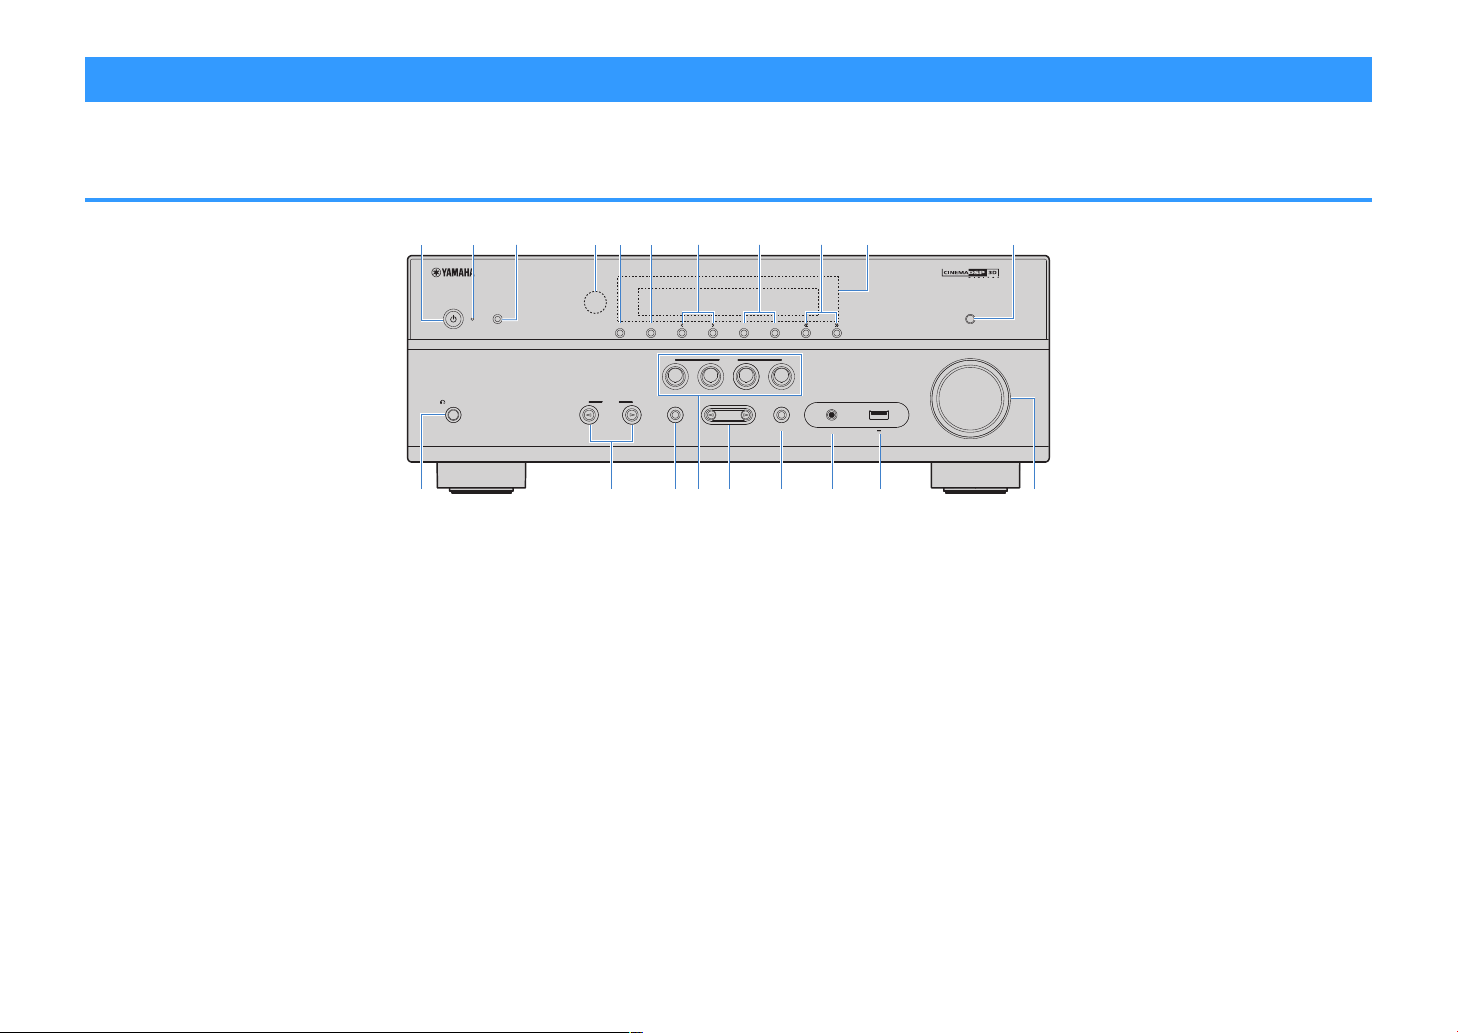
Part names and functions
PROGRAM
TONE CONTROL
STRAIGHT
(CONNECT)
AUX USB
AUDIO
5V 1A
SCENE
INPUT
PHONES
SILENT CINEMA
YPAO MIC
MEMORY
INFO (WPS)
PRESET
FM AM TUNING
DIRECT
VOLUME
TV
BD
DVD
NET
RADIO
2
3 4 6 7 8
51 09
A
B C D E F H I JG
The part names and functions of the unit and the supplied remote control are as follows.
Front panel
1
z (power) key
Turns on/off (standby) the unit.
2
Standby indicator
Lights up when the unit is in standby mode under any of
the following conditions.
• HDMI Control is enabled (p.93)
• Standby Through is enabled (p.93)
• Network Standby is enabled (p.103)
3
YPAO MIC jack
For connecting the supplied YPAO microphone (p.29).
4
Remote control sensor
Receives remote control signals (p.5).
5
INFO (WPS) key
Selects the information displayed on the front display
(p.43).
Enters the wireless LAN connection setup (WPS button
configuration) by holding down for 3 seconds (
6
MEMORY
Registers radio stations as preset stations (p.51).
key
(RX-V481 U.S.A. model)
7
PRESET keys
Select a preset radio station (p.53).
8
FM and AM keys (RX-V481) or FM and DAB keys (RXV481D)
Switch between FM and AM (p.50) or FM and DAB
(p.55).
9
TUNING keys
Select the radio frequency (p.50).
:
Front display
Displays information (p.10).
A
DIRECT key
Enables/disables the direct playback mode (p.49).
B
PHONES jack
For connecting headphones.
C
INPUT keys
Select an input source.
p.35).
D
TONE CONTROL key
Adjusts the level of high-frequency range (Treble) and lowfrequency range (Bass
) individually (p.84).
9
En
E
SCENE
keys
Select the registered input source and sound program with
one touch. Also, turns on the unit when it is in standby
mode (p.44).
F
PROGRAM keys
Select a sound program or a surround decoder (p.45).
G
STRAIGHT (CONNECT) key
Enables/disables the straight decode mode (p.48).
Enters the MusicCast network addition and the wireless
).
LAN setup by holding down for 5 seconds (p.
H
AUX jack
41
For connecting devices, such as portable audio players
(p.24).
I
USB jack
For connecting a USB storage device (p.68).
J
VOLUME knob
Adjusts the volume.
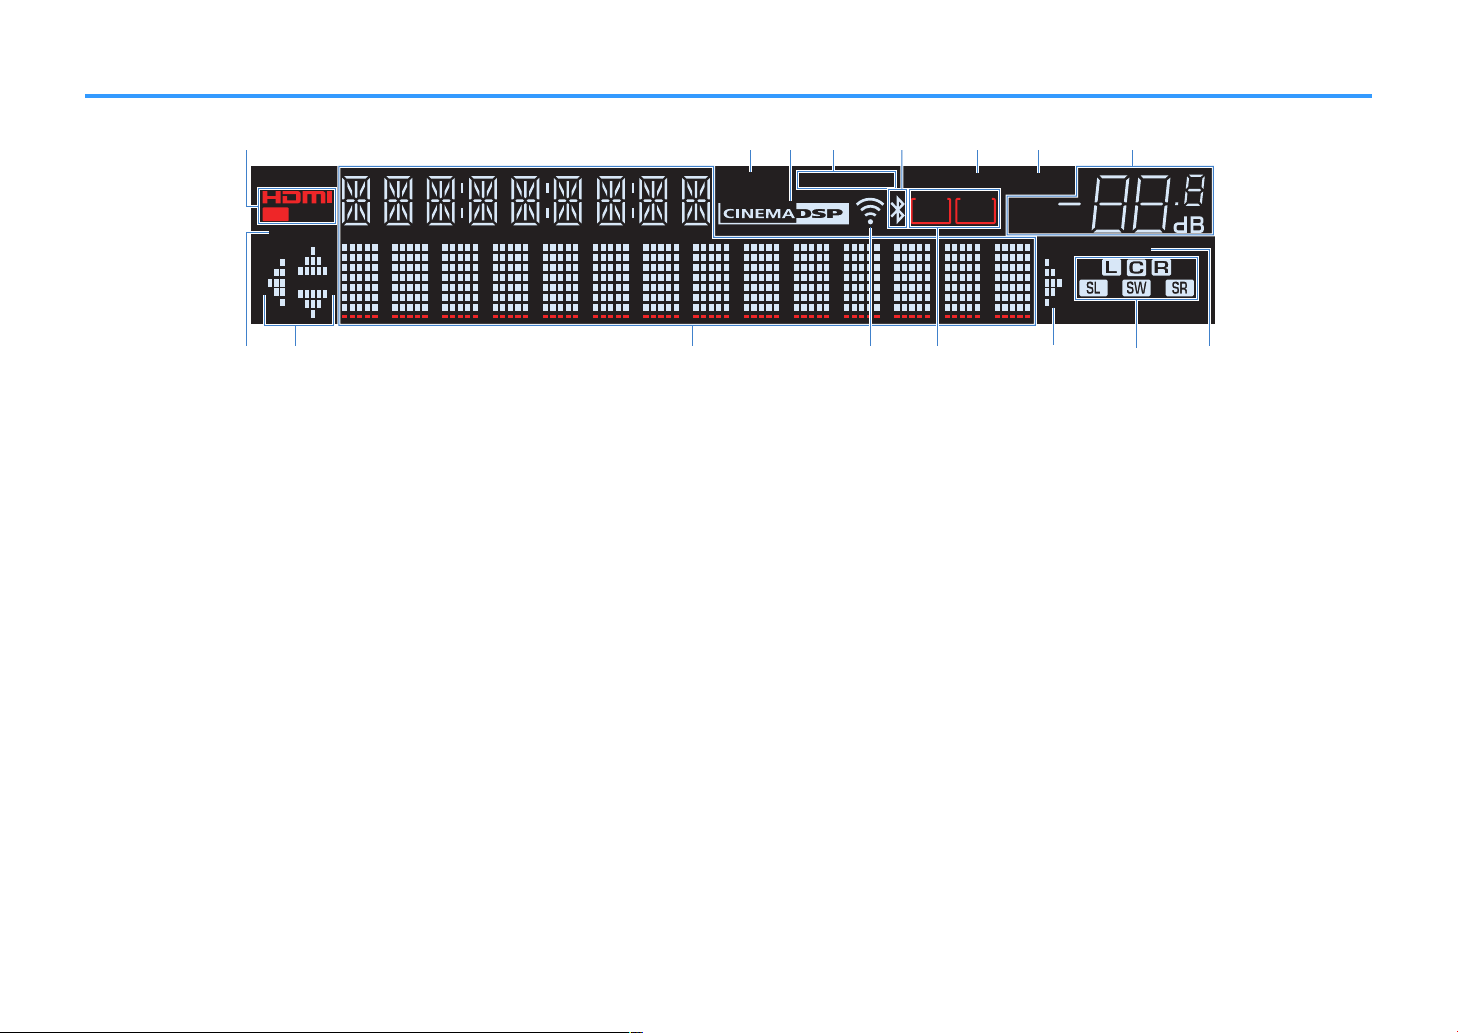
Front display (indicators)
1 2
PARTY
VIRTUAL
2 3
CHARGE
VOL.
MUTE
ENHANCER
STEREO
TUNED
SLEEP
OUT
ECO
ADAPTIVE DRC
ZONEAZONE
B
1
2
3
4
6 7 8
5
09 B 0
A
C D E
1
HDMI
Lights up when HDMI signals are being input or output.
OUT
Lights up when HDMI signals are being output.
2
ENHANCER
Lights up when Compressed Music Enhancer (p.49) is
working.
3
CINEMA DSP
Lights up when CINEMA DSP (p.46) or CINEMA DSP 3D
(p.46) is working.
4
STEREO
Lights up when the unit is receiving a stereo FM radio
signal.
TUNED
Lights up when the unit is receiving an FM/AM radio station
(RX-V481) or FM radio station (RX-V481D) signal.
5
Bluetooth indicator
Light up while the unit is connecting to a Bluetooth device.
6
SLEEP
Lights up when the sleep timer is on.
7
MUTE
Blinks when audio is temporarily muted.
8
Volume indicator
Indicates the current volume.
9
ECO
Lights up when the eco mode (p.98) is enabled.
:
Cursor indicators
Indicate the remote control cursor keys currently
operational.
A
Information display
Displays the current status (such as input name and sound
mode name). You can switch the information by pressing
INFO (p.
B
Signal strength indicator
Indicates the strength of the wireless signal (p.33).
C
ZONE indicators
Indicate the zone to which the sound is output (p.80).
D
Speaker indicators
Indicate speaker terminals from which signals are output.
A Front speaker (L)
S Front speaker (R)
D Center speaker
F Surround speaker (L)
G Surround speaker (R)
L Subwoofer
E
ADAPTIVE DRC
Lights up when Adaptive DRC (p.84) is working.
43
).
10
En
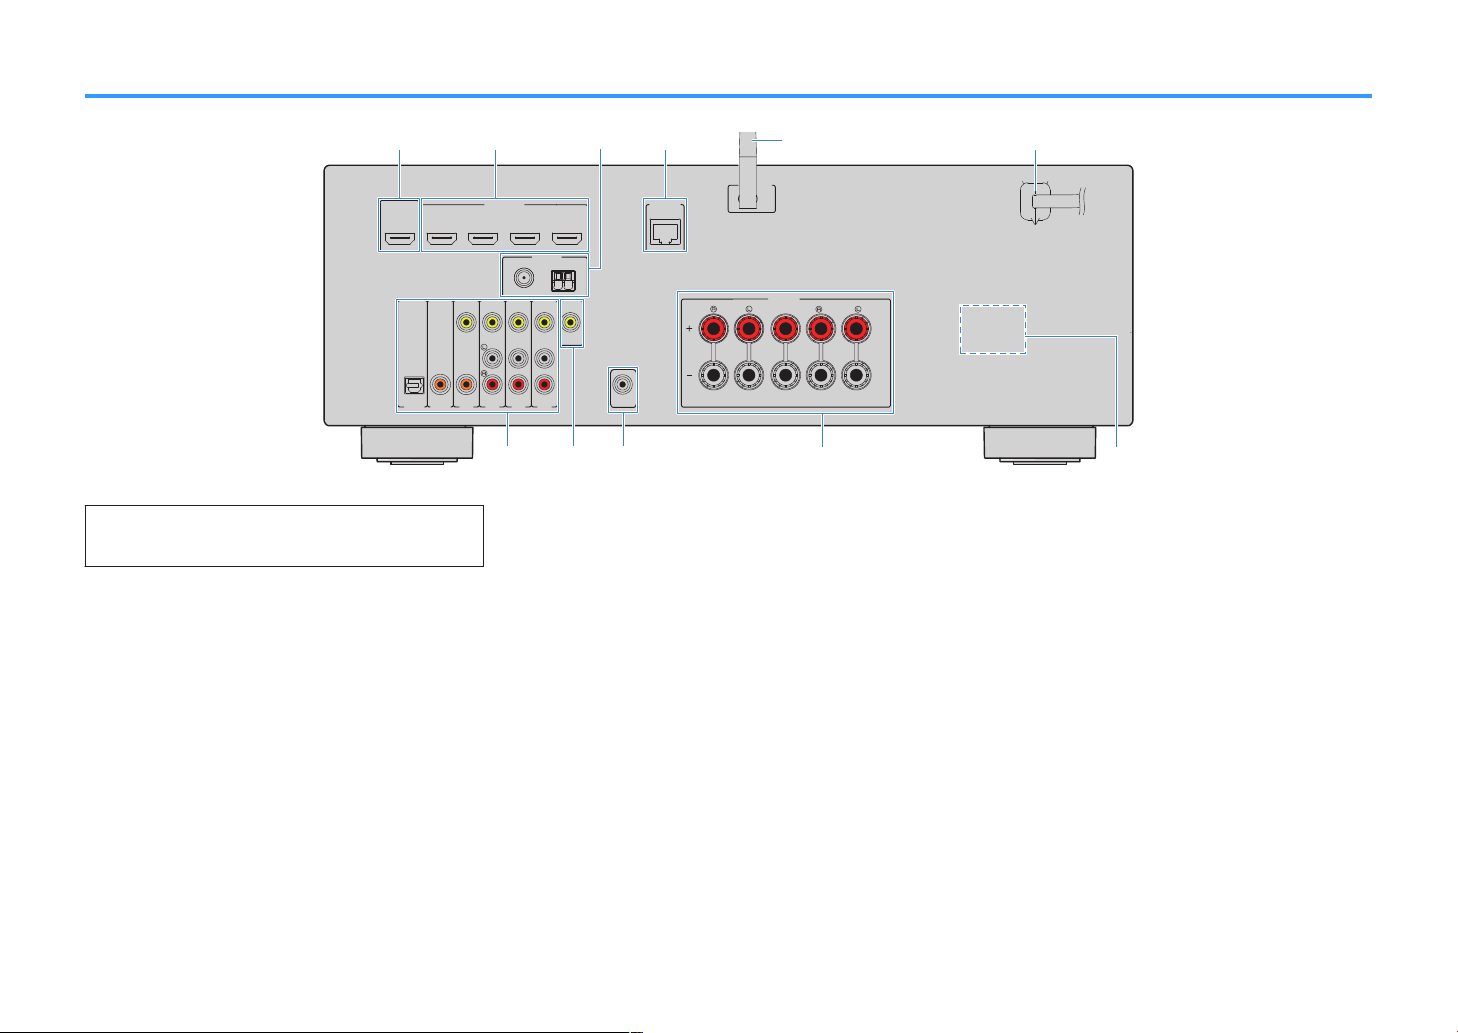
Rear panel
OPTICAL
(TV)
COAXIAL
COAXIAL
VID
EO
A
M
FM
75Ω
A
NTENNA
(R
ADIO)
M
ONI
TOR
OUT
SUBWOOF
E
R
PR
EOUT
H
DMI
(
HDCP
2.2)
1
(B
D/DV
D)
2
3
4
H
DMIO
UT
HDC
P2.2
ARC
N
ETWORK
(NET)
F
RONT
CENTER
SPEA
K
ERS
SU
RROUND/
BI-AMP
/
ZO
NEB
LESS
AV
4
AV
3
AUDI0
2
AUDIO
1
AV
2
AV
1
▪ The area around the video/audio output jacks is marked in white
on the actual product to prevent improper connections.
1
HDMI OUT jack
For connecting to an HDMI-compatible TV and outputting
video/audio signals (
signal can also be input through the HDMI OUT jack.
2
HDMI 1–4 jacks
For connecting to HDMI-compatible playback devices and
3
4
5
inputting video/audio signals (p.21).
ANTENNA
For connecting to the radio antennas (p.25).
NETWORK jack
For a wired connection to a network (p.26).
Wireless antenna
For a wireless (Wi-Fi) connection to a network (p.26).
6
Power cable
For connecting to an AC wall outlet (p.27).
jacks
p.
20). When using ARC, TV audio
(RX-V481 U.S.A. model)
7
AV jacks
AUDIO jacks
For connecting to video/audio playback devices and
inputting video/audio signals (
8
MONITOR OUT
jack
p.22).
For connecting to a TV and outputting video signals
(p.20).
9
SUBWOOFER PRE OUT jack
For connecting to a subwoofer (with built-in amplifier)
(p.18).
:
SPEAKERS terminals
For connecting to speakers (p.18).
A
VOLTAGE SELECTOR
(Taiwan, Brazil and General models only)
Selects the switch position according to your local voltage
(p.27).
11
En
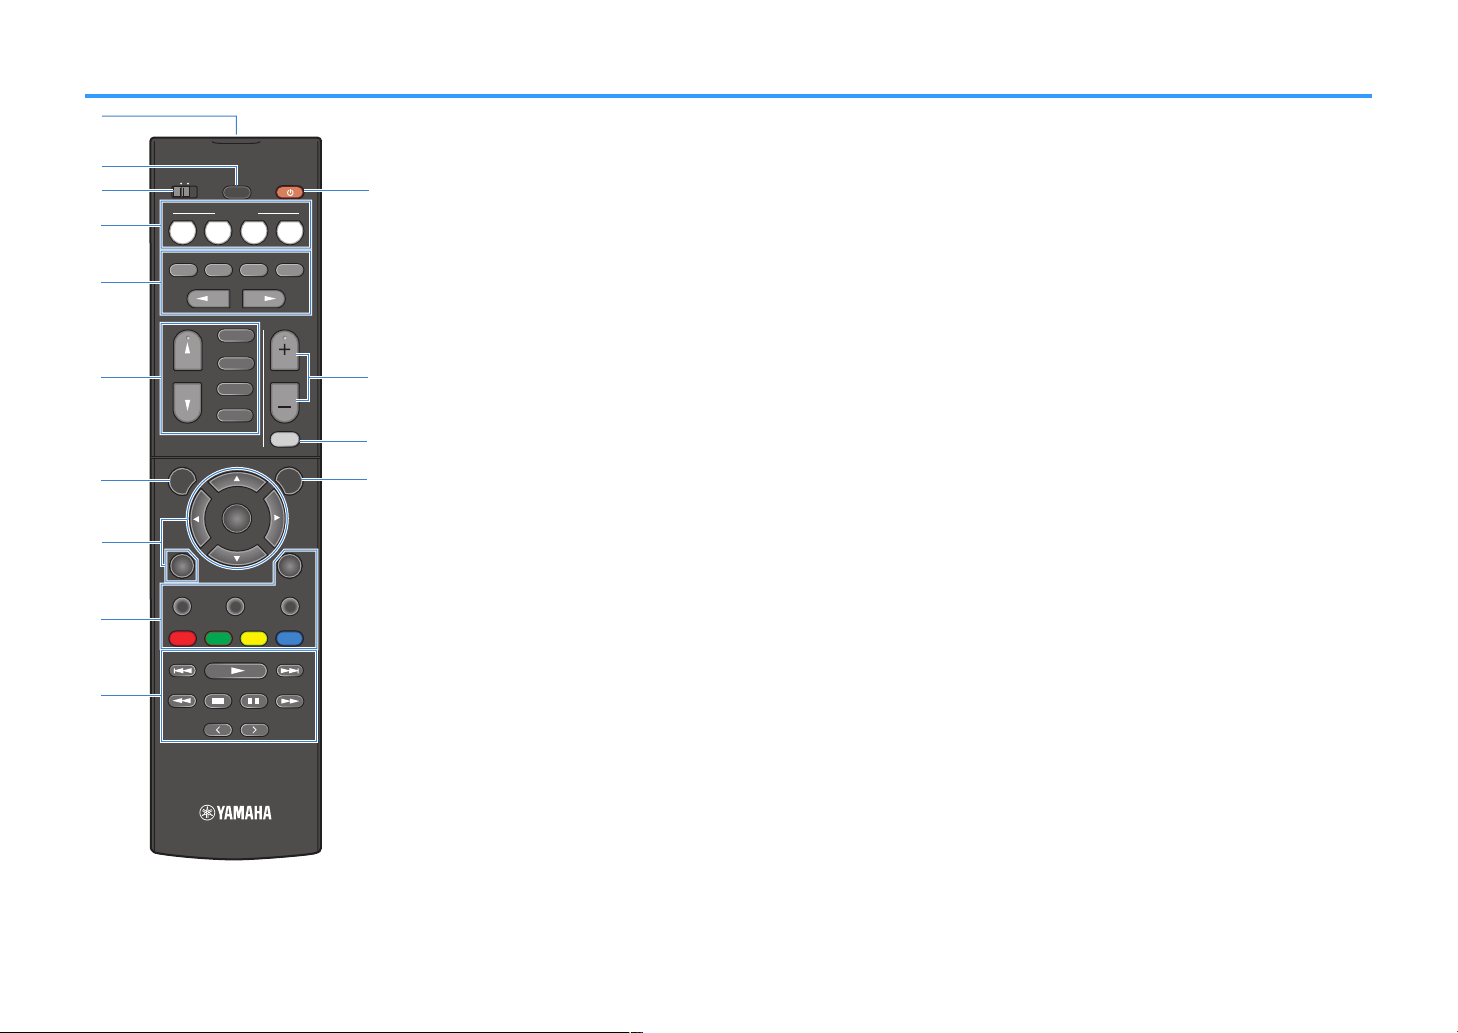
Remote control
TUNING
PRESET
MUTE
TUNING
MEMORY
TOP MENU
HOME
POP-UP/MENU
DISPLAYRETURN
SETUP
OPTION
FM/AM
VOLUME
PROG RAM
USB
STRAIGHT
ENHANCER
BASS
INP UT
BD
DVD
TV
SC ENE
RADIO
SLEEP
ENTER
BLUE
YELLOWGREEN
RED
DIRECT
ZONE A ZONE B
NET
NET
BLUETOOTH
2
3
4
6
7
5
1
9
A
B
C
D
0
8
1
Remote control signal transmitter
Transmits infrared signals.
2
SLEEP key
Pressing this key repeatedly will specify the time (120 min,
90 min, 60 min, 30 min, off), in which the unit switches to
the standby mode.
3
ZONE switch
Enable/disable the audio output to Zone A or Zone B
).
(p.79
4
SCENE keys
Select the registered input source and sound program with
one touch. Also, turn on the unit when it is in standby mode
(p.44).
5
Sound mode keys
Select a sound mode (p.45).
6
Input selection keys
Select an input source for playback.
You can select directly each input source by pressing the
following keys.
FM/AM or
FM/DAB
USB
NET
FM/AM radio (RX-V481) or FM/DAB radio
(RX-V481D)
USB jack (on the front panel)
SERVER, NET RADIO, MusicCast Link,
AirPlay and network sources (press
repeatedly to select a desired source)
BLUETOOTH
7
SETUP
Bluetooth device
key
Displays the setup menu (p.87).
8
Menu operation keys
Cursor keys
ENTER
RETURN
Select a menu or the parameter.
Confirms a selected item.
Returns to the previous screen.
89: External device operation keys
Let you perform playback operations when “USB” or “NET”
is selected as the input source, or control playback of the
HDMI Control-compatible playback device.
Note
▪ The playback devices must support HDMI Control. Some
HDMI Control-compatible devices cannot be used.
▪ You can assign the unit’s functions to the RED/GREEN/
YELLOW/BLUE keys (
:
Radio keys
p.
101).
Operate the FM/AM/DAB radio when “TUNER” is selected
as the input source (p.50).
MEMORY
PRESET
TUNING
A
z (receiver power) key
Registers radio stations as presets.
Select a preset station.
Select the radio frequency.
Turns on/off (standby) the unit.
B
VOLUME keys
Adjust the volume.
C
MUTE key
Mutes the audio output.
D
OPTION key
Displays the option menu (p.83).
12
En

PREPARATIONS
General setup procedure
1 Placing speakers……………………………………………………………………………………………………………….. (p.14)
2 Connecting speakers………………………………………………………………………………………………………… (p.18)
3 Connecting a TV/playback devices…………………………………………………………………………………….. (p.20)
4 Connecting the radio antennas…………………………………………………………………………………………. (p.25)
5 Preparing for connecting to a network………………………………………………………………………………. (p.26)
6 Connecting the power cable……………………………………………………………………………………………… (p.27)
7 Selecting an on-screen menu language……………………………………………………………………………… (p.28)
8 Optimizing the speaker settings automatically (YPAO)………………………………………………………. (p.29)
9 Connecting to a network wirelessly…………………………………………………………………………………… (p.33)
10 Setting the MusicCast……………………………………………………………………………………………………….. (p.41)
This completes all the preparations. Enjoy playing movies, music, radio and other content with the unit!
13
En

1 Placing speakers
Select the speaker layout for the number of speakers that you are using and place the speakers and subwoofer in your room. This section describes the representative speaker
layout examples.
Notice
▪ (U.S.A. and Canada models only)
Under its default settings, the unit is configured for 8-ohm speakers. When connecting 6-ohm speakers, set the unit’s speaker impedance to “6 Ω MIN”. For details, see
▪ (Except for U.S.A. and Canada models)
Use speakers with an impedance of at least 6 W.
▪ Use a subwoofer with built-in amplifier.
▪ Be sure to connect the front left and right speakers.
“Setting the speaker impedance” (p.17).
14
En
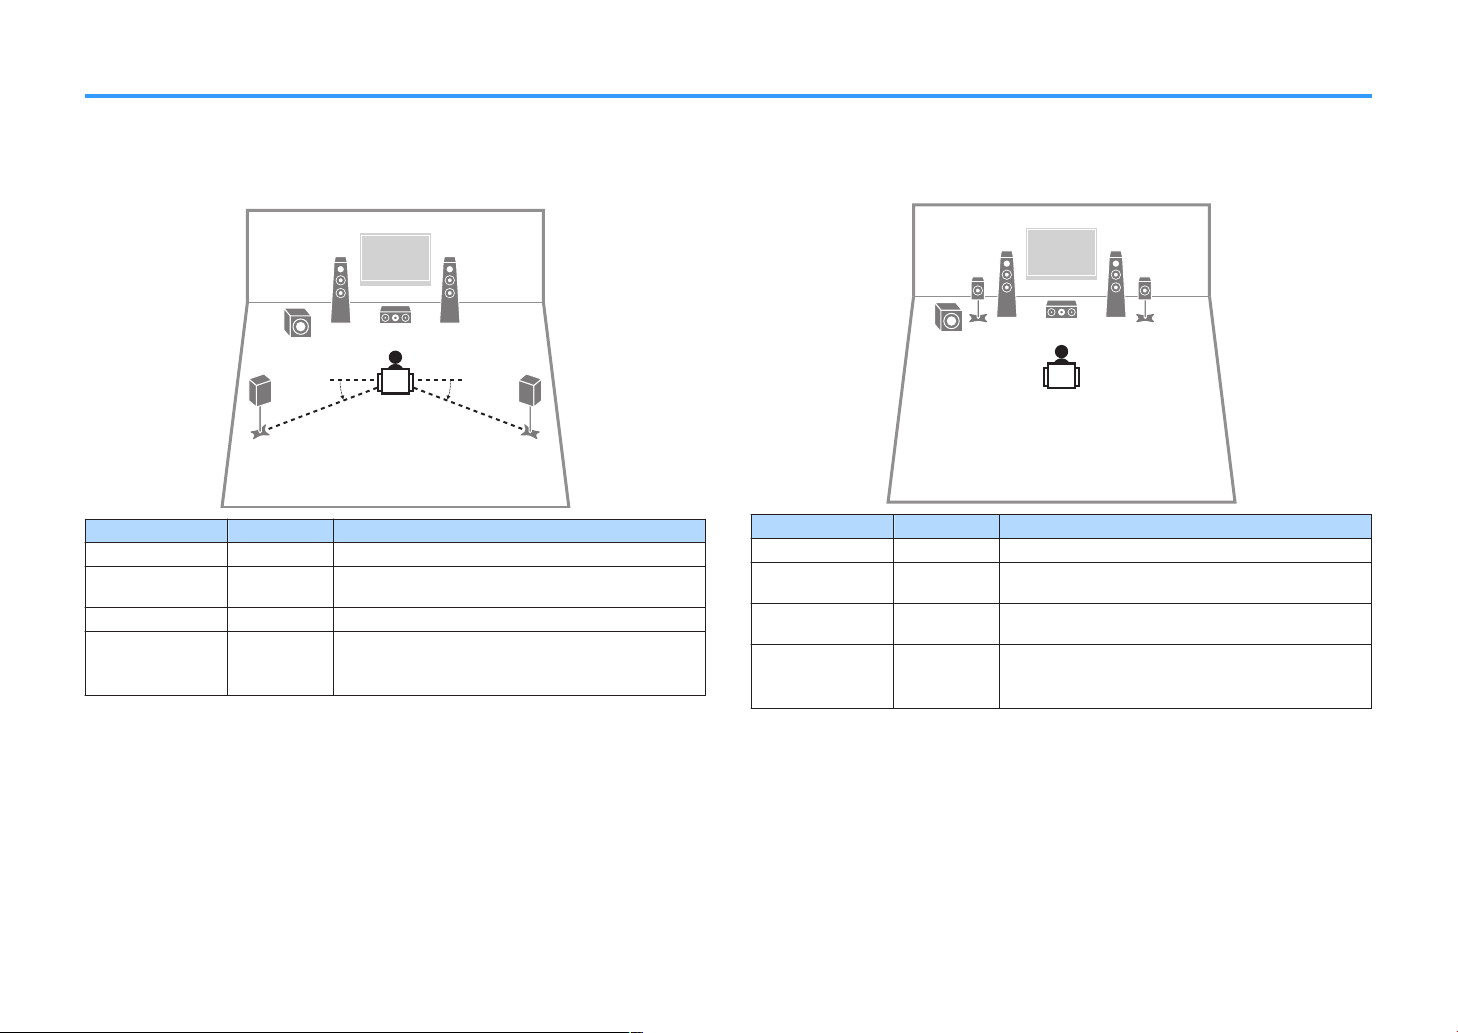
Typical speaker layouts
5.1-channel system
n
We recommend this speaker layout which can maximize the performance of the unit.
Speaker type Abbr. Function
Front (L/R)
Center
Surround (L/R)
Subwoofer
Note
▪ You can enjoy surround sound even without the center speaker (front 4.1-channel system).
▪ You can place the subwoofer either in the left or right side.
1/2
3
4/5
9
Produce front left/right channel sounds (stereo sounds).
Produces center channel sounds (such as movie dialogue
and vocals).
Produce surround left/right channel sounds.
Produces LFE (low-frequency effect) channel sounds and
reinforces the bass parts of other channels.
This channel is counted as “0.1”.
5.1-channel system (Virtual CINEMA FRONT)
n
We recommend this speaker layout when the speakers can’t be placed in back of the
room.
Speaker type Abbr. Function
Front (L/R)
Center
Surround (L/R)
Subwoofer
Note
▪ To utilize this configuration, set “Virtual CINEMA FRONT” (p.91) in the “Setup” menu to “On”.
▪ You can enjoy surround sound even without the center speaker (front 4.1-channel system).
▪ You can place the subwoofer either in the left or right side.
1/2
3
4/5
9
Produce front left/right channel sounds (stereo sounds).
Produces center channel sounds (such as movie dialogue
and vocals).
Produce surround left/right channel sounds. By this
system, place the surround speakers in front.
Produces LFE (low-frequency effect) channel sounds and
reinforces the bass parts of other channels.
This channel is counted as “0.1”.
15
En
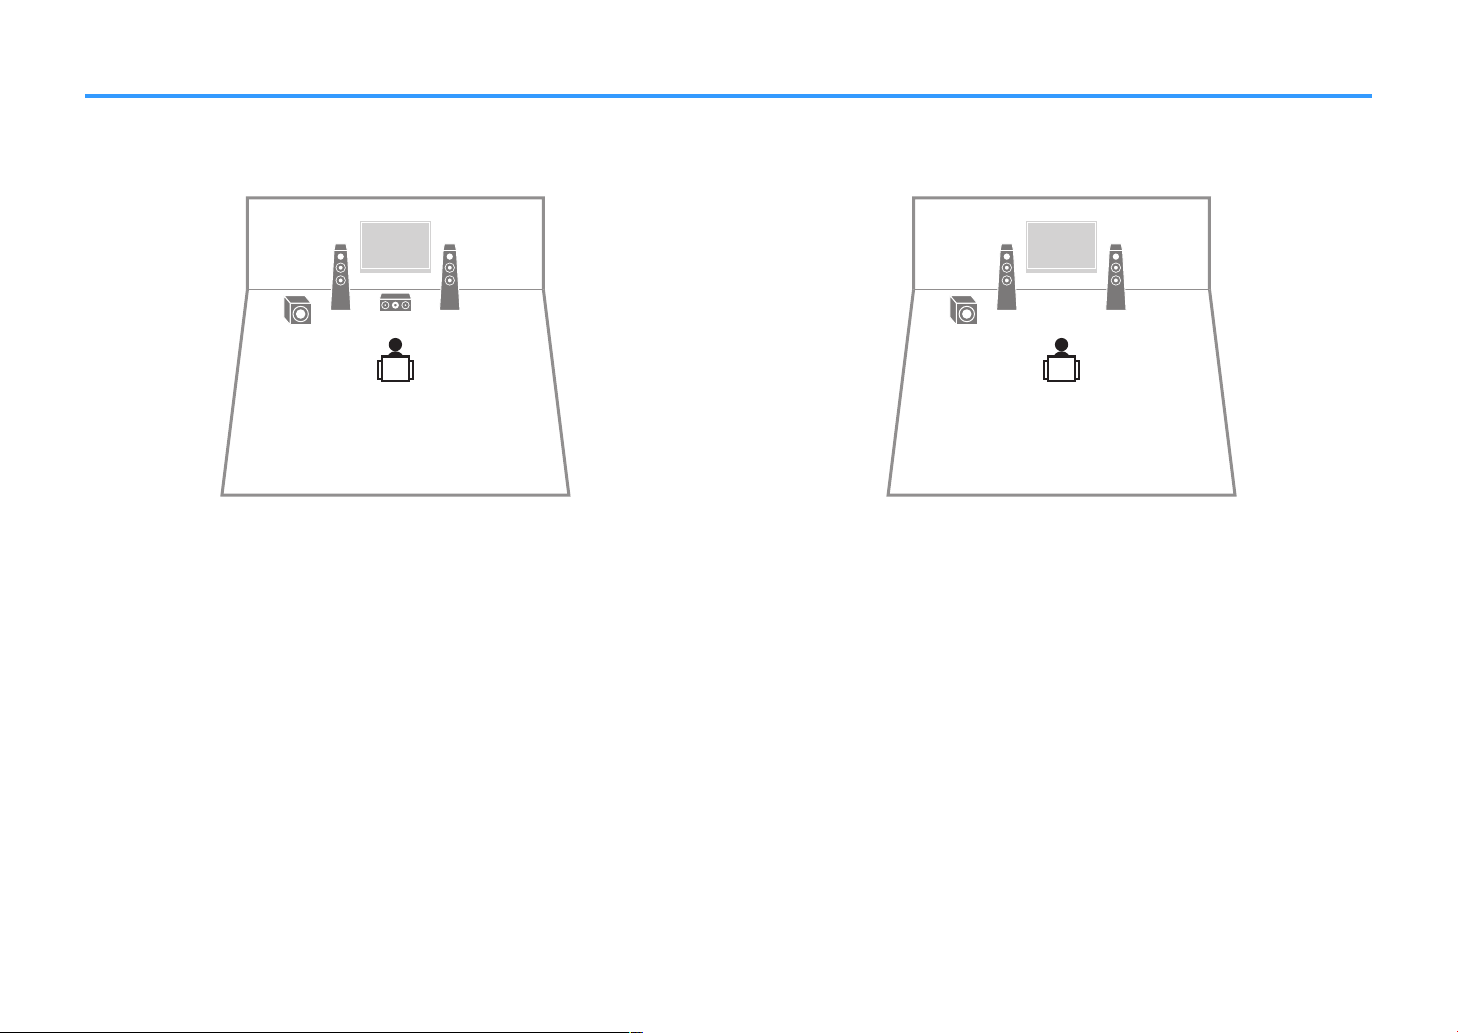
Other speaker layouts
The following speaker layouts are also available.
3.1-channel system
n
2.1-channel system
n
Note
In addition to this speaker layout, you can use bi-amp connections or the Zone B function that allows you to
play back an input source in another room (Zone B). For details, see
with bi-amp connections” (p.77) or “Playing back music in multiple rooms” (p.78).
“Playing back more high-quality sounds
Note
In addition to this speaker layout, you can use bi-amp connections or the Zone B function that allows you to
play back an input source in another room (Zone B). For details, see
with bi-amp connections” (p.77) or “Playing back music in multiple rooms” (p.78).
16
En
“Playing back more high-quality sounds

1 2
PARTY
VIRTUAL
VOL.
MUTE
ENHANCER
STEREO
TUNED
SLEEP
OUT
ECO
CHARGE
ADAPTIVE DRC
ZONE
2 A
ZONE
3B
SP IMP.••8¬MIN
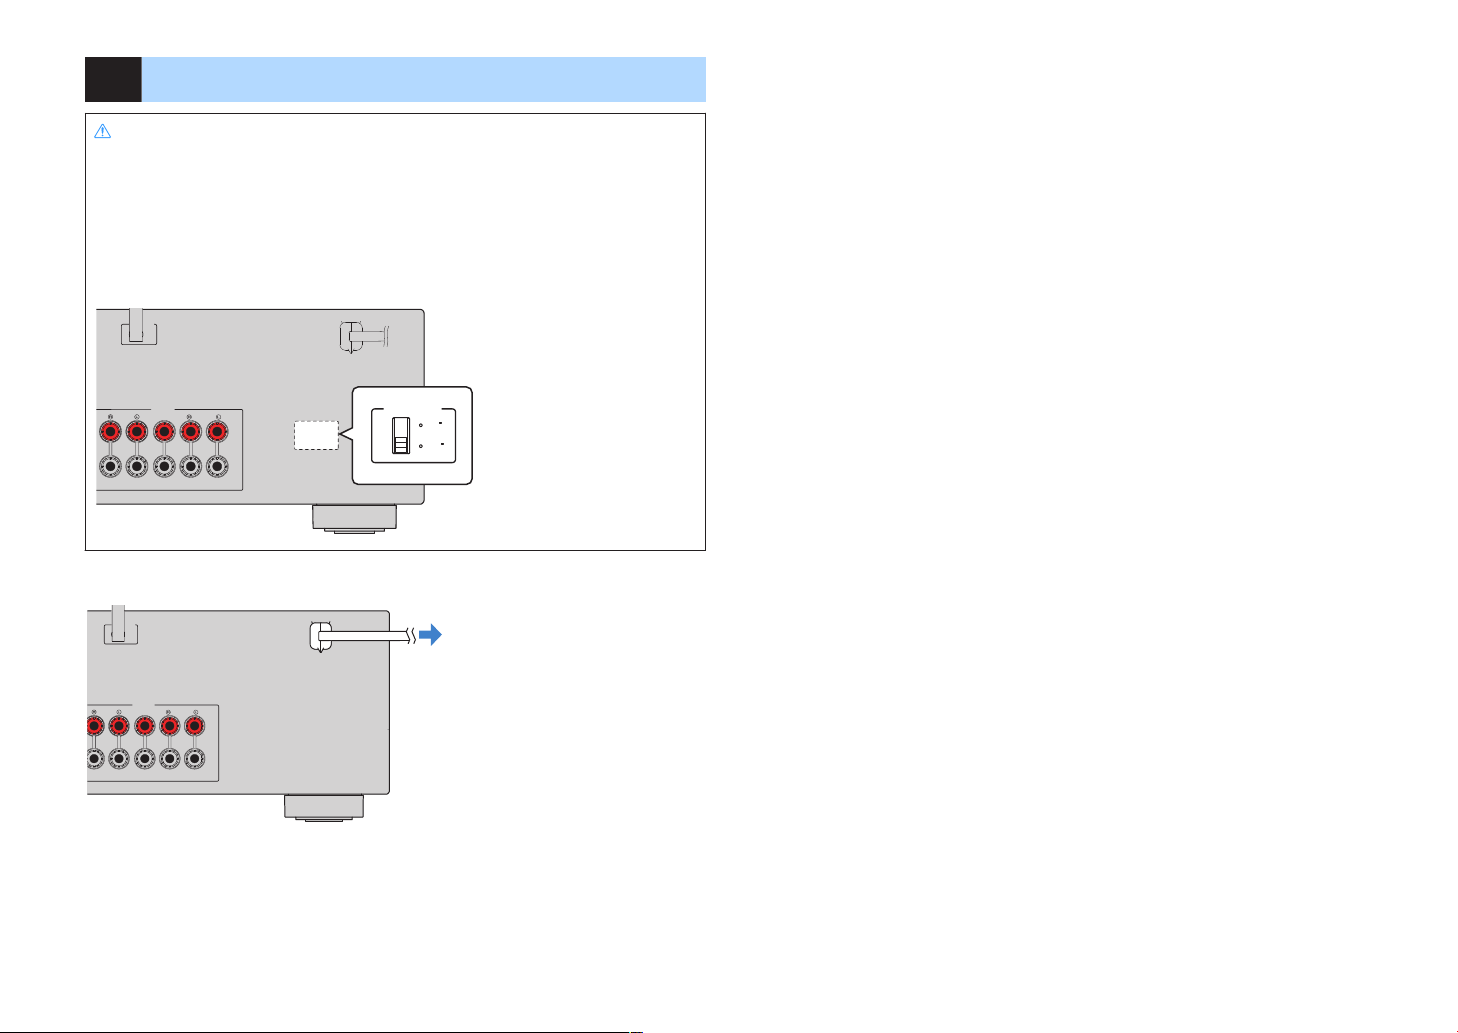
Setting the speaker impedance
(U.S.A. and Canada models only)
Under its default settings, the unit is configured for 8-ohm speakers. When connecting 6-ohm speakers, set the speaker impedance to “6 Ω MIN”.
Before connecting speakers, connect the power cable to an AC wall outlet.
1
While holding down STRAIGHT on the front panel, press z (power).
2
Check that “SP IMP.” is displayed on the front display.
3
Press STRAIGHT to select “6 Ω MIN”.
4
Press z (power) to set the unit to standby mode and remove the power cable from the AC wall outlet.
5
You are now ready to connect the speakers.
17
En
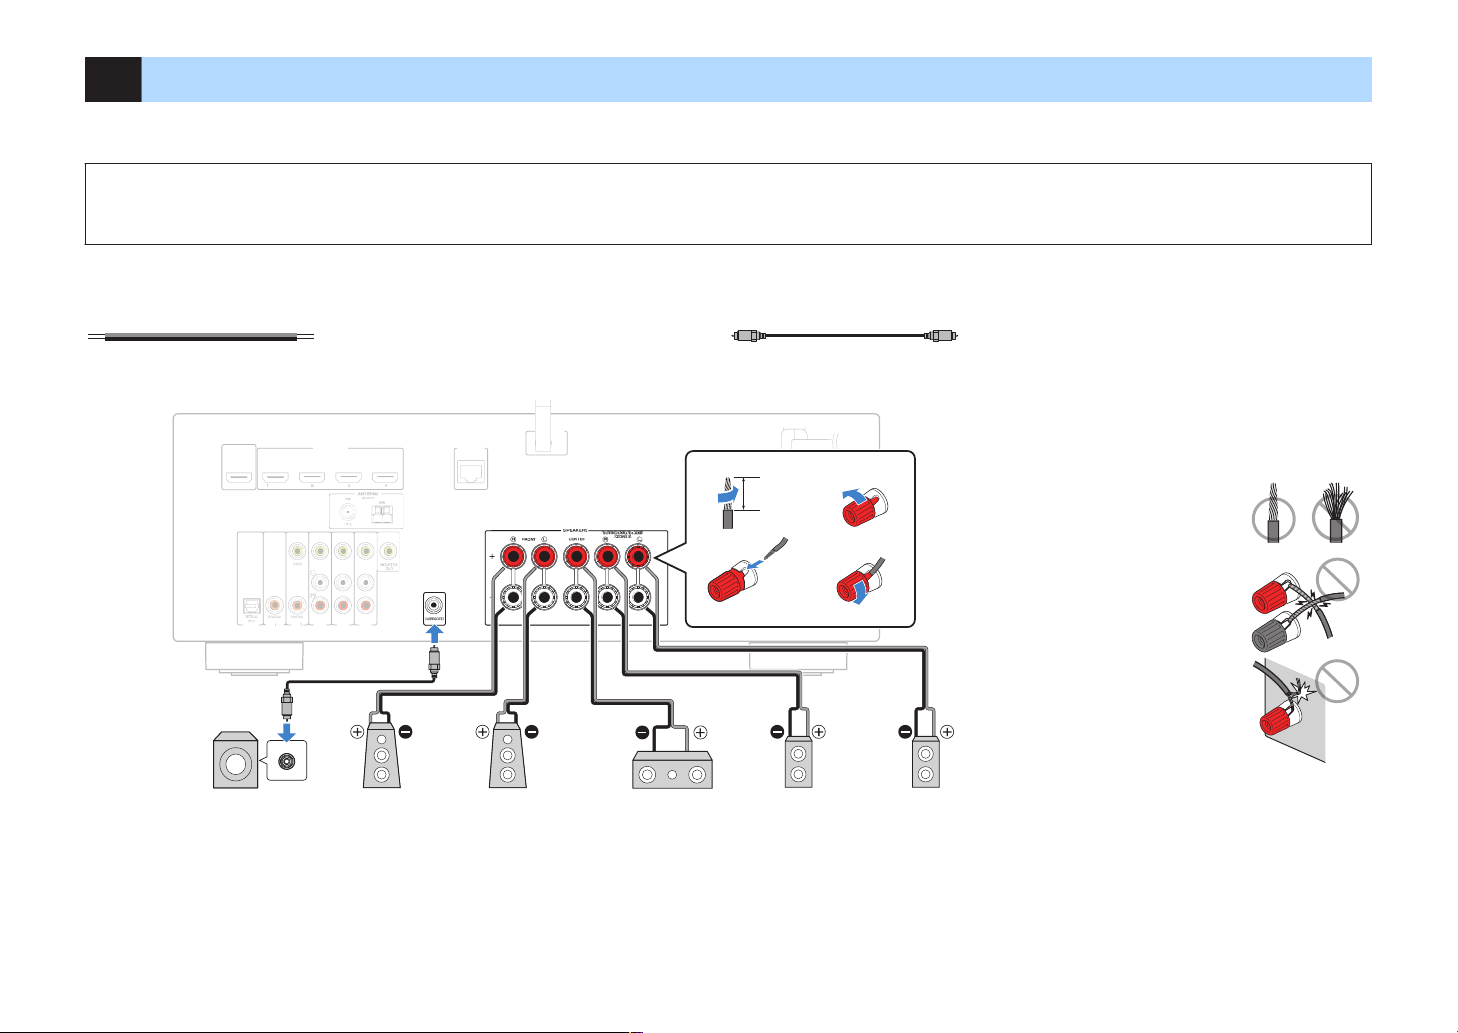
2 Connecting speakers
SUBWOOF
E
R
PR
EOUT
N
ETWORK
(NET)
F
RONT
CENTER
SPEA
KERS
SURROUND/BI-AMP
/ZONEB
LESS
The unit (rear)
Audio pin cable
Use a subwoofer with built-in
amplifier.
Subwoofer Surround (L)Surround (R)CenterFront (R) Front (L)
10 mm (3/8”)
Precaution for connecting of the speaker cables
Improper connecting of the speaker cables may cause short circuit and
also damage the unit or the speakers.
▪ Twist the bare wires of the speaker cables
firmly together.
▪ Do not let the core wires of the speaker cable
touch one another.
▪ Do not let the core wires of the speaker cable
come into contact with the unit’s metal parts
(rear panel and screws).
If “Check SP Wires” appear on the front display when the unit is turned
on, turn off the unit, and then check the speaker cables short circuit.
Connect the speakers placed in your room to the unit. The following diagrams provide connections for a 5.1-channel system as an example. For other systems, connect speakers
while referring to the connection diagram for the 5.1-channel system.
Notice
▪ Remove the unit’s power cable from an AC wall outlet and turn off the subwoofer before connecting the speakers.
▪ The speaker has the polarity (+/-). Connect the speaker cable correctly between the positive (+) terminal of the unit and the speaker, and also between the negative (-) terminal of them.
Cables required for connection (commercially available)
Speaker cables (x the number of speakers)
Audio pin cable (x1: for connecting a subwoofer)
18
En
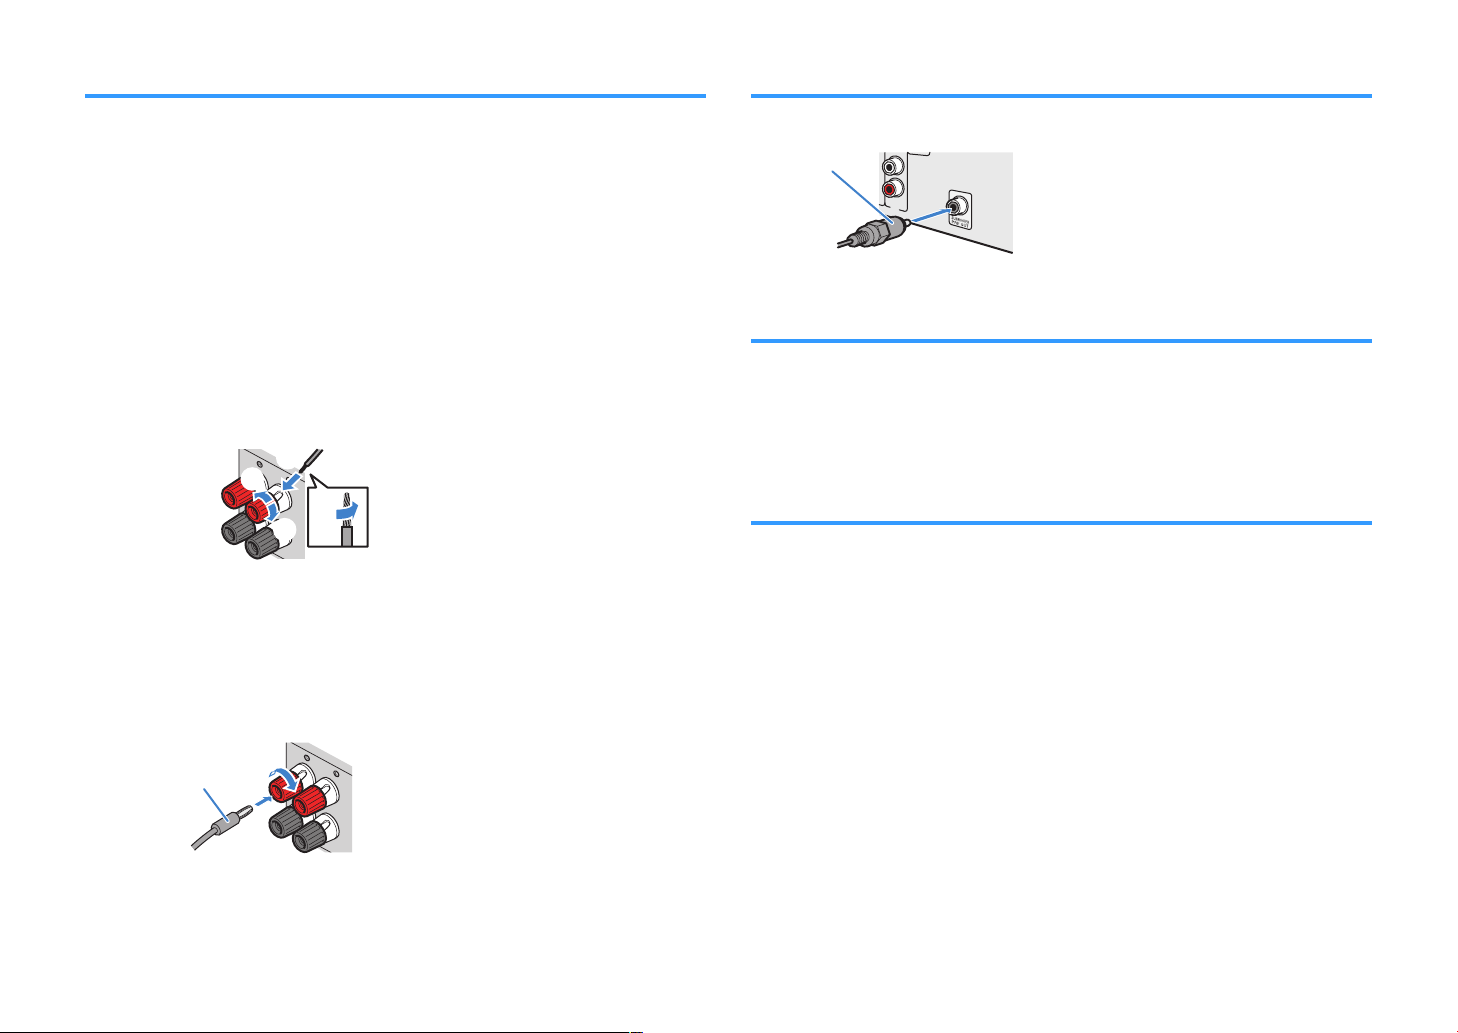
Connecting speaker cables
Connecting the subwoofer (with built-in amplifier)
Speaker cables have two wires. One is for connecting the negative (-) terminal of the
unit and the speaker, and the other is for the positive (+) terminal. If the wires are
colored to prevent confusion, connect the black wire to the negative and the other wire
to the positive terminal.
Remove approximately 10 mm (3/8”) of insulation from the ends of
1
the speaker cable, and twist the bare wires of the cable firmly
together.
Loosen the speaker terminal.
2
Insert the bare wires of the cable into the gap on the side (upper
3
right or bottom left) of the terminal.
Tighten the terminal.
4
Using a banana plug
(U.S.A., Canada, China, Australia, Taiwan, Brazil and General models only)
Tighten the speaker terminal.
1
Use an audio pin cable to connect the subwoofer.
Connecting front speakers that support bi-amp
connections
When using front speakers that support bi-amp connections, connect them to the
FRONT terminals and SURROUND/BI-AMP/ZONE B
back more high-quality sounds with bi-amp connections” (p.77).
Note
Surround speakers or Zone B speakers cannot be used during bi-amp connections.
Connecting Zone B speakers
The Zone A/B function allows you to playback an input source in the room where the
unit is installed (Zone A) and in another room (Zone B). To connect the Zone B
speakers, see “Playing back music in multiple rooms” (p.
Note
Surround speakers or bi-amp speakers cannot be used during Zone B connections.
terminals. For details, see “Playing
78).
Insert a banana plug into the end of the terminal.
2
19
En

3 Connecting a TV/playback devices
The unit is equipped with a variety of input jacks
including HDMI input jacks to allow you to connect
different types of playback devices. For information on
how to connect a Bluetooth device or a USB storage
device, see the following pages.
• Connecting a Bluetooth device (p.64)
• Connecting a USB storage device (p.68)
Input/output jacks and cables
Video/audio jacks
n
HDMI jacks
Transmit digital video and digital sound through a
single jack. Use an HDMI cable.
Note
▪ Use a 19-pin HDMI cable with the HDMI logo. We
recommend using a cable less than 5.0 m (16.4 ft) long to
prevent signal quality degradation.
▪ The unit’s HDMI jacks support the HDMI Control, Audio
Return Channel (ARC), and 3D and 4K Ultra HD video
transmission (through output) features.
▪ Use high speed HDMI cables to enjoy 3D or 4K Ultra HD
videos.
Video jacks
n
VIDEO jacks
Transmit analog video signals. Use a video pin
cable.
Audio jacks
n
OPTICAL jacks
Transmit digital audio signals. Use a digital optical
cable. Remove the tip protector (if available) before
using the cable.
COAXIAL jacks
Transmit digital audio signals. Use a digital coaxial
cable.
AUDIO jacks
(Stereo L/R jacks)
Transmit analog stereo audio signals. Use a stereo
pin cable (RCA cable).
(Stereo mini jack)
Transmits analog stereo audio signals. Use a
stereo mini-plug cable.
20
En
OPTICAL
(TV)
COAXIAL
COAXIAL
VIDEO
AM
FM
75Ω
ANTENNA
(RADIO)
MONITOR
OUT
SUBWOOFER
PR
EOUT
HDMI
(
HDCP2.2)
1
(BD/DVD)
2
3
4
HDMIOUT
HDCP2.2
ARC
N
ETWORK
(NET)
FRONT
CENTER
SPEAKERS
SURROUND/BI-AMP
/ZONEB
LESS
AV4
AV3
AUDI02
AUDIO1
AV2
AV1
HDMI
HDMI
HDMI
AUDIO 1
(TV)
OPTICAL
OPTICAL
O O
HDMI
HDMI
HDMI
AUDIO 1
(TV)
OPTICAL
OPTICAL
O O
The unit (rear)
AUDIO 1 (OPTICAL) jack
HDMI OUT jack HDMI input
Audio output
(digital optical)
TV
OPTICAL
(TV)
COAXIAL
COAXIAL
VIDEO
AM
FM
75Ω
ANTENNA
(RADIO)
MONITOR
OUT
SUBWOOFER
PR
EOUT
HDMI
(
HDCP2.2)
1
(BD/DVD)
2
3
4
HDMIOUT
HDCP2.2
ARC
N
ETWORK
(NET)
FRONT
CENTER
SPEAKERS
SURROUND/BI-AMP
/ZONEB
LESS
AV4
AV3
AUDI02
AUDIO1
AV2
AV1
VIDEO
AUDIO 1
(TV)
OPTICAL
OPTICAL
O O
MONITOR
OUT
V
V
The unit (rear)
AUDIO 1 (OPTICAL) jack
MONITOR OUT (VIDEO) jack
Video input
(composite video)
Audio output
(digital optical)
TV
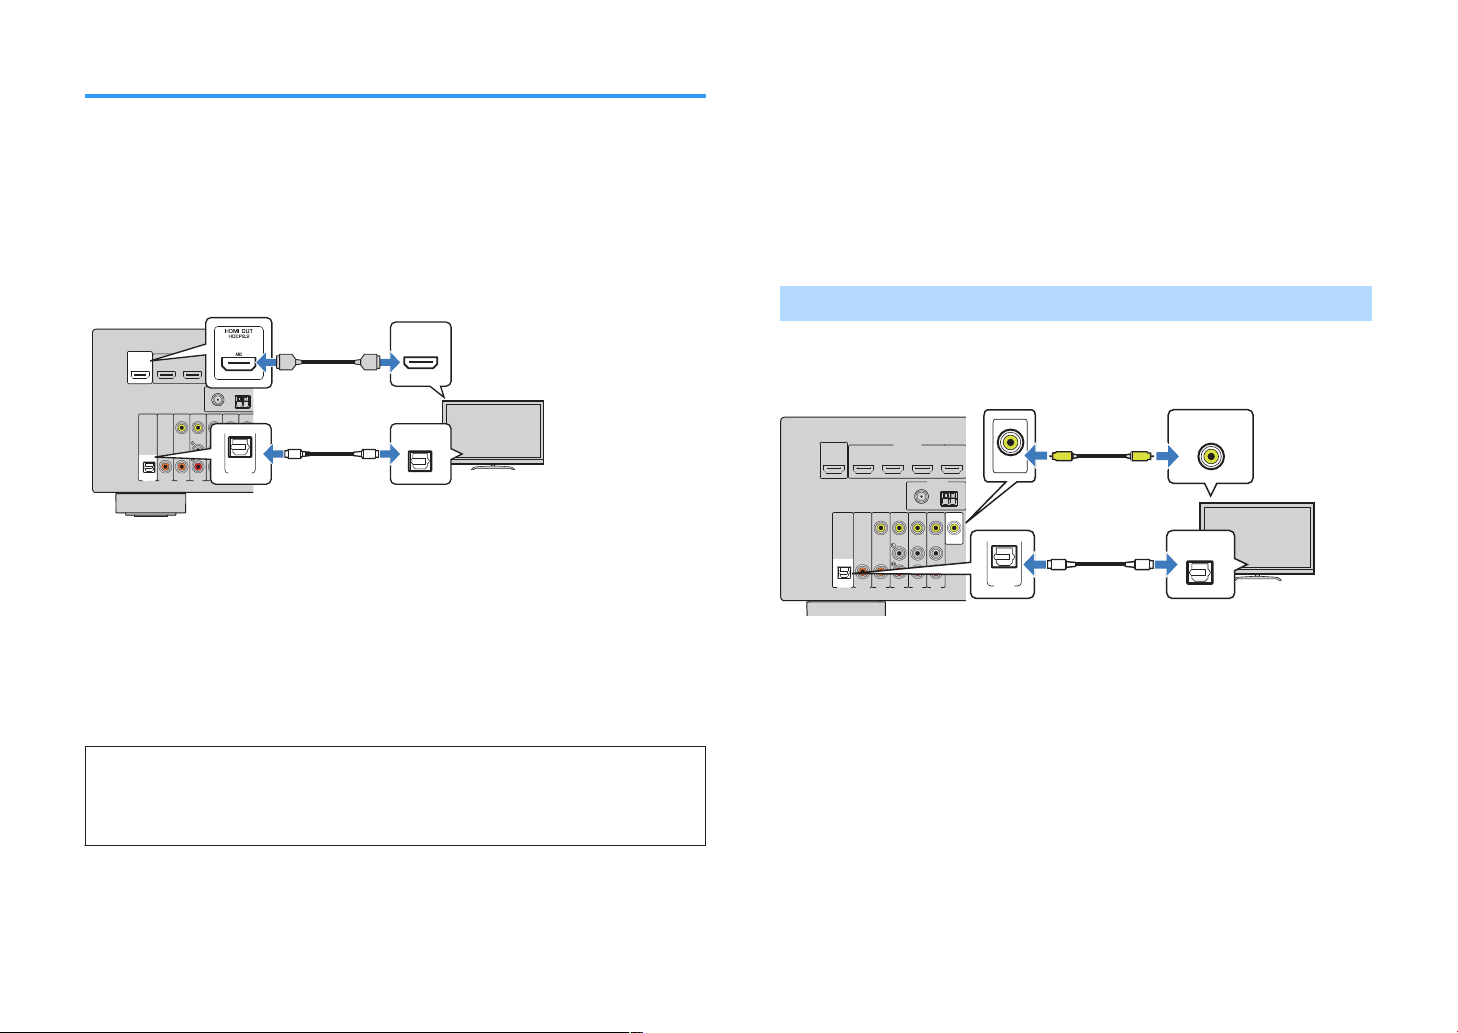
Connecting a TV
Connect a TV to the unit so that video input to the unit can be output to the TV. You
can also enjoy playback of TV audio on the unit.
To maximize the performance of the unit, we recommend connecting a TV with an
HDMI cable.
HDMI connection
n
Connect the TV to the unit with an HDMI cable and a digital optical cable.
Note
▪ You do not make a digital optical cable connection between the TV and the unit in the following cases:
– If your TV supports Audio Return Channel (ARC)
– If you will receive TV broadcasts only from the set-top box
▪ If you connect a TV that supports HDMI Control to the unit with an HDMI cable, you can control the unit’s
power and volume with the TV’s remote control.
To use HDMI Control and ARC, you need to configure the HDMI settings on the unit.
For details on the settings, see “Information on HDMI” (p.
124).
Composite video connection
n
When connecting any video device with a video pin cable, connect the TV to the
MONITOR OUT (VIDEO) jack.
Note
If you connect your TV to the unit with a cable other than HDMI, video input to the unit via HDMI cannot be
▪
output to the TV.
▪ Operations with TV screen are available only when your TV is connected to the unit via HDMI.
▪ If you will receive TV broadcasts only from the set-top box, you do not need to make an audio cable
connection between the TV and the unit.
VIDEO (composite video) connection
Connect the TV to the unit with a video pin cable and a digital optical cable.
About Audio Return Channel (ARC)
▪ ARC allows audio signals to travel both ways. If you connect a TV that supports ARC to the unit with a
single HDMI cable, you can output video/audio to the TV or input TV audio to the unit.
▪ When using ARC, connect a TV with an HDMI cable that supports ARC.
21
En
OPTICAL
(TV)
COAXIAL
COAXIAL
VIDEO
AM
FM
75Ω
ANTENNA
(RADIO)
MONITOR
OUT
SUBWOOFER
PR
EOUT
HDMI
(
HDCP2.2)
1
(BD/DVD)
2
3
4
HDMIOUT
HDCP2.2
ARC
N
ETWORK
(NET)
FRONT
CENTER
SPEAKERS
SURROUND/BI-AMP
/ZONEB
LESS
AV4
AV3
AUDI02
AUDIO1
AV2
AV1
The unit (rear)
HDMI OUT jack
HDMI 1–4 jacks
Video device
OPTICAL
(TV)
COAXIAL
COAXIAL
VIDEO
AM
FM
75Ω
ANTENNA
(RADIO)
MONITOR
OUT
SUBWOOFER
PR
EOUT
HDMI
(
HDCP2.2)
1
(BD/DVD)
2
3
4
HDMIOUT
HDCP2.2
ARC
N
ETWORK
(NET)
FRONT
CENTER
SPEAKERS
SURROUND/BI-AMP
/ZONEB
LESS
AV4
AV3
AUDI02
AUDIO1
AV2
AV1
R
L
COAXIAL
R
L
COAXIAL
VIDEO
VIDEO
C C
L
R
L
R
V
V
The unit (rear)
AV 1 (COAXIAL) jack or AV 2–4
(AUDIO) jacks
AV 1–4 (VIDEO) jacks
Video output
(composite video)
Audio output
(digital coaxial or analog
stereo)
Video device
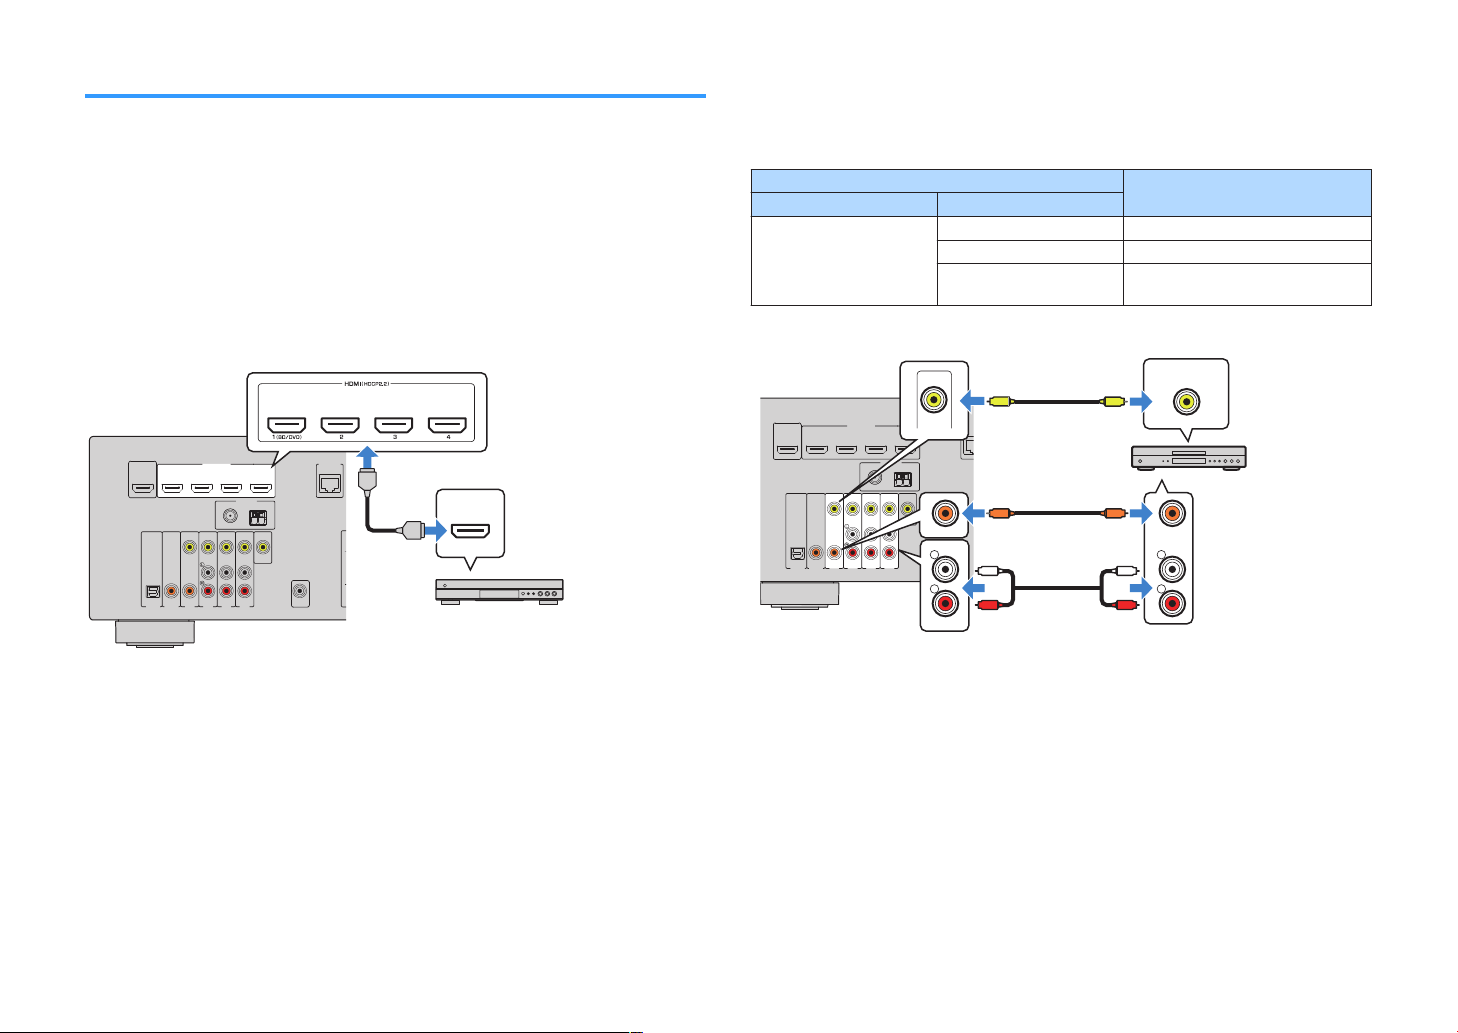
Connecting video devices (such as BD/DVD players)
Connect video devices such as BD/DVD players, set-top boxes (STBs) and game
consoles to the unit. Depending on the video/audio output jacks available on your
video device, choose one of the following connections. We recommend using an
HDMI connection if the video device has an HDMI output jack.
Note
If the combination of video/audio input jacks available on the unit does not match your video device, change
its combination according to the output jacks of your device (p.23).
HDMI connection
n
Connect a video device to the unit with an HDMI cable.
Composite video connection
n
Connect a video device to the unit with a video pin cable and an audio cable (digital
coaxial or stereo pin cable). Choose a set of input jacks (on the unit) depending on the
audio output jacks available on your video device.
Output jacks on video device
Video Audio
Composite video
Digital coaxial AV 1 (VIDEO + COAXIAL)
Analog stereo AV 2–4 (VIDEO + AUDIO)
Digital optical
Input jacks on the unit
You need to change the combination
of video/audio input jacks (p.23).
Note
To watch videos input to the HDMI 1–4 jacks, you need to connect your TV to the HDMI OUT jack of the unit
(p.21).
Note
If you connect a video device to the unit via composite video connection, you need to connect your TV to the
MONITOR OUT (VIDEO) jack of the unit (p.21).
22
En
OPTICAL
(TV)
COAXIAL
COAXIAL
VIDEO
AM
FM
75Ω
ANTENNA
(RADIO)
MONITOR
OUT
SUBWOOFER
PR
EOUT
HDMI
(
HDCP2.2)
1
(BD/DVD)
2
3
4
HDMIOUT
HDCP2.2
ARC
N
ETWORK
(NET)
FRONT
CENTER
SPEAKERS
SURROUND/BI-AMP
/ZONEB
LESS
AV4
AV3
AUDI02
AUDIO1
AV2
AV1
VIDEO
AUDIO 1
(TV)
OPTICAL
OPTICAL
O O
V
V
The unit (rear)
AUDIO 1 (OPTICAL) jack
AV 2 (VIDEO) jack
Video output
(composite video)
Audio output
(digital optical)
Video device
TOP MENU
HOME
POP-UP/MENU
DISPLAYRETURN
SETUP
OPTION
ENTER
TUNING
PRESET
MUTE
TUNING
MEMORY
TOP MENU
HOME
POP-UP/MENU
DISPLAYRETURN
SETUP
OPTION
FM/AM
VOLUME
PROGRAM
USB
STRAIGHT
ENHANCER BASS
INPUT
BD
DVD
TV
SCENE
RADIO
SLEEP
ENTER
BLUE
YELLOWGREEN
RED
DIRECT
ZONE A ZONE B
NET
NET
BLUETOOTH
MUTE
ENHANCER
STEREO
TUNED
SLEEP
OUT
ECO
CHARGE
ADAPTIVE DRC
VIRTUAL
Audio In
VOL.
MUTE
ENHANCER
STEREO
TUNED
SLEEP
OUT
ECO
CHARGE
ADAPTIVE DRC
VIRTUAL
Audio••AUDIO 1
VOL.
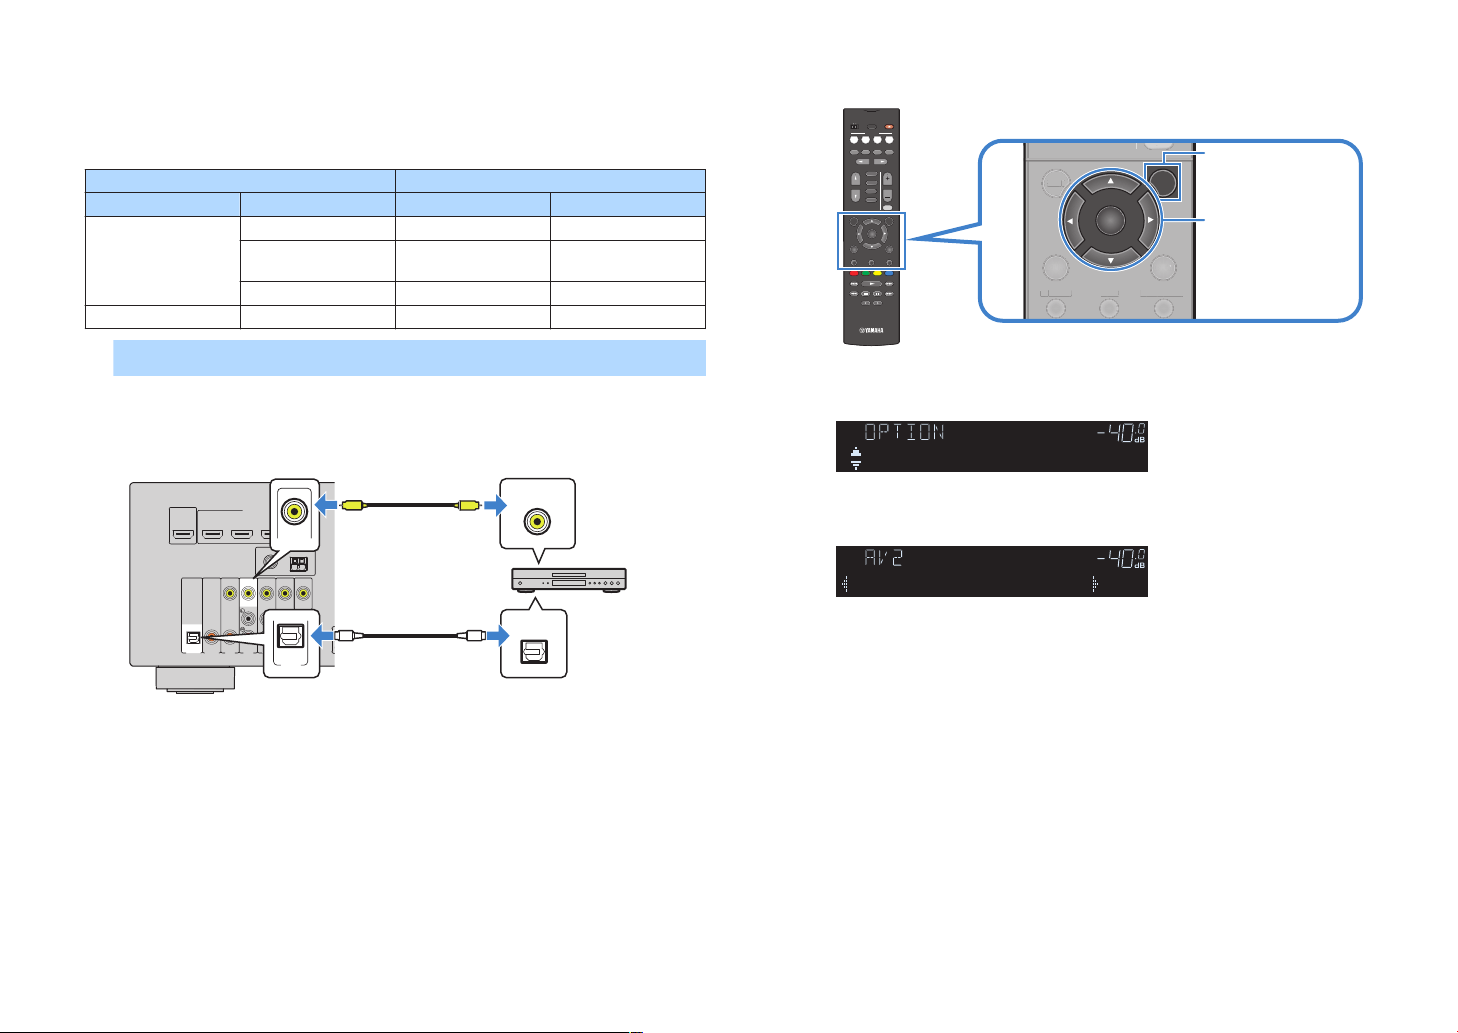
Changing the combination of video/audio input jacks
n
If the combination of video/audio input jacks available on the unit does not match your
video device, change its combination according to the output jacks of your device.
You can connect a video device that has the following video/audio output jacks.
Output jacks on video device Input jacks on the unit
Video Audio Video Audio
Digital optical HDMI 1–4 AUDIO 1 (OPTICAL)
HDMI
Digital coaxial HDMI 1–4
AUDIO 2 (COAXIAL)
AV 1 (COAXIAL)
Analog stereo HDMI 1–4 AV 2–4 (AUDIO)
Composite video Digital optical AV 1–4 (VIDEO) AUDIO 1 (OPTICAL)
Necessary setting
For example, if you have connected a video device to AV 2 (VIDEO) and AUDIO 1
(OPTICAL) jack of the unit, change the combination setting as follows.
Press OPTION.
3
Use the cursor keys (q/w) to select “Audio In” and press
4
ENTER.
Use the cursor keys (e/r) to select “AUDIO 1” (audio input
5
jack to be used).
Press OPTION.
6
This completes the necessary settings.
If you select “AV 2” as the input source by pressing INPUT, the video/audio
played back on the video device will be output from the unit.
After connecting external devices (such as a TV and playback
1
devices) and power cable of the unit, turn on the unit.
Press INPUT to select “AV 2” (video input jack to be used) as
2
the input source.
23
En
OPTICAL
(TV)
COAXIAL
COAXIAL
VIDEO
AM
FM
75Ω
ANTENNA
(RADIO)
MONITOR
OUT
SUBWOOFER
PR
EOUT
HDMI
(
HDCP2.2)
1
(BD/DVD)
2
3
4
HDMIOUT
HDCP2.2
ARC
N
ETWORK
(NET)
FRONT
CENTER
SPEAKERS
SURROUND/BI-AMP
/ZONEB
LESS
AV4
AV3
AUDI02
AUDIO1
AV2
AV1
R
L
COAXIAL
OPTICAL
R
L
COAXIAL
OPTICAL
C C
L
R
L
R
O O
The unit (rear)
AV 1–4 jacks
AUDIO 1–2 jacks
Audio output
(either digital optical, digital coaxial,
or analog stereo)
Audio device
PROGRAM
TONE CONTROL
STRAIGHT
(CONNECT)
AUX USB
AUDIO
5V 1A
INPUT
TV
BD
DVD
NET
RADIO
The unit (front)
Portable audio player
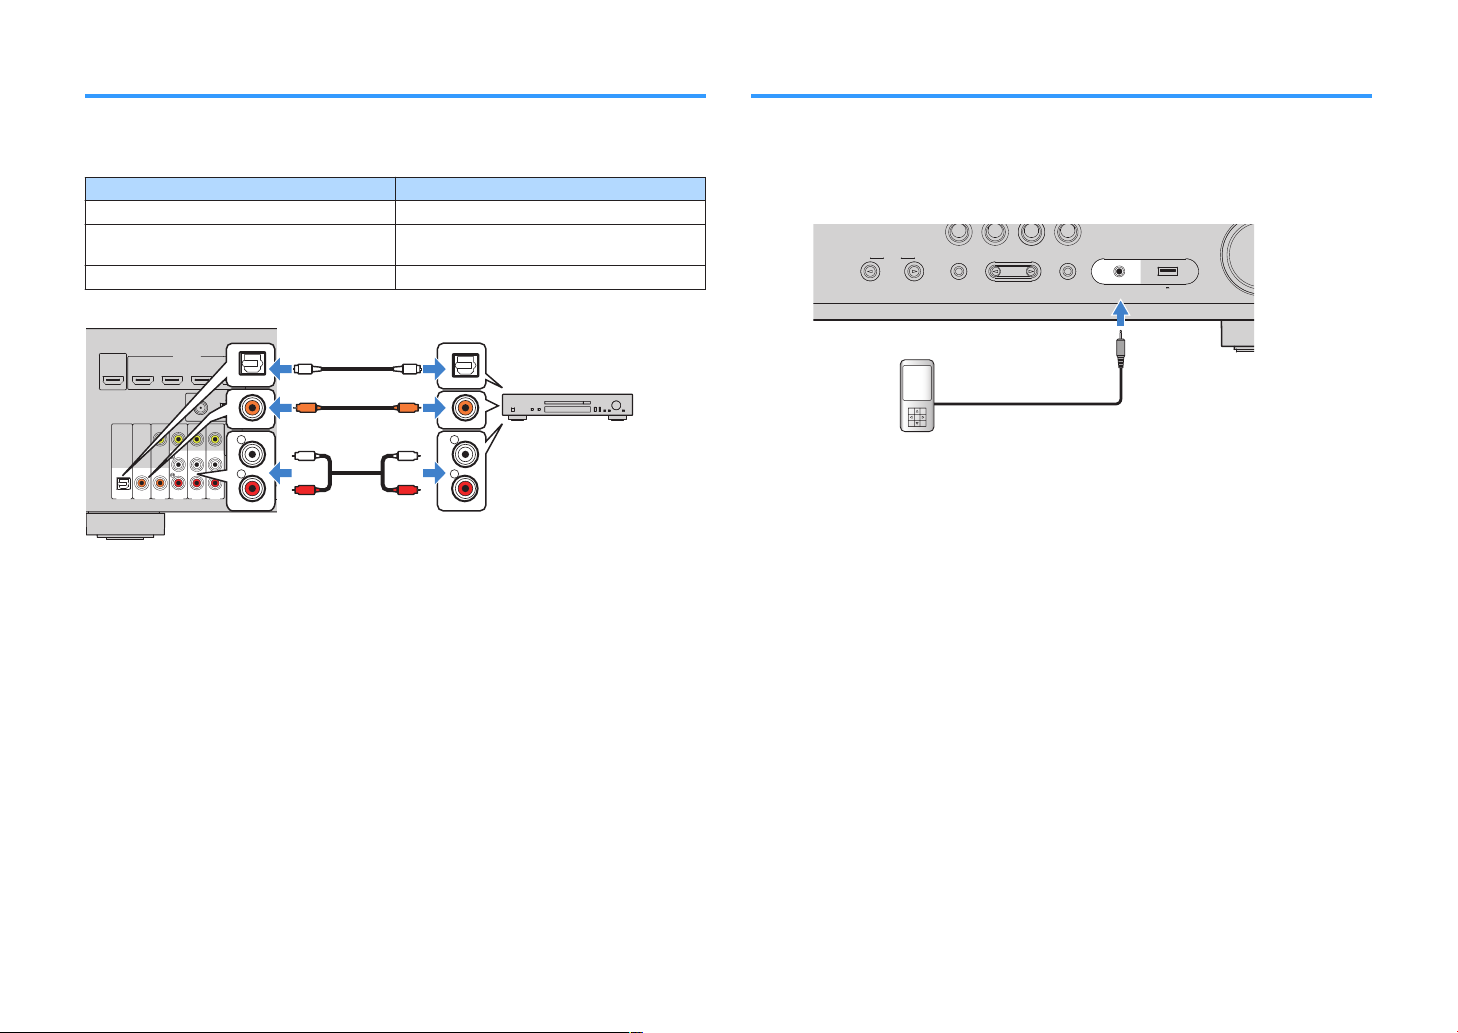
Connecting audio devices (such as CD players)
Connecting to the jack on the front panel
Connect audio devices such as CD players and MD players to the unit. Depending on
the audio output jacks available on your audio device, choose one of the following
connections.
Audio output jacks on audio device Audio input jacks on the unit
Digital optical AUDIO 1 (OPTICAL)
Digital coaxial
Analog stereo AV 2–4 (AUDIO)
AUDIO 2 (COAXIAL)
AV 1 (COAXIAL)
Use the AUX jack on the front panel to temporarily connect devices such as portable
audio players to the unit.
Before making a connection, stop playback on the device and turn down the volume
on the unit.
If you select “AUX” as the input source by pressing INPUT, the audio played back on
the device will be output from the unit.
Note
▪ You need to prepare the audio cable that matches the output jacks on your device.
▪ For details on how to connect a USB storage device, see “Connecting a USB storage device” (p.68).
24
En
4 Connecting the radio antennas
OPTICAL
(TV)
COAXIAL
COAXIAL
VIDEO
AM
FM
75Ω
ANTENNA
(RADIO)
MONITOR
OUT
SUBWOOFER
PR
EOUT
HDMI
(
HDCP2.2)
1
(BD/DVD)
2
3
4
HDMIOUT
HDCP2.2
ARC
N
ETWORK
(NET)
FRONT
CENTER
SPEAKERS
SURROUND/BI-AMP
/ZONEB
LESS
AV4
AV3
AUDI02
AUDIO1
AV2
AV1
The unit (rear)
FM antenna
AM antenna
OPTICAL
(TV)
COAXIAL
COAXIAL
VIDEO
ANTENNA
(RADIO)
MONITOR
OUT
SUBWOOFER
PREOUT
HDMI
(HDCP2.2)
1
(BD/DVD)
2
3
4
HDMIOUT
HDCP2.2
ARC
N
ETWORK
(NET)
FRONT
CENTER
SPEAKERS
SURROUNDBI-AMP
/ZONEB
LESS
AV4
AV3
AUDI02
AUDIO1
AV2
AV1
DAB/FM
75Ω
The unit (rear)
DAB/FM antenna
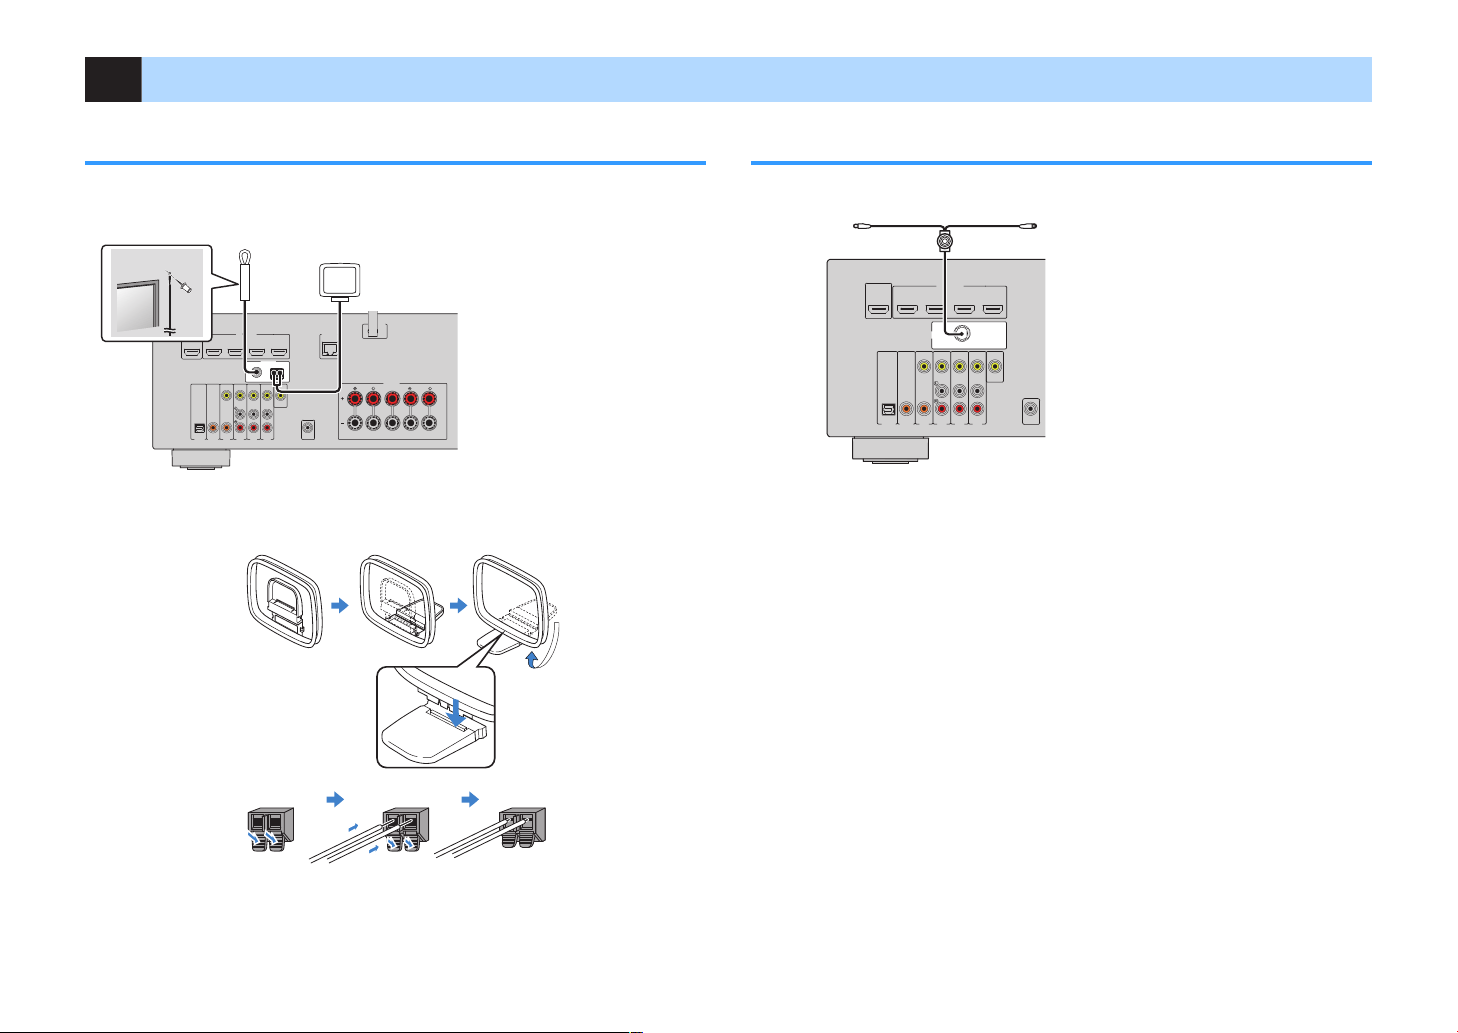
FM/AM antennas (RX-V481)
Connect the supplied FM/AM antennas to the unit.
Fix the end of the FM antenna to a wall, and place the AM antenna on a flat surface.
Assembling and connecting the AM antenna
DAB/FM antenna (RX-V481D)
Connect the supplied DAB/FM antenna to the unit and fix the antenna ends to a wall.
Note
▪ The antenna should be stretched out horizontally.
▪ If you cannot obtain good reception on the radio, adjust the height, direction or placement of the DAB/FM
antenna.
Note
▪ Unwind only the length of cable needed from the AM antenna unit.
▪ The wires of the AM antenna have no polarity.
25
En
5 Preparing for connecting to a network
AM
FM
7
5Ω
ANTENNA
(RADIO)
HDMI
(
HDCP2.
2)
1
(BD/DVD)
2
3
4
HDMIOUT
HDCP2.2
ARC
N
ETWORK
(NET)
LESS
Network Attached Storage
(NAS)
Internet
Modem
Wireless
router
PC
Network cable
The unit (rear)
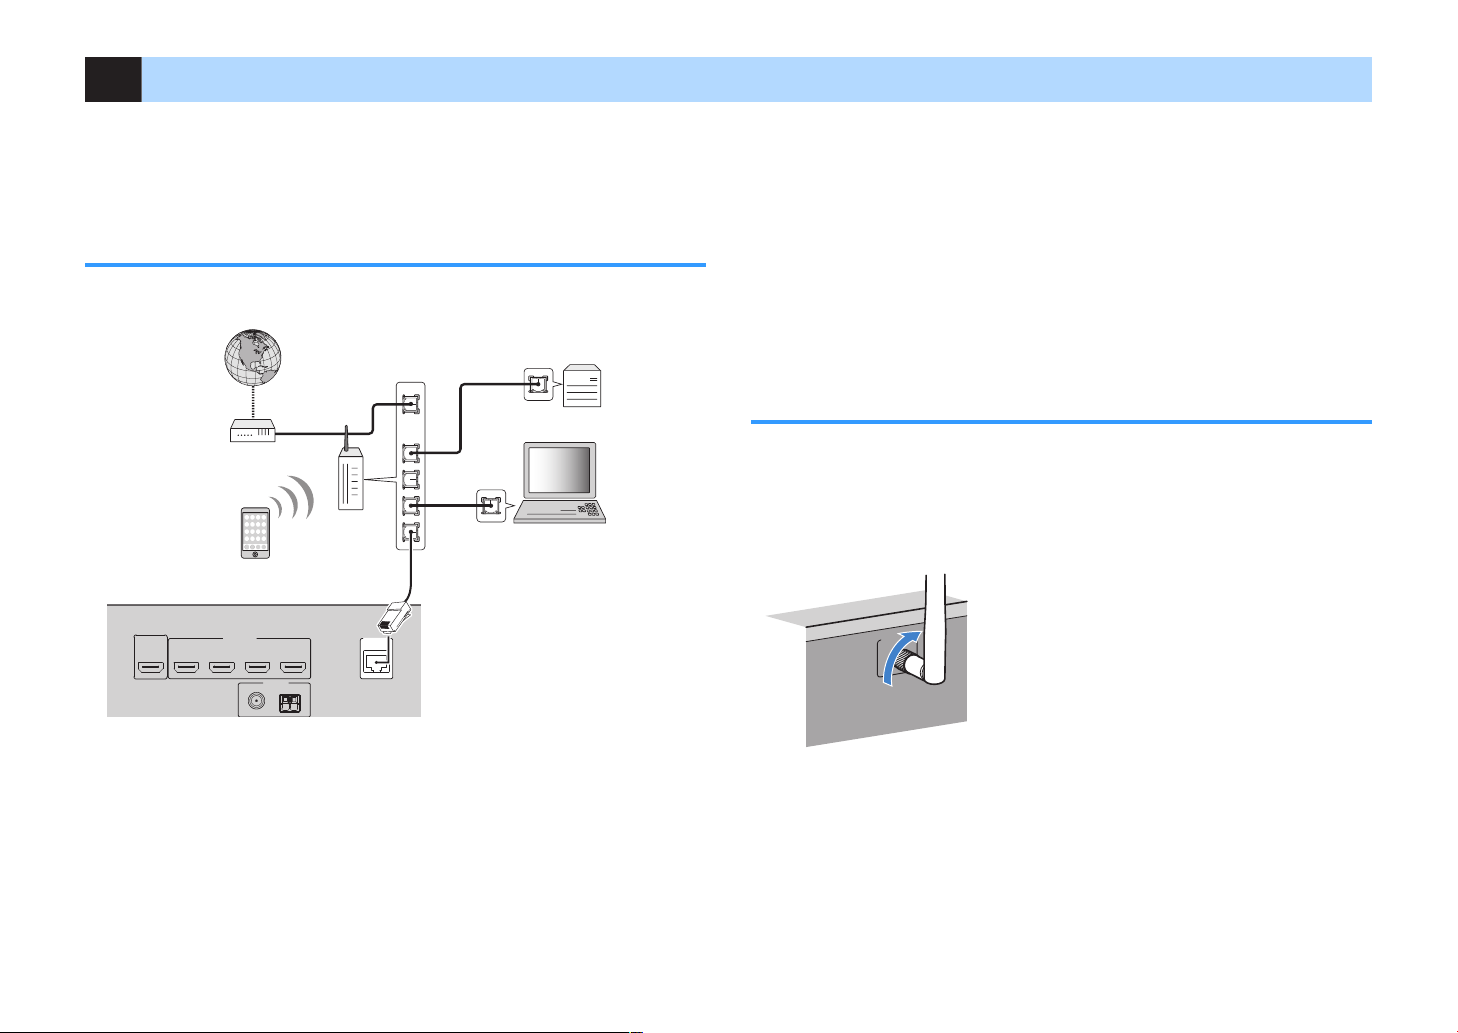
Connect the unit to a router (access point) with a network cable, or prepare the
wireless antenna for establishing a wireless network connection.
You can enjoy Internet radio or music files stored on media servers, such as PCs and
Network Attached Storage (NAS), on the unit.
Connecting a network cable
Connect the unit to your router with a commercially-available STP network cable
(CAT-5 or higher straight cable).
Note
▪ If you are using a router that supports DHCP, you do not need to configure any network settings for the
unit, as the network parameters (such as the IP address) will be assigned automatically to it. You only
need to configure the network settings if your router does not support DHCP or if you want to configure the
network parameters manually (p.
102).
▪ You can check whether the network parameters (such as IP address) are properly assigned to the unit in
“Information” (p.102) in the “Setup” menu.
▪ Some security software installed on your PC or the firewall settings of network devices (such as a router)
may block the access of the unit to the network devices or the Internet. In these cases, configure the
security software or firewall settings appropriately.
▪ Each server must be connected to the same subnet as the unit.
▪ To use the service via the Internet, broadband connection is strongly recommended.
Preparing a wireless antenna
If you connect the unit wirelessly, erect the wireless antenna.
For information on how to connect the unit to a wireless network, see “Connecting to a
network wirelessly”
(p.33).
Erect the wireless antenna.
Note
Do not apply excessive force on the wireless antenna. Doing so may damage the antenna.
26
En
6 Connecting the power cable
FRONT
CENTER
SPEAKERS
SURROUND/BI-AMP
/ZONEB
LESS
110V
120V
220V
240V
VOLTAGESELECTOR
The unit (rear)
VOLTAGE SELECTOR
FRONT
CENTER
SPEAKERS
SURROUND/BI-AMP
/ZONEB
LESS
The unit (rear)
To an AC wall outlet
Warning
(Taiwan, Brazil and General models only)
Make sure you set VOLTAGE SELECTOR of the unit BEFORE plugging the power cable into an AC wall
outlet. Improper setting of
fire hazard.
Before connecting the power cable
Set the switch position of VOLTAGE SELECTOR
120/220–240 V, 50/60 Hz.
After all the connections are complete, plug in the power cable.
VOLTAGE SELECTOR
may cause damage to the unit and create a potential
according to your local voltage. Voltages are AC 110–
27
En

7 Selecting an on-screen menu language
Setup
Speaker
HDMI
Sound
ECO
Function
Network
Bluetooth
Language
Back
RETURN
Language
English
日本語
Français
Deutsch
Español
Русский
Italiano
中文
Select the desired on-screen menu language.
Press z (receiver power) to turn on the unit.
1
Turn on the TV and switch the TV input to display video from the
2
unit (HDMI OUT jack).
Note
▪ Operations with TV screen are available only when your TV is connected to the unit via HDMI. If
not, carry out operations while viewing the front display.
▪ If you turn on the unit for the first time, the message regarding the network setup appears. To
continue the language setup, press
Press
3
4
SETUP.
Use the cursor keys to select “Language” and press ENTER.
RETURN.
To exit from the menu, press SETUP.
6
Note
The information on the front display is provided in English only.
Use the cursor keys to select the desired language.
5
28
En
VOLUME HIGH CUT
CRO
SSOVER/
MIN MAXMIN
MAX
9
The unit (front)
Ear height
Auto Setup
Start
Exit
Power Amp Assign
Zone B
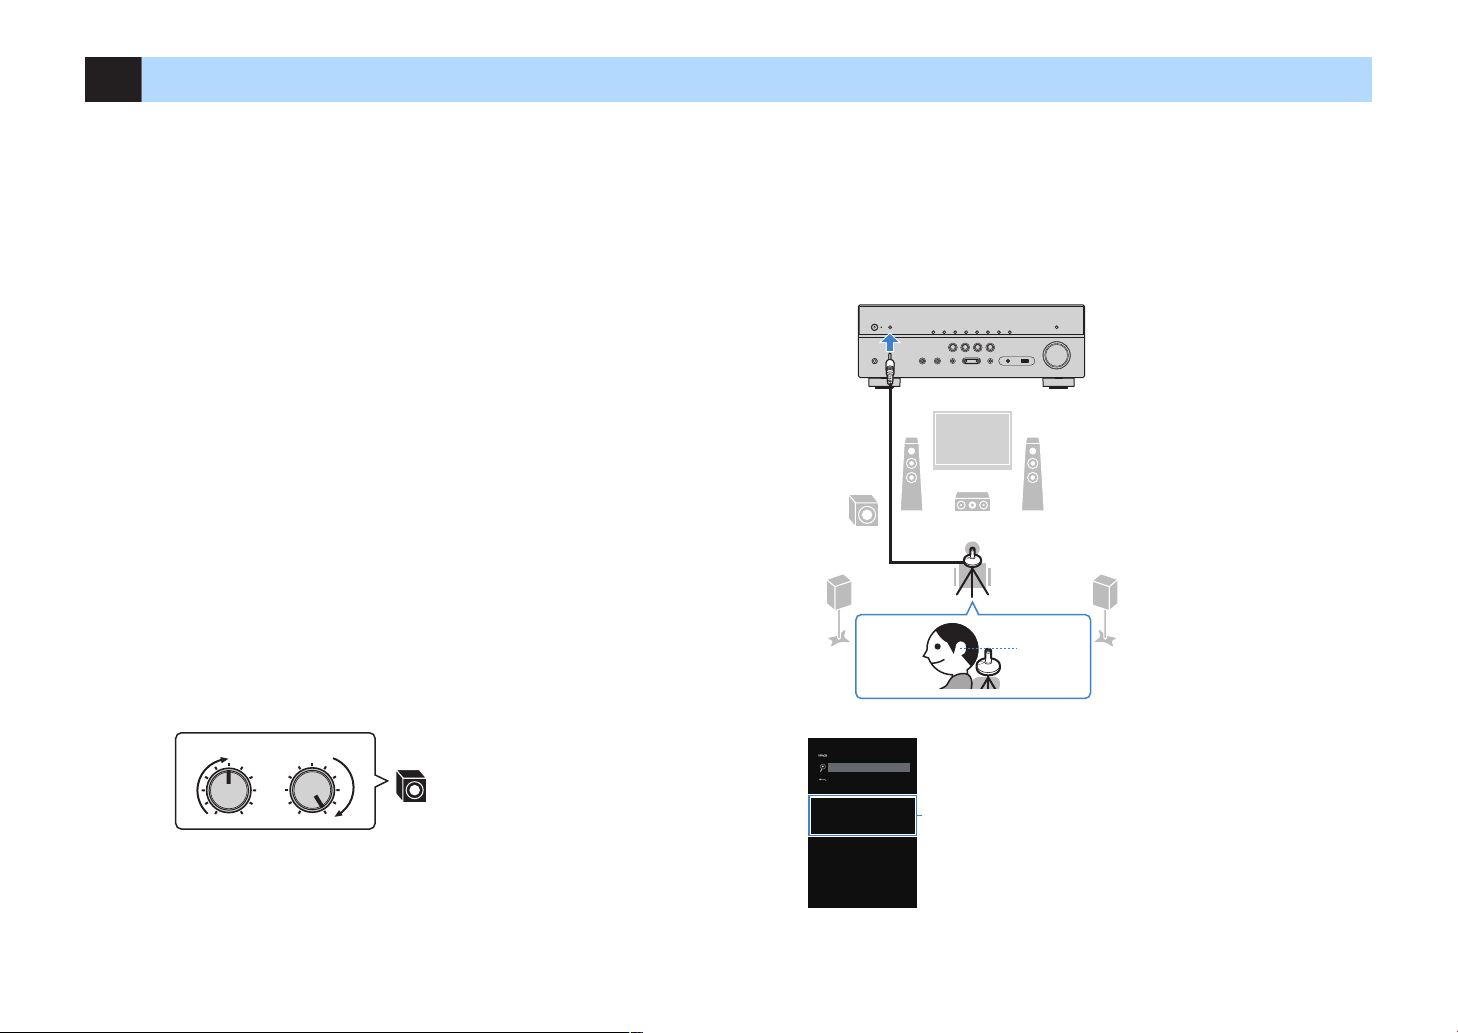
8 Optimizing the speaker settings automatically (YPAO)
The Yamaha Parametric room Acoustic Optimizer (YPAO) function detects speaker
connections, measures the distances from them to your listening position(s), and then
automatically optimizes the speaker settings, such as volume balance and acoustic
parameters, to suit your room.
Note
▪ When you use the front 5.1-channel speaker (Virtual CINEMA FRONT) configuration (p.15), set “Virtual
CINEMA FRONT” (p.91) in the “
▪ Please note the following when using YPAO.
– Use YPAO after connecting a TV and speakers to the unit.
– During the measuring process, test tones are output at high volume. Ensure that the test tones do not
frighten small children.
– During the measuring process, you cannot adjust the volume.
– During the measuring process, keep the room as quiet as possible.
– Do not connect headphones.
– Do not stand between the speakers and the YPAO microphone during the measurement process (about
3 minutes).
Press z (receiver power) to turn on the unit.
1
Turn on the TV and switch the TV input to display video from the
2
unit (HDMI OUT jack).
Note
Operations with TV screen are available only when your TV is connected to the unit via HDMI. If
not, carry out operations while viewing the front display.
Setup” menu to “
On” beforehand.
Place the YPAO microphone at your listening position and
4
connect it to the YPAO MIC jack on the front panel.
Note
Place the YPAO microphone at your listening position (same height as your ears). We recommend
the use of a tripod as a microphone stand. You can use the tripod screws to stabilize the
microphone.
Turn on the subwoofer and set the volume to half. If the crossover
3
frequency is adjustable, set it to maximum.
Note
If you are using bi-amp connections or Zone B speakers, set “Power Amp Assign” (p.90) in the
“Setup” menu to the appropriate setting before starting YPAO.
29
The following screen appears on the TV.
1
“Power Amp Assign” setting (p.90)
En
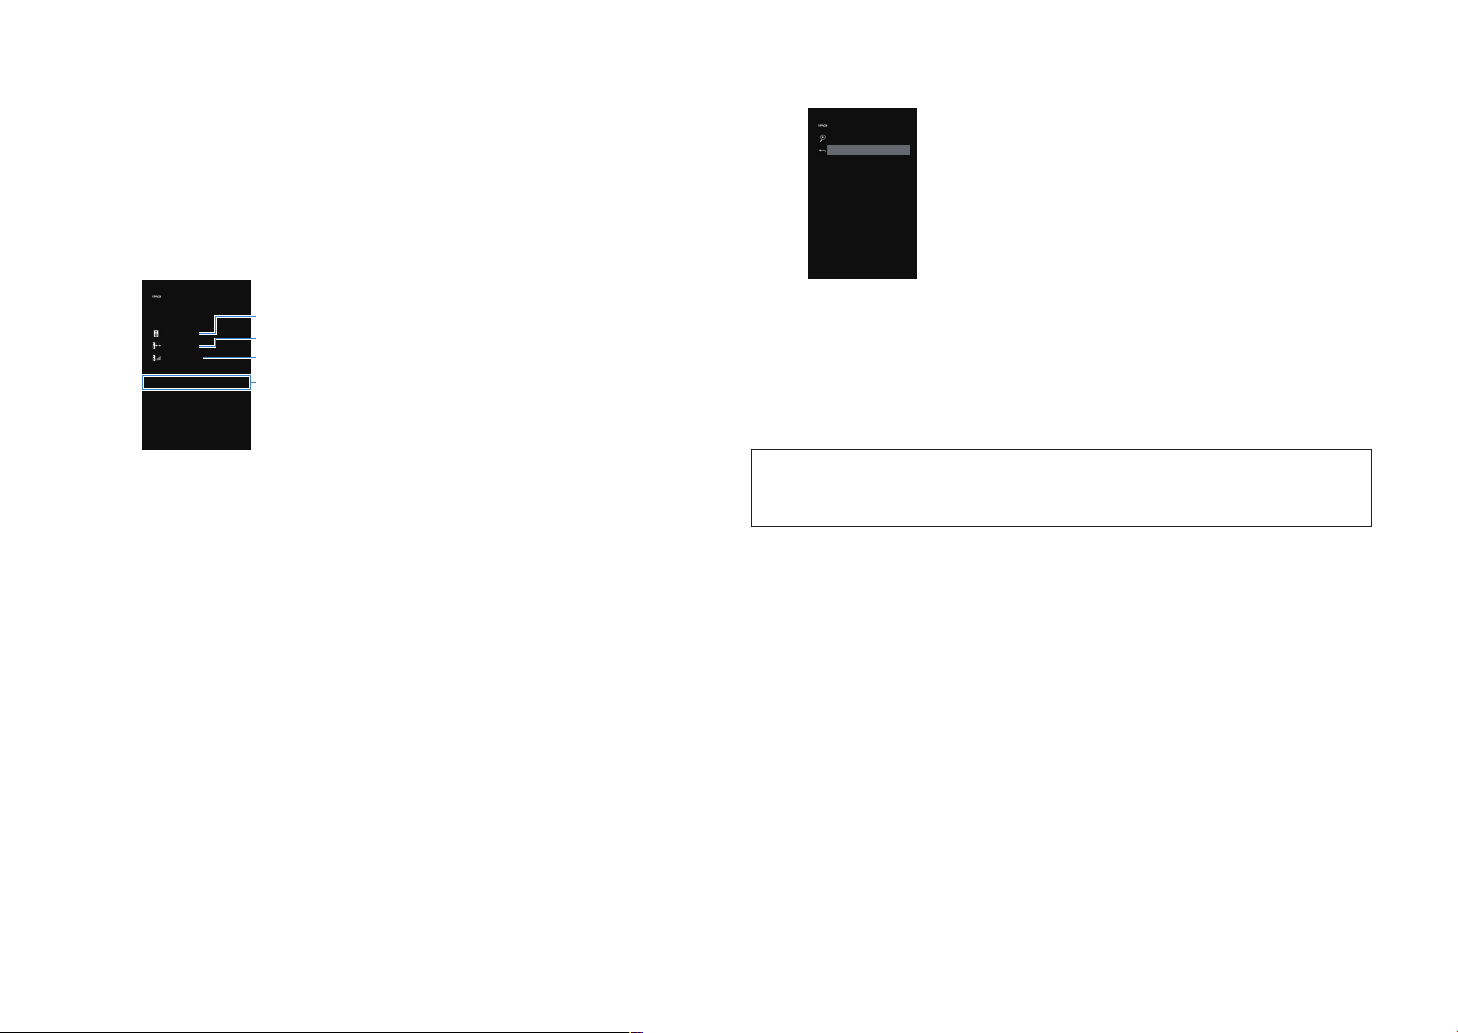
To start the measurement, use the cursor keys to select “Start”
Auto Setup
Measurement Finished
Result
3 / 2 / 0.1 ch
3.0 / 10.5 m
-3.0 / +10.0 dB
OK : ENTER
Auto Setup
Start
Exit < SAVE >
5
and press ENTER.
The measurement will start in 10 seconds. Press ENTER to start the
measurement immediately.
Note
To stop the measurement temporarily, press RETURN and follow the procedure in “Error
messages”
The following screen appears on the TV when the measurement finishes.
(p.31).
Use the cursor keys (e/r) to select “SAVE” and press ENTER.
7
The adjusted speaker settings are applied.
Note
To finish the measurement without saving the result, select “CANCEL”.
Disconnect the YPAO microphone from the unit.
8
This completes optimization of the speaker settings.
1
The number of speakers (front side/rear side/subwoofer)
2
Speaker distance (nearest/farthest)
3
Adjustment range of speaker output level
4
Warning message (if available)
Note
▪ If any error message (such as E-1) or warning message (such as W-1) appears, see “Error
messages”
▪ A speaker with a problem is indicated by blinking of the speaker indicators in the front display.
▪ If multiple warnings are given (when operating with the front display), use the cursor keys (q/w)
to check the other warning messages.
Confirm the results displayed on the screen and press ENTER.
6
“Warning messages” (p.32).
(p.31) or
30
Notice
▪ The YPAO microphone is sensitive to heat, so should not be placed anywhere where it could be
exposed to direct sunlight or high temperatures (such as on top of AV equipment).
En
Loading…
View the manual for the Yamaha MusicCast RX-V481 here, for free. This manual comes under the category receivers and has been rated by 4 people with an average of a 9.1.
This manual is available in the following languages: English. Do you have a question about the Yamaha MusicCast RX-V481 or do you need help?
Ask your question here
Yamaha MusicCast RX-V481 specifications
Below you will find the product specifications and the manual specifications of the Yamaha MusicCast RX-V481.
The Yamaha MusicCast RX-V481 is a surround receiver that offers high-quality audio output for an immersive entertainment experience. With 5.1 channels, it delivers dynamic sound to enhance your home theater setup.
Featuring a power output of 115W per channel at 1KHz and 6 Ohms, this receiver provides ample power for your audio needs. It also boasts a dynamic power of 130W per channel at 4 Ohms, ensuring a robust and clear sound performance.
In terms of connectivity, the MusicCast RX-V481 offers various options to accommodate your audio devices. It includes four HDMI inputs, four composite video inputs, one digital audio optical input, and two digital audio coaxial inputs. Additionally, there is one USB port for convenient playback of your digital media.
The receiver also provides pre-out connectivity, allowing you to connect other amplifiers or external devices to further enhance your audio setup. For video output, it offers one HDMI output and one composite video output. However, it does not have a digital audio optical output.
Overall, the Yamaha MusicCast RX-V481 combines powerful audio output with a range of connectivity options, making it a versatile receiver for your home entertainment system. Whether you are watching movies, playing music, or gaming, this receiver delivers reliable and impressive sound performance.
Power output per channel (20-20KHz@8 Ohm)
— W
Speakers connectivity type
RCA
General
| Brand | Yamaha |
| Model | MusicCast RX-V481 | RX-V481 BLACK |
| Product | receiver |
| EAN | 4957812600187 |
| Language | English |
| Filetype | User manual (PDF) |
Audio
| Power output per channel (20-20KHz@8 Ohm) | — W |
| Audio output channels | 5.1 channels |
| Receiver type | Surround |
| Power output per channel (1KHz@6 Ohm) | 115 W |
| Dynamic power per channel (4 Ohm) | 130 W |
| Audio D/A Converter (DAC) | 24-bit/192kHz |
| Pre-out connectivity | Yes |
Inputs
| HDMI in | 4 |
| Composite video in | 4 |
| Digital audio optical in | 1 |
| Digital audio coaxial in | 2 |
| USB ports quantity | 1 |
Outputs
| Number of HDMI outputs | 1 |
| Composite video out | 1 |
| Digital audio optical out | 0 |
| Digital audio coaxial out | 0 |
| Headphone outputs | 1 |
| Headphone connectivity | 6.3 mm |
Ports & interfaces
| Speakers connectivity type | RCA |
Technical details
| AUX in | Yes |
| Headphone out | Yes |
| Handheld remote control | Yes |
| Product color | Black |
| Apple docking compatibility | — |
| AirPlay | Yes |
| Display | — |
| Audio decoders | DTS-HD Master Audio, Dolby Digital Plus, Dolby TrueHD |
| x.v.Color support | Yes |
| Deep color support | Yes |
| Audio Return Channel (ARC) | Yes |
| On Screen Display (OSD) | Yes |
Network
| Ethernet LAN | Yes |
| Wi-Fi | Yes |
| Bluetooth | Yes |
Radio
| Supported radio bands | AM, FM |
| Internet radio | Yes |
| Internet radio services supported | Pandora, Spotify |
Optical drive
| Optical drive included | No |
Storage
| Card reader integrated | No |
Video
Power
| Power consumption (standby) | 0.1 W |
Weight & dimensions
| Width | 435 mm |
| Depth | 327 mm |
| Height | 161 mm |
| Weight | 8100 g |
Packaging content
| Manual | Yes |
| Warranty card | Yes |
| User guide | Yes |
show more
Frequently Asked Questions
Can’t find the answer to your question in the manual? You may find the answer to your question in the FAQs about the Yamaha MusicCast RX-V481 below.
How do I connect my Yamaha MusicCast RX-V481 receiver to my TV?
To connect your receiver to your TV, use an HDMI cable. Plug one end of the HDMI cable into the HDMI OUT port on the back of the receiver, and the other end into the HDMI input port on your TV.
How can I set up a wireless connection with my MusicCast RX-V481?
To establish a wireless connection, press the NET button on the remote control to access the Network menu. From there, select the desired wireless network and enter the password using the remote control’s arrow keys and enter button to connect to the network.
How can I pair my smartphone or tablet with the receiver for MusicCast control?
To pair your mobile device, download and install the MusicCast CONTROLLER app. Open the app, select the receiver from the list of available devices, and follow the instructions to complete the pairing process.
How can I adjust the audio settings on my MusicCast RX-V481?
To access the audio settings, press the MENU button on the remote control and navigate to the Audio menu. From there, you can adjust settings such as Bass, Treble, Surround Sound, and individual speaker levels to customize your audio experience.
How do I perform a factory reset on my MusicCast RX-V481?
To perform a factory reset, turn off the receiver and unplug it from the power outlet. Press and hold the INFO and TONE CONTROL buttons simultaneously while plugging the unit back in. Keep the buttons held down until «Init E2P» appears on the display, then release the buttons. The receiver will then be reset to its factory settings.
Is the Yamaha MusicCast RX-V481 a surround receiver?
Yes, the Yamaha MusicCast RX-V481 is a surround receiver, allowing for a more immersive audio experience.
How many audio output channels does the Yamaha MusicCast RX-V481 have?
The Yamaha MusicCast RX-V481 has 5.1 audio output channels, which means it can support a full surround sound setup with left, right, center, and rear speakers.
Does the Yamaha MusicCast RX-V481 have pre-out connectivity?
Yes, the Yamaha MusicCast RX-V481 has pre-out connectivity, which allows for additional amplification or connection to an external power amplifier for enhanced audio performance.
How many HDMI inputs does the Yamaha MusicCast RX-V481 have?
The Yamaha MusicCast RX-V481 has 4 HDMI inputs, which allows for easy connection of multiple HDMI devices such as gaming consoles, Blu-ray players, and streaming devices.
Does the Yamaha MusicCast RX-V481 have digital audio optical and coaxial inputs?
Yes, the Yamaha MusicCast RX-V481 has both digital audio optical and coaxial inputs, providing flexibility in connecting various audio sources such as TVs, CD players, and DVD players.
What is the weight of the Yamaha MusicCast RX-V481?
The Yamaha MusicCast RX-V481 has a weight of 8100 g.
Can bluetooth devices of different brands be connected to each other?
Yes, bluetooth is a universal method that allows different devices equipped with bluetooth to connect to each other.
What is the height of the Yamaha MusicCast RX-V481?
The Yamaha MusicCast RX-V481 has a height of 161 mm.
What is the width of the Yamaha MusicCast RX-V481?
The Yamaha MusicCast RX-V481 has a width of 435 mm.
What is bluetooth?
Bluetooth is a way of exchanging data wirelessly between electronic devices via radio waves. The distance between the two devices that exchange data can in most cases be no more than ten metres.
What is the depth of the Yamaha MusicCast RX-V481?
The Yamaha MusicCast RX-V481 has a depth of 327 mm.
What is HDMI?
HDMI stands for High-Definition Multimedia Interface. An HDMI cable is used to transport audio and video signals between devices.
When is my volume too loud?
A volume above 80 decibels can be harmful to hearing. When the volume exceeds 120 decibels, direct damage can even occur. The chance of hearing damage depends on the listening frequency and duration.
How can I best clean my receiver?
A slightly damp cleaning cloth or soft, dust-free cloth works best to remove fingerprints. Dust in hard-to-reach places is best removed with compressed air.
Wat is Dolby Atmos?
Dolby Atmos is a technology that ensures that the sound is reflected from the ceiling to where you are listening. This makes it possible to create a 5.1 effect with only 1 speaker.
Is the manual of the Yamaha MusicCast RX-V481 available in English?
Yes, the manual of the Yamaha MusicCast RX-V481 is available in English .
Is your question not listed? Ask your question here
Yamaha RX-V481
AV Receiver
Owner’s Manual
Read the supplied booklet “Safety Brochure” before using the unit.
EN
View the manual for the Yamaha RX-V481 here, for free. This user manual comes under the category receivers and has been rated by 6 people with an average of a 8.6. This manual is available in the following languages: English. Do you have a question about the Yamaha RX-V481?
Ask your question here
Index
- CONTENTS
- BEFORE USING THE UNIT
- FEATURES
- PREPARATIONS
- PLAYBACK
- CONFIGURATIONS
- APPENDIX
Product Images (7)

Yamaha RX-V481 specifications
Below you will find the product specifications and the manual specifications of the Yamaha RX-V481.
Power consumption (standby)
0.1 W
Remote control included
Yes
Supported radio bands
AM, FM
General
| Brand | Yamaha |
| Model | RX-V481 | RXV481BL |
| Product | receiver |
| Language | English |
| Filetype | Manual (PDF) |
Weight & dimensions
| Weight | 8100 g |
| Width | 435 mm |
| Depth | 327 mm |
| Height | 161 mm |
Power
| Power consumption (standby) | 0.1 W |
Technical details
| Remote control included | Yes |
| Product colour | Black |
| On Screen Display (OSD) | Yes |
| Headphone out | Yes |
| Deep colour support | Yes |
| x.v.Color support | Yes |
| Audio Return Channel (ARC) | Yes |
| Audio decoders | DTS-HD Master Audio, Dolby Digital Plus, Dolby TrueHD |
| AUX in | Yes |
| Display | — |
| AirPlay | Yes |
| Apple docking compatibility | — |
Radio
| Supported radio bands | AM, FM |
Outputs
| Headphone outputs | 1 |
| Composite video out | 1 |
| Digital audio coaxial out | 0 |
| Digital audio optical out | 0 |
| Number of HDMI outputs | 1 |
| Headphone connectivity | 6.3 mm |
Audio
| Pre-out connectivity | Yes |
| Audio D/A Converter (DAC) | 24-bit/192kHz |
| Audio output channels | 5.1 channels |
| Dynamic power per channel (4 Ohm) | 130 W |
| Power output per channel (1KHz@6 Ohm) | 115 W |
| Power output per channel (20-20KHz@8 Ohm) | — W |
| Receiver type | Surround |
Inputs
| Composite video in | 4 |
| Digital audio coaxial in | 2 |
| Digital audio optical in | 1 |
| USB ports quantity | 1 |
| HDMI in | 4 |
Network
| Bluetooth | Yes |
| Ethernet LAN | No |
| Wi-Fi | Yes |
Video
Storage
| Card reader integrated | No |
Ports & interfaces
| Speakers connectivity type | RCA |
Optical drive
| Optical drive included | No |
Packaging content
| User guide | Yes |
| Warranty card | Yes |
| Manual | Yes |
show more
Frequently asked questions
Can’t find the answer to your question in the manual? You may find the answer to your question in the FAQs about the Yamaha RX-V481 below.
What is the weight of the Yamaha RX-V481?
The Yamaha RX-V481 has a weight of 8100 g.
Can bluetooth devices of different brands be connected to each other?
Yes, bluetooth is a universal method that allows different devices equipped with bluetooth to connect to each other.
What is the height of the Yamaha RX-V481?
The Yamaha RX-V481 has a height of 161 mm.
What is the width of the Yamaha RX-V481?
The Yamaha RX-V481 has a width of 435 mm.
What is bluetooth?
Bluetooth is a way of exchanging data wirelessly between electronic devices via radio waves. The distance between the two devices that exchange data can in most cases be no more than ten metres.
What is the depth of the Yamaha RX-V481?
The Yamaha RX-V481 has a depth of 327 mm.
What is HDMI?
HDMI stands for High-Definition Multimedia Interface. An HDMI cable is used to transport audio and video signals between devices.
When is my volume too loud?
A volume above 80 decibels can be harmful to hearing. When the volume exceeds 120 decibels, direct damage can even occur. The chance of hearing damage depends on the listening frequency and duration.
How can I best clean my receiver?
A slightly damp cleaning cloth or soft, dust-free cloth works best to remove fingerprints. Dust in hard-to-reach places is best removed with compressed air.
Wat is Dolby Atmos?
Dolby Atmos is a technology that ensures that the sound is reflected from the ceiling to where you are listening. This makes it possible to create a 5.1 effect with only 1 speaker.
Is the manual of the Yamaha RX-V481 available in English?
Yes, the manual of the Yamaha RX-V481 is available in English .
Is your question not listed? Ask your question here
FAQ: Types of Manuals and Their Contents
Yamaha RX-V481 Manuals come in various types, each serving a specific purpose to help users effectively operate and maintain their devices. Here are the common types of Yamaha RX-V481 User Guides and the information they typically include:
- User Manuals: Provide comprehensive instructions on how to use the device, including setup, features, and operation. They often include troubleshooting tips, safety information, and maintenance guidelines.
- Service Instructions: Designed for technicians and repair professionals, these manuals offer detailed information on diagnosing and repairing issues with the device. They include schematics, parts lists, and step-by-step repair procedures.
- Installation Guides: Focus on the installation process of the device, providing detailed instructions and diagrams for proper setup. They are essential for ensuring the device is installed correctly and safely.
- Maintenance Manuals: Provide guidance on routine maintenance tasks to keep the device in optimal condition. They cover cleaning procedures, part replacements, and regular servicing tips.
- Quick Start Guides: Offer a concise overview of the essential steps needed to get the device up and running quickly. They are ideal for users who need immediate assistance with basic setup and operation.
Each type of Yamaha RX-V481 instruction is designed to address specific needs, ensuring users have the necessary information to use, maintain, and repair their devices effectively.
Related Instructions for Yamaha RX-V481:
2
aventage RX-AS710
Owner’s manual PDF User Guide (@LH3U5X), Yamaha aventage RX-AS710 Receiver (26.12.2024)
151
484
97
3
PLG150-PF
Getting started manual PDF User Manual (@7O3B2C), Yamaha PLG150-PF Electronic Keyboard (21.12.2024)
8
1358
245
5
PSR-9000 Version 2
Owner’s manual #25V1D6: PSR-9000 Version 2 Musical Instrument Owner’s manual
214
661
100
6
TDM900
Owner’s manual Yamaha Motorcycle Owner’s manual (File: yamaha-tdm900-owner-s-manual-94, 09th Nov 2024)
94
1409
310
7
NUAGE I/O Nio500-A16
Operation manual #R1XM81: NUAGE I/O Nio500-A16 Kitchen Appliances Operation manual
36
687
138
8
NS-F901
Owner’s manual Yamaha Speakers Owner’s manual (File: yamaha-ns-f901-owner-s-manual-40, Thu 04.2025)
40
820
205
10
CDX-700U
Owner’s manual CDX-700U (CD Player ePDF User Guide, #81X9S7)
16
927
223
Receiver Devices by Other Brands:
|
Marantz SR5008 Appendix Marantz Receiver Appendix (File: marantz-sr5008-appendix-238, Sat 11.2024) Appendix 23 Nov 2024 | 238 |
|
|
Panasonic SAXR50 — DIGITAL A/V RECEIVER Operating Instructions Manual Receiver #3UU62J E 03 Apr 2025 | 24 |
|
|
Samsung HTDL70DTHXAA Instruction Manual PDF Guide (@5Y6L68), Samsung HTDL70DTHXAA Home Theater System (15/11/2024) DIGITAL HOME 15 Nov 2024 | 25 |
|
|
Samson CR77 Receiver Owner’s Manual Headphone #VS2VHP U H F W I R E L E S S S Y S T E M 11 Oct 2024 | 72 |
Categories:
Exercise Bike
In-ceiling speakers
Electronic keyboards
Jet ski
Surround system
Motocycles
Хорошее руководство по эксплуатации
Законодательство обязывает продавца передать покупателю, вместе с товаром, руководство по эксплуатации Yamaha RX-V481. Отсутствие инструкции либо неправильная информация, переданная потребителю, составляют основание для рекламации в связи с несоответствием устройства с договором. В законодательстве допускается предоставлении руководства в другой, чем бумажная форме, что, в последнее время, часто используется, предоставляя графическую или электронную форму инструкции Yamaha RX-V481 или обучающее видео для пользователей. Условием остается четкая и понятная форма.
Что такое руководство?
Слово происходит от латинского «instructio», тоесть привести в порядок. Следовательно в инструкции Yamaha RX-V481 можно найти описание этапов поведения. Цель инструкции заключается в облегчении запуска, использования оборудования либо выполнения определенной деятельности. Инструкция является набором информации о предмете/услуге, подсказкой.
К сожалению немного пользователей находит время для чтения инструкций Yamaha RX-V481, и хорошая инструкция позволяет не только узнать ряд дополнительных функций приобретенного устройства, но и позволяет избежать возникновения большинства поломок.
Из чего должно состоять идеальное руководство по эксплуатации?
Прежде всего в инструкции Yamaha RX-V481 должна находится:
— информация относительно технических данных устройства Yamaha RX-V481
— название производителя и год производства оборудования Yamaha RX-V481
— правила обслуживания, настройки и ухода за оборудованием Yamaha RX-V481
— знаки безопасности и сертификаты, подтверждающие соответствие стандартам
Почему мы не читаем инструкций?
Как правило из-за нехватки времени и уверенности в отдельных функциональностях приобретенных устройств. К сожалению само подсоединение и запуск Yamaha RX-V481 это слишком мало. Инструкция заключает ряд отдельных указаний, касающихся функциональности, принципов безопасности, способов ухода (даже то, какие средства стоит использовать), возможных поломок Yamaha RX-V481 и способов решения проблем, возникающих во время использования. И наконец то, в инструкции можно найти адресные данные сайта Yamaha, в случае отсутствия эффективности предлагаемых решений. Сейчас очень большой популярностью пользуются инструкции в форме интересных анимаций или видео материалов, которое лучше, чем брошюра воспринимаются пользователем. Такой вид инструкции позволяет пользователю просмотреть весь фильм, не пропуская спецификацию и сложные технические описания Yamaha RX-V481, как это часто бывает в случае бумажной версии.
Почему стоит читать инструкции?
Прежде всего здесь мы найдем ответы касательно конструкции, возможностей устройства Yamaha RX-V481, использования отдельных аксессуаров и ряд информации, позволяющей вполне использовать все функции и упрощения.
После удачной покупки оборудования/устройства стоит посвятить несколько минут для ознакомления с каждой частью инструкции Yamaha RX-V481. Сейчас их старательно готовят или переводят, чтобы они были не только понятными для пользователя, но и чтобы выполняли свою основную информационно-поддерживающую функцию.