
25 страниц подробных инструкций и пользовательских руководств по эксплуатации на русском
79 RU
Наполнение резервуара
водой
Существует три способа наполнения
резервуара для воды: обычное наполнение,
наполнение без снятия резервуара для воды
и упрощенное наполнение.
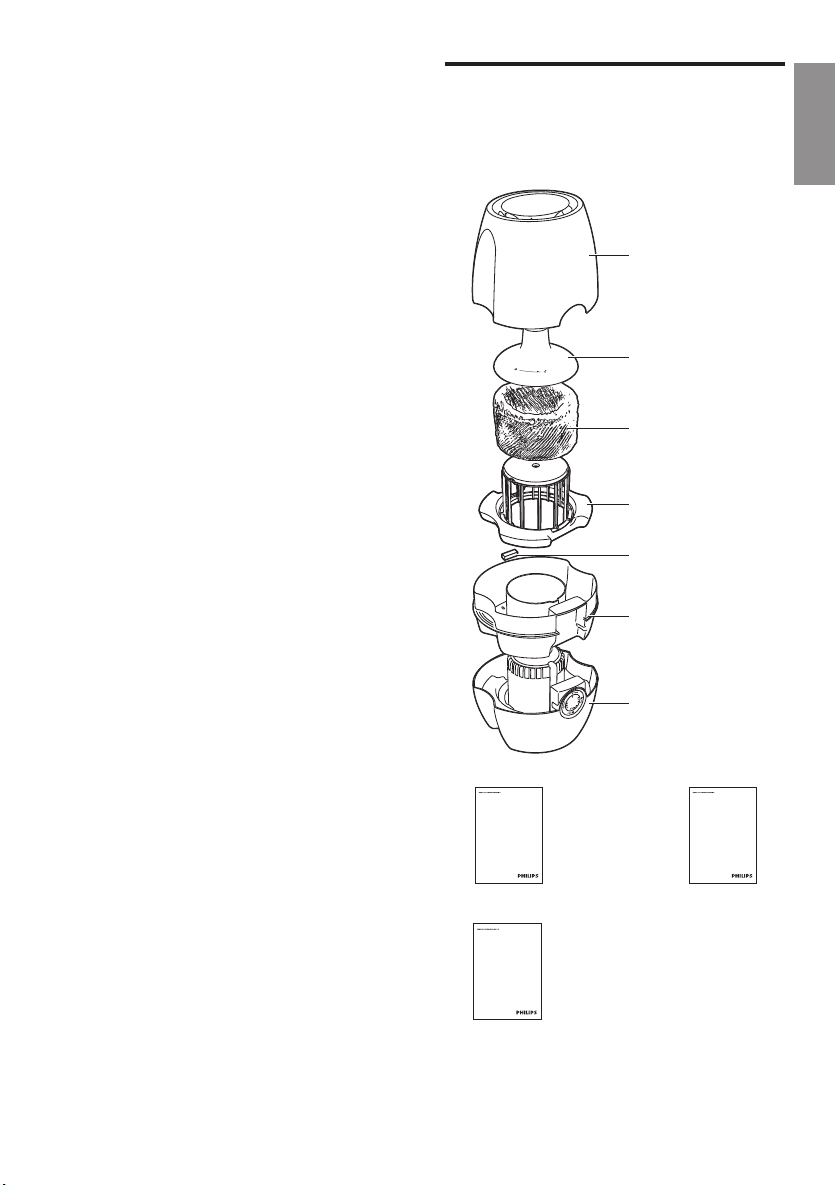
Обычное наполнение
1
Снимите верхнюю крышку, удерживая
ее с двух сторон.
2
Снимите резервуар для воды с
основания, удерживая его с двух сторон.
3
Наполните резервуар для воды
холодной водой до максимального
уровня.
MAX
»
Поплавок всплывет на поверхность
воды.
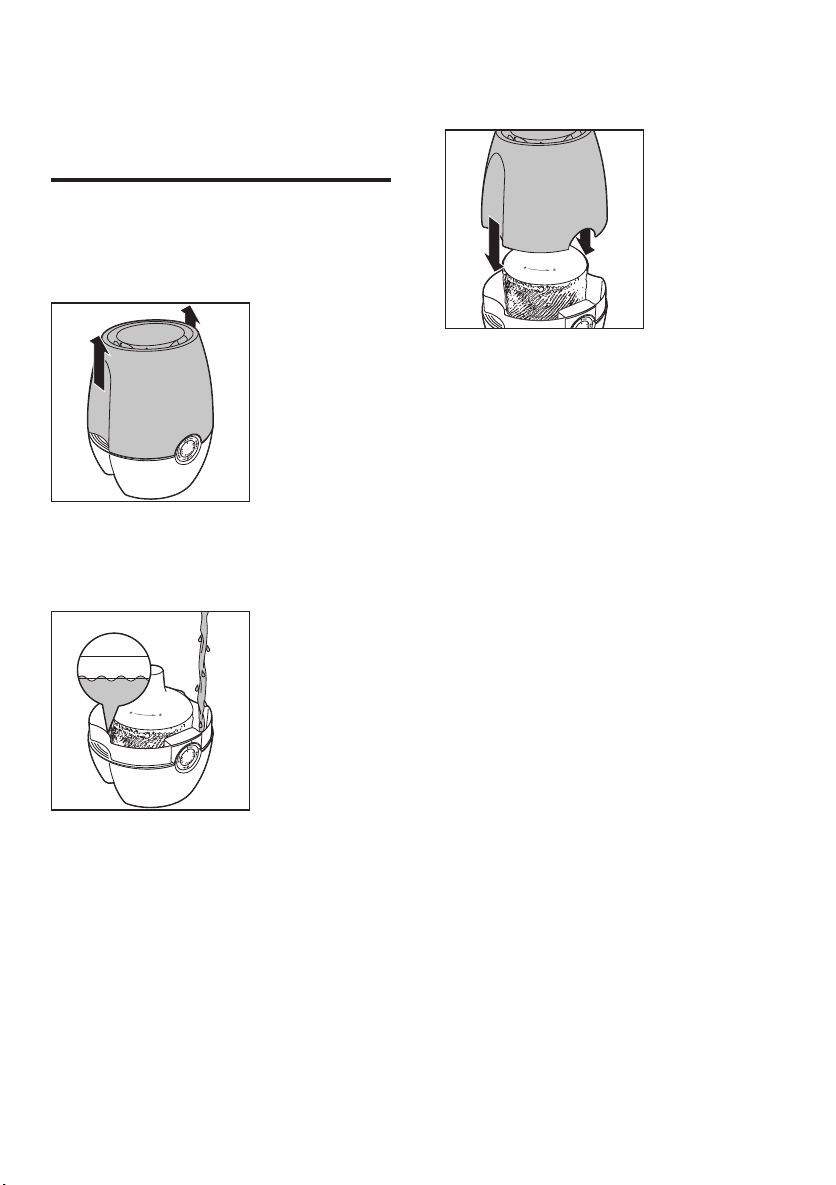
4
Поставьте резервуар для воды на
основание увлажнителя воздуха.
5
Установите верхнюю крышку на место.

80
Русский
RU
Наполнение без снятия резервуара
для воды
1
Снимите верхнюю крышку.
2
Наполните кувшин водой.
3
Наполните резервуар для воды до
максимальной отметки.
MAX
4
Установите на место верхнюю крышку.
Упрощенное наполнение
1
Наполните кувшин водой.
2
Налейте воду в резервуар для воды
через центральное наливное отверстие
в верхней части прибора. Уровень воды
должен быть таким, чтобы крышка
поплавка появилась на поверхности и
закрыла наливное отверстие.
Совет
•
Когда поднимающуюся воду станет видно,
резервуар заполнен. Прекратите наполнение
резервуара.

5 очистка увлажнителя воздуха, Очистка корпуса увлажнителя воздуха, Очистка резервуара для воды
Очистка корпуса увлажнителя, Воздуха Чат поддержки
- Изображение
- Текст
81 RU
5 Очистка
увлажнителя
воздуха
Специалисты Philips потрудились над
созданием лучшей в своем классе
конструкции, которая обеспечивает
максимальную простоту использования,
позволяя пользователям без труда
следить за гигиеной увлажнителя воздуха.
Очистка внутренних и наружных деталей
увлажнителя, особенно резервуара для воды
и отверстия для выхода воздуха, никогда
еще не была такой простой.
Примечание
•
Перед очисткой увлажнителя воздуха всегда
отсоединяйте его от электросети.
•
Запрещается использовать для очистки деталей
увлажнителя воздуха губки с абразивным
покрытием, абразивные чистящие средства или
легковоспламеняющиеся жидкости типа хлора или
спирта.
Очистка корпуса
увлажнителя воздуха
Во избежание скопления пыли регулярно
проводите очистку внутренних и внешних
поверхностей увлажнителя воздуха.
1
Стирайте пыль с корпуса увлажнителя
воздуха сухой, мягкой тканью.
2
Отверстия для входа и выхода воздуха
очищайте сухой мягкой тканью.
Очистка резервуара для
воды
Для поддержания гигиеничности прибора
резервуар для воды необходимо очищать
еженедельно.
1
Наполните резервуар для воды чистой
водой на 1/3.
2
Добавьте немного мягкого моющего
средства в резервуар с водой.
3
Руками промойте внутреннюю
поверхность резервуара.
4
Слейте жидкость из резервуара в
раковину.

6 очистка увлажняющего фильтра, Промывание увлажняющего фильтра, Промывание увлажняющего фильтра 82
Промывание увлажняющего фильтра 1 Чат поддержки
- Изображение
- Текст
82
Русский
RU
6 Очистка
увлажняющего
фильтра
Для поддержания гигиеничности прибора
увлажняющий фильтр следует промывать и
очищать от накипи еженедельно.
Промывание увлажняющего
фильтра
1
Выключите увлажнитель воздуха и
отключите его от электросети.
2
Снимите резервуар для воды с
увлажнителя воздуха.
3
Поверните крышку поплавка против
часовой стрелки и снимите ее.
2
1
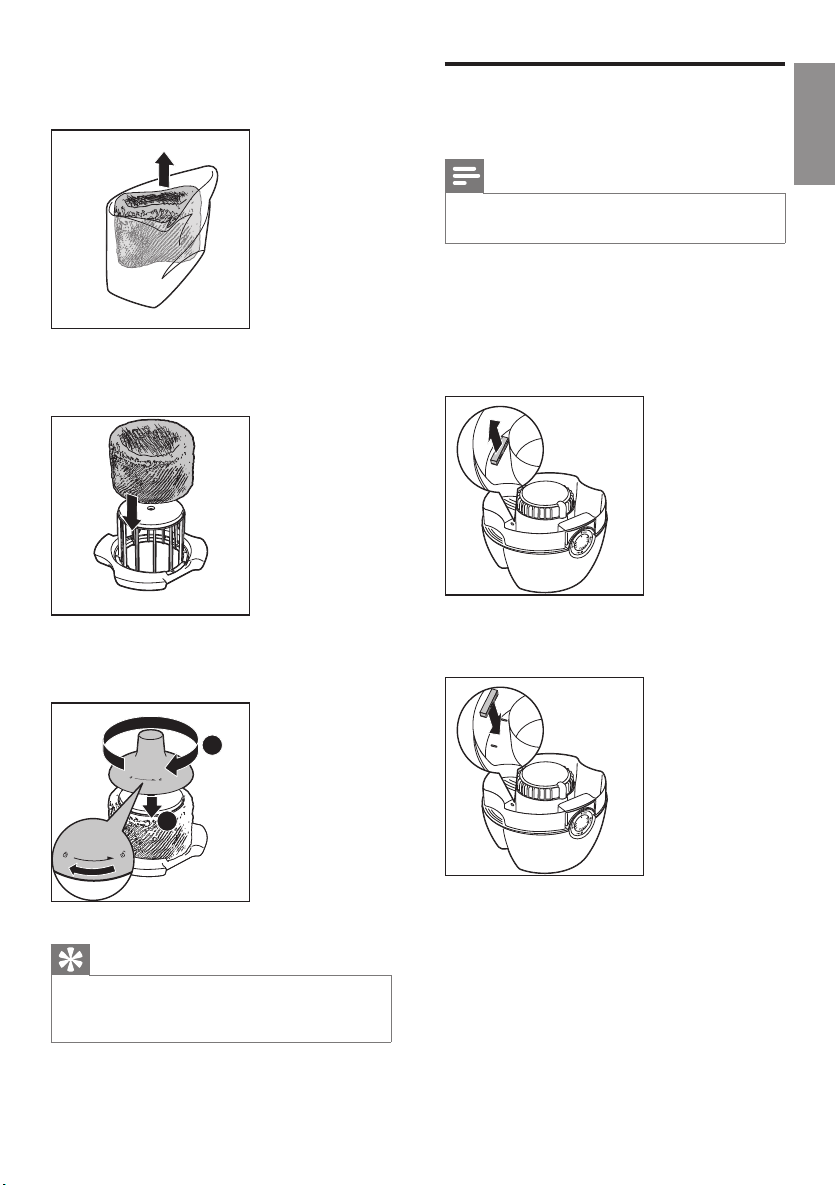
4
Снимите увлажняющий фильтр с
поплавка.
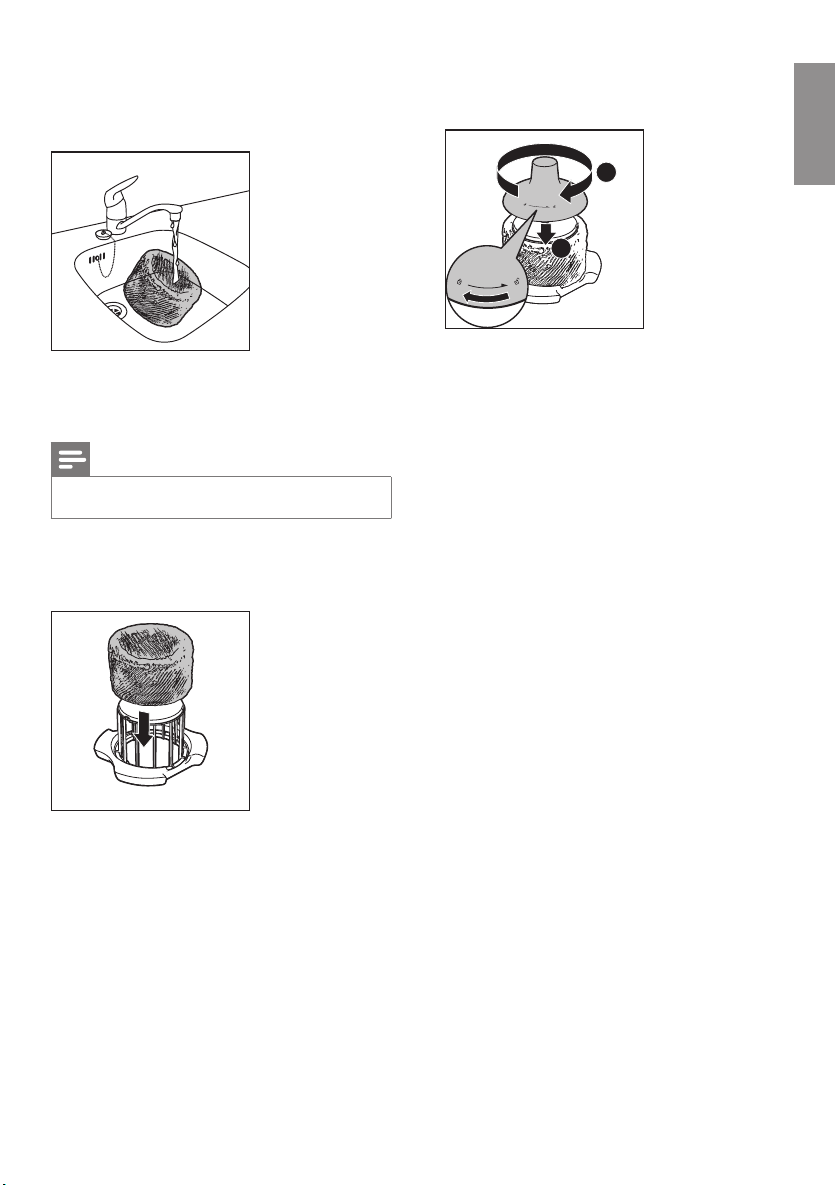
5
Промойте увлажняющий фильтр под
струей водопроводной воды.

83 RU
6
Установите увлажняющий фильтр на
поплавок.
7
Поверните крышку поплавка по часовой
стрелке и установите на место.
2
1
Удаление накипи с
увлажняющего фильтра
Примечание
•
Во избежание появления известкового налета,
который может серьезно сказаться на качестве
увлажнения, очень важно выполнять очистку
увлажняющего фильтра от накипи.
1
Выключите увлажнитель воздуха и
отключите его от электросети.
2
Снимите резервуар для воды с
увлажнителя воздуха.
3
Поверните крышку поплавка против
часовой стрелки и снимите ее.
2
1
4
Снимите увлажняющий фильтр с
поплавка.
84
Русский
5
Смешайте в равных пропорциях воду и
белый уксус в емкости, объем которой
позволяет погрузить в нее увлажняющий
фильтр.
Вода: уксус
1 : 1
1 час
Примечание
•
Необходимо использовать уксус с содержанием
уксусной кислоты 5 %.
•
Если на фильтре есть белый налет (накипь),
убедитесь, что сторона с этим налетом погружена
в воду.
6
Оставьте увлажняющий фильтр
отмокать в растворе на один час.
7
Слейте уксусный раствор.
8
Ополосните увлажняющий фильтр
под проточной водой, чтобы смыть
остатки уксуса. Во время ополаскивания
поворачивайте увлажняющий фильтр так,
чтобы промылись обе его стороны.
9
Дождитесь, пока остатки воды стекут с
увлажняющего фильтра.
10
Установите увлажняющий фильтр на
поплавок.
11
Поверните крышку поплавка по часовой
стрелке и установите на место.
2
1

85 RU
7 Замена
фильтров
Замена увлажняющего
фильтра
Для обеспечения оптимальной работы
прибора замену увлажняющего фильтра
необходимо проводить не реже, чем раз в
год.
Примечание
•
Используйте только оригинальный увлажняющий
фильтр Philips HU4101.
Совет
•
Для получения более подробной информации о
замене фильтра зарегистрируйте изделие на сайте
www.philips.com.
1
Выключите увлажнитель воздуха и
отключите его от электросети.
2
Снимите резервуар для воды.
3
Поверните крышку поплавка против
часовой стрелки и снимите ее.
2
1
4
Извлеките старый увлажняющий фильтр
из увлажнителя воздуха.

86
Русский
RU
5
Снимите с нового увлажняющего
фильтра упаковочный материал.
6
Установите новый увлажняющий фильтр
на поплавок.
7
Поверните крышку поплавка по часовой
стрелке и установите на место.
2
1
Совет
•
Более подробную информацию о замене фильтра
можно получить на сайте или по телефону в центре
поддержки потребителей.
Замена антибактериального
фильтра
Примечание
•
Антибактериальный фильтр присутствует только в
модели HU4903.
•
Используйте только оригинальный
антибактериальный фильтр Philips HU4111.
Во избежание скопления бактерий
в резервуаре для воды заменяйте
антибактериальный фильтр не реже, чем раз
в год.
• Извлеките антибактериальный фильтр.
Выбросьте его.
• Вставьте в прибор новый
антибактериальный фильтр.

87 RU
8 Определение и устранение
неисправностей
В данной главе описаны наиболее распространенные проблемы, которые могут возникнуть при
эксплуатации увлажнителя воздуха. Если приведенные ниже сведения не помогают устранить
проблему, обратитесь в центр поддержки покупателей в вашей стране.
Проблема
Возможное решение
Увлажнитель
воздуха не работает.
• Убедитесь, что увлажнитель воздуха подключен к источнику
питания.
• Убедитесь, что резервуар наполнен водой и правильно
установлен в увлажнитель воздуха.
Увлажнение воздуха
не производится.
• Убедитесь, что резервуар наполнен водой и правильно
установлен в увлажнитель воздуха.
Резервуар для воды
протекает.
• Убедитесь, что увлажнитель воздуха не переполнен водой.
• Каждый раз после проведения очистки, а также после снятия
верхней крышки и/или наполнения резервуара для воды
проверяйте сборку/подключение увлажнителя воздуха.
• Убедитесь, что резервуар для воды установлен правильно. Если
проблему решить не удалось, обратитесь в центр поддержки
потребителей в вашей стране.
Индикация
текущего уровня
влажности не
меняется.
• Убедитесь, что увлажняющий фильтр установлен на поплавок.
• Увлажняющий фильтр загрязнен. Промойте и/или очистите от
накипи увлажняющий фильтр (см. главу “Очистка увлажняющего
фильтра”).
• Возможно, в помещении повышена циркуляция воздуха. Закройте
окна и двери.
• Площадь помещения слишком большая. Для эффективной работы
моделей HU4902 и HU4903 рекомендуемая площадь помещения
составляет 50 м².
На увлажняющем
фильтре
присутствует белый
налет.
Белый налет — это накипь, которая оседает на поверхности в
виде солей. Накипь на увлажняющем фильтре влияет на качество
увлажнения. Поэтому так важно регулярно проводить очистку
увлажняющего фильтра от накипи (см. главу “Очистка увлажняющего
фильтра”).

88
Русский
RU
Через некоторое
время фильтр
приобретает
желтоватый
оттенок.
Пожелтение фильтра свидетельствует о скоплении накипи и
грязи, присутствующих в воздухе. Грязь и накипь, содержащиеся
в воздухе, проходящем через увлажняющий фильтр, оседают в
фильтре, а в воздух поступает чистый водяной пар. Накипь и грязь
на увлажняющем фильтре влияют на качество увлажнения. Поэтому
так важно регулярно проводить очистку увлажняющего фильтра от
накипи (см. главу «Очистка увлажняющего фильтра»).
Увлажнитель
воздуха издает
неприятный запах.
• Убедитесь, что резервуар для воды наполнен водой.
• Проведите очистку увлажняющего фильтра (см. главу «Очистка
увлажняющего фильтра»).
Из отверстия для
выхода воздуха не
поступает воздух.
Подключите увлажнитель воздуха к источнику питания и включите
его.
Не видно, чтобы
из увлажнителя
воздуха поступал
пар. Он работает?
Тонкодисперсный пар невидим глазу. Увлажнитель воздуха оснащен
специальным увлажняющим фильтром, который генерирует
тонкодисперсный водяной пар. Поэтому пар невидим.
Как проверить,
работает ли датчик
влажности.
Осторожно направьте поток влажного воздуха на датчик влажности.
Через какое-то время индикация влажности изменится. Примите во
внимание, что если индикация влажности уже достигла значения 60%,
она не изменится даже при направлении потока влажного воздуха на
датчик.

01:06
Сравнение шума увлажнителей Philips HU4903 и Stadler Form Oskar
10:35
Увлажнитель воздуха Philips Avent/Отзыв
03:04
Обзор увлажнителя воздуха с функцией очищения Philips HU4801/01
00:51
Увлажнитель воздуха Philips HU4803 принцип работы
14:56
Большой тест 10 увлажнителей: какой лучше увлажняет (2020)
16:53
ПОДРОБНЫЙ отзыв спустя 5 мес. Увлажнитель воздуха PHILIPS Safe&clean HU4803/01 КАК ПОЧИСТИТЬ ФИЛЬТР
Нажмите на кнопку для помощи
Question?
Contact
Philips
Always there to help you
Register your product and get support at
www.philips.com/welcome
HU4902
HU4903
User manual 3
Қолданушының нұсқасы 24
Руководство пользователя 46


Contents
1 Important 4
Safety 4
2 Your humidier 7
What’s in the box 7
3 Getting started 8
Prepare for humidication 8
4 Using the humidier 9
Understand the humidity indicator light 9
Understand the healthy air protect alert 9
Understand the healthy air protect lock 9
Switch the humidier on and off 9
Change the fan speed 10
Auto 10
Manual 11
Turbo 11
Set the timer 11
Set the humidity level 12
Water level 12
Rell the water 13
Normal rell 13
Rell without removing the water
tank 14
Easy rell 14
7 Replacing the lters 18
Replace the humidication lter 18
Replace the anti-bacterial lter 19
8 Troubleshooting 20
9 Guarantee and service 22
Order parts or accessories 22
10 Notices 23
Electromagnetic elds (EMF) 23
Compliance with EMF 23
Recycling 23
English
5 Cleaning your humidier 15
Clean the body of the humidier 15
Clean the water tank 15
6 Cleaning the humidication lter 16
Rinse the humidication lter 16
3EN

1 Important
Safety
Read this user manual carefully
before you use the humidier, and
save it for future reference.
Danger
• Do not spray any ammable
materials such as insecticides or
fragrance around the humidier.
• The water in the water tank
is not suitable for drinking. Do
not drink this water and do
not use it to feed animals or to
water plants. When you empty
the water tank, pour the water
down the drain.
Warning
• Check if the voltage indicated
on the bottom of the humidier
corresponds to the local power
voltage before you connect the
humidier.
• If the power cord is damaged,
you must have it replaced
by Philips, a service center
authorized by Philips, or similarly
qualied persons in order to
avoid a hazard.
• Do not use the humidier if the
plug, the power cord, or the
humidier itself is damaged.
• This appliance can be used by
children aged from 8 years and
above and persons with reduced
physical, sensory or mental
capabilities or lack of experience
and knowledge if they have been
given supervision or instruction
concerning use of the appliance
in a safe way and understand the
hazards involved. Cleaning and
maintenance shall not be made
by children without supervision.
• This appliance is not a toy.
Children should be supervised
to ensure that they do not play
with the humidier.
• Do not block the air inlet and
outlet, e.g. by placing items on
the air outlet or in front of the
air inlet.
Caution
• If the power socket used to
power the humidier has poor
connections, the plug of the
humidier becomes hot. Make
sure that you plug the humidier
into a properly connected
power socket.
4 EN

• Always place and use the
humidier on a dry, stable, level,
and horizontal surface.
• Do not place anything on top of
the humidier and do not sit on
the humidier.
• Make sure that the humidier is
well assembled/connected every
time after you clean it or after
you remove the upper cover
and/or water tank for relling.
The humidier must be properly
assembled to deliver a good and
safe performance.
• Only use the original Philips
lter specially intended for this
humidier. Do not use any other
lter.
• Avoid knocking against the
humidier (the air inlet and
outlet in particular) with hard
objects.
• Do not insert your ngers or
objects into the air outlet or
the air inlet to prevent physical
injury or malfunctioning of the
humidier.
• Do not use this humidier when
you have used indoor smoketype insect repellents or in
places with oily residues, burning
incense, or chemical fumes.
• Do not use the humidier near
gas appliances, heating devices
or replaces.
• Always unplug the humidier
after use and before you clean it.
• Do not use the humidier in a
room with major temperature
changes, as this may cause
condensation inside the
humidier.
• When the humidier is not used
for a long time, bacteria and
mold may grow on the lters.
Check the lters before you
start using the humidier again. If
the lter is very dirty with dark
spots, replace it (see chapter
‘Replacing the humidication
lter’).
• The humidier is only intended
for household use under normal
operating conditions.
• Clean the water tank and
humication lter every week to
keep it clean.
• Only ll the water tank with cold
tap water. Do not use ground
water or hot water.
• Do not put any substance other
than water in the water tank.
Do not put fragrance in the
water tank. Use only water (tap,
puried, mineral, any sort of
potable water).
English
5EN

• If you do not use the humidier
for a long time, clean the water
tank and dry the humidication
lter..
• If you need to move the
humidier, disconnect the
humidier from the power
supply rst. Then empty the
water tank, and carry the
humidier horizontally.
6 EN
2 Your humidifier
What’s in the box
Congratulations on your purchase, and
welcome to Philips!
To fully benet from the support that Philips
offers, register your product at
www.philips.com/welcome.
The Philips humidier brings fresh, humidied
air to your house for the health of your family.
It offers you advanced evaporation system
with NanoCloud technology, using a special
humidication lter which adds H2O molecules
to the dry air, and produces healthy humid
air without formation of water mist. Its
humidication lter retains bacteria, calcium and
other particles from the water. It delivers only
pure humidied air in your home. No more
dry air in the winter season or from the air
conditioning.
Read this user manual carefully before you
install and use the humidier. Save it for future
reference.
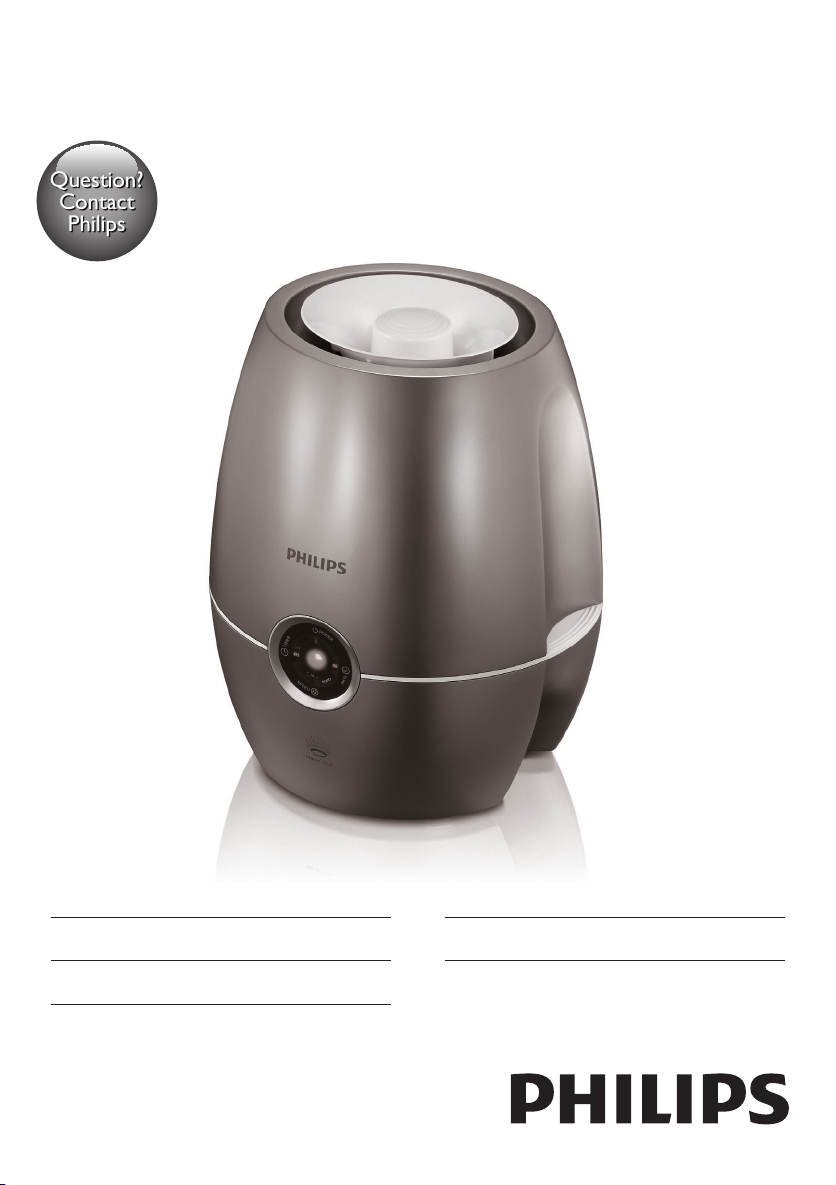
Check and identify the contents of your
package:
Upper cover
Float cover
Humidication lter
HU4101
Float
Anti-bacterial lter
HU4111 (only
available for HU4903)
Water tank
Base
English
www.philips.com/welcome
User manual
User manual
www.philips.com/welcome
Quick start guide
Quick start guide
www.philips.com/welcome
Warranty
Warranty
7EN
3 Getting started
Prepare for humidication
1 Hold by both sides of the upper cover to
lift it up.
2 Fill the water tank with cold tap water until
the water reaches the maximum water
indication level.
3 Place the upper cover back onto the
humidier.
8 EN
» The oat begins to oat.
4 Using the
humidifier
Understand the humidity
indicator light
Understand the healthy air
protect alert
English
The healthy air protect alert gives you a timely
warning when the water tank needs relling.
When the water in the tank starts getting low, a
red indicator on the control panel starts blinking
to tell you that it is time to rell the tank.
The humidier is equipped with a built-in
humidity sensor. The current humidity level is
shown on the display (40, 50 or 60 percent).
Note
• The accuracy of the humidity indication is
approximately plus or minus 5%.
• It takes some time to measure the humidity level in
the room..
Color of the humidity
indicator light
Blue target achieved
Red below target
The humidity indicator light automatically goes
on when the humidier is switched on.
Note
• The built-in humidity sensor measures the humidity
level and automatically selects the appropriate color of
the humidity sensor light. When the desired humidity
level is reached, the color of the humidity sensor light
is in blue. When the humidity level is not reached, the
color of the humidity sensor light becomes red.
Humidity level
Understand the healthy air
protect lock
The healthy air protect lock always ensures that
your humidier does not work without water
in the tank. When the water tank is empty and
needs to be relled, the healthy air protect lock
shuts off the humidier and a red indicator
lights up. When you rell the water tank
properly, the humidier is turned on again.
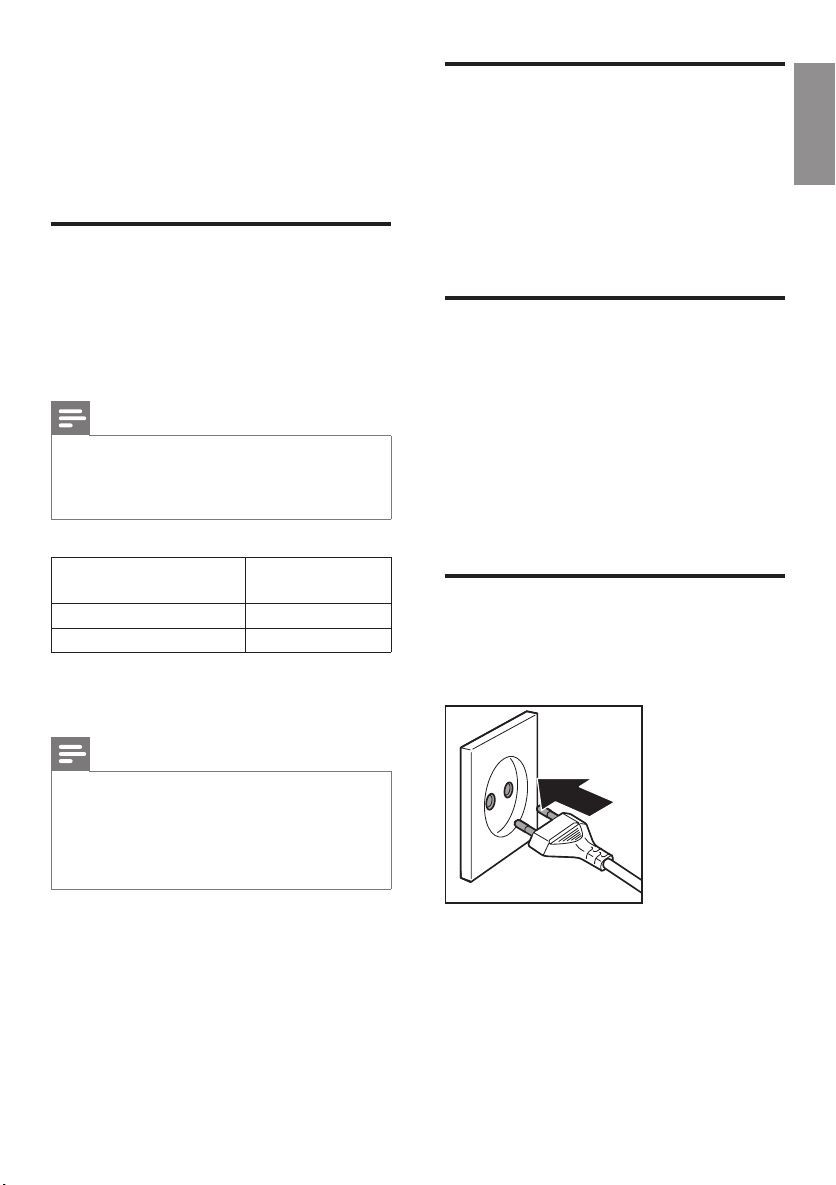
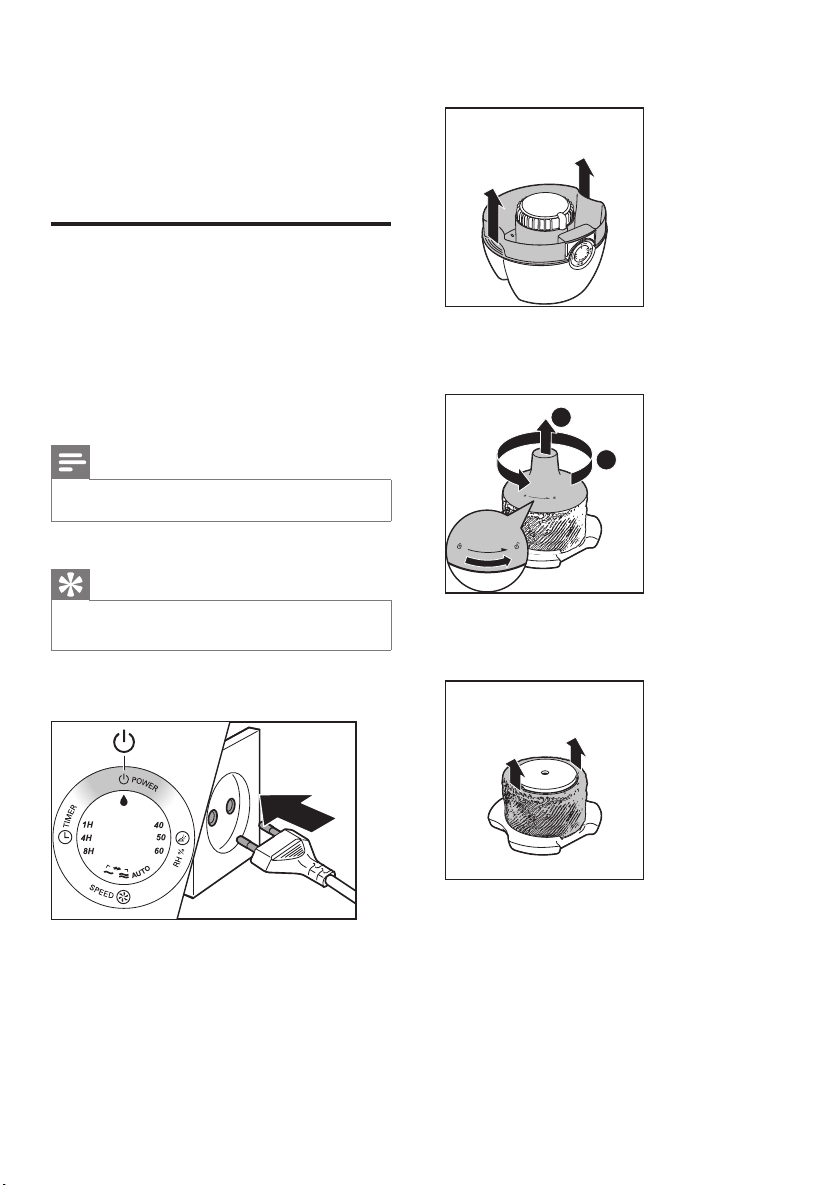
Switch the humidier on and
off
1 Put the plug in the wall socket.
9EN

2 Press the button to switch on the
humidier.
» The humidity sensor light is on.
» The humidier releases ver y ne
invisible mist.
3 Press the button to switch off the
humidier.
Note
• If the water in the tank is getting very low, the
humidier stops humidifying. The red indicator light
remains on.
• It is normal that you cannot see the mist.
» The current fan speed is shown.
» The current humidity level is shown.
10 EN
Change the fan speed
Auto
Note
• A UTO mode is only available for HU4903.
The automatic mode uses the digital sensor
to constantly monitor the air quality. It turns
your humidier on and off whenever needed
to ensure the humidity level is constantly at
the right level. The default humidity level of
the automatic mode is set at 50%, but you can
change it to your desired humidity level for the
automatic mode. Next time when you switch
on the humidier, it will remember your last
set humidity level, unless you have unplugged
the wall socket. In this case the default humidity
level of 50% is set again.
1 Press the SPEED button to select the
AUTO mode.
Turbo
Tip
• If the desired humidity level is reached, the humidier
changes to a lower fan speed automatically.
Manual
You can manually select the desired fan speed.
1 Press the SPEED button once or more
times to select the desired fan speed
(AUTO, and/or ).
Note
• Turbo mode is only available for HU4903.
1 Press the SPEED button once or more
times to select the Turbo mode.
» and are on.
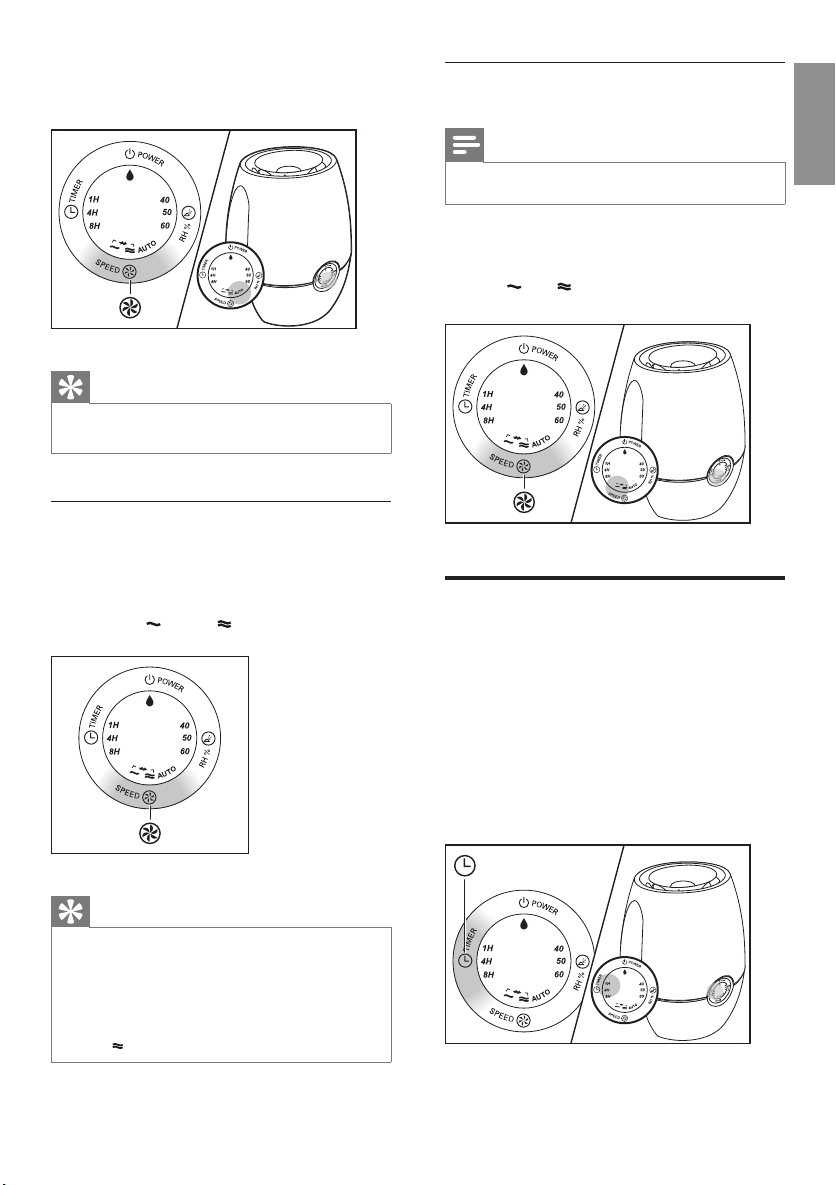
Set the timer
With the timer function, you can let the
humidier operate for a set number of hours.
When the set time has elapsed, the humidier
automatically switches off.
1 Press the TIMER button to activate the
timer.
» The TIMER light (1H, 4H or 8H) goes
on.
English
Tip
• A UTO and Turbo modes are only available for
HU4903.
• For HU4902 and non-auto mode of HU4903: if the
desired humidity level is reached, you can change to
a lower fan speed. On the other hand, if the desired
humidity level is not reached, you can select the fan
speed to humidify the air quickly.
11EN
2 Press the TIMER button repeatedly to
choose the number of hours you want the
humidier to operate. The corresponding
TIMER light goes on.
To deactivate the timer function, press the
TIMER button repeatedly until the TIMER light
(1H, 4H or 8H) is out.
Set the humidity level
Note
• Make sure that the water tank is lled with water
before the humidier can function (see the chapter
‘Getting started’, section ‘Prepare for humidication’).
• Press the HUMI button once or more
times to set the desired air humidity to 40,
50, 60 percent or no preset level.
» The humidity light (40, 50 or 60) of
the set humidity level ashes, then
it changes and stays at the current
humidity level.
Note
• If you set the humidity level to no preset level,
the humidity indicator is off but the humidier still
humidies the air.
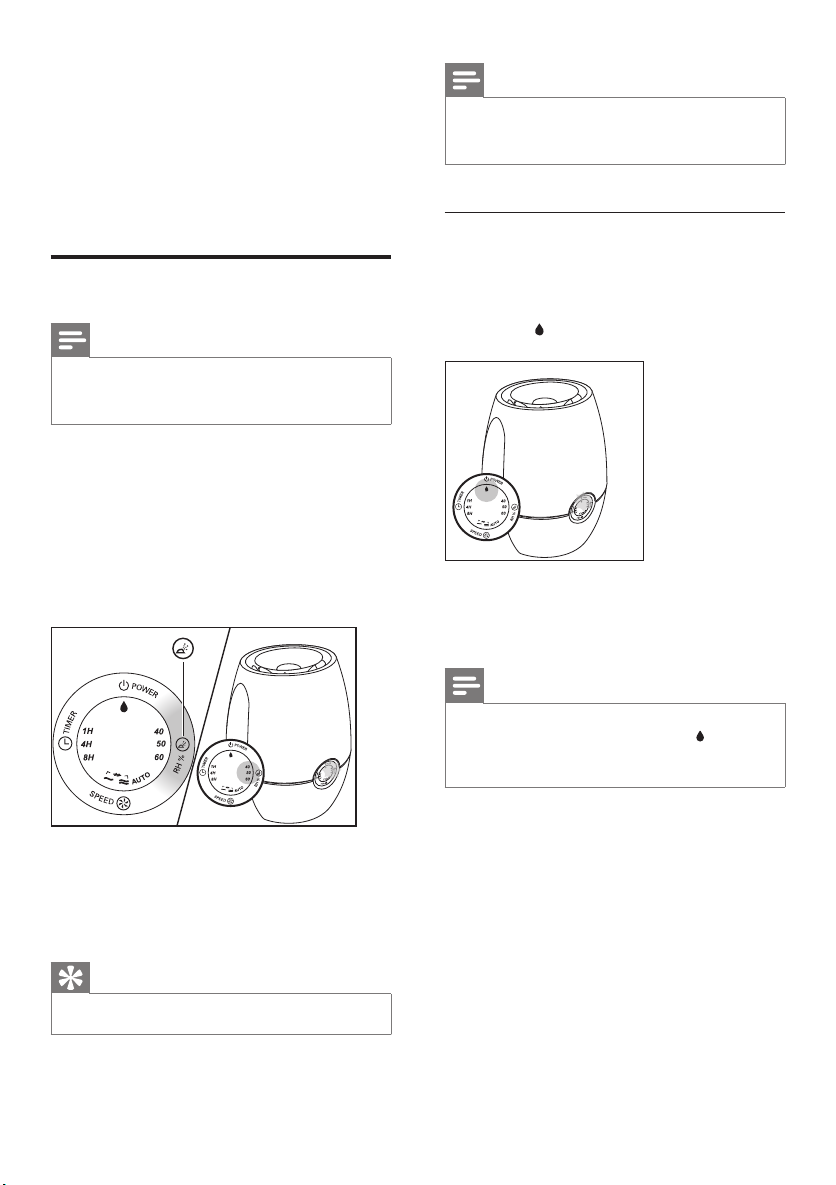
Water level
When there is not enough water in the water
tank,
• the oat sinks.
• the red indicator light starts blinking.
• the humidier continues to work for one
more hour.
You have to rell the water into the water tank.
» The humidity sensor light is in red
if the desired humidity level is not
reached. It turns blue when the desired
humidity level is reached.
Tip
• A comfor table humidity level is between 40% and 60%.
12 EN
Note
• The humidier stops humidifying if you do not rell the
water after more than one hour. The red indicator
light is on.
• It is normal to nd some water left in the tank.
Rell the water
There are three ways to rell the water into the
water tank: Normal rell, rell without removing
the water tank and easy rell.
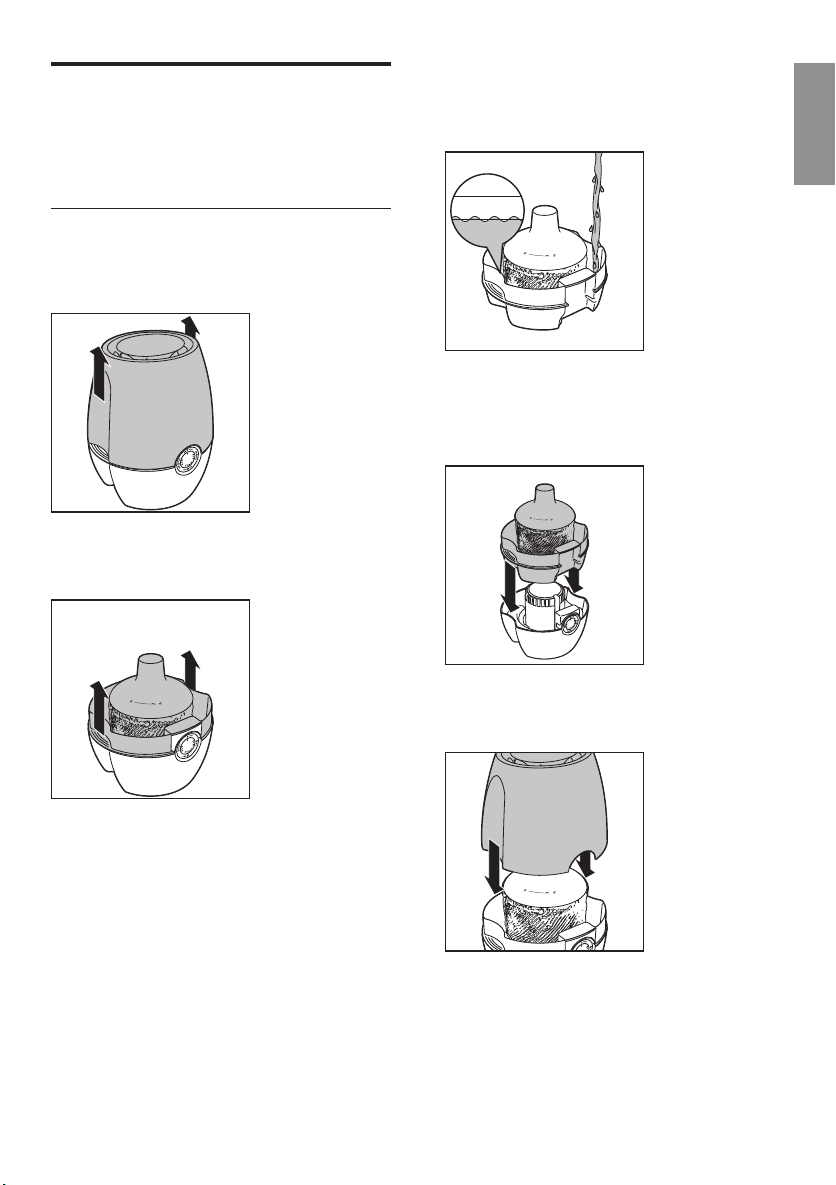
Normal rell
1 Remove upper cover by lifting it at both
sides.
2 Remove the water tank from the
humidier base by lifting it at both sides.
3 Fill the water tank with cold tap water until
the water reaches the maximum water
indication level.
English
» The oat begins to oat.
4 Place the water tank back on the
humidier base.
5 Place the upper cover back at the
humidier.
13EN
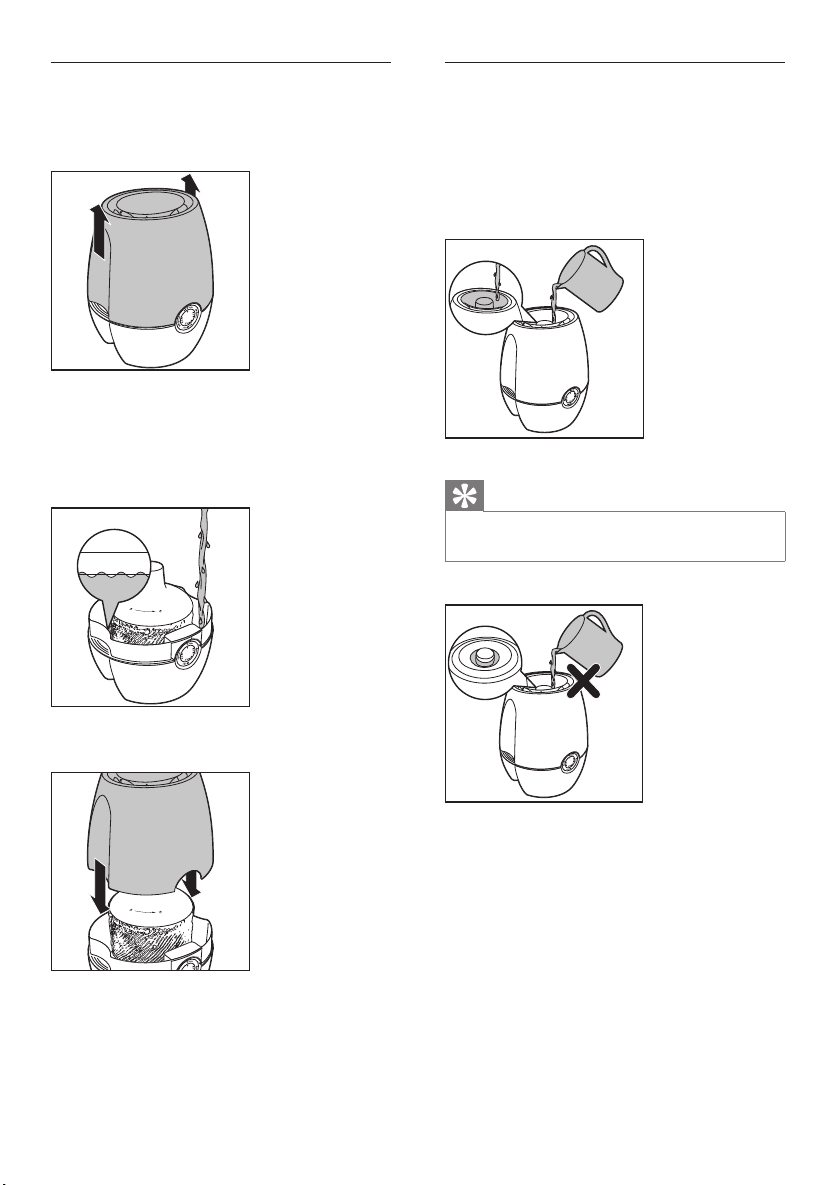
Rell without removing the water
tank
1 Remove the upper cover.
2 Fill a jar with water.
3 Pour the water into the water tank until
it reaches the the maximum water level
indication.
Easy rell
1 Fill a jar with water.
2 Pour the water to the water tank from
the top central opening until the top of
the oat cover emerges and closes the
opening completely.
Tip
• If you see the water star ts accumulating, this means the
water tank is full. Stop pouring water.
4 Put the upper cover back to the appliance.
14 EN

5 Cleaning your
humidifier
Note
• Always unplug the humidier before you clean it.
• Never use abrasive, aggressive, or ammable cleaning
agents such as bleach or alcohol to clean any part of
the humidier.
Clean the body of the
humidier
Regularly clean the inside and outside of the
humidier to prevent dust from collecting.
1 Wipe away dust with a soft dry cloth from
the body of the humidier.
2 Clean the air inlet and the air outlet with a
soft dry cloth.
Clean the water tank
Clean the water tank every week to keep it
hygienic.
1 Fill the water tank for 1/3 with water.
2 Add some mild washing-up liquid to the
water in the water tank.
3 Clean the inside of the water tank with
both hands.
4 Empty the water tank into a sink.
English
15EN

6 Cleaning the
humidification
filter
Clean the humidication lter every week to
keep it hygienic.
Rinse the humidication lter
1 Switch off the humidier and unplug it.
3 Turn the cover of the oat counter
clockwise to remove it.
2
1
4 Remove the humidication lter from the
oat.
2 Remove the water tank from the
humidier.
16 EN
5 Soak the humidication lter in tap water
for one hour.
Tap Water
1 hour
6 Rinse the humidication lter under a
slowly running tap. Do not squeeze or
wring the lter when cleaning.
7 Let excess water drip off the
humidication lter.
Note
• Do not put the humidication under direct sunlight.
8 Assemble the humidication lter round
the oat.
9 Turn the cover of the cover of the oat
clockwise to put it back in place.
English
2
1
17EN
7 Replacing the
filters
Replace the humidication
lter
2 Remove the water tank from the appliance.
Replace the humidication lter every three
months for optimal performance. If the lter
is in good condition, you could use it for a
longer period of time. Make sure to replace the
humidication lter at least once a year.
Note
• Use only Philips original humidication lter, HU4101.
Tip
• Register your product at www.Philips.com for further
information on how to replace your lter.
1 Switch off the humidier and unplug it.
3 Turn the cover of the oat counter
clockwise to remove it.
2
1
4 Remove the old humidication lter from
the humidier.
18 EN
5 Remove the packaging material from the
new humidication lter.
6 Assemble the new humidication lter
round the oat
7 Turn the cover of the oat clockwise to
put it back in place.
Replace the anti-bacterial
lter
English
Note
• The anti-bacterial lter is only available for HU4903.
• Use only Philips original anti-bacterial lter, HU4111
Replace the anti-bacterial lter at least once a
year to prevent the bacteria from growing in
the water tank.
• Pull and remove the old anti-bacterial lter.
Then, discard it.
• Push the new anti-bacterial lter down to
replace.
2
1
Tip
• You can easily nd more information about how to
replace the lter in our web page or by calling our
Consumer Care Center.
19EN

8 Troubleshooting
This chapter summarizes the most common problems you could encounter with the humidier. If you
are unable to solve the problem with the information below, contact the Consumer Care Center in
your country.
Problem Possible solution
The humidier does
not work.
There is no air
humidication.
The water tank
leaks.
I do not see the
current humidity
indication change.
There are some
white deposits on
the humidication
lter.
• Make sure that there is power supply to the humidier.
• Make sure that the water tank is lled with water and placed properly
onto the humidier.
Make sure that the water tank is lled with water and placed properly into the
humidier.
• Make sure that the humidier is not overlled with water.
• Make sure that the humidier is well assembled/connected ever y time
after you clean it or after you remove the upper cover and/or water tank
for relling.
• Make sure that water tank is placed properly. If the problem persists,
contact the Consumer Care Center in your country.
• Make sure that you have wrapped the humidication lter round the oat.
• The humidication lter is dirty. Rinse and/or descale the humidication
lter (see the chapter ‘Clean the humidication lter’).
• Your room might have too much ventilation. Please close doors and
windows.
• Your room size is too big. The recommended room size is 50m² for both
HU4902 and HU4903.
The white deposits are called scale and they consist of minerals from the water.
Scale on the humidication lter affects the humidifying performance, however
it does not harm your health. Please follow the cleaning instructions in the user
manual.
The lter turns
yellowish after
some time.
There is unpleasant
smell coming out
from the humidier.
20 EN
The yellow deposits is a natural effect of the wick material, and it has no impact
on humidication performance. Clean the humidication lter frequently to
remove the scale, and replace the humidication lter every three month.
• Make sure that the water tank is lled with water.
• Clean the humidication lter (see the chapter ‘Clean the humidication
lter’).

Problem Possible solution
No air comes out
of the air outlet.
I do not see visible
mist coming out of
the humidier. Is it
working?
I want to check
whether the
humidity sensor
works or not.
Put the plug of the humidier into the wall socket and switch on the humidier.
When mist is very ne, it is invisible. This humidier has a NanoCloud
humidication technology, which produces healthy humid air from the outlet
area without formation of water mist.Therefore, you cannot see the mist.
Gently blow moist air into the humidity sensor. After a while, the humidity
indication changes. Note that if the initial humidity indication is already 60
percent, the indication cannot show an even higher humidity when you blow
moist air towards the sensor.
English
21EN

9 Guarantee and
service
If you need information or if you have a
problem, please visit the Philips website at
www.philips.com or contact the Philips
Consumer Care Center in your country (you
nd its phone number in the worldwide
guarantee leaet). If there is no Consumer Care
Centre in your country, go to your local Philips
dealer.
Order parts or accessories
If you have to replace a part or want to
purchase an additional part, go to your Philips
dealer or visit www.philips.com/support.
If you have problems obtaining the parts, please
contact the Philips Consumer Care Center in
your country (you will nd its phone number in
the worldwide guarantee leaet).
22 EN
Loading…
Free Manuals for Philips HU4903/01
Manufacturer:Philips
Category:Home & Kitchen
Device:Philips HU4903/01
Name:User manual
Language:中文(简体)
Pages:28
Size:4.39 MB
Manufacturer:Philips
Category:Home & Kitchen
Device:Philips HU4903/01
Name:Quick start guide
Language:EnglishРусскийҚазащb
Pages:6
Size:3.30 MB
Manufacturer:Philips
Category:Home & Kitchen
Device:Philips HU4903/01
Name:User manual
Language:EnglishРусскийҚазащb
Pages:72
Size:6.38 MB
Manufacturer:Philips
Category:Home & Kitchen
Device:Philips HU4903/01
Name:User manual
Language:FrançaisDeutsch
Pages:92
Size:10.00 MB
Manufacturer:Philips
Category:Home & Kitchen
Device:Philips HU4903/01
Name:Quick start guide
Language:中文(繁體)中文(简体)
Pages:6
Size:2.03 MB
Manufacturer:Philips
Category:Home & Kitchen
Device:Philips HU4903/01
Name:User manual
Language:中文(繁體)
Pages:24
Size:3.74 MB
Скачать
HU4902
HU4903
Руководство пользователя
Мы всегда готовы помочь!
Зарегистрируйте свое устройство и получите поддержку на
www.philips.com/welcome
Возник вопрос?
Обратитесь в
Philips