
EN
Basic Operation Guide
— for use without a computer —
FR
DE
NL
Guide des opérations de base
— pour l’utilisation sans l’aide d’un ordinateur —
Benutzerhandbuch — Grundlagen
— für die Verwendung ohne Computer —
Basishandleiding
— voor gebruik zonder computer —
About This Guide
À propos de ce guide
Informationen zu diesem Handbuch
Deze handleiding
Follow these guidelines as you read your instructions:
Respectez les directives suivantes lorsque vous lisez les instructions :
Beachten Sie Folgendes beim Lesen der Anweisungen:
Houd u bij het lezen aan de volgende richtlijnen:
Warning:
Warnings must be followed
carefully to avoid bodily injury.
Attention :
avertissement à suivre à la
lettre pour éviter des blessures
corporelles.
Warnung:
Warnhinweise müssen
genau befolgt werden, um
Verletzungen zu vermeiden.
Waarschuwing:
Waarschuwingen moeten
zorgvuldig worden opgevolgd om
lichamelijk letsel te voorkomen.
2
w c
Caution:
Cautions must be observed
to avoid damage to your
equipment.
Important :
mise en garde à respecter pour
éviter d’endommager votre
équipement.
Vorsicht:
Vorsichtshinweise müssen
befolgt werden, um
Geräteschäden zu vermeiden.
Let op:
Voorzorgsmaatregelen worden aangegeven
met ‘Let op’ en moeten worden nageleefd
om schade aan de apparatuur te voorkomen.
Must be observed to avoid
bodily injury and damage to
your equipment.
À respecter pour éviter des
blessures corporelles et pour
éviter d’endommager votre
installation.
Muss befolgt werden, um
körperliche Schäden oder
Schäden an Ihren Geräten zu
vermeiden.
Moet worden nageleefd om
lichamelijk letsel en schade aan
de apparatuur te voorkomen.
Q R &
Note:
Notes contain important
information and hints for using
the printer.
Remarque :
informations importantes et
conseils d’utilisation relatifs à
l’imprimante.
Hinweis:
Hinweise enthalten wichtige
Informationen und Tipps zur
Verwendung des Druckers.
Opmerking:
Opmerkingen bevatten
belangrijke informatie en tips
voor het gebruik van de printer.
Indicates a page number where
additional information can be
found.
Indique un numéro de
page où des informations
supplémentaires sont
disponibles.
Weist auf eine Seite hin, auf der
weitere Informationen zu nden
sind.
Een verwijzing naar een pagina
waar extra informatie te vinden
is.
Copyright Notice
Mise en garde relative aux droits d’auteur
Hinweis zum Copyright
Auteursrechten
No part of this publication may be reproduced, stored in a retrieval system, or transmitted in any form or by any means, electronic, mechanical, photocopying, recording, or otherwise, without the prior
written permission of Seiko Epson Corporation. The information contained herein is designed only for use with this product. Epson is not responsible for any use of this information as applied to other
printers.
Neither Seiko Epson Corporation nor its aliates shall be liable to the purchaser of this product or third parties for damages, losses, costs, or expenses incurred by the purchaser or third parties as a result of
accident, misuse, or abuse of this product or unauthorized modications, repairs, or alterations to this product, or (excluding the U.S.) failure to strictly comply with Seiko Epson Corporation’s operating and
maintenance instructions.
Seiko Epson Corporation shall not be liable for any damages or problems arising from the use of any options or any consumable products other than those designated as Original Epson Products or Epson
Approved Products by Seiko Epson Corporation.
Seiko Epson Corporation shall not be held liable for any damage resulting from electromagnetic interference that occurs from the use of any interface cables other than those designated as Epson Approved
Products by Seiko Epson Corporation.
EPSON® and EPSON STYLUS® are registered trademarks, and Exceed Your Vision is a trademark of Seiko Epson Corporation.
SDHC™ is a trademark.
Memory Stick, Memory Stick Duo, Memory Stick PRO, Memory Stick PRO Duo, Memory Stick PRO-HG Duo, Memory Stick M icro, MagicGate Memory Stick, and MagicGate Memory Stick Duo are trademarks
of Sony Corporation.
xD-Picture Card™ is a trademark of Fuji Photo Film Co., Ltd.
General Notice: Other product names used herein are for identication purposes only and may be trademarks of their respective owners. Epson disclaims any and all rights in those marks.
3
Contents
EN
Important Safety Instructions …………………………………………………………………………………………………………….. 6
Guide to Control Panel ………………………………………………………………………………………………………………………… 8
Using the LCD Screen………………………………………………………………………………………………………………………….10
Adjusting the Angle of the LCD Screen ……………………………………………………………………………………………12
Handling Media
Selecting Paper ………………………………………………………………………………………………………………………………..14
Loading Paper ………………………………………………………………………………………………………………………………….16
Inserting a Memory Card ……………………………………………………………………………………………………………….18
Placing Originals ……………………………………………………………………………………………………………………………..20
Copying
Copying Documents ……………………………………………………………………………………………………………………….22
Copying Photos ……………………………………………………………………………………………………………………………….24
Menu List ………………………………………………………………………………………………………………………………………….26
Printing from a Memory Card
Printing Photos ………………………………………………………………………………………………………………………………..30
Printing From an Index Sheet ………………………………………………………………………………………………………..32
Menu List ………………………………………………………………………………………………………………………………………….35
Setup Mode (Maintenance)
Checking the Ink Cartridge Status ……………………………………………………………………………………………….. 38
Checking/Cleaning the Print Head ……………………………………………………………………………………………….40
Aligning the Print Head …………………………………………………………………………………………………………………. 42
PictBridge Setup………………………………………………………………………………………………………………………………44
Menu List ………………………………………………………………………………………………………………………………………….46
Solving Problems
Error Messages …………………………………………………………………………………………………………………………………48
Replacing Ink Cartridges ………………………………………………………………………………………………………………..52
Paper Jam …………………………………………………………………………………………………………………………………………56
Print Quality/Layout Problems ………………………………………………………………………………………………………58
Contacting Customer Support………………………………………………………………………………………………………62
Index ……………………………………………………………………………………………………………………………………………………..64
Table des matières
FR
Consignes de sécurité importantes …………………………………………………………………………………………………… 6
Guide du panneau de contrôle …………………………………………………………………………………………………………..8
Utilisation de l’écran LCD …………………………………………………………………………………………………………………… 10
Réglage de l’angle de l’écran LCD …………………………………………………………………………………………………….12
Gestion des supports
Sélection du papier ………………………………………………………………………………………………………………………… 14
Chargement du papier …………………………………………………………………………………………………………………..16
Insertion d’une carte mémoire ……………………………………………………………………………………………………..18
Mise en place des originaux ………………………………………………………………………………………………………….20
Copie
Copie de documents ………………………………………………………………………………………………………………………22
Copie de photos ………………………………………………………………………………………………………………………………24
Liste des menus ………………………………………………………………………………………………………………………………. 26
Impression à partir d’une carte mémoire
Impression de photos …………………………………………………………………………………………………………………….30
Impression à partir d’une feuille d’index ……………………………………………………………………………………..32
Liste des menus ………………………………………………………………………………………………………………………………. 35
Mode Cong (Maintenance)
Vérication de l’état de la cartouche d’encre ……………………………………………………………………………… 38
Vérication/nettoyage de la tête d’impression …………………………………………………………………………..40
Alignement de la tête d’impression ……………………………………………………………………………………………..42
Conguration PictBridge ……………………………………………………………………………………………………………….44
Liste des menus ………………………………………………………………………………………………………………………………. 46
Résolution des problèmes
Messages d’erreur ……………………………………………………………………………………………………………………………48
Remplacement des cartouches d’encre ………………………………………………………………………………………52
Bourrage papier ………………………………………………………………………………………………………………………………56
Problèmes de qualité d’impression/de disposition ……………………………………………………………………58
Contacter le service clientèle ………………………………………………………………………………………………………..62
Index ……………………………………………………………………………………………………………………………………………………..65
4
Inhaltsverzeichnis
DE
Wichtige Sicherheitshinweise …………………………………………………………………………………………………………….. 6
Erläuterungen zum Bedienfeld …………………………………………………………………………………………………………..8
Verwendung der LCD-Anzeige ………………………………………………………………………………………………………….10
Einstellen des Stellwinkels der LCD-Anzeige…………………………………………………………………………………..12
Handhabung von Medien
Papier auswählen …………………………………………………………………………………………………………………………….14
Papier einlegen ………………………………………………………………………………………………………………………………..16
Einsetzen einer Speicherkarte……………………………………………………………………………………………………….18
Originale einlegen ………………………………………………………………………………………………………………………….. 20
Kopieren
Dokumente kopieren ……………………………………………………………………………………………………………………..22
Fotos kopieren ………………………………………………………………………………………………………………………………… 24
Menüliste ………………………………………………………………………………………………………………………………………….26
Von der Speicherkarte drucken
Fotos drucken…………………………………………………………………………………………………………………………………..30
Drucken von einem Indexblatt …………………………………………………………………………………………………….. 32
Menüliste ………………………………………………………………………………………………………………………………………….35
Setup-Modus (Wartung)
Status der Tintenpatronen prüfen ………………………………………………………………………………………………..38
Druckkopf prüfen/reinigen ……………………………………………………………………………………………………………40
Druckkopf ausrichten …………………………………………………………………………………………………………………….. 42
Pictbridge-Setup …………………………………………………………………………………………………………………………….. 44
Menüliste ………………………………………………………………………………………………………………………………………….46
Problemlösung
Fehlermeldungen …………………………………………………………………………………………………………………………… 48
Tintenpatronen ersetzen ……………………………………………………………………………………………………………….52
Papierstau …………………………………………………………………………………………………………………………………………56
Qualitäts-/Layout-Probleme …………………………………………………………………………………………………………. 58
Kontaktaufnahme mit dem Kundendienst………………………………………………………………………………….62
Index ……………………………………………………………………………………………………………………………………………………..66
Inhoud
NL
Belangrijke veiligheidsvoorschriften …………………………………………………………………………………………………. 6
Bedieningspaneel …………………………………………………………………………………………………………………………………8
Display gebruiken ……………………………………………………………………………………………………………………………….10
Display verzetten …………………………………………………………………………………………………………………………………12
Media gebruiken
Papier selecteren ……………………………………………………………………………………………………………………………..14
Papier laden …………………………………………………………………………………………………………………………………….. 16
Geheugenkaart plaatsen ……………………………………………………………………………………………………………….18
Originelen plaatsen …………………………………………………………………………………………………………………………20
Kopiëren
Documenten kopiëren ……………………………………………………………………………………………………………………22
Foto’s kopiëren ………………………………………………………………………………………………………………………………… 24
Menu’s ……………………………………………………………………………………………………………………………………………….26
Afdrukken vanaf een geheugenkaart
Foto’s afdrukken ………………………………………………………………………………………………………………………………30
Afdrukken vanaf een index ……………………………………………………………………………………………………………32
Menu’s ……………………………………………………………………………………………………………………………………………….35
Modus Instellen (Onderhoud)
Cartridgestatus controleren …………………………………………………………………………………………………………..38
Printkop controleren/reinigen ………………………………………………………………………………………………………40
Printkop uitlijnen …………………………………………………………………………………………………………………………….42
PictBridge-instellingen …………………………………………………………………………………………………………………..44
Menu’s ……………………………………………………………………………………………………………………………………………….46
Problemen oplossen
Foutmeldingen ………………………………………………………………………………………………………………………………..48
Cartridges vervangen ……………………………………………………………………………………………………………………..52
Vastgelopen papier …………………………………………………………………………………………………………………………56
Problemen met de afdrukkwaliteit/lay-out …………………………………………………………………………………58
Contact opnemen met de klantenservice …………………………………………………………………………………..62
Index ……………………………………………………………………………………………………………………………………………………..67
5

Important Safety Instructions
Consignes de sécurité importantes
Wichtige Sicherheitshinweise
Belangrijke veiligheidsvoorschriften
Use only the power cord that
comes with the printer. Use of
another cord may cause re or
shock. Do not use the cord with
any other equipment.
Utilisez uniquement le cordon
d’alimentation livré avec
l’imprimante. L’utilisation
d’un autre cordon pourrait
provoquer un incendie ou
une électrocution. N’utilisez
pas le cordon sur un autre
équipement.
Verwenden Sie nur das mit
diesem Drucker mitgelieferte
Netzkabel. Andere Kabel
können Feuer oder
Stromschläge verursachen.
Verwenden Sie das Kabel nicht
für andere Geräte.
Gebruik alleen het netsnoer
dat bij de printer is geleverd.
Gebruik van andere snoeren
kan brand of schokken
veroorzaken. Gebruik het snoer
niet met andere apparatuur.
6
Make sure the power cord
meets all relevant local safety
standards.
Assurez-vous que le cordon
d’alimentation correspond
à l’ensemble des normes de
sécurité locales applicables.
Sicherstellen, dass das
Stromkabel allen relevanten
lokalen Sicherheitsstandards
entspricht.
Controleer of het netsnoer aan
de lokale veiligheidsnormen
voldoet.
Place the printer near a wall
outlet where the power cord
can be easily unplugged.
Placez l’imprimante à
proximité d’une prise de
courant permettant de
débrancher aisément le cordon
d’alimentation.
Den Drucker neben einer
Wandsteckdose aufstellen,
aus der das Stromkabel leicht
abgezogen werden kann.
Plaats de printer in de buurt
van een stopcontact waar u
de stekker gemakkelijk kunt
uittrekken.
Use only the type of power
source indicated on the label.
Utilisez uniquement le type de
source d’alimentation indiqué
sur l’étiquette.
Nur die auf dem Etikett
angegebene Art von
Stromquelle verwenden.
Gebruik alleen het type
voeding dat op het etiket is
aangegeven.
Do not let the power cord
become damaged or frayed.
Veillez à éviter la détérioration
ou l’usure du cordon
d’alimentation.
Abscheuerung oder
Beschädigung des Stromkabels
vermeiden.
Zorg ervoor dat het netsnoer
niet beschadigd raakt.
Do not open the scanner unit
while copying, printing, or
scanning.
N’ouvrez pas le module
scanner lorsqu’une opération
de copie, d’impression ou de
numérisation est en cours.
Die Scanner-Einheit während
eines Kopier-, Druck- oder ScanVorgangs nicht önen.
Open de scannereenheid niet
tijdens het kopiëren, afdrukken
of scannen.
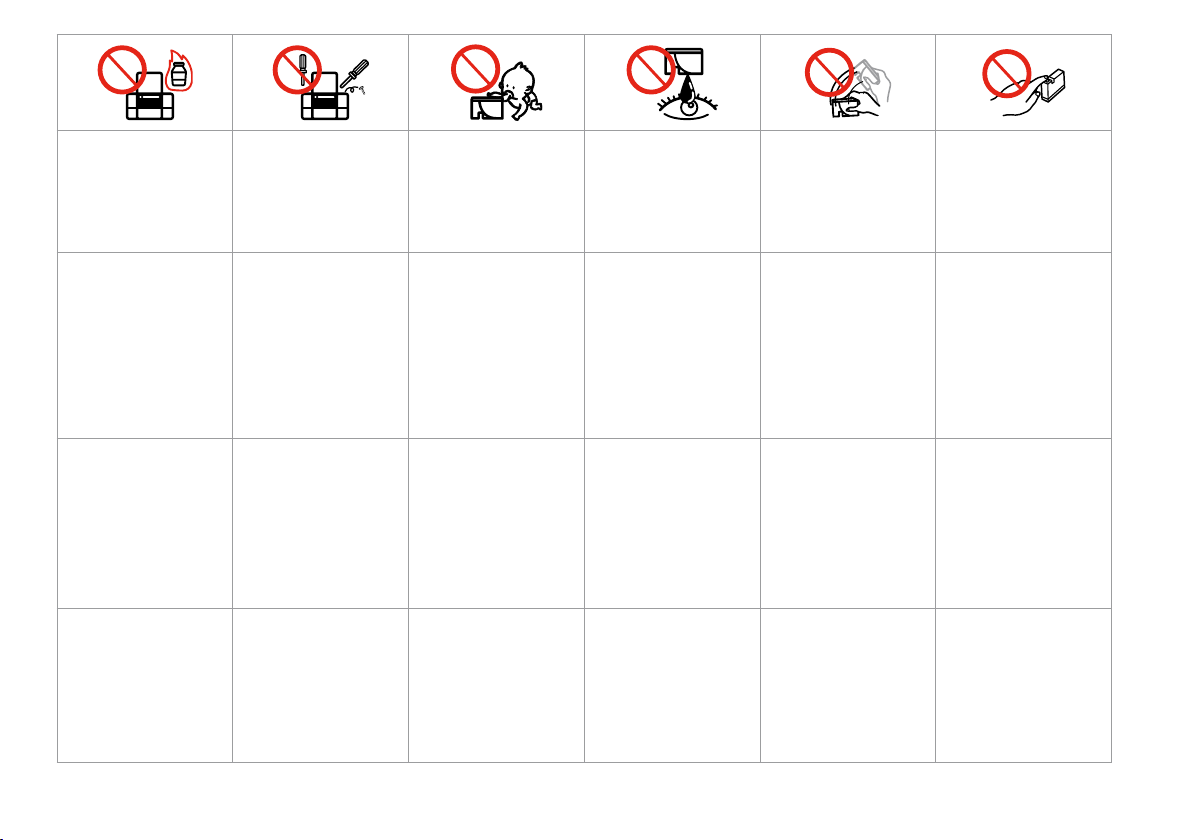
Do not use aerosol products
that contain ammable gases
inside or around the printer.
Doing so may cause re.
N’utilisez pas de produits en
aérosol contenant des gaz
inammables à l’intérieur ou
à proximité de l’imprimante,
faute de quoi un incendie
risque de survenir.
Innerhalb oder in der Nähe des
Druckers keine Sprühprodukte
verwenden, die entzündliche
Gase enthalten. Dies könnte ein
Feuer verursachen.
Gebruik in de printer of in de
buurt van de printer geen
spuitbussen die ontvlambare
gassen bevatten. Dit kan brand
veroorzaken.
Except as specically explained
in your documentation, do not
attempt to service the printer
yourself.
Ne tentez jamais de réparer
le produit par vous-même,
sauf si cela est explicitement
mentionné dans la
documentation.
Nicht versuchen, den Drucker
selbst zu warten, es sei denn,
die Dokumentation enthält
ausdrückliche Erklärungen
dazu.
Probeer de printer niet zelf
te repareren, tenzij in de
documentatie speciek wordt
uitgelegd hoe u dit moet doen.
Keep ink cartridges out of the
reach of children and do not
drink the ink.
Maintenez les cartouches
d’encre hors de portée des
enfants et ne buvez pas l’encre.
Tintenpatronen außerhalb
der Reichweite von Kindern
aufbewahren. Tinte nicht
trinken.
Houd cartridges buiten het
bereik van kinderen. Inkt niet
drinken.
If ink gets on your skin, wash
it o with soap and water. If it
gets in your eyes, ush them
immediately with water. If
you still have discomfort or
vision problems, see a doctor
immediately.
En cas de contact de l’encre
avec la peau, nettoyez à l’eau et
au savon. En cas de contact de
l’encre avec les yeux, rincez-les
abondamment avec de l’eau.
Si une gêne ou des problèmes
de vision persistent, consultez
immédiatement un médecin.
Im Falle von Hautkontakt
die Tinte mit Wasser und
Seife abwaschen. Im Falle
von Augenkontakt sofort
mit Wasser auswaschen. Bei
Sehstörungen oder anderen
Beschwerden, sofort einen Arzt
aufsuchen.
Als u inkt op uw huid krijgt,
wast u de plek met water
en zeep. Als u inkt in uw
ogen krijgt, moet u uw ogen
onmiddellijk uitspoelen met
water. Raadpleeg onmiddellijk
een arts als u daarna nog
steeds ongemak ondervindt.
Do not shake ink cartridges
after opening their packages;
this can cause leakage.
An d’éviter tout risque de
fuite, ne secouez pas les
cartouches d’encre une fois les
emballages ouverts.
Nach dem Önen der
Verpackung dürfen
Tintenpatronen nicht
geschüttelt werden, da sonst
Tinte austreten kann.
Schud cartridges niet na het
openen van de verpakking. Dit
kan lekkage veroorzaken.
If you remove an ink cartridge
for later use, protect the ink
supply area from dirt and
dust and store it in the same
environment as the printer. Do
not touch the ink supply port
or surrounding area.
Si vous retirez une cartouche
d’encre pour la réutiliser
ultérieurement, protégez la
zone d’alimentation en encre
contre les salissures et la
poussière et stockez-la dans
le même environnement que
l’imprimante. Ne touchez pas
l’orice d’alimentation en encre
de la cartouche, ni la zone qui
l’entoure.
Wird eine Tintenpatrone zum
späteren Gebrauch entfernt,
den Tintenzufuhrbereich
vor Staub und Schmutz
schützen und die Patrone in
derselben Umgebung wie den
Drucker aufbewahren. Die
Tintenversorgungsönung
oder den umgebenden Bereich
nicht berühren.
Als u een cartridge wilt
verwijderen voor later, moet
u er wel voor zorgen dat de
inkttoevoer wordt beschermd
tegen stof en vuil. Bewaar
de cartridge in dezelfde
omgeving als de printer. Raak
de inkttoevoer of het gebied
eromheen niet aan.
7
Guide to Control Panel
Guide du panneau de contrôle
Erläuterungen zum Bedienfeld
Bedieningspaneel
a b c
r C J
Enters Copy mode. Enters Memory Card
Permet d’activer le
mode Copie.
Ruft den Modus
Kopieren auf.
Modus Kopiëren
activeren.
mode.
Permet d’activer le
mode Carte mém.
Geht in den
Speicherkarte-Mode.
Modus Geheugenkaart
activeren.
Enters Photo mode. Sets the number of
Permet d’activer le
mode Photo.
Ruft den Modus Foto
auf.
Modus Foto activeren. Aantal exemplaren
+, —
copies.
Permet de dénir le
nombre de copies.
Stellt die Anzahl der
Kopien ein.
instellen.
x
Displays detailed
settings for each
mode.
Ache les paramètres
détaillés de chaque
mode.
Zeigt detaillierte
Einstellungen für
jeden Modus an.
Gedetailleerde
instellingen per
modus weergeven.
8
Control panel design varies by area.
La conception du panneau de contrôle varie d’un pays à l’autre.
Bedienfeldaufbau variiert je nach Land/Region.
Het bedieningspaneel kan per land verschillen.
d e f g h i j
u, d, l, r, OK
Selects photos and
menu items.
Permettent de
sélectionner les
photos et les éléments
de menu.
Wählt Fotos und
Menüpunkte aus.
Foto’s en menu-items
selecteren.
x P
Enters Setup mode. Starts copying/
Permet d’activer le
mode Cong.
Ruft den Modus Setup
auf.
Modus Instellen
activeren.
printing.
Permet de lancer la
copie/l’impression.
Startet Kopier-/
Druckvorgang.
Kopiëren/afdrukken
starten.
y
Turns on/o printer. Cancels/returns to the
Met l’imprimante
sous/hors tension.
Schaltet Drucker
ein/aus.
Printer uit-/aanzetten. Annuleren/terugkeren
previous menu.
Permet d’annuler/de
retourner au menu
précédent.
Bricht Vorgänge
ab/geht zurück zum
vorherigen Menü.
naar vorig menu.
Changes the view of
photos or crops the
photos.
Permet de modier
l’achage des photos
ou de rogner les
photos.
Ändert die Fotoansicht
oder schneidet Fotos
aus.
Weergave van foto’s
wijzigen of foto’s
bijsnijden.
y
Stops copying/
printing or resets
settings.
Permet d’arrêter la
copie/l’impression
ou de réinitialiser les
paramètres.
Hält Kopier-/
Druckvorgang an oder
setzt Einstellungen
zurück.
Kopiëren/afdrukken
stoppen of
instellingen resetten.
9
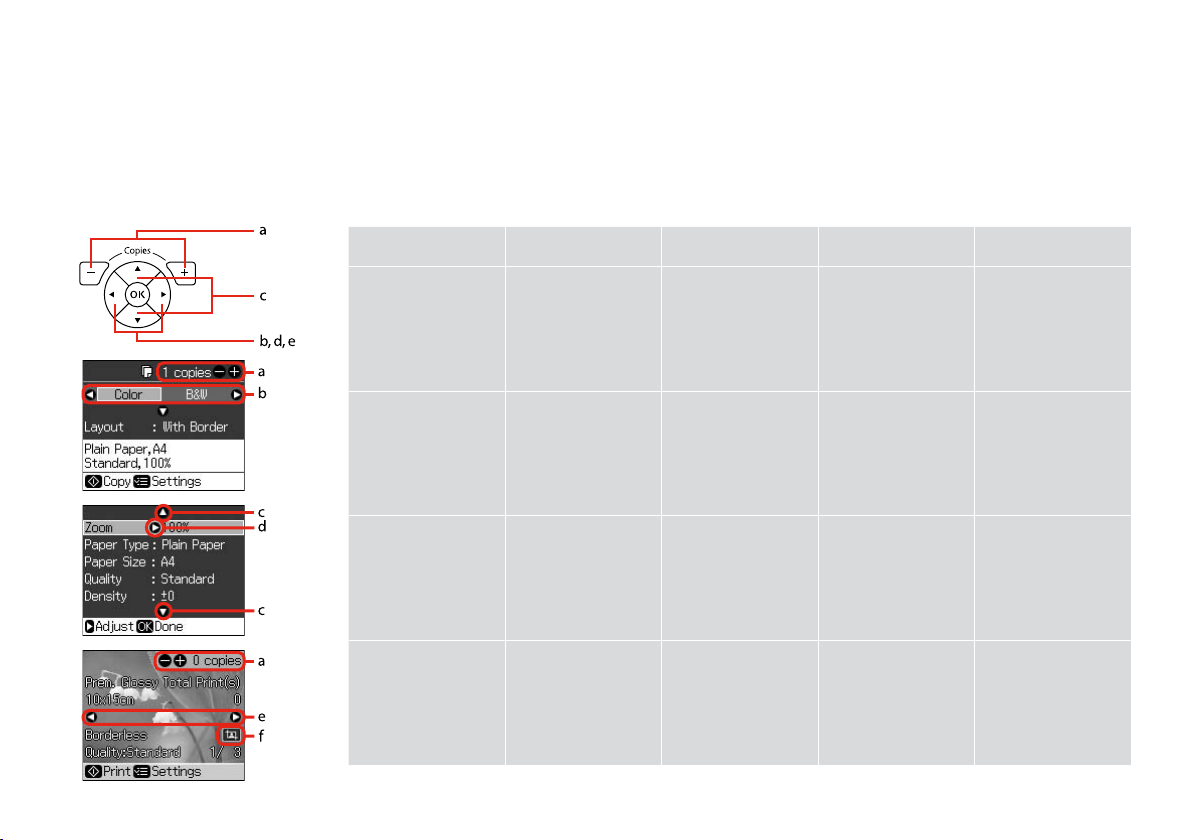
Using the LCD Screen
Utilisation de l’écran LCD
Verwendung der LCD-Anzeige
Display gebruiken
a b c d e
Use + or — to set the
number of copies for the
selected photo.
Press l or r to select the
setting item.
Press u or d to select
the menu item. The
highlight moves up or
down.
Press r to open the
setting item list.
Press l or r to change
the photo displayed on
the LCD screen.
10
Dénissez le nombre
de copies de la photo
sélectionnée à l’aide de
la touche + ou -.
Stellen Sie mit +
oder — die Anzahl der
Ausdrucke für das
ausgewählte Foto ein.
Met + of — stelt u het
aantal exemplaren voor
de geselecteerde foto in.
Appuyez sur l ou sur
r pour sélectionner
l’élément de
paramétrage.
Drücken Sie l oder
r, um die Einstellung
auszuwählen.
Met l of r selecteert u
een instelling voor een
item.
Appuyez sur u ou sur
d pour sélectionner
l’élément de menu. La
surbrillance se déplace
vers le haut ou vers
le bas.
Drücken Sie u oder d,
um den Menüpunkt
auszuwählen. Die
Markierung bewegt sich
nach oben oder unten.
Met u of d selecteert
u een menu-item. De
markering gaat naar
boven of beneden.
Appuyez sur r
pour ouvrir la liste
des éléments de
paramétrage.
Drücken Sie r, um die
Einstellungsliste zu
önen.
Met r opent u een lijst
met instellingen.
Appuyez sur l ou sur r
pour changer la photo
achée sur l’écran LCD.
Drücken Sie l oder
r, um das in der LCDAnzeige angezeigte Foto
zu ändern.
Met l of r geeft u een
andere foto weer op het
display.

f
The icon is displayed on a cropped image.
L’icône s’ache au niveau des images rognées.
Das -Symbol wird auf einem ausgeschnittenen Bild angezeigt.
Bij een foto die is bijgesneden, wordt het pictogram weergegeven.
Q
After 13 minutes of inactivity, the
screen turns black to save energy.
Press any button (except P On) to
return the screen to its previous
state.
L’écran s’éteint à l’issue de
13 minutes d’inactivité an
d’économiser l’énergie. Appuyez
sur n’importe quelle touche (à
l’exception de la touche P On)
pour rétablir l’état antérieur de
l’écran.
Wenn innerhalb von 13 Minuten
keine Aktivität erfolgt, erlischt der
Bildschirm, um Energie zu sparen.
Durch Drücken einer beliebigen
Taste (mit Ausnahme von POn)
kehrt der Bildschirm in seinen
vorherigen Zustand zurück.
Na 13 minuten inactiviteit wordt
het scherm zwart om energie
te besparen. Druk op een
willekeurige knop (behalve P On)
om terug te keren naar het laatst
weergegeven scherm.
Q
The actual screen display may
dier slightly from those shown in
this guide.
Les écrans achés peuvent être
légèrement diérents de ceux
indiqués dans ce guide.
Der tatsächliche Inhalt der LCDAnzeige kann leicht von dem in
dieser Anleitung dargestellten
Inhalt abweichen.
Wat u precies op het display
ziet, kan licht afwijken van de
afbeeldingen in deze handleiding.
11

Adjusting the Angle of the LCD Screen
Réglage de l’angle de l’écran LCD
Einstellen des Stellwinkels der LCD-Anzeige
Display verzetten
You can raise and adjust the angle of the LCD screen for better viewing.
Vous pouvez augmenter et régler l’angle de l’écran LCD pour une meilleure
visualisation.
Der Stellwinkel der LCD-Anzeige kann zur besseren Sicht eingestellt werden.
Voor een goede leesbaarheid kunt u het display naar wens hoger of lager
zetten.
12

Handling Media
Gestion des supports
Handhabung von Medien
Media gebruiken
13

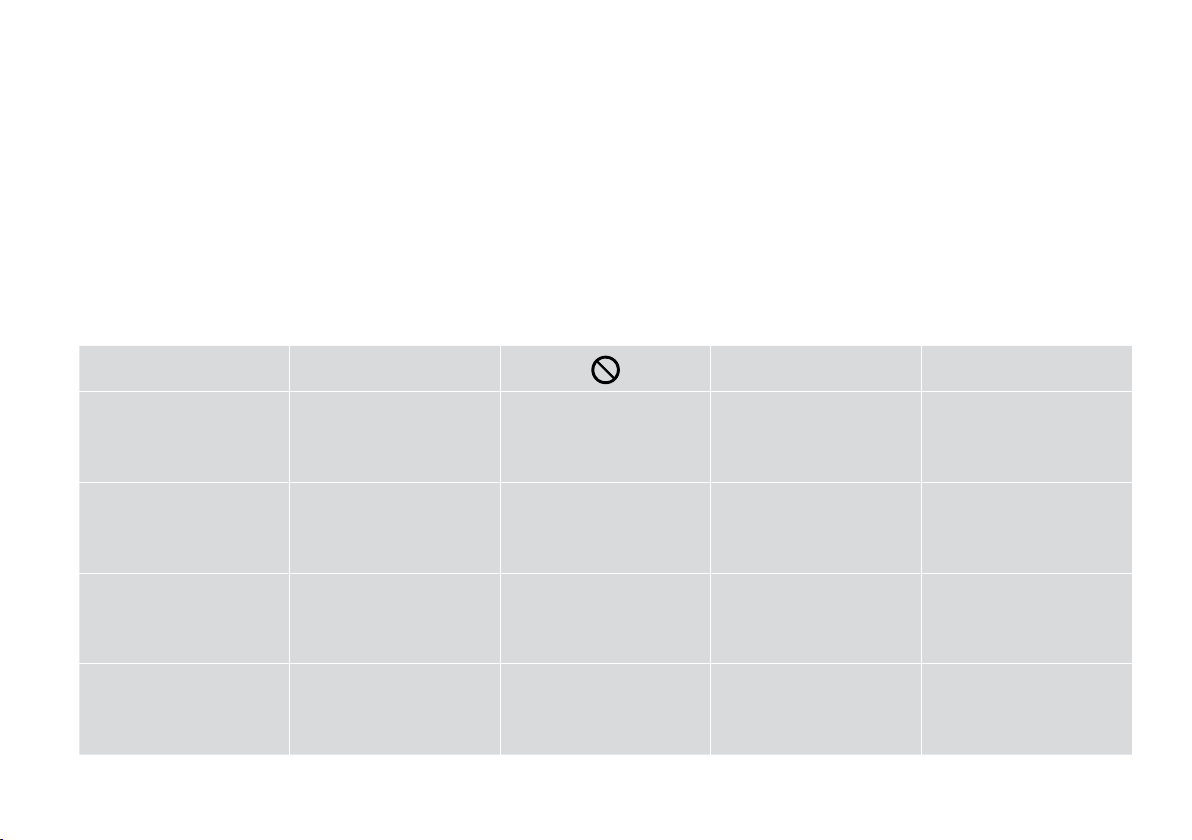
Selecting Paper
Sélection du papier
Papier auswählen
Papier selecteren
The availability of special paper
varies by area.
La disponibilité du papier spécial
varie selon les pays.
Die Verfügbarkeit von Spezialpapier
variiert je nach Land/Region.
De beschikbaarheid van speciaal
papier verschilt per land.
If you want to print
on this paper… *³
a Plain paper Plain Paper [12 mm] *¹ *²
b Epson Bright White
Ink Jet Paper
c Epson Premium Ink
Jet Plain Paper
d Epson Matte Paper
— Heavyweight
e Epson Photo
Quality Ink Jet
Paper
f Epson Premium
Glossy Photo Paper
g Epson Premium
Semigloss Photo
Paper
h Epson Ultra Glossy
Photo Paper
i Epson Glossy
Photo Paper
j Epson Photo Paper Photo Paper 20
*1 Paper with a weight of 64 to 90 g/m².
*2 30 sheets for paper that already has printing on one side.
*3 See the table on the right-hand side for the English paper
names.
Choose this Paper
Type on the LCD
screen
Plain Paper 80 *²
Plain Paper 80 *²
Matte 20
Matte 80
Prem.Glossy 20
Prem.Glossy 20
Ultra Glossy 20
Photo Paper 20
Loading
capacity
(sheets)
Si vous souhaitez
procéder à
l’impression sur ce
papier… *³
a Pap ordi Pap ordi [12 mm] *¹ *²
b Papier jet d’encre
blanc brillant
Epson
c Papier ordinaire jet
d’encre Premium
Epson
d Papier mat épais
Epson
e Papier couché
qualité photo
Epson
f Papier photo glacé
Premium Epson
g Papier photo semi-
glacé Premium
Epson
h Papier photo ultra-
glacé Epson
i Papier photo glacé
Epson
j Papier photo
Epson
*1 Papier dont le grammage est compris entre 64 et 90 g/m².
*2 30 feuilles de papier déjà imprimé d’un côté.
*3 Reportez-vous au tableau situé sur le côté droit pour les noms
de papier français.
Sélectionnez
l’option Type pap
sur l’écran LCD
Pap ordi 80 *²
Pap ordi 80 *²
Mat 20
Mat 80
Glacé Prem 20
Glacé Prem 20
Ultra-glacé 20
Papier ph 20
Papier ph 20
Capacité de
chargement
(feuilles)
14

Zu bedruckendes
Papier… *³
a Normalpapier Normalpapier [12 mm] *¹ *²
b Epson Weißes
Tintenstrahlpapier
c Epson
Normalpapier
d Epson Mattes
Papier — schwer
e Epson Fotoqualität-
Tintenstrahlpapier
f Epson Premium-
HochglanzFotopapier
g Epson Premium-
SeidenglanzFotopapier
h Epson
UltrahochglanzFotopapier
i Epson Fotopapier,
glänzend
j Epson Fotopapier Photo Paper 20
*1 Papier mit einem Gewicht von 64 bis 90 g/m².
*2 30 Blatt bei Papier, das bereits auf einer Seite bedruckt ist.
*3 Englische Papierbezeichnungen, siehe Tabelle rechts.
Diese Papiersorte
auf der LCDAnzeige wählen
Normalpapier 80 *²
Normalpapier 80 *²
Matte 20
Matte 80
Prem.Glossy 20
Prem.Glossy 20
Ultra Glossy 20
Photo Paper 20
Ladekapazität
(Blatt)
Als u hierop wilt
afdrukken… *³
a Gewoon papier Gewoon pap. [12 mm] *¹ *²
b Epson Inkjetpapier
helderwit
c Epson Gewoon
inkjetpapier
Premium
d Epson Mat papier
zwaar
e Epson Inkjetpapier
fotokwaliteit
f Epson Fotopapier
glanzend Premium
g Epson Fotopapier
halfglanzend
Premium
h Epson Fotopapier
ultraglanzend
i Epson Fotopapier
glanzend
j Epson Fotopapier Photo Paper 20
*1 Papier met een gewicht van 64 tot 90 g/m².
*2 30 vel als het papier aan één zijde is bedrukt.
*3 Zie de tabel hiernaast (rechts) voor de papiernamen in het
Engels.
Kiest u bij Pap.soort
op het display deze
instelling
Gewoon pap. 80 *²
Gewoon pap. 80 *²
Matte 20
Matte 80
Prem.Glossy 20
Prem.Glossy 20
Ultra Glossy 20
Photo Paper 20
Laadcapaciteit
(vellen)
a Plain paper
b Epson Bright White
Ink Jet Paper
c Epson Premium Ink
Jet Plain Paper
d Epson Matte Paper
— Heavyweight
e Epson Photo
Quality Ink Jet
Paper
f Epson Premium
Glossy Photo Paper
g Epson Premium
Semigloss Photo
Paper
h Epson Ultra Glossy
Photo Paper
i Epson Glossy
Photo Paper
j Epson Photo Paper
15
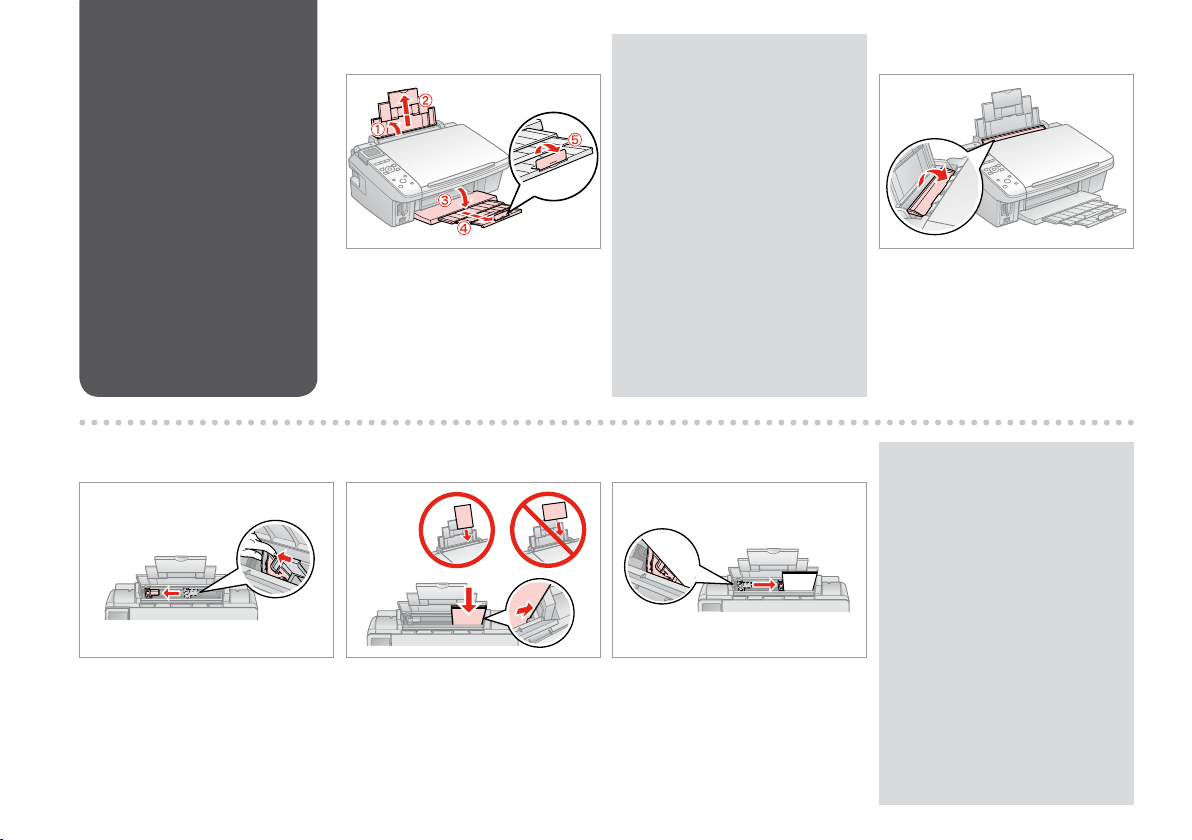
Loading Paper
Chargement du
papier
Papier einlegen
Papier laden
A B
Open and slide out.
Ouvrez et dépliez.
Önen und herausziehen.
Openen en uitschuiven.
Q
See the online User’s Guide when
using Legal size paper.
Lors de l’utilisation de papier au
format Legal, reportez-vous au
Guide d’utilisation en ligne.
Informationen zur Verwendung
der Papiergröße Legal nden Sie
im Online-Benutzerhandbuch.
Zie de onlineGebruikershandleiding bij gebruik
van papier van Legal-formaat.
Flip forward.
Rabattez vers l’avant.
Nach vorne klappen.
Naar voren klappen.
C
Pinch and slide the edge guide.
Pincez et faites glisser le guide
latéral.
Die Papierführungsschiene
zusammendrücken und verschieben.
Inknijpen en zijgeleider verschuiven.
16
D E
Load printable side up.
Chargez le côté imprimable vers le
haut.
Mit bedruckbarer Seite nach oben
einlegen.
Papier laden met afdrukzijde naar
boven.
Fit.
Réglez.
Anp.
Passen.
Q
Do not load paper above the
H arrow mark inside the edge
guide.
Ne chargez pas de papier au-delà
du repère en forme de èche
H situé à l’intérieur du guide
latéral.
Legen Sie Papier nur bis zur
Pfeilmarkierung H innen an der
Kantenführung ein.
Laat het papier niet boven de
pijl H aan de binnenzijde van de
zijgeleider komen.
F
Flip back.
Rabattez.
Nach hinten kl.
Terugklappen.
Q
Align the edges of the paper
before loading.
Alignez les bords du papier avant
de le charger.
Vor dem Einlegen des Papiers die
Kanten ausrichten.
Maak de randen van het papier
mooi recht vóór het laden.
Q
Do not use paper with binder
holes.
N’utilisez pas de papier perforé.
Verwenden Sie kein gelochtes
Papier.
Gebruik geen geperforeerd papier.
17
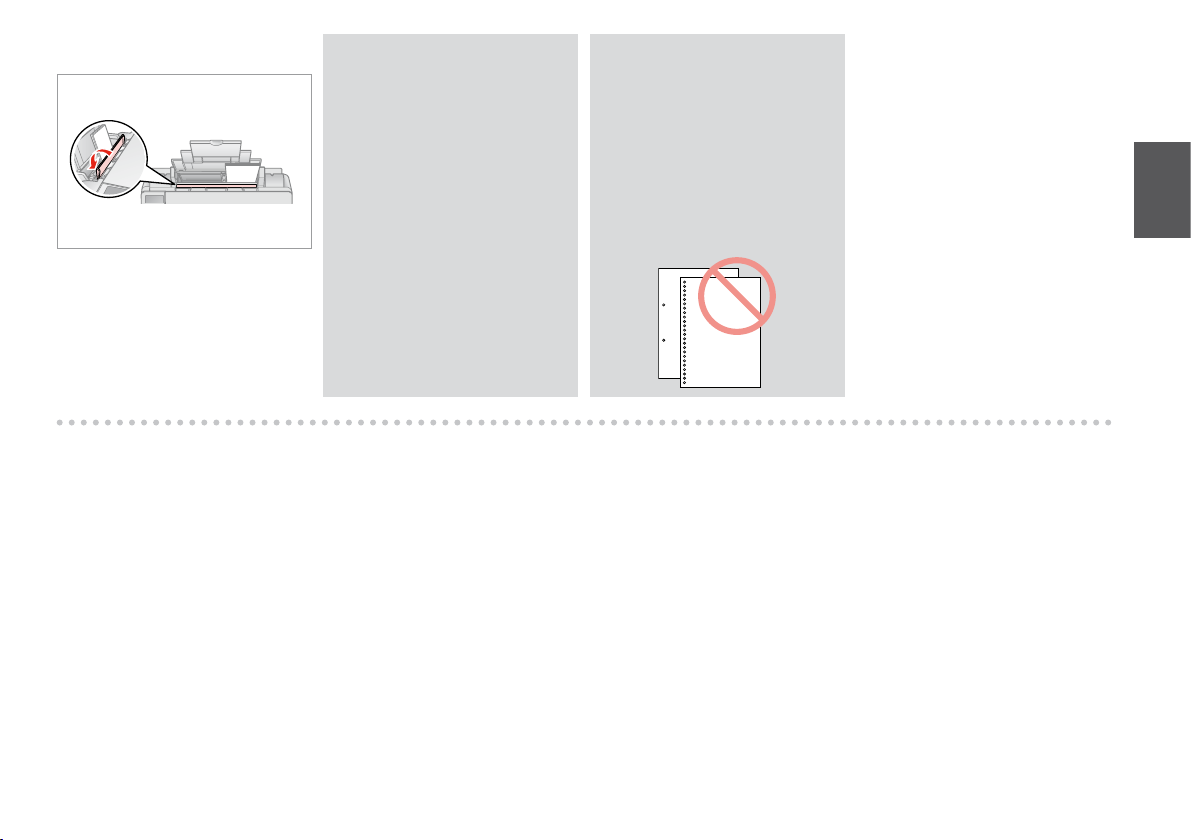
Inserting a Memory
Card
Insertion d’une carte
mémoire
Einsetzen einer
Speicherkarte
Geheugenkaart
plaatsen
A B
Insert one card at a time.
Insérez une carte à la fois.
Jeweils nur eine Karte einsetzen.
Eén kaart tegelijk plaatsen.
Check the light stays on.
Assurez-vous que le voyant reste
allumé.
Die Anzeigen müssen leuchten.
Kijken of lampje blijft branden.
c
Do not try to force the card all the
way into the slot. It should not be
fully inserted.
N’essayez pas d’insérer
complètement la carte dans
l’emplacement. Elle ne doit pas
être insérée complètement.
Versuchen Sie nicht, die Karte mit
Gewalt ganz in den Kartenschlitz
zu schieben. Sie sollte noch etwas
herausstehen.
Probeer de kaart niet helemaal in
de sleuf te duwen. De kaart kan er
niet helemaal in.
Removing a Memory
Card
Retrait d’une carte
mémoire
Speicherkarte
entfernen
Geheugenkaart
verwijderen
18
A B
Check the light stays on.
Assurez-vous que le voyant reste
allumé.
Die Anzeigen müssen leuchten.
Kijken of lampje blijft branden.
Remove.
Retirez.
Entfernen.
Verwijderen.
Q
On Flashing
Al. Clignotant
Ein Blinkt
Aan Knippert
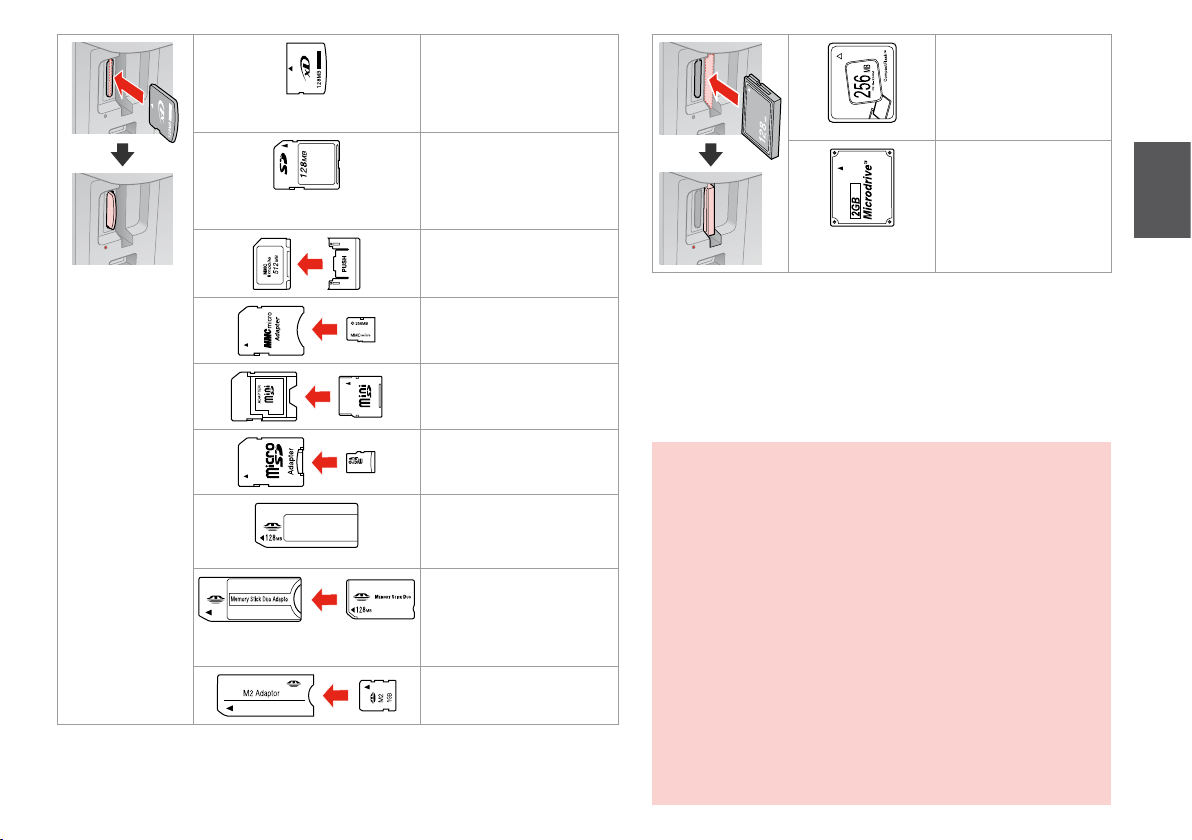
xD-Picture Card
xD-Picture Card Type M
xD-Picture Card Type M+
xD-Picture Card Type H
SD
SDHC
MultiMediaCard
MMCplus
MMCmobile *
CompactFlash
Microdrive
MMCmicro *
miniSD *
miniSDHC *
microSD *
microSDHC *
Memory Stick
Memory Stick PRO
MagicGate Memory Stick
Memory Stick Duo *
Memory Stick PRO Duo *
Memory Stick PRO-HG Duo *
MagicGate Memory Stick Duo *
Memory Stick Micro *
*Adapter required
*Adaptateur requis
*Adapter erforderlich
*Adapter nodig
c
If the memory card needs an adapter then attach it before
inserting the card into the slot, otherwise the card may get stuck.
Si la carte mémoire nécessite un adaptateur, installez l’adaptateur
avant d’insérer la carte dans l’emplacement, faute de quoi la carte
risque de rester coincée.
Wenn für die Speicherkarte ein Adapter erforderlich ist, dann
schließen Sie diesen vor dem Einsetzen der Karte an. Ansonsten
kann sich die Karte verhaken.
Als de geheugenkaart een adapter nodig heeft, moet u de kaart
in de adapter plaatsen voordat u ze samen in de sleuf plaatst.
Anders kan de kaart vastraken.
19
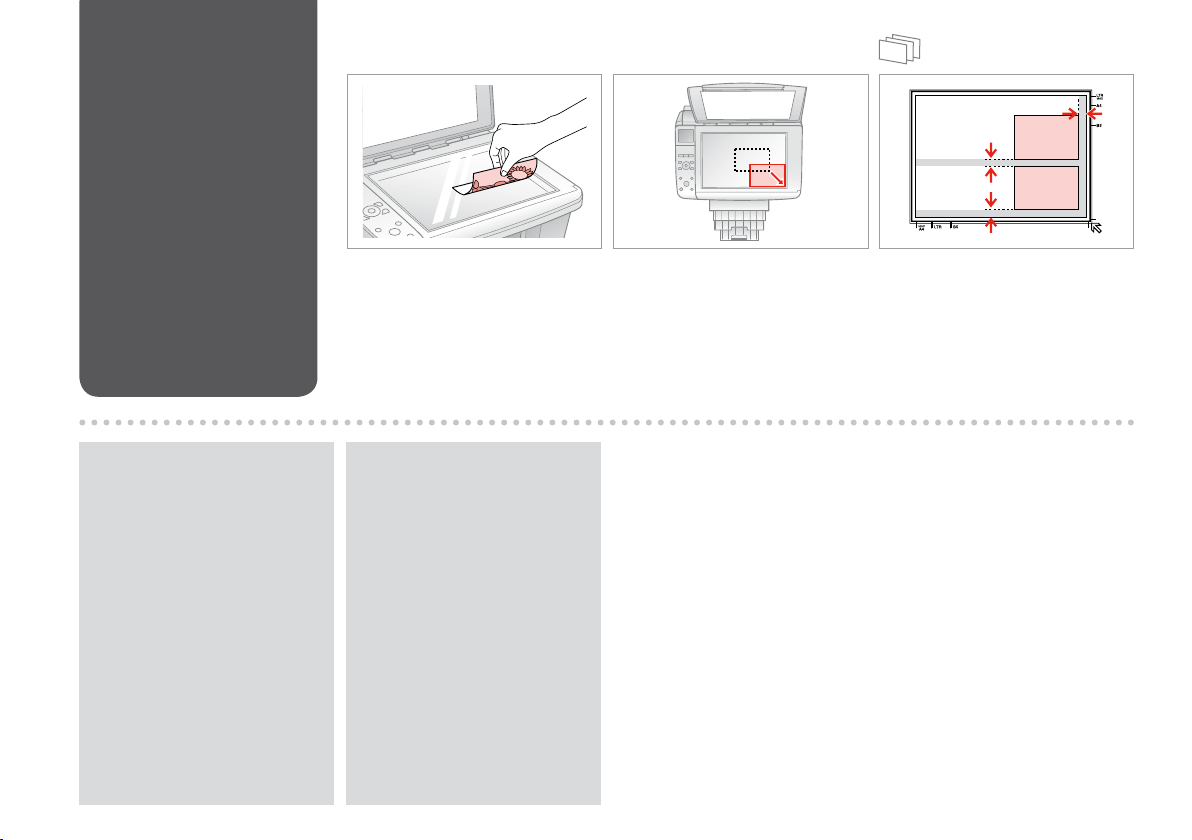
Placing Originals
Mise en place des
originaux
Originale einlegen
Originelen plaatsen
A B
Q
You can reprint photos from
30 × 40 mm to 127 × 178 mm.
Vous pouvez réimprimer des
photos dont la taille est comprise
entre 30 x 40 mm et 127 x 178 mm.
Sie können Fotos von 30 × 40 mm
bis 127 × 178 mm nachdrucken.
U kunt nieuwe afdrukken maken
van foto’s van 30 × 40 mm tot
127 × 178 mm.
20
Place face-down horizontally.
Placez horizontalement, face vers
le bas.
Einlegen (Druckseite nach unten).
Horizontaal leggen met de
afdrukzijde naar beneden.
Q
You can copy photos of dierent
sizes at the same time if they are
larger than 30 × 40 mm.
Vous pouvez copier
simultanément des photos de
diérentes tailles (dans la mesure
où leur taille est supérieure à
30 × 40 mm).
Sie können gleichzeitig Fotos
verschiedener Größen kopieren,
wenn sie größer als 30 × 40 mm
sind.
U kunt foto’s van verschillende
formaten tegelijk kopiëren, zolang
ze groter zijn dan 30 × 40 mm.
Slide to the corner.
Faites glisser vers le coin.
In die Ecke schieben.
In de hoek schuiven.
Place photos 5 mm apart.
Espacez les photos de 5 mm.
Fotos mit 5 mm Abstand einlegen.
Foto’s 5 mm van elkaar houden.

Copying
Copie
Kopieren
Kopiëren
21
Loading…
Item Preview

epsonstylustx410.jpg
80
Views
1
Favorite
DOWNLOAD OPTIONS
Uploaded by
jdog382
on
SIMILAR ITEMS (based on metadata)
-
Страница 1
Basic Operation Guide EN — for use without a comput er — Guide des opérations de base Benutzerhandbuch — Grundlagen Basishandleiding NL — voor gebruik zonder comput er — DE — für die V erwendung ohne Computer — FR — pour l’utilisation sans l’aide d’un ordinateur -[…]
-
Страница 2
2 About T his Guide À propos de ce guide Informationen zu diesem Handbuch Deze handleiding Follo w these guidelines as you read y our instructions: Respectez les directives suivantes lorsque vous lisez les instructions : Beachten Sie F olgendes beim Lesen der An weisungen: Houd u bij het lezen aan de volgende richtlijnen: w c Q R & Warning: Wa[…]
-
Страница 3
3 Copyright Notic e Mise en garde relative aux dr oits d ’aut eur Hinweis zum C opyright Auteursr echten No part of this publication may be reproduced, stored in a r etr ieval system, or transmitted in any f or m or by any means, electronic, mechanical , photocopying, r ecording, or otherwise, without the prior written permission of Seiko Epson C[…]
-
Страница 4
4 Important Safety Instruc tions …………………………………………………………………………………………………………….. 6 Guide to Control P anel ………………………………………………………………………………………………………………………… 8 Using the L CD Screen…[…]
-
Страница 5
5 Inhaltsverzeichnis DE Inhoud NL Wichtige Sicherheitshinweise …………………………………………………………………………………………………………….. 6 Erläuterungen zum Bedienfeld ………………………………………………………………………………………………………….. 8 Verw[…]
-
Страница 6
6 Impor tant Safety Instruc tions Consignes de sécurité importantes Wichtige Sicherheitshin weise Belangrijke veiligheidsvoorschriften Use only the power cord tha t comes with the printer . Use of another cord may cause re or shock. Do not use the cord with any other equipment. Make sure the power cord meets all relevant local safety standards[…]
-
Страница 7
7 Do not use aerosol products that contain ammable gases inside or around the printer . Doing so may cause re. Except as specically explained in your documentation, do not attempt to service the printer yourself . Keep ink cartridges out of the reach of children and do not drink the ink. If ink gets on your skin, wash it o with soap and[…]
-
Страница 8
8 Guide to Contr ol Panel Guide du panneau de contrôle Erläuterungen zum Bedienfeld Bedieningspaneel a b c r C J +, — x Enters Copy mode . Enters Memory Card mode. Enters Photo mode. Sets the number of copies. Displays detailed settings for each mode. Permet d’activer le mode Copie. Permet d’activer le mode Carte mém. Permet d’activer le m[…]
-
Страница 9
9 d e f g h i j u , d , l , r , OK x P y y Selects photos and menu items. Enters Setup mode. Starts copying/ printing. T ur ns on/o printer . Cancels/returns to the previous menu. Changes the view of photos or crops the photos. Stops copying/ printing or resets settings. Permettent de sélectionner les photos et les éléments de menu. Permet d?[…]
-
Страница 10
10 Using the L CD Screen Utilisation de l’ écran L CD V er wendung der L CD -Anzeige Display gebruiken a b c d e Use + or — to set the number of copies for the selected photo. Press l or r to select the setting item. Press u or d to select the menu item. The highlight moves up or down. Press r to open the setting item list. Press l or r to chang[…]
-
Страница 11
11 f The icon is displayed on a cropped image . L ’ icône s’ache au niveau des images r ognées. Das -Symbol wird auf einem ausgeschnittenen Bild angezeigt. Bij een foto die is bijgesneden, wor dt het pictogram weergegeven. After 13 minutes of inactivity, the screen turns black to save ener gy. Press an y button (except P On ) to return the[…]
-
Страница 12
12 Adjusting the Angle of the L CD Screen Réglage de l’angle de l’ écran L CD Einstellen des Stellwinkels der L CD-Anzeige Display verzetten Y ou can raise and adjust the angle of the L CD screen for better viewing. V ous pouvez augmenter et r égler l ’angle de l’ écran L CD pour une meilleure visualisation. Der Stellwinkel der L CD -An[…]
-
Страница 13
13 Handling Media Gestion des suppor ts Handhabung v on Medien Media gebruiken[…]
-
Страница 14
14 Selecting Paper Sélection du papier P apier auswählen P apier selec teren The availability of special paper varies by area. La disponibilité du papier spécial varie selon les pays. Die Verfügbarkeit von Spezialpapier variiert je nach Land/Region. De beschikbaarheid van speciaal papier verschilt per land. If you want to print on this paper .[…]
-
Страница 15
15 a Plain paper b Epson Bright White Ink Jet Paper c Epson Premium Ink Jet Plain Paper d Epson Matte Paper — Heavyweight e Epson Photo Quality Ink Jet Paper f Epson Premium Glossy Photo P aper g Epson Premium Semigloss Photo Paper h Epson Ultra Glossy Photo P aper i Epson Glossy Photo P aper j Epson Photo P aper Zu bedruckendes Papier … *³ Dies[…]
-
Страница 16
16 Loading P aper Chargement du papier P apier einlegen P apier laden Open and slide out. Ouvrez et dépliez. Önen und herausziehen. Openen en uitschuiven. Flip forward. Rabattez vers l’av ant. Nach vorne klappen. Naar voren klappen. Load printable side up . Chargez le côté imprimable vers le haut. Mit bedruckbarer Seite nach oben einlegen.[…]
-
Страница 17
17 Do not use paper with binder holes. N’utilisez pas de papier perforé. V erwenden Sie kein gelochtes Papier . Gebruik geen geper foreerd papier . Q Align the edges of the paper before loading . Alignez les bords du papier avan t de le charger . V or dem Einlegen des Papiers die Kanten ausrichten. Maak de randen van het papier mooi recht vóór[…]
-
Страница 18
18 Do not try to force the card all the way into the slot. It should not be fully inserted. N’ essay ez pas d’ insérer complètement la carte dans l’ emplacement. Elle ne doit pas être insérée complèt ement. V ersuchen Sie nicht, die Karte mit Gewalt ganz in den Kar tenschlitz zu schieben. Sie sollte noch etwas herausstehen. Probeer de k[…]
-
Страница 19
19 *Adapter requir ed *Adaptateur requis *Adapter erforderlich *Adapter nodig If the memor y card needs an adapter then attach it befor e inserting the card into the slot, otherwise the card may get stuck. Si la carte mémoire nécessite un adaptateur , installez l’adaptateur avant d’ insérer la car te dans l’ emplacement, faute de quoi la c[…]
-
Страница 20
20 Placing Originals Mise en place des originaux Originale einlegen Originelen plaatsen Place face-down horizontally. Placez horizontalement, face v ers le bas. Einlegen (Druckseite nach unten). Horizontaal leggen met de afdrukzijde naar beneden. A B Slide to the corner . F aites glisser vers le coin. In die Ecke schieben. In de hoek schuiven. Plac[…]
-
Страница 21
21 C opying C opie Kopier en Kopiër en[…]
-
Страница 22
22 Copying Documents Copie de documents Dokumente kopieren Documenten kopiëren A R & 16 B R & 20 C Load paper . Chargez du papier . Papier einlegen. Papier laden. Place original horizontally . Placez l’ original horizontalement. Original horizontal einlegen. Origineel horizontaal leggen. Enter the Copy mode . Activez le mode Copie . Kopi[…]
-
Страница 23
23 H J K Enter the copy setting menu. Accédez au menu de paramétr age des copies. Das Kopiereinstellungsmenü aufrufen. Menu met kopieerinstellingen openen. Finish the settings . Finalisez les paramètr es. Einstellungen beenden. Instellingen voltooien. Start copying. Lancez la copie. Kopiervorgang starten. Kopiëren starten. I R & 26 Make th[…]
-
Страница 24
24 C Enter the Photo mode . Activez le mode Photo . Fot o -Modus wählen. Modus Foto activer en. Load photo paper . Chargez du papier photo . Fot opapier einlegen. Fot opapier laden. A R & 16 B R & 20 Place photo(s) horizontally . Placez la ou les photos horizontalement. Fot o(s) hor izontal auegen. Fot o’ s horizontaal leggen. F Proc […]
-
Страница 25
25 H Enter the print setting menu. Accédez au menu de paramétr age des impressions. Das Druckeinstellungsmenü aufrufen. Menu met afdrukinstellingen openen. J K Finish the settings . Finalisez les paramètr es. Einstellungen beenden. Instellingen voltooien. Start copying. Lancez la copie. Kopiervorgang starten. Kopiëren starten. I R & 26 Mak[…]
-
Страница 26
26 Menu List Liste des menus Menüliste Menu’ s EN R & 26 copies 1 to 99 Color/B&W Color , B&W Layout With Border , Borderless *¹ EN r Copy Mode Zoom Actual, Auto F it Page Paper Type Plain P aper , Matte, Prem.Glossy , Ultra Glossy , Photo P aper Paper Size A4, 10 × 15 cm, 13 × 18 cm Quality Draft, Standard, Best Density -4 to +4 […]
-
Страница 27
27 Kopien 1 bis 99 F ar be/SW F ar be, SW Layout Mit Rand, Randlos *¹ DE r Kopieren-Mode Zoom Aktuell, AutoAnpass . Papiersorte Normalpapier , Matte, Prem.Glossy , Ultra Glossy , Photo P aper Papierg r . A4, 10x15cm, 13x18cm Qualität Entwurf, Standard, Beste Kopierdichte -4 bis +4 Erweiterung *² Standard, Mitte, Min. x Druckeinstellungen für de[…]
-
Страница 28
28[…]
-
Страница 29
29 P rinting fr om a M emor y Car d Impression à par tir d ’une car te mémoire V on der Speicherk ar te drucken Af druk ken vanaf een geheugenkaar t[…]
-
Страница 30
30 Y ou can crop and enlarge y our photo. P ress and make the settings. V ous pouvez rogner et ag randir la photo. A ppuyez sur et dénissez les paramètres. Sie können das Fot o zuschneiden und vergr ößern. Drücken Sie und stellen Sie das F oto ein. U kunt de foto bijsnijden en vergr oten. Druk op en geef de instellingen op. Q Printing P ho[…]
-
Страница 31
31 H R & 35 I J Make the appropriate print settings. Dénissez les paramètres d’ impression adaptés. Die geeigneten Druckeinstellungen kongurieren. Gewenste afdrukinstellingen selecteren. Finish the settings . Finalisez les paramètr es. Einstellungen beenden. Instellingen voltooien. Start printing. Lancez l’ impression. Druckvorgan[…]
-
Страница 32
32 C D Enter the Memory Card mode. Activez le mode Carte mém. Speicherkar te -Modus wählen. Modus Geheugenkaar t ac tiveren. Select Print Index Sheet . Sélectionnez Imp feuille index . Indexblatt druck en wählen. Index afdrukken selecteren. Load A4-size plain paper . Chargez du papier ordinaire de format A4. A4-Normalpapier einlegen. Gewoon A4-[…]
-
Страница 33
33 J Select border or borderless. Sélectionnez une impression avec ou sans marges. Rand oder randlos wählen. Met of zonder rand selecteren. Check u aligns with the corner of the sheet. V ériez que le repère u est aligné sur le coin de la f euille. Sicherstellen, dass u mit der Indexblattecke ausgerichtet ist. u in de hoek plaatsen. H I Sele[…]
-
Страница 34
34 N R & 16 O Load photo paper . Chargez du papier photo . Fot opapier einlegen. Fot opapier laden. Print photos fr om the index sheet. Imprimez les photos à par tir de la feuille d’ index. Fot os vom Indexblatt drucken. Fot o’ s van index afdrukken. M Place the index sheet face-down. Placez la feuille d’ index face à imprimer vers le b[…]
-
Страница 35
35 Menu List Liste des menus Menüliste Menu’ s EN R & 35 View and Print P hotos Print All Photos Print by Date Print Index Sheet Slide Show Paper Type Prem.Glossy , Ultra Glossy , Photo P aper , Plain Paper , Matte Paper Size 10 × 15 cm, 13 × 18 cm, 16:9 wide, A4 Layout Borderless *¹, With Border Quality Standard, Best Date None, yyyy.mm.[…]
-
Страница 36
36 Fot os zeigen/drucken Alle Fot os drucken Nach Datum drucken Indexblatt drucken Diashow Papiersorte Prem.Glossy , Ultra Glossy, P hoto Paper , Normalpapier , Matte Papierg r . 10x15cm, 13x18cm, 16:9 breit, A4 Layout Randlos *¹, Mit R and Qualität Standard, Beste Datum Kein, jjjj.mm.tt, mmm.tt.jjjj , tt.mmm.jjjj Bidirektional *² Ein, Aus Erwei[…]
-
Страница 37
37 Setup Mode (M aintenanc e) Mode Cong (Main tenanc e) Setup -M odus ( W ar tung) Modus Instellen ( Onderhoud)[…]
-
Страница 38
38 Checking the I nk Cartr idge Status V érication de l’ état de la car touche d’ encre Status der Tint enpatronen prüfen Cartr idgestatus controler en C Finish. T erminez. Beenden. V oltooien. Enter the Setup mode. Activez le mode Cong . Setup-Modus wählen. Modus Instellen activeren. A B Select Ink Levels . Sélectionnez État ctche […]
-
Страница 39
39 On the screen in step C , you can select to replac e ink cartridges even if they are not expended. Y ou can also start this operation by entering F Setup mode, Maint enance , and then Change Ink Cartridge . See the instructions on replacing ink cartridges. R & 52 L ’ écran de l’ étape C vous permet même de remplacer des cartouches d?[…]
-
Страница 40
40 Print head cleaning uses ink from all cartridges, so clean the print head only if quality declines. Le nettoyage de la t ête d’impression consomme de l’ encre de toutes les cartouches. Par conséquent , ne nettoyez la têt e que si la qualité d’ impression décline. Da bei der Druckkopfreinigung Tinte aus allen P atronen verbraucht wird […]
-
Страница 41
41 G Start head cleaning. Lancez le nettoyage de la têt e. Kopfreinigung starten. Printkopreinig ing starten. H Finish head cleaning . Finalisez le nett oyage de la tête . Kopfreinigung abschließen. Printkopreinig ing voltooien. If quality does not improve after cleaning four times, turn o the printer f or at least six hours. T hen tr y clean[…]
-
Страница 42
42 C Select Maintenance . Sélectionnez Maintenance . W ar tung wählen. Onderhoud selecteren. Load a A4-size plain paper . Chargez du papier ordinaire de format A4. A4-Normalpapier einlegen. Gewoon A4-papier plaatsen. A R & 16 B Enter the Setup mode. Activez le mode Cong . Setup-Modus wählen. Modus Instellen activeren. F Select the most so[…]
-
Страница 43
43 H Enter the number . Saisissez le numéro. Nummer eingeben. Nummer invoer en. I Repeat G and H for all patterns. Répétez les étapes G et H pour tous les motifs. Schritt G und H für alle Muster wiederholen. G en H herhalen v oor alle patronen. J Finish alig ning the print head. Finalisez l’ alignement de la tête d’ impression. Druckkopfa[…]
-
Страница 44
44 C Select PictBridge S etup . Sélectionnez Cong PictBridge . PictBridge -Setup wählen. PictBridge -instellingen selecteren. Remove. Retirez. Entfernen. V erwijderen. A R & 18 B Enter the Setup mode. Activez le mode Cong . Setup-Modus wählen. Modus Instellen activeren. Make the appropriate print settings. Dénissez les paramètres […]
-
Страница 45
45 Compatibility PictBridge File F ormat JPEG Image size 80 × 80 pixels t o 9200 × 9200 pixels Depending on the settings on this printer and the digital camera, some combinations of paper type, size , and layout may not be supported. Selon les paramètres de l’ imprimante et de l’appareil photo numérique, il est possible que certaines associ[…]
-
Страница 46
46 EN Ink Levels Maintenance Nozzle Check Head Cleaning Head Alignment Change Ink Cartridge Language Display Format 1-up with Info, 1-up without Info, View Thumbnail Images PictBridge Setup Restore Default Settings Setup Mode Menu List Liste des menus Menüliste Menu’ s EN R & 46 FR DE NL R & 46 R & 46 R & 46 FR DE NL Inktniveau O[…]
-
Страница 47
47 Solving Pr oblems Résolution des problèmes P roblemlösung P roblemen oplossen[…]
-
Страница 48
48 Error Messages Solution Press the OK button t o replace ink cartridges. Replace the expended ink cartridges. R & 52 Paper jam. Open the scanner unit and r emove the paper . R & 56 Press the Start button to eject the paper inside. See your documentation. R & 56 Paper is jammed in the printer . Turn o the printer , open the scanner […]
-
Страница 49
49 Messages d’ erreur Solution App sur OK pour remplacer les ctches d’ encre. Remplacez les cartouches d’ encre vides. R & 52 Bourrage. Ouvrez le module scanner et retir ez le pap. R & 56 App sur Démarrer pr éjecter papier coincé à l’ intérieur. Reportez- vs au manuel. R & 56 Possibilité de bourrage . M ettez impr hors ten[…]
-
Страница 50
50 Fehlermeldungen L ösung Drücken Sie OK, um die Patronen zu ersetzen. T auschen Sie die leeren Tintenpatronen aus. R & 52 Papierstau. Scanner önen und P apier entfernen. R & 56 Starttaste zu Papierausgabe aus Innerem drücken. Siehe Handbuch. R & 56 Im Drucker liegt wahrsch. Papierstau vor . Drucker aussch., Scannereinh. öne[…]
-
Страница 51
51 Foutmeldingen Oplossing Druk op OK om de cartridges te ver vangen. Vervang de opgebruikte cartridges. R & 52 Papier vast. Open de scanner en v er wijder het papier. R & 56 Druk op Start om het papier naar buiten te laten komen. Zie documentatie. R & 56 Papier waarschijnlijk vast in print er . Zet printer uit, open scannereenheid en v[…]
-
Страница 52
52 Replacing Ink Cartr idges Remplacement des car touches d’ encre Tint enpatronen ersetzen Cartr idges vervangen Ink Cartridge Handling Precautions Never move the print head b y hand. Some ink is consumed from all cartridges during the following operations: print head cleaning and ink charging when an ink cartridge is installed. For maximum ink […]
-
Страница 53
53 V orsichtsmaßnahmen beim Austausch von Tintenpatr onen Den Druckkopf niemals mit der Hand bewegen. W ährend der folgenden Vor gänge wird von allen P atronen etwas Tinte v er braucht: Druckkopf-Reinigung und Befüllung des Tintenzuleitungssyst ems, wenn eine Tintenpatr one installiert wird. F ür eine maximale Ausnutzung der Tinte die Tintenpa[…]
-
Страница 54
54 A B C D E Never open the cartridge cover while the print head is moving. N’ ouvrez jamais le couv ercle du logement des cartouches d’ encre lorsque la tête d’ impression se déplace. Die Tintenpatronenabdeckung nicht önen, solange sich der Druckkopf bewegt. Open de cartridgek lep nooit wanneer de printkop in beweging is. c Check the c[…]
-
Страница 55
55 F G H Remove the yellow tape . Retirez la bande adhésive jaune. Gelben Streifen entf er nen. Gele tape verwijderen. Inser t and push. Insérez et poussez. Einsetzen und drücken. Plaatsen en aandrukken. Close. Fermez. Schließen. Sluiten. I Close. Fermez. Schließen. Sluiten. If you nd it dicult to close the cover , press down on each car[…]
-
Страница 56
56 B C Remove. Retirez. Entfernen. V erwijderen. Close. Fermez. Schließen. Sluiten. A Open. Ouvrez. Önen. Openen. P aper Jam Bourrage papier P apierstau V astgelopen papier P aper Jam — jammed inside 1 Bourrage papier — papier coincé à l’ intérieur 1 P apierstau — Stau innen 1 P apier vastgelopen in apparaat — 1 If paper still remains nea[…]
-
Страница 57
57 P aper Jam — jammed inside 2 Bourrage papier — papier coincé à l’ intérieur 2 P apierstau — Stau innen 2 P apier vastgelopen in apparaat — 2 T urn o. Mise hors tension. Ausschalten. Uitzetten. Open. Ouvrez. Önen. Openen. A B Remove. Retirez. Entfernen. V erwijderen. C If paper still remains near the rear feeder , gently pull it out. […]
-
Страница 58
58 Print Quality/Lay out Pr oblems Pr oblèmes de qualité d’ impression/ de disposition Qualitäts-/Layout — Pr obleme Pr oblemen met de afdrukkwaliteit/lay- out Problems Solution No. Y ou see banding (light lines) in your printouts or copies . ABDEGI Y our printout is blurry or smeared. ABDEFH Y our printout is faint or has gaps. ABCDG Y our pr[…]
-
Страница 59
59 Problèmes N° de la solution Des bandes (lignes claires) apparaissent au niveau des impr essions ou des copies. ABDEGI L ’ impression est oue ou tachée. ABDEFH L ’ impression est pâle ou présente des trous . ABCDG L ’ impression est poivrée. E Des couleurs sont incorrectes ou manquantes. DG La taille ou la position de l’image est[…]
-
Страница 60
60 Probleme L ösung-Nr . Streifen (helle Linien) sind auf den A usdrucken oder Kopien sichtbar . ABDEGI Der Ausdruck ist verwischt oder verschmiert. ABDEFH Die Ausdrucke sind blass oder weisen L ücken auf. ABCDG Der Ausdruck ist körnig. E F alsche oder fehlende Farben. DG Die Bildgröße oder -position ist falsch. JKLM Lösungen A Darauf achten,[…]
-
Страница 61
61 Problemen Oplossing Streepvorming (licht e lijnen) in uw afdrukken of kopieën. ABDEGI Afdruk onscherp of vlekkerig. ABDEFH Afdruk vaag of er ontbr eken delen. ABCDG Afdruk is korrelig . E Onjuiste of ontbrekende kleuren. DG Grootte of positie van afbeelding klopt niet. JKLM Oplossingen A Controleer of de juiste papiersoort is geselecteerd. R &a[…]
-
Страница 62
62 Contacting Customer Support Contacter le service clientèle Kontaktaufnahme mit dem Kundendienst Contact opnemen met de klantenser vice If you cannot solve the problem using the troubleshooting inf or mation, contact customer support ser vices for assistance. Y ou can get the contact information for customer support for your ar ea in your online[…]
-
Страница 63
63[…]
-
Страница 64
64 Index A Aligning the Print Head …………………………………………………………… 42 B Bidirectional (print speed) ………………………………………………………. 35 Borderless/With Border ………………………………………………………. 26.35 Buttons, Contr ol Panel ……………………..[…]
-
Страница 65
65 Index FR A Acheur ……………………………………………………………………………………..10 Agrandissement (rog nage) ………………………………………………… 25.30 Alignement de la tête d’ impression ……………………………………….42 Appareil photo numérique, impression à partir[…]
-
Страница 66
66 Index DE A Anzeige ……………………………………………………………………………………….10 B Bedienfeld ………………………………………………………………………………. 8.10 Bidirektional (Druckgeschwindigkeit) …………………………………… 36 D Datumsstempel …………….[…]
-
Страница 67
67 Index NL B Bedieningspaneel …………………………………………………………………. 8.10 Bidirect. (afdruksnelheid) ………………………………………………………… 36 C cartridge, vervangen ………………………………………………………………… 52 Cartridgestatus ………………….[…]
-
Страница 68
Copyright © 2009 Seiko Epson Corporation. All rights reserved. Printed in XX XXXX B C M Y Epson Stylus SX410 Series *¹ T0891 T0892 T0893 T0894 T0711 T0712 T0713 T0714 T0711H — — — Epson Stylus TX410 Series *² 73N ( T0731N)/ 73HN ( T0731HN) 73N ( T0732N) 73N ( T0733N) 73N ( T0734N) EN Black Cyan Magenta Y ellow FR Noir Cyan Magenta Jaune DE Schwa[…]
Русский
- Bedienungsanleitung Epson Stylus TX410
- Epson Stylus TX410 User Manual
- Manual Usuario Epson Stylus TX410
- Mode d’emploi Epson Stylus TX410
- Istruzioni Epson Stylus TX410
- инструкция Epson Stylus TX410
- Epson Stylus TX410の取扱説明書
- Handleiding Epson Stylus TX410
- Manual de uso Epson Stylus TX410
Вам нужна инструкция? Мы поможем Вам ее найти и сэкономить Ваше время.
- 68 stron
- 1.99 mb
Изделие Epson Stylus TX410, а также другие, которыми Вы пользуетесь ежедневно, наверняка вы получили в комплекте с инструкцией обслуживания. Из опыта наших пользователей мы знаем, что большинство из Вас не уделили этому особого внимания. Большая часть инструкций, сразу же после покупки попадает в корзину для мусора вместе с коробкой — это ошибка. Ознакомьтесь с информацией, касающейся инструкции Epson Stylus TX410, которая поможет Вам в будущем сэкономить нервы и избежать головной боли.
Важная подсказка — не забывайте хотя бы раз прочитать инструкцию Epson Stylus TX410
Если вы не хотите каждый раз читать информационные брошюры, касающиеся, тех или Epson Stylus TX410 иных изделий, достаточно, прочитать их раз — сразу же после покупки устройства. Вы получите основное знания, касающиеся поддержания изделия Epson Stylus TX410 в хорошем эксплуатационном состоянии, так, чтобы без проблем достигнуть его планируемого цикла работы. Затем инструкцию можно отложить на полку и вернуться к ней только в случае, если вы не уверены, правильно ли проводится техобслуживание изделия. Правильный уход является необходимым элементом Вашего удовольствия Epson Stylus TX410.
Раз в году пересмотрите шкафчик, в котором держите инструкции для всех устройств, — выбросите те, которыми вы уже не пользуетесься. Это поможет Вам сохранять порядок в своей домашней базе инструкций обслуживания.
Summary of Contents for Epson Stylus TX410
Что находится в инструкции Epson Stylus TX410? Почему стоит ее прочитать?
- Гарантия и подробности, касающиеся техобслуживания изделия
Хорошей идеей будет прикрепить чек к странице инструкции. Если что-то плохое случится во время использования Epson Stylus TX410, у вас будет комплект документов, необходимый для гарантийного ремонта. В этой части инструкции вы найдете информацию об авторизованных сервисных центрахEpson Stylus TX410 а также, как самостоятельно правильно ухаживать за оборудованием — так, чтобы не потерять гарантийных прав. - Указания по монтажу и Setup
Не терять нервов и времени на самостоятельную попытку установки и первого запуска изделия. Воспользуйтесь рекомендациями производителя Epson Stylus TX410 чтобы правильно запустить изделие, без лишнего риска повреждения оборудования. - Информация, касающаяся дополнительных запчастей (входящих в комплект а также являющихся опцией)
Пересматривая эту часть документа вы сможете проверить, доставлен ли ваш Epson Stylus TX410 с полним комплектом аксессуаров. Вы также сможете узнать, какие дополнительные запчасти или аксессуары для Epson Stylus TX410 Вы сможете найти и докупить к своему устройству. - Troubleshooting
Самые частые проблемы, касающиеся Epson Stylus TX410 и методы их решения. Это очень полезная часть руководства по обслуживанию — она позволит Вам сэкономить много времени на поиск решений. 90% проблем с Epson Stylus TX410 повторяется у многих пользователей. - Требования, касающиеся питания и энергетический класс
Информация, касающаяся количества потребляемой энергии, а также рекомендации, касающиеся установки и питания Epson Stylus TX410. Прочитайте, чтобы оптимально пользоваться Epson Stylus TX410 и не использовать большего количества ресурсов, нежели это необходимо для правильной работы изделия. - Специальные функции Epson Stylus TX410
Здесь вы можешь узнать, как персонализировать изделие Epson Stylus TX410. Вы узнаете, какие дополнительные функции могут помочь Вам удобно использовать продукт Epson Stylus TX410 а также, какие функции Вашего устройства оптимальны для выполнения конкретной деятельности.
Как видите в инструкции вы найдете информацию, которая реально поможет Вам в использовании Вашего изделия. Стоит с ней ознакомиться, чтобы избежать разочарований, возникающих из более короткого, нежели предусматривалось, периода исправности изделия Epson Stylus TX410. Если все же вы не хотите копить инструкции в своем доме, наш сайт поможет Вам в этом — вы должны найти у нас руководство по обслуживанию большинства из своих устройств, а также Epson Stylus TX410.
Комментарии (0)
Принтер
Epson
Stylus TX410
Руководство по обслуживанию
Скриншот

Скачать
Имя: epson_stylus_nx510_nx515_sx510w_sx5….pdf
Размер: 9.66 мб
Скачать