

Bedienungsanleitung
Mode d’emploi
Istruzioni per l’uso
Gebruiksaanwijzing
CD-Stereoanlage
Chaîne stéréo avec
lecteur CD
Sistema stereo CD
CD Stereo Systeem
Model No. SC-PM250
Wir möchten Ihnen dafür danken, dass Sie sich für dieses Gerät entschieden haben.
Um eine optimale Leistung und Sicherheit zu gewährleisten, lesen Sie bitte diese Bedienungsanleitung sorgfältig durch.
Bewahren Sie diese Anleitung auf, um sie später zum Nachschlagen griffbereit zu haben.
Nous vous remercions pour votre achat de cet appareil.
Pour en obtenir des performances optimales et pour votre sécurité, veuillez lire attentivement le présent manuel.
Conservez ce manuel.
La ringraziamo per aver acquistato questo prodotto.
Per ottenere le prestazioni migliori e per la sicurezza, leggere attentamente queste istruzioni.
Conservare questo manuale per future consultazioni.
Dank u voor de aankoop van dit product.
Gelieve deze gebruiksaanwijzing aandachtig door te lezen voor een optimale prestatie en een veilig gebruik van het systeem.
Bewaar deze gebruiksaanwijzing.
EG
RQT9927-1D
Ihr System kann sich von den Abbildungen unterscheiden.
Diese Bedienungsanleitung bezieht sich auf das folgende
System:
System
Hauptgerät
Lautsprecher
SC-PM250
SA-PM250
SB-PM02
Mitgeliefertes Zubehör
Kontrollieren Sie bitte das mitgelieferte Zubehör.
1 Netzkabel
1 FM (UKW)-Zimmerantenne
1 Fernbedienung
(N2QAYB000984)
Inhaltsverzeichnis
Mitgeliefertes Zubehör. . . . . . . . . . . . . . . . . . . . . . . . . 2
Sicherheitsmaßnahmen . . . . . . . . . . . . . . . . . . . . . . . . 2
Anschließen . . . . . . . . . . . . . . . . . . . . . . . . . . . . . . . . . 3
Aufstellung der Lautsprecher . . . . . . . . . . . . . . . . . . . 3
Liste der Bedienelemente . . . . . . . . . . . . . . . . . . . . . . 4
Die Fernbedienung vorbereiten. . . . . . . . . . . . . . . . . . 4
Vorbereiten des Speichermediums. . . . . . . . . . . . . . . 5
Wiedergabe von Speichermedien. . . . . . . . . . . . . . . . 6
Radio . . . . . . . . . . . . . . . . . . . . . . . . . . . . . . . . . . . . . . 7
Uhr und Timer. . . . . . . . . . . . . . . . . . . . . . . . . . . . . . . . 8
Klangeffekte . . . . . . . . . . . . . . . . . . . . . . . . . . . . . . . . . 9
Andere . . . . . . . . . . . . . . . . . . . . . . . . . . . . . . . . . . . . . 9
Fehlersuchanleitung. . . . . . . . . . . . . . . . . . . . . . . . . . 10
Pflege und Instandhaltung. . . . . . . . . . . . . . . . . . . . . 11
Bluetooth
Lizenzen . . . . . . . . . . . . . . . . . . . . . . . . . . . . . . . . . . . 12
Technische Daten . . . . . . . . . . . . . . . . . . . . . . . . . . . 13
RQT9927
2
2
®
-Informationen . . . . . . . . . . . . . . . . . . . . . 12
Sicherheitsmaßnahmen
WARNUNG!
Gerät
• Zur Reduzierung der Gefahr von Brand, elektrischem
Schlag und Beschädigung:
– Dieses Gerät sorgfältig vor Nässe, Feuchtigkeit, Spritz-
und Tropfwasser schützen.
– Blumenvasen und andere mit Flüssigkeiten gefüllte
Behälter dürfen nicht auf dieses Gerät gestellt werden.
– Ausschließlich das empfohlene Zubehör verwenden.
– Auf keinen Fall die Abdeckung entfernen.
– Versuchen Sie nie, dieses Gerät selbst zu reparieren.
Reparaturarbeiten sind grundsätzlich dem
Kundendienstpersonal zu überlassen.
– Lassen Sie keine Metallgegenstände in dieses Gerät
fallen.
Netzkabel
• Das Netzkabel ist das trennende Gerät. Installieren Sie
dieses Gerät so, dass das Netzkabel sofort aus der
Steckdose gezogen werden kann, wenn irgendwelche
Probleme auftreten.
VORSICHT!
Gerät
• Zur Reduzierung der Gefahr von Brand, elektrischem
Schlag und Beschädigung:
– Um ausreichende Belüftung zu gewährleisten, darf
dieses Gerät nicht in einem Bücherregal,
Einbauschrank oder einem sonstigen engen Raum
installiert oder aufgestellt werden.
– Achten Sie darauf, die Entlüftungsschlitze des Gerätes
nicht durch Gegenstände aus Papier oder Stoff zu
blockieren, z. B. Zeitungen, Tischdecken und
Vorhänge.
– Stellen Sie keine Quellen offener Flammen, z. B.
brennende Kerzen, auf das Gerät.
• Dieses Gerät ist für den Betrieb in Gebieten mit
gemäßigtem Klima bestimmt.
• Dieses Gerät kann beim Betrieb Hochfrequenzstörungen
auffangen, die von einem in der Nähe verwendeten Handy
verursacht werden. Falls eine solche Störbeeinflussung
festgestellt wird, sollte das Handy in größerer Entfernung
von diesem Gerät betrieben werden.
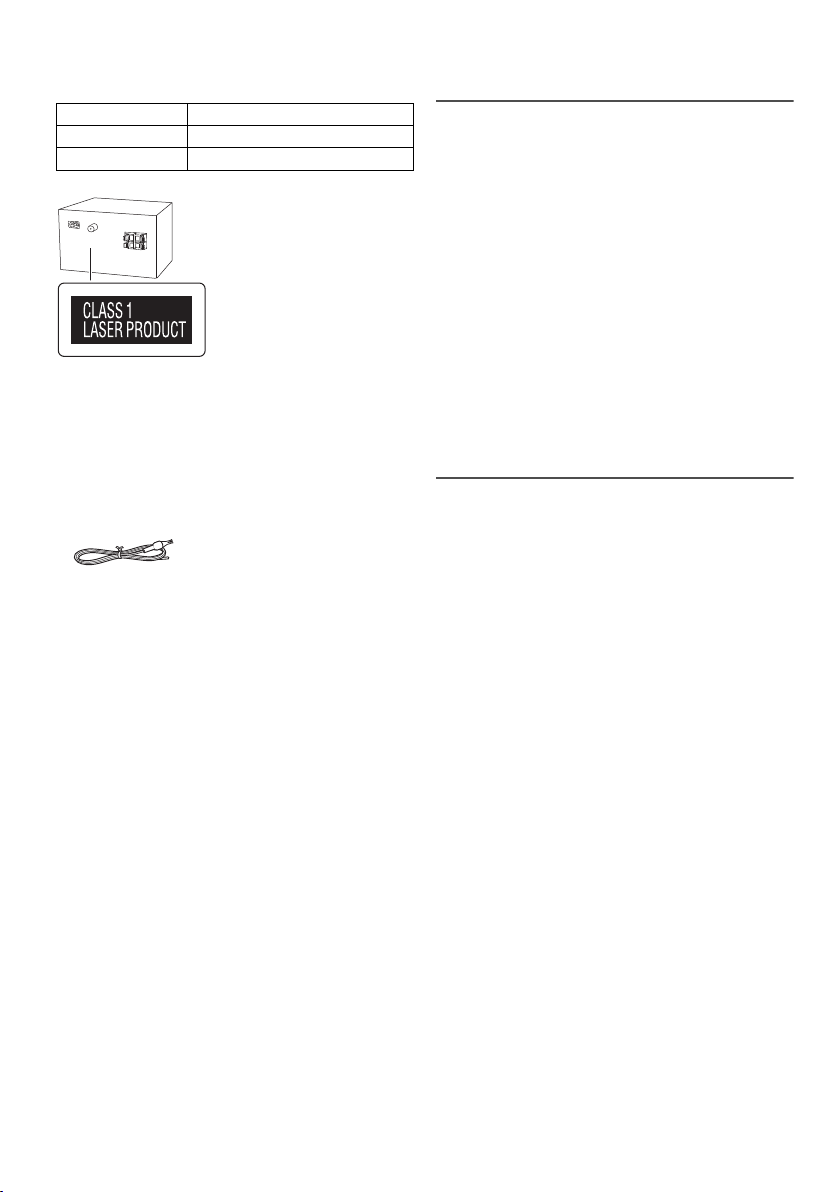
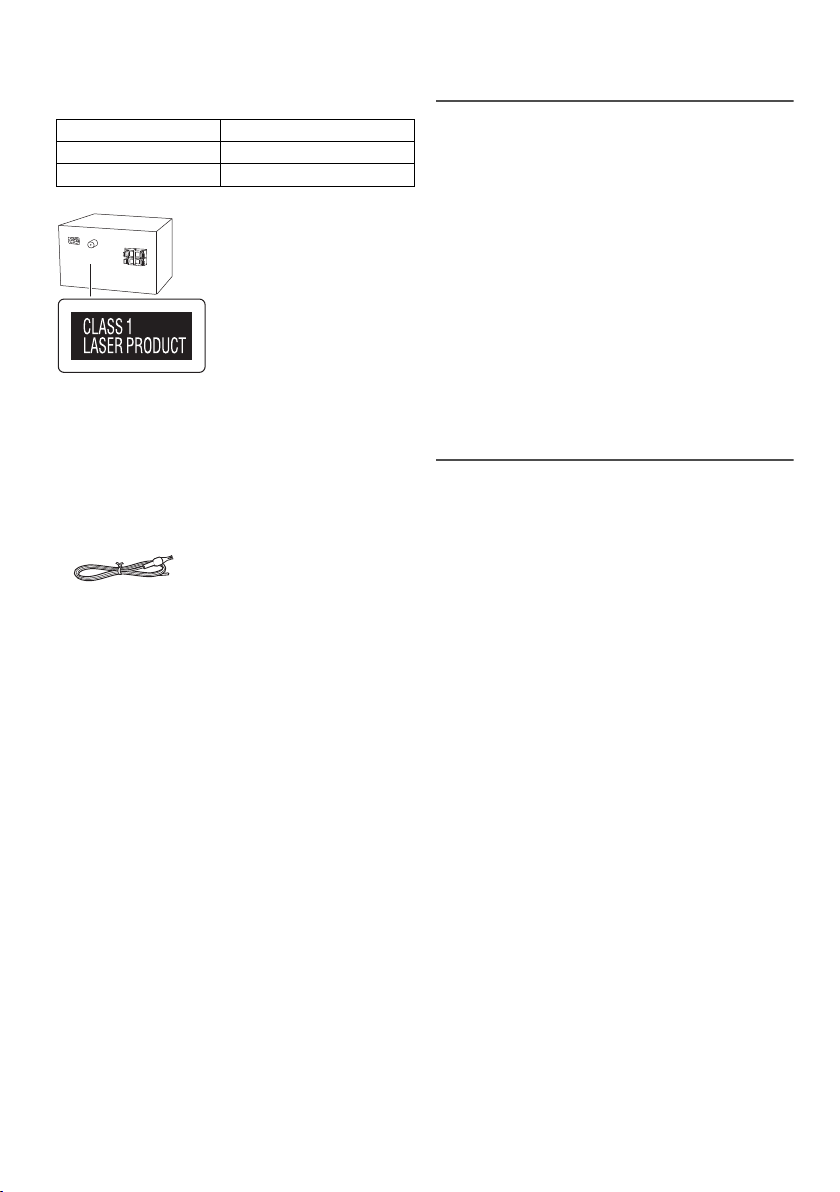
• Dieses Gerät erzeugt Laserstrahlung. Durchführung
anderer Vorgänge als der hier angegebenen kann zu
gefährlicher Strahlung führen.
Batterie
• Explosionsgefahr bei falschem Einlegen der Batterie. Nur
mit einem vom Hersteller empfohlenen Typ ersetzen.
• Was die Entsorgung der Batterien betrifft, erfragen Sie
bitte bei den örtlichen Behörden oder Ihrem Händler,
welches die ordnungsgemäße Entsorgungsmethode ist.
• Niemals starker Wärme oder offenen Flammen aussetzen.
• Die Batterie(n) nicht über längere Zeit bei geschlossenen
Türen und Fenstern in direktem Sonnenlicht im Auto
liegen lassen.
• Die Batterie niemals zerlegen oder kurzschließen.
• Die Alkali- oder Mangan-Batterie niemals wieder aufladen.
• Niemals eine Batterie mit abgelöster Umhüllung benutzen.
• Wenn die Fernbedienung für längere Zeit nicht benutzt
wird, nehmen Sie die Batterie heraus. Bewahren Sie sie an
einem kühlen, dunklen Ort auf.
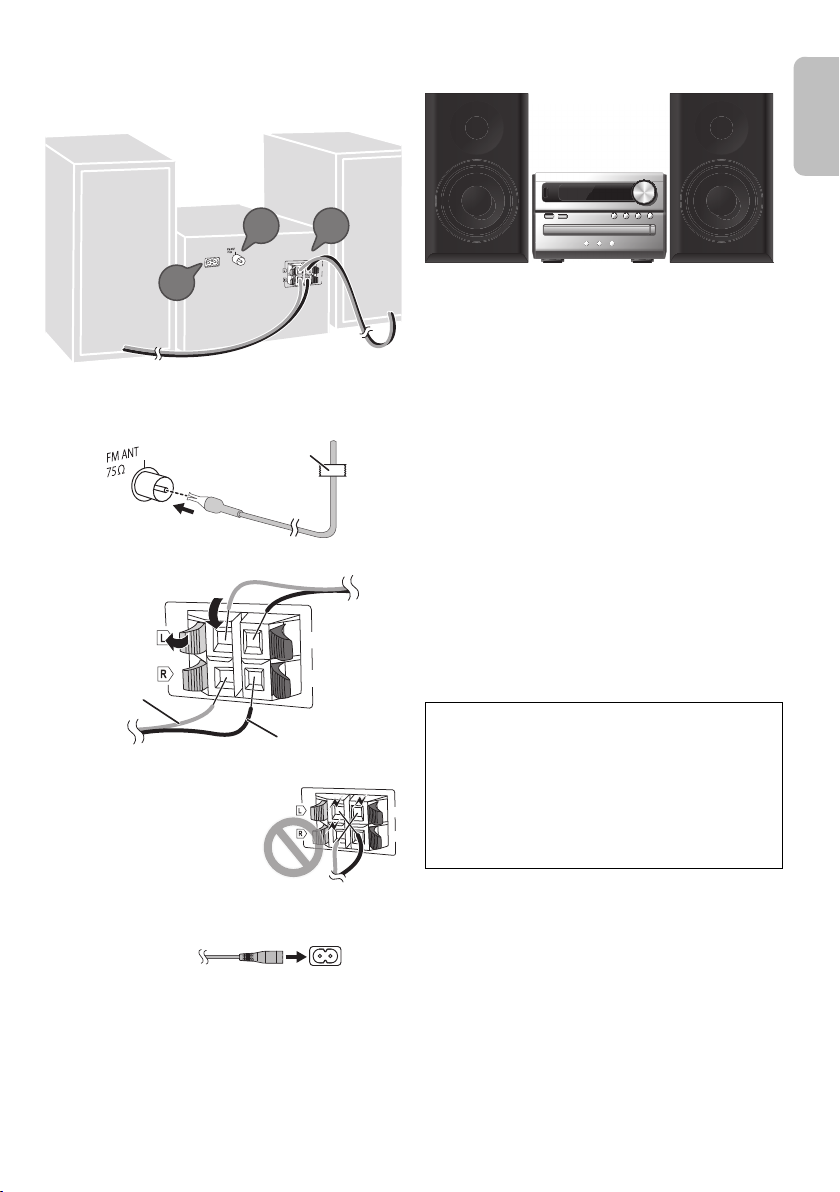
Anschließen
(6:)
(6:)
SPEAKERS
(SB-PM02)
2
1
3
Klebeband
(nicht mitgeliefert)
(6:)
(6:)
B
A
Rot
Schwarz
Schließen Sie das Netzkabel erst an, nachdem alle anderen
Anschlüsse vorgenommen wurden.
1
Verbinden Sie die FM (UKW)-Zimmerantenne.
Befestigen Sie den Antennendraht in der Position, in der
die optimale Empfangsqualität erzielt wird.
2
Verbinden Sie die Lautsprecher.
Achten Sie darauf, die
Lautsprecherkabel nicht
kurzzuschließen oder
umzupolen, da dies die
Lautsprecher
beschädigen kann.
Aufstellung der Lautsprecher
Die linken und rechten Lautsprecher sind identisch.
Die Frontgitter der Lautsprecher sind nicht abnehmbar.
Verwenden Sie ausschließlich die mitgelieferten
Lautsprecher.
Die Verwendung anderer Lautsprecher kann zu
Systemschäden führen und die Klangqualität
beeinträchtigen.
Hinweis:
• Stellen Sie die Lautsprecher in einer Entfernung von mehr
als 10 mm vom Hauptgerät auf, um ausreichende
Luftzirkulation zu gewährleisten.
• Stellen Sie die Lautsprecher auf eine sichere und ebene
Oberfläche.
• Diese Lautsprecher sind nicht mit einer magnetischen
Abschirmung ausgestattet. Sie dürfen daher nicht in der
Nähe von Fernsehgeräten, PCs oder anderen Geräten, die
für magnetische Einstreuungen empfindlich sind,
aufgestellt werden.
• Wiedergabe mit hohem Lautstärkepegel über längere
Zeiträume hinweg kann zu einer Beschädigung und einer
Verkürzung der Lebensdauer der Lautsprecher führen.
• Verringern Sie die Lautstärke bei folgenden Bedingungen,
um Schäden vorzubeugen:
– Bei der Klang verzerrt ist.
– Bei der Einstellung des Klangcharakters.
VORSICHT!
•
Verwenden Sie diese Lautsprecher ausschließlich mit
dem dafür vorgesehenen System. Anderenfalls kann
es zu Schäden am Verstärker und den Lautsprechern
kommen und Brandgefahr bestehen. Falls ein
Schaden auftritt oder sich die Wiedergabeleistung
plötzlich verschlechtert, wenden Sie sich bitte an den
Kundendienst.
•
Folgen Sie den in dieser Anleitung vorgegebenen
Schritten zum Anschließen der Lautsprecher.
3
Verbinden Sie das Netzkabel.
Kein Netzkabel eines anderen Gerätes verwenden.
Stromsparmodus
Das System verbraucht eine geringe Menge an Strom
Z
(
Standby-Modus befindet. Bei Nichtverwendung
empfehlen wir, das System von der Stromversorgung zu
trennen.
Einige Einstellungen werden gelöscht, wenn das System
von der Stromversorgung getrennt wird. Diese müssen
erneut vorgenommen werden.
„Technische Daten“), wenn es sich im
RQT9927
3
3

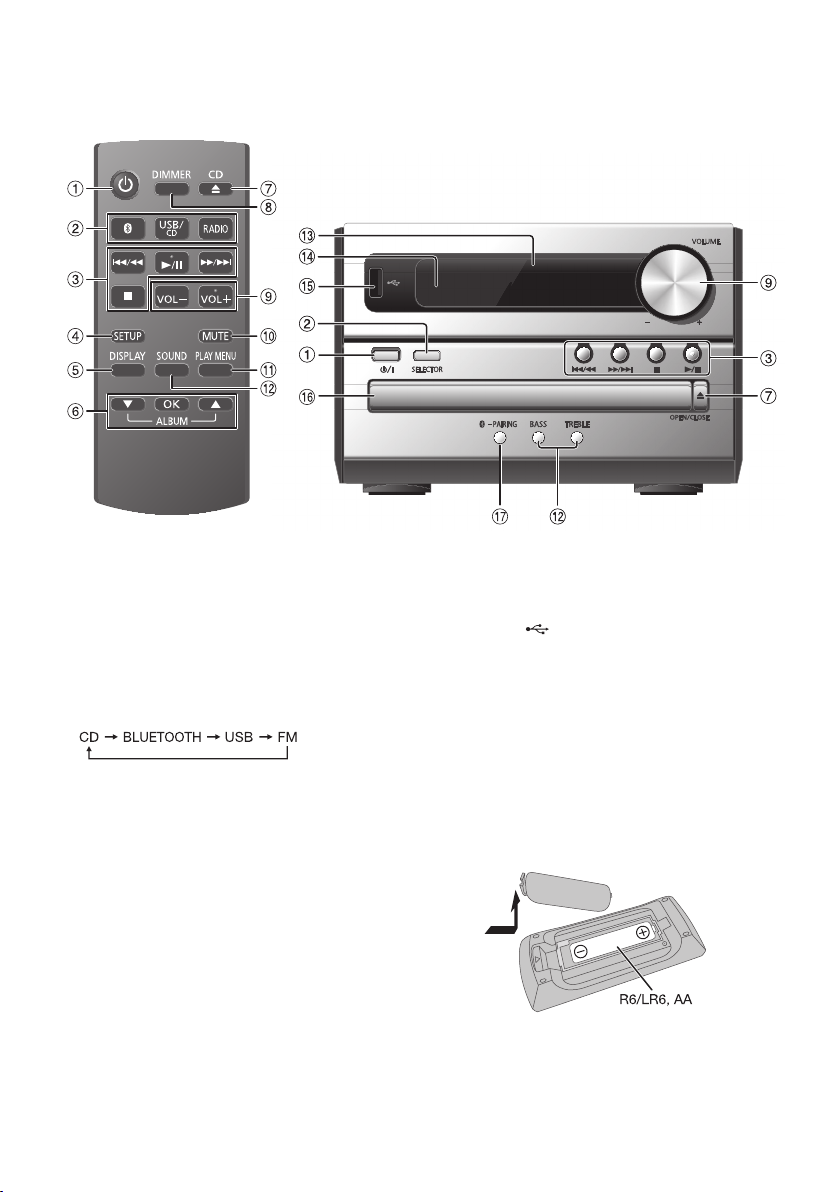
Liste der Bedienelemente
Steuern Sie das System per Fernbedienung. Diese Funktionen können auch mit den Tasten des Hauptgeräts ausgeführt
werden, wenn diese die gleichen Bezeichnungen aufweisen.
A Bereitschafts-/Ein-Schalter [`], [1]
Mit diesem Schalter wird das Gerät aus der elektrischen
Betriebsbereitschaft heraus eingeschaltet. Auch im
Bereitschaftszustand nimmt das Gerät eine geringe
Menge Strom auf.
B
Audioquelle auswählen
Info über die Fernbedienung:
Drücken Sie die zugehörige Taste, um die Quelle
auszuwählen.
Info über das Hauptgerät:
C Einfache Wiedergabesteuerung
D Setup-Menü anzeigen
E Informationen anzeigen
F Wählen bzw. bestätigen Sie die Option
G Öffnen und schließen des Disc-Fachs
H
Helligkeit der Anzeige einstellen
Um diese Funktion zu löschen, Taste erneut drücken.
I Stellen Sie den Lautstärkepegel ein
J
Stummschalten des Tons
Um diese Funktion zu löschen, Taste erneut drücken.
„MUTE“ wird ebenfalls abgeschaltet, wenn die
Lautstärke verändert oder das Gerät ausgeschaltet wird.
K Wiedergabemenü anzeigen
L Klangeffekte auswählen
M Anzeigebereich
N
Fernbedienungssensor
RQT9927
Entfernung: Innerhalb von ca. 7 m
Winkel: Ca. 20° auf und ab, 30° nach links und rechts
4
4
O USB-Port ( )
P Disc-Fach
Q Wählen Sie
Um die Bluetooth®-Kopplung zu starten, halten Sie die
Taste gedrückt.
„BLUETOOTH“
als Audioquelle
Die Fernbedienung vorbereiten
Benutzen Sie eine Alkali- oder Mangan-Batterie.
Legen Sie die Batterie so ein, dass die Pole (+ und –) mit den
Symbolen in der Fernbedienung übereinstimmen.
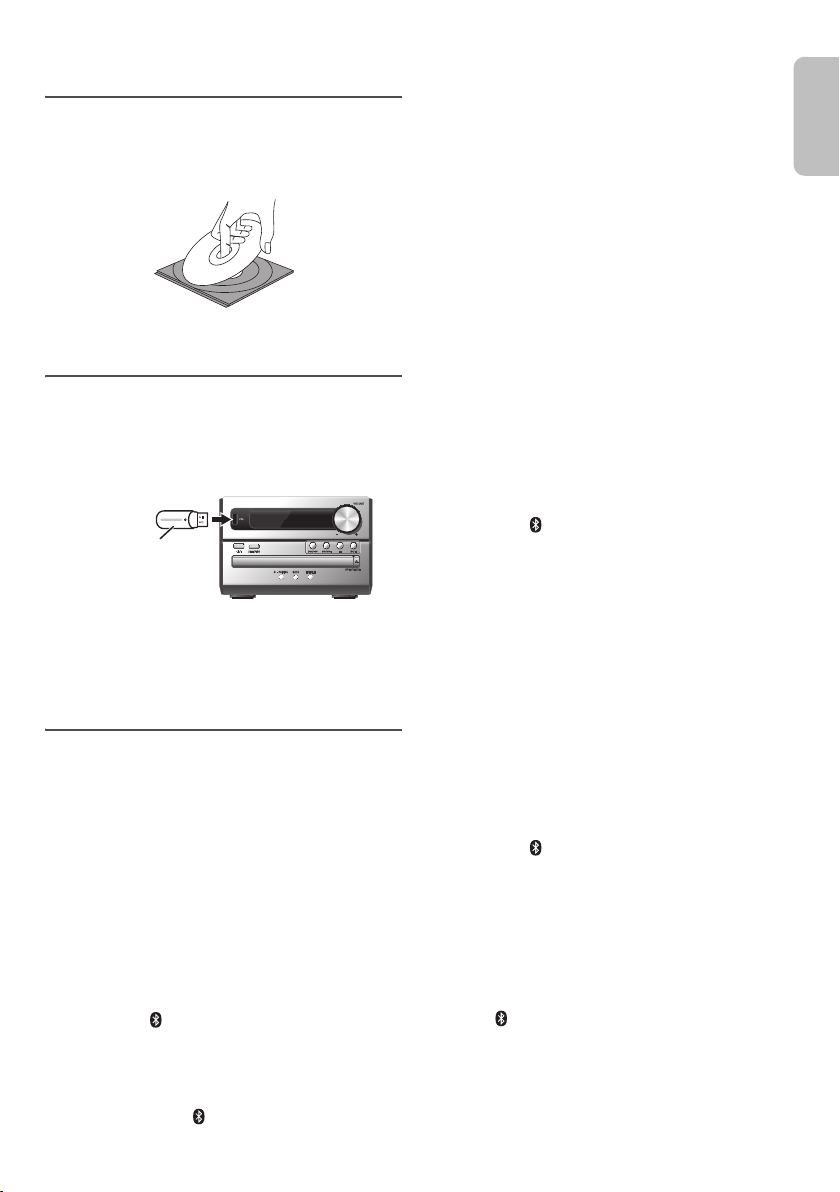
Vorbereiten des Speichermediums
USB-Gerät
(nicht mitgeliefert
)
Disc
1
Drücken Sie [CDx] (Hauptgerät: [xOPEN/CLOSE]),
um das Disc-Fach zu öffnen.
Legen Sie eine Disc mit dem Label nach oben ein.
Drücken Sie erneut, um das Disc-Fach zu schließen.
2
Drücken Sie [USB/CD] um „CD“ auszuwählen.
USB
1
Verringern Sie die Lautstärke und schließen Sie das
USB-Gerät an den USB-Anschluss an.
Halten Sie das Hauptgerät fest, wenn Sie das
USB-Gerät anschließen oder entfernen.
2
Drücken Sie [USB/CD] um „USB“ auszuwählen.
Hinweis:
Verwenden Sie keine USB-Verlängerungskabel. USB-Geräte, die
über ein Kabel angeschlossen sind, werden von diesem System
nicht erkannt.
Bluetooth
Mit Bluetooth® können Sie die Verbindung und Wiedergabe
mit einem Audiogerät drahtlos durchführen.
Vorbereitung
• Schalten Sie die Bluetooth®-Funktion des Geräts ein
und platzieren Sie das Gerät in der Nähe des Systems.
• Für weitere Details lesen Sie die Bedienungsanleitung
des Geräts.
█ Koppeln eines Geräts
Vorbereitung
Wenn dieses System mit einem Bluetooth®-Gerät verbunden
ist, trennen Sie es (
Gerät“).
1
Drücken Sie [ ].
Wenn „PAIRING“ angezeigt wird, fahren Sie mit Schritt 4
fort.
2
Drücken Sie [PLAY MENU] um „PAIRING“
auszuwählen.
Alternativ halten Sie [ –PAIRING] am Hauptgerät
gedrückt, bis „PAIRING“ angezeigt wird. Fahren Sie mit
Schritt 4 fort.
®
Z
„Trennen der Verbindung mit dem
3
Drücken Sie [R,T], um „OK? YES“ auszuwählen, und
danach [OK].
„PAIRING“ wird angezeigt.
Um die Funktion abzuschalten, wählen Sie „OK? NO“.
4
Wählen Sie „SC-PM250“ aus dem Bluetooth®-Menü
des Geräts.
Wenn Sie zur Eingabe eines Passworts aufgefordert
werden, geben Sie „0000“ ein.
Nachdem das Pairing erfolgt ist, wird das Gerät einen
automatischen Verbindungsaufbau mit dem System
herstellen.
Der Name des angeschlossenen Geräts wird für einige
Sekunden angezeigt.
Hinweis:
Das Pairing kann mit bis zu 8 Geräten mit diesem System
ausgeführt werden. Beim Koppeln eines 9. Geräts wird das am
längsten nicht verwendete Gerät ersetzt.
█ Anschließen eines Geräts
Vorbereitung
Wenn dieses System mit einem Bluetooth®-Gerät verbunden
ist, trennen Sie es (
Gerät“).
1
Drücken Sie [ ].
„BLUETOOTH READY“ wird angezeigt.
2
Wählen Sie „SC-PM250“ aus dem Bluetooth®-Menü
des Geräts.
Der Name des angeschlossenen Geräts wird für einige
Sekunden angezeigt.
3
Starten Sie die Wiedergabe auf dem Gerät.
Hinweis:
• Damit das Gerät verbunden wird, muss ein Pairing
durchgeführt werden.
• Dieses System kann jeweils nur mit einem Gerät verbunden
werden.
•Wenn
„BLUETOOTH“
dieses System automatisch, eine Verbindung mit dem
zuletzt verbundenen Gerät herzustellen.
Z
„Trennen der Verbindung mit dem
als Quelle ausgewählt ist, versucht
█ Trennen der Verbindung mit dem Gerät
1
Drücken Sie [ ].
2
Drücken Sie wiederholt [PLAY MENU] um
„DISCONNECT?“ auszuwählen.
3
Drücken Sie [R,T], um „OK? YES“ auszuwählen, und
danach [OK].
„BLUETOOTH READY“ wird angezeigt.
Um die Funktion abzuschalten, wählen Sie „OK? NO“.
Verwenden des Hauptgeräts
Halten Sie [ –PAIRING] gedrückt, bis „PAIRING“
angezeigt wird.
Hinweis:
Die Verbindung zum Gerät wird unterbrochen, wenn:
• Wählen Sie eine andere Quelle.
• Platzieren Sie das Gerät außerhalb der maximalen
Reichweite.
• Deaktivieren Sie die Bluetooth
• Das System oder das Gerät abgeschaltet wird.
®
-Übertragung des Geräts.
RQT9927
5
5

Wiedergabe von Speichermedien
Die folgenden Markierungen zeigen die Verfügbarkeit der
Funktion.
CD
: CD-R/RW im CD-DA-Format oder mit
MP3-Dateien.
USB
: USB-Gerät mit MP3-Dateien.
BLUETOOTH
:Bluetooth®-Gerät.
Einfache Wiedergabe
CD USB BLUETOOTH
Wiedergabe Drücken Sie [4/9].
Stopp Drücken Sie [8].
Pause Drücken Sie [4/9].
Überspringen Drücken Sie [2/3] oder [5/6],
Suchen Halten Sie [2/3] oder [5/6]
Hinweis:
Je nach Bluetooth®-Gerät ist es möglich, dass einige Funktionen
wirkungslos sind.
USB
Der Titel ist gespeichert.
„RESUME“ wird angezeigt.
Drücken Sie erneut, um vollständig zu
stoppen.
Drücken Sie erneut, um die Wiedergabe
fortzusetzen.
um den Titel zu überspringen.
CD USB
Drücken Sie [R,T], um das MP3-Album zu
überspringen.
gedrückt.
Verfügbare Informationen anzeigen
CD USB BLUETOOTH
Die verfügbaren Informationen erscheinen auf dem Display.
Drücken Sie [DISPLAY].
Hinweis:
• Maximale Anzahl von Zeichen, die angezeigt werden
können:
CD USB
: ungefähr 32
BLUETOOTH
• Dieses System unterstützt ID3-Tags der Versionen 1.0, 1.1
• Textdaten, die vom System nicht unterstützt werden,
• Beispiel: Anzeige von MP3-Album und -Titelnummer.
RQT9927
6
6
: ungefähr 16
und 2.3.
werden womöglich anders angezeigt.
Wiedergabemenü
CD USB
1
Drücken Sie wiederholt [PLAY MENU] um
„PLAYMODE“ oder „REPEAT“ auszuwählen.
2
Drücken Sie [R,T], um den Einstellungen zu wählen,
und drücken Sie dann [OK].
PLAYMODE
OFF
PLAYMODE
1-TRACK
1TR
1-ALBUM
1ALBUM
RANDOM
RND
1-ALBUM
RANDOM
1ALBUM RND
REPEAT
OFF REPEAT Verwerfen Sie die Einstellung.
ON REPEAT Wiedergabe wiederholen.
Hinweis:
• Bei Zufallswiedergabe ist kein Sprung zu Titeln möglich, die
bereits abgespielt wurden .
• Beim Öffnen das Disc-Fach wird die Einstellung verworfen.
Verwerfen Sie die Einstellung.
Einen ausgewählten Titel abspielen.
Drücken Sie [
zur Wahl des gewünschten Titels.
Ein ausgewähltes MP3-Album
abspielen.
Drücken Sie [
auszuwählen.
Alle Titel in zufälliger Reihenfolge
abspielen.
Alle Titel eines ausgewählten
MP3-Albums in zufälliger Reihenfolge
abspielen.
Drücken Sie [
auszuwählen.
2/3
] oder [5/6]
R,T
], um das MP3-Album
R,T
], um das MP3-Album
Link-Modus
BLUETOOTH
Sie können den Link-Modus ändern, um ihn an den
Verbindungstyp anzupassen.
Vorbereitung
Wenn dieses System mit einem Bluetooth®-Gerät verbunden
ist, trennen Sie es (
Gerät“).
1
Drücken Sie wiederholt [PLAY MENU] um
„LINK MODE“ auszuwählen.
2
Drücken Sie [R,T], um den Modus zu wählen, und
drücken Sie dann [OK].
MODE 1 Schwerpunkt auf
MODE 2
(Standardeinstellung)
Hinweis:
Wählen Sie „MODE 1“, wenn der die Tonausgabe ist
unterbrochen.
Z
„Trennen der Verbindung mit dem
Konnektivität.
Schwerpunkt auf
Klangqualität.

Eingangspegel
BLUETOOTH
Sie können die Eingangspegel-Einstellung ändern, wenn der
Ton-Eingangspegel der Bluetooth
ist.
1
Drücken Sie wiederholt [PLAY MENU] um
„INPUT LEVEL“ auszuwählen.
2
Drücken Sie [R,T], um den Pegel zu wählen, und
drücken Sie dann [OK].
Hinweis:
Wählen Sie
█
• Dieses System kann CD-R/RW mit Inhalten im CD-DA-
• Finalisieren Sie die Disc vor der Wiedergabe auf dem
• Einige CD-R/RW können aufgrund der Beschaffenheit
█
• Dieses System unterstützt USB 2.0 bei voller
• Dieses System kann USB-Geräte von bis zu 32 GB
• Nur das FAT 12/16/32-Dateisystem wird unterstützt.
█
• Dateien werden als Titel behandelt, während Ordner
• Die Titel müssen die Erweiterung
• Die Titel werden nicht unbedingt in der Reihenfolge der
• Je nach Sektorgröße ist es möglich, dass einige
MP3-Datei auf einer Disc
• Dieses System hat Zugriffsmöglichkeiten auf bis zu:
• Discs müssen dem Format ISO9660 Stufe 1 oder 2
MP3-Datei auf einem USB-Gerät
• Dieses System hat Zugriffsmöglichkeiten auf bis zu:
„LEVEL 0“
, wenn der Klang verzerrt ist.
Hinweis zu Disc
oder MP3-Format wiedergeben.
Gerät, auf dem sie aufgenommen wurde.
der Aufnahme nicht abgespielt werden.
Hinweis zu USB-Geräten
Geschwindigkeit.
unterstützen.
Hinweis zu MP3-Dateien
als Alben angesehen werden.
besitzen.
Aufnahme abgespielt.
Dateien nicht funktionieren.
– 255 Alben (einschließlich Hauptordner)
–999 Titel
–20 Sitzungen
entsprechen (außer erweiterte Formate).
– 800 Alben (einschließlich Hauptordner)
– 8000 Titel
–999 Titel in einem Album
®
-Übertragung zu niedrig
„.mp3“ oder „.MP3“
Radio
Vorbereitung
Drücken Sie [RADIO].
Manuelle Abstimmung
1
Drücken Sie wiederholt [PLAY MENU] um
„TUNEMODE“ auszuwählen.
2
Drücken Sie [R,T], um „MANUAL“ auszuwählen, und
danach [OK].
3
Drücken Sie [2/3] oder [5/6], um den
Sender einzustellen.
Zur automatischen Abstimmung halten Sie die Taste
gedrückt, bis die Frequenz sich schnell zu ändern
beginnt.
„STEREO“ wird angezeigt, wenn eine Stereosendung
empfangen wird.
Speicher voreinstellen
Sie können bis zu 30 FM (UKW)-Sender speichern.
█ Automatische Voreinstellung
1
Drücken Sie [PLAY MENU] um „A.PRESET“
auszuwählen.
2
Drücken Sie [R,T], um den Einstellungen zu wählen,
und drücken Sie dann [OK].
LOWEST Die Abstimmung beginnt mit der
CURRENT Die Abstimmung beginnt mit der aktuellen
Danach belegt der Tuner die Speicherplätze in
aufsteigender Reihenfolge mit allen beim Suchlauf
abgestimmten Sendern.
Um die Funktion abzuschalten, [
█ Manuelle Voreinstellung
1
Drücken Sie wiederholt [PLAY MENU] um
„TUNEMODE“ auszuwählen.
2
Drücken Sie [R,T], um „MANUAL“ auszuwählen, und
danach [OK].
3
Drücken Sie [2/3] oder [5/6], um den
Sender einzustellen.
4
Drücken Sie [OK].
5
Drücken Sie [R,T], um einen Speicherplatz zu
wählen, und drücken Sie dann [OK].
Wiederholen die Schritte 3 bis 5, um weitere Sender
einzustellen.
Der neue Sender ersetzt den Sender mit der gleichen
Voreinstellungsnummer.
niedrigsten Frequenz.
Frequenz.
8
] drücken.
RQT9927
7
7

█ Einen vorprogrammierten Sender
auswählen
1
Drücken Sie wiederholt [PLAY MENU] um
„TUNEMODE“ auszuwählen.
2
Drücken Sie [R,T], um „PRESET“ auszuwählen, und
danach [OK].
3
Drücken Sie [2/3] oder [5/6] um den
vorprogrammierten Sender auszuwählen.
Verbessern der Klangqualität
1
Drücken Sie wiederholt [PLAY MENU] um „FM MODE“
auszuwählen.
2
Drücken Sie [R,T], um „MONO“ auszuwählen, und
danach [OK].
Um die Funktion abzuschalten, wählen Sie „STEREO“.
Der „MONO“-Modus wird auch aufgehoben, wenn die
Frequenz geändert wird.
Um die Einstellung beizubehalten
Fahren Sie mit Schritt 4 von „Manuelle Voreinstellung“ fort.
Überprüfen des Signalstatus
Drücken Sie [PLAY MENU], um „FM STATUS“
auszuwählen, und danach [OK].
FM Das FM (UKW)-Signal ist mono.
FM ST Das FM (UKW)-Signal ist stereo.
FM MONO Als „MONO“ wurde „FM MODE“ gewählt.
Das System ist nicht auf einen Sender
eingestellt.
Empfang von RDS-Programmen
Der Tuner dieses Systems ermöglicht den Empfang von
Sendern des Radiodatensystems (RDS) in Gebieten, wo
RDS-Programme ausgestrahlt werden.
Drücken Sie [DISPLAY].
PS Programmdienst
PTY Programmtyp
FREQ Frequenz
Hinweis:
Bei ungünstigen Empfangsbedingungen erscheinen u. U. keine
RDS-Anzeigen.
Uhr und Timer
Uhr einstellen
Dies ist eine 24-Stunden-Uhr.
1
Drücken Sie wiederholt [SETUP] um „CLOCK“
auszuwählen.
2
Drücken Sie [R,T], um die Zeit einzustellen, und
drücken Sie dann [OK].
Zum Überprüfen der Zeit
Drücken Sie wiederholt [SETUP], um „CLOCK“
auszuwählen, und danach [OK].
Drücken Sie im Standby-Modus [DISPLAY].
Hinweis:
Achten Sie darauf, die Uhr in regelmäßigen Abständen zu stellen.
Wiedergabetimer
(Außer für eine Bluetooth®-Quelle)
Sie können die Zeitschaltuhr so einstellen, dass sie sich zu
einem bestimmten Zeitpunkt einschaltet, um Sie zu wecken.
Vorbereitung
Stellen Sie die Uhr ein.
1
Drücken Sie wiederholt [SETUP] um „TIMER ADJ“
auszuwählen.
2
Drücken Sie [R,T], um die Startzeit einzustellen, und
drücken Sie dann [OK].
3
Wiederholen Sie Schritt 2, um die Endzeit einzustellen.
4
Drücken Sie [R,T], um die wiederzugebende Quelle
zu wählen, und drücken Sie dann [OK].
So aktivieren Sie den Timer
1
Drücken Sie wiederholt [SETUP] um „TIMER SET“
auszuwählen.
2
Drücken Sie [R,T], um „SET“ auszuwählen, und
danach [OK].
„#“ wird angezeigt.
Um die Funktion abzuschalten, wählen Sie „OFF“.
Die Timerfunktionen werden nur aktiviert, wenn das
System ausgeschaltet ist.
Zum Überprüfen der Einstellung
Drücken Sie wiederholt [SETUP], um „TIMER ADJ“
auszuwählen, und danach [OK].
Drücken Sie im Standby-Modus zweimal [DISPLAY].
Hinweis:
• Der Timer beginnt mit einer niedrigen Lautstärke und wird
sich nach und nach bis zum voreingestellten Pegel
erhöhen.
• Der Timer wird täglich zur eingestellten Zeit aktiviert, wenn
er eingeschaltet ist.
• Wenn Sie das System bei aktiviertem Timer aus- und dann
wieder einschalten, stoppt der Timer nicht bei der Endzeit.
RQT9927
8
8
Einschlaftimer
Der Einschlaftimer schaltet das System nach der
festgelegten Zeit ab.
1
Drücken Sie [SETUP] um „SLEEP“ auszuwählen.
2
Drücken Sie [R,T], um die Einstellung (in Minuten) zu
wählen, und drücken Sie dann [OK].
Um die Funktion abzuschalten, wählen Sie „OFF“.
Hinweis:
• Die verbleibende Zeit wird immer auf dem Display
angezeigt. Das Display ändert sich vorübergehend, wenn
Sie andere Vorgänge ausführen.
• Einschlaf- und Wiedergabetimer können gemeinsam
verwendet werden.
• Der Einschlaftimer hat grundsätzlich Vorrang. Stellen Sie
sicher, dass sich die Timer-Einstellungen nicht
überschneiden.
Klangeffekte
1
Drücken Sie wiederholt [SOUND], um den Klangeffekt
auszuwählen.
2
Drücken Sie [R,T], um den Einstellungen zu wählen,
und drücken Sie dann [OK].
PRESET EQ „HEAVY“ (Standardeinstellung), „SOFT“,
BASS –4 bis +4 (Standardeinstellung: 0)
TREBLE –4 bis +4 (Standardeinstellung: 0)
D.BASS „ON D.BASS“ (Standardeinstellung) oder
SURROUND „ON SURROUND“ oder
„CLEAR“, „VOCAL“ oder „FLAT“
Verwenden des Hauptgeräts
1. Drücken Sie
2. Drücken Sie
[
5/6].
Verwenden des Hauptgeräts
1. Drücken Sie
2. Drücken Sie
5/6].
[
„OFF D.BASS“
„OFF SURROUND“ (Standardeinstellung)
[BASS]
.
[2/3] oder
[TREBLE]
.
[2/3] oder
Andere
Automatisches Ausschalten
Dieses System schaltet sich automatisch ab, wenn Sie es
20 Minuten lang nicht verwenden.
1
Drücken Sie wiederholt [SETUP] um „AUTO OFF“
auszuwählen.
2
Drücken Sie [R,T], um „ON“ auszuwählen, und
danach [OK].
Um die Funktion abzuschalten, wählen Sie „OFF“.
Hinweis:
Diese Funktion steht nicht zur Verfügung, wenn die Quelle das
Radio ist oder wenn ein Bluetooth
Bluetooth®-Standby
Diese Funktion schaltet automatisch das System ein, wenn
Sie eine Bluetooth
Gerät herstellen.
1
Drücken Sie wiederholt [SETUP] um
„BLUETOOTH STANDBY“ auszuwählen.
2
Drücken Sie [R,T], um „ON“ auszuwählen, und
danach [OK].
Um die Funktion abzuschalten, wählen Sie „OFF“.
®
-Verbindung von einem gekoppelten
Überprüfen der Software-Version
1
Drücken Sie wiederholt [SETUP], um „SW VER.“
auszuwählen, und danach [OK].
Die Software-Version wird angezeigt.
2
Drücken Sie [OK] erneut, um zu beenden.
®
-Gerät verbunden ist.
RQT9927
9
9

Fehlersuchanleitung
Führen Sie die folgenden Kontrollen durch, bevor Sie den
Kundendienst anrufen. Falls Sie Fragen zu den Prüfpunkten
haben oder sich eine Störung anhand der angegebenen
Abhilfemaßnahmen nicht beseitigen lässt, nehmen Sie bitte
Kontakt mit Ihrem Fachhändler auf.
█ Allgemeine Störungen
Das Gerät funktioniert nicht.
• Die Sicherheitsvorrichtung wurde aktiviert. Führen Sie
Folgendes durch:
1. Drücken Sie [1] am Hauptgerät, um das Gerät in den
Bereitschaftsmodus zu schalten. Wenn das Gerät nicht
in den Bereitschaftsmodus schaltet,
– Halten Sie die Taste gedrückt, mindestens
10 Sekunden lang gedrückt. Oder,
– Trennen Sie das Netzkabel, und schließen Sie es
wieder an.
2. Drücken Sie [1] erneut, um das Gerät einzuschalten.
Wenn das Problem bestehen bleibt, wenden Sie sich an
Ihren Händler.
Die Fernbedienung funktioniert nicht.
• Überprüfen Sie, ob die Batterie korrekt eingesetzt ist.
Verzerrter bzw. kein Ton.
• Die Systemlautstärke einstellen.
• Schalten Sie das System aus, stellen Sie die Ursache fest
und beheben Sie sie. Schalten Sie das System dann wieder
ein. Ursache können eine Überlastung der Lautsprecher
durch übermäßige Lautstärke oder Strom und der
Gebrauch des Systems in heißer Umgebung sein.
Während der Wiedergabe ist ein Brummton zu hören.
• Das System befindet sich in der Nähe von Netzkabeln oder
Leuchtstofflampen. Halten Sie andere Geräte und Kabel
von den Kabeln dieses Systems fern.
█ Disc
Die Anzeige des Displays funktioniert nicht richtig.
Wiedergabe startet nicht.
• Sie haben die Disc nicht richtig eingelegt. Legen Sie sie
richtig ein.
• Die Disc ist verschmutzt. Reinigen Sie die Disc.
• Wechseln Sie die Disc aus, falls sie zerkratzt, verwellt oder
nicht normgerecht ist.
• Kondenswasser hat sich gebildet. Warten Sie 1 bis 2
Stunden, bis das System wieder trocken ist.
█ USB
Das USB-Gerät bzw. dessen Inhalt wird nicht erkannt.
• Das Format oder der Inhalt des USB-Geräts ist mit dem
System nicht kompatibel.
• USB-Geräte mit einer Speicherkapazität von mehr als
32 GB funktionieren unter Umständen manchmal nicht.
Langsamer Betrieb des USB-Geräts.
• Große Dateien oder USB-Geräte mit einer hohen
Speicherkapazität werden langsamer gelesen.
Die verstrichene Spielzeit auf der Anzeige unterscheidet
sich von der tatsächlichen Abspielzeit.
• Speichern Sie die Daten auf einem anderen USB-Gerät
oder sichern Sie die Daten und formatieren Sie das
USB-Gerät neu.
RQT9927
10
10
█ Radio
Der Klang ist verzerrt.
• Installieren Sie eine optionale Außenantenne. Die
Außenantenne sollte von einem qualifizierten Fachmann
installiert werden.
Es sind Klopfgeräusche zu hören.
• Schalten Sie das Fernsehgerät aus oder stellen Sie das
System weiter entfernt von Fernsehgeräten auf.
• Wenn Interferenzen auftreten, entfernen Sie Mobiltelefone
aus der Nähe das System.
█ Bluetooth
®
Das Pairing kann nicht durchgeführt werden.
• Kontrollieren Sie den Zustand des Bluetooth®-Geräts.
• Das Gerät befindet sich außerhalb der 10 m
Kommunikationsreichweite. Platzieren Sie das Gerät näher
zum System.
Das Gerät kann nicht verbunden werden.
• Das Pairing des Geräts ist fehlgeschlagen. Führen Sie das
Pairing nochmals durch.
• Das Pairing des Geräts ersetzt wurde. Führen Sie das
Pairing nochmals durch.
• Dieses System könnte mit einem anderen Gerät verbunden
sein. Trennen Sie das andere Gerät, und versuchen Sie
erneut, das Gerät zu koppeln.
Das Gerät ist verbunden, aber die Audiowiedergabe ist
über das System nicht hörbar.
• Bei einigen eingebauten Bluetooth
Audioausgabe zu „SC-PM250“
werden. Für weitere Details lesen Sie die
Bedienungsanleitung des Geräts.
Die Tonausgabe des Geräts ist unterbrochen.
• Das Gerät befindet sich außerhalb der 10 m
Kommunikationsreichweite. Platzieren Sie das Gerät näher
zum System.
• Entfernen Sie etwaige Hindernisse zwischen dem System
und dem Gerät.
• Andere Geräte, die das 2,4 GHz-Frequenzband verwenden
(WLAN-Router, Mikrowellen, schnurlose Telefone usw.),
stören. Stellen Sie das Gerät näher am System und weiter
entfernt von den anderen Geräten auf.
• Wählen Sie
Wiedergabe von Bild und Ton sind nicht synchron.
• Starten Sie die Wiedergabe-App des Geräts neu.
„MODE 1“
für eine stabile Kommunikation.
®
-Geräten, muss die
manuell eingestellt
█ Anzeigen auf dem Hauptgerät
„
—:—“
• Diese Anzeige erscheint beim erstmaligen Anschließen des
Netzkabels sowie nach Auftreten eines Stromausfalls.
Stellen Sie die Uhr ein.
„
ADJUST CLOCK“
• Die Uhr ist nicht eingestellt. Stellen Sie die Uhr.
„
ADJUST TIMER“
• Der Wiedergabetimer ist nicht eingestellt. Stellen Sie den
Wiedergabetimer ein.
„
AUTO OFF“
• Das System wurde 20 Minuten lang nicht verwendet und
schaltet sich in einer Minute aus. Um abzubrechen,
drücken Sie eine beliebige Taste.

„
ERROR“
• Es wurde ein Fehler in der Bedienung vorgenommen. Bitte
lesen Sie die Bedienungsanleitung und versuchen Sie es
nochmals.
„
F61“
„
F77“
• Trennen Sie das Netzkabel, und wenden Sie sich an Ihren
Händler.
„
F70“
• Überprüfen Sie das Bluetooth®-Gerät.
• Trennen Sie das Bluetooth
System aus und anschließend wieder ein.
„
F76“
• Es gibt ein Problem mit der Stromversorgung.
• Trennen Sie das Netzkabel, und wenden Sie sich an Ihren
Händler.
„
NODEVICE“
• Das USB-Gerät ist nicht angeschlossen. Überprüfen Sie
den Anschluss.
„
NO DISC“
• Sie haben die Disc nicht eingelegt.
„
NO PLAY“
• Prüfen Sie den Inhalt. Sie können nur unterstützte Formate
wiedergeben.
• Das System hat möglicherweise ein Problem. Schalten Sie
das System aus und anschließend wieder ein.
„
PLAYERROR“
• Sie haben eine nicht unterstützte MP3-Datei abgespielt.
Dieser Titel wird übersprungen, und die Wiedergabe wird
mit dem nächsten Titel fortgesetzt.
„
REMOTE 1“
„
REMOTE 2“
• Die Fernbedienung und das Hauptgerät verwenden
verschiedene Codes. Ändern Sie den Code der
Fernbedienung.
– Wenn
„REMOTE 1“ angezeigt wird, halten Sie [OK] und
[]
mindestens 4 Sekunden lang gedrückt.
„REMOTE 2“ angezeigt wird, halten Sie [OK] und
– Wenn
„
USB OVER CURRENT ERROR“
• Das USB-Gerät verbraucht zu viel Strom. Trennen Sie das
USB-Gerät, und schalten Sie das System aus und dann
wieder ein.
„
–VBR–“
• Bei Titeln mit variabler Bitrate (VBR) kann die Restspielzeit
nicht angezeigt werden.
mindestens 4 Sekunden lang gedrückt.
[USB/CD]
®
-Gerät. Schalten Sie das
Code der Fernbedienung
Wenn andere Geräte von Panasonic mit der Fernbedienung
dieses Systems aktiviert werden, müssen Sie den Code der
System-Fernbedienung ändern.
Vorbereitung
Drücken Sie [USB/CD] um „CD“ auszuwählen.
█ So setzen Sie den Code auf „REMOTE 2“
1
Halten Sie am Hauptgerät [SELECTOR] und auf der
Fernbedienung [USB/CD] gedrückt.
„REMOTE 2“ wird angezeigt.
2
Halten Sie [OK] und [USB/CD] mindestens 4 Sekunden
lang.
█ So setzen Sie den Code auf „REMOTE 1“
1
Halten Sie am Hauptgerät [SELECTOR] und auf der
Fernbedienung [ ] gedrückt.
„REMOTE 1“ wird angezeigt.
2
Halten Sie [OK] und [ ] mindestens 4 Sekunden lang.
Systemspeicher zurücksetzen
Setzen Sie den Speicher in folgenden Fällen zurück:
• Das Gerät reagiert beim Drücken der Knöpfe nicht.
• Sie möchten den gesamten Speicherinhalt löschen und
zurücksetzen.
1
Ziehen Sie das Netzkabel.
2
Halten Sie den Schalter [1] am Hauptgerät gedrückt
und schließen Sie das Netzkabel erneut an.
Halten Sie den Schalter weiter gedrückt, bis
„––––––––“ angezeigt wird.
3
[1] Schalter freigeben.
Alle Einstellungen werden auf die werkseitigen
Voreinstellungen zurückgesetzt.
Sämtliche gespeicherte Eingaben müssen neu
festgelegt werden.
Pflege und Instandhaltung
Entfernen Sie Schmutzflecken mit einem weichen,
trockenen Tuch.
• Verwenden Sie zum Reinigen dieser Anlage auf keinen
Fall Alkohol, Farbverdünner oder Benzin.
• Vor Gebrauch eines chemisch behandelten
Reinigungstuchs lesen Sie bitte die dem Tuch
beiliegende Gebrauchsanweisung.
11
11
RQT9927
Bluetooth®-Informationen
Panasonic übernimmt keine Haftung für Daten und/oder
Informationen, die während einer drahtlosen Übertragung
kompromittiert werden.
Frequenzband
• Dieses System nutzt das 2,4 GHz Frequenzband.
Zertifizierung
• Dieses System hält die Frequenzbeschränkungen ein
und verfügt über eine Zertifizierung gemäß der
Frequenznutzungsplanverordnung. Deshalb ist eine
Funkzulassung nicht notwendig.
• Die folgenden Handlungen sind strafbar:
– Das Zerlegen oder Ändern des Hauptgeräts.
– Spezifikationsanzeigen werden entfernt.
Nutzungsbeschränkungen
• Drahtlose Übertragung und/oder Verwendung von mit
Bluetooth
• Alle Geräte müssen den Normen der Bluetooth SIG,
Inc. entsprechen.
• Je nach Spezifikationen und Einstellungen eines
Gerätes, kann die Verbindung nicht hergestellt werden
oder einige Funktionen können unterschiedlich sein.
• Dieses System unterstützt Bluetooth
Sicherheitsfunktionen. Je nach Betriebskonfiguration
und/oder Einstellungen ist diese Sicherheit
möglicherweise nicht ausreichend. Die drahtlose
Übertragung von Daten in dieses System sollte mit
Vorsicht erfolgen.
• Dieses System kann keine Daten auf ein
Bluetooth
Verwendungsbereich
• Verwenden Sie dieses Gerät in einem maximalen
Bereich von 10 m.
• Die Reichweite kann sich aufgrund der Umgebung,
Hindernissen oder Interferenzen verringern.
Interferenzen von anderen Geräten
• Dieses System funktioniert evtl. nicht richtig, und
Probleme wie Rauschen und Tonsprünge können
durch Funkstörungen entstehen, wenn sich das Gerät
zu nahe an anderen Bluetooth
die das 2,4-GHz-Band verwenden, befindet.
• Dieses System funktioniert evtl. nicht ordnungsgemäß,
wenn Funkwellen von einer in der Nähe befindlichen
Sendestation usw. zu stark sind.
Verwendungszweck
• Dieses System ist nur für den normalen, allgemeinen
Gebrauch bestimmt.
• Verwenden Sie dieses System nicht in der Nähe von
Geräten oder in einer Umgebung, die empfindlich auf
Radiofrequenzen reagiert (wie z.B. Flughäfen,
Krankenhäuser, Laboratorien usw.).
RQT9927
12
12
®
ausgerüsteten Geräten ist nicht garantiert.
®
-Gerät übertragen.
®
-Geräten oder Geräten,
Lizenzen
Die Verschlüsselungstechnologie für MP3-Dateien (MPEG
Audio Layer-3) wurde von Fraunhofer IIS und Thomson
lizenziert.
Der Name Bluetooth
Bluetooth SIG, Inc. und werden von der Panasonic
Corporation unter Lizenz verwendet. Alle anderen Marken
und Firmennamen ihrer jeweiligen Inhaber sind Eigentum
dieser Firmen.
Konformitätserklärung
Hiermit erklärt
Gerät alle Grundanforderungen und sonstigen relevanten
Auflagen der Direktive 1999/5/EC erfüllt.
Kunden können eine Kopie des Originals der
Konformitätserklärung unserer R&TTE-Produkte von der
®
folgenden Webseite herunterladen:
http://www.doc.panasonic.de
Kontaktadresse: Panasonic Marketing Europe GmbH,
Panasonic Testing Centre, Winsbergring 15, 22525
Hamburg, Bundesrepublik Deutschland
Dieses Produkt ist für allgemeine Verbraucher bestimmt.
(Kategorie 3)
Entsorgung von veralteten Geräten und benutzten
Batterien
Nur für EU und Länder mit Recycling-Systemen
®
und das Logo sind Eigentum der
„Panasonic Corporation“
Diese Symbole auf den Produkten,
Verpackungen und/oder Begleitdokumenten
bedeuten, dass benutzte elektrische und
elektronische Produkte und Batterien nicht in
den allgemeinen Hausmüll gegeben werden
dürfen.
Bitte bringen Sie diese alten Produkte und
Batterien zur Behandlung, Aufarbeitung bzw.
zum Recycling gemäß Ihrer
Landesgesetzgebung zu Ihren zuständigen
Sammelpunkten.
Indem Sie sie ordnungsgemäß entsorgen,
helfen Sie dabei, wertvolle Ressourcen zu
schützen und eventuelle negative
Auswirkungen auf die menschliche Gesundheit
und die Umwelt zu vermeiden.
Wenn Sie ausführlichere Informationen zur
Sammlung und zum Recycling wünschen,
wenden Sie sich bitte an Ihre örtlichen
Verwaltungsbehörden.
Gemäß Landesvorschriften können wegen
nicht ordnungsgemäßer Entsorgung dieses
Abfalls Strafgelder verhängt werden.
Hinweis zum Batteriesymbol (unteres
Symbol):
Dieses Symbol kann in Kombination mit einem
chemischen Symbol verwendet werden. In
diesem Fall erfüllt es die Anforderungen
derjenigen Richtlinie, die für die betreffende
Chemikalie erlassen wurde.
, dass sich das

Technische Daten
█ Verstärkerteil
Effektive Ausgangsleistung im Stereo-Modus
Frontkanal (beide Kanäle angesteuert)
Gesamte effektive Ausgangsleistung im Stereo-Modus
10 W pro Kanal (an 6
Ω
), 1 kHz, 10 % THD
█ Tuner-, Anschlussteil
Anzahl der speicherbaren Festsender
Frequenzmodulation (FM (UKW))
Frequenzbereich
Antennenklemmen 75
87,50 MHz bis 108,00 MHz (50 kHz-Raster)
30 FM (UKW)-Sender
Ω
(unsymmetrisch)
█ Discteil
Geeignete Discs (Durchmesser 8 cm oder 12 cm)
Aufnehmer
Wellenlänge 790 nm (CD)
MPEG-1 Layer 3, MPEG-2 Layer 3
CD, CD-R/RW (CD-DA, MP3 )
█ USB-Teil
USB-Port
USB-Standard USB 2.0 volle Geschwindigkeit
Speichermedium Formatunterstützung MP3 (
Dateisystem des USB-Geräts FAT12, FAT16, FAT32
Leistung des USB-Ports DC-Ausgang 5 V, 500 mA
20 W
*
.mp3)
█ Bluetooth
Version
Klasse
Unterstützte Profile
Betriebsfrequenz
Reichweite
®
-Teil
Bluetooth® Ver. 2.1 + EDR
Klasse 2
A2DP, AVRCP
2,4GHz-Band FH-SS
10 m Sichtlinie
█ Lautsprecherbox
Lautsprechereinheit(en)
Gesamter Bereich 10 cm Konustyp x 1 pro Kanal
Impedanz
Abmessungen (B x H x T)
Masse
139 mm x 224 mm x 136 mm
6
1,3 k
█ Allgemeine Daten
Stromversorgung
Leistungsaufnahme
Abmessungen (B x H x T)
Masse
Betriebstemperaturbereich
Betriebsluftfeuchtigkeitsbereich
35% bis 80% rel. Feuchte (ohne Kondensatbildung)
Leistungsaufnahme im Bereitschaftszustand
(Wenn „BLUETOOTH STANDBY“ auf „OFF“ gesetzt ist)
Leistungsaufnahme im Bereitschaftszustand
(Wenn „BLUETOOTH STANDBY“ auf „ON“ gesetzt ist)
Hinweis:
• Änderungen der technischen Daten sind jederzeit
vorbehalten.
Die angegebenen Masse- und Abmessungsdaten sind
ungefähre Werte.
• Der Gesamtklirrfaktor wurde mit einem Digitalspektrometer
gemessen.
220 V bis 240 V Wechselstrom, 50 Hz
14 W
184 mm x 123 mm x 228 mm
1,1 k
0°C bis +40°C
0,2 W (ca.)
0,3 W (ca.)
Ω
g
g
13
13
RQT9927
Votre appareil et les illustrations peuvent se présenter
différemment.
Ces instructions de fonctionnement s’appliquent au
système suivant.
Chaîne SC-PM250
Appareil principal SA-PM250
Enceintes SB-PM02
Accessoires fournis
Vérifier que tous les accessoires fournis sont présents.
1 Cordon d’alimentation secteur
1 Antenne FM intérieure
1 Télécommande
(N2QAYB000984)
Table des matières
Accessoires fournis . . . . . . . . . . . . . . . . . . . . . . . . .2
Précautions de sécurité . . . . . . . . . . . . . . . . . . . . . .2
Raccordements. . . . . . . . . . . . . . . . . . . . . . . . . . . . .3
Emplacement des enceintes . . . . . . . . . . . . . . . . . .3
Présentation des commandes . . . . . . . . . . . . . . . . .4
Préparation de la télécommande. . . . . . . . . . . . . . .4
Préparation du multimédia. . . . . . . . . . . . . . . . . . . .5
Lecture multimédia. . . . . . . . . . . . . . . . . . . . . . . . . .6
Radio . . . . . . . . . . . . . . . . . . . . . . . . . . . . . . . . . . . . .7
Horloge et minuteries . . . . . . . . . . . . . . . . . . . . . . . .8
Effets sonores. . . . . . . . . . . . . . . . . . . . . . . . . . . . . .9
Autres . . . . . . . . . . . . . . . . . . . . . . . . . . . . . . . . . . . .9
Guide de dépannage . . . . . . . . . . . . . . . . . . . . . . .10
Entretien . . . . . . . . . . . . . . . . . . . . . . . . . . . . . . . . .11
Licences . . . . . . . . . . . . . . . . . . . . . . . . . . . . . . . . .11
À propos de Bluetooth® . . . . . . . . . . . . . . . . . . . . .12
Spécifications . . . . . . . . . . . . . . . . . . . . . . . . . . . . .13
RQT9927
2
14
Précautions de sécurité
AVERTISSEMENT !
Appareil
• Pour réduire les risques d’incendie, d’électrocution ou de
dommages au produit :
– Ne pas exposer cet appareil à la pluie, à l’humidité, à
la chute de gouttes ou à des éclaboussures.
– Ne placer aucun récipient contenant un liquide, tel
qu’un vase, sur l’appareil.
– N’utiliser que les accessoires recommandés.
– Ne pas retirer les couvercles.
– Ne pas réparer cet appareil soi-même. Pour toute
intervention, faire appel à un technicien qualifié.
– Ne pas laisser d’objets métalliques tomber dans
l’appareil.
Cordon d’alimentation secteur
• La fiche d’alimentation est ce qui permet de
déconnecter l’appareil. Installer cet appareil de telle
sorte que la fiche d’alimentation puisse être
débranchée immédiatement de la prise de courant.
ATTENTION !
Appareil
• Pour réduire les risques d’incendie, d’électrocution ou
de dommages au produit :
– Ne pas installer ni placer l’appareil dans une
bibliothèque, un placard encastré ni aucun autre
espace réduit de façon à assurer une bonne
ventilation.
– Ne pas obstruer les orifices de ventilation de
l’appareil avec des journaux, des nappes, des
rideaux ou des objets similaires.
– Ne pas placer des sources de flammes vives, telles
que des bougies allumées, sur l’appareil.
• Cet appareil est destiné aux climats tempérés.
• Cet appareil peut être perturbé par les ondes radio des
téléphones mobiles pendant l’utilisation. Si vous
constatez de telles interférences, éloignez le téléphone
mobile de l’appareil.
• Cet appareil utilise un laser. L’exécution de procédures
ou l’utilisation de commandes ou de réglages autres
que ceux spécifiés ici peuvent provoquer une
exposition à des radiations dangereuses.
Pile
• L’utilisation d’une pile de rechange incorrecte peut
entraîner des risques d’explosion. N’utiliser qu’une pile
identique ou le type de pile recommandé par le
fabricant.
• Lors de la mise au rebut des piles, contacter les
autorités locales ou le revendeur pour connaître la
méthode de mise au rebut appropriée.
• Ne pas chauffer ni exposer à une flamme.
• Ne pas laisser la/les pile(s) dans un véhicule exposé à
la lumière directe du soleil, portes et vitres fermées
pendant une longue période.
• Ne pas démonter ou court-circuiter les piles.
• Ne pas charger la pile alcaline ou au manganèse.
• Ne pas utiliser de piles dont l’enveloppe a été retirée.
• Retirez la pile si vous n’utilisez pas la télécommande
pendant une longue période de temps. Ranger dans un
endroit frais et sombre.

Raccordements
(6:)
(6:)
SPEAKERS
(SB-PM02)
2
1
3
Ruban adhésif
(non fourni)
Brancher le cordon d’alimentation dans la prise secteur
une fois que tous les autres raccordements ont été
effectués.
1 Raccorder l’antenne FM intérieure.
Placer l’antenne là où la réception est maximale.
2 Raccorder les enceintes.
Veillez à ne pas croiser
(court-circuiter) ou
inverser la polarité des
câbles d’enceinte afin de
ne pas endommager les
enceintes.
Emplacement des enceintes
Les enceintes gauche et droite sont les mêmes.
Le filet des enceintes ne doit pas être retiré.
N’utiliser que les enceintes fournies.
Vous pouvez endommager le système et diminuer la
qualité du son si vous utilisez d’autres enceintes.
Remarque :
• Gardez vos enceintes à plus de 10 mm de l’unité principale
pour la ventilation.
• Placez les enceintes sur une surface plane en toute
sécurité.
• Ces enceintes n’ont pas de blindage magnétique. Ne pas
les placer près de téléviseurs, d’ordinateurs ou d’autres
appareils facilement influencés par le magnétisme.
• Lorsque vous jouez à des niveaux élevés pendant une
longue période, elles peuvent causer des dommages au
enceintes et diminuer la durée de vie les enceintes.
• Diminuer le volume dans ces conditions pour éviter tout
dommage :
– Si le son est déformé.
– Lorsque vous ajustez la qualité sonore.
ATTENTION !
• Utiliser les enceintes seulement avec la chaîne
recommandée. Sinon, l’amplificateur et les
enceintes peuvent subir des dommages, et il y aura
risque d’incendie. En cas de dommages ou de
changement brusque des performances, s’adresser
à un technicien de réparations qualifié.
• Suivre les procédures figurant dans ces
instructions lorsque vous montez les enceintes.
3 Raccorder le cordon d’alimentation secteur.
Ne pas utiliser le cordon d’alimentation secteur d’un
autre appareil.
Économie d’énergie
L’appareil consomme une petite quantité d’électricité
(Z« Spécifications ») quand il est en mode veille.
Débrancher l’alimentation si vous n’utilisez pas
l’appareil.
Certains réglages seront perdus après avoir
débranché l’appareil. Vous devez les régler de
nouveau.
RQT9927
3
15
Présentation des commandes
Effectuer les procédures avec la télécommande. Il est également possible d’utiliser les touches de l’appareil principal,
si ce sont les mêmes.
A Interrupteur de veille/marche [`], [1]
Appuyer sur cet interrupteur pour faire basculer
l’appareil du mode de marche au mode de veille, et
vice versa. En mode de veille, l’appareil continue de
consommer une petite quantité de courant.
B Sélectionner la source audio
Sur la télécommande :
Appuyer sur la touche correspondante pour
sélectionner la source.
Sur l’appareil principal :
C Commande de lecture de base
D Voir le menu de configuration
E Afficher les informations le contenu
F Sélectionner ou confirmer l’option
G Ouvrir ou fermer le tiroir du disque
H Diminuer la luminosité de l’écran
Pour annuler, ré-appuyez sur la touche.
I Ajuster le niveau de volume
J Désactiver le son
Pour annuler, ré-appuyez sur la touche.
« MUTE » est également annulé lorsque vous ajustez
le volume ou lorsque vous éteignez l’appareil.
K Afficher le menu de lecture
L Sélectionner des effets sonores
M Afficheur
RQT9927
4
16
N Capteur de la télécommande
Distance : Dans le rayon de 7 m environ
Angle : Environ 20° de haut en bas, 30° à gauche et à
droite
O Port USB ( )
P Tiroir de disque
Q Sélectionner « BLUETOOTH » comme source audio
Appuyer et maintenir la touche enfoncée pour
démarrer l’appairage Bluetooth
®
.
Préparation de la
télécommande
Utiliser des pile alcalines ou au manganèse.
Installez la pile de sorte que les pôles (+ et –) soient
alignés avec ceux de la télécommande.
Loading…
-
Инструкции по эксплуатации
1
Panasonic SC-PM250EE-S инструкция по эксплуатации
(32 страницы)
- Языки:Русский
-
Тип:
PDF -
Размер:
3.41 MB -
Описание:
Музыкальный центр
Просмотр
На NoDevice можно скачать инструкцию по эксплуатации для Panasonic SC-PM250EE-S. Руководство пользователя необходимо для ознакомления с правилами установки и эксплуатации Panasonic SC-PM250EE-S. Инструкции по использованию помогут правильно настроить Panasonic SC-PM250EE-S, исправить ошибки и выявить неполадки.
Страницы и текст этой инструкции
Инструкция музыкального центра Panasonic SC-PM250
Информация отображена на картинке
Информация отображена на картинке
Информация отображена на картинке
Информация отображена на картинке
Как использовать наш сайт инструкций OnlineManuals.ru
Наша цель состоит в том, чтобы предоставить вам быстрый доступ к содержанию инструкции для музыкального центра Panasonic SC-PM250.
С помощью онлайн просмотра, Вы можете быстро просмотреть содержимое инструкции и найти решение проблемы с музыкального центра Panasonic SC-PM250.
Для Вашего удобства
Если листать руководство пользователя музыкального центра Panasonic SC-PM250 прямо на сайте, не очень удобно для Вас, есть два возможных решения:
• Просмотр в полноэкранном режиме — легко просмотреть руководство пользователя (без загрузки его на свой компьютер), Вы можете использовать режим полноэкранного просмотра.
Для просмотра инструкции пользователя музыкального центра Panasonic SC-PM250 на полном экране, используйте кнопку «Открыть в Pdf-viewer».
• Загрузка на компьютер — Вы можете также скачать Инструкция музыкального центра Panasonic SC-PM250 на свой компьютер и сохранить его в файлах.
Многие люди предпочитают читать документы не на экране, а в печатной версии.
Возможность печати руководства пользователя также была предусмотрена на нашем сайте,
и вы можете использовать ее, нажав на иконку «печать» в Pdf-viewer.
Нет необходимости печатать все руководство музыкального центра Panasonic SC-PM250, можно выбрать только нужные страницы инструкции.
- Standby/on switch [], [/I]
Press to switch the unit from on to standby mode or vice versa. In standby mode, the unit is still consuming a small amount of power. - Select the audio source
On the remote control:
Press the corresponding button to select the source.
On the main unit:* For Australia and New Zealand
- Basic playback control
- View the setup menu
- View the content information
- Select or confirm the option
- Open or close the disc tray
- Decrease the brightness of the display panel
To cancel, press the button again. - Adjust the volume level
- Mute the sound
To cancel, press the button again.
«MUTE» is also cancelled when you adjust the volume or when you switch off the system. - View the play menu
- Select the sound effects
- Display panel
- Remote control sensor
Distance: Within approximately 7 m
Angle: Approximately 20° up and down, 30° left and right - USB port ()
- Disc tray
- Select «BLUETOOTH» as the audio source
To start Bluetooth® pairing, press and hold the button.
Preparing the remote control
Use alkaline or manganese battery.
Install the battery so that the poles (+ and –) align with those in the remote control.
Disc
- Press [CD ] (main unit: [OPEN/CLOSE]) to open the disc tray.
Put in a disc with the label facing up.Press again to close the disc tray.
- Press [USB/CD] to select «CD».
USB
- Reduce the volume and connect the USB device to the USB port.
Hold the main unit when connecting or disconnecting the USB device. - Press [USB/CD] to select «USB».
Note:
Do not use a USB extension cable. The system cannot recognise USB device connected through a cable.
Bluetooth®
You can connect and play an audio device wirelessly through Bluetooth®.
Preparation
- Switch on the Bluetooth® feature of the device and put the device near the system.
- Read the operating instructions of the device for details.
Pairing a device
Preparation
If this system is connected to a Bluetooth® device, disconnect it (→ «Disconnecting a device»).
- Press [].
If «PAIRING» is shown, continue with step 4. - Press [PLAY MENU] to select «PAIRING».
Or press and hold [ –PAIRING] on the main unit until «PAIRING» is shown. Continue with step 4. - Press [] to select «OK? YES» and then press [OK].
«PAIRING» is shown.
To cancel, select «OK? NO». - Select «SC-PM250» from the Bluetooth® menu of the device.
If prompted for a passkey, input «0000».
The device connects with this system automatically after pairing is complete.
The name of the connected device is shown for a few seconds.
Note:
You can pair up to 8 devices with this system. If a 9th device is paired, the device that has not been used for the longest time will be replaced.
Connecting a device
Preparation
If this system is connected to a Bluetooth® device, disconnect it (→ «Disconnecting a device»).
- Press [].
«BLUETOOTH READY» is shown. - Select «SC-PM250» from the Bluetooth® menu of the device.
The name of the connected device is shown for a few seconds. - Start playback on the device.
Note:
- A device must be paired to connect.
- This system can only connect to one device at a time.
- When «BLUETOOTH» is selected as the source, this system will automatically try to connect to the last connected device.
Disconnecting a device
- Press [].
- Press [PLAY MENU] repeatedly to select «DISCONNECT?».
- Press [] to select «OK? YES» and then press [OK].
«BLUETOOTH READY» is shown.
To cancel, select «OK? NO».
Using the main unit
Press and hold [–PAIRING] until «PAIRING» is shown.
Note:
A device is disconnected when you:
- Select a different source.
- Move the device out of the maximum range.
- Disable the Bluetooth® transmission of the device.
- Switch off the system or the device.
The following marks indicate the availability of the feature.
CD: CD-R/RW in CD-DA format or with MP3 files.
USB: USB device with MP3 files.
BLUETOOTH: Bluetooth® device.
Basic playback
CD USB BLUETOOTH
| Play | Press []. |
| Stop |
Press []. USB The track is memorised. |
| Pause |
Press []. Press again to continue playback. |
| Skip |
Press [] or [] to skip track. CD USB Press [] to skip MP3 album. |
| Search | Press and hold [] or []. |
Note:
Depending on the Bluetooth® device, some operations may not work.
Viewing available information
CD USB BLUETOOTH
You can view the available information on the display panel.
Press [DISPLAY].
Note:
- Maximum characters that can be shown:
CD USB: approximately 32
BLUETOOTH: approximately 16 - This system supports ver. 1.0, 1.1 and 2.3 ID3 tags.
- Text data that the system does not support can show differently.
- Example: MP3 album and track number display.
CD USB
- Press [PLAY MENU] repeatedly to select «PLAYMODE» or «REPEAT».
- Press [] to select the setting and then press [OK].
| PLAYMODE | |
| OFF PLAYMODE | Cancel the setting. |
| 1-TRACK 1TR |
Play one selected track. Press [] or [] to select the track. |
| 1-ALBUM 1ALBUM |
Play one selected MP3 album. Press [] to select the MP3 album. |
| RANDOM RND |
Play all tracks randomly. |
| 1-ALBUM RANDOM 1ALBUM RND |
Play all tracks in one selected MP3 album randomly. Press [] to select the MP3 album. |
| REPEAT | |
| OFF REPEAT | Cancel the setting. |
| ON REPEAT | Repeat playback. |
Note:
- During random playback, you cannot skip to tracks which have been played.
- The setting is cancelled when you open the disc tray.
Link mode
BLUETOOTH
You can change the link mode to suit the connection type.
Preparation
If this system is connected to a Bluetooth® device, disconnect it (→ «Disconnecting a device»).
- Press [PLAY MENU] repeatedly to select «LINK MODE».
- Press [] to select the mode and then press [OK].
MODE 1 Emphasis on connectivity. MODE 2
(default)Emphasis on sound quality.
Input level
BLUETOOTH
You can change the input level setting if the sound input level of the Bluetooth® transmission is too low.
- Press [PLAY MENU] repeatedly to select «INPUT LEVEL».
- Press [] to select the level and then press [OK].
Note:
Select «LEVEL 0» if the sound is distorted.
Note on disc
- This system can play CD-R/RW with CD-DA or MP3 format content.
- Some CD-R/RW cannot be played because of the condition of the recording.
Note on USB device
- This system supports USB 2.0 full speed.
- This system can support USB devices of up to 32 GB.
- Only FAT 12/16/32 file system is supported.
Note on MP3 file
- Files are defined as tracks and folders are defined as albums.
- Tracks must have the extension «.mp3» or «.MP3».
- Tracks will not necessarily be played in the order you recorded them.
- Some files can fail to work because of the sector size.
MP3 file on disc
- This system can access up to:
- 255 albums (including root folder)
- 999 tracks
- 20 sessions
- Disc must conform to ISO9660 level 1 or 2 (except for extended formats).
MP3 file on USB device
- This system can access up to:
- 800 albums (including root folder)
- 8000 tracks
- 999 tracks in one album
Radio
Preparation
For Australia and New Zealand
Press [RADIO] to select «FM» or «AM».
For others
Press [RADIO].
Manual tuning
- Press [PLAY MENU] repeatedly to select «TUNEMODE».
- Press [] to select «MANUAL» and then press [OK].
- Press [] or [] to tune in to the station.
To tune automatically, press and hold the button until the frequency starts changing quickly.
«STEREO» is shown when a stereo broadcast is being received.
Memory presetting
You can preset up to 30 FM stations.
For Australia and New Zealand
You can preset up to 15 AM stations.
Automatic presetting
- Press [PLAY MENU] to select «A.PRESET».
- Press [] to select the setting and then press [OK].
LOWEST Tuning begins from the lowest frequency. CURRENT Tuning begins from the current frequency. The tuner presets all the stations it can receive into the channels in ascending order.
To cancel, press [].
Manual presetting
- Press [PLAY MENU] repeatedly to select «TUNEMODE».
- Press [] to select «MANUAL» and then press [OK].
- Press [] or [] to tune in to the station.
- Press [OK].
- Press [] to select a preset number and then press [OK].
Do steps 3 through 5 again to preset more stations. The new station replaces any station that occupies the same preset number.
Selecting a preset station
- Press [PLAY MENU] repeatedly to select «TUNEMODE».
- Press [] to select «PRESET» and then press [OK].
- Press [] or [] to select the preset station.
Improving the sound quality
When «FM» is selected
- Press [PLAY MENU] repeatedly to select «FM MODE».
- Press [] to select «MONO» and then press [OK].
To cancel, select «STEREO».
«MONO» is also cancelled when you change the frequency.
To memorise the setting
Continue with step 4 of «Manual presetting».
Checking the signal status
When «FM» is selected
For Continental Europe, the United Kingdom and Ireland
Press [PLAY MENU] repeatedly to select «FM STATUS» and then press [OK].
For others
Press [DISPLAY].
| FM | The FM signal is in monaural. The system is not tuned in to a station. |
| FM ST | The FM signal is in stereo. |
| FM MONO | «MONO» is selected as the «FM MODE». |
RDS broadcasting
For Continental Europe, the United Kingdom and Ireland
This system can show the text data transmitted by the radio data system (RDS) available in some areas.
Press [DISPLAY].
| PS | Programme service |
| PTY | Programme type |
| FREQ | Frequency |
Note:
RDS may not be available if the reception is poor.
AM allocation setting
For Australia and New Zealand
This system can also receive AM broadcasts allocated in 10 kHz steps.
- Press [RADIO] to select «AM».
- Press and hold [SELECTOR] on the main unit.
After a few seconds, the display panel shows the current minimum radio frequency. Release the button when the minimum frequency changes.
- To go back to the initial setting, do the above steps again.
- Preset frequencies are erased after you change the setting.
Clock and timers
Setting the clock
This is a 24-hour clock.
- Press [SETUP] repeatedly to select «CLOCK».
- Press [] to set the time and then press [OK].
To check the time
Press [SETUP] repeatedly to select «CLOCK» and then press [OK].
In standby mode, press [DISPLAY].
Note:
Reset the clock regularly to maintain accuracy.
Sleep timer
The sleep timer switches off the system after the set time.
- Press [SETUP] to select «SLEEP».
- Press [] to select the setting (in minutes) and then press [OK].
To cancel, select «OFF».
Note:
- The remaining time is always shown on the display. The display changes temporarily when you perform other operations.
- The sleep timer can be used together with the play timer.
- The sleep timer always comes first. Be sure not to set an overlap of timers.
Play timer
(Except for Bluetooth® source)
You can set the timer to come on at a certain time to wake you up.
Preparation
Set the clock.
- Press [SETUP] repeatedly to select «TIMER ADJ».
- Press [] to set the start time and then press [OK].
- Do step 2 again to set the end time.
- Press [] to select the source you want to play and then press [OK].
To start the timer
- Press [SETUP] repeatedly to select «TIMER SET».
- Press [] to select «SET» and then press [OK].
«» is shown.
To cancel, select «OFF».
The system must be switched off for the timer to operate.
To check the setting
Press [SETUP] repeatedly to select «TIMER ADJ» and then press [OK].
In standby mode, press [DISPLAY] two times.
Note:
- The timer starts at a low volume and increases gradually to the preset level.
- The timer comes on at the set time every day if the timer is on.
- If you switch off the system and then switch on again while a timer is in operation, the timer will not stop at the end time.
Sound effects
- Press [SOUND] repeatedly to select the sound effect.
- Press [] to select the setting and then press [OK].
| PRESET EQ | «HEAVY» (default), «SOFT», «CLEAR», «VOCAL» or «FLAT» |
| BASS |
–4 to +4 (default: 0) Using the main unit
|
| TREBLE |
–4 to +4 (default: 0) Using the main unit
|
| D.BASS | «ON D.BASS» (default) or «OFF D.BASS» |
| SURROUND | «ON SURROUND» or «OFF SURROUND» (default) |
Others
Auto off
This system automatically switches off when you do not use it for 20 minutes.
- Press [SETUP] repeatedly to select «AUTO OFF».
- Press [] to select «ON» and then press [OK].
To cancel, select «OFF».
Note:
This function does not work when you are in radio source or when a Bluetooth® device is connected.
Bluetooth® standby
This function automatically switches on the system when you establish a Bluetooth® connection from a paired device.
- Press [SETUP] repeatedly to select «BLUETOOTH STANDBY».
- Press [] to select «ON» and then press [OK].
To cancel, select «OFF».
Checking the software version
- Press [SETUP] repeatedly to select «SW VER.» and then press [OK].
The software version is shown. - Press [OK] again to exit.
Maintenance
To clean this system, wipe with a soft, dry cloth.
- Never use alcohol, paint thinner or benzine to clean this system.
- Before using chemically treated cloth, read the instructions that came with the cloth carefully.
Troubleshooting
Before requesting service, make the following checks. If you are in doubt about some of the check points, or if the solutions indicated do not solve the problem, consult your dealer for instructions.
Common problems
No operations can be done with the remote control.
- Examine that the battery is installed correctly.
Sound is distorted or no sound.
- Adjust the volume of the system.
- Switch off the system, determine and correct the cause, and then switch on again. It can be caused by straining of the speakers through excessive volume or power, and when using the system in a hot environment.
A humming sound can be heard during playback.
- An AC mains lead or fluorescent light is near the cables. Keep other appliances and cords away from the cables of this system.
Disc
Display not shown correctly.
Playback does not start.
- You have not put in the disc correctly. Put it in correctly.
- Disc is dirty. Clean the disc.
- Replace the disc if it is scratched, warped, or non-standard.
- There is condensation. Let the system dry for 1 to 2 hours.
USB
The USB device or the contents in it cannot be read.
- The format of the USB device or the contents in it are not compatible with the system.
- USB devices with storage capacity of more than 32 GB cannot work in some conditions.
Slow operation of the USB device.
- Large content size or large memory USB device takes longer time to read.
The elapsed time shown is different from the actual play time.
- Transfer the data to another USB device or backup the data and reformat the USB device.
Radio
Sound is distorted.
- Use an optional outdoor antenna. The antenna should be installed by a competent technician.
A beat sound is heard.
- Switch off the TV or move it away from the system.
- Move mobile telephones away from the system if the interference is apparent.
A low hum is heard during AM broadcast.
- Separate the antenna from other cables and cords.
Bluetooth®
Pairing cannot be done.
- Check the Bluetooth® device condition.
- The device is out of the 10 m communication range. Move the device nearer to the system.
The device cannot be connected.
- The pairing of the device was unsuccessful. Do pairing again.
- The pairing of the device has been replaced. Do pairing again.
- This system might be connected to a different device. Disconnect the other device and try pairing the device again.
The device is connected but audio cannot be heard through the system.
- For some built-in Bluetooth® devices, you have to set the audio output to «SC-PM250» manually. Read the operating instructions of the device for details.
Sound from the device is interrupted.
- The device is out of the 10 m communication range. Move the device nearer to the system.
- Remove any obstacle between the system and the device.
- Other devices that use the 2.4 GHz frequency band (wireless router, microwaves, cordless phones, etc.) are interfering. Move the device nearer to the system and distance it from the other devices.
- Select «MODE 1» for stable communication.
Playback image and sound are not synchronised.
- Restart the playback app of the device.
Main unit displays
«—:—«
- You connected the AC mains lead for the first time or there was a power failure recently. Set the clock.
«ADJUST CLOCK»
- The clock is not set. Adjust the clock.
«ADJUST TIMER»
- The play timer is not set. Adjust the play timer.
«AUTO OFF»
- The system has not been used for 20 minutes and will switch off within a minute. To cancel, press any button.
«ERROR»
- An incorrect operation was done. Read the instructions and try again.
«F61″
«F77″
- Disconnect the AC mains lead and consult your dealer.
«F70″
- Examine the Bluetooth® device.
- Disconnect the Bluetooth® device. Switch off the system and then switch on again.
«F76″
- There is a problem with the power supply.
- Disconnect the AC mains lead and consult your dealer.
«NODEVICE»
- The USB device is not connected. Examine the connection.
«NO DISC»
- You have not put in a disc.
«NO PLAY»
- Examine the content. You can only play supported format.
- The system may have a problem. Switch off the system and then switch on again.
«PLAYERROR»
- You disconnected the USB device during playback. Connect the USB device again.
«REMOTE 1″
«REMOTE 2″
- The remote control and the main unit are using different codes. Change the code of the remote control.
- When «REMOTE 1» is shown, press and hold [OK] and []for a minimum of 4 seconds.
- When «REMOTE 2» is shown, press and hold [OK] and [USB/CD] for a minimum of 4 seconds.
«USB OVER CURRENT ERROR»
- The USB device is using too much power. Disconnect the USB device, switch off the system and then switch on again.
«–VBR–»
- The system cannot show the remaining play time for variable bit rate (VBR) tracks.
Remote control code
When other Panasonic equipment responds to the remote control of this system, change the remote control code for this system.
Preparation
Press [USB/CD] to select «CD».
To set the code to «REMOTE 2»
- Press and hold [SELECTOR] on the main unit and [USB/CD] on the remote control.
«REMOTE 2» is shown. - Press and hold [OK] and [USB/CD] for a minimum of 4 seconds.
To set the code to «REMOTE 1»
- Press and hold [SELECTOR] on the main unit and [] on the remote control.
«REMOTE 1» is shown. - Press and hold [OK] and [] for a minimum of 4 seconds.
System memory reset
Reset the memory when the following situations occur:
- There is no response when buttons are pressed.
- You want to clear and reset the memory contents.
- Disconnect the AC mains lead.
- While you press and hold [/I] on the main unit, connect the AC mains lead again.
Continue to press and hold the button until «– – – – – – – –» is shown. - Release [/I].
All the settings are set back to the factory preset. It is necessary to set the memory items again.
About Bluetooth®
Panasonic cannot be held responsible for data and/or information that can possibly be compromised during a wireless transmission.
Frequency band
- This system uses the 2.4 GHz frequency band.
Certification
- This system conforms to the frequency restrictions and has received certification based on frequency laws. Thus, a wireless permit is not necessary.
- The actions below are punishable by law:
- Taking apart or modifying the main unit.
- Removing specification indications.
Restrictions of use
- Wireless transmission and/or usage with all Bluetooth® equipped devices is not guaranteed.
- All devices must conform to standards set by Bluetooth SIG, Inc.
- Depending on the specifications and settings of a device, it can fail to connect or some operations can be different.
- This system supports Bluetooth® security features. But depending on the operating environment and/or settings, this security is possibly not sufficient. Transmit data wirelessly to this system with caution.
- This system cannot transmit data to a Bluetooth® device.
Range of use
- Use this device at a maximum range of 10 m.
- The range can decrease depending on the environment, obstacles or interference.
Interference from other devices
- This system may not function properly and troubles such as noise and sound jumps may arise due to radio wave interference if this unit is located too close to other Bluetooth® devices or the devices that use the 2.4 GHz band.
- This system may not function properly if radio waves from a nearby broadcasting station, etc. is too strong.
Intended usage
- This system is for normal, general use only.
- Do not use this system near an equipment or in an environment that is sensitive to radio frequency interference (example: airports, hospitals, laboratories, etc.).
Licenses
| MPEG Layer-3 audio coding technology licensed from Fraunhofer IIS and Thomson. |
| The Bluetooth® word mark and logos are owned by the Bluetooth SIG, Inc. and any use of such marks by Panasonic Corporation is under license. Other trademarks and trade names are those of their respective owners. |
Making the connections
Connect the AC mains lead only after all the other connections have been made.
The illustrations shown are of the model for Australia and New Zealand. Your unit may differ in appearance.

- Connect the FM indoor antenna.
Place the antenna where reception is best.For the United Kingdom and Ireland
Connect the FM outdoor antenna.
Use an outdoor antenna if the reception is poor.Keep the antenna plug adaptor out of reach of children to prevent swallowing.
Note:
- Do not use the outdoor antenna during a lightning storm.
- Disconnect the outdoor antenna if you do not use the system.
- For Australia and New Zealand
Connect the AM loop antenna.
Stand the antenna up on its base until it clicks. - Connect the speakers.
Be careful not to cross (short-circuit) or reverse the polarity of the speaker wires as doing so may damage the speakers.
- Connect the AC mains lead.
(For the AC mains plug of three pins)
READ THE «Caution for AC mains lead» BEFORE CONNECTION.Do not use an AC mains lead from other equipment.
Conserving power
The system consumes a small amount of power (→ «Specifications») when it is in standby mode. Disconnect the power supply if you do not use the system.
Some settings will be lost after you disconnect the system. You have to set them again.
Your system and the illustrations can look differently. These operating instructions are applicable to the following system.
| System | SC-PM250 |
| Main unit | SA-PM250 |
| Speakers | SB-PM02 |
Back of product
Supplied accessories
Check and identify the supplied accessories.
For the United Kingdom and Ireland
Use numbers indicated in parentheses when asking for replacement parts. (Product numbers correct as of February 2014. These may be subject to change.)
Safety precautions
Unit
- To reduce the risk of fire, electric shock or product damage,
- Do not expose this unit to rain, moisture, dripping or splashing.
- Do not place objects filled with liquids, such as vases, on this unit.
- Use only the recommended accessories.
- Do not remove covers.
- Do not repair this unit by yourself. Refer servicing to qualified service personnel.
- Do not let metal objects fall inside this unit.
AC mains lead
- The mains plug is the disconnecting device. Install this unit so that the mains plug can be unplugged from the socket outlet immediately.
Unit
- To reduce the risk of fire, electric shock or product damage,
- Do not install or place this unit in a bookcase, built-in cabinet or in another confined space. Ensure this unit is well ventilated.
- Do not obstruct this unit’s ventilation openings with newspapers, tablecloths, curtains, and similar items.
- Do not place sources of naked flames, such as lighted candles, on this unit. •
- For Asia and the Middle East
This unit is intended for use in tropical climates.
For others
This unit is intended for use in moderate climates. - This unit may receive radio interference caused by mobile telephones during use. If such interference occurs, please increase separation between this unit and the mobile telephone.
- This unit utilizes a laser. Use of controls or adjustments or performance of procedures other than those specified herein may result in hazardous radiation exposure.
Battery
- Danger of explosion if battery is incorrectly replaced. Replace only with the type recommended by the manufacturer.
- When disposing the batteries, please contact your local authorities or dealer and ask for the correct method of disposal.
- Do not heat or expose to flame.
- Do not leave the battery(ies) in a car exposed to direct sunlight for a long period of time with doors and windows closed.
- Do not break open or short-circuit the battery.
- Do not charge the alkaline or manganese battery.
- Do not use the battery if the cover has peeled off.
- Remove the battery if you do not use the remote control for a long period of time. Keep in a cool, dark area.
Caution for AC mains lead
(For the AC mains plug of three pins)
For your safety, please read the following text carefully.
This appliance is supplied with a moulded three pin mains plug for your safety and convenience.
A 5-ampere fuse is fitted in this plug.
Should the fuse need to be replaced please ensure that the replacement fuse has a rating of 5-ampere and that it is approved by ASTA or BSI to BS1362.
Check for the ASTA mark or the BSI mark on the body of the fuse.
If the plug contains a removable fuse cover you must ensure that it is refitted when the fuse is replaced.
If you lose the fuse cover the plug must not be used until a replacement cover is obtained.
A replacement fuse cover can be purchased from your local dealer.
Before use
Remove the connector cover.
How to replace the fuse
The location of the fuse differ according to the type of AC mains plug (figures A and B). Confirm the AC mains plug fitted and follow the instructions below.
Illustrations may differ from actual AC mains plug.
- Open the fuse cover with a screwdriver.

- Replace the fuse and close or attach the fuse cover.


Disposal of Old Equipment and Batteries
Only for European Union and countries with recycling systems
These symbols on the products, packaging, and/or accompanying documents mean that used electrical and electronic products and batteries must not be mixed with general household waste.
For proper treatment, recovery and recycling of old products and used batteries, please take them to applicable collection points in accordance with your national legislation. By disposing of them correctly, you will help to save valuable resources and prevent any potential negative effects on human health and the environment.
For more information about collection and recycling, please contact your local municipality.
Penalties may be applicable for incorrect disposal of this waste, in accordance with national legislation.
Note for the battery symbol (bottom symbol):
This symbol might be used in combination with a chemical symbol. In this case it complies with the requirement set by the Directive for the chemical involved.
Sales and Support Information
For the United Kingdom and Ireland
Customer Communications Centre
- For customers within the UK: 0844 844 3899
- For customers within Ireland: 01 289 8333
- Monday – Friday 9:00am – 5:00pm (Excluding public holidays).
- For further support on your product, please visit our website: www.panasonic.co.uk
Direct Sales at Panasonic UK
- Order accessory and consumable items for your product with ease and confidence by phoning our Customer Communications Centre Monday – Friday 9:00am – 5:00pm (Excluding public holidays).
- Or go on line through our Internet Accessory ordering application at www.pas-europe.com.
- Most major credit and debit cards accepted.
- All enquiries transactions and distribution facilities are provided directly by Panasonic UK.
- It couldn’t be simpler!
- Also available through our Internet is direct shopping for a wide range of finished products. Take a browse on our website for further details.
Specifications
Amplifier section
RMS output power stereo mode
Front Ch (both ch driven) 10 W per channel (6 Ω), 1 kHz, 10% THD
Total RMS stereo mode power 20 W
For Asia and the Middle East
PMPO output power 220 W
Tuner, terminals section
Preset memory FM 30 stations
For Australia and New Zealand
AM 15 stations
Frequency modulation (FM)
Frequency range 87.50 MHz to 108.00 MHz (50 kHz step)
Antenna terminals 75 Ω (unbalanced)
For Australia and New Zealand
Amplitude modulation (AM)
Frequency range 522 kHz to 1629 kHz (9 kHz step)
520 kHz to 1630 kHz (10 kHz step)
Disc section
Disc played (8 cm or 12 cm) CD, CD-R/RW (CD-DA, MP3)
Pick up
Wavelength 790 nm (CD)
MPEG-1 Layer 3, MPEG-2 Layer 3
USB section
USB port
USB standard USB 2.0 full speed
Media file format support MP3 (*.mp3)
USB device file system FAT12, FAT16, FAT32
USB port power DC OUT 5 V, 500 mA
Bluetooth® section
Version Bluetooth® Ver. 2.1 + EDR
Class Class 2
Supported profiles A2DP, AVRCP
Operating frequency 2.4 GHz band FH-SS
Operation distance 10 m line of sight
Speaker section
Speaker unit(s)
Full range 10 cm cone type x 1 per channel
Impedance 6 Ω
Dimensions (W x H x D) 139 mm x 224 mm x 136 mm
Mass 1.3 kg
General
Power supply
For Asia and the Middle East AC 110 V to 240 V, 50/60 Hz
For others AC 220 V to 240 V, 50 Hz
Power consumption 14 W
Dimensions (W x H x D) 184 mm x 123 mm x 228 mm
Mass 1.1 kg
Operating temperature range 0°C to +40°C
Operating humidity range 35% to 80% RH (no condensation)
Power consumption in standby mode
(With «BLUETOOTH STANDBY» set to «OFF»)
0.2 W (approximate)
Power consumption in standby mode
(With «BLUETOOTH STANDBY» set to «ON»)
0.3 W (approximate)
Note:
- Specifications are subject to change without notice. Mass and dimensions are approximate.
- Total harmonic distortion is measured by the digital spectrum analyzer.
Manufactured by: Panasonic Corporation
Kadoma, Osaka, Japan
Importer for Europe: Panasonic Marketing Europe GmbH
Panasonic Testing Centre
Winsbergring 15, 22525 Hamburg, Germany
Panasonic Corporation
Web Site: http://panasonic.net
© Panasonic Corporation 2014
Here you can download full pdf version of manual, it may contain additional safety instructions, warranty information, FCC rules, etc.