
Marantz, мировой лидер в области передовых аудио технологий, выпустил пару тонкопрофильных AV ресиверов — NR1510 и NR1710 с 4K Ultra HD разрешением видео. Умещаясь в очень компактном корпусе, новые NR ресиверы оснащены новейшими технологиями, необходимыми для создания подлинно волнующего, полного погружения в окружающий звук, не принося при этом в жертву ценное жилое пространство, отведенное для центра развлечений. Как и другие компоненты Marantz, новые AV ресиверы тщательно тюнингованы экспертами по звуку Marantz – чтобы выдавать прославленное, фирменное звучание Marantz для взыскательных аудиофилов и просто любителей музыки.
Информация взята с сайта avcomfort.ru
«Последние дополнения к нашей серии тонкопрофильных сетевых AV ресиверов продолжают демонстрировать мастерство Marantz в синтезе самого музыкального звучания с передовыми технологическими решениями и элегантным тонким дизайном», — сказал Эммануэль Мийо (Emmanuel Millot), глобальный бренд-директор (Global Brand Director) Marantz. «Мы оснастили обе модели большой мощностью и включили в них последнюю версию HDMI интерфейса, наряду с совместимостью голосового управления с ведущими в отрасли платформами искусственного интеллекта. Обе новые модели легко отвечают потребностям большинства энтузиастов, не жертвуя при этом жилым пространством, и являются идеальным вариантом для слушателей, желающих перейти от саундбара к продукту с лучшим звуком и большей простотой использования».
Возможность полного погружения в окружающий звук. NR1510 позволяет владельцу преобразовать свои впечатления от домашнего кино и поднять их на новую высоту — благодаря поддержке многомерных объектно-ориентированных аудио форматов, включая Dolby Atmos, а также технологии виртуализации верхних каналов Dolby Atmos Height Virtualization, DTS:X и DTS Virtual:X — для того чтобы создать поразительно реалистичные кинематографические ощущения.
Технология Dolby Atmos Height Virtualization, реализованная в NR1510, дает покупателям возможность получить 3D звуковое поле без необходимости установки специальных верхних или тыловых колонок. Слушатели могут сконфигурировать до пяти каналов для комплекта 5.1, а технология Dolby Atmos Height Virtualization добавляет виртуальные эффекты высоты и окружения звуком. Можно также использовать все семь каналов для 7.1-канального комплекта, а технология Height Virtualization добавит виртуальные эффекты высоты — для более захватывающего впечатления, без выделенных тыловых или верхних колонок.
Мощные усилители. Усилители мощности на дискретных элементах, выдающие большие токи, обеспечивают исключительно высокое качество звука для фильмов и музыки. Все каналы выдают одинаковую мощность с возможностью работы с широким разнообразием акустических систем – от полочных до крупных напольных колонок, требовательных по нагрузке.
Новейшие технологии HDMI. Marantz NR1510 имеет шесть HDMI входов, один из них на передней панели для быстрого подсоединения. Каждый из них поддерживает новейшие аудио и видео форматы, в том числе HDCP 2.3, 4K Ultra HD 60Hz видео, цветовое кодирование 4:4:4, Dolby Vision, HLG, High Dynamic Range (HDR10), и сквозной пропуск BT.2020.
Благодаря поддержке eARC (Enhanced Audio Return Channel), обеспечивающему передачу объектно-ориентированного аудио и файлов со сжатием без потерь – таких как Dolby TrueHD и Dolby Atmos из TV приложений, Marantz NR1510 позволяет владельцам легко наслаждаться полным погружением в аудио и звуком лучшего качества с телевизора.
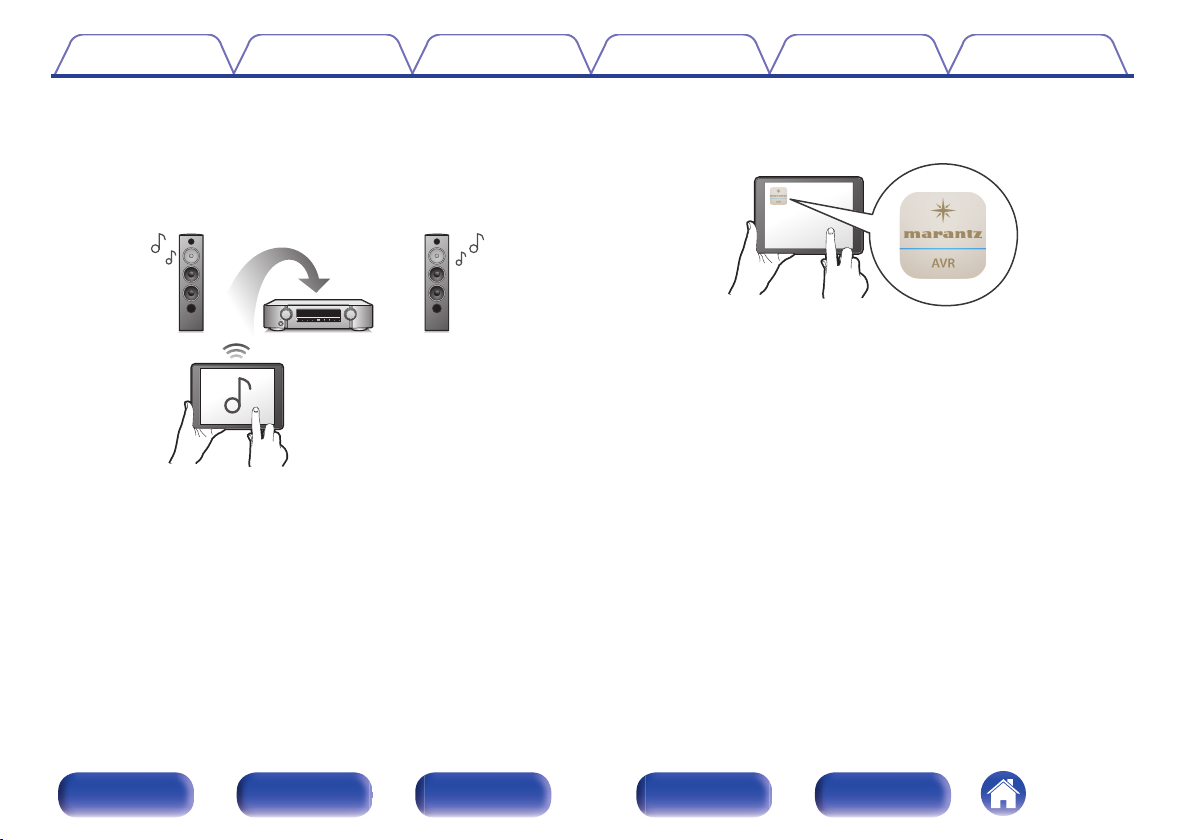
Легкая настройка, простота использования. На задней панели Marantz NR1510 горизонтальный ряд колоночных клемм премиум-класса с цветовым кодированием, а в комплекте прилагаются соответствующие наклейки на кабели – чтобы гарантировать правильное соединение. Помощник в настройке — Setup Assistant вместе с системой автокалибровки акустики Audyssey MultEQ Room Correction выдает на экране четкие указания, для оптимальную настройку для любой конфигурации и любой жилой комнаты. А благодаря приложению HEOS повседневное использование значительно облегчается.
Голосовое управление. Благодаря встроенному HEOS, Marantz NR1510 может работать с ведущими голосовыми агентами — Amazon Alexa, Google Assistant и Apple Siri. Используя приложение HEOS, владельцы могут своим голосом запускать стриминг музыки с различных популярных онлайн сервисов. Другими командами можно переключать подключенные компоненты, регулировать громкость, делать паузы, приглушать звук, переходить к предыдущей или следующей дорожке, и многое другое.
Ключевые достоинства Marantz NR1510:
— 5.2-канальный ресивер, до 85 Вт на канал чистого звука Marantz
— Сквозной пропуск 4K/60 Hz, цветовое кодирование 4:4:4, HDR10 и BT.2020
— Поддержка Dolby Vision, Hybrid Log-Gamma (HLG), eARC и ALLM для улучшенного качества аудио и видео
— Dolby TrueHD и DTS-HD Master Audio
— Возможность декодирования ALAC, FLAC и WAV файлов с разрешением до 24-bit/192-kHz, а также треков в DCD 2.8MHz и 5.6MHz для прослушивания звука высокого разрешения
— Встроенный HEOS для мультирумного стриминга, передачи музыки и голосового управления
— Поддержка систем голосового управления Alexa, Google Home и Apple Siri
— Поддержка всех основных стриминговых сервисов, включая Spotify, Amazon Music, Deezer, Tidal, и некоторых других
— Поддержка стриминга музыки через Bluetooth, AirPlay 2 или приложение HEOS
— Встроенный вход Phono для подключения проигрывателей виниловых пластинок
— Встроенный Wi-Fi с поддержкой двух диапазонов 2.4GHz/5GHz (две антенны)
— Авто-режим с малой задержкой (Auto Low Latency Mode — ALLM) для консолей Xbox One, 2 выхода на сабвуферы
Дополнительные функции NR1510 включают 5.2-канальный ресивер, с 85 Вт на канал чистого звука Marantz. Шесть HDMI входов с масштабированием до 4K. Полное погружение в 3D звук с помощью Dolby Atmos/Dolby Height Virtualization и DTS:X/DTS Virtual:X. совершенствованный графический интерфейс пользователя…
Информация взята с сайта avcomfort.ru
Хорошее руководство по эксплуатации
Законодательство обязывает продавца передать покупателю, вместе с товаром, руководство по эксплуатации Marantz NR1510. Отсутствие инструкции либо неправильная информация, переданная потребителю, составляют основание для рекламации в связи с несоответствием устройства с договором. В законодательстве допускается предоставлении руководства в другой, чем бумажная форме, что, в последнее время, часто используется, предоставляя графическую или электронную форму инструкции Marantz NR1510 или обучающее видео для пользователей. Условием остается четкая и понятная форма.
Что такое руководство?
Слово происходит от латинского «instructio», тоесть привести в порядок. Следовательно в инструкции Marantz NR1510 можно найти описание этапов поведения. Цель инструкции заключается в облегчении запуска, использования оборудования либо выполнения определенной деятельности. Инструкция является набором информации о предмете/услуге, подсказкой.
К сожалению немного пользователей находит время для чтения инструкций Marantz NR1510, и хорошая инструкция позволяет не только узнать ряд дополнительных функций приобретенного устройства, но и позволяет избежать возникновения большинства поломок.
Из чего должно состоять идеальное руководство по эксплуатации?
Прежде всего в инструкции Marantz NR1510 должна находится:
— информация относительно технических данных устройства Marantz NR1510
— название производителя и год производства оборудования Marantz NR1510
— правила обслуживания, настройки и ухода за оборудованием Marantz NR1510
— знаки безопасности и сертификаты, подтверждающие соответствие стандартам
Почему мы не читаем инструкций?
Как правило из-за нехватки времени и уверенности в отдельных функциональностях приобретенных устройств. К сожалению само подсоединение и запуск Marantz NR1510 это слишком мало. Инструкция заключает ряд отдельных указаний, касающихся функциональности, принципов безопасности, способов ухода (даже то, какие средства стоит использовать), возможных поломок Marantz NR1510 и способов решения проблем, возникающих во время использования. И наконец то, в инструкции можно найти адресные данные сайта Marantz, в случае отсутствия эффективности предлагаемых решений. Сейчас очень большой популярностью пользуются инструкции в форме интересных анимаций или видео материалов, которое лучше, чем брошюра воспринимаются пользователем. Такой вид инструкции позволяет пользователю просмотреть весь фильм, не пропуская спецификацию и сложные технические описания Marantz NR1510, как это часто бывает в случае бумажной версии.
Почему стоит читать инструкции?
Прежде всего здесь мы найдем ответы касательно конструкции, возможностей устройства Marantz NR1510, использования отдельных аксессуаров и ряд информации, позволяющей вполне использовать все функции и упрощения.
После удачной покупки оборудования/устройства стоит посвятить несколько минут для ознакомления с каждой частью инструкции Marantz NR1510. Сейчас их старательно готовят или переводят, чтобы они были не только понятными для пользователя, но и чтобы выполняли свою основную информационно-поддерживающую функцию.
Contents Connections Playback Settings Tips Appendix
.
AV Surround Receiver
NR1510
Front panel Display Rear panel Remote Index
1
Owner’s Manual
Contents Connections Playback Settings Tips Appendix
Accessories
Inserting the batteries
Operating range of the remote control unit
Features
High quality sound
High performance
Easy operation
Part names and functions
Front panel
Display
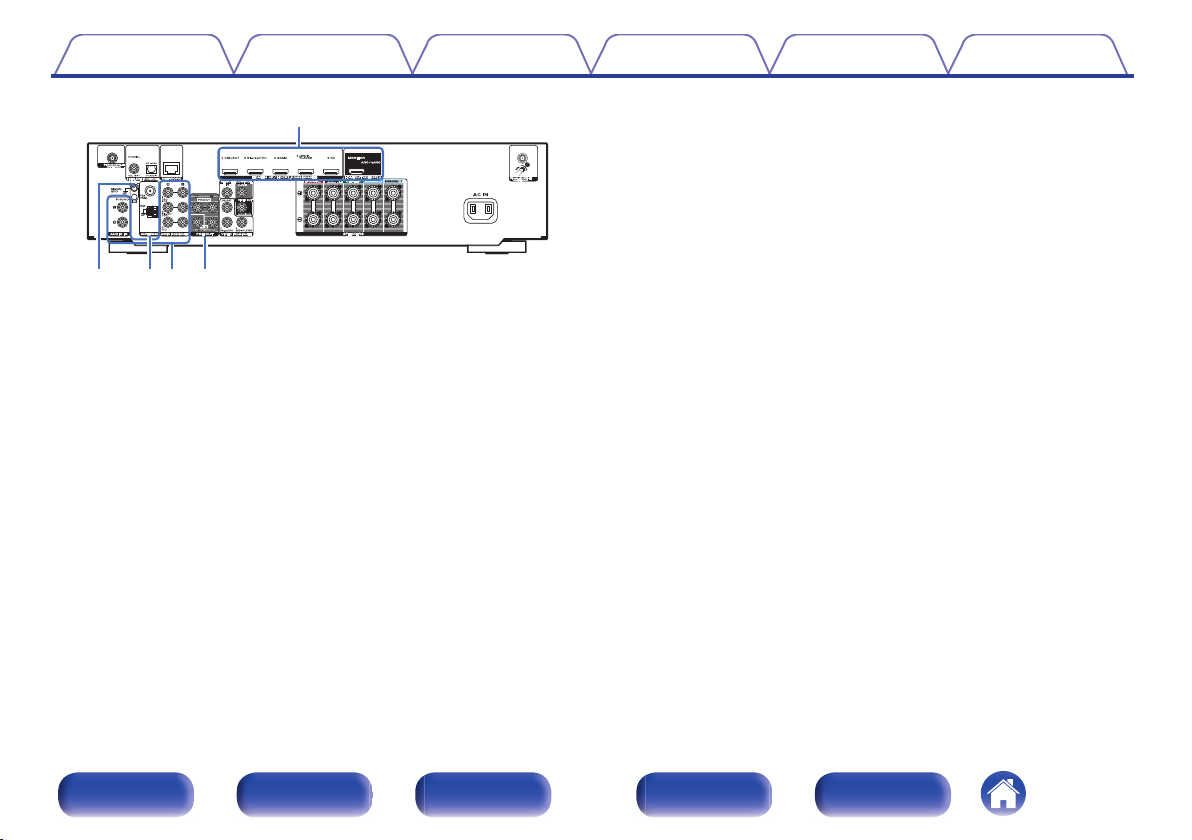
Rear panel
Remote control unit
Connections
Speaker installation
Connecting speakers
Before connecting speakers
Standard connection
8
Connecting a TV
Connection 1 : TV equipped with an HDMI connector and
9
compatible with the ARC (Audio Return Channel) / eARC
9
10
10
10
13
14
14
17
19
23
27
29
29
32
(Enhanced Audio Return Channel)
Connection 2 : TV equipped with an HDMI connector and
incompatible with the ARC (Audio Return Channel) / eARC
(Enhanced Audio Return Channel)
Connection 3 : TV equipped without an HDMI connector
Connecting a playback device
Connecting a set-top box (Satellite tuner/cable TV)
Connecting a DVD player or Blu-ray Disc player
Connecting a video camcorder or game console
Connecting a turntable
Connecting a USB memory device to the USB port
Connecting FM/AM antennas
Connecting to a home network (LAN)
Wired LAN
Wireless LAN
Connecting an external control device
REMOTE CONTROL jacks
Connecting the power cord
34
35
36
37
38
39
40
41
42
43
44
46
46
47
48
48
49
Front panel Display Rear panel Remote Index
2
Contents Connections Playback Settings Tips Appendix
Playback
Basic operation
Turning the power on
Selecting the input source
Adjusting the volume
Turning off the sound temporarily (Muting)
Playback a DVD player/Blu-ray Disc player
Playing a USB memory device
Playing files stored on USB memory devices
Listening to music on a Bluetooth device
Playing music from Bluetooth device
Pairing with other Bluetooth devices
Reconnecting to this unit from a Bluetooth device
Listening to FM/AM broadcasts
51
51
51
52
52
52
53
54
57
58
59
60
Listening to FM/AM broadcasts
Tuning in by entering the frequency (Direct Tune)
RDS Search
PTY Search
TP Search
Radio text
Changing the tune mode (Tune Mode)
Tuning in to stations and presetting them automatically (Auto
Preset)
Presetting the current broadcast station (Preset Memory)
Listening to preset stations
Specify a name for the preset broadcast station (Preset Name)
Skipping preset broadcast stations (Preset Skip)
Cancelling Preset Skip
61
62
64
64
65
66
66
67
67
68
68
69
70
71
Front panel Display Rear panel Remote Index
3

Contents Connections Playback Settings Tips Appendix
Listening to Internet Radio
Listening to Internet Radio
Playing back files stored on a PC or NAS
Playing back files stored on a PC or NAS
Getting the HEOS App
HEOS Account
Playing from streaming music services
Listening to the same music in multiple rooms
AirPlay function
Playing songs from your iPhone, iPod touch or iPad
Playing iTunes music with this unit
Play a song from your iPhone, iPod touch or iPad on multiple
synced devices (AirPlay 2)
Spotify Connect function
Playing Spotify music with this unit
Convenience functions
Adding to HEOS Favorites
Playing back HEOS Favorites
Deleting a HEOS Favorites
Adjusting the volume of each channel to match the input source
(Ch Level Adjust)
Adjusting the tone (Tone)
Displaying your desired video during audio playback (Video
Select)
72
Selecting a sound mode
73
74
75
78
79
80
83
87
88
88
89
90
90
91
92
92
93
94
95
96
Selecting a sound mode
Direct playback
Pure Direct playback
Auto surround playback
Description of sound mode types
Sound mode that can be selected for each input signal
HDMI Control function
Setting procedure
Smart Menu function
Sleep timer function
Using the sleep timer
Smart select function
Calling up the settings
Changing the settings
Panel lock function
Disabling all key button operations
Disabling all button operations except VOLUME
Canceling the Panel lock function
Remote lock function
Disabling the sensor function of the remote control unit
Enabling the remote sensor function
Web control function
Controlling the unit from a web control
97
98
99
99
100
101
104
107
107
108
110
111
112
113
114
115
115
115
116
117
117
117
118
118
Front panel Display Rear panel Remote Index
4

Contents Connections Playback Settings Tips Appendix
Settings
Menu map
Menu operations
Audio
Center Level
Subwoofer Level
Surr.Parameter
M-DAX
Audio Delay
Volume
Audyssey
Manual EQ
Video
HDMI Setup
On Screen Disp.
4K Signal Format
TV Format
®
120
124
125
125
125
126
130
131
132
133
135
137
137
142
143
144
Inputs
Input Assign
Source Rename
Hide Sources
Source Level
Speakers
Audyssey® Setup
Procedure for speaker settings (Audyssey® Setup)
Error messages
Retrieving Audyssey® Setup settings
Manual Setup
Speaker Config.
Distances
Levels
Crossovers
Bass
145
145
148
148
148
149
149
151
157
158
159
159
161
162
163
164
Front panel Display Rear panel Remote Index
5

Contents Connections Playback Settings Tips Appendix
Network
Information
Connection
Wi-Fi Setup
Settings
Network Control
Friendly Name
Diagnostics
AirPlay
HEOS Account
You have not signed in
You have already signed in
165
165
165
166
167
169
169
170
170
171
171
171
General
Language
ECO
Smart Sel.Names
Front Display
Firmware
Information
Usage Data
Save & Load
Setup Lock
Reset
172
172
172
175
175
176
179
180
181
181
182
Front panel Display Rear panel Remote Index
6
Contents Connections Playback Settings Tips Appendix
Tips
Tips
Troubleshooting
Power does not turn on / Power is turned off
Operations cannot be performed through the remote control unit
Display on this unit shows nothing
No sound comes out
Desired sound does not come out
Sound is interrupted or noise occurs
No video is shown on the TV
The menu screen is not displayed on the TV
The color of the menu screen and operations content displayed
on the television is different from normal
AirPlay cannot be played back
USB memory devices cannot be played back
Bluetooth cannot be played back
The Internet radio cannot be played back
Music files on PC or NAS cannot be played back
Various online services cannot be played
The HDMI Control function does not work
Cannot connect to a wireless LAN network
Update/upgrade error messages
Resetting factory settings
Resetting network settings
184
186
187
188
188
189
190
192
193
194
194
195
196
197
198
199
200
200
201
202
203
204
Appendix
About HDMI
Playing back a USB memory devices
Playing back a Bluetooth device
Playing back a file saved on a PC or NAS
Playing back Internet Radio
Personal memory plus function
Last function memory
Sound modes and channel output
Sound modes and surround parameters
Types of input signals, and corresponding sound modes
Explanation of terms
Trademark information
Specifications
Index
205
208
209
210
211
211
211
212
213
216
219
226
228
234
Front panel Display Rear panel Remote Index
7
Quick Start Guide
Safety Instructions
Cautions on Using Batteries Notes on radio Cable labels
Power cord
FM indoor antenna AM loop antenna
Sound calibration
microphone
Sound calibration
microphone stand
Remote control unit
(RC040SR)
R03/AAA batteries External antennas for
Bluetooth/wireless
connectivity
Contents Connections Playback Settings Tips Appendix
Thank you for purchasing this Marantz product.
To ensure proper operation, please read this owner’s manual carefully before using the product.
After reading this manual, be sure to keep it for future reference.
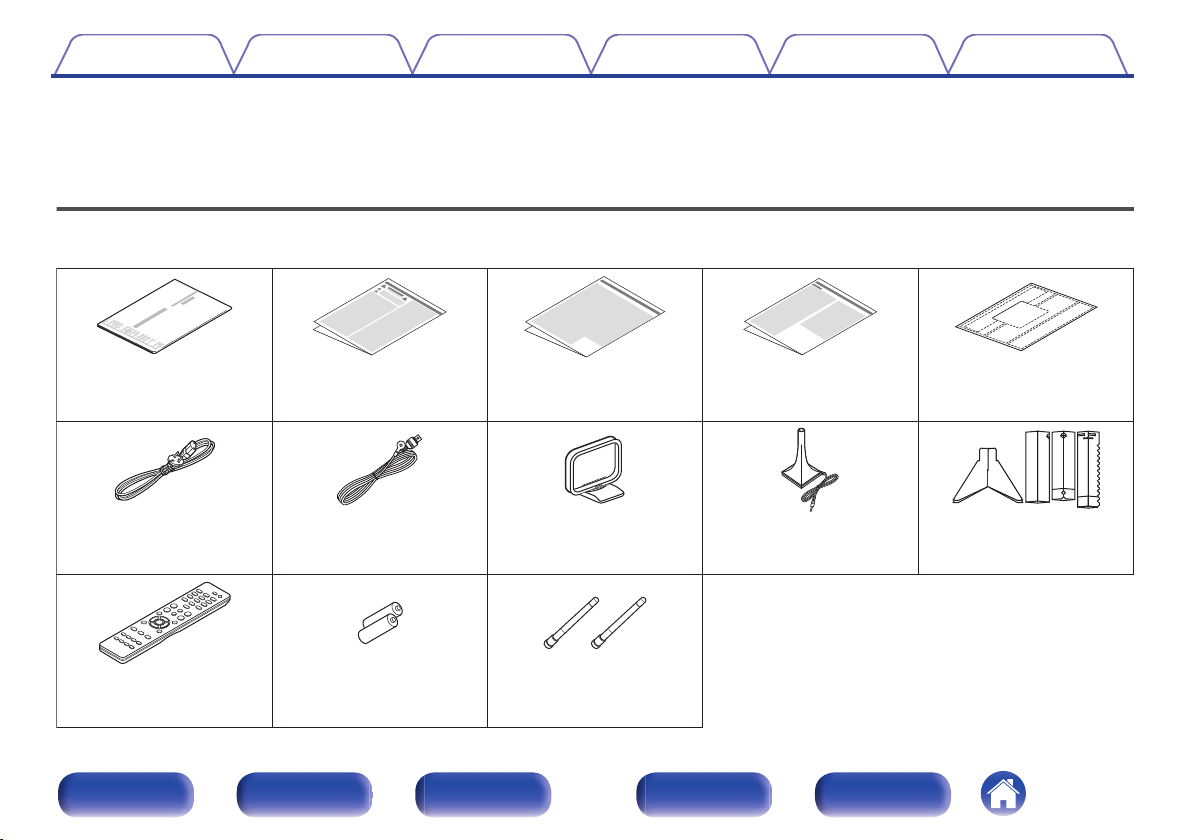
Accessories
Check that the following parts are supplied with the product.
.
Front panel Display Rear panel Remote Index
8
Contents
Connections Playback Settings Tips Appendix
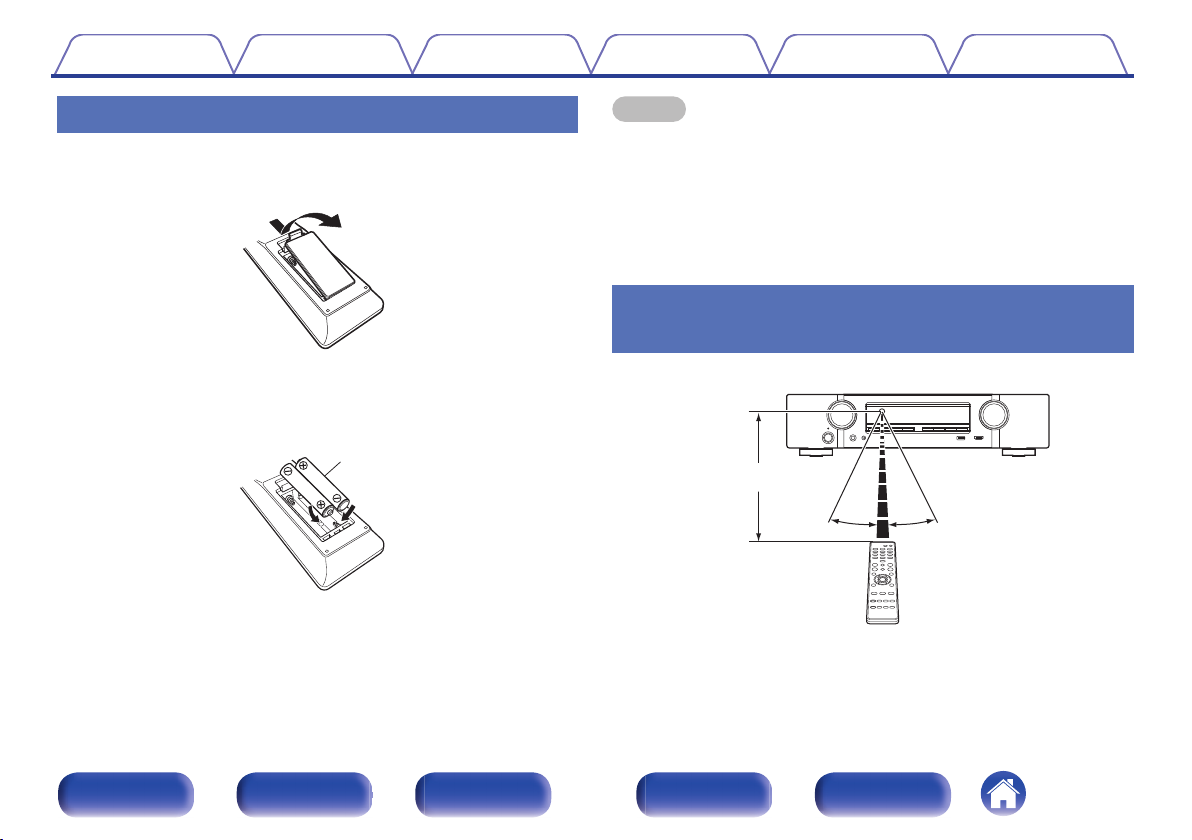
Inserting the batteries
Remove the rear lid in the direction of the arrow and
1
remove it.
Insert two batteries correctly into the battery
2
compartment as indicated.
Put the rear cover back on.
3
NOTE
To prevent damage or leakage of battery fluid:
0
Do not use a new battery together with an old one.
0
Do not use two different types of batteries.
0
Remove the batteries from the remote control unit if it will not be in use for long
0
periods.
If the battery fluid should leak, carefully wipe the fluid off the inside of the battery
0
compartment and insert new batteries.
Operating range of the remote control
unit
.
.
Point the remote control unit at the remote sensor when operating it.
.
Front panel Display Rear panel Remote Index
9
Contents
Features
Connections Playback Settings Tips Appendix
High quality sound
With discrete circuit technology, the power amplifier provides
0
identical quality for all 5-channels (60 Watts x 5-channels)
For optimum realism and stunning dynamic range, the power amplifier
section features discrete power devices (not integrated circuitry).
By using high current, high power discrete power devices, the amplifier
is able to easily drive high quality speakers.
High performance
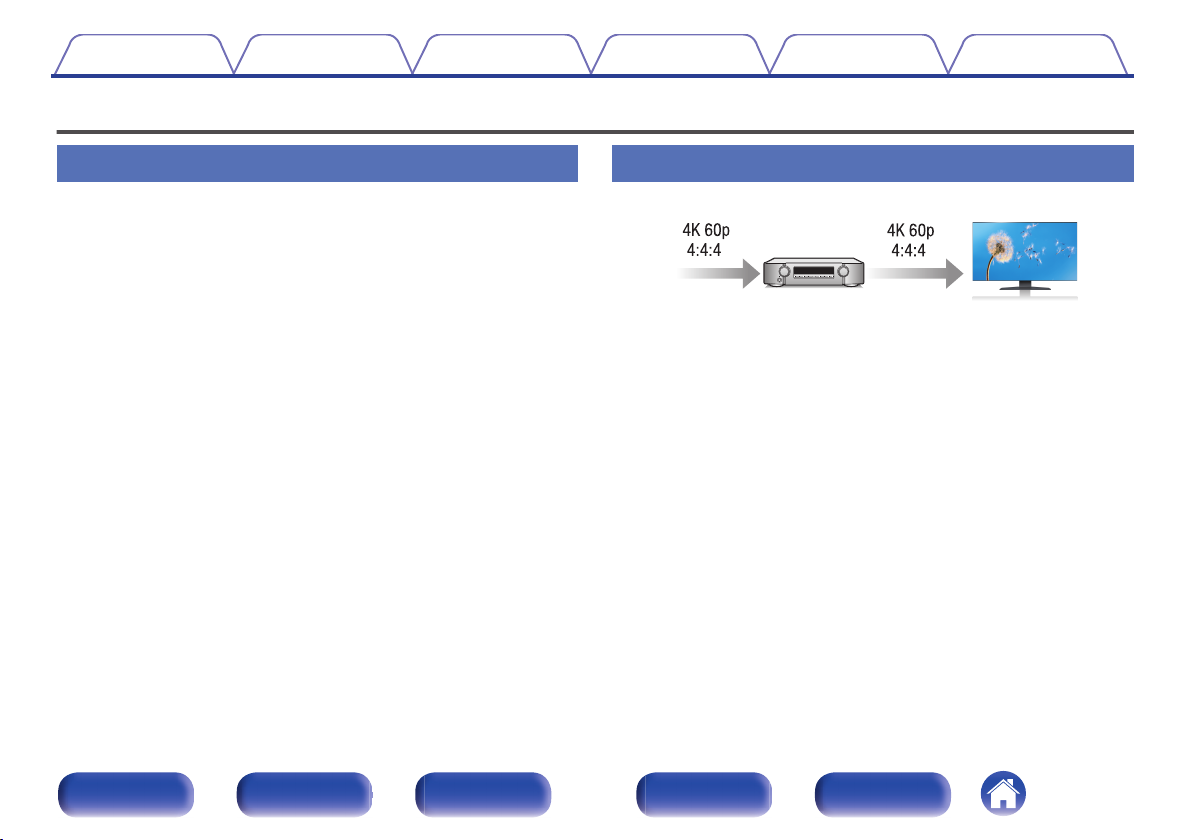
4K 60Hz input/output supported
0
.
When 4K Ultra HD (High Definition) is used, an input/output speed of 60
frames per second (60p) is achieved for video signals. When connected
to 4K Ultra HD and 60p video signal input compatible TV, you can enjoy
the sense of realism only available from high-definition images, even
when viewing fast-moving video.
This unit also supports image processing for 4K 60p, 4:4:4 and 24-bit
videos. By processing the video at the original resolution, this unit lets
you enjoy flawless, high-definition picture quality.
This unit also supports HDR (High Dynamic Range) and BT.2020 wide
color gamut.
HDCP 2.3
0
This unit is compatible with HDCP 2.3 copyright protection standard.
Front panel Display Rear panel Remote Index
10
Contents
Connections Playback Settings Tips Appendix
eARC (Enhanced Audio Return Channel) function compatibility
0
The eARC function is compatible with conventional ARC functioncompatible audio formats in addition to multichannel linear PCM, Dolby
TrueHD, DTS-HD Master Audio and other audio formats a conventional
ARC function cannot transmit.
Additionally, connecting to an eARC function-compatible television
enables enjoyment of higher-quality surround playback of the audio
content played from your television.
HDMI connections enable connection to various digital AV
0
devices (6 inputs, 1 output)
.
This unit is equipped with 6 HDMI inputs and 1 HDMI output enabling
connection to various HDMI compatible devices such as Blu-ray Disc
players, game consoles and HD video camcorders.
0
The device is equipped with a AirPlay® function in addition to
network functions such as Internet radio etc. (v p. 87)
.
You can enjoy a wide variety of content, including listening to Internet
Radio, playing audio files stored on your PC.
This unit also supports Apple AirPlay which lets you stream your music
library from an iPhone®, iPad®, iPod touch® or iTunes®.
0
Supports AirPlay 2® wireless audio
Sync multiple AirPlay 2 compatible devices/speakers for simultaneous
playback.
This unit supports AirPlay 2 and requires iOS 11.4 or later.
Front panel Display Rear panel Remote Index
11
Contents
Playback of DSD and FLAC files via USB and networks
0
Connections Playback Settings Tips Appendix
This unit supports the playback of high resolution audio formats such as
DSD (5.6 MHz) and FLAC 192 kHz files. It provides high quality
playback of high resolution files.
Wireless connection with Bluetooth devices can be carried out
0
easily (v p. 57)
.
You can enjoy music simply by connecting wirelessly with your
smartphone, tablet, PC, etc.
Energy-saving design
0
This unit is equipped with an ECO Mode function that allows you to
enjoy music and movies while reducing the power consumption during
use, and also an auto-standby function that automatically turns off the
power supply when the unit is not in use. This helps reduce
unnecessary power use.
0
Compatible with the “Marantz 2016 AVR Remote” Appz for
performing basic operations of the unit with an iPad, iPhone or
Android™ devices (Google, Amazon Kindle Fire)
.
Along with many new features, the graphics and user interface have
been completely overhauled. The new app gives you full control of this
unit as well as access to its setup menu for detailed adjustments from
your phones or tablets. “Marantz 2016 AVR Remote” App also gives
you quick access to the receiver’s status display, option menus,
Marantz Blu-ray Disc player control, and online owner’s manual for your
convenience.
Download the appropriate “Marantz 2016 AVR Remote” App for your iOS or
z
Android devices. This unit needs to be connected to the same LAN or Wi-Fi
(wireless LAN) network that the iPad, iPhone or Android™ is connected to.
Front panel Display Rear panel Remote Index
12
Contents Connections Playback Settings Tips Appendix
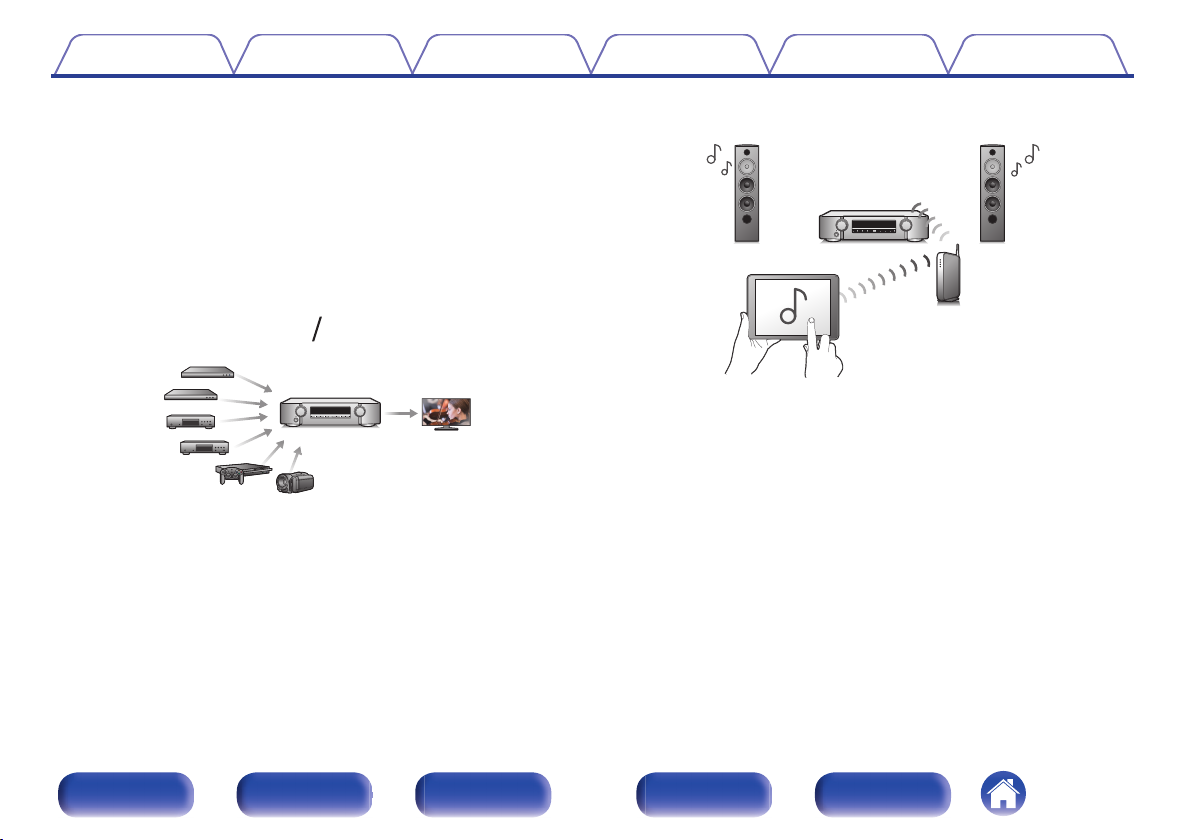
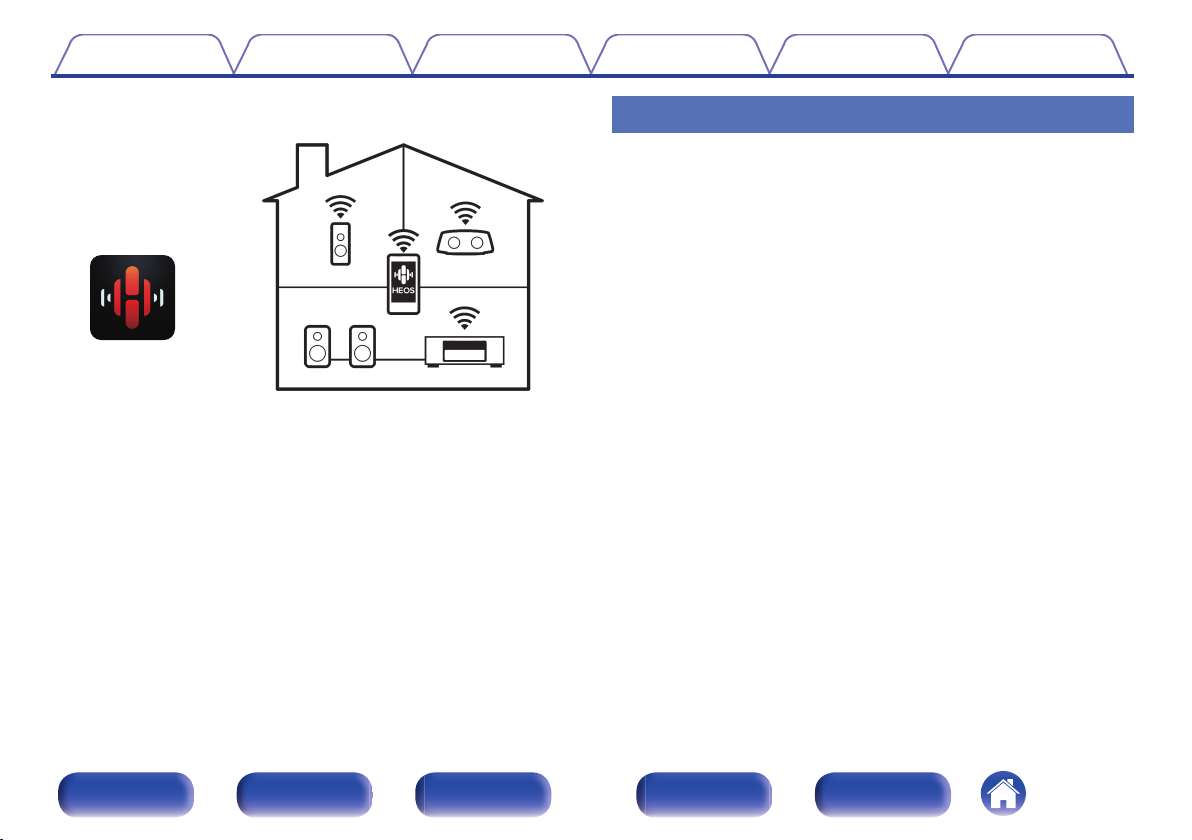
HEOS provides streaming music from your favorite online music
0
sources
.
HEOS wireless multi-room sound system that enables you to enjoy your
favorite music anywhere and everywhere around your home. By utilizing
your existing home network and the HEOS App (available for iOS,
Android and Amazon devices), you can explore, browse, and play
music from your own music library or from many online streaming music
services.
When multiple HEOS devices are connected to the same network,
HEOS devices can be grouped to play back the same music on all
devices simultaneously, or different music can be played on each
separate HEOS device.
Easy operation
“Setup Assistant” provides easy-to-follow setup instructions
0
First select the language when prompted. Then simply follow the
instructions displayed on the TV screen to set up the speakers, network,
etc.
Easy to use Graphical User Interface
0
This unit is equipped with a Graphical User Interface for improved
operability.
Front panel Display Rear panel Remote Index
13
Contents
Connections Playback Settings Tips Appendix
Part names and functions
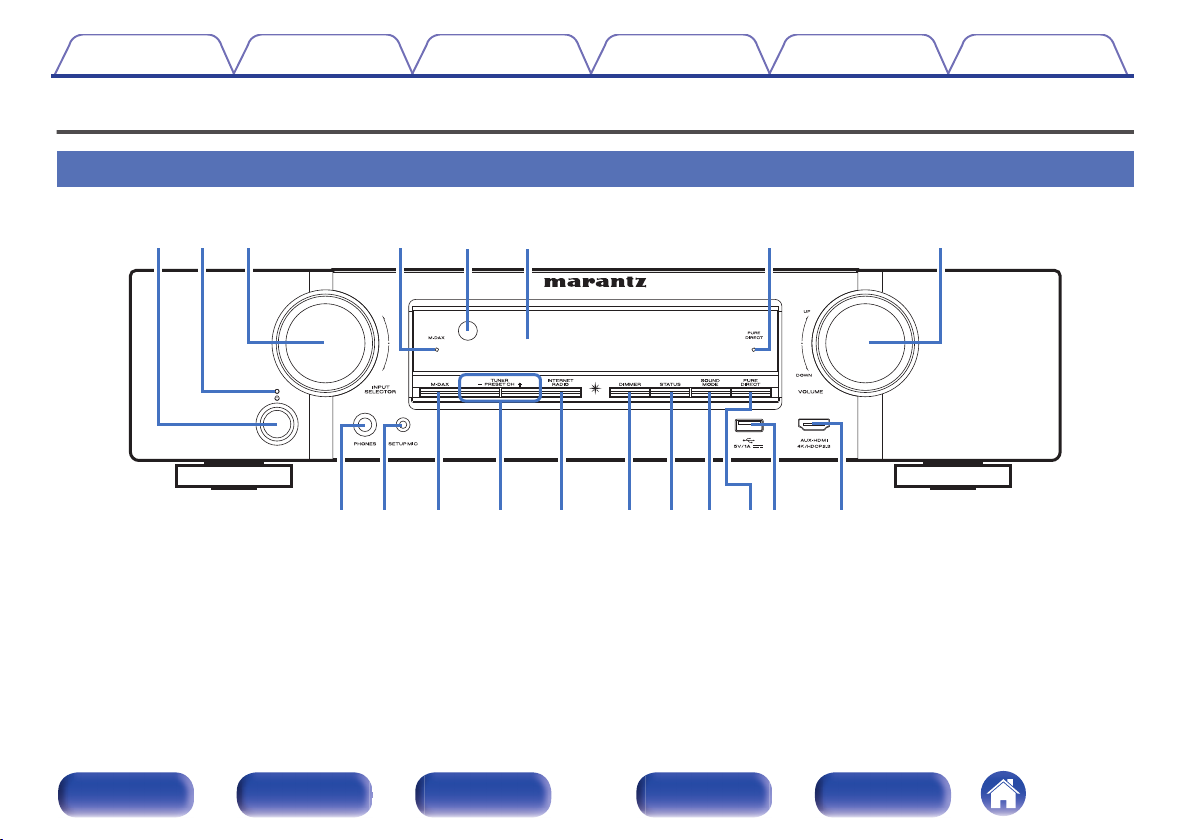
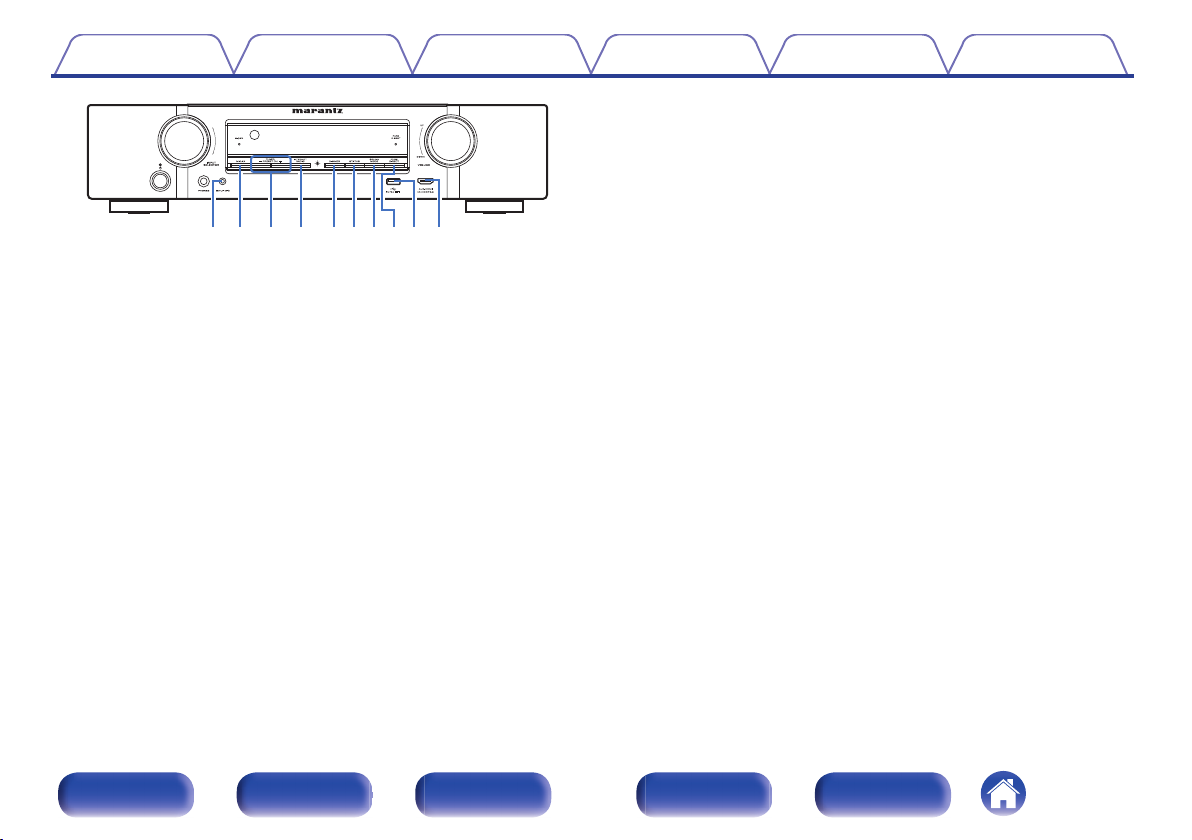
Front panel
.
For details, see the next page.
14
Front panel Display Rear panel Remote Index
Contents Connections Playback Settings Tips Appendix
INPUT SELECTOR knob
C
This selects the input source. (v p. 51)
M-DAX indicator
D
This lights when the M-DAX mode is selected. (v p. 130)
Remote control sensor
E
This receives signals from the remote control unit. (v p. 9)
Display
F
.
Power operation button (X)
A
Used to turn the power on/off (standby). (v p. 51)
Power indicator
B
This is lit as follows according to the power status:
Off: Power on
0
Red: Normal standby
0
Orange:
0
0
When “HDMI PassThrough” is set to “On” (v p. 138)
0
When “HDMI Control” is set to “On” (v p. 139)
0
When “Network Control” is set to “Always On” (v p. 169)
This displays various pieces of information. (v p. 17)
PURE DIRECT indicator
G
This lights when the “Pure Direct” mode is selected as the sound mode.
(v p. 99)
VOLUME knob
H
This adjusts the volume level. (v p. 52)
Headphones jack (PHONES)
I
This is used to connect headphones.
When the headphones are plugged into this jack, audio will no longer
be output from the connected speakers or from the PRE OUT
connectors.
NOTE
To prevent hearing loss, do not raise the volume level excessively when using
0
headphones.
Front panel Display Rear panel Remote Index
15
Contents
.
SETUP MIC jack
J
This is used to connect the supplied Sound calibration microphone.
(v p. 152)
M-DAX button
K
This switches the M-DAX mode. (v p. 130)
Tuner preset channel buttons
L
(TUNER PRESET CH +, –)
These select preset broadcast stations. (v p. 68)
INTERNET RADIO button
M
This switches the input source to “HEOS Music” – “TuneIn Internet
Radio”. (v p. 72)
Connections Playback Settings Tips Appendix
DIMMER button
N
Each press of this switches the brightness of the display. (v p. 175)
STATUS button
O
Each press of this switches the status information that is shown on the
display.
SOUND MODE button
P
Switching the sound mode. (v p. 97)
PURE DIRECT button
Q
This switches the sound mode between Direct, Pure Direct and Auto
surround.
“Direct playback” (v p. 99)
0
“Pure Direct playback” (v p. 99)
0
“Auto surround playback” (v p. 100)
0
R
USB port (T)
This is used to connect USB storages (such as USB memory devices).
(v p. 43)
AUX-HDMI connector
S
This is used to connect HDMI output compatible devices such as video
camcorders and game consoles. (v p. 41)
Front panel Display Rear panel Remote Index
16
Contents Connections Playback Settings Tips Appendix
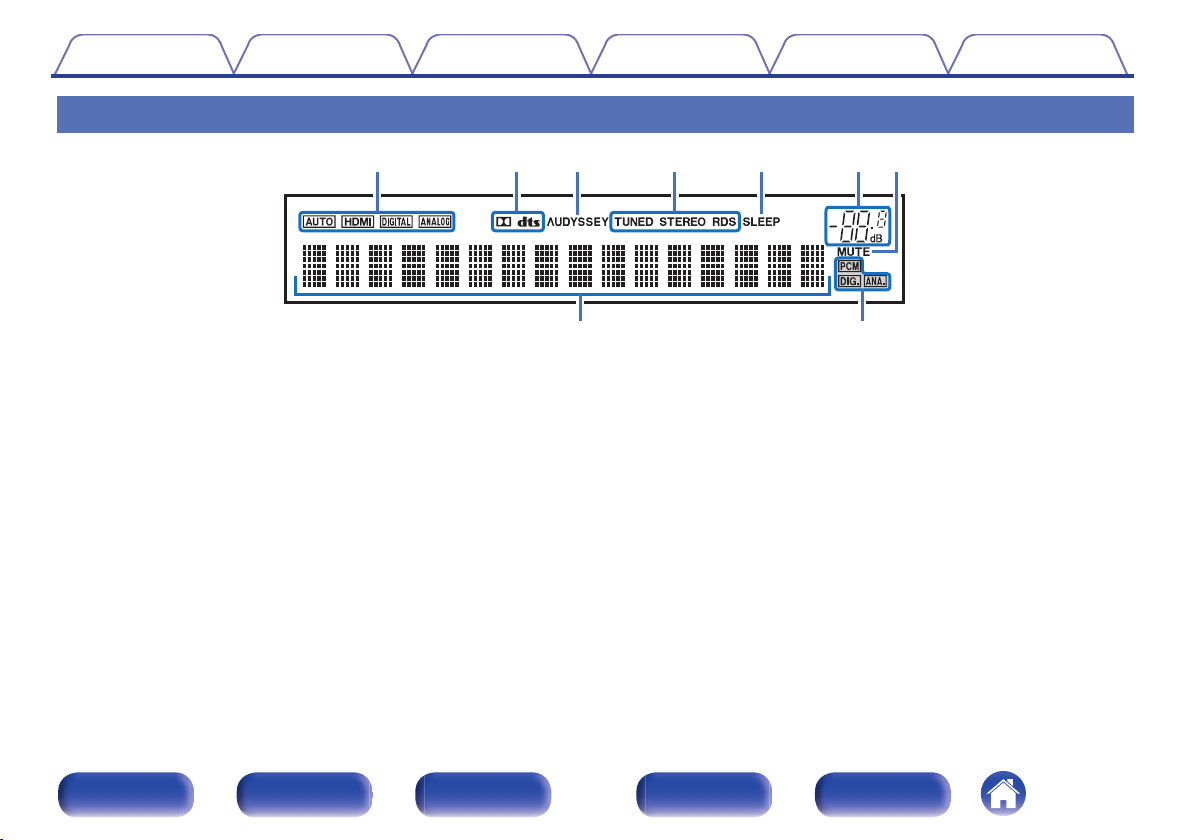
Display
.
Input mode indicators
A
These light according to the audio input mode settings of each input
source. (v p. 147)
Decoder indicators
B
These light when Dolby or DTS signals are input or when the Dolby or
DTS decoder is running.
C
Audyssey® indicator
This lights when “MultEQ®”, “Dynamic EQ” or “Dynamic Volume” has
been set up. (v p. 133)
Tuner reception mode indicators
D
These light up according to the reception conditions when the input
source is set to “Tuner”.
TUNED: Lights up when the broadcast is properly tuned in.
STEREO: Lights up when receiving FM stereo broadcasts.
RDS: Lights up when receiving RDS broadcasts.
Sleep timer indicator
E
This lights when the sleep mode is selected. (v p. 110)
Front panel Display Rear panel Remote Index
17

Contents Connections Playback Settings Tips Appendix
.
Volume indicator
F
MUTE indicator
G
This blinks while the sound is muted. (v p. 52)
Information display
H
The input source name, sound mode, setting values and other
information are displayed here.
Input signal indicators
I
The respective indicator will light corresponding to the input signal.
Front panel Display Rear panel Remote Index
18
Contents
Connections Playback Settings Tips Appendix
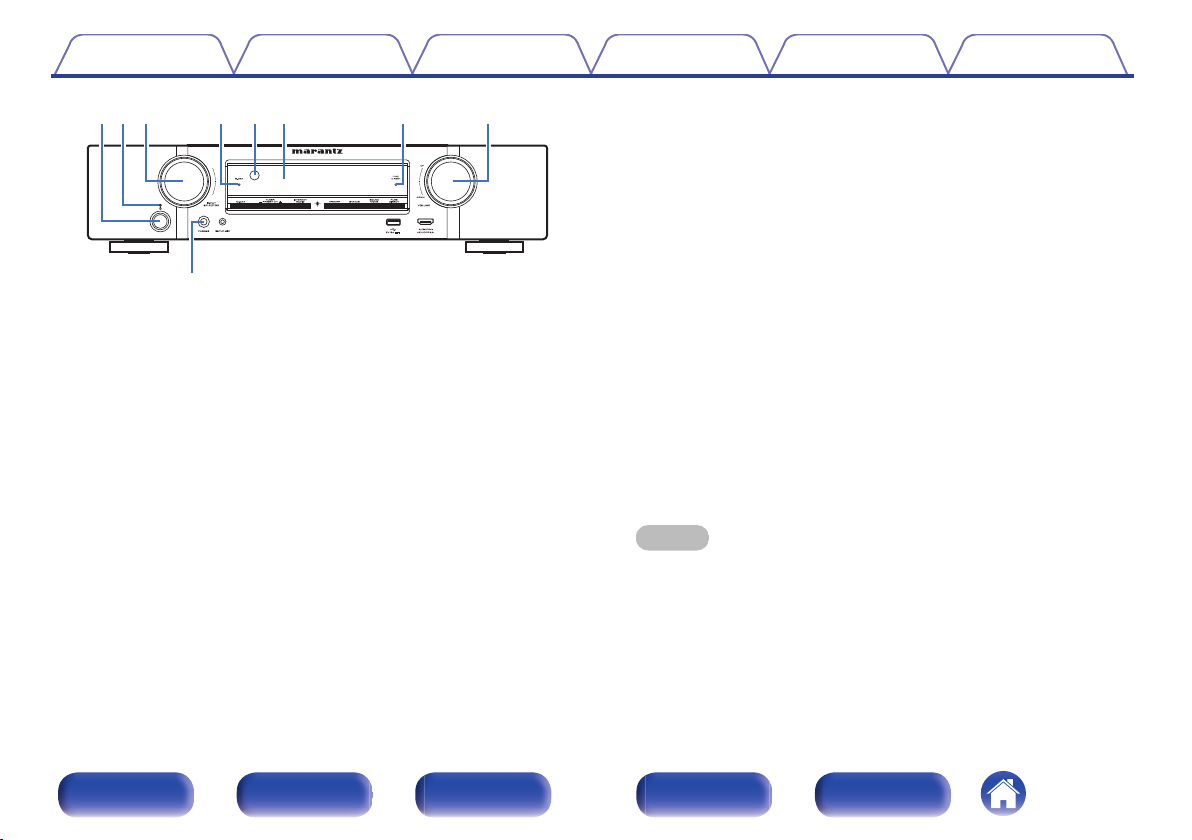
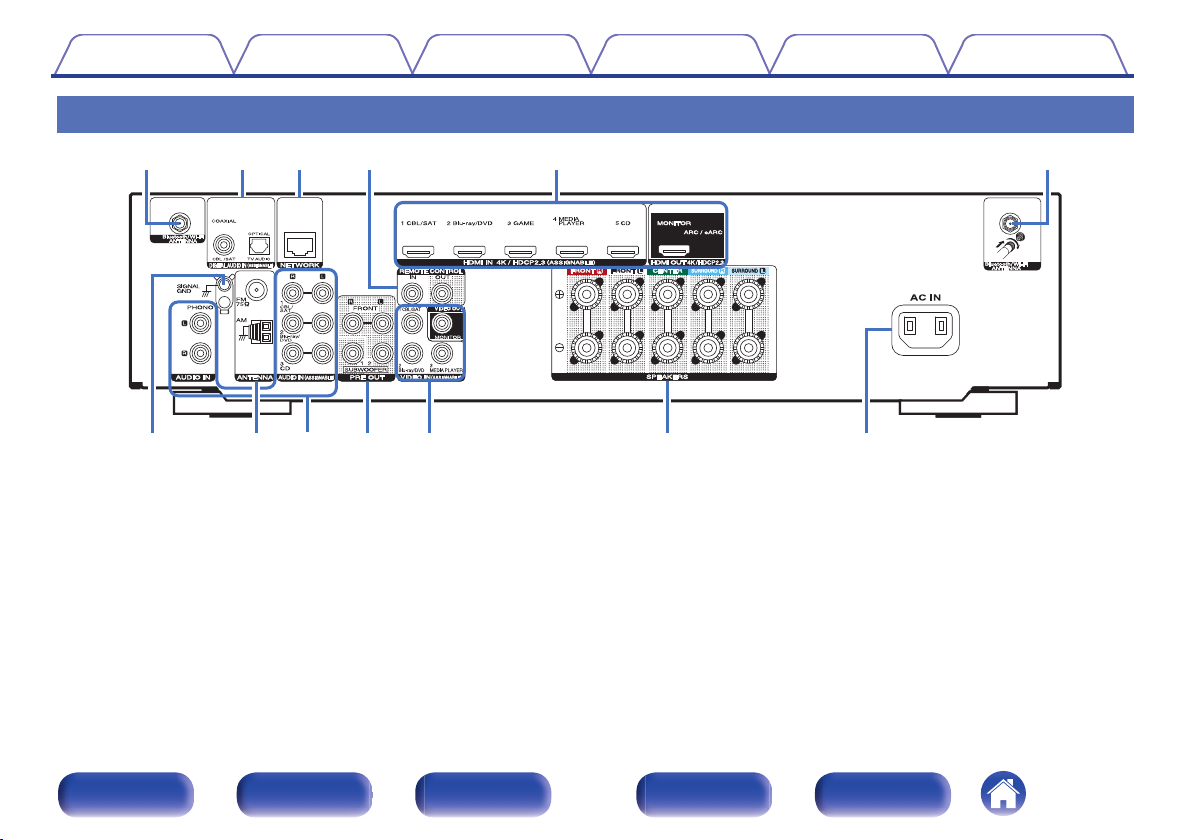
Rear panel
.
For details, see the next page.
19
Front panel Display Rear panel Remote Index
Contents
.
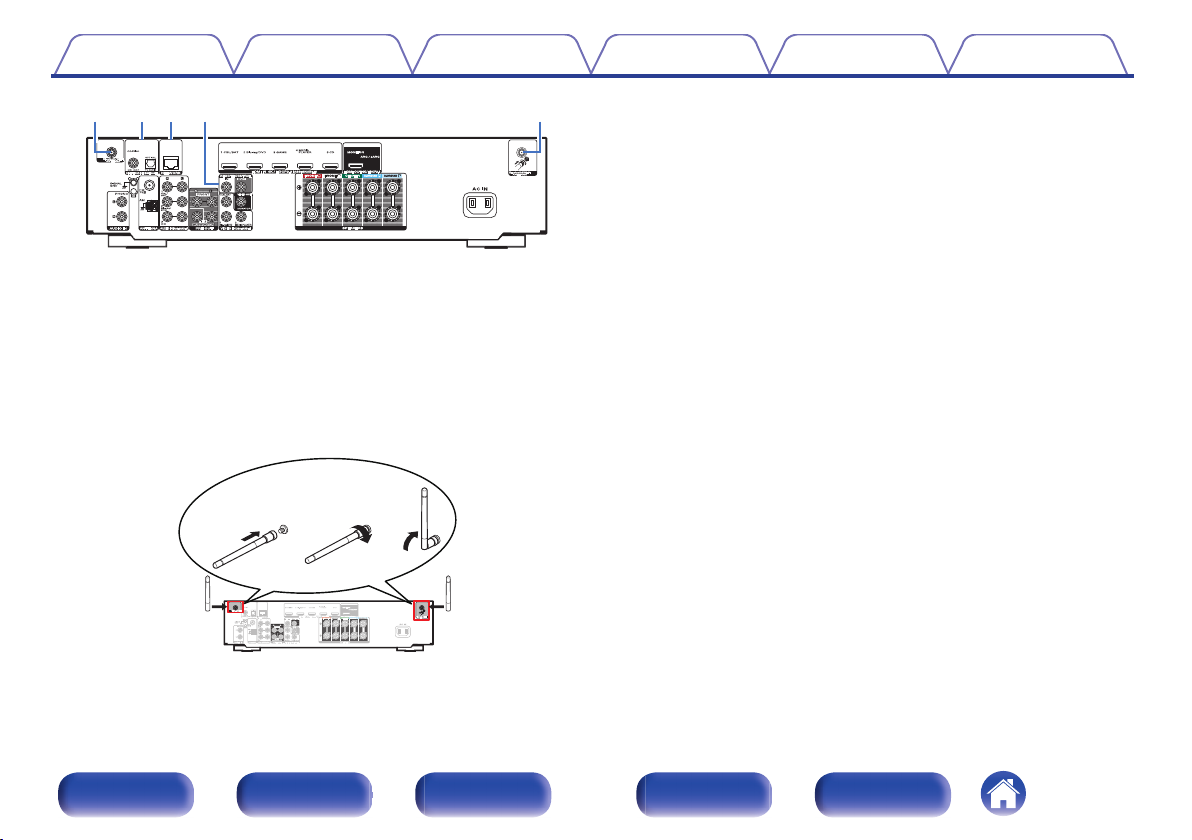
Bluetooth/wireless LAN antenna connectors
A
Connections Playback Settings Tips Appendix
Used to connect the included external antennas for Bluetooth/wireless
connectivity when connecting to a network via wireless LAN, or when
connecting to a handheld device via Bluetooth. (v p. 47)
Place the external antennas for Bluetooth/wireless connectivity
A
evenly over the screw terminal of rear.
Turn clockwise until the antennas is fully connected.
B
Rotate the antenna upwards for best reception.
C
Digital audio connectors (DIGITAL AUDIO)
B
Used to connect devices equipped with digital audio connectors.
“Connection 2 : TV equipped with an HDMI connector and
0
incompatible with the ARC (Audio Return Channel) / eARC
(Enhanced Audio Return Channel)” (v p. 36)
“Connection 3 : TV equipped without an HDMI
0
connector” (v p. 37)
“Connecting a set-top box (Satellite tuner/cable TV)” (v p. 39)
0
NETWORK connector
C
Used to connect to a LAN cable when connecting to a wired LAN
network. (v p. 46)
REMOTE CONTROL jacks
D
Used to connect infrared receivers/transmitters in order to operate this
unit and external devices from a different room. (v p. 48)
.
Front panel Display Rear panel Remote Index
20
Contents Connections Playback Settings Tips Appendix
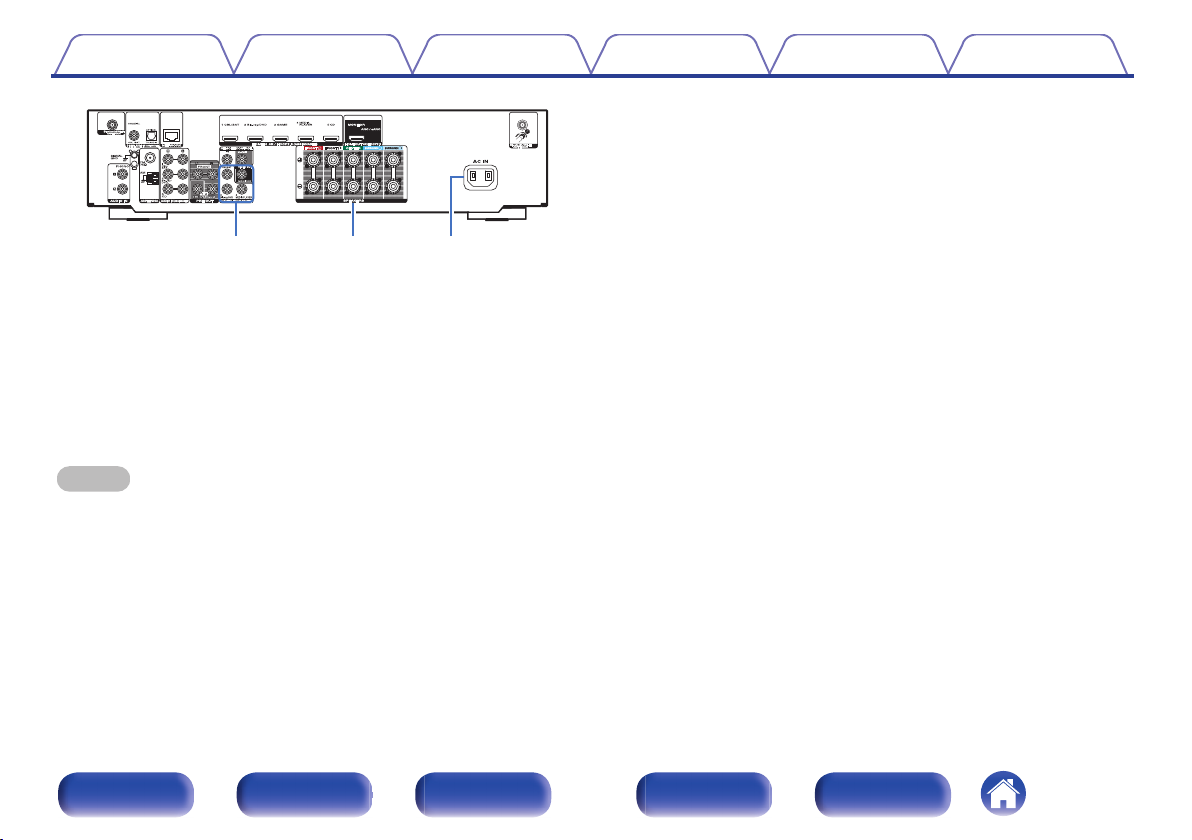
SIGNAL GND terminal
F
Used to connect a ground wire for the turntable. (v p. 42)
FM/AM antenna terminals (ANTENNA)
G
Used to connect FM antennas and AM loop antennas. (v p. 44)
Analog audio connectors (AUDIO)
H
Used to connect devices equipped with analog audio connectors.
“Connecting a set-top box (Satellite tuner/cable TV)” (v p. 39)
0
“Connecting a DVD player or Blu-ray Disc player” (v p. 40)
.
HDMI connectors
E
Used to connect devices equipped with HDMI connectors.
“Connection 1 : TV equipped with an HDMI connector and
0
compatible with the ARC (Audio Return Channel) / eARC (Enhanced
Audio Return Channel)” (v p. 35)
“Connection 2 : TV equipped with an HDMI connector and
0
incompatible with the ARC (Audio Return Channel) / eARC
(Enhanced Audio Return Channel)” (v p. 36)
“Connecting a set-top box (Satellite tuner/cable TV)” (v p. 39)
0
“Connecting a DVD player or Blu-ray Disc player” (v p. 40)
0
0
“Connecting a turntable” (v p. 42)
0
PRE OUT connectors
I
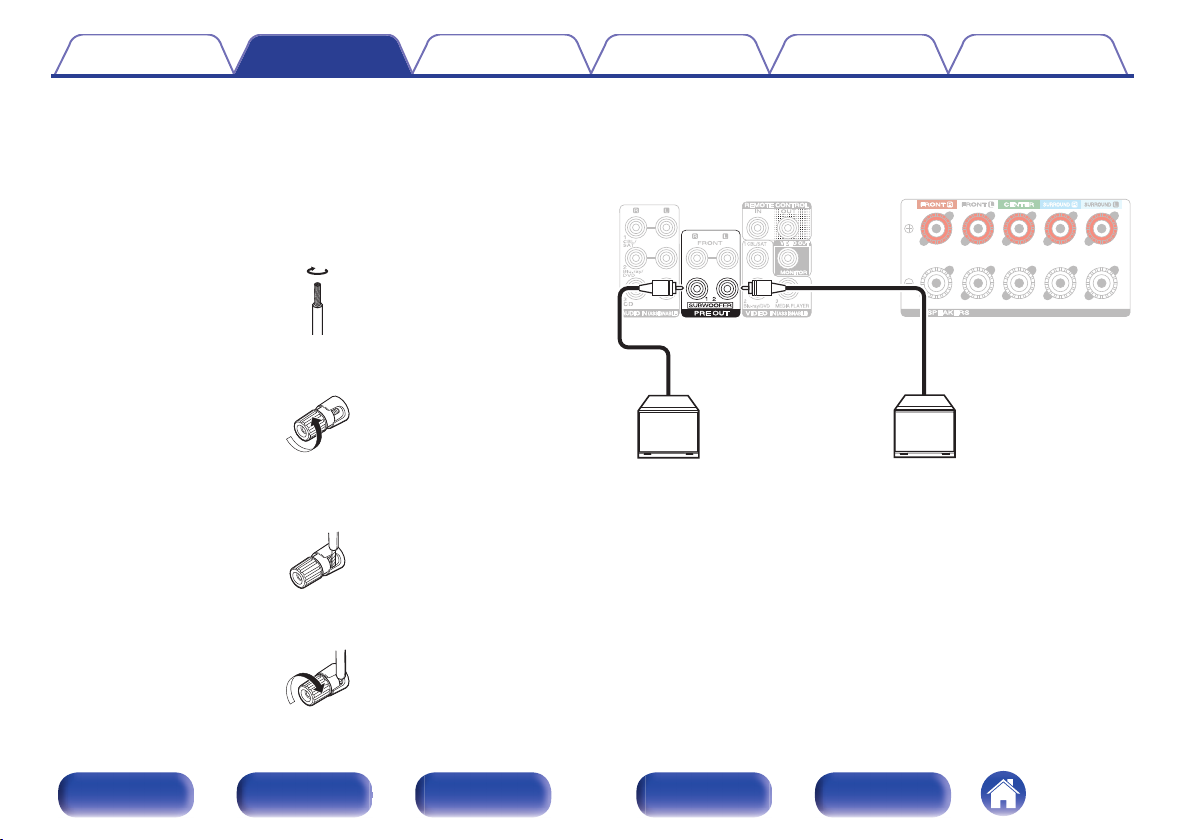
Used to connect a subwoofer with a built-in amplifier. (v p. 30)
Front panel Display Rear panel Remote Index
21
Contents Connections Playback Settings Tips Appendix
.
Video connectors (VIDEO)
J
Used to connect devices equipped with video connectors.
“Connecting a set-top box (Satellite tuner/cable TV)” (v p. 39)
0
“Connecting a DVD player or Blu-ray Disc player” (v p. 40)
0
Speaker terminals (SPEAKERS)
K
Used to connect speakers. (v p. 29)
AC inlet (AC IN)
L
Used to connect the power cord. (v p. 49)
NOTE
Do not touch the inner pins of the connectors on the rear panel. Electrostatic
0
discharge may cause permanent damage to the unit.
Front panel Display Rear panel Remote Index
22
Contents Connections Playback Settings Tips Appendix
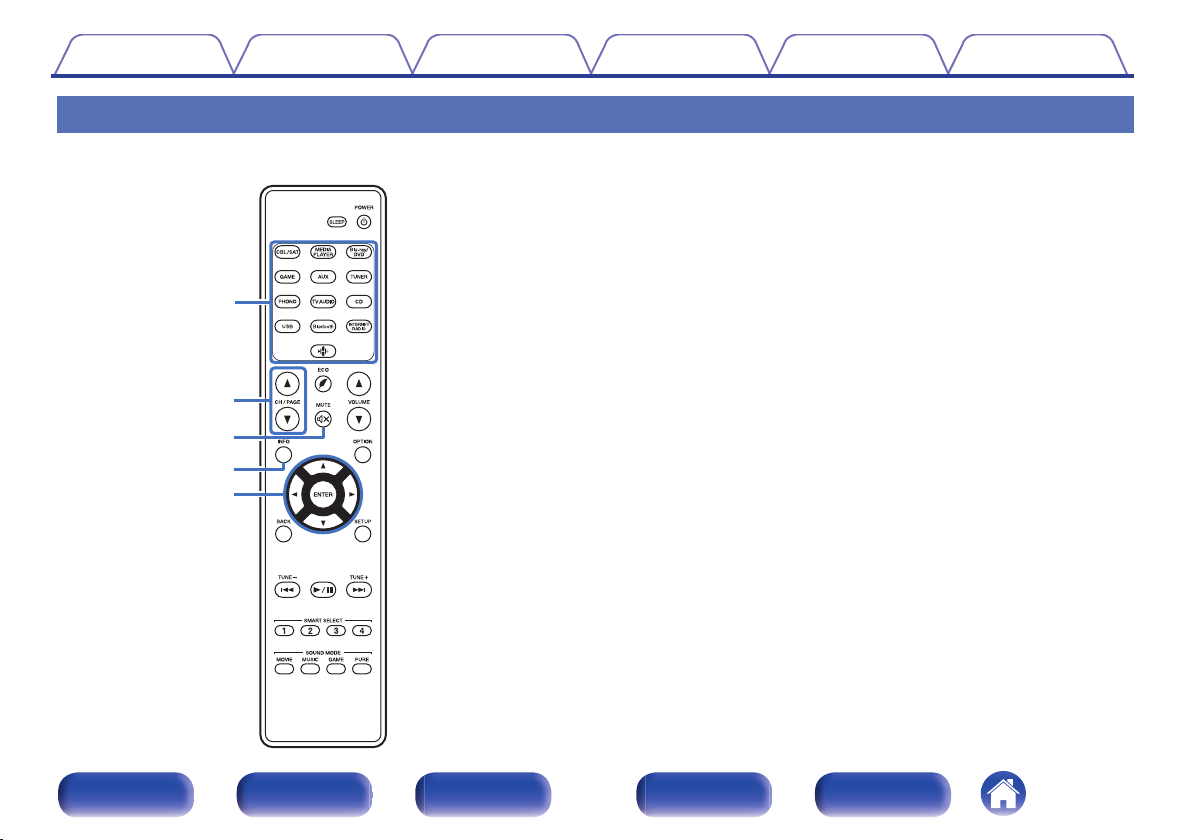
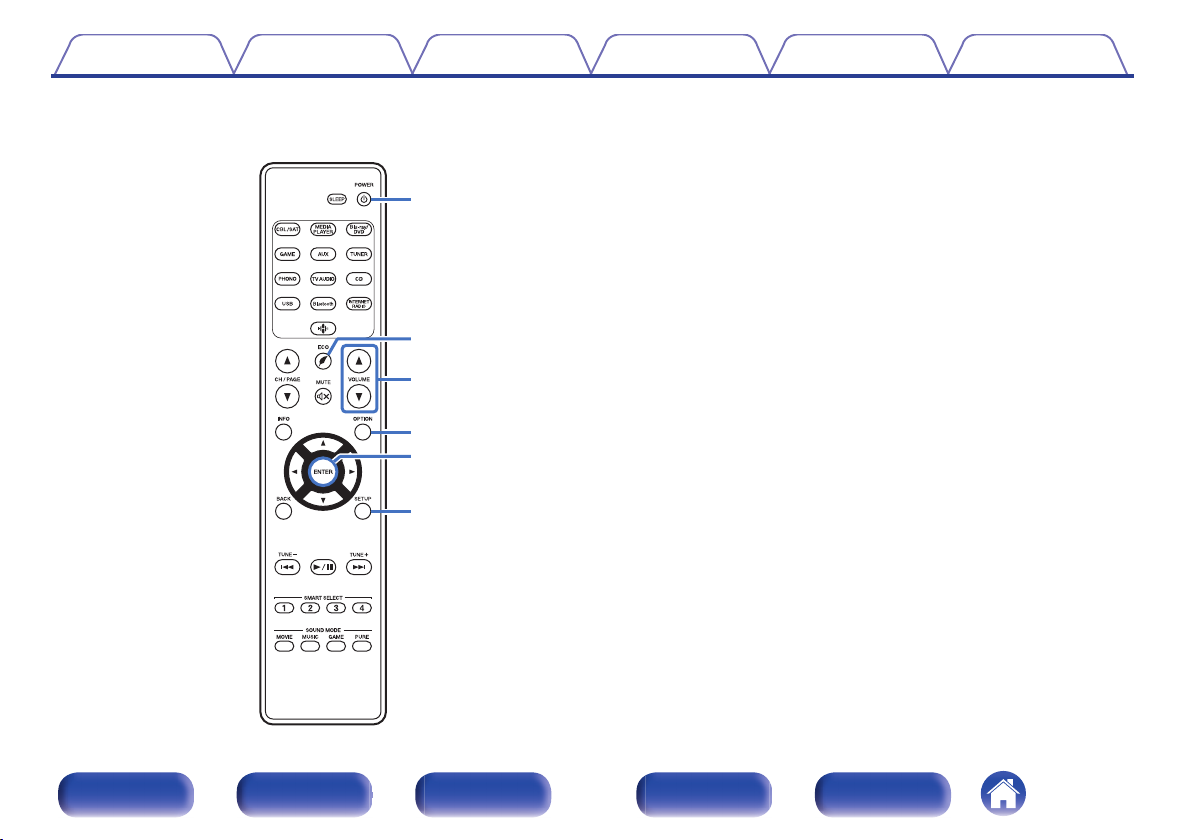
Remote control unit
Input source select buttons
A
These selects the input source. (v p. 51)
Channel/page search buttons (CH/PAGE df)
B
These select radio stations registered to presets or switch pages.
(v p. 68)
MUTE button (:)
C
This mutes the output audio. (v p. 52)
Information button (INFO)
D
This displays the status information on the TV screen. (v p. 180)
Cursor buttons (uio p)
E
These select items.
Front panel Display Rear panel Remote Index
23
Contents
Connections Playback Settings Tips Appendix
BACK button
F
This returns to the previous screen.
System buttons
G
These perform playback related operations.
Tuning up / Tuning down buttons (TUNE +, –)
These select either FM broadcast or AM broadcast. (v p. 62)
SMART SELECT buttons (1 – 4)
H
These call up settings registered to each button, such as input source,
volume level and sound mode settings. (v p. 112)
SOUND MODE buttons
I
These select the sound mode. (v p. 97)
Remote control signal transmitter
J
This transmits signals from the remote control unit. (v p. 9)
SLEEP button
K
This sets the sleep timer. (v p. 110)
Front panel Display Rear panel Remote Index
24
Contents Connections Playback Settings Tips Appendix
POWER button (X)
L
This turns the power on/off. (v p. 51)
M
ECO Mode button (G)
This switches to ECO Mode. (v p. 172)
VOLUME buttons (df)
N
These adjusts the volume level. (v p. 52)
OPTION button
O
This displays the option menu on the TV screen.
ENTER button
P
This determines the selection.
SETUP button
Q
This displays the menu on the TV screen. (v p. 124)
Front panel Display Rear panel Remote Index
25
Contents Connections Playback Settings Tips Appendix
o
Contents
Speaker installation 27
Connecting speakers 29
Connecting a TV 34
Connecting a playback device 38
Connecting a USB memory device to the USB port 43
Connecting FM/AM antennas 44
Connecting to a home network (LAN) 46
Connecting an external control device 48
Connecting the power cord 49
NOTE
Do not plug in the power cord until all connections have been completed.
0
However, when the “Setup Assistant” is running, follow the instructions in the
“Setup Assistant” (page 9 in the separate “Quick Start Guide”) screen for making
connections. (During “Setup Assistant” operation, the input/output connectors do
not conduct current.)
Do not bundle power cords together with connection cables. Doing so can result in
0
noise.
o
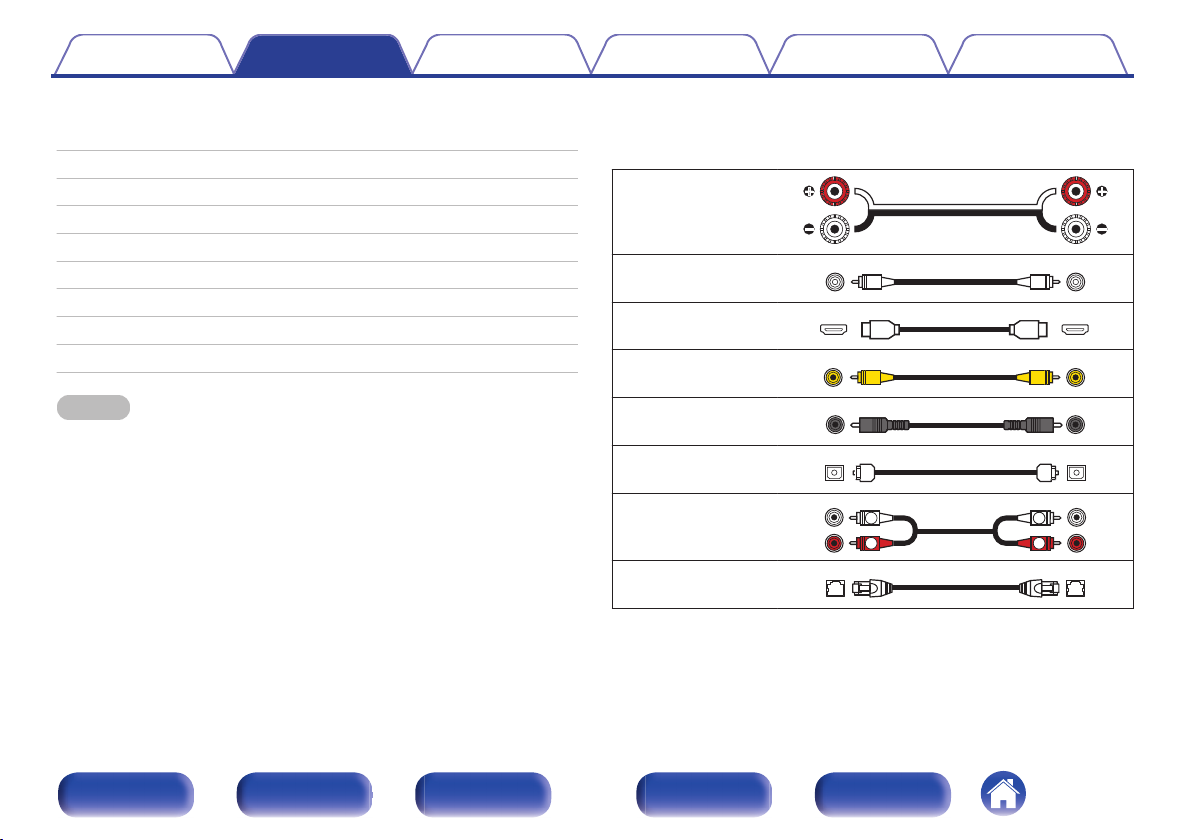
Cables used for connections
Provide necessary cables according to the devices you want to
connect.
Speaker cable
.
Subwoofer cable
HDMI cable
Video cable
Coaxial digital cable
Optical cable
.
.
.
.
.
Audio cable
.
LAN cable
.
Front panel Display Rear panel Remote Index
26
Contents Connections Playback Settings Tips Appendix
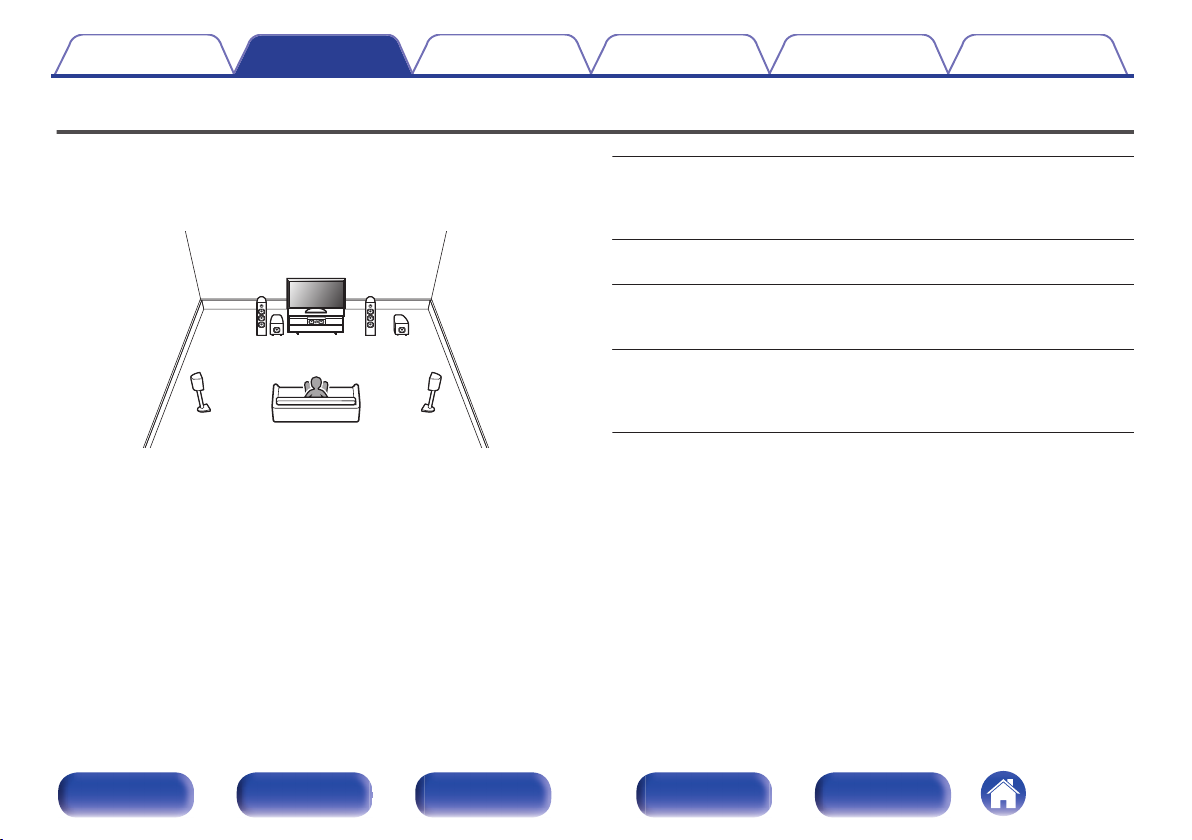
Speaker installation
Determine the speaker system depending on the number of speakers you
are using and install each speaker and subwoofer in the room.
Speaker installation is explained using this example of a typical
installation.
.
FL/FR
(Front speaker left/
right):
C
(Center speaker):
SL/SR
(Surround speaker left/
right):
SW 1/2
(Subwoofer):
Place the FRONT left and right speakers an
equal distance from the main listening position.
The distance between each speaker and your TV
should also be the same.
Place the CENTER speaker in between the front
speakers and above or below your TV.
Place the SURROUND left and right speakers an
equal distance to the left and right sides of the
main listening position.
Place the SUBWOOFER at a convenient location
near the front speakers. If you have two
subwoofers, place them asymmetrically across
the front of your room.
Front panel Display Rear panel Remote Index
27

GViewed from the sideH
Front speaker
Surround speaker
60 – 90 cm
Contents
Use the illustration below as a guide for how high each speaker should be
0
Connections Playback Settings Tips Appendix
installed. The height does not need to be exactly the same.
.
When 5.1-channel speakers are installed
o
.
z1 22° — 30° z2 120°
Front panel Display Rear panel Remote Index
28
Contents
Connections Playback Settings Tips Appendix
Connecting speakers
Here we connect the speakers in the room to this unit.
Before connecting speakers
NOTE
Disconnect this unit’s power plug from the power outlet before connecting the
0
speakers. Also, turn off the subwoofer.
Connect so that the speaker cable core wires do not protrude from the speaker
0
terminal. The protection circuit may be activated if the core wires touch the rear
panel or if the + and — sides touch each other. (“Protection circuit” (v p. 225))
Never touch the speaker terminals while the power cord is connected. Doing so
0
could result in electric shock. When the “Setup Assistant” (page 9 in the separate
“Quick Start Guide”) is running, follow the instructions in the “Setup Assistant”
screen for making connections. (Power is not supplied to the speaker terminals
while the “Setup Assistant” is running.)
Use speakers with an impedance of 4 – 16 Ω/ohms.
0
Front panel Display Rear panel Remote Index
NOTE
Carry out the following settings when using a speaker with an impedance of 4 – 6
0
Ω/ohms.
1. Press and hold the main unit’s TUNER PRESET CH + and STATUS at the
same time for at least 3 seconds.
“V.Format:< PAL>” appears on the display.
2. Press DIMMER on the main unit three times.
“Sp.Imp.:<8ohms>” appears on the display.
3. Press TUNER PRESET CH + or TUNER PRESET CH — on the main unit to
select the impedance.
8ohms
(Default):
6ohms:
4ohms:
4. Press the main unit’s STATUS to complete the setting.
Select when the impedance for all of the
connected speakers is 8 Ω/ohms or over.
Select when the impedance for any of the
connected speakers is 6 Ω/ohms.
Select when the impedance for any of the
connected speakers is 4 Ω/ohms.
29
Contents
Connections Playback Settings Tips Appendix
o
Connecting the speaker cables
Carefully check the left (L) and right (R) channels and + (red) and –
(black) polarities on the speakers being connected to this unit, and be
sure to connect the channels and polarities correctly.
Peel off about 10 mm of sheathing from the tip of the
1
speaker cable, then either twist the core wire tightly or
terminate it.
.
Turn the speaker terminal counterclockwise to loosen it.
2
.
Insert the speaker cable’s core wire to the hilt into the
3
speaker terminal.
.
Turn the speaker terminal clockwise to tighten it.
4
o
Connecting the subwoofer
Use a subwoofer cable to connect the subwoofer. Two subwoofers can
be connected to this unit.
The same signal is output from the respective subwoofer terminals.
.
.
Front panel Display Rear panel Remote Index
30
Loading…
Руководство пользователя Marantz AV7005
Размер: 10.66 Мб (RAR)
Руководство пользователя Marantz AV8003
Размер: 6.86 Мб (RAR)
Руководство пользователя Marantz CD5004
Размер: 1.17 Мб (RAR)
Руководство пользователя Marantz CD6003
Размер: 1.66 Мб (RAR)
Руководство пользователя Marantz M-CR502
Размер: 53 Кб (RAR)
Руководство пользователя Marantz M-CR503
Размер: 2.41 Мб (RAR)
Руководство пользователя Marantz MM-7025,7055
Размер: 1.58 Мб (RAR)
Руководство пользователя Marantz MM-8003
Размер: 2.41 Мб (RAR)
Руководство пользователя Marantz NA7004
Размер: 2.59 Мб (RAR)
Руководство пользователя Marantz NR1501
Размер: 111 Кб (RAR)
Руководство пользователя Marantz NR1601
Размер: 6.65 Мб (RAR)
Руководство пользователя Marantz PM-15S1
Размер: 394 Кб (RAR)
Руководство пользователя Marantz PM5004
Размер: 854 Кб (RAR)
Руководство пользователя Marantz PM6003
Размер: 875 Кб (RAR)
Руководство пользователя Marantz PM-KI-PEARL-LITE PM7004
Размер: 1.36 Мб (RAR)
Руководство пользователя Marantz SA-11S2
Размер: 33 Кб (RAR)
Руководство пользователя Marantz SA-15S1
Размер: 89 Кб (RAR)
Руководство пользователя Marantz SA-KI-PEARL-LITE
Размер: 1.77 Мб (RAR)
Руководство пользователя Marantz SC-11S1
Размер: 48 Кб (RAR)
Руководство пользователя Marantz PM-11S1
Размер: 31 Кб (RAR)
Руководство пользователя Marantz SR5005
Размер: 9.21 Мб (RAR)
Руководство пользователя Marantz SR5023
Размер: 1.62 Мб (RAR)
Руководство пользователя Marantz SR6005
Размер: 7.38 Мб (RAR)
Руководство пользователя Marantz SR7005
Размер: 11.57 Мб (RAR)
Руководство пользователя Marantz ST-15S1
Размер: 48 Кб (RAR)
Руководство пользователя Marantz TT-15S1
Размер: 421 Кб (RAR)
Руководство пользователя Marantz TT42
Размер: 1.11 Мб (RAR)
Руководство пользователя Marantz UD5005
Размер: 5.41 Мб (RAR)
Руководство пользователя Marantz UD8004
Размер: 2.68 Мб (RAR)
Руководство пользователя Marantz UD9004
Размер: 2.78 Мб (RAR)
Руководство пользователя Marantz UD7006
Размер: 4.01 Мб (RAR)
Руководство пользователя Marantz NA-11S1
Размер: 2.34 Мб (RAR)
Руководство установки драйвера Windows для Marantz NA-11S1
Размер: 706 Кб (RAR)
Руководство пользователя Marantz PM-11S3
Размер: 2.52 Мб (RAR)
Руководство пользователя Marantz SA-11S3
Размер: 1.25 Мб (RAR)
Руководство пользователя Marantz PM-14S1
Размер: 3.13 Мб (RAR)
Руководство пользователя Marantz SA-14S1
Размер: 2.68 Мб (RAR)
Начало работы Marantz PM8005
Размер: 512 Кб (RAR)
Руководство пользователя Marantz PM8005
Размер: 936 Кб (RAR)
Начало работы Marantz PM6005
Размер: 807 Кб (RAR)
Руководство пользователя Marantz PM6005
Размер: 839 Кб (RAR)
Начало работы Marantz SA8005
Размер: 435 Кб (RAR)
Руководство пользователя Marantz SA8005
Размер: 2.22 Мб (RAR)
Начало работы Marantz CD6005
Размер: 646 Кб (RAR)
Руководство пользователя Marantz CD6005
Размер: 1011 Кб (RAR)
Руководство пользователя Marantz TT5005
Размер: 1.08 Мб (RAR)
Начало работы Marantz AV8801
Размер: 2.2 Мб (RAR)
Руководство пользователя Marantz AV8801
Размер: 17.22 Мб (ZIP)
Руководство пользователя Marantz MM8077
Размер: 937 Кб (RAR)
Начало работы Marantz AV7701
Размер: 2.07 Мб (RAR)
Руководство пользователя Marantz AV7701
Размер: 15.43 Мб (ZIP)
Начало работы Marantz SR7008
Размер: 965 Кб (RAR)
Руководство пользователя Marantz SR7008
Размер: 6.39 Мб (RAR)
Начало работы Marantz SR6008
Размер: 611 Кб (RAR)
Руководство пользователя Marantz SR6008
Размер: 5.44 Мб (RAR)
Начало работы Marantz SR5008
Размер: 2.33 Мб (RAR)
Руководство пользователя Marantz SR5008
Размер: 4.83 Мб (RAR)
Начало работы Marantz NR1604
Размер: 815 Кб (RAR)
Руководство пользователя Marantz NR1604
Размер: 4.33 Мб (RAR)
Начало работы Marantz NR1504
Размер: 783 Кб (RAR)
Руководство пользователя Marantz NR1504
Размер: 4.08 Мб (RAR)
Начало работы Marantz UD7007
Размер: 2.03 Мб (RAR)
Руководство пользователя Marantz UD7007
Размер: 5.8 Мб (ZIP)
Начало работы Marantz UD5007
Размер: 1.96 Мб (RAR)
Руководство пользователя Marantz UD5007
Размер: 5.44 Мб (ZIP)
Начало работы Marantz Melody Stream
Размер: 1.01 Мб (RAR)
Руководство пользователя Marantz Melody Stream
Размер: 1.56 Мб (RAR)
Начало работы Marantz Melody Media
Размер: 2.42 Мб (RAR)
Руководство пользователя Marantz Melody Media
Размер: 2.03 Мб (RAR)
Руководство пользователя Marantz MM7025 — MM7055
Размер: 1.58 Мб (RAR)
Руководство пользователя Marantz CD5004
Размер: 1.17 Мб (RAR)
Руководство пользователя Marantz PM5004
Размер: 854 Кб (RAR)
Руководство пользователя Marantz Consolette
Размер: 4.65 Мб (ZIP)
Начало работы Marantz NA8005
Размер: 694 Кб (RAR)
Руководство пользователя Marantz NA8005
Размер: 2.1 Мб (RAR)
Marantz PM6006
Размер: 1.36 Мб (PDF)
SR6014 Product Information Sheet
Размер: 756 Кб (RAR)
SR6014 Owner’s Manual
Размер: 15.87 Мб (RAR)
SR6014 Quick Start Guide
Размер: 1.36 Мб (RAR)
SR5014 Product Information Sheet
Размер: 725 Кб (RAR)
SR5014 Owner’s Manual
Размер: 14.7 Мб (RAR)
SR5014 Quick Start Guide
Размер: 1.21 Мб (RAR)
NR1200 Product Information Sheet
Размер: 602 Кб (RAR)
NR1200 Owner’s Manual
Размер: 11.08 Мб (RAR)
NR1710 Owner’s Manual Russia
Размер: 13.68 Мб (RAR)
NR1710 Product Information Sheet
Размер: 1.49 Мб (RAR)
NR1510 Owner’s Manual Russia
Размер: 10.67 Мб (RAR)
NR1510 Product Information Sheet
Размер: 1.43 Мб (RAR)
Marantz NR1711 product info sheet EU
Размер: 0 Кб (ZIP)
Marantz SR5015 product info sheet EU
Размер: 0 Кб (RAR)
Marantz SR6015 product info sheet EU
Размер: 0 Кб (RAR)
Marantz SR7015 product info sheet EU
Размер: 0 Кб (RAR)
Marantz SR8015 product info sheet EU
Размер: 0 Кб (RAR)
AV ресивер 5,2, Wi-Fi AirPlay2, HEOS Multiroom, Bluetooth, Streaming, 4K Ultra HD HDR10, выходная мощность: 2 x 50 Вт, декодеры: DTS HD Master, Dolby TrueHD, сетевые функции: DLNA, Internet Radio, Spotify, Tidal, Amazon Prime, Pandora, HEOS Multiroom, DSD Audio, аудио форматы: FLAC, WAV, ALAC, DSD5.6, управление: Android/iOS, Voice Control, габариты: 440 x 378 x 105 мм, вес: 8.2 кг, цвет чёрный.
Характеристики
Диапазон воспроизводимых частот
10 — 100000 Гц (+1/-3 дБ)
Все характеристики
68 000 руб./шт
75 000 руб.
В наличии
«Доставим сегодня»
Нашли дешевле?
Рассчитать доставку
Цена действительна только для интернет-магазина и может отличаться от цен в розничных магазинах