
Report abuse
Libble takes abuse of its services very seriously. We’re committed to dealing with such abuse according to the laws in your country of residence. When you submit a report, we’ll investigate it and take the appropriate action. We’ll get back to you only if we require additional details or have more information to share.
Product:
Get your user manual by e-mail
Enter your email address to receive the manual of Volkswagen RNS 315 in the language / languages: English as an attachment in your email.
The manual is 3,99 mb in size.
You will receive the manual in your email within minutes. If you have not received an email, then probably have entered the wrong email address or your mailbox is too full. In addition, it may be that your ISP may have a maximum size for emails to receive.
The manual is sent by email. Check your email
If you have not received an email with the manual within fifteen minutes, it may be that you have a entered a wrong email address or that your ISP has set a maximum size to receive email that is smaller than the size of the manual.
Навигационная система RNS 315 предназначена для установки в транспортное средство. Она также может быть монтирована в новом автомобиле. Все функции отображаются на цветном дисплее. По краям экрана располагаются важные системные клавиши.
Обзор устройства
Технические характеристики RNS 315 обусловлены наличием встроенного Bluetooth, тюнера с диапазонами AM/FM. Возможно воспроизведение компакт-дисков в формате CD/MP3/WMA. Присутствует наличие вывода информации климат-контроля и показаний датчиков парктроника на дисплей. Цветной экран является сенсорным с диагональю 5 дюймов и точечным разрешением 400 на 240 пикселей. Прибор оснащен слотом для SD-карты объемом до 4 Гб.

Навигационное программное обеспечение выбирает непосредственно сам пользователь, если нет предустановленного производителем.
В приборе привод для компакт-дисков находится в верхней части устройства, по обеим бокам которого расположены управляющие кнопки. Слева и справа от дисплея, находящегося в центре, есть функциональные клавиши для удобства перемещения между главными опциями радионавигационной системы. Справа – это Radio, Media, Phone, слева – Nav, TMC и Setup. Рядом с экраном оборудован разъем для вкладывания карты памяти.
Описание RNS 315
Внизу аппарата присутствует крутящаяся кнопка управления питанием прибора, поворотная кнопка для перемещения по опциям меню с двумя дополнительными клавишами, гнездо AUX и кнопка возврата в предыдущее меню.
Кнопка питания служит также для регулировки громкости воспроизводимого источника звука. Клавиша Radio включает режим радиоприемника и переключает частотные полосы. Media в RNS 315 запускает последнее использовавшееся устройство воспроизведения или активирует новое. Phone — в случае ее нажатия будет приглушена громкость проигрываемого устройства. Функция активна при условии наличия подготовки для пользования мобильным телефоном. Клавиша Nav предназначена для активации навигационной системы. TMC выводит на дисплей загруженные сообщения о транспортных ситуациях. Setup дает возможность настройки каждой опции в отдельности.
Режимная клавиша Setup
Данная кнопка имеет очень широкий спектр действий. В поставляемых инструкциях к RNS 315 функция Setup описана в первую очередь, так как является важнейшей опцией в управлении устройства. Она участвует в настройках звука, системы, радио настройках, настройках сообщений о транспортной ситуации, экрана, медиа и навигации.
При нажатии Setup и выборе функции «Звук» можно регулировать громкость звука, балансировку между сторонами, настраивать эквалайзер и пространственный звук. Выбрав функцию «Система», откроете доступ к языковому меню, расположению клавиш для ввода текста, настройкам экрана, информации по статусу карты SD и ее безопасному извлечению.
В режиме Radio клавиша Setup включает/выключает функцию TMC, а также настраивает источник для выбора радиостанций при помощи кнопки «Поиск».
В настройках экрана регулируется яркость, изображение для ночи и дня, включается подтверждающий звуковой тон кнопок.
В режиме Media Setup позволяет активировать Bluetooth, управлять громкостью AUX и MIDI.
При активации опции «Навигация» режимная клавиша дает доступ к управлению навигационными функциями: настройка прокладки маршрута и его критерии, громкость голосовых указаний, масштабирование карты и т. д.
Клавиша режима Radio
Этот режим в навигационной системе RNS 315 позволяет выбирать радиовещательные станции из списка или искать новые, изменять радиовещательные станции из содержимого памяти станций или осуществить ручную настройку.
Тут же доступна функция Scan. Она активирует автоматическое проигрывание в прослушиваемой полосе частот. При нажатии кнопки «Инструменты» и выборе функции «Сканирование» начнется проигрывание, всегда протяженностью около 5 секунд, всех доступных радиостанций в том порядке, в каком они зарезервированы в списке станций. Для того чтобы закончить автоматическое проигрывание необходимо повторно нажать на «Сканирование». Зафиксируется та частота, на которой было остановлено сканирование.
Также в этом режиме доступна функция включения/выключения сообщений о транспортной ситуации. Посредством выбора функции Extras («Экстра») появится всплывающее окно с обозначением ТР, активируя которое запустится функция сообщений.
Клавиша TMC
TMC запускает изображения сообщений о транспортной ситуации. Используется такая функция во время наводки на цель для оптимизации маршрута в случаях, когда возникают осложнения транспортного характера.
В изображении подробных сведений возможно при помощи клавиш выбора функции просматривать постепенно все принятые сообщения о проблемах.
Их вид отображается на карте определенными символами и цветом. Осложненная ситуация, встречающаяся по направлению движения, показывается красным цветом, а транспортное осложнение на противоположном направлении – серым.
Необходимо учитывать, что сообщения о транспортных ситуациях будут оцениваться и загружаться прибором RNS 315 только в том случае, если доступны данные (SD или компакт-диск) по навигации для области, по которой происходит движение.
Правильность динамической наводки на цель зависит от транспортных редакций радиовещательных станций.
Кнопка режима Media
Опция позволяет управлять источниками воспроизведения, в том числе последнего проигрываемого. Переключается она между компакт-дисками, SD картой, AUX, MIDI или Bluetooth-Audio.
Также в режиме Media имеется меню Audio, в котором доступна кнопка «Инструменты». При нажатии позволяет запустить проигрывание в произвольной последовательности (Mix), с начала композиций (Scan), доступно повторение одной композиции или всего каталога в целом, а «Выбор» дает возможность запустить музыкальную композицию вручную по выбору пользователя.
Следует учитывать, что имеются определенные требования к носителям музыкальных файлов формата МР3 и WMA. Так, компакт-диски (CD, CD-R, CD-RW) должны быть емкостью до 700 Мб. Навигационной системой RNS 315 опознаются карты SD и ММС объемом до 4 Гб и SDHC емкостью до 32 Гб.

Кнопка режима навигации Nav
Функция навигации RNS 315 будет доступна при загрузке программного обеспечения с навигационного CD. Подобные данные необходимо регулярно обновлять вследствие постоянного изменения дорожных условий.
В режиме Nav имеется главное меню, в котором доступны такие кнопки, как:
- «Адрес» – позволяет ввести адрес конечной цели маршрута.
- «Память адресных пунктов» – открывает загруженные пункты назначения.
- «Последние адреса» – открывает последние цели.
- «АЗС» – показывает ближайшие автозаправочные станции.
- «Стоянки» – ближайшие стоянки.
- «Особый пункт назначения» – открывает строку поиска для особой цели.
Также в таком режиме имеется возможность введения флажной цели посредством активации кнопки функции «Пункт назначения «флажок». Этот «Пункт…» впоследствии всегда можно переименовать.
Возможно провести динамическую наводку на цель путем последовательного нажатия клавиш Setup — «Настройки проклад. маршрута» — «Динамич. проклад. маршрута».
-
Page 1
R NS 310 , R NS 315 Navigation system US Edition Navigationssystem_111.5U6.N31 _23.book Seite i Donnerstag, 22. April 2010 5:16 17[…]
-
Page 2
Signs and s ymbols DA N G E R T exts with this s ymbol contain inf ormation r e- garding hazard ous situations which will cause death or sever e injuries if ignored. WA R N I N G T exts with this s ymbol contain inf ormation r e- garding hazardous situations which could c ause death or sever e injuries if ignored. CA U TI ON T exts with this s ymbo[…]
-
Page 3
V olkswagen AG is const antly working t o improve all types and models. Theref ore, ple ase under- stand that c hanges to the delivery scope in design, equipm ent and technology are possible at any time. The information r ega rding the scope of de- livery , appearance, perfo rmance, dimensions, weights, fuel consumption, standards and func- tions o[…]
-
Page 4
RNS 310, RNS 315: Navigatio n sy stem Print status: 0 7 .04.2010 Ausgabe: englis ch USA: 05.2010 | Art.-Nr.: 111.5U6.N31.23 Navigationssystem_111.5U6.N31 _23.book Seite iv Donnerstag, 22. April 2010 5:16 17[…]
-
Page 5
Table of contents 1 111.5U6.N31.23 T able of contents About this manual . . . . . . . . . . . . . . . . . . . . Introduction . . . . . . . . . . . . . . . . . . . . . . . . . . . . Before using . . . . . . . . . . . . . . . . . . . . . . . . . . . . . . . Safety instructions . . . . . . . . . . . . . . . . . . . . . . . . . . Device ov erview . . .[…]
-
Page 6
RNS 310, RNS 3 15 About this manual • At the end of this manu al, you will find an al- phabetical index . • A list of abbreviations explains technical abbr e- viations and terminology . • Directions ar e usually from the point o f view of the direction of tr avel. • Illustr ations ar e used for orientation and should be considered only as c[…]
-
Page 7
Introduction 3 111.5U6.N31.23 Introduction Before using P rior to the first use of the device, the f ollowing steps shou ld be carried out in order to operate the device safely and to enjoy the use of all fu nctions to their full capacit y: F ollow all basic safety instructions ⇒ page 8. F amiliarize yourself with the device overview […]
-
Page 8
RNS 310, RNS 3 15 • Inserting a second CD while a CD is in the drive or being ej ected from i t can destr oy the CD drive. Alway s wait for th e CD ejection t o finish! Note Cont aminants on a disc and warped discs can damage the CD drive. • Only use clean, st andard 12 centimeter CDs! − Do not affix labels or similar items t o CDs. Labels ca[…]
-
Page 9
Introduction 5 111.5U6.N31.23 4 Navigationssystem_111.5U6.N31 _23.book Seite 5 Donnerstag, 22. April 2010 5:16 17[…]
-
Page 10
RNS 310, RNS 3 15 Device overview Fig . 1 Overview of the contr ols. Rotary and push butt on. − Press to switch on or of f ⇒ page 8. − Tu rn t o adjust the volume ⇒ page 8. Pr ess to open a function ar ea. Labeling and fu nctions depend on the specific device. − or : Switch t o Radio mode and change fr equencies ⇒ page 12. − : Swi[…]
-
Page 11
Introduction 7 111.5U6.N31.23 AUX IN sock et to connect an external audio sour ce ⇒ page 21. Adjustment knob : F unction depends on the current oper ating mode. − T urn in all Radio modes ⇒ page 12 to manually set c hannel or fr equency settings. − In Media mode , turn t o change title manually and pr ess to st art and stop scanning (SCAN) […]
-
Page 12
RNS 310, RNS 3 15 Basic operating instructions Introduction In this section you’ll f ind inf ormation on the fo l- lowing: Switchi ng on or off . . . . . . . . . . . . . . . . . . . . . . . . . . . Changing the def ault volu me . . . . . . . . . . . . . . . . . . Additional di splays and options . . . . . . . . . . . . . . . Function but t[…]
-
Page 13
Introduction 9 111.5U6.N31.23 Changing the default volume Please first re ad and observe the safety instructi ons on page 3 and the introduct ory informa tion on page 8. V olume adjustments are indicated on the scr een by a “bar”. Meanwhile, device oper ation is block ed. The device is muted by pressing “0” (Displa y: ) and the current […]
-
Page 14
RNS 310, RNS 3 15 Function buttons and device buttons Fig . 2 RAD IO main menu with pop-up window . Please first re ad and observe the safety in- structions on page 3 and the intr oduc- tory inf ormation on page 8. The device is eq uipped with a t ouc h screen . The menu that is currently selected is displayed In the middle of the bo tt om screen l[…]
-
Page 15
Introduction 11 111.5U6.N31.23 Bro wsing lists and selecting items Fig . 3 T rack list of an MP3 CD. Please first read and observe the safety in- structions on page 3 and the introduc- to ry information on page 8. A vailable station s and selectable trac ks are dis- played as items in lists. The current st ation or trac k is highlighted ⇒ fig. 3 […]
-
Page 16
RNS 310, RNS 3 15 A udio mode R adio mode Introduction In this section you’ll f ind inf ormation on the fo l- lowing: Opening the RADIO main menu . . . . . . . . . . . . . . . Changing frequ ency bands . . . . . . . . . . . . . . . . . . . Changing radio stations or selecting from the F M station list . . . . . . . . . . . . . . . . . . . […]
-
Page 17
Audio mode 13 111.5U6.N31.23 Changing frequency ban ds Fig . 6 RA DIO main menu: Frequency funct ion button. Please first read and observe the safety in- structions on page 3 and the introduc- to ry information on page 12. The curr ently selected freq uency band (FM or AM) is indicated above the statio n name and in the bottom scr een line. Changin[…]
-
Page 18
RNS 310, RNS 3 15 Autom atic s can/tune Fig . 8 RA DIO main menu: Extras function butt on. Fig . 9 RA DIO main menu with station scanning func- tion. Please first re ad and observe the safety in- structions on page 3 and the intr oduc- tory inf ormation on page 12. When station scanning is running, all stations o f the current fr equency band whic […]
-
Page 19
Audio mode 15 111.5U6.N31.23 Displaying and hiding s tation preset buttons and storing stations Fig . 1 1 RA DIO main menu: Extras function button. Fig . 1 2 RA DIO main menu with display of the station preset butt ons . Please first read and observe the safety in- structions on page 3 and the introduc- to ry information on page 12. Radio stations […]
-
Page 20
RNS 310, RNS 3 15 Accessing stat ions stored on statio n preset buttons Fig . 13 R ADIO main menu with display of the station preset butt ons. Please first re ad and observe the safety in- structions on page 3 and the intr oduc- tory inf ormation on page 12. • Open the RADIO main menu and display st a- tion preset butt ons if necessary ⇒ page 1[…]
-
Page 21
Audio mode 17 111.5U6.N31.23 S atellite radio ma in menu Fig . 1 4 Satellite radio main menu. Please first read and observe the safety in- structions on page 3 and the introduc- to ry information on page 12. • In the main menu press the RADIO butt on and quic kly one after the other in or der to view all available fr equency bands. • OR: Pr ess[…]
-
Page 22
RNS 310, RNS 3 15 Changing Sirius s tations Fig . 15 Station selection options . Fig . 16 Station list in the selected category . Please first re ad and observe the safety in- structions on page 3 and the intr oduc- tory inf ormation on page 12. Changing stations using the arrow buttons • Pr ess one of the arrow butt ons on the device ⇒ page 6,[…]
-
Page 23
Audio mode 19 111.5U6.N31.23 Selecting stations from a pa rticular category Fig . 1 7 Station selection options. Fig . 1 8 Select a category . Please first read and observe the safety in- structions on page 3 and the introduc- to ry information on page 12. • Pr ess the function button in the Satel- lite radio main menu and pr ess the func- tion b[…]
-
Page 24
RNS 310, RNS 3 15 Radio settings menu (SET U P) Please first re ad and observe the safety in- structions on page 3 and the intr oduc- tory inf ormation on page 12. In the RADIO main menu, press the butt on in order t o open the Radio Settings menu . SETUP F unction button: Ef fect : Define st ation selection f or arrow butt ons and . : All stations[…]
-
Page 25
Audio mode 21 111.5U6.N31.23 Media mode Introduction In this section you’ll f ind information on the fol- lowing: Requirements for media sources and audio files . . Playback sequenc e of files and folders . . . . . . . . . . ME D IA main men u . . . . . . . . . . . . . . . . . . . . . . . . . . . Insert ing or ejecting a CD . . . . . . . .[…]
-
Page 26
RNS 310, RNS 3 15 Limitations and instructions Dirt, high temperatur es and mec hanical damage can render a dat a medium unusable. Please ob- serve data medium manufactur er information. Quality diff erences betwee n data media of dif- ferent manuf acturers c an cause problems during playbac k. Observe all le gal req uirements regarding copy- right[…]
-
Page 27
Audio mode 23 111.5U6.N31.23 4. Tr ack in the first subf older F1.1.1 of the sub- folde r F1. 1 5. T rac k in the second subfol der F1.2 of the folde r F1 6. T rac k and in the second folde r F2 Play lists are tr eated like folders in the playbac k sequence. ME DI A main menu Fig . 2 0 ME D IA main menu: Audio CD tr ack display . Fig . 21 M ED […]
-
Page 28
RNS 310, RNS 3 15 Inserting or ejectin g a CD Fig . 22 M ED IA main menu: CD media source. Please first re ad and observe the safety in- structions on page 3 and the intr oduc- tory inf ormation and s afety instructions on page 21. The internal CD drive can play audio CDs as well as MP3 CDs. An audio or MP3 CD is indicated on the scre en by CD or ?[…]
-
Page 29
Audio mode 25 111.5U6.N31.23 If an inserted memory card cannot be read, a pop- up window with a rela ted mess age is opened. • Pr ess the function button and wait for the prompt to eject the memory card! When a memory car d which does not cont ain any audio files is inserted, the function button in the Media selection menu will remain inactive ?[…]
-
Page 30
RNS 310, RNS 3 15 Connecting external audi o sources via Bluetooth ® Fig . 24 Bluetooth audio mode. Fig . 25 Media selection menu with BT audio tagged. Please first re ad and observe the safety in- structions on page 3 and the intr oduc- tory inf ormation and s afety instructions on page 21. Blueto oth audio mode is only possible in vehicles equip[…]
-
Page 31
Audio mode 27 111.5U6.N31.23 Selecting a media source Fig . 2 6 ME DI A main menu. Fig . 27 Media selection menu. Please first read and observe the safety in- structions on page 3 and the introduc- to ry information and safe ty instructions on page 21. In the MEDIA main menu, the current media source is indicated in the cente r of the bott om line […]
-
Page 32
RNS 310, RNS 3 15 Manual track change Fig . 28 T rack list of a playing MP3 CD. Fig . 29 Highest level of a playing MP3 CD. Please first re ad and observe the safety in- structions on page 3 and the intr oduc- tory inf ormation and s afety instructions on page 21. Start playbac k of a media source (CD, memory card, MDI) controlled via the radio nav[…]
-
Page 33
Audio mode 29 111.5U6.N31.23 If a MEDIA-IN multimedia interface is installed and an iP od ®1) or iPhone 1) is connected to it, a special iP od selection menu is displayed in the t op selection level (root folder) ⇒ page 32, fig. 35 . Selecting tr acks and CDs fr om an external CD changer ⇒ page 34. Changing play back mode ( function ke y) Fig […]
-
Page 34
RNS 310, RNS 3 15 Media settings menu(SETU P) Please first re ad and observe the safety in- structions on page 3 and the intr oduc- tory inf ormation and s afety instructions on page 21. In Media mode, press the butt on in order t o open the Media Setup menu . The c hoice of setup options depends on the device and eq uipment and other accessories. […]
-
Page 35
Audio mode 31 111.5U6.N31.23 ME DIA-I N multimedia interface Introduction In this section you’ll f ind information on the fol- lowing: Instructions for connecting a data medium . . . . . . . Connectio n and operation . . . . . . . . . . . . . . . . . . . . . Depending on th e vehicl e, the MEDIA-IN multi- media interface is located either […]
-
Page 36
RNS 310, RNS 3 15 Instruct ions and re quireme nts Instruct ions and r estrictio ns The radio navigatio n system can display , play back and control r eadable audio files only via the MEDIA-IN multimedia interface. Depending on battery status and dat a volume, it can tak e MTP players several minutes until they are r eady t o play . With data media[…]
-
Page 37
Audio mode 33 111.5U6.N31.23 Depending on the device in q uestion, it may be necessary t o manually launch playback on the radio system after conne cting and swi tching the external data m edium on. • Open the MEDIA main menu. • Pr ess butt on in order t o open the Media selection menu ⇒ page 31, fig. 33 . • Pr ess the function button t o s[…]
-
Page 38
RNS 310, RNS 3 15 External CD changer Introduction In this section you’ll f ind inf ormation on the fo l- lowing: Front-loading external CD changer . . . . . . . . . . . . . External CD chan ger with magazine . . . . . . . . . . . . Operation vi a the radio navigati on system . . . . . . Depending on the vehic le, there ma y be may be an e[…]
-
Page 39
Audio mode 35 111.5U6.N31.23 In order t o remove all CDs at the same time, pre ss the button for longe r than 3 seconds. The CDs are move d one by one t o the eject ion position. LED status displays Note Prior t o closing the stor age compartment at the passenger side or the fr ont center armr est, verify that the CD has been completel y loaded or […]
-
Page 40
RNS 310, RNS 3 15 Remo ving and inserting the magazine • Slide the magazine cover ⇒ page 35, fig. 37 completely open in order t o expose the magazine. • Pr ess the button f or magazine r emoval and remove the magazine . • In order t o insert the maga zine again, insert and push the magazine as far as it will go with the label “disc” fac[…]
-
Page 41
Navigation 37 111.5U6.N31.23 Navigation Introduction to navigation Introduction In this section you’ll f ind information on the fol- lowing: Navigation limit ations . . . . . . . . . . . . . . . . . . . . . . . . R NS 315: Updating the internally-stored navigation data . . . . . . . . . . . . . . . . . . . . . . . . . . . . . . . . . . . .[…]
-
Page 42
RNS 310, RNS 3 15 tion data you ar e travelling int o is r equir ed (only for RNS 310). Stre et routing is sub ject t o ongoing c hanges such as new streets, str eet names or street numbers. After a while, navigation CDs become out of date. Theref ore, r oute guidanc e can be inaccur ate or fau lty. Current na vigation data media and other country […]
-
Page 43
Navigation 39 111.5U6.N31.23 Navigation main menu Fig . 42 Navigation main menu with destination input options . Fig . 4 3 V ehicle location in the Map view . Please first read and observe the safety in- structions on page 3 and the introduc- to ry information on page 37. The navigation functions ar e only accessible if navigation data f or the reg[…]
-
Page 44
RNS 310, RNS 3 15 Input screens with on-scr een key board Fig . 44 Keypad for entering f ree text. Fig . 45 Input screen for selecting a destination. Please first re ad and observe the safety in- structions on page 3 and the intr oduc- tory inf ormation on page 37. Input scre ens with screen k eypad are used f or des- tination address selection or […]
-
Page 45
Navigation 41 111.5U6.N31.23 Destination input Introduction In this section you’ll f ind information on the fol- lowing: Selecting a destination addre ss or intersection . . . . Selecting stored desti nations . . . . . . . . . . . . . . . . . . . Selecting a poi nt of interest . . . . . . . . . . . . . . . . . . . . Details view of a desti[…]
-
Page 46
RNS 310, RNS 3 15 Selecting stored destinations Fig . 48 List of automatically stor ed recen t destina- tions. Fig . 49 List of destinations manually stored in the des- tination memory . Please first re ad and observe the safety in- structions on page 3 and the intr oduc- tory inf ormation on page 41. Y ou can start route guidance t o a saved home […]
-
Page 47
Navigation 43 111.5U6.N31.23 Opens the list of availabl e point of inter est catego- ries ⇒ page 42, fig. 50 . Searching for points of inte rest at the current loca- tion • Select the de sired point of in terest category by turning and pushing the tuning knob ⇒ page 6, fig. 1 or by pressing the screen ⇒ page 8. P oints of interest in your d[…]
-
Page 48
RNS 310, RNS 3 15 Details view of a de stination Fig. 52 Details view of a destination saved in the ad- dress book Please first re ad and observe the safety in- structions on page 3 and the intr oduc- tory inf ormation on page 41. In Details view , the name under which the destina- tion was saved as well as additional destinatio n details ar e disp[…]
-
Page 49
Navigation 45 111.5U6.N31.23 Destination memory Introduction In this section you’ll f ind information on the fol- lowing: Automatically saved r ecent des tinations . . . . . . . . . Saving destinatio ns manually . . . . . . . . . . . . . . . . . . Deleting or renaming address book entries . . . . . . . Displaying the Info window and saving[…]
-
Page 50
RNS 310, RNS 3 15 S aving destinations manual ly Fig. 54 Input screen for defining in dividual names . Please first re ad and observe the safety in- structions on page 3 and the intr oduc- tory inf ormation on page 45. If the function butt on is shown, the displayed destination can be st ored in the destinatio n memory . • Pr essing the function […]
-
Page 51
Navigation 47 111.5U6.N31.23 • OR: Pr ess the function button t o delete all destinations fr om the L ast Dest inations list. • OR: Press the button t o close t he pop-up window without s a ving any changes. Displaying the In fo window and saving the vehicle position Fig . 57 Info window with Details view of the current location. Fig. 58 Addr e[…]
-
Page 52
RNS 310, RNS 3 15 S aving or editing the home addr ess Fig . 59 Navigation main menu: Select the home ad- dress Fig. 60 Modifying the saved home addr ess. Please first re ad and observe the safety in- structions on page 3 and the intr oduc- tory inf ormation on page 45. Only one address or position can be s aved as the home address. Route guidance […]
-
Page 53
Navigation 49 111.5U6.N31.23 R oute guidance Introduction In this section you’ll f ind information on the fol- lowing: Routing optio ns . . . . . . . . . . . . . . . . . . . . . . . . . . . . . . Navigation messages (acoustic driving suggest ions) . . . . . . . . . . . . . . . . . . . . . . . . . . . . . . . . . Visual driving recommendati[…]
-
Page 54
RNS 310, RNS 3 15 • Select or deselect the desired option by acti- vating the chec kbox ⇒ page 49, fig. 62 . Defining routing criteria • Pr ess the function butt on in the Route options Setup Menu . • In the pop-up window , select the desired set- ting by pressing it. Excluding road types for the calculation The , and function buttons sp e […]
-
Page 55
Navigation 51 111.5U6.N31.23 V isual dri ving recommendations in Map view mode Fig. 63 Map view during active r oute guidance with overlaid functional ar eas. Fig. 64 Map view during active r oute guidance. Please first read and observe the safety in- structions on page 3 and the introduc- to ry information and safe ty instructions on page 49. Afte[…]
-
Page 56
RNS 310, RNS 3 15 • Pr ess the function button in the pop-up window t o display t he curren t position and the destination on an overview map. The scale of the overview map cannot be c hanged. • Pr ess the funct ion button in the overview map to change back t o the previous map view . Displaying the speed limit If the spe ed limit for the road […]
-
Page 57
Navigation 53 111.5U6.N31.23 Entering an intermediate destin ation Fig . 67 Info window showing intermediate destination during route guidance. Please first read and observe the safety in- structions on page 3 and the introduc- to ry information and safe ty instructions on page 49. During route guidance one additional destin ation can be enter ed a[…]
-
Page 58
RNS 310, RNS 3 15 • Pr ess the function button in the Info window . • Pr ess the function butt on in the pop- up window . • The route list c orresponding t o the active route guidance is calculated and displayed ⇒ page 53, fig. 68 . The route list displays str eet names or designa- tions which must be passed until the next turn. These are r[…]
-
Page 59
Navigation 55 111.5U6.N31.23 RNS 315: Blocking upcoming route sectio ns (congestion ahead) Please first read and observe the safety in- structions on page 3 and the introduc- to ry information and safe ty instructions on page 49. An upcoming section of road c an be block ed man- ually while route guidance is in pr ocess. • Pr ess the button in an[…]
-
Page 60
RNS 310, RNS 3 15 Navigation settings menu Fig . 69 Navigation setup menu. Fig . 7 0 Navigation setup menu. Please first re ad and observe the safety in- structions on page 3 and the intr oduc- tory inf ormation and s afety instructions on page 49. Pr ess the butt on in any navigation menu in order t o open the Navigation setup menu ⇒ fig. 6 9 . […]
-
Page 61
Navigation 57 111.5U6.N31.23 : Deletes saved destinations ⇒ page 45. : Show information r egarding the dat a media used during navigation as well as the navigation data st ored on them ⇒ page 37. F unction butt on: Eff ect Delete Destination memory Navigation Database 56 Navigationssystem_111.5U6.N31 _23.book Seite 57 Donnerstag, 22. April 2010[…]
-
Page 62
RNS 310, RNS 3 15 T elephone operation (Phone) Introduction Introduction In this section you’ll f ind inf ormation on the fo l- lowing: Places with s pecial r egulations . . . . . . . . . . . . . . . . . Using a mo bile phone withou t a connection to the outside antenn a . . . . . . . . . . . . . . . . . . . . . . . . . . . . . Connecti ng[…]
-
Page 63
Telephon e operation (Phon e) 59 111.5U6.N31.23 SOS and emergency call functions ma y not be displayed in all devices and may not be available in all countries via all phone service pro- viders. Please note the instructions given in the mo- bile phone’s and accessories’ user manuals as well as any laws or r egulations pertaining t o the u[…]
-
Page 64
RNS 310, RNS 3 15 toot h® -compatible cell phones. Mobile p hones must be located on an appr opriate cradle. In addi- tion, the phone cradle must be s afely secur ed to the base plate. Placing th e phone in its cradle per- mits it to be charged, but mor e importa ntly con- nects the cell ular phone to the vehicle’s outside antenna. A cellular[…]
-
Page 65
Telephon e operation (Phon e) 61 111.5U6.N31.23 PH ON E main menu Fig . 7 1 P HONE main menu . Please first read and note the intr oduct ory information and heed the W ARNINGS on page 5 8. After the pairing process, th e address book and call list data on the connected mobile phone will be transf erred t o the radio navigation system and can be acc[…]
-
Page 66
RNS 310, RNS 3 15 Sa ved phone numbers Introduction In this section you’ll f ind inf ormation on the fo l- lowing: Phone book . . . . . . . . . . . . . . . . . . . . . . . . . . . . . . . . . Searching address boo k entries . . . . . . . . . . . . . . . . Displaying and edit ing phone numbers . . . . . . . . . Call lists . . . . . . . . . […]
-
Page 67
Telephon e operation (Phon e) 63 111.5U6.N31.23 • Delete char acters in the entry field until a name is suggested for selection. Entries in the address book sear ch ar e not case sensitive. • Pr ess the function button t o tag the list entry . • OR: Press the right button t o tag the list entr y . • P ress the t agged telephone book entry t[…]
-
Page 68
RNS 310, RNS 3 15 Calling Introduction In this section you’ll f ind inf ormation on the fo l- lowing: Accepting, ending or rejecting calls . . . . . . . . . . . . Entering and call ing phone numbe rs . . . . . . . . . . . Making a call from th e phone book . . . . . . . . . . . . Making a call fr om the call list . . . . . . . . . . . . . […]
-
Page 69
Telephon e operation (Phon e) 65 111.5U6.N31.23 Making a call fr om the call list Please first read and note the intr oduct ory information on page 64. • Open the call list in the PHONE main menu. • Mark the desir ed list entry by turning the tuning knob ⇒ page 6, fig. 1 . • Pr ess the tuning knob t o begin a call. • OR: Pr ess the tagged[…]
-
Page 70
RNS 310, RNS 3 15 Making and receivin g additional calls Fig. 77 Call waiting. Please first re ad and note the introduct ory information on page 64. An additional call can be r eceived during a phone call. Y ou can switch from one call t o the other . Call waiting: answ ering an additional incoming call • If another caller contacts you during whe[…]
-
Page 71
Settings (SETUP) 67 111.5U6.N31.23 Settings (SETU P) Sound, v olume and sy stem settings Introduction In this section you’ll f ind information on the fol- lowing: Sound and volume sett ings . . . . . . . . . . . . . . . . . . . . System settings ( SETU P) . . . . . . . . . . . . . . . . . . . . . . . Pr essing the button will always open a[…]
-
Page 72
RNS 310, RNS 3 15 Sound and volume settings Fig . 79 T one settings selection menu . Fig . 80 Setup menu for tone pitch. Please first re ad and observe the safety in- structions on page 3 and the intr oduc- tory inf ormation on page 67. Calling up the Sound main menu • Pr ess the butt on from any menu. • Pr ess the function button on the l ower[…]
-
Page 73
Settings (SETUP) 69 111.5U6.N31.23 Sy stem settings ( SETU P ) Please first read and observe the safety in- structions on page 3 and the introduc- to ry information on page 67. • Pr ess the button and pr ess the function butt on in order to open the system set- tings. Rev erting to factor y settings Resetting t o the original conditions deletes a[…]
-
Page 74
RNS 310, RNS 3 15 Navigationssystem_111.5U6.N31 _23.book Seite 70 Donnerstag, 22. April 2010 5:16 17[…]
-
Page 75
Abbreviations 71 111.5U6.N31.23 Abbre viations Abbreviation Meaning AM Am plitude modulation (medium wave, MW). AUX Auxiliary input EON Enhanced Other Network (s upport f or other networks). FM Freq uency modulation (u ltra short wave, VHF). MDI Media Device Interface RDS Radio D ata System TMC T raf fic Message Channel TP T raf fic Pr ogram (tr af[…]
-
Page 76
RNS 310, RNS 3 15 Alphabetical inde x A Activating or deactivating checkboxes . . . . . 10 Address book deleting entries . . . . . . . . . . . . . . . . . . . . . . 4 6 renaming destina tions . . . . . . . . . . . . . . . 46 Address input NAV (Navigatio n) . . . . . . . . . . . . . . . . . . . . . 41 AM . . . . . . . . . . . . . . . . . . . . . . .[…]
-
Page 77
Alphabetical index 73 111.5U6.N31.23 Display AC display . . . . . . . . . . . . . . . . . . . . . . . . . . . 69 brightness . . . . . . . . . . . . . . . . . . . . . . . . . . . 69 keypad display . . . . . . . . . . . . . . . . . . . . . . . 69 kilometers or miles . . . . . . . . . . . . . . . . . . . 69 map appeara nce . . . . . . . . . . . . . . […]
-
Page 78
RNS 310, RNS 3 15 playback volume . . . . . . . . . . . . . . . . . . . . . 30 requirement s for . . . . . . . . . . . . . . . . . . . . . . 31 MEDIA . . . . . . . . . . . . . . . . . . . . . . . . . . . . . . . . . . 21 AUX volume . . . . . . . . . . . . . . . . . . . . . . . . . 30 bitrate . . . . . . . . . . . . . . . . . . . . . . . . . . . . .[…]
-
Page 79
Alphabetical index 75 111.5U6.N31.23 navigation region . . . . . . . . . . . . . . . . . . . . . 37 on-screen keyboard . . . . . . . . . . . . . . . . . . 40 position . . . . . . . . . . . . . . . . . . . . . . . . . . . . . 47 postal code Input . . . . . . . . . . . . . . . . . . . . . 41 recent destinations as destin ation . . . . . . 42 renaming[…]
-
Page 80
RNS 310, RNS 3 15 Route Guidance blocking routes . . . . . . . . . . . . . . . . . . . . . . 54 Route guidance . . . . . . . . . . . . . . . . . . . . . . . . . 4 9 blocking routes . . . . . . . . . . . . . . . . . . . . . . 54 Demo mode . . . . . . . . . . . . . . . . . . . . . . . . . 55 map . . . . . . . . . . . . . . . . . . . . . . . . . . . .[…]
-
Page 81
Alphabetical index 77 111.5U6.N31.23 playback volume (AUX, MDI, BT audio). 30 see: Changing the de fault volume . . . . . . . 9 Speed-dependent volume adjustment (SD- VA) . . . . . . . . . . . . . . . . . . . . . . . . . . . . . . . . 68 traffic announcements . . . . . . . . . . . . . . . . 68 W Warnings . . . . . . . . . . . . . . . . . . . . . . […]
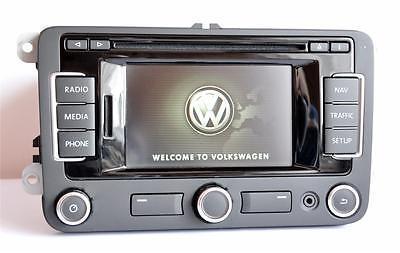
Navigation system RNS 315 is designed for installation in a vehicle. It can also be installed in a new vehicle. All functions are displayed on a color display. The edges of the screen are important system keys.
Hardware Overview
Specifications RNS 315 due to the presence of the built-in Bluetooth, tuner bands AM/FM. Perhaps the CD playback in CD/MP3/WMA. There is the presence of information output of the climate control sensor Parktronic display. Color screen is a touchscreen with a diagonal of 5 inches and a dot resolution of 400 by 240 pixels. The device is equipped with a slot for SD-cards up to 4 GB.
The Navigation software selects the user himself or herself, if not preinstalled by manufacturer.
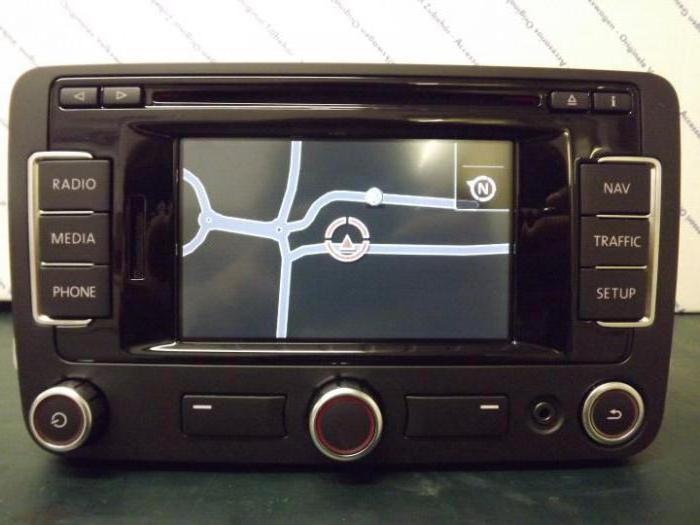
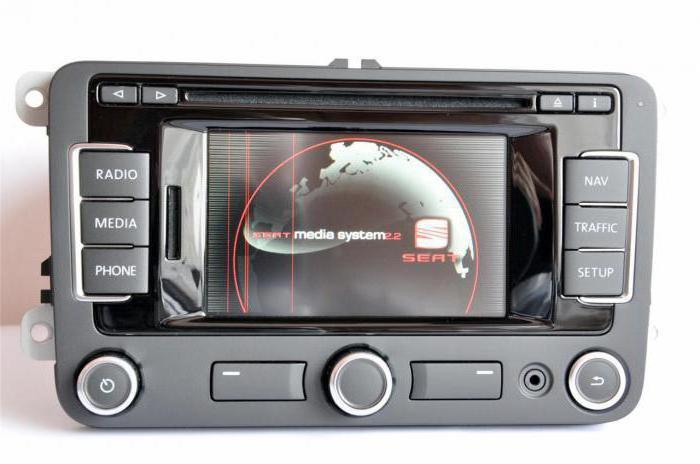
The device drive CD-ROM drive is at the top of the device on both sides of which are control buttons. Left and right of the display, located in the center, there is function key for easy movement between the main options of the navigation system. Right – Radio, Media, Phone, to the left – Nav, TMC and Setup. Next to the screen has a connector for memory card.
Description RNS 315
At the Bottom of the device has a spinning power control button of the appliance, the turning knob to navigate the options menu with two additional keys, the AUX button return to the previous menu.

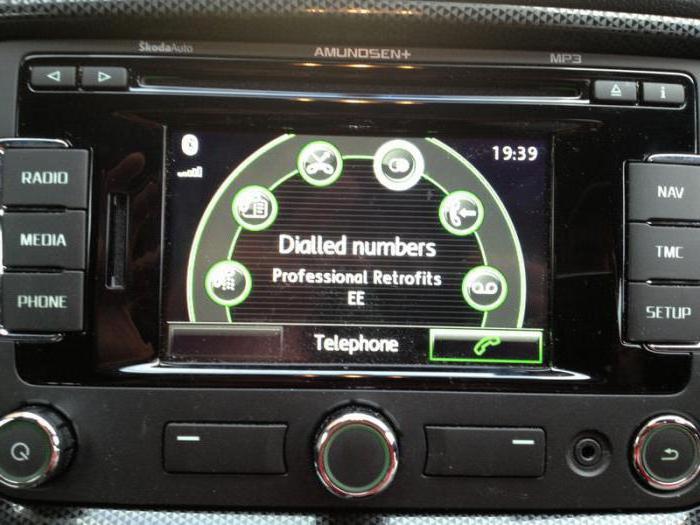
The power Button is also used to adjust the volume of the playback sound source. Key Radio includes the radio mode and switches the frequency bands. Media in RNS 315 launches the last-used playback device or activates a new one. Phone — in case of depression is muted the volume of the playable device. The function is active, subject to the availability of training for use of a mobile phone. Nav key is used to activate the navigation system. TMC displays the downloaded messages on the traffic situations. Setup allows you to configure each option separately.
Modal key Setup
This button has a very wide range of action. In the supplied instructions RNS 315 function Setup is described first, as it is the most important option in the management of the device. It is involved in the sound settings, system, radio settings, message settings on the transport situation, screen media and navigation.
When you press Setup and select «Audio» you can adjust the volume balance between the parties, adjust the equalizer and surround sound. Selecting «System», open access to the language menu, the location of the keys for text input, display settings, information on the status of the SD card and its safe extraction.

In the Radio Setup mode key turns on/off the TMC function, and configures the source to select radio stations using the «Search»button.
In the settings screen adjustable brightness, picture for night and day, included confirming audible tone buttons.
In the Media Setup mode allows you to activate the Bluetooth to control the volume for AUX and MIDI.
If you enable the option «Navigation» secure key gives access to the navigation management functions: setting of route and its criteria, the volume of the voice guidance, map zooming, etc.
Radio Button
This mode in the navigation system RNS 315 allows you to select broadcasting stations from a list or search for new ones, change the broadcasting station from the memory list of the stations or to carry out manual configuration.
Immediately available Scan function. It activates automatic playback in the listening bandwidth. When you click «Tools» and select «Scan» will start playing, always stretching for about 5 seconds all available stations in the order in which they are reserved in the station list. To end auto playback, you must re-click on «Scan». Locks the frequency at which scanning was stopped.
Also available in this mode function turn on/off the traffic announcements. By the function key Extras («Extras») a popup window will appear with the designation TR, which starts activating a function of the messages.

Key TMC
TMC launches the image of the traffic announcements. You use this function during a route guidance for route optimization in cases where there are complications of a transport nature.
In the detailed imageinformation is possible with the selection keys display gradually all adopted reports of problems.
Their appearance is shown on the map defined symbols and color. Complicated situation occurring in the direction of movement, shown in red, and a traffic problem on the opposite direction – grey.

Be aware that messages about traffic situations will be evaluated and boot device RNS 315 only if available data (SD or CD) in the navigation region at which movement occurs.
The accuracy of the dynamic route guidance depends on the transport newsrooms broadcast stations.
Button mode Media
Option allows you to control playback sources, including the last playable. It switches between CD, SD card, AUX, MIDI or Bluetooth Audio.
Also in the Media there Audio menu where the button «Tools». Clicking allows you to start playing in random order (Mix), from the beginning of tracks (Scan), is available to repeat one song or the entire catalog as a whole, and «Choice” gives you the opportunity to start a song manually at the user’s choice.
Note that there are certain requirements to the holders of the music files MP3 and WMA. So, CDs (CD, CD-R, CD-RW) must be a capacity up to 700 MB. RNS 315 navigation system recognizes the SD and MMC up to 4 GB and SDHC capacity up to 32GB.

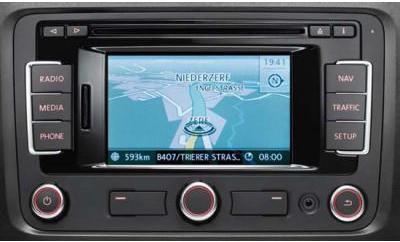
Button to the navigation mode Nav
The navigation Function RNS 315 will be available when downloading software from the navigation CD. Such data should be updated regularly due to continuous changes of road conditions.
In the Nav mode has a main menu, which offers such buttons as:
- «Address» – allows you to enter an address the ultimate goal of the route.
- «Memory address points» – opens the downloaded destinations.
- The»Last address» – opens the last goal.
- «station» – shows you the next petrol station.
- The ‘Parking lot’ – the next Parking lot.
- «Special destination» – opens the search bar for a specific purpose.
Also in this mode there is the possibility of introducing flag of the goal by activating the function button «destination «check box». This «Point…» you can then always rename.
It is Possible to carry out dynamic route guidance by sequentially pressing keys Setup — «Configure the installation. route» — «Dynamic. spacers to make it work. route.»
English
- Bedienungsanleitung Seat RNS 315
- Seat RNS 315 User Manual
- Manual Usuario Seat RNS 315
- Mode d’emploi Seat RNS 315
- Istruzioni Seat RNS 315
- инструкция Seat RNS 315
- Seat RNS 315の取扱説明書
- Handleiding Seat RNS 315
- Manual de uso Seat RNS 315
Need user manual? We will help you to find it and save your time.
- 105 pages
- 10.58 mb
The Seat RNS 315 and other products you use every day were certainly offered in the manual set. We know from our users’ experience that most of people do not really attach importance to these manuals. Many instructions, immediately after the purchase, go into the trash along with the box, which is a mistake. Get acquainted with the information concerning the manual for Seat RNS 315, which will help you to avoid troubles in the future.
Important note — be sure to read the Seat RNS 315 at least once
If you do not want to read brochures every time concerning a Seat RNS 315 or other products, it is enough to read them once only — just after buying the device. You will then acquire basic knowledge to maintain Seat RNS 315 in good operating condition to make it easily reach the intended life cycle. Then you can put away the manual on a shelf and use it again only in a situation where you’re not sure whether you perform maintenance of the product appropriately. Proper maintenance is a necessary part of your satisfaction from Seat RNS 315.
Once a year, clean the closet where you keep all your devices manuals and throw out the ones that you don’t use. This will help you maintain order in your home base of manuals.
Summary of Contents for Seat RNS 315
What does the Seat RNS 315 manual include? Why is it worth reading?
- Warranty and details concerning the maintenance of the product
It is a good idea to attach a document of purchase of the device to this page of the manual. If something bad happens while using a Seat RNS 315, you will have a set of documents that are required to obtain warranty repairs. It is in this part of the manual that you will also find information about the authorized service points of Seat RNS 315 as well as how you can properly maintain the device by yourself so as not to lose the warranty for the product. - Assembly guidelines and Setup
Do not lose your nerves and time for trying to assembly the product and launch it on your own. Use the instructions of the Seat RNS 315 manufacturer to run the product properly, without unnecessary risk of damage to the equipment. - Information concerning additional parts (included in the set and optional)
By looking through this part of the document, you will be able to verify whether your Seat RNS 315 has been delivered to you with a full set of accessories. You will also be able to find out what optional parts or accessories to Seat RNS 315 you will be able to find and buy to your device. - Troubleshooting
The most common problems that concern Seat RNS 315 and how to solve them. This is a very useful part of the manual which will save you a lot of time related to finding a solution. 90% of the problems with a Seat RNS 315 are common to many users. - Power requirements and energy class
Information concerning the amount of energy used as well as recommendations regarding the installation and supply for Seat RNS 315. Read to optimally use the Seat RNS 315 and not to consume more power than is necessary for the proper operation of the product. - Special functions of the Seat RNS 315
Here you can learn how to customize the product Seat RNS 315. You will learn what additional features can help you use the product Seat RNS 315 in a comfortable way and what functions of your device are the best to perform specific tasks.
As you can see, in the manual you will find information that will really help you use your product. It is good to get acquainted with it to avoid disappointments resulting from a shorter exploitation time of the product Seat RNS 315 than expected. However, if you cannot be convinced to collect manuals at your home, our website will provide you with help. You should find here the manuals for most of your devices, including Seat RNS 315.