
Общая информация
Система управления сетевым видеонаблюдением NVMS1000 (Network Video Management System) для персонального компьютера создана для управления камерами видеонаблюдения и видеорегистратором по локальной сети. NVMS1000 имеет возможность создания профилей пользователя с разными приоритетами доступа и парольной защитой.
Основные функции NVMS1000 включают в себя просмотр в реальном времени, управление воспроизведением и записью на жестком диске, управление функциями тревожных датчиков, удаленная настройка изображения и сетевых функций. Также NVMS1000 содержит возможность создания интерактивной карты помещения, с отображением в реальном времени срабатывания тревожных датчиков с демонстрацией видео на камерах, посылающих сигнал тревоги
Требования к системе.
- Поддерживаемые операционные системы.
Windows 7 Windows 7 (32bit/64bit, support SP1), DirectX 11.0 или выше Windows 8 Windows 8 (32bit/64bit), DirectX 11.0 или выше Windows 10 Windows 10 (32bit/64bit), DirectX 12.0 или выше - Требования к оборудованию.
CPU Intel Core Duo, 2.6GHz или выше Memory WIN7/ WIN 8/ WIN 10 2GB или выше HDD 250GB или больше Graphics Card Independent graphics card; 512M графической памяти или больше
Установка и удаление
Установка программного обеспечения
Дважды щелкните setup.exe для перехода к установке.
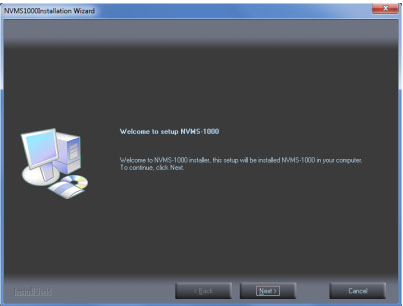
Нажмите кнопку «Next», чтобы продолжить.
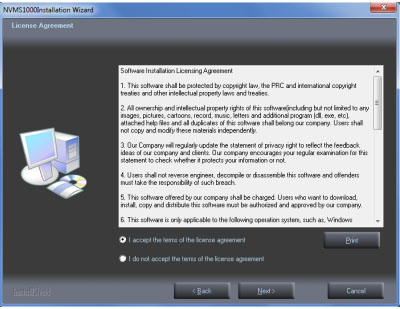
Выберите «I accept the terms of the license agreement.», а затем нажмите кнопку «Next», чтобы продолжить.
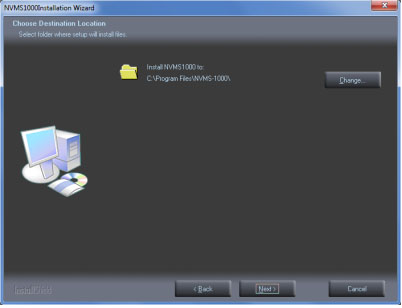
Нажмите кнопку «Change», чтобы изменить путь установки. Нажмите кнопку «Next», чтобы продолжить.
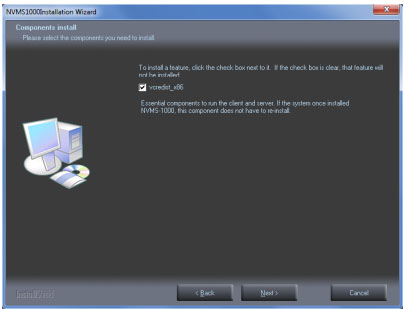
Далее запустится установка компонента Microsoft Visual C++ “vcredist_x86 » или «vcredist_x64» для 64-битной системы, нажмите “Next”.
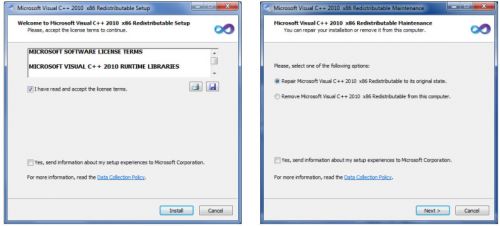
Для дальнейшей установки нужно принять условия лицензии и нажать «Install». Затем жмите кнопочку «Next» до завершения установки.
Наконец, установите флажок создать ярлыки на рабочем столе и
затем нажмите кнопку «Finish», чтобы завершить установку.
Удаление программного обеспечения производится также при помощи запуска программы установки.
Первый вход в систему
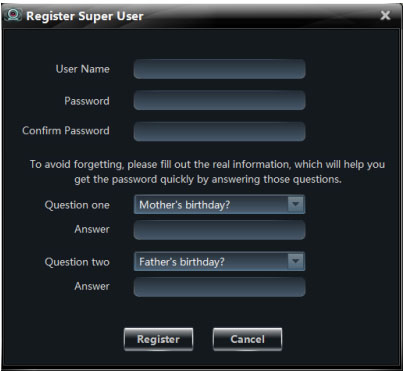
При первом запуске NVMS1000 создается административная учетная запись с полными правами. Создаем логин и пароль, а также ответ на выбранный секретный вопрос. Далее нажимаем «Register».
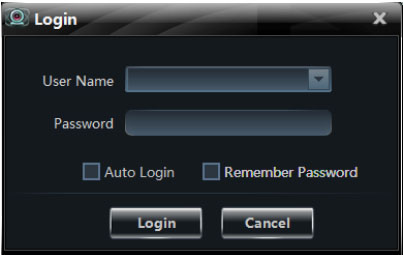
Окно входа в систему. Можно установить галочку запомнить пароль и автологин, для того чтобы не вводить пароль при каждом входе в систему.
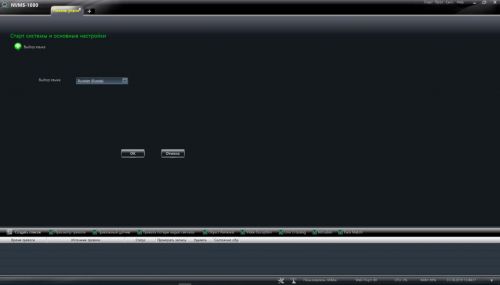
После удачного входа в систему появится следующее окно:
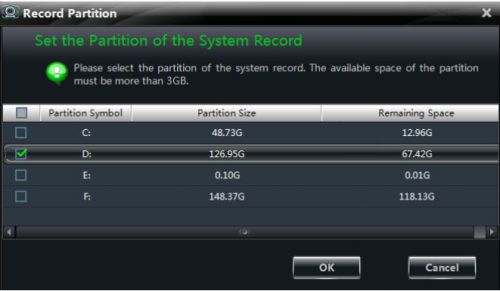
На данном этапе нам необходимо выбрать диск, на котором будут сохраняться файлы видео и скриншоты, которые вы предпочтете сохранить на компьютере.
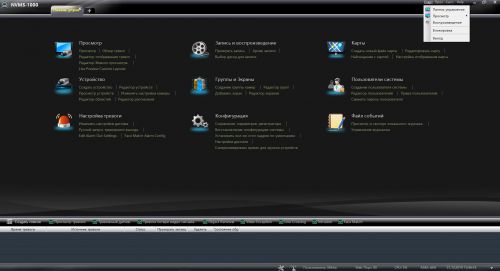
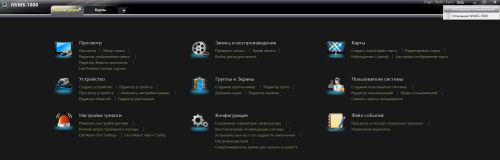
Основное меню программы
На русском языке. Русский язык обычно устанавливается автоматически. Выбрать язык работы программы можно в меню «Конфигурация» «Выбор языка»
Главный интерфейс программы содержит 5 основных областей.
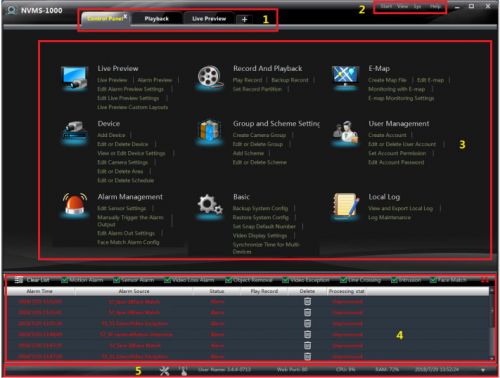
| Область | Описание | Область | Описание |
| 1 | Переключатель закладок | 2 | Меню быстрого доступа |
| 3 | Меню функций | 4 | Список сигналов тревоги |
| 5 | Строка общей информации |
Меню быстрого доступа предоставляет возможность, управлять базовыми функциями одним нажатием.
Меню функций – это основное меню программы позволяющее перемещаться по «дереву функций», осуществлять глубокую настройку подключаемого оборудования.
| Меню | Описание |
| Просмотр | Базовое меню для просмотра и управления основным функционалом подключенных регистраторов и камер. |
| Запись и воспроизведение | Для удаленного просмотра и управления записью и воспроизведением локальных устройств. |
| Карты | Для просмотра и расстановки на интерактивной карте устройств для быстрого доступа к просмотру и точек срабатывания сигнализации. |
| Устройство | Подключение и базовые настройки сетевых устройств видеонаблюдения к программе. |
| Группы и Экраны | Конфигурирование групп камер и групп просмотра, для быстрого доступа (в случае применения большого количества камер). |
| Пользователи системы | Создание, удаление, назначение прав пользователей системы. |
| Настройка тревоги | Настройка тревожных сообщений и интеллектуальных датчиков |
| Конфигурация | Настройка базовых параметров работы программы, сохранение и восстановление сохраненных конфигураций программы. |
| Файл событий | Просмотр лог-файлов системы, логов тревоги. |
Добавление устройств
Войдите в меню «Устройство» на панели функций или нажмите в строке статуса для перехода к редактору устройств.
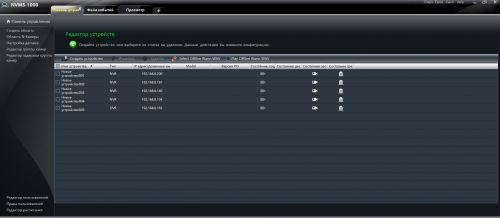
Обычно если устройства подключены их список будет сформирован автоматически. У активного устройства значок состояние подключения будет гореть зеленым. Чтобы посмотреть статус записи достаточно щелкнуть по значку «Статус записи».
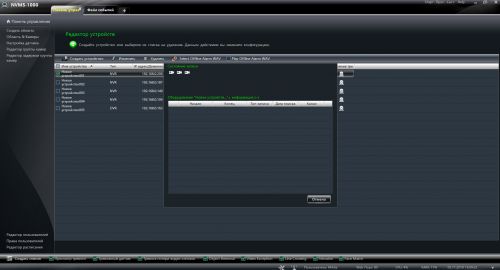
Чтобы изменить настройки устройства, которое уже есть в списке достаточно щелкнуть по нему 2 раза. Откроется меню редактирования настроек устройства.
Для того чтобы добавить новое устройство нажмите «Создать устройство»
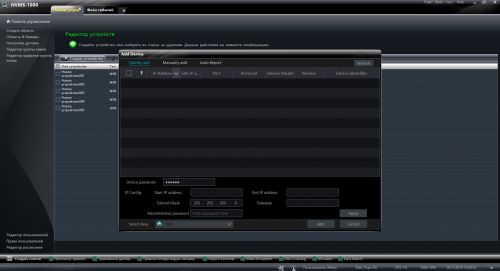
Появится меню, в котором будет список определенных устройств, в этом случае достаточно будет поставить галочку на устройство и вписать необходимые уточнения, например, пароль для видеокамеры. Затем нажать «Add» и устройства добавятся.
Если устройств по-прежнему не видно переходим в закладку «Manually added» и указываем IP адрес устройства и другие настройки необходимые для подключения устройства.
Редактирование устройств
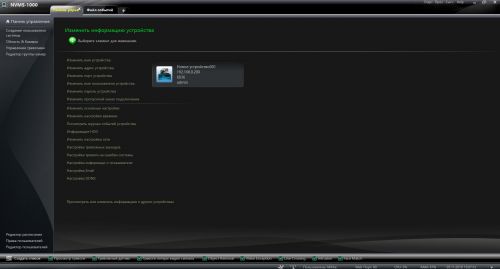
В данном меню можно поменять сетевые настройки, настройки изображения, настройки подключения, настройки тревоги и почтовых служб. Также при наличии у камер функции распознавания лиц, здесь появится меню настройки системы распознавания лиц.
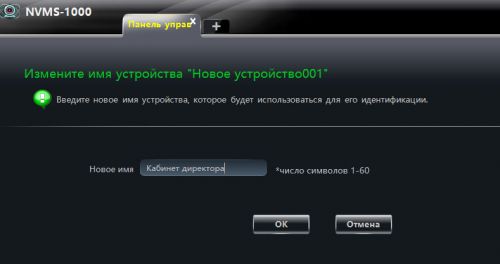
Изменение имени устройства
Можно выбрать любое имя для устройства, но для удобства наблюдения лучше придумать название по месту расположения, например, «Вход №1», «Рецепшн», «Кабинет руководителя департамента». Затем в списке камер вы увидите именно это название.
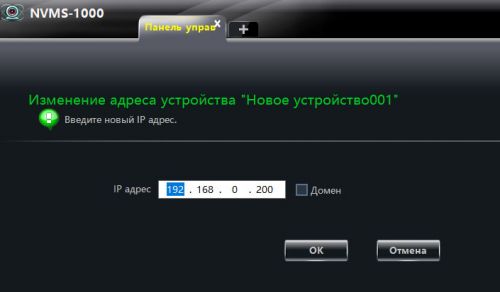
Изменение сетевого адреса устройства
Обычно сетевые адреса формируются при установке оборудования по DHCP либо в виде статических адресов системным администратором. Если вы не знаете топографию своей локальной сети, лучше довериться IP адресам, сформированным автоматически, либо попросить поменять адрес устройства системного администратора.
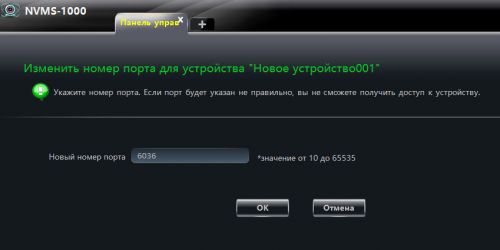
Изменение порта по умолчанию
Порты для устройств обычно установлены по умолчанию. Для смены портов устройств вы должны быть уверены, в том, что эти порты открыты и поддерживаются Вашими устройствами.
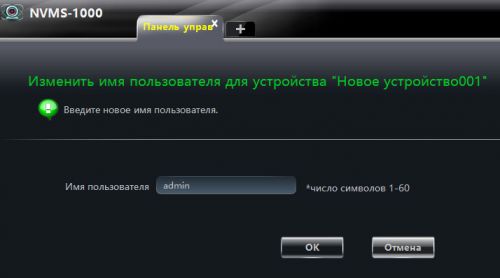
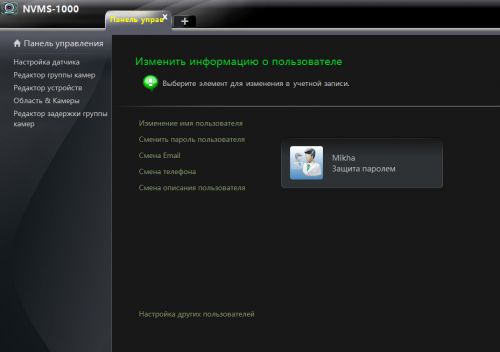
Изменение имени пользователя
В данном меню можно поменять только имя текущего пользователя. Изменить уровень доступа и приоритеты пользователя можно только имея приоритет «Администратор» из меню «Изменить информацию о пользователе».
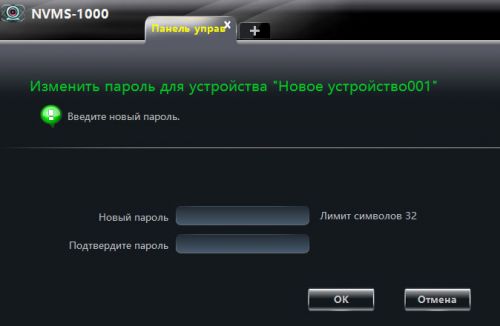
Изменение пароля
Изменение пароля производится также только в том случае если вы имеете уровень доступа «Администратор». Пароль должен содержать не менее 8 знаков и должен содержать буквы латинского алфавита как в нижнем, так и в верхнем регистре и несколько цифр.
Изменение пропускного канала
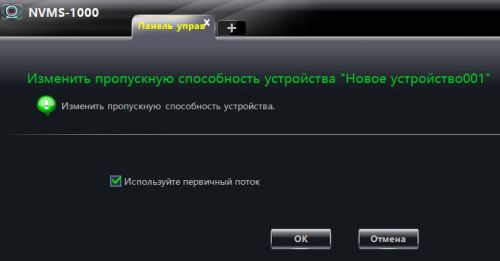
Данная функция переключает поток видео умолчанию. Первичный или вторичный (как правило с худшим разрешением, но с большим битрейтом).
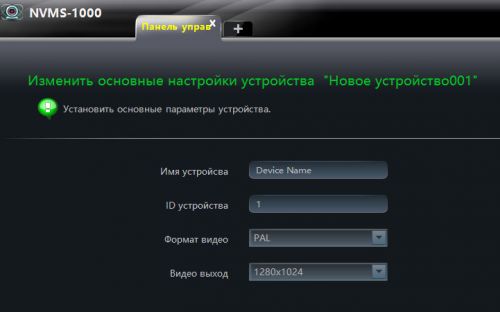
Изменение базовых настроек устройства
В данном меню можно поменять формат видеовыхода, видеоподсистему по умолчанию, и поменять имя и ID устройства.
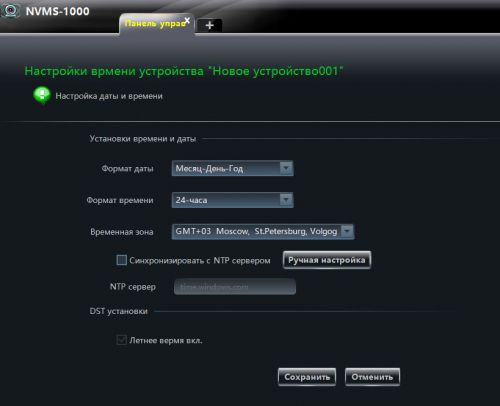
Настройка даты и времени
Помимо изменения даты и времени, можно настроить автоматическую синхронизацию устройства через сервера NTP в интернете.
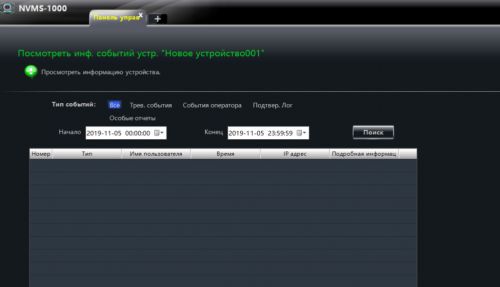
Журнал событий
Здесь можно посмотреть журнал событий устройства. Ошибки устройства, тревоги, зафиксированные устройством и многое другое, будут записываться в данный журнал.
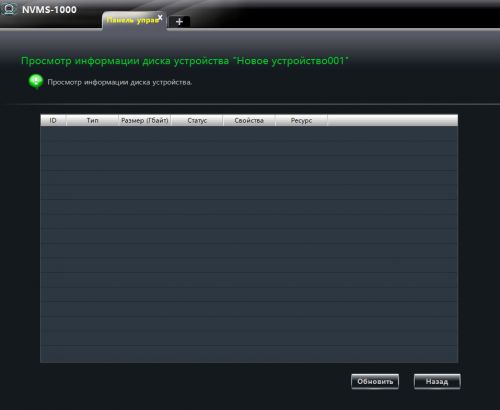
Просмотр информации о жестком диске устройства
В данном списке будут отображаться жесткие диски локального устройства, подключенного к системе (видеорегистратора).
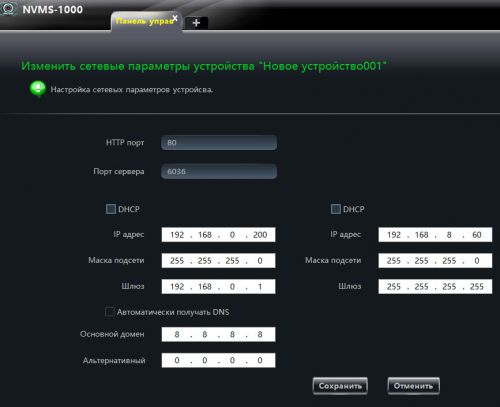
Изменение настроек сети
Если устройство подключилось, скорее всего оно либо настроено на автоматическое подключение, либо его уже предварительно настроили. Если вы хотите изменить сетевые настройки, предварительно посоветуйтесь с установщиками оборудования либо с системным администратором локальной сети.
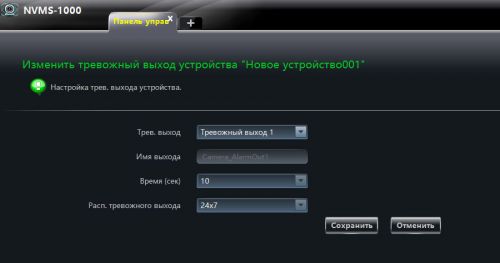
Настройка тревожных выходов
Данная настройка бывает необходима если у вас присутствует в системе более одного тревожного выхода для оповещения.
Настройка тревоги на ошибки системы
Здесь можно произвести настройку тревоги на системные ошибки.

Настройка информации пользователя
Можно посмотреть и при соответствующем уровне доступа изменить информацию пользователя.

Изменение настроек электронной почты
Настройка информации об электронной почте необходима для отправки на электронную почту пользователя тревожных сообщений.

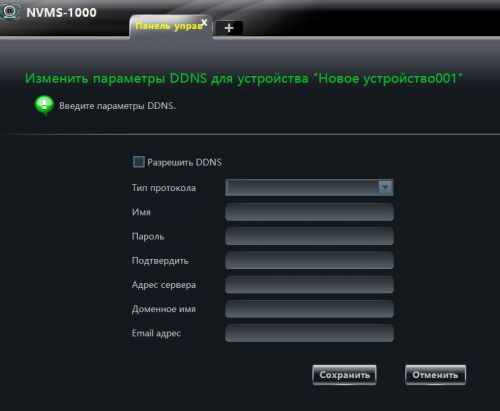
Изменение настроек DDNS
DDNS настраивается в случае отсутствия возможности получить от оператора связи «белый» IP адрес для прямого доступа к устройству к сети INTERNET. В данном случае доступ к устройству реализуется через сервера DDNS.
Распознавание лиц
В том случае если регистратор и камеры поддерживают распознавание лица, в меню настроек активируется функция «Распознавание лиц».
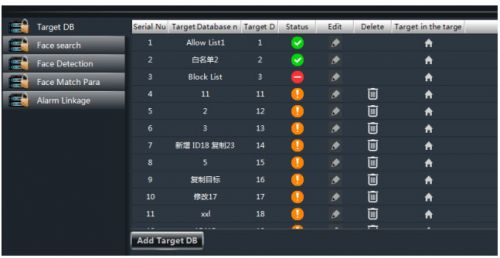
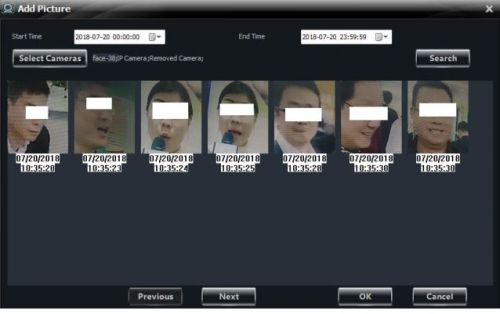
Нажмите «Add target DB» или «Создайте новую базу объектов». Когда новая база будет создана. Вы можете в нее скопировать уже созданные объекты, либо ввести новые фотографии лиц и данные кнопкой «Добавить объект» или «Add target». Выберите нужные фотографии.
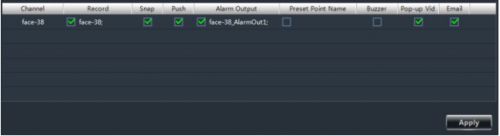
Не забудьте расставить галочки, чтобы включить распознавание в меню «Распознавание»
Меню область и камеры
Создание области просмотра
Меню создание области позволяет создать отдельную область для нескольких камер. Понятие область, чем-то похоже на создание групп камер в отдельном меню, но является более функциональным, например, тревожные события и срабатывания можно привязывать сразу к целым областям камер.
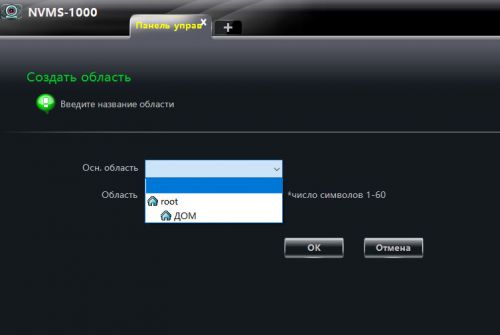
Создаем область, в которую переносим камеры, которые объединены каким-либо общим функционалом. Для этого используется кнопка «Изменить область камеры».
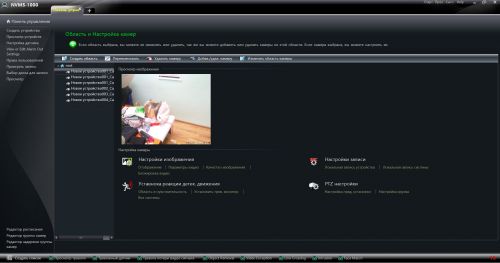
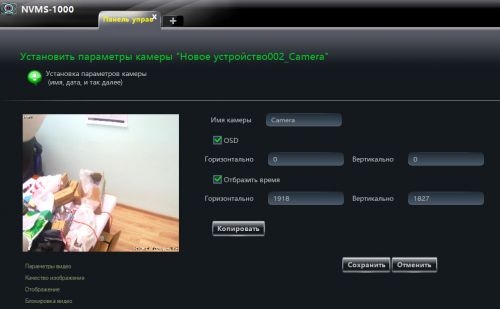
Меню «Настройка изображения» в меню «Область и настройка камер»
При входе в меню «Настройка изображения» можно установить имя камеры и настроить отображение имени камеры и текущее время на дисплее.
«Параметры видео» в меню «Настройка изображения»
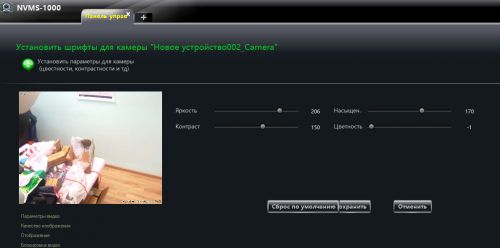
В параметрах видео настраиваем необходимые параметры яркости, контраста, насыщенности и цветности. Вернуться в предыдущее меню можно нажав на кнопку «Отображение». В более новых версиях предполагается более тонкая настройка параметров самих камер, настройка фильтров камер и параметров отображения. Пока этого нет для более точной настройки камер рекомендуем настройку параметров изображения через WEB админ панель камер.
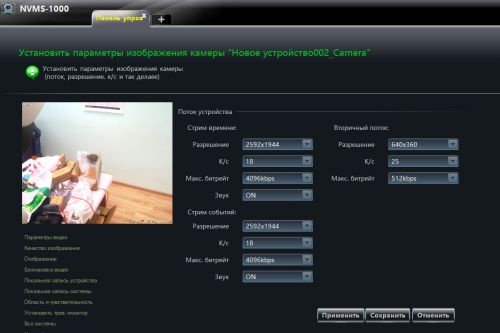
«Качество изображения» в меню «Настройка изображения»
В меню качество изображения настраиваем разрешение изображения для «Первичного потока» и «Вторичного потока». «Первичный поток» обычно используется для работы с изображением максимального качества для просмотра изображения напрямую с регистратора. «Вторичный поток» используется чаще всего для мобильных устройств и для просмотра изображения через интернет, для снижения нагрузки на интернет канал. Здесь же можно отрегулировать используемый битрейт, а также включить и выключить звук с камер (при наличии микрофона).
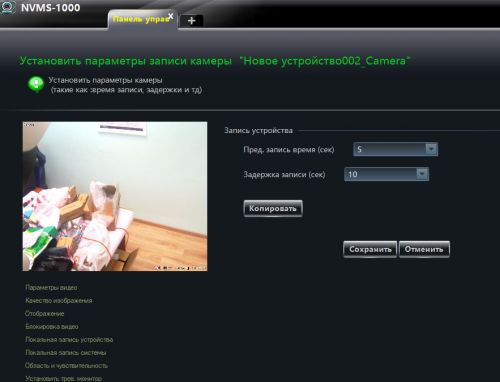
«Локальная запись устройства» в меню «Настройки записи»
Настраиваем время записи и время задержки записи.
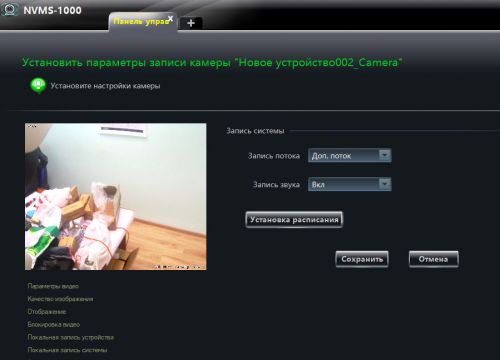
«Локальная запись системы» в меню «Настройки записи»
Здесь можно установить какой поток вторичный или первичный будет использоваться системой на запись по умолчанию.
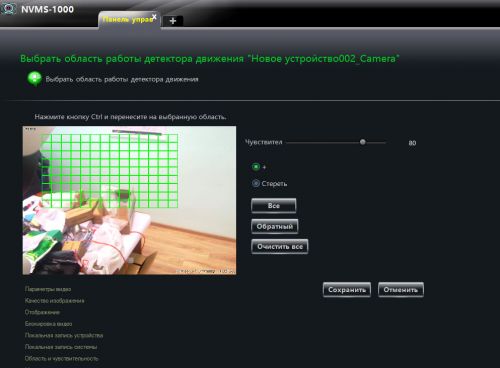
«Область и чувствительность» в меню «Установка реакции детекции движения»»
В разделе область и чувствительность настраиваем область действия датчика движения и чувствительность датчика.
«Установить тревожный монитор» в меню «Установка реакции детекции движения»»
Данный раздел позволяет включить датчик движения и установить расписание срабатывания датчика движения.
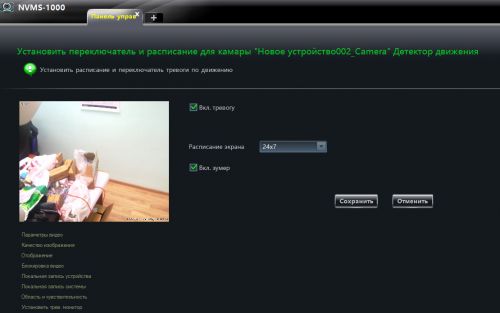
«Включение системы» в меню «Установка реакции детекции движения»»
«Включение системы» позволяет настроить воспроизведение определенного звукового файла на срабатывание датчика движения, запустить запись видео по датчику с определенной камеры, и включить увеличение экрана сработавшей по датчику камеры до полноэкранного режима.
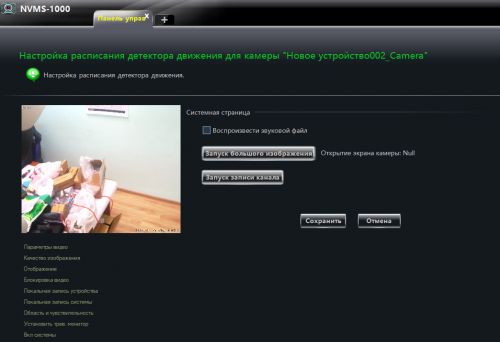
Стоит обратить внимание, что какие бы настройки в запуск датчика движения вы не вносили в других отделах. Система детекции движения не будет запущена, пока не будет включена в данном меню для каждого устройства.
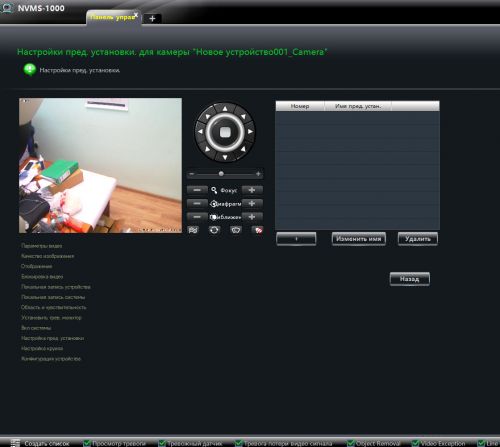
Меню «Настройка пред.установки» в разделе «PTZ настройки»
Предназначено для камер с функциями удаленного увеличения и фокусировки, а также для камер с PTZ функциями, для управления движением камеры, увеличением и фокусировкой.
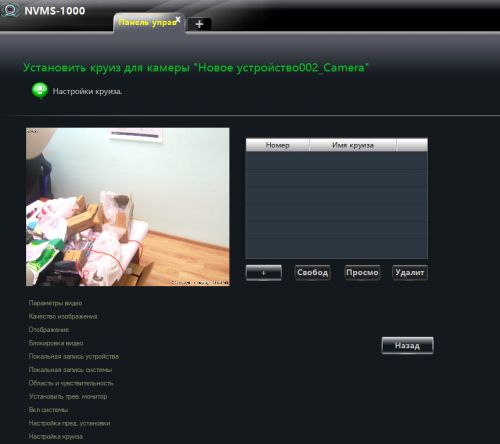
Меню «Настройки круиза» в разделе «PTZ настройки»
Включает в PTZ камерах функцию «Круиз». Для автоматического обследования и записи заданной области пространства.
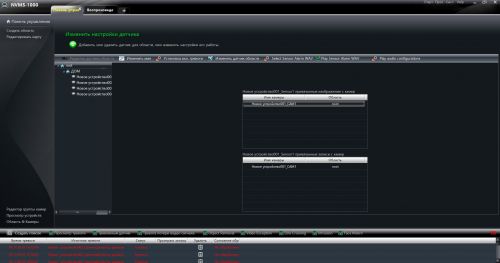
Меню «Настройки датчика» раздела «Устройство»
В меню «Настройки датчика можно произвести настройку датчиков камер.

Меню установка вкл. тревоги позволяет связать между собой датчики и камеры для включения просмотра или записи на камере при срабатывании датчика.
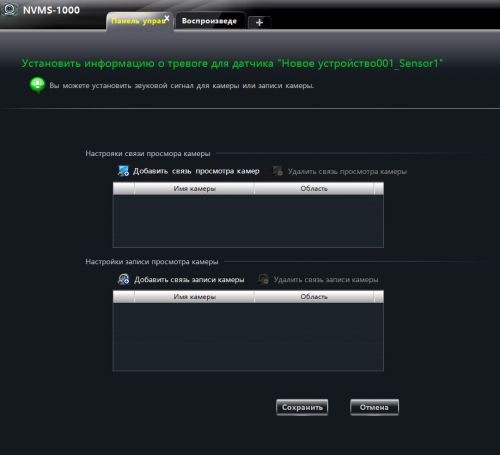
В процессе срабатывания датчика будут появляться привязанные к датчику изображения и записи.
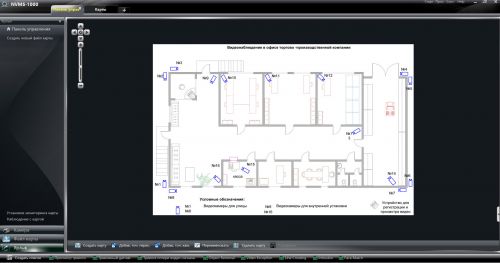
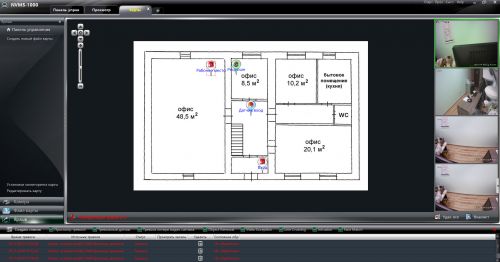
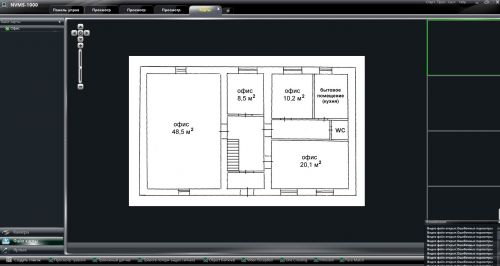
Меню «Редактировать карту» раздела «Устроство»
На самом деле для редактирования и создания карт существует отдельный раздел «Карты» (фактически данное меню просто перебрасывает нас в работу с разделом «Карты»).
Позволяет создать интерактивную карту на плане помещения. Нажимаем «Создать новую карту» привязываем необходимое изображение нужной карты.
Далее открываем карту, слева увидим все наши устройства. Входим в меню «Создать ярлык».
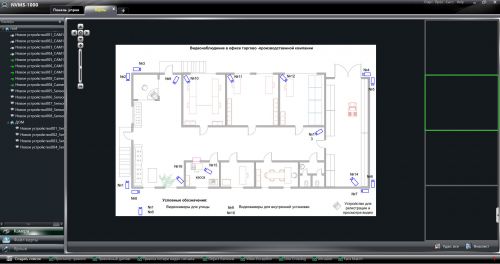
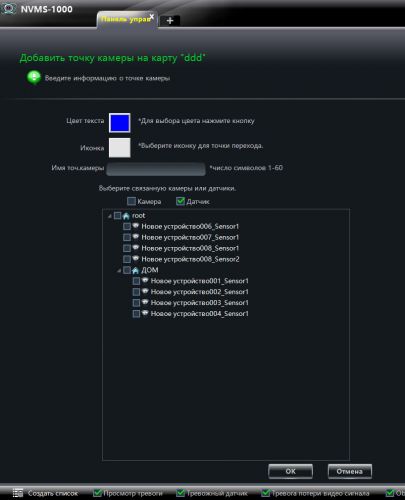
“Редактировать карту»
Устанавливаем на карте ярлычки камер, датчиков и точек перехода.
Получаем карту с нанесенными на нее камерами и датчиками. Очень удобно переходить от одной камеры к другой на реальной карте помещения. А в случае настройки датчиков движения, тревога будет отображаться в режиме реального времени на карте вместе с видео.
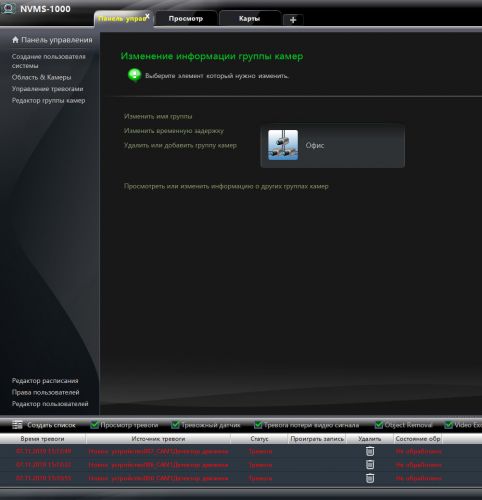
Меню «Редактор гурппы камер» раздела «Утройство»
Позволяет объединять камеры в группы по какому либо признаку для удобства работы.

Здесь же можно изменить и дополнить информацию по группе.
Раздел «Запись и воспроизведение»
В меню “Запись и воспроизведение» можно просмотреть записи на локальных устройствах, на камерах и регистраторах.
«Проиграть запись»
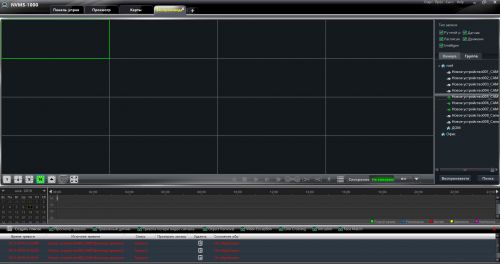
Видеоплеер позволяет проигрывать записи со всех устройств подключенных к программе, настраивать воспроизведение моментов записи по времени и по событиям. Нажатие клавиши “Ctrl” с установленным на выделенную запись курсором мыши, позволяет при помощи колесика мыши масштабировать запись, выбирать более короткие фрагменты на выбранной шкале. Здесь же можно выбирать запись по календарю , по дням и месяцам, а также настраивать синхронное воспроизведение с разных камер или сопоставление по времени видео с разных источников.
«Архив записи»
Эта функция предназначена для копирования интересующей части архива с жесткого диска регистратора на компьютер. Здесь можно выбрать интересующую камеру на которой хранится требуемая запись. Выбрать временной промежуток и тип записи по расписанию, по датчику движения, по срабатыванию интеллектуальных датчиков и ручная запись.
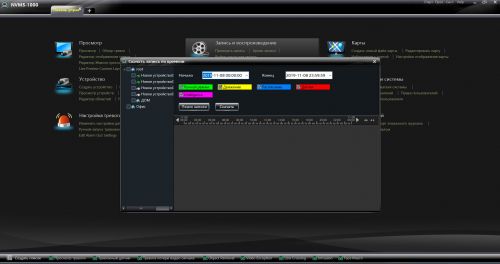
Запись можно скачать на жесткий диск в формате .avi и .dat
Раздел «Группы и экраны»
Данный раздел уже встречался нам в самом начале, здесь можно разбить все устройства на группы по назначению.
Раздел «Конфигурация»
В разделе “Конфигурация» настраиваются основные базовые параметры работы с программой.
Папка и диск
Позволяет выбрать жесткий диск и папку для хранения скриншотов и частей архивов записей на компьютере.

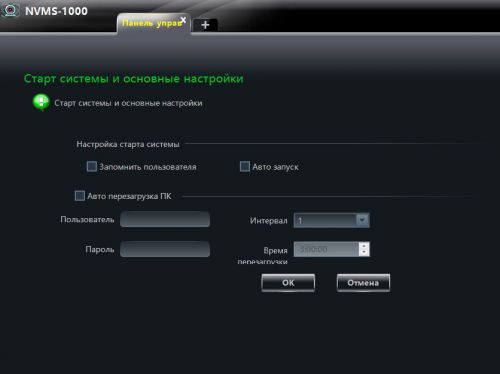
«Старт системы и основные настройки»
Настройка старта и запуска программы. Быстрая смена пароля.
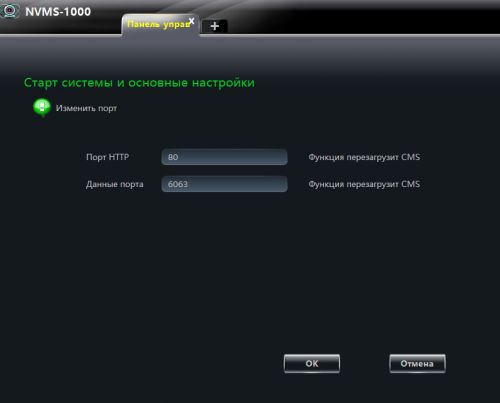
Базовая настройка портов и уровня безопасности при старте программы.
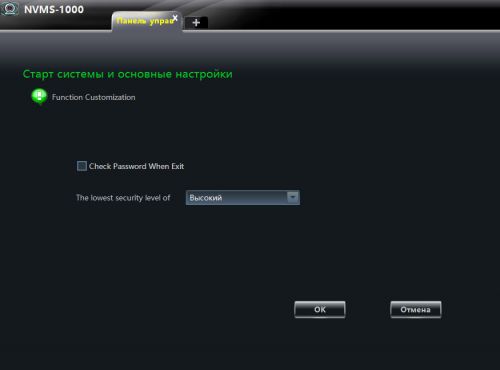
Можно также отключить проверку пароля при выходе из программы.
«Архив и восстановление»
Архив и восстановление повзоляют сохранить конфигурацию и настройки. Которые в случае сбоя можно загрузить из сохраненного на диске файла.
Раздел «Пользователи системы»
Настроить пользователей системы и добавить дополнительную информацию о пользователе позволяет раздел «Пользователи системы».
Здесь же настраиваются права пользователей системы и пароли.
Раздел «Карты»
Доступ к разделу «Карты» и к настройкам и созданию карт возможен из разных разделов программы. Большую часть работы с данным разделом был уже рассмотрен ранее в разделе «Устройство». Подчеркнем лишь, что раздел «Карты» позволяет создавать и настраивать интерактивные карты помещений для повышения удобства работы и повышения скорости реагирования на события.
«Просмотр»
Это основной раздел программы, благодаря которому и происходит просмотр видео на всех подсоединенных устройствах. Но к нему стоит приступать когда все разделы программы уже настроены.
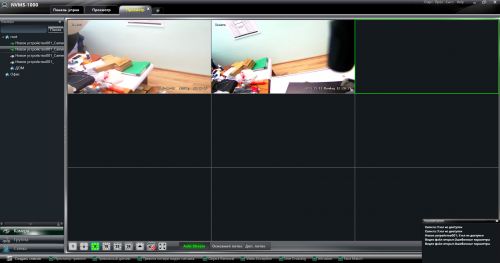
В данном разделе можно просматривать камеры по группам и по областям, выбирать потоки воспроизведения. Область живого просмотра поддерживает до 36 одновременно выводимых на экран окон устройств. Нижнее меню с квадратиками от 1 до 36 позволяет менять количество окон видео на экране. Для добавления видео с камеры достаточно выбрать устройство и отметить свободное окно на экране.
В нижнем левом углу каждого окна при наведении курсора мыши можно увидеть панельку настроек камеры. По функционалу слева направо «Выключить изображение», «Стоп-кадр», «Включить запись», «PTZ управление», «Начать 3D увеличение», «Звонок устройству» (для устройств с микрофоном), «Настройка камеры», «Звук», «Увеличение» (имеется ввиду цифровое увеличение), «Полноэкранный просмотр».
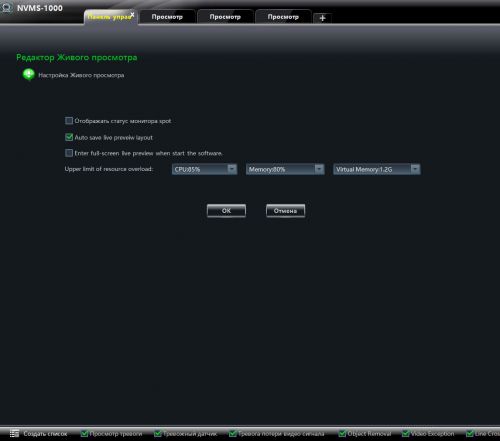
В этом же разделе просмотр можно настроить функции «Живого просмотра»
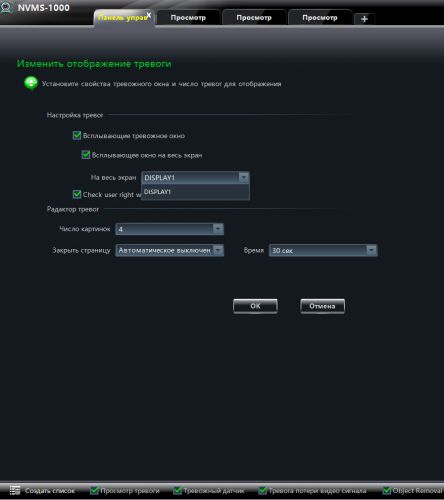
А также настроить отображение тревоги на экране.
Полную инструкцию пользователя на английском языке можно посмотреть в меню быстрого доступа в правом верхнем углу программы в разделе «Help».
Скачать программу NVMS1000 и дополнения к ней можно по указанному ниже адресу или используя QR код.
Titanium CMS NVMS 2 User Guide, NVMS Lite is a newly integrated security management platform released by TVT, featuring seamless access to all TVT’s products and encoding devices of the famous manufacturers in the industry (like Hikvison, Dahua, etc.). With the powerful capability of video surveillance management, real-time preview, record storage, record playback, record download, alarm linkage, decoding on TV Wall and keyboard control are supported.
Additionally, due to its small, exquisite, flexible and diverse deployment, NVMS Lite can meet various demands of small-sized projects and can be widely used in the video surveillance of industrial park, education, banking, chain stores, buildings and transportation.
If you see the CPU and Memory red and maxed out while trying to see live view, follow the steps below.


Log into NVMS.

Click on Edit Common Function. (If you have this function already, skip to the next step)

Titanium CMS NVMS 2 User Guide
Read More : NVMS 2 Installation Guide
Select Local Configuration and click OK.

Click on Local Setting.

Under Decoding Mode, select Soft Decoding and click Apply.

At the top, select Overload Setting.

Select max CPU and Memory.


Close NVMS and don’t save live view settings.
Restart NVMS. The changes made will help lower overloading. If it’s still maxing out and struggling to stream live view, consider changing the stream to sub stream, lowering the resolution on the cameras and not using any other applications in the background.
Link to video:
https://app.screencast.com/AjNAFgyJz4jQN
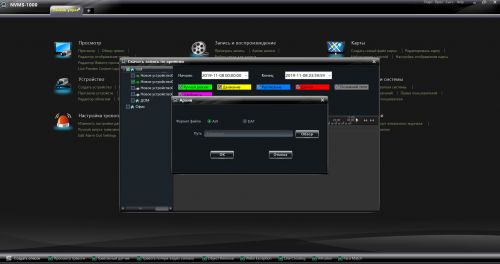
Plate Capture Export on NVMS / Monitor Client
1.Select License Plate Comparison Retrieval under Search

2.Select the LPR under Monitoring Point and date in which for plate captures and select Search

3.Once the search has populated with information, select Export or Export Cur Page to export all of the plate captures for the designated date and time or of the current page. Designate the directory in which the export will be and Save.

NVMS1000 Notice
The NVMS1000 program is EOL.
3.4.5 is the final version for the software with 3.0 recorders. No future updates.
Recorders on the Titanium Interface will require the use of NVMS 2.0 Lite(256 Ch free) or Standard (32 Ch free)
Windows:
https://drive.google.com/drive/u/0/folders/1nOxFnJBzBmqln2mUiD0Uo7GRInsj1shl
Mac (NVMS Lite ONLY):
https://drive.google.com/drive/u/0/folders/1noAUhQbofFP8natvOt4WsVNJigxRQvOs
Installing NVMS 2.0 Lite (2.1.1)
Default username: admin
Default password: 123456
Download and run the NVMS Lite exe.
https://drive.google.com/drive/u/0/folders/1tarCVJie8corwQIx46_OGde6k3Nc6SOR
Click “More Info” when the splash screen displays.

Click “Run Anyway”

Select your desired language and click “OK”
Read the software license agreement and select the “I accept” option and click “Next” to continue.

Click next on the next screen. (Note: You may change the install directory by clicking “browse”)

Click “Finish” to complete the install.

You may use the drop down menus under “Question:” to select security questions. Otherwise, hit “Skip”.

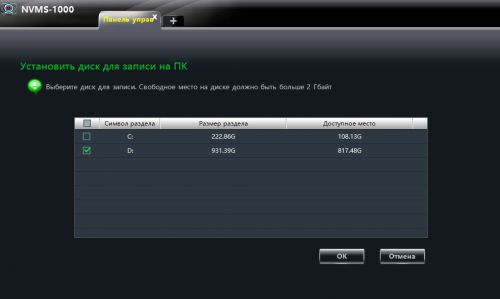
Once the software launches, you will need to select a record partition.

Live View NVMS 2.0 (2.1.1)
Select “Live View”

You may use the “area” (house icon) to call the cameras within the area. Alternatively, you may call the cameras individually.
To call a channel you can either drag and drop OR select a channel within the layout then double click the channel.

You can modify the channel layouts by selecting them at the bottom of the screen. The arrow will provide additional options.

The full screen button will expand your active channels to full screen. Press Escape on your keyboard to exit the mode.

Select OSD to toggle the On Screen Display Overlay. This setting is off by default. Enabling will make the NVMS 2.0 create an overlay with the Device and channel name.

The audio enable button will start audio on the selected channel. The camera must be audio capable for this function to work.

The Intelligent function sense button will toggle the intelligent function overlays. (e.g. line crossing, intrusion, etc)

The close stream button will close all active streams.

The “Save View” button will allow you to name the active channel layout and save it.

To call the saved view, click the “View” button on the sidebar. This section will contain any saved views.

Playback on NVMS 2.0 (2.1.1)
Click on “Storage Playback”

Select the device & channel you want to perform playback on.
Use the calendar icon to select the date, then press search.

When you highlight a channel, the device will report whether footage is present or not by shading the day.
If you wish to synchronize the display please click the “Sync/Async” button to toggle the option.

You can change the Storage Playback layout by selecting the desired channel configuration.

To call the footage you can drag and drop the channel or area into a blank space.

Use the “Full Screen” Button to turn on full screen mode. Press escape to exit.

Select OSD to toggle the On Screen Display Overlay. This setting is off by default. Enabling will make the NVMS 2.0 create an overlay with the Device and channel name.

The close stream button will close all active streams.

You can slow down the speed of the footage by clicking the “Slow” button. Note: You can slowdown the speed multiple times. Allow for a few seconds to switch mode.
You can terminate the playback stream and close the channel by clicking the “Stop” button.
You can fast forward the footage by clicking the “Fast” button. Note: You can speed up the playback multiple times. Allow for a few seconds to switch mode.

Use the “Pause” button to pause playback.
The << 30S button will rewind 30 seconds.
The 30S >> button will jump forward 30 seconds.

The “Back up start time” button will mark the start of the footage back up. (Scissor icon pointing left)
The “Back up end time” button will mark the end of the footage back up. (Scissor icon pointing to the right)
The “Download” button will redirect you to Record Management and Download the clip.

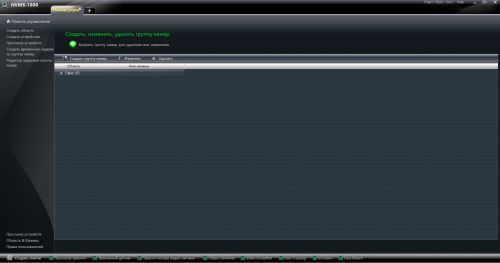
NVMS 2.0 Channel Group Control (2.1.1)
Click “Channel Group Setting” under “Resource Management”

Click add
Enter a “Channel Group Name”
Select the desired cameras for the group

Click the right arrow to add the checked cameras into the group
Click OK

Repeat the process for additional camera groups
Be mindful of the “Parent Channel Group” – leave blank to keep at the same level

Open a Live View Tab
Drag and drop the Channel Group to begin streaming

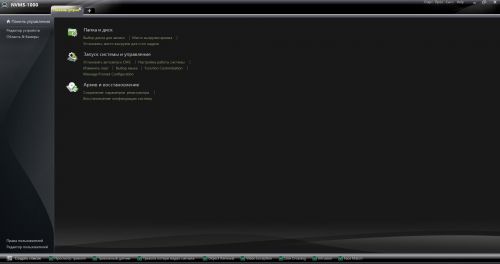
Export/Import NVMS-1000 Configurations- Windows
Please make sure you are logged into NVMS-1000 prior to continuing with the following steps :
Step 1- Please select the Control Panel option located above
Step 2- Under Basic please select- Backup System Config

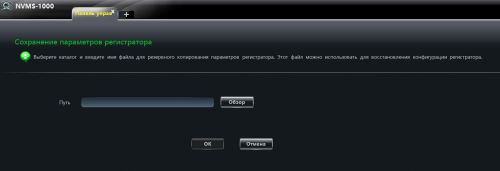
Step 3- Select Browse – Create file name and select the location you wish to back up the Backup File(Dat)

Step 4- Select Save once Step 3 is completed

Please note: Once you confirmed the files have been exported successfully. Please proceed with Importing NVMS-1000 configuration.
NVMS Importing:
Step 1- Please select the Control Panel option located above
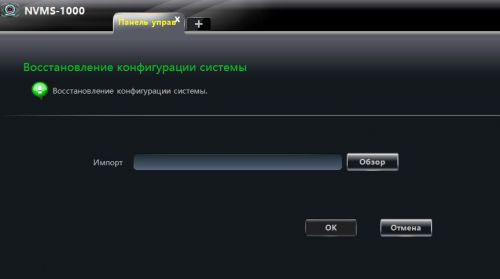
Step 2- Under Basic please select- Restore System Config

Step 3- Select browse and Open the Exported file you created

Once the file is selected please select Ok
Please note: NVMS-1000 Application will close out but will open automatically reflecting the correct configuration exported.
Adding P2P Device to NVMS 2.0 (2.1.1)
Click “Resource Management”

Click “Add”

Click “Manually Add”

Click in the blank section next to “IP Address”

Select “Serial No.”

Enter the QR Code / P2P Code / Serial No. of the device to add. Enter your desired username and password. You may click “Test” to confirm that the device is reachable.


It is recommended to select “Automatically Link Area”. This will create an area based on your device’s name.

The “Online Status” section will say “Online” upon successful connection.
NVMS 2.0 Mac firewall configuration
There is an option to automatically allow signed software to receive incoming connections. This means the NVMS2.0 apps and services signed by a valid certificate authority will automatically added to this list. Any app that is created by Apple, for example, that needs to receive incoming connections will be automatically added to the list. If NVMS2.0 can not connect to devices successfully, the firewall may be blocking the network access of NVMS 2.0.
Blocking all incoming connections will “prevent incoming incoming connections to nonessential services and apps.” This means that the firewall allows your Mac to find authorized services provided by other computers on your network, but prevents connections to all other sharing services.

Adding NVMS 2.0 services to the OS Firewall whitelist
Click on the Apple icon and select “System Preferences”
Click “Security & Privacy”

Select “Firewall”

Select “Firewall Options”
You may need to click the lock icon to make changes to the setting. You will be prompted to enter your Mac OS credentials.

Select “Firewall options”

You will need to allow connections on the services listed in the snapshot below. Press “OK” to confirm.

Installing NVMS 2.0 Lite (2.1.1) MAC
Default username: admin
Default password: 123456
Download and run the NVMS 2.0 pkg.
https://drive.google.com/drive/u/0/folders/1g2TmrNn7ecJy0LLQPX5tILYZ0S6xWJYk

You might receive a notification that the OS put a hold on the installation.

Click the Apple icon, then “System Preferences”

Click on “Security & Privacy”

Select “General”

Click the lock icon if “Open Anyway” is not selectable.

Click “Open”

Click “Continue”

If you wish to change the install location, you may do so here. Otherwise, click “Install”

Login using your computer’s credentials to continue the Installation.

You will receive a prompt that the install was successful.

You may “Keep” or discard the installation file using “Move to Trash”

To open the NVMS 2.0, open the “Monitor Client.app” in Finder->Applications.

When you open the program you will be prompted for the username and password. The defaults are admin/123456. Click Login.

You will be prompted to create security questions. This is optional. You may hit “Skip”


Back up footage through NVMS 2.0 (2.1.1)
Playing back using the clip option
To Back up footage using the clipping function, open “Storage Playback” and playback the desired footage.

Once you have found the desired footage:
Click the “Back up start time” button will mark the start of the footage back up. (Scissor icon pointing left)
Click the “Back up end time” button will mark the end of the footage back up. (Scissor icon pointing to the right)
Click the “Download” button will redirect you to Record Management and Download the clip.

When the back up starts you will be able to see the progress and have the ability to cancel the back up using “Stop” or “Pause” to pause the download.

You can use the “Open File Position” to open the folder containing back up footage.
You will also have a progress bar. When the progress bar reaches 100%, the footage download is complete.

Back up using Record Management
Select “Back up” under “Storage Playback”

Expand the area and select your desired channels and date.

Click the “Search” button to populate the Backup timeline.

Click and drag your mouse cursor to mark the desired Playback footage.
The “Backup” button will begin the download.
You can use the “Zoom In”, “Zoom out”, and “24hr” button to manipulate the timeline.

When the back up starts you will be able to see the progress and have the ability to cancel the back up using “Stop” or “Pause” to pause the download.

When the footage completes, you will be able to click “Open File Position” to locate the back up folder.
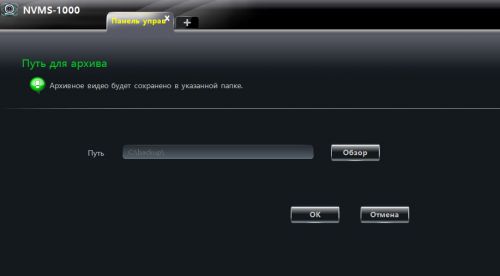
Changing the Back up path
Click the “Backup” option from the main menu.

Select “Backup Path”

To change the backup location, select “Browse” next to the “Save Backup Files to” option.
You may also change the “Backup File Format”
AVI will allow for playback in common video players when the codec is present. The DAT option will use the proprietary file format.
Click Apply to save settings. Note: You will need to close any active Record Management tabs to reflect the updated Backup location.

Disable Password Authentication when Closing NVMS-1000 – Windows
Please make sure you are logged into NVMS-1000 Prior to continuing:
Step 1- Please select “Basic“

Step 2- Under System and Maintenance please select- “Function Customization”

Step 3- Unselect “Check Password When Exit” and Select “OK”

Step 4- You can now close the application without being asked to confirm your Password. Select “OK” to close the application

LPR Initial Configuration for NVMS 2.1.3
LPR Initial Configuration for NVMS 2.1.3
Preface – This is for the first time configuration of an LPR to NVMS. This will allow the export of plate captures.
Requirements
NVMS V2.1.3
LPR connected to an NVR
NVR connection through AutoNAT
1. Go to Group Management (1) > People & Vehicle Management (1) > Vehicle Registration interface (2) > Click [Add] to add the vehicle information to Allow List or Block List (3).


2. Add a single license plate using 00000 and save.

3. Click the “Task” tab to setting license plate recognition task (1). Select the license plate recognition camera(2) and then click applicable scenario(3). Select “Vehicle deployment control” (4) and click “OK” (5).

4. The LPR Capture and Comparison is now added to NVMS and this will allow exporting of plate captures.
Change NVMS 2.0 language from Chinese to English
By default, the username is admin, and the password is 123456

This port we select skip.

Click the button that the arrow pointed

put the check mark on it


select this one

First, go to the second tab
and then the arrow point to left is for language select
remember to Apply

Question:
Change Language / Resolution will reboot the software, do you want to continue?
It’s NO on the left and YES on the right.

Question:
It will reboot the software, do you want to save the Live View?
If we select YES, NVMS will save a live view in Chinese title, so we select NO.
NVMS will get the selected language after restarting.
Cheat Sheet
Titanium-General-Cheat-Sheet
Answer
|
Recorder Ports: |
|||
|
HTTP port |
80 |
Web access *Required for port forwarding. |
|
|
HTTPS port |
443 |
HTTPS web access |
|
|
Server port |
6036 |
server port for general comm *Required for port forwarding. |
|
|
POS port |
9036 |
Port for Point-of-Sale comm |
|
|
RTSP |
554 |
||
|
IP Cam Ports |
|||
|
HTTP port |
80 |
Web access *Required for port forwarding. |
|
|
HTTPS port |
443 |
HTTPS web access |
|
|
Data port |
9008 |
Data port for general comm *Required for port forwarding. |
|
|
RTSP port |
554 |
Real time streaming protocol port |
|
|
Mac address prefix: |
0018AE 585B69 |
||
|
Recorder default IP |
192.168.1.200 |
||
|
IPC default IP |
192.168.226.201 |
||
|
Default switch IP |
10.151.151.1 |
||
|
Password |
Forced activation or 123456 |
||
|
IP-PT1100 – 8888 |
|||
|
Phone app |
Super Live Plus |
||
|
Legacy phone app |
Super Live Pro |
Super Live Pro should be replaced by SLPlus. SLPro only to be used when legacy equipment does not function on SLPlus. |
|
|
CMS Software |
NVMS 2.0 |
256Ch limit w/o license. Program titles are MonitorClient and ServerTrayUI |
|
|
Legacy CMS |
NVMS1000 (Windows) /1200 (Mac) |
Push to use NVMS 2.0. Only use legacy NVMS for old 3.0 FW models. Autonat 2.0 not compatible. |
|
|
Tools |
|||
|
IP Manager Tool |
Used for detecting Titanium devices on Network. Activate IPC, FW update, batch addressing, detects ONVIF devices. |
||
|
IPTOOL 2.0 |
Used for detecting Titanium devices on Network. Can default IPCs with tool. |
||
|
IPTOOL 1.8 |
Used for detecting Titanium devices on Network. Can Upgrade Titanium equipment using the tool. |
||
|
RPAS |
Used to playback proprietary record files. Used for opening HDDs that were formatted on Titanium. |
||
|
SDPlayer |
Used to playback record files from Titanium IPC when SD card is removed from device. |
||
|
SuperPlayer |
Used to playback proprietary record files. Used for opening HDDs that were formatted on Titanium 3.0. Not usable on Titanium GUI. |
||
|
RTSP Strings |
|||
|
RTSP IPC String |
rtsp://IP or domain name:port/profile1 |
||
|
Main = profile1, Sub = profile2, Thirdstream = profile 3 |
|||
|
example |
rtsp://172.16.6.107:554/profile1 |
||
|
RTSP NVR/DVR String |
rtsp://x.x.x.x:554/chID=1&streamType=main&linkType=tcp |
not available on 3.0 GUI |
|
|
ChID=Ch# | Type=main or sub |
|||
|
example |
rtsp://192.168.1.192:554/chID=1&streamType=main&linkType=tcp |

NVMS — ПО под ОС Windows для работы с видеорегистраторами

ПО под ОС Windows для работы с видеорегистраторами
Особенности:
- поддержка до 64 каналов видео с видеорегистраторов и IP видеокамер;
- поддержка видеорегистраторов Polyvision PVNR-9X-XXEX, PVNR-9X-XXFX, PVNR-9X-XXHX;
- поддержка сторонних устройств по протоколу Onvif;
- поддержка работы через облачный сервис Cloud (P2P) регистраторов серии PVNR-9X;
- управление поворотными видеокамерами;
- удаленная настройка оборудования;
- встроенный плеер для локального и удаленного воспроизведения видеозаписей;
- возможность записи видео и скриншотов на ПК;
- импорт/экспорт конфигурации ПО;
- журнал событий;
- разграниченная система прав доступа для каждого пользователя;
- поддержка русского языка.
Данные для авторизации по умолчанию:
Логин: admin
Пароль: 123456
| Дата релиза | Описание | Ссылка |
|---|---|---|
| 32-битная версия программ NVMS Lite V2.1.1.10414 | Скачать | |
| 64-битная версия программ NVMS Lite V2.1.1.10414 | Скачать | |
| 64-битная версия программ NVMS Lite V2.1.3.20505 | Скачать | |
| 64-битная версия программ NVMS Lite V2.1.4.30715 | Скачать |
Views: 126
How to setup the NVMS 2.0, This guide will show you have to set up the NVMS software to veiw your DVR and Cameras on your computer. We can also offer our Remote Setup Service where we can setup the system for you, this utilises port forwarding on your router allows you to view your cameras from a Smartphone, Tablet and computer (Mac or PC). Firstly you will need to download and install the the correct software for your computer either Mac or PC and this can be found on our NVMS 2.0 download page.
Once installed you will have the below icons, the monitor client and the server tray, the server tray can for the most part be ignored and the monitor client will start the software.
When the NVMS software starts you will be presented with the login dialog the default login details will be username: admin and password: 123456.

If you would like bypass the login screen in the future you can also tick the “remember password” and “Auto Login” this will skip the login next time you open the software.
Next you will be presented with the option to create security question and answers or you can leave them blank and skip past this.

Once the software main screen opens, it may have selected “storage playback” by default

You will want to click on the resource management tab to then click the “Add, Edit or Delete” button to add the DVR to the software

A window will then pop up and if we’re lucky it may recognise the DVR and have it listed in the quickly add tab it will then just be a matter of checking the box next to the DVR and clicking OK.

If the DVR isn’t in the list then we will need to add it manually.

by clicking on the IP address it will give you some options for connection types the three we usually use is “IP Address, Domain Name and Serial Number”.

• The IP Address can be either the local address of the DVR usually starting with 192.168.x.x or it can be a Public IP Address.
• The Domain name can be a DDNS address for example myDVR.ddns.net they can be set up at sites like noip.com.
• The serial Number can be found on the NAT page of the network settings of the DVR itself and you will need to go through the remote setup process first.
The next step is to input the password for the DVR.
Read Also : Download FLIR Firmware and Software

Also select the area (or group) you want to assign the cameras too, this is normally more important if you need to intergrate multiple DVRs and want to keep them in orderly sections. There is a default area as a standard general pool.

There is also the option to customise the areas so they are more specific to your needs which can be done by clicking on the create area button.
To create a new area click on the Parent Area drop down and choose the blank option, input the area name (this can be called anything you like) and then OK, if you do not change the parent area it will nest your new area under which ever area you have assigned as the parent.
Once you have created your new area you can then select it under the select area section and then click OK to finish.

You will then be taken back to the resource management screen where you will find your DVR has now been added to the list, you will also notice that the information looks “greyed out” while it is searching for and connecting to the DVR

this will turn black and fill out the channel, alarm in/out sections once the connect has been established

If after a few minutes it doesn’t turn black, if you look under the Online Status column it will give an error message, in most cases the information that has been input may be incorrect and will need adjusting which can be done by clicking on the pen/paper under the Edit column.

Clicking on the “Live View” tab across the top will now allow you to view your cameras but the camera layout will need to be populated first. On the left of the screen under “Monitoring Point” you will notice the default area and if you created a custom area that will also be listed there. A small “+” symbol will be to the left of the title to signify that area has some cameras assigned to it and can be expanded by clicking.


Hold left-click on one of the cameras and drag across to one of the blank window to the right and keep doing this for each of your cameras, to change the layout for more cameras at the bottom of the feed windows you will notice white boxes with numbers in and this will split the window accordingly or the white box with the black triangle will give even more layouts


and that’s it for getting started with the NVMS software, when you come to close the program, click OK to exit and it will also ask to save the populated camera layout so when next started it will be ready to go, click yes to save.


Here are the download links to our most recent NVMS software.
Mac
CCTV42 NVMS 2.0 Software
Windows
CCTV42 NVMS 2.0 Software for Windows 64bit
Manual
CCTV42 NVMS 2.0 User Manual
Need a little help setting the NVMS software up to view your DVR and cameras?
Install NVMS Lite 2.1 CMS, Log in & Connect Device to Monitor on Windows OS
The complete installation to monitoring steps are explained here. They are demonstrated with images and narrations for a better understanding. It is defined in three steps.
Step 1- Install NVMS Lite 2.1 on Windows
When we open the executable file, we get the following page. Here, we have to select the language.
Chooseyour language of preference and then press the ok button.
This page appears on the screen. It shows that the setup files are preparing to install.
When the setup file becomes ready, we get the next page.

It says that to install properly, take it with administrator account. Press the OK button and move to the next window.
The agreement page appears on the screen.

Select the ‘I accept the terms of the license agreement’ option and then press the next button.
The page for giving path and folder location to the software appears.

Give the proper path and folder location and then press the next button.
The files will begin to transfer on the PC.

App installation process is going on. When the process is finished, we get a new page informing it.

The installation process is finished. Press the ‘Finish’ button for the next step.
The step- 2 is about the login process.
Step 2- Log in to the NVMS Lite 2.1 App
When we open the installed app, we get the following page. It is the login page.

You have to fill the Username and password of the application. The by default username and password are respectively “admin” and “123456“.

You will login to the software. This way the step 2 is complete.
Now, we will go to add the devices.
Step 3- Add Devices for Monitoring
After the sign-in, we have to give these optional answers to recover password in case we forget them. It is an option. You can skip the process too if you want.

After that, the homepage of the NVMS Lite 2.1 appears.

We have to add the device. Press the marked option to connect devices.
This page surfaces. Press the add button now for connecting cameras.

When you press the add button, you get this page. Here, you can add cameras or devices. To add manually click the encircled button.

Fill the IP address and press ok to connect. You can add all the devices similarly.
Now move to the home page and select the live view option.

Added device will appear on screen. This way you can monitor from remote areas.

The full demonstration of this app must be helpful for readers and users.
SuperLive Plus For PC Free Download For Windows
Here you can download the latest version of Superlive Plus on your computer.
All you have to do is click on the download button according to your choice.
Superlive Plus is also available for MAC PC you can live your cameras on your MAC PC also.
Apply any given method and then you can see the live view of your cameras on your PC.
Method 1 (SuperLive Plus For PC using NVMS 1000)
Every CCTV company offers a CMS for Windows setup of its cameras. Superlive plus also offers its called NVMS 1000.
By using this, you can get a view of SuperLive plus camera on your computer screen. So download the setup for that from the given link.
Step 1.
Download the Setup from the given link below (Old Version).
Download Superlive Plus For PC
Download Superlive Plus for MAC
After downloading the setup open the folder where it has been downloaded the file name is “Superlive-Plus-for-PC. Just install this setup on your PC.
Step 2
Now come to the configuration of superlive plus for PC (windows).
After completing the installation process you will get an icon on your desktop named “NVMS-1000″. Just double click on that icon and it will ask for the registration of the user.
Here assign a user name and password and register the user. You may leave other options on the registration screen. This user name and password are only for this software not for your DVR/NVR.
Step 3
Now a new screen will open asking for the username and password. Insert the username and password that you registered at step 2. A screen will appear in front of you as shown below.
Step 4
Just click the option “Device” and you will find the next screen as shown below.

Click on the “Add Device” option and come to the next screen.
Step 5
Click on the “manually add” option from the top of the screen. Here, you have to add a device serial number, IP address or a domain as per your mode of DVR/NVR’s registration.


So choose one of them as per your desire. After filling the information. Just click on the “Test link” button. Test link must be popped up “Test connection success” then clicks “ok” and then “Add” button.

Now the device is registered successfully now you can see all the cameras on your computer screen. To do this you should go to the “live preview” option.

Method 2 (SuperLive Plus For PC using BlueStack)
To use this method you have to use an android emulator on your PC. One of the best emulators is Bluestack. Just install it on your PC and follows the steps.
• Download and install the emulator.
• You will get an icon of the emulator to appear on the desktop.
• Now find the play store icon on the emulator. It is just like your android phone.
• Login to your play store.
• Search for the Superlive plus and install it.
• Now just put the information in the process of registration device.
• Just enjoy Superlive Plus for PC.
SuperLive Plus For PC Free Download For MAC
If you have a MAC system then you can also get your cameras on your MAC system. The company also offers set up it on your MAC OS. Here we are going to demonstrate how to download and configure super live plus for PC(MAC).
Step 1
Download the setup of superlive plus for pc from the given link below.
Download Superlive Plus for PC (MAC)
Just install it on your PC and come to the second step.
Step 2
Now you can see an icon on your computer screen named “MAC Super CMS…app”. Just open it and the screen will ask you for the account creation. Just create an account for that by putting a username and password.

After the registration window will ask you to log in. just logged in by using the username and password that you registered.

Step 3
After logging in you can see the screen as shown below.

On your right bottom, an option shows as “Add”. Click on that icon and you will see the next screen.
Step 4
In this step, a screen will appear as shown below.

It asks for some detail related to your device. Just fill it up. In the “Title” option you can choose a title your device as per your choice. In the address, you have put the IP address of the device(DVR/NVR/IP camera).
Title: As per your choice.
Address: The IP address or domain name of the device you want to add.
Port: The HTTP port of the device you want to add.
Account: The login account of the device. The default account is “admin”.
Password: The login password of the device. The default password is 123456.
Step 5
Now click on the “Save” button to save the information. Now you can see the DVR/NVR list in the device list as shown in the below picture.

Conclusion
So this is all about Superlive plus for PC. Using these steps you can easily configure the SuperlivePro DVR/NVR/IP camera for your window laptop and desktop. If you have any queries or suggestion please write to us in the comment box below.
Frequently Asked Question
What is NVMS Lite Edition?
NVMS Lite Edition and NVMS Lite 2.1 Edition are security management platforms given by TVT. They are software for connecting CCTV devices for remote access. You can be live from any place and monitor your locations.
What is the password for Nvms Lite Edition?
The by-default username and password for the NVMS lite are “admin” and “123456” respectively.
What is NVMS software?
It is a security surveillance app. It is designed to monitor CCTV devices from remote areas. It is available for Android, iPhone, Windows and Mac versions. It supports TVT cameras and recorders. It also connects some third-party devices.
What is the default IP address of the TVT CCTV camera?
The company has provided the following IP address and by default setting. IP address: 192.168. 226.201 Subnet Mask: 255.255. 255.0 Gateway: 192.168. 226.1 HTTP: 80 Data port: 9008 The default password of the administrator is “123456”
What is the default password for TVT security cameras?
The default password for CCTV cameras is 123456.
Related Posts
Get and learn in detail about the process of how to install NVMS on PC/Mac OS. NVMS Lite 2.1 App Download is free of cost and one of the best software for TVT CCTV cameras.
This CMS provides the live View of TVT cameras on your computer. This is available for Windows and MAC OS so download it according to the operating system’s requirement.
Get here the free link for Windows and Mac OS for this NVMS lite 2.1 Download CMS. The downloaded file is in the compressed format and it must be extracted before installing the software by using a compressed file extraction tool.
This is the best solution to watching TVT’s CCTV cameras and is also good for managing cameras using a PC.
This CMS is for controlling and administering your CCTV cameras setup on PCs.
This helps you to keep surveillance on your area, residence, and office premises. The software is only available for Windows operating systems in the market.
But we have provided the Mac OS users with other CMS i.e., NVMS 1000.

We provide below the free download link for this software on Windows OS. Read the steps of the installation process clearly to understand how to install it on your laptop/computer. Read and follow the steps very carefully while installing the CMS on Windows OS.
What is NVMS Lite 2.1 Download?
This is the software designed and developed by the Shenzhen TVT Digital Technology Company.
This allows you to get your CCTV camera on your desktop screen and control those cameras. This is the best CMS introduced by the Shenzhen TVT Digital Technology Company.
Features of the NVMS Software
Here is a list of features provided in the CMS for Windows. Features help us to provide detailed insight regarding this CMS.
Features also help us to understand the benefits of the application.
- Provides PTZ Control.
- Live Stream on WiFi, 3G, and also on 4G networks.
- Snapshots are captured from a live recording.
- Playback recorded videos.
- Alarm alert system.
NVMS Lite 2.1 CMS (Windows 11/10/8/7)
Get the free link on Windows here. This is one of the best software to control CCTV cameras of TVT on the Windows Operating system.
The download link of the application is given below, click on the link download to have this amazing CCTV CMS.
Extract the downloaded file of the application on Windows using an extraction tool.
Read the process given below clearly to install and view your CCTV cameras live session on this CMS.
Open the folder where you saved the downloaded file of this software on Windows to start the installation process.
NVMS Lite 2.1 CMS (Mac OS)
Shenzhen TVT Digital Technology Company has also provided software for Mac OS for its Mac user clients. We have provided the below link for Mac. Click on the link below to get this software for MAC OS’
You can also use the NVMS 1000 on your MAC PC. We have provided you with software for Mac clients. This is the alternate version for MAC users. Therefore, you can also install this CMS on Mac by clicking on the link provided below.
Installation of NVMS Lite 2.1 CMS on Windows PC
As we have provided above the free link of the software for Windows and Mac operating system.
Get the version of CMS according to your operating system requirements.
The file of CMS on Windows is in the compressed format. Extract the file and open the folder then click on the application file.
1. Step- How to install the CMS on a Windows PC
After starting the software application on Windows, a window will appear on the screen to select the language in which you want to run the application. Then click on the “OK” button.
The initializing progress will appear on the screen, wait for completion.
Now the terms and agreement window will appear, click on the option “I accept terms and agreement” then click on the “Next” button.

The installation directory screen will appear, select the destination folder where you want to install the CMS on your PC by clicking on the “Browse” button or leave it as default then click on the “Next” button.

Here you can see the installation progress has begun, wait for the process to get completed.

After the completion of the installation, select the option “Launch CMS” to start the on Windows after clicking on the “Finish” button.

Now the login panel will appear on the screen, enter the username and password and select all options given as shown in the image. Then click on the “Login” button.
The Default username and password
Username – “admin”
Password – “123456″

2nd Step – Add devices on Windows
The Home tab will open automatically on the screen of the application on Windows. Click on the “Add, Edit or Delete Device” option in the Resource Management section of Windows.

Device manager screen will appear on the screen, click on the “Add” option to add devices on the CMS.

Click on the option “Manually Add” then click on the section of IP Address/IP Range/Domain Name/Serial Number.
In my case, I chose Serial No., Enter the serial No. correctly then enter the username and password in their respective section.
Click on the “Connection” option under the Connection section. A window will appear on the screen, informing about the connection test. As the connection test gets completed click on the “OK” button.

The status of your device will be displayed on the device manager screen of Windows.

3. Step – Live view of CCTV Cameras
Go to the home tab again and Click on the “Live view” option in the Live view section.

Here is a sample screenshot of a live view of CCTV Cameras on Windows OS.

Conclusion
We have discussed in detail the procedure to be followed to install and run this software.
This helps to connect the CCTV cameras of TVT to the PC. This software is beneficial software for TVT CCTV camera setup. This application has many functions and advantages for TVT CCTV camera users.
We also appreciate that the company also provide the application for Mac OS. But we also have provided the best solution available to the TVT CCTV users working on Mac OS.
We are glad that you have learned about this NVMS Lite Application here.
If you have any questions or queries regarding the software you can contact us by commenting on the section of Comment.
Thank You.
What is NVMS Lite?
NVMS Lite is a CCTV surveillance application that allows users to view and manage security camera and Recorder feeds on PCs and Smartphones from remote locations.
Where can I download NVMS Lite?
You can download NVMS Lite from the Google Play Store (Android) and Apple App Store (iOS).
Which devices are compatible with NVMS Lite?
NVMS Lite works with Android and iOS smartphones and is compatible with most NVRs, DVRs, and IP cameras from supported manufacturers.
Can I playback recorded videos in NVMS Lite?
Yes, you can view playback. Go to the interface of the app and select the playback option. After that mention the camera and time of the event and then press the search button. This way you can witness the recorded event.
Can I use NVMS Lite on multiple devices?
Yes, you can install and log into NVMS Lite on multiple devices using the same account.
How many cameras can I add to NVMS Lite?
The app supports multiple cameras, but the exact number depends on the device’s performance and network bandwidth.