
Добрый день, с вами художественная школа Империя Пикчер и я, Светлана Юрьевна, ведущий её преподаватель.
Мы сегодня вместе нарисуем собаку Корги карандашом и потом скетч маркерами.
Если Вас интересует обучение в художественной школе онлайн, переходите по этой ссылке!
Все курсы по скетч маркерам можно посмотреть по этой ссылке.

Рисуем корги вот с такой «сосиски». Сначала рисуем сосиску, примерно по центру.

Далее с правой стороны рисуем кружочек. Это голова Корги.

И еще один маленький кружочек. Это будет мордочка, именно то место где будет носик и щеки собаки.

Потом рисуем центр, то есть ось, которая идет вдоль мордочки.

После чего относительно осевой линии мы рисуем два уха. Стараемся, чтобы они были симметричные, но небольшая асимметрия допускается.

Далее соединяем большую сосиску тела и голову вместе.

Далее мы рисуем лапки Корги. Линию прямую опускаем от ушка.

И здесь еще будет один овальчик – это лапа передняя, которая ближе всего к нам.

Из нее рисуем саму лапку. Лапки у Корги достаточно коротенькие, поэтому сильно их не удлиняем.

Рисуем полосочку и овальчик самой лапки.

После чего прорисовываем тело более четко. То есть мы из нашей сосиски вылепливаем более характерное тело собаки.

Добавляем толщину на ушках.

Уже начинаем работать с характером. Сначала мы построили, примерно все закомпановали, а потом начинаем заниматься детализацией.
Рисуем носик.

Рисуем щечки.

Рисуем язычок.

Вот такая вот мордашка получается.
Далее саму пасть.

Потом с правой стороны дорисовываем мордочку.

Ушко делаем более характерным.

Рисуем внутреннюю часть ушек.

Затем рисуем линию глаз и на линии глаз рисуем два кружочка.

Также слегка срисовываем сразу окрас.

После чего прорисовываем край Корги.

Рисунок не всегда получается с первого раза. Для этого у нас есть ластик. Этот ластик всегда идет в ход, если что-то не так. Не понравилось – стерли, переделали.

Добавляем немного рыхлый край.

Ну что, наш рисунок готов.
Теперь переходим на обводку черным линером. Берем черный линер и начинаем обводить нашу Корги.


Затем стираем весь простой карандаш.

Переходим к заливке.
Берем светлый цвет (Sg1). Проходим все самые светлые места на собаке (грудь, кончики лап, заднюю часть, немного ушки с верхней стороны и животик).

Далее Vg1. Немножко заливаем тень в этом светлом цвете. Двигаемся от светлого к темному.

Проходим этим цветом еще дополнительные полосочки. Ушки тоже чуть сильнее затемняем.

Под глазками.

На щечках.

По правой стороне чуть-чуть посильнее затемняем.

Немного добавляем на животик.

На лапки. И на заднюю часть. Работаем мазочками. Такими полосочками.

134 цвет. Это бежевый цвет. Этим цветом мы заливаем свет на Корги, то есть самые светлые участки.

В скетчинге на заливке всегда сначала делаются светлые места, а потом переходим к темным, как в акварельке.

Теперь 169 цветом начинаем затемнять нашу Корги. Около 134 делаем 169 цветом.

Берем коричневый цвет (у меня это 96 цвет, светло-коричневый), именно этим цветом у нас и окрашена Корги. Этим цветом мы проходим всю оставшуюся часть собачки, самые темные места.

Обходим светлые пятнышки.

Я залила тени около глаз, над глазами.

На кончиках ушей.

На правой стороне головы тоже делаю тени.

Вторым слоем заливаем еще более темные тени. Внутри ушка тоже затемняем.

Корги – эта работа по форме, то есть не просто ровными линиями делаем, а делаем все мазочки вдоль роста шерсти.

Красным цветом заливаем язычок.

Далее 2 цветом делаем тень на язычке, оставляя красным цветом краешек.

Vg3 это уже более темный цвет или теплый серый – им заливаем носик, заливаем тени под пастью. Заливаем тени, которые идут на голову.

Делаем более темные места.

Затем начинаем переходить к более темным местам – затемняем тени. Делаем контуры.

Очень-очень много мазочков, очень много всяких оттенков.
Создаем шерсть, затемняем тени.

Сейчас самое время перейти к собственным теням, более темным. То есть постепенно от светленького набираем тон на собачке.

Эта работа очень похожа на акварельную. Также мы работаем акварельными красками. Не зря скетч маркеры называют акварельными маркерами, потому что система одна. Можно сказать – мы маркерами пишем живопись.

Переходим на Vg6, более темный цвет. Затемняем тень в ушках посильнее.

Затемняем под глазками тени посильнее.

Делаем тени на голове.

По левой стороне ушка одного и второго.

6 цвет – самый темный цвет на Корги. Я на Корги взяла 2 палитры серых цветов – одну холодную, другую – теплую.

Берем серый цвет Cg6 и делаем темный носик. Пасть делаем темной. Также этим цветом делаем глазки. Полностью их заливаем.

Далее Cg2 им делаем тени на белой части Корги.

Также обязательно делаем падающую тень под собакой.

Далее берем Сg 1 и размываем край падающей тени.

И немножко размываем белые части Корги.

Vg9 самый темный цвет, практически черный. Делаем ноздри и небольшую толщину на носике. Также затемняем глазки по краям.

21 цвет — темно-коричневый. Им проходим еще раз спинку. Чуть-чуть усиливаем ее.

Заодно объединяем пятнышки, чтобы не было дробности на собачке.

Добавляем тени на ушках.

Также на голове добавляем немного теней.

Чуть-чуть перемешиваем цвета и добавляем немного рыжего.

Сg2. Прохожу тени. Это холодные тени.

Теперь переходим на обводку и доработку черным линером. Здесь доработки будет достаточно много. Мы не только дорабатываем обводочку, убираем не нужные дырочки, но еще добавляем текстуру шерсти на собачке.

Точечки на усиках. Делаем полосочками из точек.

Язычок подчеркиваем.

Добавляем штришочки на нашу собачку.


После того, как мы все доработали черным линером, берем белую ручку и рисуем блики на Корги.
Добавляем блики в глазах.

На носике.

С помощью белой ручки можно сделать изображение декоративным, легким, особенным.
Добавляем шерстинки на самой Корги.

Также добавляем немного точек в самые темные места.

Теперь нам осталось добавить надпись. Сначала я рисую ее обычным простым карандашом.

Затем 120 цветом рисую толщину букв.

Далее линером прорисовываем надпись.

Вот такая собака Корги у нас получилась.

I love to draw Corgis, they are definitely one of my favorite dog breeds!
They’re so small and weirdly proportioned.
So, of course, I wanted to figure out correctly how to draw such a cute animal! I know that dogs or even animals, in general, can seem hard to draw. Especially if you’re not used to it!
Generally, I draw people more often than dogs, but it’s all the same logic!
Draw the main shapes and go from there.
How can you draw an adorable Corgi? Simple. Break your subject down into simple shapes and build your drawing from there! Following this step-by-step guide, you’ll learn how to draw an adorable Corgi quickly.
I will go over my whole process with very simple steps so you can follow this tutorial and not feel overburdened, so let’s start!
Table Of Contents
- 1 Drawing A Corgi Step-By-Step
- 1.1 1- Draw A Big Rounded Rectangle
- 1.2 2- Add A Small Box On The Top Corner For The Neck
- 1.3 3- Draw a Half Circle For The Tail
- 1.4 4- Add Tiny Squares For The Paws
- 1.5 5- Draw A Square Shaped Box And Triangle For Head
- 1.6 6- Draw Triangles For The Ears
- 1.7 7- Sketch Up the Fur And Add Details!
- 1.8 8- Draw The Lineart Of Our Corgi Drawing
- 1.9 9- Color Your Drawing Of A Corgi
- 2 Try Different Corgi Shapes!
- 3 Drawing Dog Expressions
Drawing A Corgi Step-By-Step
When drawing a new subject I like to start with very simple shapes.
Nothing too complicated, just basic shapes like rectangles, circles, triangles, etc.
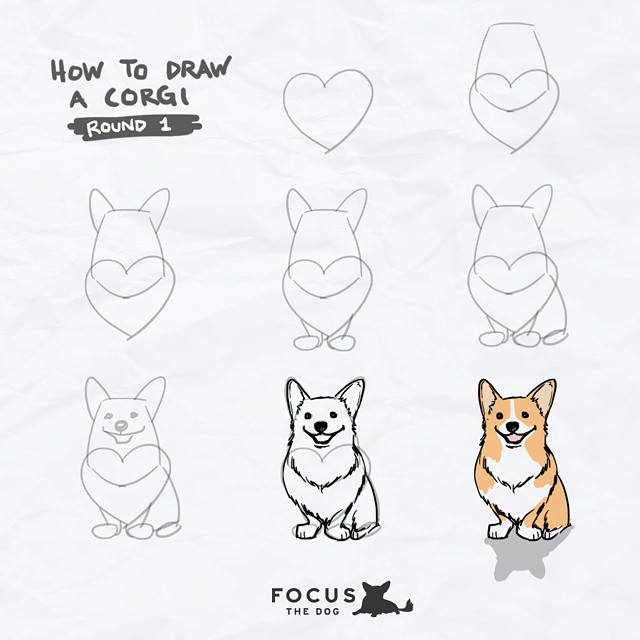
Just follow this guide on how to draw a corgi step by step!
1- Draw A Big Rounded Rectangle
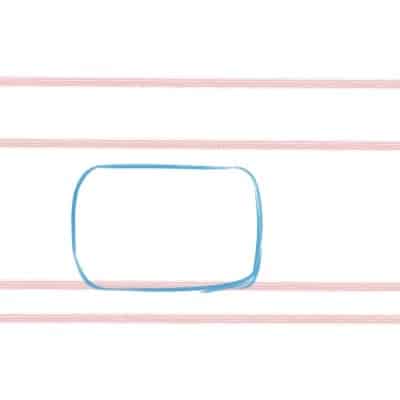
Corgi’s bodies are very rectangular. So that’s the first shape that comes to my mind and that I put down on paper.
Like a big loaf of bread from the side.
With only one shape, we already have a big part of our Corgi drawn!
You can make your rectangle as rounded as you wish. I always like to give it some roundness right away, to appeal to the cute fluffy side of Corgis.
2- Add A Small Box On The Top Corner For The Neck
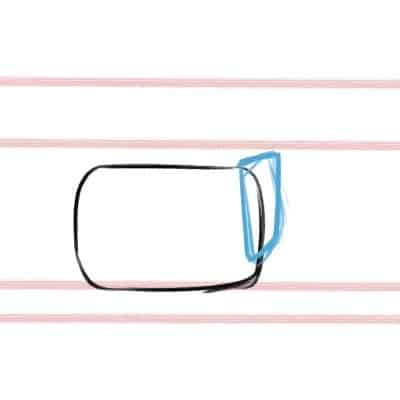
Now draw a small box on the top corner for the neck, we can worry about the side of the head later!
Corgis are very small and disproportionate.
Even though they look like it’s just a body and head, there’s still a neck there, and we need to draw it.
This is a very small shape to help us figure out where and how the head should be!
3- Draw a Half Circle For The Tail
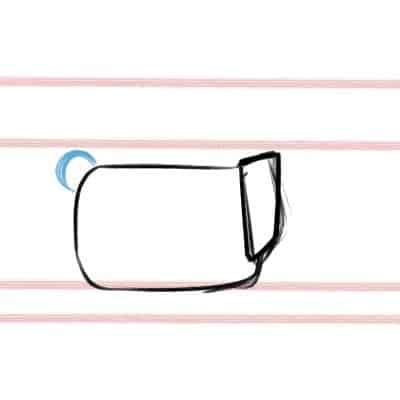
Before drawing the head and its features, let’s add some other very simple but also very important shapes!
On the opposite side of the rectangle, let’s add a half circle.
Simply draw a curved line for the tail.
It’s very rare to see Corgis with tails, so we’re going for the stub as a tail since it’s the most common.
Use light lines with your pencil or pen if you’d like for now!
Wen can worry about cleaning everything up and erase what looks wrong later.
4- Add Tiny Squares For The Paws
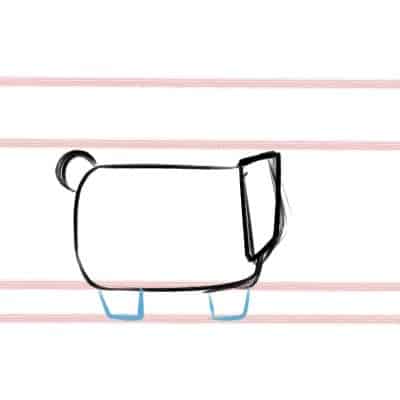
Now, draw two small boxes for the Paws!
Corgis legs are very, very short. This is one of the features that make them look so cute.
And that’s why we add such small shapes.
We can barely see the paws, tiny little things underneath the body and fur.
Feel free to exaggerate your shapes according to your style and how cartoony you want your drawing to be. Depending on your taste and style, our drawings will look different from one another.
This is always a good time to experiment and try different things, so you can figure out how you like your art to look!
5- Draw A Square Shaped Box And Triangle For Head
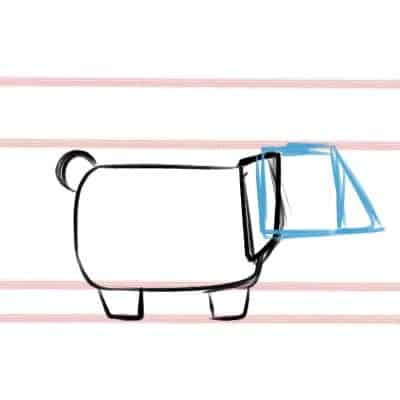
For the corgi’s head, add a square-shaped box and a triangle for the snout!
Leave the top of the head very flat for now.
Let’s not add too much here yet. We’ll need to draw the face, but we’ll leave that for the next stage.
But if you look at what we have right now, it’s already starting to look like a dog!
Just one thing missing.
6- Draw Triangles For The Ears
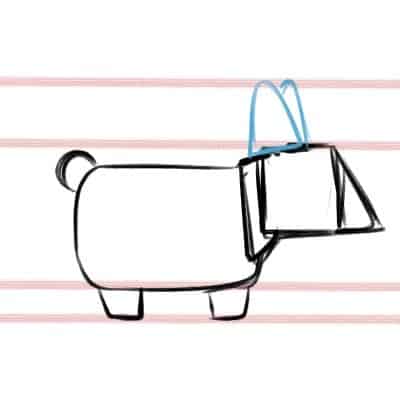
Corgis usually have rounded tips at the end of their Ears so don’t make them too sharp!
You can add the ears by drawing two rounded Triangle shapes next to each other on top of the previous box we did for the Head.
We can worry about the inside of the ears of our cartoon corgi drawing later!
We now have the General shape of our Corgi Dog. Well done!
With very simple shapes, we already have something that resembles a Corgi.
Now, we just need to refine our drawing and clean it up.
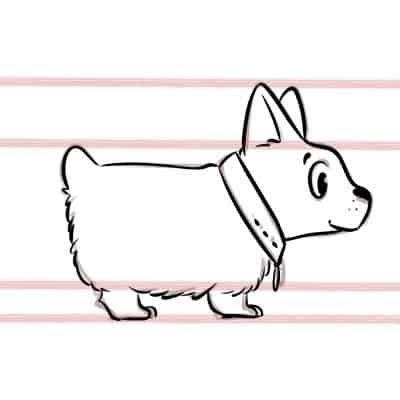
7- Sketch Up the Fur And Add Details!
Before doing our final lines, I like to do a second sketch.
Here I add more details and have a better idea of where everything is and how it’s going to look.
Add small lines for the fuzzy and furry hairy parts of the Dog, like under the belly, near the legs, and Neck.
Next, we add a small nose and an Eye for the Dog.
You can do any shape you want, I will go with a Simple Round Eye. Feel free to add a Collar as well if you’d like!
This is the perfect time to add personalized details to your cute corgi drawing.
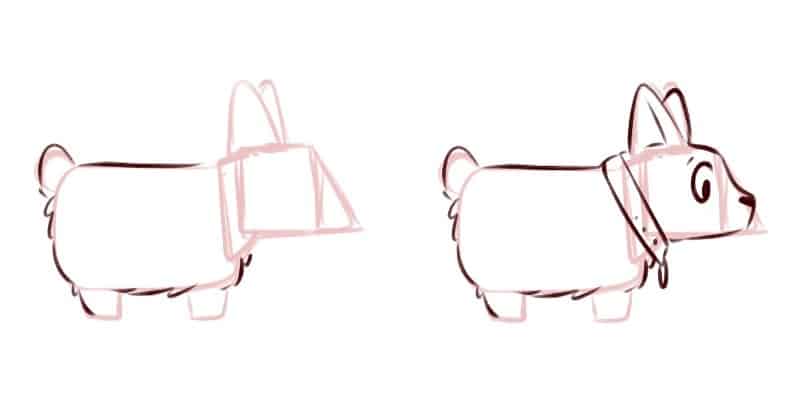
You can add a collar or any other kind of accessory! Like a flower crown or a bow on the neck or tail.
Let your imagination roam and try out new and different things.
Finally, we can also add some more detail to the paws.
We only have stubs right now, and we can add little toes to them! It all depends on how simple you want your style to be.
You can leave them as squared shapes to appeal more to the cuteness of a Corgi or give it more detail. Just have fun!
Don’t rush it. Loosen up and enjoy the process.
Remember, this is only your sketch, so use simple lines for our pembroke welsh corgi drawing.
It doesn’t need to look perfect right now.
That’s for our next step!
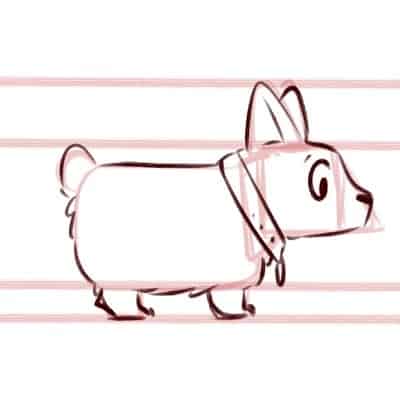
8- Draw The Lineart Of Our Corgi Drawing
We started with shapes, then a final sketch to lay everything we needed down. Now, let’s get started by cleaning up our lineart!
On top of your sketch, draw your final lineart. Take all the time you need and relax.
If you’re doing this traditionally, use a pen and erase the pencil lines later.
Digitally, just add a new layer on top!
Draw long smooth lines when you feel they’re needed and short lines for the fur.
You’ve done all of this already in your sketch, now it’s all a matter of repeating the process!
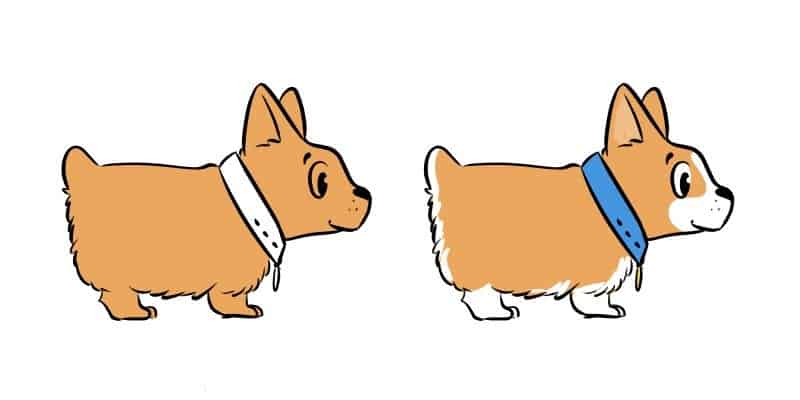
9- Color Your Drawing Of A Corgi
We are mostly done with our drawing, now all we are missing is to color our cartoon corgi’s fur!
This doesn’t need to be too complicated, either.
So start with the Base colors, choose a color that you’d like your Corgi main Body to be, and start Painting!
The most common colors for a corgi are cream-tone or black.
Then paint the Details: the Collar, the Eye, the little Medal, keeping everything pretty simple.
They also have very characteristic patterns, so remember to add those!
And you’re done! You can now (hopefully) draw an adorable Corgi with very simple and easy shapes with this drawing tutorial.
Look at that cute muzzle!
Just go step-by-step, without worries, and have fun while doing so. I’m sure you’ll end with a very good drawing!
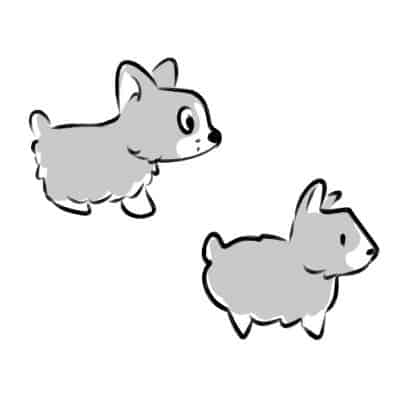
Try Different Corgi Shapes!
Now, I gave you a step-by-step guide, but this doesn’t mean you need to follow these steps strictly.
Be inventive with your shapes!
Try different shapes or even play with the proportions. You can exaggerate even more how long the body is. Or draw the head with very big ears.
There are lots of options for you to explore, and I highly recommend you to experiment with them.
This is how we improve as artists and find our own art style!
By experimenting, by looking at how other artists express their art. We’re always learning and always improving.
You can look for more photo references or other artists that draw dogs and corgis.
This is always a good way to find inspiration and maybe even understand and learn something new.
We constantly learn with the world around us and other people. As always, all these are just a stepping stone for your own style and drawings.
The goal is not to either copy exactly what we see (unless you’re really aiming for realistic art) or to copy other people.
The goal is to learn with others, so we can improve and do our own thing. And, as always, while having fun with our drawings!
Take your time by trying our different shapes for your Corgi drawings. I’m sure you can get hilarious looking Corgis or even cuter! This is what makes drawing fun: experimenting, even if it looks or sounds silly.
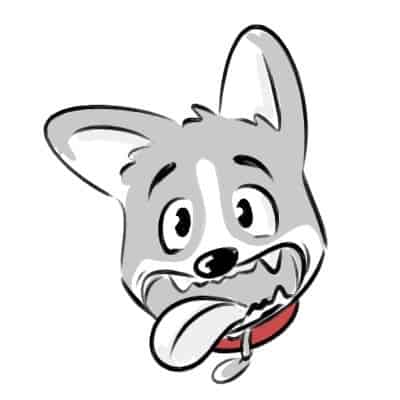
Drawing Dog Expressions
If you’re going with the cartoony style, play with expressions. Even dogs in real life will show different expressions!
Happy, sad, nervous or scared. Anything you want.
It’s also a good idea to make an expression sheet if you wish to.
Practice your expressions and when you’re happy with them, add them to the sheet. This way, you have something to go back to if you can’t remember or something’s missing in your drawing.
When drawing the expressions, it is the same logic as with when drawing people’s emotions. Happy and positive emotions are very open, and that will show in the drawings.
While negative expressions are the opposite!
Again it’s good to find references of dogs, in different activities and showing different attitudes and demeanor.
Having a good understanding of both a dog’s expression and people will help you immensely in drawing a cartoon dog.
Watch some of your favorite cartoon series or movies.
Disney is very well known for their character design and can be a good way to study expressions on animals.
It is also a good excuse to watch some of your favorite movies for an evening or two!
Every subject becomes easier to draw once we break it down to simple shapes.
It is much less scary to draw simple shapes than all the details at once.
Just relax and have some fun with dogs!
Want to draw more cartoon art? Check my article on How To Draw Cartoons On Your Computer!
Patricia Caldeira is the main writer here at Don Corgi. She’s an art teacher with over 20.000 happy students across many platforms and courses!
Enjoy your stay and as always:
Keep on drawing!
Хотите узнать как рисовать Корги? Как можно нарисовать эту очаровательную собачку, похожую на булочку, легко и быстро? У нас есть для вас наглядная инструкция с поэтапным процессом рисования корги. Причем начинать рисунок вы будете с сердечка, ну разве это не мило?
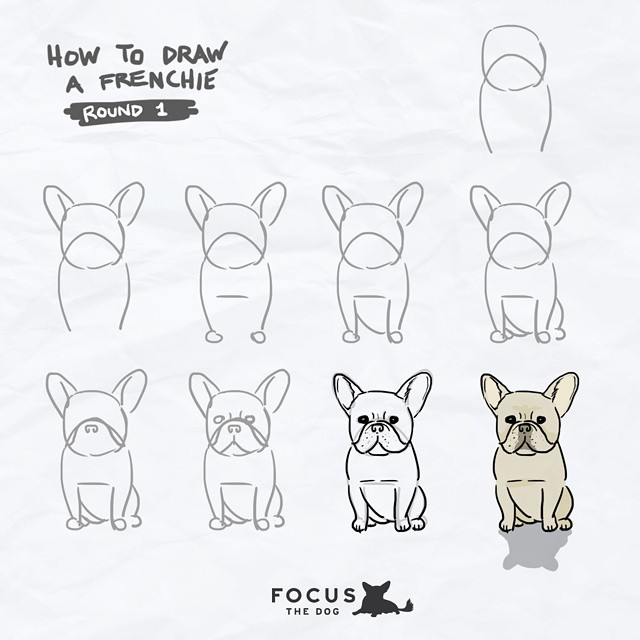
Бонус. Картинка подсказка как легко нарисовать французского бульдога.
Теги: Как рисовать Как рисовать мило Рисовать мило Рисовать собаку Рисовать поэтапно Рисовать карандашом
Работа выполнена материалами:
- Спиртовые маркеры SKETCHMARKER BRUSH PRO
- Спиртовые маркеры SKETCHMARKER
В уроке используются оттенки:
- O74 Satin (Сатин)
- R53 English Rose (Английская роза)
- TG3 Toner Gray 3 (Тонированный серый 3)
- CG6 Cool Gray 6 (Прохладный серый 6)
- BR12 Ginger (Имбирь)
- TG1Toner Gray 1 (Тонированный серый 1)
Шаг 1
Делаем карандашный набросок. Лишний графит убираем клячкой
Шаг 2
Маркером O74 намечаем рыжие участки, заливаем язык и уши R53, TG3 показываем нос, пасть и глаза
Шаг 3
CG 6 прорисовываем складки одеяла, падающие собственные тени, показывая шерсть корги
Шаг 4
С помощью BR12 прорисовываем мордочку, добавляем контраста в тёмные участки с TG1
Шаг 5
Белой ручкой прорисовываем шёрстку и блики на глазах. Милый корги готов!