
Существуют самые разные варианты расцветки мегаминкса, головоломки-додекаедра, у которой 12 сторон. Поэтому было придумано множество вариантов цветовой схемы за долгое время существования этой интересной головоломки. Ниже мы представили 2 наиболее распространенных варианта расцветки мегаминкса.
Цветовая схема, используемая организацией WCA (Всемирной Ассоциацией Кубика), используется при выведении скрамблов (схем перемешивания) на официальных соревнованиях. Именно такую схему лежит в основе данной обучалки.

Цветовая схема, используемая ведущими производителями головоломок во всем мире: QiYi, MoYu, DaYan, ShengShou. Именно с такой расцветкой мегаминксы ведущих марок выпускаются с заводов.

Движения кубика и перехваты записываются в соответствии со следующими правилами:
— Если написана только буква — крутим сторону по часовой стрелке, как если бы мы смотрели на грань в лицо
— Если после буквы стоит штрих «’» — крутим сторону против часовой стрелки, как если бы мы смотрели на грань в лицо
— Если после буквы стоит «2» — крутим эту сторону на 180 градусов. Если ещё стоит штрих, к примеру U2′, то это означает, что в данном алгоритме нужно вращать U2 против часовой стрелки
Ниже показаны грани, которые относятся к каждому обозначению.
OLL (Orientation of the Last Layer) – предпоследний этап сборки мегаминкса, который ориентирует все углы и ребра последнего слоя.
Сначала мы соберем на последнем слое характерную звезду, используя следующие алгоритмы.
После чего перейдем непосредственно к ориентации угловых элементов.
R U R U R’ U R U2′ R’ U’ R’
R U R’ U R U R’ U2′ R U’ R’
y R U R U2 R’ U’ R U’ R’ U’ R’
R U R’ U R U R’ U’ R U2′ R’
R U2 R’ U’ R U R’ U’ R U’ R’
R U R’ U R U’ R’ U R U2′ R’
R U2 R’ U’ R U’ R2′ U’ R U’ R’ U2 R
R U2′ R’ U’ R U R’ U’ R U2′ R’
R’ U2 R U R’ U’ R U R’ U2 R
R U R’ U2 R U2′ R’ U R U2′ R’
R U2 R’ U’ R U2 R’ U2′ R U’ R’
PLL (Permutation of the Last Layer) – заключительный этап сборки мегаминкса, заключающийся в перестановке (пермутации) ребер и углов последнего слоя, относительно друг друга, когда они уже ориентированы.
Сначала мы будем расставлять ребра по местам, используя алгоритмы, представленные ниже.
R’ U’ R U’ R U R2′ U R U’ R U’ R’
R U R’ U R’ U’ R2 U’ R’ U R’ U R U2′
И затем расставим по местам углы.
y x R2′ U2 R’ dR’ R U2′ R’ dR R2′
y x U2 R2 U L U’ R2 U L’ U2
R2 U R’ y U’ R U R’ U’ R U R’ U’ R U R’ y’ R U’ R2′
R’ U’ R’ z’ R’ U L’ U’ R U L U’ R’ U L U’ R U2
L’ R U R’ U R U’ R’ U R U’ R’ U R U2′ R’ L
bR’ R’ U L U’ R’ U L’ U’ R2 bR
bR’ R2′ U L U’ R U L’ U’ R bR
Поздравляем! Вы собрали ваш первый мегаминкс!
Многих начинающих куберов Мегаминкс пугает своим видом, и их можно понять, ведь на головоломке целых 12 сторон!
На самом же деле, Megaminx совсем не сложен в сборке, благодаря своей схожести с обычным кубиком Рубика.
Чтобы быстро разобраться в этапах сборки Мегаминкса и легко понять его логику, советуем посмотреть наше обучающее видео по этой головоломке! Самый простой и понятный способ сборки со схемами покажет Ниикта Беспалов.
Этапы сборки Мегаминкса
0:16 Введение и строение
1:09 Язык вращения
5:18 Этапы сборки
7:05 Нижняя звезда
11:13 Первые 2 слоя (метод Фридрих)
12:54 Первые 2 слоя (для новичков)
18:24 Блоки
25:35 Слоты (метод Фридрих)
26:14 Слоты (для новичков)
28:03 Верхняя звезда
30:07 Верхняя сторона
32:04 Перемещение рёбер
34:53 Перемещение углов
Обозначение сторон мегаминкса
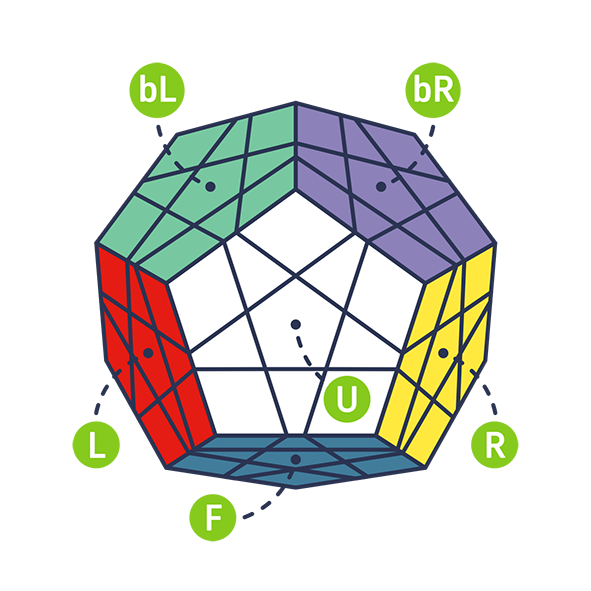
Язык вращения мегаминкса
x — весь мегаминкс вращается от себя по плоскости, совпадающей с правым (R) и левым (L) слоями (F превращается в U)
x’ — весь мегаминкс вращается к себе по плоскости, совпадающей с правым (R) и левым (L) слоями (F превращается в D)
y — весь мегаминкс вращается по часовой стрелке в горизонтальной плоскости (F превращается в L)
y’ — весь мегаминкс вращается против часовой стрелки в горизонтальной плоскости (F превращается в R)
z — весь мегаминкс вращается по часовой стрелке в фронтальной плоскости (U превращается в R)
z’ — весь мегаминкс вращается против часовой стрелки в фронтальной плоскости (U превращается в L)
Купить Мегаминкс
Как собрать
Мегаминкс

Все видео мы перенесли на новый канал!
Подпишись,
чтобы не пропустить новые уроки!
Схемы
Этапы 2,4,6 Углы
Алгоритм ПРАВОЙ руки

Алгоритм ЛЕВОЙ руки

Этап 3. Ребра | слой 2
Постановка ребра НАПРАВО

Постановка ребра НАЛЕВО

Этап 5. Ребра | слой 3
Постановка ребра НАПРАВО

Постановка ребра НАЛЕВО

Этап 7. Ребра | слой 4
Постановка ребра НАПРАВО

Постановка ребра НАЛЕВО

Этап 8. Серая звезда | последний слой
Схема
Этап 9. Ребра
Schema
Этап 10. Постановка углов
Schema
Этап 11. Ориентация углов
Schema
Обсудить, задать вопросы по этому этапу 👉 здесь

Instagram
Youtube
Telegram
Познакомьтесь, это мой племянник Илья
который научил меня собирать Мегаминкс, спасибо Илье за предоставленные алгоритмы.

Существуют самые разные варианты расцветки мегаминкса, головоломки-додекаедра, у которой 12 сторон. Поэтому было придумано множество вариантов цветовой схемы за долгое время существования этой интересной головоломки. Ниже мы представили 2 наиболее распространенных варианта расцветки мегаминкса.
WCA расцветка
Цветовая схема, используемая организацией WCA (Всемирной Ассоциацией Кубика), используется при выведении скрамблов (схем перемешивания) на официальных соревнованиях. Именно такую схему лежит в основе данной обучалки.

Самая популярная расцветка
Цветовая схема, используемая ведущими производителями головоломок во всем мире: QiYi, MoYu, DaYan, ShengShou. Именно с такой расцветкой мегаминксы ведущих марок выпускаются с заводов.

A Megaminx is a 3D puzzle with 12 sides or faces. Each side is in the shape of a Pentagon (5 sides and corners). In geometry this shape is called a Dodecahedron, but in the magic puzzle industry this is called a Megaminx.
If you already know how to solve a 3×3 then you certainly can make a start on a Megaminx, it just takes longer as there are more pieces to put in place.
At a beginner level the puzzle is solved layer-by-layer in the following steps:
- STEP 1 — SOLVE THE FIRST LAYER STAR
- STEP 2 — SOLVE THE FIRST LAYER CORNERS
- STEP 3 — SOLVE THE SECOND LAYER EDGES
- STEP 4 — SOLVE THE THIRD LAYER CORNERS AND EDGES
- STEP 5 — SOLVE THE FORTH LAYER CORNERS AND EDGES
- STEP 6 — SOLVE THE LAST LAYER EDGES
- STEP 7 — SOLVE THE LAST LAYER CORNERS
STEP 1 — SOLVE THE FIRST LAYER STAR
Solving the fist layer star is the same as solving the first layer cross of a 3×3.
- Keeping the WHITE center on top and the PURPLE center facing you.
- Find the WHITE/PURPLE edge piece (it has 2 colours) and turn it so that it is in the same face as the purple center. (keeping white on top and purple in front)
- Use the options below as a guide to put the WHITE/PURPLE edge place.
Repeat the steps for all the WHITE edges. This makes the white star making sure all the side colours match.
Result:
This step is quite intuitive; you can do it for sure but it does take a little practice. Move the white edges to their places not messing up the ones already done.
STEP 2 — SOLVE THE FIRST LAYER CORNERS
- Keep the WHITE center on top
- Put the YELLOW centre in front (facing you)
- Find the WHITE/YELLOW/PURPLE corner (it has 3 colours) and place it in one of the positions below (without disturbing the white cross)
- Choose from the steps below to place the WHITE/YELLOW/PURPLE corner in place without disturbing the white cross.

Possible Problem:
If the corner you are looking for is in the first layer, but in the wrong position or the wrong way around then you can use the same steps above to move the corner out.
Keeping white on top, Follow the above instructions for all the WHITE corners.
Result:
STEP 3 — SOLVE THE SECOND LAYER EDGES
- Keep white on top
- Find the PURPLE/YELLOW edge piece
- Move the edge to the layer below to match the edge with the center colour.
- Choose from the steps below to put the edge in place
Continue the steps for all the second layer edges only: YELLOW/BLUE, DARK BLUE/RED, RED/DARK GREEN, DARK GREEN/PURPLE.
Possible Problem:
If the edge you are looking for is in the second layer, but in the wrong position or the wrong way around then you can use the same steps above to move the edge out of the second layer.
Result:
STEP 4 — SOLVE THE THIRD LAYER CORNERS AND EDGES «TEARDROP»
- Turn the Megaminx around so that the GREY center is now on top.
- Find the PURPLE/ORANGE edge piece
- Move the edge in place (between the orange and purple centers) without disturbing the first two layers. This can be done intuitively — no algorithms is necessary.
- Find the PURPLE/ORANGE/YELLOW corner and place it to the bottom right of where it needs to go.
- Use the steps below to put the corner in place.
- Find the YELLOW/ORANGE edge piece
- Put the edge in the ORANGE or YELLOW face, matching the center color in the position shown in the image below.
- Use the steps below to put the edge in place.
The next «tear drop» to do is to the right, with the GREY center still on top. Start by putting the LIGHT-GREEN/YELLOW edge in place, followed by the YELLOW/DARK-BLUE/LIGHT-GREEN edge using the same steps as above.
Work your way around the Megaminx, until you have only one set to do.
IMPORTANT:
To complete the last «teardrop» set you will need to rotate the face you are completing one turn to the right so that you don’t disturb the completed sets
Follow the steps below to insert the corner.
Follow the steps below to insert the last teardrop edge.
This is the most difficult part done and your Megaminx should now look like this:
Result:

STEP 5 — SOLVE THE FORTH LAYER CORNERS AND EDGES
- Turn the Megaminx around so that the GREY center is now on top.
- Find a corner in the GREY face that doesn’t have GREY.
- Turn the top layer only so that the corner is between the matching center colours. In the pic below we use the PURPLE/LIGHT-BLUE/ORANGE corner place it between the ORANGE and LIGHT-BLUE centers.
- Use the steps below to put the corner in place.
Repeat this step for all the remaining corners that doesn’t have grey
- Find an edge in the GREY face that doesn’t have GREY.
- Turn the top layer only so that the edge matches its center colour.
- Use the steps below to put the edge in place
Repeat this step for all the remaining edges that doesn’t have grey
Result:
STEP 6 — SOLVE THE LAST LAYER STAR
- Hold your Megaminx with the GREY center on top.
- You should have 1,2 or 3 edges with GREY facing up.
- The idea is to first make the GREY star and then swap pieces into their correct position.
- Perform the algorithm below until you get the GREY star making sure your Megaminx is orientated is shown in the image.
You will now have 2 or 5 edges pieces in the correct place, meaning they match with the center colors.
If you have 2 edge pieces in the correct position, but they are not adjacent to each other then hold your Megaminx, with one correct edge in the left bottom side. Use the algorithm below to cycle the edge pieces until you have two correct edge pieces adjacent to each other.
If you have 2 edge pieces in the correct position and the are adjacent to each other then hold your Megaminx, with the correct edges in the front and left positions. Use the algorithm below to cycle the edge pieces until all edge pieces in the correct position.
Result:
STEP 7 — SOLVE THE LAST CORNERS
First we will put the corners in the correct position.
You will now have either 2 or ALL the corners pieces will be in their correct positions, either the right way up or reversed. If two corners are in the correct position, then hold the Megaminx so that this correct corners are the front-left and left position as as shown in the image below.
Repeat the sequence of moves until all the corners are in the correct position.
The next steps will turn the corners (one by one) the correct way and ultimately solve the cube.
NOTE: THIS ROUTINE MAY APPEAR TO UPSET THE REST OF THE CUBE. DO NOT DESPAIR AND KEEP THE SAME SIDE FACING YOU IT WILL ONLY BE SOLVED ONCE THE LAST CORNER IS ORIENTATED.
Repeat the moves until the GREY side of the corner piece is on top. You may have to do it 2-3 times.
KEEP THE SAME SIDE FACING YOU. Rotate the TOP LAYER ONLY until the next corner piece to be rotated is in the top right position. Repeat the above sequence until the GREY side of the corner that you are rotating is on top. Continue the process until the cube is complete.