
Данная лицензия не предназначена для продажи этого Руководства и Вы не становитесь владельцем этого Руководства после приобретения любого продукта, загрузки и/или использования. Nikon сохраняет за собой право владения данным Руководством и, следовательно, всеми копиями и все соответствующие права, относящиеся к интеллектуальной собственности, и сохраняет за собой все права, которые явно не предоставлены Вам в рамках данного Соглашения. Данное Соглашение представляет собой полное и эксклюзивное соглашение, устное и письменное, между Вами и Nikon.
1. РУКОВОДСТВО
Руководство предназначено для клиентов, которые приобрели наши продукты. Мы можем не иметь возможности ответить на запрос физических лиц, которые не приобрели наши продукты. Пожалуйста, имейте в виду, что данное руководство и контактная информация, указанные здесь, могут быть изменены без уведомления.
Данное Руководство защищено Законом об авторском праве Японии и международными законами об авторском праве и международными договорами. Вам необходимо воспроизвести на каждой копии уведомление об авторском праве Nikon и любую другую информацию о праве собственности, которые присутствовали на оригинале.
2. ОГРАНИЧЕНИЯ
Кроме случаев, когда в данном Соглашении указано иное, нельзя делать или передавать копии данного Руководства другим или передавать в электронной форме Руководство с одного компьютера на другой по сети. НЕЛЬЗЯ ИЗМЕНЯТЬ ИЛИ УДАЛЯТЬ ЛЮБЫЕ УВЕДОМЛЕНИЯ ОБ АВТОРСКОМ ПРАВЕ, ТОРГОВОЙ МАРКЕ ИЛИ ДРУГИЕ ЗАЩИТНЫЕ УВЕДОМЛЕНИЯ, СОДЕРЖАЩИЕСЯ В ДАННОМ РУКОВОДСТВЕ. НЕЛЬЗЯ ПРИСВАИВАТЬ ИЛИ ИНЫМ ОБРАЗОМ ИЗБАВЛЯТЬСЯ, МОДИФИЦИРОВАТЬ, НАСТРАИВАТЬ, ПЕРЕВОДИТЬ, АРЕНДОВАТЬ, БРАТЬ В НАЕМ, ЗАНИМАТЬ, ПЕРЕПРОДАВАТЬ, РАСПРОСТРАНЯТЬ, ПЕРЕДАВАТЬ ПО СЕТИ ИЛИ СОЗДАВАТЬ ИЛИ ИМЕТЬ СОЗДАННЫЕ ПРОИЗВОДСТВЕННЫЕ РАБОТЫ, ОСНОВАННЫЕ НА ДАННОМ РУКОВОДСТВЕ ИЛИ ЛЮБОЙ ЧАСТИ ТАКОВОГО.
3. ОГРАНИЧЕННАЯ ГАРАНТИЯ И ОТКАЗ
В НАИБОЛЬШЕЙ СТЕПЕНИ, РАЗРЕШЕННОЙ В СИЛУ ДЕЙСТВУЮЩЕГО ЗАКОНОДАТЕЛЬСТВА, ДАННОЕ РУКОВОДСТВО ПРЕДОСТАВЛЕНО НА ОСНОВЕ ПРИНЦИПА «КАК ЕСТЬ», БЕЗ ГАРАНТИИ В ЛЮБОЙ ФОРМЕ, И КОМПАНИЯ NIKON, ЕЕ СОТРУДНИКИ, РАСПРОСТРАНИТЕЛИ, ДИЛЕРЫ И АГЕНТЫ ПРЯМО НЕ ПРИЗНАЮТ ЛЮБУЮ ГАРАНТИЮ В ЛЮБОЙ ФОРМЕ, ВЫРАЖЕННУЮ ИЛИ ПОДРАЗУМЕВАЕМУЮ, ВКЛЮЧАЯ, НО НЕ ОГРАНИЧИВАЯСЬ, ЛЮБОЙ ПОДРАЗУМЕВАЕМОЙ ГАРАНТИЕЙ ПРИГОДНОСТИ ДЛЯ ТОРГОВЛИ, ПРИГОДНОСТИ ДЛЯ ОПРЕДЕЛЕННОГО НАЗНАЧЕНИЯ ИЛИ ОТСУТСТВИЯ НАРУШЕНИЙ. В НАИБОЛЬШЕЙ СТЕПЕНИ, РАЗРЕШЕННОЙ В СИЛУ ДЕЙСТВУЮЩЕГО ЗАКОНОДАТЕЛЬСТВА, КОМПАНИЯ NIKON, ЕЕ СОТРУДНИКИ, РАСПРОСТРАНИТЕЛИ, ДИЛЕРЫ И АГЕНТЫ НЕ ГАРАНТИРУЮТ ИСПОЛНЕНИЕ ИЛИ РЕЗУЛЬТАТЫ, КОТОРЫЕ ВЫ МОЖЕТЕ ПОЛУЧИТЬ ИЗ ДАННОГО РУКОВОДСТВА, ИЛИ ЧТО ДАННОЕ РУКОВОДСТВО БУДЕТ СООТВЕТСТВОВАТЬ ВАШИМ ТРЕБОВАНИЯМ ИЛИ ЧТО РАБОТА РУКОВОДСТВА БУДЕТ БЕСПЕРЕБОЙНОЙ, БЕЗОШИБОЧНОЙ ИЛИ НЕ БУДЕТ СОДЕРЖАТЬ ВИРУСОВ. В НАИБОЛЬШЕЙ СТЕПЕНИ, РАЗРЕШЕННОЙ В СИЛУ ДЕЙСТВУЮЩЕГО ЗАКОНОДАТЕЛЬСТВА, НИ КОМПАНИЯ NIKON, НИ ЕЕ СОТРУДНИКИ, РАСПРОСТРАНИТЕЛИ, ДИЛЕРЫ И АГЕНТЫ НЕ ДОЛЖНЫ НЕСТИ ПЕРЕД ВАМИ ОТВЕТСТВЕННОСТЬ ЗА ЛЮБЫЕ КОСВЕННЫЕ, ПОСЛЕДУЮЩИЕ ИЛИ НЕПРЕДНАМЕРЕННЫЕ УБЫТКИ, ПОТЕРИ ИЛИ ИЗДЕРЖКИ ЛЮБОГО ТИПА, БУДЬ ТО ПОТЕРЯ ПРИБЫЛИ, ПЕРЕРЫВ В ДЕЯТЕЛЬНОСТИ ИЛИ ИНЫМ СПОСОБОМ ВОЗНИКАЮЩИЙ ИЛИ ЯВЛЯЮЩИЙСЯ СЛЕДСТВИЕМ ДАННОГО РУКОВОДСТВА, ВЫЗВАННЫЙ КАКИМ-ЛИБО СПОСОБОМ, ДАЖЕ ЕСЛИ КОМПАНИЯ NIKON, ЕЕ СОТРУДНИКИ, РАСПРОСТРАНИТЕЛИ, ДИЛЕРЫ ИЛИ АГЕНТЫ УВЕДОМЛЕНЫ О ВОЗМОЖНОСТИ ВОЗНИКНОВЕНИЯ ТАКИХ УБЫТКОВ, ПОТЕРЬ ИЛИ ИЗДЕРЖЕК. ЭТОТ ОТКАЗ СОСТАВЛЯЕТ СУЩЕСТВЕННУЮ ЧАСТЬ ДАННОГО СОГЛАШЕНИЯ, И НЕИСПОЛЬЗОВАНИЕ ДАННОГО РУКОВОДСТВА УПОЛНОМОЧЕНО, КРОМЕ СЛУЧАЕВ В РАМКАХ ДАННОГО ОТКАЗА.
4. ОБЩИЕ СВЕДЕНИЯ
Данное соглашение регулируется и должно истолковываться в соответствии с законами Японии независимо от его принципов коллизионного права. В случае возникновения спора в рамках или в связи с данным соглашением Вы, таким образом, даете согласие на персональную юрисдикцию Японии и отказываетесь от любого возражения, что такая дискуссия вызывает затруднение. Далее Вы соглашаетесь на получение судебных извещений в любом действии, возникающем из данного Соглашения по обычной почте или другими коммерчески оправданными способами доставки расписки в получении. Если любое положение данного Соглашения должно быть определено недействительным по какой-либо причине, то оставшиеся положения не должны быть признаны недействительными и должны остаться в силе без изменений. Данное Соглашение устанавливает в дальнейшем целое соглашение и понимание между Вами и компанией Nikon, и замещает собой и заменяет любые другие соглашения, относящиеся к сути дела данного Соглашения. Неуспех любой стороны в настаивании на строгом исполнении любого правила или положения данного соглашения, или выполнение любой опции, права или защиты прав, содержащихся в данном документе, не должны толковаться в качестве отказа от любого применения такого правила, положения, опции, права или защиты прав в будущем, и такое правило, положение, опция, право или защита прав должны продолжиться и сохранить полную юридическую силу и действие. Заголовки разделов данного Соглашения вставлены только для удобства и не должны составлять часть данного документа или влиять каким-либо образом на значение или толкование данного Соглашения. Кроме случаев, когда иначе явно указано в данном документе, положения раздела 3 и раздела 4 вместе с любыми положениями, которые с помощью своих прямо выраженных условий относятся к периодам после прекращения срока действия данного Соглашения, должны оставаться в силе после прекращения действия данного Соглашения по какой-либо причине.
Руководства для продуктов Nikon/ 2018/02/15/ Вер. 2.0.0
Воспроизведение данного руководства в любой форме,
полностью или частично (кроме краткого цитирования в
критических статьях и обзорах) без письменного разрешения
корпорации NIKON CORPORATION запрещено.
Отпечатано в России
CT1A01(1D)
6MM0301D-01
ЦИФРОВАЯ ФОТОКАМЕРА
Руководство пользователя
Сведения о товарных знаках
• Microsoft, Windows и Windows Vista являются охраняемыми товарными знаками
или официальными товарными знаками корпорации Майкрософт в США и/или
других странах.
• Macintosh, Mac OS и QuickTime являются товарными знаками Apple Inc.,
зарегистрированными в США и других странах. Логотип iFrame и знак iFrame
являются товарными знаками Apple Inc.
• Adobe и Acrobat являются зарегистрированными товарными знаками
корпорации Adobe Systems Inc.
• Логотипы SDXC, SDHC и SD являются товарными знаками SD-3C, LLC.
• PictBridge является товарным знаком.
• HDMI логотип (
), и High-Definition Multimedia Interface являются
товарными знаками или зарегистрированными товарными знаками HDMI
Licensing LLC.
• Все прочие торговые наименования, приводимые в настоящем руководстве и в
другой документации, которая поставляется вместе с изделиями компании
Nikon, являются товарными знаками или зарегистрированными товарными
знаками своих владельцев.
AVC Patent Portfolio License
Данный продукт имеет лицензию AVC Patent Portfolio License для личного и
некоммерческого использования клиентом в целях (i) кодирования видео в
соответствии со стандартом AVC («видеосодержимое AVC») и/или (ii)
декодирования видеосодержимого AVC, закодированного клиентом в рамках
личной и некоммерческой деятельности и/или полученного от поставщика
видеосодержимого, имеющего лицензию на предоставление видеосодержимого
AVC. Эта лицензия не распространяется на любое другое использование, а также
не подразумевается для такого использования. Дополнительную информацию
можно получить от MPEG LA, L.L.C.
См. веб-сайт http://www.mpegla.com.
ii
Меры предосторожности
Перед началом работы с устройством внимательно изучите следующие меры
безопасности во избежание получения травм и повреждения изделия Nikon.
Всем лицам, использующим данное изделие, следует ознакомиться с
инструкциями по безопасности.
Возможные последствия нарушения указанных мер безопасности обозначены
следующим символом:
ПРЕДУПРЕЖДЕНИЯ
В случае неисправности
выключите фотокамеру
При появлении дыма или необычного
запаха, исходящего из фотокамеры
или блока питания, отсоедините блок
питания от сети и немедленно
извлеките батареи, стараясь не
допустить ожогов. Продолжение
работы с устройством может
привести к получению травм. После
извлечения батареи или отключения
источника питания доставьте изделие
для проверки в ближайший
авторизованный сервисный центр
компании Nikon.
Не разбирайте фотокамеру
Прикосновение к внутренним частям
фотокамеры или сетевого блока
питания может привести к получению
травм. Ремонт должен производиться
только квалифицированными
специалистами. В случае повреждения
корпуса фотокамеры или сетевого
блока питания в результате падения
или другого происшествия отключите
сетевой блок питания и/или извлеките
батареи и доставьте изделие для
проверки в ближайший
авторизованный сервисный центр
Nikon.
Не пользуйтесь
фотокамерой или сетевым
блоком питания при наличии в
воздухе
легковоспламеняющихся
газов
Не работайте с электронным
оборудованием и с фотокамерой при
наличии в воздухе
легковоспламеняющихся газов: это
может привести к взрыву или пожару.
Меры предосторожности
при обращении с ремнем
фотокамеры
Запрещается надевать ремень
фотокамеры на шею младенца или
ребенка.
Храните в недоступном для
детей месте
Примите особые меры
предосторожности во избежание
попадания батарей и других небольших
предметов детям в рот.
Данным символом отмечены предупреждения и сведения, с которыми необходимо
ознакомиться до начала работы с изделием Nikon во избежание травм.
iii
Меры предосторожности
Соблюдайте меры
предосторожности при
обращении с батареями
Неправильное обращение с батареями
может привести к их протеканию или
взрыву. При обращении с батареями для
данного изделия соблюдайте следующие
меры предосторожности.
• Перед заменой батарей выключите
изделие. Если используется сетевой
блок питания, убедитесь, что он
отключен от сети.
• Используйте только батареи,
рекомендованные для данного изделия
(
A 14). Не используйте старые и новые
батареи одновременно, а также батареи
разных производителей или типов.
• При зарядке никель-металлогидридных
аккумуляторных батарей Nikon EN-MH2
следует использовать только указанное
зарядное устройство и заряжать по
четыре батареи одновременно. При
замене батарей на батареи типа
EN-MH2-B2 (приобретаются отдельно)
покупайте два комплекта (всего четыре
батареи).
• Аккумуляторные батареи
EN-MH2 предназначены для
использования только в цифровых
фотокамерах Nikon и совместимы с
фотокамерой COOLPIX L120.
• Соблюдайте полярность установки
батарей.
• Не закорачивайте и не разбирайте
батареи.
Не удаляйте и не вскрывайте
изоляцию или корпус батарей.
• Не допускайте воздействия пламени
или высоких температур на батареи.
• Не погружайте батареи в воду и не
допускайте попадания на них воды.
• Не перевозите и не храните
батареи вместе с металлическими
предметами, например
украшениями или шпильками.
• Из полностью разряженных батарей
может вытекать жидкость. Во избежание
повреждения изделия извлекайте из него
разряженные батареи.
• Немедленно прекратите использовать
батарею, если вы заметили в ней какие-либо
изменения, например смену окраски или
деформацию.
• В случае попадания жидкости, вытекшей
из поврежденной батареи, на одежду или
кожу немедленно смойте ее большим
количеством воды.
Во время эксплуатации
зарядного устройства
(поставляется отдельно)
соблюдайте следующие
меры предосторожности:
• Не допускайте попадания воды на
устройство. Несоблюдение этого
требования может привести к возгоранию
или поражению электрическим током.
• Пыль на металлических частях сетевой
вилки или вокруг них необходимо
удалять с помощью сухой ткани.
Продолжение работы с устройством
может привести к возгоранию.
• Не пользуйтесь сетевым шнуром и не
находитесь рядом с зарядным устройством
во время грозы. Несоблюдение этого
требования может привести к поражению
электрическим током.
• Берегите шнур питания от повреждений, не
вносите в него конструктивные изменения,
не перегибайте его и не тяните за него с
силой, не ставьте на него тяжелые
предметы, не подвергайте его воздействию
высоких температур или открытого огня. В
случае повреждения изоляции сетевого
шнура и оголения проводов отнесите его
для проверки в авторизованный сервисный
центр Nikon. Несоблюдение этого
требования может привести к возгоранию
или поражению электрическим током.
• Не прикасайтесь к сетевой вилке или к
зарядному устройству мокрыми руками.
Несоблюдение этого требования может
привести к поражению электрическим
током.
• Не используйте с преобразователями
напряжения или преобразователями
постоянного тока. Несоблюдение этого
требования может привести к повреждению
изделия, а также к его перегреву или
возгоранию.
iv
Меры предосторожности
Используйте только
соответствующие кабели
При подключении кабелей к входным и
выходным разъемам и гнездам
фотокамеры используйте только
специальные кабели Nikon,
поставляемые вместе с фотокамерой
или продаваемые отдельно.
Соблюдайте осторожность
при обращении с
подвижными частями
фотокамеры
Будьте внимательны. Следите за тем,
чтобы ваши пальцы и другие
предметы не были зажаты крышкой
объектива или другими подвижными
частями фотокамеры.
Компакт-диски
Запрещается воспроизводить
компакт-диски, прилагаемые
к изделию, в аудиопроигрывателях
компакт-дисков. Воспроизведение
компакт-дисков с данными на
аудиопроигрывателе может привести
к нарушениям слуха или
повреждению оборудования.
Соблюдайте осторожность
при использовании вспышки
Применение вспышки рядом с глазами
снимаемого человека может привести к
временному ухудшению зрения.
Особую осторожность следует
соблюдать при фотографировании
детей: вспышка должна находится на
расстоянии не менее 1 м от объекта
съемки.
Не используйте вспышку,
когда ее излучатель
соприкасается с телом
человека или каким-либо
предметом
Несоблюдение этой меры
предосторожности может привести к
ожогам или пожару.
Избегайте контакта
с жидкокристаллическим
веществом
Если монитор разбился, необходимо
предпринять срочные меры во
избежание травм осколками стекла и
предупредить попадание
жидкокристаллического вещества на
кожу, в глаза и в рот.
Выключайте питание при
использовании в самолете
или в больнице
Выключайте питание, находясь
внутри самолета во время взлета или
посадки.
При использовании в больнице
выполняйте предписания для этой
больницы. Электромагнитные волны,
излучаемые этой фотокамерой, могут
вызвать нарушения в работе
электронных систем в самолете или
приборов в больнице.
v
Уведомления
Символ для раздельной
утилизации, применяемый
в европейских странах
Данный символ означает, что
изделие должно
утилизироваться отдельно.
Следующие замечания
касаются только
пользователей в
европейских странах.
• Данное изделие предназначено
для раздельной утилизации
в соответствующих пунктах
утилизации. Не выбрасывайте
изделие вместе с бытовым
мусором.
• Подробные сведения можно
получить у продавца или в местной
организации, ответственной за
вторичную переработку отходов.
Этот символ на батарее
указывает на то, что данная
батарея подлежит
раздельной утилизации.
Следующие замечания касаются
только пользователей в европейских
странах:
• Все батареи, независимо от того,
промаркированы ли они этим
символом или нет, подлежат
раздельной утилизации в
соответствующих пунктах сбора. Не
выбрасывайте их вместе с
бытовыми отходами.
• Подробные сведения можно
получить у продавца или в местной
организации, ответственной за
вторичную переработку отходов.
DIGITAL CAMERA
User’s Manual
En

Trademark Information
• Microsoft, Windows and Windows Vista are either registered trademarks or
trademarks of Microsoft Corporation in the United States and/or other countries.
• Macintosh, Mac OS, and QuickTime are trademarks of Apple Inc., registered in the U.S.
and other countries. The iFrame logo and the iFrame symbol are trademarks of Apple
Inc.
• Adobe and Acrobat are registered trademarks of Adobe Systems Inc.
• SDXC, SDHC and SD Logos are trademarks of SD-3C, LLC.
• PictBridge is a trademark.
•
HDMI, ( ) logo and High-Definition Multimedia Interface are trademarks or
registered trademarks of HDMI Licensing LLC.
• All other trade names mentioned in this manual or the other documentation
provided with your Nikon product are trademarks or registered trademarks of their
respective holders.
AVC Patent Portfolio License
his product is licensed under the AVC Patent Portfolio License for the personal and
non-commercial use of a consumer to (i) encode video in compliance with the AVC
standard (“AVC video”) and/or (ii) decode AVC video that was encoded by a consumer
engaged in a personal and non-commercial activity and/or was obtained from a video
provider licensed to provide AVC video. No license is granted or shall be implied for any
other use. Additional information may be obtained from MPEG LA, L.L.C.
See
http://www.mpegla.com
.

Introduction
First Steps
Basic Photography and Playback: G Easy Auto Mode
More on Shooting
More on Playback
Editing Image
Movie Recording and Playback
Connecting to Televisions, Computers and Printers
Basic Camera Setup
Notes on Camera Care and General Usage
Technical Notes
i

For Your Safety
To prevent damage to your Nikon product or injury to yourself or to others, read
the following safety precautions in their entirety before using this equipment.
Keep these safety instructions where all those who use the product will read them.
The consequences that could result from failure to observe the precautions listed
in this section are indicated by the following symbol:
This icon marks warnings, information that should be read before using this Nikon
product, to prevent possible injury.
WARNINGS
Turn off in the event of
malfunction
Should you notice smoke or an unusual
smell coming from the camera or AC
adapter, unplug the AC adapter and
remove the battery immediately, taking
care to avoid burns. Continued
operation could result in injury. After
removing or disconnecting the power
source, take the equipment to a Nikonauthorized service representative for
inspection.
Do not disassemble
Touching the internal parts of the
camera or AC adapter could result in
injury. Repairs should be performed
only by qualified technicians. Should
the camera or AC adapter break open
as the result of a fall or other accident,
take the product to a Nikon-authorized
service representative for inspection,
after unplugging the product and/or
removing the battery.
Do not use the camera or AC
adapter in the presence of
flammable gas
Do not use electronic equipment in the
presence of flammable gas, as this
could result in explosion or fire.
Handle the camera strap with
care
Never place the strap around the neck
of an infant or child.
Keep out of reach of children
Particular care should be taken to
prevent infants from putting the
battery or other small parts into their
mouths.
ii

For Your Safety
Observe caution when
handling the battery
The battery may leak or explode if
improperly handled. Observe the
following precautions when handling
the battery for use in this product:
• Before replacing the battery, turn the
product off. If you are using the AC
adapter, be sure it is unplugged.
• Use only the batteries approved for
use in this product (A 14). Do not
combine old and new batteries or
batteries of different makes or types.
• When charging Nikon EN-MH2
rechargeable Ni-MH batteries, use
only the specified charger and
charge the batteries four at a time.
When replacing the batteries with
EN-MH2-B2 batteries (available
separately), purchase two sets (total
of four batteries).
• The EN-MH2 rechargeable batteries
are for use with Nikon digital cameras
only, and are compatible with
COOLPIX L120.
• Insert batteries in the correct
orientation.
• Do not short or disassemble the
battery or attempt to remove or
break the battery insulation or casing.
• Do not expose the battery to flame
or to excessive heat.
• Do not immerse in or expose to
water.
• Do not transport or store with metal
objects such as necklaces or hairpins.
• Batteries are prone to leakage when
fully discharged. To avoid damage to
the product, be sure to remove the
battery when no charge remains.
• Discontinue use immediately should
you notice any change in the battery,
such as discoloration or deformation.
If liquid from the damaged battery
•
comes in contact with clothing or skin,
rinse immediately with plenty of water.
Observe the following
precautions when handling the
Battery Chargers (available
separately)
• Keep Dry. Failure to observe this
precaution could result in fire or
electric shock.
• Dust on or near the metal parts of the
plug should be removed with a dry
cloth. Continued use could result in
fire.
• Do not handle the power cable or go
near the battery charger during
lightning storms. Failure to observe
this precaution could result in
electric shock.
• Do not damage, modify, forcibly tug or
bend the power cable, place it under
heavy objects, or expose it to heat or
flame. Should the insulation be
damaged and the wires become
exposed, take it to a Nikon-authorized
service representative for inspection.
Failure to observe these precautions
could result in fire or electric shock.
• Do not handle the plug or battery
charger with wet hands. Failure to
observe this precaution could result
in electric shock.
Do not use with travel converters or
•
adapters designed to convert from one
voltage to another or with DC-to-AC
inverters. Failure to observe this
precaution could damage the product
or result in overheating or fire.
iii

For Your Safety
Use appropriate cables
When connecting cables to the input
and output jacks, use only the cables
provided or sold by Nikon for the
purpose, to maintain compliance with
product regulations.
Handle moving parts with care
Be careful that your fingers or other
objects are not pinched by the lens
cover or other moving parts.
CD-ROMs
The CD-ROMs supplied with this device
should not be played back on audio CD
equipment. Playing CD-ROMs on an
audio CD player could cause hearing
loss or damage the equipment.
Observe caution when using
the flash
Using the flash close to your subject’s
eyes could cause temporary visual
impairment. Particular care should be
observed if photographing infants,
when the flash should be no less than 1
m (3 ft. 4 in.) from the subject.
Do not operate the flash with
the flash window touching a
person or object
Failure to observe this precaution could
result in burns or fire.
Avoid contact with liquid
crystal
Should the monitor break, care should
be taken to avoid injury caused by
broken glass and to prevent liquid
crystal from the monitor touching the
skin or entering the eyes or mouth.
Turn the power off when using
inside an airplane or the
hospital
Turn the power off while inside the
airplane during take off or landing.
Follow the instructions of the hospital
when using while in a hospital. The
electromagnetic waves given out by
this camera may disrupt the electronic
systems of the airplane or the
instruments of the hospital.
iv

Notices
Notice for Customers in the U.S.A.
Federal Communications
Commission (FCC) Radio Frequency
Interference Statement
This equipment has been tested and
found to comply with the limits for a
Class B digital device, pursuant to Part
15 of the FCC rules. These limits are
designed to provide reasonable
protection against harmful interference
in a residential installation. This
equipment generates, uses, and can
radiate radio frequency energy and, if
not installed and used in accordance
with the instructions, may cause
harmful interference to radio
communications. However, there is no
guarantee that interference will not
occur in a particular installation. If this
equipment does cause harmful
interference to radio or television
reception, which can be determined by
turning the equipment off and on, the
user is encouraged to try to correct the
interference by one or more of the
following measures:
• Reorient or relocate the receiving
antenna.
• Increase the separation between the
equipment and receiver.
• Connect the equipment into an
outlet on a circuit different from that
to which the receiver is connected.
• Consult the dealer or an experienced
radio/television technician for help.
CAUTIONS
Modifications
The FCC requires the user to be notified
that any changes or modifications
made to this device that are not
expressly approved by Nikon
Corporation may void the user’s
authority to operate the equipment.
Interface Cables
Use the interface cables sold or
provided by Nikon for your equipment.
Using other interface cables may
exceed the limits of Class B Part 15 of
the FCC rules.
Notice for customers in the State of
California
WARNING
Handling the cord on this product will
expose you to lead, a chemical known
to the State of California to cause birth
defects or other reproductive harm.
Wash hands after handling.
Nikon Inc.,
1300 Walt Whitman Road
Melville, New York 11747-3064
USA
Tel: 631-547-4200
v

Notices
Notice for customers in Canada
CAUTION
This Class B digital apparatus complies
with Canadian ICES-003.
ATTENTION
Cet appareil numérique de la classe B
est conforme à la norme NMB-003 du
Canada.
Symbol for Separate Collection in
European Countries
This symbol indicates that this
product is to be collected
separately.
The following apply only to
users in European countries:
• This product is designated for
separate collection at an appropriate
collection point. Do not dispose of as
household waste.
• For more information, contact the
retailer or the local authorities in
charge of waste management.
This symbol on the battery
indicates that the battery is to
be collected separately.
The following apply only to
users in European countries:
• All batteries, whether marked with
this symbol or not, are designated for
separate collection at an appropriate
collection point. Do not dispose of as
household waste.
• For more information, contact the
retailer or the local authorities in
charge of waste management.
vi

Table of Contents
For Your Safety………………………………………………………………………………………………………………………. ii
WARNINGS………………………………………………………………………………………………………………………………………………ii
Notices …………………………………………………………………………………………………………………………………….v
Introduction ………………………………………………………………………………………………………………………….1
About This Manual ………………………………………………………………………………………………………………..1
Information and Precautions………………………………………………………………………………………………. 2
Parts of the Camera………………………………………………………………………………………………………………. 4
The Camera Body …………………………………………………………………………………………………………………………………4
Attaching the Camera Strap and Lens Cap………………………………………………………………………………..6
Raising and Lowering the Flash………………………………………………………………………………………………………7
The Monitor…………………………………………………………………………………………………………………………………………….8
Basic Operations…………………………………………………………………………………………………………………..10
A (Shooting mode) Button…………………………………………………………………………………………………………10
c (Playback) Button……………………………………………………………………………………………………………………….10
b (e Movie-record) Button………………………………………………………………………………………………………10
The Multi Selector………………………………………………………………………………………………………………………………11
Using Camera Menus……………………………………………………………………………………………………………………….12
Switching Between Tabs of Menu Screen……………………………………………………………………………….13
About the Shutter-release Button……………………………………………………………………………………………….13
First Steps……………………………………………………………………………………………………………………………14
Inserting the Batteries…………………………………………………………………………………………………………14
Applicable Batteries ………………………………………………………………………………………………………………………….14
Turning On and Off the Camera…………………………………………………………………………………………………..14
Setting Display Language, Date and Time ………………………………………………………………………16
Inserting Memory Cards ……………………………………………………………………………………………………..18
Removing Memory Cards……………………………………………………………………………………………………………….18
vii

Table of Contents
Basic Photography and Playback: G Easy Auto Mode ………………………………………………. 20
Step 1 Turn the Camera On and Select G (Easy Auto) Mode ………………………………………20
Indicators Displayed in G (Easy auto) Mode………………………………………………………………………….21
Step 2 Frame a Picture ………………………………………………………………………………………………………..22
Using the Zoom………………………………………………………………………………………………………………………………….23
Step 3 Focus and Shoot………………………………………………………………………………………………………24
Step 4 Viewing and Deleting Images………………………………………………………………………………..26
Viewing Images (Playback Mode) ……………………………………………………………………………………………….26
Deleting Unwanted Images…………………………………………………………………………………………………………..27
Using the Flash……………………………………………………………………………………………………………………..28
Selecting a Flash Mode……………………………………………………………………………………………………………………28
Taking Pictures with the Self-timer …………………………………………………………………………………..31
Adjusting the Brightness: Exposure Compensation ………………………………………………………32
More on Shooting ……………………………………………………………………………………………………………..33
Selecting Shooting Mode …………………………………………………………………………………………………..33
Easy Auto Mode……………………………………………………………………………………………………………………34
Shooting Suited for the Scene (Scene Mode)………………………………………………………………….35
Selecting a Scene Mode………………………………………………………………………………………………………………….35
Choosing a Scene and Shooting (Scene Mode Types and Characteristics)………………..36
Shooting for a Panorama………………………………………………………………………………………………………………..44
Capturing Smiling Faces Automatically (Smart Portrait Mode)……………………………………46
Shooting Continuously at High Speed (Sport Continuous) ………………………………………….48
Changing the Sport Continuous Shooting Mode Settings ………………………………………………49
Auto Mode…………………………………………………………………………………………………………………………….50
Macro Mode…………………………………………………………………………………………………………………………………………51
Changing A (Auto) Mode Settings (Shooting Menu) ……………………………………………………….52
Displaying the Shooting Menu…………………………………………………………………………………………………….52
Image Mode (Image Quality/Image Size)…………………………………………………………………………………53
White Balance (Adjusting Hue)…………………………………………………………………………………………………….55
Continuous…………………………………………………………………………………………………………………………………………..57
ISO Sensitivity ……………………………………………………………………………………………………………………………………..58
Color Options………………………………………………………………………………………………………………………………………59
Camera Settings that Cannot Be Set at the Same Time……………………………………………………..60
viii

Table of Contents
More on Playback………………………………………………………………………………………………………………61
Full-frame Operation …………………………………………………………………………………………………………..61
Viewing Multiple Images: Thumbnail Playback………………………………………………………………62
Calendar Display…………………………………………………………………………………………………………………………………63
Taking a Closer Look: Playback Zoom………………………………………………………………………………64
Playback Menu……………………………………………………………………………………………………………………..66
a Print Order …………………………………………………………………………………………………………………………………….67
b Slide Show…………………………………………………………………………………………………………………………………….70
d Protect…………………………………………………………………………………………………………………………………………….71
f Rotate Image………………………………………………………………………………………………………………………………..73
h Copy: Copying Between Memory Card and Internal Memory…………………………………74
Editing Image……………………………………………………………………………………………………………………..75
Image Editing Function ………………………………………………………………………………………………………75
Editing Images ……………………………………………………………………………………………………………………..76
I D-Lighting: Enhancing Brightness and Contrast……………………………………………………………76
g Small Picture: Decreasing Image Size…………………………………………………………………………………77
o Crop: Creating a Cropped Copy …………………………………………………………………………………………..78
Movie Recording and Playback……………………………………………………………………………………….79
Recording Movies ………………………………………………………………………………………………………………..79
Changing Movie Recording Settings…………………………………………………………………………………………82
Movie Options…………………………………………………………………………………………………………………………………….84
Autofocus Mode…………………………………………………………………………………………………………………………………85
Electronic VR ……………………………………………………………………………………………………………………………………….85
Wind Noise Reduction……………………………………………………………………………………………………………………..86
Enhanced Resolution ………………………………………………………………………………………………………………………86
Movie Playback…………………………………………………………………………………………………………………….87
Deleting Movies………………………………………………………………………………………………………………………………….87
Editing Movies………………………………………………………………………………………………………………………88
Connecting to Televisions, Computers and Printers……………………………………………………90
Connecting to a TV………………………………………………………………………………………………………………90
Connecting to a Computer…………………………………………………………………………………………………92
Before Connecting the Camera……………………………………………………………………………………………………92
Transferring Images from a Camera to a Computer…………………………………………………………….93
Connecting to a Printer……………………………………………………………………………………………………….97
Connecting the Camera and Printer…………………………………………………………………………………………..98
Printing Images One at a Time……………………………………………………………………………………………………..99
Printing Multiple Images………………………………………………………………………………………………………………100
ix

Table of Contents
Basic Camera Setup …………………………………………………………………………………………………………103
Setup Menu……………………………………………………………………………………………………………………….. 103
Welcome Screen……………………………………………………………………………………………………………………………..105
Time Zone and Date………………………………………………………………………………………………………………………106
Monitor Settings………………………………………………………………………………………………………………………………110
Print Date……………………………………………………………………………………………………………………………………………112
Vibration Reduction ……………………………………………………………………………………………………………………….113
Motion Detection……………………………………………………………………………………………………………………………114
AF Assist………………………………………………………………………………………………………………………………………………115
Sound Settings ………………………………………………………………………………………………………………………………..115
Auto Off ………………………………………………………………………………………………………………………………………………116
Format Memory/Format Card……………………………………………………………………………………………………117
Language……………………………………………………………………………………………………………………………………………118
TV Settings …………………………………………………………………………………………………………………………………………119
Blink Warning …………………………………………………………………………………………………………………………………..119
Reset All ………………………………………………………………………………………………………………………………………………121
Battery Type ……………………………………………………………………………………………………………………………………..123
Firmware Version…………………………………………………………………………………………………………………………….124
Notes on Camera Care and General Usage………………………………………………………………….125
Caring for the Camera………………………………………………………………………………………………………125
Cleaning ……………………………………………………………………………………………………………………………………………..127
Storage………………………………………………………………………………………………………………………………………………..128
Technical Notes………………………………………………………………………………………………………………..129
Optional Accessories ……………………………………………………………………………………………………….. 129
Approved Memory Cards…………………………………………………………………………………………………………….130
File and Folder Names……………………………………………………………………………………………………… 131
Error Messages…………………………………………………………………………………………………………………..132
Troubleshooting………………………………………………………………………………………………………………..136
Specifications ……………………………………………………………………………………………………………………. 141
Supported Standards…………………………………………………………………………………………………………………….144
Index…………………………………………………………………………………………………………………………………… 145
x

Introduction
About This Manual
Thank you for purchasing a Nikon COOLPIX L120 digital camera. This manual was
written to help you enjoy taking pictures with your Nikon digital camera. Read this
manual thoroughly before use, and keep it where all those who use the product
will read it.
Symbols and Conventions
To make it easier to find the information you need, the following symbols and
conventions are used:
This icon marks cautions,
information that should be read
B
before use, to prevent damage to
the camera.
This icon marks notes, information
that should be read before using
C
the camera.
Notations
• Secure Digital (SD) memory card, SDHC memory card, and SDXC memory card
are referred to as “memory card.”
• The setting at the time of purchase is referred to as the “default setting.”
• The names of menu items displayed in the camera monitor, and the names of
buttons or messages displayed in the computer monitor appear in bold.
Screen Samples
In this manual, images are sometimes omitted from monitor display samples so
that monitor indicators can be more clearly shown.
Illustrations and Screen Display
Illustrations and text displays shown in this manual may differ from actual display.
This icon marks tips, additional
information that may be helpful
D
when using the camera.
This icon indicates that more
information is available elsewhere
A
in this manual or in the Quick Start
Guide.
Introduction
C Memory Cards
Pictures taken with this camera can be stored in the camera’s internal memory or on removable
memory cards. If a memory card is inserted, all new pictures will be stored on the memory card and
delete, playback and format operations will apply only to the pictures on the memory card. The
memory card must be removed before the internal memory can be formatted or used to store,
delete or view pictures.
1

Information and Precautions
Life-Long Learning
As part of Nikon’s “Life-Long Learning” commitment to ongoing product support and education,
continually updated information is available online at the following sites:
Introduction
• For users in the U.S.A.: http://www.nikonusa.com/
• For users in Europe and Africa: http ://www.europe-nikon.com/support/
• For users in Asia, Oceania, and the Middle East: http://www.nikon-asia.com/
Visit these sites to keep up-to-date with the latest product information, tips, answers to frequently
asked questions (FAQs), and general advice on digital imaging and photography. Additional
information may be available from the Nikon representative in your area. See the URL below for
contact information:
http://imaging.nikon.com/
Use Only Nikon Brand Electronic Accessories
Nikon COOLPIX cameras are designed to the highest standards and include complex electronic
circuitry. Only Nikon brand electronic accessories (including battery chargers, batteries and AC
adapters) certified by Nikon specifically for use with this Nikon digital camera are engineered and
proven to operate within the operational and safety requirements of this electronic circuitry.
THE USE OF NON-NIKON ELECTRONIC ACCESSORIES COULD DAMAGE THE CAMERA AND MAY
VOID YOUR
For more information about Nikon brand accessories, contact a local authorized Nikon dealer.
Before Taking Important Pictures
Before taking pictures on important occasions (such as at weddings or before taking the camera on
a trip), take a test shot to ensure that the camera is functioning cor rectly. Nikon will not be held liable
for damages or lost profits that may result from product malfunction.
About the Manuals
• No part of the manuals included with this product may be reproduced, transmitted, transcribed,
• Nikon reserves the right to change the specifications of the hardware and software described in
• Nikon will not be held liable for any damages resulting from the use of this product.
• While every effort was made to ensure that the information in these manuals is accurate and
NIKON WARRANTY.
stored in a retrieval system, or translated into any language in any form, by any means, without
Nikon’s prior written permission.
these manuals at any time and without prior notice.
complete, we would appreciate it were you to bring any errors or omissions to the attention of the
Nikon representative in your area (address provided separately).
2

Information and Precautions
Notice Concerning Prohibition of Copying or Reproduction
Note that simply being in possession of material that was digitally copied or reproduced by means
of a scanner, digital camera or other device may be punishable by law.
• Items prohibited by law from being copied or reproduced
Do not copy or reproduce paper money, coins, securities, government bonds or local government
bonds, even if such copies or reproductions are stamped “Sample”. The copying or reproduction
of paper money, coins, or securities that are circulated in a foreign country is prohibited. Unless the
prior permission of the government was obtained, the copying or reproduction of unused
postage stamps or post cards issued by the government is prohibited. The copying or
reproduction of stamps issued by the government and of certified documents stipulated by law is
prohibited.
• Cautions on certain copies and reproductions
The government has issued cautions on copies or reproductions of securities issued by private
companies (shares, bills, checks, gift certificates, etc.), commuter passes or coupon tickets, except
when a minimum of necessary copies are to be provided for business use by a company. Also, do
not copy or reproduce passports issued by the government, licenses issued by public agencies
and private groups, ID cards and tickets, such as passes and meal coupons.
• Comply with copyright notices
The copying or reproduction of copyrighted creative works such as books, music, paintings,
woodcut prints, maps, drawings, movies and photographs is governed by national and
international copyright laws. Do not use this product for the purpose of making i llegal cop ies or to
infringe copyright laws.
Disposing of Data Storage Devices
Please note that deleting images or formatting data storage devices such as memory cards or builtin camera memory does not completely erase the original image data. Deleted files can sometimes
be recovered from discarded storage devices using commercially available software, potentially
resulting in the malicious use of personal image data. Ensuring the privacy of such data is the user’s
responsibility.
Before discarding a data storage device or transferring ownership to another person, erase all data
using commercial deletion software, or format the device and then completely refill it with images
containing no private information (for example, pictures of empty sky). Be sure to also replace any
pictures selected for the welcome screen (A 105). Care should be taken to avoid injury or damage
to property when physically destroying data storage devices.
Introduction
3
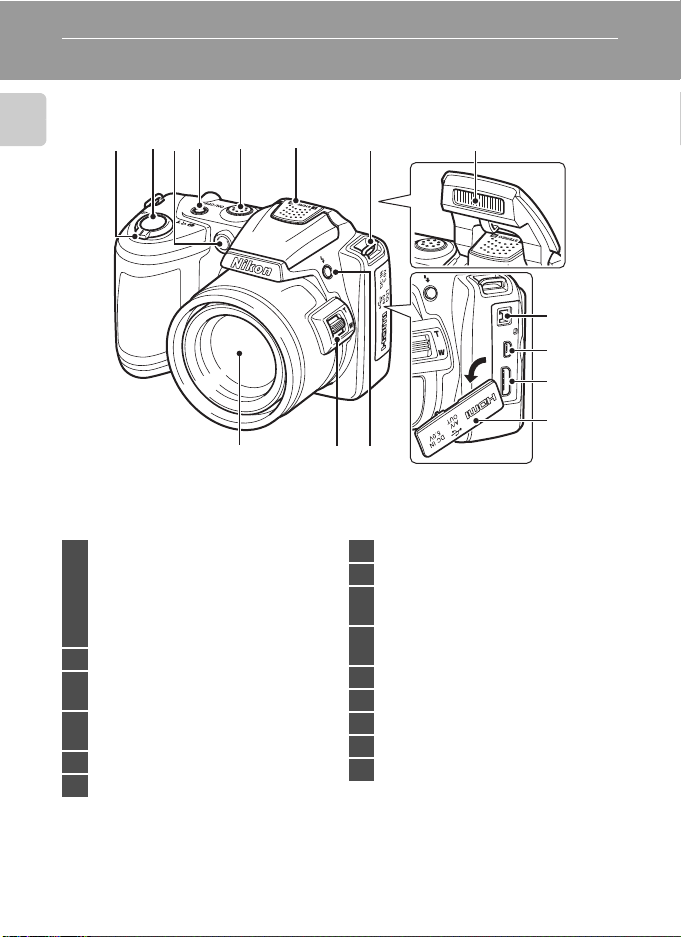
Parts of the Camera
The Camera Body
Introduction
Zoom control ………………………………………….23
f : wide …………………………………………..23
g : tele ……………………………………………..23
1
h : thumbnail playback ……………. 62
i : playback zoom ………………………64
j : help ……………………………………………35
2 Shutter-release button ……………………….24
Self-timer lamp ………………………………………31
3
AF-assist illuminator …………………..25, 115
Power switch/Power-on lamp
4
…………………………………………………………….20, 116
5 Speaker ……………………………………………………..87
6 Built-in microphone (stereo) ……………. 79
4321
15
765
8
9
10
11
12
1314
7 Eyelet for camera strap ………………………….6
8 Flash ……………………………………………………….7, 28
DC input connector (for AC adapter
9
available separately from Nikon) ….15, 129
USB connector and audio/video
10
output …………………………………………90, 93, 98
11 HDMI mini connector ………………………….90
12 Pin cover …………………………………….90, 93, 98
13 m (flash pop-up) button ………………..7, 28
14 Side zoom control ………………………………..23
15 Lens ………………………………………………..127, 141
4
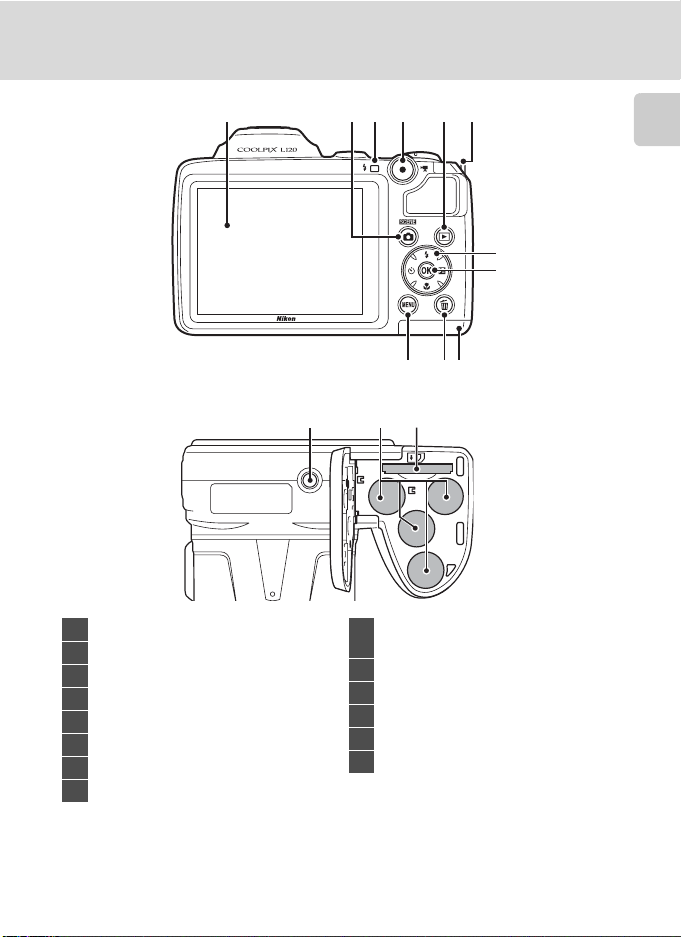
Parts of the Camera
576
1
432
Introduction
8
10 911
12 13 14
1 Monitor ………………………………………………………..8
2 A (shooting mode) button ……………..10
3 Flash lamp ……………………………………………….28
4 b (e movie-record) button ………….10
5 c (playback) button …………………..10, 26
6 Eyelet for camera strap …………………………..6
7 Multi selector ………………………………………….11
8 k (apply selection) button ……………… 11
Battery-chamber/
9
memory card slot cover ………………14, 18
10 l (delete) button ………………………….27, 87
11 d button ……………….12, 52, 66, 82, 104
12 Tripod socket ……………………………………….142
13 Battery-chamber ……………………………………14
14 Memory card slot ………………………………….18
5
Parts of the Camera
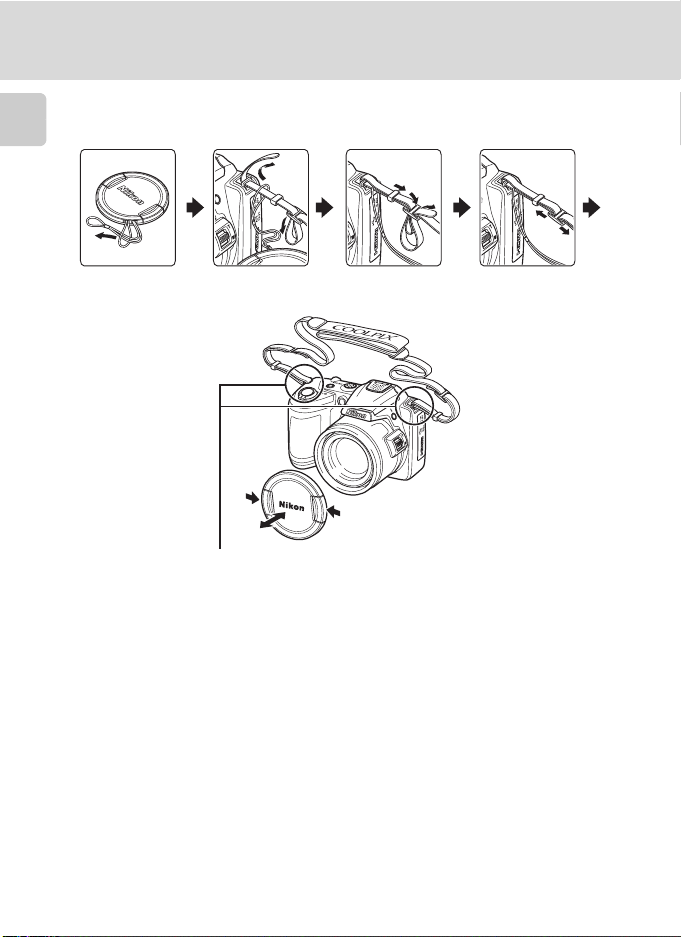
Attaching the Camera Strap and Lens Cap
Attach the lens cap to the camera strap, and then attach the strap to the camera.
Introduction
Attach them at two places.
B Lens Cap
• Remove the lens cap before you take a picture.
• At times when you will not be taking pictures such as when the power is off or while you are
carrying the camera, attach the lens cap to the camera to protect the lens.
6
Parts of the Camera
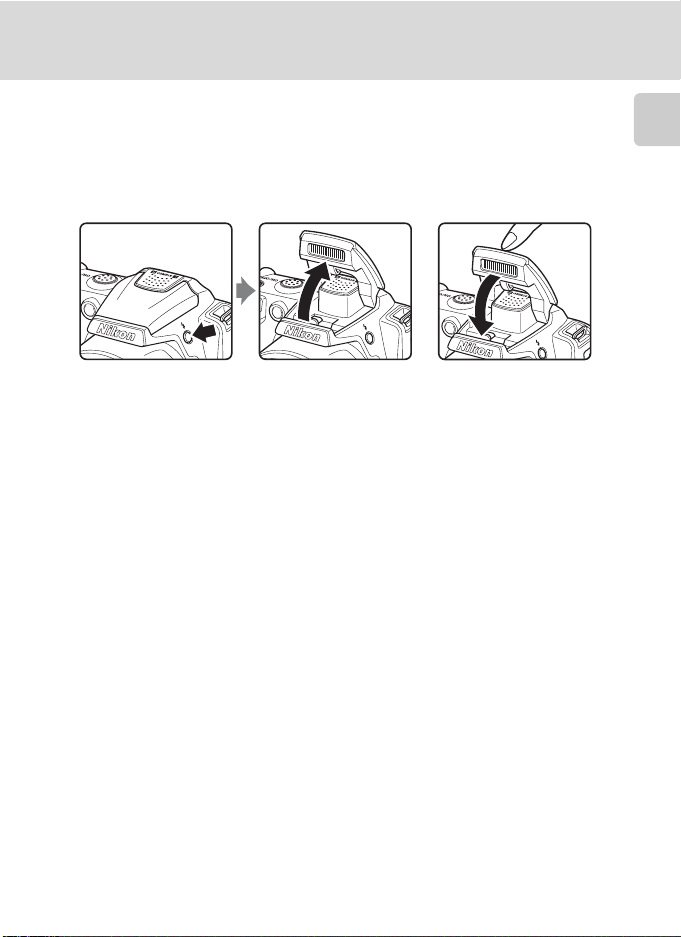
Raising and Lowering the Flash
Press the m (flash pop-up) button to raise the flash.
• See “Using the Flash” (A 28) for more information on setting the flash.
• Push the flash down gently to lower the flash until it clicks into place when not
in use.
Introduction
7
Parts of the Camera
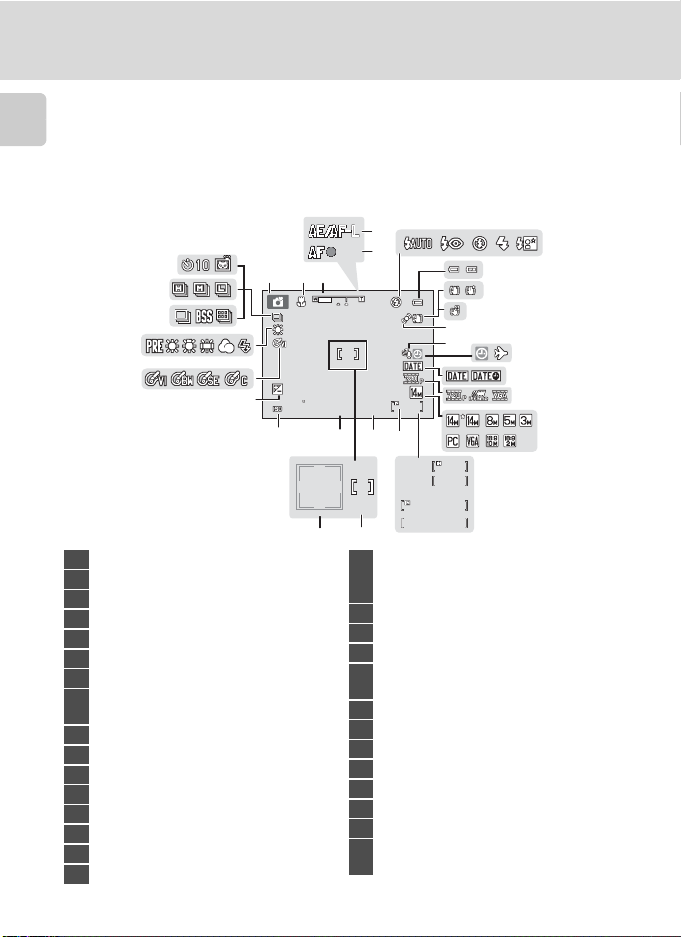
The Monitor
The following indicators may be displayed in the monitor during shooting and
playback (actual display varies with current camera settings).
Introduction
The indicators and photo info displayed during shooting and playback will turn off
after a few seconds (A 110).
Shooting
4
29
28
123
27
26
25
24
+1.0
+1.0
3200
23
21
1 Shooting mode*…. 20, 33, 46, 48, 50, 79
2 Macro mode …………………………………………..51
3 Zoom indicator ……………………………….23, 51
4 AE/AF-L indicator …………………………………. 45
5 Focus indicator ……………………………………… 24
6 Flash mode …………………………………………….. 28
7 Battery level indicator …………………………20
Vibration reduction icon (still images)
8
……………………………………………………………..21, 113
9 Electronic VR (movies) ………………………..85
10 Motion detection icon ……………….21, 114
11 Wind noise reduction ………………………….86
12 “Date not set” indicator …………………….132
13 Travel destination indicator …………….106
14 Print date ………………………………………………..112
15 Movie options ……………………………………….. 84
16 Image mode ………………………………………….. 53
* The icon displayed varies with the shooting mode.
8
5
7
8
9
10
12 13
11
14
1/125
22
F3.1
19
18
999
999
17
999
999
9999
9999
1
m00s
1m00s
m00s
1m00s
1
15
a
b
20
a Number of exposures remaining
17
(still images) ………………………………………20
b Movie length ……………………………………. 79
18 Internal memory indicator ……………….. 21
19 Aperture ………………………………………………….. 24
20 Focus area …………………………………………22, 24
Focus area (Face Detection,
21
Pet Detection) ………………………………….22, 24
22 Shutter speed…………………………………………. 24
23 ISO sensitivity …………………………………..30, 58
24 Exposure compensation value ……….. 32
25 Color options ………………………………………….59
26 White balance mode ………………………….. 55
27 Continuous shooting mode ……………. 57
28 Type of sport continuous mode ……. 49
Self-timer indicator/Pet portrait auto
29
release …………………………………………………31, 43
6
16
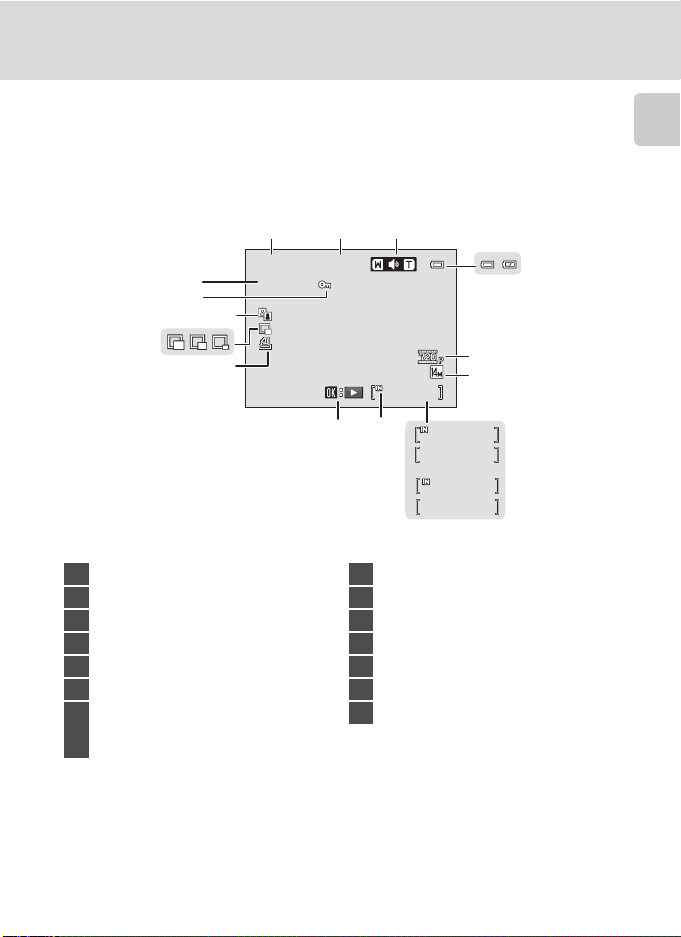
Playback
1 5 /0 5/ 20 11 1 2: 00
9 9 99 .J PG
11
14
13
12
15/05/2011 12:00
15/05/2011 12:00
9999.JPG
9999.JPG
12
Parts of the Camera
Introduction
3
4
10
999
999/ 999
8
9
5
6
7
999
999/ 999
9999/9999
999
1m00s
a
b
1m00s
1 Date of recording ………………………………… 16
2 Time of recording ………………………………… 16
3 Volume …………………………………………………….. 87
4 Battery level indicator …………………………20
5 Movie options* ……………………………………… 84
6 Image mode* …………………………………………. 53
a Current frame number/
7
total number of frames ………………… 26
b Movie length ……………………………………. 87
* The icon displayed varies with the setting that was set at the time of shooting.
8 Internal memory indicator ……………….. 26
9 Movie playback indicator ………………….87
10 Print order icon ……………………………………..67
11 Small picture ………………………………………….. 77
12 D-Lighting icon ……………………………………..76
13 Protect icon ……………………………………………. 71
14 File number and type ………………………..131
9
Basic Operations
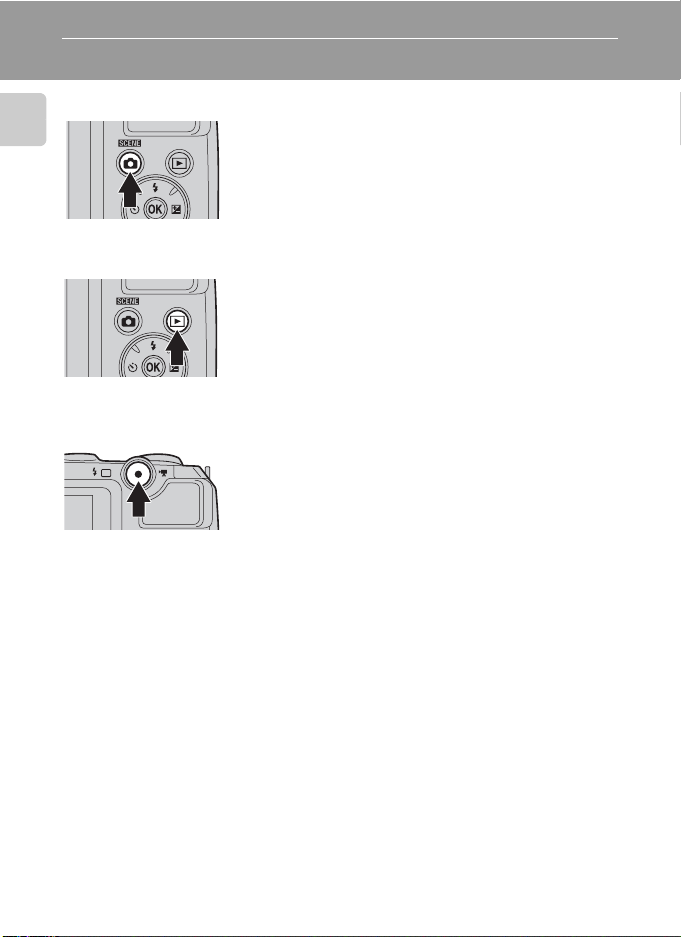
A (Shooting mode) Button
Introduction
c (Playback) Button
b (e Movie-record) Button
• Press the A button in playback mode to enter
shooting mode.
• Press the A button in shooting mode to display
the shooting-mode selection menu and change
the shooting mode (A 33).
• During shooting mode, the camera enters the
playback mode when the c button is pressed.
• If the camera is turned off, hold down the c
button to turn the camera on in playback mode.
• Press the b (e movie-record) button in
shooting mode to start recording a movie. Press
the b (e movie-record) button again to stop
recording.
• Press the b (e movie-record) button in
playback mode to enter shooting mode.
10
Basic Operations
15 /0 5 /2 01 1 1 5: 3 0
00 04 . JP G
The Multi Selector
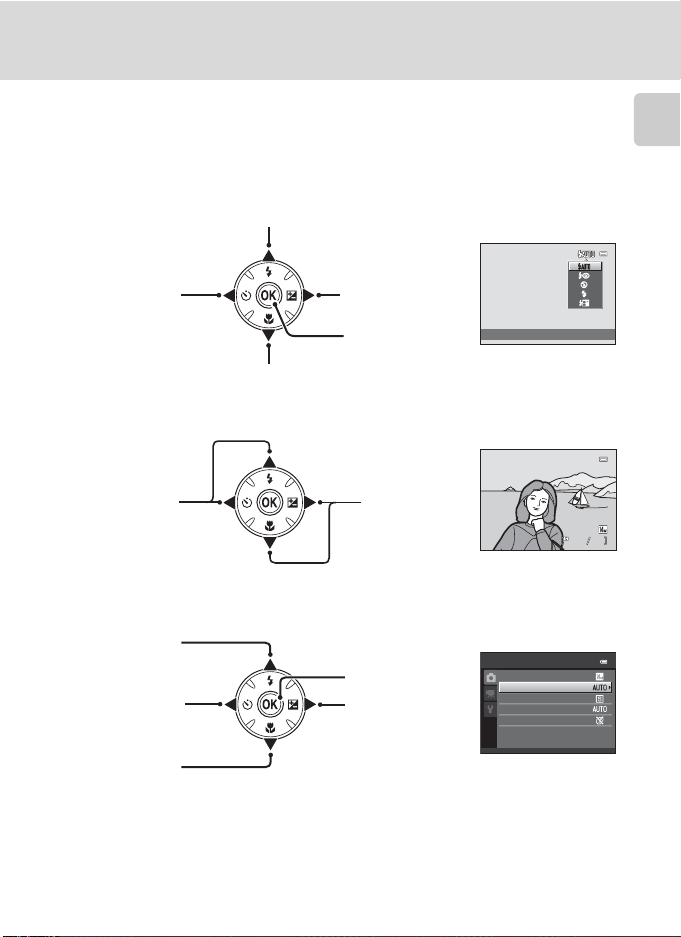
Operate the multi selector by pressing it up (H), down (I), left (J), right (K), or
by pressing the k button.
For Shooting
Display m (flash mode) menu (A 28)/select the item above.
Introduction
Display n (selftimer) menu
(A 31).
Display p (macro mode) menu (A 51)/select the item below.
For Playback
Display the
previous image.
For the Menu Screen
Select the item
above.
Select the item
on the left/
return to the
previous screen.
Select the item
below.
Display o(exposure
compensation)
menu (A 32).
Apply selection.
Display the next
image.
Apply selection (Go
to the next screen).
Select the item on
the right/
go to the next screen
(apply selection).
Flash mode
15/05/2011 15:30
0004.JPG
Shooting menu
Image mode
White balance
Continuous
ISO sensitivity
Color options
44
11
Basic Operations
Using Camera Menus
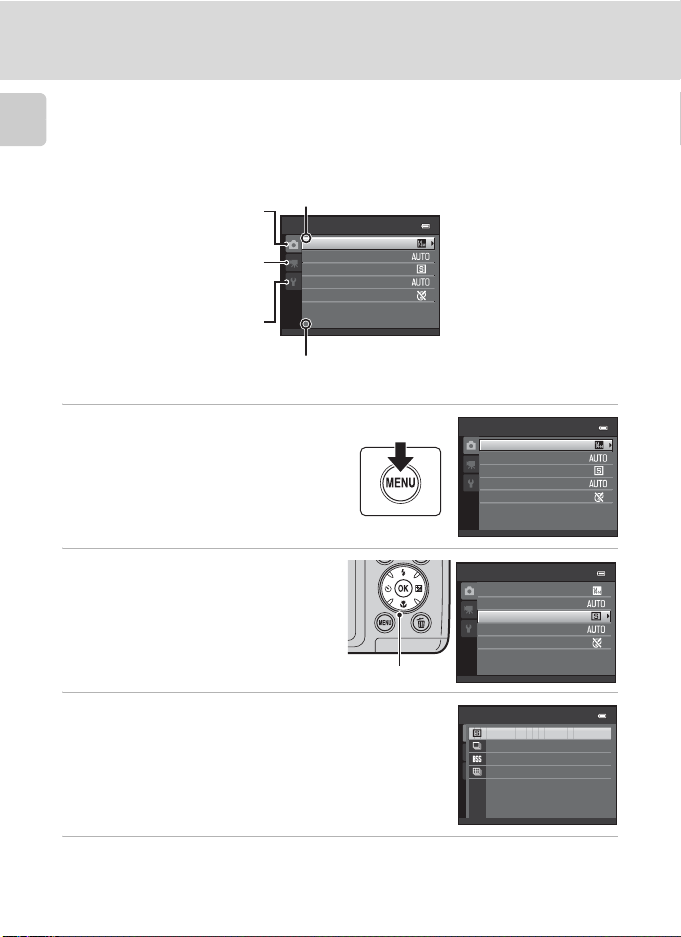
Press the d button (A 5) to display the menu for the selected mode.
Introduction
Use the multi selector (A 11) to apply settings of each menu item.
Tab for the menus available in
the current shooting mode/
tab for playback menu
Tab for movie menu (during
shooting mode)/setup menu
(during playback mode)
Tab for displaying the setup
menu (during shooting mode)
K is displayed when previous
menu items are available.
Shooting menu
Image mode
White balance
Continuous
ISO sensitivity
Color options
L is displayed when there are one
or more menu items to follow.
1 Press the d button.
2 Press the multi selector H or I
to choose an item, and then
press K or the k button.
To change tabs, press J (A 13).
Multi selector
3 Press H or I to choose an item and press the
k button.
The setting is applied.
4 When setting is finished, press the d button.
The camera exits the menu display.
12
Shooting menu
Image mode
White balance
Continuous
ISO sensitivity
Color options
Shooting menu
Image mode
White balance
Continuous
ISO sensitivity
Color options
Continuous
Single
Continuous
BSS
Multi-shot 16
Switching Between Tabs of Menu Screen
Shooting menu
Image mode
White balance
Continuous
ISO sensitivity
Color options
Shooting menu
Image mode
White balance
Continuous
ISO sensitivity
Color options
Basic Operations
Movie
Movie options
Autofocus mode
Electronic VR
Wind noise reduction
Enhanced resolution
Introduction
Press the multi selector
J to highlight the tab.
Press the multi selector
H or I to select a tab
The selected menu will
be displayed.
and press the k button
or K.
To display the tabs, press the multi selector J while the menu is displayed in the
following modes.
• Easy auto mode, scene mode and smart portrait mode
About the Shutter-release Button
The camera features a two-stage shutter-release button. To set focus and
exposure, press the shutter-release button halfway, stopping when you feel
resistance. When the shutter-release button is pressed halfway, focus and
exposure (shutter speed and aperture value) are set. Focus and exposure remain
locked while the shutter-release button is pressed halfway.
While the shutter-release button is held in this position, release the shutter and
take a picture by pressing the shutter-release button the rest of the way down. Do
not use force when pressing the shutter-release button, as this may result in
camera shake and blurred images.
Press the shutterrelease button
halfway to set focus
and exposure.
Press the shutterrelease button the
rest of the way down
to take a picture.
13
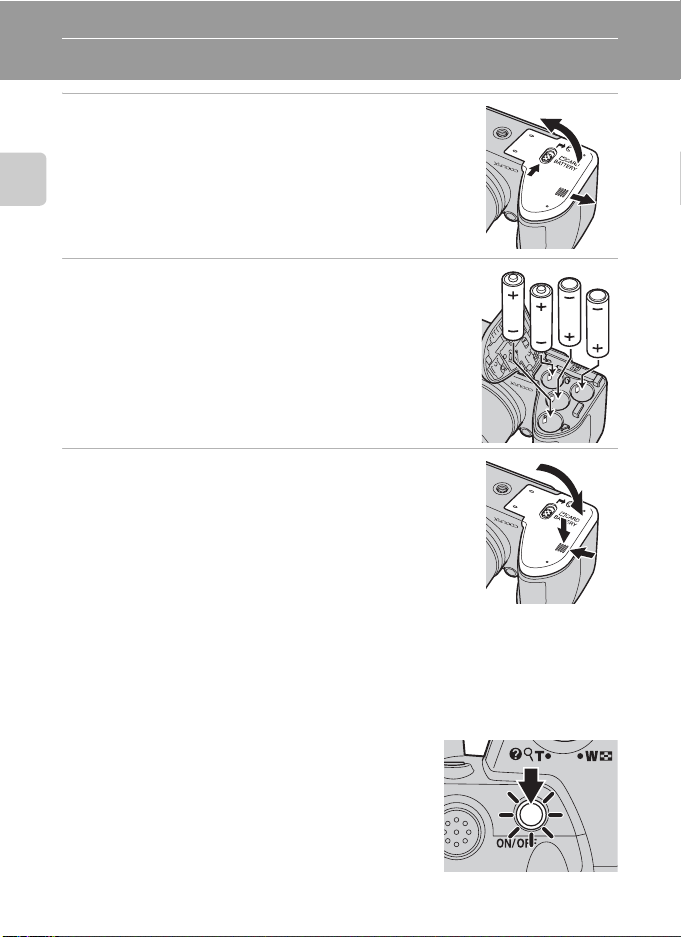
First Steps
Inserting the Batteries
1 Open the battery-chamber/memory card slot
cover.
Before opening the battery-chamber/memory card slot cover,
hold the camera upside down to prevent the batteries from
falling out.
First Steps
The camera, batteries or memory card may be hot
immediately after using the camera. Observe caution when
removing the batteries or memory card.
2 Insert the Batteries
Confirm that the positive (+) and negative (-) terminals are
oriented correctly as described on the label at the entrance of
the battery chamber, and insert the batteries.
3 Close the battery-chamber/memory card slot
cover.
Slide the cover while securely holding down the area marked
2.
Applicable Batteries
• Four LR6/L40 (AA-size) alkaline batteries (batteries supplied)
• Four FR6/L91 (AA-size) lithium batteries
• Four EN-MH2 rechargeable Ni-MH (nickel metal hydride) batteries
* EN-MH1 rechargeable Ni-MH batteries cannot be used.
Turning On and Off the Camera
Remove the lens cap, and then press the power switch
to turn on the camera. The power-on lamp (green) will
light, and then the monitor will turn on (the power-on
lamp turns off when the monitor turns on).
Press the power switch again to turn the camera off.
When the camera turns off, both the power-on lamp
and monitor turn off.
If the camera is turned off, hold down the c button
to turn the camera on in playback mode (A 26).
14
3
1
2
1
2
3
Inserting the Batteries
B
If Turn the camera off, remove the lens cap, and turn the camera on. is displayed
Make sure that the lens cap has been removed, and turn the camera off and then on again.
B Removing the Batteries
Turn the camera off and be sure that the power-on lamp and the monitor have turned off before
opening the battery-chamber/memory card slot cover.
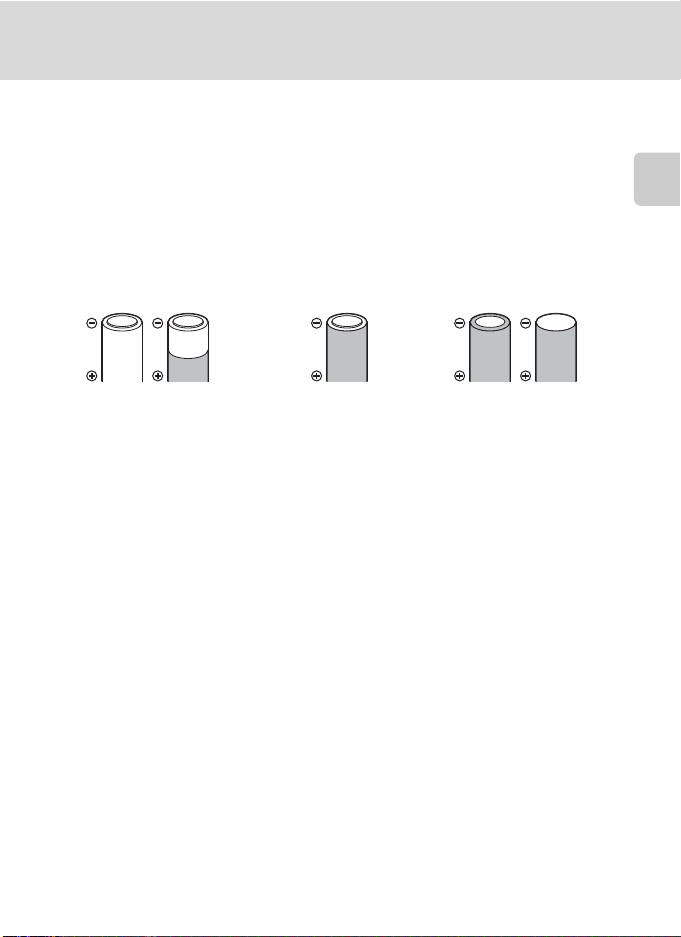
B Additional Precautions Regarding Batteries
• Read and follow the warnings and cautions (A iii, 126).
• Be sure to read and follow the warnings for the battery on page iii and the section, “The Battery”
(A 126), before using the battery.
• Do not combine old and new batteries or batteries of different makes or types.
• Batteries with the following defects cannot be used:
First Steps
Batteries with peeling Batteries with insulation that
does not cover the area
around the negative terminal
Batteries with a flat
negative terminal
B Note on the EN-MH2 rechargeable Ni-MH batteries
When using EN-MH2 batteries with the COOLPIX L120, charge the batteries four at a time using
Battery Charger MH-73 (A 123, 129).
B Battery Type
To improve battery performance, set the Battery type setting (A 123) in the setup menu (A 103)
to match the type of batteries inserted into the camera.
The default setting is the type of battery supplied with purchase. When any other type of battery is
used, turn the camera on and change the setting.
C Alkaline Batteries
Performance of alkaline batteries may vary greatly depending on the manufacturer. Choose a
reliable brand.
C Alternative Power Sources
To power the camera continuously for extended periods, use an AC Adapter EH-67 (available
separately) (A 129). Do not, under any circumstances, use another make or model of AC adapter.
Failure to observe this precaution could result in overheating or in damage to the camera.
C Power Saving Function (Auto Off)
If no operations are performed for a while, the monitor will turn off, the camera will enter standby
mode, and the power-on lamp will blink. If no operations are performed for another three minutes,
the camera will turn off automatically.
When the power-on lamp is blinking, pressing any of the following buttons will turn the monitor back on.
➝ Power switch, shutter-release button, A button, c button, or b (e movie-record) button
In shooting or playback mode, the camera will enter standby mode in about 30 seconds (default setting).
• The time allowed to elapse before the camera enters standby mode can be changed from the
Auto off option (A 116) in the setup menu (A 103).
15
Setting Display Language, Date and Time
When the first time the camera is turned on, the language- selection screen and
the date and time setting screen for the camera clock are displayed.
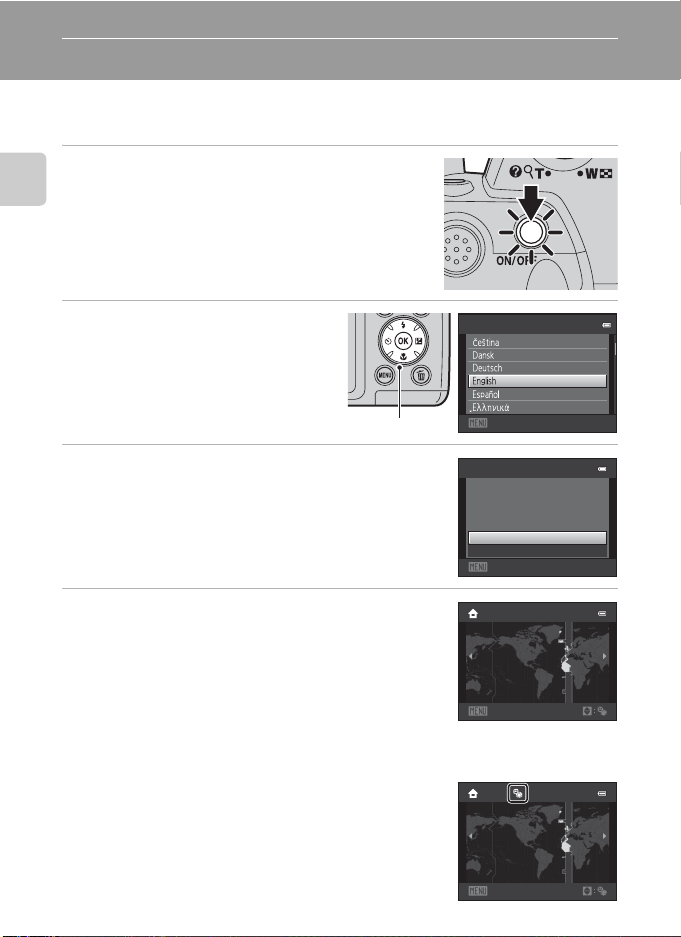
1 Press the power switch to turn on the
camera.
First Steps
The power-on lamp (green) will light, and then the
monitor will turn on (the power-on lamp turns off when
the monitor turns on).
2 Press the multi selector H or I
to choose the desired language
and press the k button.
Multi selector
3 Press H or I to choose Yes and press the k
button.
To cancel the time zone and date settings, select No.
4 Press J or K to choose your home time zone
(A 109) and press the k button.
D Daylight Saving Time
If daylight saving time is in effect, press H to enable the daylight
saving time function while setting the region in step 4.
When the daylight saving time function is enabled, W is displayed
at the top of the monitor. Press I to disable the daylight saving
time function.
16
Language
Cancel
Time zone and date
Choose time zone and
set date and time?
Yes
No
Cancel
London
Casablanca
Back
London
Casablanca
Back
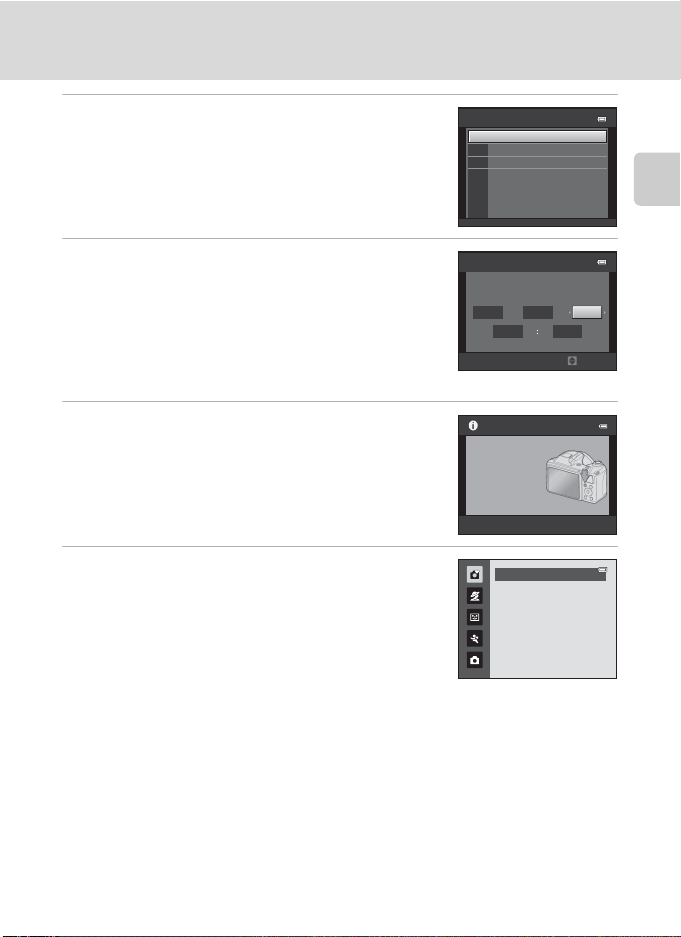
Setting Display Language, Date and Time
5 Press H or I to choose the date format, and
press the k button or K.
6 Press H, J, I, or K to set the date and press
the k button.
Choose an item: Press K or J (to change between D, M,
Y, Hour, and Minute).
Edit the highlighted item: Press H or I.
Apply the setting: Choose Minute and press the k
button or K.
7 Make sure that the lens cap has been
removed, then press the A button.
The lens extends and the shooting-mode selection
screen is displayed.
8 When Easy auto mode is displayed, press the
k button.
The camera enters shooting mode and you can take
pictures in Easy auto mode (A 20).
Press the multi selector H or I before pressing the k
button, to switch to another shooting mode (A 33).
Date format
Y/M/D
Year/Month/Day
M/D/Y
Month/Day/Year
D/M/Y
Day/Month/Year
Date and time
DMY
01 01
Press this button in
shooting mode for
shooting-mode
selection menu.
2011
0000
Edit
Easy auto mode
First Steps
D Print Date and Changing the Date and Time
• To imprint the date on images while taking pictures, set Print date (A 112) in the setup menu
(A 103) after the date and time have been set.
• To change the date and time settings of the camera clock, select the Time zone and date option
(A 106) in the setup menu (A 103).
17
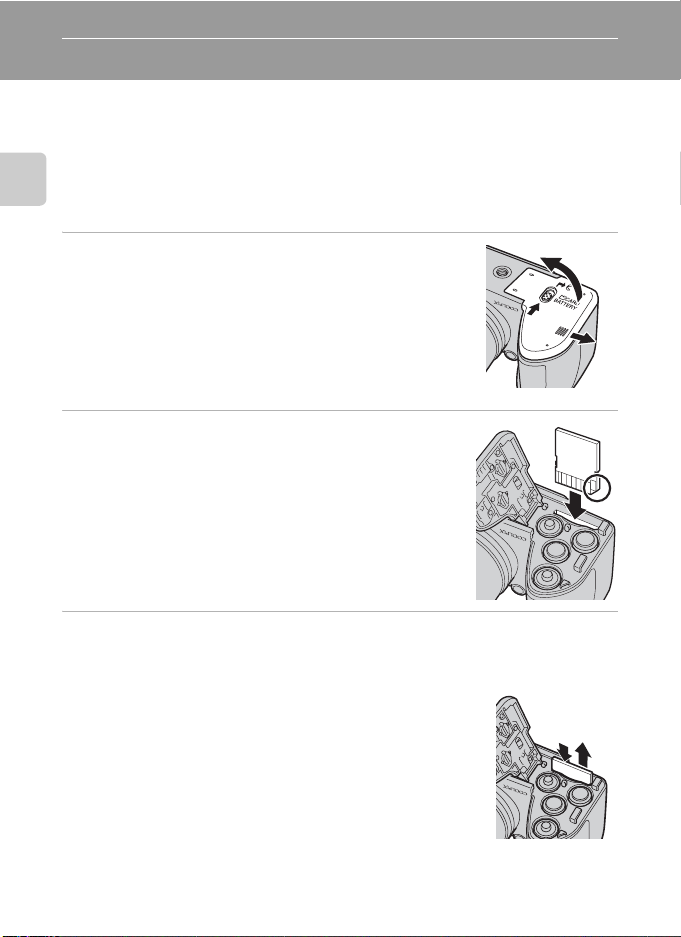
Inserting Memory Cards
Data is saved in the camera’s internal memory (approximately 102 MB) or on
removable Secure Digital (SD) memory cards (commercially available; (A 129).
If a memory card is inserted into the camera, images are automatically saved on
the memory card and images saved to the memory card can be played back,
deleted or transferred. Remove the memory card to save images in the internal
memory, or play back, delete or transfer images from the internal memory.
First Steps
1 Confirm the power-on lamp and the monitor
are off and open the battery-chamber/
memory card slot cover.
Be sure to turn off the camera before opening the
battery-chamber/memory card slot cover.
Before opening the battery-chamber/memory card slot
cover, hold the camera upside down to prevent the
batteries from falling out.
2 Insert the memory card.
Slide the memory card in until it clicks into place.
B Inserting Memory Cards
Inserting the memory card upside down or backwards
could damage the camera or the memory card. Make
sure that the memory card is correctly oriented.
3 Close the battery-chamber/memory card slot cover.
Removing Memory Cards
Turn the camera off and be sure that the power-on
lamp and the monitor have turned off before opening
the battery-chamber/memory card slot cover.
Press the card in (1) to partially eject the card, then
remove the card by hand while being careful not to
remove it at an angle (2).
• The camera, battery or memory card may be hot
immediately after using the camera. Observe caution
when removing the batteries or memory card.
18
3
1
2
12
Loading…
Nikon Coolpix L120
No reproduction in any form of this manual, in whole or in part
(except for brief quotation in critical articles or reviews), may be
made without written authorization from NIKON CORPORATION.
CT1B03(11)
6MM02811-03
En
DIGITAL CAMERA
En
Manual
View the manual for the Nikon Coolpix L120 here, for free. This manual comes under the category photo cameras and has been rated by 1 people with an average of a 5.8.
This manual is available in the following languages: English. Do you have a question about the Nikon Coolpix L120 or do you need help?
Ask your question here
Index
- For Your Safety
- Notices
- Introduction
- First Steps
- Basic Photography and Playback: Easy Auto Mode
- More on Shooting
- More on Playback
- Editing Image
- Movie Recording and Playback
- Connecting to Televisions, Computers and Printers
- Basic Camera Setup
- Notes on Camera Care and General Usage
- Technical Notes
Product Images (1)
Nikon Coolpix L120 specifications
Below you will find the product specifications and the manual specifications of the Nikon Coolpix L120.
The Nikon Coolpix L120 is a bridge camera with a 14.1-megapixel CCD image sensor. It has a maximum image resolution of 4320 x 3240 pixels, allowing for high-quality photographs. The camera offers a total of 14.48 megapixels for capturing detailed images.
Featuring a 21x optical zoom, the Coolpix L120 allows for distant subjects to be brought closer with clarity. Additionally, there is a 4x digital zoom available for further magnification. The camera has a minimum focal length of 25 mm, offering a wide-angle perspective, and a maximum focal length of 525 mm for capturing distant objects.
With an aperture range of 3.1 to 5.8, this camera allows users to control the amount of light entering the lens, enabling greater control over depth of field. The Coolpix L120 also includes an image stabilizer, which helps reduce blur and camera shake, resulting in clear and sharp images.
Designed to be user-friendly, this camera offers a selection of shooting modes and scene modes to suit different photography needs. It also features a 3-inch LCD screen for easy framing and reviewing of images.
The Nikon Coolpix L120 is a reliable and durable camera, constructed with premium materials to withstand regular use. The bridge camera design combines the convenience of a compact camera with features typically found in larger, more professional models. Overall, the Coolpix L120 provides users with the ability to capture high-quality images, whether they are close-ups or distant shots, making it suitable for a range of photography enthusiasts.
ISO sensitivity
80,400,800,3200,6400,Auto
Fastest camera shutter speed
1/4000 s
General
| Brand | Nikon |
| Model | Coolpix L120 | 999CL120B |
| Product | photo camera |
| Language | English |
| Filetype | User manual (PDF) |
Picture quality
| Megapixel | 14.1 MP |
| Camera type | Bridge camera |
| Image sensor size | 1/2.3 « |
| Sensor type | CCD |
| Maximum image resolution | 4320 x 3240 pixels |
| Still image resolution(s) | 4320 x 3240 |
| Image stabilizer | Yes |
| Total megapixels | 14.48 MP |
Lens system
| Optical zoom | 21 x |
| Digital zoom | 4 x |
| Focal length range | 4.5 — 94.5 mm |
| Minimum focal length (35mm film equiv) | 25 mm |
| Maximum focal length (35mm film equiv) | 525 mm |
| Minimum aperture number | 3.1 |
| Maximum aperture number | 5.8 |
| Lens structure (elements/groups) | 12/9 |
| Combined zoom | 84 x |
Focusing
| Focus | TTL |
| Focus adjustment | Auto |
| Auto focusing (AF) modes | Centre weighted Auto Focus |
| Normal focusing range | 0.5 — ∞ m |
| Closest focusing distance | 0.01 m |
| Auto Focus (AF) lock | Yes |
| Normal focusing range (wide) | 0.5 — ∞ m |
| Normal focusing range (tele) | 1.5 — ∞ m |
| Face |
Exposure
| ISO sensitivity | 80,400,800,3200,6400,Auto |
| Light exposure modes | Auto |
| Light exposure control | Program AE |
| Light exposure correction | ± 2EV (1/3EV step) |
| Light metering | Centre-weighted |
| Auto Exposure (AE) lock | Yes |
| ISO sensitivity (min) | 80 |
| ISO sensitivity (max) | 6400 |
Shutter
| Fastest camera shutter speed | 1/4000 s |
| Slowest camera shutter speed | 4 s |
| Camera shutter type | Electronic, Mechanical |
Flash
| Flash modes | Auto |
| Flash range (wide) | 0.5 — 6 m |
| Flash range (tele) | 1.5 — 3 m |
Other features
| Built-in flash | Yes |
| Video capability | Yes |
| HDMI ports quantity | 1 |
| Power source type | Battery |
| Camera shutter speed | 1/1000 — 1 s |
Camera
| White balance | Auto, Manual |
| Shooting modes | Auto |
| Scene modes | Backlight, Beach, Dawn, Dusk, Fireworks, Museum, Night, Night landscape, Night portrait, Panorama, Party (indoor), Portrait, Self-portrait, Snow, Sunset, Landscape (scenery) |
| Camera playback | Movie, Single image, Thumbnails |
| Self-timer delay | 2, 10 s |
| Tripod mounting supported | Yes |
| Photo effects | Black&White |
| Image editing | Crop |
| On Screen Display (OSD) languages | ARA, CHI (SIMPL), CHI (TR), CZE, DAN, DEU, DUT, ENG, ESP, FIN, FRE, GRE, HUN, ITA, JPN, KOR, NOR, POL, POR, RUM, RUS, SWE, THA, TUR, UKR |
| Camera file system | DCF 2.0, DPOF 1.1, Exif 2.3 |
| Image quality adjustment | Brightness |
Video
| Maximum video resolution | 1280 x 720 pixels |
| Video resolutions | 1280 x 720 pixels |
| Video formats supported | H.264, MPEG4 |
| Motion JPEG frame rate | 30 fps |
| Analog signal format system | NTSC, PAL |
| HD type | HD |
| Video recording | Yes |
Audio
| Built-in microphone | Yes |
| Voice recording | Yes |
| Audio formats supported | AAC |
Memory
| Internal memory | 102 MB |
| Compatible memory cards | SD, SDHC, SDXC |
| Memory slots | 1 |
Display
| Display | LCD |
| Display diagonal | 3 « |
| Display resolution (numeric) | 921000 pixels |
| Field of view | 100 % |
Ports & interfaces
| USB version | 2.0 |
| DC-in jack | Yes |
| PictBridge | Yes |
Design
Weight & dimensions
| Width | 109.9 mm |
| Depth | 78.4 mm |
| Height | 76.5 mm |
| Weight | 431 g |
Battery
| Battery technology | Alkaline |
| Battery life (CIPA standard) | 330 shots |
| Battery type | AA |
| Number of batteries supported | 4 |
Packaging content
| Cables included | AV, USB |
| Batteries included | Yes |
| Hand strap | Yes |
show more
Frequently Asked Questions
Can’t find the answer to your question in the manual? You may find the answer to your question in the FAQs about the Nikon Coolpix L120 below.
Why are my photos coming out blurry?
Ensure that you are holding the camera steady while taking the shot and check if the Image Stabilization feature is enabled. Additionally, verify that the autofocus is working properly and the subject is in focus before capturing the image.
How can I adjust the exposure settings for my photos?
To modify the exposure settings, access the camera’s menu and locate the «Exposure Compensation» option. Increase or decrease the value to adjust the brightness of your images.
What settings should I use for capturing action shots?
Switch to the «Sports» or «Action» mode on your camera for shooting fast-moving subjects. This mode will optimize the settings for capturing quick motion while reducing motion blur.
How can I utilize the camera’s macro function?
Explore the camera’s menu to find the «Macro» mode, usually represented by a flower symbol. This mode allows you to capture detailed close-up shots. Make sure to position your subject within the camera’s recommended macro focus range.
How do I remove the red-eye effect in my photos?
Navigate through the menu options to find the «Red-Eye Reduction» feature. Enable this setting to automatically reduce red-eye caused by the camera’s flash. Alternatively, you can use photo editing software to remove red-eye after capturing the image.
What is the megapixel count of the Nikon Coolpix L120?
The Nikon Coolpix L120 has a 14.1 MP megapixel count.
Is the Nikon Coolpix L120 a bridge camera?
Yes, the Nikon Coolpix L120 is a bridge camera.
What is the sensor size of the Nikon Coolpix L120?
The sensor size of the Nikon Coolpix L120 is 1/2.3″.
Does the Nikon Coolpix L120 have image stabilization?
Yes, the Nikon Coolpix L120 has image stabilization.
What is the optical zoom of the Nikon Coolpix L120?
The Nikon Coolpix L120 has a 21x optical zoom. This is a relatively high optical zoom compared to other cameras, allowing for closer and clearer shots of distant objects.
What is the weight of the Nikon Coolpix L120?
The Nikon Coolpix L120 has a weight of 431 g.
What is the height of the Nikon Coolpix L120?
The Nikon Coolpix L120 has a height of 76.5 mm.
What is the width of the Nikon Coolpix L120?
The Nikon Coolpix L120 has a width of 109.9 mm.
What is the depth of the Nikon Coolpix L120?
The Nikon Coolpix L120 has a depth of 78.4 mm.
What is the screen size of the Nikon Coolpix L120?
The screen size of the Nikon Coolpix L120 is 3 «.
Is the manual of the Nikon Coolpix L120 available in English?
Yes, the manual of the Nikon Coolpix L120 is available in English .
Is your question not listed? Ask your question here

No reproduction in any form of this manual, in whole or in part
(except for brief quotation in critical articles or reviews), may be
made without written authorization from NIKON CORPORATION.
CT1B03(11)
6MM02811-03
En
DIGITAL CAMERA
User’s Manual
En