
- Вернуться к приложению
- Содержание
- Замечания по использованию сайта и файлов cookie
- Рекомендации по поиску

TR150 series
Příručka online
čeština (Czech)

Obsah
Použití dokumentu Příručka online. . . . . . . . . . . . . . . . . . . . . . . . . . . . . . . . . . . . 8
Symboly použité v tomto dokumentu. . . . . . . . . . . . . . . . . . . . . . . . . . . . . . . . . . . . . . . . . . 9
Uživatelé dotykových zařízení (systém Windows). . . . . . . . . . . . . . . . . . . . . . . . . . . . . . . 10
Ochranné známky a licence. . . . . . . . . . . . . . . . . . . . . . . . . . . . . . . . . . . . . . . . . . . . . . . . 11
Síť. . . . . . . . . . . . . . . . . . . . . . . . . . . . . . . . . . . . . . . . . . . . . . . . . . . . . . . . . . . . 26
Omezení. . . . . . . . . . . . . . . . . . . . . . . . . . . . . . . . . . . . . . . . . . . . . . . . . . . . . . . . . . . . . . . 29
Tipy k síťovému připojení. . . . . . . . . . . . . . . . . . . . . . . . . . . . . . . . . . . . . . . . . . . . . . . . . . 31
Výchozí nastavení sítě. . . . . . . . . . . . . . . . . . . . . . . . . . . . . . . . . . . . . . . . . . . . . . . . . . . . . . . . . . . . . . . 32
Zjistit stejný název tiskárny. . . . . . . . . . . . . . . . . . . . . . . . . . . . . . . . . . . . . . . . . . . . . . . . . . . . . . . . . . . 34
Připojení k jinému počítači pomocí sítě LAN / Změny připojení z USB na LAN. . . . . . . . . . . . . . . . . . . 35
Tisk síťového nastavení. . . . . . . . . . . . . . . . . . . . . . . . . . . . . . . . . . . . . . . . . . . . . . . . . . . . . . . . . . . . . . 36
Změna konfigurace způsobu připojení k síti Wi-Fi. . . . . . . . . . . . . . . . . . . . . . . . . . . . . . . . . . . . . . . . . . 41
Použití přímého bezdrátového připojení. . . . . . . . . . . . . . . . . . . . . . . . . . . . . . . . . . . . . . . . . . . . . . . . . 42
IJ Network Device Setup Utility (macOS). . . . . . . . . . . . . . . . . . . . . . . . . . . . . . . . . . . . . . 46
Nástroj IJ Network Device Setup Utility. . . . . . . . . . . . . . . . . . . . . . . . . . . . . . . . . . . . . . . . . . . . . . . . . . 47
Spuštění nástroje IJ Network Device Setup Utility. . . . . . . . . . . . . . . . . . . . . . . . . . . . . . . . . . . . . . . . . . 48
Diagnostika a opravy nastavení sítě. . . . . . . . . . . . . . . . . . . . . . . . . . . . . . . . . . . . . . . . . . . . . . . . . . . . 49
Seznam modelů, které nepodporují funkci diagnostiky a oprav. . . . . . . . . . . . . . . . . . . . . . . . . . . . . . . . 50
Manipulace s papírem, nádržkami s inkoustem atd.. . . . . . . . . . . . . . . . . . . . . . 51
Vkládání papíru. . . . . . . . . . . . . . . . . . . . . . . . . . . . . . . . . . . . . . . . . . . . . . . . . . . . . . . . . . 52
Vložení běžného nebo fotografického papíru. . . . . . . . . . . . . . . . . . . . . . . . . . . . . . . . . . . . . . . . . . . . . 53
Vkládání obálek. . . . . . . . . . . . . . . . . . . . . . . . . . . . . . . . . . . . . . . . . . . . . . . . . . . . . . . . . . . . . . . . . . . . 57
Výměna nádržek s inkoustem. . . . . . . . . . . . . . . . . . . . . . . . . . . . . . . . . . . . . . . . . . . . . . . 61
Výměna nádržek s inkoustem. . . . . . . . . . . . . . . . . . . . . . . . . . . . . . . . . . . . . . . . . . . . . . . . . . . . . . . . . 62
Kontrola stavu inkoustu na displeji LCD. . . . . . . . . . . . . . . . . . . . . . . . . . . . . . . . . . . . . . . . . . . . . . . . . 68
Tipy k inkoustu. . . . . . . . . . . . . . . . . . . . . . . . . . . . . . . . . . . . . . . . . . . . . . . . . . . . . . . . . . . . . . . . . . . . . 70
Pokud je tisk nejasný nebo nerovnoměrný. . . . . . . . . . . . . . . . . . . . . . . . . . . . . . . . . . . . . 71
Postup údržby. . . . . . . . . . . . . . . . . . . . . . . . . . . . . . . . . . . . . . . . . . . . . . . . . . . . . . . . . . . . . . . . . . . . . 72
Tisk testovacího vzorku trysek. . . . . . . . . . . . . . . . . . . . . . . . . . . . . . . . . . . . . . . . . . . . . . . . . . . . . . . . . 74
Kontrola testovacího vzorku trysek. . . . . . . . . . . . . . . . . . . . . . . . . . . . . . . . . . . . . . . . . . . . . . . . . . . . . 75
Čištění tiskové hlavy. . . . . . . . . . . . . . . . . . . . . . . . . . . . . . . . . . . . . . . . . . . . . . . . . . . . . . . . . . . . . . . . 77

Hloubkové čištění tiskové hlavy. . . . . . . . . . . . . . . . . . . . . . . . . . . . . . . . . . . . . . . . . . . . . . . . . . . . . . . . 79
Nastavení tiskové hlavy. . . . . . . . . . . . . . . . . . . . . . . . . . . . . . . . . . . . . . . . . . . . . . . . . . . . . . . . . . . . . . 81
Ruční nastavení tiskové hlavy. . . . . . . . . . . . . . . . . . . . . . . . . . . . . . . . . . . . . . . . . . . . . . . . . . . . . . . . . 83
Provádění funkcí údržby z počítače (systém macOS). . . . . . . . . . . . . . . . . . . . . . . . . . . . 87
Otevření Vzdáleného UR kvůli údržbě. . . . . . . . . . . . . . . . . . . . . . . . . . . . . . . . . . . . . . . . . . . . . . . . . . . 88
Čištění tiskových hlav. . . . . . . . . . . . . . . . . . . . . . . . . . . . . . . . . . . . . . . . . . . . . . . . . . . . . . . . . . . . . . . 89
Nastavení polohy Tisková hlava. . . . . . . . . . . . . . . . . . . . . . . . . . . . . . . . . . . . . . . . . . . . . . . . . . . . . . . 91
Kontrola stavu inkoustu z počítače. . . . . . . . . . . . . . . . . . . . . . . . . . . . . . . . . . . . . . . . . . . . . . . . . . . . . 92
Čištění. . . . . . . . . . . . . . . . . . . . . . . . . . . . . . . . . . . . . . . . . . . . . . . . . . . . . . . . . . . . . . . . . 93
Čištění válečků podavače papíru. . . . . . . . . . . . . . . . . . . . . . . . . . . . . . . . . . . . . . . . . . . . . . . . . . . . . . . 94
Čištění vnitřku tiskárny (čištění spodní desky). . . . . . . . . . . . . . . . . . . . . . . . . . . . . . . . . . . . . . . . . . . . . 96
Přehled. . . . . . . . . . . . . . . . . . . . . . . . . . . . . . . . . . . . . . . . . . . . . . . . . . . . . . . . 99
Bezpečnost. . . . . . . . . . . . . . . . . . . . . . . . . . . . . . . . . . . . . . . . . . . . . . . . . . . . . . . . . . . . 100
Bezpečnostní opatření. . . . . . . . . . . . . . . . . . . . . . . . . . . . . . . . . . . . . . . . . . . . . . . . . . . . . . . . . . . . . . 101
Informace o předpisech. . . . . . . . . . . . . . . . . . . . . . . . . . . . . . . . . . . . . . . . . . . . . . . . . . . . . . . . . . . . . 103
WEEE (EU&EEA). . . . . . . . . . . . . . . . . . . . . . . . . . . . . . . . . . . . . . . . . . . . . . . . . . . . . . . . . . . . . . . . . 104
Pokyny pro obsluhu. . . . . . . . . . . . . . . . . . . . . . . . . . . . . . . . . . . . . . . . . . . . . . . . . . . . . 117
Právní omezení tisku. . . . . . . . . . . . . . . . . . . . . . . . . . . . . . . . . . . . . . . . . . . . . . . . . . . . . . . . . . . . . . . 118
Pokyny pro obsluhu tiskárny. . . . . . . . . . . . . . . . . . . . . . . . . . . . . . . . . . . . . . . . . . . . . . . . . . . . . . . . . 119
Přeprava tiskárny. . . . . . . . . . . . . . . . . . . . . . . . . . . . . . . . . . . . . . . . . . . . . . . . . . . . . . . . . . . . . . . . . . 120
Oprava, zapůjčení nebo likvidace tiskárny. . . . . . . . . . . . . . . . . . . . . . . . . . . . . . . . . . . . . . . . . . . . . . . 121
Zachování vysoké kvality tisku. . . . . . . . . . . . . . . . . . . . . . . . . . . . . . . . . . . . . . . . . . . . . . . . . . . . . . . . 122
Přeprava tiskárny. . . . . . . . . . . . . . . . . . . . . . . . . . . . . . . . . . . . . . . . . . . . . . . . . . . . . . . . . . . . . . . . . . 123
Hlavní součásti a jejich použití. . . . . . . . . . . . . . . . . . . . . . . . . . . . . . . . . . . . . . . . . . . . . 124
Hlavní součásti. . . . . . . . . . . . . . . . . . . . . . . . . . . . . . . . . . . . . . . . . . . . . . . . . . . . . . . . . . . . . . . . . . . . 125
Pohled zepředu. . . . . . . . . . . . . . . . . . . . . . . . . . . . . . . . . . . . . . . . . . . . . . . . . . . . . . . . . . . . . . . 126
Pohled zezadu. . . . . . . . . . . . . . . . . . . . . . . . . . . . . . . . . . . . . . . . . . . . . . . . . . . . . . . . . . . . . . . . 128
Pohled dovnitř. . . . . . . . . . . . . . . . . . . . . . . . . . . . . . . . . . . . . . . . . . . . . . . . . . . . . . . . . . . . . . . . 129
Ovládací panel. . . . . . . . . . . . . . . . . . . . . . . . . . . . . . . . . . . . . . . . . . . . . . . . . . . . . . . . . . . . . . . . 131
Napájení. . . . . . . . . . . . . . . . . . . . . . . . . . . . . . . . . . . . . . . . . . . . . . . . . . . . . . . . . . . . . . . . . . . . . . . . . 132
Kontrola, zda je zapnuto napájení. . . . . . . . . . . . . . . . . . . . . . . . . . . . . . . . . . . . . . . . . . . . . . . . . 133
Zapnutí a vypnutí tiskárny. . . . . . . . . . . . . . . . . . . . . . . . . . . . . . . . . . . . . . . . . . . . . . . . . . . . . . . 134
Kontrola zástrčky / napájecího kabelu. . . . . . . . . . . . . . . . . . . . . . . . . . . . . . . . . . . . . . . . . . . . . . 137
Odpojení tiskárny. . . . . . . . . . . . . . . . . . . . . . . . . . . . . . . . . . . . . . . . . . . . . . . . . . . . . . . . . . . . . . 138

Kontrola stavu baterie na displeji LCD. . . . . . . . . . . . . . . . . . . . . . . . . . . . . . . . . . . . . . . . . . . . . . 140
LCD a ovládací panel. . . . . . . . . . . . . . . . . . . . . . . . . . . . . . . . . . . . . . . . . . . . . . . . . . . . . . . . . . . . . . . 141
Změna nastavení. . . . . . . . . . . . . . . . . . . . . . . . . . . . . . . . . . . . . . . . . . . . . . . . . . . . . . . 144
Změna nastavení tiskárny z počítače (systém macOS). . . . . . . . . . . . . . . . . . . . . . . . . . . . . . . . . . . . . 145
Správa napájení tiskárny. . . . . . . . . . . . . . . . . . . . . . . . . . . . . . . . . . . . . . . . . . . . . . . . . . . . . . . . 146
Změna provozního režimu tiskárny. . . . . . . . . . . . . . . . . . . . . . . . . . . . . . . . . . . . . . . . . . . . . . . . 147
Změna nastavení z ovládacího panelu. . . . . . . . . . . . . . . . . . . . . . . . . . . . . . . . . . . . . . . . . . . . . . . . . 148
Změna nastavení z ovládacího panelu. . . . . . . . . . . . . . . . . . . . . . . . . . . . . . . . . . . . . . . . . . . . . 149
Nastavení položek na ovládacím panelu. . . . . . . . . . . . . . . . . . . . . . . . . . . . . . . . . . . . . . . . . . . . 151
Nastav. tisku. . . . . . . . . . . . . . . . . . . . . . . . . . . . . . . . . . . . . . . . . . . . . . . . . . . . . . . . . . . . . . . . . 152
Nastavení sítě LAN. . . . . . . . . . . . . . . . . . . . . . . . . . . . . . . . . . . . . . . . . . . . . . . . . . . . . . . . . . . . 154
Nastavení dalšího zařízení. . . . . . . . . . . . . . . . . . . . . . . . . . . . . . . . . . . . . . . . . . . . . . . . . . . . . . 159
Výběr jazyka. . . . . . . . . . . . . . . . . . . . . . . . . . . . . . . . . . . . . . . . . . . . . . . . . . . . . . . . . . . . . . . . . 160
Aktualizace firmwaru. . . . . . . . . . . . . . . . . . . . . . . . . . . . . . . . . . . . . . . . . . . . . . . . . . . . . . . . . . . 161
Obnovit výchozí nastavení. . . . . . . . . . . . . . . . . . . . . . . . . . . . . . . . . . . . . . . . . . . . . . . . . . . . . . . 162
Nastavení podavače. . . . . . . . . . . . . . . . . . . . . . . . . . . . . . . . . . . . . . . . . . . . . . . . . . . . . . . . . . . 163
Nastavení webové služby. . . . . . . . . . . . . . . . . . . . . . . . . . . . . . . . . . . . . . . . . . . . . . . . . . . . . . . 164
Nastavení režimu ECO. . . . . . . . . . . . . . . . . . . . . . . . . . . . . . . . . . . . . . . . . . . . . . . . . . . . . . . . . 165
Nastavení tichého režimu. . . . . . . . . . . . . . . . . . . . . . . . . . . . . . . . . . . . . . . . . . . . . . . . . . . . . . . 166
Systémová informace. . . . . . . . . . . . . . . . . . . . . . . . . . . . . . . . . . . . . . . . . . . . . . . . . . . . . . . . . . 167
Technické údaje. . . . . . . . . . . . . . . . . . . . . . . . . . . . . . . . . . . . . . . . . . . . . . . . . . . . . . . . 168
Informace o papíru. . . . . . . . . . . . . . . . . . . . . . . . . . . . . . . . . . . . . . . . . . . . . . 171
Podporované typy médií. . . . . . . . . . . . . . . . . . . . . . . . . . . . . . . . . . . . . . . . . . . . . . . . . . 172
Omezení pro vkládání papíru. . . . . . . . . . . . . . . . . . . . . . . . . . . . . . . . . . . . . . . . . . . . . . . . . . . . . . . . . 175
Nepodporované typy médií. . . . . . . . . . . . . . . . . . . . . . . . . . . . . . . . . . . . . . . . . . . . . . . . 177
Manipulace s papírem. . . . . . . . . . . . . . . . . . . . . . . . . . . . . . . . . . . . . . . . . . . . . . . . . . . 178
Tisk. . . . . . . . . . . . . . . . . . . . . . . . . . . . . . . . . . . . . . . . . . . . . . . . . . . . . . . . . . 179
Tisk z počítače. . . . . . . . . . . . . . . . . . . . . . . . . . . . . . . . . . . . . . . . . . . . . . . . . . . . . . . . . 180
Tisk z aplikace (macOS AirPrint). . . . . . . . . . . . . . . . . . . . . . . . . . . . . . . . . . . . . . . . . . . . . . . . . . . . . . 181
Tisk. . . . . . . . . . . . . . . . . . . . . . . . . . . . . . . . . . . . . . . . . . . . . . . . . . . . . . . . . . . . . . . . . . . . . . . . 182
Provedení tisku bez ohraničení. . . . . . . . . . . . . . . . . . . . . . . . . . . . . . . . . . . . . . . . . . . . . . . . . . . 185
Tisk na média Hagaki. . . . . . . . . . . . . . . . . . . . . . . . . . . . . . . . . . . . . . . . . . . . . . . . . . . . . . . . . . 187
Přidání tiskárny. . . . . . . . . . . . . . . . . . . . . . . . . . . . . . . . . . . . . . . . . . . . . . . . . . . . . . . . . . . . . . . 188

Postup otevření obrazovky s nastavením tiskárny. . . . . . . . . . . . . . . . . . . . . . . . . . . . . . . . . . . . 189
Otevření obrazovky se stavem tisku. . . . . . . . . . . . . . . . . . . . . . . . . . . . . . . . . . . . . . . . . . . . . . . 190
Odstranění nepotřebné tiskové úlohy. . . . . . . . . . . . . . . . . . . . . . . . . . . . . . . . . . . . . . . . . . . . . . 192
Odebrání tiskárny ze seznamu tiskáren, pokud ji už nepoužíváte. . . . . . . . . . . . . . . . . . . . . . . . . 193
Tisk z aplikace Canon. . . . . . . . . . . . . . . . . . . . . . . . . . . . . . . . . . . . . . . . . . . . . . . . . . . . . . . . . . . . . . 194
Tisk z chytrého telefonu nebo tabletu. . . . . . . . . . . . . . . . . . . . . . . . . . . . . . . . . . . . . . . . 195
Tisk šablony uložené v tiskárně. . . . . . . . . . . . . . . . . . . . . . . . . . . . . . . . . . . . . . . . . . . . . . . . . . . . . . . 196
Nastavení papíru. . . . . . . . . . . . . . . . . . . . . . . . . . . . . . . . . . . . . . . . . . . . . . . . . . . . . . . 198
Časté dotazy. . . . . . . . . . . . . . . . . . . . . . . . . . . . . . . . . . . . . . . . . . . . . . . . . . . 202
Nastavení sítě a běžné potíže. . . . . . . . . . . . . . . . . . . . . . . . . . . . . . . . . . . . . . . . . . . . . 204
Potíže se síťovou komunikací. . . . . . . . . . . . . . . . . . . . . . . . . . . . . . . . . . . . . . . . . . . . . . 206
Nelze vyhledat tiskárnu v síti. . . . . . . . . . . . . . . . . . . . . . . . . . . . . . . . . . . . . . . . . . . . . . . . . . . . . . . . . 207
Během nastavení nelze vyhledat tiskárnu na obrazovce Zkontrolovat nastavení tiskárny (systém
Windows). . . . . . . . . . . . . . . . . . . . . . . . . . . . . . . . . . . . . . . . . . . . . . . . . . . . . . . . . . . . . . . . . . . . 208
Během nastavení Wi-Fi nelze vyhledat tiskárnu na obrazovce Zkontrolovat nastavení tiskárny
(systém Windows) – Kontrola stavu napájení. . . . . . . . . . . . . . . . . . . . . . . . . . . . . . . . . . . . 209
Během nastavení Wi-Fi nelze vyhledat tiskárnu na obrazovce Zkontrolovat nastavení tiskárny
(systém Windows) – Kontrola připojení počítačové sítě. . . . . . . . . . . . . . . . . . . . . . . . . . . . 210
Během nastavení Wi-Fi nelze vyhledat tiskárnu na obrazovce Zkontrolovat nastavení tiskárny
(systém Windows) – Kontrola nastavení Wi-Fi tiskárny. . . . . . . . . . . . . . . . . . . . . . . . . . . . . 211
Během nastavení Wi-Fi nelze vyhledat tiskárnu na obrazovce Zkontrolovat nastavení tiskárny
(systém Windows) – Kontrola prostředí Wi-Fi. . . . . . . . . . . . . . . . . . . . . . . . . . . . . . . . . . . . 212
Během nastavení Wi-Fi nelze vyhledat tiskárnu na obrazovce Zkontrolovat nastavení tiskárny
(systém Windows) – Kontrola adresy IP tiskárny. . . . . . . . . . . . . . . . . . . . . . . . . . . . . . . . . 214
Během nastavení Wi-Fi nelze vyhledat tiskárnu na obrazovce Zkontrolovat nastavení tiskárny
(systém Windows) – Kontrola nastavení softwaru. . . . . . . . . . . . . . . . . . . . . . . . . . . . . . . . . 215
Během nastavení Wi-Fi nelze vyhledat tiskárnu na obrazovce Zkontrolovat nastavení tiskárny
(systém Windows) – Kontrola nastavení bezdrátového směrovače. . . . . . . . . . . . . . . . . . . 216
Nelze pokračovat za obrazovku Připojení tiskárny. . . . . . . . . . . . . . . . . . . . . . . . . . . . . . . . . . . . 217
Tiskárna nebyla při použití Wi-Fi nalezena. . . . . . . . . . . . . . . . . . . . . . . . . . . . . . . . . . . . . . . . . . 219
Potíže se síťovým připojením. . . . . . . . . . . . . . . . . . . . . . . . . . . . . . . . . . . . . . . . . . . . . . . . . . . . . . . . 222
Tiskárna z nějakého důvodu náhle přestala pracovat. . . . . . . . . . . . . . . . . . . . . . . . . . . . . . . . . . 223
Neznámý síťový klíč (heslo). . . . . . . . . . . . . . . . . . . . . . . . . . . . . . . . . . . . . . . . . . . . . . . . . . . . . 228
Po výměně bezdrátového směrovače nebo změně nastavení bezdrátového směrovače nelze
tiskárnu používat. . . . . . . . . . . . . . . . . . . . . . . . . . . . . . . . . . . . . . . . . . . . . . . . . . . . . . . . . . . . . . 230
Jiné potíže se sítí. . . . . . . . . . . . . . . . . . . . . . . . . . . . . . . . . . . . . . . . . . . . . . . . . . . . . . . . . . . . . . . . . . 232

Kontrola informací o síti. . . . . . . . . . . . . . . . . . . . . . . . . . . . . . . . . . . . . . . . . . . . . . . . . . . . . . . . . 233
Obnovení výchozího nastavení. . . . . . . . . . . . . . . . . . . . . . . . . . . . . . . . . . . . . . . . . . . . . . . . . . . 236
Potíže s tiskem z chytrého telefonu nebo tabletu. . . . . . . . . . . . . . . . . . . . . . . . . . . . . . . 237
Nelze tisknout z chytrého telefonu nebo tabletu. . . . . . . . . . . . . . . . . . . . . . . . . . . . . . . . . . . . . . . . . . 238
Potíže při tisku. . . . . . . . . . . . . . . . . . . . . . . . . . . . . . . . . . . . . . . . . . . . . . . . . . . . . . . . . 242
Tiskárna netiskne. . . . . . . . . . . . . . . . . . . . . . . . . . . . . . . . . . . . . . . . . . . . . . . . . . . . . . . . . . . . . . . . . . 243
Nevystřikuje se inkoust. . . . . . . . . . . . . . . . . . . . . . . . . . . . . . . . . . . . . . . . . . . . . . . . . . . . . . . . . . . . . 245
Tiskárna nezvedá nebo nepodává papír / zobrazí se chyba „Není papír“. . . . . . . . . . . . . . . . . . . . . . . 247
Při vkládání papíru se neotevře obrazovka pro registraci informací o papíru. . . . . . . . . . . . . . . . . . . . 249
Stránka pro registraci papíru se otevře, i když není vložen žádný papír. . . . . . . . . . . . . . . . . . . . . . . . 250
Výtisky jsou neuspokojivé. . . . . . . . . . . . . . . . . . . . . . . . . . . . . . . . . . . . . . . . . . . . . . . . . . . . . . . . . . . 251
Výtisky jsou prázdné/rozmazané nebo neostré/nepřesné nebo mají rozteklé barvy/pruhy nebo čáry.
. . . . . . . . . . . . . . . . . . . . . . . . . . . . . . . . . . . . . . . . . . . . . . . . . . . . . . . . . . . . . . . . . . . . . . . . . . . . 253
Čáry nejsou vyrovnané / jsou deformované. . . . . . . . . . . . . . . . . . . . . . . . . . . . . . . . . . . . . . . . . 256
Papír je špinavý / Potištěný povrch je poškrábaný. . . . . . . . . . . . . . . . . . . . . . . . . . . . . . . . . . . . 257
Mechanické potíže. . . . . . . . . . . . . . . . . . . . . . . . . . . . . . . . . . . . . . . . . . . . . . . . . . . . . . 261
Tiskárna se nezapne. . . . . . . . . . . . . . . . . . . . . . . . . . . . . . . . . . . . . . . . . . . . . . . . . . . . . . . . . . . . . . . 262
Tiskárna se neočekávaně nebo pravidelně vypne. . . . . . . . . . . . . . . . . . . . . . . . . . . . . . . . . . . . . . . . . 263
Potíže s připojením USB. . . . . . . . . . . . . . . . . . . . . . . . . . . . . . . . . . . . . . . . . . . . . . . . . . . . . . . . . . . . 264
S tiskárnou nelze komunikovat prostřednictvím připojení USB. . . . . . . . . . . . . . . . . . . . . . . . . . . . . . . 265
Na displeji LCD se zobrazí špatný jazyk. . . . . . . . . . . . . . . . . . . . . . . . . . . . . . . . . . . . . . . . . . . . . . . . 266
Potíže s instalací nebo stahováním. . . . . . . . . . . . . . . . . . . . . . . . . . . . . . . . . . . . . . . . . 267
Instalace ovladače tiskárny se nezdařila (systém Windows). . . . . . . . . . . . . . . . . . . . . . . . . . . . . . . . . 268
Aktualizace ovladačů tiskárny v síti (Windows). . . . . . . . . . . . . . . . . . . . . . . . . . . . . . . . . . . . . . . . . . . 270
Chyby a zprávy. . . . . . . . . . . . . . . . . . . . . . . . . . . . . . . . . . . . . . . . . . . . . . . . . . . . . . . . . 271
Pokud dojde k chybě. . . . . . . . . . . . . . . . . . . . . . . . . . . . . . . . . . . . . . . . . . . . . . . . . . . . . . . . . . . . . . . 272
Zobrazí se zpráva (kód podpory). . . . . . . . . . . . . . . . . . . . . . . . . . . . . . . . . . . . . . . . . . . . . . . . . . . . . . 274
Seznam kódů podpory pro případ chyby . . . . . . . . . . . . . . . . . . . . . . . . . . . . . 278
Seznam kódů podpory pro případ chyby (uvíznutí papíru). . . . . . . . . . . . . . . . . . . . . . . . 280
1300. . . . . . . . . . . . . . . . . . . . . . . . . . . . . . . . . . . . . . . . . . . . . . . . . . . . . . . . . . . . . . . . . . . . . . . . . . . . 281
Papír uvíznul uvnitř tiskárny. . . . . . . . . . . . . . . . . . . . . . . . . . . . . . . . . . . . . . . . . . . . . . . . . . . . . . . . . . 283
V tiskárně došel papír (1000).. . . . . . . . . . . . . . . . . . . . . . . . . . . . . . . . . . . . . . . . . . . . . . 287
1200. . . . . . . . . . . . . . . . . . . . . . . . . . . . . . . . . . . . . . . . . . . . . . . . . . . . . . . . . . . . . . . . . 288

1401. . . . . . . . . . . . . . . . . . . . . . . . . . . . . . . . . . . . . . . . . . . . . . . . . . . . . . . . . . . . . . . . . 289
1600. . . . . . . . . . . . . . . . . . . . . . . . . . . . . . . . . . . . . . . . . . . . . . . . . . . . . . . . . . . . . . . . . 291
1660. . . . . . . . . . . . . . . . . . . . . . . . . . . . . . . . . . . . . . . . . . . . . . . . . . . . . . . . . . . . . . . . . 292
1687. . . . . . . . . . . . . . . . . . . . . . . . . . . . . . . . . . . . . . . . . . . . . . . . . . . . . . . . . . . . . . . . . 293
1688. . . . . . . . . . . . . . . . . . . . . . . . . . . . . . . . . . . . . . . . . . . . . . . . . . . . . . . . . . . . . . . . . 295
1689. . . . . . . . . . . . . . . . . . . . . . . . . . . . . . . . . . . . . . . . . . . . . . . . . . . . . . . . . . . . . . . . . 296
1700. . . . . . . . . . . . . . . . . . . . . . . . . . . . . . . . . . . . . . . . . . . . . . . . . . . . . . . . . . . . . . . . . 297
1806. . . . . . . . . . . . . . . . . . . . . . . . . . . . . . . . . . . . . . . . . . . . . . . . . . . . . . . . . . . . . . . . . 298
1807. . . . . . . . . . . . . . . . . . . . . . . . . . . . . . . . . . . . . . . . . . . . . . . . . . . . . . . . . . . . . . . . . 299
2114. . . . . . . . . . . . . . . . . . . . . . . . . . . . . . . . . . . . . . . . . . . . . . . . . . . . . . . . . . . . . . . . . 300
4103. . . . . . . . . . . . . . . . . . . . . . . . . . . . . . . . . . . . . . . . . . . . . . . . . . . . . . . . . . . . . . . . . 302
5100. . . . . . . . . . . . . . . . . . . . . . . . . . . . . . . . . . . . . . . . . . . . . . . . . . . . . . . . . . . . . . . . . 303
5200. . . . . . . . . . . . . . . . . . . . . . . . . . . . . . . . . . . . . . . . . . . . . . . . . . . . . . . . . . . . . . . . . 304
5B00. . . . . . . . . . . . . . . . . . . . . . . . . . . . . . . . . . . . . . . . . . . . . . . . . . . . . . . . . . . . . . . . . 305
6000. . . . . . . . . . . . . . . . . . . . . . . . . . . . . . . . . . . . . . . . . . . . . . . . . . . . . . . . . . . . . . . . . 306

Použití dokumentu Příručka online
Provozní prostředí
Symboly použité v tomto dokumentu
Uživatelé dotykových zařízení (systém Windows)
Tisk dokumentu Příručka online
Ochranné známky a licence
Snímky obrazovky v této příručce
8

Symboly použité v tomto dokumentu
Varování
Při nedodržení pokynů hrozí nebezpečí smrti, vážného zranění nebo poškození majetku způsobené
nesprávným používáním zařízení. Tyto pokyny je třeba dodržovat pro zajištění bezpečného provozu.
Upozornění
Při nedodržení těchto pokynů hrozí nebezpečí zranění osob nebo poškození majetku způsobené
nesprávným používáním zařízení. Tyto pokyny je třeba dodržovat pro zajištění bezpečného provozu.
Důležité
Pokyny obsahují důležité informace, které je třeba dodržovat, abyste předešli poškození, zranění nebo
nesprávnému použití výrobku. Přečtěte si níže uvedené pokyny.
Poznámka
Pokyny obsahují poznámky týkající se provozu a doplňková vysvětlení.
Základy
Pokyny vysvětlující základní použití produktu.
Poznámka
• Ikony se mohou lišit v závislosti na příslušném produktu.
9

Uživatelé dotykových zařízení (systém Windows)
Při použití dotykové obrazovky si jednoduše nahraďte výraz „klepnutí pravým tlačítkem“ v tomto dokumentu
za akci nastavenou v operačním systému. Pokud tedy například je odpovídající akcí ve vašem operačním
systému „přidržení“, nahraďte výraz „klepnutí pravým tlačítkem“ pokynem „přidržet“.
10

Ochranné známky a licence
• Microsoft je registrovaná ochranná známka společnosti Microsoft Corporation.
• Windows je ochranná známka nebo registrovaná ochranná známka společnosti Microsoft Corporation v
USA a dalších zemích.
• Windows Vista je ochranná známka nebo registrovaná ochranná známka společnosti Microsoft
Corporation v USA a dalších zemích.
• Internet Explorer je ochranná známka nebo registrovaná ochranná známka společnosti Microsoft
Corporation v USA a dalších zemích.
• Mac, Mac OS, macOS, OS X, AirPort, App Store, AirPrint, logo AirPrint, Safari, Bonjour, iPad, iPhone
a iPod touch jsou ochranné známky společnosti Apple Inc. registrované v USA a dalších zemích.
• IOS je ochranná známka nebo registrovaná ochranná známka společnosti Cisco, registrovaná v USA a
v dalších zemích a je použita v rámci licence.
• Google Cloud Print, Google Chrome, Chrome OS, Chromebook, Android, Google Drive, Google Apps
a Google Analytics jsou registrované ochranné známky nebo ochranné známky společnosti Google Inc.
Google Play a logo Google Play jsou ochrannými známkami společnosti Google LLC.
• Adobe, Acrobat, Flash, Photoshop, Photoshop Elements, Lightroom, Adobe RGB a Adobe RGB (1998)
jsou registrované ochranné známky nebo ochranné známky společnosti Adobe Systems Incorporated
v USA a dalších zemích.
• Bluetooth je ochranná známka společnosti Bluetooth SIG, Inc., USA licencovaná společností Canon Inc.
• Autodesk a AutoCAD jsou registrované ochranné známky nebo ochranné známky společnosti
Autodesk, Inc. a/nebo dceřiných či přidružených společností v USA a dalších zemích.
• USB Type-C™ is a trademark of USB Implementers Forum.
Poznámka
• Formální název systému Windows Vista je operační systém Microsoft Windows Vista.
Copyright (c) 2003-2015 Apple Inc. All rights reserved.
Redistribution and use in source and binary forms, with or without modification, are permitted provided
that the following conditions are met:
1. Redistributions of source code must retain the above copyright notice, this list of conditions and the
following disclaimer.
2. Redistributions in binary form must reproduce the above copyright notice, this list of conditions and
the following disclaimer in the documentation and/or other materials provided with the distribution.
3. Neither the name of Apple Inc. («Apple») nor the names of its contributors may be used to endorse or
promote products derived from this software without specific prior written permission.
THIS SOFTWARE IS PROVIDED BY APPLE AND ITS CONTRIBUTORS «AS IS» AND ANY EXPRESS
OR IMPLIED WARRANTIES, INCLUDING, BUT NOT LIMITED TO, THE IMPLIED WARRANTIES OF
MERCHANTABILITY AND FITNESS FOR A PARTICULAR PURPOSE ARE DISCLAIMED. IN NO
EVENT SHALL APPLE OR ITS CONTRIBUTORS BE LIABLE FOR ANY DIRECT, INDIRECT,
INCIDENTAL, SPECIAL, EXEMPLARY, OR CONSEQUENTIAL DAMAGES (INCLUDING, BUT NOT
LIMITED TO, PROCUREMENT OF SUBSTITUTE GOODS OR SERVICES; LOSS OF USE, DATA, OR
PROFITS; OR BUSINESS INTERRUPTION) HOWEVER CAUSED AND ON ANY THEORY OF
LIABILITY, WHETHER IN CONTRACT, STRICT LIABILITY, OR TORT (INCLUDING NEGLIGENCE OR
OTHERWISE) ARISING IN ANY WAY OUT OF THE USE OF THIS SOFTWARE, EVEN IF ADVISED OF
THE POSSIBILITY OF SUCH DAMAGE.
11

Apache License
Version 2.0, January 2004
http://www.apache.org/licenses/
TERMS AND CONDITIONS FOR USE, REPRODUCTION, AND DISTRIBUTION
1. Definitions.
«License» shall mean the terms and conditions for use, reproduction, and distribution as defined by
Sections 1 through 9 of this document.
«Licensor» shall mean the copyright owner or entity authorized by the copyright owner that is granting
the License.
«Legal Entity» shall mean the union of the acting entity and all other entities that control, are controlled
by, or are under common control with that entity. For the purposes of this definition, «control» means
(i) the power, direct or indirect, to cause the direction or management of such entity, whether by
contract or otherwise, or (ii) ownership of fifty percent (50%) or more of the outstanding shares, or (iii)
beneficial ownership of such entity.
«You» (or «Your») shall mean an individual or Legal Entity exercising permissions granted by this
License.
«Source» form shall mean the preferred form for making modifications, including but not limited to
software source code, documentation source, and configuration files.
«Object» form shall mean any form resulting from mechanical transformation or translation of a Source
form, including but not limited to compiled object code, generated documentation, and conversions to
other media types.
«Work» shall mean the work of authorship, whether in Source or Object form, made available under
the License, as indicated by a copyright notice that is included in or attached to the work (an example
is provided in the Appendix below).
«Derivative Works» shall mean any work, whether in Source or Object form, that is based on (or
derived from) the Work and for which the editorial revisions, annotations, elaborations, or other
modifications represent, as a whole, an original work of authorship. For the purposes of this License,
Derivative Works shall not include works that remain separable from, or merely link (or bind by name)
to the interfaces of, the Work and Derivative Works thereof.
«Contribution» shall mean any work of authorship, including the original version of the Work and any
modifications or additions to that Work or Derivative Works thereof, that is intentionally submitted to
Licensor for inclusion in the Work by the copyright owner or by an individual or Legal Entity
authorized to submit on behalf of the copyright owner. For the purposes of this definition, «submitted»
means any form of electronic, verbal, or written communication sent to the Licensor or its
representatives, including but not limited to communication on electronic mailing lists, source code
control systems, and issue tracking systems that are managed by, or on behalf of, the Licensor for
the purpose of discussing and improving the Work, but excluding communication that is
conspicuously marked or otherwise designated in writing by the copyright owner as «Not a
Contribution.»
«Contributor» shall mean Licensor and any individual or Legal Entity on behalf of whom a Contribution
has been received by Licensor and subsequently incorporated within the Work.
12

2. Grant of Copyright License. Subject to the terms and conditions of this License, each Contributor
hereby grants to You a perpetual, worldwide, non-exclusive, no-charge, royalty-free, irrevocable
copyright license to reproduce, prepare Derivative Works of, publicly display, publicly perform,
sublicense, and distribute the Work and such Derivative Works in Source or Object form.
3. Grant of Patent License. Subject to the terms and conditions of this License, each Contributor hereby
grants to You a perpetual, worldwide, non-exclusive, no-charge, royalty-free, irrevocable (except as
stated in this section) patent license to make, have made, use, offer to sell, sell, import, and
otherwise transfer the Work, where such license applies only to those patent claims licensable by
such Contributor that are necessarily infringed by their Contribution(s) alone or by combination of
their Contribution(s) with the Work to which such Contribution(s) was submitted. If You institute patent
litigation against any entity (including a cross-claim or counterclaim in a lawsuit) alleging that the
Work or a Contribution incorporated within the Work constitutes direct or contributory patent
infringement, then any patent licenses granted to You under this License for that Work shall terminate
as of the date such litigation is filed.
4. Redistribution. You may reproduce and distribute copies of the Work or Derivative Works thereof in
any medium, with or without modifications, and in Source or Object form, provided that You meet the
following conditions:
1. You must give any other recipients of the Work or Derivative Works a copy of this License; and
2. You must cause any modified files to carry prominent notices stating that You changed the files;
and
3. You must retain, in the Source form of any Derivative Works that You distribute, all copyright,
patent, trademark, and attribution notices from the Source form of the Work, excluding those
notices that do not pertain to any part of the Derivative Works; and
4. If the Work includes a «NOTICE» text file as part of its distribution, then any Derivative Works that
You distribute must include a readable copy of the attribution notices contained within such
NOTICE file, excluding those notices that do not pertain to any part of the Derivative Works, in at
least one of the following places: within a NOTICE text file distributed as part of the Derivative
Works; within the Source form or documentation, if provided along with the Derivative Works; or,
within a display generated by the Derivative Works, if and wherever such third-party notices
normally appear. The contents of the NOTICE file are for informational purposes only and do not
modify the License. You may add Your own attribution notices within Derivative Works that You
distribute, alongside or as an addendum to the NOTICE text from the Work, provided that such
additional attribution notices cannot be construed as modifying the License.
You may add Your own copyright statement to Your modifications and may provide additional or
different license terms and conditions for use, reproduction, or distribution of Your modifications,
or for any such Derivative Works as a whole, provided Your use, reproduction, and distribution of
the Work otherwise complies with the conditions stated in this License.
5. Submission of Contributions. Unless You explicitly state otherwise, any Contribution intentionally
submitted for inclusion in the Work by You to the Licensor shall be under the terms and conditions of
this License, without any additional terms or conditions. Notwithstanding the above, nothing herein
shall supersede or modify the terms of any separate license agreement you may have executed with
Licensor regarding such Contributions.
6. Trademarks. This License does not grant permission to use the trade names, trademarks, service
marks, or product names of the Licensor, except as required for reasonable and customary use in
describing the origin of the Work and reproducing the content of the NOTICE file.
13

7. Disclaimer of Warranty. Unless required by applicable law or agreed to in writing, Licensor provides
the Work (and each Contributor provides its Contributions) on an «AS IS» BASIS, WITHOUT
WARRANTIES OR CONDITIONS OF ANY KIND, either express or implied, including, without
limitation, any warranties or conditions of TITLE, NON-INFRINGEMENT, MERCHANTABILITY, or
FITNESS FOR A PARTICULAR PURPOSE. You are solely responsible for determining the
appropriateness of using or redistributing the Work and assume any risks associated with Your
exercise of permissions under this License.
8. Limitation of Liability. In no event and under no legal theory, whether in tort (including negligence),
contract, or otherwise, unless required by applicable law (such as deliberate and grossly negligent
acts) or agreed to in writing, shall any Contributor be liable to You for damages, including any direct,
indirect, special, incidental, or consequential damages of any character arising as a result of this
License or out of the use or inability to use the Work (including but not limited to damages for loss of
goodwill, work stoppage, computer failure or malfunction, or any and all other commercial damages
or losses), even if such Contributor has been advised of the possibility of such damages.
9. Accepting Warranty or Additional Liability. While redistributing the Work or Derivative Works thereof,
You may choose to offer, and charge a fee for, acceptance of support, warranty, indemnity, or other
liability obligations and/or rights consistent with this License. However, in accepting such obligations,
You may act only on Your own behalf and on Your sole responsibility, not on behalf of any other
Contributor, and only if You agree to indemnify, defend, and hold each Contributor harmless for any
liability incurred by, or claims asserted against, such Contributor by reason of your accepting any
such warranty or additional liability.
END OF TERMS AND CONDITIONS
—- Part 1: CMU/UCD copyright notice: (BSD like) ——
Copyright 1989, 1991, 1992 by Carnegie Mellon University
Derivative Work — 1996, 1998-2000
Copyright 1996, 1998-2000 The Regents of the University of California
All Rights Reserved
Permission to use, copy, modify and distribute this software and its documentation for any purpose and
without fee is hereby granted, provided that the above copyright notice appears in all copies and that both
that copyright notice and this permission notice appear in supporting documentation, and that the name of
CMU and The Regents of the University of California not be used in advertising or publicity pertaining to
distribution of the software without specific written permission.
CMU AND THE REGENTS OF THE UNIVERSITY OF CALIFORNIA DISCLAIM ALL WARRANTIES
WITH REGARD TO THIS SOFTWARE, INCLUDING ALL IMPLIED WARRANTIES OF
MERCHANTABILITY AND FITNESS. IN NO EVENT SHALL CMU OR THE REGENTS OF THE
UNIVERSITY OF CALIFORNIA BE LIABLE FOR ANY SPECIAL, INDIRECT OR CONSEQUENTIAL
DAMAGES OR ANY DAMAGES WHATSOEVER RESULTING FROM THE LOSS OF USE, DATA OR
PROFITS, WHETHER IN AN ACTION OF CONTRACT, NEGLIGENCE OR OTHER TORTIOUS ACTION,
ARISING OUT OF OR IN CONNECTION WITH THE USE OR PERFORMANCE OF THIS SOFTWARE.
—- Part 2: Networks Associates Technology, Inc copyright notice (BSD) ——
Copyright (c) 2001-2003, Networks Associates Technology, Inc
All rights reserved.
14

Redistribution and use in source and binary forms, with or without modification, are permitted provided
that the following conditions are met:
* Redistributions of source code must retain the above copyright notice, this list of conditions and the
following disclaimer.
* Redistributions in binary form must reproduce the above copyright notice, this list of conditions and the
following disclaimer in the documentation and/or other materials provided with the distribution.
* Neither the name of the Networks Associates Technology, Inc nor the names of its contributors may be
used to endorse or promote products derived from this software without specific prior written permission.
THIS SOFTWARE IS PROVIDED BY THE COPYRIGHT HOLDERS AND CONTRIBUTORS «AS IS»
AND ANY EXPRESS OR IMPLIED WARRANTIES, INCLUDING, BUT NOT LIMITED TO, THE IMPLIED
WARRANTIES OF MERCHANTABILITY AND FITNESS FOR A PARTICULAR PURPOSE ARE
DISCLAIMED. IN NO EVENT SHALL THE COPYRIGHT HOLDERS OR CONTRIBUTORS BE LIABLE
FOR ANY DIRECT, INDIRECT, INCIDENTAL, SPECIAL, EXEMPLARY, OR CONSEQUENTIAL
DAMAGES (INCLUDING, BUT NOT LIMITED TO, PROCUREMENT OF SUBSTITUTE GOODS OR
SERVICES; LOSS OF USE, DATA, OR PROFITS; OR BUSINESS INTERRUPTION) HOWEVER
CAUSED AND ON ANY THEORY OF LIABILITY, WHETHER IN CONTRACT, STRICT LIABILITY, OR
TORT (INCLUDING NEGLIGENCE OR OTHERWISE) ARISING IN ANY WAY OUT OF THE USE OF
THIS SOFTWARE, EVEN IF ADVISED OF THE POSSIBILITY OF SUCH DAMAGE.
—- Part 3: Cambridge Broadband Ltd. copyright notice (BSD) ——
Portions of this code are copyright (c) 2001-2003, Cambridge Broadband Ltd.
All rights reserved.
Redistribution and use in source and binary forms, with or without modification, are permitted provided
that the following conditions are met:
* Redistributions of source code must retain the above copyright notice, this list of conditions and the
following disclaimer.
* Redistributions in binary form must reproduce the above copyright notice, this list of conditions and the
following disclaimer in the documentation and/or other materials provided with the distribution.
* The name of Cambridge Broadband Ltd. may not be used to endorse or promote products derived from
this software without specific prior written permission.
THIS SOFTWARE IS PROVIDED BY THE COPYRIGHT HOLDER «AS IS» AND ANY EXPRESS OR
IMPLIED WARRANTIES, INCLUDING, BUT NOT LIMITED TO, THE IMPLIED WARRANTIES OF
MERCHANTABILITY AND FITNESS FOR A PARTICULAR PURPOSE ARE DISCLAIMED. IN NO
EVENT SHALL THE COPYRIGHT HOLDER BE LIABLE FOR ANY DIRECT, INDIRECT, INCIDENTAL,
SPECIAL, EXEMPLARY, OR CONSEQUENTIAL DAMAGES (INCLUDING, BUT NOT LIMITED TO,
PROCUREMENT OF SUBSTITUTE GOODS OR SERVICES; LOSS OF USE, DATA, OR PROFITS; OR
BUSINESS INTERRUPTION) HOWEVER CAUSED AND ON ANY THEORY OF LIABILITY, WHETHER
IN CONTRACT, STRICT LIABILITY, OR TORT (INCLUDING NEGLIGENCE OR OTHERWISE) ARISING
IN ANY WAY OUT OF THE USE OF THIS SOFTWARE, EVEN IF ADVISED OF THE POSSIBILITY OF
SUCH DAMAGE.
—- Part 4: Sun Microsystems, Inc. copyright notice (BSD) ——
Copyright c 2003 Sun Microsystems, Inc., 4150 Network Circle, Santa Clara, California 95054, U.S.A. All
rights reserved.
15

Use is subject to license terms below.
This distribution may include materials developed by third parties.
Sun, Sun Microsystems, the Sun logo and Solaris are trademarks or registered trademarks of Sun
Microsystems, Inc. in the U.S. and other countries.
Redistribution and use in source and binary forms, with or without modification, are permitted provided
that the following conditions are met:
* Redistributions of source code must retain the above copyright notice, this list of conditions and the
following disclaimer.
* Redistributions in binary form must reproduce the above copyright notice, this list of conditions and the
following disclaimer in the documentation and/or other materials provided with the distribution.
* Neither the name of the Sun Microsystems, Inc. nor the names of its contributors may be used to
endorse or promote products derived from this software without specific prior written permission.
THIS SOFTWARE IS PROVIDED BY THE COPYRIGHT HOLDERS AND CONTRIBUTORS «AS IS»
AND ANY EXPRESS OR IMPLIED WARRANTIES, INCLUDING, BUT NOT LIMITED TO, THE IMPLIED
WARRANTIES OF MERCHANTABILITY AND FITNESS FOR A PARTICULAR PURPOSE ARE
DISCLAIMED. IN NO EVENT SHALL THE COPYRIGHT HOLDERS OR CONTRIBUTORS BE LIABLE
FOR ANY DIRECT, INDIRECT, INCIDENTAL, SPECIAL, EXEMPLARY, OR CONSEQUENTIAL
DAMAGES (INCLUDING, BUT NOT LIMITED TO, PROCUREMENT OF SUBSTITUTE GOODS OR
SERVICES; LOSS OF USE, DATA, OR PROFITS; OR BUSINESS INTERRUPTION) HOWEVER
CAUSED AND ON ANY THEORY OF LIABILITY, WHETHER IN CONTRACT, STRICT LIABILITY, OR
TORT (INCLUDING NEGLIGENCE OR OTHERWISE) ARISING IN ANY WAY OUT OF THE USE OF
THIS SOFTWARE, EVEN IF ADVISED OF THE POSSIBILITY OF SUCH DAMAGE.
—- Part 5: Sparta, Inc copyright notice (BSD) ——
Copyright (c) 2003-2012, Sparta, Inc
All rights reserved.
Redistribution and use in source and binary forms, with or without modification, are permitted provided
that the following conditions are met:
* Redistributions of source code must retain the above copyright notice, this list of conditions and the
following disclaimer.
* Redistributions in binary form must reproduce the above copyright notice, this list of conditions and the
following disclaimer in the documentation and/or other materials provided with the distribution.
* Neither the name of Sparta, Inc nor the names of its contributors may be used to endorse or promote
products derived from this software without specific prior written permission.
THIS SOFTWARE IS PROVIDED BY THE COPYRIGHT HOLDERS AND CONTRIBUTORS «AS IS»
AND ANY EXPRESS OR IMPLIED WARRANTIES, INCLUDING, BUT NOT LIMITED TO, THE IMPLIED
WARRANTIES OF MERCHANTABILITY AND FITNESS FOR A PARTICULAR PURPOSE ARE
DISCLAIMED. IN NO EVENT SHALL THE COPYRIGHT HOLDERS OR CONTRIBUTORS BE LIABLE
FOR ANY DIRECT, INDIRECT, INCIDENTAL, SPECIAL, EXEMPLARY, OR CONSEQUENTIAL
DAMAGES (INCLUDING, BUT NOT LIMITED TO, PROCUREMENT OF SUBSTITUTE GOODS OR
SERVICES; LOSS OF USE, DATA, OR PROFITS; OR BUSINESS INTERRUPTION) HOWEVER
CAUSED AND ON ANY THEORY OF LIABILITY, WHETHER IN CONTRACT, STRICT LIABILITY, OR
16

TORT (INCLUDING NEGLIGENCE OR OTHERWISE) ARISING IN ANY WAY OUT OF THE USE OF
THIS SOFTWARE, EVEN IF ADVISED OF THE POSSIBILITY OF SUCH DAMAGE.
—- Part 6: Cisco/BUPTNIC copyright notice (BSD) ——
Copyright (c) 2004, Cisco, Inc and Information Network Center of Beijing University of Posts and
Telecommunications.
All rights reserved.
Redistribution and use in source and binary forms, with or without modification, are permitted provided
that the following conditions are met:
* Redistributions of source code must retain the above copyright notice, this list of conditions and the
following disclaimer.
* Redistributions in binary form must reproduce the above copyright notice, this list of conditions and the
following disclaimer in the documentation and/or other materials provided with the distribution.
* Neither the name of Cisco, Inc, Beijing University of Posts and Telecommunications, nor the names of
their contributors may be used to endorse or promote products derived from this software without specific
prior written permission.
THIS SOFTWARE IS PROVIDED BY THE COPYRIGHT HOLDERS AND CONTRIBUTORS «AS IS»
AND ANY EXPRESS OR IMPLIED WARRANTIES, INCLUDING, BUT NOT LIMITED TO, THE IMPLIED
WARRANTIES OF MERCHANTABILITY AND FITNESS FOR A PARTICULAR PURPOSE ARE
DISCLAIMED. IN NO EVENT SHALL THE COPYRIGHT HOLDERS OR CONTRIBUTORS BE LIABLE
FOR ANY DIRECT, INDIRECT, INCIDENTAL, SPECIAL, EXEMPLARY, OR CONSEQUENTIAL
DAMAGES (INCLUDING, BUT NOT LIMITED TO, PROCUREMENT OF SUBSTITUTE GOODS OR
SERVICES; LOSS OF USE, DATA, OR PROFITS; OR BUSINESS INTERRUPTION) HOWEVER
CAUSED AND ON ANY THEORY OF LIABILITY, WHETHER IN CONTRACT, STRICT LIABILITY, OR
TORT (INCLUDING NEGLIGENCE OR OTHERWISE) ARISING IN ANY WAY OUT OF THE USE OF
THIS SOFTWARE, EVEN IF ADVISED OF THE POSSIBILITY OF SUCH DAMAGE.
—- Part 7: Fabasoft R&D Software GmbH & Co KG copyright notice (BSD) ——
Copyright (c) Fabasoft R&D Software GmbH & Co KG, 2003 oss@fabasoft.com
Author: Bernhard Penz <bernhard.penz@fabasoft.com>
Redistribution and use in source and binary forms, with or without modification, are permitted provided
that the following conditions are met:
* Redistributions of source code must retain the above copyright notice, this list of conditions and the
following disclaimer.
* Redistributions in binary form must reproduce the above copyright notice, this list of conditions and the
following disclaimer in the documentation and/or other materials provided with the distribution.
* The name of Fabasoft R&D Software GmbH & Co KG or any of its subsidiaries, brand or product names
may not be used to endorse or promote products derived from this software without specific prior written
permission.
THIS SOFTWARE IS PROVIDED BY THE COPYRIGHT HOLDER «AS IS» AND ANY EXPRESS OR
IMPLIED WARRANTIES, INCLUDING, BUT NOT LIMITED TO, THE IMPLIED WARRANTIES OF
MERCHANTABILITY AND FITNESS FOR A PARTICULAR PURPOSE ARE DISCLAIMED. IN NO
EVENT SHALL THE COPYRIGHT HOLDER BE LIABLE FOR ANY DIRECT, INDIRECT, INCIDENTAL,
17

SPECIAL, EXEMPLARY, OR CONSEQUENTIAL DAMAGES (INCLUDING, BUT NOT LIMITED TO,
PROCUREMENT OF SUBSTITUTE GOODS OR SERVICES; LOSS OF USE, DATA, OR PROFITS; OR
BUSINESS INTERRUPTION) HOWEVER CAUSED AND ON ANY THEORY OF LIABILITY, WHETHER
IN CONTRACT, STRICT LIABILITY, OR TORT (INCLUDING NEGLIGENCE OR OTHERWISE) ARISING
IN ANY WAY OUT OF THE USE OF THIS SOFTWARE, EVEN IF ADVISED OF THE POSSIBILITY OF
SUCH DAMAGE.
—- Part 8: Apple Inc. copyright notice (BSD) ——
Copyright (c) 2007 Apple Inc. All rights reserved.
Redistribution and use in source and binary forms, with or without modification, are permitted provided
that the following conditions are met:
1. Redistributions of source code must retain the above copyright notice, this list of conditions and the
following disclaimer.
2. Redistributions in binary form must reproduce the above copyright notice, this list of conditions and
the following disclaimer in the documentation and/or other materials provided with the distribution.
3. Neither the name of Apple Inc. («Apple») nor the names of its contributors may be used to endorse or
promote products derived from this software without specific prior written permission.
THIS SOFTWARE IS PROVIDED BY APPLE AND ITS CONTRIBUTORS «AS IS» AND ANY EXPRESS
OR IMPLIED WARRANTIES, INCLUDING, BUT NOT LIMITED TO, THE IMPLIED WARRANTIES OF
MERCHANTABILITY AND FITNESS FOR A PARTICULAR PURPOSE ARE DISCLAIMED. IN NO
EVENT SHALL APPLE OR ITS CONTRIBUTORS BE LIABLE FOR ANY DIRECT, INDIRECT,
INCIDENTAL, SPECIAL, EXEMPLARY, OR CONSEQUENTIAL DAMAGES (INCLUDING, BUT NOT
LIMITED TO, PROCUREMENT OF SUBSTITUTE GOODS OR SERVICES; LOSS OF USE, DATA, OR
PROFITS; OR BUSINESS INTERRUPTION) HOWEVER CAUSED AND ON ANY THEORY OF
LIABILITY, WHETHER IN CONTRACT, STRICT LIABILITY, OR TORT (INCLUDING NEGLIGENCE OR
OTHERWISE) ARISING IN ANY WAY OUT OF THE USE OF THIS SOFTWARE, EVEN IF ADVISED OF
THE POSSIBILITY OF SUCH DAMAGE.
—- Part 9: ScienceLogic, LLC copyright notice (BSD) ——
Copyright (c) 2009, ScienceLogic, LLC
All rights reserved.
Redistribution and use in source and binary forms, with or without modification, are permitted provided
that the following conditions are met:
* Redistributions of source code must retain the above copyright notice, this list of conditions and the
following disclaimer.
* Redistributions in binary form must reproduce the above copyright notice, this list of conditions and the
following disclaimer in the documentation and/or other materials provided with the distribution.
* Neither the name of ScienceLogic, LLC nor the names of its contributors may be used to endorse or
promote products derived from this software without specific prior written permission.
THIS SOFTWARE IS PROVIDED BY THE COPYRIGHT HOLDERS AND CONTRIBUTORS «AS IS» AND
ANY EXPRESS OR IMPLIED WARRANTIES, INCLUDING, BUT NOT LIMITED TO, THE IMPLIED
WARRANTIES OF MERCHANTABILITY AND FITNESS FOR A PARTICULAR PURPOSE ARE
DISCLAIMED. IN NO EVENT SHALL THE COPYRIGHT HOLDERS OR CONTRIBUTORS BE LIABLE
18

FOR ANY DIRECT, INDIRECT, INCIDENTAL, SPECIAL, EXEMPLARY, OR CONSEQUENTIAL
DAMAGES (INCLUDING, BUT NOT LIMITED TO, PROCUREMENT OF SUBSTITUTE GOODS OR
SERVICES; LOSS OF USE, DATA, OR PROFITS; OR BUSINESS INTERRUPTION) HOWEVER
CAUSED AND ON ANY THEORY OF LIABILITY, WHETHER IN CONTRACT, STRICT LIABILITY, OR
TORT (INCLUDING NEGLIGENCE OR OTHERWISE) ARISING IN ANY WAY OUT OF THE USE OF
THIS SOFTWARE, EVEN IF ADVISED OF THE POSSIBILITY OF SUCH DAMAGE.
LEADTOOLS
Copyright (C) 1991-2009 LEAD Technologies, Inc.
CMap Resources
————————————————————
Copyright 1990-2009 Adobe Systems Incorporated.
All rights reserved.
Copyright 1990-2010 Adobe Systems Incorporated.
All rights reserved.
Redistribution and use in source and binary forms, with or
without modification, are permitted provided that the
following conditions are met:
Redistributions of source code must retain the above
copyright notice, this list of conditions and the following
disclaimer.
Redistributions in binary form must reproduce the above
copyright notice, this list of conditions and the following
disclaimer in the documentation and/or other materials
provided with the distribution.
Neither the name of Adobe Systems Incorporated nor the names
of its contributors may be used to endorse or promote
products derived from this software without specific prior
written permission.
THIS SOFTWARE IS PROVIDED BY THE COPYRIGHT HOLDERS AND
CONTRIBUTORS «AS IS» AND ANY EXPRESS OR IMPLIED WARRANTIES,
INCLUDING, BUT NOT LIMITED TO, THE IMPLIED WARRANTIES OF
MERCHANTABILITY AND FITNESS FOR A PARTICULAR PURPOSE ARE
DISCLAIMED. IN NO EVENT SHALL THE COPYRIGHT HOLDER OR
CONTRIBUTORS BE LIABLE FOR ANY DIRECT, INDIRECT, INCIDENTAL,
SPECIAL, EXEMPLARY, OR CONSEQUENTIAL DAMAGES (INCLUDING, BUT
NOT LIMITED TO, PROCUREMENT OF SUBSTITUTE GOODS OR SERVICES;
LOSS OF USE, DATA, OR PROFITS; OR BUSINESS INTERRUPTION)
HOWEVER CAUSED AND ON ANY THEORY OF LIABILITY, WHETHER IN
CONTRACT, STRICT LIABILITY, OR TORT (INCLUDING NEGLIGENCE OR
OTHERWISE) ARISING IN ANY WAY OUT OF THE USE OF THIS
SOFTWARE, EVEN IF ADVISED OF THE POSSIBILITY OF SUCH DAMAGE.
————————————————————
19

MIT License
Copyright (c) 1998, 1999, 2000 Thai Open Source Software Center Ltd
Permission is hereby granted, free of charge, to any person obtaining a copy of this software and
associated documentation files (the «Software»), to deal in the Software without restriction, including
without limitation the rights to use, copy, modify, merge, publish, distribute, sublicense, and/or sell copies
of the Software, and to permit persons to whom the Software is furnished to do so, subject to the following
conditions:
The above copyright notice and this permission notice shall be included in all copies or substantial
portions of the Software.
THE SOFTWARE IS PROVIDED «AS IS», WITHOUT WARRANTY OF ANY KIND, EXPRESS OR
IMPLIED, INCLUDING BUT NOT LIMITED TO THE WARRANTIES OF MERCHANTABILITY, FITNESS
FOR A PARTICULAR PURPOSE AND NONINFRINGEMENT. IN NO EVENT SHALL THE AUTHORS OR
COPYRIGHT HOLDERS BE LIABLE FOR ANY CLAIM, DAMAGES OR OTHER LIABILITY, WHETHER
IN AN ACTION OF CONTRACT, TORT OR OTHERWISE, ARISING FROM, OUT OF OR IN
CONNECTION WITH THE SOFTWARE OR THE USE OR OTHER DEALINGS IN THE SOFTWARE.
Copyright 2000 Computing Research Labs, New Mexico State University
Copyright 2001-2015 Francesco Zappa Nardelli
Permission is hereby granted, free of charge, to any person obtaining a copy of this software and
associated documentation files (the «Software»), to deal in the Software without restriction, including
without limitation the rights to use, copy, modify, merge, publish, distribute, sublicense, and/or sell copies
of the Software, and to permit persons to whom the Software is furnished to do so, subject to the following
conditions:
The above copyright notice and this permission notice shall be included in all copies or substantial
portions of the Software.
THE SOFTWARE IS PROVIDED «AS IS», WITHOUT WARRANTY OF ANY KIND, EXPRESS OR
IMPLIED, INCLUDING BUT NOT LIMITED TO THE WARRANTIES OF MERCHANTABILITY, FITNESS
FOR A PARTICULAR PURPOSE AND NONINFRINGEMENT. IN NO EVENT SHALL THE COMPUTING
RESEARCH LAB OR NEW MEXICO STATE UNIVERSITY BE LIABLE FOR ANY CLAIM, DAMAGES OR
OTHER LIABILITY, WHETHER IN AN ACTION OF CONTRACT, TORT OR OTHERWISE, ARISING
FROM, OUT OF OR IN CONNECTION WITH THE SOFTWARE OR THE USE OR OTHER DEALINGS IN
THE SOFTWARE.
Written by Joel Sherrill <joel@OARcorp.com>.
COPYRIGHT (c) 1989-2000.
On-Line Applications Research Corporation (OAR).
Permission to use, copy, modify, and distribute this software for any purpose without fee is hereby
granted, provided that this entire notice is included in all copies of any software which is or includes a
copy or modification of this software.
THIS SOFTWARE IS BEING PROVIDED «AS IS», WITHOUT ANY EXPRESS OR IMPLIED WARRANTY.
IN PARTICULAR, THE AUTHOR MAKES NO REPRESENTATION OR WARRANTY OF ANY KIND
20

CONCERNING THE MERCHANTABILITY OF THIS SOFTWARE OR ITS FITNESS FOR ANY
PARTICULAR PURPOSE.
(1) Red Hat Incorporated
Copyright (c) 1994-2009 Red Hat, Inc. All rights reserved.
This copyrighted material is made available to anyone wishing to use, modify, copy, or redistribute it
subject to the terms and conditions of the BSD License. This program is distributed in the hope that it will
be useful, but WITHOUT ANY WARRANTY expressed or implied, including the implied warranties of
MERCHANTABILITY or FITNESS FOR A PARTICULAR PURPOSE. A copy of this license is available at
http://www.opensource.org/licenses. Any Red Hat trademarks that are incorporated in the source code or
documentation are not subject to the BSD License and may only be used or replicated with the express
permission of Red Hat, Inc.
(2) University of California, Berkeley
Copyright (c) 1981-2000 The Regents of the University of California.
All rights reserved.
Redistribution and use in source and binary forms, with or without modification, are permitted provided
that the following conditions are met:
* Redistributions of source code must retain the above copyright notice, this list of conditions and the
following disclaimer.
* Redistributions in binary form must reproduce the above copyright notice, this list of conditions and the
following disclaimer in the documentation and/or other materials provided with the distribution.
* Neither the name of the University nor the names of its contributors may be used to endorse or promote
products derived from this software without specific prior written permission.
THIS SOFTWARE IS PROVIDED BY THE COPYRIGHT HOLDERS AND CONTRIBUTORS «AS IS» AND
ANY EXPRESS OR IMPLIED WARRANTIES, INCLUDING, BUT NOT LIMITED TO, THE IMPLIED
WARRANTIES OF MERCHANTABILITY AND FITNESS FOR A PARTICULAR PURPOSE ARE
DISCLAIMED. IN NO EVENT SHALL THE COPYRIGHT OWNER OR CONTRIBUTORS BE LIABLE FOR
ANY DIRECT, INDIRECT, INCIDENTAL, SPECIAL, EXEMPLARY, OR CONSEQUENTIAL DAMAGES
(INCLUDING, BUT NOT LIMITED TO, PROCUREMENT OF SUBSTITUTE GOODS OR SERVICES;
LOSS OF USE, DATA, OR PROFITS; OR BUSINESS INTERRUPTION) HOWEVER CAUSED AND ON
ANY THEORY OF LIABILITY, WHETHER IN CONTRACT, STRICT LIABILITY, OR TORT (INCLUDING
NEGLIGENCE OR OTHERWISE) ARISING IN ANY WAY OUT OF THE USE OF THIS SOFTWARE,
EVEN IF ADVISED OF THE POSSIBILITY OF SUCH DAMAGE.
The FreeType Project LICENSE
—————————-
2006-Jan-27
Copyright 1996-2002, 2006 by
David Turner, Robert Wilhelm, and Werner Lemberg
Introduction
============
21

The FreeType Project is distributed in several archive packages; some of them may contain, in addition to
the FreeType font engine, various tools and contributions which rely on, or relate to, the FreeType Project.
This license applies to all files found in such packages, and which do not fall under their own explicit
license. The license affects thus the FreeType font engine, the test programs, documentation and
makefiles, at the very least.
This license was inspired by the BSD, Artistic, and IJG (Independent JPEG Group) licenses, which all
encourage inclusion and use of free software in commercial and freeware products alike. As a
consequence, its main points are that:
o We don’t promise that this software works. However, we will be interested in any kind of bug reports.
(`as is’ distribution)
o You can use this software for whatever you want, in parts or full form, without having to pay us.
(`royalty-free’ usage)
o You may not pretend that you wrote this software. If you use it, or only parts of it, in a program, you
must acknowledge somewhere in your documentation that you have used the FreeType code. (`credits’)
We specifically permit and encourage the inclusion of this software, with or without modifications, in
commercial products.
We disclaim all warranties covering The FreeType Project and assume no liability related to The
FreeType Project.
Finally, many people asked us for a preferred form for a credit/disclaimer to use in compliance with this
license. We thus encourage you to use the following text:
«»»
Portions of this software are copyright © <year> The FreeType
Project (www.freetype.org). All rights reserved.
«»»
Please replace <year> with the value from the FreeType version you actually use.
Legal Terms
===========
0. Definitions
—————
Throughout this license, the terms `package’, `FreeType Project’, and `FreeType archive’ refer to the set
of files originally distributed by the authors (David Turner, Robert Wilhelm, and Werner Lemberg) as the
`FreeType Project’, be they named as alpha, beta or final release.
`You’ refers to the licensee, or person using the project, where `using’ is a generic term including
compiling the project’s source code as well as linking it to form a `program’ or `executable’.
This program is referred to as `a program using the FreeType engine’.
This license applies to all files distributed in the original FreeType Project, including all source code,
binaries and documentation, unless otherwise stated in the file in its original, unmodified form as
distributed in the original archive.
If you are unsure whether or not a particular file is covered by this license, you must contact us to verify
this.
22

The FreeType Project is copyright (C) 1996-2000 by David Turner, Robert Wilhelm, and Werner Lemberg.
All rights reserved except as specified below.
1. No Warranty
—————
THE FREETYPE PROJECT IS PROVIDED `AS IS’ WITHOUT WARRANTY OF ANY KIND, EITHER
EXPRESS OR IMPLIED, INCLUDING, BUT NOT LIMITED TO, WARRANTIES OF MERCHANTABILITY
AND FITNESS FOR A PARTICULAR PURPOSE. IN NO EVENT WILL ANY OF THE AUTHORS OR
COPYRIGHT HOLDERS BE LIABLE FOR ANY DAMAGES CAUSED BY THE USE OR THE INABILITY
TO USE, OF THE FREETYPE PROJECT.
2. Redistribution
——————
This license grants a worldwide, royalty-free, perpetual and irrevocable right and license to use, execute,
perform, compile, display, copy, create derivative works of, distribute and sublicense the FreeType Project
(in both source and object code forms) and derivative works thereof for any purpose; and to authorize
others to exercise some or all of the rights granted herein, subject to the following conditions:
o Redistribution of source code must retain this license file (`FTL.TXT’) unaltered; any additions, deletions
or changes to the original files must be clearly indicated in accompanying documentation. The copyright
notices of the unaltered, original files must be preserved in all copies of source files.
o Redistribution in binary form must provide a disclaimer that states that the software is based in part of
the work of the FreeType Team, in the distribution documentation. We also encourage you to put an URL
to the FreeType web page in your documentation, though this isn’t mandatory.
These conditions apply to any software derived from or based on the FreeType Project, not just the
unmodified files. If you use our work, you must acknowledge us. However, no fee need be paid to us.
3. Advertising
—————
Neither the FreeType authors and contributors nor you shall use the name of the other for commercial,
advertising, or promotional purposes without specific prior written permission.
We suggest, but do not require, that you use one or more of the following phrases to refer to this software
in your documentation or advertising materials: `FreeType Project’, `FreeType Engine’, `FreeType library’,
or `FreeType Distribution’.
As you have not signed this license, you are not required to accept it. However, as the FreeType Project
is copyrighted material, only this license, or another one contracted with the authors, grants you the right
to use, distribute, and modify it.
Therefore, by using, distributing, or modifying the FreeType Project, you indicate that you understand and
accept all the terms of this license.
4. Contacts
————
There are two mailing lists related to FreeType:
o freetype@nongnu.org
23

Discusses general use and applications of FreeType, as well as future and wanted additions to the library
and distribution.
If you are looking for support, start in this list if you haven’t found anything to help you in the
documentation.
o freetype-devel@nongnu.org
Discusses bugs, as well as engine internals, design issues, specific licenses, porting, etc.
Our home page can be found at
http://www.freetype.org
— end of FTL.TXT —
The TWAIN Toolkit is distributed as is. The developer and distributors of the TWAIN Toolkit expressly
disclaim all implied, express or statutory warranties including, without limitation, the implied warranties of
merchantability, noninfringement of third party rights and fitness for a particular purpose. Neither the
developers nor the distributors will be liable for damages, whether direct, indirect, special, incidental, or
consequential, as a result of the reproduction, modification, distribution or other use of the TWAIN Toolkit.
JSON for Modern C++
Copyright (c) 2013-2017 Niels Lohmann
Permission is hereby granted, free of charge, to any person obtaining a copy of this software and
associated documentation files (the «Software»), to deal in the Software without restriction, including
without limitation the rights to use, copy, modify, merge, publish, distribute, sublicense, and/or sell copies
of the Software, and to permit persons to whom the Software is furnished to do so, subject to the following
conditions:
The above copyright notice and this permission notice shall be included in all copies or substantial
portions of the Software.
THE SOFTWARE IS PROVIDED «AS IS», WITHOUT WARRANTY OF ANY KIND, EXPRESS OR
IMPLIED, INCLUDING BUT NOT LIMITED TO THE WARRANTIES OF MERCHANTABILITY, FITNESS
FOR A PARTICULAR PURPOSE AND NONINFRINGEMENT. IN NO EVENT SHALL THE AUTHORS OR
COPYRIGHT HOLDERS BE LIABLE FOR ANY CLAIM, DAMAGES OR OTHER LIABILITY, WHETHER
IN AN ACTION OF CONTRACT, TORT OR OTHERWISE, ARISING FROM, OUT OF OR IN
CONNECTION WITH THE SOFTWARE OR THE USE OR OTHER DEALINGS IN THE SOFTWARE.
Copyright (c) 2011 — 2015 ARM LIMITED
All rights reserved.
Redistribution and use in source and binary forms, with or without modification, are permitted provided
that the following conditions are met:
— Redistributions of source code must retain the above copyright notice, this list of conditions and the
following disclaimer.
— Redistributions in binary form must reproduce the above copyright notice, this list of conditions and the
following disclaimer in the documentation and/or other materials provided with the distribution.
— Neither the name of ARM nor the names of its contributors may be used to endorse or promote products
derived from this software without specific prior written permission.
24

THIS SOFTWARE IS PROVIDED BY THE COPYRIGHT HOLDERS AND CONTRIBUTORS «AS IS» AND
ANY EXPRESS OR IMPLIED WARRANTIES, INCLUDING, BUT NOT LIMITED TO, THE IMPLIED
WARRANTIES OF MERCHANTABILITY AND FITNESS FOR A PARTICULAR PURPOSE ARE
DISCLAIMED. IN NO EVENT SHALL COPYRIGHT HOLDERS AND CONTRIBUTORS BE LIABLE FOR
ANY DIRECT, INDIRECT, INCIDENTAL, SPECIAL, EXEMPLARY, OR CONSEQUENTIAL DAMAGES
(INCLUDING, BUT NOT LIMITED TO, PROCUREMENT OF SUBSTITUTE GOODS OR SERVICES;
LOSS OF USE, DATA, OR PROFITS; OR BUSINESS INTERRUPTION) HOWEVER CAUSED AND ON
ANY THEORY OF LIABILITY, WHETHER IN CONTRACT, STRICT LIABILITY, OR TORT (INCLUDING
NEGLIGENCE OR OTHERWISE) ARISING IN ANY WAY OUT OF THE USE OF THIS SOFTWARE,
EVEN IF ADVISED OF THE POSSIBILITY OF SUCH DAMAGE.
Následující vyjádření se vztahuje pouze na produkty podporující připojení Wi-Fi.
(c) 2009-2013 by Jeff Mott. All rights reserved.
Redistribution and use in source and binary forms, with or without modification, are permitted provided
that the following conditions are met:
* Redistributions of source code must retain the above copyright notice, this list of conditions, and the
following disclaimer.
* Redistributions in binary form must reproduce the above copyright notice, this list of conditions, and the
following disclaimer in the documentation or other materials provided with the distribution.
* Neither the name CryptoJS nor the names of its contributors may be used to endorse or promote
products derived from this software without specific prior written permission.
THIS SOFTWARE IS PROVIDED BY THE COPYRIGHT HOLDERS AND CONTRIBUTORS «AS IS,»
AND ANY EXPRESS OR IMPLIED WARRANTIES, INCLUDING, BUT NOT LIMITED TO, THE IMPLIED
WARRANTIES OF MERCHANTABILITY AND FITNESS FOR A PARTICULAR PURPOSE, ARE
DISCLAIMED. IN NO EVENT SHALL THE COPYRIGHT HOLDER OR CONTRIBUTORS BE LIABLE
FOR ANY DIRECT, INDIRECT, INCIDENTAL, SPECIAL, EXEMPLARY, OR CONSEQUENTIAL
DAMAGES (INCLUDING, BUT NOT LIMITED TO, PROCUREMENT OF SUBSTITUTE GOODS OR
SERVICES; LOSS OF USE, DATA, OR PROFITS; OR BUSINESS INTERRUPTION) HOWEVER
CAUSED AND ON ANY THEORY OF LIABILITY, WHETHER IN CONTRACT, STRICT LIABILITY, OR
TORT (INCLUDING NEGLIGENCE OR OTHERWISE) ARISING IN ANY WAY OUT OF THE USE OF
THIS SOFTWARE, EVEN IF ADVISED OF THE POSSIBILITY OF SUCH DAMAGE.
25
Síť
Dostupné metody připojení
V tiskárně jsou k dispozici následující metody připojení.
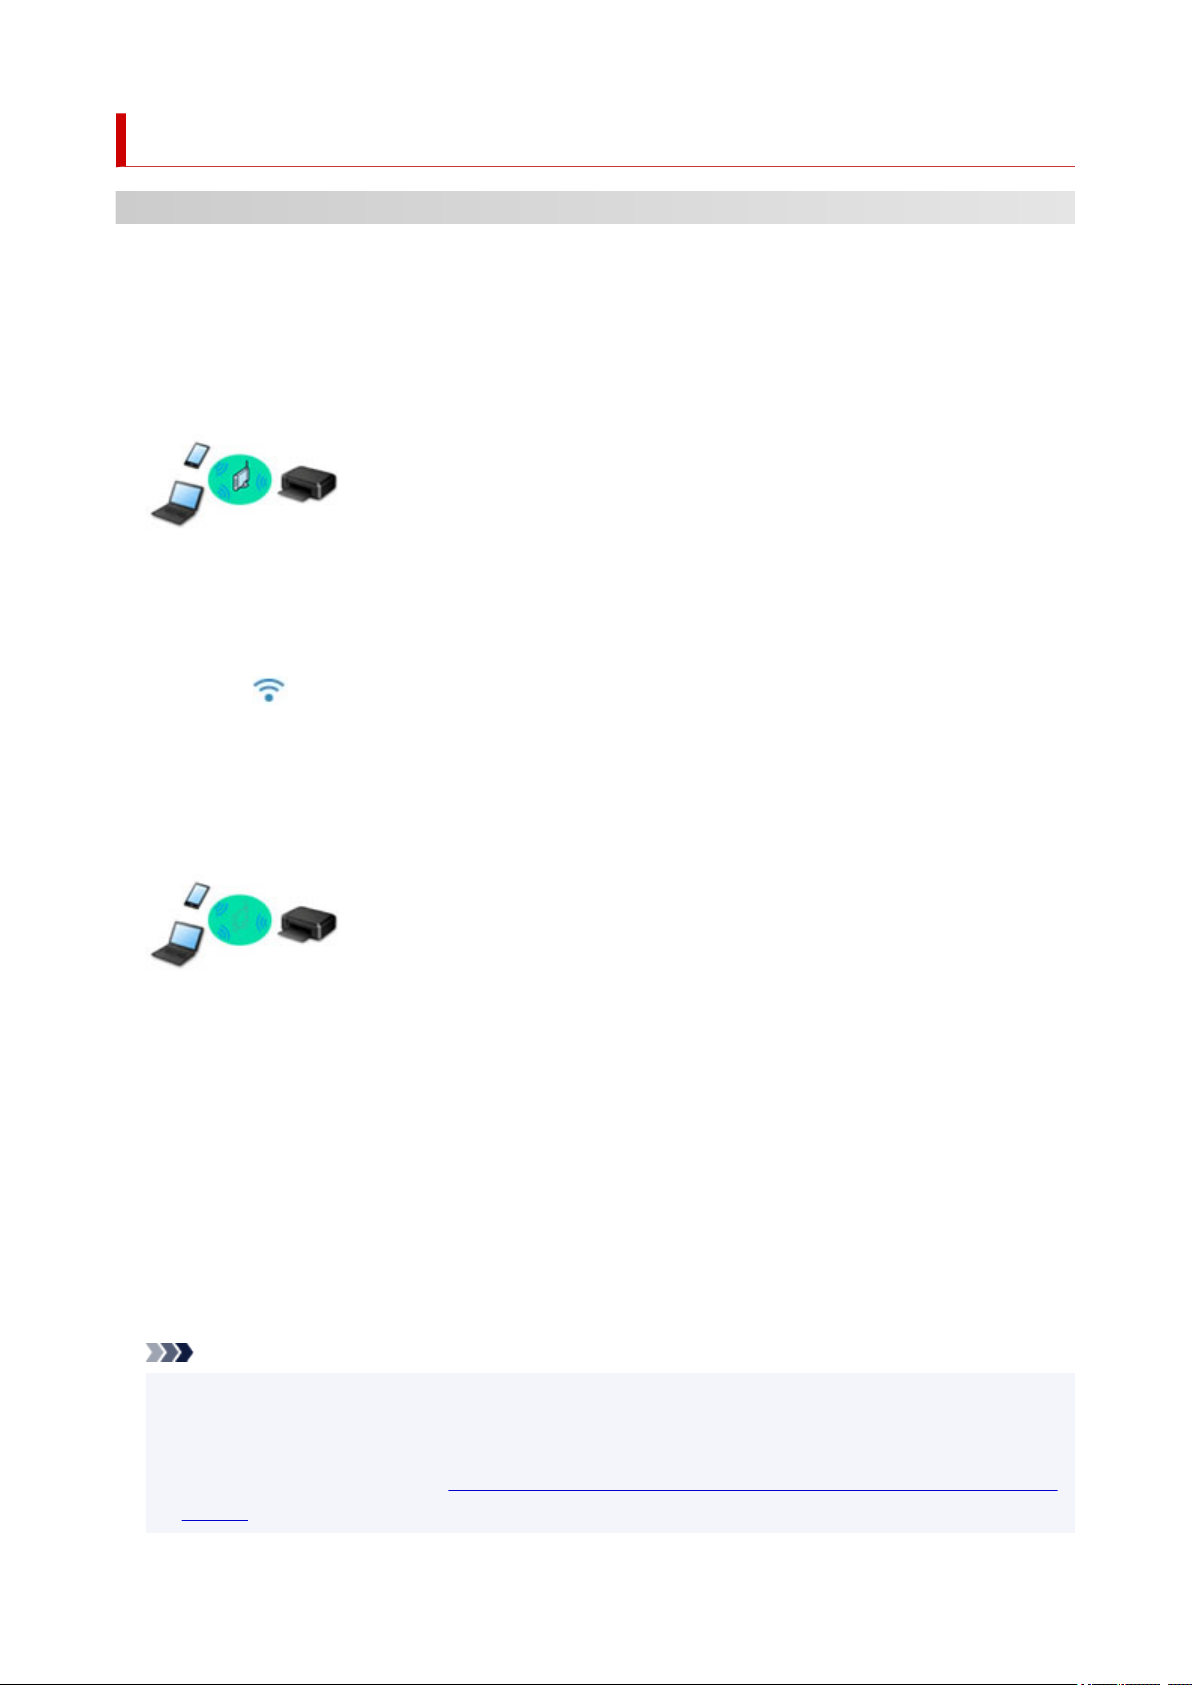
• Bezdrátové připojení
Tiskárnu a zařízení, jako je počítač, chytrý telefon nebo tablet, propojte pomocí bezdrátového
směrovače.
Pokud máte k dispozici bezdrátový směrovač, doporučujeme jej využít pro bezdrátové připojení.
◦ Metody připojení se liší v závislosti na typu bezdrátového směrovače.
◦ Podle potřeby můžete v tiskárně změnit síťová nastavení, např. název sítě (SSID) a protokol
zabezpečení.
◦ Jakmile se vytvoří spojení mezi zařízením a bezdrátovým směrovačem a na obrazovce zařízení se
zobrazí (ikona Wi-Fi), můžete zařízení připojit k tiskárně prostřednictvím bezdrátového
směrovače.
• Přímé připojení (Wireless Direct)
Tiskárnu a zařízení, jako je počítač, chytrý telefon nebo tablet, propojte bez pomoci bezdrátového
směrovače.
◦ Během používání tiskárny v režimu přímého bezdrátového připojení bude připojení k internetu
v tiskárně nedostupné. V takovém případě nelze webové služby tiskárny používat.
◦ Pokud prostřednictvím bezdrátového směrovače k tiskárně v režimu přímého bezdrátového připojení
připojíte zařízení s přístupem k Internetu, spojení mezi zařízením a bezdrátovým směrovačem se
přeruší. V takovém případě může zařízení v závislosti na svém typu automaticky přejít k připojení
s využitím mobilních dat. Mohou vám být účtovány poplatky za připojení k Internetu s využitím
mobilních dat.
◦ V režimu přímého bezdrátového připojení můžete k tiskárně současně připojit až pět zařízení. Pokud
se pokusíte po připojení pěti zařízení připojit šesté, zobrazí se chybová zpráva. V případě zobrazení
chybové zprávy odpojte od tiskárny nepoužívané zařízení a nastavení znovu upravte.
◦ Síťová nastavení, např. název sítě (SSID) a protokol zabezpečení se nastaví automaticky.
Poznámka
• Pokud chcete současně využít připojení Wi-Fi a přímé bezdrátové připojení, přečtěte si pokyny
v tématu Tisk při pobytu mimo domov..
• Tiskárnu s počítačem můžete propojit pomocí kabelu USB (připojení USB). Připravte si kabel USB.
Podrobnosti naleznete v části Připojení k jinému počítači pomocí sítě LAN / Změny připojení z USB
na LAN.
26

Nastavení síťového připojení
Nastavte připojení pro tiskárnu a počítač/chytrý telefon/tablet.
Další informace o postupu nastavení získáte po klepnutí zde.
Změna síťového nastavení
V následující části naleznete postup pro změnu nastavení připojení tiskárny a počítače/chytrého telefonu/
tabletu.
• Postup změny způsobu připojení k síti:
Změna konfigurace způsobu připojení k síti Wi-Fi
Změna režimu připojení
• Postup přidání počítače/chytrého telefonu/tabletu k tiskárně:
Připojení k jinému počítači pomocí sítě LAN / Změny připojení z USB na LAN
• Postup dočasného použití přímého bezdrátového připojení:
Použití přímého bezdrátového připojení
Nástroj IJ Network Device Setup Utility
Nástroj IJ Network Device Setup Utility ověří a diagnostikuje nastavení tiskárny a počítače a v případě potíží
v síti obnoví jejich stav. Ke stažení nástroje IJ Network Device Setup Utility můžete použít následující
odkazy.
Kontrola stavu připojení tiskárny pomocí nástroje IJ Network Device Setup Utility
• Provedení/změna síťových nastavení (systém Windows)
V systému Windows můžete k nastavení sítě použít nástroj IJ Network Device Setup Utility.
Nástroj IJ Network Device Setup Utility (systém Windows)
• Diagnostika a oprava síťového nastavení (systém Windows/macOS)
Nastavení sítě můžete diagnostikovat a podle potřeby opravit v nástroji IJ Network Device Setup Utility.
◦ V systému Windows:
Nástroj IJ Network Device Setup Utility (systém Windows)
◦ V systému macOS:
Nástroj IJ Network Device Setup Utility (systém macOS)
Tipy k síťovému připojení
V následující části naleznete rady pro používání tiskárny po připojení v síti.
Tipy k síťovému připojení
Konfigurace pro obsluhu tiskárny pomocí webového prohlížeče
Opatření zabraňující neoprávněnému přístupu
Řešení potíží
Informace pro řešení potíží s připojením k síti naleznete v části Nastavení sítě a běžné potíže.
Upozornění/Omezení
Podrobnosti naleznete níže.
• Omezení pro nastavení sítě:
27

Omezení
• Upozornění při tisku prostřednictvím webové služby:
Upozornění k tisku prostřednictvím webové služby
28

Omezení
Chcete-li připojit další zařízení, zatímco je k tiskárně již určité zařízení (jako je počítač) připojeno, využijte
v obou případech stejnou metodu připojení.
Jestliže použijete jinou metodu připojení, připojení používaného zařízení se ukončí.
Připojení pomocí bezdrátového směrovače
• Ujistěte se, že jsou zařízení a bezdrátový směrovač připojeny. Podrobné informace o ověření těchto
nastavení naleznete v příručce dodané k bezdrátovému směrovači nebo se obraťte na jeho výrobce.
Pokud je zařízení připojeno k tiskárně bez využití bezdrátového směrovače, připojte je znovu
s využitím bezdrátového směrovače.
• Konfigurace, funkce směrovače, postupy nastavení a nastavení zabezpečení bezdrátových
směrovačů se liší v závislosti na prostředí systému. Podrobné informace naleznete v příručce dodané
s bezdrátovým směrovačem nebo se obraťte na výrobce.
• Tato tiskárna nepodporuje protokol IEEE802.11ac. Protokol IEEE802.11a a IEEE802.11n (5 GHz)
nemusí být v závislosti na vaší zemi nebo oblasti k dispozici. Ujistěte se, že vaše zařízení podporuje
protokol IEEE802.11n, IEEE802.11g, IEEE802.11b nebo IEEE802.11a.
• Pokud je zařízení nastaveno na režim „pouze IEEE802.11n“, protokol WEP ani TKIP nelze jako
protokol zabezpečení použít. Použijte u zařízení jiný protokol zabezpečení než WEP a TKIP nebo
použijte jiné nastavení než „pouze IEEE802.11n“.
Propojení mezi zařízením a bezdrátovým směrovačem bude během úpravy nastavení dočasně
odpojeno. K další obrazovce této příručky nepokračujte, dokud nebude nastavení dokončeno.
• Při připojování k Wi-Fi venku se nepřipojujte k síti 5 GHz (SSID).
Pásmo 5 GHz dostupné pro tiskárnu zahrnuje kanály, které jsou povoleny pouze pro vnitřní použití,
v závislosti na vaší zemi nebo oblasti.
Podrobné informace o síti 5 GHz (SSID) vašeho bezdrátového směrovače naleznete v příručce
dodávané s bezdrátovým směrovačem, nebo se obraťte na jeho výrobce.
• Pokud používáte zařízení v kanceláři, obraťte se na správce sítě.
• Mějte na paměti, že pokud se připojíte k síti, která není chráněna, existuje riziko, že vaše osobní
informace budou zpřístupněny třetí straně.
Přímé bezdrátové připojení
Důležité
• Pokud prostřednictvím bezdrátového směrovače k tiskárně v režimu přímého bezdrátového připojení
připojíte zařízení s přístupem k internetu, spojení mezi zařízením a bezdrátovým směrovačem se
přeruší. V takovém případě může zařízení v závislosti na svém typu automaticky přejít k připojení
s využitím mobilních dat. V závislosti na využívaných službách vám mohou vám být po připojení
k Internetu s využitím mobilních dat účtovány poplatky.
Po připojení zařízení k tiskárně v režimu přímého bezdrátového připojení se informace
o připojení uloží v nastavení Wi-Fi. Zařízení se k tiskárně může připojit automaticky i po jeho
odpojení nebo připojení k jinému bezdrátovému směrovači.
Aby nedocházelo k automatickému připojení k tiskárně v režimu přímého bezdrátového
připojení, je vhodné po použití tiskárny upravit režim připojení nebo v nastavení Wi-Fi zařízení
zakázat automatické připojení.
29

Podrobné informace o změně nastavení zařízení naleznete v příručce dodané k zařízení,
případně se obraťte na jeho výrobce.
• Při navázání připojení zařízení k tiskárně v režimu přímého bezdrátového připojení nemusí být
(v závislosti na vašem prostředí) připojení k internetu k dispozici. V takovém případě nelze webové
služby tiskárny používat.
• V režimu přímého bezdrátového připojení můžete k tiskárně současně připojit až pět zařízení. Pokud
se pokusíte po připojení pěti zařízení připojit šesté, zobrazí se chybová zpráva.
V případě zobrazení chybové zprávy odpojte od tiskárny nepoužívané zařízení a nastavení znovu
upravte.
• Zařízení připojená k tiskárně v režimu přímého bezdrátového připojení nemohou navzájem
komunikovat.
• V aktivním režimu přímého bezdrátového připojení nebudou k dispozici aktualizace firmwaru tiskárny.
• Pokud je zařízení připojeno k tiskárně bez využití bezdrátového směrovače a vy je chcete znovu
připojit prostřednictvím stejné metody připojení, nejprve je odpojte. Připojení mezi zařízením
a tiskárnou můžete přerušit na obrazovce pro nastavení Wi-Fi.
30
Loading…
-
Драйверы
3
-
Инструкции по эксплуатации
2
Языки:
Canon PIXMA TR150 инструкция по эксплуатации
(76 страниц)
- Языки:Английский, Греческий, Датский, Испанский, Итальянский, Немецкий, Нидерландский, Португальский, Финский, Французский, Шведский
-
Тип:
PDF -
Размер:
17.04 MB -
Описание:
This pdf manual is a Getting Started Guide.
На NoDevice можно скачать инструкцию по эксплуатации для Canon PIXMA TR150. Руководство пользователя необходимо для ознакомления с правилами установки и эксплуатации Canon PIXMA TR150. Инструкции по использованию помогут правильно настроить Canon PIXMA TR150, исправить ошибки и выявить неполадки.

Aloitusopas
Lue Turvallisuus ja tärkeitä tietoja (lisähuomautus)
ensin.
Før du begynder
Læs Sikkerhedsoplysninger og vigtige
oplysninger (tillæg) først.
Komme i gang
Les Sikkerhetsinformasjon og viktig informasjon
(tillegg) først.
Uppstartsguide
Läs Information om säkerhet och annan viktig
information (bilaga) först.
Ξεκινώντας
Διαβάστε πρώτα τις Πληροφορίες για την ασφάλεια
και σημαντικές πληροφορίες (συμπλήρωμα).
Guía de inicio
Lea primero Información de seguridad
e información importante (apéndice).
Para Começar
Leia Informações Importantes e Sobre Segurança
(adendo) primeiro.
Guida Rapida
Leggere innanzitutto Informazioni importanti
e sulla sicurezza (addendum).
Aan de Slag-gids
Lees eerst Veiligheidsinformatie en belangrijke
informatie (addendum).
Inbetriebnahme
Lesen Sie Sicherheitsinformationen und wichtige
Hinweise (Anhang) zuerst.
Démarrage
Commencez par lire Sécurité et informations
importantes (addendum).
Getting Started
Read Safety and Important Information
(addendum) rst.

Go
Tulostimen asennus ………………………………………………………………………………………………………. sivu 1
Yhdistäminen tietokoneeseen, älypuhelimeen tai tablet-tietokoneeseen …. sivu 4
Ohjevideot
Installation af printeren …………………………………………………………………………………………………side 1
Tilslutning til en computer, smartphone eller tablet ………………………………………..side 4
Instruktionsvideoer
Installere skriveren ………………………………………………………………………………………………………….side 1
Koble til en datamaskin, en smarttelefon eller et nettbrett ……………………………side 4
Instruksjonsvideoer
Installera skrivaren…………………………………………………………………………………………………………..sida 1
Ansluta till en dator, smarttelefon eller surfplatta ………………………………………………sida 4
Instruktionsfilmer
Εγκατάσταση του εκτυπωτή ………………………………………………………………………………….σελίδα 1
Σύνδεση σε υπολογιστή, smartphone ή tablet ……………………………………………..σελίδα 4
Εκπαιδευτικό βίντεο
Instalación de la impresora …………………………………………………………………………………..página 1
Conexión con un ordenador, teléfono inteligente o tableta ………………….. página 4
Vídeos instructivos
Instalando a impressora ………………………………………………………………………………………… página 1
Conectando a um computador, smartphone ou tablet ……………………………página 4
Vídeos instrucionais
Installazione della stampante ……………………………………………………………………………… pagina 1
Connessione a un computer, uno smartphone o un tablet …………………….pagina 4
Video informativi
De printer installeren……………………………………………………………………………………………….pagina 1
Verbinden met een computer, smartphone of tablet ………………………………..pagina 4
Instructievideo’s
Installation des Druckers ……………………………………………………………………………………………. Seite 1
Herstellen einer Verbindung mit einem Computer, Smartphone oder Tablet ….Seite 4
Anleitungsvideos
Installation de l’imprimante ……………………………………………………………………………………..page 1
Connexion à un ordinateur, un smartphone ou une tablette …………………….page 4
Instructions vidéo
Instructional Videos
Installing the Printer …………………………………………………………………………………………………….page 1
Connecting to a Computer, Smartphone or Tablet ……………………………………….. page 4

1
ENGLISH
Setting Up the Printer
1. Box Contents
•
Ink Tanks
Black Color
•
Print Head
•
AC Adapter •
Setup CD-ROM for Windows
•
Power Cord •
Safety and Important Information
•
USB Cable •
Getting Started (this manual)
2. Removing Packing Materials
1 Remove and dispose of any packing materials
and orange tape.
2 Open and extend the rear tray cover, and then
remove and dispose of the protective material.
• The paper output slot cover opens automatically.
a
b
c
3. Turning on the Printer
1 Connect the power cord.
a
b
c
Important
At this time, do not connect any other cables.
2 Press and hold the ON button until the ON lamp
lights up.
3 Use the {, } and OK buttons to select a
language.
4 Press the OK button.
Important
Scan the QR code for a video tutorial of the setup procedure.
4. Installing the Print Head
1 Open the print head cover.
Caution
Do not touch the print head holder until it stops moving.

2
Setting Up the Printer
2 Press inward on both tabs on the print head lock
lever to release the lock, and then raise it rmly
until it stops.
3 Remove the print head from its package.
Important
There may be some transparent or light color ink on the inside
of the bag the print head comes in — this has no effect on print
quality. Be careful not to get ink on yourself when handling
these items.
4 Remove the protective cap.
Important
Do not touch the areas shown in
the figure. Otherwise, the printer
may not print correctly.
5 Set the print head in the print head holder so
the mark faces inward.
6 Hold both tabs on the print head lock lever, and
then lower it.
Important
Once you have installed the print head, do not remove it
unnecessarily.
7 To lock the print head lock lever, push the left
and then the right tabs until they snap into
place.
5. Installing the Ink Tanks
1 Remove the orange cap from the Black ink tank.
Black
2 Install the ink tank.
• Insert the ink tank into the right-hand side of the
print head so the mark faces inward, and then
press down until it clicks.
• Check that the lamp on the ink tank is lit. If the lamp
is not lit, press down on the back of the ink tank.

3
ENGLISH
3 Repeat steps 1 to 2 and install the Color ink tank
as well, on the left-hand side.
4 Close the print head cover.
6. Loading Paper
1 Press the OK button.
2 Slide the paper guide to the left.
3 Load Letter or A4 sized plain paper against the
right edge with the print side facing up.
4 Align the paper guide to the width of the paper,
and then check that the paper thickness lever is
set to the right.
5 Press the OK button.
6 Press the OK button.
Important
Scan the QR code for a video tutorial of the setup procedure.
7 Check that the following screen appears.

7-a
4
Setting Up the Printer
Computer Smartphone
Computer and
smartphone
Connecting to a Computer
If you are using multiple computers, perform these steps on each computer.
1 Access the Canon website from a
computer.
2 Select Set Up.
3 Enter your printer’s model name and
click Go.
• If prompted, select your country or region.
4 Click Start.
5 Click If you have already prepared
your printer, go to Connect.
Note
The following steps are for Windows users.
6 Click Download.
7 Run the downloaded le.
8 Click Start Setup.
9 Follow the on-screen instructions.
• These operations may take some time.
• To connect to a smartphone as well, see
«7-b. Connecting to a Smartphone» on page
5.
What device are you connecting?
7-a.Connecting to a Computer
Using the Setup CD-ROM for Windows
Double click EasySetup.exe in the CD-ROM, and then continue from step 3. If you do not have an
internet connection, open the win folder in the CD-ROM and double click SETUP.exe. This will install
the printer driver.
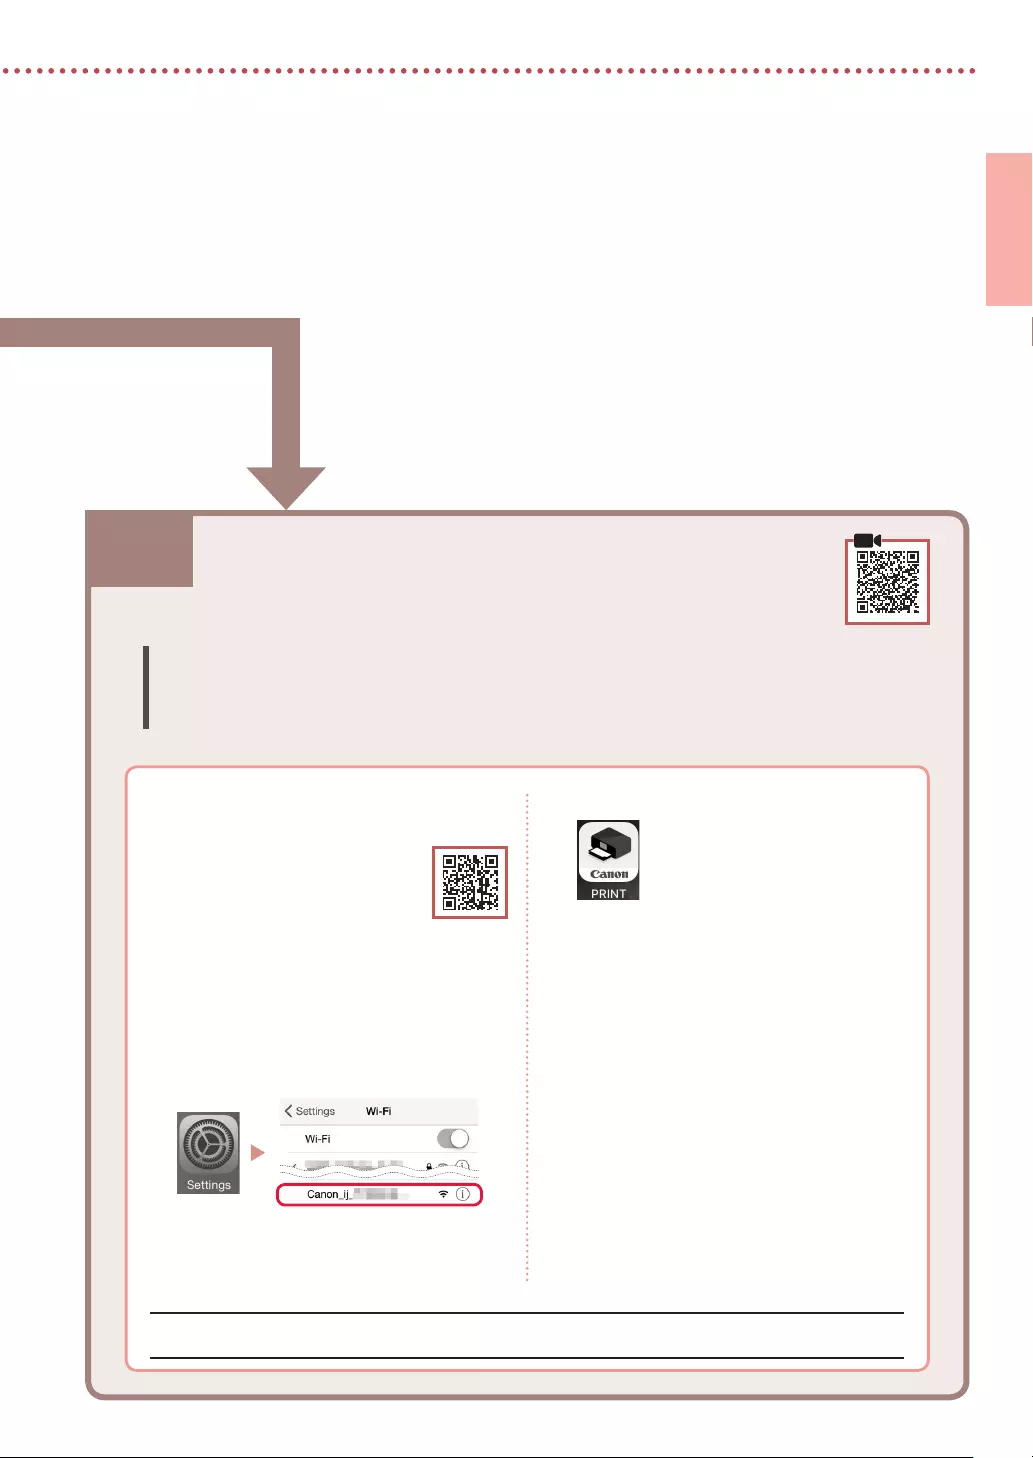
5
ENGLISH
7-b. Connecting to a Smartphone
7-b
1 Install the «Canon PRINT Inkjet/SELPHY»
app on your smartphone.
• Scan the QR code shown on
the right to access the Canon
website, and then download
the app.
2 Open your smartphone’s Wi-Fi settings.
Tap the network name (SSID) that starts
with «Canon_ij_«.
If «Canon_ij_» does not appear, proceed
to step 3.
(Example of iOS screen)
Connecting to a Smartphone
If you are using multiple smartphones, perform these steps on each smartphone.
Prepare the following before starting.
a Enable the Wi-Fi setting on your smartphone.
b Connect your smartphone to the wireless router (if you have a wireless router).
Refer to your smartphone and wireless router manuals for more details.
Once you have added your printer, you can print from your smartphone.
3 Open the installed app.
4 Follow the on-screen instructions in the
app to add your printer.

6
Using your Printer Without a Wireless Router
Refer to Print While Away from Home in the Online Manual.
In order to use the printer in an area where you do not have access to Wi-Fi, you must change the settings on
your computer or smartphone.
Normally you will use a wireless router to connect
your printer to your computer or smartphone.
When a wireless router is not available, you can
connect your printer directly to your computer or
smartphone (Wireless Direct).

1
FRANÇAIS
Conguration de l’imprimante
1. Contenu de la boîte
•
Cartouches d’encre
Noir Couleur
•
Tête d’impression
•
Adaptateur secteur •
CD-ROM d’installation pour Windows
•
Cordon d’alimentation •
Sécurité et informations importantes
•
Câble USB •
Démarrage (ce manuel)
2. Retrait du matériel
d’emballage
1 Enlevez et jetez tout matériel d’emballage et
bande orange.
2 Ouvrez et déployez le couvercle du réceptacle
arrière, puis enlevez et jetez le matériau
protecteur.
• Le capot de la fente d’éjection papier s’ouvre
automatiquement.
a
b
c
3. Mise sous tension de
l’imprimante
1 Branchez le cordon d’alimentation.
a
b
c
Important
À ce stade, ne branchez aucun autre câble.
2 Appuyez sur le bouton MARCHE (ON) de
l’imprimante et maintenez-le enfoncé jusqu’à ce
que le voyant MARCHE (ON) s’allume.
3 Utilisez les boutons {, } et OK pour
sélectionner une langue.
4 Appuyez sur le bouton OK.
Important
Numérisez le code QR pour obtenir un didacticiel vidéo de la
procédure de configuration.
4. Installation de la tête
d’impression
1 Ouvrez le capot des têtes d’impression.
Attention
Évitez tout contact avec le support de tête d’impression tant
que celui-ci n’est pas arrêté.

2
Conguration de l’imprimante
2 Appuyez vers l’intérieur sur les deux onglets du
levier de verrouillage de tête d’impression pour
libérer le verrou, puis soulevez-le fermement
jusqu’à ce qu’il s’arrête.
3 Sortez la tête d’impression de son paquet.
Important
Il peut y avoir de l’encre transparente ou de couleur claire
à l’intérieur du sac contenant la tête d’impression ; ceci n’a
aucune incidence sur la qualité de l’impression. Veillez à ne pas
vous tacher avec l’encre lorsque vous manipulez ces éléments.
4 Retirez la capsule de protection.
Important
Ne touchez pas les zones
présentées dans la figure.
Sinon, l’imprimante pourrait
ne pas imprimer correctement.
5 Insérez la tête d’impression dans le support de
tête d’impression de sorte que la marque soit
orientée vers l’intérieur.
6 Tenez les deux onglets du levier de verrouillage
de tête d’impression et abaissez celui-ci.
Important
Une fois que vous avez installé la tête d’impression, ne la retirez
pas inutilement.
7 Pour verrouiller le levier de verrouillage de tête
d’impression, appuyez sur l’onglet gauche puis
sur l’onglet droit jusqu’à ce qu’ils s’enclenchent.
5. Installation des cartouches
d’encre
1 Retirez le capuchon orange de la cartouche
d’encre Noir.
Noir
2 Installez la cartouche d’encre.
• Insérez la cartouche d’encre dans la partie droite de
la tête d’impression de sorte que la marque soit
orientée vers l’intérieur et appuyez dessus jusqu’à ce
qu’un clic se produise.
• Vérifiez que le voyant de la cartouche d’encre est
allumé. Si ce n’est pas le cas, appuyez sur la partie
arrière de la cartouche d’encre.
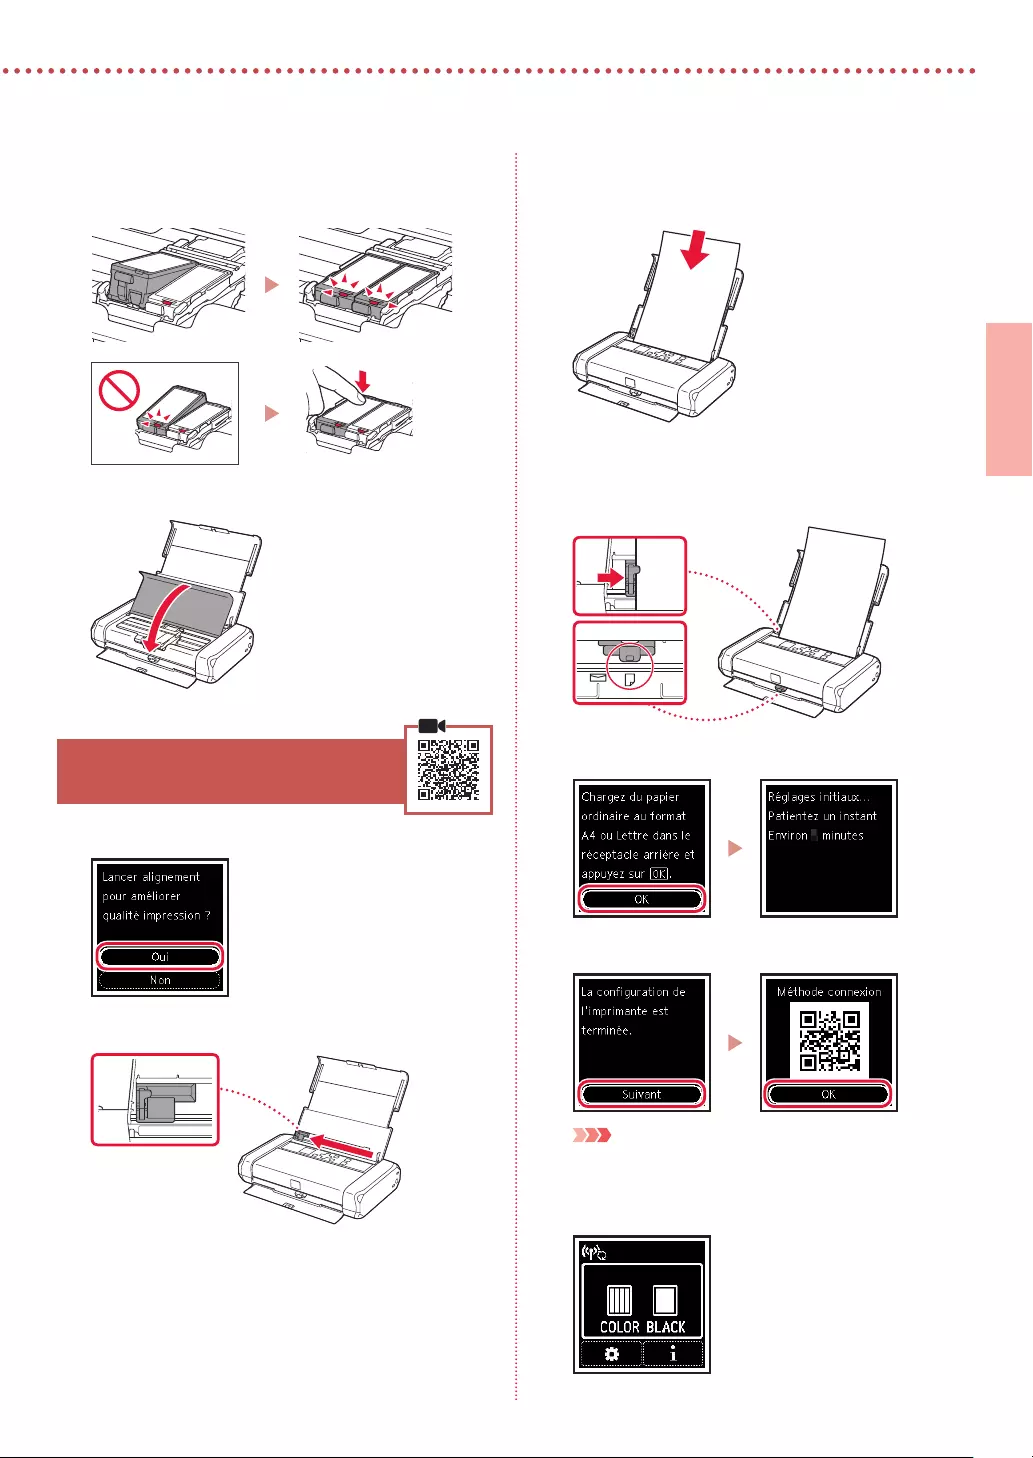
3
FRANÇAIS
3 Répétez les étapes1 et2 et installez également
la cartouche d’encre Couleur dans la partie
gauche.
4 Fermez le capot des têtes d’impression.
6. Chargement du papier
1 Appuyez sur le bouton OK.
2 Faites glisser le guide papier vers la gauche.
3 Chargez du papier ordinaire au format A4 ou
Lettre le long du bord droit face à imprimer vers
le haut.
4 Alignez le guide papier sur la largeur du
papier, puis vériez que le levier de sélection
d’épaisseur du papier est réglé sur la droite.
5 Appuyez sur le bouton OK.
6 Appuyez sur le bouton OK.
Important
Numérisez le code QR pour obtenir un didacticiel vidéo de la
procédure de configuration.
7 Assurez-vous que l’écran suivant s’ache.
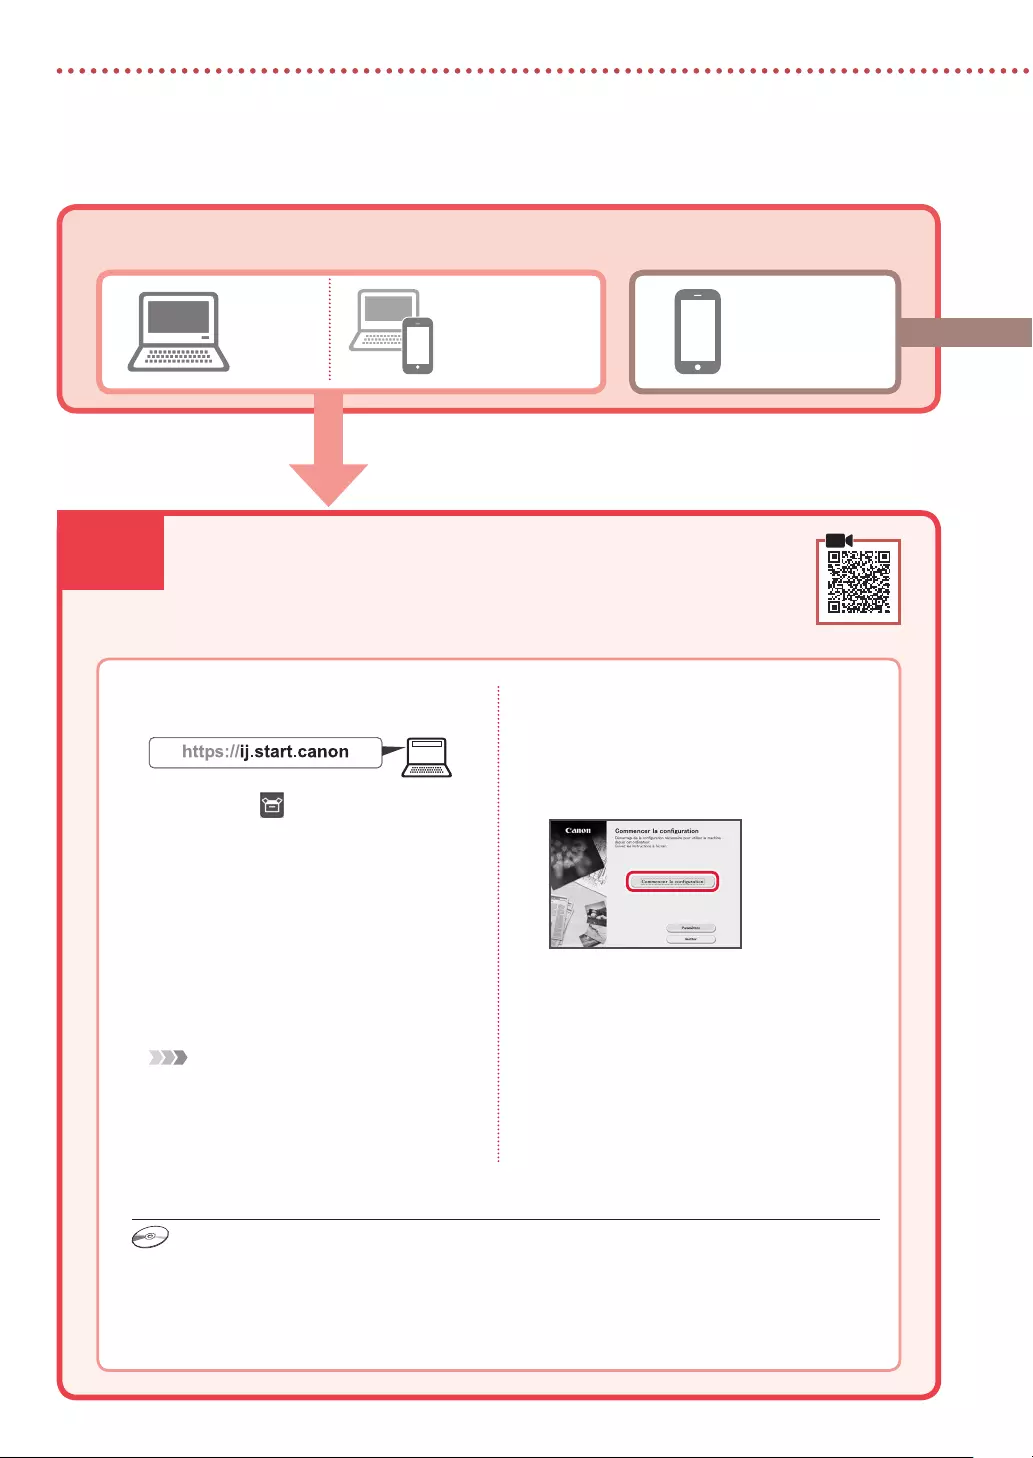
7-a
4
Conguration de l’imprimante
Ordinateur Smartphone
Ordinateur et
smartphone
Connexion à un ordinateur
Si vous utilisez plusieurs ordinateurs, effectuez ces étapes sur chaque ordinateur.
1 Accès au site Web Canon à partir d’un
ordinateur.
2 Sélectionnez Conguration.
3 Entrez le nom de modèle de votre
imprimante et cliquez sur Accéder.
• Si vous y êtes invité, sélectionnez votre pays
ou votre région.
4 Cliquez sur Démarrer.
5 Cliquez sur Si vous avez déjà préparé
votre imprimante, allez à Connecter.
Remarque
Les étapes suivantes concernent les utilisateurs
Windows.
6 Cliquez sur Télécharger.
7 Exécutez le chier téléchargé.
8 Cliquez sur Commencer la
conguration.
9 Suivez les instructions à l’écran.
• Ces opérations peuvent prendre du temps.
• Pour vous connecter aussi à un smartphone,
voir « 7-b. Connexion à un smartphone » à
la page 5.
Quel périphérique connectez-vous ?
7-a.Connexion à un ordinateur
Utilisation du CD-ROM d’installation pour Windows
Cliquez deux fois sur EasySetup.exe à partir du CD-ROM, puis continuez à partir de l’étape 3. Si vous ne
disposez pas d’une connexion Internet, ouvrez le dossier win à partir du CD-ROM et cliquez deux fois
sur SETUP.exe. Cette procédure permet d’installer le pilote d’imprimante.
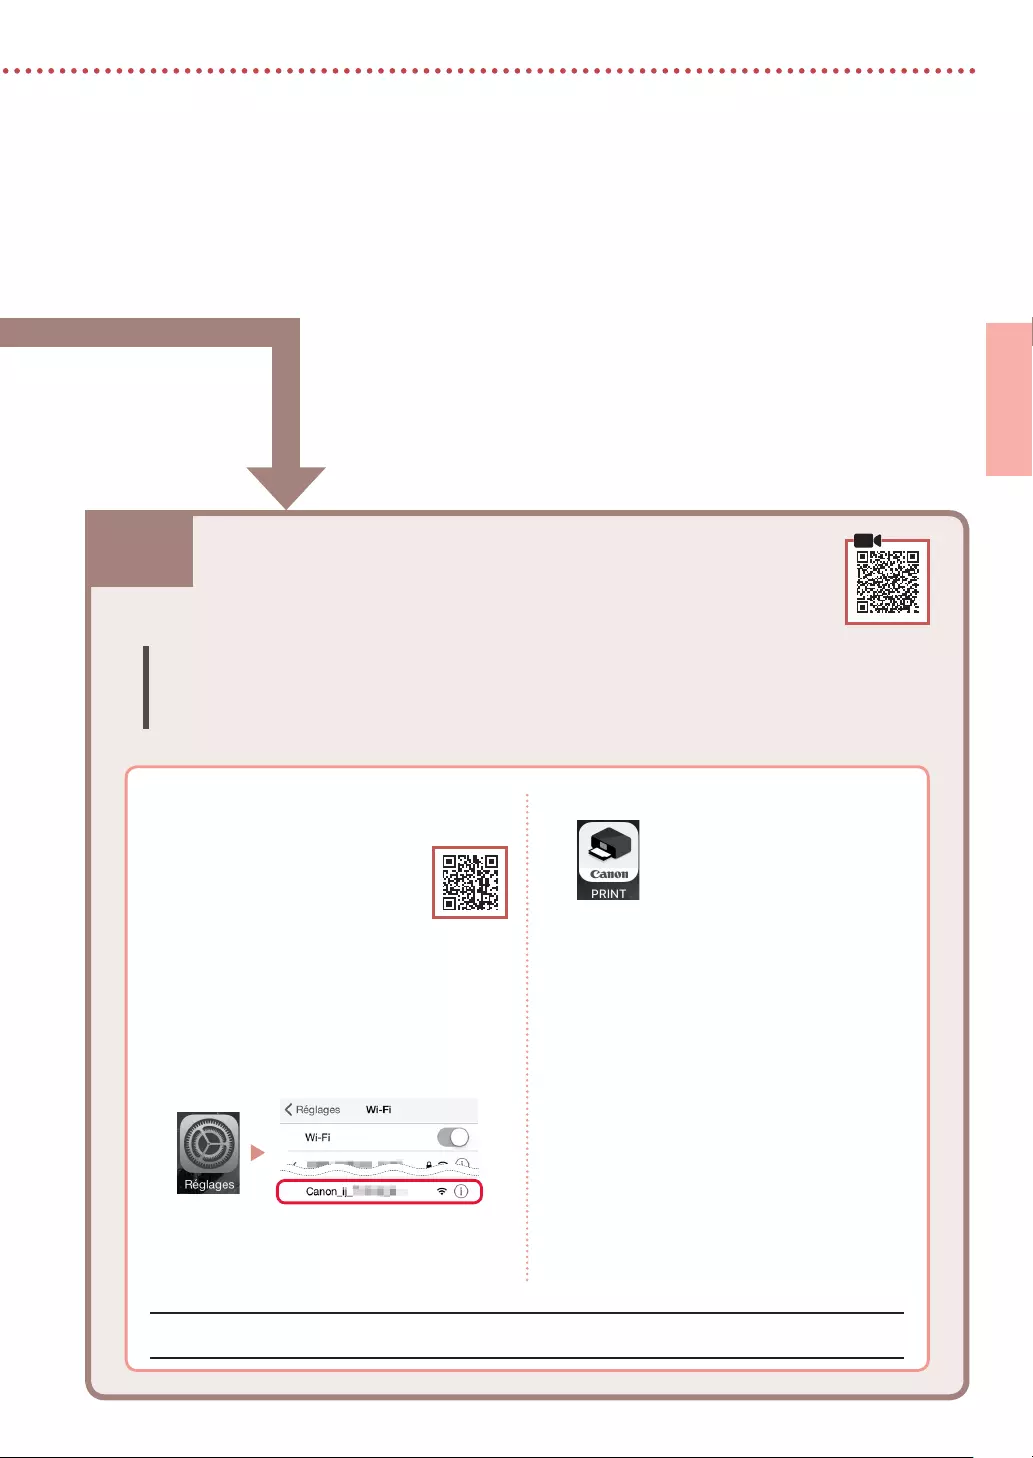
5
FRANÇAIS
7-b. Connexion à un smartphone
7-b
1 Installez l’application «Canon PRINT
Inkjet/SELPHY» sur votre smartphone.
• Scannez le code QR qui
apparaît à droite pour accéder
au site Web Canon, puis
téléchargez l’application.
2 Ouvrez les paramètres Wi-Fi de votre
smartphone. Touchez le nom du réseau
(SSID) qui commence par «Canon_ij_».
Si «Canon_ij_» n’apparaît pas, passez à
l’étape 3.
(Exemple d’écran iOS)
Connexion à un smartphone
Si vous utilisez plusieurs smartphones, effectuez ces étapes sur chaque smartphone.
Préparez les éléments suivants avant de démarrer.
a Activez le paramètre Wi-Fi sur votre smartphone.
b Connectez votre smartphone au routeur sans fil (si vous disposez d’un routeur sans fil).
Pour plus d’informations, consultez la documentation de votre smartphone et du routeur sans fil.
Une fois que vous avez ajouté votre imprimante, vous pouvez imprimer depuis votre smartphone.
3 Ouvrez l’application installée.
4 Suivez les instructions à l’écran fournies
par l’application pour ajouter votre
imprimante.

6
Utilisation de votre imprimante sans routeur sans l
Reportez-vous à Impression lorsque vous n’êtes pas à votre domicile dans le Manuel en ligne.
Pour utiliser l’imprimante dans un lieu où vous n’avez pas d’accès au Wi-Fi, vous devez modifier les paramètres sur
votre ordinateur ou votre smartphone.
Normalement, vous utiliserez un routeur sans
fil pour connecter votre imprimante à votre
ordinateur ou à votre smartphone.
Si aucun routeur sans fil n’est disponible, vous
pouvez connecter votre imprimante directement
à votre ordinateur ou à votre smartphone
(Connexion directe sans l).

1
DEUTSCH
Einrichten des Druckers
1. Inhalt der Box
•
Tintenbehälter
Schwarz Farbe
•
Druckkopf
•
Netzteil •
Installations-CD-ROM für Windows
•
Netzkabel •
Sicherheitsinformationen und wichtige
Hinweise
•
USB-Kabel •
Inbetriebnahme (dieses Handbuch)
2. Entfernen des
Verpackungsmaterials
1 Entfernen und entsorgen Sie das gesamte
Verpackungsmaterial sowie das orangefarbene
Klebeband.
2 Önen Sie die Abdeckung des hinteren Fachs,
ziehen Sie sie heraus und entfernen und
entsorgen Sie dann das Schutzmaterial.
• Die Abdeckung für den Papierausgabeschacht öffnet
sich automatisch.
a
b
c
3. Einschalten des Druckers
1 Schließen Sie das Netzkabel an.
a
b
c
Wichtig
Schließen Sie zum jetzigen Zeitpunkt keine weiteren Kabel an.
2 Halten Sie die Taste EIN (ON) gedrückt, bis die
EIN (ON)—Anzeige leuchtet.
3 Verwenden Sie die Tasten {, } und OK, um
eine Sprache auszuwählen.
4 Drücken Sie die Taste OK.
Wichtig
Scannen Sie den QR-Code für ein Videolernprogramm zum
Einrichtungsverfahren.
4. Installation des Druckkopfs
1 Önen Sie die Abdeckung für den Druckkopf.
Vorsicht
Berühren Sie den Druckkopfhalter nicht, solange er sich bewegt.

2
Einrichten des Druckers
2 Drücken Sie beide Laschen am Sperrhebel
für den Druckkopf nach innen, um die Sperre
aufzuheben, und heben Sie ihn dann langsam
bis zum Anschlag an.
3 Entnehmen Sie den Druckkopf aus seiner
Verpackung.
Wichtig
Möglicherweise befindet sich etwas transparente oder helle
Tinte auf der Innenseite der Tüte, in der der Druckkopf geliefert
wird – dies hat keine Auswirkungen auf die Druckqualität.
Achten Sie darauf, sich beim Umgang mit diesen Objekten
nicht mit Tinte zu beschmutzen.
4 Entfernen Sie die Schutzkappe.
Wichtig
Berühren Sie nicht die in der
Abbildung gezeigten Bereiche.
Andernfalls druckt der Drucker
möglicherweise nicht richtig.
5 Setzen Sie den Druckkopf so in den
Druckkopfhalter ein, dass das Zeichen nach
innen zeigt.
6 Fassen Sie den Sperrhebel für den Druckkopf an
beiden Laschen an und senken Sie ihn.
Wichtig
Entfernen Sie den Druckkopf nach dem Einsetzen nicht
unnötigerweise.
7 Um den Sperrhebel für den Druckkopf zu
arretieren, drücken Sie die linke und dann die
rechte Lasche, bis sie einrasten.
5. Installation der
Tintenbehälter
1 Nehmen Sie die orangefarbene Kappe vom
Tintenbehälter mit schwarzer Tinte ab.
Schwarz
2 Setzen Sie den Tintenbehälter ein.
• Setzen Sie den Tintenbehälter so in die rechte Seite
des Druckkopfs ein, dass das Zeichen nach innen
zeigt, und drücken Sie ihn dann nach unten, bis er
einrastet.
• Vergewissern Sie sich, dass die Anzeige am
Tintenbehälter leuchtet. Wenn die Anzeige
nicht leuchtet, drücken Sie den hinteren Teil des
Tintenbehälters nach unten.

3
DEUTSCH
3 Wiederholen Sie die Schritte 1 bis 2 und setzen
Sie auch den Tintenbehälter mit farbiger Tinte
auf der linken Seite ein.
4 Schließen Sie die Abdeckung für den Druckkopf.
6. Einlegen von Papier
1 Drücken Sie die Taste OK.
2 Schieben Sie die Papierführung nach links.
3 Legen Sie Normalpapier des Formats Letter oder
A4 an der rechten Kante mit der bedruckbaren
Seite nach oben ein.
4 Richten Sie die Papierführung an der Breite des
Papiers aus und vergewissern Sie sich, dass der
Papierstärkehebel nach rechts ausgerichtet ist.
5 Drücken Sie die Taste OK.
6 Drücken Sie die Taste OK.
Wichtig
Scannen Sie den QR-Code für ein Videolernprogramm zum
Einrichtungsverfahren.
7 Überprüfen Sie, ob der folgende Bildschirm
angezeigt wird.

7-a
4
Einrichten des Druckers
Computer Smartphone
Computer und
Smartphone
Herstellen einer Verbindung mit einem Computer
Wenn Sie mehrere Computer verwenden, führen Sie diese Schritte auf jedem
Computer aus
.
1 Greifen Sie von einem Computer aus auf
die Canon-Website zu.
2 Wählen Sie Einrichten aus.
3 Geben Sie den Modellnamen Ihres
Druckers ein und klicken Sie auf Los.
• Wählen Sie Ihr Land oder Ihre Region aus,
wenn Sie dazu aufgefordert werden.
4 Klicken Sie auf Start.
5 Klicken Sie auf Wenn Sie Ihren Drucker
bereits vorbereitet haben, wechseln
Sie zu Verbindung herstellen.
Hinweis
Die folgenden Schritte gelten für Benutzer von
Windows.
6 Klicken Sie auf Herunterladen.
7 Führen Sie die heruntergeladene Datei
aus.
8 Klicken Sie auf Setup starten (Start
Setup).
9 Befolgen Sie die Anweisungen auf dem
Bildschirm.
• Diese Verfahren können einige Zeit dauern.
• Um auch eine Verbindung mit einem
Smartphone herzustellen, lesen Sie „7-b.
Herstellen einer Verbindung mit einem
Smartphone” auf Seite 5.
Mit welchem Gerät stellen Sie eine Verbindung her?
7-a.Herstellen einer Verbindung mit einem
Computer
Verwenden der Installations-CD-ROM für Windows
Doppelklicken Sie auf EasySetup.exe auf der CD-ROM und fahren Sie dann bei Schritt 3 fort. Wenn Sie
keinen Internetzugang haben, öffnen Sie den Ordner win auf der CD-ROM und doppelklicken Sie auf
SETUP.exe. Dadurch wird der Druckertreiber installiert.
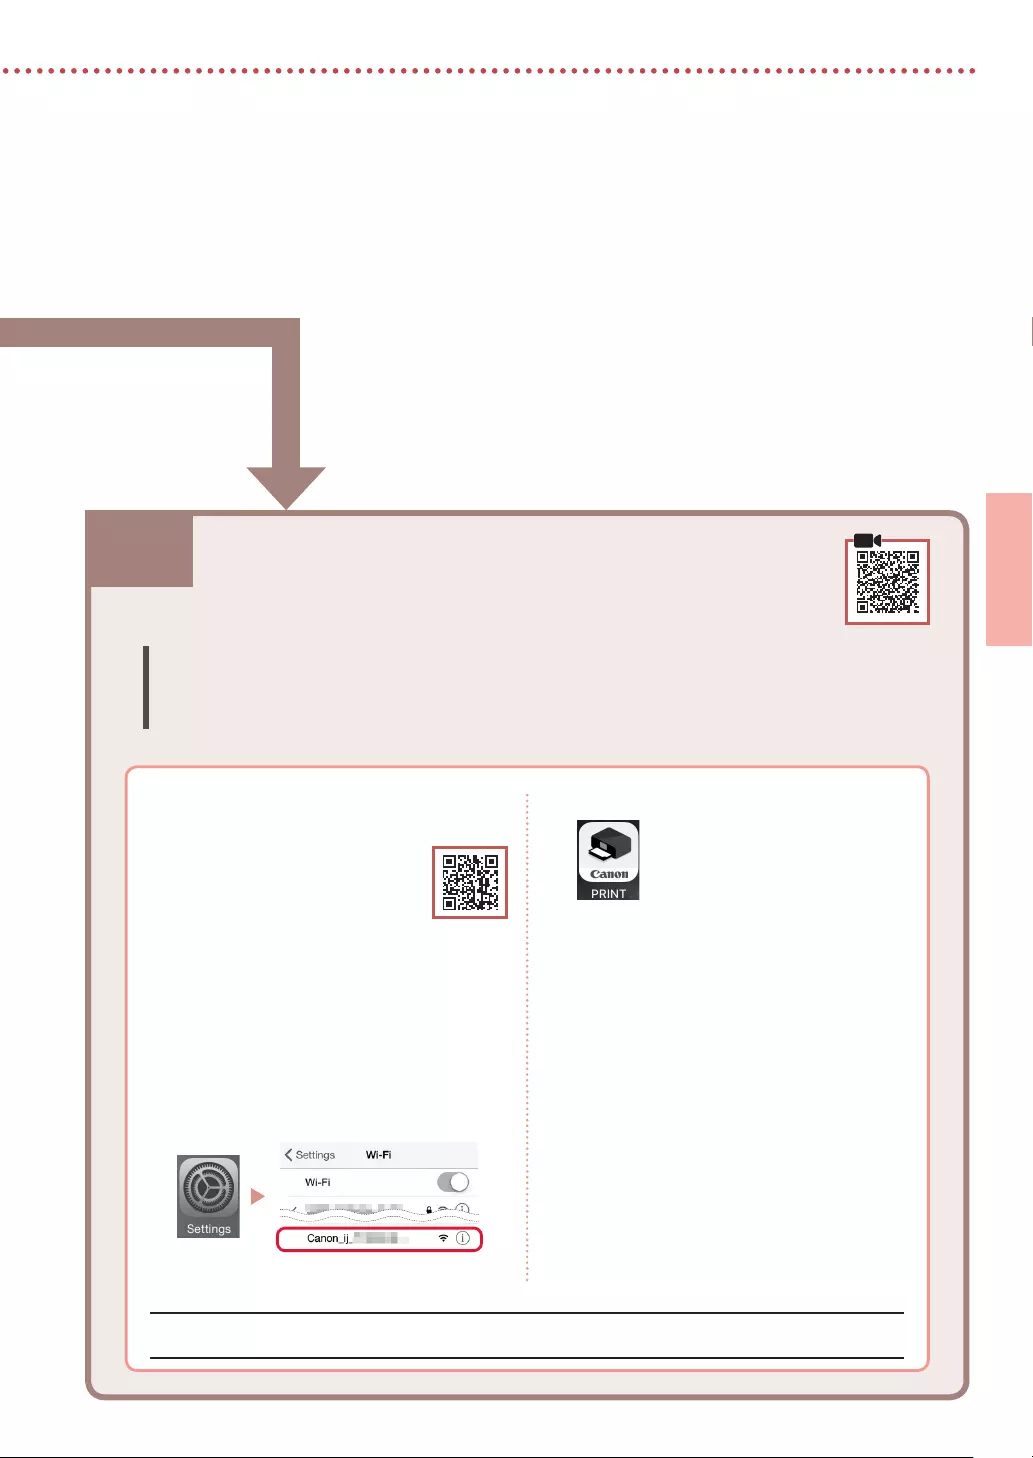
5
DEUTSCH
7-b. Herstellen einer Verbindung mit einem
Smartphone
7-b
1 Installieren Sie die App „Canon PRINT
Inkjet/SELPHY” auf Ihrem Smartphone.
• Scannen Sie den QR-Code
auf der rechten Seite, um die
Canon-Website aufzurufen,
und laden Sie dann die App
herunter.
2 Önen Sie die Wi-Fi-Einstellungen auf
Ihrem Smartphone. Tippen Sie auf den
Namen des Netzwerks (SSID), das mit
„Canon_ij_” beginnt.
Wenn „Canon_ij_” nicht angezeigt wird,
fahren Sie mit Schritt 3 fort.
(Beispiel für iOS-Bildschirm)
Herstellen einer Verbindung mit einem Smartphone
Wenn Sie mehrere Smartphones verwenden, führen Sie diese Schritte auf jedem
Smartphone aus.
Bereiten Sie Folgendes vor, bevor Sie beginnen.
a Aktivieren Sie die Wi-Fi-Einstellung auf Ihrem Smartphone.
b
Stellen Sie eine Verbindung zwischen Ihrem Smartphone und dem Wireless Router her (wenn Sie über einen Wireless Router verfügen).
Weitere Informationen finden Sie in den Handbüchern zu Ihrem Smartphone und dem Wireless Router.
Sobald Sie Ihren Drucker hinzugefügt haben, können Sie über Ihr Smartphone drucken.
3 Önen Sie die installierte App.
4 Befolgen Sie die Anweisungen auf
dem App-Bildschirm, um Ihren Drucker
hinzuzufügen.

6
Verwenden des Druckers ohne Wireless Router
Weitere Informationen finden Sie unter Drucken von unterwegs im Online-Handbuch.
Wenn Sie den Drucker in einem Bereich verwenden möchten, in dem Sie keinen Zugriff auf Wi-Fi haben, müssen
Sie die Einstellungen auf Ihrem Computer oder Smartphone ändern.
Normalerweise verwenden Sie einen Wireless
Router, um Ihren Drucker mit Ihrem Computer
oder Smartphone zu verbinden.
Wenn kein Wireless Router verfügbar ist, können
Sie Ihren Drucker direkt mit Ihrem Computer oder
Smartphone verbinden (Drahtlos Direkt).
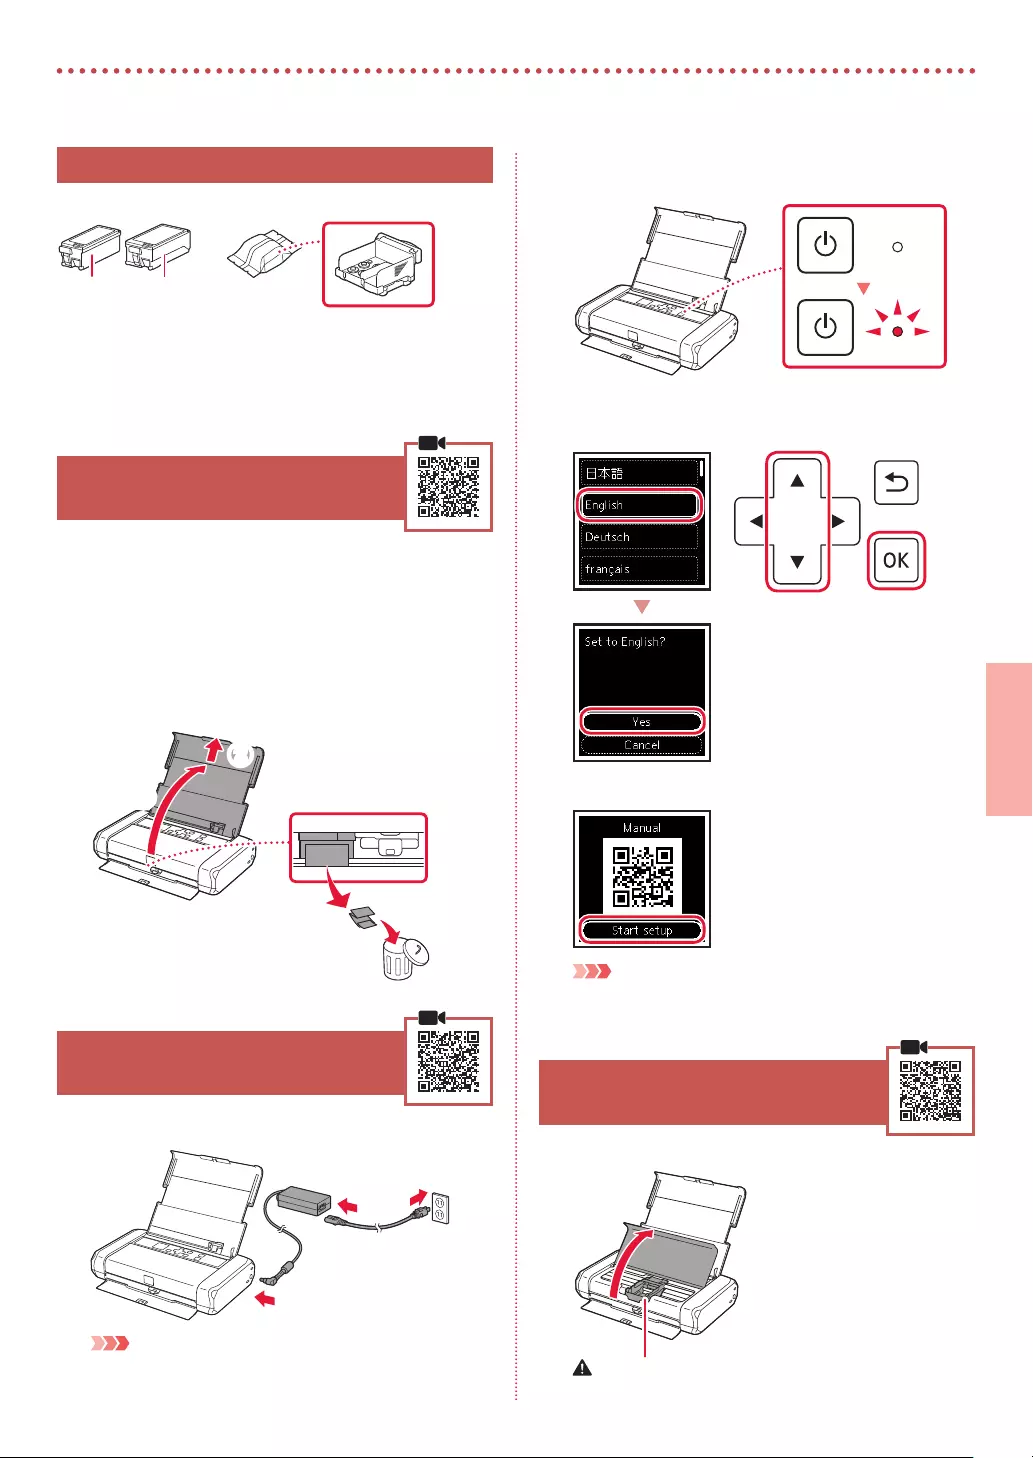
1
NEDERLANDS
De printer instellen
1. Inhoud van de doos
•
Inkttanks
Zwart Kleur
•
Printkop
•
Netspanningsadapter •
Installatie-cd-rom voor Windows
•
Netsnoer •
Veiligheidsinformatie en belangrijke
informatie
•
USB-kabel •
Aan de Slag-gids (deze handleiding)
2. Verpakkingsmateriaal
verwijderen
1 Verwijder het verpakkingsmateriaal en de
oranje tape en gooi het weg.
2 Open de klep van de achterste lade, trek hem
uit, verwijder het beschermende materiaal en
gooi het weg.
• De klep van de papieruitvoersleuf wordt automatisch
geopend.
a
b
c
3. De printer inschakelen
1 Sluit het netsnoer aan.
a
b
c
Belangrijk
Sluit op dit moment nog geen andere kabels aan.
2 Houd de knop AAN (ON) op de printer
ingedrukt totdat het AAN (ON)-lampje brandt.
3 Gebruik de knoppen {, } en OK om een taal
te selecteren.
4 Druk op de knop OK.
Belangrijk
Scan de QR-code voor een videozelfstudie van de
installatieprocedure.
4. De printkop installeren
1 Open het klepje over de printkop.
Let op
Raak de printkophouder niet aan totdat deze stopt met bewegen.

2
De printer instellen
2 Druk beide lipjes op de printkopvergrendeling
naar binnen om de vergrendeling te openen en
trek deze omhoog totdat hij stopt.
3 Haal de printkop uit de verpakking.
Belangrijk
Er zit mogelijk wat transparante of lichte inkt op de binnenkant
van de zak waarin de printkop wordt geleverd, maar dit is niet
van invloed op de afdrukkwaliteit. Wees voorzichtig dat u geen
inkt op u krijgt wanneer u deze items vastpakt.
4 Verwijder het beschermkapje.
Belangrijk
Raak de aangegeven gebieden
in de afbeelding niet aan. De
printer kan anders mogelijk
niet correct afdrukken.
5 Plaats de printkop in de printkophouder, waarbij
de marketing naar binnen is gericht.
6 Pak beide lipjes op de printkopvergrendeling
vast en duw deze omlaag.
Belangrijk
Nadat u de printkop hebt geïnstalleerd, mag u deze niet
onnodig verwijderen.
7 U vergrendelt de printkopvergrendeling door
op het linkerlipje en daarna op het rechterlipje
te duwen totdat ze vastklikken.
5. De inkttanks installeren
1 Verwijder het oranje kapje van de zwarte
inkttank.
Zwart
2 Installeer de inkttank.
• Plaats de inkttank rechts in de printkop, waarbij de
markering naar binnen is gericht, en druk hem
omlaag totdat hij klikt.
• Controleer of het lampje op de inkttank brandt. Als
het lampje niet brandt, drukt u de achterkant van de
inkttank omlaag.
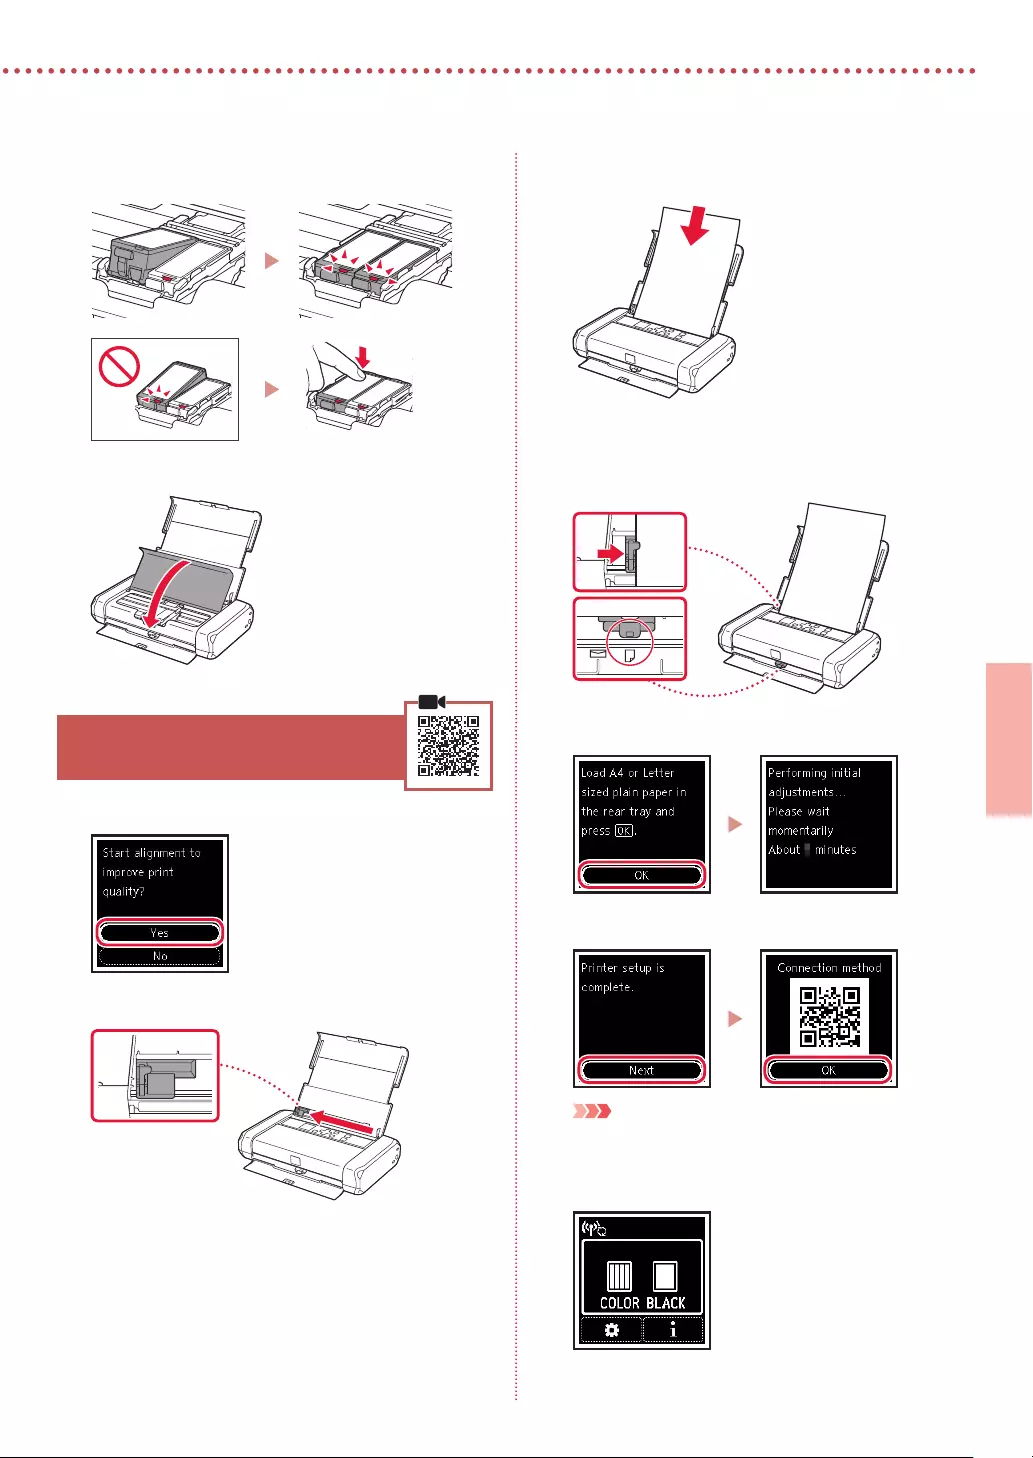
3
NEDERLANDS
3 Herhaal stap 1 tot en met 2 om ook de
kleureninkttank aan de linkerkant te plaatsen.
4 Sluit het klepje over de printkop.
6. Papier plaatsen
1 Druk op de knop OK.
2 Schuif de papiergeleider naar links.
3 Plaats normaal papier van Letter- of A4-formaat
tegen de rechterrand met de afdrukzijde omhoog.
4 Lijn de papiergeleider uit met de breedte van
het papier en controleer of de hendel voor
papierdikte naar rechts is geschoven.
5 Druk op de knop OK.
6 Druk op de knop OK.
Belangrijk
Scan de QR-code voor een videozelfstudie van de
installatieprocedure.
7 Controleer of het volgende scherm verschijnt.

7-a
4
De printer instellen
Computer Smartphone
Computer en
smartphone
Verbinden met een computer
Als u meerdere computers gebruikt, voert u deze stappen uit op elke computer.
1 Ga naar de Canon-website op een
computer.
2 Selecteer Installatie.
3 Voer de modelnaam van de printer in
en klik op Ga.
• Selecteer uw land of regio wanneer u
daarom wordt gevraagd.
4 Klik op Start.
5 Klik op Als u uw printer al hebt
voorbereid, gaat u naar Verbinden.
Opmerking
De volgende stappen zijn bedoeld voor Windows-
gebruikers.
6 Klik op Downloaden.
7 Voer het gedownloade bestand uit.
8 Klik op Beginnen met instellen (Start
Setup).
9 Volg de instructies op het scherm.
• Deze handelingen kunnen enige tijd duren.
• Als u ook verbinding wilt maken met een
smartphone, raadpleegt u «7-b. Verbinden
met een smartphone» op pagina 5.
Met welk apparaat maakt u verbinding?
7-a.Verbinden met een computer
De installatie-cd-rom gebruiken voor Windows
Dubbelklik op EasySetup.exe vanaf de cd-rom en ga verder vanaf stap 3. Als u geen internetverbinding
hebt, opent u de map win van de cd-rom en dubbelklikt u op SETUP.exe. Hiermee wordt het
printerstuurprogramma geïnstalleerd.

5
NEDERLANDS
7-b. Verbinden met een smartphone
7-b
1 Installeer de app «Canon PRINT Inkjet/
SELPHY» op uw smartphone.
• Scan de QR-code rechts om
naar de Canon-website te gaan
en de app te downloaden.
2 Open de Wi-Fi-instellingen op uw
smartphone. Tik op de netwerknaam
(SSID) die met «Canon_ij_» begint.
Als «Canon_ij_» niet wordt
weergegeven, gaat u verder met stap 3.
(Voorbeeld van iOS-scherm)
Verbinden met een smartphone
Als u meerdere smartphones gebruikt, voert u deze stappen uit op elke smartphone.
Bereid het volgende voor voordat u begint.
a Schakel de Wi-Fi-instelling op uw smartphone in.
b Verbind uw smartphone met de draadloze router (als u een draadloze router gebruikt).
Raadpleeg de handleiding van uw smartphone en draadloze router voor meer informatie.
Nadat u de printer hebt toegevoegd, kunt u afdrukken vanaf uw smartphone.
3 Open de geïnstalleerde app.
4 Volg de instructies op het scherm in de
app om de printer toe te voegen.

6
De printer gebruiken zonder een draadloze router
Raadpleeg Afdrukken op afstand in de Online handleiding.
Als u de printer wilt gebruiken op een locatie waar u geen toegang hebt tot Wi-Fi, moet u de instellingen op uw
computer of smartphone wijzigen.
Gewoonlijk gebruikt u een draadloze router om
de printer te verbinden met uw computer of
smartphone.
Als er geen draadloze router beschikbaar is, kunt
u de printer rechtstreeks verbinden met uw
computer of smartphone (Draadloos direct).

1
ITALIANO
Impostazione della stampante
1. Contenuto della scatola
•
Serbatoi d’inchiostro
Nero Colore
•
Testina di stampa
•
Adattatore CA •
CD-ROM di installazione per Windows
•
Cavo di alimentazione •
Informazioni importanti e sulla sicurezza
•
Cavo USB •
Guida Rapida (questo manuale)
2. Rimozione del materiale da
imballaggio
1 Rimuovere e disfarsi di eventuale materiale da
imballaggio e del nastro arancione.
2 Aprire ed estendere il coperchio del vassoio
posteriore, quindi rimuovere il materiale di
protezione e disfarsene.
• Il coperchio dello slot di uscita della carta si apre
automaticamente.
a
b
c
3. Accensione della stampante
1 Collegare il cavo di alimentazione.
a
b
c
Importante
In questa fase, non collegare altri cavi.
2 Tenere premuto il pulsante ON nché non si
accende la spia ON.
3 Utilizzare i pulsanti {, } e OK per selezionare
una lingua.
4 Premere il pulsante OK.
Importante
Eseguire la scansione del codice QR per un video tutorial della
procedura di impostazione.
4. Installazione della testina di
stampa
1 Aprire il coperchio della testina di stampa.
Attenzione
Non toccare il supporto della testina di stampa fino a
quando non si ferma.

2
Impostazione della stampante
2 Premere entrambe le linguette sulla leva
di bloccaggio della testina di stampa verso
l’interno per rilasciare il bloccaggio, quindi
sollevare la leva con fermezza nché non scatta
in posizione.
3 Rimuovere la testina di stampa dal pacchetto.
Importante
Potrebbe esserci dell’inchiostro trasparente o dell’inchiostro
colore chiaro sulla busta della testina di stampa — ciò non ha
alcun effetto sulla qualità di stampa. Fare attenzione a non
sporcarsi di inchiostro quando si maneggiano questi elementi.
4 Rimuovere il cappuccio protettivo.
Importante
Non toccare le aree mostrate
nella figura. Altrimenti, la
stampante potrebbe non
stampare correttamente.
5 Inserire la testina di stampa nel supporto della
testina di stampa in modo che il segno sia
rivolto verso l’interno.
6 Tenere entrambe le linguette sulla leva di
bloccaggio della testina di stampa, quindi
abbassare la leva.
Importante
Una volta installata la testina di stampa, non rimuoverla
inutilmente.
7 Per bloccare la leva di bloccaggio della testina
di stampa, spingere la linguetta sinistra e poi
quella destra nché non scattano in posizione.
5. Installazione dei serbatoi
d’inchiostro
1 Rimuovere il coperchietto arancione dal
serbatoio d’inchiostro del nero.
Nero
2 Installare il serbatoio d’inchiostro.
• Inserire il serbatoio d’inchiostro sul lato destro della
testina di stampa in modo che il segno sia rivolto
verso l’interno, quindi premere finché non si sente
un clic.
• Controllare che la spia sul serbatoio d’inchiostro sia
accesa. Se la spia non è accesa, premere il retro del
serbatoio d’inchiostro.

3
ITALIANO
3 Ripetere i passi da 1 a 2 e installare anche il
serbatoio d’inchiostro del colore sul lato sinistro.
4 Chiudere il coperchio della testina di stampa.
6. Caricamento della carta
1 Premere il pulsante OK.
2 Far scorrere la guida della carta verso sinistra.
3 Caricare carta comune in formato Letter o A4
contro il margine destro con il lato di stampa
rivolto verso l’alto.
4 Allineare la guida della carta alla larghezza della
carta, quindi controllare che la leva spessore
carta sia rivolta verso destra.
5 Premere il pulsante OK.
6 Premere il pulsante OK.
Importante
Eseguire la scansione del codice QR per un video tutorial della
procedura di impostazione.
7 Vericare che venga visualizzata la schermata
seguente.

7-a
4
Impostazione della stampante
Computer Smartphone
Computer e
smartphone
Connessione a un computer
Se si utilizzano più computer, eseguire questi passaggi su ciascun computer.
1 Accedere al sito Web di Canon da un
computer.
2 Selezionare Impostazione.
3 Immettere il nome del modello della
stampante e fare clic su Vai.
• Se richiesto, selezionare il paese o la
regione.
4 Fare clic su Avvio.
5 Fare clic su Se la stampante è già
preparata, connettersi.
Nota
Le seguenti procedure sono destinate agli utenti
Windows.
6 Fare clic su Scarica.
7 Eseguire il le scaricato.
8 Fare clic su Avvia impostazione (Start
Setup).
9 Seguire le istruzioni visualizzate sullo
schermo.
• Queste operazioni possono richiedere del
tempo.
• Per connettersi anche a uno smartphone,
vedere «7-b. Connessione a uno smartphone»
a pagina 5.
Quale periferica si sta connettendo?
7-a. Connessione a un computer
Utilizzo del CD-ROM di installazione per Windows
Fare doppio clic su EasySetup.exe nel CD-ROM, quindi continuare dal passo 3. Se non si dispone di una
connessione Internet, aprire la cartella win nel CD-ROM e fare doppio clic su SETUP.exe. Verrà installato
il driver della stampante.

5
ITALIANO
7-b. Connessione a uno smartphone
7-b
1 Installare l’app «Canon PRINT Inkjet/
SELPHY» sullo smartphone.
• Eseguire la scansione del codice
QR sulla destra per accedere al
sito Web di Canon e scaricare
l’app.
2 Aprire le impostazioni Wi-Fi dello
smartphone. Toccare il nome di rete
(SSID) che inizia con «Canon_ij_«.
Se «Canon_ij_» non appare, procedere
al passo 3.
(Esempio di schermata iOS)
Connessione a uno smartphone
Se si utilizzano più smartphone, eseguire questi passaggi su ciascuno smartphone.
Prima di iniziare, eettuare quanto segue.
a Abilitare l’impostazione Wi-Fi sullo smartphone.
b Connettere lo smartphone al router wireless (se si dispone di un router wireless).
Per ulteriori informazioni, fare riferimento ai manuali dello smartphone e del router wireless.
Una volta aggiunta la stampante, è possibile stampare dallo smartphone.
3 Aprire l’app installata.
4 Per aggiungere la stampante, attenersi
alle istruzioni visualizzate nell’app.
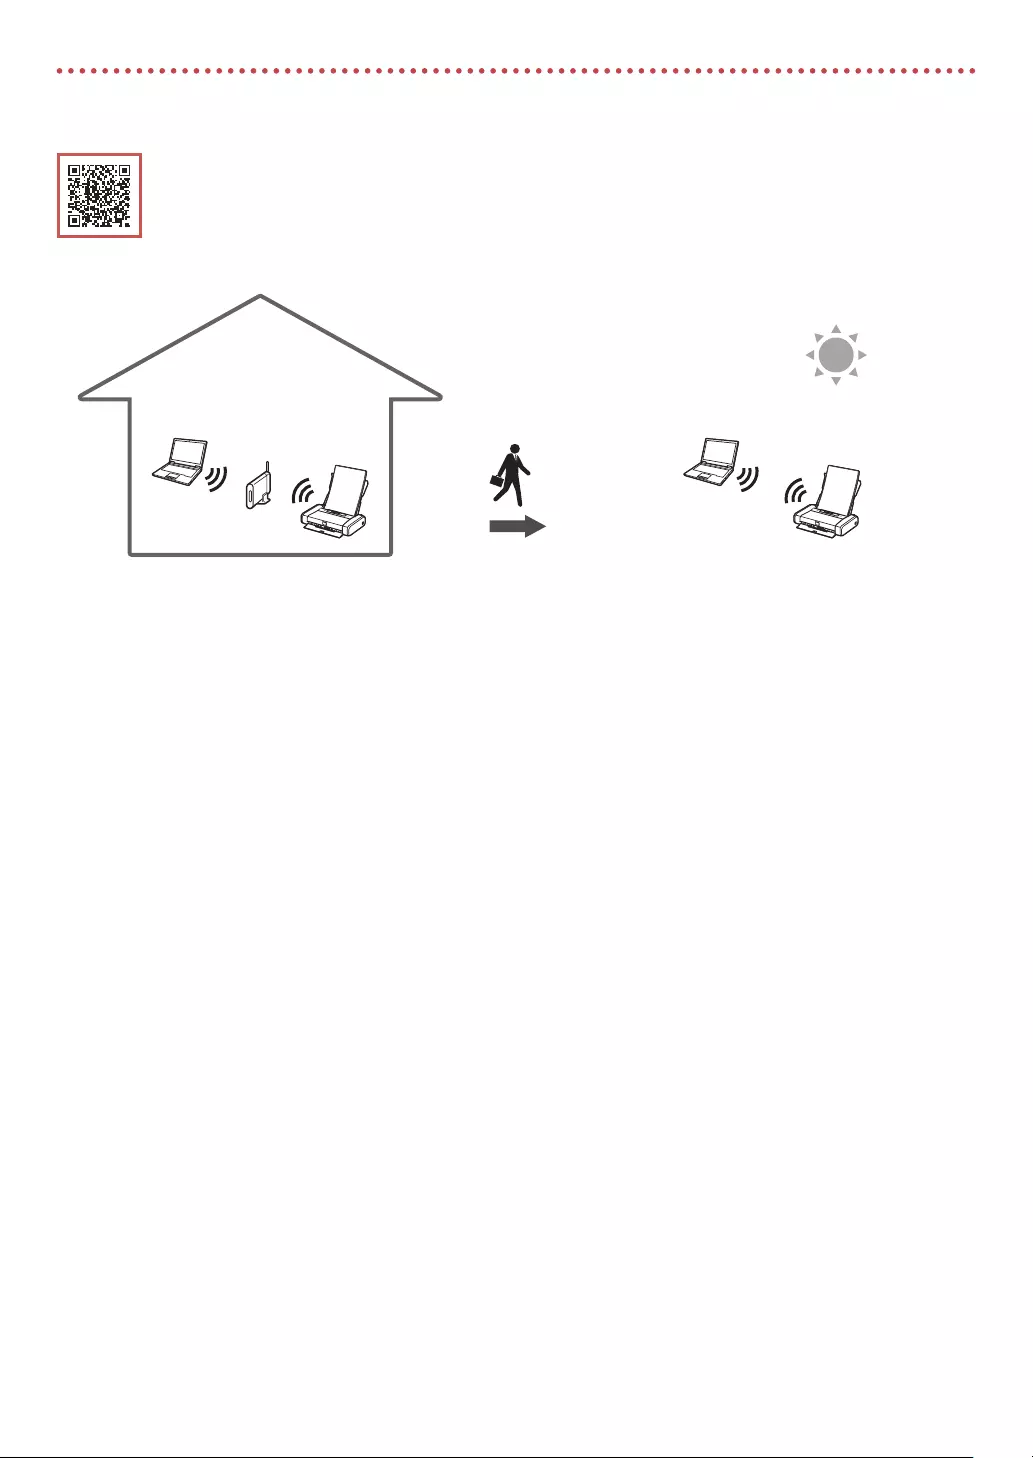
6
Utilizzo della stampante senza un router wireless
Fare riferimento a Stampa mentre sei fuori casa in Manuale online.
Per utilizzare la stampante in un’area in cui non si ha accesso a Wi-Fi, è necessario modificare le impostazioni del
computer o dello smartphone.
Di solito si utilizza un router wireless per
connettere la stampante al computer o allo
smartphone.
Quando non è disponibile un router wireless, è
possibile connettere la stampante direttamente al
computer o allo smartphone (Wireless diretto).

1
PORTUGUÊS
Congurando a impressora
1. Conteúdo da Caixa
•
Cartuchos de tinta
Preto Colorido
•
Cabeça de impressão
•
Adaptador CA •
CD-ROM de instalação para Windows
•
Cabo de alimentação •
Informações Importantes e Sobre Segurança
•
Cabo USB •
Para Começar (este manual)
2. Removendo os materiais da
embalagem
1 Remova e descarte quaisquer materiais de
embalagem e a ta laranja.
2 Abra e estenda a tampa da bandeja traseira e,
em seguida, remova e descarte o material de
proteção.
• A tampa do slot de saída do papel se abre
automaticamente.
a
b
c
3. Ligando a Impressora
1 Conecte o cabo de alimentação.
a
b
c
Importante
Não conecte quaisquer outros cabos ainda.
2 Mantenha pressionado o botão ATIVADO (ON)
até o indicador luminoso ATIVADO (ON) acender.
3 Use os botões {, } e OK para selecionar um
idioma.
4 Pressione o botão OK.
Importante
Leia o Código QR para um tutorial em vídeo do procedimento
de configuração.
4. Instalando a Cabeça de
Impressão
1 Abra a tampa da cabeça de impressão.
Cuidado
Não toque no suporte da cabeça de impressão antes de ele
parar de se mover.

2
Congurando a impressora
2 Pressione para dentro as duas linguetas da
alavanca de bloqueio da cabeça de impressão
para soltar a trava e, em seguida, eleve-a
rmemente até que ela pare.
3 Remova a cabeça de impressão de seu pacote.
Importante
Pode ser que haja tinta transparente ou de cor clara no interior
da embalagem em que a cabeça de impressão veio; isso não
tem nenhum efeito na qualidade de impressão. Tenha cuidado
para não se manchar com a tinta ao manusear esses itens.
4 Remova a tampa de proteção.
Importante
Não toque nas áreas mostradas
na figura. Caso contrário, a
impressora pode não imprimir
corretamente.
5 Instale a cabeça de impressão no suporte da
cabeça de impressão de modo que a marca
esteja virada para dentro.
6 Segure as duas linguetas da alavanca de
bloqueio da cabeça de impressão e, em seguida,
abaixe-a.
Importante
Depois que tiver instalado a cabeça de impressão, não
remova-a desnecessariamente.
7 Para travar a alavanca de bloqueio da cabeça de
impressão, empurre as linguetas da esquerda e
da direita até que elas se encaixem no lugar.
5. Instalando os cartuchos de tinta
1 Retire a tampa laranja do cartucho de tinta
preta.
Preto
2 Instale o cartucho de tinta.
• Insira o cartucho de tinta no lado direito da cabeça
de impressão de modo que a marca esteja virada
para dentro e, em seguida, pressione-o até ouvir um
clique.
• Verifique se o indicador luminoso no cartucho de
tinta está aceso. Se o indicador não estiver aceso,
pressione a parte traseira do cartucho de tinta.

3
PORTUGUÊS
3 Repita as etapas 1 a 2 e instale o cartucho de
tinta colorido também, no lado esquerdo.
4 Feche a tampa da cabeça de impressão.
6. Colocando papel
1 Pressione o botão OK.
2 Deslize a guia do papel para a esquerda.
3 Coloque o papel Letter comum ou tamanho A4
contra a borda direita com o lado a ser impresso
voltado para cima.
4 Alinhe a guia do papel para a largura do papel
e verique se o alavanca de espessura do papel
está virada para a direita.
5 Pressione o botão OK.
6 Pressione o botão OK.
Importante
Leia o Código QR para um tutorial em vídeo do procedimento
de configuração.
7 Verique se a tela a seguir aparece.

7-a
4
Congurando a impressora
Computador Smartphone
Computador e
smartphone
Conectando a um Computador
Se você estiver usando vários computadores, execute estas etapas em cada
computador.
1 Acesse o site Canon de um computador.
2 Selecione Congurar.
3 Insira o nome do modelo da sua
impressora e clique em Ir.
• Se solicitado, selecione seu país ou região.
4 Clique em Iniciar.
5 Clique em Se você já tiver preparado a
sua impressora, vá para Conectar.
Nota
As etapas a seguir são para usuários do Windows.
6 Clique em Download.
7 Execute o arquivo baixado.
8 Clique em Iniciar conguração (Start
Setup).
9 Siga as instruções na tela.
• Estas operações podem levar algum tempo.
• Para conectar a um smartphone também,
consulte «7-b. Conectando a um
smartphone» na página 5.
Qual dispositivo você está conectando?
7-a.Conectando a um computador
Usando o CD-ROM de instalação para Windows
Clique duas vezes em EasySetup.exe no CD-ROM e, em seguida, continue a partir da etapa 3. Se você
não tiver uma conexão com a internet, abra a pasta win no CD-ROM clique duas vezes em SETUP.exe.
Isso instalará o driver da impressora.

5
PORTUGUÊS
7-b. Conectando a um smartphone
7-b
1 Instale o aplicativo «Canon PRINT Inkjet/
SELPHY» no seu smartphone.
• Leia o código QR exibido à
direita para acessar o site da
Canon e fazer download do
aplicativo.
2 Abra as congurações do seu Wi-Fi
smartphone. Toque no nome da rede
(SSID) que começa com «Canon_ij_«.
Se «Canon_ij_» não aparecer, prossiga
para a etapa 3.
(Exemplo da tela do iOS)
Conectando a um smartphone
Se você estiver usando vários smartphones, execute estas etapas em cada
smartphone.
Prepare o seguinte antes de iniciar.
a Ative a configuração Wi-Fi no seu smartphone.
b Conecte seu smartphone ao roteador sem fio (se você tiver um roteador sem fio).
Consulte os manuais do seu smartphone e do seu roteador sem fio para obter mais detalhes.
Depois que você adicionar a impressora, poderá imprimir do seu smartphone.
3 Abra o aplicativo instalado.
4 Siga as instruções na tela do aplicativo
para adicionar sua impressora.

6
Usando a impressora sem um roteador sem o
Consulte Imprimir quando não estiver em casa no Manual On-line.
Para usar a impressora em uma área na qual você não tem acesso a Wi-Fi, é necessário alterar as configurações do
seu computador ou smartphone.
Você, normalmente, usará um roteador sem fio
para conectar sua impressora ao computador ou
smartphone.
Quando não houver disponibilidade de um
roteador sem fio, você poderá conectar sua
impressora diretamente ao computador ou
smartphone (Conexão direta sem o).

1
ESPAÑOL
Instalación de la impresora
1. Contenido de la caja
•
Depósitos de tinta
Negro Color
•
Cabezal de impresión
•
Adaptador de CA •
CD-ROM de instalación para Windows
•
Cable de alimentación •
Información de seguridad e información
importante
•
Cable USB •
Guía de inicio (este manual)
2. Retirar los materiales de
protección
1 Retire y tire los materiales de protección y la
cinta naranja.
2 Abra y extienda la cubierta de la bandeja
posterior y, a continuación retire y deseche el
material de protección.
• La cubierta de la ranura de salida del papel se abre
automáticamente.
a
b
c
3. Encender la impresora
1 Conecte el cable de alimentación.
a
b
c
Importante
En este momento, no conecte ningún otro cable.
2 Pulse el botón ACTIVADO (ON) y manténgalo
pulsado hasta que se encienda la luz ACTIVADO
(ON).
3 Utilice los botones {, } y OK para seleccionar
un idioma.
4 Pulse el botón OK.
Importante
Escanee el código QR para ver un tutorial en vídeo sobre el
procedimiento de configuración.
4. Instalar el cabezal de
impresión
1 Abra la cubierta del cabezal de impresión.
Precaución
No toque el soporte del cabezal de impresión hasta que deje
de moverse.

2
Instalación de la impresora
2 Presione hacia dentro ambas lengüetas de la
palanca de bloqueo del cabezal de impresión
para liberar el bloqueo y, a continuación,
levántela con rmeza hasta que se detenga.
3 Saque el cabezal de impresión de su paquete.
Importante
Puede haber algo de tinta transparente o de color claro en el
interior de la bolsa en la que viene el cabezal de impresión;
esto no tiene ningún efecto en la calidad de impresión.
Tenga cuidado de no mancharse de tinta al manipular estos
elementos.
4 Retire la tapa protectora.
Importante
No toque las áreas que se
muestran en la imagen. Si lo
hace, puede que la impresora
no imprima correctamente.
5 Coloque el cabezal de impresión en el soporte
del cabezal de impresión de forma que la marca
mire hacia dentro.
6 Sujete ambas lengüetas en la palanca de
bloqueo del cabezal de impresión y, a
continuación, bájela.
Importante
Cuando haya instalado el cabezal de impresión, no lo retire
innecesariamente.
7 Para bloquear la palanca de bloqueo del cabezal
de impresión, presione la lengüeta izquierda
y después la derecha hasta que encajen en su
sitio.
5. Instalación de los depósitos
de tinta
1 Retire la tapa naranja del depósito de tinta negro.
Negro
2 Instale el depósito de tinta.
• Inserte el depósito de tinta en el lado derecho del cabezal
de impresión de forma que la marca mire hacia
dentro y, a continuación, presiónelo hasta que encaje.
• Compruebe que la luz del depósito de tinta esté
encendida. Si la luz no está encendida, presione la
parte posterior del depósito de tinta.
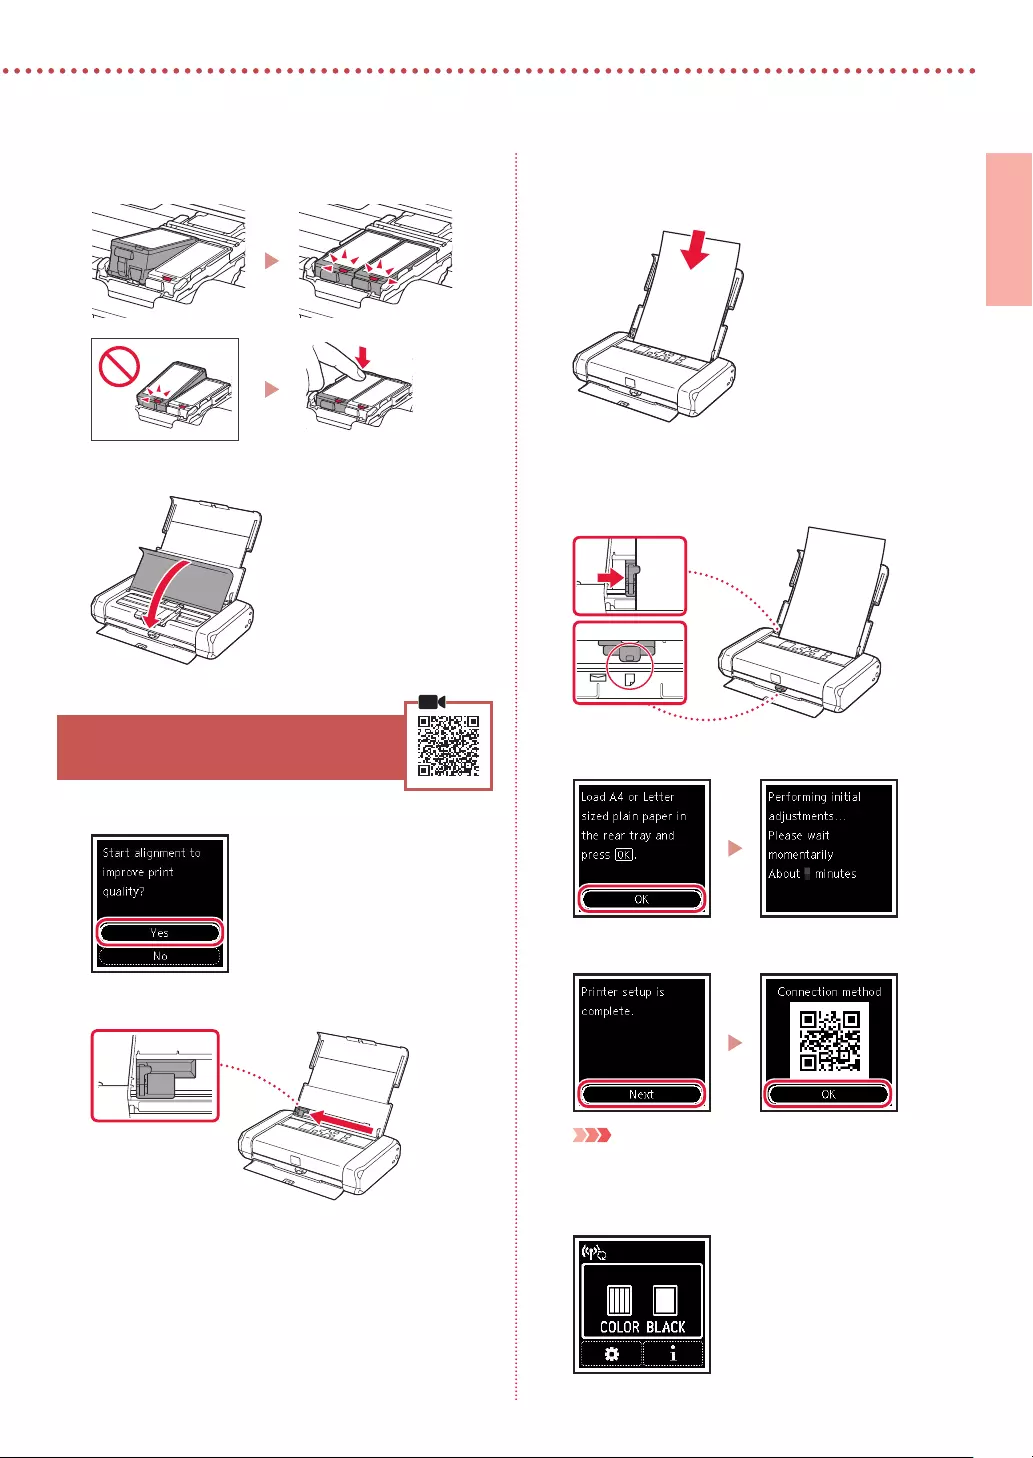
3
ESPAÑOL
3 Repita los pasos del 1 al 2 e instale el depósito
de tinta de color también en el lado izquierdo.
4 Cierre la cubierta del cabezal de impresión.
6. Carga del papel
1 Pulse el botón OK.
2 Deslice la guía del papel hacia la izquierda.
3 Cargue papel normal de tamaño Carta o
A4 contra el borde derecho con el lado de
impresión hacia arriba.
4 Alinee la guía del papel con el ancho del papel
y, a continuación, compruebe que la palanca de
grosor del papel esté colocada a la derecha.
5 Pulse el botón OK.
6 Pulse el botón OK.
Importante
Escanee el código QR para ver un tutorial en vídeo sobre el
procedimiento de configuración.
7 Compruebe que aparezca la siguiente pantalla.

7-a
4
Instalación de la impresora
Ordenador Teléfono inteligente
Ordenador y
teléfono inteligente
Conectar al ordenador
Si utiliza varios ordenadores, realice estos pasos en cada ordenador.
1 Acceda al sitio web de Canon desde un
ordenador.
2 Seleccione Congurar.
3 Escriba el nombre del modelo de su
impresora y haga clic en Ir.
• Si se le solicita, seleccione su país o región.
4 Haga clic en Iniciar.
5 Haga clic en Si ya ha preparado la
impresora, vaya a Conectar.
Nota
Los siguientes pasos son para usuarios de Windows.
6 Haga clic en Descargar.
7 Ejecute el archivo descargado.
8 Haga clic en Iniciar conguración
(Start Setup).
9 Siga las instrucciones que aparezcan en
pantalla.
• Estas operaciones pueden llevar algún
tiempo.
• Para conectar con un teléfono inteligente
también, consulte «7-b. Conexión con un
teléfono inteligente» en la página 5.
¿Qué dispositivo va a conectar?
7-a.Conexión con un ordenador
Uso del CD-ROM de instalación para Windows
Haga doble clic en EasySetup.exe en el CD-ROM y después continúe desde el paso 3. Si no tiene una
conexión a Internet, abra la carpeta win en el CD-ROM y haga doble clic en SETUP.exe. Esto instalará el
controlador de la impresora.

5
ESPAÑOL
7-b. Conexión con un teléfono inteligente
7-b
1 Instale la aplicación «Canon PRINT
Inkjet/SELPHY» en su teléfono
inteligente.
• Escanee el código QR que
se muestra a la derecha para
acceder al sitio web de Canon
y, a continuación, descargue
la aplicación.
2 Abra la conguración de Wi-Fi de su
teléfono inteligente. Toque el nombre de
red (SSID) que empieza con «Canon_ij_«.
Si no aparece «Canon_ij_«, vaya al paso 3.
(Ejemplo de la pantalla de iOS)
Conexión con un teléfono inteligente
Si utiliza varios teléfonos inteligentes, realice estos pasos en cada teléfono inteligente.
Prepare lo siguiente antes de empezar.
a Active la configuración de Wi-Fi en su teléfono inteligente.
b Conecte su teléfono inteligente al router inalámbrico (si tiene un router inalámbrico).
Consulte los manuales de su teléfono inteligente y del router inalámbrico para obtener más detalles.
Cuando haya agregado la impresora, podrá imprimir desde su teléfono inteligente.
3 Abra la aplicación instalada.
4 Siga las instrucciones en pantalla de la
aplicación para agregar su impresora.

6
Uso de la impresora sin un router inalámbrico
Consulte Imprimir fuera de casa en el Manual en línea.
Para usar la impresora en un área donde no tiene acceso a Wi-Fi, debe cambiar la configuración de su ordenador
o teléfono inteligente.
Normalmente se utiliza un router inalámbrico
para conectar la impresora al ordenador o al
teléfono inteligente.
Cuando un router inalámbrico no está disponible,
puede conectar la impresora directamente al
ordenador o al teléfono inteligente (Conexión
directa inalám.).

1
ΕΛΛΗΝΙΚΗ
Ρύθμιση του εκτυπωτή
1. Περιεχόμενα συσκευασίας
•
Δοχεία μελάνης
Μαύρο Έγχρωμο
•
Κεφαλή εκτύπωσης
•
Προσαρμογέας AC •
CD-ROM εγκατάστασης για Windows
•
Καλώδιο τροφοδοσίας •
Πληροφορίες για την ασφάλεια και
σημαντικές πληροφορίες
•
Καλώδιο USB •
Ξεκινώντας (αυτό το εγχειρίδιο)
2. Αφαίρεση υλικών
συσκευασίας
1 Αφαιρέστε και απορρίψτε τυχόν υλικά
συσκευασίας και πορτοκαλί ταινία.
2 Ανοίξτε και εκτείνετε το κάλυμμα πίσω θήκης
και στη συνέχεια αφαιρέστε και απορρίψτε το
προστατευτικό υλικό.
• Το κάλυμμα υποδοχής εξόδου χαρτιού ανοίγει
αυτόματα.
a
b
c
3. Ενεργοποίηση του εκτυπωτή
1 Συνδέστε το καλώδιο τροφοδοσίας.
a
b
c
Σημαντικό
Προς το παρόν, μη συνδέσετε άλλα καλώδια.
2 Πατήστε παρατεταμένα το κουμπί ON μέχρι να
ανάψει η λυχνία ON.
3 Χρησιμοποιήστε τα κουμπιά {, } και OK για να
επιλέξετε μια γλώσσα.
4 Πατήστε το κουμπί OK.
Σημαντικό
Σαρώστε τον κωδικό QR για να δείτε ένα βίντεο με οδηγίες
σχετικά με τη διαδικασία ρύθμισης.
4. Εγκατάσταση της κεφαλής
εκτύπωσης
1 Ανοίξτε το κάλυμμα κεφαλής εκτύπωσης.
Προσοχή
Μην αγγίζετε τη θήκη κεφαλής εκτύπωσης μέχρι να
σταματήσει να μετακινείται.

2
Ρύθμιση του εκτυπωτή
2 Πατήστε προς τα μέσα και τις δύο πλευρές του
μοχλού ασφάλισης κεφαλής εκτύπωσης για να
ελευθερώσετε την ασφάλιση και στη συνέχεια
σηκώστε τον σταθερά μέχρι να σταματήσει.
3 Βγάλτε την κεφαλή εκτύπωσης από τη
συσκευασία της.
Σημαντικό
Ενδέχεται να υπάρχει διάφανο ή απαλό έγχρωμο μελάνι στο
εσωτερικό της σακούλας μέσα στην οποία έρχεται η κεφαλή
εκτύπωσης — αυτό δεν επηρεάζει την ποιότητα εκτύπωσης.
Προσέχετε να μη λερωθείτε με μελάνη όταν χειρίζεστε αυτά τα
αντικείμενα.
4 Αφαιρέστε το προστατευτικό κάλυμμα.
Σημαντικό
Μην αγγίζετε τις περιοχές που
υποδεικνύονται στην εικόνα.
Διαφορετικά, ο εκτυπωτής
ενδέχεται να μην εκτυπώνει
σωστά.
5 Τοποθετήστε την κεφαλή εκτύπωσης στη θήκη
κεφαλής εκτύπωσης ώστε το σημάδι να
κοιτάζει προς τα μέσα.
6 Κρατήστε και τις δύο πλευρές του μοχλού
ασφάλισης κεφαλής εκτύπωσης και στη
συνέχεια κατεβάστε τον.
Σημαντικό
Αφού τοποθετήσετε την κεφαλή εκτύπωσης, μην την
αφαιρέσετε χωρίς λόγο.
7 Για να ασφαλίσετε τον μοχλό ασφάλισης
κεφαλής εκτύπωσης, πιέστε την αριστερή και
έπειτα τη δεξιά πλευρά μέχρι να ασφαλίσουν
στη θέση τους.
5. Εγκατάσταση των δοχείων
μελάνης
1 Αφαιρέστε το πορτοκαλί κάλυμμα από το μαύρο
δοχείο μελάνης.
Μαύρο
2 Εγκαταστήστε το δοχείο μελάνης.
• Τοποθετήστε το δοχείο μελάνης στη δεξιά πλευρά
της κεφαλής εκτύπωσης ώστε το σημάδι να
κοιτάζει προς τα μέσα και στη συνέχεια πιέστε το
προς τα κάτω μέχρι να κάνει κλικ.
• Ελέγξτε ότι η λυχνία στο δοχείο μελάνης είναι
αναμμένη. Αν η λυχνία δεν είναι αναμμένη, πιέστε προς
τα κάτω στην πίσω πλευρά του δοχείου μελάνης.
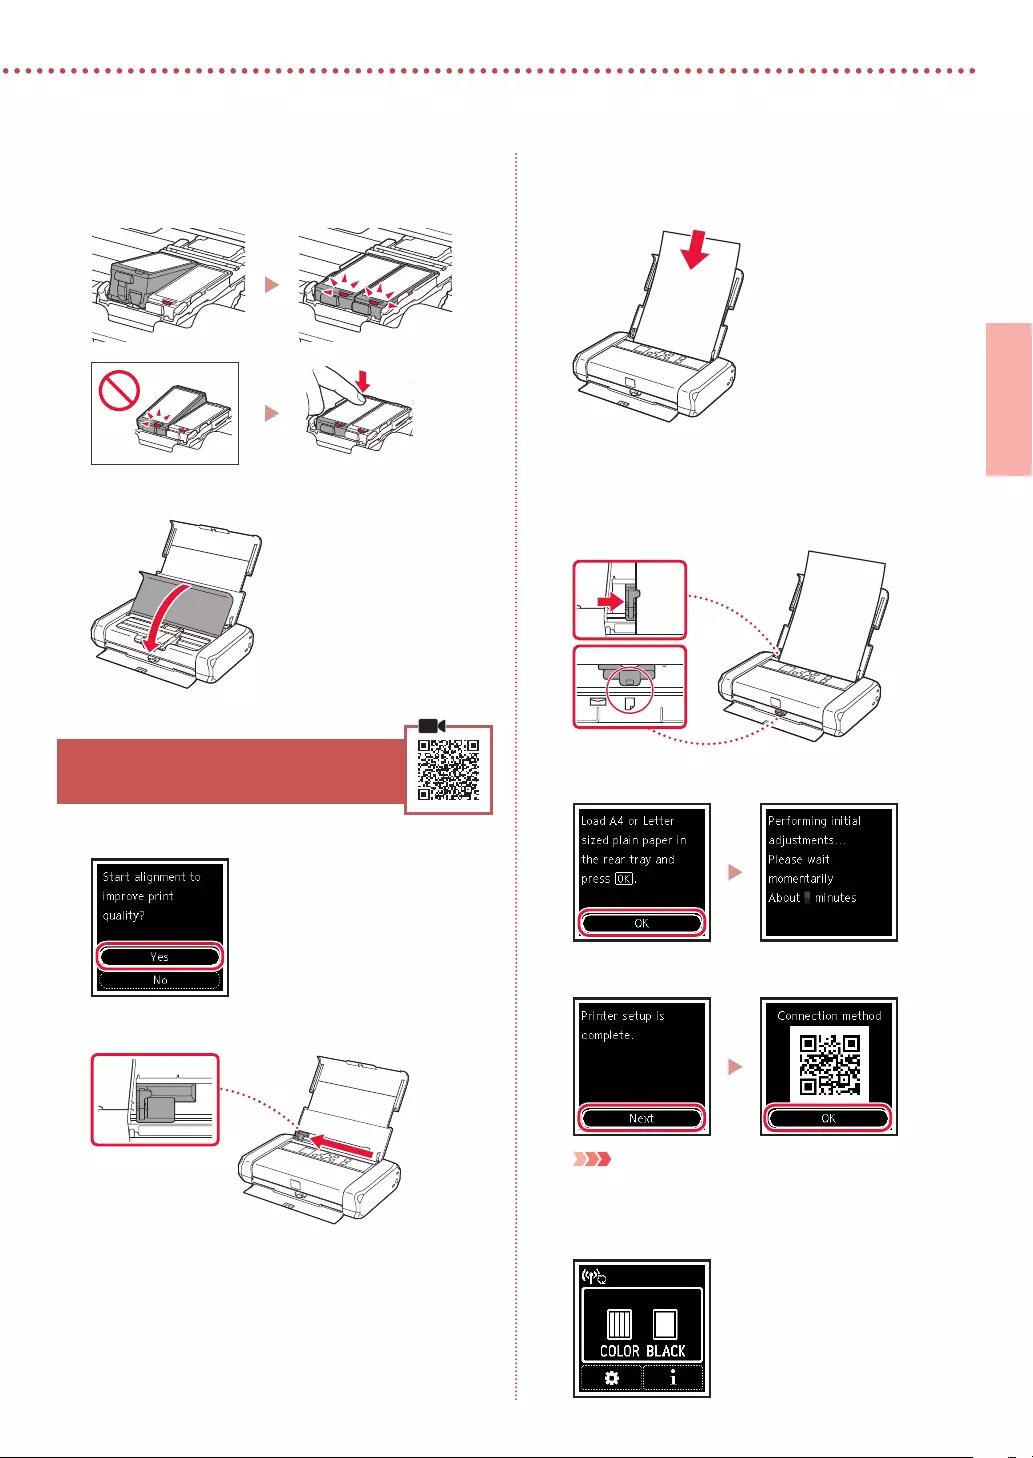
3
ΕΛΛΗΝΙΚΗ
3 Επαναλάβετε τα βήματα 1 έως 2 και
τοποθετήστε και το έγχρωμο δοχείο μελάνης
στην αριστερή πλευρά.
4 Κλείστε το κάλυμμα κεφαλής εκτύπωσης.
6. Τοποθέτηση χαρτιού
1 Πατήστε το κουμπί OK.
2 Σύρετε τον οδηγό χαρτιού προς τα αριστερά.
3 Τοποθετήστε απλό χαρτί μεγέθους Letter ή A4
έτσι ώστε να ακουμπά στη δεξιά πλευρά και με την
πλευρά εκτύπωσης στραμμένη προς τα επάνω.
4 Ευθυγραμμίστε τον οδηγό χαρτιού με το πλάτος
του χαρτιού και στη συνέχεια ελέγξτε ότι ο
μοχλός πάχους χαρτιού είναι τοποθετημένος
στα δεξιά.
5 Πατήστε το κουμπί OK.
6 Πατήστε το κουμπί OK.
Σημαντικό
Σαρώστε τον κωδικό QR για να δείτε ένα βίντεο με οδηγίες
σχετικά με τη διαδικασία ρύθμισης.
7 Βεβαιωθείτε ότι εμφανίζεται η ακόλουθη οθόνη.

7-a
4
Ρύθμιση του εκτυπωτή
Υπολογιστής Smartphone
Υπολογιστής και
smartphone
Σύνδεση με υπολογιστή
Εάν χρησιμοποιείτε πολλούς υπολογιστές, εκτελέστε αυτά τα βήματα σε κάθε υπολογιστή.
1 Μεταβείτε στη διαδικτυακή τοποθεσία
της Canon από έναν υπολογιστή.
2 Επιλέξτε Εγκατάσταση.
3 Καταχωρίστε το όνομα μοντέλου του
εκτυπωτή σας και κάντε κλικ στην
επιλογή Μετάβαση.
• Αν ζητηθεί, επιλέξτε τη χώρα ή την περιοχή
σας.
4 Κάντε κλικ στο Έναρξη.
5 Κάντε κλικ στο Αν έχετε ήδη
προετοιμάσει τον εκτυπωτή σας,
μεταβείτε στη Σύνδεση.
Σημείωση
Τα παρακάτω βήματα αφορούν τους χρήστες
Windows.
6 Κάντε κλικ στο Λήψη.
7 Εκτελέστε το ληφθέν αρχείο.
8 Κάντε κλικ στο Εκκίνηση ρύθμισης
(Start Setup).
9 Ακολουθήστε τις οδηγίες στην οθόνη.
• Αυτές οι λειτουργίες ενδέχεται να
χρειαστούν κάποιο χρόνο.
• Για να συνδέσετε και σε smartphone,
ανατρέξτε στην ενότητα «7-b. Σύνδεση με
Smartphone» στη σελίδα 5.
Τι συσκευή σκοπεύετε να συνδέσετε;
7-a.Σύνδεση με υπολογιστή
Χρήση του CD-ROM εγκατάστασης για Windows
Κάντε διπλό κλικ στο αρχείο EasySetup.exe που υπάρχει στο CD-ROM και, έπειτα, συνεχίστε από το
βήμα 3. Αν δεν έχετε σύνδεση internet, ανοίξτε το φάκελο win στο CD-ROM και κάντε διπλό κλικ στο
αρχείο SETUP.exe. Αυτή η ενέργεια θα εγκαταστήσει το πρόγραμμα οδήγησης του εκτυπωτή.

5
ΕΛΛΗΝΙΚΗ
7-b. Σύνδεση με Smartphone
7-b
1 Εγκαταστήστε την εφαρμογή «Canon
PRINT Inkjet/SELPHY» στο smartphone
σας.
• Για πρόσβαση στην τοποθεσία
web της Canon, σαρώστε τον
κωδικό QR που εμφανίζεται
στα δεξιά και, έπειτα,
πραγματοποιήστε λήψη της
εφαρμογής.
2 Ανοίξτε τις ρυθμίσεις Wi-Fi του
smartphone σας. Πατήστε το όνομα
δικτύου (SSID) που ξεκινά με «Canon_ij_».
Αν το όνομα «Canon_ij_» δεν
εμφανίζεται, συνεχίστε στο βήμα 3.
(Παράδειγμα της οθόνης iOS)
Σύνδεση με Smartphone
Εάν χρησιμοποιείτε πολλά smartphone, εκτελέστε αυτά τα βήματα σε κάθε smartphone.
Προετοιμάστε τα εξής προτού ξεκινήσετε.
a Ενεργοποιήστε τη ρύθμιση Wi-Fi στο smartphone σας.
b Συνδέστε το smartphone σας στον ασύρματο δρομολογητή (εάν έχετε ασύρματο δρομολογητή).
Για περισσότερες λεπτομέρειες, ανατρέξτε στα εγχειρίδια του smartphone και του ασύρματου δρομολογητή.
Αφού προσθέσετε τον εκτυπωτή σας, μπορείτε πλέον να εκτυπώνετε από το smartphone σας.
3 Ανοίξτε την εγκατεστημένη εφαρμογή.
4 Ακολουθήστε τις οδηγίες που
εμφανίζονται στην οθόνη της
εφαρμογής για να προσθέσετε τον
εκτυπωτή σας.

6
Χρήση του εκτυπωτή σας χωρίς ασύρματο δρομολογητή
Ανατρέξτε στο Εκτυπώστε όταν δε βρίσκεστε σπίτι στο Εγχειρίδιο Online.
Για να χρησιμοποιήσετε τον εκτυπωτή σε περιοχή που δεν έχετε πρόσβαση σε Wi-Fi, πρέπει να αλλάξετε τις
ρυθμίσεις στον υπολογιστή ή το smartphone σας.
Συνήθως θα χρησιμοποιείτε έναν ασύρματο
δρομολογητή για να συνδέσετε τον εκτυπωτή σας
στον υπολογιστή ή το smartphone σας.
Όταν δεν υπάρχει διαθέσιμος ασύρματος
δρομολογητής, μπορείτε να συνδέσετε τον
εκτυπωτή σας άμεσα στον υπολογιστή ή το
smartphone σας (Ασύρματη άμεση σύνδεση).

1
SVENSKA
Ställa in skrivaren
1. Boxens innehåll
•
Bläckbehållare
Svart Färg
•
Skrivhuvud
•
Nätadapter •
Installations-CD för Windows
•
Strömkabel •
Information om säkerhet och annan viktig
information
•
USB-kabel •
Uppstartsguide (denna handbok)
2. Ta bort förpackningsmaterial
1 Ta bort och kassera eventuellt
förpackningsmaterial och orange tejp.
2 Öppna och dra ut det bakre fackets lock och ta
sedan bort och kassera skyddsmaterialet.
• Pappersutmatningsfackets lock öppnas automatiskt.
a
b
c
3. Slå på skrivaren
1 Anslut strömkabeln.
a
b
c
Viktigt!
Anslut inga andra kablar än strömkabeln ännu.
2 Tryck och håll in PÅ (ON)-knappen tills PÅ (ON)—
lampan tänds.
3 Använd knapparna {, } och OK för att välja ett
språk.
4 Tryck på OK.
Viktigt!
Skanna QR-koden för videoinstruktioner för installationsproceduren.
4. Installera skrivhuvudet
1 Öppna locket för skrivhuvudet.
Försiktighet
Rör inte hållaren för skrivhuvudet förrän den slutar röra sig.
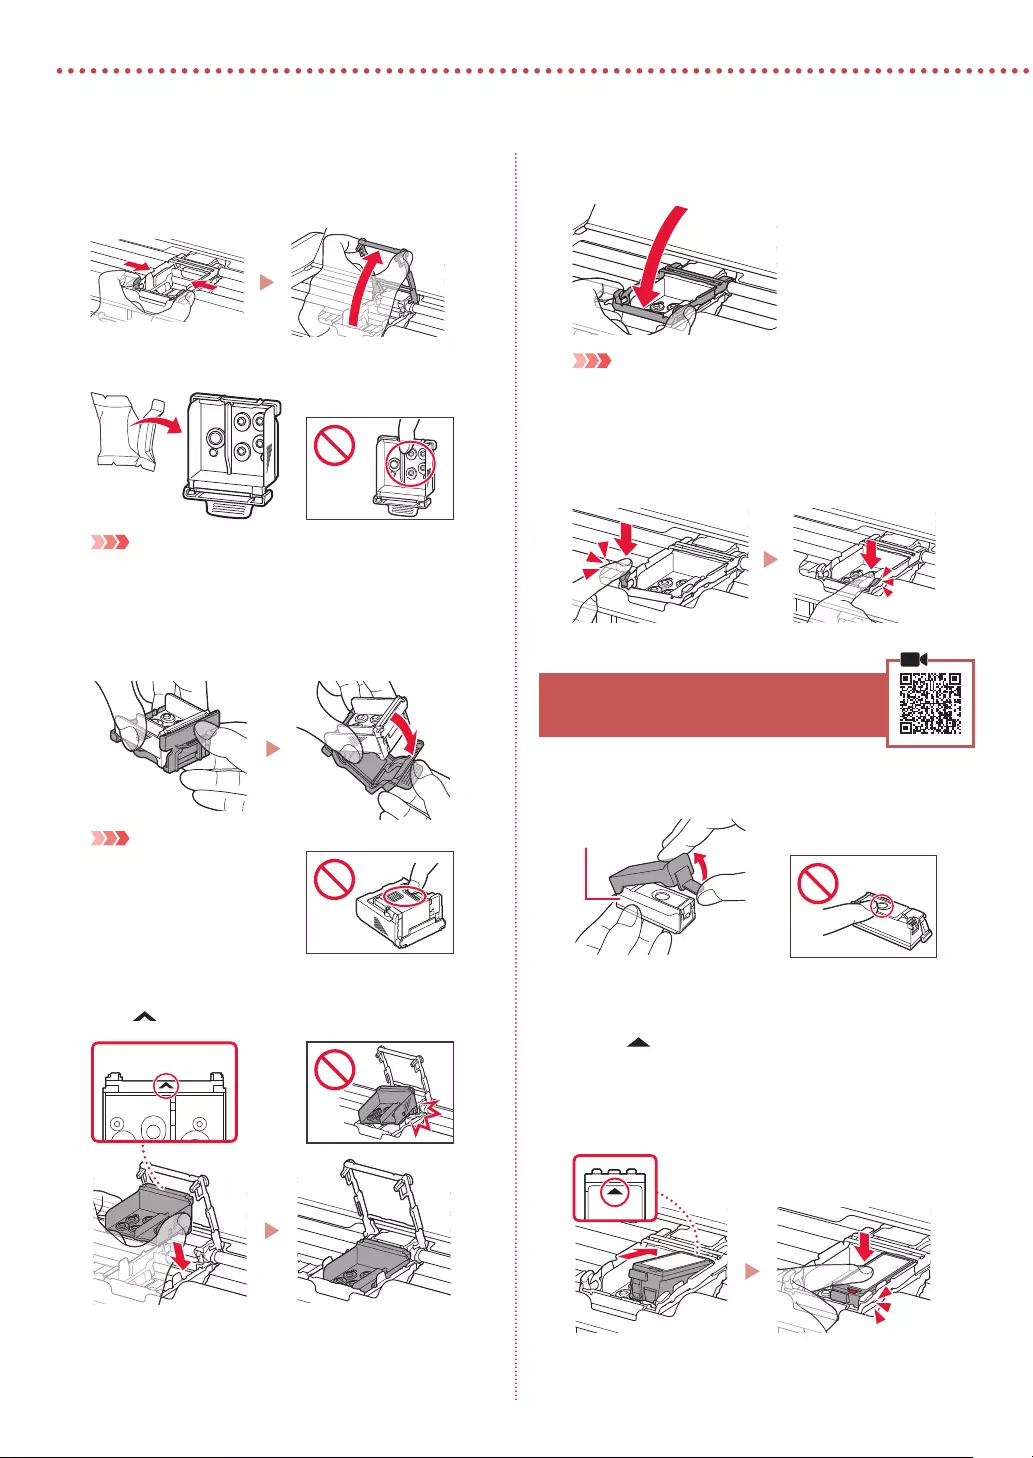
2
Ställa in skrivaren
2 Tryck in båda ikarna på låsspaken för
skrivhuvudet för att låsa upp, och lyft den sedan
tills det tar stopp.
3 Ta ut skrivhuvudet ur förpackningen.
Viktigt!
Det kan finnas genomskinligt eller ljust färgat bläck på insidan
av påsen som skrivhuvudet levereras i. Det påverkar inte
utskriftskvaliteten. Var försiktig så att du inte får bläck på dig när
du hanterar dessa delar.
4 Ta bort skyddslocket.
Viktigt!
Rör inte områdena som visas
på bilden. Annars kanske inte
skrivaren fungerar korrekt.
5 Sätt i skrivhuvudet i hållaren för skrivhuvudet
med -markeringen inåt.
6 Håll in båda ikarna på låsspaken för
skrivhuvudet och tryck sedan ner den.
Viktigt!
När du har installerat skrivhuvudet ska du inte ta bort det i
onödan.
7 För att låsa låsspaken för skrivhuvudet trycker
du på vänster och sedan på höger ik tills de
klickar på plats.
5. Installera bläckbehållarna
1 Ta bort det orange locket från den svarta
bläckbehållaren.
Svart
2 Installera bläckbehållaren.
• Sätt i bläckbehållaren på höger sida om skrivhuvudet
med -markeringen inåt och tryck sedan nedåt tills
den klickar på plats.
• Kontrollera att lampan på bläckbehållaren
lyser. Om lampan inte lyser trycker du baktill på
bläckbehållaren.

3
SVENSKA
3 Upprepa steg 1 till 2 och installera även
färgbläckbehållaren på vänster sida.
4 Stäng locket för skrivhuvudet.
6. Fylla på papper
1 Tryck på OK.
2 Skjut pappersledaren åt vänster.
3 Lägg i vanligt Letter— eller A4-papper mot höger
kant med utskriftssidan vänd uppåt.
4 Justera pappersledaren till papperets bredd och
kontrollera sedan att spaken för papperstjocklek
är inställd till höger.
5 Tryck på OK.
6 Tryck på OK.
Viktigt!
Skanna QR-koden för videoinstruktioner för installationsproceduren
.
7 Kontrollera att följande skärm visas.

7-a
4
Ställa in skrivaren
Dator Smarttelefon
Dator och
smarttelefon
Ansluta till dator
Om du använder flera datorer utför du dessa steg på varje dator.
1 Gå till Canons webbplats på en dator.
2 Välj Kongurera.
3 Mata in skrivarens modellnamn och
klicka på Kör.
• Välj land eller region om du blir ombedd att
göra det.
4 Klicka på Starta.
5 Klicka på Om du redan har förberett
skrivaren går du till Anslut.
Obs!
Följande steg gäller för Windows-användare.
6 Klicka på Hämta.
7 Starta den hämtade len.
8 Klicka på Starta inställningar (Start
Setup).
9 Följ instruktionerna på skärmen.
• Dessa åtgärder kan ta en stund.
• Om du vill ansluta till en smarttelefon
också, läs «7-b. Ansluta till en smarttelefon»
på sida 5.
Vilken enhet ansluter du?
7-a. Ansluta till dator
Använda installations-CD:n för Windows
Dubbelklicka på EasySetup.exe på CD:n och fortsätt sedan från steg 3. Om du inte har någon
internetanslutning öppnar du win-mappen på CD:n och dubbelklickar på SETUP.exe. Då installeras
skrivardrivrutinen.

5
SVENSKA
7-b. Ansluta till en smarttelefon
7-b
1 Installera appen «Canon PRINT Inkjet/
SELPHY» på smarttelefonen.
• Skanna QR-koden som visas
till höger för att komma till
Canons webbplats och ladda
sedan ner appen.
2 Öppna Wi-Fi-inställningarna
på smarttelefonen. Tryck på
nätverksnamnet (SSID) som börjar med
«Canon_ij_«.
Om «Canon_ij_» inte visas går du vidare
till steg 3.
(Exempel på iOS-skärm)
Ansluta till en smarttelefon
Om du använder flera smarttelefoner utför du dessa steg på varje smarttelefon.
Förbered följande innan du börjar.
a Aktivera inställningen Wi-Fi på smarttelefonen.
b Anslut smarttelefonen till den trådlösa routern (om du har en trådlös router).
Läs smarttelefonens och den trådlösa routerns handböcker för mer detaljer.
När du har lagt till skrivaren kan du skriva ut från din smarttelefon.
3 Öppna den installerade appen.
4 Följ instruktionerna på skärmen i appen
för att lägga till skrivaren.

6
Använda skrivaren utan en trådlös router
Läs Skriva ut från andra ställen än hemma i Onlinehandbok.
För att använda skrivaren i ett område där du inte har tillgång till Wi-Fi måste du ändra inställningarna på din
dator eller smarttelefon.
I vanliga fall använder du en trådlös router för att
ansluta skrivaren till din dator eller smarttelefon.
När du inte har tillgång till en trådlös router
kan du ansluta skrivaren direkt till datorn eller
smarttelefonen (Trådlöst direkt).

1
NORSK(BOKMÅL)
Kongurere skriveren
1. Innhold i esken
•
Blekktanker
Svart Farge
•
Skrivehode
•
Strømadapter •
Installerings-CD-ROM for Windows
•
Strømledning •
Sikkerhetsinformasjon og viktig informasjon
•
USB-kabel •
Komme i gang (denne manualen)
2. Fjerne beskyttelsesmateriale
1 Fjern og kast eventuelt beskyttelsesmateriale og
oransje tape.
2 Åpne og forleng bakskudekselet, og ern og
kast deretter beskyttelsesmaterialet.
• Dekselet for papirleveringssporet åpnes automatisk.
a
b
c
3. Slå på skriveren
1 Koble til strømledningen.
a
b
c
Viktig!
Ikke koble til andre kabler på dette tidspunktet.
2 Trykk og hold inne PÅ (ON)-knappen inntil PÅ
(ON)-lampen begynner å lyse.
3 Bruk knappene {, } og OK for å velge et språk.
4 Trykk på OK-knappen.
Viktig!
Skann QR-koden for en videoveiledning om
oppsettsprosedyren.
4. Installere skrivehode
1 Åpne dekselet for skrivehodet.
Forsiktig!
Ikke rør skrivehodeholderen før den har sluttet å bevege seg.

2
Kongurere skriveren
2 Trykk begge tappene på låsehendelen for
skrivehodet innover for å frigi låsen, og løft den
deretter opp til den stopper.
3 Fjern skrivehodet fra innpakningen.
Viktig!
Det kan være litt transparent eller lyst fargeblekk på innsiden
av posen som skrivehodet leveres i – dette påvirker ikke
utskriftskvaliteten. Vær forsiktig så du ikke får blekk på deg når
du håndterer disse elementene.
4 Fjern den beskyttende korken.
Viktig!
Ikke berør områdene som er
vist på figuren. Skriveren vil
ellers ikke kunne skrive ut
riktig.
5 Sett skrivehodet i skrivehodeholderen slik at
merkene vender innover.
6 Hold i begge tappene på låsehendelen for
skrivehodet, og senk den.
Viktig!
Når du har installert skrivehodet, bør du ikke erne det igjen
unødvendig.
7 For å låse låsehendelen for skrivehodet trykker
du på venstre og deretter høyre tapp til de
klikker på plass.
5. Installere blekktankene
1 Ta av den oransje korken på den svarte
blekktanken.
Svart
2 Installer blekktanken.
• Sett inn blekktanken på høyre side av skrivehodet,
slik at merket vender innover, og trykk den ned til
den klikker.
• Kontroller at lampen på blekktanken lyser. Hvis
lampen fortsatt ikke lyser, trykker du ned på baksiden
av blekktanken.

3
NORSK(BOKMÅL)
3 Gjenta trinn 1 til 2 og installer fargeblekktanken
også, på venstre side.
4 Lukk dekselet for skrivehodet.
6. Legge i papir
1 Trykk på OK-knappen.
2 Dra papirføreren til venstre.
3 Legg inn vanlig papir i Letter- eller A4-størrelse
inntil den høyre kanten med utskriftssiden opp.
4 Juster papirføreren ut fra bredden på papiret,
og kontroller deretter at håndtaket for
papirtykkelse er stilt til høyre.
5 Trykk på OK-knappen.
6 Trykk på OK-knappen.
Viktig!
Skann QR-koden for en videoveiledning om oppsettsprosedyren.
7 Sjekk at følgende skjermbilde vises.

7-a
4
Kongurere skriveren
Datamaskin Smarttelefon
Datamaskin og
smarttelefon
Koble til en datamaskin
Hvis du bruker flere datamaskiner, utfører du disse trinnene på hver datamaskin.
1 Åpne Canon-nettstedet fra en
datamaskin.
2 Velg Oppsett.
3 Angi skriverens modellnavn og klikk på Gå.
• Hvis du blir bedt om det, velger du land
eller region.
4 Klikk på Start.
5 Klikk på Hvis du allerede har gjort klar
skriveren, går du til Koble til.
Merk
Følgende trinn gjelder Windows-brukere.
6 Klikk på Last ned.
7 Kjør den nedlastede len.
8 Klikk på Start oppsett (Start Setup).
9 Følg instruksjonene på skjermen.
• Disse operasjonene kan ta litt tid.
• Se «7-b. Koble til en smarttelefon» på
side 5 hvis du i tillegg vil koble til en
smarttelefon.
Hvilken enhet kobler du til?
7-a.Koble til en datamaskin
Bruke installerings-CD-ROM for Windows
Dobbeltklikk på EasySetup.exe på CD-en, og fortsett deretter fra trinn 3. Hvis du ikke har
internettforbindelse, kan du åpne win-mappen på CD-en og dobbeltklikke på SETUP.exe. Dette
installerer skriverdriveren.

5
NORSK(BOKMÅL)
7-b. Koble til en smarttelefon
7-b
1 Installer «Canon PRINT Inkjet/SELPHY»-
appen på smarttelefonen.
• Skann QR-koden til høyre for å
få tilgang til Canon-nettstedet,
og last deretter ned appen.
2 Åpne Wi-Fi-innstillingen på
smarttelefonen. Trykk på
nettverksnavnet (SSID) som begynner
med «Canon_ij_«.
Hvis «Canon_ij_» ikke vises, fortsetter du
til trinn 3.
(Eksempel på iOS skjermbilde)
Koble til en smarttelefon
Hvis du bruker flere smarttelefoner, utfører du disse trinnene på hver smarttelefon.
Klargjør følgende før du starter.
a Aktiver Wi-Fi-innstillingen på smarttelefonen.
b Koble smarttelefonen til den trådløse ruteren (hvis du har en trådløs ruter).
Se manualene for smarttelefonen og den trådløse ruteren for å få flere detaljer.
Når du har lagt til skriveren din, kan du skrive ut fra smarttelefonen.
3 Åpne den installerte appen.
4 Følg instruksjonene på skjermen i
appen for å legge til skriveren.

6
Bruke skriveren uten en trådløs ruter
Se Skrive ut når du er hjemmefra i Nettbasert manual hvis du ønsker mer informasjon.
For å kunne bruke skriveren på et sted der du ikke har tilgang til Wi-Fi, må du endre innstillingene på
datamaskinen eller smarttelefonen.
Normalt sett bruker du en trådløs ruter for å koble
skriveren til datamaskin eller smarttelefon.
Når en trådløs ruter ikke er tilgjengelig, kan du
koble skriveren direkte til datamaskinen eller
smarttelefonen (Direkte trådløs tilkobling).

1
DANSK
Kongurere printeren
1. Æskens indhold
•
Blækbeholdere
Sort Farve
•
Printhoved
•
Lysnetadapter •
Installations-cd-rom til Windows
•
Netledning •
Sikkerhedsoplysninger og vigtige
oplysninger
•
USB-kabel •
Før du begynder (denne vejledning)
2. Fjern emballage
1 Fjern og bortskaf al emballage og orange tape.
2 Åbn dækslet til bagerste bakke, og træk det ud.
Fjern derefter det beskyttende materiale, og
smid det væk.
• Dækslet til udgangen til udbakken åbnes automatisk.
a
b
c
3. Tænd printeren
1 Tilslut netledningen.
a
b
c
Vigtigt
På dette tidspunkt må du ikke tilslutte nogen andre kabler.
2 Tryk på knappen TIL (ON), og hold den inde,
indtil lampen TIL (ON) lyser.
3 Brug knapperne {, } og OK til at vælge et
sprog.
4 Tryk på knappen OK.
Vigtigt
Scan QR-koden for at se en videovejledning til opsætningen.
4. Installation af printhovedet
1 Åbn printhoveddækslet.
Forsigtig
Undgå at røre ved printhovedholderen, før den stopper.

2
Kongurere printeren
2 Tryk indad på begge tapper på printhovedets
låsehåndtag for at frigøre låsen, og løft den
derefter, indtil den stopper.
3 Tag printhovedet ud af pakken.
Vigtigt
Der kan være noget gennemsigtigt eller lyst farveblæk på
indersiden af den pose, som printhovedet leveres i – det har
ingen betydning for udskriftskvaliteten. Pas på, at du ikke får
blæk på dig, når du håndterer disse elementer.
4 Fjern beskyttelseshætten.
Vigtigt
Rør ikke de områder, der vises
på figuren. Hvis du gør det, kan
printeren muligvis ikke udskrive
korrekt.
5 Indsæt printhovedet i printhovedholderen, så
mærket vender indad.
6 Hold på begge tapper på printhovedets
låsehåndtag, og sænk det.
Vigtigt
Når du har installeret printhovedet, skal du ikke erne det,
medmindre det er nødvendigt.
7 For at låse printhovedets låsehåndtag skal du
skubbe venstre tap og derefter højre tap, indtil
de klikker på plads.
5. Installation af blækbeholdere
1 Fjern den orange hætte fra den sorte
blækbeholder.
Sort
2 Installer blækbeholderen.
• Indsæt blækbeholderen i højre siden af printhovedet,
så mærket vender indad. Tryk derefter nedad,
indtil den klikker.
• Tjek, at lampen på blækbeholderen lyser. Hvis lampen
ikke lyser, skal du trykke nedad på bagsiden af
blækbeholderen.

3
DANSK
3 Gentag trin 1 til 2, og installer blækbeholderen
med farve til venstre.
4 Luk printhoveddækslet.
6. Ilægning af papir
1 Tryk på knappen OK.
2 Skub papirstyret til venstre.
3 Ilæg almindeligt papir i Letter- eller A4-størrelse
mod den højre kant med udskriftssiden opad.
4 Juster papirstyret med bredden af papiret,
og tjek derefter, at grebet til justering af
papirtykkelse er placeret til højre.
5 Tryk på knappen OK.
6 Tryk på knappen OK.
Vigtigt
Scan QR-koden for at se en videovejledning til opsætningen.
7 Tjek, at følgende skærmbillede vises.
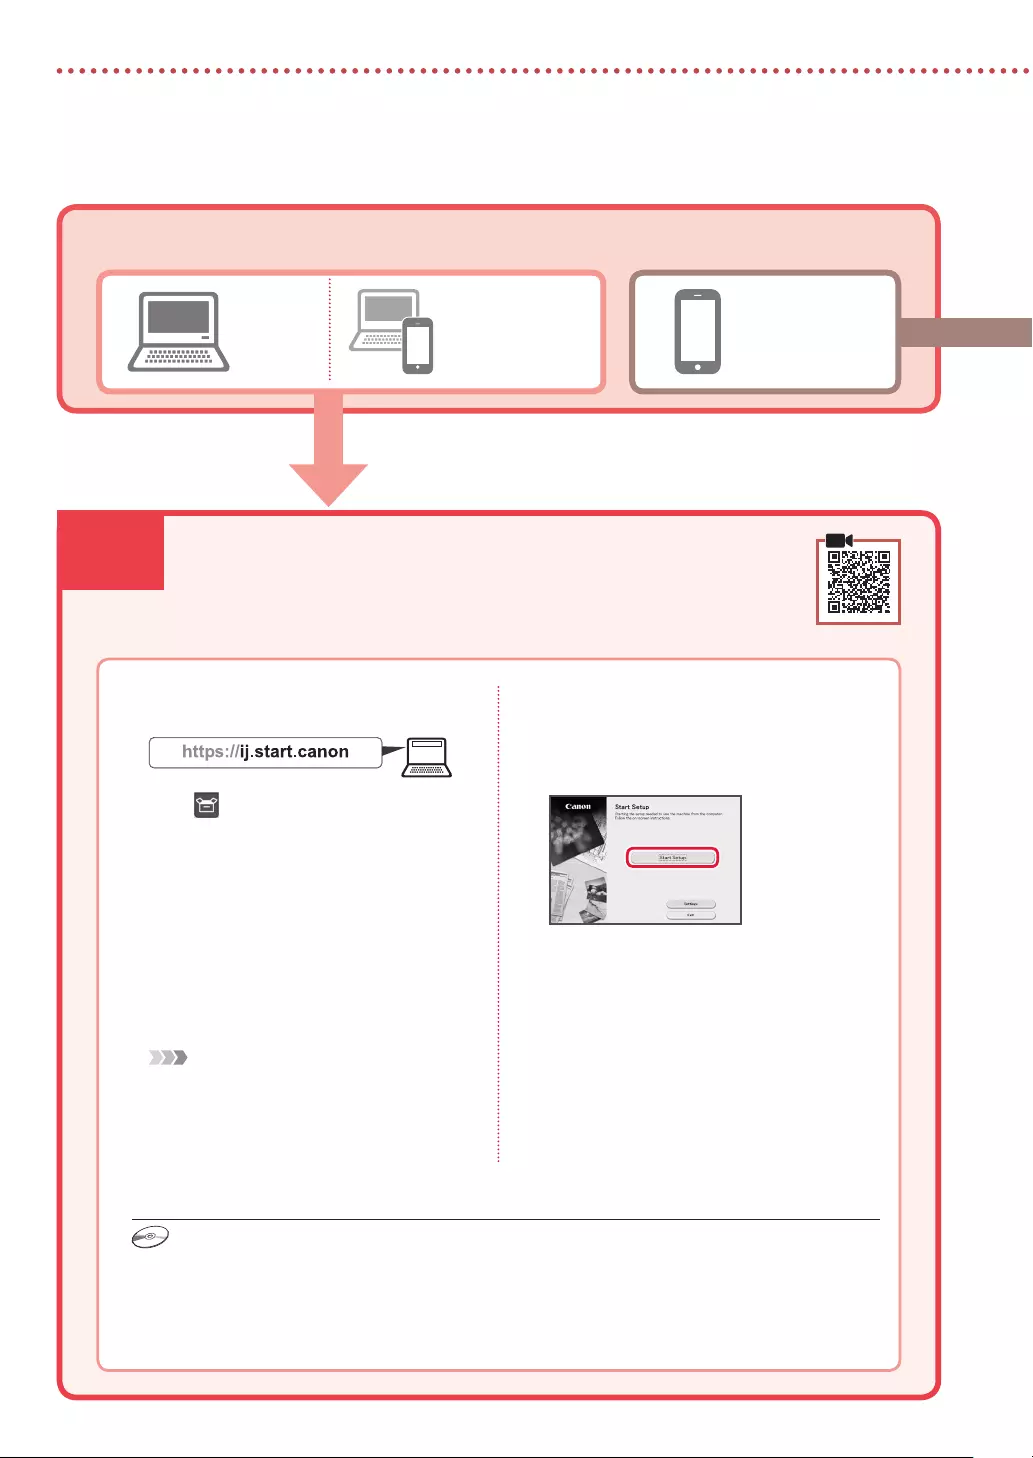
7-a
4
Kongurere printeren
Computer Smartphone
Computer og
smartphone
Tilslutning til en computer
Hvis du bruger flere computere, skal du udføre disse trin på hver computer.
1 Gå til Canon-webstedet fra en
computer.
2 Vælg Konguration.
3 Skriv printerens modelnavn, og klik på
Ok.
• Vælg land eller område, hvis du bliver bedt
om det.
4 Klik på Start.
5 Klik på Hvis du allerede har forberedt
din, skal du gå til Tilslut.
Bemærk
Følgende trin gælder for Windows-brugere.
6 Klik på Hent.
7 Kør den downloadede l.
8 Klik på Start opsætning (Start Setup).
9 Følg instruktionerne på skærmen.
• Disse handlinger kan tage lidt tid.
• Hvis du også vil tilslutte en smartphone, skal
du se «7-b. Tilslutning til en smartphone» på
side 5.
Hvilken enhed tilslutter du?
7-a. Tilslutning til en computer
Brug installations-cd-rom’en til Windows
Dobbeltklik på EasySetup.exe på cd-rom’en, og fortsæt derefter fra trin 3. Hvis du ikke har en
internetforbindelse, skal du åbne mappen win på cd-rom’en og dobbeltklikke på SETUP.exe. Herefter
installeres printerdriveren.

5
DANSK
7-b. Tilslutning til en smartphone
7-b
1 Installer appen «Canon PRINT Inkjet/
SELPHY» på din smartphone.
• Scan den QR-kode, der vises
til højre, for at få adgang til
Canon-webstedet, og
download derefter appen.
2 Åbn Wi-Fi-indstillingerne på din
smartphone. Tryk på det netværksnavn
(SSID), der starter med «Canon_ij_«.
Hvis «Canon_ij_» ikke vises, skal du
fortsætte til trin 3.
(Et eksempel på en iOS-skærm)
Tilslutning til en smartphone
Hvis du bruger flere smartphones, skal du udføre disse trin på hver smartphone.
Forbered følgende inden start.
a Aktivér indstillingen Wi-Fi på din smartphone.
b Slut din smartphone til den trådløse router (hvis du har en trådløs router).
Se brugervejledningerne til din smartphone og trådløse router for at få flere oplysninger.
Når du har tilføjet din printer, kan du udskrive fra din smartphone.
3 Åbn den installerede app.
4 Følg instruktionerne på skærmen i
appen for at tilføje din printer.

6
Brug af printeren uden en trådløs router
Se Udskriv, når du ikke er hjemme i Online vejledning.
Hvis du vil bruge printeren i et område, hvor du ikke har adgang til Wi-Fi, skal du ændre indstillingerne på din
computer eller smartphone.
Normalt bruger du en trådløs router til at tilslutte
din printer til din computer eller smartphone.
Hvis der ikke er en tilgængelig trådløs router, kan
du tilslutte din printer direkte til din computer
eller smartphone (Trådløs direkte).

1
SUOMI
Tulostimen asennus
1. Paketin sisällys
•
Mustesäiliöt
Musta Väri
•
Tulostuspää
•
Verkkolaite •
Asennus-CD Windows-tietokoneelle
•
Virtajohto •
Turvallisuus ja tärkeitä tietoja
•
USB-kaapeli •
Aloitusopas (tämä käyttöopas)
2. Pakkausmateriaalien
poistaminen
1 Poista kaikki pakkausmateriaalit ja oranssi
teippi.
2 Avaa ja laajenna takalokeron kansi, ja poista ja
hävitä sitten suojamateriaali.
• Paperin luovutustason kansi avautuu automaattisesti.
a
b
c
3. Virran kytkeminen
tulostimeen
1 Kytke virtajohto.
a
b
c
Tärkeää
Älä tässä vaiheessa kytke mitään muuta johtoa.
2 Pidä painettuna KÄYTÖSSÄ (ON) -painiketta,
kunnes KÄYTÖSSÄ (ON) -merkkivalo syttyy.
3 Valitse kieli {-, }— ja OK-painikkeilla.
4 Paina OK-painiketta.
Tärkeää
Skannaa QR-koodi, jos haluat katsoa asetuksen video-ohjeet.
4. Tulostuspään asentaminen
1 Avaa tulostuspään pidikkeen kansi.
Huomio
Älä koske tulostuspään pidikkeeseen, ennen kuin sen liike
pysähtyy.

2
Tulostimen asennus
2 Paina sisäänpäin molempia tulostuspään
lukitusvivun kielekkeitä lukon vapauttamiseksi,
ja sitten nosta sitä varovasti, kunnes se pysähtyy.
3 Poista tulostuspää paketista.
Tärkeää
Tulostuspään sisältävässä pussissa voi olla hieman läpinäkyvää
tai vaaleaa mustetta — tämä ei vaikuta tulostuslaatuun. Varo,
ettet tahraa itseäsi musteeseen, kun käsittelet näitä kohteita.
4 Poista suojus.
Tärkeää
Älä koske kuvassa merkittyihin
alueisiin. Tulostin välttämättä
tulosta muussa tapauksessa
oikein.
5 Aseta tulostuspää tulostuspään pidikkeeseen
niin, että -merkki osoittaa sisäänpäin.
6 Pitele tulostuspään lukitusvivun molempia
kielekkeitä ja laske se alas.
Tärkeää
Kun olet asentanut tulostuspään, älä poista sitä tarpeettomasti.
7 Voit lukita tulostuspään lukitusvivun painamalla
ensin vasenta ja sitten oikeaa kielekettä, kunnes
ne napsahtavat paikoilleen.
5. Mustesäiliöiden asennus
1 Poista oranssi suojus mustasta mustesäiliöstä.
Musta
2 Asenna mustesäiliö.
• Aseta mustesäiliö tulostuspään oikealle puolelle niin,
että -merkki osoittaa sisäänpäin, ja paina sitten
alas, kunnes se naksahtaa.
• Tarkista, että mustesäiliön merkkivalo palaa. Jos
merkkivalo ei pala, paina mustesäiliön takaosaa.

3
SUOMI
3 Toista vaiheet 1–2 ja asenna myös värillinen
mustesäiliö vasemmalle.
4 Sulje tulostuspään kansi.
6. Paperin asettaminen
1 Paina OK-painiketta.
2 Liu’uta paperiohjain vasemmalle.
3 Aseta tavallinen Letter- tai A4-kokoinen paperi
oikeaa reunaa vasten tulostuspuoli ylöspäin.
4 Kohdista paperiohjain paperin leveyteen ja
tarkista sitten, että paperin paksuudensäätövipu
on asetettu oikealle.
5 Paina OK-painiketta.
6 Paina OK-painiketta.
Tärkeää
Skannaa QR-koodi, jos haluat katsoa asetuksen video-ohjeet.
7 Tarkista, että seuraava näyttö tulee näkyviin.

7-a
4
Tulostimen asennus
Tietokone Älypuhelin
Tietokone ja
älypuhelin
Yhdistäminen tietokoneeseen
Jos käytät useita tietokoneita, suorita nämä vaiheet jokaiselle tietokoneelle.
1 Avaa tietokoneesta Canon-
verkkosivusto.
2 Valitse Määritys.
3 Anna tulostinmallin nimi ja valitse
Siirry.
• Voit valita oman maan tai alueen, mikäli sitä
pyydetään.
4 Valitse Aloita.
5 Valitse Jos olet jo valmistellut
tulostimen, siirry kohtaan Yhdistä.
Huomautus
Seuraavat vaiheet ovat Windows-käyttäjille.
6 Valitse Lataa.
7 Suorita ladattu tiedosto.
8 Valitse Aloita asetukset (Start Setup).
9 Noudata näytön ohjeita.
• Näissä toiminnoissa voi kestää hetken.
• Jos haluat liittää myös älypuhelimen, katso
kohtaa «7-b. Yhdistäminen älypuhelimeen»
sivulla 5.
Mitä laitetta olet yhdistämässä?
7-a.Yhdistäminen tietokoneeseen
Asennus-CD-levyn käyttö Windows-järjestelmässä
Kaksoisnapsauta CD-levyn EasySetup.exe-tiedostoa, ja jatka sitten vaiheesta 3. Jos sinulla ei ole
internet-yhteyttä, avaa CD-levyn win-kansio ja kaksoisnapsauta SETUP.exe. Tämä asentaa tulostinajurin.

5
SUOMI
7-b. Yhdistäminen älypuhelimeen
7-b
1 Asenna «Canon PRINT Inkjet/SELPHY»
-sovellus älypuhelimeen.
• Skannaa QR-koodi, joka näkyy
oikealla, niin pääset Canon-
sivustoon, ja lataa sitten
sovellus.
2 Avaa älypuhelimen Wi-Fi-asetukset.
Napauta verkkonimeä (SSID), joka alkaa
tekstillä «Canon_ij_«.
Jos «Canon_ij_» ei ole näkyvissä, jatka
vaiheesta 3.
(Esimerkki iOS-näytöstä)
Yhdistäminen älypuhelimeen
Jos käytät useita älypuhelimia, suorita nämä vaiheet jokaiselle älypuhelimelle.
Valmistele seuraavat, ennen kuin aloitat.
a Ota Wi-Fi-asetus käyttöön älypuhelimessa.
b Yhdistä älypuhelin langattomaan reitittimeen (jos käytössäsi on langaton reititin).
Katso lisätietoja älypuhelimen ja langattoman reitittimen käyttöoppaista.
Kun olet lisännyt tulostimen, voit tulostaa älypuhelimestasi.
3 Avaa asennettu sovellus.
4 Noudata tulostimen lisäämisessä
sovelluksen näytön ohjeita.

6
Tulostimen käyttö ilman langatonta reititintä
Katso lisätietoja Online-käyttöopas-oppaan kohdasta Tulostaminen ollessasi poissa kotoa.
Jos haluat tulostaa sellaisella alueella, jossa ei ole Wi-Fi-yhteyttä, muuta tietokoneen tai älypuhelimen asetuksia.
Tavallisesti käytät langatonta reititintä tulostimen
yhdistämiseen tietokoneen tai älypuhelimen kanssa.
Kun langatonta reititintä ei ole käytettävissä, voit
yhdistää tulostimen suoraan tietokoneeseen tai
älypuhelimeen (Langaton suora).

RMC (Regulatory Model Code): K10513

Online-käyttöopas-oppaan käyttö
Selaimesta
Åbn Online vejledning
Fra din browser
Gå til Nettbasert manual
Fra nettleseren din
Läs Onlinehandbok
Från webbläsaren
Αποκτήστε πρόσβαση στο Εγχειρίδιο Online
Από το πρόγραμμα περιήγησής σας
Acceso al Manual en línea
Desde su navegador
Acesse o Manual On-line
Do seu navegador
Accedere al Manuale online
Dal browser
Online handleiding openen
Via de browser
Zugriff auf das Online-Handbuch
Über Ihren Browser
Accès au Manuel en ligne
À partir de votre navigateur
Access Online Manual
From your browser
PRINTED IN XXXXXXXX
QT6-3566-V01 © CANON INC. 2019XXXXXXXX
Download Canon PIXMA TR150 Manual – This portable printer with dimensions of 322 x 185 x 66 mm and weighing around 2.1 kg was presented, one of which is because currently people are being hit by a pandemic outbreak, which requires that some workers in various segments have to work from home (Work From Home). Not a few of these workers also need a printer to be able to print documents, where this portable printer can be a solution where these workers need a printer to be carried anywhere, Canon PIXMA TR150 has a 1.44 ″ OLED (Mono) panel which is targeted at the home market to small offices, using two types of ink cartridges, namely Black and Color, each of which has a total print volume of up to 200 sheets and 260 sheets. Apart from being portable, its compact design makes the printer more space-efficient, along with the option to use it while using a battery pack or using a charging adapter. Interestingly enough, the battery pack presented for the printer itself can be recharged via a power bank (USB) or an AC adapter. This printer has a paper capacity of up to 50 sheets that can print borderless up to A4 size paper, has a speed of 9 ipm / 5.5 ipm when the printer is on with AC or using a battery pack, and has a photo printing speed of 53 seconds. For the speed of charging a battery pack using ordinary electricity or an AC adapter, it takes about 140 minutes, while if you use a power bank or USB with a 5V / 1.5A adapter, it takes about 5 hours. To make it easier to use again, the Canon PIXMA TR150 is also equipped with wireless connectivity, where users just need to press the Wireless Connect Button to activate it, also has direct wireless connection support for PCs, smartphones, tablets, and cameras that already have PictBridge wireless support. Interestingly enough, this printer is also equipped with Print Templates that can be customized by yourself to print the various types of templates you want.
Canon PIXMA TR150 Manual
Read Canon PIXMA TR150 Manual and Getting Started Guide
Canon PIXMA TR150 driver file is required. You also have to connect a USB cable from the printer to the connector on the printer package. Then follow the manual instructions on how to install the Canon PIXMA TR150 printer.
Precautions when using a USB connection
- Disconnect the USB cable connecting the device and computer before installing the driver. After installing the driver, connect the USB cable.
Drivers and applications are compressed. - Download the Canon PIXMA TR150 driver that is available on the canon support or many sites on the internet. Click [Run] on the file download screen (the file is not saved to disk).
- When the User Account Control prompt is displayed, click [Yes], and then click [Execute] on the subsequent security warning screen.
- The setup wizard starts. When the setup wizard starts, follow the on-screen instructions to install.
When it is complete, you can see that the printer is ready for use and you can follow the manual, Download the Canon PIXMA TR150 manual from the link below.
Read Also: Canon PIXMA TR4520 Manual
Canon PIXMA TR150 User Manual and Getting Started Guide
Canon PIXMA TR150 series (PDF) User Manual (Windows)
Canon PIXMA TR150 series (PDF) User Manual (Mac)
Canon PIXMA TR150 series Getting Started Guide
After downloading the manual for Canon PIXMA TR150, open your manual with pdf viewer or browser, then find how to use your printer properly.