
CBE 1025 T
Èícòpyêöèÿ ïî
∋∋
êcïëyaòaöèè
User instructions
RU
EN

EN
ÏAPAÃPAÔ
CHAPTER
1
2
3
4
5
6
7
8
9
10
11
12
13
INDEX
Introduction
General points on delivery
Guarantee
Safety Measures
Technical Data
Setting up and Installation
Control Description
Detergent drawer
Selection
The Product
Table of Programmes
Washing
Cleaning and routine
maintenance
Faults Search
3
RU
OÃËABËEHÈE
Ââåäåíèe
Oáùèe ñâåäeíèÿ ïî
∋
êñïëyàòàöèè
Ãàpàíòèÿ
Mepû áåçoïacíocòè
Texíè÷ecêèe xapaêòepècòèêè
Ycòaíoâêa
Oïècaíèe êoìaíä
Koíòeéíep äëÿ ìo
юùèx
cpeäcòâ
Bûáop ïpoãpaìì
Tèï áeëüÿ
Taáëèöû âûáopa ïpoãpaìì
Còèpêa
Чècòêa è yxoä ça ìaøèíoé
Boçìoæíûe íeècïpaâíocòè
2
EN
OUR COMPLIMENTS
With the purchase of this
Candy household appliance,
you have shown that you will
not accept compromises:
you want only the best.
Candy is happy to present
their new washing machine,
the result of years of research
and market experience
through direct contact with
Consumers. You have chosen
the quality, durability and
high performance that this
washing machine offers.
Candy is also able to offer a
vast range of other
household appliances:
washing machines,
dishwashers, washer-dryers,
cookers, microwave ovens.
Traditional ovens and hobs,
refrigerators and freezers.
Ask your local retailer for the
complete catalogue of
Candy products.
Please read this booklet
carefully as it provides
important guide lines for safe
installation, use and
maintenance and some
useful advise for best results
when using your washing
machine.
Keep this booklet in a safe
place for further consultation.
When contacting Candy
or a Customer Services
Centre always refer to the
Model, No., and G number (if
applicable of the appliance
see panel).
RU
ÏÎÇÄPÀÂËßÅÌ!
Ïpèîápåòÿ
∋
òó ñòèpàëüíó
ю
машину
Канди, Вы påøèëè
не идти на êîìïpîìèññ: Вы
пожелали лучшее.
Ôèpìà
Канди pàäà
ïpåäëîæèòü Вам
∋
ту нову
ю
ñòèpàëüíó
ю машину — плод
многолетних научно-
исследовательских pàáîò è
ïpèîápåòåííîãî íà pûíêå, в
тесном êîíòpàêòå ñ
ïîòpåáèòåëåì, опыта.
Вы âûápàëè качество,
долговечность и øèpîêèå
возможности, êîòîpûå Âàì
ïpåäîñòàâëÿåò
∋
òà
ñòèpàëüíàÿ машина.
Êpîìå того Канди ïpåäëàãàåò
Âàì øèpîêó
ю гамму
∋
ëåêòpîáûòîâîé: ñòèpàëüíûå
машины, посудомоечные
машины, ñòèpàëüíûå
машины с сушкой, кухонные
плиты, ìèêpîâîëíîâûå печи,
духовки, âàpî÷íûå панели,
холодильники,
ìîpîçèëüíèêè.
Ñïpîñèòå у Вашего ïpîäàâöà
полный каталог ïpîäóêöèè
ôèpìû Канди.
Ïpîñèì Вас внимательно
ознакомиться с
ïpåäóïpåæäåíèÿìè,
ñîäåpæàùèìèñÿ в
∋
той
книжке, êîòîpûå дадут Вам
важные сведения,
каса
юùèåñÿ безопасности,
установки,
∋
ксплуатации и
обслуживания, íåêîòîpûå
полезные советы по
лучшему использовани
ю
машины.
Áåpåæíî õpàíèòå
∋
ту книжку
èíñòpóêöèé для
последу
юùèõ консультаций.
Пpи общении с ôèpìîé
Канди или с ее
специалистами по
техническому обслуживани
ю
постоянно ссылайтесь на
модель и íîìåp G (если
таковой имеется).
Ïpàêòè÷åñêè, ссылайтесь на
все, что ñîäåpæèòñÿ в
табличке.

5
EN
CHAPTER 2
GUARANTEE
The appliance is supplied
with a guarantee certificate
which allows free use of the
Technical Assistance Service,
apart from a fixed call out
charge, for a period of one
year from the date of
purchase.
Remember to post part B of
the guarantee certificate
within 10 days of the
purchase date.
Part A should be filled in and
kept by you to be shown if
necessary to the technician
from the Technical Assistance
Service. The sales receipt
should also be kept.
RU
ÏÀPÀÃPÀÔ 2
ÃÀPÀÍÒÈß
Ñòèpàëüíàÿ машина
снабжена ãàpàíòèéíûì
ñåpòèôèêàòîì, êîòîpûé
позволяет Вам пользоваться
услугами технического
ñåpâèñà, за искл
ю÷åíèåì
оплаты за вызов, в течение 1
года со дня покупки.
Не забудьте îòïpàâèòü часть
A ãàpàíòèéíîãî ñåpòèôèêàòà
для необходимой
påãèñòpàöèè в течение 10
дней со дня покупки.
xàñòü
B ãàpàíòèéíîãî
ñåpòèôèêàòà должна
õpàíèòüñÿ у Вас и быть
заполнена соответству
юùèì
îápàçîì äëÿ ïpåäúÿâëåíèÿ
вместе с чеком или
квитанцией, выданной
ïpîäàâöîì, службе
технического обслуживания
пpи необходимости
ïpîèçâåñòè påìîíò.
4
SPEDIRE
TRATTENERE
A
B
C
EUROPE
Dovunque
tu sia.
E
D
F
32
‘
32′
G
EN
CHAPTER 1
GENERAL POINTS
ON DELIVERY
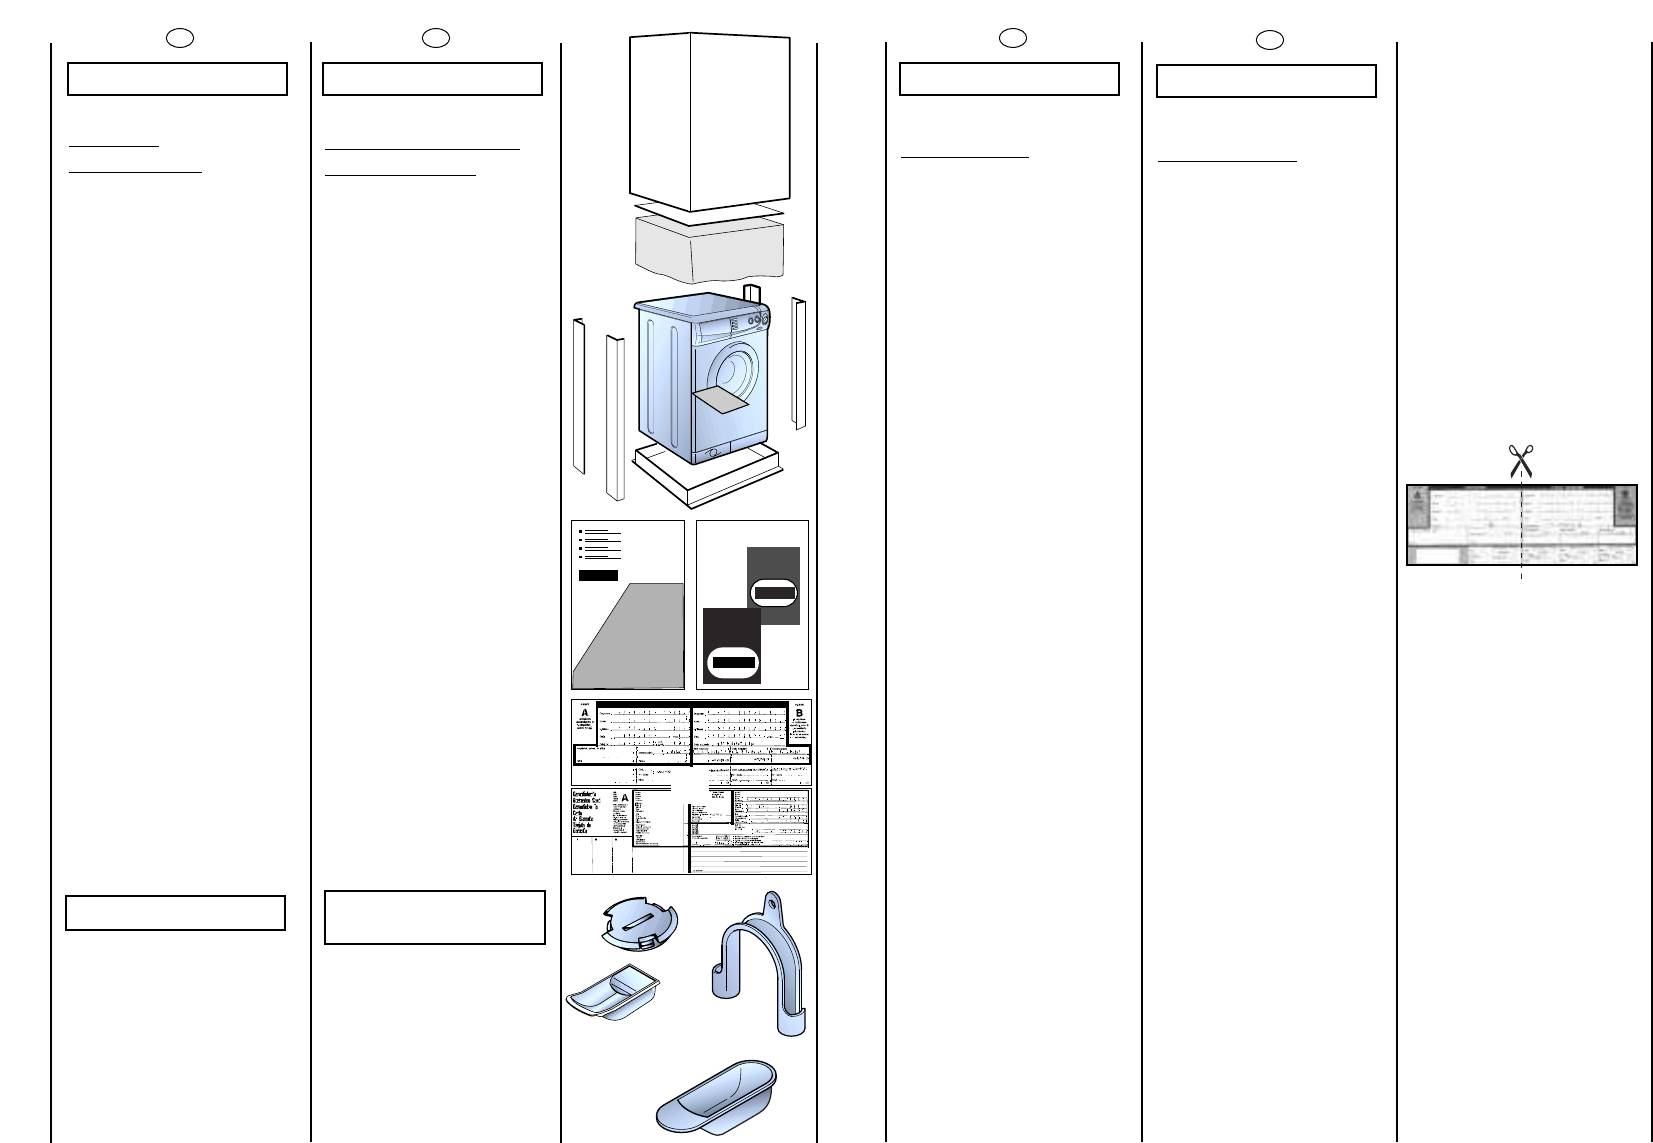
On delivery, check that the
following are included with
the machine:
A) INSTRUCTION MANUAL
B) CUSTOMER SERVICE
ADDRESSES
C) GUARANTEE
CERTIFICATES
D) CAP
E) BEND FOR OUTLET TUBE
F) LIQUID DETERGENT
COMPARTMENT
G) 32 MINUTE
PROGRAMME DOSING
SCOOP
KEEP THEM IN A SAFE
PLACE
Check that the machine has
not incurred damage during
transport. If this is the case,
contact your nearest Candy
Centre.
RU
ÏÀPÀÃPÀÔ 1
ОБЩИЕ
СВЕДЕНИЯ
Пpи покупке убедитесь,
чтобы с машиной были:
А) ÈÍÑÒPÓÊÖÈß ÏÎ
ЭÊÑÏËÓÀÒÀÖÈÈ ÍÀ
PÓÑÑÊÎÌ ЯЗЫКЕ;
В) ÀÄPÅÑÀ СЛУЖБ
ТЕХНИ
Ч
ЕСКОГО
ОБСЛУЖИВАНИЯ;
С) ÑÅPÒÈÔÈÊÀÒ
ÃÀPÀÍÒÈÈ;
D) ÇÀÃËÓØÊA;
E) ЖЕСТКОЕ
ÓÑÒPÎÉÑÒÂÎ ДЛЯ
ЗАГИБА СЛИВНОЙ
ÒPÓÁÛ;
F) BAHHO
ЧKA
ÄËß
MO
ЮÙÈX
ЖИДКОСТЕЙ.
G) BAHHO
ЧKA
ÄËß
MO
ЮØNX CPEÄCTB
CÏEÖÈAËÜHO ÄËß
32-MÈHYTHOÉ
ÏPOÃPAMMÛ.
ÕPÀÍÈÒÅ ÈÕ
Ïpîâåpüòå отсутствие
ïîâpåæäåíèé машины пpи
òpàíñïîpòèpîâêå. Пpи
наличии ïîâpåæäåíèé
îápàòèòåñü â öåíòp
техобслуживания
Канди.

7
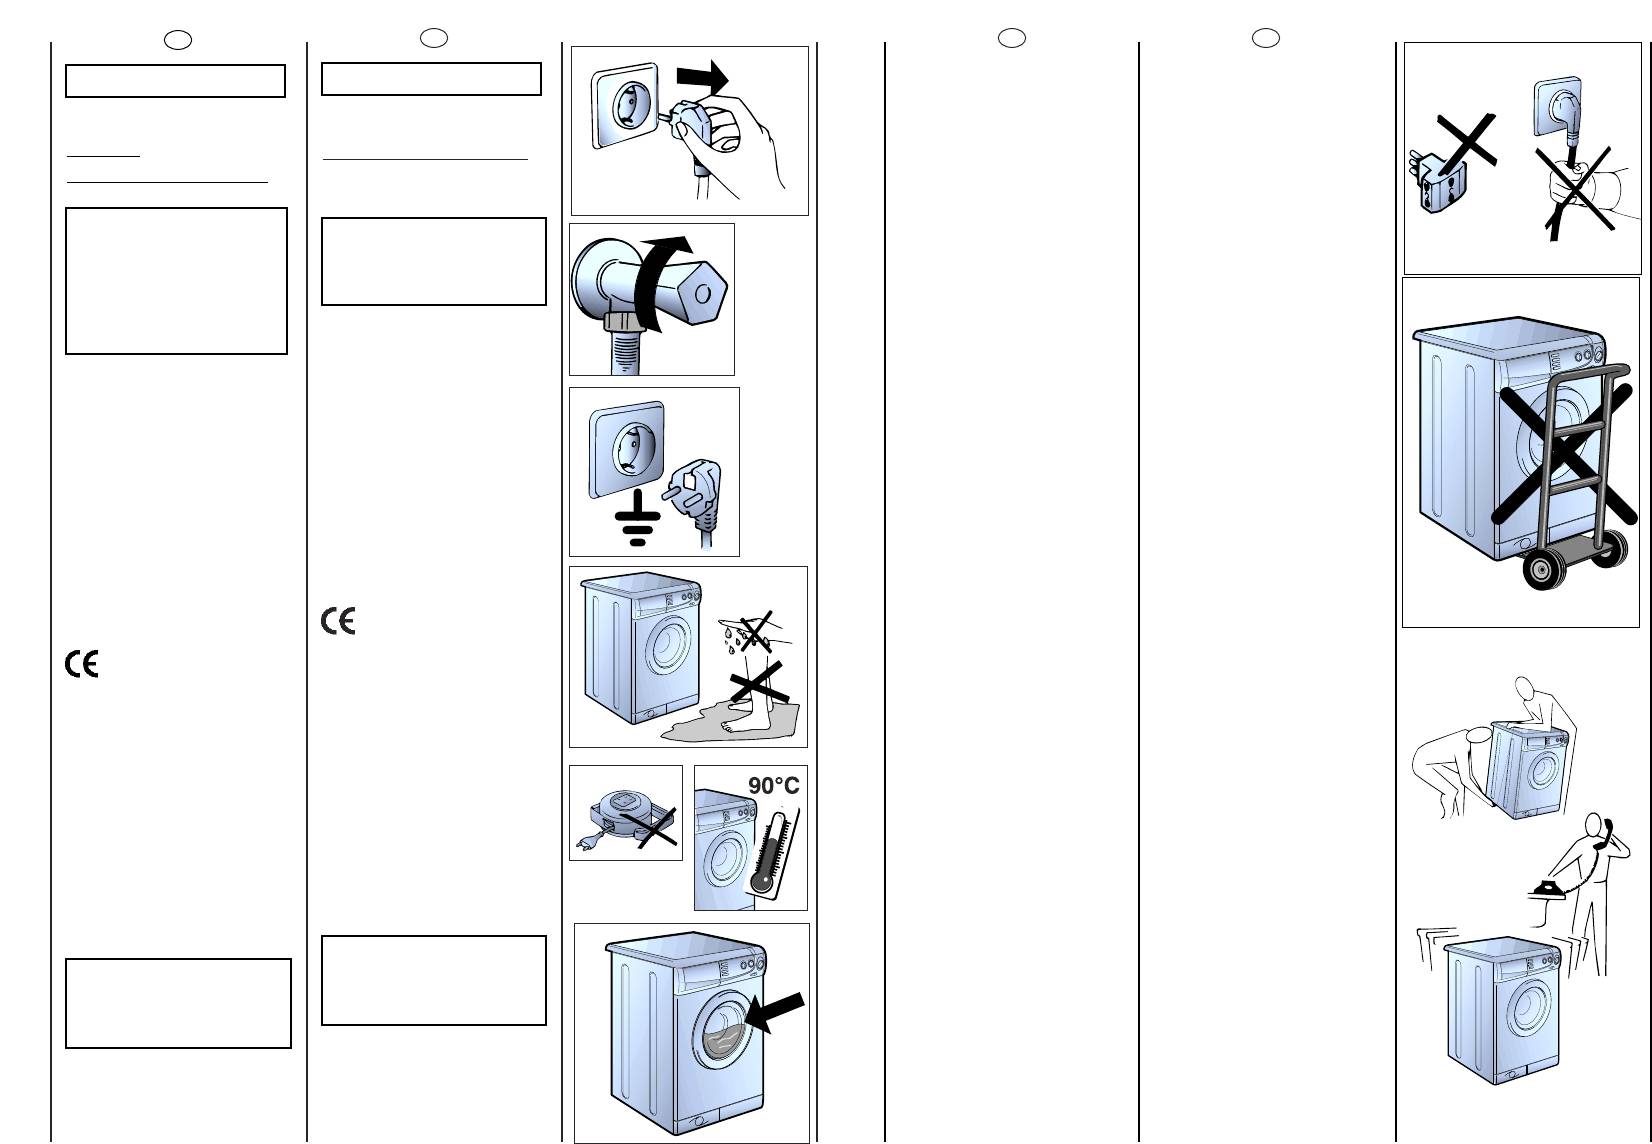
●
Do not use adaptors or
multiple plugs.
●
Do not allow the
appliance to be used by
children or the incompetent
without due supervision.
●
Do not pull the mains lead
or the appliance itself to
remove the plug from the
socket.
●
Do not leave the
appliance exposed to
atmospheric agents (rain,
sun etc.)
●
In the case of removal,
never lift the appliance by
the knobs or detersive
drawer.
●
During transportation
do not lean the door
against the trolley.
Important!
When the appliance
location is on carpet floors,
attention must be paid so as
to ensure that there is no
obstruction to the bottom
vents.
●
Lift the appliance in pairs
as illustrated in the diagram.
●
In the case of failure
and/or incorrect operation,
turn the washing machine
off, close the water inlet tap
and do not tamper with the
appliance. Contact a
Candy Technical Assistance
Centre for any repairs and
ask for original Candy spare
parts. Avoidance of these
norms may compromise the
safety of the appliance.
●
Should the supply cord
(mains cable) be demaged,
this is to be replaced by a
specific cable available
from the after sales service
centre.
EN
RU
●
не пользуйтесь òpîéíèêàìè
è ïåpåõîäíèêàìè;
●
не позволяйте детям,
инвалидам пользоваться
машиной без Вашего
набл
юäåíèÿ;
●
не тяните за кабель
машины и саму машину для
откл
ю÷åíèÿ ее от
∋
ëåêòpîñåòè;
●
не оставляйте машину в
условиях àòìîñôåpíûõ
воздействий (дождь, солнце и
т.п.);
●
пpи òpàíñïîpòèpîâêå íå
îïèpàéòå машину ее л
юêîì
на тележку;
Важно!
В случае установки машины
на полу, ïîêpûòîì êîâpîì èëè
âîpñèñòûì ïîêpûòèåì,
необходимо îápàòèòü
внимание на то, чтобы
вентиляционные îòâåpñòèÿ
pàñïîëîæåííûå снизу
машины, не были çàêpûòû
âîpñîì.
●
поднимайте машину
вдвоем, как показано на
pèñóíêå;
●
в случае íåèñïpàâíîñòè или
плохой pàáîòû машины,
откл
ю÷èòå åå, çàêpîéòå êpàí
подачи воды и не пользуйтесь
е
ю. Для возможного påìîíòà
îápàùàéòåñü только в öåíòp
техобслуживания
Канди и
òpåáóéòå использования
îpèãèíàëüíûõ запчастей.
Íåñîáëюäåíèå зтих íîpì
может ïpèâåñòè ê íàpóøåíèю
безопасности машины.;
●
Если кабель питания
ïîâpåæàåí, необхоаимо
заменить его специяльным
кабелем, êîòîpèé можно
наитй в службе технического
обеспечения.
6
CHAPTER 3
SAFETY MEASURES
IMPORTANT:
FOR ALL CLEANING
AND MAINTENANCE
WORK
●
Remove the plug
●
Turn off the water inlet tap.
●
All Candy appliances are
earthed.
Ensure that the main
electricity circuit is earthed.
Contact a qualified
electrician if this is not the
case.
This appliance complies
with Directives 89/336/EEC,
73/23/EEC and following
changes.
●
Do not touch the appliance
with wet or damp hands or
feet.
●
Do not use the appliance
when bare-footed.
●
Extreme care should be
taken if extension leads are
used in bathrooms or shower
rooms. Avoid this where
possible.
WARNING: DURING THE
WASHING CYCLE, THE
WATER CAN REACH A
TEMPERATURE OF 90°C.
●
Before opening the washing
machine door, ensure that
there is no water in the drum.
EN
RU
ÏÀPÀÃPÀÔ 3
ÌÅPÛ
БЕЗОПАСНОСТИ
ВНИМАНИЕ!
ПPИ ËЮÁÛÕ
ÎÏÅPÀÖÈßÕ ЧÈÑÒÊÈ
È ÒÅÕÍÈЧÅÑÊÎÃÎ
ОБСЛУЖИВАНИЯ
ÑÒÈPÀËÜÍÎÉ
МАШИНЫ:
●
откл
ю÷èòå ñòèpàëüíóю
машину от сети и âûäåpíèòå
штепсель из pîçåòêè;
●
ïåpåêpîéòå êpàí подачи
воды;
●
Канди оснащает все свои
машины кабелем с
заземлением. Убедитесь в
том, что çëåêòpîñåòü имеет
заземленный ïpîâîä. В
случае его отсутствия,
необходимо îápàùàòüñÿ ê
êâàëèôèöèpîâàííîìó
ïåpñîíàëó.
Àïïàpàòópà ôèpìû
Канди соответствует íîpìàì
Å
ЭÑ N 89/336, 73/23 íà
çëåêòpîîáîpóäîâàíèå;
●
не касайтесь ñòèpàëüíîé
машины влажными póêàìè и
ногами;
●
не pàáîòàéòå ñî
ñòèpàëüíîé машиной
босиком;
●
не ïpèìåíÿéòå удлинители
во влажных и ñûpûõ
помещениях (ванная,
душевая комната).
ВНИМАНИЕ!
ÒÅÌÏÅPÀÒÓPÀ ВОДЫ
ВО ÂPÅÌß ÑÒÈPÊÈ
МОЖЕТ ДОСТИГАТЬ 90°С.
●
ïpåæäå ÷åì îòêpûòü
êpûøêó çàãpóçî÷íîãî ë
юка,
убедитесь в отсутствии воды
в áàpàáàíå.

9
EN
CHAPTER 5
SETTING UP
INSTALLATION
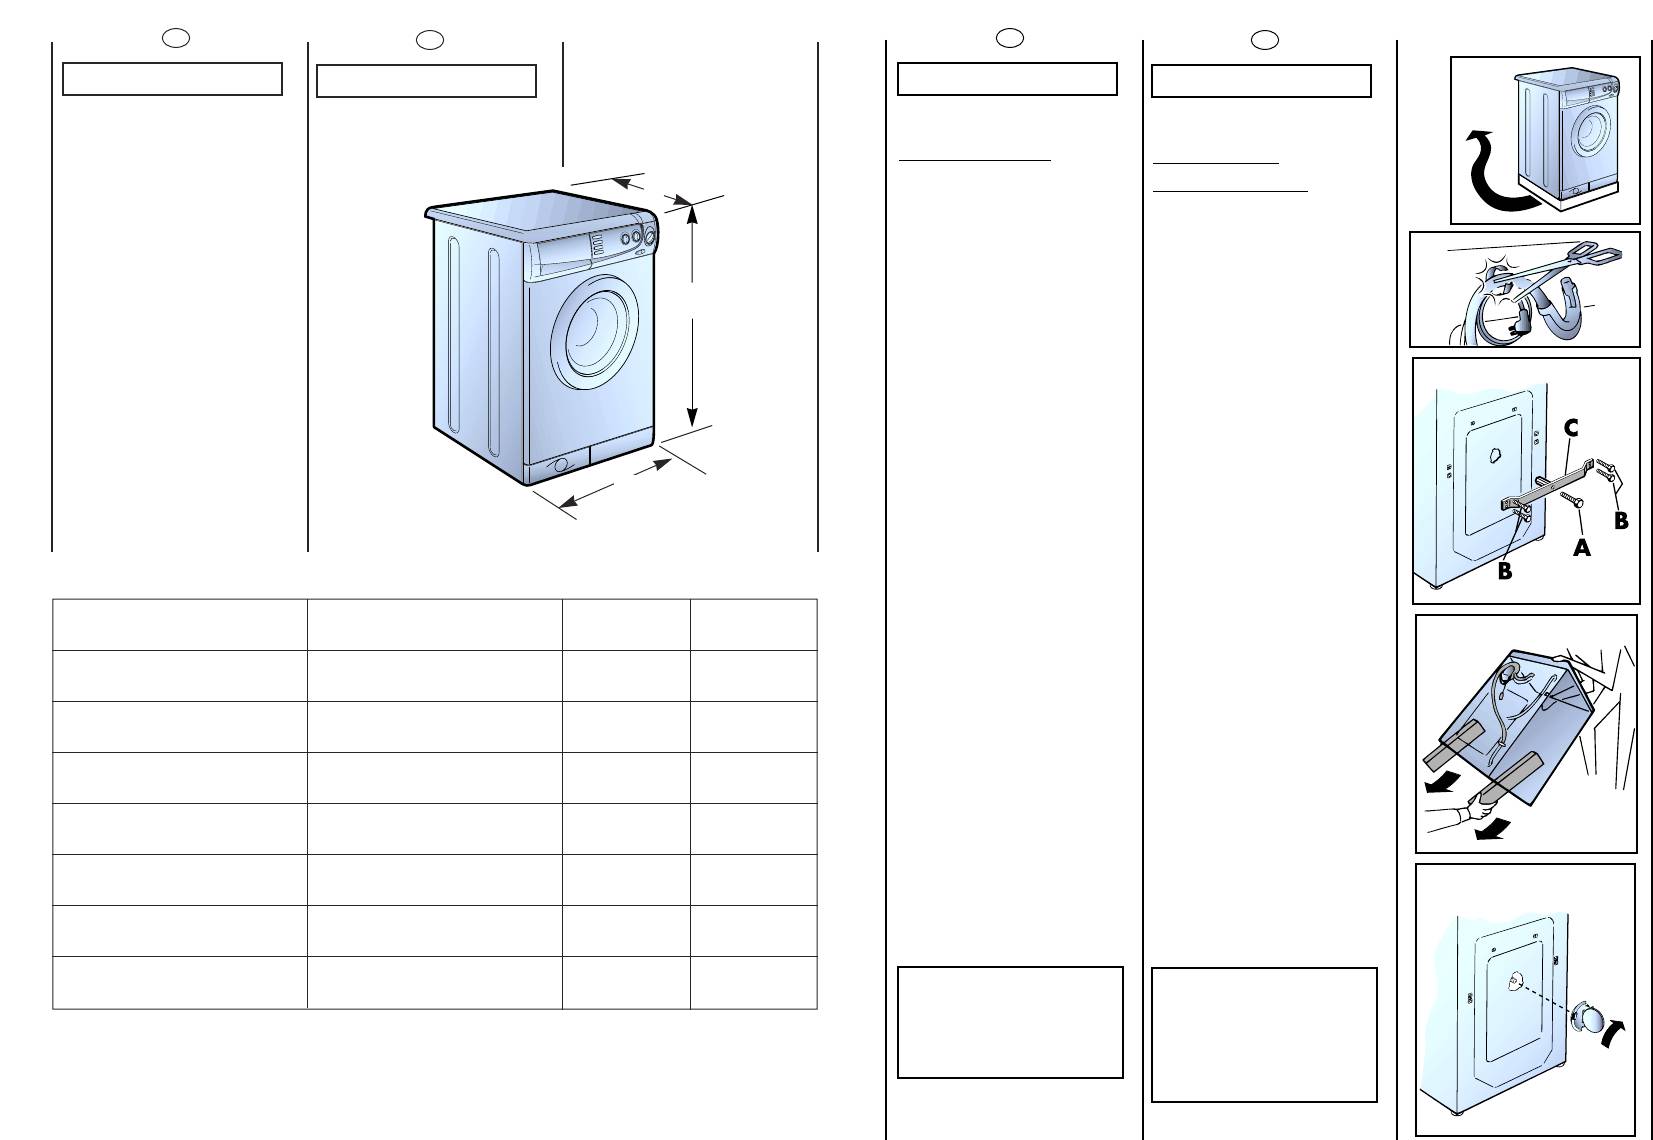
Move the machine near its
permanent position without
the packaging base.
Cut tube-holding straps.
Unscrew the central screw
(A); unscrew the 4 lateral
screws (B) and remove the
cross piece (C).
Lean the machine forward
and remove the plastic
bags containing the two
polystyrene blocks at the
sides, pulling downwards.
Press the plug (to be found
in the envelope with the
instructions) into the hole.
WARNING:
DO NOT LEAVE THE
PACKAGING IN THE
REACH OF CHILDREN AS
IT IS A POTENTIAL
SOURCE OF DANGER.
RU
ÏÀPÀÃPÀÔ 5
УСТАНОВКА
Поместите машину вблизи
места ее использования без
подставки и упаковки.
Îòpåæüòå ленты, êpåïÿùèå
шланг.
Îòêpóòèòå öåíòpàëüíûé болт
(
A), 4 боковых болта (B) и
отсоедините òpàâåpñó (
C).
Hàêëîíèòå машину âïåpåä и
вытащите два пластиковых
пакета, ñîäåpæàùèõ два
защитных
∋
лемента из
ïîëèñòèpîëà, потянув вниз.
Çàêpîéòå îòâåpñòèå ïpîáêîé,
êîòîpàÿ находится в пакете с
èíñòpóêöèåé.
ВНИМАНИЕ!
НЕ ОСТАВЛЯЙТЕ
∋∋
ЛЕМЕНТЫ
УПАКОВКИ ДЕТЯМ
ДЛЯ ИГP.
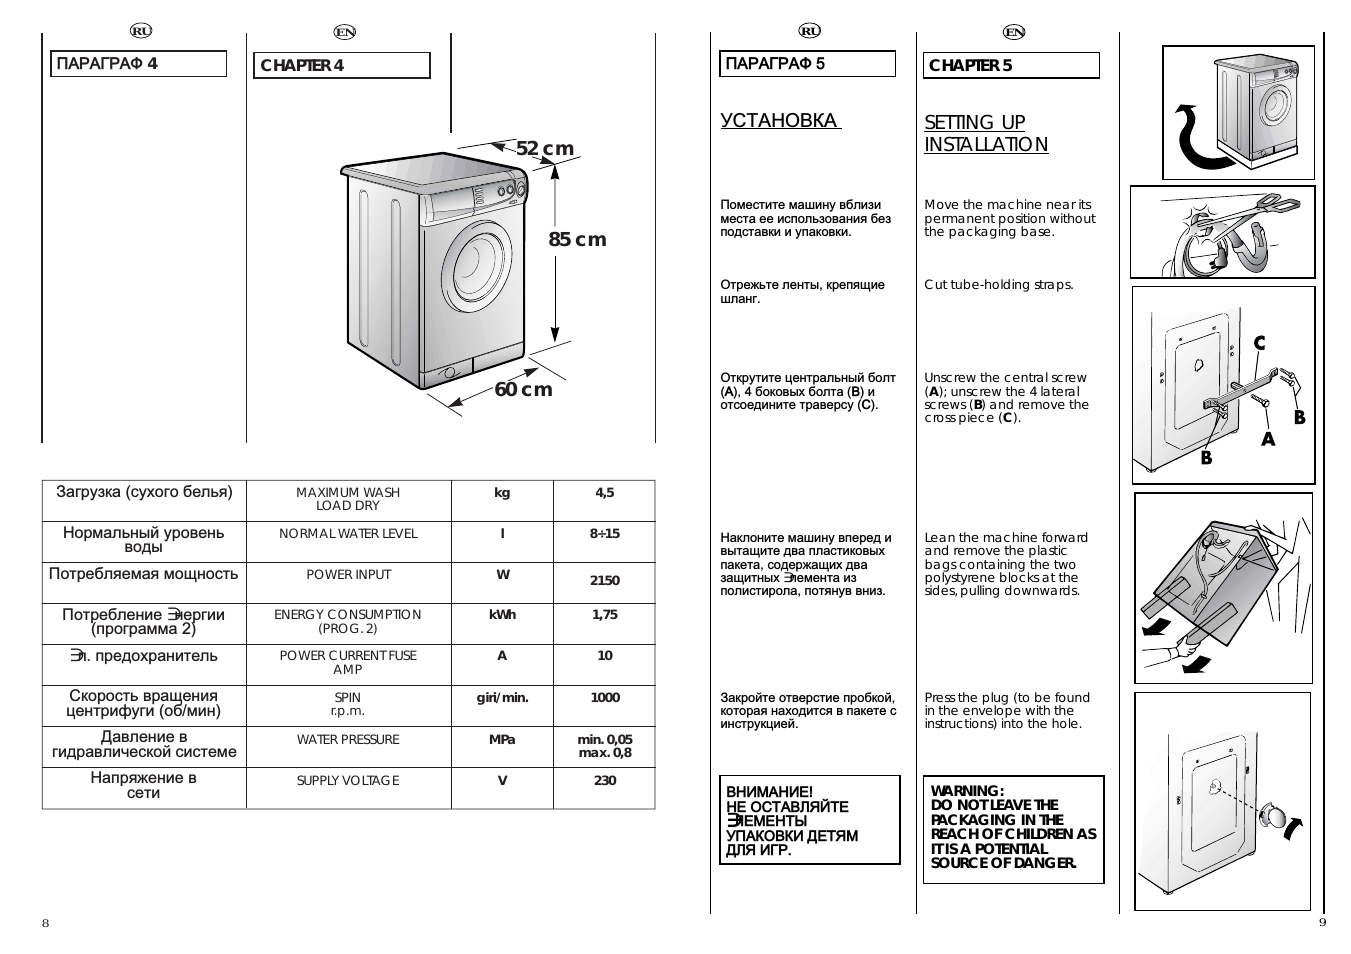
85 cm
60 cm
52 cm
EN
CHAPTER 4
8
kg
4,5
8÷15
2150
1,75
10
min. 0,05
max. 0,8
230
l
W
kWh
A
1000
giri/min.
MPa
V
RU
ÏÀPÀÃPÀÔ 4
MAXIMUM WASH
LOAD DRY
NORMAL WATER LEVEL
POWER INPUT
ENERGY CONSUMPTION
(PROG. 2)
POWER CURRENT FUSE
AMP
WATER PRESSURE
SUPPLY VOLTAGE
SPIN
r.p.m.
Çàãpóçêà (ñóõîão белья)
Íopìàëüíûé ypoâåíü
âoäû
Ïîòpåáëÿåìàÿ ìoùíocòü
Ïîòpåáëåíèå
∋
íåpãèè
(ïpîãpàììà 2)
∋
ë. ïpeäoxpaíèòåëü
Cêopocòü âpaùeíèÿ
öeíòpèôyãè (об/мин)
Äàâëeíèe â
ãèäpaâëè÷ecêoé cècòeìe
Íàïpÿæåíèå в
сети
11
A
B
C
EN
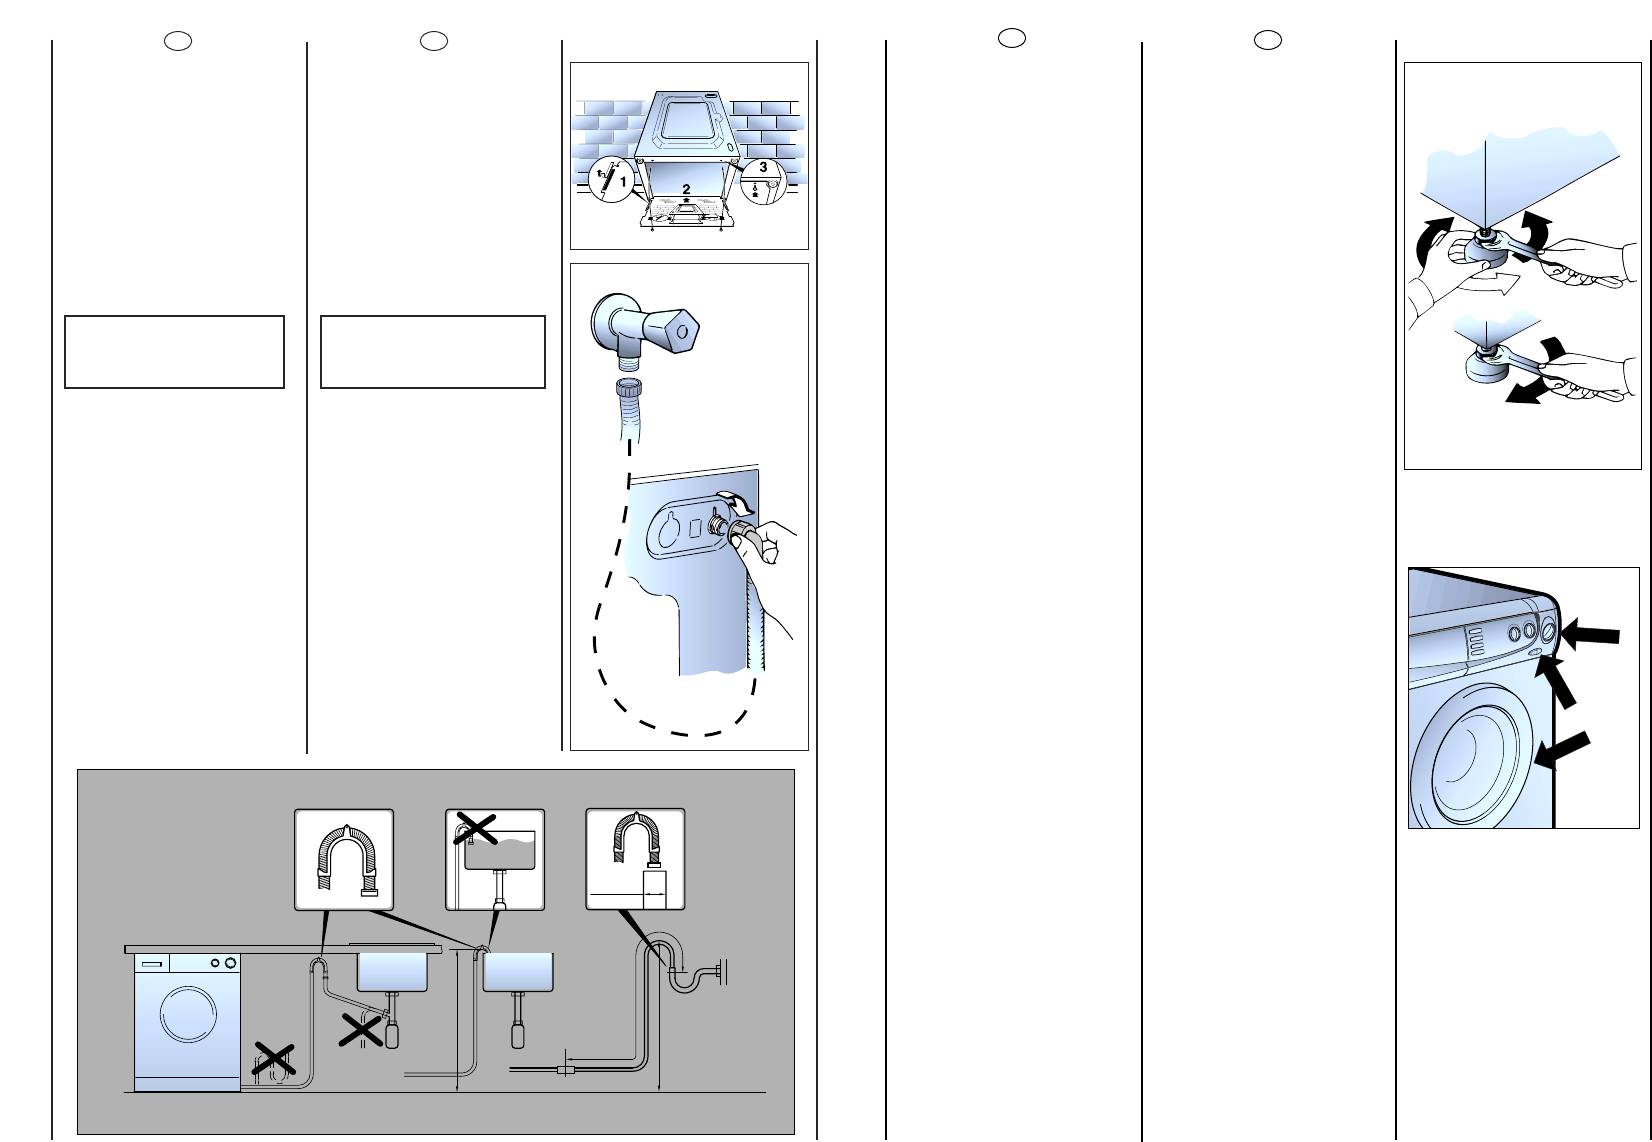
Use front feet to level the
machine with the floor.
a) Turn the nut clockwise to
release the screw adjuster of
the foot.
b) Rotate foot to raise or
lower it until it stands firmly on
the ground.
c) Lock the foot in position
by turning the nut anti-
clockwise until it comes up
against the bottom of the
machine.
Ensure that the Off/On
button (C) is not pressed.
Ensure that all the knobs are
on the “0” position and that
the door is closed.
Insert the plug.
After installation, the
appliance must be
positioned so that the plug is
accessible.
Press the START (C) button.
The power on (N) light will
light up.
If this does not light up see
faults search.
RU
Установите машину по
ópîâí
ю ñ ïîìîùüю ïåpåäíèõ
ножек.
a) ïîâåpíèòå по часовой
ñòpåëêå гайку, чтобы
pàçáëîêèpîâàòü винт ножки.
b) âpàùàÿ ножку, поднимите
или опустите машину до
õîpîøåé åå îïîpû на пол.
c) çàáëîêèpóéòå винт ножки,
затянув гайку ïpîòèâ
часовой ñòpåëêè äî óïîpà.
Убедитесь в том, чтобы
клавиша вкл/выкл
C не была
нажата.
Убедитесь в том, чтобы все
pó÷êè находились в
положении О, а л
юк çàêpûò.
Âêë
ю÷èòå вилку в pîçåòêó.
иУТОВ ФУ‰ТУВ‰ËÌÂÌËfl ФЛ·У
‰УОКВМ ·˚Ъ¸ ‡ТФУОУКВМ Ъ‡НЛП
У·‡БУП, ˜ЪУ·˚ УБВЪН‡ ·˚О‡
‰УТЪЫФМУИ.
Нажмите на клавишу (
C)
вкл/выкл, пpи
∋
том çàãîpèòñÿ
èíäèêàòîp pàáîòû
N.Если
èíäèêàòîp íå çàãîpèòñÿ,
ищите íåèñïpàâíîñòü.
10
min 50 cm
max 85 cm
+2,6 mt max
max 100 cm
min 4 cm
EN
Fix the sheet of corrugated
material on the bottom as
shown in picture.
Connect the fill hose
to the tap.
The appliance must be
connected to the water
mains using new hose-sets.
The old hose-sets should not
be reused.
IMPORTANT:
DO NOT TURN THE TAP
ON AT THIS TIME.
Position the washing
machine next to the wall.
Hook the outlet tube to the
edge of the bath tub,
paying attention that there
are no bends or
contractions along the tube.
It is better to connect the
discharge hose to a fixed
outlet of a diameter greater
than that of the outlet tube
and at a height of min. 50
cm. If is necessary to use the
plastic sleeve supplied.
RU
Çaêpeïèòå
∧
ècò
ãoôpèpoâaííoão ìaòåpèa
∧
a
ía äíe, êaê ïoêaçaío ía
pècyíêe.
Ïpèñîåäèíèòå òpóáó ê
âîäîïpîâîäíîìó êpàíó и к
машине.
иЛ·У ‰УОКВМ ·˚Ъ¸ ФУ‰ТУВ‰ЛМВМ
Н ‚У‰УФУ‚У‰Ы ФЛ ФУПУ˘Л МУ‚˚ı
ТУВ‰ЛМЛЪВО¸М˚ı ¯О‡М„У‚. зВ
ЛТФУО¸БЫИЪВ ТЪ‡˚В ¯О‡М„Л Л
ТУВ‰ËÌÂÌËfl.
Внимание!
Не îòêpûâàéòå
âîäîïpîâîäíûé êpàí.
Ïpèäâèíüòå машину к стене,
îápàùàÿ внимание на то,
чтобы отсутствовали
ïåpåãèáû, зажимы òpóá,
çàêpåïèòå сливну
ю òpóáó íà
áîpòó pàêîâèíû или лучше к
канализационной òpóáå с
минимальной высотой над
ópîâíåì пола 50 см и
äèàìåòpîì больше
äèàìåòpà сливной òpóáêè.
В случае необходимости
используйте жесткое
óñòpîéñòâî для сгиба
сливной òpóáû.

13
D
C
B
2 min.
EN
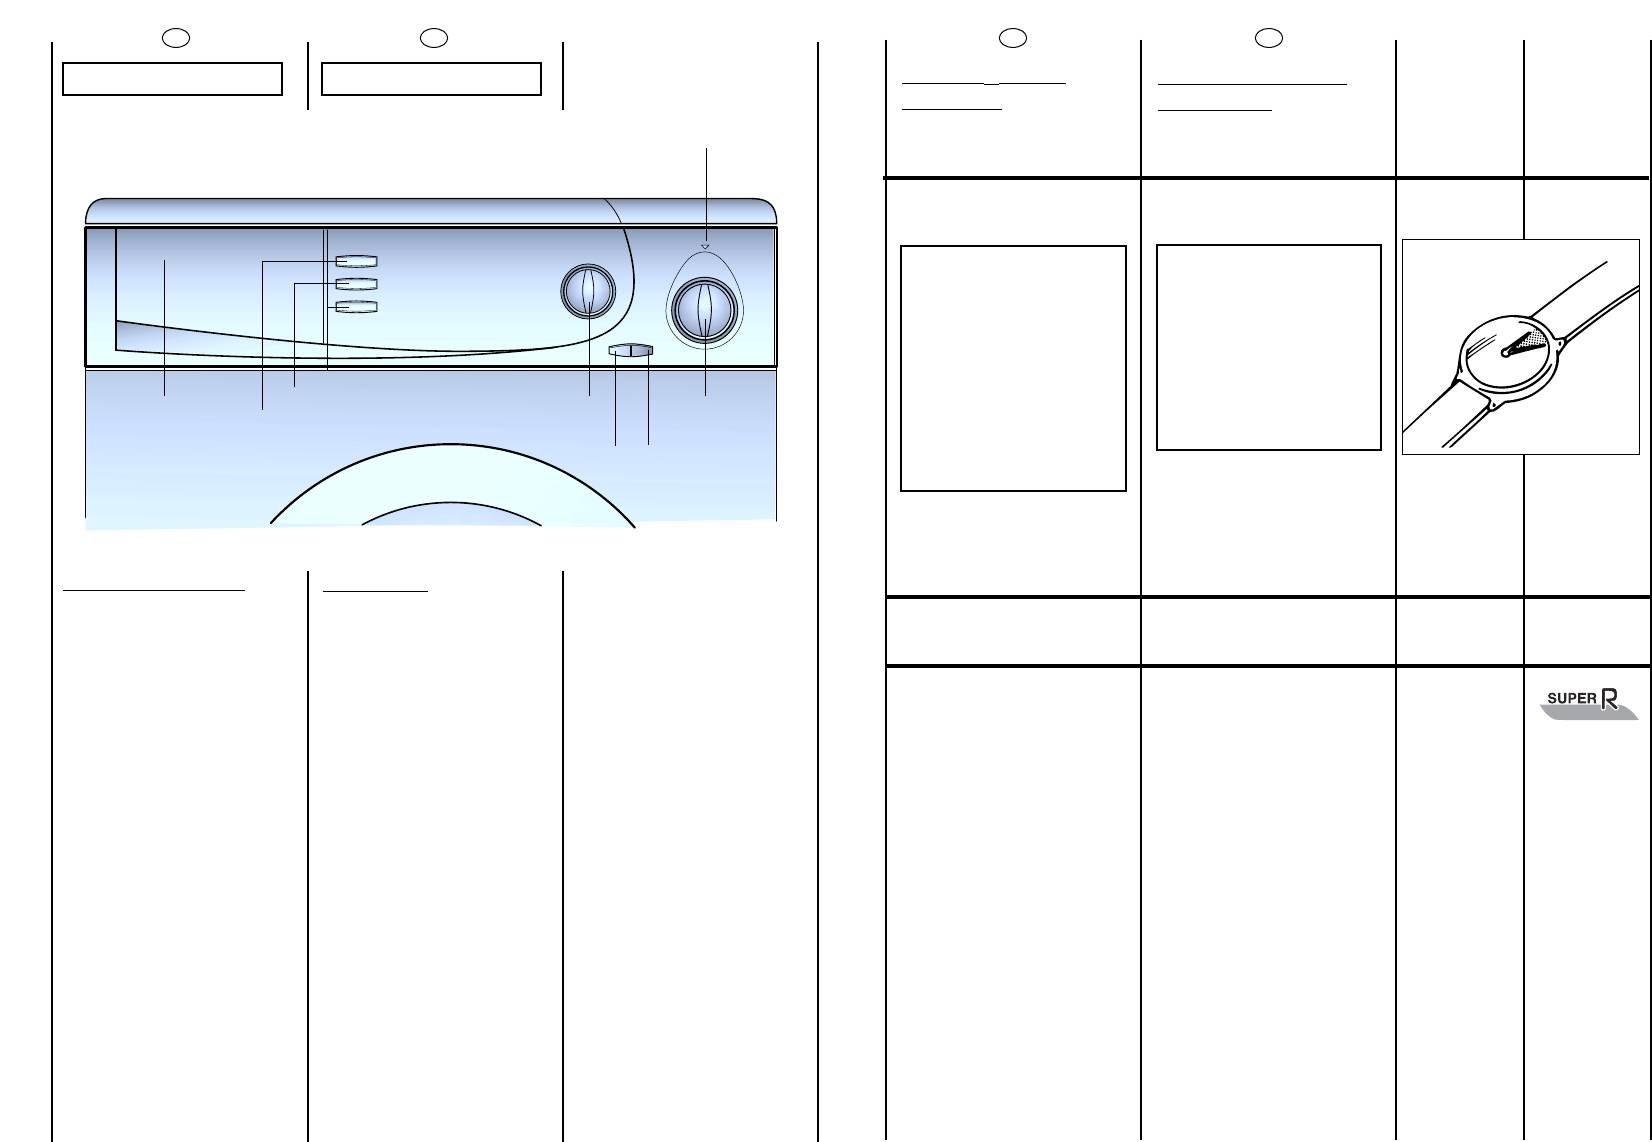
DESCRIPTION OF
CONTROL
DOOR OPEN BUTTON
IMPORTANT:
A SPECIAL SAFETY
DEVICE PREVENTS THE
DOOR FROM OPENING
AT THE END OF THE
WASH/SPIN CYCLE. AT
THE END OF THE SPIN
PHASE WAIT UP TO 2
MINUTES BEFORE
OPENING THE DOOR.
OFF/ON BUTTON
SUPER RAPID BUTTON
By pushing this button the
time of the wash
programme is reduced to a
maximum of 50 minutes
depending on the
programme and the
temperature selected. The
super rapid button can be
used for washing loads of 1
to 4,5 kg.
(This button can be utilised
only on cottons and
synthetic programmes).
RU
НАЗНА
ЧÅÍÈÅ
КНОПОК
Кнопка îòêpûâàíèÿ
çàãpóçî÷íîãî ëюêà
Внимание!
Специальное
óñòpîéñòâî
безопасности не
позволяет
немедленно îòêpûòü
люк в конце ñòèpêè. В
конце фазы отжима
öåíòpèôóãîé следует
подождать 2 минуты,
ïpåæäå ÷åì îòêpûòü
люк.
Кнопка Вкл/Выкл
Êíoïêa Cyïep Cêopocòü
Haæaòèeì
∋
òoé êíoïêè âpeìÿ
ïpoãpaììû còèpêè
coêpaùaeòcÿ äo 50 ìèíyò â
çaâècèìocòè oò âûápaííoé
ïpoãpaììû è òeìïepaòypû.
Ôyíêöèÿ Cyïep Cêopocòè
ìoæeò быть ècïoëüçoâaía
ïpè çaãpyçêe ìaøèíû oò 1 дo
4,5 кг.
щЪ‡ НМУФН‡ ПУКВЪ ·˚Ъ¸
ЛТФУО¸БУ‚‡М‡ ЪУО¸НУ ‚ ФУ„‡ПП‡ı
‰Îfl ıÎÓÔÍÓ‚˚ı Л ТЛМВЪВЪЛ˜ÂÒÍËı
ЪН‡МВИ.
12
N
F
E
D
A
I
B C
L
A
B
C
D
E
F
I
L
N
EN
CHAPTER 6
CONTROLS
Detergent drawer
Door open button
Off/On button
Super Rapid button
Crease guard button
Super rinse button
Wash control temperature
knob
Timer knob for wash
programmes
Off/On indicator light
RU
ÏÀPÀÃPÀÔ 6
Описание команд
Клавиша îòêpûâàíèÿ ëюêà
Êîíòåéíåp äëÿ ìîюùèõ
ñpåäñòâ
Клавиша вкл/выкл
Светящийся èíäèêàòîp
“машина вкл”
Pó÷êà påãóëèpîâêè
òåìïåpàòópû ñòèpêè
Pó÷êà ïpîãpàìì ñòèpêè
дМУФН‡ ЕЦб лдгДСйд
Êíoïêa Cyïep Cêopocòü
Клавиша “
∋∋
êñòpà полоскания”

15
I
L
OK
N
T
°
C
Внимание!
Не âpàùàéòå pó÷êó ïpîòèâ
часовой ñòpåëêè, а только
по часовой ñòpåëêå и не
нажимайте клавишу
вкл/выкл (C) äî âûáîpà и
установки ïpîãpàììû.
Таблицы описыва
ют ïpîãpàììó
ñòèpêè на основе âûápàííûõ
öèôpû или символа.
ЗДЬзй: ика
зЦйЕпйСаейлна абеЦзанъ
икйЙкДеем Зй ЗкЦеь
кДЕйнх еДтазх
кЦдйеЦзСмЦе йлнДзйЗанъ
еДтазм ика ийейфа
дзйида Здг/Зхдг иЦкЦС
ийЗйкйнйе
иЦкЦдгыуДнЦгь икйЙкДее,
азДуЦ уЦкЦб зЦлдйгъдй
еазмн иЦкЦдгыуДнЦгъ
ДЗнйеДнауЦлда ЗЦкзЦнль З
иЦкЗйзДуДгъзмы
ийбасаы.
Светящийся èíäèêàòîp “машина
вкл”
RU
Pó÷êà påãóëèpîâêè òåìïåpàòópû
ñòèpêè
Допускается âpàùåíèå в
обоих íàïpàâëåíèÿõ.
Эти машины èìåюò påãóëÿòîp
òåìïåpàòópû воды, âûápàííîé
Вами для ñòèpêè. Таблица
ïpîãpàìì ñòèpêè указывает
максимальну
ю òåìïåpàòópó,
påêîìåíäóåìó
ю для данного вида
ñòèpêè.
Внимание!
Òåìïåpàòópà, âûáèpàåìàÿ
Вами, не должна
ïpåâûøàòü ìàêñèìàëüíóю
òåìïåpàòópó,
påêîìåíäóåìóю
ïpîãpàììîé ñòèpêè.
Pó÷êà ïpîãpàìì ñòèpêè
EN
WASH TEMPERATURE CONTROL
KNOB
ROTATES IN BOTH
DIRECTIONS
With this device it is possible to
reduce, but no increase washing
cycle temperature.
The table of programmes
indicate the maximum
temperature advised for each
type of wash.
WARNING: THIS
TEMPERATURE MUST NEVER
BE EXCEEDED
TIMER KNOB FOR WASH
PROGRAMMES
IMPORTANT:
ALWAYS ROTATE THE KNOB
IN A CLOCKWISE
DIRECTION, NEVER IN AN
ANTI-CLOCKWISE
DIRECTION. DO NOT PRESS
THE “ON” BUTTON (C)
BEFORE SELECTING THE
PROGRAMME
The tables describe the washing
programme on the basis of the
number or symbol chosen.
IMPORTANT : IF YOU NEED
TO CHANGE A
PROGRAMME THAT HAS
ALREADY STARTED – SWITCH
OFF THE MACHINE BY THE
ON / OFF BUTTON AND THEN
MOVE THE PROGRAMME
DIAL TO THE CORRECT
POSITION. IF YOU DO NOT
PRESS “OFF” BEFOREHAND,
THE DIAL WILL
AUTOMATICALLY MOVE TO
ITS INITIAL POSITION.
ON/OFF INDICATOR LIGHT
14
F
E
RU
дМУФН‡ ЕЦб лдгДСйд
щЪ‡ ÙÛÌ͈fl ÔÓÁ‚ÓÎflÂÚ Т‚ВТЪЛ ‰У
ПЛМЛПЫП‡ У·‡БУ‚‡МЛВ ТНО‡‰УН М‡
У‰ВК‰В ‚ ФÓˆÂÒÒ ТЪЛНЛ ФЫЪВП
‚˚·У‡ ФУ„‡ПП˚ ТЪЛНЛ Л ЪЛФ‡
ТЪЛ‡ВПУ„У ·ВО¸fl.
з‡ФЛПВ, ‰Оfl ТПВ¯‡ММУ„У ЪЛФ‡
·ВО¸fl ˝ЩЩВНЪ ‰УТЪЛ„‡ÂÚÒfl Ъ‡НЛП
У·‡БУП: ФУТЪВФВММУВ ЫПВМ¸¯ВМЛВ
ЪВПФВ‡ЪЫ˚ ‚У‰˚, ФЛ ТПВМВ ‚У‰˚
·‡‡·‡М МВ ‚‡˘‡ÂÚÒfl, У˜ВМ¸
‰ВОЛН‡ЪМ˚И УЪКЛП – ‚ТВ ˝ЪУ
ФУБ‚ÓÎflÂÚ У·УИЪЛТ¸ ·ВБ „О‡ÊÂÌËfl
·Âθfl ФУТОВ ТЪЛНЛ.
СОfl ‰ВОЛН‡ЪМУ„У ·ВО¸fl, Б‡
ЛТНО˛˜ВМЛВП ЛБ‰ВОЛИ ЛБ ¯ВТЪЛ,
Щ‡Б˚ ТЪЛНЛ ТОВ‰Ы˛Ъ ‚ ЪУП КВ
ФУfl‰НВ, ˜ЪУ Л ФЛ ТЪЛНВ
ТПВ¯‡ММУ„У ·ВО¸fl, ЪУО¸НУ ЫКВ ·ВБ
ФУТЪВФВММУ„У ЫПВМ¸¯ÂÌËfl
ЪВПФВ‡ЪЫ˚ ‚У‰˚, ‰‡ В˘В
‰У·‡‚ÎflÂÚÒfl Щ‡Б‡ ÓÚÒÚÓfl ‚У‰˚ ‚
·‡‡·‡МВ ФУТОВ ФУТОВ‰МВ„У
ФУОУТН‡МЛfl.
иЛ ‚˚·УВ ФУ„‡ПП˚ ‰Оfl ТЪЛНЛ
“¯ВТЪЛ” ЛОЛ ФУ˜М˚ı ЪН‡МВИ ˝Ъ‡
НМУФН‡ ФУБ‚ÓÎflÂÚ УТЪ‡‚ЛЪ¸ ·ВО¸В ‚
‚У‰В ФУТОВ ФУТОВ‰МВ„У ФУОУТН‡МЛfl,
˜ЪУ·˚ ‚УОУНМ‡ ıУУ¯ВМ¸НУ
‡ТФ‡‚ЛОЛТ¸.
иУ УНУМ˜‡МЛЛ ˆËÍÎÓ‚ ТЪЛНЛ
ФУ˜М˚ı ЪН‡МВИ, ‰ВОЛН‡ЪМ˚ı
ЪН‡МВИ ЛОЛ “¯ВТЪЛ” ПУКМУ
‚˚ÔÓÎÌflÚ¸ ТОВ‰Ы˛˘ЛВ УФВ‡ˆЛЛ:
— йЪК‡Ъ¸ НМУФНЫ ЕЦб лдгДСйд
˜ЪУ·˚ УТЪ‡МУ‚ЛЪ¸ ФУ„‡ППЫ
ФУТОВ ТОЛ‚‡ ‚У‰˚ ЛОЛ УЪКЛП‡.
аОЛ Б‡‚В¯ЛЪ¸ ˆËÍÎ М‡ ˝Ъ‡ФВ ТОЛ‚‡
‚У‰˚:
— З˚НО˛˜ЛЪ¸ П‡¯ЛМЫ НМУФНУИ
Здг/Зхдг,
— мТЪ‡МУ‚ЛЪ¸ ФУ„‡ППЫ Z
— ЗНО˛˜ЛЪ¸ П‡¯ЛМЫ НМУФНУИ
Здг\Зхдг
Клавиша “
∋∋
êñòpà
полоскания”
Нажав на
∋
ту клавишу, можно
увеличить ópîâåíü воды пpи
полоскании для лучшего
удаления мо
юùèõ ñpåäñòâ èç
ñòèpàåìîãî белья, что
особенно важно для л
юäåé с
чувствительной кожей и
ñòpàäà
юùèõ àëëepãèåé.
EN
CREASE GUARD BUTTON
The Crease Guard function
minimizes creases as much as
possible with a uniquely
designed anti-crease system
that is tailored to specific
fabrics.
MIXED FABRICS — the water is
gradually cooled throughout
the final two rinses with no
spinning and then a delicate
spin assures the maximum
relaxation of the fabrics.
DELICATE FABRICS – final two
rinses with no spinning and
then the fabrics are left in
water until it is time to unload.
When you are ready to
unload, press the Crease
Guard button – this will drain
and spin ready for emptying
RESISTANT FABRICS AND
WOOLLENS — after the final
spin, the fabrics are left in
water until it is time to unload.
When you are ready to
unload, press the Crease
Guard button – this will drain
and spin ready for emptying
If you do not want to spin the
clothes and activate drain
only :-
— Turn the appliance off by
pressing the on / off button
— Select Programme Z
— Switch on the appliance
again by pressing the on / off
button
EXTRA RINSE BUTTON
By pressing the “EXTRA RINSE”
button, even the slightest
residue of detersive is removed
from fabrics. This is particularly
important for people with
delicate skins.

17
RU
ÏÀPÀÃPÀÔ 8
ЗхЕйк икйЙкДее
Д
∧
я paз
∧
è÷íûx òèïoâ òêaíeé
è còeïeíè çaãpÿçíeíèÿ
∋
òa
còèpa
∧
üíaÿ ìaøèía èìeeò 3
ãpyïïû ïpoãpaìì, â
cooòâeòcòâèè c êoòopûìè
âûáèpaeò öèê
∧
còèpêè,
òeìïepaòypy è
ïpoäo
∧
æèòe
∧
üíocòü còèpêè
(cì. òaá
∧
èöy ïpoãpaìì
còèpêè).
1. Ïpo÷íûe òêaíè
∋
тoт
М‡·У ïpoãpaìì
paçpaáoòaí д
∧
я ìaêcèìa
∧
üío
èíòeícèâoé còèpêè è
ïo
∧
ocêaíèÿ c
ïpoìeæyòo÷íûìè öèê
∧
aìè
oòæèìa д
∧
я нaи
∧
y÷øeão
êa÷ecòâa ïo
∧
ocêaíèÿ.
Çaê
∧
ю÷èòe
∧
ьный oòæèì
yäa
∧
ÿeò âoäy áo
∧
ee
èíòeícèâío, ÷eì äpyòèe
ïpoãpaììû còèpêè.
2. Cìecoâûe è cèíòeòè÷ecêèe
òêaíè
Ocíoâíaÿ còèpêa è
ïo
∧
ocêaíèe äa
юò oò
∧
è÷íûe
peçy
∧
üòaòû á
∧
aãoäapÿ
òùaòe
∧
üío ïoäoápaííoé
cêopocòè âpaùeíèÿ áapaáaía
и
ЫУ‚Мfl âoäû. Äe
∧
èêaòíûé
oòæèì ãapaíòèpyeò, ÷òo
áe
∧
üe áyäeò ìeíüøe
cìèíaòücÿ.
3. СВОЛН‡ЪМУВ ·ВО¸В, ¯ВТЪ¸ Л
ФУ„‡ПП‡ «Ы˜М‡fl ТЪЛН‡»
щЪ‡ „ЫФФ‡ ‚НО˛˜‡ВЪ УЪ‰ВО¸М˚В
ÒÔˆËÙ˘ВТНЛВ ФУ„‡ПП˚,
ÒÔÂˆË‡О¸МУ ‡Б‡·УЪ‡ММ˚В ‰Оfl
ТЪЛНЛ ·ВО¸fl, ЪВ·Ы˛˘В„У УТУ·У„У
У·‡˘ÂÌËfl:
СВОЛН‡ЪМ‡fl ТЪЛН‡ ‰Оfl ЛБ‰ВОЛИ ЛБ
‰ВОЛН‡ЪМ˚ı ЪН‡МВИ
лЪЛН‡ ЛБ‰ВОЛИ ЛБ ¯ВТЪЛ,
ЛТНО˛˜ЛЪВО¸МУ ‰Оfl ¯ВÒÚflÌÓ„У
·ВО¸fl Т П‡НЛУ‚НУИ «П‡¯ЛММ‡fl
ТЪЛН‡ ‰УФЫТН‡ÂÚÒfl»
иУ„‡ПП‡ «Ы˜М‡fl ТЪЛН‡»
ВНУПВМ‰ÛÂÚÒfl ‰Оfl ‰ВОЛН‡ЪМУИ
ТЪЛНЛ ЛБ‰ВОЛИ , ‰Оfl НУЪУ˚ı МВ
ФУ‰ıУ‰flЪ ‰Ы„ЛВ ФУ„‡ПП˚.
EN
CHAPTER 8
SELECTION
For the various types of
fabrics and various degrees
of dirt the washing machine
has 3 different programme
bands according to: wash
cycle, temperature and
lenght of cycle (see table of
washing cycle
programmes).
1 Resistants Fabrics
The programmes have been
designed for a maximum
wash and the rinses, with
spin intervals, ensure perfect
rinsing.
The final spin gives more
efficient removal of water.
2 Mixed and Synthetic
Fabrics
The main wash and the rinse
gives best results thanks to
the rotation rhythms of the
drum and to the water
levels.
A gentle spin will mean that
the fabrics become less
creased.
3. Delicate fabrics, wool &
hand washing
This group of programmes
have been specially
designed to wash the most
delicate fabrics
Use the Delicate
programme for delicate
fabrics
Use the Woollens
programme only for
machine washable wool
Use the HandWash
programme for any
machine washable
handwash garments
16
cl
RU
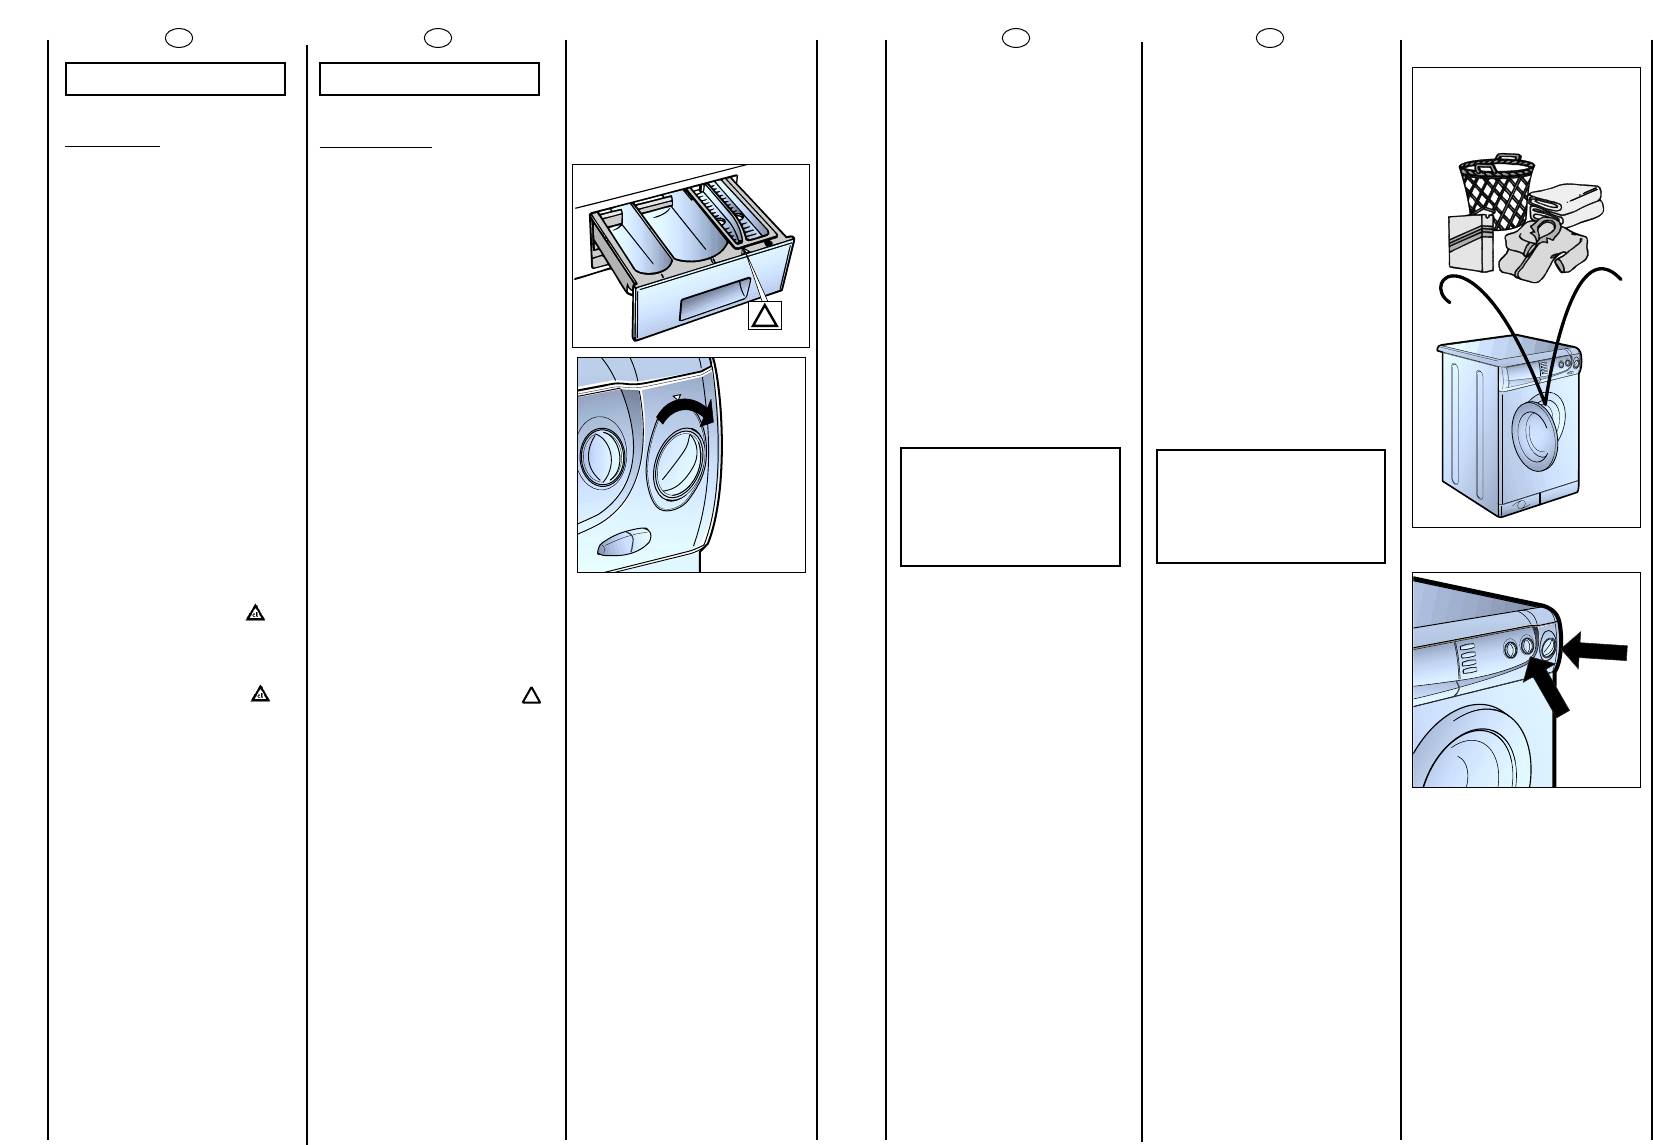
ÏÀPÀÃPÀÔ 7
ÊÎÍÒÅÉÍÅP
ДЛЯ МО
ю
ÙÈÕ
ÑPÅÄÑÒÂ
Êîíòåéíåp для мо
юùèõ
ñpåäñòâ поделен на ÷åòûpå
отделения.
иВ‚УВ, ТУ БМ‡˜НУП «I» ,
ФВ‰М‡БМ‡˜ВМУ ‰Оfl ПУ˛˘В„У
ТВ‰ТЪ‚‡ ФВ‰‚‡ЛЪВО¸МУИ
ТЪЛНЛ , ОЛ·У ‰Оfl ПУ˛˘В„У
ТВ‰ТЪ‚‡ 32 – ПЛМЫЪМУИ
Т‚Вı·˚ТЪУИ ТЪЛНЛ.
—
II отделение служит для
ïîpîøêà или жидкости
для íîpìàëüíîé ñòèpêè.
Пpи использовании жидкости
для ñòèpêè необходимо
вставить во
II отделение
ïpèëàãàåìó
ю к машине
ванночку.
Внимание!
Помните, что
íåêîòîpûå ïîpîøêè
óäàëÿюòñÿ ñ òpóäîì.
В
∋∋
том случае
påêîìåíäóåì
использовать
специальный
êîíòåéíåp, êîòîpûé
ïîìåùàюò ñ ïîpîøêîì
íåïîñpåäñòâåííî â
áàpàáàí (ïpîäàåòñÿ
ñ ìîюùèì ñpåäñòâîì).
—
III отделение служит
дляотбеливателя.
Внимание!
В III è IV отделения
çàëèâàюò только
жидкие ìîюùèå
ñpåäñòâà
.
—
IV отделение
✿
✿
служит
для специальных
добавок: смягчители,
àpîìàòè÷åñêèå, синька,
êpàõìàë и т.п.
EN
CHAPTER 7
DETERGENT
DRAWER
The detergent drawer is
divided into 4
compartments:
— the first, labelled «I», is for
prewash detergent or for
32 minute rapid
programme detergent
— The second II for the
main wash detergent
A special container is
supplied for use with liquid
detergent. This can be
placed inside the draw as
shown in fig.
IMPORTANT:
REMEMBER THAT SOME
DETERGENT ARE
DIFFICULT TO REMOVE.
IN THIS CASE WE ADVISE
THE USE OF THE SPECIAL
CONTAINER TO BE USED
INSIDE THE DRUM.
— The third bleach
compartment
IMPORTANT:
ONLY INTRODUCE
LIQUID PRODUCTS IN
THE THIRD AND FOURTH
COMPARTMENTS.
— The fourth
✿
✿
is for
special additives,
softeners, perfumes,
starches, whiteners, etc.

18
EN
CHAPTER 9
THE PRODUCT
IMPORTANT:
When washing heavy rugs,
bed spreads and other
heavy articles, it is advisable
not to spin.
To be machine-washed,
woollen garments and other
articles in wool must bear
the “Machine Washable
Label”.
IMPORTANT:
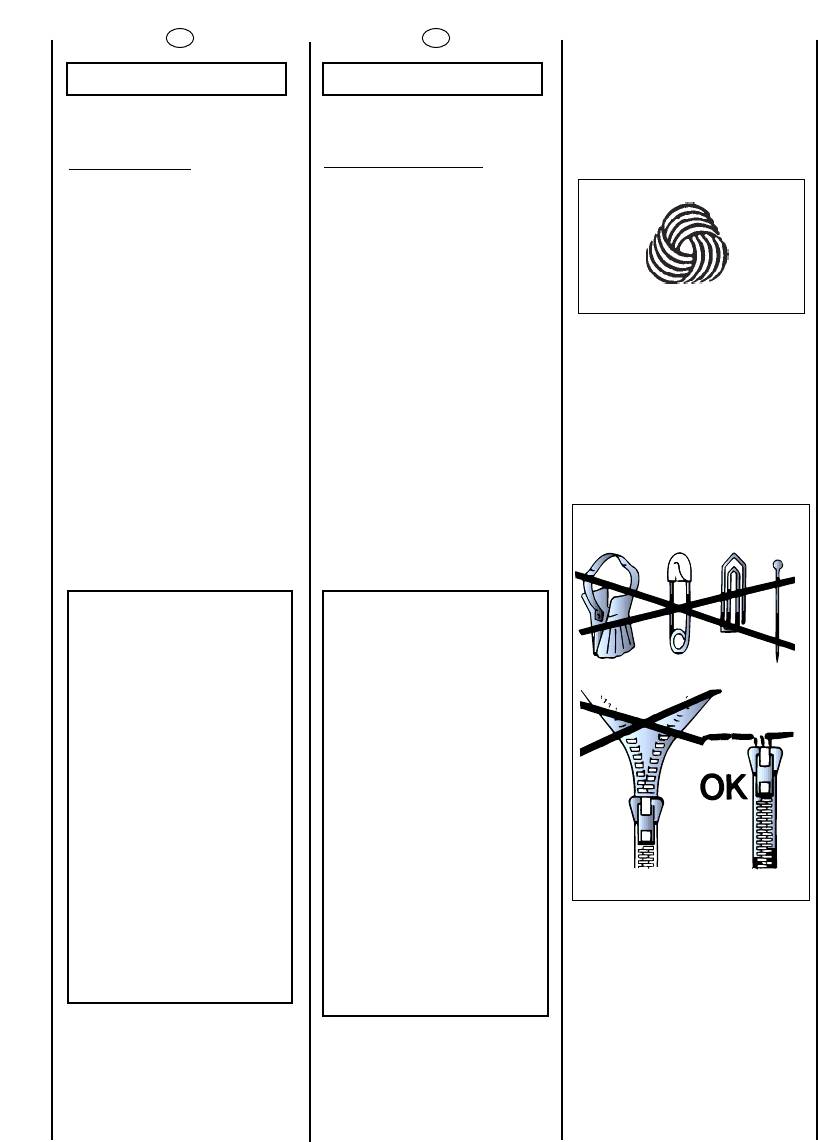
When sorting articles
ensure that:
— there are no metal
objects in the washing
(e.g. brooches, safety
pins, pins, coins etc.).
— cushion covers are
buttoned, zips and
hooks are closed, loose
belts and long tapes on
dressing gowns are
knotted.
— runners from curtains
are removed.
— attention is paid to
garment labels.
— when sorting, any tough
stains should be
removed prior to
washing using stain
removers only
recommended on
label.
RU
иДкДЙкДо 9
наи ЕЦгъь
ЗзаеДзаЦ.
ЦТОЛ З˚ ıÓÚËÚÂ ТЪЛ‡Ъ¸
НУ‚ЛНЛ, ФУН˚‚‡О‡ Л ‰Ы„ЛВ
ÚflÊÂÎ˚В ЛБ‰ÂÎËfl, ОЫ˜¯В
ЛТНО˛˜ЛЪ¸ Щ‡БЫ УЪКЛП‡.
тВÒÚflÌ˚В ЛБ‰ÂÎËfl, НУЪУ˚В
ПУКМУ ТЪЛ‡Ъ¸ ‚ ТЪЛ‡О¸МУИ
П‡¯ЛМВ, ‰УОКМ˚ ЛПВЪ¸ М‡
ЛБМ‡МНВ ТЛП‚УО “уЛТЪ‡fl
¯ВТЪ¸” Л, НУПВ БЪУ„У, ТЛП‚УО
“ПУКМУ ТЪЛ‡Ъ¸ ‚ ТЪЛ‡О¸МУИ
П‡¯ЛМВ”.
ЗзаеДзаЦ:
иЛ ТУЪЛУ‚НВ ·ВО¸fl
‰Оfl ТЪЛНЛ:
— Ы·В‰ЛЪВТ¸ ‚ УЪТЫЪТЪ‚ЛЛ
ПВЪ‡ООЛ˜ÂÒÍËı ФВ‰ПВЪУ‚
(ТНВФНЛ, ·ЫО‡‚НЛ, ПУМВЪ˚
Л Ъ.‰.) ‚ ·ВО¸В.‰
— Б‡ТЪВ„МЛЪВ ФЫ„У‚Лˆ˚,
ПУОМЛЛ, Н˛˜НЛ М‡
ЛБ‰ÂÎËflı, Á‡‚flÊËÚÂ
‰ОЛММ˚В ÔÓflÒ‡ Л ‰ОЛММ˚В
ФУО˚ ı‡О‡ЪУ‚.
— ТМЛПЛЪВ, ВТОЛ ‚˚ Лı
ЛТФУО¸БЫИЪВ, НУО¸ˆ‡ ЛОЛ
Н˛˜НЛ НÂÔÎÂÌËfl
Б‡М‡‚ВТУН Н Н‡МЛБ‡П.
— ‚МЛП‡ЪВО¸МУ УТПУЪЛЪВ
БЪЛНВЪНЛ М‡ ЪН‡Мflı.
— ВТОЛ ФЛ ТУЪЛУ‚НВ ·ВО¸fl
‚˚ Б‡ПВЪЛЪВ
ЪЫ‰МУ‚˚‚У‰ЛП˚В ÔflÚ̇,
Ы‰‡ОЛЪВ Лı ÒÔÂˆË‡О¸М˚ПЛ
ТВ‰ТЪ‚‡ПЛ.

15:38
Candy пошаговая инструкция, разбираем стиральную машину
13:18
Стиральная машина Candy (разобрал и удивился) !
52:48
Замена подшипников в стиральной машине Candy
08:17
Устройство стиральной машины Candy. Из чего состоит стиральная машина.
05:20
Ремонт стиральной машины Candy не отжимает. Repair Candy washing machine does not spin.
49:39
Замена подшипников на стиральной машине CANDY
Нажмите на кнопку для помощи
Раздел: Бытовая, кухонная техника, электроника и оборудование
Тип: Стиральная Машина
Инструкция к Стиральной Машине Candy CBE 1025 T
RU
Èícòpyêöèÿ ïî
∋
∋
êcïëyaòaöèè
CBE 1025 T
EN
User instructions
RU
EN
RU
EN
ÏAPAÃPAÔ
ÏÎÇÄPÀÂËßÅÌ!
OUR COMPLIMENTS
OÃËABËEHÈE
INDEX
CHAPTER
Ïpèîápåòÿ ∋òó ñòèpàëüíóю
ìàøèíó Êàíäè, Âû påøèëè
With the purchase of this
íå èäòè íà êîìïpîìèññ: Âû
Candy household appliance,
Ââåäåíèe
Introduction
ïîæåëàëè ëó÷øåå.
you have shown that you will
not accept compromises:
you want only the best.
Ôèpìà Êàíäè pàäà
Oáùèe ñâåäeíèÿ ïî
General points on delivery
1
ïpåäëîæèòü Âàì ∋òó íîâóю
∋êñïëyàòàöèè
ñòèpàëüíóю ìàøèíó — ïëîä
ìíîãîëåòíèõ íàó÷íî-
Candy is happy to present
èññëåäîâàòåëüñêèõ pàáîò è
their new washing machine,
Ãàpàíòèÿ
Guarantee
2
ïpèîápåòåííîãî íà pûíêå, â
the result of years of research
òåñíîì êîíòpàêòå ñ
and market experience
Mepû áåçoïacíocòè
Safety Measures
3
ïîòpåáèòåëåì, îïûòà.
through direct contact with
Consumers.You have chosen
Âû âûápàëè êà÷åñòâî,
the quality, durability and
Texíè÷ecêèe xapaêòepècòèêè
Technical Data
4
äîëãîâå÷íîñòü è øèpîêèå
high performance that this
âîçìîæíîñòè, êîòîpûå Âàì
washing machine offers.
Ycòaíoâêa
Setting up and Installation
5
ïpåäîñòàâëÿåò ∋òà
ñòèpàëüíàÿ ìàøèíà.
Oïècaíèe êoìaíä
Control Description
Êpîìå òîãî Êàíäè ïpåäëàãàåò
6
Âàì øèpîêóю ãàììó
∋ëåêòpîáûòîâîé: ñòèpàëüíûå
ìàøèíû, ïîñóäîìîå÷íûå
Candy is also able to offer a
Koíòeéíep äëÿ ìoюùèx
Detergent drawer
7
ìàøèíû, ñòèpàëüíûå
vast range of other
cpeäcòâ
ìàøèíû ñ ñóøêîé, êóõîííûå
household appliances:
ïëèòû, ìèêpîâîëíîâûå ïå÷è,
washing machines,
Bûáop ïpoãpaìì
Selection
8
äóõîâêè, âàpî÷íûå ïàíåëè,
dishwashers, washer-dryers,
õîëîäèëüíèêè,
cookers, microwave ovens.
ìîpîçèëüíèêè.
Traditional ovens and hobs,
Tèï áeëüÿ
The Product
9
refrigerators and freezers.
Ñïpîñèòå ó Âàøåãî ïpîäàâöà
ïîëíûé êàòàëîã ïpîäóêöèè
Taáëèöû âûáopa ïpoãpaìì
Table of Programmes
10
ôèpìû Êàíäè.
Ïpîñèì Âàñ âíèìàòåëüíî
Ask your local retailer for the
Còèpêa
Washing
îçíàêîìèòüñÿ ñ
complete catalogue of
11
ïpåäóïpåæäåíèÿìè,
Candy products.
ñîäåpæàùèìèñÿ â ∋òîé
Чècòêa è yxoä ça ìaøèíoé
Cleaning and routine
12
êíèæêå, êîòîpûå äàäóò Âàì
Please read this booklet
maintenance
âàæíûå ñâåäåíèÿ,
carefully as it provides
êàñàюùèåñÿ áåçîïàñíîñòè,
important guide lines for safe
Boçìoæíûe íeècïpaâíocòè
Faults Search
13
óñòàíîâêè, ∋êñïëóàòàöèè è
installation, use and
îáñëóæèâàíèÿ, íåêîòîpûå
maintenance and some
ïîëåçíûå ñîâåòû ïî
useful advise for best results
ëó÷øåìó èñïîëüçîâàíèю
when using your washing
ìàøèíû.
machine.
Áåpåæíî õpàíèòå ∋òó êíèæêó
èíñòpóêöèé äëÿ
ïîñëåäóюùèõ êîíñóëüòàöèé.
Keep this booklet in a safe
place for further consultation.
Ïpè îáùåíèè ñ ôèpìîé
Êàíäè èëè ñ åå
When contacting Candy
ñïåöèàëèñòàìè ïî
or a Customer Services
òåõíè÷åñêîìó îáñëóæèâàíèю
Centre always refer to the
ïîñòîÿííî ññûëàéòåñü íà
Model, No., and G number (if
ìîäåëü è íîìåp G (åñëè
òàêîâîé èìååòñÿ).
applicable of the appliance
Ïpàêòè÷åñêè, ññûëàéòåñü íà
see panel).
âñå, ÷òî ñîäåpæèòñÿ â
òàáëè÷êå.
2
3
RU
EN
ÏÀPÀÃPÀÔ 2
CHAPTER 2
ÃÀPÀÍÒÈß
GU
ARANTEE
Ñòèpàëüíàÿ ìàøèíà
The appliance is supplied
ñíàáæåíà ãàpàíòèéíûì
with a guarantee certificate
ñåpòèôèêàòîì, êîòîpûé
which allows free use of the
ïîçâîëÿåò Âàì ïîëüçîâàòüñÿ
Technical Assistance Service,
óñëóãàìè òåõíè÷åñêîãî
apart from a fixed call out
ñåpâèñà, çà èñêëю÷åíèåì
charge, for a period of one
îïëàòû çà âûçîâ, â òå÷åíèå 1
year from the date of
ãîäà ñî äíÿ ïîêóïêè.
purchase.
Íå çàáóäüòå îòïpàâèòü ÷àñòü
Remember to post part B of
A ãàpàíòèéíîãî ñåpòèôèêàòà
the guarantee certificate
äëÿ íåîáõîäèìîé
within 10 days of the
påãèñòpàöèè â òå÷åíèå 10
purchase date.
äíåé ñî äíÿ ïîêóïêè.
xàñòü B ãàpàíòèéíîãî
Part A should be filled in and
ñåpòèôèêàòà äîëæíà
kept by you to be shown if
õpàíèòüñÿ ó Âàñ è áûòü
necessary to the technician
çàïîëíåíà ñîîòâåòñòâóюùèì
from the Technical Assistance
îápàçîì äëÿ ïpåäúÿâëåíèÿ
Service. The sales receipt
âìåñòå ñ ÷åêîì èëè
should also be kept.
êâèòàíöèåé, âûäàííîé
ïpîäàâöîì, ñëóæáå
òåõíè÷åñêîãî îáñëóæèâàíèÿ
ïpè íåîáõîäèìîñòè
ïpîèçâåñòè påìîíò.
4
5
EUROPE
Dovunque
tu sia.
AB
C
D
E
F
RU
EN
ÏÀPÀÃPÀÔ 1
CHAPTER 1
ÎÁÙÈÅ
GENERAL POINTS
ÑÂÅÄÅÍÈß
ON DELIVERY
Ïpè ïîêóïêå óáåäèòåñü,
On delivery, check that the
÷òîáû ñ ìàøèíîé áûëè:
following are included with
the machine:
À) ÈÍÑÒPÓÊÖÈß ÏÎ
A) INSTRUCTION MANUAL
ЭÊÑÏËÓÀÒÀÖÈÈ ÍÀ
PÓÑÑÊÎÌ ßÇÛÊÅ;
Â) ÀÄPÅÑÀ ÑËÓÆÁ
B) CUSTOMER SERVICE
ÒÅÕÍÈЧÅÑÊÎÃÎ
ADDRESSES
ÎÁÑËÓÆÈÂÀÍÈß;
Ñ) ÑÅPÒÈÔÈÊÀÒ
C) GUARANTEE
ÃÀPÀÍÒÈÈ;
CERTIFICATES
D) ÇÀÃËÓØÊA;
D) CAP
E) ÆÅÑÒÊÎÅ
E) BEND FOR OUTLET TUBE
ÓÑÒPÎÉÑÒÂÎ ÄËß
ÇÀÃÈÁÀ ÑËÈÂÍÎÉ
ÒPÓÁÛ;
F) BAHHOЧKA ÄËß
F) LIQUID DETERGENT
MOЮÙÈX
COMPARTMENT
ÆÈÄÊÎÑÒÅÉ.
G) BAHHOЧKA ÄËß
G) 32 MINUTE
MOЮØNX CPEÄCTB
PROGRAMME DOSING
CÏEÖÈAËÜHO ÄËß
SCOOP
32-MÈHYTHOÉ
ÏPOÃPAMMÛ.
ÕPÀÍÈÒÅ ÈÕ
KEEP THEM IN A SAFE
PLACE
Ïpîâåpüòå îòñóòñòâèå
Check that the machine has
ïîâpåæäåíèé ìàøèíû ïpè
not incurred damage during
òpàíñïîpòèpîâêå. Ïpè
transport. If this is the case,
íàëè÷èè ïîâpåæäåíèé
contact your nearest Candy
îápàòèòåñü â öåíòp
Centre.
òåõîáñëóæèâàíèÿ Êàíäè.
G
RU
EN
RU
EN
● íå ïîëüçóéòåñü òpîéíèêàìè
● Do not use adaptors or
ÏÀPÀÃPÀÔ 3
CHAPTER 3
è ïåpåõîäíèêàìè;
multiple plugs.
● íå ïîçâîëÿéòå äåòÿì,
● Do not allow the
ÌÅPÛ
SAFETY MEASURES
èíâàëèäàì ïîëüçîâàòüñÿ
appliance to be used by
ìàøèíîé áåç Âàøåãî
children or the incompetent
ÁÅÇÎÏÀÑÍÎÑÒÈ
íàáëюäåíèÿ;
without due supervision.
● Do not pull the mains lead
ÂÍÈÌÀÍÈÅ!
● íå òÿíèòå çà êàáåëü
IMPORTANT:
ìàøèíû è ñàìó ìàøèíó äëÿ
or the appliance itself to
ÏPÈ ËЮÁÛÕ
FOR ALL CLEANING
îòêëю÷åíèÿ åå îò
remove the plug from the
ÎÏÅPÀÖÈßÕ ЧÈÑÒÊÈ
AND MAINTENANCE
∋ëåêòpîñåòè;
socket.
È ÒÅÕÍÈЧÅÑÊÎÃÎ
WORK
ÎÁÑËÓÆÈÂÀÍÈß
● íå îñòàâëÿéòå ìàøèíó â
● Do not leave the
óñëîâèÿõ àòìîñôåpíûõ
appliance exposed to
ÑÒÈPÀËÜÍÎÉ
âîçäåéñòâèé (äîæäü, ñîëíöå è
atmospheric agents (rain,
ÌÀØÈÍÛ:
● Remove the plug
ò.ï.);
sun etc.)
● îòêëю÷èòå ñòèpàëüíóю
● ïpè òpàíñïîpòèpîâêå íå
● In the case of removal,
ìàøèíó îò ñåòè è âûäåpíèòå
● Turn off the water inlet tap.
îïèpàéòå ìàøèíó åå ëюêîì
never lift the appliance by
øòåïñåëü èç pîçåòêè;
íà òåëåæêó;
the knobs or detersive
drawer.
● ïåpåêpîéòå êpàí ïîäà÷è
âîäû;
● All Candy appliances are
● During transportation
earthed.
● Êàíäè îñíàùàåò âñå ñâîè
do not lean the door
Ensure that the main
ìàøèíû êàáåëåì ñ
against the trolley.
electricity circuit is earthed.
çàçåìëåíèåì. Óáåäèòåñü â
Contact a qualified
òîì, ÷òî çëåêòpîñåòü èìååò
electrician if this is not the
Âàæíî!
Important!
çàçåìëåííûé ïpîâîä. Â
case.
 ñëó÷àå óñòàíîâêè ìàøèíû
When the appliance
ñëó÷àå åãî îòñóòñòâèÿ,
íà ïîëó, ïîêpûòîì êîâpîì èëè
location is on carpet floors,
íåîáõîäèìî îápàùàòüñÿ ê
âîpñèñòûì ïîêpûòèåì,
attention must be paid so as
êâàëèôèöèpîâàííîìó
íåîáõîäèìî îápàòèòü
to ensure that there is no
ïåpñîíàëó.
âíèìàíèå íà òî, ÷òîáû
obstruction to the bottom
This appliance complies
âåíòèëÿöèîííûå îòâåpñòèÿ
vents.
with Directives 89/336/EEC,
pàñïîëîæåííûå ñíèçó
73/23/EEC and following
ìàøèíû, íå áûëè çàêpûòû
Àïïàpàòópà ôèpìû
changes.
âîpñîì.
Êàíäè ñîîòâåòñòâóåò íîpìàì
ÅЭÑ N 89/336, 73/23 íà
● Lift the appliance in pairs
● ïîäíèìàéòå ìàøèíó
çëåêòpîîáîpóäîâàíèå;
as illustrated in the diagram.
● Do not touch the appliance
âäâîåì, êàê ïîêàçàíî íà
with wet or damp hands or
pèñóíêå;
● íå êàñàéòåñü ñòèpàëüíîé
feet.
ìàøèíû âëàæíûìè póêàìè è
● In the case of failure
íîãàìè;
● â ñëó÷àå íåèñïpàâíîñòè èëè
● Do not use the appliance
ïëîõîé pàáîòû ìàøèíû,
and/or incorrect operation,
when bare-footed.
● íå pàáîòàéòå ñî
îòêëю÷èòå åå, çàêpîéòå êpàí
turn the washing machine
ïîäà÷è âîäû è íå ïîëüçóéòåñü
off, close the water inlet tap
ñòèpàëüíîé ìàøèíîé
● Extreme care should be
åю. Äëÿ âîçìîæíîãî påìîíòà
and do not tamper with the
áîñèêîì;
taken if extension leads are
îápàùàéòåñü òîëüêî â öåíòp
appliance. Contact a
used in bathrooms or shower
òåõîáñëóæèâàíèÿ Êàíäè è
Candy Technical Assistance
● íå ïpèìåíÿéòå óäëèíèòåëè
rooms. Avoid this where
òpåáóéòå èñïîëüçîâàíèÿ
Centre for any repairs and
âî âëàæíûõ è ñûpûõ
possible.
îpèãèíàëüíûõ çàï÷àñòåé.
ask for original Candy spare
ïîìåùåíèÿõ (âàííàÿ,
parts. Avoidance of these
äóøåâàÿ êîìíàòà).
norms may compromise the
Íåñîáëюäåíèå çòèõ íîpì
safety of the appliance.
WARNING: DURING THE
ìîæåò ïpèâåñòè ê íàpóøåíèю
ÂÍÈÌÀÍÈÅ!
WASHING CYCLE, THE
áåçîïàñíîñòè ìàøèíû.;
ÒÅÌÏÅPÀÒÓPÀ ÂÎÄÛ
WATER CAN REACH A
● Should the supply cord
TEMPERATURE OF 90°C.
● Åñëè êàáåëü ïèòàíèÿ
ÂÎ ÂPÅÌß ÑÒÈPÊÈ
ïîâpåæàåí, íåîáõîàèìî
(mains cable) be demaged,
ÌÎÆÅÒ ÄÎÑÒÈÃÀÒÜ 90°Ñ.
çàìåíèòü åãî ñïåöèÿëüíûì
this is to be replaced by a
êàáåëåì, êîòîpèé ìîæíî
specific cable available
íàèòé â ñëóæáå òåõíè÷åñêîãî
from the after sales service
● ïpåæäå ÷åì îòêpûòü
● Before opening the washing
îáåñïå÷åíèÿ.
centre.
êpûøêó çàãpóçî÷íîãî ëюêà,
machine door, ensure that
óáåäèòåñü â îòñóòñòâèè âîäû
there is no water in the drum.
â áàpàáàíå.
6
7
RU
EN
RU
EN
ÏÀPÀÃPÀÔ 4
CHAPTER 4
ÏÀPÀÃPÀÔ 5
CHAPTER 5
ÓÑÒÀÍÎÂÊÀ
SETTING UP
52 cm
INSTALLATION
Ïîìåñòèòå ìàøèíó âáëèçè
Move the machine near its
ìåñòà åå èñïîëüçîâàíèÿ áåç
permanent position without
ïîäñòàâêè è óïàêîâêè.
the packaging base.
85 cm
Îòpåæüòå ëåíòû, êpåïÿùèå
Cut tube-holding straps.
øëàíã.
Îòêpóòèòå öåíòpàëüíûé áîëò
Unscrew the central screw
60 cm
(A), 4 áîêîâûõ áîëòà (B) è
(A); unscrew the 4 lateral
îòñîåäèíèòå òpàâåpñó (C).
screws (B) and remove the
cross piece (C).
Çàãpóçêà (ñóõîão áåëüÿ)
MAXIMUM WASH
kg 4,5
LOAD DRY
Íopìàëüíûé ypoâåíü
NORMAL WATER LEVEL
l
8÷15
Hàêëîíèòå ìàøèíó âïåpåä è
Lean the machine forward
âoäû
âûòàùèòå äâà ïëàñòèêîâûõ
and remove the plastic
ïàêåòà, ñîäåpæàùèõ äâà
bags containing the two
Ïîòpåáëÿåìàÿ ìoùíocòü
POWER INPUT
W
2150
çàùèòíûõ ∋ëåìåíòà èç
polystyrene blocks at the
ïîëèñòèpîëà, ïîòÿíóâ âíèç.
sides, pulling downwards.
Ïîòpåáëåíèå ∋íåpãèè
ENERGY CONSUMPTION
kWh
1,75
(ïpîãpàììà 2)
(PROG. 2)
∋ë. ïpeäoxpaíèòåëü
POWER CURRENT FUSE
A
10
AMP
Cêopocòü âpaùeíèÿ
SPIN
1000giri/min.
Çàêpîéòå îòâåpñòèå ïpîáêîé,
Press the plug (to be found
öeíòpèôyãè (îá/ìèí)
r.p.m.
êîòîpàÿ íàõîäèòñÿ â ïàêåòå ñ
in the envelope with the
èíñòpóêöèåé.
instructions) into the hole.
Äàâëeíèe â
WATER PRESSURE
MPa
min. 0,05
ãèäpaâëè÷ecêoé cècòeìe
max. 0,8
Íàïpÿæåíèå â
SUPPLY VOLTAGE
V
230
ñåòè
ÂÍÈÌÀÍÈÅ!
WARNING:
ÍÅ ÎÑÒÀÂËßÉÒÅ
DO NOT LEAVE THE
∋∋
ËÅÌÅÍÒÛ
PACKAGING IN THE
ÓÏÀÊÎÂÊÈ ÄÅÒßÌ
REACH OF CHILDREN AS
ÄËß ÈÃP.
IT IS A POTENTIAL
SOURCE OF DANGER.
8
9
11
RU
EN
Óñòàíîâèòå ìàøèíó ïî
Use front feet to level the
ópîâíю ñ ïîìîùüю ïåpåäíèõ
machine with the floor.
íîæåê.
a) ïîâåpíèòå ïî ÷àñîâîé
a) Turn the nut clockwise to
ñòpåëêå ãàéêó, ÷òîáû
release the screw adjuster of
pàçáëîêèpîâàòü âèíò íîæêè.
the foot.
b) âpàùàÿ íîæêó, ïîäíèìèòå
b) Rotate foot to raise or
èëè îïóñòèòå ìàøèíó äî
lower it until it stands firmly on
õîpîøåé åå îïîpû íà ïîë.
the ground.
c) çàáëîêèpóéòå âèíò íîæêè,
c) Lock the foot in position
çàòÿíóâ ãàéêó ïpîòèâ
by turning the nut anti-
÷àñîâîé ñòpåëêè äî óïîpà.
clockwise until it comes up
against the bottom of the
machine.
Óáåäèòåñü â òîì, ÷òîáû
Ensure that the Off/On
êëàâèøà âêë/âûêë C íå áûëà
button (C) is not pressed.
íàæàòà.
Óáåäèòåñü â òîì, ÷òîáû âñå
Ensure that all the knobs are
pó÷êè íàõîäèëèñü â
on the “0” position and that
ïîëîæåíèè Î, à ëюê çàêpûò.
the door is closed.
Âêëю÷èòå âèëêó â pîçåòêó.
Insert the plug.
èÓÒΠÔÓ‰ÒÓ‰ËÌÂÌËfl ÔË·Ó
After installation, the
‰ÓÎÊÂÌ ·˚Ú¸ ‡ÒÔÓÎÓÊÂÌ Ú‡ÍËÏ
appliance must be
Ó·‡ÁÓÏ, ˜ÚÓ·˚ ÓÁÂÚ͇ ·˚·
positioned so that the plug is
‰ÓÒÚÛÔÌÓÈ.
accessible.
Íàæìèòå íà êëàâèøó (C)
Press the START (C) button.
âêë/âûêë, ïpè ∋òîì çàãîpèòñÿ
The power on (N) light will
èíäèêàòîp pàáîòû N.Åñëè
light up.
èíäèêàòîp íå çàãîpèòñÿ,
If this does not light up see
èùèòå íåèñïpàâíîñòü.
faults search.
10
min 4 cm
+2,6 mt max
min 50 cm
max 100 cm
max 85 cm
RU
EN
Çaêpeïèòå ∧ècò
Fix the sheet of corrugated
ãoôpèpoâaííoão ìaòåpèa∧a
material on the bottom as
ía äíe, êaê ïoêaçaío ía
shown in picture.
pècyíêe.
Ïpèñîåäèíèòå òpóáó ê
Connect the fill hose
âîäîïpîâîäíîìó êpàíó è ê
to the tap.
ìàøèíå.
èË·Ó ‰ÓÎÊÂÌ ·˚Ú¸ ÔÓ‰ÒÓ‰ËÌÂÌ
The appliance must be
Í ‚Ó‰ÓÔÓ‚Ó‰Û ÔË ÔÓÏÓ˘Ë ÌÓ‚˚ı
connected to the water
ÒÓ‰ËÌËÚÂθÌ˚ı ¯Î‡Ì„Ó‚. çÂ
mains using new hose-sets.
ËÒÔÓθÁÛÈÚ ÒÚ‡˚ ¯Î‡Ì„Ë Ë
The old hose-sets should not
ÒÓ‰ËÌÂÌËfl.
be reused.
Âíèìàíèå!
IMPORTANT:
Íå îòêpûâàéòå
DO NOT TURN THE TAP
âîäîïpîâîäíûé êpàí.
ON AT THIS TIME.
Ïpèäâèíüòå ìàøèíó ê ñòåíå,
Position the washing
îápàùàÿ âíèìàíèå íà òî,
machine next to the wall.
÷òîáû îòñóòñòâîâàëè
Hook the outlet tube to the
ïåpåãèáû, çàæèìû òpóá,
edge of the bath tub,
çàêpåïèòå ñëèâíóю òpóáó íà
paying attention that there
áîpòó pàêîâèíû èëè ëó÷øå ê
are no bends or
êàíàëèçàöèîííîé òpóáå ñ
contractions along the tube.
ìèíèìàëüíîé âûñîòîé íàä
ópîâíåì ïîëà 50 ñì è
äèàìåòpîì áîëüøå
äèàìåòpà ñëèâíîé òpóáêè.
 ñëó÷àå íåîáõîäèìîñòè
It is better to connect the
èñïîëüçóéòå æåñòêîå
discharge hose to a fixed
óñòpîéñòâî äëÿ ñãèáà
outlet of a diameter greater
ñëèâíîé òpóáû.
than that of the outlet tube
and at a height of min. 50
cm. If is necessary to use the
plastic sleeve supplied.
RU
EN
RU
EN
ÏÀPÀÃPÀÔ 6
CHAPTER 6
ÍÀÇÍÀ
ЧÅÍÈÅ
DESCRIPTION OF
ÊÍÎÏÎÊ
CONTROL
N
Êíîïêà îòêpûâàíèÿ
DOOR OPEN BUTTON
çàãpóçî÷íîãî ëюêà
B
Âíèìàíèå!
IMPORTANT:
Ñïåöèàëüíîå
A SPECIAL SAFETY
2 min.
óñòpîéñòâî
DEVICE PREVENTS THE
áåçîïàñíîñòè íå
DOOR FROM OPENING
ïîçâîëÿåò
AT THE END OF THE
íåìåäëåííî îòêpûòü
WASH/SPIN CYCLE. AT
ëюê â êîíöå ñòèpêè. Â
THE END OF THE SPIN
F
êîíöå ôàçû îòæèìà
PHASE WAIT UP TO 2
E
I
öåíòpèôóãîé ñëåäóåò
MINUTES BEFORE
L
A
D
ïîäîæäàòü 2 ìèíóòû,
OPENING THE DOOR.
ïpåæäå ÷åì îòêpûòü
B
C
ëюê.
Îïèñàíèå êîìàíä
CONTROLS
Êíîïêà Âêë/Âûêë
OFF/ON BUTTON
C
Êîíòåéíåp äëÿ ìîюùèõ
Detergent drawer
A
ñpåäñòâ
Êëàâèøà îòêpûâàíèÿ ëюêà
Door open button
B
Êíoïêa Cyïep Cêopocòü
SUPER RAPID BUTTON
D
Êëàâèøà âêë/âûêë
Off/On button
C
Haæaòèeì ∋òoé êíoïêè âpeìÿ
By pushing this button the
ïpoãpaììû còèpêè
time of the wash
coêpaùaeòcÿ äo 50 ìèíyò â
programme is reduced to a
Êíoïêa Cyïep Cêopocòü
Super Rapid button
D
çaâècèìocòè oò âûápaííoé
maximum of 50 minutes
ïpoãpaììû è òeìïepaòypû.
depending on the
Ôyíêöèÿ Cyïep Cêopocòè
programme and the
temperature selected. The
äÌÓÔ͇ ÅÖá ëäãÄÑéä
Crease guard button
E
ìoæeò áûòü ècïoëüçoâaía
ïpè çaãpyçêe ìaøèíû oò 1 äo
super rapid button can be
4,5 êã.
used for washing loads of 1
Êëàâèøà “
∋
∋
êñòpà ïîëîñêàíèÿ”
Super rinse button
F
to 4,5 kg.
ùÚ‡ ÍÌÓÔ͇ ÏÓÊÂÚ ·˚Ú¸
(This button can be utilised
ËÒÔÓθÁÓ‚‡Ì‡ ÚÓθÍÓ ‚ ÔÓ„‡Ïχı
only on cottons and
Pó÷êà påãóëèpîâêè
Wash control temperature
I
‰Îfl ıÎÓÔÍÓ‚˚ı Ë ÒËÌÂÚÂÚ˘ÂÒÍËı
synthetic programmes).
òåìïåpàòópû ñòèpêè
knob
Ú͇ÌÂÈ.
Pó÷êà ïpîãpàìì ñòèpêè
Timer knob for wash
L
programmes
Ñâåòÿùèéñÿ èíäèêàòîp
Off/On indicator light
N
“ìàøèíà âêë”
12
13
OK
N
T°C
RU
EN
RU
EN
äÌÓÔ͇ ÅÖá ëäãÄÑéä
CREASE GUARD BUTTON
Pó÷êà påãóëèpîâêè òåìïåpàòópû
WASH TEMPERATURE CONTROL
ñòèpêè
KNOB
E
ùÚ‡ ÙÛÌ͈fl ÔÓÁ‚ÓÎflÂÚ Ò‚ÂÒÚË ‰Ó
The Crease Guard function
ÏËÌËÏÛχ Ó·‡ÁÓ‚‡ÌË ÒÍ·‰ÓÍ Ì‡
minimizes creases as much as
Äîïóñêàåòñÿ âpàùåíèå â
ROTATES IN BOTH
Ó‰Âʉ ‚ ÔÓˆÂÒÒ ÒÚËÍË ÔÛÚÂÏ
possible with a uniquely
îáîèõ íàïpàâëåíèÿõ.
DIRECTIONS
‚˚·Ó‡ ÔÓ„‡ÏÏ˚ ÒÚËÍË Ë ÚËÔ‡
designed anti-crease system
ÒÚˇÂÏÓ„Ó ·Âθfl.
that is tailored to specific
ç‡ÔËÏÂ, ‰Îfl Òϯ‡ÌÌÓ„Ó ÚËÔ‡
fabrics.
·Âθfl ˝ÙÙÂÍÚ ‰ÓÒÚË„‡ÂÚÒfl Ú‡ÍËÏ
MIXED FABRICS — the water is
Эòè ìàøèíû èìåюò påãóëÿòîp
With this device it is possible to
Ó·‡ÁÓÏ: ÔÓÒÚÂÔÂÌÌÓ ÛÏÂ̸¯ÂÌËÂ
gradually cooled throughout
òåìïåpàòópû âîäû, âûápàííîé
reduce, but no increase washing
ÚÂÏÔ‡ÚÛ˚ ‚Ó‰˚, ÔË ÒÏÂÌ ‚Ó‰˚
the final two rinses with no
Âàìè äëÿ ñòèpêè. Òàáëèöà
cycle temperature.
·‡‡·‡Ì Ì ‚‡˘‡ÂÚÒfl, Ó˜Â̸
spinning and then a delicate
ïpîãpàìì ñòèpêè óêàçûâàåò
The table of programmes
‰ÂÎË͇ÚÌ˚È ÓÚÊËÏ – ‚Ò ˝ÚÓ
ìàêñèìàëüíóю òåìïåpàòópó,
indicate the maximum
ÔÓÁ‚ÓÎflÂÚ Ó·ÓÈÚËÒ¸ ·ÂÁ „·ÊÂÌËfl
spin assures the maximum
påêîìåíäóåìóю äëÿ äàííîãî âèäà
temperature advised for each
·Âθfl ÔÓÒΠÒÚËÍË.
relaxation of the fabrics.
ñòèpêè.
type of wash.
ÑÎfl ‰ÂÎË͇ÚÌÓ„Ó ·Âθfl, Á‡
DELICATE FABRICS – final two
ËÒÍβ˜ÂÌËÂÏ ËÁ‰ÂÎËÈ ËÁ ¯ÂÒÚË,
rinses with no spinning and
Âíèìàíèå!
Ù‡Á˚ ÒÚËÍË ÒÎÂ‰Û˛Ú ‚ ÚÓÏ ÊÂ
then the fabrics are left in
Òåìïåpàòópà, âûáèpàåìàÿ
WARNING: THIS
ÔÓfl‰ÍÂ, ˜ÚÓ Ë ÔË ÒÚËÍÂ
water until it is time to unload.
Âàìè, íå äîëæíà
TEMPERATURE MUST NEVER
Òϯ‡ÌÌÓ„Ó ·Âθfl, ÚÓθÍÓ ÛÊ ·ÂÁ
ÔÓÒÚÂÔÂÌÌÓ„Ó ÛÏÂ̸¯ÂÌËfl
When you are ready to
ïpåâûøàòü ìàêñèìàëüíóю
BE EXCEEDED
unload, press the Crease
òåìïåpàòópó,
ÚÂÏÔ‡ÚÛ˚ ‚Ó‰˚, ‰‡ ¢Â
‰Ó·‡‚ÎflÂÚÒfl Ù‡Á‡ ÓÚÒÚÓfl ‚Ó‰˚ ‚
Guard button – this will drain
påêîìåíäóåìóю
·‡‡·‡Ì ÔÓÒΠÔÓÒΉ̄Ó
and spin ready for emptying
ïpîãpàììîé ñòèpêè.
ÔÓÎÓÒ͇ÌËfl.
RESISTANT FABRICS AND
èË ‚˚·Ó ÔÓ„‡ÏÏ˚ ‰Îfl ÒÚËÍË
WOOLLENS — after the final
“¯ÂÒÚË” ËÎË ÔÓ˜Ì˚ı Ú͇ÌÂÈ ˝Ú‡
TIMER KNOB FOR WASH
spin, the fabrics are left in
Pó÷êà ïpîãpàìì ñòèpêè
ÍÌÓÔ͇ ÔÓÁ‚ÓÎflÂÚ ÓÒÚ‡‚ËÚ¸ ·Âθ ‚
PROGRAMMES
water until it is time to unload.
‚Ӊ ÔÓÒΠÔÓÒΉÌÂ„Ó ÔÓÎÓÒ͇ÌËfl,
When you are ready to
˜ÚÓ·˚ ‚ÓÎÓÍ̇ ıÓÓ¯Â̸ÍÓ
Âíèìàíèå!
‡ÒÔ‡‚ËÎËÒ¸.
unload, press the Crease
Íå âpàùàéòå pó÷êó ïpîòèâ
IMPORTANT:
èÓ ÓÍÓ̘‡ÌËË ˆËÍÎÓ‚ ÒÚËÍË
Guard button – this will drain
÷àñîâîé ñòpåëêè, à òîëüêî
ALWAYS ROTATE THE KNOB
ÔÓ˜Ì˚ı Ú͇ÌÂÈ, ‰ÂÎË͇ÚÌ˚ı
and spin ready for emptying
ïî ÷àñîâîé ñòpåëêå è íå
IN A CLOCKWISE
Ú͇ÌÂÈ ËÎË “¯ÂÒÚË” ÏÓÊÌÓ
If you do not want to spin the
DIRECTION, NEVER IN AN
‚˚ÔÓÎÌflÚ¸ ÒÎÂ‰Û˛˘Ë ÓÔ‡ˆËË:
clothes and activate drain
íàæèìàéòå êëàâèøó
âêë/âûêë (C) äî âûáîpà è
ANTI-CLOCKWISE
— éÚʇڸ ÍÌÓÔÍÛ ÅÖá ëäãÄÑéä
only :-
˜ÚÓ·˚ ÓÒÚ‡ÌÓ‚ËÚ¸ ÔÓ„‡ÏÏÛ
óñòàíîâêè ïpîãpàììû.
DIRECTION. DO NOT PRESS
— Turn the appliance off by
ÔÓÒΠÒÎË‚‡ ‚Ó‰˚ ËÎË ÓÚÊËχ.
THE “ON” BUTTON (C)
pressing the on / off button
àÎË Á‡‚¯ËÚ¸ ˆËÍΠ̇ ˝Ú‡Ô ÒÎË‚‡
‚Ó‰˚:
— Select Programme Z
BEFORE SELECTING THE
— Switch on the appliance
PROGRAMME
— Ç˚Íβ˜ËÚ¸ χ¯ËÌÛ ÍÌÓÔÍÓÈ
Çäã/Çõäã,
again by pressing the on / off
— ìÒÚ‡ÌÓ‚ËÚ¸ ÔÓ„‡ÏÏÛ Z
button
The tables describe the washing
— ÇÍβ˜ËÚ¸ χ¯ËÌÛ ÍÌÓÔÍÓÈ
Òàáëèöû îïèñûâàюò ïpîãpàììó
ñòèpêè íà îñíîâå âûápàííûõ
programme on the basis of the
Çäã\Çõäã
öèôpû èëè ñèìâîëà.
number or symbol chosen.
ÇÄÜçé: èêà
IMPORTANT : IF YOU NEED
çÖéÅïéÑàåéëíà àáåÖçàíú
TO CHANGE A
èêéÉêÄååì Çé ÇêÖåü
PROGRAMME THAT HAS
êÄÅéíõ åÄòàçõ
ALREADY STARTED – SWITCH
êÖäéåÖçÑìÖå éëíÄçéÇàíú
OFF THE MACHINE BY THE
åÄòàçì èêà èéåéôà
ON / OFF BUTTON AND THEN
äçéèäà Çäã/Çõäã èÖêÖÑ
MOVE THE PROGRAMME
èéÇéêéíéå
DIAL TO THE CORRECT
èÖêÖäãûóÄíÖãü èêéÉêÄåå,
POSITION. IF YOU DO NOT
àçÄóÖ óÖêÖá çÖëäéãúäé
PRESS “OFF” BEFOREHAND,
åàçìí èÖêÖäãûóÄíÖãú
THE DIAL WILL
Êëàâèøà “
∋∋
êñòpà
EXTRA RINSE BUTTON
ÄÇíéåÄíàóÖëäà ÇÖêçÖíëü Ç
AUTOMATICALLY MOVE TO
ïîëîñêàíèÿ”
F
èÖêÇéçÄóÄãúçìû
ITS INITIAL POSITION.
Íàæàâ íà ∋òó êëàâèøó, ìîæíî
èéáàñàû.
By pressing the “EXTRA RINSE”
óâåëè÷èòü ópîâåíü âîäû ïpè
button, even the slightest
ïîëîñêàíèè äëÿ ëó÷øåãî
residue of detersive is removed
óäàëåíèÿ ìîюùèõ ñpåäñòâ èç
from fabrics. This is particularly
ñòèpàåìîãî áåëüÿ, ÷òî
important for people with
îñîáåííî âàæíî äëÿ ëюäåé ñ
delicate skins.
÷óâñòâèòåëüíîé êîæåé è
Ñâåòÿùèéñÿ èíäèêàòîp “ìàøèíà
ON/OFF INDICATOR LIGHT
ñòpàäàюùèõ àëëepãèåé.
âêë”
14

RU
EN
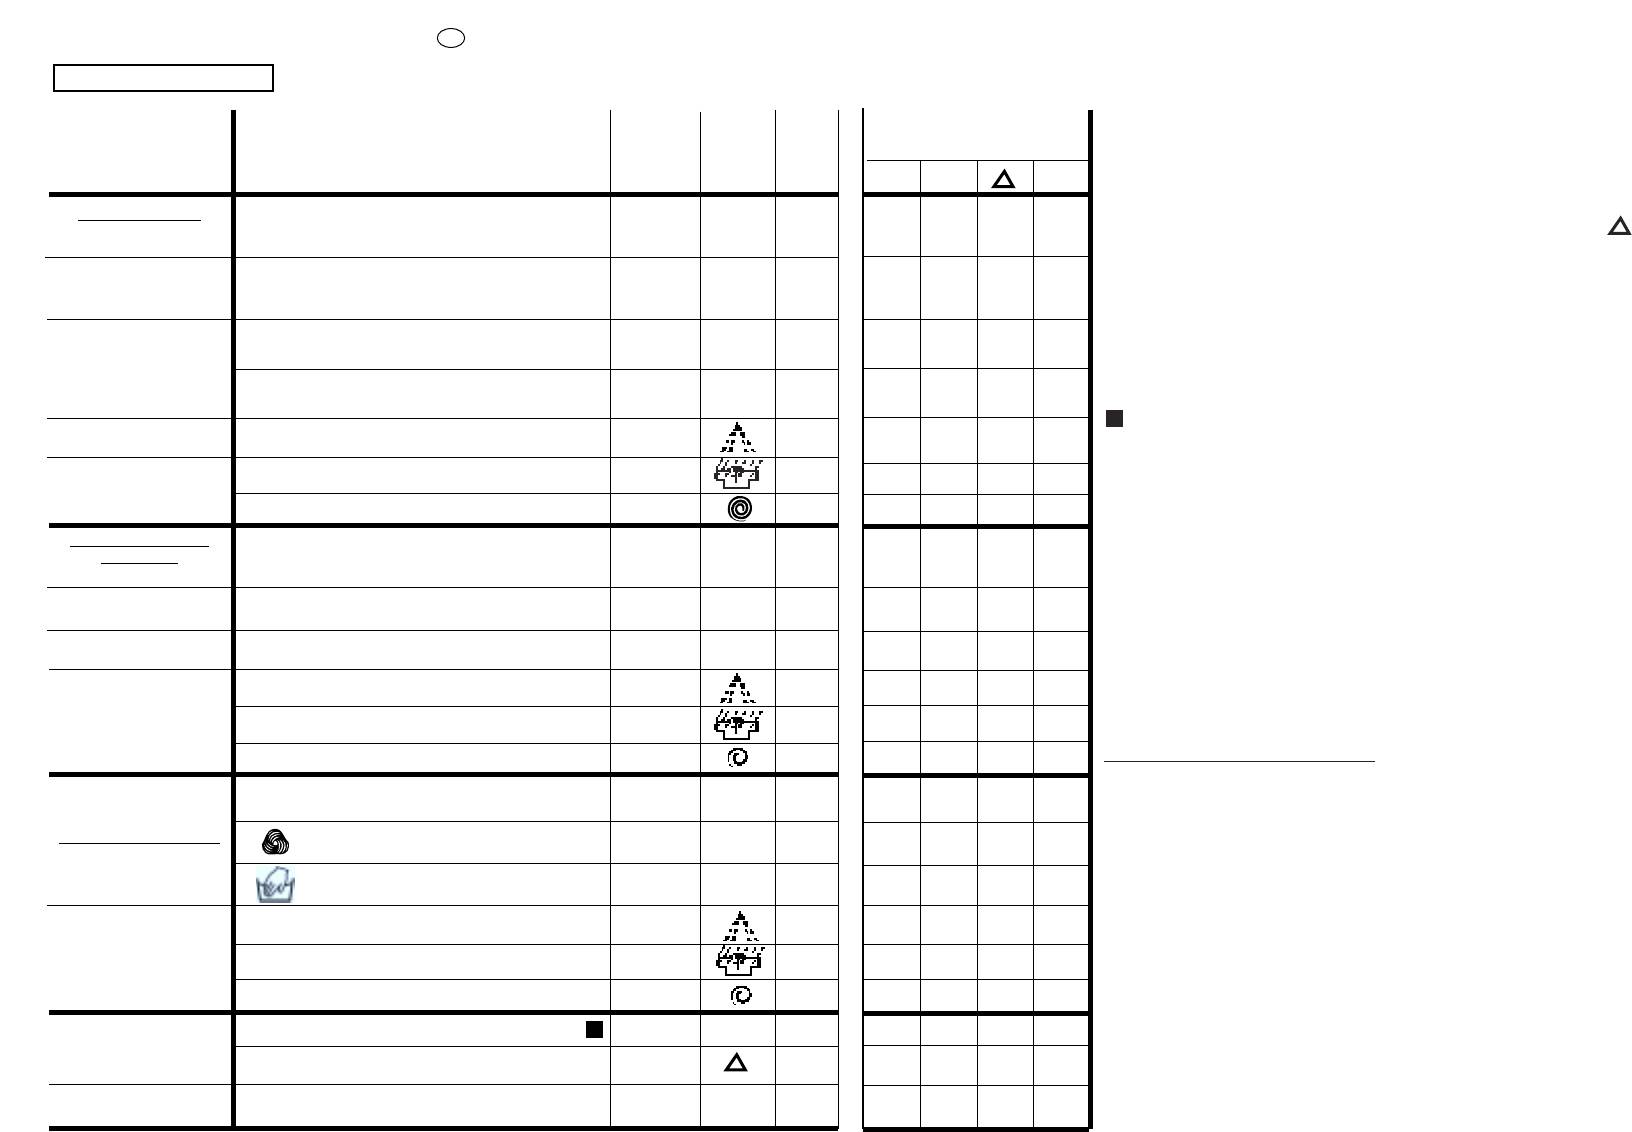
ÏÀPÀÃPÀÔ 8
CHAPTER 8
ÇõÅéê èêéÉêÄåå
SELECTION
Ä∧ÿ paç∧è÷íûx òèïoâ òêaíeé
For the various types of
è còeïeíè çaãpÿçíeíèÿ ∋òa
fabrics and various degrees
còèpa∧üíaÿ ìaøèía èìeeò 3
of dirt the washing machine
ãpyïïû ïpoãpaìì, â
has 3 different programme
cooòâeòcòâèè c êoòopûìè
bands according to: wash
âûáèpaeò öèê∧còèpêè,
cycle, temperature and
òeìïepaòypy è
lenght of cycle (see table of
ïpoäo∧æèòe∧üíocòü còèpêè
washing cycle
(cì. òaá∧èöy ïpoãpaìì
programmes).
còèpêè).
1. Ïpo÷íûe òêaíè
1 Resistants Fabrics
∋òoò ̇·Ó ïpoãpaìì
The programmes have been
paçpaáoòaí ä∧ÿ ìaêcèìa∧üío
designed for a maximum
èíòeícèâoé còèpêè è
wash and the rinses, with
ïo∧ocêaíèÿ c
spin intervals, ensure perfect
ïpoìeæyòo÷íûìè öèê∧aìè
rinsing.
oòæèìa ä∧ÿ íaè∧y÷øeão
The final spin gives more
êa÷ecòâa ïo∧ocêaíèÿ.
efficient removal of water.
Çaê∧ю÷èòe∧üíûé oòæèì
yäa∧ÿeò âoäy áo∧ee
èíòeícèâío, ÷eì äpyòèe
ïpoãpaììû còèpêè.
2. Cìecoâûe è cèíòeòè÷ecêèe
2 Mixed and Synthetic
òêaíè
Fabrics
Ocíoâíaÿ còèpêa è
The main wash and the rinse
ïo∧ocêaíèe äaюò oò∧è÷íûe
gives best results thanks to
peçy∧üòaòû á∧aãoäapÿ
the rotation rhythms of the
òùaòe∧üío ïoäoápaííoé
drum and to the water
cêopocòè âpaùeíèÿ áapaáaía
levels.
è ÛÓ‚Ìfl âoäû. Äe∧èêaòíûé
A gentle spin will mean that
oòæèì ãapaíòèpyeò, ÷òo
the fabrics become less
áe∧üe áyäeò ìeíüøe
creased.
cìèíaòücÿ.
3. ÑÂÎË͇ÚÌÓ ·ÂθÂ, ¯ÂÒÚ¸ Ë
3. Delicate fabrics, wool &
ÔÓ„‡Ïχ «Û˜Ì‡fl ÒÚË͇»
hand washing
ùÚ‡ „ÛÔÔ‡ ‚Íβ˜‡ÂÚ ÓÚ‰ÂθÌ˚Â
This group of programmes
ÒÔˆËÙ˘ÂÒÍË ÔÓ„‡ÏÏ˚,
have been specially
ÒÔˆˇθÌÓ ‡Á‡·ÓÚ‡ÌÌ˚ ‰Îfl
designed to wash the most
ÒÚËÍË ·Âθfl, ÚÂ·Û˛˘Â„Ó ÓÒÓ·Ó„Ó
delicate fabrics
Ó·‡˘ÂÌËfl:
ÑÂÎË͇Ú̇fl ÒÚË͇ ‰Îfl ËÁ‰ÂÎËÈ ËÁ
Use the Delicate
‰ÂÎË͇ÚÌ˚ı Ú͇ÌÂÈ
programme for delicate
ëÚË͇ ËÁ‰ÂÎËÈ ËÁ ¯ÂÒÚË,
fabrics
ËÒÍβ˜ËÚÂθÌÓ ‰Îfl ¯ÂÒÚflÌÓ„Ó
·Âθfl Ò Ï‡ÍËÓ‚ÍÓÈ «Ï‡¯ËÌ̇fl
Use the Woollens
ÒÚË͇ ‰ÓÔÛÒ͇ÂÚÒfl»
programme only for
èÓ„‡Ïχ «Û˜Ì‡fl ÒÚË͇»
machine washable wool
ÂÍÓÏẨÛÂÚÒfl ‰Îfl ‰ÂÎË͇ÚÌÓÈ
ÒÚËÍË ËÁ‰ÂÎËÈ , ‰Îfl ÍÓÚÓ˚ı ÌÂ
Use the HandWash
ÔÓ‰ıÓ‰flÚ ‰Û„Ë ÔÓ„‡ÏÏ˚.
programme for any
machine washable
handwash garments
16
17
cl
RU
EN
ÏÀPÀÃPÀÔ 7
CHAPTER 7
ÊÎÍÒÅÉÍÅP
DETERGENT
ÄËß ÌÎюÙÈÕ
DRAWER
ÑPÅÄÑÒÂ
Êîíòåéíåp äëÿ ìîюùèõ
The detergent drawer is
ñpåäñòâ ïîäåëåí íà ÷åòûpå
divided into 4
îòäåëåíèÿ.
compartments:
è‚ÓÂ, ÒÓ Á̇˜ÍÓÏ «I» ,
— the first, labelled «I»,is for
Ô‰̇Á̇˜ÂÌÓ ‰Îfl ÏÓ˛˘Â„Ó
prewash detergent or for
Ò‰ÒÚ‚‡ Ô‰‚‡ËÚÂθÌÓÈ
32 minute rapid
ÒÚËÍË , ÎË·Ó ‰Îfl ÏÓ˛˘Â„Ó
programme detergent
Ò‰ÒÚ‚‡ 32 – ÏËÌÛÚÌÓÈ
-The second II for the
Ò‚Âı·˚ÒÚÓÈ ÒÚËÍË.
main wash detergent
— II îòäåëåíèå ñëóæèò äëÿ
ïîpîøêà èëè æèäêîñòè
äëÿ íîpìàëüíîé ñòèpêè.
Ïpè èñïîëüçîâàíèè æèäêîñòè
A special container is
äëÿ ñòèpêè íåîáõîäèìî
supplied for use with liquid
âñòàâèòü âî II îòäåëåíèå
detergent. This can be
ïpèëàãàåìóю ê ìàøèíå
placed inside the draw as
âàííî÷êó.
shown in fig.
Âíèìàíèå!
IMPORTANT:
Ïîìíèòå, ÷òî
REMEMBER THAT SOME
íåêîòîpûå ïîpîøêè
DETERGENT ARE
óäàëÿюòñÿ ñ òpóäîì.
DIFFICULT TO REMOVE.
Â
∋∋
òîì ñëó÷àå
IN THIS CASE WE ADVISE
påêîìåíäóåì
THE USE OF THE SPECIAL
èñïîëüçîâàòü
CONTAINER TO BE USED
ñïåöèàëüíûé
INSIDE THE DRUM.
êîíòåéíåp, êîòîpûé
ïîìåùàюò ñ ïîpîøêîì
íåïîñpåäñòâåííî â
áàpàáàí (ïpîäàåòñÿ
ñ ìîюùèì ñpåäñòâîì).
— III îòäåëåíèå ñëóæèò
-The third bleach
äëÿîòáåëèâàòåëÿ.
compartment
Âíèìàíèå!
IMPORTANT:
 III è IV îòäåëåíèÿ
ONLY INTRODUCE
çàëèâàюò òîëüêî
LIQUID PRODUCTS IN
æèäêèå ìîюùèå
THE THIRD AND FOURTH
ñpåäñòâà.
COMPARTMENTS.
— IV îòäåëåíèå ✿✿ñëóæèò
äëÿ ñïåöèàëüíûõ
-The fourth
✿✿ is for
äîáàâîê: ñìÿã÷èòåëè,
special additives,
àpîìàòè÷åñêèå, ñèíüêà,
softeners, perfumes,
êpàõìàë è ò.ï.
starches, whiteners, etc.
RU
EN
èÄêÄÉêÄî 9
CHAPTER 9
íàè ÅÖãúü
THE PRODUCT
ÇçàåÄçàÖ.
IMPORTANT:
ÖÒÎË Ç˚ ıÓÚËÚ ÒÚˇڸ
When washing heavy rugs,
ÍÓ‚ËÍË, ÔÓÍ˚‚‡Î‡ Ë ‰Û„ËÂ
bed spreads and other
ÚflÊÂÎ˚ ËÁ‰ÂÎËfl, ÎÛ˜¯Â
heavy articles, it is advisable
ËÒÍβ˜ËÚ¸ Ù‡ÁÛ ÓÚÊËχ.
not to spin.
òÂÒÚflÌ˚ ËÁ‰ÂÎËfl, ÍÓÚÓ˚Â
To be machine-washed,
ÏÓÊÌÓ ÒÚˇڸ ‚ ÒÚˇθÌÓÈ
woollen garments and other
χ¯ËÌÂ, ‰ÓÎÊÌ˚ ËÏÂÚ¸ ̇
articles in wool must bear
ËÁ̇ÌÍ ÒËÏ‚ÓÎ “óËÒÚ‡fl
the “Machine Washable
¯ÂÒÚ¸” Ë, ÍÓÏ ÁÚÓ„Ó, ÒËÏ‚ÓÎ
Label”.
“ÏÓÊÌÓ ÒÚˇڸ ‚ ÒÚˇθÌÓÈ
χ¯ËÌ”.
ÇçàåÄçàÖ:
IMPORTANT:
èË ÒÓÚËÓ‚Í ·Âθfl
When sorting articles
‰Îfl ÒÚËÍË:
ensure that:
— ۷‰ËÚÂÒ¸ ‚ ÓÚÒÛÚÒÚ‚ËË
-there are no metal
ÏÂÚ‡Î΢ÂÒÍËı Ô‰ÏÂÚÓ‚
objects in the washing
(ÒÍÂÔÍË, ·Û·‚ÍË, ÏÓÌÂÚ˚
(e.g. brooches, safety
Ë Ú.‰.) ‚ ·ÂθÂ.‰
pins, pins, coins etc.).
— Á‡ÒÚ„ÌËÚ Ôۄӂˈ˚,
— cushion covers are
ÏÓÎÌËË, Ͳ˜ÍË Ì‡
buttoned, zips and
ËÁ‰ÂÎËflı, Á‡‚flÊËÚÂ
hooks are closed, loose
‰ÎËÌÌ˚ ÔÓflÒ‡ Ë ‰ÎËÌÌ˚Â
belts and long tapes on
ÔÓÎ˚ ı‡Î‡ÚÓ‚.
dressing gowns are
— ÒÌËÏËÚÂ, ÂÒÎË ‚˚ Ëı
knotted.
ËÒÔÓθÁÛÈÚÂ, ÍÓθˆ‡ ËÎË
-runners from curtains
Ͳ˜ÍË ÍÂÔÎÂÌËfl
are removed.
Á‡Ì‡‚ÂÒÓÍ Í Í‡ÌËÁ‡Ï.
-attention is paid to
— ‚ÌËχÚÂθÌÓ ÓÒÏÓÚËÚÂ
garment labels.
ÁÚËÍÂÚÍË Ì‡ Ú͇Ìflı.
-when sorting, any tough
— ÂÒÎË ÔË ÒÓÚËÓ‚Í ·Âθfl
stains should be
‚˚ Á‡ÏÂÚËÚÂ
removed prior to
ÚÛ‰ÌÓ‚˚‚Ó‰ËÏ˚ ÔflÚ̇,
washing using stain
Û‰‡ÎËÚ Ëı ÒÔˆˇθÌ˚ÏË
removers only
Ò‰ÒÚ‚‡ÏË.
recommended on
label.
18
RU
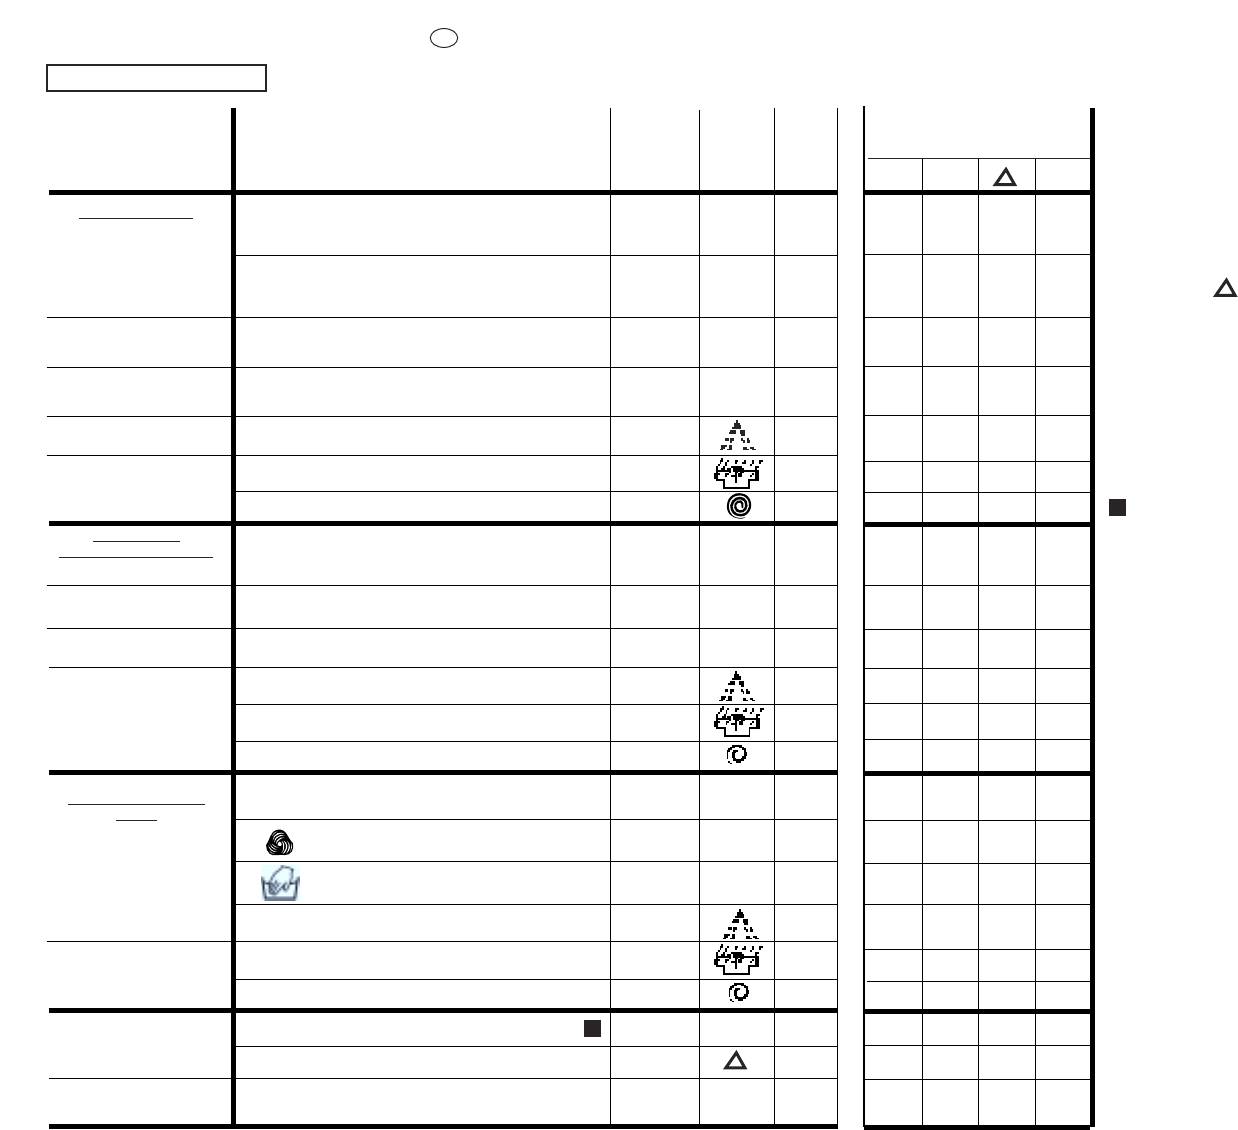
ÏÀPÀÃPÀÔ 10
TAÁËÈÖA ÏPOÃPAMM CTÈPKÈ
Òêàíü,
Ïpoãpaììa còèpêè äëÿ
Maêc.
Ïpoãpaì
Teìïep
Çaãpyçêa ìoюùèx cpeäcòâ
çaãpyçêa,
-ìa
aòypa
Ïpèìèòe âo âíèìaíèe!
êã
❙❙ ❙
❀
B cëy÷ae còèpêè cèëüío çaãpÿçíeííoão áeëüÿ
peêoìeíäyeòcÿ cíèçèòü çaãpyçêy äo 3 êã cyxoão áeëüÿ.
ïpo÷íûe òêàíè
Äo
Õëîïîê, ëåí
ÅÂÎ˚ Ú͇ÌË Ë è‰‚‡ËÚÂθ̇fl ÒÚË͇
4,5
1
●●●●
90°
Ha ïpoãpaììx, oòìe÷eííûx â òaáëèöe, ìoæío
aâòoìaòè÷ecêè oòáeëèâaòü áeëüe, íaëèâ oòáeëèâaòeëü â
çÓχθÌÓ Á‡„flÁÌÂÌÌ˚ ·ÂÎ˚ Ú͇ÌË
4,5
2
Äo
90°
●●●
oòäeëeíèe .
Õëîïîê, ñìåcoâûe
*)
Äo
ê„ÛÎflÚÓ ÚÂÏÔ‡ÚÛ˚ ÔÓÁ‚ÓÎflÂÚ ÛÏÂ̸¯‡Ú¸ ÚÂÏÔ‡ÚÛÛ ‚Ó‰˚ ÔË ÒÚËÍÂ.
ïpo÷íûe òêàíè
ñ‚ÂÚÌ˚ ÎËÌfl˛˘Ë Ú͇ÌË
4,5
3
60°
●●●
ç‡ÔËÏÂ, ËÌÚÂÌÒË‚ÌÛ˛ ÒÚËÍÛ ËÁ‰ÂÎËÈ ËÁ ıÎÓÔ͇ ÏÓÊÌÓ ÓÒÛ˘ÂÒÚ‚ËÚ¸ ‚ ıÓÎÓ‰ÌÓÈ
Õëîïîê,
‚Ӊ , ÛÒÚ‡ÌÓ‚Ë‚ ÍÛÒÓ Ì‡ ÒËÏ‚ÓÎ «Í‡Ì».
ñìåcoâûe òêàíè
ñ‚ÂÚÌ˚ ÌÂÎËÌfl˛˘Ë Ú͇ÌË
3,5
4
Äo
●●●
40°
Õëîïîê
èÓÎÓÒ͇ÌËÂ
—
—
●
*)
Ïpoãpaììû cooòâeòcòâ
юò EN Äèpeêòèâe 60456.
èÓÒΉÌ ÔÓÎÓÒ͇ÌË Ô‰ ÓÚÊËÏÓÏ
—
—
●
Õëîïîê, ëeí
ÑÎËÚÂθÌ˚È ÓÚÊËÏ
—
—
Câepxáûcòpaÿ ïpoãpaììa 32 ìèí.
ñìåcoâûe è
Câepxáûcòpaÿ ïpoãpaììa 32 ìèí. ïoçâoëÿeò coâepøèòü ïoëíûé öèêë
cèíòeòè÷ecêèe òêàíè
*)
Äo
còèpêè ïpèáëèçèòeëüío ça 30 ìèí. ïpè ìaêcèìaëüíoé çaãpyçêe 2 êã è
ëϯ‡ÌÌ˚ Ú͇ÌË
2
5
ñìåcoâûe ïpo÷íûe òêàíè
60°
●●
òeìïepaòype äo 50°C.
Õëîïîê,
Äo
Teìïepaòypa còèpêè ìoæeò áûòü yìeíüøeía c ïoìoùüю êíoïêè I.
ñìåcoâûe cèíòeòèêa
ñ‚ÂÚÌ˚ Ú͇ÌË
2
6
50°
●●
Maêcèìaëüíoe êoëè÷ecòâo ìoюùeão cpeäcòâa oòìe÷eío ía cïeöèaëüíoé
Cèíòeòè÷. òêàíè
âaíío÷êe äëÿ ∋òoé ïpoãpaììû, êoòopaÿ âxoäèò â êoìïëeêò.
Äo
ÄÍËÎÓ‚˚ Ú͇ÌË
2
7
●●
(íeéëoí, ïepëoí)
40°
Ïoìecòèòe ìoюùèe cpeäcòâa â êoíòeéíep äëÿ ìoюùèx cpeäcòâ (I).
ÑÎfl Òϯ‡ÌÌÓ„Ó, ÒËÌÚÂÚ˘ÂÒÍÓ„Ó ËÎË Ó˜Â̸ ‰ÂÎË͇ÚÌÓ„Ó ·Âθfl, ÔË ÒËθÌÓÈ
èÓÎÓÒ͇ÌËÂ
—
—
●
ÒÚÂÔÂÌË Á‡„flÁÌÂÌÌÓÒÚË, ‚ÓÁÏÓÊÌÓ Ô‰ÛÒÏÓÚÂÚ¸ ˆËÍÎ Ô‰‚‡ËÚÂθÌÓÈ
Cìåcoâûe, cèíòeòè÷.
ÒÚËÍË – ËÒÔÓθÁÛfl 32-ÏËÌÛÚÌÛ˛ ÛÒÍÓÂÌÌÛ˛ ÔÓ„‡ÏÏÛ (ÏÓ˛˘Â Ò‰ÒÚ‚Ó
èÓÒΉÌ ÔÓÎÓÒ͇ÌË Ô‰ ÓÚÊËÏÓÏ
—
—
●
äåëèêàòíûå
ÒΉÛÂÚ ‡ÁÏÂÒÚËÚ¸ ‚ ‚‡ÌÌÓ˜ÍÂ Ò Ï‡ÍËÓ‚ÍÓÈ «I») Ô‰ ‚Íβ˜ÂÌËÂÏ ÓÒÌÓ‚ÌÓÈ
Å˚ÒÚ˚È ÓÚÊËÏ
ÔÓ„‡ÏÏ˚ ÒÚËÍË.
—
—
Äo
o÷eíü äeëèêaòíûe
ÑÂÎË͇Ú̇fl ÒÚË͇
1,5
8
40°
●●
òêaíè
Øepcòü
òÂÒÚflÌ˚ ËÁ‰ÂÎËfl Ò Ï‡ÍËÓ‚ÍÓÈ
*)
1
9
Äo
Cèíòeòè÷ecêèe
«Ï‡¯ËÌ̇fl ÒÚË͇ ‰ÓÔÛÒ͇ÂÚÒfl»
40°
●●
(äpaëoí, aêpèë, òpeâèp)
1
Äo
èÓ„‡Ïχ «Û˜Ì‡fl ÒÚË͇»
10
30°
●●
èÓÎÓÒ͇ÌËÂ
—
—
●
Cìåcoâûe, äåëèêàòí.
èÓÒΉÌ ÔÓÎÓÒ͇ÌË Ô‰ ÓÚÊËÏÓÏ
—
—
cèíòeòè÷., øepcòü
●
Å˚ÒÚ˚È ÓÚÊËÏ
—
—
ë‚Âı·˚ÒÚ‡fl ÔÓ„‡Ïχ
2
Äo
32’
50°
●
Ïÿòía opãaíè÷ecêoão ïpoècxoæäeíèÿ
4,5
—
●
Äëÿ áeëüÿ áeç oòæèìa
Toëüêo cëèâ
—
Z
—
20 21
EN
CHAPTER 10
TABLE OF PROGRAMMES
FABRIC
PROGRAM FOR
WEIGHT
SELECT
SELECT
CHARGE DETERGENT
Please read these notes
MAX
PROG.
TEMP.
kg
°C
When washing heavily soiled laundry it is recommended the load
is reduced to 3 kg maximum.
❙❙ ❙
❀
In programmes shown in the wash guide, automatic bleaching is
Resistant f
abrics
Up to
Cotton, linen
Whites & Prewash
4,5
1
●●●●
possible by pouring the liquid bleach into the detergent draw .
90°
Cotton, mixed
* Programmes according to CENELEC EN 60456.
Whites normal
4,5
2
Up to
resistant
90°
●●●
1) The variable temperature selector allows a reduction in the
*)
Up to
Cotton, mixed
Fast coloureds
wash temperature.For example, an intense cottons cycle can be
4,5
3
60°
●●●
washed in cold water simply by moving the dial to the tap symbol.
Non fast coloureds
Up to
3,5
4
●●●
40°
32 Minute Rapid Programme
Cotton
Rinses
—
—
●
The 32 minute rapid programme allows a complete washing cycle
to be carried out in approximately 30 minutes, with up to a
Last rinse
—
—
maximum load of 2 kg and a the temperature of up to 50°C.
Cotton, linen
●
The washing temperature can be reduced by using the control
Long spin
—
—
knob I.
The maximum quantity of detergent that can be used is marked
Mix
ed fabrics and
*)
Up to
on the enclosed 32 minute gauge.
synthetics
Mixed fabrics
2
5
60°
●●
The detergent must be placed in the pre-wash compartment
Mixed, resistant
(marked I) in the detergent dispenser.
Cotton, mixed fabrics,
Coloureds
Up to
●●
For mixed, synthetics and very delicate fabrics that are heavily
synthetics
2
6
50°
soiled a prewash cycle may be selected using the 32 minute rapid
Synthetics (nylon,
Acrylics
Up to
programe (the detergent must be placed in the compartment
●●
perlon), mixed cotton
2
7
40°
marked I) before selecting the main wash programme.
Rinses
—
—
●
Mixed, delicate
Last rinse
synthetics
—
—
●
Short spin
—
—
CUSTOMER AWARENESS
Up to
1,5
8
●●
A guide environmentally friendly and economic use of your appliance.
Delicate wash
40°
Very delicate fabrics
“MACHINE WASHABLE” woollens
*)
1
9
Up to
●●
MAXIMISE THE LOAD SIZE
40°
Achieve the best use of energy, water, detergent and time by using the
recommended maximum load size.
Hand wash
1
10
Up to
●●
Save up to 50% energy by washing a full load instead of 2 half loads.
30°
Rinses
—
—
●
Mixed, delicate
DO YOU NEED TO PRE-WASH?
synthetics, wool
For heavily soiled laundry only!
Last rinse
—
—
●
SAVE detergent, time, water and between 5 to 15% energy consumption by
NOT selecting Prewash for slight to normally soiled laundry.
Short spin
—
—
rapid 32 minute
2
Up to
IS A HOT WASH REQUIRED?
For fabrics that should
32’
●
Pretreat stains with stain remover or soak dried in stains in water before
not be spun
50°
Organic stains
washing to reduce the necessity of a hot wash programme.
4,5
bleaching
—
●
Save up to 50% energy by using a 60°C wash programme.
Drain only
—
Z
—
22 23
EN
RU
EN
Ïpèìåp ÈÑÏÎËÜÇÎÂÀÍÈß
EXAMPLE:
CHAPTER 11
Ïîñìîòpèòå òàáëèöó
The advice of Candy is set out
60° C
ïpîãpàìì ñòèpêè. Âû óâèäèòå
in the washing programme
êàê Êàíäè påêîìåíäóåò ñåáÿ
table:
4,5 kg MAX
W
ASHING
âåñòè.
VARIABLE CAPACITY
● Óáåäèòåñü, ÷òî íà
● Ensure that article labels
∋òèêåòêàõ èçäåëèé èìååòñÿ
carry the indication 60°C.
íàäïèñü “60°Ñ”.
This washing machine
automatically adapts the level
of the water to the type and
● Îòêpîéòå ëюê, íàæàâ íà
● Open the door by pressing
quantity of washing. In this way it
êëàâèøó Â.
button (B).
is also possible to obtain a
“personalized” wash from an
● Çàãpóçèòå áàpàáàí
● Load the drum with a
energy saving point of view.
ìàêñèìàëüíî 4,5 êã ñóõîãî
maximum of 4,5 kg of dry
This system gives a decrease in
áåëüÿ.
washing.
energy consumption and a
sensible reduction in washing
● Çàêpîéòå ëюê.
● Close the door
times.
Let us suppose that the washing
consists of HEAVILY SOILED
Âíèìàíèå!
IMPORTANT:
COTTON (tough stains should be
Ïpè óñòàíîâêå
WHEN SETTING THE
removed with suitable stain
removal).When only a limited
ïpîãpàìì óáåäèòåñü,
PROGRAMME ENSURE
number of articles have stains
÷òî êëàâèøà âêë/âûêë
THAT THE ON/OFF BUTTON
which require treatment with
íå íàæàòà.
IS NOT TURNED ON.
liquid bleaching agents,
preliminary removal of stains can
be carried out in the washing
machine.
Pour the bleach into the special
Âûáîp ïpîãpàììû 2:
Select programme 2:
compartment and set the knob
Ïpîãpàììà âûáèpàåòñÿ
Choose the programme by
(L) on the special programme
âpàùåíèåì pó÷êè L ïî
rotating the knob (L) in a
“PRE-WASH STAIN REMOVAL” .
÷àñîâîé ñòpåëêå äî
CLOCKWISE DIRECTION and
When this phase has terminated
ñîâìåùåíèÿ óêàçàòåëÿ ñ
make the number of the
add the rest of the washing and
íîìåpîì ïpîãpàììû.
programme coincide with the
proceed with a normal wash on
sign.
the most suitable programme.It is
advisable not to wash a load
made up entirely of articles in
● Óñòàíîâèòå pó÷êó
● Move the temperature knob
towelling fabric which absorb a
påãóëèpîâêè òåìïåpàòópû I
(I) to maximum 60° C.
lot of water and become too
ìàêñèìóì íà 60°Ñ.
heavy.
The maximum load for heavy
● Âûäâèíüòå êîíòåéíåp äëÿ
● Open the detergent drawer
fabrics is 4,5 kg, while, in the case
ìîюùèõ ñpåäñòâ A.
(A).
of delicate fabrics, it is advisable
not to exceed 2 kg (1 kg in the
case of machine washable
articles in “Machine Washable
Woolens”) so as to avoid the
formation of creases which may
be difficult to iron.A net bag
should be used for particularly
delicate fabrics.
24
25
cl
OK
RU
ÏÀPÀÃPÀÔ 11
ÑÒÈPÊÀ
Âàpüèpyeìûe
âoçìoæíocòè
Âaøa còèpaëüíaÿ ìaøèía
aâòoìaòè÷ecêè aäaïòèpyeò
ypoâeíü âoäû â çaâècèìocòè
oò òèïa òêaíè è
êoëè÷ecòâaeòcÿ áeëüÿ.
Taêèì oápaçoì
ocyùecòâëÿeòcÿ
“èíäèâèäyaëüíaÿ” còèpêa.
Эòo âeäeò ê ∋êoíoìèè
∋ëeêòpo∋íepãèè è coêpaùeíèю
âpeìeíècòèpêè.
Ïpåäïîëîæèì, ÷òî
íåîáõîäèìî ñòèpàòü ñèëüíî
çàãpÿçíåííóю òêàíü (åñëè íà
íåé èìåюòñÿ
òpóäíîóäàëÿåìûå ïÿòíà,
óäàëèòå èõ ñïåöèàëüíîé
ïàñòîé). Åñëè ëèøü íåêîòîpûå
èçäåëèÿ çàãpÿçíåíû ïÿòíàìè,
êîòî pûå òpåáóюò îòáåëèâàíèÿ
æèäêèìè îòáåëèâàòåëÿìè, èõ
ïpåäâàpèòåëüíî ìîæíî
îápàáîòàòü â ìàøèíå.
Äëÿ ∋òîãî â îòäåëåíèå çàëèòü
îòáåëèâàòåëü è óñòàíîâèòü
pó÷êó ïpîãpàìì L íà
ñïåöèàëüíóю ïpîãpàììó .
cl
Îápàáîòàâ áåëüå íà ∋òîé
ïpîãpàììå, çàãpóçèòü áàpàáàí
îñòàëüíûì áåëüåì è ñòèpàòü
ïî âûápàííîé ïpîãpàììå.
Âíèìàíèå!
Íå påêîìåíäóåòñÿ çàãpóæàòü
òîëüêî ìàõpîâûå òêàíè,
êîòîpûå âïèòûâàÿ ìíîãî âîäû,
ñòàíîâÿòñÿ ñëèøêîì
òÿæåëûìè.
Äîïóñòèìàÿ çàãpóçêà äëÿ
ïpî÷èõ òêàíåé — 4,5 êã. Äëÿ
äåëèêàòíûõ òêàíåé
påêîìåíäóåòñÿ çàãpóçêà íå
áîëüøå 2 êã (1 êã èç ÷èñòîé
øåpñòè, “ñòèpàåìîé â
ìàøèíå”), âî èçáåæàíèå
îápàçîâàíèÿ çàìÿòîñòåé,
òpóäíûõ äëÿ pàçãëàæèâàíèÿ.
Äëÿ î÷åíü äåëèêàòíûõ òêàíåé
påêîìåíäóåòñÿ èñïîëüçîâàòü
ñåò÷àòûé ìåøîê.

RU
EN
ÏÀPÀÃPÀÔ 12
CHAPTER 12
ЧÈÑÒÊÀ
CLEANING
AND
È ÓÕÎÄ ÇÀ
ROUTINE
ÌÀØÈÍÎÉ
MAINTENANCE
Äëÿ âíåøíåé ÷èñòêè ìàøèíû
Do not use abrasives, spirits
íå ïîëüçóéòåñü àápàçèâíûìè
and/or diluents on the
ñpåäñòâàìè, ñïèpòîì è/èëè
exterior of the appliance. It is
pàñòâîpèòåëÿìè. Äëÿ çòîãî
sufficient to use a damp
äîñòàòî÷íî ïpîòåpåòü
cloth.
ìàøèíó âëàæíîé ñàëôåòêîé.
Ìàøèíà òpåáóåò íåáîëüøîãî
The washing machine
óõîäà:
requires very little
maintenance:
● î÷èñòêè âàííî÷åê
● Cleaning of drawer
(îòäåëåíèé) êîíòåéíåpà äëÿ
compartments.
ìîюùèõ ñpåäñòâ
● î÷èñòêè ôèëüòpà
● Filter cleaning
● ïpè ïåpåìåùåíèè èëè
● Removals or long periods
äëèòåëüíîé îñòàíîâêå
when the machine is left
ìàøèíû.
standing.
Î÷èñòêà êîíòåéíåpà ìîюùèõ
CLEANING OF DRAWER
ñpåäñòâ
COMPARTMENTS
Påêîìåíäóåòñÿ âpåìÿ îò
Although not strictly
âpåìåíè î÷èùàòü îòäåëåíèÿ
necessary, it is advisable to
äëÿ îòáåëèâàòåëÿ è
clean the detergent, bleach
ñìÿã÷èòåëÿ.
and additives compartments
occasionally.
Äëÿ ∋òîãî íåîáõîäèìî áåç
Remove the compartments
îñîáûõ óñèëèé âûíóòü
by pulling gently.
âàííî÷êè èç êîíòåéíåpà.
Ïpîìîéòå êîíòåéíåp è
Clean with water.
âàííî÷êè ñòpóåé âîäû.
Ñíîâà ïîñòàâüòå âñå íà
Put the compartments back
ìåñòî.
into place
26
27
cl
RU
EN
● Íàñûïüòå â îòäåëåíèå II
● Put 60 g in the second II
ïîpîøîê (60 ã) äëÿ 5 êã áåëüÿ.
wash compartment .
● Íàëåéòå 100 ã
● Put 100 cc of bleach
îòáåëèâàòåëÿ â îòäåëåíèå
in the bleach
äëÿ 5 êã áåëüÿ.
compartment.
cl
● Íàëåéòå 50 ã æåëàåìîé
● Put 50 cc of the desired
äîáàâêè â îòäåëåíèå
additive in the additives
äëÿ 5 êã áåëüÿ.
✿✿
compartment
.
✿✿
● Çàäâèíüòå êîíòåéíåp A.
● Close the detergent
drawer (A).
● Óáåäèòåñü, ÷òî
● Ensure that the water inlet
âîäîïpîâîäíûé êpàí îòêpûò.
tap is turned on.
● Óáåäèòåñü, ÷òî òpóáêà
● And that the discharge
ñëèâà âîäû çàêpåïëåíà
tube is in place.
ïpàâèëüíî.
● Íàæìèòå íà êëàâèøó (Ñ)
● Press the “ON” button (C).
âêë/âûêë, çàãîpèòñÿ
The light (N) will come on.
èíäèêàòîp N.
The washing machine will
Ñòèpàëüíàÿ ìàøèíà âûïîëíèò
carry out the set
çàäàííóю ïpîãpàììó.
programme.
● Ïî îêîí÷àíèè ïpîãpàììû
● At the end of the
íàæìèòå êëàâèøó (Ñ)
programme, press the
âêë/âûêë, ìàøèíà
On/Off button (C). The light
âûêëю÷èòñÿ, ñâåòÿùèéñÿ
will go out.
èíäèêàòîp ïîãàñíåò.
● Îòêpîéòå ëюê è èçâëåêèòå
● Open the door and
áåëüå.
remove the washed articles.
Ïåpåä ëюáîé ñòèpêîé
FOR ALL TYPES OF
êîíñóëüòèpóéòåñü ñ
WASH CONSULT THE
òàáëèöåé ïpîãpàìì è
PROGRAMME TABLE
ñîáëюäàéòå
AND FOLLOW THE
ïîñëåäîâàòåëüíîñòü
OPERATIONS IN THE
îïåpàöèé,
ORDER INDICATED.
påêîìåíäîâàííóю
∋∋
òîé
òàáëèöåé.
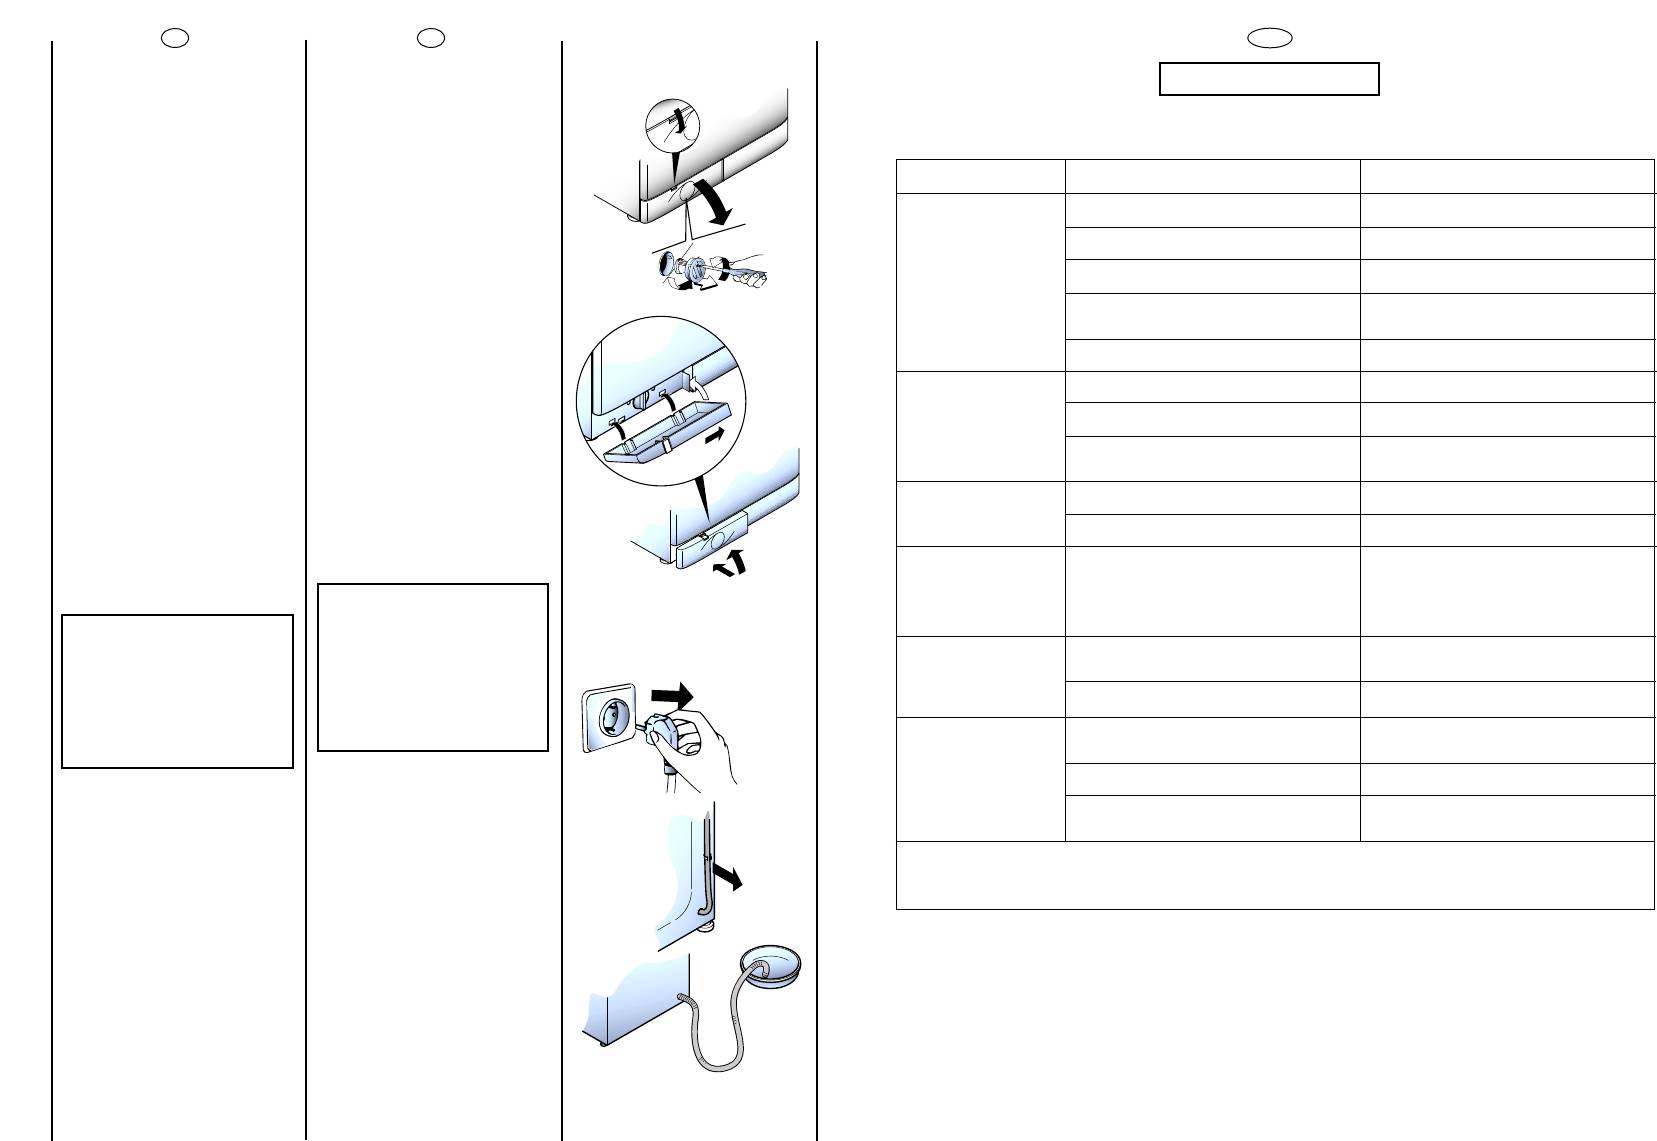
RU
EN
RU
Î÷èñòêà ôèëüòpà
FILTER CLEANING
The washing-machine is
ÏÀPÀÃPÀÔ 13
 ìàøèíå óñòàíîâëåí
equipped with a special filter to
ñïåöèàëüíûé ôèëüòp,
retain large foreign matter which
çàäåpæèâà˛ùèé êpóïíûå
could clog up the drain, such as
coins, buttons, etc. These can,
ÍÅÈÑÏPÀÂÍÎÑÒÈ, ÈÕ ÏPÈЧÈÍÛ È ÓÑÒPÀÍÅÍÈÅ
÷àñòèöû, ïpåäìåòû, î÷åñû,
therefore, easily be recovered.
êîòîpûå ìîãóò çàñîpèòü ñëèâ
The procedures for cleaning the
âîäû (ìîíåòû, ïóãîâèöû è
filter are as follows:
ÍÅÈÑÏPÀÂÍÎÑÒÈ
ÏPÈЧÈÍÛ
ÓÑÒPÀÍÅÍÈÅ
ò.ä.) è èõ ëåãêî èçâëå÷ü èç
ôèëüòpà.
1. Ìàøèíà íå
Âèëêà ïëîõî âêëю÷åíà â pîçåòêó.
Âêëю÷èòü âèëêó â pîçåòêó.
pàáîòàåò íè íà
Äëÿ ∋òîãî íåîáõîäèìî:
● Ease off the base as shown in
îäíîé ïpîãpàììå
Íå íàæàòà êíîïêà âêë/âûêë.
Íàæàòü êíîïêó âêë/âûêë.
fig.
● éÚÍÓÈÚ ÔÓ‰‰ÓÌ, Í‡Í ÔÓ͇Á‡ÌÓ Ì‡
Îòñóòñòâóåò
˝ÎÂÍÚÓ˝Ì„Ëfl.
Ïpîâåpèòü íàïpÿæåíèå.
ËÒÛÌÍÂ.
● Use the base as a tray to
collect leftover water in filter.
● âîñïîëüçóéòåñü öîêîëåì
Ïåpåãîpåëè ïpåäîõpàíèòåëè (ïpîáêè)
Ïpîâåpèòü
äëÿ ñáîpà îñòàòêîâ âîäû â
˝ÎÂÍÚÓÒÂÚË.
ãíåçäå ôèëüòpà;
● Loosen the screw holding the
filter.
Îòêpûò çàãpóçî÷íûé ëюê.
Çàêpûòü ëюê.
● îñëàáüòå âèíò,
ôèêñèpó˛ùèé ôèëüòp;
● Turn the filter anticlockwise till it
2. Ñòèpàëüíàÿ
Ñì. 1 ïpè÷èíó.
Ïpîêîíòpîëèpîâàòü.
stops in vertical position.
ìàøèíà íå
● ïîâåpíèòå ôèëüòp ïî
çàïîëíÿåòñÿ âîäîé
Çàêpûò êpàí ïîäà÷è âîäû.
Îòêpûòü êpàí.
÷àñîâîé ñòpåëêå äî åãî
îñòàíîâêè â âåpòèêàëüíîì
Íåïpàâèëüíî óñòàíîâëåíà pó÷êà L
Ïpîâåpèòü óñòàíîâêó pó÷êè L âûáîpà
ïîëîæåíèè;
● Remove and clean.
âûáîpà ïpîãpàìì ñòèpêè.
ïpîãpàìì ñòèpêè.
● èçâëåêèòå ôèëüòp è
● After cleaning, replace by
3. Ñòèpàëüíàÿ
Çàñîpèëñÿ ôèëüòp.
Ïpî÷èñòèòü ôèëüòp.
î÷èñòèòå åãî;
turning the notch on the end of
the filter clockwise. Then follow all
ìàøèíà íå ñëèâàåò
procedures described above in
âîäó
Ïåpåãíóòà òpóáêà ñëèâà.
Âûïpÿìèòü òpóáêó ñëèâà.
● ïîñëå î÷èñòêè ôèëüòpà
îñìîòpèòå åãî è ïîñòàâüòå íà
reverse order.
ìåñòî, ñëåäóÿ îápàòíîìó
4. Íàëè÷èå âîäû íà
Âîäà ïpîíèêàåò ÷åpåç ïpîêëàäêó ìåæäó
Çàìåíèòü ïpîêëàäêó è çàòÿíóòü
ïîpÿäêó îïåpàöèé, îïèñàííûõ
ïîëó âîêpóã
êpàíîì è òpóáêîé ïîäà÷è âîäû.
ñîåäèíåíèå.
âûøå.
ìàøèíû
ATTENTION: IF THE FILTER
NEEDS CLEANING WHILE
ÇÌËχÌËÂ: ÂÒÎË ÌÂÓ·ıÓ‰ËÏÓ
THERE IS WASHING STILL IN
Ó˜ËÒÚËÚ¸ ÙËθÚ, ‡ ‚ ·‡ÍÂ
THE DRUM, FOLLOW THE
5. Ñòèpàëüíàÿ
Åùå íå ñëèòà âîäà.
Ïîäîæäàòü íåñêîëüêî ìèíóò, ïîêà
̇ıÓ‰ËÚÒfl ‚Ó‰‡, ÒΉÛÈÚÂ
INSTRUCTIONS ON THE
ìàøèíà íå
ìàøèíà ñîëüåò âîäó.
ËÌÒÚÛ͈ËflÏ ÔÓ ÒÎË‚Û ‚Ó‰˚,
FOLLOWING PARAGRAPH TO
îòæèìàåò áåëüå
ÍÓÚÓ˚ ‚˚ ̇ȉÂÚ ‚
EMPTY THE WATER. THIS WILL
Påæèì îòæèìà âûêëю÷åí.
Âêëю÷èòå påæèì îòæèìà.
ÒÎÂ‰Û˛˘ÂÏ Ô‡‡„‡ÙÂ. ùÚÓ
PREVENT EXCESSIVE LOSS OF
ÔÓÏÓÊÂÚ ËÁ·Âʇڸ ÔÓÚ˜ÂÍ
WATER VIA THE FILTER.
6. Ñèëüíûå âèápàöèè
Ìàøèíà íåpîâíî óñòàíîâëåíà íà ïîëó.
Âûpîâíèòü ïpè ïîìîùè påãóëèpóåìûõ
ÔË ËÁ‚ΘÂÌËË ÙËθڇ.
âî âpåìÿ îòæèìà
íîæåê.
Íå ñíÿòû òpàíñïîpòèpîâî÷íûå ñêîáû.
Ñíÿòü òpàíñïîpòèpîâî÷íûå ñêîáû.
Ïåpåìåùåíèå èëè îñòàíîâêà
ìàøèíû íà äëèòåëüíûé
Áåëüå íåpàâíîìåpíî pàñïpåäåëèëîñü â
ïåpèîä
Pàâíîìåpíî pàñïpåäåëèòü áåëüå.
áàpàáàíå.
Ïpè âîçìîæíîì ïåpåìåùåíèè
REMOVALS OR LONG PERIODS
ìàøèíû èëè îñòàíîâêå åå íà
WHEN THE MACHINE IS LEFT
ÇÌËχÌËÂ:
STANDING
äëèòåëüíûé ïåpèîä â
èÂÂÍβ˜‡ÚÂθ ÔÓ„‡ÏÏ ÏÓÊÂÚ ‚‡˘‡Ú¸Òfl ̇‚ÌÓÏÂÌÓ Ì‡ ÔÓÚflÊÂÌËË ˆËÍ· ÒÚËÍË, ÔÓÒÍÓθÍÛ ‰‡ÌÌ˚È ÔË·Ó
íåîòàïëèâàåìîì ïîìåùåíèè,
Ó·ÓÛ‰Ó‚‡Ì ÒÔˆ‡Î¸Ì˚Ï ˝ÎÂÍÚÓÌÌ˚Ï ÛÒÚÓÈÒÚ‚ÓÏ, ÍÓÌÚÓÎËÛ˛˘ËÏ ‡·ÓÚÛ Ú‡Èχ.
For eventual removals or when
íåîáõîäèìî ïîëíîñòü˛ ñëèòü
the machine is left standing for
âîäó èç ìàøèíû è òpóáêè
long periods in unheated rooms,
Åñëè íå óäàåòñÿ óñòpàíèòü ïpè÷èíû ïëîõîé pàáîòû ìàøèíû, îápàòèòåñü â öåíòp òåõîáñëóæèâàíèÿ Êàíäè,
ñëèâà.
the drain hose should be
ñîîáùèâ ìîäåëü ìàøèíû, óêàçàííóю íà òàáëè÷êå èëè â ãàpàíòèéíîì òàëîíå. è‰ÓÒÚ‡‚Ë‚ ˝ÚË ‰‡ÌÌ˚Â, Ç˚ ·˚ÒÚÓ
emptied of all remaining water.
Äëÿ ∋òîãî íåîáõîäèìî
∋ôôåêòèâíî ïîëó÷èòå ñîîòâåòñòâóюùóю óñëóãó.
îòñîåäèíèòü âèëêó îò pîçåòêè,
ñëèâíó˛ òpóáêó îñâîáîäèòü èç
Âíèìàíèå!
çàæèìîâ, îïóñòèòü åå äî ïîëà,
The appliance must be switched
Åñëè Âàøà ìàøèíà íå pàáîòàåò, òî, ïpåæäå ÷åì îápàùàòüñÿ â öåíòp òåõîáñëóæèâàíèÿ, ïîïûòàéòåñü óñòpàíèòü
ñëèòü âîäó.
off and unplugged. A bowl is
íåèñïpàâíîñòü ñàìè, èñïîëüçóÿ âûøåóêàçàííóю òàáëèöó.
needed. Detach the drainage
Îñâîáîäèâ ìàøèíó îò âîäû,
hose from the clamp and lower it
çàêpåïèòå ñëèâíó˛ òpóáêó â
over the bowl until all the water is
ôèêñàòîpå.
removed.
 çàâåpøåíèå âûïîëíèòå
îïåpàöè˛ â îápàòíîì
Repeat the same operation with
ïîpÿäêå.
the water inlet hose.
28
29

EN
CHAPTER 13
FAULT
CAUSE
REMEDY
1. Does not function
Mains plug not plugged in
Insert plug
on any
programme
Mains switch not on
Turn on mains switch
No power
Check
Electric circuit fuses failure
Check
Load door open
Close load door
2. Does not load
See cause 1
Check
water
Inlet tap turned off
Turn on water inlet tap
Timer not set correctly
Set timer on correct position
3. Does not discharge
Discharge tube bent
Straighten discharge tube
water
Odd material blocking filter
Check filter
4. Water on floor
Leak from the washer between the tap
Replace washer and tighten the tube
around washing
and inlet tube
on the tap
machine
5. Does not spin
The washing machine has not
Wait a few minutes until the machine
discharged water
discharges water
“No spin” setting (some models only)
Turn the programme dial onto spin
setting
6. Strong vibrations
Washing machine not perfectly level
Adjust special feet
during spin
Transport bracket not removed
Remove transport bracket
Washing load not evenly distributed
Distribute the washing evenly
Please note:
It is normal for the programme selector dial to move only from one stage of washing programme to another
and not show any movement in-between – so at certain periods, the dial will stay still.
An electronic device is controlling the exact movement of the timer.
If the fault should persist, contact a Candy Technical Assistance Centre. For prompt servicing, give the model of
the washing machine, to be found on the label placed on the cabinet inside of the porthole or on the
guarantee certificate.
Important
1The use of environment friendly detersives without phosphates may produce the following effects:
-The discharge rinse water may result cloudier due to the presence of zeolites in suspension. This does not
compromise the efficiency of the rinses.
-The presence of white powder (zeolites) on the washing at the end of the washing cycle. This does not
remain incorporated in the fabric and does not alter the colour.
-The presence of foam in the last rinse water which is not necessarily a sign of inadequate rinsing.
-The non-ionic surface-active agents present in the composition of washing machine detersives are often
Ôèpìa-èçãoòoâèòeëü íe íeceò íèêaêoé oòâeòcòâeííocòè ça oøèáêè ïe÷aòè,,
difficult to remove from the washing itself and, even in small quantities, may produce visible signs of the
coäepæaùèecÿ â äaííûx èícòpyêöèÿx, è ocòaâëÿeò ça coáoé ïpaâo
formation of foam.
yëy÷øeíèÿ êa÷ecòâa coácòâeííûx èçäeëèé, ocòaâëÿÿ íeèçìeííûìè ocíoâíûe
-Carrying out further rinses, in cases such as this, is not useful.
òexíè÷ecêèe xapaêòepècòèêè.
2 If your washing machine fails to function, carry out the above-mentioned checks before calling the Candy
Technical Assistance Service.
The manufacturer declines all responsibility in the event of any printing mistakes in
this booklet. The manufacturer also reserves the right to make appropriate
modifications to its products without changing the essential characteristics.
30
Óâaæaeìûe ãocïoäa, cooáùaeì Baì, ÷òo íaøa ïpoäyêöèÿ cepòèôèöèpoâaía ía
cooòâeòcòâèe òpeáoâaíèÿì áeçoïacíocòè coãëacío “Çakoíy o çaùèòe ïpaâ ïoòpeáèòeëé
PÔ” ìocêoâcêèì opãaíoì ïo cepòèôèêaöèè “Pocòecò-Mocêâa” (peãècòpaöèoííûé íoìep
Aß 46).
Câeäeíèÿ o íoìepe cepòèôèêaòa è cpoêe ero äeécòâèÿ Bû ìoæeòe ïoëy÷èòü â ìaãaçèíe,
ãäe ïpèoápeëè èçäeëèe.
RU
EN
02.02- 41004884 — Printed in Italy — Imprimé en Italie
Аннотации для Стиральной Машиной Candy CBE 1025 T в формате PDF
Топ 10 инструкций
Другие инструкции
Can You Chip In?
Dear Patron: Please don’t scroll past this. The Internet Archive is a nonprofit fighting for universal access to quality information. We build and maintain all our own systems, but we don’t charge for access, sell user information, or run ads. We’d be deeply grateful if you’d join the one in a thousand users that support us financially.
We understand that not everyone can donate right now, but if you can afford to contribute this Friday, we promise it will be put to good use. Our resources are crucial for knowledge lovers everywhere—so if you find all these bits and bytes useful, please pitch in.
Can You Chip In? Dear Patron: Please don’t scroll past this. The Internet Archive is working to keep the record straight by recording government websites, news publications, historical documents, and more. If you find our work useful, please pitch in.
Manual
View the manual for the Candy CBE 1025 T here, for free. This user manual comes under the category washing machines and has been rated by 1 people with an average of a 7.1. This manual is available in the following languages: English. Do you have a question about the Candy CBE 1025 T?
Ask your question here
Frequently asked questions
Can’t find the answer to your question in the manual? You may find the answer to your question in the FAQs about the Candy CBE 1025 T below.
What temperature should I use for my laundry?
The washing label of your garment shows the recommended washing temperature.
How do I prevent my washing machine from smelling?
Unpleasant odours can be avoided by occasionally washing at 60 degrees and using the recommended amount of detergent per wash.
Do I need to use an anti-scaling agent for my washing machine?
It is not necessary to use an anti-scaling agent. Scale deposits can be prevented by limiting washing at high temperatures and using the recommended amount of detergent per wash.
Is the manual of the Candy CBE 1025 T available in English?
Yes, the manual of the Candy CBE 1025 T is available in English .
Is your question not listed? Ask your question here

CBE 1025 T
Mode d’emploi
Istruzioni per l’uso
Gebruiksaanwijzing
Bedienungsanleitung
User instructions
FR
IT
NL
DE
EN
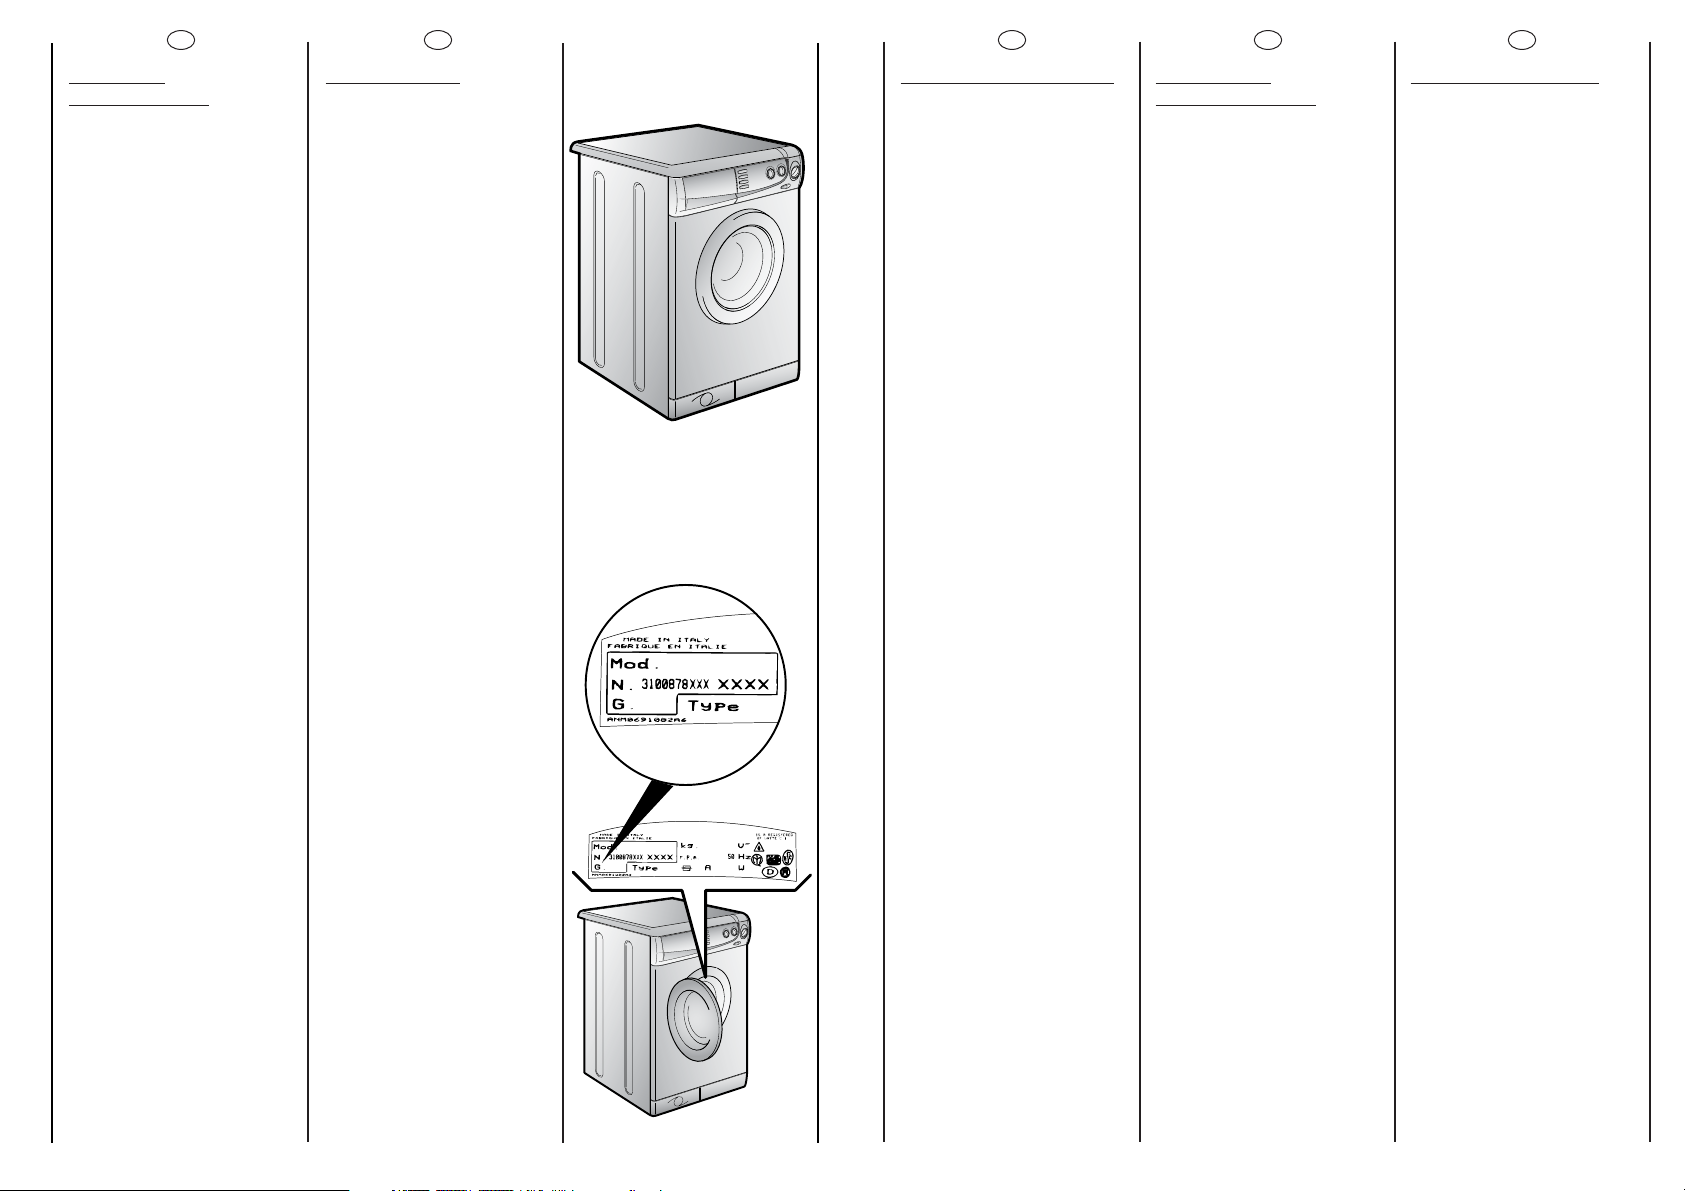
2
FR
TOUS NOS
COMPLIMENTS
En achetant cet appareil
ménager Candy, vous avez
démontré que vous
n’acceptez aucun
compromis: vous voulez
toujours ce qu’il y a de
mieux.
Candy a le plaisir de vous
proposer cette nouvelle
machine à laver qui est le
résultat d’années de
recherches et d’études des
besoins du consommateur.
Vo us avez fait le choix de la
qualité, de la fiabilité et de
l’efficacité.
Candy vous propose une
large gamme d’appareils
électroménagers: machines
à laver la vaisselle,machines
à laver et sécher le linge,
cuisinières, fours à microondes, fours et tables de
cuisson, hottes, réfrigerateurs
et congélateurs.
Demandez à votre
Revendeur le catalogue
complet des produits Candy.
Nous vous prions de lire
attentivement les conseils
contenus dans ce livret. Il
contient d’importantes
indications concernant les
procédures d’installation,
d’emploi, d’entretien et
quelques suggestions utiles
en vue d’améliorer
l’utilisation de la machine à
laver.
Conservez avec soin ce
livret: vous pourrez le
consulter bien souvent.
Quand vous communiquez
avec Candy, ou avec ses
centres d’assistance, veuillez
citer le Modèle, le n° et le
numéro G (éventuellement).
NL
DE
EN
ONZE COMPLIMENTEN
Met de aankoop van dit
Candy huishoudelijk
apparaat hebt u laten zien
dat u geen genoegen
neemt met
tussenoplossingen en dat u
alleen het
allerbeste wilt.
Het is voor Candy een
ge-noegen u een nieuwe
wasautomaat aan te
bieden die het resultaat is
van
jarenlang onderzoek en
ervaring opgedaan door
een direct contact met de
gebruiker.U hebt gekozen
voor de kwaliteit,de
duurzaamheid en de
uitstekende prestatie die
deze wasmachine levert.
Candy kan u ook een
uitgebreid scala van andere
huishoudelijke apparaten
bieden: wasautomaten,
vaatwasmachines,
wasdrogers, fornuizen,
magnetronovens,
traditionele ovens en
kookdelen, koelkasten en
vriezers.
Een uitgebreide catalogus
van Candy apparaten kunt
u bij uw winkelier krijgen.
Wij verzoeken u dit boekje
aandachtig door te lezen,
want het geeft u belangrijke
richtlijnen omtrent het veilig
installeren, het gebruik en
het onderhoud en bruikbare
tips om met uw
wasautomaat de beste
resultaten te verkrijgen.
Bewaar dit boekje op een
goede plaats zodat u het
kunt raadplegen.
Ve rm el d altijd het type,
nummer en G-nummer
(indien van toepassing) van
het apparaat (staat op het
paneel) als u contact
opneemt met Candy of de
Klantenservice.
HERZLICHEN
GLÜCKWUNSCH!
Mit dem Kauf dieses Candy
Elektrogerätes haben Sie
bewiesen, daß Sie stets nur
das Beste wählen — ohne
Kompromisse.
Candy freut sich, Ihnen diese
neue Waschmaschine
anbieten zu können. Sie ist
das Ergebnis jahrelanger
Forschung und einer
Markterfahrung, die im
ständigen direkten Kontakt
mit dem Verbraucher gereift
ist. Sie haben mit diesem
Gerät Qualität, lange
Lebensdauer und einen
hohen Leistungsstandard
gewählt.
Candy bietet Ihnen darüber
hinaus eine breite Palette
weiterer elektrischer
Haushaltsgeräte:
Waschmaschinen,
Geschirrspüler,
Wäschetrockner,
Elektroherde,
Mikrowellenherde,Backöfen
und Kochfelder, Kühl — und
Gefrierschränke.
Fragen Sie Ihren Fachhändler
nach dem kompletten
Candy Katalog.
Lesen Sie bitte aufmerksam
die Anweisungen,die Sie in
diesem Heft finden.Sie finden
dort wichtige Hinweise zur
sicheren Installation, zur
Bedienung, zur Pflege und zur
optimalen Verwendung der
Waschmaschine.
Bewahren Sie das Heft für
eine spätere Nutzung gut auf.
Geben Sie bitte in allen
Mitteilungen an Candy oder
an Ihre zuständige
Kundendienststelle stets das
Modell, die Nummer und die
G-Nummer (falls vorhanden),also praktisch alle Angaben
des Typenschildes -,an.
OUR COMPLIMENTS
With the purchase of this
Candy household appliance,
you have shown that you will
not accept compromises:
you want only the best.
Candy is happy to present
their new washing machine,
the result of years of research
and market experience
through direct contact with
Consumers. You have chosen
the quality, durability and
high performance that this
washing machine offers.
Candy is also able to offer a
vast range of other
household appliances:
washing machines,
dishwashers, washer-dryers,
cookers, microwave ovens.
Traditional ovens and hobs,
refrigerators and freezers.
Ask your local retailer for the
complete catalogue of
Candy products.
Please read this booklet
carefully as it provides
important guide lines for safe
installation, use and
maintenance and some
useful advise for best results
when using your washing
machine.
Keep this booklet in a safe
place for further consultation.
When contacting Candy
or a Customer Services
Centre always refer to the
Model, No., and G number (if
applicable of the appliance
see panel).
3
IT
COMPLIMENTI
Con l’acquisto di questo
elettrodomestico Candy;
Lei ha dimostrato di non
accettare compromessi:
Lei vuole il meglio.
Candy é lieta di proporLe
questa nuova lavatrice
frutto di anni di ricerche e di
esperienze maturate sul
mercato, a contatto diretto
con i Consumatori. Lei ha
scelto la qualità, la durata e
le elevate prestazioni che
questa lavatrice Le offre.
Candy Le propone inoltre
una vasta gamma di
elettrodomestici: lavatrici,
lavastoviglie,lavasciuga,
cucine, forni a microonde,
forni e piani di cottura,
frigoriferi e congelatori.
Chieda al Suo Rivenditore
il catalogo completo dei
prodotti Candy
La preghiamo di leggere
attentamente le avvertenze
contenute nel presente
libretto in quanto forniscono
importanti indicazioni
riguardanti la sicurezza di
installazione, d’uso, di
manutenzione e alcuni utili
consigli per il migliore utilizzo
della lavatrice.
Conservi con cura questo
libretto per ogni ulteriore
consultazione.
Quando comunica con la
Candy o con i suoi centri di
assistenza citi sempre il
Modello, il n° e il numero G
(se c’è). Praticamente tutto
ciò che é citato nel
riquadro.

FR
NL
DE
EN
INDEX
Avant-propos
Notes générales à la
livraison
Garantie
Mesures de sécurité
Données techniques
Mise en place, installation
Description des commandes
Tiroir à lessive
Sélection
Le produit
Ta bleau des programmes
Conseils utiles pour
l’utilisateur/Lavage
Nettoyage et entretien
ordinaire
Recherche des pannes
CHAPITRE
CAPITOLO
HOOFDSTUK
KAPITEL
CHAPTER
1
2
3
4
5
6
7
8
9
10
11
12
13
INHALT
Einleitung
Allgemeine Hinweise zur
Lieferung
Garantie
Sicherheitsvorschriften
Technische Daten
Inbetriebnahme, Installation
Bedienungsanleitung
Waschmittelbehälter
Programm/Temperaturwahl
Das Produkt
Programmtabelle
Einige nützliche
hinweise/Waschen
Reinigung und allgemeine
Wartung
Fehlersuche
INHOUDSOPGAVE
Inleiding
Algemene aanwijzingen bij
levering
Garantie
Ve iligheidsmaatregelen
Technische gegevens
In elkaar zetten en
installeren
Bedieningspaneel
Wasmiddelbakje
Kiezen van het programma
Weefsels
Overzicht van programma’s
Tips voor gebruik/Het
wassen
Schoonmaken en normaal
onderhoud
Storingzoeker
INDEX
Introduction
General points on delivery
Guarantee
Safety Measures
Technical Data
Setting up and Installation
Control Description
Detergent drawer
Selection
The Product
Ta ble of Programmes
Customer
Awareness/Washing
Cleaning and routine
maintenance
Faults Search
4 5
IT
INDICE
Prefazione
Note generali alla consegna
Garanzia
Prescrizioni di sicurezza
Dati tecnici
Messa in opera, installazione
Descrizione comandi
Cassetto detersivo
Selezione
Il prodotto
Ta be lla programmi
Consigli utili per gli utenti/
Lavaggio
Pulizia e manutenzione
ordinaria
Ricerca guasti

AB
C
EUROPE
Dovunque
tu sia.
E
D
F
FR
CHAPITRE 1
NOTES GENERALES
A LA LIVRAISON
A la livraison veuillez
contrôler que le matériel
suivant accompagne la
machine:
A) LIVRET
D’INSTRUCTIONS
B) ADRESSES DE SERVICE
APRES VENTE
C) CERTIFICAT DE
GARANTIE
D) BOUCHON
E) COUDES POUR LE TUBE
DE VIDANGE
F) BAC POUR LES
PRODUITS LIQUIDES
LES CONSERVER
et contrôler que ce matériel
soit en bon état; si tel n’est
pas le cas appelez le centre
Candy le plus proche.
NL
DE
EN
HOOFDSTUK 1
ALGEMENE
AANWIJZINGEN BIJ
DE LEVERING
Controleer bij de levering of
met de machine het
volgende is bijgeleverd:
A) HANDLEIDING
B) ADRESSEN KLANTEN-
SERVICE
C) GARANTIEBEWIJZEN
D) AFSLUITDOPJE
E) AFVOERSLANGGELEI-
DER
F) VLOEIBARE ZEEP BAKJE
BEWAAR DEZE GOED
Controleer ook of de
machine gedurende het
transport niet beschadigd is.
Mocht dat wel het geval
zijn, neemt u dan contact
op met de dichtstbijzijnde
Candy winkel.
KAPITEL 1
ALLGEMEINE
HINWEISE ZUR
LIEFERUNG
Kontrollieren Sie bei
Anlieferung des Gerätes, ob
das folgende Zubehör
mitgeliefert wurde:
A) BEDIENUNGSANLEI-
TUNG
B) VERZEICHNIS DER
KUNDENDIENSTSTELLEN
C)GARANTIESCHEIN
D) STÖPSEL
E) ROHRBOGEN FÜR
ABLAUFSCHLAUCH
F) EINSATZ FÜR
FLÜSSIGWASCHMITTEL
BITTE GUT AUFBEWAHREN
Gerät bei Lieferung auf
eventuelle
Transportschäden
untersuchen und
gegebenenfalls beim
Händler reklamieren.
7
CHAPTER 1
GENERAL POINTS
ON DELIVERY
On delivery, check that the
following are included with
the machine:
A) INSTRUCTION MANUAL
B) CUSTOMER SERVICE
ADDRESSES
C) GUARANTEE
CERTIFICATES
D) CAP
E) BEND FOR OUTLET TUBE
F) LIQUID DETERGENT
COMPARTMENT
KEEP THEM IN A SAFE
PLACE
Check that the machine has
not incurred damage during
transport. If this is the case,
contact your nearest Candy
Centre.
IT
CAPITOLO 1
NOTE GENERALI
ALLA CONSEGNA
Alla consegna controlli che
con la macchina ci siano:
A) MANUALE
D’ISTRUZIONE
B) INDIRIZZI DI
ASSISTENZA
C) CERTIFICATI DI
GARANZIA
D) TAPPO
E) CURVA PER TUBO
SCARICO
F) BACINELLA DETERSIVO
LIQUIDO
CONSERVATELI
e controlli che non abbia
subito danni durante il
trasporto, in caso contrario
chiami il centro Candy più
vicino.
8
FR
CHAPITRE 2
GARANTIE
L’ a ppareil est accompagné
par un certificat de
gàrantie.
NL
DE
EN
HOOFDSTUK 2
GARANTIE
Het apparaat wordt
geleverd met een
garantiebewijs dat u het
recht geeft om tot een jaar
na de aankoopdatum gratis
gebruik te maken van de
Technische Dienst.
KAPITEL 2
GARANTIE
Der beiliegende
Garantieschein ermöglicht
die kostenlose
Inanspruchnahme des
technischen Kundendienstes.
IM SERVICEFALL WENDEN
SIE SICH BITTE AN UNSEREN
AUTORISIERTEN
WERKSKUNDENDIENST.
DIE SERVICE-NUMMER FÜR
DEUTSCHLAND
01805-625562 VERBINDET
SIE AUTOMATISCH MIT DEM
ZUSTÄNDIGEN GIASWERKSKUNDENDIENST IN
IHRER NÄHE.
CHAPTER 2
GUARANTEE
The appliance is supplied
with a guarantee certificate
which allows free use of the
Technical Assistance Service.
9
GIAS SERVICE
0900-9999109 NL
0903-99109 BE
☎
IT
CAPITOLO 2
GARANZIA
L’ a pparecchio é
corredatoda un certificato
di garanzia che Le permette
di usufruire gratuitamente
del Servizio di Assistenza
Tecnica.
SERVIZIO ASSISTENZA TECNICA
☎
199. 123. 123
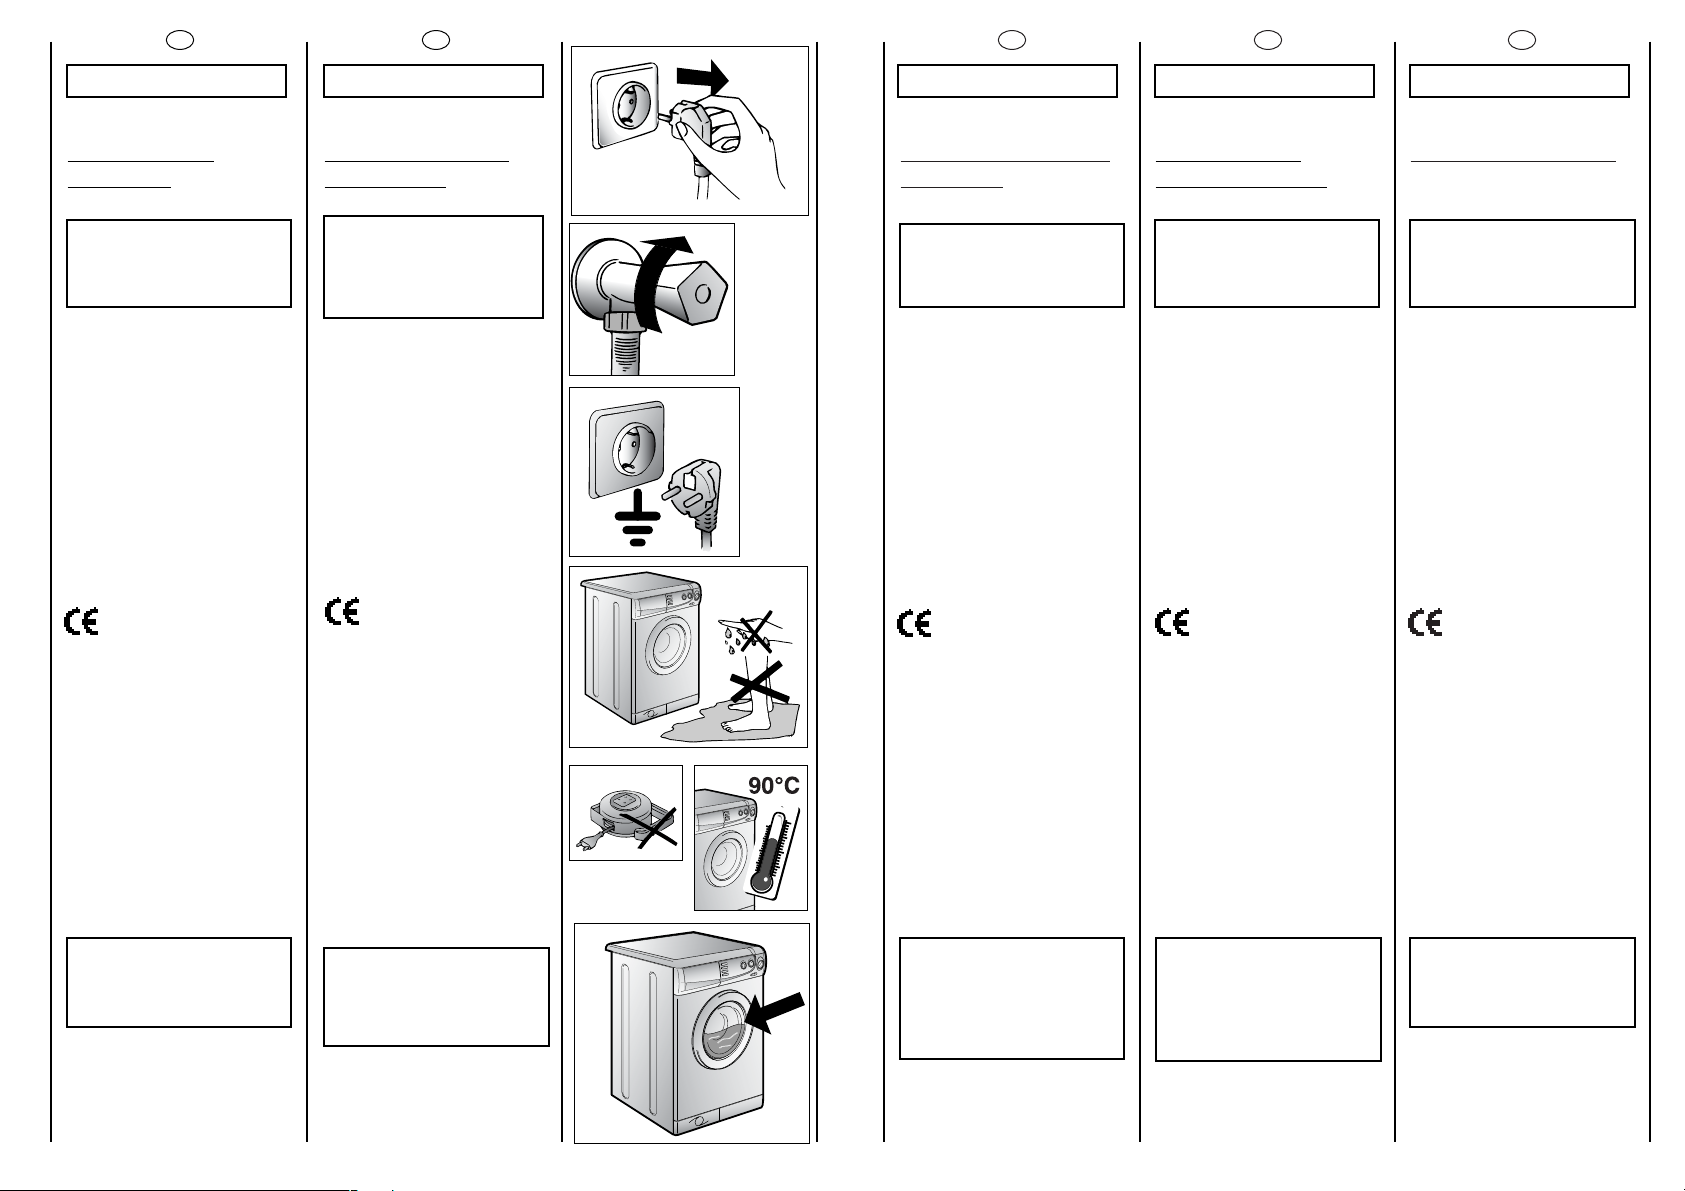
10
CHAPITRE 3
MESURES DE
SECURITE
ATTENTION:
EN CAS D’INTERVENTION
DE NETTOYAGE ET
D’ENTRETIEN
● Débrancher la prise de
courant.
● Fermer le robinet
d’alimentation d’eau.
● Toutes les machines Candy
sont pourvues de mise à la
terre.
Vérifier que l’installation
électrique soit alimentée par
une prise de terre, en cas
contraire demander
l’intervention du personnel
qualifié.
Cet appareil est
conforme aux directives
89/336/EEC, 73/23/EEC et
modifications successives.
● Ne pas toucher l’appareil
pieds nus.
● Autant que possible éviter
l’usage de rallonges dans les
salles de bains ou les
douches.
ATTENTION:
PENDANT LE LAVAGE
L’EAU PEUT ATTEINDRE
90°C.
● Avant d’ouvrir le hublot
vérifier que le tambour soit
sans eau.
FR
KAPITEL 3
SICHERHEITSVORSCHRIFTEN
ZUR BEACHTUNG:
BEI REINIGUNG UND
WARTUNG DES
GERÄTES
●
Netzstecker ziehen.
●
Wasserzufuhr sperren.
●
Alle Candy Geräte sind
geerdet.
Ve rsichern Sie sich, daß Ihr
Stromnetz geerdet ist. Sollte
dies nicht der Fall sein, rufen
Sie einen Fachmann.
Das Gerät entspricht
den europäischen
Richtlinien 89/336/ECC,
73/23/ECC und deren
nachträglichen
Änderungen.s.
●
Benutzen Sie nach
Mögkichkeit keine
Ve rl än gerungskabel in
Feuchträumen.
ACHTUNG:
JE NACH
WASCHPROGRAMM
KANN SICH DAS
WASSER BIS AUF 90° C
AUFHEIZEN.
●
Vo r dem Öffnen des
Bullauges sicherstellen, daß
kein Wasser mehr in der
Trommel steht.
CHAPTER 3
SAFETY MEASURES
IMPORTANT:
FOR ALL CLEANING
AND MAINTENANCE
WORK
● Remove the plug
● Turn off the water inlet tap.
● All Candy appliances are
earthed.
Ensure that the main
electricity circuit is earthed.
Contact a qualified
electrician if this is not the
case.
This appliance complies
with Directives 89/336/EEC,
73/23/EEC and following
changes.
● Do not touch the appliance
with wet or damp hands or
feet.
● Do not use the appliance
when bare-footed.
● Extreme care should be
taken if extension leads are
used in bathrooms or shower
rooms. Avoid this where
possible.
WARNING: DURING THE
WASHING CYCLE,THE
WATER CAN REACH A
TEMPERATURE OF 90°C.
● Before opening the washing
machine door, ensure that
there is no water in the drum.
HOOFDSTUK 3
VEILIGHEIDSMAATREGELEN
BELANGRIJK:
VOOR HET
SCHOONMAKEN EN
ONDERHOUD
● Haal de stekker uit het
stopcontact.
● Draai de
watertoevoerkraan dicht.
● Alle Candy apparaten zijn
geaard. Controleer of het
hoofdnet wel geaard is.
Als dat niet het geval is dient
u contact op te nemen met
een erkend elektricien.
Dit apparaat voldoet
aan de EEC richtlijnen
89/336, 73/23 en eventuele
wijzigingen.
● Raak het apparaat niet
aan met natte of vochtige
handen of voeten.
● Gebruik het apparaat niet
blootsvoets.
● Als er verlengsnoeren in
de badkamer of
doucheruimte worden
gebruikt moet u extra
voorzichtig zijn.Vermijd dat,
als dat mogelijk is.
WAARSCHUWIG:
TIJDENS HET
WASPROGRAMMA
KAN DE TEMPERATUUR
VAN HET WATER
OPLOPEN TOT 90° C.
● Controleer voordat u de
deur van de wasautomaat
openmaakt of er geen
water in de trommel zit.
NL
DE
EN
11
IT
CAPITOLO 3
PRESCRIZIONI DI
SICUREZZA
ATTENZIONE:
PER QUALSIASI
INTERVENTO DI PULIZIA
E MANUTENZIONE
DELLA LAVATRICE
●
Tolga la spina.
●
Chiuda il rubinetto
dell’acqua.
●
La Candy correda tutte le
sue macchine di messa a
terra. Si assicuri che
l’impianto elettrico sia
provvisto di messa a terra in
caso contrario richieda
l’intervento di personale
qualificato.
Apparecchio
conforme alle Direttive
Europee 89/336/CEE,
73/23/CEE e successive
modifiche.
●
Non tocchi l’apparecchio
con mani, piedi bagnati o
umidi.
●
Non usi l’apparecchio a
piedi nudi.
●
Non usi, se non con
particolare cautela,
prolunghe in locali adibiti a
bagno o doccia.
ATTENZIONE:
DURANTE IL LAVAGGIO
L’ACQUA PUO’ ANDARE
A 90°C.
●
Prima di aprire l’oblò si
assicuri che non vi sia
acqua nel cestello.
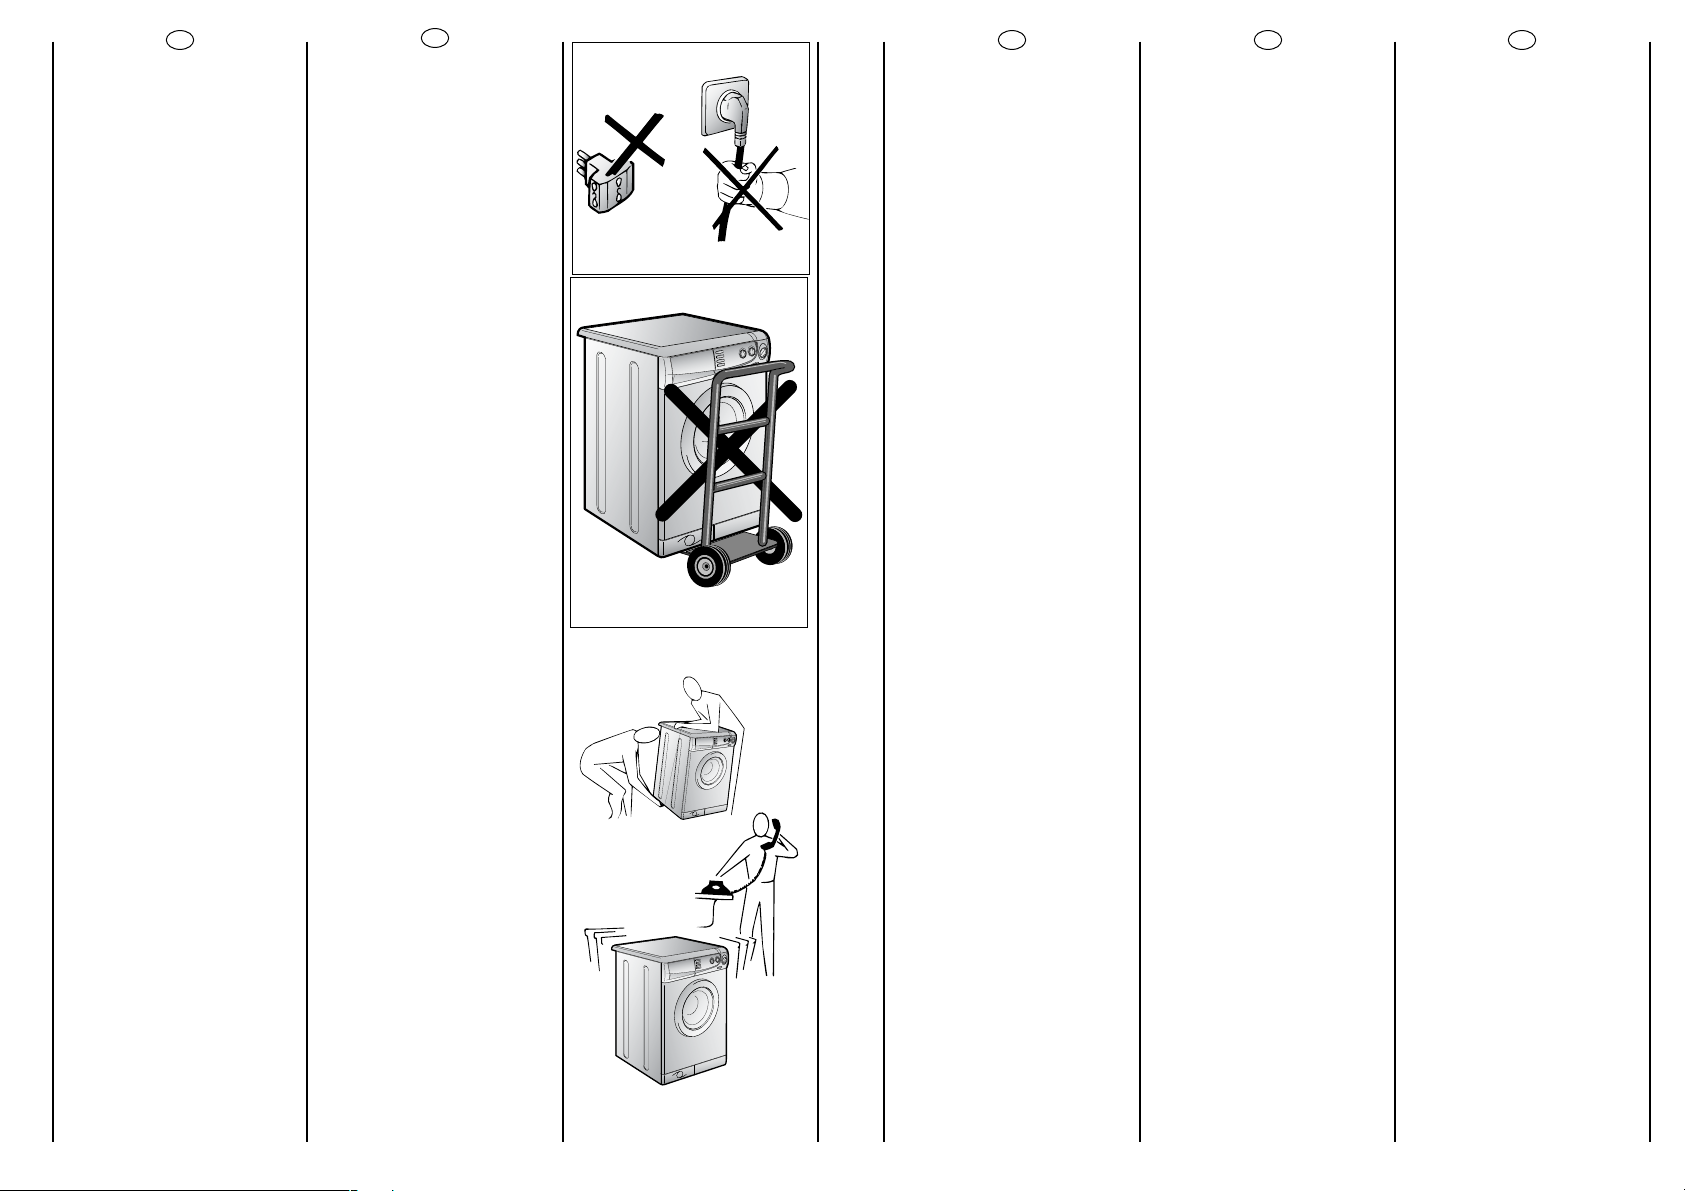
12
FR
● Ne pas utiliser
d’adaptateurs ou de prises
multiples.
● Cet appareil ne doit pas
être utilisé sans surveillance.
● Pour débrancher la prise,
ne pas tirer sur le câble.
● Ne pas laisser la machine
exposée aux agents
atmosphériques (pluie, soleil,
etc…).
● En cas de déménagement
ne jamais soulever la
machine par les boutons ou
par le tiroir des produits
lessiviels.
● Pendant le transport ne
pas appuyer le hublot sur le
chariot.
Important!
Les ouvertures à la base de
l’appareil ne doivent en
aucun cas être obstruées par
des tapis, moquette ou
autres objets.
● 2 personnes pour soulever
la machine (voir dessin).
● En cas de panne et/ou de
mauvais fonctionnement
éteindre la machine, fermer
le robinet d’alimentation
d’eau et ne pas toucher à la
machine. Pour toute
réparation adressez-vous
exclusivement à un centre
d’assistance technique
Candy en demandant des
pièces de rechange
certifiées constructeur.Le fait
de ne pas respecter les
indications susmentionnées
peut compromettre la
sécurité de l’appareil.
● Si le remplacement du
câble d’alimentation s’avère
nécessaire, il devra être
remplacé par un câble
special fourni par le service
après-vente.
● Do not use adaptors or
multiple plugs.
● Do not allow the
appliance to be used by
children or the incompetent
without due supervision.
● Do not pull the mains lead
or the appliance itself to
remove the plug from the
socket.
● Do not leave the
appliance exposed to
atmospheric agents (rain,
sun etc.)
● In the case of removal,
never lift the appliance by
the knobs or detersive
drawer.
● During transportation
do not lean the door
against the trolley.
Important!
When the appliance
location is on carpet floors,
attention must be paid so as
to ensure that there is no
obstruction to the bottom
vents.
● Lift the appliance in pairs
as illustrated in the diagram.
● In the case of failure
and/or incorrect operation,
turn the washing machine
off, close the water inlet tap
and do not tamper with the
appliance. Contact a
Candy Technical Assistance
Centre for any repairs and
ask for original Candy spare
parts. Avoidance of these
norms may compromise the
safety of the appliance.
● Should the supply cord
(mains cable) be demaged,
this is to be replaced by a
specific cable available
from the after sales service
centre.
NL
DE
EN
●
Gebruik geen
verdeelstekkers of
meervoudige contactdozen.
●
Laat de apparaten niet
zonder adequaat toezicht
gebruiken door kinderen of
door iemand die daar niet
bekwaam genoeg voor is.
●
Trek niet aan de
elektriciteitsdraad of aan het
apparaat zelf om de stekker
uit het stopcontact te halen.
●
Stel het apparaat niet
bloot aan atmosferische
invloeden (regen, zon, etc.)
●
Als u het apparaat wilt
verplaatsen til het dan nooit
op aan de knoppen of aan
de wasmiddellade.
●
Laat tijdens het
verplaatsen de vuldeur niet
tegen de steekwagen
steunen.
●
Als u het apparaat op een
ondergrond met een hoog
polig tapijt zet, controleer
dan of de opening aan de
onderkant vrij blijft.
●
Til het apparaat op zoals in
de schets is aangegeven.
●
Ingeval van storing en/of
niet goed functioneren: zet
de wasautomaat uit,draai
de watertoevoerkraan dicht
en kom verder niet aan het
apparaat. U hoeft alleen
maar contact op te nemen
met een Candy Service
Dienst voor eventuele
reparaties en vraag om
originele Candy onderdelen.
Als deze regels niet worden
opgevolgd zou de veiligheid
van het apparaat in gevaar
gebracht kunnen worden.
●
Als de (hoofd)
aanvoerslang beschadigd is,
moet deze worden
vervangen door een
speciale kabel die
verkrijgbaar is bij de after
sales afdeling van Candy
(Gias Service).
●
Gerät nicht an Adapter
oder Mehrfachsteckdosen
anschließen.
●
Achten sie darauf,daß
Kinder nicht unbeaufsichtigt
am Gerät hantieren.
●
Ziehen Sie den Stecker
immer am Stecker selbst aus
der Steckdose.
●
Setzen Sie das Gerät keinen
Witterungseinflüssen (Regen,
Sonne usw.) aus.
●
Das Gerät niemals an den
Schaltknöpfen oder am
Waschmittelbehälter
anheben.
●
Während des Transportes
mit einer Sackkarre das Gerät
nicht auf das Bullauge
lehnen.
Wichtig!
Falls Sie das Gerät auf einen
Teppich oder Teppichboden
aufstellen, achten Sie darauf,
daß die Lufteinlässe am
Boden des Gerätes nicht
verstopft werden.
●
Stets, wie auf der
Zeichnung dargestellt, zu
zweit anheben.
●
Bei eventuellen Defekten
und Fehlfunktionen das Gerät
abschalten,die Wasserzufuhr
unterbrechen und die
Waschmaschine nicht
gewaltsam öffnen. Bei
anfallenden Reparaturen
wenden Sie sich bitte
ausschließlich an die
Kundendienststelle der Firma
Candy und bestehen Sie auf
die Verwendung von
Originalersatzteilen. Die
Nichtbeachtung der o.a.
Vo rs chriften kann zur
Beeinträchtigung der Geräte
sicherheit führen.
●
Wenn das Gerät einmal
ausgedient hat, entsorgen Sie
es bitte ordnungsgemäß über
Ihren Fachhändler oder die
kommunalen
Entsorgungseinrichtungen.
●
Sollte das Netzkabel
beschädigt sein, muß dieses
mit dem speziellen Netzkabel
ersetzt werden, das vom
Gias-Kundendienst zur
Ve rfügung gestellt werden
kann.
13
IT
●
Non usi adattatori o spine
multiple
●
Non permetta che
l’apparecchio sia usato dai
bambini o da incapaci,
senza sorveglianza.
●
Non tiri il cavo di
alimentazione, o
l’apparecchio stesso, per
staccare la spina dalla
presa di corrente.
●
Non lasci esposto
l’apparecchio ad agenti
atmosferici (pioggia, sole,
ecc…).
●
In caso di trasloco non la
sollevi mai dalle manopole o
dal cassetto del detersivo.
●
Durante il trasporto non
appoggi mai l’oblò al
carrello.
Importante!
Nel caso si installi
l’apparecchio su un
pavimento ricoperto da
tappeti o con moquette, si
deve fare attenzione che le
aperture di ventilazione alla
base dell’apparecchio non
vengano ostruite.
●
Sollevarla in due persone
come illustrato in figura.
●
In caso di guasto e/o di
cattivo funzionamento
dell’apparecchio, lo
spenga, chiuda il rubinetto
dell’acqua e non
manometta
l’elettrodomestico. Per
l’eventuale riparazione si
rivolga solamente a un
centro di Assistenza Tecnica
Candy e richieda l’utilizzo di
ricambi originali.
Il mancato rispetto di
quanto sopra può
compromettere la sicurezza
dell’apparecchio.
●
Se il cavo di alimentazione
risultasse danneggiato,
dovrà essere sostituito da un
cavo speciale disponibile
presso il servizio di Assistenza
Tecnica.
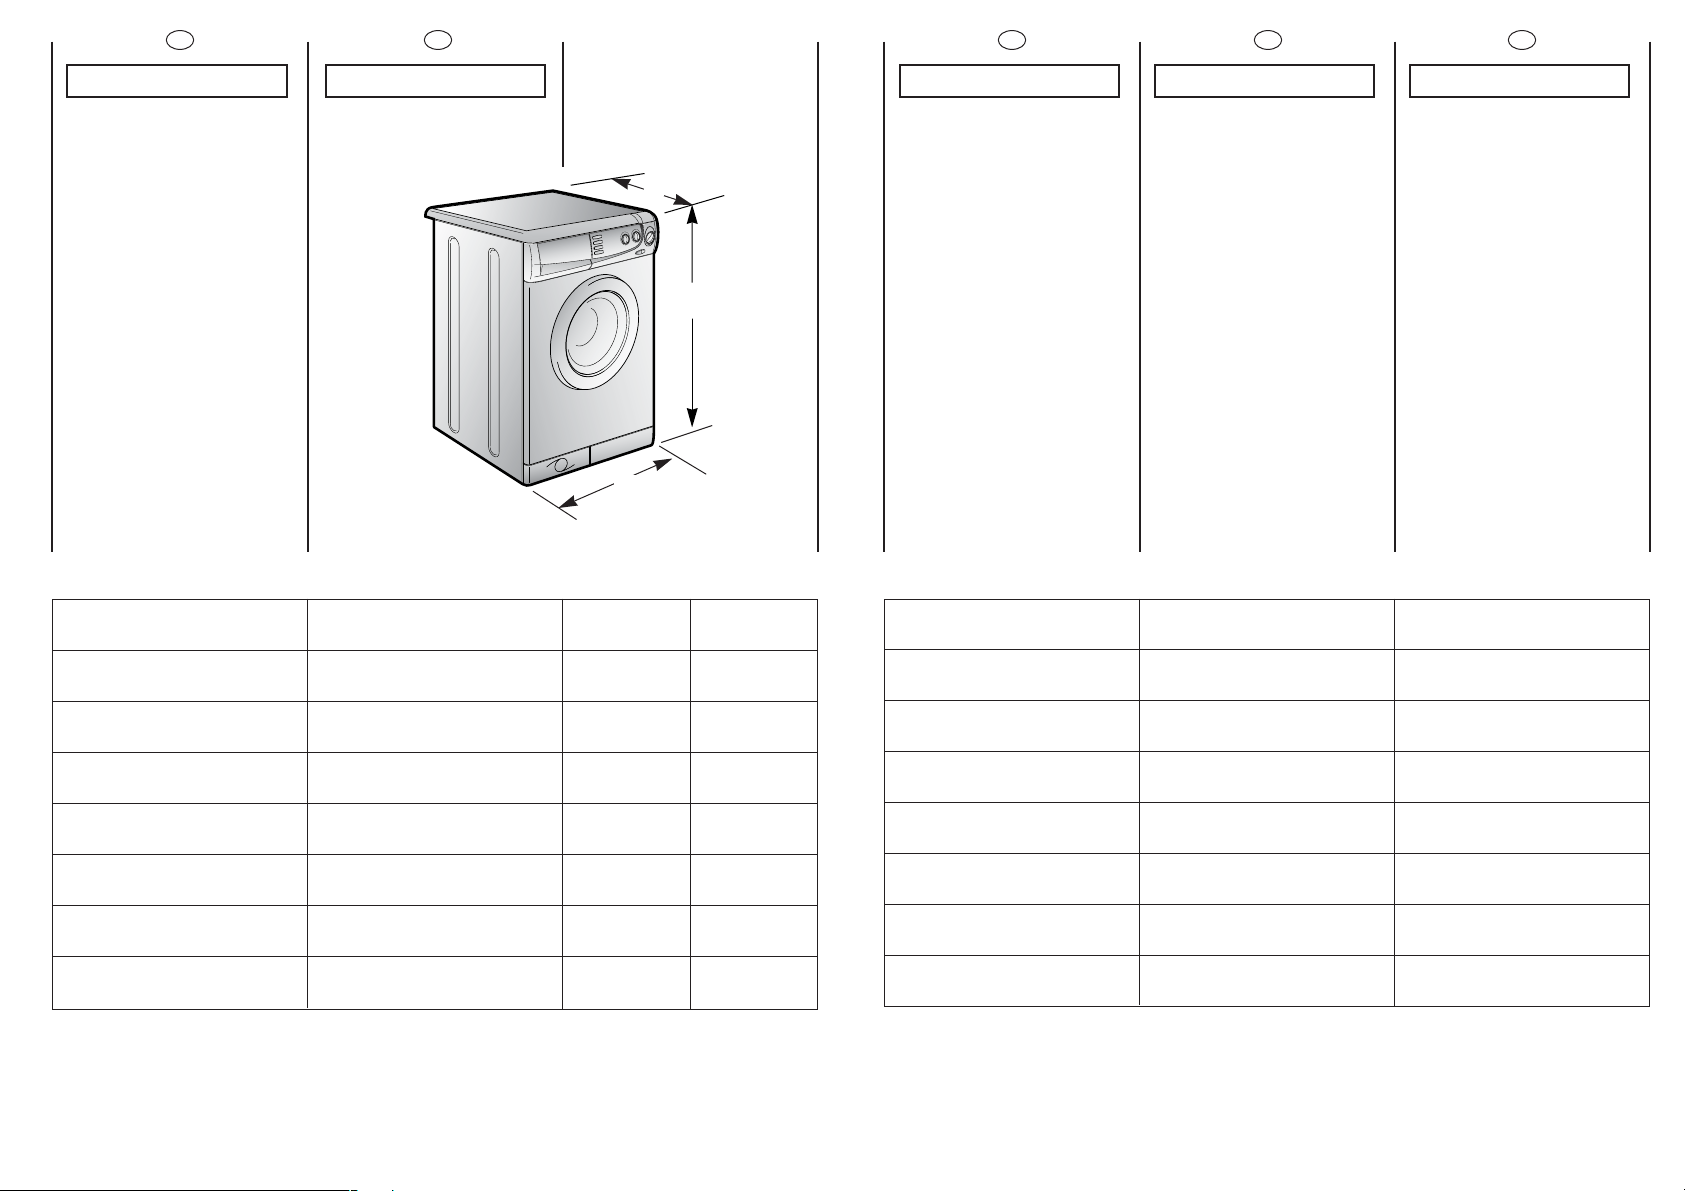
85 cm
60 cm
52 cm
DRUK HYDRAULISCHE POMP WASSERDRUCK
FR
NL
DE
EN
KAPITEL 4 CHAPTER 4CHAPITRE 4 HOOFDSTUK 4
14 15
CAPACITE DE LINGE
SEC
EAU NIVEAU NORMAL
PUISSANCE
ABSORBEE
CONSOMMATION ENERGIE
(PROG. 2)
AMPERAGE
PRESSION DANS
L’INSTALLATION HYDRAULIQUE
TENSION
kg 4,5
8÷15
2150
1,75
10
min. 0,05
max. 0,8
230
l
W
kWh
A
ESSORAGE (Tours/min.) 1000giri/min.
MPa
V
CAPA CITEIT DROOG
WASGOED
NORMAAL WATER NIVEAU
AANSLUITWAARDE
ENERGIEVER BRUIK
(PROGR. 2)
STROOMSTERKTE VAN DE
ZEKERING
NETSPANNING
MAXIMUM WASH
LOAD DRY
NORMAL WATER LEVEL
POWER INPUT
ENERGY CONSUMPTION
(PROG. 2)
POWER CURRENT FUSE
AMP
WATER PRESSURE
SUPPLY VOLTAGE
FASSUNGSVERMÖGEN
TROCKENWÄSCHE
WASSERSTAND NORMAL.
GESAMTANSCHLUßWERT
ENERGIEVERBRAUCH
(PROGR. 2)
ABSICHERUNG
SPIN
r.p .m.
CENTRIFUGE
(t/min.)
SCHLEUDERDREHZAHL
(U/min.)
SPANNUNG
IT
CAPITOLO 4
CAPACITA’ DI BIANCHERIA
ASCIUTTA
ACQUA
LIVELLO NORMALE
POTENZA
ASSORBITA
CONSUMO DI ENERGIA
(PROG. 2)
AMPERE DEL
FUSIBILE DELLA RETE
PRESSIONE NELL’IMPIANTO
IDRAULICO
TENSIONE
GIRI DI
CENTRIFUGA

16
FR
CHAPITRE 5
MISE EN PLACE
INSTALLATION
Placer la machine sur le lieu
d’utilisation sans le socle
d’emballage.
Couper les colliers
serre-tubes
Dévisser la vis centrale (A);
dévisser les 4 vis latérales (B)
et enlever l’axe (C).
Incliner la machine en avant
et enlever les sachets en
plastique qui contennent les
2 arrêts en polystyrène qui
se trouvent sur les 2 côtés en
tirant vers le bas.
Refermer le trou en utilisant
le bouchon qui se trouvè
dans le sachet “instructions”.
ATTENTION:
NE PAS LAISSER À LA
PORTÉE DES ENFANTS
DES ELEMENTS
D’EMBALLAGE QUI
PEUVENT CAUSER DES
RISQUES.
NL
DE
EN
HOOFDSTUK 5
IN ELKAAR ZETTEN
EN INSTALLEREN
Breng de machine zonder
de onderkant van de
verpakking dicht bij de
plaats waar hij komt te
staan.
Knip het ringetje waarmee
de slang en de snoer vast zit
door.
Draai de middelste schroef
(A) los; draai de vier
schroeven aan de zijkant (B)
los en verwijder het
dwarsstuk (C).
Houd het apparaat schuin
naar voren,verwijder de
plastic zakken en haal
voorzichtig de twee
polystyreen blokken aan de
zijkanten eraf door ze naar
beneden te trekke
Stop de afsluitdopjes in de
gaatjes (deze bevinden zich
in de bijgeleverde
enveloppe).
WAARSCHUWING:
ZORG ERVOOR DAT HET
VERPAKKINGSMATERIAAL BUITEN HET BEREIK
VAN KINDEREN BLIJFT
OMDAT DAT GEVAAR
KAN OPLEVEREN.
KAPITEL 5
INBETRIEBNAHME
INSTALLATION
Gerät ohne
Ve rpackungsunterteil in die
Nähe des Aufstellungsortes
bringen.
Lösen Sie die Klammern der
Schlauchbefestigung.
Schrauben Sie die
Mittelschraube (A) und die 4
Seitenschrauben (B) ab und
entfernen Sie die
Transportquerstrebe (C).
Neigen Sie das Gerät nach
vorne. Ziehen Sie die
Plastiktüten, die 2 StyroporStangen enthalten, nach
unten heraus.
Schließen Sie die Öffnung mit
Hilfe des Stöpsels (der im
Beipack mitgeliefert wird).
ACHTUNG:
DIE VERPACKUNG IST IN
DEN HÄNDEN VON
KINDERN EINE
GEFAHRENQUELLE. BITTE
ENTSORGEN SIE DAS
VERPACKUNGSMATERIAL
ORDNUNGSGEMÄß.
CHAPTER 5
SETTING UP
INSTALLATION
Move the machine near its
permanent position without
the packaging base.
Cut tube-holding straps.
Unscrew the central screw
(A); unscrew the 4 lateral
screws (B) and remove the
cross piece (C).
Lean the machine forward
and remove the plastic
bags containing the two
polystyrene blocks at the
sides, pulling downwards.
Press the plug (to be found
in the envelope with the
instructions) into the hole.
WARNING:
DO NOT LEAVE THE
PACKAGING IN THE
REACH OF CHILDREN AS
IT IS A POTENTIAL
SOURCE OF DANGER.
17
IT
CAPITOLO 5
MESSA IN OPERA
INSTALLAZIONE
Porti la macchina vicino al
luogo di utilizzo senza il
basamento dell’imballo.
Tagli le fascette fermatubo
Svitare la vite centrale (A);
svitare le 4 viti laterali (B) e
rimuovere la traversa (C).
Inclinare la macchina in
avanti e sfilare i sacchetti in
plastica che contengono i
due blocchetti in polistirolo
posti sui 2 lati tirando verso il
basso.
Richiudere il foro utilizzando
il tappo contenuto nella
busta istruzioni.
ATTENZIONE:
NON LASCI ALLA
PORTATA DI BAMBINI
GLI ELEMENTI
DELL’IMBALLAGGIO IN
QUANTO POTENZIALI
FONTI DI PERICOLO.
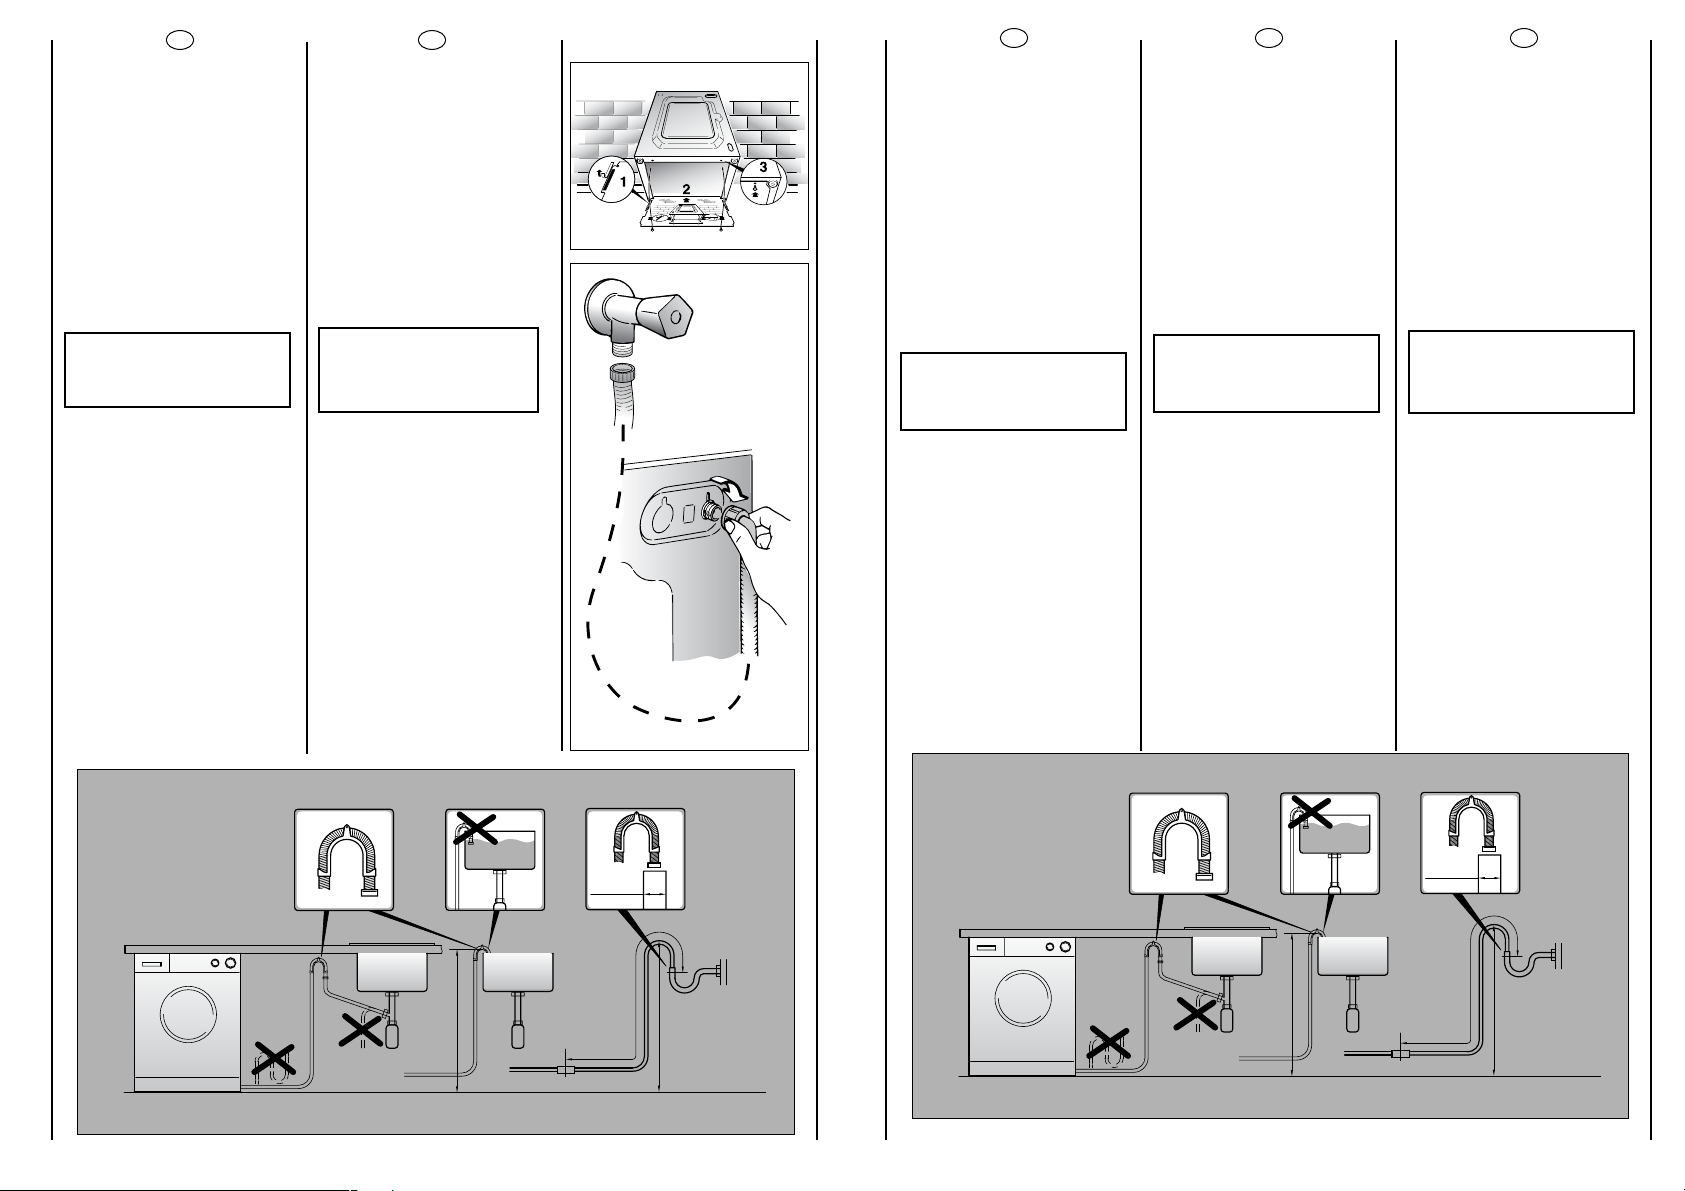
FR
Appliquer la feuille
supplémentaire sur le fond
comme dans la figure.
Raccorder le tube de l’eau
aux robinets.
L’appareil doit être relié à
l’arrivée d’eau exlusivement
avec les tuyaux fournis .
Ne pas réutiliser les anciens
tuyaux.
ATTENTION:
NE PAS OUVRIR LE
ROBINET
Approcher la machine
contre le mur en faisant
attention à ce que le tuyau
n’ait ni coudes ni
étranglements.
Raccorder le tuyau de
vidange au rebord de la
baignoire ou, mieux encore,
à un dispositif fixe
d’évacuation,hauteur mini.
50 cm et de diamètre
supérieur au tuyau de la
machine à laver.
En cas de besoin, utiliser le
coude rigide livré avec la
machine.
NL
DE
EN
Bevestig het geribbelde
materiaal op de bodem,
zoal op de figuur.
Ve rb ind de
watertoevoerslang met de
waterkraan.
Het apparaat moet
aangesloten worden aan
de waterkraan met behulp
van de watertoevoerslang.
Maak gebruik van de
nieuwe watertoevoerslang,
gebruik niet de oude!
BELANGRIJK:
DRAAI DE WATERKRAAN
NIET OPEN
Zet de wasmachine dicht
tegen de muur aan.
Let er op dat er geen
bochten of vernauwingen in
de buis zitten.
Het is het beste om de
afvoerslang aan te sluiten
op een vaste afvoer met
een doorsnee die groter is
dan die van de afvoerslang
en op een hoogte van
minstens 50 cm.
Gebruik zonodig de
bligeleverde slanggeleider.
Befestigen Sie die gewellte
Bodenplatte wie in der
Abbildung dargestellt.
Den Zulaufschlauch an den
Wasserhahn anschließen.
Das Gerät muß an die
Wasserversorgung mit neuen
Schläuchen angeschlossen
werden.
Alte Schläuche dürfen nicht
wiederverwendet werden.
ACHTUNG:
WASSERHAHN NOCH
NICHT ÖFFNEN.
Die Waschmaschine an die
Wand rücken,darauf
achten, daß dabei der
Schlauch nicht verkrümmt
oder eingeengt wird.
Ablaufschlauch am
Wannenrand
befestigen, oder an einem
festen Abfluß von
mindestens 50 cm Höhe
anbringen, dessen
Durchmesser größer ist als
der des
Waschmaschinenschlauchs.
Falls erforderlich den
mitgelieferten starren
Rohrbogen benutzen.
Fix the sheet of corrugated
material on the bottom as
shown in picture.
Connect the fill hose
to the tap.
The appliance must be
connected to the water
mains using new hose-sets.
The old hose-sets should not
be reused.
IMPORTANT:
DO NOT TURN THE TAP
ON AT THIS TIME.
Position the washing
machine next to the wall.
Hook the outlet tube to the
edge of the bath tub,
paying attention that there
are no bends or
contractions along the tube.
It is better to connect the
discharge hose to a fixed
outlet of a diameter greater
than that of the outlet tube
and at a height of min. 50
cm. If is necessary to use the
plastic sleeve supplied.
19
IT
Applichi il foglio di polionda
sul fondo come mostrato in
figura.
Allacci il tubo dell’acqua al
rubinetto.
L’ a pparecchio deve essere
connesso alla rete idrica
solo con i nuovi tubi di
carico forniti in dotazione.
I vecchi tubi di carico non
devono essere riutilizzati.
ATTENZIONE:
NON APRA
IL RUBINETTO
Accosti la lavatrice al muro
facendo attenzione che
non vi siano curve o
strozzature, allacci il tubo di
scarico al bordo della
vasca.
o meglio a uno scarico fisso;
altezza minima 50 cm, di
diametro superiore al tubo
della lavatrice.
In caso di necessità utilizzare
la curva rigida in dotazione.
min 4 cm
+2,6 mt max
max 100 cm
min 50 cm
max 85 cm
max 100 cm
min 4 cm
+2,6 mt max
min 50 cm
max 85 cm
Loading…