
182845
Не так давно я уже писал о настройке повторителя Wi-Fi сети TP-Link TL-WA850RE. А в этой статье мы будем настраивать репитер TP-Link AC750 RE200. Его основное отличие в том, что это двухдиапазонный усилитель Wi-Fi сети. То есть, он может одновременно расширять покрытие беспроводной сети на двух частотах 2.4GHz, и 5GHz. Модель AC750 RE200 подойдет в том случае, если у вас двухдиапазонный маршрутизатор, и вы одновременно используете есть на обоих частотах. Если же вы только собираетесь покупать повторитель, ищите хорошую модель, и у вас обычный роутер который раздает Wi-Fi на одной частоте (2.4GHz), то можете купить модель TL-WA850RE. Или RE200, с запасом на будущее, если поменяете роутер на двухдиапазонный.
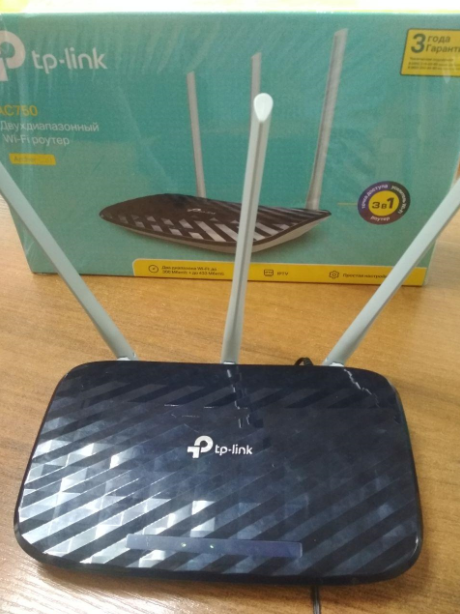
Я настроил свой TP-Link AC750 RE200 за одну минуту. Ровно столько времени нужно для того, чтобы включить репитер в розетку, нажать кнопку WPS на роутере, и на самом репитере. После чего, этот ретранслятор сам подключается к роутеру, и начинает расширять беспроводную сеть. К тому же, у меня таким способом получилось усилить сигнал Wi-Fi сети в двух диапазонах 2.4GHz, и 5GHz. Есть информация, что через кнопку WPS не всегда получается настроить ретранслятор сразу для двух частот, нужно делать это через панель управления. Мы рассмотрим этот вариант в статье. Настраивал я этот репитер с двухдиапазонным роутером TP-Link Archer C20i.
Усиление сигнала Wi-Fi сети на частотах 2.4GHz, и 5GHz с помощью TP-Link RE200
Давайте сначала рассмотрим быструю настройку с помощью кнопки WPS. Скорее всего, на вашем маршрутизаторе есть такая кнопка. Если ее нет, или этот способ не сработает, то ниже я покажу как все настроить через панель управления самого ретранслятора.
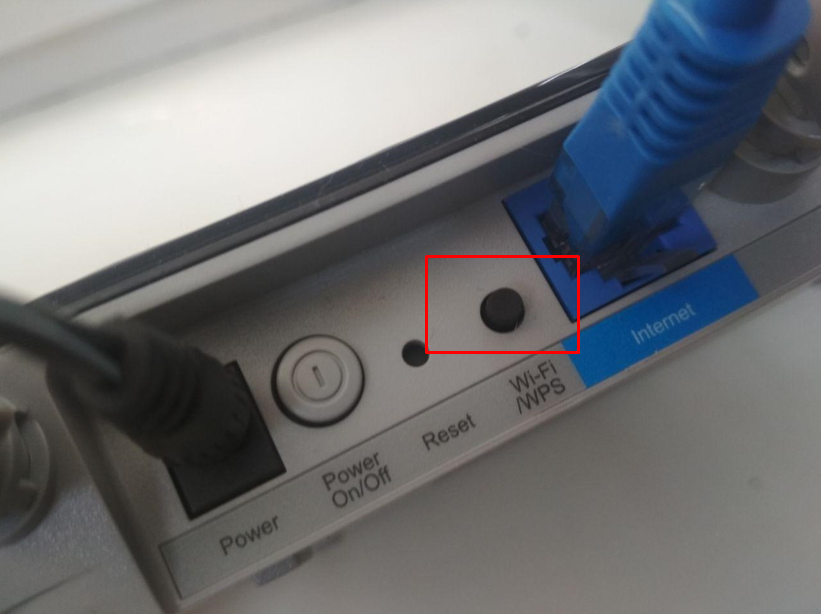
Первым делом, включите повторитель в розетку, и подождите секунд 15, пока он загрузится. Затем, на роутере нажмите кнопку WPS. На моем TP-Link Archer C20i она выглядит вот так:

Важно! Не держите кнопку WPS на роутере нажатой слишком долго. Особенно, если она подписана «WPS/Reset». Примерно через 5 секунд после нажатия на кнопку, будут сброшены настройки роутера к заводским.
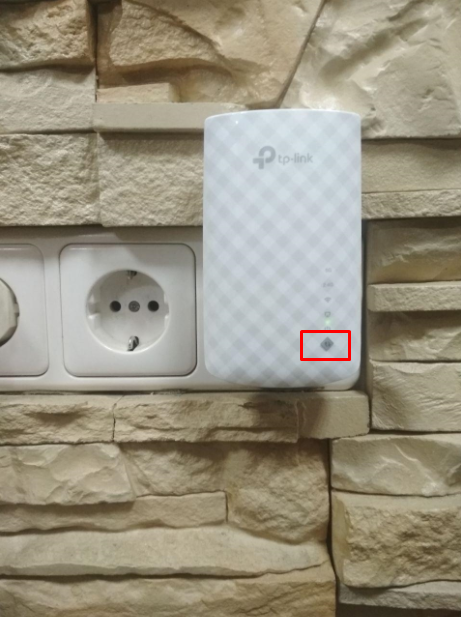
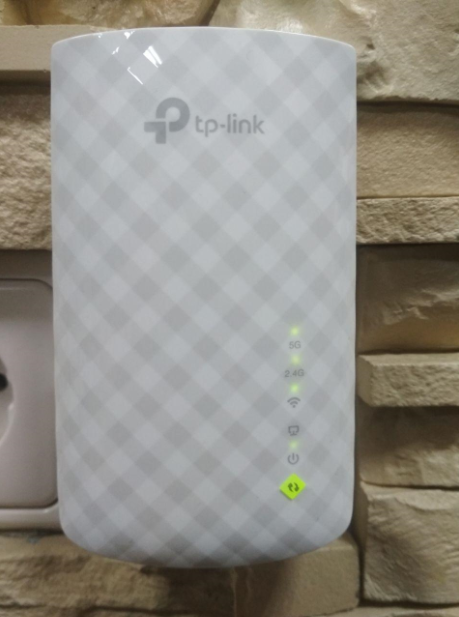
После нажатия на кнопку на маршрутизаторе, сразу идем, и нажимаем кнопку WPS на репитере TP-Link AC750 RE200.

Как вы можете увидеть на скриншоте выше, у меня загорелись индикаторы возле 5G, и 2.4G. Это значит, что ретранслятор уже усиливает беспроводную сеть в двух диапазонах. Если горит красный индикатор, то это значит, что сигнал от роутера очень слабый, и нужно установить репитер ближе к точке доступа. А если индикатор возле какой-то сети вообще не загорелся, но у вас роутер транслирует сеть на двух частотах, то это значит, что нужно попробовать настроить AC750 RE200 через панель управления. Так как подключится сразу к двум сетям через кнопку WPS, и усиливать их, не всегда получается.
Настройка TP-Link AC750 RE200 через панель управления
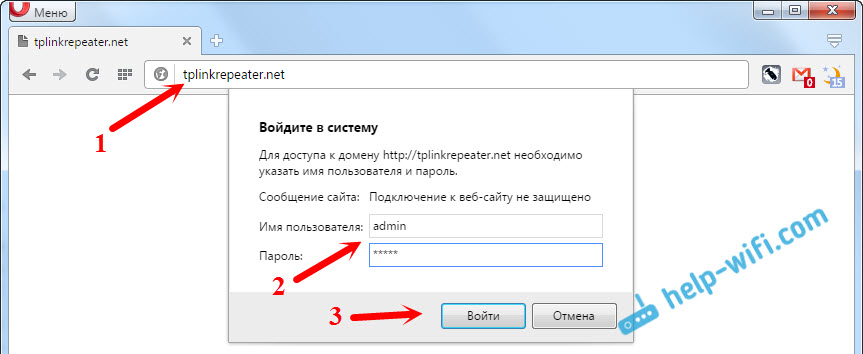
Включите репитер в розетку, и подключитесь к нему по Wi-Fi, или с помощью сетевого кабеля. Откройте браузер, и перейдите по адресу tplinkrepeater.net. Появится страница авторизации. Стандартный пароль и логин: admin и admin. Откроются настройки ретранслятора TP-Link AC750 RE200.
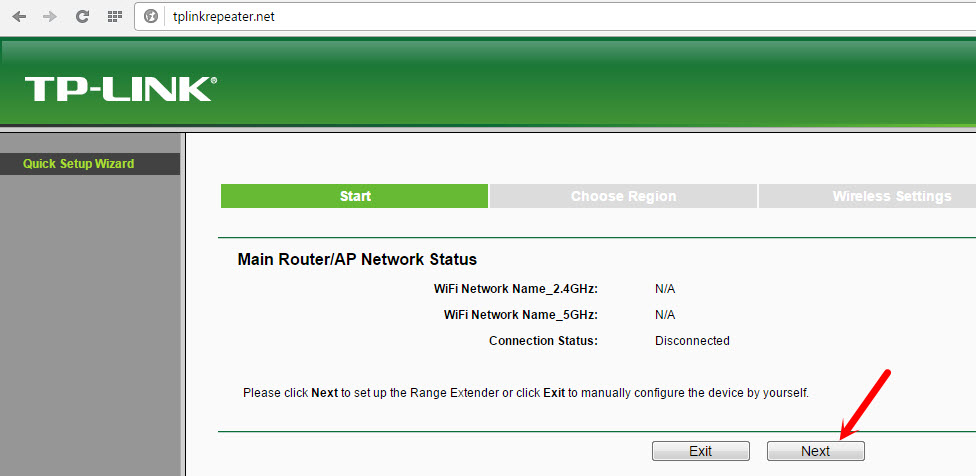
Скорее всего, перед вами сразу появится окно с мастером быстрой настройки (если нет, то перейдите на вкладку Wireless — Connect To Existing Network). Просто нажмите на кнопку «Next».
Выберите свой регион.

Дальше репитер выполнит поиск сетей на частоте 2.4ГГц. Выделите свою сеть, и нажмите кнопку «Next».

В следующем окне нужно только указать пароль от Wi-Fi сети, которую вы хотите расширить.

Дальше репитер начнет поиск сетей на частоте 5GHz.

Подключаемся к своей сети на другом диапазоне точно так же, как я показывал выше. Нужно только выбрать сеть, уже на частоте 5GHz и указать пароль к ней.
В итоге, роутер должен выдать информацию по всем настройкам, и нам нужно только нажать на кнопку «Finish».

Репитер перезагрузится, и начнет усиливать ваши Wi-Fi сети. Обратите только внимание на индикаторы на самом устройстве, которые возле 5G, и 2.4G. Они должны гореть зеленым цветом. Если горят красным, то установите репитер ближе к роутеру. Вообще, советую выбрать такое расположение усилителя, что бы он находился в зоне стабильного сигнала от маршрутизатора, и максимально покрывал сигналом нужную вам площадь.
Несколько полезных советов:
1
После настройки, вы сможете отключать TP-Link AC750 RE200, и включать его в другом месте. Повторно настройку выполнять не нужно, все будет работать. Главное, чтобы повторитель был в зоне покрытия Wi-Fi сети, которую вы хотите усилить.
2
На повторителе есть один Ethernet порт, а в комплекте есть сетевой кабель. Это значит, что вы можете подключить к интернету одно устройство по кабелю (игровую приставку, стационарный компьютер, Smart TV). Устройство, у которого нет возможности подключится к интернету по Wi-Fi.
3
Вы всегда можете сбросить настройки AC750 RE200 и выполнить его повторную настройку. Снизу есть кнопка Reset. Нажмите на нее чем-то острым, подержите примерно 10 секунд, и настройки повторителя будут сброшены к заводским.

4
Если вы заметил какие-то проблемы в работе этого ретранслятора, или у вас не получается что-то настроить, то попробуйте обновить прошивку. Достаточно скачать новую версию прошивки для модели AC750 RE200 с сайта TP-Link, зайти в настройки повторителя на вкладку System Tools — Firmware Upgrade, выбрать файл прошивки с расширением .bin, и запустить процесс обновления. Только смотрите, чтобы скачанная прошивка была для вашей аппаратной версии. Аппаратная версия указана на самом устройстве.
В данном видео Вы можете посмотреть краткий обзор усилителя сигнала TP-Link AC750 RE200 и немного об истории появления двухдиапазонных репитеров .
Настройка и подключение TP-Link AC750 RE200
Для настройки усилителя существует несколько способов. Рассмотрим эти способы.
1-й способ
Через кнопку wps. Включаем усилитель в розетку. После полной загрузки горит один индикатор питания. Для достижения максимального эффекта располагать гаджет рекомендуется в прямой видимости роутера. Нажимаем кнопку wps (обозначена на фото). Индикатор начинает мигать.
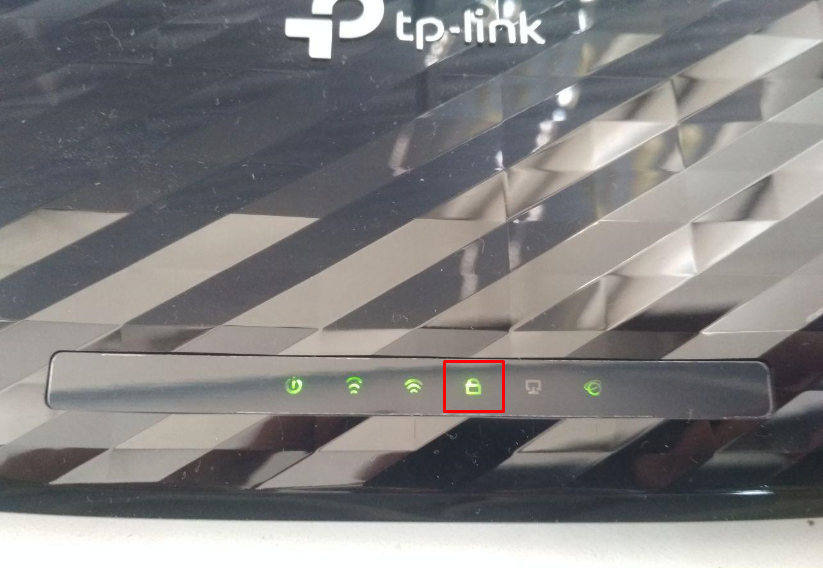
Нажимаем на кнопку wps на вашем роутере. В нашем случае, это Archer c20. Начинает мигать индикатор “замок”.
Нам осталось только подождать, пока усилитель подключится к роутеру. При успешном подключении вы увидите соответствующую индикацию
По умолчанию, при подключении к роутеру без функции бесшовного wifi, усилитель называет свою точку аналогично вашему wifi и добавляет _EXT. Пароль остается тот же.
Данные настройки (и не только) можно изменить через веб интерфейс усилителя. Об этом чуть позже.
Далее подключаемся к вашей расширенной сети и пользуемся интернетом. Так же подключаться к усилителю можно и проводом. Усилитель имеет один lan-порт.
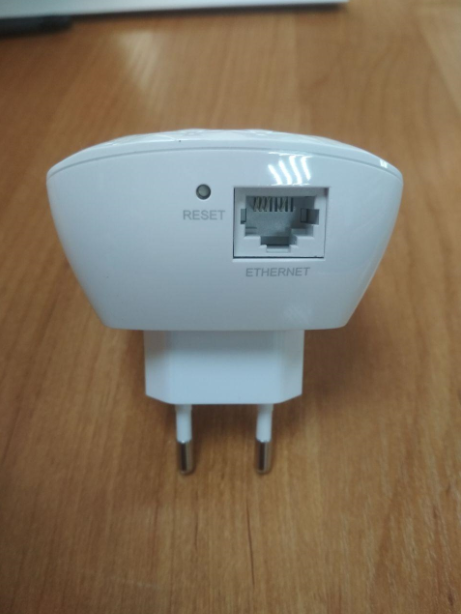
В случае необходимости, усилитель можно сбросить на заводские настройки. Для этого нужно кратковременно единожды нажать на кнопку reset.
2-ой способ
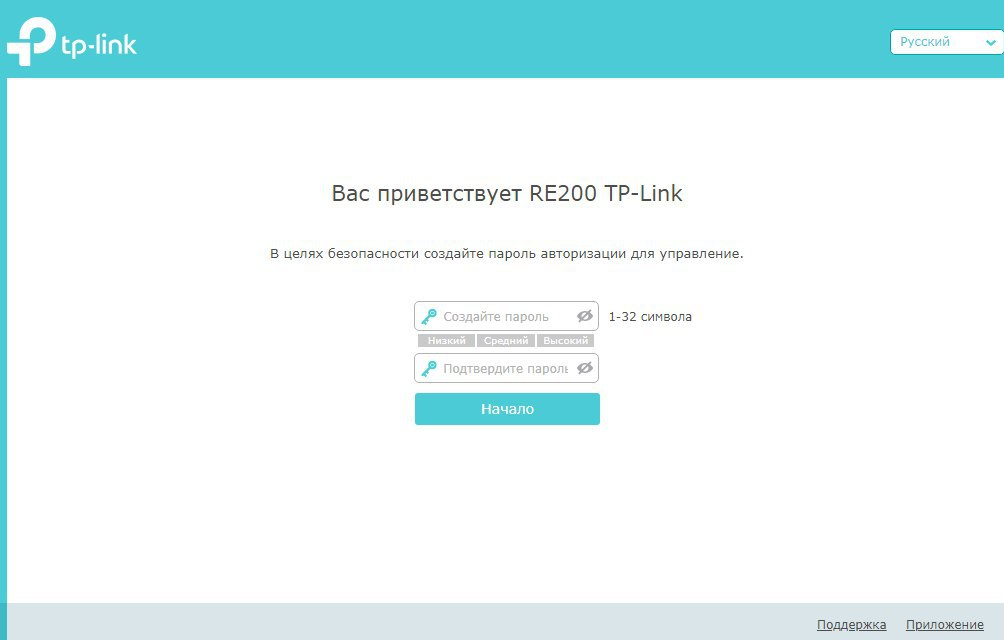
Настройка через web-интерфейс. По умолчанию усилитель имеет адрес 192.168.0.254. Включаем в розетку, подключаемся к усилителю через lan-порт и вводим в браузере в адресной строке данный адрес. Попадаем в интерфейс гаджета. Для начала, он попросит создать пароль безопасности. Вводим дважды пароль, который захотим (главное не забыть его в будущем).
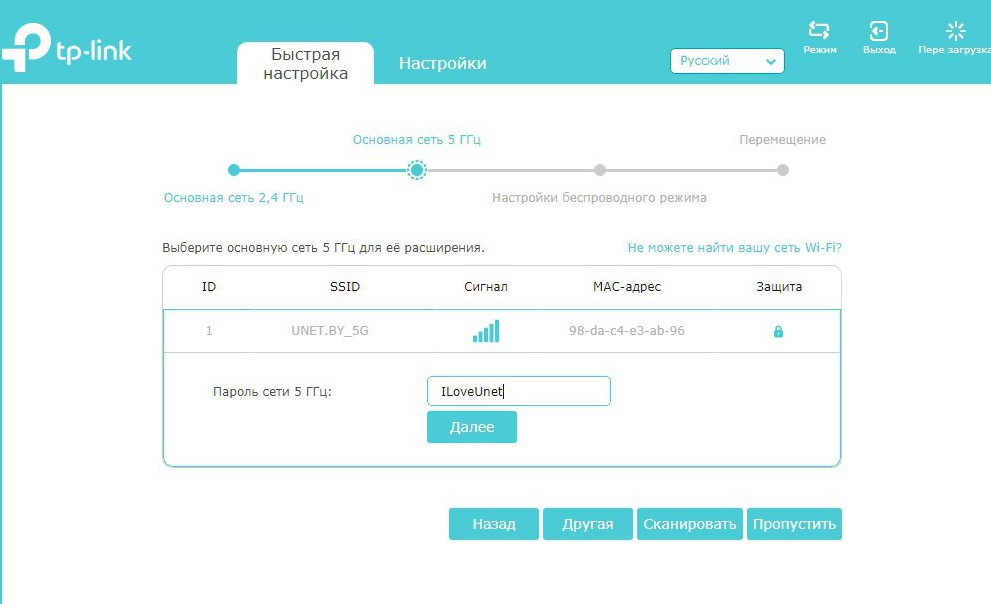
Далее открывается окно быстрой настройки, где нам нужно будет пошагово указать, к каким сетям и с какими паролями будет подключаться усилитель.

В примере мы подключаемся на первом этапе к сети UNET.BY с паролем ILoveUnet, на втором этапе к сети 5ггц UNET.BY_5G с паролем ILoveUnet.
На третьем этапе настройки мы указываем как будет называться расширенная wifi сеть и какой пароль будет иметь.
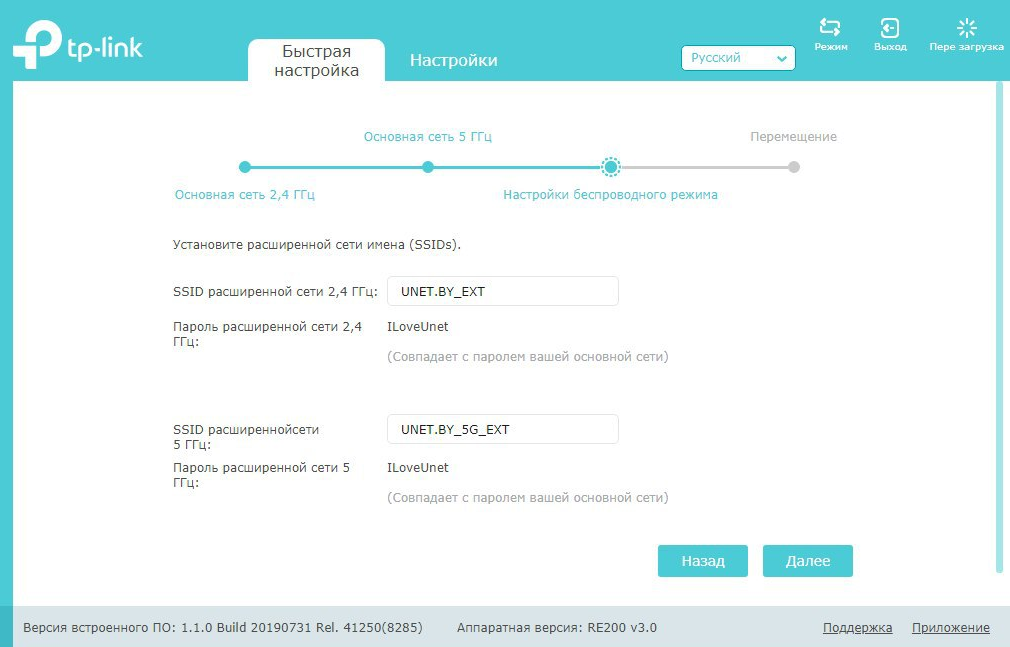
Сохраняем настройки. Наслаждаемся работой интернета.
3-й способ
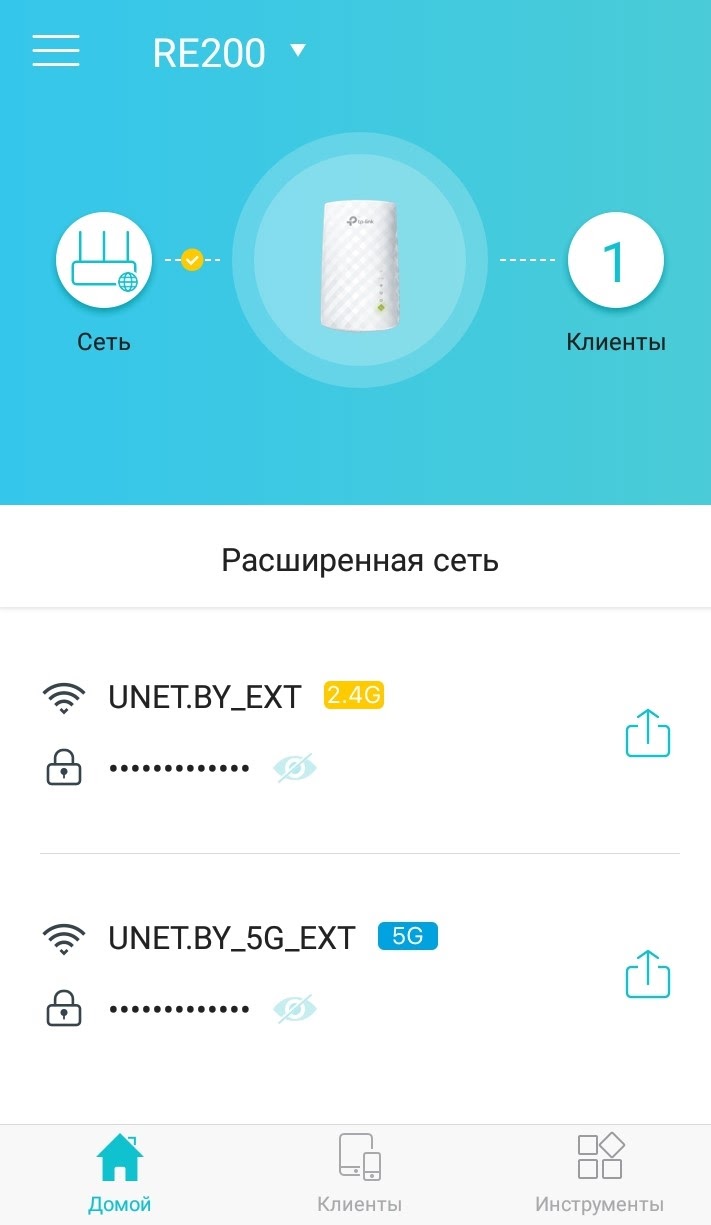
Управление усилителем через мобильное приложение Tether. Устанавливаем приложение, запускаем и выбираем необходимый гаджет. В нашем случае это усилитель RE200.

Изменяем интересующие нас настройки wifi.
Подпишитесь на мобильное приложение: Viber, Telegram.
А также следите за актуальными новостями в нашем Telegram-канале.
Если у Вас возникли вопросы — напишите нам или позвоните 7778282 (любой мобильный оператор).
RE200
AC750 WiFi Range Extender
REV1.0.0
1910011070

COPYRIGHT & TRADEMARKS
Specifications are subject to change without notice. is a registered trademark
of TP-LINK TECHNOLOGIES CO., LTD. Other brands and product names are trademarks or
registered trademarks of their respective holders.
No part of the specifications may be reproduced in any form or by any means or used to make any
derivative such as translation, transformation, or adaptation without permission from TP-LINK
TECHNOLOGIES CO., LTD. Copyright © 2014 TP-LINK TECHNOLOGIES CO., LTD.
All rights reserved.
http://www.tp-link.com

FCC STATEMENT
This equipment has been tested and found to comply with the limits for a Class B digital device,
pursuant to part 15 of the FCC Rules. These limits are designed to provide reasonable protection
against harmful interference in a residential installation. This equipment generates, uses and can
radiate radio frequency energy and, if not installed and used in accordance with the instructions,
may cause harmful interference to radio communications. However, there is no guarantee that
interference will not occur in a particular installation. If this equipment does cause harmful
interference to radio or television reception, which can be determined by turning the equipment off
and on, the user is encouraged to try to correct the interference by one or more of the following
measures:
• Reorient or relocate the receiving antenna.
• Increase the separation between the equipment and receiver.
• Connect the equipment into an outlet on a circuit different from that to which the receiver
is connected.
• Consult the dealer or an experienced radio/ TV technician for help.
This device complies with part 15 of the FCC Rules. Operation is subject to the following two
conditions:
1) This device may not cause harmful interference.
2) This device must accept any interference received, including interference that may
cause undesired operation.
Any changes or modifications not expressly approved by the party responsible for compliance
could void the user’s authority to operate the equipment.
Note: The manufacturer is not responsible for any radio or tv interference caused by unauthorized
modifications to this equipment. Such modifications could void the user’s authority to operate the
equipment.
FCC RF Radiation Exposure Statement
This equipment complies with FCC RF radiation exposure limits set forth for an uncontrolled
environment. This device and its antenna must not be co-located or operating in conjunction with
any other antenna or transmitter.
“To comply with FCC RF exposure compliance requirements, this grant is applicable to only
Mobile Configurations. The antennas used for this transmitter must be installed to provide a
separation distance of at least 20 cm from all persons and must not be co-located or operating in
conjunction with any other antenna or transmitter.”

CE Mark Warning
This is a class B product. In a domestic environment, this product may cause radio interference, in
which case the user may be required to take adequate measures.
National Restrictions
This device is intended for home and office use in all EU countries (and other countries following
the EU directive 1999/5/EC) without any limitation except for the countries mentioned below:
Country Restriction Reason/remark
Bulgaria None
Outdoor use limited to
France
Italy None
Luxembourg None
Norway Implemented
Russian Federation None Only for indoor applications
Note: Please don’t use the product outdoors in France.
10 mW e.i.r.p. within
the band 2454-2483.5
MHz
General authorization required for outdoor use and
public service
Military Radiolocation use. Refarming of the 2.4 GHz
band has been ongoing in recent years to allow current
relaxed regulation. Full implementation planned 2012
If used outside of own premises, general authorization is
required
General authorization required for network and service
supply(not for spectrum)
This subsection does not apply for the geographical area
within a radius of 20 km from the centre of Ny-Ålesund
Canadian Compliance Statement
This device complies with Industry Canada license-exempt RSS standard(s). Operation is subject
to the following two conditions:
(1)This device may not cause interference, and
(2)This device must accept any interference, including interference that may cause undesired
operation of the device.
Cet appareil est conforme aux norms CNR exemptes de licence d’Industrie Canada. Le
fonctionnement est soumis aux deux conditions suivantes:
(1)cet appareil ne doit pas provoquer d’interférences et
(2)cet appareil doit accepter toute interférence, y compris celles susceptibles de provoquer un
fonctionnement non souhaité de l’appareil.
Industry Canada Statement
Complies with the Canadian ICES-003 Class B specifications.
Cet appareil numérique de la classe B est conforme à la norme NMB-003 du Canada.
This device complies with RSS 210 of Industry Canada. This Class B device meets all the
requirements of the Canadian interference-causing equipment regulations.
Cet appareil numérique de la Classe B respecte toutes les exigences du Règlement sur le
matériel brouilleur du Canada.
Korea Warning Statements
당해 무선설비는 운용중 전파혼신 가능성이 있음.
NCC Notice & BSMI Notice
注意!
依據 低功率電波輻射性電機管理辦法
第十二條 經型式認證合格之低功率射頻電機,非經許可,公司、商號或使用者均不得擅自變更頻
率、加大功率或變更原設計之特性或功能。
第十四條 低功率射頻電機之使用不得影響飛航安全及干擾合法通行;經發現有干擾現象時,應立
即停用,並改善至無干擾時方得繼續使用。前項合法通信,指依電信規定作業之無線電信。低功率
射頻電機需忍受合法通信或工業、科學以及醫療用電波輻射性電機設備之干擾。
減少電磁波影響,請妥適使用。
於 5.25GHz 至 5.35GHz 區域內操作之無線設備的警告聲明
工作頻率 5.250~5.350GHz 該頻段限於室內使用。
安全諮詢及注意事項
●請使用原裝電源供應器或只能按照本產品注明的電源類型使用本產品。
●清潔本產品之前請先拔掉電源線。請勿使用液體、噴霧清潔劑或濕布進行清潔。
●注意防潮,請勿將水或其他液體潑灑到本產品上。
●插槽與開口供通風使用,以確保本產品的操作可靠並防止過熱,請勿堵塞或覆蓋開口。
●請勿將本產品置放於靠近熱源的地方。除非有正常的通風,否則不可放在密閉位置中。
●請不要私自打開機殼,不要嘗試自行維修本產品,請由授權的專業人士進行此項工作。
Продукт сертифіковано згідно с правилами системи УкрСЕПРО на відповідність вимогам
нормативних документів та вимогам, що передбачені чинними законодавчими актами
України.

Safety Information
z When product has power button, the power button is one of the way to shut off the product;
when there is no power button, the only way to completely shut off power is to disconnect the
product or the power adapter from the power source.
z Don’t disassemble the product, or make repairs yourself. You run the risk of electric shock
and voiding the limited warranty. If you need service, please contact us.
z Avoid water and wet locations.
This product can be used in the following countries:
AT BG BY CA CZ DE DK EE
ES FI FR GB GR HU IE IT
LT LV MT NL NO PL PT RO
RU SE SK TR UA US

TP-LINK TECHNOLOGIES CO., LTD
DECLARATION OF CONFORMITY
For the following equipment:
Product Description: AC750 WiFi Range Extender
Model No.: RE200
Trademark: TP-LINK
We declare under our own responsibility that the above products satisfy all the technical
regulations applicable to the product within the scope of Council Directives:
Directives 1999/5/EC, Directives 2004/108/EC, Directives 2006/95/EC, Directives 1999/519/EC,
Directives 2011/65/EU
The above product is in conformity with the following standards or other normative documents
ETSI EN 300 328 V1.7.1: 2006
ETSI EN 301 489-1 V1.9.2:2011& ETSI EN 301 489-17 V2.2.1:2012
EN 55022:2010
EN 55024:2010
EN 61000-3-2:2006+A1:2009+A2:2009
EN 61000-3-3:2008
EN 60950-1:2006+A11:2009+A1:2010+A12:2011
EN 62311:2008
The product carries the CE Mark:
Person responsible for making this declaration:
Yang Hongliang
Product Manager of International Business
Date of issue: 2014
TP-LINK TECHNOLOGIES CO., LTD.
Building 24 (floors 1, 3, 4, 5), and 28 (floors 1-4) Central Science and Technology Park,
Shennan Rd, Nanshan, Shenzhen, China

CONTENTS
Package Contents ………………………………………………………………………………………. 1
Chapter 1 Introduction………………………………………………………………………………. 2
1.1 Product Overview…………………………………………………………………………………. 2
1.2 Main Features ……………………………………………………………………………………… 2
1.3 Appearance…………………………………………………………………………………………. 2
Chapter 2 Hardware Installation ………………………………………………………………… 4
2.1 Before You Begin…………………………………………………………………………………. 4
2.2 Basic Requirements……………………………………………………………………………… 4
2.3 Connecting the Device………………………………………………………………………….. 5
Chapter 3 Quick Installation Guide…………………………………………………………….. 6
Chapter 4 Configure the Device……………………………………………………………….. 12
4.1 Status……………………………………………………………………………………………….. 12
4.2 Quick Setup ………………………………………………………………………………………. 14
4.3 Network…………………………………………………………………………………………….. 14
4.3.1 LAN……………………………………………………………………………………………………15
4.3.2 DHCP Settings…………………………………………………………………………………….16
4.3.3 DHCP Client List…………………………………………………………………………………. 18
4.4 Wireless ……………………………………………………………………………………………. 18
4.4.1 Connect To Existing Network ………………………………………………………………..19
4.4.2 Extender Settings ………………………………………………………………………………..19
4.4.3 Advanced Settings………………………………………………………………………………. 20
4.4.4 High Speed………………………………………………………………………………………… 21
4.4.5 Wireless Statistics………………………………………………………………………………..21
4.5 LED On/Off ……………………………………………………………………………………….. 22
4.6 System Tools …………………………………………………………………………………….. 22
4.6.1 Firmware Upgrade……………………………………………………………………………….23
4.6.2 Factory Defaults…………………………………………………………………………………..24
4.6.3 Backup & Restore………………………………………………………………………………..24
4.6.4 Reboot ……………………………………………………………………………………………….25
4.6.5 Password…………………………………………………………………………………………… 25
4.6.6 System Log………………………………………………………………………………………… 26
Appendix A: Factory Defaults ……………………………………………………………………. 27
Appendix B: Troubleshooting……………………………………………………………………. 28
Appendix C: Specifications……………………………………………………………………….. 30
Appendix D: Glossary……………………………………………………………………………….. 31

RE200 AC750 WiFi Range Extender User Guide
Package Contents
The following items should be found in your package:
¾ RE200 AC750 WiFi Range Extender
¾ Ethernet Cable
¾ Quick Installation Guide
¾ Resource CD for RE200 AC750 WiFi Range Extender, including:
z This User Guide
Note:
)
Make sure that the package contains the above items. If any of the listed items is damaged or
missing, please contact your distributor.
Conventions
The Range Extender, the Device or RE200 mentioned in this User guide stands for RE200 AC750
WiFi Range Extender without any explanations.
Parameters provided in the pictures are just references for setting up the product, which may differ
from the actual situation. You can set the parameters according to your demand.
The power plug may differ from the picture illustrated in this UG due to different regional
power specifications. As follows we just take that of EU version for example.
1

RE200 AC750 WiFi Range Extender User Guide
Chapter 1 Introduction
1.1 Product Overview
The RE200 AC750 WiFi Range Extender is dedicated to Small Office/Home Office (SOHO)
wireless network solutions. It will enlarge your existing wireless network and mobility within your
wireless network while also allowing you to connect a wired device to a wireless environment.
Increased mobility and the absence of cabling will be beneficial for your network.
With using IEEE 802.11ac wireless technology, this device can transmit wireless data at the rate
of up to 300Mbps (2.4GHz) + 433Mbps (5GHz). With multiple protection measures, including
wireless LAN 64/128/152-bit WEP encryption, Wi-Fi protected Access (WPA2-PSK, WPA-PSK),
the RE200 AC750 WiFi Range Extender delivers complete data privacy. It is also compatible with
all IEEE 802.11n, IEEE 802.11a, IEEE 802.11b and IEEE 802.11g products.
It supports an easy wireless connection to the root Router/AP (equipped with WPS/QSS button) by
pressing the WPS button on the front panel. It also supports an easy, web-based setup for
installation and management. Even though you may not be familiar with the Range Extender, you
can easily configure it with the help of this Guide. Before installing the Range Extender, please
look through this Guide to get the full information of the RE200 AC750 WiFi Range Extender.
1.2 Main Features
¾ Complies with IEEE 802.11ac
¾ Provides multiple encryption security Types including: 64/128/152-bit WEP and
WPA-PSK/WPA2-PSK
¾ Supports Built-in DHCP server
¾ Supports Firmware Upgrade
¾ Supports Web-based Management
1.3 Appearance
Figure 1-1
2
RE200 AC750 WiFi Range Extender User Guide
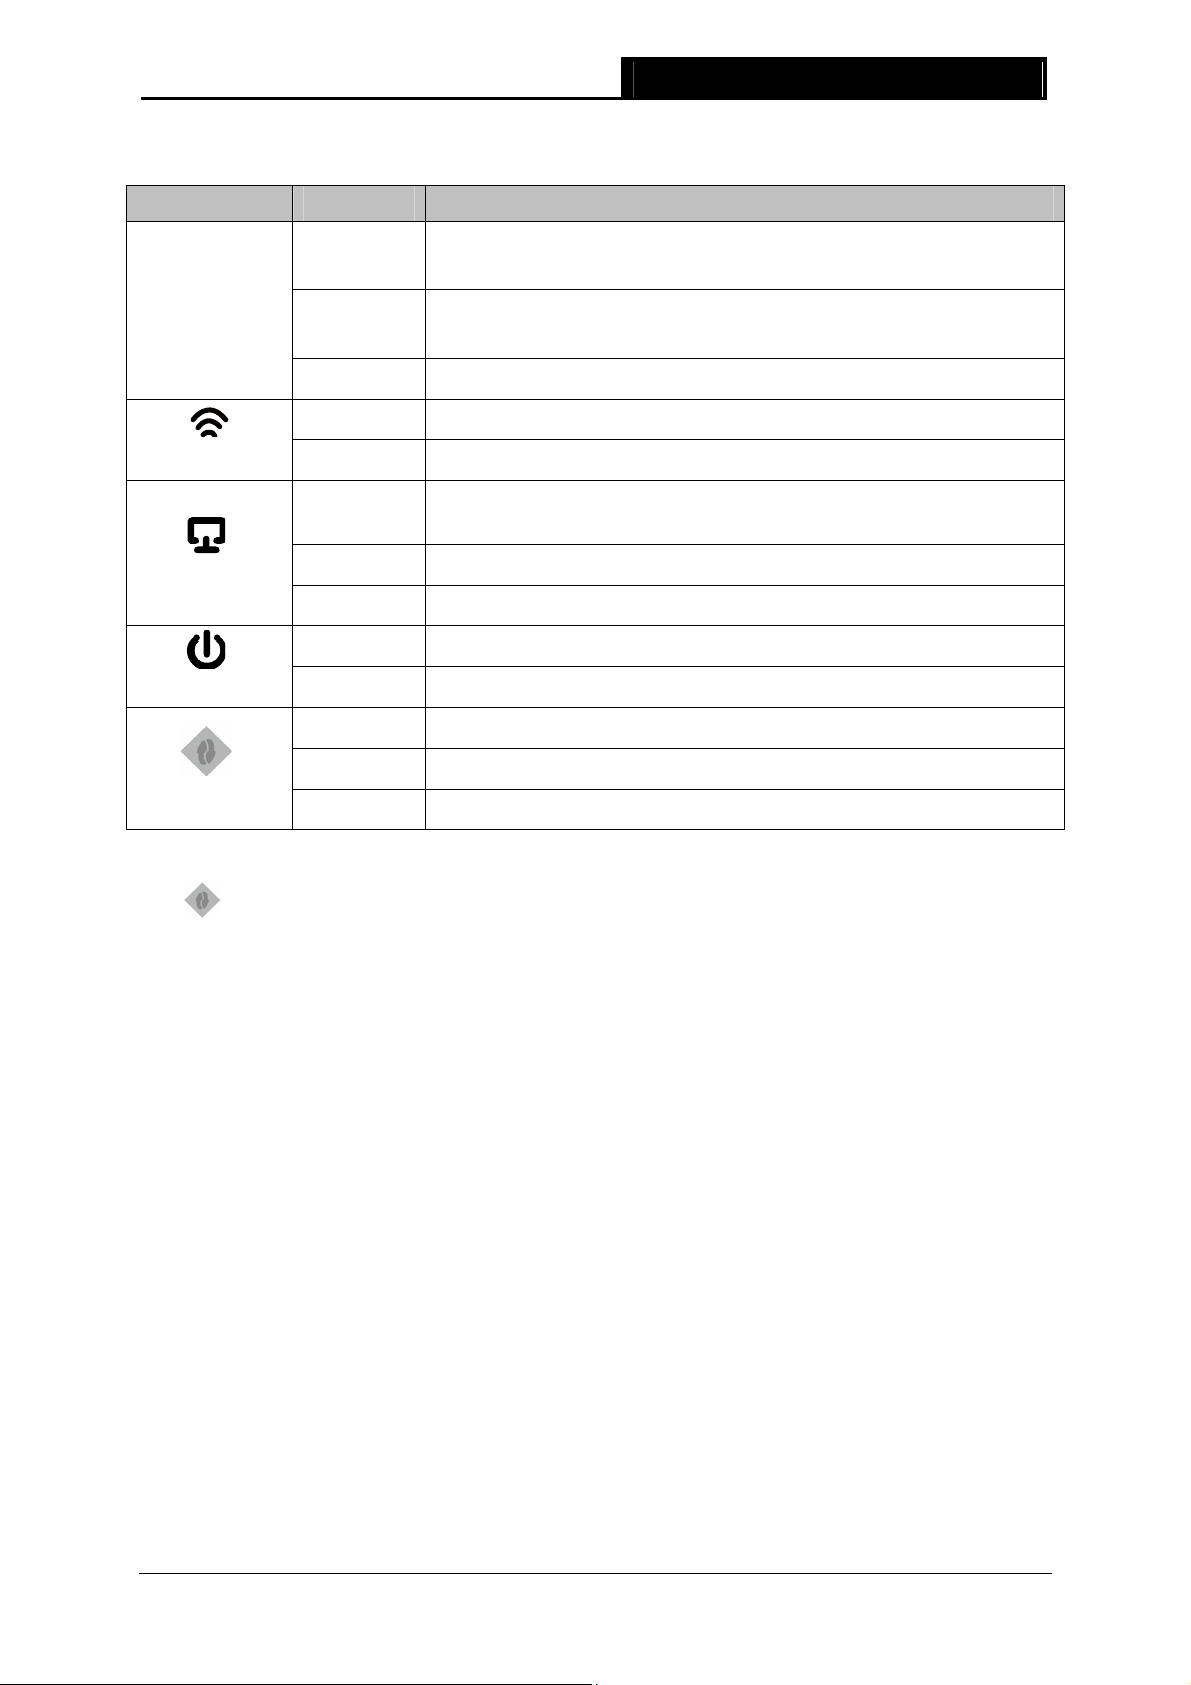
z LED Explanation:
Name Status Indication
5G/2.4G
Wireless Signal
ETHERNET
Power
RE
Solid Green
The Range Extender is connected to the 5G/2.4G wireless network
of your main Router/AP, and the signal strength is strong.
Solid Red
The Range Extender is connected to the 5G/2.4G wireless network
of your main Router/AP, but the signal strength is weak.
Off
On
Off
On
Flashing
Off
On
Off
On
The Range Extender isn’t connected to your main Router/AP.
The Range Extender’s wireless function is enabled.
The Range Extender’s wireless function is disabled.
A device is connected to the ETHERNET port, but there is no
activity.
A device is connected to the ETHERNET port, and is active.
No device is connected to the ETHERNET port.
The Range Extender is on.
The Range Extender is off.
The Range Extender has established a secure connection.
Flashing The Range Extender is establishing a secure connection.
Off No active connection.
Table 1-1
z
(RANGE EXTENDER/WPS): If your Wireless router or AP supports WPS or QSS
function, you can press the WPS or QSS button and then press the RANGE EXTENDER
button to establish a secure connection between the Wireless router or AP and the Range
Extender RE200.
z RESET: This button is used to restore the Range Extender’s factory default settings.
There are two ways to reset the Range Extender’s factory defaults:
Method One: With the Range Extender powered on, use a pin to press RESET button (about
1 seconds) until all the LEDs flash once. And then release the button and wait the Range
Extender to reboot to its factory default settings.
Method Two: Restore the default settings from “System Tools > Factory Defaults” of the
Range Extender’s Web-based Management page.
z ETHERNET: One 10/100Mbps RJ45 Ethernet port used to add wireless connectivity to an
Ethernet-enabled device such as Internet TV, DVR, Gaming console and so on. Please note
that this port is not allowed to be connected with router or AP.
3
RE200 AC750 WiFi Range Extender User Guide
Chapter 2 Hardware Installation
2.1 Before You Begin
Please read this User Guide carefully before installing and using the equipment. The operating
distance range of your wireless connection can vary significantly depending on the physical
position of the wireless devices. Factors that can weaken signals by getting in the way of your
network’s radio waves are metal appliances or obstructions, and walls. Typical ranges vary based
on the types of materials and background RF (radio frequency) noise in your home or office.
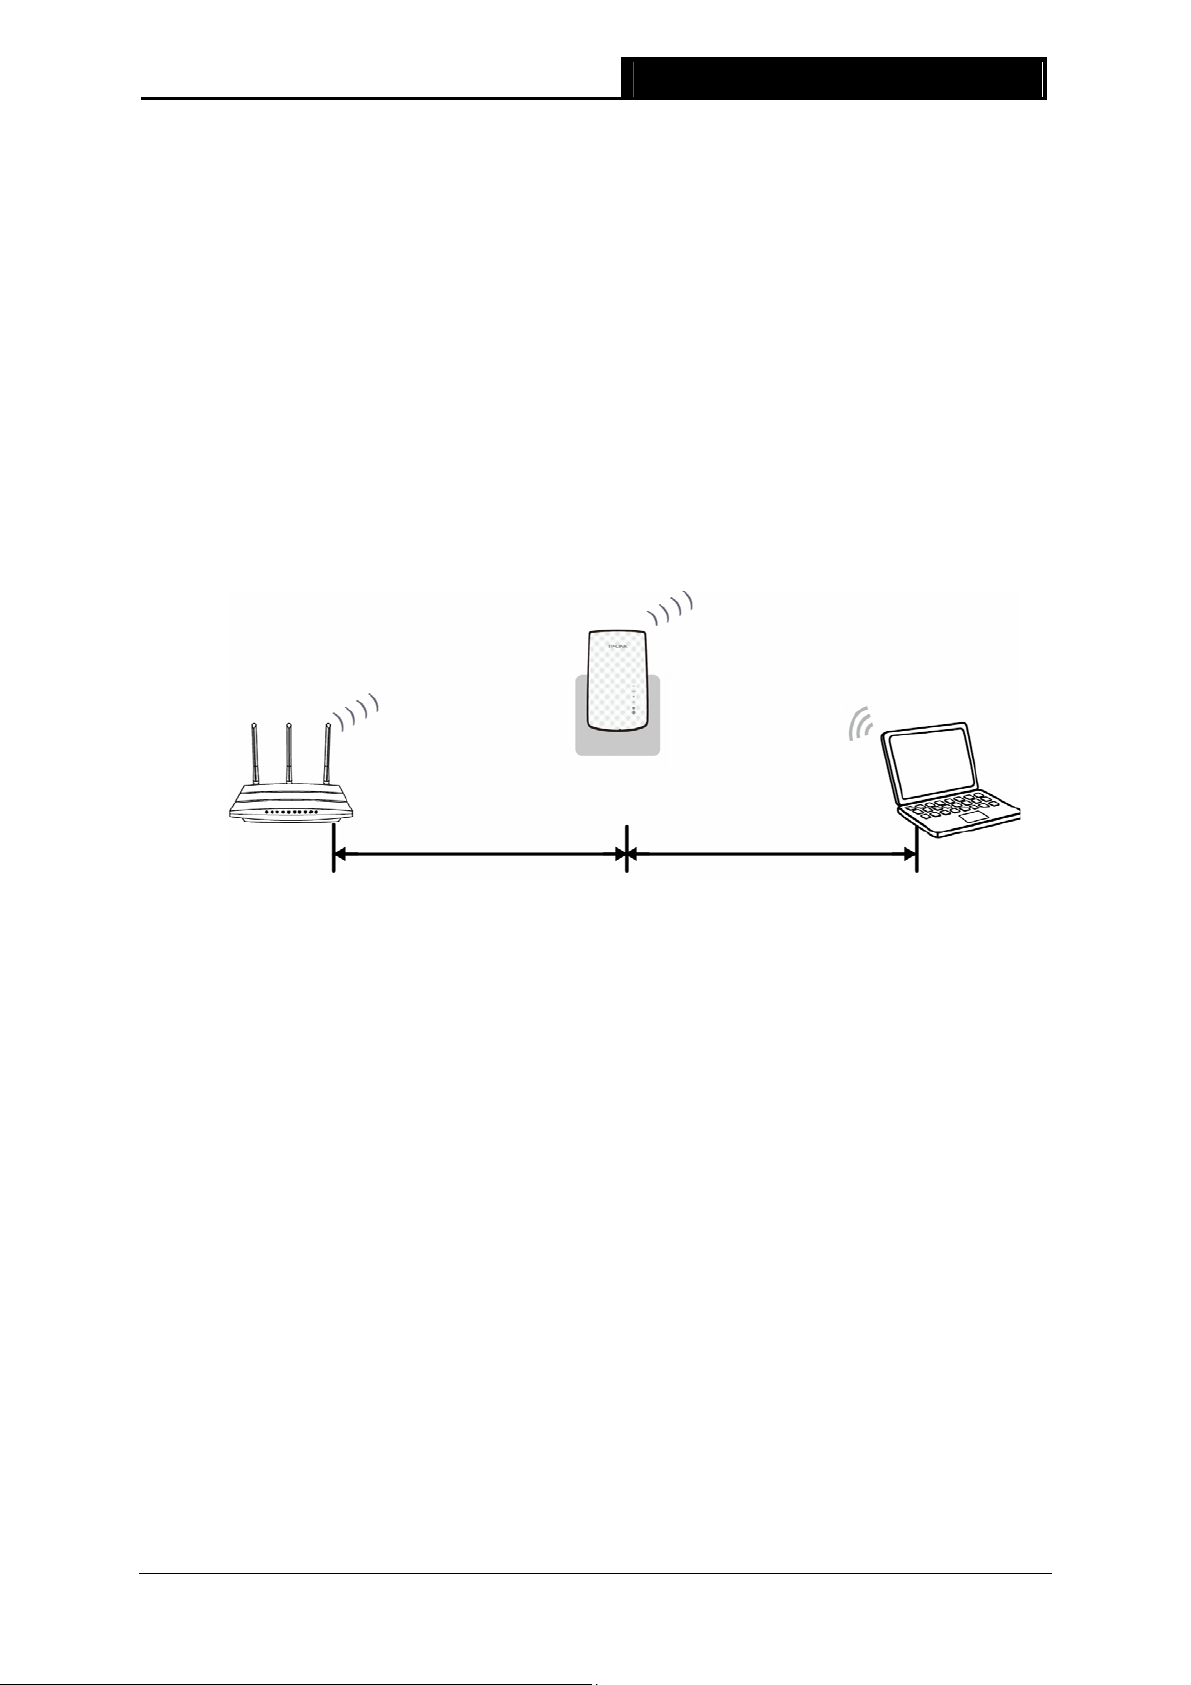
In order to optimize the performance of RE200, please follow the instructions below to achieve an
ideal location (please make sure it is always within the wireless coverage of the wireless router).
1) Half-way Between — Generally, the ideal location for RE200 is half-way between the
Wireless router and Wireless Client. If the wireless signal is not satisfactory, you may place
RE200 somewhat nearer to the Wireless router.
2) No Obstacles and Spacious — Clear obstacles in the way between RE200 and Wireless
router. It’s better to locate it in a spacious place, such as near the corridors.
3) No Interference — Keep RE200 far away from wireless interference, which may come from
electrical appliances that works in the same frequency band as RE200, such as Blue tooth
devices, cordless phones, microwave ovens, etc.
Note:
)
TP-LINK recommends that you connect to the Range Extender when your home network
connection is poor, or when you want a larger wireless coverage to eliminate “dead zones”. As in
compliance with the wireless transmission protocol, all the Range Extender devices are set to
work in half-duplex instead of full-duplex mode. In other words, the Range Extender has to
process one-way communication between your root Wireless Router or AP and the terminal
clients; so the transmission time will be double-increased, while the speed will be decreased.
2.2 Basic Requirements
z Place your Range Extender in a well-ventilated place far from direct sunlight, any heater or
heating vent.
z Leave at least 2 inches (5cm) space around the device for heat dissipation.
z Turn off your Range Extender and unplug the power adapter in a lighting storm to avoid
damage.
4
Loading…
350 East Plumeria Drive
San Jose, CA 95134
USA
October 2015
202-11307-05
AC750 WiFi Range Extender
Model EX6100
User Manual

2
AC750 WiFi Range Extender
Support
Thank you for purchasing this NETGEAR product. You can visit www.netgear.com/support to register your product, get help,
access the latest downloads and user manuals, and join our community. We recommend that you use only official NETGEAR
support resources.
Conformity
For the current EU Declaration of Conformity, visit http://kb.netgear.com/app/answers/detail/a_id/11621.
Compliance
For regulatory compliance information, visit http://www.netgear.com/about/regulatory.
See the regulatory compliance document before connecting the power supply.
Trademarks
© NETGEAR, Inc., NETGEAR and the NETGEAR Logo are trademarks of NETGEAR, Inc. Any non-NETGEAR trademarks are
used for reference purposes only.

3
AC750 WiFi Range Extender
Contents
Chapter 1 Get to Know Your Extender
Front Panel and Side Panel LEDs and Buttons . . . . . . . . . . . . . . . . . . . . . . . . . . . . . 6
When to Use Your Extender. . . . . . . . . . . . . . . . . . . . . . . . . . . . . . . . . . . . . . . . . . . . 7
Support for the 802.11ac Networking Standard. . . . . . . . . . . . . . . . . . . . . . . . . . 8
Chapter 2 Get Started
Use the Extender in Extender Mode. . . . . . . . . . . . . . . . . . . . . . . . . . . . . . . . . . . . 10
Place the Extender and Apply Power . . . . . . . . . . . . . . . . . . . . . . . . . . . . . . . . . 10
Connect to an Existing WiFi Network . . . . . . . . . . . . . . . . . . . . . . . . . . . . . . . . 10
Use the Extender in Access Point Mode. . . . . . . . . . . . . . . . . . . . . . . . . . . . . . . . . 15
Access Extender Settings . . . . . . . . . . . . . . . . . . . . . . . . . . . . . . . . . . . . . . . . . . . . . 16
Run Smart Setup . . . . . . . . . . . . . . . . . . . . . . . . . . . . . . . . . . . . . . . . . . . . . . . . . . . . 17
Chapter 3 Extender Network Settings
View Connected Devices . . . . . . . . . . . . . . . . . . . . . . . . . . . . . . . . . . . . . . . . . . . . . 19
Boost Your Video Streaming With FastLane Technology . . . . . . . . . . . . . . . . . . . 19
View WiFi Settings. . . . . . . . . . . . . . . . . . . . . . . . . . . . . . . . . . . . . . . . . . . . . . . . . . . 21
Change the WiFi Network Name . . . . . . . . . . . . . . . . . . . . . . . . . . . . . . . . . . . . . . . 22
Turn Off the SSID Broadcast to Create a Hidden Network . . . . . . . . . . . . . . . . . 22
Disable or Enable the WiFi Radios . . . . . . . . . . . . . . . . . . . . . . . . . . . . . . . . . . . . . . 23
Change the WiFi Speed. . . . . . . . . . . . . . . . . . . . . . . . . . . . . . . . . . . . . . . . . . . . . . . 24
Use WPS to Add a Computer to the Extender’s WiFi Network. . . . . . . . . . . . . . 25
Use WPS With the Push Button Method . . . . . . . . . . . . . . . . . . . . . . . . . . . . . . 26
Use WPS With the PIN Method. . . . . . . . . . . . . . . . . . . . . . . . . . . . . . . . . . . . . . 27
Deny Access to a Computer or WiFi Device . . . . . . . . . . . . . . . . . . . . . . . . . . . . . 27
Set Up an Access Schedule. . . . . . . . . . . . . . . . . . . . . . . . . . . . . . . . . . . . . . . . . . . . 29
Change the Extender’s Device Name . . . . . . . . . . . . . . . . . . . . . . . . . . . . . . . . . . . 30
Set Up the Extender to Use a Static IP Address . . . . . . . . . . . . . . . . . . . . . . . . . . 31
Use the Extender With MAC Filtering or Access Control. . . . . . . . . . . . . . . . . . . 32
Chapter 4 Monitor and Maintain the Extender
Change the Extender User Name and Password. . . . . . . . . . . . . . . . . . . . . . . . . . 34
Turn Password Protection Off and On . . . . . . . . . . . . . . . . . . . . . . . . . . . . . . . . . . 35
Recover a Forgotten User Name or Password. . . . . . . . . . . . . . . . . . . . . . . . . . . . 35
Automatically Adjust for Daylight Saving Time. . . . . . . . . . . . . . . . . . . . . . . . . . . 36
Manually Set the Extender Clock . . . . . . . . . . . . . . . . . . . . . . . . . . . . . . . . . . . . . . 36
Back Up and Manage the Extender Configuration . . . . . . . . . . . . . . . . . . . . . . . . 37
Back Up the Configuration Settings . . . . . . . . . . . . . . . . . . . . . . . . . . . . . . . . . . 37
Restore the Configuration Settings . . . . . . . . . . . . . . . . . . . . . . . . . . . . . . . . . . 38
Return the Extender to Its Factory Settings . . . . . . . . . . . . . . . . . . . . . . . . . . . . . 39
Use the Factory Reset Button to Restore Factory Settings . . . . . . . . . . . . . . 39

4
AC750 WiFi Range Extender
Erase the Settings and Return to Factory Settings . . . . . . . . . . . . . . . . . . . . . 39
Update the Firmware . . . . . . . . . . . . . . . . . . . . . . . . . . . . . . . . . . . . . . . . . . . . . . . . 40
Restart the Extender Remotely. . . . . . . . . . . . . . . . . . . . . . . . . . . . . . . . . . . . . . . . 41
Chapter 5 FAQs and Troubleshooting
FAQs . . . . . . . . . . . . . . . . . . . . . . . . . . . . . . . . . . . . . . . . . . . . . . . . . . . . . . . . . . . . . . 44
Cannot Connect to the Extender . . . . . . . . . . . . . . . . . . . . . . . . . . . . . . . . . . . . . . 45
Cannot Join a WiFi Network. . . . . . . . . . . . . . . . . . . . . . . . . . . . . . . . . . . . . . . . . . . 45
Appendix A Supplemental Information
Factory Default Settings . . . . . . . . . . . . . . . . . . . . . . . . . . . . . . . . . . . . . . . . . . . . . 47
Technical Specifications . . . . . . . . . . . . . . . . . . . . . . . . . . . . . . . . . . . . . . . . . . . . . . 47

5
1
1. Get to Know Your Extender
The AC750 WiFi Range Extender boosts your existing network range and speed, delivering
dual-band WiFi. You can also use the extender in access point mode as a WiFi access point and
create a new WiFi hotspot by using a wired Ethernet connection.
This chapter covers the following topics:
•Front Panel and Side Panel LEDs and Buttons
•When to Use Your Extender
•Support for the 802.11ac Networking Standard
Note: For more information about the topics covered in this manual, visit the
support website at www.netgear.com/support.
Note: Firmware updates with new features and bug fixes are made
available from time to time on downloadcenter.netgear.com. Some
products can regularly check the site and download new firmware, or
you can check for and download new firmware manually. If the
features or behavior of your product does not match what is
described in this guide, you might need to update your firmware.
Get to Know Your Extender
6
AC750 WiFi Range Extender
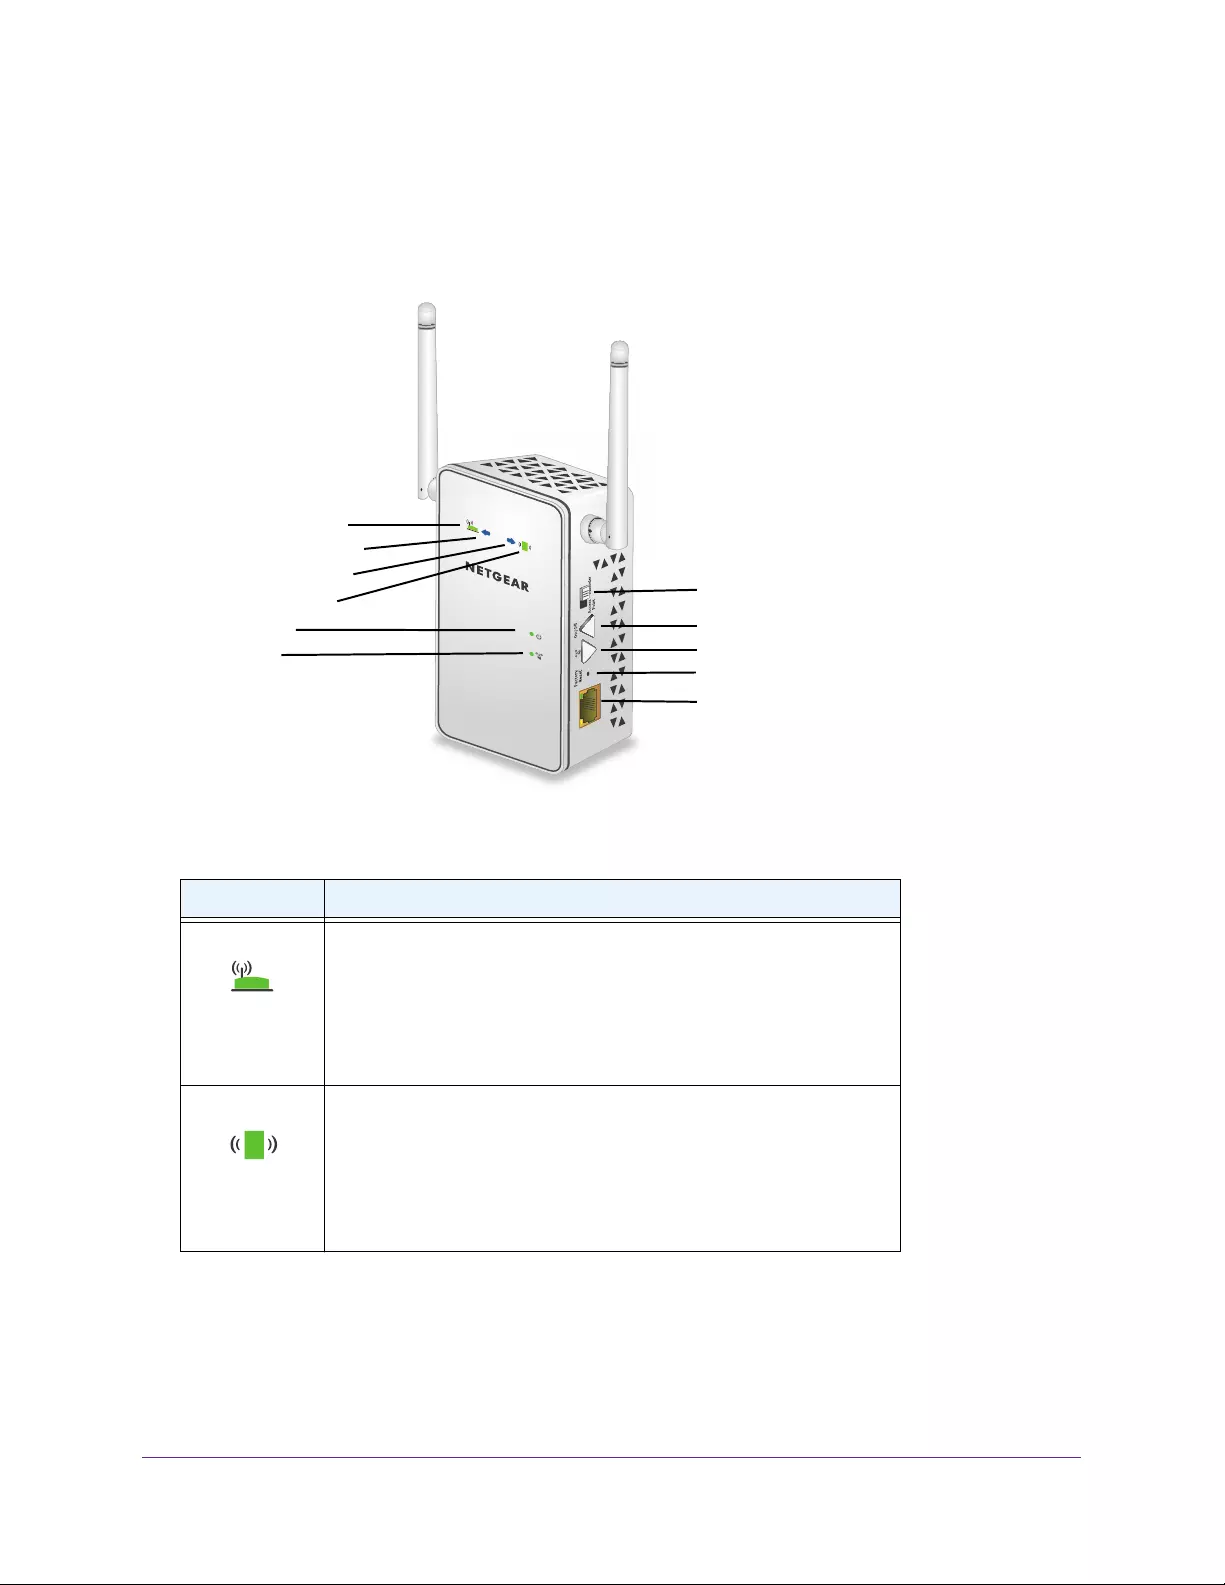
Front Panel and Side Panel LEDs and Buttons
The LEDs are located on the front panel. A switch, buttons, and an Ethernet port are located
on the side panel.
Router Link LED
Client Link LED
Power LED
WPS LED
Access Point/Extender switch
Power On/Off button
WPS button
Ethernet port
Factory Reset button
Router Arrow LED
Client Arrow LED
Figure 1. Extender front panel and side panel
Table 1. LEDs
LED Description
Router Link LED This LED indicates the connection between the extender and the router
or access point.
• Solid green. Best connection.
• Solid amber. Good connection.
• Solid red. Poor connection.
• Off. No connection.
Client Link LED This LED indicates the connection between the extender and a
computer or mobile device.
• Solid green. Best connection.
• Solid amber. Good connection.
• Solid red. Poor connection.
• Off. No connection.
Get to Know Your Extender
7
AC750 WiFi Range Extender
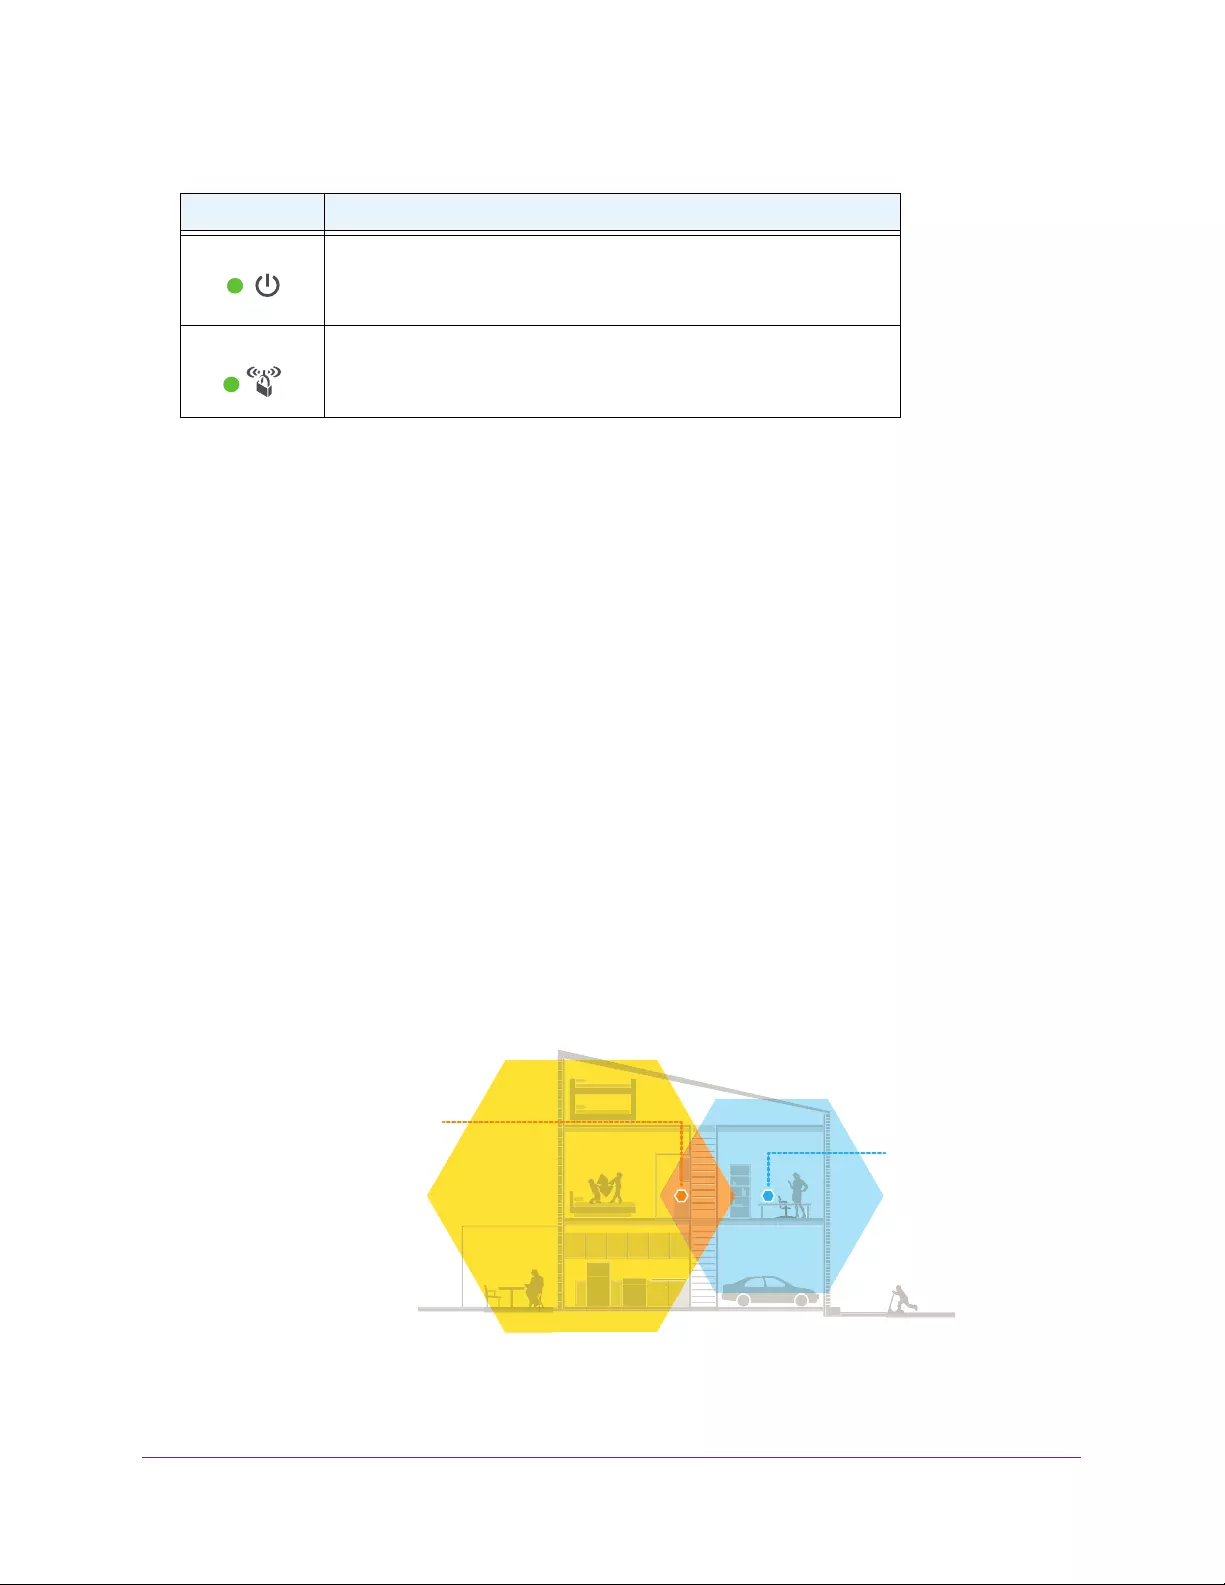
When to Use Your Extender
We recommend that you connect to the extender only when your WiFi network connection is
poor. Data traffic routed through the extender is inherently slower than traffic routed directly
from the network.
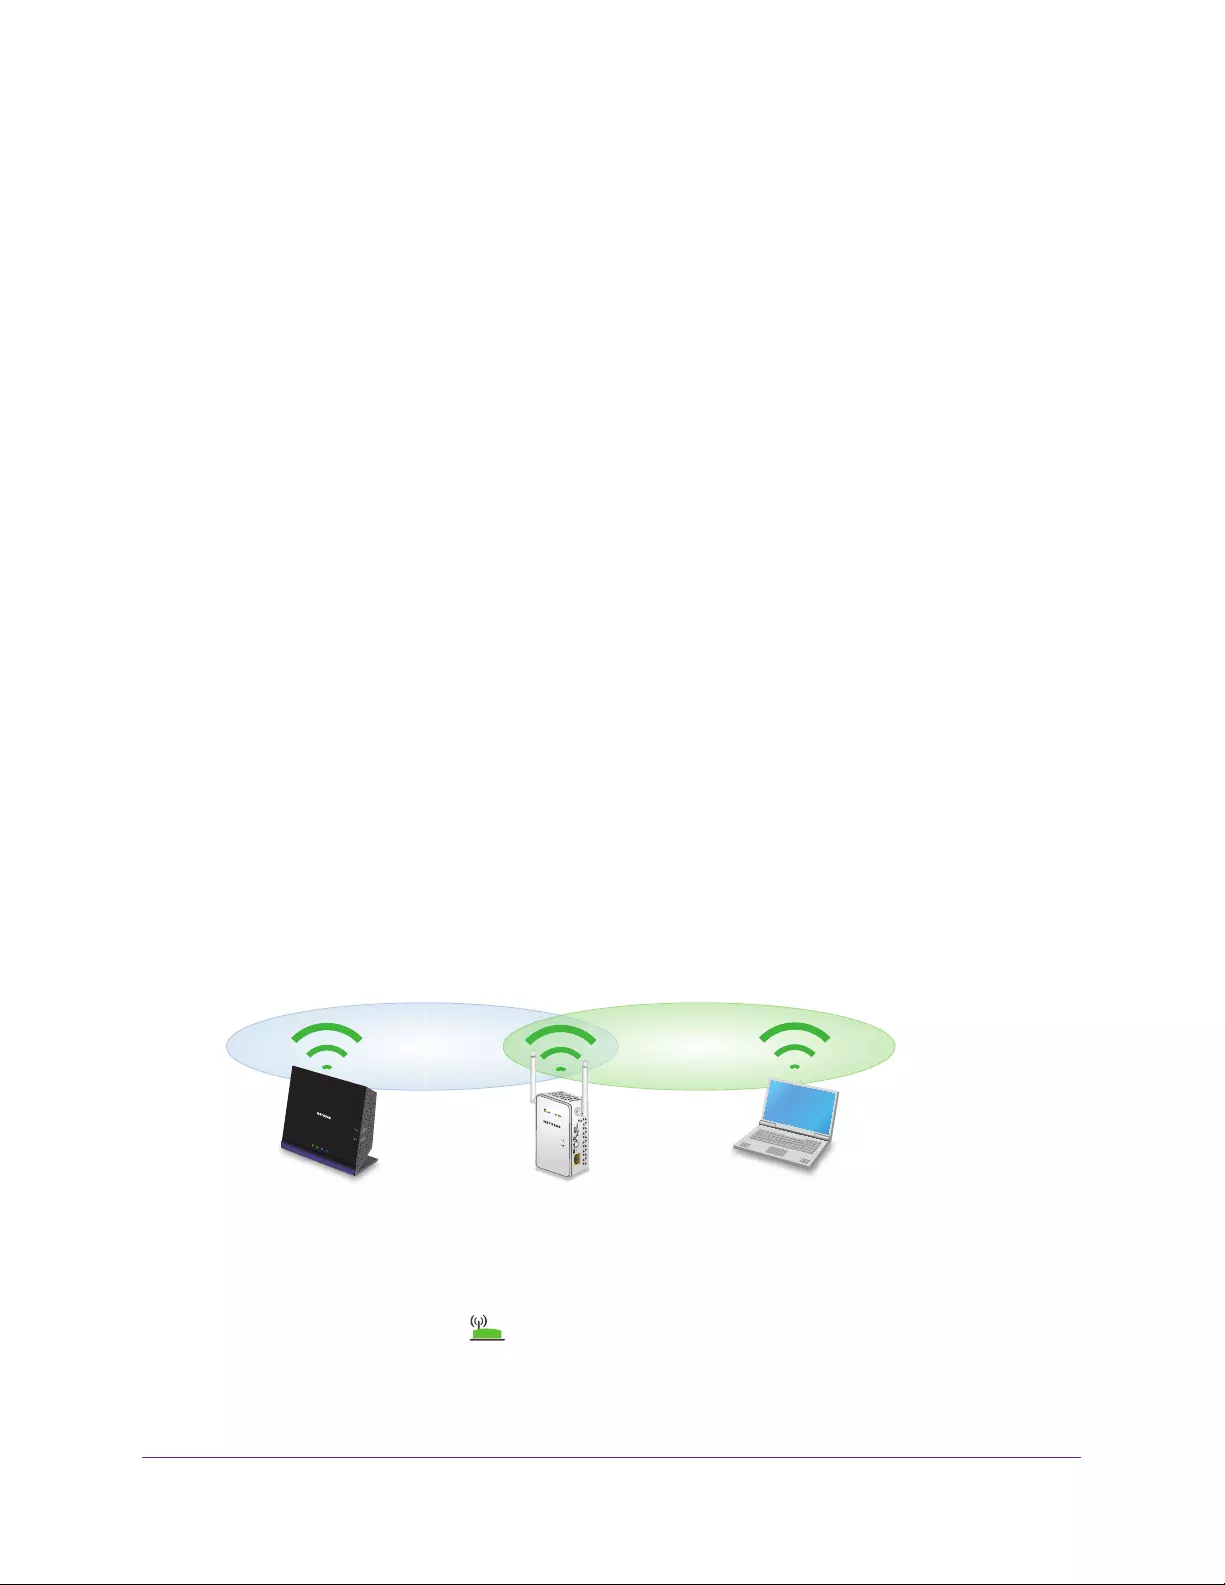
How the Extender Works
The extender works like a bridge between a WiFi router (or a WiFi access point) and a WiFi
device outside the range of the WiFi router. The extender performs two main jobs:
•The extender connects to a working WiFi network.
When the extender connects over WiFi to an existing network, it functions as a network
client, similar to how a WiFi device connects to a network.
•The extender acts as an access point for WiFi devices.
The extender broadcasts its own WiFi network that WiFi devices can join. In its role as an
access point, the extender performs tasks that WiFi routers do, such as broadcasting its
network name (SSID).
The extender must do each of these jobs so that both ends of the bridge are in place.
Existing WiFi
Sometimes your
router does not
provide the WiFi
coverage that you
need.
WiFi Range Extender
Boosts the range of
your existing WiFi and
creates a stronger
signal in hard-to-reach
areas.
Figure 2. Range extender in a home
Power LED • Solid amber. The extender is booting.
• Solid green. The extender is powered on.
• Off. The extender is powered off.
WPS LED • Solid green. WiFi security is enabled (WPA or WPA2).
• Blinking green. The extender is making a WPS connection.
• Off. WiFi security is not enabled.
Table 1. LEDs (continued)
LED Description

Get to Know Your Extender
8
AC750 WiFi Range Extender
Support for the 802.11ac Networking Standard
The extender supports the 802.11ac networking standard. This new standard offers better
speed, improved reliability, and more range than older WiFi networking standards. The
extender is backward compatible with earlier WiFi standards. However, to get the benefits of
802.11ac, your WiFi router must support the 802.11ac WiFi networking standard.
To learn more about the 802.11ac WiFi networking standard, visit
netgear.com/landing/80211ac/.
Figure 3. Speed comparison between the 802.11n and 802.11ac standards

9
2
2. Get Started
This chapter covers the following topics:
•Use the Extender in Extender Mode
•Use the Extender in Access Point Mode
•Access Extender Settings
•Run Smart Setup

Get Started
10
AC750 WiFi Range Extender
Use the Extender in Extender Mode
The extender repeats signals from an existing WiFi router or access point. Place the
extender, apply power, and connect the extender to your WiFi network.
Note: You can also use the extender as a WiFi access point and create a
new WiFi hotspot by using a wired Ethernet connection. See Use the
Extender in Access Point Mode on page 15.
Place the Extender and Apply Power
To place the extender and apply power:
1. Set the Access Point/Extender switch to the Extender position.
2. Place your extender in the same room as your WiFi router.
Proximity to the WiFi router is required only during the initial setup process.
3. Plug the extender into an electrical outlet.
4. Wait for the Power LED to light green.
If the Power LED does not light, press the Power On/Off button on the extender.
Connect to an Existing WiFi Network
To extend the range of your WiFi network, you must connect the extender to your existing
WiFi network. You can do this in one of two ways:
•Connect with WPS. For more information, see Connect With WPS on page 10.
•Connect with web browser setup. For more information, see Connect With Web
Browser Setup on page 12.
Connect With WPS
Wi-Fi Protected Setup (WPS) lets you join a secure WiFi network without typing the network
name and password.
Note: WPS does not support WEP network security. If you are using WEP
security, follow the instructions in Connect With Web Browser Setup
on page 12.

Get Started
11
AC750 WiFi Range Extender
To use WPS to connect the extender to your WiFi router:
1. Press the WPS button on the side panel of the extender.
The WPS LED blinks.
2. Within two minutes, press the WPS button on your router or access point.
When the extender connects to your existing WiFi network, the WPS LED on the
extender lights solid green and the Router Link LED lights. If the Router Link LED
does not light, try again. If it still does not light, see Connect With Web Browser Setup on
page 12.
3. If your WiFi router supports the 5 GHz band, repeat Steps 1 and 2 to connect the extender
to the 5 GHz band.
4. Unplug the extender and move it to a new location that is about halfway between your router
and the area with a poor router WiFi signal.
The location that you choose must be within the range of your existing WiFi router
network.
5. Plug the extender into an electrical outlet and wait for the Power LED to light green.
6. Use the Router Link LED to help you choose a spot where the extender-to-router
connection is optimal.
7. If the Router Link LED does not light amber or green, plug the extender into an outlet closer
to the router and try again.
Keep moving the extender to outlets closer to the router until the Router Link LED lights
amber or green.
8. On your computer or WiFi device, find and connect to the new extended WiFi network.
The extender creates two new extended WiFi networks. The extender’s new WiFi
network names are based on your existing WiFi network name, with _EXT at the end of
the name.
For example:
•Existing WiFi network name. MyNetworkName
•New extended network names. MyNetworkName_2GEXT and
MyNetworkName_5GEXT
Use the same WiFi password that you use for your WiFi router.
Get Started
12
AC750 WiFi Range Extender
9. Test the extended WiFi range by moving your computer or WiFi device to the area with a
poor router WiFi signal:
a. Leave your computer or WiFi device in the area with a poor router WiFi signal and
return to the extender.
b. Check the Client Link LED on the extender:
•If the Client Link LED is solid green or amber, your extended WiFi network
reaches the area with a poor router WiFi signal and your network setup is
complete.
•If the Client Link LED is red, your extended WiFi network does not reach the area
with a poor router WiFi signal.
You must move the computer or WiFi device closer to the extender until the Client
Link LED turns solid green or amber.
Connect With Web Browser Setup
To connect with web browser setup:
1. Use a WiFi network manager on a computer or WiFi device to find and connect to the
extender WiFi network EX6100_NETGEAR_2EXT.
After the connection with the computer or WiFi device is established, the Client Link LED
lights.
2. Launch a web browser.
3. Enter www.mywifiext.net in the address field of the browser.
The New Extender Setup page displays.
4. Click the NEW EXTENDER SETUP button.
5. Complete the fields on the page and click the NEXT button.
6. Verify that the Access Point/Extender switch is set to Extender and click the
Continue button.
Get Started
13
AC750 WiFi Range Extender
7. Select a WiFi network to extend and click the NEXT button.
If you do not want to extend both WiFi bands, clear the 2.4 GHz WiFi Networks or the
5 GHz WiFi Networks check box.
8. In the Password (Network Key) field, type the existing WiFi network password (also called
passphrase or security key) and click the NEXT button.
9. Set the network name (SSID) and password for your new extender WiFi network and click
the NEXT button.
Wait for the page to display a list of available extended WiFi networks, which might take
up to one minute.
10. Connect the computer or WiFi device to the new extended WiFi network using the extender
SSID and password that you created in Step 9.
Note: To connect additional devices, repeat Step 10.
11. Make sure that your computer or WiFi device is connected before you click the Continue
button.
12. Click the Continue button.
A message displays confirming that the extender is connected and ready.
13. Click the Next button.
The registration page displays.
14. Complete the registration fields and click the Finish button to complete the setup.
If you do not want to register your extender, click the Skip Registration link. Note that
you must register your extender before you can use NETGEAR telephone support.
The Status page displays.
15. Unplug the extender and move it to a new location that is about halfway between your router
and the area with a poor router WiFi signal.
The location that you choose must be within the range of your existing WiFi router
network.
16. Plug the extender into an electrical outlet and wait for the Power LED to light green.
17. Use the Router Link LED to help you choose a spot where the extender-to-router
connection is optimal.
Get Started
14
AC750 WiFi Range Extender
18. If the Router Link LED doesn’t light amber or green, plug the extender into an outlet closer
to the router and try again.
Keep moving the extender to outlets closer to the router until the Router Link LED lights
amber or green.
19. Reconnect your computer or WiFi device to the new extended WiFi network.
20. Test the extended WiFi range by moving your computer or WiFi device to the area with a
poor router WiFi signal:
a. Leave your computer or WiFi device in the area with a poor router WiFi signal and
return to the extender.
b. Check the Client Link LED on the extender:
•If the Client Link LED is solid green or amber, your extended WiFi network
reaches the area with a poor router WiFi signal and your network setup is
complete.
•If the Client Link LED is red, your extended WiFi network does not reach the area
with a poor router WiFi signal.
You must move the computer or WiFi device closer to the extender until the Client
Link LED turns solid green or amber.
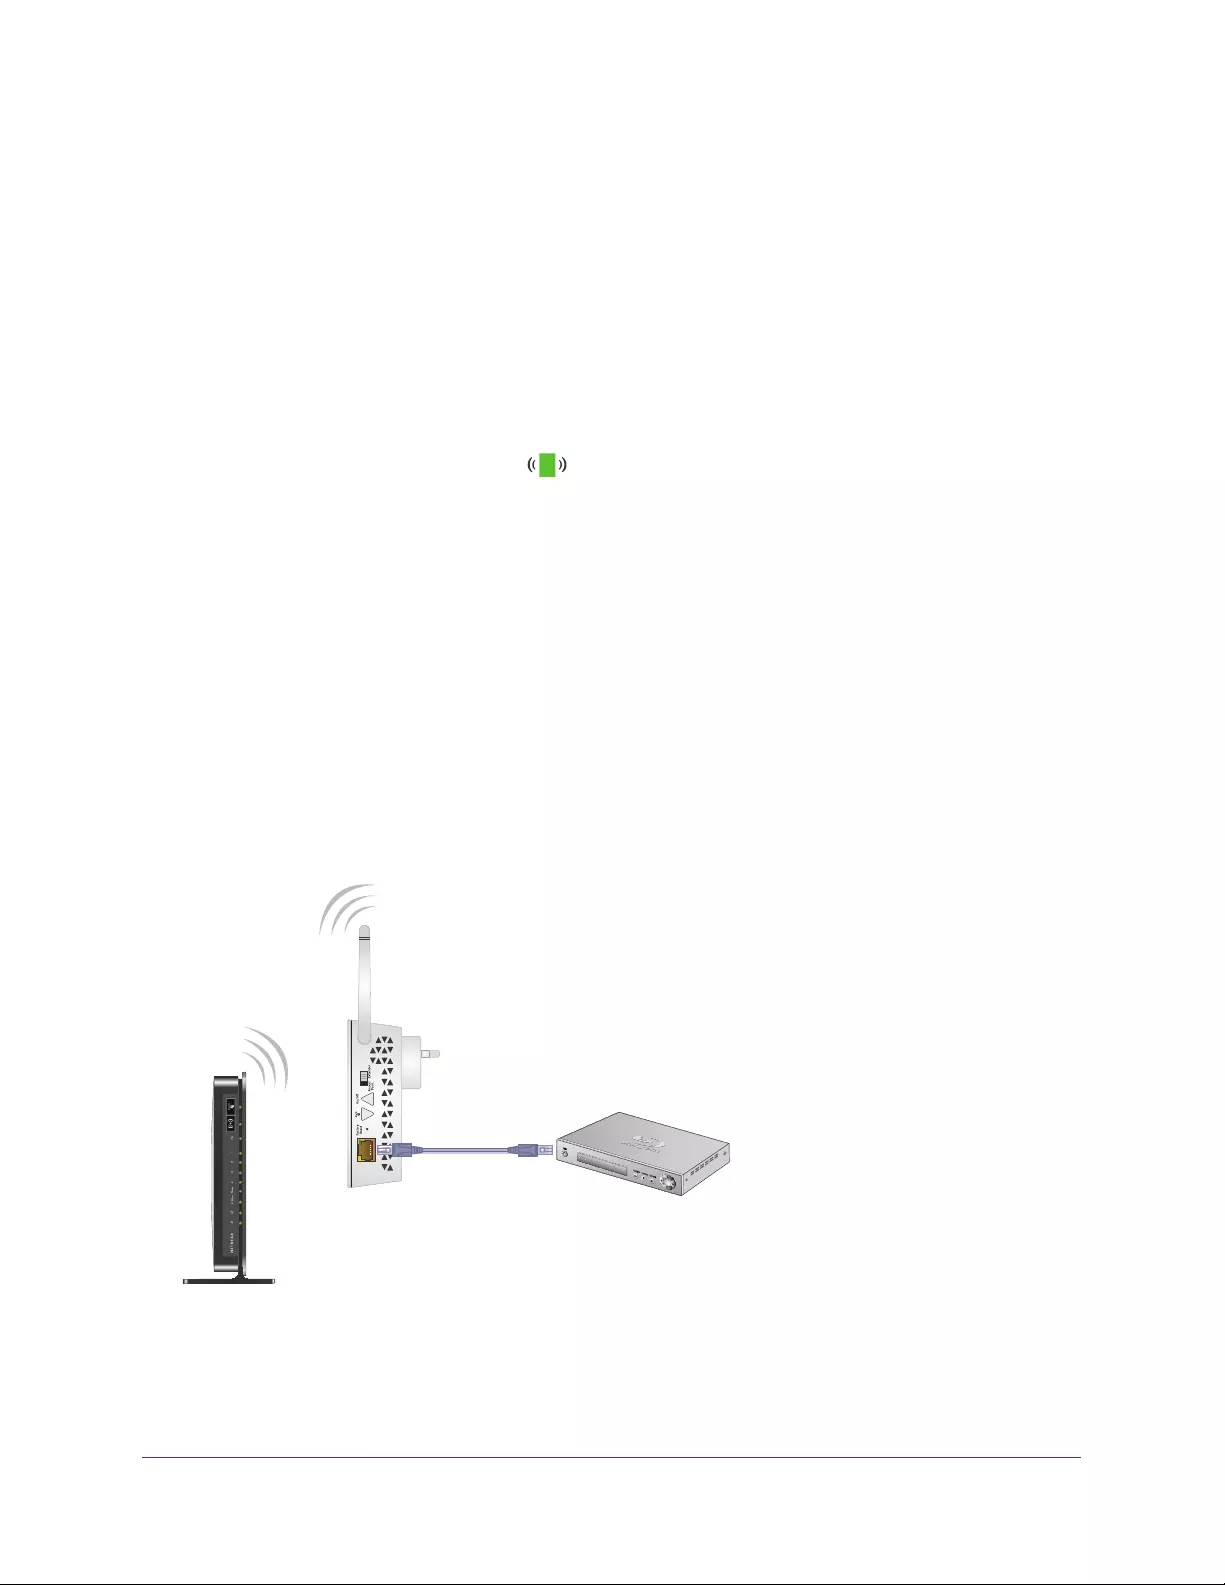
Connect Ethernet-Enabled Devices
After the extender is connected to your existing WiFi network, you can connect a device to
the extender using an Ethernet cable. Then that device can access your existing network
through the extender-to-router WiFi connection.
WiFi router
Extender
Blu-ray player
Figure 4. Ethernet connection to the extender

Get Started
15
AC750 WiFi Range Extender
Use the Extender in Access Point Mode
You can use the extender as a WiFi access point, which creates a new WiFi hotspot by using
a wired Ethernet connection.
Figure 5. Extender as an access point
To install the extender as an access point:
1. Set the Access Point/Extender switch to the Access Point position.
2. Use an Ethernet cable to connect the Ethernet port on the extender to an Ethernet LAN port
on a router or a remote Ethernet LAN jack with LAN access.
3. Plug the extender into an electrical outlet and wait for the Power LED to light green.
4. If the Power LED does not light, press the Power On/Off button.
5. Use a WiFi network manager on a computer or WiFi device to find and connect to the
EX6100_NETGEAR_2GEXT or the EX6100_NETGEAR_5GEXT WiFi network.

Get Started
16
AC750 WiFi Range Extender
After the connection with the computer or WiFi device is established, the Client Link LED
lights.
6. Launch a web browser and enter www.mywifiext.net in the address field.
The New Extender Setup page displays.
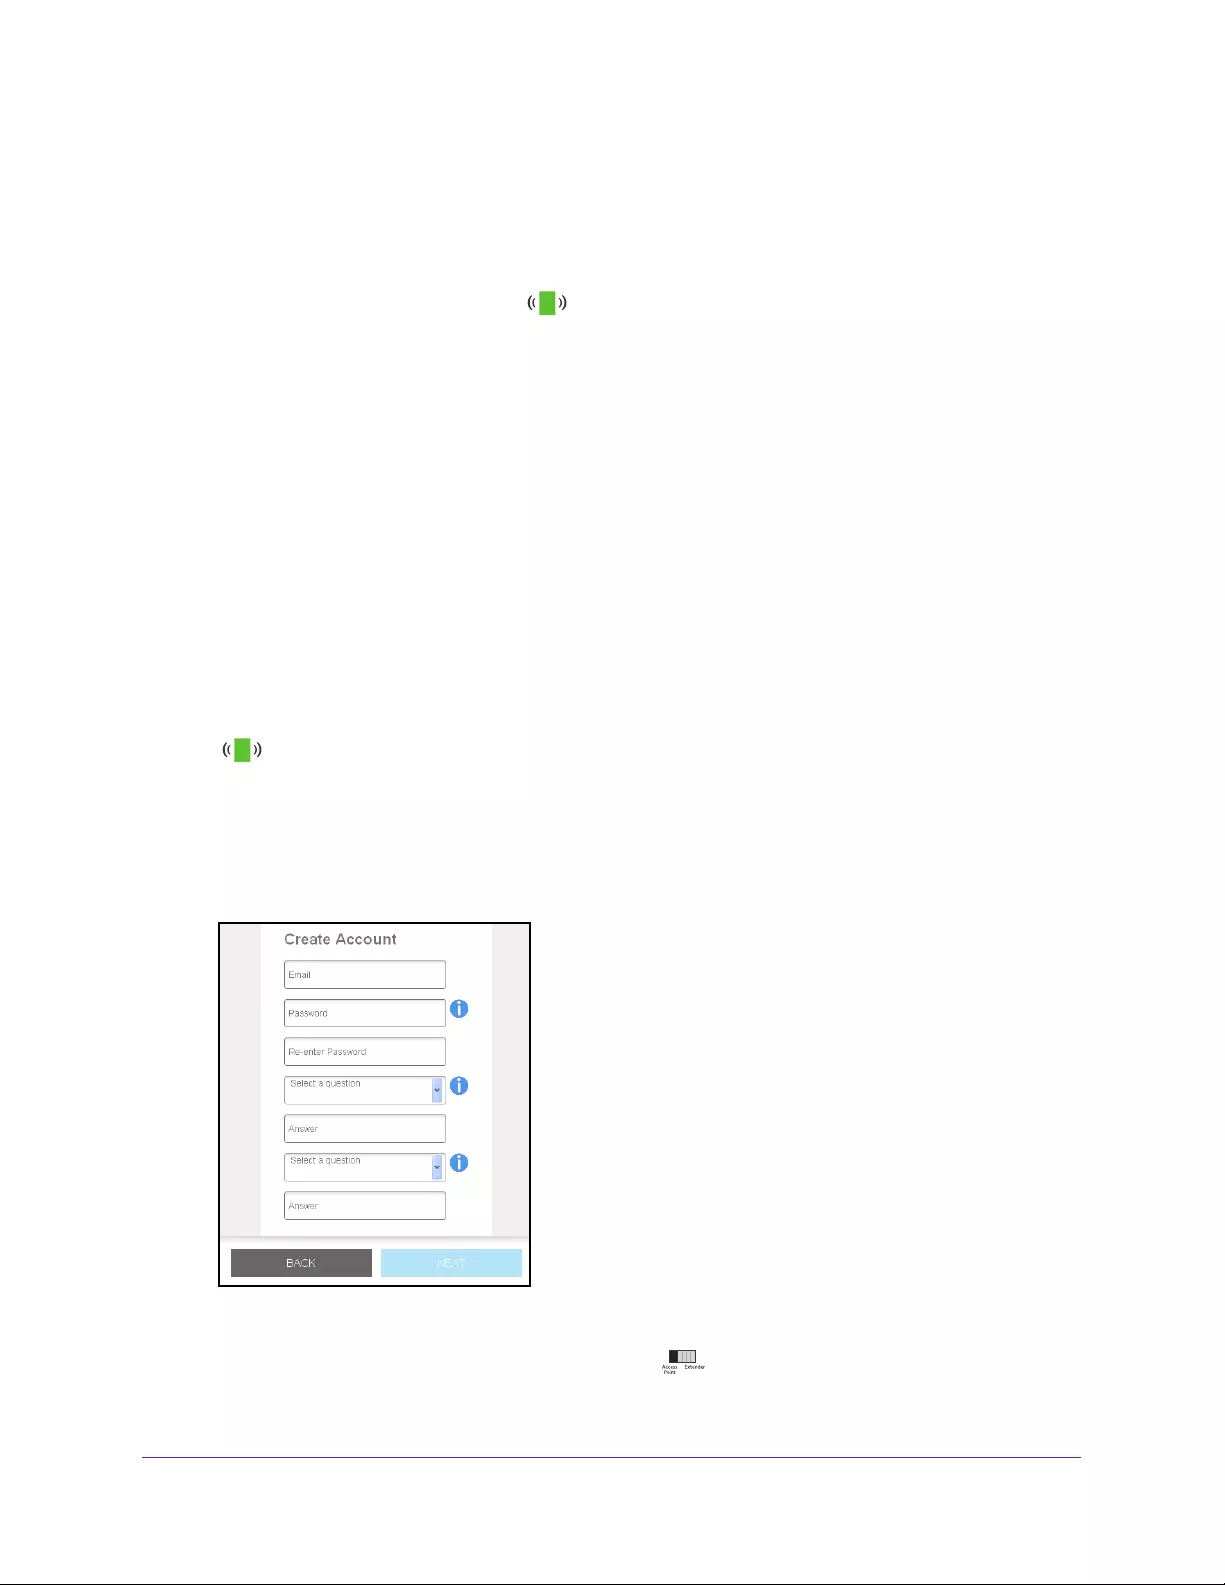
7. Click the NEW EXTENDER SETUP button.
The Create Account page displays.
8. Complete the fields on the page and click the NEXT button.
9. Verify that the Access Point/Extender switch is set to Access Point and click the
Continue button.
The extender checks for an Internet connection.
10. Click the HOME NETWORK or PUBLIC NETWORK button.
11. Set the network name (SSID), security option, and password for each access point network
and click the NEXT button.
Your settings are applied and the extender is ready to be used as an access point.
12. Use a WiFi network manager on the computer or WiFi device to connect to the new access
point WiFi network.
13. Click the Continue button.
A page displays that says you successfully created an access point.
14. Click the Next button.
The registration page displays.
15. Follow the onscreen instructions to register your extender.
Access Extender Settings
After installation, you can log in to the extender to view or change the extender’s settings.
To log in to the extender:
1. Use a WiFi network manager on a computer or WiFi device to find and connect to the
new extended WiFi network.
After the connection with the computer or WiFi device is established, the
Client Link LED lights.
2. Launch a web browser.
3. Enter www.mywifiext.net in the address field of the browser.
A login window opens.
4. Enter your user name and password and click the LOG IN button.
The Status page displays.

Get Started
17
AC750 WiFi Range Extender
Run Smart Setup
You can use Smart Setup to change the extender settings. This is an easy way to connect
the extender to a different router or to change the extender WiFi network name (SSID) or
WiFi password.
To run Smart Setup:
1. Use a WiFi network manager on a computer or WiFi device to find and connect to the
new extended WiFi network.
After the connection with the computer or WiFi device is established, the Device Link LED
lights solid green.
2. Launch a web browser.
3. Enter www.mywifiext.net in the address field of the browser.
A login window opens.
4. Enter your user name and password and click the LOG IN button.
The Status page displays.
5. Click the SMART SETUP button.
The Welcome page displays.
6. Click the WIFI RANGE EXTENDER button.
The extender scans for WiFi signals and finds the WiFi networks in your area and
displays a list.
7. Select your WiFi network and click the NEXT button.
8. When prompted, enter the password to connect to your WiFi network and click the NEXT
button.
A message displays when the extender connects to your existing router’s WiFi network.
9. Click the NEXT button.
The extender applies your settings to its WiFi network names and WiFi passwords.
During this change, the extender disconnects you from its WiFi network.
10. When prompted, connect your WiFi devices to the extender WiFi network and click the
CONTINUE button.
The registration page displays.
11. Complete the registration fields and click the FINISH button to complete the setup.
If you do not want to register your extender, click the Skip Registration link. Note that
you must register your extender before you can use NETGEAR telephone support.
The Status page displays.

18
3
3. Extender Network Settings
This chapter covers the following topics:
•View Connected Devices
•Boost Your Video Streaming With FastLane Technology
•View WiFi Settings
•Change the WiFi Network Name
•Turn Off the SSID Broadcast to Create a Hidden Network
•Disable or Enable the WiFi Radios
•Change the WiFi Speed
•Use WPS to Add a Computer to the Extender’s WiFi Network
•Deny Access to a Computer or WiFi Device
•Set Up an Access Schedule
•Change the Extender’s Device Name
•Set Up the Extender to Use a Static IP Address
•Use the Extender With MAC Filtering or Access Control
Extender Network Settings
19
AC750 WiFi Range Extender
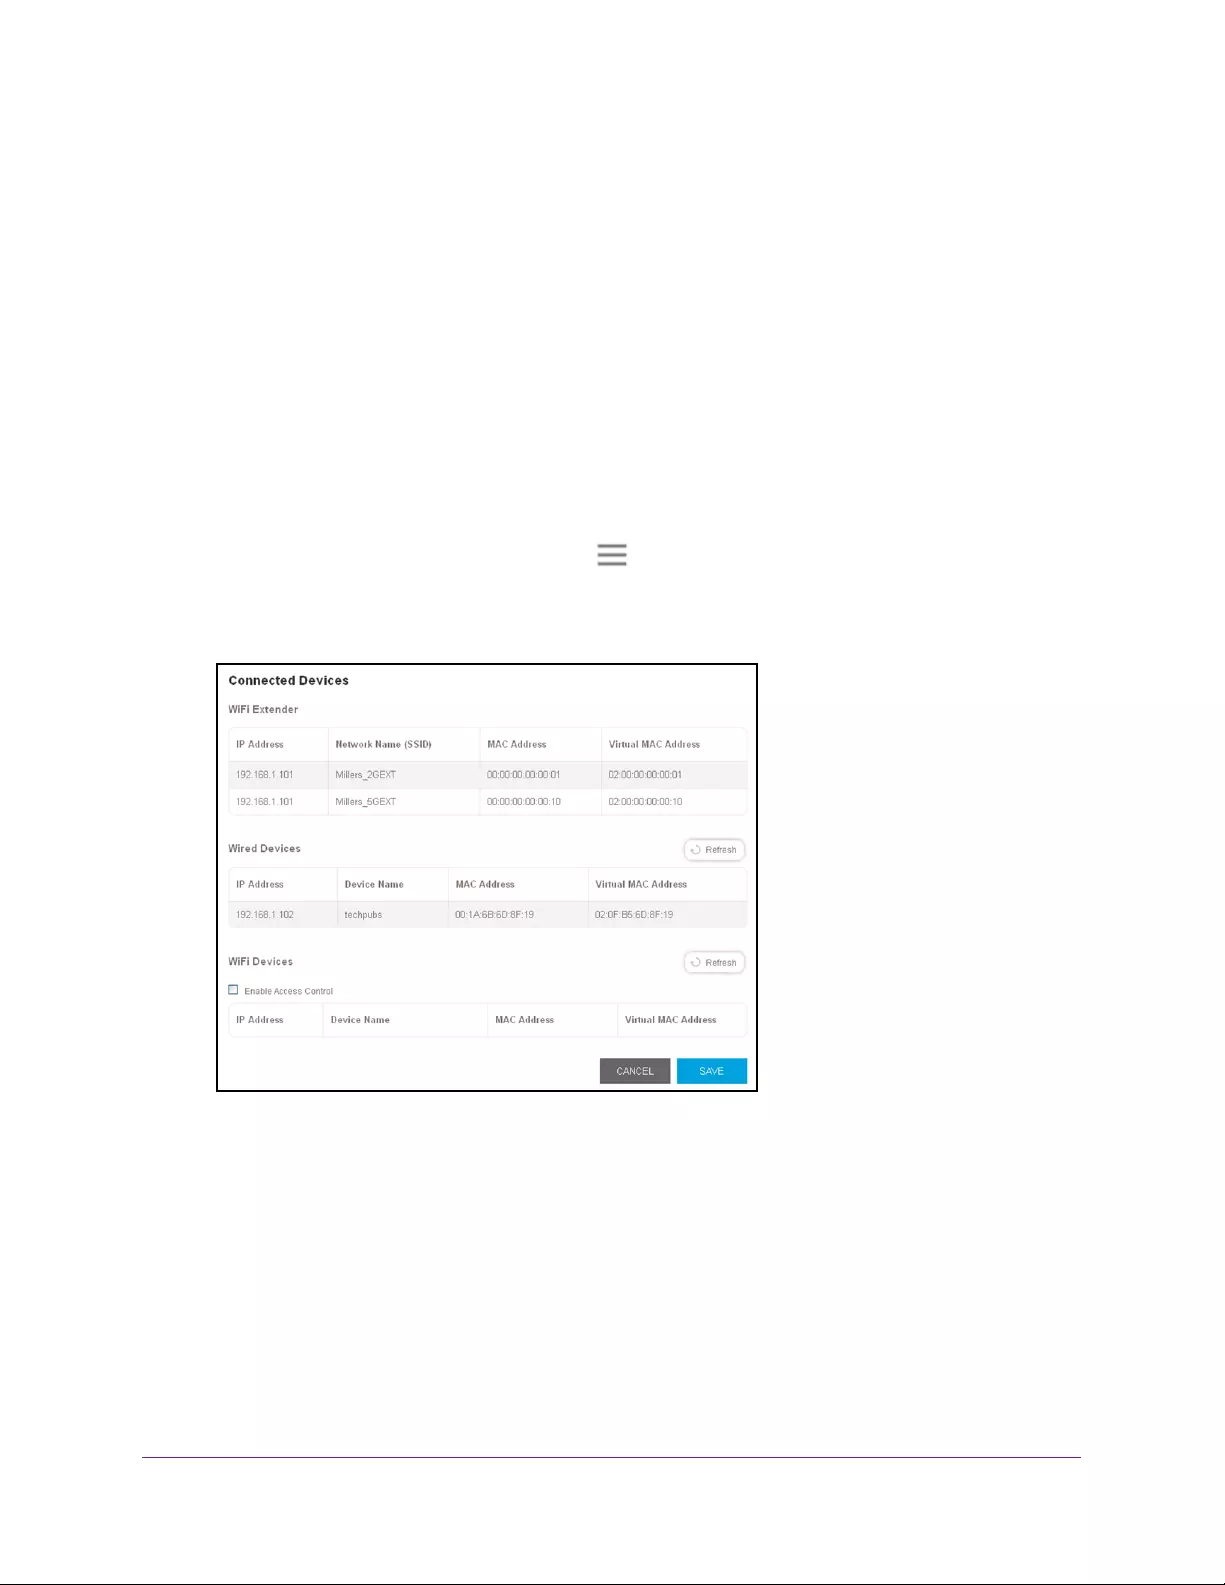
View Connected Devices
You can view a list of devices that are connected to the extender network.
To view connected devices:
1. On a computer or WiFi device that is connected to the extender network, launch a web
browser.
2. In the address field of your browser, enter www.mywifiext.net.
A login page opens.
3. Enter your user name and password and click the LOG IN button.
The Status page displays.
4. If your browser displays the Menu icon , click it.
The extender menu displays.
5. Select Settings > Connected Devices.
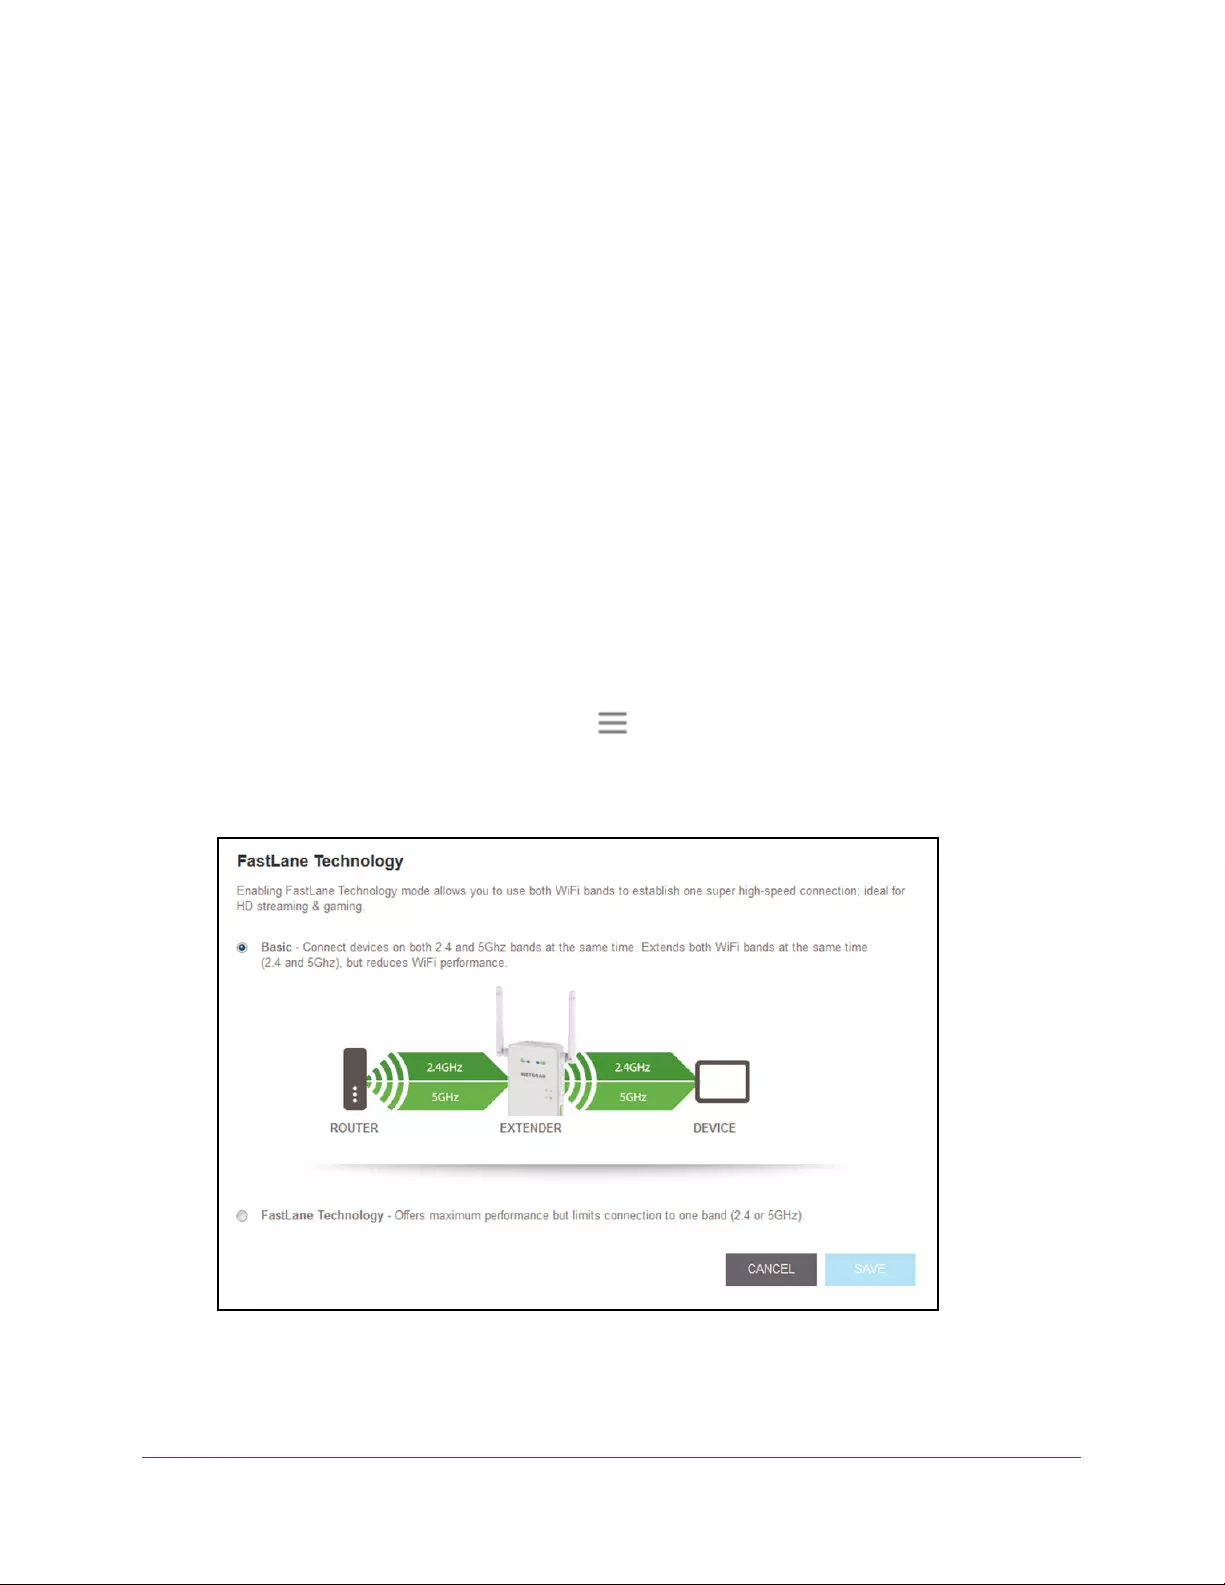
Boost Your Video Streaming With FastLane Technology
Get the most out of your HD entertainment with FastLane technology. With FastLane
technology, the extender connects to your router using one band and connects to your
devices using another band. Because a band is dedicated to each function, performance is
enhanced.
If all your devices and your WiFi router support only the 2.4 GHz band, or all your devices
and your WiFi router support only the 5 GHz band, do not enable FastLane Technology.
Extender Network Settings
20
AC750 WiFi Range Extender
When you enable FastLane Technology, two options are available:
•Use the 2.4 GHz band to connect the extender to the WiFi devices and use the 5 GHz
band to connect the extender to the WiFi router. Use this mode if your WiFi router
supports the 5 GHz band but the devices that you want to use for gaming and streaming
support the 2.4 GHz band.
•Use the 5 GHz band to connect the extender to the WiFi devices and use the 2.4 GHz
band to connect the extender to the WiFi router. Use this mode if the devices that you
want to use for gaming and streaming support the 5 GHz band but your WiFi router
supports the 2.4 GHz band.
To activate FastLane mode:
1. On a computer or WiFi device that is connected to the extender network, launch a web
browser.
2. In the address field of your browser, enter www.mywifiext.net.
A login page opens.
3. Enter your user name and password and click the LOG IN button.
The Status page displays.
4. If your browser displays the Menu icon , click it.
The extender menu displays.
5. Select Do More > FastLane.
6. Select the FastLane Technology radio button.
The page adjusts and displays two more radio buttons.
Extender Network Settings
21
AC750 WiFi Range Extender
7. Select a radio button:
•Router-to-Extender in 2.4 GHz only and Extender-to-Device in 5 GHz only
•Router to Extender in 5 GHz only and Extender-to-Device in 2.4 GHz only
8. Click the Save button.
Your settings are saved.
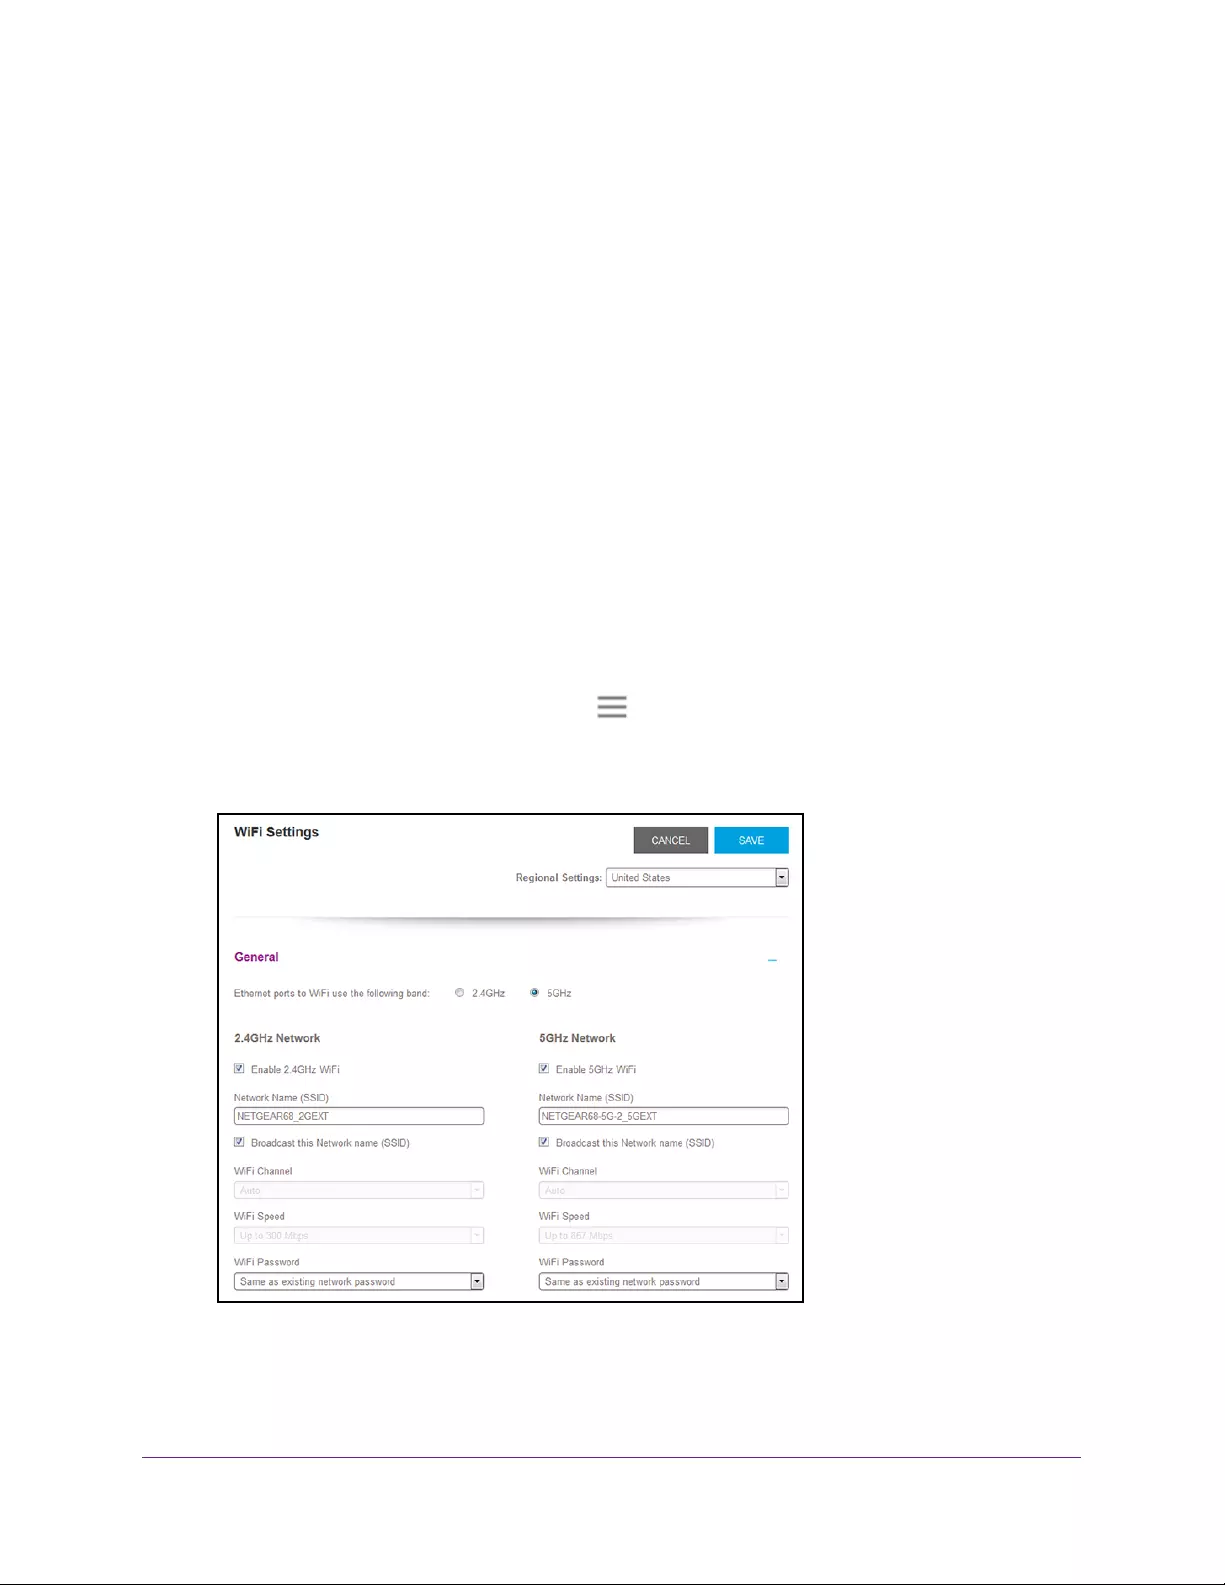
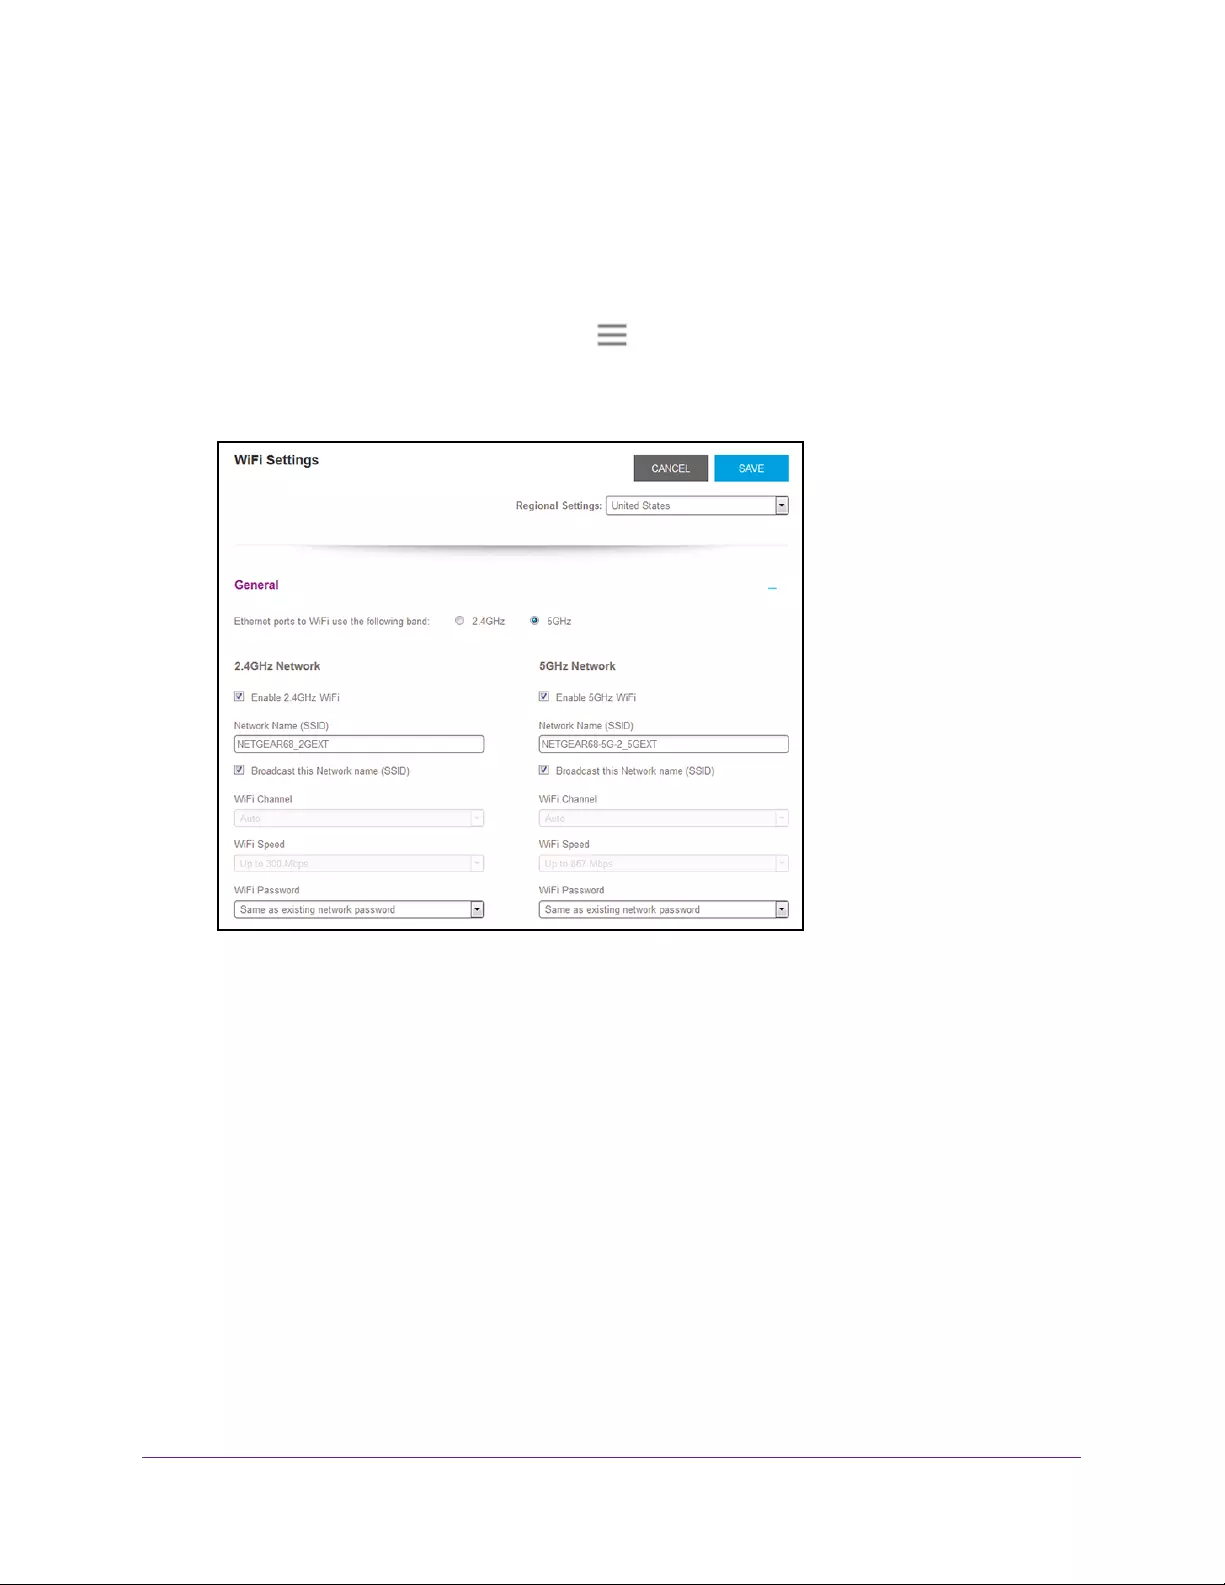
View WiFi Settings
To view the WiFi settings:
1. On a computer or WiFi device that is connected to the extender network, launch a web
browser.
2. In the address field of your browser, enter www.mywifiext.net.
A login page opens.
3. Enter your user name and password and click the LOG IN button.
The Status page displays.
4. If your browser displays the Menu icon , click it.
The extender menu displays.
5. Select Settings > Wireless.
Extender Network Settings
22
AC750 WiFi Range Extender
Change the WiFi Network Name
To change the WiFi network name:
1. On a computer or WiFi device that is connected to the extender network, launch a web
browser.
2. In the address field of your browser, enter www.mywifiext.net.
A login page opens.
3. Enter your user name and password and click the LOG IN button.
The Status page displays.
4. If your browser displays the Menu icon , click it.
The extender menu displays.
5. Select Settings > Wireless.
6. In each Network Name (SSID) field, type a network name.
7. Click the SAVE button.
Your settings are saved.
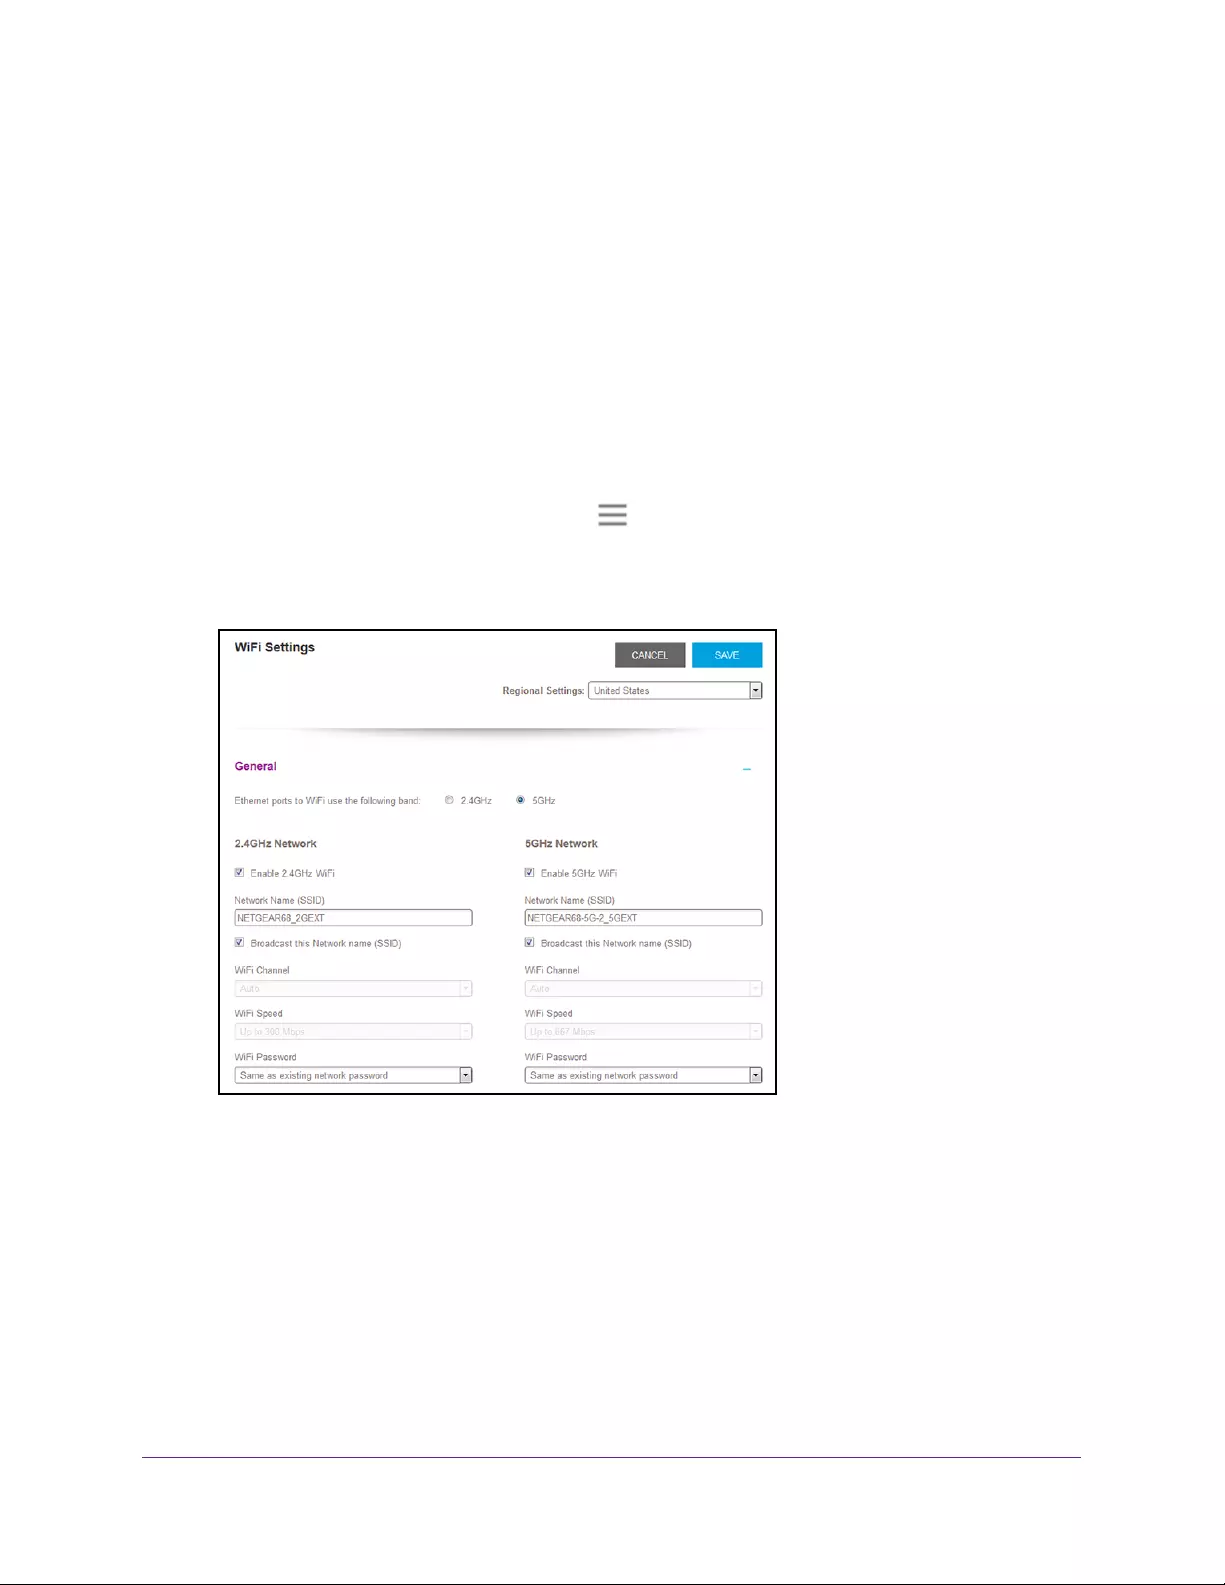
Turn Off the SSID Broadcast to Create a Hidden Network
By default, the extender broadcasts its WiFi signal so that its WiFi network names (SSIDs)
are easy for you to find and connect to from your computer, tablet, or smartphone. You can
Extender Network Settings
23
AC750 WiFi Range Extender
turn off the SSID broadcast to create a hidden WiFi network. To connect to a hidden network
you must know its SSID and password and manually enter them.
To turn off the SSID broadcast to create a hidden network:
1. On a computer or WiFi device that is connected to the extender network, launch a web
browser.
2. In the address field of your browser, enter www.mywifiext.net.
A login page opens.
3. Enter your user name and password and click the LOG IN button.
The Status page displays.
4. If your browser displays the Menu icon , click it.
The extender menu displays.
5. Select Settings > Wireless.
6. Clear the Broadcast the Network name (SSID) check box.
7. Click the SAVE button.
Your settings are saved.
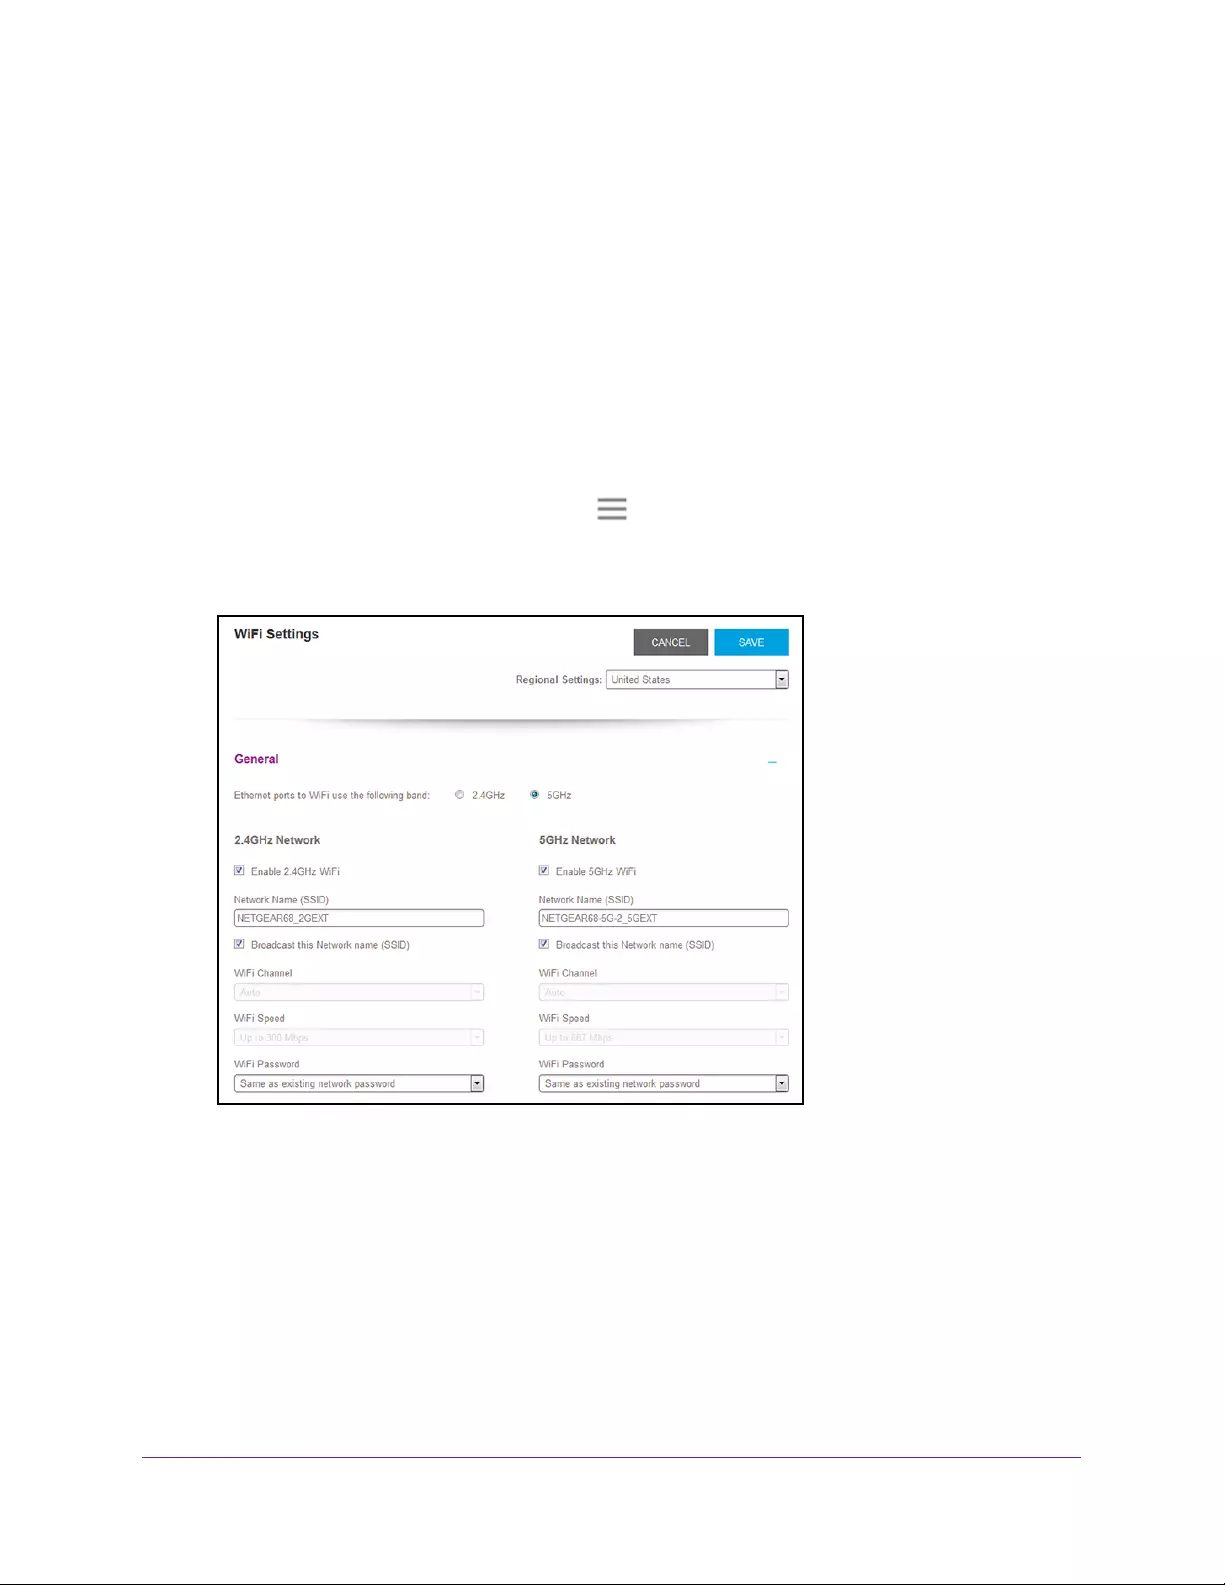
Disable or Enable the WiFi Radios
By default, the extender’s WiFi radios broadcast signals in the 2.4 GHz and 5 GHz bands. If
you disable the WiFi radios, then no one can connect with WiFi to the extender.
Extender Network Settings
24
AC750 WiFi Range Extender
To enable or disable the WiFi radios:
1. On a computer or WiFi device that is connected to the extender network, launch a web
browser.
2. In the address field of your browser, enter www.mywifiext.net.
A login page opens.
3. Enter your user name and password and click the LOG IN button.
The Status page displays.
4. If your browser displays the Menu icon , click it.
The extender menu displays.
5. Select Settings > Wireless.
6. Select or clear the Enable 2.4 GHz WiFi check box.
7. Select or clear the Enable 5 GHz WiFi check box.
8. Click the SAVE button.
Your settings are saved.
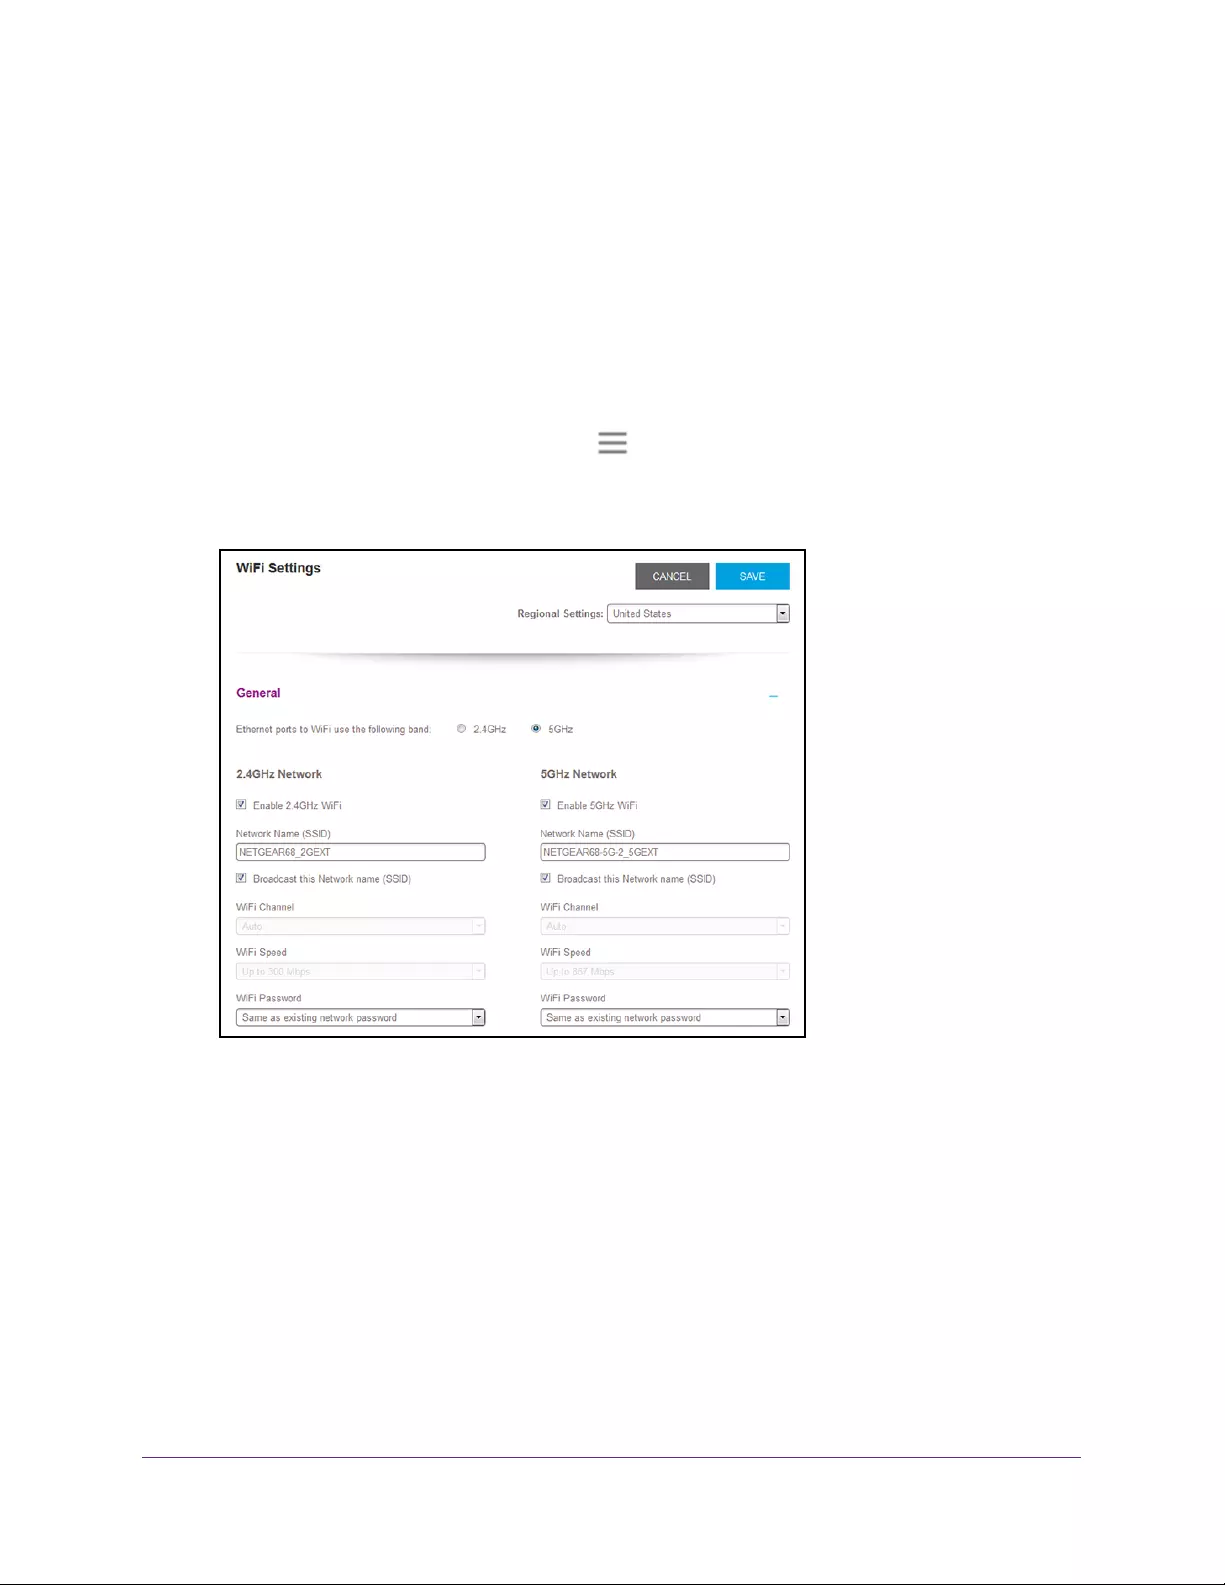
Change the WiFi Speed
To change the WiFi speed:
1. On a computer or WiFi device that is connected to the extender network, launch a web
browser.
Extender Network Settings
25
AC750 WiFi Range Extender
2. In the address field of your browser, enter www.mywifiext.net.
A login page opens.
3. Enter your user name and password and click the LOG IN button.
The Status page displays.
4. If your browser displays the Menu icon , click it.
The extender menu displays.
5. Select Settings > Wireless.
6. In each WiFi Speed menu, select a speed.
7. Click the SAVE button.
Your settings are saved.
Use WPS to Add a Computer to the Extender’s WiFi
Network
WPS (Wi-Fi Protected Setup) lets you connect a computer or WiFi device to the extender’s
network without entering the WiFi network passphrase or key. Instead, you use a WPS button
or enter a PIN to connect.
If you use the push button method, the WiFi device that you are trying to connect must
include a physical button or a software button. If you use the PIN method, you must know the
PIN of the WiFi device that you are trying to connect.
Extender Network Settings
26
AC750 WiFi Range Extender
WPS supports WPA and WPA2 WiFi security. If your extender network is open (no WiFi
security is set), connecting with WPS automatically sets WPA + WPA2 WiFi security on the
extender network and generates a random passphrase. You can view this passphrase on the
WiFi Settings page (for more information, see View WiFi Settings on page 21).
For information about using WPS to connect the extender to a WiFi network during setup,
see Use the Extender in Access Point Mode on page 15.
Use WPS With the Push Button Method
For you to use the push button method to connect a WiFi device to the extender’s WiFi
network, the WiFi device that you are trying to connect must include a physical WPS button
or an onscreen WPS button that you can click.
To use WPS to add a computer or WiFi device to the extender’s WiFi network:
1. On a computer or WiFi device that is connected to the extender network, launch a web
browser.
2. In the address field of your browser, enter www.mywifiext.net.
A login page opens.
3. Enter your user name and password and click the LOG IN button.
The Status page displays.
4. If your browser displays the Menu icon , click it.
The extender menu displays.
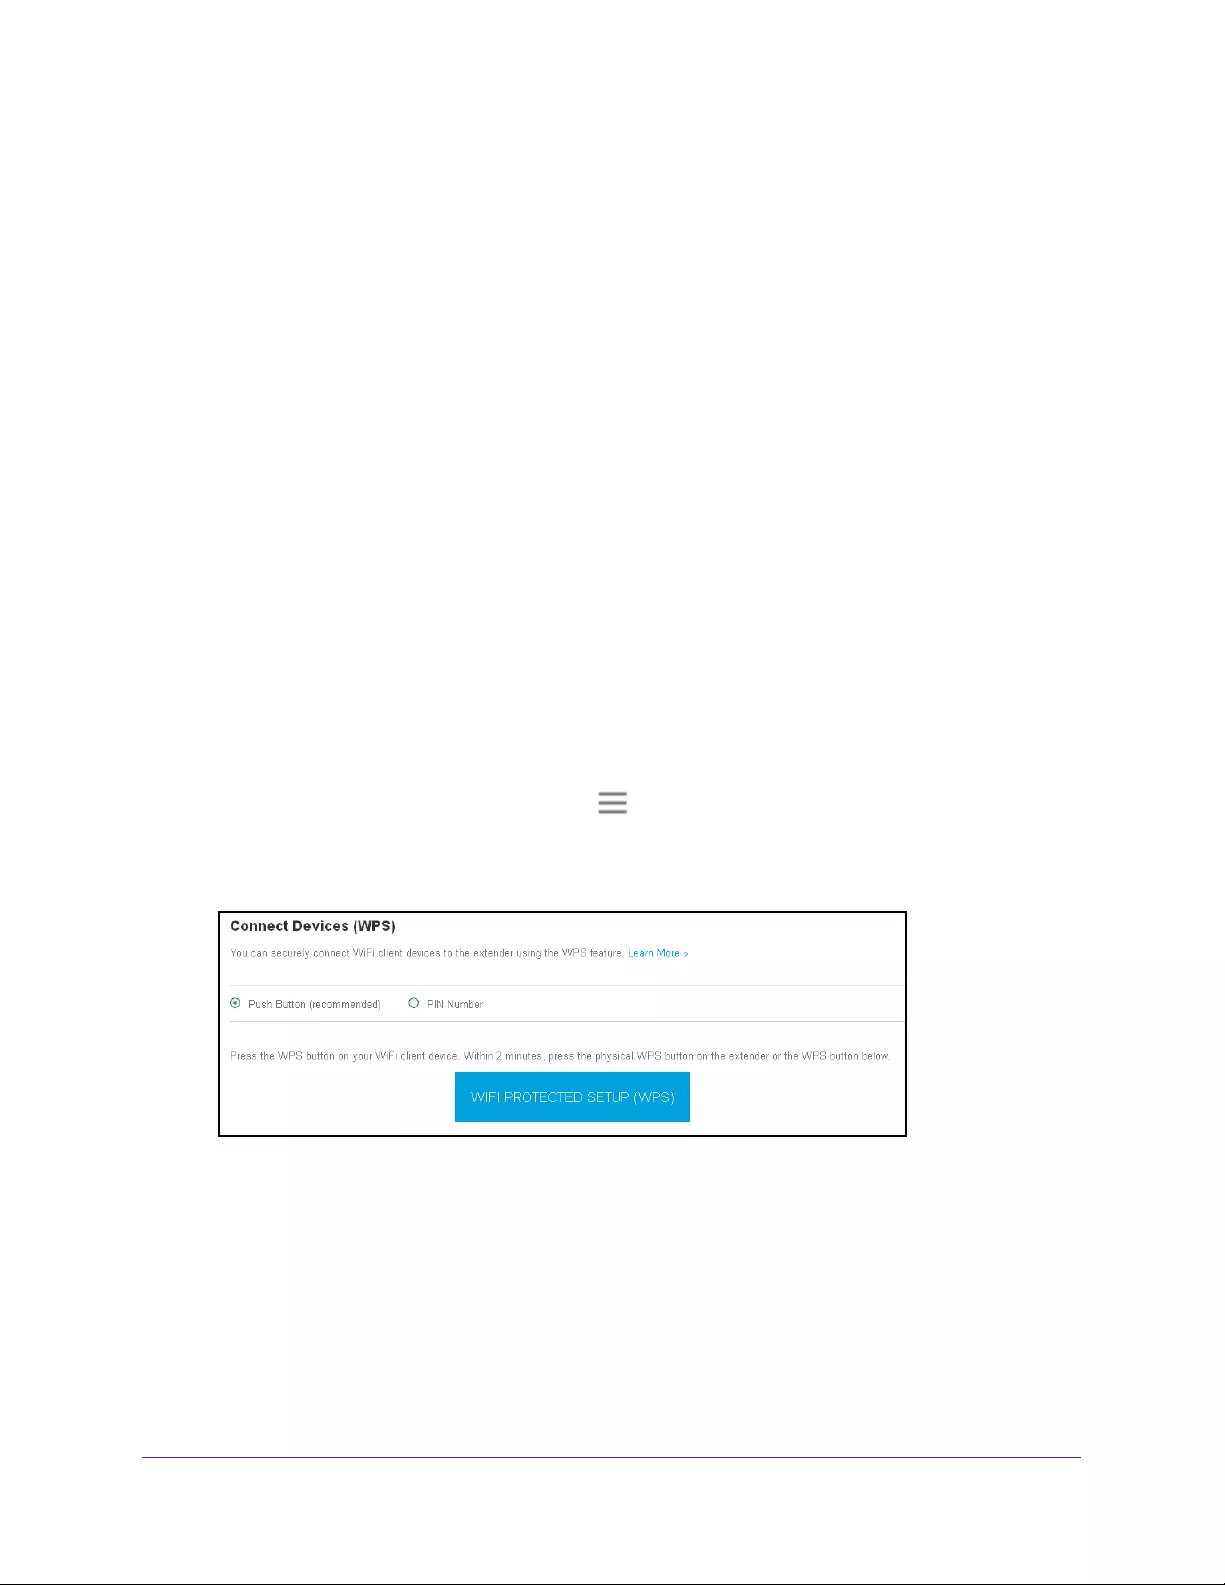
5. Select Do More > Connect Devices (WPS).
6. Leave the Push Button (recommended) radio button selected.
7. Click the WIFI PROTECTED SETUP (WPS) button.
For two minutes, the extender attempts to add the computer or WiFi device to its WiFi
network.
8. Within two minutes, go to the computer WiFi device and press or click its WPS button.
9. To verify that the WiFi device is connected to the extender’s WiFi network, select
Settings > Connected Devices.
The WiFi device displays on the page.
Extender Network Settings
27
AC750 WiFi Range Extender
Use WPS With the PIN Method
To use the PIN method to connect a WiFi device to the extender’s WiFi network, you must
know the PIN of the WiFi device that you are trying to connect.
To add a computer or WiFi device to the extender’s WiFi network:
1. On a computer or WiFi device that is connected to the extender network, launch a web
browser.
2. In the address field of your browser, enter www.mywifiext.net.
3. When prompted, enter your user name and password and click the LOG IN button.
The Status page displays.
4. If your browser displays the Menu icon , click it.
The extender menu displays.
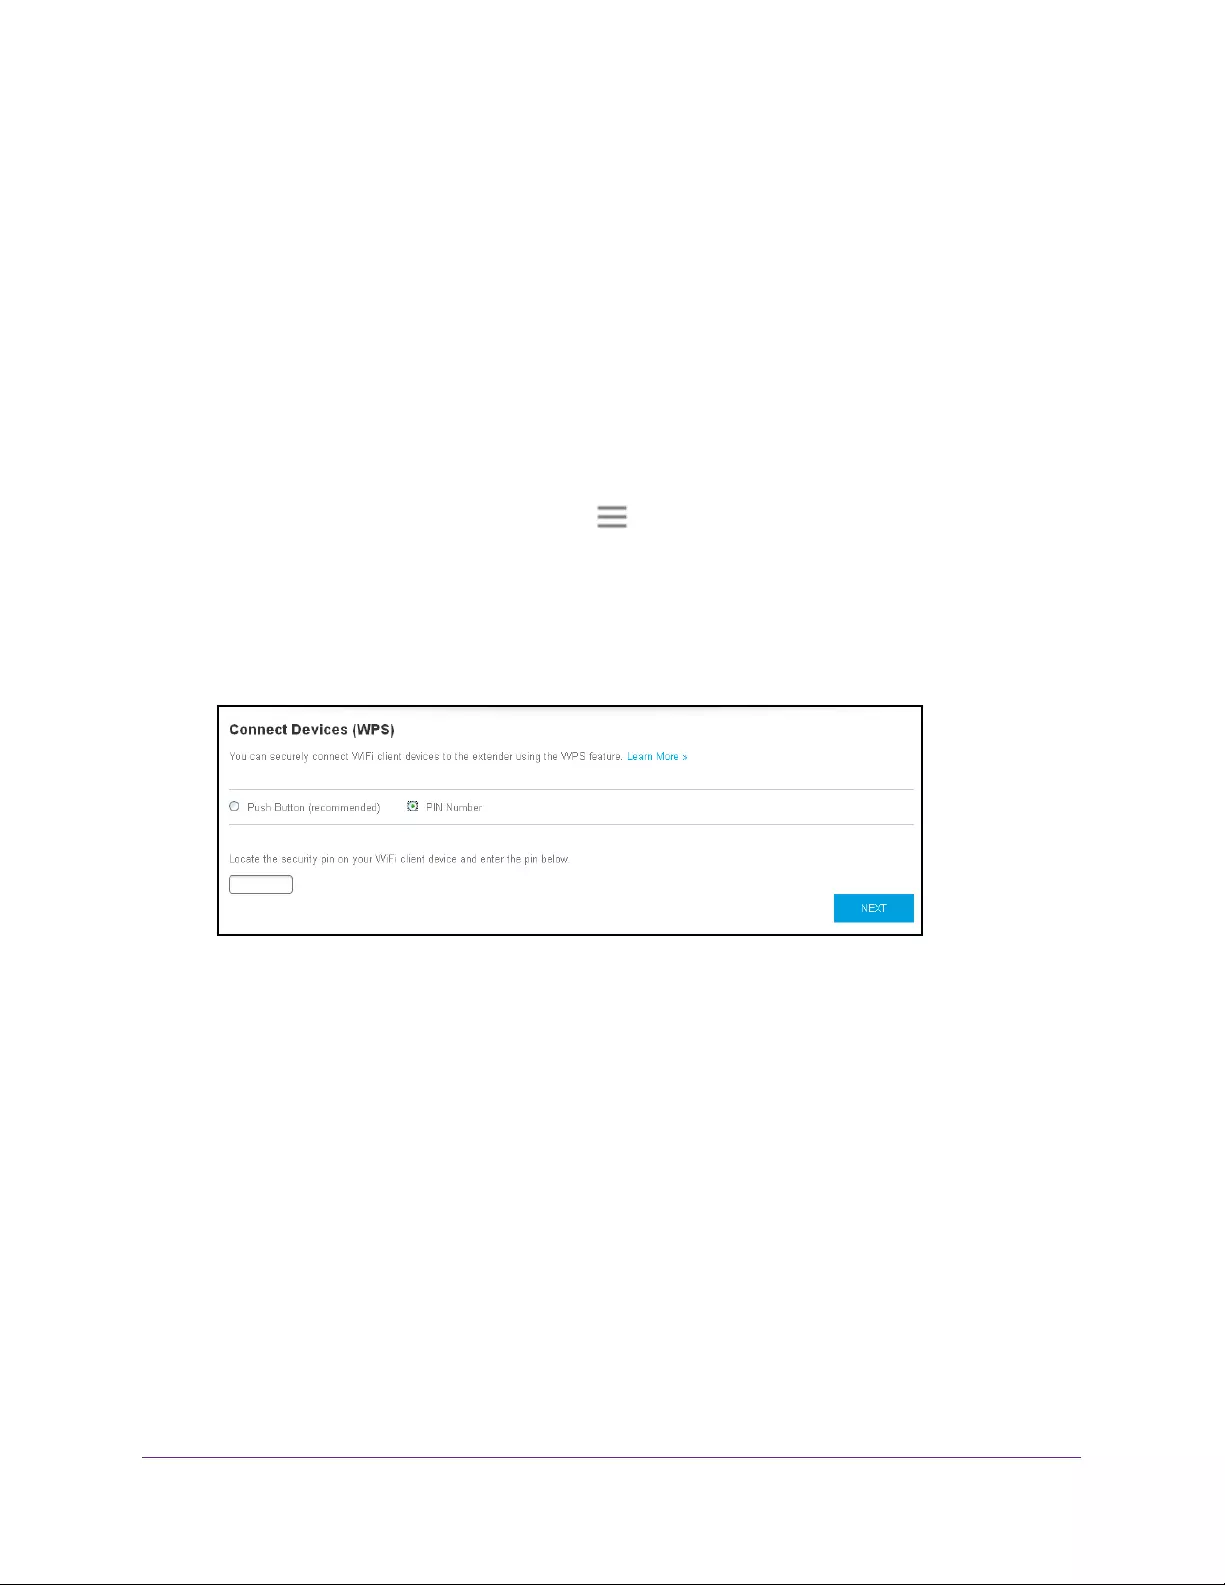
5. Select Do More > Connect Devices (WPS).
The Connect Devices (WPS) page displays.
6. Select the PIN Number radio button.
7. Type the PIN of the WiFi device in the field.
8. Click the NEXT button.
For four minutes, the extender attempts to find the computer or WiFi device.
9. Within four minutes, go to the WiFi device and use its WPS software to join the WiFi
network.
10. To verify that the WiFi device is connected to the extender’s WiFi network, select
Settings > Connected Devices.
The WiFi device displays on the page.
Deny Access to a Computer or WiFi Device
By default, access control is disabled so that it is easy for you to connect to the extender’s
WiFi networks.

Extender Network Settings
28
AC750 WiFi Range Extender
You can deny network access to specific computers and WiFi devices based on their MAC
addresses. Each network device is assigned a MAC address, which is a unique 12-character
physical address, containing the hexadecimal characters 0–9, a–f, or A–F only, and
separated by colons (for example, 00:09:AB:CD:EF:01). Typically, the MAC address is on the
label of the WiFi device. If you cannot access the label, you can display the MAC address
using the network configuration utilities of the computer. You might also find the MAC
addresses on the Connected Devices page (see View Connected Devices on page 19).
To use WiFi access control to deny access:
1. On a computer or WiFi device that is connected to the extender network, launch a web
browser.
2. In the address field of your browser, enter www.mywifiext.net.
3. When prompted, enter your user name and password and click the LOG IN button.
The Status page displays.
4. If your browser displays the Menu icon , click it.
The extender menu displays.
5. Select Settings > Connected Devices.
6. In the WiFi Devices section, select the Enable Access Control check box.
The WiFi Devices table displays the names and MAC addresses of WiFi devices that are
connected to the extender.
7. Select the Deny check box for the device.
8. Click the SAVE button.
Extender Network Settings
29
AC750 WiFi Range Extender
Your settings are saved and that device cannot connect to the extender’s WiFi network.
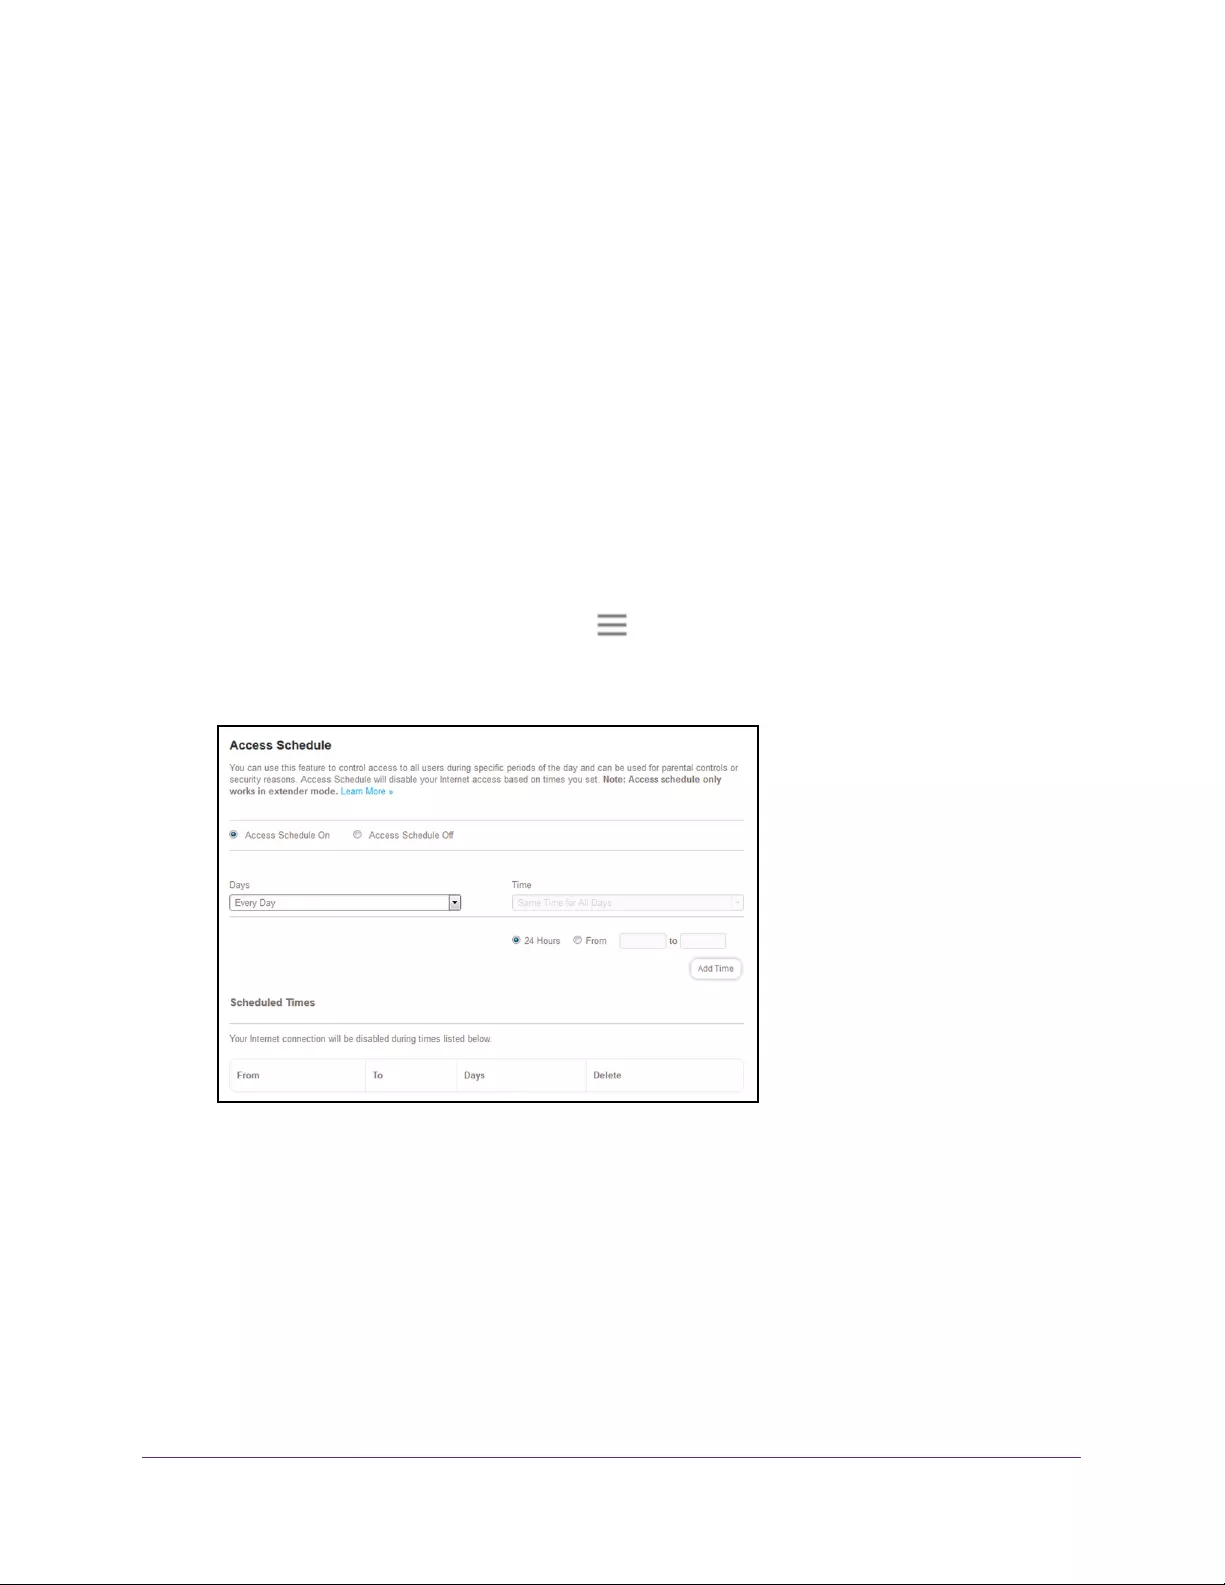
Set Up an Access Schedule
You can control access to all users during specific periods of the day. You can set up an
access schedule that prevents Internet access through the extender network based on the
times that you set.
To set up an access schedule:
1. On a computer or WiFi device that is connected to the extender network, launch a web
browser.
2. In the address field of your browser, enter www.mywifiext.net.
3. When prompted, enter your user name and password and click the LOG IN button.
The Status page displays.
4. If your browser displays the Menu icon , click it.
The extender menu displays.
5. Select Do More > Access Schedule.
6. Select the Access Schedule On radio button.
The page adjusts.
7. In the Days menu and the Time menu, select the day and time when you want to disable
Internet access.
8. Click the Add Time button.
The time you specified is added to the Scheduled Times table.
9. Click the SAVE button.
Your settings are saved.
Extender Network Settings
30
AC750 WiFi Range Extender
Change the Extender’s Device Name
The default name is EX6100.
To change the extender’s device name:
1. On a computer or WiFi device that is connected to the extender network, launch a web
browser.
2. In the address field of your browser, enter www.mywifiext.net.
A login page opens.
3. Enter your user name and password and click the LOG IN button.
The Status page displays.
4. If your browser displays the Menu icon , click it.
The extender menu displays.
5. Select Settings > Wireless.
The WiFi Settings page displays.
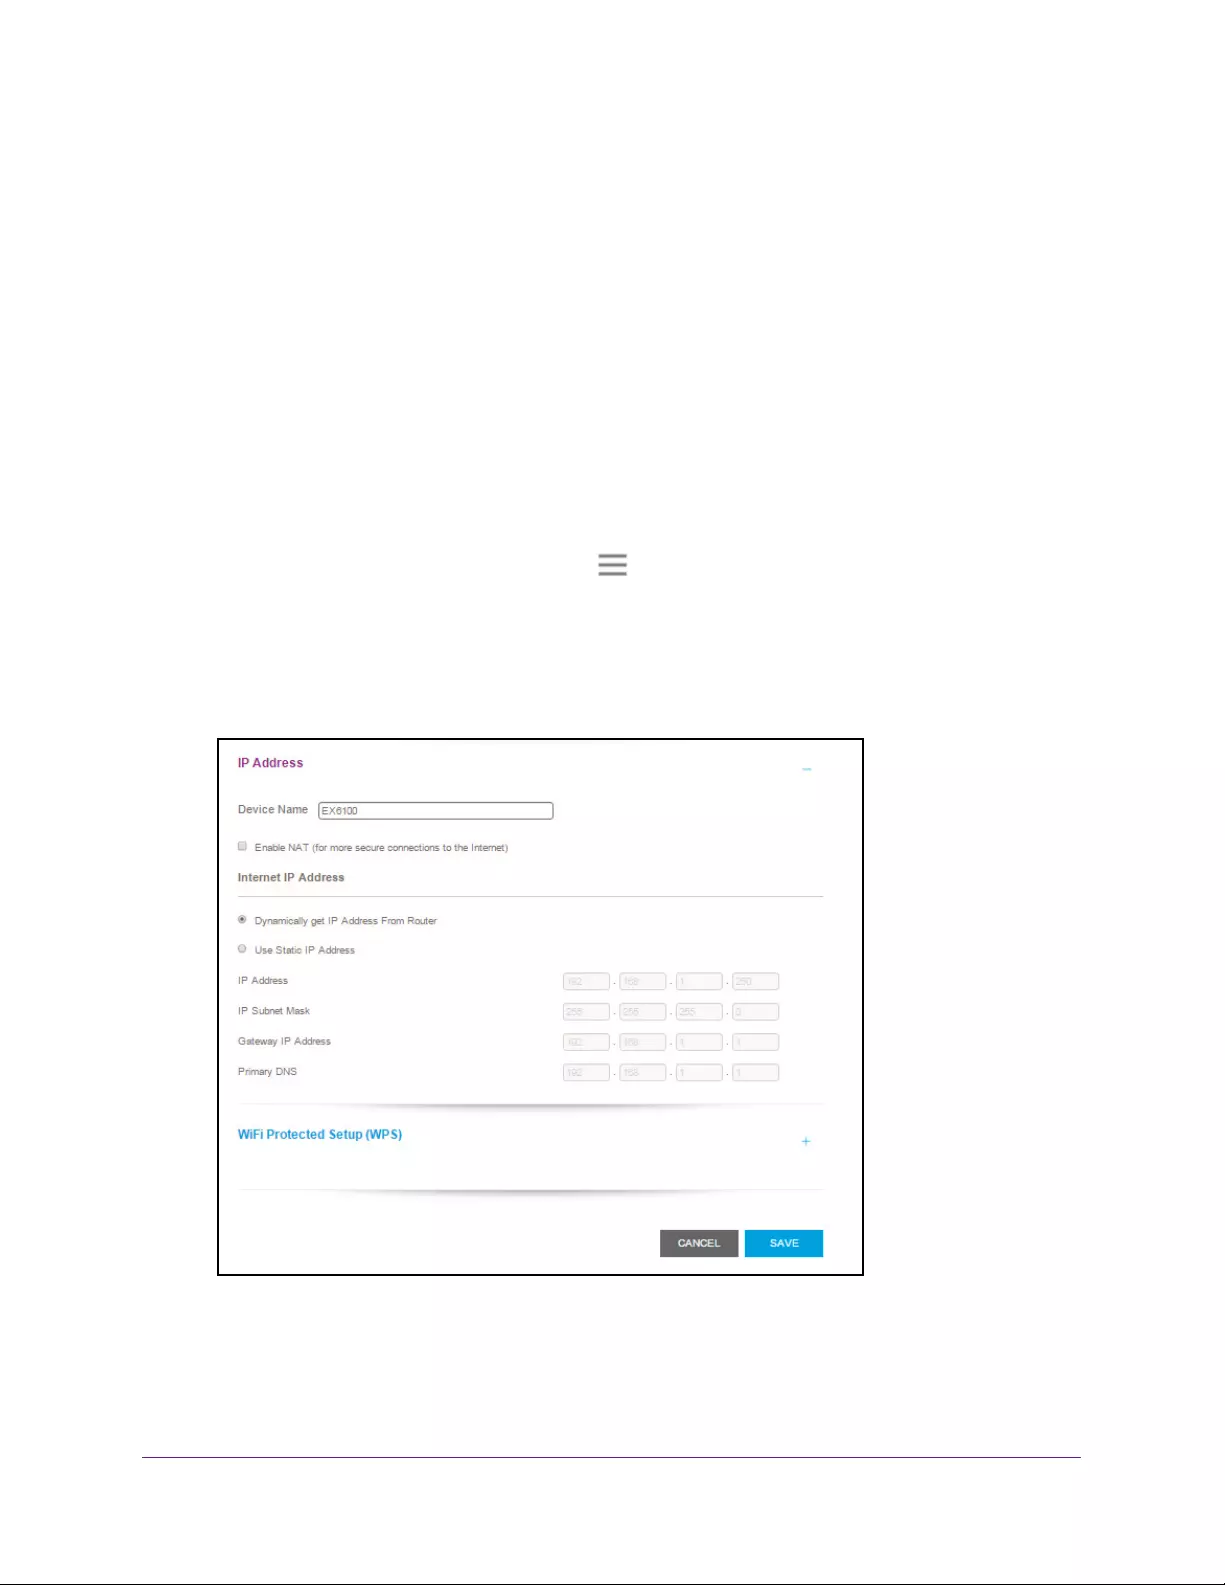
6. Scroll down and click the IP Address heading.
7. In the Device Name field, type a name.
8. Click the SAVE button.
Your settings are saved.
Extender Network Settings
31
AC750 WiFi Range Extender
Set Up the Extender to Use a Static IP Address
The extender comes set up to use a dynamic IP address, which is the correct setting for most
home networks.
To set up the extender to use a static IP address:
1. On a computer or WiFi device that is connected to the extender network, launch a web
browser.
2. In the address field of your browser, enter www.mywifiext.net.
A login page opens.
3. Enter your user name and password and click the LOG IN button.
The Status page displays.
4. If your browser displays the Menu icon , click it.
The extender menu displays.
5. Select Settings > Wireless.
The WiFi Settings page displays.
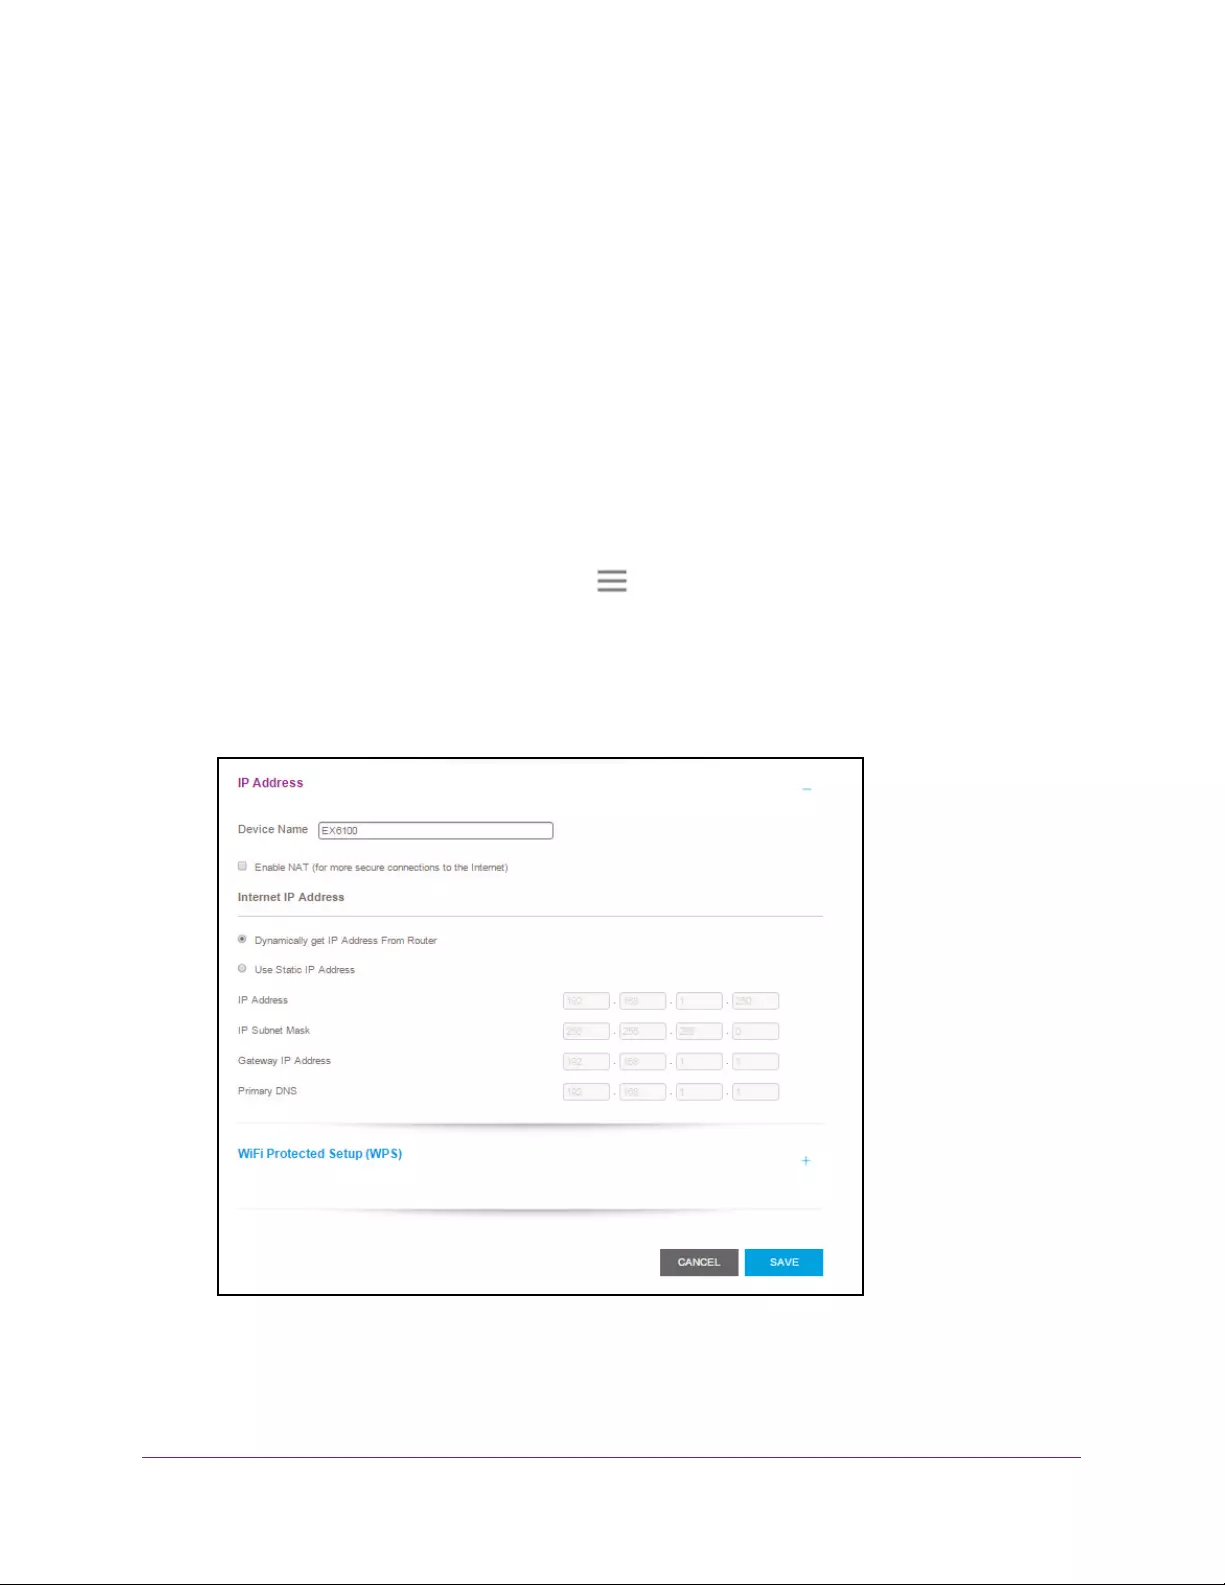
6. Scroll down and click the IP Address heading.
By default, the Dynamically get IP Address from Router radio button is selected.
7. Select the Use Static IP Address radio button.
8. Complete the fields to specify the IP network IP addresses.

Extender Network Settings
32
AC750 WiFi Range Extender
9. Click the SAVE button.
Your settings are saved.
Use the Extender With MAC Filtering or Access Control
When the WiFi device connects through the extender to your router, the MAC address of the
WiFi device that is shown on the router is translated to another MAC address. If your router’s
MAC filter, WiFi access control, or ACL is enabled, the WiFi device connects to the extender
but cannot get an IP address from the extender and cannot access the Internet. To allow the
WiFi device to receive an IP address from the extender and access the Internet, you must
provide the translated MAC address to the router.
To add a translated MAC address to your router:
1. Log in to your router and disable the MAC filter, WiFi access control, or ACL.
For information about how to disable your router’s MAC filter, WiFi access control, or
ACL, see your router’s documentation.
2. Power on the extender and connect all of your WiFi devices to the extender.
3. Make sure that the Link Rate LED remains lit.
4. Log in to your extender:
a. Launch a web browser.
b. Enter www.mywifiext.net in the address field of the browser.
A login page opens.
c. Enter your user name and password and click the LOG IN button.
The Status page displays
5. If your browser displays the Menu icon , click it.
The extender menu displays.
6. Select Settings > Connected Devices.
The Connected Devices page displays the MAC addresses and virtual MAC addresses
for computers and WiFi devices that are connected to the extender network.
7. On the router, add the extender’s virtual MAC address and all the virtual MAC addresses
connected to the extender network to your router’s MAC filter table.
8. Enable the router’s MAC filter, WiFi access control, or ACL.

33
4
4. Monitor and Maintain the Extender
This chapter covers the following topics:
•Change the Extender User Name and Password
•Turn Password Protection Off and On
•Recover a Forgotten User Name or Password
•Automatically Adjust for Daylight Saving Time
•Manually Set the Extender Clock
•Back Up and Manage the Extender Configuration
•Return the Extender to Its Factory Settings
•Update the Firmware
•Restart the Extender Remotely
Monitor and Maintain the Extender
34
AC750 WiFi Range Extender
Change the Extender User Name and Password
You can change the user name and password to log in to the extender.
To add an extender user:
1. On a computer or WiFi device that is connected to the extender network, launch a web
browser.
2. In the address field of your browser, enter www.mywifiext.net.
A login page opens.
3. Enter your user name and password and click the LOG IN button.
The Status page displays.
4. If your browser displays the Menu icon , click it.
The extender menu displays.
5. Select Settings > Password.
6. In the New User Name field, type a user name.
7. Type the password in the New Password field and the Verify Password field.
8. Select questions and enter the answers.
9. Click the SAVE button.
Your settings are saved.

Monitor and Maintain the Extender
35
AC750 WiFi Range Extender
Turn Password Protection Off and On
We recommend that you leave password protection on to help keep your network secure.
You can turn password protection off and on.
To turn password protection off or on:
1. On a computer or WiFi device that is connected to the extender network, launch a web
browser.
2. In the address field of your browser, enter www.mywifiext.net.
A login page opens.
3. Enter your user name and password and click the LOG IN button.
The Status page displays.
4. If your browser displays the Menu icon , click it.
The extender menu displays.
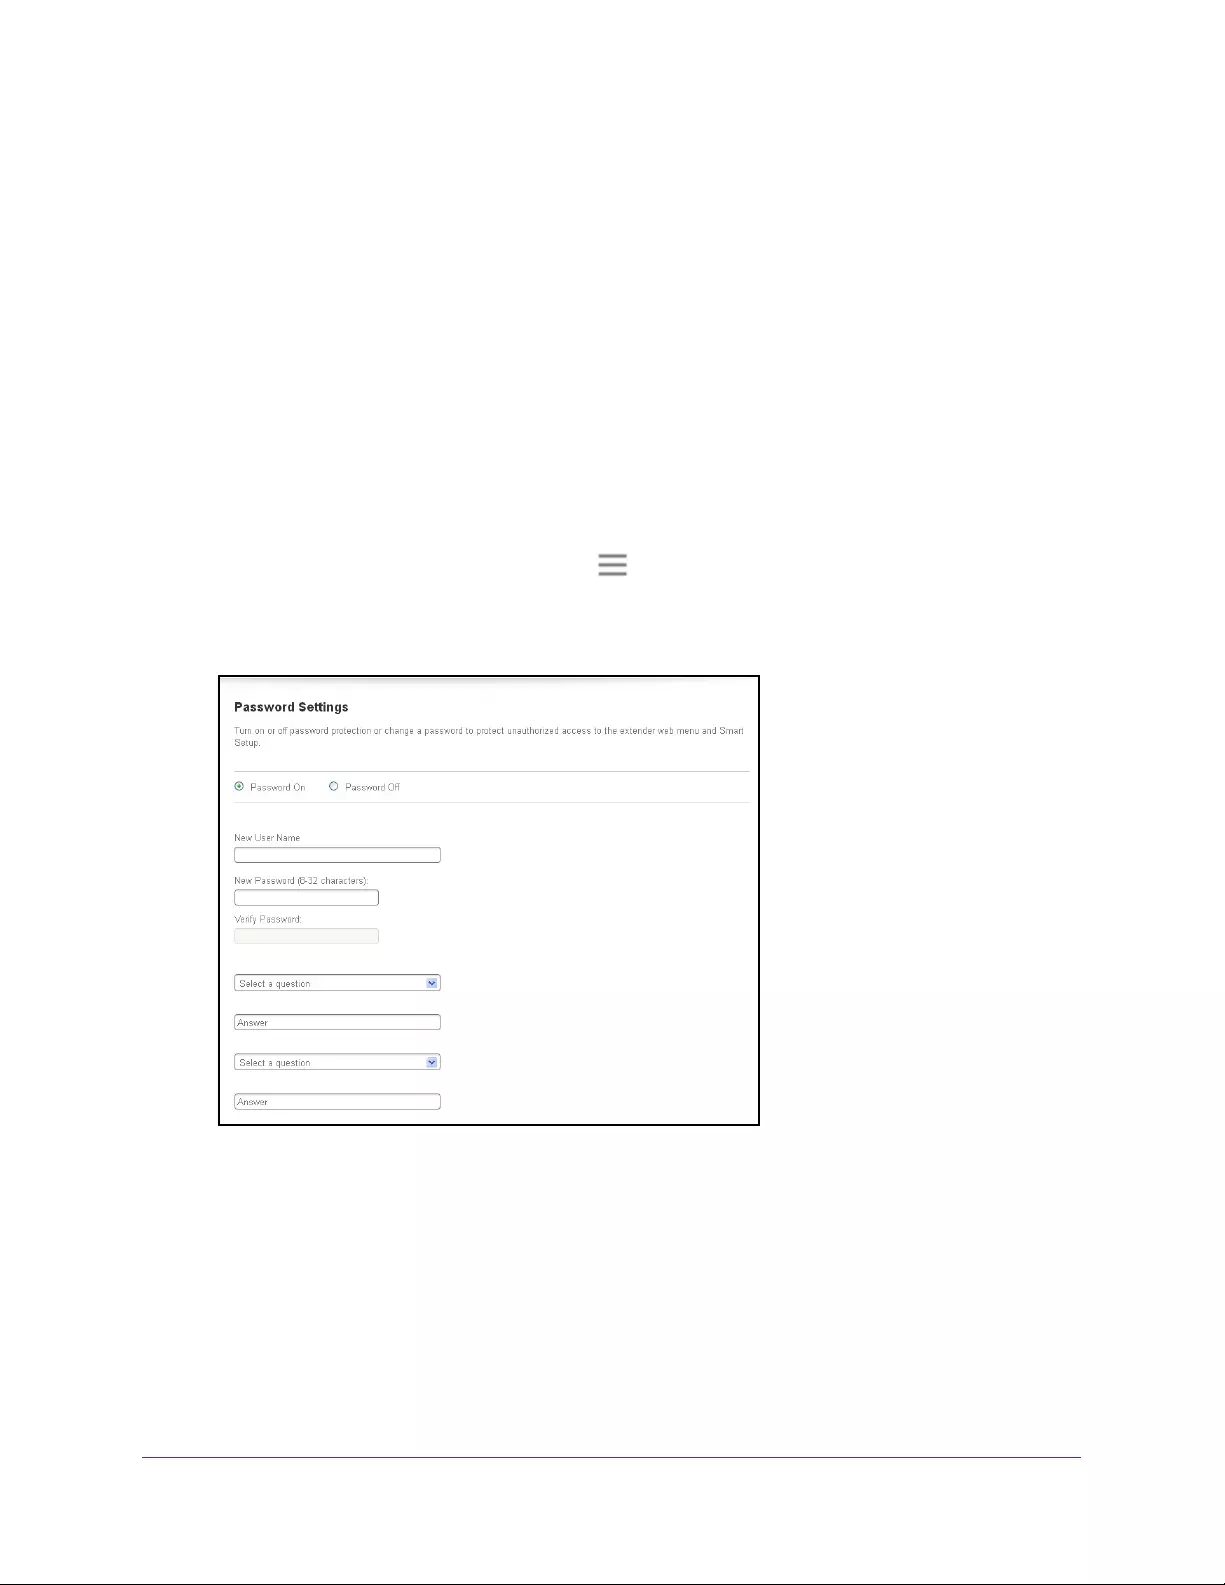
5. Select Settings > Password.
The Password Settings page displays.
6. Select the Password Off or Password On radio button.
7. Click the SAVE button.
Your settings are saved.
Recover a Forgotten User Name or Password
If you changed the password to access the extender and set up password recovery, you can
recover your password if you lose it.
To recover your password to access the extender:
1. On a computer or WiFi device that is connected to the extender network, launch a web
browser.
2. In the address field of your browser, enter www.mywifiext.net.
You are prompted to enter a user name and password.
3. Click the Username & Password Help link.
A page displays requesting the answers to your security questions.
If you forgot the answers to your security questions, restore the extender’s factory
settings and set up your user name and password again. See Return the Extender to Its
Factory Settings on page 39 and Chapter 2, Get Started.
4. Enter the saved answers to your security questions.
5. Click the NEXT button.

Monitor and Maintain the Extender
36
AC750 WiFi Range Extender
Your email and password are displayed.
6. Click the BACK button.
A login window opens.
Log in to the extender.
Automatically Adjust for Daylight Saving Time
1. On a computer or WiFi device that is connected to the extender network, launch a web
browser.
2. In the address field of your browser, enter www.mywifiext.net.
A login page opens.
3. Enter your user name and password and click the LOG IN button.
The Status page displays.
4. If your browser displays the Menu icon , click it.
The extender menu displays.
5. Select Do More > Access Schedule.
The Access Schedule page displays.
6. Select the Automatically adjust for daylight savings time check box.
7. Click the SAVE button.
Your settings are saved.
Manually Set the Extender Clock
To manually set the extender clock:
1. On a computer or WiFi device that is connected to the extender network, launch a web
browser.
2. In the address field of your browser, enter www.mywifiext.net.
A login page opens.
3. Enter your user name and password and click the LOG IN button.
The Status page displays.
4. If your browser displays the Menu icon , click it.
The extender menu displays.
5. Select Do More > Access Schedule.
The Access Schedule page displays.
Monitor and Maintain the Extender
37
AC750 WiFi Range Extender
6. In the Extender Clock section, select the Manual radio button.
7. To specify the time, complete the fields or click the Sync Clock button to synchronize the
extender time to the time on the computer or WiFi device that you are using.
8. Click the SAVE button.
Your settings are saved.
Back Up and Manage the Extender Configuration
When the extender works correctly after initial setup, we recommend that you back up the
extender configuration settings. After you back up the settings, if you change the extender
configuration settings but are not content with the new settings, you can restore the extender
configuration to the backed-up settings.
Back Up the Configuration Settings
You can back up the configuration file of the extender.
To back up the extender configuration settings:
1. On a computer or WiFi device that is connected to the extender network, launch a web
browser.
2. In the address field of your browser, enter www.mywifiext.net.
A login page opens.
3. Enter your user name and password and click the LOG IN button.
The Status page displays.
4. If your browser displays the Menu icon , click it.
The extender menu displays.
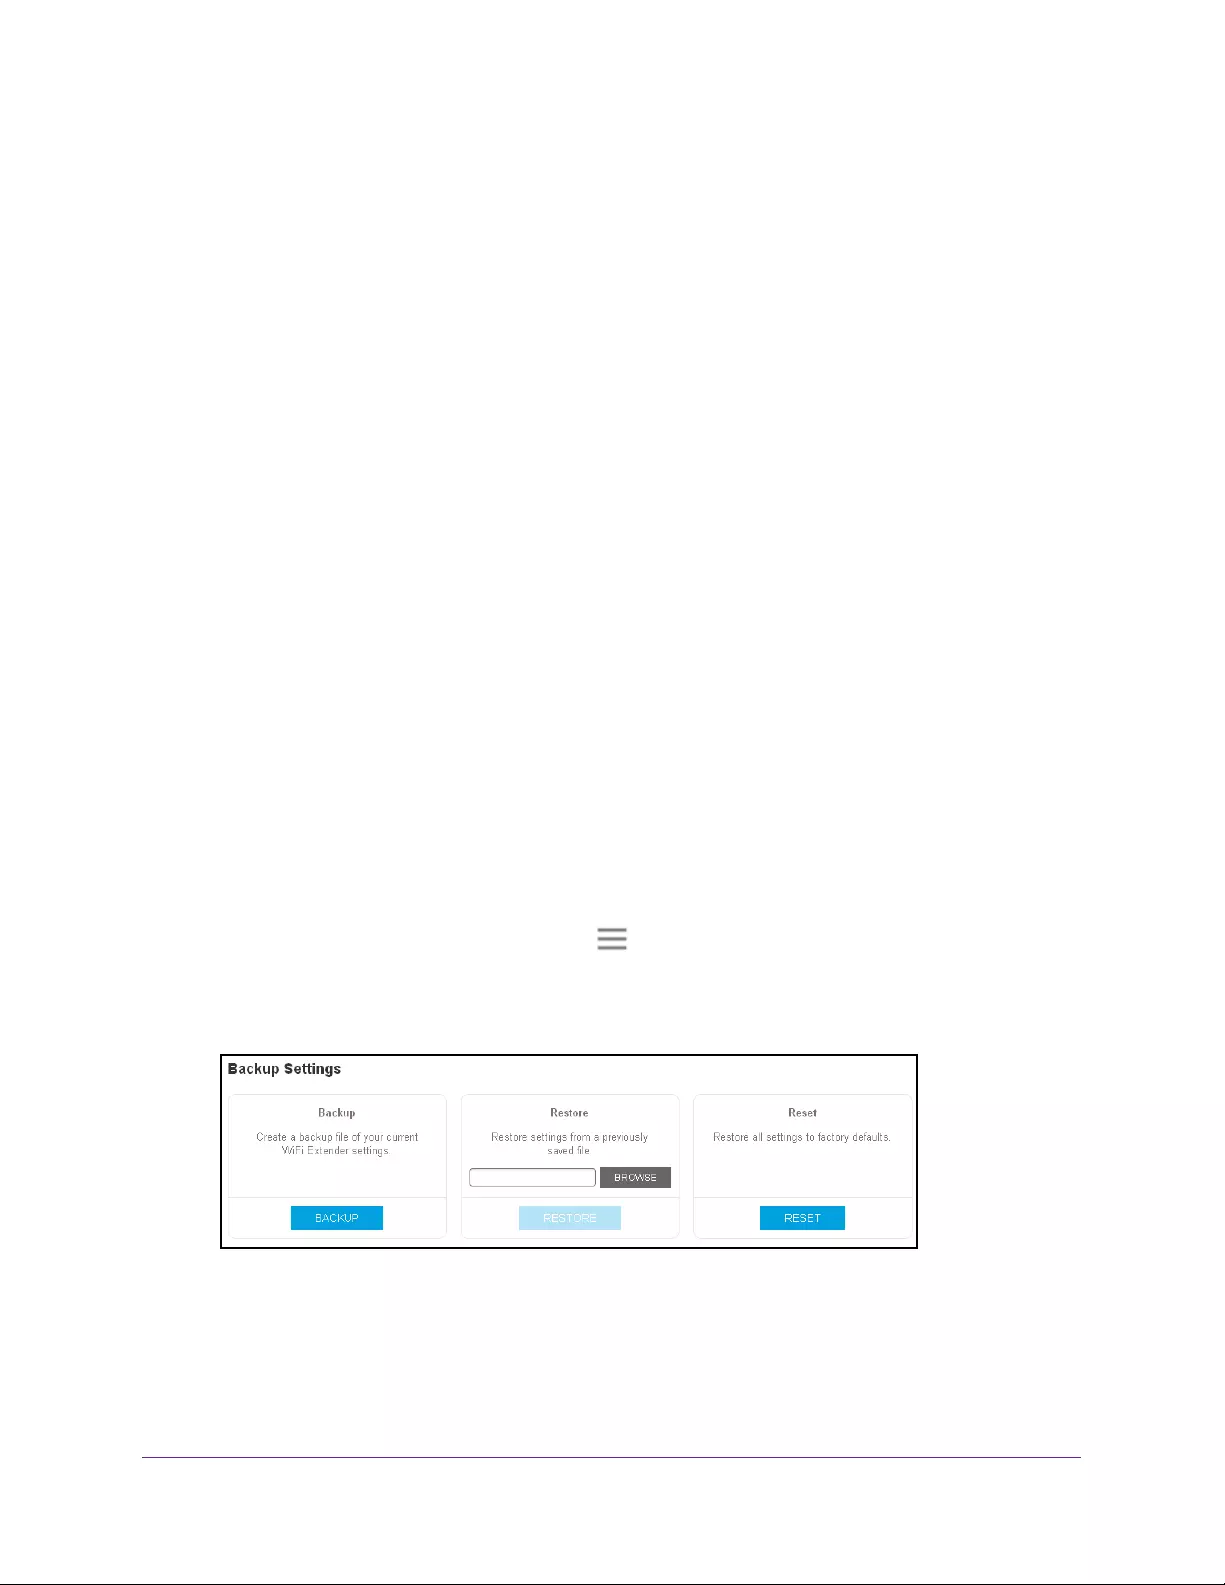
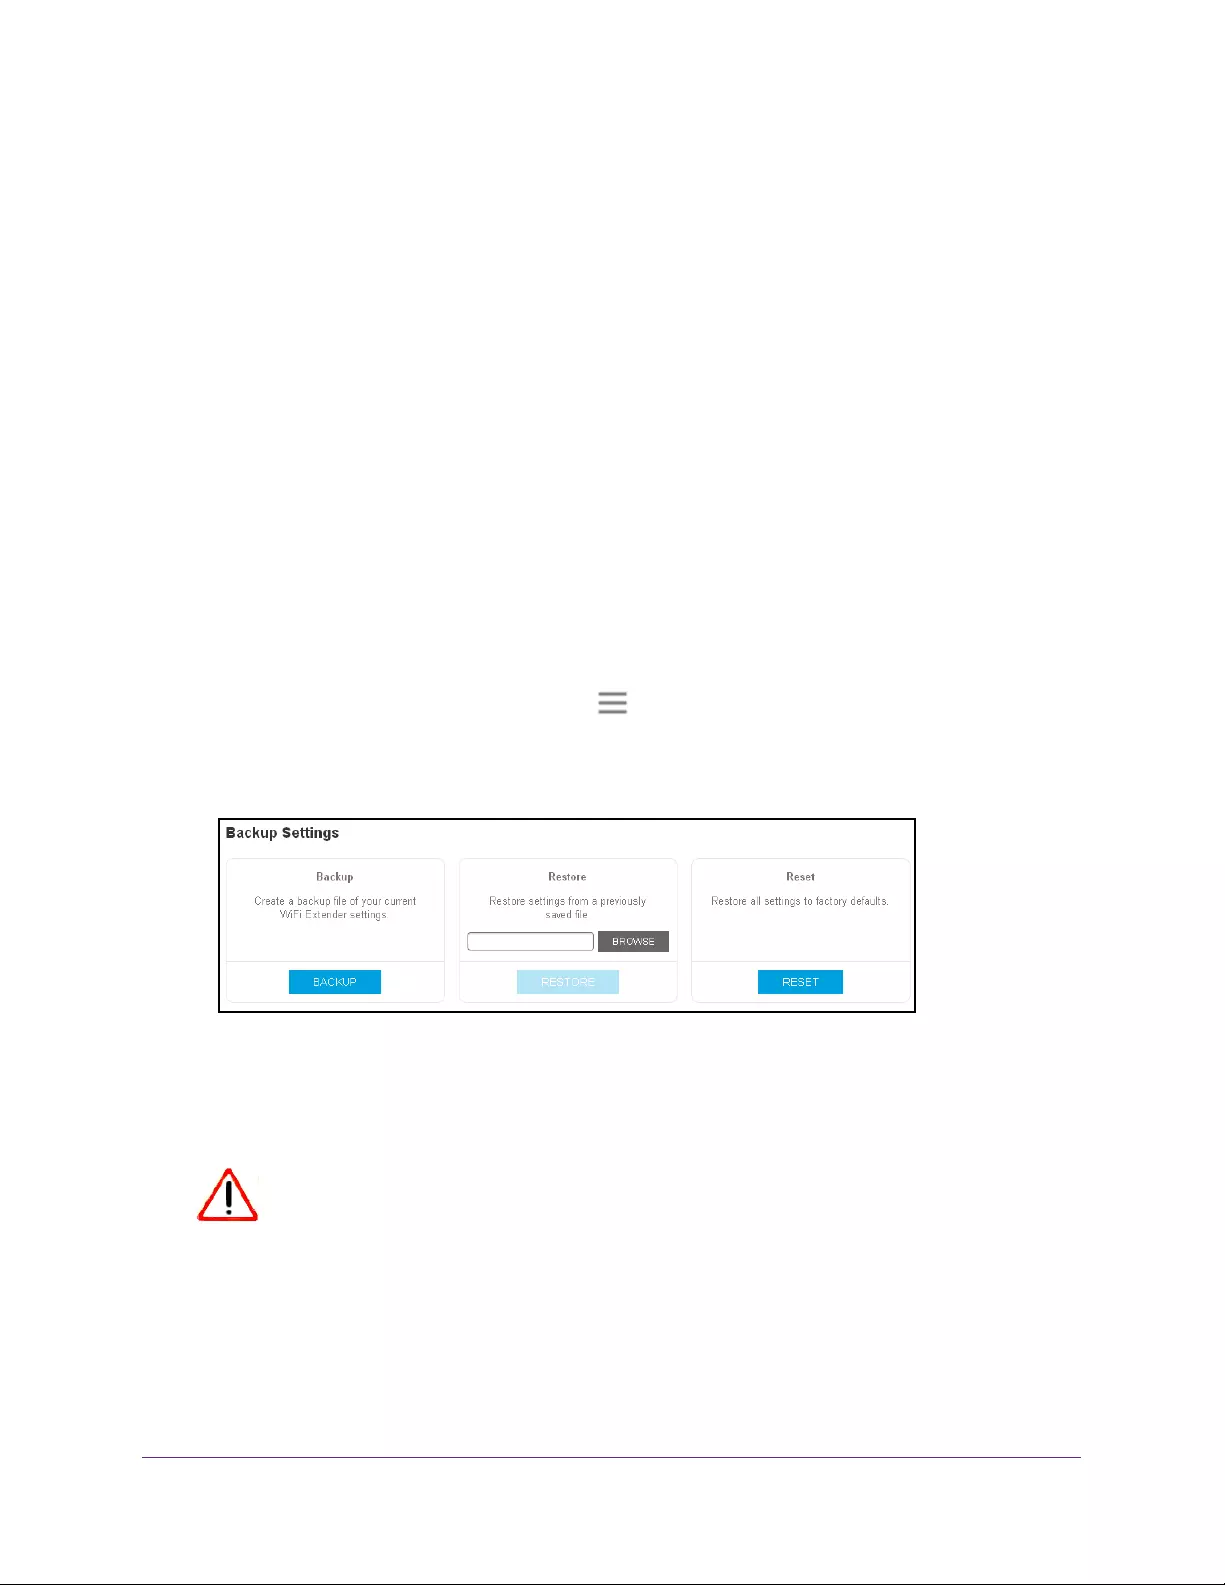
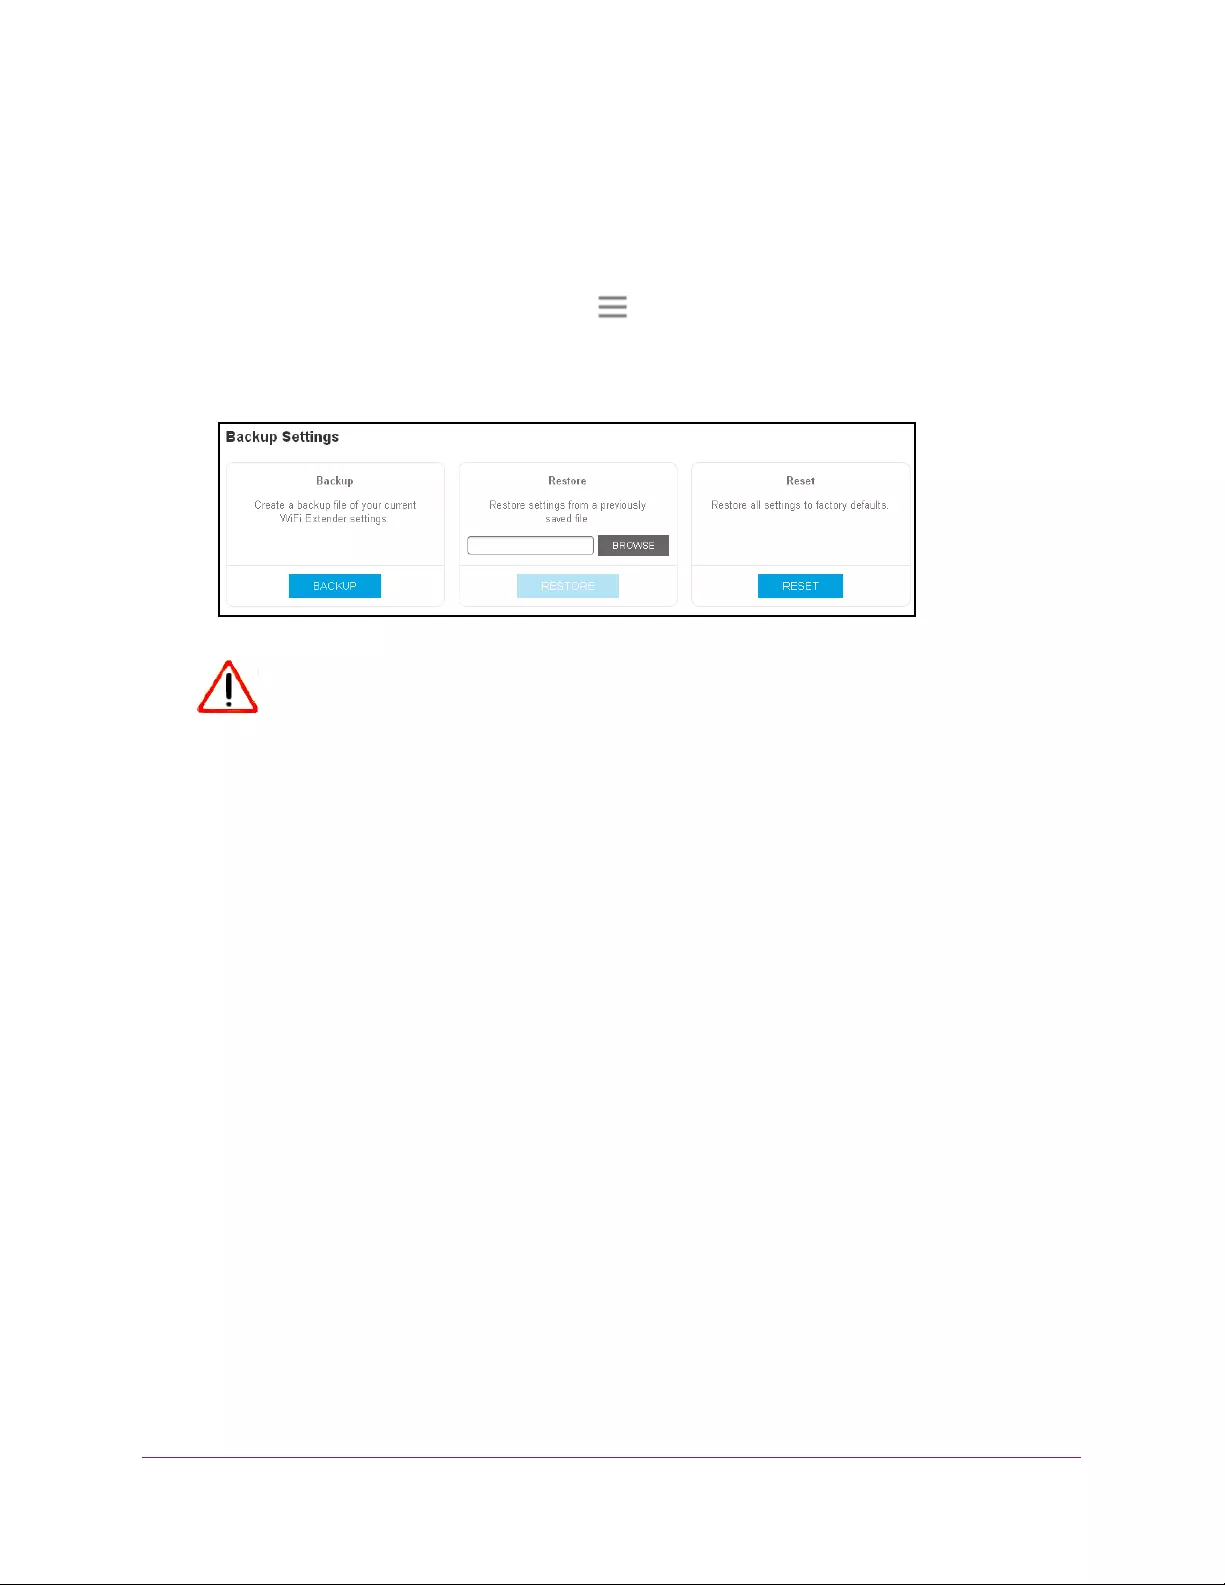
5. Select Settings > Other.
6. Click the BACKUP button.
Your browser extracts the configuration file from the extender. By default, the name of the
backup file is NETGEAR_Ex6100.cfg.
Monitor and Maintain the Extender
38
AC750 WiFi Range Extender
7. If your browser is not set up to save downloaded files automatically, locate where you want
to save the file.
8. Click the OK button.
The extender configuration settings are backed up.
Restore the Configuration Settings
You can restore the configuration file of the extender to a previously saved configuration file.
To restore the extender configuration settings:
1. On a computer or WiFi device that is connected to the extender network, launch a web
browser.
2. In the address field of your browser, enter www.mywifiext.net.
A login page opens.
3. Enter your user name and password and click the LOG IN button.
The Status page displays.
4. If your browser displays the Menu icon , click it.
The extender menu displays.
5. Select Settings > Other.
6. Click the BROWSE button.
7. Locate and select the previously saved backup file.
By default, the name of the backup file is NETGEAR_EX6000.cfg.
CAUTION:
After you click the RESTORE button, do not try to go online, turn off the
extender, shut down the computer, or do anything else to the extender
until it finishes restarting.
8. Click the RESTORE button.
A confirmation pop-up window opens.
Monitor and Maintain the Extender
39
AC750 WiFi Range Extender
9. Confirm your decision.
The extender configuration is restored and the extender restarts. This process takes
about one minute.
Return the Extender to Its Factory Settings
To reset the extender to its factory settings, you can use the Factory Reset button or the
Erase feature. For information about the factory settings, see Factory Default Settings on
page 47.
Use the Factory Reset Button to Restore Factory Settings
CAUTION:
This process erases any settings that you have configured in the extender.
To restore factory settings:
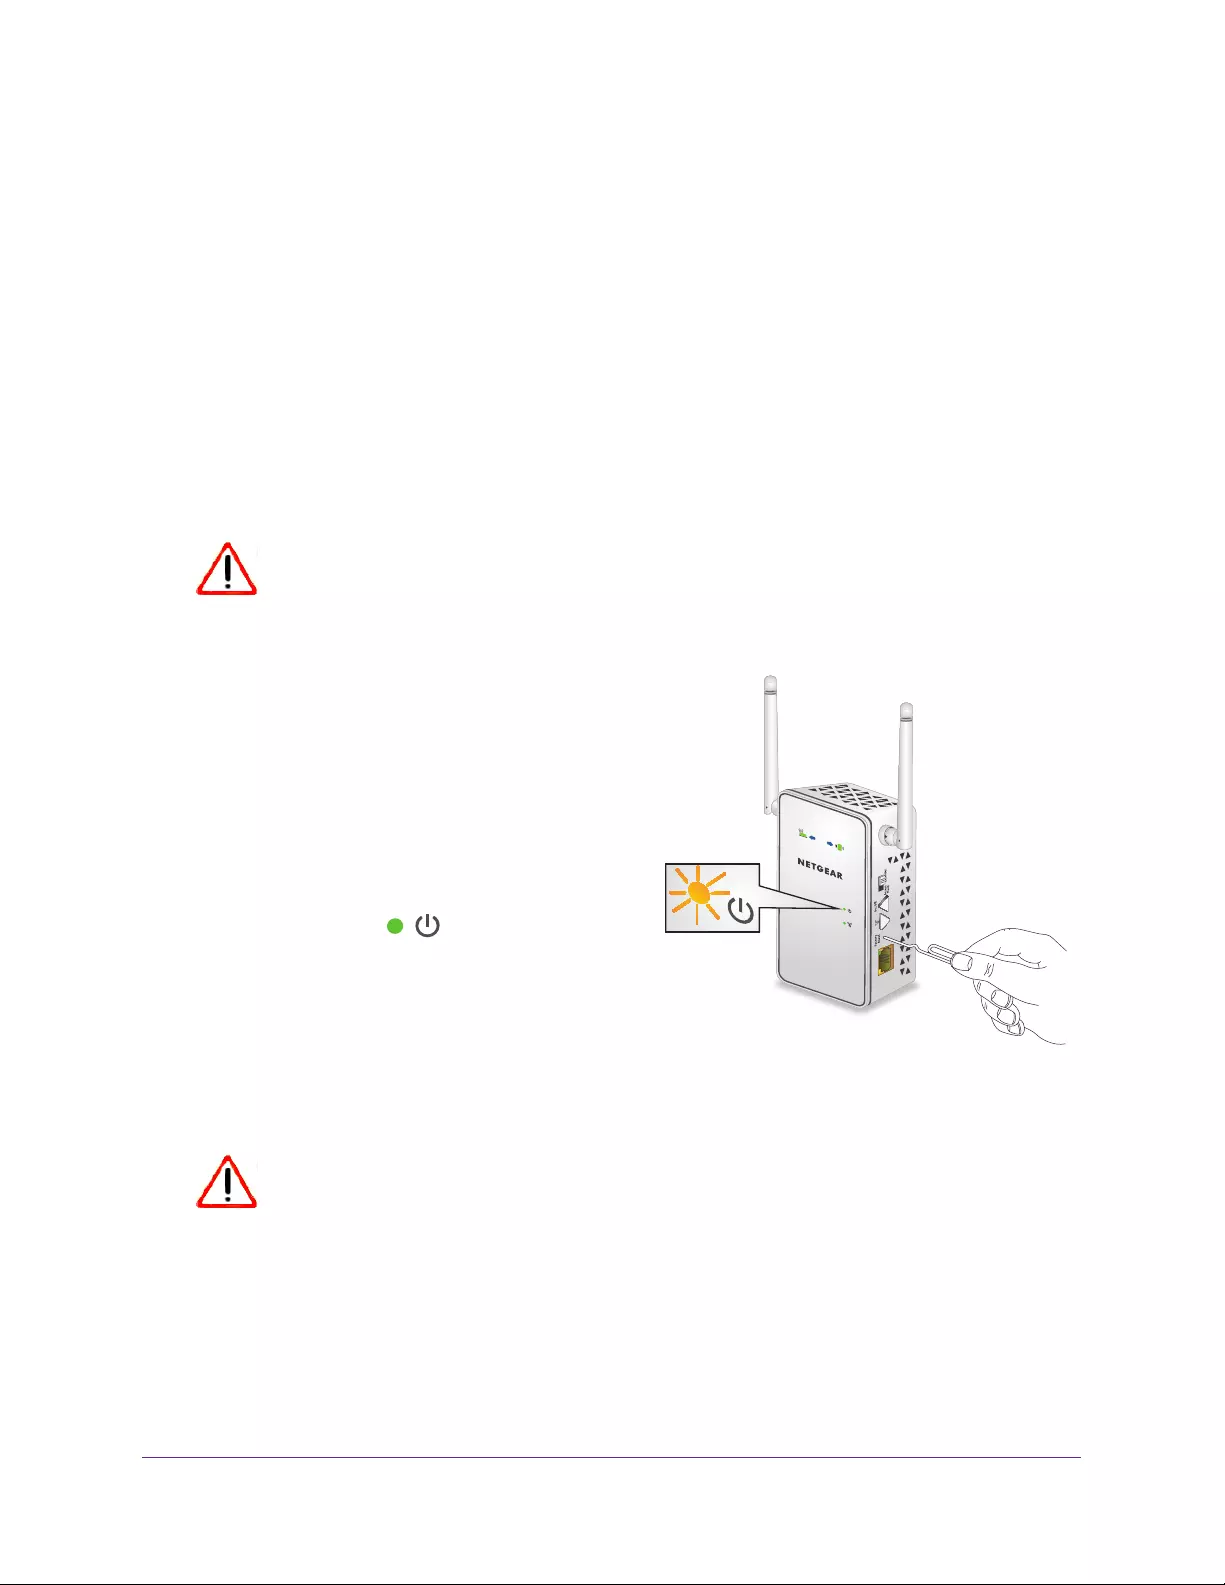
1. Insert a paper clip into the Factory Reset
hole and hold it until the Power LED blinks
amber.
2. Release the button.
All the LEDs turn off for about 3 seconds.
The Power LED lights solid amber for about
30 seconds.
The Power LED lights solid green.
The extender returns to its factory settings.
When you plug in the extender, it detects the
position of its Access Point/Extender switch.
Erase the Settings and Return to Factory Settings
CAUTION:
This process erases any settings that you have configured in the extender.
To erase the extender’s current settings:
1. On a computer or WiFi device that is connected to the extender network, launch a web
browser.
2. In the address field of your browser, enter www.mywifiext.net.
Monitor and Maintain the Extender
40
AC750 WiFi Range Extender
A login page opens.
3. Enter your user name and password and click the LOG IN button.
The Status page displays.
4. If your browser displays the Menu icon , click it.
The extender menu displays.
5. Select Settings > Other Settings.
CAUTION:
After you click the RESET button, do not try to go online, turn off the
extender, shut down the computer, or do anything else to the extender
until it finishes restarting.
6. Click the RESET button.
A confirmation pop-up window opens.
7. Confirm your decision.
The extender returns to its factory settings and restarts. This process takes about one
minute.
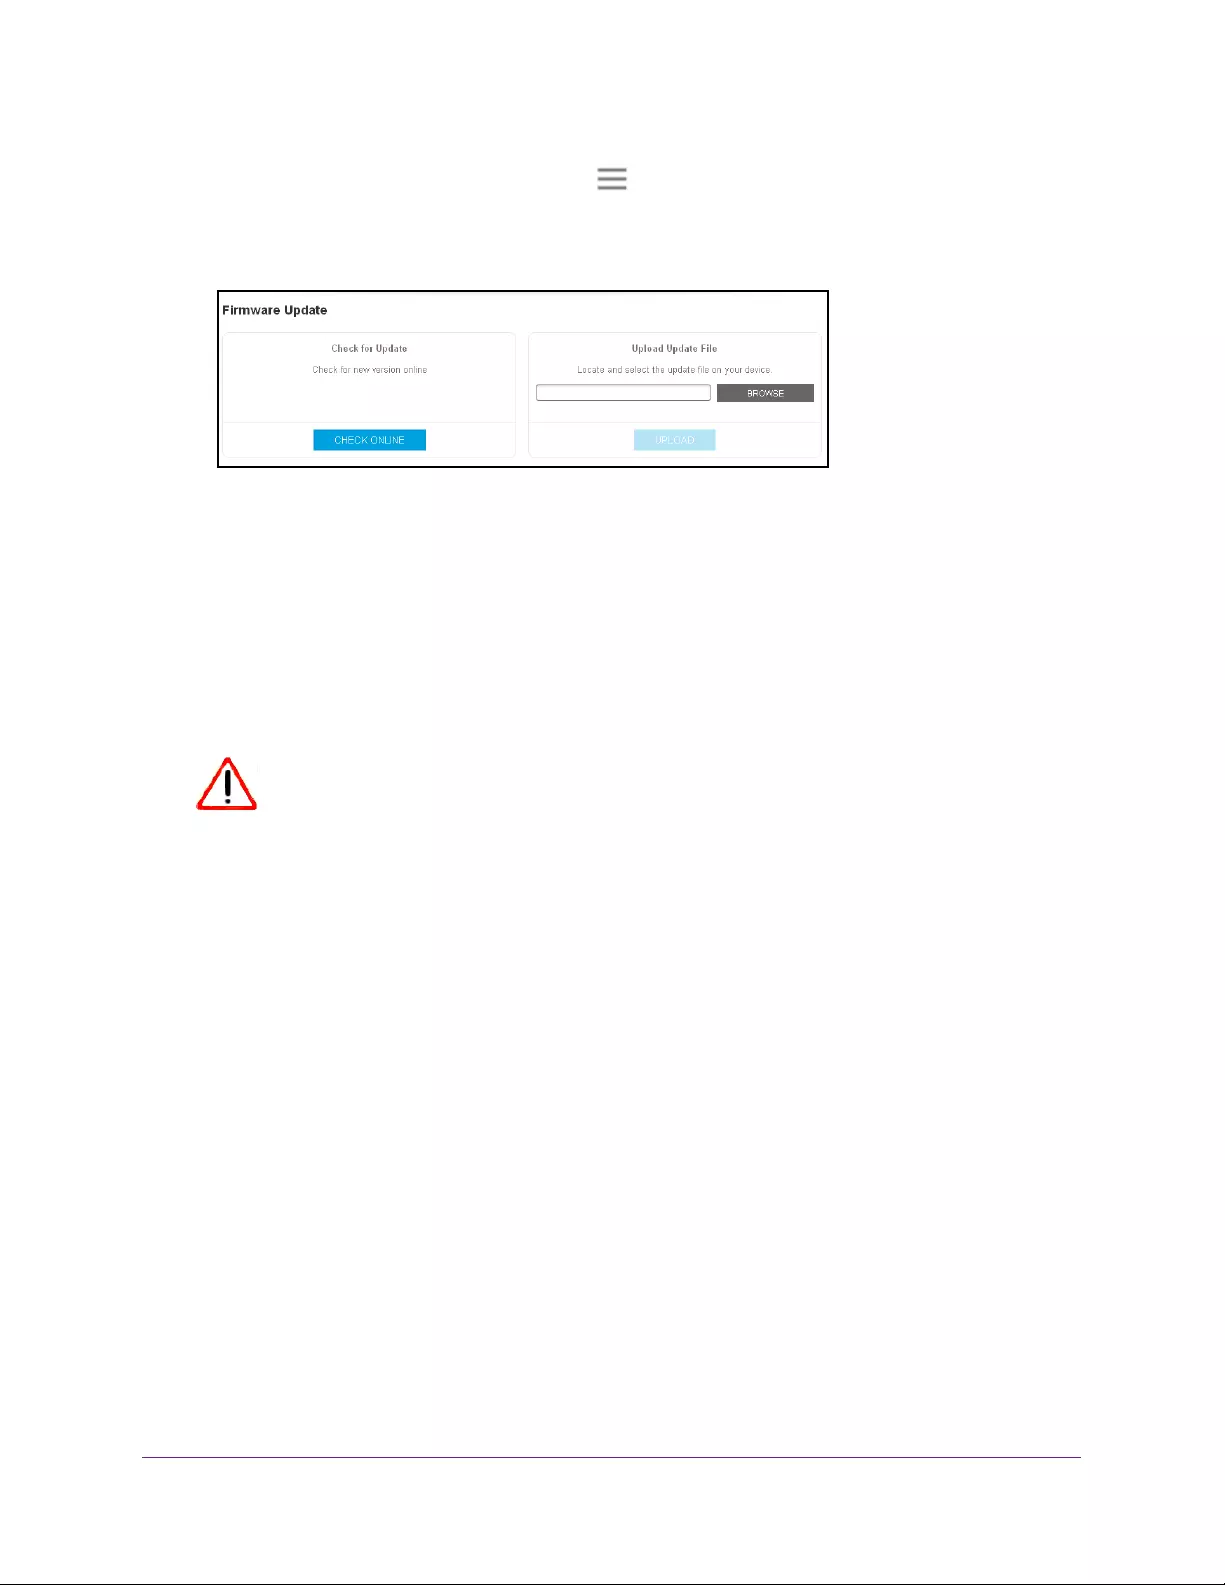
Update the Firmware
Unless you changed the settings in the Firmware Update page previously, the extender is set
up to check for new firmware automatically at login.
To check manually for new firmware and, if available, update the firmware:
1. On a computer or WiFi device that is connected to the extender network, launch a web
browser.
2. In the address field of your browser, enter www.mywifiext.net.
A login page opens.
3. Enter your user name and password and click the LOG IN button.
The Status page displays.
Monitor and Maintain the Extender
41
AC750 WiFi Range Extender
4. If your browser displays the Menu icon , click it.
The extender menu displays.
5. Select Firmware Update.
6. Click the CHECK ONLINE button.
7. If new firmware is available, follow the onscreen prompts to download it onto your computer.
Note: You might need to unzip the firmware file.
8. Click the BROWSE button.
9. Locate and select the new firmware file.
The firmware file name ends with a .chk extension.
CAUTION:
After you click the UPLOAD button, do not try to go online, turn off the
extender, shut down the computer, or do anything else to the extender
until it finishes restarting.
10. Click the UPLOAD button.
The firmware update starts and the extender restarts. The firmware update process takes
about two minutes.
Restart the Extender Remotely
You can log in to the extender and restart it. When the extender restarts, all computers and
WiFi devices that are connected to its WiFi network are automatically disconnected.
To restart the extender remotely:
1. On a computer or WiFi device that is connected to the extender network, launch a web
browser.
2. In the address field of your browser, enter www.mywifiext.net.
A login page opens.
3. Enter your user name and password and click the LOG IN button.

Monitor and Maintain the Extender
42
AC750 WiFi Range Extender
The Status page displays.
4. If your browser displays the Menu icon , click it.
The extender menu displays.
5. Select Settings > Other.
The Other Settings page displays.
6. Click the RESTART button and click the Yes button to confirm.
The extender restarts, which takes about two minutes.

43
5
5. FAQs and Troubleshooting
This chapter covers the following topics:
•FAQs
•Cannot Connect to the Extender
•Cannot Join a WiFi Network

FAQs and Troubleshooting
44
AC750 WiFi Range Extender
FAQs
This section provides answers for difficulties you might experience with the extender.
The web browser setup keeps asking me for my network password (passphrase) or
security key, and I am sure that I entered the correct password. What can I do?
The extender is probably placed at the borderline of the range covered by the router or
access point. For more information about where the place the extender, see Place the
Extender and Apply Power on page 10.
If you are using WEP security, make sure that you are typing the network password in the
correct field.
Can I set up the extender in extender mode if I connect it to the router or access point
with an Ethernet cable?
No. The extender is designed to connect wirelessly to the router or access point if it is in
extender mode. If the extender is in access point mode, you can connect it to the router or
access point with an Ethernet connection. For more information about access point mode,
see Use the Extender in Access Point Mode on page 15.
I forgot my login user name and password. What can I do?
In the login window, click the Username & Password Help link to answer the security
questions that you set up during the initial setup. For more information, see Recover a
Forgotten User Name or Password on page 35.
How do I restore the extender to its factory default settings?
To restore factory settings:
1. Use a sharp object such as a pen or paper clip to press and hold the Factory Reset
button on the extender until the Power LED blinks amber.
2. Release the Factory Reset button and wait for the extender to reboot.
The extender resets and returns to the factory default settings.
I am connected to the extender WiFi network and launched a browser. Why can’t I see
the web browser setup?
Try these troubleshooting steps:
•Make sure that your computer is set up to use DHCP (most are).
•Make sure that the Device Link LED is green and that you are using a valid IP address.
•Relaunch the web browser and enter www.mywifiext.net in the address field. Type your
user name and password and click the LOG IN button.

FAQs and Troubleshooting
45
AC750 WiFi Range Extender
Cannot Connect to the Extender
If you cannot connect to the extender, determine what prevents you from connecting:
•If you forgot your user name or password, click the Username & Password Help link.
For more information, see FAQs on page 44.
•If your browser displays an error page, include http:// in the address field of your browser
by typing http://www.mywifiext.net.
•If you already set up the extender but can no longer connect to it over WiFi, check to see
if the Device Link LED is off or red. This indicates a poor connection or no connection.
Check to see if you accidentally connected to a different WiFi network instead of the
extender network.
•If you cannot get a WiFi connection working, you can use an Ethernet cable to connect
your computer to the extender.
Cannot Join a WiFi Network
To join a WiFi network, you must know its network name (also called the SSID) so that you
can select it. If the network is secure, you must know the passphrase or key. If the extender
does not connect to the network that you select, the cause might be one of the following:
•It is possible that you typed the network name, passphrase, or key incorrectly. Use Smart
Setup (see Run Smart Setup on page 17) to select a WiFi network and retype the
passphrase or key. The passphrase or key is case-sensitive. For example,
PASSWORD25 is not the same as Password25 or password25.
•If the extender cannot detect your WiFi network, check to see if your WiFi network is still
working. Make sure that the WiFi router is turned on. If possible, move the extender
closer to the WiFi router.
•If the extender Device Link LED is red, the WiFi connection between the WiFi router and
the extender is poor. You can establish the best connection with a clear line of sight
between the extender and the WiFi router. Make sure that no physical obstacles exist
between the extender and the WiFi router, and try to move the extender closer to the WiFi
router.
If you use Smart Setup, and the extender does not connect to the WiFi router, does not
connect to the Internet, or cannot get an IP address from the WiFi router, Smart Setup
displays a message to notify you that the extender is not configured.
To run Smart Setup again, click the YES button. To manually configure the extender, click the
NO, CONFIGURE MANUALLY button.

46
A
A. Supplemental Information
This appendix includes the following sections:
•Factory Default Settings
•Technical Specifications

Supplemental Information
47
AC750 WiFi Range Extender
Factory Default Settings
The following table includes the factory settings for the extender. You can use the Factory
Reset button or the Erase feature to return the extender to these settings. (See Return the
Extender to Its Factory Settings on page 39.)
Table 2. Factory default settings
Feature Setting
Setup Wizard Enabled
Wireless communication Enabled
Wireless network names (SSIDs) • 2.4 GHz network: EX6100_NETGEAR_2GEXT
• 5 GHz network: EX6100_NETGEAR_5GEXT
Security Disabled
Transmission speed Auto1
1. Maximum wireless signal rate (IEEE Standard 802.11). Actual throughput will vary. Network conditions and environmental
factors, including volume of network traffic, building materials and construction, and network overhead, lower actual data
throughput rate.
Country/region Varies by region
Operating mode 802.11ac, 802.11n, 802.11g, 802.11b, 802.11a
Data rate Up to 300 Mbps for 2.4 GHz network and 433 Mbps for 5 GHz network
DHCP Client enabled
Technical Specifications
The following table includes the product specifications.
Table 3. Technical specifications
Feature Description
Network protocol and standards
compatibility
Data and routing protocols: TCP/IP, DHCP server and client, DNS
relay, NAT (many-to-one)
Power consumption 100–240V, 50/60 Hz, 0.21A maximum
Physical specifications • Dimensions: 122 x 74 x 38 mm (4.8 x 2.9 x 1.5 in.)
• Weight: 213 g (8.15 oz.)
Supplemental Information
48
AC750 WiFi Range Extender
Environmental • Operating temperature: 32° to 140°F (0° to 40°C)
• Operating humidity: 90% maximum relative humidity,
noncondensing
• Electromagnetic emissions: Meets requirements of FCC Part 15
Class B.
Interface • Local: 10BASE-T, 100/1000BASE-Tx, RJ-45
• 802.11ac, 802.11n, 802.11a, 802.11g, 802.11b
Table 3. Technical specifications (continued)
Feature Description
Привет, друзья! Многие из нас часто сталкиваются с такой проблемой как плохой сигнал Wi-Fi и из-за этого низкая скорость. Также все мы знаем про 2 диапазона. При одновременном подключении к беспроводной сети телевизора, компьютера, медиаплеера и других гаджетов частоты в 2,4 ГГц может показаться мало. Теряется качество сигнала, не загружаются страницы или процесс происходит слишком медленно.
Проблема плохого сигнала решается двумя способами – подключением в каждой комнате точки доступа или же подсоединением TP-Link RE200 AC750. Ретранслятор обеспечит стабильный сигнал с заявленной скоростью соединения, причем для двух диапазонов. А это очень важно, ведь диапазон 5 ГГц часто более свободный.
Не забывайте! Модель подойдет, если в доме используется двухдиапазонный маршрутизатор.
Содержание
- Комплектация
- Внешние данные
- Функциональные возможности
- Подключение
- Задать вопрос автору статьи
Комплектация
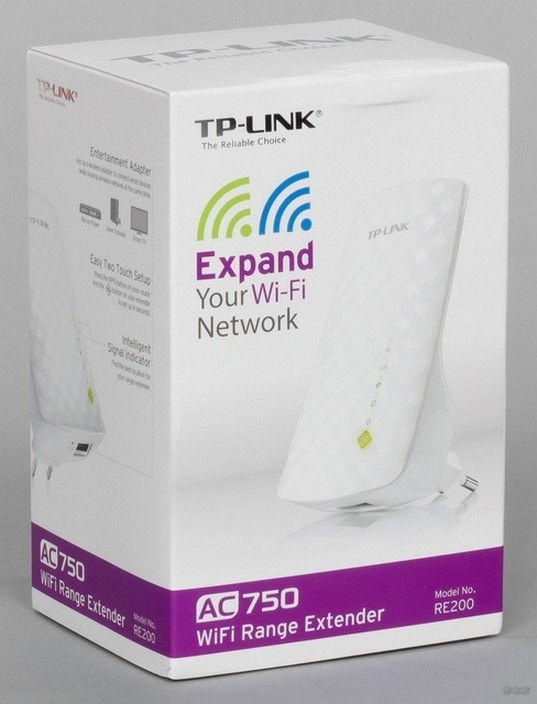
Усилитель Wi-Fi сигнала упакован в светлую картонную коробку. На русском представлено описание модели RE200 AC750, но более детальная информация написана на английском языке. В коробке вы найдете:
- сам ретранслятор TP-Link (так же его называют репитер или повторитель);
- гарантийный талон;
- инструкцию;
- диск;
- патч-корд белого цвета.
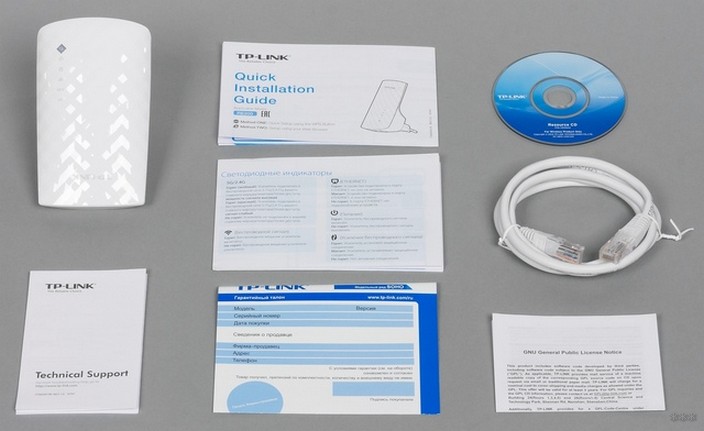
Внешние данные
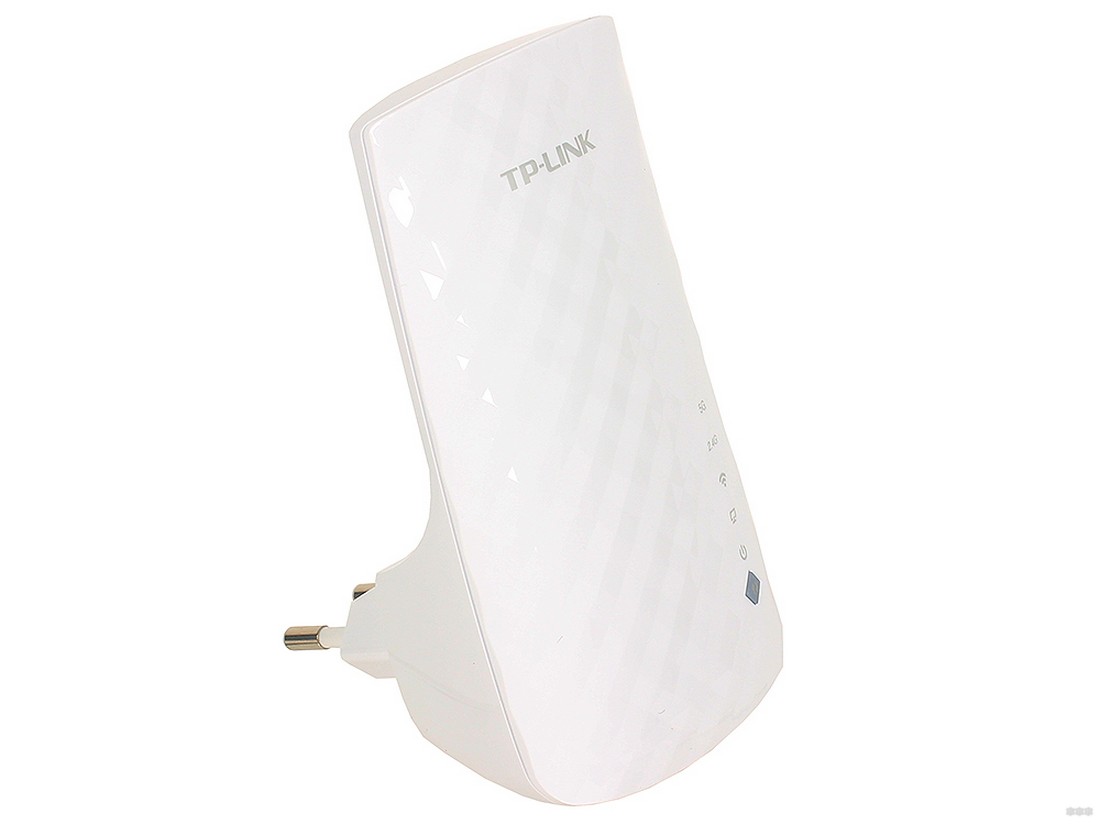
Начнем наш обзор с внешнего вида. TP-Link RE200 выглядит привлекательно и стильно, что позволяет ему вписаться в любой интерьер современной комнаты. Дизайнеры явно поработали над формой, ведь она совсем не простая. Смотрится компактно и аккуратно за счет незначительных параметров 65×38×110 мм. Несмотря на отсутствие продуманной системы решеток вентиляции, нагрев корпуса незначительный.
Для подключения к электрической сети устройство оснащено обычной двухполюсной вилкой. Изделие не предусматривает отдельного выключателя питания. Согласно указанным параметрам, потребление электроэнергии составляет 3,5 Вт.
Корпус лицевой части выполнен из глянцевого пластика, что смотрится как «бриллиантовая» фактура. В верхней части красуется логотип компании, в нижней имеется блок индикаторов и кнопка WPS. Мигают отображатели не ярко, поэтому не раздражают. На задней части корпуса размещена кнопка сброса настроек.
Посмотрите обзор двух усилителей от TP-Link:
Функциональные возможности
Беспроводной повторитель расширяет зону покрытия сигнала Wi-Fi на частоте 2,4 ГГц и в более свободном диапазоне на 5 ГГц. При этом поддерживается популярный стандарт 802.11ac, выдающий максимально возможную скорость соединения – 433 Мбит/с. Устройство можно задействовать в качестве адаптера для подключения разных приборов по Wi-Fi.
Преимущества TP-Link RE200 AC750:
- Ретранслятор устанавливается между роутером и устройством, которое работает от беспроводной сети, что позволяет увеличить площадь покрытия. Общая скорость беспроводного соединения – до 750 Мбит/с. Радиус действия – 185 м2, чего вполне достаточно для просмотра HD-видео, запуска онлайн-игр и выполнения других усложненных задач.
- RE200 поддерживает 802.11ac, что позволяет гарантировать мощное подключение к беспроводному интернету. Совместим с любым роутером с технологией DUAL BAND, предоставляя при этом расширение зоны покрытия двух диапазонов.
- Моментальное подключение одним из способов – нажатием WPS на роутере и на репитере. Всего пару минут и интернет будет доступен, там, где раньше не был. После подключения устройство легко перемещается и переключается в других комнатах. Проведение повторных настроек не требуется.
- Индикатор позволяет оценить степень сигнала, который поступает от роутера. Такая оценка гарантирует удобную установку на нужном расстоянии от маршрутизатора.
- Наличие проводного порта Ethernet расширяет возможности. Повторитель используется как адаптер для подключения устройств: приставки IPTV, игровой консоли и Smart TV. При этом основной функционал не теряется, и устройство продолжает параллельно работать как усилитель сигнала.
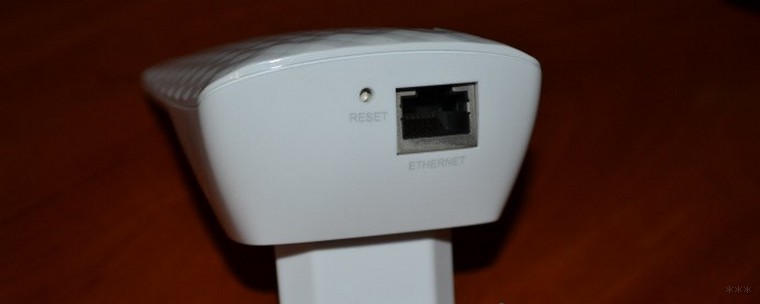
Результаты тестирования производительности оказались хорошими. В самой дальней точке прибор обеспечивает надёжный сигнал на хорошей скорости в 50+ Мбит/с, чего вполне достаточно даже для просмотра HD-видео.
Подключение
В следующем видео – подключение и тестирование ретрансляторов:
Самый простой способ запуска этой модели – применение технологии WPS. Для этого подключение к ПК не требуется. Достаточно нажать кнопку (на репитере она выглядит как значок синхронизации), а также оценить ее работу по индикаторам. Сохраняется код и прочие настройки доступа.

Кнопка необходима для подсоединения повторителя к роутеру, а не к клиентам. Нажимается она одновременно и на роутере.
Чтобы изменить существующие параметры устройства, необходимо обратиться к веб-интерфейсу. Для этого потребуется ПК и запуск такого помощника, как «Quick Setup Wizard», который упрощает процесс конфигурации. Такие настройки проводятся редко.
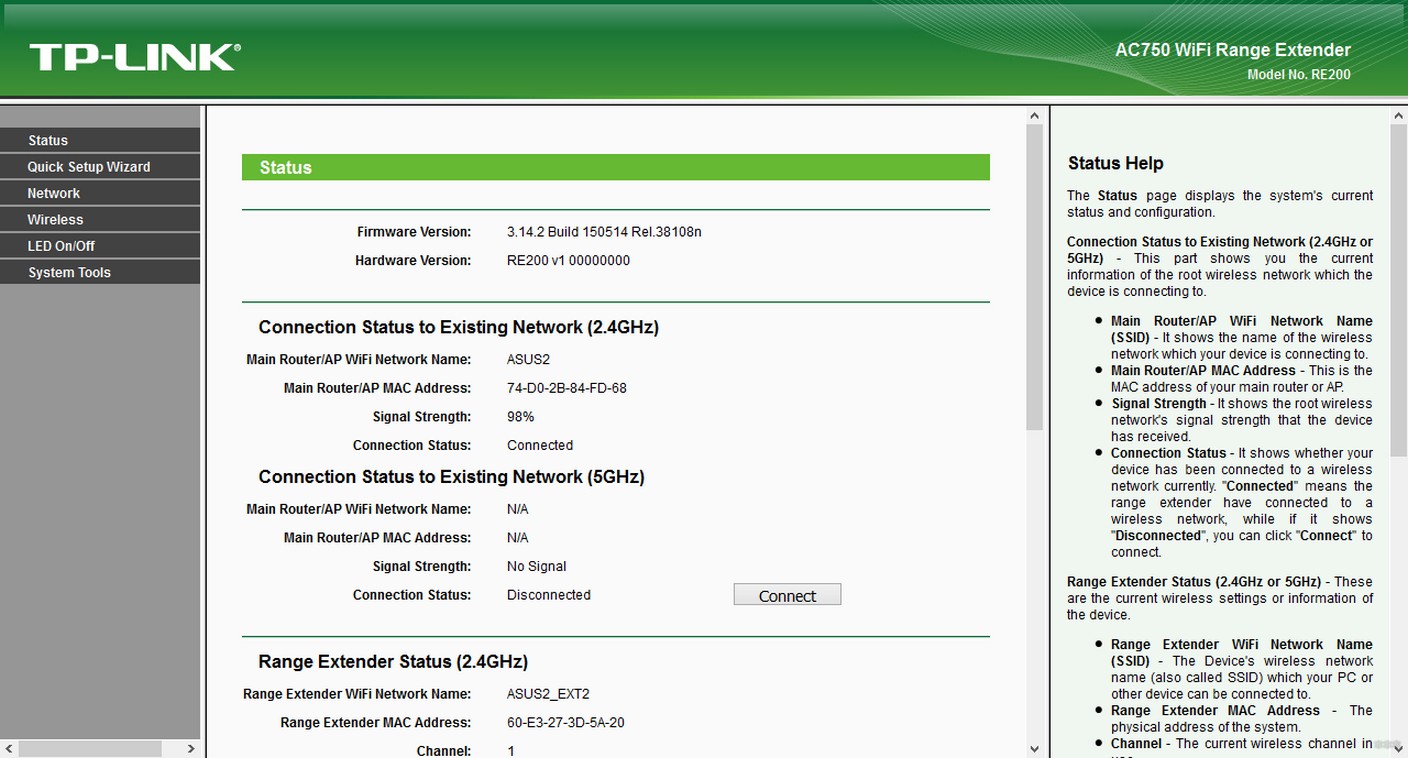
Вкратце я все же их опишу:
- Чтобы попасть в админку, пишем «tplinkrepeater.net».
- С появлением окна авторизации введите admin в обе строки.
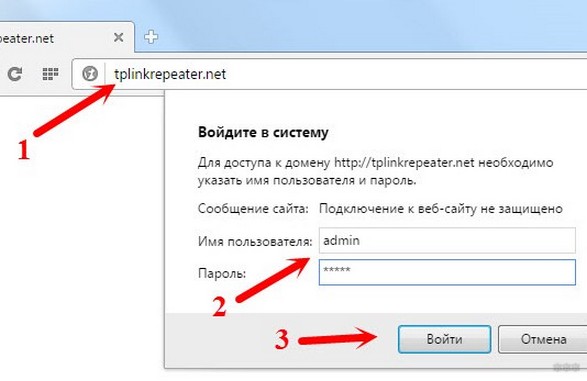
- При появлении окна настроек выберите свой регион, нажмите на кнопку «Next».
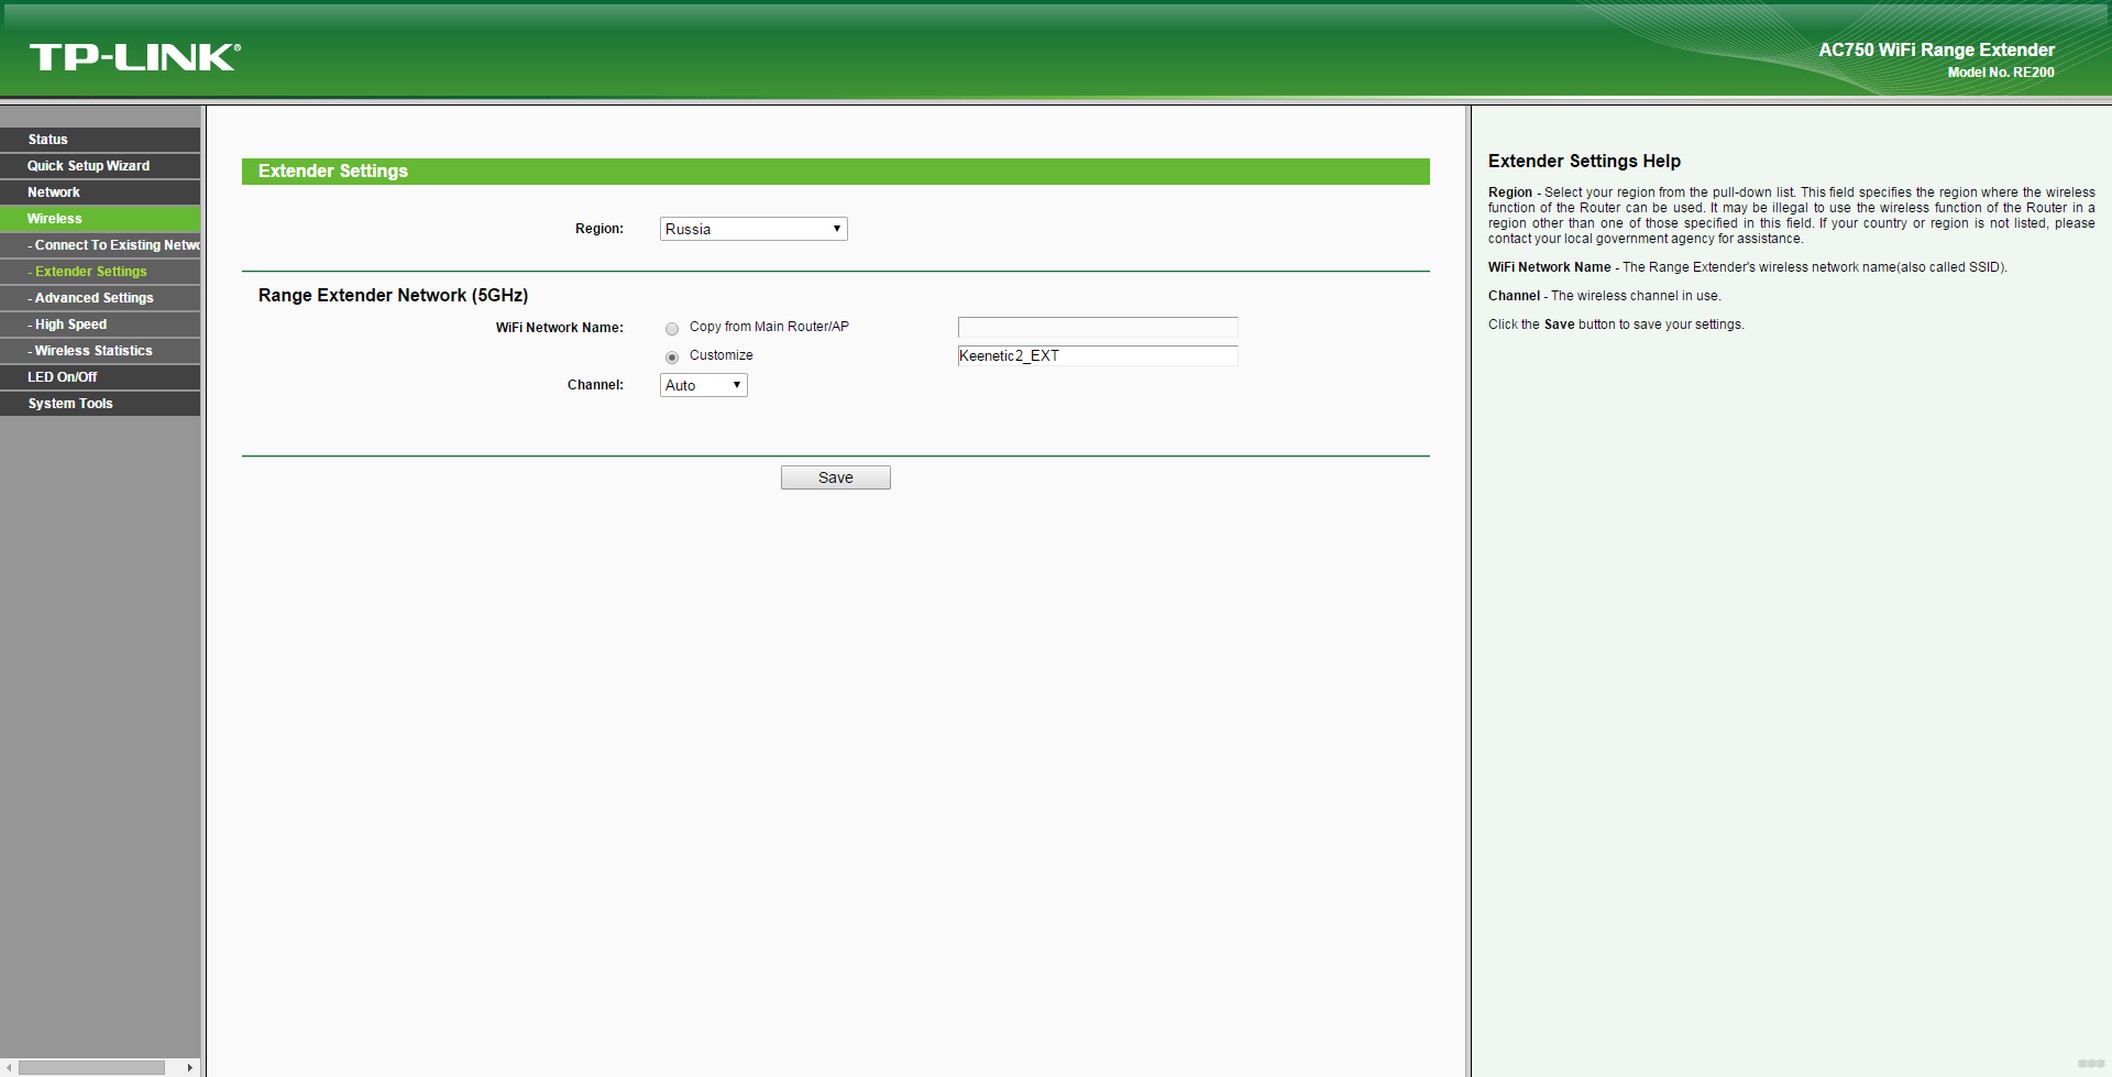
- Устройство определит поиск сетей на частоте 2,4 ГГц, выберите из списка свою.
- Укажите пароль от сети, которую желаете расширить.
- Потом прибор осуществляет поиск на частоте 5GHz и подключение проводится по такому же принципу, что и с другой частотой.
- На экране появляется информация со всеми настройками. Их стоит подтвердить, нажав кнопку Finish. Репитер перезагрузиться и начнет усиливать Wi-Fi сигнал.
Для неискушенных пользователей TP-Link RE200 AC750 – это настоящая находка, ведь модель функциональная и простая в плане установки. Проведенное тестирование продемонстрировало, что представленная модель не отличается от аналоговых вариантов от других производителей. При этом гарантирована бесперебойная работа и расширение зоны покрытия сети.
Такое устройство – настоящее спасение для тех, кто желает пользоваться интернетом, но радиус покрытия обычного адаптера совсем мал. Легко перемещается и подключается в розетку. При этом дополнительных настроек делать не придется.
Каждый пользователь оценит технические характеристики, среди которых скорость беспроводного соединения, недоступная многим конкурентам. Оценив обзор, многие решаться на покупку, а при эксплуатации убедятся, что прибор стоит потраченных средств.
Кстати, стоит репитер в сетевых магазинах бытовой техники 2000 рублей. На мой взгляд, можно брать, если у вас большая квартира и двухдиапазонный роутер. Если ваш маршрутизатор работает только на одной частоте 2,4 ГГц, то выберите другой ретранслятор. Как правило, репитеры для одного диапазона стоят чуть дешевле (примерно на 500 рублей).
Ставьте оценку, если статья была полезной! Есть вопросы? Смело пишите в комментарии! А я прощаюсь и иду писать для вас дальше. Всем пока!