

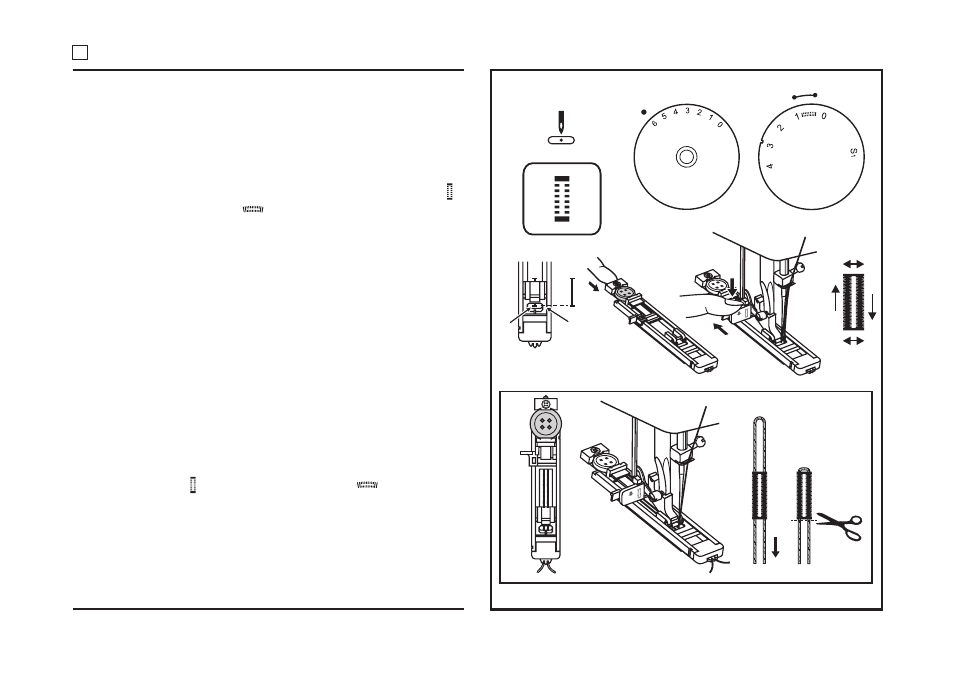
5, 6, 8, 10 Stitch Sewing Machine
5
Four-step buttonhole
(only for machines with 5, 6, 8 and 10 stitches)
Your machine makes buttonholes to any size you
choose in only four, easy steps.
* You never need to move the fabric or reposition the
needle.
* Always make a practice buttonhole on a sample of
your fabric.
* Be sure bobbin contains enough thread.
* When making buttonholes on hard-to-reach areas
convert machine bed to free arm sewing.
* Mark buttonhole position on fabric as indicated in
pattern.
Recommended settings
Stitch Selection
Buttonhole Stitch
Stitch Width:
Pre-set
Foot:
Buttonhole (L)
Needle Plate:
General Purpose (A)
Step A
* Raise presser foot.
* Place fabric under foot.
* Center 3 red guidelines (1) of foot around beginning
line of buttonhole.
* Turn buttonhole dial to the buttonhole symbol (A) for
the first step.
* Position needle in fabric at point (2) by turning the
hand wheel towards you.
* Stitch down to point 3.
35
If your four step buttonhole symbols are located on the stitch length dial on the front of your machine read the Manual instructions or watch this VIDEO
If your four step buttonhole symbols are located on the pattern selector of your machine read the Automatic Instructions.
4-Step Manual Buttonholes
Preparation: Measure the diameter and thickness of your chosen button and add 1/8″ for bar tacks and mark the button hole size on the fabric.
Figures 1 & 2:
1. Raise the presser foot.
2. Place the fabric under the foot.
3. Center three red guidelines (refer Figure 1) of the buttonhole foot around the beginning line of the buttonhole.
4. Turn the buttonhole dial to the button symbol «1» for the first step.
5. Position the needle in the fabric at point #2 by turning the handwheel towards you.
6. Stitch down to point #3. Your buttonhole should appear as shown in Figure 2.
Figure 3:
1. Raise the needle out of the fabric.
2.Turn the buttonhole dial to the buttonhole symbol «2» for the second step.
3. Make at least four stitches, ending at point #4
Figure 4:
1. Raise the needle out of the fabric.
2. Turn the buttonhole dial to the buttonhole symbol «3» for the third step.
3. Stitch up to point #5.
Figure 5:
1. Raise the needle out of the fabric.
2. Turn the buttonhole dial to the buttonhole symbol for «4» for the fourth/last step.
3. Make at least 4 stitches, ending at point #6.
4. Raise the presser foot and remove the garment from the machine.
5. Clip thread ends.
6. To open the buttonhole insert a seam ripper from both ends towards the middle.
4-Step Automatic Buttonhole
Preparation: Measure the Diameter and thickness of your chosen button and add 1/8″ for bar tacks and mark the buttonhole size on the fabric.
- Remove the General Purpose presser foot from your machine and attach your Buttonhole presser foot.
- Place your fabric under the foot so the markings on the Buttonhole presser foot align with your markings on the fabric.
- Adjust the stitch length dial to 0.5 — 1 to set the density. Note: Density varies according to the fabric. Always sew a test buttonhole first.
- Follow the 4-step sequence changing from one step to another with the stitch pattern selector dial. Take care not to sew too many stitches in steps in 1 and 3.
- Insert a seam ripper to open the buttonhole from both ends towards the middle.
Tips:
- Reduce the upper thread tension slightly for better results.
- Use a backing for fine or stretchy fabrics.
- It is advisable to use heavy thread or cord for stretch knit fabrics.
elna 200-123-028 4 Step Buttonhole Foot
4-STEP BUTTONHOLE FOOT
Ref: 200-123-028
Carefully mark the buttonhole length on fabric.
Place the fabric under the foot and follow the buttonhole instructions in your
owner’s manual.
Move the slider forward so that the top mark on the slider meets the start
mark.
Line up the markings on the foot with the top of the mark on the fabric.

Machine Settings
Stitch : Buttonhole stitch
Thread tension : 1 – 5
Stitch length : 0.5 – 1
Stitch width : 5
Read User Manual Online (PDF format)
Read User Manual Online (PDF format) >>
Download This Manual (PDF format)
Download this manual >>

SEWING THE STITCHES
Utility Stitches
101
3
Four-step Buttonholes
You can sew 4-step buttonholes using the following 4 stitches together. You can sew any desired length
for the buttonhole when using 4-step buttonholes. 4-step buttonholes are a good option when attaching
oversize buttons.
Four-step buttonholes are sewn as shown below.
a
aa
aMark the position and length of the
buttonhole on the fabric.
aMarks on fabric
bFinished stitching
b
bb
bAttach monogramming foot “N”, and select
stitch to sew the left side of the
buttonhole.
Note
When changing the stitch settings for the left side of the buttonhole, make sure that all setting should be
changed to match.
Stitch Stitch name Presser
foot Applications
Stitch width
[mm (inch.)]
Stitch length
[mm (inch.)] Twin
needle
Auto. Manual Auto. Manual
4 step buttonhole 1 Left side of 4 step buttonhole 5.0
(7/32)
1.5 — 7.0
(1/16 — 1/4)
0.4
(1/64)
0.2 — 1.0
(1/64 — 1/16) NO
4 step buttonhole 2 Bar tack of 4 step buttonhole 5.0
(7/32)
1.5 — 7.0
(1/16 — 1/4)
0.4
(1/64)
0.2 — 1.0
(1/64 — 1/16) NO
4 step buttonhole 3 Right side of 4 step buttonhole 5.0
(7/32)
1.5 — 7.0
(1/16 — 1/4)
0.4
(1/64)
0.2 — 1.0
(1/64 — 1/16) NO
4 step buttonhole 4 Bar tack of 4 step buttonhole 5.0
(7/32)
1.5 — 7.0
(1/16 — 1/4)
0.4
(1/64)
0.2 — 1.0
(1/64 — 1/16) NO
ab
If your four step buttonhole symbols are located on the stitch length dial on the front of your machine read the Manual instructions or watch this VIDEO
If your four step buttonhole symbols are located on the pattern selector of your machine read the Automatic Instructions.
4-Step Manual Buttonholes
Preparation: Measure the diameter and thickness of your chosen button and add 1/8″ for bar tacks and mark the button hole size on the fabric.
Figures 1 & 2:
1. Raise the presser foot.
2. Place the fabric under the foot.
3. Center three red guidelines (refer Figure 1) of the buttonhole foot around the beginning line of the buttonhole.
4. Turn the buttonhole dial to the button symbol «1» for the first step.
5. Position the needle in the fabric at point #2 by turning the handwheel towards you.
6. Stitch down to point #3. Your buttonhole should appear as shown in Figure 2.
Figure 3:
1. Raise the needle out of the fabric.
2.Turn the buttonhole dial to the buttonhole symbol «2» for the second step.
3. Make at least four stitches, ending at point #4
Figure 4:
1. Raise the needle out of the fabric.
2. Turn the buttonhole dial to the buttonhole symbol «3» for the third step.
3. Stitch up to point #5.
Figure 5:
1. Raise the needle out of the fabric.
2. Turn the buttonhole dial to the buttonhole symbol for «4» for the fourth/last step.
3. Make at least 4 stitches, ending at point #6.
4. Raise the presser foot and remove the garment from the machine.
5. Clip thread ends.
6. To open the buttonhole insert a seam ripper from both ends towards the middle.
4-Step Automatic Buttonhole
Preparation: Measure the Diameter and thickness of your chosen button and add 1/8″ for bar tacks and mark the buttonhole size on the fabric.
- Remove the General Purpose presser foot from your machine and attach your Buttonhole presser foot.
- Place your fabric under the foot so the markings on the Buttonhole presser foot align with your markings on the fabric.
- Adjust the stitch length dial to 0.5 — 1 to set the density. Note: Density varies according to the fabric. Always sew a test buttonhole first.
- Follow the 4-step sequence changing from one step to another with the stitch pattern selector dial. Take care not to sew too many stitches in steps in 1 and 3.
- Insert a seam ripper to open the buttonhole from both ends towards the middle.
Tips:
- Reduce the upper thread tension slightly for better results.
- Use a backing for fine or stretchy fabrics.
- It is advisable to use heavy thread or cord for stretch knit fabrics.

\
V».
/
6. FOUR-STEP
BUTTONHOLE
Your machine makes buttonholes to any
size you choose in only four, easy steps.
• You never need to move the fabric or repo
sition the needle.
• Always make a practice buttonhole on a
sample of your fabric.
• Be sure bobbin contains enough thread.
• When making buttonholes on hard-to-
reach areas convert machine bed to free
arm sewing.
• Mark buttonhole position on fabric as indi
cated in pattern.
Recommended settings
Stitch Selection:
Buttonhole Stitch
no. 1
Stitch Width:
Pre-set
Foot:
Buttonhole (L)
Needle Plate:
General Purpose (A)
step 1
Raise presser foot.
Place fabric under foot.
Centre 3 red guidelines (1) of foot around
beginning line of buttonhole.
Turn buttonhole dial to the first buttonhole
symbol for the first step.
Position needle in fabric at point (2) by
turning the hand wheel towards you.
Stitch down to point 3.
step 2
• Raise needle out of fabric.
• Turn buttonhole dial to the second button
hole symbol for the second step.
• Make at least four stitches, ending at
point (4).
34

Добро пожаловать в мир шитья! Если вы только начинаете свой путь в этом увлекательном хобби или уже являетесь опытным рукодельницей, вы наверняка знаете, насколько важна швейная машина. Сегодня мы поговорим о функции 4 step buttonhole (четырехшаговая петля) на вашей швейной машине и рассмотрим пошаговую инструкцию на русском языке.
4 step buttonhole, или четырехшаговая петля, — это способ автоматического создания петли для крепления пуговицы на вашей одежде. Многие швейные машины оснащены этой функцией, чтобы облегчить вам жизнь и сделать процесс шитья более эффективным.
4 step buttonhole: инструкция на русском
Перед тем, как начать создавать 4 step buttonhole с помощью вашей швейной машины, убедитесь, что у вас есть все необходимые материалы: швейная машина с функцией 4 step buttonhole, пуговица, нитки подходящего цвета и игла для шитья.
- Выберите нужную длину петли в зависимости от размера пуговицы и ткани, с которой вы работаете. Обычно для петелек на обычной одежде используется длина около 1 см, но вы всегда можете подстроиться под свои потребности.
- Подготовьте швейную машину, установив подходящую иглу и пропустив нитку через все необходимые направляющие.
- Расположите пуговицу на ткани в месте, где вы хотите создать петлю.
- Начните процесс создания 4 step buttonhole, следуя инструкциям вашей конкретной модели швейной машины. Обычно это включает набор нужных настроек на панели управления и последовательное продвижение ткани под иглой швейной машины.
Важно помнить, что каждая швейная машина может иметь свои уникальные особенности и нюансы работы с функцией 4 step buttonhole. Чтение инструкции и ознакомление с руководством пользователя будет полезным шагом для достижения наилучших результатов.
Итог

Теперь вы знаете, что такое функция 4 step buttonhole на швейной машине и как ею пользоваться. Создание петли для крепления пуговицы стало гораздо проще благодаря этой функции. Не забывайте ознакомиться с инструкцией вашей швейной машины, так как каждая модель может иметь свои особенности работы с этой функцией. Приятного шитья и удачных творческих идей!
4 step buttonhole швейная машина инструкция на русском
Швейная машина — незаменимый инструмент для многих людей, которые хотят создавать собственную одежду или вносить различные изменения в уже готовую. Использование швейной машины может быть простым и удобным, особенно если у вас есть правильная инструкция по использованию. В этой статье мы рассмотрим 4 step buttonhole швейную машину и предоставим вам подробную инструкцию на русском языке, чтобы вы могли без труда использовать ее для создания прекрасных пуговиц.
Шаг 1: Подготовка машины и ткани
Первым шагом перед началом работы с 4 step buttonhole швейной машиной является правильная подготовка машины и ткани. Убедитесь, что машина находится на ровной поверхности и имеет пространство для работы. Также удостоверьтесь, что у вас есть все необходимые принадлежности и аксессуары, такие как пуговицы и нитки.
Когда швейная машина и все необходимые материалы готовы, следующим шагом является подготовка ткани. Убедитесь, что ваша ткань подходит для создания пуговиц и не имеет повреждений. При необходимости вытяните ткань и убедитесь, что она не складывается или морщится.
Шаг 2: Настройка машины и выбор стежка
После подготовки машины и ткани вы должны настроить машину на создание пуговиц. Посмотрите руководство пользователя швейной машины для определения необходимых настроек. Обычно это включает выбор соответствующего стежка и регулировку ширины и длины стежка.
Выбор стежка очень важен для создания прочной пуговицы. Обычно для пуговиц используется стежок с низким номером, такой как 1, чтобы обеспечить достаточную прочность и надежность. Регулируйте ширину стежка в соответствии с размерами пуговицы, которую вы хотите создать.
Шаг 3: Создание пуговицы
Теперь, когда ваша машина настроена и ткань подготовлена, вы можете приступить к созданию самой пуговицы. Включите швейную машину и разместите ткань под иглой. Убедитесь, что игла находится ниже верхнего края пуговицы.

Нажмите на педаль для начала шитья. Важно помнить, что при создании пуговицы важно следовать определенной последовательности операций. 4 step buttonhole швейные машины обычно имеют четыре шага создания пуговицы: первый шаг — шаг вперед, второй — шаг влево, третий — шаг назад, четвертый — шаг вправо. При каждом шаге машина автоматически выполняет нужный шов для создания пуговицы.
Шаг 4: Завершение работы и фиксация пуговицы
После завершения шитья пуговицы важно правильно закрепить ее на ткани. Используйте ножницы или другие подходящие инструменты для обрезания излишков нитей. Проверьте пуговицу на прочность, убедитесь, что она надежно пришита и не будет легко оторвана.

Итак, как вы видите, создание прекрасных пуговиц на 4 step buttonhole швейной машине не является сложной задачей, если у вас есть правильная инструкция и немного терпения. Следуя этим 4 шагам, вы сможете создавать красивые и надежные пуговицы для своих швейных проектов. Не бойтесь экспериментировать с различными тканями и стилями, чтобы создать уникальные дизайны и придать своей одежде особый шарм.
4 step buttonhole швейная машина инструкция на русском
Рукоделие – это не только увлекательное хобби, но и способ проявить свою креативность и создать уникальные вещи своими руками. И для того чтобы создавать профессиональные выкройки и обновлять одежду, нужны определенные инструменты. Одним из самых полезных и популярных в мире шитья является швейная машина, а особенно 4 step buttonhole.
Что такое 4 step buttonhole?

4 step buttonhole – это уникальная функция некоторых швейных машин, которая позволяет без особых усилий создавать идеальные петли для пуговиц. С помощью этой функции можно создавать настоящие профессиональные петли, которые выдержат любые нагрузки и не потеряют своей формы даже после многократной стирки. Это особенно важно при создании одежды, так как петли для пуговиц являются одним из самых важных элементов, от которых зависит удобство и эстетический вид одежды.
Инструкция по использованию 4 step buttonhole

Прежде чем начать использовать функцию 4 step buttonhole, необходимо убедиться, что ваша швейная машина оснащена этой функцией. Если она не имеет такой возможности, вам придется прибегнуть к другим методам создания петель для пуговиц. Однако, если ваша машина поддерживает функцию 4 step buttonhole, следуйте следующей инструкции:
- Подготовьте свою ткань. Убедитесь, что края ткани аккуратно подрублены и не обработаны швом. Ткань должна быть гладкой и ровной.
- Выберите нужный размер петли для пуговицы на машине. Это можно сделать с помощью специального колесика или кнопок на панели машины.
- Поместите ткань под лапкой машины и закрепите ее стопорными пальцами, чтобы она не смещалась во время работы.
- Нажмите на педаль машины, чтобы она начала создавать петлю. Важно следить за процессом и вовремя остановить машину, когда петля достигнет нужного размера.
После завершения этих четырех шагов, ваша петля для пуговицы готова. Остается только пристегнуть пуговицу к ткани, прошедшей через петлю, и ваша одежда будет полностью готова.
Выводы
4 step buttonhole – это незаменимая функция для всех, кто занимается рукоделием и шитьем. С помощью нее можно создавать профессиональные петли для пуговиц, что делает вашу одежду качественной и стильной. Использование функции 4 step buttonhole на швейной машине дает возможность воплотить в жизнь любые дизайнерские идеи и создать уникальные вещи. Не бойтесь экспериментировать и делать что-то новое – ваша швейная машина с функцией 4 step buttonhole будет вашим верным помощником в этом деле.

17
Sew 4-step Buttonholes
Prepare
Note:
Tips:
1. Take off the all purpose foot and attach the buttonhole foot.
2. Measure diameter and thickness of button and add 0.3cm
(1/8″) for bartacks to obtain correct buttonhole length; mark
buttonhole size on fabric (a).
3. Place fabric under the foot, so that marking on the
buttonhole foot aligns with starting marking on fabric. Lower
the foot, so that the buttonhole center line marked on the
fabric aligns with the center of the buttonhole foot
.
Density varies according to the fabric.
Always test sew a buttonhole on the fabric you are using
to sew the buttonhole.
Follow the 4-step sequence changing from one step to
another with the Pattern Selector Dial. When moving from
step to step through the buttonhole process, be sure that the
needle is raised before turning the Pattern Selector Dial to
the next step. Take care not to sew too many stitches in
steps 1 and 3. Use seam ripper and cut buttonhole open
from both ends towards the middle.
— Slightly reducing upper thread tension will produce better
results.
— Use a stabilizer for fine or stretchy fabrics.
— It is advisable to use heavy thread or cord for stretch or
knit fabrics. The zig-zag should sew over the heavy thread
or cord. (A)
(b)
Adjust the Stitch Length Dial (model 1409 only) in the «
«
range to set stitch density.
A
1
3
4
2
Model 1409 only
2
3
1
4
2
4
3
1
(a) (b)

20
2
1
4
3
A
D
a
b
E
B
C
Buttonhole sewing is a simple process that provides reliable
results. However, it is strongly suggested to always make a
practice buttonhole on a sample of your fabric and stabilizer.
Making a Buttonhole
Making a Buttonhole on Stretch Fabrics (E)
1. Using tailor’s chalk, mark the position of the buttonhole on the
fabric.
2. Attach the buttonhole foot and set the Pattern Selector Dial to «
«.
Set stitch length dial to «
«. Set the stitch width at «6». The
width however may need to be adjusted according to the
project. Sew a test first to determine this.
3. Lower the presser foot aligning the marks on foot with the
marks on the fabric (A). (The front bar tack will be sewn first.)
(Align the mark on the fabric (a) with the mark on the foot (b).)
4. Open the button plate and insert the button (B).
5. Lower the buttonhole lever and gently push it back (C).
6. While lightly holding the upper thread, start the machine.
7. Buttonhole stitching is done in the order (D).
8. Stop the machine when the buttonhole cycle has completed.
When sewing buttonholes on stretch fabric, hook heavy thread or
cord under the buttonhole foot. When the buttonhole is sewn the
legs will overcast the cord.
1. Mark the position of the buttonhole on the fabric with the
tailor’s chalk, attach the buttonhole foot, and set the pattern
selector dial to «
«. Set stitch length dial to «
«.
2. Hook the heavy thread onto the back end of the buttonhole foot,
then bring the two heavy thread ends to the front of the foot,
insert them into the grooves and temporarily tie them there.
3. Lower the presser foot and start sewing.
*Set the stitch width to match the diameter of the gimp thread.
4. Once sewing is completed, gently pull the heavy thread to
remove any slack, then trim off the excess.
PUS
H
PUSH
M
Sew 1-step Buttonholes
31
5
Lower the buttonhole lever and push it back
slightly.
6
While gently holding the upper thread, start
the machine.
7
The bar tacks of the buttonhole are sewn in
the order shown.
8
Stop the machine when buttonhole stitching is
finished.
■ Making a Buttonhole on Stretch Fabrics
When sewing buttonholes on stretch fabric, the
buttonhole stitching is sewn over a gimp thread.
1
Using tailor’s chalk, mark the position of the
buttonhole on the fabric, and then attach the
buttonhole foot and set the pattern selection
dial to “ ”.
2
Hook the gimp thread onto the back end of
the buttonhole foot, bring the two gimp
thread ends to the front of the foot, insert
them into the grooves, and then temporarily
tie them there.
3
Lower the presser foot and start sewing.
*Set the stitch width to match the diameter of
the gimp thread.
4
Once sewing is completed, gently pull the
gimp thread to remove any slack, and then
trim off the excess.
Making a Buttonhole
(4-Step Buttonhole)
Memo
● We recommend that you practice making a
buttonhole on a scrap piece of fabric before
you try it on the actual garment.
● When making buttonholes on soft fabrics,
place stabilizer material on the underside of
the fabric.
Making a buttonhole is a simple process that
provides reliable results.
■ Making a Buttonhole
1
Using tailor’s chalk, mark the position and
length of the buttonhole on the fabric.
2
Attach the buttonhole foot, and then slide the
outside frame of the buttonhole foot as far
back as possible.
PUSH
1
3
2
4
Pattern
Stitch Length
[mm (inch)]
Stitch
Width
[mm (inch)]
Foot
(4-Step
Buttonhole)
-1.5
(1/64-1/16)
3-5
(1/8-3/16)
Buttonhole
Foot
PUSH
PUSH
1408 / 1409 Instruction Manual
IMPORTANT SAFETY INSTRUCTIONS When using an electrical appliance, basic safety should always be followed, including the following: Read all instructions before using this sewing machine. DANGER — To reduce the risk of electric shock: 1. An appliance should never be left unattended when plugged in.
Congratulations As the owner of a new Singer sewing machine, you are about to begin an exciting adventure in creativity. From the moment you first use your machine, you will know you are sewing on one of the easiest to use sewing machines ever made. May we recommend that, before you start to use
List of Contents Machine Basics Principle Parts of the Machine…………………………………………………………………………………………………………………………….2/3 Connecting Machine to Power Source
Principal Parts of the Machine 1. Thread tension dial 2. Thread take-up lever 3. Thread cutter 4. Face plate 5. Presser foot 6. Needle plate 7. Removable extension table/ accessory storage 8. Pattern selector dial 9. Bobbin stopper 10. Stitch length dial (Model 1409) 11. Reverse sewing lever 2
Principal Parts of the Machine 12. Handle 13. Bobbin winding spindle 14. Spool pins 15. Handwheel 16. Power and light switch 17. Main plug socket 18. Bobbin thread guide 19. Presser foot lifter 20. Foot speed control 21. Power cord 3
Connecting Machine to Power Source Connect the machine to a power source as illustrated. (1) This appliance is equipped with a polarized plug which must be used with the appropriate polarized outlet. (2) A Attention: Unplug power cord when machine is not in use. Foot control The foot control pedal
Two Step Presser Foot Lifter When sewing several layers or thick fabrics, the presser foot can be raised to a higher position for easy positioning of the work. (A) A 5
Accessories Standard accessories (1) a. All purpose foot b. Zipper foot c. Buttonhole foot d. Button sewing foot e. L-screwdriver f. Seam ripper/ brush g. Spool pin felt (2x) h. Pack of needles (3x) i. Edge/ quilting guide j. Bobbin (3x) k. Darning plate 1 Standard accessories Optional accessories
Winding the Bobbin — Place the thread and Spool pin felt (a) onto the spool pin. (1) — Wind thread clockwise around bobbin winder tension discs. (2) — Thread bobbin as illustrated and place on spindle. (3) — Push bobbin spindle to right. (4) — Hold thread end. (5) — Step on foot control pedal. (6)
Inserting the Bobbin When inserting or removing the bobbin, the needle must be fully raised. 1. Open the hinged cover. 2. Pull the bobbin case tab (a) and remove the bobbin case. 3. Hold the bobbin case with one hand. Insert the bobbin so that the thread runs in a clockwise direction (arrow). 4.
Threading the Upper Thread This is a simple operation but it is important to carry out correctly as by not doing so several sewing problems could result. — Start by raising the needle to its highest point (1), and continue turning the handwheel counterclockwise until the needle just slightly begins
Raising the Bobbin Thread Hold the upper thread with the left hand. Turn the handwheel (1) towards you (counterclockwise) lowering, then raising needle. Note: If it is difficult to raise the bobbin thread, check to make sure the thread is not trapped by the hinged cover or the Removable Extension
Thread Tension Upper thread tension Basic thread tension setting: «4». (1) To increase the tension, turn the dial to the next number up. To reduce the tension, turn the dial to the next number down. A. Normal thread tension for straight stitch sewing. B. Thread tension too loose for straight stitch
How to Choose Your Pattern To select a stitch, simply turn the pattern selector dial (a). The pattern selector dial may be turned in either direction. The following page shows the recommended range of stitch lengths. a b Adjust the stitch length with the stitch length dial (b) according to the
Stitch Length Dial (Model 1409 only) Function of stitch length dial for when straight stitching For straight stitch sewing, turn the Pattern Selector Dial to the straight stitch setting. (1) Turn the Stitch Length Dial, and the length of the individual stitches will decrease as the dial approaches
Sewing Straight Stitch To begin sewing, set the machine for straight stitch. (1) Place the fabric under the presser foot with the fabric edge lined up with the desired seam guide line on the needle plate. (2) Lower the presser foot lifter, and then step on the foot controller to start sewing. (3) 1
Reverse Sewing To secure the beginning and the end of a seam, press down the reverse sewing lever (A). Sew a few reverse stitches. Release the lever and the machine will sew forward again. (1) A Removing the Work Turn the handwheel toward you (counterclockwise) to bring the thread take up lever to
Blind Hem For hems, curtains, trousers, skirts, etc. Blind hem for stretch fabrics. Blind hem/ lingerie for firm fabrics. Note: It takes practice to sew blind hems. Always make a sewing test first. Model 1409 only Blind Hem: Turn up the hem to the desired width and press. Fold back (as shown in
Sew 4-step Buttonholes Prepare 1. Take off the all purpose foot and attach the buttonhole foot. 2. Measure diameter and thickness of button and add 0.3cm (1/8″) for bartacks to obtain correct buttonhole length; mark buttonhole size on fabric (a). 3. Place fabric under the foot, so that marking on
Sewing on Buttons (Model 1408 only) Install the darning plate. (1) Change the all purpose foot to button sewing foot. (2) Position the work under the foot. Place the button in the desired position and lower the foot. Set the Pattern Selector Dial for the second zig-zag pattern (as shown), which
Sewing on Buttons (Model 1409 only) Install the darning plate. (1) Change the all purpose foot to button sewing foot. (2) Position the work under the foot. Place the button in the desired position and lower the foot. Set the Pattern Selector Dial on » » and sew a few securing stitches. Select one
Free Motion Darning, Stippling * The darning/ embroidery foot is an optional accessory not included with your machine. (1) Darning: Install the darning plate. (2) Remove the presser foot shank. (3) Attach the darning/ embroidery foot to the presser foot bar. The lever (a) should be behind the
Installing the Removable Extension Table Hold the removable extension table horizontally, and push it in the direction of the arrow. (1) To remove the extension table, pull it toward the left. 1 The inside of the removable extension table can be utilized as an accessory box. 2 21
Attaching the Presser Foot Shank Raise the presser foot bar (a) with the presser foot lifter. Attach the presser foot shank (b) as illustrated. (1) a a Attaching the presser foot Lower the presser foot shank (b) using the presser foot lifter, until the cut-out (c) is directly above the pin (d). (2)
Needle/ Fabric/ Thread Chart NEEDLE, FABRIC, THREAD SELECTION GUIDE NEEDLE SIZE FABRICS Lightweight fabrics-thin cottons, voile, silk, muslin, 9-11 (70-80) interlocks, cotton knits, tricots, jerseys, crepes, woven polyester, shirt & blouse fabrics. 11-14 (80-90) 14 (90) 16 (100) 18 (110) Medium
Darning Plate For certain types of work, (e.g. darning or free-hand embroidery), the darning plate must be used. Install the darning plate as illustrated. For normal sewing, remove the darning plate. For free-motion sewing it is recommended to use a darning/embroidery foot, available as an optional
Inserting & Changing Needles Change the needle regularly, especially if it is showing signs of wear and causing problems. For best sewing results ® always use SINGER Brand Needles. D A Insert the needle as illustrated as follows: A. Loosen the needle clamp screw and tighten again after inserting
Changing the Bulb Disconnect the machine from the power supply by removing the plug from the main socket! Replace bulb with same type rated 10 watts (110-120V area) or 15 watts (220-240V area). — A B Loosen screw (A) as illustrated. (1) Remove the face plate (B). (2) Unscrew the bulb and install a
Troubleshooting Guide Problem Cause Correction Upper thread breaks 1. The machine is not threaded correctly. 2. The thread tension is too tight. 3. The thread is too thick for the needle. 4. The needle is not inserted correctly. 5. The thread is wound around the spool holder pin. 6. The needle is
Please note that on disposal, this product must be safely recycled in accordance with relevant National legislation relating to electrical/electronic products. If in doubt please contact your retailer for guidance.
Ïðè ïîäêëþ÷åíèè ýòîãî ïðîäóêòà íåîáõîäèìî âíèìàòåëüíî îçíàêîìèòüñÿ ñ ïðàâèëàìè ïî òåõíèêå áåçîïàñíîñòè, â ñîîòâåòñòâèè ñ äåéñòâóþùèì çàêîíîäàòåëüñòâîì â âàøåé ñòðàíå. Ïîæàëóéñòà, ó÷òèòå, ÷òî ïî îêîí÷àíèè ñðîêà ñëóæáû ýòîò ïðîäóêò äîëæåí áûòü óòèëèçèðîâàí â ñîîòâåòñòâèè ñ äåéñòâóþùèì Íàöèîíàëüíûì
Íåïîëàäêè è èõ óñòðàíåíèå Óäàëèòå âåðõíþþ íèòü è äîñòàíüòå øïóëüíîå ãíåçäî, ïîâåðíèòå âðó÷íóþ ìàõîâîå êîëåñî íà ñåáÿ è îò ñåáÿ è äîñòàíüòå îñòàòêè íèòîê è âîðñà. Çàïóòûâàíèå íèòè â ÷åëíîêå Òÿæåëûé õîä ìàøèíû 1. Çàìåíèòå èãëó 2. Ñìåíèòå ñìàçî÷íîå ìàñëî 1. Ïîâðåæäåíà èãëà 2. Ìàñëî ïëîõîãî êà÷åñòâà
Çàìåíà ëàìïî÷êè Îòêëþ÷èòå ìàøèíó îò ñåòè, âûíóâ ñåòåâîé øíóð èç ðîçåòêè! Èñïîëüçóéòå ëàìïî÷êè òàêîãî æå òèïà 15 âàòò (äëÿ 220240V). — A B Âûêðóòèòå âèíò (A) êàê ïîêàçàíî íà ðèñ. (1) Ñíèìèòå êðûøêó êîðïóñà (B). (2) Âûêðóòèòå ëàìïî÷êó è âñòàâüòå íîâóþ (C). (3) Ïîñòàâüòå êðûøêó êîðïóñà íà ìåñòî è
Óñòàíîâêà è ñìåíà èãëû Ìåíÿéòå èãëû ðåãóëÿðíî ïîñëå øèòüÿ êàæäîãî ïðîåêòà èëè ïðè âîçíèêíîâåíèè êàêèõ-ëèáî ïðîáëåì. ® Èñïîëüçóéòå èãëû SINGER äëÿ ëó÷øåãî êà÷åñòâà øèòüÿ. D A Âñòàâüòå èãëó, êàê ïîêàçàíî íà ðèñóíêå. A. Îñëàáüòå âèíò èãëû è çàòåì çàòÿíèòå åãî ñíîâà, ïîñëå òîãî, êàê âñòàâèòå íîâóþ
Øòîïàëüíàÿ ïëàñòèíà Äëÿ íåêîòîðûõ âèäîâ ðàáîò (íàïðèìåð, øòîïêà èëè øèòüå â òåõíèê å «ñâîáîäíîãî ïåðåäâèæåíèÿ») øòîïàëüíàÿ ïëàñòèíà äîëæíà áûòü óñòàíîâëåíà. Óñòàíîâèòå øòîïàëüíóþ ïëàñòèíó êàê óêàçàíî íà ðèñóíêå. Äëÿ øèòüÿ â îáû÷íîì ðåæèìå, ñíèìèòå øòîïàëüíóþ ïëàñòèíó. Äëÿ øèòüÿ â òåõíèêå
Ñîîòâåòñòâèå èãëû/ òêàíè/ íèòè Ðóêîâîäñòâî ïî âûáîðó èãë/ òêàíåé/ íèòîê Ïëîòíàÿ øåðñòü, òêàíü äëÿ ïàëüòî, îáèâî÷íûå òêàíè, íåêîòîðûå âèäû êîæè è âèíèë. 18 (110) Áîëüøèíñòâî ïðîäàâàåìûõ íèòåé ñòàíäàðòíîãî ðàçìåðà è ïðèìåíèìû äëÿ ýòèõ òêàíåé è ðàçìåðîâ èãë. Èñïîëüçóéòå ïîëèýñòðîâûå èëè ñèíòåòè÷åñêèå
Óñòàíîâêà äåðæàòåëÿ ëàïêè Ïîäíèìèòå äåðæàòåëü ëàïêè (à). Íàäåíüòå äåðæàòåëü ïðèæèìíîé ëàïêè (b), êàê ïîêàçàíî íà ðèñóíêå. (1) a a Óñòàíîâêà ïðèæèìíîé ëàïêè. Îïóñòèòå äåðæàòåëü ïðèæèìíîé ëàïêè (b), ïîêà âûåìêà (ñ) íå ñîâïàäåò ñ îñüþ (d). (2) Ïîäíèìèòå ðû÷àã (å). Îïóñòèòå äåðæàòåëü ïðèæèìíîé ëàïêè
Óñòàíîâêà ñúåìíîé ðàáî÷åé ïîâåðõíîñòè Äåðæèòå ñúåìíóþ ðàáî÷óþ ïîâåðõíîñòü ãîðèçîíòàëüíî è çàäâèíüòå åå ïî íàïðàâëåíèþ ñòðåëîê. (1) ×òîáû îòñîåäèíèòü ðàáî÷óþ ïîâåðõíîñòü, ïîòÿíèòå åå âëåâî. 1 Âíóòðåííÿÿ ÷àñòü ñúåìíîé ðàáî÷åé ïîâåðõíîñòè ìîæåò èñïîëüçîâàòüñÿ äëÿ õðàíåíèÿ àêñåññóàðîâ. 2 21
Øòîïêà â òåõíèêå ñâîáîäíîãî ïåðåäâèæåíèÿ, ñòåæêà * Ëàïêà äëÿ øòîïêè ÿâëÿåòñÿ äîïîëíèòåëüíûì àêñåñóàðîì, íå ïðèëàãàåòñÿ ê ìàøèíå. (1) Øòîïêà: Óñòàíîâèòå øòîïàëüíóþ ïëàñòèíó (2) è ñíèìèòå ëàïêîäåðæàòåëü (3). Ïðèñîåäèíèòå ëàïêó äëÿ øòîïêè ê ëàïêîäåðæàòåëþ. Ðû÷àã (à) äîëæåí íàõîäèòüñÿ çà âèíòîì
Ïðèøèâàíèå ïóãîâèöû (Òîëüêî äëÿ ìîäåëè 1409) Óñòàíîâèòå øòîïàëüíóþ ïëàñòèíó (1). Ñìåíèòå ïðèæèìíóþ ëàïêó íà ëàïêó äëÿ ïóãîâèöû (2). Ðàñïîëîæèòå èçäåëèå è ïóãîâèöó ïîä ïðèæèìíîé ëàïêîé, îïóñòèòå ëàïêó. Ñ ïîìîùüþ ðåãóëÿòîðà âûáîðà ñòðî÷åê óñòàíîâèòå » » è ñäåëàéòå íåñêîëüêî ôèêñèðóþùèõ ñòåæêîâ. Çàòåì
Ïðèøèâàíèå ïóãîâèöû (Òîëüêî äëÿ ìîäåëè 1408) Óñòàíîâèòå øòîïàëüíóþ ïëàñòèíó (1). Ñìåíèòå ïðèæèìíóþ ëàïêó íà ëàïêó äëÿ ïóãîâèöû (2). Ðàñïîëîæèòå èçäåëèå è ïóãîâèöó ïîä ïðèæèìíîé ëàïêîé, îïóñòèòå ëàïêó. Ñ ïîìîùüþ ðåãóëÿòîðà âûáîðà ñòðî÷åê óñòàíîâèòå âòîðîé âèä ñòðî÷êè çèã-çàã (êàê ïîêàçàíî íà
×åòûðåõ-øàãîâàÿ ïåòëÿ Ïîäãîòîâêà 1. Ñ í è ì è ò å Óí è â å ð ñ à ë ü í ó þ ï ð è æ è ì í ó þ ë à ï ê ó è ïðèñîåäèíèòå ëàïêó äëÿ Âûìåòûâàíèÿ ïåòåëü. 2. Îïðåäåëèòå äèàìåòð è òîëùèíó ïóãîâèöû, äîáàâüòå 0.3ñì íà çàêðåïêè, ñäåëàéòå ìåòêè äëÿ ðàçìåùåíèÿ ïåòëè íà èçäåëèè. (à) 3. Ðàçìåñòèòå òêàíü ïîä
Íåâèäèìàÿ ïîäãèáêà/ Áåëüåâàÿ ñòðî÷êà Äëÿ ïîòàéíîé ïîäðóáêè øòîð, áðþê, þáîê è ò.ä. Íåâèäèìàÿ ïîäãèáêà äëÿ ýëàñòè÷íûõ òêàíåé Íåâèäèìàÿ ïîäãèáêà äëÿ ïëîòíûõ òêàíûõ ìàòåðèàëîâ Âàæíî: Íåîáõîäèìà ïðàêòèêà äëÿ îñâîåíèÿ ýòîé îïåðàöèè. Âñåãäà äåëàéòå ïðîáíûé øîâ íà êóñî÷êå òêàíè. Òîëüêî äëÿ ìîäåëè 1409
Øèòüå íàçàä Äëÿ çàêðåïëåíèÿ øâà â íà÷àëå è êîíöå ñòðî÷êè, íàæèìàéòå íà ðû÷àã ðåâåðñà (À). Ñäåëàéòå íåñêîëüêî ñòåæêîâ â îáðàòíîì íàïðàâëåíèè. Îòïóñòèòå ðû÷àã è ìàøèíà ñíîâà áóäåò øèòü âïåðåä. (1) A Îêîí÷àíèå øèòüÿ Ïîâåðíèòå ìàõîâîå êîëåñî íà ñåáÿ (ïðîòèâ ÷àñîâîé ñòðåëêè) äëÿ òî ãî , ÷ òî áû ïðèâåñòè
Ïðÿìàÿ ñòðî÷êà Äëÿ íà÷àëà, óñòàíîâèòå Ðåãóëÿòîð âûáîðà ñòðî÷åê íà ïðÿìóþ ñòðî÷êó. (1) Ðàçìåñòèòå òêàíü ïîä ïðèæèìíîé ëàïêîé òàê, ÷òîáû êðàé òêàíè ñîâïàäàë ñ îäíîé èç âûáðàííûõ îòìåòîê íà èãîëüíîé ïëàñòèíå. (2) Îïóñòèòå ïðèæèìíóþ ëàïêó, íàæìèòå íà ïåäàëü óïðàâëåíèÿ, ÷òîáû íà÷àòü øèòü. (3) 1 2 3 14
Ðåãóëÿòîð äëèíû ñòåæêà (Òîëüêî äëÿ ìîäåëè 1409) Èñïîëüçîâàíèå Ðåãóëÿòîðà äëèíû ñòåæêà äëÿ ïðÿìîé ñòðî÷êè Ñ ïîìîùüþ Ðåãóëÿòîðà âûáîðà ñòðî÷åê âûáåðèòå ïðÿìóþ ñòðî÷êó (1). Ïîâåðíèòå Ðåãóëÿòîð äëèíû ñòåæêà â ñòîðîíó îòìåòêè «0», ïðè ýòîì äëèíà ñòåæêà óìåíüøèòñÿ. Äëèíà ñòåæêà áóäåò óâåëè÷èâàòüñÿ ïî
Âûáîð ñòðî÷êè ×òîáû óñòàíîâèòü âûáðàííóþ ñòðî÷êó âîñïîëüçóéòåñü ðåãóëÿòîðîì âûáîðà ñòðî÷åê (à). Ðåãóëÿòîð ìîæíî âðàùàòü â ëþáóþ ñòîðîíó. Íà ñëåäóþùåé ñòðàíèöå ñîäåðæèòñÿ èíôîðìàöèÿ î ðåêîìåíäóåìîé äëèíå ñòåæêà äëÿ ðàçíûõ âèäîâ ñòðî÷åê. a b Óñòàíîâèòå äëèíó ñòåæêà ñ ïîìîùüþ ðåãóëÿòîðà äëèíû
Íàòÿæåíèå íèòè Íàòÿæåíèå âåðõíåé íèòè Ñòàíäàðòíîå íàòÿæåíèå íèòè íàõîäèòñÿ â ïîëîæåíèè: «4». (1) Äëÿ óâåëè÷åíèÿ íàòÿæåíèÿ íèòè ïîâåðíèòå ðåãóëÿòîð íà áîëüøåå çíà÷åíèå. À. Íîðìàëüíîå íàòÿæåíèå íèòè äëÿ ïðÿìîé ñòðî÷êè. Â. Íåäîñòàòî÷íîå íàòÿæåíèå íèòè äëÿ ïðÿìîé ñòðî÷êè. Ïåðåâåäèòå ðåãóëÿòîð íà
Ïîäúåì íèæíåé íèòè Ïðèäåðæèâàéòå âåðõíþþ íèòü ëåâîé ðóêîé. Ïîâåðíèòå ìàõîâîå êîëåñî (1) íà ñåáÿ (ïðîòèâ ÷àñîâîé ñòðåëêè), îïóñòèòå è çàòåì ïîäíèìèòå èãëó. Âàæíî: Åñëè âäðóã ñëîæíî ïîäíÿòü íèæíþþ íèòü, óáåäèòåñü, ÷òî îíà íå çàñòðÿëà â ñúåìíîé ðàáî÷åé ïîâåðõíîñòè. 1 Ìÿãêî ïîòÿíèòå çà âåðõíþþ íèòü è
Çàïðàâêà âåðõíåé íèòè Ýòî ïðîñòàÿ îïåðàöèÿ, íî î÷åíü âàæíî âûïîëíÿòü åå ïðàâèëüíî, âî èçáåæàíèå ïðîÿâëåíèÿ ïðîáëåì ïðè øèòüå. — Ïîäíèìèòå èãëó â íàèâûñøåå ïîëîæåíèå (1) è ïðîäîëæàéòå ïîâîðà÷èâàòü ìàõîâîå êîëåñî íà ñåáÿ, ïðîòèâ ÷àñîâîé ñòðåëêè, ïîêà èãëà ñëåãêà íå îïóñòèòñÿ, ÷òîáû îñâîáîäèòü äèñê
Óñòàíîâêà øïóëüíîãî êîëïà÷êà Âî âðåìÿ óñòàíîâêè èëè ñíÿòèÿ øïóëüíîãî êîëïà÷êà èãëà äîëæíà âñåãäà íàõîäèòüñÿ â ñàìîì âåðõíåì ïîëîæåíèè. 1. Îòêðîéòå ÷åëíî÷íûé îòñåê. 2. Îòîãíèòå çàùåëêó øïóëüíîãî êîëïà÷êà è âûíüòå øïóëüíûé êîëïà÷îê. 3. Âîçüìèòå øïóëüíûé êîëïà÷îê îäíîé ðóêîé. Âñòàâüòå øïóëüêó òàêèì
Íàìîòêà øïóëüêè — Íàäåíüòå êàòóøêó è ôåòðîâûé äèñê (à) íà ãîðèçîíòàëüíûé äåðæàòåëü. (1) — Îáâåäèòå íèòü âîêðóã äèñêà, ðåãóëèðóþùåãî íàòÿæåíèå íèòè, ïî ÷àñîâîé ñòðåëêå. (2) — Íàìîòàéòå íèòü íà øïóëüêó (êàê óêàçàíî íà ðèñóíêå) è íàäåíüòå íà ñòåðæåíü äëÿ íàìîòêè øïóëüêè. (3) — Îòâåäèòå âïðàâî ðû÷àã
Àêñåññóàðû Ñòàíäàðòíûå àêñåññóàðû (1) a. Óíèâåðñàëüíàÿ ïðèæèìíàÿ ëàïêà b. Ïðèæèìíàÿ ëàïêà äëÿ âøèâàíèÿ ìîëíèè c. Ïðèæèìíàÿ ëàïêà äëÿ âûìåòûâàíèÿ ïåòåëü d. Ïðèæèìíàÿ ëàïêà äëÿ ïðèøèâàíèÿ ïóãîâèöû e. L-îòâåðòêà f. Ïðîðåçàòåëü ïåòåëü/ Êèñòî÷êà g. Ôåòðîâàÿ ïðîêëàäêà (2x) h. Óïàêîâêà èãë (3x) i.
Äâóõøàãîâûé ïîäúåì ëàïêè Ïðè øèòüå ìíîãîñëîéíûõ èëè òîëñòûõ òêàíåé ïðèæèìíàÿ ëàïêà äîëæíà áûòü ïîäíÿòà â ñàìîå âåðõíåå ïîëîæåíèå äëÿ îáëåã÷åíèÿ ïðîòàñêèâàíèÿ èçäåëèé ïîä ëàïêó (À). A 5
Ïîäêëþ÷åíèå ìàøèíû ê ýëåêòðîñåòè Ïîäêëþ÷èòå ìàøèíó ê ýëåêòðîñåòè, êàê ïîêàçàíî íà ðèñóíêå. (1) Âñòàâüòå âèëêó â ðîçåòêó. (2) A Âíèìàíèå: Îòêëþ÷àéòå ìàøèíó îò ñåòè, åñëè íå èñïîëüçóåòå åå äëèòåëüíîå âðåìÿ. Ïåäàëü óïðàâëåíèÿ Ïðè ïîìîùè íîæíîé ïåäàëè âû ðåãóëèðóåòå ñêîðîñòü ìàøèíû. (3) Âíèìàíèå:
Îñíîâíûå äåòàëè ìàøèíû 12. Ðó÷êà 13. Ðû÷àã íàìîòêè øïóëüêè 14. Äåðæàòåëè êàòóøåê 15. Ìàõîâîå êîëåñî 16. Âûêëþ÷àòåëü ìàøèíû è ëàìïî÷êè 17. Ãëàâíûé ðàçúåì äëÿ øíóðà 18. Íèòåâîäèòåëü äëÿ øïóëüêè 19. Ðû÷àã ïîäúåìà ëàïêè 20. Êîíòðîëü ñêîðîñòè 21. Âèëêà ñåòåâîãî øíóðà 3
Îñíîâíûå äåòàëè ìàøèíû 1. Íàòÿæåíèå íèòè 2. Ðû÷àã — íèòåïðèòÿãèâàòåëü 3. Íîæ äëÿ îáðåçêè íèòè 4. Êîðïóñ ìàøèíû 5. Ïðèæèìíàÿ ëàïêà 6. Èãîëüíàÿ ïëàñòèíà 7. Ñúåìíàÿ ðàáî÷àÿ ïîâåðõíîñòü/ ñâîáîäíûé ðóêàâ 8. Ðåãóëÿòîð âûáîðà ñòðî÷åê 9. Ñòîïîð íàìîòêè øïóëüêè 10. Ðåãóëÿòîð äëèíû ñòåæêà (Òîëüêî äëÿ ìîäåëè
Îãëàâëåíèå ÇÍÀÊÎÌÑÒÂÎ Ñ ÌÀØÈÍÎÉ Îñíîâíûå äåòàëè ìàøèíû ……………………………………………………………………………………………………………………………….2/3 Ïîäêëþ÷åíèå ìàøèíû ê ýëåêòðîñåòè
Ïîçäðàâëÿåì Âû ñòàëè îáëàäàòåëåì íîâîé øâåéíîé ìàøèíû è òåïåðü ìîæåòå íà÷àòü îòêðûâàòü íîâûå ïóòè â òâîð÷åñòâå. Ñ ýòîãî ìîìåíòà âû óçíàåòå íàñêîëüêî ëåãêî è óäîáíî ìîæíî øèòü íà ñîâðåìåííîé øâåéíîé ìàøèíå. Ïîæàëóéñòà, âíèìàòåëüíî ïðî÷èòàéòå èíñòðóêöèþ ïî ýêñïëóàòàöèè ìàøèíû — ýòî ñàìûé ëåãêèé ïóòü
Ïðàâèëà òåõíèêè áåçîïàñíîñòè Ïðåæäå ÷åì âêëþ÷èòü øâåéíóþ ìàøèíó, âíèìàòåëüíî ïðî÷èòàéòå ñëåäóþùèå ðåêîìåíäàöèè: ÎÏÀÑÍÎ — âî èçáåæàíèå ýëåêòðè÷åñêîãî øîêà: 1. Íåëüçÿ îñòàâëÿòü âêëþ÷åííóþ ìàøèíó áåç ïðèñìîòðà. 2. Íåîáõîäèìî îòêëþ÷àòü ìàøèíó îò ýëåêòðîñåòè, åñëè ñîáèðàåòåñü åå ÷èñòèòü. 3. Âñåãäà
1408 / 1409 Èíñòðóêöèÿ ïî ýêñïëóàòàöèè 021M1A0103( ) Apr/10 SINGER 1408/1409(M10A/M20A)
Sew 4-step buttonholes – Инструкция по эксплуатации SINGER Promise 1408
Страница 20
Sew 4-step Buttonholes
1. Take off the all purpose foot and attach the buttonhole foot.
2. Measure diameter and thickness of button and add 0.3cm
(1/8″) for bartacks to obtain correct buttonhole length; mark
buttonhole size on fabric (a).
3. Place fabric under the foot, so that marking on the
buttonhole foot aligns with starting marking on fabric. Lower
the foot, so that the buttonhole center line marked on the
fabric aligns with the center of the buttonhole foot
Density varies according to the fabric.
Always test sew a buttonhole on the fabric you are using
to sew the buttonhole.
Follow the 4-step sequence changing from one step to
another with the Pattern Selector Dial. When moving from
step to step through the buttonhole process, be sure that the
needle is raised before turning the Pattern Selector Dial to
the next step. Take care not to sew too many stitches in
steps 1 and 3. Use seam ripper and cut buttonhole open
from both ends towards the middle.
— Slightly reducing upper thread tension will produce better
— Use a stabilizer for fine or stretchy fabrics.
— It is advisable to use heavy thread or cord for stretch or
knit fabrics. The zig-zag should sew over the heavy thread
or cord. (A)
Adjust the Stitch Length Dial (model 1409 only) in the «
Источник
Sew 1-step buttonholes – Инструкция по эксплуатации SINGER Heavy Duty 4423
Страница 23
Buttonhole sewing is a simple process that provides reliable
results. However, it is strongly suggested to always make a
practice buttonhole on a sample of your fabric and stabilizer.
Making a Buttonhole
Making a Buttonhole on Stretch Fabrics (E)
1. Using tailor’s chalk, mark the position of the buttonhole on the
2. Attach the buttonhole foot and set the Pattern Selector Dial to «
Set stitch length dial to «
«. Set the stitch width at «6». The
width however may need to be adjusted according to the
project. Sew a test first to determine this.
3. Lower the presser foot aligning the marks on foot with the
marks on the fabric (A). (The front bar tack will be sewn first.)
(Align the mark on the fabric (a) with the mark on the foot (b).)
4. Open the button plate and insert the button (B).
5. Lower the buttonhole lever and gently push it back (C).
6. While lightly holding the upper thread, start the machine.
7. Buttonhole stitching is done in the order (D).
8. Stop the machine when the buttonhole cycle has completed.
When sewing buttonholes on stretch fabric, hook heavy thread or
cord under the buttonhole foot. When the buttonhole is sewn the
legs will overcast the cord.
1. Mark the position of the buttonhole on the fabric with the
tailor’s chalk, attach the buttonhole foot, and set the pattern
selector dial to «
«. Set stitch length dial to «
2. Hook the heavy thread onto the back end of the buttonhole foot,
then bring the two heavy thread ends to the front of the foot,
insert them into the grooves and temporarily tie them there.
3. Lower the presser foot and start sewing.
*Set the stitch width to match the diameter of the gimp thread.
4. Once sewing is completed, gently pull the heavy thread to
remove any slack, then trim off the excess.
Источник
Sew 1-step buttonholes – Инструкция по эксплуатации SINGER Talent 3223
Страница 22
Sew 1-step Buttonholes
Buttonhole sewing is a simple process that provides reliable
results. However, it is strongly suggested to always make a
practice buttonhole on a sample of your fabric and stabilizer.
Making a Buttonhole
Making a Buttonhole on Stretch Fabrics (E)
1. Using tailor’s chalk, mark the position of the buttonhole on the
2. Attach the buttonhole foot and set the Pattern Selector Dial to «
Set stitch length dial to «
«. Set the stitch width at «6». The
width however may need to be adjusted according to the
project. Sew a test first to determine this.
3. Lower the presser foot aligning the marks on foot with the
marks on the fabric (A). (The front bar tack will be sewn first.)
(Align the mark on the fabric (a) with the mark on the foot (b).)
4. Open the button plate and insert the button (B).
5. Lower the buttonhole lever and gently push it back (C).
6. While lightly holding the upper thread, start the machine.
7. Buttonhole stitching is done in the order (D).
8. Stop the machine when the buttonhole cycle has completed.
When sewing buttonholes on stretch fabric, hook heavy thread or
cord under the buttonhole foot. When the buttonhole is sewn the
legs will overcast the cord.
1. Mark the position of the buttonhole on the fabric with the
tailor’s chalk, attach the buttonhole foot, and set the pattern
selector dial to «
«. Set stitch length dial to «
2. Hook the heavy thread onto the back end of the buttonhole foot,
then bring the two heavy thread ends to the front of the foot,
insert them into the grooves and temporarily tie them there.
3. Lower the presser foot and start sewing.
*Set the stitch width to match the diameter of the gimp thread.
4. Once sewing is completed, gently pull the heavy thread to
remove any slack, then trim off the excess.
Источник
Button hole – 4 Step
Button hole – 4 Step
If your four step buttonhole symbols are located on the stitch length dial on the front of your machine read the Manual instructions or watch this VIDEO
If your four step buttonhole symbols are located on the pattern selector of your machine read the Automatic Instructions.
4-Step Manual Buttonholes
Preparation: Measure the diameter and thickness of your chosen button and add 1/8″ for bar tacks and mark the button hole size on the fabric.
Figures 1 & 2:
1. Raise the presser foot.
2. Place the fabric under the foot.
3. Center three red guidelines (refer Figure 1) of the buttonhole foot around the beginning line of the buttonhole.
4. Turn the buttonhole dial to the button symbol “1” for the first step.
5. Position the needle in the fabric at point #2 by turning the handwheel towards you.
6. Stitch down to point #3. Your buttonhole should appear as shown in Figure 2.
Figure 3:
1. Raise the needle out of the fabric.
2.Turn the buttonhole dial to the buttonhole symbol “2” for the second step.
3. Make at least four stitches, ending at point #4
Figure 4:
1. Raise the needle out of the fabric.
2. Turn the buttonhole dial to the buttonhole symbol “3” for the third step.
3. Stitch up to point #5.
Figure 5:
1. Raise the needle out of the fabric.
2. Turn the buttonhole dial to the buttonhole symbol for “4” for the fourth/last step.
3. Make at least 4 stitches, ending at point #6.
4. Raise the presser foot and remove the garment from the machine.
5. Clip thread ends.
6. To open the buttonhole insert a seam ripper from both ends towards the middle.
4-Step Automatic Buttonhole
Preparation: Measure the Diameter and thickness of your chosen button and add 1/8″ for bar tacks and mark the buttonhole size on the fabric.
- Remove the General Purpose presser foot from your machine and attach your Buttonhole presser foot.
- Place your fabric under the foot so the markings on the Buttonhole presser foot align with your markings on the fabric.
- Adjust the stitch length dial to 0.5 – 1 to set the density. Note: Density varies according to the fabric. Always sew a test buttonhole first.
- Follow the 4-step sequence changing from one step to another with the stitch pattern selector dial. Take care not to sew too many stitches in steps in 1 and 3.
- Insert a seam ripper to open the buttonhole from both ends towards the middle.
Tips:
- Reduce the upper thread tension slightly for better results.
- Use a backing for fine or stretchy fabrics.
- It is advisable to use heavy thread or cord for stretch knit fabrics.
Источник
ugra.ru
Summary:
электромеханическое управление;качающийся челнок;количество операций: 24;полуавтоматическая обработка петли;обметочная строчка, потайная строчка, эластичная строчка, эластичная потайная строчка
Обзор:
Швейная машина Dragonfly 324- относится к типу электромеханических, выполняет наиболее распространённые общеизвестные типы строчек, таких как прямые, эластичные, потайные, зигзаг и др. Эта модель имеет вертекальное челночное устройство, выполняет петлю в полуавтоматическом режиме, оснащена подсветкой и съёмной рукавной платформой с отсеком для хранения аксессуаров, быстрая смена лапок,встроенный нитеобрезатель .
Для заказа товара из категории Швейные машины позвоните по телефону 8 (495) 640-99-22. Чтобы купить товар прямо на сайте, нажмите «Купить». Обратите внимание: производитель может не предупредив поменять внешний вид изделия Швейная машина Dragonfly 324 вертикальный челнок, описание, характеристики и цвета. Из за этого некоторые параметры могут отличаться от приведенных на сайте. Швейные машины, Швейная машина Dragonfly 324 вертикальный челнок – лучший выбор и лучшие цены в интернет-магазине Равта! Ковальчек Мирослава. 16.09.2016. Отзыв о модели: Швейная машина Dragonfly 324 вертикальный челнок.
Электронная инструкция по эксплуатации Швейной машины DRAGONFLY 324, скачайте бесплатно это руководство пользователя. Инструкция, паспорт, описание, мануал, руководство, форум, инструкция по эксплуатации.. DRAGONFLY 324 инструкция, характеристики, поломки и ремонт. В представленном списке руководства для конкретной модели Швейных машин — DRAGONFLY 324. Вы можете скачать инструкции к себе на компьютер или просмотреть онлайн на страницах сайта бесплатно или распечатать. Категории Бытовая техника Техника для дома Швейные машины DRAGONFLY 324.
Швейная машина DragonFly 324. Характеристики товара: Страна производитель — Китай Страна сборщик — Китай Гарантия — 12 месяцев Тип машины — электромеханическая Количество выполняемых рпераций — 24 Виды строчек — прямая, эластичная(трикотажная),оверлочна, потайная подшивка низа, фестонная отделка строчки. Количество выполняемых петель — 1 Выполнение петель — авто. ещематически Максимальная длина стежка — 4 мм Максимальная ширина стежка — 5 мм Тип челнока — вертикальный качающийся Устройство обрезки нити — нитеобрезатель.
Устройство и работа швейной машины
Источник