

Максим aka WisH
Высшее образование по специальности «Информационные системы». Опыт работы системным администратором — 5 лет.
Задать вопрос
Сегодня поговорим про сетевые хранилища данных или NAS. Они используются в локальных сетях для того, чтобы записывать туда какие-то данные, скачивать их оттуда, настраивать прямую загрузку и все такое.
Например, вы можете дома поставить такое хранилище, записать туда фильмов в хорошем качестве, а потом смотреть с любого устройства, подключенного к сети. Позволяет лучше организовать управление своими данными. Сегодня поговорим про Zyxel NAS326, который является одним из недорогих и доступных хранилищ на рынке.
Содержание
- Обзор характеристик Zyxel NAS326
- Настройка сетевого хранилища
- Первоначальные манипуляции
- Настройка удаленного доступа через интернет
- Доступ с помощью мобильного приложения
- Пароли в NAS326
- Сброс устройства
- Отзывы пользователей
Обзор характеристик Zyxel NAS326
Для проверки характеристик сравним Zyxel nas32- eu0101f с подобными моделями, которые находятся примерно в том же ценовом диапазоне. Наши характеристики будут в первом столбце, следующая модель чуть дешевле, а последняя немного дороже.
Итоговая спецификация следующая:
| Характеристики | Zyxel NAS326 | WD My Cloud Home | Synology Disk Station DS118 | |
| Процессор | Модель | Marvell Armada 380 | Realtek RTD1295PB-CG | Realtek RTD1296PB-CG |
| Частота | 1300 МГц | 1400 МГц | 1400 МГц | |
| Количество ядер | 2 | 4 | 4 | |
| Оперативная память | 512 Мб | 1024 МБ | 1024 МБ | |
| Количество накопителей в комплекте | 0 | 1 | 0 | |
| Всего отсеков для накопителей | 2 | 1 | 1 | |
| Максимальный объем одного диска | 16 Тб | 4 Тб | 12 Тб | |
| Интерфейс диска | SATA II | SATA | SATA | |
| Форм-фактор | 3.5″ или 2.5″ | 3.5″ | 3.5″ или 2.5″ | |
| Поддерживаемые уровни RAID | RAID 0, RAID 1, JBOD | нет | Basic | |
| Количество интернет портов | 1 | 1 | 1 | |
| Скорость интернета | 1 Гбит | 1 Гбит | 1 Гбит | |
| Наличие Wi-Fi | нет | нет | нет | |
| USB | Количество | 3 | 1 | 2 |
| Тип | USB 2.0 x 1, USB 3.2 Gen 1 x 2 | USB 3.2 Gen 1 x 1 | USB 3.2 Gen 1 x 2 | |
| Блок питания | Мощность | 28 Вт | 7 Вт | 9.4 Вт |
| Система охлаждения | есть | нет | есть |
Также он обладает следующими возможностями:
- Медиа-сервера (Медиа-сервер Twonky с DLNA 1.5 и UPnP AV, Сервер iTunes, Медиа-сервер Logitech);
- Веб-сервисы (WebDAV, FTP сервер, phpMyAdmin/MySQL/PHP, RSS-клиент и сервер, Принт-сервер (CIFS), Поддержка удаленного доступа (DyDNS));
- Управление сетевыми приложениями (Управление пользователями и группами, Управление пакетами для установки приложений);
- Сетевая безопасность (Поддержка HTTPS и FTPES (FTP через TLS/SSL), Зашифрованная удаленная репликация NAS-NAS, Зашифрованное резервное копирование NAS на внешний диск);
- Управляет данными, может проводить автоматическую загрузку/выгрузку и резервное копирование.
Проводить сравнение по этим пунктам нет смысла. В чем-то они похожи, в чем-то отличаются. Если не знать, для какой конкретно цели вы берете хранилище, то важную информацию можно пропустить. Лучше самостоятельно перед покупкой посмотрите на сайте подробные характеристики, чтобы точно знать, что ваше устройство умеет.
Из плюсов стоит отметить, что он 2х дисковый, а также наличие вентиляторов, выполняющих роль системы охлаждения.
Их недостатков имеется высокое энергопотребление, чуть меньший объем оперативной памяти, а также отсутствие дисков в комплекте.
В общем, получается система, которую вы сможете собрать под свои нужды. Диски поставите те по объему, которые требуется для работы в данный момент, можно не переплачивать за объем. Возможность создать рейд из двух дисков позволит обезопасить ваши данные от повреждения.
Настройка сетевого хранилища
Перед началом использования лучше ознакомиться с инструкцией, идущей в комплекте поставки. Сложного здесь ничего не будет, так что справиться с установкой параметров получится легко. Из инструкции вам нужно узнать способы включения и отключение, что значит звуковая и цветовая индикация, чтобы понимать, какие ошибки вам выдает устройство.

После прочтения инструкции выберите место для установки устройства. Учтите, что оно потребляет приличное количество энергии, а значит греется. Наличие вентилятора не решит эту проблему, если поставить девайс в неправильное место.
Не устанавливайте у батареи и на солнце, черный корпус хорошо впитывает тепло. Не ставьте в угол и пыльные места, вентилятору нужно откуда-то брать воздух и куда-то его выдувать.
Остальные советы стандартные для всей техники: не должно быть влажно, избегайте натяжения проводов, постарайтесь подключить к розетке через фильтр напряжения или источник бесперебойного питания.
Последний совет актуален в тех домах, где часто пропадает электричество. Пару экстренных выключений NAS переживет спокойно, но если это будет происходить часто, то данные свои можно будет потерять.
Первоначальные манипуляции
Дисков в комплекте нет, так что вам нужно их купить и установить. Учитывайте, что интерфейс там стоит SATA II, так что жесткие диски с лучшими характеристиками брать смысла нет. После покупки их потребуется установить. Несильно надавите на центр правого края и потяните руку влево. Должна открыться крышка, под которой и находится отсек с дисками.

Теперь нажмите снизу на рычажок и потяните один из салазок на себя. Они должны легко достаться. На них закрепите винтами ваш жесткий диск, проверьте, чтобы он не шатался и сидел крепко.
На всякий случай скажу, что устанавливать диск следует наклейкой вверх. То есть, в той части салазок, что есть небольшая решетка, у вас будет находиться нижняя часть диска, на которой видна плата. Сверху же вы должны суметь спокойно рассмотреть заводскую наклейку со всеми характеристиками.

Вставьте салазки также, как и доставали их из устройства. Рычажок должен защелкнуться, чтобы крепко удерживать их внутри. Также поступите со вторым слотом под диск, если собираетесь его устанавливать. Закройте крышу и поместите устройство в предназначенное для него место, подключив к локальной сети и воткнув в розетку.
Для подключения с компьютера используйте FindMe или NAS StarterUtility. В первом случае введите в адресную строку браузера https://findme.zyxel.com, подождите загрузки окна, в котором кликните по «Find NAS». Дождитесь окончания процедуры и введите логин с паролем. Стандартно стоят admin/1234.
NAS StarterUtility – это программа, которая делает то же самое, только нет необходимости пользоваться браузером. Скачайте ей, запустите, подождите пока она найдет сетевое хранилище и подключитесь к нему.

После первого входа потребуется сменить пароль по умолчанию, так что введите новый. Теперь создайте том, если это первый вход в хранилище и диск новый. Здесь есть всего одна кнопка, так что жмите её. В следующем окне выберите размер создаваемого тома и дождитесь окончания операции. Теперь вы попадаете на рабочий стол.
Иногда может потребоваться запуск мастера инициализации, это делается через NAS StarterUtility. Это требуется редко, потому что устройство сразу готово к работе. Подключение с компьютера лучше делать через WebDAV, чтобы хранители отображались в качестве сетевого диска. Можно обратиться и напрямую по адресу, чтобы получать доступ как в локальной сети.
Настройка удаленного доступа через интернет
Откройте окно с настройками. В нижней части нажмите на mycloud.zyxel.com. Вас перекинет на соответствующую страницу в интернете.

Здесь придется зарегистрироваться. Это официальный сайт компании, так что вводите свои данные без опасений. Обычно там достаточно ввести почту и учетные данные, кому будет принадлежать учетная запись.
После регистрации и входа в личный кабинет щелкайте Search Devices, чтобы найти ваш NAS в списке устройств и затем кнопку the Pair NAS with account. Кнопка LocateNAS пригодится при наличии нескольких хранилищ в сети. При нажатии на неё будет мигать индикатор на выбранном хранилище, так что вы сможете проверить, что подключаете.

В следующем окне кликните Confirm для подтверждения связывания аккаунта и устройства. Вас переведет в новое окно, в котором вы сможете скачать приложения для телефона.

Щелкните по DDNS Setting, это позволит открыть окно с назначением адреса. Вы сможете сделать это и позже в списке устройств, нажав там на DDNS Setup. Задайте здесь в первом окошке то имя, по которому хотите получать доступ. Оно должно быть уникальным, так что потребуется время для подбора подходящего значения.
Теперь вы сможете получать доступ не только с устройств внутри сети, но и из интернета. Этот адрес позволит подключить устройства через WebDAV, через приложение или прямым запросом.
Доступ с помощью мобильного приложения
После регистрации вы можете зайти на страницу http://zyxel.to/zdrive и там перейти по ссылкам для вашего устройства. После загрузки приложения вам потребуется ввести в приложении на смартфоне данные от аккаунта. Теперь вам станет доступно приложение, которое, в некотором смысле повторяет меню компьютера, но и отличается от него.

В верхней части окна вам доступны ваши устройства, подключенные к аккаунту. Нажмите на них и перейдите к списку расшаренных папок. В нижней части доступны те папки, к которым вам дали доступ на других устройствах.
Настроек здесь не так уж и много, а доступ к папкам осуществляется привычным для смартфонов образом. Остается привыкнуть к интерфейсу. Если возникнут какие-то проблемы, то обращайтесь к инструкции, там подробно расписано значение каждой кнопки.
Пароли в NAS326
Фактически вы будете использовать две учетные записи: одна потребуется для доступа непосредственно к устройству из локальной сети. Здесь нужно ввести логин и пароль от устройства, после этого станет доступна возможность настройки. Стандартное сочетание admin/1234. Смена пароля происходит при первом входе в устройство.
Второй пароль от вашего аккаунта на сайте разработчика. Он потребуется для привязки новых устройств, создания имен и настройки доступа из интернета к ним.
Для одиночного пользователя больше ничего не потребуется. Если же вы планируете давать доступ разным людям и вам их надо как-то ограничить, то добро пожаловать в раздел Control Panel – Overview. Здесь создайте аккаунты для разных пользователей и с разными правами. Можно создать группы с правами доступа в определенные папки и уже в них добавлять пользователей.
Настройка доступа по объему тянет на отдельную статью, так что подробно разбирать не будем. Если вы хотите создать пару пользователей для семьи, то для этого хватит инструкции. Если же вы хотите заниматься администрированием облачного сервиса с доступом посторонних людей, то явно знаете, как это сделать.
Сброс устройства
Кнопка RESET на задней панели устройства предназначена для восстановления настроек NAS по умолчанию. Нажмите и держите её. Отпустите после первого сигнала, чтобы поменять адрес устройства и пароль на нем. Если же хотите сбросить до заводских настроек, то держите до третьего сигнала. Это около 5-7 секунд. Потом проведите новую полную настройку.

Даже после полного сброса все данные на дисках останутся на месте. Потеряете только сами настройки групп и пользователей, которые проводили на NAS.
Отзывы пользователей
Отзывы пользователей, в целом, положительные.
2 диска;
Большой объем диска;
Возможность создать рейд;
Наличие охлаждения;
Большое количество новых USB-разъемов для подключения внешних дисков;
Низкая цена.
Большое энергопотребление;
Шум вентилятора;
Отсутствие диска в комплекте.
Это хорошее устройство для домашнего использования или для использования в небольшом офисе. Оно может обеспечить достаточно большой объем сохраняемой информации, возможность создания резервных копий, а также доступа из интернета. Для активного использования с большими объемами данных следует купить хорошие диски, а также обеспечить охлаждение устройства.
Default Login Details
User’s Guide
NAS Series
Model: NAS326, NAS520, NAS540, and NAS542
Personal Cloud Storage
Copyright © 2019 Zyxel Communications Corporation
Ways to Find Your
NAS
FindMe
NAS Starter Utility
Web Address http://(NAS Server Name)
http://(NAS IP Address)
User Name admin
Password 1234
Version 5.21 Edition 3, 9/2019

NAS Series User’s Guide
2
IMPORTANT!
READ CAREFULLY BEFORE USE.
KEEP THIS GUIDE FOR FUTURE REFERENCE.
Screenshots and graphics in this book may differ slightly from what you see due to differences in your
product firmware or your computer operating system. Every effort has been made to ensure that the
information in this manual is accurate.
Related Documentation
•Quick Start Guide
The Quick Start Guide shows how to connect the NAS.
•More Information
Go to support.zyxel.com to find other information on the NAS.
NAS Series User’s Guide
3
Document Conventions
Warnings and Notes
These are how warnings and notes are shown in this guide.
Warnings tell you about things that could harm you or your device.
Note: Notes tell you other important information (for example, other things you may need to
configure or helpful tips) or recommendations.
Syntax Conventions
• The NAS Series in this user’s guide may be referred to as the “NAS” in this guide.
• Product labels, screen names, field labels and field choices are all in bold font.
• A right angle bracket ( > ) within a screen name denotes a mouse click. For example, Network Setting
> Routing > DNS Route means you first click Network Setting in the navigation panel, then the Routing
sub menu and finally the DNS Route tab to get to that screen.
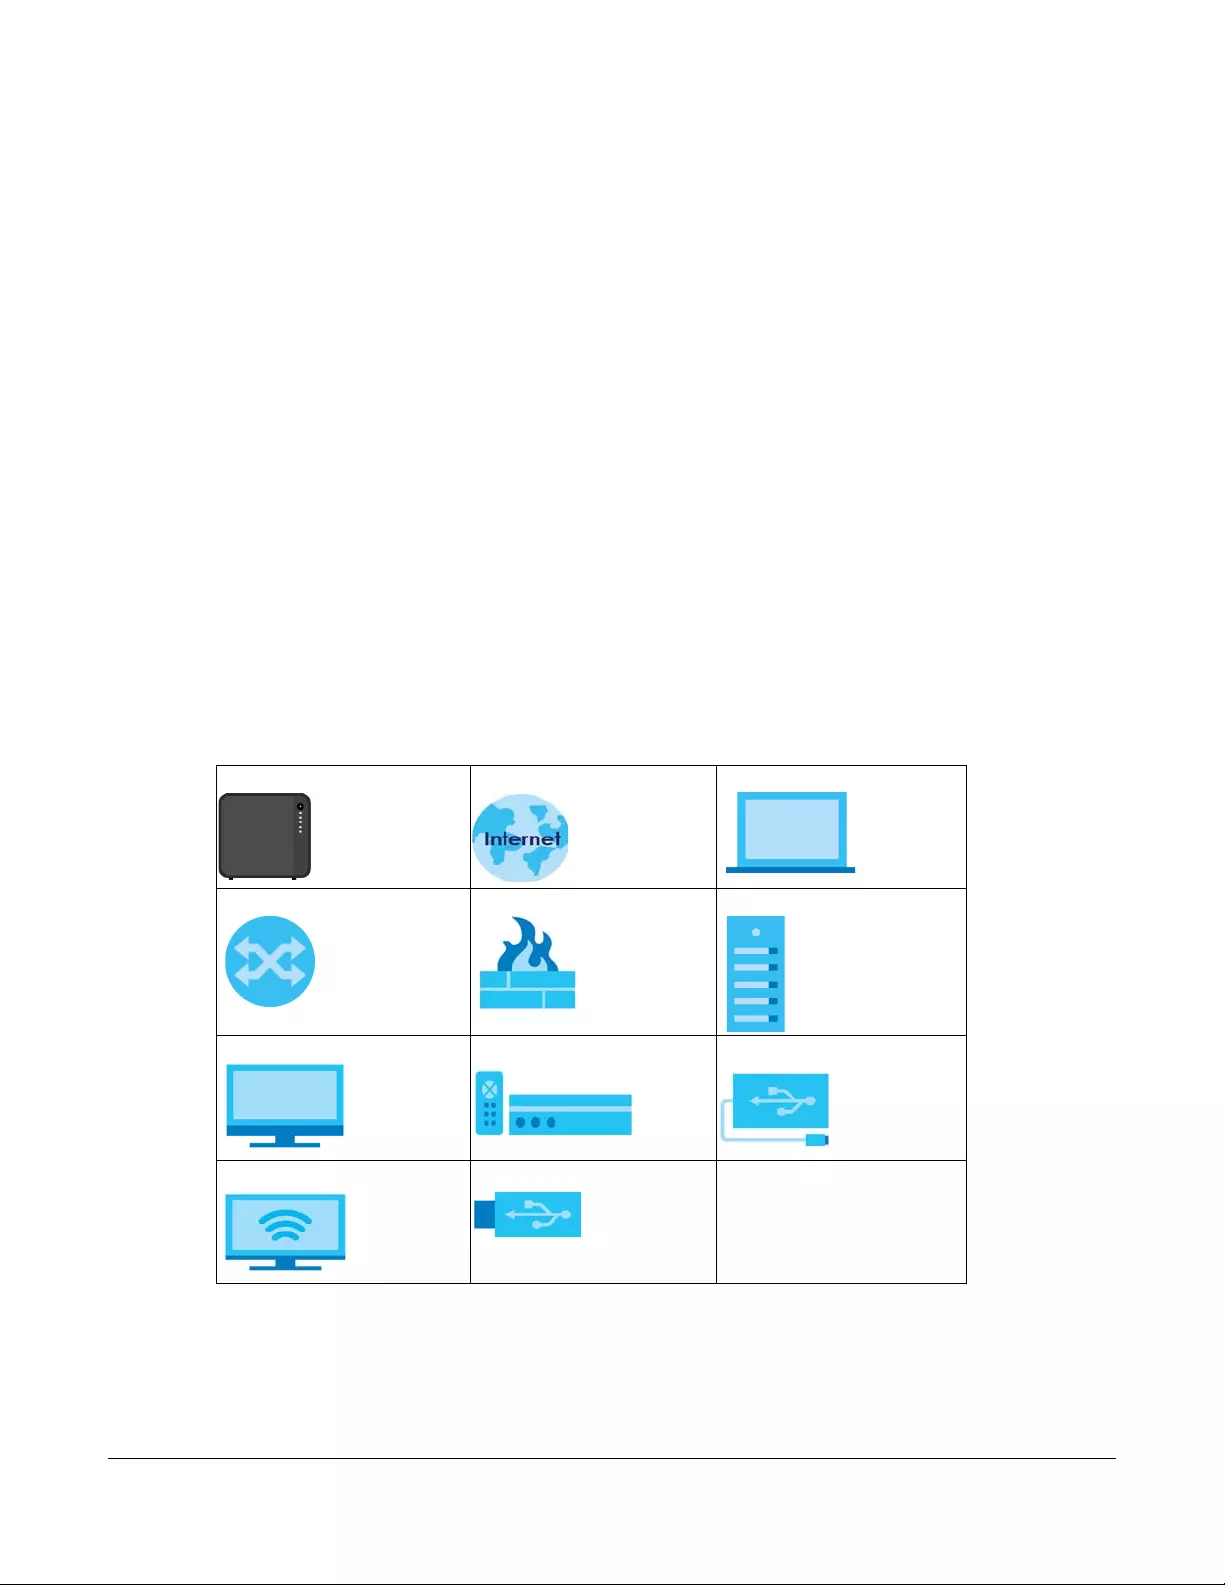
Icons Used in Figures
Figures in this user guide may use the following generic icons. The NAS icon is not an exact
representation of your device.
NAS Internet Laptop Computer
Switch Firewall Server
Desktop Computer Media Player USB Storage Drive
TV USB Hard Drive

Contents Overview
NAS Series User’s Guide
4
Contents Overview
Get to Know Your NAS ………………………….……………………………………………………..………….…………… 13
Find and Access Your NAS ………………………………………………….……………………………..………………… 18
Web Configurator …………………….……………………………………………………..…………………..………………. 26
Video Tutorials ………………………….……………………………………………………..…………………………………… 37
Storage Manager …………………………..……………………………………………………..……………..……………… 41
Control Panel: Overview …………..……………………………………………………..……………………………..….. 101
Control Panel: Privilege and Sharing …………………………………………………………………..………….…… 104
Control Panel: Network …………………..……………………………………………………..……………….………….. 129
Control Panel: System ….…………………………….……………………….……………………………..….…………… 147
Control Panel: Service ……………………………………………………………………..……………………………..….. 158
Control Panel: Maintenance ………………………………………..……………………….…………………….…….. 177
Status Center ………………………………….…………………………….……………………….………..…………………. 196
App Center and Packages ………………………..……………………………..……………………….………..…….. 199
Download Service ………………………….……………………………………………………..……………..……………. 236
Upload Manager …..……………………………..……………………………………………………..……….……………. 252
Backup Planner ………………………………………………………………….……………………………...……………… 267
File Browser, Photo, Music & Video ………..…………………………….……………………….……………….……. 292
Access Your Cloud Remotely via myZyxelCloud and Zyxel Drive App ……………………….………… 304
Play Media Files on TVs Using zCloud App ………..……………………….……………………………..………… 316
Troubleshooting ……………………….…………………………….……………………….…………………………………. 322

Table of Contents
NAS Series User’s Guide
5
Table of Contents
Document Conventions ……………… ….………….. …. ….………….. …. ….………….. …. ….…………… … .………..3
Contents Overview …………………………..……………….…………..……………….…………………….…………….4
Table of Contents………………………………………..……………….…………..………………………………………….5
Chapter 1
Get to Know Your NAS……………..……………….…………..……………….…………..……………….…..…………13
1.1 Overview …………………………………………………………………………….…………………………………………. 13
1.2 LEDs ……………………………..……………………………………………….……………………………………………….. 14
1.3 Hard Disks …………………….……………………………………………………..…………………….……………..……. 15
1.4 SD Card .……………………….…………………………….……………………….…………………………………………. 15
1.5 Power Button ………….…………………………….……………………….……………………………..…….………….. 15
1.6 COPY/SYNC Button …………….……………………………………………………..……………………….………….. 16
1.7 RESET Button ……………………………..……………………………………………………..………….…………………. 16
Chapter 2
Find and Access Your NAS ……………..…………..……………….…………..…………………………….…..……..18
2.1 Overview …………………………………………………………………………….…………………………………………. 18
2.2 FindMe ……………………………….……………………………………………….…………………………………………. 18
2.3 NAS Starter Utility ……………………………..…………………………….……………………….………………………. 19
2.3.1 NAS Seeker Screen …………..……………………………………………………..…………………………….. 19
2.3.2 Main NAS Starter Utility Screen …….……………………………………………………………..………..… 20
2.3.3 Directory of the NAS ……………….……………………………………………………..……………….……… 22
2.3.4 Network Drive …………….…………………………….……………………….………………………..…………. 22
2.3.5 Configure System Settings …………….……………………………..……………………….…………….….. 23
Chapter 3
Web Configurator……….……………….……………………………………………………………………….…………....26
3.1 Overview …………………………………………………………………………….…………………………………………. 26
3.2 Access the NAS Web Configurator ……………..……………………….……………………………..………..… 26
3.3 Desktop ………………………………………………………………….……………………….…………………………….. 30
3.3.1 Status Zone …………..……………………………………………………..……………………….…..……………. 33
3.3.2 Switch between Desktop Pages ………………………………….……………………………..………….. 33
3.3.3 Group Icons ………………………………………………………………..……………………….…….………….. 34
3.3.4 Move Icons ………….……………………………………………………..……………………….…….………….. 36
Chapter 4
Video Tutorials………………………………………………………………………………………………….………………..37
4.1 Overview …………………………………………………………………………….…………………………………………. 37

Table of Contents
NAS Series User’s Guide
6
4.2 Create a volume and copy files using Windows Explorer …………………………………………..……. 37
4.3 Enable Time Machine on the NAS and your Mac computer ……………………………………………. 37
4.4 Back up files to the NAS using Windows File History ………………………………….………………………. 39
4.5 Restore a backup using Windows File History ………………………..……………………….………………… 40
4.6 Remotely access files on the NAS using WebDAV ………….……………………….………………………. 40
Chapter 5
Storage Manager……….……………….……………………………………………………..………………...……………41
5.1 Overview …………………………………………………………………………….…………………………………………. 41
5.2 Storage Manager Overview …………………………….……………………………..……………………….……. 41
5.2.1 Internal Volumes Screen ……………………………………………..……………………………..………….. 41
5.2.2 External Volumes Screen …………………………..……………………………..………………………...….. 43
5.3 Internal Storage ………………………………………………………………………..………………….……………….. 43
5.3.1 Volume Screens …………………………..……………………….……………………………..………..………. 45
5.3.2 Disk Group Screens …………..…………………………….……………………….……………………..……… 70
5.3.3 Hard Disk Screens …………….…………………………….……………………….…………………………….. 74
5.4 iSCSI LUNs Screens …………………………..…………………………….……………………….……….……………… 80
5.4.1 Create a New LUN ………………………………………….……………………….…………………………….. 82
5.4.2 iSCSI Targets Screens …………………………………………………………………………..………………… 84
5.5 External Storage ………………………………………….……………………….………………………..……………….. 94
5.5.1 What You Need to Know …………………………………………………..……………………….………….. 94
5.5.2 External Storage Screens …..…………………………….……………………….………………………..…… 94
5.5.3 Format the External Volume …………………………………………………………..…………………….... 96
5.6 Technical Reference …………………………….……………………………..……………………….………………… 97
Chapter 6
Control Panel: Overview …… ….………….. …. …. ……………… …. … ….…………… … …. ….…………… ..………101
6.1 Overview …………………………………………………………………………….……………………………………….. 101
6.2 Control Panel Overview .…………………………….……………………….……………………………...……….. 101
Chapter 7
Control Panel: Privilege and Sharing …….. ….………….. …. …. ……………… …. … ….…………… …. … ….....104
7.1 Overview …………………………………………………………………………….……………………………………….. 104
7.2 What You Can Do …………………………..……………………………………………………..………….…………. 104
7.3 Users ………………………………………………………………………………………….…………..…………………….. 104
7.3.1 Users Screen …………………………………………….……………………….…………………………………. 106
7.3.2 Add an Account ………..…………………………….……………………………..……………………..……. 107
7.3.3 Edit an Account …..……………………………………………………..……………………….……….……… 111
7.3.4 User Info ……………….…………………………….……………………….……………………………………….. 112
7.4 Groups ………………………………………………………………………………..……………………………………….. 113
7.4.1 Groups Screen ……………………………………………….……………………….…………………..………. 113
7.4.2 Add a Group ………………………….…………………………….……………………….…………….………. 114
7.4.3 Edit a Group …………………………..…………………………….……………………….…………..………… 118

Table of Contents
NAS Series User’s Guide
7
7.4.4 Group Information ……………………….……………………….……………………………..………………. 119
7.5 Shared Folders ……….…………………………….……………………….……………………….…………………….. 120
7.5.1 Share and Folder Names ……………………………………………………………….……………………..120
7.5.2 Shared Folders Screen .…………………………….……………………….……………………………..….. 120
7.5.3 Add a Share ………………………………………………………….……………………………..…….………… 122
7.5.4 Edit a Share ………….……………………………………………………..……………………….…..………….. 126
7.5.5 Shared Folder Information ……………………………………………………….…………………………... 127
7.5.6 Recycle Bin Screen …………………………….……………………………..……………………….…..……. 128
Chapter 8
Control Panel: Network …….. …. … …. ….………….. …. …. ……………… …. ……………… …. ….………………….129
8.1 Overview …………………………………………………………………………….……………………………………….. 129
8.2 What You Can Do …………………………..……………………………………………………..………….…………. 129
8.3 What You Need to Know …….…………………………….……………………….…………………………..…….. 129
8.4 TCP/IP Screens ………………………….……………………………………………………..…………………………… 130
8.4.1 Configure General TCP/IP Settings .……………………….……………………………..………………. 130
8.4.2 Configure Network Interface ……………………………………………..……………………….………… 131
8.4.3 Configure Web Configurator …..…………………………….……………………….…………………….. 136
8.4.4 Configure Network Diagnosis …………………………………………….……………………………..….. 137
8.5 UPnP Port Mapping Screens ……………………………………………………………..……………………..……. 138
8.5.1 UPnP and the NAS’s IP Address .……………………………………………………..…………………….. 139
8.5.2 UPnP and Security …………………..…………………………….……………………….…………………….. 140
8.5.3 The NAS’s Services and UPnP ………..……………………………..……………………….………………. 140
8.5.4 Configure UPnP Router ………………………………………….……………………….………………….…. 140
8.5.5 Configure UPnP Port Mapping ………………….……………………….……………………………..….. 141
8.6 Terminal Screen ………………………………………………………………….……………………………………….. 144
8.7 DyDNS Screen ……………..…………………………….……………………….……………………………………….. 145
Chapter 9
Control Panel: System……. …. …. … …. ….………….. …. ….………….. …. ….………….. …. …. ….……….…………147
9.1 Overview …………………………………………………………………………….……………………………………….. 147
9.2 What You Can Do …………………………..……………………………………………………..………….…………. 147
9.3 What You Need to Know …….…………………………….……………………….…………………………..…….. 147
9.4 Server Name Screen ……………………………………………………………………….…………………………… 148
9.5 Date/Time Screen ……………….…………………………….……………………….…………………….……….….. 149
9.5.1 Configure Date/Time …………………………………………………..……………………….…………..….. 149
9.5.2 Configure Daylight Saving Time …………………………….……………………….…………………….. 150
9.6 FW Upgrade Screens ………………………………………..……………………………..…………………………… 151
9.6.1 Latest Firmware Check ………………………………………….……………………………..………………. 151
9.6.2 Manual Firmware Upgrade …………………………………………………………………..………………. 152
9.7 SSL Screens …………………………………….…………………………….……………………….…………………….. 153
9.7.1 Install System CA ….…………………………….……………………….……………………………....………. 153
9.7.2 Modify the Existing Certificate …………….……………………………..……………………………..….. 154

Table of Contents
NAS Series User’s Guide
8
9.7.3 Create a Certificate …..……………………………………………………..……………………….…..……. 155
Chapter 10
Control Panel: Service..…………… …. …. ……………… …. ……………… …. ……………… …. …. ……….…………158
10.1 Overview ……….……………………….…………………………….……………………….…………………………… 158
10.2 What You Can Do ……………………………………………………….……………………………..…….………… 158
10.3 What You Need to Know …………………….……………………………..……………………….………………. 158
10.4 Media Server Screens …………………………………………………………………..………………….……….. 159
10.4.1 Media Server Share Publish Screen ……………………………………………..…………………….. 160
10.5 iTunes Server Screen ……………….……………………………………………………..……………….………….. 161
10.6 FTP Screens ……………………………..……………………………………………………..…………………………… 162
10.6.1 General Settings ………………………………………………………..……………………….……….……… 162
10.6.2 Transfer Settings ….…………………………….……………………….……………………………...……….. 163
10.6.3 Character Set ……………………………………………….……………………….…………………..………. 165
10.7 WebDAV Screen ………………………………………………………………..……………………….………………. 165
10.7.1 How to Use NetDrive with the NAS …………………………………………………………….………… 166
10.8 Web Publishing Screens …………..……………………………………………………..…………………..………. 167
10.8.1 Status …………………………………………………………………………………………..…………………….. 167
10.8.2 Share Publish ……………………………………………………….……………………….…………..………… 168
10.8.3 How to Configure Web Publishing …………………………………………………………………..….. 169
10.9 Print Server Screen ………………………………………….……………………….…………………………………. 171
10.9.1 Print Server Edit ……………….…………………………….……………………….…………………………… 172
10.10 Syslog Server Screen ……………..……………………………………………………..………………..……..….. 172
10.11 Technical Reference ……………..…………………………….……………………………..…………………….. 174
10.11.1 Share Media Files on Your Network ………………………….……………………………..………… 174
10.11.2 Web Publishing ………………………………………………….……………………………..………………. 175
10.11.3 Printer Sharing ……………………………………….……………………….………………………..……….. 176
Chapter 11
Control Panel: Maintenance ….………………………………………………………………………………………….177
11.1 Overview ……….……………………….…………………………….……………………….…………………………… 177
11.2 What You Can Do ……………………………………………………….……………………………..…….………… 177
11.3 Power Screens …………………………………………………………………..……………………….………………. 177
11.3.1 Power Management ………………………..……………………….……………………………..………...177
11.3.2 Power On/Off Schedule …………………………………………………..……………………….………...179
11.3.3 Add the Power Control Schedule …………..……………………………..……………………….….. 180
11.4 Log Screen …………………………………..…………………………….……………………….…….………………. 181
11.4.1 Log Report Configuration Screen ………………………..……………………….…………………….. 182
11.4.2 Email Setting …………….…………………………….……………………….……………………….………… 183
11.4.3 Report Setting ……………………….……………………………………………………..…………………….. 184
11.4.4 Syslog Server Setting ……….……………………………………………………..……………………..……. 184
11.5 Configuration Backup Screens .…………………………….……………………….………………………..…. 185
11.5.1 Configuration Backup …………..……………………………………………………..…………………..… 185

Table of Contents
NAS Series User’s Guide
9
11.5.2 Configuration Restore …………………………….……………………….……………………………...…. 186
11.5.3 Factory Reset ………………………..…………………………….……………………………..……..……….. 187
11.6 Technical Reference …………………………..……………………………..……………………….…….………… 188
11.6.1 Log Classes …………………………………………….……………………………..…………………………… 189
11.6.2 Log Severity Levels …………………………………………………….……………………………..………… 189
11.6.3 Log Messages …………………………….……………………………..……………………….……….……… 189
Chapter 12
Status Center …………..……………………………………………………………………………………….………………196
12.1 Overview ……….……………………….…………………………….……………………….…………………………… 196
12.1.1 System Information ………………………………………………………………..…………………………… 196
12.1.2 Network ……………..……………………………………………….……………………………..………………. 197
Chapter 13
App Center and Packages……………………………………….………………………..………………………..…..199
13.1 About Packages ………………………………………………………….……………………………..…..………….. 199
13.1.1 Available Packages ………..……………………………………………………..……………………….….. 199
13.2 App Center Screens ………………..…………………………….……………………….…………………………… 200
13.2.1 Installed Applications ……..……………………………………………………..…………………………… 201
13.2.2 Application Update ….……………………………………………………..……………………….…….….. 203
13.2.3 Browse All Apps ………..……………………………………………………..……………………….………… 204
13.3 AuroraSyncBackup ……..……………………………………………………..……………………….…….………… 205
13.3.1 How to check video backups ……………………….……………………….…………………………… 207
13.4 DropboxClient ……………………………….…………………………….……………………….…………………….. 208
13.4.1 Configure Account Setting ……………………..……………………………..……………………….….. 209
13.4.2 How to associate NAS share/account with Dropbox account …………….………………. 211
13.4.3 Configure Update Period …………………………………………..……………………….……………….215
13.5 GoogleDriveClient ………………………………………….……………………….……………………..………….. 216
13.5.1 Configure Account Setting ……………………..……………………………..……………………….….. 216
13.5.2 How to link NAS account, share and Google account ……………..………………………… 218
13.5.3 Configure Update Period ……..…………………………….……………………….……………………..221
13.6 NFS ………………..……………………….…………………………….……………………….…………………………… 222
13.6.1 Add/Edit NFS Share …………………………..……………………………..……………………….………… 224
13.6.2 NFS Session ………………………………………………………….……………………….………….…………. 226
13.7 PHP-MySQL-phpMyAdmin ……………………………….……………………….……………………………...…. 227
13.8 TFTP ………………………………….……………………………………………………..…………………………………. 228
13.9 pyLoad …………..……………………………..……………………………………………….………..…………………. 230
13.10 Memopal ……………………………………………………………………………………..…………………………… 231
13.10.1 Memopal Status ……..…………………………….……………………….…………………………….…… 231
13.10.2 Memopal Settings …………………….……………………………..……………………….…………..….. 232
13.11 ownCloud ………………………………………………………………….……………………….…………………….. 234
Chapter 14
Download Service……… …. ….…………… ……………… …. ……………… …. ……………… ….………….………….236

Table of Contents
NAS Series User’s Guide
10
14.1 Overview ……….……………………….…………………………….……………………….…………………………… 236
14.2 What You Need to Know …………………….……………………………..……………………….………………. 236
14.3 Download Service Screen ……………………………….……………………………..……………………..……. 236
14.3.1 Add a Download Task …………………………………..……………………….…………………………... 239
14.3.2 Configure General Download Settings …………………………………..……………………….….. 240
14.3.3 Configure the P2P Download Settings ………………………………………………..………………. 242
14.3.4 Configure the IP Filter Settings .…………………………….……………………….…………………….. 244
14.3.5 Configure the Email notifications Settings ……………………………………………………………. 245
14.3.6 Select Files to Download ……………………………….……………………….…………………………… 246
14.3.7 Display the Task Information ……………..……………………….……………………….……………….246
14.4 Download Notify Screen ………………..…………………………….……………………….……………..……… 248
14.5 Technical Reference …………………………..……………………………..……………………….…….………… 249
14.5.1 Download Service ………………………………………………………………….…………………………… 249
14.5.2 P2P Download Security ………………………………………………………………..…………………….. 250
Chapter 15
Upload Manager………..……………….………………………………………………………………………..………….252
15.1 Overview ……….……………………….…………………………….……………………….…………………………… 252
15.2 What You Can Do ……………………………………………………….……………………………..…….………… 252
15.3 What You Need to Know …………………….……………………………..……………………….………………. 252
15.4 Flickr/YouTube Screen ..…………………………….……………………….……………………………..………… 253
15.4.1 Configure the Flickr Settings …….………..……………………….……………………………..………… 253
15.4.2 Configure the YouTube Settings ………………………………………………………………..………… 259
15.5 FTP Uploadr Screen .……………………….……………………………………………………..…………………….. 261
15.5.1 Add or Edit an FTP Server Entry …………………………………..……………………….………………. 263
15.5.2 FTP Uploadr Preferences Screen ……………..……………………………..……………………….….. 263
Chapter 16
Backup Planner………….……………….……………………………………………………………………………………267
16.1 About Backups ……………………….……………………………………………………..…………………………… 267
16.1.1 Manage a USB Device and USB Backups ……………………………………..…………………….. 267
16.1.2 Remote Backups ……………………………………………………………..……………………….………… 267
16.1.3 Internal Backups …………………………………………………………………….…………………………… 267
16.1.4 Cloud Backups ……………………..…………………………….……………………….…………………….. 267
16.1.5 Synchronize Files ………………………………………………….……………………….…………….………. 268
16.2 What You Can Do ……………………………………………………….……………………………..…….………… 268
16.3 Backup Screens ………….……………………………………………………..……………………….….…………… 268
16.3.1 Add a new backup job …………………….……………………………..……………………….………...270
16.3.2 Edit Job Screens ………………………………………………………..……………………….……….……… 276
16.3.3 Restore Screens …………………….……………………………………………………..…………………….. 280
16.4 Copy/Sync Button Screens …………………………………………..……………………………..………………. 286
16.4.1 Configure Copy Settings …………….……………………….……………………………..…………….... 286
16.4.2 Sync Settings …………….…………………………….……………………….……………………….…….….. 287

Table of Contents
NAS Series User’s Guide
11
16.4.3 How to Copy Files …………………………….……………………….……………………………..…..……. 288
16.4.4 How to Synchronize Files ……………………………………..……………………………..…………….… 289
16.5 Time Machine Screen …………………………………………………………………….…………………..………. 290
Chapter 17
File Browser, Photo, Music & Video ….…………..……………….………………………………………………..…292
17.1 Overview ……….……………………….…………………………….……………………….…………………………… 292
17.2 File Browser ………….……………………….…………………………….……………………….…………………….. 292
17.3 Photo …………………………………………………………………….……………………….…………………………… 294
17.3.1 Exif and Google Maps (Photos) ……………………………………….……………………….………… 297
17.3.2 Slideshow (Photos) ……………………..……………………………..……………………….………………. 298
17.4 Music ……………..……………………….…………………………….……………………….…………………………… 298
17.4.1 Now Playing (Music) …………………..……………………….……………………………..…………..….. 300
17.5 Video ………………………….……………………………………………………..……………………………………….. 300
17.6 Playzone Settings ………………………………..……………………….……………………………..………………. 302
17.7 Application Zone ……………………………………………………………….…………………………..…………… 303
Chapter 18
Access Your Cloud Remotely via myZyxelCloud and Zyxel Drive App………………….……………304
18.1 myZyxelCloud Service ………………………………………………….……………………….…………………….. 304
18.1.1 myZyxelCloud Screen ………………………………………….……………………….…………………..… 304
18.1.2 Pair your NAS …………………………………………………………………..………………………..……….. 305
18.1.3 DDNS Setup …………………………………………….……………………….…………………………………. 307
18.1.4 NAS Information …………………………………………………………………….…………………….…….. 308
18.1.5 UPnP Setup ……………………………………….……………………….……………………………………….. 309
18.2 Zyxel Drive ……………………………………..…………………………….……………………….….…………………. 309
18.2.1 Zyxel Drive Welcome …………….……………………………………………………..………………….…. 310
18.2.2 NAS and File List ………..……………………………………………………..……………………….………… 310
18.2.3 Uploading and Media Streaming .……………………….……………………………..………………. 311
18.2.4 Instant Upload …………………………………………………….……………………….…………….………. 312
Chapter 19
Play Media Files on TVs Using zCloud App……………………. … …. ….………….. …. …. ….………….. …. ….316
19.1 Using zCloud ……………………………………………..……………………….……………………….………………. 316
19.2 zCloud TV Streaming ………………………………………………………………..……………………….………… 317
19.3 zCloud Instant Upload …………………………………………..……………………….………………….……….. 319
Chapter 20
Troubleshooting..…………………………….…………..……………….…………..……………….……….…………….322
20.1 Troubleshooting Overview …………………..……………………………..……………………….………..…….. 322
20.2 Power, Hardware, Connections, and LEDs ……….……………………….……………………………..….. 322
20.3 NAS Starter Utility ……………………..……………………………………………………..…………………………… 324
20.4 NAS Login and Access ……………………………………………………………..………………………...………. 325

Table of Contents
NAS Series User’s Guide
12
20.4.1 Enabling Scripting of Safe ActiveX Controls ………………………………….…………………….. 326
20.5 I Cannot Access The NAS ………………………………..……………………….…………..…………..………… 328
20.6 Users Cannot Access the NAS ………..………….……………………….…………..…………..………………. 329
20.7 External USB Drives …………………..………….…………..……………………….…………..…………………….. 330
20.8 Storage ………….……………………….………….……………………….……………………….…………………….. 330
20.9 Firmware …………………….…………………………………..……………………….…………..…………………….. 331
20.10 File Transfer ……………………..…………..……………………………………………….…………………………… 331
20.11 Networking ………………………………….………….……………………….…………..…………………………… 332
20.12 Some Features’ Screens Do Not Display ……………………..……………………….…………..………… 332
20.13 Media Server Functions ………….………….…………..……………………….…………..…………………….. 333
20.14 Download Service Functions ………………………………..…………..…………..…………………………… 335
20.15 Web Publishing ..…………………….………….……………………….…………..…………..…………………….. 335
20.16 Auto Upload ………………………………..…………………………………..……………………….………………. 336
20.17 App Center …………………….…………..……………………………………………….…………..………………. 337
20.18 Backups ……….……………………….………….……………………….……………………….…………………….. 337
20.19 Google Drive ……………………………….…………………………………..……………………….………………. 338
Appendix A Customer Support ……………………………………………………………………………………….. 339
Appendix B Product Specifications…………………………………………..…………………………………….. 345
Appendix C Legal Information ………………………………………………………………………………………… 346
Index……………………………………………………………..………………………………………………………………..350

NAS Series User’s Guide
13
CHAPTER 1
Get to Know Your NAS
1.1 Overview
This User’s Guide covers the following models: NAS326, NAS520, NAS540, and NAS542.
Use the NAS as your own personal cloud. Here are some key features:
•Start using Zyxel NAS instantly with FindMe — Use Zyxel FindMe to discover your NAS on your home
network and get in control in under 15 seconds. Then do an easy installation with no need to install a
NAS utility.
•Access and share files from your NAS wherever you are — Using the Zyxel Drive mobile app makes it
easy.
•Create a shared cloud space for people without a NAS — Provide your cloud space for your friends or
family members when you share a folder from the NAS with the Zyxel Drive mobile app. Your friends
and family members don’t need to purchase an additional NAS — just install the Zyxel Drive mobile
app on their mobile devices.
•Protect your data from drive failure — The NAS’s RAID 1 capability clones contents from one drive to
another. If a drive is damaged or corrupted, you still have another drive to restore from or use.
•Get up and running quickly with the easy-to-us e interface — The Zyxel NSM (NAS Station Management)
5.2 intelligent desktop provides a rich feature set of tools with an easy-to-understand GUI design to
help you get things done quickly. The multitasking capability through a multi-window interface
enables you to quickly get applications up and running.
•Check your NAS while you’re away — Even if you have several Zyxel NAS devices, visit the
myZyxelcloud Web portal from anywhere to see their health status at a glance.
•Stream multimedia contents to your big screen TV — Bring your favorite multimedia files on the NAS to
the big screen. Zyxel zCloud app lets you play your favorite videos, music, or photos on your big
screen with TV streaming devices such as Apple TV, Google Chromecast, Roku 3, and Amazon Fire TV;
or directly on smart TVs like those from Samsung and LG.
Table 1 NAS Series Comparison Table
FEATURES NAS326 NAS520 NAS540 NAS542
RAM Size 512 MB DDR III 1 GB DDR III 1 GB DDR III 1 GB DDR III
Number of Hard Disk Bays 2 2 4 4
Supported RAID Types RAID0
RAID1
JBOD
BASIC
RAID0
RAID1
JBOD
BASIC
RAID0
RAID1
RAID5
RAID6
RAID10
JBOD
BASIC
RAID0
RAID1
RAID5
RAID6
RAID10
JBOD
BASIC
Number of Ethernet Ports 1 2 2 2
Port Trunking Support No Yes Yes Yes
Number of USB Ports 2 (USB3.0)
1 (USB2.0) 3 (USB3.0) 3 (USB3.0) 3 (USB3.0)
Number of SD Card Slots N/A 1 1 1
Chapter 1 Get to Know Your NAS
NAS Series User’s Guide
14
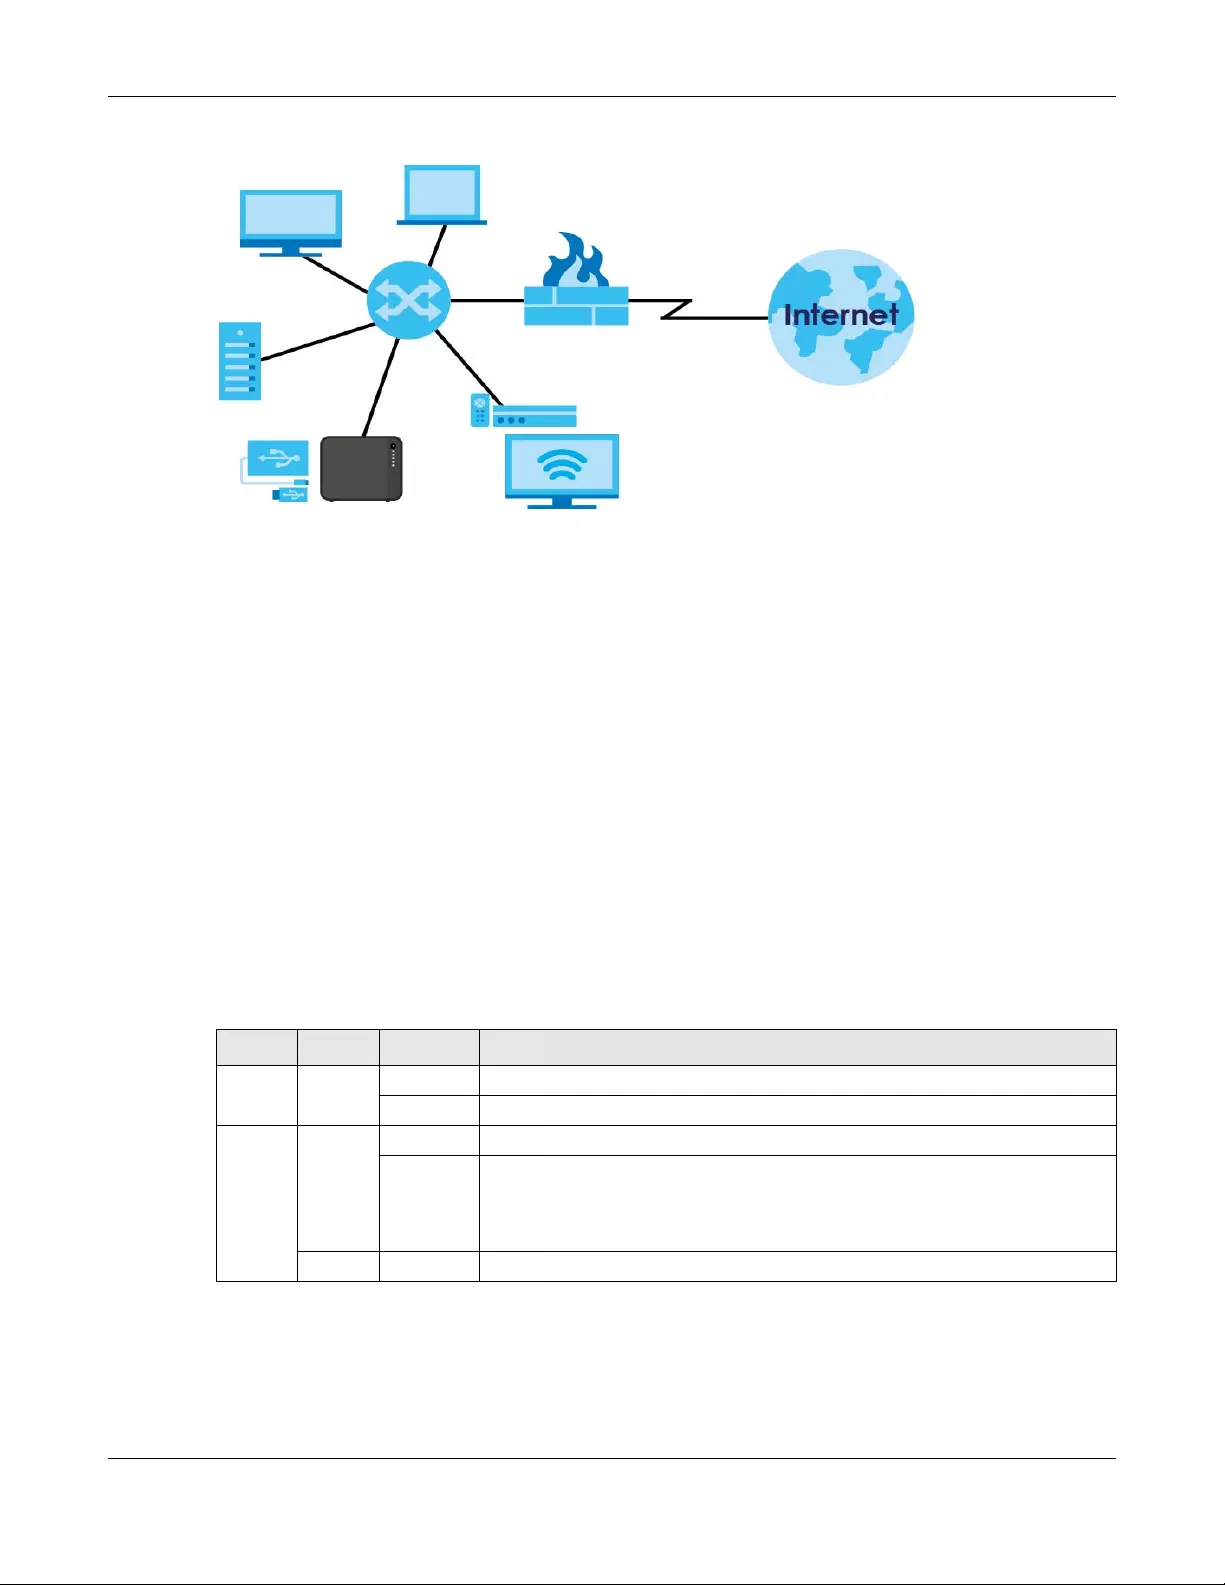
Figure 1 Example of the NAS in a Home Network
Above is the NAS in a home network. Users back up and share data on the NAS. The media player (A)
plays the NAS’s media files on the TV. A USB hard drive (B) provides extra storage space and files are
copied directly from the USB storage device to the NAS.
Place the NAS behind a firewall and/or IDP (Intrusion Detection and Prevention) device to protect it
from attacks from the Internet.
Refer to the Quick Start Guide for hardware connections and how to install and remove hard drives from
the disk trays.
Note: Turn off and disconnect the NAS before you install or remove the internal hard disk or
disks.
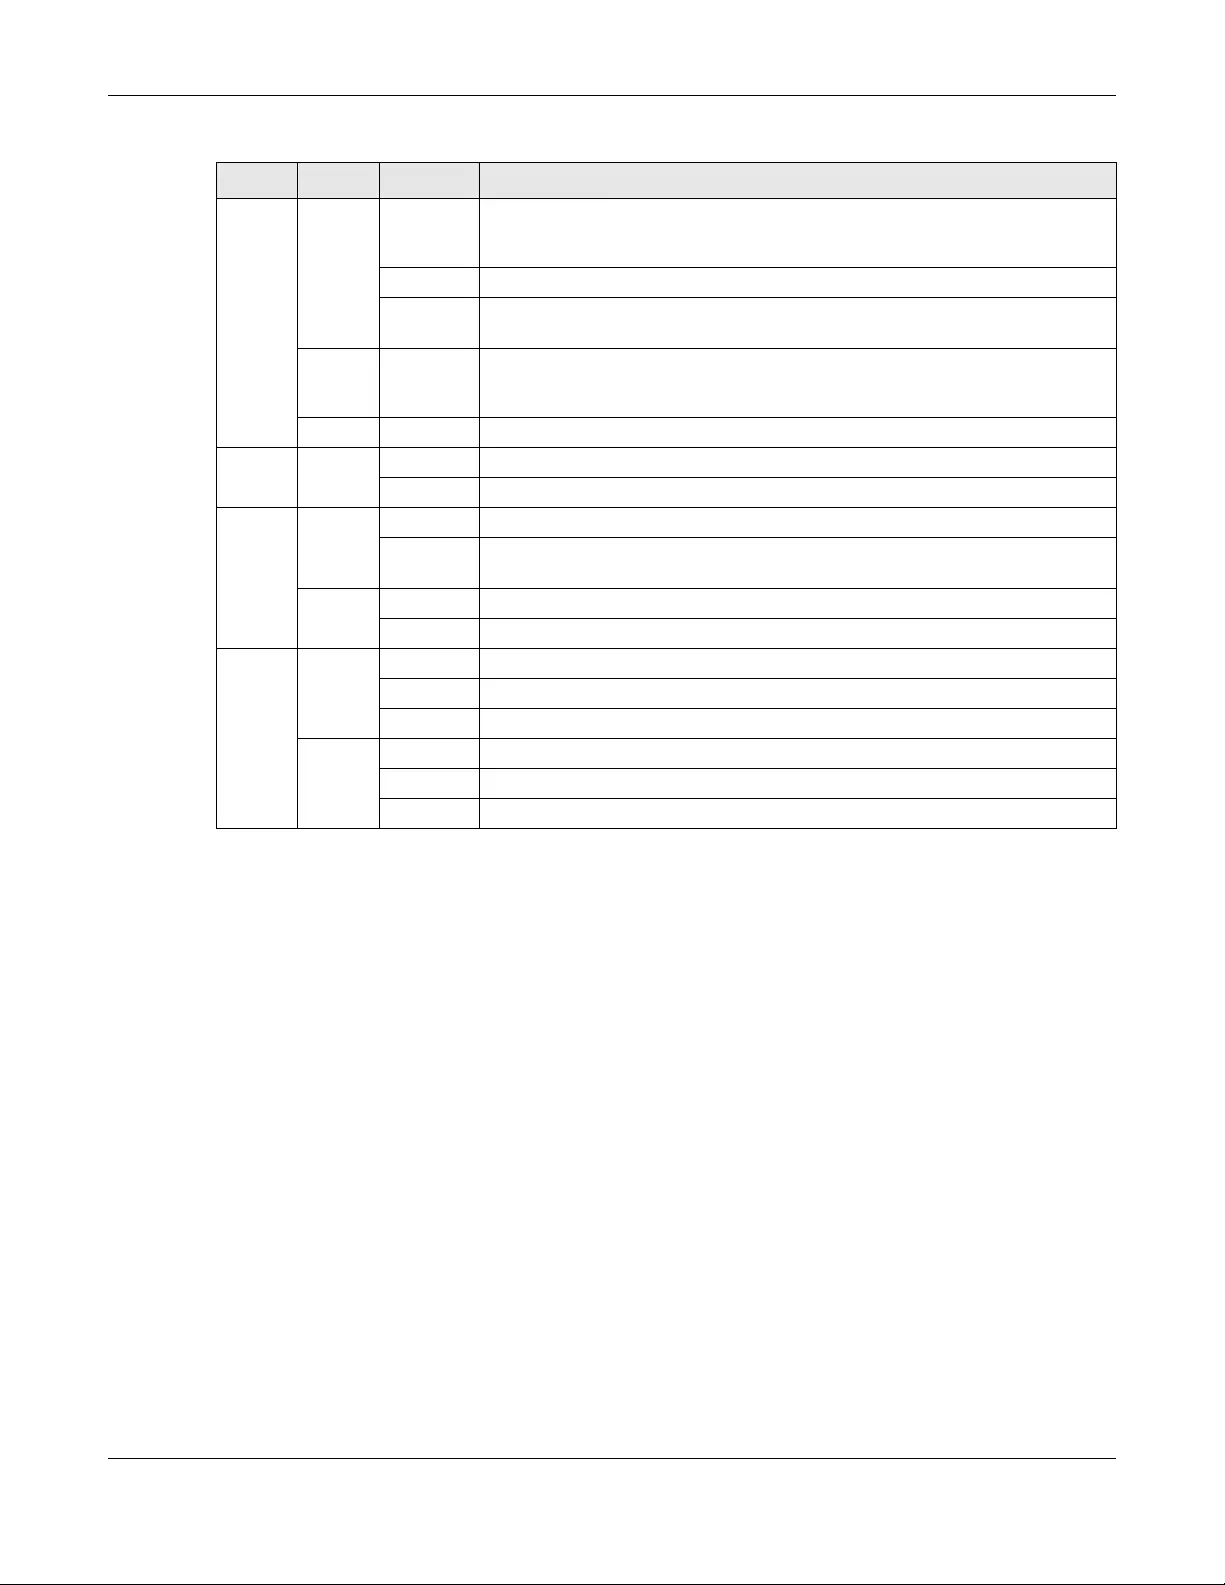
1.2 LEDs
This table describes the NAS’s LEDs.
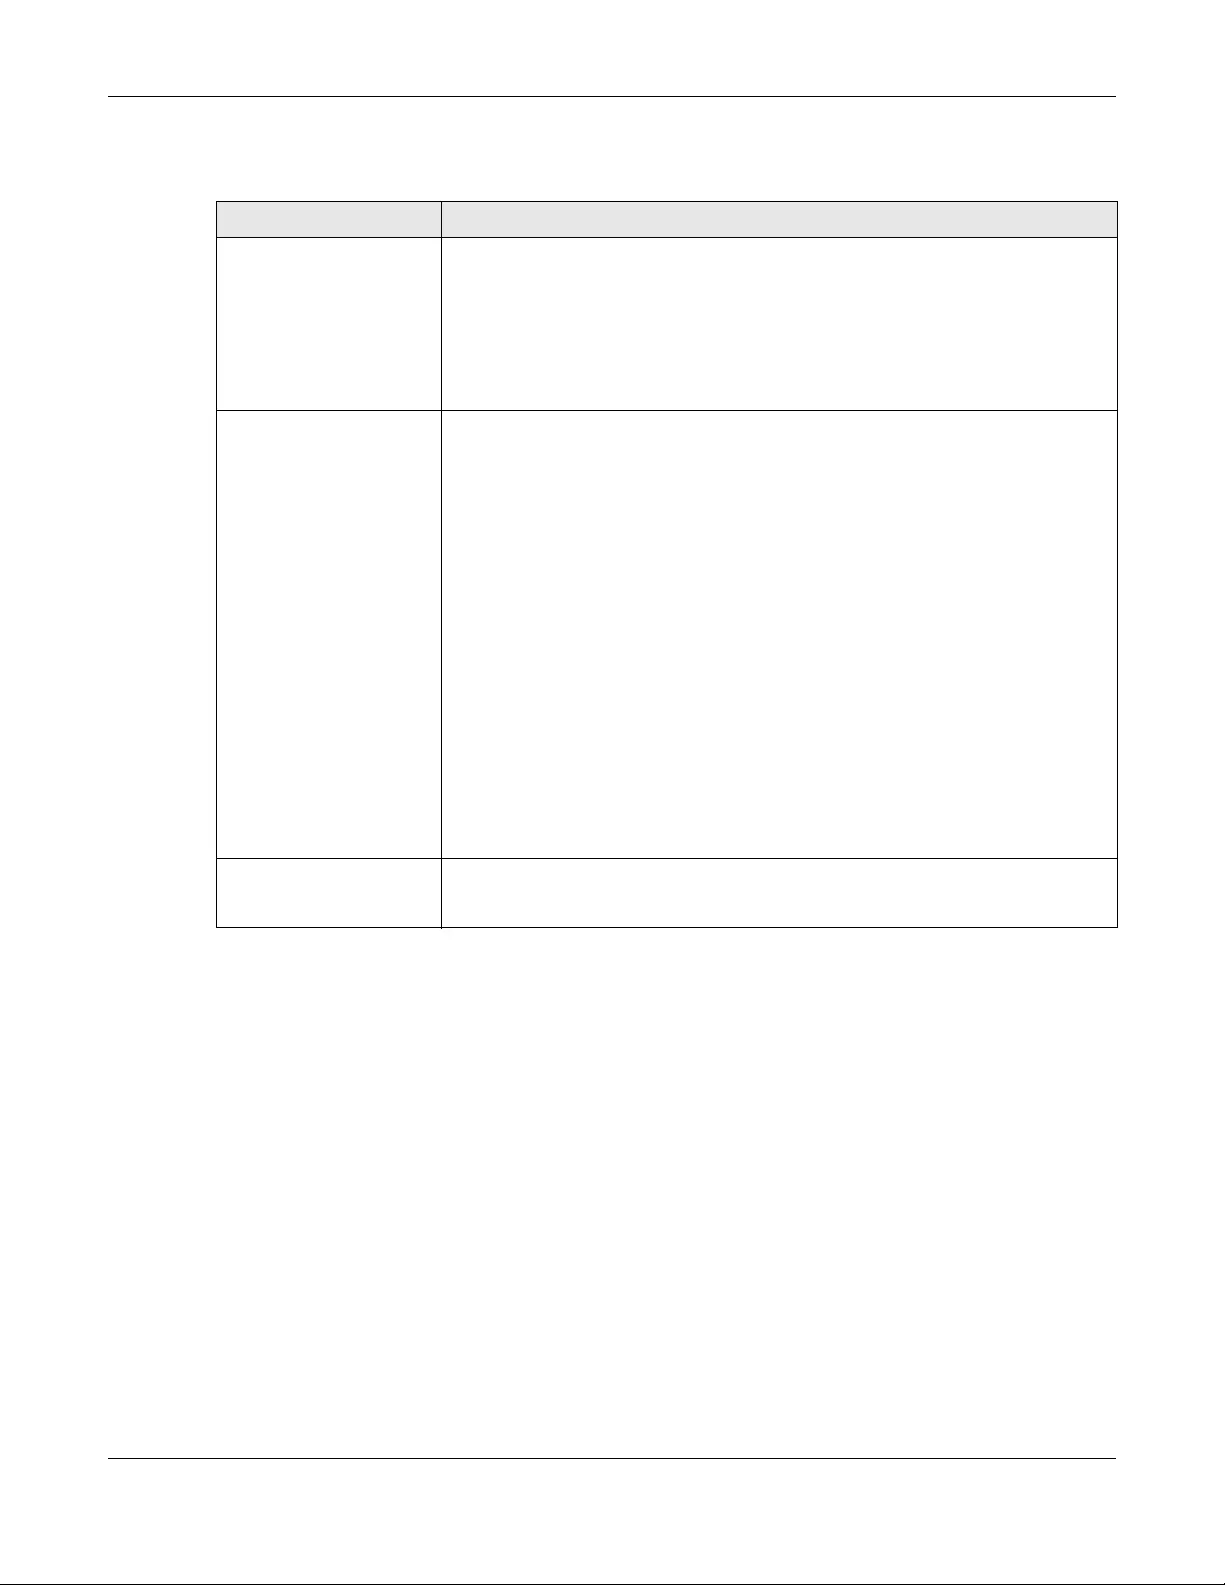
Table 2 LEDs
LED COLOR STATUS DESCRIPTION
POWER White On The NAS is turned on and receiving power, or in the process of starting up.
Off The NAS is turned off.
SYSTEM White On The NAS has fully started and is operating normally.
Blinking The NAS is starting up or upgrading the firmware.
Note: Do not turn off the NAS while it is upgrading the firmware or you
may render it unusable.
Red On The NAS has a system error.
Chapter 1 Get to Know Your NAS
NAS Series User’s Guide
15
1.3 Hard Disks
The NAS has internal hard disk bays. Install SATA (Serial Advanced Technology Attachment) hard disks.
Note that the SATA hard disks are treated as internal or SATA volumes. Any hard disk connected to a USB
port is considered an external or USB volume.
1.4 SD Card
Use up to a 128 GB SDXC card with the front panel SD card slot. The SD card slot works with the COPY/
SYNC button (see Section 1.6 on page 16 for details).
1.5 Power Button
Use the power button on the front panel to turn the NAS on or off.
HDD1/2 White On The hard disk drive is connected properly to the NAS. This LED stays on white
when the hard disk drive is in hibernation if you do not enable sleeping HDD LED
blinking.
Blinking The NAS is saving data to the hard disk drive.
Slow
Blinking
Sleeping HDD LED blinking is enabled and the hard disk drive is in hibernation.
Red On The NAS detected an error on the hard disk drive (like a bad sector for example).
The NAS automatically tries to recover a bad sector, but the LED stays red until
the NAS restarts.
Off The NAS cannot detect a hard disk in the disk bay or the LED is disabled.
USB White On The NAS has a USB device installed.
Off There is no USB device installed or the NAS does not detect a USB connection.
COPY White On A USB or SD device is connected to the NAS and the NAS is ready to copy.
Blinking The NAS is copying or synchronizing files, or in the process of pairing with a
myZyxelcloud account.
Red On Copying or synchronizing files to or from the USB or SD failed.
Off No USB/SD device is connected.
LAN /
LAN1 /
LAN2
Green On The NAS has a successful 10/100 Mbps Ethernet connection.
Blinking The 100M LAN is sending or receiving packets.
Off The NAS does not have a 10/100 Mbps Ethernet connection.
Amber On The NAS has a successful 1000 Mbps Ethernet connection.
Blinking The 1000 M LAN is sending or receiving packets.
Off The NAS does not have a 1000 Mbps Ethernet connection.
Table 2 LEDs (continued)
LED COLOR STATUS DESCRIPTION

Chapter 1 Get to Know Your NAS
NAS Series User’s Guide
16
Power On
• Press the power button for one second to turn on the NAS. When the system is on and ready, you will
hear one beep.
Power Off
Figure 2 Using the Power Button to Turn Off the NAS
• To have the NAS go through its normal software shutdown process and turn itself off, press the power
button until you hear one beep (after about three seconds), then release it.
• To perform a hardware shutdown and have the NAS immediately turn itself off without going through
the normal shutdown process, press the power button until you hear a second beep (after about five
seconds), then release it.
1.6 COPY/SYNC Button
Use the COPY/SYNC button on the front panel to copy or synchronize files between a connected USB or
SD device and the NAS. See Section 16.4 on page 286 for more details on how to configure the copy/
sync settings.
1.7 RESET Button
Use the RESET button on the rear panel to restore the NAS’s default settings.
Figure 3 The RESET Button
• Press the RESET button until you hear one beep (after about two seconds), then release it. You will
hear one more beep after you release the button.
This resets the NAS’s IP address and password to the default values.
Press 1 Beep 2 Beeps
2 more seconds
Release for
3 seconds
Release for
software
shutdown hardware
shutdown
Press 1 Beep 2 Beeps
IP Address
Password Clear All Settings
5 more seconds
Release to
Release to Reset

Chapter 1 Get to Know Your NAS
NAS Series User’s Guide
17
• Press the RESET button until you hear two beeps. After the second beep, continue pressing the button
for five more seconds, then release it. You will hear three quick beeps after you release the button.
This resets the NAS to the factory default configuration. All settings you have configured on the NAS,
including IP address, password, user accounts, groups, and so on will be reset to the factory defaults.
The reset process does NOT affect the volume settings, nor data stored on the NAS.
You should periodically back up your configuration file to your computer (see Section 11.5 on page 185
for details about managing the NAS’s configuration file). You could then restore your configuration in
the event that you or someone else reset the NAS to the factory defaults.
Note: Keep the NAS in a secure location in order to prevent unauthorized reset of the device.
You may need to close and re-open the NAS Starter Utility to discover the NAS. This is because the NAS
automatically re-acquires IP address information, so its IP address may change. If no IP address
information is assigned, the NAS uses Auto-IP to assign itself an IP address and subnet mask. For example,
you could connect the NAS directly to your computer. If the computer is also set to get an IP address
automatically, the computer and the NAS will choose addresses for themselves and be able to
communicate.
NAS Series User’s Guide
18
CHAPTER 2
Find and Access Your NAS
2.1 Overview
Use FindMe or the NAS Starter Utility to find and access the NAS and the files on it.
The NAS Starter Utility supports Windows XP, Windows Vista, Windows 7, and Windows 8. Click Help to
open a Web Help page about the NAS Starter Utility screens.
Note: Installing this version of the NAS Starter Utility uninstalls previous versions.
Note: Refer to the Quick Start Guide for your NAS’s hardware connections.
2.2 FindMe
1Make sure both the NAS and your computer are connected to a switch or router with Internet access.
2Open your web browser and type «https://findme.zyxel.com» as the website address.
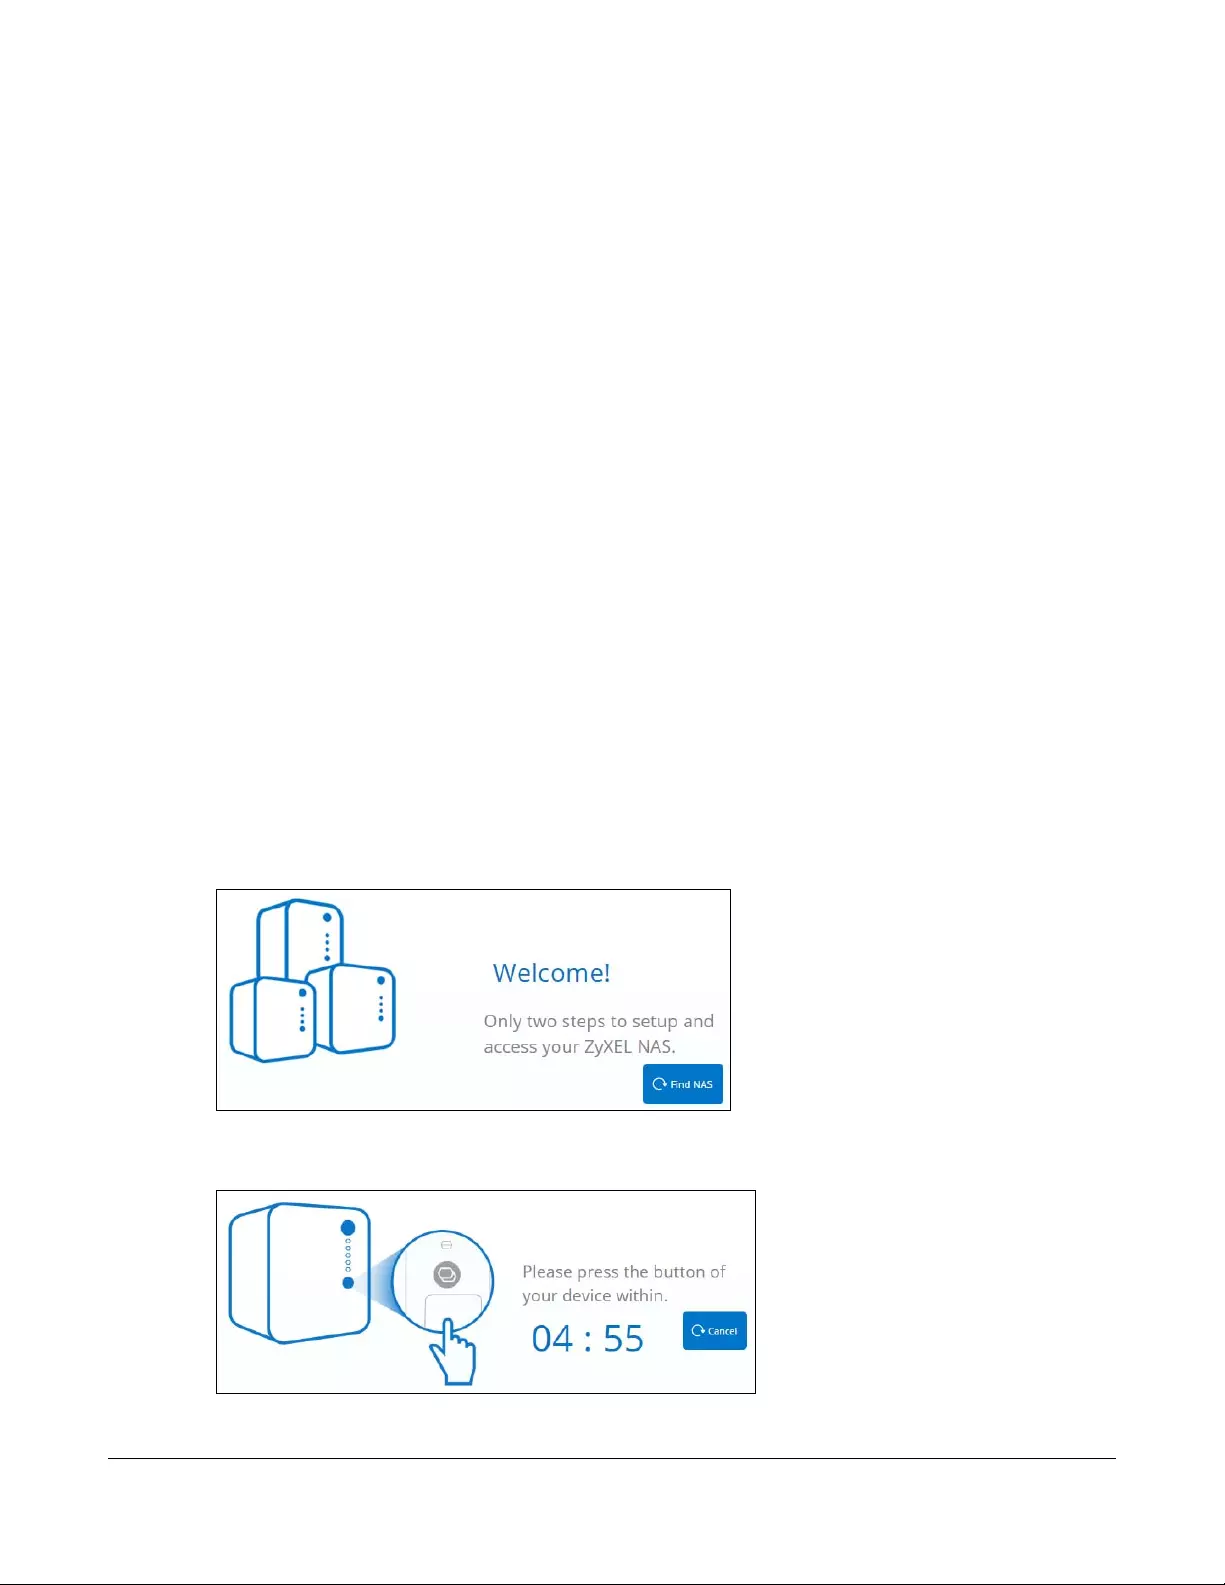
3Click Find NAS to discover your NAS.
Figure 4 Find NAS
4Press the Copy button on the NAS within 5 minutes.
Figure 5 Press the Copy button
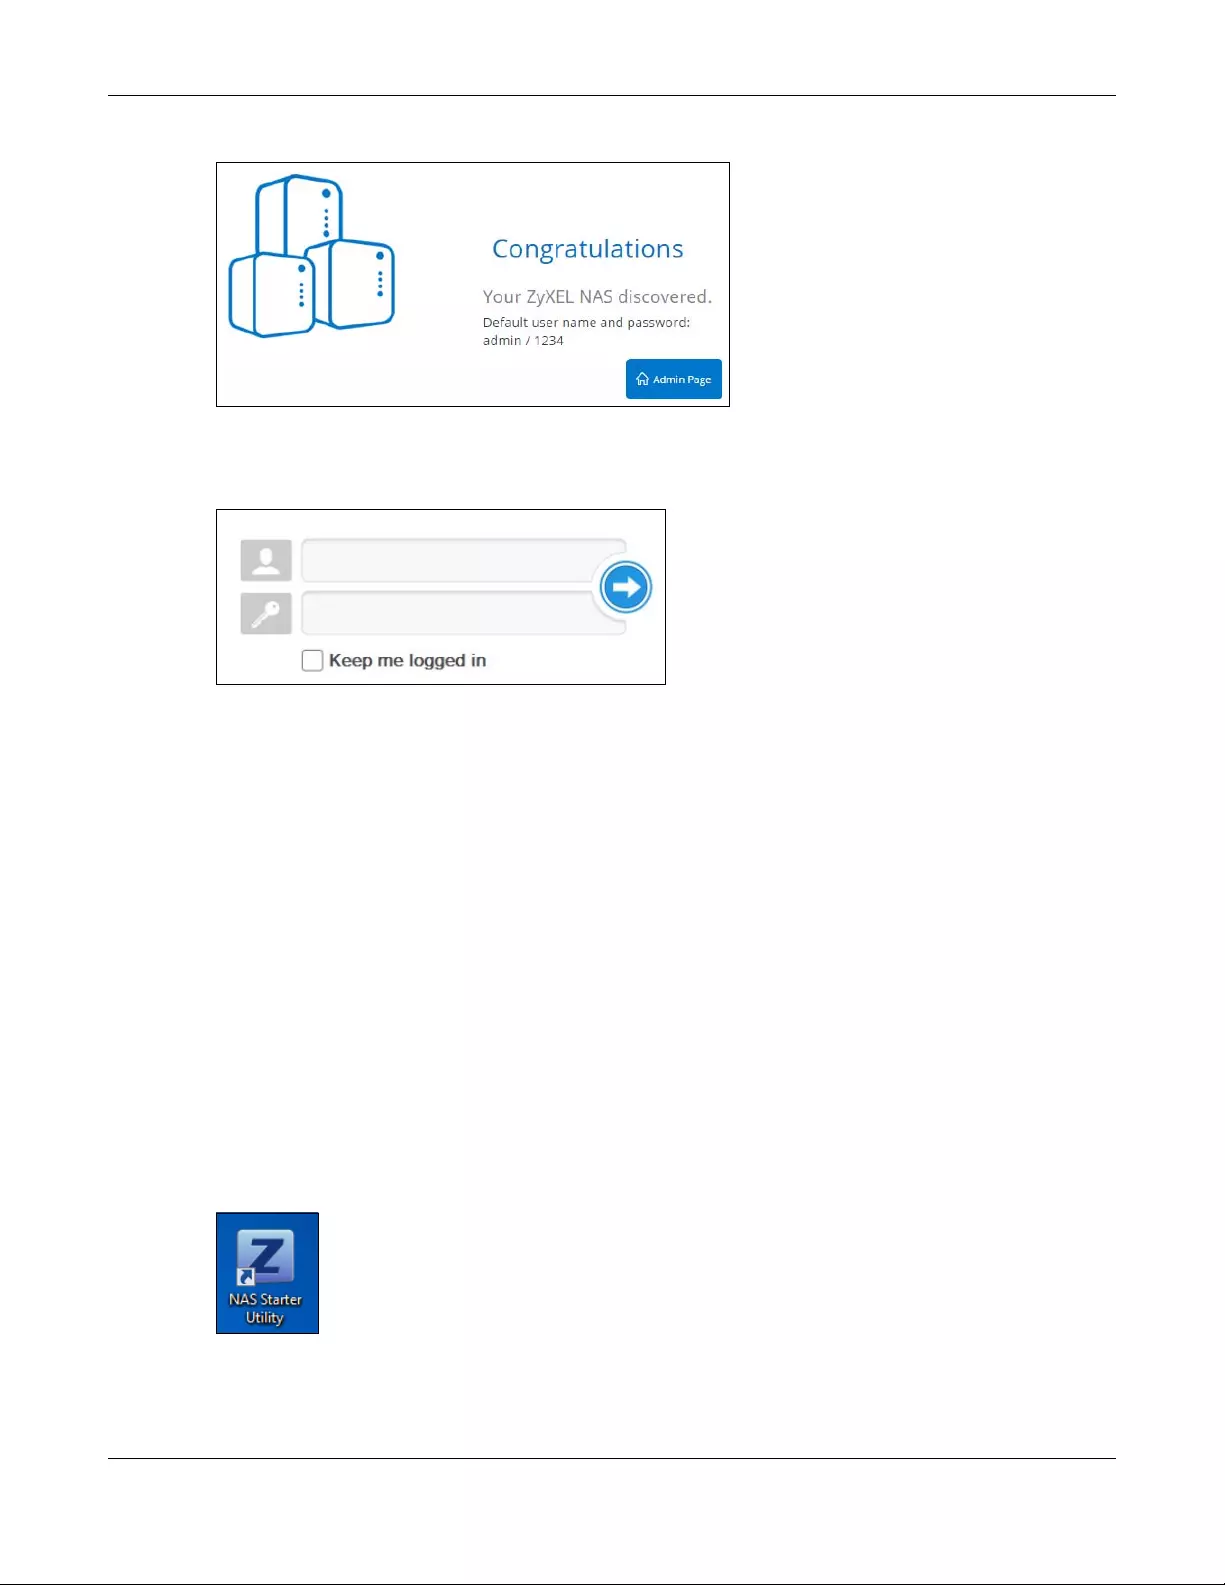
5Your NAS is now discovered. Click Admin Page to open the login screen.
Chapter 2 Find and Access Your NAS
NAS Series User’s Guide
19
Figure 6 Congratulations
6Use the default username “admin” and password “1234” to log in. See Chapter 3 on page 26 for more
on the web desktop.
Figure 7 NAS Login Screen
2.3 NAS Starter Utility
• The NAS Starter Utility broadcasts a request packet when you first run it. Each NAS has an NAS Starter
Utility Agent that always listens and responds to requests from the NAS Starter Utility. The NAS Starter
Utility receives the response packet that contains information, such as host name, IP, and so on.
• If you plan to use more than one NAS in your network, configure them with unique server names. This
enables you to identify each NAS in the NAS Starter Utility screens.
2.3.1 NAS Seeker Screen
Use this screen to view the NASs in your network. The NAS’s Server Name. The default is ‘NAS’ followed by
the number of your model (‘NAS540’ for example). See Section 2.3.5 on page 23 for how to change it to
a more recognizable one in your network.
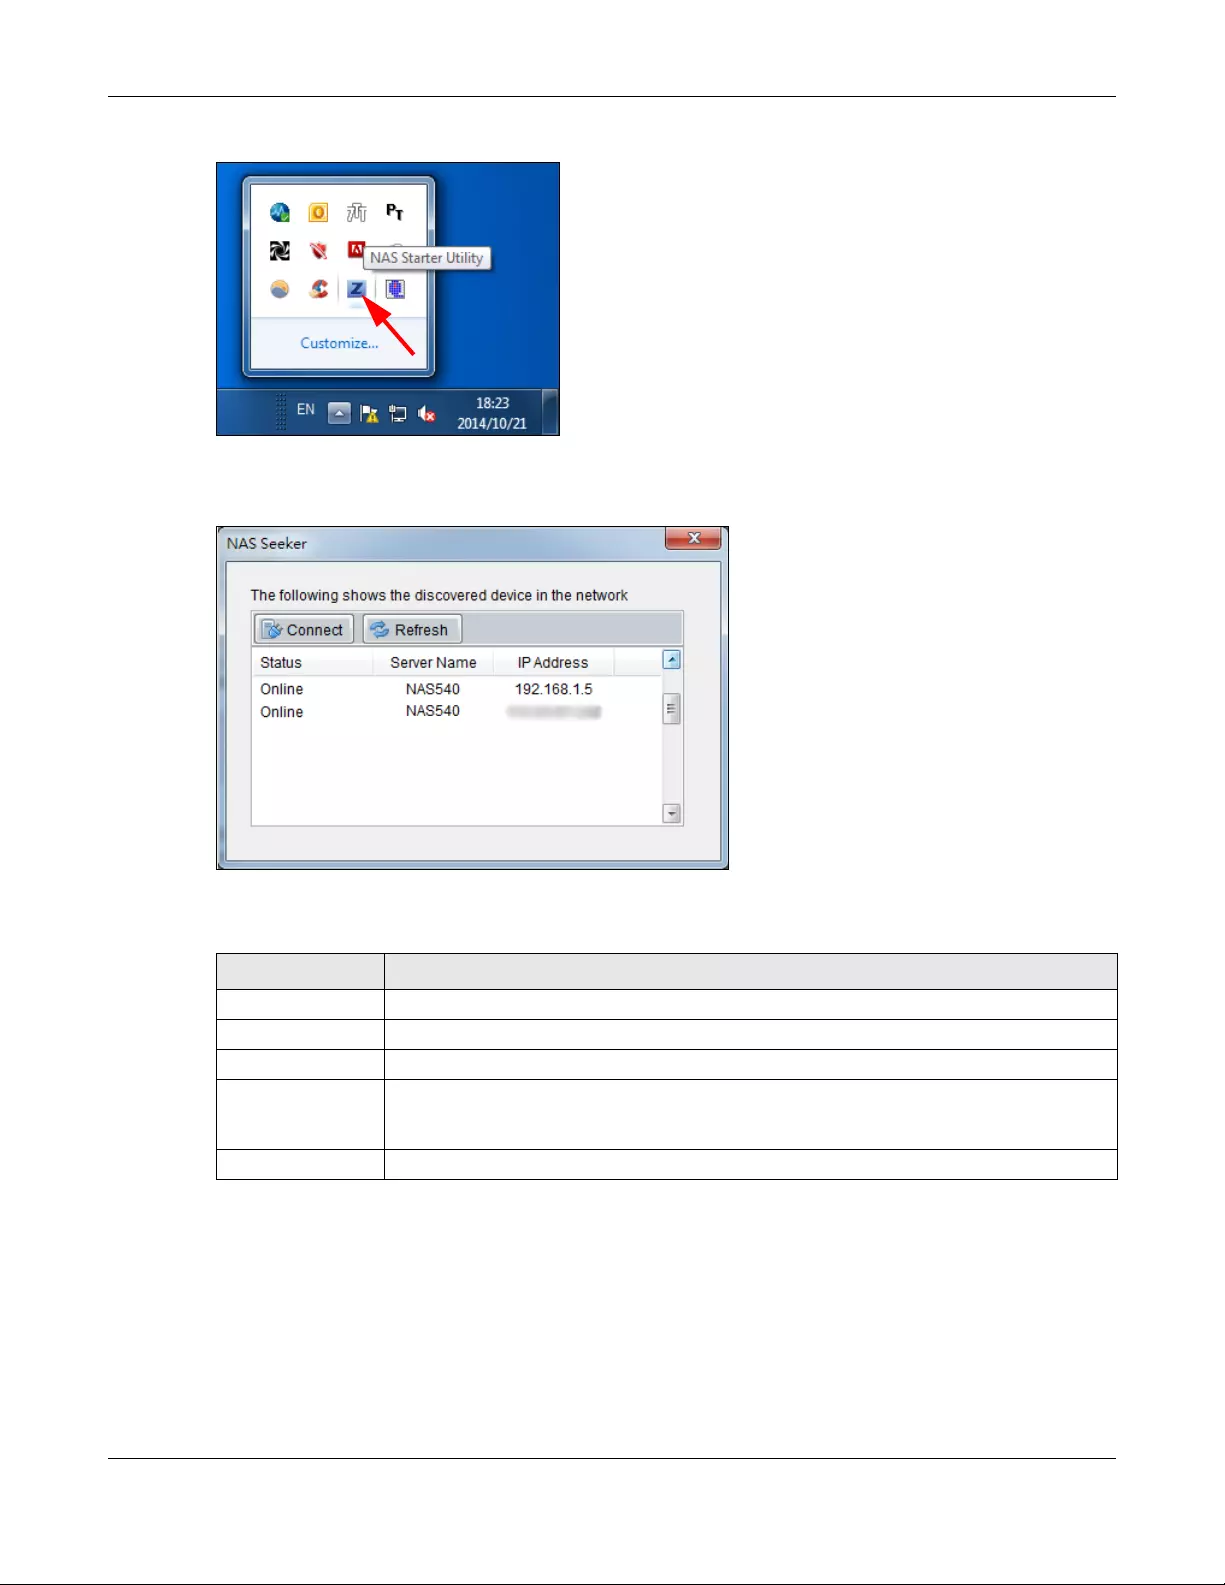
Click the NAS Starter Utility icon on your desktop or in the Windows system tray to start the NAS Starter
Utility. Alternatively you can click Start > Programs > Zyxel > NAS Starter Utility.
Figure 8 NAS Starter Utility Desktop Icon
Chapter 2 Find and Access Your NAS
NAS Series User’s Guide
20
Figure 9 NAS Starter Utility Windows System Tray Icon
The first time you open the NAS Starter Utility the discovery screen appears as follows.
Figure 10 NAS Seeker
The following table describes the labels in this screen.
2.3.2 Main NAS Starter Utility Screen
The main NAS Starter Utility screen displays after you select an NAS in the NAS Seeker screen.
Table 3 NAS Seeker
LABEL DESCRIPTION
Connect Select a NAS and click this to connect to it.
Refresh Click this to refresh the screen. The NAS Starter Utility does not automatically refresh.
Status This shows whether the NAS is Online, Unreachable, Configuring, or Config Failed.
Server Name This is the server name you configured for the NAS. If you have more than one NAS in your
network, it is recommended that you give each one a unique name for identification
purposes.
IP Address This is the current IP address of the NAS.
Chapter 2 Find and Access Your NAS
NAS Series User’s Guide
21
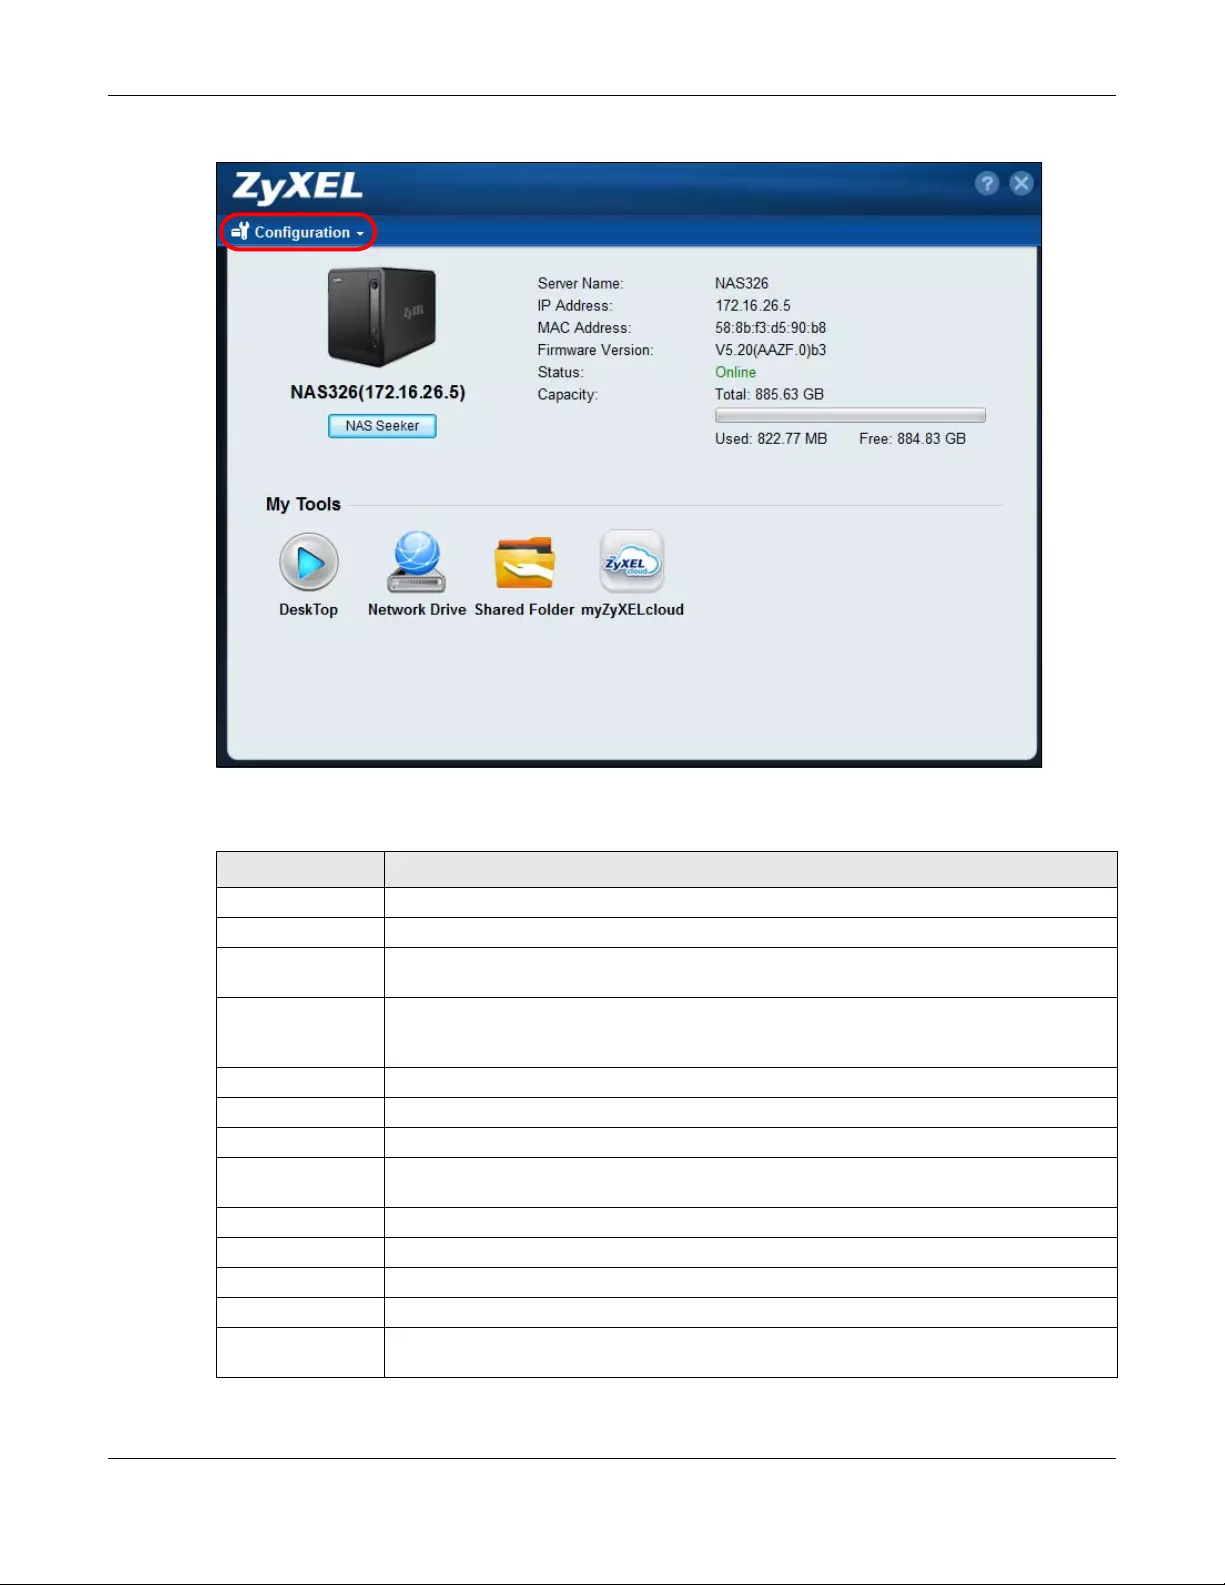
Figure 11 NAS Starter Utility Main Screen
The following table describes the labels in this screen.
Table 4 NAS Starter Utility Main Screen
LABEL DESCRIPTION
? Click this to display the utility help.
Configuration Click this to configure system settings (see Section 2.3.5 on page 23).
NAS Seeker Click this to use the NAS Seeker screen (see Section 2.3.1 on page 19) to find and connect to
a different NAS on your network.
Server Name This is the server name you configured for the NAS. If you have more than one NAS in your
network, it is recommended that you give each one a unique name for identification
purposes.
IP Address This is the current IP address of the NAS.
MAC Address This is the NAS’s unique physical hardware address (MAC).
Firmware Version This shows the version of firmware the NAS is currently using.
Status This shows whether the NAS is Online, Uninitialized, Unreachable, Configuring, or Config
Failed.
Capacity This shows the NAS’s total, in-use, and remaining storage capacity.
DeskTop Click this button to go to the Web Configurator login screen (see Section 3.2 on page 26).
Network Drive Click this to add the NAS as a network drive in your computer’s Windows Explorer.
Shared Folder Click this to log into the NAS’s file directory in Windows Explorer.
myZyxelCloud Click this to go to mycloud.zyxel.com to set up a free DDNS hostname for the NAS so you can
connect to it easily from the Internet.
Chapter 2 Find and Access Your NAS
NAS Series User’s Guide
22
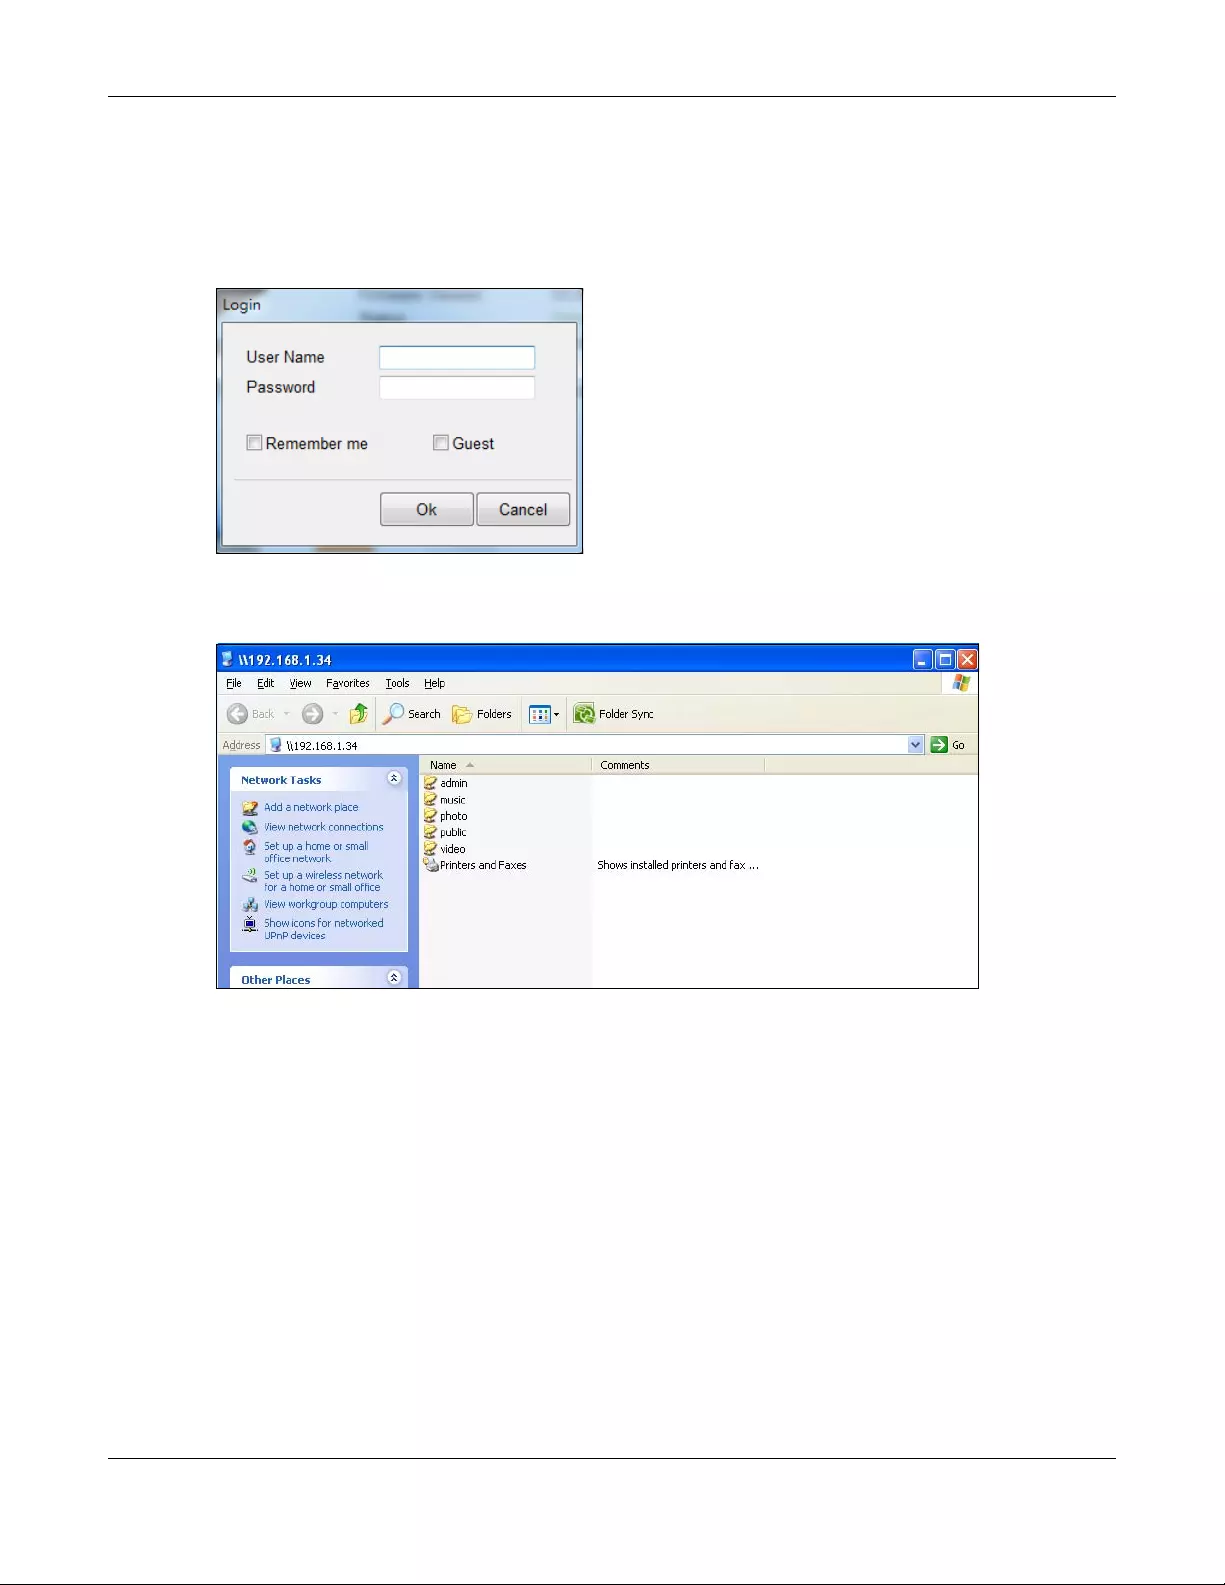
2.3.3 Directory of the NAS
In the main NAS Starter Utility screen click Shared Folder to log into the NAS’s file directory in Windows
Explorer. Enter the administrator user name and password and click Login.
Figure 12 Login
The utility opens the NAS’s directory in Windows Explorer.
Figure 13 Directory
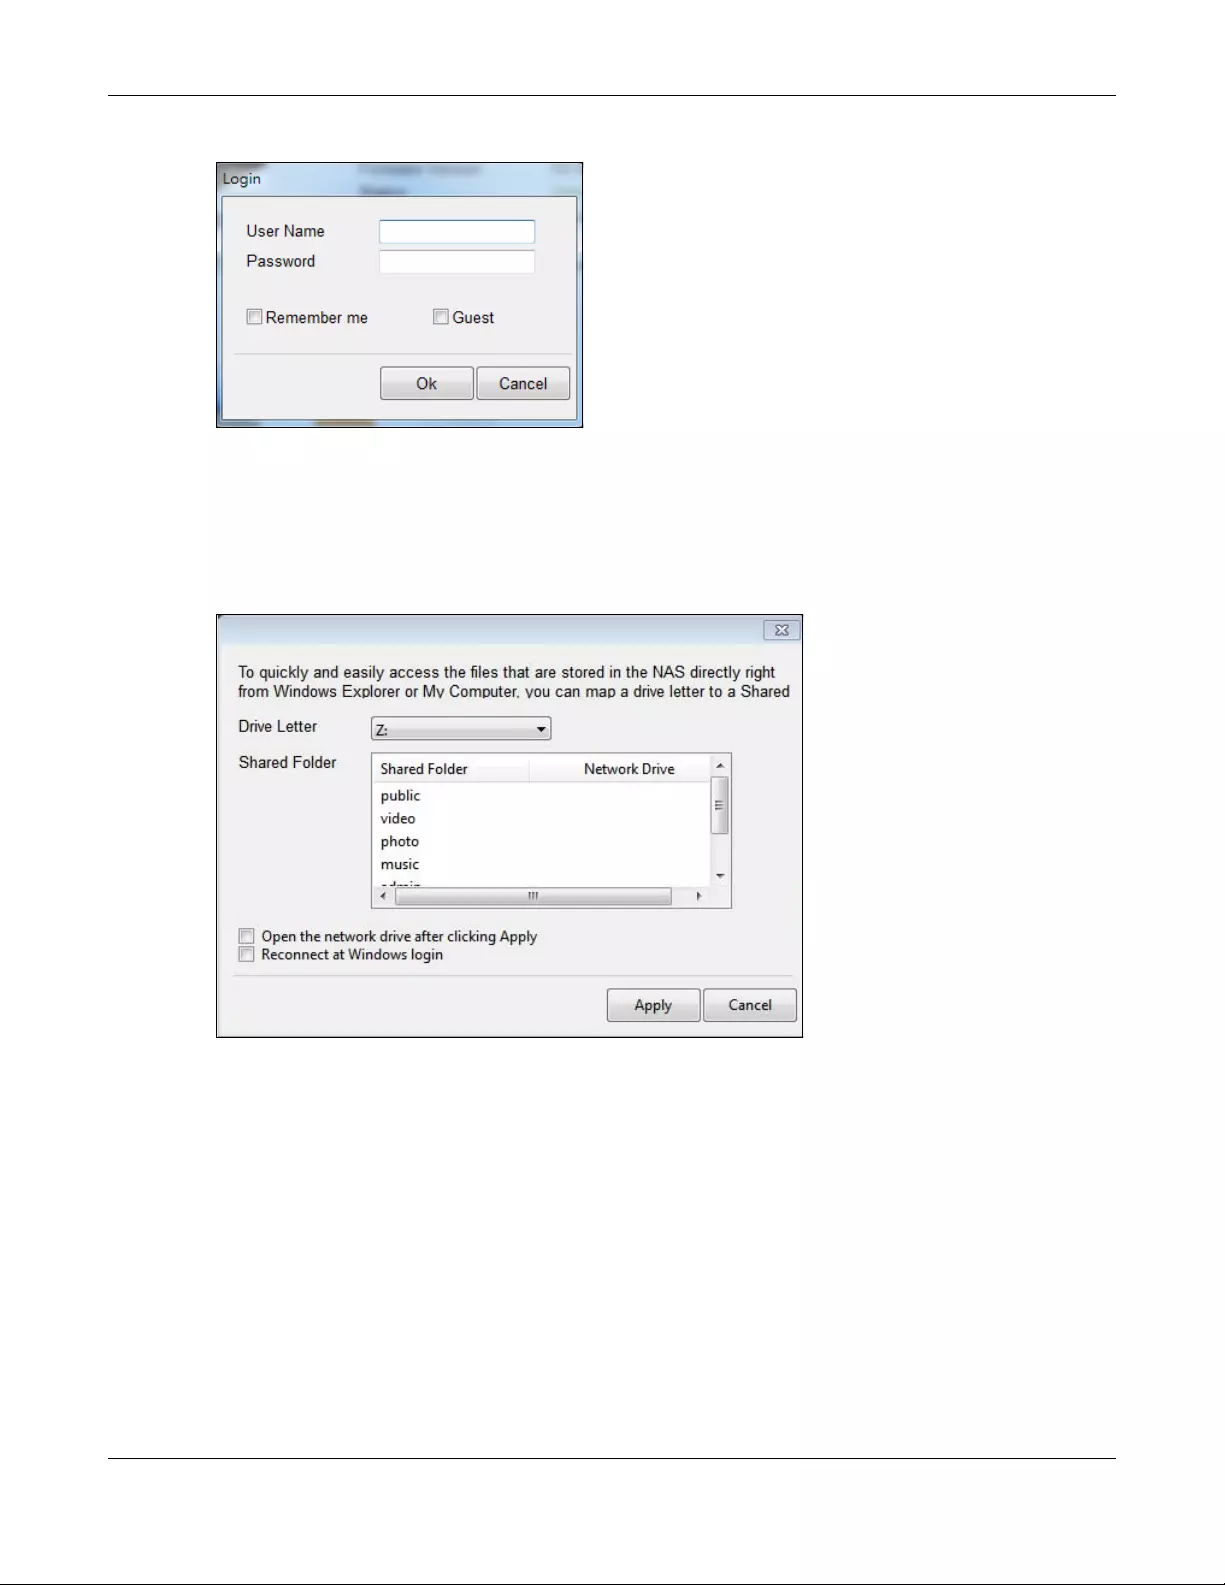
2.3.4 Network Drive
In the main NAS Starter Utility screen click Network Drive to add the NAS as a network drive in your
computer’s Windows Explorer.
Enter your user name and password and click Login to be able to add the NAS’s shares to which you
have access as network drives. Otherwise select Guest and click Login to be able to add the NAS’s
public shares as network drives.
Chapter 2 Find and Access Your NAS
NAS Series User’s Guide
23
Figure 14 Login
Select a share on the NAS and the drive letter on your computer to which you want to map it. The shares
that each user can select to map depends on the user’s permissions. For example, if share1 is private to
user1, then only user1 is allowed to map share1. The table displays the NAS shares that are already
mapped to drive letters on your computer. After you click Apply you can see the new drive in Windows
Explorer (My Computer) where you can access and use it like your computer’s other drives.
Figure 15 Network Drive
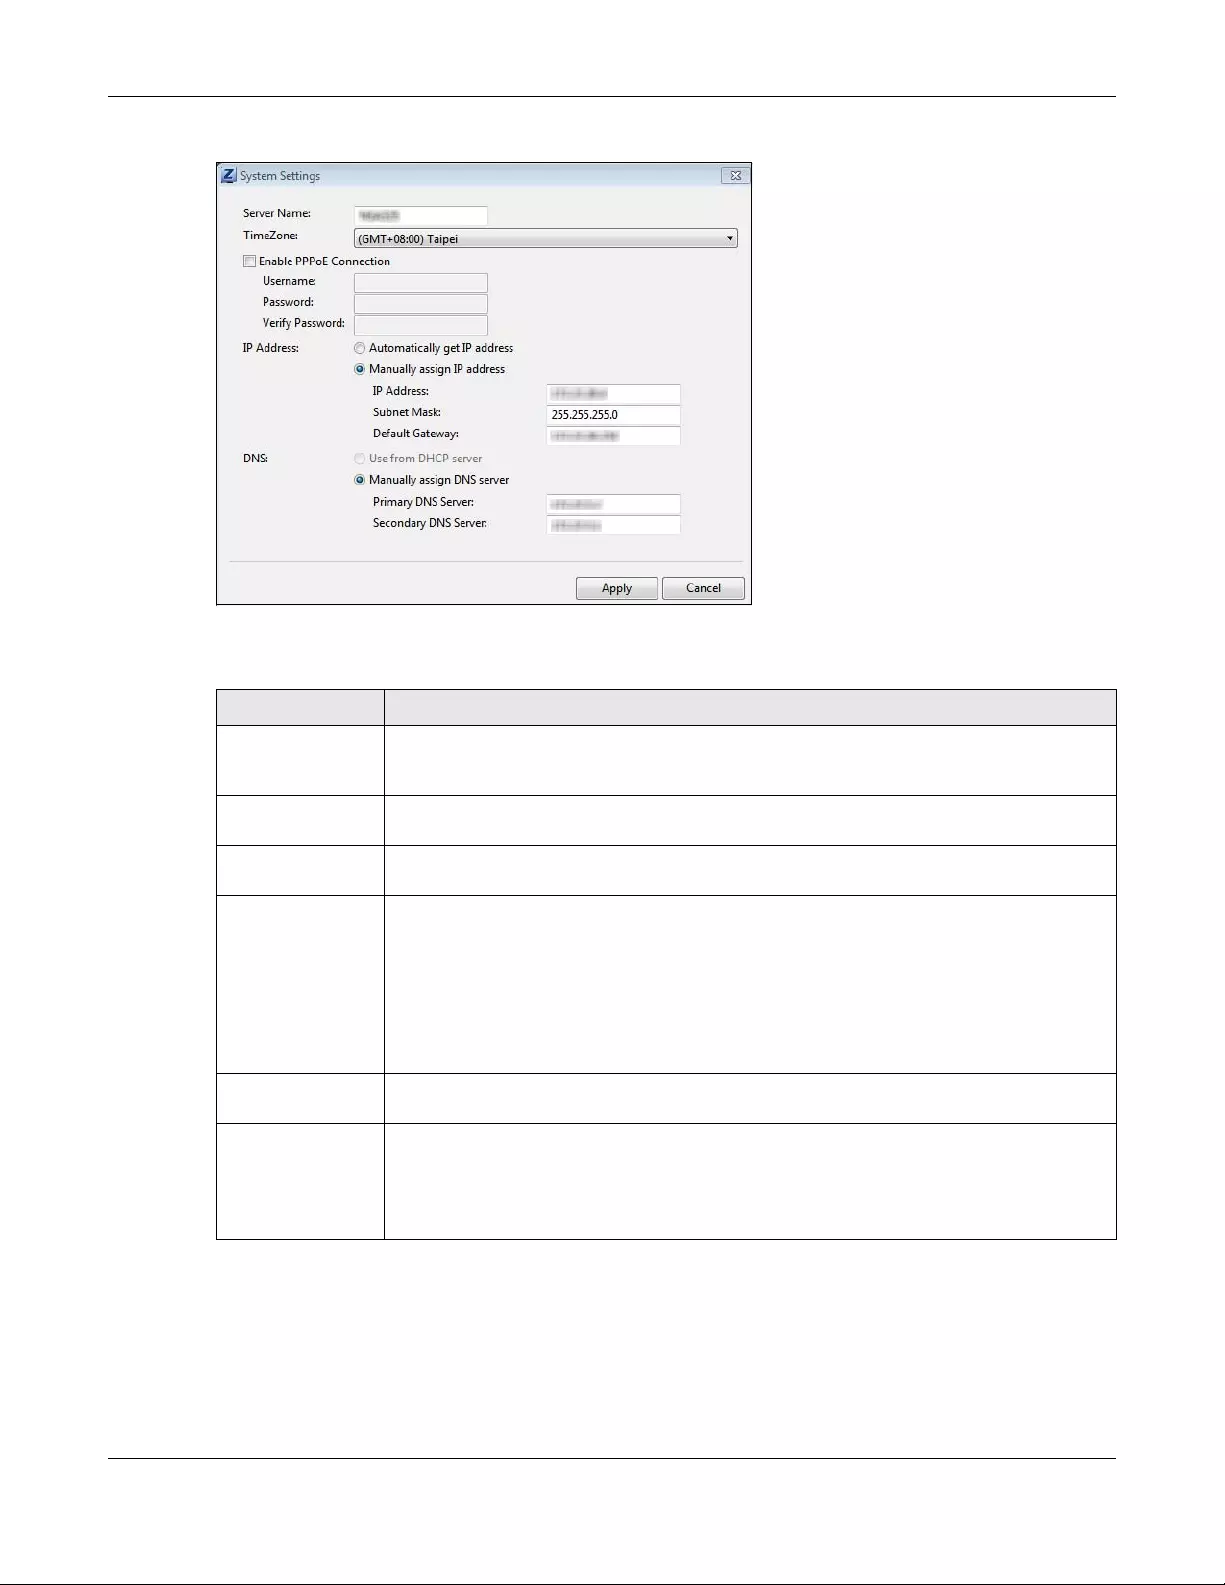
2.3.5 Configure System Settings
Use these screens to be able to change the NAS’s server name, time zone, PPPoE, IP address, subnet
mask, default gateway, or DNS settings.
Click Configuration > System Setting in the main utility screen to display the following screen.
Chapter 2 Find and Access Your NAS
NAS Series User’s Guide
24
Figure 16 NAS Starter Utility > Configuration > System Setting
The following table describes the labels in this screen.
Table 5 NAS Starter Utility > Configuration > System Setting
LABEL DESCRIPTION
Server Name Specify a name to uniquely identify the NAS on your network. You can enter up to 15
alphanumeric characters with minus signs allowed but not as the last character. The name
must begin with an alphabetic character (a-z) and is case sensitive.
Time Zone Choose the time zone of your location. This will set the time difference between your time
zone and Greenwich Mean Time (GMT).
Enable PPPoE
Connection
Click this if your Internet connection requires you to enter a user name and password to
connect to the Internet. Enter your user name and password
IP Address Use these fields to configure the IP address of the LAN interface through which you are
connected to the NAS.
When the LAN interfaces are set to stand-alone, this configures the IP address of the LAN
interface in the same subnet as your computer. It configures LAN1 if both LAN interfaces are
in the same subnet as your computer.
If you use the administrator configuration screens to set the LAN interfaces to link
aggregation, this configures the IP address that both LAN interfaces share.
Automatically get
IP address
Select this if the NAS is automatically assigned an IP address from the ISP or a DHCP server in
your network.
Manually assign IP
address
Select this if you want to assign the NAS a fixed IP address, subnet mask and default
gateway.
Note: Do not configure an IP address that is already in use in your network. This
results to a network IP address conflict and makes the NAS inaccessible.
Chapter 2 Find and Access Your NAS
NAS Series User’s Guide
25
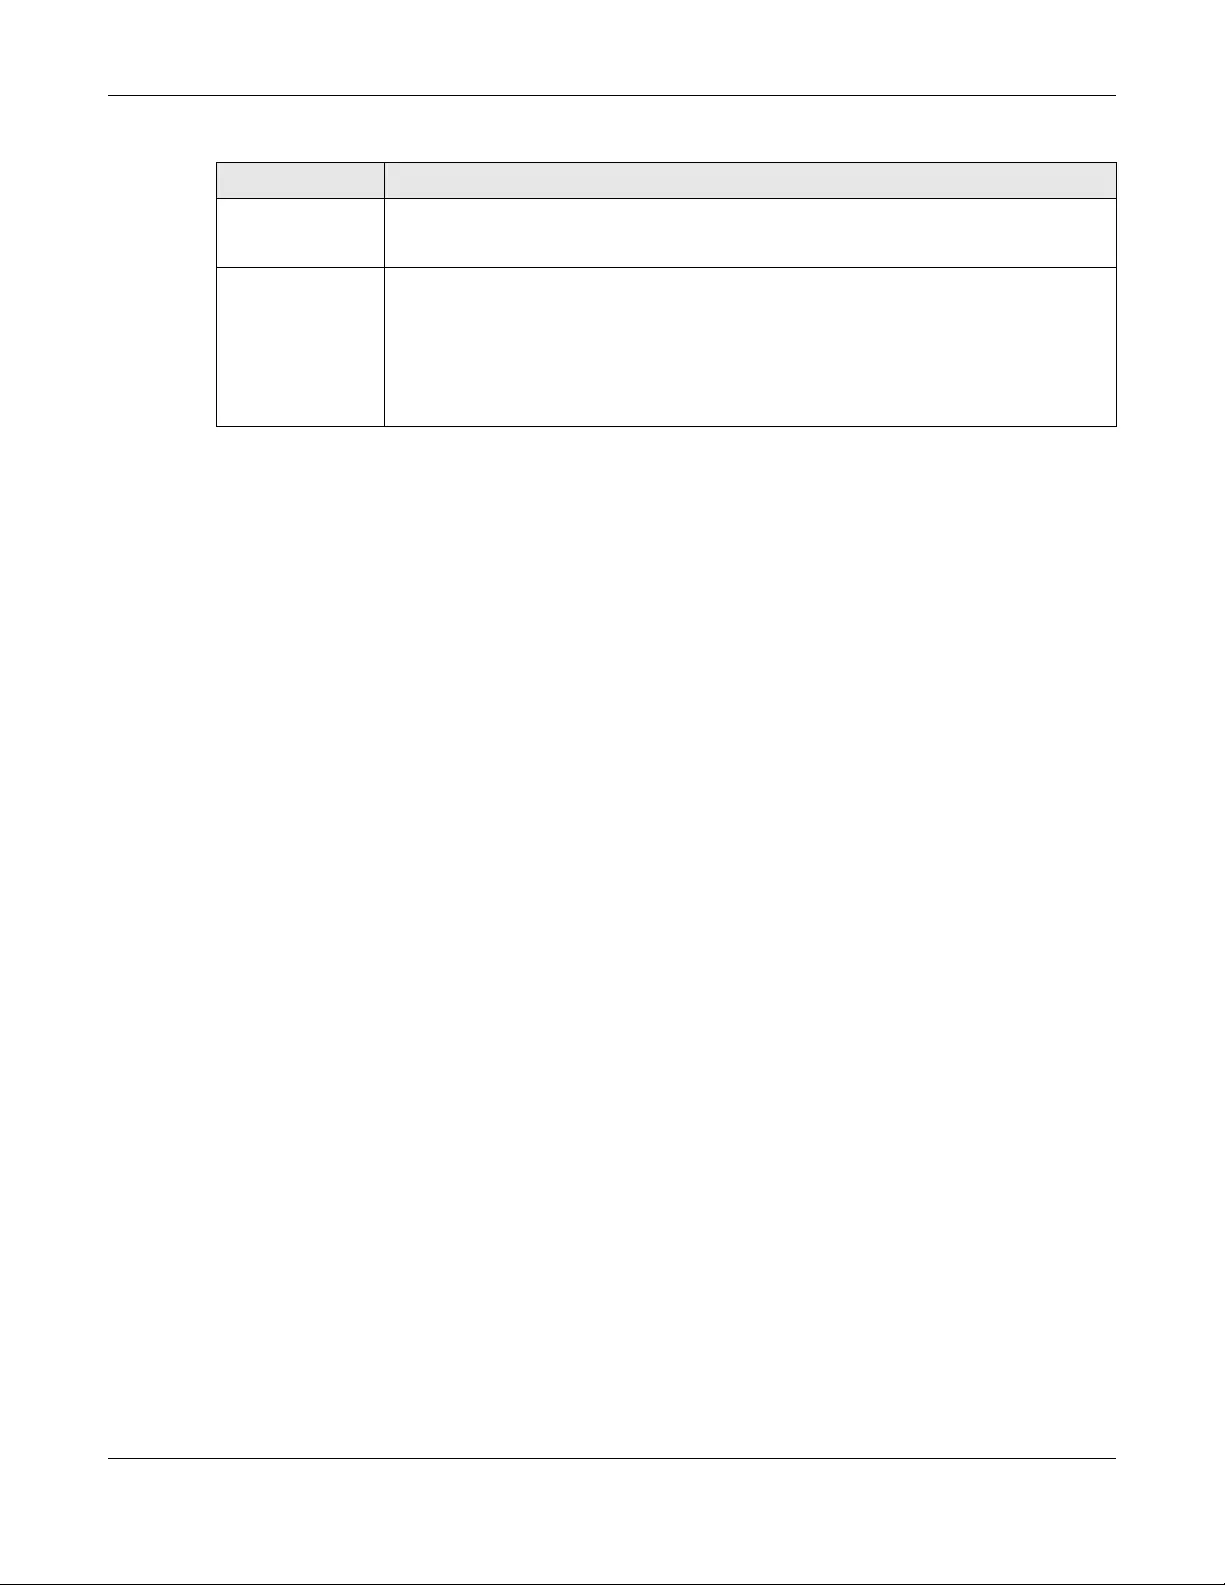
Use from DHCP
server
Domain Name System (DNS) is for mapping a domain name to its corresponding IP address
and vice versa. Select this if the NAS is automatically given DNS information from the ISP or a
DHCP server in your network.
DNS Domain Name System (DNS) is for mapping a domain name to its corresponding IP address
and vice versa.
Select Use from DHCP server if the NAS is automatically given DNS information from the ISP or
a DHCP server in your network.
Select Manually assign DNS server if you were given specific IP address(es) of the DNS
server(s). Enter the primary and secondary DNS in the corresponding fields.
Table 5 NAS Starter Utility > Configuration > System Setting (continued)
LABEL DESCRIPTION
NAS Series User’s Guide
26
CHAPTER 3
Web Configurator
3.1 Overview
This chapter describes how to access the NAS web configurator and provides an overview of its screens.
The web configurator is an HTML-based management interface that allows easy NAS setup and
management using an Internet browser.
Use Internet Explorer 11.0.9, Mozilla Firefox 31.0, Safari 5.1.7, Google Chrome 37.0.2, or later versions of
these browsers. The recommended screen resolution is 1440 by 900 pixels or higher.
In order to use the web configurator you need to allow:
• Web browser pop-up windows from your device. Web pop-up blocking is enabled by default in
Windows XP SP (Service Pack) 2.
• JavaScript (enabled by default).
3.2 Access the NAS Web Configurator
This guide uses the NAS326 screens as an example. The screens may vary slightly for different models.
1Make sure your NAS is properly connected and that your computer is in the same subnet as the NAS
(refer to the Quick Start Guide or the appendices).
Open your web browser and type in the server name of the NAS. The default is “nas” followed by the
number of your model (“nas326” for example). Configure the server name of your NAS using the Control
Panel > System > Server Name screen (Section 9.4 on page 148) or the System Setting screen (Section
2.3.5 on page 23) of the NAS Starter Utility.
Figure 17 NAS URL
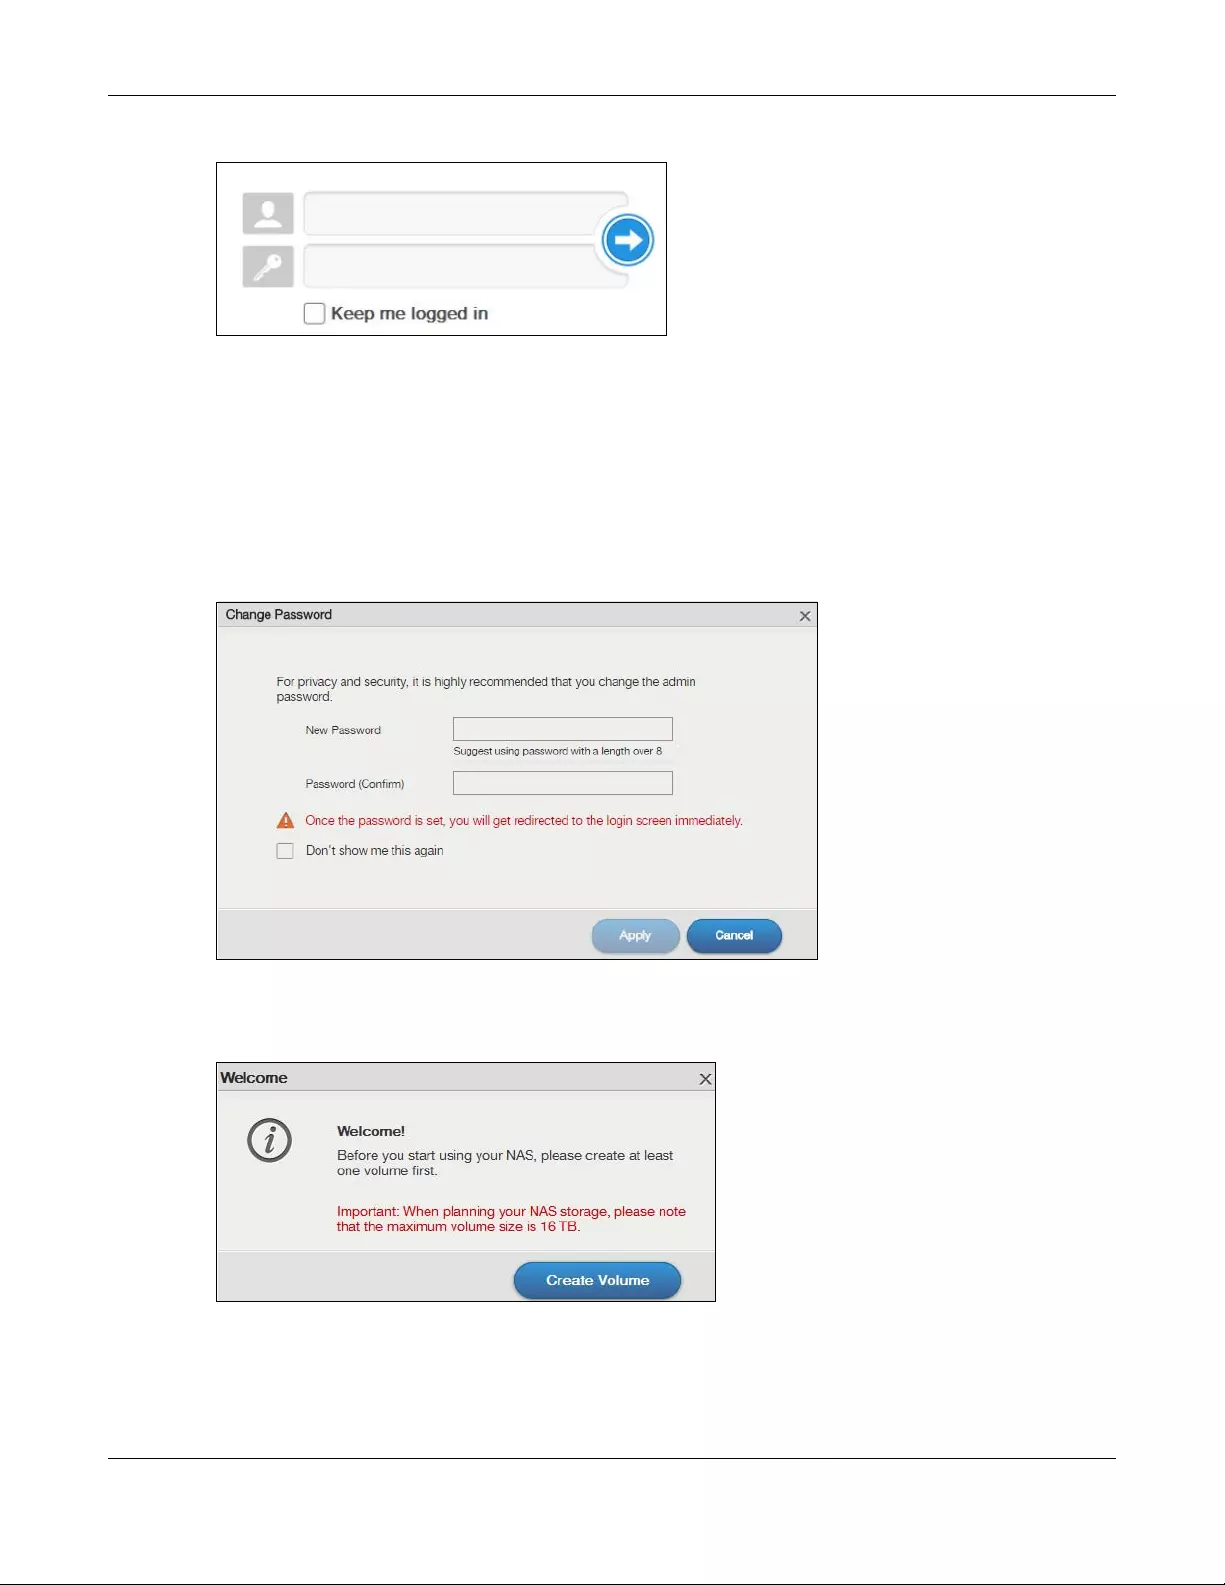
2The default user name and password are “admin” and “1234” respectively. Enter your user name and
password. See Chapter 7 on page 104 for how to create other user accounts. If you use the option to
stay logged in (assuming you do not log out), make sure you keep your computer secure from
unauthorized access. Click the arrow to log in. Logging in with a (non-administrator) user account takes
you to a different Desktop screen (see Section 3.3 on page 30 for details).
Chapter 3 Web Configurator
NAS Series User’s Guide
27
Figure 18 NAS Login Screen
Make sure you have a backup of any existing data in the hard disk
before installing it in the NAS. Creating a volume formats the hard disk
and deletes all data in the process.
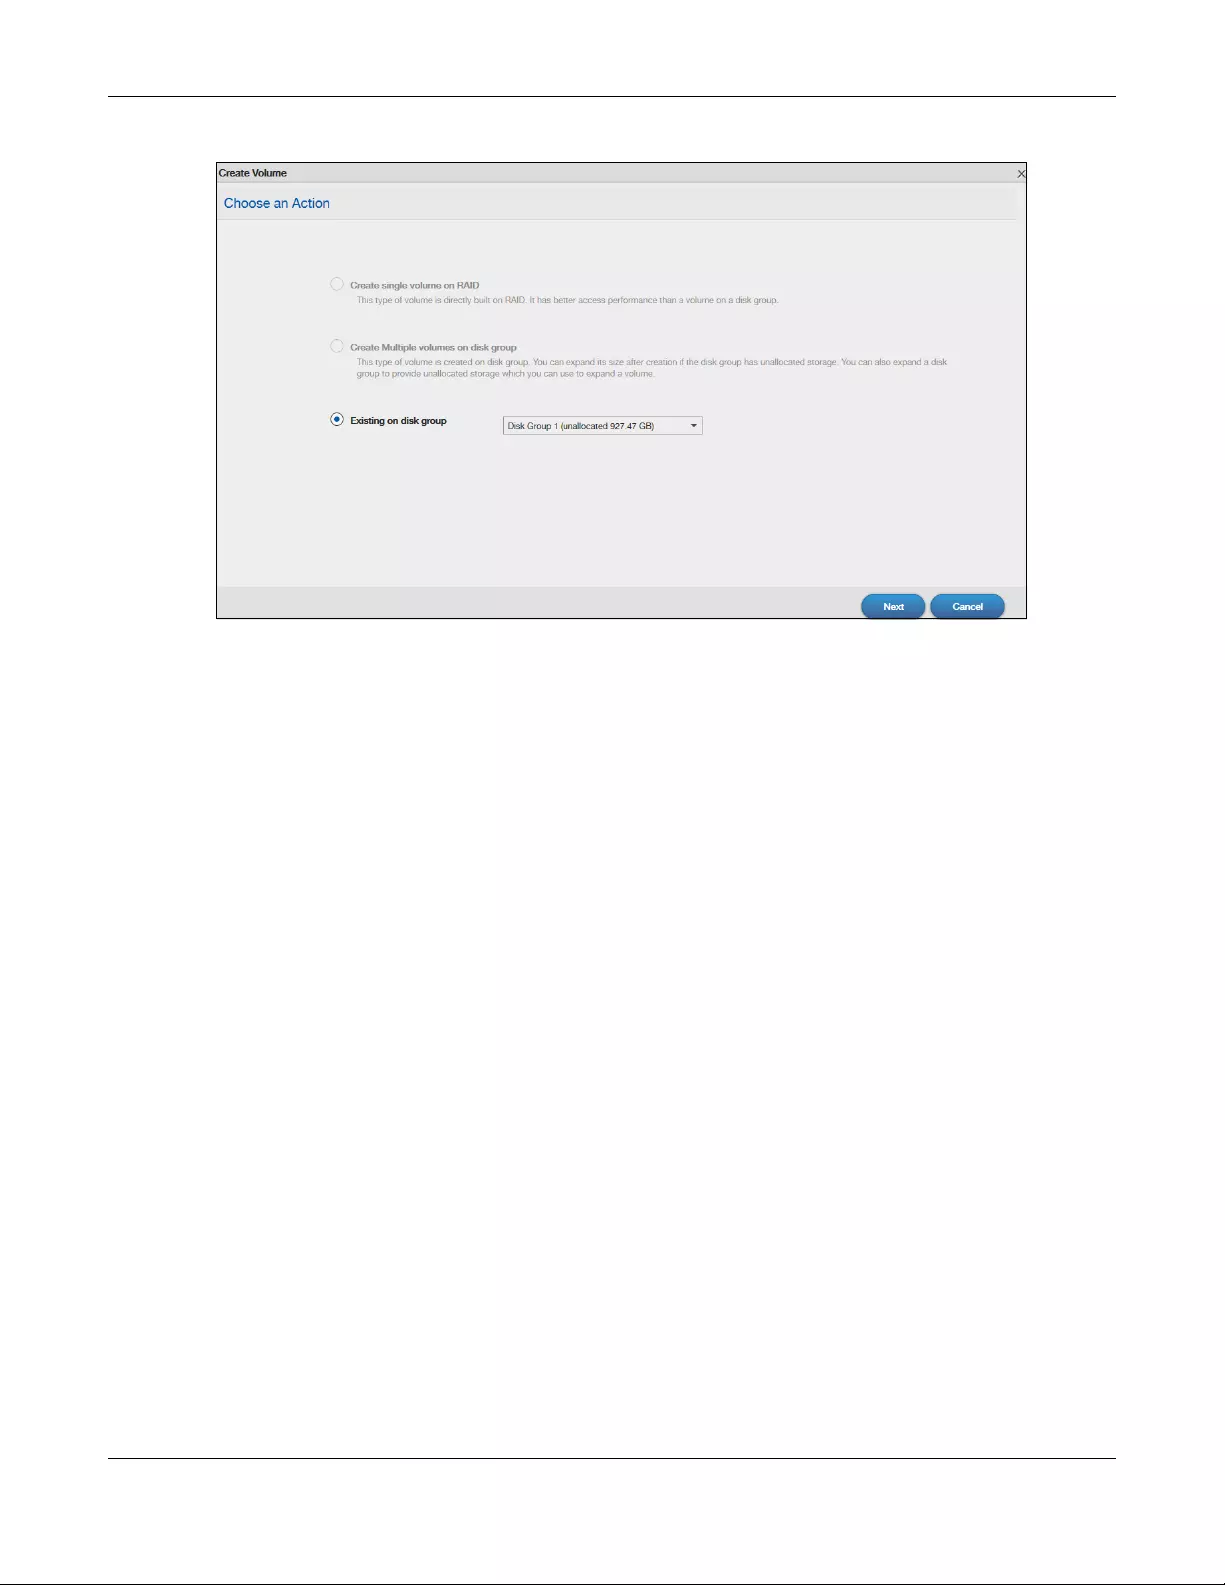
3You should see a screen asking you to change your password (highly recommended) as shown next.
Type a new password in the New Password field. Retype the password for confirmation in the Password
(Confirm) field. Click Cancel if you do not want to change the password this time. Click Apply to save
your changes back to the NAS.
Figure 19 Change Default Password Screen
4This screen displays if you have not created a volume yet. Click Create Volume to make a volume or
click the x to close the screen to go to the Desktop (Section 3.3 on page 30).
Figure 20 Welcome Screen
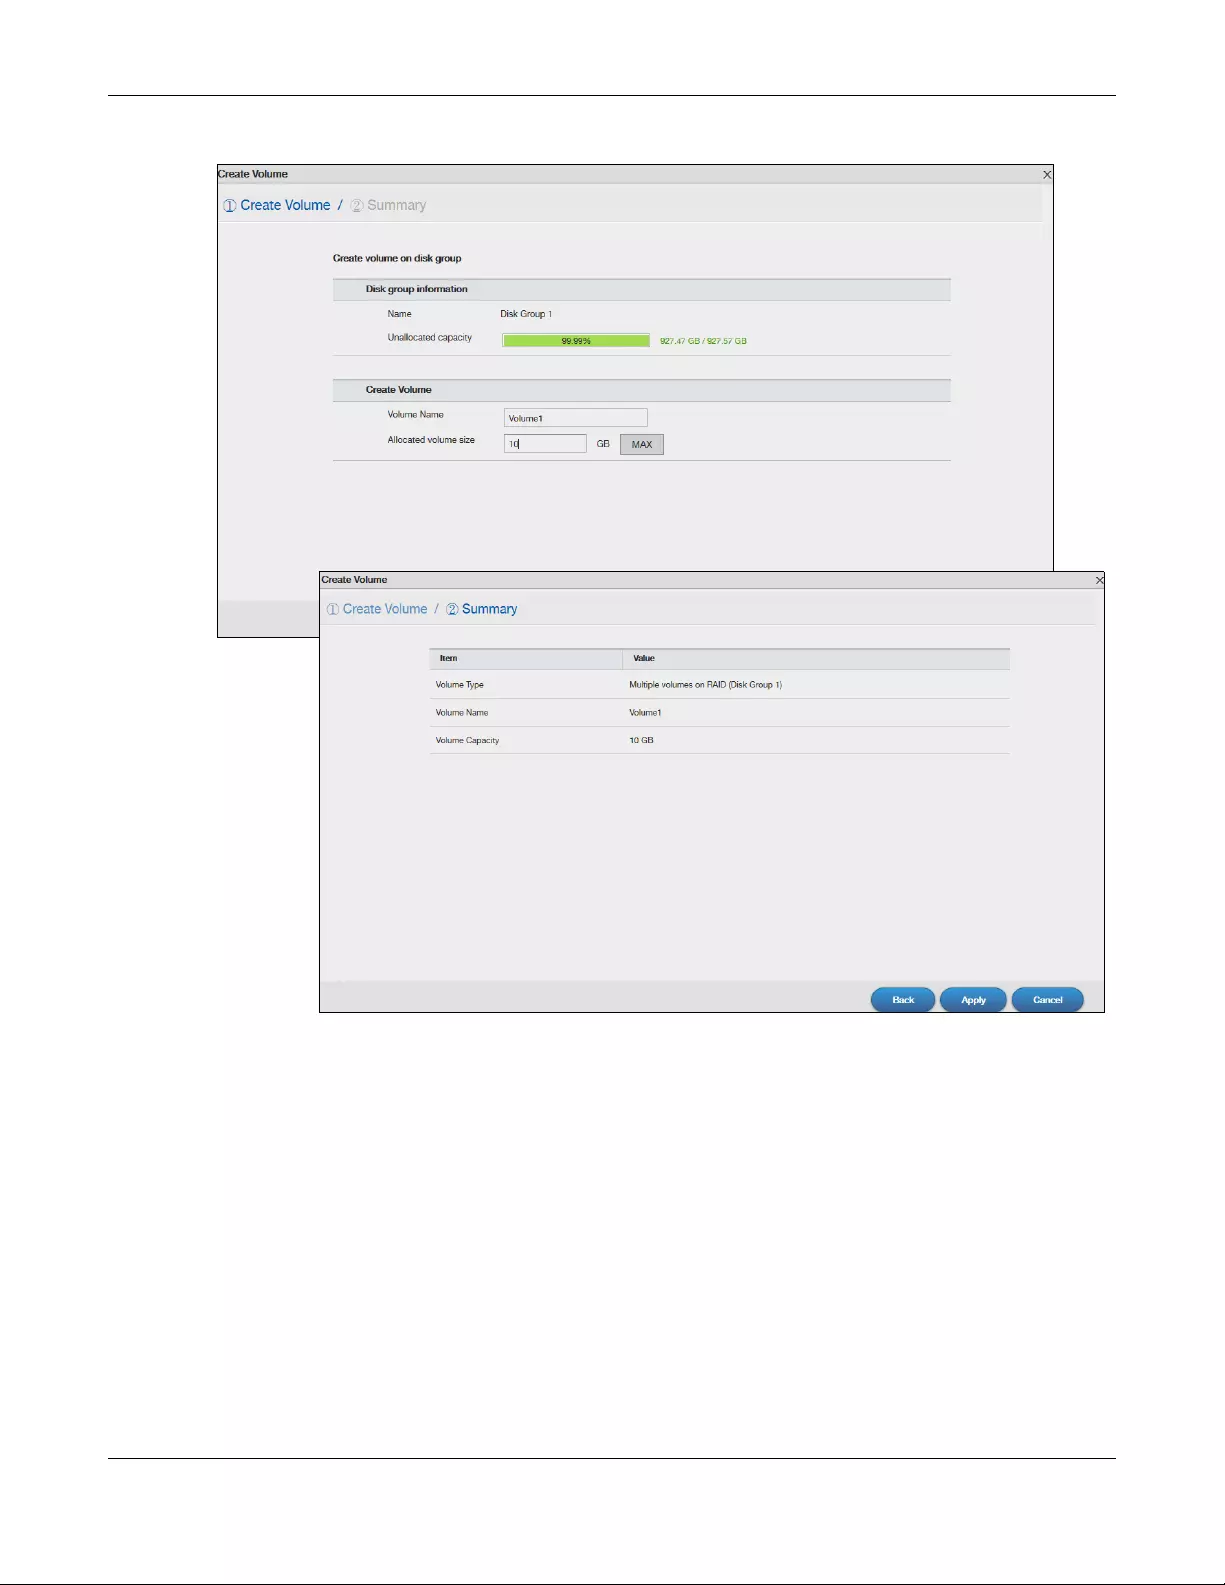
5Select Create single volume on RAID for a simple set up. Go to Section 5.3.1.1 on page 49 for details.
Select Create Multiple volumes on disk group to be able to create more than one storage volume. Go
to Section 5.3.1.7 on page 62 for details.
Chapter 3 Web Configurator
NAS Series User’s Guide
28
Figure 21 Create Volume
If you choose Existing on disk group, you will go to the screens below after clicking Next.
Chapter 3 Web Configurator
NAS Series User’s Guide
29
Figure 22 Existing on Disk Group
If this is the first time the NAS has created a volume, it needs to reboot after the volume is created. Click
Yes to reboot or No to go to the Desktop.
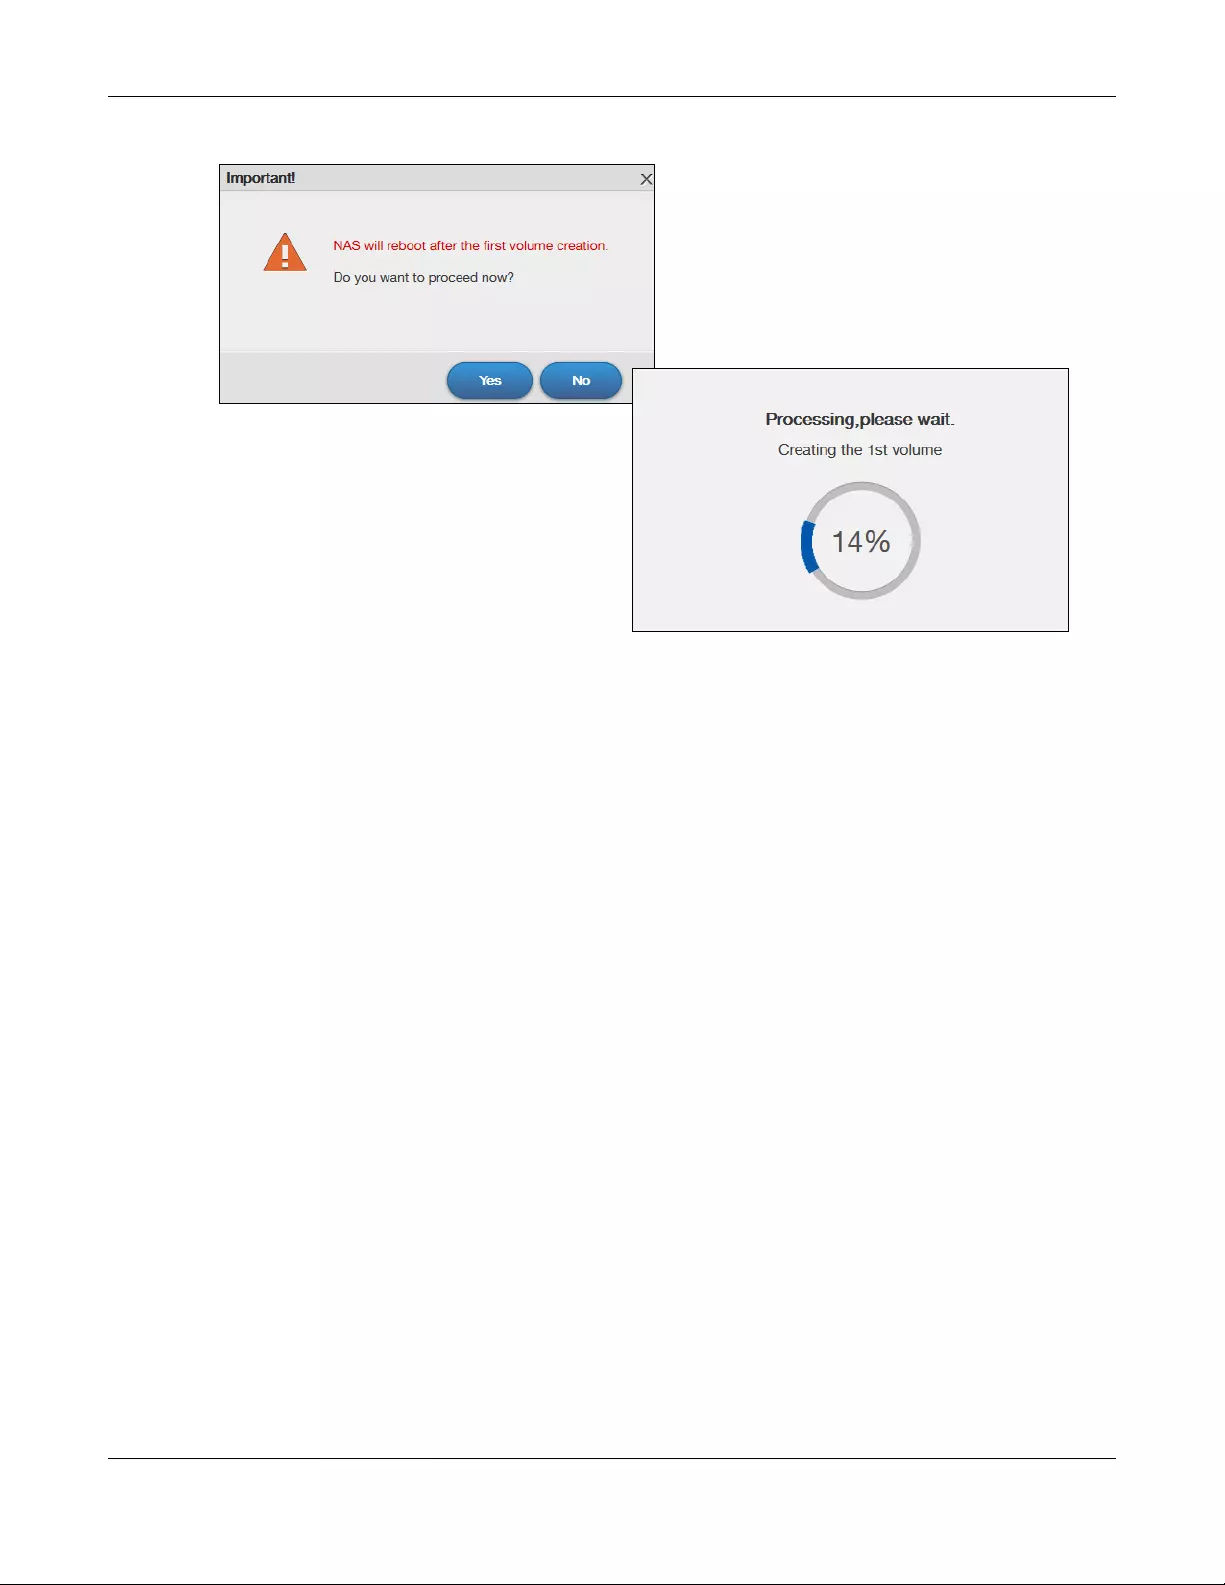
Chapter 3 Web Configurator
NAS Series User’s Guide
30
Figure 23 Reboot
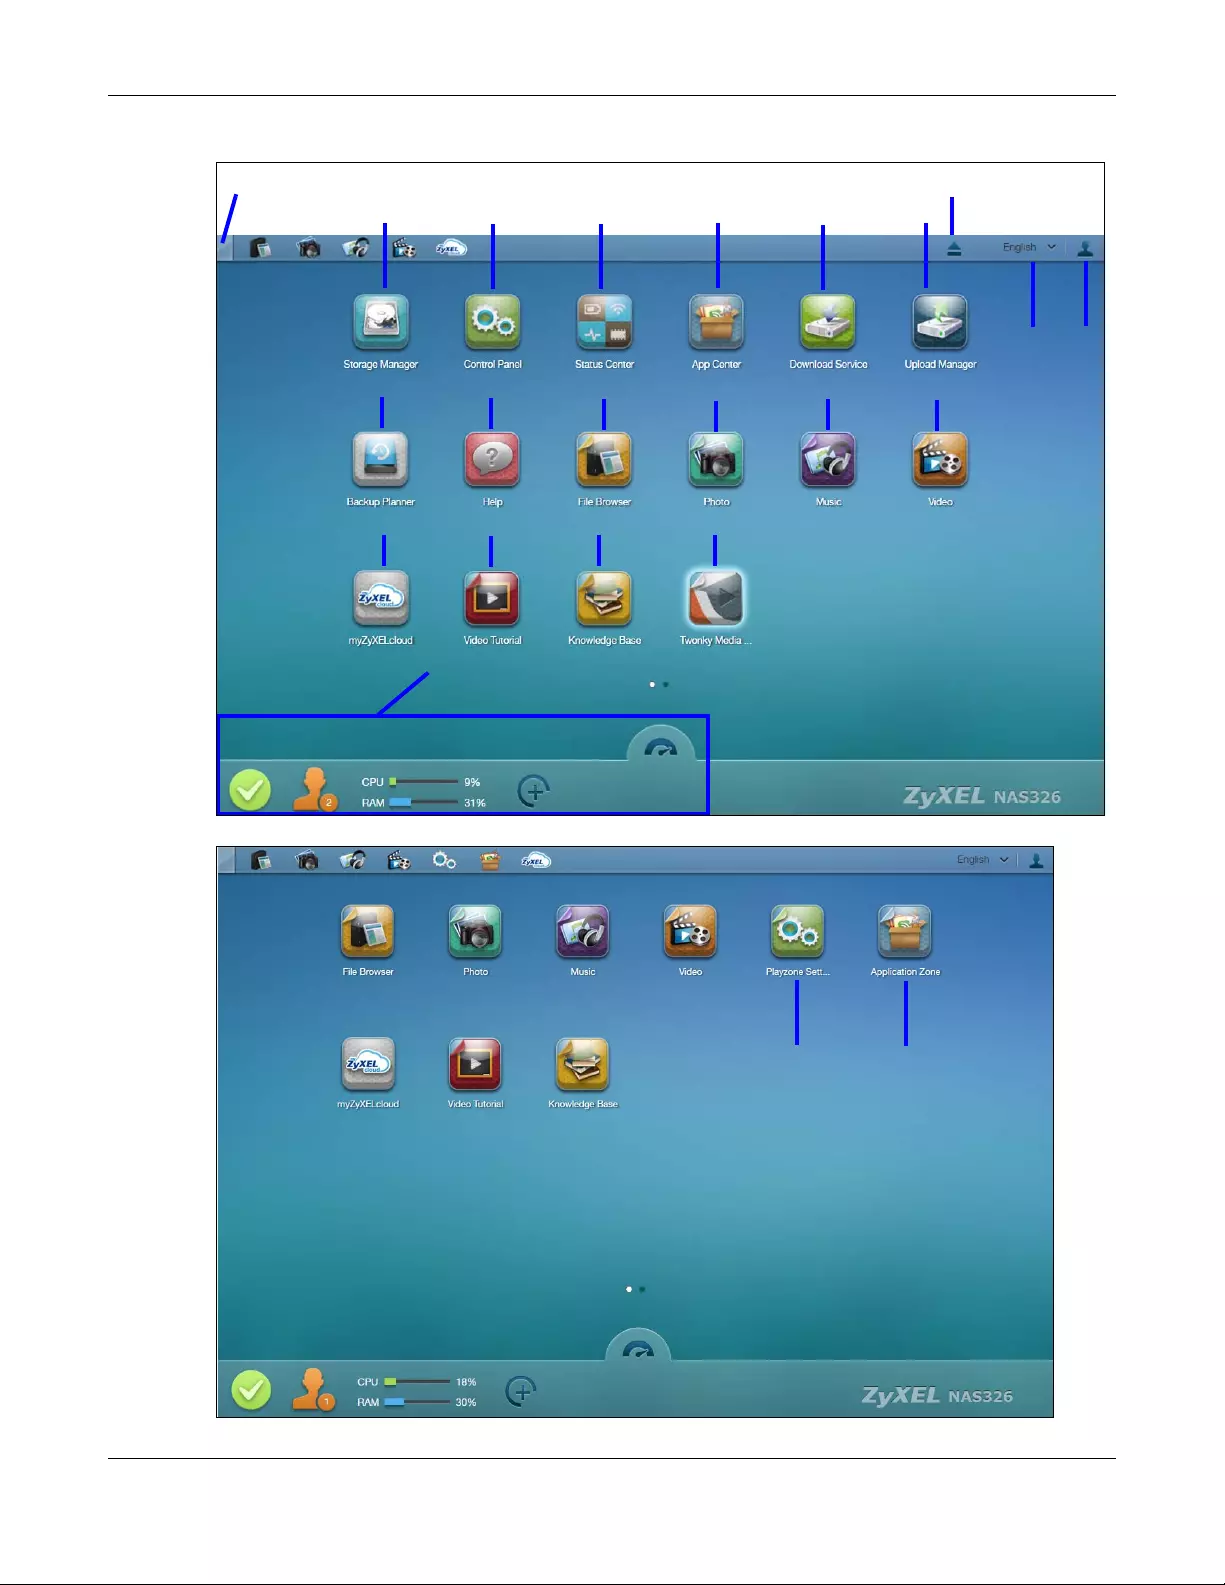
3.3 Desktop
The Desktop screen displays after you log in. Hover your mouse over the heading bar icons to display
their names.
Chapter 3 Web Configurator
NAS Series User’s Guide
31
Figure 24 Desktop (Administrator)
Figure 25 Desktop (User)
Status Zone
1234 567
891011
2019
12 13
14 15 16 17
18

Chapter 3 Web Configurator
NAS Series User’s Guide
32
Note: The Web Configurator session automatically times out if left idle for 15 minutes. Simply
log back into the NAS if this happens to you.
1Desktop — click this to minimize all windows so you can see the desktop. Click it again to restore the
windows to their previous state.
2Storage Manager— click this to open the storage configuration screens to display the status of both
internal and external storage, and configure disk groups, volumes, and iSCSI functions.
3Control Panel — click this to open the control panel screens to configure user’s access privileges, network,
system, media services and maintenance settings.
4Status Center — click this to display NAS system information or network connection status.
5App Center — click this to discover, install and update applications which packed in the NAS.
6Download Service — click this to configure download settings and view download details.
7Upload Manager — click this to upload files to FTP servers, your Flickr and YouTube accounts.
8Backup Planner — click this to set up your backup plan, restore backups, configure copy and
synchronous settings or turn Time Machine support on.
9Help — click this to display the NAS’ embedded help system screens.
10 File Browser — click this to see files in a tree-folder structure.
11 Photo — click this to view photos in the shares that publish photos.
12 Music — click this to view and play music files in the shares that publish music.
13 Video — click this to view and play video files in the shares that publish videos.
14 myZyxelCloud — click this to open a screen to set up myZyxelCloud service.
15 Video Tutorial — click this to view Zyxel’s youtube videos, which show you how to use the NAS.
16 Knowledge Base — click this to visit Zyxel product support website and find articles related to product
applications, FAQ, and user experience.
17 Twonky Media Player — click this to open the Twonky media server configuration screens to check media
server status or modify media server settings.
18 Eject NAS External Drives — click this to eject the connected external volumes.
19 Language — this displays current language using by the NAS. Click to select the language you want to
use to configure the Web Configurator.
20 User — click this to restart, shutdown, log out and change your user account password.
21 Playzone Settings — click this to open the playzone configuration screen in a new tab.
22 Application Zone — click this to open the application zone in a new tab.
Chapter 3 Web Configurator
NAS Series User’s Guide
33
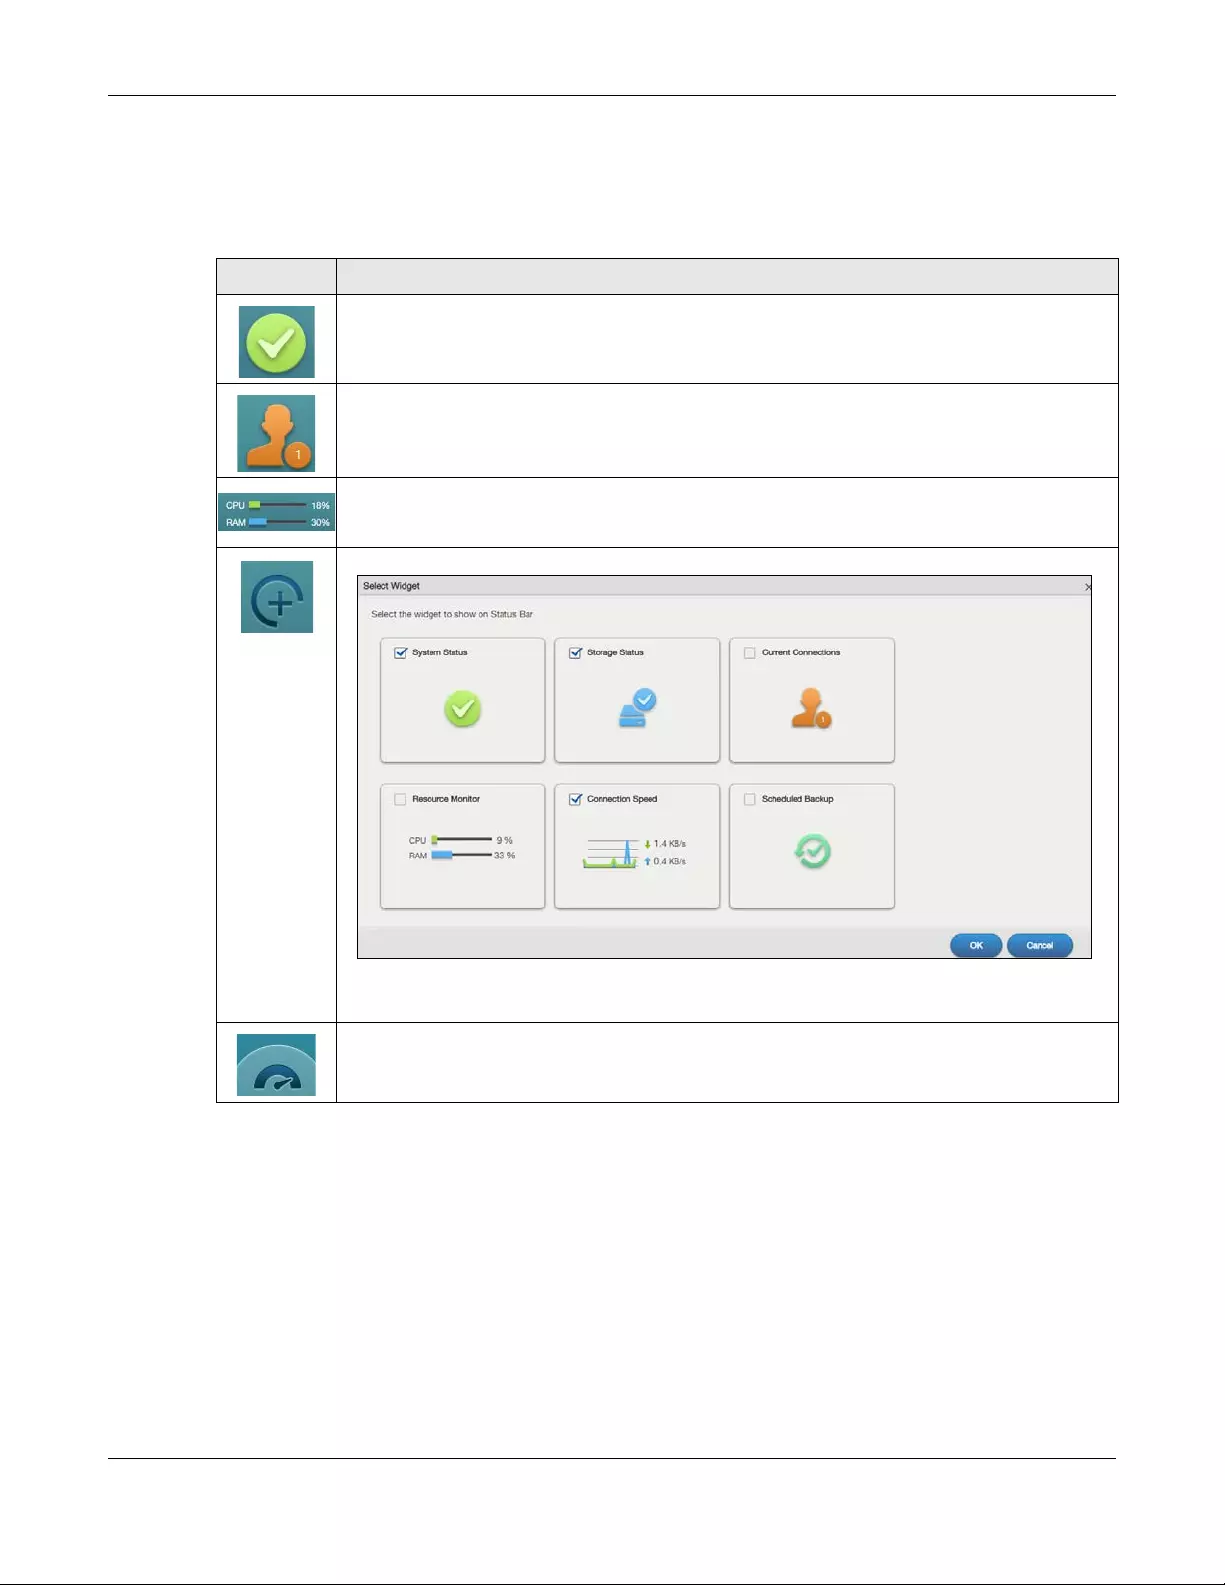
3.3.1 Status Zone
The Status Zone displays icons for various features you can access.
3.3.2 Switch between Desktop Pages
Click the dot to move between multiple desktop pages. A white dot indicates the current page. The
maximum number of the desktop pages is five.
Table 6 Status Zone Icons
ICON DESCRIPTION
Click System Status to open the Status Center screen. System Status displays the health state of the
NAS. A green circle with a check mark indicates healthy.
User Type displays the current number of web sessions. Click this to go to the Status Center >
Network screen for more details.
CPU displays what percentage of the NAS’s processing capability is currently being used. RAM
displays what percentage of the NAS’s memory is currently being used. Click this to open the Status
Center > System Information screen for more details.
Click this to select widgets to show on the status bar.
Select or clear the widgets to show or hide on the Status bar. Click OK to save your changes or
Cancel to exit this screen without saving changes.
Click this to hide or show the status bar.
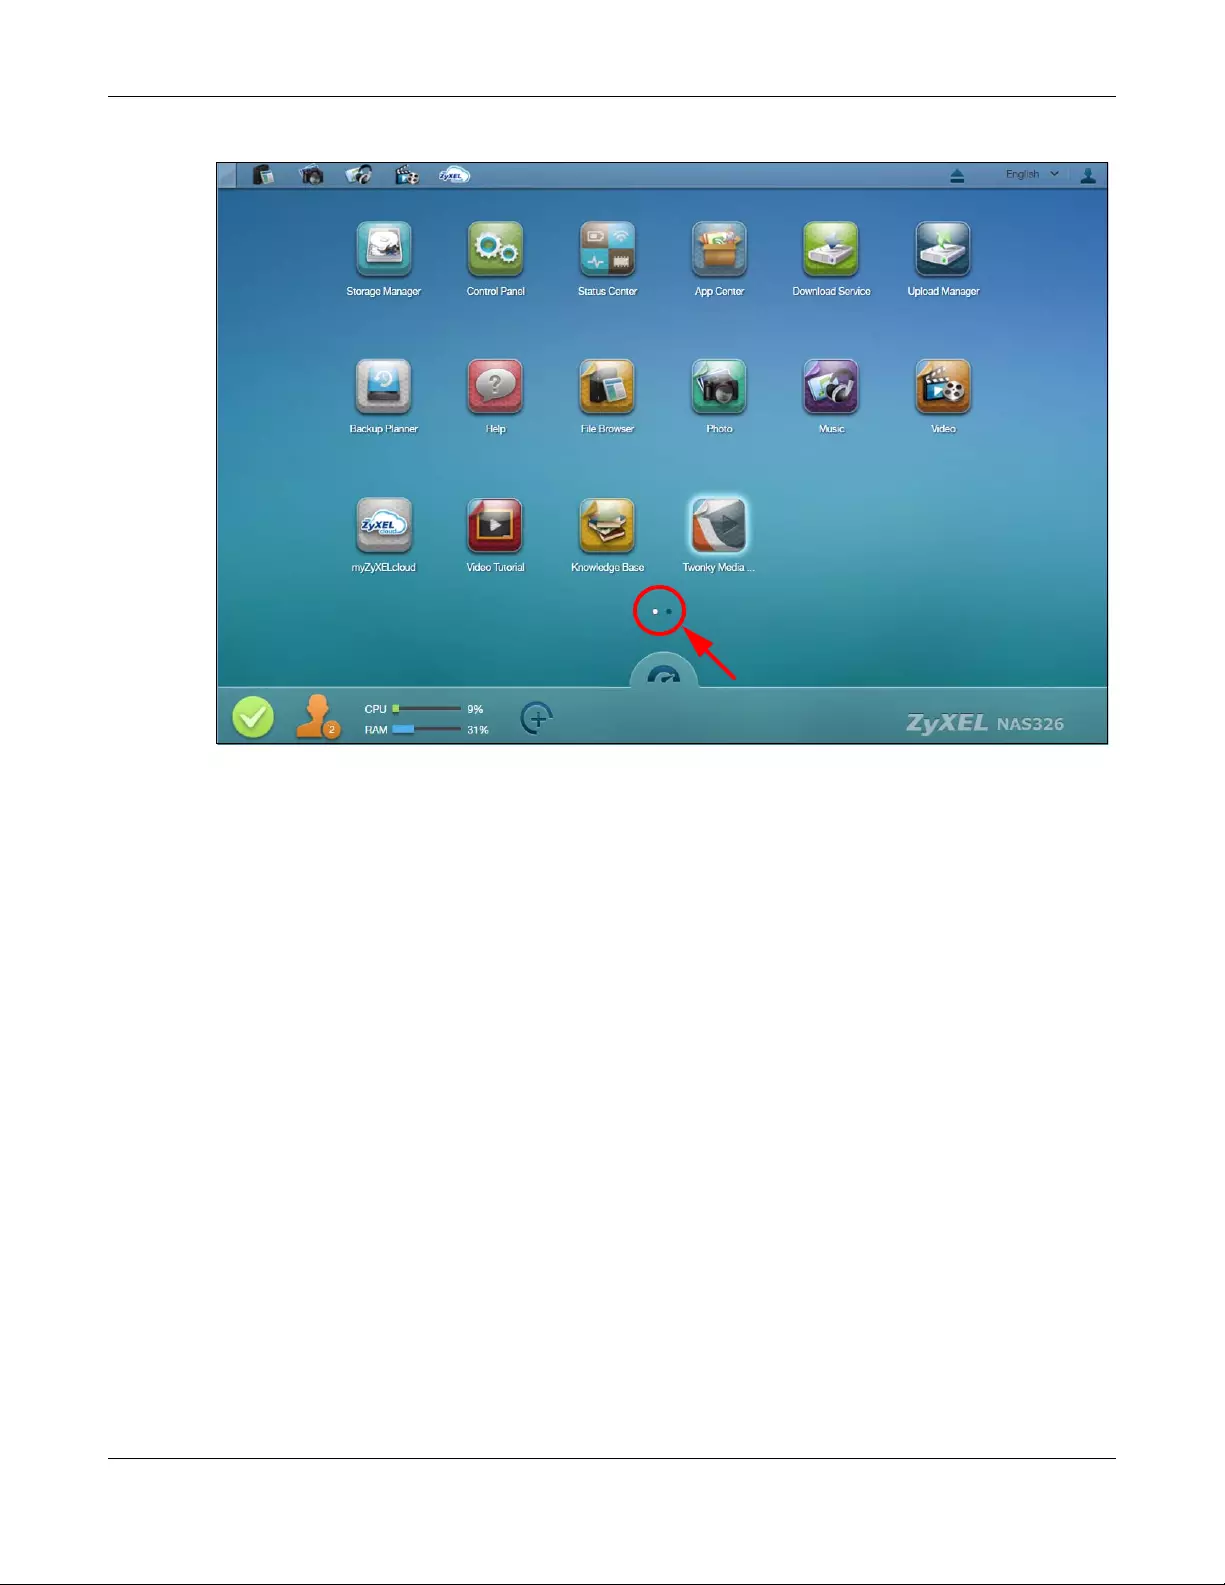
Chapter 3 Web Configurator
NAS Series User’s Guide
34
Figure 26 Switch between Desktop Pages
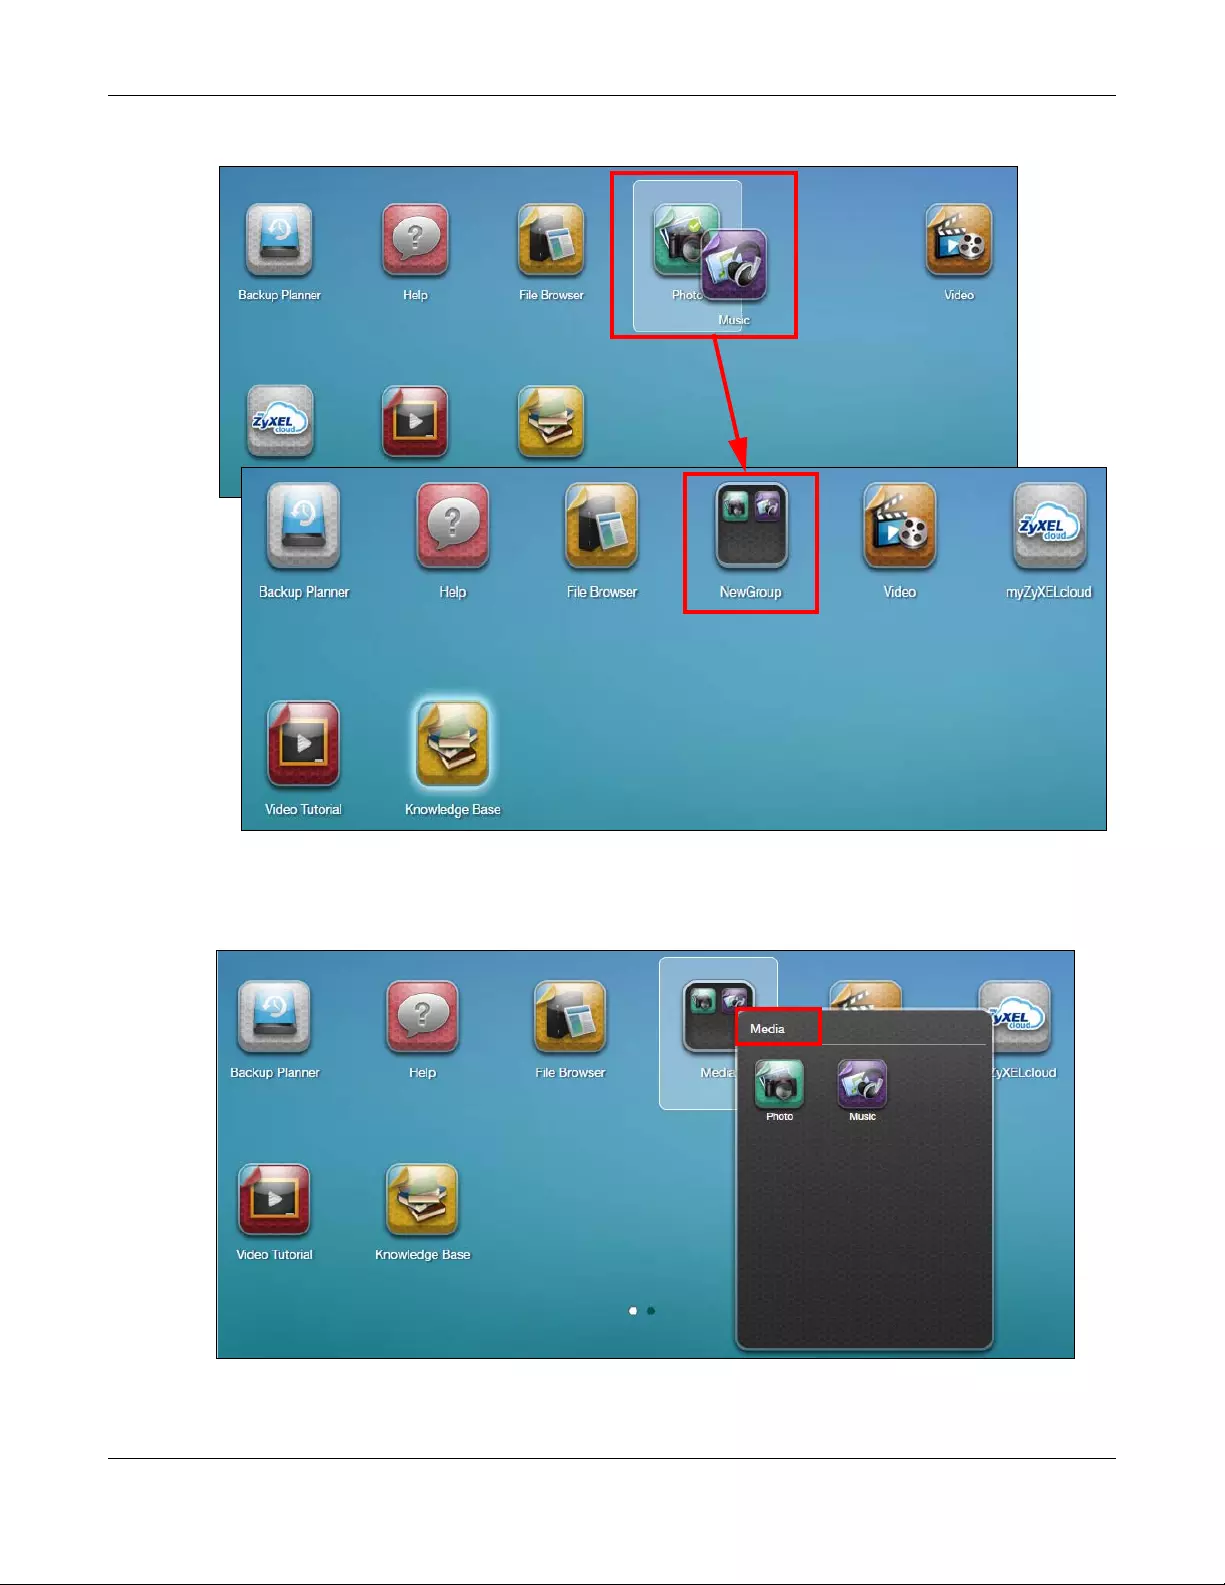
3.3.3 Grou p Icons
You can drag one icon to another one and make them a group as shown below.
Chapter 3 Web Configurator
NAS Series User’s Guide
35
Figure 27 Group Icons
After the group is created, the default group name is “NewGroup”. You can click the icon to change
the group name. In the following example, the group name is changed to Media.
Figure 28 Change the Group Name
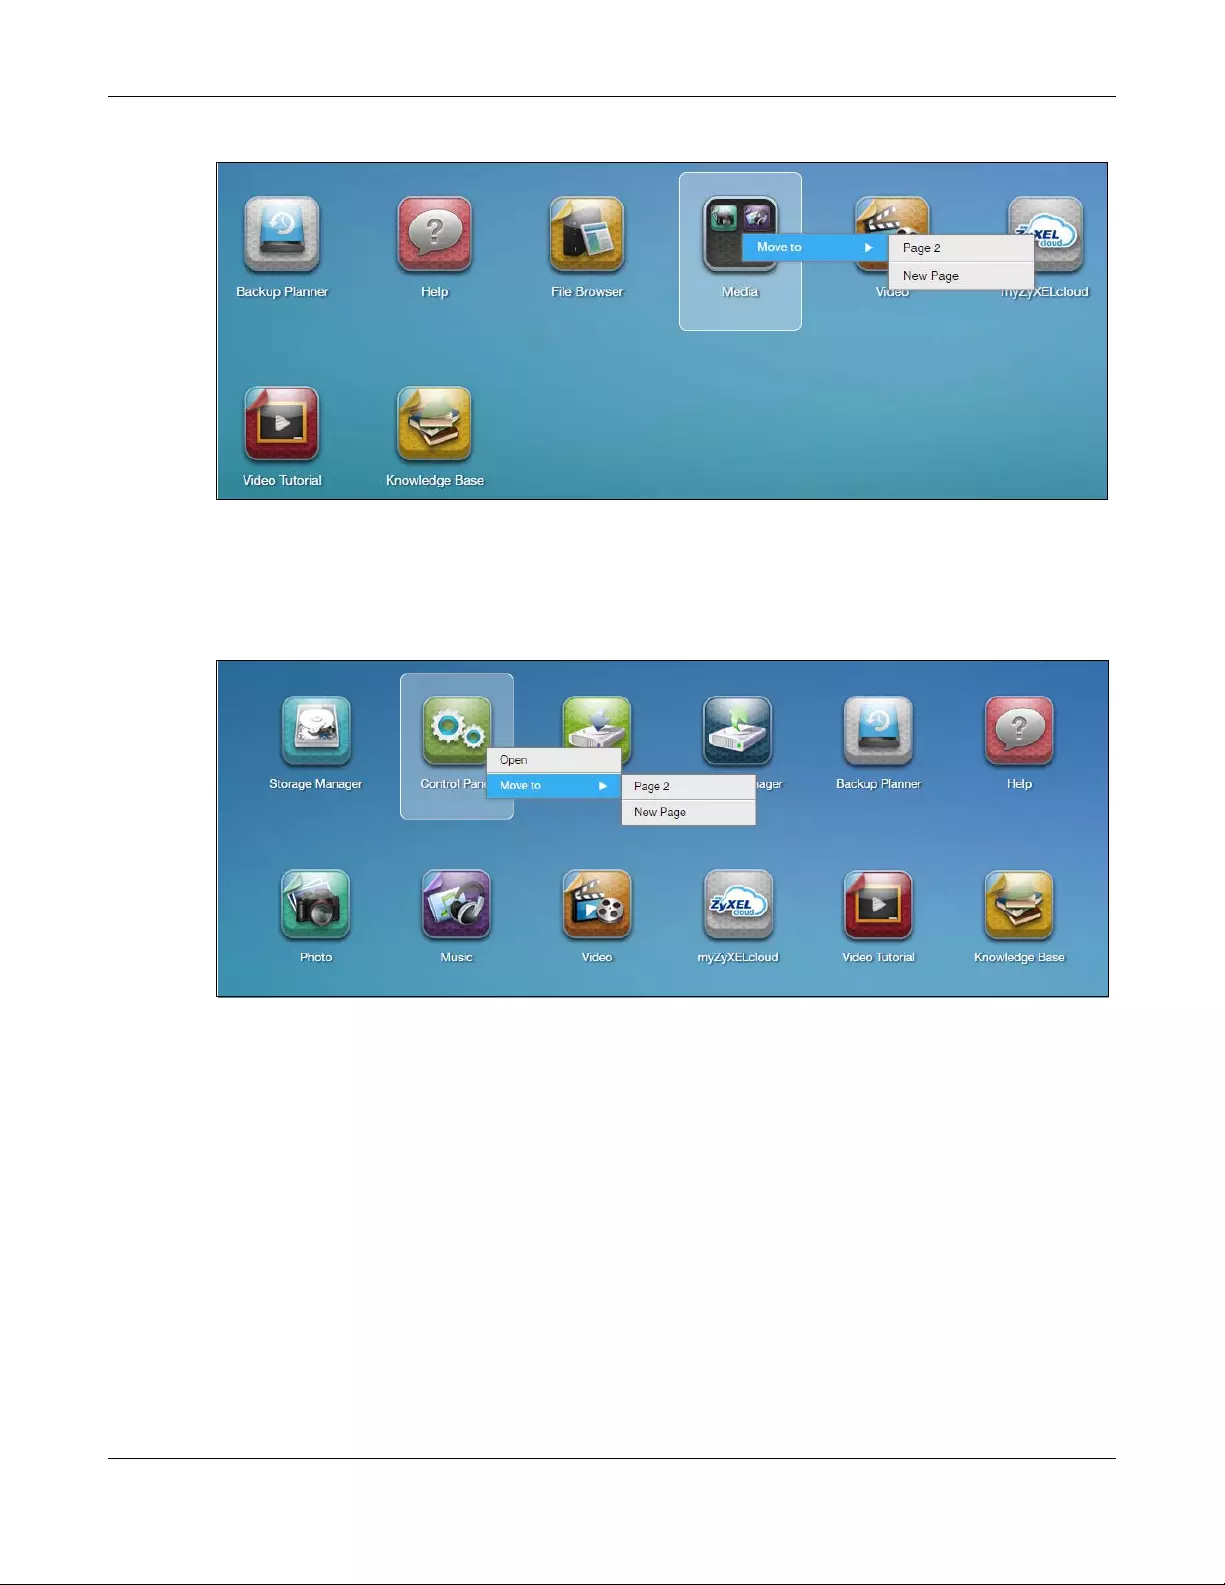
You can also move the group to another page by right-clicking the icon as shown next.
Chapter 3 Web Configurator
NAS Series User’s Guide
36
Figure 29 Move the Group Location
3.3.4 Move Icons
You can move an icon to another page by right-clicking the icon as shown next.
Figure 30 Move the Icon Location

NAS Series User’s Guide
37
CHAPTER 4
Video Tutorials
4.1 Overview
Click Video Tutorial on the Desktop to go to www.youtube.com to view Zyxel’s youtube videos, which
show you how to use the NAS. This chapter provides information about the following tutorials.
•Create a volume and copy files using Windows Explorer, see page 37
•Enable Time Machine on the NAS and your Mac computer, see page 37
•Back up files to the NAS using Windows File History, see page 39
•Restore a backup using Windows File History, see page 40
•Remotely access files on the NAS using WebDAV, see page 40
Note: Screens and graphics in the video may differ slightly from your product due to
differences in your product firmware or your computer operating system.
4.2 Create a volume and copy files using Windows
Explorer
After you find and log into the NAS, you must create a volume to start using the NAS. You can then use
Windows Explorer to copy files from your computer to the NAS.
Creating a volume formats the hard disk and deletes all data in the
process. Make sure you have a backup of any existing data in the hard
disk before installing it in the NAS.
See https://www.youtube.com/watch?v=_-WeIgHdxwA&index=1&list=PL-69xFi03dP9zQn8gHGcVwf-
X6ShkNU27 for the related Zyxel youtube video.
4.3 Enable Time Machine on the NAS and your Mac
computer
Time Machine is a backup system provided by Mac OS X. It automatically backs up everything on your
Mac, including pictures, music, videos, documents, applications, and settings. This tutorial helps you to
enable Time Machine in OS X to use your NAS as a backup volume.
Use the Backup Planner > Time Machine screen (Section 16.5 on page 290) to turn Time Machine
support on or off, and designate a share for Time Machine backups.
Chapter 4 Video Tutorials
NAS Series User’s Guide
38
After enabling Time Machine on the NAS, follow the steps below to set up Time Machine on your Mac to
use your NAS for backup.
You can also see https://www.youtube.com/watch?v=nzpZNJuEsUs&index=2&list=PL-
69xFi03dP9zQn8gHGcVwf-X6ShkNU27 for the related Zyxel youtube video.
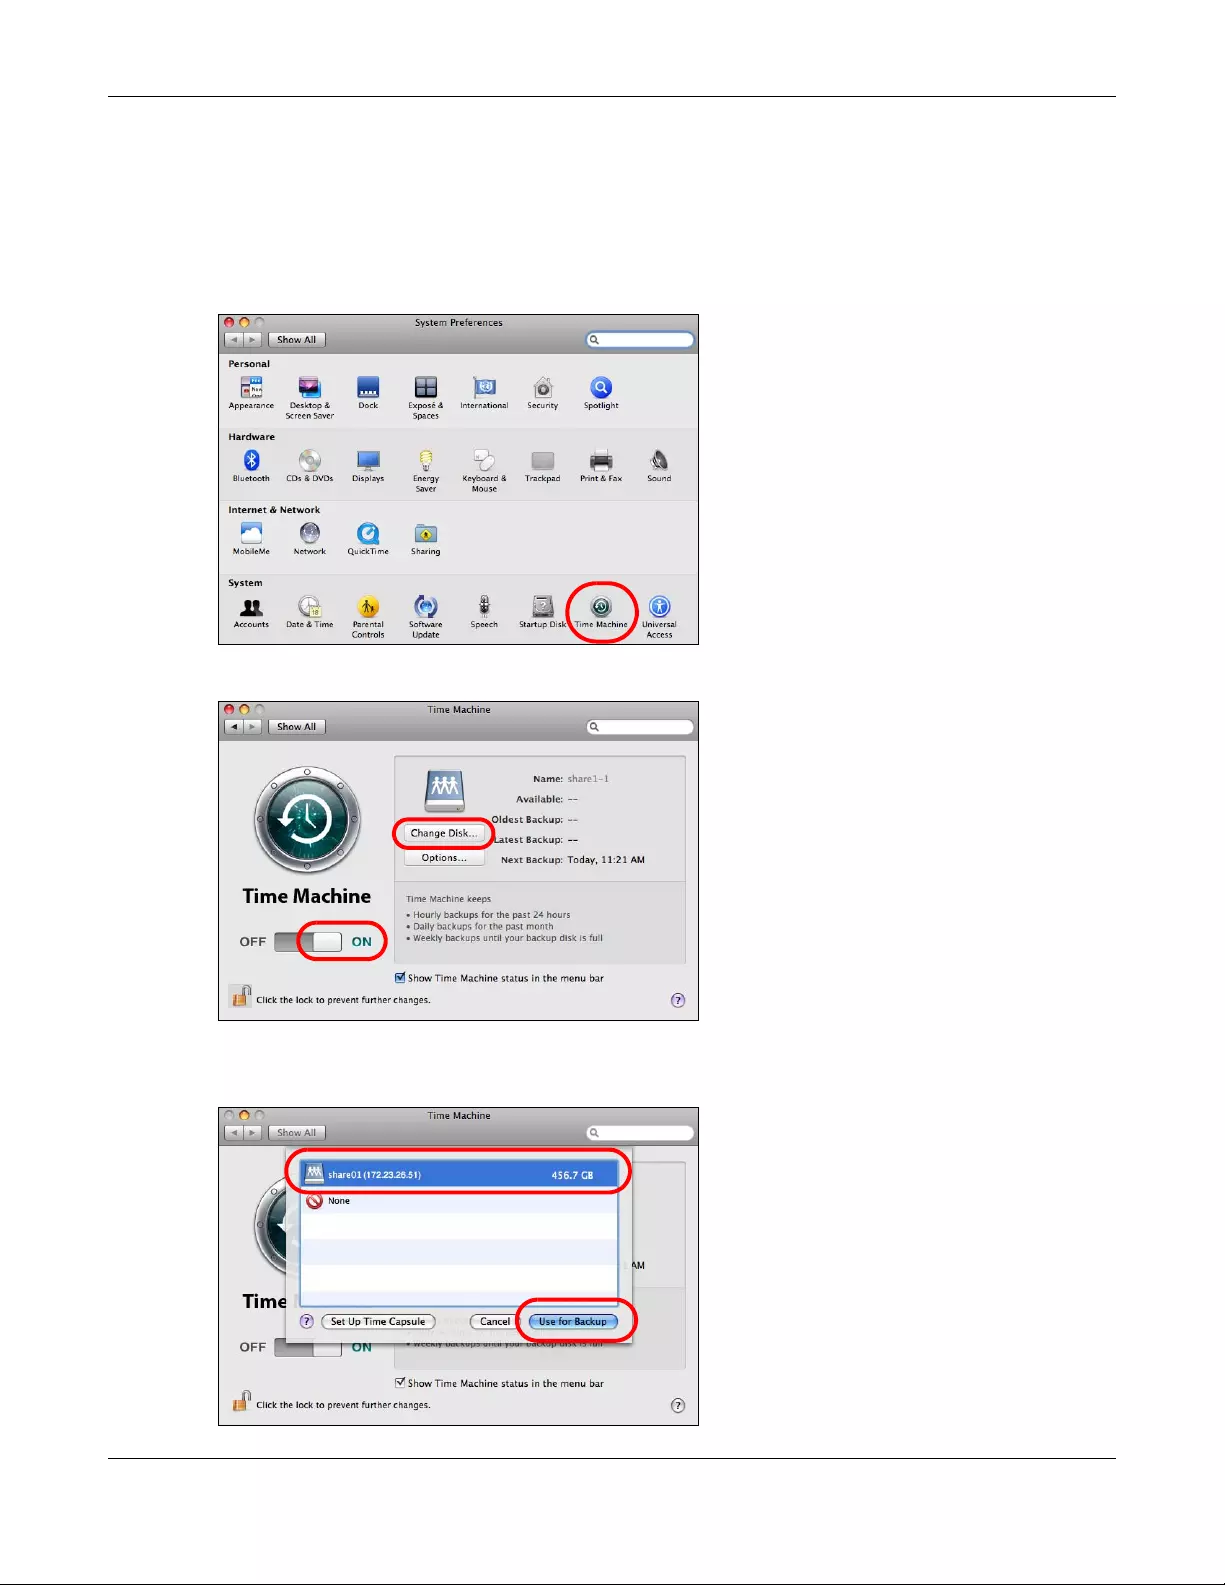
1Click Apple > System Preferences. Then go to System and select Time Machine.
2Turn Time Machine ON. Then click Change Disk.
3Select the share you designated on the NAS as the backup disk (share01 in this example). Then click Use
for Backup.
Chapter 4 Video Tutorials
NAS Series User’s Guide
39
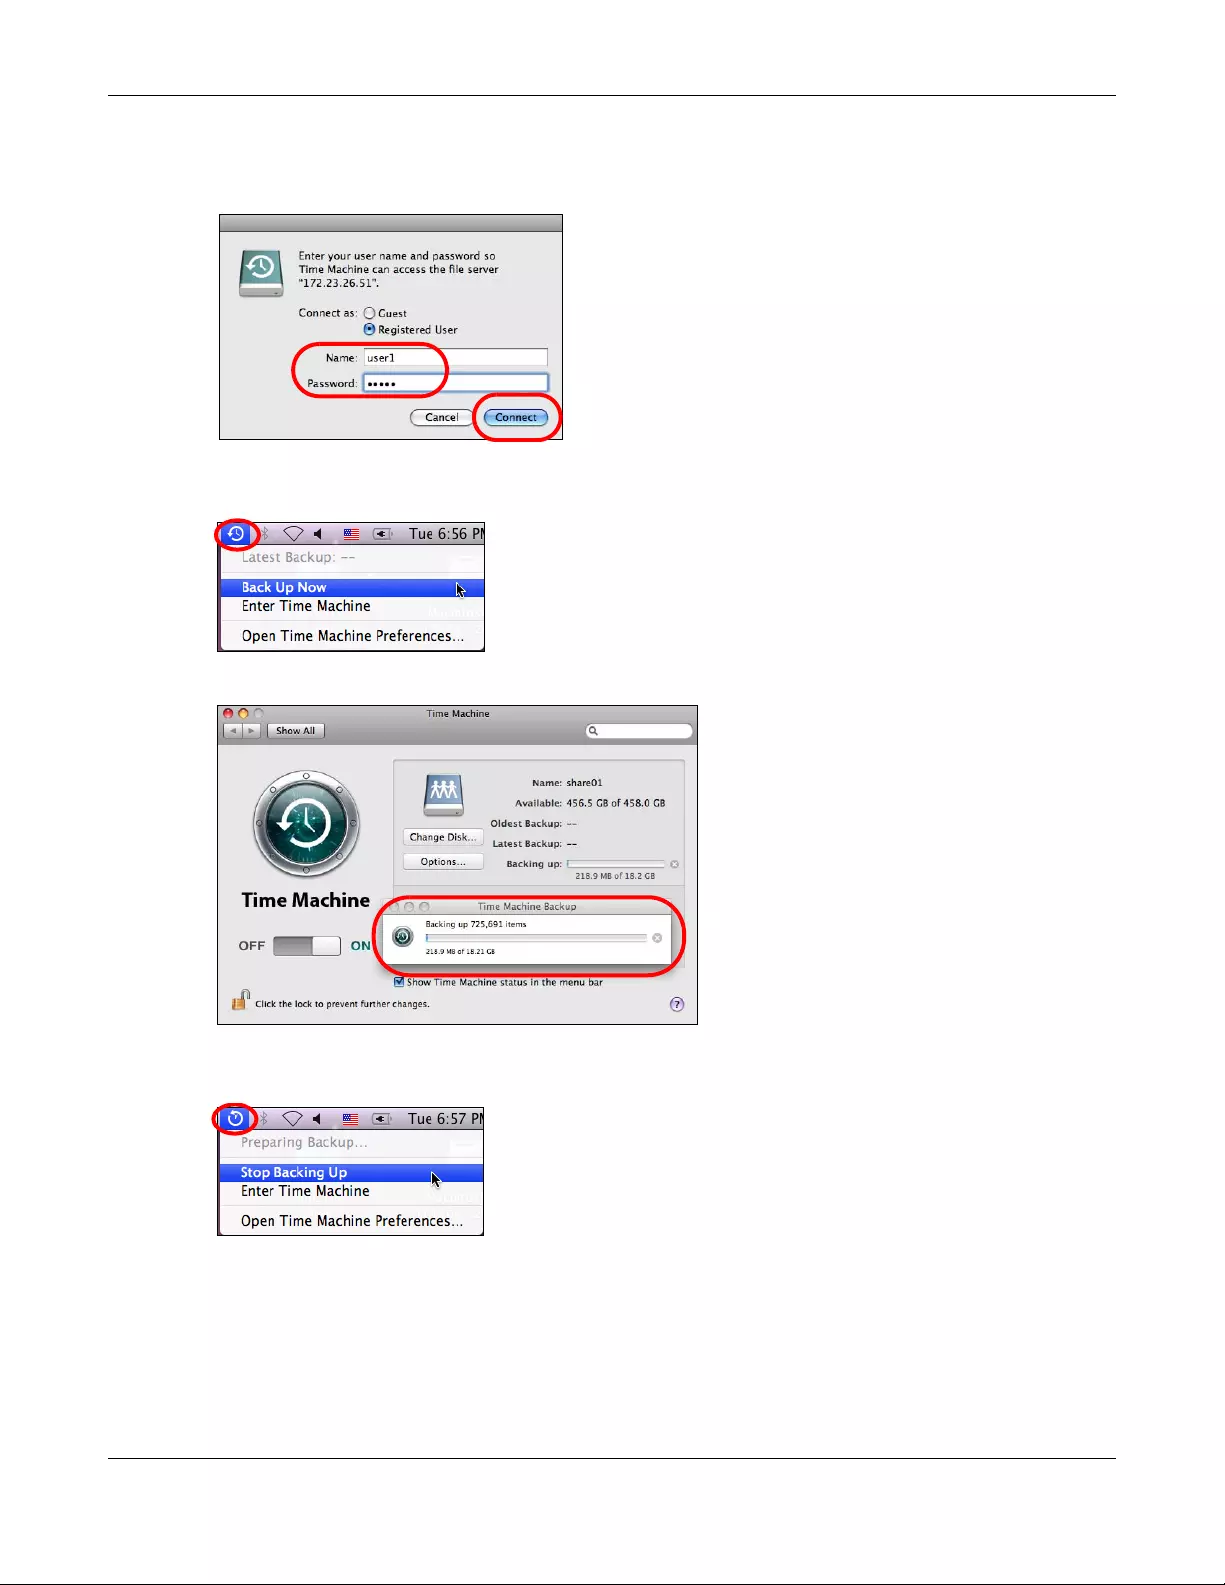
4When prompted for the username and password of share01, enter the login information for an existing
user account with write access permission on share01 (for information on configuring user accounts and
shares see Chapter 7 on page 104). In this example user1/12345 is used. Then click Connect.
5Time Machine starts backing up files to share01 after 120 seconds. If you want to back up immediately,
click the Time Machine icon and select Back Up Now.
6The screen shows the status of the backup once the process begins.
7To stop the backup process, click the Time Machine icon and select Stop Backing Up. Then turn Time
Machine OFF.
4.4 Back up files to the NAS using Windows File History
File History is a Windows backup tool which was original introduced in Windows 8. You can set up File
History in your Windows computer to automatically back up your files to a connected NAS.

Chapter 4 Video Tutorials
NAS Series User’s Guide
40
See https://www.youtube.com/watch?v=xt1XdMAZisU&list=PL-69xFi03dP9zQn8gHGcVwf-
X6ShkNU27&index=3 for how to use File History in Windows 10 to back up files from a computer to the
NAS.
4.5 Restore a backup using Windows File History
If you used Windows File History to back up files from your computer to the NAS, File History also allows
you to restore the backup.
See https://www.youtube.com/watch?v=xt1XdMAZisU&list=PL-69xFi03dP9zQn8gHGcVwf-
X6ShkNU27&index=3 for how to use File History in Windows 10 to restore files from a backup.
4.6 Remotely access files on the NAS using WebDAV
If your computer is not connected to the NAS’s local network, WebDAV allows you to use client
programs that support WebDAV to remotely edit and manage files stored on the NAS.
In this example, you need to:
1Click Control Panel > Service > WebDAV to enable WebDAV on your NAS (see Section 10.7 on page
165).
2Click the myZyxelcloud icon on the desktop to create a myZyxelcloud account at https://
mycloud.zyxel.com.
3Pair the NAS and the myZyxelcloud account.
4Set up a free DDNS host name for the NAS so you can connect to it easily from the Internet.
5Configure UPnP port mapping to allow access from the WAN (Internet) to the WebDAV services on the
NAS.
6Install a client program that supports WebDAV (NetDrive for example) on the computer from which you
want to remotely access files stored on the NAS.
See https://www.youtube.com/watch?v=Z9oxXx1rZAA&index=5&list=PL-69xFi03dP9zQn8gHGcVwf-
X6ShkNU27 for the Zyxel youtube video.

NAS Series User’s Guide
41
CHAPTER 5
Storage Manager
5.1 Overview
This chapter displays the status of both internal and external storage, and introduces how to configure
disk groups, volumes, and iSCSI functions. After you log in with an administrator account, click Storage
Manager on the Desktop to go to the following screens in a new window.
5.2 Storage Manager Overview
Click Storage Manager on the Desktop to display the status of both internal and external storage, and
configure disk groups, volumes, and iSCSI functions.
The Storage Manager Overview screen displays the status, current storage configuration and volume
usage of internal volumes and capacity usage of external volumes.
5.2.1 Internal Volumes Screen
Figure 31 Storage Manager > Overview > Internal Volumes
Chapter 5 Storage Manager
NAS Series User’s Guide
42
The following table describes the labels in this screen.
Table 7 Storage Manager > Overview > Internal Volumes
LABEL DESCRIPTION
Storage The circular icon displays the overall health state of the NAS.
A green circle with a check mark indicates healthy.
An orange circle with an exclamation mark indicates attention. This appears when a
volume or disk group is degraded. Click Repair to repair it.
An red circle with an exclamation mark indicates danger. This appears when a
volume or disk group is crashed. You cannot recover the volume.
Volume on RAID This section shows the current storage usage for each volume built directly on top of a
RAID. These volumes have higher access performance than volumes on a disk group
but are less flexible in regards to size.
Details include the currently used percentage of the volume.
Shared Folder (Normal) — green on the circle represents the volume’s percentage of
used capacity in a healthy state.
LUN (Normal) — blue on the circle represents the iSCSI LUN’s percentage of used
capacity.
Degraded — orange on the circle represents the volume’s percentage of used
capacity in a degraded state. Degraded means one or more disks has failed but you
can still replace a faulty disk to recover the volume.
Crashed/Full — a red exclamation point represents the volume is in a down state.
Down means you cannot recover the volume. Full means the volume has run out of
space.
Available — gray on the circle represents the volume’s percentage of unused
capacity.
This section also displays the volume’s used capacity, and total capacity available.
Volume on Disk Group This section shows the current storage usage for each volume built on top of a disk
group. You can expand a volume’s size after creation if the disk group has
unallocated space. You can also expand a disk group by adding hard disks.
Chapter 5 Storage Manager
NAS Series User’s Guide
43
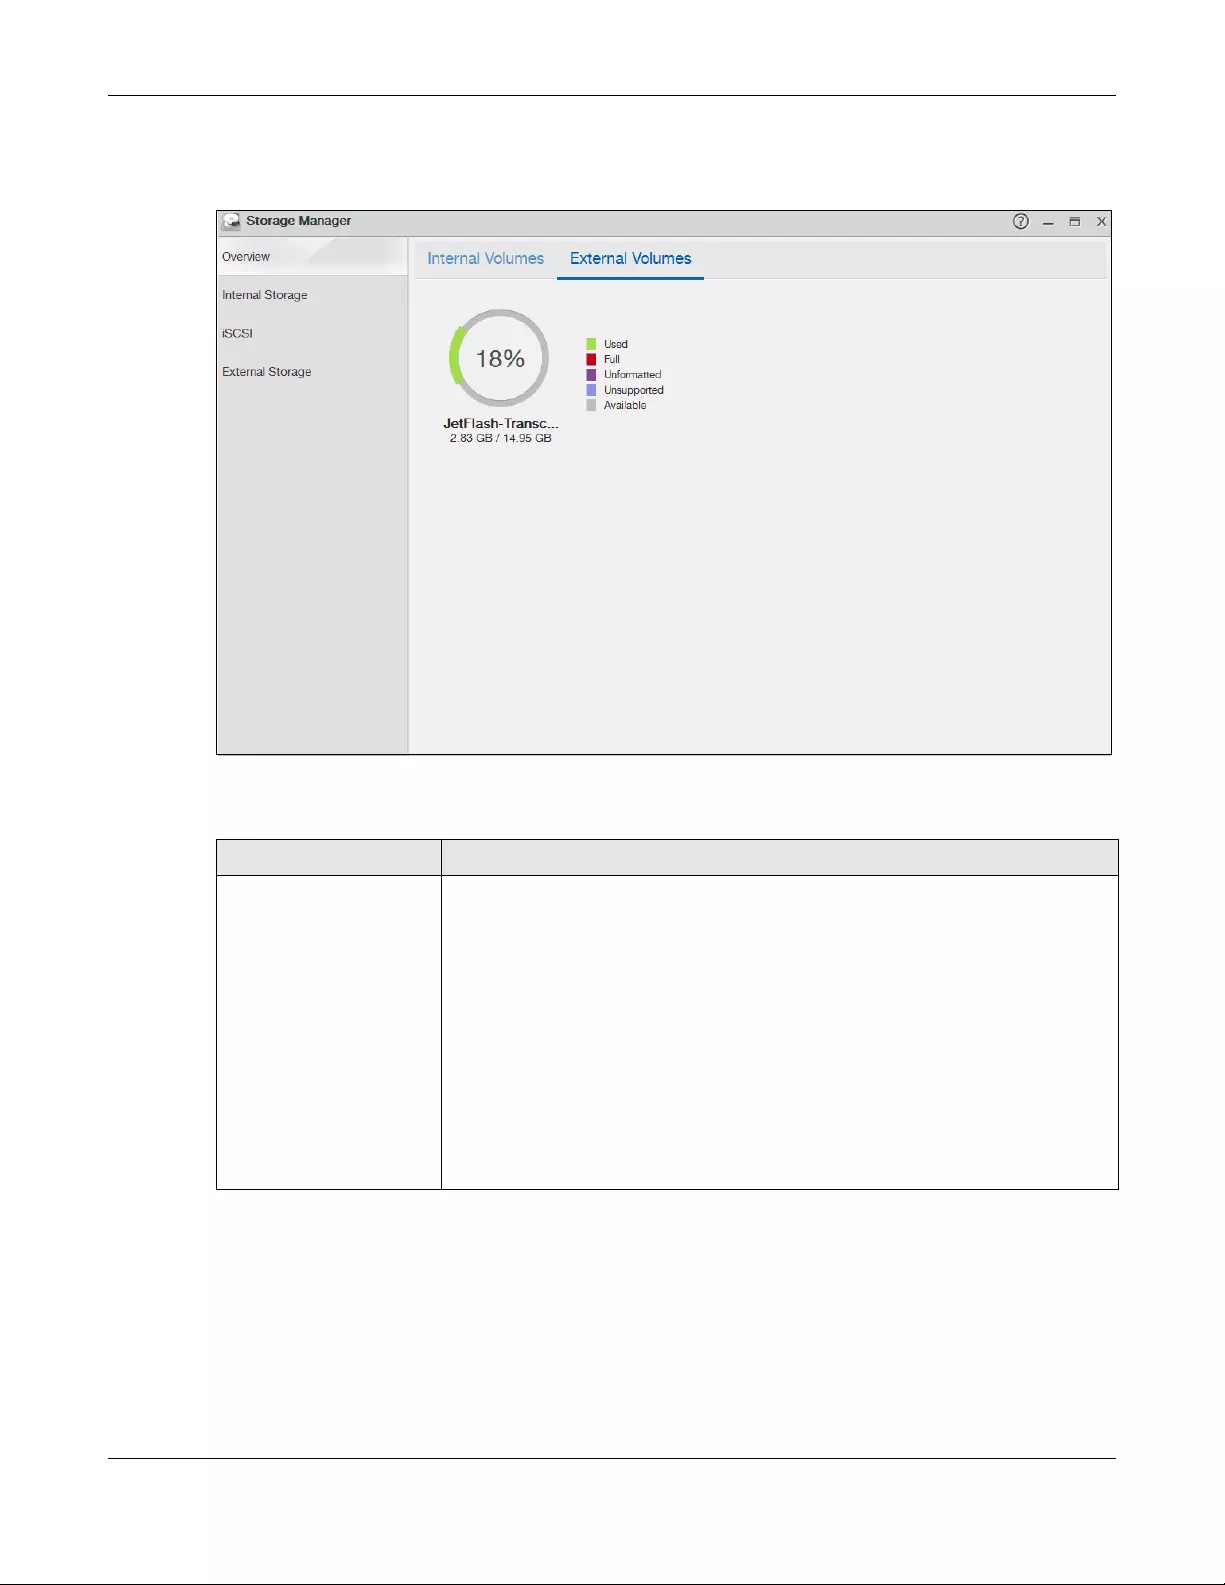
5.2.2 External Volumes Screen
Figure 32 Storage Manager > Overview > External Volumes
The following table describes the labels in this screen.
5.3 Internal Storage
A volume is a basic storage space on the NAS. To store data on the NAS, you must create at least one
volume. Your NAS supports the following:
• Internal volumes (built on the hard disks installed in the NAS)
Table 8 Storage Manager > Overview > External Volumes
LABEL DESCRIPTION
Volume Details include the currently used percentage of the volume.
Used — green on the circle represents the volume’s percentage of used capacity in a
healthy state.
Full — a red exclamation point represents the volume has run out of space.
Unformatted — purple on the circle represents the connected USB storage device is not
formatted with a file system.
Unsupported — violet on the circle represents the connected USB storage device uses
a file system the NAS does not support.
Available — gray on the circle represents the volume’s percentage of unused
capacity.
This section also displays the volume’s used capacity, and total capacity available.
Chapter 5 Storage Manager
NAS Series User’s Guide
44
• External volumes (built on the external storage devices attached to the NAS)
Internal Volumes
RAID Types
The following table describes RAID types.
Note: RAID 5, RAID 6, RAID 10, and the hot spare option apply to 4-bay NAS devices.
Repair Volumes or Disk Groups
If a hard disk in a RAID 1 with a hot spare or a RAID 5 with a hot spare fails, the NAS automatically uses
the hot spare to re-build the volume or disk group. Later you can replace the failed hard disk and add
the new disk as a hot spare.
A hard disk failure in a RAID 1, RAID 5, RAID 6, or RAID 10 degrades the volume or disk group. Replace
the failed disk and use the Internal Storage screen’s Repair link to repair the volume.
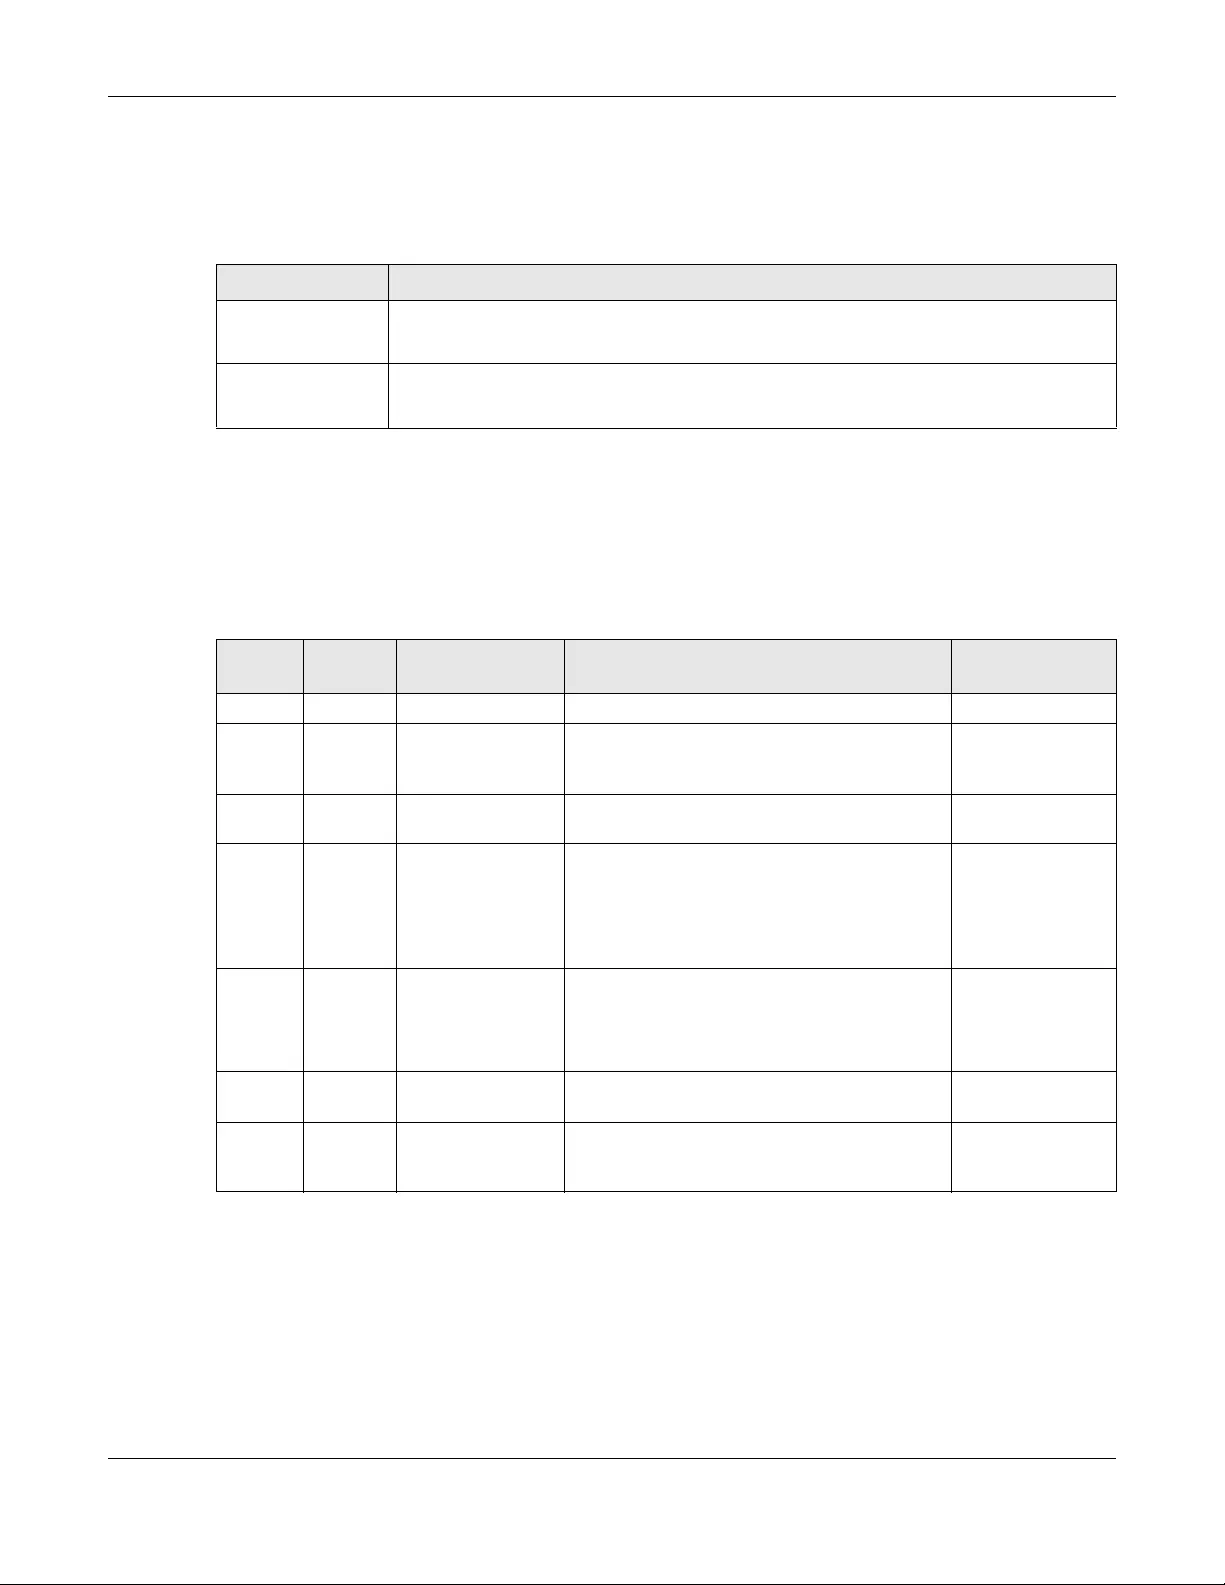
Table 9 Internal Volumes
OPTION DESCRIPTION
Volume Allocates all the available space to the volume.
Provides better performance.
Volume on Disk
Group
Allows you to create multiple volumes on a disk group.
Allows you to customize the size of a volume.
Table 10 RAID Types
RAID
TYPE NO. OF
HDD NO. OF HDD
ALLOWED TO FAIL DESCRIPTION CAPACITY
Basic 1 0 Use Basic with one disk. It has no fault tolerance. 1 x (HDD size)
JBOD 2-4 0 Use JBOD with two or more disks for maximum
capacity. This is just a collection of disks with no
fault tolerance.
sum of HDD sizes
RAID 0 2-4 0 Use RAID 0 with two or four disks for maximum
speed and no fault tolerance.
sum of HDD sizes
RAID 1 2-4 (No. of HDD) -1 Use RAID 1 to create an exact copy of data on
one disk to a second disk. Use this with two to
four disks to mirror primary data to another
disk(s) with high performance.
You can add a hot spare to a 2-disk RAID 1.
Smallest HDD size
RAID 5 3-4 1 Use RAID 5 with three or four disks to balance
performance and hard disk capacity usage
with data protection in case of disk failure.
You can add a hot spare to a 3-disk RAID 5.
(No. of HDD – 1) x
(smallest HDD size)
RAID 6 4 2 Use RAID 6 with four disks for more data
protection in case of disk failure.
(No. of HDD – 2) x
(smallest HDD size)
RAID 10 4 1 HDD in each RAID
1 group Use RAID 10 with four disks to get better
performance than RAID 6, with slightly less data
protection.
(No. of HDD / 2) x
(smallest HDD size)
Chapter 5 Storage Manager
NAS Series User’s Guide
45
Change RAID Type
You can change the following RAID types without losing stored data. This can help you manage your
storage capacity as you add more disks.
Expand Volumes or Disk Groups
As your content grows, you can do the following to expand the storage capacity of a volume or disk
group without losing stored data.
5.3.1 Volume Sc reens
Use the Volume screen to configure and manage internal volumes. From the Internal Storage screen,
click Volume to open the screen as shown.
Table 11 Internal Volumes
RAID TYPE WHAT YOU CAN CHANGE IT TO
Basic RAID 1
RAID 1 RAID 1 with a hot spare or RAID 5
RAID 5 RAID 5 with a hot spare or RAID 6
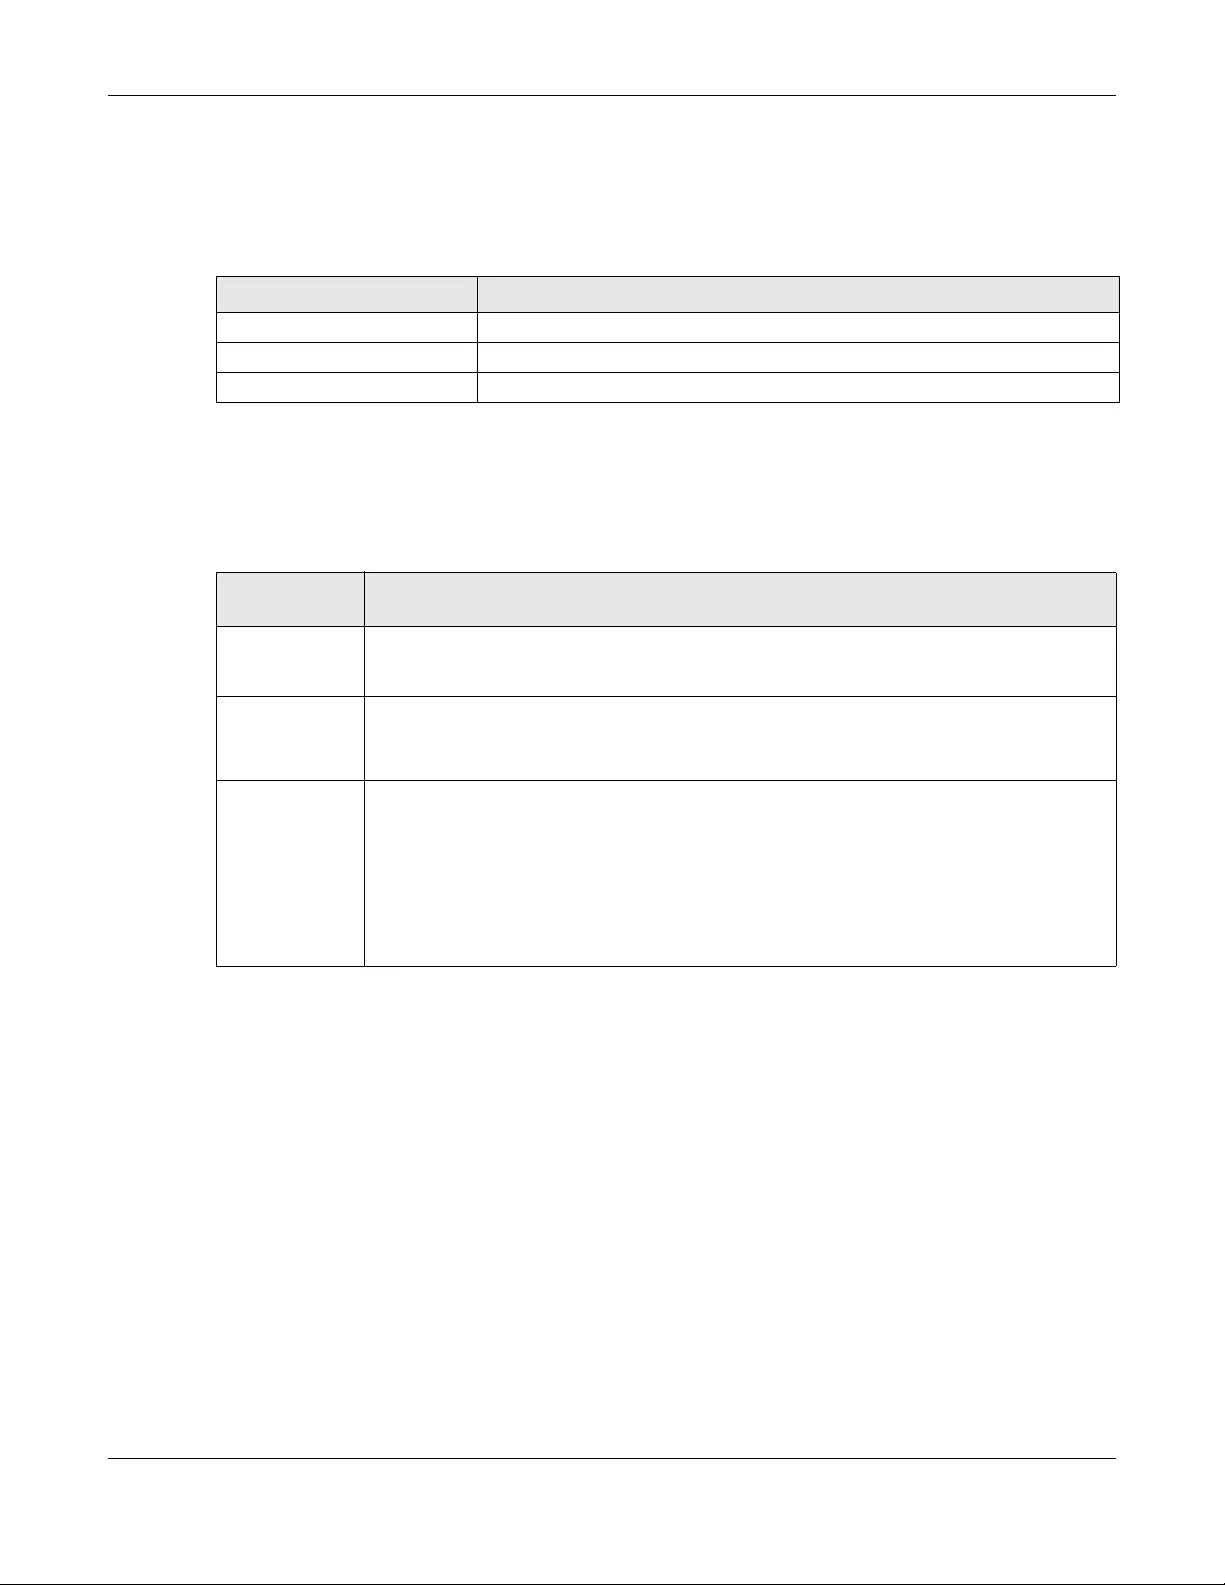
Table 12 Expand Volumes and Disk Groups
EXPANSION
METHOD DESCRIPTION
Using
unallocated disk
space
You can add more storage space to a volume if there is still some space unallocated on the
same disk group.
Adding disks You can add one or more disks to a JBOD, RAID 1 or RAID 5.
The hard disk you want to add must have capacity equal to or greater than the smallest disk in
the volume or disk group.
Replacing with
larger disks
You can replace smaller disks in a RAID 1, RAID 5, or RAID 6 with larger disks.
Replace disks one-by-one.
Replace the smallest disk in the volume or disk group first.
After replacing a disk, you must use the Internal Storage screen’s Manage link to repair the
volume.
Wait for the repair process to complete before you replace another disk.

Chapter 5 Storage Manager
NAS Series User’s Guide
46
Figure 33 Internal Storage Volume
The following table describes the labels in this screen.
Table 13 Storage Manager > Internal Storage > Volume
LABEL DESCRIPTION
Volume
Use this section to configure and manage volumes built on hard disks directly.
Create Click this to format internal hard disks and create a new volume. All data on the disk(s) will
be lost.
Note: This button is not available while the NAS is creating, deleting, or changing
the RAID type of any volume or disk group.
A pop-up screen appears if all installed hard disks are used by other volumes or disk groups.
You will need to install another hard disk into the NAS if any disk tray is available or remove
unnecessary volumes or disk groups to release the storage space. Click OK to close this
screen.
Manage Select a volume and click Manage to edit, repair or expand the volume.
Note: This button is available only when you can repair, expand or change the
RAID type.
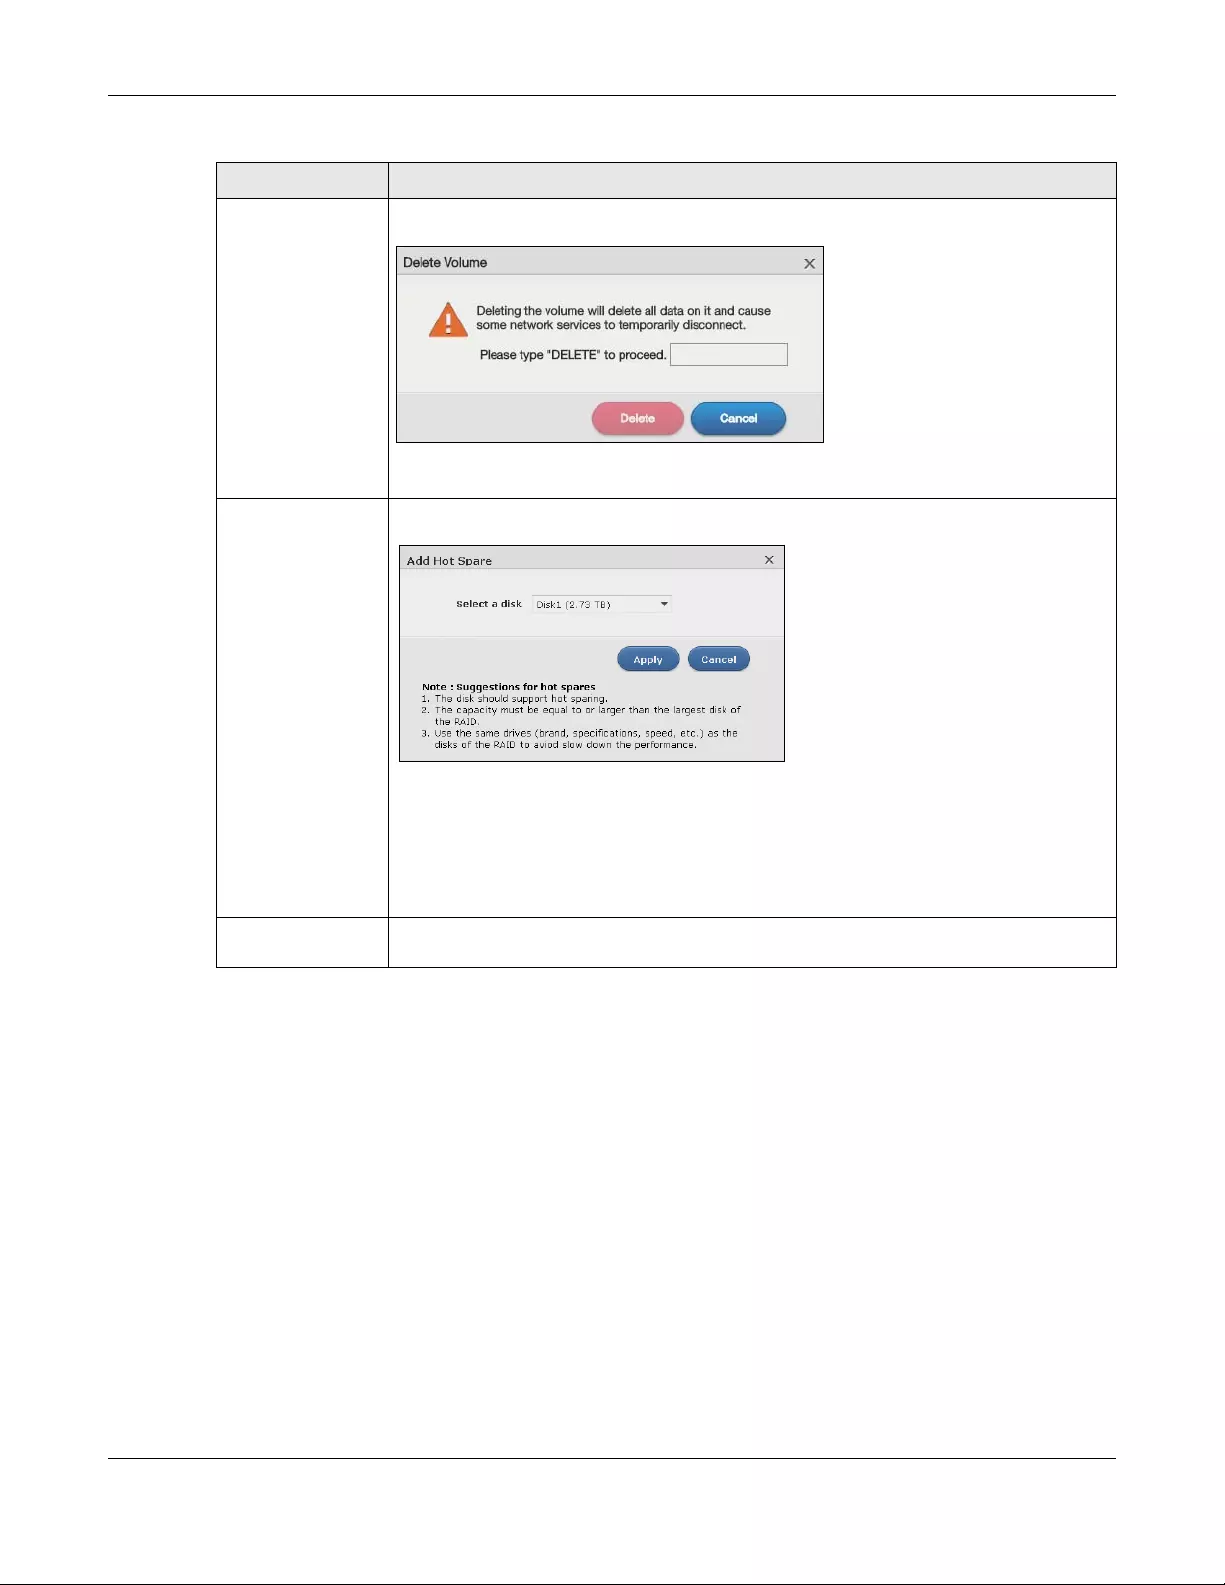
Chapter 5 Storage Manager
NAS Series User’s Guide
47
Delete Click Delete to remove the selected volume. A pop-up screen displays. Type «DELETE» in the
text box and click Delete to remove it.
Note: If you delete a volume, all data in the volume disks is erased.
Add Hot Spare Select a RAID 1 or RAID 5 volume and click Add Hot Spare to add another disk as a hot-spare
(standby) to the RAID array. A pop-up screen displays.
Select a disk from the drop-down list box and then click Apply.
See Table 10 on page 44 for more information about RAID.
Note: The capacity of the disk you are adding must be equal to or greater than
the largest disk in the RAID 1 or RAID 5 array.
Remove Hot Spare Select a RAID 1 or RAID 5 volume and click Remove Hot Spare to remove the standby drive
from the RAID array.
Table 13 Storage Manager > Internal Storage > Volume (continued)
LABEL DESCRIPTION
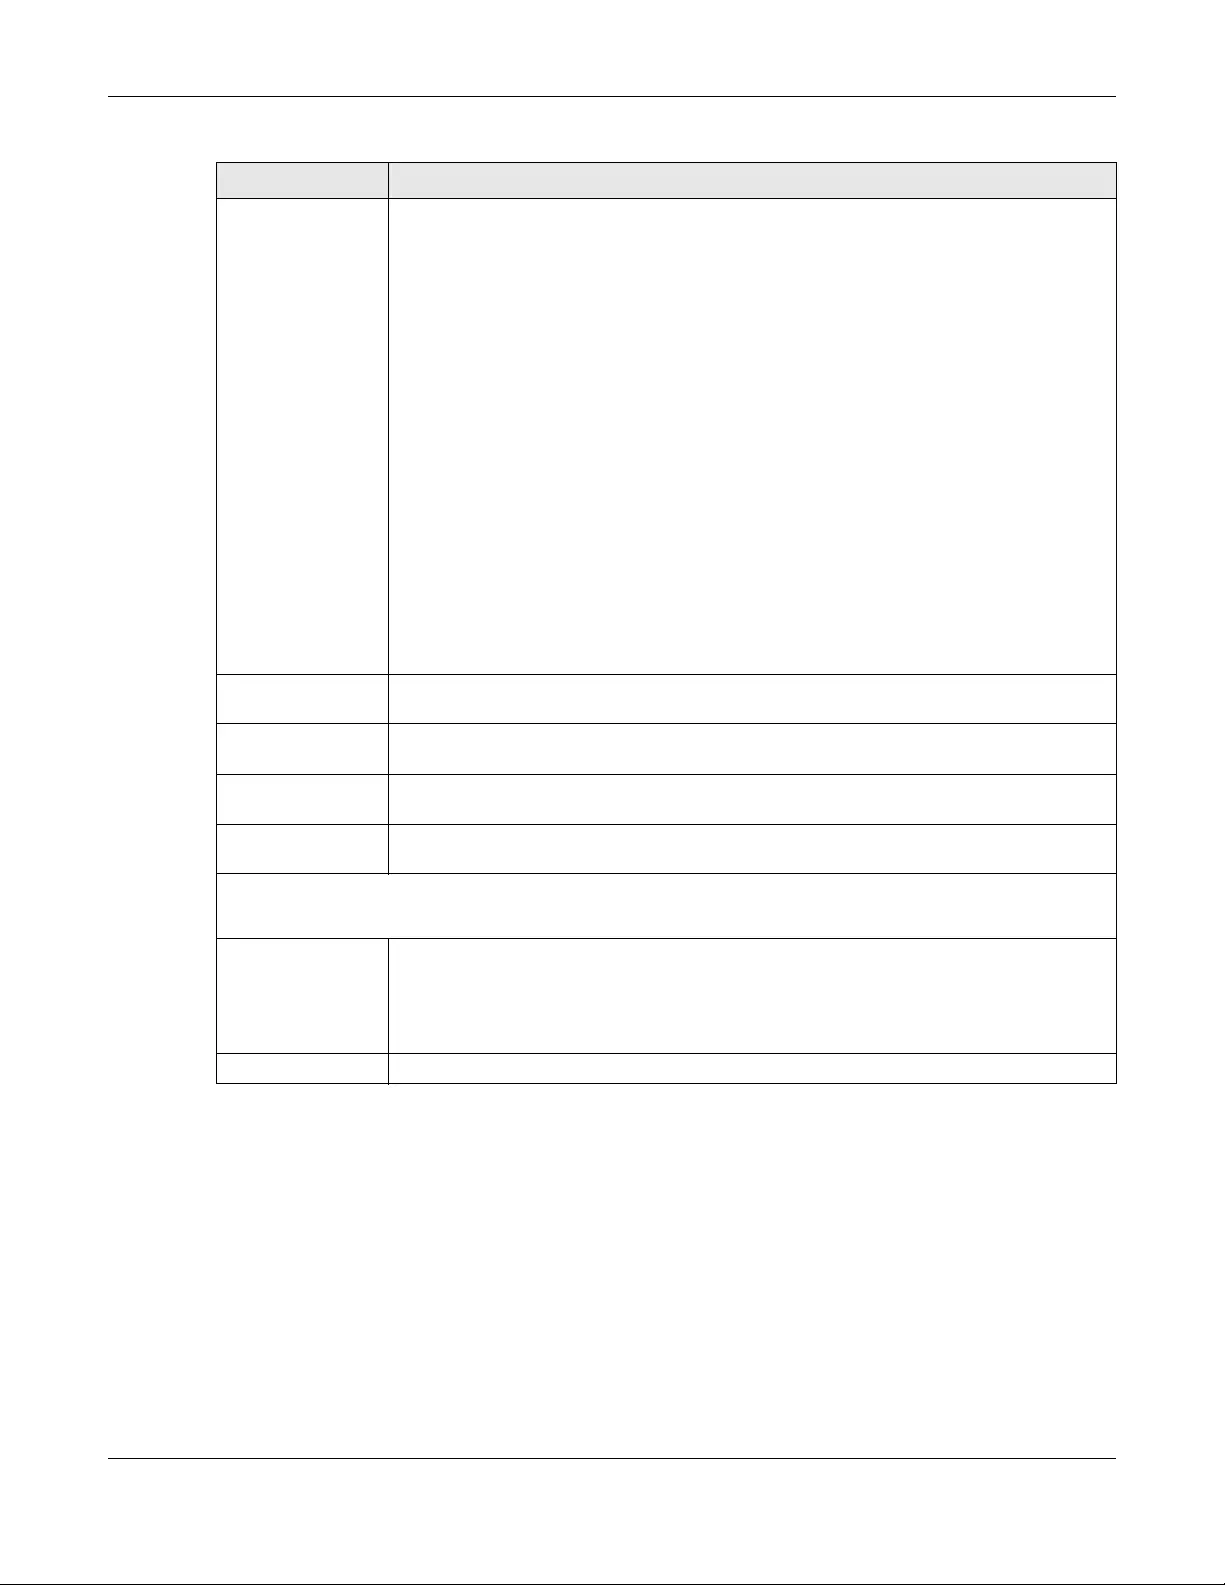
Chapter 5 Storage Manager
NAS Series User’s Guide
48
Status This field shows whether the volume is normal, degraded, crashed, Creating, Deleting,
Expanding, Repairing or Changing the RAID type.
Normal: A green circle represents a healthy volume.
Degraded: An orange circle represents a degraded RAID 1 volume.
Crashed: A red circle represents a down volume.
The following status also displays the percentage of an action has been completed.
Creating: The NAS’s percentage progress in creating the volume.
Deleting: The NAS’s percentage progress in deleting the volume.
Expanding: The NAS’s percentage progress in expanding the volume. For a RAID 1 volume,
this also displays the percentage of resynchronizing the NAS has finished and the evaluated
remaining time.
Repairing: The NAS’s percentage progress in repairing the volume. For a RAID 1 volume, this
also displays the percentage of resynchronizing the NAS has finished and the evaluated
remaining time.
Changing: The NAS’s percentage progress in changing the volume’s RAID type. For a RAID 1
volume, this also displays the percentage of resynchronizing the NAS has finished and the
evaluated remaining time.
Volume Name This field shows the name of the volume. Click the column’s heading cell to display an arrow.
Use the arrow to sort the table entries in ascending or descending order.
RAID Type This field shows what type of disk storage technology (Basic, a RAID level or JBOD) a volume
uses.
Usage This field shows the percentage of the volume being used, the percentage that is available,
and the total disk size.
Hot Spare This field shows the name of the standby disk if there is any for a RAID 1 or RAID 5 volume.
Otherwise, it shows not suppor ted.
Volume on Disk Group
Use this section to configure and manage volumes built on disk groups.
Create Click this to format internal hard disks and create a new volume on a disk group. All data on
the disks will be lost.
Note: This button is unavailable when a volume or disk group is being created,
deleted or changing the RAID type.
Edit Select a volume and click Edit to expand the volume’s capacity.
Table 13 Storage Manager > Internal Storage > Volume (continued)
LABEL DESCRIPTION
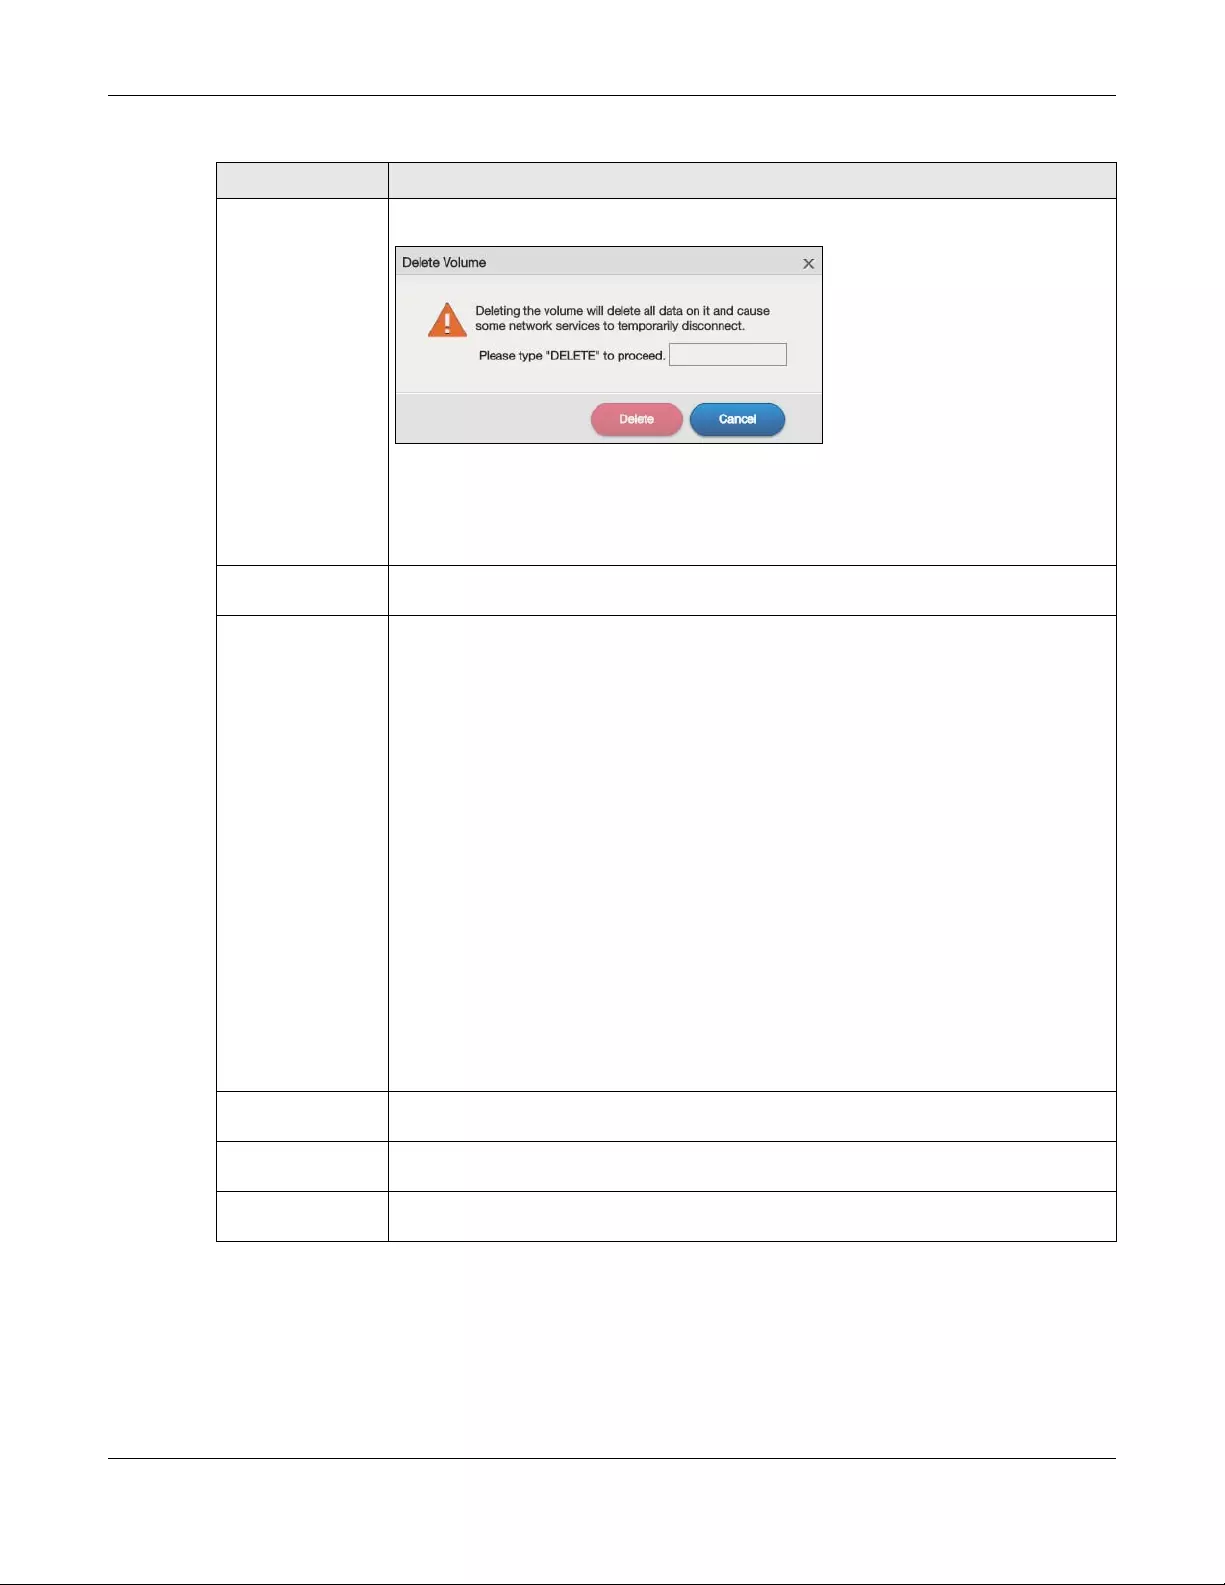
Chapter 5 Storage Manager
NAS Series User’s Guide
49
5.3.1.1 Create a Volume
Use the Create Volume screen to configure a volume directly on a disk/RAID, which has better
performance. Click Create in the Volume section of the Storage Manager > Internal Storage > Volume
screen to open the screen as shown.
Delete Click Delete to remove the selected volume. A pop-up screen displays. Type «DELETE» in the
text box and click Delete to remove it.
Note: If you delete a volume, all data in the volume disks is erased.
Note: Deleting a volume on a disk group here does not delete the corresponding
disk group. To delete a disk group, click Internal Storage > Disk Group.
Disk Group X This field shows the name of the disk group, the percentage of the disk group size that is
available, the disk group size being used, and the total disk group size.
Status This field shows whether the volume is normal, degraded, crashed, Creating, Deleting,
Expanding, Repairing or Changing the RAID type.
Normal: A green circle represents a healthy volume.
Degraded: An orange circle represents a degraded RAID 1 volume.
Crashed: A red circle represents a down volume.
The following status also displays the percentage of an action has been completed.
Creating: The NAS’s percentage progress in creating the volume.
Deleting: The NAS’s percentage progress in deleting the volume.
Expanding: The NAS’s percentage progress in expanding the volume. For a RAID 1 volume,
this also displays the percentage of resynchronizing the NAS has finished and the evaluated
remaining time.
Repairing: The NAS’s percentage progress in repairing the volume. For a RAID 1 volume, this
also displays the percentage of resynchronizing the NAS has finished and the evaluated
remaining time.
Changing: The NAS’s percentage progress in changing the volume’s RAID type. For a RAID 1
volume, this also displays the percentage of resynchronizing the NAS has finished and the
evaluated remaining time.
Volume Name This field shows the name of the volume. Click the column’s heading cell to display an arrow.
Use the arrow to sort the table entries in ascending or descending order.
File System This field shows what file system the volume uses. At the time of writing, your NAS uses the
EXT4 file system for internal volumes.
Usage This field shows the percentage of the volume being used, the percentage that is available,
and the total disk group size.
Table 13 Storage Manager > Internal Storage > Volume (continued)
LABEL DESCRIPTION
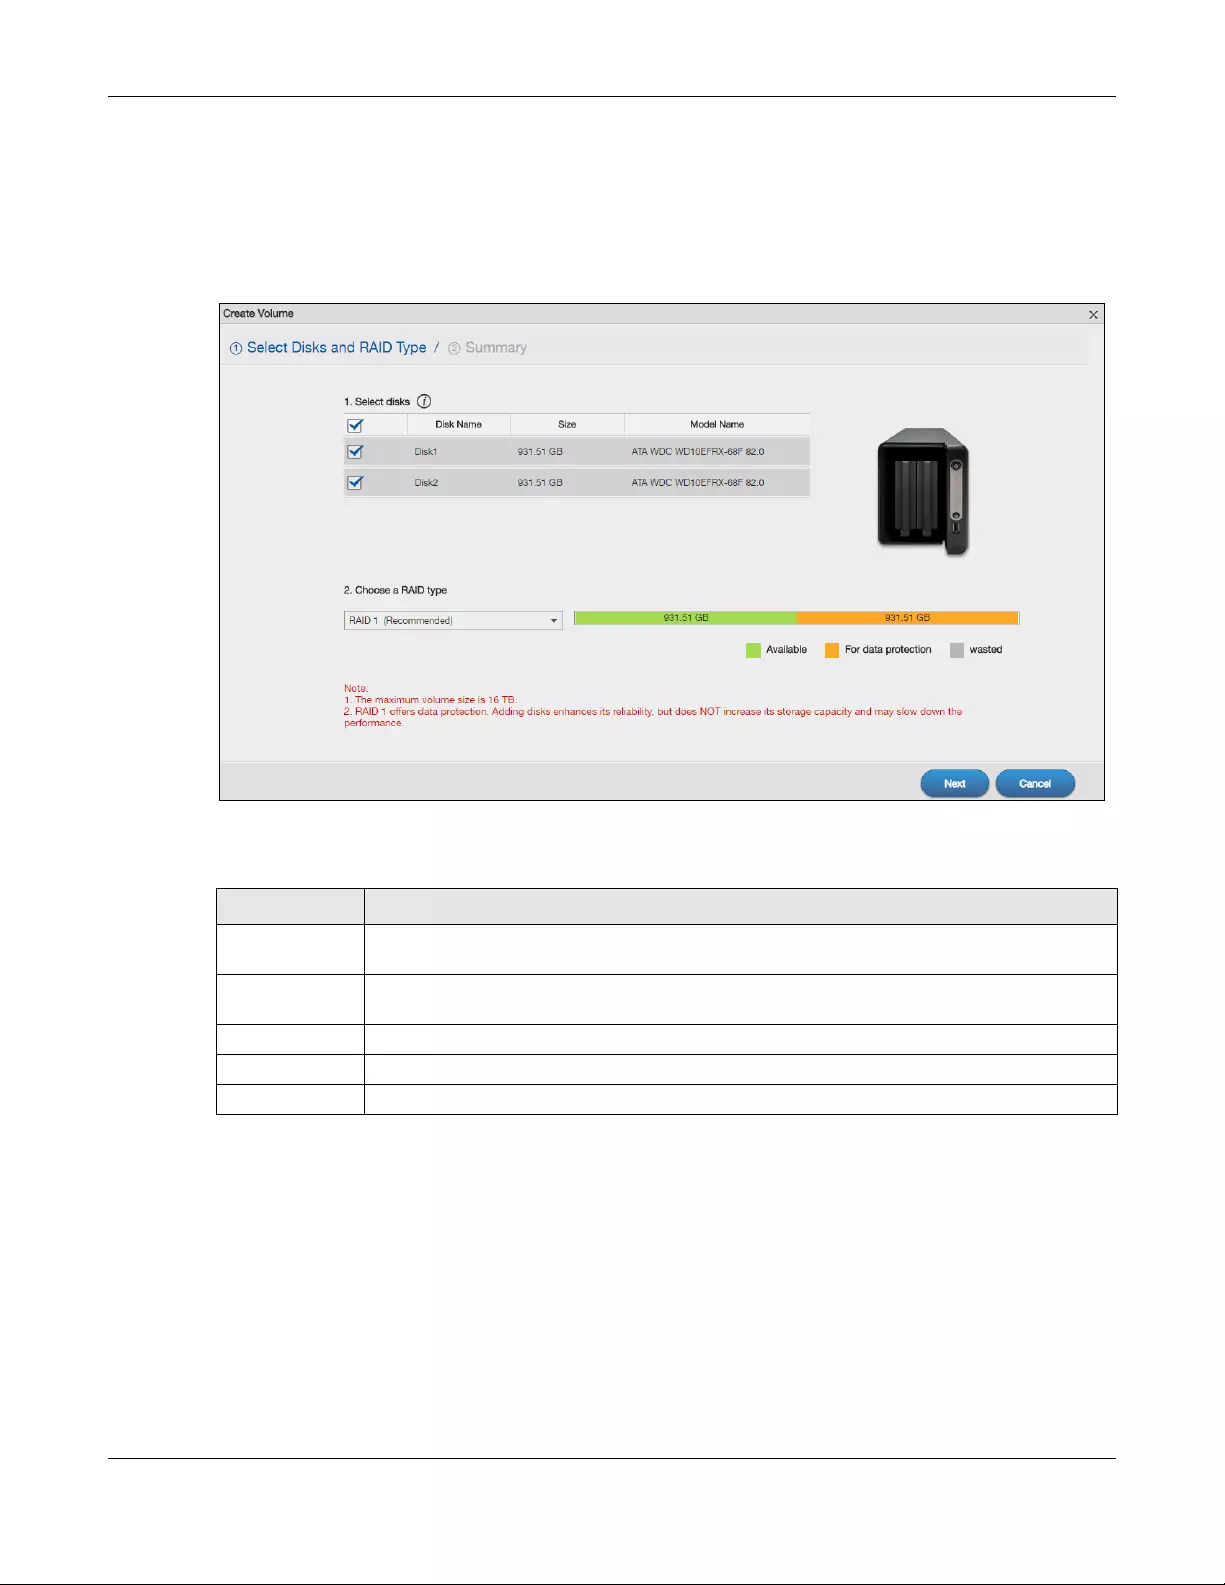
Chapter 5 Storage Manager
NAS Series User’s Guide
50
Note: Create a volume on a disk group instead if you want to have multiple volumes on a
disk. See Section 5.3.1.7 on page 62 for more information. Moreover, the maximum size
for one volume is 16TB.
Step 1 Select Disks and RAID Type
Figure 34 Create Volume: Select Disks and RAID Type
The following table describes the labels in this screen.
Table 14 Create Volume: Select Disks and RAID Type
LABEL DESCRIPTION
1. Select disks This section lists all available hard disks in the table and displays the disk trays where they are
currently installed on the graphic at the right.
Select one or more hard disks where you want to create a volume. Use the check box on the
top to select or unselect all entries in this column.
Disk Name This field shows the name of the hard disk.
Size This field shows the total disk size.
Model Name This field shows the model of the hard disk.
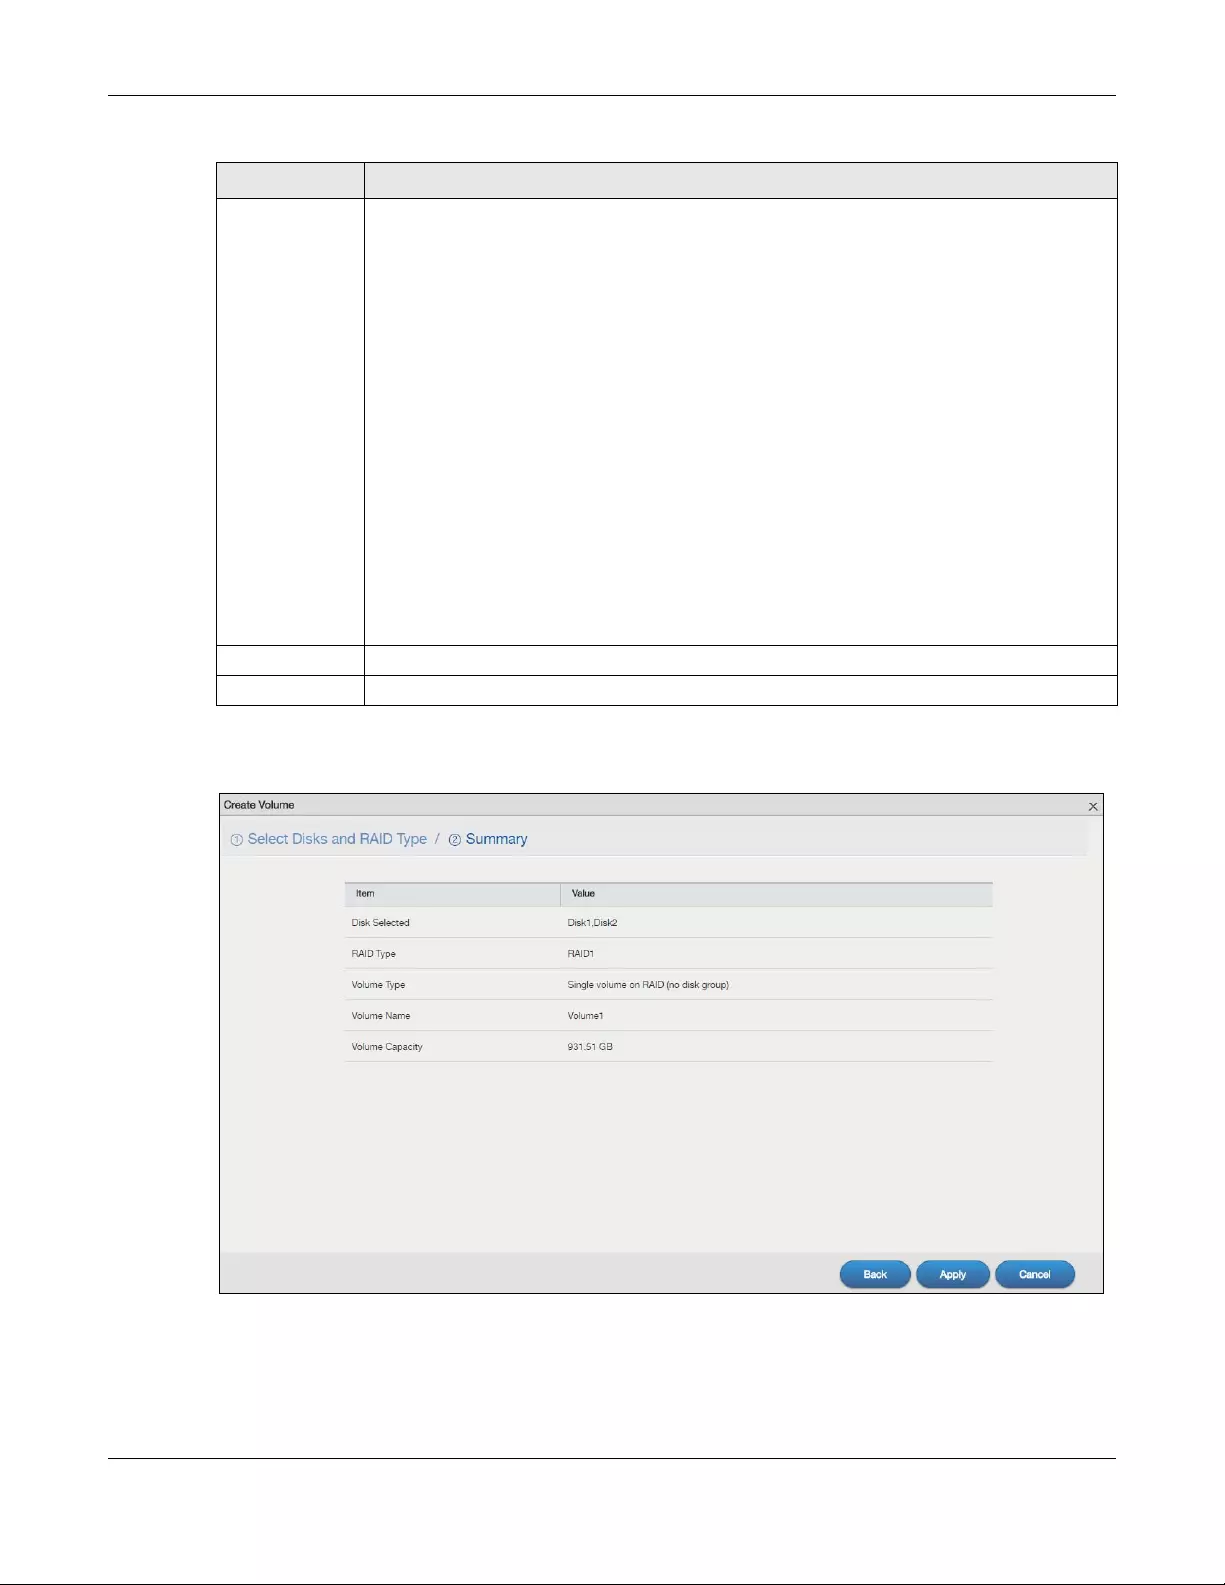
Chapter 5 Storage Manager
NAS Series User’s Guide
51
Step 2 Summary
Figure 35 Create Volume: Summary
2. Choose a
RAID type
Select a RAID type from the drop-down list box. The corresponding space allocations of
available size, data protection area, and wasted size display.
Use Basic with one disk.
Use JBOD with two or more disks for maximum capacity.
Use RAID 0 with two or four disks for maximum speed.
Use RAID 1 with two or more disks to mirror primary data to another disk(s) with high
performance.
Use RAID 5 with three or more disks to balance performance, hard disk capacity usage with
data protection in case of disk failure.
Use RAID 6 with four disks for more data protection in case of disk failure.
Use RAID 10 with four disks to get better performance than RAID 6, with slightly less data
protection.
See Table 10 on page 44 or Section 5.6 on page 97 for more information.
Note: Use the same capacity of hard disks for RAID 1, 5, 6, or 10 to avoid wasting
space.
Next Click Next to go to the next step.
Cancel Click Cancel to close the screen without saving any settings.
Table 14 Create Volume: Select Disks and RAID Type (continued)
LABEL DESCRIPTION
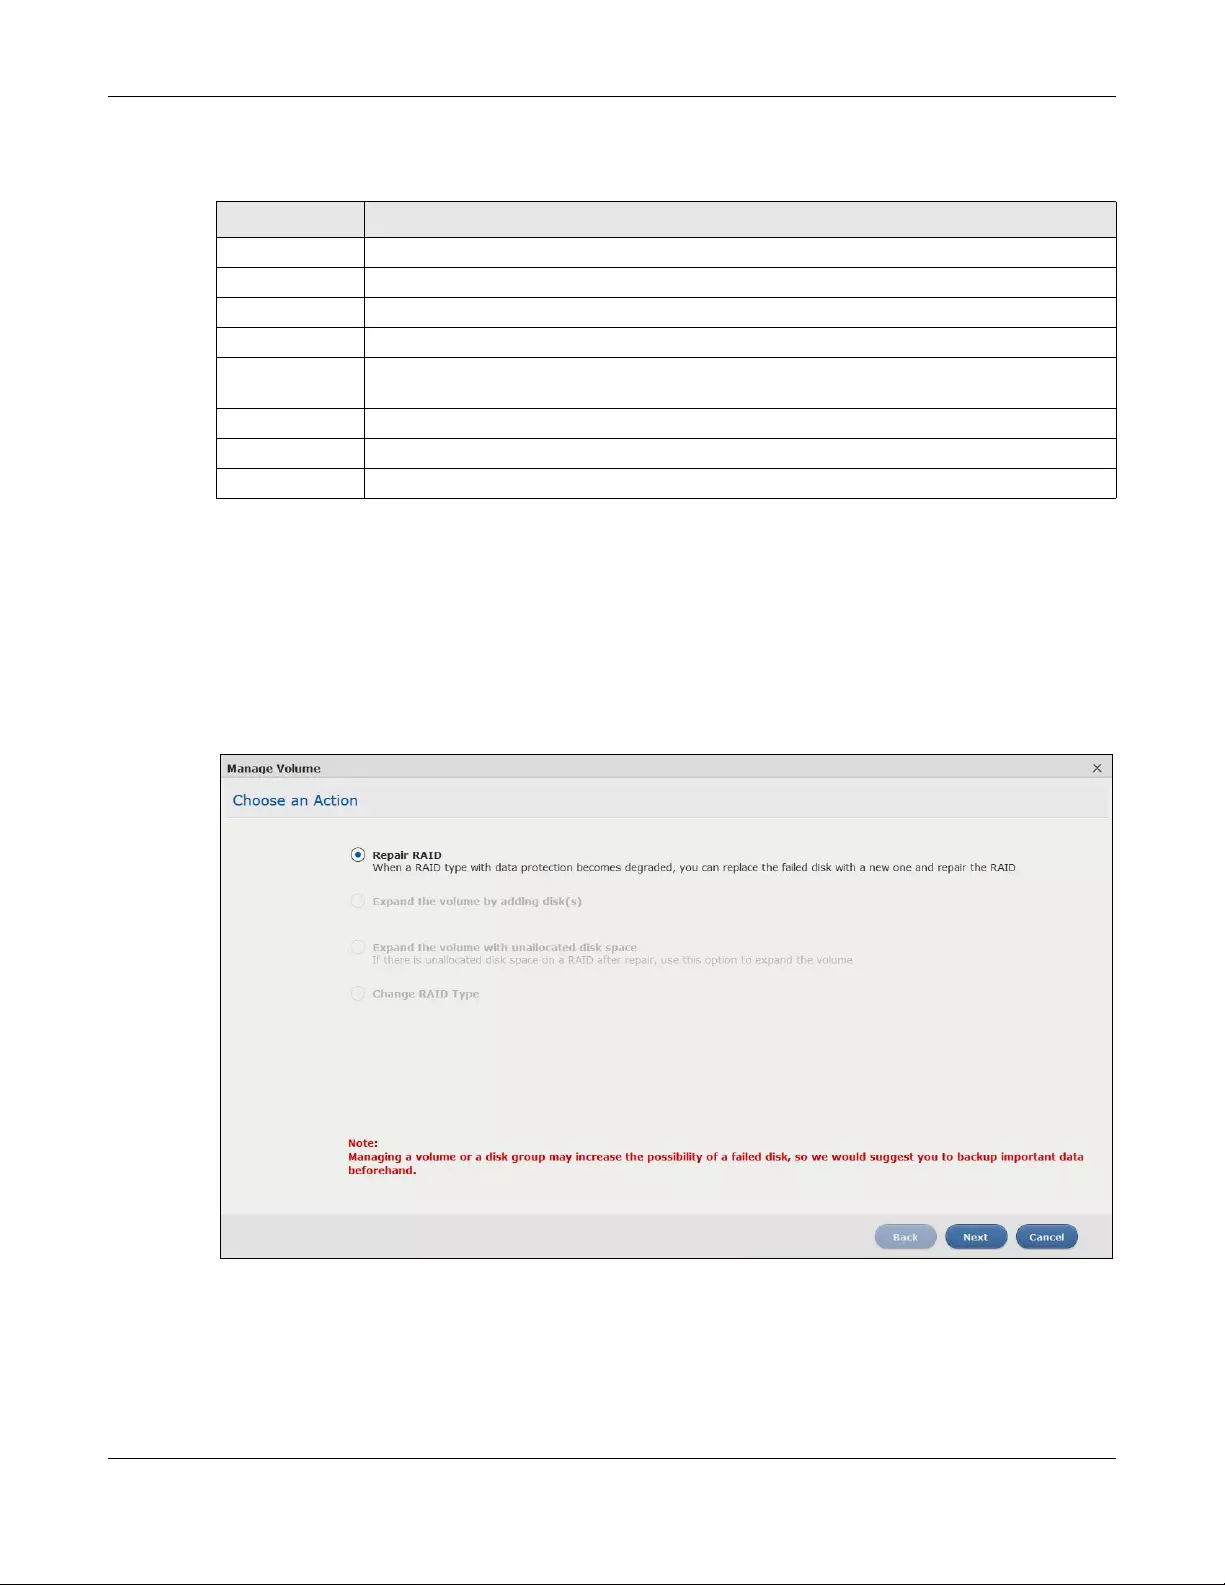
Chapter 5 Storage Manager
NAS Series User’s Guide
52
The following table describes the labels in this screen.
5.3.1.2 Manage a Volume
Use the Manage Volume screen to repair, expand a volume or change the volume’s RAID type. In the
Storage Manager > Internal Storage > Volume screen, select a volume and then click Manage in the
Volume section to open the screen as shown.
The available options vary depending on the conditions it matches. For example, the Repair RAID
option is available only when a degraded volume is selected.
Figure 36 Manage Volume
Table 15 Create Volume: Summary
LABEL DESCRIPTION
Disk Selected This field displays the hard disks you have selected.
RAID Type This field displays the type of RAID on which the volume will be built.
Volume Type This field displays the type of the volume, Single volume on RAID (no disk group).
Volume Name This field displays the name of the volume.
Volume
Capacity
This field displays the size of the volume.
Back Click Back to go to the previous step.
Apply Click Apply to save the settings.
Cancel Click Cancel to close the screen without saving any settings.
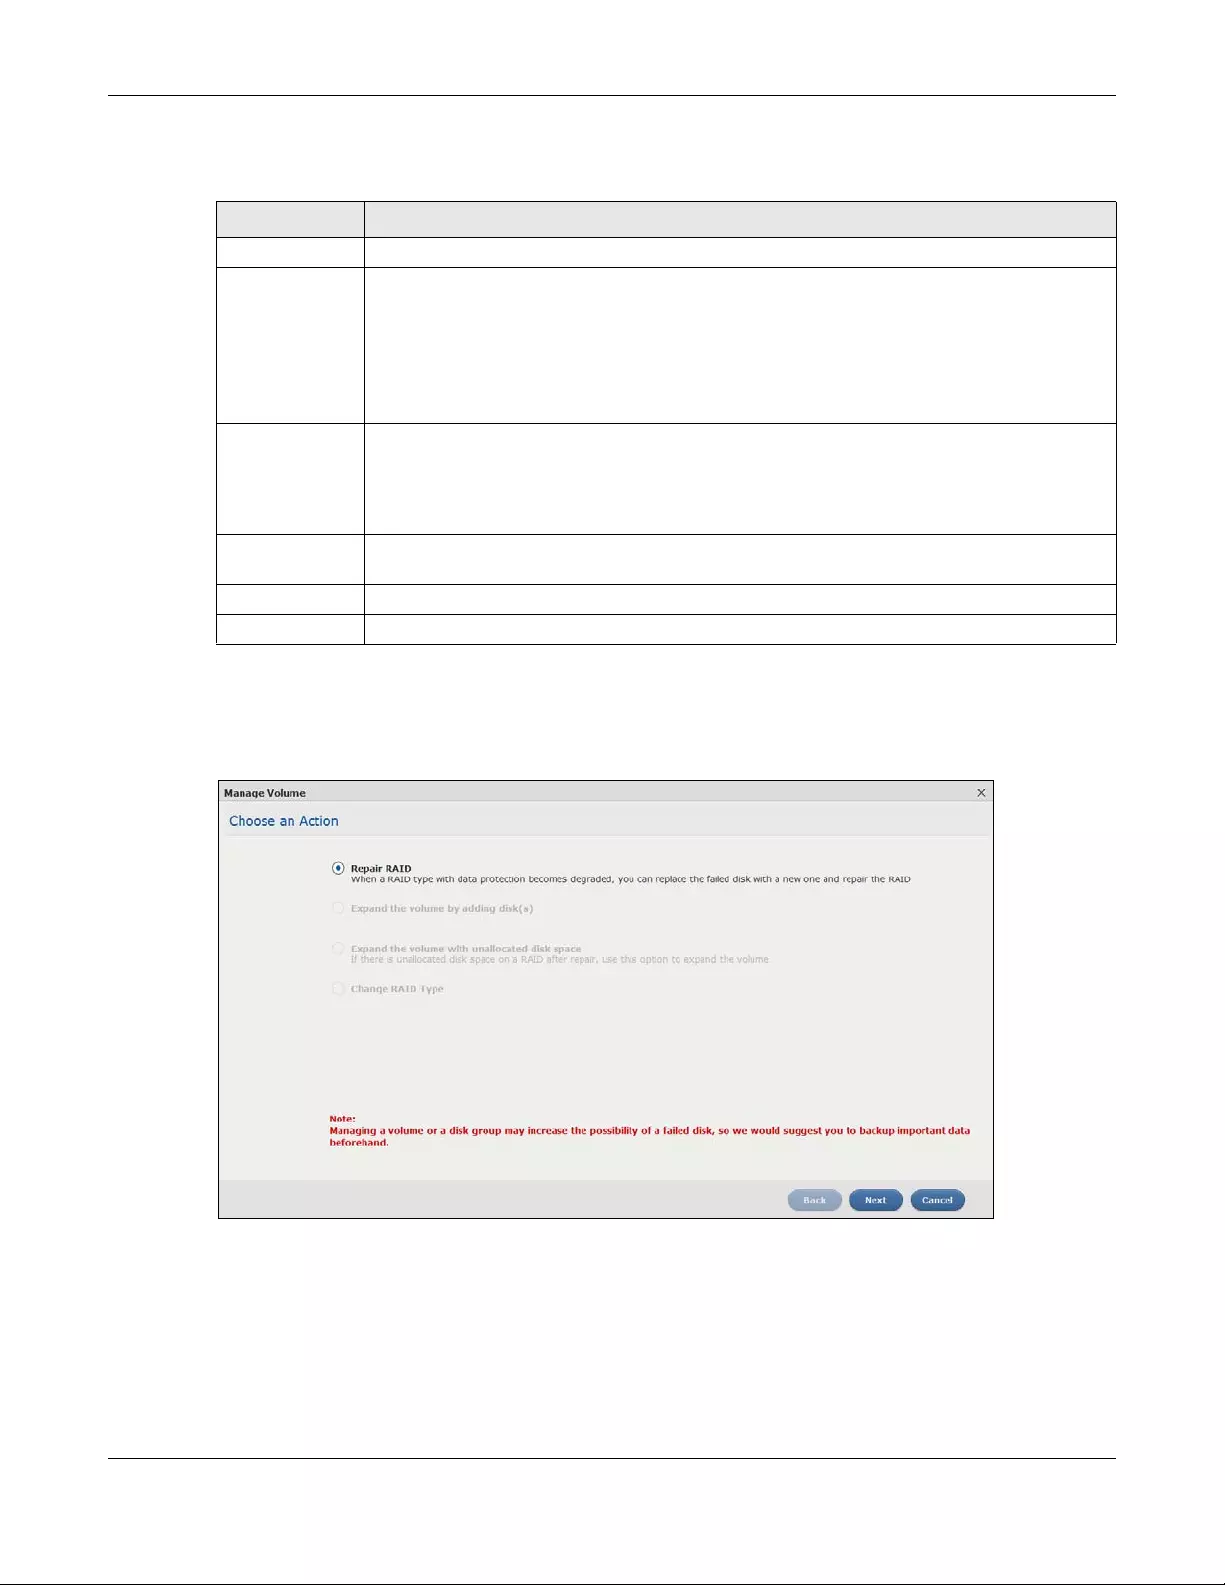
Chapter 5 Storage Manager
NAS Series User’s Guide
53
The following table describes the labels in this screen.
5.3.1.3 Repair RAID
Select Repair RAID in the Storage Manager > Internal Storage > Volume: Manage screen. Click Next.
Figure 37 Manage Volume (Repair RAID)
Table 16 Manage Volume
LABEL DESCRIPTION
Repair RAID Select this to repair a degraded RAID volume.
Expand the
volume by
adding disk(s)
Select this to add one or more disks to a JBOD, RAID 1 or RAID 5 volume. You can add a disk to
increase an array’s capacity or to use as a hot-spare (standby). When you add a disk to an
existing array, you do not have to re-create shares, access rights and so on as you would if you
create a new volume.
Note: This option is available when a disk has not been allocated to any volume or
disk group yet.
Expand the
volume with
unallocated disk
space
Select this to add more storage space to a volume if there is still some space unallocated on
the same disk group. Select this if the NAS fails to expand a volume by adding disk(s) and the
final volume capacity is not as expected. For example, you want to expand a 1 TB RAID 1
volume by adding two more 1 TB disks. The volume size should be 2 TB after expansion,
however, you just see 1 TB. Use this option to fix the issue.
Change RAID
Type
Select this if you want to change the volume’s RAID type from Basic to RAID 1, RAID 1 to RAID 5,
or RAID 5 to RAID 6.
Next Click Next to go to the next step.
Cancel Click Cancel to close the screen without saving any settings.
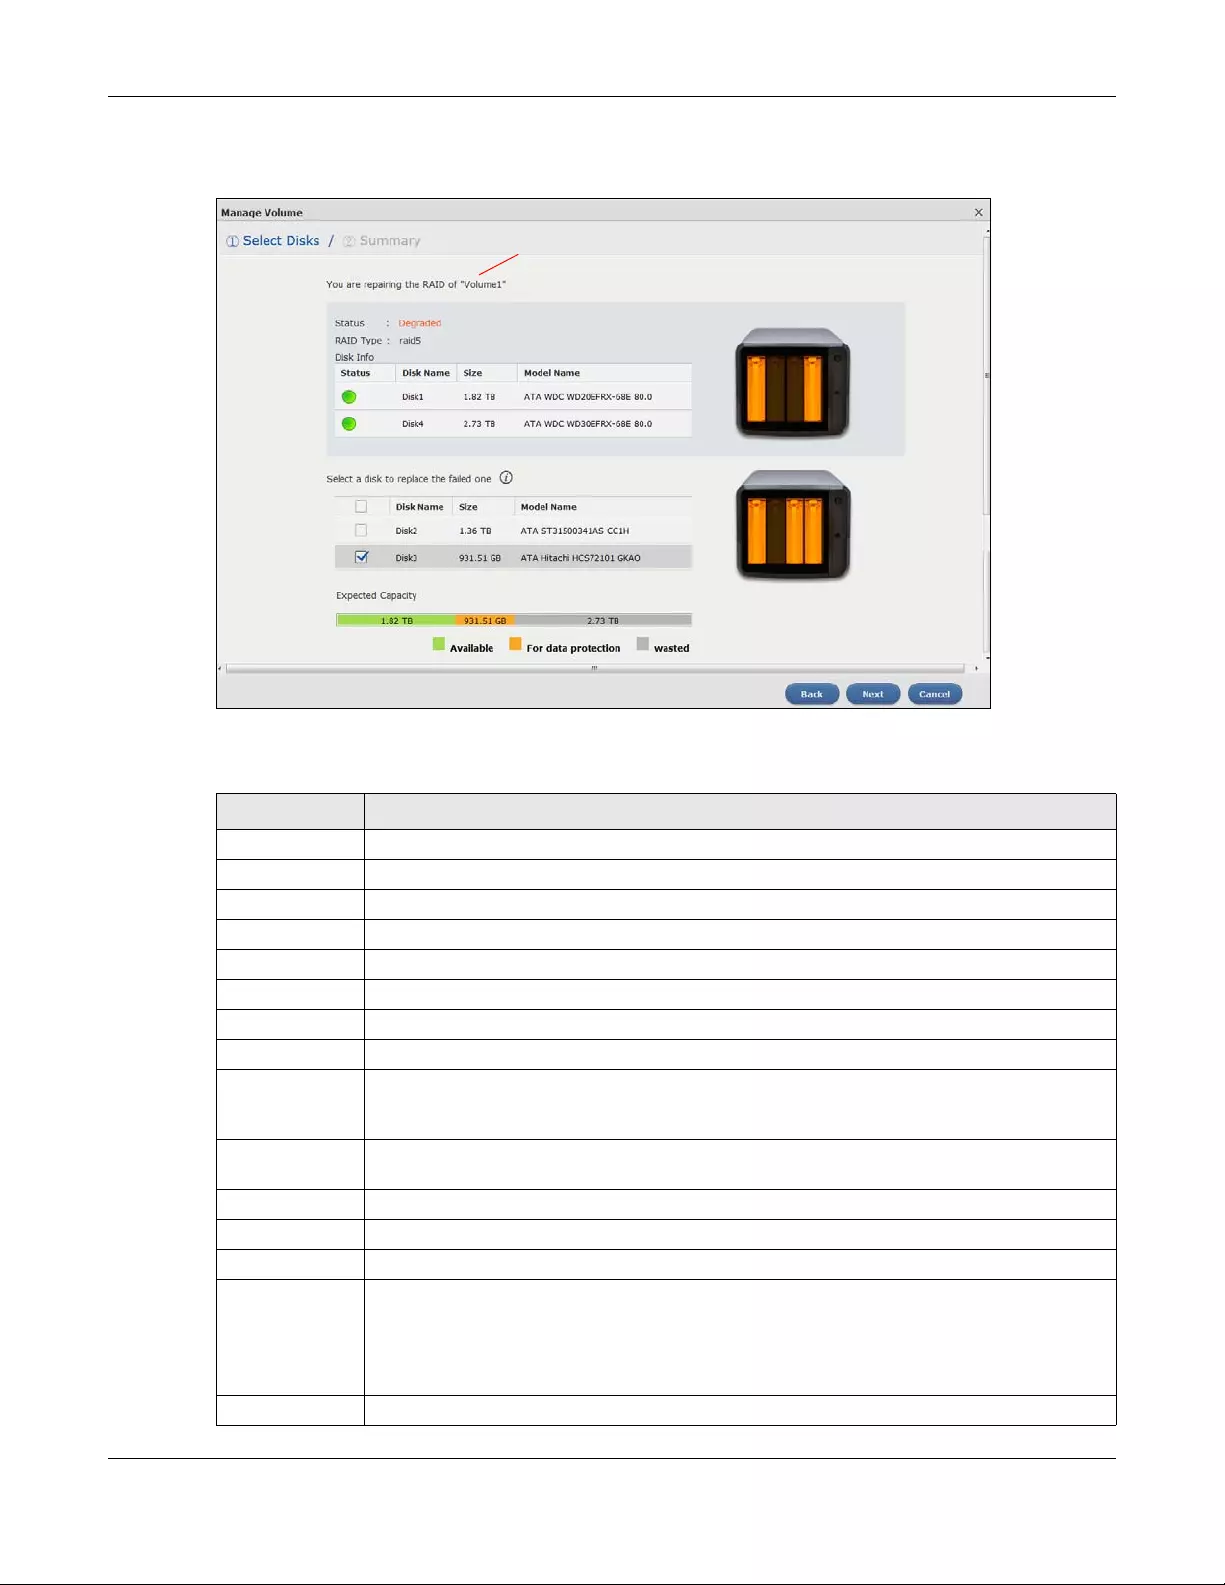
Chapter 5 Storage Manager
NAS Series User’s Guide
54
Step 1 Select Disks
Figure 38 Manage Volume (Repair RAID): Select Disks
The following table describes the labels in this screen.
Table 17 Manage Volume (Repair RAID): Select Disks
LABEL DESCRIPTION
A This shows the name of the volume you have selected.
Status This field displays the status of the volume.
RAID Type This field displays the type of RAID on which the volume is built.
Disk Info
Status This field displays the status of the disk.
Disk Name This field displays the name of the disk.
Size This field displays the total capacity of the disk.
Model Name This field displays the model of the disk.
Select a disk to
replace the
failed one
This section lists all available hard disks in the table and displays the corresponding disk tray of
the disks you selected on the graphic at the right.
Select one or more hard disks for increasing the volume’s capacity. Use the check box on the
top to select or unselect all entries in this column.
Disk Name This field shows the name of a hard disk.
Size This field shows the total disk size.
Model Name This field shows the model of the hard disk.
Expected
Capacity
This field shows the corresponding space allocations of available size, data protection area,
and wasted size according to your selections on hard disks above.
Note: Use the same capacity of hard disks for RAID 1, 5, 6, or 10 to avoid wasting
space.
Back Click Back to go to the previous step.
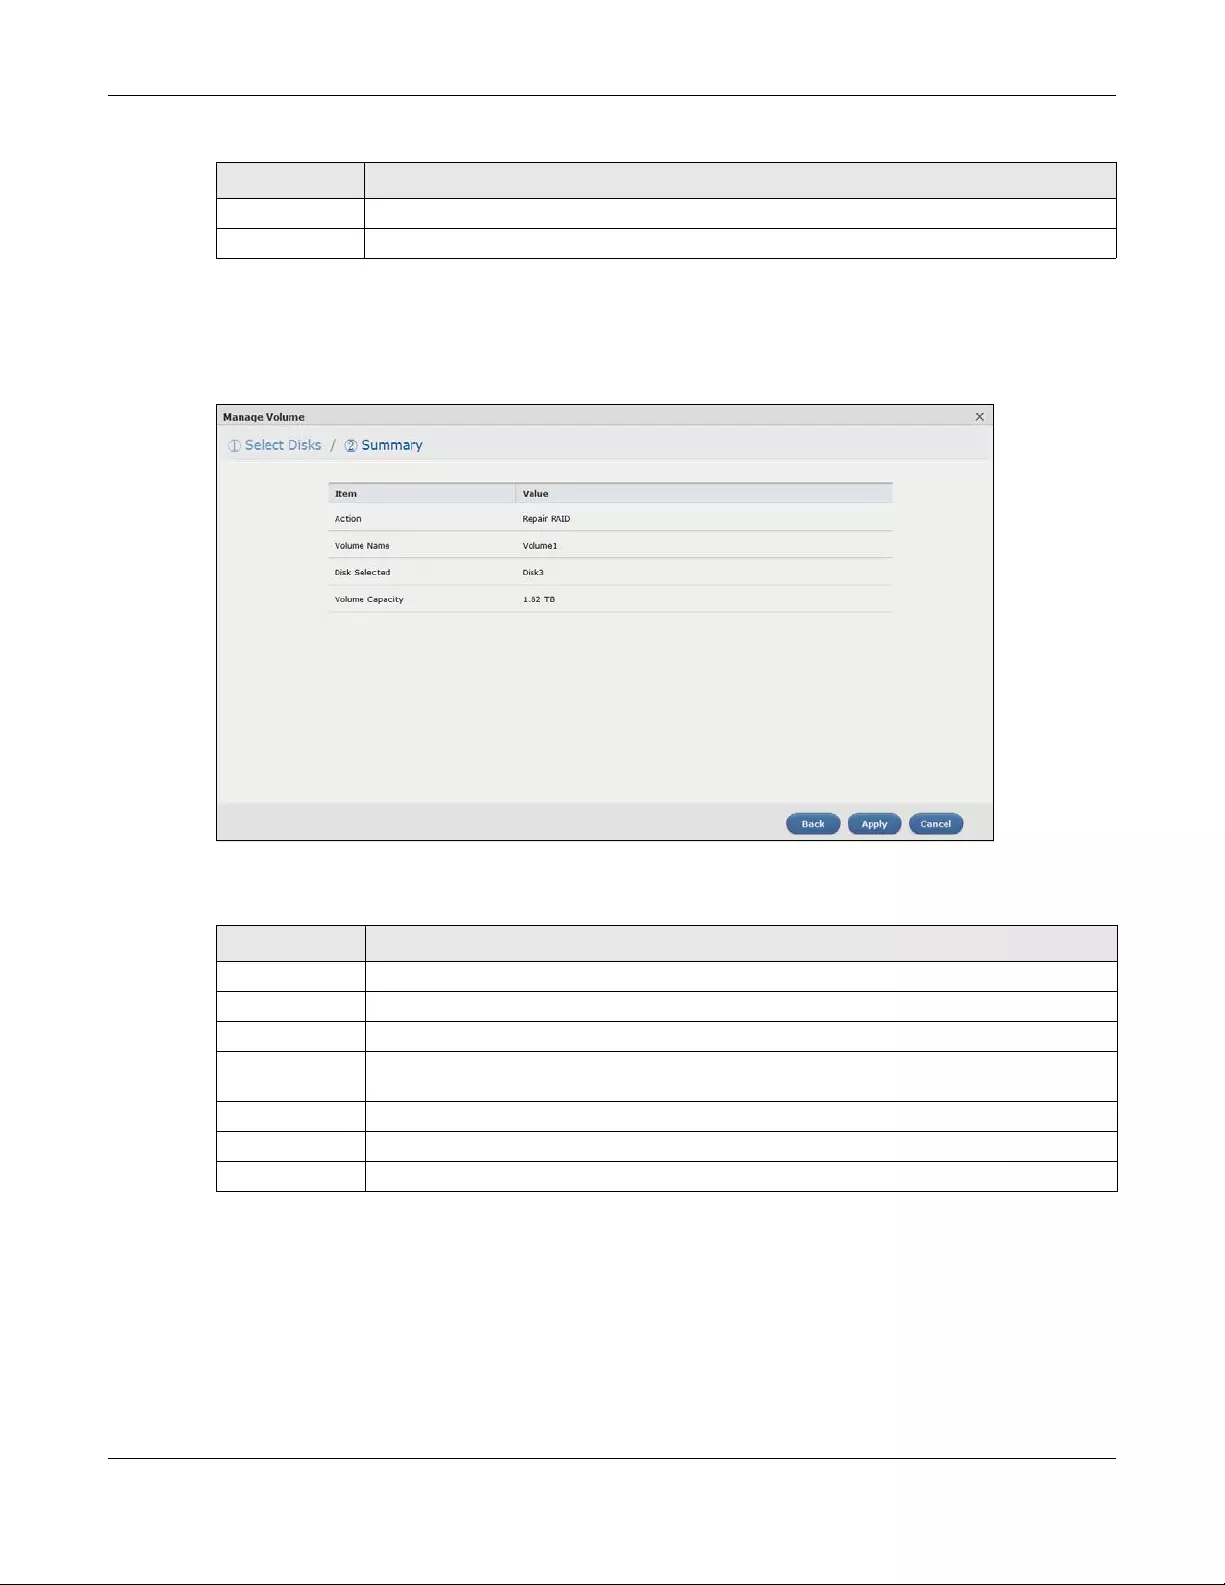
Chapter 5 Storage Manager
NAS Series User’s Guide
55
Step 2 Summary
Use this screen to review the settings you configured in the last step.
Figure 39 Manage Volume (Repair RAID): Summary
The following table describes the labels in this screen.
5.3.1.4 Expand the volume by adding disk(s)
Select Expand the volume by adding disk(s) in the Storage Manager > Internal Storage > Volume:
Manage screen. Click Next.
Next Click Next to go to the next step.
Cancel Click Cancel to close the screen without saving any settings.
Table 18 Manage Volume (Repair RAID): Summary
LABEL DESCRIPTION
Action This field displays for what the configuration is.
Volume Name This field displays the name of the volume.
Disk Selected This field displays the hard disks you have selected.
Volume
Capacity
This field displays the total available size of the volume.
Back Click Back to go to the previous step.
Apply Click Apply to save the settings.
Cancel Click Cancel to close the screen without saving any settings.
Table 17 Manage Volume (Repair RAID): Select Disks (continued)
LABEL DESCRIPTION
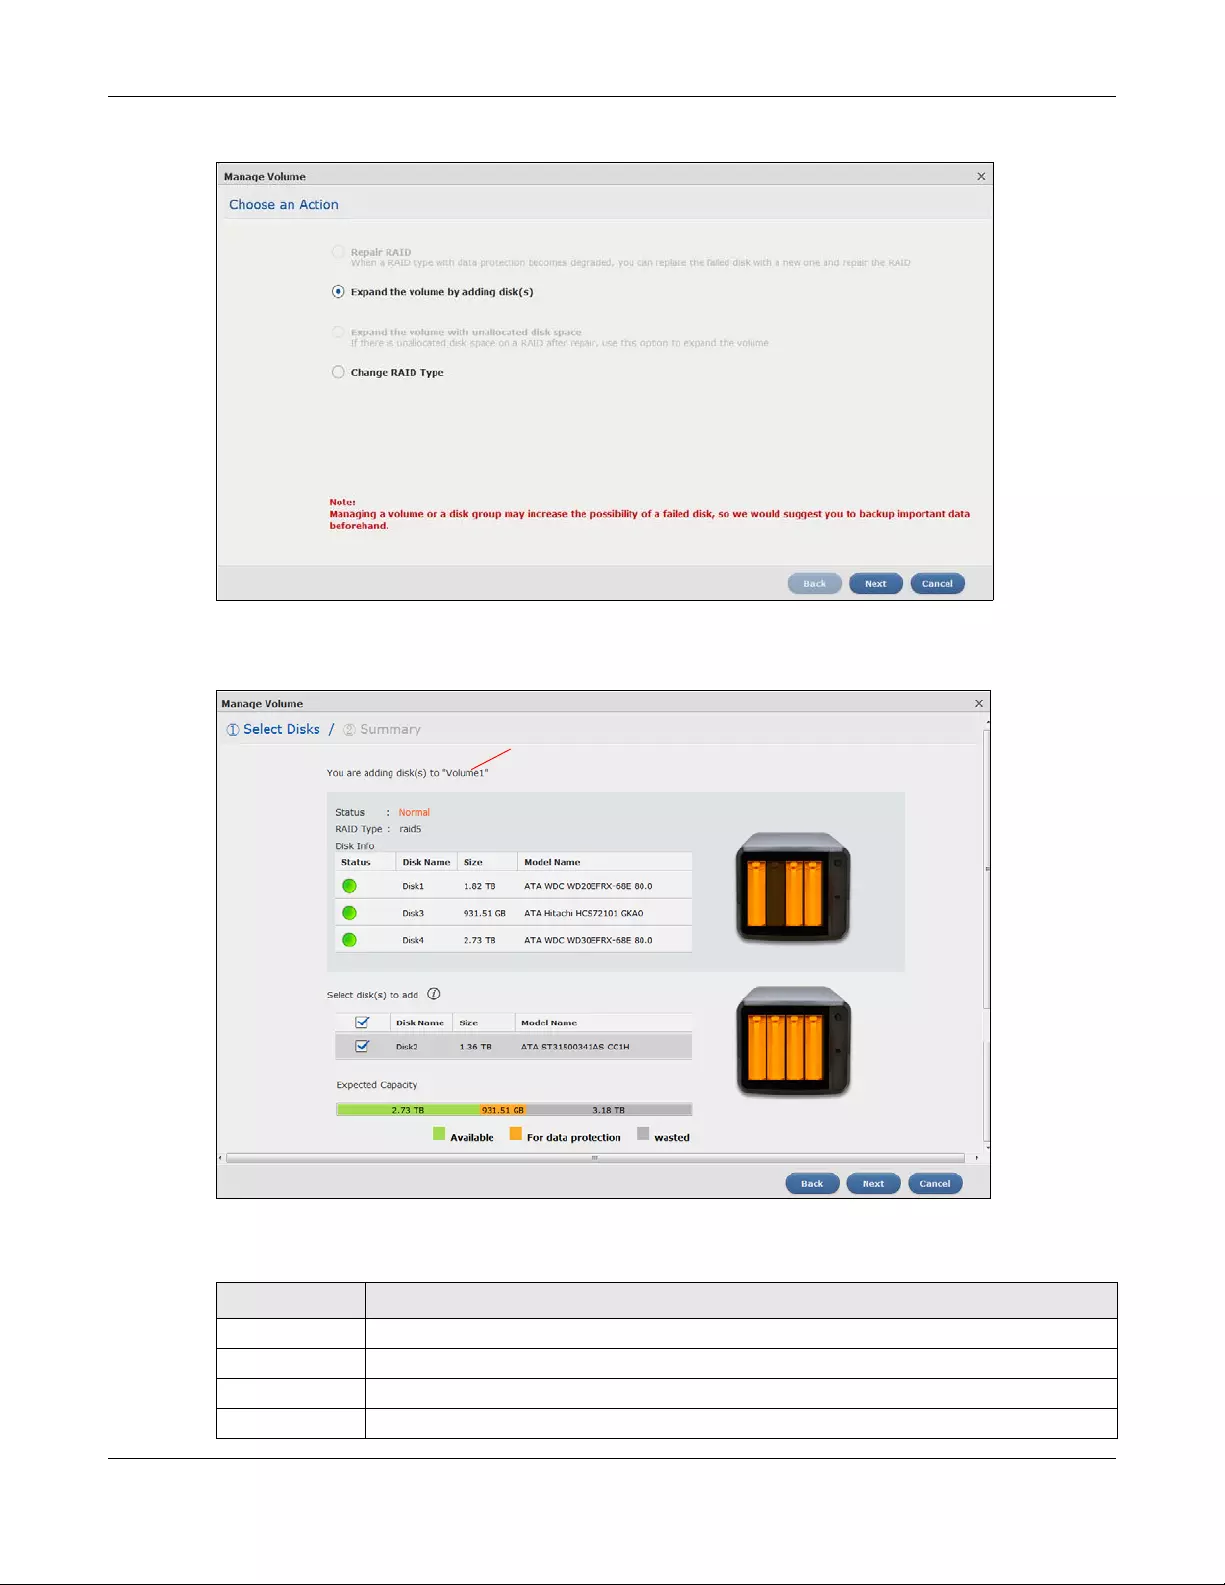
Chapter 5 Storage Manager
NAS Series User’s Guide
56
Figure 40 Manage Volume (Expand the volume by adding disk(s))
Step 1 Select Disks
Figure 41 Manage Volume (Expand the volume by adding disk(s)): Select Disks
The following table describes the labels in this screen.
Table 19 Manage Volume (Expand the volume by adding disk(s)): Select Disks
LABEL DESCRIPTION
A This shows the name of the volume you have selected.
Status This field displays the status of the volume.
RAID Type This field displays the type of RAID on which the volume is built.
Disk Info
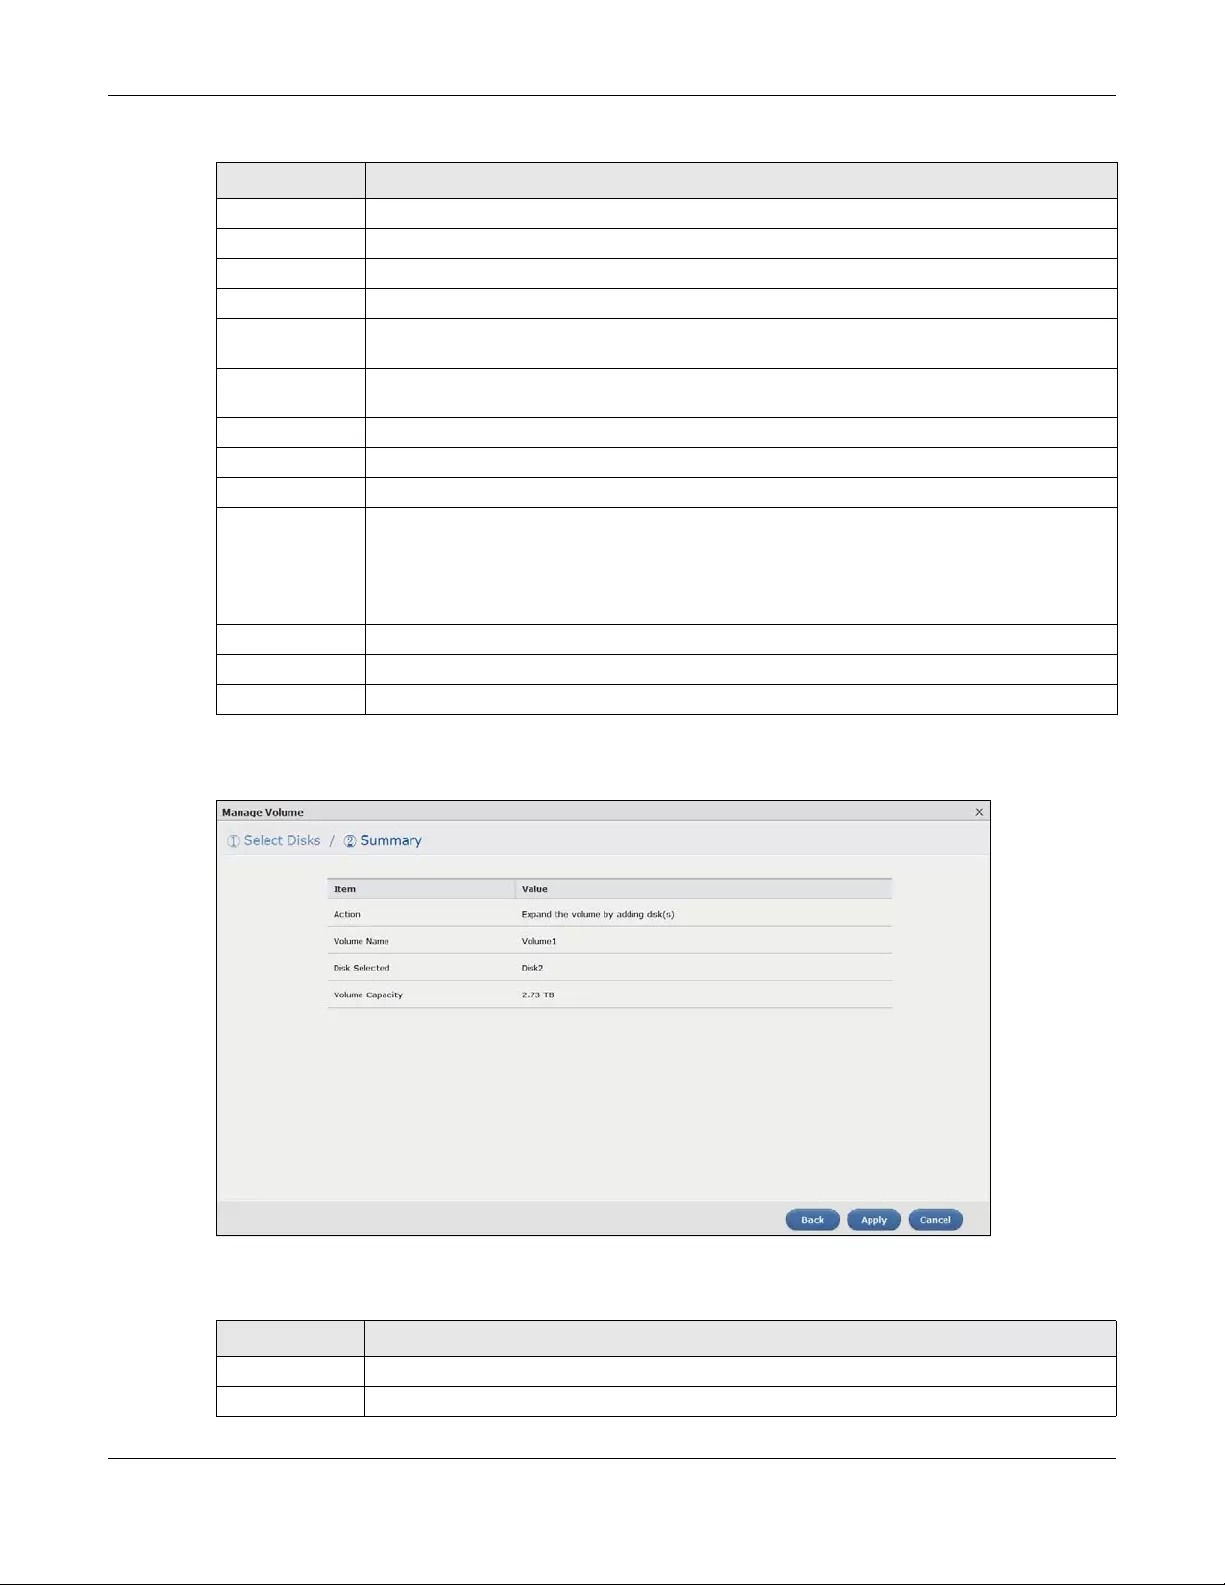
Chapter 5 Storage Manager
NAS Series User’s Guide
57
Step 2 Summary
Figure 42 Manage Volume (Expand the volume by adding disk(s)): Summary
The following table describes the labels in this screen.
Status This field displays the status of the disk.
Disk Name This field displays the name of the disk.
Size This field displays the total capacity of the disk.
Model Name This field displays the model of the disk.
Select disk(s) to
add
This section lists all available hard disks in the table and displays the corresponding disk tray of
the disks you selected on the graphic at the right.
Select one or more hard disks for increasing the volume’s capacity. Use the check box on the
top to select or unselect all entries in this column.
Disk Name This field shows the name of a hard disk.
Size This field shows the total disk size.
Model Name This field shows the model of the hard disk.
Expected
Capacity
This field shows the corresponding space allocations of available size, data protection area,
and wasted size according to your selections on hard disks above.
Note: Use the same capacity of hard disks for RAID 1, 5, 6, or 10 to avoid wasting
space.
Back Click Back to go to the previous step.
Next Click Next to go to the next step.
Cancel Click Cancel to close the screen without saving any settings.
Table 20 Manage Volume (Expand the volume by adding disk(s)): Summary
LABEL DESCRIPTION
Action This field displays for what the configuration is.
Volume Name This field displays the name of the volume.
Table 19 Manage Volume (Expand the volume by adding disk(s)): Select Disks (continued)
LABEL DESCRIPTION
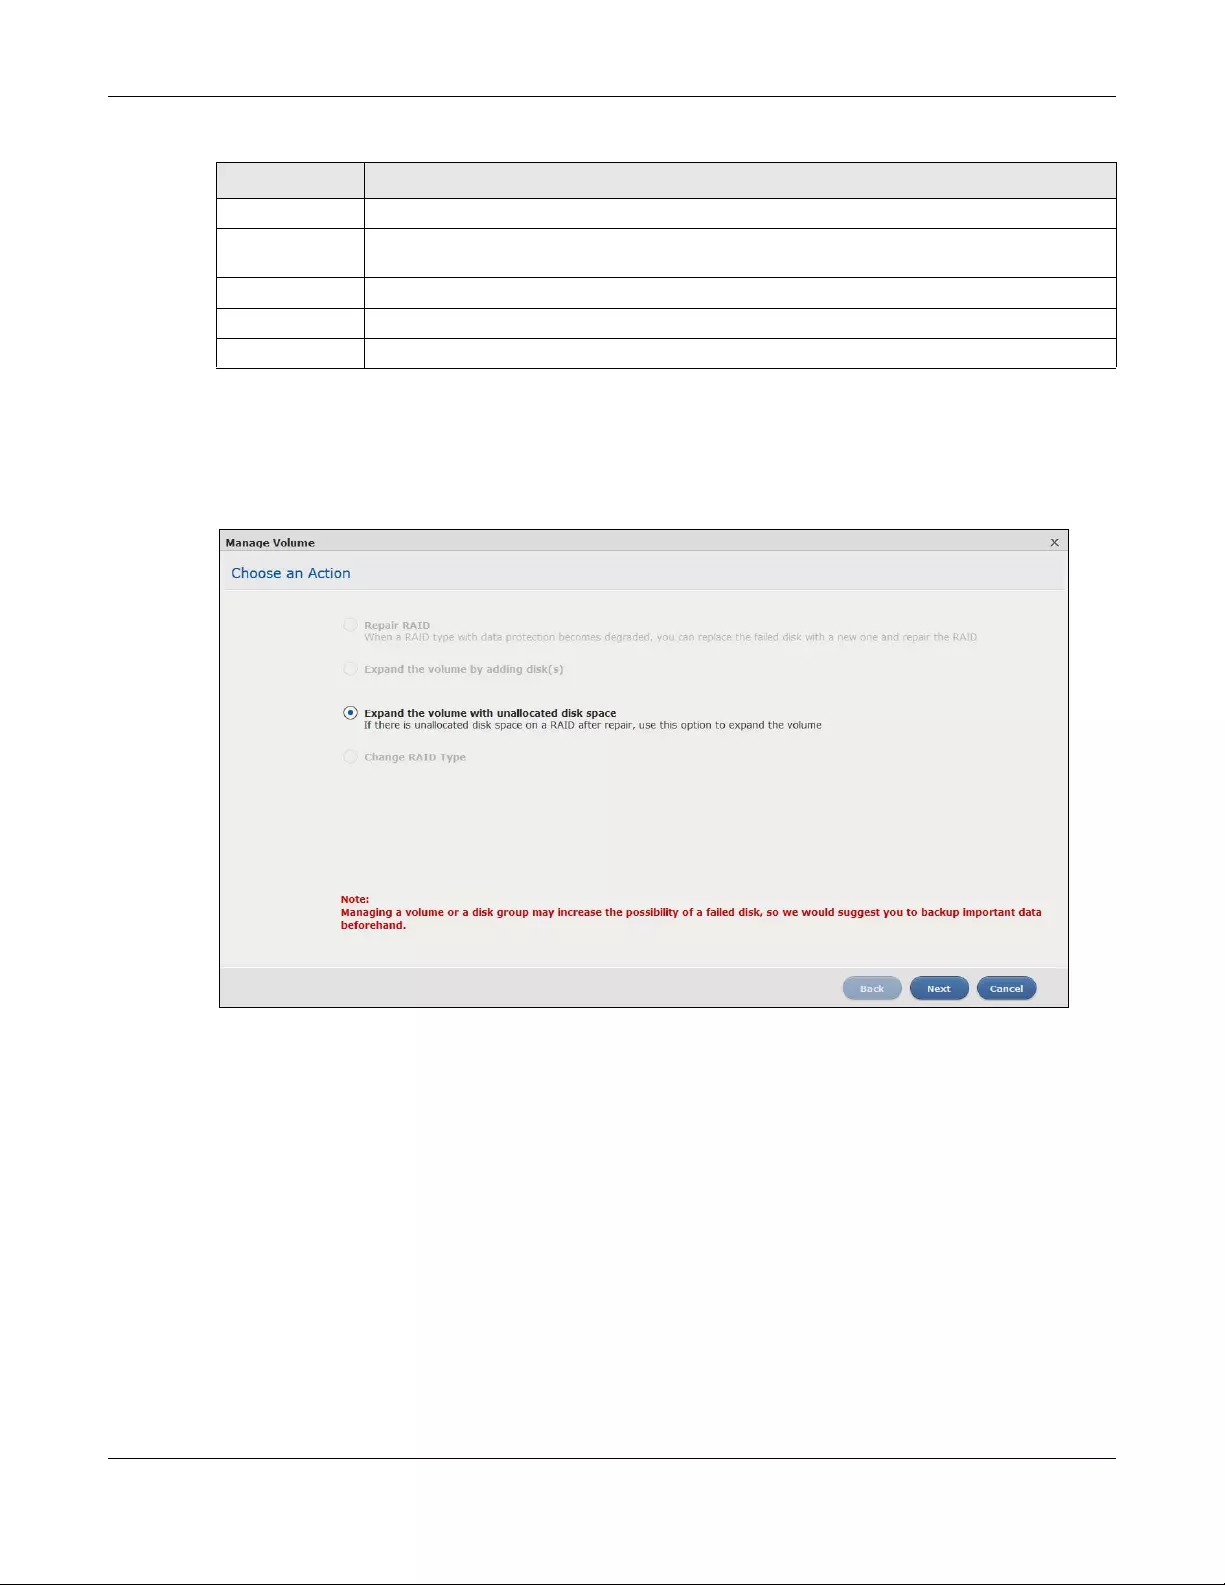
Chapter 5 Storage Manager
NAS Series User’s Guide
58
5.3.1.5 Expand the volume with unallocated disk space
Select Expand the volume with unallocated disk space in the Storage Manager > Internal Storage >
Volume: Manage screen. Click Next.
Figure 43 Manage Volume (Expand the volume with unallocated disk space)
Summary
Use this screen to review the settings you configured.
Disk Selected This field displays the hard disks you have selected.
Volume
Capacity
This field displays the total available size of the volume.
Back Click Back to go to the previous step.
Apply Click Apply to save the settings.
Cancel Click Cancel to close the screen without saving any settings.
Table 20 Manage Volume (Expand the volume by adding disk(s)): Summary (continued)
LABEL DESCRIPTION

Chapter 5 Storage Manager
NAS Series User’s Guide
59
Figure 44 Manage Volume (Expand the volume with unallocated disk space)
The following table describes the labels in this screen.
5.3.1.6 Change RAID Type
Select Change RAID Type in the Storage Manager > Internal Storage > Volume: Manage screen. Click
Next.
Table 21 Manage Volume (Expand the volume with unallocated disk space)
LABEL DESCRIPTION
Action This field displays for what the configuration is.
Volume Name This field displays the name of the volume.
Volume
Capacity
This field displays the total available size of the volume.
Back Click Back to go to the previous step.
Apply Click Apply to save the settings.
Cancel Click Cancel to close the screen without saving any settings.
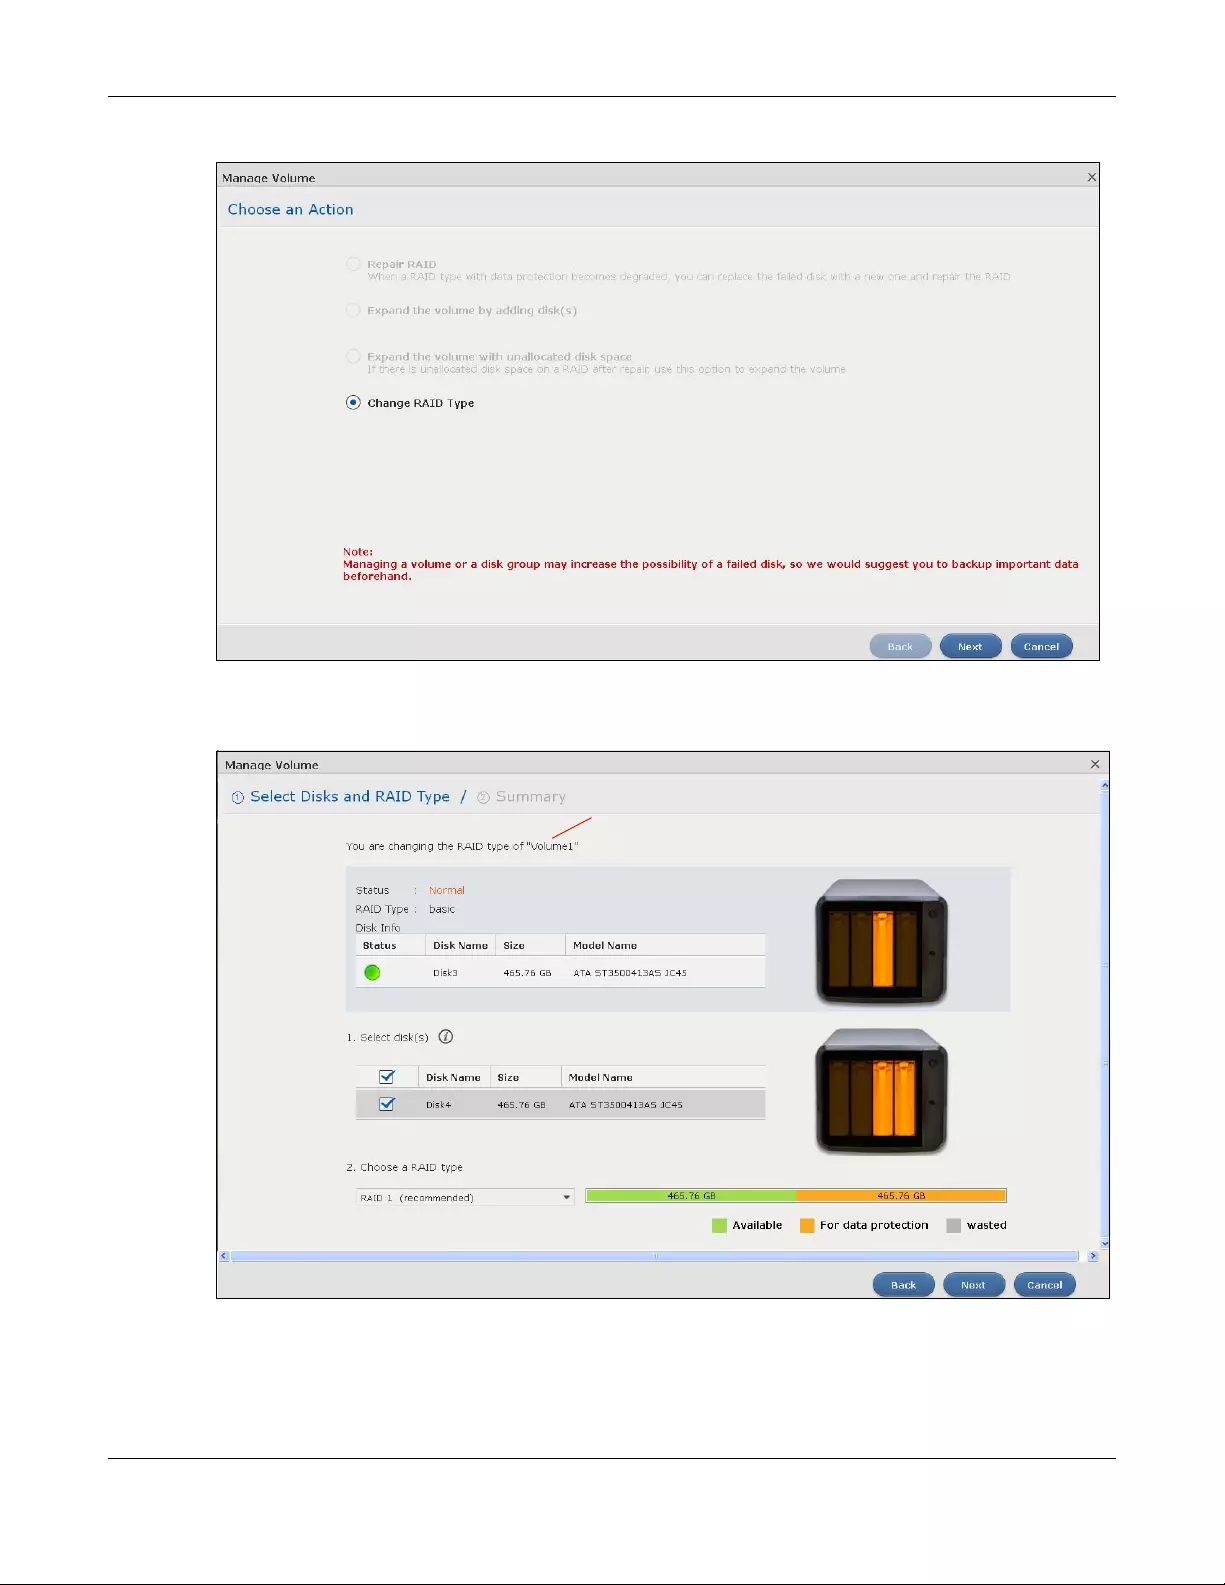
Chapter 5 Storage Manager
NAS Series User’s Guide
60
Figure 45 Manage Volume (Change RAID Type)
Step 1 Select Disks and RAID Type
Figure 46 Manage Volume (Change RAID Type): Select Disks and RAID Type
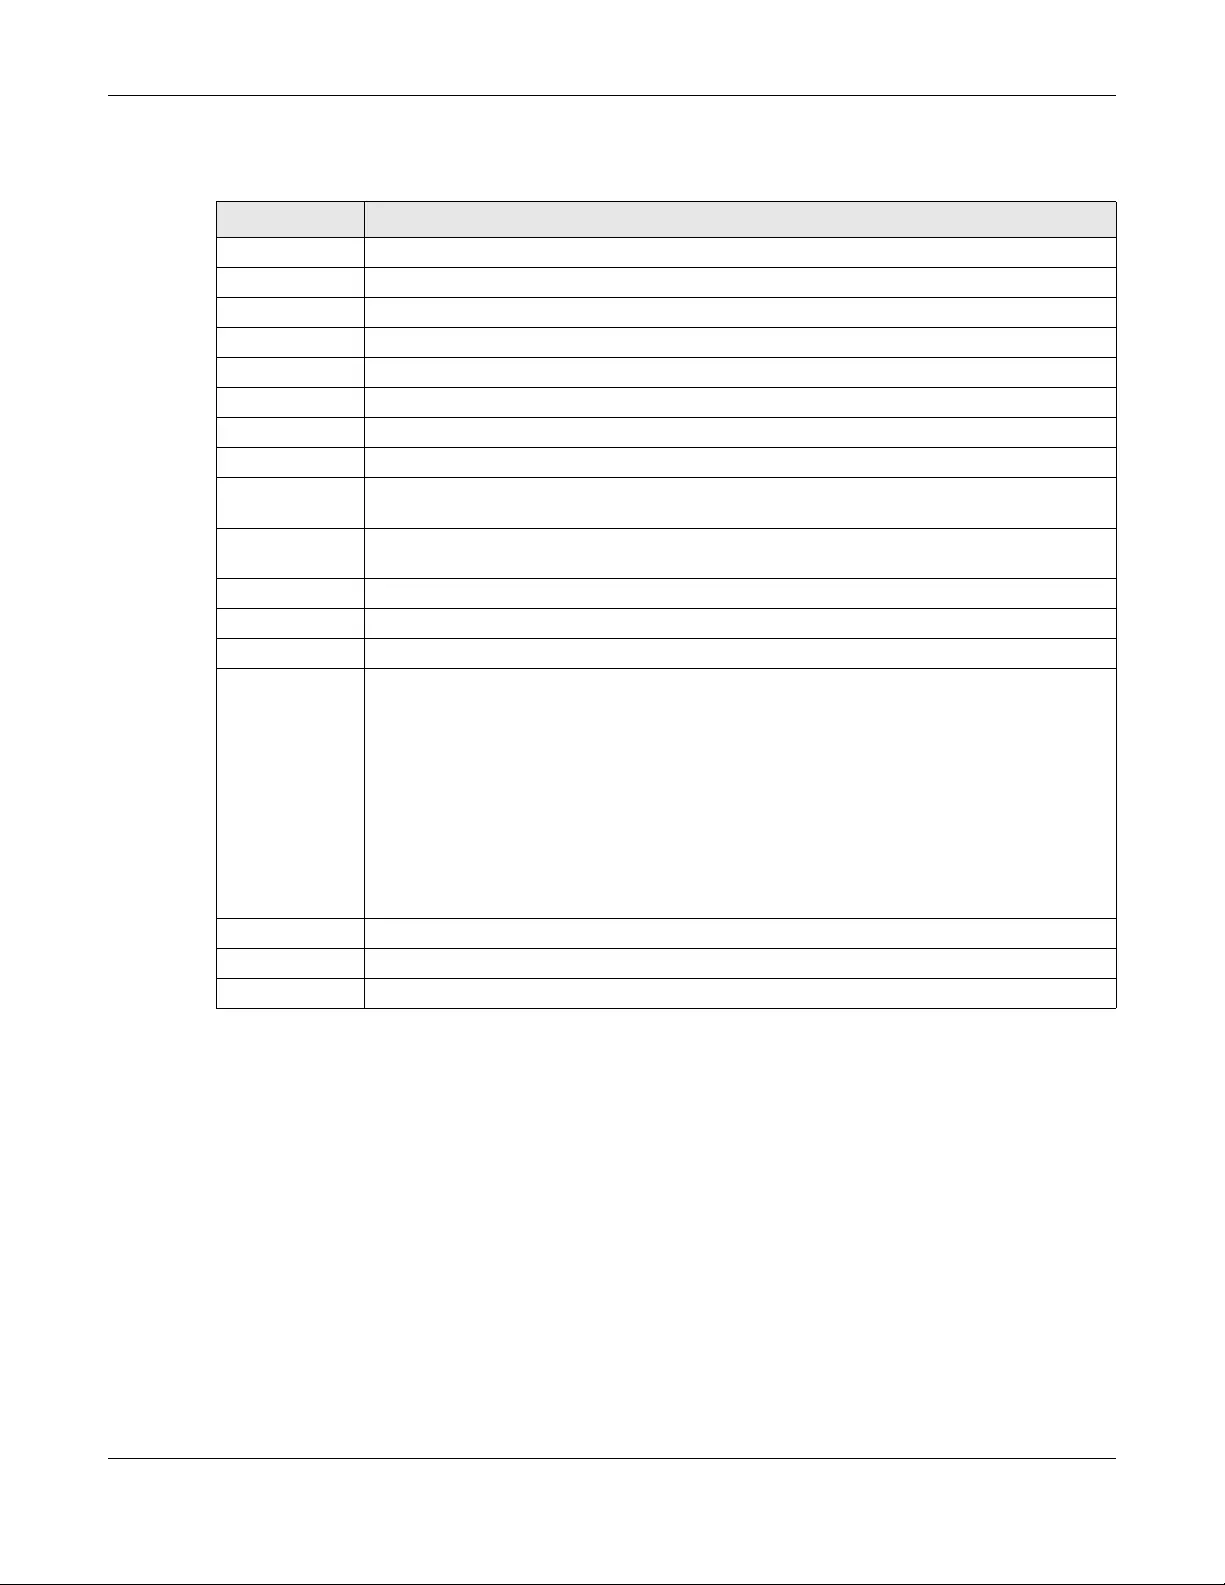
Chapter 5 Storage Manager
NAS Series User’s Guide
61
The following table describes the labels in this screen.
Table 22 Manage Volume (Change RAID Type): Select Disks and RAID Type
LABEL DESCRIPTION
A This shows the name of the volume you have selected.
Status This field displays the status of the volume.
RAID Type This field displays the type of RAID on which the volume is built.
Disk Info
Status This field displays the status of the disk.
Disk Name This field displays the name of the disk.
Size This field displays the total capacity of the disk.
Model Name This field displays the model of the disk.
Select disk(s) This section lists all available hard disks in the table and displays the corresponding disk tray of
the disks you selected on the graphic at the right.
Select one or more hard disks for changing the volume’s RAID type. Use the check box on the
top to select or unselect all entries in this column.
Disk Name This field shows the name of a hard disk.
Size This field shows the total disk size.
Model Name This field shows the model of the hard disk.
Choose a RAID
type
Select a RAID type from the drop-down list box. The corresponding space allocations of
available size, data protection area, and wasted size display.
Use RAID 1 with two or four disks to mirror primary data to another disk(s) with high performance.
Use RAID 5 with three or more disks to balance performance, hard disk capacity usage with
data protection in case of disk failure.
Use RAID 6 with four disks for more data protection in case of disk failure.
See Table 10 on page 44 or Section 5.6 on page 97 for more information.
Note: Use the same capacity of hard disks for RAID to avoid wasting space.
Back Click Back to go to the previous step.
Next Click Next to go to the next step.
Cancel Click Cancel to close the screen without saving any settings.
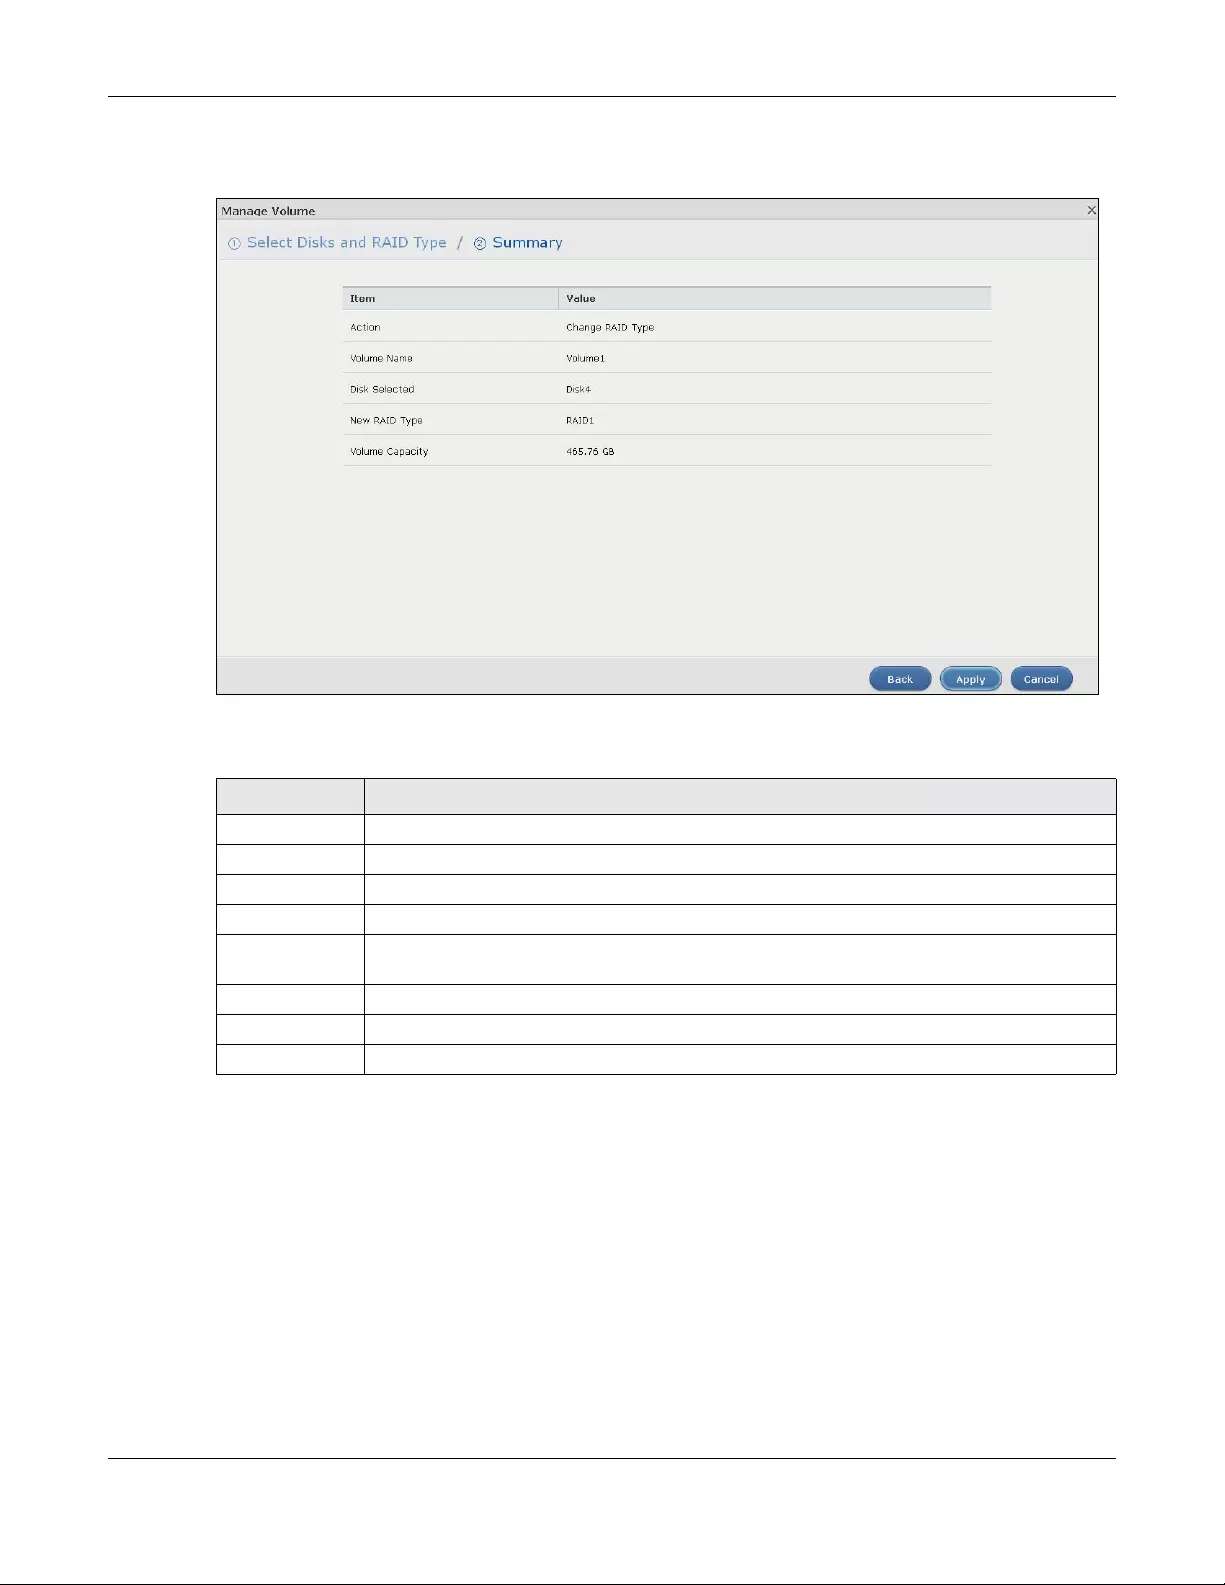
Chapter 5 Storage Manager
NAS Series User’s Guide
62
Step 2 Summary
Figure 47 Manage Volume (Change RAID Type): Summary
The following table describes the labels in this screen.
5.3.1.7 Create a Volume on Disk Group
Use the Create Volume on Disk Group screen to configure a volume on an existing or new disk group.
Click Create in the Volume on Disk Group section of the Storage Manager > Internal Storage > Volume
screen to open the screen as shown.
Note: It is suggested to create a volume directly on a disk instead of on a disk group if high
performance is important to you. See Section 5.3.1.1 on page 49 for more information.
5.3.1.8 Create a Volume on an Existing Disk Group
Select Existing on disk group and a disk group from the drop-down list box to create a volume on the
disk group. This option is available only when there is an existing disk group available. Click Next to go to
the next step.
Table 23 Manage Volume (Change RAID Type): Summary
LABEL DESCRIPTION
Action This field displays for what the configuration is.
Volume Name This field displays the name of the volume.
Disk Selected This field displays the hard disks you have selected.
RAID Type This field displays the type of RAID on which the volume will be built.
Volume
Capacity
This field displays the total size of the volume.
Back Click Back to go to the previous step.
Apply Click Apply to save the settings.
Cancel Click Cancel to close the screen without saving any settings.
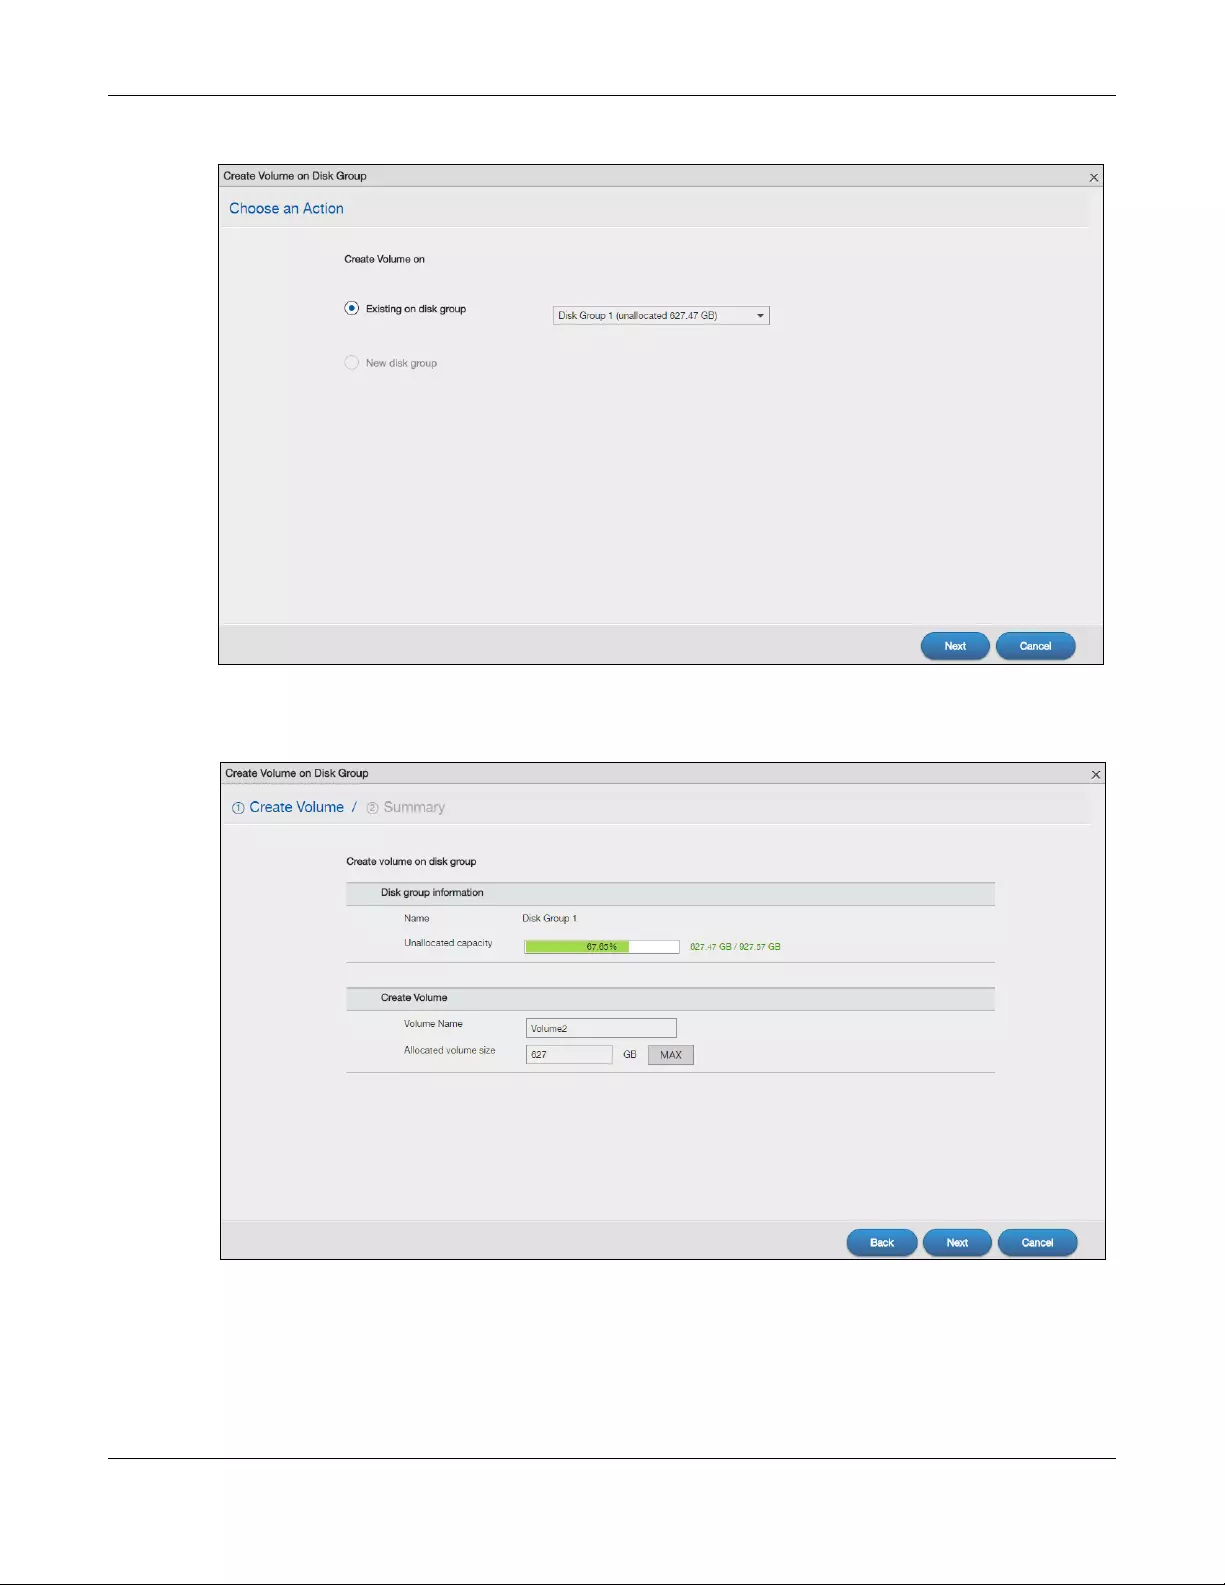
Chapter 5 Storage Manager
NAS Series User’s Guide
63
Figure 48 Create a Volume on an Existing Disk Group
Step 1 Create Volume
Figure 49 Create a Volume on an Existing Disk Group: Create Volume
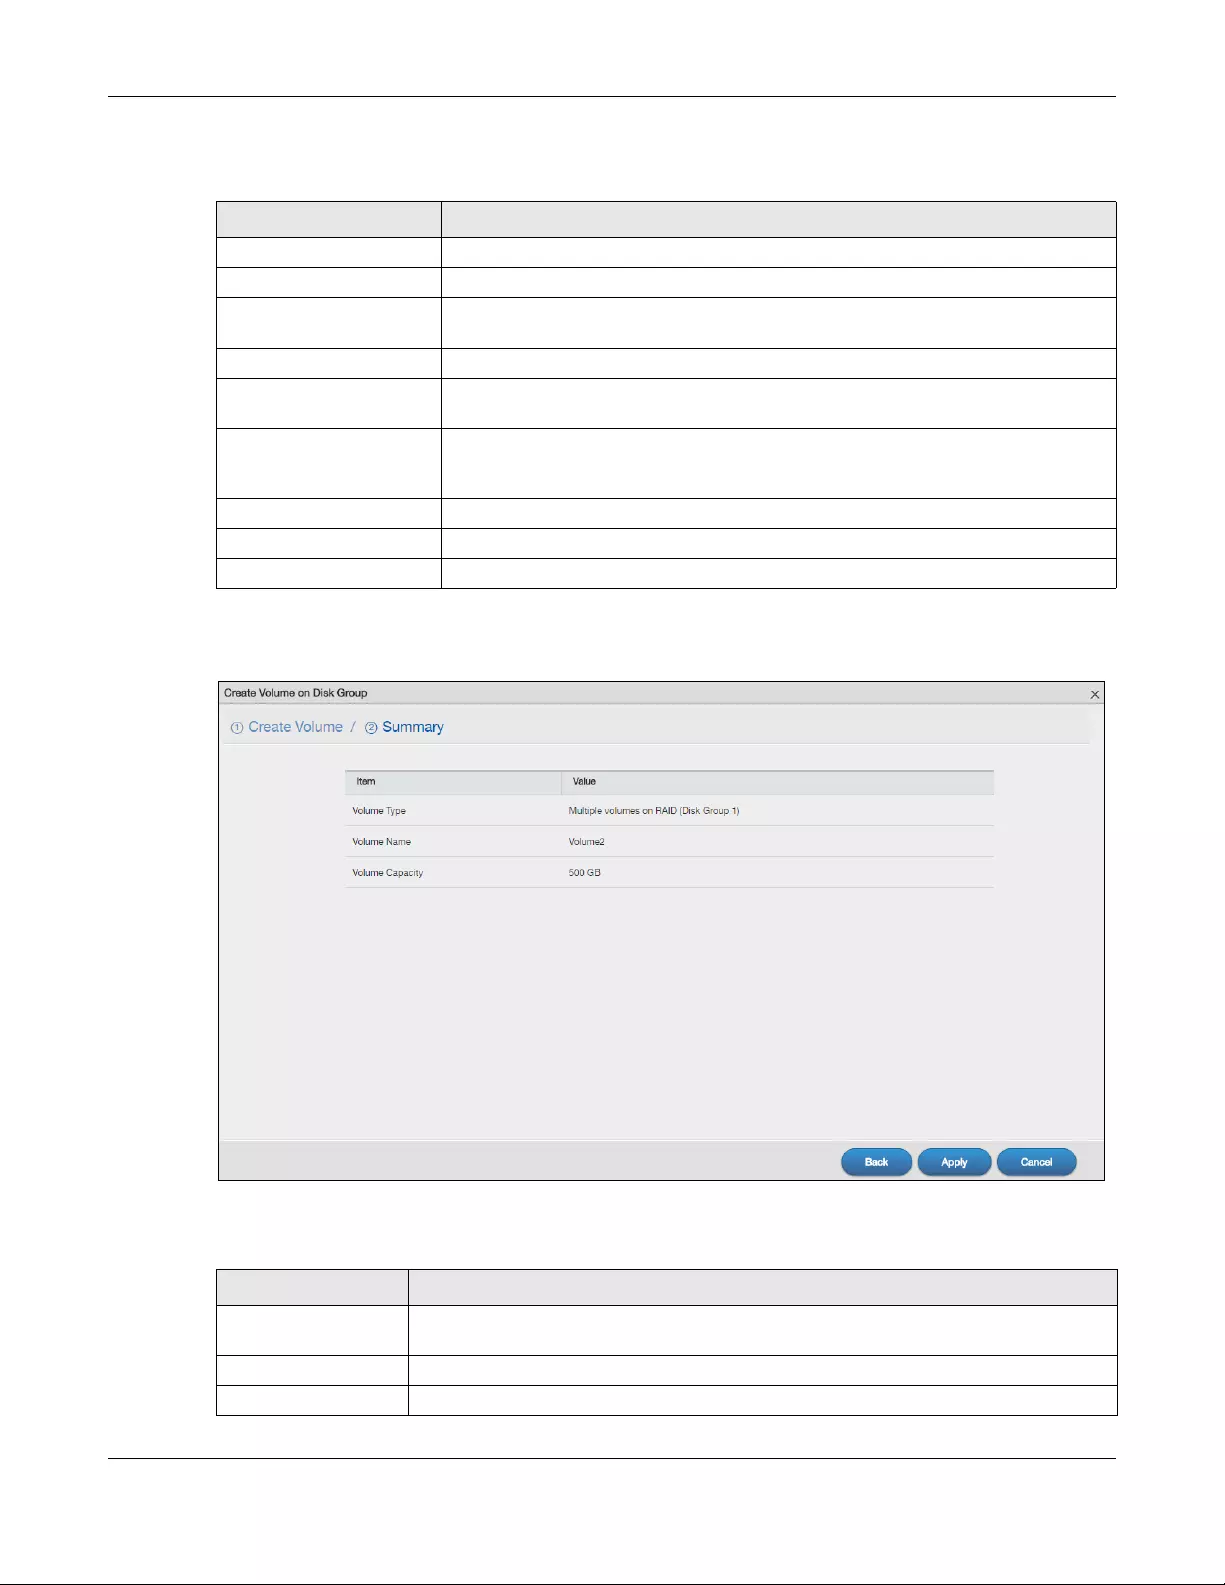
Chapter 5 Storage Manager
NAS Series User’s Guide
64
The following table describes the labels in this screen.
Step 2 Summary
Figure 50 Create a Volume on an Existing Disk Group: Summary
The following table describes the labels in this screen.
Table 24 Create a Volume on Disk Group: Create Volume
LABEL DESCRIPTION
Disk group information
Name This field displays the name of the disk group.
Unallocated capacity This field displays the percentage of the available size, the size in use, and total size of
the disk group.
Create Volume
Volume Name This field displays the default name of the volume. You can also type a new name for
the volume.
Allocated Volume Size This field displays the number of Gigabytes available on the volume by default. You
can change the size to allocate to this volume. Click MAX to allocate all available
size of the disk group to the volume.
Back Click Back to go to the previous step.
Next Click Next to go to the next step.
Cancel Click Cancel to close the screen without saving any settings.
Table 25 Create a Volume on Disk Group: Summary
LABEL DESCRIPTION
Volume Type This field displays the type of the volume, Multiple volumes on RAID (Disk Group X) where
Disk Group X is the disk group’s name.
Volume Name This field displays the name of the volume.
Volume Capacity This field displays the size of the volume.
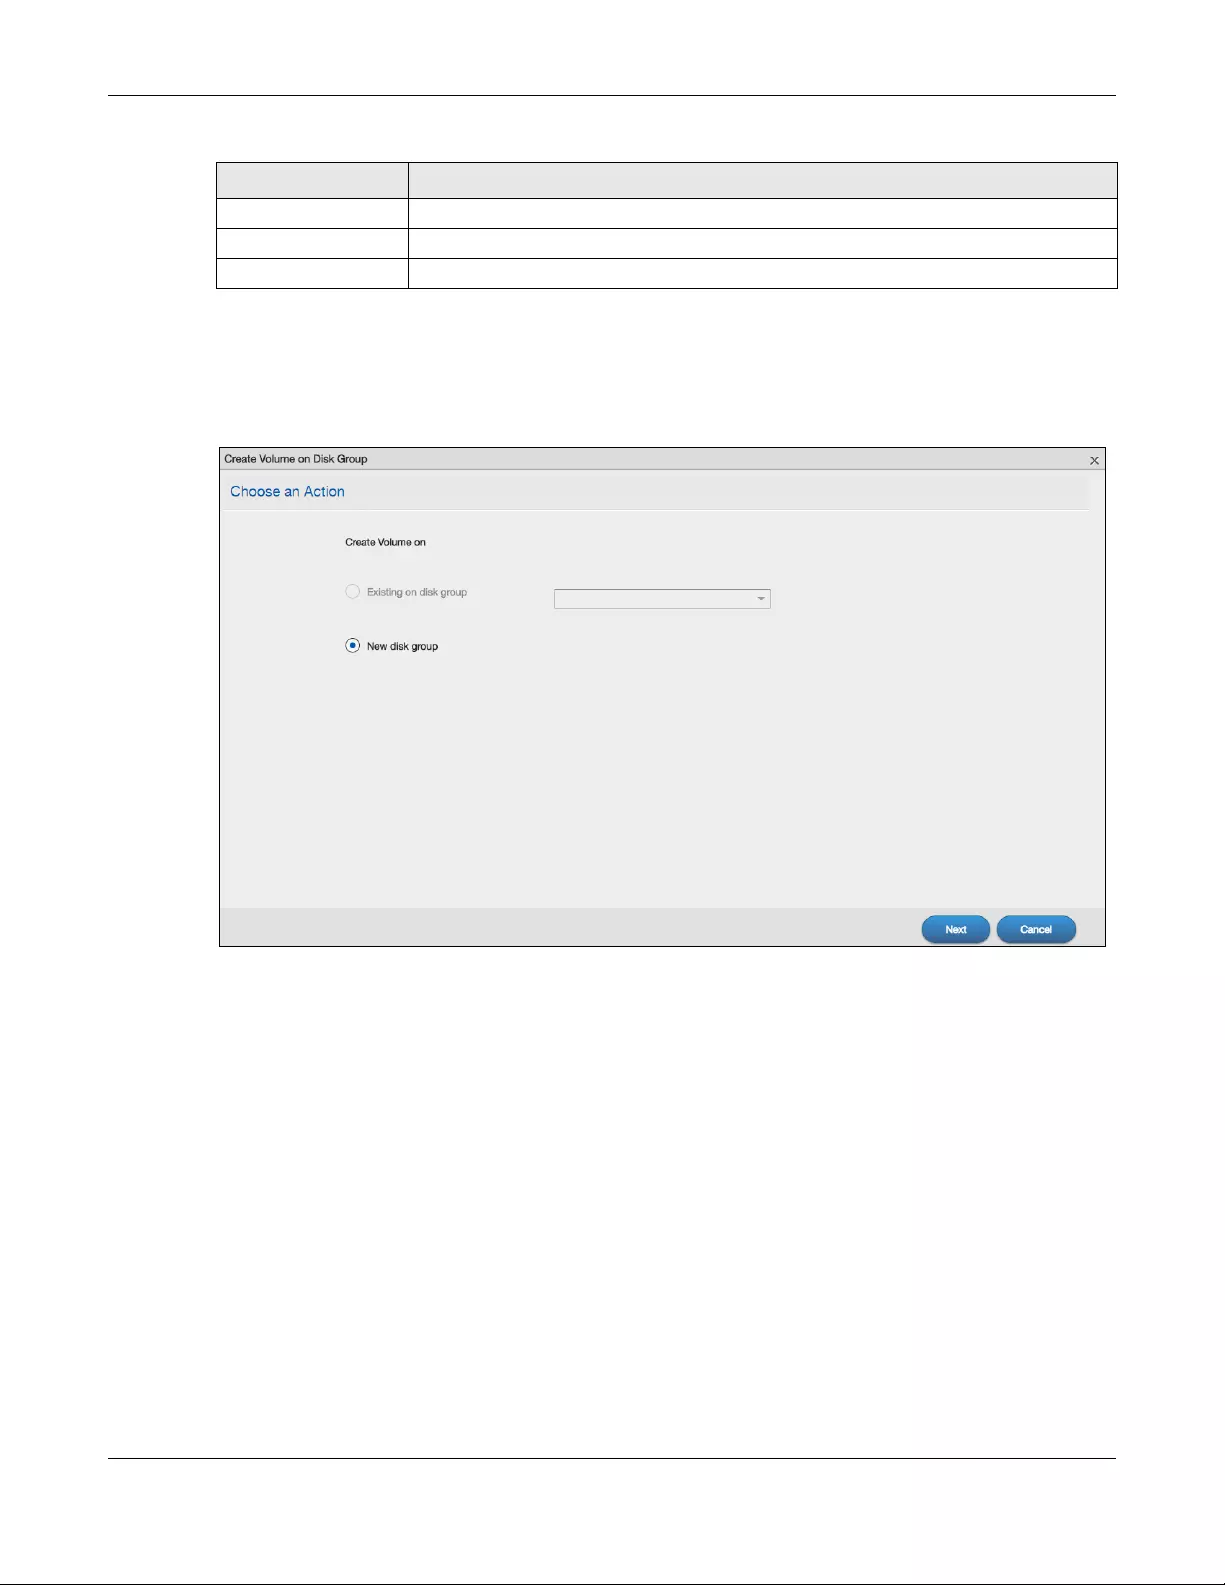
Chapter 5 Storage Manager
NAS Series User’s Guide
65
5.3.1.9 Create a Volume on a New Disk Group
Select New disk group to create a disk group and then a volume on the disk group. Click Next to go to
the next step.
Figure 51 Create Volume on a New Disk Group
Back Click Back to go to the previous screen.
Apply Click Apply to save the settings.
Cancel Click Cancel to close the screen without saving any settings.
Table 25 Create a Volume on Disk Group: Summary (continued)
LABEL DESCRIPTION
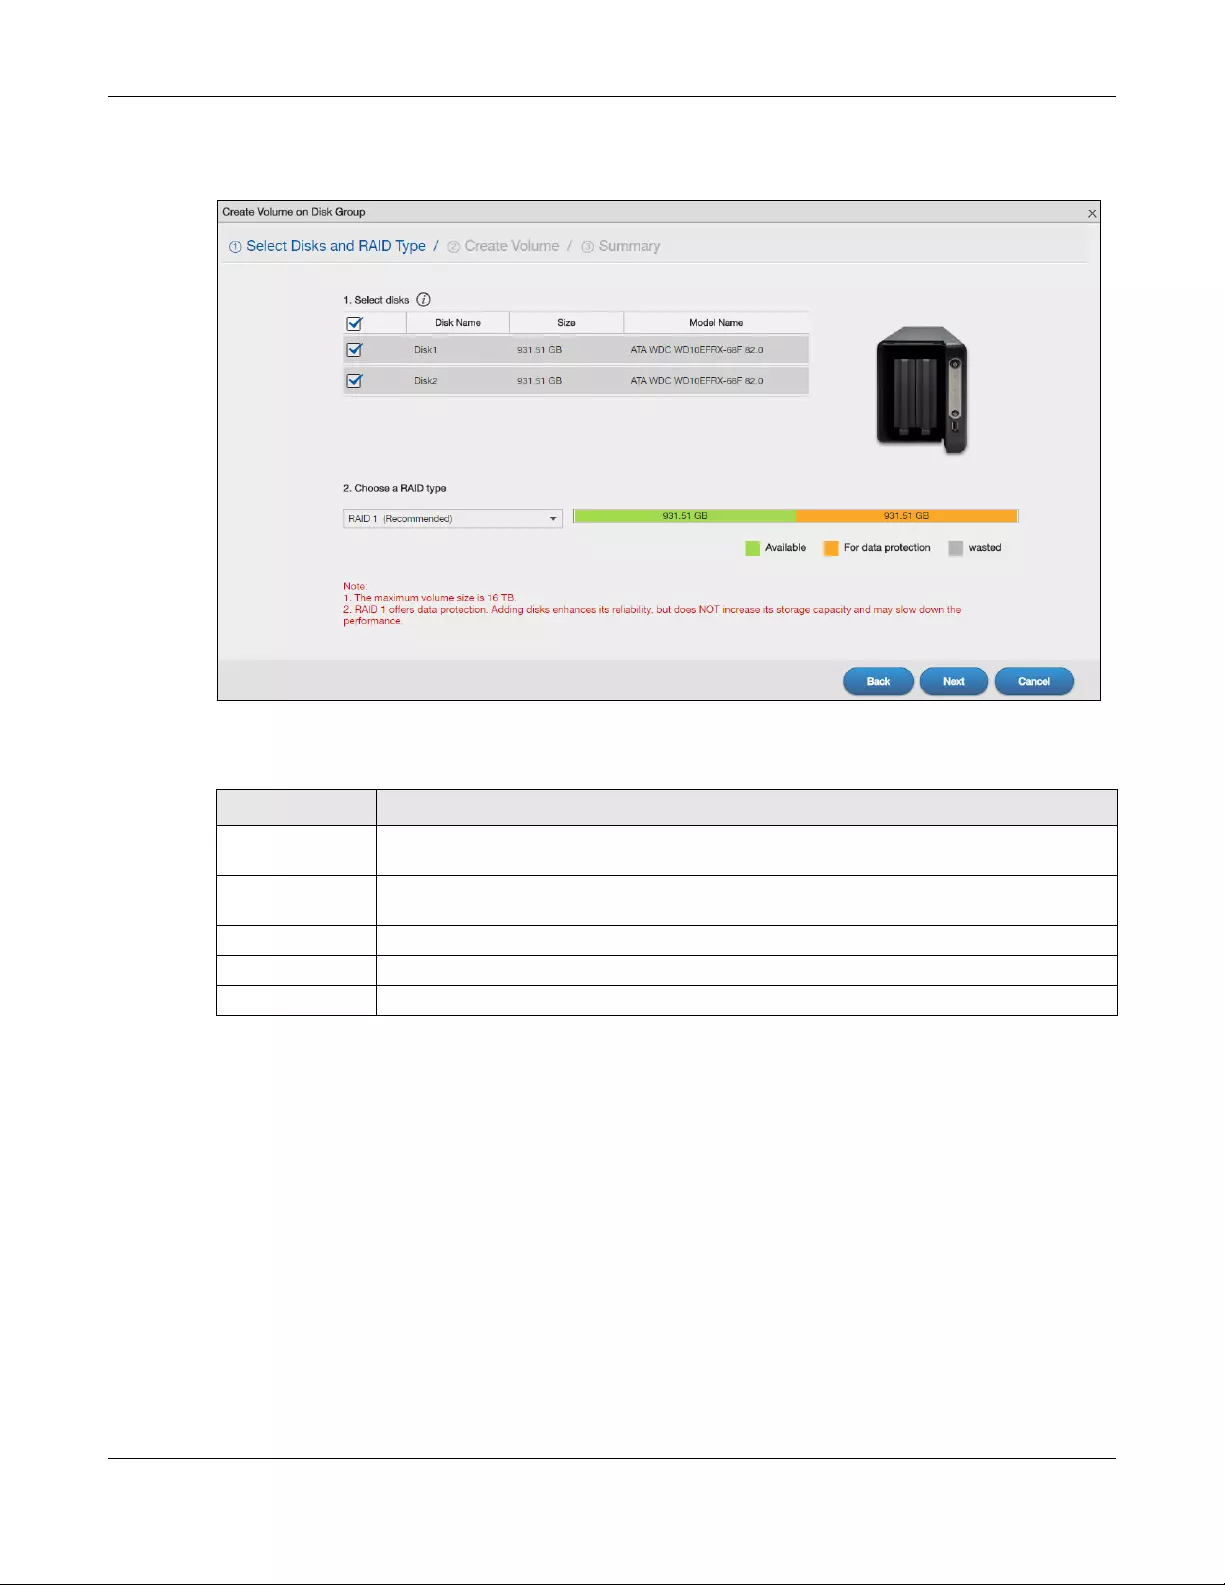
Chapter 5 Storage Manager
NAS Series User’s Guide
66
Step 1 Select Disks and RAID Type
Figure 52 Create Volume on a New Disk Group: Select Disks and RAID Type
The following table describes the labels in this screen.
Table 26 Create Volume on Disk Group: Select Disks and RAID Type
LABEL DESCRIPTION
Select disks This section lists all available hard disks in the table and displays the disk trays they are currently
installed on the graphic at the right.
Select one or more hard disks where you want to create a volume. Use the check box on the
top to select or unselect all entries in this column.
Disk Name This field shows the name of the hard disk.
Size This field shows the total disk size.
Model Name This field shows the model of the hard disk.
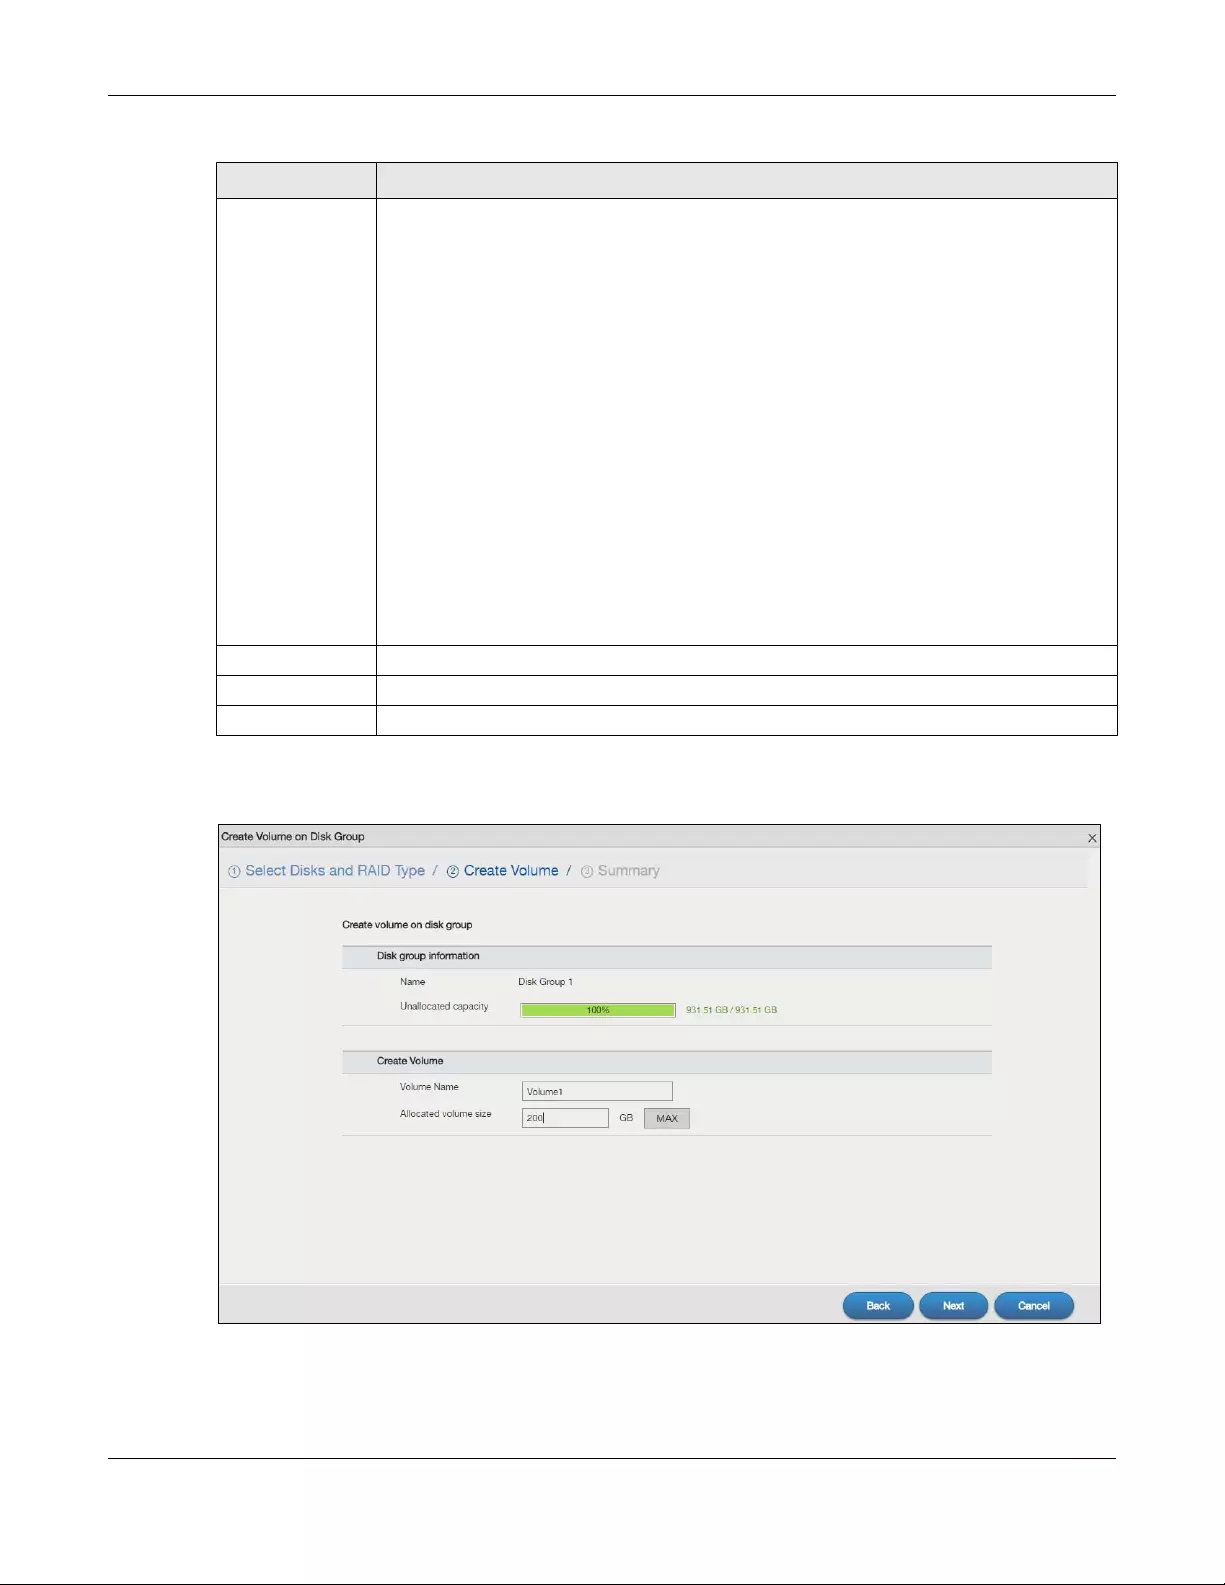
Chapter 5 Storage Manager
NAS Series User’s Guide
67
Step 2 Create Volume
Figure 53 Create Volume on a New Disk Group: Create Volume
Choose a RAID
type
Select a RAID type from the drop-down list box. The corresponding space allocations of
available size, data protection area, and wasted size display.
Use Basic with one disk.
Use JBOD with two or more disks for maximum capacity.
Use RAID 0 with two or four disks for maximum speed.
Use RAID 1 with two or more disks to mirror primary data to another disk(s) with high
performance.
Use RAID 5 with three or more disks to balance performance, hard disk capacity usage with
data protection in case of disk failure.
Use RAID 6 with four disks for more data protection in case of disk failure.
Use RAID 10 with four disks to get better performance than RAID 6, with slightly less data
protection.
See Table 10 on page 44 or Section 5.6 on page 97 for more information.
Note: Use the same capacity of hard disks for RAID 1, 5, 6, or 10 to avoid wasting
space.
Back Click Back to go to the previous screen.
Next Click Next to go to the next step.
Cancel Click Cancel to close the screen without saving any settings.
Table 26 Create Volume on Disk Group: Select Disks and RAID Type (continued)
LABEL DESCRIPTION
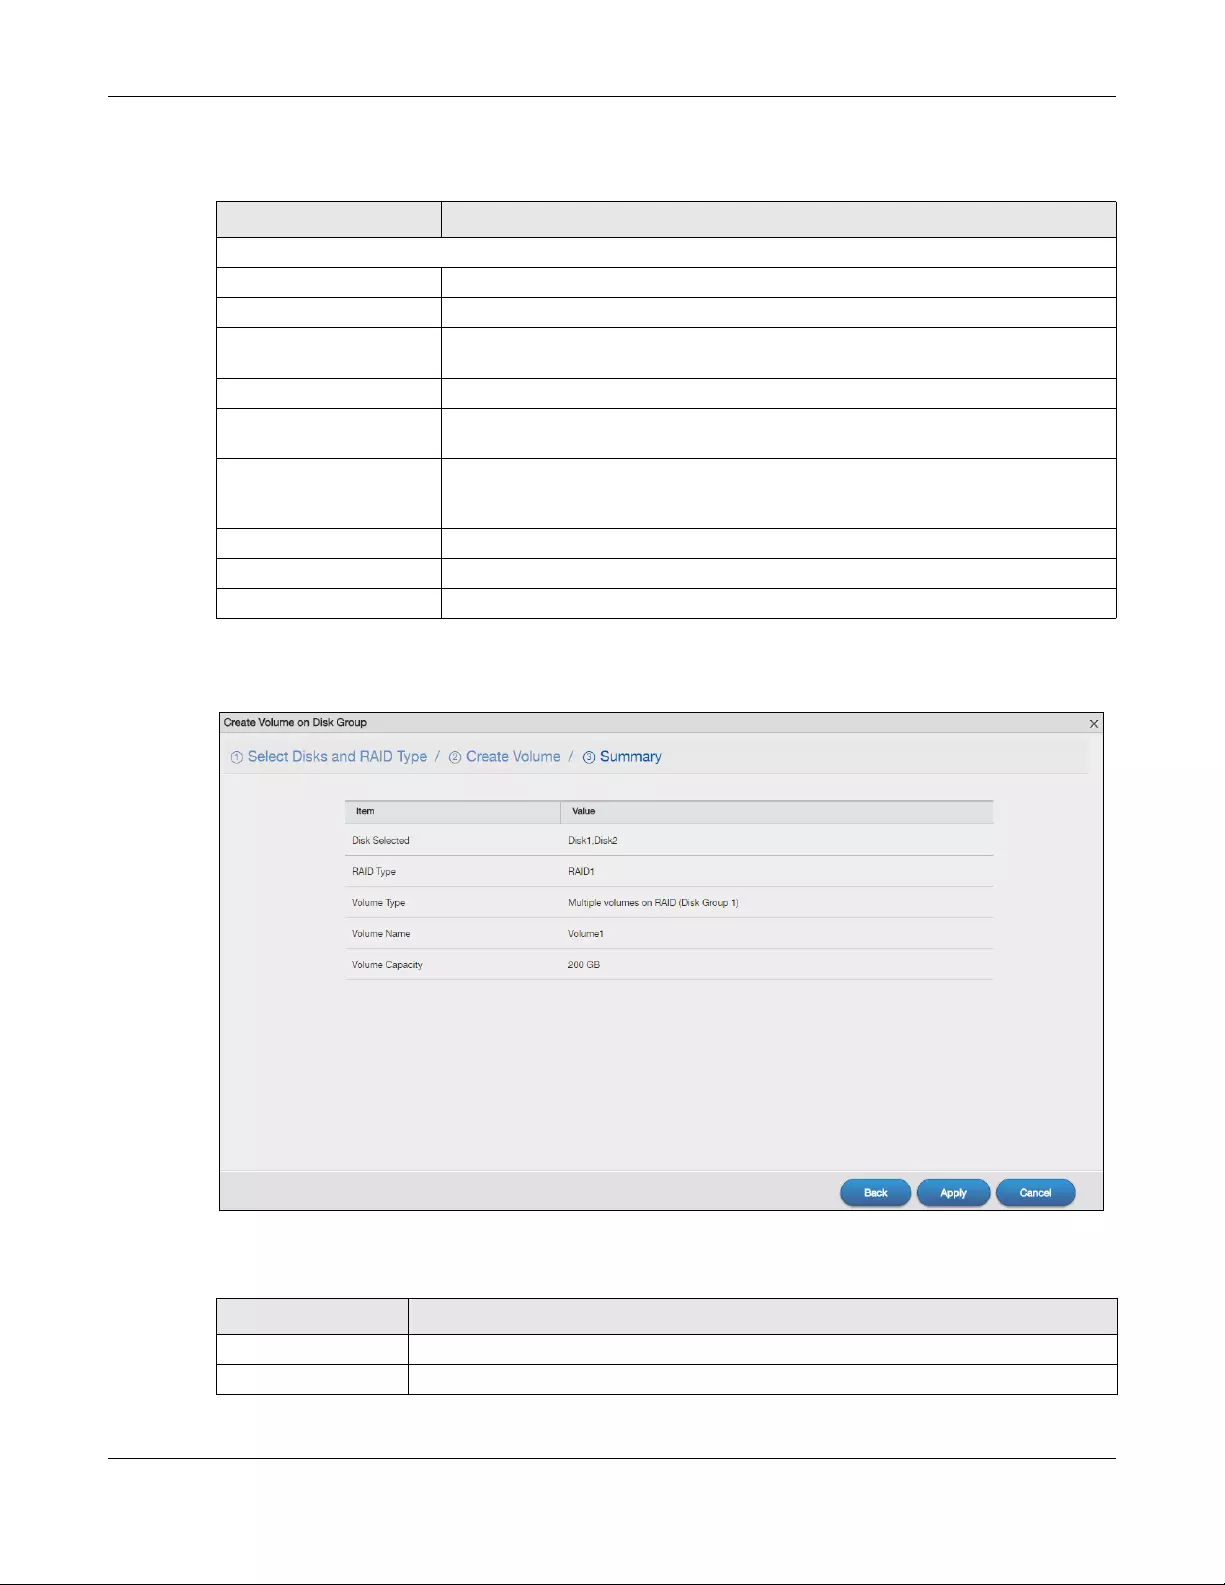
Chapter 5 Storage Manager
NAS Series User’s Guide
68
The following table describes the labels in this screen.
Step 3 Summary
Figure 54 Create Volume on a New Disk Group: Summary
The following table describes the labels in this screen.
Table 27 Create Volume on Disk Group: Create Volume
LABEL DESCRIPTION
Step 2. Create Volume
Disk group information
Name This field displays the name of the disk group.
Unallocated capacity This field displays the percentage of the available size, the size in used, and total size
of the disk group.
Create Volume
Volume Name This field displays the default name of the volume. You can also type a new name for
the volume.
Allocated volume size This field displays the number of Gigabytes available on the volume by default. You
can set the size to allocate for this volume. Click MAX to allocate all available
capacity of the disk group to the volume.
Back Click Back to go to the previous step.
Next Click Next to go to the next step.
Cancel Click Cancel to close the screen without saving any settings.
Table 28 Create Volume on Disk Group: Summary
LABEL DESCRIPTION
Disk Selected This field displays the hard disk(s) on which the RAID array will be built.
RAID Type This field displays the type of RAID on which the volume will be built.
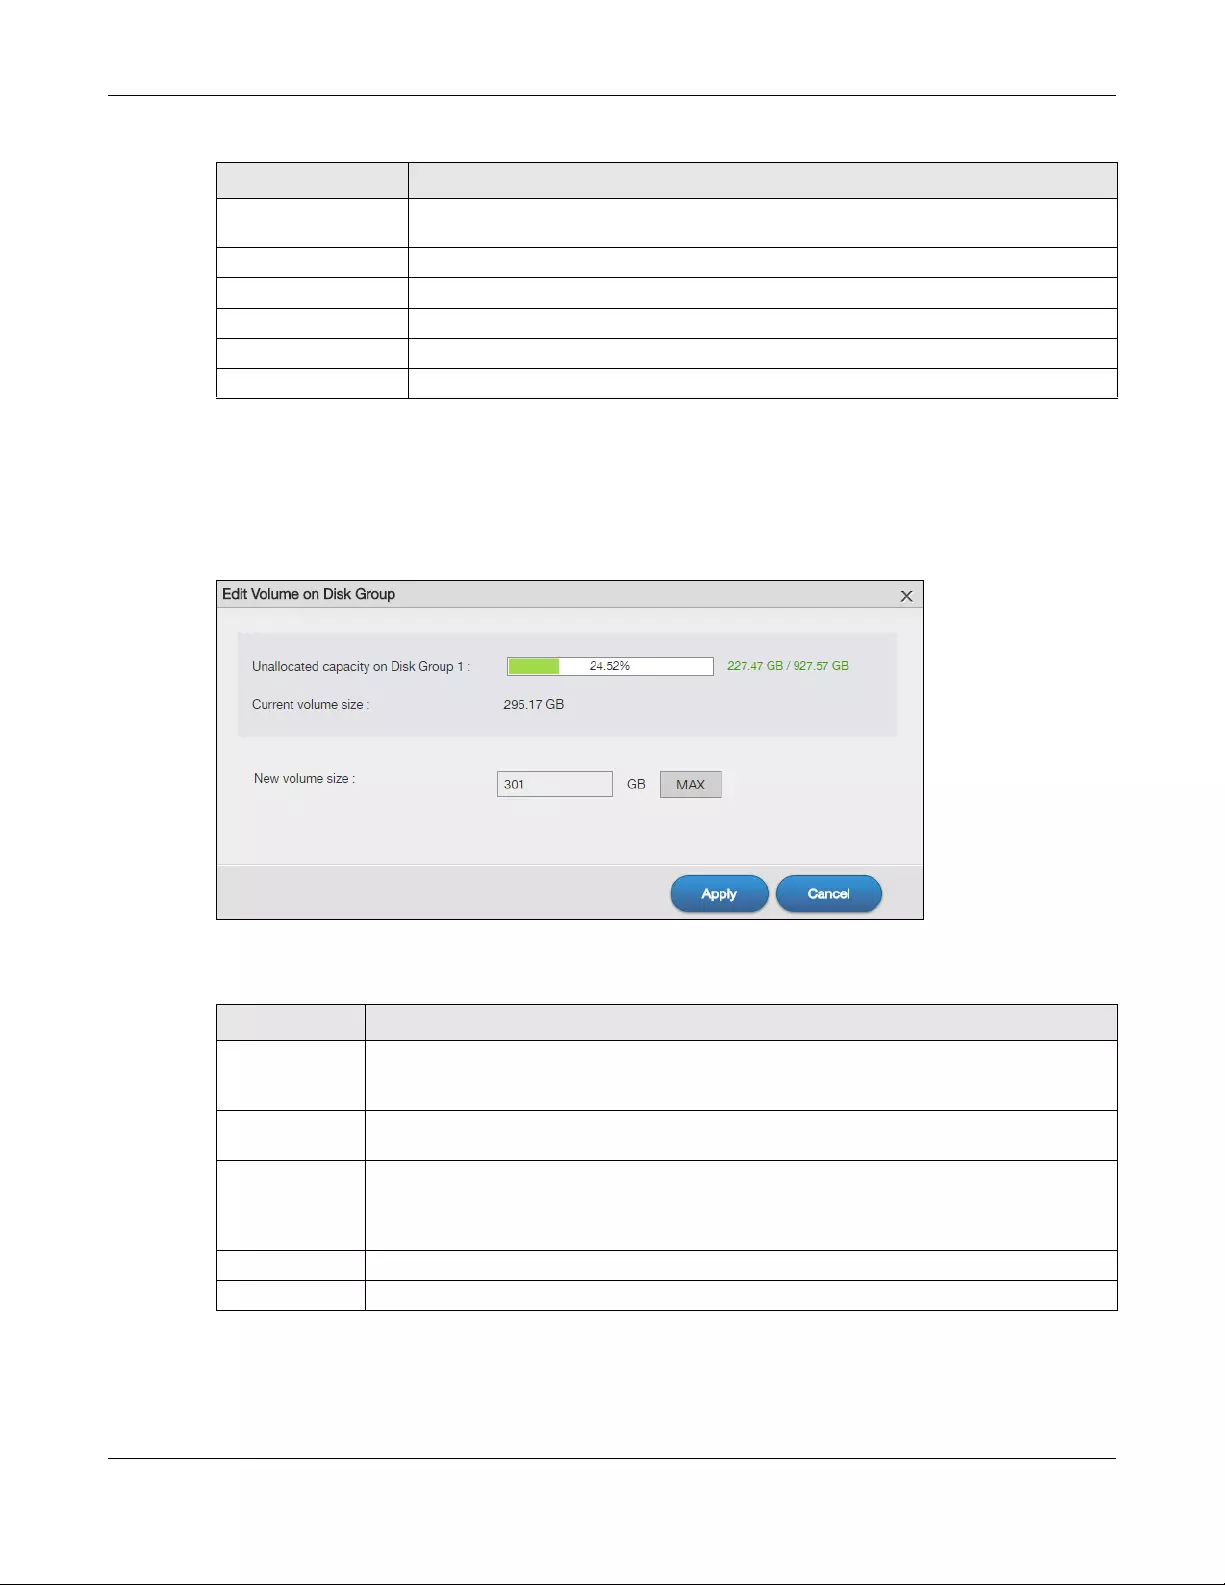
Chapter 5 Storage Manager
NAS Series User’s Guide
69
5.3.1.10 Edit a Volume on Disk Group
Use the Edit Volume on Disk Group screen to expand a volume’s capacity. In the Storage Manager >
Internal Storage > Volume screen, select a volume and then click Edit in the Volume on Disk Group
section to open the screen as shown.
Figure 55 Edit Volume on Disk Group
The following table describes the labels in this screen.
Volume Type This field displays the type of the volume, Multiple volumes on RAID (Disk Group X) where
Disk Group X is the disk group’s name.
Volume Name This field displays the name of the volume.
Volume Capacity This field displays the size of the volume.
Back Click Back to go to the previous step.
Apply Click Apply to save the settings.
Cancel Click Cancel to close the screen without saving any settings.
Table 28 Create Volume on Disk Group: Summary (continued)
LABEL DESCRIPTION
Table 29 Edit Volume on Disk Group
LABEL DESCRIPTION
Unallocated
capacity on Disk
Group X
This field displays the percentage of the disk group size unallocated to other volumes, the size in
use, and total size of the disk group.
Current volume
size
This field displays the total size of the volume, excluding the file system size.
New volume size This field displays the smallest size to which you can expand the volume (this includes the
volume’s current available size, file system size, and a minimum additional capacity for
expansion). You can enter a bigger number or click MAX to allocate all the rest of the space in
the disk group to the volume.
Apply Click Apply to save the settings.
Cancel Click Cancel to close the screen without saving any settings.
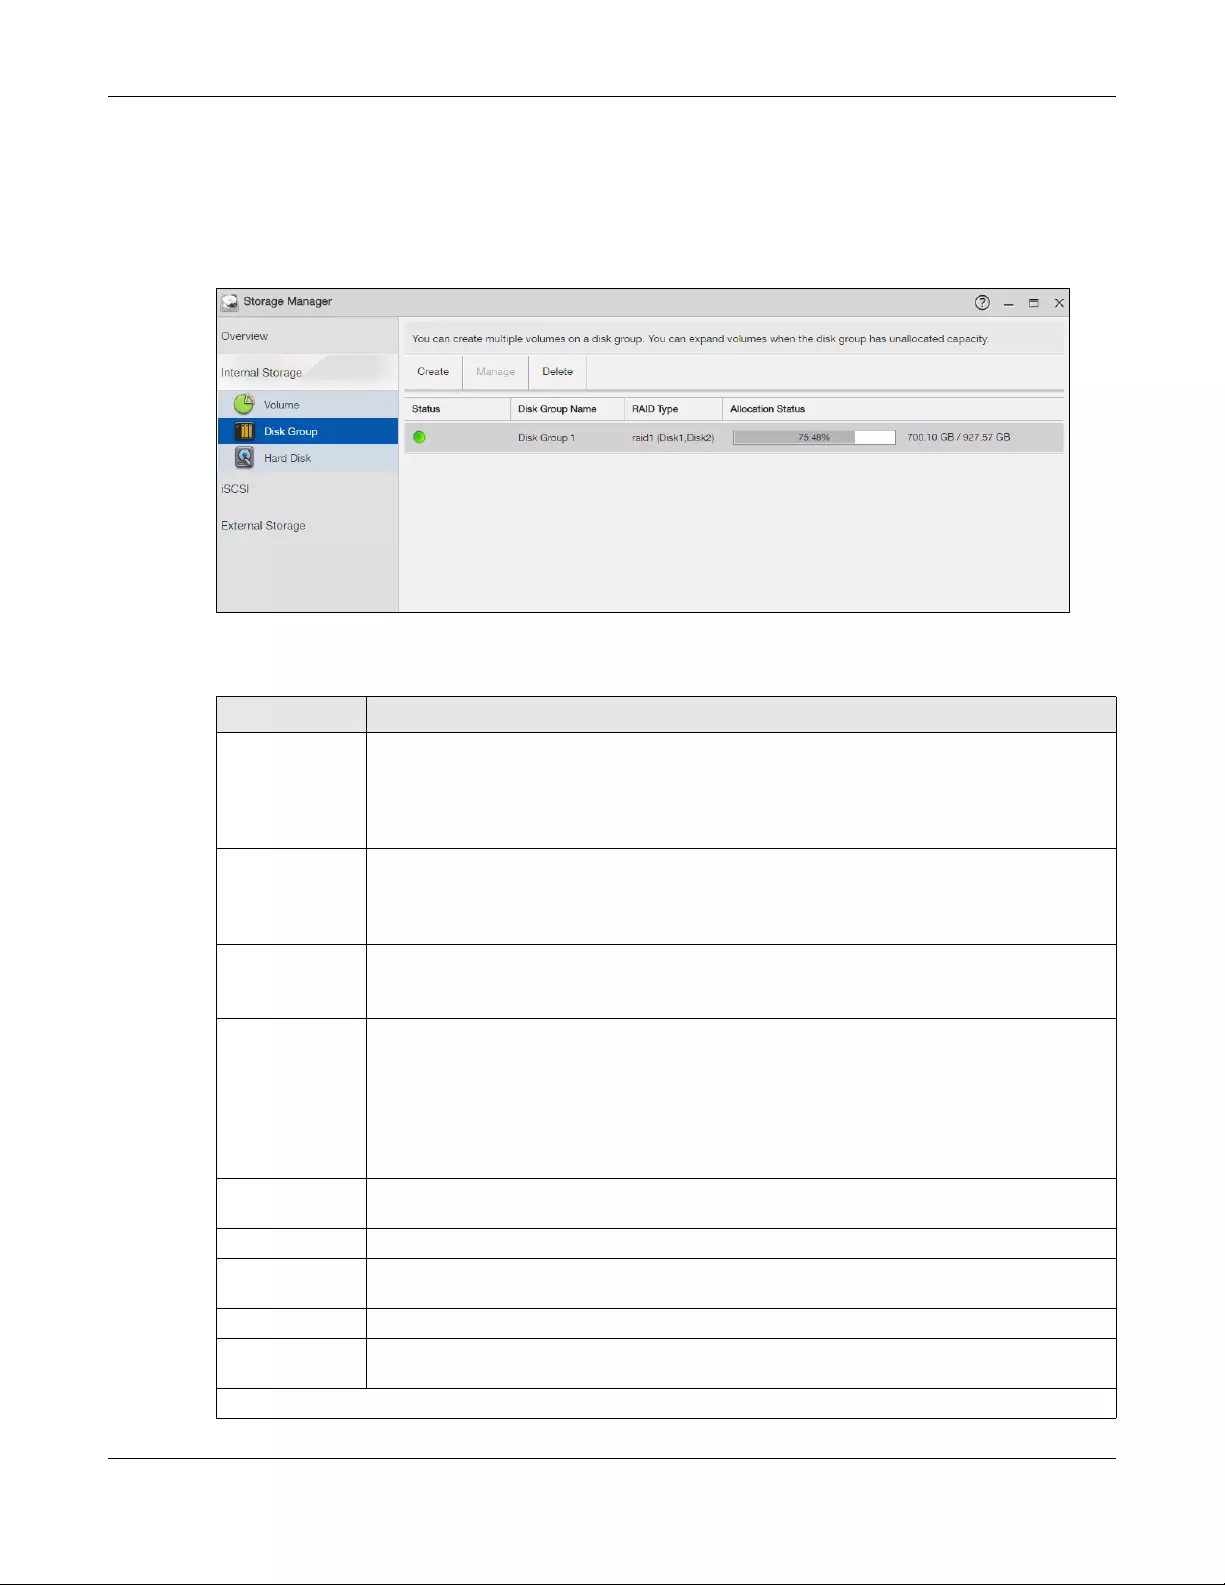
Chapter 5 Storage Manager
NAS Series User’s Guide
70
5.3.2 Disk Group Screens
Use the Disk Group screen to configure and manage disk groups. Click Storage Manager > Internal
Storage > Disk Group screen to open the screen as shown.
Figure 56 Disk Group
The following table describes the labels in this screen.
Table 30 Disk Group
LABEL DESCRIPTION
Create Click this to format internal hard disks and create a new disk group. All data on the disk(s) will
be lost.
Note: This button is not available while the NAS is creating, deleting, or changing the
RAID type of any volume or disk group.
Manage Select a volume and click Manage to edit, repair, or expand the volume.
Note: This button is available only when you can repair, expand or change RAID
type.
Delete Select a disk group and click Delete to remove it.
Note: If you delete a disk group, all data in the disk group is erased.
Add Hot Spare Select a RAID 1 or RAID 5 disk group and click Add Hot Spare to add another disk as a hot-spare
(standby) to the RAID array. See Section 5.6 on page 97 for more information.
Note: The capacity of the disk you are adding must be equal to or greater than the
largest disk in the RAID 1 or RAID 5 array.
Note: You need four hard disks installed to use RAID 5 with hotspare.
Remove Hot
Spare
Select a RAID 1 or RAID 5 disk group and click Remove Hot Spare to remove the standby drive
from the RAID array.
Status This field shows the status of the disk group.
Disk Group
Name
This field shows the name of the disk group.
RAID Type This field shows the type of the RAID over which this disk group is running.
Allocation Status This field shows the percentage of the disk group size that is available, the disk group size being
used, and the total disk group size.
Hot Spare
Chapter 5 Storage Manager
NAS Series User’s Guide
71
5.3.2.1 Create a Disk Group
Use the Create Disk Group screen to create a disk group. From the Storage Manager > Internal Storage
> Disk Group screen, click the Create button to open the screen as shown.
Status This field shows the status of the hot-spare disk.
This field shows the name of the disk group and whether it is normal, degraded, crashed,
Creating, Deleting, Expanding, Repairing or Changing the RAID type.
Normal: A green circle represents a healthy volume.
Degraded: An orange circle represents a degraded RAID 1 volume.
Crashed: A red circle represents a down volume.
The following status also displays the percentage of an action has been completed.
Creating: The NAS’s percentage progress in creating the volume.
Deleting: The NAS’s percentage progress in deleting the volume.
Expanding: The NAS’s percentage progress in expanding the volume. For a RAID 1 volume, this
also displays the percentage of resynchronizing the NAS has finished and the evaluated
remaining time.
Repairing: The NAS’s percentage progress in repairing the volume. For a RAID 1 volume, this also
displays the percentage of resynchronizing the NAS has finished and the evaluated remaining
time.
Changing: The NAS’s percentage progress in changing the volume’s RAID type. For a RAID 1
volume, this also displays the percentage of resynchronizing the NAS has finished and the
evaluated remaining time.
Disk Name This field shows the name of the hot-spare disk.
Size This field shows the total size of the hot-spare disk.
Model Name This field shows the model of the hot-spare disk.
Table 30 Disk Group (continued)
LABEL DESCRIPTION
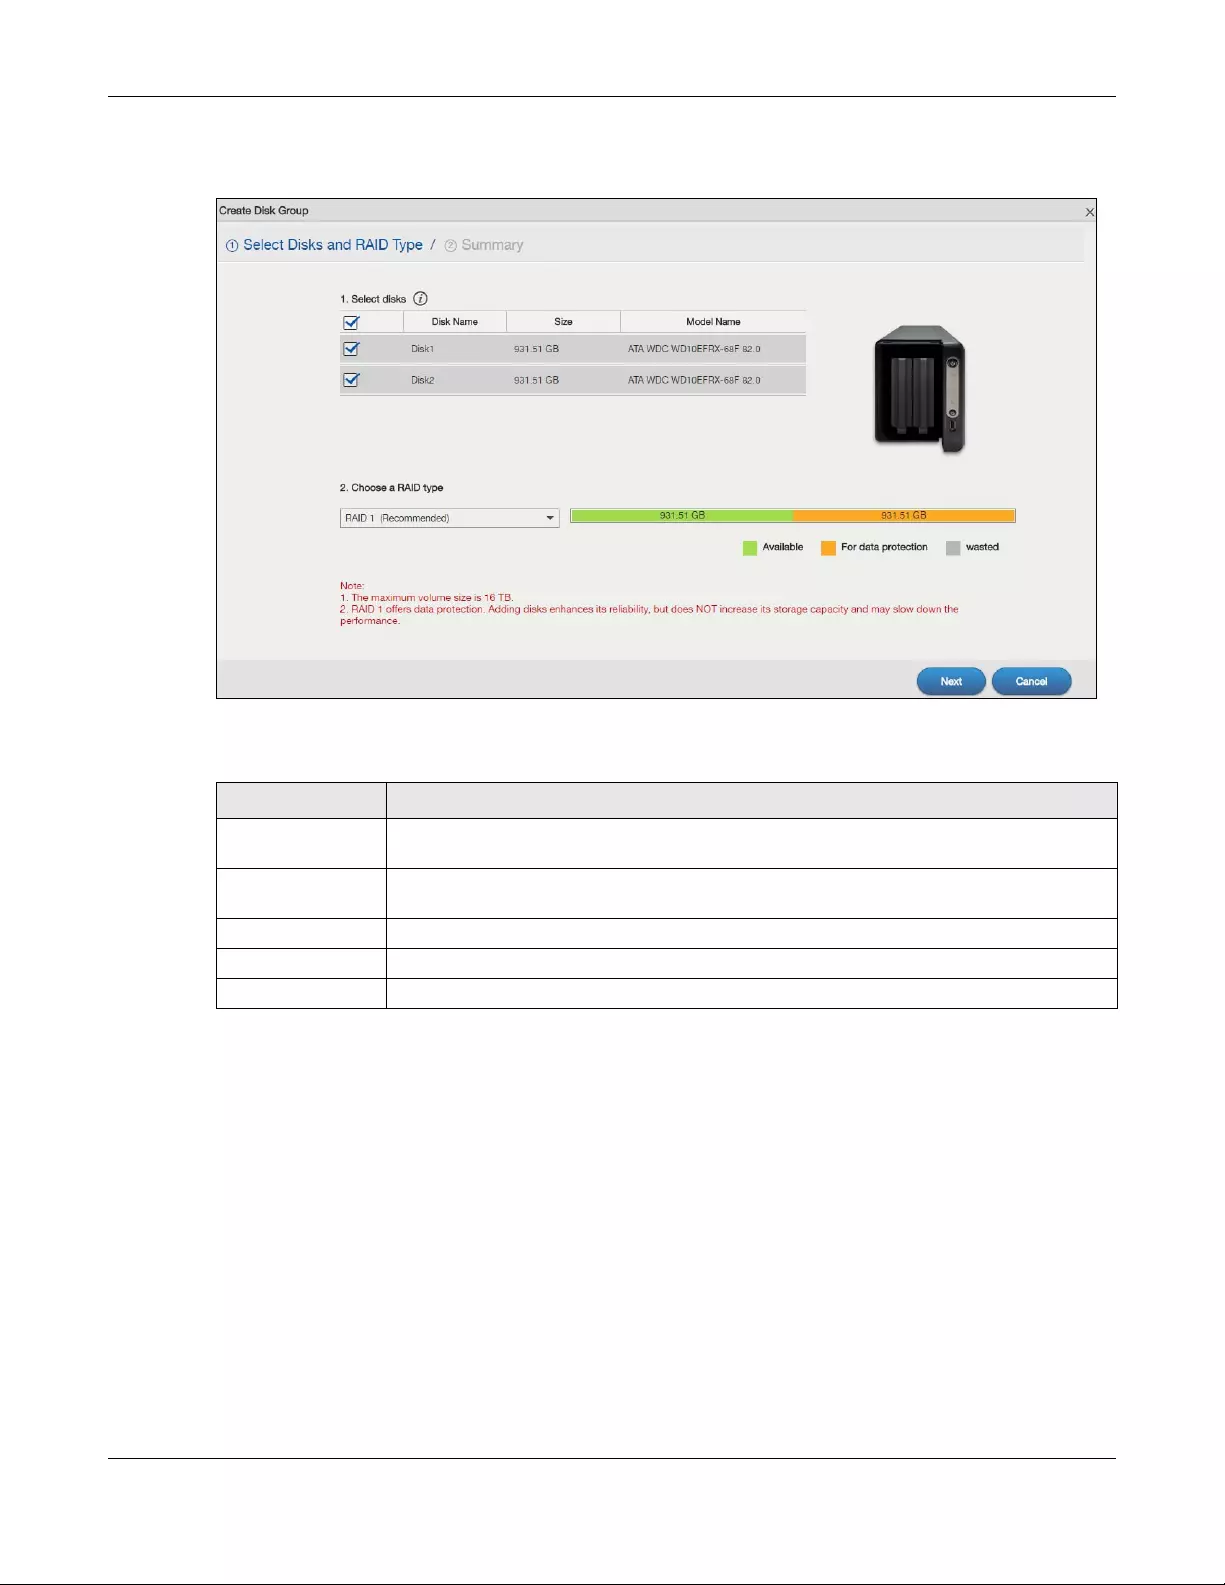
Chapter 5 Storage Manager
NAS Series User’s Guide
72
Step 1 Select Disks and RAID Type
Figure 57 Create Disk Group: Select Disks and RAID Type
The following table describes the labels in this screen.
Table 31 Create Disk Group: Select Disks and RAID Type
LABEL DESCRIPTION
Select disks This section lists all available hard disks in the table and displays the disk trays the hard disks
are currently installed in the graphic on the right.
Select one or more hard disks where you want to create a disk group. Use the check box on
the top to select or unselect all entries in this column.
Disk Name This field shows the name of the hard disk.
Size This field shows the total disk size.
Model Name This field shows the model of the hard disk.
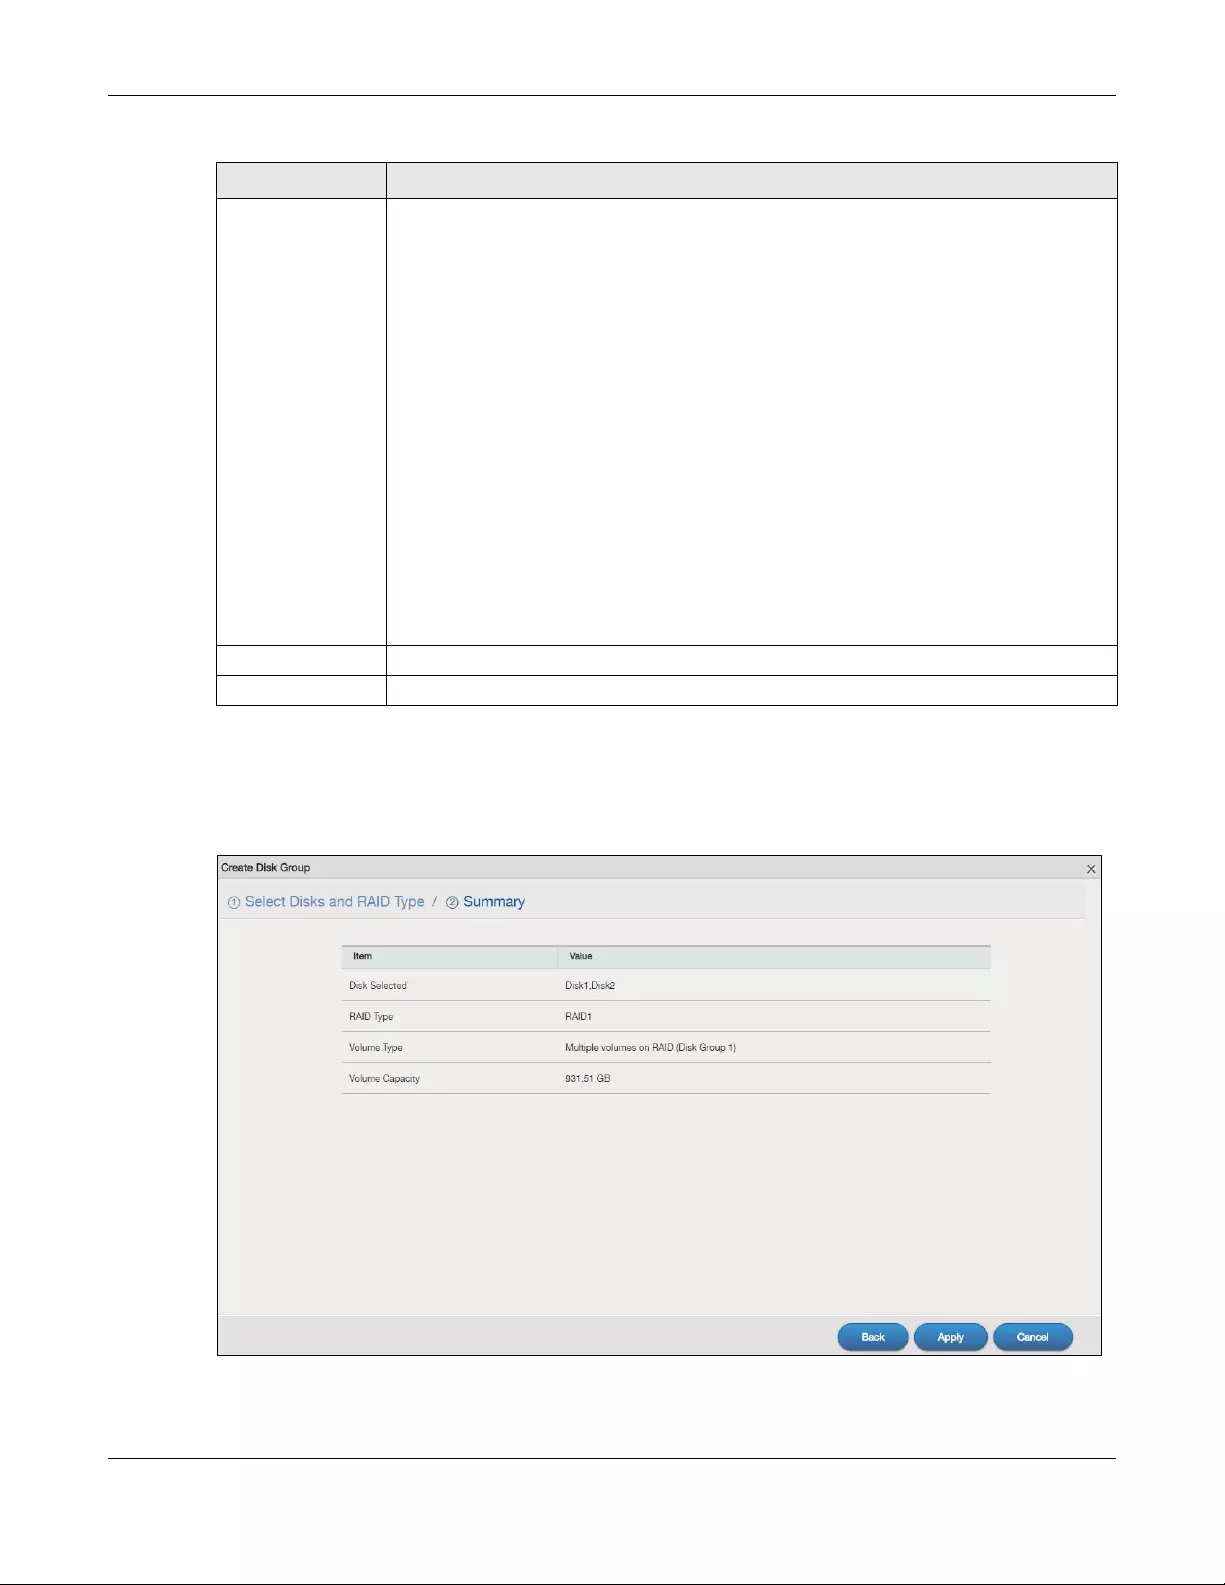
Chapter 5 Storage Manager
NAS Series User’s Guide
73
Step 2 Summary
Use this screen to review the settings you configured in the last step.
Figure 58 Create Disk Group: Summary
Choose a RAID
type
Select a RAID type from the drop-down list box. The corresponding space allocations of
available size, data protection area, and wasted size display.
Use Basic with one disk.
Use JBOD with two or more disks for maximum capacity.
Use RAID 0 with two or four disks for maximum speed.
Use RAID 1 with two or more disks to mirror primary data to another disk(s) with high
performance.
Use RAID 5 with three or more disks to balance performance, hard disk capacity usage with
data protection in case of disk failure.
Use RAID 6 with four disks for more data protection in case of disk failure.
Use RAID 10 with four disks to get better performance than RAID 6, with slightly less data
protection.
See Table 10 on page 44 or Section 5.6 on page 97 for more information.
Note: Use the same capacity of hard disks for RAID 1, 5, 6, or 10 to avoid wasting
space.
Next Click Next to go to the next step.
Cancel Click Cancel to close the screen without saving any settings.
Table 31 Create Disk Group: Select Disks and RAID Type (continued)
LABEL DESCRIPTION
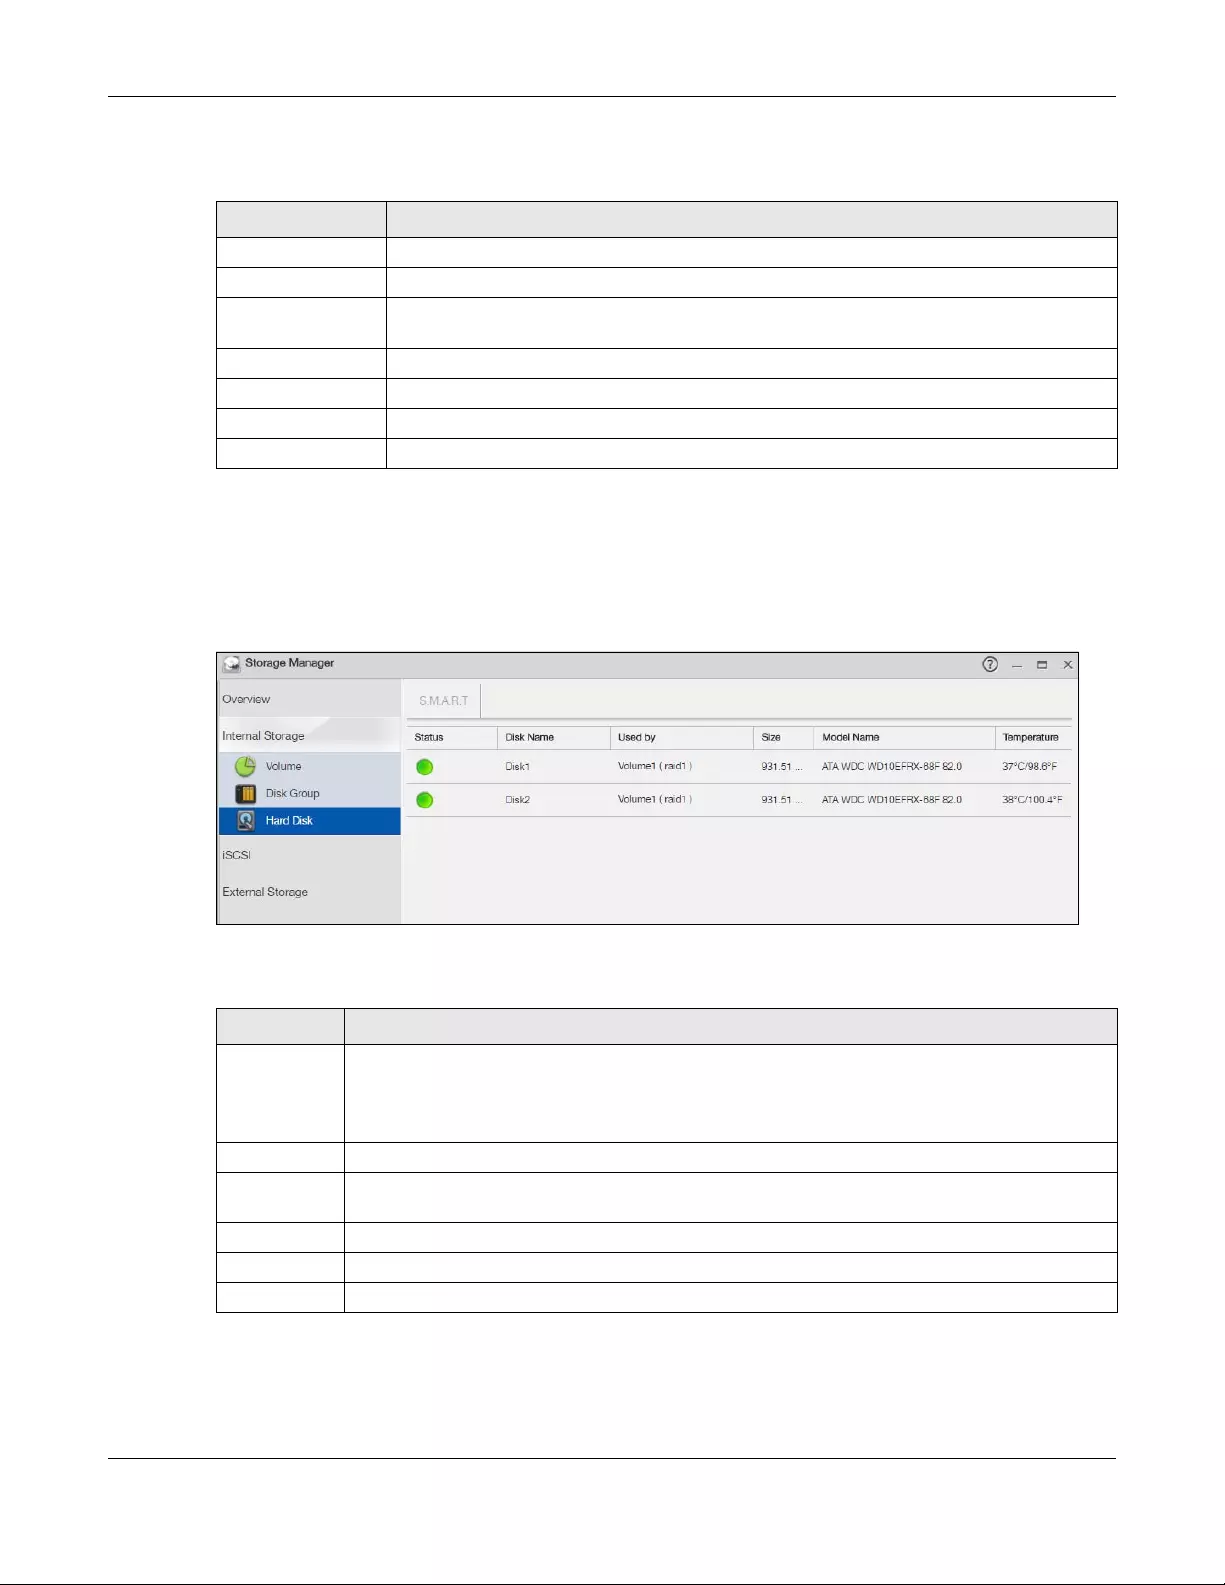
Chapter 5 Storage Manager
NAS Series User’s Guide
74
The following table describes the labels in this screen.
5.3.3 Hard Disk Screens
Use the Hard Disk screen to view all disk information. Click Storage Manager > Internal Storage > Hard
Disk screen to open the screen as shown.
Figure 59 Hard Disk
The following table describes the labels in this screen.
Table 32 Create Disk Group: Summary
LABEL DESCRIPTION
Disk Selected This field displays the hard disk(s) on which the RAID array will be built.
RAID Type This field displays the type of RAID on which the volume will be built.
Volume Type This field displays the type of the volume, Multiple volumes on RAID (Disk Group X) where Disk
Group X is the disk group’s name.
Volume Capacity This field displays the size of the volume.
Back Click Back to go to the previous step.
Apply Click Apply to save the settings.
Cancel Click Cancel to close the screen without saving any settings.
Table 33 Hard Disk
LABEL DESCRIPTION
Status This field shows the status of an installed hard disk.
Normal: A green circle displays. This represents the volume is functioning normally.
Crashed: A red circle displays. This represents the volume is down.
Disk Name This field shows the name of the hard disk.
Used by This field shows the name of a volume or disk group built on the hard disk if any. This field also
displays the RAID type the volume or disk group is using.
Size This field shows the total size of the hard disk.
Model Name This field shows the model of the hard disk.
Temperature This field shows the temperature of the hard disk in degrees celsius (oC) and fahrenheit (oF).
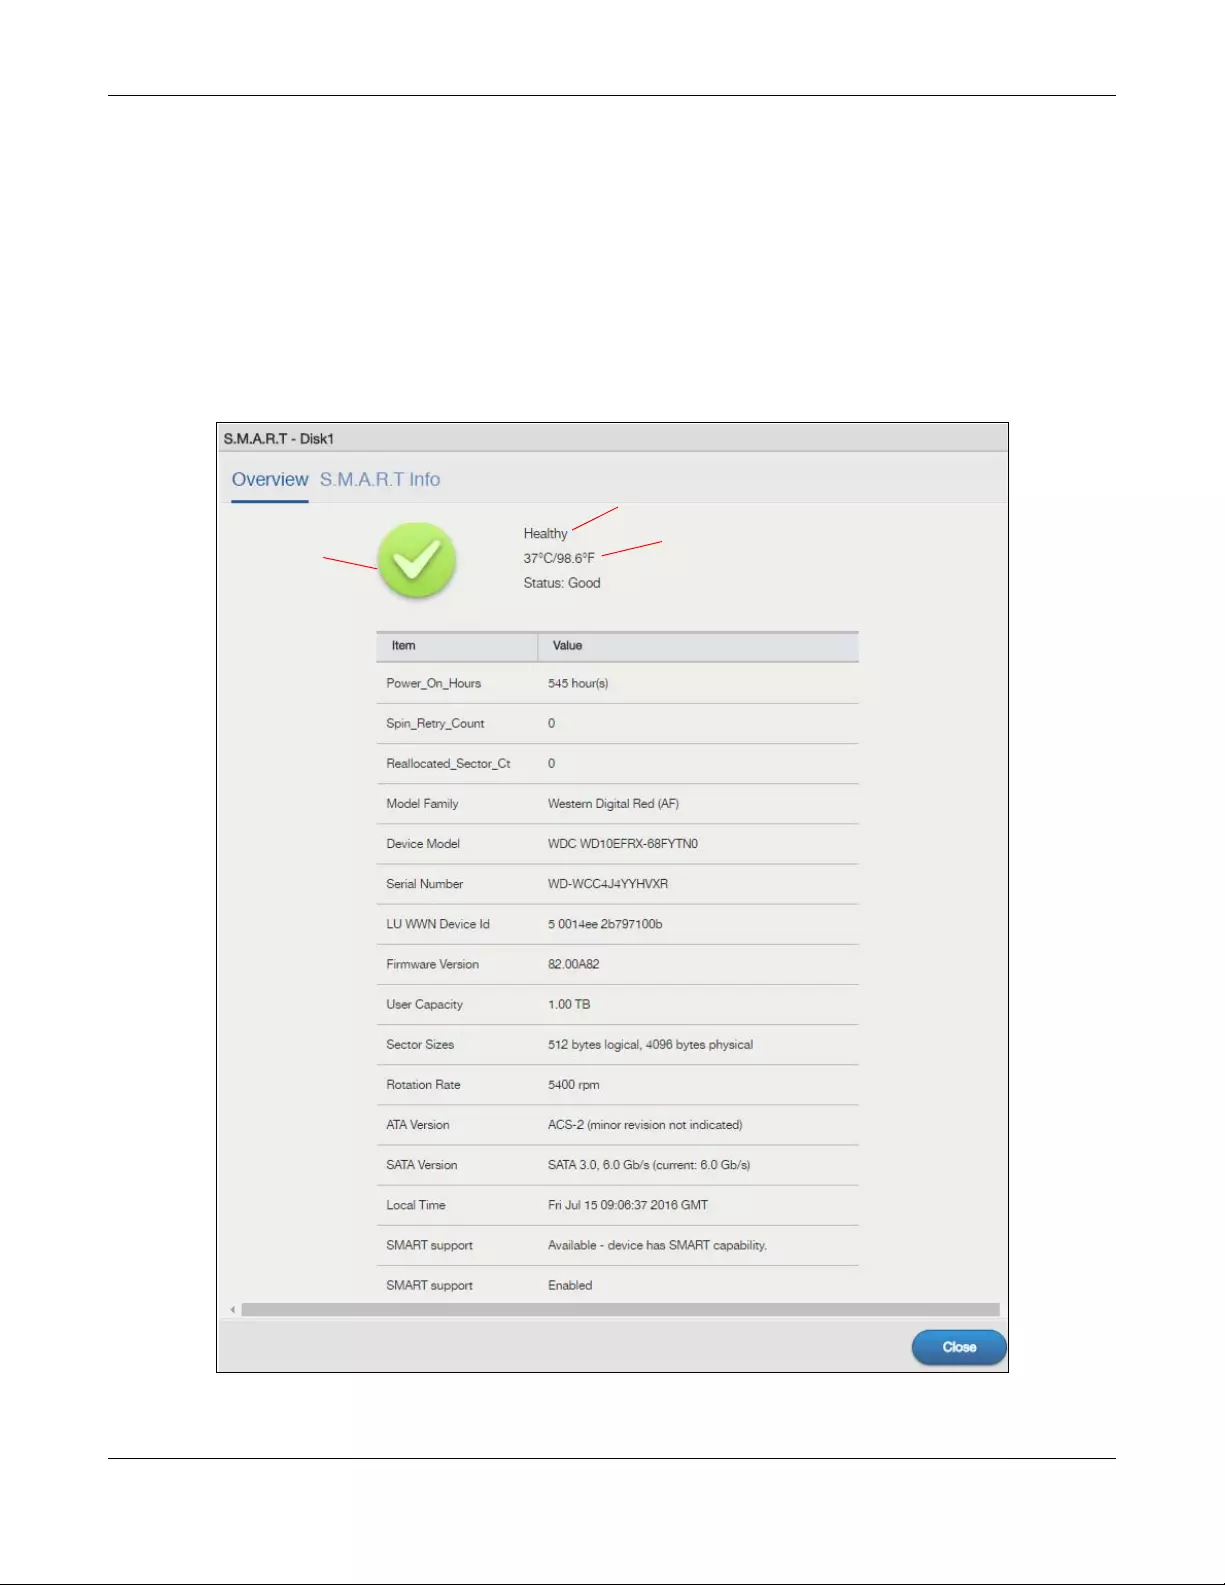
Chapter 5 Storage Manager
NAS Series User’s Guide
75
5.3.3.1 S.M.A.R.T
Use the S.M.A.R.T screens to view hard disk health indicators. Self Monitoring, Analysis, and Reporting
Technology (S.M.A.R.T) detects and reports the reliability of hard disks using standard indicators (called
“attributes”), to help you anticipate possible disk failures.
Note: The available S.M.A.R.T information varies from one hard disk vendor to another.
From the Storage Manager > Internal Storage > Hard Disk screen, select a disk and click S.M.A.R.T to
open the screen as shown.
Figure 60 S.M.A.R.T Overview
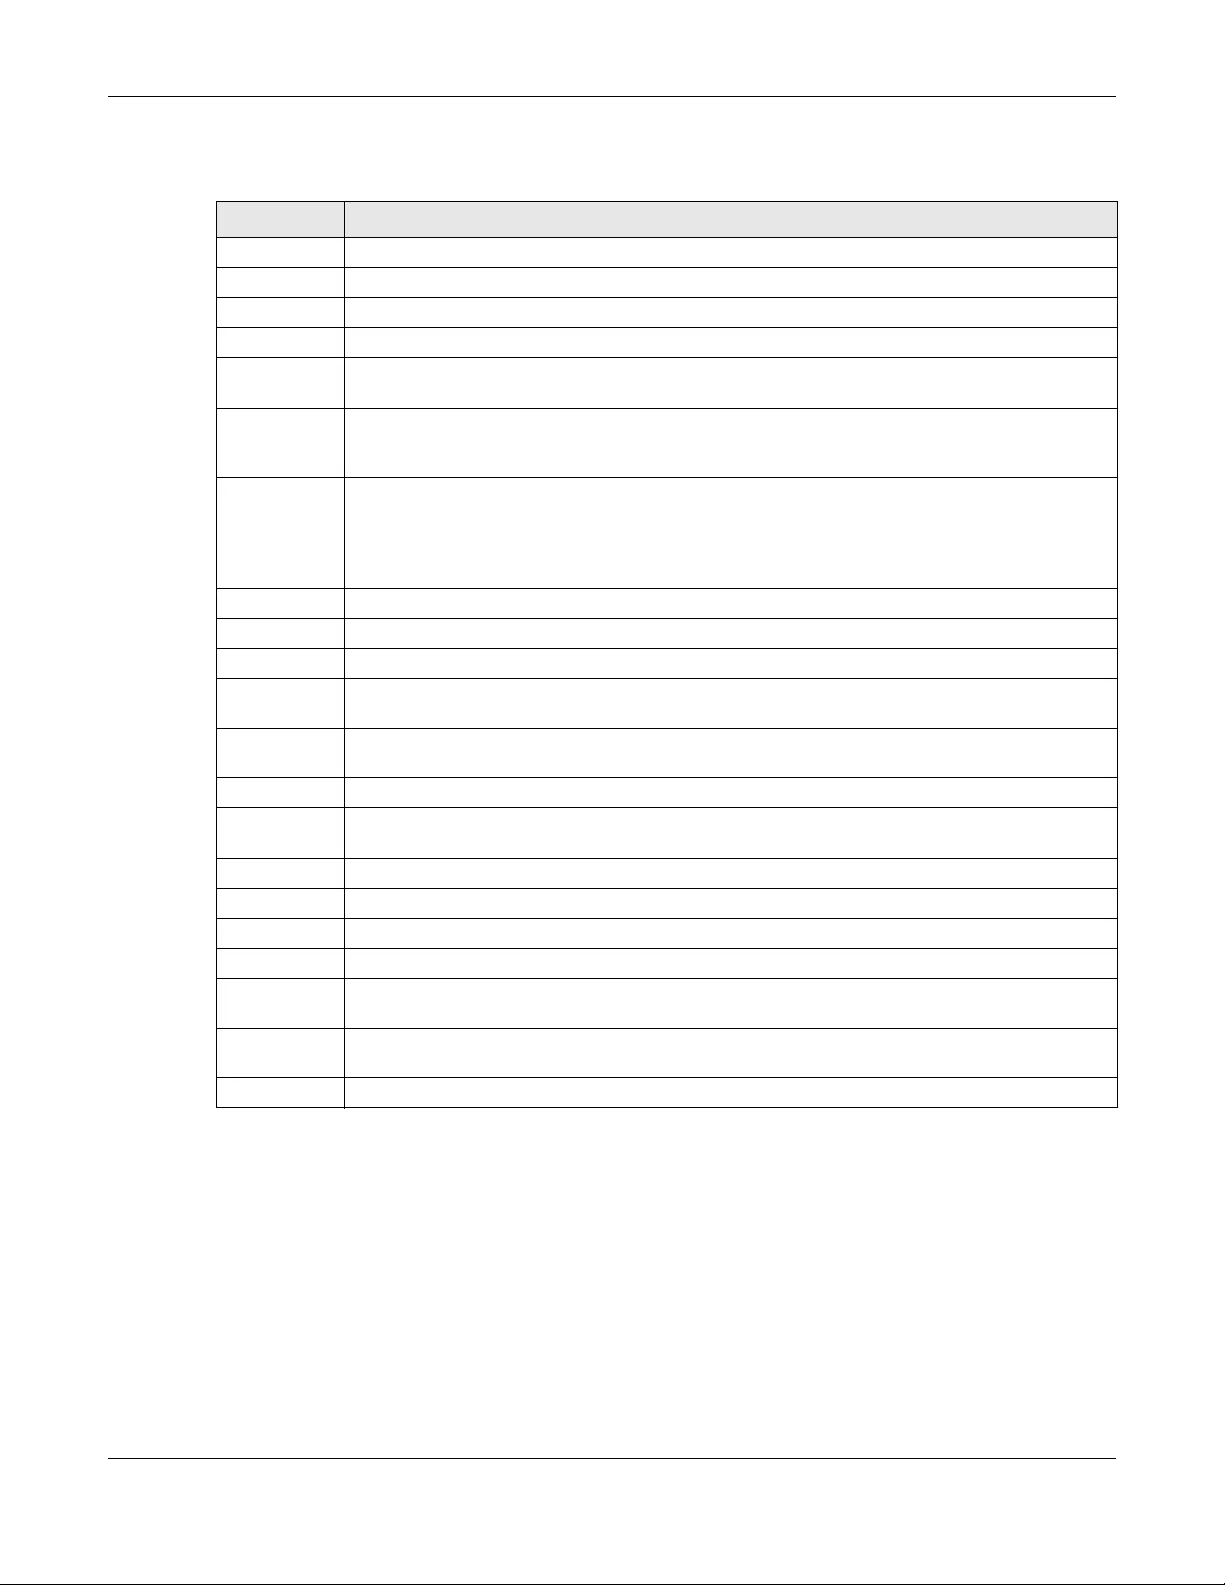
Chapter 5 Storage Manager
NAS Series User’s Guide
76
The following table describes the labels in this screen.
5.3.3.2 SMART Info
Use this screen to display more details information about the volume.
Click S.M.A.R.T Info in the S.M.A.R.T Overview screen to display the following.
Table 34 S.M.A.R.T Overview
LABEL DESCRIPTION
A This shows the current status of the hard disk (a green circle with a check mark indicates healthy).
B This shows the overall health of the hard disk based on S.M.A.R.T diagnostics.
C This shows the temperature of the hard disk in degrees celsius (oC) and fahrenheit (oF).
Status This shows your hard disk’s performance (Good or Bad).
Power_On_Ho
urs
This field shows the number of hours the hard disk has been in power-on state since it was
produced.
Spin_Retry_Co
unt
This field shows the total number of spin start retry attempts. This is the number of attempts to spin
up to fully operational speed the hard drive has made when the first attempt did not succeed. An
increase in this value is an indicator of hard disk mechanical subsystem problems.
Reallocated_S
ector_Ct
This field shows the total number of reallocated sectors on the hard drive. When the hard drive
detects a read/write/verification error, it marks the sector as “reallocated” and transfers the data
to a specially reserved (spare) area. The process is also known as remapping with “reallocated”
sectors known as remaps. The more sectors the hard disk has to reallocate, the slower read and
write speeds become.
Model Family This field shows the model family of the hard disk.
Device Model This field shows the hard disk model number that uniquely identifies a hard disk.
Serial Number This field shows this individual hard disk’s serial number from the manufacturer.
LU WWN
Device Id
This field shows the hard disk’s Logical Unit World Wide Name Device Identifier.
Firmware
Version
This field shows the version number of the hard disk’s internal operating software.
User Capacity This field shows the hard disk’s usable size.
Sector Sizes This field shows the sector size of the hard disk. A sector is the smallest physical storage unit on a
hard disk. Normally it is 512 bytes.
Rotation Rate This field shows the rotational speed of the hard disk, measured in revolutions per minute (rpm).
ATA Version This field shows the hard disk’s Advanced Technology Attachment version number.
SATA Version This field shows the hard disk’s Serial ATA (SATA) version number.
Local Time This field shows the local time that the hard disk is using.
SMART
support
This field shows whether or not the hard disk is SMART-capable.
SMART
support
This field shows whether or not the hard disk has SMART monitoring turned on.
Close Click this button to close the screen.
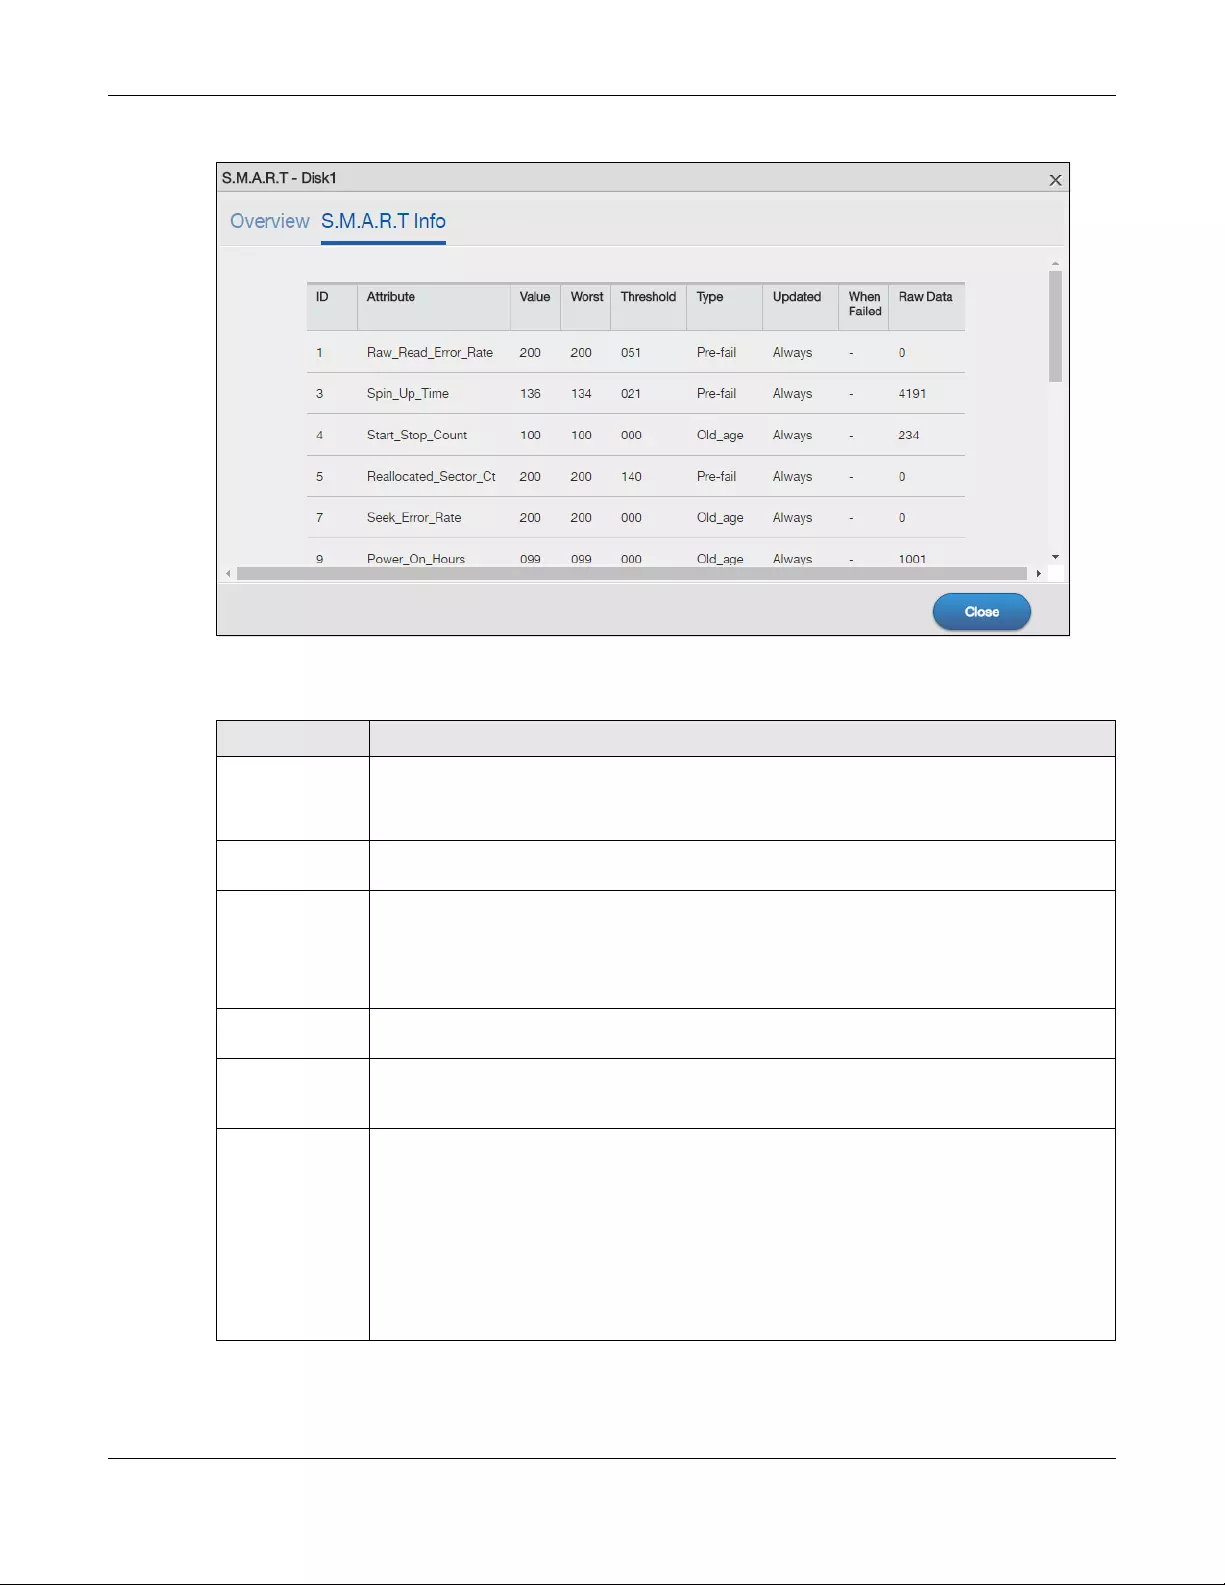
Chapter 5 Storage Manager
NAS Series User’s Guide
77
Figure 61 S.M.A.R.T Info
The following table describes the labels in this screen.
Table 35 S.M.A.R.T Info
LABEL DESCRIPTION
ID This is the identification number used to tag a hard disk attribute.
This is standard across all S.M.A.R.T-enabled storage devices. However it depends on the
storage vendor which attributes it will allow S.M.A.R.T to diagnose.
Attribute This refers to an attribute of the hard disk that S.M.A.R.T can assess. Attributes describe the hard
disk’s physical state, performance, wear-and-tear, and so on.
Value This is a value that corresponds to the Raw Data. Compare this with the Threshold.
S.M.A.R.T compresses the raw value(s) into a digit from 1 to 253, where 1 indicates the worst
scenario while 253 indicates the best scenario.
The values 100 or 200 usually represent the mean or normal value.
Worst This is the lowest value attained by the hard disk since S.M.A.R.T started its assessment of the
hard disk.
Threshold This is the attribute’s threshold value. If the attribute’s current normalized value is less than or
equal to the threshold, the attribute has failed. An attribute value close to or below the
threshold indicates the hard drive is no longer reliable.
Type This shows S.M.A.R.T’s assessment of the hard disk.
Old_age indicates end-of-product life from old-age (normal wearing out) if the attribute value
is less than or equal to the threshold.
Pre-fail indicate imminent hard drive failure if the attribute value is less than or equal to the
threshold.
Note that just because an attribute is of the Pre-fail type does not mean your hard drive is
ready to fail. It only means this if the current normalized value of the attribute is less than or
equal to the threshold.
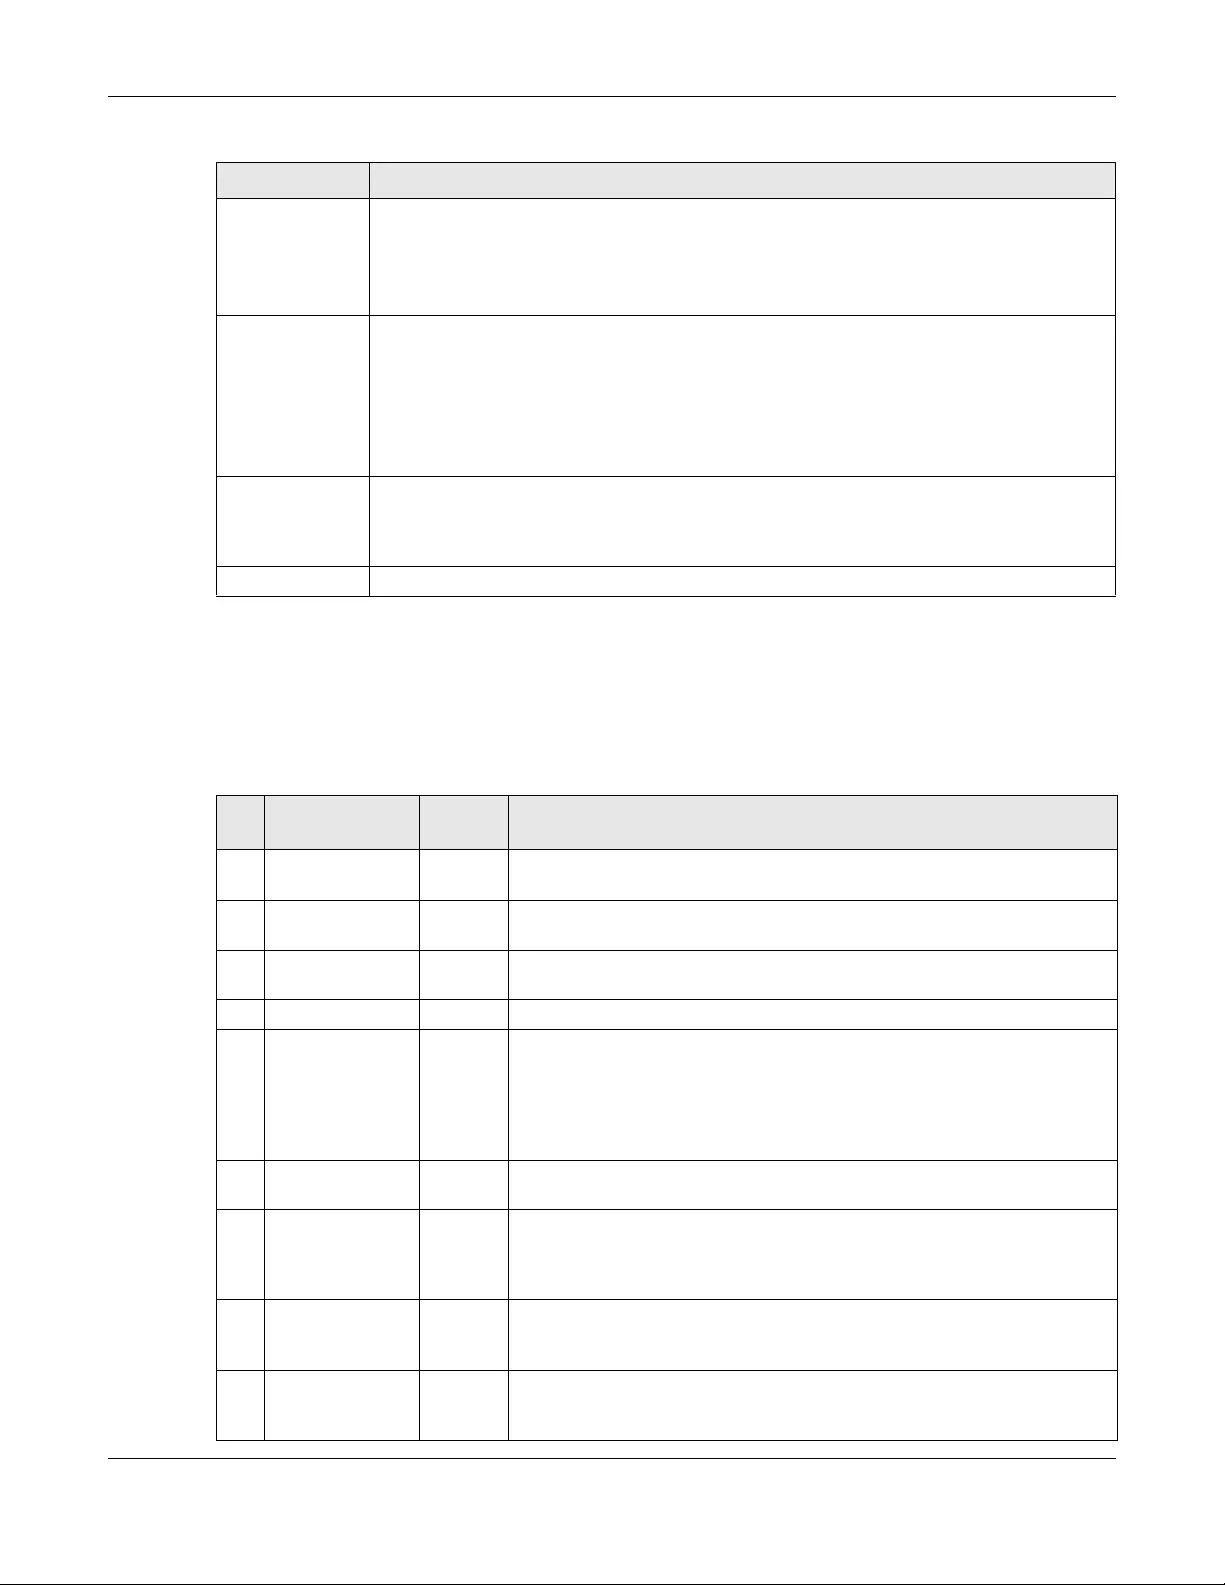
Chapter 5 Storage Manager
NAS Series User’s Guide
78
5.3.3.3 S.M.A.R.T Attributes
The following table describes some common S.M.A.R.T. attributes. If a higher or lower raw attribute value
is better, it is indicated in the BETTER column. Since S.M.A.R.T. attributes and their definitions vary by
manufacturer, refer to the hard drive manufacturer for details about the attributes your hard drive
supports.
Updated This indicates when the hard drive updates the value for this attribute.
•Always means the hard drive updates this attribute during normal operation and during
offline activities.
•Offline means the hard drive only updates this attribute when no one is accessing the hard
drive.
When Failed This column indicates when (if ever) the attribute failed. An attribute has failed if the normalized
value is less than or equal to the threshold.
•—: This displays if the attribute is not failing now and has never failed in the past.
•FAILING_NOW: This displays if the attribute’s current normalized value is less than or equal to
the threshold.
•In_the_past: This displays if the attribute’s current normalized value is greater than the
threshold but the worst recorded value is less than or equal to the threshold.
Raw Data This is the attribute’s unprocessed raw data. These values show exact amounts of time or
numbers of attempts or errors. The meaning to the raw values is specific to the hard drive
manufacturer. Table 42 on page 156 has some information about whether a higher or lower
individual raw S.M.A.R.T. attribute value is better.
Close Click this button to close the screen.
Table 35 S.M.A.R.T Info
LABEL DESCRIPTION
Table 36 S.M.A.R.T. Attributes
ID ATTRIBUTE
NAME BETTER DESCRIPTION
01 Read Error Rate Low Shows the rate of hardware read errors. If this is not zero, there is a problem
with the disk surface or the read/write heads.
02 Throughput
Performance
High This is the hard drive’s general (overall) throughput performance. A
decreasing value indicates a problem.
03 Spin-Up Time Low This is the average number of milliseconds the hard drive took for spindle spin
up (from zero RPM to fully operational).
04 Start/Stop Count The total number of spindle start and stop cycles.
05 Reallocated
Sectors Count
Low Total number of reallocated sectors on the hard drive. When the hard drive
detects a read/write/verification error, it marks the sector as “reallocated”
and transfers the data to a specially reserved (spare) area. The process is
also known as remapping with “reallocated” sectors known as remaps. The
more sectors the hard drive has to reallocate, the slower read and write
speeds become.
06 Read Channel
Margin
This is the margin of a channel when it reads data.
07 Seek Error Rate Low This is the rate of the magnetic heads’ seek errors. A failure in the mechanical
positioning system, such as servo damage or a thermal widening of the disk,
results in seek errors. An increasing number of seek errors indicate the
condition of the disk surface and the mechanical subsystem are worsening.
08 Seek Time
Performance
High This is an average performance indicator for the seek operations of the
magnetic heads. Mechanical subsystem problems cause this value to
decrease.
09 Power-On Hours
(POH)
Low This is how many hours the hard drive has been in a power-on state. The raw
value lists the total number of hours (or minutes, or seconds depending on
the manufacturer).
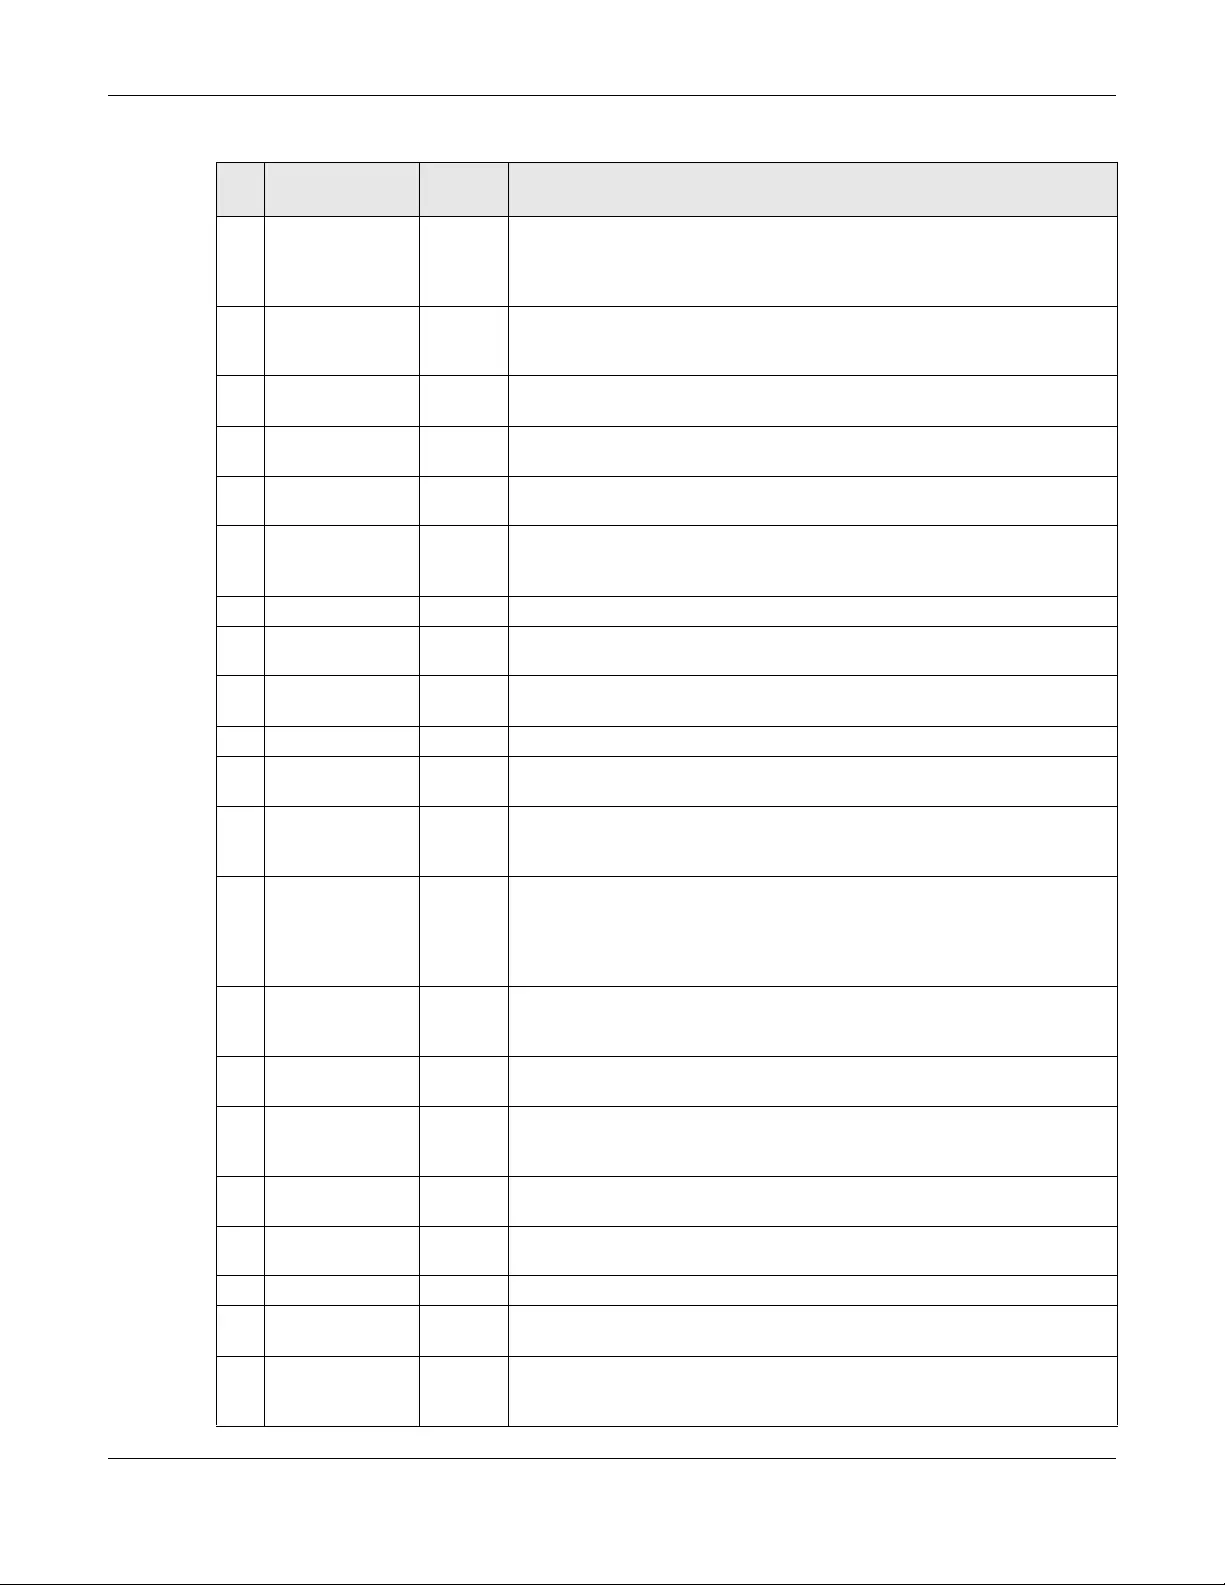
Chapter 5 Storage Manager
NAS Series User’s Guide
79
10 Spin Retry Count Low This is the total number of spin start retry attempts. This is the number of
attempts to spin up to fully operational speed the hard drive has made when
the first attempt did not succeed. An increase in this value is an indicator of
hard disk mechanical subsystem problems.
11 Recalibration
Retries
High This is the number of times recalibration was requested when the first attempt
did not succeed. A decrease in this value is an indicator of hard disk
mechanical subsystem problems.
12 Device Power
Cycle Count
This is the number of times the hard drive has gone through a full power on
and power off.
13 Soft Read Error
Rate
Low This is the number of uncorrected read errors the hard drive has reported. If
this is not zero, back up your data.
190 Airflow
Temperature
Low This indicates the temperature of the airflow measured by a Western Digital
hard drive.
190 Temperature
Difference from
100
High This indicates the value of 100 — the temperature in degrees Celsius.
Manufacturers can set a minimum threshold that corresponds to a maximum
temperature.
191 G-sense error rate Low This is the number of mistakes caused by impact loads.
192 Power-off Retract
Count
Low This is how many times the heads are loaded off the media.
193 Load/Unload
Cycle
Low This is the number of load and unload cycles into head landing zone position.
194 Temperature Low This is the hard drive’s internal temperature.
195 Hardware ECC
Recovered
High This is the time between ECC (Error Correction Code)-corrected errors.
196 Reallocation
Event Count
Low This is the total number of reallocation (remap) operations. The raw value is
the total attempts to move data from reallocated sectors to a spare area.
Successful and unsuccessful attempts are both included.
197 Current Pending
Sector Count
Low This is the number of unstable sectors awaiting reallocation. If the sector is
later successfully written or read, this value decreases and reallocation is not
performed. Only failed write attempts cause a reallocation, not read errors.
This can be difficult to test since only direct I/O writes to the disk cause
reallocations, not cached writes.
198 Uncorrectable
Sector Count
Low This is the number of errors reading or writing a sector that were not
correctable. An increase in this value is an indicator of disk surface defects or
mechanical subsystem problems.
199 UltraDMA CRC
Error Count
Low This is the number of data transfer errors through the interface cable
according to the ICRC (Interface Cyclic Redundancy Check).
200 Write Error Rate /
Multi-Zone Error
Rate
Low This is the total number of errors in writing sectors.
201 Soft Read Error
Rate
Low This is the number of read/write head off-track errors. If the value is not zero,
make a backup.
202 Data Address
Mark Errors
Low This is the number of data address mark errors. This could also be a different,
manufacturer-specific attribute.
203 Run Out Cancel Low This is the number of ECC (Error Correction Code) errors.
204 Soft ECC
Correction
Low This is the number of errors corrected by software ECC (Error Correction
Code).
205 Thermal Asperity
Rate (TAR)
Low This is the number of thermal asperity errors. Thermal asperity is a read signal
spike caused by sensor temperature rise due to touching the disk surface or
contaminant particles.
Table 36 S.M.A.R.T. Attributes (continued)
ID ATTRIBUTE
NAME BETTER DESCRIPTION
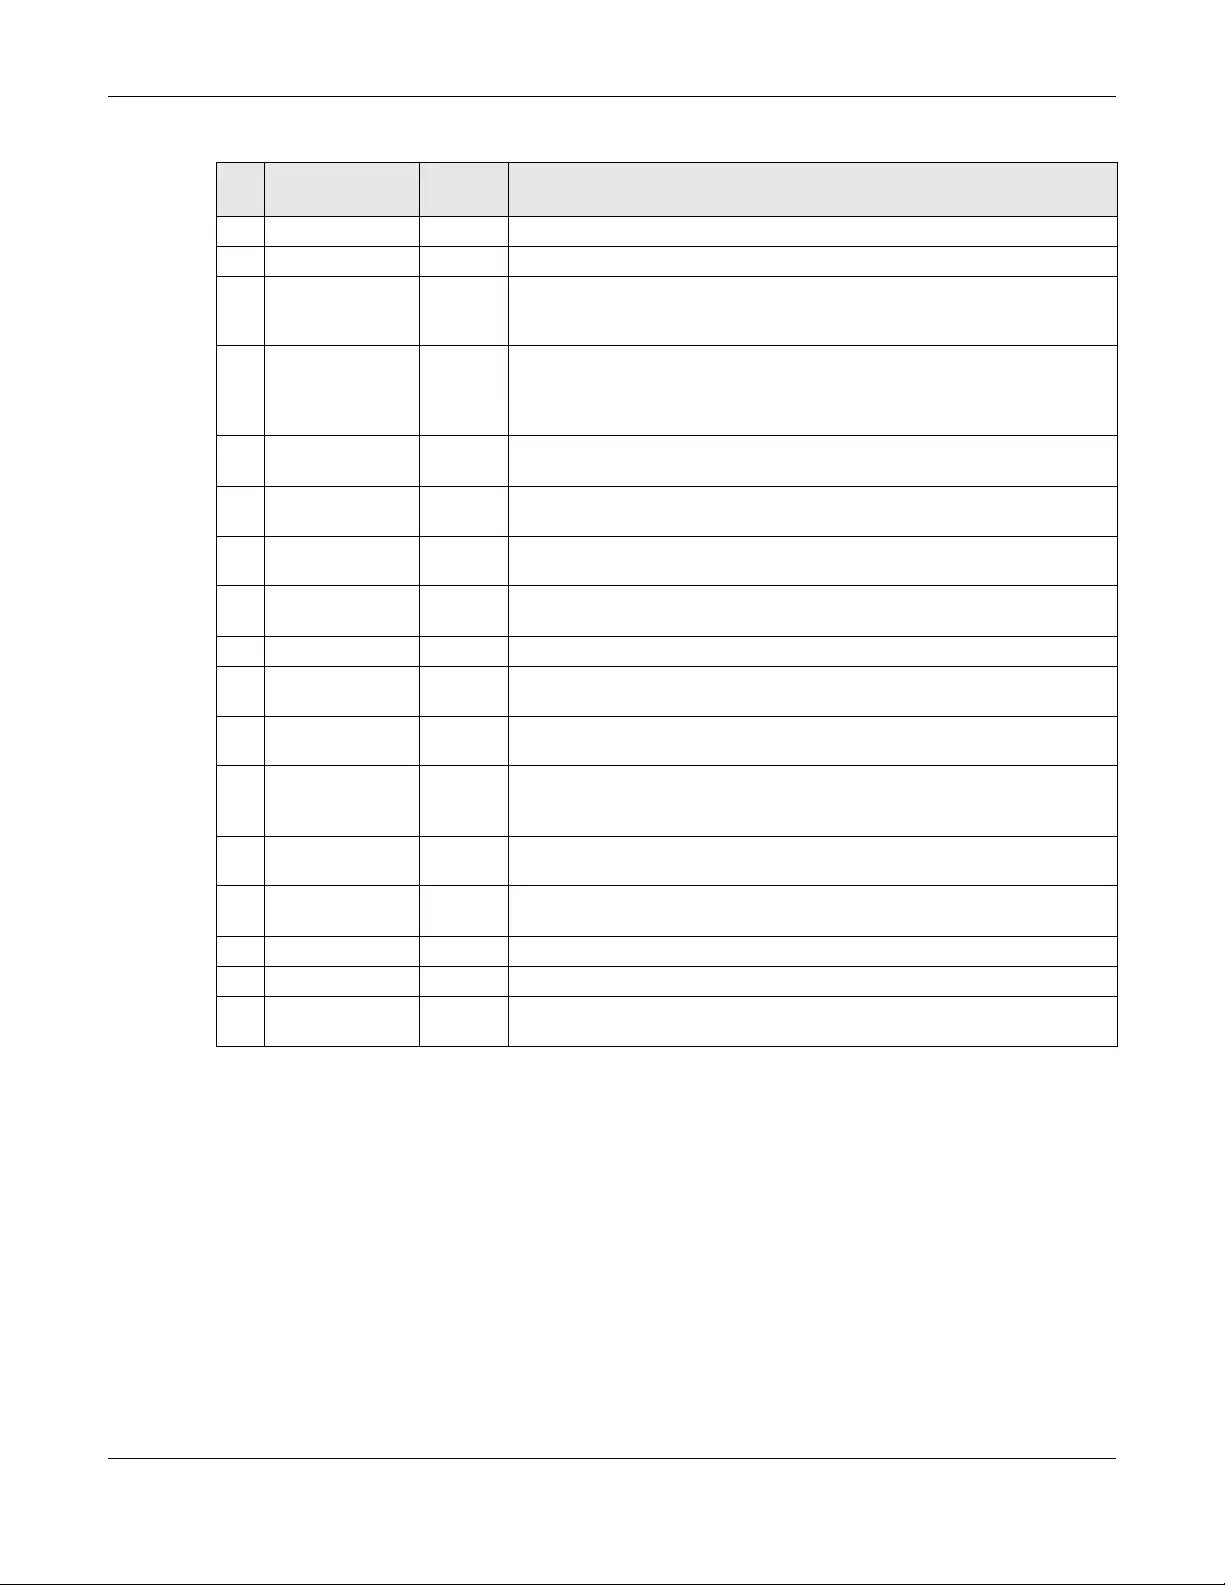
Chapter 5 Storage Manager
NAS Series User’s Guide
80
5.4 iSCSI LUNs Screens
This section enables you to create, up-map, and delete LUN volumes, as well as display the volumes’
information. Click Storage Manager > iSCSI > iSCSI LUNs to display the following screen.
206 Flying Height This is the height of the hard drive’s read/write heads above the disk surface.
207 Spin High Current This is the quantity of high current used to spin up the drive.
208 Spin Buzz This is the number of buzz routines to spin up the drive. When the arm holding
the read/write heads is stuck, the motor driving it tries to oscillate the arm to
free it. This causes an audible vibration.
209 Offline Seek
Performance
This is the hard drive’s seek performance during offline operations. Offline
operations are tests the drive does itself as opposed to those that an external
diagnostic tool has it do. Seek performance is how quickly the drive moves
from track to track.
220 Disk Shift Low This is how far the disk has moved relative to the spindle (this kind of shift is
usually due to shock).
221 G-Sense Error
Rate
Low This is the number of errors that have resulted from external vibration and
shock.
222 Loaded Hours This is how long the hard drive has operated under data load (this requires
movement of the magnetic head armature).
223 Load/Unload
Retry Count
This is how many time the magnetic head has changed position.
224 Load Friction Low This is resistance caused by friction in mechanical parts during operation.
225 Load/Unload
Cycle Count
Low This is the total number of load cycles.
226 Load ‘In’-time This is the total time that the magnetic heads actuator has had a load (not
been in the parking area).
227 Torque
Amplification
Count
Low This is the number of attempts to compensate for variations in platter speed.
228 Power-Off Retract
Cycle
Low This is how many times the magnetic armature was automatically retracted
because the power was cut.
230 GMR Head
Amplitude
This is the amplitude of thrashing (or the distance of repetitive forward and
reverse head motion).
231 Temperature Low This is the hard drive’s temperature.
240 Head Flying Hours This is the total time that the head has been positioning.
250 Read Error Retry
Rate
Low This is the number of errors in reading from the disk.
Table 36 S.M.A.R.T. Attributes (continued)
ID ATTRIBUTE
NAME BETTER DESCRIPTION
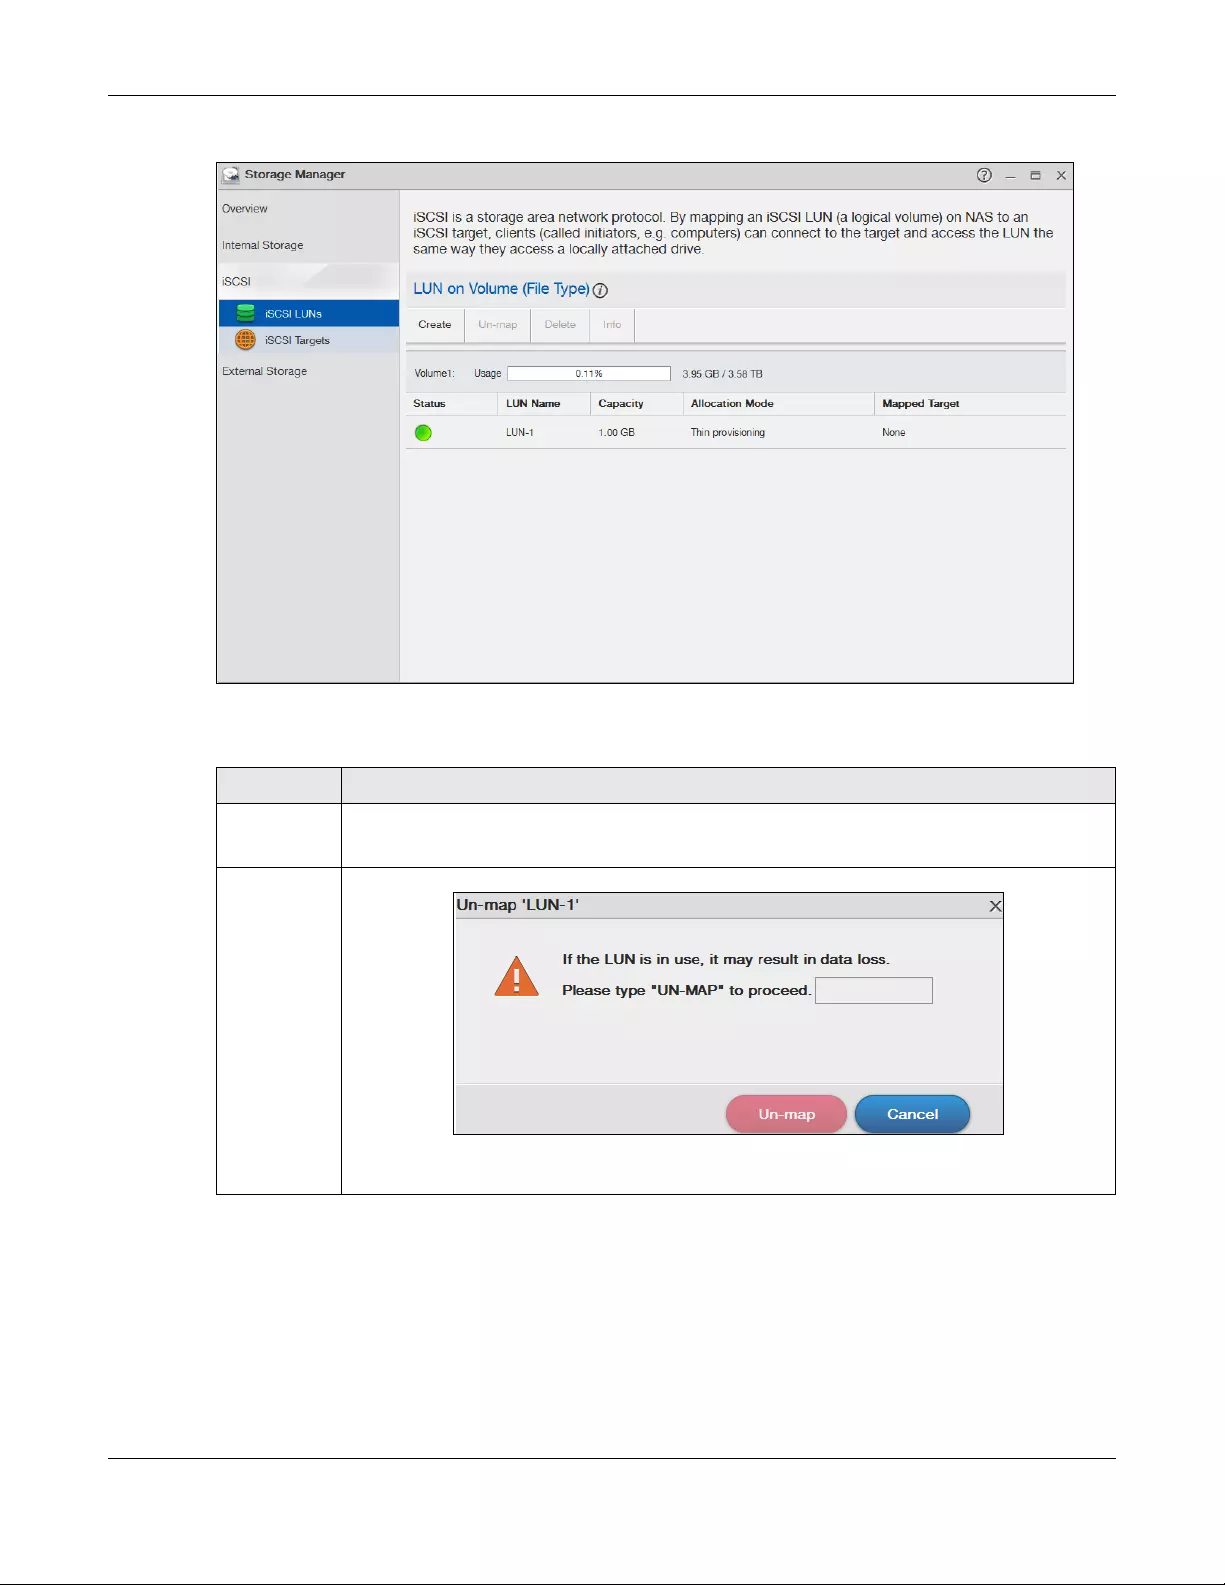
Chapter 5 Storage Manager
NAS Series User’s Guide
81
Figure 62 Storage Manager > iSCSI > iSCSI LUNs
The following table describes the labels in this screen.
Table 37 Storage Manager > iSCSI > iSCSI LUNs
LABEL DESCRIPTION
Create Click this to create a new LUN on a volume.
See more details on Section 5.4.1 on page 82.
Un-map Click this to open the following screen where you can up-map the LUN from the iSCSI target.
Key in UN-MAP and click Un-map to un-map the LUN from the iSCSI target. Click Cancel to close
this screen.
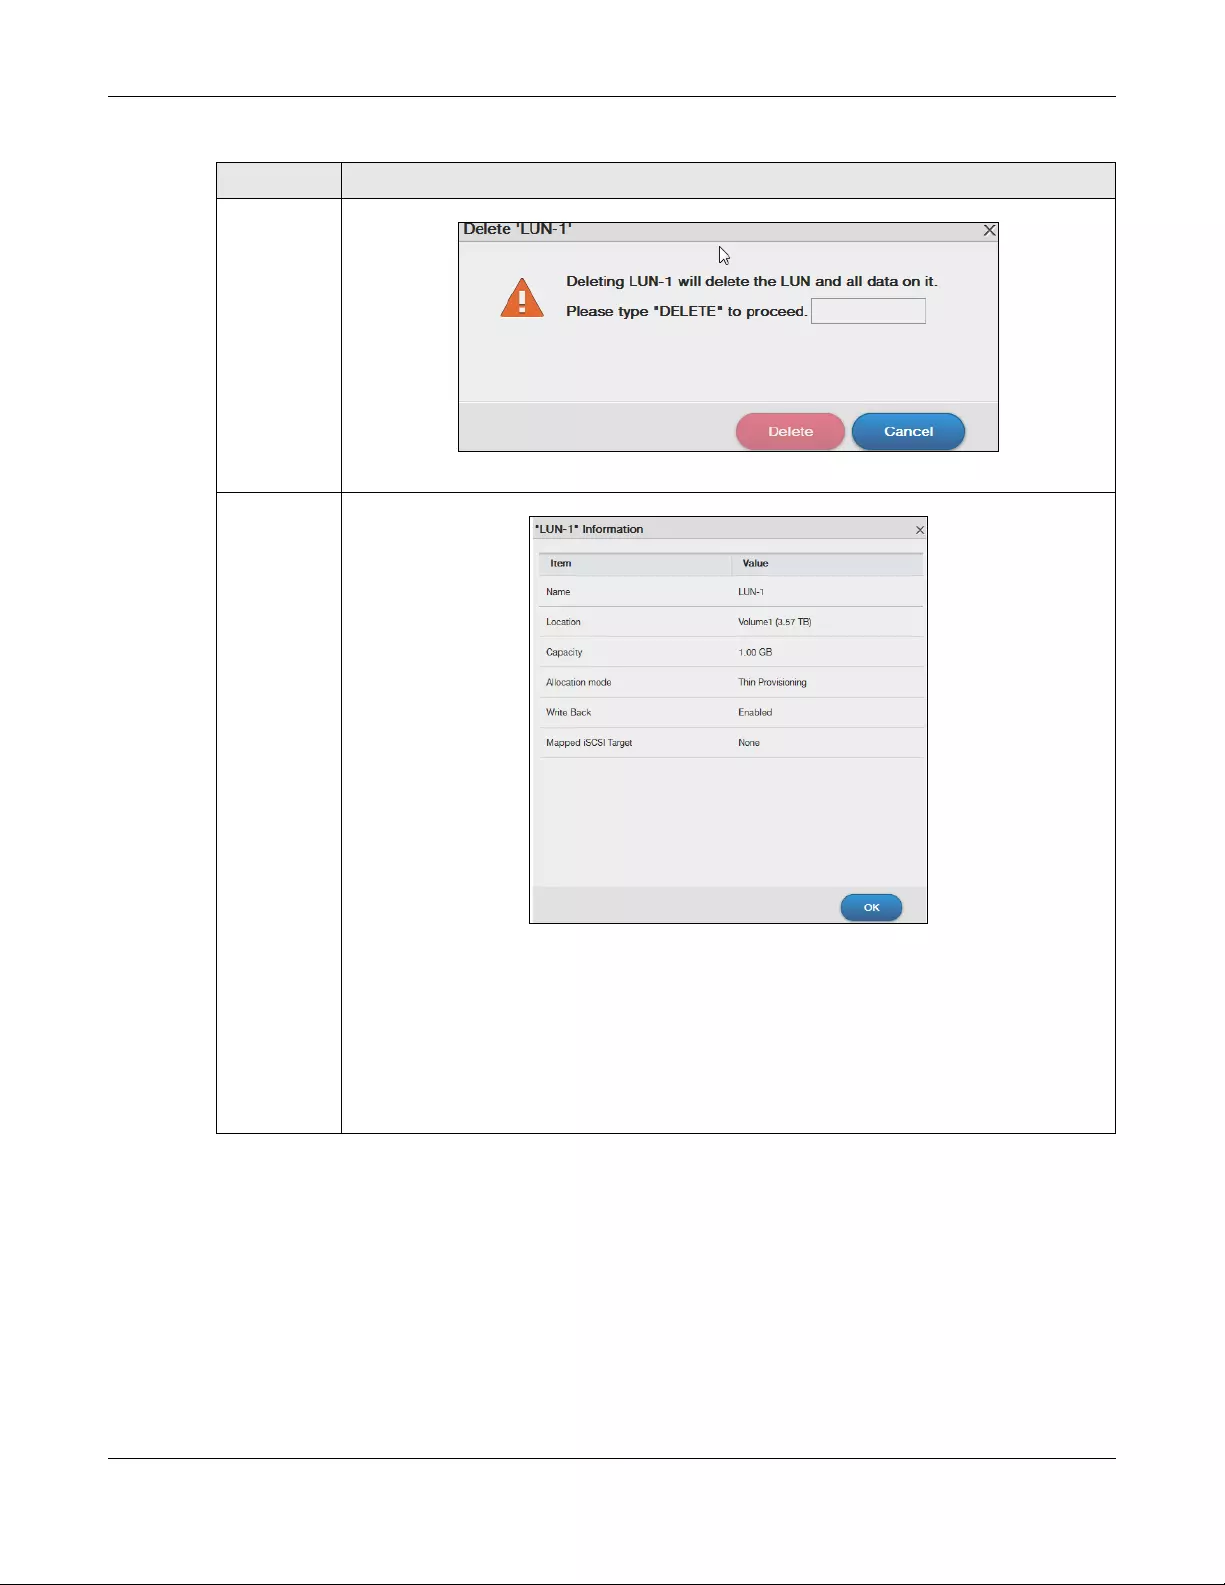
Chapter 5 Storage Manager
NAS Series User’s Guide
82
5.4.1 Create a New LUN
A LUN is a unit of storage shared over iSCSI that can be mapped to an iSCSI target. You must create an
iSCSI LUN volume before you configure an iSCSI target for it. Click Create in the iSCSI LUNs section of the
Storage Manager > iSCSI screen to open the screens as shown.
Delete Click this to open the following screen where you can delete an existing LUN.
Key in DELETE and click Delete to remove an existing LUN. Click Cancel to close this screen.
Info Click this item to check detailed information about the LUN.
Name — Displays the name of the LUN.
Location — Displays the name of the volume the LUN is located in.
Capacity — Displays the size of the LUN.
Allocation mode — Displays the allocation method the LUN applies.
Write Back — Displays whether the write back feature is enabled or disabled.
Mapped iSCSI Target — Displays the iSCSI target name the LUN is mapped to.
Table 37 Storage Manager > iSCSI > iSCSI LUNs (continued)
LABEL DESCRIPTION
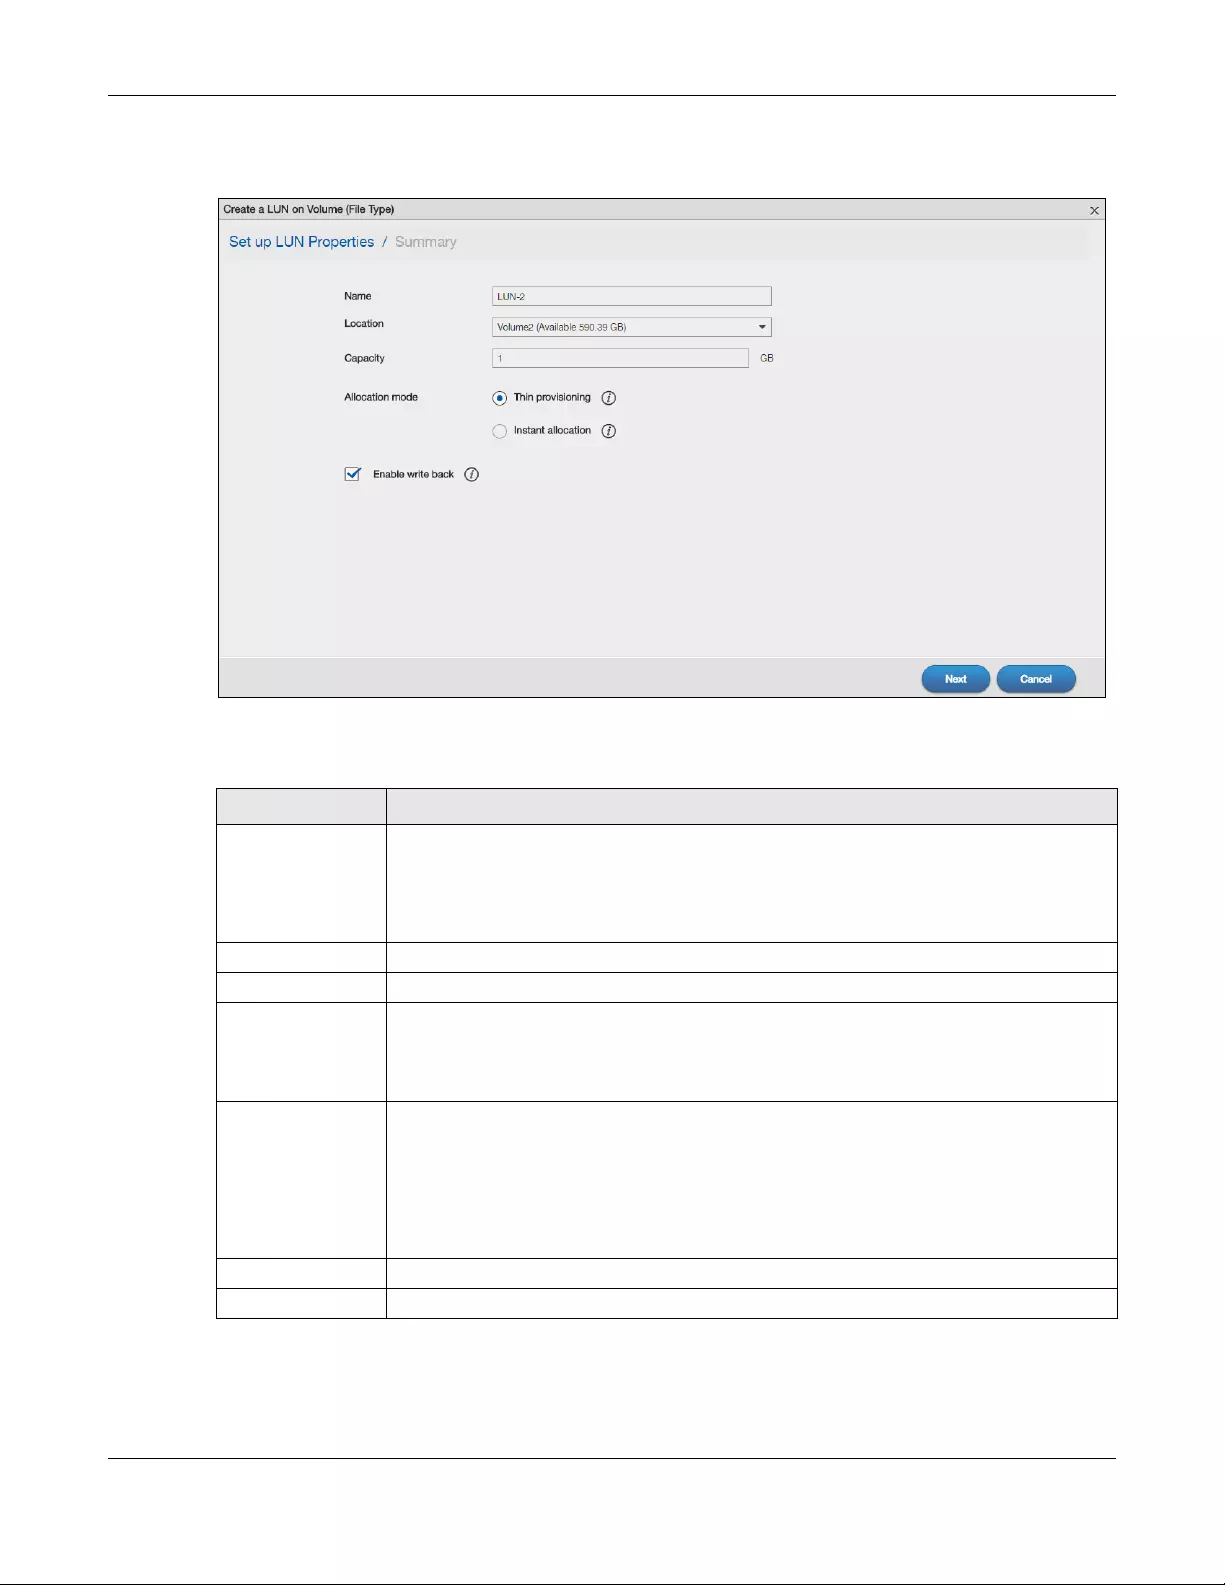
Chapter 5 Storage Manager
NAS Series User’s Guide
83
Step 1 Set up LUN Properties
Figure 63 Creating a New LUN: Set up LUN Properties
The following table describes the labels in these screens.
Step 2 Summary
Use this screen to review the settings you configured in the last step.
Table 38 Create a New LUN: Set up LUN Properties
LABEL DESCRIPTION
Name Type a LUN name in this field.
Note: Valid characters for the name are 0-9, a-z, and A-Z, and the maximum
length is 30 characters. The “-” symbol is allowed as well, but cannot be the
first character.
Location Select a volume to create the LUN on.
Capacity Type the size of the LUN in this field.
Allocation Mode Select the method the NAS uses to allocate storage space to the LUN.
Thin provisioning — Allocate space only when an initiator writes data to it.
Instant allocation — Allocate the specified disk space to the LUN when you create the LUN.
Enable Write Back Select this option to increase the write performance. Write Back is a feature that collects
data in the hard disk’s cache memory first and permanently writes data into the hard disk
when the system is idle.
Note: It also creates a serious data integrity hazard. Data loss may occur if the NAS
experiences unexpected power loss before it has time to write the cached
data to the hard disk.
Next Click Next to go to the next step.
Cancel Click Cancel to close the screen without saving any settings.
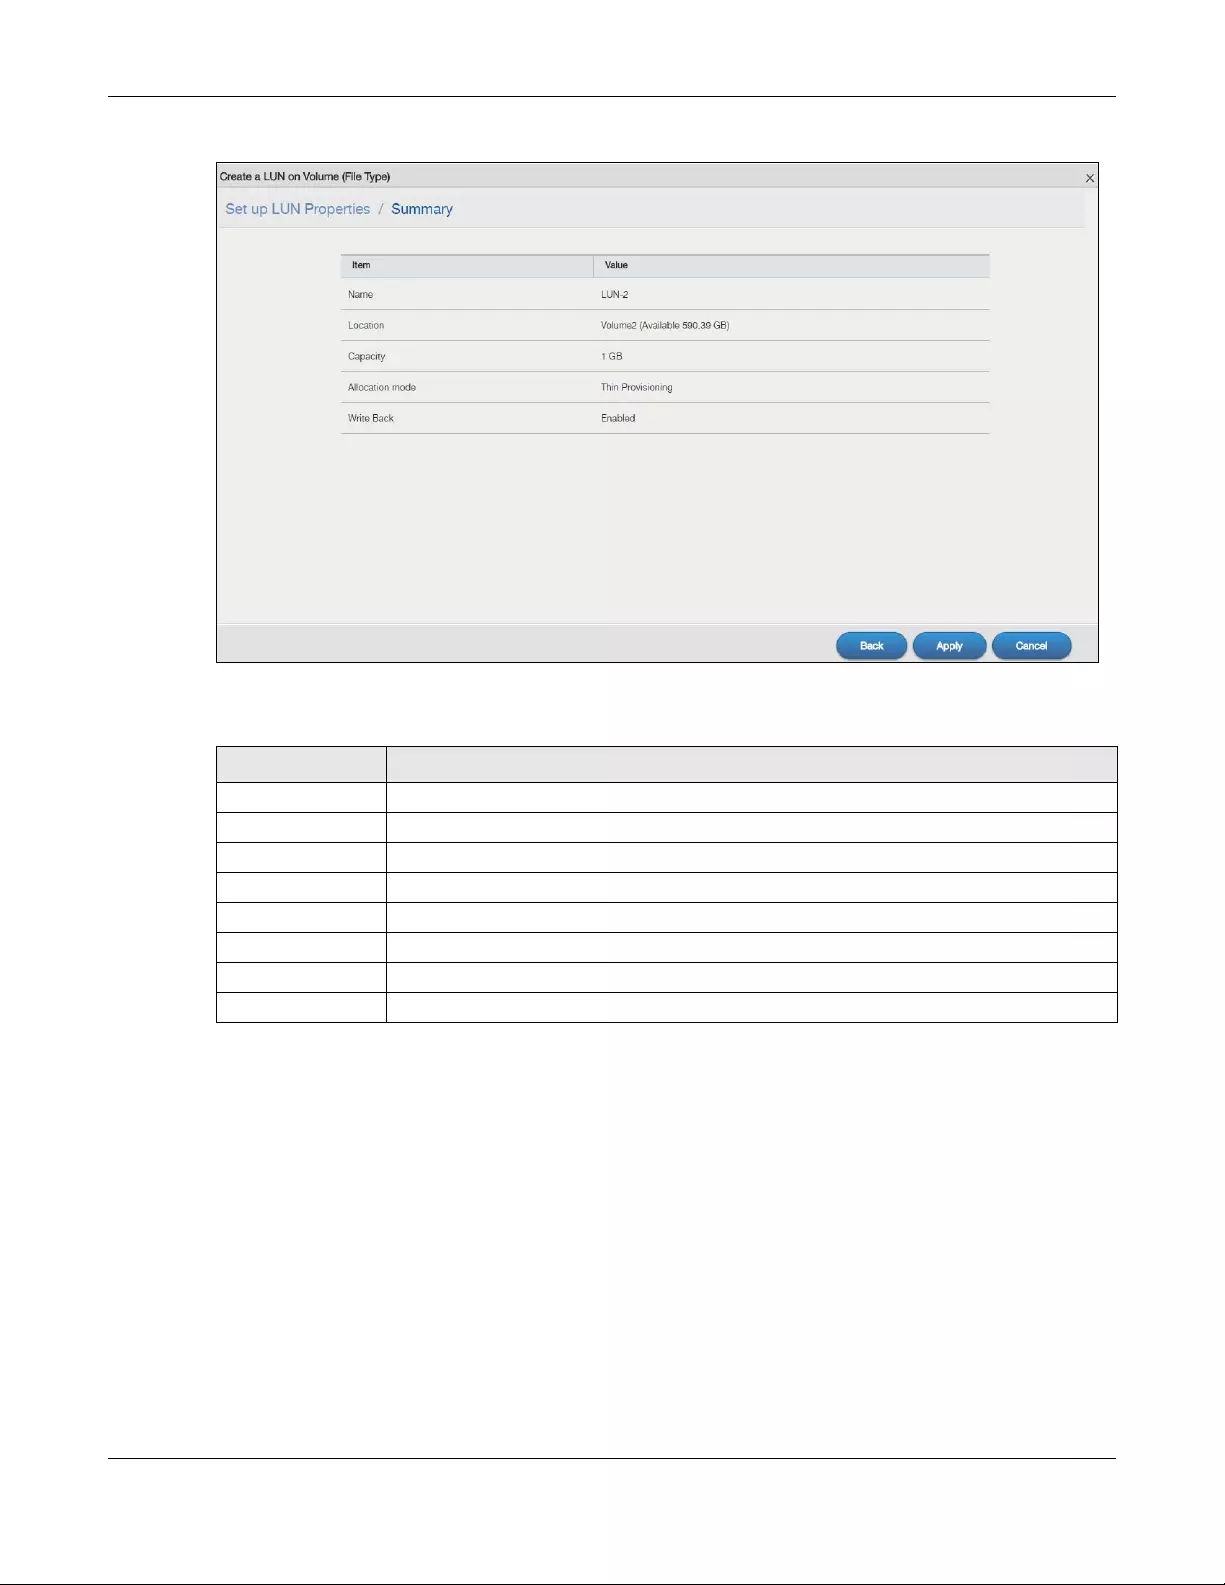
Chapter 5 Storage Manager
NAS Series User’s Guide
84
Figure 64 Creating a New LUN: Summary
The following table describes the labels in these screens.
5.4.2 iSCSI Targets Screens
The iSCSI target refers to the storage resource that is actually attached to the iSCSI storage device. The
initiator can manage the assigned disk volume on the iSCSI target over the Internet as if it was the
initiator’s internal storage volume.
iSCSI Targets allows you to create, edit, and delete an iSCSI target and map a target to an existing LUN.
Click Storage Manager > iSCSI > iSCSI Targets to show the following screen.
Table 39 Create a New LUN: Summary
LABEL DESCRIPTION
Name Displays the name of the LUN.
Location Displays the name of the volume the LUN is located in.
Capacity Displays the size of the LUN.
Allocation Mode Displays the allocation method the LUN applies.
Write Back Displays whether the Write Back feature is enabled or disabled.
Back Click Back to go to the previous step.
Apply Click Apply to save the settings.
Cancel Click Cancel to close the screen without saving any settings.
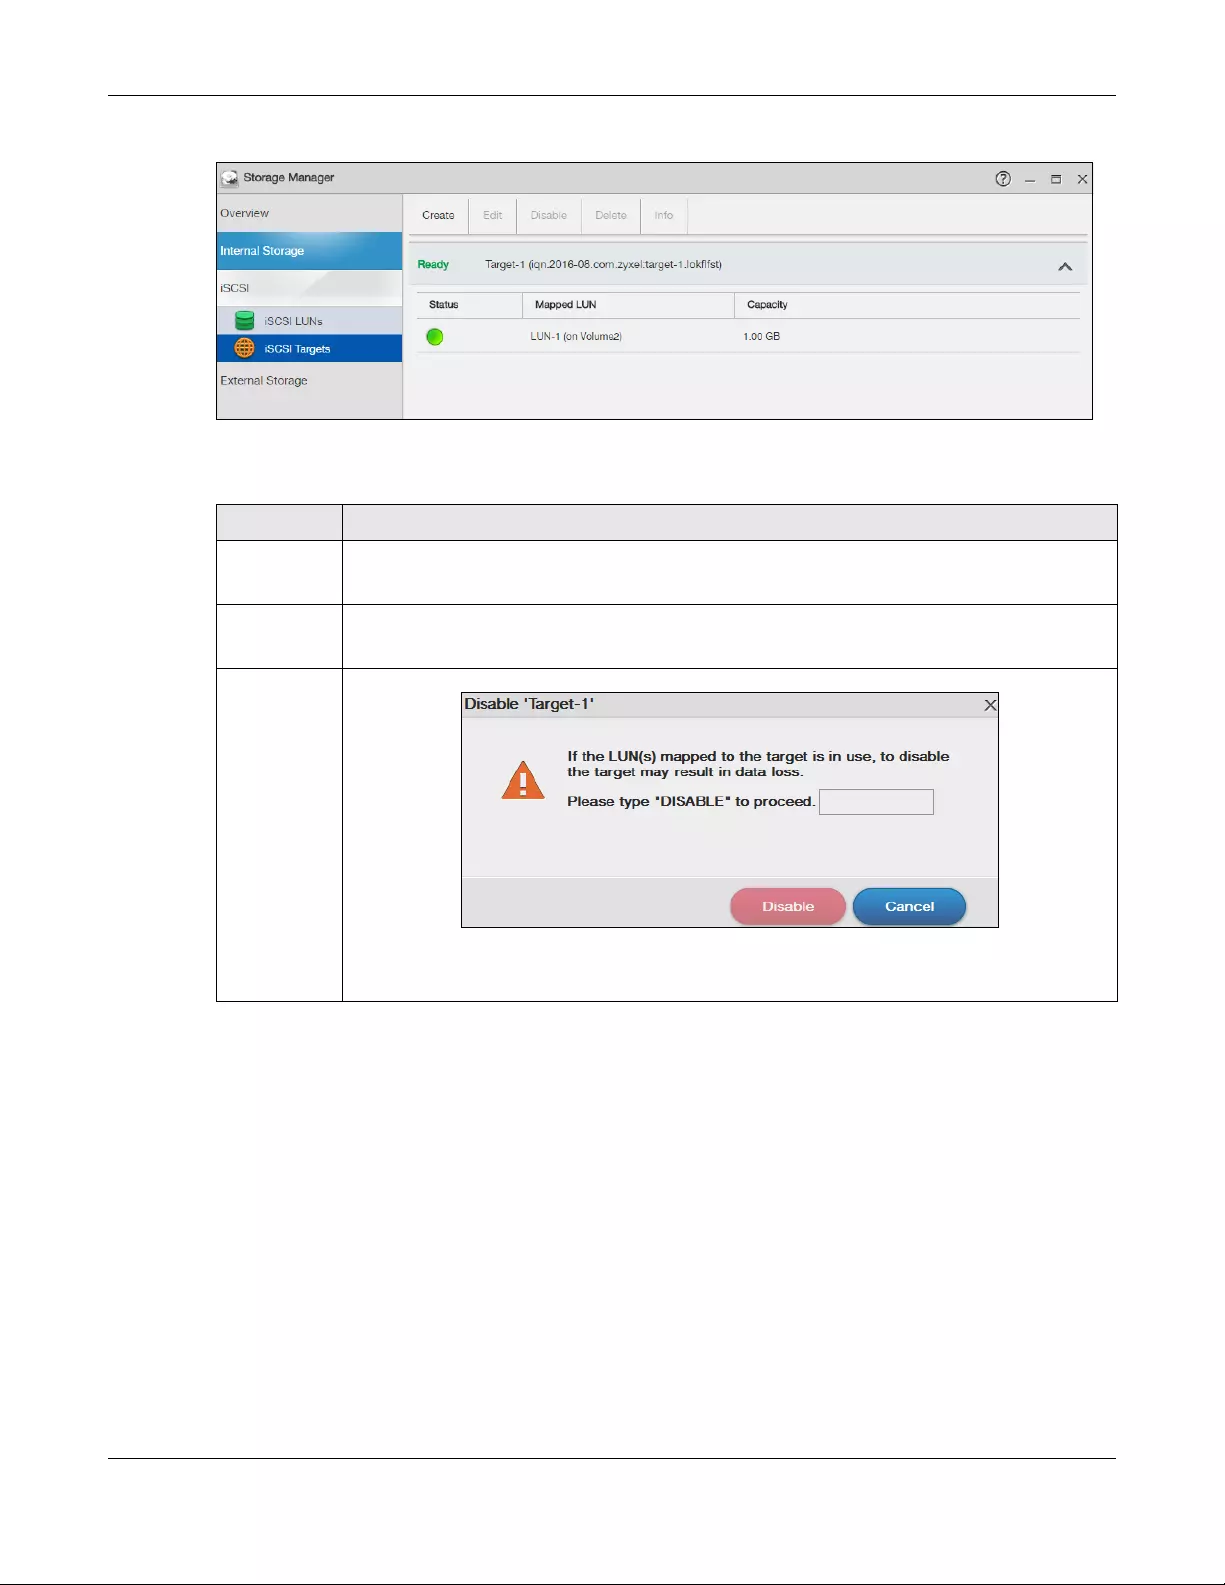
Chapter 5 Storage Manager
NAS Series User’s Guide
85
Figure 65 Storage Manager > iSCSI > iSCSI Targets
The following table describes the labels in these screens.
Table 40 Storage Manager > iSCSI > iSCSI Targets
LABEL DESCRIPTION
Create Click this to create a new iSCSI target.
See more details on Section 5.4.2.1 on page 86.
Edit Click this to modify the configuration of the iSCSI target.
See more detailed on Section 5.4.2.2 on page 91.
Disable /
Enable
Disable — Click this to open the following screen where you can deactivate an existing target.
Key in DISABLE and click Disable to deactivate the target. Click Cancel to close this screen.
Enable — When the iSCSI is disabled, click Enable will activate the target.
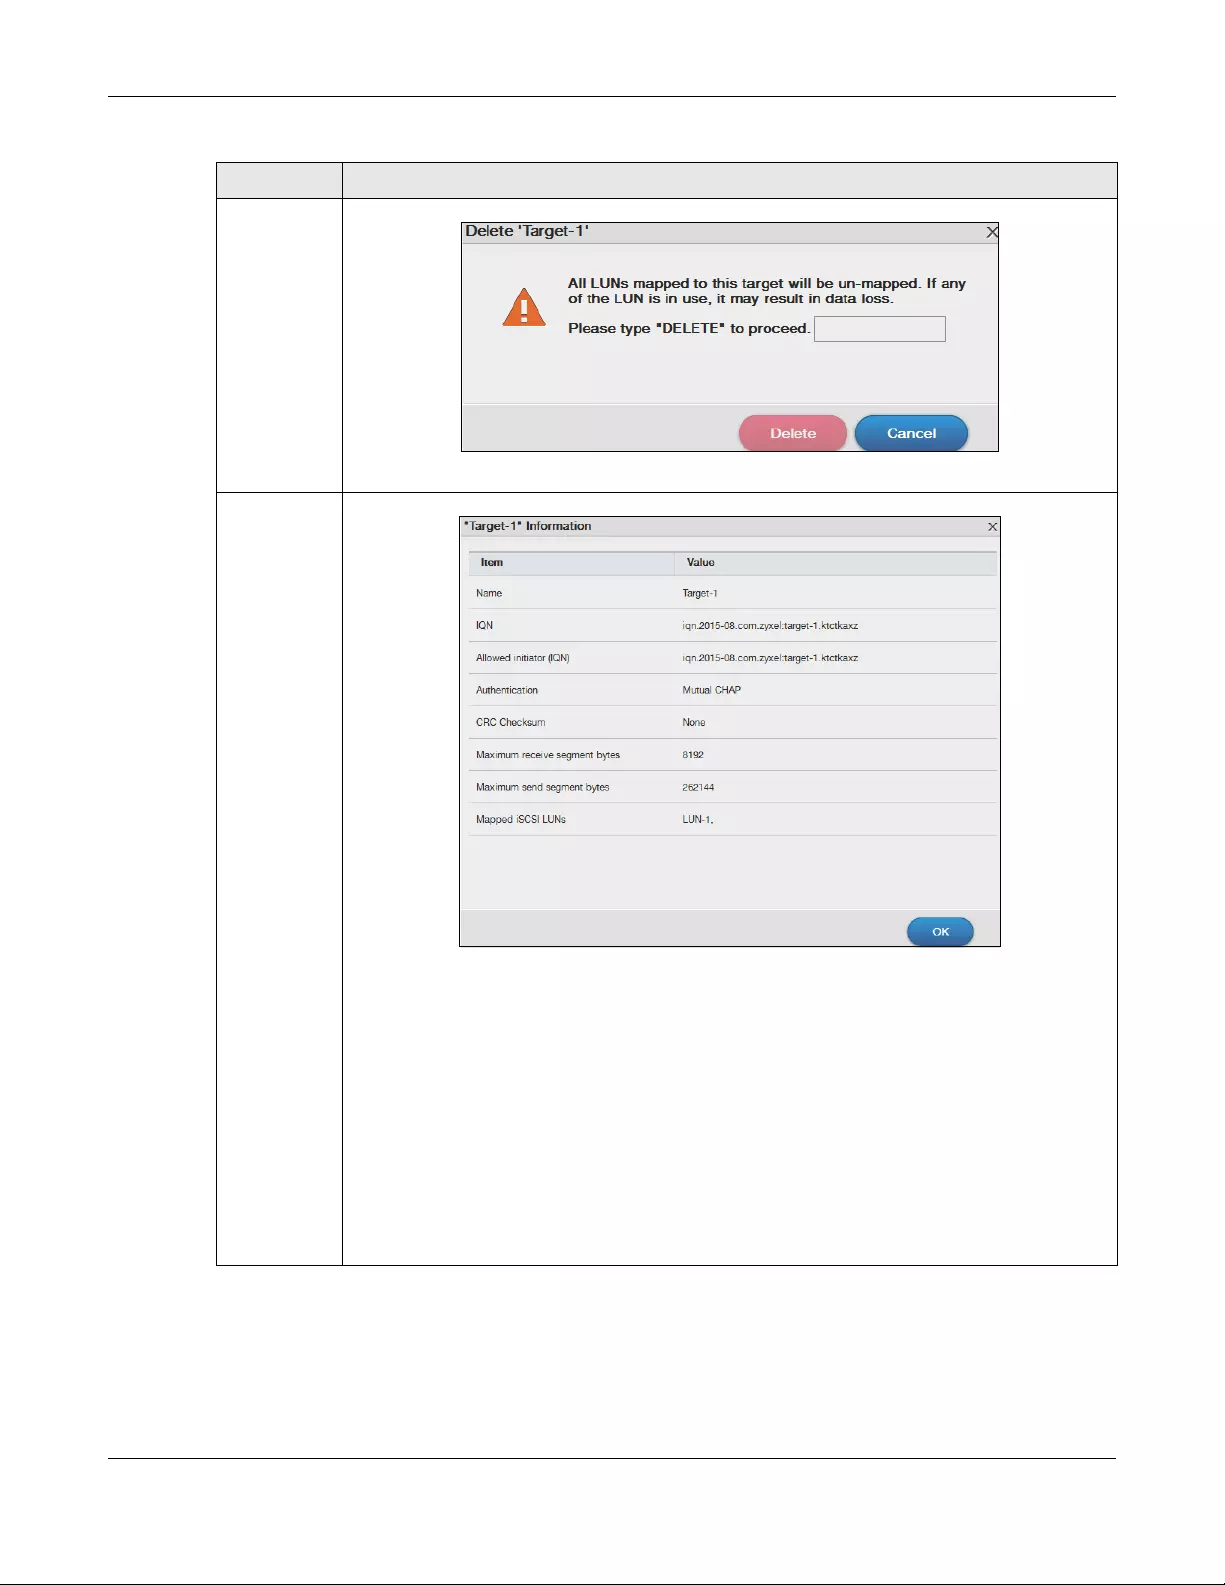
Chapter 5 Storage Manager
NAS Series User’s Guide
86
5.4.2.1 Create a New Target
Click Create in the iSCSI Targets section of the Storage Manager > iSCSI screen to open the screens as
shown.
Note: The NAS can create only 10 targets at maximum.
Delete Click this to open the following screen where you can delete an existing target.
Key in DELETE and click Delete to remove an existing target. Click Cancel to close this screen.
Info Click this item to check detailed information about the target.
Name — Displays the created target name.
IQN — Displays the target’s iSCSI Qualified Name (IQN) format.
Allowed initiator (IQN) — Displays the allowed initiator’s iSCSI Qualified Name (IQN) format.
Authentication — Displays the authentication method the target applies.
CRC Checksum — Displays the data transmission error detecting technique.
Maximum receive segment bytes — Displays the maximum data segment length in bytes that the
iSCSI target can receive.
Maximum send segment bytes — Displays the maximum data segment length in bytes that the iSCSI
target can send. This feature is for the NAS326 only.
Mapped iSCSI Luns — Displays the LUNs mapped with the target.
Table 40 Storage Manager > iSCSI > iSCSI Targets (continued)
LABEL DESCRIPTION
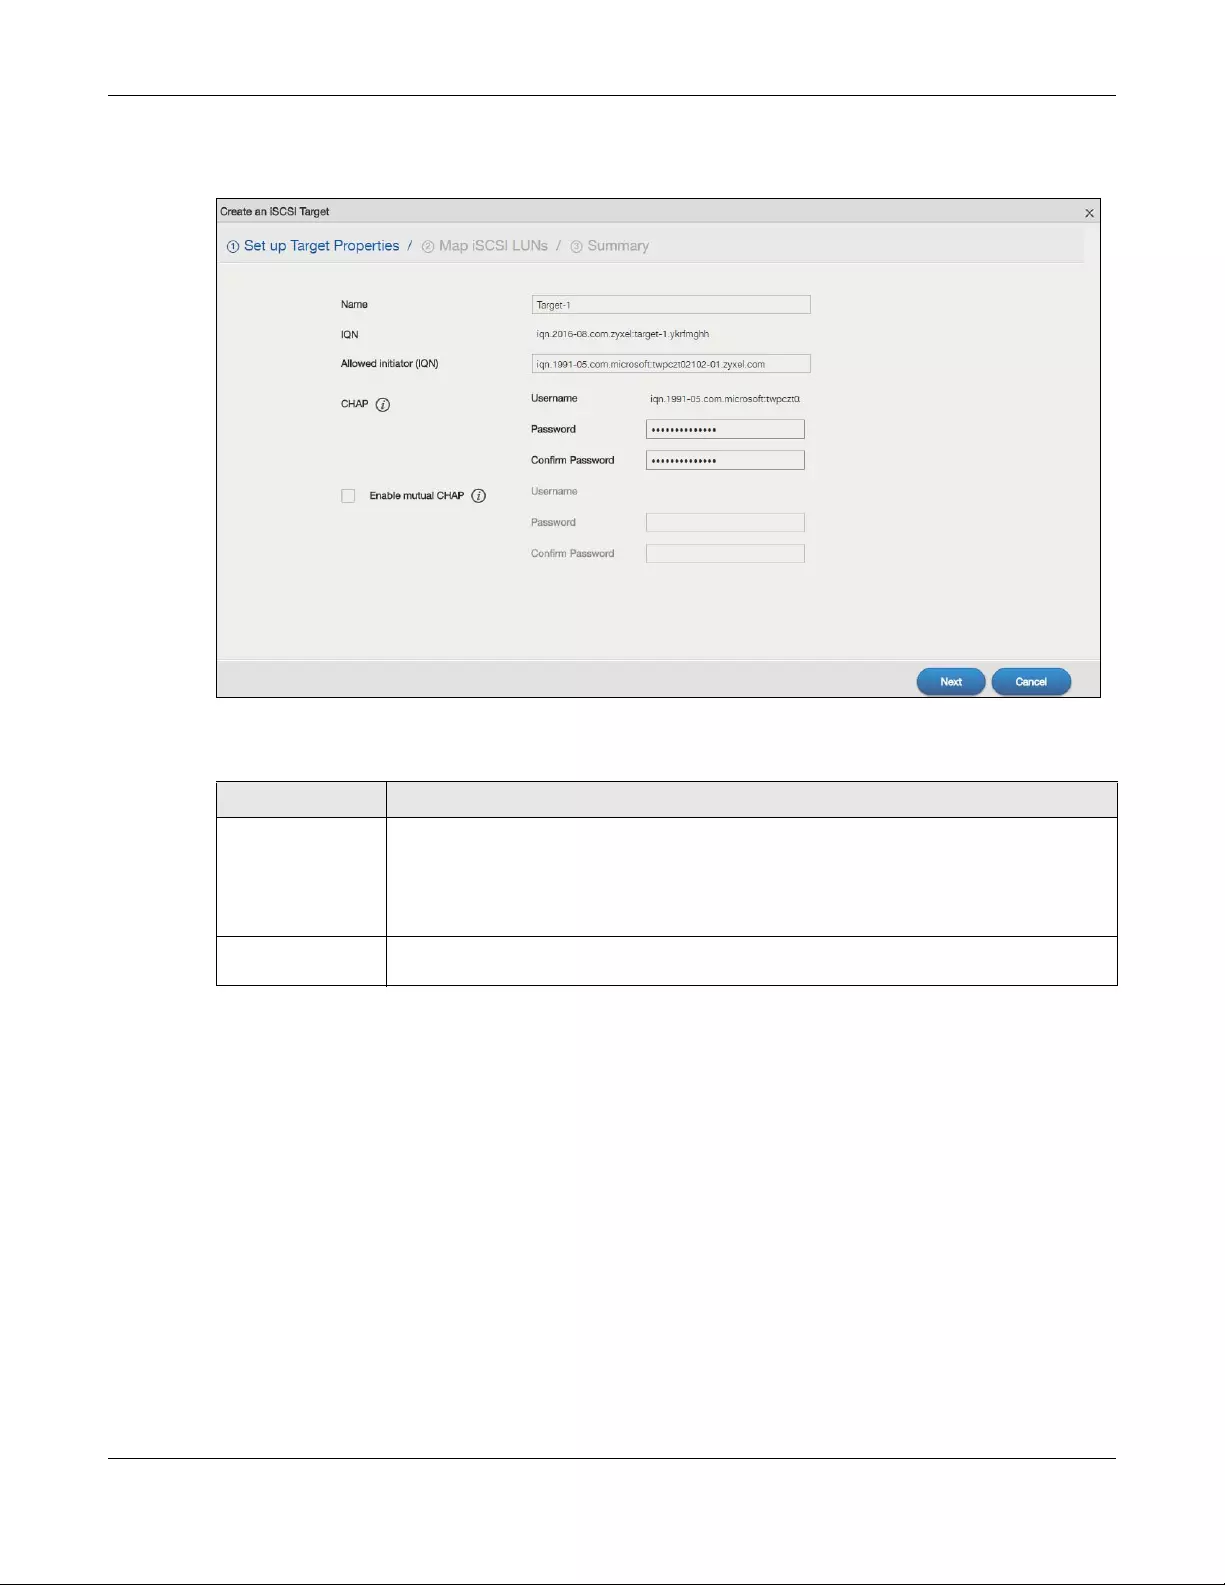
Chapter 5 Storage Manager
NAS Series User’s Guide
87
Step 1 Set up Target Properties
Figure 66 Creating a new Target: Set up Target Properties
The following table describes the labels in these screens.
Table 41 Create a New Target: Set up Target Properties
LABEL DESCRIPTION
Name Enter the name of your iSCSI target.
Note: Valid characters for the name are 0-9, a-z, and A-Z, and the maximum
length is 30 characters. The “-” symbol is allowed as well, but cannot be the
first character.
IQN The iSCSI Qualified Name (IQN) of the target is automatically generated after you enter the
target name.
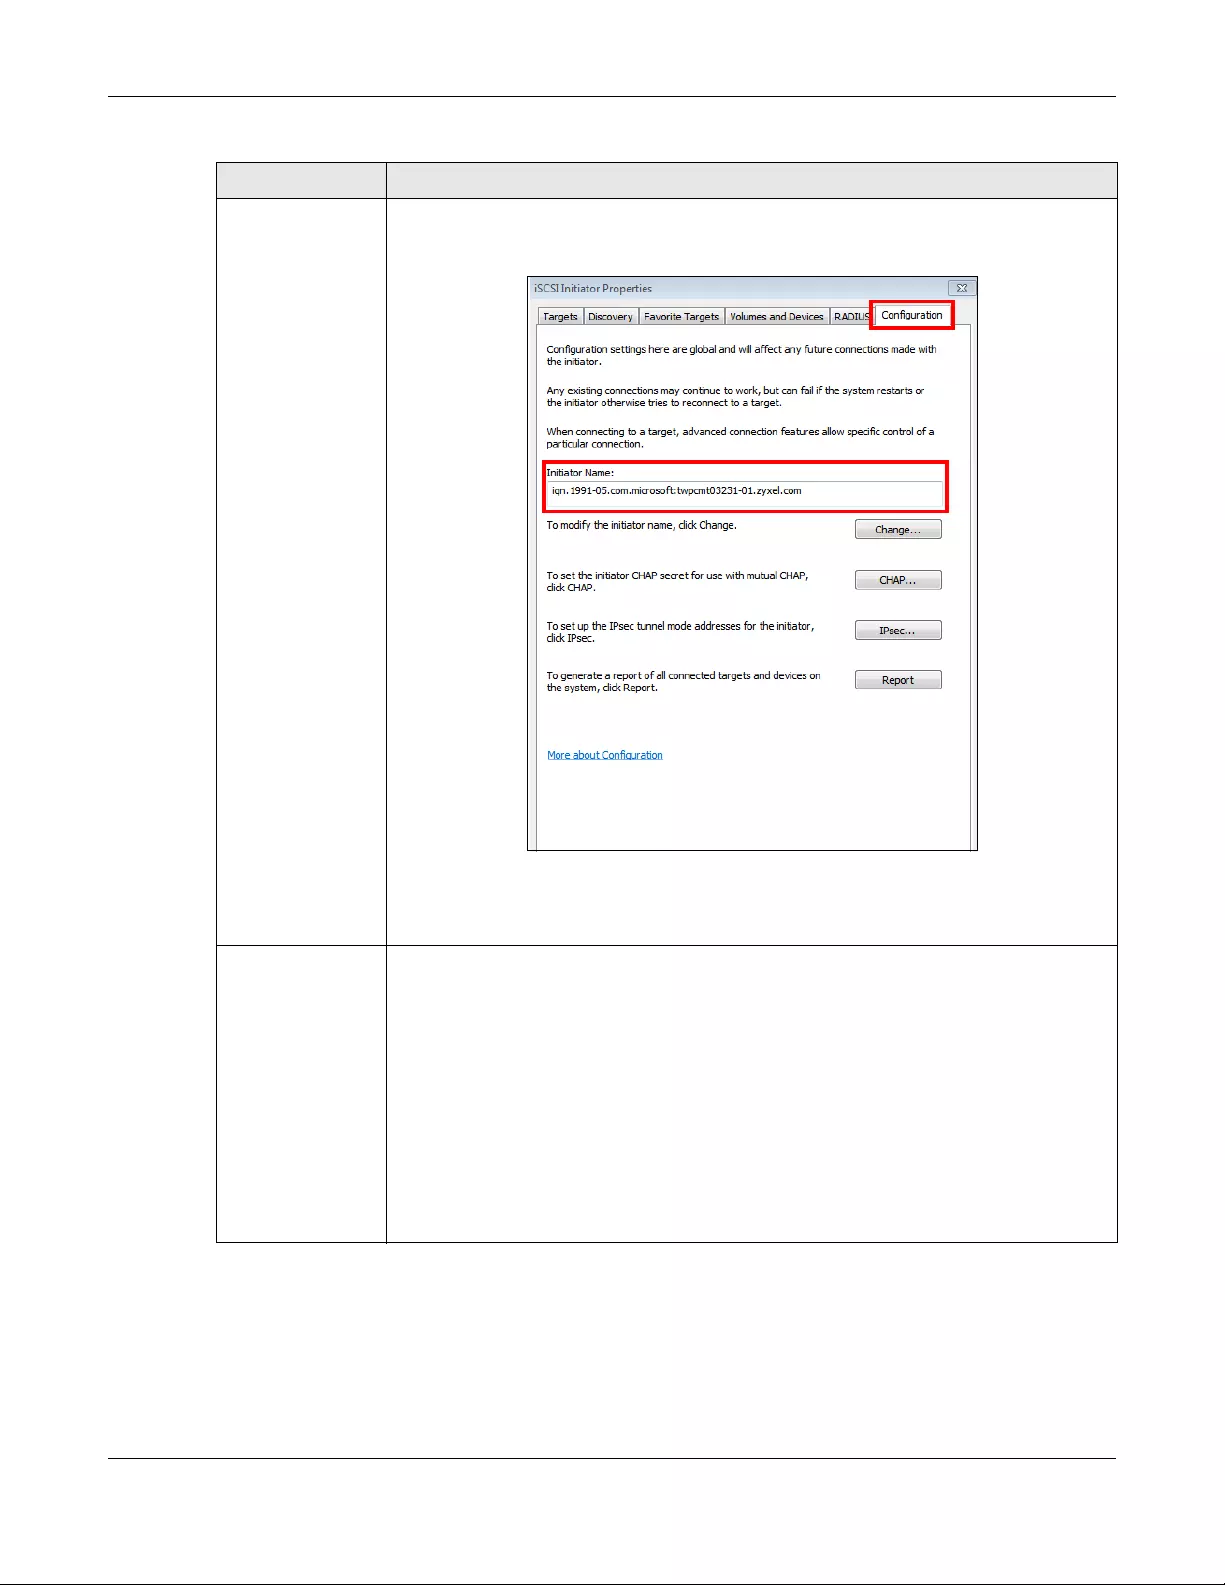
Chapter 5 Storage Manager
NAS Series User’s Guide
88
Allowed initiator
(IQN)
The allowed initiator name is in the iSCSI Qualified Name (IQN) format.
To check the initiator name, open the iSCSI Initiator program on your computer. Select the
Configuration tab and you can see the initiator name as shown in the following screen.
Note: If you use your computer as the iSCSI initiator, download and install the iSCSI
Initiator first. For example, use Microsoft iSCSI Software Initiator with a
Microsoft OS or globalSAN iSCSI Initiator with MAC OS.
CHAP If the iSCSI target has configured Challenge Handshake Authentication Protocol (CHAP)
here, the initiator needs to enter the secret before the initiator connects to the target. The
target will authenticate the initiator with the username and password (shared secret). The
connection fails if the username and password are not entered correctly.
Username — The user name is for the initiator to authenticate the initiator when attempting
connection.
Password — The password is for the target to authenticate the initiator when attempting
connection.
Confirm password — Re-type the password to make sure you entered it correctly.
Note: Valid characters for password are 0-9, a-z, and A-Z. The password length is 12
to 16 characters.
Table 41 Create a New Target: Set up Target Properties (continued)
LABEL DESCRIPTION
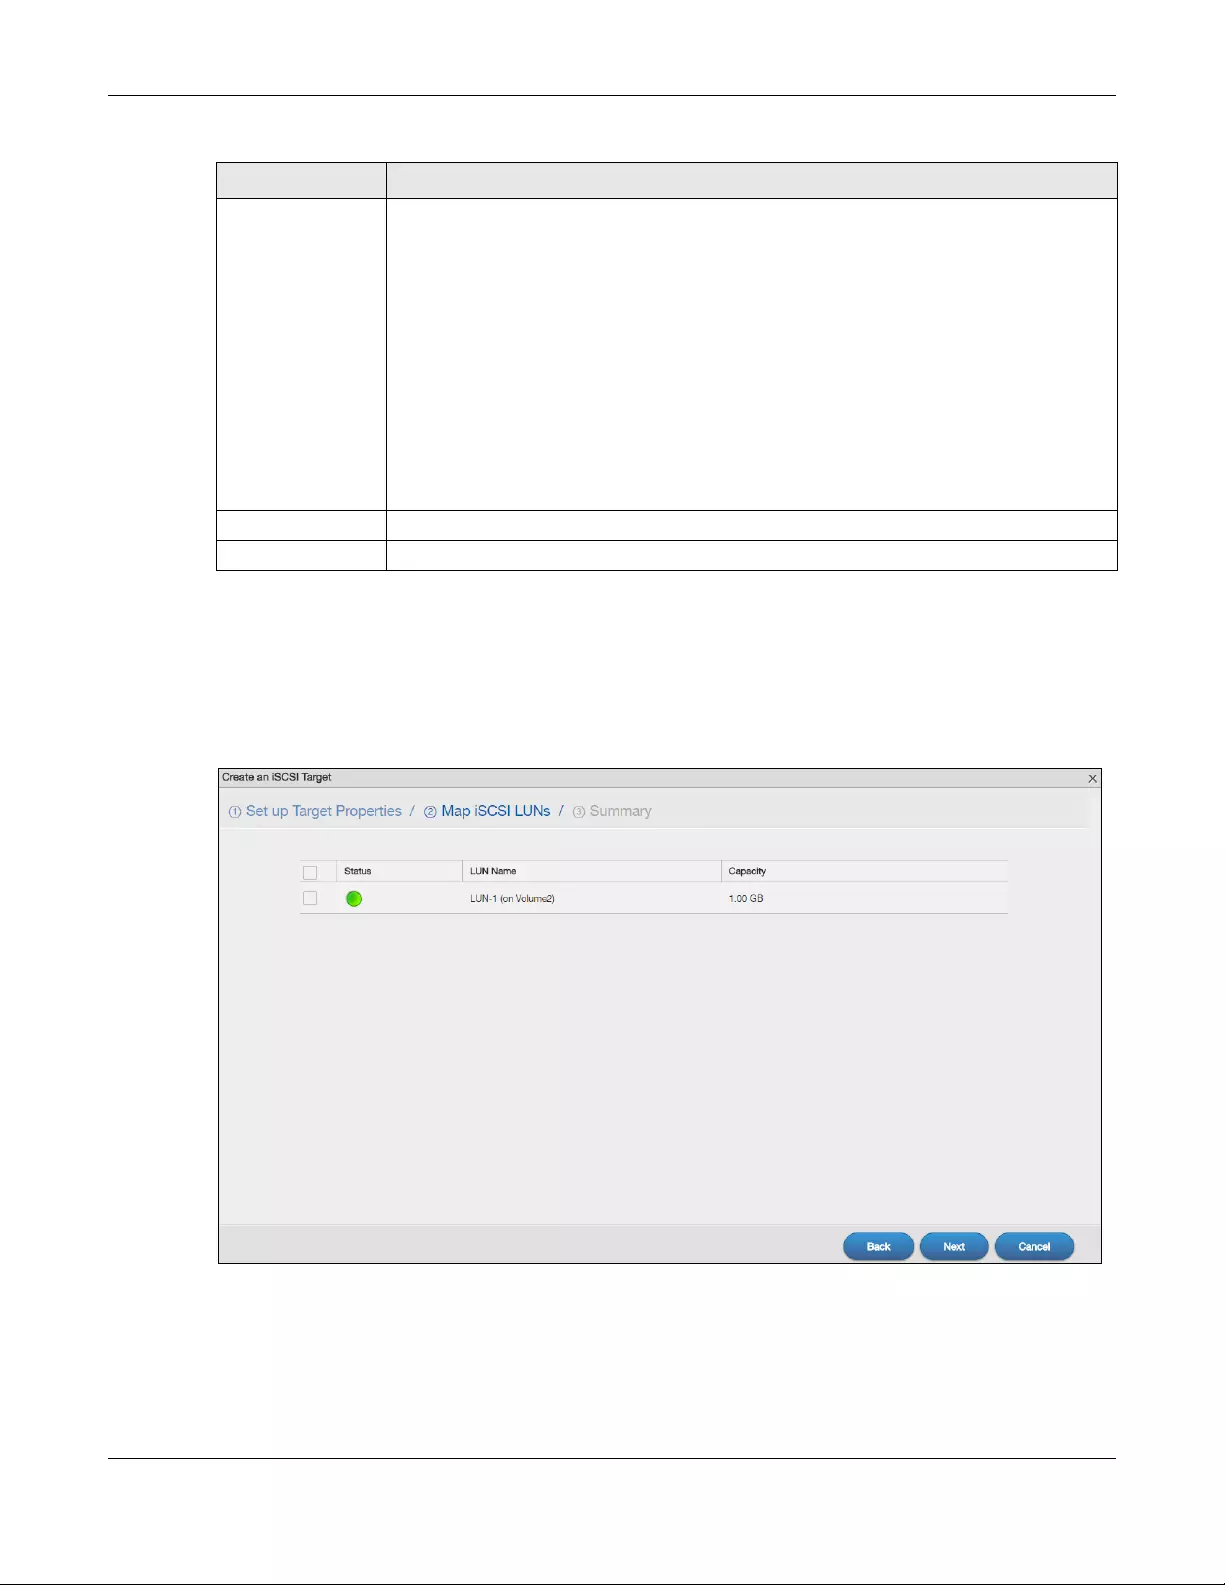
Chapter 5 Storage Manager
NAS Series User’s Guide
89
Step 2 Map iSCSI LUNs
Use this screen to map the iSCSI target to an existing LUN.
Note: One iSCSI target can map to several LUN, but one LUN can only map to one target.
Figure 67 Creating a new Target: Map iSCSI LUNs
Enable mutual
CHAP
Mutual CHAP is a two-way authentication between the iSCSI initiator and the target. If the
initiator has configured CHAP authentication, the target must enter the secret that’s set up
by the initiator when attempting connection.
Select this check box to perform mutual CHAP on the target.
Username — The user name is for the initiator to authenticate the initiator when attempting
connection.
Password — The password is for the target to authenticate the initiator when attempting
connection.
Confirm password — Re-type the password to make sure you entered it correctly.
Note: Valid characters for password are 0-9, a-z, and A-Z. The password length is 12
to 16 characters.
Next Click Next to go to the next step.
Cancel Click Cancel to close the screen without saving any settings.
Table 41 Create a New Target: Set up Target Properties (continued)
LABEL DESCRIPTION
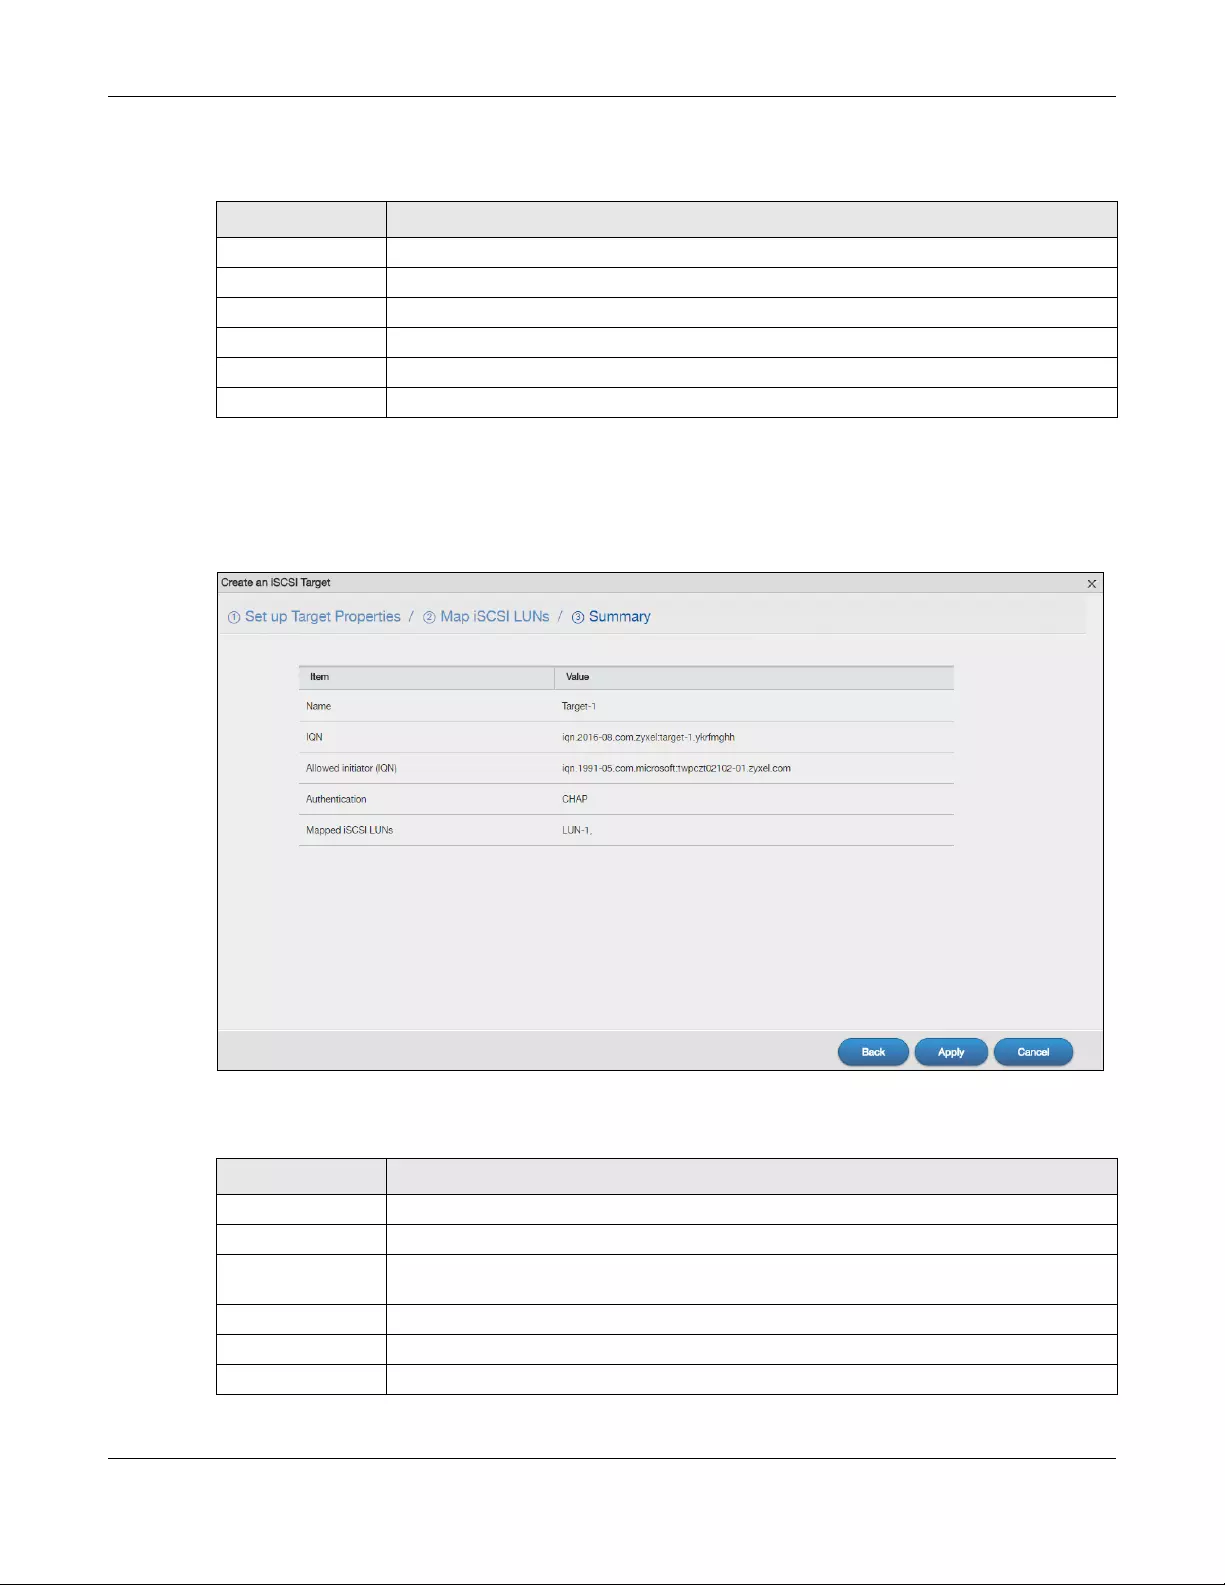
Chapter 5 Storage Manager
NAS Series User’s Guide
90
The following table describes the labels in these screens.
Step 3 Summary
Use this screen to review the settings you configured in the last step.
Figure 68 Creating a new Target: Summary
The following table describes the labels in these screens.
Table 42 Create a New Target: Map iSCSI LUNs
LABEL DESCRIPTION
Status Displays the status of the iSCSI LUN(s).
LUN Name Displays the LUN name.
Capacity Displays the size of the iSCSI LUN(s).
Back Click Back to go to the previous step.
Next Click Next to go to the next step.
Cancel Click Cancel to close the screen without saving any settings.
Table 43 Create a New Target: Summary
LABEL DESCRIPTION
Name Displays the iSCSI target name.
IQN Displays the IQN of the target.
Allowed initiator
(IQN)
Displays the IQN of the allowed initiator.
Authentication Displays the CHAP authentication method the target applies.
Mapped iSCSI LUNs Displays the iSCSI LUN the target maps to.
Back Click Back to go to the previous step.
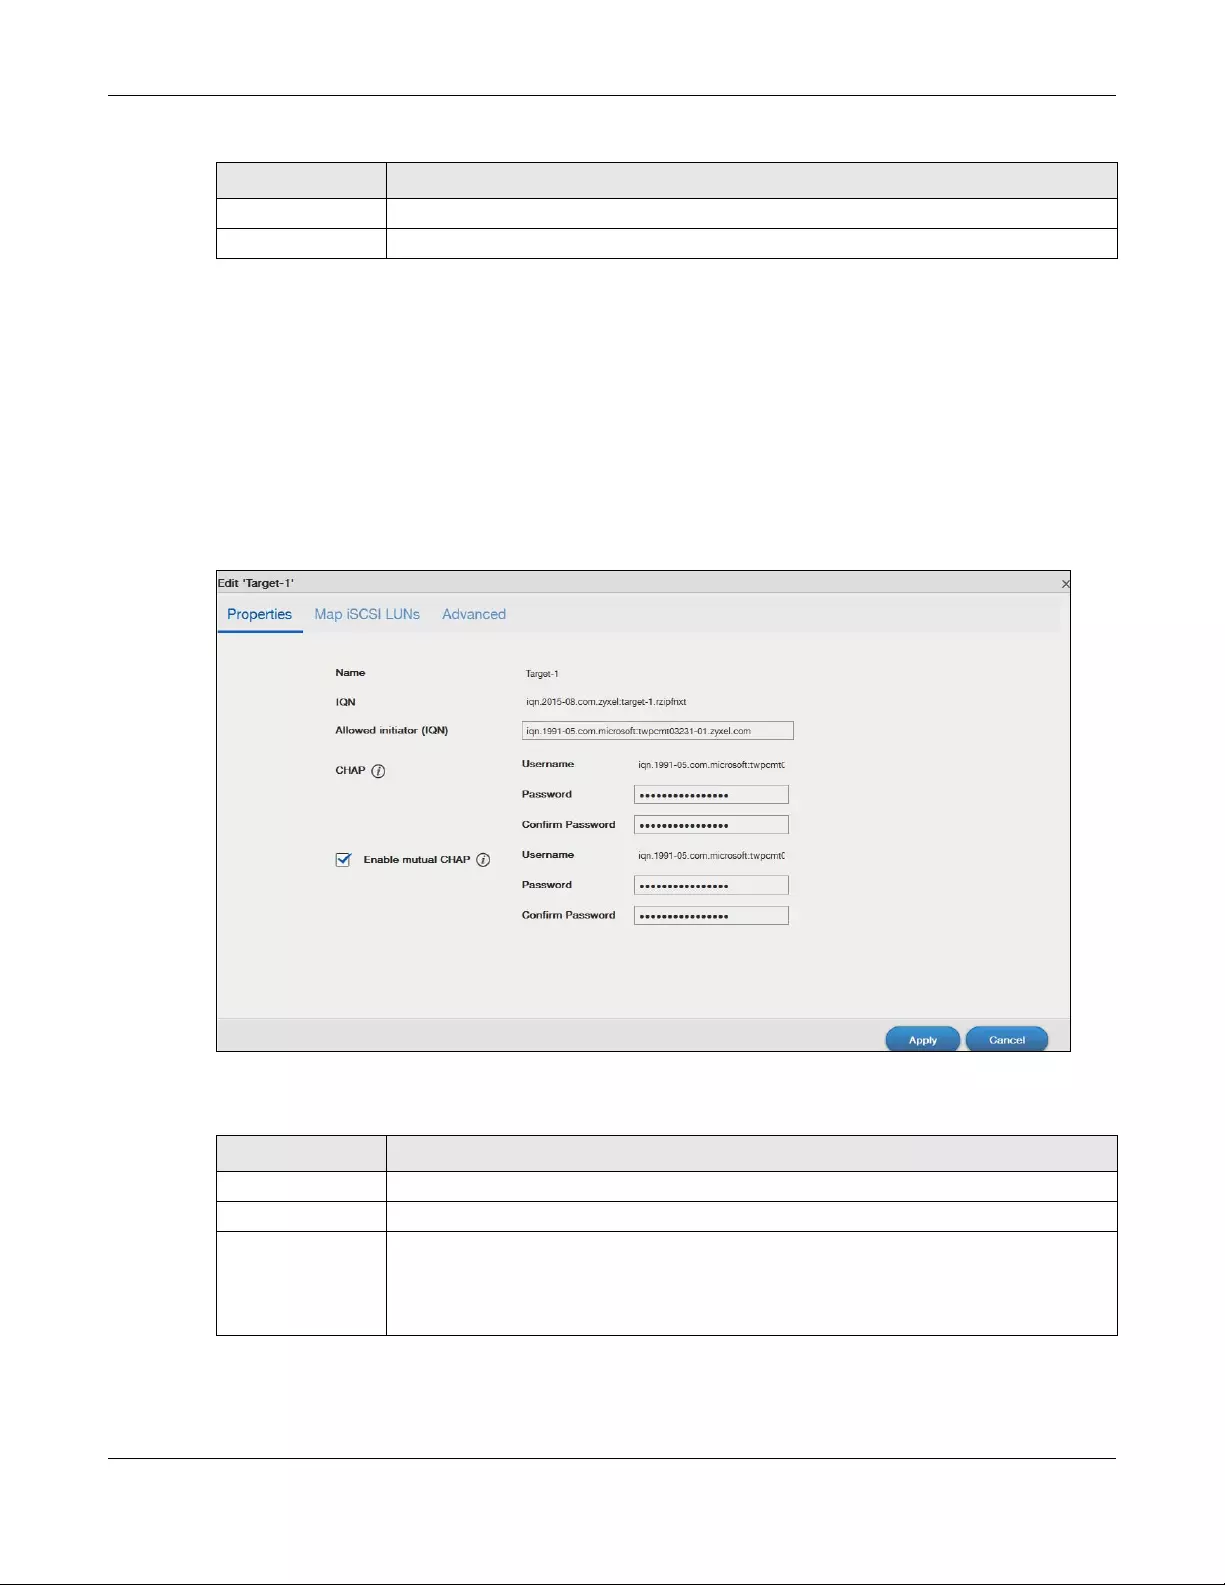
Chapter 5 Storage Manager
NAS Series User’s Guide
91
5.4.2.2 Edit a Created Target
You can edit iSCSI target settings such as allowed initiator (IQN), CHAP, and CRC checksum after you
create a target. Click Storage Manager > iSCSI > iSCSI Targets and select Edit to open the following
screens.
Properties
The Properties screen allows you to edit the allowed initiator (IQN), CHAP authentication features as
shown in the following screen.
Figure 69 Storage Manager > iSCSI > iSCSI Targets > Edit > Properties
The following table describes the labels in these screens.
Apply Click Apply to save the settings.
Cancel Click Cancel to close the screen without saving any settings.
Table 43 Create a New Target: Summary (continued)
LABEL DESCRIPTION
Table 44 Storage Manager > iSCSI > iSCSI Targets > Edit > Properties
LABEL DESCRIPTION
Name Displays the name of your iSCSI target.
IQN Displays the iSCSI Qualified Name (IQN) of the target.
Allowed initiator
(IQN)
The allowed initiator name is in the iSCSI Qualified Name (IQN) format. You can connect with
another initiator by changing the allowed initiator IQN.
The system will display a prompt if you enter an invalid character or username of
unacceptable length in this field.
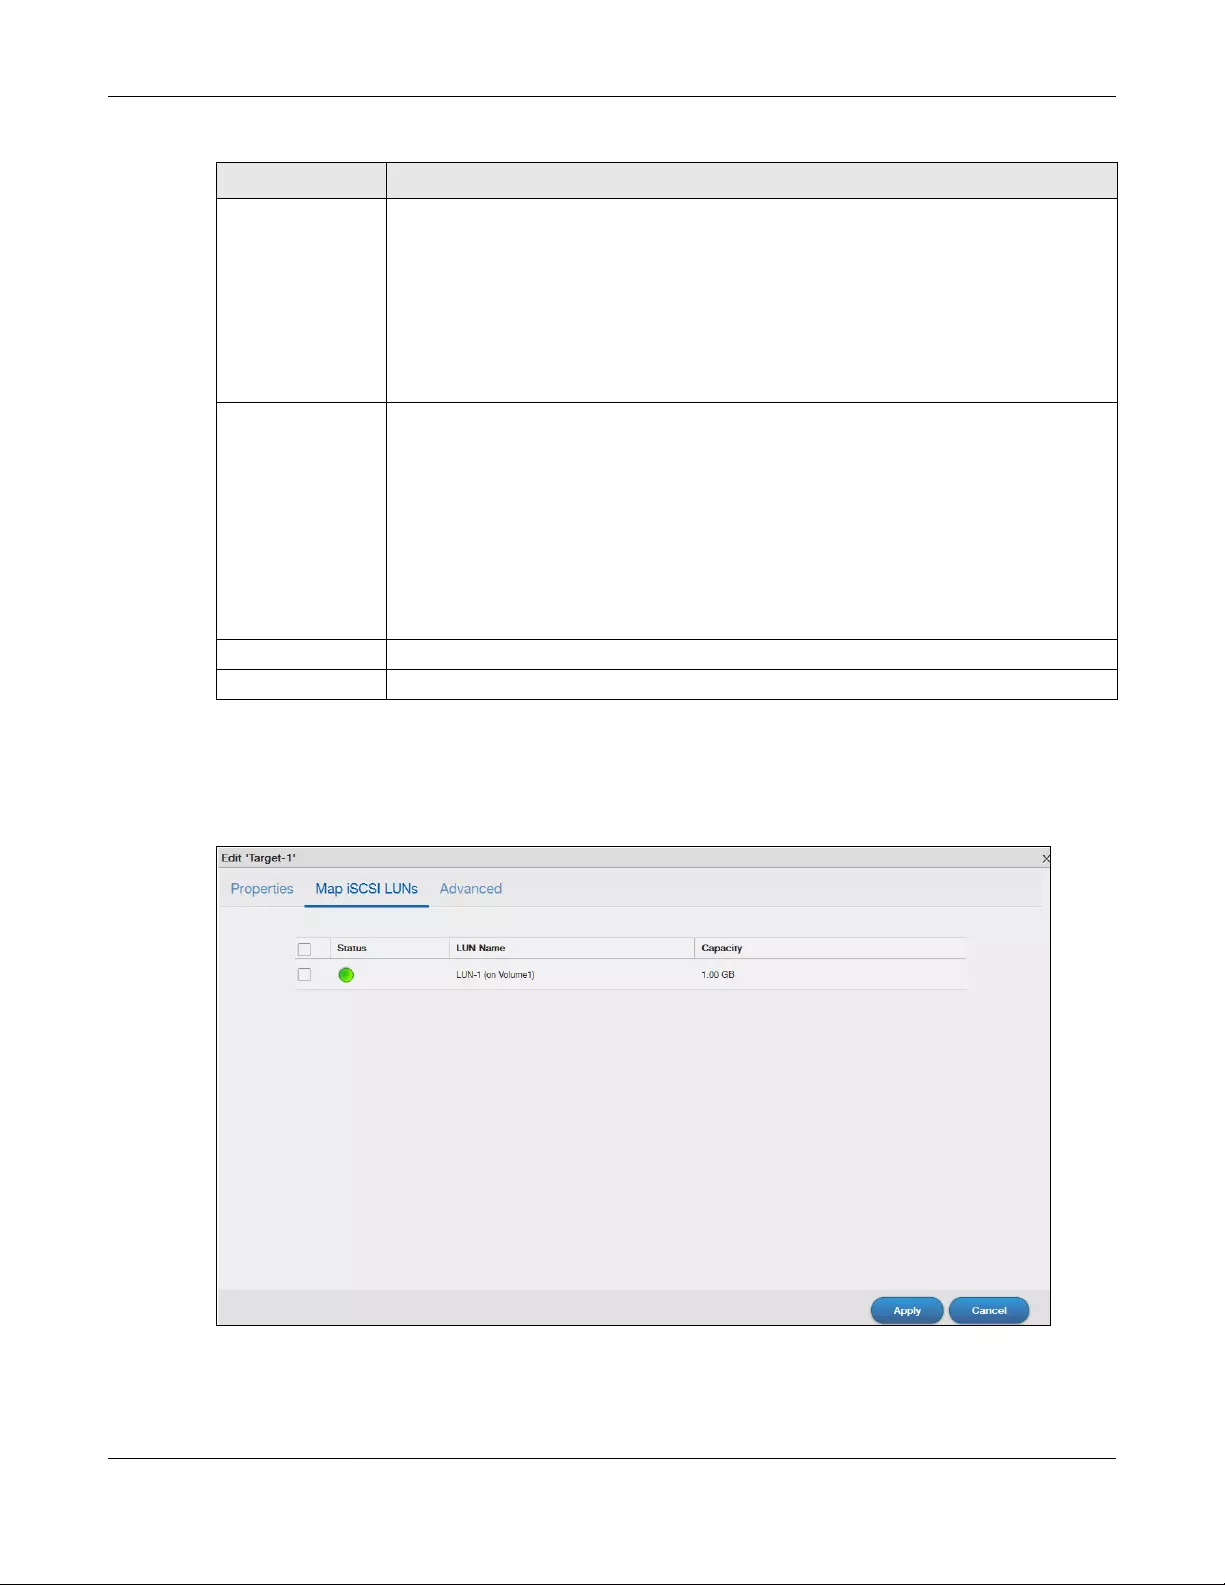
Chapter 5 Storage Manager
NAS Series User’s Guide
92
Map iSCSI LUNs
If the existing iSCSI target doesn’t map to any iSCSI LUN, go to Map iSCSI LUN s to configure the mapping.
Figure 70 Storage Manager > iSCSI > iSCSI Targets > Edit > Map iSCSI LUNs
CHAP Username — The user name is for the initiator to authenticate the initiator when attempting
connection.
Password — The password is for the target to authenticate the initiator when attempting
connection.
Confirm password — Re-type the password to make sure you entered it correctly.
Note: Valid characters for password are 0-9, a-z, and A-Z. The password length is 12
to 16 characters.
Enable mutual
CHAP
Select this check box to perform mutual CHAP on the target.
Username — The user name is for the target to authenticate the initiator when attempting
connection.
Password — The password is for the target to authenticate the initiator when attempting
connection.
Confirm password — Re-type the password to make sure you entered it correctly.
Note: Valid characters for password are 0-9, a-z, and A-Z. The password length is 12
to 16 characters.
Apply Click Apply to save your changes.
Cancel Click Cancel to close the screen without saving any settings.
Table 44 Storage Manager > iSCSI > iSCSI Targets > Edit > Properties (continued)
LABEL DESCRIPTION
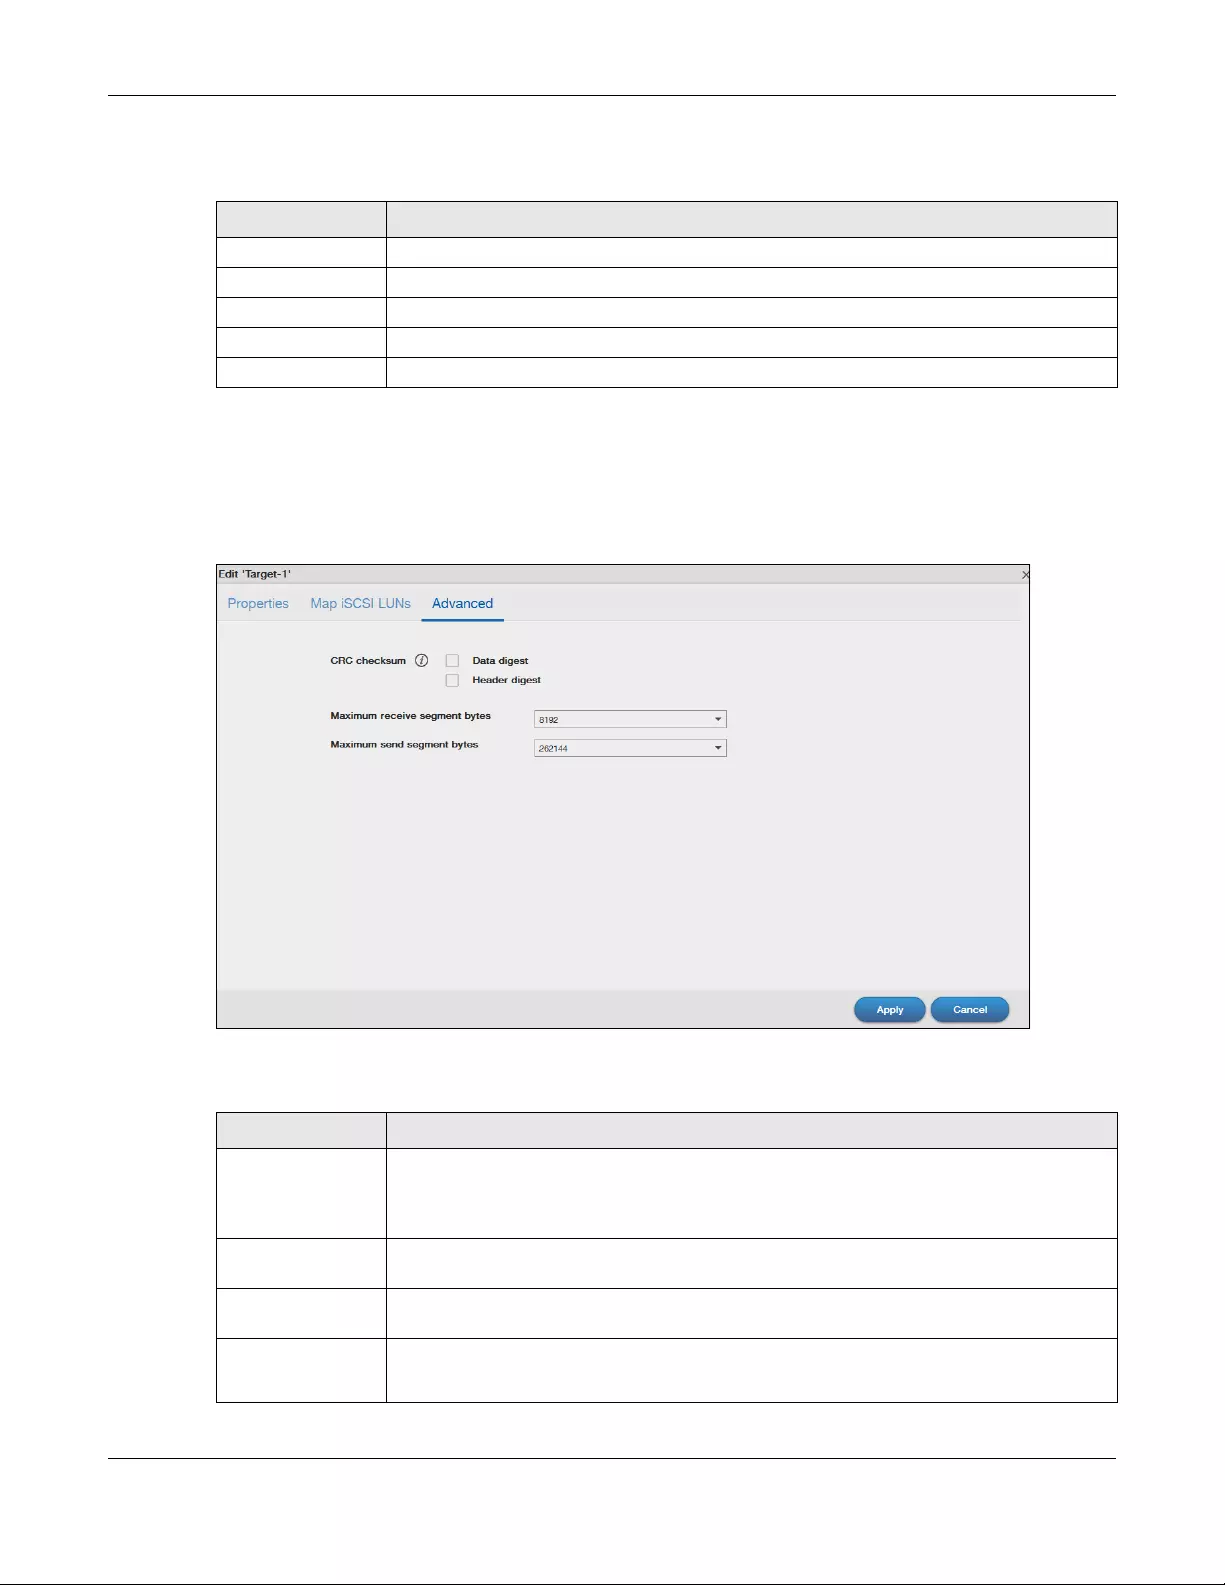
Chapter 5 Storage Manager
NAS Series User’s Guide
93
The following table describes the labels in these screens.
Advanced
Go to Advanced screen for other configurations such as CRC checksum and maximum receive/send
segments.
Figure 71 Storage Manager > iSCSI > iSCSI Targets > Edit > Advanced
The following table describes the labels in these screens.
Table 45 Storage Manager > iSCSI > iSCSI Targets > Edit > Map iSCSI LUNs
LABEL DESCRIPTION
Status Displays the status of the iSCSI LUN.
LUN Name Displays the iSCSI LUN name.
Capacity Displays the size of the iSCSI LUN.
Apply Select the check to choose a LUN, and click Apply to save your changes.
Cancel Click Cancel to close the screen without saving any settings.
Table 46 Storage Manager > iSCSI > iSCSI Targets > Edit > Advanced
LABEL DESCRIPTION
CRC checksum Cyclic Redundancy Check (CRC) checksum is a technique for detecting data transmission
errors. It ensures correct data transmissions between the initiator and the target. If you select
the Data/Header Digest, the iSCSI initiator will be verified by these parameters when
transmitting data.
Data digest Select the check box to enable data digest. The data digest protects the integrity of the
data.
Header digest Select the check box to enable header digest. The header digest protects the integrity of the
header.
Maximum receive
segment bytes
Select the maximum receive segments allowed in bytes.
Four options are applied: 262144, 65536, 9182, 4092.
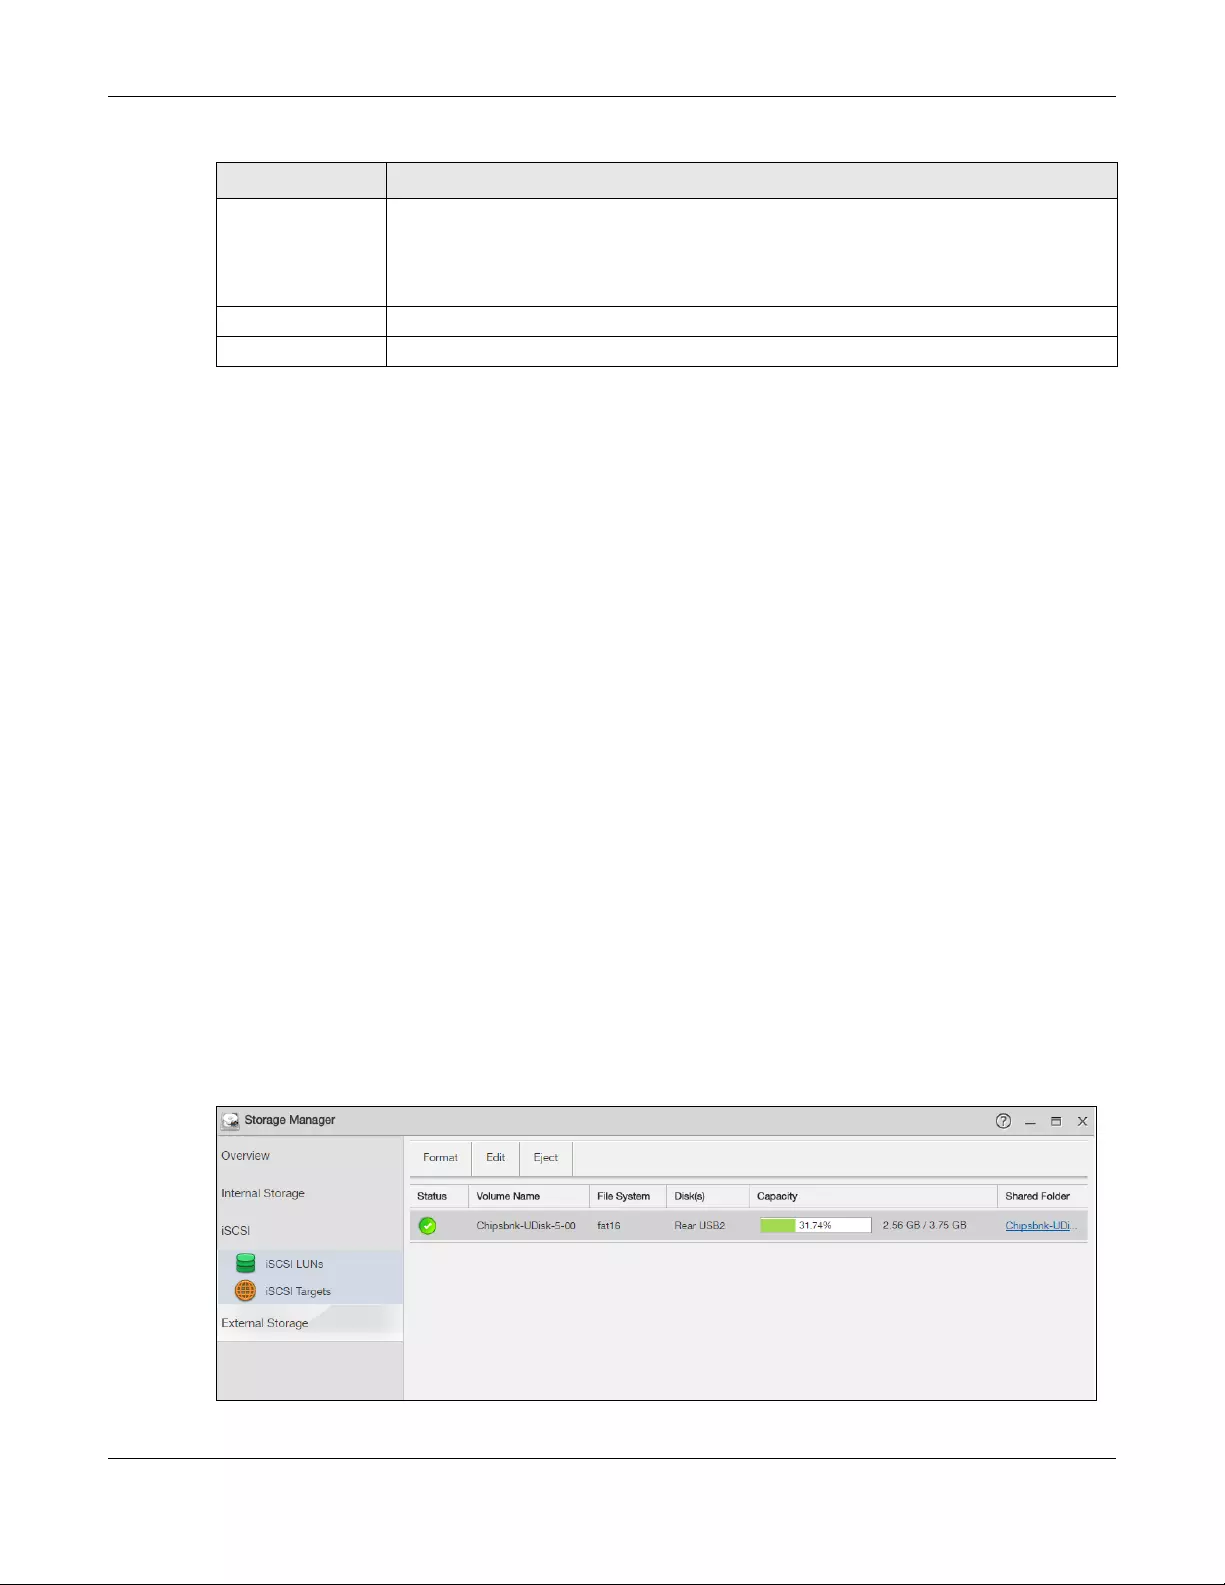
Chapter 5 Storage Manager
NAS Series User’s Guide
94
5.5 External Storage
This section covers the management of external volumes and disks.
Use the External Storage screen (Section 5.5.2 on page 94) to display information on all external
volumes, configure volumes’ name and format volumes.
5.5.1 What You Need to Know
Disk
USB-attached storage disks and SD cards are treated as external disks/volumes.
Volume
A volume is a storage area on a disk or disks. You can create volumes on SD cards or external disks
attached to the USB ports. You cannot spread a volume across external disks like you can with internal
disks.
5.5.2 External Storage Screens
Click Storage Manager > External Storage in the navigation panel to display the following screen. Use
this screen to format and edit external volumes on USB-connected storage and SD cards.
Figure 72 Storage Manager > External Storage
Maximum send
segment bytes
Select the maximum send segments allowed in bytes.
Four options are applied: 262144, 65536, 9182, 4092.
Note: This feature is for the NAS326 only.
Apply Click Apply to save your changes.
Cancel Click Cancel to close the screen without saving any settings.
Table 46 Storage Manager > iSCSI > iSCSI Targets > Edit > Advanced (continued)
LABEL DESCRIPTION
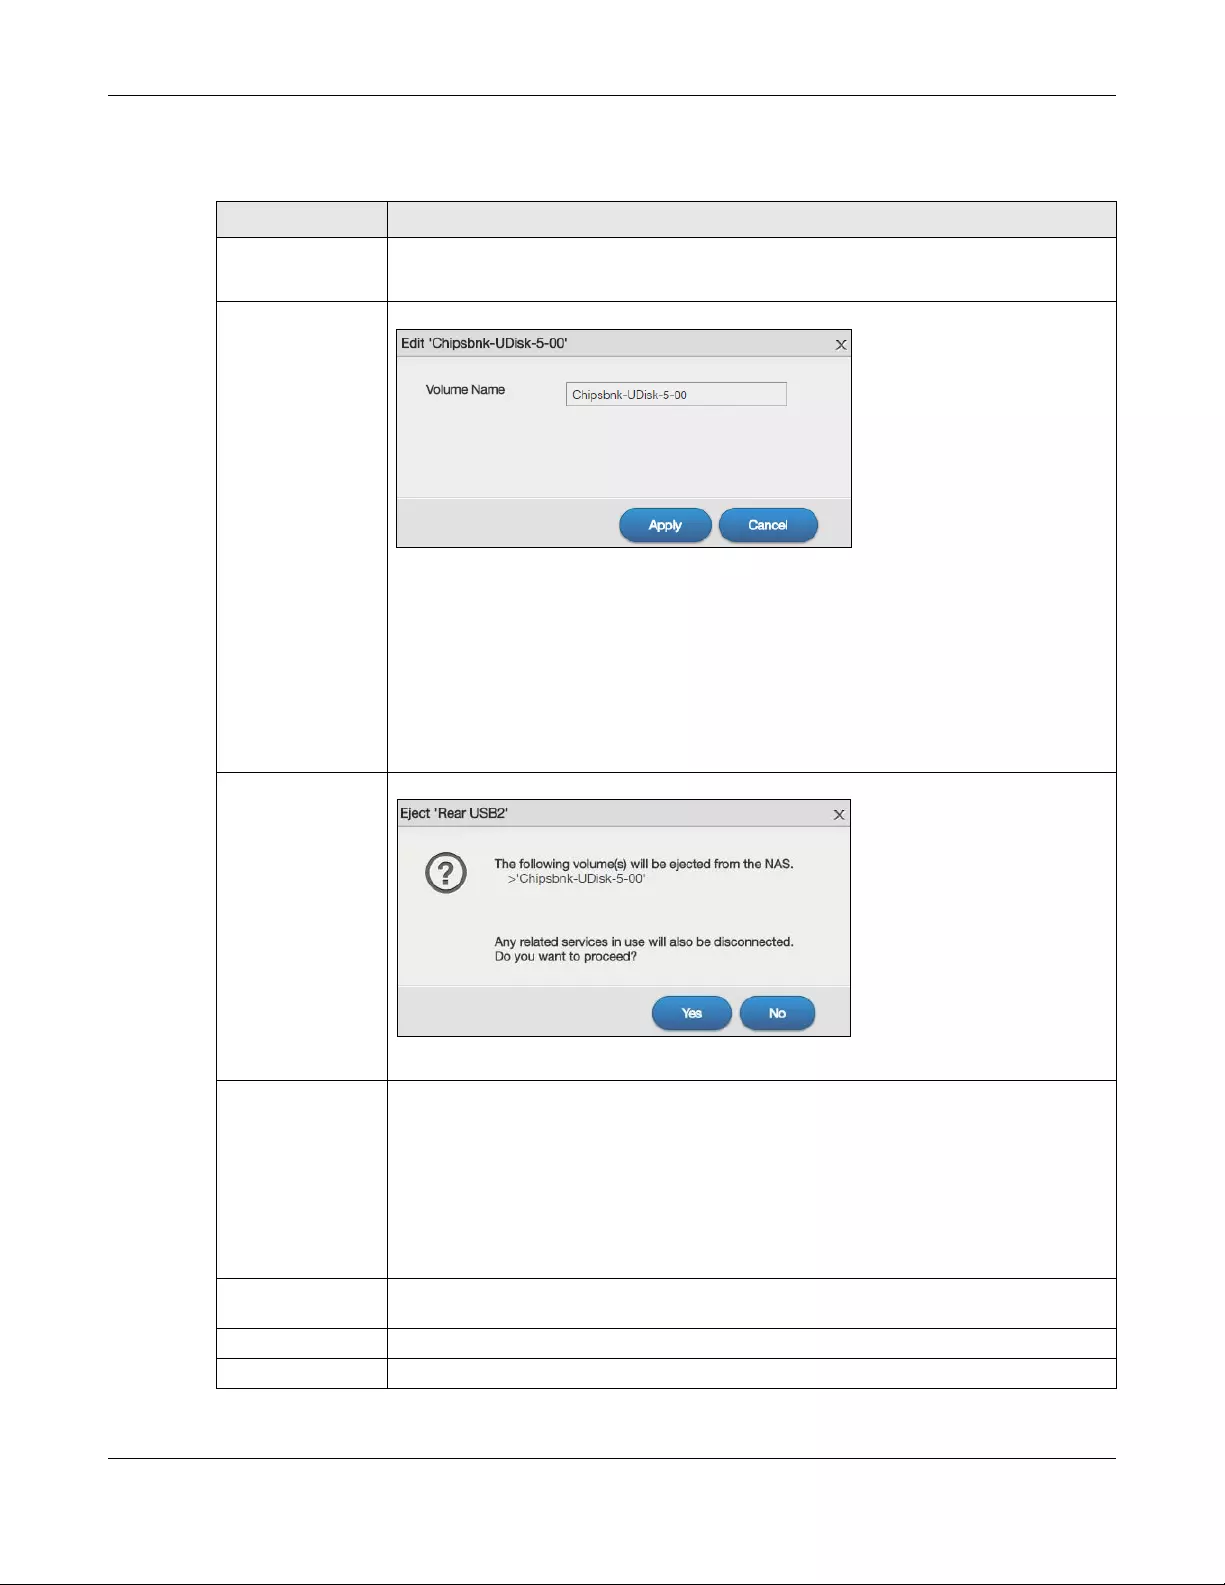
Chapter 5 Storage Manager
NAS Series User’s Guide
95
The following table describes the labels in this screen.
Table 47 Storage Manager > External Storage
LABEL DESCRIPTION
Format Click this to format the connected USB disk.
See Section 5.5.3 on page 96 for more information.
Edit Click this to modify the volume name.
Volume name —
• Type a volume name from 1 to 31 characters.
• Acceptable characters are all alphanumeric characters and » » [spaces], «_»
[underscores], and «.» [periods].
• The first character must be alphanumeric (A-Z 0-9).
• The last character cannot be a space » «.
Apply — Click this to save your change and rename the volume.
Cancel — Click this to exit this screen without saving changes.
Eject Click this to eject the external volume.
Click Yes to eject the volume or No to exit this screen without saving changes.
Status This field shows whether the volume is Normal, Unsupported, or Unformatted.
Normal means the USB connected device is functioning properly.
Unsupported means the USB connected device uses a file system the NAS does not support.
Unformatted means the USB connected device is not formatted with a file system.
Note: There is no explicit message from CIFS that tells users their volume is
degraded or down.
Volume Name This field displays the volume name. If the status is Unsupported or Unformatted, the volume
name displays “—”.
File System This field displays the file system that an external (USB or SD) volume is using.
Disk(s) This field shows to which USB port the disk is connected.
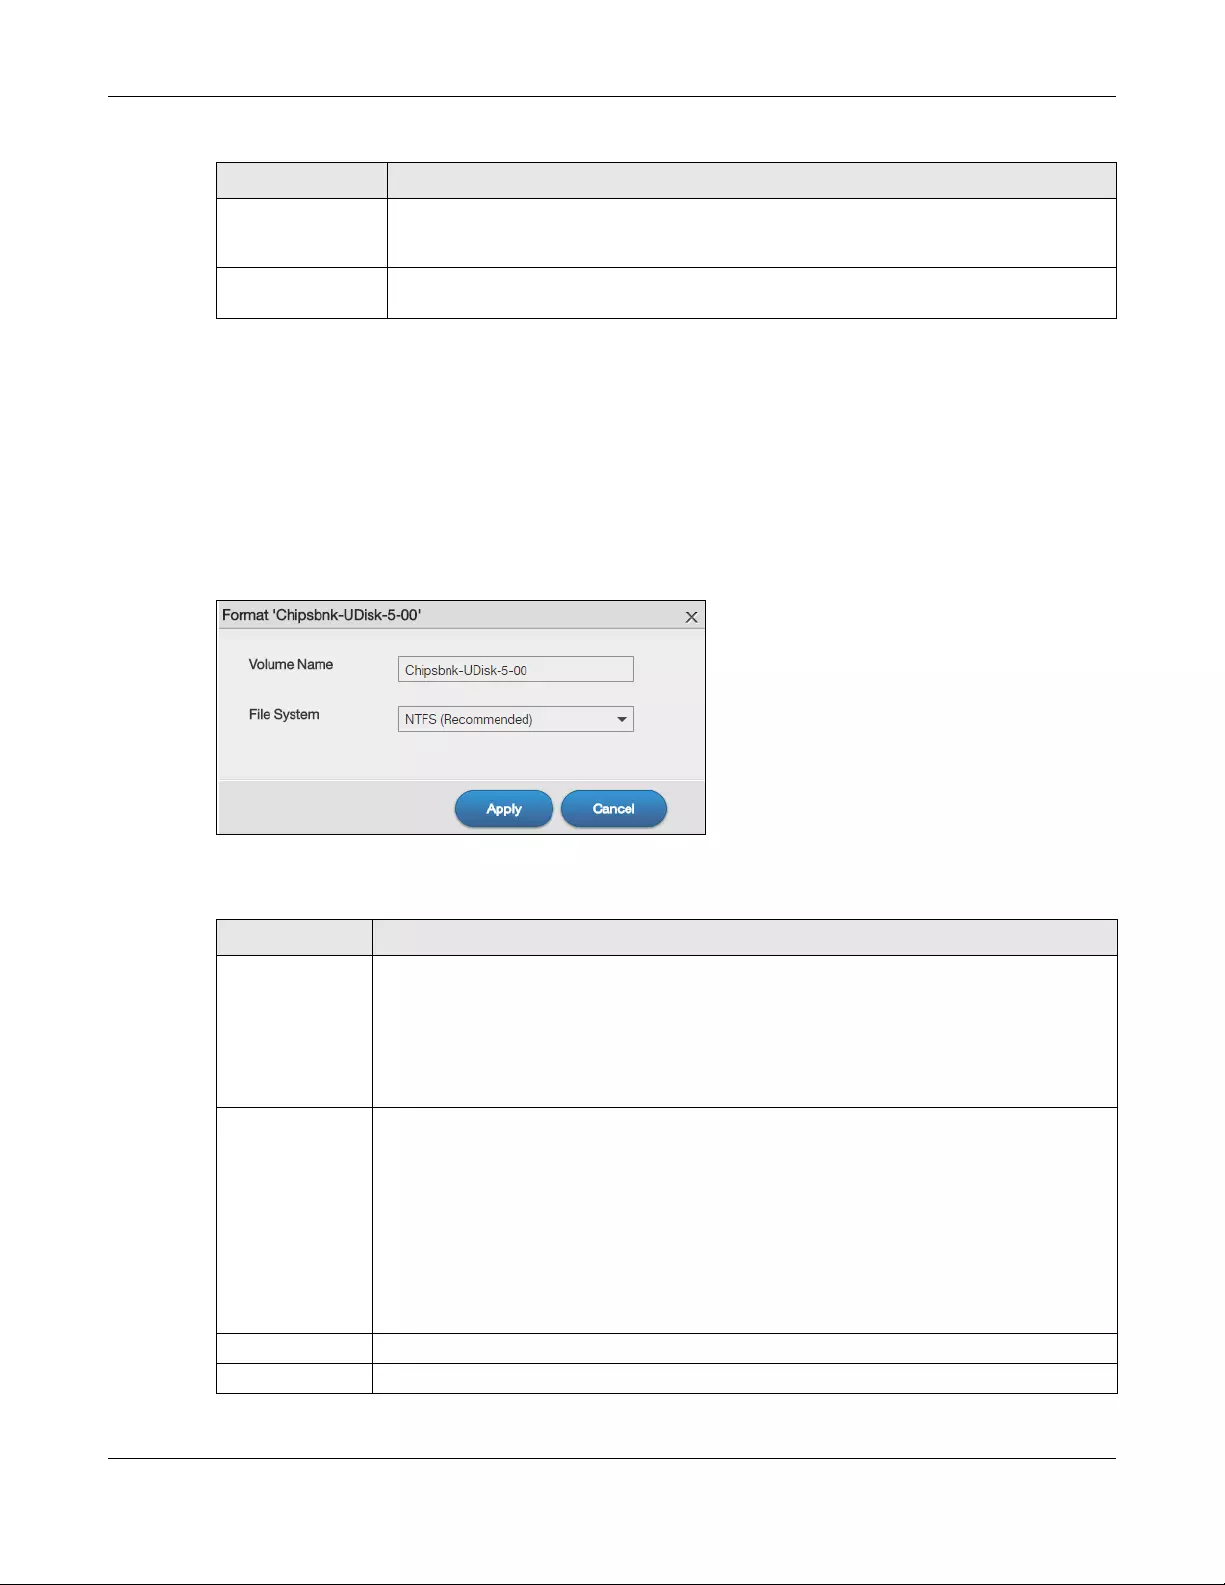
Chapter 5 Storage Manager
NAS Series User’s Guide
96
5.5.3 Format the External Volume
This allows you to format the connected USB disk. Click Storage Manager > External Storage > Format to
show the following screen.
Note: Formatting the disk will also delete all your data in the USB drive. If the connected
external volume has more than one partition, you can choose which partition you want
to format.
Figure 73 Storage Manager > External Storage > Format
The following table describes the labels in this screen.
Capacity This field shows total disk size, the percentage of the volume being used and the percentage
that is available. If the status is Unsupported, the capacity displays “Unknown”. If the status is
Unformatted, the capacity displays “—”.
Shared Folder This field displays the folder that shares files. Roll your mouse over the link and click it to
display the files in the File Browser.
Table 47 Storage Manager > External Storage (continued)
LABEL DESCRIPTION
Table 48 Storage Manager > External Storage > Format
LABEL DESCRIPTION
Volume Name Type a volume name from 1 to 31 characters.
Acceptable characters are all alphanumeric characters and » » [spaces], «_» [underscores],
and «.» [periods].
The first character must be alphanumeric (A-Z 0-9).
The last character cannot be a space » «.
File System Select the file system you want the new volume to use.
Windows file systems
NTFS: Recommended.
FAT32: Newer, and more efficient than FAT16. Supports a volume size of up to 2 TB (Tera
Bytes) and individual file sizes of up to 4 GB.
Linux file systems
EXT2: Older file system.
EXT3: The same as EXT2, but adds a journaled file system and is more robust.
EXT4: Supports larger files and better performance than EXT3.
Apply Click this to save your changes and format the disk.
Cancel Click this to exit this screen without saving changes.
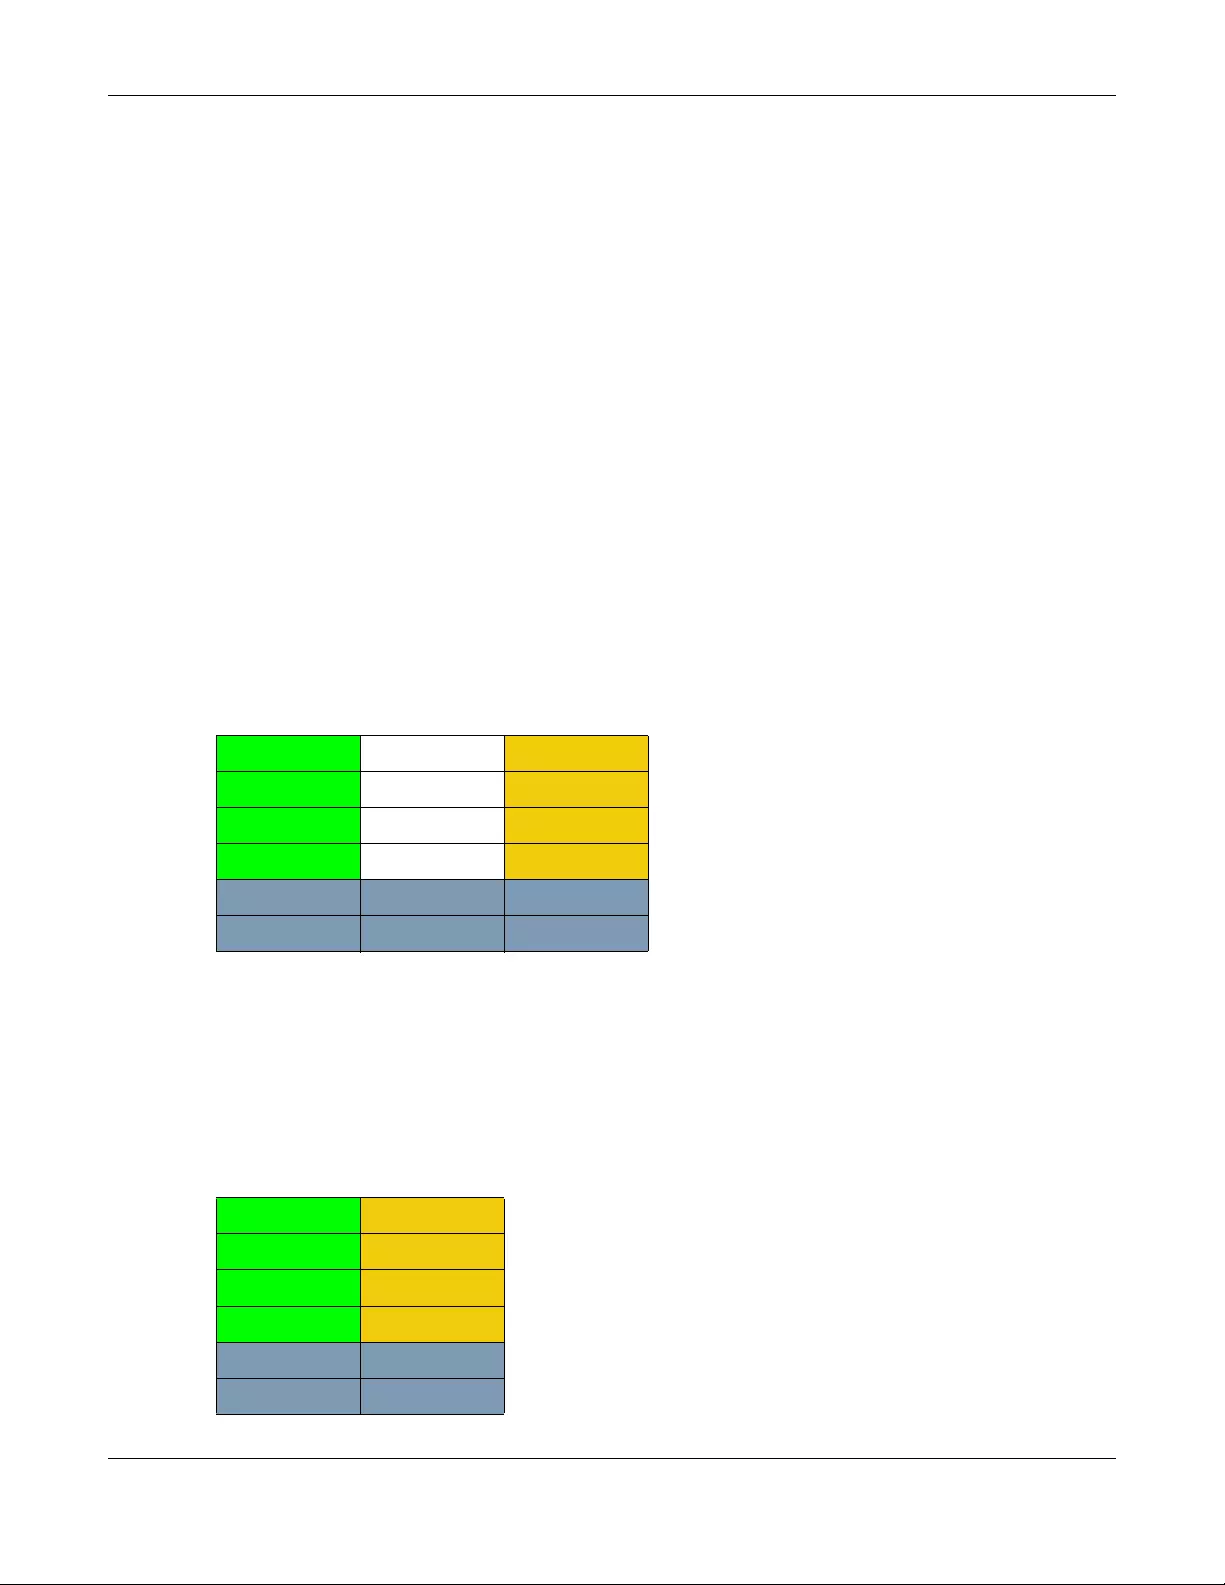
Chapter 5 Storage Manager
NAS Series User’s Guide
97
5.6 Technical Reference
This section contains background on JBOD and the RAID levels used on the NAS.
JBOD
• Minimum number of disks: 1
• Total capacity: Sum of the member disks
• Advantages: Maximum storage capacity, especially for disks of mixed sizes. Flexibility (you can add
disks to the JBOD
• Disadvantages: Not as fast or reliable as RAID.
JBOD allows you to combine multiple physical disk drives into a single virtual one, so they appear as a
single large disk. JBOD can be used to turn several different-sized drives into one big drive. For example,
JBOD could convert 100 GB, 200 GB, 250 GB, and 500 GB drives into one large logical drive of 1050 GB.
Since data isn’t striped across disks, if one disk fails, you should just lose the data on that disk (but you
may lose data in the whole array depending on the nature of the disk failure). You can add disks to the
JBOD array later (using the Add disk to JBOD feature) and even remove them so JBOD offers a lot of
flexibility. However JBOD read performance is not as good as RAID as only one disk can be read at a
time and they must be read sequentially. The following figure shows three disks in a single JBOD array.
Data is not written across disks but written sequentially to each disk until it’s full.
RAID 0
RAID 0 spreads data across two or more disks (data striping) with no mirroring nor parity for data
redundancy, so if one disk fails the entire array will be lost. The major benefit of RAID 0 is performance.
The following figure shows two disks in a single RAID 0 array. Data can be written and read across disks
simultaneously for faster performance.
Table 49 JBOD
A1 B1 C1
A2 B2 C2
A3 B3 C3
A4 B4 C4
DISK 1 DISK 2 DISK 3
Table 50 RAID 0
A1 A2
A3 A4
A5 A6
A7 A8
DISK 1 DISK 2
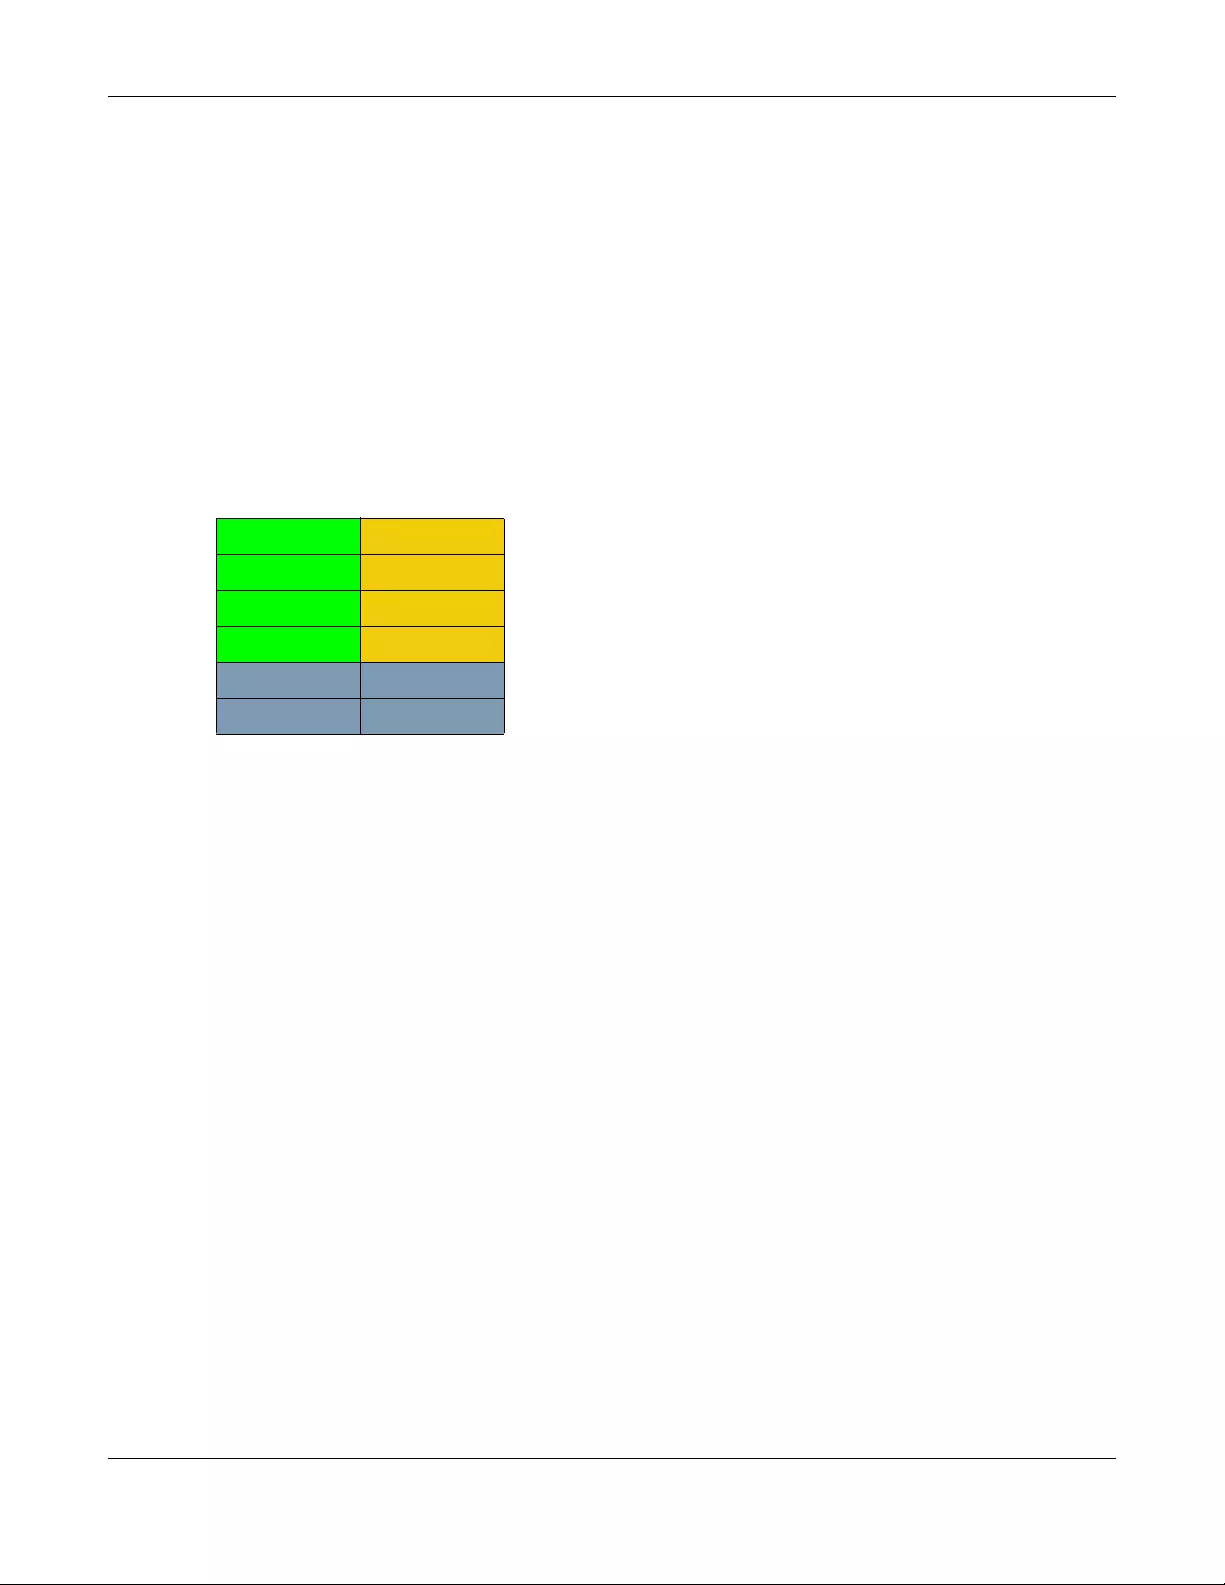
Chapter 5 Storage Manager
NAS Series User’s Guide
98
RAID 0 capacity is the size of the sum of the capacities of the disks in the RAID 0. For example, if you
have four disks of sizes 1 TB, 2 TB, 3 TB and 2 TB respectively in one RAID 0 array, then the maximum
capacity is 8 TB.
Typical applications for RAID 0 are non-critical data (or data that changes infrequently and is backed
up regularly) requiring high write speed such as audio, video, graphics, games and so on.
RAID 1
RAID 1 creates an exact copy (or mirror) of a set of data on another disk. This is useful when data
backup is more important than data capacity. The following figure shows two disks in a single RAID 1
array with mirrored data. Data is duplicated across two disks, so if one disk fails, there is still a copy of the
data.
As RAID 1 uses mirroring and duplexing, a RAID 1 array needs an even number of disks (two or four for
the NAS).
RAID 1 capacity is limited to the size of the smallest disk in the RAID array. For example, if you have two
disks of sizes 150 GB and 200 GB respectively in one RAID 1 array, then the maximum capacity is 150 GB
and the remaining space (50 GB) is unused.
Typical applications for RAID 1 are those requiring high fault tolerance without need of large amounts of
storage capacity or top performance, for example, accounting and financial data, small database
systems, and enterprise servers.
RAID 6
RAID 6 can tolerate two simultaneous drive failures by calculating dual distributed parity data on striped
data across disks. Dual parity provides extra data protection, however, it is slower to write than most
other RAID levels.
RAID 6 uses parity to store redundant data on space equal to the size of two disks for later data
recovery. Therefore, on a RAID 6 array, only 50% of the space is available as usable capacity. If you
have four disks of sizes 1TB, 1TB, 2TB, 2TB respectively in one RAID 6 array, then the maximum capacity of
Table 51 RAID 1
A1 A1
A2 A2
A3 A3
A4 A4
DISK 1 DISK 2
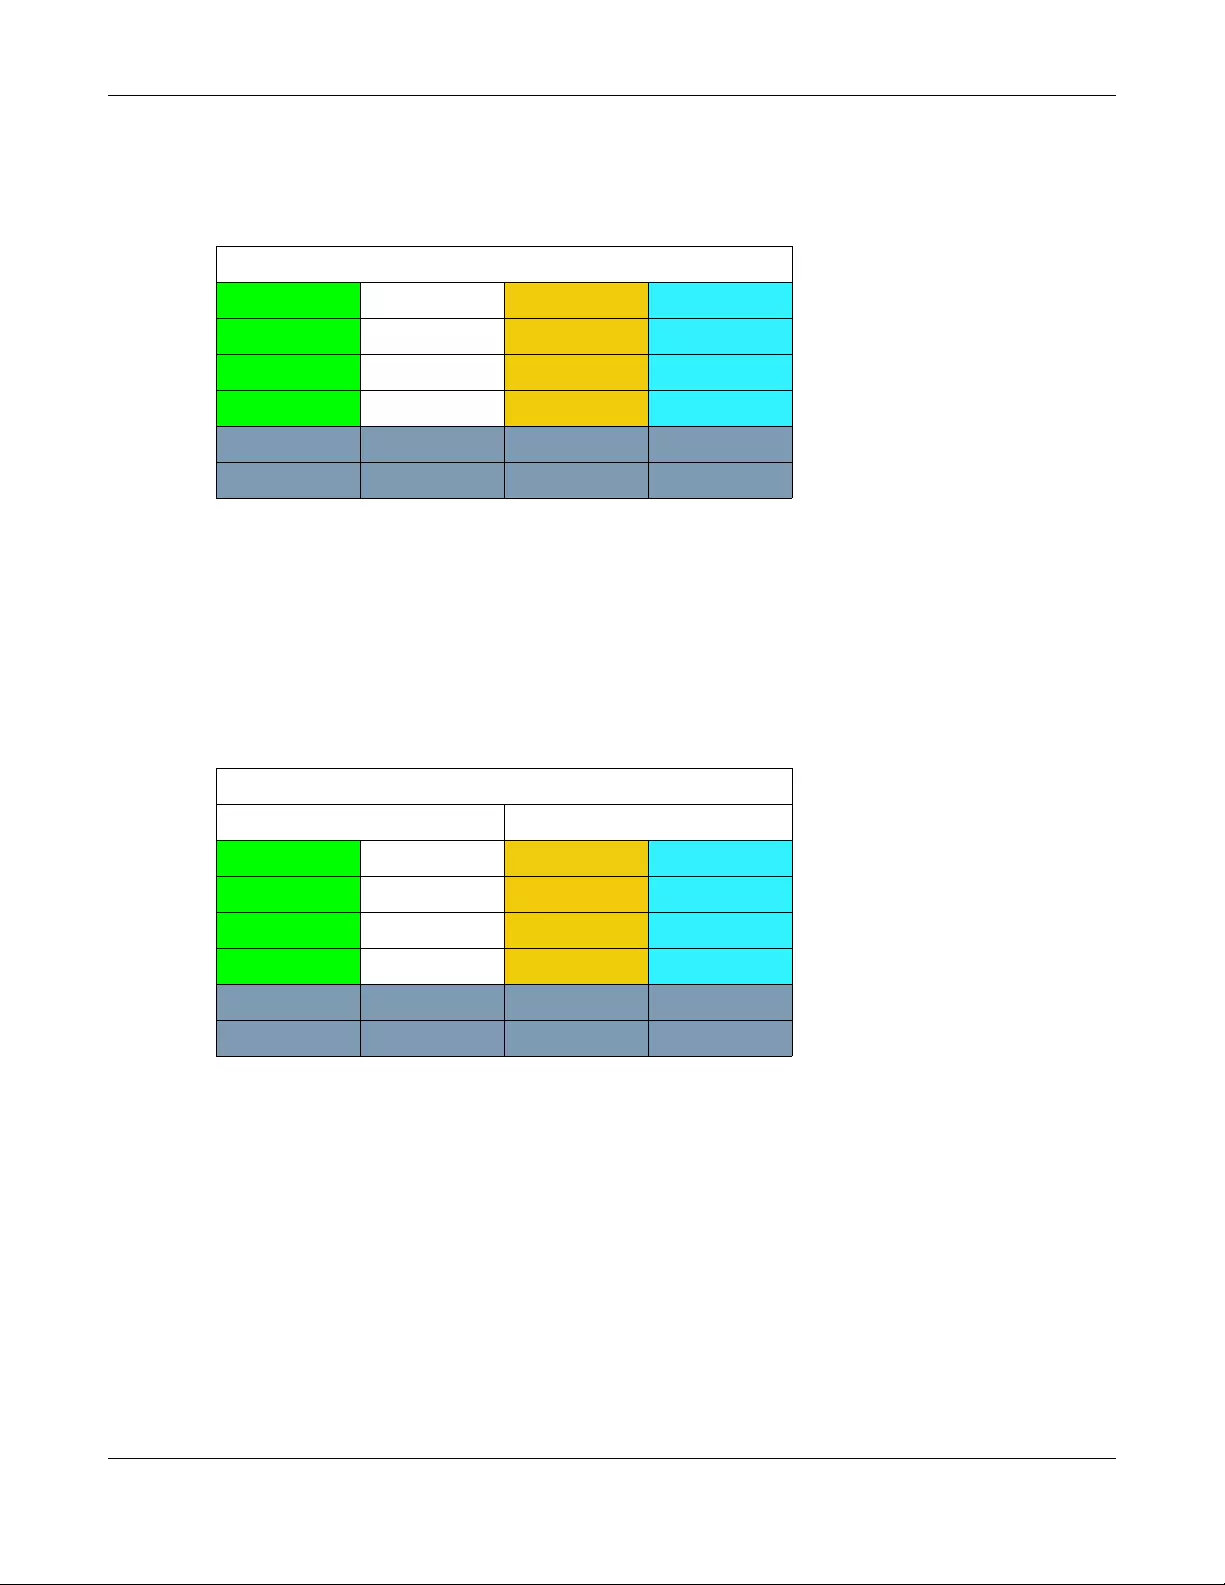
Chapter 5 Storage Manager
NAS Series User’s Guide
99
the array is the capacity of the smallest drive (1TB, 1TB, 2TB, 2TB) * (Number of disks — 2) = 1TB * (4-2) = 2TB.
The remaining space (2 TB) is unused.
RAID 10
RAID 10 (RAID 1+0) is a nested RAID where two RAID 1 arrays are stored on the physical disks with a RAID
0 array on top. It is a stripe of mirrors. RAID 1 provides redundancy while RAID 0 boosts performance. The
following figure shows two disks in two RAID 1 arrays. Data is duplicated across two disks, so if one disk
fails, there is still a copy of the data. These two arrays are configured as a single RAID 0 array for faster
performance.
Typical applications for RAID 10 are those requiring both high performance and reliability such as
enterprise servers and high-end moderate-sized database systems. RAID 10 is often used in place of
RAID 1 or RAID 5 by those requiring higher performance. It may be used instead of RAID 1 for
applications requiring more capacity.
RAID 5
RAID 5 provides the best balance of capacity and performance while providing data redundancy. It
provides redundancy by striping data across three disks and keeps the parity information (AP) on the
fourth disk (in each stripe). In case of disk failure, data can be recovered from the surviving disks using
the parity information. When you replace the failed disk, the reconstructed data is written onto the new
disk. Re-synchronize the array to have it return to its original state. The following example shows data
Table 52 RAID 6
RAID 6
A1 A2 AP AQ
B1 BP BQ B2
CP CQ C1 C2
DQ D1 D2 DP
DISK 1 DISK 2 DISK 3 DISK 4
Table 53 RAID 10
RAID 0
RAID 1 RAID 1
A1 A1 A2 A2
A3 A3 A4 A4
A5 A5 A6 A6
A7 A7 A8 A8
DISK 1 DISK 2 DISK 3 DISK 4
Chapter 5 Storage Manager
NAS Series User’s Guide
100
stripped across three disks (A1 to A3 in the first strip for example) with parity information (AP) on the
fourth disk.
The capacity of a RAID 5 array is the smallest disk in the RAID set multiplied by one less than the number
of disks in the RAID set. For example, if you have four disks of sizes 150 GB, 150 GB, 200 GB and 250 GB
respectively in one RAID 5 array, then the maximum capacity is 450 GB (3 * 150 GB, the smallest disk size)
and the remaining space (300 GB) is unused.
Typical applications for RAID 10 are transaction processing, relational database applications, enterprise
resource planning and other business systems. For write-intensive applications, RAID 1 or RAID 1+0 are
probably better choices, as the performance of RAID 5 will begin to substantially decrease in a write-
heavy environment.
Hot-spare
A RAID 1 or RAID 5 array with a hot-spare operates as a three-disk RAID 1 or RAID 5 array with the fourth
disk on standby. The standby disk automatically comes into play if a disk in the array fails. The
advantage of a hot-spare is that if a disk fails, then the array resynchronizes automatically with the
standby disk and operates at healthy array speed after the resynchronization.
Note: You need four hard disks installed to use RAID 10, RAID 5 or RAID 5 with hot-spare.
RAID and Data Protection
If a hard disk fails and you’re using a RAID 1, RAID 10, or RAID 5 array then your data will still be available
(but at degraded speeds until you replace the hard disk that failed and re-synchronize the array).
However, RAID cannot protect against file corruption, virus attacks, files incorrectly deleted or modified,
or the NAS malfunctioning.
Table 54 RAID 5
A1 A2 A3 AP
B1 B2 BP B3
C1 CP C2 C3
DP D1 D2 D3
DISK 1 DISK 2 DISK 3 DISK 4

NAS Series User’s Guide
101
CHAPTER 6
Control Panel: Overview
6.1 Overview
This chapter discusses the Control Panel screens. Use the Control Panel screens to configure
administrator settings. The Control Panel icon displays on the Desktop when you log in with an
administrator account.
6.2 Control Panel Overview
The Control Panel Overview screen displays user’s access privileges, network, system, media services
and maintenance settings. Click Control Panel on the Desktop to display the following screen.
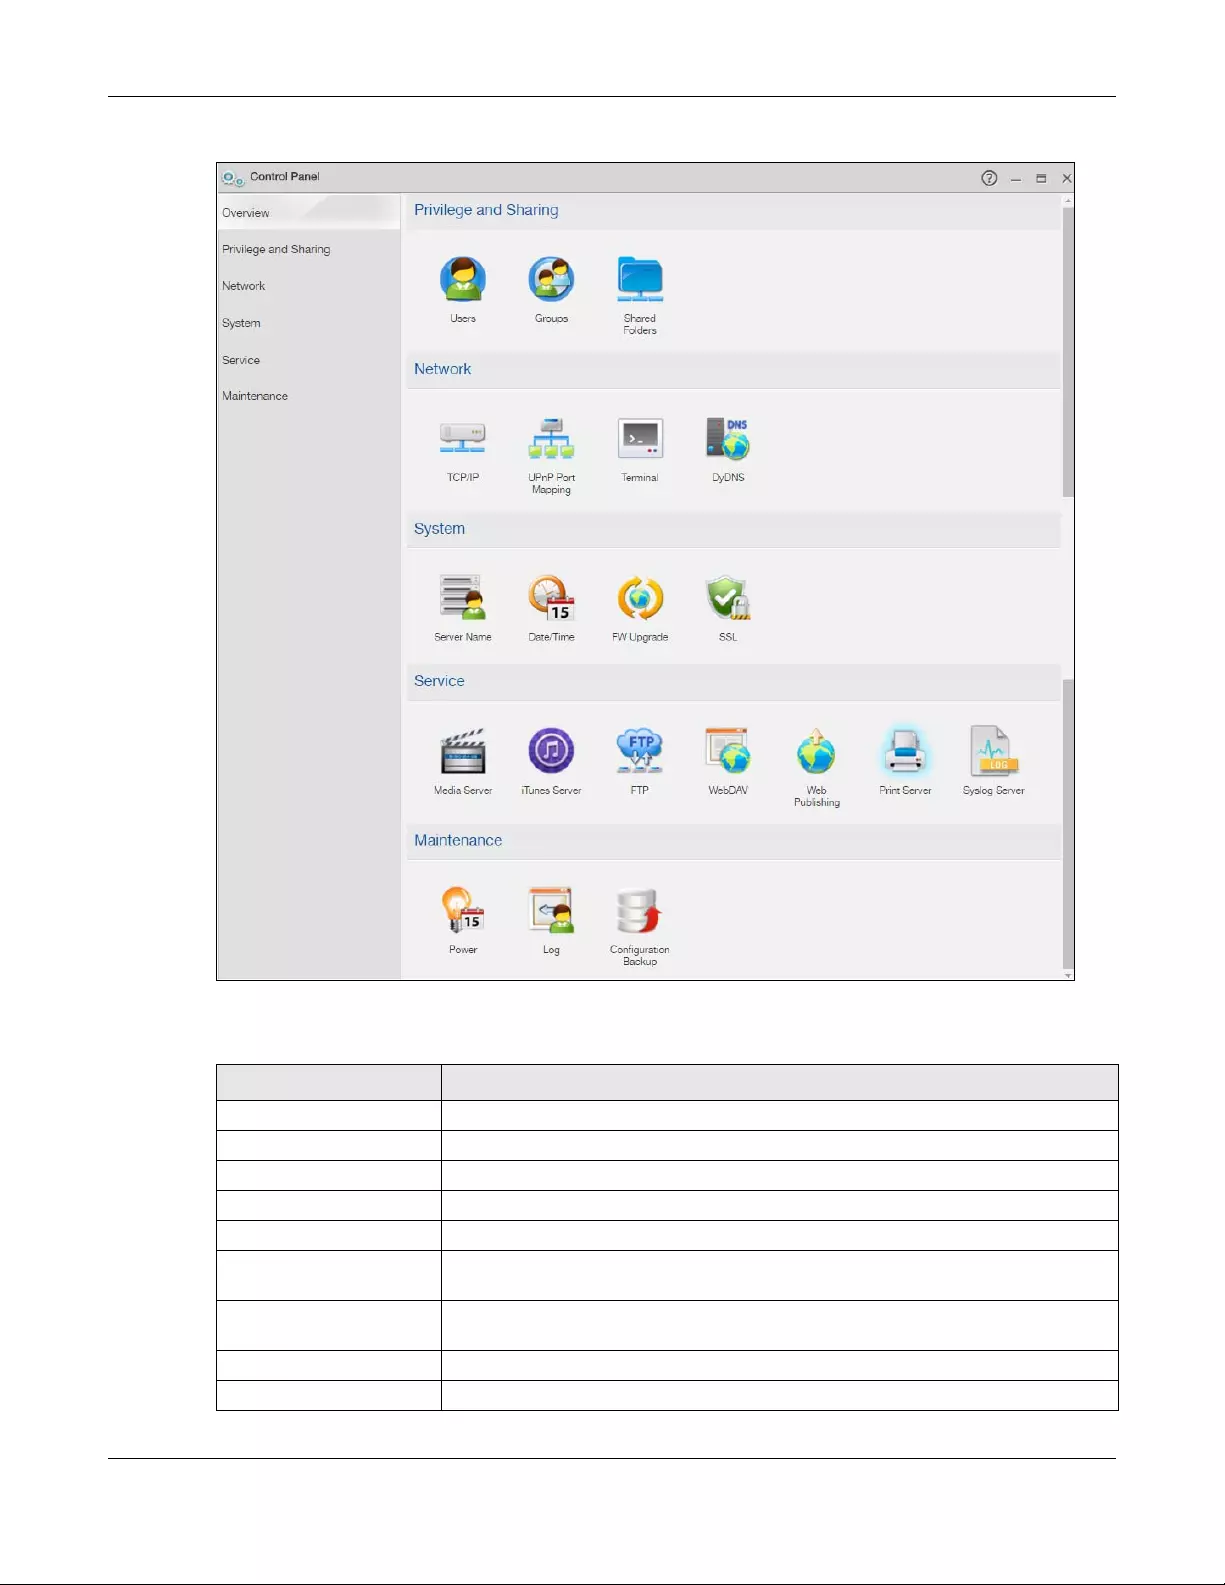
Chapter 6 Control Panel: Overview
NAS Series User’s Guide
102
Figure 74 Control Panel > Overview
The following table describes the labels in this screen.
Table 55 Control Panel > Overview
LABEL DESCRIPTION
Privilege and Sharing
Users Use this section to display and manage a list of user accounts created on the NAS.
Groups Use this section to display and manage a list of groups created on the NAS.
Shared Folders Use this section to navigate a list of shares created on the NAS.
Network
TCP/IP Use this section to configure the NAS’s TCP/IP network connection settings such as the
teaming mode and IP addresses.
UPnP Port Mapping Use this section to automatically configure your Internet gateway’s firewall and
Network Address Translation (NAT) to allow access to the NAS from the Internet.
Terminal Use this section to enable or disable Telnet and SSH access.
DyDNS Use this section to configure the domain name settings of your NAS.
Chapter 6 Control Panel: Overview
NAS Series User’s Guide
103
System
Server Name Use this section to specify the NAS’s server and workgroup names.
Date/Time Use this section to set up date/time and choose a time zone for the NAS.
FW Upgrade Use this section to upgrade the NAS firmware.
SSL Use this section to configure the NAS’s SSL certificate.
Service
Media Server Use this section to enable or disable the sharing of media files and select which shares
to share.
iTunes Server Use this section to share media files with iTunes users on your network.
FTP Use this section to enable FTP file transfer to/from the NAS, set the number of FTP
connections allowed, an FTP idle timeout, and the character set.
WebDAV Use this section to allow remote users to use client programs that support WebDAV to
edit and manage files stored on the NAS.
Web Publishing Use this section to let people use a web browser to access files in shares without
logging into the Web Configurator.
Print Server Use this section to view and manage the NAS’s list of printers and print jobs.
Syslog Server Use this section to enable the syslog server and select the categories to include in the
log report.
Maintenance
Power Use this section to configure power saving settings for the NAS and have the NAS turn
itself off and on or reboot according to the schedules you configure.
Log Use this section to view the NAS’s logs and configure how you want to receive the log
reports.
Configuration Backup Use this section to back up and/or restore the NAS configuration file.
Table 55 Control Panel > Overview (continued)
LABEL DESCRIPTION

NAS Series User’s Guide
104
CHAPTER 7
Control Panel: Privilege and
Sharing
7.1 Overview
This chapter introduces the Control Panel > Privilege and Sharing screens.
7.2 What You Can Do
• Use the Users screens (Section 7.3 on page 104) to display and manage a list of user accounts
created on the NAS.
• Use the Groups screens (Section 7.4 on page 113) to display and manage a list of groups created on
the NAS.
• Use the Shared Folders screens (Section 7.5 on page 120) to navigate a list of shares created on the
NAS.
7.3 Users
Use the Users screens to create and manage administrator and user accounts.
Administrators can:
• Configure and manage the NAS.
• Create volumes, shares, and user accounts.
• Assign individual users specific access rights for specific shares.
Users are people who have access rights to the NAS and can store files there for later retrieval. A user
can:
• Change his own password.
• Access the contents of other shares to which he is given access rights.
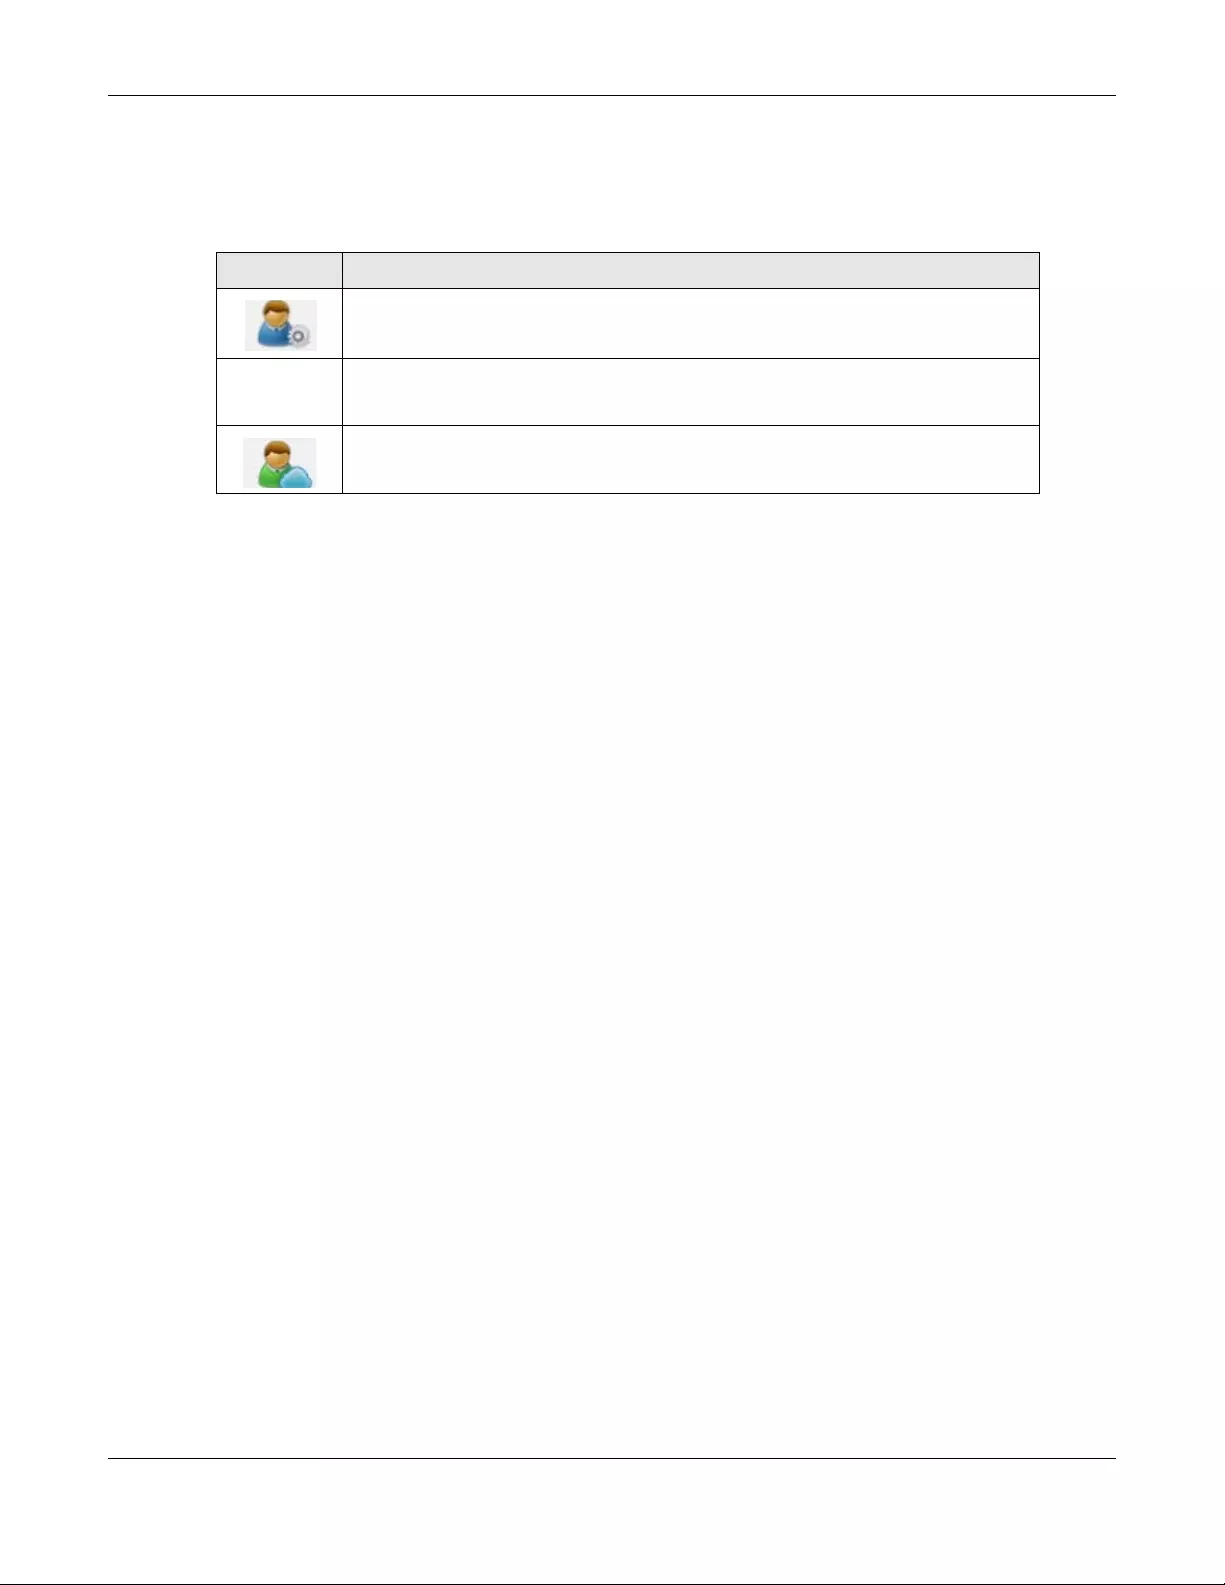
Chapter 7 Control Panel: Privilege and Sharing
NAS Series User’s Guide
105
User Icons
The following table describes the user icons.
Usernames
Enter a username from one to 32 characters. The first character must be alphabetical (case insensitive,
[A-Z a-z]); numeric characters are not allowed as the first character.
The username can only contain the following characters:
• Alphanumeric A-z 0-9. Usernames are supported with CIFS and web configurator logins.
•Spaces
• _ [underscores]
•. [periods]
• — [dashes]
Other limitations on usernames are:
• All leading and trailing spaces are removed automatically.
• Multiple spaces within names are converted to a single space.
• Usernames are case insensitive. The username cannot be the same (no matter the letter case) as an
existing user. For example, if a user exists with the name ‘BOB’, you cannot create a user named ‘bob’.
If you enter a user ‘bob’ but use ‘BOB’ when connecting via CIFS or FTP, it will use the account settings
used for ‘bob’.
• The username cannot be the same as a system username such as pc-guest nor be the same as an
existing user. Other reserved usernames that are not allowed are:
•bin
•daemon
•ftp
•anonymous
•nobody
• root
•pc—guest
•admin
•password
Table 56 User Icons
ICON DESCRIPTION
This icon is for an administrator account.
This icon is for a user account.
This icon is for a myZyxelCloud account.

Chapter 7 Control Panel: Privilege and Sharing
NAS Series User’s Guide
106
pc-guest
If you give the pc-guest user read-only access or full access to files in a share. The share becomes a
public share. Everyone on the network can use Windows Explorer to access a public share without a
login user name and password.
7.3.1 Users Screen
Use this screen to create and manage accounts for users who can store files on the NAS. Click Control
Panel > Privilege and Sharing > Users to display the screen shown next.
Figure 75 Control Panel > Privilege and Sharing > Users
The following table describes the labels in this screen.
Table 57 Control Panel > Privilege and Sharing > Users
LABEL DESCRIPTION
Add User Click this to open a screen where you can configure a new user account.
Refer to Section 7.3.2 on page 107 to see the screen.
Edit User Select an account and click this to open a screen where you can edit the properties of the
account.
Refer to Section 7.3.3 on page 111 to see the screen.
Delete Selected
Users
Select an account and click this to open a screen where you can delete the user account.
User Info Select an account and click this to open a screen displaying the amount of storage space
used by the account. You can also check the account’s membership in any groups.
Refer to Section 7.3.4 on page 112 to see the screen.
Refresh Click this to renew this screen.
Select what users you want to see from the drop-down list box.
Type This field displays whether the account is an administrator account or a user account.
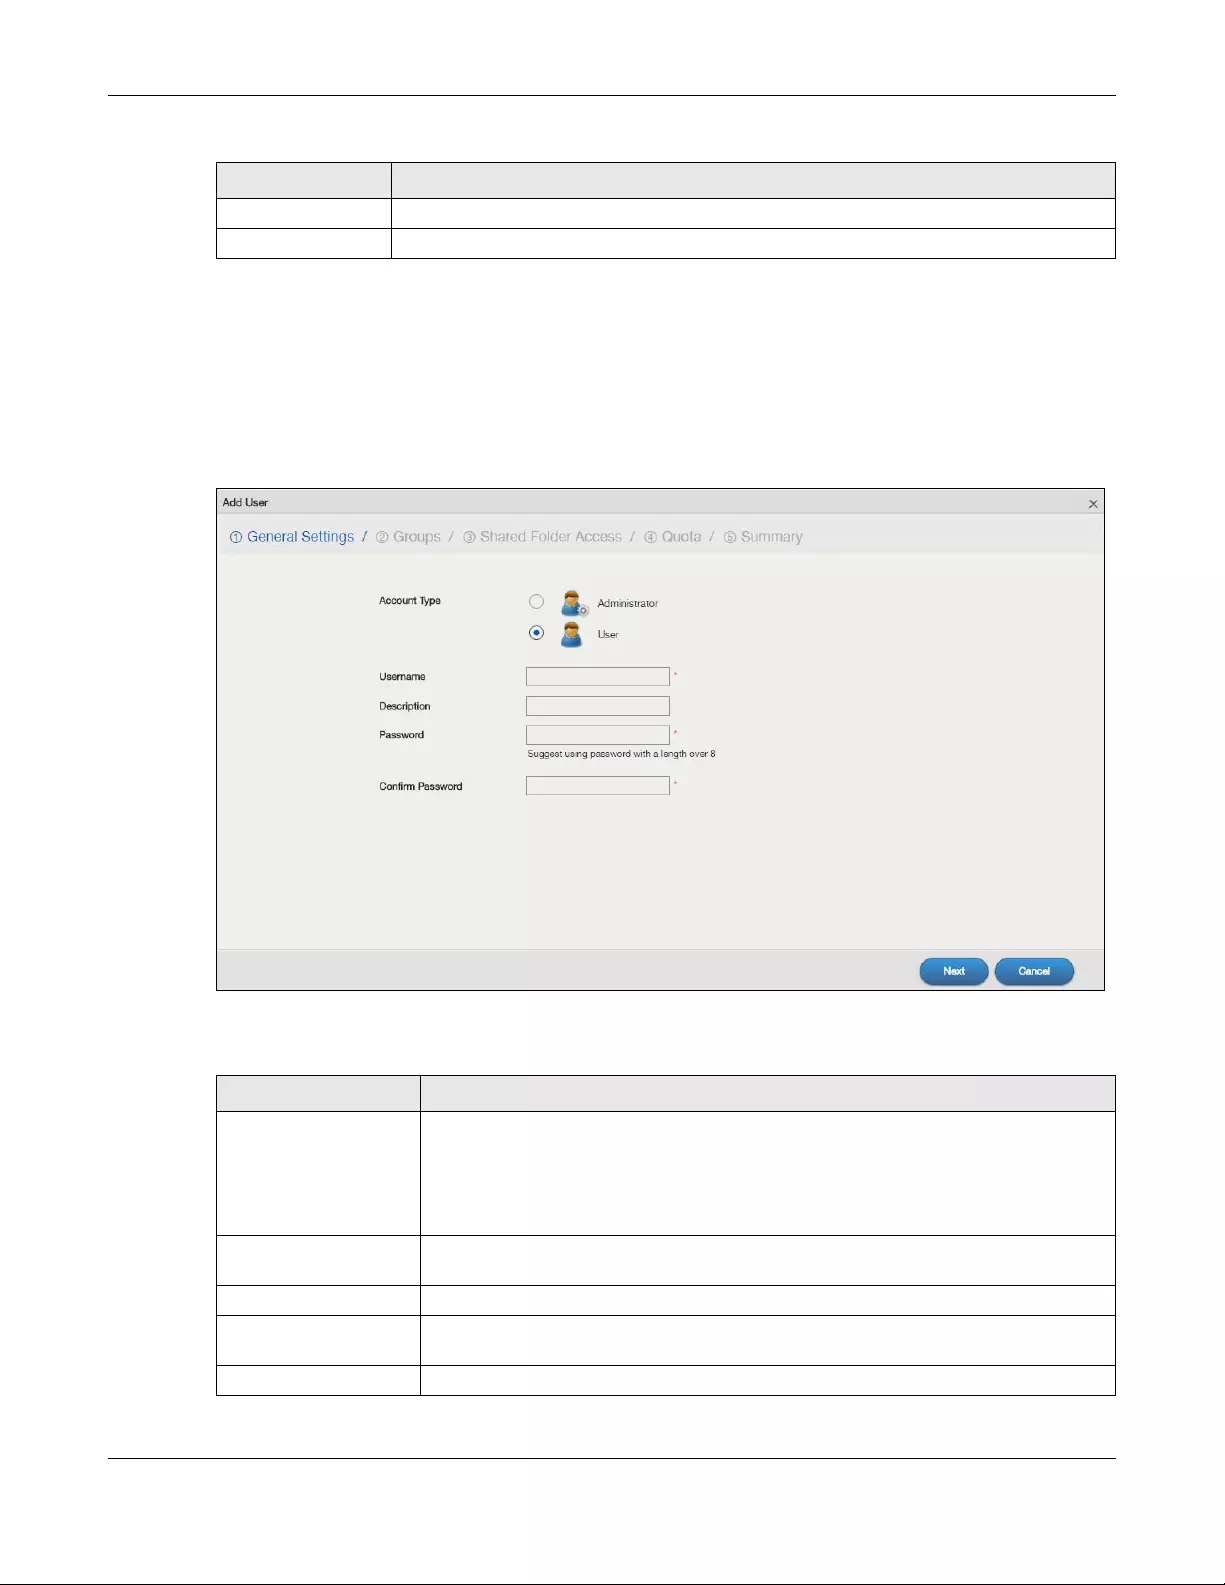
Chapter 7 Control Panel: Privilege and Sharing
NAS Series User’s Guide
107
7.3.2 Add an Account
Use this screen to create a NAS user account with NAS access password. Click the Add User button in
the Users screen to open the following screens.
Step 1 General Settings
Figure 76 Control Panel > Privilege and Sharing > Users > Add a User: General Settings
The following table describes the labels in this screen.
Username This field displays the username of each account.
Description This field displays the description of each account.
Table 57 Control Panel > Privilege and Sharing > Users (continued)
LABEL DESCRIPTION
Table 58 Control Panel > Privilege and Sharing > Users > Add a User: General Settings
LABEL DESCRIPTION
Account Type Select Administrator to give the account full configuration and management access to
the NAS.
Select User to give the account basic access rights to the NAS and allow the user to
manage his own shares, change his own password, and access the contents of other
shares to which he is given access rights.
Username Type a name from 1 to 32 single-byte (no Chinese characters allowed for example)
ASCII characters. See Section 7.3 on page 104 for more details on usernames.
Description Type the description for this account.
Password Create a password associated with this user. You can type from one to 14 single-byte
(no Chinese characters allowed for example) ASCII characters.
Confirm Password You must type the exact same password that you just typed in the above field.
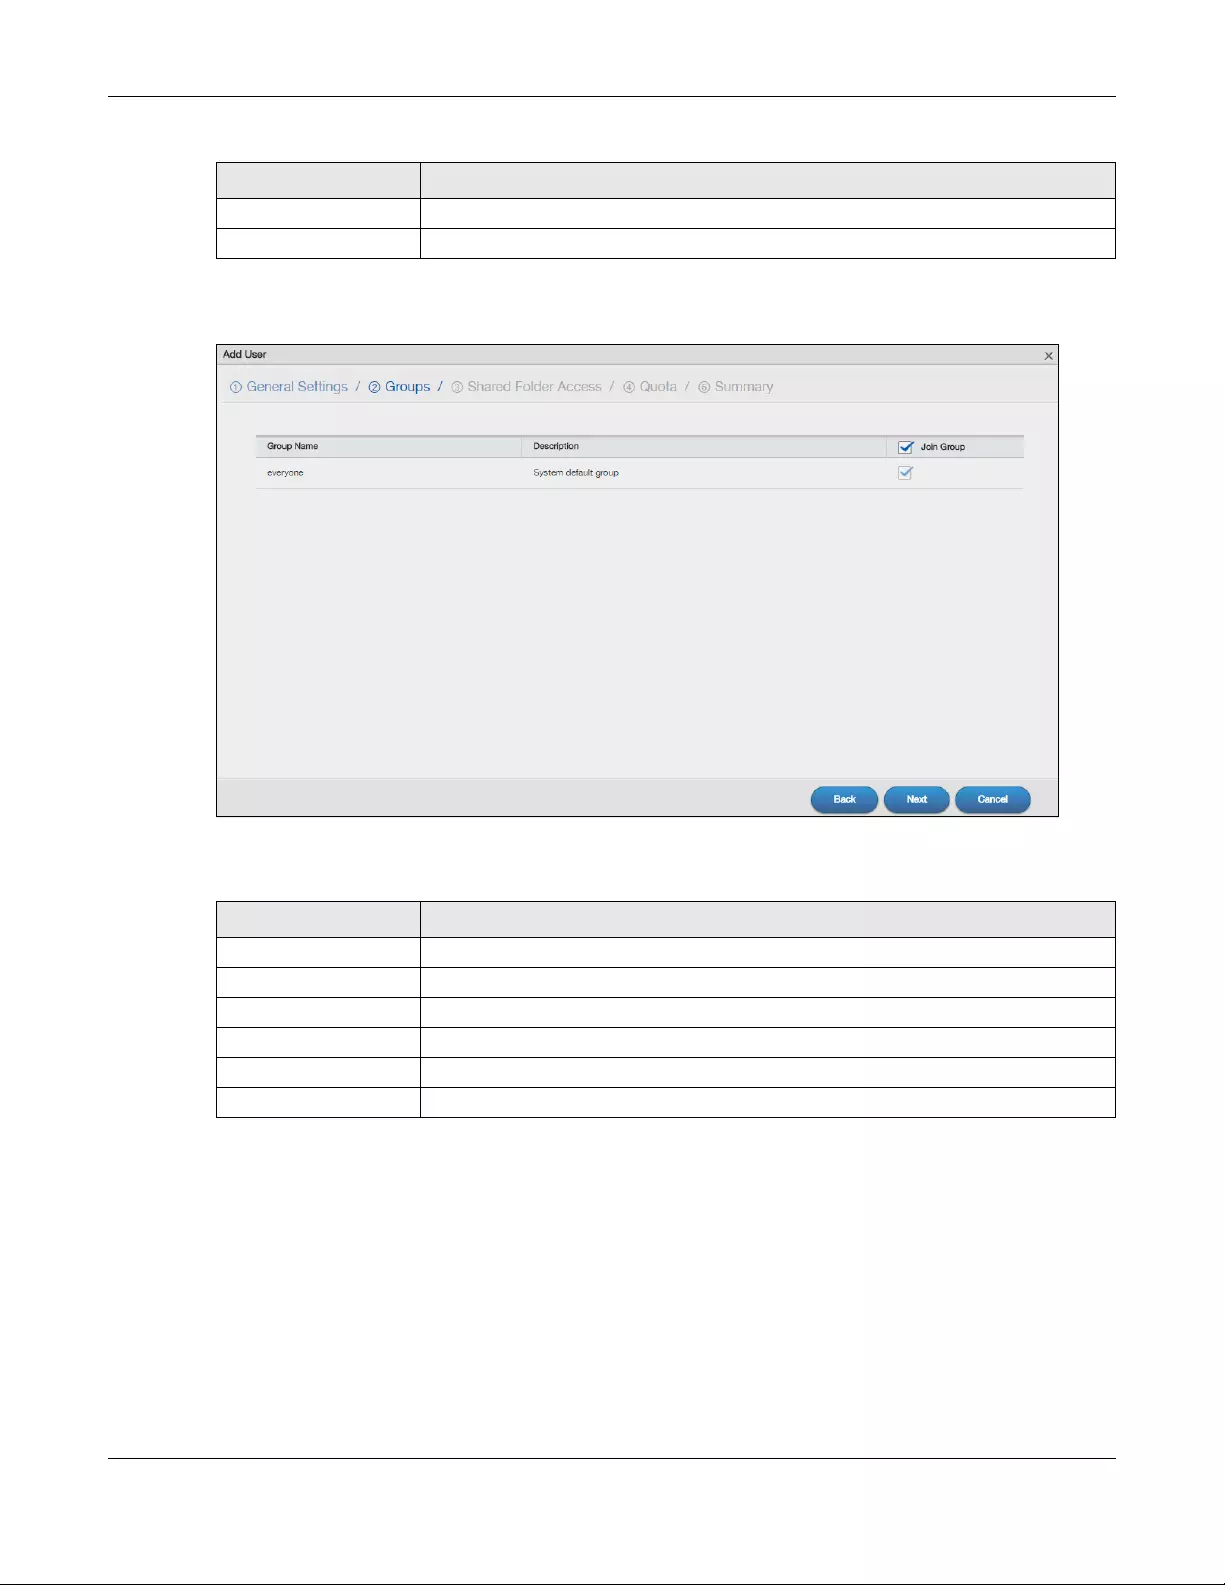
Chapter 7 Control Panel: Privilege and Sharing
NAS Series User’s Guide
108
Step 2 Groups
Figure 77 Control Panel > Privilege and Sharing > Users > Add a User: Groups
The following table describes the labels in this screen.
Next Click this to go to the next step.
Cancel Click this to return to the previous screen without saving.
Table 59 Control Panel > Privilege and Sharing > Users > Add a User: Groups
LABEL DESCRIPTION
Group Name This field displays the group name.
Description This field displays the description of the group.
Join Group Click this to add the account to the group.
Back Click this to return to the previous step.
Next Click this to go to the next step.
Cancel Click this to return to the previous screen without saving.
Table 58 Control Panel > Privilege and Sharing > Users > Add a User: General Settings (continued)
LABEL DESCRIPTION
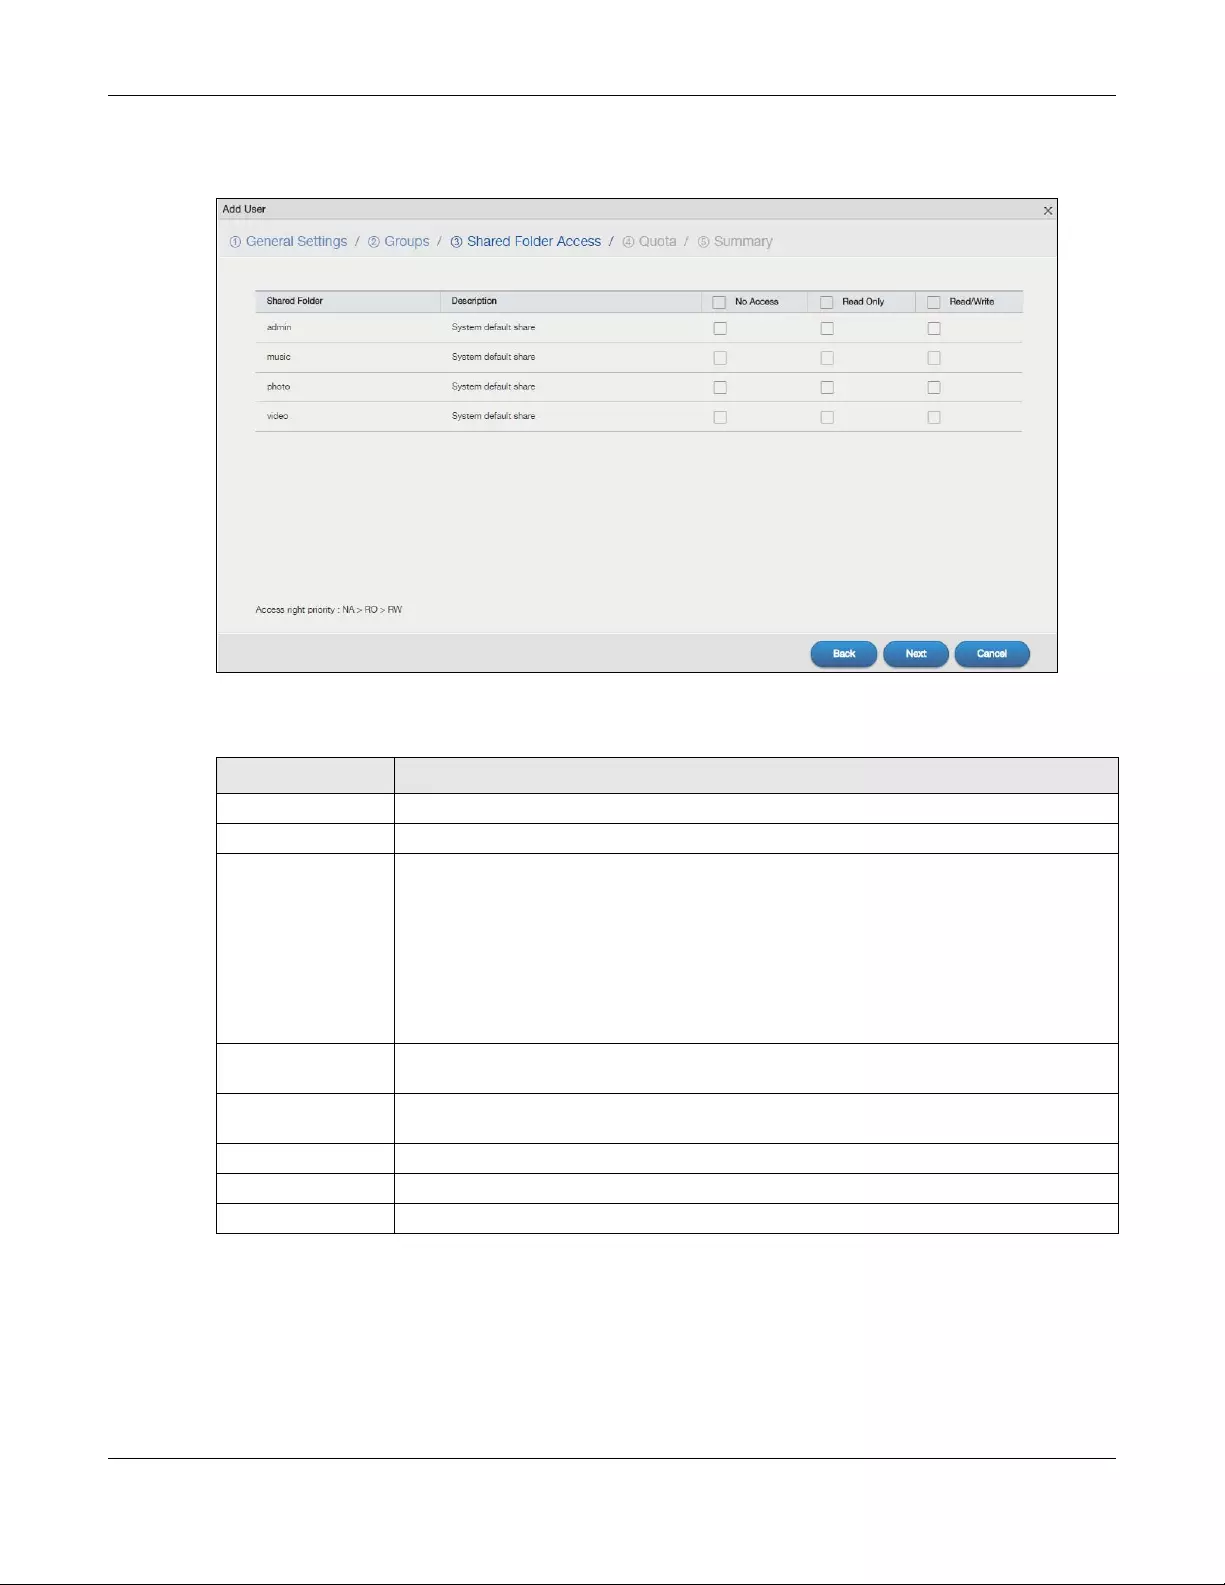
Chapter 7 Control Panel: Privilege and Sharing
NAS Series User’s Guide
109
Step 3 Shared Folder Access
Figure 78 Control Panel > Privilege and Sharing > Users > Add a User: Shared Folder Access
The following table describes the labels in this screen.
Table 60 Control Panel > Privilege and Sharing > Users > Add a User: Shared Folder Access
LABEL DESCRIPTION
Shared Folder This field lists the shares to which you can assign access rights.
Description This field displays the description of the shared folder.
No Access Click the check box to block access (users cannot read, modify, nor execute) to all files
contained within this share.
Among all access rights, No Access has the highest . For example, User A belongs to Group
1. You assign User A full access rights to the Music share but deny access rights to Group 1.
Then User A cannot access the Music share.
Note: If you deny access to all users, no-one can use the share, not even the
administrator.
Read Only Click the check box to give users read-only access (they cannot modify nor execute) to all
files contained within this share.
Read/Write Click the check box to give users full access (read, write and execute) to all files contained
within this share.
Back Click this to return to the previous step.
Next Click this to go to the next step.
Cancel Click this to return to the previous screen without saving.
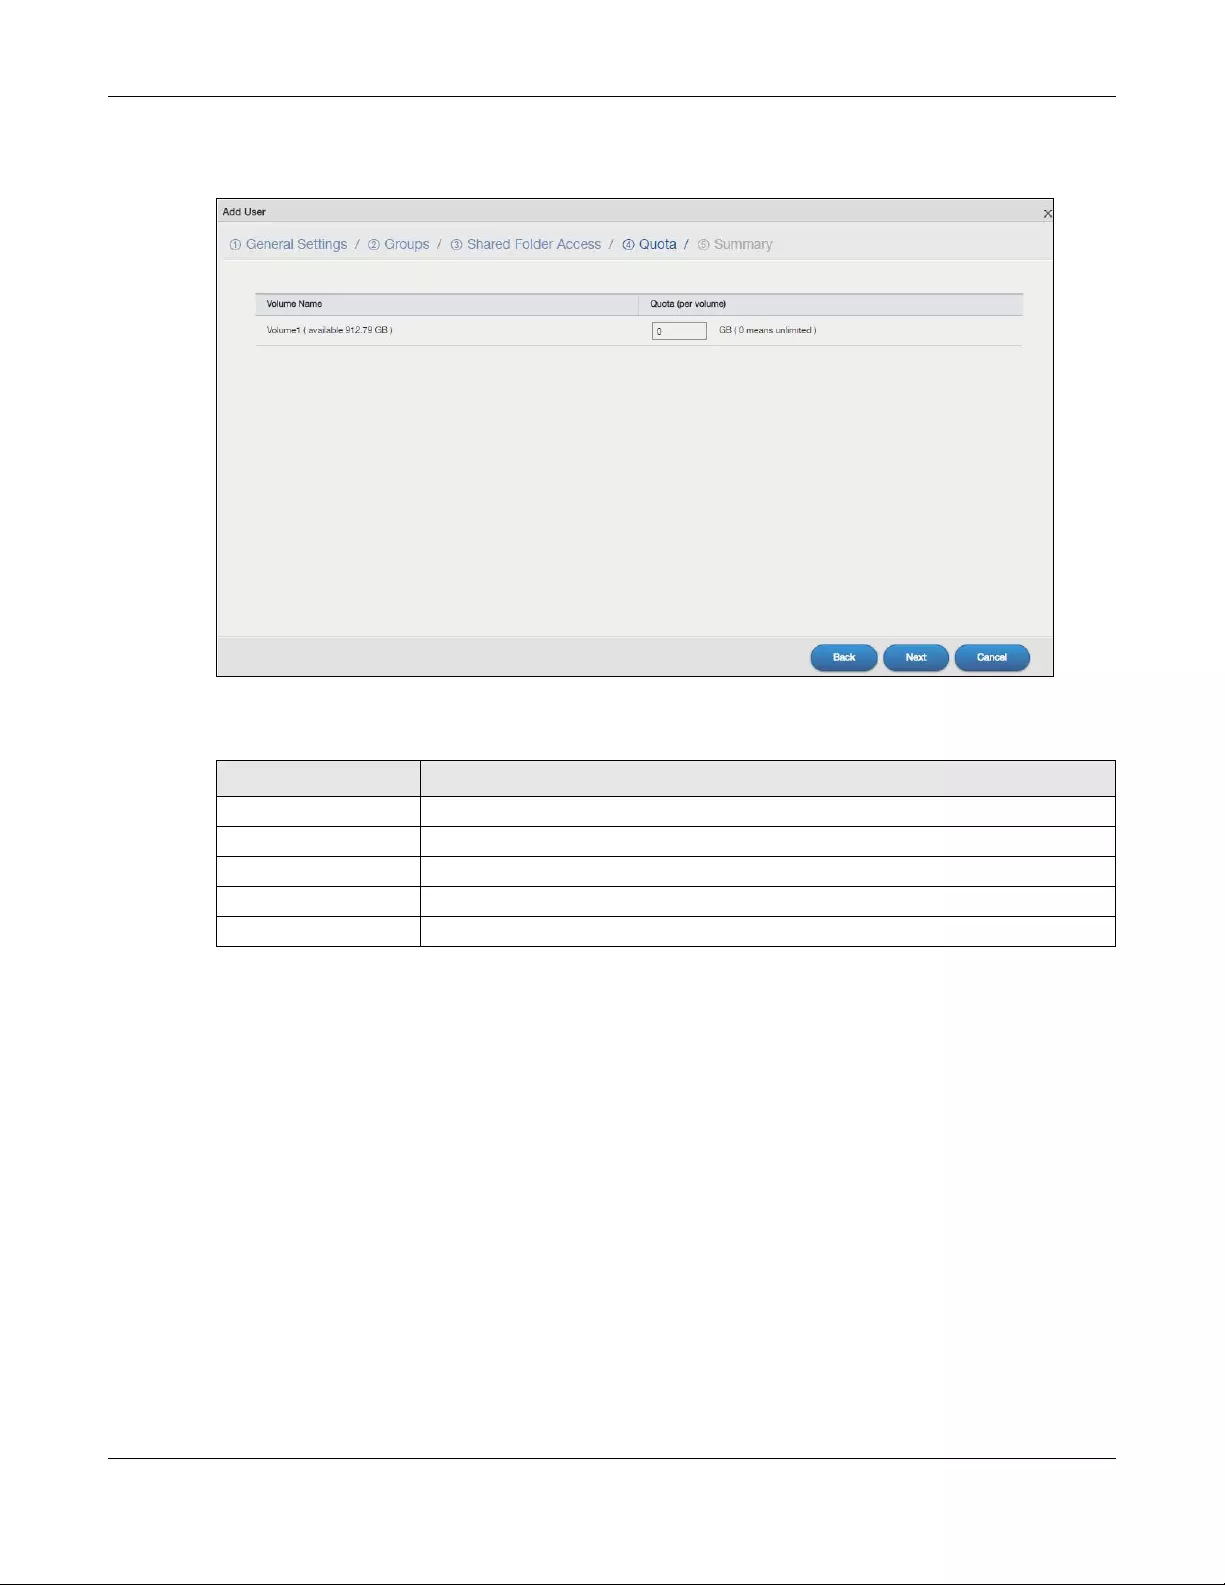
Chapter 7 Control Panel: Privilege and Sharing
NAS Series User’s Guide
110
Step 4 Quota
Figure 79 Control Panel > Privilege and Sharing > Users > Add a User: Quota
The following table describes the labels in this screen.
Table 61 Control Panel > Privilege and Sharing > Users > Add a User: Quota
LABEL DESCRIPTION
Volume Name Select the volume in which you want the user’s files to be stored.
Quota (per volume) Enter how much space (in gigabytes) you want to allow for the user to store files.
Back Click this to return to the previous step.
Next Click this to go to the next step.
Cancel Click this to return to the previous screen without saving.
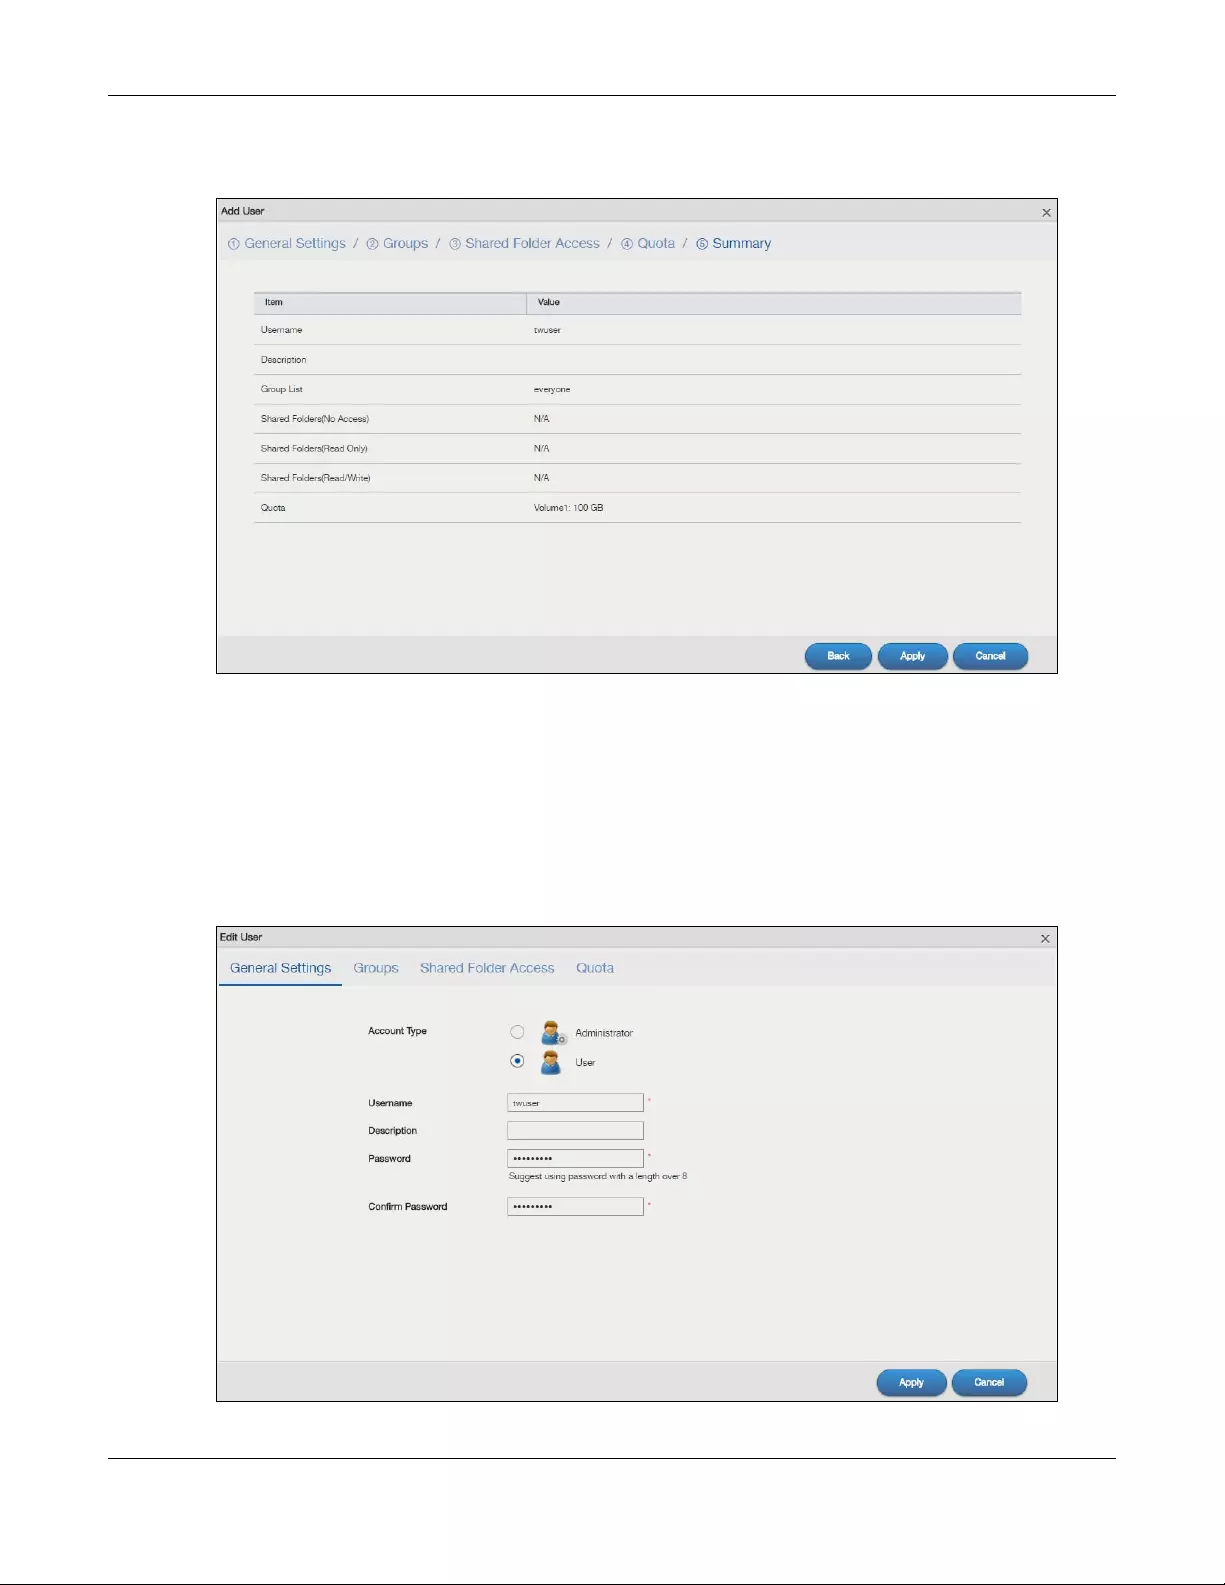
Chapter 7 Control Panel: Privilege and Sharing
NAS Series User’s Guide
111
Step 5 Summary
Figure 80 Control Panel > Privilege and Sharing > Users > Add a User: Summary
Use this screen to view your account settings. Click Back to return to the previous step. Click Apply to
save your changes. Click Cancel to return to the previous screen without saving.
7.3.3 Edit an Account
Use this screen to edit a NAS user account with NAS access password. Select an account and click the
Edit User button in the Users screen to open the following screen.
Figure 81 Control Panel > Privilege and Sharing > Users > Edit a User
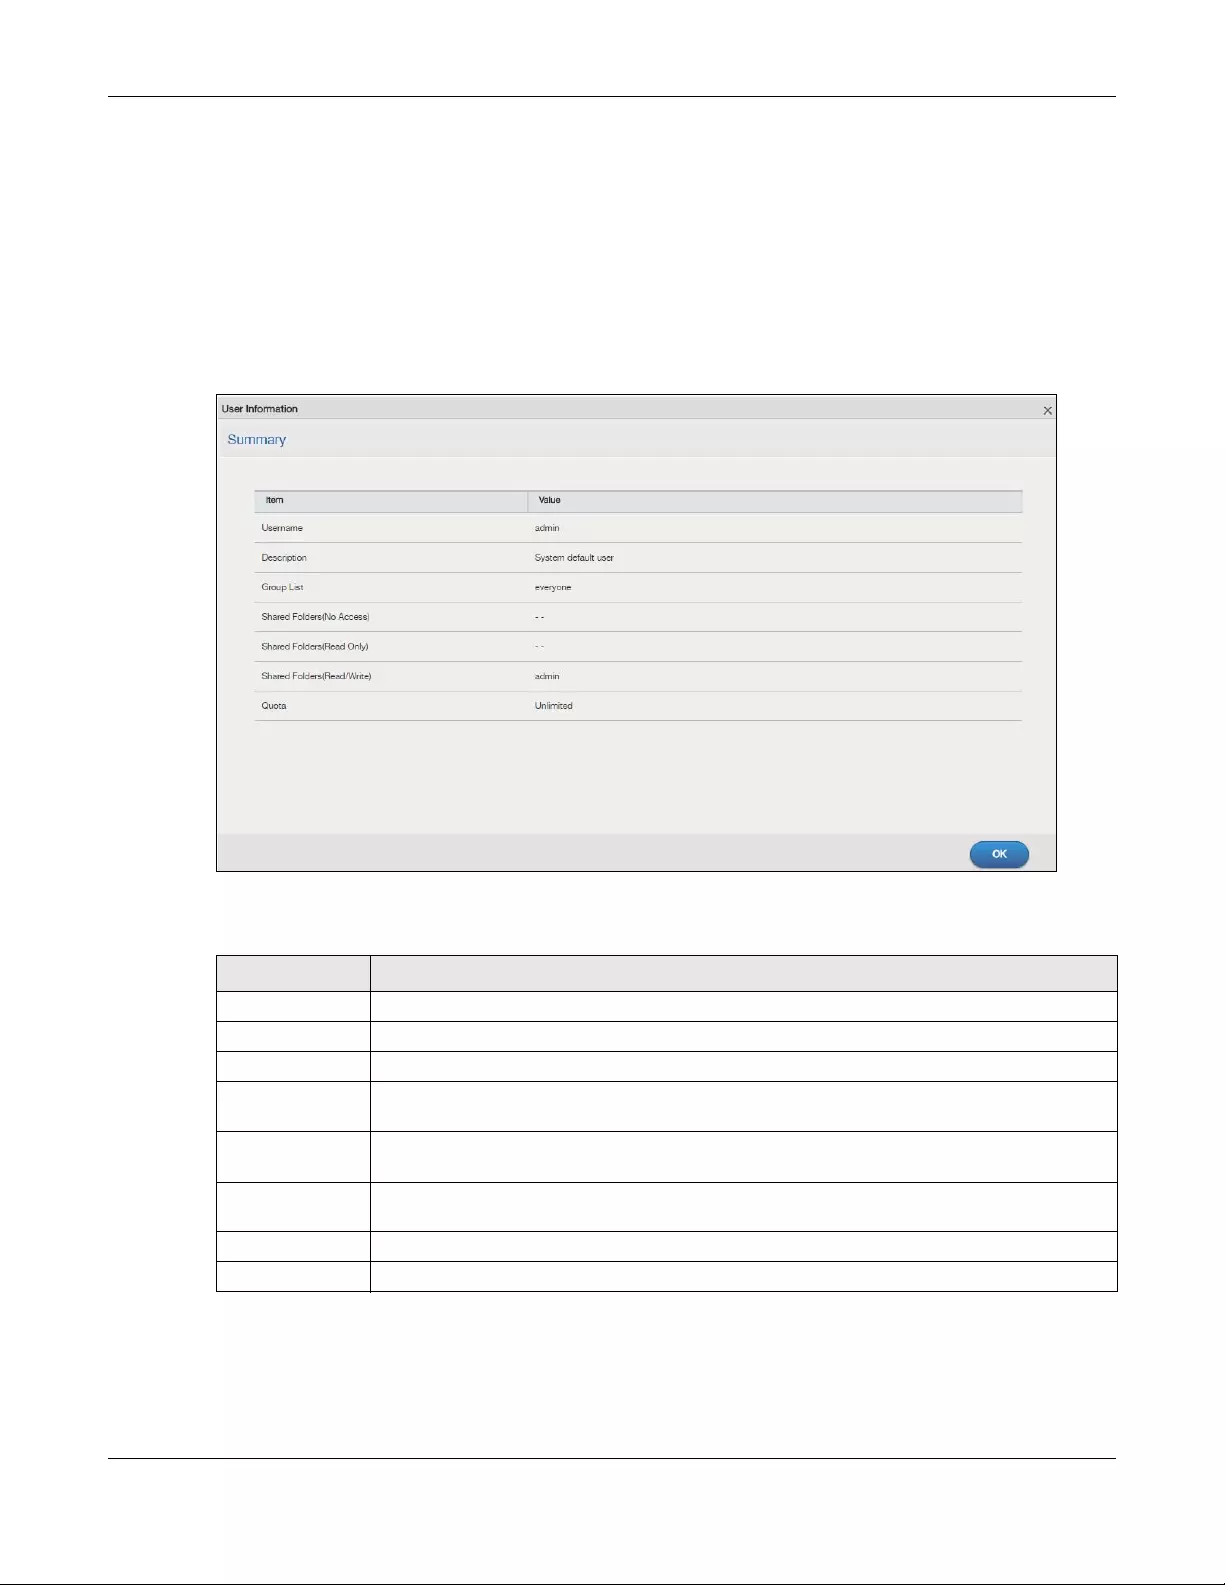
Chapter 7 Control Panel: Privilege and Sharing
NAS Series User’s Guide
112
Click General Settings, Groups, Shared Folder Access or Quota to edit the account settings. Refer to
Section 7.3.2 on page 107 for more information on the screens. Click Apply to save your changes. Click
Cancel to return to the previous screen without saving.
7.3.4 User Info
Use this screen to display a user’s information. In the Users screen, select an account and click the User
Info button to open the following screen.
Figure 82 Control Panel > Privilege and Sharing > Users > User Info
The following table describes the labels in this screen.
Table 62 Sharing > Users > User Info
LABEL DESCRIPTION
Username This field displays the selected username.
Description This field displays the description of the user.
Group List This field displays the list of groups to which the selected user belongs.
Shared Folders
(No Access)
This field displays the access permission to the user.
Shared Folders
(Read Only)
This field displays the access permission to the user.
Shared Folders
(Read/Write)
This field displays the access permission to the user.
Quota This field displays the amount of volume space used by the selected account.
OK Click this to close the current screen.

Chapter 7 Control Panel: Privilege and Sharing
NAS Series User’s Guide
113
7.4 Groups
Use the Groups screens to create and manage groups. You can assign users to groups and grant
individual groups access rights to specific shares.
Group Names
Enter a group name from 1 to 32 characters. The first character must be alphabetical (case insensitive,
[A-Z a-z]); numeric characters are not allowed as the first character.
The group name can only contain the following characters:
• Alphanumeric A-z 0-9. Unicode usernames are supported with CIFS logins, but not FTP or web
configurator logins.
•Spaces
• _ [underscores]
•. [periods]
• — [dashes]
Other limitations on group names are:
• All leading and trailing spaces are removed automatically.
• Multiple spaces within names are converted to a single space.
• Group names are case insensitive. The group name cannot be the same (no matter the letter case)
as an existing group. For example, if a group exists with the name ‘FAMILY’, you cannot create a
group named ‘family’.
• The group name cannot be the same as a system group name such as EVERYONE nor be the same as
an existing group. Other reserved groups names that are not allowed are:
•nobody
• root
•everyone
7.4.1 Groups Screen
Use this screen to create and manage groups. Click Control Panel > Privilege and Sharing > Groups to
display the screen shown next.
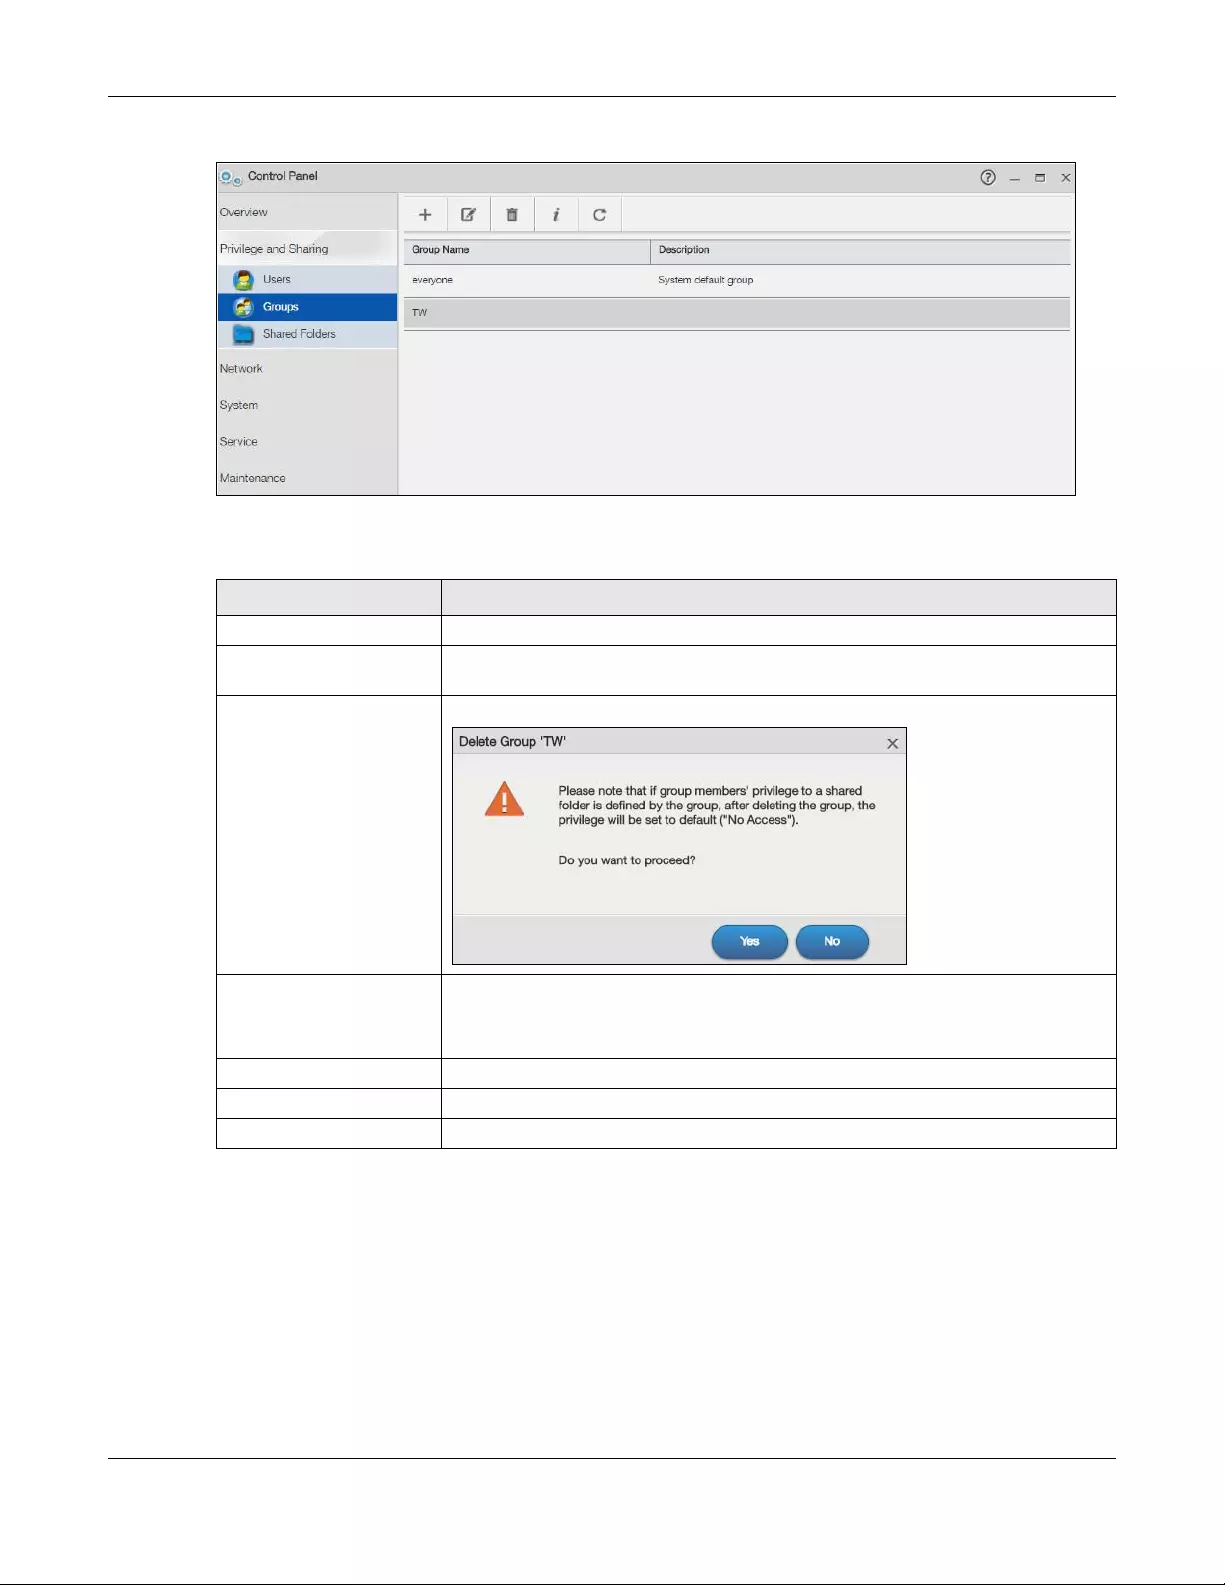
Chapter 7 Control Panel: Privilege and Sharing
NAS Series User’s Guide
114
Figure 83 Control Panel > Privilege and Sharing > Groups
The following table describes the labels in this screen.
7.4.2 Add a Group
Use this screen to create a NAS group. Click the Add Group button in the Groups screen to open the
following screens.
Table 63 Control Panel > Privilege and Sharing > Groups
LABEL DESCRIPTION
Add Group Click this to open a screen where you can configure a new group.
Edit Group Select a group and click this to open a screen where you can edit the properties of
the selected group.
Delete Selected Group(s) Select a group and click this to open a screen where you can delete the group.
Group Information Select a group and click this to open a screen displaying the details. You can also
check the group’s membership in any groups.
Refer to Section 7.4.4 on page 119 to see the screen.
Refresh Click this to renew this screen.
Group Name This field displays the group name created on the NAS.
Description This field displays the description of each group.
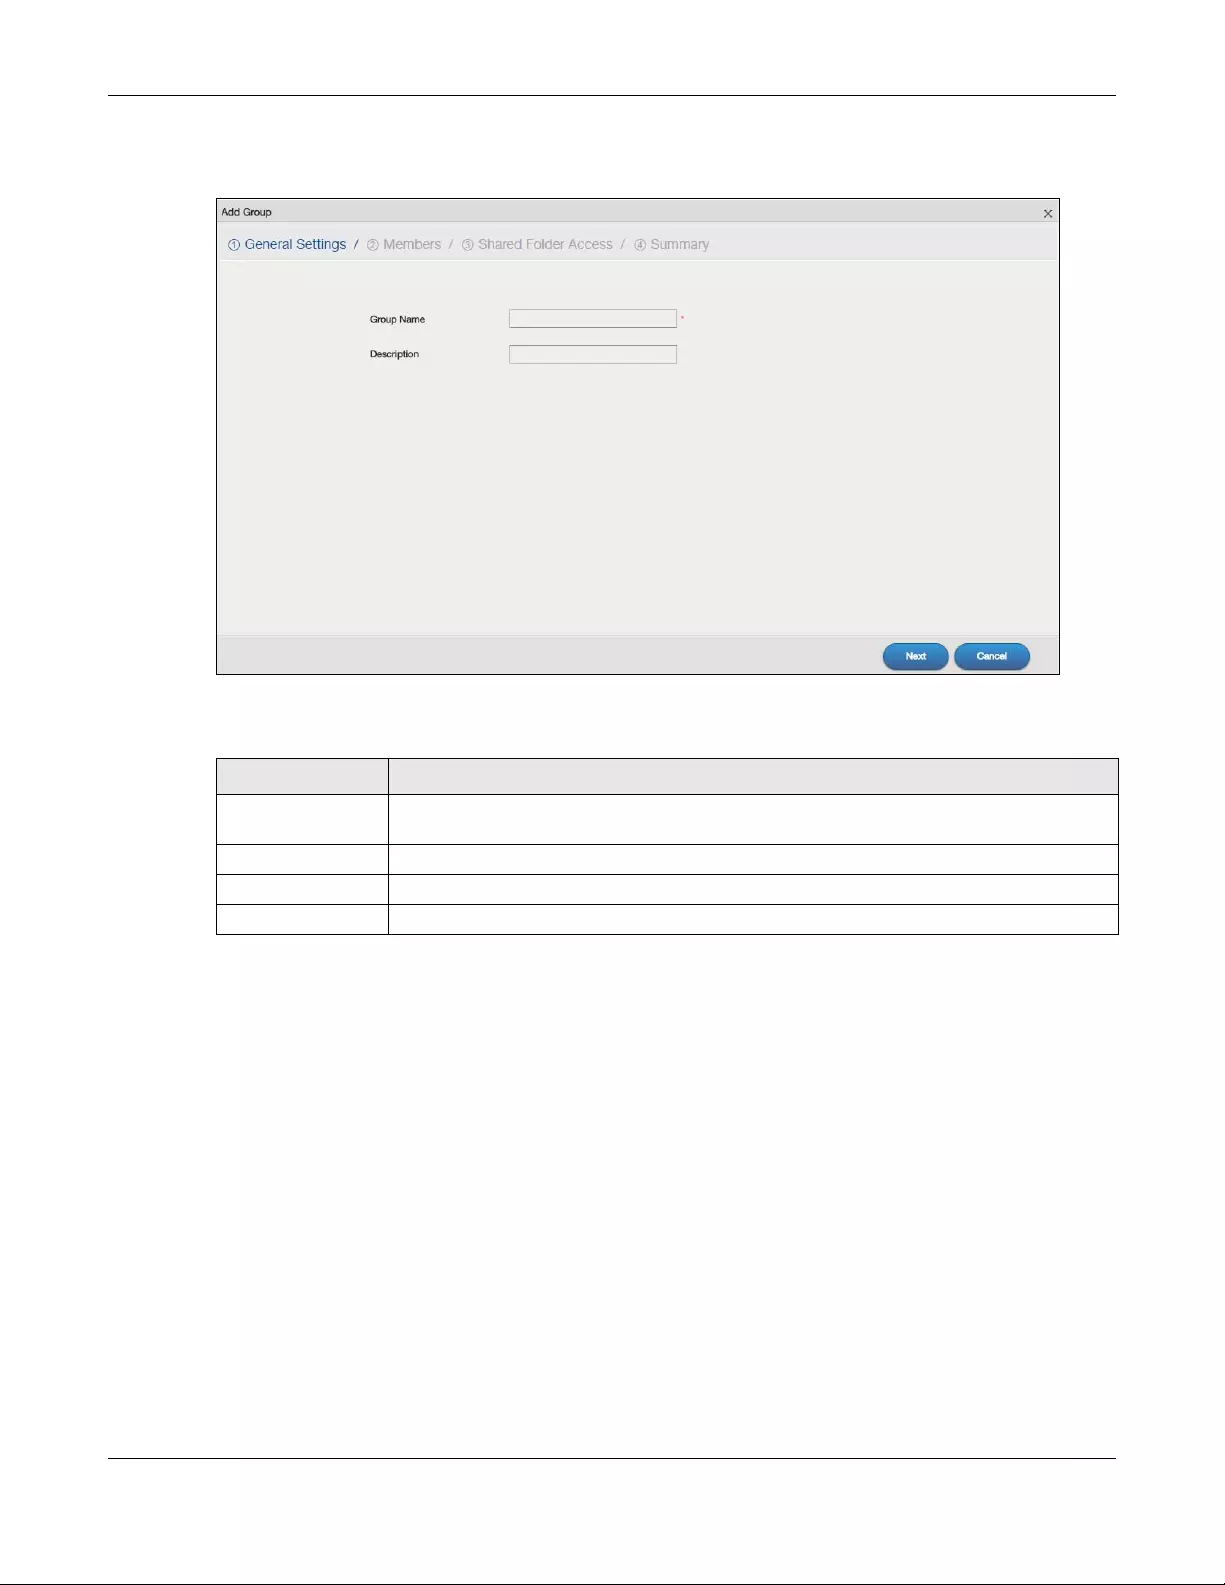
Chapter 7 Control Panel: Privilege and Sharing
NAS Series User’s Guide
115
Step 1 General Settings
Figure 84 Control Panel > Privilege and Sharing > Groups > Add a Group: General Settings
The following table describes the labels in this screen.
Table 64 Control Panel > Privilege and Sharing > Groups > Add a Group: General Settings
LABEL DESCRIPTION
Group Name Type a name from 1 to 32 single-byte (no Chinese characters allowed for example) ASCII
characters. See Section 7.4 on page 113 for more details on group names.
Description Type the description for this group name.
Next Click this to go to the next step.
Cancel Click this to return to the previous screen without saving.

Chapter 7 Control Panel: Privilege and Sharing
NAS Series User’s Guide
116
Step 2 Members
Figure 85 Control Panel > Privilege and Sharing > Groups > Add a Group: Members
The following table describes the labels in this screen.
Table 65 Control Panel > Privilege and Sharing > Groups > Add a Group: Members
LABEL DESCRIPTION
Type This field displays whether the account is an administrator account or a user account.
Username This field lists the user accounts created on the NAS.
Description This field displays the description of each user.
Add Click this to add the user account to the group. Otherwise, clear this field to remove the user
account from the group.
Back Click this to return to the previous step.
Next Click this to go to the next step.
Cancel Click this to return to the previous screen without saving.
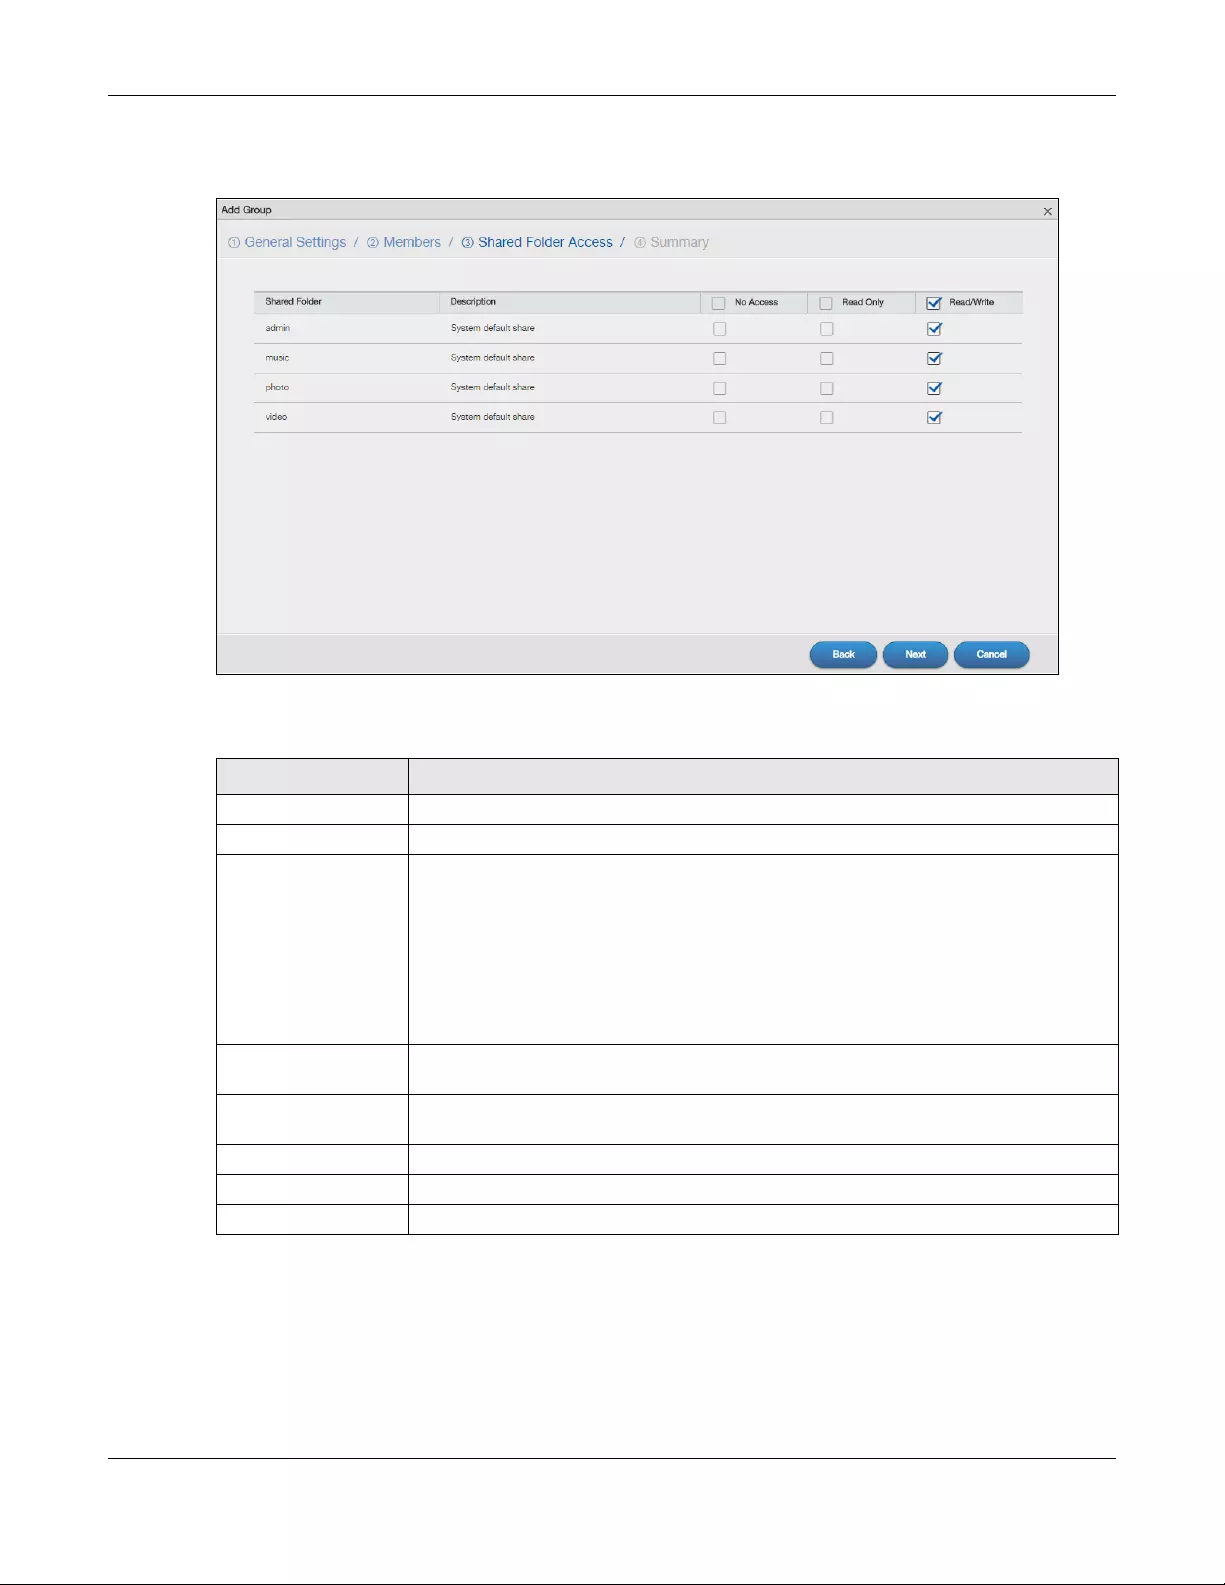
Chapter 7 Control Panel: Privilege and Sharing
NAS Series User’s Guide
117
Step 3 Shared Folder Access
Figure 86 Control Panel > Privilege and Sharing > Groups > Add a Group: Shared Folder Access
The following table describes the labels in this screen.
Table 66 Control Panel > Privilege and Sharing > Groups > Add a Group: Shared Folder Access
LABEL DESCRIPTION
Shared Folder This field lists the shares to which you can assign access rights.
Description This field displays the description of the shared folder.
No Access Click the check box to block access (groups cannot read, modify, nor execute) to all files
contained within this share.
Among all access rights, No Access has the highest . For example, User A belongs to
Group 1. You assign User A full access rights to the Music share but deny access rights to
Group 1. Then User A cannot access the Music share.
Note: If you deny access to all users, no-one can use the share, not even the
administrator.
Read Only Click the check box to give groups read-only access (they cannot modify nor execute) to
all files contained within this share.
Read/Write Click the check box to give groups full access (read, write and execute) to all files
contained within this share.
Back Click this to return to the previous step.
Next Click this to go to the next step.
Cancel Click this to return to the previous screen without saving.
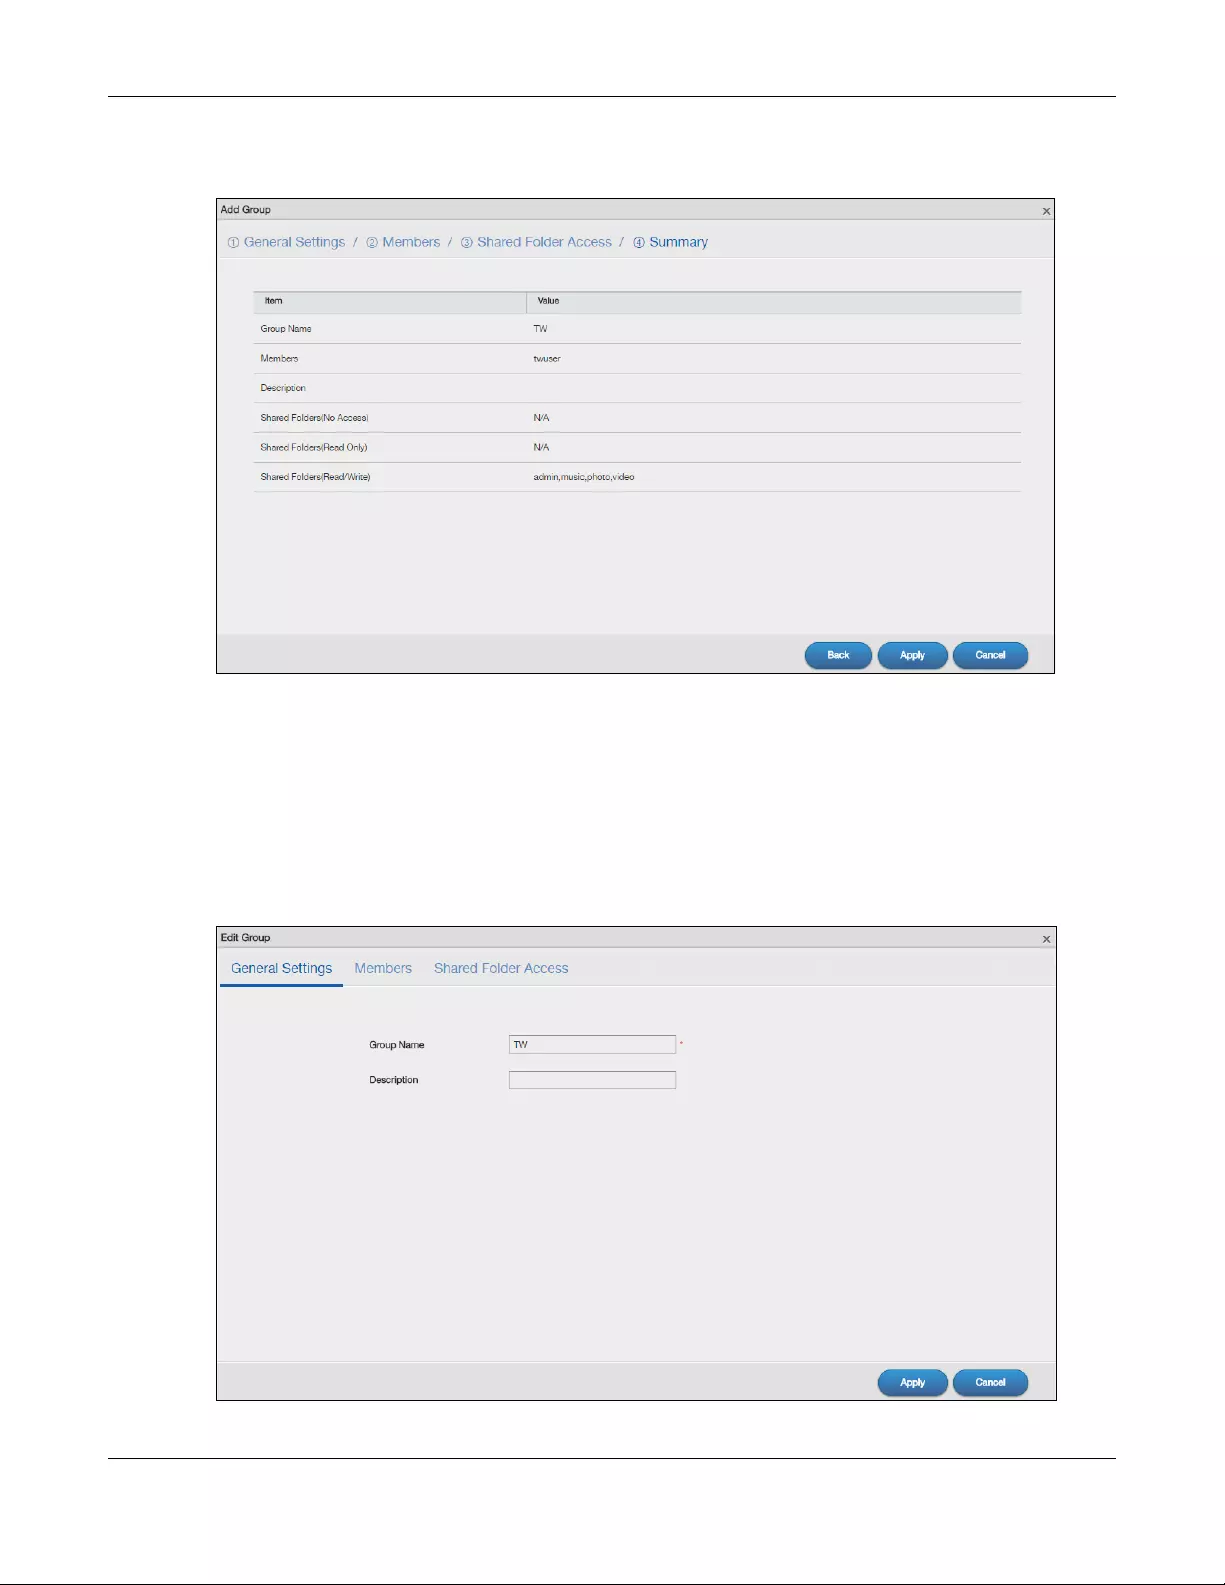
Chapter 7 Control Panel: Privilege and Sharing
NAS Series User’s Guide
118
Step 4 Summary
Figure 87 Control Panel > Privilege and Sharing > Groups > Add a Group: Summary
Use this screen to view your group settings. Click Back to return to the previous step. Click Apply to save
your changes. Click Cancel to return to the previous screen without saving.
7.4.3 Edit a Group
Use this screen to edit a NAS group. Select a group and click the Edit Group button in the Groups screen
to open the following screen.
Figure 88 Control Panel > Privilege and Sharing > Groups > Edit a Group
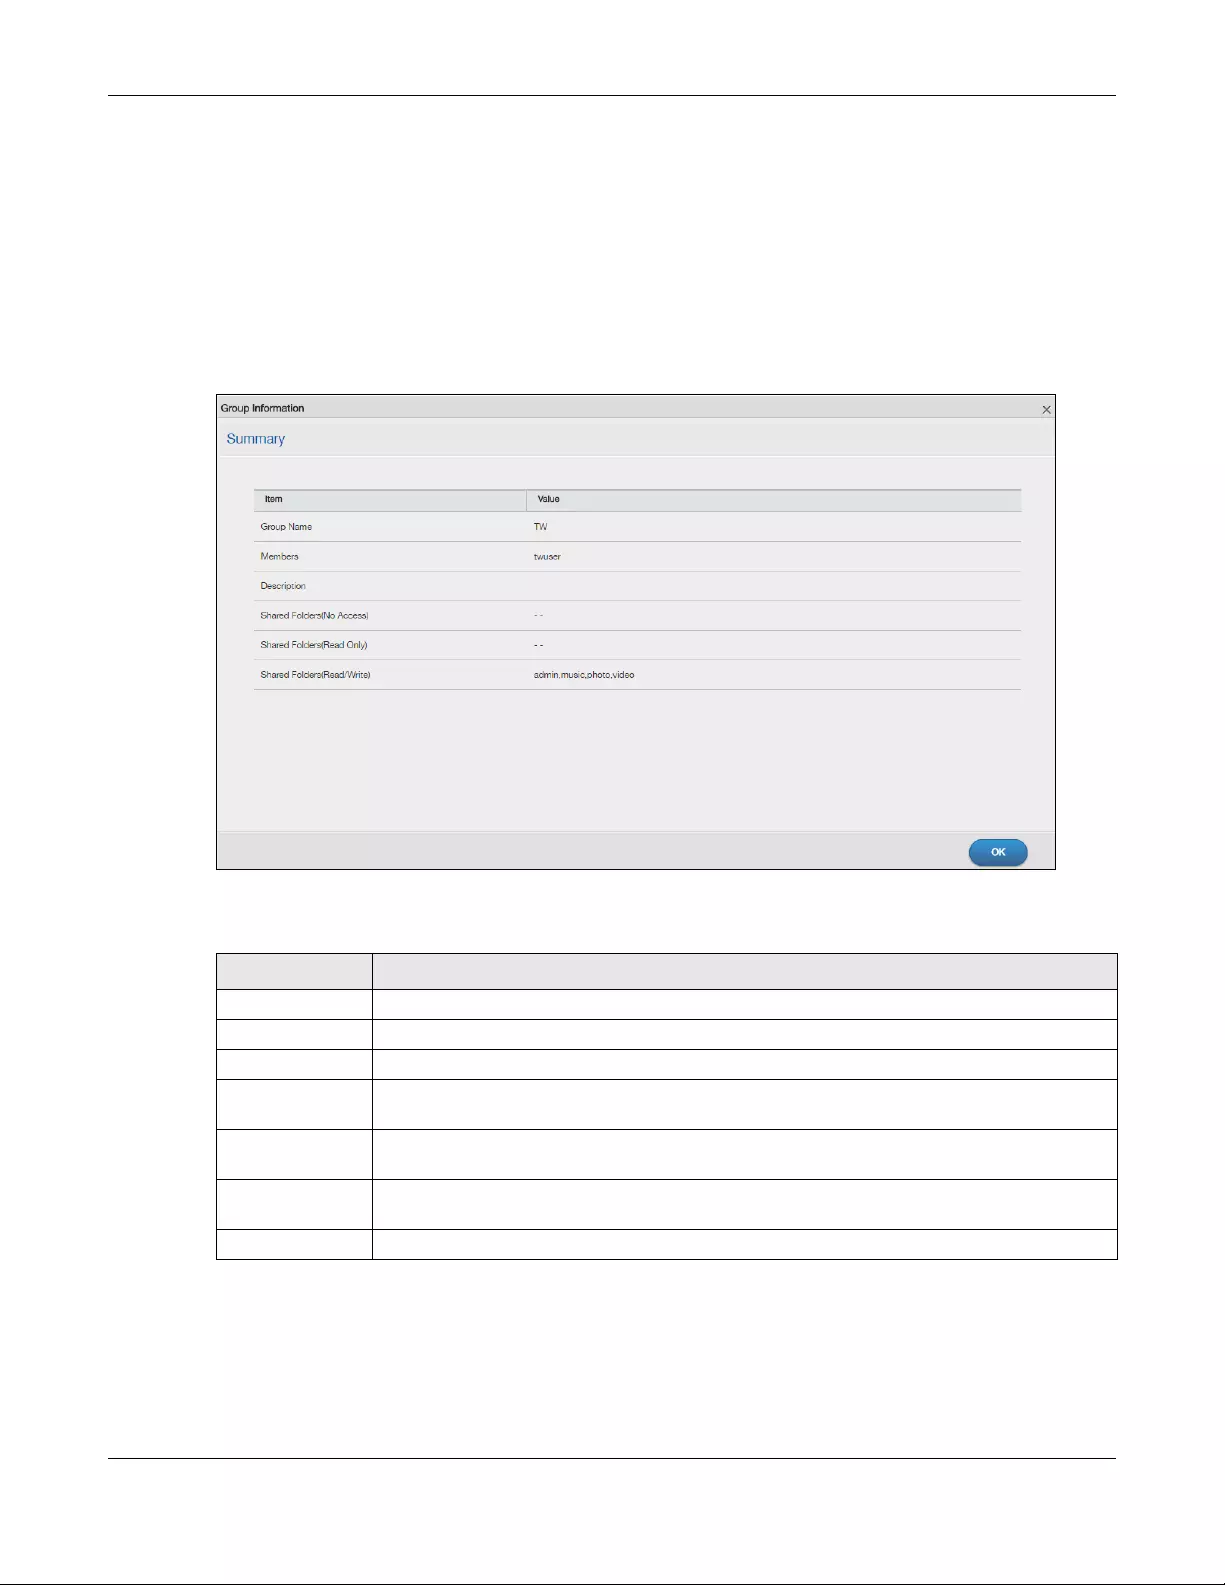
Chapter 7 Control Panel: Privilege and Sharing
NAS Series User’s Guide
119
Click General Settings, Members, or Shared Folder Access to edit the group settings. Refer to Section
7.4.2 on page 114 for more information on the screens. Click Apply to save your changes. Click Cancel
to return to the previous screen without saving.
7.4.4 Group Information
Use this screen to display a group’s information. In the Groups screen, select a group and click the
Group Information button to open the following screen.
Figure 89 Control Panel > Privilege and Sharing > Groups > Group Information
The following table describes the labels in this screen.
Table 67 Control Panel > Privilege and Sharing > Groups > Group Information
LABEL DESCRIPTION
Group Name This field displays the selected group name.
Members This field displays the selected group’s membership.
Description This field displays the description of the group.
Shared Folders
(No Access)
This field displays the access permission to the group.
Shared Folders
(Read Only)
This field displays the access permission to the group.
Shared Folders
(Read/Write)
This field displays the access permission to the group.
OK Click this to close the current screen.

Chapter 7 Control Panel: Privilege and Sharing
NAS Series User’s Guide
120
7.5 Shared Folders
A share is a set of access permissions mapped to a specific folder on a volume. It is equivalent to the
Windows concept of a shared folder. You can map a share to a network drive for easy and familiar file
transfer for Windows users.
7.5.1 Share and Folder Names
The name can only contain the following characters:
• Alphanumeric (A-z, 0-9) and Unicode.
The NAS allows FTP access to shares, folders or files with names encoded in the UTF-8 (8-bit UCS/
Unicode Transformation Format) format. So your FTP client must support UTF-8 in order to access
shares, folders or files on the NAS with Unicode names.
•Spaces
• _ [underscores]
•. [periods]
• — [dashes]
Other limitations include:
• All leading and trailing spaces are removed automatically.
• Multiple spaces within names are converted to a single space.
• Share names must be unique (they cannot be the same as other share names).
• The NAS creates automatic volume names for external (USB) disk volumes. These are a type of share,
so the share name you configure cannot conflict with the external (USB) disk volume names. “ExtVol1”
or “ExtVol2” are examples of external (USB) disk volume names.
• Folder names must be unique (they cannot be the same as other folder names).
• The minimum character length of a name is one character, that is a name cannot be blank.
• The maximum character length of share name is 239 characters.
• Unicode is supported for share names, although your FTP client must support UTF-8. Full support should
be available in all Windows versions after Windows 2000.
7.5.2 Shared Folders Screen
Click Control Panel > Privilege and Sharing > Shared Folders in the navigation panel to open the
following screen. This screen lists all shares created on the NAS.
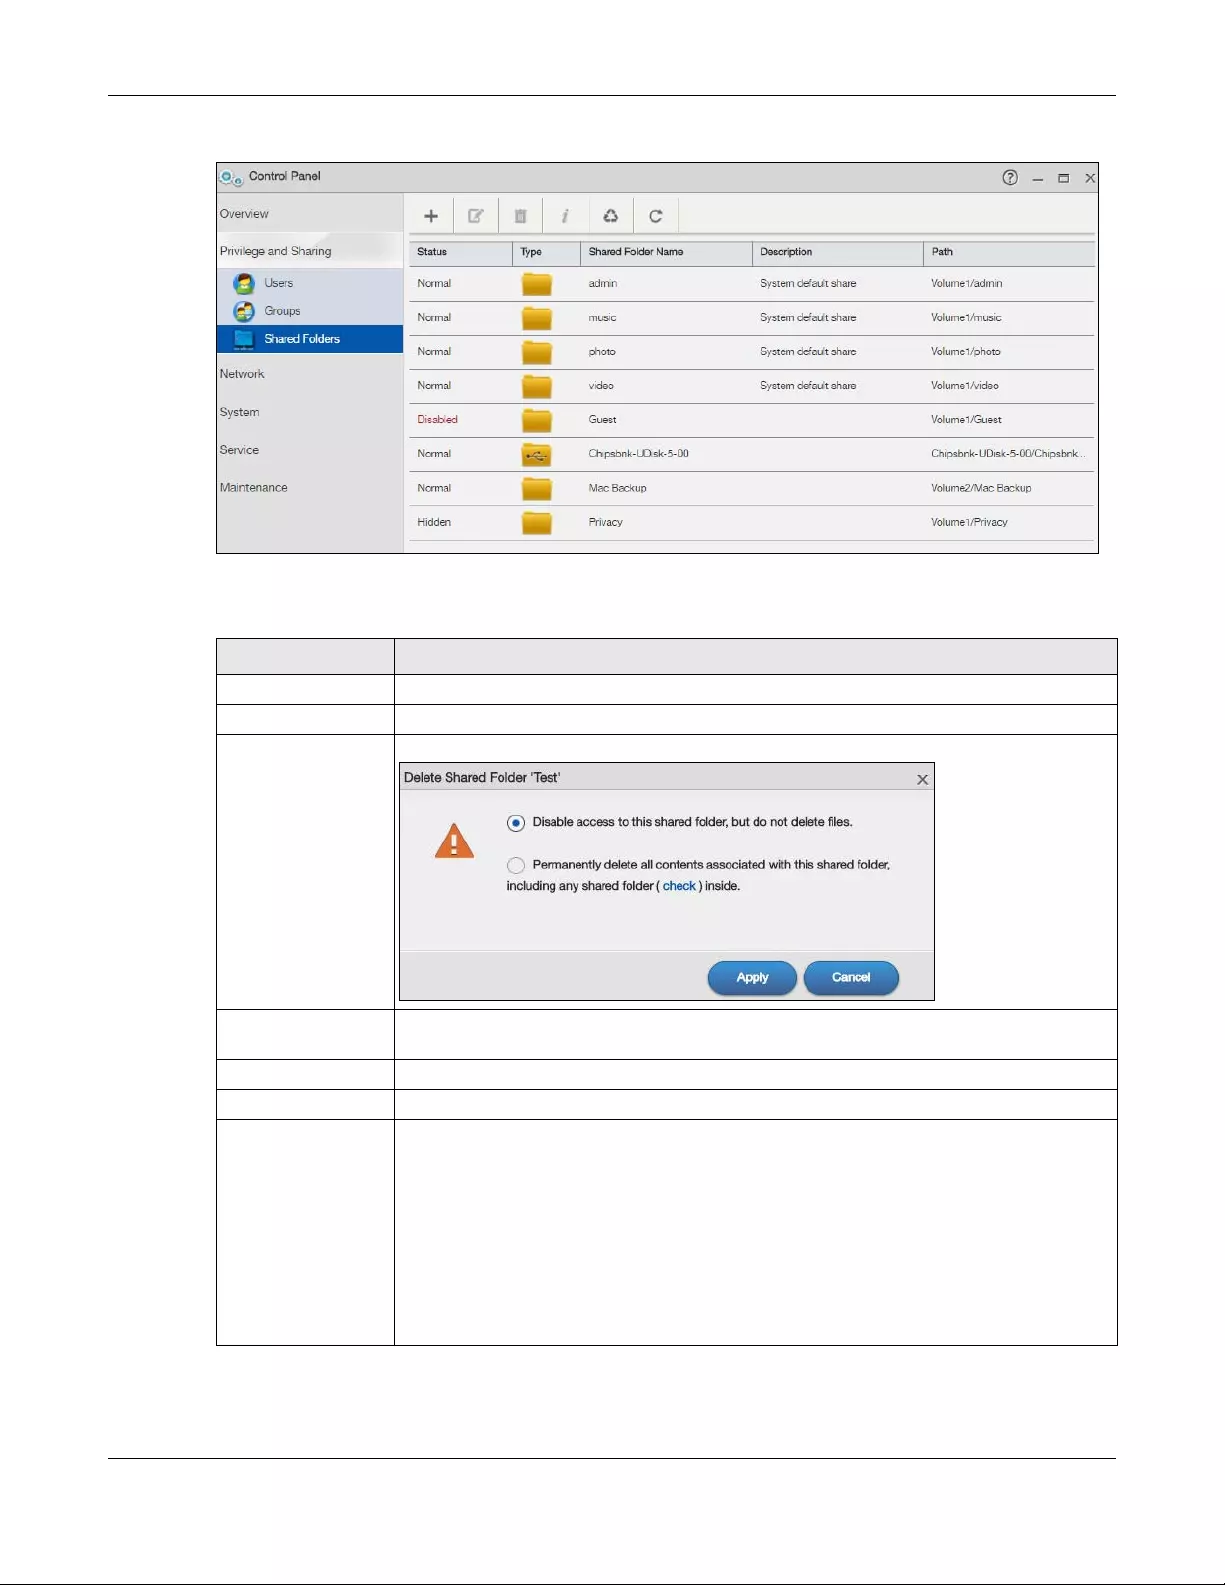
Chapter 7 Control Panel: Privilege and Sharing
NAS Series User’s Guide
121
Figure 90 Control Panel > Privilege and Sharing > Shared Folders
The following table describes the labels in this screen.
Table 68 Control Panel > Privilege and Sharing > Shared Folders
LABEL DESCRIPTION
Add Share Click this to create a new share.
Edit Share Select a share and click this to edit the share.
Delete Share Select a share and click this to remove or restrict access to the share.
Shared Folder
Information
This field displays the general settings and access permission of a share.
Recycle Bin Click this to configure recycle bins.
Refresh Click this to renew this screen.
Status This field displays four types of status: Normal, Disabled, Lost, and Hidden.
Normal: This represents a built-in or user-created share on a volume on the internal hard
drives and an auto or user-created share on a volume on the external (USB) devices.
Disabled: This represents a disabled share that no user can access.
Lost: This represents a missing share. The NAS cannot find the hard disk associated with the
share (the disk may be removed from the NAS for example). You may install the disk back to
the NAS to recover the share, or you may delete the share from the NAS.
Hidden: This represents a hidden share on the network.
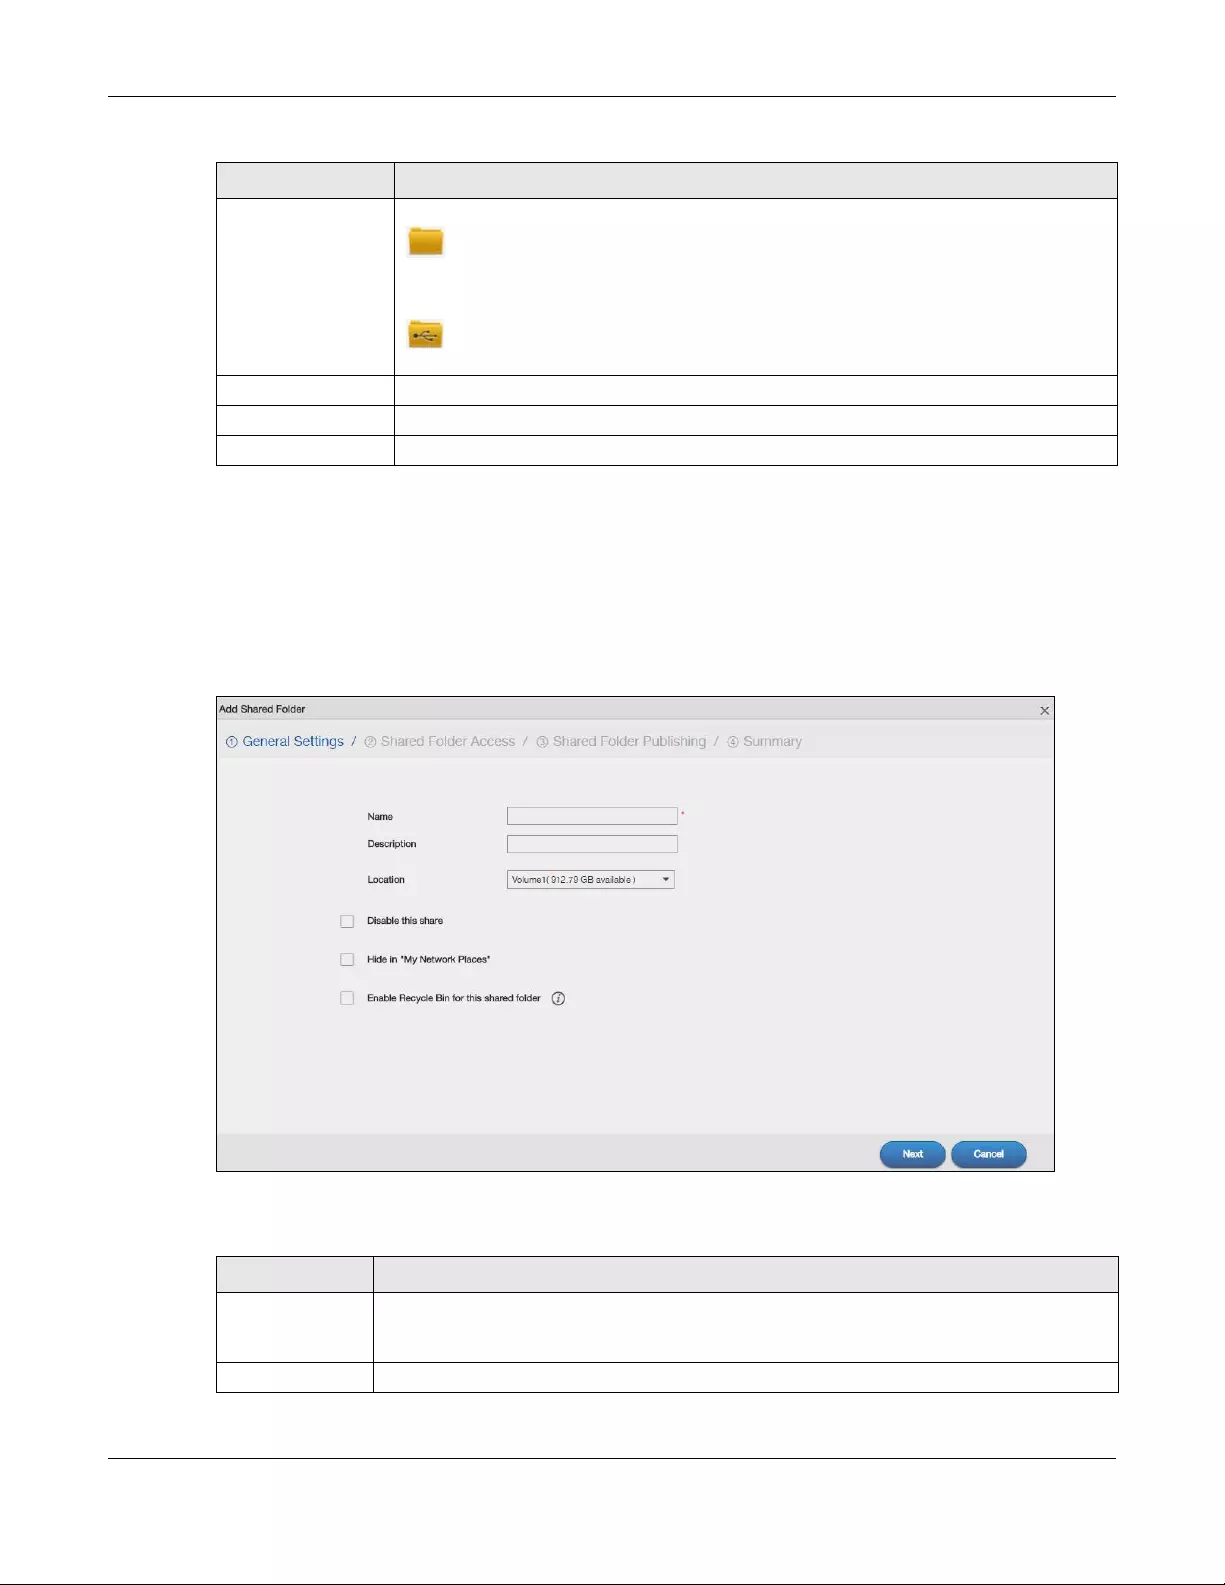
Chapter 7 Control Panel: Privilege and Sharing
NAS Series User’s Guide
122
7.5.3 Add a Share
Use this screen to create a new share. Click the Add Share button in the Shared Folders screen to open
the following screens.
Step 1 General Settings
Figure 91 Control Panel > Privilege and Sharing > Shared Folders > Add Share: General Settings
The following table describes the labels in this screen.
Type This field displays the type icons.
represents built-in or user-created or predefined shares on the internal hard drives.
Predefined shares include music, video, and photo, always exist as long as there is a
volume. If you delete the volume containing these built-in or predefined shares, the NAS
automatically creates these shares in the next volume by alphabetical order.
represents an auto share that is automatically created on an external (USB) device
when a user plugs in the device.
Shared Folder Name This field displays the share’s names.
Description This field displays the description of each share.
Path This field displays the share’s file path, for example, volume1/music.
Table 68 Control Panel > Privilege and Sharing > Shared Folders (continued)
LABEL DESCRIPTION
Table 69 Control Panel > Privilege and Sharing > Shared Folders > Add Share: General Settings
LABEL DESCRIPTION
Name Type a share name from 1 to 239 single-byte (no Chinese characters allowed for example)
ASCII characters. The name cannot be the same as another existing share. See Section 7.5.1
on page 120 for more information on share names.
Description Type the description for this shared folder.
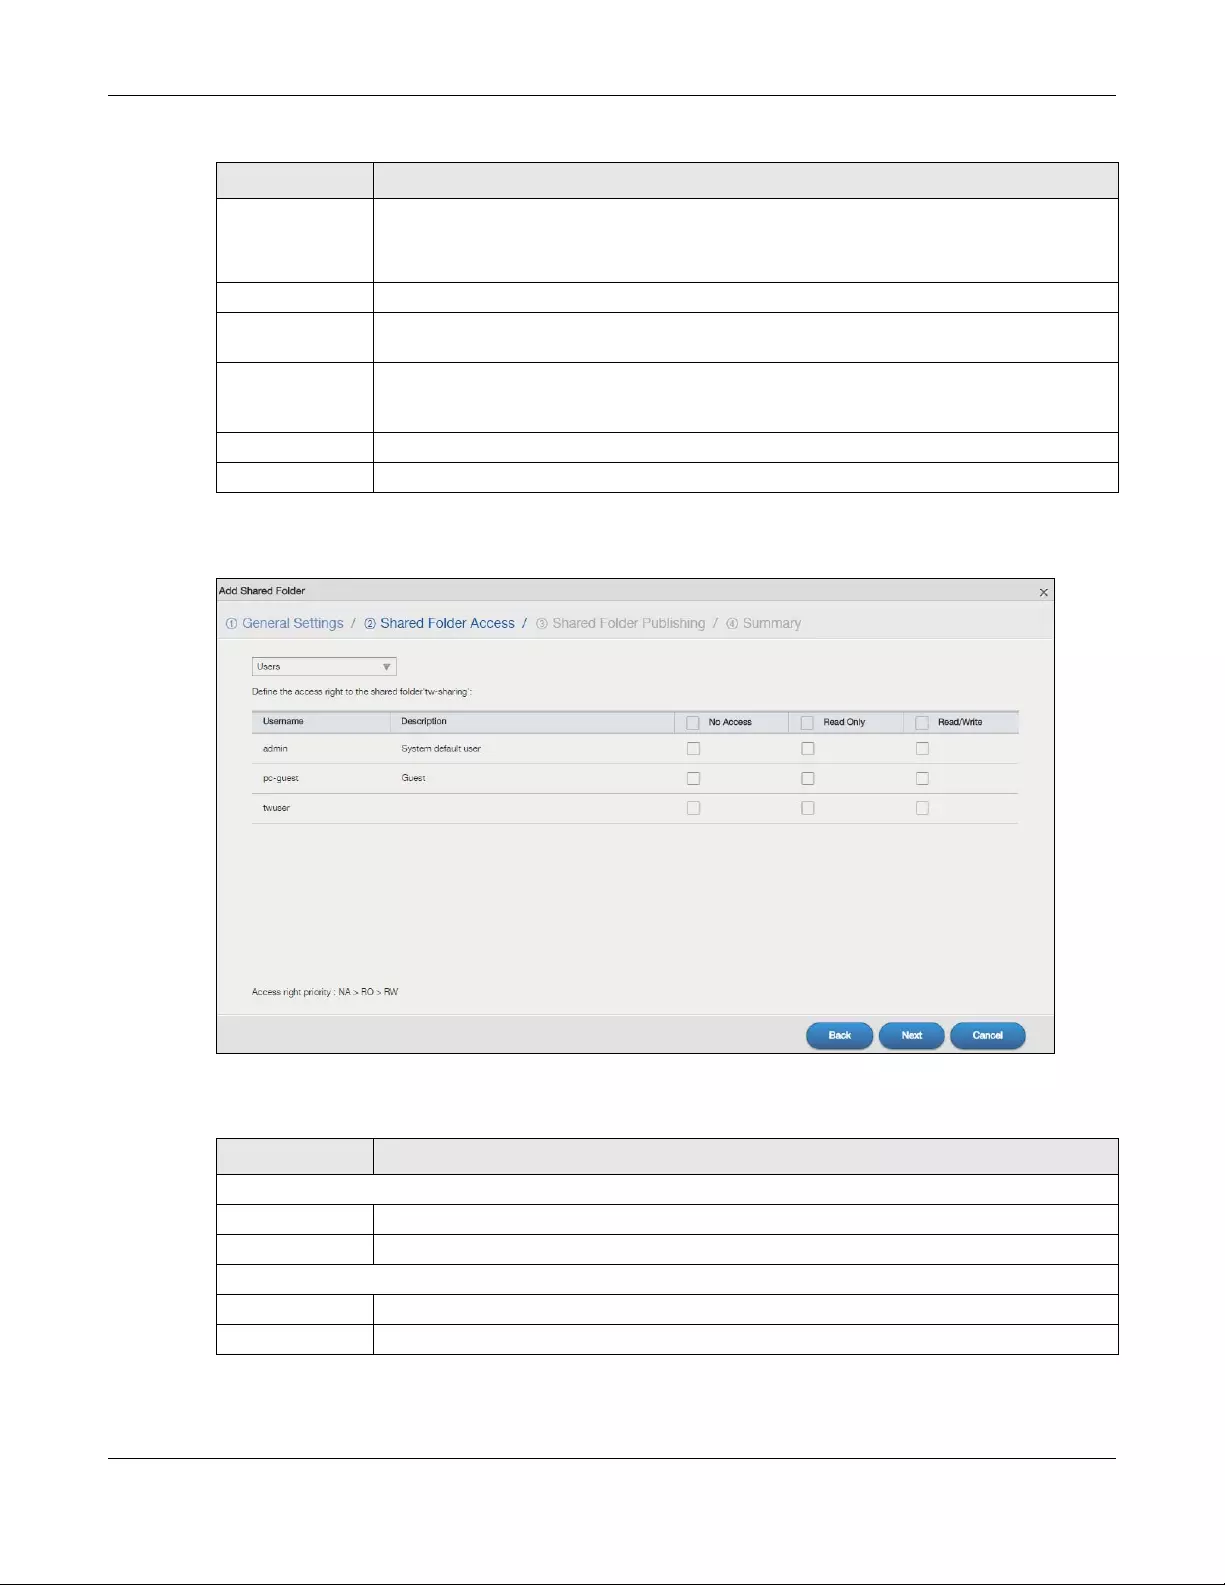
Chapter 7 Control Panel: Privilege and Sharing
NAS Series User’s Guide
123
Step 2 Shared Folder Access
Figure 92 Control Panel > Privilege and Sharing > Shared Folders > Add Share: Shared Folder Access
The following table describes the labels in this screen.
Location You should have already created volumes (a single accessible storage area with a single file
system) on the NAS. Select the one that contains the folder that you want to share out.
You cannot modify this when editing a share.
Disable this share Click this to disallow access to this share.
Hide in «My
Network Places»
Click this to hide the share on the network.
Enable Recycle
Bin for this shared
folder
Click this to activate the recycle bin. When you delete a file from this share, a recycle folder is
created to store the deleted item.
Next Click this to go to the next step.
Cancel Click this to return to the previous screen without saving.
Table 70 Control Panel > Privilege and Sharing > Shared Folders > Add Share: Shared Folder Access
LABEL DESCRIPTION
The following fields display only when you select Users from the drop-down list box.
Username This field lists the users to which you can assign access rights.
Description This field displays the description of each account.
The following fields display only when you select Groups from the drop-down list box.
Group Name This field lists the groups to which you can assign access rights.
Description This field displays the description of each group.
Table 69 Control Panel > Privilege and Sharing > Shared Folders > Add Share: General Settings
LABEL DESCRIPTION
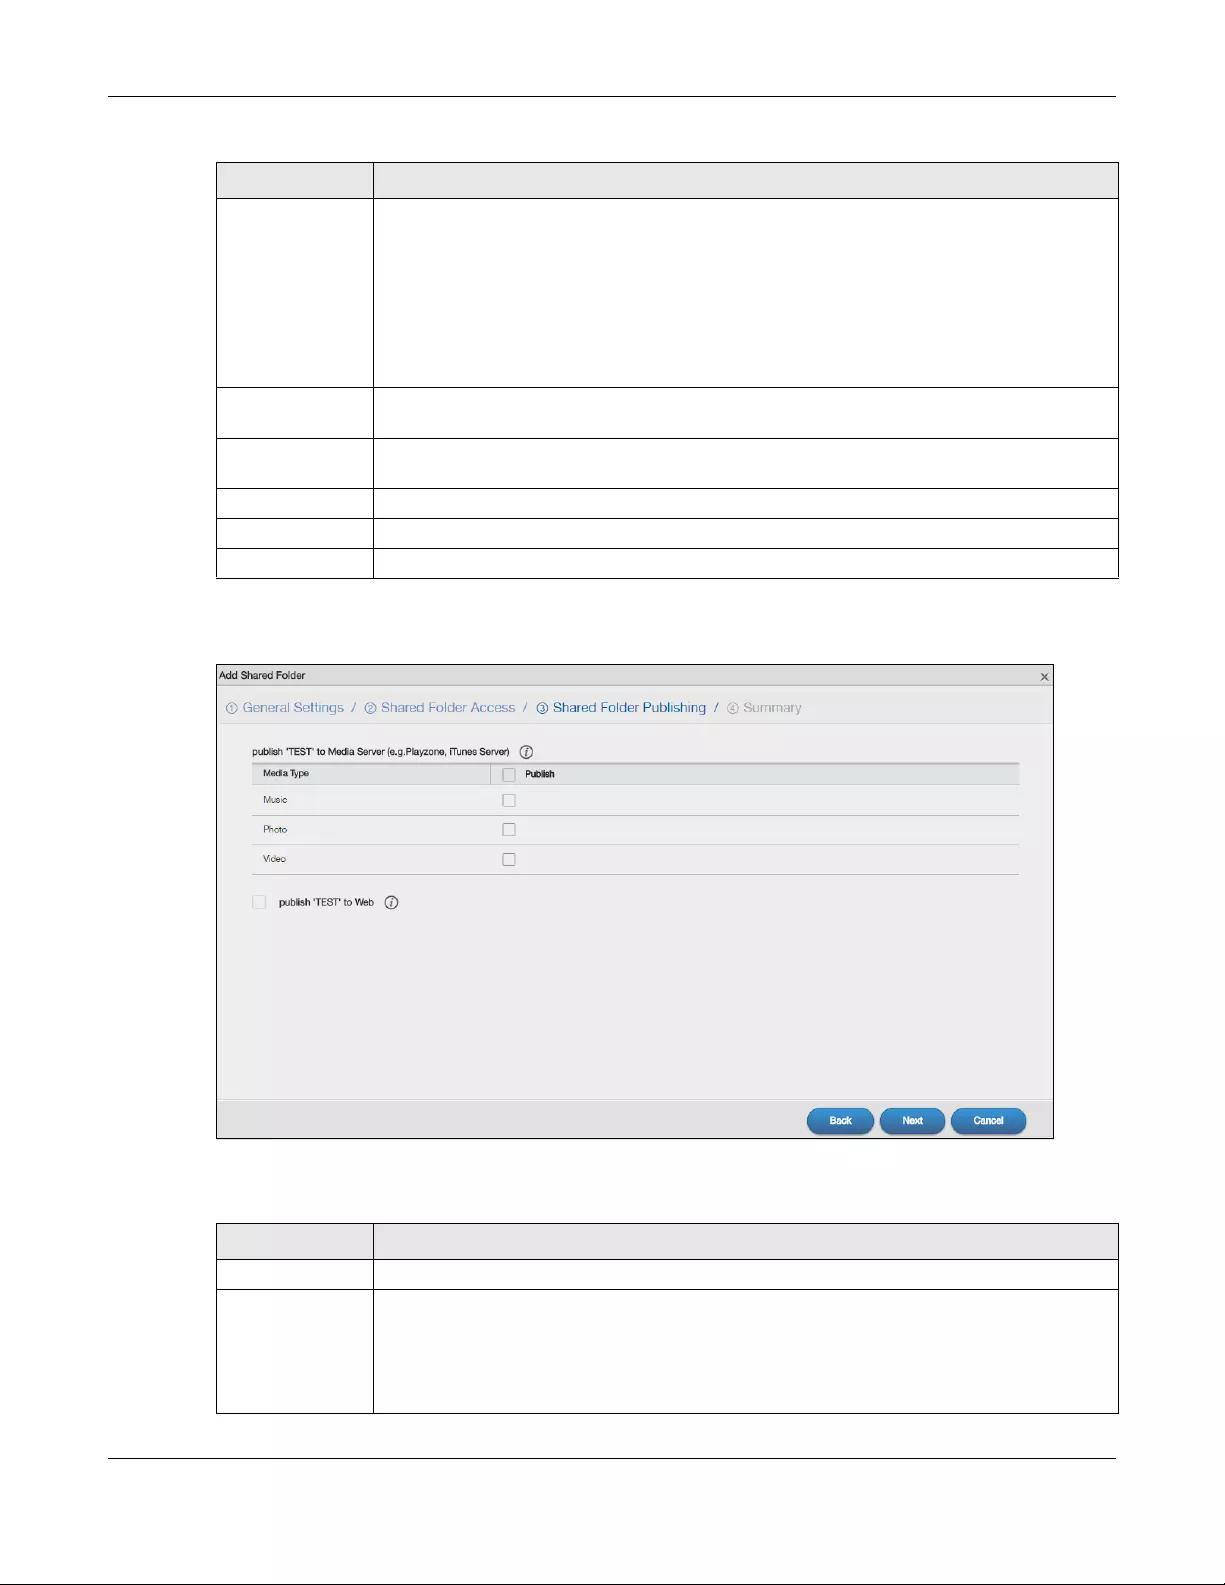
Chapter 7 Control Panel: Privilege and Sharing
NAS Series User’s Guide
124
Step 3 Shared Folder Publishing
Figure 93 Control Panel > Privilege and Sharing > Shared Folders > Add Share: Shared Folder Publishing
The following table describes the labels in this screen.
No Access Click the check box to block access (users/groups cannot read, modify, nor execute) to all
files contained within this share.
Among all access rights, No Access has the highest . For example, User A belongs to Group 1.
You assign User A full access rights to the Music share but deny access rights to Group 1. Then
User A cannot access the Music share.
Note: If you deny access to all users, no-one can use the share, not even the
administrator.
Read Only Click the check box to give users/groups read-only access (they cannot modify nor execute)
to all files contained within this share.
Read/Write Click the check box to give users/groups full access (read, write and execute) to all files
contained within this share.
Back Click this to return to the previous step.
Next Click this to go to the next step.
Cancel Click this to return to the previous screen without saving.
Table 71 Control Panel > Privilege and Sharing > Shared Folders > Add Share: Shared Folder Publishing
LABEL DESCRIPTION
Media Type This field displays media types that you publish media files to media server.
Publish to Media
Server
This option is available only when you enable the Media Server (Section 10.4 on page 159).
Click this check box to have the NAS make media files in this share available to media clients
and through the Playzone screens. When you publish a share, you can also select whether or
not to publish music tracks, photos, and videos. The media clients do not have to use a
password to play the shares you publish.
Table 70 Control Panel > Privilege and Sharing > Shared Folders > Add Share: Shared Folder Access
LABEL DESCRIPTION
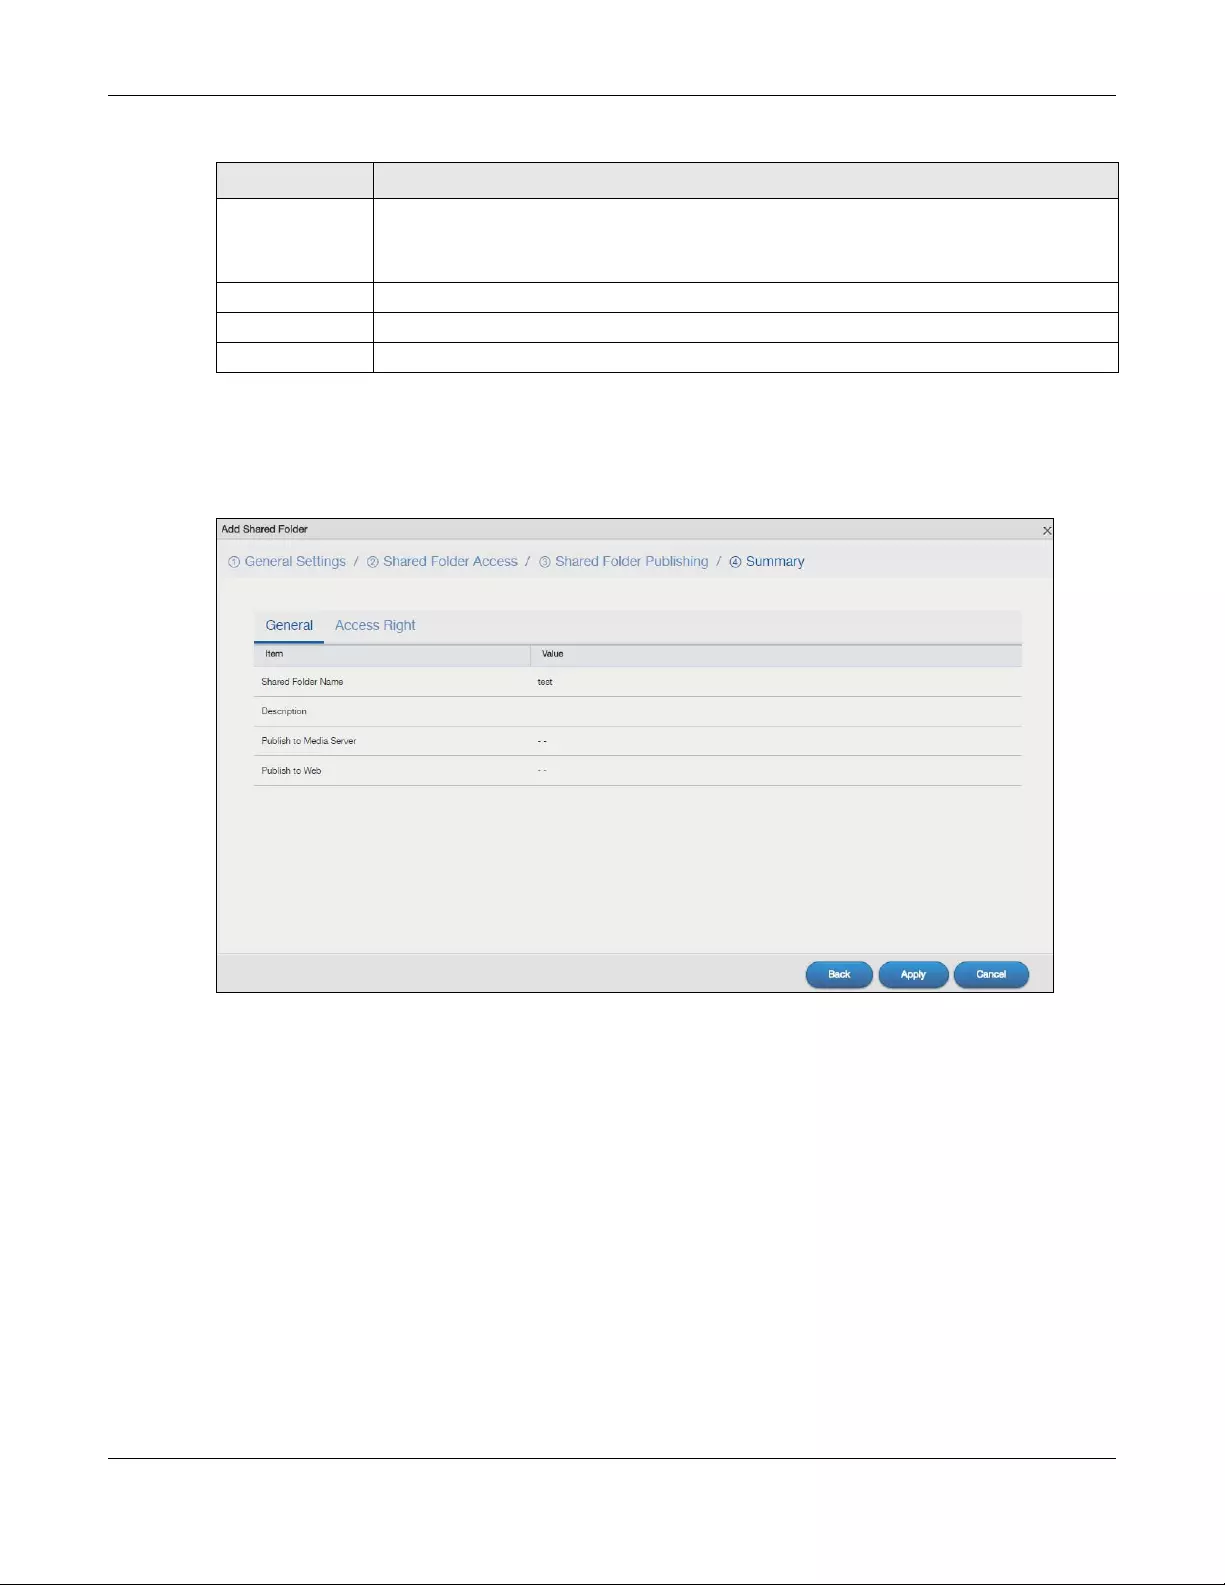
Chapter 7 Control Panel: Privilege and Sharing
NAS Series User’s Guide
125
Step 4 Summary
Click General to view your share settings and open the following screen.
Figure 94 Control Panel > Privilege and Sharing > Shared Folders > Add Share: Summary: General
Click Access Right to view access rights to groups or users and open the following screen.
Publish to Web This option is available when you enable the Web Publish (Section 10.8 on page 167).
Click this check box to let people use a web browser to access this share’s files without logging
into the Web Configurator.
Back Click this to return to the previous step.
Next Click this to go to the next step.
Cancel Click this to return to the previous screen without saving.
Table 71 Control Panel > Privilege and Sharing > Shared Folders > Add Share: Shared Folder Publishing
LABEL DESCRIPTION
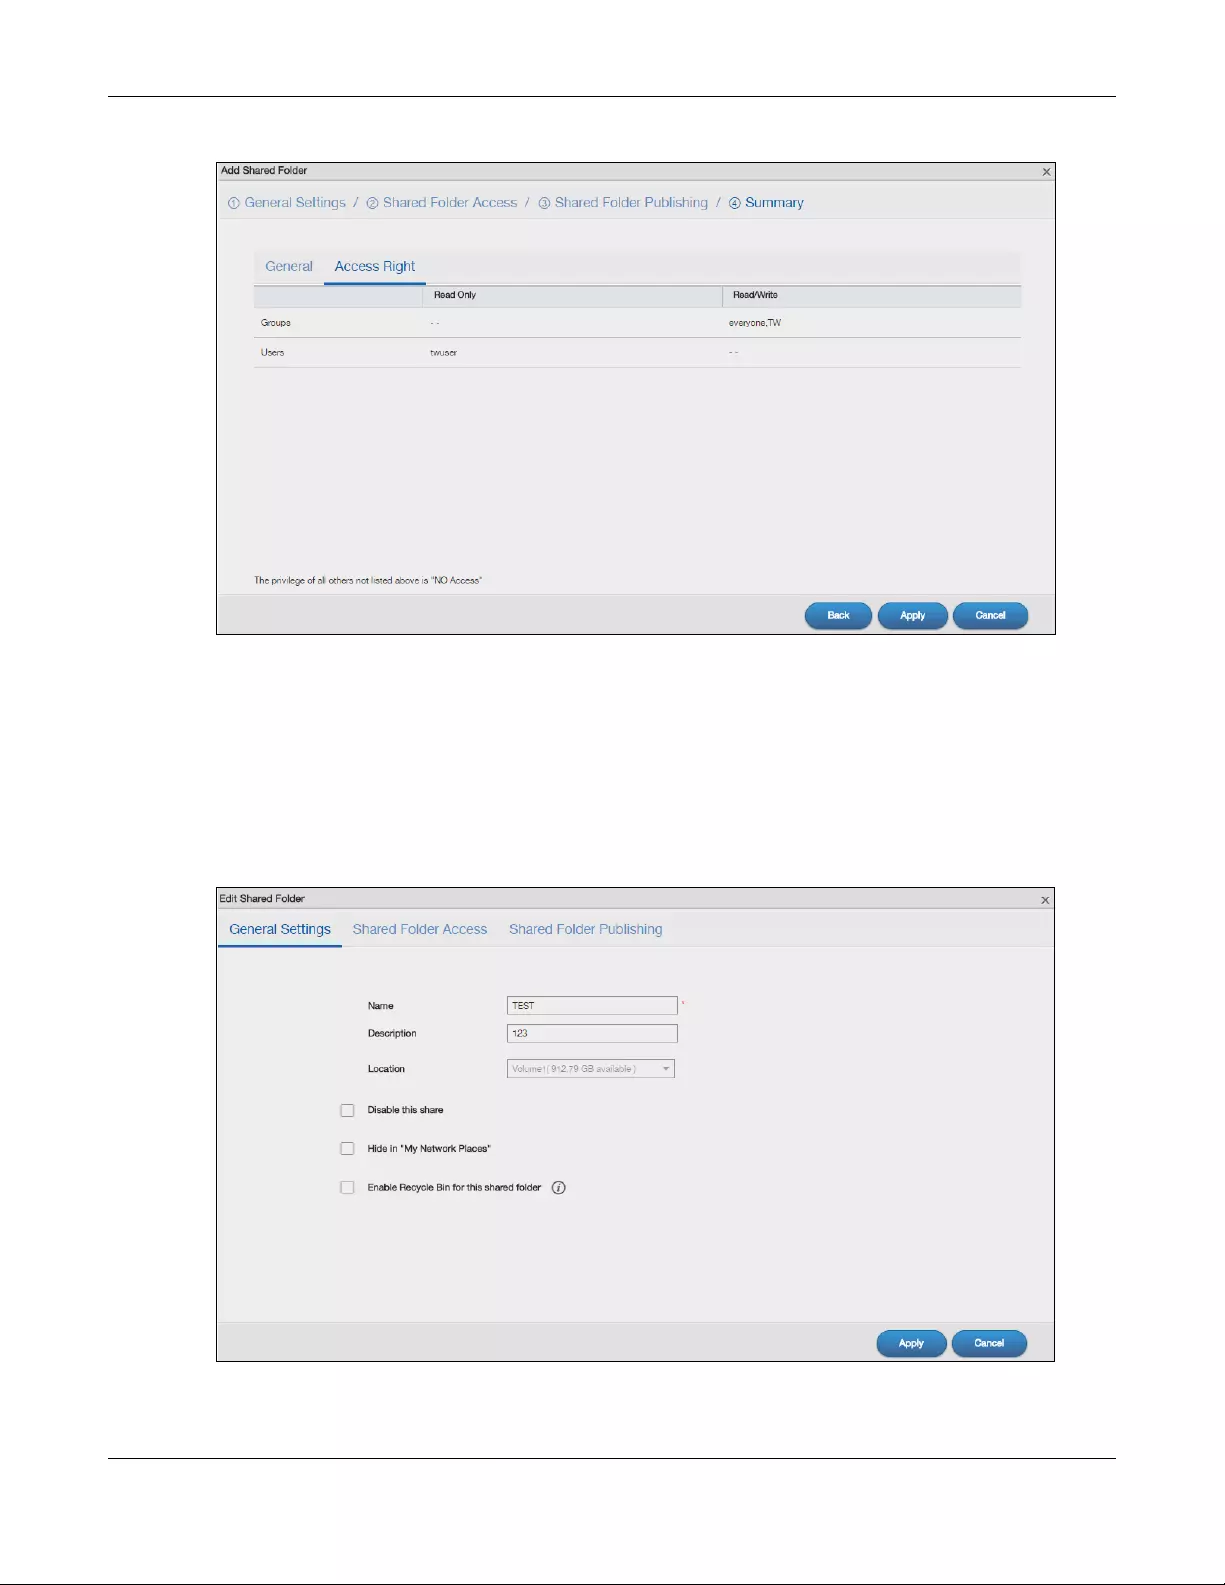
Chapter 7 Control Panel: Privilege and Sharing
NAS Series User’s Guide
126
Figure 95 Control Panel > Privilege and Sharing > Shared Folders > Add Share: Summary: Access Right
Click Back to return to the previous step. Click Apply to save your changes. Click Cancel to return to the
previous screen without saving.
7.5.4 Edit a Share
Use this screen to edit a share. Select a share and click the Edit Share button in the Shared Folders
screen to open the following screen.
Figure 96 Control Panel > Privilege and Sharing > Shared Folders > Edit Share
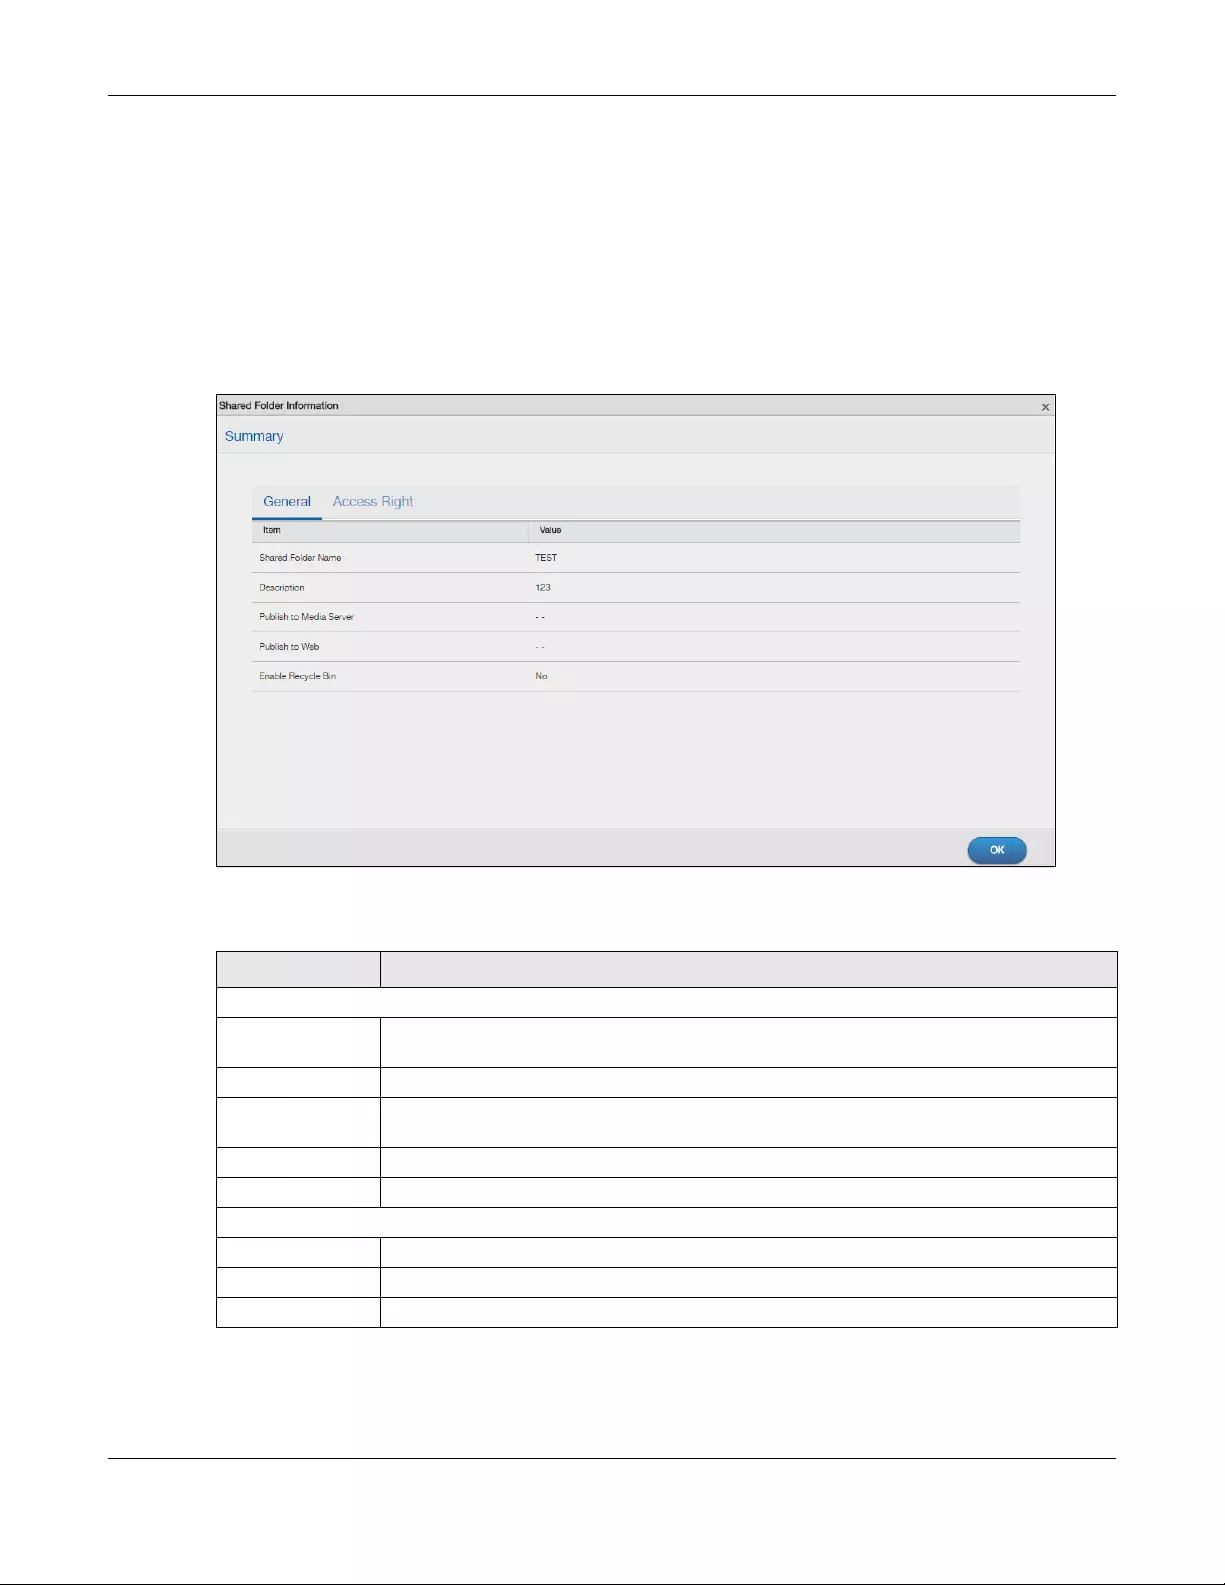
Chapter 7 Control Panel: Privilege and Sharing
NAS Series User’s Guide
127
Click General Settings, Sha red Folder Acc ess or Shared Folder Publishing to edit the share settings. Refer
to Section 7.5.3 on page 122 for more information on the screens. Click Apply to save your changes.
Click Cancel to return to the previous screen without saving.
7.5.5 Shared Folder Information
Use this screen to display a share’s information. In the Shared Folders screen, select a share and click the
Shared Folder Information button to open the following screen.
Figure 97 Control Panel > Privilege and Sharing > Shared Folders > Shared Folder Information
The following table describes the labels in this screen.
Table 72 Control Panel > Privilege and Sharing > Shared Folders > Shared Folder Information
LABEL DESCRIPTION
The following fields display only when you click General from this screen.
Shared Folder
Name
This field displays the selected share’s name.
Description This field displays the description of the share.
Publish to Media
Server
This field displays whether you publish a share to the media server.
Publish to Web This field displays whether you publish a share to the web.
Enable Recycle Bin This field displays whether the recycle bin is activated or not.
The following fields display only when you click Access Right from this screen.
Read Only This field displays the access permission to specific groups or users.
Read/Write This field displays the access permission to specific groups or users.
OK Click this to close the current screen.
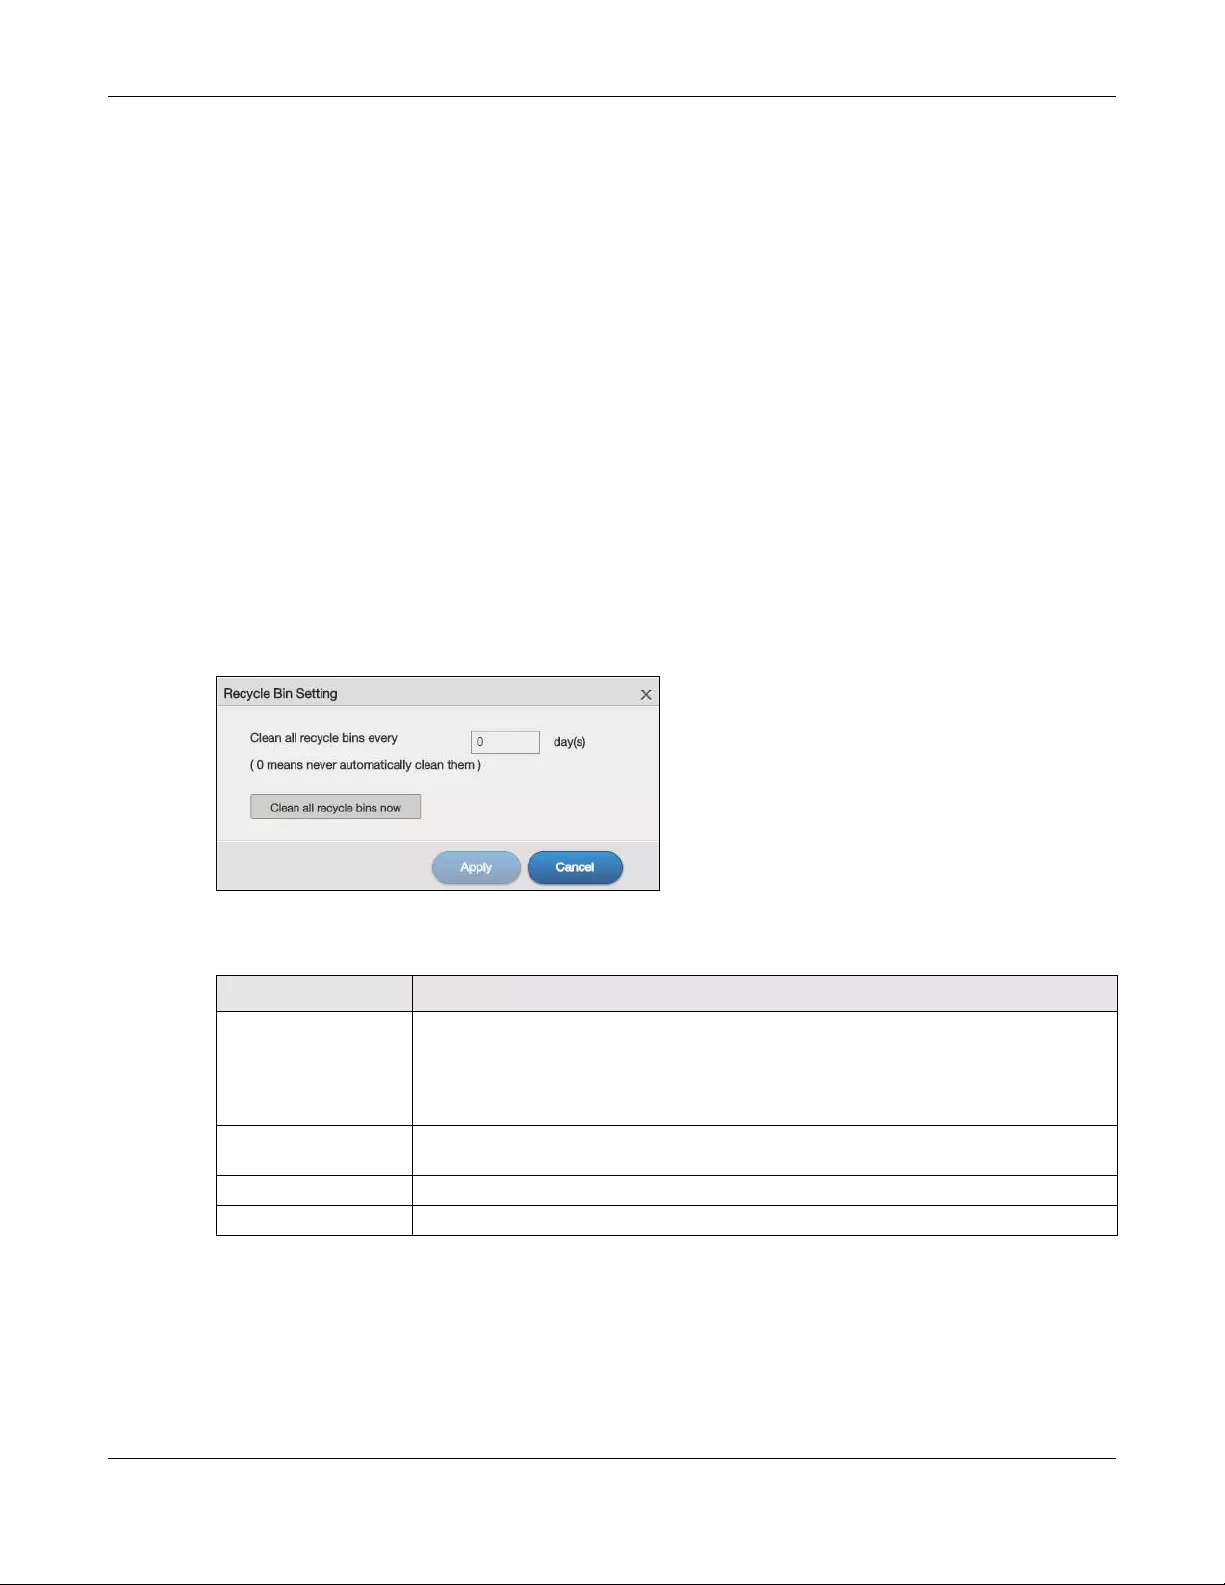
Chapter 7 Control Panel: Privilege and Sharing
NAS Series User’s Guide
128
7.5.6 Recycle Bin Screen
Use this screen to periodically clean up items in all recycle bins.
Recycle Bins
Recycle bins in the NAS help users recover accidentally deleted files or folders in the shares. When you
delete an item, a recycle folder is created within the share to hold the deleted item.
Every share can have its own recycle folder. You must enable the recycle-bin function to recycle
deleted items. You can configure this setting when you add or edit a share. See Section 7.5.6.1 on page
128 for details on activating the recycle bin in a share.
Later if you want to retrieve a deleted item, you can locate the item in the recycle folder. You may
move or copy the deleted item to another share.
7.5.6.1 Configure Recycle Bins
In the Control Panel > Privilege and Sharing > Shared Folders screen, click the Recycle Bin button to
open the following screen.
Figure 98 Control Panel > Privilege and Sharing > Shared Folders > Recycle Bin
The following table describes the labels in this screen.
Table 73 Control Panel > Privilege and Sharing > Shared Folders > Recycle Bin
LABEL DESCRIPTION
Clean all recycle bins
every N days
Specify how often you want to clear the contents in all recycle bins. The specified days
correspond to how long a file has been stored in a recycle bin. For example, if you set the
interval to be 3 days, recycle bins will clean up items deleted or not accessed for 3 days.
Note: Cleaning up recycle bins permanently removes the files from the NAS.
Clean all recycle bins
now
Click this to immediately remove contents from all recycle bins.
Apply Click this to save your changes.
Cancel Click this to return to the previous screen without saving.

NAS Series User’s Guide
129
CHAPTER 8
Control Panel: Network
8.1 Overview
This chapter discusses the Control Panel > Network screens. Use the Network screens to configure
network settings.
8.2 What You Can Do
• Use the TCP/IP screens (Section 8.4 on page 130) to configure the NAS’s TCP/IP network connection
settings such as the IP addresses.
• Use the UPnP Port Mapping screen (Section 8.5 on page 138) to automatically configure your Internet
gateway’s firewall and Network Address Translation (NAT) to allow access to the NAS from the
Internet.
• Use the Terminal screen (Section 8.6 on page 144) to enable or disable Telnet and SSH access.
• Use the DyDNS screen (Section 8.7 on page 145) to configure the domain name settings of your NAS.
8.3 What You Need to Know
IP Address
The NAS needs an IP address to communicate with other devices on your network. The NAS can get an
IP address automatically if you have a device on your network that gives them out. Or you can assign
the NAS a static (fixed) IP address.
DNS Server Address
A DNS (Domain Name System) server maps domain names (like www.zyxel.com) to their corresponding
numerical IP addresses. This lets you use domain names to access web sites without having to know their
IP addresses. The NAS can receive the IP address of a DNS server automatically (along with the NAS’s
own IP address). You can also manually enter a DNS server IP address in the NAS.
PPPoE
Point-to-Point Protocol over Ethernet (PPPoE) allows the NAS to establish a direct Internet connection if
you do not have a router. PPPoE is a dial-up connection. You need a username and password from your
Internet Service Provider (ISP) to set up the connection.
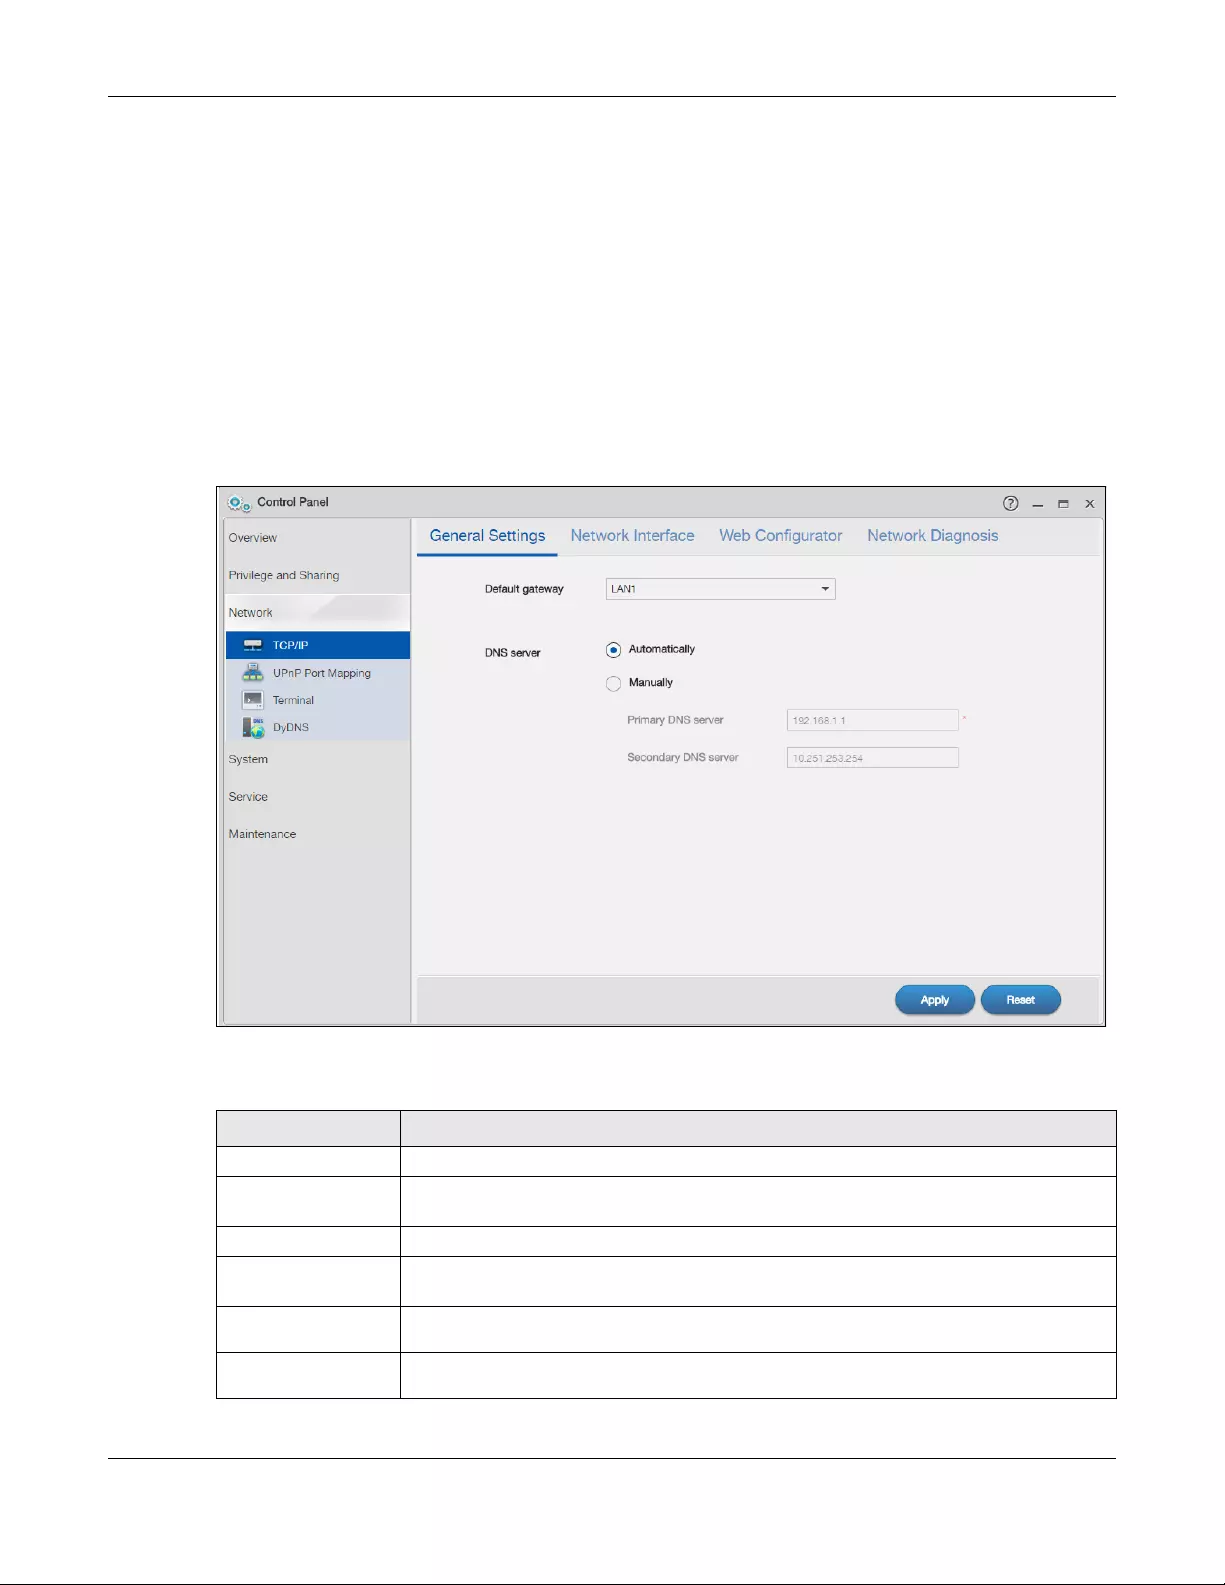
Chapter 8 Control Panel: Network
NAS Series User’s Guide
130
8.4 TCP/IP Screens
Use the TCP/IP screens to have the NAS use a dynamic or static IP address, to configure its subnet mask,
default gateway, PPPoE and DNS servers, and to test the network connection.
8.4.1 Configure General TCP/IP Settings
Click Control Panel > Network > TCP/IP > General Settings in the navigation panel to open the following
screen. This screen allows you to configure the default gateway and DNS server.
Note: If you change the NAS’s IP address, you need to log in again after you apply changes.
Figure 99 Control Panel > Network > TCP/IP > General Settings
The following table describes the labels in this screen
Table 74 Control Panel > Network > TCP/IP > General Settings
LABEL DESCRIPTION
Default Gateway Select the LAN interface to use as the default gateway.
DNS Server DNS (Domain Name System) is for mapping a domain name to its corresponding IP address
and vice versa. If you have the IP address(es) of the DNS server(s), enter them.
Automatically Select the option to have the NAS get a DNS server address automatically.
Manually Select this option to choose a static DNS server address. Type the DNS server IP address(es)
into the fields below.
Primary DNS
Server Type a primary DNS server IP address.
Secondary DNS
Server Type a secondary DNS server IP address.
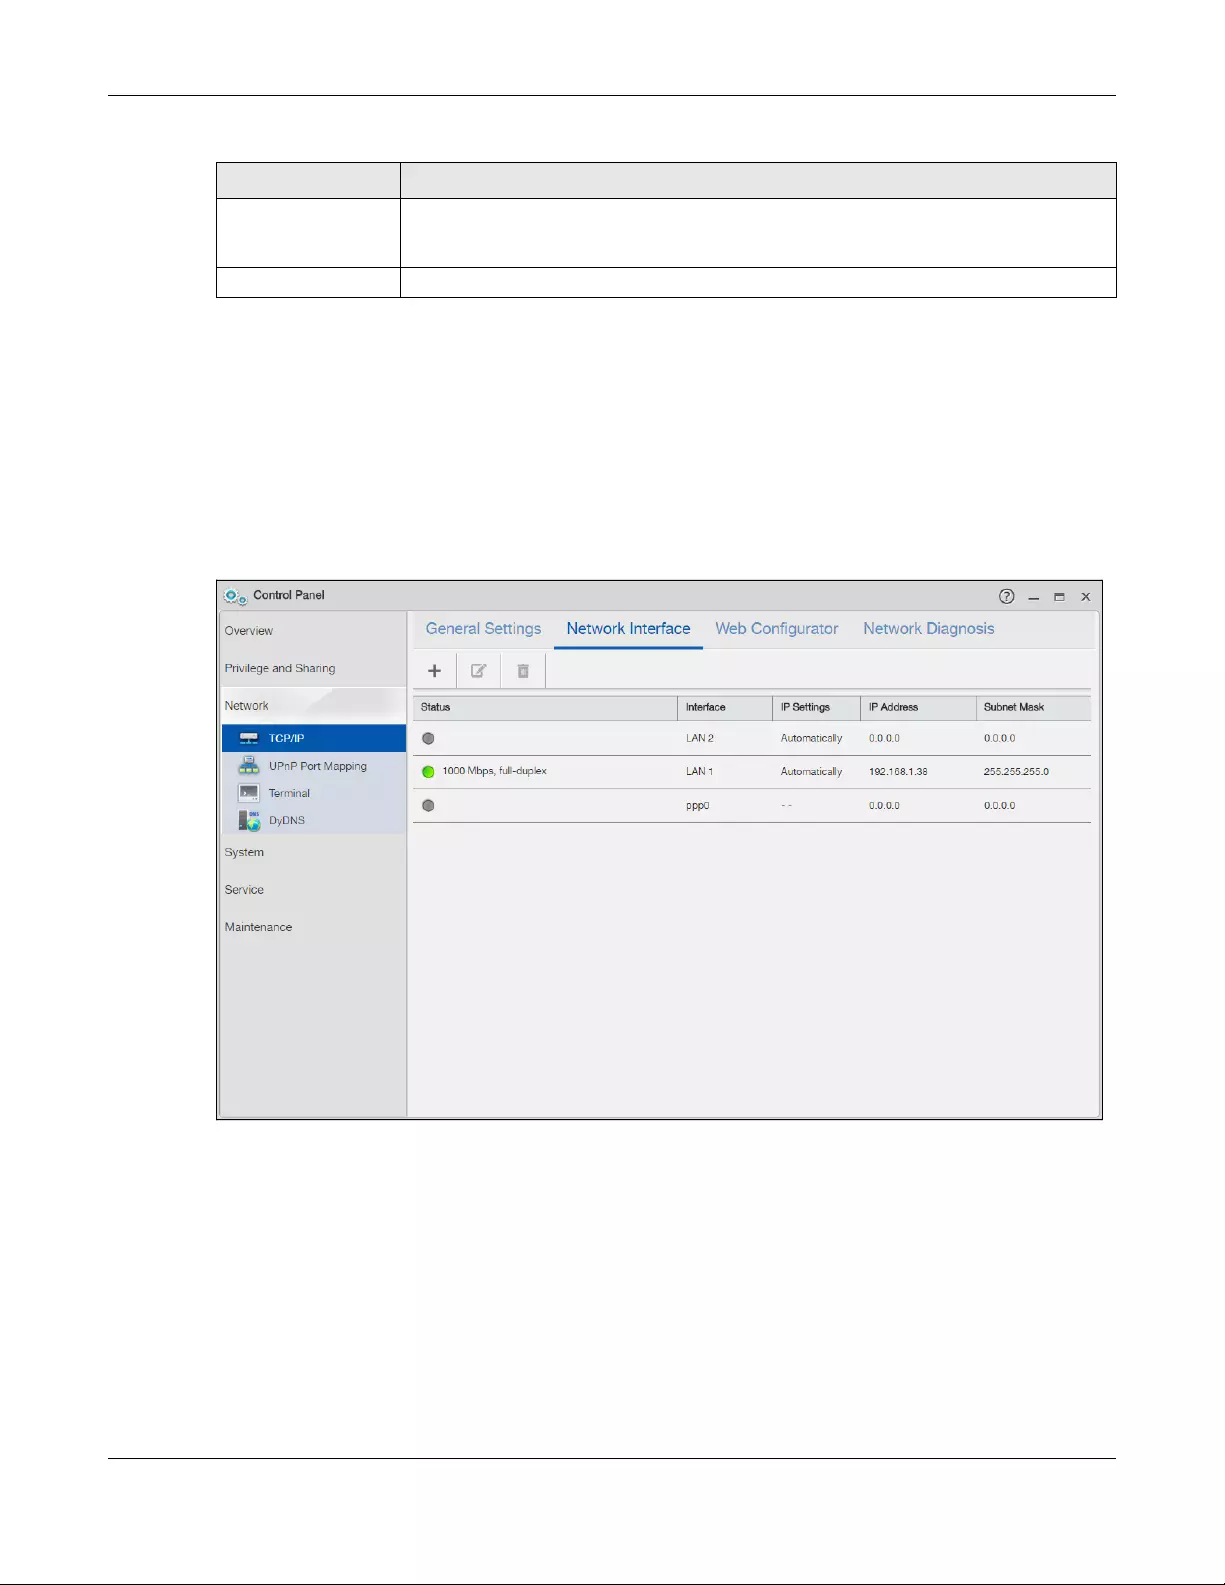
Chapter 8 Control Panel: Network
NAS Series User’s Guide
131
8.4.2 Configure Network Interface
Use the Network Interface screen to edit the IPv4 or IPv6 settings of LAN 1 and LAN 2, set up port trunking,
and configure PPPoE settings. Click Control Panel > Network > TCP/IP > Network Interface in the
navigation panel to open the following screen.
Note: LAN 2 and port trunking are available only on the NAS which has multiple Ethernet
ports.
Figure 100 Control Panel > Network > TCP/IP > Network Interface
Apply Click this to save your TCP/IP configurations. After you click Apply, the NAS restarts. Wait
until you see the Login screen or until the NAS fully boots and then use the NAS Starter Utility
to rediscover it.
Reset Click this to restore your previously saved settings.
Table 74 Control Panel > Network > TCP/IP > General Settings (continued)
LABEL DESCRIPTION
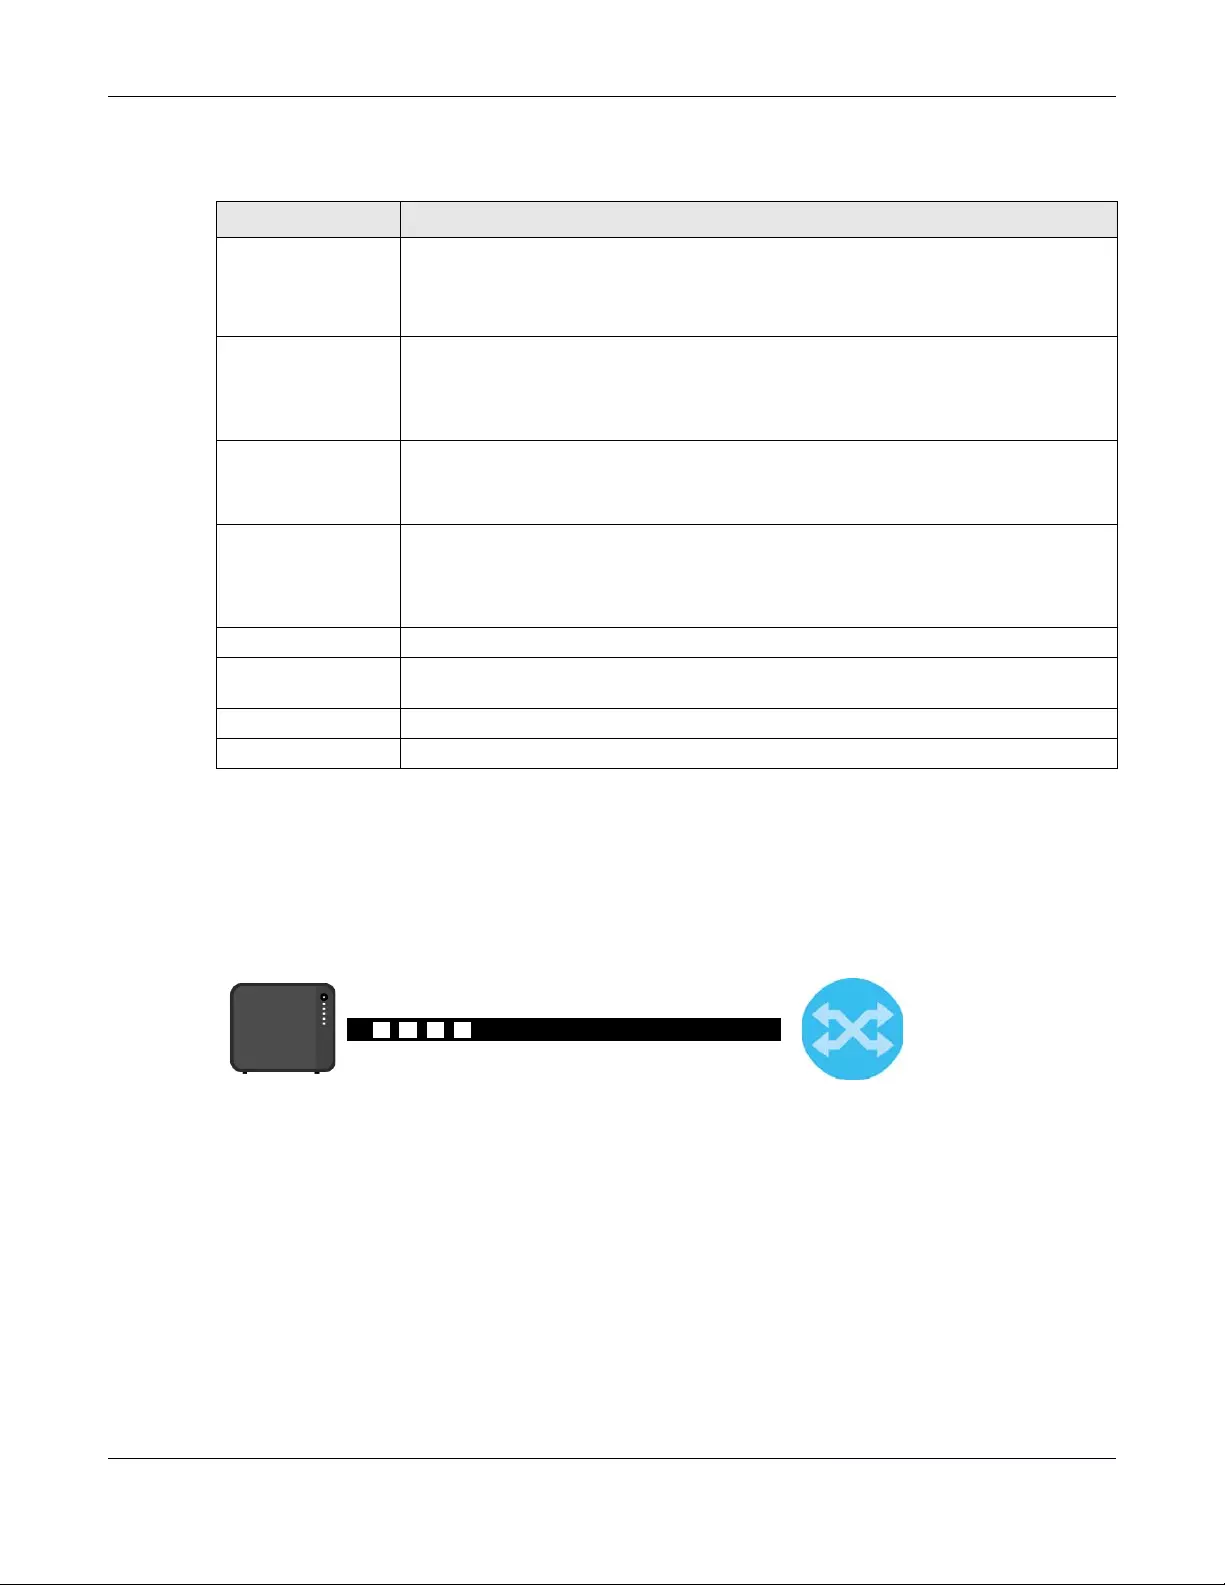
Chapter 8 Control Panel: Network
NAS Series User’s Guide
132
The following table describes the labels in this screen.
8.4.2.1 Create a Port Trunking
Link aggregation combines LAN1 and LAN2 into a single logical link with greater bandwidth. Both
interfaces use the same IP address and MAC address. It also includes fault tolerance and load
balancing. Connect LAN1 and LAN2 to the same Ethernet switch.
Figure 101 Link Aggregation
Use this screen to set up port trunking. Click Control Panel > Network > TCP/IP > Network Interface, and
then click Create.
Table 75 Control Panel > Network > TCP/IP > Network Interface
LABEL DESCRIPTION
Create This button is available only on the NAS which has multiple Ethernet ports.
Click it to open the following screen to set up a port trunking.
For adding a port trunking, see Section 8.4.2.1 on page 132.
Edit Select the LANx interface and click this to modify the IPv4 or IPv6 settings. See Section
8.4.2.2 on page 133.
Select the ppp0 interface and click this to edit the PPPoE settings. See Section 8.4.2.3 on
page 135.
Remove This button is available only on the NAS which has multiple Ethernet ports and when a port
trunking is created.
Click this to remove the port trunking.
Status This shows the data transmission rate and duplex setting (full-duplex or half-duplex) of the
interface. This field is left blank if the interface is not connected.
A green ball signifies that this interface is active. A gray ball signifies that this interface is not
active.
Interface This shows the interface name.
IP Settings This shows whether the interface obtains the IP settings automatically or the IP address
information is configured manually.
IP Address This shows the IP address of an interface.
Subnet Mask This shows the subnet mask of an interface.
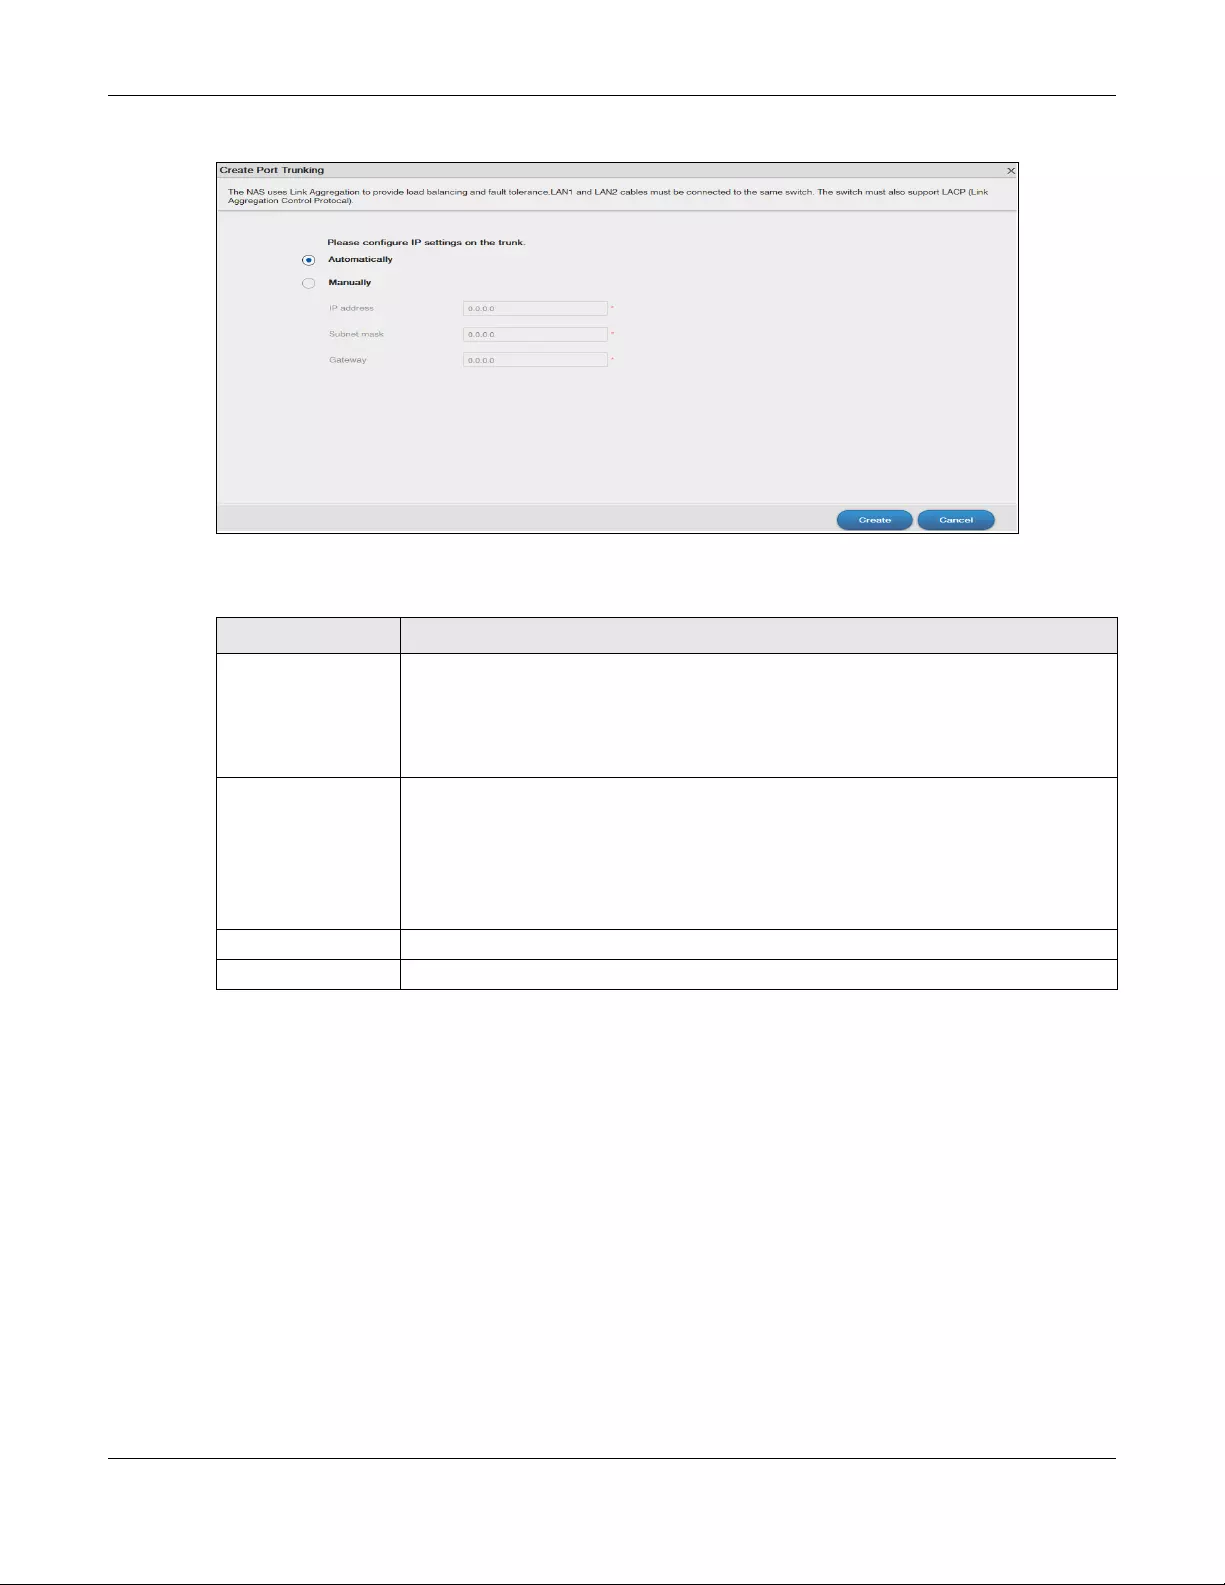
Chapter 8 Control Panel: Network
NAS Series User’s Guide
133
Figure 102 Creating a Port Trunking
The following table describes the labels in this screen.
8.4.2.2 Edit LAN1
Use this screen to configure IPv4 and/or IPv6 settings for LAN1. Select the LAN1 interface and then click
Edit.
IPv4
Click IPv4 to configure the IPv4 settings.
Table 76 Control Panel > Network > TCP/IP > Network Interface > Create
LABEL DESCRIPTION
Automatically Select this option to have the interface get IP address information automatically.
If no IP address information is assigned, the NAS uses Auto-IP to assign itself an IP address
and subnet mask. For example, you could connect the NAS directly to your computer. If
the computer is also set to get an IP address automatically, the computer and the NAS will
choose addresses for themselves and be able to communicate.
Manually Select this option for the interface to use fixed TCP/IP information. You must fill in the
following fields.
IP Address — Type an IP address in this field.
Subnet Mask — Type an IP subnet mask in this field.
Default Gateway — Type a default gateway address in this field.
Create Click this to save the settings and create a port trunking.
Cancel Click this to return to the previous screen without saving.
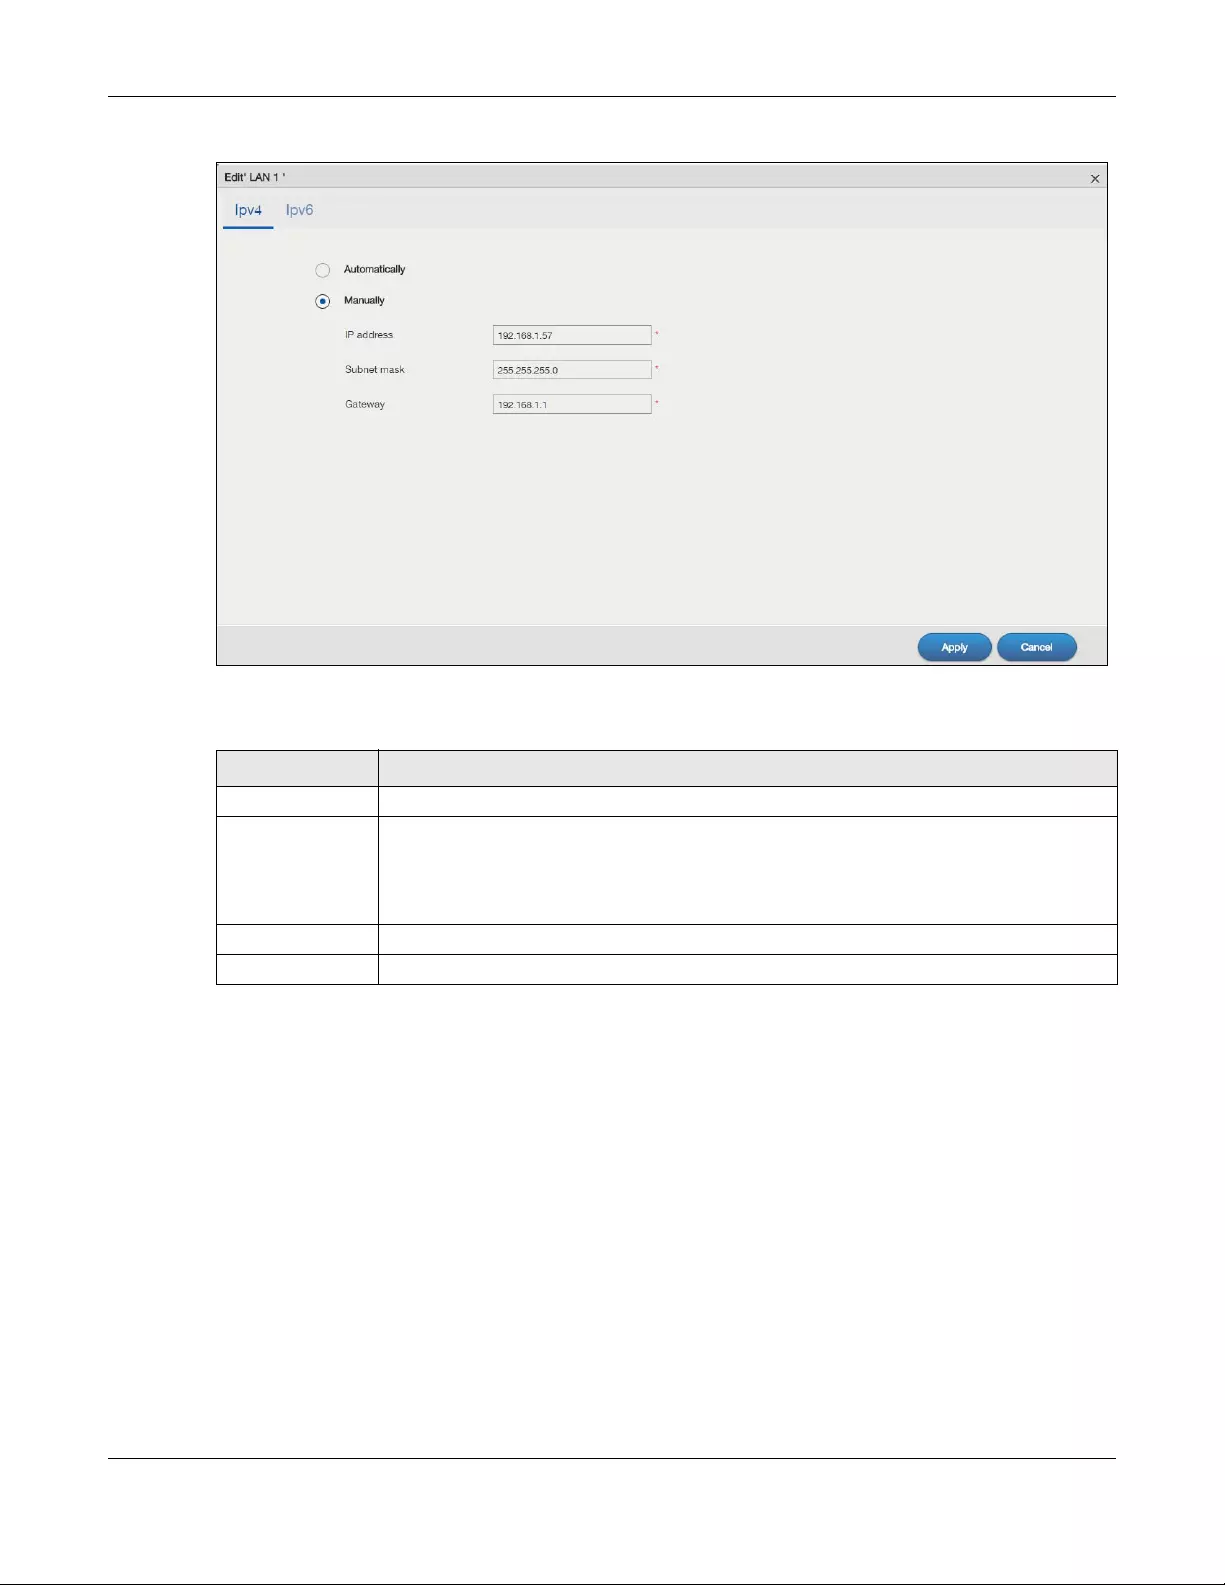
Chapter 8 Control Panel: Network
NAS Series User’s Guide
134
Figure 103 Control Panel > Network > TCP/IP > Network Interface > LAN1: IPv4
The following table describes the labels in this screen.
IPv6
Click IPv6 to configure the IPv6 settings.
Table 77 Control Panel > Network > TCP/IP > Network Interface > LAN1: IPv4
LABEL DESCRIPTION
Automatically Select this option to have the interface get IP address information automatically.
Manually Select this option for the interface to use fixed TCP/IP information.
•IP Address — Type an IP address in this field.
•Subnet Mask — Type an IP subnet mask in this field.
•Default Gateway — Type a default gateway address in this field.
Apply Click this to save your changes.
Cancel Click this to return to the previous screen without saving.
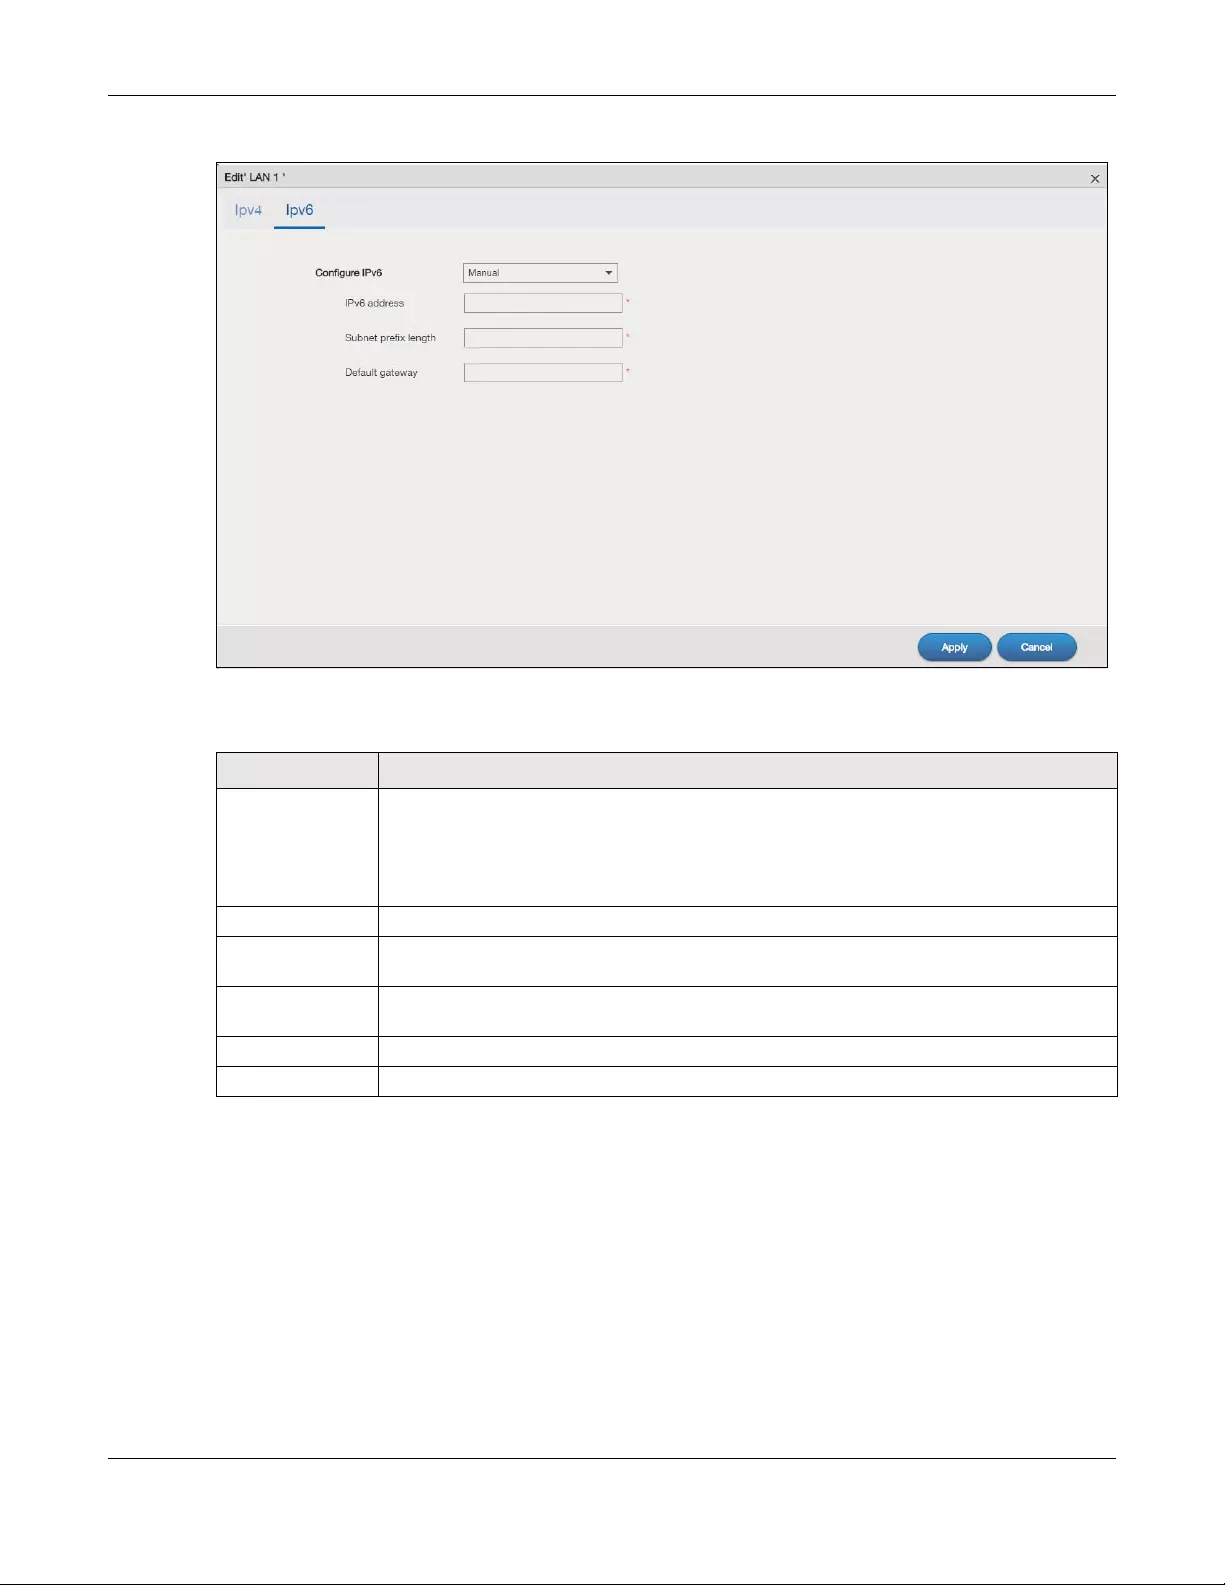
Chapter 8 Control Panel: Network
NAS Series User’s Guide
135
Figure 104 Control Panel > Network > TCP/IP > Network Interface > LAN1: IPv6
The following table describes the labels in this screen.
8.4.2.3 Configure PPPoE Settings
Use this screen to configure PPPoE settings for a direct Internet connection. Select the ppp0 interface
and then click Edit.
Table 78 Control Panel > Network > TCP/IP > Network Interface > LAN1: IPv6
LABEL DESCRIPTION
Configure IPv6 Select Auto to have the NAS use the IPv6 prefix from the connected router’s Router
Advertisement (RA) to generate an IPv6 address.
Select Manual if you have a fixed IPv6 address assigned by your ISP.
Select Disable to not assign any IPv6 address for the NAS.
IPv6 Address Enter the IPv6 address assigned by your ISP if you select Manual.
Subnet prefix
length Enter the address prefix length to specify how many most significant bits in an IPv6 address
compose the network address. The range is 0 to 128.
Default
Gateway Enter the IP address of the next-hop gateway. The gateway is a router or switch on the same
segment as your NAS’s interface(s). The gateway helps forward packets to their destinations.
Apply Click this to save your changes.
Cancel Click this to return to the previous screen without saving.
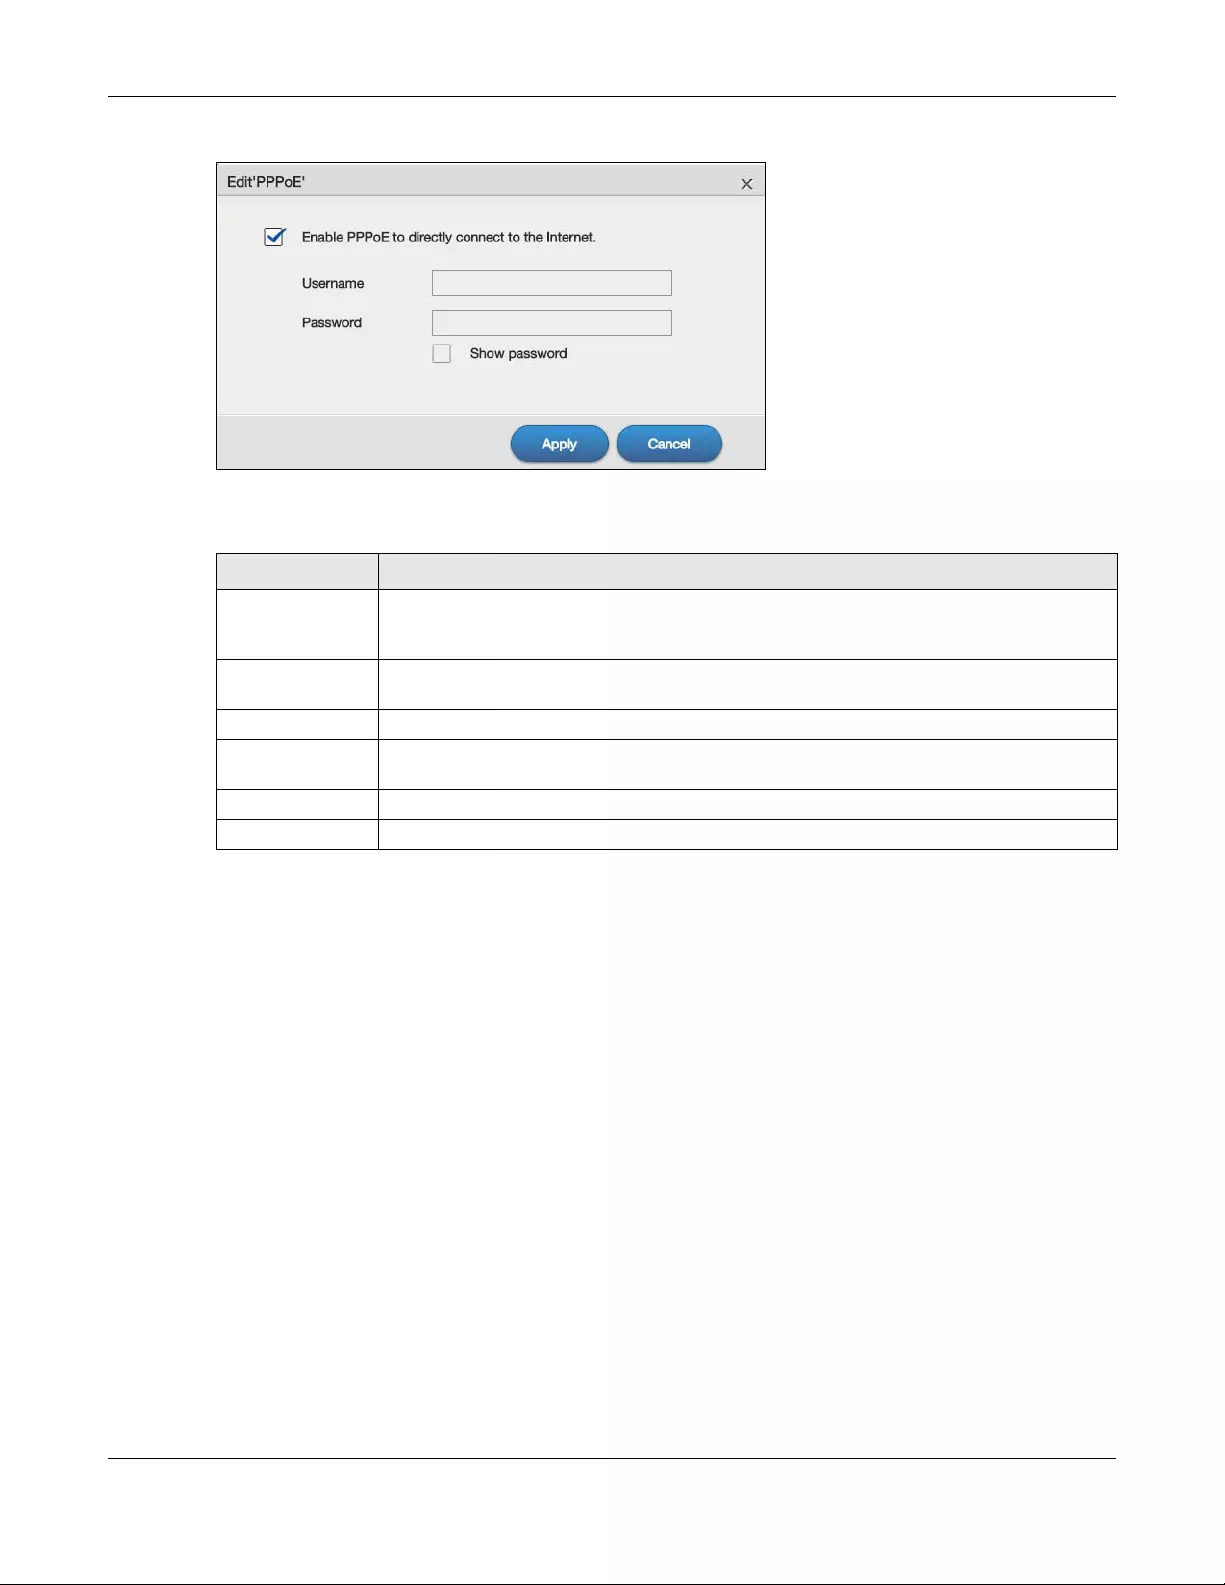
Chapter 8 Control Panel: Network
NAS Series User’s Guide
136
Figure 105 Control Panel > Network > TCP/IP > Network Interface > PPPoE
The following table describes the labels in this screen.
8.4.3 Configure Web Configurator
Click Control Panel > Network > TCP/IP > Web Configurator to configure the port number of HTTP and
HTTPs.
Table 79 Control Panel > Network > TCP/IP > Network Interface > PPPoE
LABEL DESCRIPTION
Enable PPPoE to
directly connect
to the Internet.
Select or clear this field to enable or disable PPPoE.
Username Enter the username exactly as your ISP assigned. If assigned a name in the form user@domain
where domain identifies a service name, then enter both components exactly as given.
Password Enter the password associated with the username above.
Show password Select this field to reveal the password hidden behind asterisks or clear this field to hide the
password.
Apply Click this to save your changes.
Cancel Click this to return to the previous screen without saving.

Chapter 8 Control Panel: Network
NAS Series User’s Guide
137
Figure 106 Control Panel > Network > TCP/IP > Web Configurator
The following table describes the labels in this screen.
8.4.4 Configure Network Diagnosis
Click Control Panel > Network > TCP/IP > Network Diagnosis to test the network connection to a
particular IP address or domain name.
Table 80 Control Panel > Network > TCP/IP > Web Configurator
LABEL DESCRIPTION
HTTP connection
Port Number Specify the port number of HTTP connection.
Note: The port number 8082 is reserved for media streaming.
Enable HTTPS
connection
Select or clear this field to enable or disable HTTPS connection.
Port Number Specify the port number of HTTPS connection.
Allow only
HTTPS
connection
Select this field to allow connection to the Web Configurator via HTTPS only. Clear this field to
allow connection to the Web Configurator via both HTTP and HTTPS.
Apply Click this to save your changes.
Reset Click this to restore your previously saved settings.
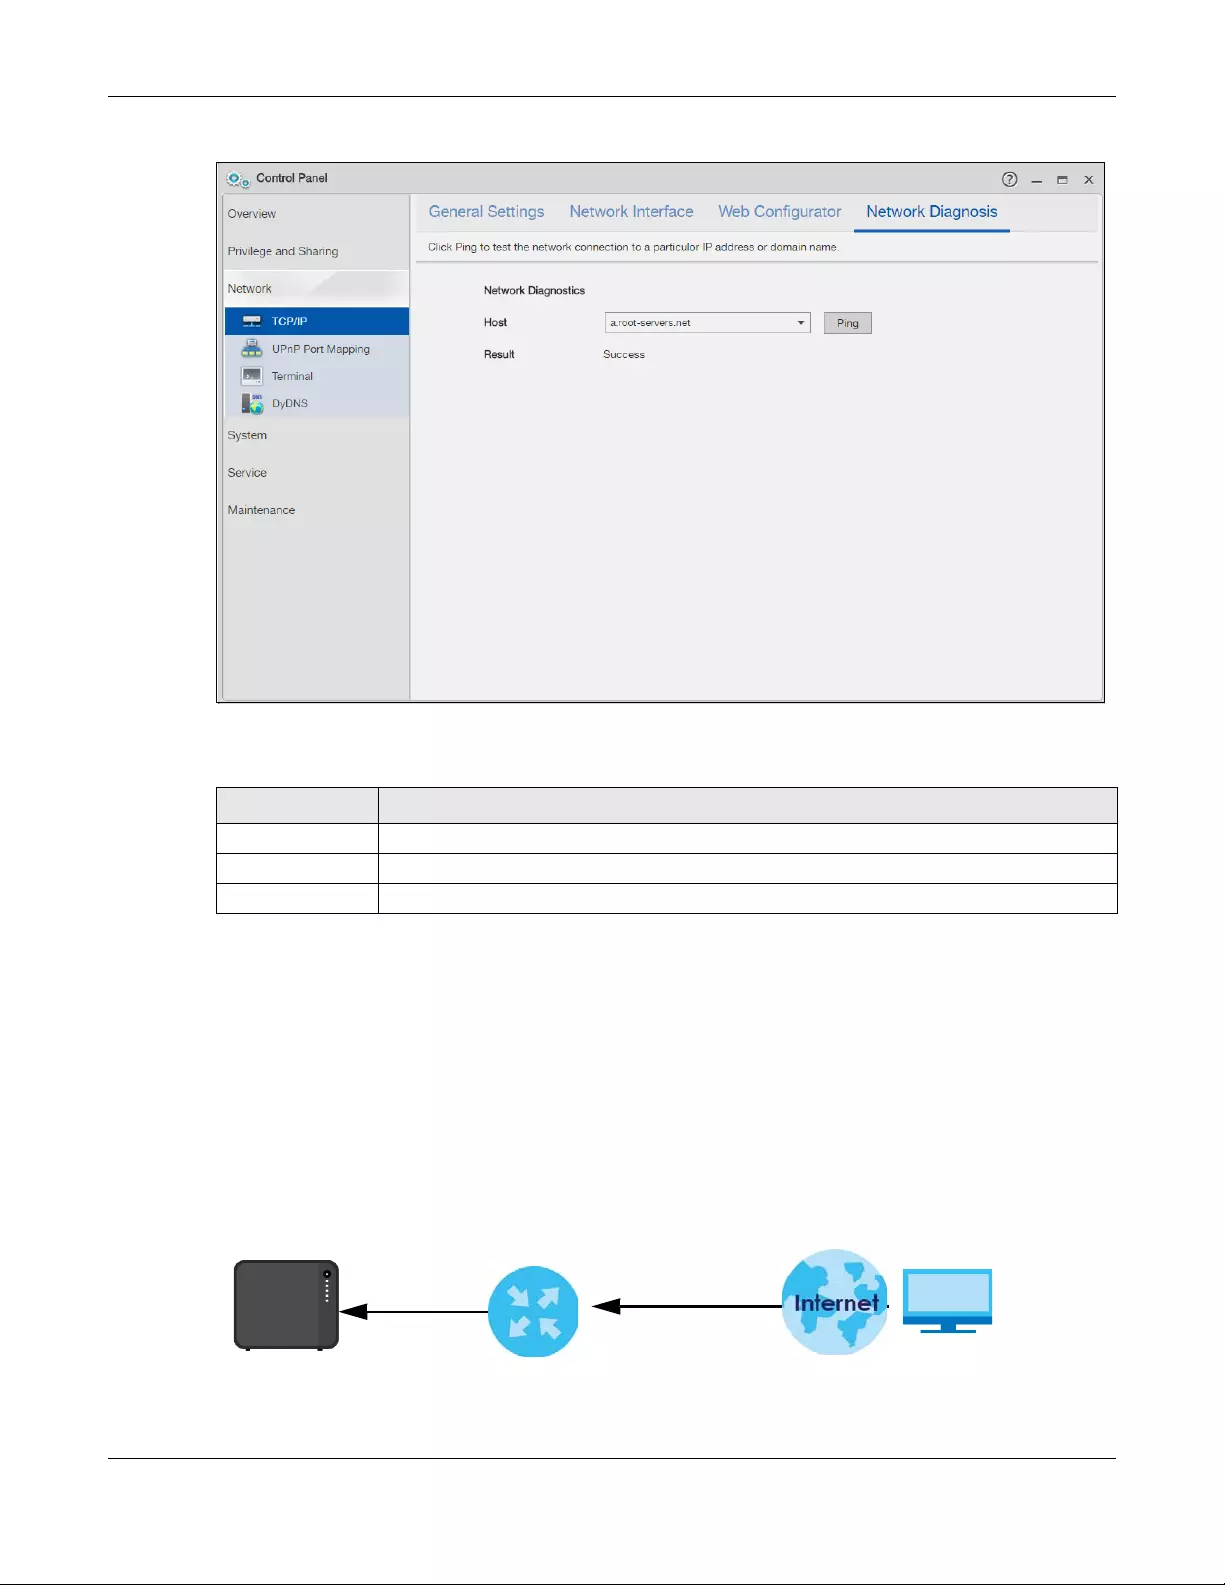
Chapter 8 Control Panel: Network
NAS Series User’s Guide
138
Figure 107 Control Panel > Network > TCP/IP > Network Diagnosis
The following table describes the labels in this screen.
8.5 UPnP Port Mapping Screens
Use UPnP (Universal Plug and Play) port mapping to allow access from the WAN to services you select on
the NAS. It is recommended that you place the NAS behind an Internet gateway firewall device to
protect the NAS from attacks from the Internet. Many such Internet gateways use UPnP to simplify peer-
to-peer network connectivity between devices. UPnP can automatically configure the Internet
gateway’s firewall and Network Address Translation (NAT) to allow access to the NAS from the Internet.
Figure 108 UPnP for FTP Access
Table 81 Control Panel > Network > TCP/IP > Network Diagnosis
LABEL DESCRIPTION
Host Select a specific host to perform the diagnosis.
Ping Click this to test the network connection.
Result Displays whether or not the test received a response from the host.
TCP: 21
TCP: 21
192.168.1.20
a.b.c.d
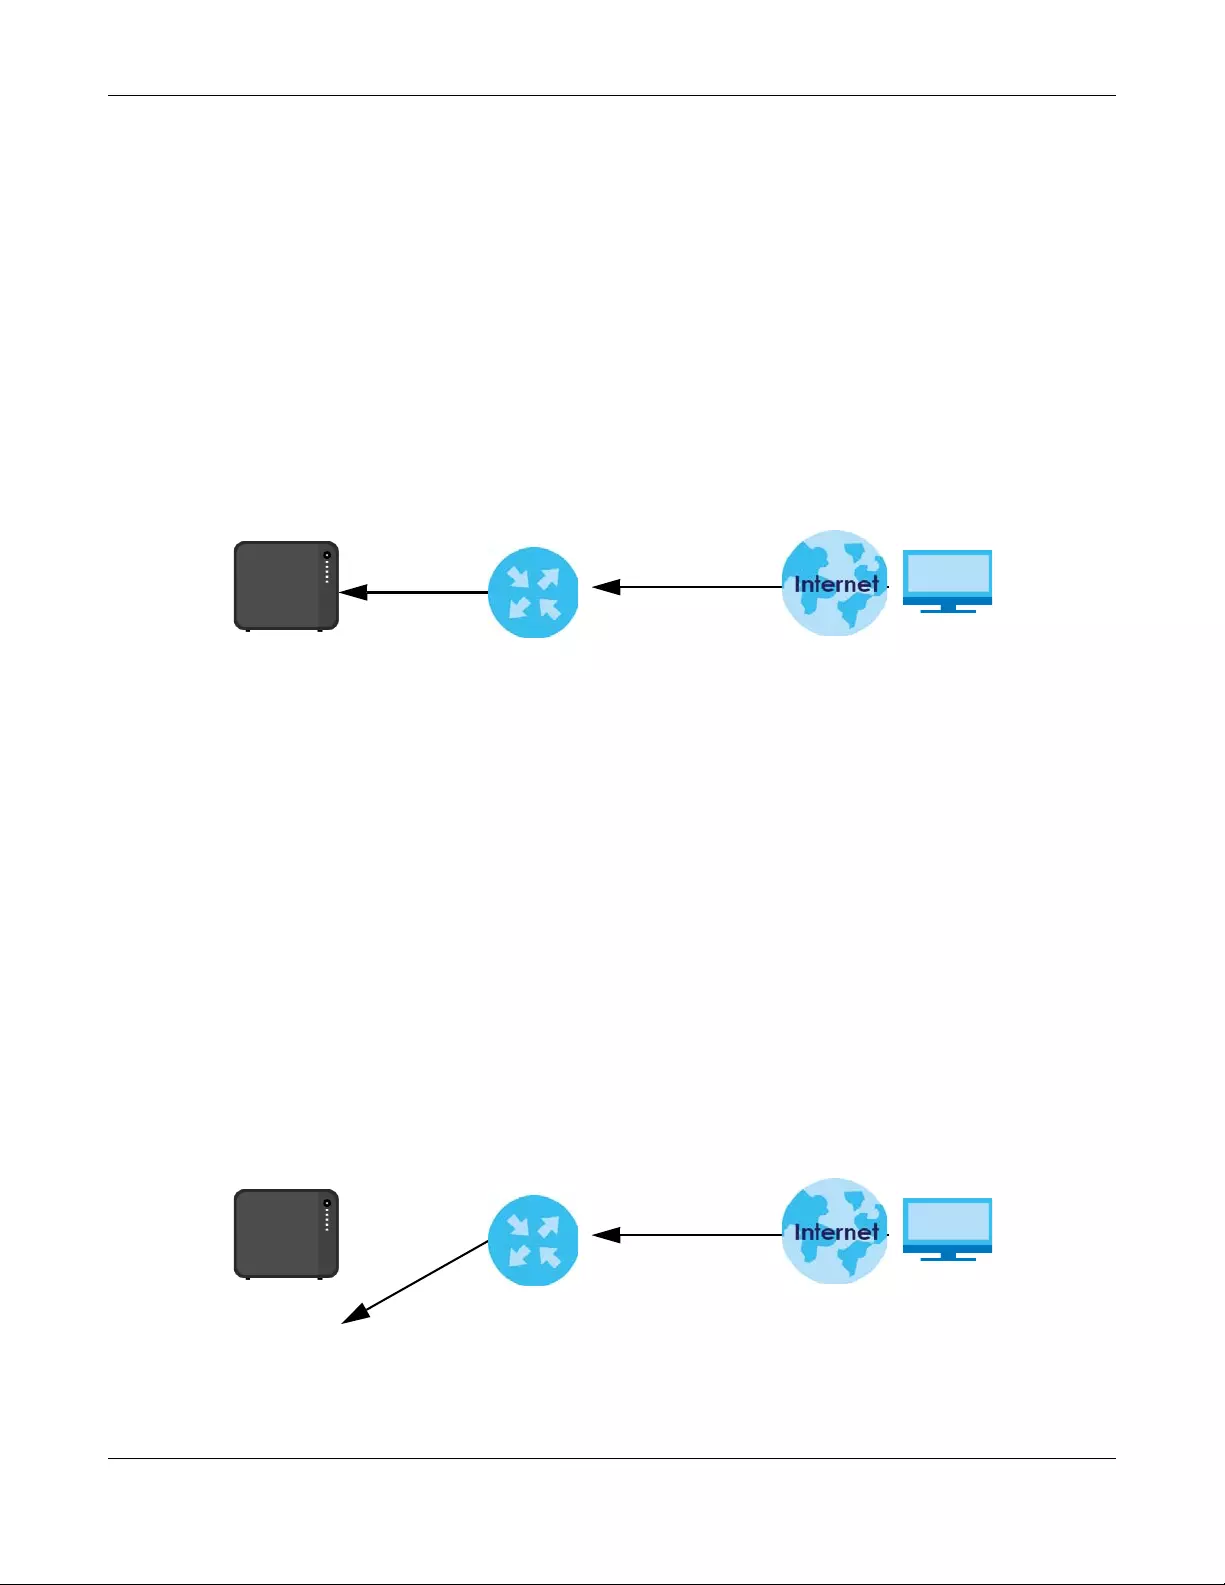
Chapter 8 Control Panel: Network
NAS Series User’s Guide
139
In the above example, UPnP creates a firewall rule and NAT port forwarding mapping to send FTP traffic
(using TCP port number 21) from the public IP address a.b.c.d to the NAS’s private IP address of
192.168.1.20.
Use the NAS’s UPnP Port Mapping screen to configure the UPnP settings your Internet gateway uses to
allow access from the WAN (Internet) to services you select on the NAS. You can also set which port
Internet users need to use in order to access a specific service on the NAS.
Note: To use UPnP port mapping, your Internet gateway must have UPnP enabled.
If your Internet gateway supports Port Address Translation (PAT is sometimes included with a port
forwarding feature), you can have the Internet users use a different TCP port number from the one the
NAS uses for the service.
Figure 109 UPnP Port Address Translation for FTP Example
In the above example, the Internet gateway uses PAT to accept Internet user FTP sessions on port 2100,
translate them to port 21, and forward them to the NAS.
8.5.1 UPnP and the NAS’s IP Address
It is recommended that the NAS use a static IP address (or a static DHCP IP address) if you will allow
access to the NAS from the Internet. The UPnP-created NAT mappings keep the IP address the NAS had
when you applied your settings in the UPnP Port Mapping screen. They do not automatically update if
the NAS’s IP address changes.
Note: WAN access stops working if the NAS’s IP address changes.
For example, if the NAS’s IP address was 192.168.1.33 when you applied the UPnP Port Mapping screen’s
settings and the NAS later gets a new IP address of 192.168.1.34 through DHCP, WAN access stops
working because the Internet gateway still tries to forward traffic to IP address 192.168.1.33. Since you
can no longer access the NAS from the WAN, you would have to access the NAS from the LAN and re-
apply your UPnP Port Mapping screen settings to update the Internet gateway’s UPnP port mappings.
Figure 110 UPnP Using the Wrong IP Address
TCP: 2100
TCP: 21
192.168.1.20
a.b.c.d
192.168.1.34
a.b.c.d
192.168.1.33

Chapter 8 Control Panel: Network
NAS Series User’s Guide
140
8.5.2 UPnP and Security
UPnP’s automated nature makes it easier to use than manually configuring firewall and NAT rules, but it
is also less secure. Using UPnP may make your network more susceptible to snooping and hacking
attacks.
8.5.3 The NAS’s Services and UPnP
This section introduces the NAS’s services which an Internet gateway can use UPnP to allow access to
and from the Internet.
CIFS (Windows File Sharing)
Common Internet File System (CIFS) is a standard protocol supported by most operating systems in order
to share files across the network. Using UPnP port mapping for CIFS allows users to connect from the
Internet and use programs like Windows Explorer to access the NAS’s shares to copy files from the NAS,
delete files on the NAS, or upload files to the NAS from the Internet.
If you configure UPnP port mapping to allow CIFS access from the WAN but cannot get it to work, you
may also have to configure the Internet gateway to also allow NetBIOS traffic. See Windows/CIFS on
page 147 for more on CIFS.
FTP
File Transfer Protocol is a standard file transfer service used on the Internet. Using UPnP port mapping for
FTP allows remote users to use FTP from the Internet to access the NAS’s shares. A user with read and
write access to a share can copy files from the share, delete files from the share, or upload files to the
share. See Section 10.6 on page 162 for more on FTP. If you use UPnP to allow FTP access from the WAN,
you may want to use a different WAN port number (instead of the default of port 21) to make it more
secure. Remember to tell the remote users to use the custom port number when using FTP to access the
NAS.
HTTP (Web Configurator)
You can use UPnP port mapping to allow access to the NAS’s management screens. If you use UPnP to
allow web configurator access from the WAN, you may want to use a different WAN port number
(instead of the default of port 80) to make it more secure. Remember to use the custom port number
when accessing the NAS’s web configurator from the Internet.
HTTP (Web Published Shares)
This is the NAS’s web publishing feature that lets people access files using a web browser without having
to log into the Web Configurator. Use UPnP port mapping to allow access to these files from the Internet
without having to enter a user name or password. See Section 10.8 on page 167 for more on web
publishing.
8.5.4 Configure UPnP Router
UPnP allows access to your NAS through a UPnP router. Click Network > UPnP Port Mapping > UPnP Router
to check if the NAS has found a UPnP router on the network.
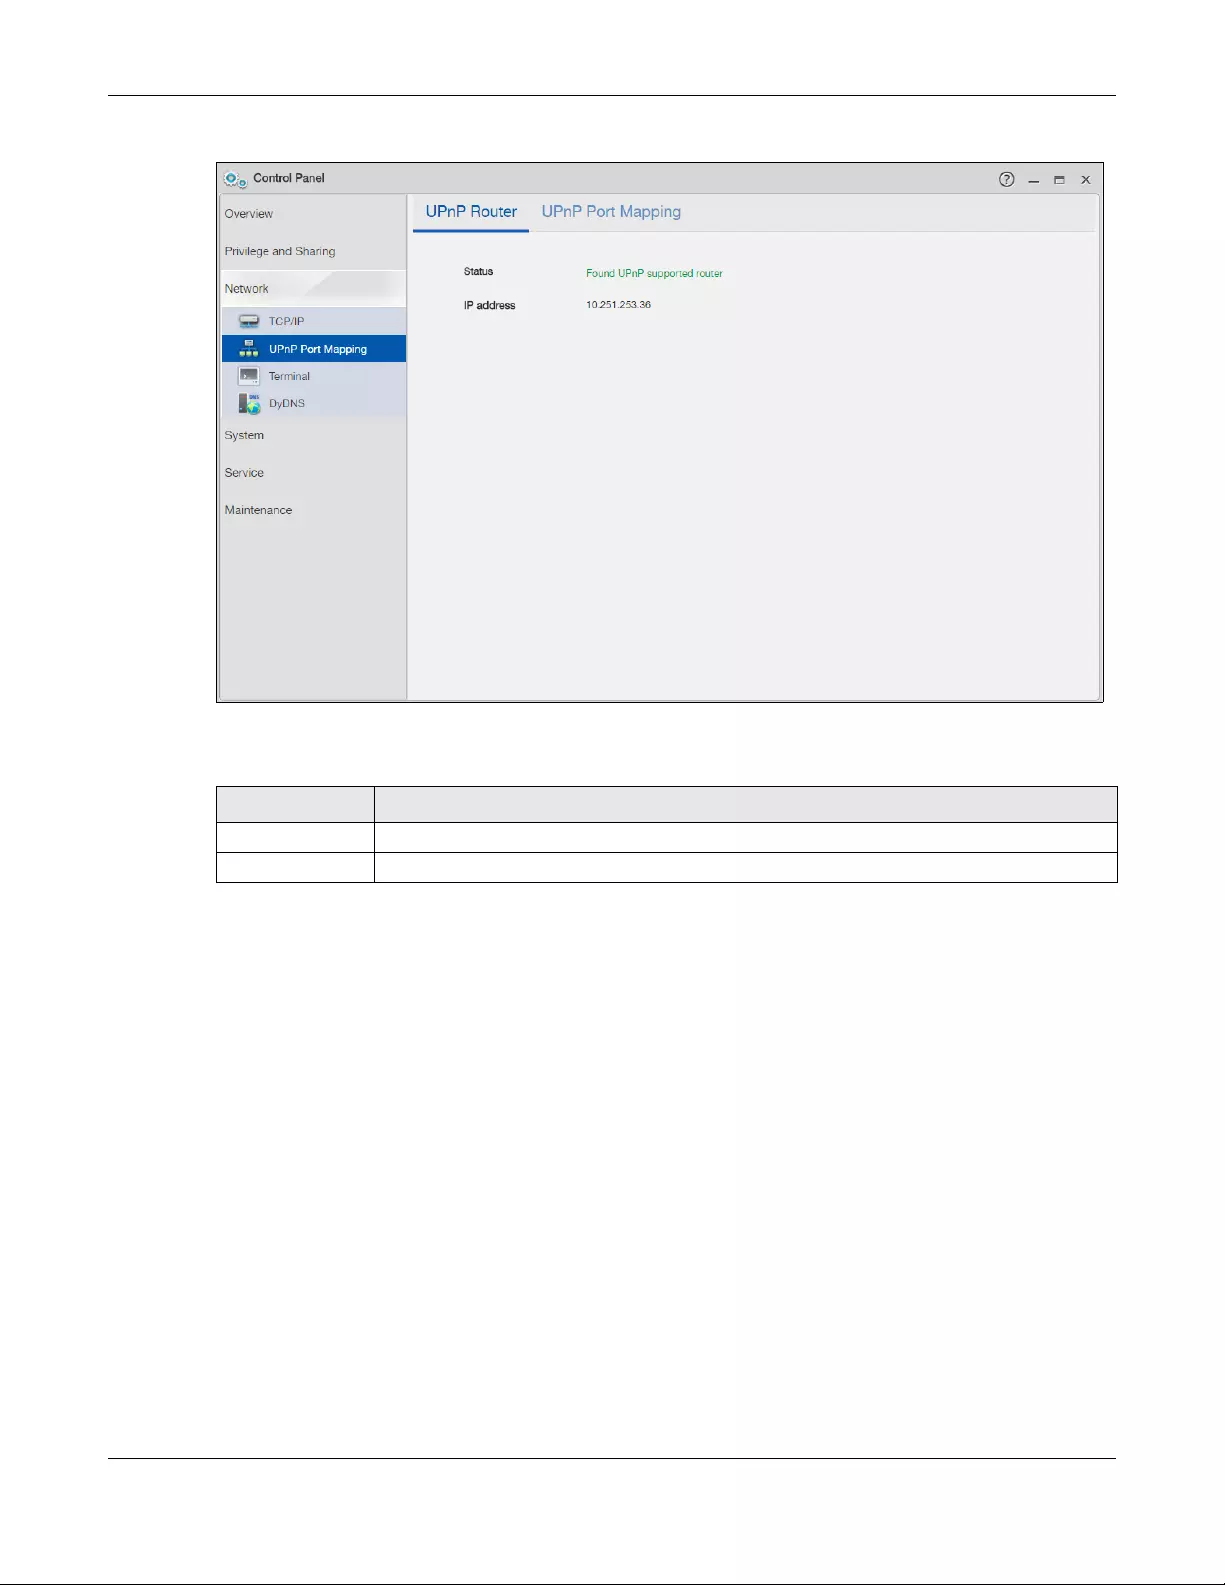
Chapter 8 Control Panel: Network
NAS Series User’s Guide
141
Figure 111 Network > UPnP Port Mapping > UPnP Router
The following table describes the labels in this screen.
8.5.5 Configure UPnP Port Mapping
Click Network > UPnP Port Mapping > UPnP Port Mapping to display the UPnP Port Mapping screen.
Use this screen to set how the Internet gateway’s UPnP feature configures the Internet gateway’s NAT IP
address mapping and port mapping settings. These settings allow Internet users connected to the
Internet gateway’s WAN interface to access services on the NAS. You can set which port Internet users
need to use to access a specific service on the NAS.
Table 82 Network > UPnP Port Mapping > UPnP Router
LABEL DESCRIPTION
Status This displays whether a UPnP router is found.
IP address This displays the IP address of the UPnP router.
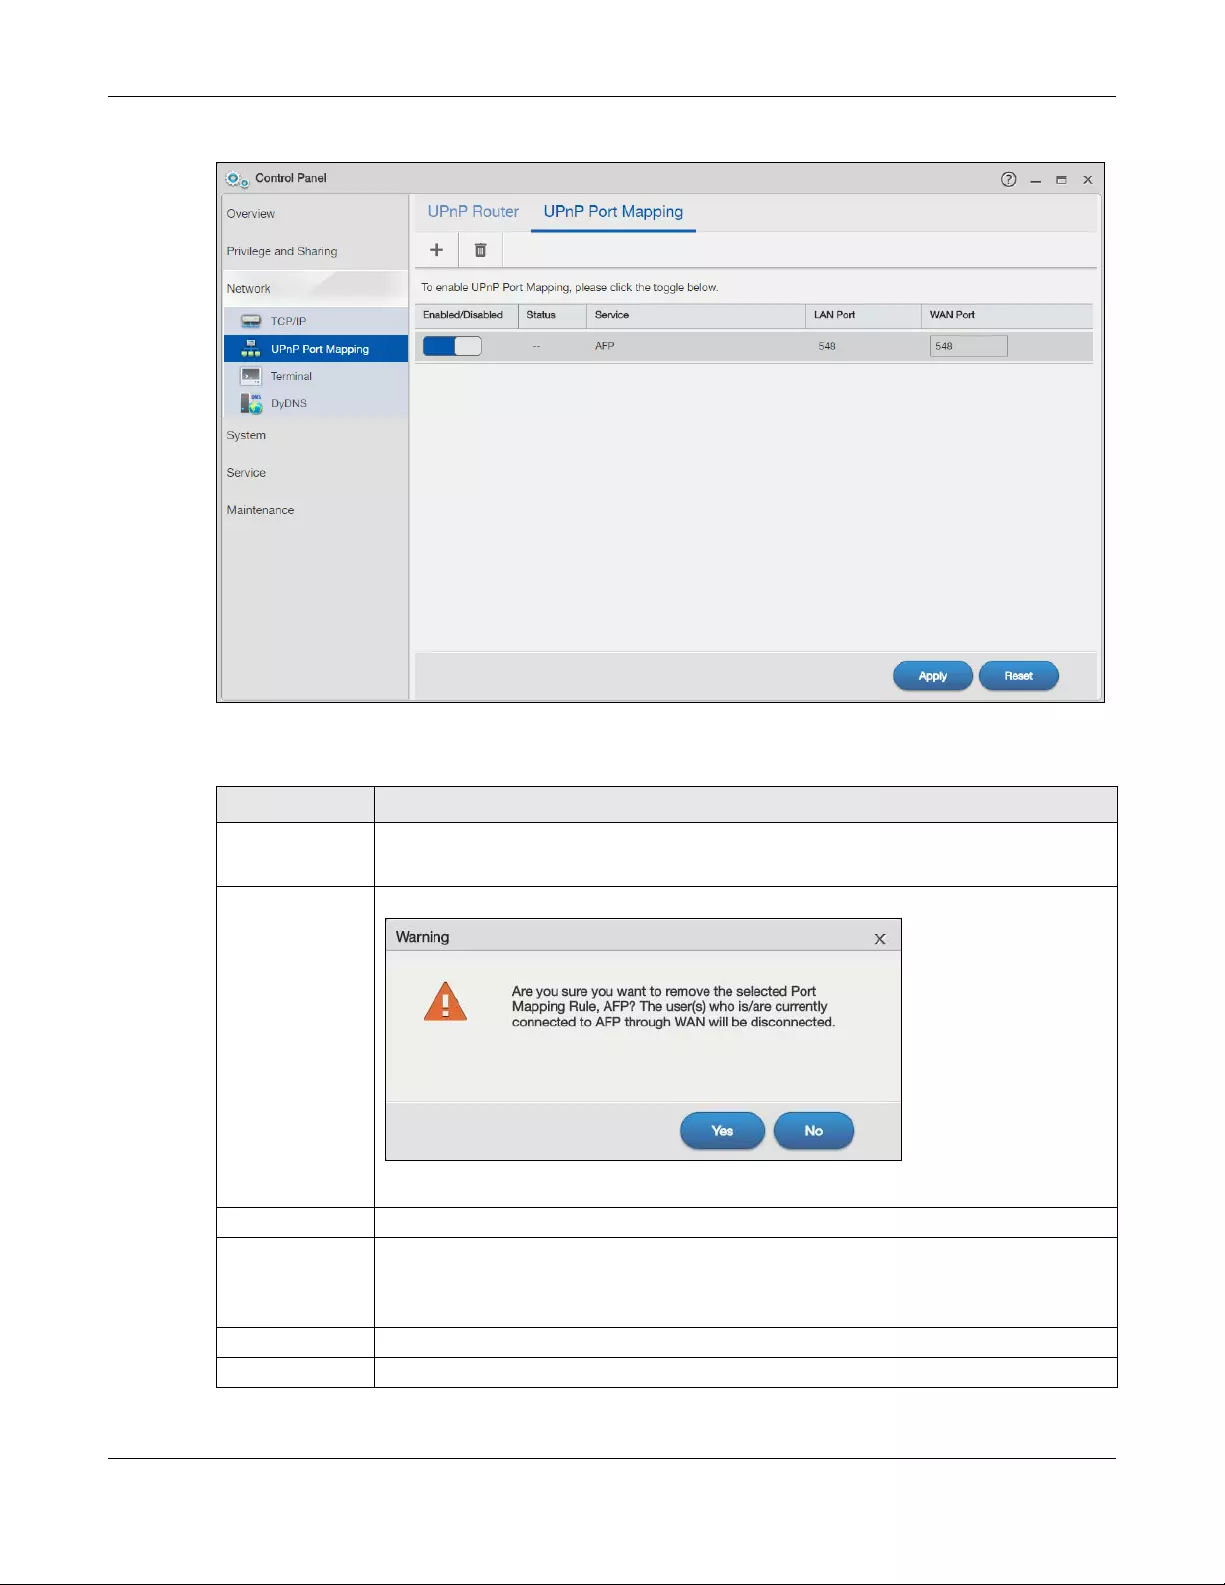
Chapter 8 Control Panel: Network
NAS Series User’s Guide
142
Figure 112 Network > UPnP Port Mapping > UPnP Port Mapping
The following table describes the labels in this screen.
Table 83 Network > UPnP Port Mapping > UPnP Port Mapping
LABEL DESCRIPTION
Add Click this to add a service and create a port mapping rule.
See more details on Section 8.5.5.1 on page 143.
Remove Click this to open the following screen where you can remove a port mapping rule.
Click Yes to remove the selected port mapping rule or No to close this screen.
Enabled/Disabled Use this to enable or disable a selected port mapping rule.
Status Displays the status of the port mapping rule. A green circle indicates the port mapping rule is
enabled and you can access the service. A grey circle indicates the port mapping rule is
disabled. A red circle indicates the router’s settings failed to be changed. “-” indicates a new
mapping rule.
Service This read-only field identifies a service on the NAS.
LAN Port Displays the NAS’s internal port number for the service.
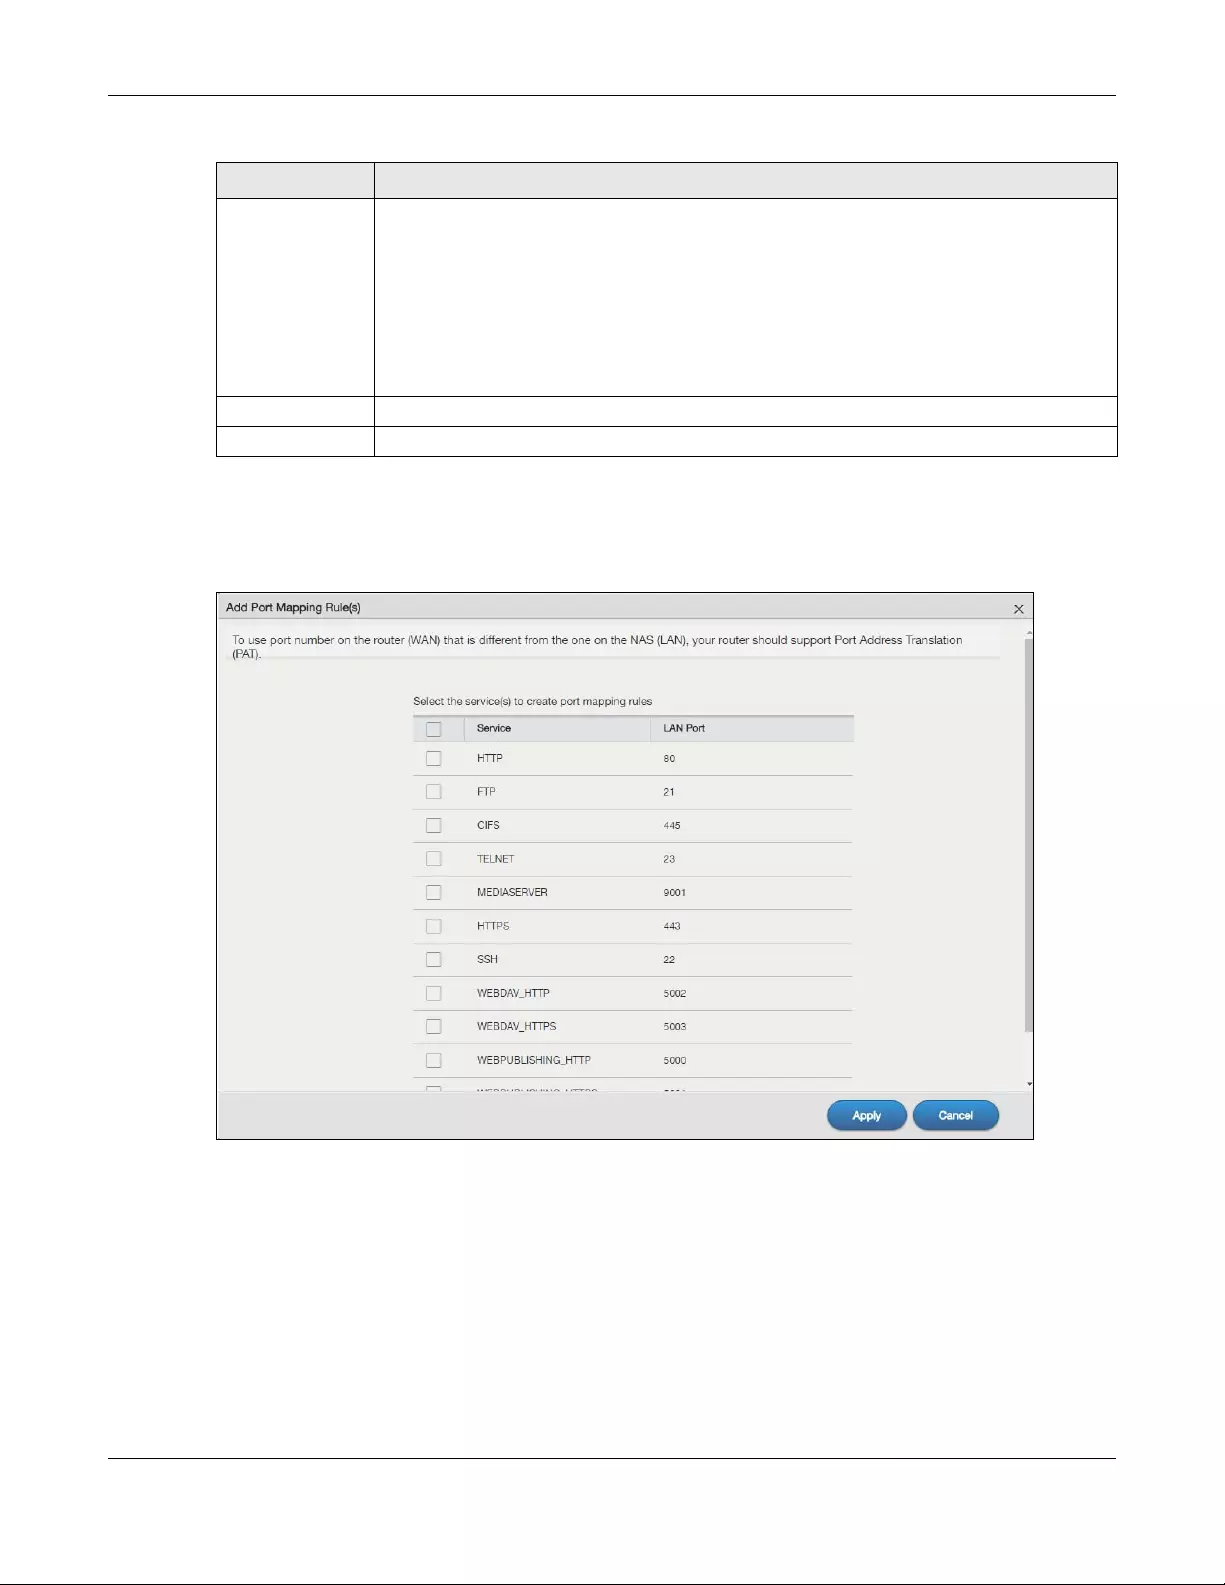
Chapter 8 Control Panel: Network
NAS Series User’s Guide
143
8.5.5.1 Add a Port Mapping Rule
Some Internet gateways will delete all UPnP mappings after reboot. So if the Internet gateway reboots,
you may need to re-apply the UPnP port mapping again. Click UPnP Port Mapping > Add to add NAS
services and create port mapping rules.
Select the services you want to create port mapping rules for, and click Apply to add the services. Click
Cancel to close the screen without saving any setting.
WAN Port When you enable one of the NAS’s services, specify the port number (1~65,535) Internet uses
need to use to connect to the Internet gateway’s WAN port in order to access the service on
the NAS. Whoever wants to access a service on the NAS from the Internet must use this port
number.
Make sure there is not another service using TCP protocol with the same port number.
If another device is using the same port (the Internet gateway has the same port number
mapped to another LAN IP address), the NAS overwrites it when you apply the setting and
WAN users can no longer access the other device.
Apply Click Apply to save your changes back to the NAS.
Reset Click Reset to begin configuring this screen afresh.
Table 83 Network > UPnP Port Mapping > UPnP Port Mapping (continued)
LABEL DESCRIPTION
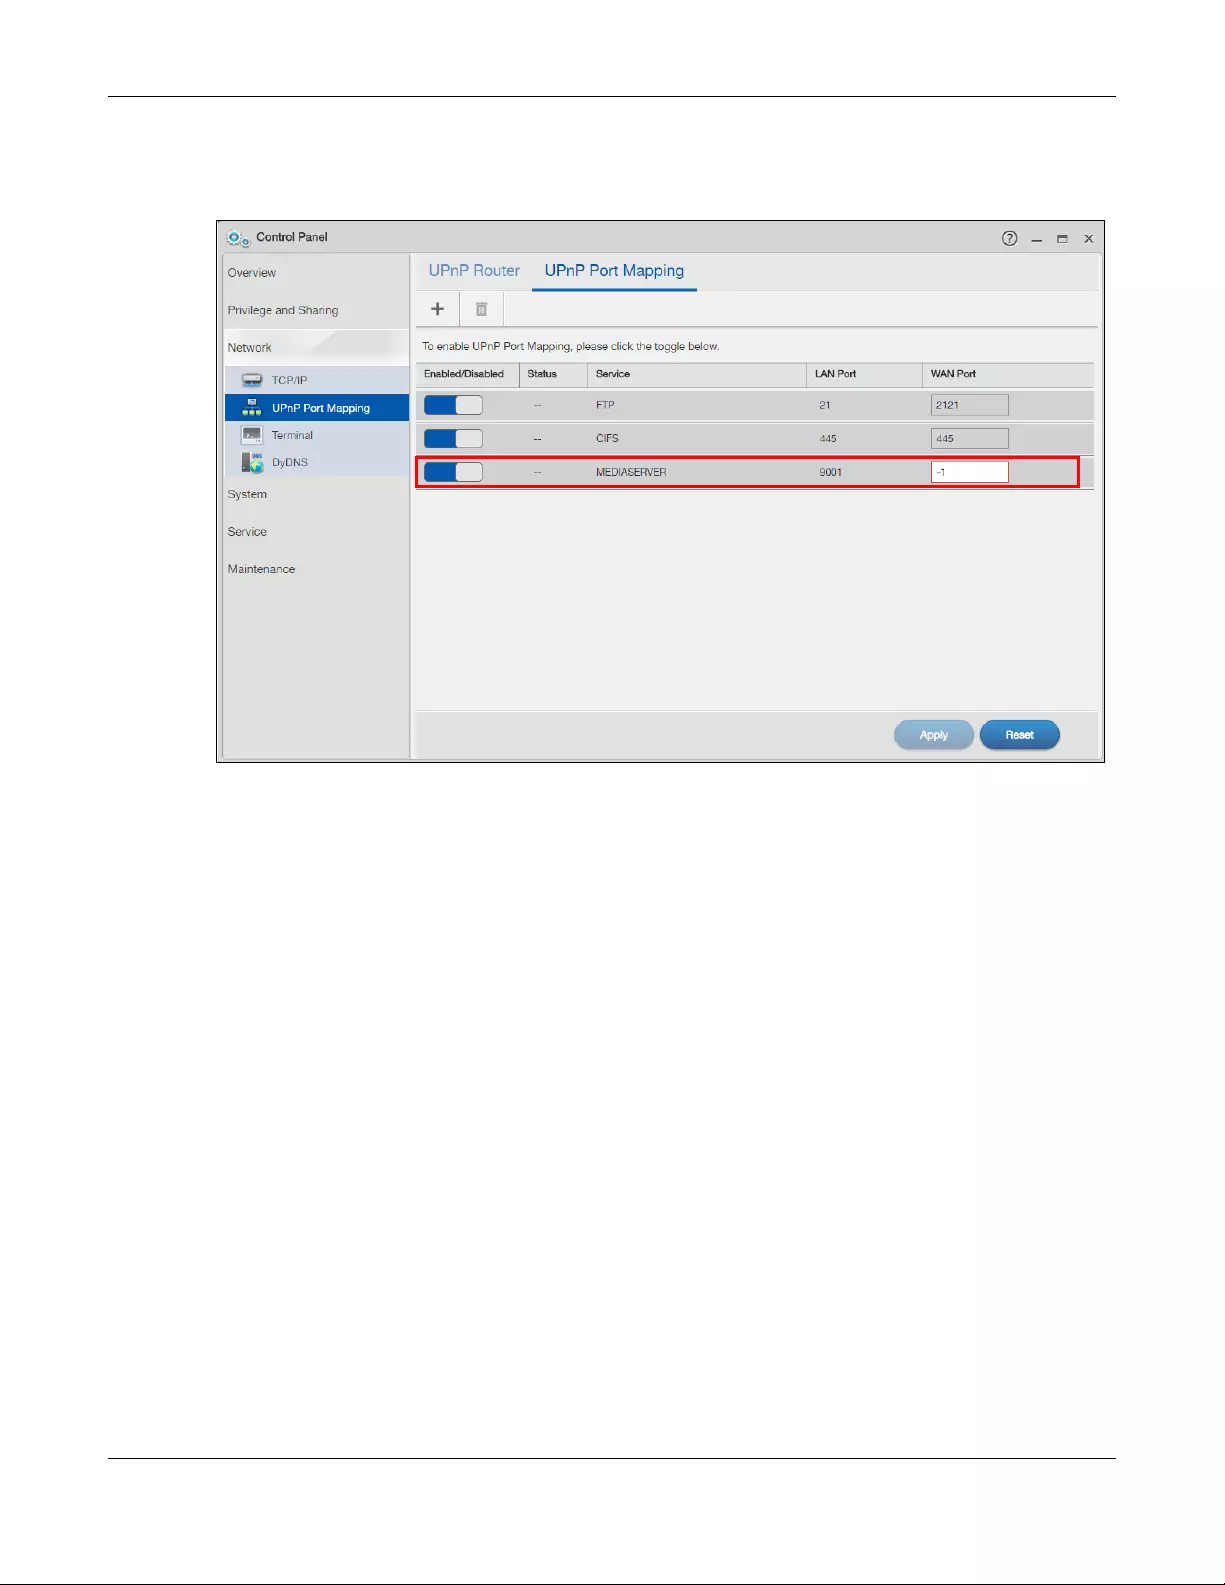
Chapter 8 Control Panel: Network
NAS Series User’s Guide
144
Note: The default of the WAN port for the newly created service displays -1. Specify the port
number from 1 to 65,535, or you cannot access that service from the Internet.
8.6 Terminal Screen
Use this screen to enable or disable Telnet and SSH (Secure SHell) access to the NAS.
Telnet or SSH access lets you use line commands to configure the NAS. Use these commands at your
own risk. The vendor takes no responsibility for any changes you make using the commands.
Click Control Panel > Network > Terminal in the navigation panel to open the following screen.
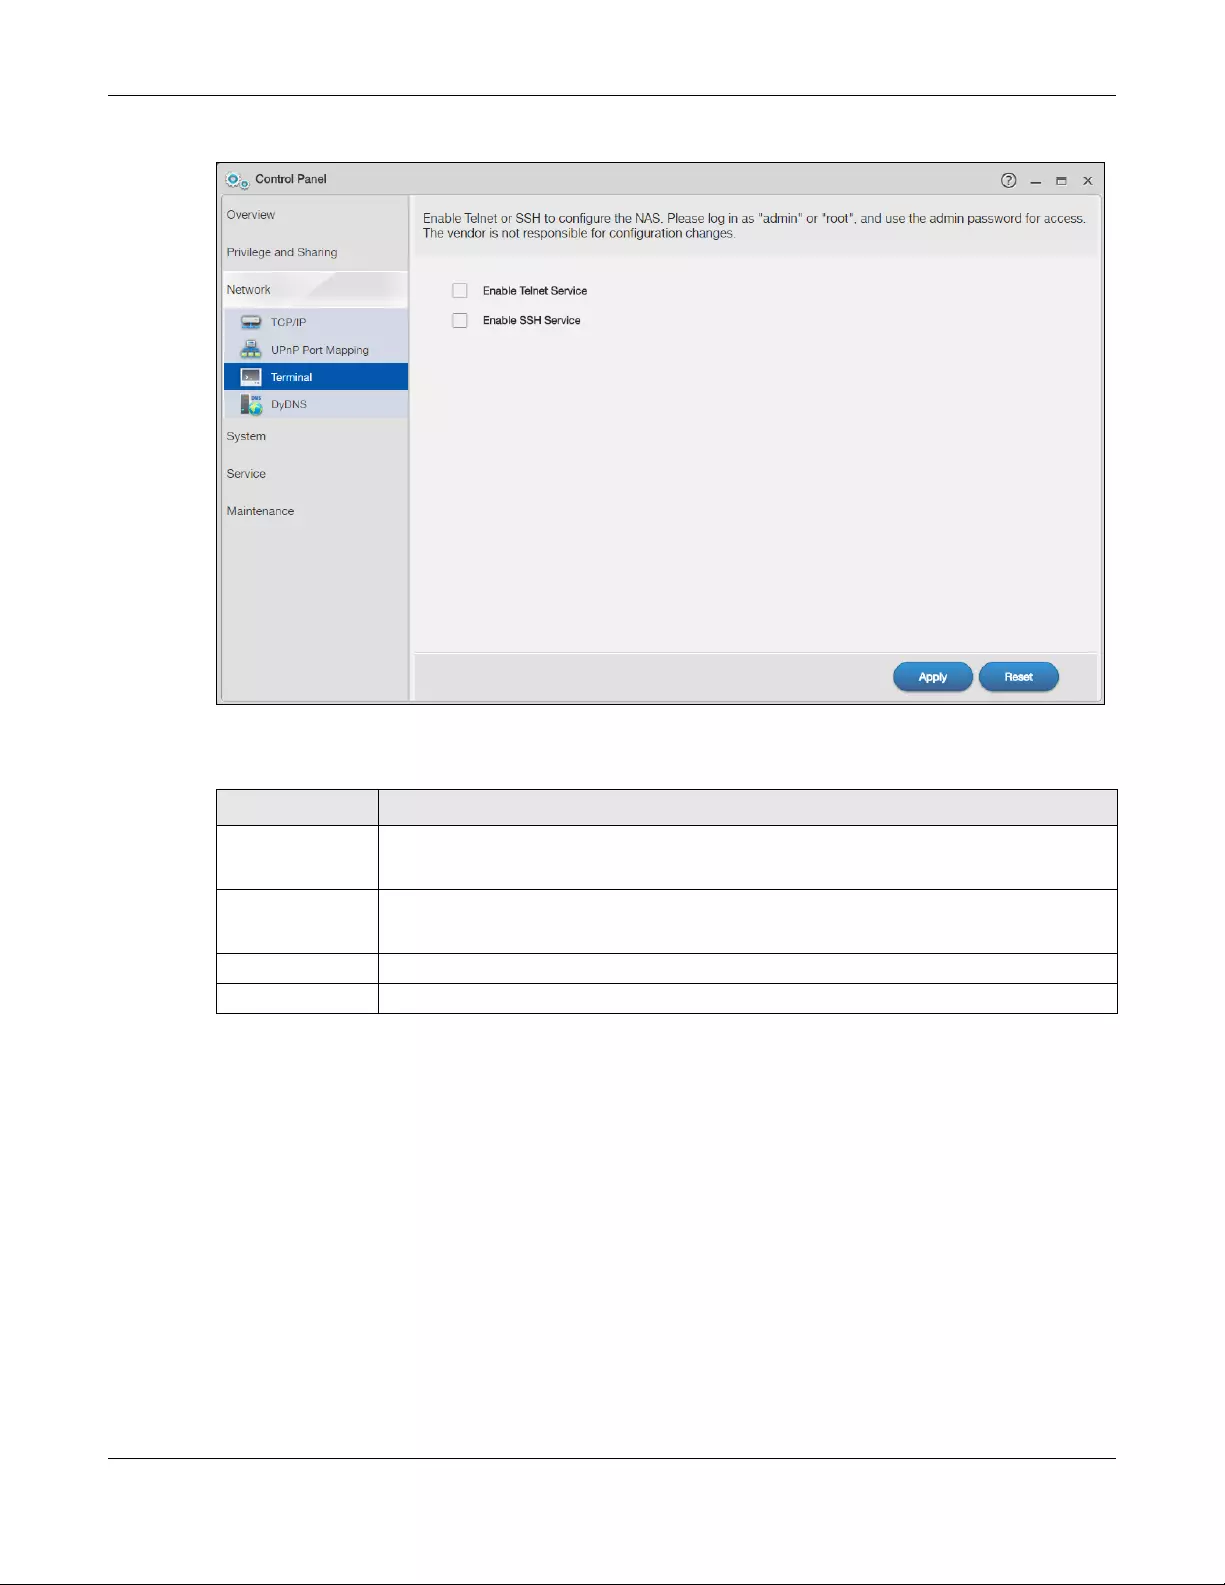
Chapter 8 Control Panel: Network
NAS Series User’s Guide
145
Figure 113 Control Panel > Network > Terminal
The following table describes the labels in this screen.
8.7 DyDNS Screen
Use this screen to enable and configure Dynamic DNS.
Dynamic DNS (DyDNS) allows you to update your current dynamic IP address with a dynamic DNS
service so that anyone can contact you (such as through NetMeeting or CUSeeMe). You can also
access your FTP server or Web site on your own computer using a domain name (for instance
myhost.dhs.org, where myhost is a name of your choice) that will never change instead of using an IP
address that changes each time you reconnect. Your friends or relatives will always be able to call you
even if they don’t know your IP address.
Click Control Panel > Network > DyDNS to open the following screen.
Table 84 Control Panel > Network > Terminal
LABEL DESCRIPTION
Enable Telnet
Service
Select this to enable Telnet access to the NAS. Clear it to not allow Telnet access to the NAS.
To use Telnet, log in as “admin” or “root” and use the admin password.
Enable SSH Service Select this to enable SSH access to the NAS. Clear it to not allow SSH access to the NAS.
To use SSH, log in as “admin” or “root” and use the admin password.
Apply Click this to save your changes.
Reset Click this to restore previously saved settings.

Chapter 8 Control Panel: Network
NAS Series User’s Guide
146
Figure 114 Control Panel > Network > DyDNS
The following table describes the labels in this screen.
Table 85 Control Panel > Network > DyDNS
LABEL DESCRIPTION
Enable DyDNS Select this to use dynamic DNS.
You need to have registered a dynamic DNS account with a service provider such as
www.dyndns.org. The Dynamic DNS service provider will give you a password or key.
Service Provider Select your Dynamic DNS service provider.
Hostname Enter your host name provided by the Dynamic DNS service.
Username Enter your user name for your DNS account.
Password Enter the password assigned to your DNS account.
Status This shows the DyDNS update result:
Disabled – You have manually disabled the DyDNS feature.
Error – An unrecoverable error (such as authentication error) occurred caused the NAS to
disable the DyDNS feature automatically.
Fail to update – A recoverable error (such as a temporary Internet disconnect) occurred.
The NAS will retry later.
Updated — The NAS updated the DyDNS server with the NAS’s public IP address.
Default Gateway This shows with which public IP of interface the NAS updated the DyDNS server.
External Address This shows the IP address of the NAS that can be accessed in the Wide Area Network
(WAN). Note that this is not assigned by the DyDNS server.
Apply Click this to save your changes.
Reset Click this to clear the fields.

NAS Series User’s Guide
147
CHAPTER 9
Control Panel: System
9.1 Overview
This chapter gives an overview of the various features included in the system screens.
9.2 What You Can Do
• Use the Server Name screen (Section 9.4 on page 148) to specify the NAS’s server and workgroup
names.
• Use the Date/Time screen (Section 9.5 on page 149) to set up date/time and choose a time zone for
the NAS.
• Use the FW Upgrade screen (Section 9.6 on page 151) to upgrade the NAS firmware.
• Use the SSL screen (Section 9.7 on page 153) to configure the NAS’s SSL certificate.
9.3 What You Need to Know
Windows/CIFS
Common Internet File System (CIFS) is a standard protocol supported by most operating systems in order
to share files across the network.
• CIFS is included by default in Windows operating systems.
• You can use Samba with Linux to use CIFS.
• CIFS transfers use security.
Time Lag
Time lag occurs when the time on the NAS falls behind the time on the time server. This may happen if:
• the time server is no longer reachable
• the NAS is shut down often (the NAS internal battery keeps time when the NAS is shut down and this
may cause possible variance)
• power surges occur.
The NAS gives no warning if time lag occurs. You should resynchronize the time after a power surge or
after you have shut down the NAS several times.
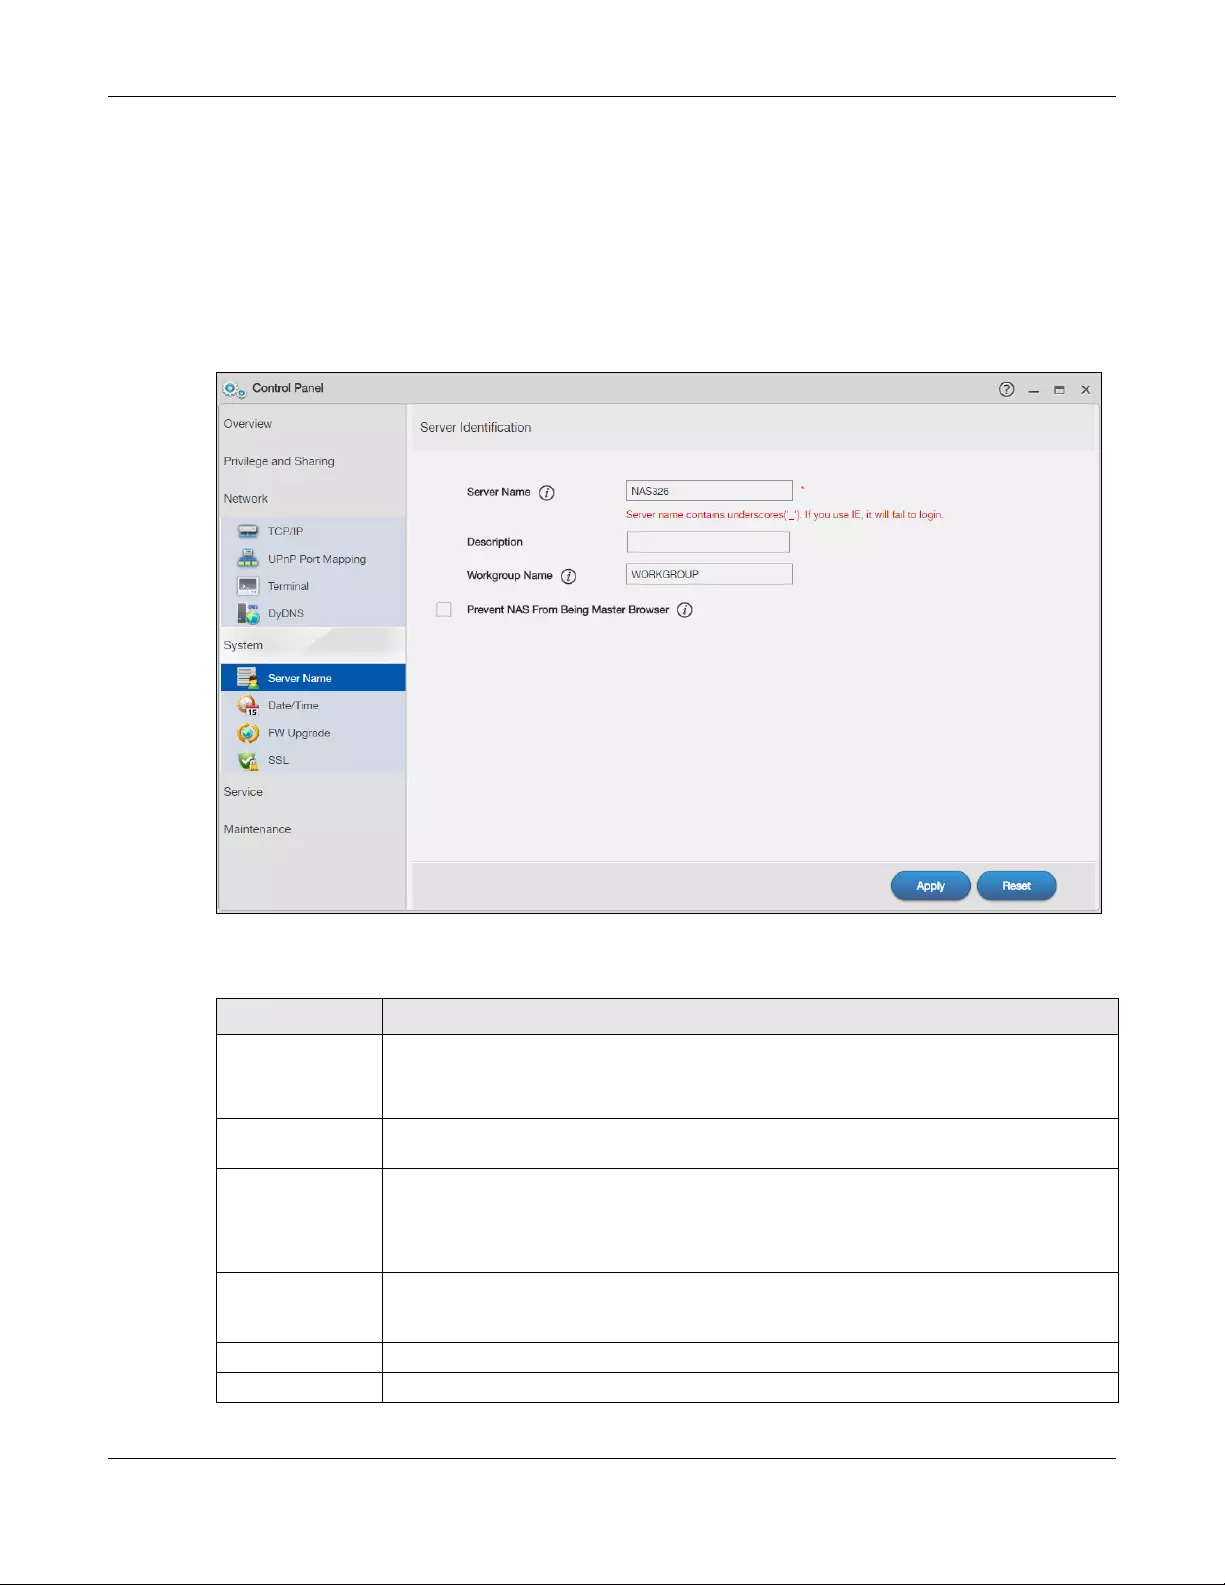
Chapter 9 Control Panel: System
NAS Series User’s Guide
148
9.4 Server Name Screen
Click Control Panel > System > Server Name to open the following screen. Use this screen to configure
your CIFS settings. In this screen you can set your server name and specify if your NAS is a part of a
workgroup.
Note: CIFS cannot be disabled on the NAS.
Figure 115 Control Panel > System > Server Name
The following table describes the labels in these screens.
Table 86 Control Panel > System > Server Name
LABEL DESCRIPTION
Server Name Enter a name to identify your NAS on the network in this field.
You can enter up to 15 alphanumeric characters with minus signs allowed but not as the last
character. The name must begin with an alphabet (a-z) and is NOT case sensitive.
Description Add text here to describe the NAS if the Server Name field is not enough. Use up to 61
characters. You can use all characters except the following: /\:|[]<>+;,?=*»~.
Workgroup Name Type your workgroup name in this field. A workgroup is a group of computers on a network
that can share files. These user accounts are maintained on the NAS.
You can enter up to 15 alphanumeric characters with minus signs allowed but not as the last
character. The name must begin with an alphabet (a-z) and is NOT case sensitive.
Prevent NAS From
Being Master
Browser
Select this option if computers in your workgroup are named with non-English characters
(such as Chinese and Russian). When you perform a search in the workgroup, this option
allows you to locate computers named with non-English characters.
Apply Click this to save your changes.
Reset Click this to restore previously saved settings.
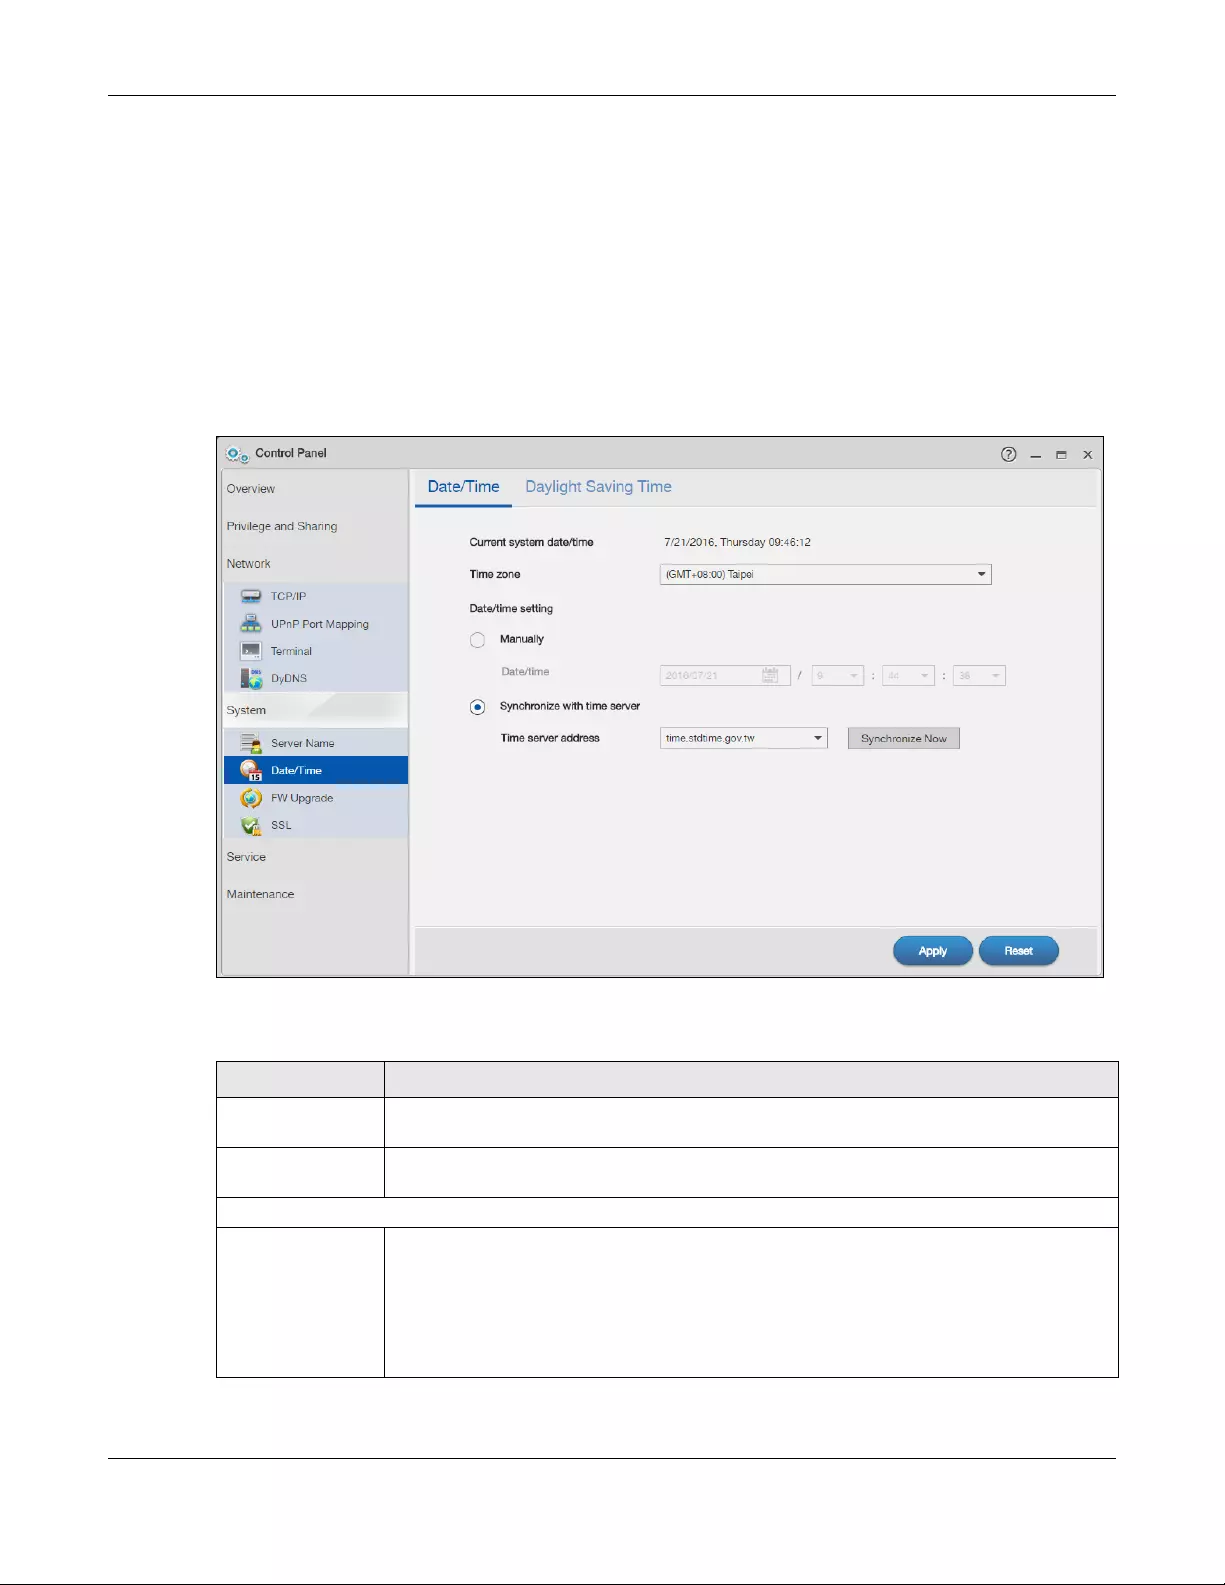
Chapter 9 Control Panel: System
NAS Series User’s Guide
149
9.5 Date/Time Screen
Use this screen to select a time zone and a time server from which your NAS can get the time and date.
This time is then used in NAS logs and alerts.
9.5.1 Configure Date/Time
Click the Control Panel > System link in the navigation panel and then click the Date/Time link to access
the Date/Time screen.
Figure 116 Control Panel > System > Date/Time
The following table describes the labels in this screen.
Table 87 Control Panel > System > Date/Time
LABEL DESCRIPTION
Current system
date/time
This field displays the current date and time used by your NAS for its logs and alerts.
Time Zone Choose the time zone of your location. This will set the time difference between your time
zone and Greenwich Mean Time (GMT).
Date/time setting
Manually Select this radio button to enter the time and date manually.
When you enter the time settings manually, the NAS uses the new setting once you click
Apply.
Note: If you enter time settings manually, they revert to their defaults when power is
lost.
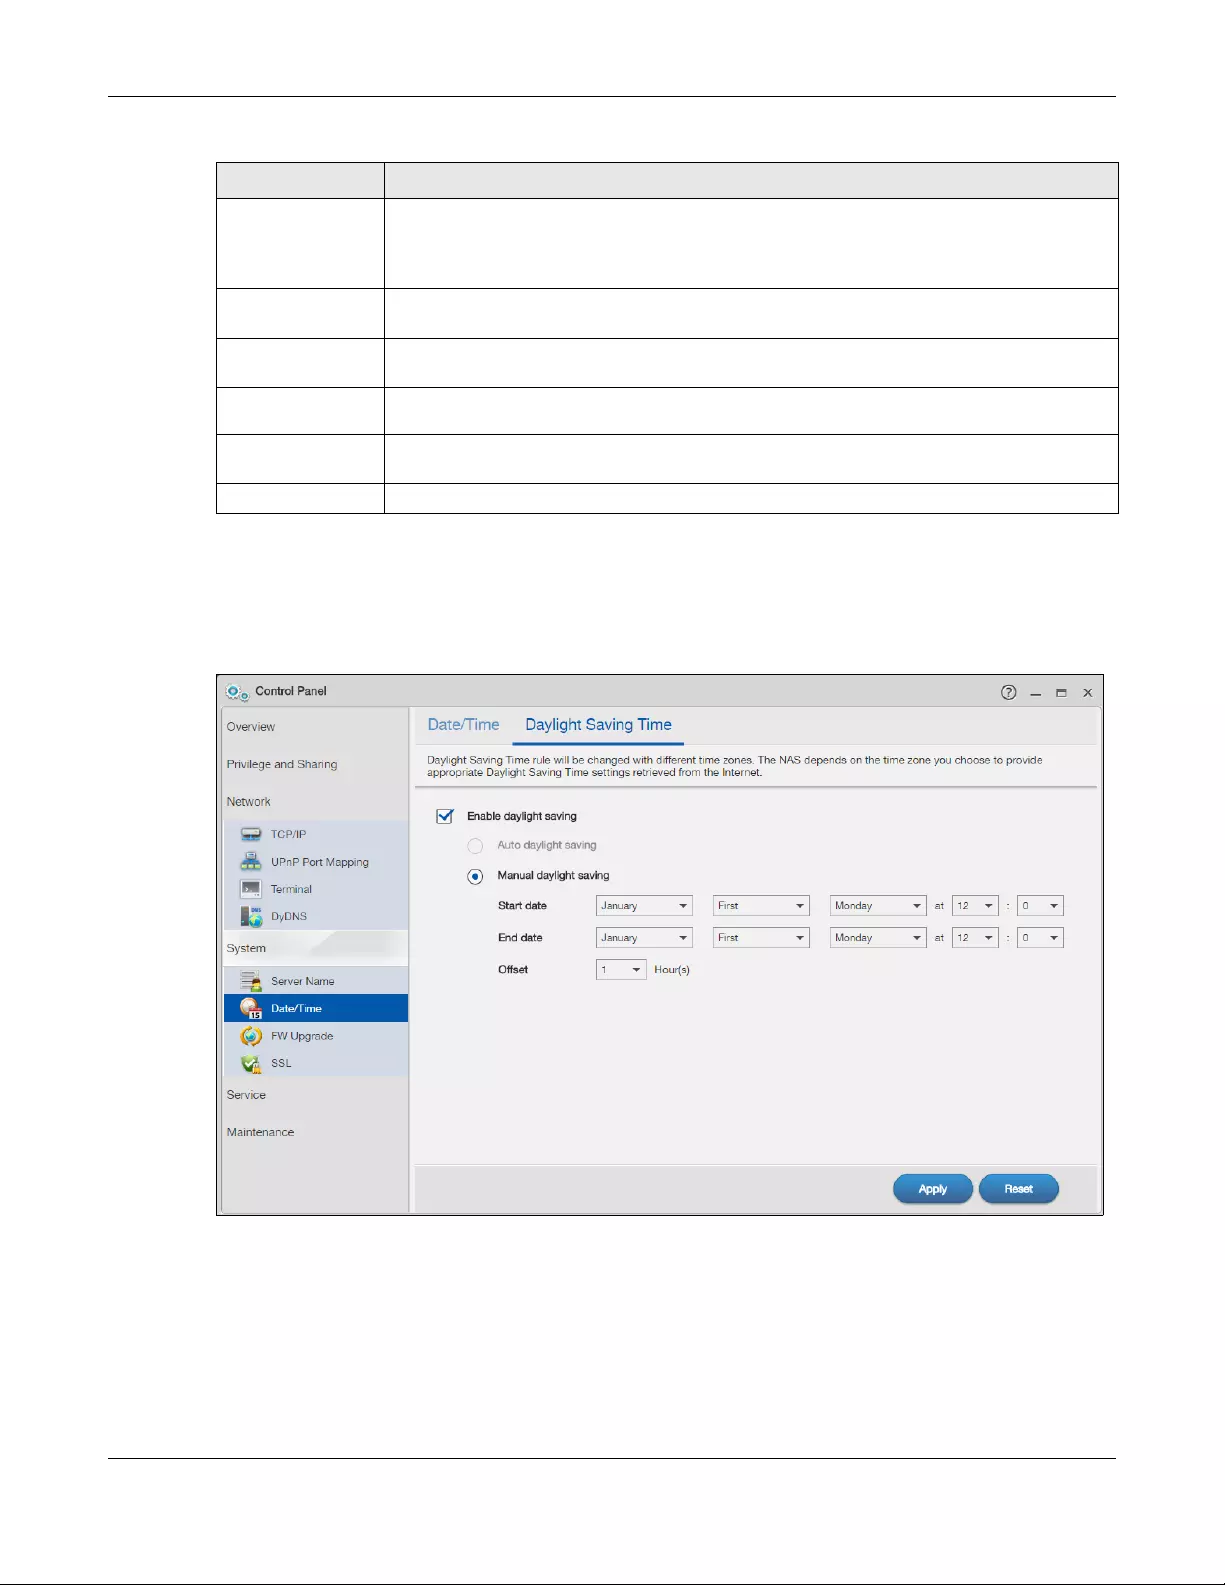
Chapter 9 Control Panel: System
NAS Series User’s Guide
150
9.5.2 Configure Daylight Saving Time
Click Control Panel > System > Date/Time >Daylight Saving Time to open the following screen.
Figure 117 Control Panel > System > Date/Time > Daylight Saving Time
Date/time This field displays the last updated date and time from the time server or the last date and
time configured manually.
When you set Date/time setting to Manually, enter the new date and time in this field and
then click Apply.
Synchronize with
time server
Select this option to have the NAS get the time and date from the time server you select in
the Time server address field.
Time server
address Select a time server from the drop-down list box. Check with your ISP/network administrator if
you are unsure of this information.
Synchronize
Now Click this for the NAS to retrieve the correct time from the configured time server right away.
Apply Click this to save your changes. If you configured a new time and date, Time Zone and
Daylight Saving at the same time, all of the settings take affect.
Reset Click this to restore your previously saved settings.
Table 87 Control Panel > System > Date/Time (continued)
LABEL DESCRIPTION
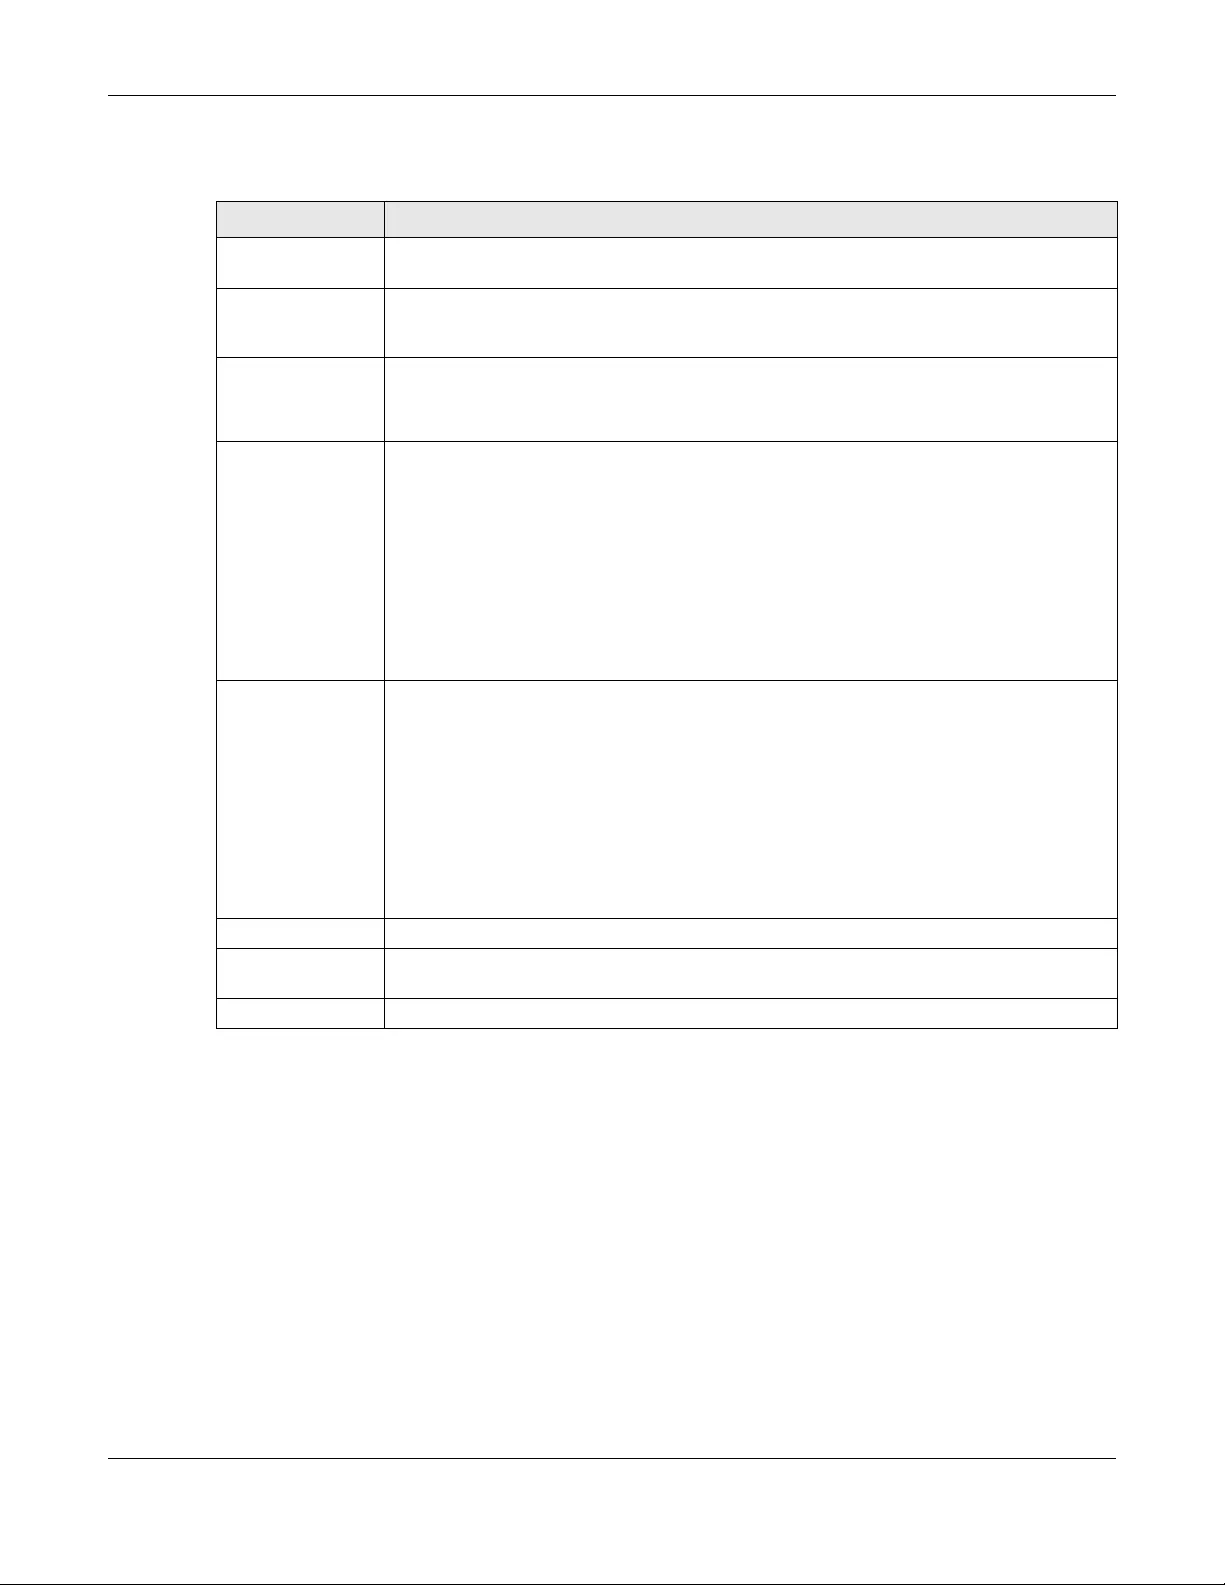
Chapter 9 Control Panel: System
NAS Series User’s Guide
151
The following table describes the labels in this screen.
9.6 FW Upgrade Screens
Use this screen to upgrade the NAS firmware. You should first have downloaded the latest firmware files
from the Zyxel website.
Do not turn off the NAS while it is upgrading the firmware or you may
render it unusable.
9.6.1 Latest Firmware Check
Click Control Panel > System > FW Upgrade to open the following screen. Latest Firmware Check allows
you to check the latest firmware version and perform the upgrade.
Table 88 Control Panel > System > Date/Time > Daylight Saving Time
LABEL DESCRIPTION
Enable daylight
saving
Select this option to use daylight saving time.
Auto daylight
saving
Select this option to have the NAS automatically retrieve Daylight Saving Time settings from
the Internet. The NAS will download a new daylight saving resource file from the Internet
every month.
Manual Daylight
Saving
Daylight saving is a period from late spring to fall when many countries set their clocks ahead
of normal local time by one hour to give more daytime light in the evening.
Select this option to manually enter Daylight Saving Time settings.
Start Date Configure the day and time when Daylight Saving Time starts if you selected Enable Daylight
Saving. The hour field uses the 24 hour format. Here are a couple of examples:
Daylight Saving Time starts in most parts of the United States on the second Sunday of March.
Each time zone in the United States starts using Daylight Saving Time at 2 A.M. local time. So in
the United States you would use March, Second, Sunday, at 2:00.
Daylight Saving Time starts in the European Union on the last Sunday of March. All of the time
zones in the European Union start using Daylight Saving Time at the same moment (1 A.M.
GMT or UTC). So in the European Union you would select March, Last, Sunday. The time you
specify depends on your time zone. In Germany for instance, you would type 2 because
Germany’s time zone is one hour ahead of GMT or UTC (GMT+1).
End Date Configure the day and time when Daylight Saving Time ends if you selected Enable Daylight
Saving. The o’clock field uses the 24 hour format. Here are a couple of examples:
Daylight Saving Time ends in the United States on the first Sunday of November. Each time
zone in the United States stops using Daylight Saving Time at 2 A.M. local time. So in the
United States you would select November, First, Sunday, at 2:00.
Daylight Saving Time ends in the European Union on the last Sunday of October. All of the
time zones in the European Union stop using Daylight Saving Time at the same moment (1
A.M. GMT or UTC). So in the European Union you would select October, Last, Sunday. The time
you specify depends on your time zone. In Germany for instance, you would type 2 because
Germany’s time zone is one hour ahead of GMT or UTC (GMT+1).
Offset Specify by how many hours to change the time for Daylight Saving Time.
Apply Click this to save your changes. If you configured a new time and date, Time Zone and
Daylight Saving at the same time, all of the settings take affect.
Reset Click this to restore your previously saved settings.

Chapter 9 Control Panel: System
NAS Series User’s Guide
152
Figure 118 Control Panel > System > FW Upgrade > Latest Firmware Check
The following table describes the labels in this screen.
9.6.2 Manual Firmware Upgrade
You can also download the firmware from the Zyxel website and upgrade the firmware manually. Click
Control Panel > System > FW Upgrade > Manual Firmware Upgrade to show the following screen.
Table 89 Control Panel > System > FW Upgrade > Latest Firmware Check
LABEL DESCRIPTION
Model Name Displays the model name of you NAS
Current Firmware
Version
Displays the current firmware version of your NAS
Last Check Displays the last checking time. If no, it is blank.
Check Now Click this to check Zyxel’s server for updated firmware.
Periodically Check for
Latest Firmware
Automatically
Select this to have the NAS regularly check Zyxel’s server for updated firmware. The NAS
notifies you at login if a new firmware is available.
Click Apply to save this field’s setting.
Status Displays the firmware checking status or error messages. If there is no previous checking
information, it displays —.
Upgrade Now Click this to upload the new firmware. The NAS automatically restarts after you upgrade.
Wait until the restart completes before accessing the NAS again. If you interrupt the
upgrade, then the NAS may become unusable. See Section 1.2 on page 14 for your
model’s LED behavior during firmware upgrade.
Reset Click this to refresh the screen.
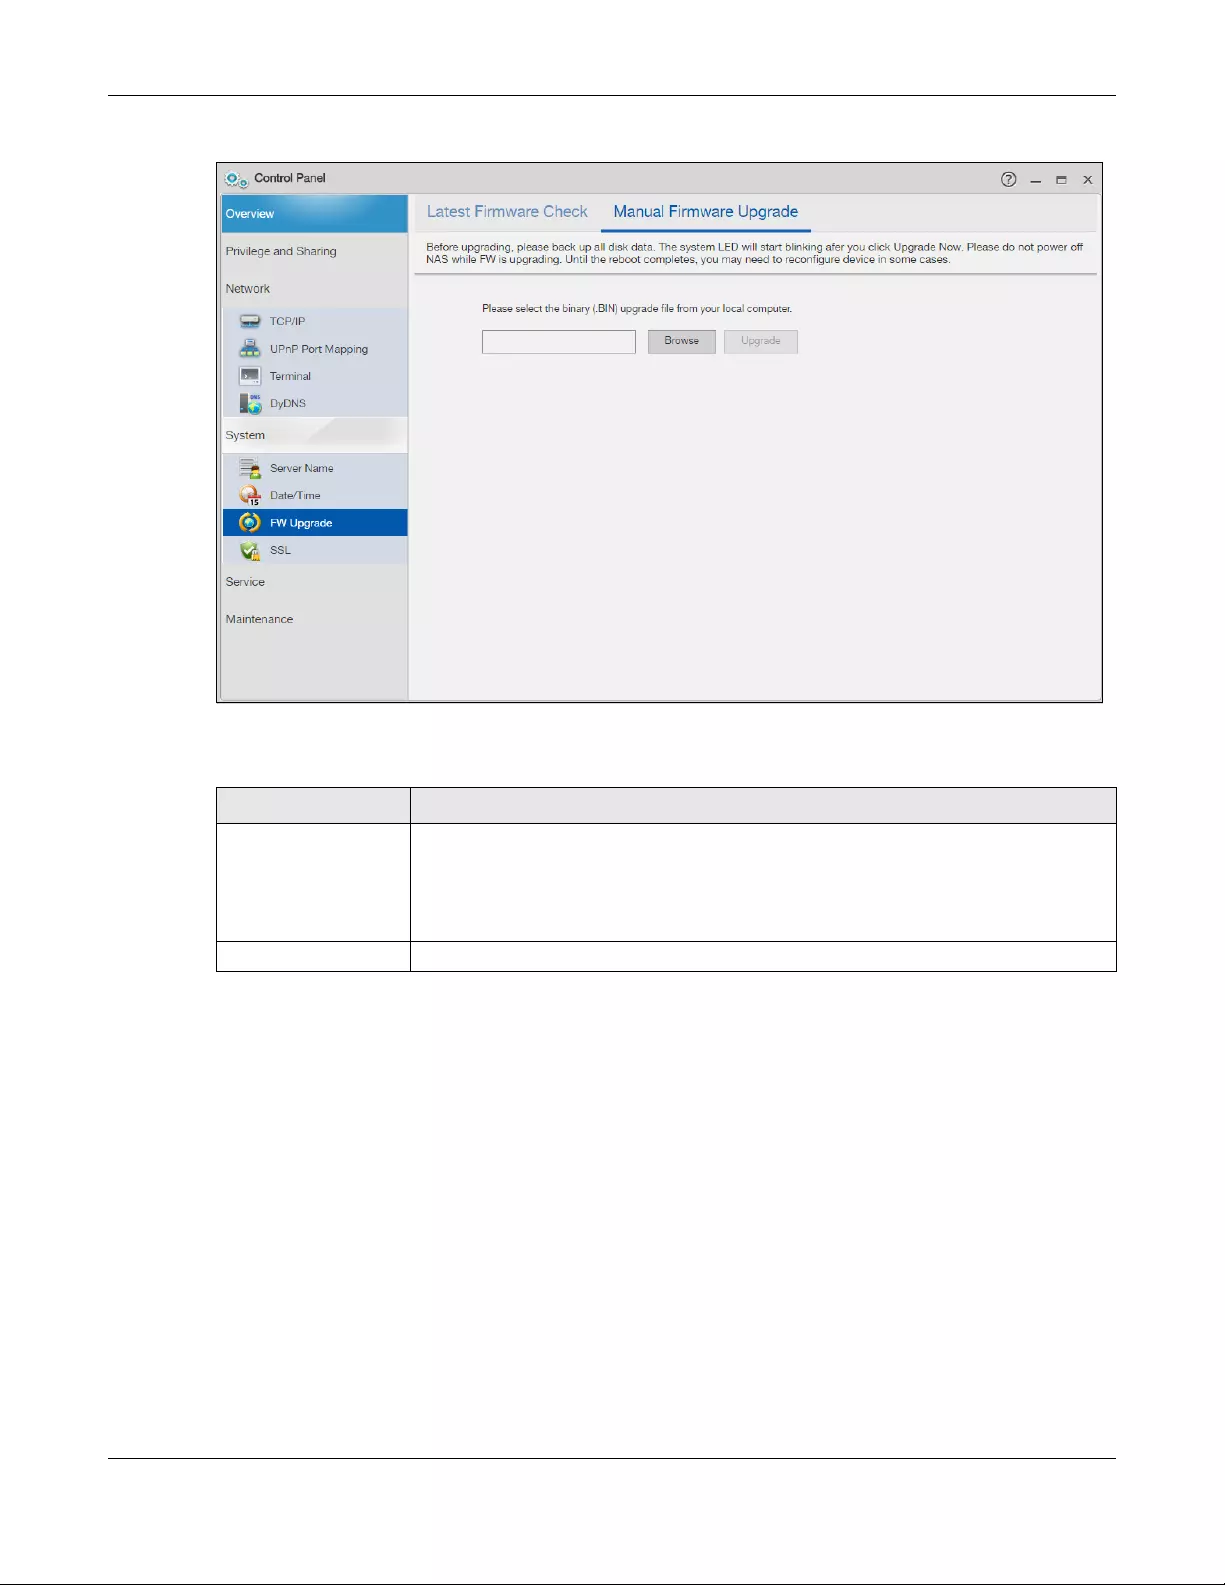
Chapter 9 Control Panel: System
NAS Series User’s Guide
153
Figure 119 Control Panel > System > FW Upgrade > Manual Firmware Upgrade
The following table describes the labels in this screen.
9.7 SSL Screens
Click Control Panel > System > SSL to open this screen, where you can create a public key certificate, or
upload a public key certificate that was issued by a known certificate authority.
9.7.1 Install System CA
Click Control Panel > System > SSL > Install System CA to show the following screen.
Click the Download button to save a copy of the NAS’s public key certificate to your local computer.
This is useful for installing the certificate without having to connect to the NAS, or for sending by email to
other users for them to install prior to logging into the NAS for the first time. After saving the certificate to
your computer, double-click it to install it.
Note: Each web browser handles certificate installation differently.
Table 90 Control Panel > System> FW Upgrade > Manual Firmware Upgrade
LABEL DESCRIPTION
Browse Click this to find the file on your computer.
Note: You cannot choose a downgraded firmware. If you do, the screen will
show: The NAS firmware cannot be downgraded, please select a newer
version of binary (BIN) upgrade file from your computer.
Upgrade Click this to upgrade the firmware after you find the file.

Chapter 9 Control Panel: System
NAS Series User’s Guide
154
Figure 120 Control Panel > System > SSL > Install System CA
9.7.2 Modify the Existing Certificate
Click Control Panel > System > SSL > Modify the Existing Certificate to show the following screen.
Click Edit, then follow the on-screen instructions for creating a public key certificate signed by the NAS
as the local certificate authority. See Edit or Create a Certificate on page 156 for more information.
Note: Use certificates created and signed by the NAS if the device is not open to external
access.
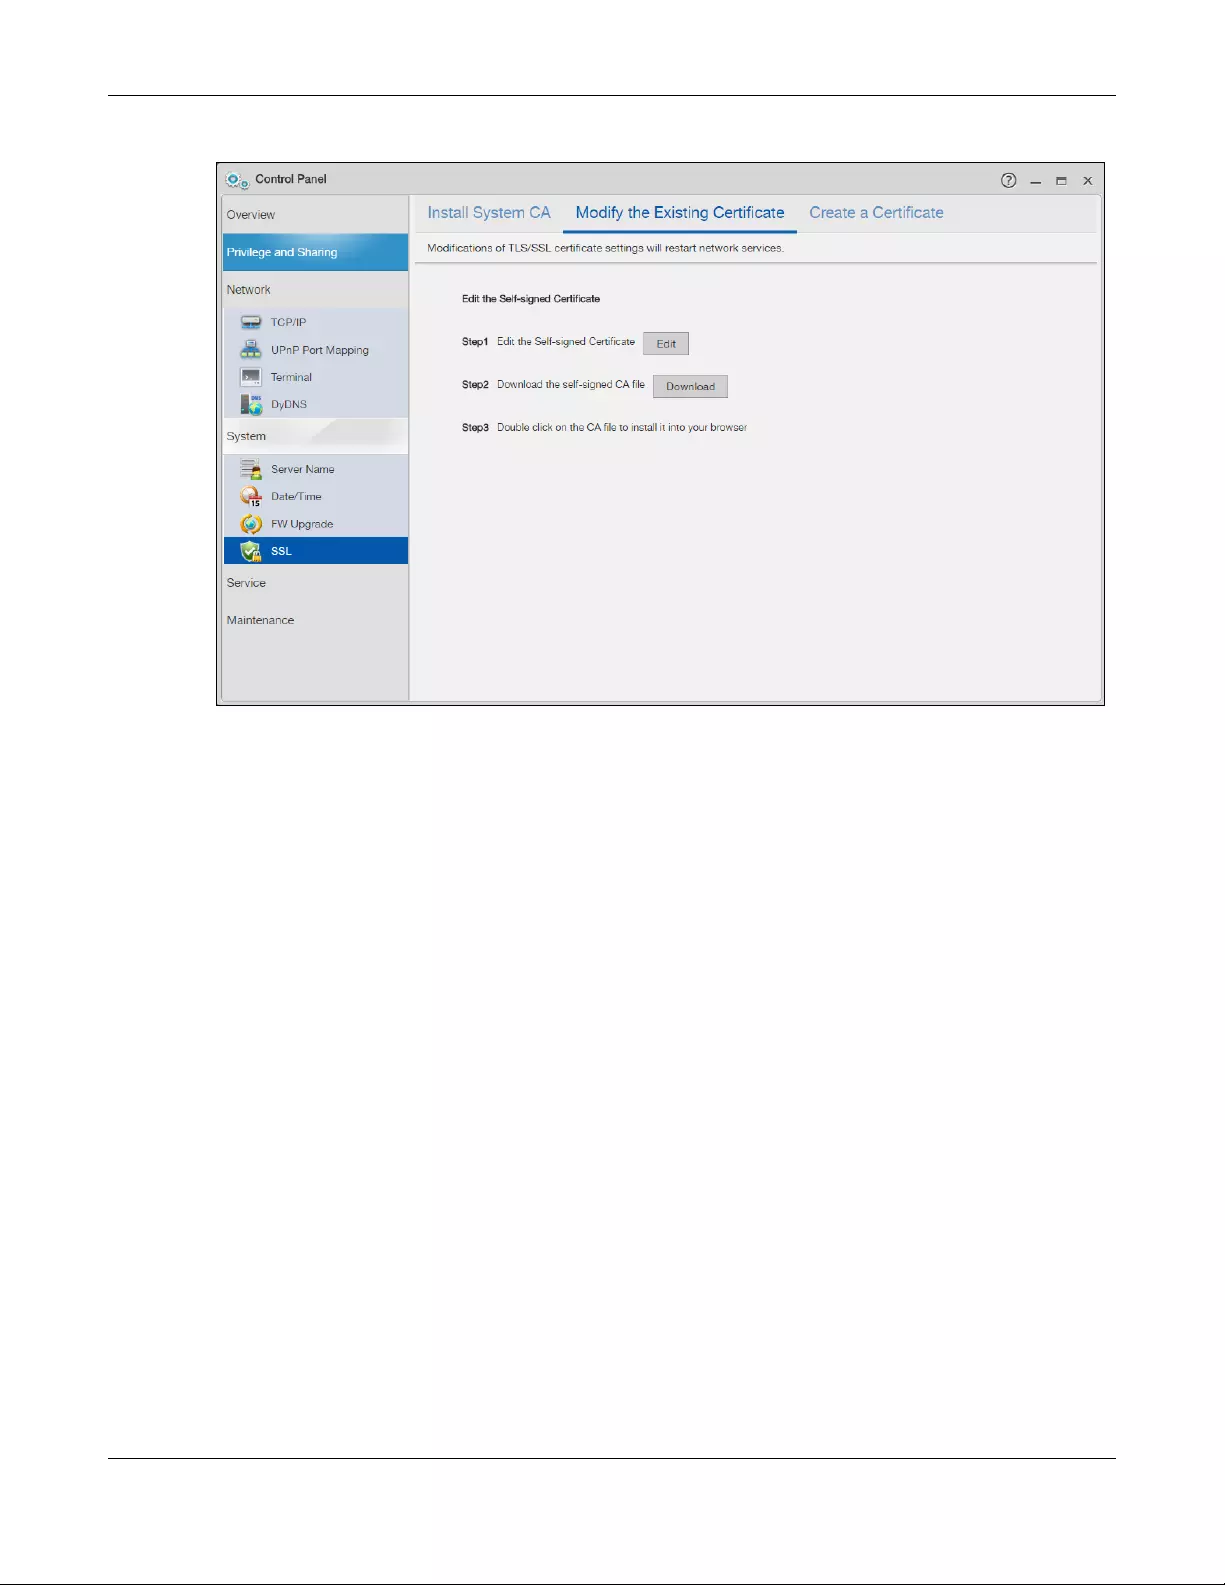
Chapter 9 Control Panel: System
NAS Series User’s Guide
155
Figure 121 Control Panel > System > SSL > Modify the Existing Certificate
9.7.3 Create a Certificate
Click Control Panel > System > SSL > Create Certificate to show the following screen.
Click Create, then follow the on-screen instructions to install a certificate that has been authorized by a
third-party certificate authority. See Edit or Create a Certificate on page 156 for more information.
Note: Use this method if the device is open to external access, such as allowing users to
connect through the Internet using FTP over TLS or HTTPs.
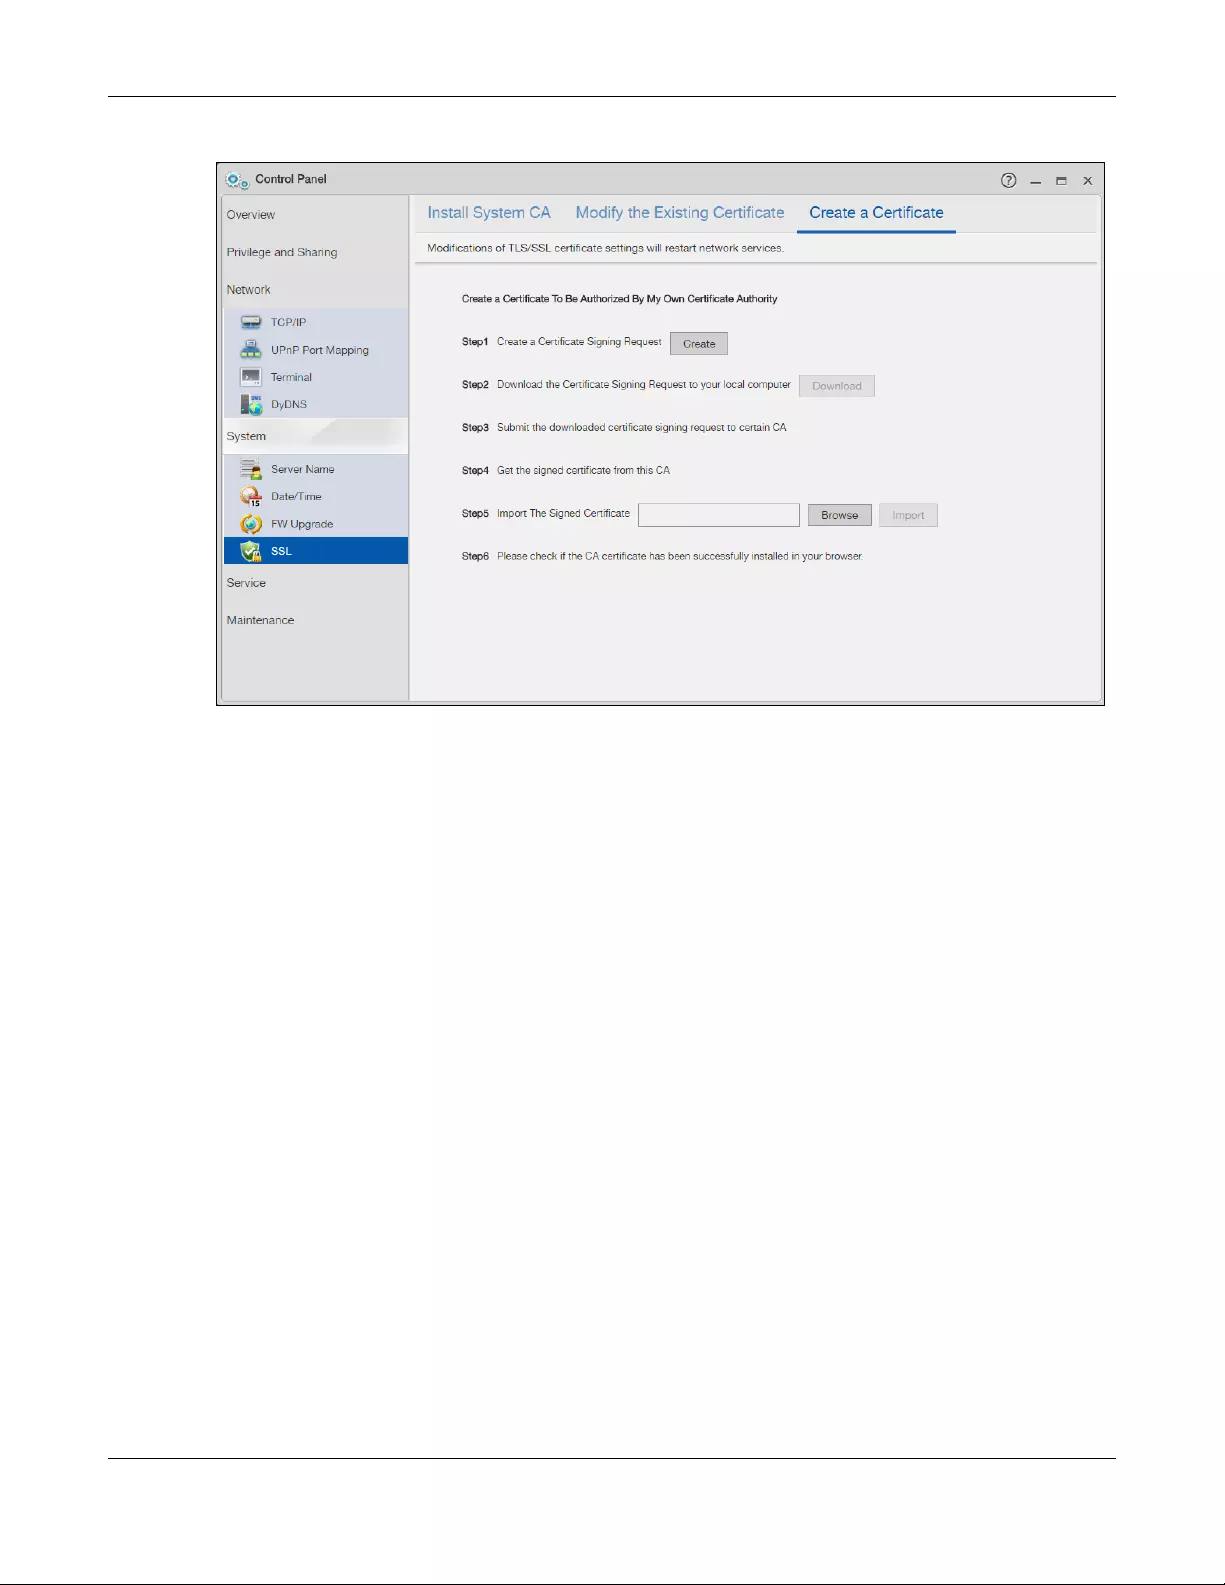
Chapter 9 Control Panel: System
NAS Series User’s Guide
156
Figure 122 Control Panel > System > SSL > Create a Certificate
Edit or Create a Certificate
When you click the Edit button in the SSL > Modify the Existing Certificate screen, a screen opens to allow
you to make adjustments to the NAS’s public key certificate.
The screen is also the same for the Create button in the SSL > Create a Certificate screen.
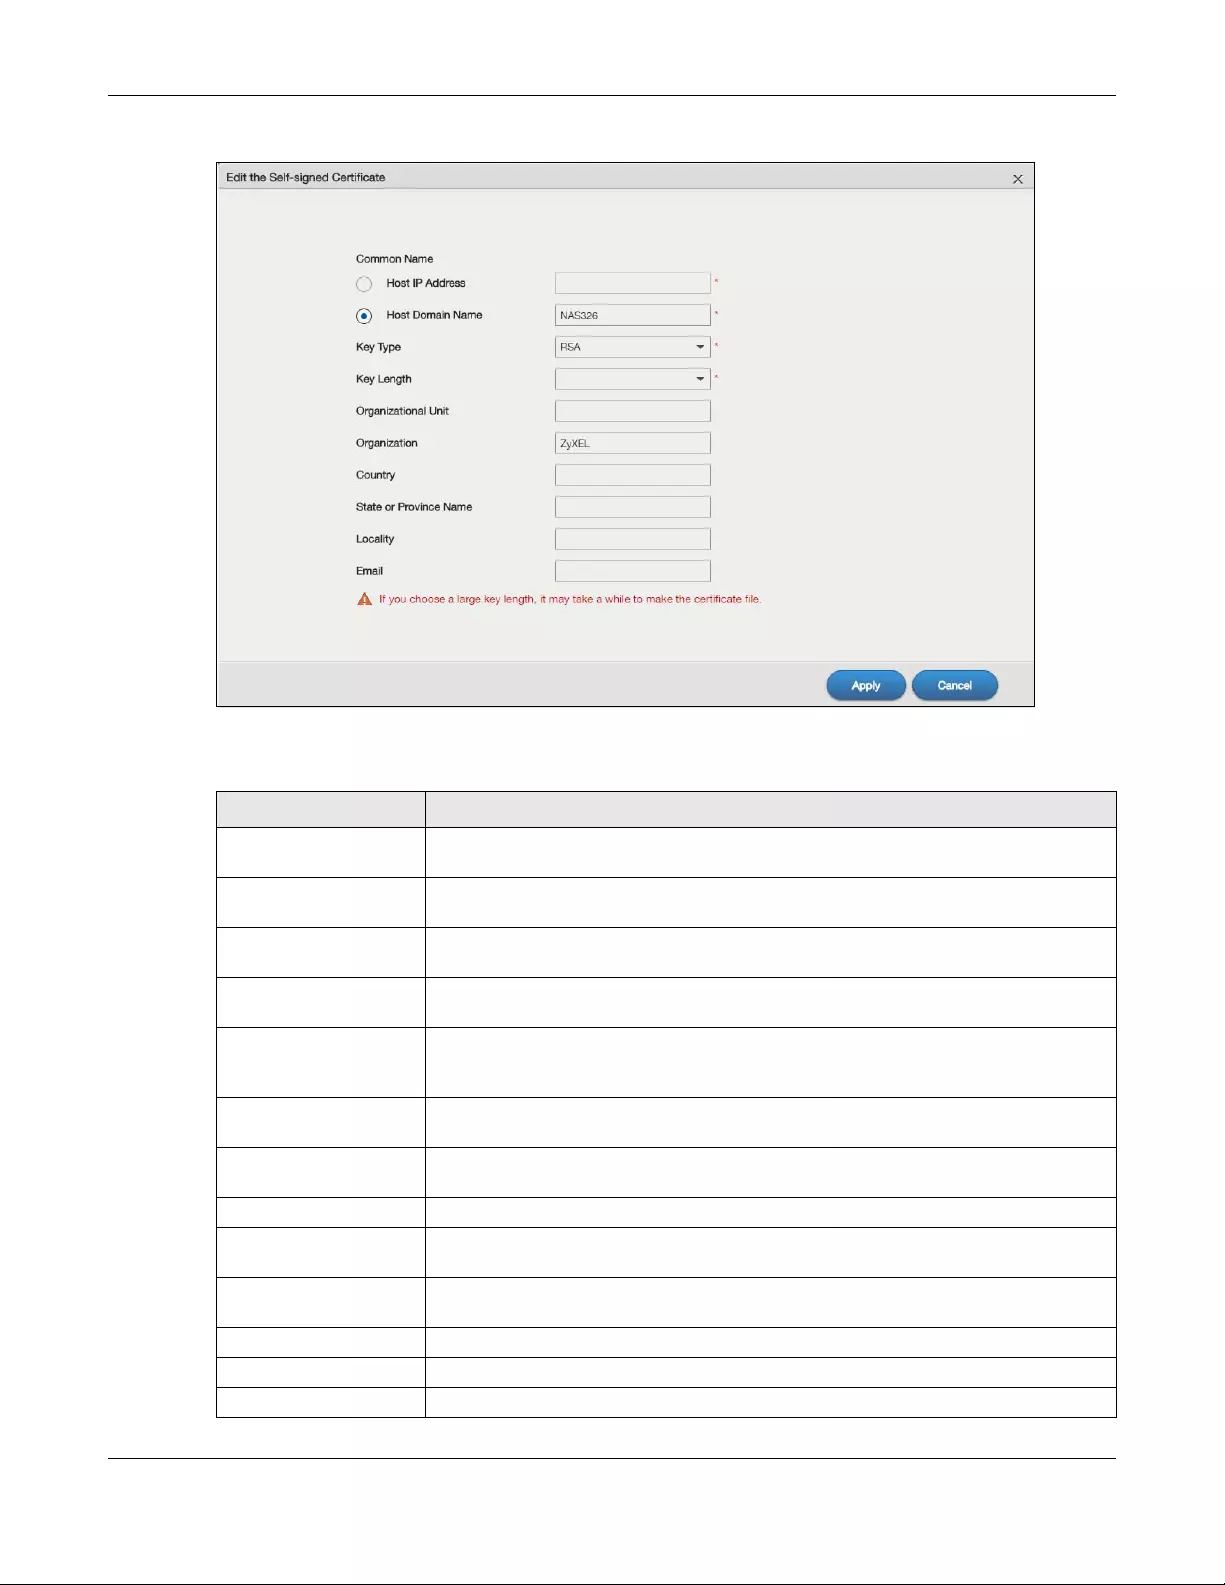
Chapter 9 Control Panel: System
NAS Series User’s Guide
157
Figure 123 Maintenance > SSL > Create or Edit a Certificate
The following table describes the labels in this screen.
Table 91 Maintenance > SSL > Create or Edit a Certificate
LABEL DESCRIPTION
Common Name This name describes the certificate’s origin, either in the form of an IP address or a
domain name.
Host IP Address Select this option and enter the NAS’s IP address if you want to use this for the common
name.
Host Domain Name Select this option and enter the NAS’s domain name if you want to use this for the
common name
Key Type Select the certificate’s key type, either RSA or DSA. RSA is a public-key encryption and
digital signature algorithm, while DSA is only a digital signature algorithm.
Key Length Select the encryption key length. The longer the key, the better the encryption security.
The only drawback to having a long key is that the file encrypted with it swells in size as
well.
Organizational Unit Enter this name of the organizational unit which owns or maintains the NAS. This is an
optional field.
Organization Enter this name of the organization or company which owns or maintains the NAS. This is
an optional field.
Country Enter this name of the country in which the NAS is located. This is an optional field.
State or Province Name Identify the state or province where the certificate owner is located. You can use up to
64 characters. You can use alphanumeric characters, the hyphen and the underscore.
Locality Identify the town or city where the certificate owner is located. You can use up to 64
characters. You can use alphanumeric characters, the hyphen and the underscore.
Email Enter the certificate’s e-mail address.
Apply Click this to save your changes.
Cancel Click this to discard changes and close the window.

NAS Series User’s Guide
158
CHAPTER 10
Control Panel: Service
10.1 Overview
This chapter discusses the features in the Service screens. The NAS contains various applications for file
sharing.
10.2 What You Can Do
• Use the Media Server screens (Section 10.4 on page 159) to share files with media clients.
• Use the iTunes Server screens (Section 10.5 on page 161) to share files with iTunes users on your
network.
• Use the FTP screen (Section 10.6 on page 162) to configure settings for FTP file transfers to/from the
NAS.
• Use the WebDAV screen (Section 10.7 on page 165) to allow remote users to use client programs that
support WebDAV to edit and manage files stored on the NAS.
• Use the Web Publishing screen (Section 10.8 on page 167) to publish shares for people to access files
using a web browser.
• Use the Print Server screen (Section 10.9 on page 171) to share a printer.
• Use the Syslog Server screen (Section 10.10 on page 172) to configure the NAS to accept syslog logs
from syslog clients.
10.3 What You Need to Know
FTP
File Transfer Protocol (FTP) is a file transfer service that operates on the Internet. A system running the FTP
server accepts commands from a system running an FTP client. FTP is not a secure protocol. Your file
transfers could be subject to snooping.
FTPES (File Transfer Protocol over Explicit TLS/SSL)
File Transfer Protocol over Explicit TLS/SSL (FTPES) is a file transfer service that uses either TLS (Transport
Layer Security) or SSL (Secure Sockets Layer) for secure transfers across the Internet. It requests for a
mutual method of encryption from the FTP server for its file transfer sessions. Your FTP client must be set to
use FTPES as in the following example.
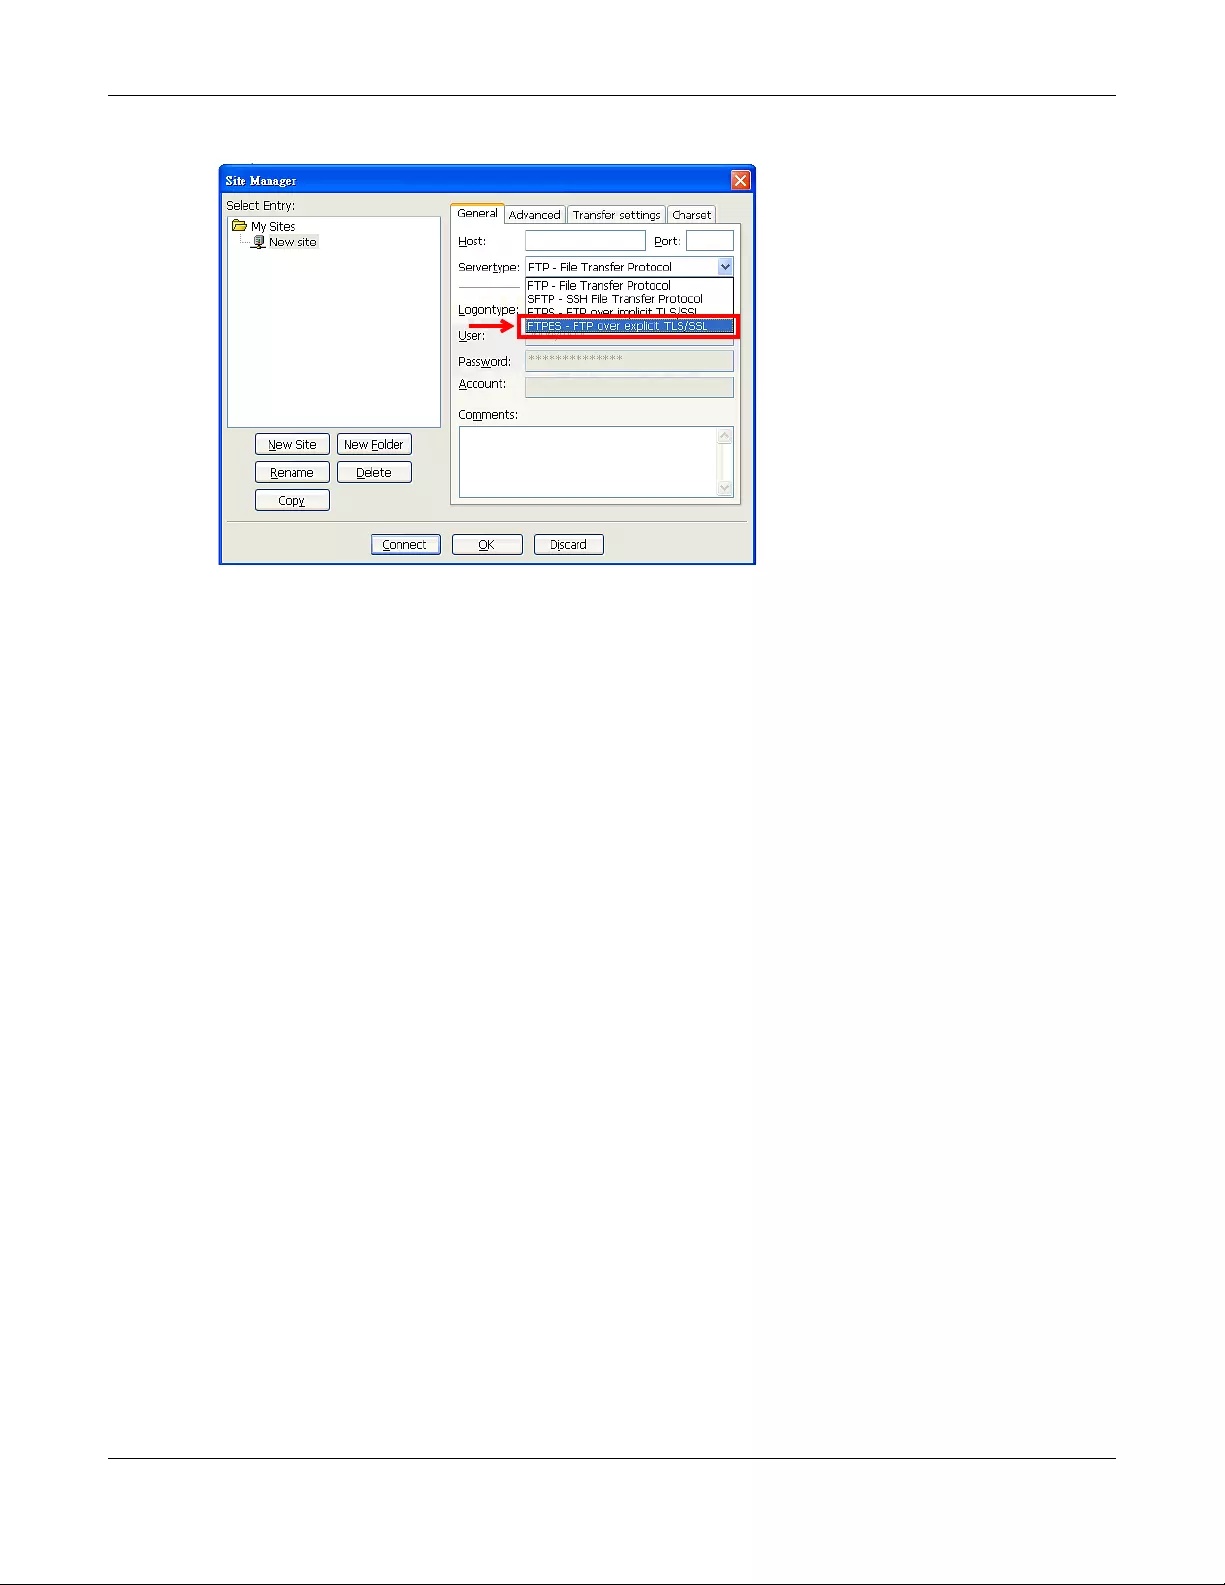
Chapter 10 Control Panel: Service
NAS Series User’s Guide
159
Figure 124 FTP Client Example
Media Server
The media server feature lets anyone on your network play video, music, and photos from the NAS
(without having to copy them to another computer). The NAS can function as a DLNA—compliant media
server and/or an iTunes server. The NAS streams files to DLNA-compliant media clients or computers
using iTunes. The Digital Living Network Alliance (DLNA) is a group of personal computer and electronics
companies that works to make products compatible in a home network.
iTunes Server
The NAS iTunes server feature lets you use Apple’s iTunes software on a computer to play music and
video files stored on the NAS. You can download iTunes from www.apple.com.
Web Publishing
Web publishing lets you “publish” shares (containing folders and files) on the NAS so people can access
the files using a web browser without having to log into the Web Configurator. This way you can share
files with others without them having to know and enter a username and password.
For example, if you want to share photos in a FamilyPhotos share, you could “web publish” it and others
could use a web browser to access the photos at http://my-NAS’s-IP-Address/MyWeb/FamilyPhotos.
RSS
RSS (Really Simple Syndication) is a format for delivering frequently updated digital content. A channel
uses a feed to deliver its contents (items). Subscribe the NAS to a feed to be able to download the
contents.
10.4 Media Server Screens
The media server application allows you to share media files with media clients.
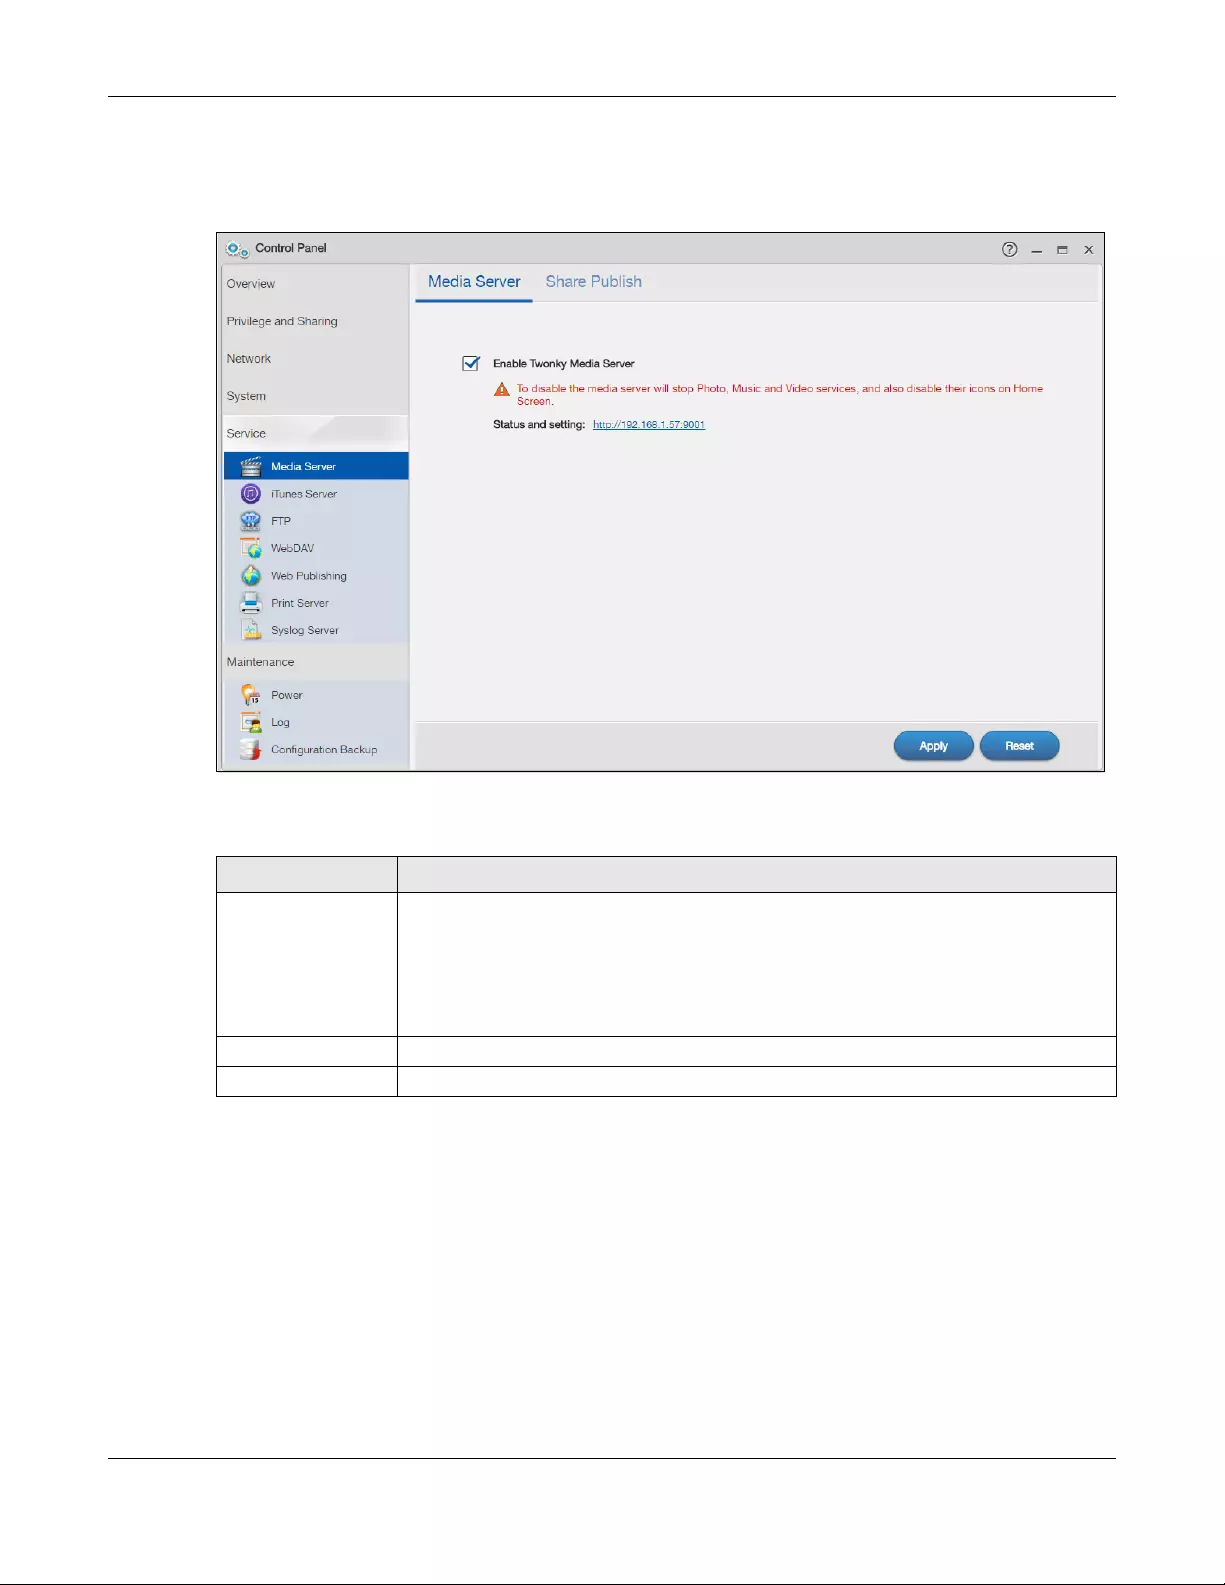
Chapter 10 Control Panel: Service
NAS Series User’s Guide
160
Click Control Panel > Service > Media Server to open the following screen. Use this screen to view the
media server’s status and rebuild the media server database.
Figure 125 Control Panel > Service > Media Server > Media Server
The following table describes the labels in this screen.
10.4.1 Media Server Share Publish Screen
Click Control Panel > Service > Media Server > Share Publish to open the following screen. Use this
screen to select shares to publish (share with media clients like a media player or iTunes).
Table 92 Control Panel > Service > Media Server > Media Server
LABEL DESCRIPTION
Enable Twonky
Media Server
Select this to have the NAS share the media files in the shares selected in the Share Publish
tab. Clear it to stop the NAS from sharing media files through the Playzone screens or media
players.
Click the hyper link to open the Twonky media server configuration screens to check media
server status or modify media server settings. See the help center in the Twonky screens for
details.
Apply Click this to save your changes.
Reset Click this to restore your previously saved settings.
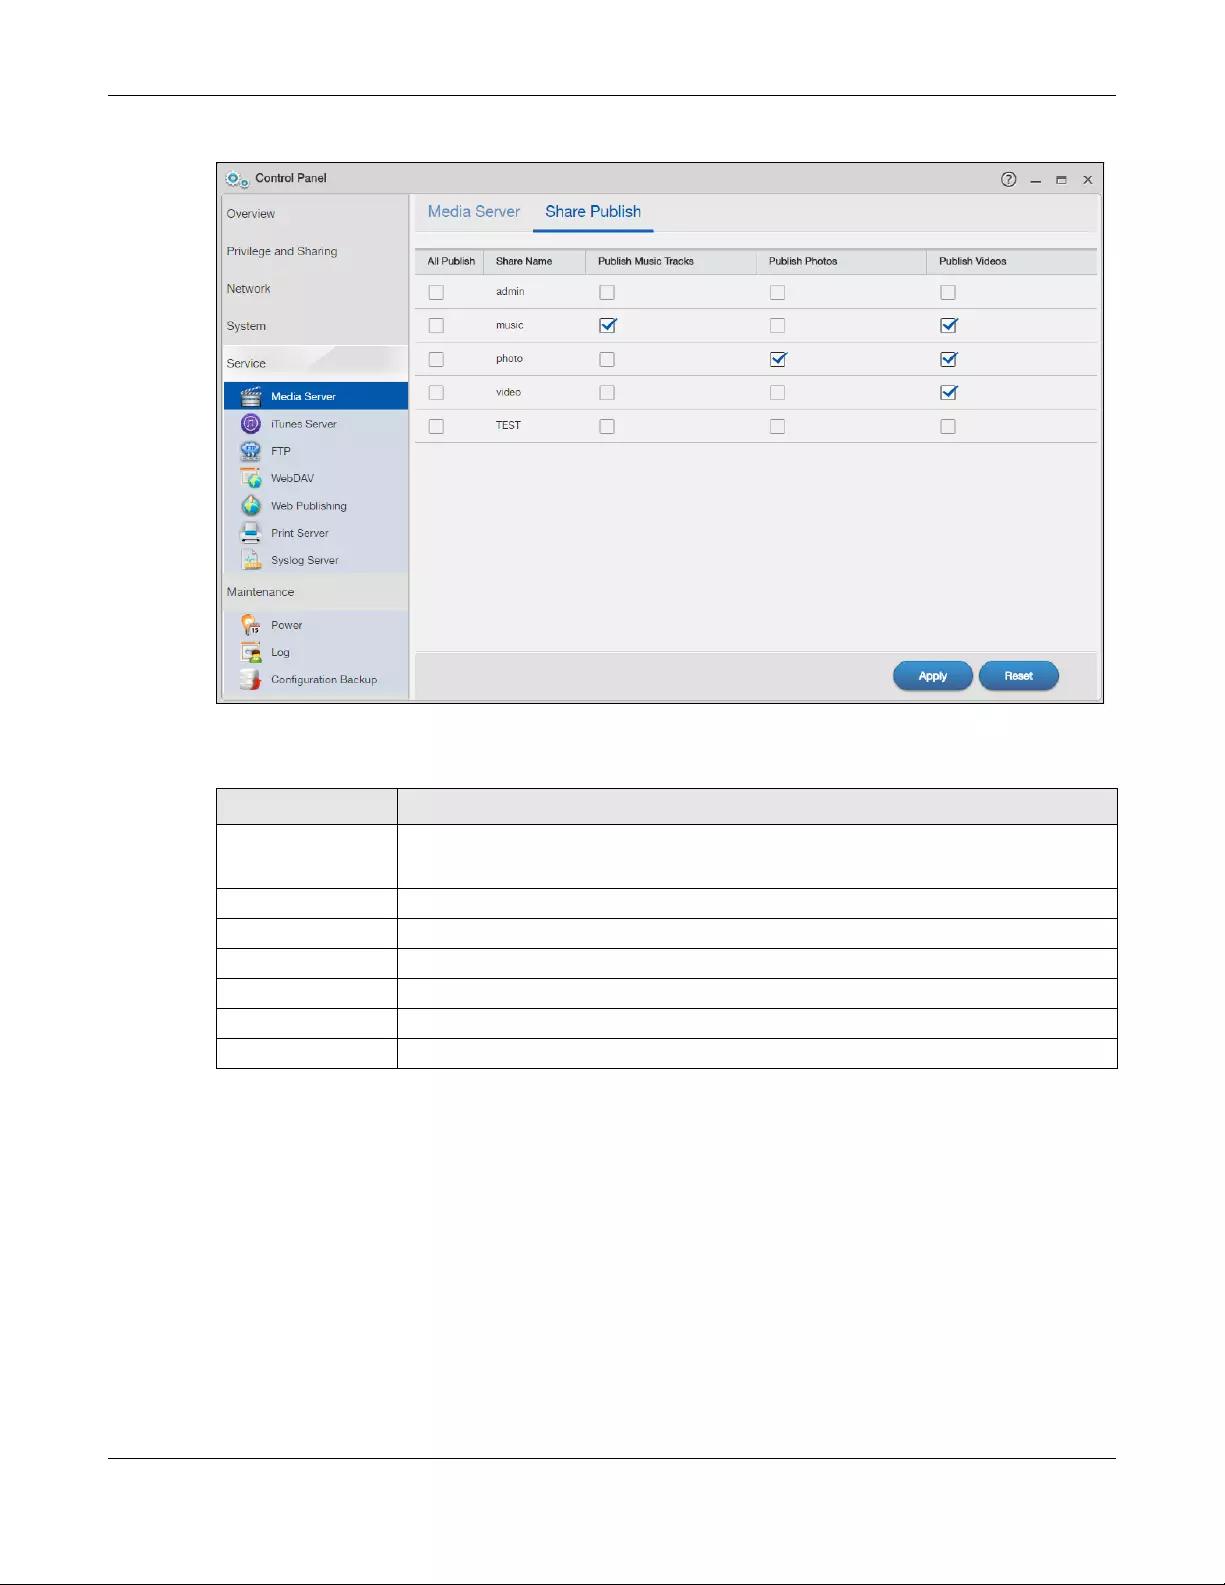
Chapter 10 Control Panel: Service
NAS Series User’s Guide
161
Figure 126 Control Panel > Service > Media Server > Share Publish
The following table describes the labels in this screen.
10.5 iTunes Server Screen
Click Control Panel > Service > iTunes Server to open the following screen. Use this screen to turn the
iTunes server on or off.
Table 93 Control Panel > Service > Media Server > Share Publish
LABEL DESCRIPTION
All Publish Select this to have the media server share a share’s media files with media clients.
Clear this to not share any media files of the share.
Share Name This column lists names of shares on the NAS.
Publish Music Tracks Select this to give media clients access to the share’s music files.
Publish Photos Select this to give media clients access to the share’s photo files.
Publish Videos Select this to give media clients access to the share’s video files.
Apply Click this to save your changes.
Reset Click this to restore your previously saved settings.

Chapter 10 Control Panel: Service
NAS Series User’s Guide
162
Figure 127 Control Panel > Service > iTunes Server
The following table describes the labels in this screen.
10.6 FTP Screens
Use FTP or FTPES (FTP over Explicit TTL/SSL) to upload files to the NAS and download files from the NAS.
10.6.1 General Settings
Click Control Panel > Service > FTP > General Settings to open the following screen.
Table 94 Control Panel > Service > iTunes Server
LABEL DESCRIPTION
Enable iTunes
Server
Check this to let anyone on your network use iTunes to play music files in the published shares.
Apply Click this to save your changes.
Reset Click this to restore your previously saved settings.

Chapter 10 Control Panel: Service
NAS Series User’s Guide
163
Figure 128 Control Panel > Service > FTP > General Settings
The following table describes the labels in this screen.
10.6.2 Transfer Settings
Click Control Panel > Service > FTP > Transfer Settings to open the following screen.
Table 95 Control Panel > Service > FTP > General Settings
LABEL DESCRIPTION
Enable FTP You can use FTP to send files to the NAS or get files from the NAS. Select this check box to
allow users to connect to the NAS via FTP; otherwise clear the check box.
Connection Limit Enter the maximum number of concurrent FTP connections allowed on the NAS in this field.
See your screen for your model’s connection limit.
Idle Timeout Enter the length of time that an FTP connection can be idle before timing out. The timeout
limit is 300 minutes.
Port Number This is the port number used by the NAS for FTP traffic.
Enable Anonymous
FTP Access
Select this check box to allow any user to log into the NAS using ‘anonymous’ as a
username and no password. Any other name is considered a username, so must be valid
and have a corresponding correct password.
Note: If users log into the NAS using ‘anonymous’ as a username, they can only
access files in the shares to which the “pc-guest” user is given access. See
Section 7.3 on page 104.
Apply Click this to save your changes.
Reset Click this to restore your previously saved settings.
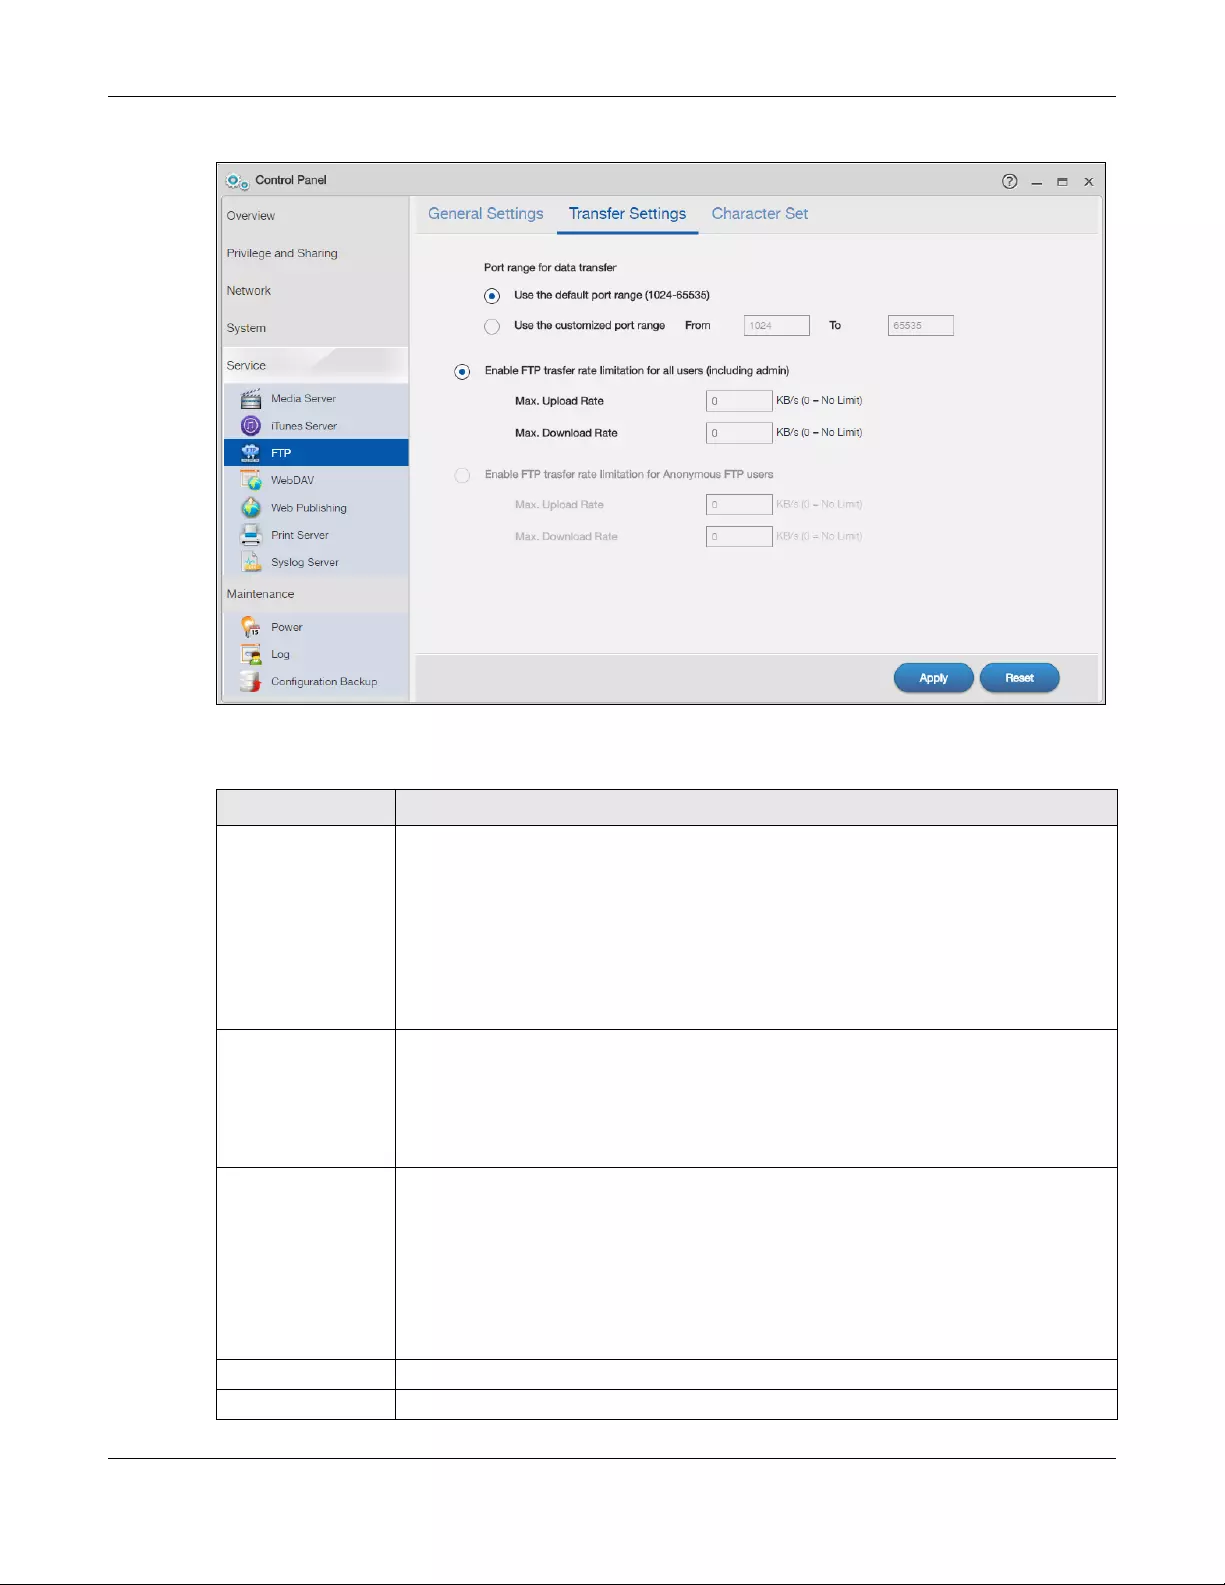
Chapter 10 Control Panel: Service
NAS Series User’s Guide
164
Figure 129 Control Panel > Service > FTP > Transfer Settings
The following table describes the labels in this screen.
Table 96 Control Panel > Service > FTP > Transfer Settings
LABEL DESCRIPTION
Port range for data
transfer
Select to Use the default port range. Otherwise, select Use the customized port range to
assign a port range for FTP clients to use when downloading files from the NAS using passive
mode. If you select Use the customized port range, enter the first and last port numbers in
the range. Choose from 1024 to 65535.
The connection limit is restricted to half of the port numbers within the range if this value is
smaller than the one configured in the Connection Limit field of the FTP > General Settings
screen. For example, you specified a port range from 1024 to 1029 and configured 10 in the
Connection Limit field. The FTP connection limit will only be 3 (6 ports in the range divided by
2) because it is the smaller value.
Enable FTP transfer
rate limitation for all
users (including
admin)
Select this if you want to limit the download/upload bandwidth for all users who are logged
into the NAS, including the administrator.
•Max. Upload Rate — Enter the upload speed (in kilobytes/s) that the NAS allows for users
who are logged into the NAS.
•Max. Download Rate — Enter the download speed (in kilobytes/s) that the NAS allows for
users who are logged into the NAS.
Enable FTP transfer
rate limitation for
Anonymous FTP users
This option is configurable only when you select Enable Anonymous FTP Access in the FTP >
General Settings screen.
Select this if you want to limit the download/upload bandwidth for users who log into the
NAS using ‘FTP’ or ‘anonymous’ as a username and no password.
•Max. Upload Rate — Enter the upload speed (in kilobytes/s) that the NAS allows for users
who are logged into the NAS.
•Max. Download Rate — Enter the download speed (in kilobytes/s) that the NAS allows for
users who are logged into the NAS.
Apply Click this to save your changes.
Reset Click this to restore your previously saved settings.
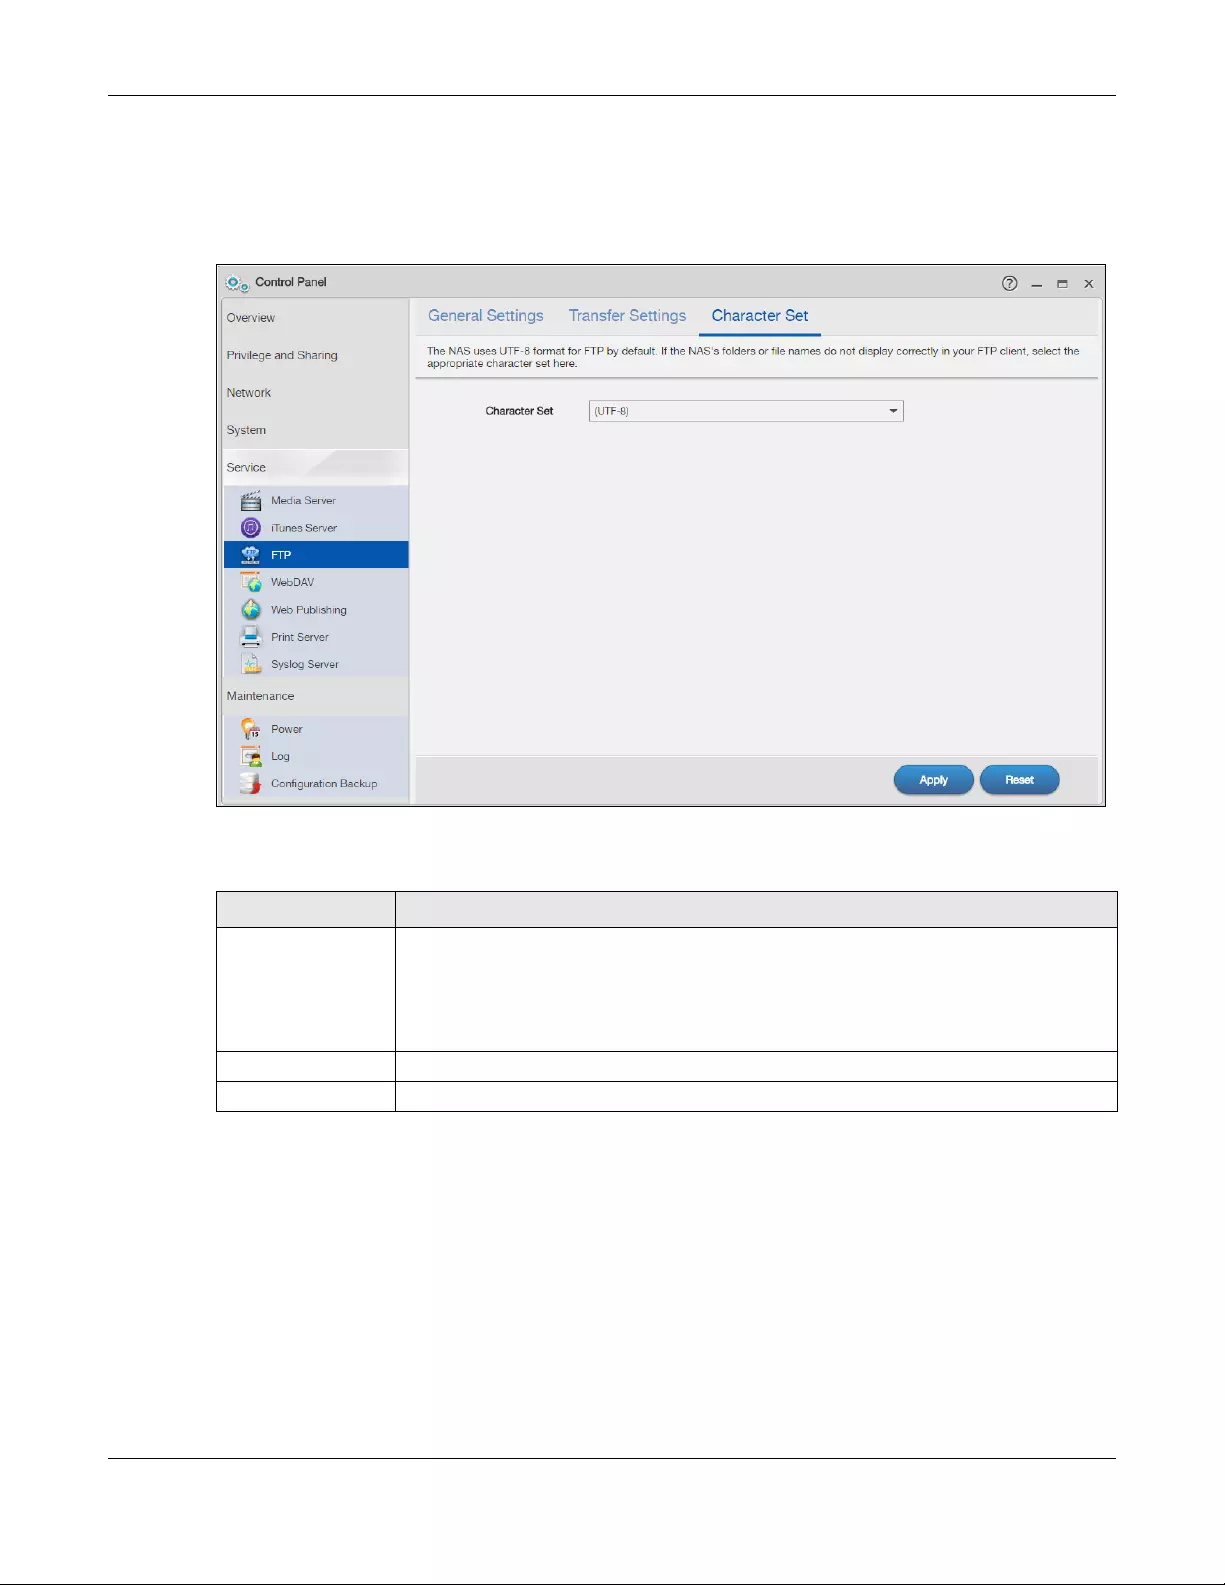
Chapter 10 Control Panel: Service
NAS Series User’s Guide
165
10.6.3 Character Set
Click Control Panel > Service > FTP > Character Set to open the following screen.
Figure 130 Control Panel > Service > FTP > Character Set
The following table describes the labels in this screen.
10.7 WebDAV Screen
The WebDAV HTTP extension lets users edit and manage files stored on remote servers. The NAS’s
WebDAV service allows client programs that support WebDAV, such as NetDrive and BitKinex on
Windows, Mac OS Finder, and Linux file browsers remotely edit and manage files stored on the NAS.
Use the WebDAV screen to allow remote users to use client programs that support WebDAV to edit and
manage files stored on the NAS.
Click Control Panel > Service > WebDAV to open the following screen.
Table 97 Control Panel > Service > FTP > Character Set
LABEL DESCRIPTION
Character Set The NAS uses UTF-8 (8-bit UCS/Unicode Transformation Format) format for FTP by default. If
the NAS’s folders, or file names do not display correctly in your FTP client, select the
appropriate language encoding here.
This setting applies to all FTP client connections to the NAS. It does not affect your Windows/
CIFS connections (it will not correct the character display in Windows Explorer).
Apply Click this to save your changes.
Reset Click this to restore your previously saved settings.
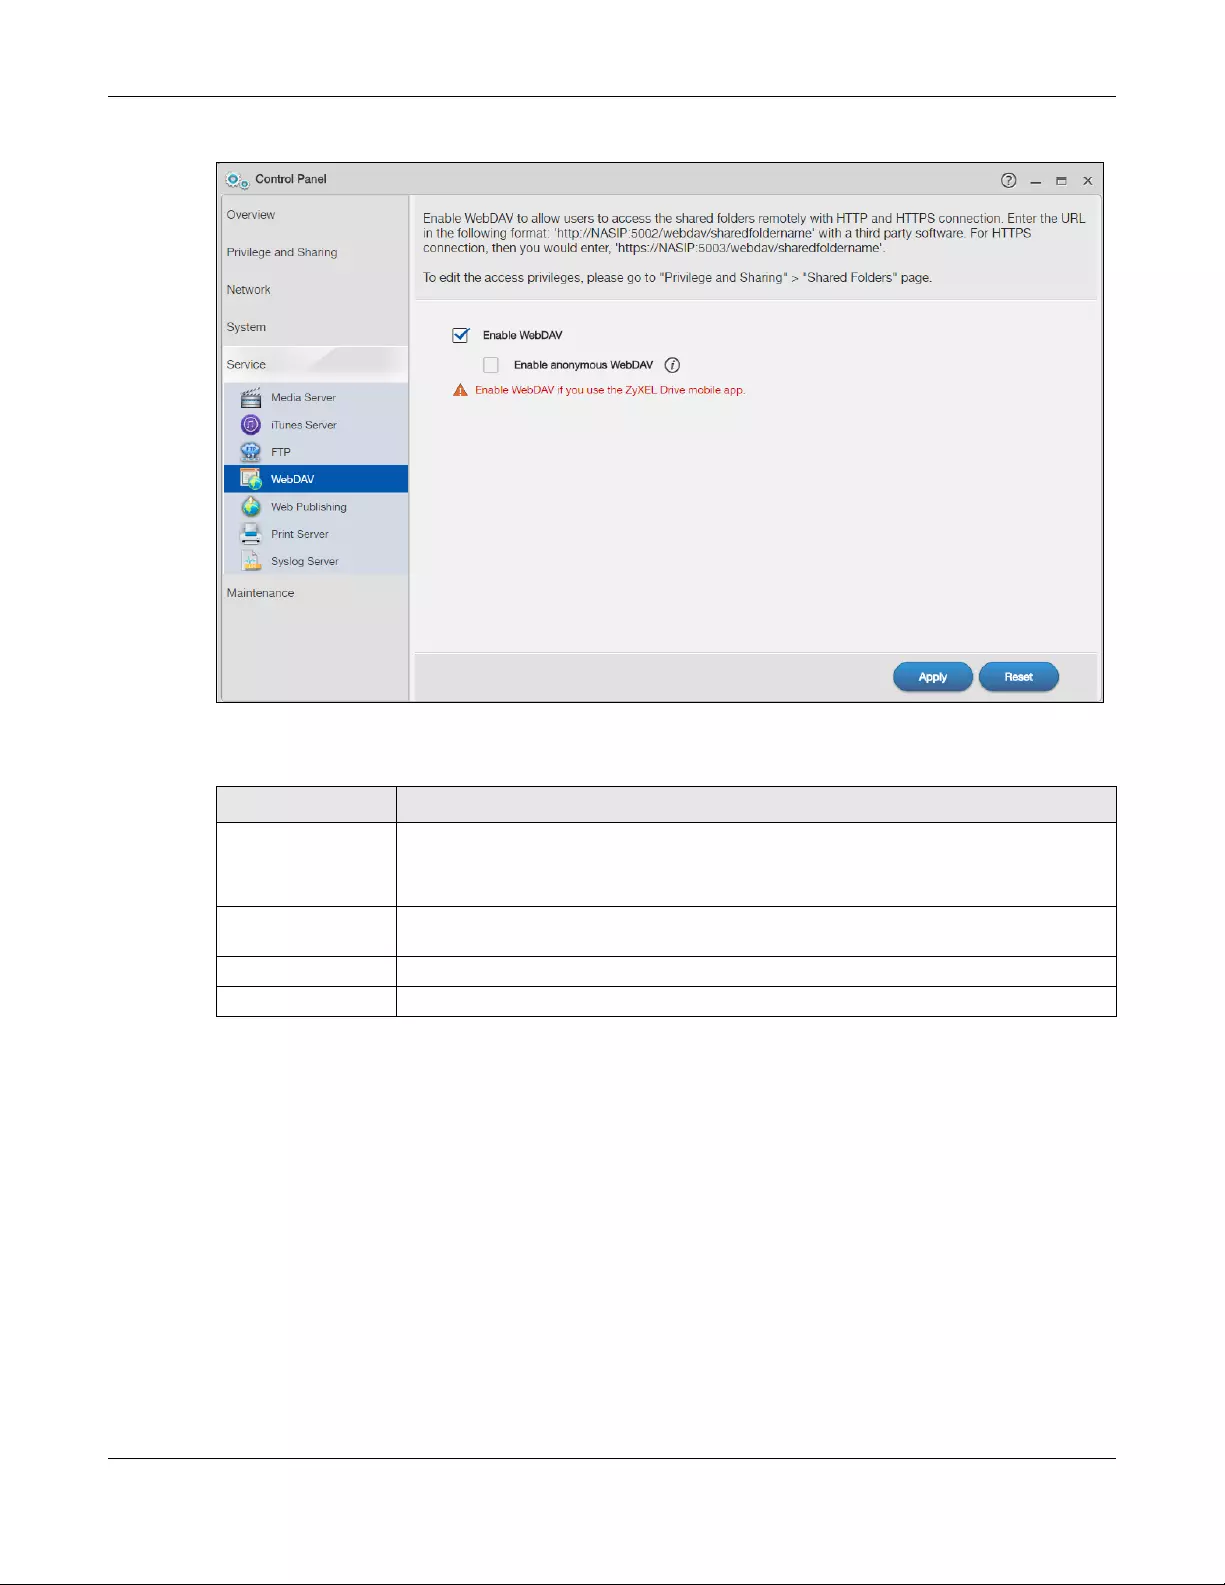
Chapter 10 Control Panel: Service
NAS Series User’s Guide
166
Figure 131 Control Panel > Service > WebDAV
The following table describes the labels in this screen.
10.7.1 How to Use NetDrive with the NAS
Here is an example of how to use the NetDrive WebDAV client with the NAS.
1Download and install NetDrive.
2Click Add Drive and use the URL for WebDAV connections to the NAS to add a drive entry for accessing
the NAS.
Table 98 Control Panel > Service > WebDAV
LABEL DESCRIPTION
Enable WebDAV Select this to allow remote users to work with files stored on the NAS. Edit the access
privileges in Privilege and Sharing > Shared Folders.
Https is for secure WebDAV connections to the NAS.
Enable anonymous
WebDAV
Select this to allow remote users to use WebDAV to access all shares on the NAS without a
login name or password.
Apply Click this to save your changes.
Reset Click this to discard any unsaved changes and restore previously saved settings.
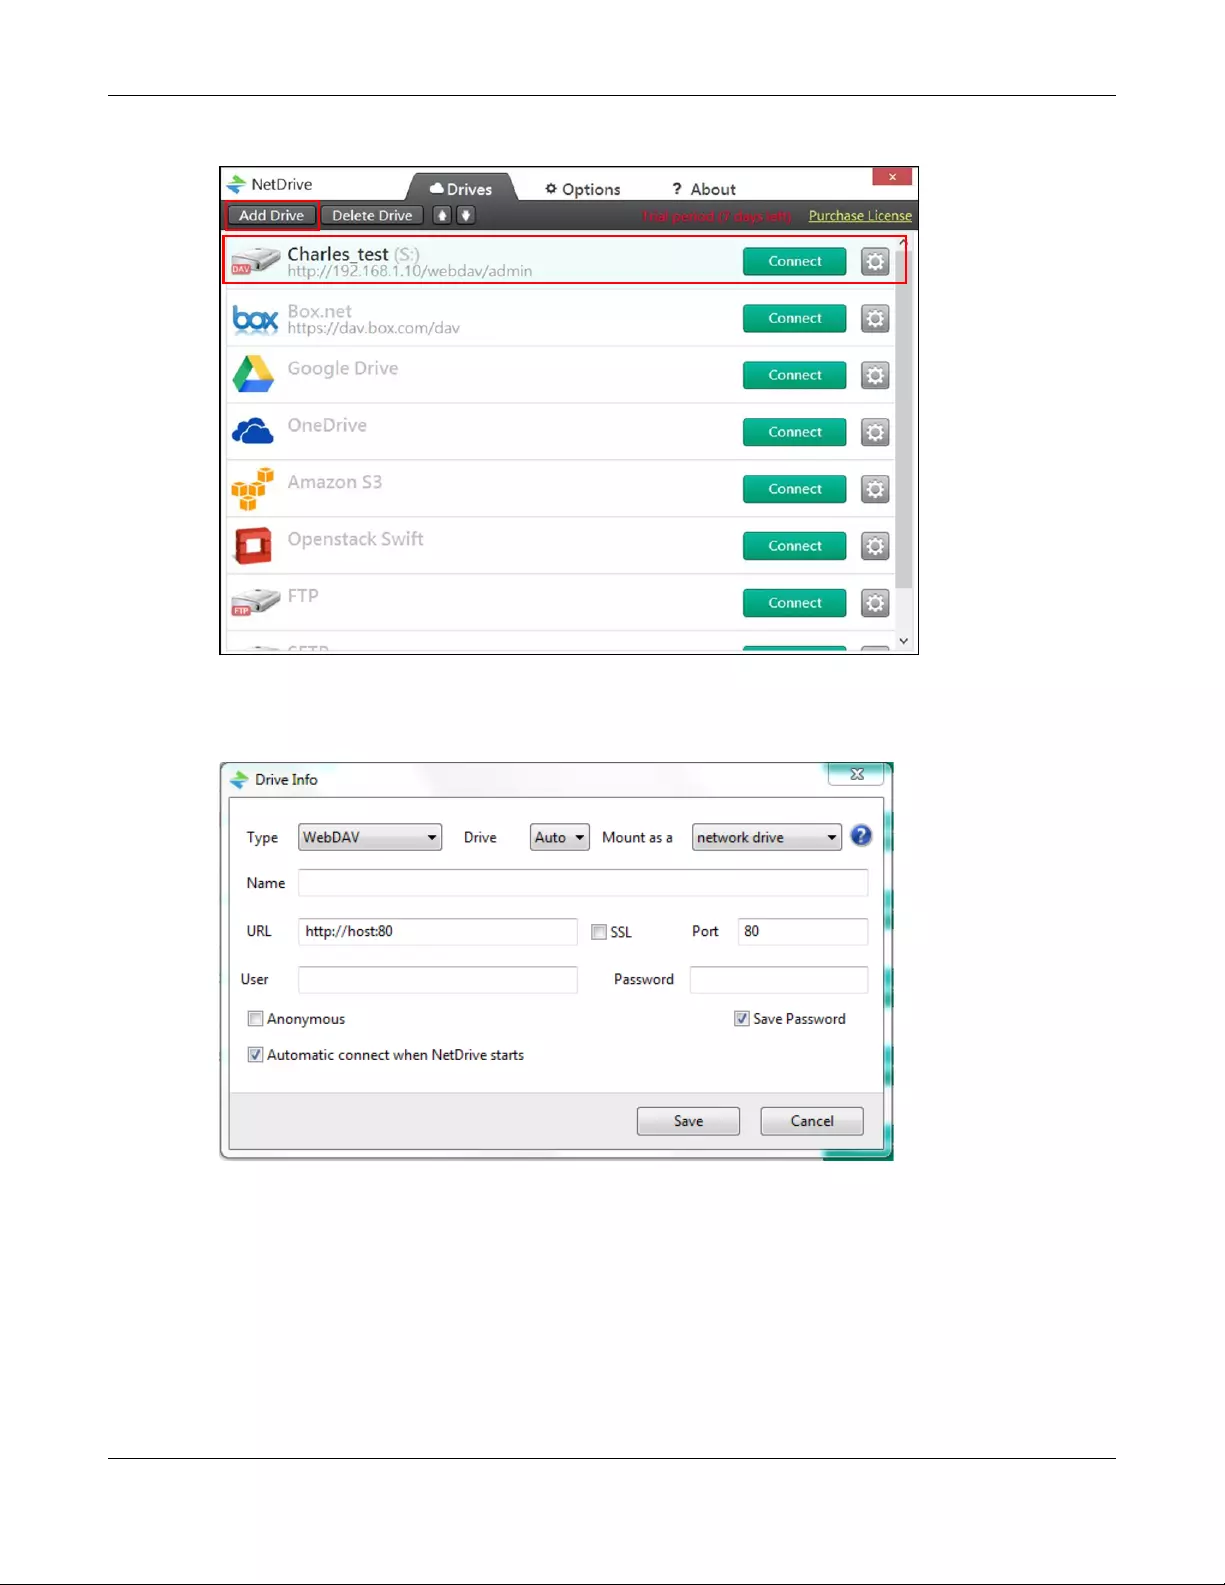
Chapter 10 Control Panel: Service
NAS Series User’s Guide
167
Figure 132 NetDrive Example
3Name the drive and specify the URL of the share to access. Select SSL if the NAS forces HTTPs use. Specify
your user name and password for accessing the share on the NAS.
Figure 133 NetDrive Add Drive
10.8 Web Publishing Screens
Use this screen to turn web publishing on or off and select shares to publish.
10.8.1 Status
Click Control Panel > Service > Web Publishing > Status to open the following screen.

Chapter 10 Control Panel: Service
NAS Series User’s Guide
168
Figure 134 Control Panel > Service > Web Publishing > Status
The following table describes the labels in this screen.
Note: If you installed php-MySQL-phpMyAdmin through the App Center screen (Section 13.2
on page 200) and enable it, you can use PHP and MySQL in your published web page.
10.8.2 Share Publish
Click Control Panel > Service > Web Publishing > Share Publish to open the following screen.
Table 99 Control Panel > Service > Web Publishing > Status
LABEL DESCRIPTION
Enable Web
Publishing
Select this option to turn on web publishing to let people access files in the published shares
using a web browser, without having to log into the Web Configurator.
Support HTTPS Select this to allow users to use web browser security for connections to the web-published
shares. In order to use secured connections users must use “https://” in the NAS’s web
address and install the NAS’s public key certificate.
Apply Click this to save your changes.
Reset Click this to restore your previously saved settings.
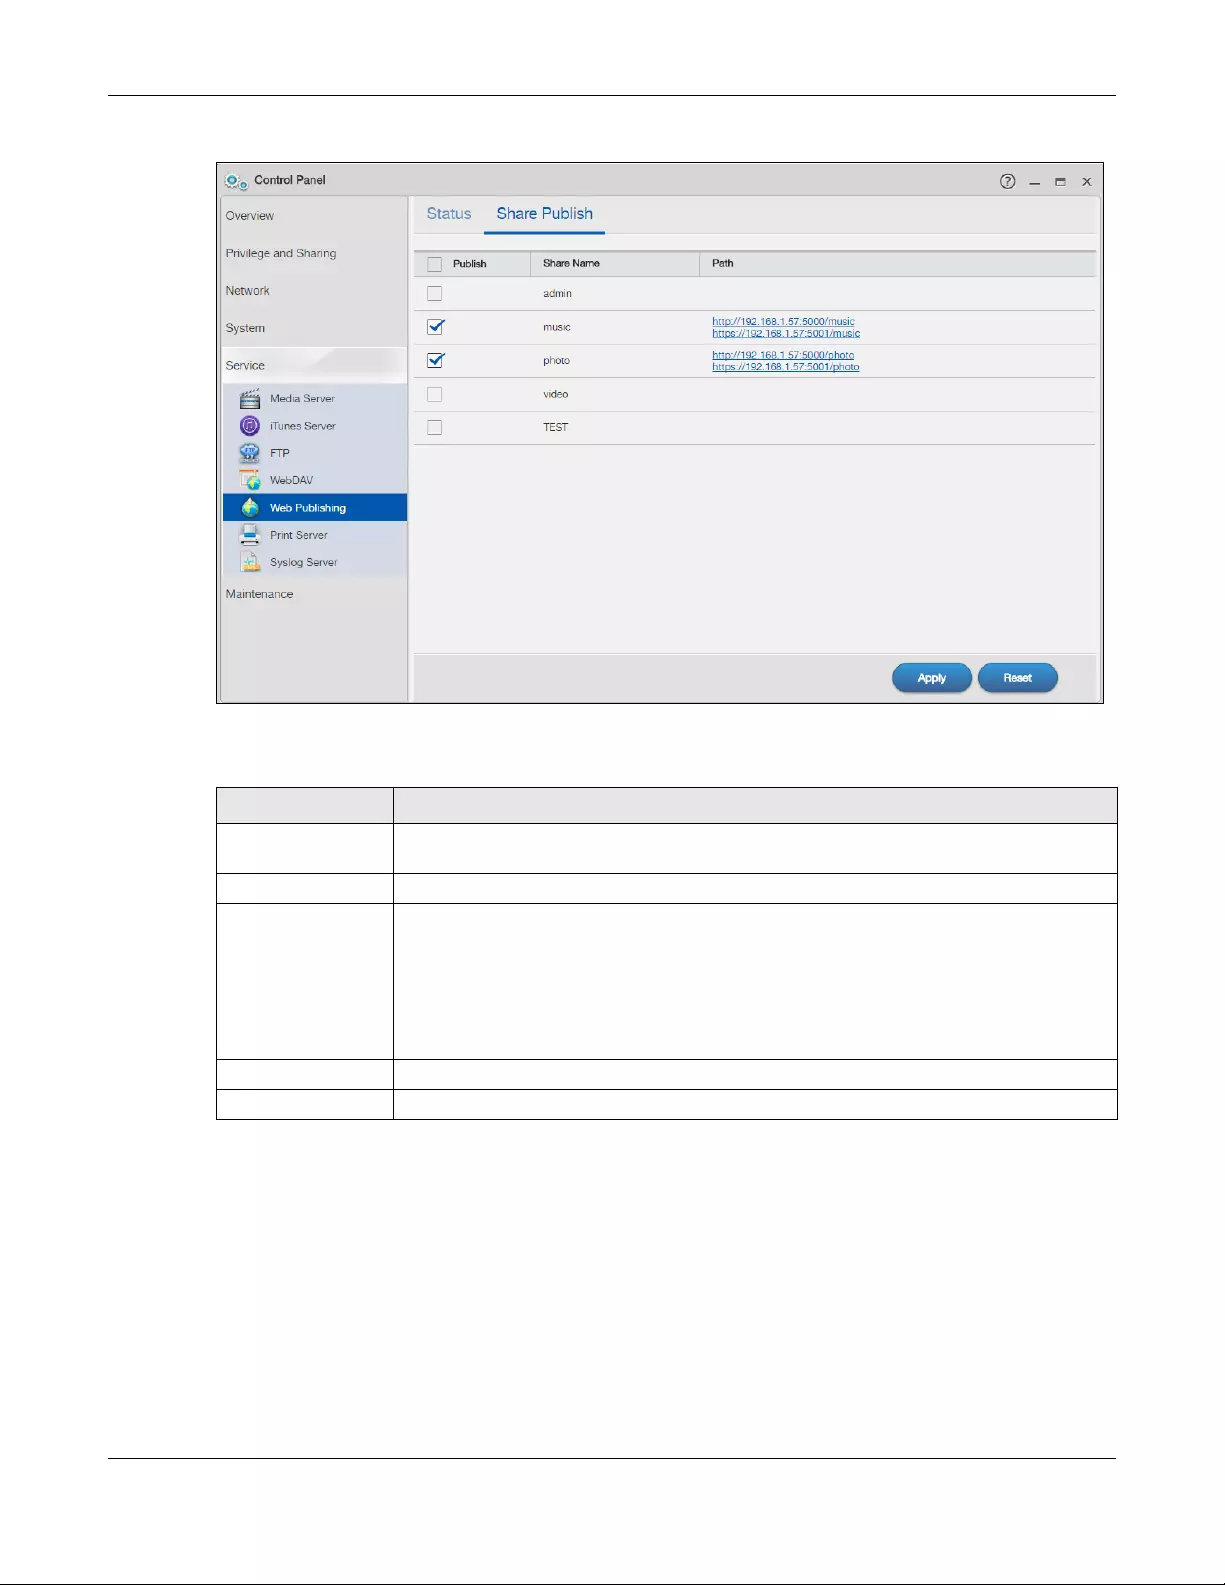
Chapter 10 Control Panel: Service
NAS Series User’s Guide
169
Figure 135 Control Panel > Service > Web Publishing > Share Publish
The following table describes the labels in this screen.
10.8.3 How to Configure Web Publishing
This example covers how to configure the Web Publishing screen to let people use a web browser to
access a share named FamilyPhotos (created using the Control Panel > Privilege and Sharing > Shared
Folders screen) without logging into the Web Configurator and shows how to access the share through
the Internet.
1Click Control Panel > Service > Web Publishing and configure the screen as shown (enable the web
publishing in the Web Publishing > Status screen and select FamilyPhotos to publish in the Web Publishing
> Share Publish screen) and click Apply.
Table 100 Control Panel > Service > Web Publishing > Share Publish
LABEL DESCRIPTION
Publish Select the share(s) to publish for web browser access. People can access files in the
published shares using a web browser, without logging into the Web Configurator.
Share Name This displays the name of the share created on the NAS.
Path After you select a share and click Apply, this displays the web address that you can enter in
your browser’s address bar to access the published share’s web page. It contains the NAS’s
IP address, a port number for accessing the published share websites hosted on the NAS,
and the name of the web-published share.
Note: By default, the web-published shares use port 5000 for HTTP and 5001 for
HTTPS.
Apply Click this to save your changes.
Reset Click this to restore your previously saved settings.
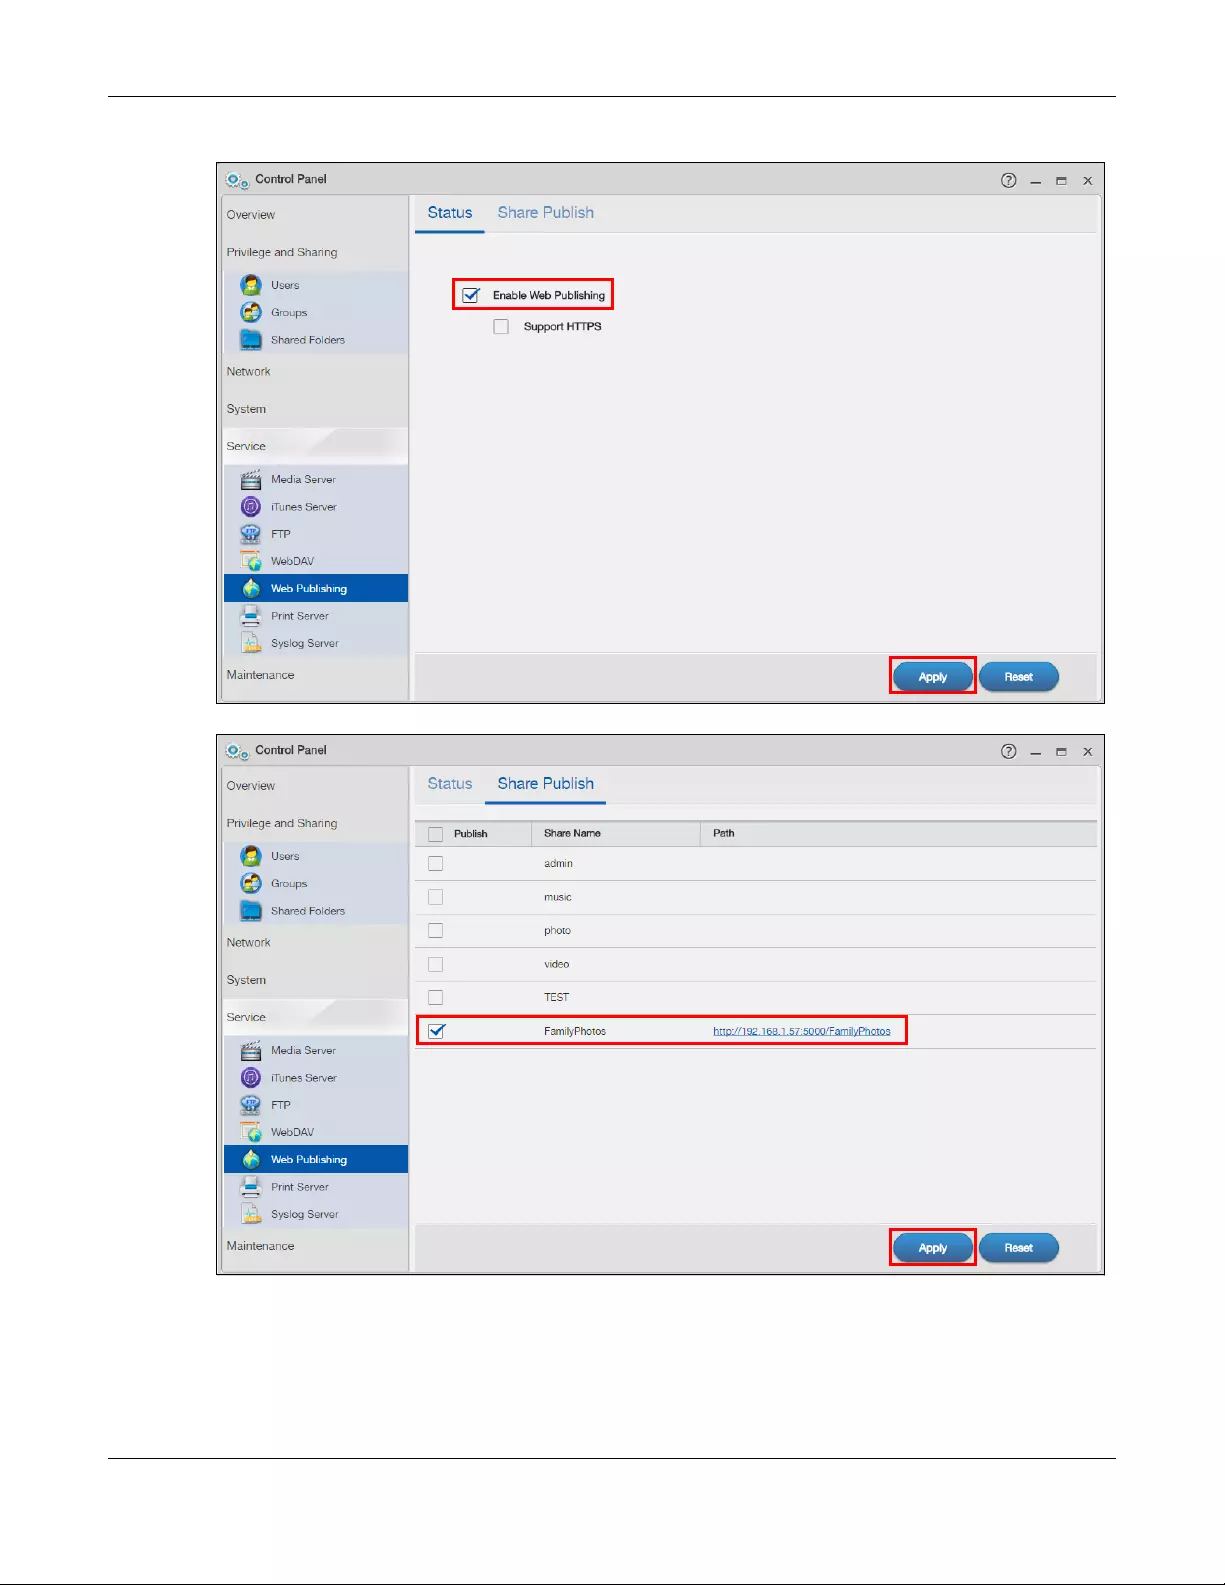
Chapter 10 Control Panel: Service
NAS Series User’s Guide
170
Figure 136 Control Panel > Service > Web Publishing > Status (Example)
Figure 137 Control Panel > Service > Web Publishing > Share Publish (Example)
2Now open your web browser and type in the address of the NAS’s FamilyPhotos web page. In this
example, the NAS’s IP address is 192.168.1.57, and the name of the web-published share is FamilyPhotos.
So you would enter “http://192.168.1.57:5000/MyWeb/FamilyPhotos/” in your browser’s address bar.
Then press [ENTER] or click Go. A screen displays listing the share’s files.
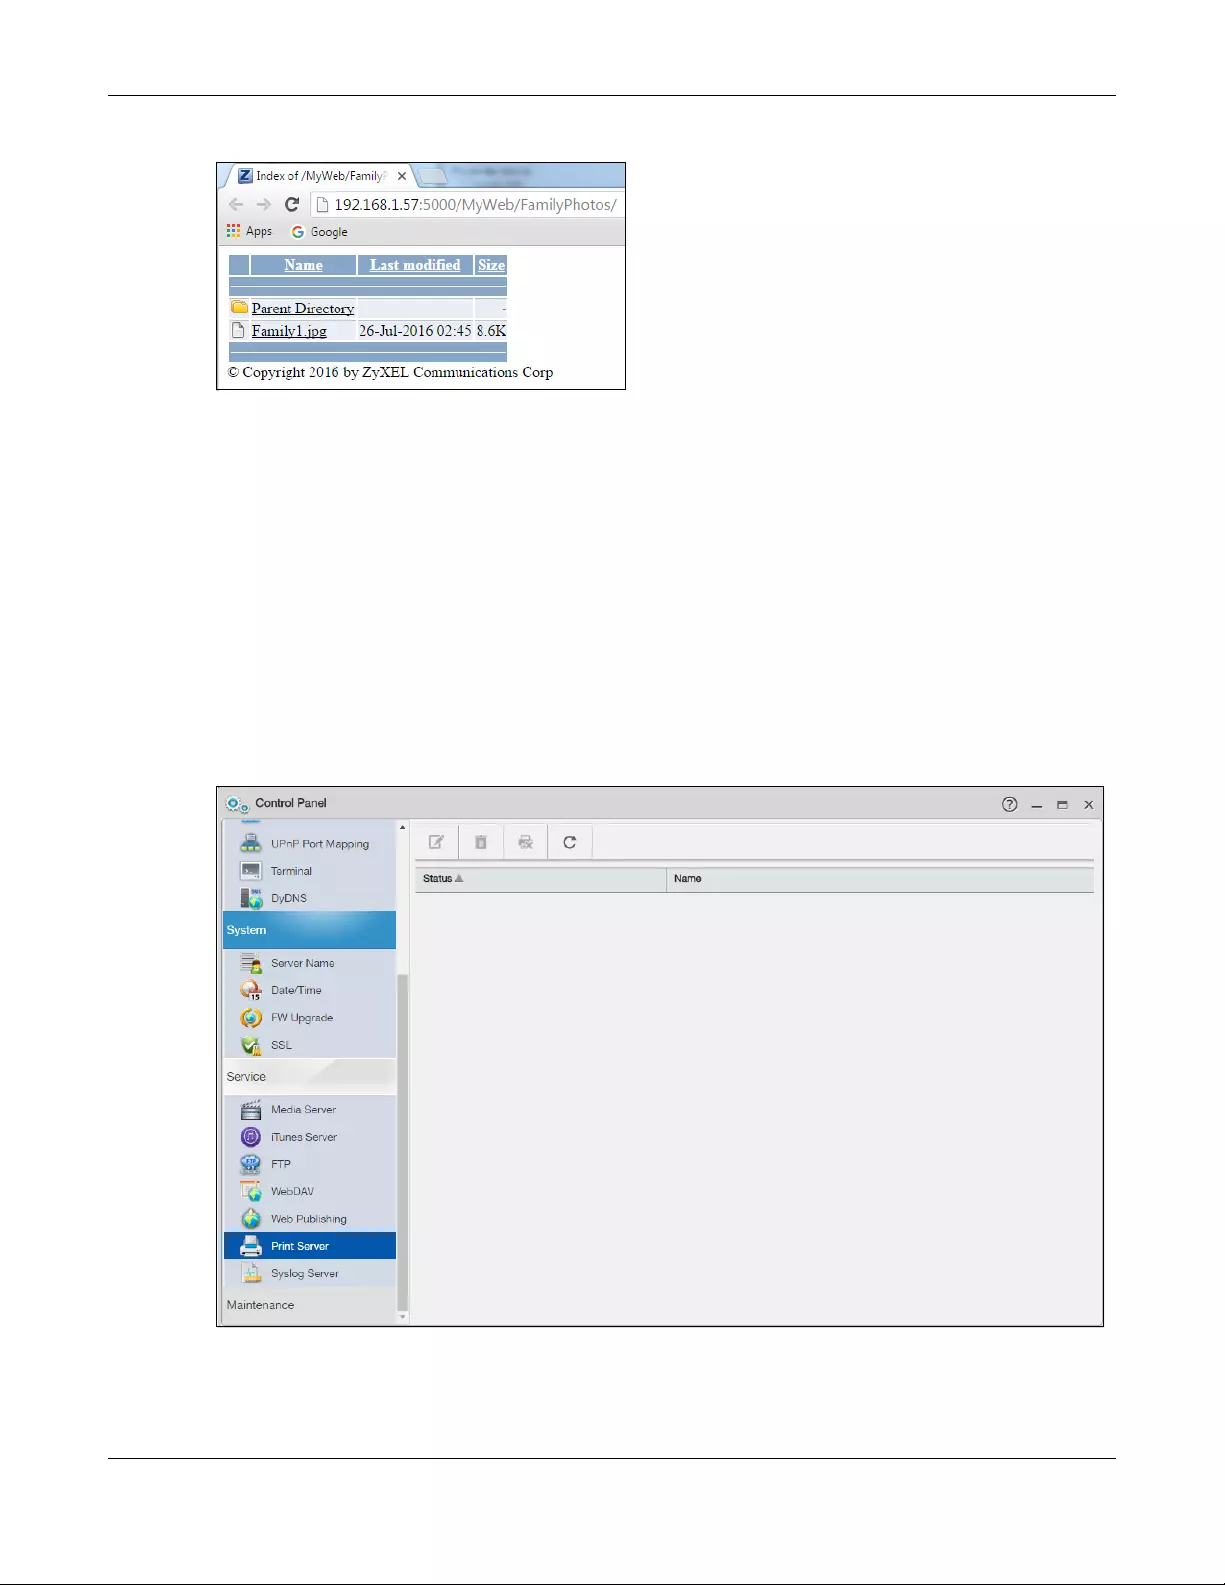
Chapter 10 Control Panel: Service
NAS Series User’s Guide
171
Figure 138 Browsing to an NAS Share Example
• Click a file’s link to open the file.
• Right-click a file’s link and select Save Target As.. to save a copy of the file.
• Click a label in the heading row to sort the files by that criteria.
• To customize how the page looks and works, create an index.html or index.htm file and store it in the
share.
10.9 Print Server Screen
Use the Print Server screen to view and manage the NAS’s list of printers and print jobs.
Click Control Panel > Service > Print Server to open the following screen.
Figure 139 Control Panel > Service > Print Server
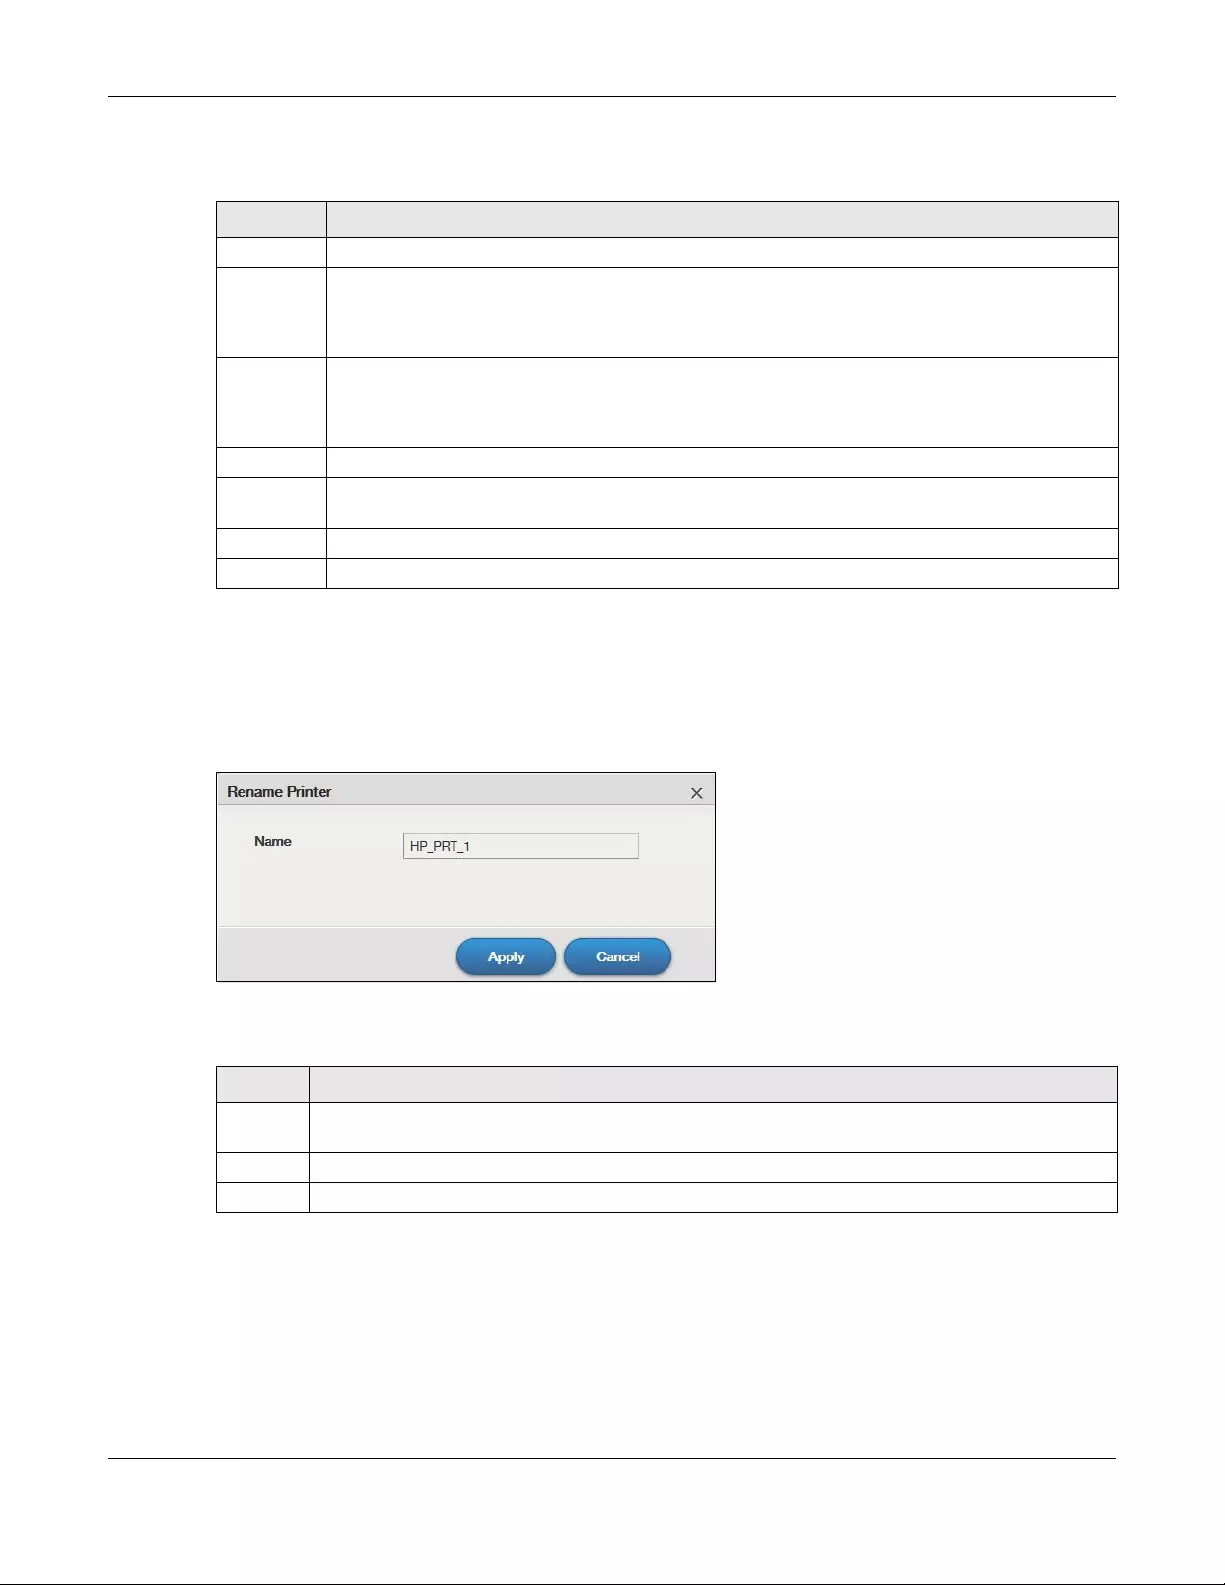
Chapter 10 Control Panel: Service
NAS Series User’s Guide
172
The following table describes the labels in this screen.
10.9.1 Print Server Edit
Click Control Panel > Service > Print Server and a printer’s Edit icon to open the following screen. Use this
screen to change the name the NAS uses for the printer.
Figure 140 Control Panel > Service > Print Server > Edit
The following table describes the labels in this screen.
10.10 Syslog Server Screen
Use this screen to configure the NAS to accept syslog logs from syslog clients such as Zyxel’s G-4100 v2.
Table 101 Control Panel > Service > Print Server
LABEL DESCRIPTION
Edit Select a printer and click this to change the name the NAS uses for the printer.
Delete Select a printer and click this to remove a printer from the NAS’s printer list. To add the printer back
into the list, disconnect the printer from the NAS’s USB port and reconnect it. If that does not work,
disconnect the USB port and turn off the printer’s power. Then reconnect the printer and turn it back
on.
Cancel Job Select a printer and click this to remove all print jobs from the NAS queue for a particular printer.
However, since the NAS sends print jobs to the printer as soon as it can, this button may only have an
effect if there are very large or many print jobs in the queue. To stop a print job that has already
started, you may have to turn off the printer.
Refresh Click this to update the list of printers and print jobs.
The table lists printers and their queued print jobs. Click a column’s heading to sort the entries by that
criteria.
Status This fields shows whether the printer is connected and turned on (on-line) or not (off-line).
Name This identifies the printer. Each printer connected to the NAS must use a unique name.
Table 102 Control Panel > Service > Print Server > Edit
LABEL DESCRIPTION
Name Type a new name to identify the printer. The name must be unique from all the other names of printers
connected to the NAS.
Apply Click this to save your changes.
Cancel Click this to return to the previous screen without saving.
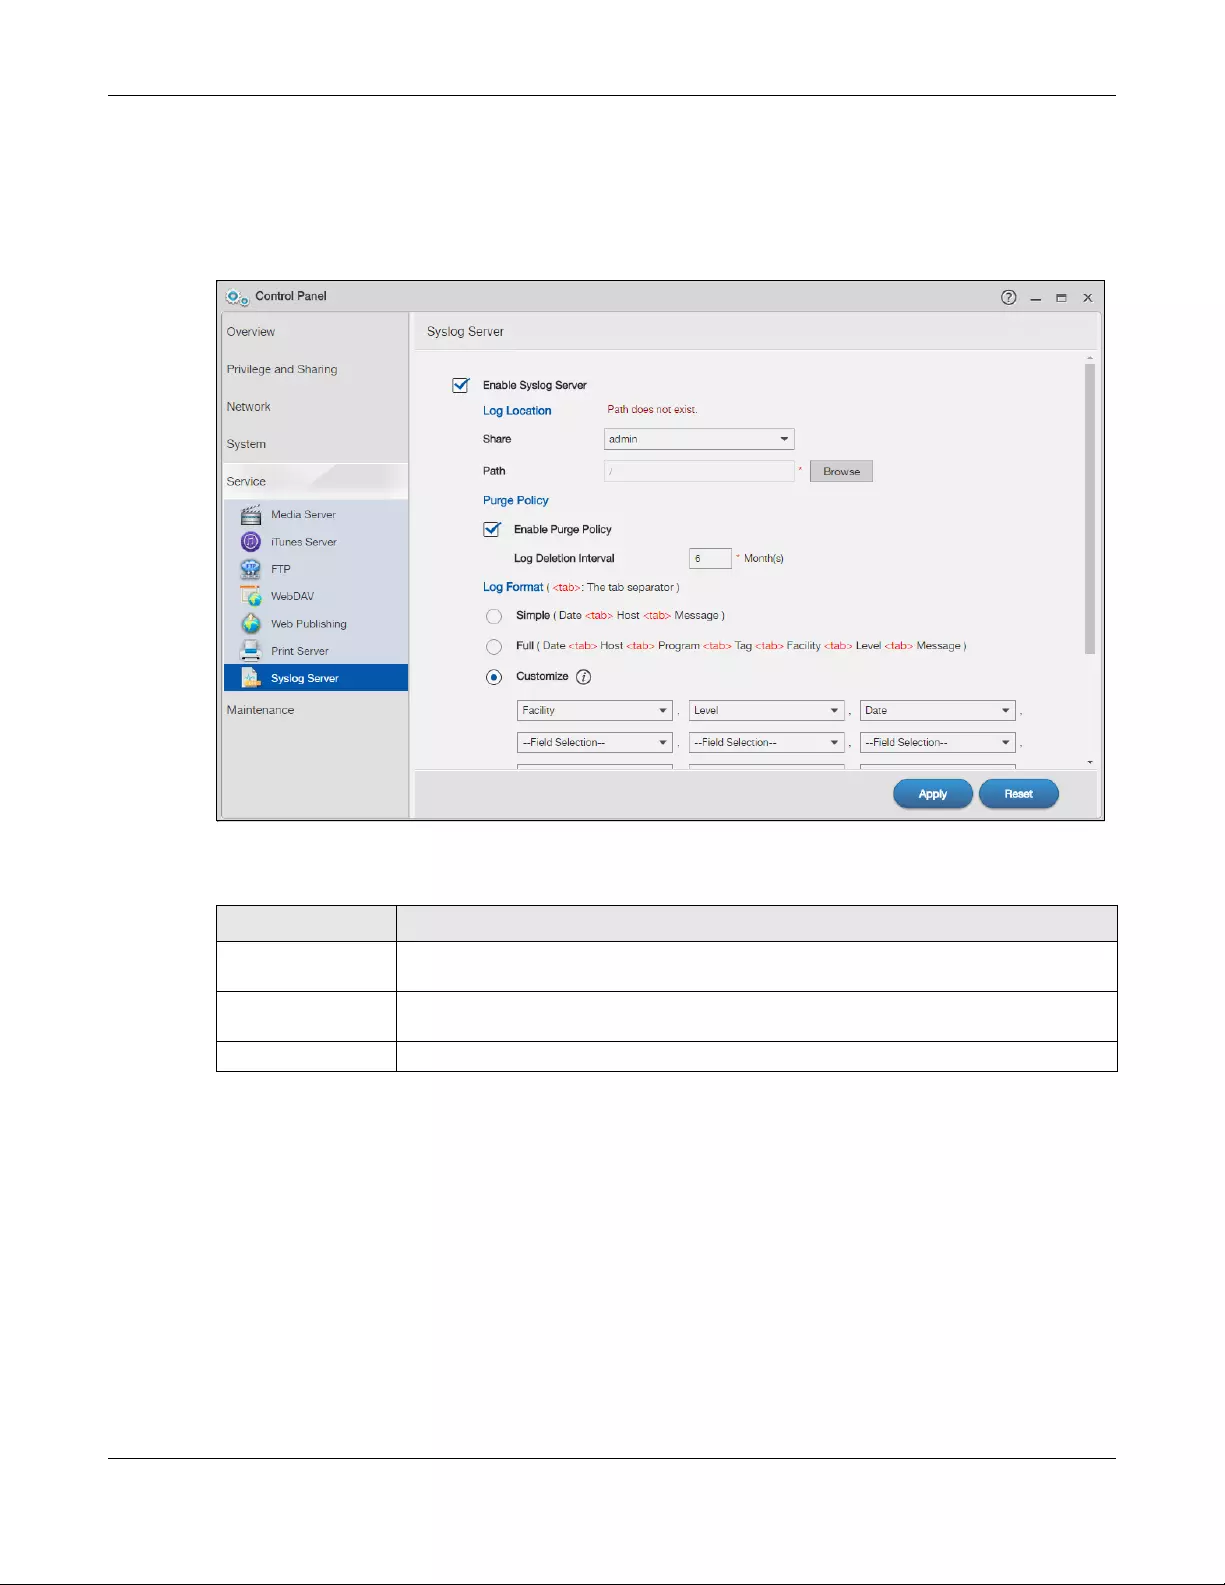
Chapter 10 Control Panel: Service
NAS Series User’s Guide
173
Note: You may need to configure any firewalls between the NAS and the syslog clients in
order to let the syslog traffic go to the NAS.
Click Control Panel > Service > Syslog Server to open the following screen.
Figure 141 Control Panel > Service > Syslog Server
The following table describes the labels in this screen.
Table 103 Control Panel > Service > Syslog Server
LABEL DESCRIPTION
Enable Syslog Server Select this to have the NAS accept syslog logs from syslog clients. Clear it to stop the NAS
from accepting syslog logs from syslog clients.
Log Location Click View Files to browse to where you want to store the syslog logs on the NAS after you
click Apply.
Share Select the share in which to store the syslog logs.
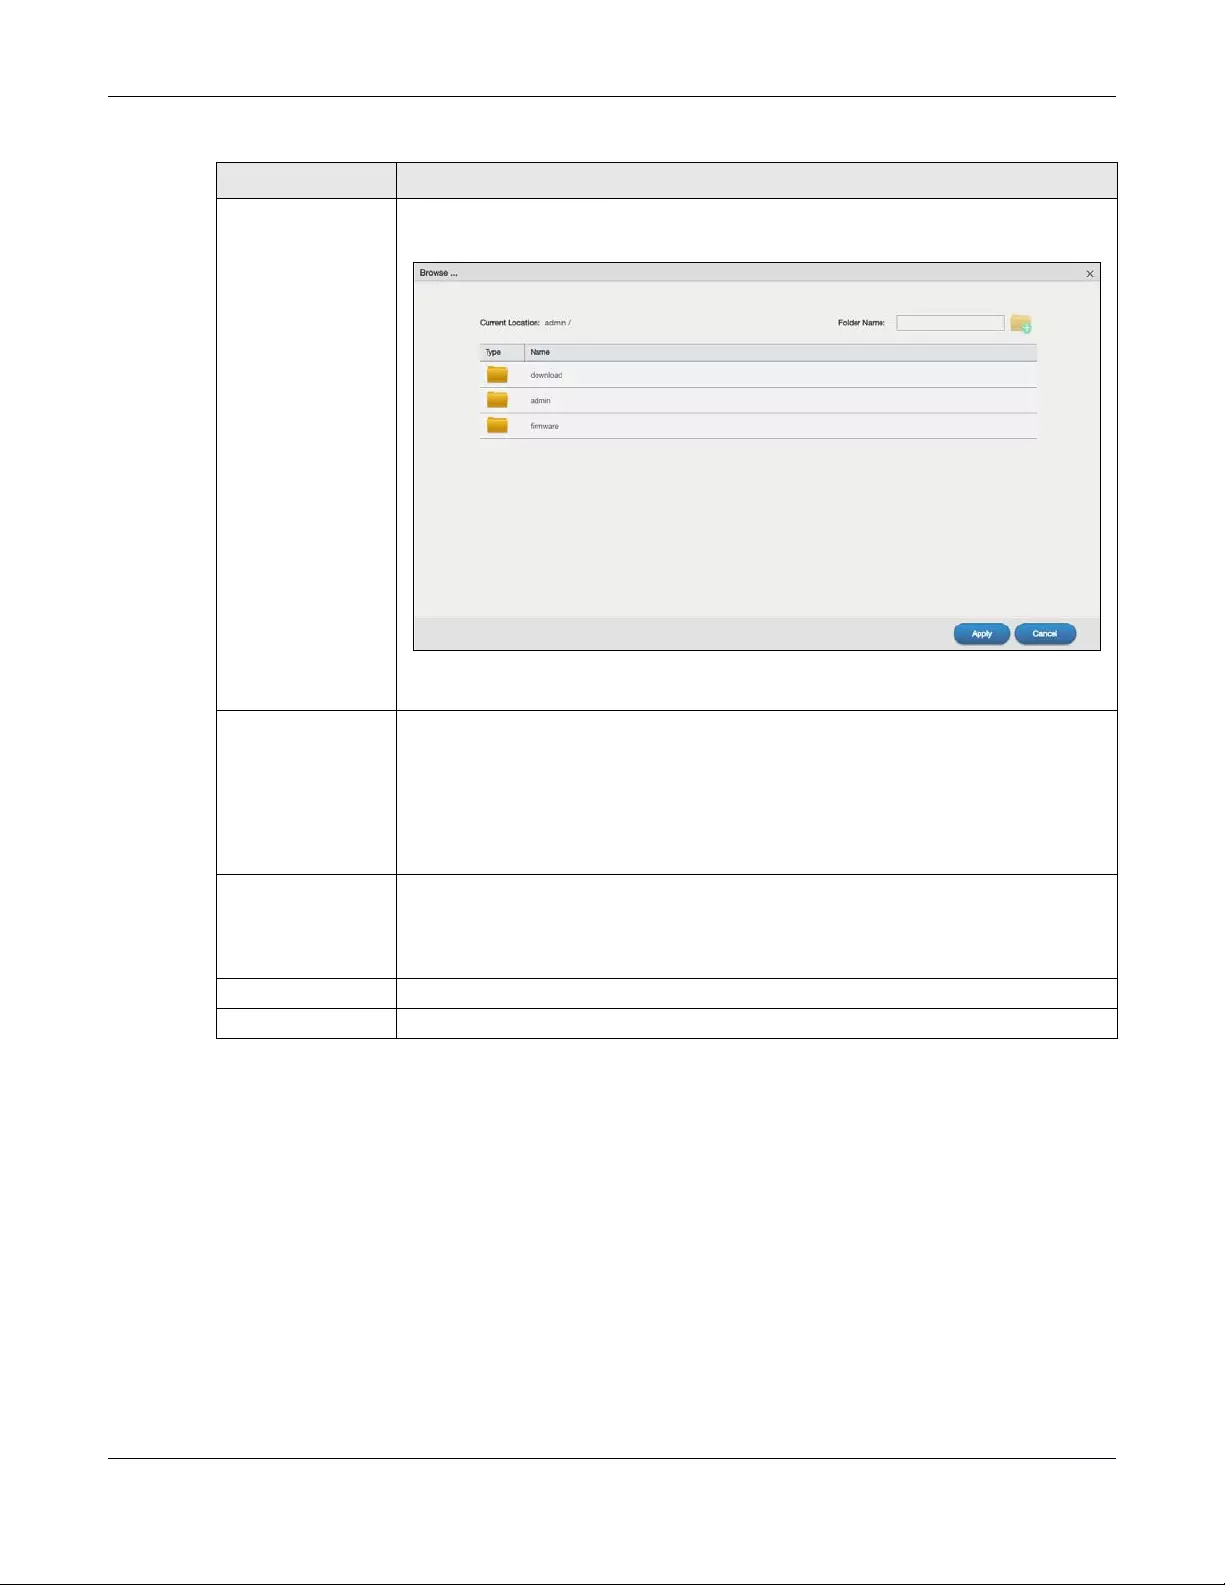
Chapter 10 Control Panel: Service
NAS Series User’s Guide
174
10.11 Technical Reference
This section provides technical background information on the topics discussed in this chapter.
10.11.1 Share Media Files on Your Network
The media server feature lets anyone on your network play video, music, and photos from the NAS
(without having to copy them to another computer). The NAS can function as a DLNA—compliant media
server and/or an iTunes server. The NAS streams files to DLNA-compliant media clients or computers
using iTunes. The Digital Living Network Alliance (DLNA) is a group of personal computer and electronics
companies that works to make products compatible in a home network.
Path Use this if you want to further specify a folder within the share. This field displays the share
folder’s path. Type the location of the folder using forward slashes as branch separators or
use Browse to find or create a folder on the NAS.
After you click Apply in the Syslog Server screen the NAS creates a folder for the current
month’s logs. The folder’s name uses the year and month in YYYYMM format.
Purge Policy Select Enable Purge Policy and set a number of months in the Log Deletion Interval field that
displays to have the NAS delete the syslog messages after keeping them for the specified
period of time.
Regardless of how you set the purge policy, to save hard disk space the NAS archives the
syslog logs in a .tgz file on the second day of each month and deletes the original folder
and syslog files. The NAS creates a new folder for the syslog logs it receives after that. You
can use a zip program such as 7-zip to open the archives.
Log Format Select the format you want to use for recording the received logs.
The Example item below the drop-down list boxes displays how the selected custom format
looks. For example, if you select Full Date, the individual log entries would display with
something like 2009 May 13 17:15:51 in front of them.
Apply Click this to save your changes.
Reset Click this to restore the screen’s last-saved settings.
Table 103 Control Panel > Service > Syslog Server (continued)
LABEL DESCRIPTION
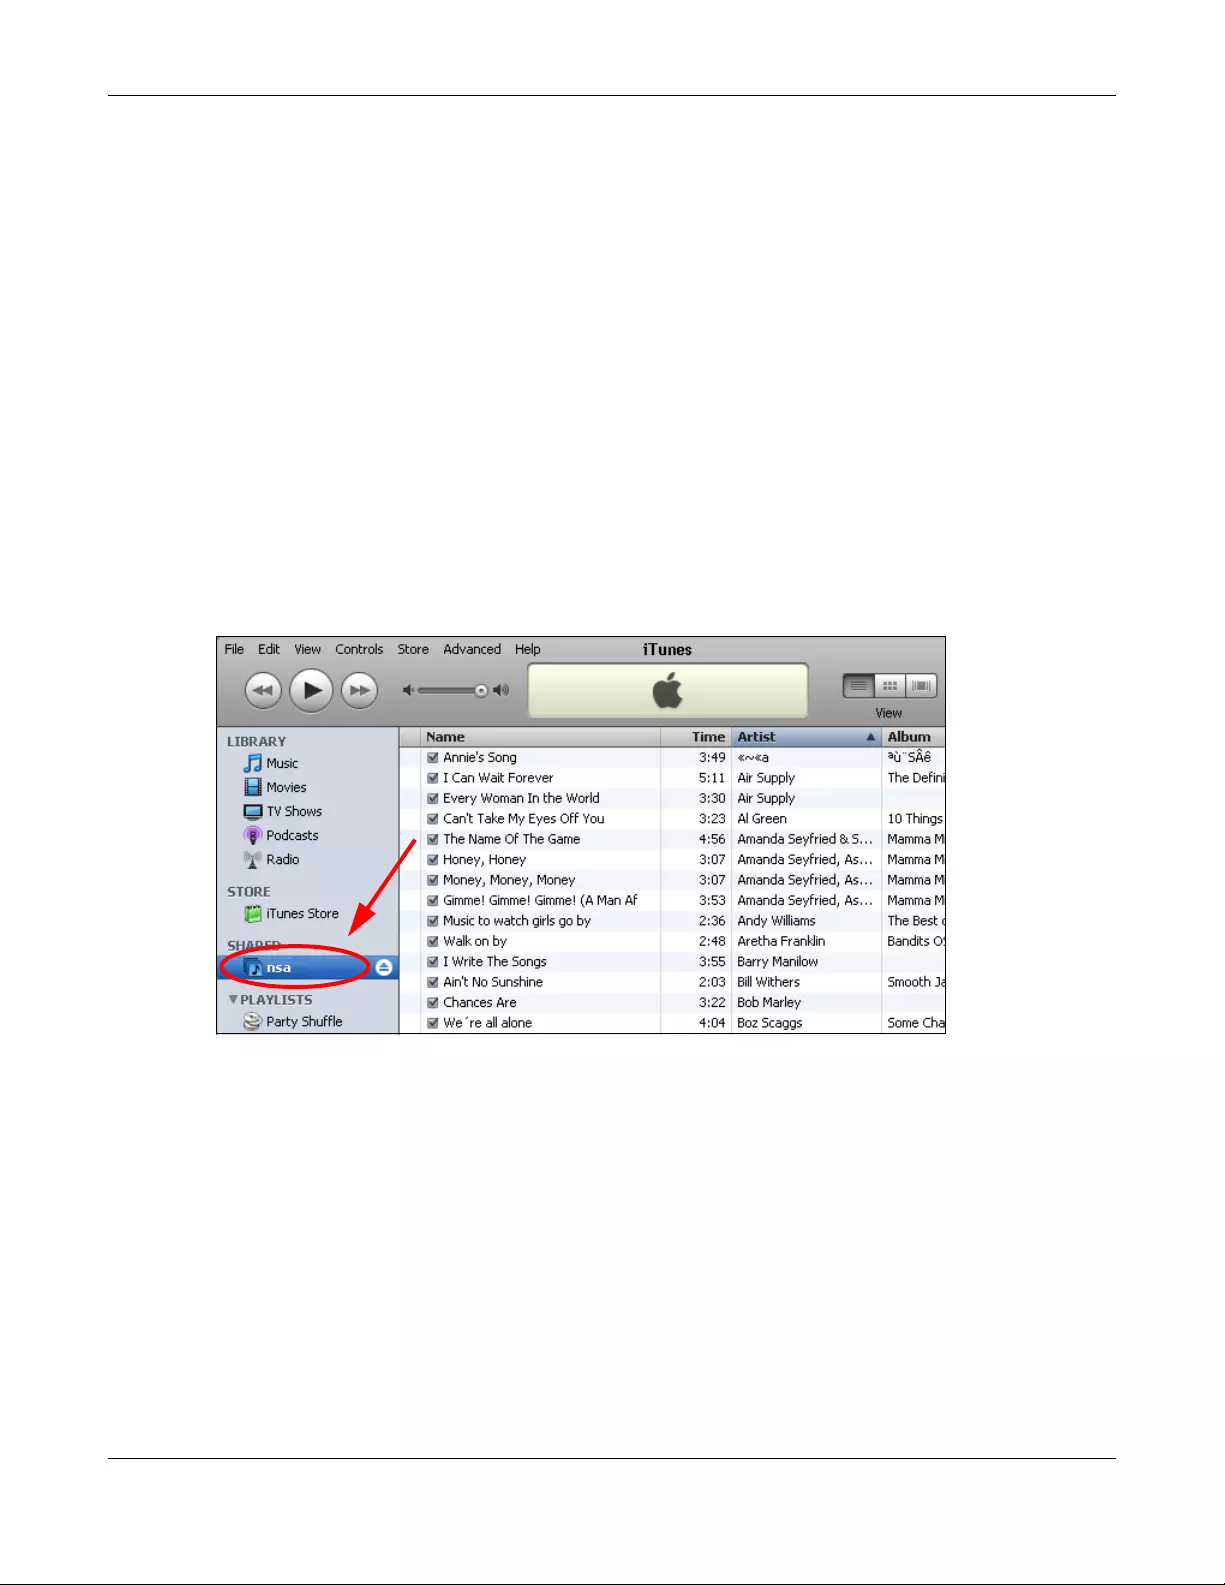
Chapter 10 Control Panel: Service
NAS Series User’s Guide
175
• Publish shares to let others play the contained media files.
• The media server is a convenient way to share files you download.
• Hardware-based media players can also play the files. See Supported Media Server Content Formats
on page 345 for the supported multimedia file formats.
Note: Anyone on your network can play the media files in the published shares. No user name
and password or other form of security is used. The media server is enabled by default
with the video, photo, and music shares published.
Songs from the iTunes Store
After using iTunes on your computer to download songs from Apple’s iTunes Store, you can copy them
to the NAS. Many of these songs have DRM (Digital Rights Management). At the time of writing, you can
use your Apple account ID and password to authorize up to a total of five computers to play the files. To
authorize a computer, open iTunes and click Store > Authorize Computer.
A link for the NAS in iTunes under SHARED. Click it to display the NAS’s published media files as shown
next.
Figure 142 NAS link in iTunes
10.11.2 Web Publishing
Web publishing lets you “publish” shares (containing folders and files) on the NAS so people can access
the files using a web browser without having to log into the Web Configurator. This way you can share
files with others without them having to know and enter a user name and password.
For example, if you want to share photos in a FamilyPhotos share, you could “web publish” it and others
could use a web browser to access the photos at http://my-NAS’s-IP-Address/MyWeb/FamilyPhotos.
Note: The NAS does not use any security for the files in the published folders. It is not
recommended to publish shares if you do not have the NAS behind a good hardware-
based firewall. See page 250 for more on firewalls.
Additionally, you can use HTML editing software (not included) to create an index.html or index.htm file
to define and customize how your website works and looks.
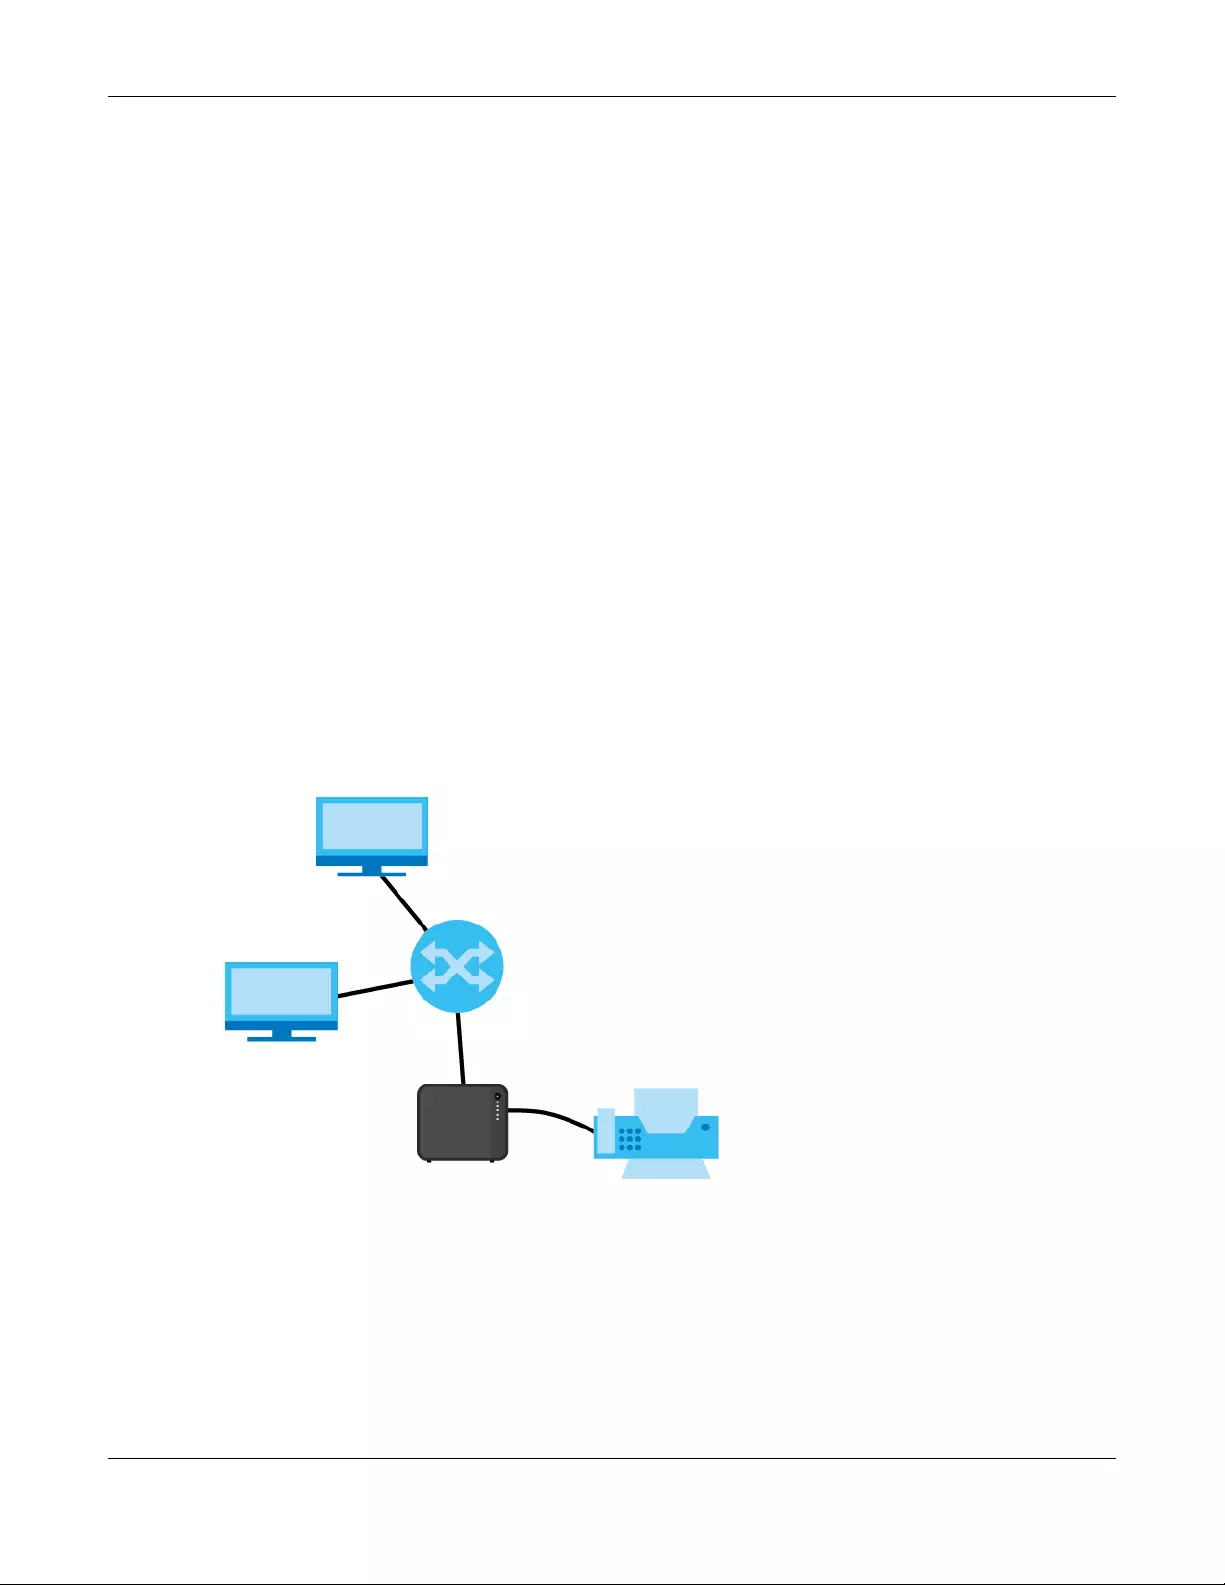
Chapter 10 Control Panel: Service
NAS Series User’s Guide
176
Accessing Web-published Shares from the Internet
You need to use a public address to access the NAS’s web-published shares from the Internet. If your
NAS uses a private IP address, you may need to use the public IP address of your Internet gateway and
configure NAT or port forwarding on your Internet gateway and possibly firewall rules in order to let
people access the NAS’s web-published shares from the Internet.
Web Publishing Port Number
By default, the web-published shares use port 5000 for HTTP and 5001 for HTTPS. Users must include it after
the NAS’s IP address in order to access the NAS’s web-published shares. For example, the NAS’s IP
address is 192.168.1.23, and the name of the web-published share is FamilyPhotos. You would have to
enter “http://192.168.1.23:5000/MyWeb/FamilyPhotos/” in your browser’s address bar to access the
share’s web page.
you can configure one set of firewall rules and NAT or port forwarding settings on your Internet gateway
specifically for allowing access to the web-published shares and another separate set of rules for
accessing the NAS’s web configurator.
10.11.3 Printer Sharing
The NAS can act as a print server. A print server lets multiple computers share a printer. Connect a
printer to the NAS’s USB port to let multiple computers on your network use it. See www.zyxel.com for a
list of compatible printers.
Figure 143 Printer Sharing

NAS Series User’s Guide
177
CHAPTER 11
Control Panel: Maintenance
11.1 Overview
This chapter discusses the Maintenance screens. The Maintenance screens allow you to manage system
configurations.
11.2 What You Can Do
• Use the Power screen (Section 11.3 on page 177) to configure power settings for the NAS, including
power saving, UPS, power on/off after power failure, power on/off schedule, and Wake on LAN.
• Use the Log screen (Section 11.4 on page 181) to check the system’s logs.
• Use the Configuration Backup screen (Section 11.5 on page 185) to backup or restore the NAS
configuration file.
11.3 Power Screens
Use these screens to manage power settings for the NAS.
11.3.1 Power Management
Click Maintenance > Power > Power Management to display the following screen.
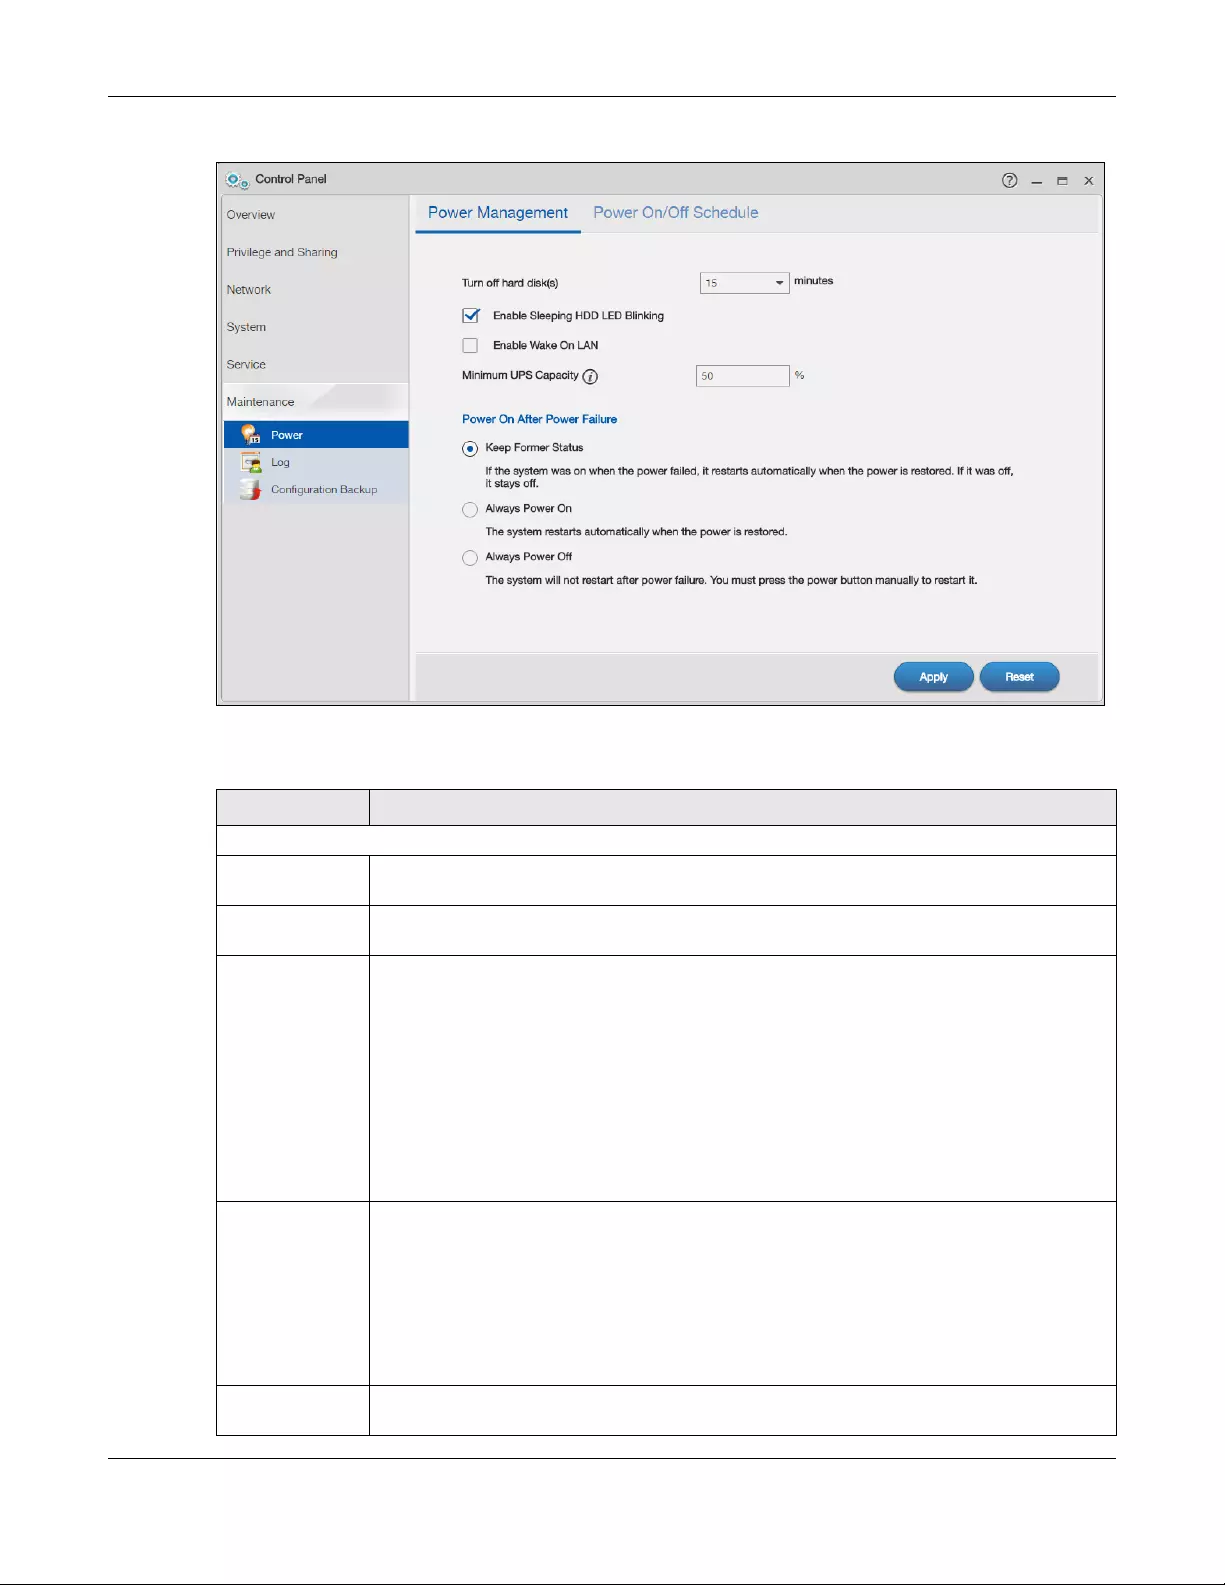
Chapter 11 Control Panel: Maintenance
NAS Series User’s Guide
178
Figure 144 Control Panel > Maintenance > Power > Power Management
The following table describes the labels in this screen.
Table 104 Control Panel > Maintenance > Power > Power Management
LABEL DESCRIPTION
Power Management
Turn off hard
disk(s)
Enter the number of minutes to wait when the NAS is idle before spinning the hard disks down to
sleep (hibernation). The default time is 15 minutes.
Enable Sleeping
HDD LED Blinking
Select this to have the HDD LED blink slowly when the hard disk is sleeping (hibernating). Clear
this to have the HDD LED stay on when the hard disk is sleeping.
Enable Wake On
LAN
Select this to be able to turn on the NAS through its wired Ethernet connection.
You must have a computer or router on your LAN that supports sending Wake On LAN “magic
packets” to turn on the NAS.
To use Wake On LAN from a computer on your LAN, install a program such as Wake On LAN EX
or another Wake On LAN program that supports sending magic packets.
You can use Wake On LAN from a remote location if the router in front of the NAS supports
sending magic packets.
Use the NAS’s power button or the User > Restart/Shutdown menu in the upper right corner of
the Web Configurator screen to turn off the NAS.
Minimum UPS
Capacity
When you use an APC Uninterruptible Power Supply (UPS) with a USB connection to the NAS,
the NAS shuts itself down if the APC UPS’s battery charge gets down to the percentage you
specify in this field. This allows the NAS to shut down properly and avoid data loss caused by a
power failure when the UPS stops supplying power.
A setting around 50% is recommended. A setting close to 100% is not recommended since it
would cause the NAS to shut down whenever the UPS is charging. A setting close to 0 is also not
recommended since the UPS would not have enough power to allow the NAS to shutdown
properly.
Power On After
Power Failure
Select an option to set whether or not the NAS restarts when the power is restored after a
power failure.
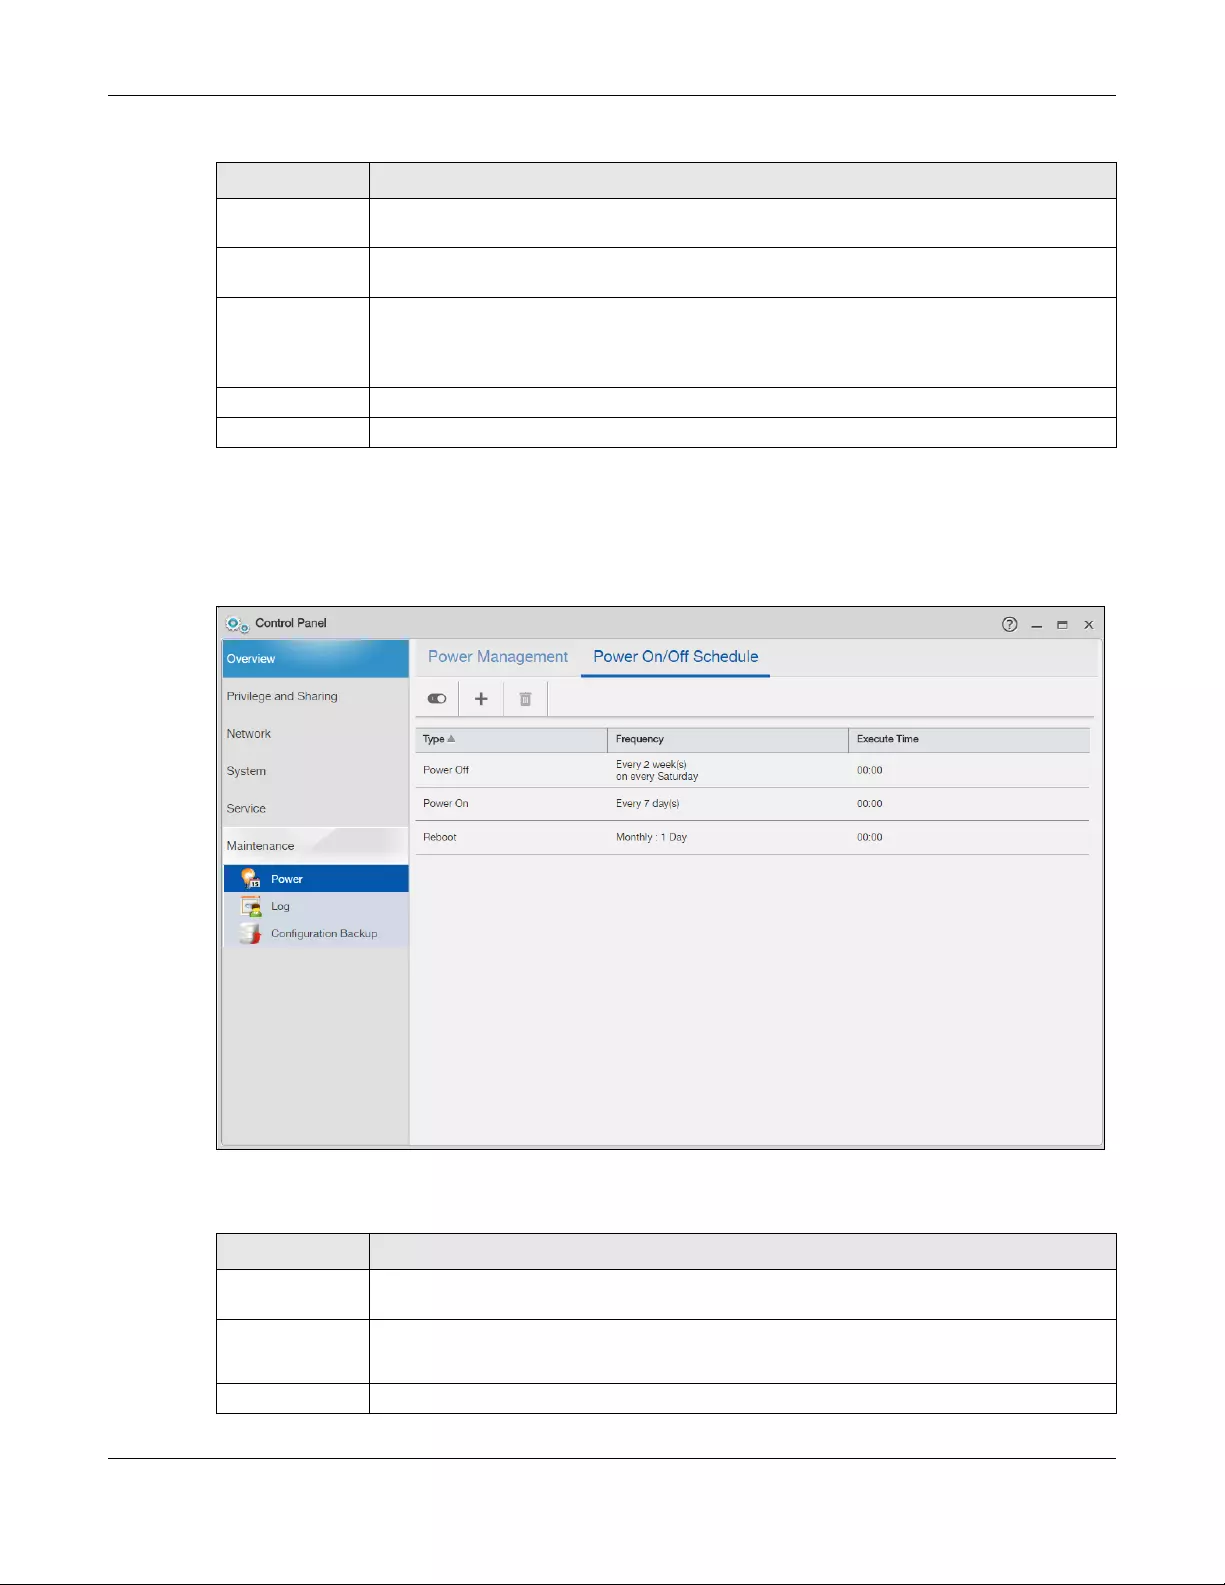
Chapter 11 Control Panel: Maintenance
NAS Series User’s Guide
179
11.3.2 Power On/Off Schedule
Click Maintenance > Power > Power On/Off Schedule to display the following screen.
Figure 145 Control Panel > Maintenance > Power > Power On/Off Schedule
The following table describes the labels in this screen.
Keep Former
Status Select this option to have the NAS automatically restart only if it was operating when the power
failed. The NAS remains off if it was already off when the power failed.
Always Power
On Select this option to keep the NAS operating as much of the time as possible. The NAS restarts
automatically even if it was turned off when the power failed.
Always Power
Off Select this option to keep the NAS from automatically restarting when the power is restored
after a power failure. This is a computer’s “traditional” behavior. Select this if you have other
servers such as a domain controller or DNS server that you want to start or check after a power
failure before the NAS turns on.
Apply Click this to save your changes.
Reset Click this to restore previously saved settings.
Table 104 Control Panel > Maintenance > Power > Power Management (continued)
LABEL DESCRIPTION
Table 105 Control Panel > Maintenance > Power > Power On/Off Schedule
LABEL DESCRIPTION
Enable Power
Control Schedule
Click this to have the NAS turn itself off and on or reboot according to the schedules you
configured.
Add Power
Control Schedule
Click this to go to the screen where you can configure the power control schedules.
Refer to Section 11.3.3 on page 180 for this screen.
Delete Click this to remove the selected power control schedule(s) from the list.
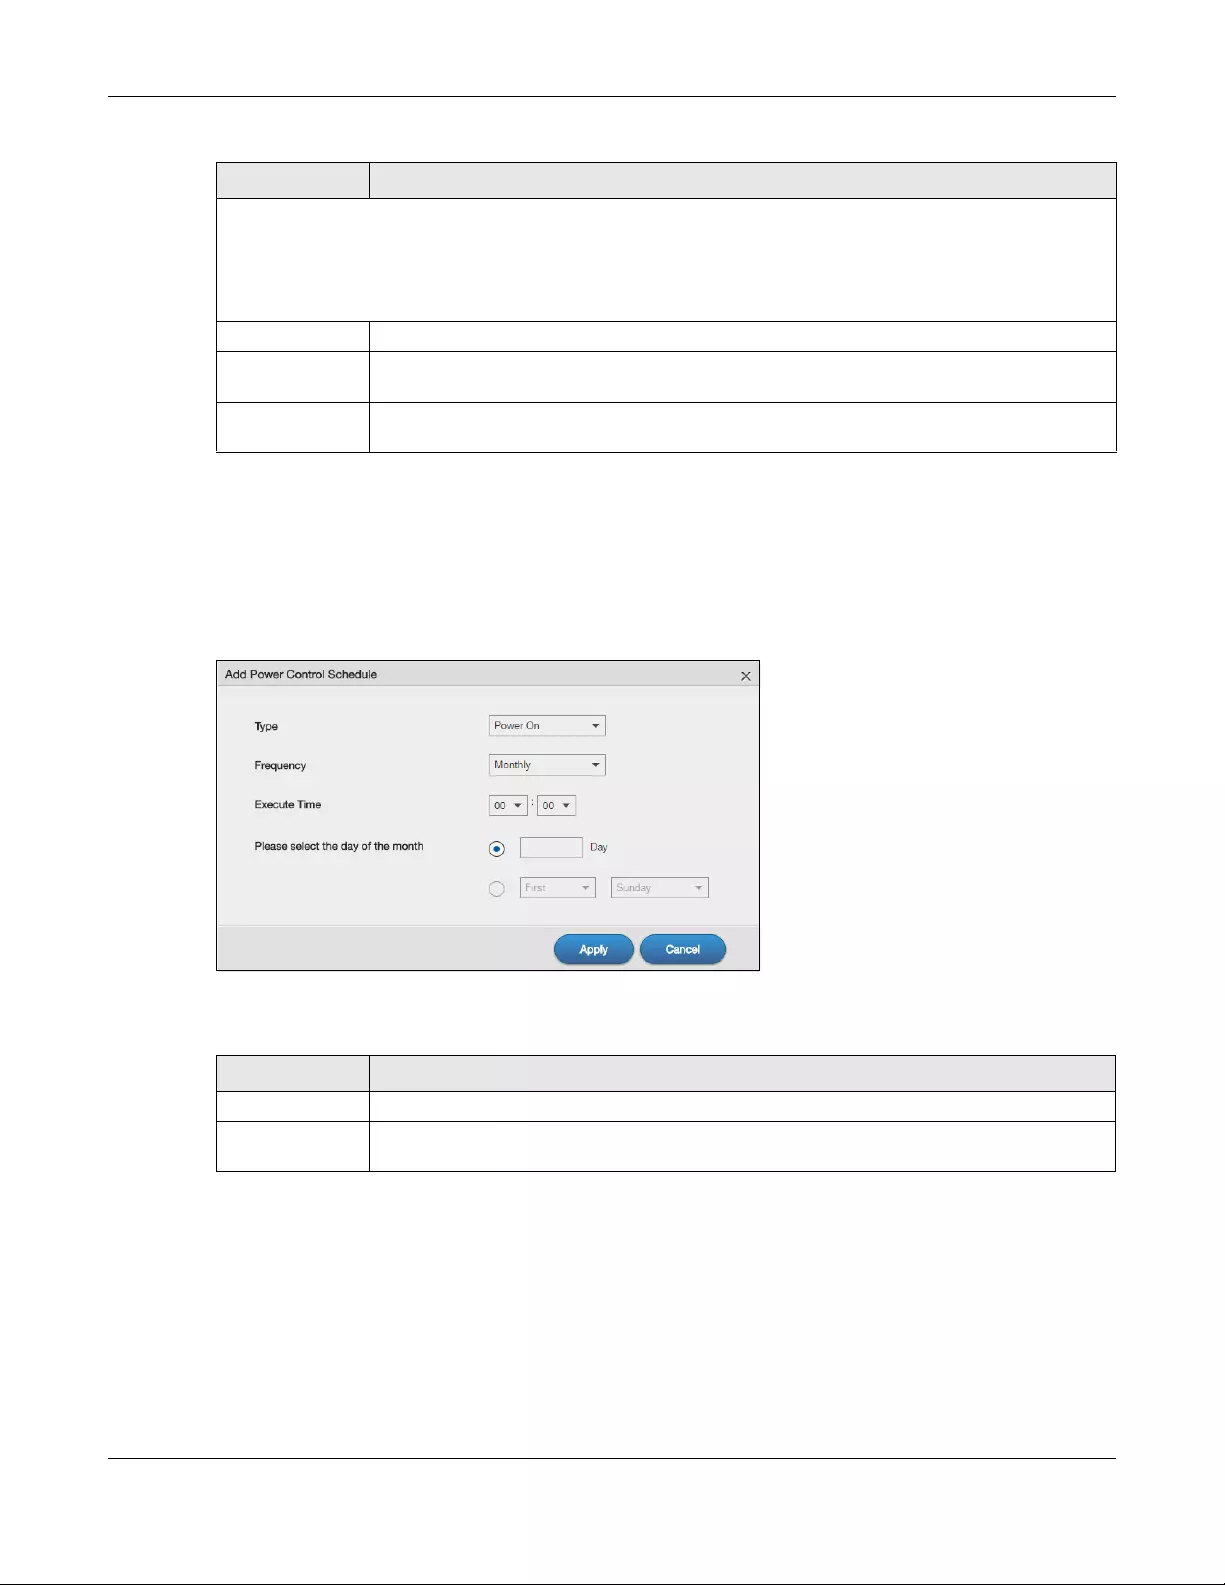
Chapter 11 Control Panel: Maintenance
NAS Series User’s Guide
180
11.3.3 Add the Power Control Schedule
Click the Add Power Control Schedule icon in the Control Panel > Maintenance > Power > Power On/Of f
Schedule screen to open this screen. Use this screen to configure power control schedules to have the
NAS turn on, turn off, or reboot at specified times.
Figure 146 Control Panel > Maintenance > Power > Power On/Off Schedule: Add
The following table describes the labels in this screen.
This table lists the power on, power off, and reboot schedules. For example, you could have one schedule to turn
the NAS on every morning, at 8:00, another schedule to turn it off every evening at 18:00, and a third schedule to
have it reboot every Friday at 14:00.
Click a column’s heading cell to sort the schedules by that column’s criteria. Click the heading cell again to
reverse the sort order.
Type This field displays whether the power control schedule has the NAS turn on, turn off, or reboot.
Frequency This field shows how often (monthly, weekly, or daily) the NAS is to apply this power control
schedule.
Execute Time This field shows when the NAS is to use this power control schedule (when the NAS is to turn on,
turn off, or reboot).
Table 105 Control Panel > Maintenance > Power > Power On/Off Schedule (continued)
LABEL DESCRIPTION
Table 106 Control Panel > Maintenance > Power > Power On/Off Schedule: Add
LABEL DESCRIPTION
Type Select whether this power control schedule has the NAS turn on, turn off, or reboot.
Frequency Select whether the NAS is to apply this power control schedule entry on a monthly, weekly, or
daily basis.
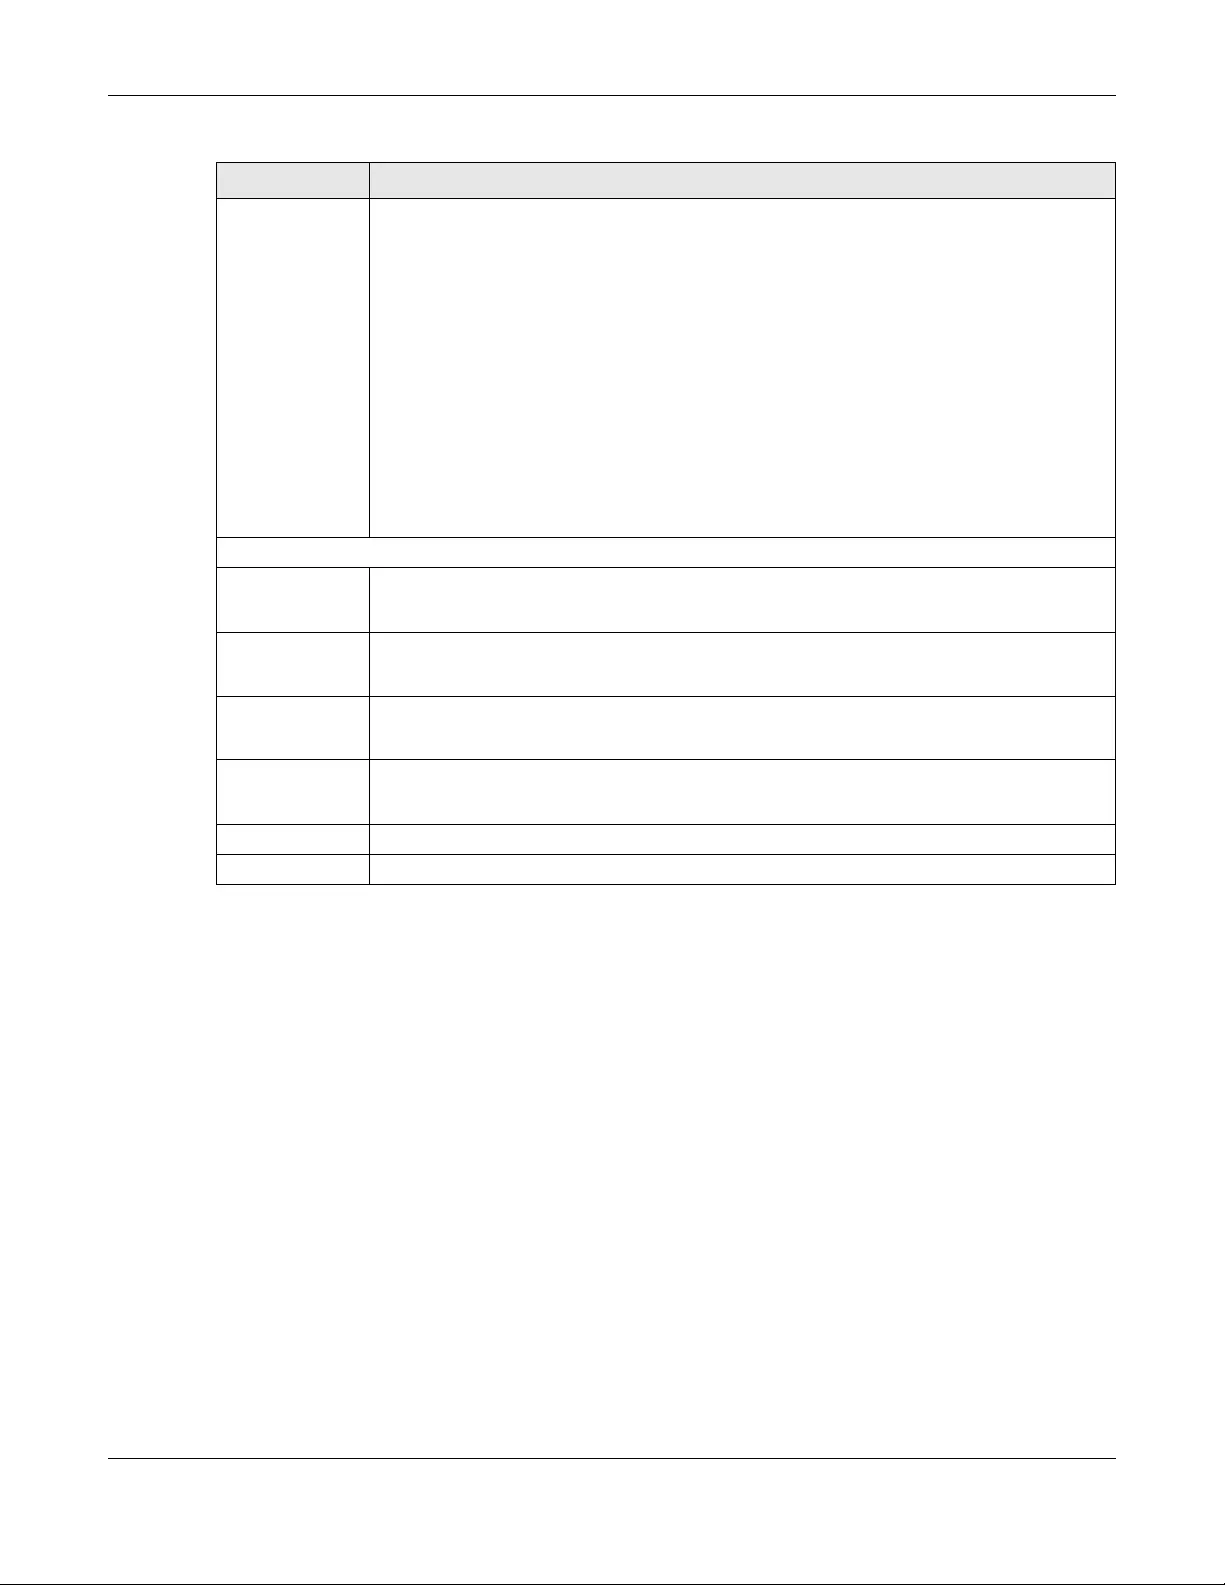
Chapter 11 Control Panel: Maintenance
NAS Series User’s Guide
181
11.4 Log Screen
Click Control Panel > Service > Maintenance > Log to open the following screen.
Use this screen to display all NAS logs. There are at most 512 entries in the log. Older logs are removed by
the system. You cannot download the log file via FTP or CIFS.
Execute Time
(hh:mm)
Enter the time, day, and/or day of the month as appropriate for this power control schedule
entry. Leave more than 10 minutes between the execution times of the entries.
If the NAS turns off or restarts while a user is transferring files to or from the NAS, the transfer fails.
The user will need to restart the transfer.
The NAS skips a scheduled restart or power off if the execution time comes while the NAS is
doing any of the following:
• Resynchronizing a RAID
• Upgrading firmware
• Replacing the configuration file
If the NAS is turned off at the time when a restart or power off is scheduled, the NAS does not
perform the restart or power off.
If the NAS is turned on at the time when a power on is scheduled, the NAS does not perform the
power on.
Use this part of the screen to configure power on, power off, and reboot times.
Please select the
day of the month
This is only available if you set the Frequency to Monthly.
Choose the day of each month for the power control schedule entry.
Every how many
weeks?
This is only available if you set the Frequency to Weekly.
Enter the interval between weeks.
on every This is only available if you set the Frequency to Weekly.
Choose the day of the week for the power control schedule entry
Every This is only available if you set the Frequency to Daily.
Enter the interval between days for the power control schedule entry.
Apply Click this to save your changes.
Cancel Click this to return to the previous screen without saving.
Table 106 Control Panel > Maintenance > Power > Power On/Off Schedule: Add (continued)
LABEL DESCRIPTION
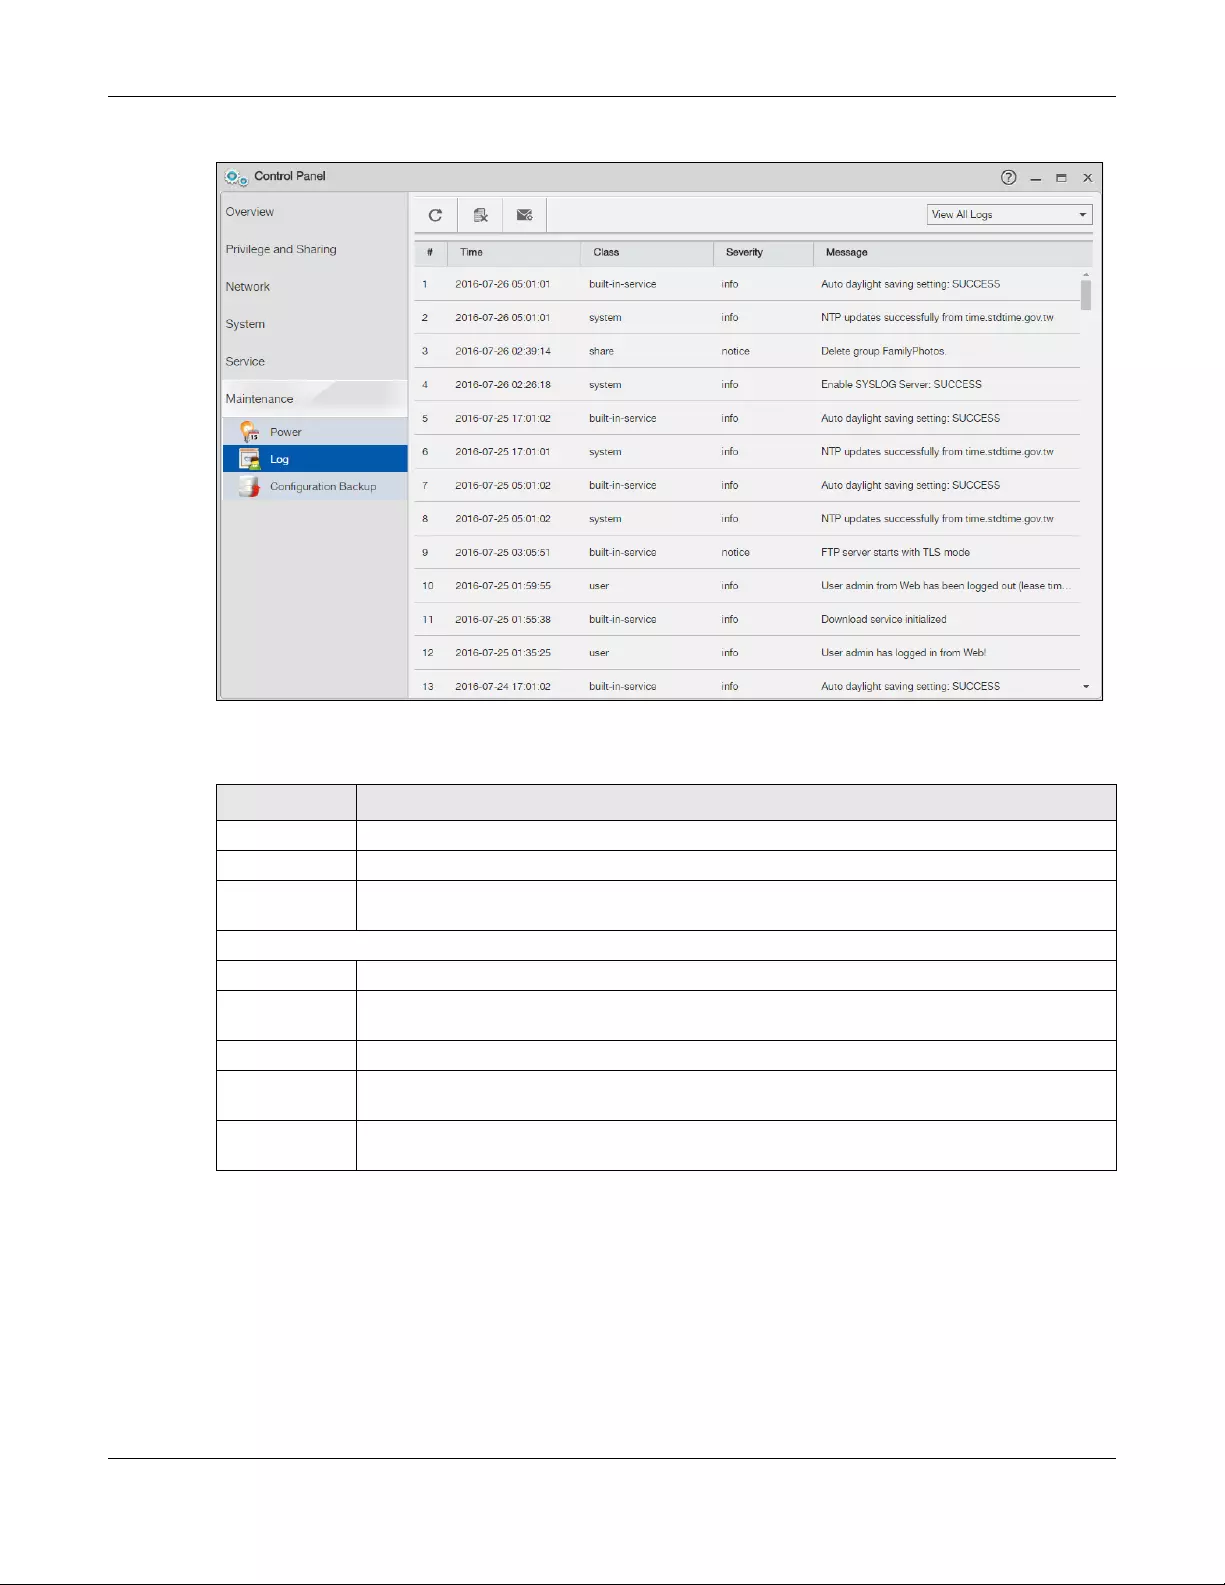
Chapter 11 Control Panel: Maintenance
NAS Series User’s Guide
182
Figure 147 Control Panel > Service > Maintenance > Log
The following table describes the labels in this screen.
11.4.1 Log Report Configuration Screen
In the Log screen, click Report Config to do the following:
• Use the Email Setting screen (Section 11.4.2 on page 183) to enable and configure e-mail alerts from
the NAS.
• Use the Report Setting screen (Section 11.4.3 on page 184) to select the type of alerts you want to
receive through e-mail and schedule when the NAS e-mails the alerts.
Table 107 Control Panel > Service > Maintenance > Log
LABEL DESCRIPTION
Refresh Click this to update the log display.
Purge all Logs Click this to erase all logs from the NAS.
Report Config Click this to open a screen where you can configure email alerts for logs. Refer to Section 11.4.1
on page 182 to see the screens for this.
The screen always shows all logs by default. Choose a specific log category to view logs for just that category.
# This is the log entry’s number in the list according to the currently selected sort order.
Time This shows the date and time the log was created. Click the top of the column to sort by oldest or
newest.
Class This displays the log category; see Table 111 on page 189 for details.
Severity This displays how serious the log is rated by the NAS. See Table 112 on page 189 for more
information.
Message This displays a description of the log. Click the top of the column to sort by alphabetical or
reverse alphabetical order.
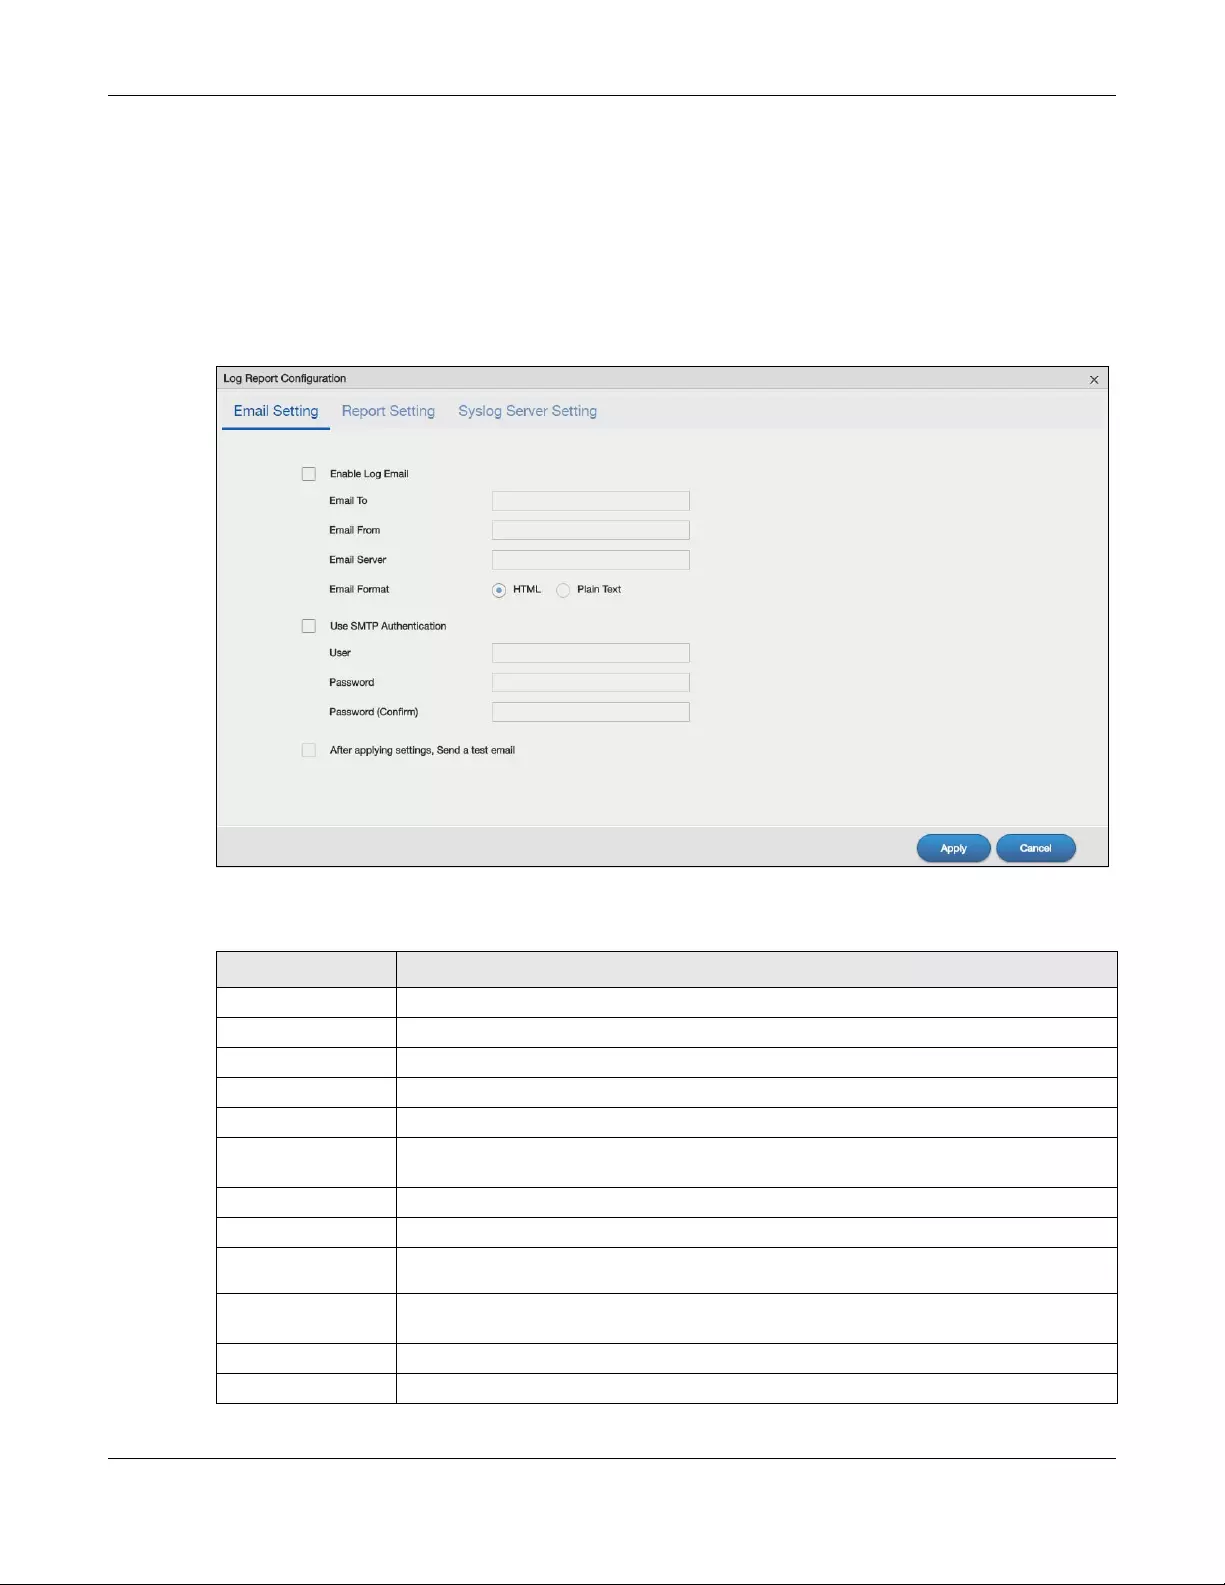
Chapter 11 Control Panel: Maintenance
NAS Series User’s Guide
183
• Use the Syslog Server Setting screen (Section 11.4.4 on page 184) to enable the syslog server and
select the categories to include in the log report.
11.4.2 Email Setting
You can enable and configure e-mail alerts from the NAS. In the Log Report Configuration screen, click
the Email Setting tab to open the following screen.
Figure 148 Control Panel > Service > Maintenance > Log > Report Config: Email Setting
The following table describes the labels in this screen.
Table 108 Control Panel > Service > Maintenance > Log > Report Config: Email Setting
LABEL DESCRIPTION
Enable Log Email Click this to have the NAS e-mail log alerts to your e-mail account.
Email To Enter the e-mail address where you want to receive the log alerts.
Email From Enter the e-mail address the NAS uses in the From field of the e-mail header for its log alerts.
Email Server Enter the e-mail server address the NAS uses to send e-mail alerts,
Email Format Select the e-mail format you want the NAS to use in its e-mail alerts.
Use SMTP
Authentication
Click this if the e-mail server you want the NAS to use for its e-mail alerts requires a username
and password.
User Enter the username for the e-mail server.
Password Enter the password for the e-mail server.
Password
(Confirm) Re-enter the password to confirm it.
After apply settings,
send a test email
Click this to have the NAS send a test e-mail to the settings you have entered.
Apply Click this to save your changes.
Cancel Click this to return to the previous screen without saving.
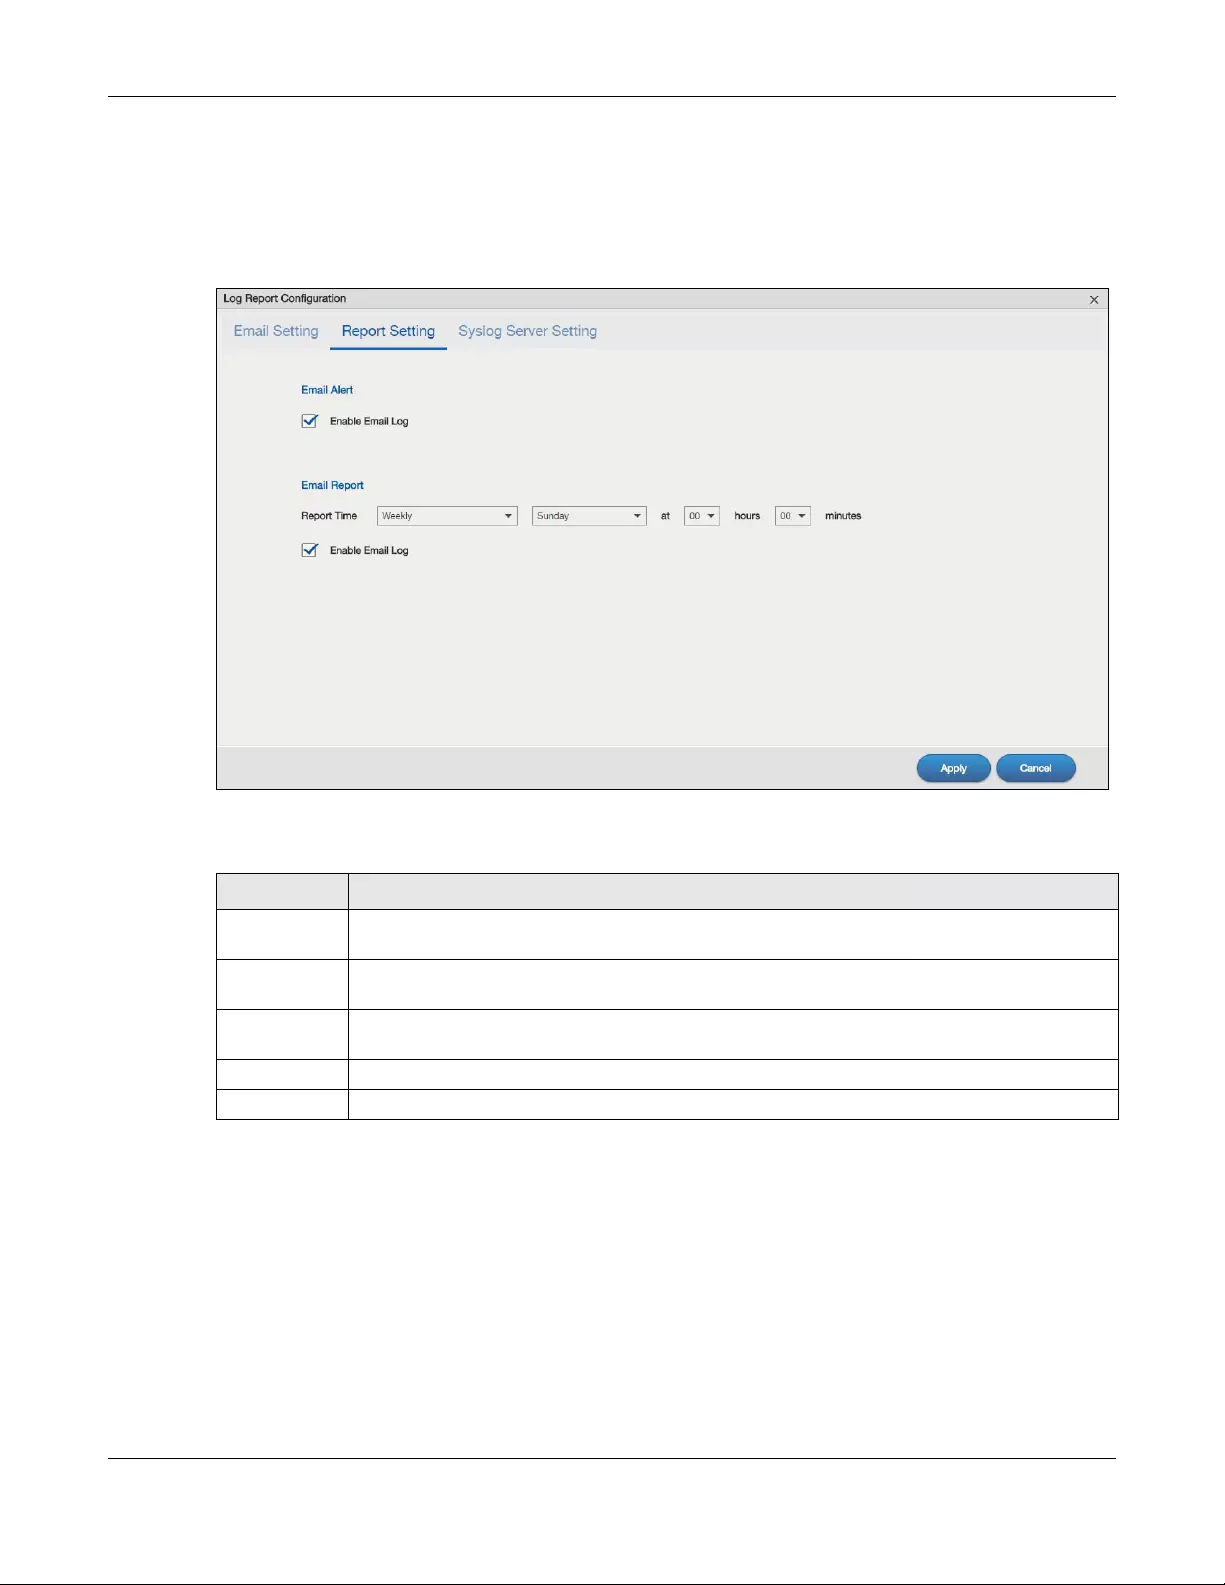
Chapter 11 Control Panel: Maintenance
NAS Series User’s Guide
184
11.4.3 Report Setting
You can have the NAS email you alerts and reports. In the Log Report Configuration screen, click the
Report Setting tab to open the following screen.
Figure 149 Control Panel > Service > Maintenance > Log > Report Config: Report Setting
The following table describes the labels in this screen.
11.4.4 Syslog Server Setting
You can enable the syslog server and select the categories to include in the log report. In the Log Report
Configuration screen, click the Syslog Server Setting tab to open the following screen.
Table 109 Control Panel > Service > Maintenance > Log > Report Config: Report Setting
LABEL DESCRIPTION
Email Alert Select the Enable Email Log check box to have the NAS send an alert email to the configured
email address whenever the NAS generates a critical severity log.
Report Time Select how often (Weekly, Daily or Hourly), the day of the week (for weekly reports), and the time
(hour:minutes) the NAS sends a report email.
Enable Email
Log
Select the check box to have the NAS email reports of all logs the NAS generates to the
configured email address.
Apply Click this to save your changes.
Cancel Click this to return to the previous screen without saving.
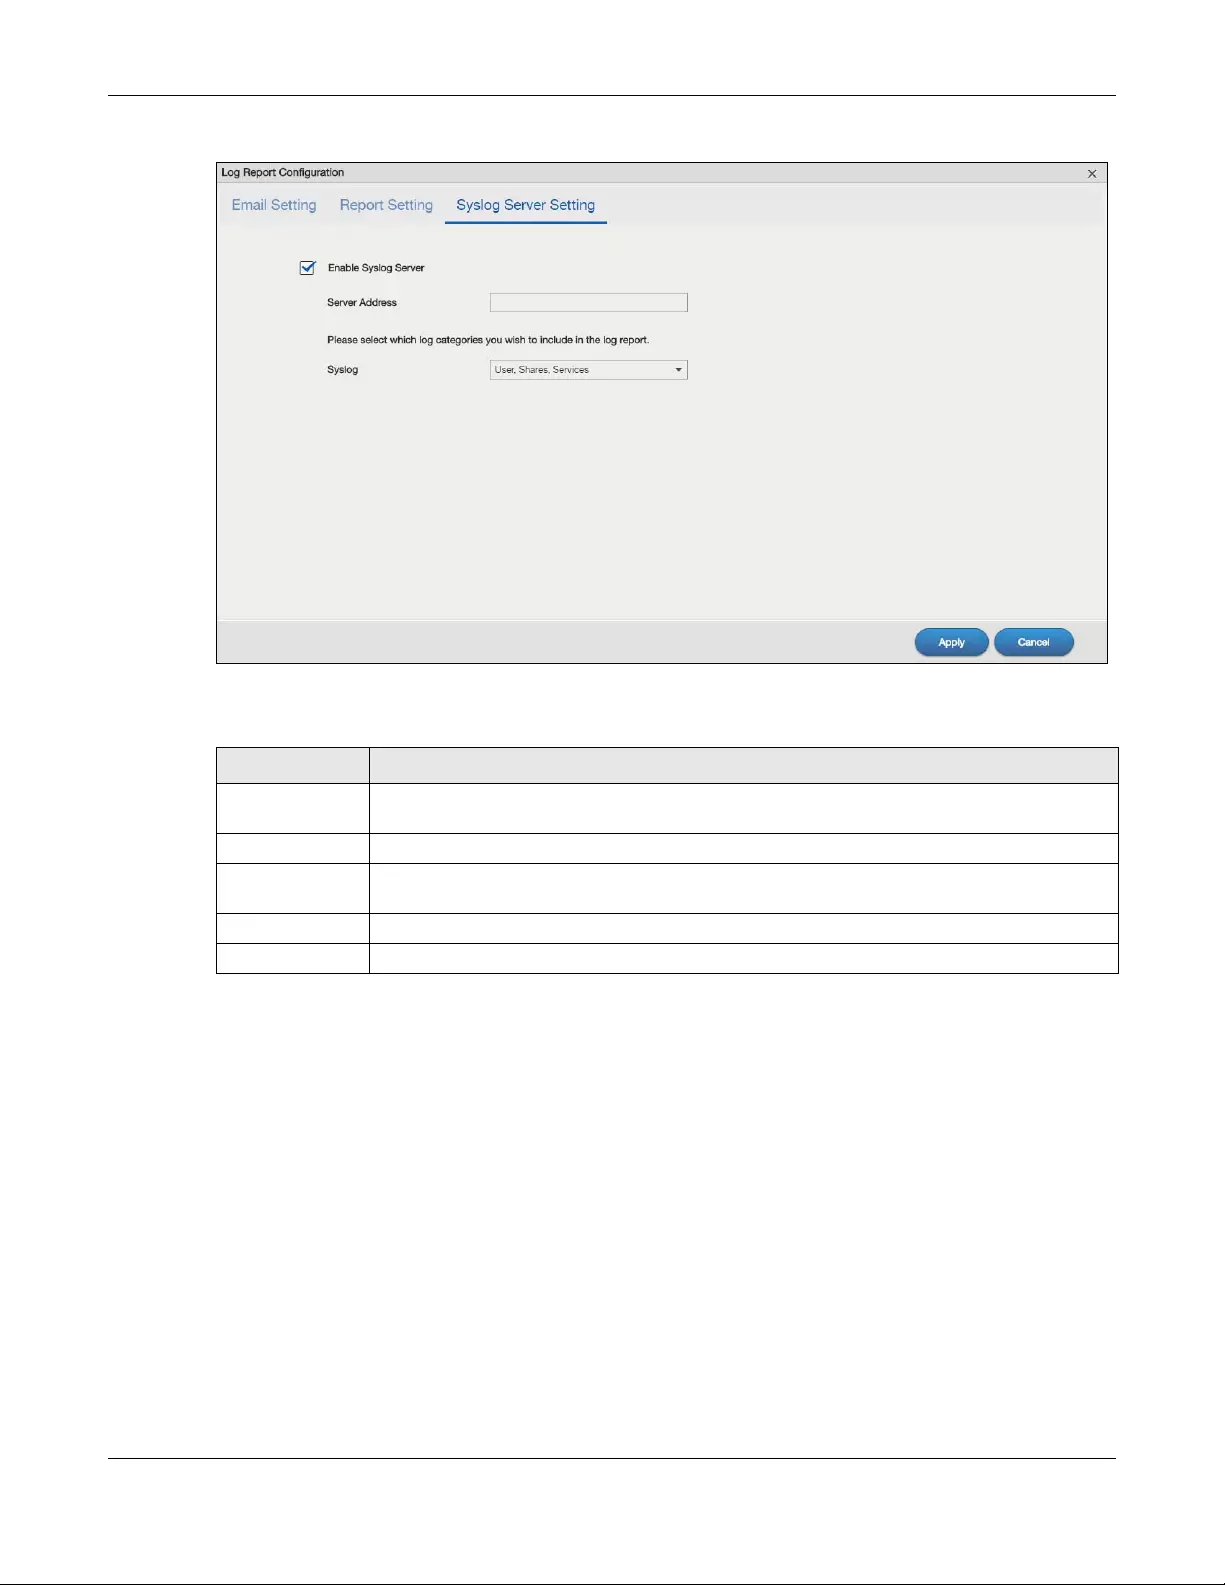
Chapter 11 Control Panel: Maintenance
NAS Series User’s Guide
185
Figure 150 Control Panel > Service > Maintenance > Log > Report Config: Syslog Server Setting
The following table describes the labels in this screen.
11.5 Configuration Backup Screens
Use these screens to backup or restore the NAS configuration settings. You can also reset your device
settings back to the factory default.
11.5.1 Configuration Backup
Click Control Panel > Service > Maintenance > Configuration Backup to open the following screen.
Click Backup to save the current configuration of the NAS to your computer. A pop-up screen appears
asking you to confirm.
Table 110 Control Panel > Service > Maintenance > Log > Report Config: Syslog Server Setting
LABEL DESCRIPTION
Enable Syslog
Server
Check this to enable syslog server.
Server Address Enter the syslog server address you want the NAS to use for its log alerts.
Syslog Select the type of log alerts you want to receive in your e-mail. Select All Logs to include all
types of log alerts.
Apply Click this to save your changes.
Cancel Click this to return to the previous screen without saving.
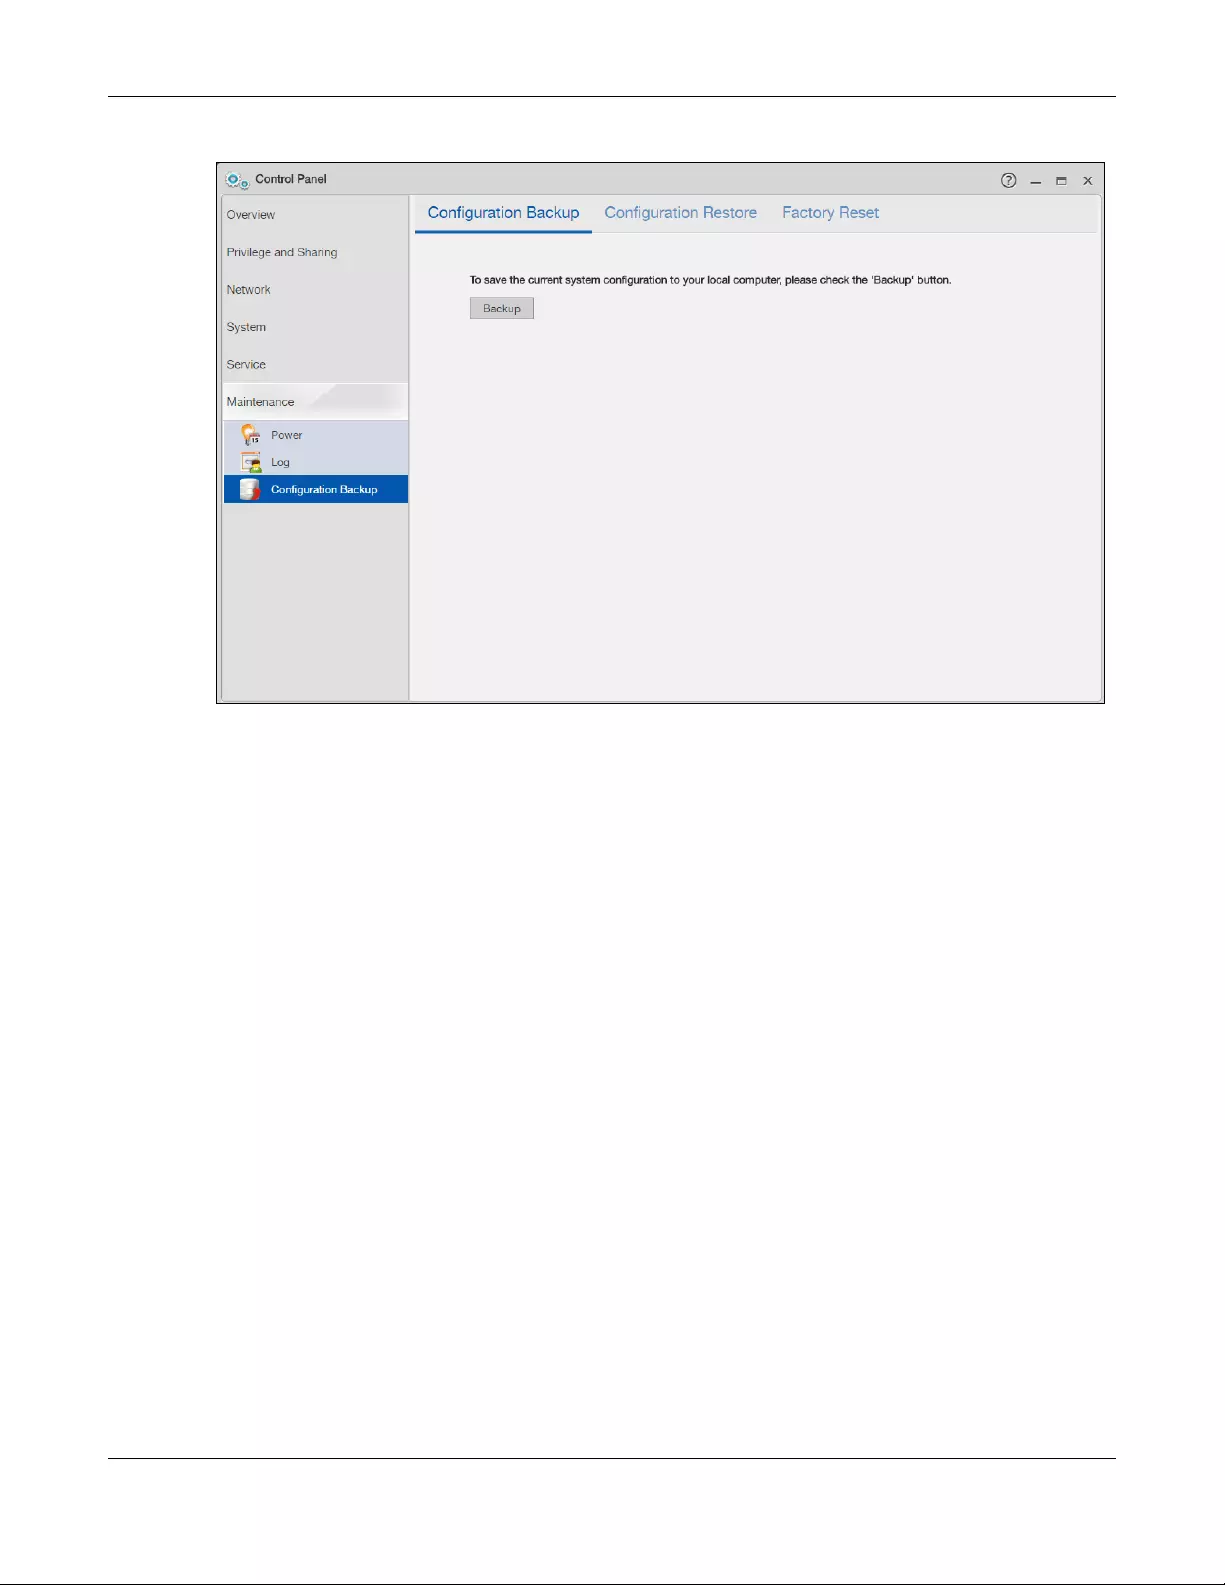
Chapter 11 Control Panel: Maintenance
NAS Series User’s Guide
186
Figure 151 Control Panel > Service > Maintenance > Configuration Backup
11.5.2 Configuration Restore
Click Control Panel > Service > Maintenance > Configuration Backup > Configuration Restore to open
the following screen. Restore Configuration allows you to upload a new or previously saved
configuration file from your computer to your NAS.
Note: When you restore a file configuration, the NAS checks the volumes/share paths on the
NAS and the configuration file.
If the volume exists but the share path is missing in the NAS, the NAS automatically
creates this share path.
If the volume does not exist on the NAS, the Status of the share will show “Lost” in the
Control Panel > Privilege and Sharing > Shared Folders screen (see Table 68 on page
121).
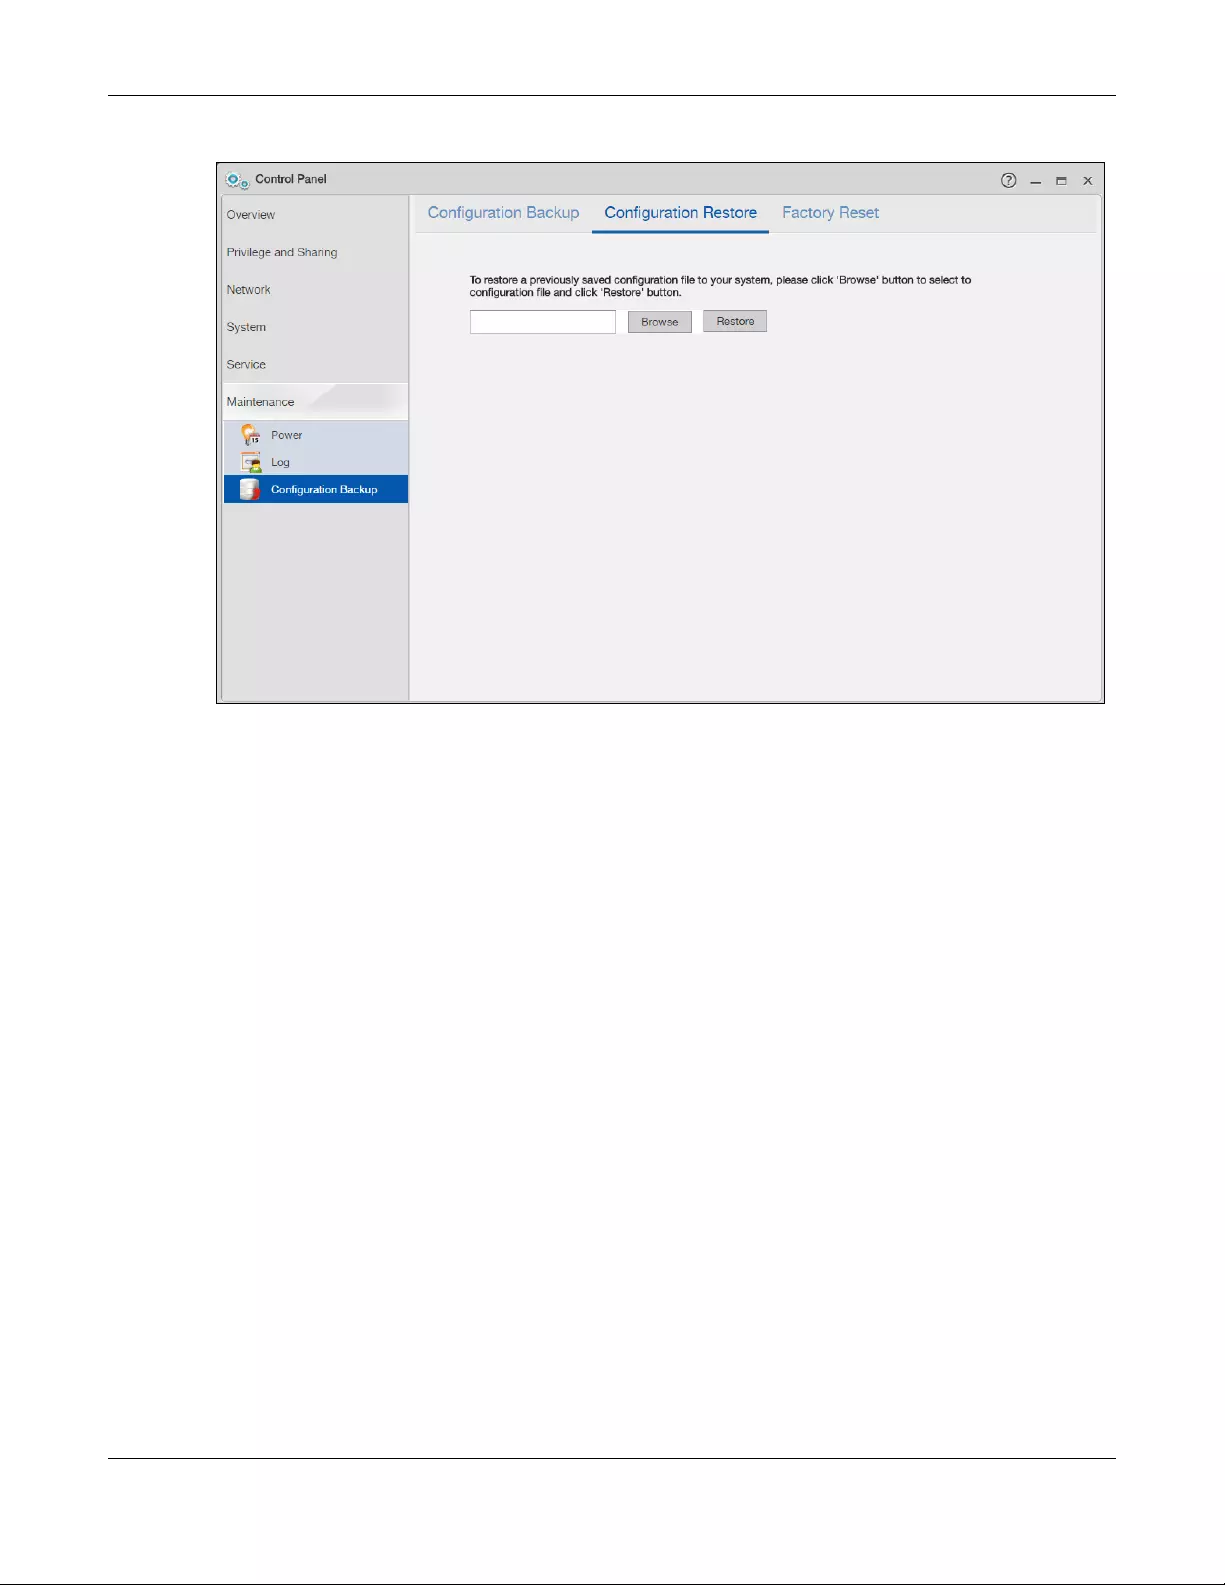
Chapter 11 Control Panel: Maintenance
NAS Series User’s Guide
187
Figure 152 Control Panel > Service > Maintenance > Configuration Backup > Configuration Restore
Click Browse to locate a previously-saved configuration file. Then click Restore to load the previously-
saved configuration file to the NAS. This replaces your current NAS configuration settings with the settings
in the previously-saved configuration file.
A pop-up screen appears asking you to confirm. Click OK to continue or Cancel to quit.
11.5.3 Factory Reset
Click Control Panel > Service > Maintenance > Configuration Backup > Factory Reset to open the
following screen.
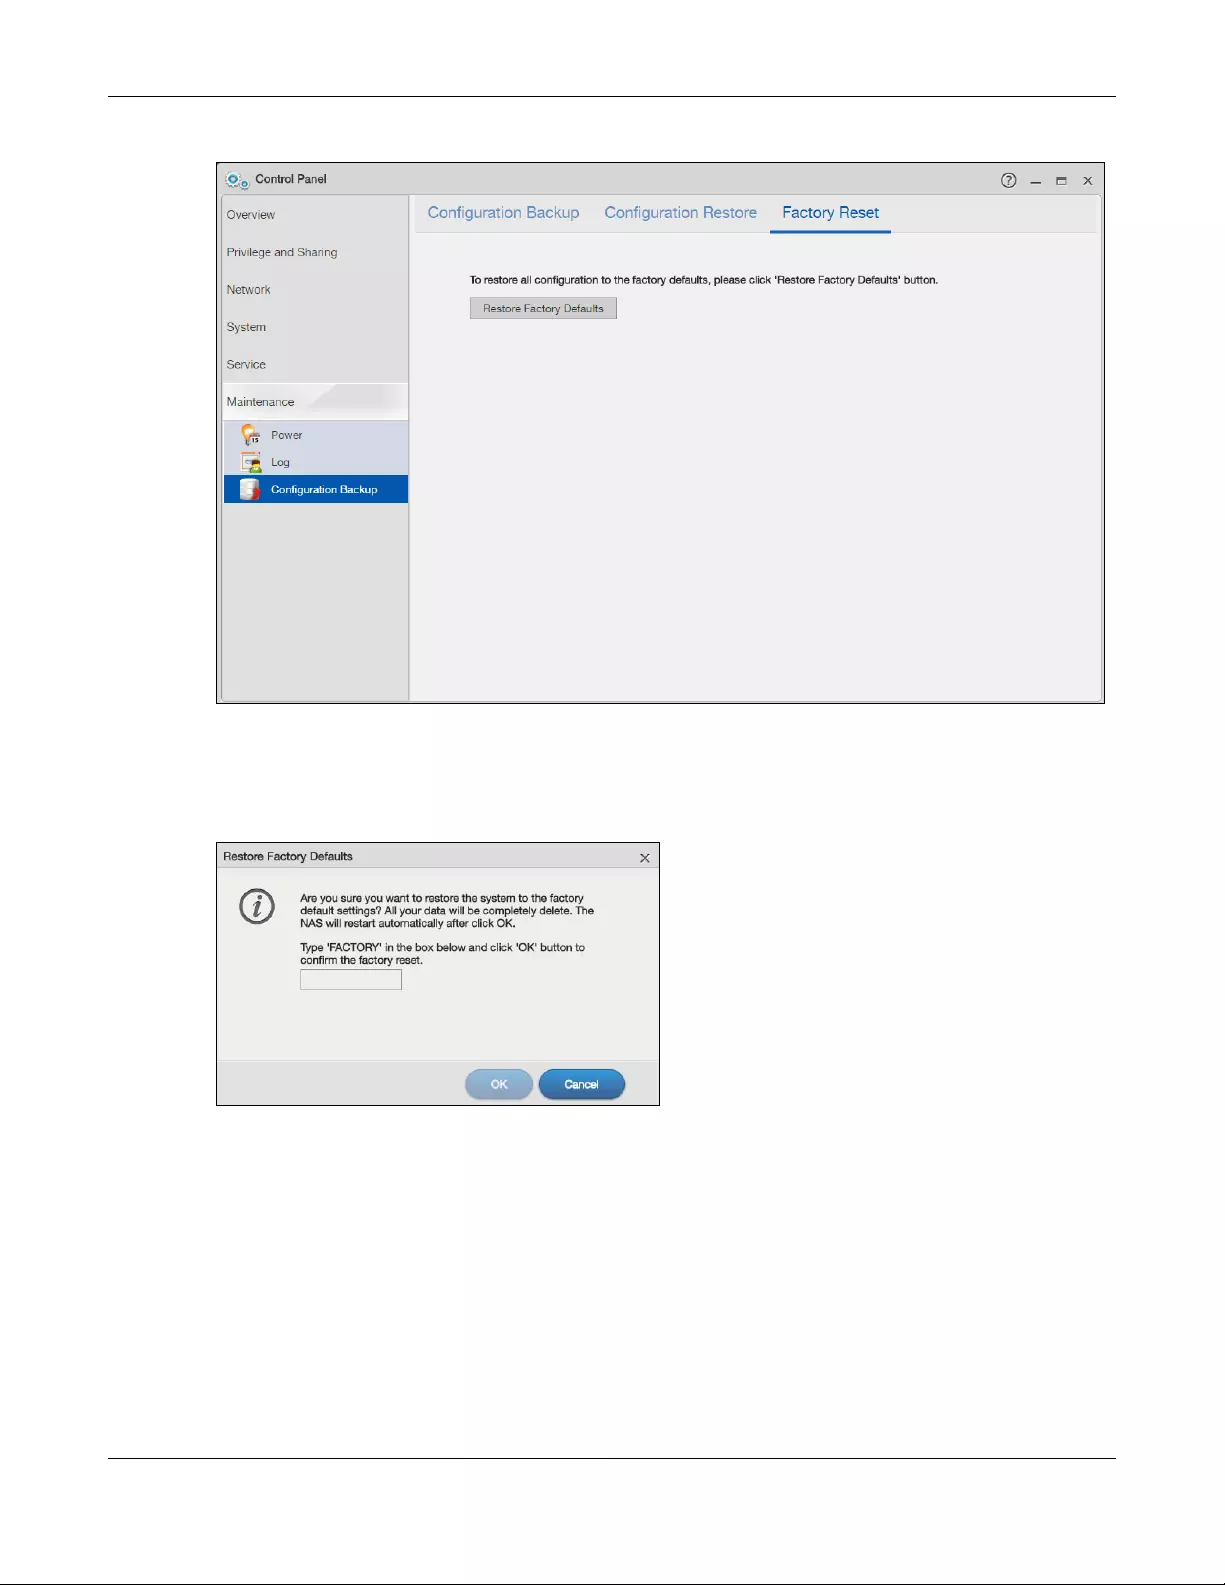
Chapter 11 Control Panel: Maintenance
NAS Series User’s Guide
188
Figure 153 Control Panel > Service > Maintenance > Configuration Backup > Factory Reset
Click Restore Factory Defaults to clear all user-entered configuration information and return the NAS to
its factory defaults.
A warning screen appears asking you to confirm. Enter “FACTORY” and click OK to continue or click
Cancel to quit.
11.6 Technical Reference
This section provides technical background information on the topics discussed in this chapter.
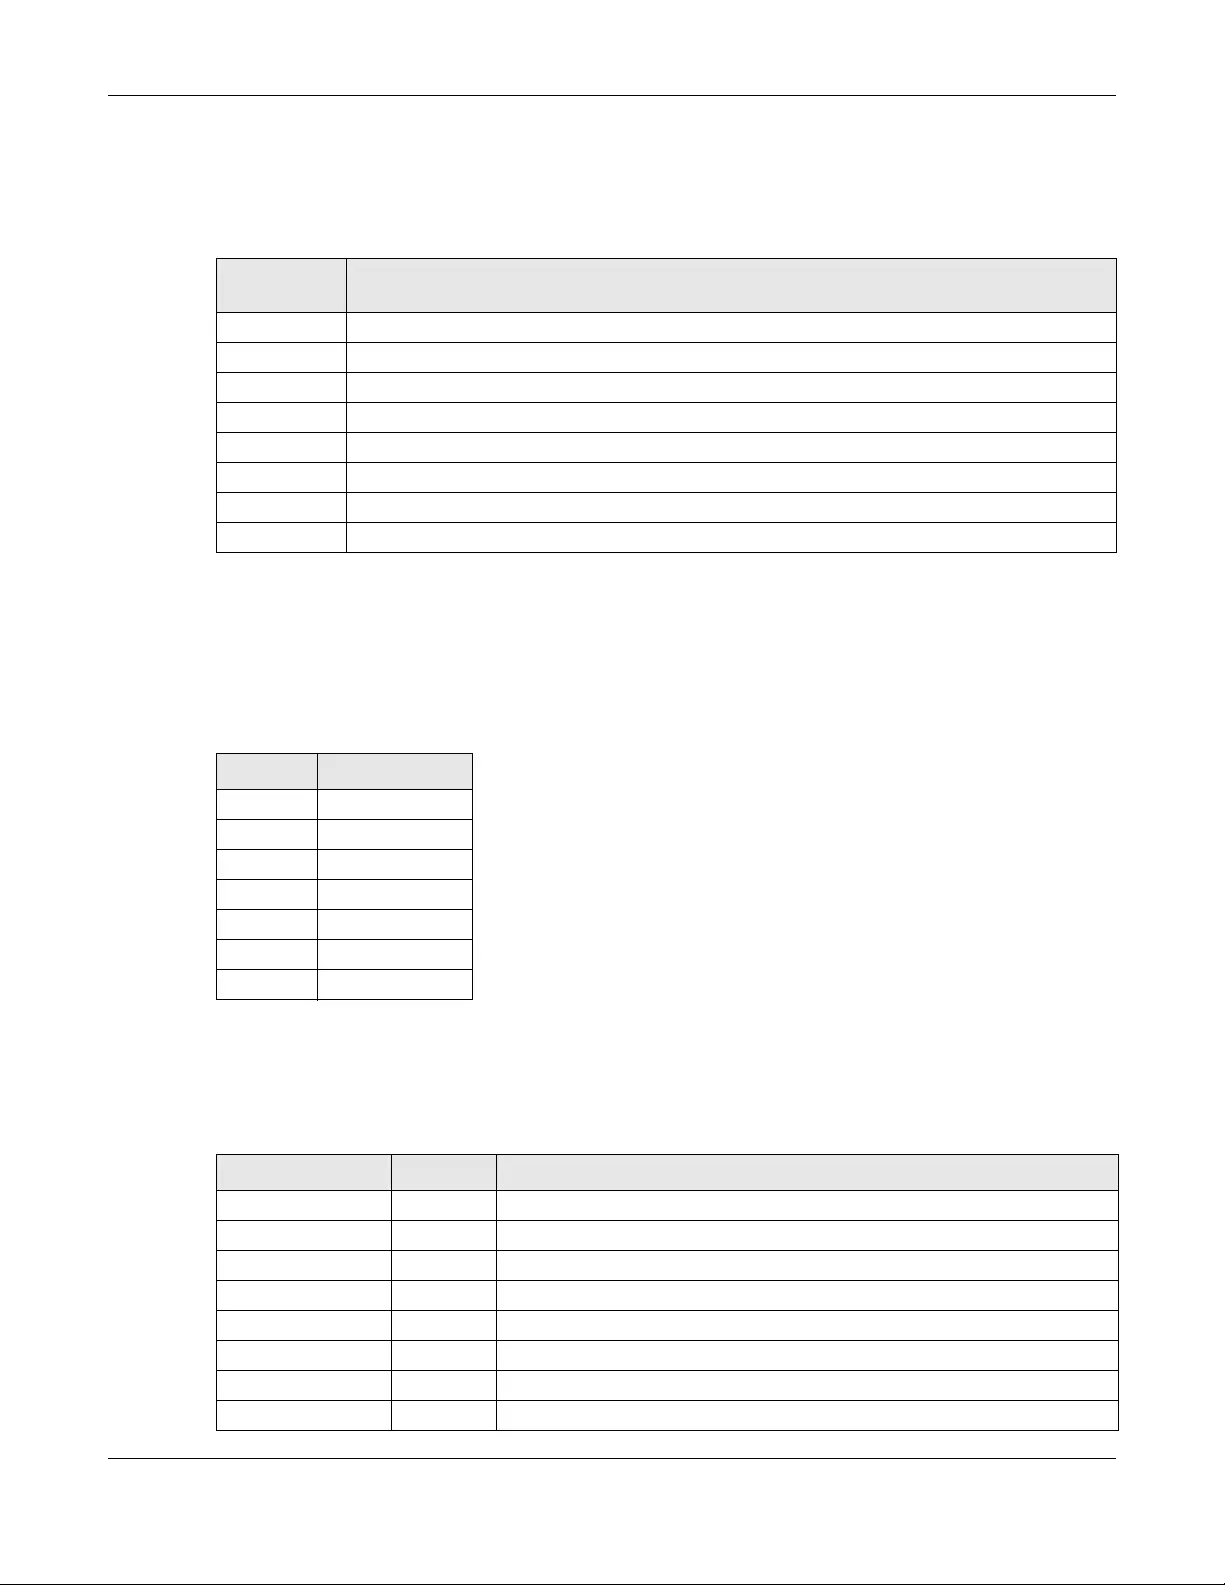
Chapter 11 Control Panel: Maintenance
NAS Series User’s Guide
189
11.6.1 Log Classes
The following table shows information on log classes.
11.6.2 Log Severity Levels
The following table shows information on log severity levels. Levels range from 0 to 6 with 0 being the
most severe level log and 6 being an informational log only. Log levels are not displayed in the logs and
are for your reference only.
11.6.3 Log Messages
Here are some example log messages.
Table 111 Log Classes
LOG
CATEGORY DESCRIPTION
Users This log class shows information on user access to the NAS.
Shares This log class shows information on shares being created or deleted.
Services This log class shows information on the operation of the NAS’s built-in services.
System This log class shows all other system related messages.
Network This log class shows information on network configuration, setting changes and so on.
Storage This log class shows information on the NAS’s internal and external storage activities.
Backup This log class shows information on all backup-related activities.
Auto Upload This log class shows information on automatic uploads done by the NAS.
Table 112 Log Severity Levels
LEVEL DESCRIPTION
0Emergency
1Alert
2 Critical
3 Error
4 Warning
5Notice
6Info
Table 113 Log Messages
CLASS SEVERITY MESSAGE
Auto upload INFO %s is queued.
Auto upload INFO %s uploaded (Flickr or YouTube Upload).
Auto upload WARNING error uploading «%s» (%s): %s
Auto upload INFO %s will not be uploaded to %s for there is already a duplicate file.
Auto upload INFO Failed to upload %s to %s (FTP Upload) : %s
Auto upload INFO Successfully upload %s to %s (FTP Upload)
Copy/Sync Button ERROR [USB %s] Backup Folder Does Not Exist.
Copy/Sync Button ERROR [USB %s] Target Folder Does Not Exist.

Chapter 11 Control Panel: Maintenance
NAS Series User’s Guide
190
Copy/Sync Button ERROR [USB Sync] Failed at %s: It is a Folder in Internal Volume. But It is not a Folder in
USB.
Copy/Sync Button ERROR [USB Sync] Failed at %s: It is a Folder in USB. But It is not a Folder in Internal
Volume.
Copy/Sync Button ERROR [USB Sync] Failed at File %s.
Copy/Sync Button ERROR [USB Sync] Sync Failed at Folder %s.
Copy/Sync Button ERROR Modify COPY/SYNC Button Configuration: %s
Copy/Sync Button ERROR Please Change Your Folder Name. Invalid Path: %s
Copy/Sync Button INFO [USB Sync] Copying %s from Internal Volume to Backup Folder.
Copy/Sync Button INFO [USB Sync] Copying %s from Internal Volume to USB.
Copy/Sync Button INFO [USB Sync] Copying %s from USB to Backup Folder.
Copy/Sync Button INFO [USB Sync] Copying %s from USB to Internal Volume.
Copy/Sync Button INFO [USB Sync] Deleting %s from Internal Volume.
Copy/Sync Button INFO [USB Sync] Deleting %s from USB.
Copy/Sync Button INFO [USB Sync] Deleting %s from USB Recursively.
Copy/Sync Button INFO [USB Sync] Finished. Elapsed Time %s Seconds.
Copy/Sync Button INFO [USB Sync] Moving %s from Internal Volume to Backup Folder.
Copy/Sync Button INFO [USB Sync] Moving %s from USB to Backup Folder
Copy/Sync Button INFO [USB Sync] Skip %s: File not Exist
Copy/Sync Button INFO [USB Sync] Skip %s: Not a Regular File.
Copy/Sync Button INFO [USB Sync] Start Pre-Processing: Generating File Lists.
Copy/Sync Button NOTICE [USB Sync] Start Copying Files.
Download Service ERROR Download service cannot find a volume
Download Service ERROR Download service failed to find ipfilter.dat
Download Service INFO Download service add a URL download job %s
Download Service INFO Download service delete %s by user
Download Service INFO Download service download %s error (0x%08x)
Download Service INFO Download service download %s finished in %s
Download Service INFO Download service found a new torrent file %s
Download Service INFO Download service initialized
Download Service INFO Download service pause %s by user
Download Service INFO Download service set %s to %s priority by user
Download Service INFO Download service set default download location to %s
Download Service INFO Download service set max P2P download rate to %d KB/s by user
Download Service INFO Download service set max P2P upload rate to %d KB/s by user
Download Service INFO Download service set max download slot to %d
Download Service INFO Download service set seeding time to %d minutes
Download Service INFO Download service set TCP port to %d and UDP port to %d
Download Service INFO Download service set torrent monitor location to %s
Download Service INFO Download service start to download %s
Download Service INFO Download service stopped
Table 113 Log Messages (continued)
CLASS SEVERITY MESSAGE

Chapter 11 Control Panel: Maintenance
NAS Series User’s Guide
191
Download Service INFO Download service suspend %s because of no data income detected or to limit
max download slot
Download Service INFO Download service add comment %s to %s by user
Download Service INFO Download service set min upload/download ratio to %d%
Download Service INFO Download service set max seed slot to %d
Download Service INFO Download service start loading ipfilter.dat
Download Service INFO Download service clear all ipfilter rules
Download Service INFO Download service blocked peer removed from peer list
Download Service INFO Download service disconnected blocked peer
Download Service INFO Download service incoming connection blocked by IP filter
Download Service INFO Download service peer from tracker blocked by IP filter
Download Service INFO Download service abort loading ipfilter.dat
Download Service INFO Download service will update ipfilter.dat from %s after %d day(s)
Download Service INFO Download service added %d rules from ipfilter.dat
Download Service INFO Download service detected invalid ip range %s in ipfilter.dat
Download Service WARNING Download service default location does not exist. Load default
Download Service WARNING Download service default torrent location does not exist. Load default
Groups NOTICE Add new group %s.
Groups NOTICE Delete group %s.
Network INFO DyDNS: Start Success
Network INFO DyDNS: Stop Success
Network NOTICE %s is active because of changing Port Group. Enable DHCP client.
Network NOTICE %s is inactive because of changing Port Group. Disable DHCP client.
Network NOTICE %s MTU > (%s MTU — 8), %s may not work correctly.
Network NOTICE (%s MTU —  < %s MTU, %s may not work correctly.
Network NOTICE Add interface %s.
Network NOTICE Because %s link down. Default route will not apply until %s link up.
Network NOTICE Because base interface %s will be disabled. Interface %s is disabled now.,
base_ud_iface
Network NOTICE Network Config setting is changed
Network NOTICE Interface %s was disabled.
Network NOTICE Interface %s was enabled.
Network NOTICE Port Group on %s is changed. Renew DHCP client.
Network NOTICE Account pppoe was changed
Network NOTICE Add account pppoe
Network NOTICE ADD interface ppp0
Network NOTICE Interface ppp0 will reapply because Device-Ha become active status.
Network NOTICE Interface ppp0 will reapply because Device-Ha is not running.
Network NOTICE Network port is disabled
Network NOTICE Network port is enabled
Network ERROR DyDNS: Start Error
Network ERROR DyDNS: Stop Error
Table 113 Log Messages (continued)
CLASS SEVERITY MESSAGE

Chapter 11 Control Panel: Maintenance
NAS Series User’s Guide
192
Services INFO HTTP management port has changed to %s
Services INFO Clock timezone is set to GMT%s
Services INFO Clock timezone is set to default
Services INFO Clock daylight saving is enabled
Services INFO Clock daylight saving is disabled
Services INFO Clock has disable daylight saving
Services INFO MyClock has enable daylight saving
Services INFO MyClock has set timezone to %s
Services INFO MyClock has set timezone to default
Services INFO The date and time are updated from NTP server.
Services INFO The date and time are updated manually.
Services INFO The time is updated manually.
Services NOTICE FTP server stops
Services NOTICE FTP server starts
Services NOTICE MyClock has changed daylight saving interval
Services NOTICE MyClock has disabled daylight saving interval
Services NOTICE NTP server has set to ‘%s’
Services NOTICE NTP server has set to null
Services NOTICE The NTP service is disabled.
Services NOTICE The NTP service is enabled.
Services WARNING Reaching Maximum Allowed Rules
Services WARNING Rule is empty
Services WARNING The Rule Does Not Exist
Shares INFO Expire recycle-bin finish for share %s, process time: %s seconds, remove %s file
(%s bytes)
Shares NOTICE Add new disabled share %s for unshared folder: %s in volume: %s.
Shares NOTICE Add new share %s.
Shares NOTICE Delete share %s.
Shares NOTICE Purge all files in recycle-bin folder in share: %s.
Shares NOTICE Recycle-bin disabled. Remove recycle-bin folder in share: %s.
Storage ERROR Eject External Disk (%s): FAILED
Storage INFO Eject External Disk (%s): SUCCESS
Storage ERROR Cancel External Volume Scan: FAILED
Storage ERROR Cannot Unmount Volume and RAID. System Busy Using Volume and RAID:
Please Reboot and Try Again
Storage ERROR Create External Normal Volume [%s] (%s): FAILED
Storage ERROR Rename External Volume to [%s]: FAILED
Storage ERROR Scan External Volume: FAILED
Storage INFO Cancel External Volume Scan: SUCCESS
Storage INFO Create External Normal Volume [%s] (%s): SUCCESS
Storage INFO Rename External Volume to [%s]: SUCCESS
Storage INFO Scan External Volume: SUCCESS
Table 113 Log Messages (continued)
CLASS SEVERITY MESSAGE

Chapter 11 Control Panel: Maintenance
NAS Series User’s Guide
193
storage Info Create raidType [Volume1]: SUCCESS
storage error Create raidType [Volume1]: FAILED
storage Info Create raidType [Disk group 1]: SUCCESS
storage error Create raidType [Disk group 1]: FAILED
storage Info Create Internal Volume [Volume1] (Size=512MB): SUCCESS
storage error Create Internal Volume [Volume1] (Size=512MB): FAILED
storage Info Delete Volume [Volume1] SUCCESS
storage error Delete Volume [Volume1] FAILED
storage Info Delete Disk Group [Disk Group 1] SUCCESS
storage error Delete Disk Group [Disk Group 1] FAILED
storage Info initialize Repair Degraded Raid [Volume1]: SUCCESS
storage error initialize Repair Degraded Raid [Volume1]: FAILED
storage Info initialize Repair Degraded Raid [Disk Group 1]: SUCCESS
storage error initialize Repair Degraded Raid [Disk Group 1]: FAILED
storage Info Add disk1 to Volume1: SUCCESS
storage error Add disk1 to Volume1: FAILED
storage Info Add disk1 to Disk Group 1: SUCCESS
storage error Add disk1 to Disk Group 1: FAILED
storage Info Change Volume1 Raid type to raid5: SUCCESS
storage error Change Volume1 Raid type to raid5: FAILED
storage Info Change Disk Group 1 Raid type to raid5: SUCCESS
storage error Change Disk Group 1 Raid type to raid5: FAILED
storage Info Add Hot-Spare disk1 to Raid [Volume1]: SUCCESS
storage error Add Hot-Spare disk1 to Raid [Volume1]: FAILED
storage Info Add Hot-Spare disk1 to Raid [Disk Group 1]: SUCCESS
storage error Add Hot-Spare disk1 to Raid [Disk Group 1]: FAILED
storage Info Remove Hot-Spare disk1 from Raid [Volume1]: FAILED
storage error Remove Hot-Spare disk1 from Raid [Volume1]: SUCCESS
storage Info Remove Hot-Spare disk1 from Raid [Disk Group1]: FAILED
storage error Remove Hot-Spare disk1 from Raid [Disk Group1]: SUCCESS
storage Info Expand Volume [Volume1]: SUCCESS
storage error Expand Volume [Volume1]: FAILED
storage Info Expand Disk Group [Disk Group 1] SUCCESS
storage error Expand Disk Group [Disk Group 1] FAILED
System INFO NTP update failed
System INFO NTP updates successfully from %s
System INFO NTP fails to update from %s
System INFO Device is rebooted by administrator!
System INFO Device is shutdown by administrator!
System NOTICE DNS server is changed.
System NOTICE Hostname is cleared.
Table 113 Log Messages (continued)
CLASS SEVERITY MESSAGE

Chapter 11 Control Panel: Maintenance
NAS Series User’s Guide
194
System NOTICE Hostname is set to ‘%s’.
System NOTICE System description is changed.
System NOTICE System description is empty now.
System NOTICE DNS server setting is changed
System NOTICE DNS server address is changed to be given from DHCP server
System NOTICE DNS server address is changed to be assigned by user
System NOTICE Name server is changed.
USB NOTICE An external APC UPS device is plugged/unplugged.
USB NOTICE An external Mass Storage device is plugged/unplugged.
USB NOTICE An external Printer device is plugged/unplugged.
USB NOTICE An external USB hub device is plugged/unplugged.
Users ALERT Failed %s login attempt (incorrect password or inexistent username)
Users ALERT Failed %s login attempt (incorrect password or inexistent username)
Users INFO User %s has logged in from %s!
Users INFO User %s has logged out from %s!
Users INFO User %s from %s has been logged out (re-auth timeout)!
Users INFO User %s from %s has been logged out (lease timeout)!
Users NOTICE Add new user %s by %s from %s.
Users NOTICE User %s password has been changed.
Users NOTICE Delete user %s by %s from %s.
Users NOTICE The user %s from %s has attempted to change the user %s password but old
password verification fail.
Users NOTICE User %s on %u.%u.%u.%u has been denied access from %s
Users NOTICE User %s password has been changed by %s from %s.
Backup/Restore ERROR When query remote target [%s]: %s
Backup/Restore INFO Backup job [%s] successfully
Backup/Restore ERROR When backup [%s]: %s
Backup/Restore ERROR When backup [%s], error happens: %s
Backup/Restore INFO Start to restore backup job [%s].
Backup/Restore INFO Restore backup job [%s] successfully.
Backup/Restore ERROR Restore backup job [%s] failed: %s
Backup/Restore INFO Start to restore backup job [%s] from [%s].
Backup/Restore INFO Restore from [%s] successfully.
Backup/Restore ERROR Restore from [%s] failed: %s
Backup/Restore ERROR When restore [%s]: %s
Backup/Restore ERROR When restore job [%s], error happens: %s
Power
Management
INFO Job [%s] is triggered by schedule
Power
Management
INFO Job [%s] is triggered by user
Power
Management
ERROR Job [%s] is resulted as failed
Table 113 Log Messages (continued)
CLASS SEVERITY MESSAGE
Chapter 11 Control Panel: Maintenance
NAS Series User’s Guide
195
Power
Management
INFO Job [%s] is finished successfully
Power
Management
INFO Job [%s] is pending because other job is running
Power
Management
INFO Job [%s] is canceled by user
Power
Management
INFO Restore job [%s] is triggered by user
Power
Management
INFO [Power On] schedule is triggered.
Power
Management
INFO [Power Off] schedule is triggered.
Power
Management
INFO [Reboot] schedule is triggered.
Table 113 Log Messages (continued)
CLASS SEVERITY MESSAGE
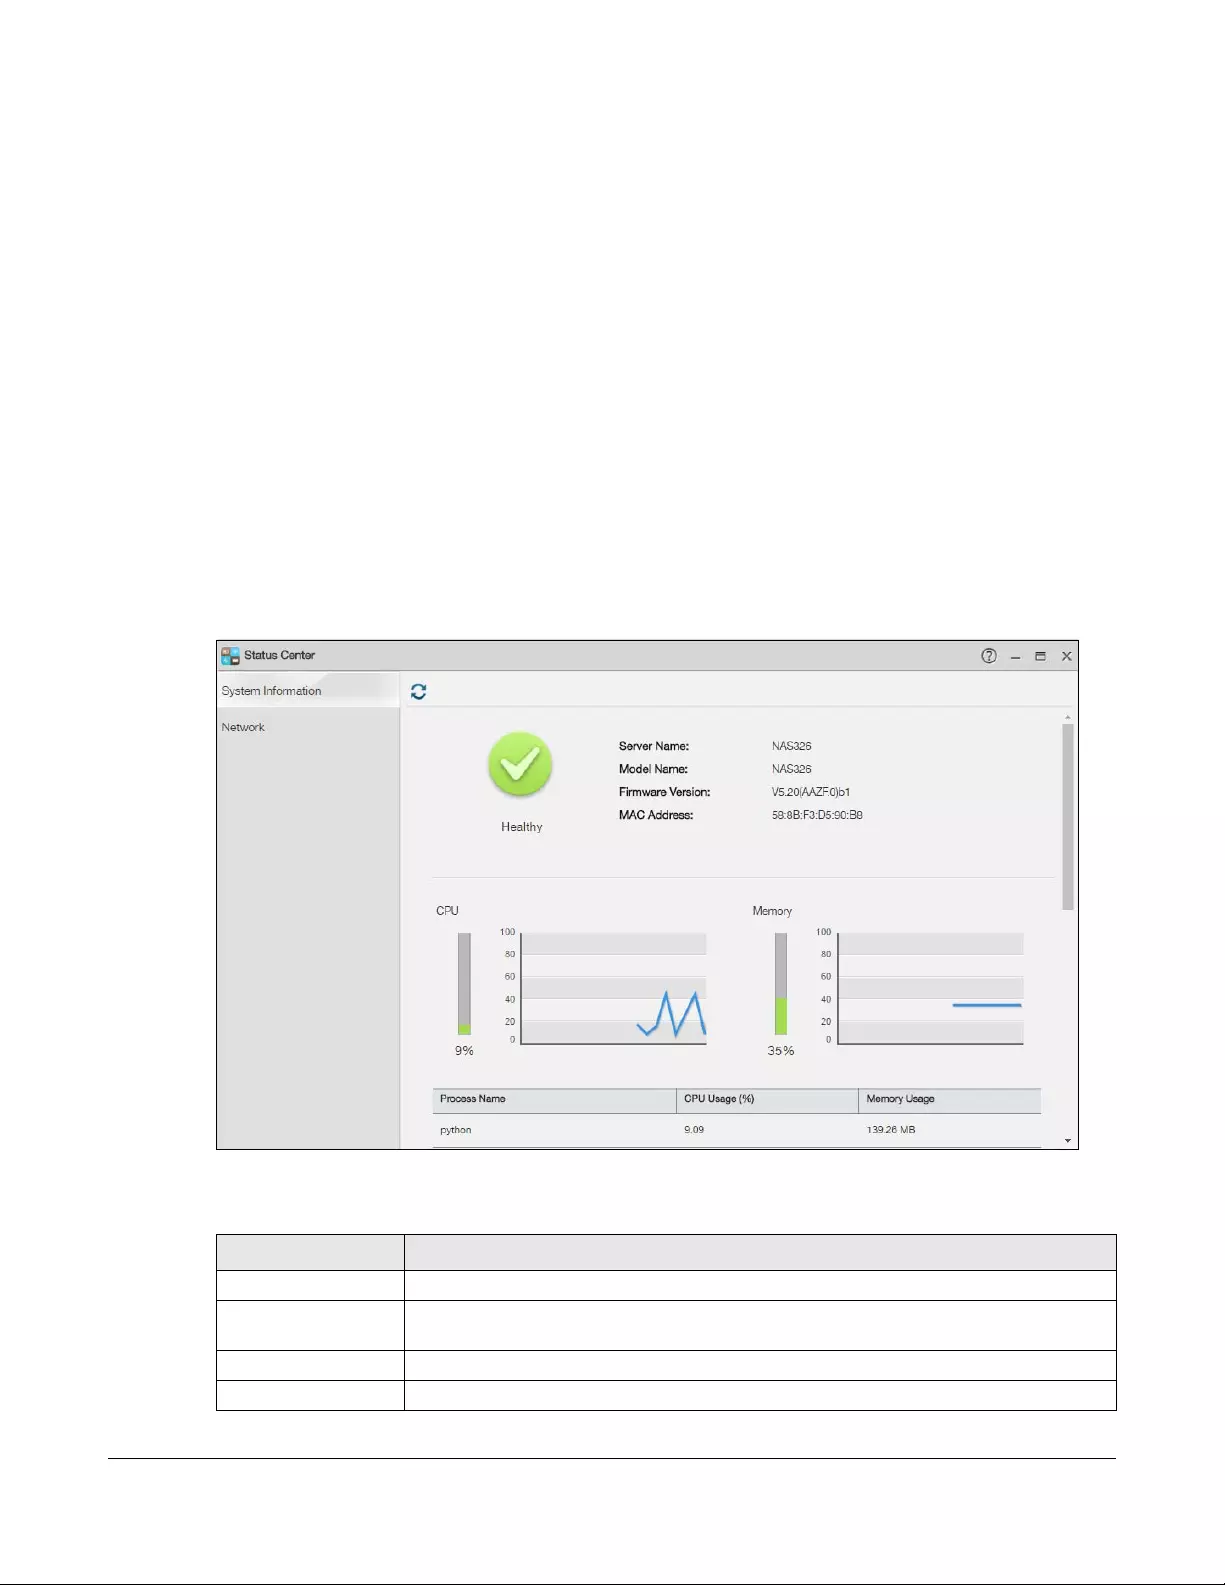
NAS Series User’s Guide
196
CHAPTER 12
Status Center
12.1 Overview
Status Center displays the system information or network connection status. You can also click the
System Status icon from the Status Zone (see Section 3.3.1 on page 33) to open the Status Center screen.
12.1.1 System Information
In the Desktop screen, click Status Center to display System Information for detailed NAS status
information.
Figure 154 Status Center > System Information
The following table describes the labels in this screen.
Table 114 Status Center > System Information
LABEL DESCRIPTION
Refresh Click the Refresh icon to update this display.
Status The circular icon displays the health state of the NAS. A green circle with a check mark
indicates healthy.
Server Name This displays the name which helps you find the NAS on the network.
Model Name This displays which model this NAS device is.
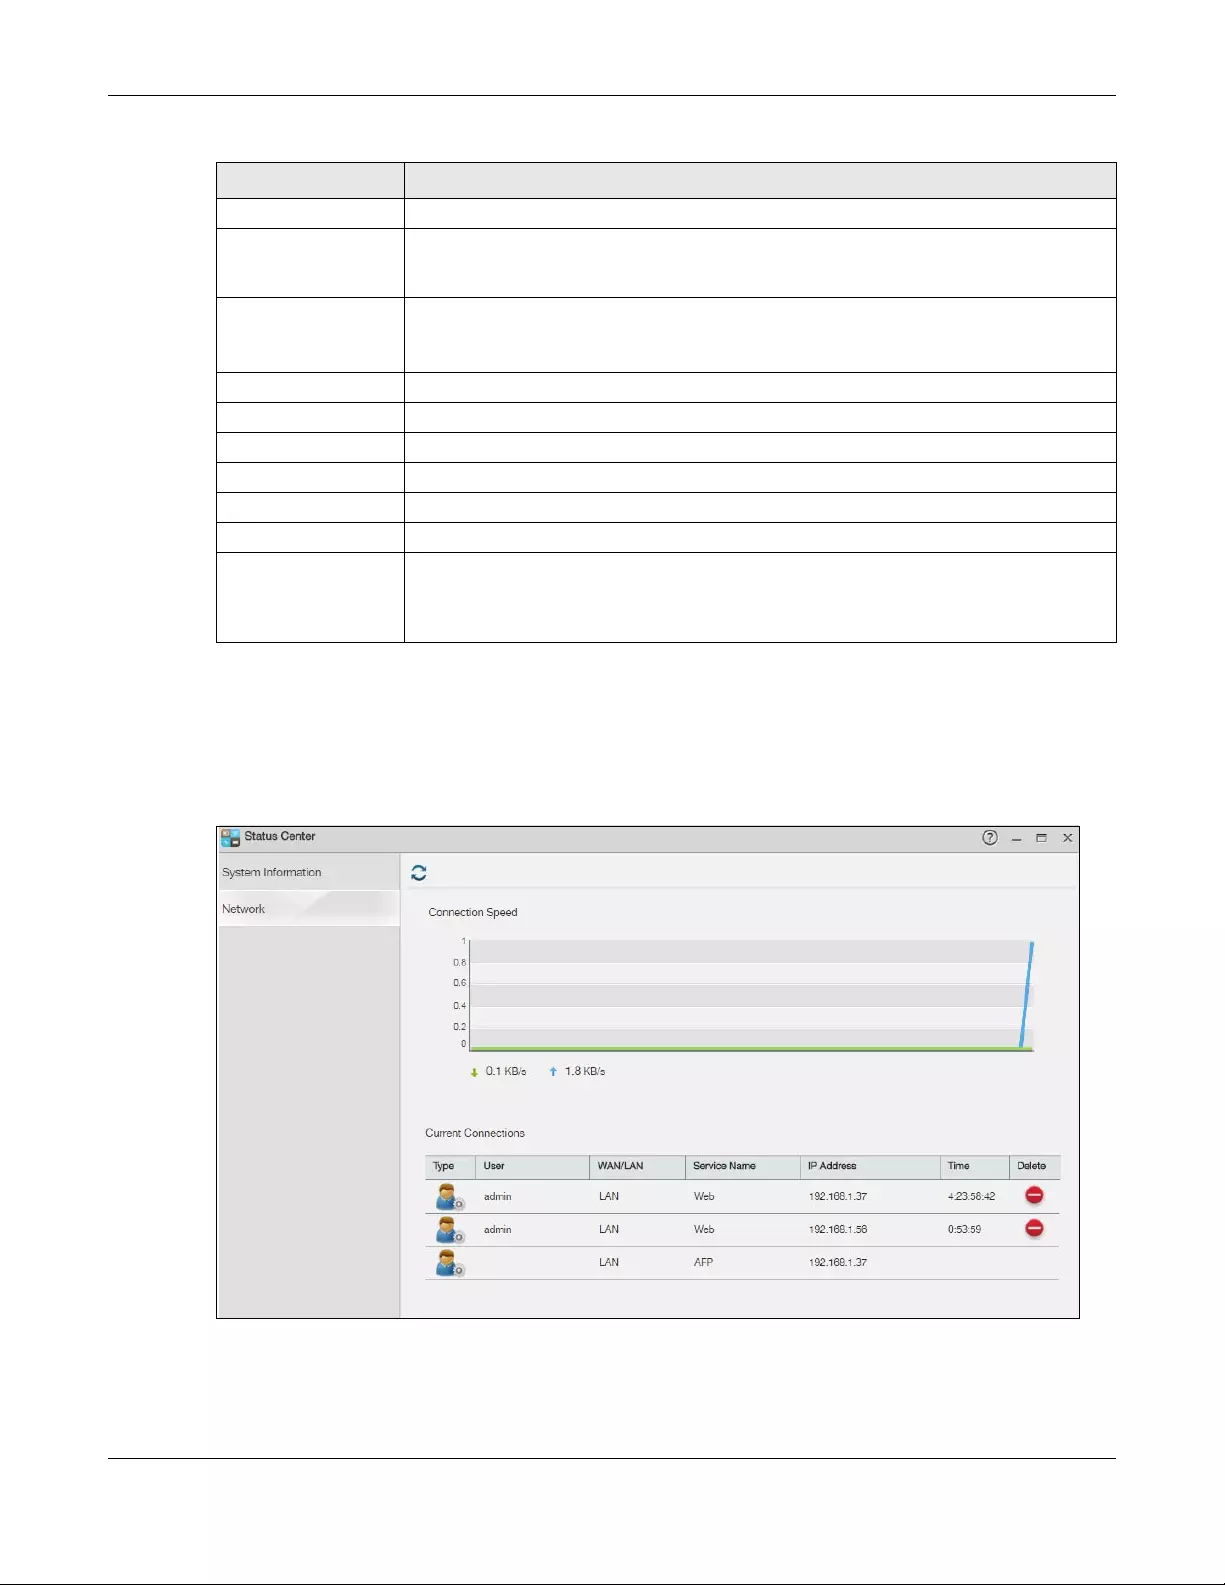
Chapter 12 Status Center
NAS Series User’s Guide
197
12.1.2 Network
The Network screen display the NAS connection status. From the Status Center screen, click Network to
open the screen as shown.
Figure 155 Status Center > Network
Firmware Version This is the NAS firmware version.
MAC Address This displays the NAS’s unique physical hardware address (MAC) for the LAN Ethernet port.
You need the MAC address to register the product at myZyxel.com. Customer support
may also request it for troubleshooting purposes.
CPU This displays a summary of CPU usage by all current processes.
Note: If too many users are using the NAS then the NAS may appear sluggish.
Memory This shows how much of the NAS’s total memory is being used.
Process Name This displays the top 10 processes that occupy the most CPU usage.
CPU Usage This displays a summary of CPU usage by all current processes.
Memory Usage This shows how much of the NAS’s total memory is being used.
UPS This shows the Uninterruptible Power Supply (UPS) capacity.
Fan Speed This is the RPM (Rotations Per Minute) of the NAS’s fans.
CPU Temperature This displays the temperature near the NAS’s CPU. The NAS generates an emergency log if
the temperature goes out of the normal operating range. If the temperature goes even
higher, the NAS shuts down automatically to avoid damage from overheating. If the NAS
overheats, make sure the fans are working and it is in a well ventilated place.
Table 114 Status Center > System Information (continued)
LABEL DESCRIPTION

Chapter 12 Status Center
NAS Series User’s Guide
198
The following table describes the labels in this screen.
Table 115 Status Center > Network
LABEL DESCRIPTION
Type Displays the type of the user account.
User Displays the user name.
WAN/LAN Displays whether the connection is from the WAN or the LAN.
Service Name Displays the service name.
IP Address Displays the IP address of the user.
Time Displays the connection time.
Delete Click this to disconnect the user.

NAS Series User’s Guide
199
CHAPTER 13
App Center and Packages
13.1 About Packages
Packages extend the functions of your NAS. Your NAS supports various packages that let you do more.
The App Center screen includes a list of packages to add. This chapter also describes the screens for
features you can add to the NAS by installing packages.
Note: Check what packages do before you install them. Only install packages you actually
plan to use.
Note: Get support for each package through its individual vendor.
13.1.1 Available Packages
You can install and use the following applications.
Note: Once you install applications and enable them, additional icons show up on the
Desktop.
•AuroraSyncBackup — Use this to copy videos stored on a Zyxel Aurora IP camera to the NAS share. See
Section 13.3 on page 205.
•DropboxClient — Use this to synchronize local NAS shares or folders and Dropbox accounts. See
Section 13.4 on page 208.
•GoogleDriveClient — Use this to synchronize local NAS shares or folders and Google Drive accounts.
See Section 13.5 on page 216.
•Gallery — This web-based application allows your NAS to host pictures. You can upload images in your
local computer or shares to this application. Use the Gallery administrator account (default username
admin, password 1234) to log into the Gallery console. There you can create accounts for other users.
•NFS — NFS (Network File System) is a file-sharing protocol most commonly implemented on Unix-like
systems. See Section 13.6 on page 222.
•NZBGet — This news grabber helps download files from UseNet.
•PHP-MySQL-phpMyAdmin — This tool can be used to manage MySQL through the web. Enter ‘root’ as
the username and ‘1234’ as the password to log in. This includes MySQL, PHP, and phpMyAdmin. See
Section 13.7 on page 227.
•Logitech® Media Server — This enables you to manage a Logitech’s Squeezebox device connected to
the NAS.
•TFTP — Use this to configure the NAS to accept log files from TFTP clients. See Section 13.8 on page 228.
•Transmission — This Bit Torrent client supports adding tasks through torrent files and magnet links.
•WordPress — This allows you to create and manage a blog. Use the WordPress administrator account
(default username admin, password 1234) to log in. You can then create accounts for other users.

Chapter 13 App Center and Packages
NAS Series User’s Guide
200
•pyLoad — Use this to have the NAS manage your downloads including those from one-click hosting
sites. One-click hosting sites allow Internet users to easily upload files to the one-click host’s server so
others can download them. See Section 13.9 on page 230.
•Memopal — Use this to back up files on the NAS to your Memopal online backup and storage account.
See Section 13.10 on page 231.
•ownCloud — Use this to store, synchronize, and share files, photos, calendars, and more with computers
and mobile devices using an ownCloud client. See Section 13.11 on page 234.
•myZyxelcloud-Agent — Use this to go to mycloud.zyxel.com to set up a free DDNS hostname for the
NAS so you can connect to it easily from the Internet.
The following applications come with their own configuration screens and documentation:
• Gallery
• NZBGet
•PHP—MySQL—phpMyAdmin
• Logitech® Media Server
• Transmission
• WordPress
•myZyxelcloud—Agent
•ownCould
13.2 App Center Screens
The App Center screens allow you to download and install, remove, or upgrade packages.
After logging into the NAS with an administrator account, click App Center on the Desktop to open the
following screen.
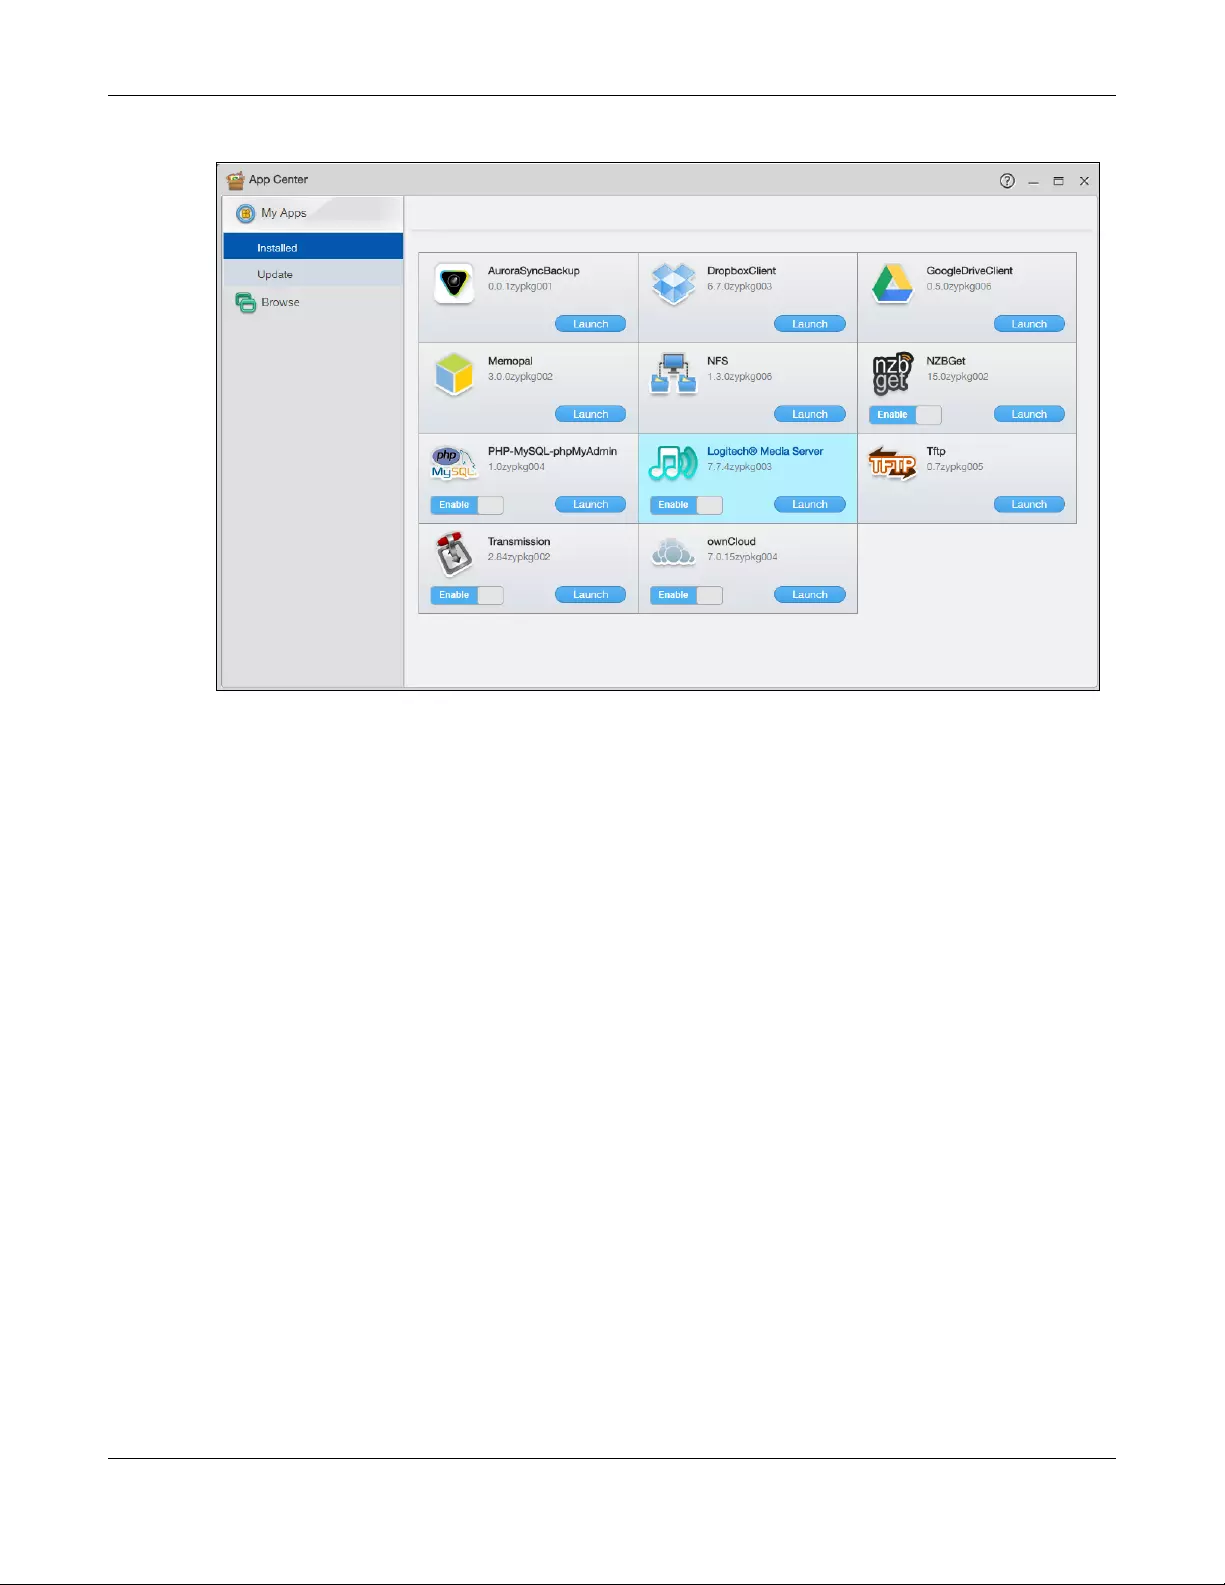
Chapter 13 App Center and Packages
NAS Series User’s Guide
201
Figure 156 App Center
13.2.1 Installed Applications
Use this screen to view the applications that you have installed in the NAS. Click App Center > My Apps
> Installed on the Desktop to open the following screen.
The Enable/Disable button is only for non built-in packages and available only if you have previously
installed the package. Click the button to enable or disable the application(s) on your system.
Click Launch to open the web configuration screen for the application.
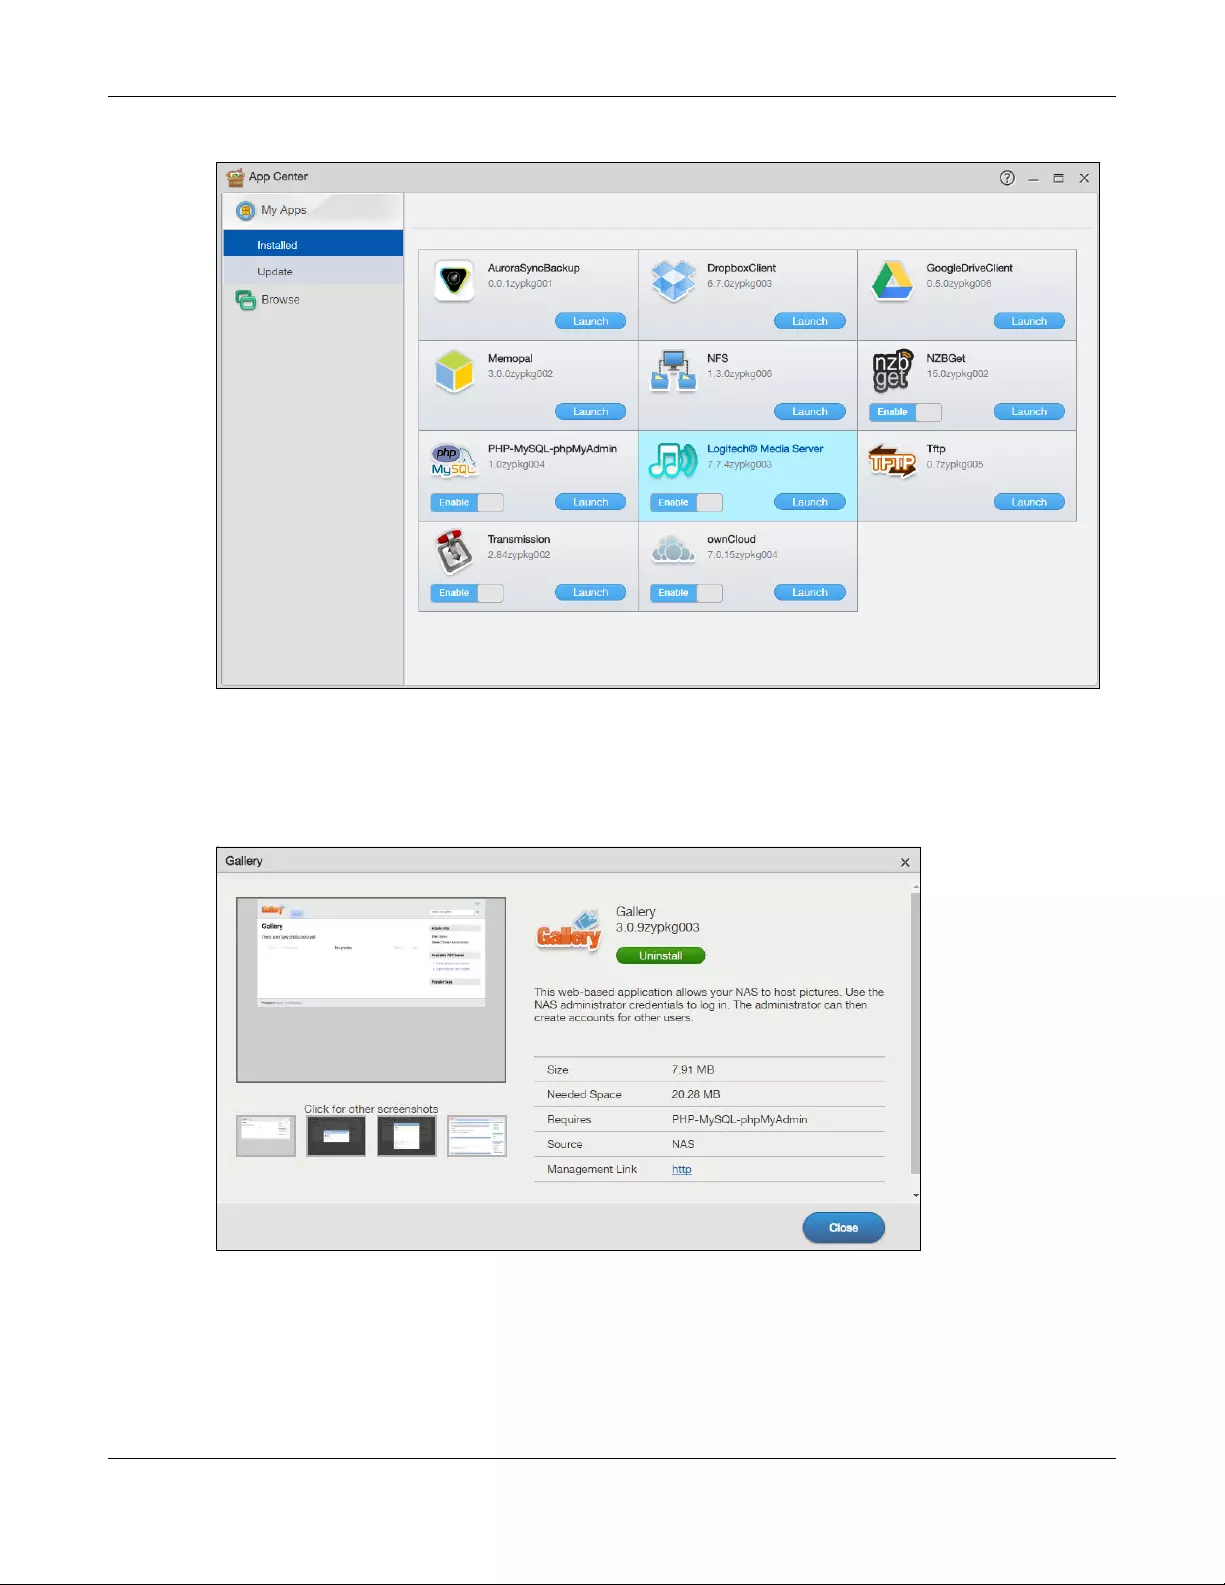
Chapter 13 App Center and Packages
NAS Series User’s Guide
202
Figure 157 App Center > My Apps > Installed
13.2.1.1 Display package information
Click a package’s name or icon to open the screen, where you can view information about the
package or uninstall the package.
Figure 158 App Center > My Apps > Installed: Package Information
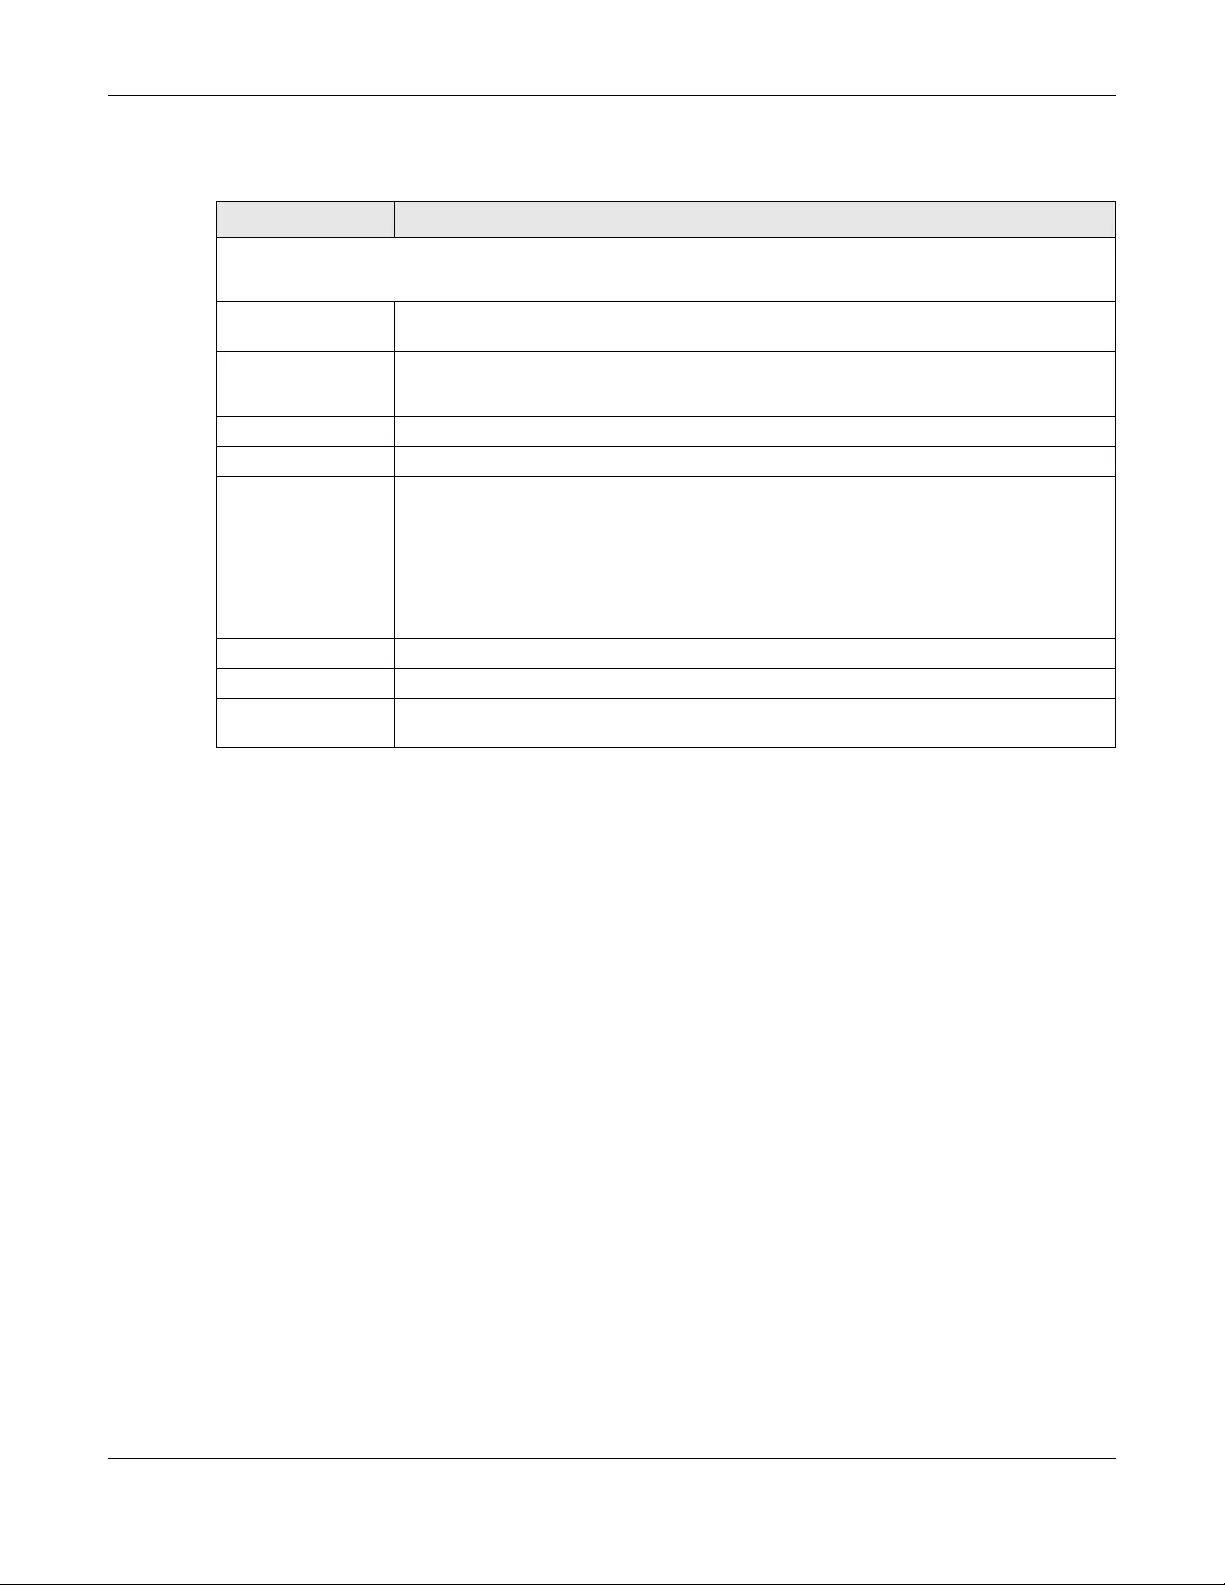
Chapter 13 App Center and Packages
NAS Series User’s Guide
203
The following table describes the labels in this screen.
13.2.2 Application Update
This screen displays the applications that you have installed when a more recent version of the
application is available. It also shows the progress bar when you install a new package.
Click App Center > My Apps > Update to open the following screen.
You can upgrade an application at a time, or click Update All to upgrade all the previously installed
applications to the latest version.
Table 116 App Center > My Apps > Installed: Package Information
LABEL DESCRIPTION
The left side shows the screenshots of the application web configurator.
It also shows the name, version number and a brief description of the application at the right side.
Install/Upgrade Click this to install the application on your system or upgrade to the latest version if you
have previously installed the application.
Uninstall Click this to uninstall the application from your system.
This is only available if you have previously installed the package.
Size This is the size of the application at initial download.
Needed Space This is the needed space to complete the installation of the application.
Requires This shows the other packages required in order to run this application.
Note: A package would be disabled/enabled simultaneously if its prerequisite
package(s) has been disabled/enabled. For example, when you enable
WordPress, this also enables PHP-MySQL-phpMyAdmin automatically.
However when you enable PHP-MySQL-phpMyAdmin, this does not
automatically enable WordPress.
Required By This shows which other packages require this application in order to be usable.
Source This shows the location of the installed files of the application.
Management Link This shows the link to the screens, console or web configurator where you can manage the
application (after the package has been installed on the system).
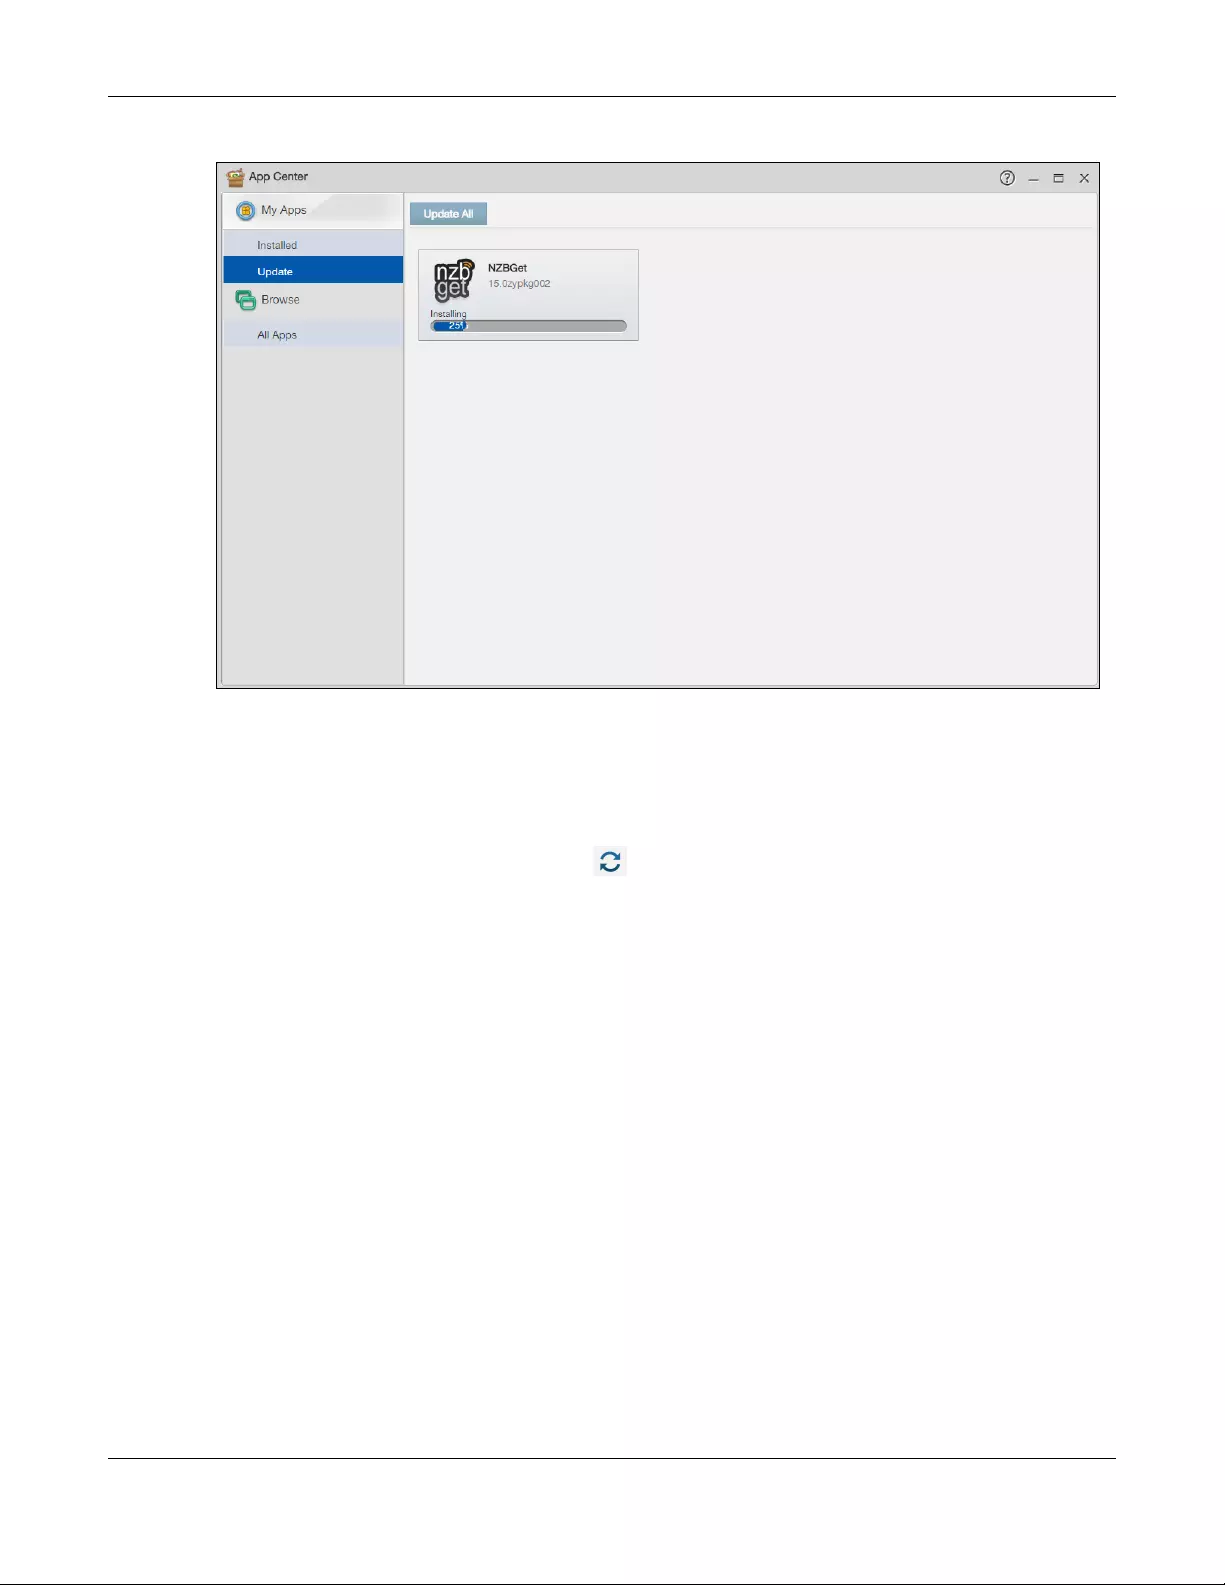
Chapter 13 App Center and Packages
NAS Series User’s Guide
204
Figure 159 App Center > My Apps > Update
13.2.3 Browse All Apps
This screen shows a list of packages supported by the NAS. Click App Center > Browse > All Apps to
open the following screen.
• Click the Retrieve List From Internet icon ( ) to retrieve a list of available packages from the Zyxel
website.
• Click Install to install the application on the NAS.
• Click Cancel to stop downloading or cancel the current installation process.
• The Enable/Disable button is only for non built-in packages and available only if you have previously
installed the package. Click the button to enable or disable the application(s) on your system.
• Click Launch to open the web configuration screen for the application.
• Click a package’s name or icon to open a screen, where you can view information about the
package or uninstall the package. See Section 13.2.1.1 on page 202.
•Unknown error displays if the web location for the application is unavailable.
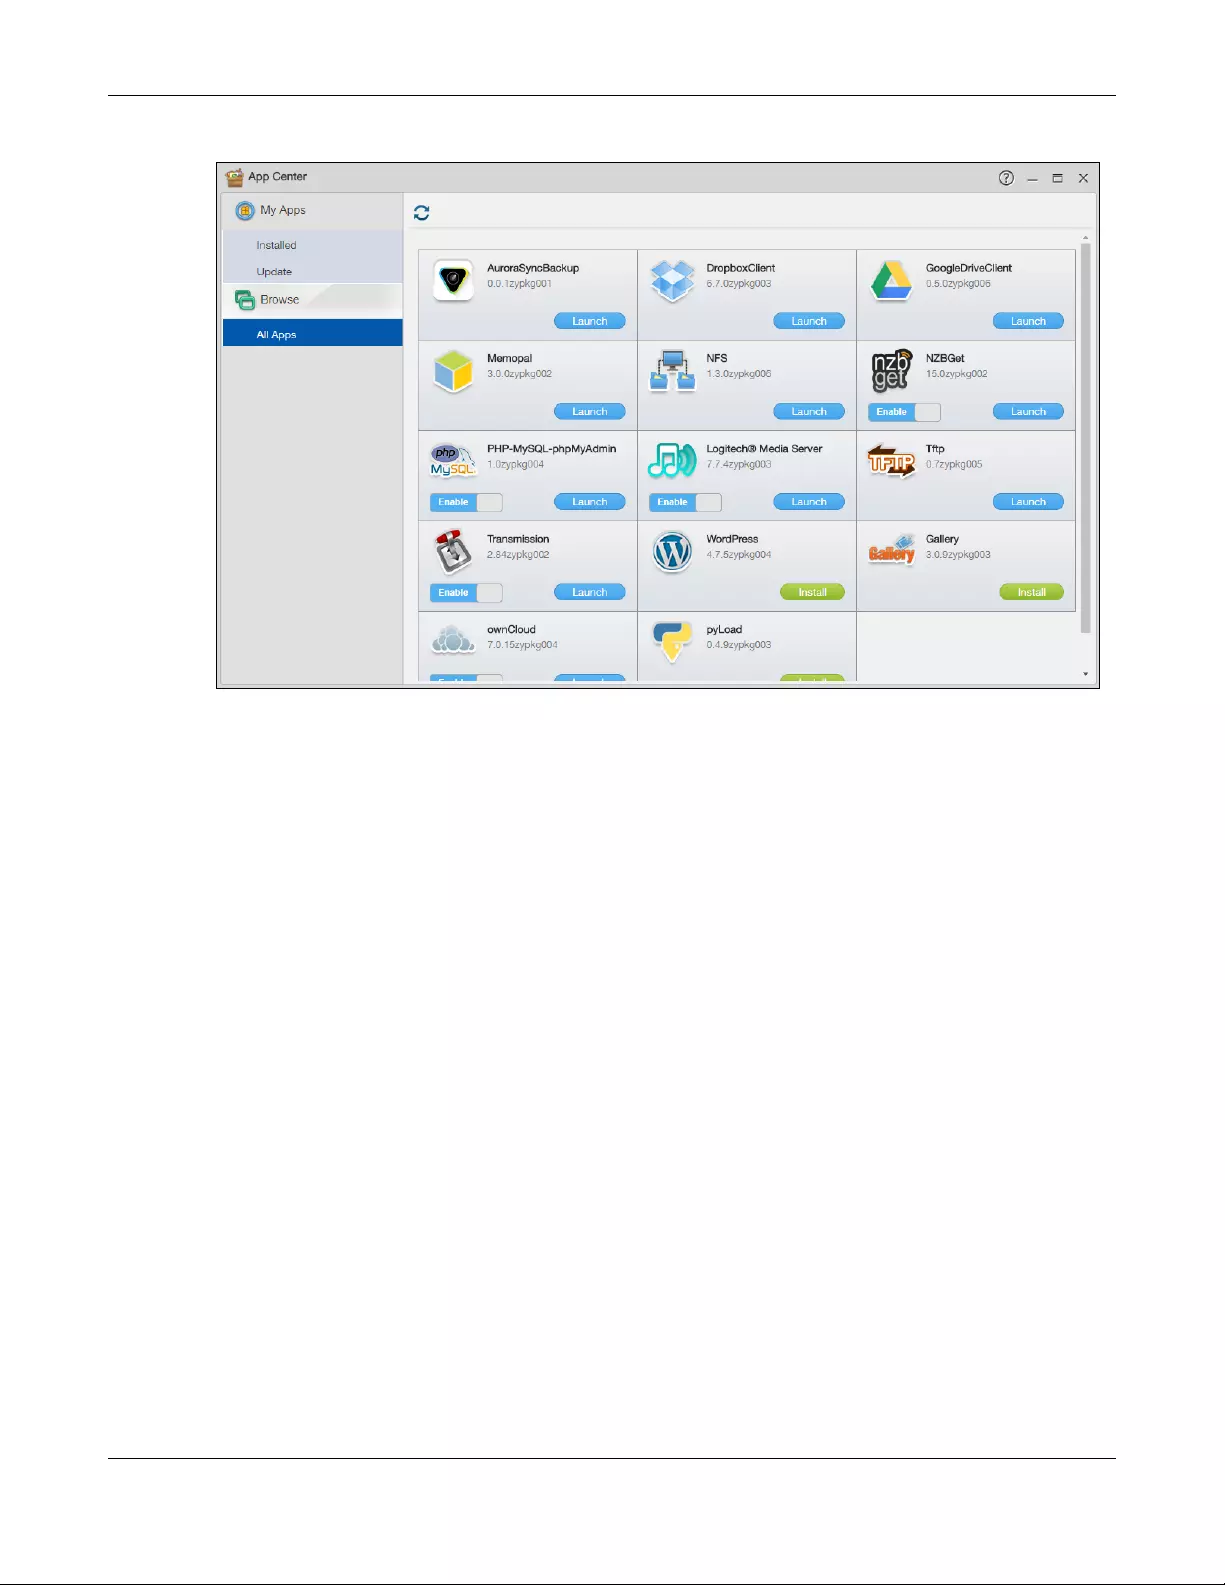
Chapter 13 App Center and Packages
NAS Series User’s Guide
205
Figure 160 App Center > Browse > All Apps
13.3 AuroraSyncBackup
Use AuroraSyncBackup to back up videos from a Zyxel Aurora camera to the NAS local shared folder.
Note: You must pair the NAS and the Zyxel Aurora camera with the same myZyxelCloud
account before you can activate and configure Aurora backup settings.
Click AuroraSyncBackup on the Desktop or the Launch button in the App Center screen to open the
following screen.
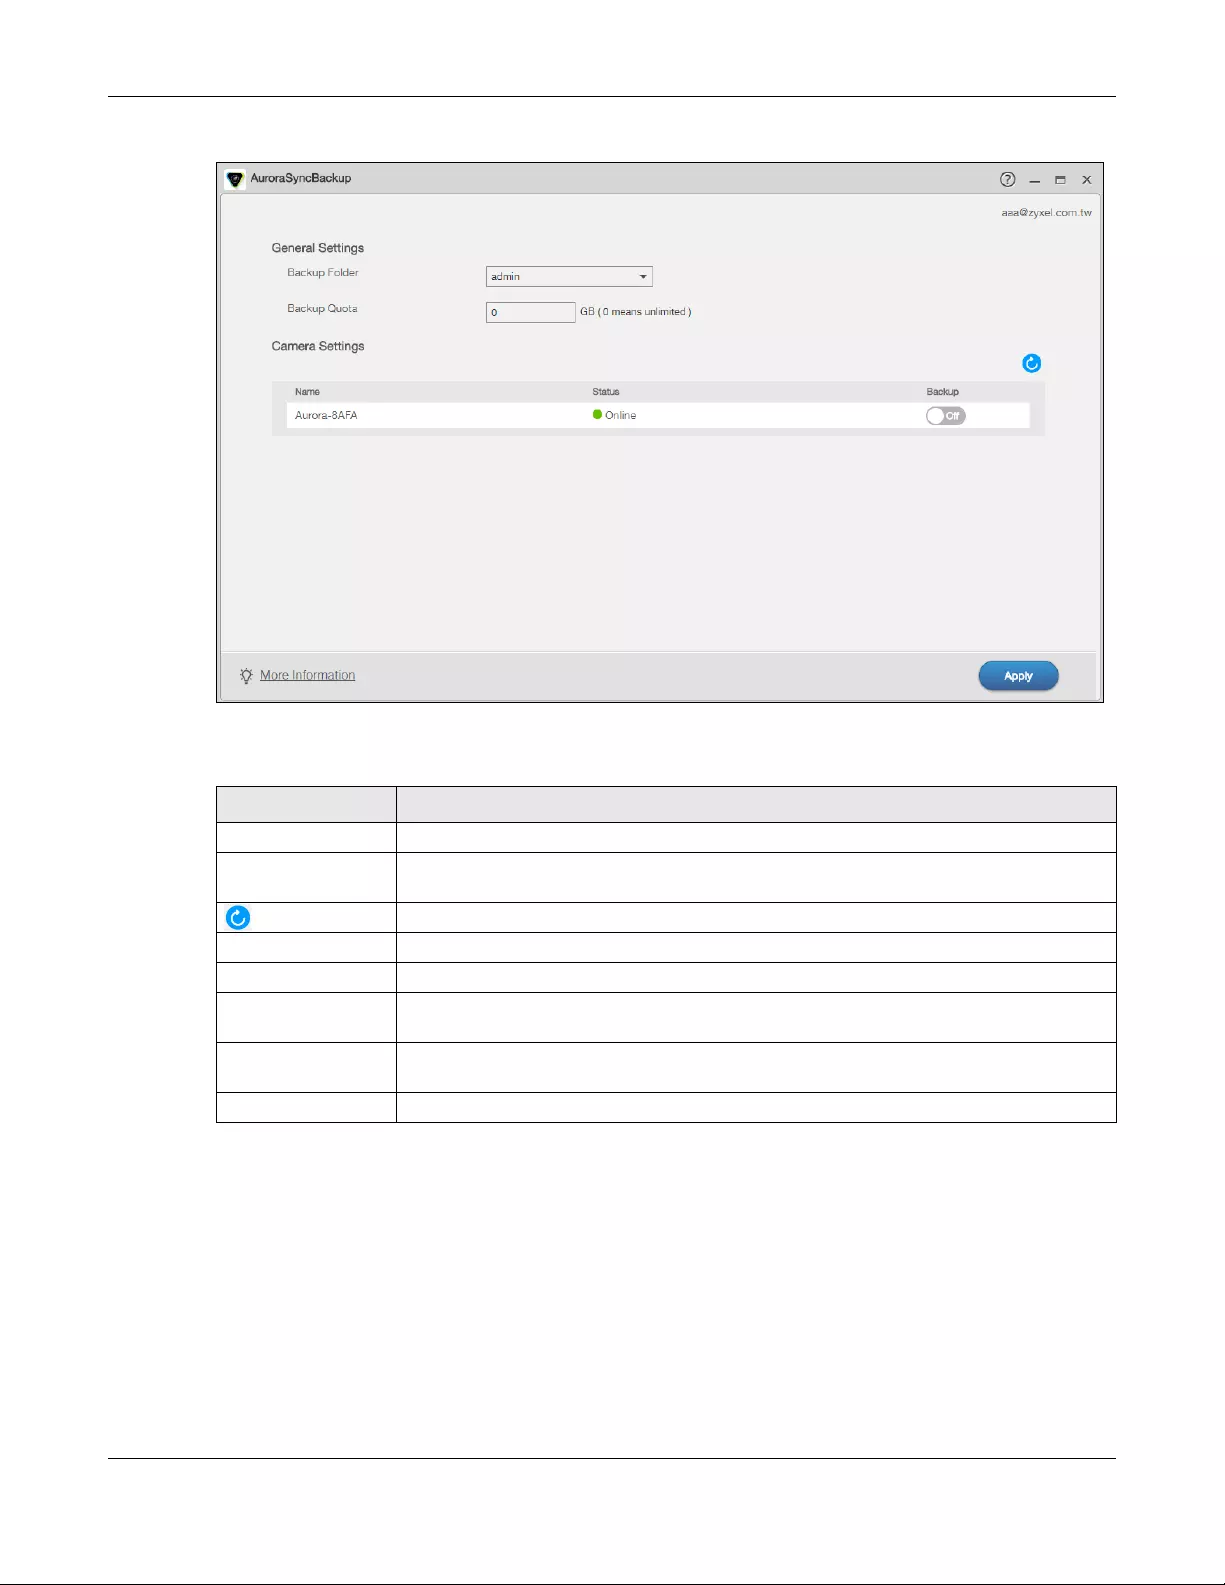
Chapter 13 App Center and Packages
NAS Series User’s Guide
206
Figure 161 AuroraSyncBackup
The following table describes the labels in this screen.
If the following screen displays after you click AuroraSyncBackup on the Desktop, the NAS cannot
discover any Aurora camera. Make sure the NAS and the Aurora camera(s) are both paired with an
identical myZyxelCloud account, and then follow the on-screen instructions.
Table 117 AuroraSyncBackup
LABEL DESCRIPTION
Backup Folder Select the name of a share on the NAS where you want to place the video backup.
Backup Quota Enter how much space (in gigabytes) you want to allow for the NAS to store videos from the
associated Zyxel Aurora camera.
Click this to renew this screen.
Name This shows the name of the Aurora camera.
Status This shows whether the Aurora camera is online or goes off-line.
Backup Select On to allow the NAS to copy videos from the Aurora camera to the specified share.
Otherwise, select Off to disable it.
More Information Click this to open a screen that shows you where and how to find the video backups. See
also Section 13.3.1 on page 207.
Apply Click this to save your changes.
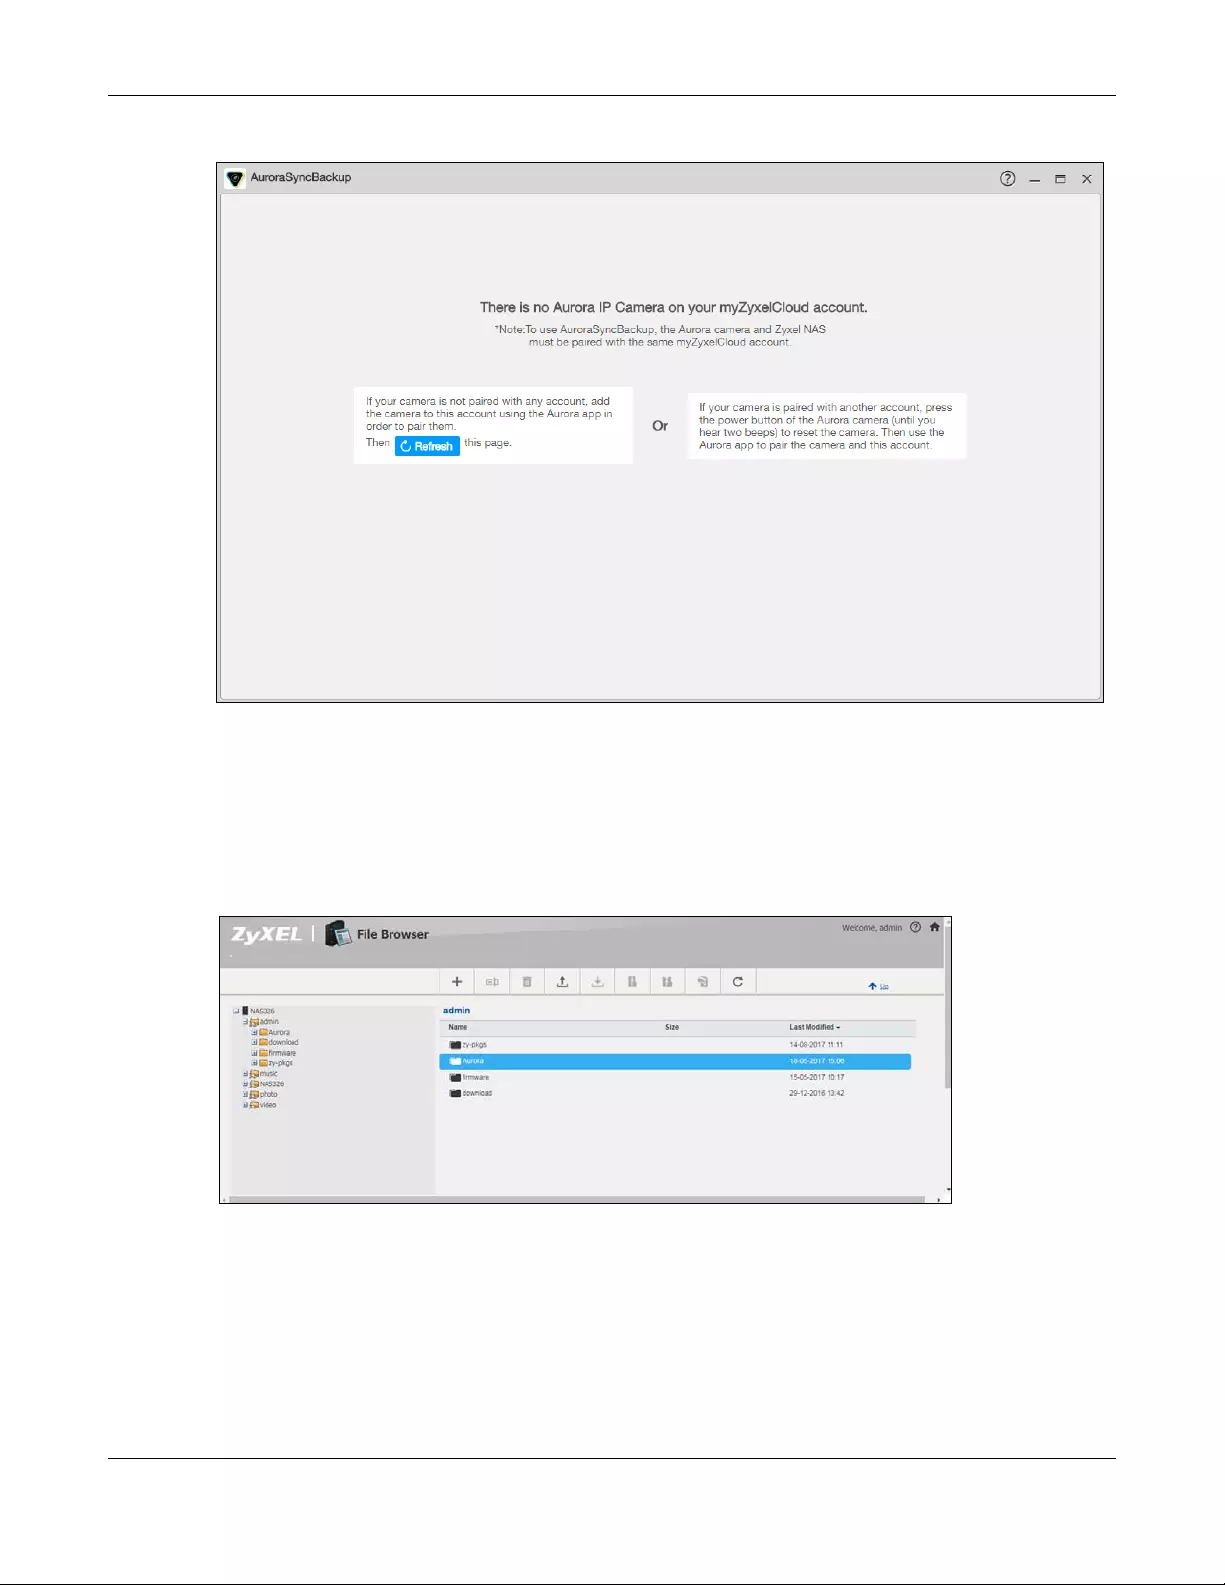
Chapter 13 App Center and Packages
NAS Series User’s Guide
207
Figure 162 AuroraSyncBackup: No Aurora camera detected
13.3.1 How to check video backups
A folder named “Aurora” is created automatically under the specified share after you click Apply in the
AuroraSyncBackup screen. You can use File Browser, Windows Explorer, or the Zyxel Drive app to access,
open or download a video.
Figure 163 Check video backups via file browser
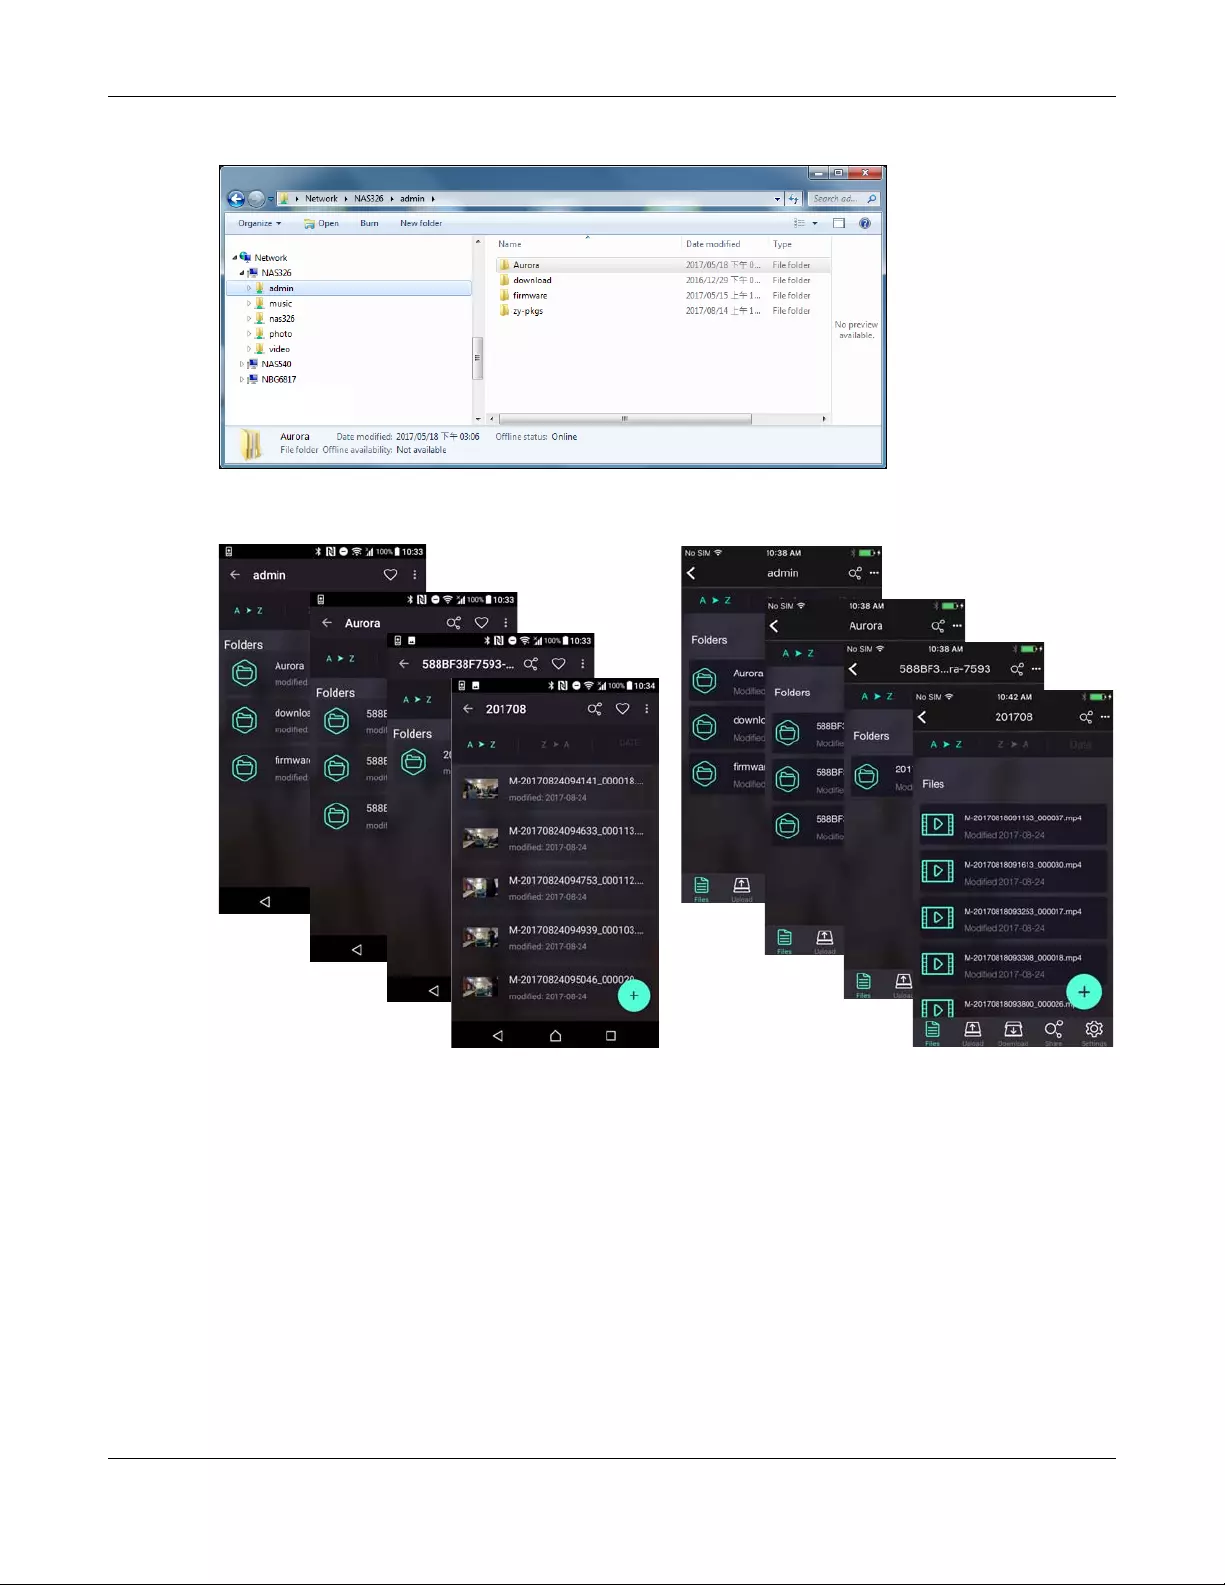
Chapter 13 App Center and Packages
NAS Series User’s Guide
208
Figure 164 Check video backups via Windows Explorer
Figure 165 Check video backups via Zyxel Drive app
13.4 DropboxClient
Use DropboxClient to synchronize NAS local shared folders and your Dropbox accounts. You need to
associate a shared folder and user account with your Dropbox account before the NAS can copy or
synchronize files between the folder and the associated Dropbox account. The NAS checks the
Dropbox account’s individual files at the end of the specified time interval. This two-way synchronization
means changes in the Dropbox account appear in the local sync folder and changes in the local sync
folder appear in the Dropbox account.
Note: Do not store your only copy of a document in Dropbox or the local sync folder.
• Modifying or deleting a file or folder at either end modifies or deletes it at the other end.
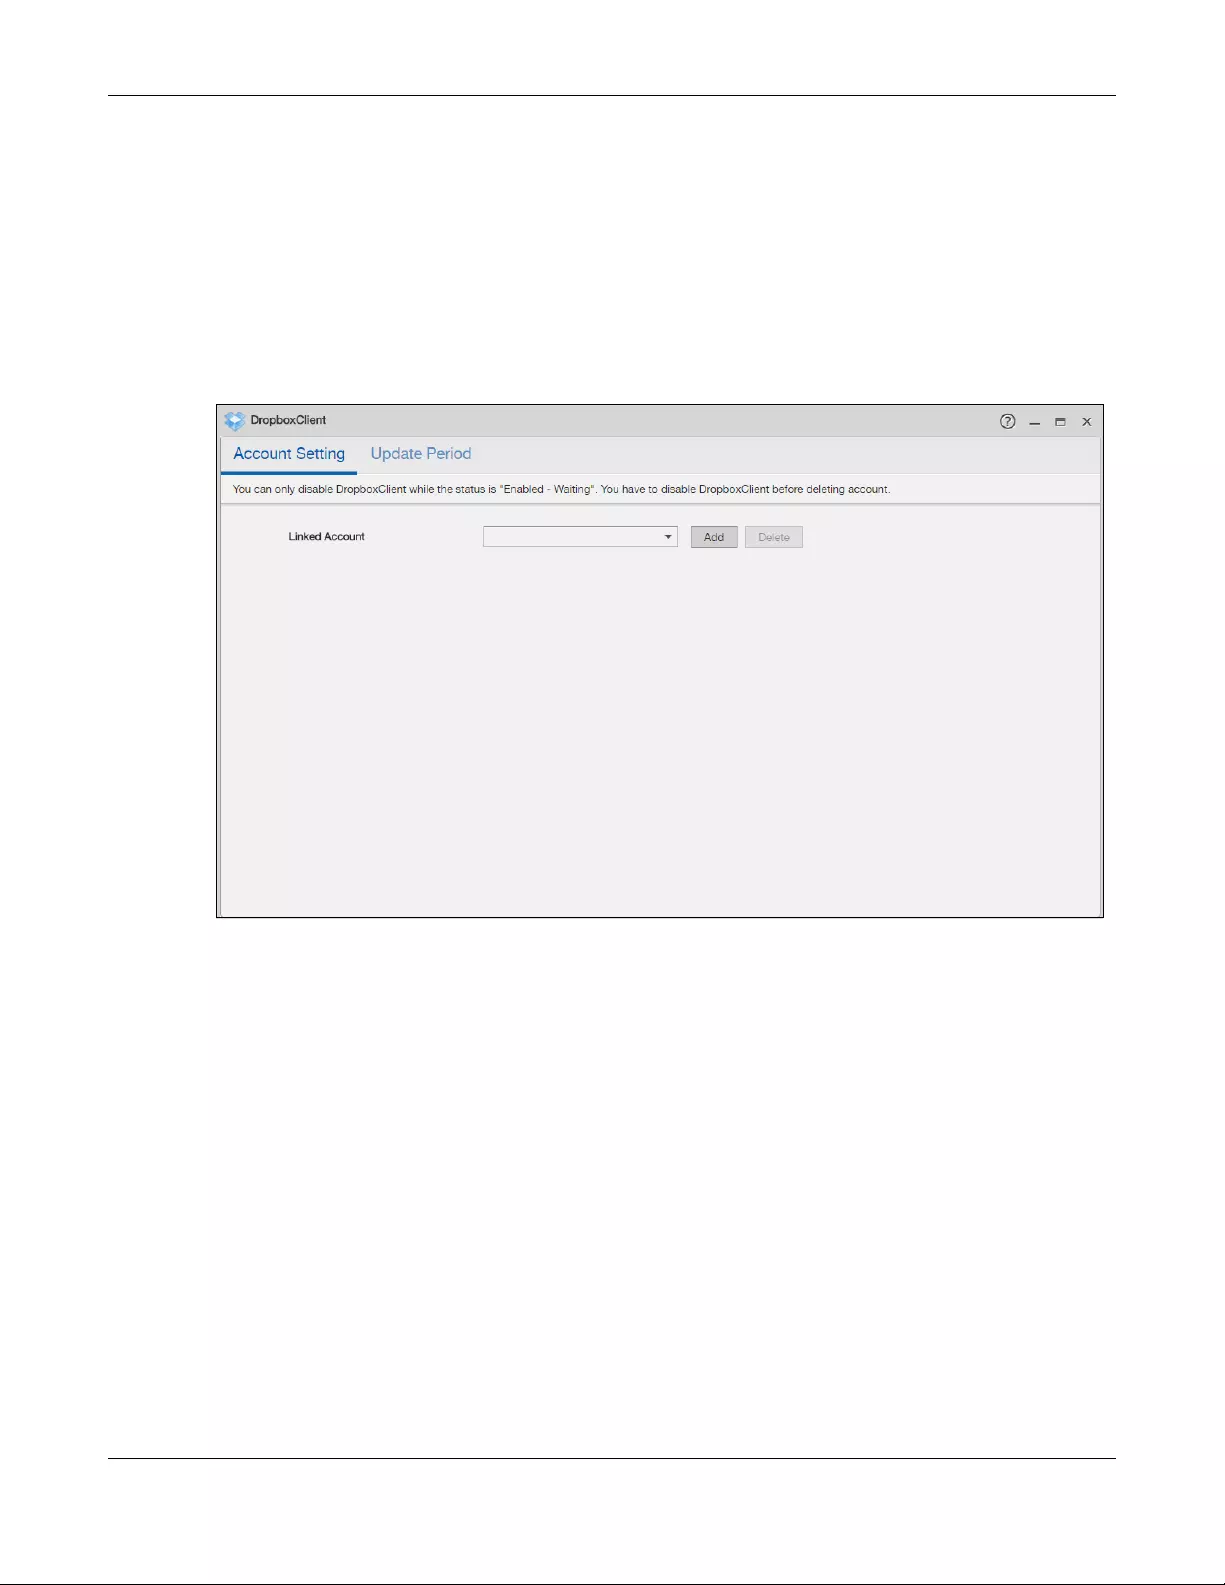
Chapter 13 App Center and Packages
NAS Series User’s Guide
209
• Moving a file out of the local sync folder or Dropbox deletes it at the other end.
• Use the Backup Planner screens instead of Dropbox for backups (see Chapter 16 on page 267).
• You can link multiple NAS user accounts to Dropbox accounts.
• You can link an individual NAS user account to multiple Dropbox accounts.
• You can only link each individual Dropbox account to one NAS user account.
Click DropboxClient on the Desktop or the Launch button in the App Center screen to open the
following screen.
Figure 166 DropboxClient
13.4.1 Configure Account Setting
Click DropboxClient > Account Setting to open the following screen. Use this screen to associate the
NAS shared folder and account with a Dropbox account.
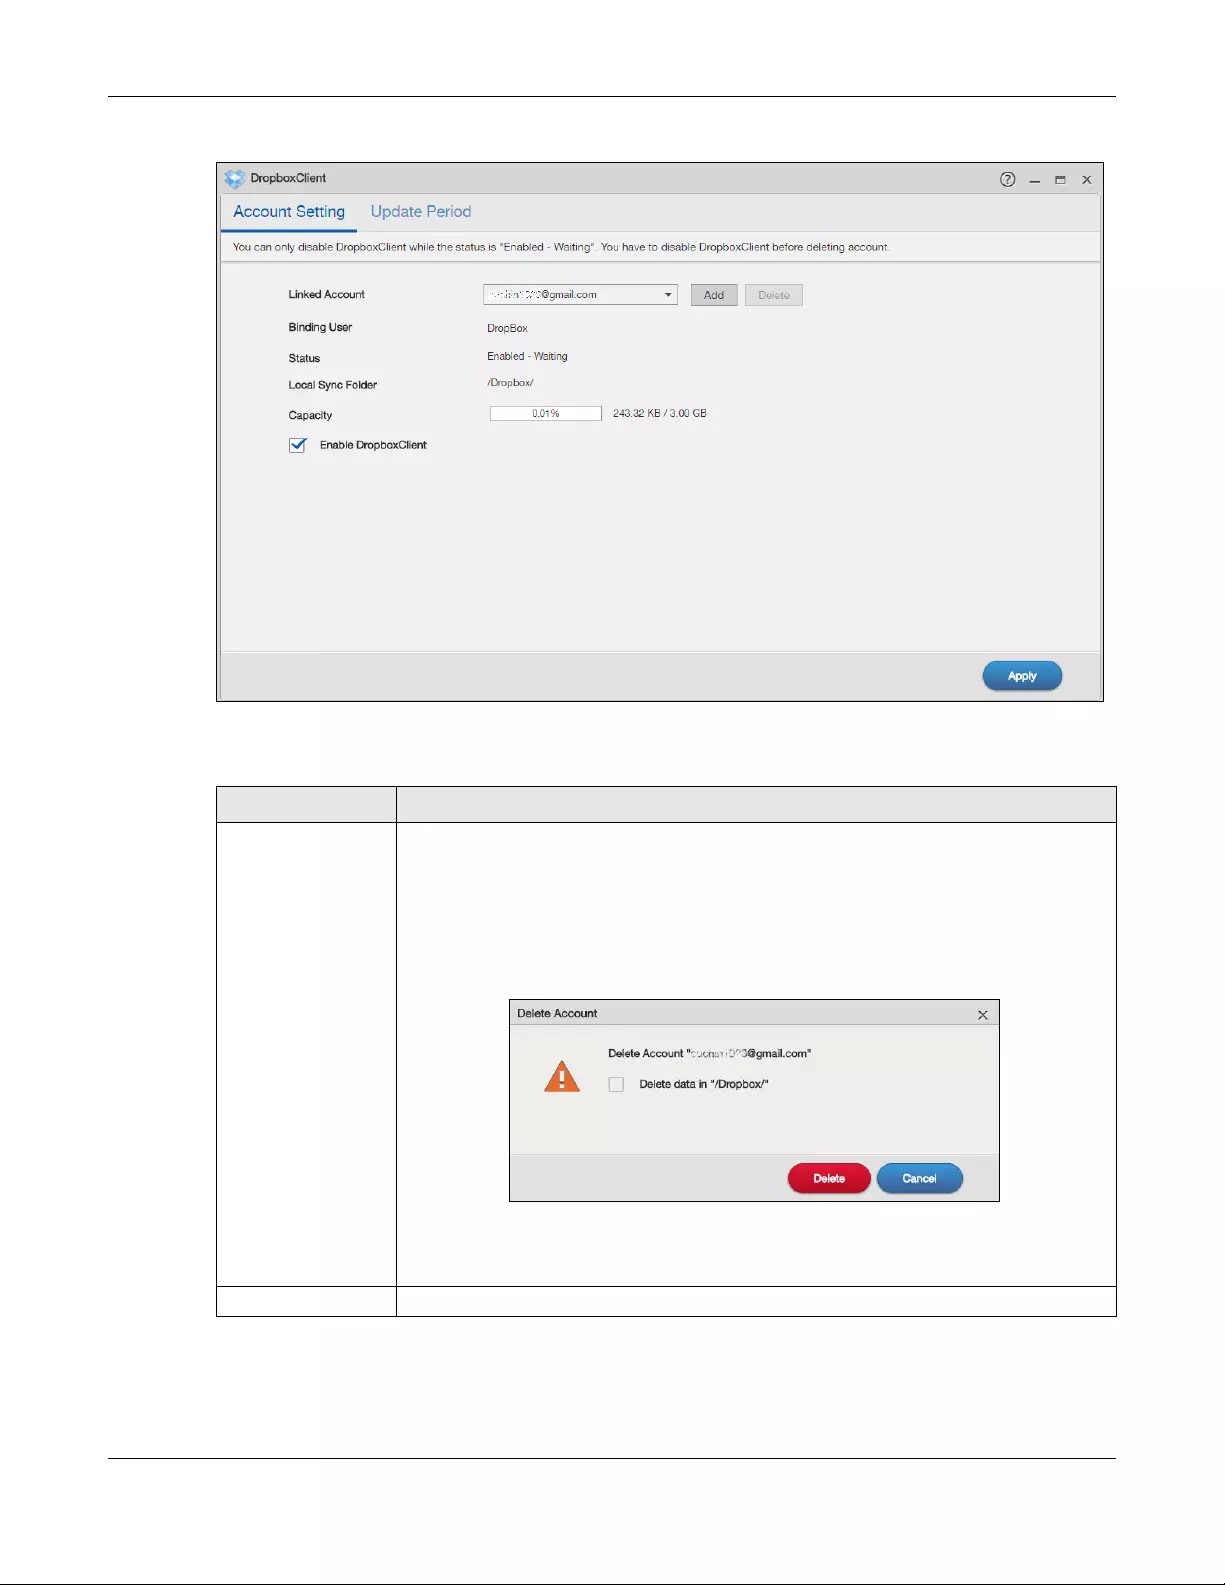
Chapter 13 App Center and Packages
NAS Series User’s Guide
210
Figure 167 DropboxClient > Account Setting
The following table describes the labels in this screen.
Table 118 DropboxClient > Account Setting
LABEL DESCRIPTION
Linked Account This displays the e-mail address of the owner of the Dropbox account the NAS is configured
to use. Select a Dropbox account linked to an NAS user account.
Click Add to open a screen where you can link an NAS user account and a Dropbox
account.
Click Delete to remove the NAS’s link to the selected Dropbox account. You must disable
the DropboxClient feature for the account before you can do this. A screen pops up to let
you decide what to do with the data in the NAS’s linked local sync folder.
Select the check box to delete all data in the local sync folder. Clear the check box to
remove the link to the selected Dropbox account but keep the data in the local sync
folder. Click Cancel to do nothing (keep the account link and data).
Binding User This displays the NAS user account which is linked to the selected Dropbox account.
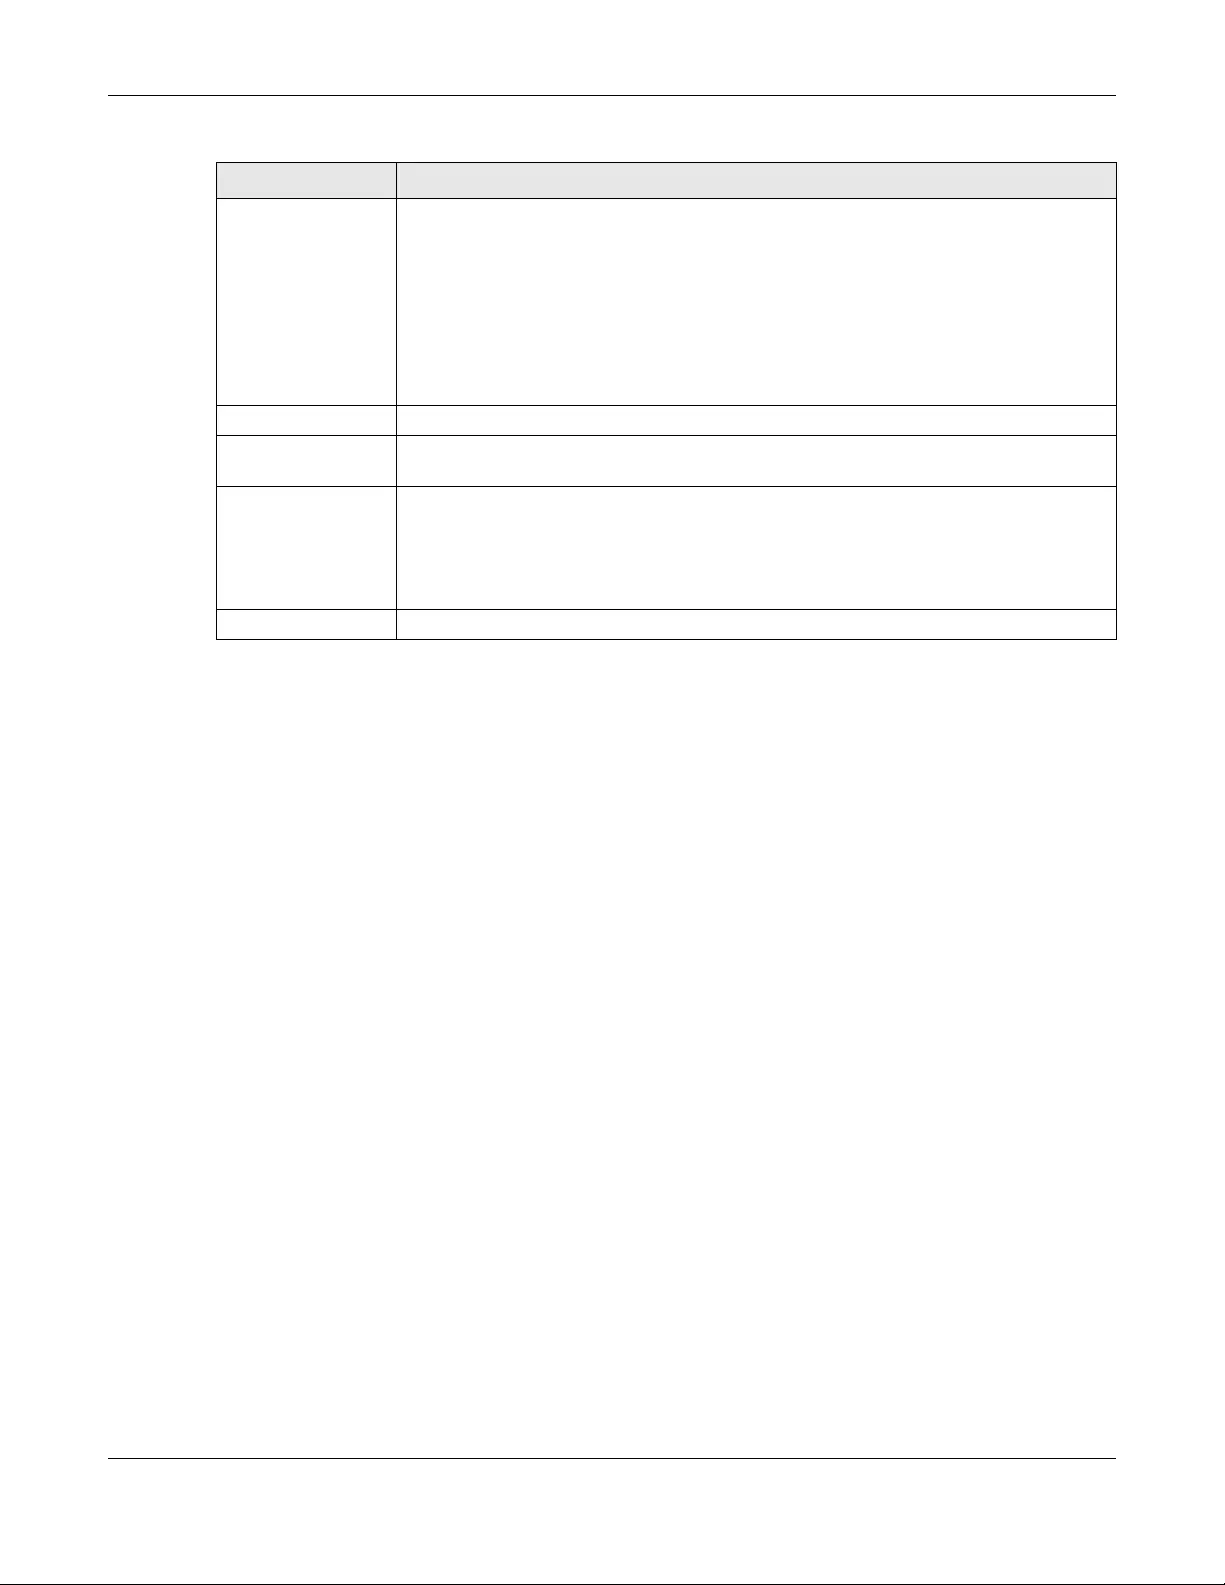
Chapter 13 App Center and Packages
NAS Series User’s Guide
211
13.4.2 How to associate NAS share/account with Dropbox account
Use the Add Account screens to link an NAS user account and a Dropbox account. Click Add in the
DropboxClient > Account Setting screen to open the following screen.
Note: The user has to log into the Dropbox account on the same computer to allow the NAS
to link to it.
Step1 Local Sync Folder
Use this screen to specify the folder on the NAS to synchronize with Dropbox for the local user.
Status This displays the current status of the DropboxClient feature for the selected Dropbox
account.
•Disabled — The DropboxClient feature is turned off. During this state you can use the
other sections of this screen to add or delete linked accounts or enable Google Drive.
•Enabled — Waiting — The DropboxClient feature is configured, enabled, and waiting to
perform the next Dropbox update. During this state you can use the other sections of
this screen to add or delete linked accounts or disable DropboxClient.
•Enabled — Synchronizing — The DropboxClient feature is synchronizing the local sync
folder and the Dropbox account. During this state you can use the other sections of this
screen to add linked accounts during this state.
Local Sync Folder This displays the NAS folder or share the NAS synchronizes with the linked Dropbox account.
Capacity This displays the Dropbox account’s used, available, and total online Dropbox storage
space.
Enable
DropboxClient
Select this to have the NAS periodically synchronize the selected linked account’s local
sync folder and Dropbox storage. You can enable synchronizing with Dropbox for individual
accounts and disable it for other accounts.
Clear this option to disable synchronizing the selected linked account’s local sync folder
and Dropbox storage.
Apply Click this to save your changes.
Table 118 DropboxClient > Account Setting (continued)
LABEL DESCRIPTION
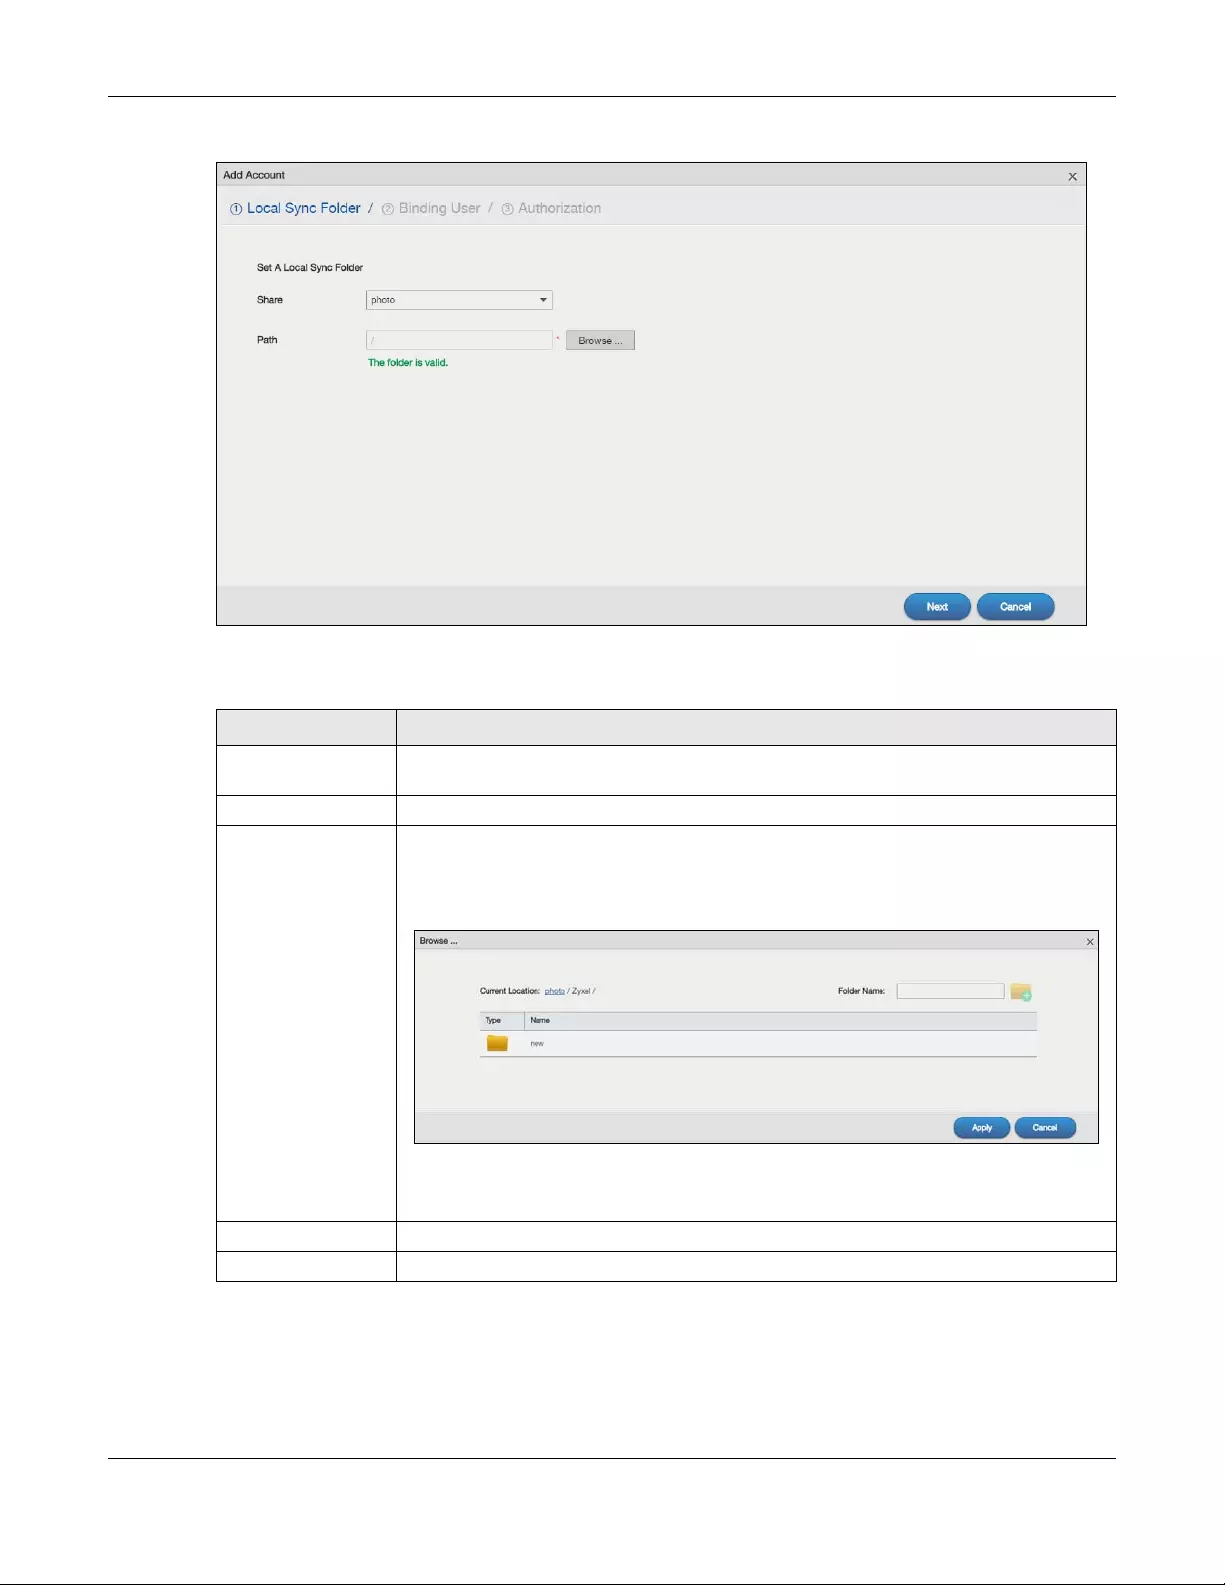
Chapter 13 App Center and Packages
NAS Series User’s Guide
212
Figure 168 DropboxClient > Account Setting > Add: Step1 Local Sync Folder
The following table describes the labels in this screen.
Step2 Binding User
Use this screen to select the local NAS user account to link with Dropbox. Click Next to continue.
Table 119 DropboxClient > Account Setting > Add: Step1 Local Sync Folder
LABEL DESCRIPTION
Share Select the name of a share on the NAS containing the folder the NAS synchronizes with
Dropbox.
Path This shows the location of the folder the NAS synchronizes with Dropbox.
Browse Click this to open the following screen where you can specify the share or folder to
synchronize with Dropbox. The NAS’s sharing configuration must allow the user access. The
user must also have a large enough quota on both the NAS and Dropbox to hold whatever
files go in the local sync folder and in the Dropbox account (since they both end up
containing everything you put in either).
•Current Location — This shows the folder location in the share.
•Folder Name — Enter a descriptive name and click Create New Folder to add a new
folder in the current share or folder.
Next Click this to save your changes and proceed.
Cancel Click this to return to the previous screen without saving.
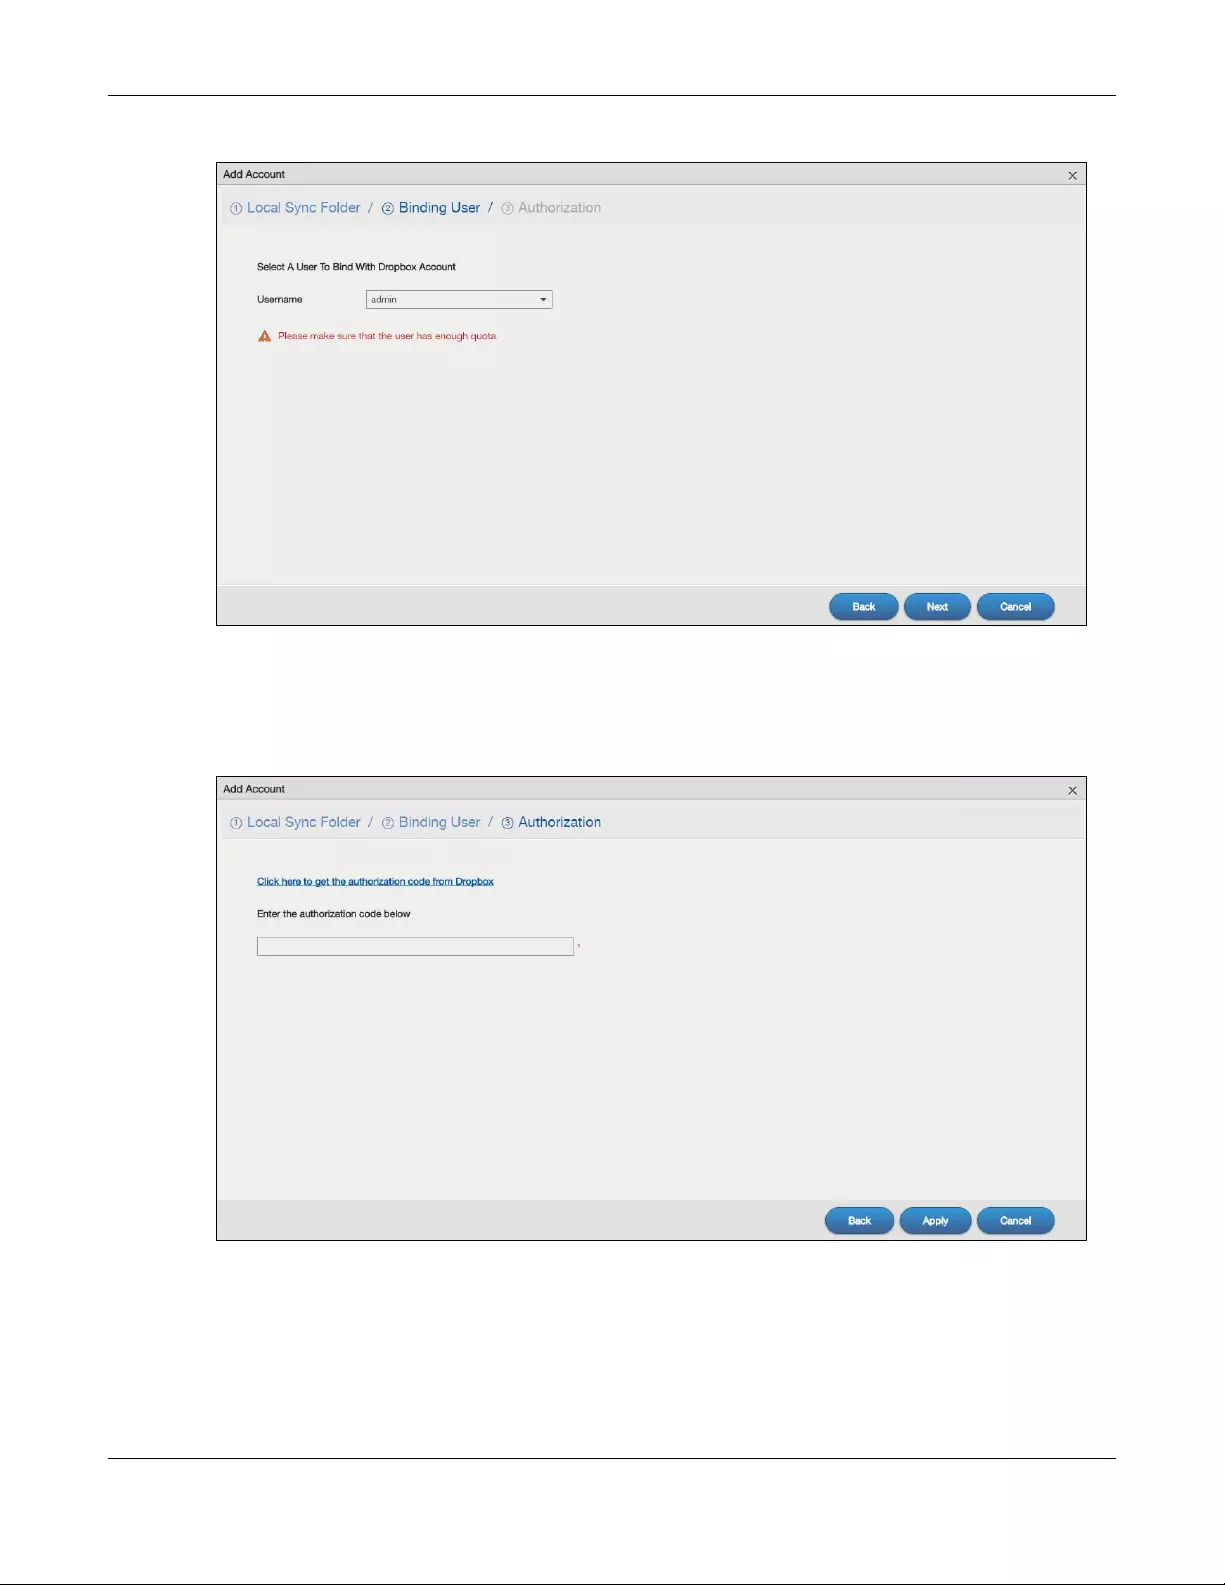
Chapter 13 App Center and Packages
NAS Series User’s Guide
213
Figure 169 DropboxClient > Account Setting > Add: Step2 Binding User
Step3 Authorization
Click the link in this screen to get the authorization code from Dropbox.
Figure 170 DropboxClient > Account Setting > Add: Step3 Authentication
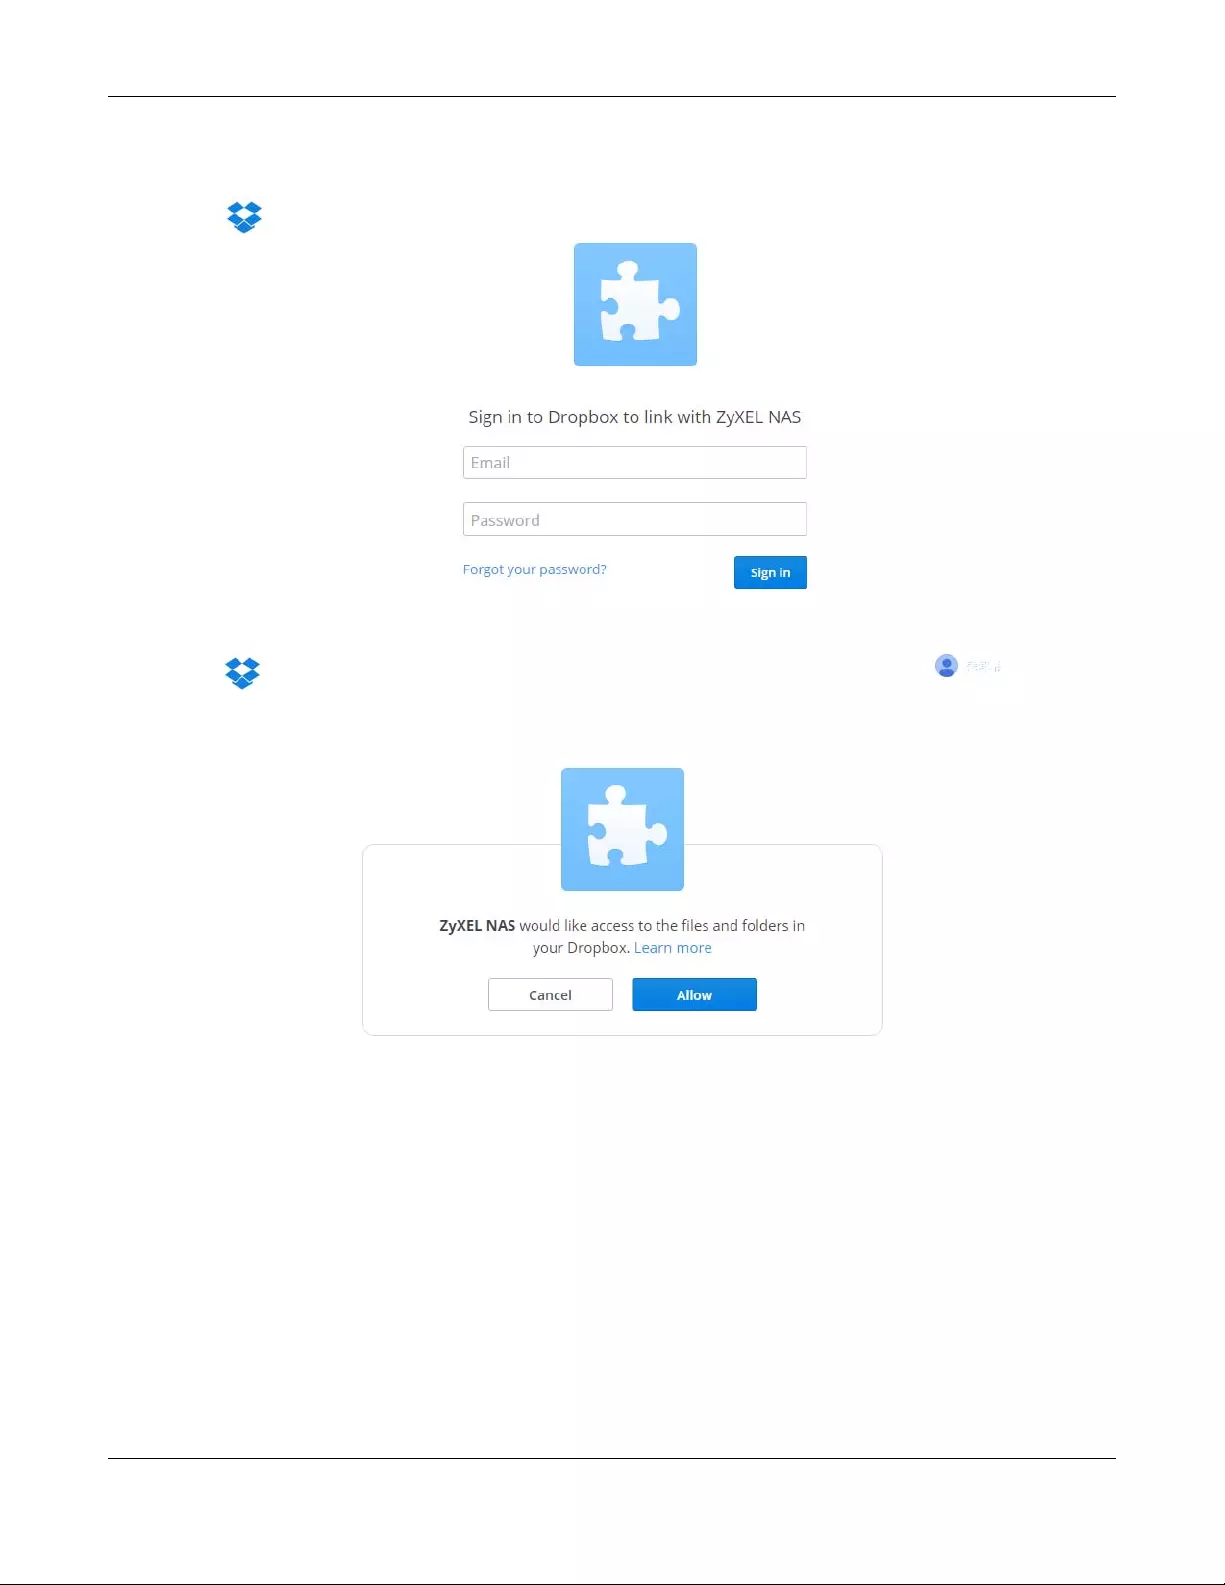
Chapter 13 App Center and Packages
NAS Series User’s Guide
214
The user must sign into the Dropbox account. You may need to sign out of Dropbox’s services first if
another user account is already signed in.
Click Allow when the following screen displays to allow access to the files in your Dropbox.
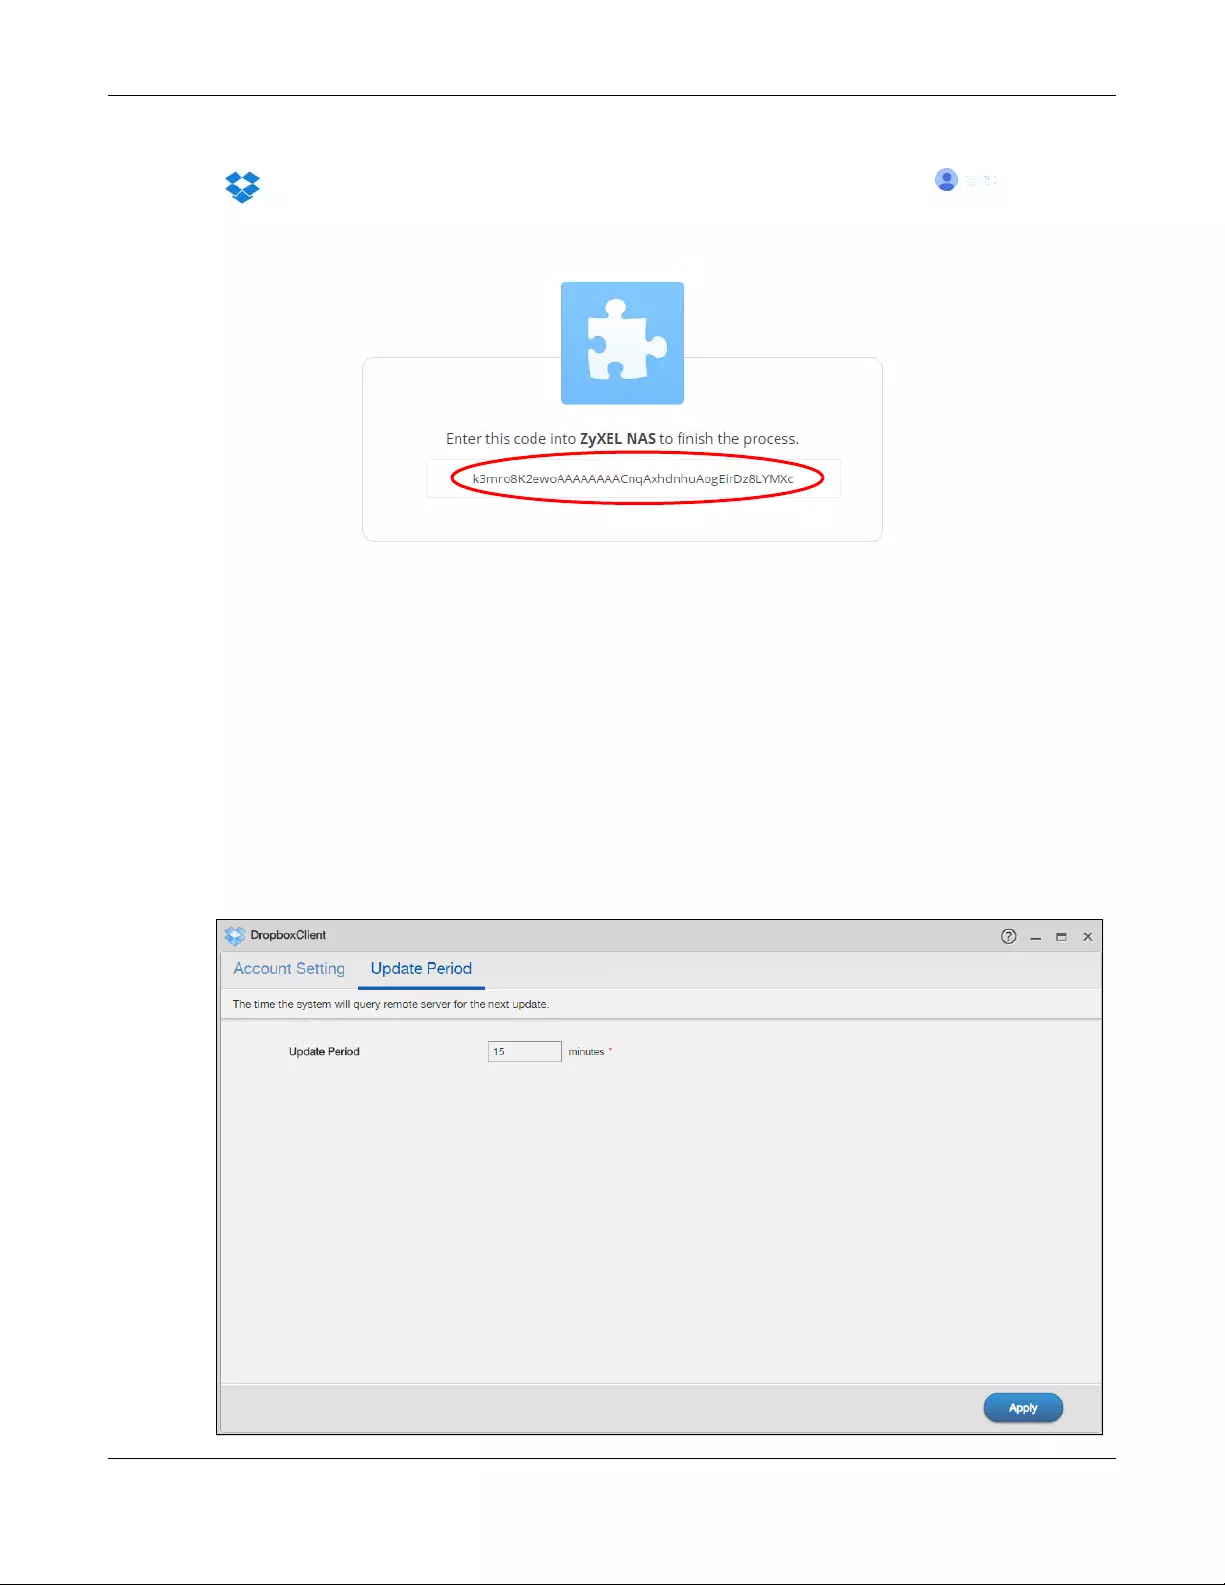
Chapter 13 App Center and Packages
NAS Series User’s Guide
215
Copy the code and paste it into the field in the Web Configurator screen.
Click Apply to have the NAS connect to Dropbox and complete the authorization.
In the DropboxClient > Account Setting screen, select the Enable DropboxClient option and click Apply
to start synchronizing your files with Dropbox.
13.4.3 Configure Update Period
Use the Update Period screen to set how often the NAS synchronizes with the associated Dropbox
account. The NAS initiates the connections, thus you do not have to configure rules on a firewall located
in front of the NAS to allow access.
Click DropboxClient > Update Period to open the following screen.
Figure 171 DropboxClient > Update Period

Chapter 13 App Center and Packages
NAS Series User’s Guide
216
The following table describes the labels in this screen.
13.5 GoogleDriveClient
Use GoogleDriveClient to synchronize local NAS user folders and Google Drive cloud storage accounts.
This two-way synchronization means changes in the Google Drive account appear in the local sync
folder and changes in the local sync folder appear in the Google Drive account.
Note: Do not store your only copy of a document in Google Drive or the local sync folder.
• Modifying or deleting a file or folder at either end modifies or deletes it at the other end.
• Moving a file out of the local sync folder or Google Drive deletes it at the other end.
• Use the Backup Planner screens instead of Google Drive for backups (see Chapter 16 on page 267).
• You can link multiple NAS user accounts to Google accounts.
• You can link an individual NAS user account to multiple Google accounts.
• You can only link each individual Google account to one NAS user account.
• This feature does not currently download Google Documents.
Click GoogleDriveClient on the Desktop or the Launch button in the App Center screen to open the
configuration screen.
13.5.1 Configure Account Setting
Use the Account Setting screen to synchronize local NAS shares or folders and Google Drive accounts.
Click GoogleDriveClient > Account Setting to open the following screen.
Table 120 DropboxClient > Update Period
LABEL DESCRIPTION
Update Period Specify how frequently the NAS synchronizes the local sync folders and the linked Dropbox
accounts. The range is 1 to 4320 minutes (3 days).
Apply Click this to save your changes.
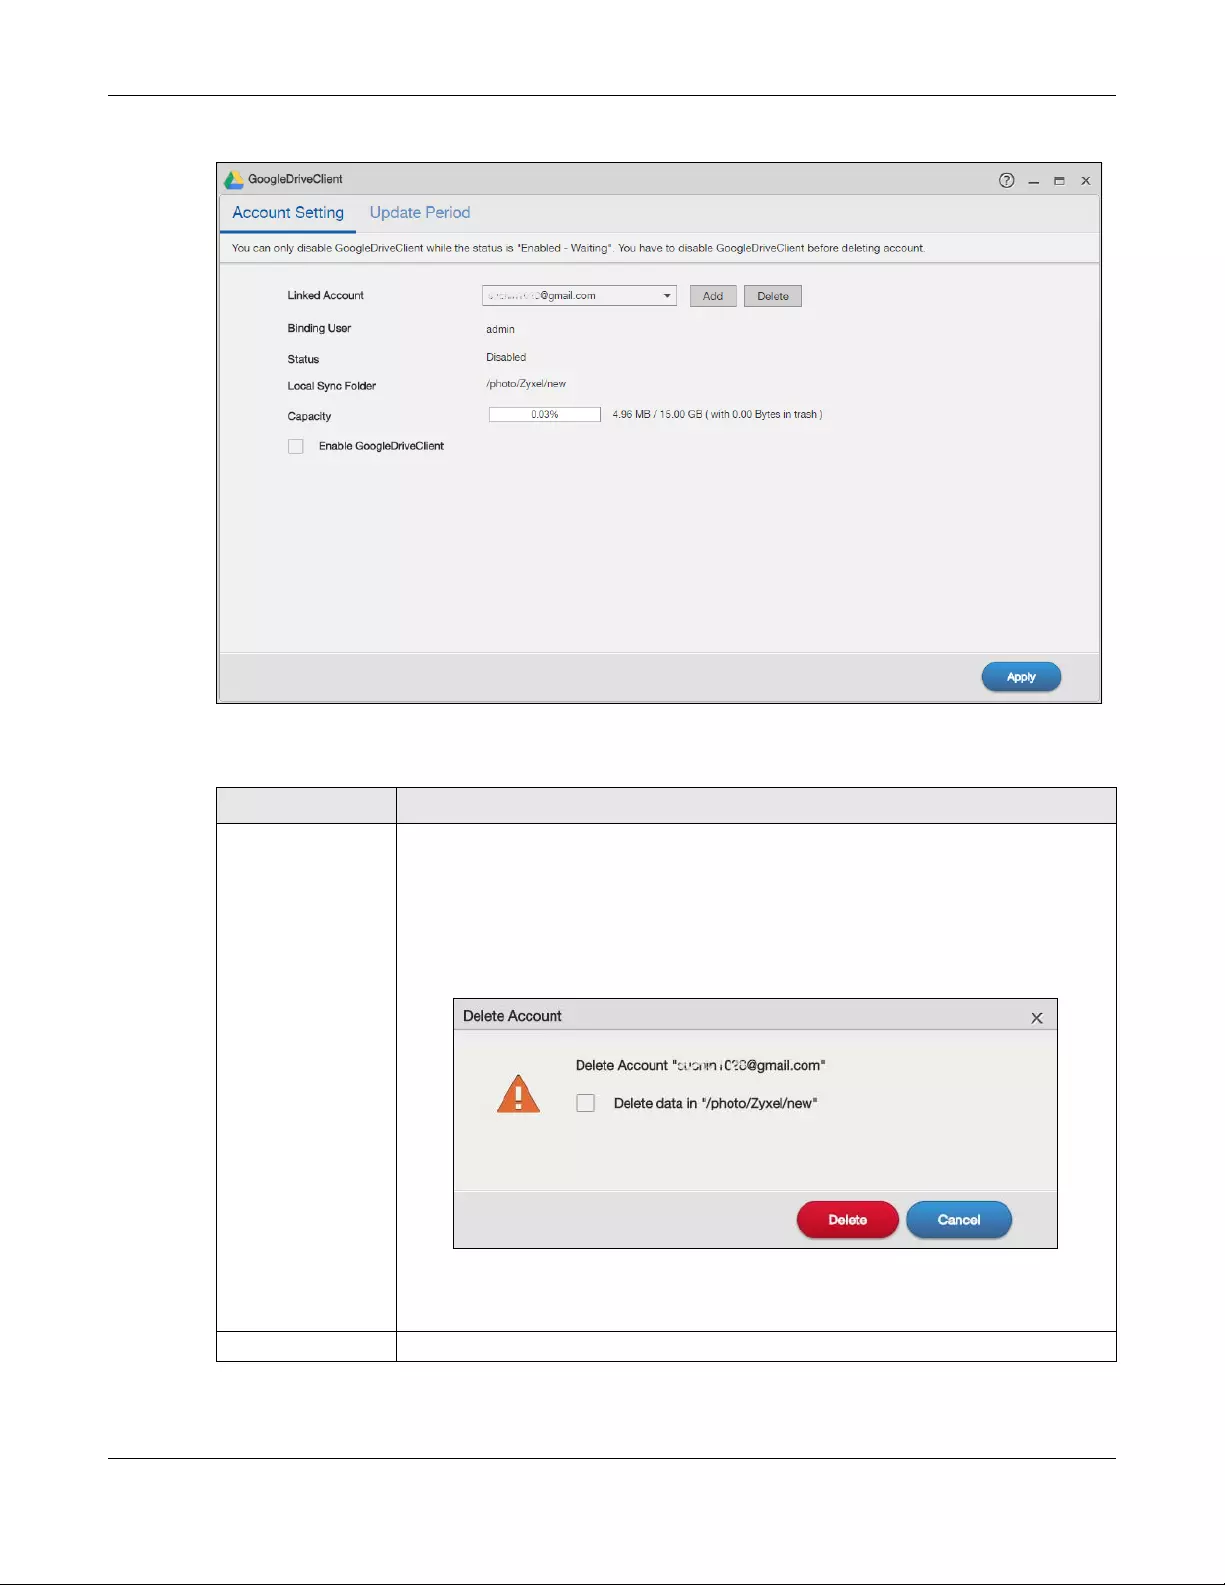
Chapter 13 App Center and Packages
NAS Series User’s Guide
217
Figure 172 GoogleDriveClient > Account Setting
The following table describes the labels in this screen.
Table 121 GoogleDriveClient > Account Setting
LABEL DESCRIPTION
Linked Account This displays the e-mail address of the owner of the Google account the NAS is configured
to use. Select a Google account linked to an NAS user account.
Click Add to open a screen where you can link an NAS user account and a Google
account.
Click Delete to remove the NAS’s link to the selected Google account. You must disable the
Google Drive feature for the account before you can do this. A screen pops up to let you
decide what to do with the data in the NAS’s linked local sync folder.
Select the check box to delete all data in the local sync folder. Clear the check box to
remove the link to the selected Google account but keep the data in the local sync folder.
Click Cancel to do nothing (keep the account link and data).
Binding User This shows the NAS user account which is linked to the selected Google account.
Chapter 13 App Center and Packages
NAS Series User’s Guide
218
13.5.2 How to link NAS account, share and Google account
Use the Add Account screens to link an NAS user account and a Google account. Click Add in the
GoogleDriveClient > Account Setting screen to open the following screen.
Note: The user has to log into the Google account on the same computer to allow the NAS to
link to it.
Step1 Local Sync Folder
Use this screen to specify the folder on the NAS to synchronize with Google Drive for the local user.
Status This shows the current status of the GoogleDrive feature for the selected Google account.
•Disabled — The GoogleDrive feature is turned off. During this state you can use the other
sections of this screen to add or delete linked accounts or enable Google Drive.
•Enabled — Waiting — The GoogleDrive feature is configured, enabled, and waiting to
perform the next Google Drive update. During this state you can use the other sections
of this screen to add or delete linked accounts or disable Google Drive.
•Enabled — Synchronizing — The GoogleDrive feature is synchronizing the local sync folder
and the Google account. During this state you can use the other sections of this screen
to add linked accounts during this state.
Local Sync Folder The NAS folder or share the NAS synchronizes with the linked Google account.
Capacity The Google account’s used, available, and total online Google Drive storage space.
Enable GoogleDrive Select this to have the NAS periodically synchronize the selected linked account’s local
sync folder and Google Drive storage. You can enable synchronizing with Google Drive for
individual accounts and disable it for other accounts.
Clear this option to disable synchronizing the selected linked account’s local sync folder
and Google Drive storage.
Apply Click this to save your changes.
Table 121 GoogleDriveClient > Account Setting (continued)
LABEL DESCRIPTION
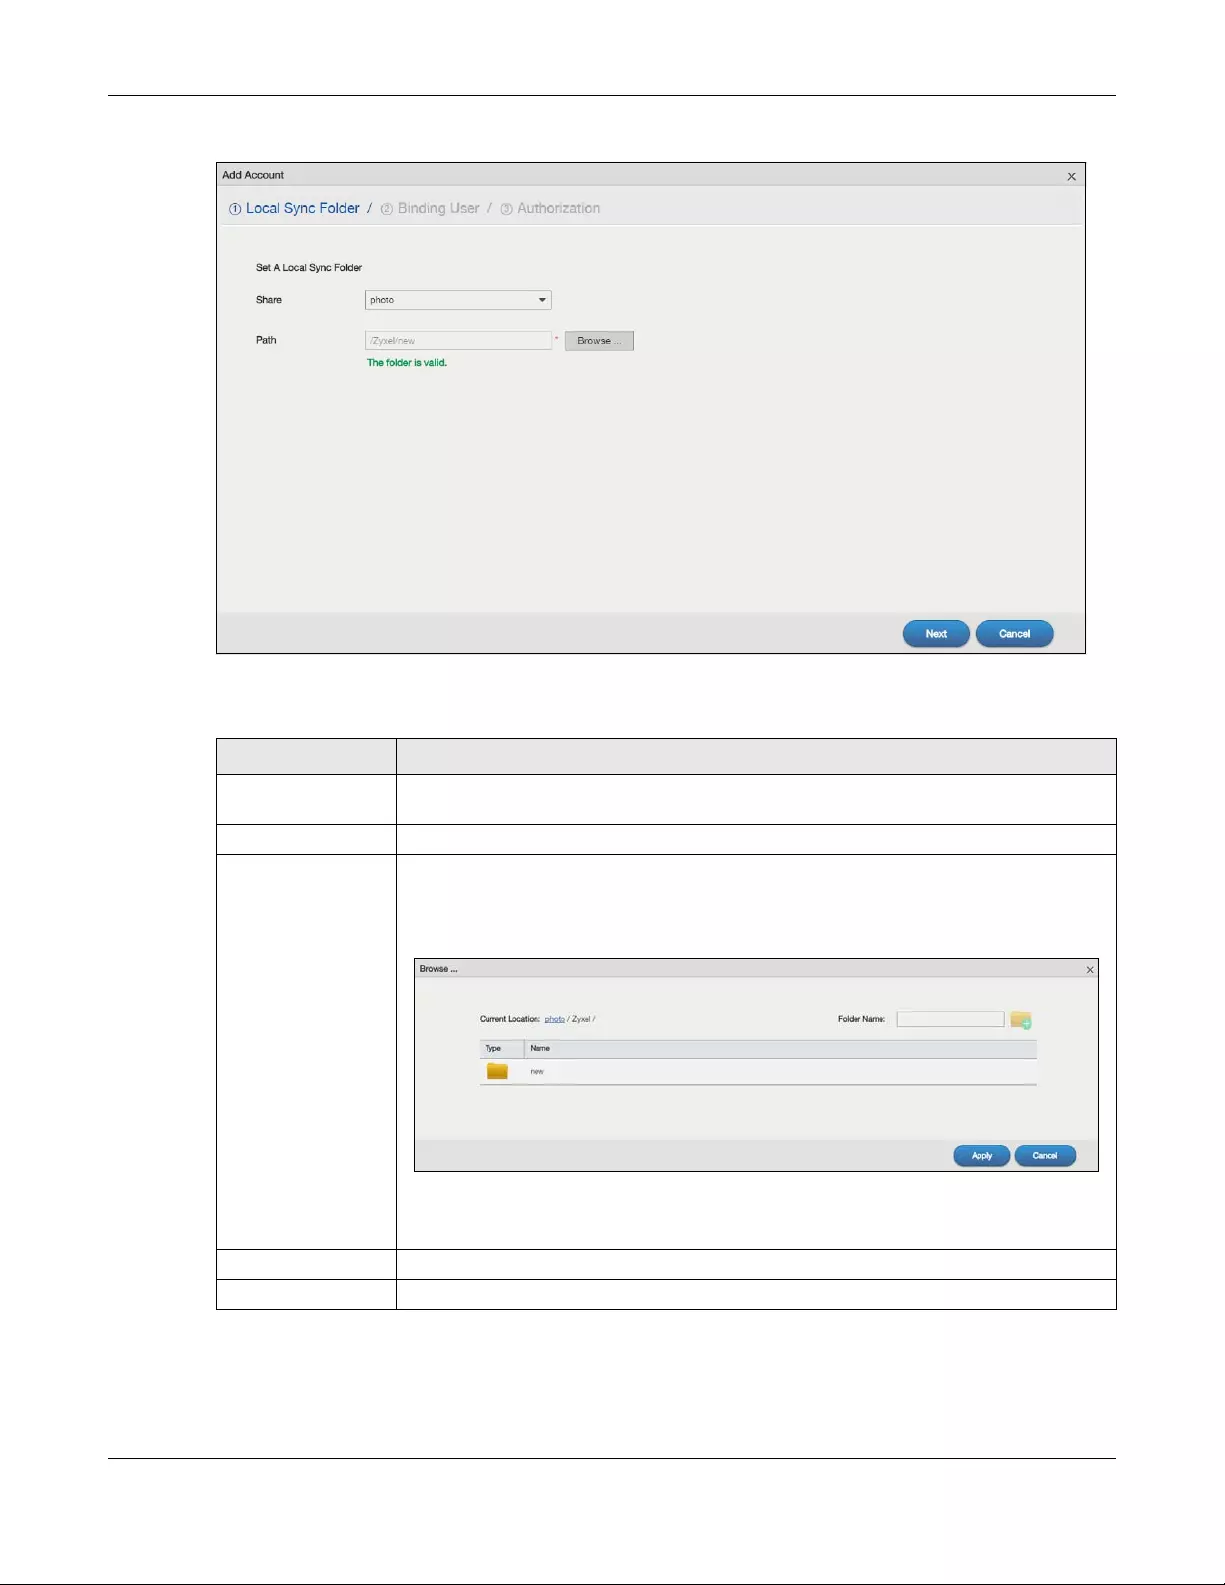
Chapter 13 App Center and Packages
NAS Series User’s Guide
219
Figure 173 GoogleDriveClient > Account Setting > Add: Step1 Local Sync Folder
The following table describes the labels in this screen.
Step2 Binding User
Use this screen to select the local NAS user account to link with Google Drive. Click Next to continue.
Table 122 GoogleDriveClient > Account Setting > Add: Step1 Local Sync Folder
LABEL DESCRIPTION
Share The name of a share on the NAS containing the folder the NAS synchronizes with Google
Drive.
Path The location of the folder the NAS synchronizes with Google Drive.
Browse Click this to open the following screen where you can specify the share or folder to
synchronize with Google Drive. The NAS’s sharing configuration must allow the user access.
The user must also have a large enough quota on both the NAS and Google Drive to hold
whatever files go in the local sync folder and in the Google Drive account (since they both
end up containing everything you put in either).
•Current Location — This shows the folder location in the share.
•Folder Name — Enter a descriptive name and click Create New Folder to add a new
folder in the current share or folder.
Next Click this to save your changes and proceed.
Cancel Click this to return to the previous screen without saving.
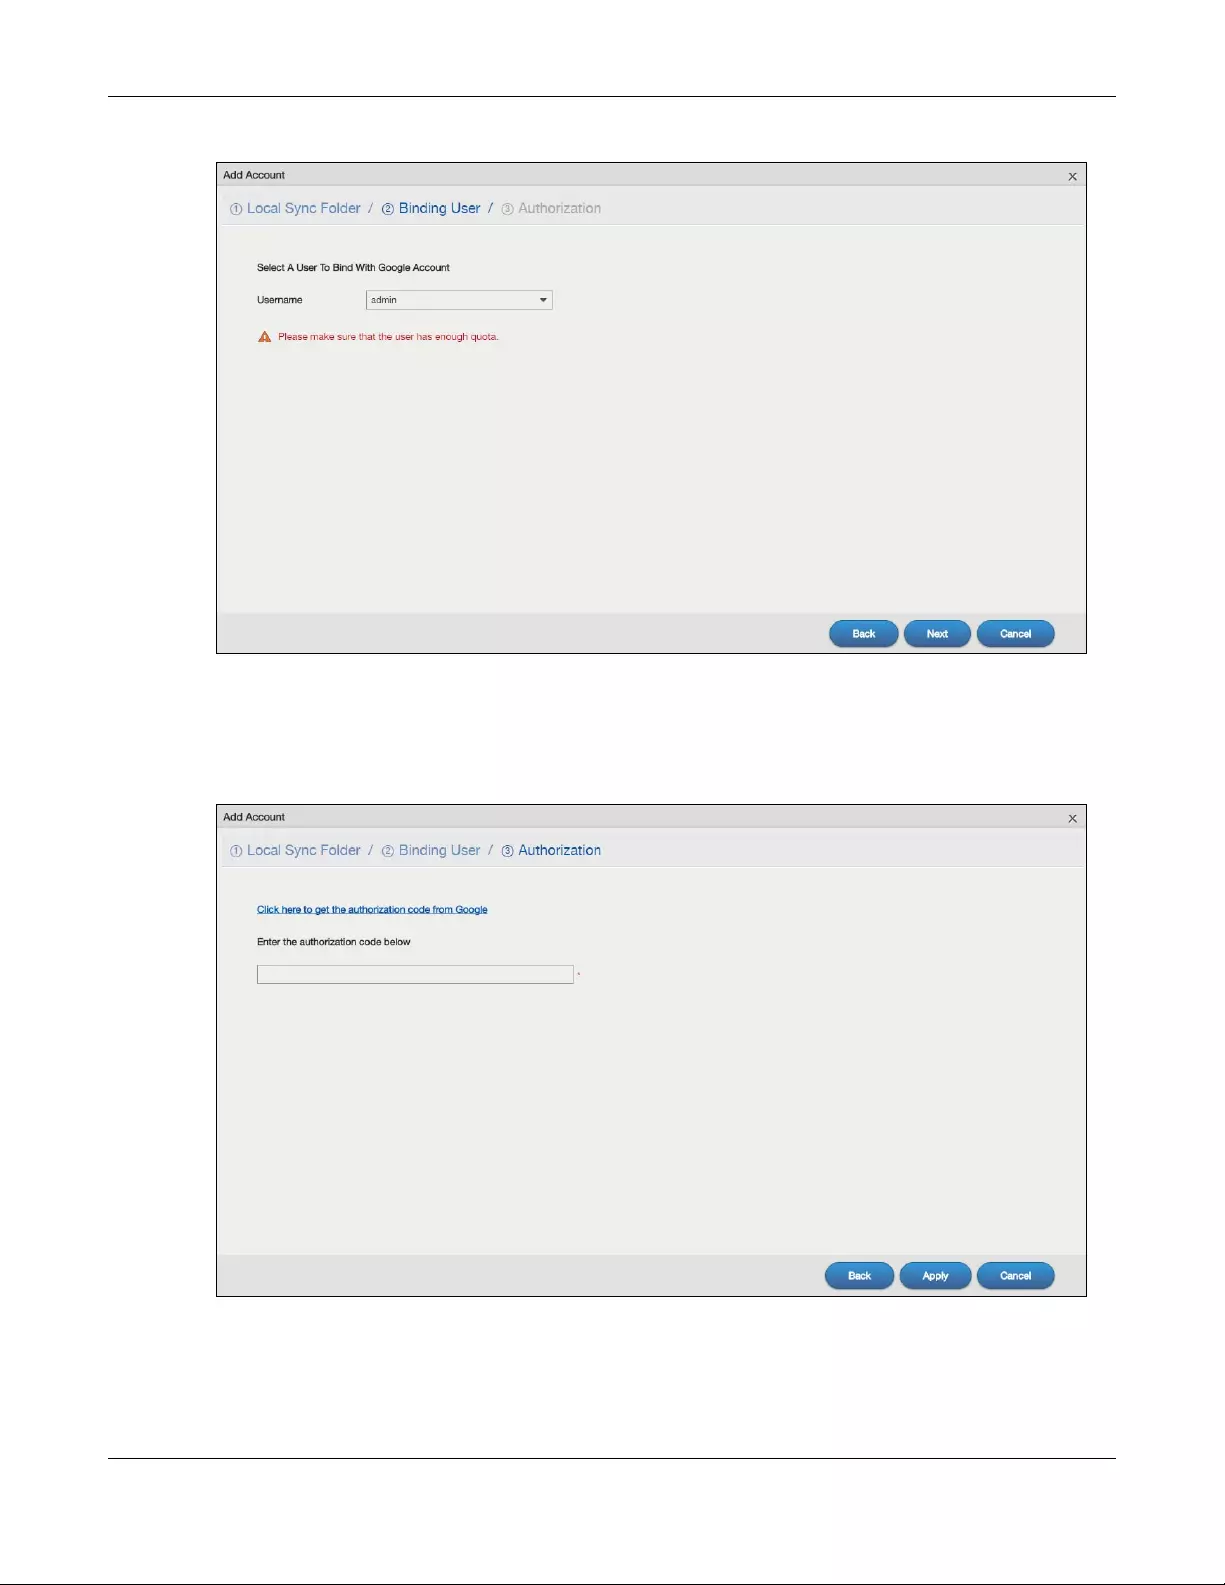
Chapter 13 App Center and Packages
NAS Series User’s Guide
220
Figure 174 GoogleDriveClient > Account Setting > Add: Step2 Binding User
Step3 Authorization
Click the link in this screen to get the authorization code from Google.
Figure 175 GoogleDriveClient > Account Setting > Add: Step3 Authentication

Chapter 13 App Center and Packages
NAS Series User’s Guide
221
The user must sign into the Google account. You may need to sign out of Google’s services first if
another user account is already signed in.
Click Allow when the following screen displays to allow access to the files in your Google Drive.
Copy the code and paste it into the field in the Web Configurator screen.
Click Apply to have the NAS connect to Google and complete the authorization.
In the DropboxClient > Account Setting screen, select the Enable GoogleDriveClient option and click
Apply to start synchronizing your files with Google Drive.
13.5.3 Configure Update Period
Use the Update Period screen to set how often the NAS synchronizes with Google Drive. The NAS initiates
the connections, thus you do not have to configure rules on a firewall located in front of the NAS to
allow access.
Click GoogleDriveClient > Update Period to open the following screen.
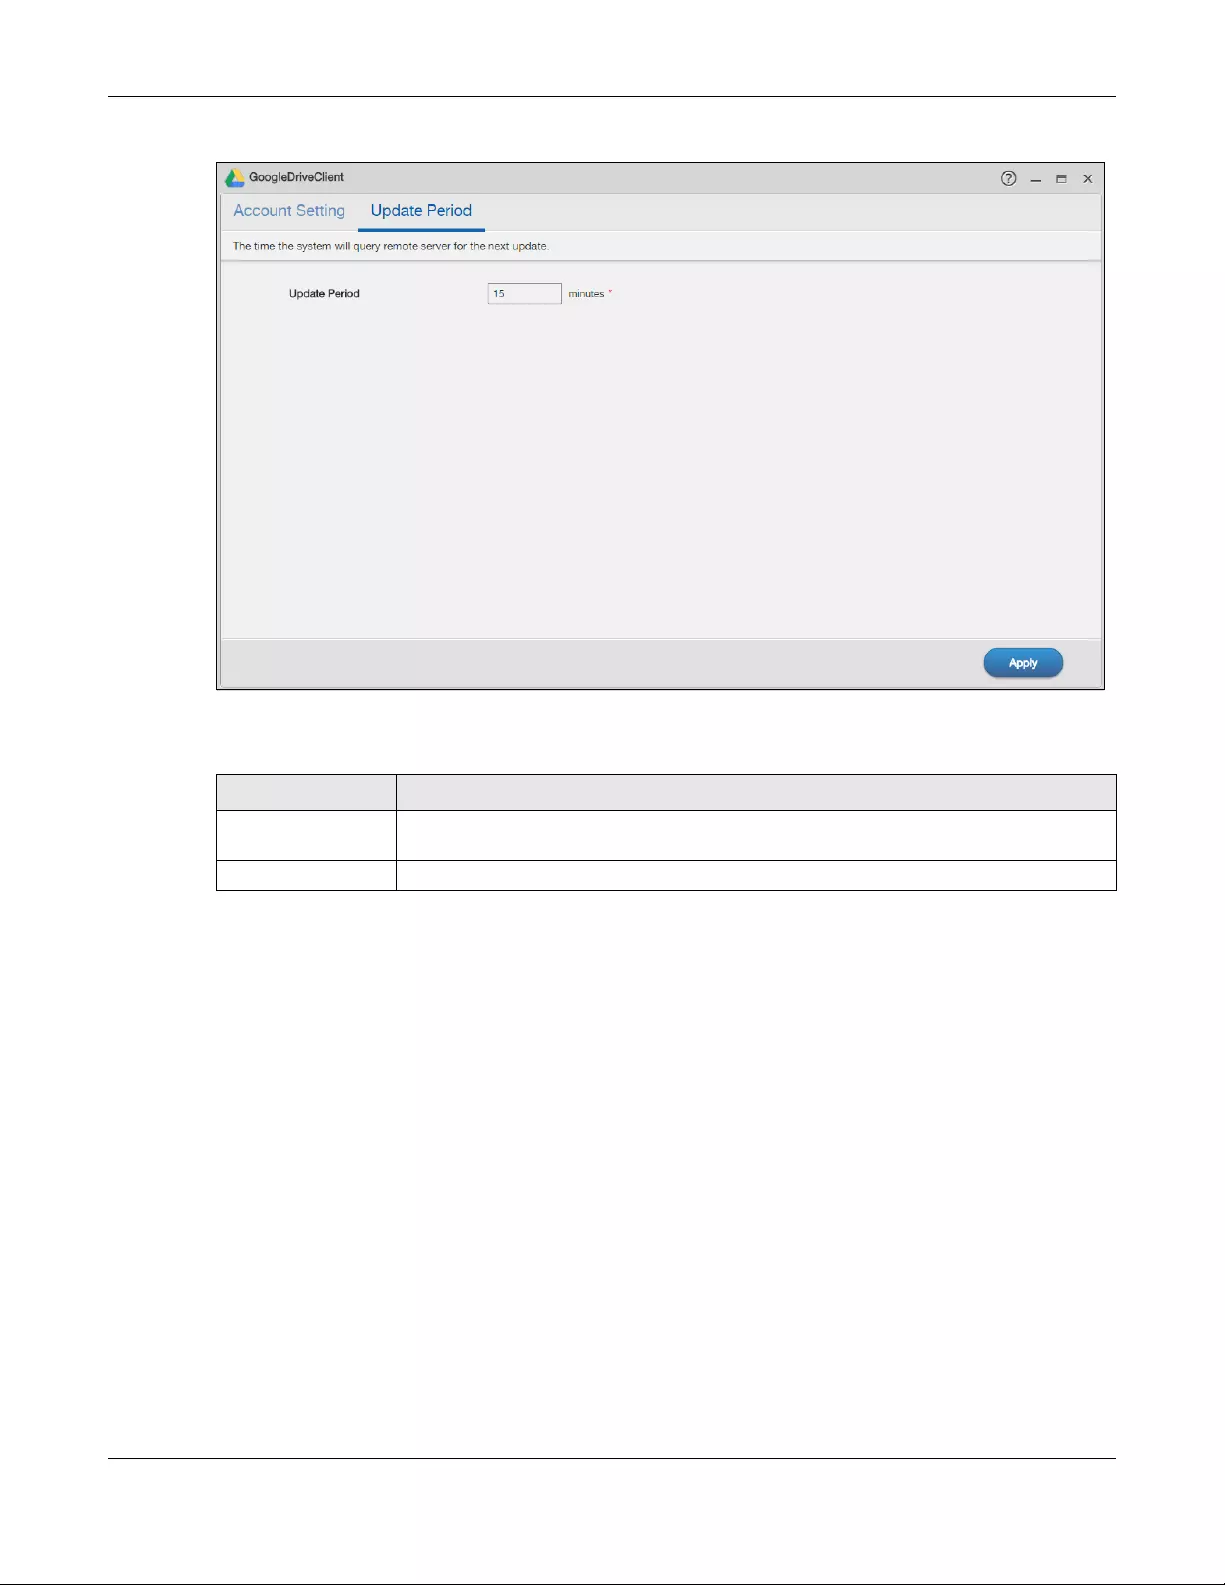
Chapter 13 App Center and Packages
NAS Series User’s Guide
222
Figure 176 GoogleDriveClient > Update Period
The following table describes the labels in this screen.
13.6 NFS
NFS is a distributed file service that provides transparent file sharing for network environments. This allows
shared folders in your NAS to be accessible like a local folder in a user’s computer.
Use the NFS screens to enable and configure Network File System (NFS) settings on your NAS.
Click NFS on the Desktop or the NFS Launch button in the App Center screen to open the following
screen.
Table 123 GoogleDriveClient > Update Period
LABEL DESCRIPTION
Update Period Specify how frequently the NAS synchronizes the local sync folders and the linked Google
Drive accounts. The range is 1 to 4320 minutes (3 days).
Apply Click this to save your changes.
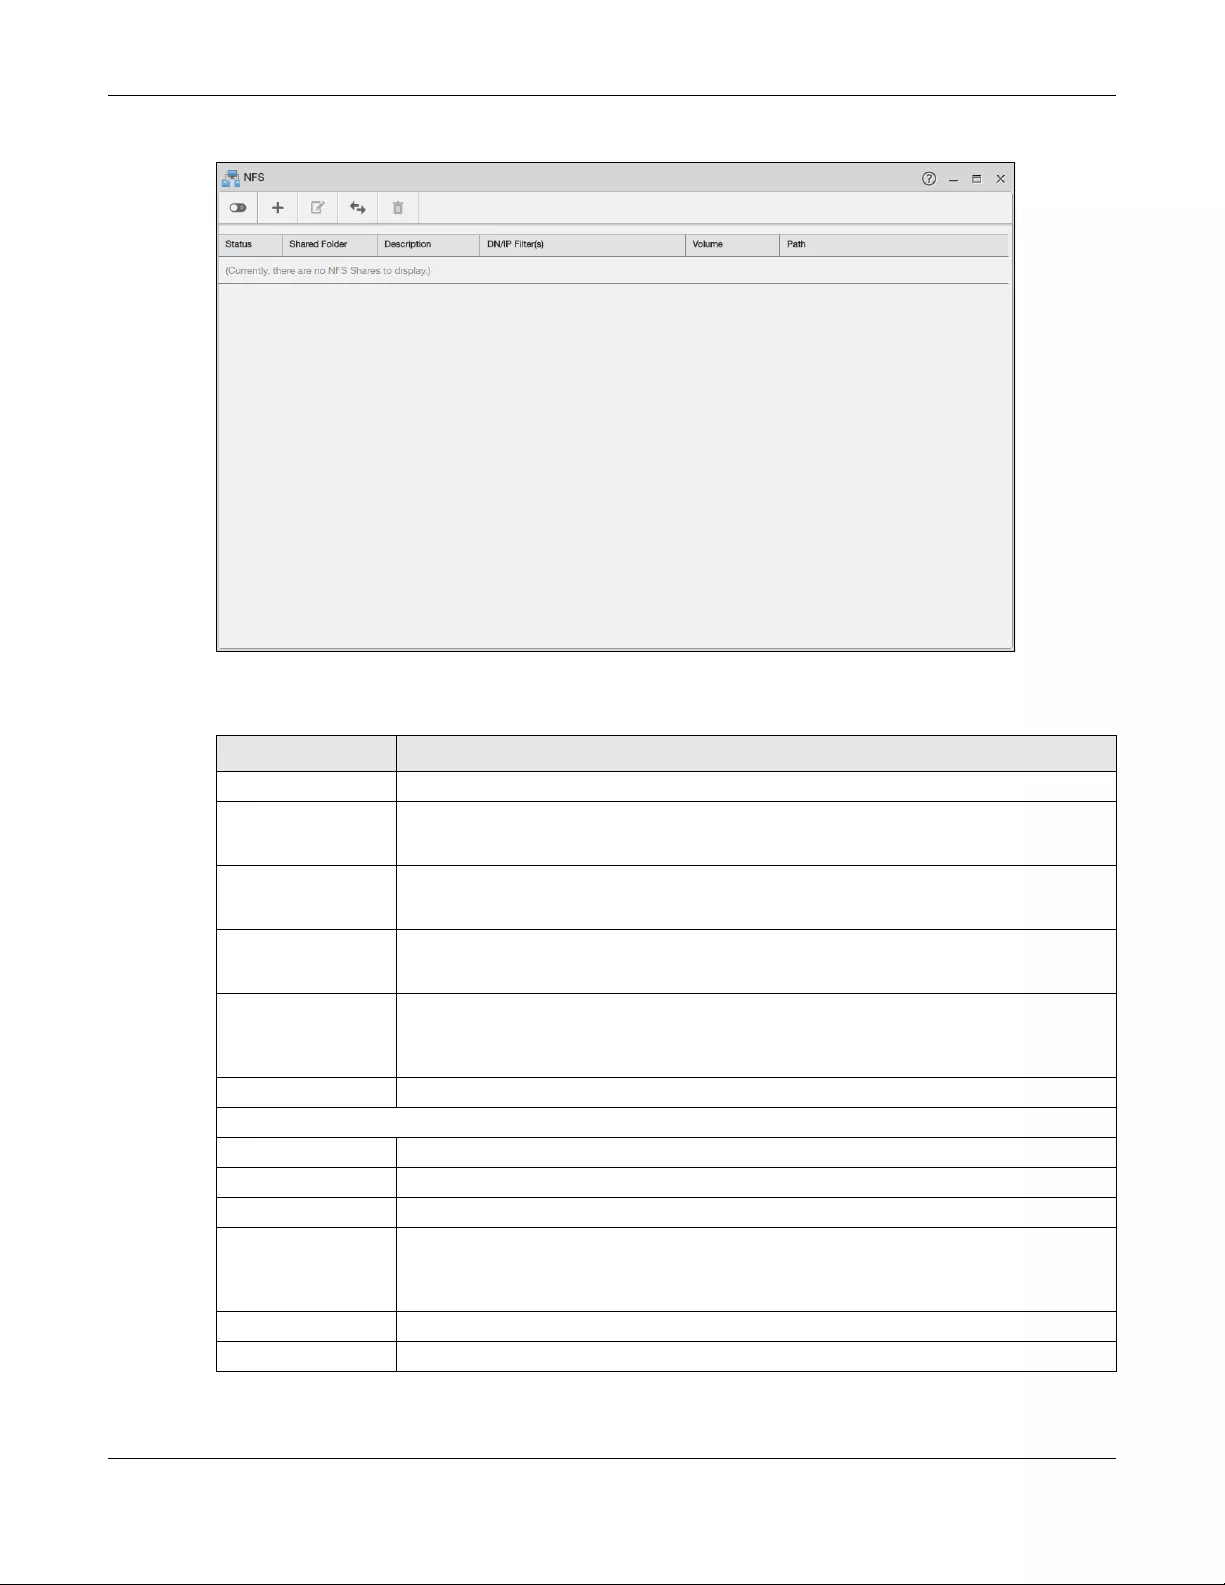
Chapter 13 App Center and Packages
NAS Series User’s Guide
223
Figure 177 NFS
The following table describes the labels in this screen.
You see a warning screen before you delete an NFS share.
Table 124 NFS
LABEL DESCRIPTION
Enable Click this to employ NFS in your NAS.
Disable Click this to stop using NFS.
This makes all NFS shares unavailable.
Add NFS Share Click this to add an NFS share.
Refer to Section 13.6.1 on page 224 for the Add NFS Share screen.
Edit NFS Share Select an NFS share from the list and click this to edit it.
Refer to Section 13.6.1 on page 224 for the Edit NFS Share screen.
NFS Session Click this to view active NFS sessions. You can see the list of users who have access to the
NFS shares.
Refer to Section 13.6.2 on page 226 for the NFS Session screen.
Delete NFS Share (s) Select an NFS share from the list and click this to delete it.
The table lists your NFS shares. Click a column’s heading to sort the entries by that criteria.
Status This shows whether the share is active or not.
Shared Folder This shows the name of the NFS share.
Description This shows a short description of the share.
DN/IP Filter(s) This shows which domain name(s) or IP address(es) have read/write access to the NFS
shares.
Refer to Section 13.6.1 on page 224 for the screen where you can configure this.
Volume This shows the volume where the NFS share is located.
Path This shows the location of the share in the NAS.
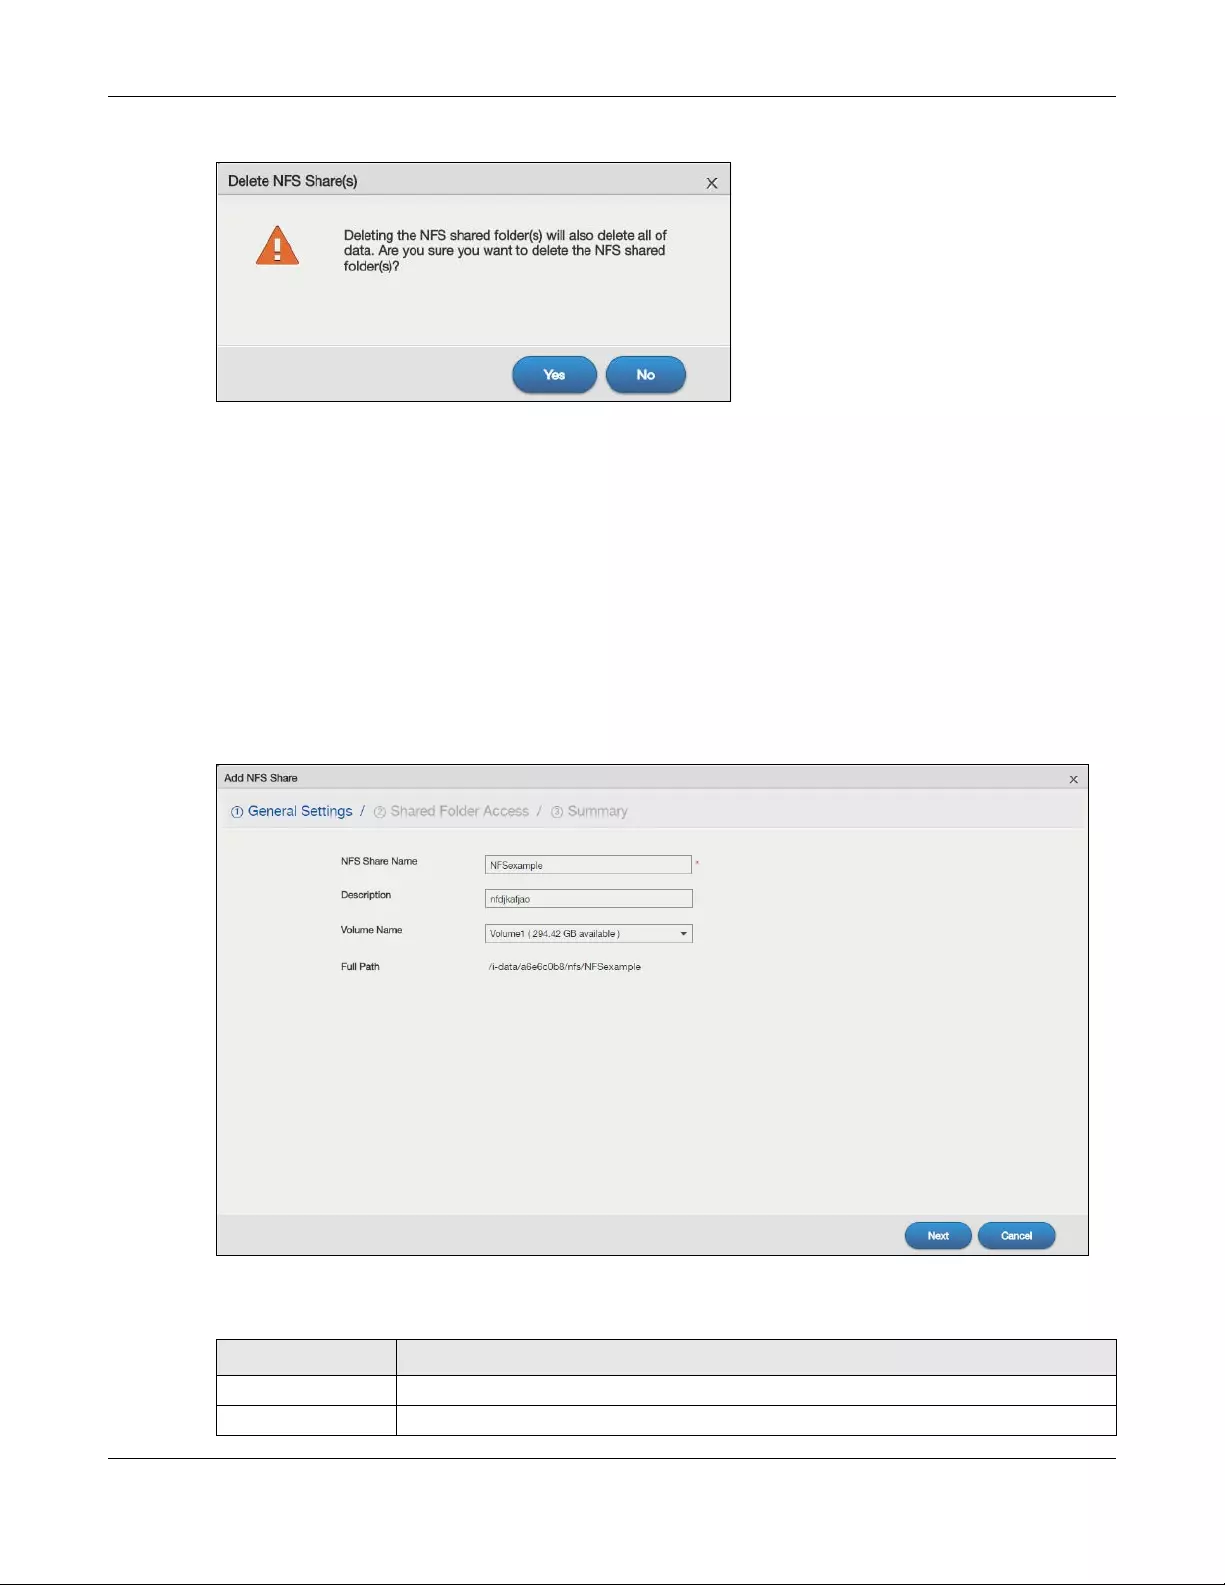
Chapter 13 App Center and Packages
NAS Series User’s Guide
224
Figure 178 Delete an NFS Share
13.6.1 Add/Edit NFS Share
Use this screen to add or edit an NFS share.
Note: Some attributes of the NFS share cannot be edited.
Click Add NFS Share or Edit NFS Share in the NFS screen to open the following screen.
Step 1 General Settings
Use this screen to set the NFS share name and location.
Figure 179 NFS: Add/Edit: Step 1 General Settings
The following table describes the labels in this screen.
Table 125 NFS: Add/Edit: Step 1 General Settings
LABEL DESCRIPTION
NFS Share Name Enter the name you want to give to the NFS share.
Description Enter a short description for the share.
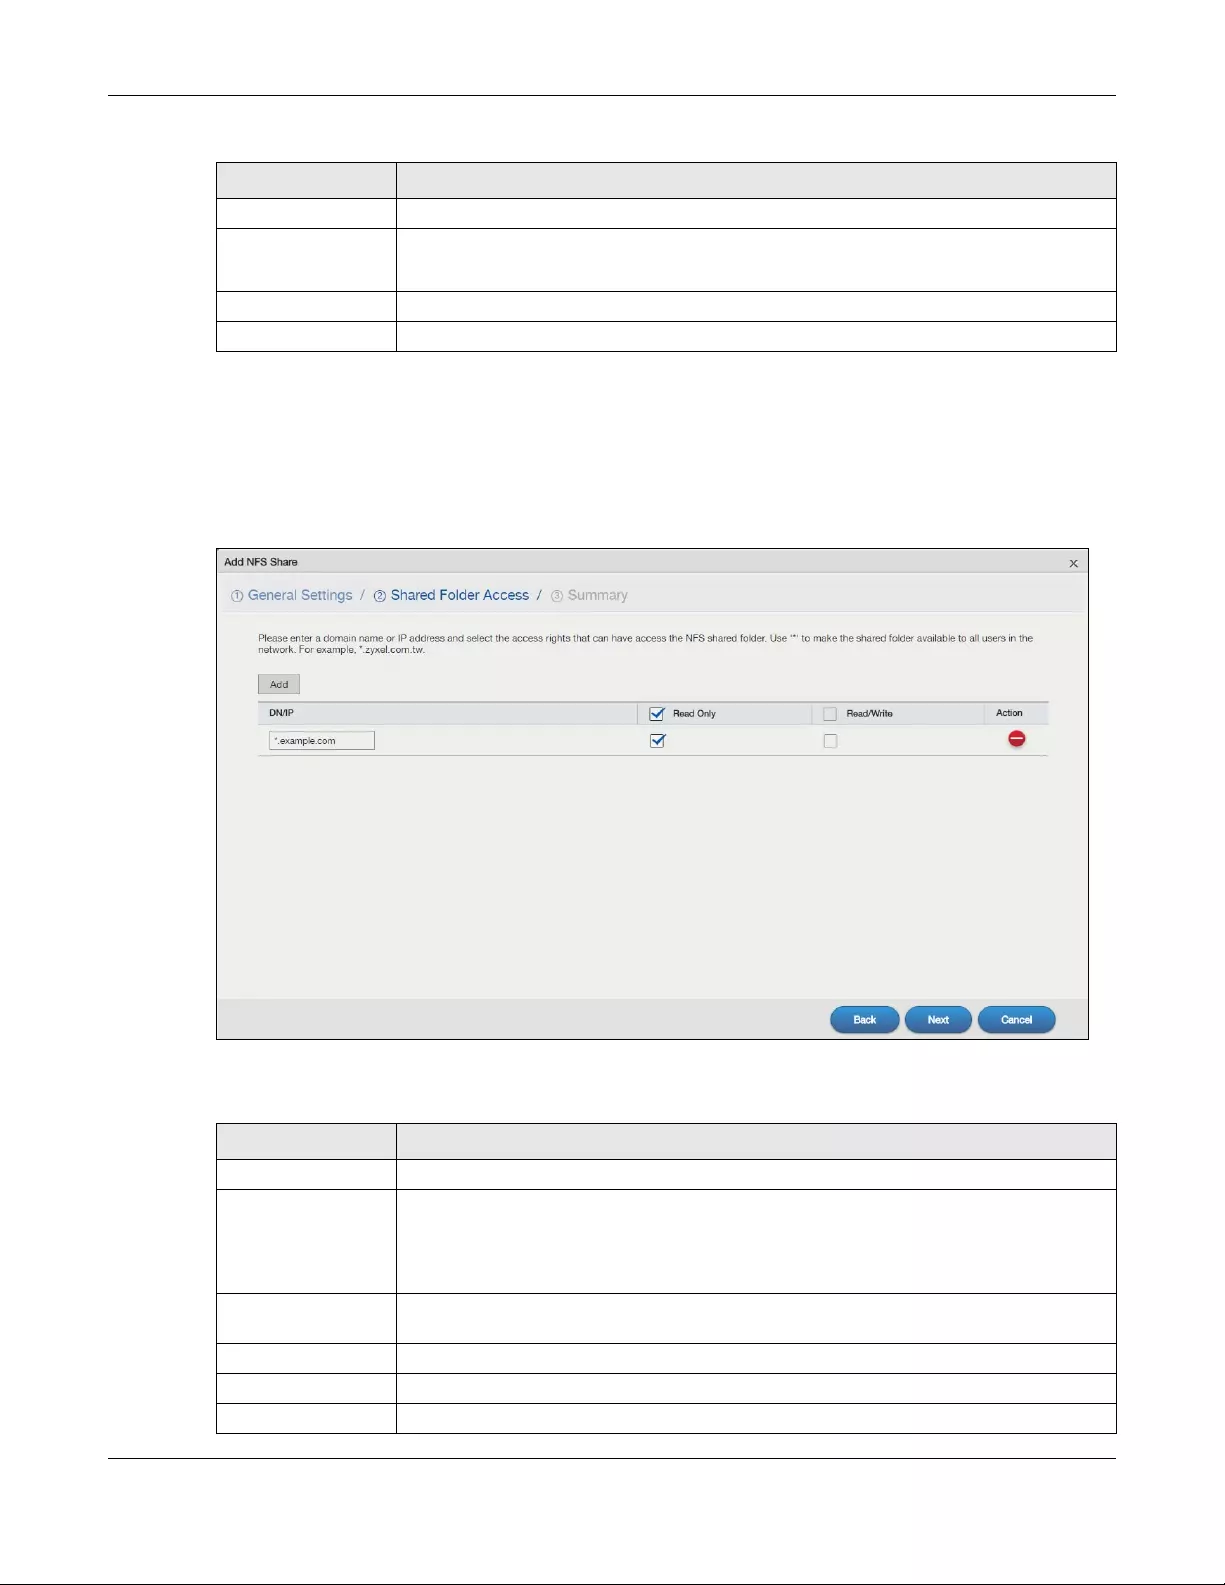
Chapter 13 App Center and Packages
NAS Series User’s Guide
225
Step 2 Shared Folder Access
Use this screen to configuer the access rights you want to grant to each domain name or IP address.
Note: NFS v4 supports Read/Write only, and NFS v3 supports both Read Only and Read/Write.
Figure 180 NFS: Add/Edit: Step 2 Shared Folder Access
The following table describes the labels in this screen.
Volume Name Select the volume where the folder you want to add as an NFS share is located.
Full Path This shows the location of the NFS share in the NAS.
The NFS server assigns this path to the share folder you input.
Next Click this to go to the next screen.
Cancel Click this to close the screen without saving.
Table 126 NFS: Add/Edit: Step 2 Shared Folder Access
LABEL DESCRIPTION
Add Click this to create a new entry.
DN/IP Enter the domain name(s) or IP address(es) that can have access to the NFS share.
Enter ‘*’ to make the share available to all users in the network. You can also enter a
wildcard, such as ‘*.domain.com’ to indicate that all users within that network have access
to the share.
Read Only Users with this access right can only view and copy files in the NFS share but cannot modify
or delete them.
Read/Write Users with this access right can view, edit or delete files in the NFS share.
Action Click this to delete an entry.
Back Click this to go back to the previous screen.
Table 125 NFS: Add/Edit: Step 1 General Settings (continued)
LABEL DESCRIPTION
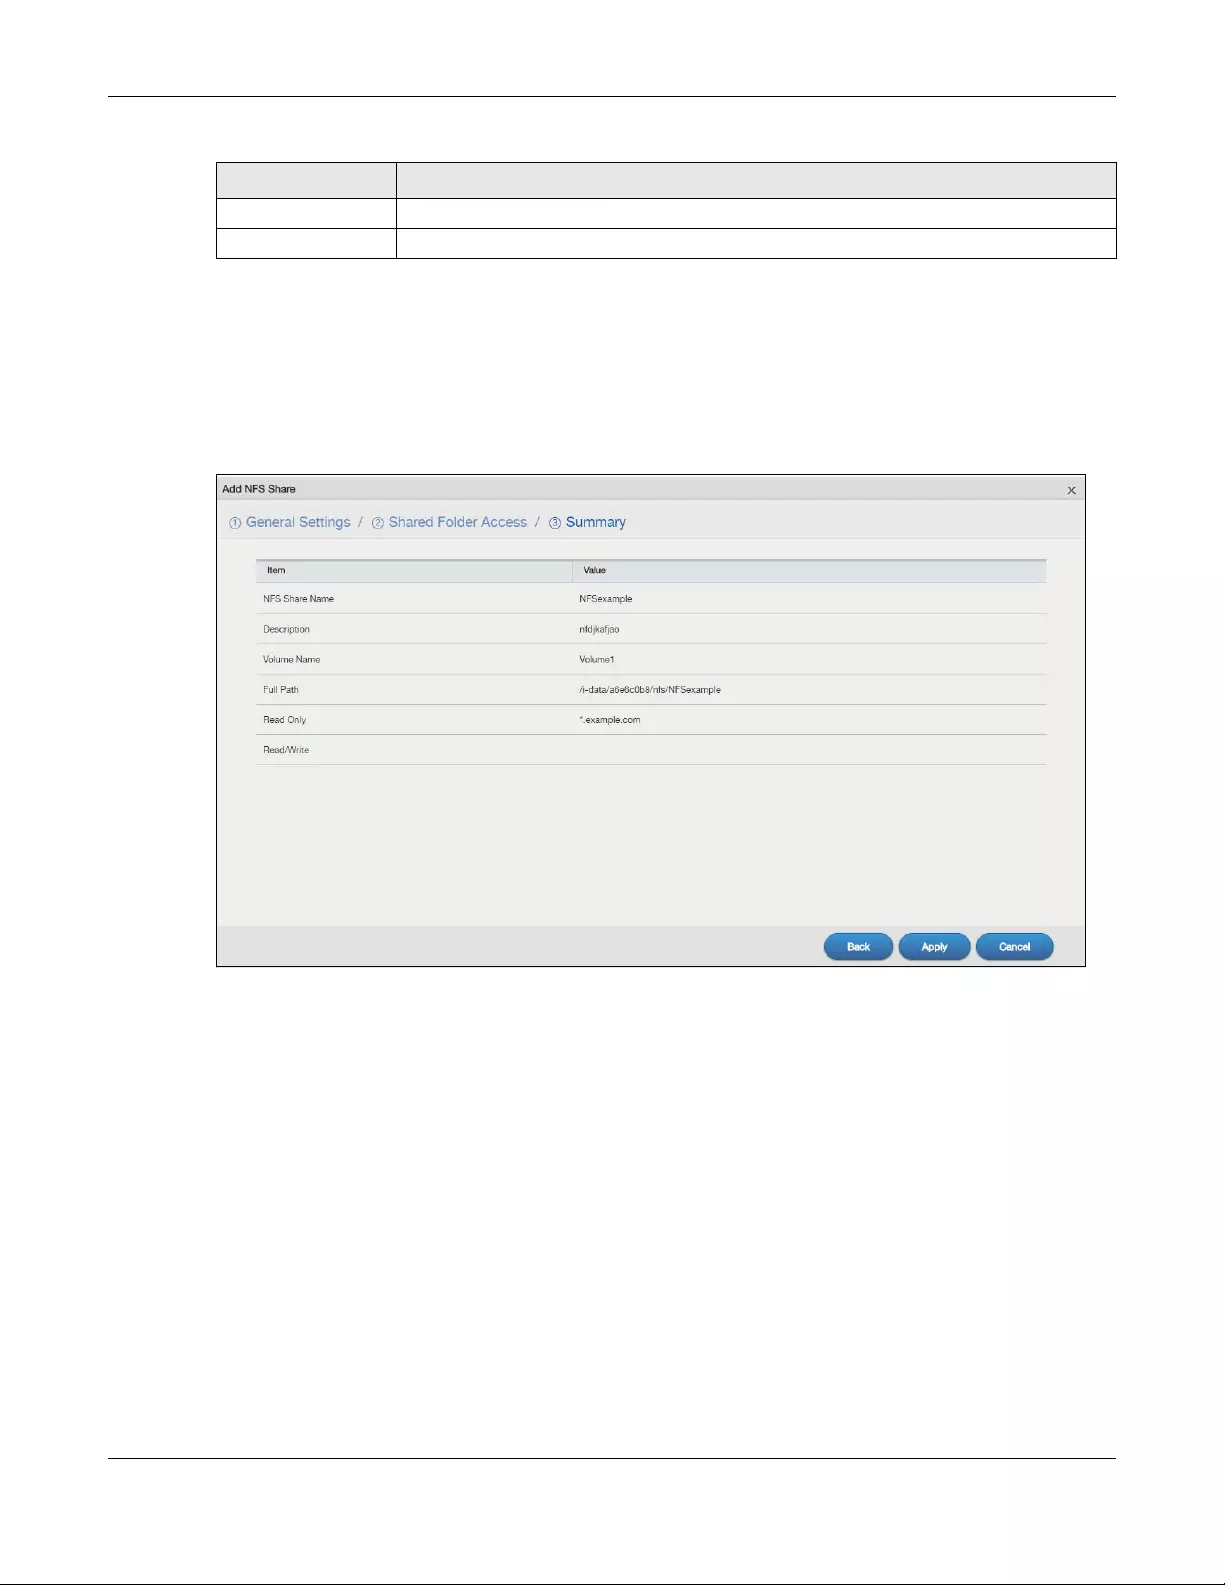
Chapter 13 App Center and Packages
NAS Series User’s Guide
226
Step 3 Summary
This screen is not available when you are editing an existing NFS share.
Use this screen to review the settings you configured. Click Apply to complete the setup. Otherwise,
click Back to return to the previous screen, or click Cancel to close the screen without saving.
Figure 181 NFS: Add/Edit: Step 3 Summary
13.6.2 NFS Session
Use this screen to view a list of active NFS sessions. You can see which users are connected the NFS
shares.
Click NFS Session in the NFS screen to open the following.
Next Click this to go to the next screen.
Cancel Click this to close the screen without saving.
Table 126 NFS: Add/Edit: Step 2 Shared Folder Access (continued)
LABEL DESCRIPTION
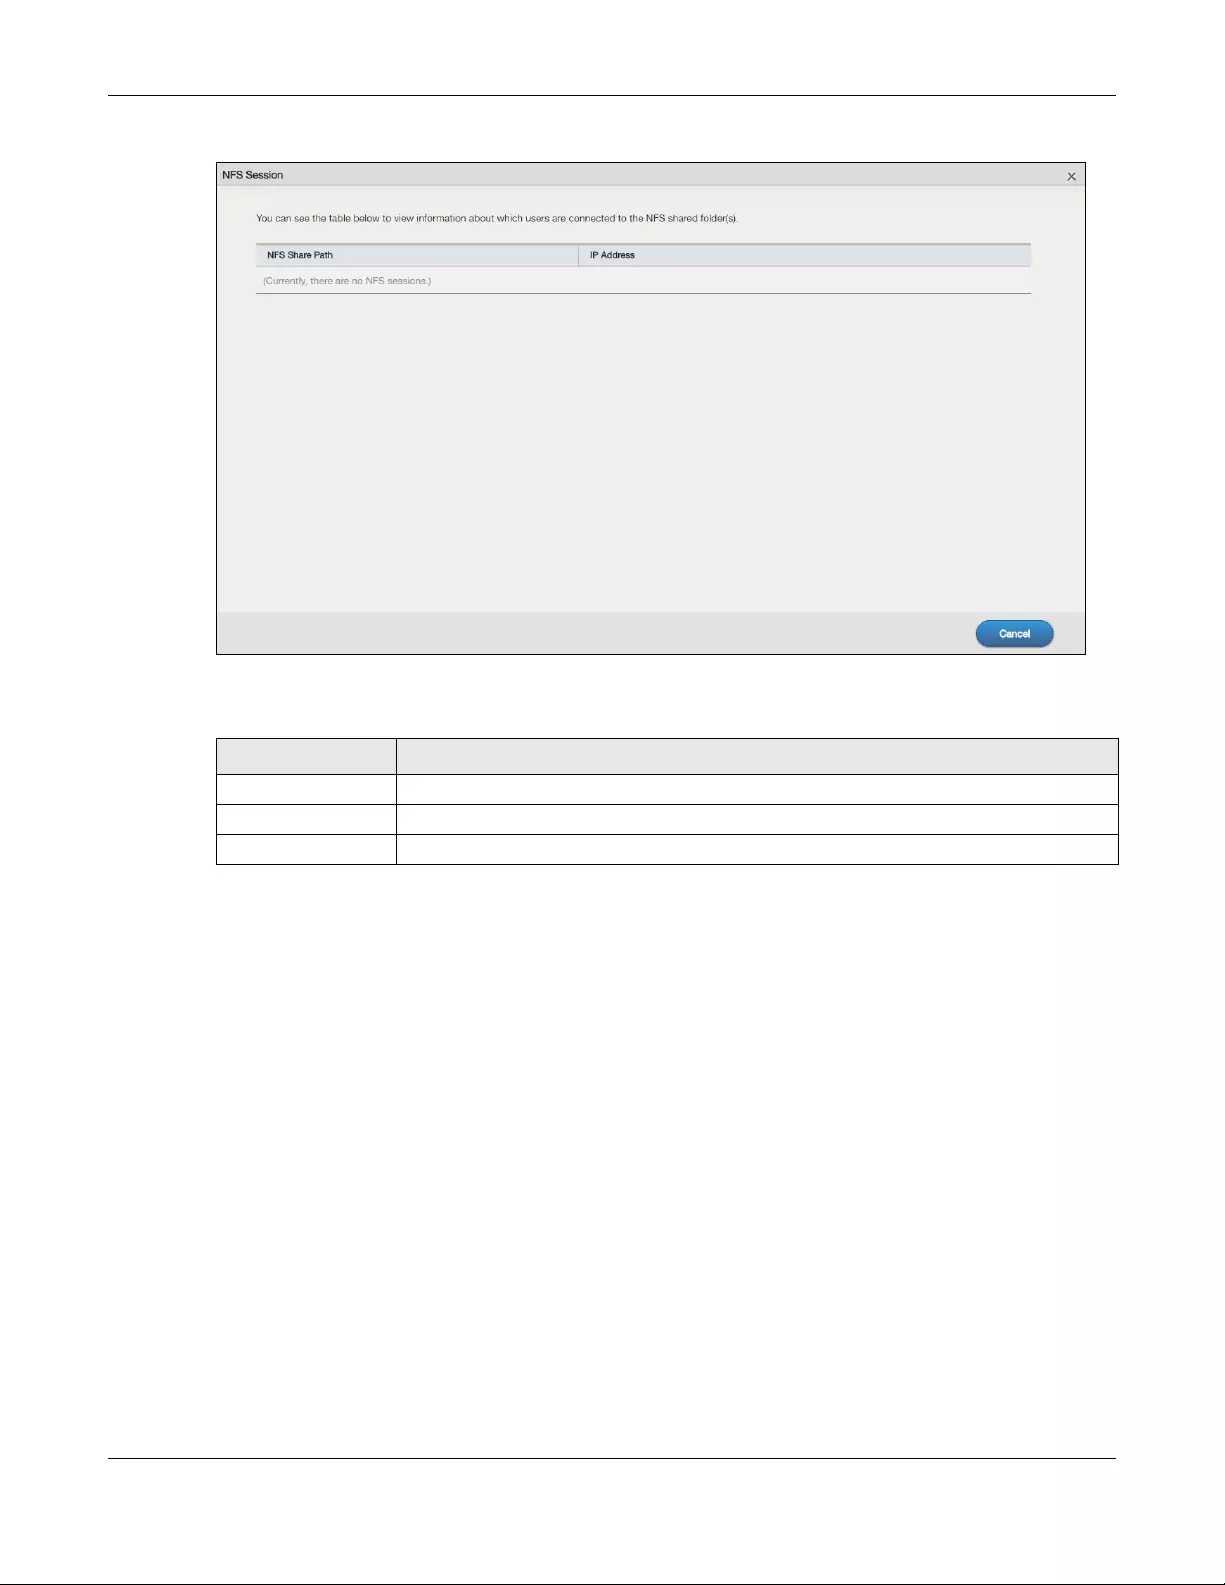
Chapter 13 App Center and Packages
NAS Series User’s Guide
227
Figure 182 NFS: NFS Session
The following table describes the labels in this screen.
13.7 PHP-MySQL-phpMyAdmin
This tool can be used to manage MySQL through the web. This includes MySQL, PHP, and phpMyAdmin.
phpMyAdmin allows you to view and modify a database.
Click PHP-MySQL-phpMyAdmin on the Desktop to display the following screen.
Table 127 NFS: NFS Session
LABEL DESCRIPTION
NFS Share Path This shows the location of the share in the NAS.
IP Address This shows the IP address of the user accessing the NFS share.
Cancel Click this to close the window.
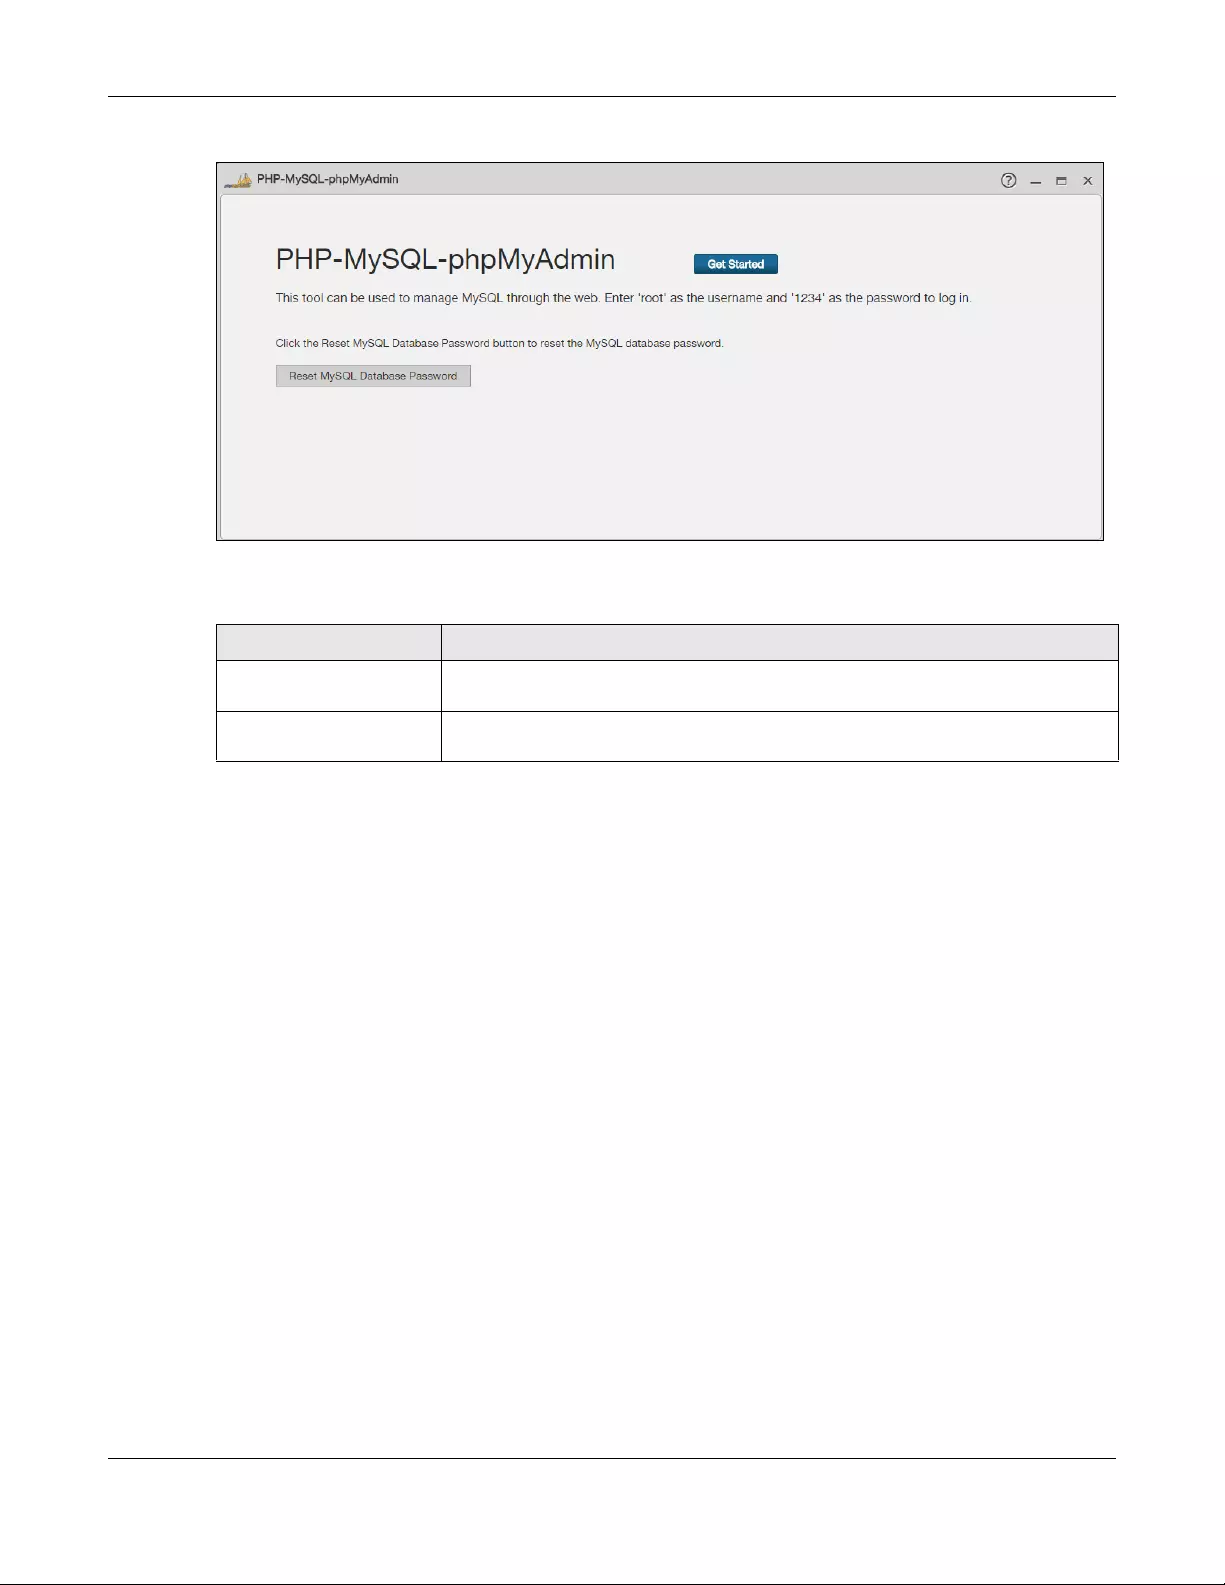
Chapter 13 App Center and Packages
NAS Series User’s Guide
228
Figure 183 PHP-MySQL-phpMyAdmin
The following table describes the labels in this screen.
13.8 TFTP
Trivial File Transfer Protocol (TFTP) is an Internet file transfer protocol similar to FTP and often used for
transmitting large numbers of small files. Use this screen to configure the NAS to accept log files from TFTP
clients such as Zyxel’s G-4100 v2.
Note: You may need to configure any firewalls between the NAS and the TFTP clients in order
to let the log files go to the NAS.
Click TFTP on the Desktop or the Launch button in the App Center screen to open the following screen.
Table 128 PHP-MySQL-phpMyAdmin
LABEL DESCRIPTION
Get Started Click this to access and log into phpMyAdmin to manage your databases. Enter ‘root’
as the username and ‘1234’ as the password to log in.
Reset MySQL Database
Password
If you change and forget your password, you will need to use this button. The
password will be reset to “1234”.
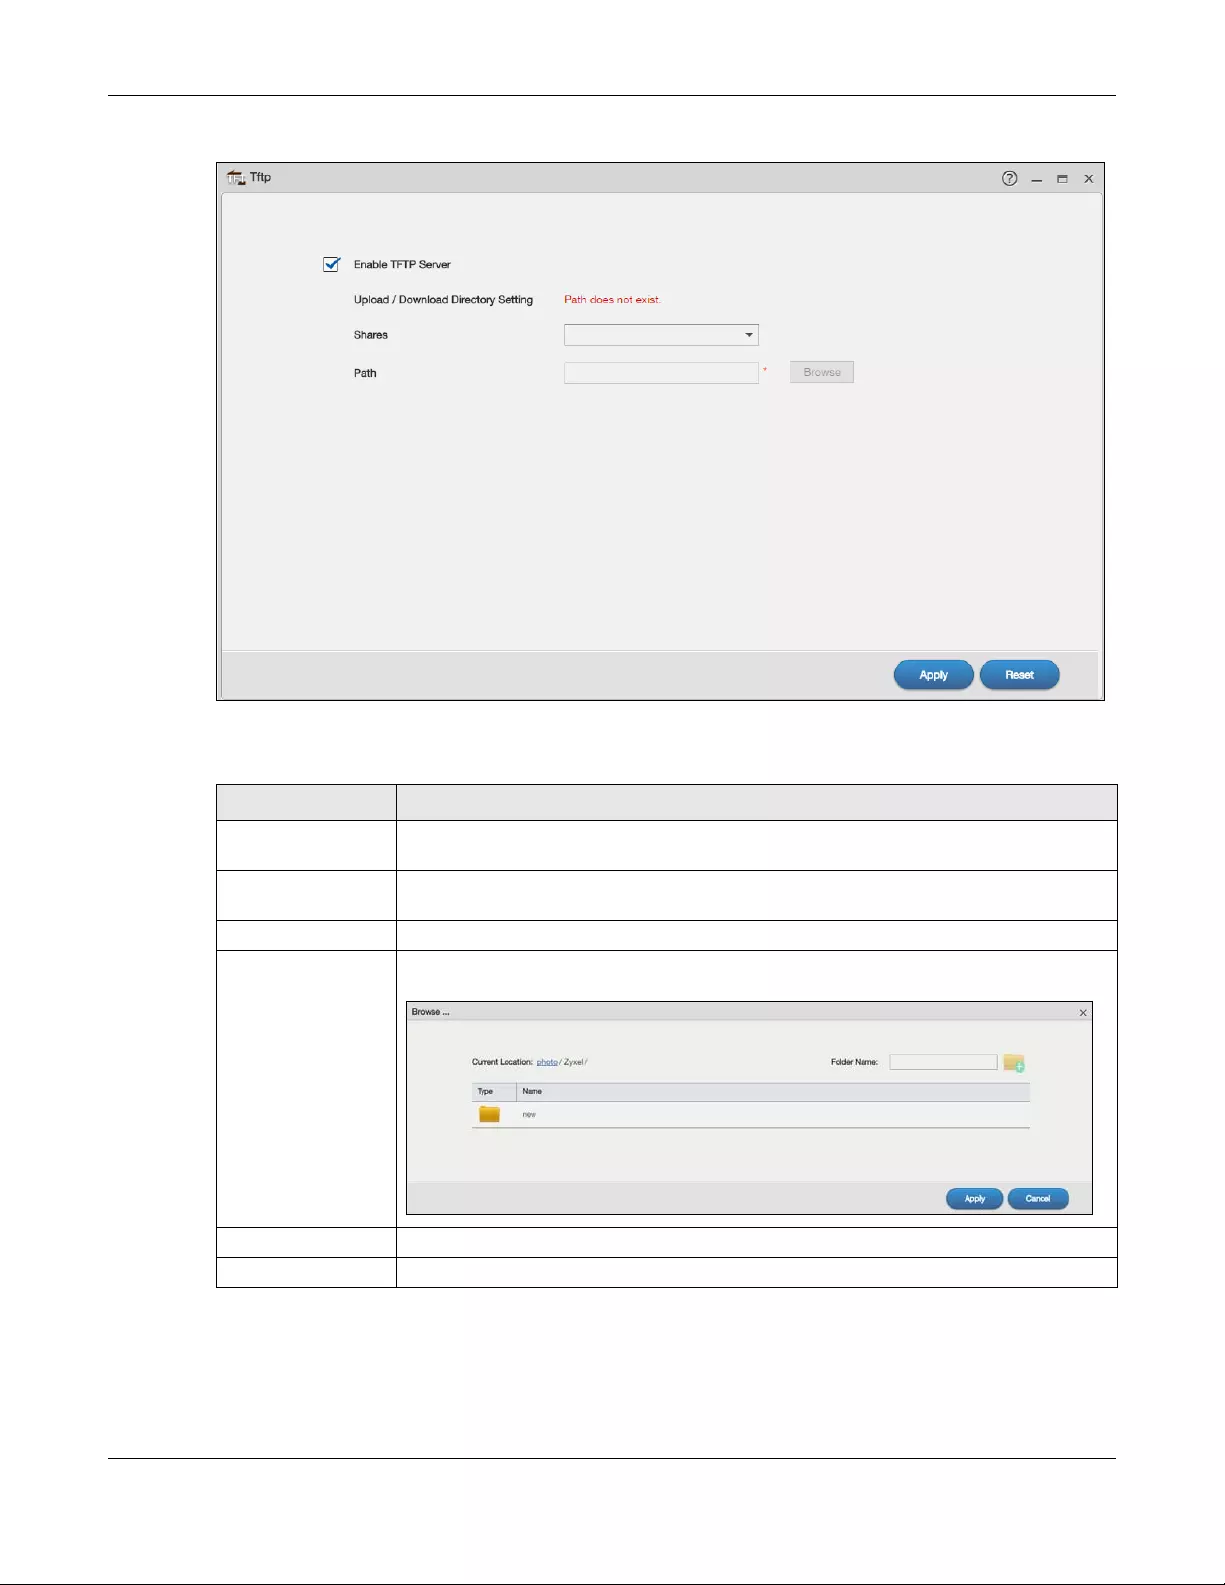
Chapter 13 App Center and Packages
NAS Series User’s Guide
229
Figure 184 TFTP
The following table describes the labels in this screen.
Table 129 TFTP
LABEL DESCRIPTION
Enable TFTP Server Select this to have the NAS accept log files from TFTP clients. Clear it to stop the NAS from
accepting log files from TFTP clients.
Upload / Download
Directory Setting
Click View Files to browse to where you want to store the log files on the NAS.
Shares Select the share in which to store the log files.
Path This field displays the share folder’s path. If you want to further specify a folder within the
share, click Browse to find or create a folder on the NAS.
Apply Click this to save your changes.
Reset Click this to restore the screen’s last-saved settings.
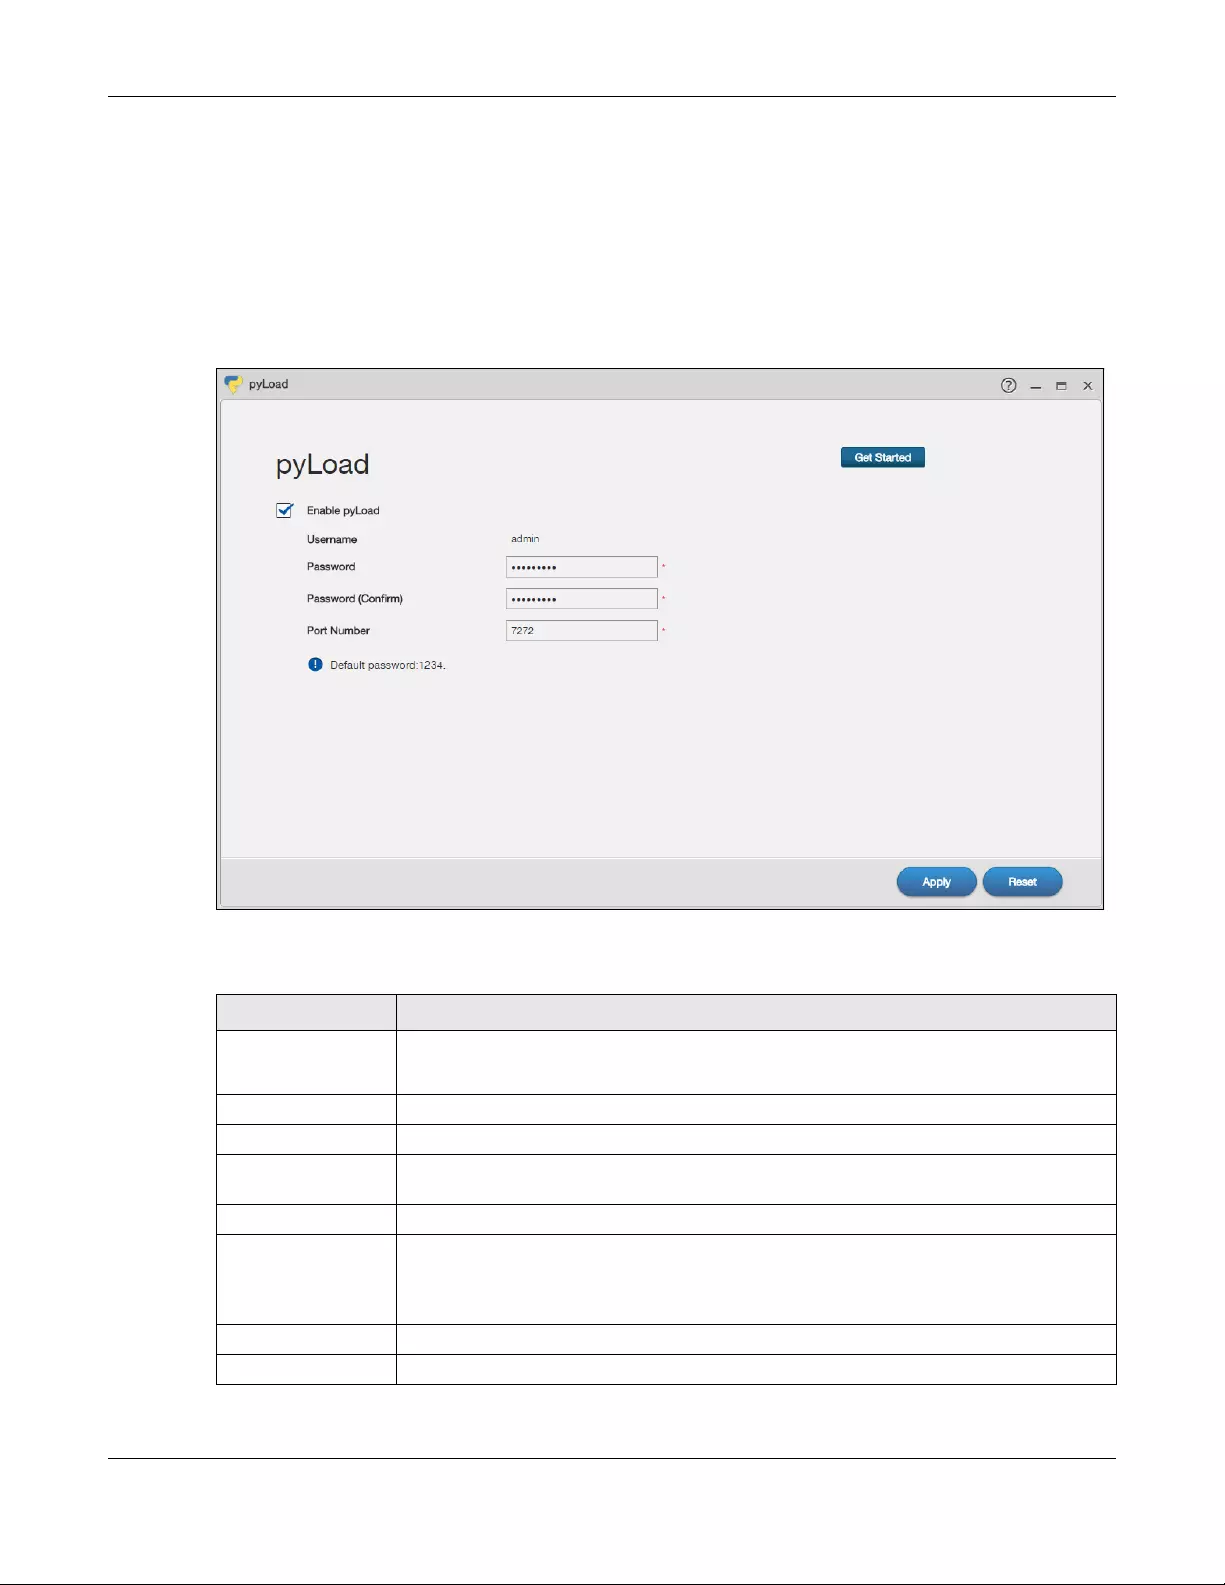
Chapter 13 App Center and Packages
NAS Series User’s Guide
230
13.9 pyLoad
Use this screen to configure the NAS so you can use pyLoad to manage your downloads, including
those from one-click hosting sites.
Click pyLoad on the Desktop or the Launch button in the App Center screen to open the following
screen.
Figure 185 pyLoad
The following table describes the labels in this screen.
Table 130 Applications > pyLoad
LABEL DESCRIPTION
Get Started This is available only when you select Enable pyLoad and click Apply.
Click this button to go to the pyLoad management login screen.
Enable pyLoad Select this to have the NAS manage your downloads. Clear it to turn the feature off.
Username Only the admin account can log into the pyLoad management screen.
Password You can configure a separate password for using the admin account to access the NAS’s
pyLoad management screen.
Password (Confirm) Type the same password again to make sure you entered it correctly.
Port Number Set the pyLoad management page’s port number. The range of valid port numbers is
1024~65536. Include this port number after the IP address when manually entering the
pyLoad management login page’s address in your browser’s address bar. For example,
192.168.1.2:7272.
Apply Click this to save your changes.
Reset Click this to restore the screen’s last-saved settings.
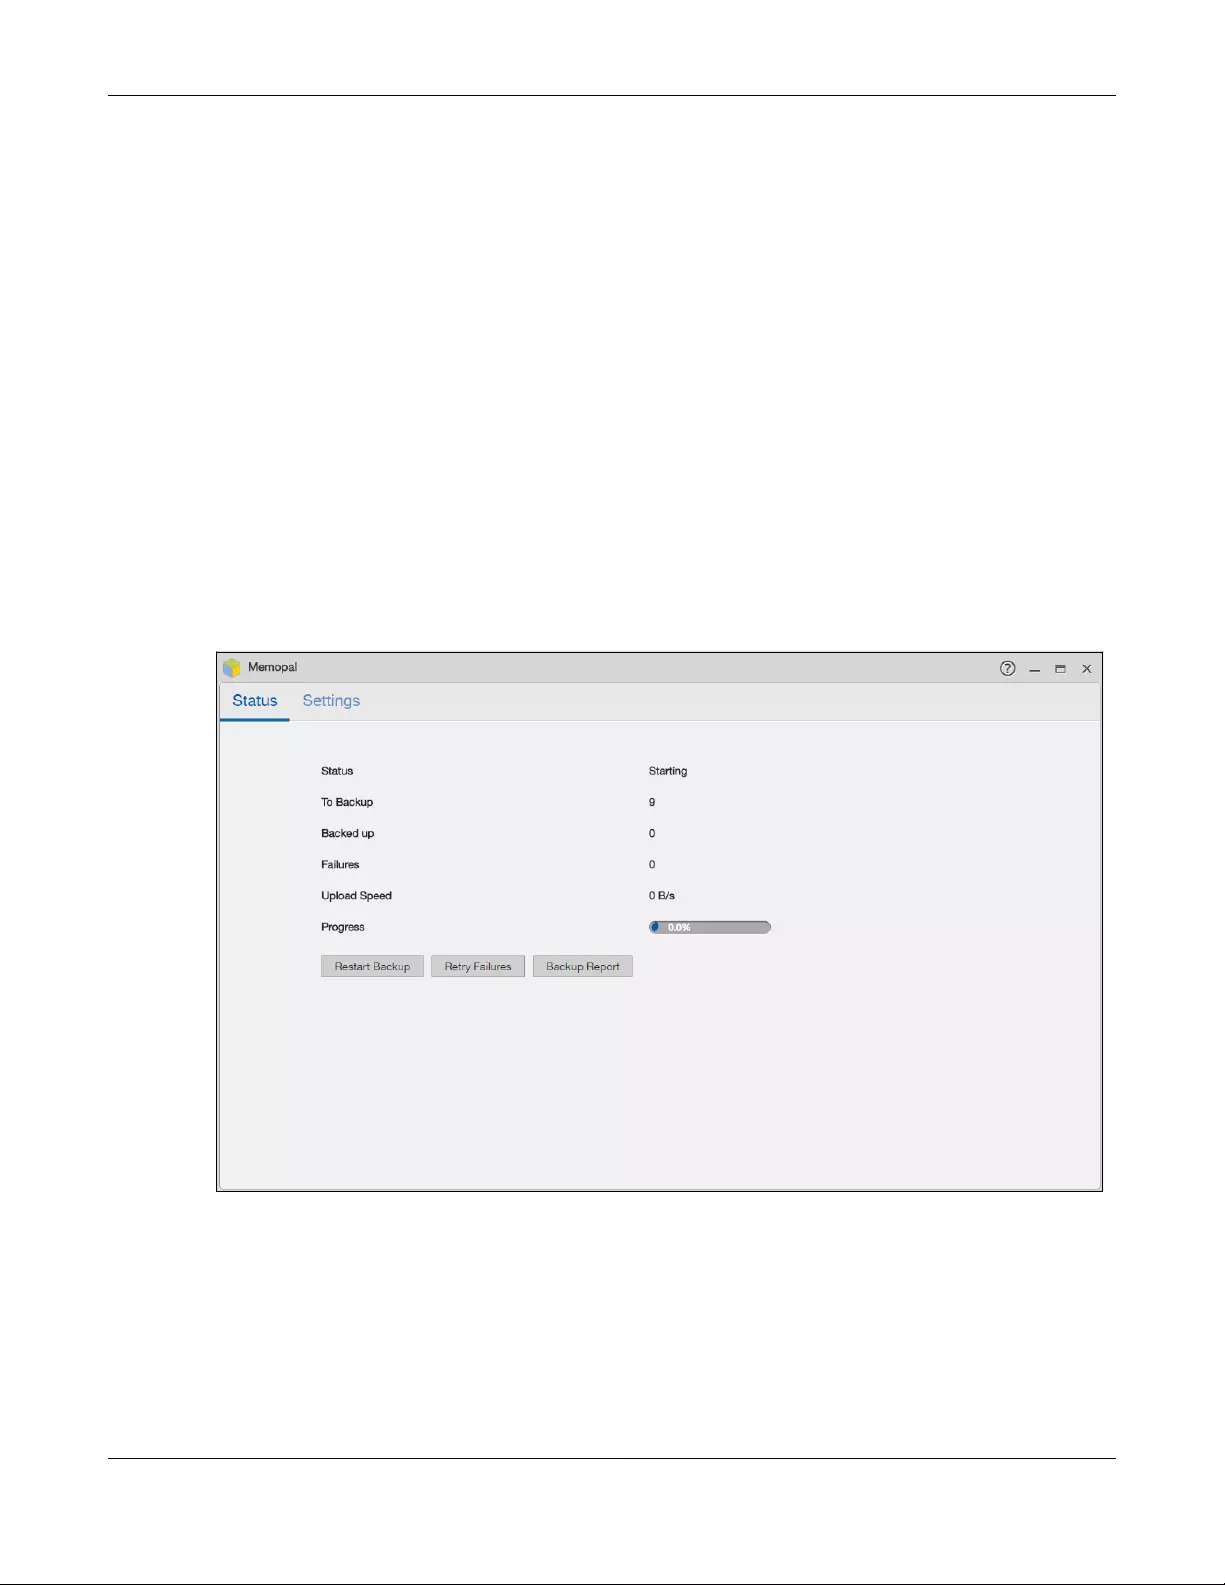
Chapter 13 App Center and Packages
NAS Series User’s Guide
231
13.10 Memopal
Install the Memopal package to back up folders of files on the NAS to your Memopal online backup and
storage account.
Note: Deleting files from your Memopal account’s online backup set does not delete the files
from the NAS, just as deleting a file from the NAS does not delete a backup copy in your
Memopal account’s online backup set.
Deleting a file or a folder from your Memopal account’s online backup set deletes all
versions of that file from the online backup set.
Click Memopal on the Desktop or the Launch button in the App Center screen to open the following
screen.
13.10.1 Memopal Status
Click Memopal > Status on the Desktop to open the following screen.
Figure 186 Memopal > Status

Chapter 13 App Center and Packages
NAS Series User’s Guide
232
The following table describes the labels in this screen.
13.10.2 Memopal Settings
Use this screen to enable and configure Memopal backup settings. Click Memopal > Settings on the
Desktop to open the following screen.
Table 131 Memopal > Status
LABEL DESCRIPTION
Status This shows the status of the Memopal application’s interaction with the Memopal server.
Disabled: The NAS Memopal application is turned off.
Starting: The backup job is initializing and the NAS is getting ready to back up.
Running: The backup job is executing.
Stopped: The backup job is stopped. This may be due to a network error, remote server
error, or other issue.
Completed: The backup job finished.
To Backup The number of files remaining to back up.
Backed up The number of files backed up already.
Failures The number of files the NAS failed to back up to the Memopal server.
Upload Speed This is how fast in Bytes per second the NAS is backing up to the Memopal server.
Progress This shows the percentage of the files already backed up from the total files to be backed
up.
Restart Backup This button is available only when you enable Memopal in the Memopal > Settings screen.
Click this to re-scan all files and perform a backup.
Retry Failures This button is available only when you enable Memopal in the Memopal > Settings screen.
Click this to only re-scan and back up files the NAS failed to back up.
Backup Report This button is available only when you enable Memopal in the Memopal > Settings screen.
Click this to display backup record details.
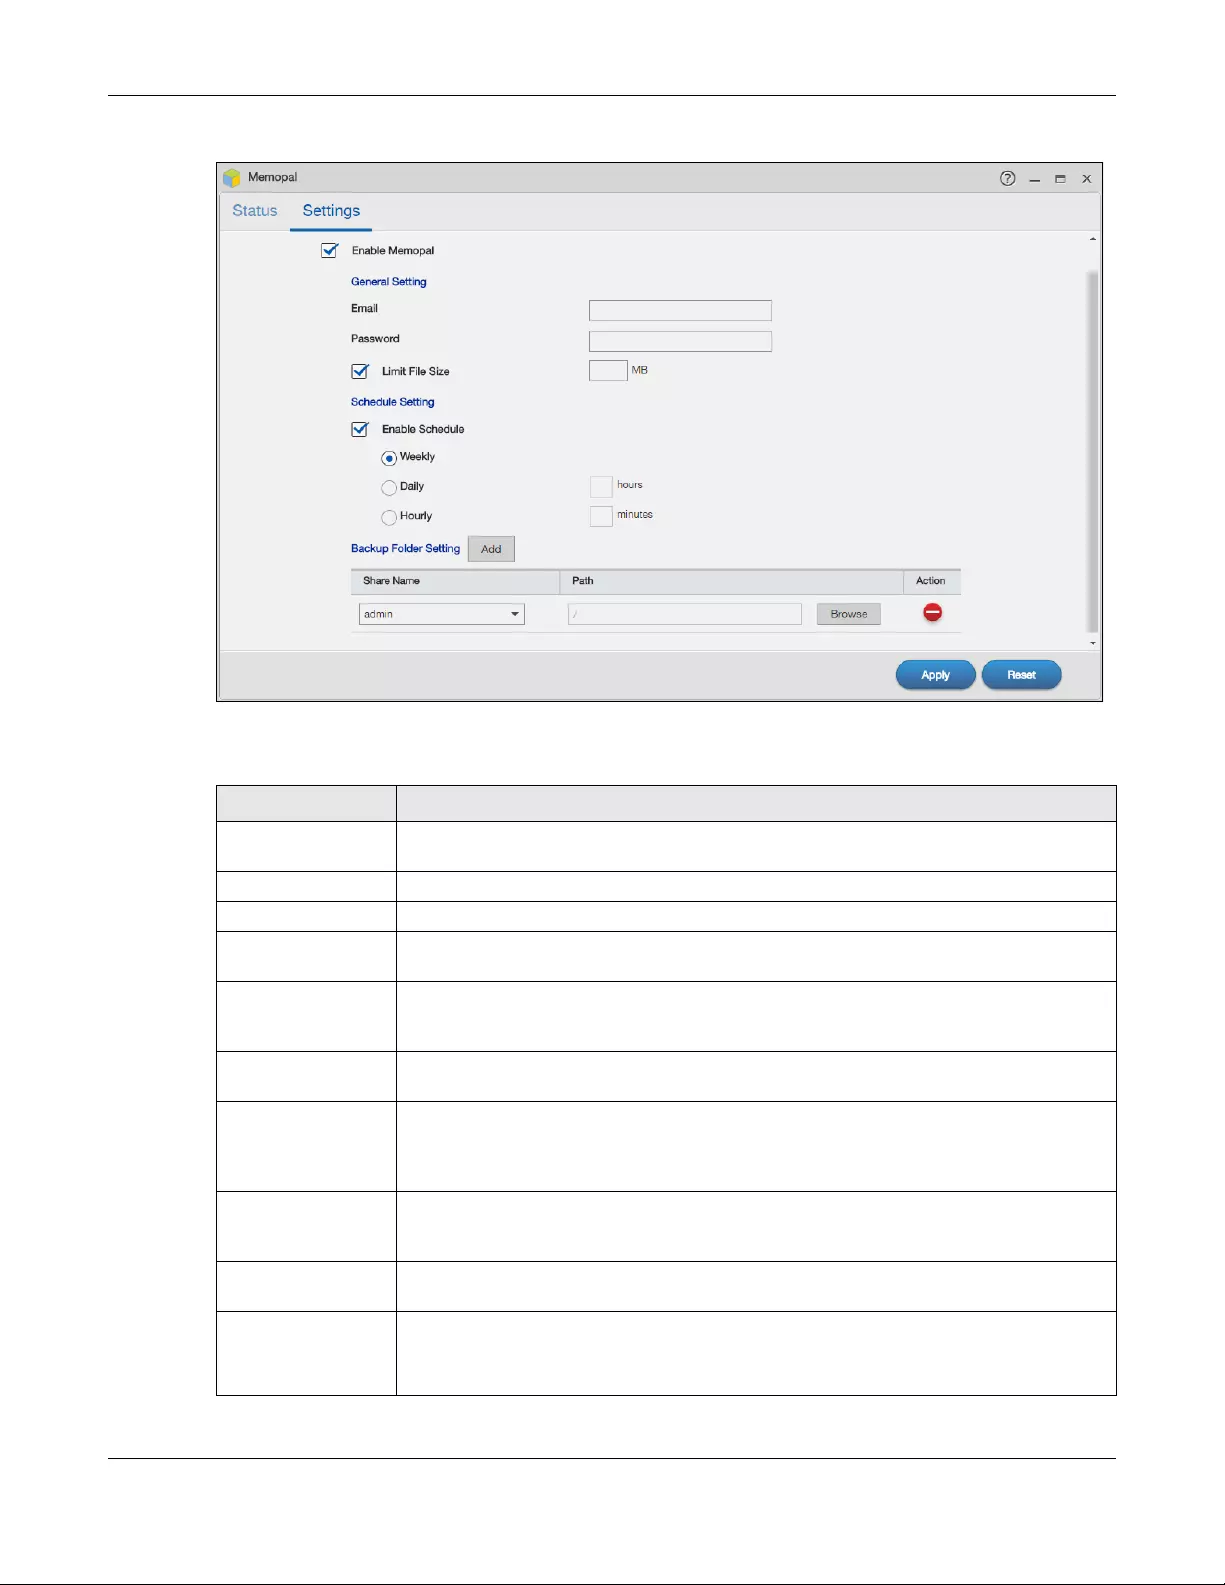
Chapter 13 App Center and Packages
NAS Series User’s Guide
233
Figure 187 Memopal > Settings
The following table describes the labels in this screen.
Table 132 Memopal > Settings
LABEL DESCRIPTION
Enable Memopal Select this to back up files to your Memopal account. The rest of the configuration fields
display.
Email Enter the email address you use for your Memopal account.
Password Enter the password for your Memopal account.
Limit File Size Select this and enter a number of MegaBytes if you want to restrict the size of files the NAS
uploads to the Memopal account. You have to enter your password again if you select this.
Enable Schedule Select this to set when the Memopal backups occur. You have to enter your password
again if you select this. Clear this to have the NAS back up files in the selected folders to
your Memopal account in real-time whenever you add or modify the files.
Weekly Select this to perform a Memopal backup on a weekly basis. The NAS performs the backup
job every Sunday at 2:00 AM and continues until the job finishes.
Daily Select this to perform a Memopal backup every day. The NAS performs the backup job
every day at 2:00 AM. Use hours to specify for up to how many hours the NAS can perform a
Memopal backup. Enter 0 in hours to have the NAS continue the backup job until it finishes
(no time limit).
Hourly Select this to perform a Memopal backup every hour. Use minutes to specify for up to how
many minutes the NAS can perform a Memopal backup. Enter 0 in minutes to have the NAS
continue the backup job until it finishes (no time limit).
Add Click Add to add a folder to the list of folders the NAS Memopal application backs up to the
Memopal server.
Share Name This is the name of the share containing a folder the NAS Memopal application backs up to
the Memopal server.
Select the share containing the folder to back up to the Memopal server.
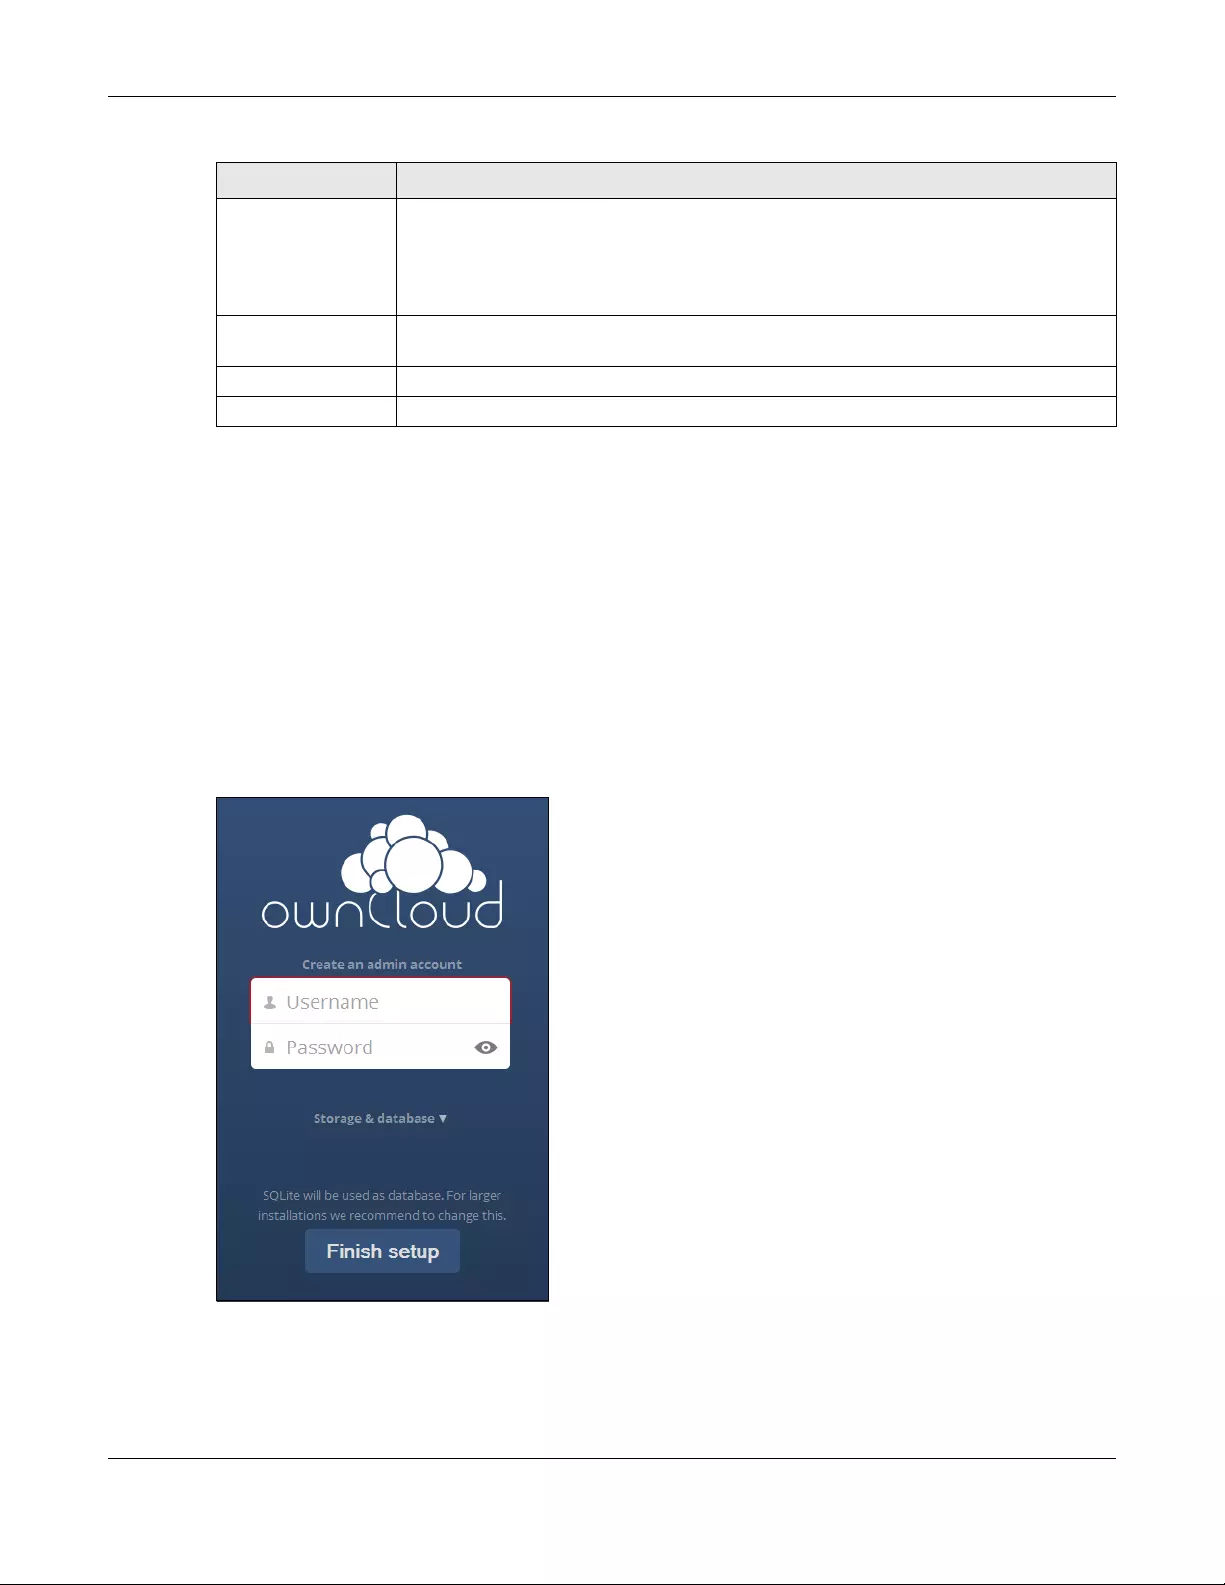
Chapter 13 App Center and Packages
NAS Series User’s Guide
234
13.11 ownCloud
Install the ownCloud package to store, synchronize, and share files, photos, calendars, and more with
computers and mobile devices.
Refer to the applications’ own documentation for further information.
1Click ownCloud on the Desktop or the Launch button in the App Center screen.
2The ownCloud login screen appears. Create an administrator user name and password and click Finish
Setup.
3The main ownCloud screen displays. Use this web interface to manage files on the NAS ownCloud
server. Click your user name in the upper-right corner to see the help for more information on using
ownCloud.
Path This field displays the share folder’s path.
Identify the folder to back up to the Memopal server.
Use Browse to find or create a folder on the NAS or type the location of the folder using
forward slashes as branch separators.
Action Click the Delete icon to remove the folder from the list of folders the NAS Memopal
application backs up to the Memopal server.
Apply Click this to save your changes.
Reset Click this to restore the screen’s last-saved settings.
Table 132 Memopal > Settings (continued)
LABEL DESCRIPTION
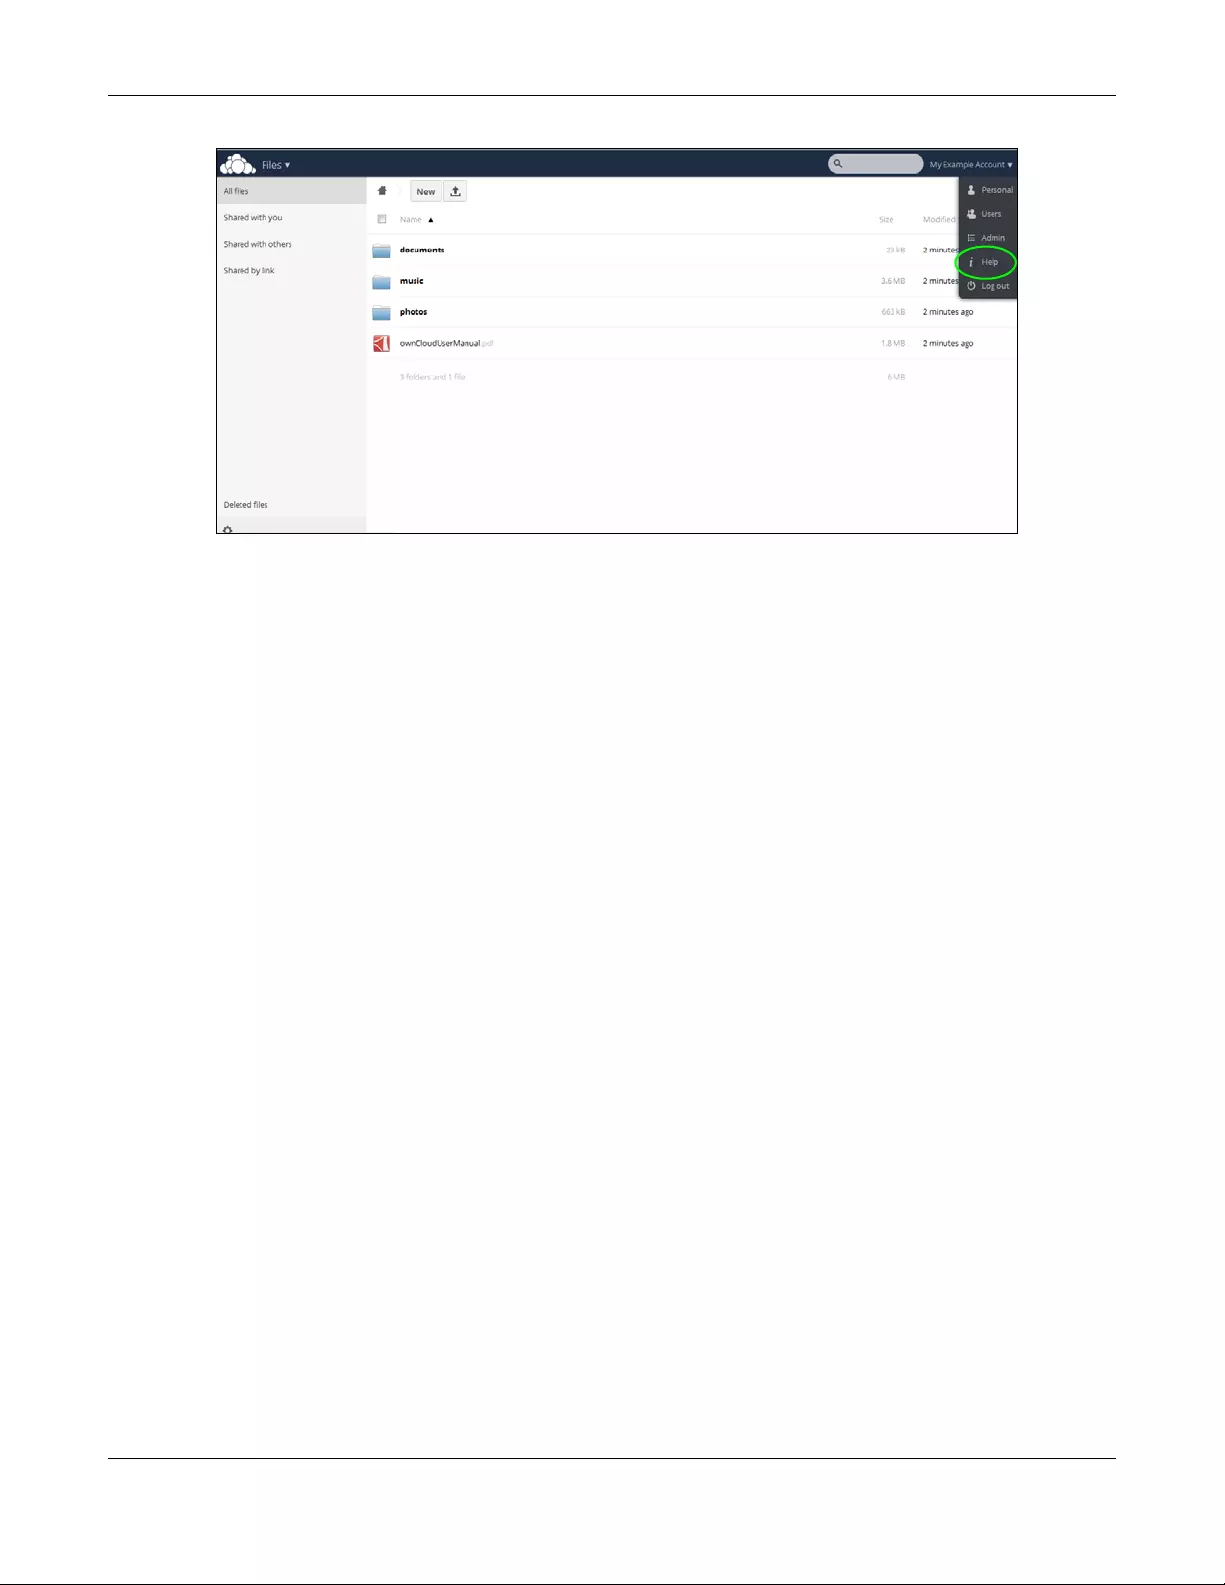
Chapter 13 App Center and Packages
NAS Series User’s Guide
235
Note: Get ownCloud desktop clients from owncloud.org and ownCloud mobile apps from
Google Play or the Apple App Store.

NAS Series User’s Guide
236
CHAPTER 14
Download Service
14.1 Overview
This chapter discusses the features in the Download Service screens. Use the Download Service screen to
download files from the Internet.
14.2 What You Need to Know
Download Service
The NAS’s download service downloads files from the Internet directly to the NAS. You do not have to
download to your computer and then copy to the NAS. This can free up your computer’s system
resources.
The NAS can download using these protocols.
• HTTP: The standard protocol for web pages.
• FTP: A standard Internet file transfer service.
• P2P download: Peer-to-peer files sharing protocol.
RSS
RSS (Really Simple Syndication) is a format for delivering frequently updated digital content. A channel
uses a feed to deliver its contents (items). Subscribe the NAS to a feed to be able to download the
contents.
14.3 Download Service Screen
The Download Service screen allows you to download files from the Internet.
Click Download Service > Download Service to open the following screen. Use this screen to manage
the NAS’s file downloads. The screen varies depending on the type of downloads you select.
Note: By default, the NAS saves downloads in the admin share’s download folder.
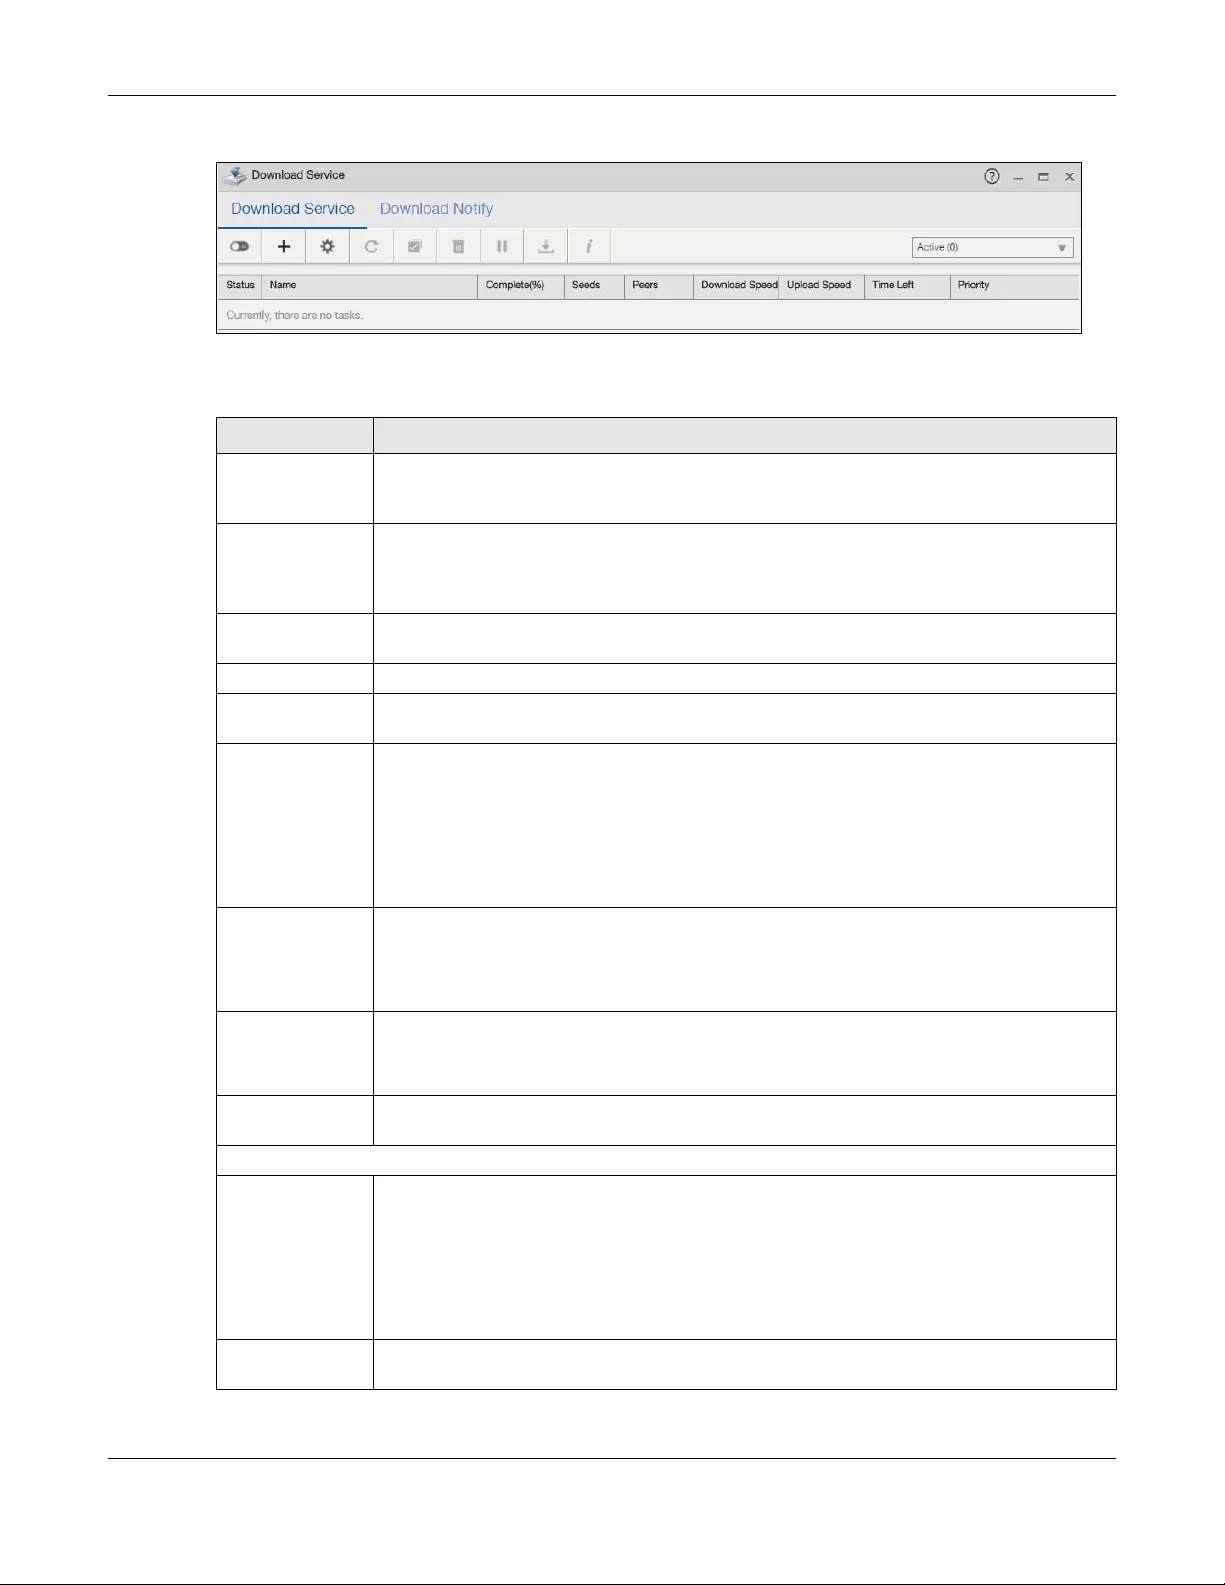
Chapter 14 Download Service
NAS Series User’s Guide
237
Figure 188 Download Service > Download Service
The following table describes the labels in this screen.
Table 133 Download Service > Download Service
LABEL DESCRIPTION
Enable Download
Service
Use this option to turn the download service off or on. If you turn off the service, all downloads
are paused. Files currently downloading are queued. Turning on the download service
resumes downloads (or restarts them if they are not able to resume).
Add After you find a file to download, copy the file’s URL. Then log into the NAS web configurator
and go to the Download Service screen and click this button. A screen opens where you
create a new download task. You can paste the file’s URL or use a P2P download file. See
Section 14.3.1 on page 239.
Preferences Click this to open a screen where you can set the default location for saving downloads and
configure your P2P download settings. See Section 14.3.2 on page 240.
Refresh Click this to update the information displayed on the screen.
Select Files A single P2P download torrent file is often for multiple files. If you do not need all of the files the
torrent file specifies, click this to select which files to download.
Delete To delete download tasks (or manually clear out completed download tasks), select a
download task and click this to remove it from the list. A pop-up screen asks you to confirm.
Click Apply to delete or Cancel to quit. When you delete a download task, you are given the
option to delete the associated files. Selecting this option deletes a downloaded file and in the
case of a P2P download task, also deletes the related .torrent file.
Use your keyboard’s [SHIFT] key to select a range of download tasks. Use the [CTRL] key and
click individual download tasks to select multiple individual download tasks.
Pause Select a downloading item and click this to temporarily stop the download. Paused
downloads appear in the Download Service screen.
Use your keyboard’s [SHIFT] key to select a range of download tasks. Use the [CTRL] key and
click individual download tasks to select multiple individual download tasks.
Resume Select a paused item and click this to continue downloading the file.
Select a completed item and click this to re-seed a P2P file or download a file again. If you
want to re-seed a P2P task, keep the P2P file and the completed file in their original locations.
Task Info Select an item on the list and click this to display information about the download task. See
Section 14.3.7 on page 246 for more details.
Select the type from the drop-down list box to list your downloads.
Active Select this to see the list of files the NAS is currently downloading or sharing with other P2P users.
The NAS handles a maximum of 10 active tasks at a time (or fewer depending on how much of
the NAS’s system memory is available). If you add more, they appear in the screen for the
Inactive downloads type.
P2P downloads may appear in the screen for a while when you select Inactive from the
downloads type list. The NAS automatically moves completed tasks to the screen for the
Completed type.
Inactive Select this to see the list of files that are queued (waiting in line) for the NAS to download or the
downloads that have been manually paused.
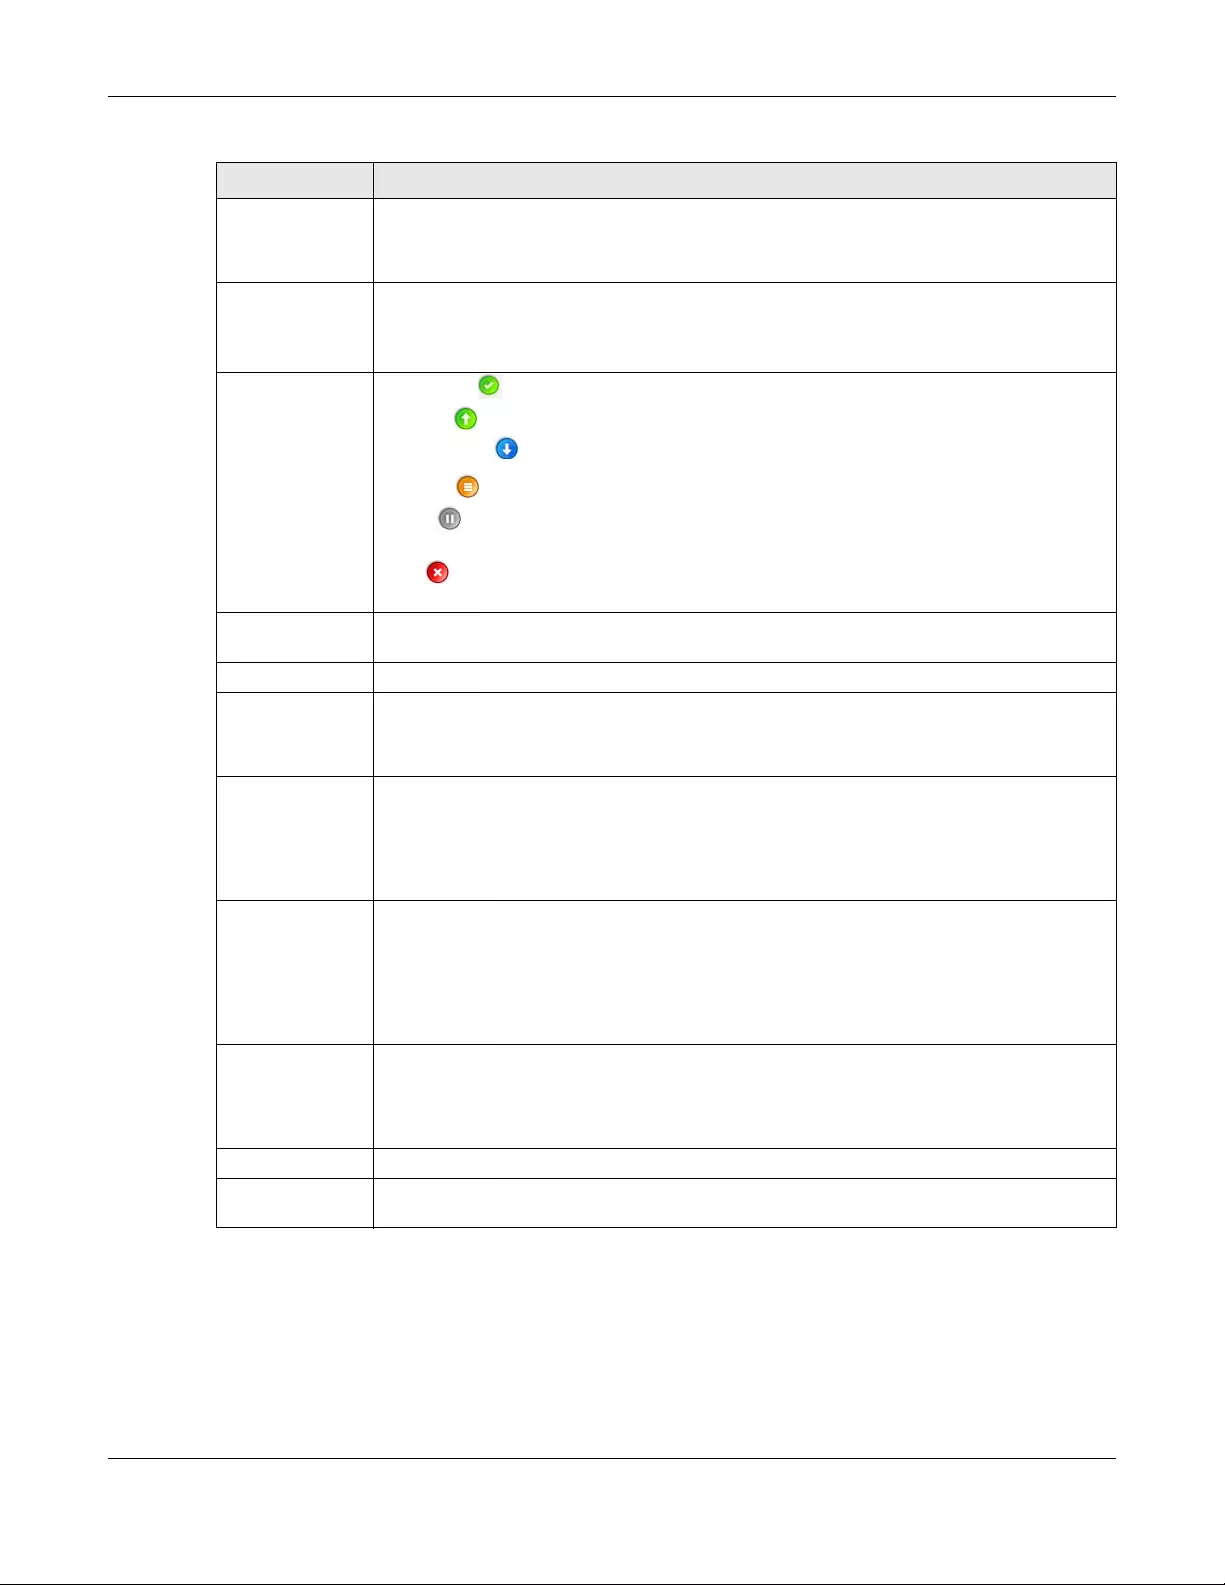
Chapter 14 Download Service
NAS Series User’s Guide
238
Completed Click this to see the list of files that the NAS has finished downloading.
The Location column shows where a downloaded file is saved on the NAS. Click on the
location link to open the share browser and access the file.
Error Click this to see the list of files that the NAS was not able to download. The NAS automatically
retries unsuccessful download attempts. The download displays in the error tab when the re-
attempts are also unsuccessful and the NAS stops trying to download the file. To try the
download again, use the Add button to create a new download task.
Status Completed : The NAS has downloaded the whole file.
Seeding : The download is finished and the NAS is allowing other P2P users to download it.
Downloading : The NAS is getting the file.
Queued : The download is waiting in line for the NAS to download it.
Pause : The download has been manually stopped. Select it and click Resume to continue
it.
Error : The NAS was not able to complete the download. Select it and click Resume to
reattempt the download.
Name This identifies the download file. A “…” indicates an abbreviated name. Hold your cursor over
the name to display the full name.
Complete (%) This is the percentage of the file that the NAS has downloaded.
Location This appears in the screen for the Completed type.
It displays the path for where the file is saved. Click on the location link to open the share
browser and access the file.
Seeds Seeds apply to P2P downloads. This is the number of computers that are sharing the complete
file that you are downloading.
This value is in the format “Leeches(Seeds)” where Leeches refer to peers that do not have a
complete copy of the file yet and are still downloading; Seeds refer to peers that have the
complete file.
Peers Peers apply to P2P downloads. This is the number of other computers that are also
downloading (and sharing) the file you are downloading.
This value is in the format “ConnectedPeers(AllPeers)[Health]” where Connected Peers is the
number of computers to which the NAS is connected in order to download the file; AllPeers
refer to the total number of computers to which the NAS can connect in order to download
the file; Health indicates the availability of the file.
Download
Speed This is how fast the NAS is getting the file.
It is normal for a P2P download to start out with a slow download speed since it has to set up
numerous connections. The speed should increase as the download progresses and decrease
near the end of the download.
Upload Speed This is how fast the NAS is sending the file to other P2P users.
Time Left This is how much longer (in hours, minutes, and seconds) it should take to finish the download
at the current download speed.
Table 133 Download Service > Download Service (continued)
LABEL DESCRIPTION
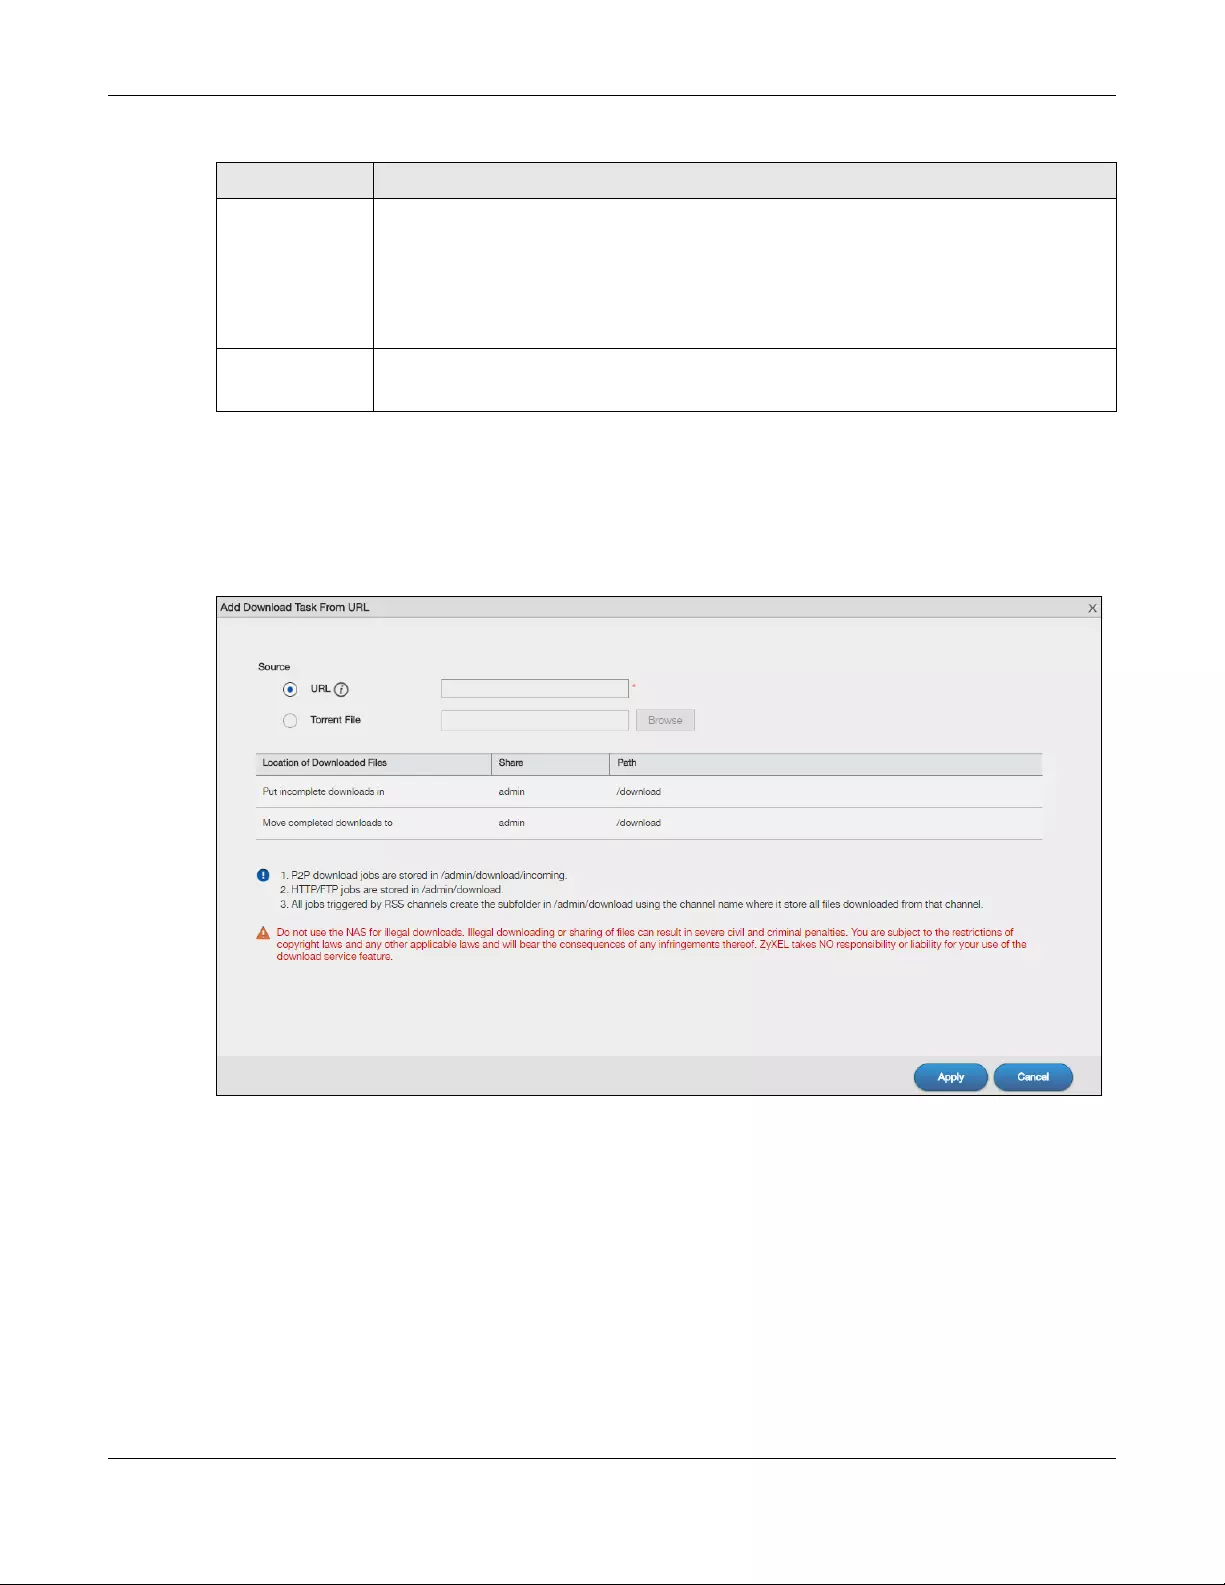
Chapter 14 Download Service
NAS Series User’s Guide
239
14.3.1 Add a Download Task
Click Download Service > Download Service > Add to open the following screen. Use this screen to
specify a file for the NAS to download.
Figure 189 Download Service > Download Service > Add
Priority This is the download priority on the NAS. Select Auto to have the NAS automatically determine
the task’s priority. Select High to have the NAS download this file before the other files. You can
set a download to high priority to have the NAS try to download it before the other files.
However the actual download speed depends more on factors like the speed of you Internet
connection, the speed of the download source’s Internet connection, how many others are
trying to download at the same time, the peers and seeds available and general network
conditions.
Error Message This appears in the screen for the Error type.
This message states what went wrong with the download.
Table 133 Download Service > Download Service (continued)
LABEL DESCRIPTION
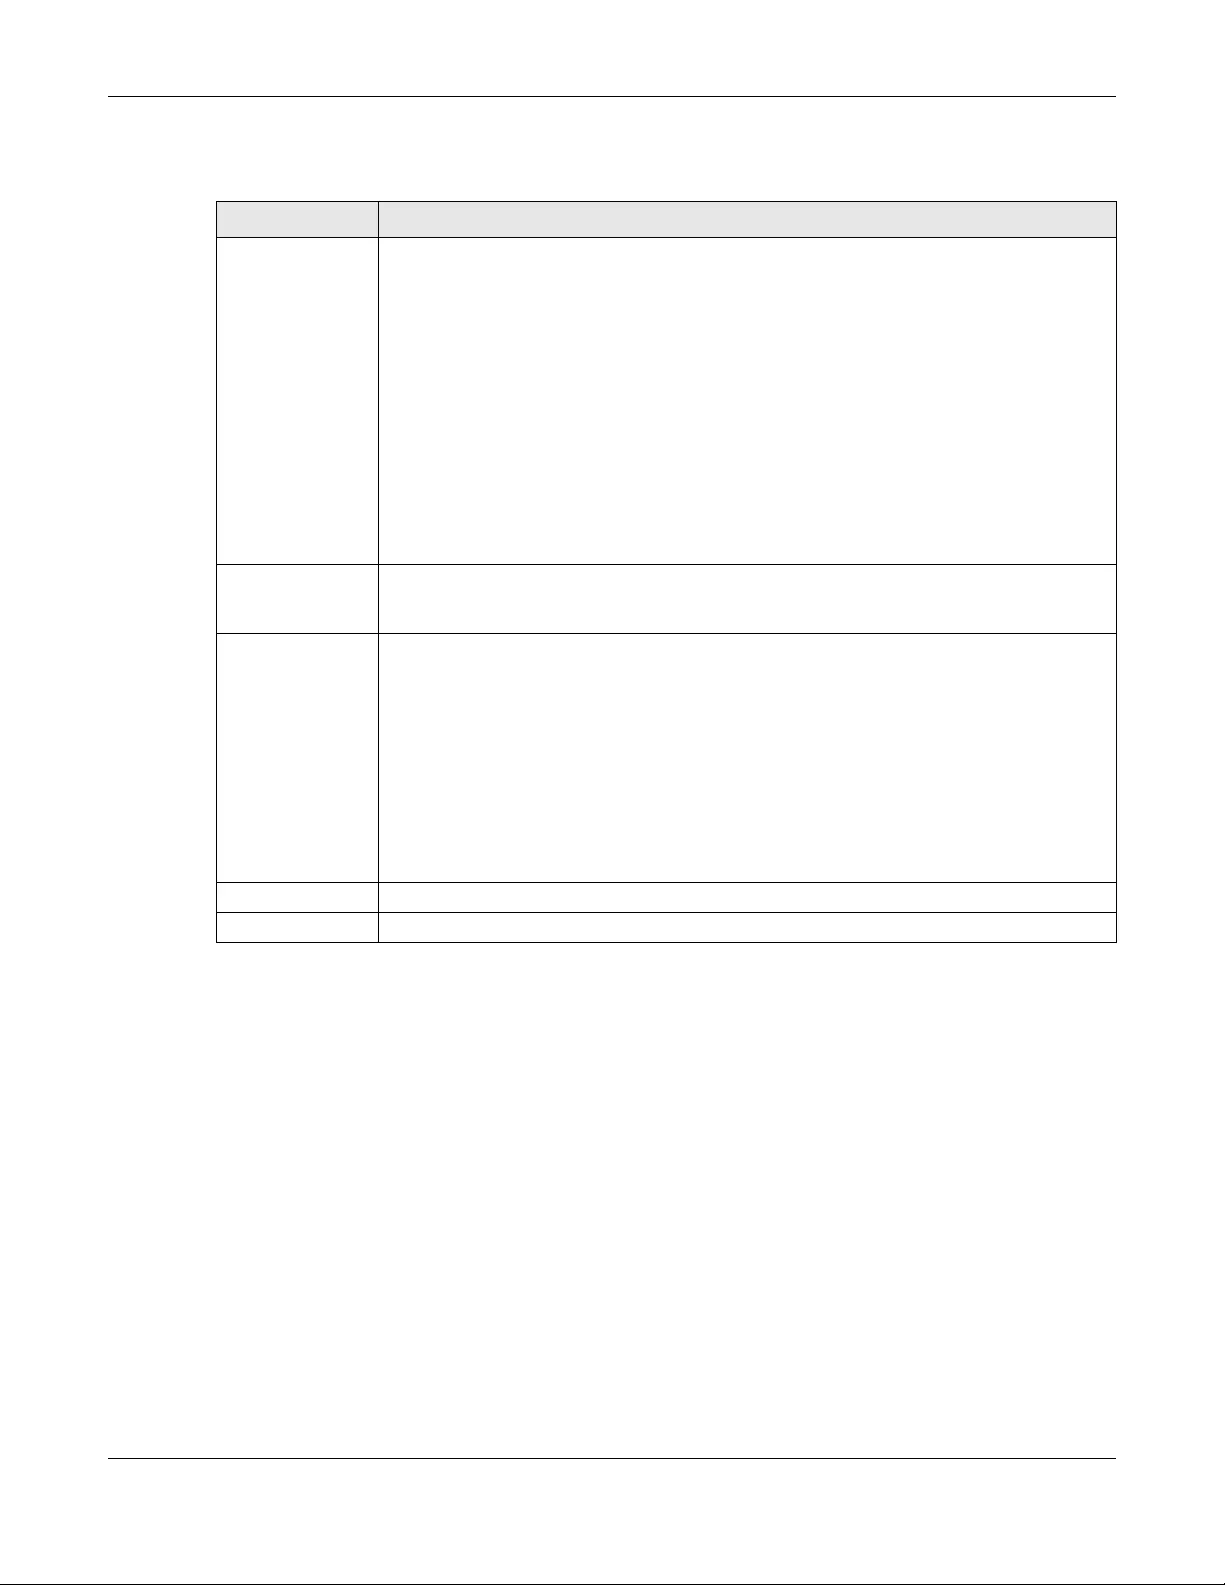
Chapter 14 Download Service
NAS Series User’s Guide
240
The following table describes the labels in this screen.
14.3.2 Configure General Download Settings
Click Download Service > Download Service > Preferences to open the following screen. Use this screen
to set the default location for saving downloads and configure the download period.
Table 134 Download Service > Download Service > Add
LABEL DESCRIPTION
URL Paste the URL or magnet link of the file you want to download into this field. The URL can be for
an HTTP, FTP, or P2P download. A magnet link is for a P2P download.
For a P2P download using a magnet link the NAS automatically downloads the file related to
the magnet link.
For a P2P download using a .torrent file, you can copy and paste the URL of the .torrent file.
The NAS will automatically download the .torrent file and use it. You do not have to manually
download the .torrent file or save it to your computer.
Note: Make sure the link opens either the file you want or a pop-up window about
how to handle the file.
It is also OK for the link to open a .torrent file. If you are redirected to a screen that says the
download should start in a few seconds, there may be a link to click if the download does not
start automatically. See if that link opens the file or the pop-up window.
Torrent File A “torrent” file has information the NAS uses to do a P2P download. A torrent file uses a .torrent
extension. If you already have a torrent file saved on your computer, select the Torrent File
option and specify its path or click Browse and look for its location.
Location of
Downloaded Files
This shows where the NAS stores new downloads (Put incomplete downloads in) and where
the NAS moves completed downloads (Move completed downloads to).
The Share column shows the name of the share where the file is downloaded.
The Path column points to the location in the share where the NAS will save the downloaded
files.
• P2P download jobs are stored in /*/incoming (where ‘*’ is a folder that you have set.)
• HTTP/FTP jobs are stored in /* (where ‘*’ is a folder that you have set.)
• All jobs triggered by RSS channels create the subfolder in /* using the channel name
where it stores all files downloaded from that channel (where ‘*’ is a folder that you have
set.)
Apply Click this to save your changes.
Cancel Click this to return to the previous screen without saving.
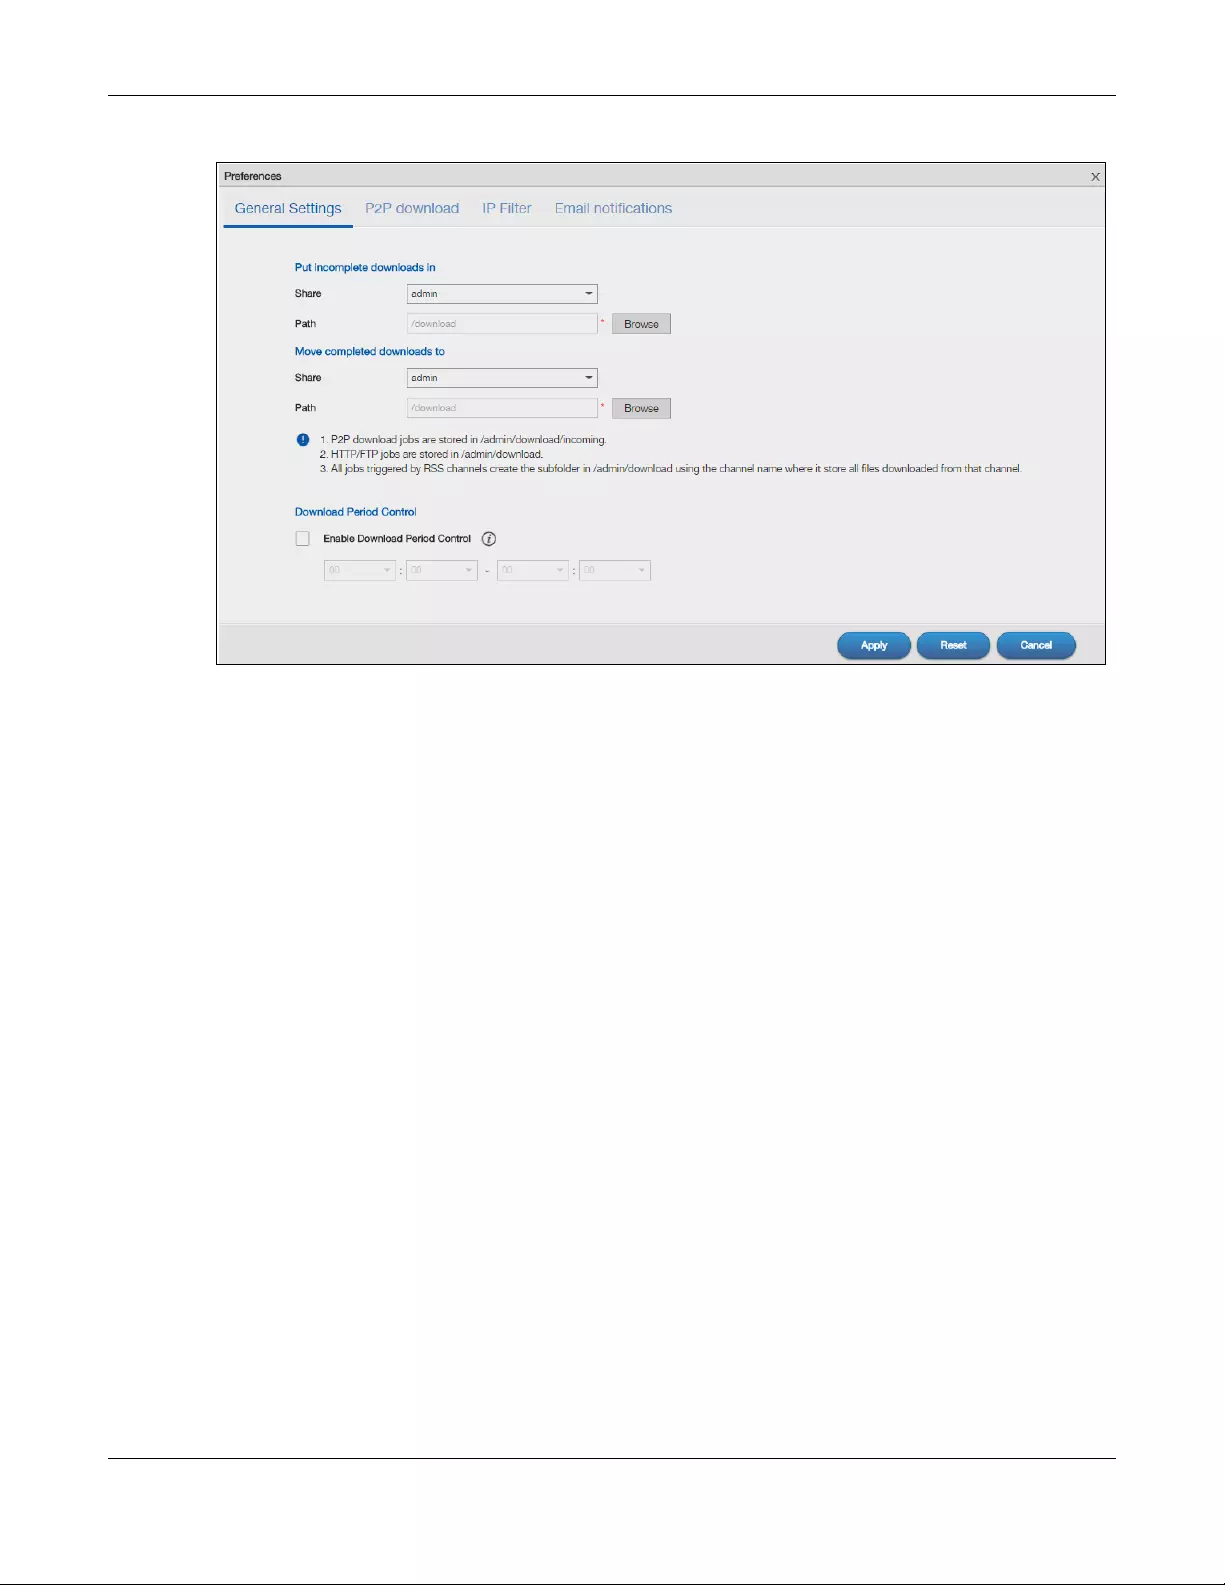
Chapter 14 Download Service
NAS Series User’s Guide
241
Figure 190 Download Service > Download Service > Preferences > General Settings
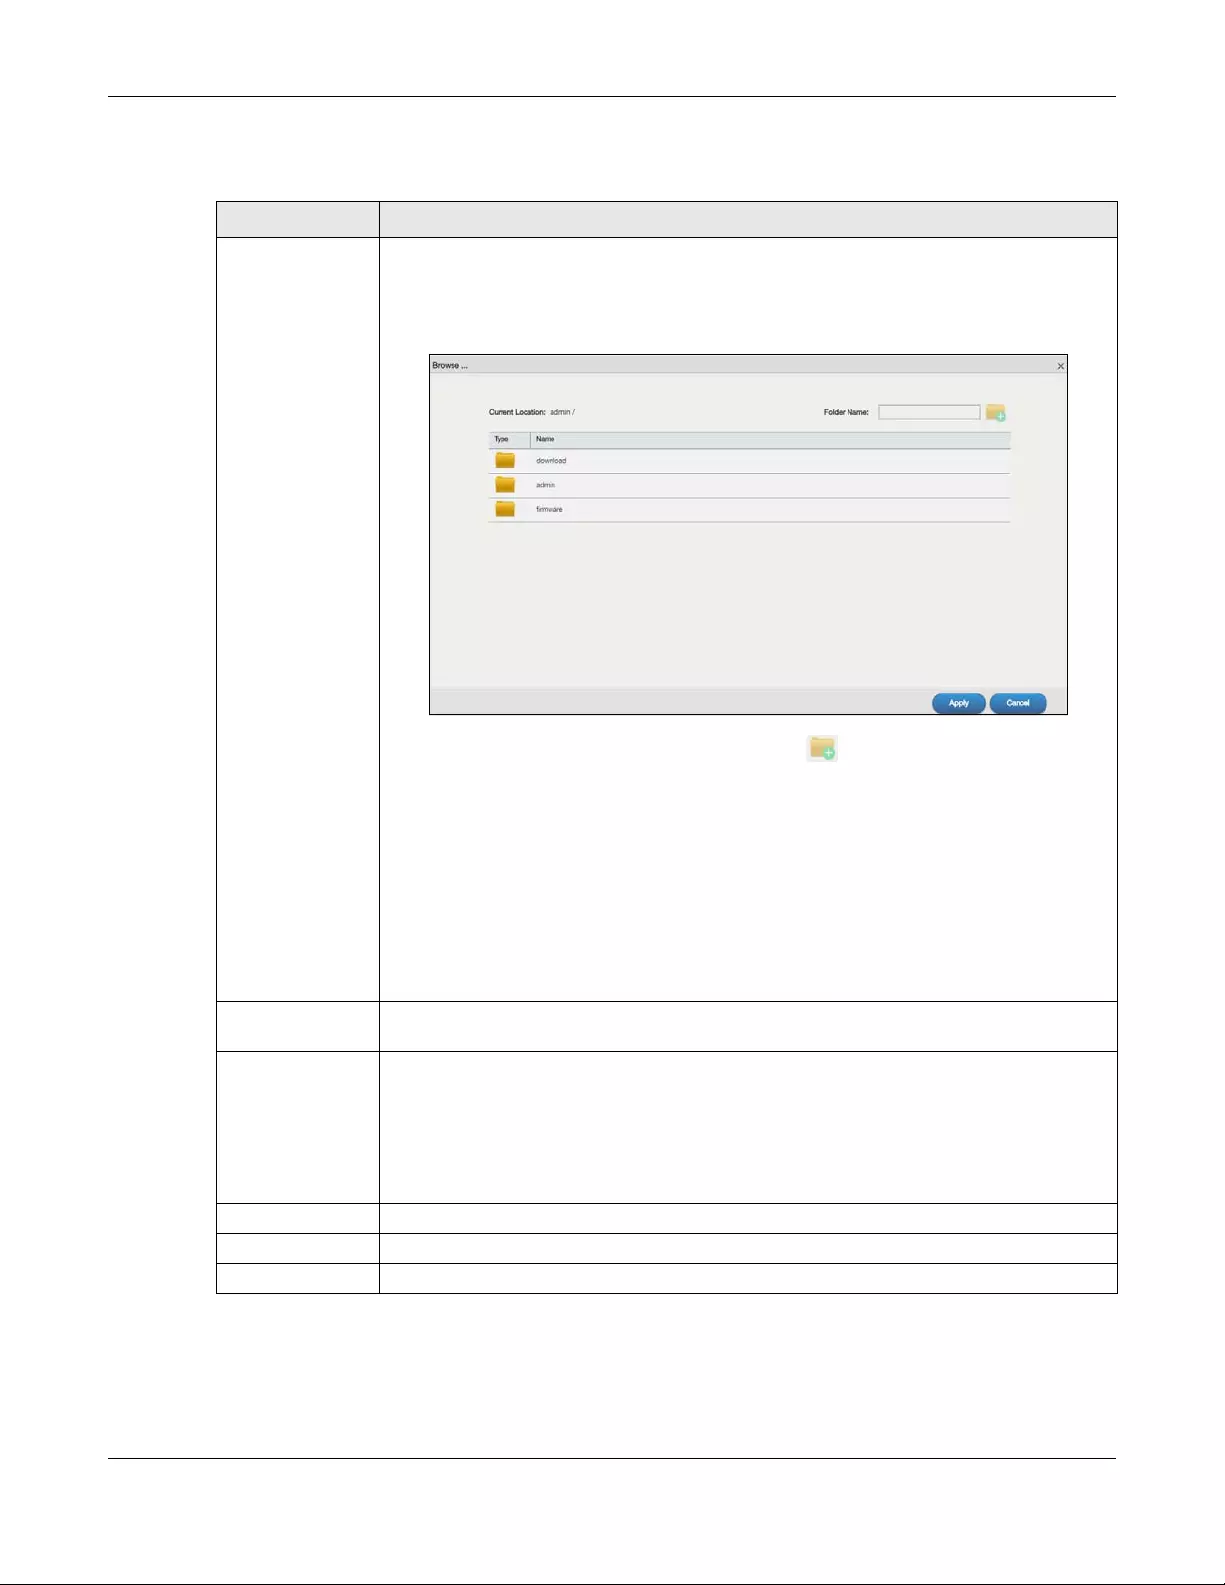
Chapter 14 Download Service
NAS Series User’s Guide
242
The following table describes the labels in this screen.
14.3.3 Configure the P2P Download Settings
Click Download Service > Download Service > Preferences > P2P download to open the following
screen. Use this screen to configure P2P download settings.
Table 135 Download Service > Download Service > Preferences > General Settings
LABEL DESCRIPTION
Put incomplete
downloads in/
Move completed
downloads to
Set the default folder location where you “Put incomplete downloads in” and “Move
complete downloads to”:
•Share — Select the share from the list.
•Path — Type the folder location in the share directly or click Browse to open the following
screen and navigate to the file’s location.
•Current Location — This is the location of the selected folder.
•Folder Name — Enter a new folder name and click to create it.
•Type — This identifies the item as a file or folder.
•Name — This is the name of the folder/file.
Select a folder. If you don’t select a folder, a forward slash (/) displays in the Path field. All
contents within the specified share are automatically selected.
Click Apply to save your settings and Cancel to close the screen.P2P download jobs are
stored in /*/incoming (where ‘*’ is a folder that you have set.)
• HTTP/FTP jobs are stored in /* (where ‘*’ is a folder that you have set.)
• All jobs triggered by RSS channels create the subfolder in /* using the channel name
where it store all files downloaded from that channel (where ‘*’ is a folder that you have
set.)
Download Period
Control
This feature sets the NAS to download files only within a specified time period.
Enable Download
Period Control
Use the check box to turn the download period control on or off.
Specify the time period for the NAS to download files.
Note: If you also configured the Power On/Off Schedule feature in the Cont rol Panel
> Maintenance > Power > Power Management screen, make sure your active
download period does not conflict with the power-off period.
Apply Click this to save your changes.
Reset Click this to restore your previously saved settings.
Cancel Click this to return to the previous screen without saving.
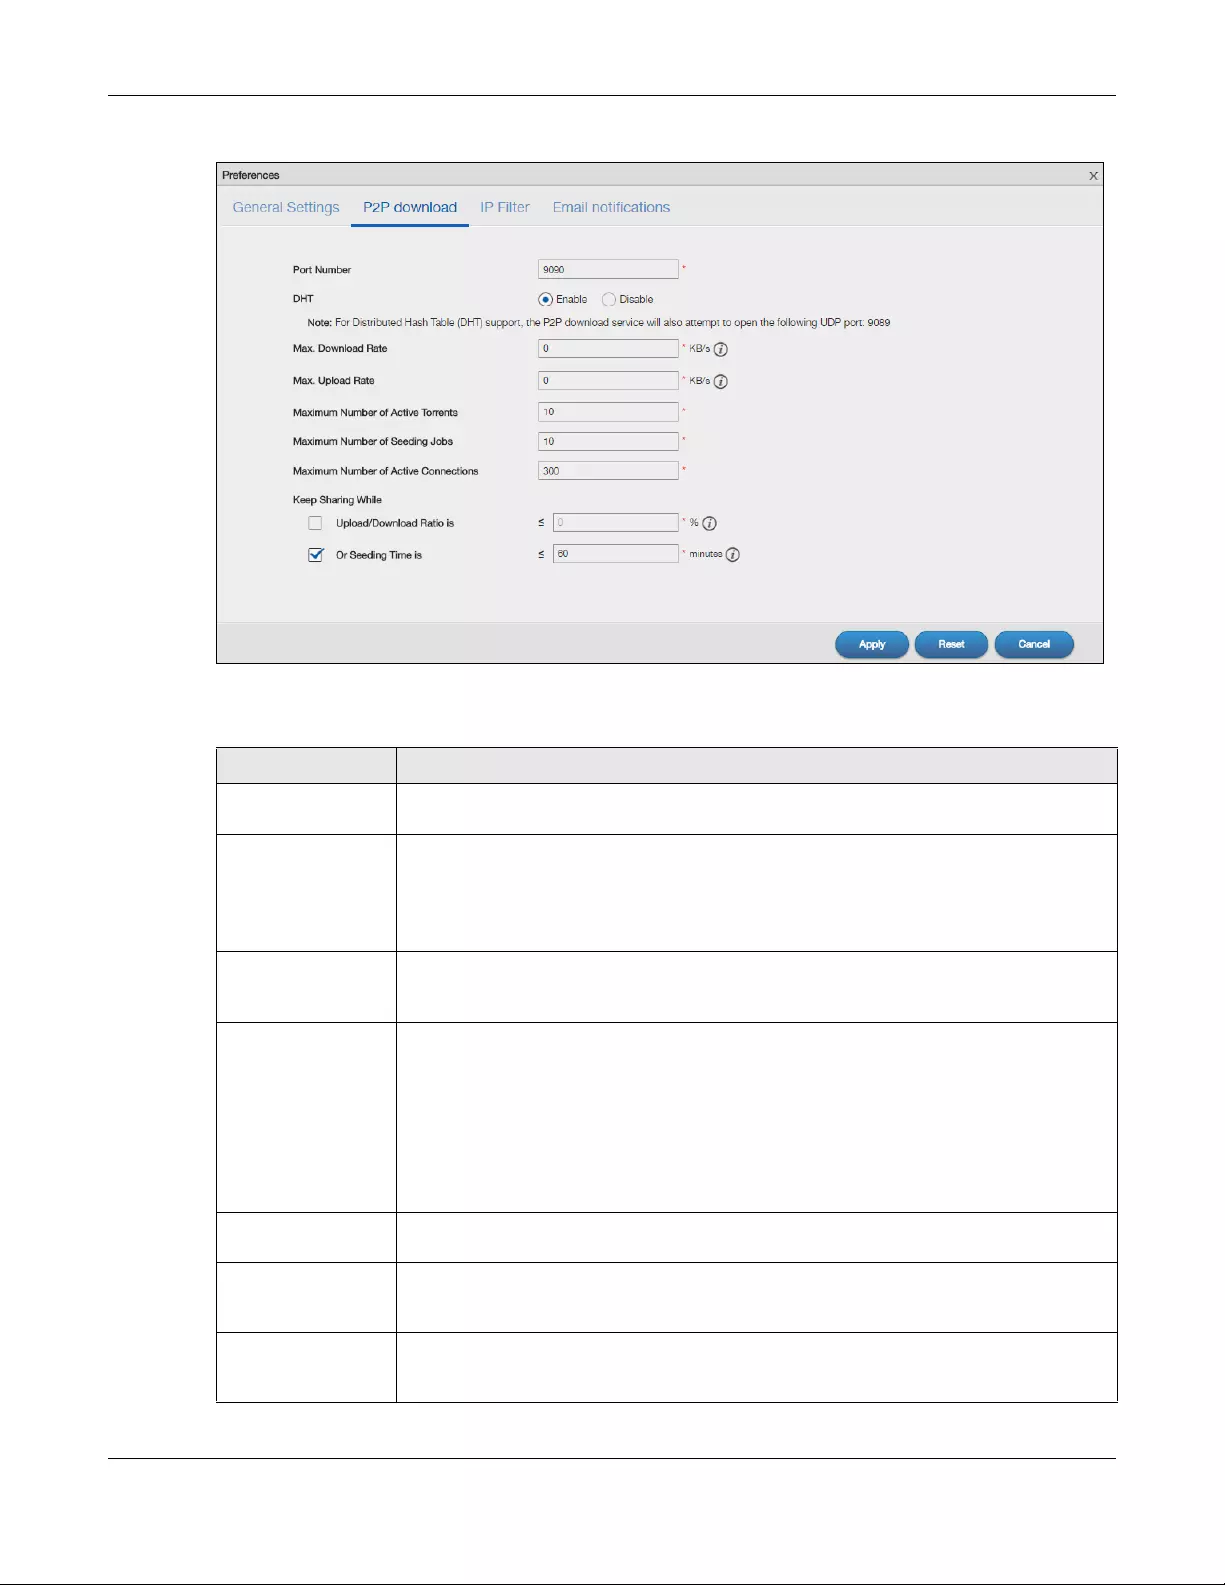
Chapter 14 Download Service
NAS Series User’s Guide
243
Figure 191 Download Service > Download Service > Preferences > P2P download
The following table describes the labels in this screen.
Table 136 Download Service > Download Service > Preferences > P2P download
LABEL DESCRIPTION
Port Number Assign a port number for P2P downloads. You can select a number from 2 to 65536. It is
recommended to use a port number greater than 1025.
DHT Select Enable or Disable to use Distributed Hash Table (DHT) or not.
Note: When you use DHT, the NAS will also attempt to open a UDP port one
number smaller than the P2P download port number. So if the P2P
download port number is 9090, the NAS uses UDP port 9089.
Max. download rate You may need to limit the bandwidth the NAS uses for P2P downloads if your network’s
other Internet applications are not getting enough downstream bandwidth. 0 has the NAS
impose no restriction.
Max. upload rate You may need to limit the bandwidth the NAS uses to share files through P2P download if
your network’s other Internet applications are not getting enough upstream bandwidth. 0
has the NAS impose no restriction.
If you do not allow any uploads, (for example, you set a limit of 1 KB/s) you will not have a
good standing in the P2P download community.
Note: The settings for maximum download/upload rates would not affect peers
accessing the NAS from the same LAN.
Maximum Number of
Active Torrents
Specify how many simultaneous P2P downloads are allowed on the NAS. You can enter a
number from 1 to 10.
Maximum Number of
Seeding Jobs
Specify how many simultaneous seeds are allowed on the NAS. Enter a number from 1 to 10.
This value cannot exceed the one you configured in the Maximum Number of Active
Torrents field.
Maximum Number of
Active Connections
Specify how many active connections are allowed on the NAS. Enter a number from 1 to
500. This specifies the number of computers that can connect to the NAS to download files
being shared by the NAS.
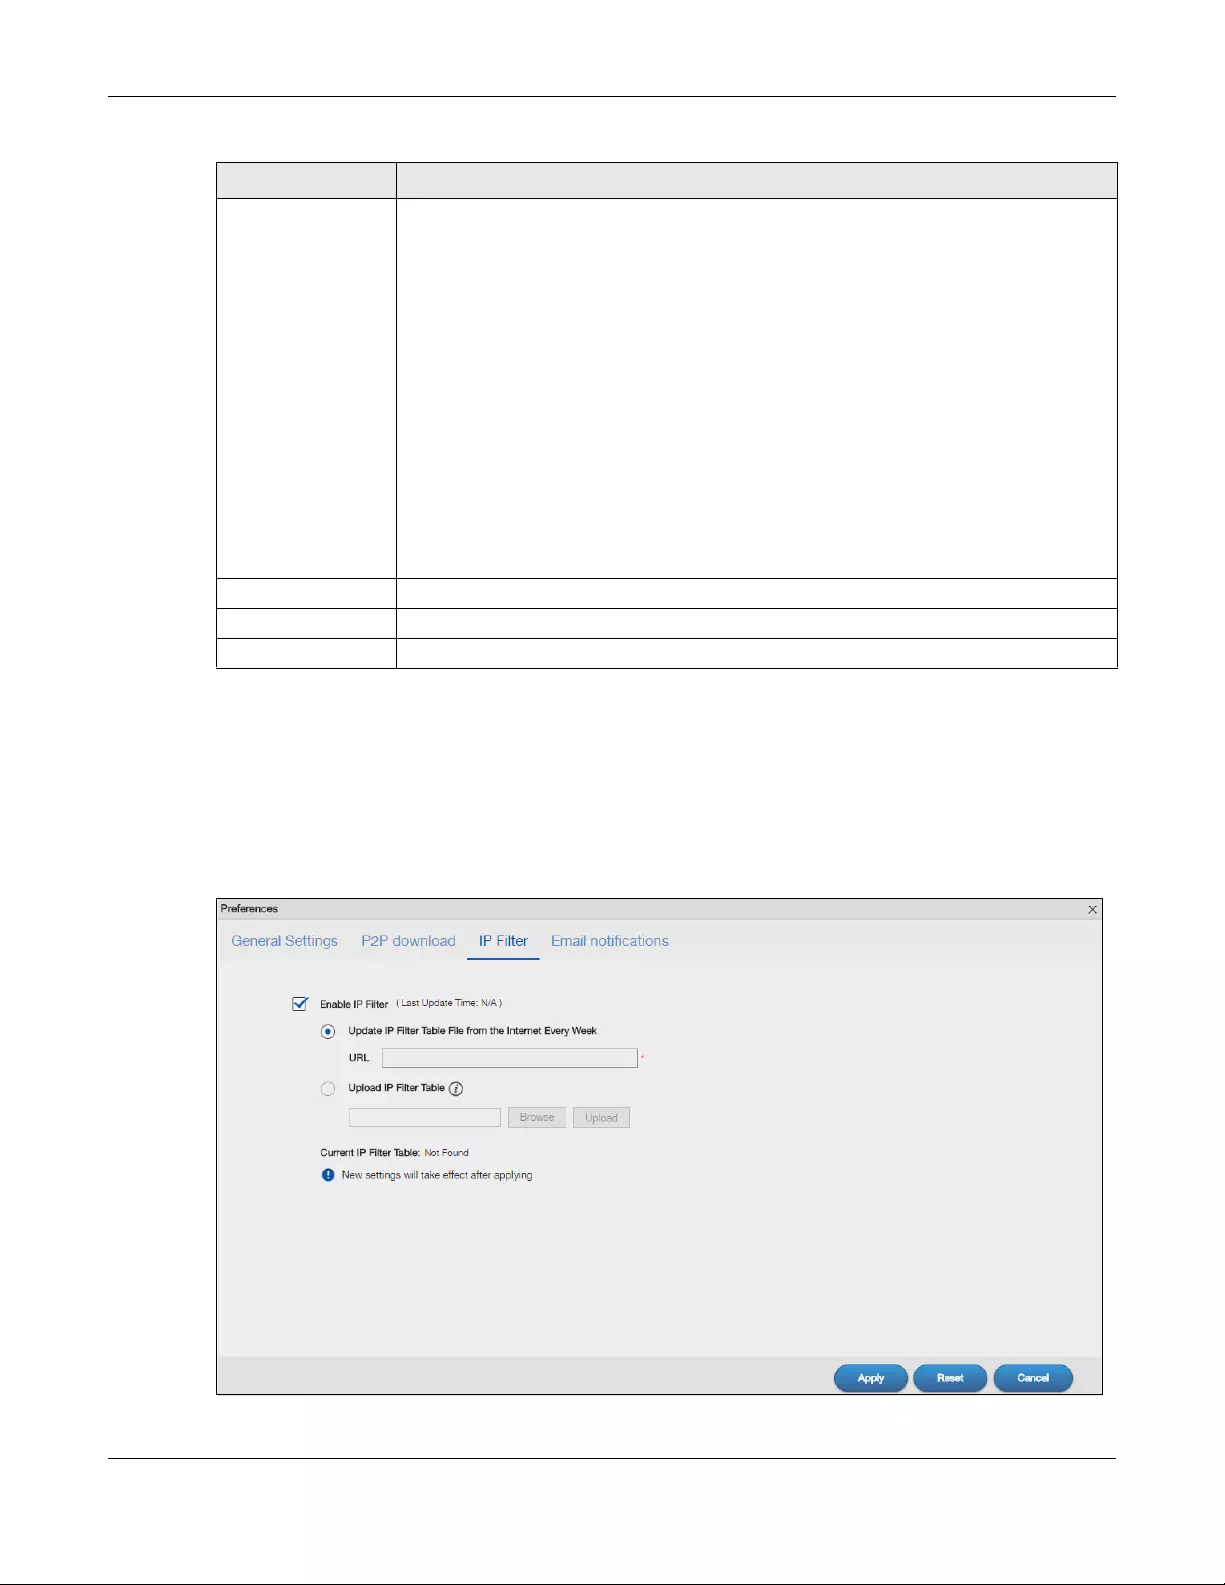
Chapter 14 Download Service
NAS Series User’s Guide
244
14.3.4 Configure the IP Filter Settings
Use this screen to enable or disable IP filtering for P2P downloads. IP filtering blocks IP addresses known
to share fake files. You can either get an IP filter table from a website or use your own table.
Click Download Service > Download Service > Preferences > IP Filter to open the following screen.
Figure 192 Download Service > Download Service > Preferences > IP Filter
Keep Sharing While With P2P download, the NAS starts sharing a file while you are downloading it. Set how long
to continue sharing a file after the NAS finishes the download.
Select Upload/Download Ratio to keep sharing a file until the NAS has uploaded a specific
percent compared to the download.
Select Seeding Time to keep sharing a file for a specific number of minutes after the
download finishes.
Continuing to share a file helps other P2P download users finish downloading it. Sharing out
at least as much as you download helps keep you in good standing in the P2P download
community.
Enter -1 to share a file indefinitely. Leave both check boxes blank to have the NAS stop
sharing the file as soon as the download finishes.
If you select both options, the NAS keeps sharing a file until both conditions exceed the
values you configure. For example, you entered 150% in the Upload/Download Ratio field
and 120 minutes in the Seeding Time field. The NAS keeps sharing a file until it has shared 1.5
times the size of the file and has passed 120 minutes.
Apply Click this to save your changes.
Reset Click this to restore your previously saved settings.
Cancel Click this to return to the previous screen without saving.
Table 136 Download Service > Download Service > Preferences > P2P download (continued)
LABEL DESCRIPTION
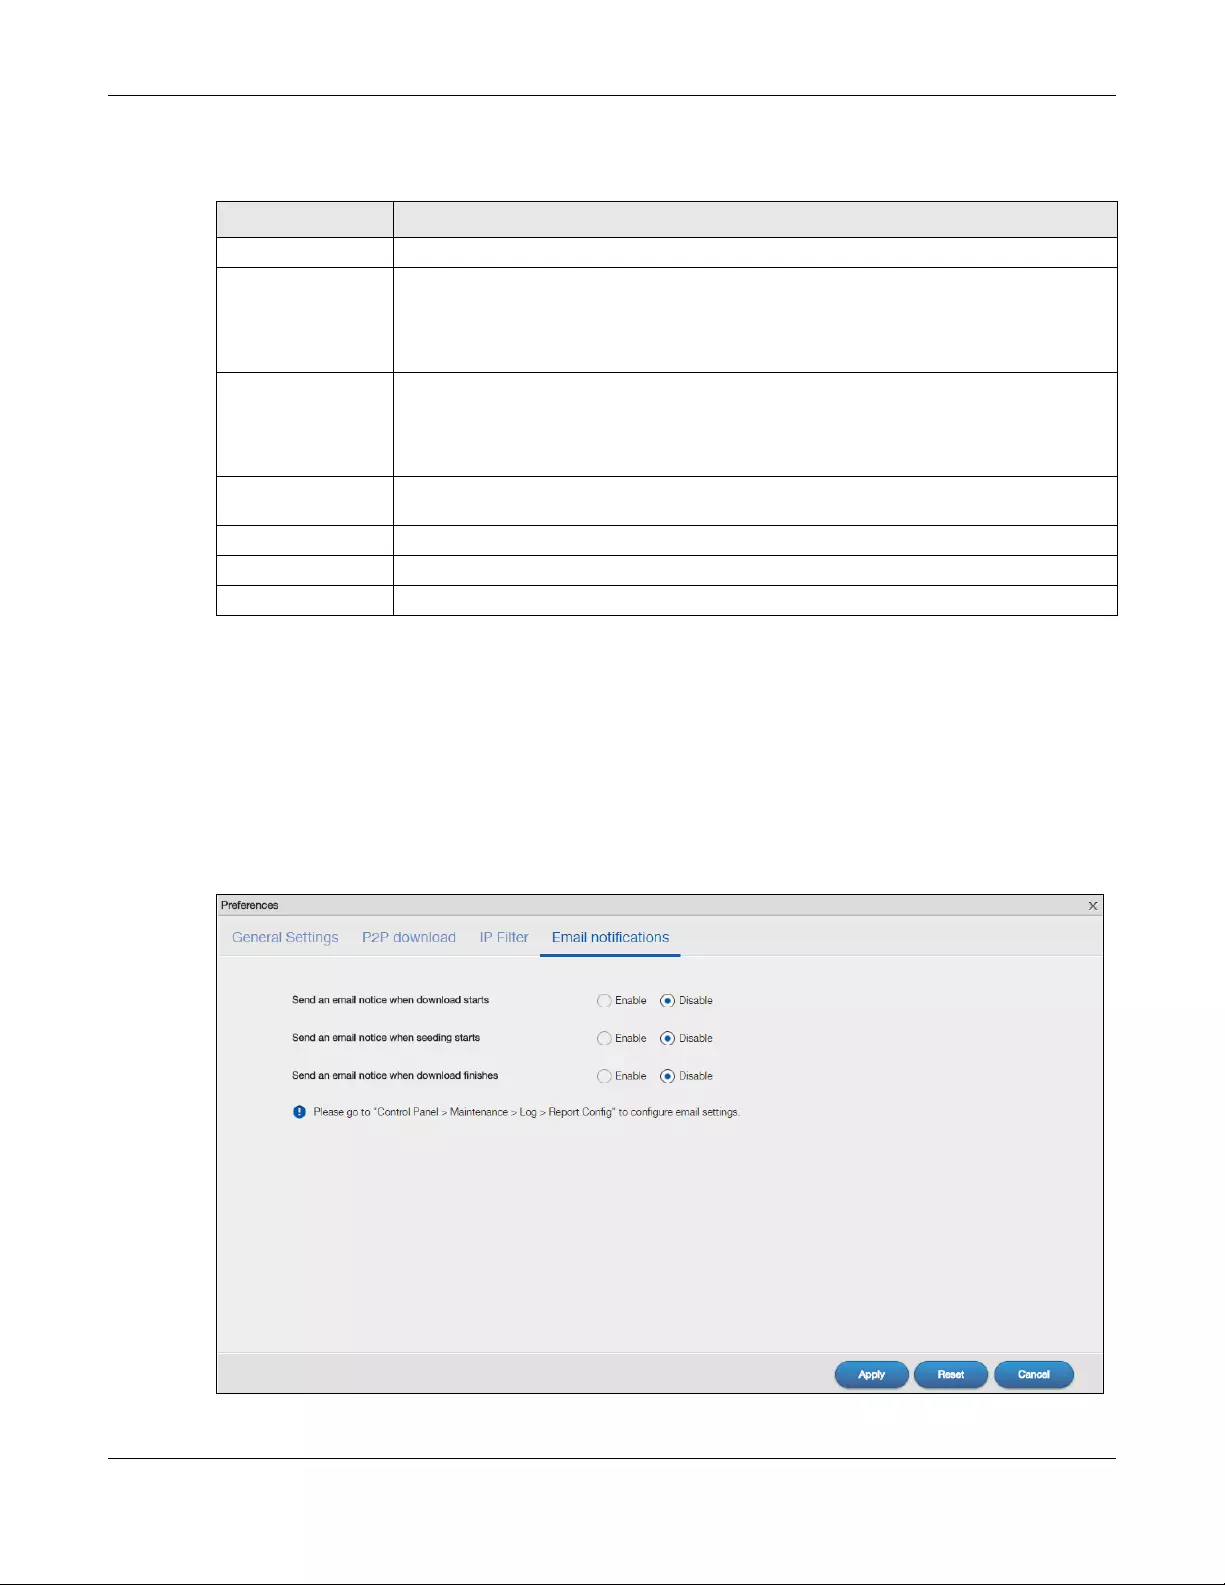
Chapter 14 Download Service
NAS Series User’s Guide
245
The following table describes the labels in this screen.
14.3.5 Configure the Email notifications Settings
Select whether or not to send emails to the email address configured for emailing log reports (see
Section 11.4.2 on page 183) when the NAS starts downloading the file, seeding the file, and/or finishes
downloading the file.
Click Download Service > Download Service > Preferences > Email notifications to open the following
screen.
Figure 193 Download Service > Download Service > Preferences > Email notifications
Table 137 Download Service > Download Service > Preferences > IP Filter
LABEL DESCRIPTION
Enable IP Filter Click this to enable or disable IP filtering for P2P downloads.
Update IP Filter
Table File from
the Internet
Every Week
Select this option and enter a URL to use an online IP filter table. You can find an online IP
filter table in websites such as http://www.bluetack.co.uk/config/level1.gz.
When you change the URL of the online IP filter table, the NAS also performs an update after
you click Apply.
Upload IP Filter
Table Select this option to upload your own IP filter table. Use the Browse button to locate the file
and click Upload to save it on the NAS.
The NAS supports .txt, .dat, .gz, .tgz, and .tar.gz file extensions. The NAS saves the IP filter
table as /admin/download/ipfilter.dat.
Current IP Filter Table If there is an online IP filter table, it will display Exist in this field. Click Download to save a
copy of the IP filter table on your computer.
Apply Click Apply to update the IP filter table from the specified URL.
Reset Click this to restore your previously saved settings.
Cancel Click this to return to the previous screen without saving.
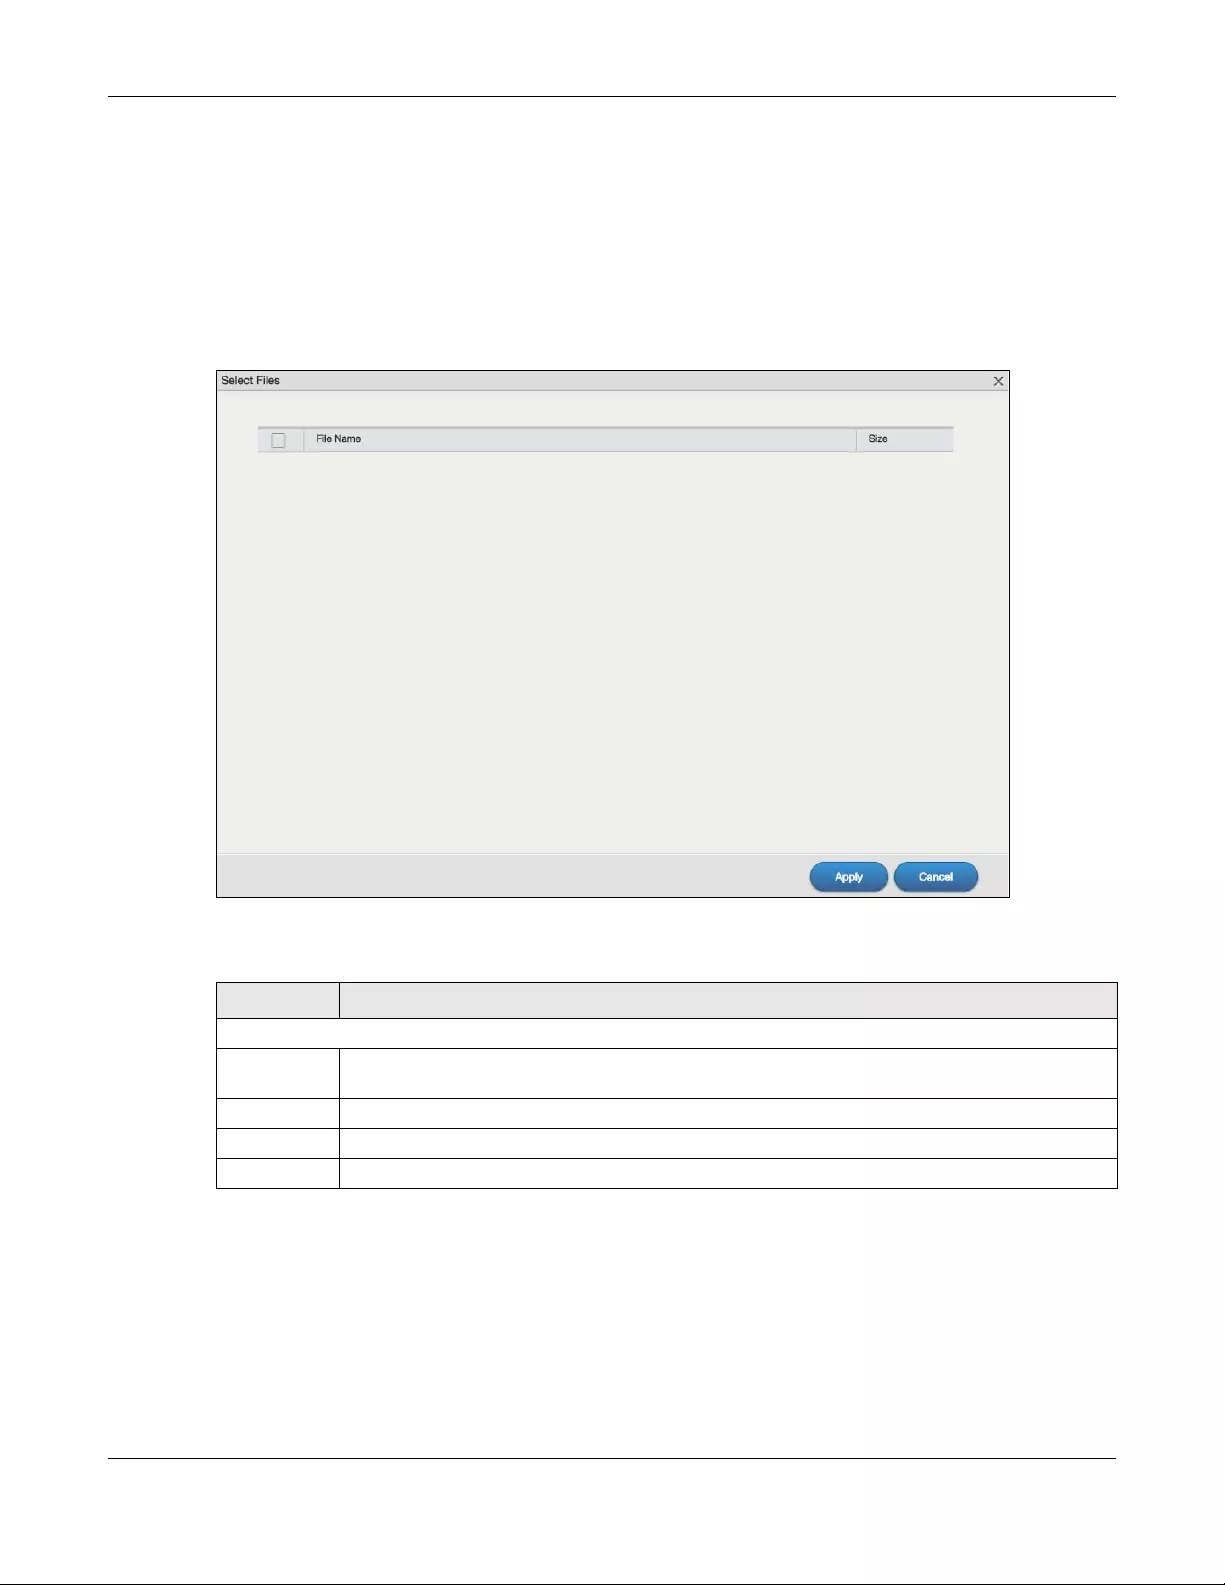
Chapter 14 Download Service
NAS Series User’s Guide
246
Click Apply to save your changes. Click Reset to restore your previously saved settings. Click Cancel to
return to the previous screen without saving.
14.3.6 Select Files to Download
Select an item in the Download Service > Download Service screen’s list and click Select Files to open
the following screen. Use this screen to select which of the torrent’s files to download.
Figure 194 Download Service > Download Service > Select Files
The following table describes the labels in this screen.
14.3.7 Display the Task Information
Select an item on the list and click Task Info. Use this screen to check detailed information about the
task.
Table 138 Download Service > Download Service > Select Files
LABEL DESCRIPTION
Select Files
File Name This is the name of a file specified in the torrent file. Select the check boxes of the files you want to
download.
Size This is the size of the file to be downloaded.
Apply Click this to save your changes.
Cancel Click this to return to the previous screen without saving.
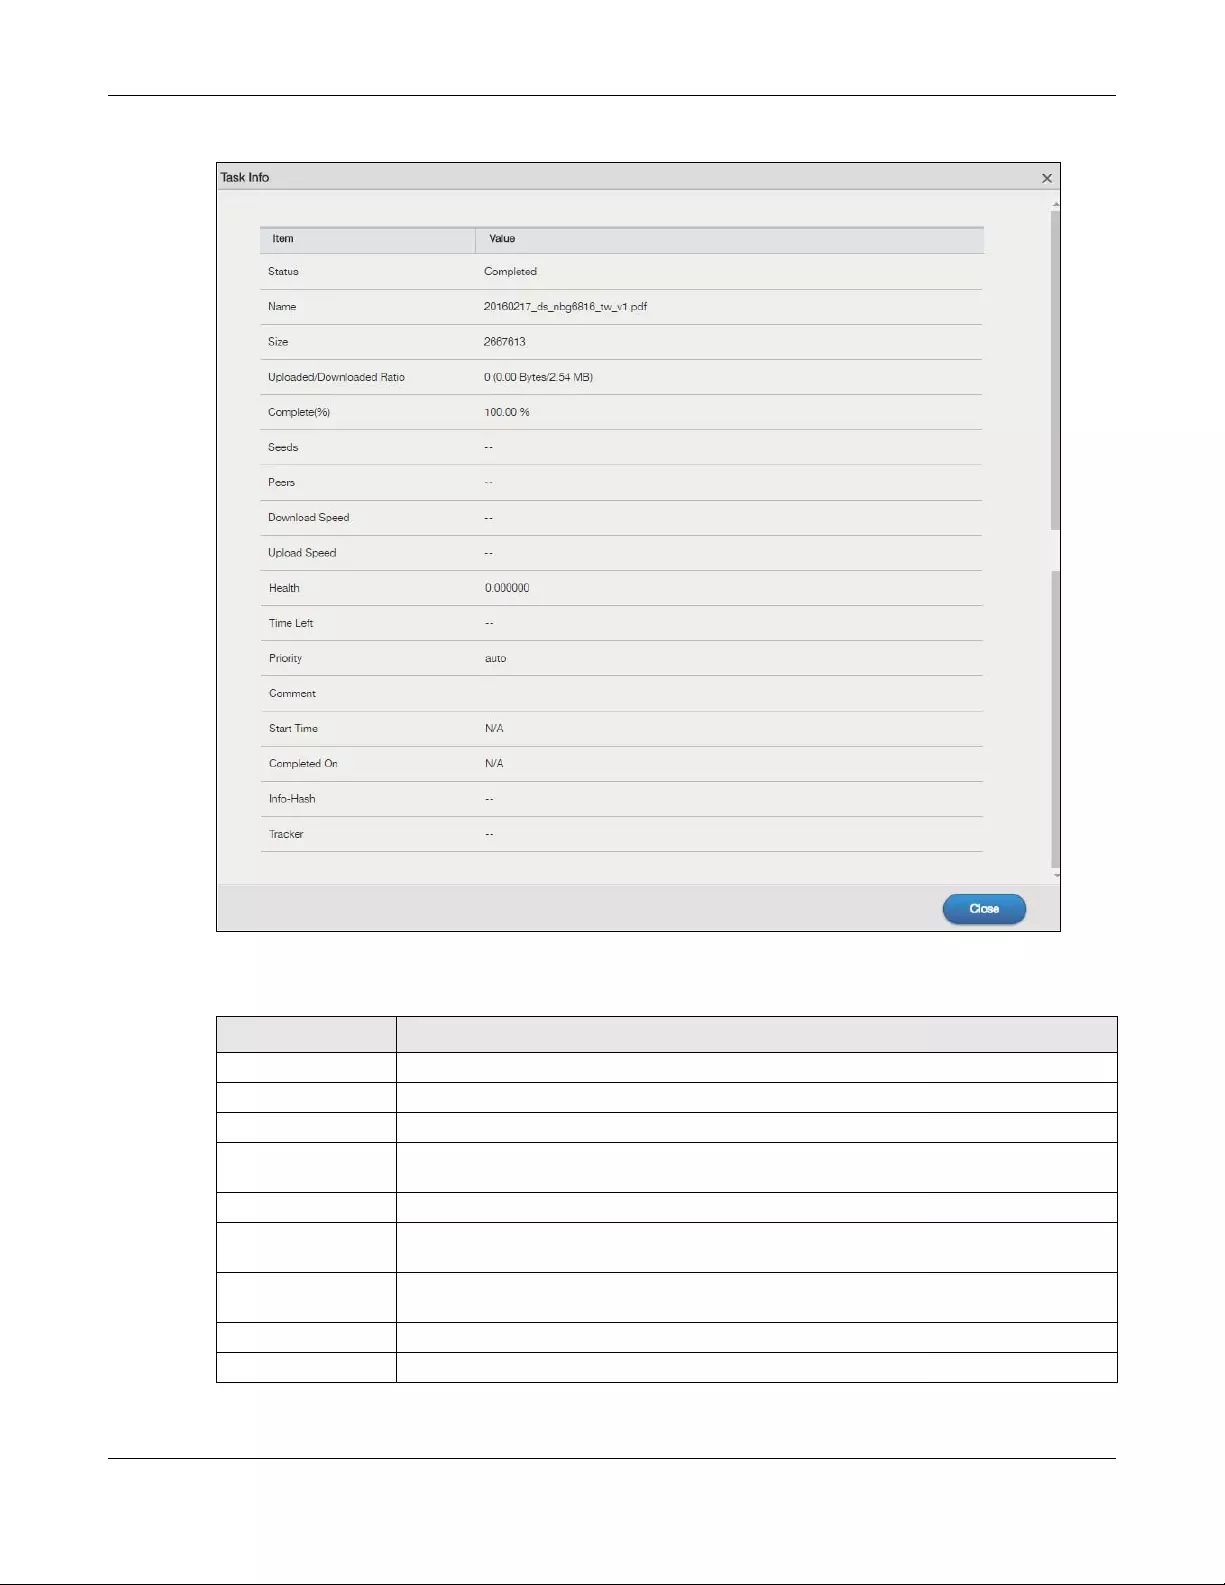
Chapter 14 Download Service
NAS Series User’s Guide
247
Figure 195 Download Service > Download Service > Task Info
The following table describes the labels in this screen.
Table 139 Download Service > Download Service > Task Info
LABEL DESCRIPTION
Status This is the current status of the task.
Name This is the name of the task.
Size This is the size of the file to be downloaded.
Uploaded/
Downloaded Ratio
This is the ratio of total uploaded data to downloaded data.
Complete(%) This field displays how much has been downloaded to the NAS.
Seeds This is the number of computers that are sharing the complete file that you are
downloading.
Peers This is the number of other computers that are also downloading (and sharing) the file you
are downloading.
Download Speed This field displays how fast the NAS downloads the file.
Upload Speed This field displays how fast the NAS uploads the file.
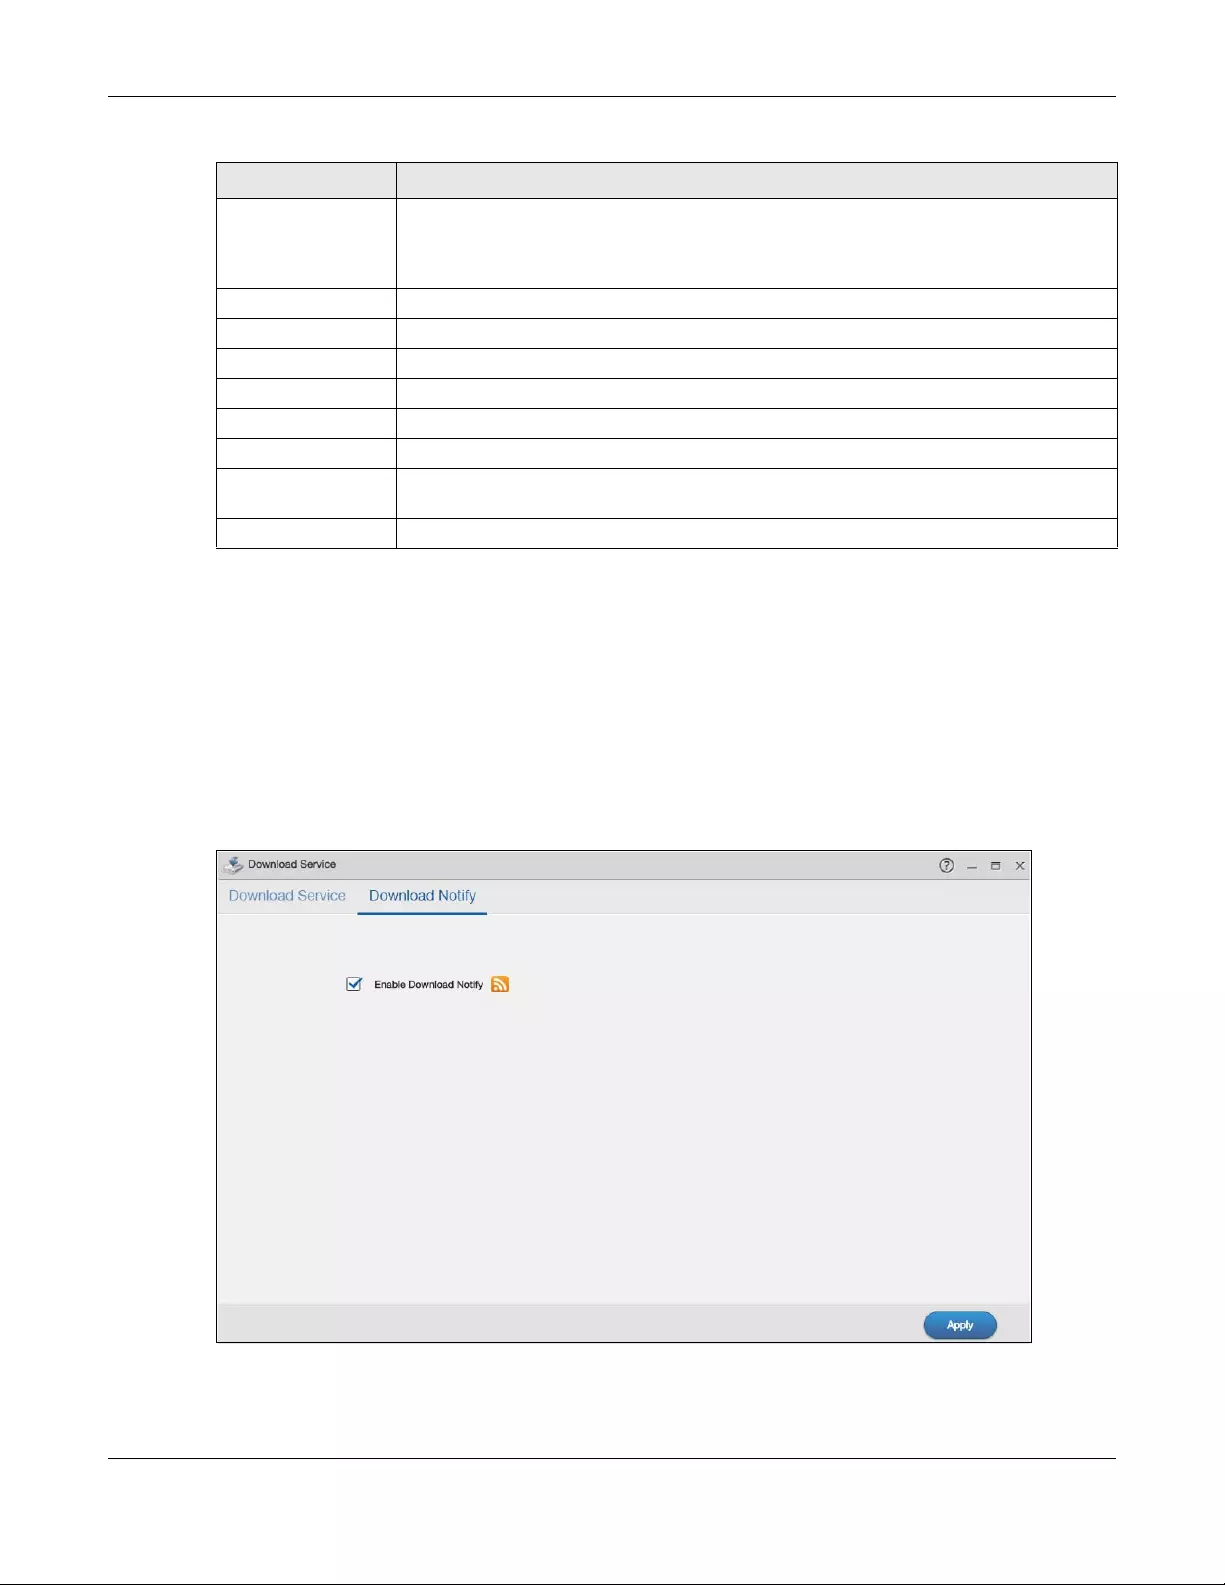
Chapter 14 Download Service
NAS Series User’s Guide
248
14.4 Download Notify Screen
Click Download Service > Download Notify to open the following screen. Use this screen to keep track of
downloaded files on the NAS.
Note: The download service notification only keeps track of files downloaded via P2P
download.
Figure 196 Download Service > Download Notify
Health This field displays how many full copies of the file are available for this task. The NAS can
download a file with a higher health value more efficiently. If the health value is less than 1
(0.65 for example), there is no full copy of the file, and the NAS may not be able to
complete downloading the file.
Time Left This is the time remaining to complete the task.
Priority This field displays the priority of the task.
Comment This field displays the description of the task.
Start Time This field displays when the NAS started to download files.
Completed on This field displays when the file was successfully downloaded to the NAS.
Info-Hash This information is used to verify the torrent file.
Tracker This field displays the tracker that NAS is currently connected to. A tracker is a server used for
finding peers sharing the file.
Close Click this to close the screen.
Table 139 Download Service > Download Service > Task Info (continued)
LABEL DESCRIPTION
Chapter 14 Download Service
NAS Series User’s Guide
249
The following table describes the labels in this screen.
14.5 Technical Reference
This section provides technical background information on the topics discussed in this chapter.
14.5.1 Download Service
The NAS’s download service downloads files from the Internet directly to the NAS. You do not have to
download to your computer and then copy to the NAS. This can free up your computer’s system
resources.
The NAS can download using these protocols.
• HTTP: The standard protocol for web pages.
• FTP: A standard Internet file transfer service.
• P2P download: Peer-to-peer files sharing protocol.
Note: Do not use the NAS for illegal purposes. Illegal downloading or sharing of files can result
in severe civil and criminal penalties. You are subject to the restrictions of copyright laws
and any other applicable laws and will bear the consequences of any infringements
thereof. Zyxel bears NO responsibility or liability for your use of the download service
feature.
Torrent Files
The NAS needs a “.torrent” file for P2P download to download a file. The torrent file gives the NAS
information about the file to be downloaded (and shared) and the tracker(s) (computers) that
coordinates the distribution of the file.
When you add a P2P download task in the NAS’s web configurator screens, you can copy and paste
the URL of the torrent file. The NAS automatically downloads the torrent file and saves it in a torrent folder
within the folder where the NAS stores downloaded files (the admin share’s download folder by default).
If you already have the torrent file saved on your computer, you can just specify its location when
adding a download task through the web configurator. Another method is to use FTP or a CIFS program
(Windows Explorer for example) to copy the torrent file into the torrent folder. The NAS automatically
uses the torrent file.
Table 140 Download Service > Download Notify
LABEL DESCRIPTION
Enable
Download
Notify
Select this to keep track of downloaded files on the NAS.
At the time of writing, the NAS supports RSS 2.0 feeds.
Click this to get and subscribe to the NAS channel feed. This enables you to keep track and
download the NAS’s new contents (items).
Apply Click this to save your changes.
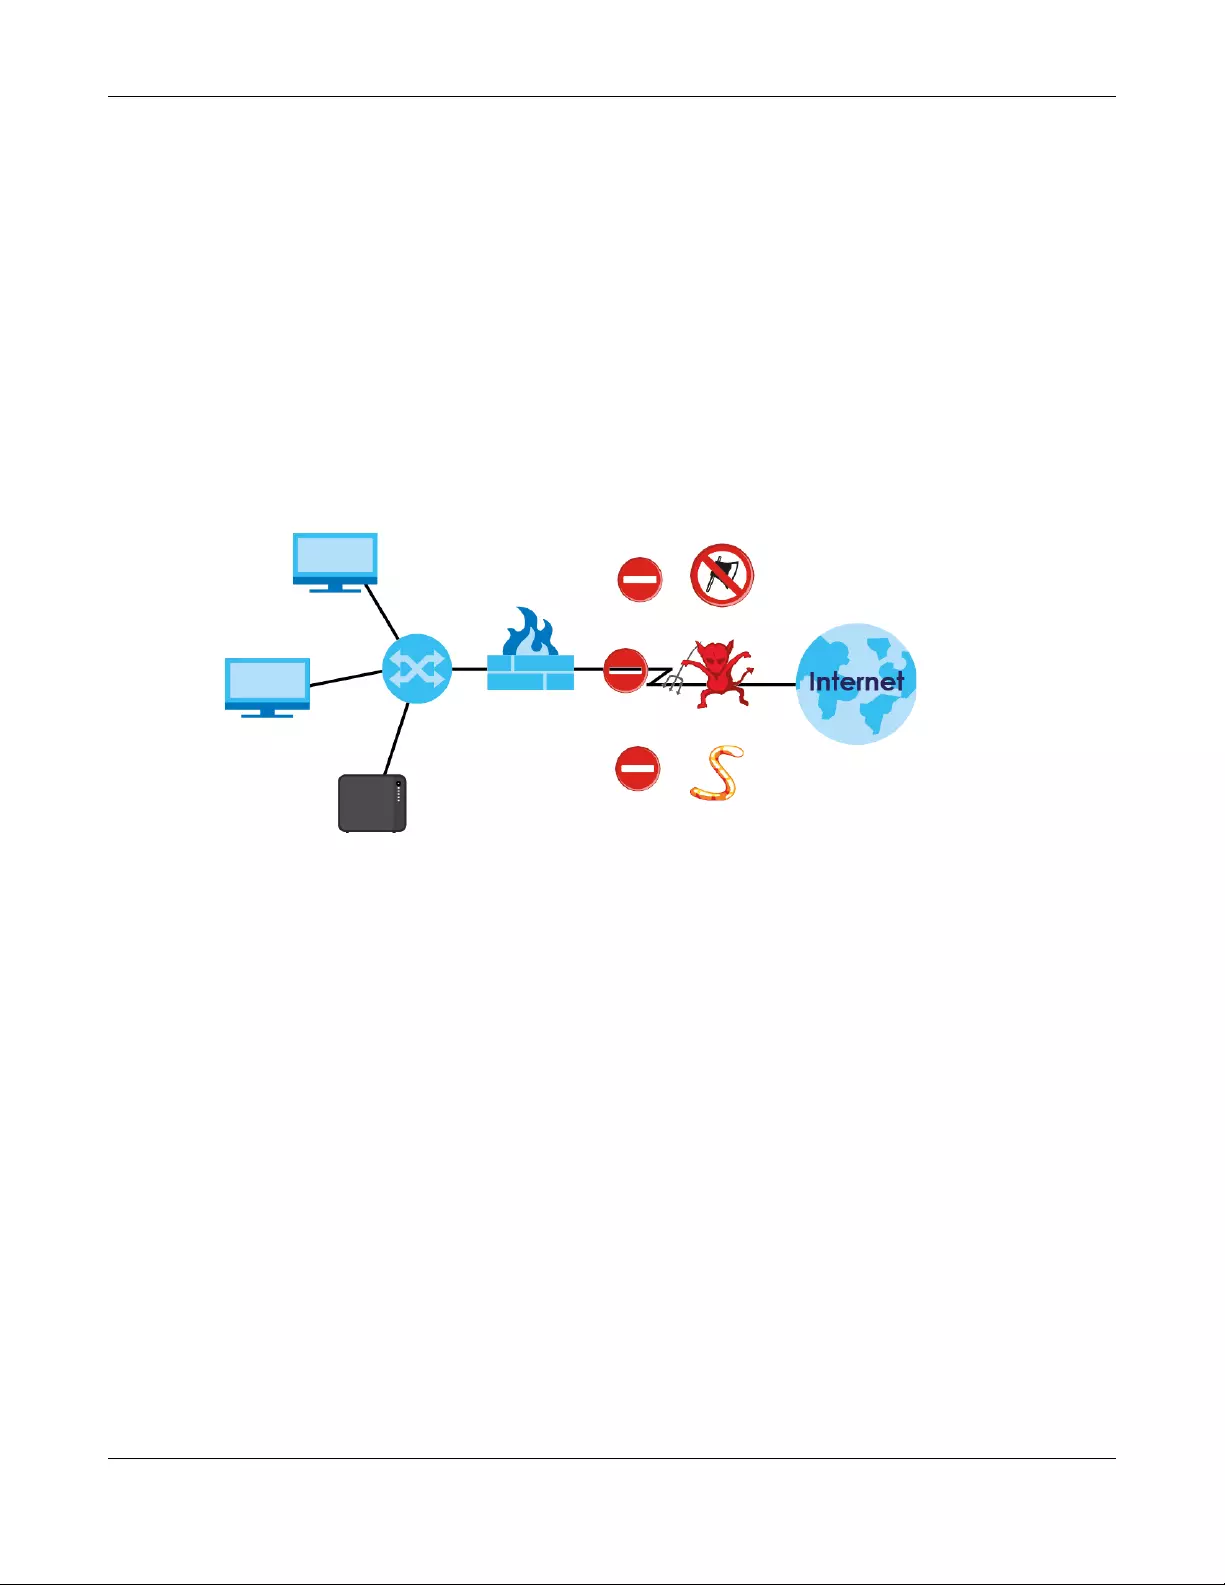
Chapter 14 Download Service
NAS Series User’s Guide
250
After your P2P download and sharing are finished, you can go to the incoming folder within the
destination share or folder and delete the .torrent file if you need to free up hard disk space.
14.5.2 P2P Download Security
When you download using P2P, you reveal your IP address. This increases the risk of hacking attacks,
which can be protected against by a good firewall.
Use a Hardware-based Firewall
Place a hardware-based firewall between your network and the Internet (a software-based firewall on
your computer would just protect the computer itself, not the NAS since your computer is not between
your NAS and the Internet).
Figure 197 Firewall
Ideally your firewall should have the following:
• Stateful packet inspection to control access between the Internet and your network and protect your
NAS (and computers) from hacking attacks.
• IDP (Intrusion Detection and Prevention) to detect malicious packets within normal network traffic
and take immediate action against them.
• Anti-virus to check files you download for computer viruses.
P2P Download and Your Firewall
The anti-virus feature on a firewall probably cannot check P2P downloads for viruses, so use anti-virus
software on your computer to scan the NAS for viruses.
When you download using P2P download, many other P2P download users are also trying to download
the file from you. The firewall slows this down because by default, it only allows traffic from the Internet in
response to a request that originated on the LAN (it lets you get files from the Internet and blocks those
on the Internet from getting files from you).
Hackers
Malicious Packets
Viruses
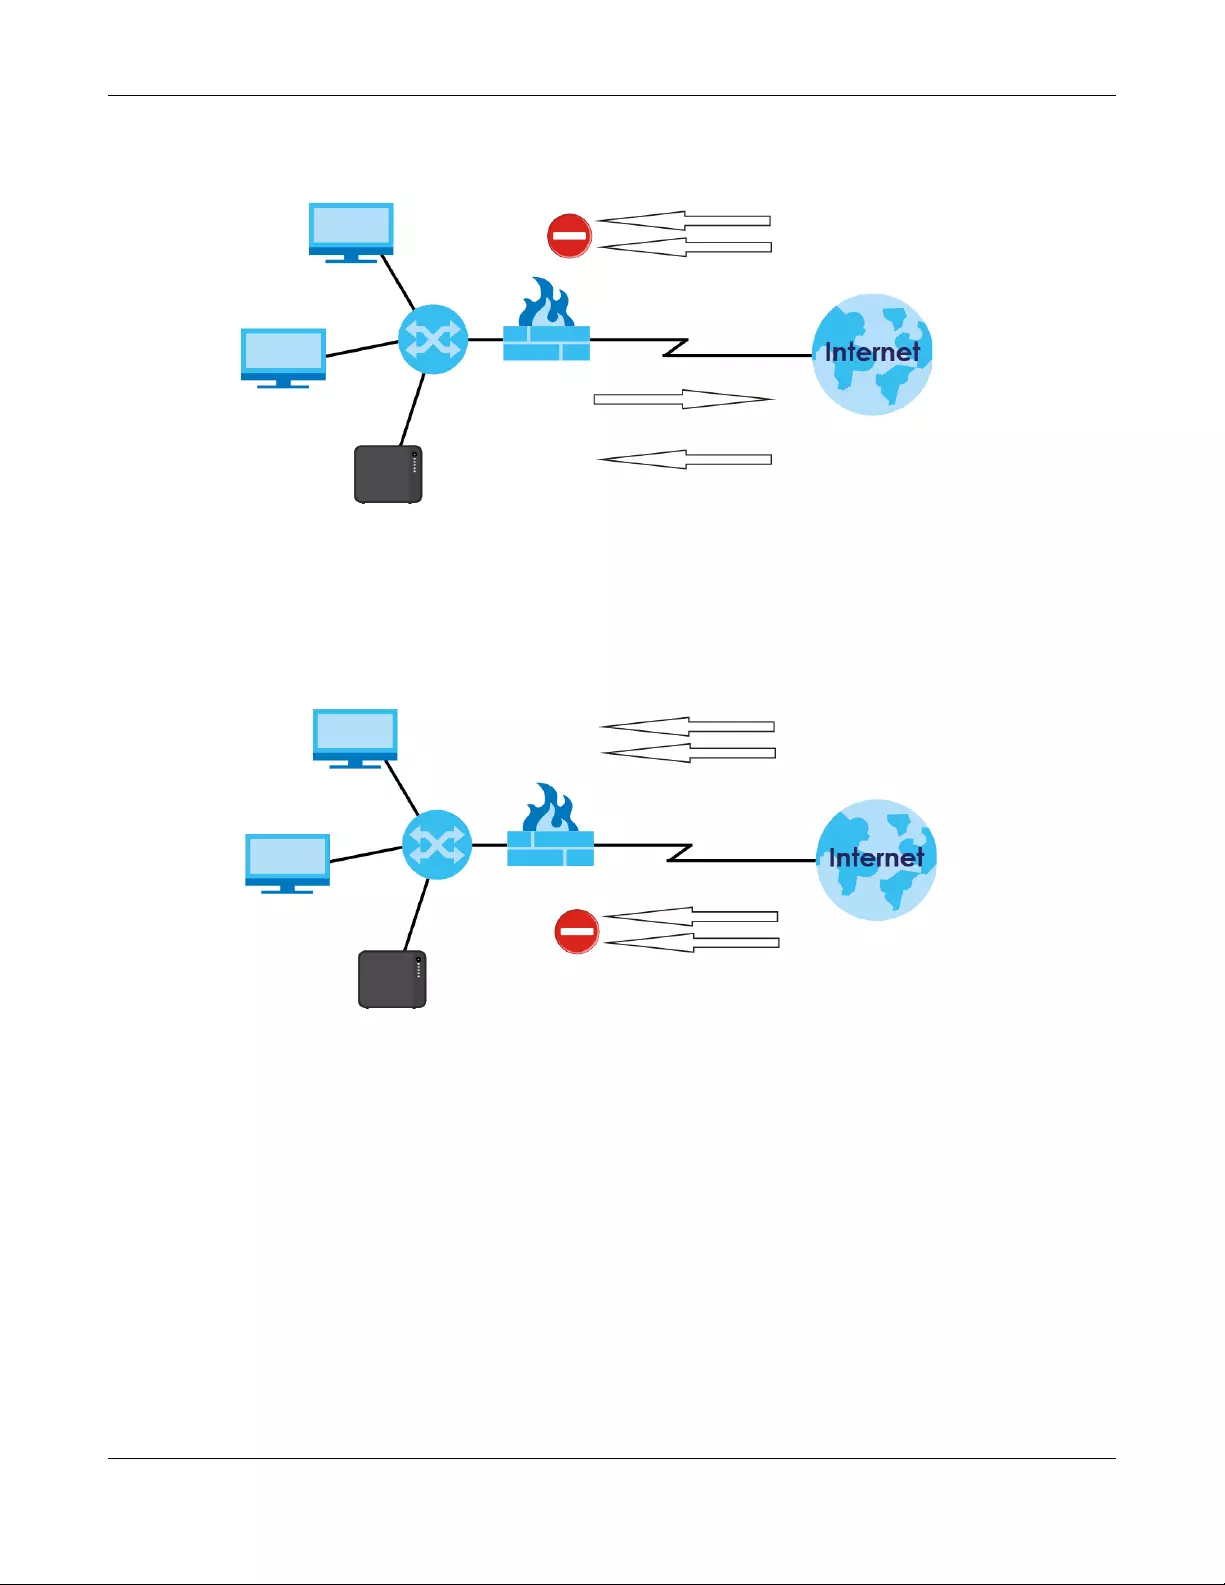
Chapter 14 Download Service
NAS Series User’s Guide
251
Figure 198 Firewall Blocking Incoming P2P Download Requests
To speed up P2P download file transfers, configure your firewall’s port forwarding to send incoming TCP
port 9090 and UDP port 9089 connections to the NAS. You probably need to use your firewall’s HTML
(web-based) configuration interface to set this up (see the firewall’s manual for details). You may also
have to configure a corresponding firewall rule.
Figure 199 Firewall Configured to Allow Incoming P2P Download Requests
Incoming BitTorrent requests blocked
Outgoing BitTorrent requests allowed
Corresponding BitTorrent reply allowed
Incoming BitTorrent requests allowed
Other incoming traffic blocked

NAS Series User’s Guide
252
CHAPTER 15
Upload Manager
15.1 Overview
This chapter discusses the features in the Upload Manager screens.
The auto upload feature uploads media files stored in the NAS to the Flickr and/or YouTube sharing
websites or uploads files stored in the NAS to FTP servers. Besides web publishing and media server, auto
upload is another convenient way to share media files with your friends and family.
You can link the NAS to your Flickr and/or YouTube account and select shares for the NAS to upload. The
NAS uploads the media files stored in the specified shares to your Flickr and/or YouTube account. When
you add new files to the specified shares, the NAS also automatically uploads the new files to your Flickr
and/or YouTube account.
You can also link the NAS to the FTP server or the FTP server on another NAS and select shares or folders
for the NAS to upload. The NAS uploads the files stored in the specified shares to the FTP server. When
you add new files to the specified shares, the NAS also automatically uploads the new files to the FTP
server.
15.2 What You Can Do
• Use the Flickr/YouTube screen (Section 15.4 on page 253) to upload photos and videos to your Flickr
and YouTube accounts.
• Use the FTP Uploadr screen (Section 15.5 on page 261) to upload files to FTP servers.
15.3 What You Need to Know
FTP
File Transfer Protocol (FTP) is a file transfer service that operates on the Internet. A system running the FTP
server accepts commands from a system running an FTP client. FTP is not a secure protocol. Your file
transfers could be subject to snooping.
FTPES (File Transfer Protocol over Explicit TLS/SSL)
File Transfer Protocol over Explicit TLS/SSL (FTPES) is a file transfer service that uses TLS (Transport Layer
Security) or Secure Socket Layer (SSL) for secure transfers across the Internet.
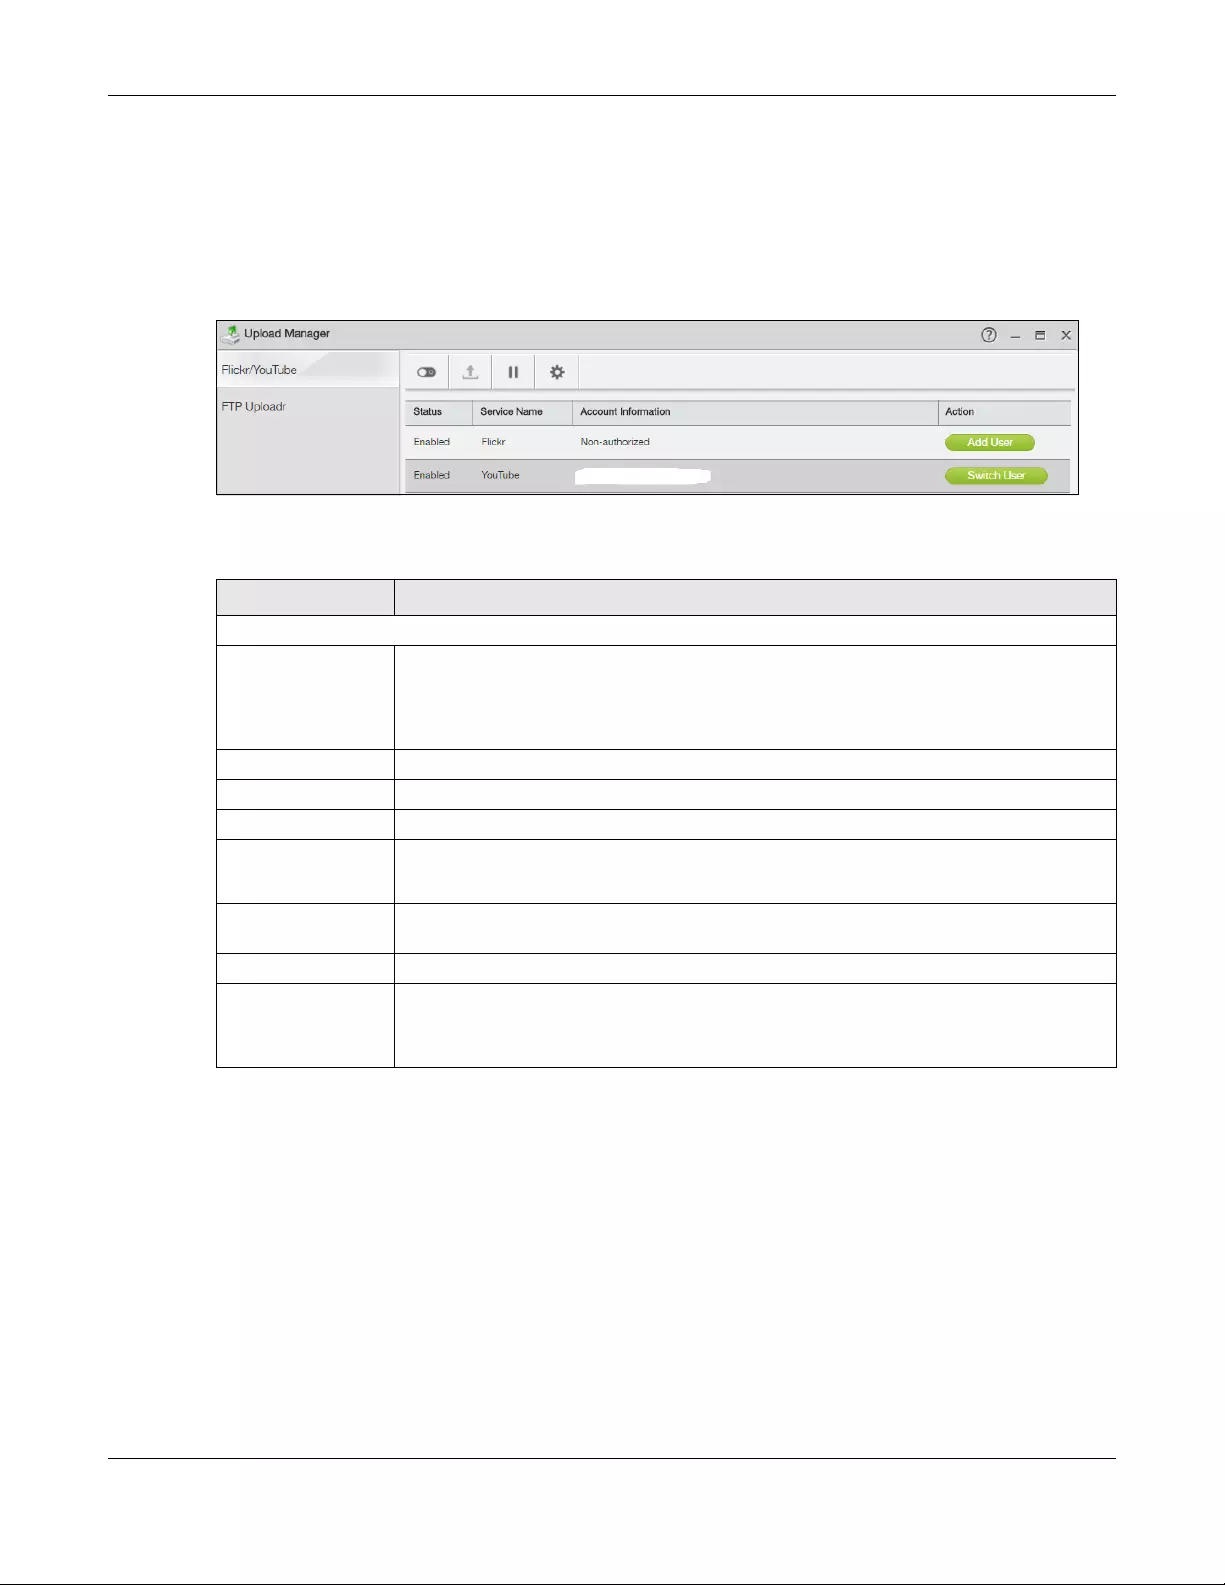
Chapter 15 Upload Manager
NAS Series User’s Guide
253
15.4 Flickr/YouTube Screen
Use this screen to upload photos and videos to your Flickr and YouTube accounts.
Click Upload Manager > Flickr/YouTube to open the following screen.
Figure 200 Upload Manager > Flickr/YouTube
The following table describes the labels in this screen.
15.4.1 Configure the Flickr Settings
In the Upload Manager > Flickr/YouTube screen, select Flickr from the list and then click the Config
button.
The following screen displays if you have not authorized the NAS to use a Flickr account. Click OK to
continue the authorization process.
Table 141 Upload Manager > Flickr/YouTube
LABEL DESCRIPTION
Flickr/YouTube
Disable/Enable Select a service from the list and click this to turn the service on or off.
If you disable the service and add more files to the watch folder(s), the NAS will not auto
upload these files. However, the NAS still uploads any files added before you turned off the
service.
Resume Select a service from the list and click this to resume the auto upload feature.
Pause Select a service from the list and click this to pause the auto upload feature.
Config Select a service from the list and click this to manage the service’s settings.
Status This field displays the service’s status.
The service may be Enabled, Disabled, Uploading or Paused.
Service Name This field displays the name of a sharing website to which the NAS can automatically
upload files.
Account Information This field displays the username of the account to use with the auto upload feature.
Action Click Add User to link the NAS to your Flickr and/or YouTube account.
Click Switch User to use a different Flickr and/or YouTube account for the auto upload
feature.
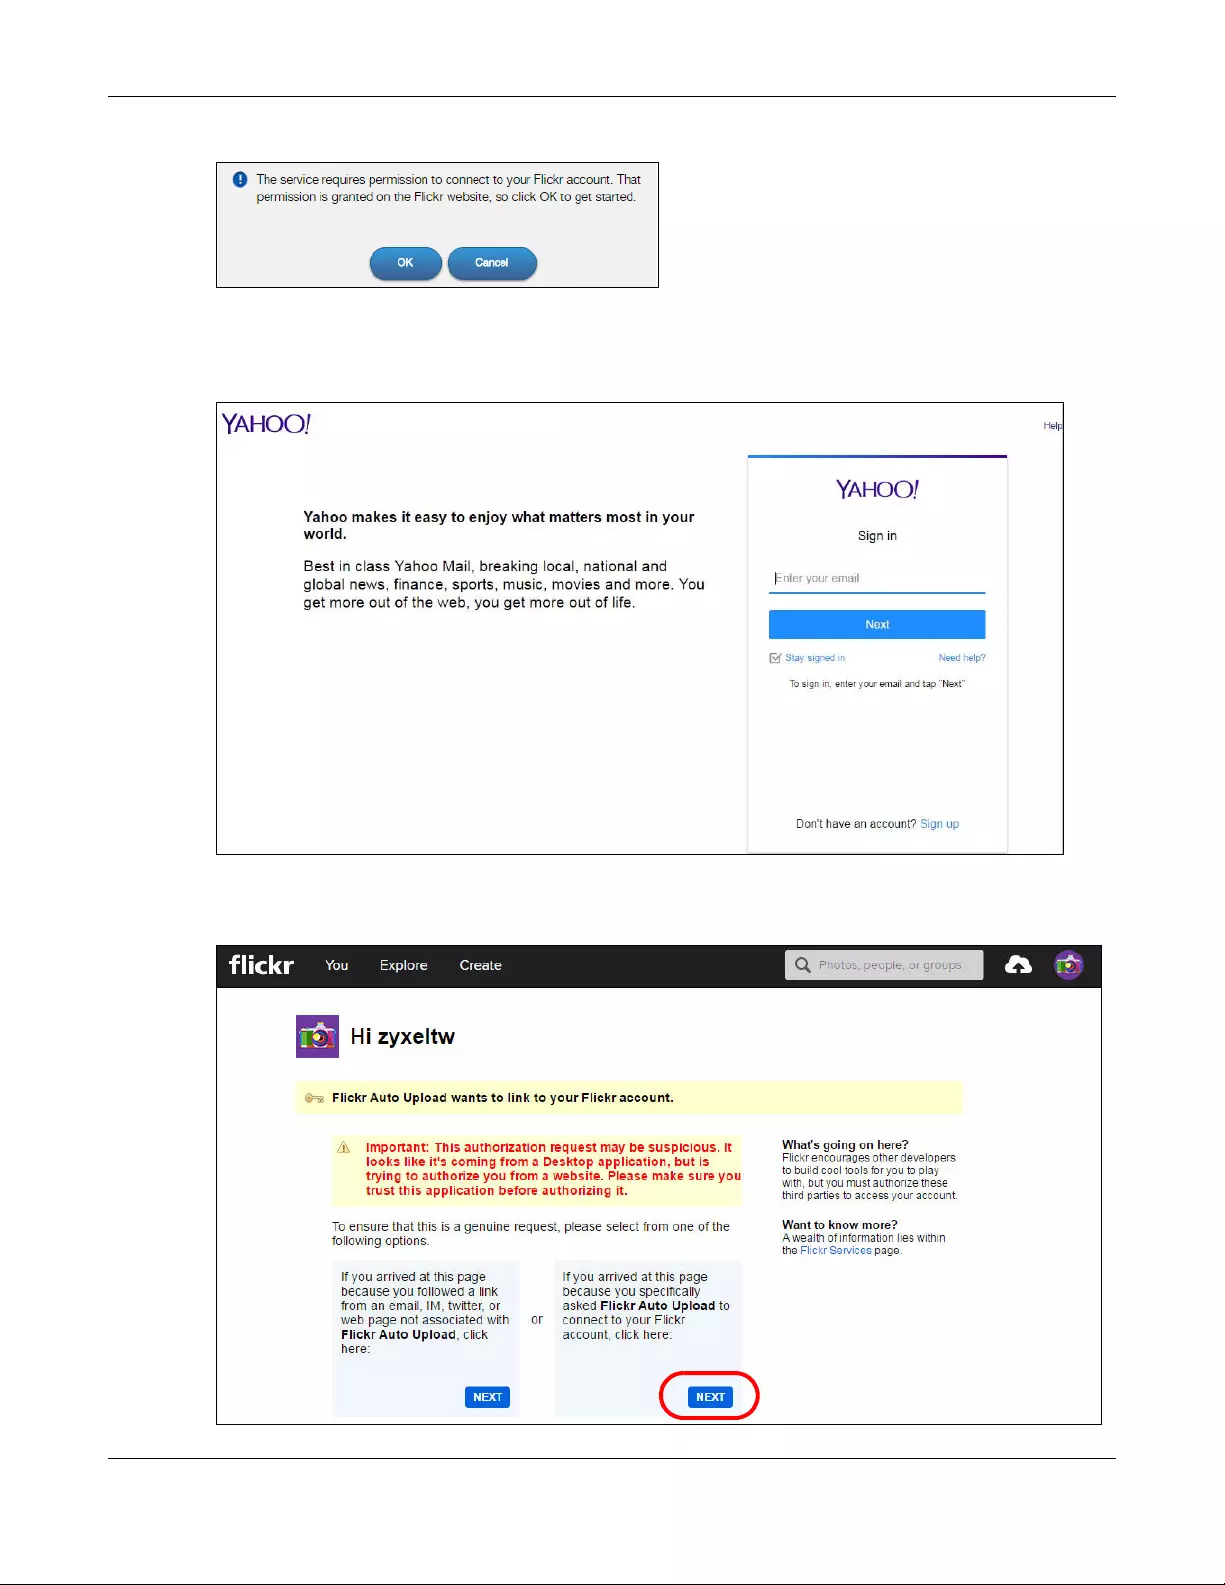
Chapter 15 Upload Manager
NAS Series User’s Guide
254
Figure 201 Linking NAS to Flickr
The web browser opens the Yahoo! Flickr login page. Enter your Yahoo account’s information and click
Sign In.
Figure 202 Yahoo! Flickr Login Page
The following page displays asking for your authorization. Click NEXT to go to the next page.
Figure 203 Flickr Authorization
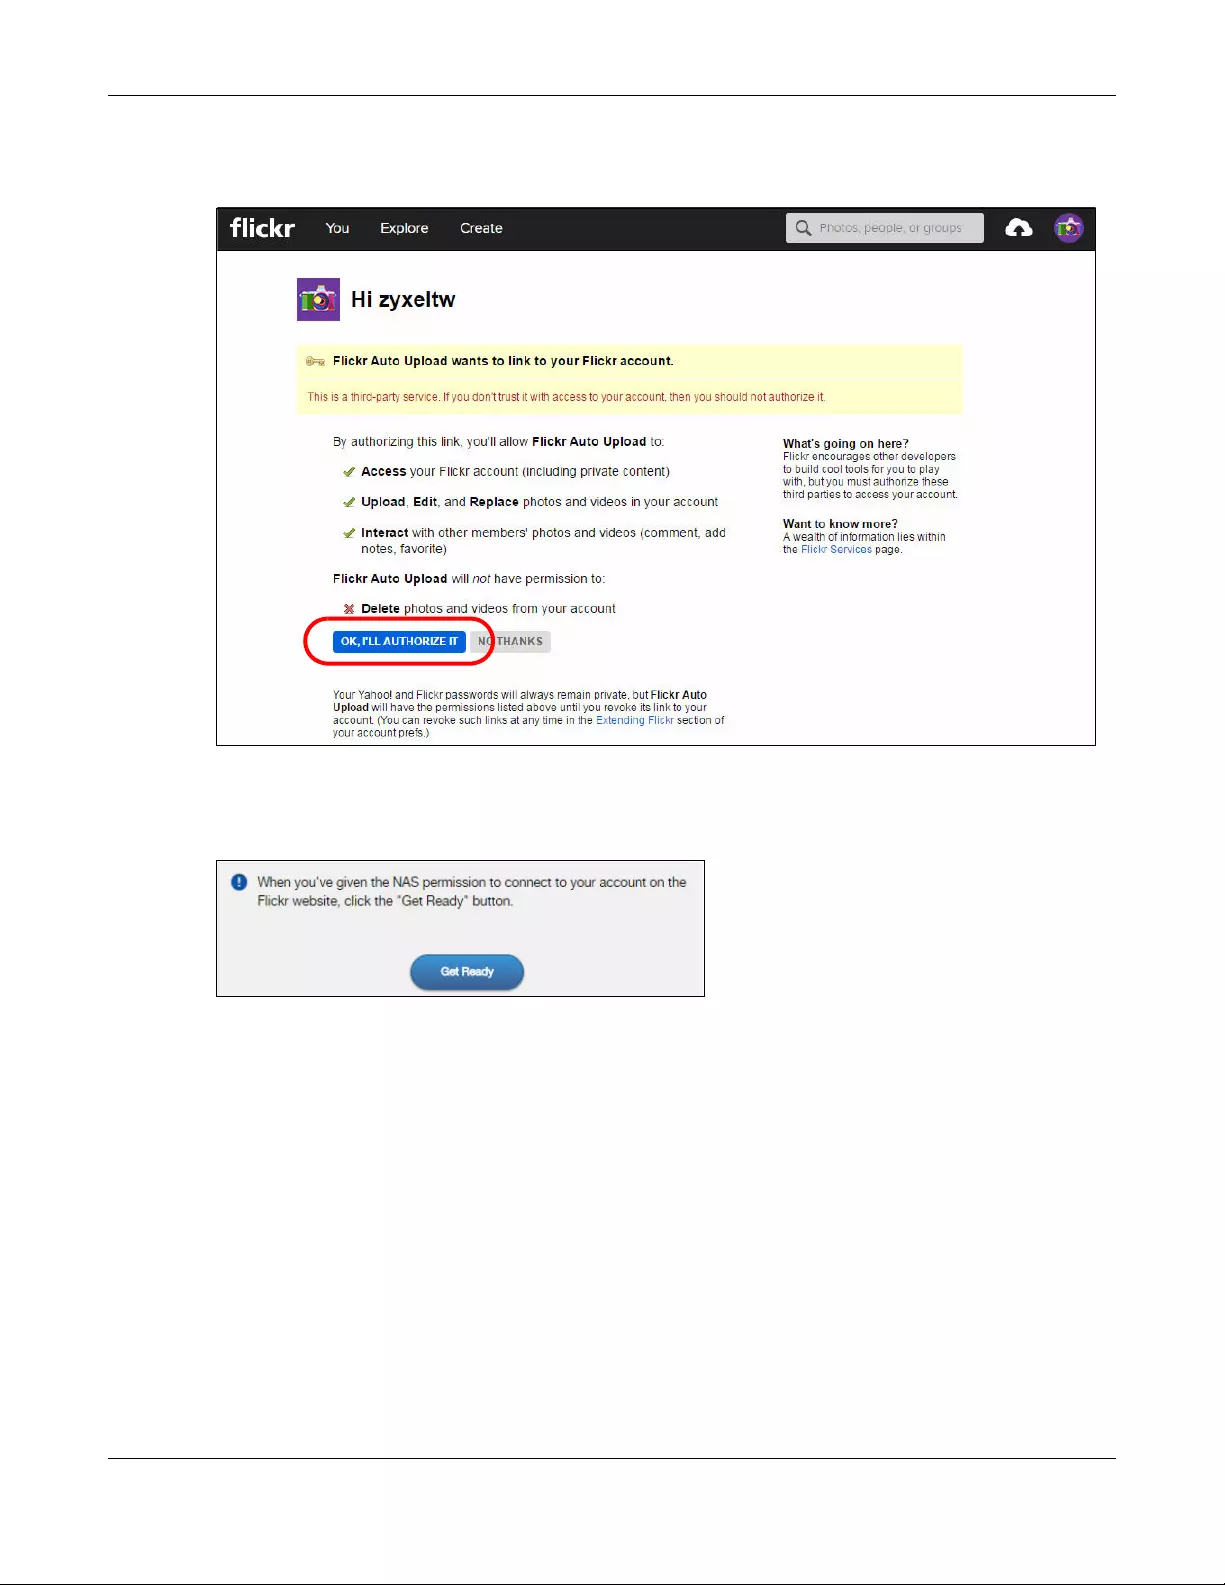
Chapter 15 Upload Manager
NAS Series User’s Guide
255
Click OK, I’LL AUTHORIZE IT to establish a link between the NAS and your Flickr account.
Figure 204 Flickr Authorization
A confirmation page displays indicating successful authorization. Return to the NAS web configurator.
Click Get Ready in the following screen to complete the authorization process.
Figure 205 Confirming Flickr Authorization
Once the NAS is associated with your Flickr account, you can configure auto upload settings in the
following screens.
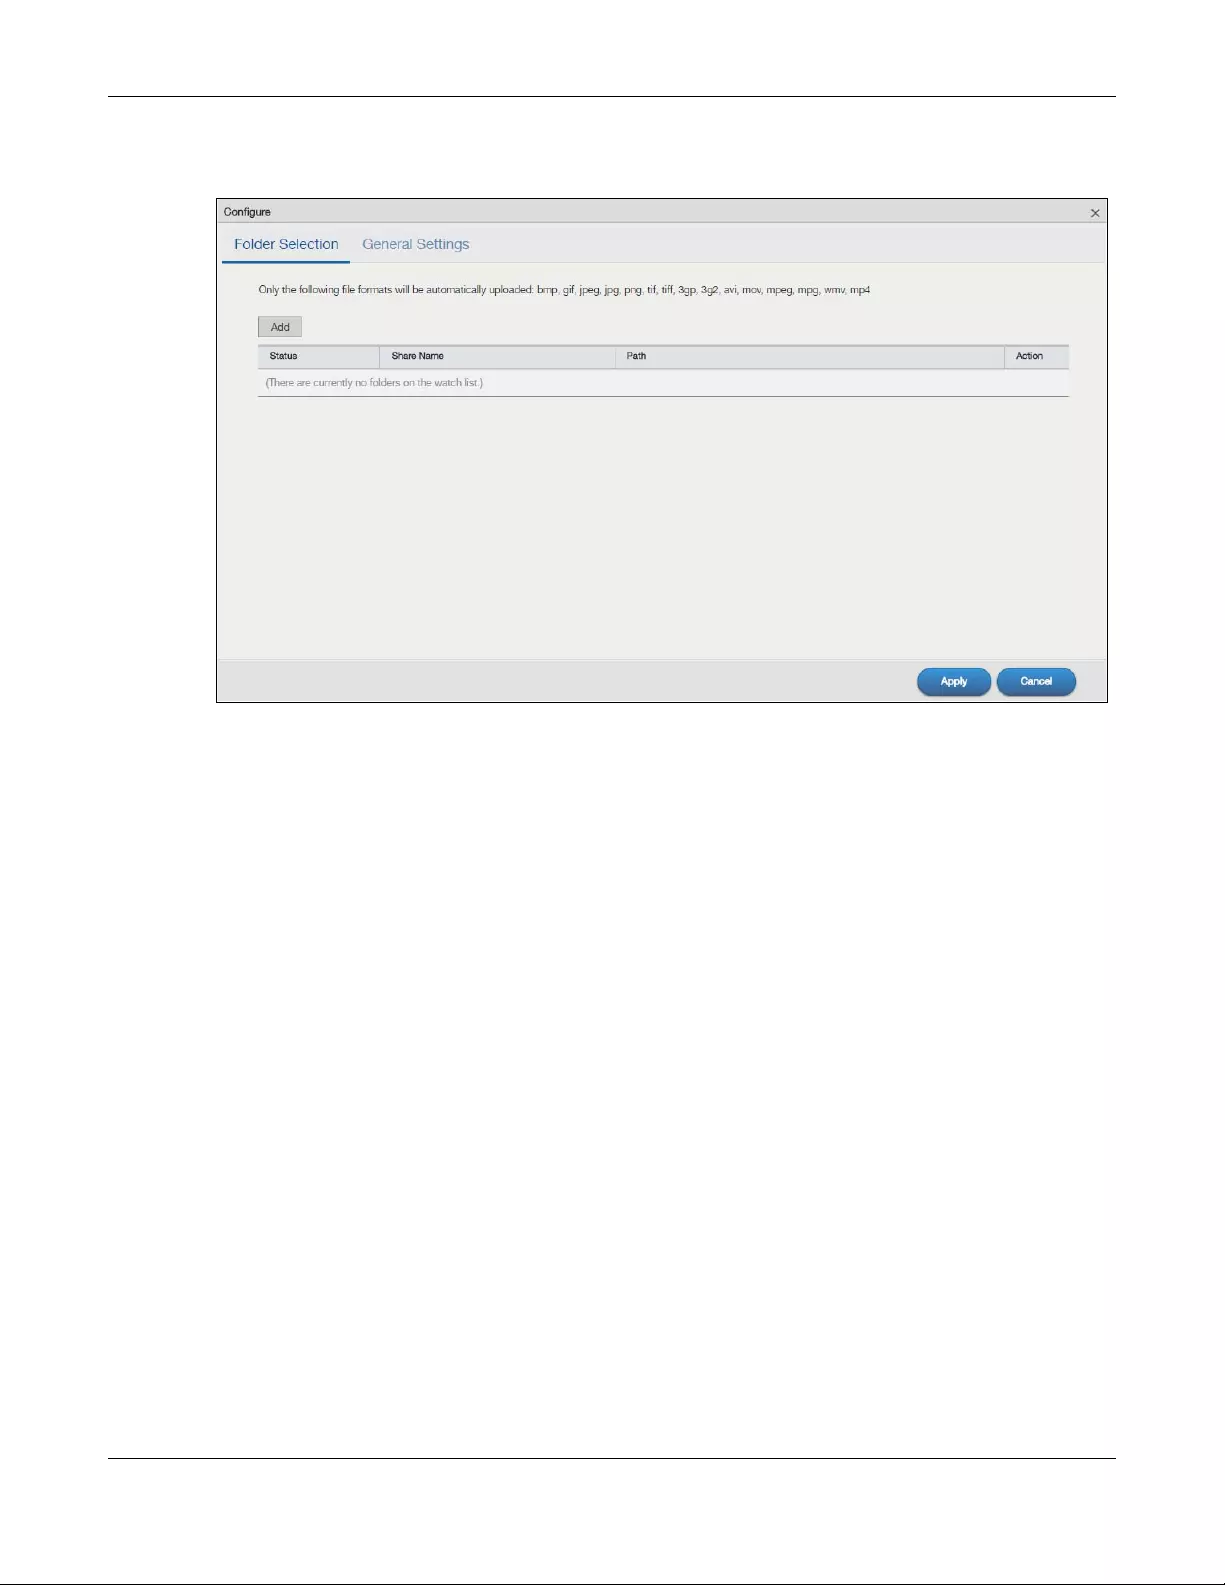
Chapter 15 Upload Manager
NAS Series User’s Guide
256
Folder Selection
Figure 206 Upload Manager > Flickr/YouTube > Config (Flickr): Folder Selection
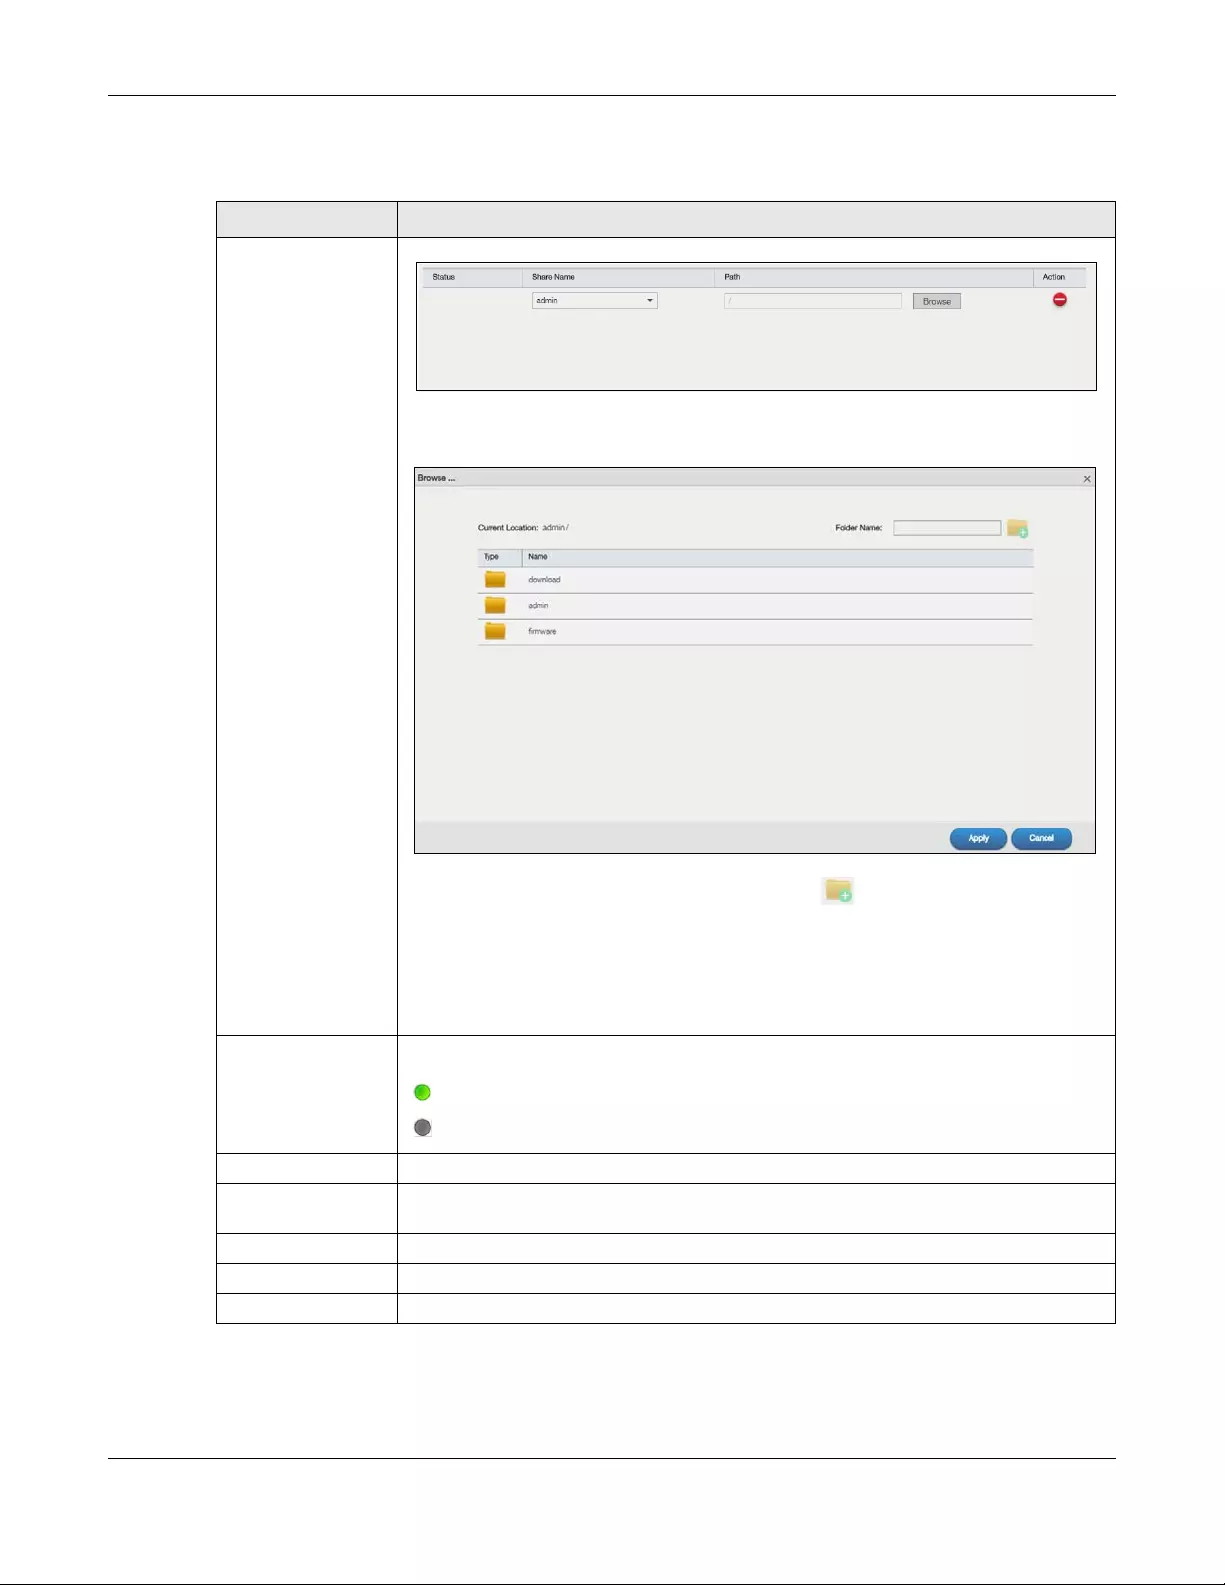
Chapter 15 Upload Manager
NAS Series User’s Guide
257
The following table describes the labels in this screen.
Table 142 Upload Manager > Flickr/YouTube > Config (Flickr): Folder Selection
LABEL DESCRIPTION
Add Click this to set a folder that contains files you want the NAS to automatically upload.
•Share Name — Select the share from the list.
•Path — Type the folder location in the share directly or click Browse to open the following
screen and navigate to the folder’s location.
•Current Location — This is the location of the selected folder.
•Folder Name — Enter a new folder name and click to create it.
•Type — This is the type of the folder/file.
•Name — This is the name of the folder/file.
Select a folder. If you don’t select a folder, a forward slash (/) displays in the Path field. All
contents within the specified share are automatically selected.
Click Apply to save your settings and Cancel to close the screen.
Status This indicates whether the folder or share is available.
represents a valid folder. The folder is available for auto upload.
represents a missing folder. The share may be deleted from the NAS, or the hard disk
was removed from the NAS.
Share Name This is the share selected for auto upload.
Path This is the path of a folder selected for auto upload. The NAS only uploads files stored in the
specified share or folder to your Flickr account.
Action Use the Delete icon to remove a folder from the list.
Apply Click this to save your changes.
Cancel Click this to restore your previously stored settings.
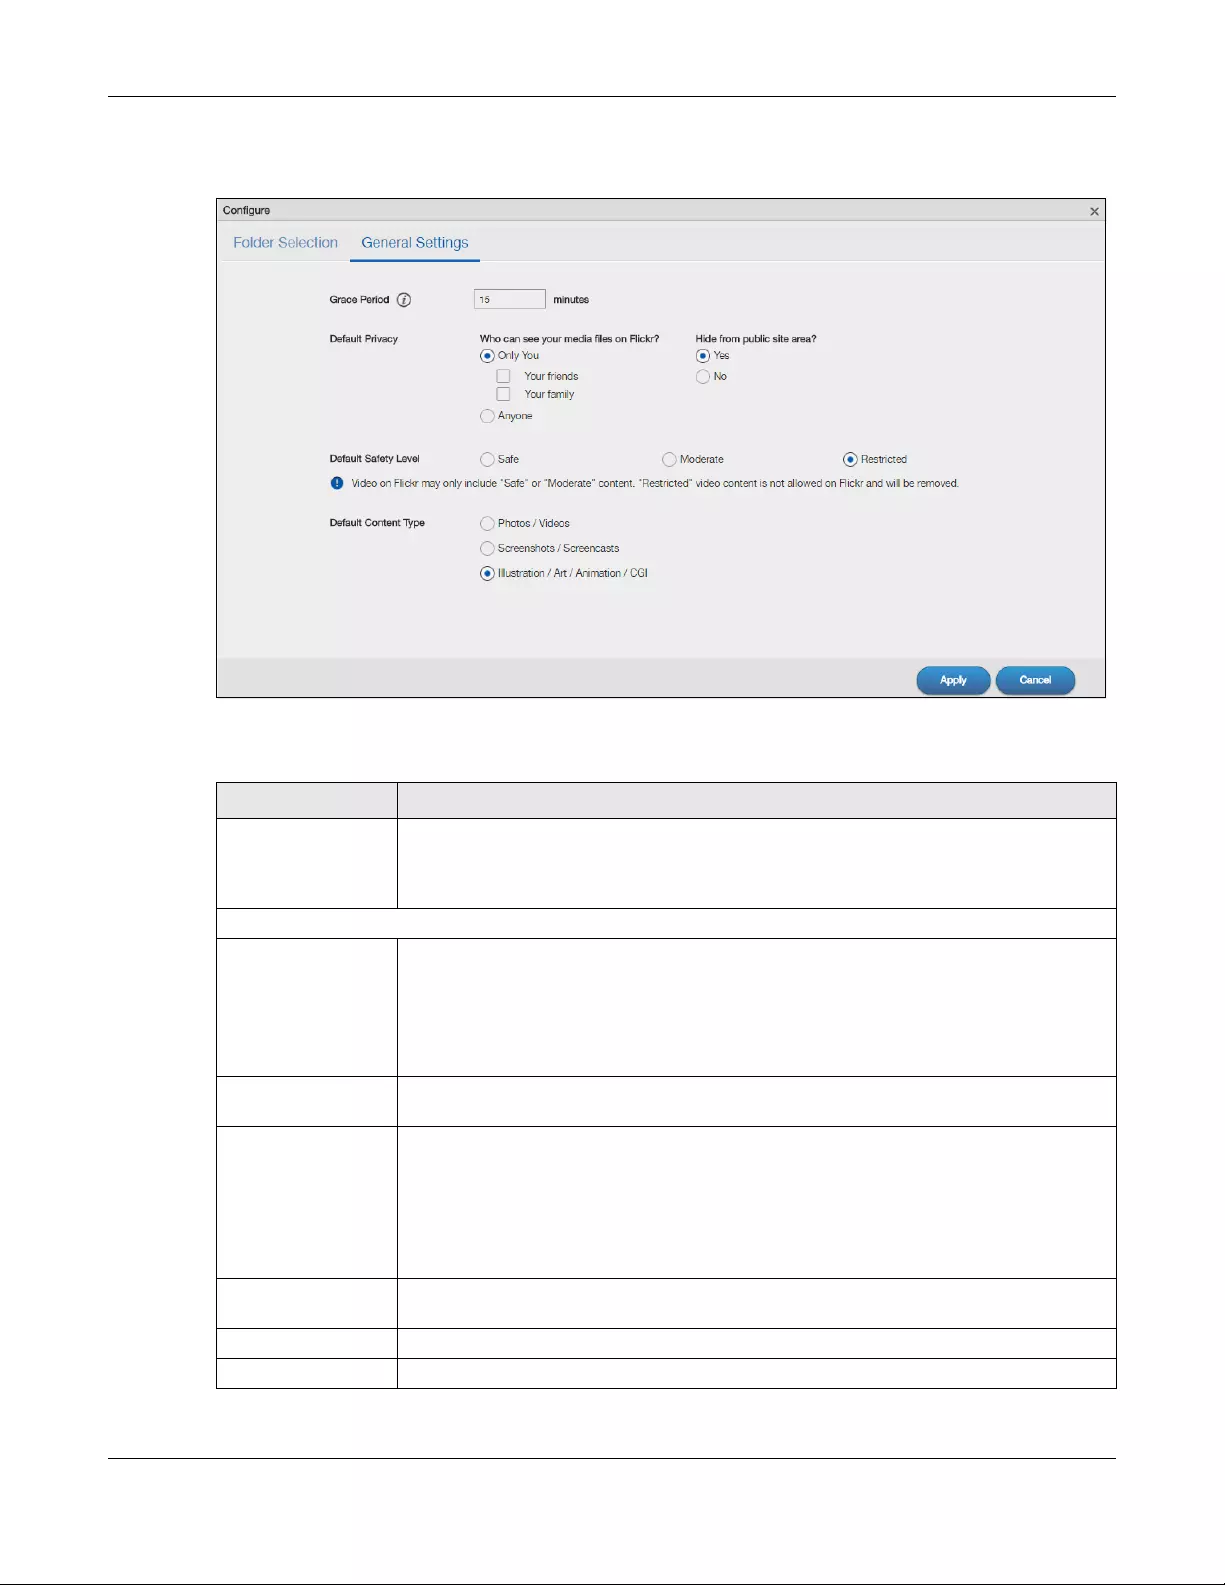
Chapter 15 Upload Manager
NAS Series User’s Guide
258
General Settings
Figure 207 Upload Manager > Flickr/YouTube > Config (Flickr): General Settings
The following table describes the labels in this screen.
Table 143 Upload Manager > Flickr/YouTube > Config (Flickr): General Settings
LABEL DESCRIPTION
Grace Period N
minutes
Specify how long the NAS should wait when you add a new file for auto upload. For
example, if you set the grace period to 5 minutes, the NAS uploads a new file after it has
been in a watched folder for 5 minutes. You can choose from a range of 1 to 10080 minutes
(up to one week).
Default Privacy
Who can see your
media files on Flickr?
Determine who has the right to see files uploaded to your Flickr account.
Select Only You if you do not want anyone else to see your files. You may also restrict the
access to Your friends and/or Your family. You can set up a friend/family list in your Flickr
account.
Select Anyone to allow everyone to see your files.
Hide from public site
area
Check this option to prevent others from finding your files when they perform a search in
the Flickr website.
Default Safety Level Assign a safety level to your files.
Select Safe if the contents of your files are suitable for the general public.
Select Moderate if the contents of your files may be offensive to some people.
Select Restricted if the contents of your files are not suitable for certain people, such as
children or your colleagues.
Default Content Type Select a content type for your files. You can choose Photo/Video, Screenshots/
Screencasts, or Illustration/Art/Animation/CGI.
Apply Click this to save your changes.
Cancel Click this to restore previously saved settings.
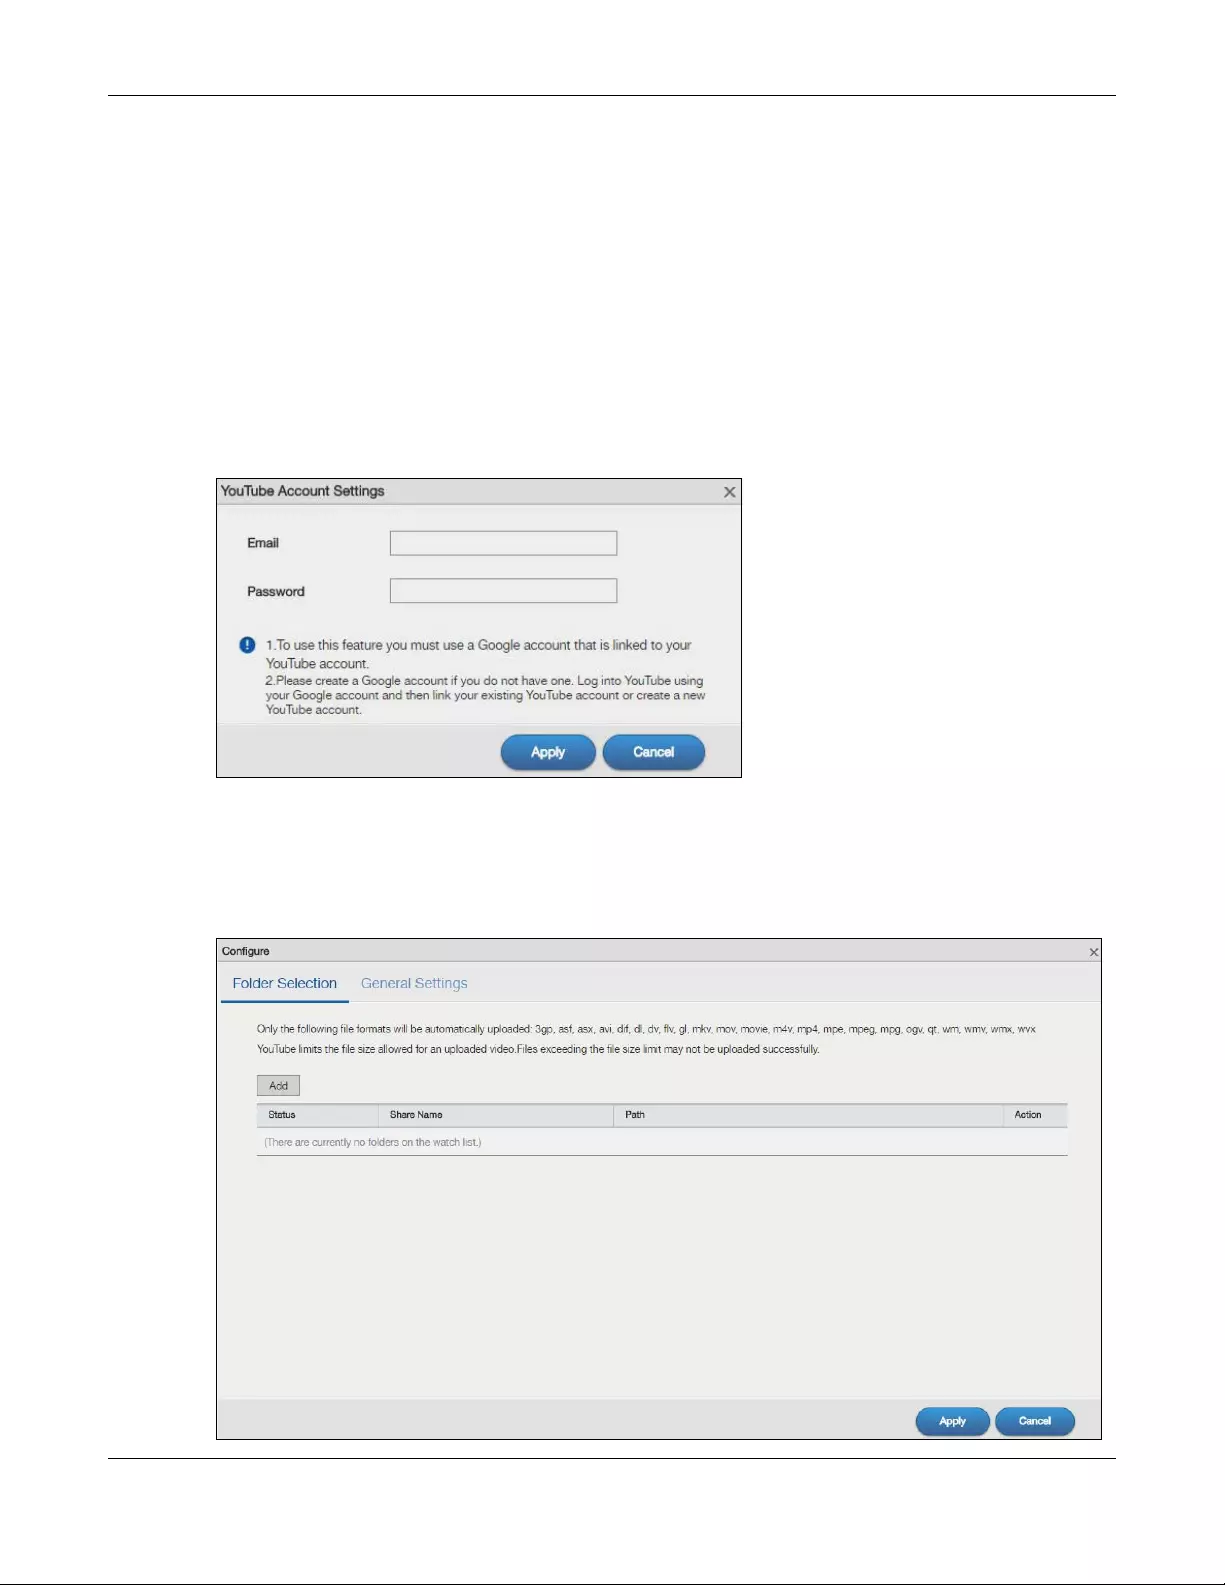
Chapter 15 Upload Manager
NAS Series User’s Guide
259
15.4.2 Configure the YouTube Settings
In the Upload Manager > Flickr/YouTube screen, select YouTube from the list and then click the Config
button.
Note: Your YouTube account must be associated with a Google account.
Get a Google account and use it to log into YouTube. You can then merge the existing YouTube
account to your Google account.
If you have not authorized a YouTube account on the NAS, the following screen displays. Enter your
Google account’s e-mail address and password in the fields and click Apply to authorize the service.
Figure 208 YouTube Account Settings
Once the NAS is associated with your YouTube account, you can configure auto upload settings in the
following screens.
Folder Selection
Figure 209 Upload Manager > Flickr/YouTube > Config (YouTube): Folder Selection

Chapter 15 Upload Manager
NAS Series User’s Guide
260
The following table describes the labels in this screen.
Table 144 Upload Manager > Flickr/YouTube > Config (YouTube): Folder Selection
LABEL DESCRIPTION
Add Click this to set a folder that contains files you want the NAS to automatically upload.
•Share Name — Select the share from the list.
•Path — Type the folder location in the share directly or click Browse to open the following
screen and navigate to the folder’s location.
•Current Location — This is the location of the selected folder.
•Folder Name — Enter a new folder name and click to create it.
•Type — This is the type of the folder/file.
•Name — This is the name of the folder/file.
Select a folder. If you don’t select a folder, a forward slash (/) displays in the Path field. All
contents within the specified share are automatically selected.
Click Apply to save your settings and Cancel to close the screen.
Status This field indicates whether the share or folder is available.
represents a valid folder. The folder is available for auto upload.
represents a missing folder. The share may be deleted from the NAS, or the hard disk
was removed from the NAS.
Share Name This field displays the share selected for auto upload.
Path This field displays the path of a folder selected for auto upload. The NAS only uploads the
files stored in the specified share or folder to your YouTube account.
Action Use the Delete icon to delete a folder from the list.
Apply Click this to save your changes.
Cancel Click this to restore your previously stored settings.
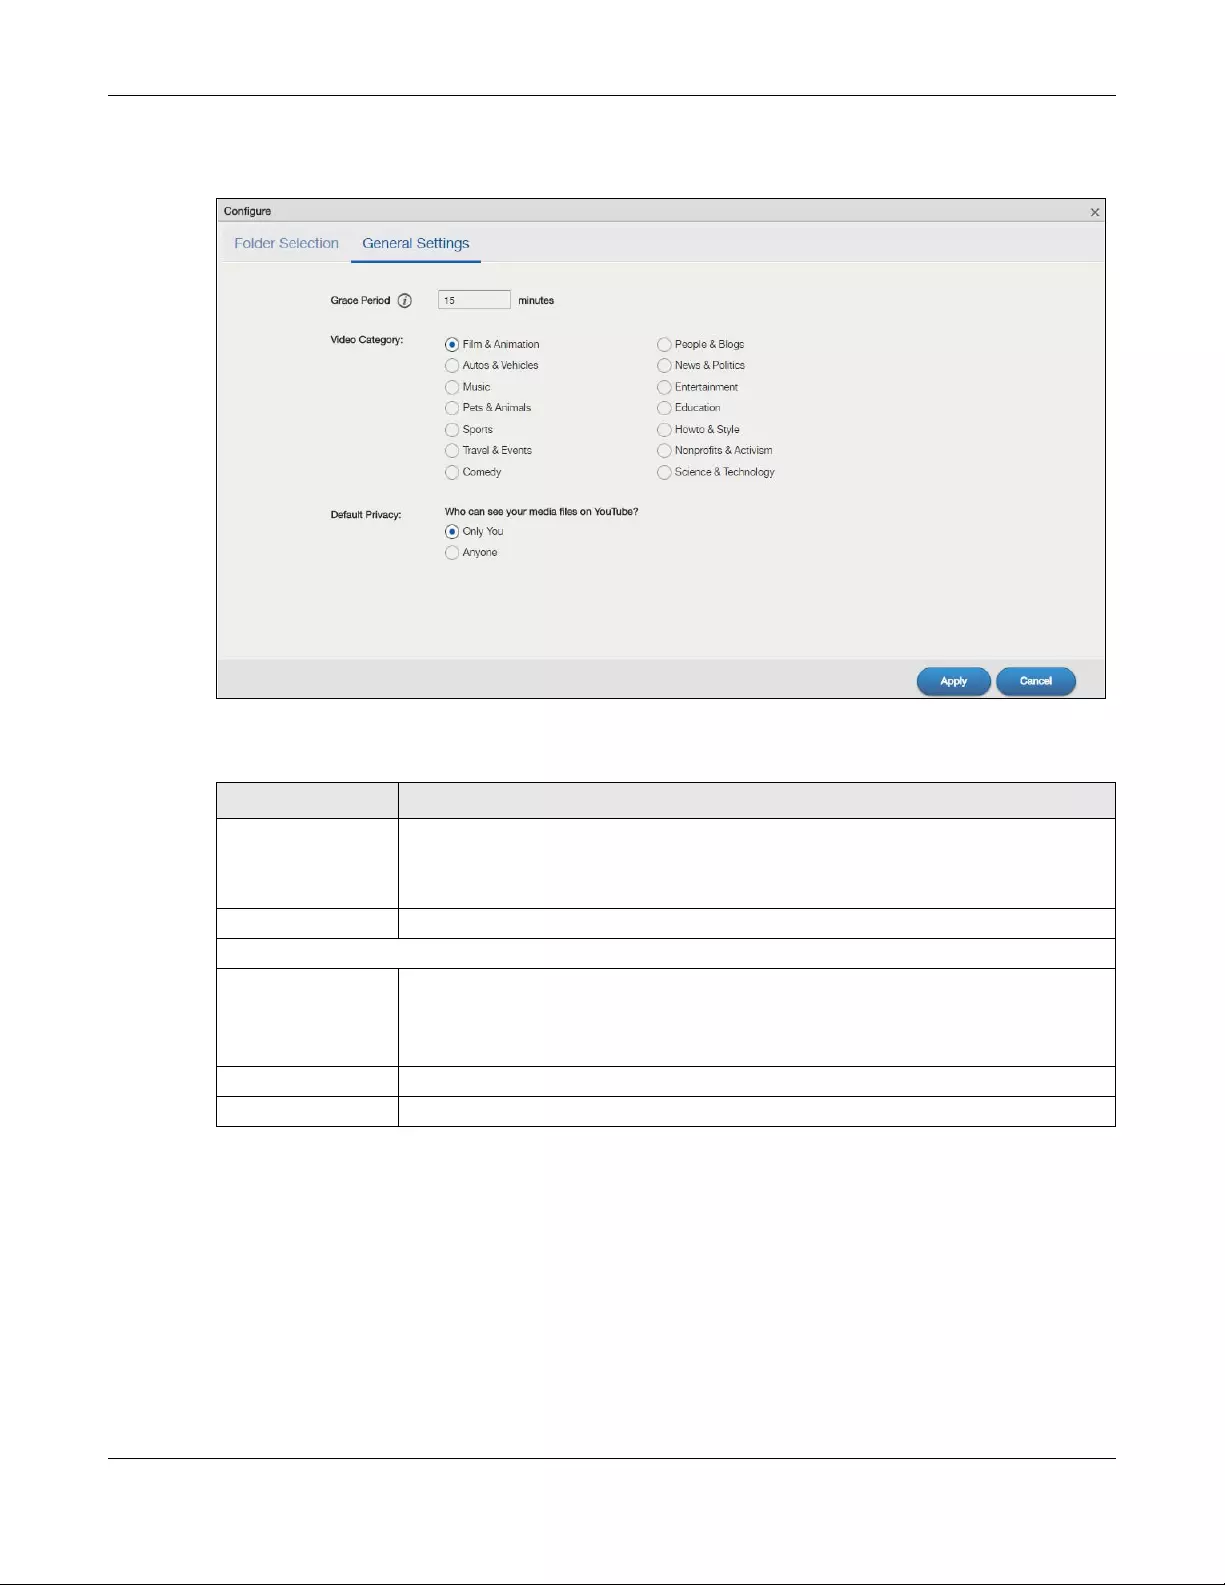
Chapter 15 Upload Manager
NAS Series User’s Guide
261
General Settings
Figure 210 Upload Manager > Flickr/YouTube > Config (YouTube): General Settings
The following table describes the labels in this screen.
15.5 FTP Uploadr Screen
Use this screen to configure the FTP Uploadr.
Click Upload Manager > FTP Uploadr to open the screen shown next.
Table 145 Upload Manager > Flickr/YouTube > Config (YouTube): General Settings
LABEL DESCRIPTION
Grace Period N
minutes
Specify how long the NAS should wait when you add a new file for auto upload. For
example, if you set the grace period to 5 minutes, the NAS uploads a new file after it has
been in a watched folder for 5 minutes. You can choose from a range of 1 to 10080
minutes (up to one week).
Video Category Select the category that best describes the media files you want to upload.
Default Privacy
Who can see your
media files on
YouTube?
Determine who has the right to see files uploaded to your YouTube account.
Select Only You if you do not want anyone else to see your files.
Select Anyone to allow everyone to see your files.
Apply Click this to save your changes.
Cancel Click this to restore your previously stored settings.
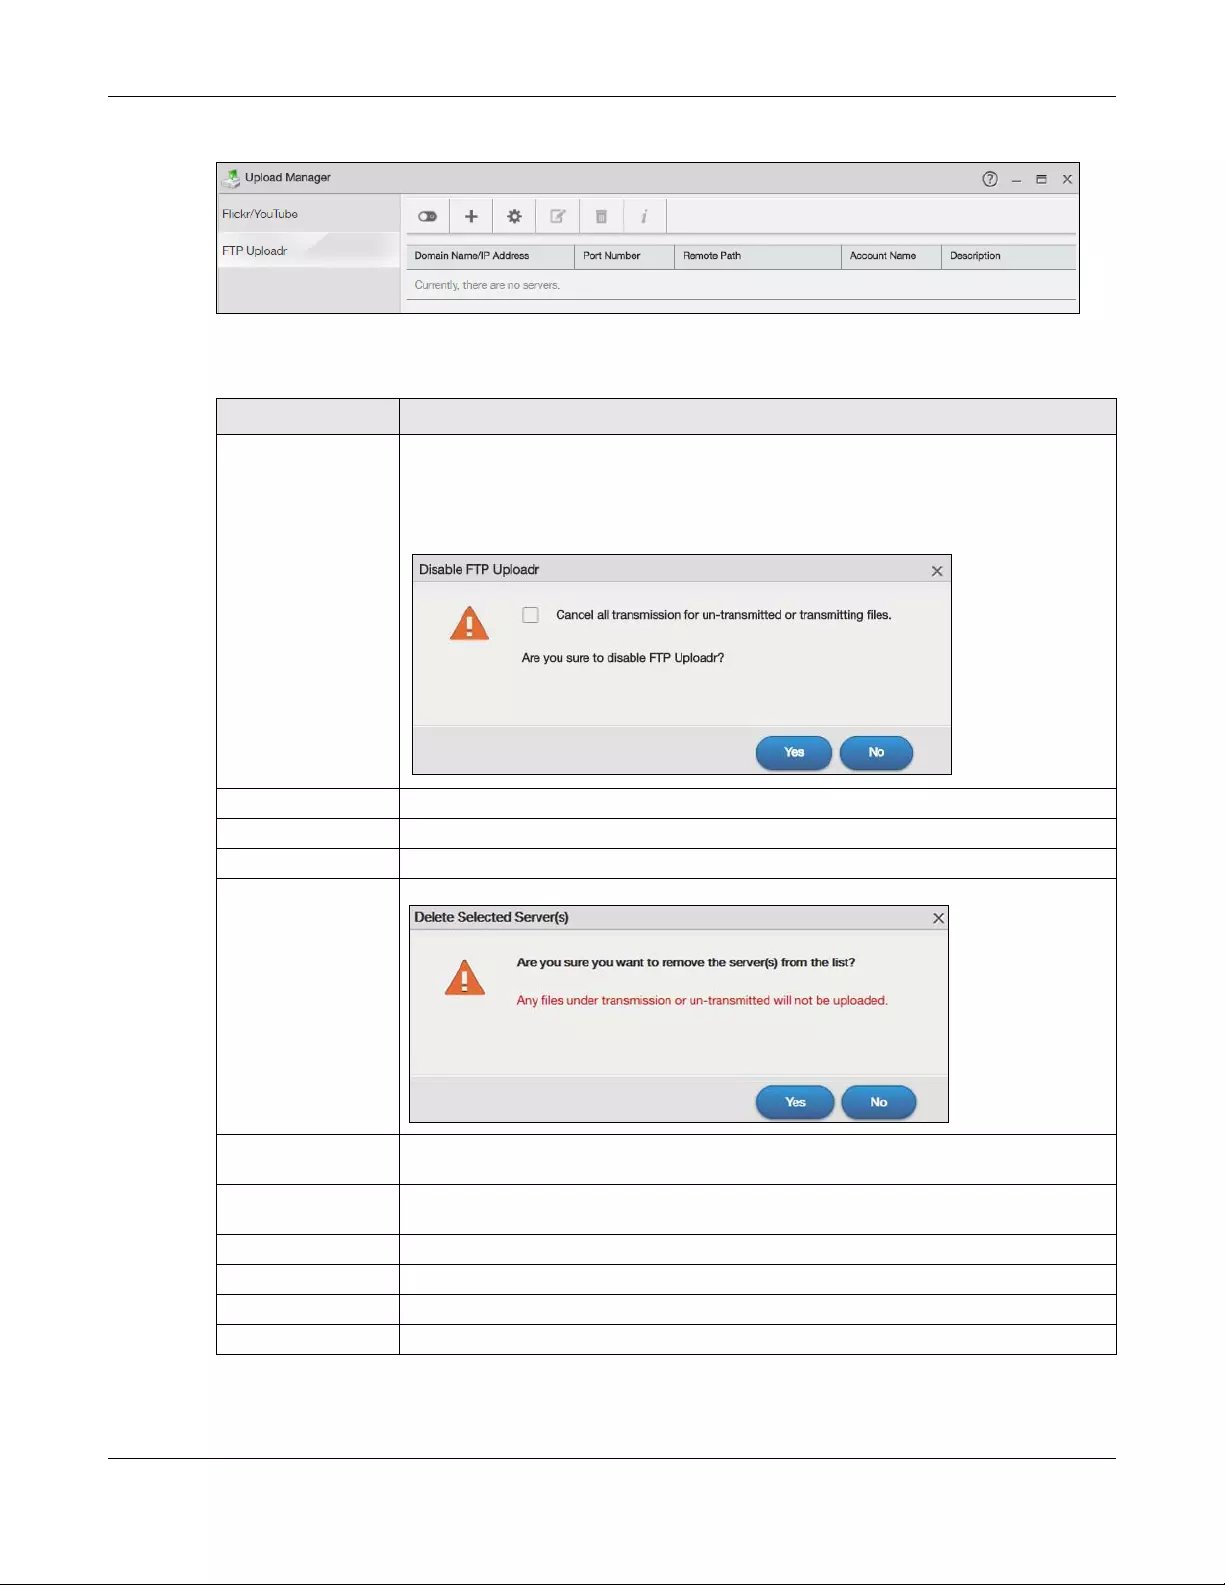
Chapter 15 Upload Manager
NAS Series User’s Guide
262
Figure 211 Upload Manager > FTP Uploadr
The following table describes the labels in this screen.
Table 146 Upload Manager > FTP Uploadr
LABEL DESCRIPTION
Enable FTP Uploadr Click this to enable or disable the FTP Uploadr.
When you disable the FTP Uploadr, a screen opens requesting confirmation. Select the
check box to stop any current or queued uploads. If you do not select the check box, the
FTP Uploadr will finish uploading the files that are already in the queue list. Clicking Yes will
disable the FTP Uploadr.
Add Server Click this to add a target FTP server entry. See Section 15.5.1 on page 263 for more details.
Preferences Click this to manage the settings of the FTP Uploadr.
Edit Server Select a server from the list and click this to edit the FTP server entry.
Delete Selected
Server(s)
Select a server from the list and click this to remove the FTP server entry.
Server Information Select a server from the list and click this to display the status and settings about the FTP
server.
Domain Name/IP
Address
This is the domain name or IP address of the FTP server.
Port Number This is the port number used by the FTP server.
Remote Path The NAS automatically uploads files to this location of the FTP server.
Account Name This is the login account for the FTP server.
Description This is the information related to the FTP server.
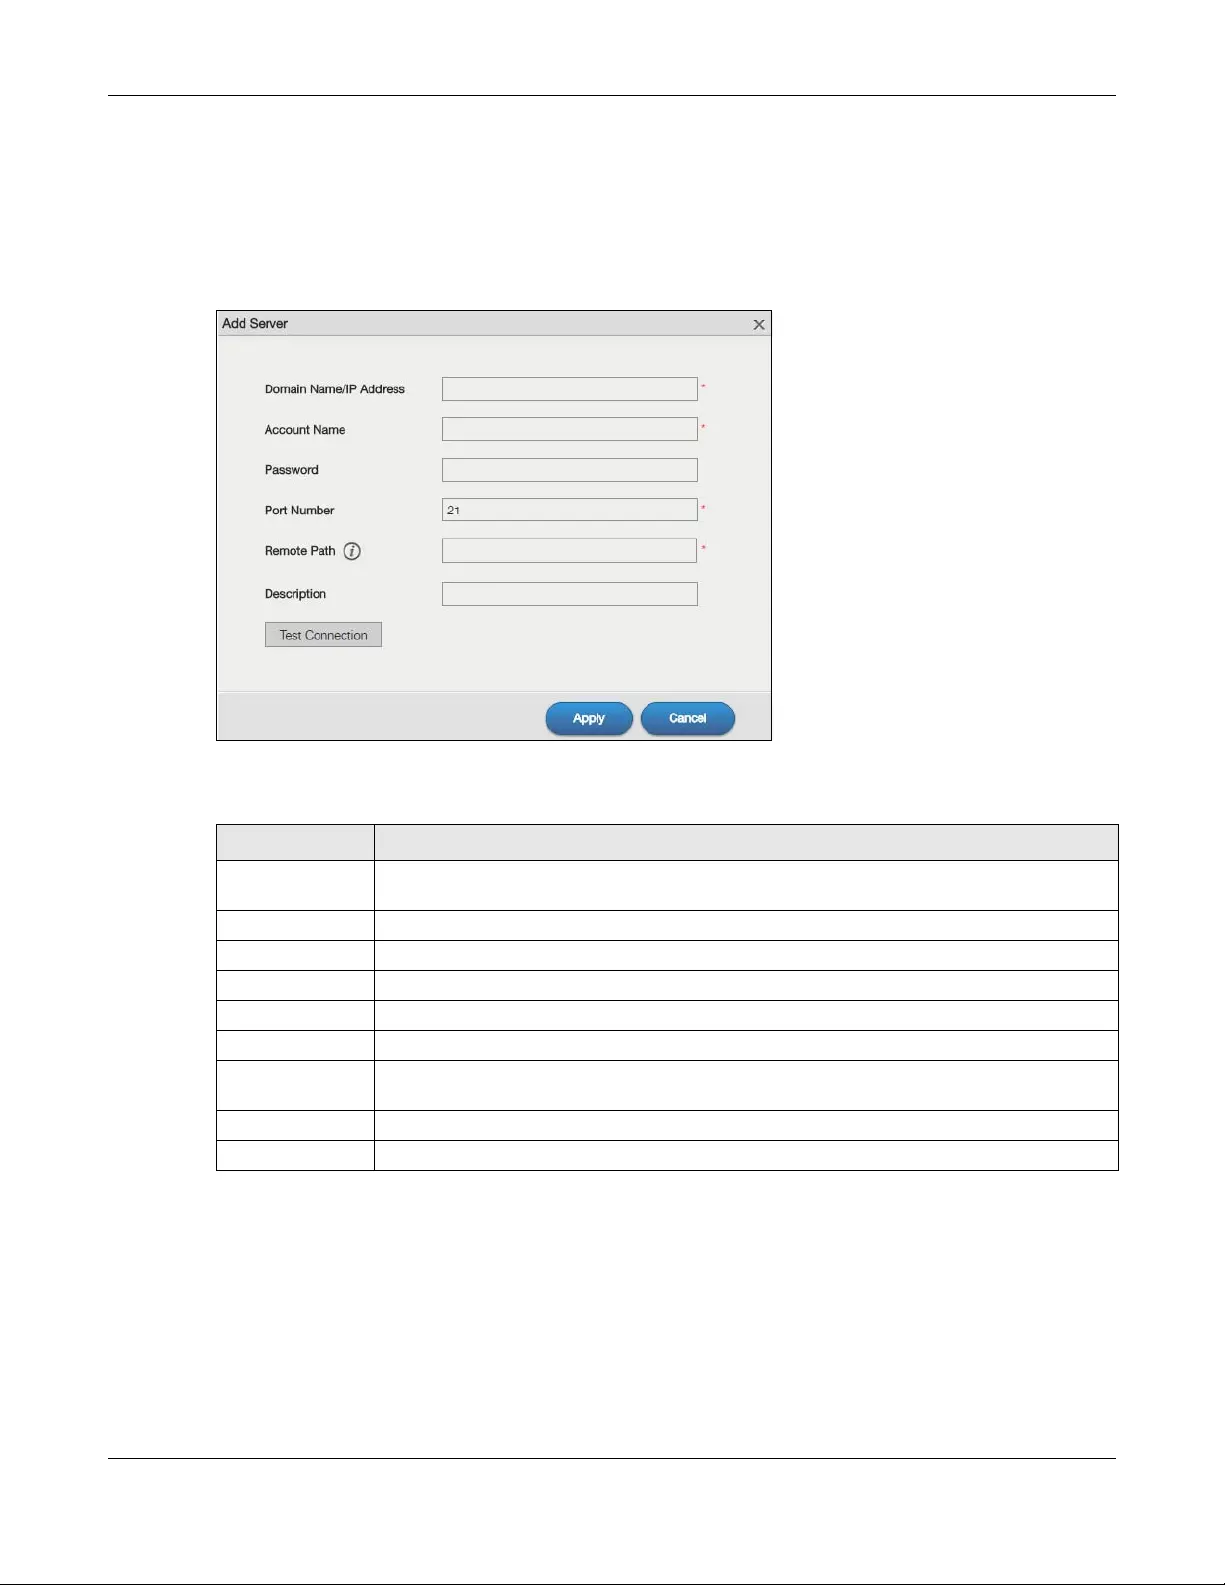
Chapter 15 Upload Manager
NAS Series User’s Guide
263
15.5.1 Add or Edit an FTP Server Entry
Use this screen to add or edit an FTP server entry for auto upload.
In the FTP Uploadr screen, click the Add Server or Edit Server button to open the following screen.
Figure 212 Upload Manager > FTP Uploadr > Add or Edit a Server
The following table describes the labels in this screen.
15.5.2 FTP Uploadr Preferences Screen
Use this screen to configure the general settings for the FTP Uploadr.
In the FTP Uploadr screen, click the Preferences icon to open the following screens.
Table 147 Upload Manager > FTP Uploadr > Add or Edit a Server
LABEL DESCRIPTION
Domain Name/IP
Address
Enter the domain name or IP address of the FTP server.
Account Name Enter the account name used to access the FTP server.
Password Enter the password associated with the account name.
Port Number Enter the port number for the FTP server.
Remote Path Enter the path of the FTP server where the NAS automatically uploads files.
Description Enter additional information about this FTP server.
Test Connection Click this to test your settings and check whether you can use the settings to connect to the
FTP server.
Apply Click this to save your changes.
Cancel Click this to return to the previous screen without saving.
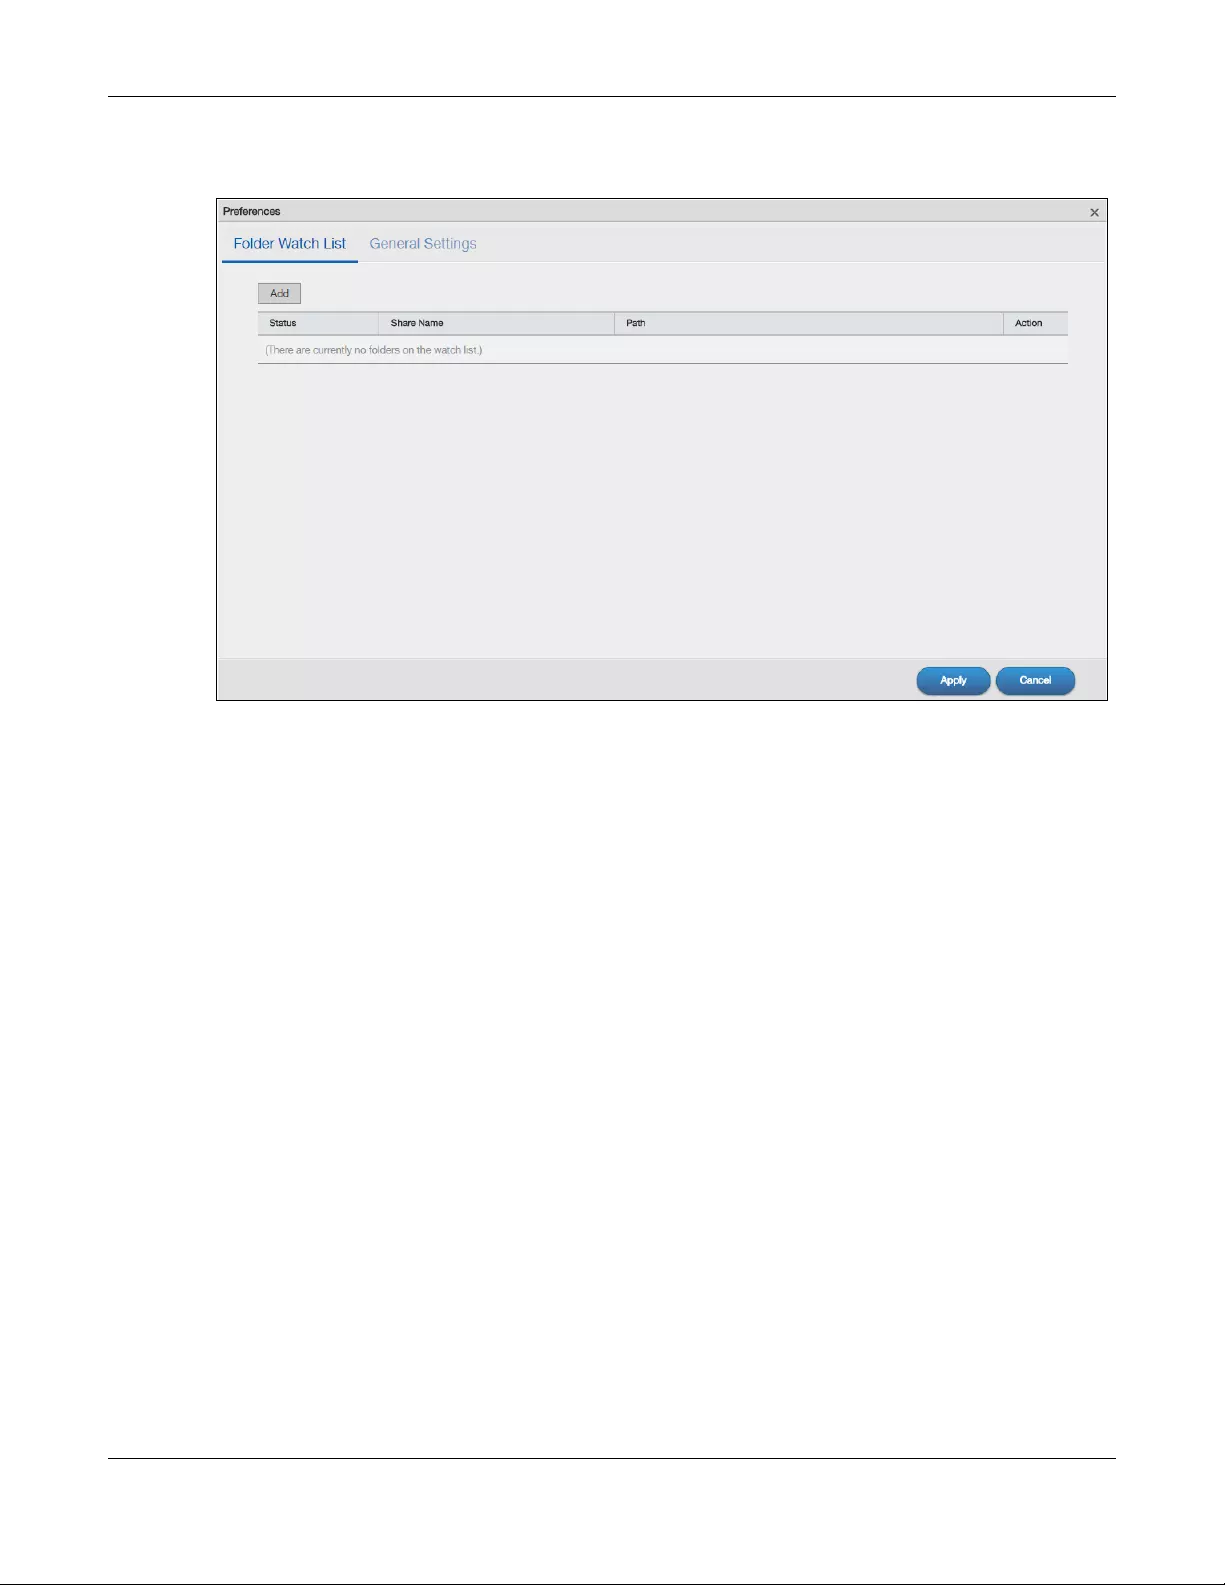
Chapter 15 Upload Manager
NAS Series User’s Guide
264
Folder Watch List
Figure 213 Upload Manager > FTP Uploadr > Preferences: Folder Watch List

Chapter 15 Upload Manager
NAS Series User’s Guide
265
The following table describes the labels in this screen.
Table 148 Upload Manager > FTP Uploadr > Preferences: Folder Watch List
LABEL DESCRIPTION
Add Click this to set a folder that contains files you want the NAS to automatically upload.
•Share Name — Select the share from the list.
•Path — Type the folder location in the share directly or click Browse to open the following
screen and navigate to the folder’s location.
•Current Location — This is the location of the selected folder.
•Folder Name — Enter a new folder name and click to create it.
•Type — This is the type of the folder/file.
•Name — This is the name of the folder/file.
Select a folder. If you don’t select a folder, a forward slash (/) displays in the Path field. All
contents within the specified share are automatically selected.
Click Apply to save your settings and Cancel to close the screen.
Status This field indicates whether the share or folder is available.
represents a valid folder. The folder is available for auto upload.
represents a missing folder. The share may be deleted from the NAS, or the hard disk
was removed from the NAS.
Share Name This is the share selected for auto upload.
Path This is the path of a folder selected for auto upload. The NAS only uploads files stored in the
specified share or folder to your FTP server.
Action Use the Delete icon to delete a folder from the list.
Apply Click this to save your changes in this section.
Cancel Click this to return to the previous screen without saving.
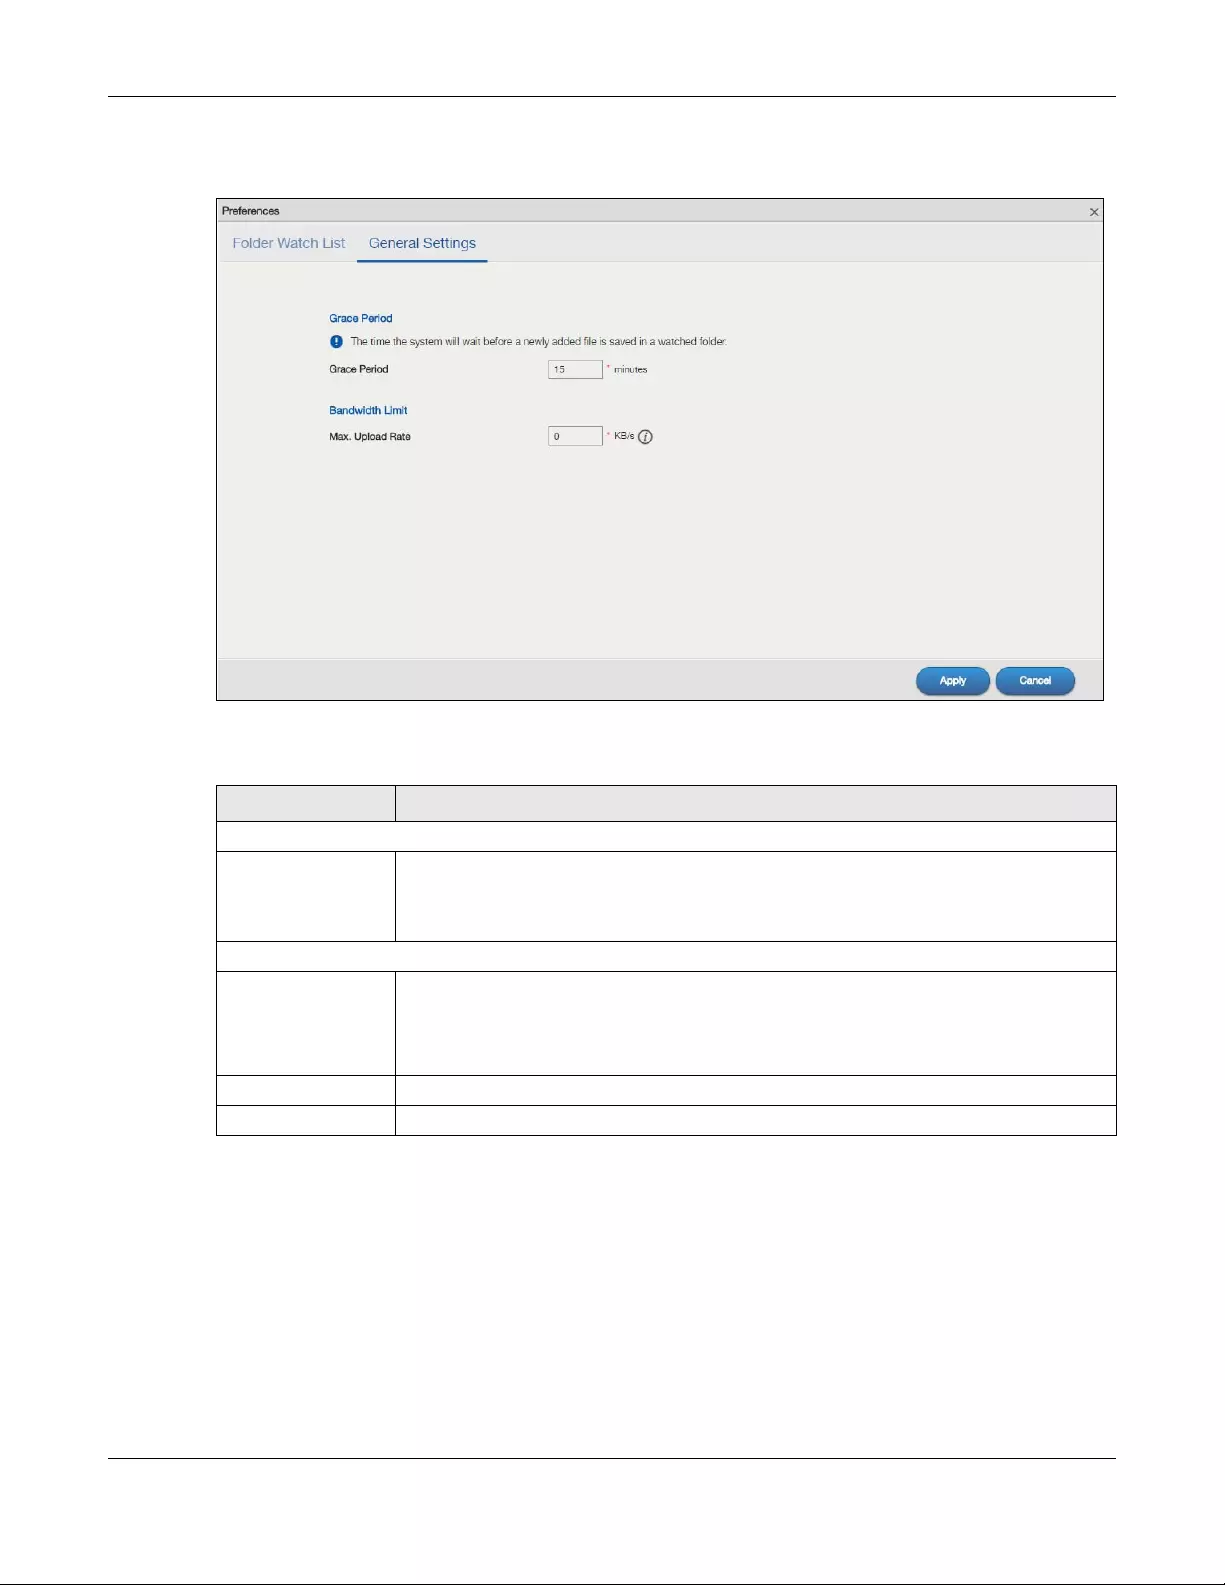
Chapter 15 Upload Manager
NAS Series User’s Guide
266
General Settings
Figure 214 Upload Manager > FTP Uploadr > Preferences: General Settings
The following table describes the labels in this screen.
Table 149 Upload Manager > FTP Uploadr > Preferences: General Settings
LABEL DESCRIPTION
Grace Period
Grace Period Specify how long the NAS should wait when you add a new file for auto upload. For
example, if you set the grace period to 5 minutes, the NAS uploads a new file after it has
been in a watched folder for 5 minutes. You can choose from a range of 1 to 10080 minutes
(up to one week).
Bandwidth Limit
Max. Upload Rate Enter the maximum upload rate for auto upload. You can choose from a range of 0 to
100,000 KB/s. Enter 0 if you do not want to set any limit.
Use this to leave bandwidth on your network connection for other traffic, especially if your
Internet connection has restricted upload speed.
Apply Click this to save your changes in this section.
Cancel Click this to return to the previous screen without saving.

NAS Series User’s Guide
267
CHAPTER 16
Backup Planner
16.1 About Backups
Backup before you need it. The NAS’s multiple backup methods make it easy to follow the 3-2-1 backup
rule:
• At least 3 copies of data
• Stored on at least 2 different media
• With at least 1 copy off-site.
16.1.1 Manage a USB Device and USB Backups
Use the USB ports and SD card slot to copy or synchronize files between a connected USB or SD device
and the NAS. You can use the USB drive or SD card for off-site backups.
• Use the Copy/Sync button on the front panel to copy or synchronize files between a connected USB
or SD storage device and the NAS. See Section 16.4 on page 286 to configure the copy/sync settings.
• Use the NAS’s Backup screens (Section 16.3 on page 268) to schedule backups of files and folders on
your NAS to a USB device or SD card.
16.1.2 Remote Backups
Use the NAS’s Backup screens (Section 16.3 on page 268) to schedule backups of files and folders on
your NAS to another Zyxel NAS or a NAS using rsync.
• Use the Restore screens (Section 16.3.3 on page 280) to restore previous backups based on the
backup job.
• If you deleted an archive backup job or the NAS or the RAID array containing the backup job failed,
you can restore by backup files.
16.1.3 Internal Backups
Use the NAS’s Backup screens (Section 16.3 on page 268) to schedule backups of files and folders on
your NAS to another folder on the NAS.
Use the Restore screens (Section 16.3.3 on page 280) to restore previous backups based on the backup
job or backup files.
16.1.4 Cloud Backups
Use the NAS with cloud services for off-site backups and synchronization.

Chapter 16 Backup Planner
NAS Series User’s Guide
268
• Use Memopal (Section 13.10 on page 231) to back up files on the NAS to your Memopal online
backup and storage account.
16.1.5 Synchronize Files
Besides backups, the NAS also provides pure synchronization solutions.
Note: Synchronization is not backup. When you delete a file in one location, synchronization
deletes it in the other location. Do not store your only copy of a document in a
synchronized folder.
• Use the DropboxClient package (Section 13.4 on page 208) to two-way synchronize local NAS folders
and Dropbox accounts. Changes in the Dropbox account appear in the local sync folder and
changes in the local sync folder appear in the Dropbox account.
• Use the GoogleDriveClient package (Section 13.5 on page 216) to two-way synchronize local NAS
folders and Google Drive accounts. Changes in the Google Drive account appear in the local sync
folder and changes in the local sync folder appear in the Google Drive account.
• Use the ownCloud package (Section 13.11 on page 234) to host your own private cloud on the NAS.
The ownCloud package lets the NAS work as an ownCloud server so computers and mobile devices
using the ownCloud client can access, sync, and share files across devices.
16.2 What You Can Do
• Use the Backup screens (Section 16.3 on page 268) to create and customize backup jobs.
• Use the Restore screens (Section 16.3.3 on page 280) to restore previous backups made with the NAS.
• Use the Copy/Sync Button screens (Section 16.4 on page 286) to configure the copy/sync settings.
• Use the Time Machine screens (Section 16.5 on page 290) to turn Time Machine support on or off, and
designate the share for Time Machine backups.
16.3 Backup Screens
Use this screen to create and customize scheduled backup jobs for your files.
You can have several backup jobs for specific folders and time periods.
Click Backup Planner > Backup > Backup to open the following screen.
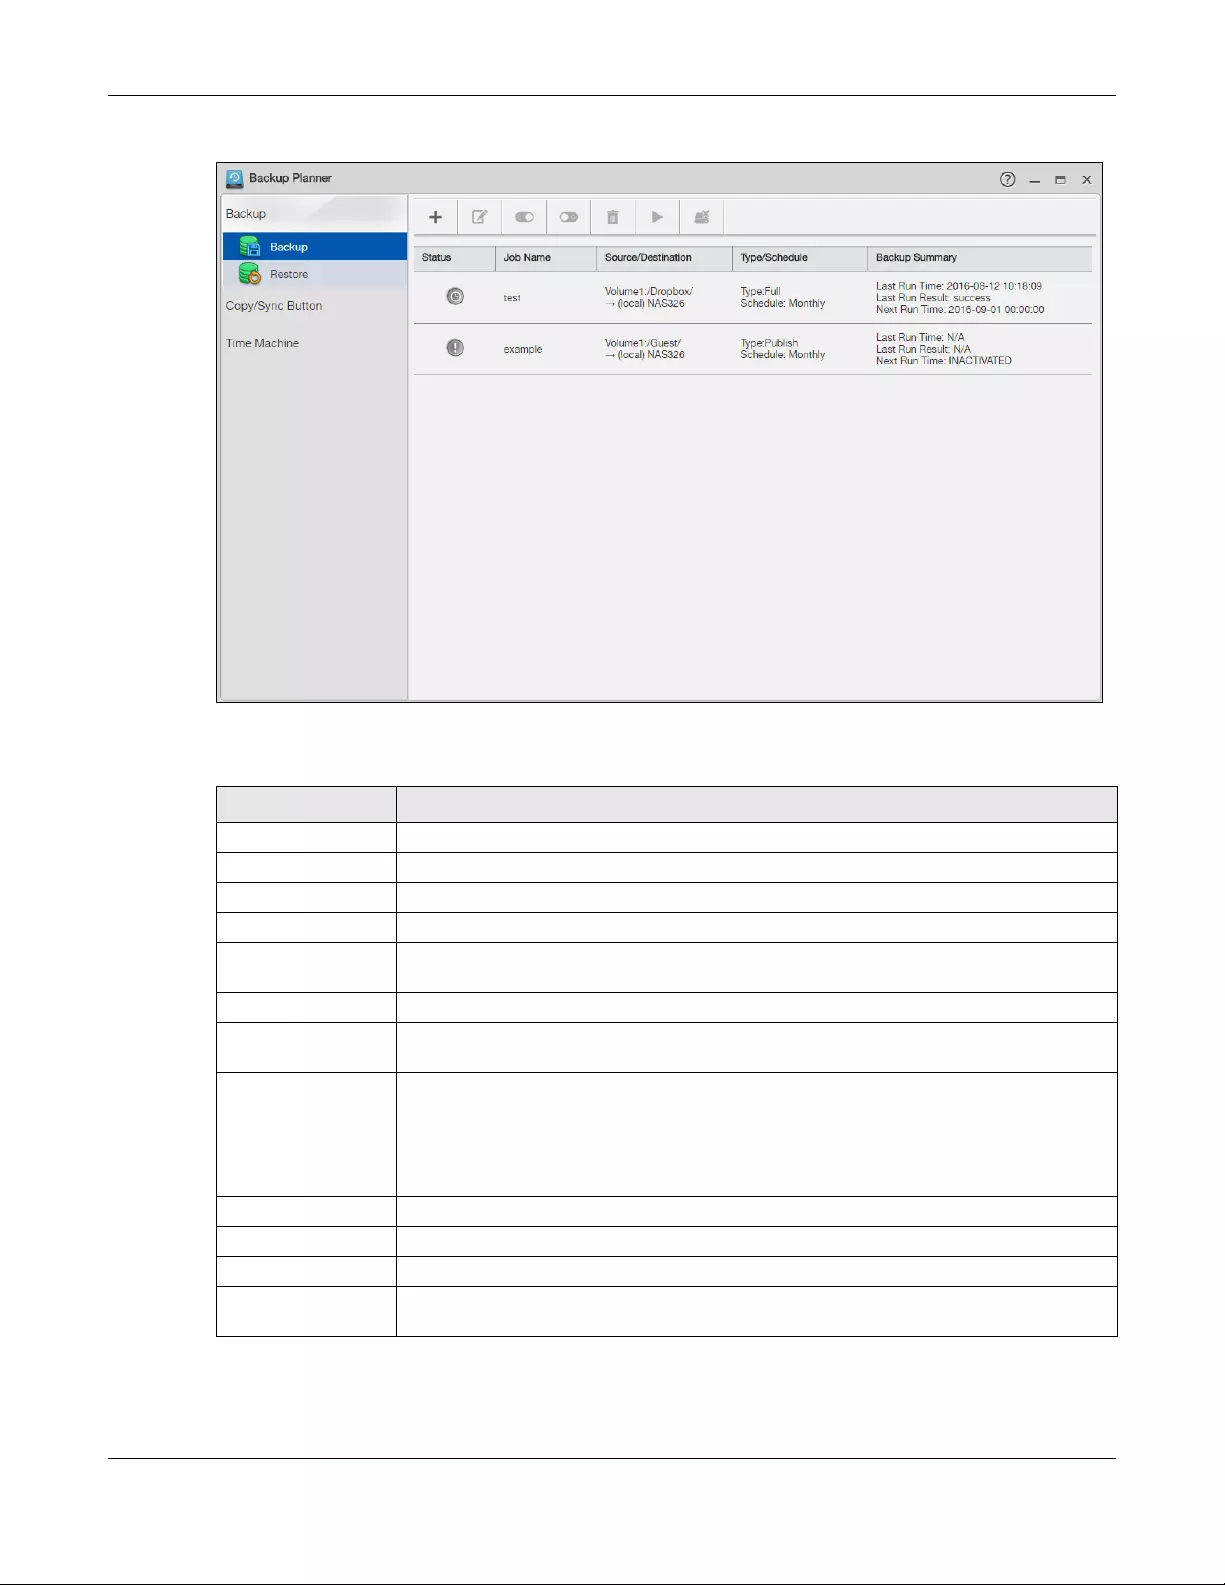
Chapter 16 Backup Planner
NAS Series User’s Guide
269
Figure 215 Backup Planner > Backup > Backup
The following table describes the labels in this screen.
Table 150 Backup Planner > Backup > Backup
LABEL DESCRIPTION
Add Job Click this to create and customize a backup job.
Edit Job Select a backup job in the list and click this to make some changes to it.
Activate Job Click this to enable the selected backup job.
Inactivate Job Click this to disable the selected backup job.
Delete Selected
Job(s)
Select a backup job in the list and click this to delete it.
Backup Now Select a backup job in the list and click this to run the backup job immediately.
Abort Job Select a backup job in the list and click this to stop the process if the backup job is currently
active.
Status This shows the current state of the backup job.
•Waiting means the backup job is not active but is scheduled to run at some time.
•Running indicates that the NAS is currently doing the backup job. When the backup job
is running, you can also see a progress bar.
•Inactivated means the backup job is disabled.
Job Name This identifies the backup job.
Source/Destination This shows the backup job’s source and target.
Type/Schedule This shows the backup type and frequency.
Backup Summary This shows the time it was last run in (and whether or not it succeeded), and when it is
scheduled to run again. The times use yyyy-mm-dd hh:mm:ss format.
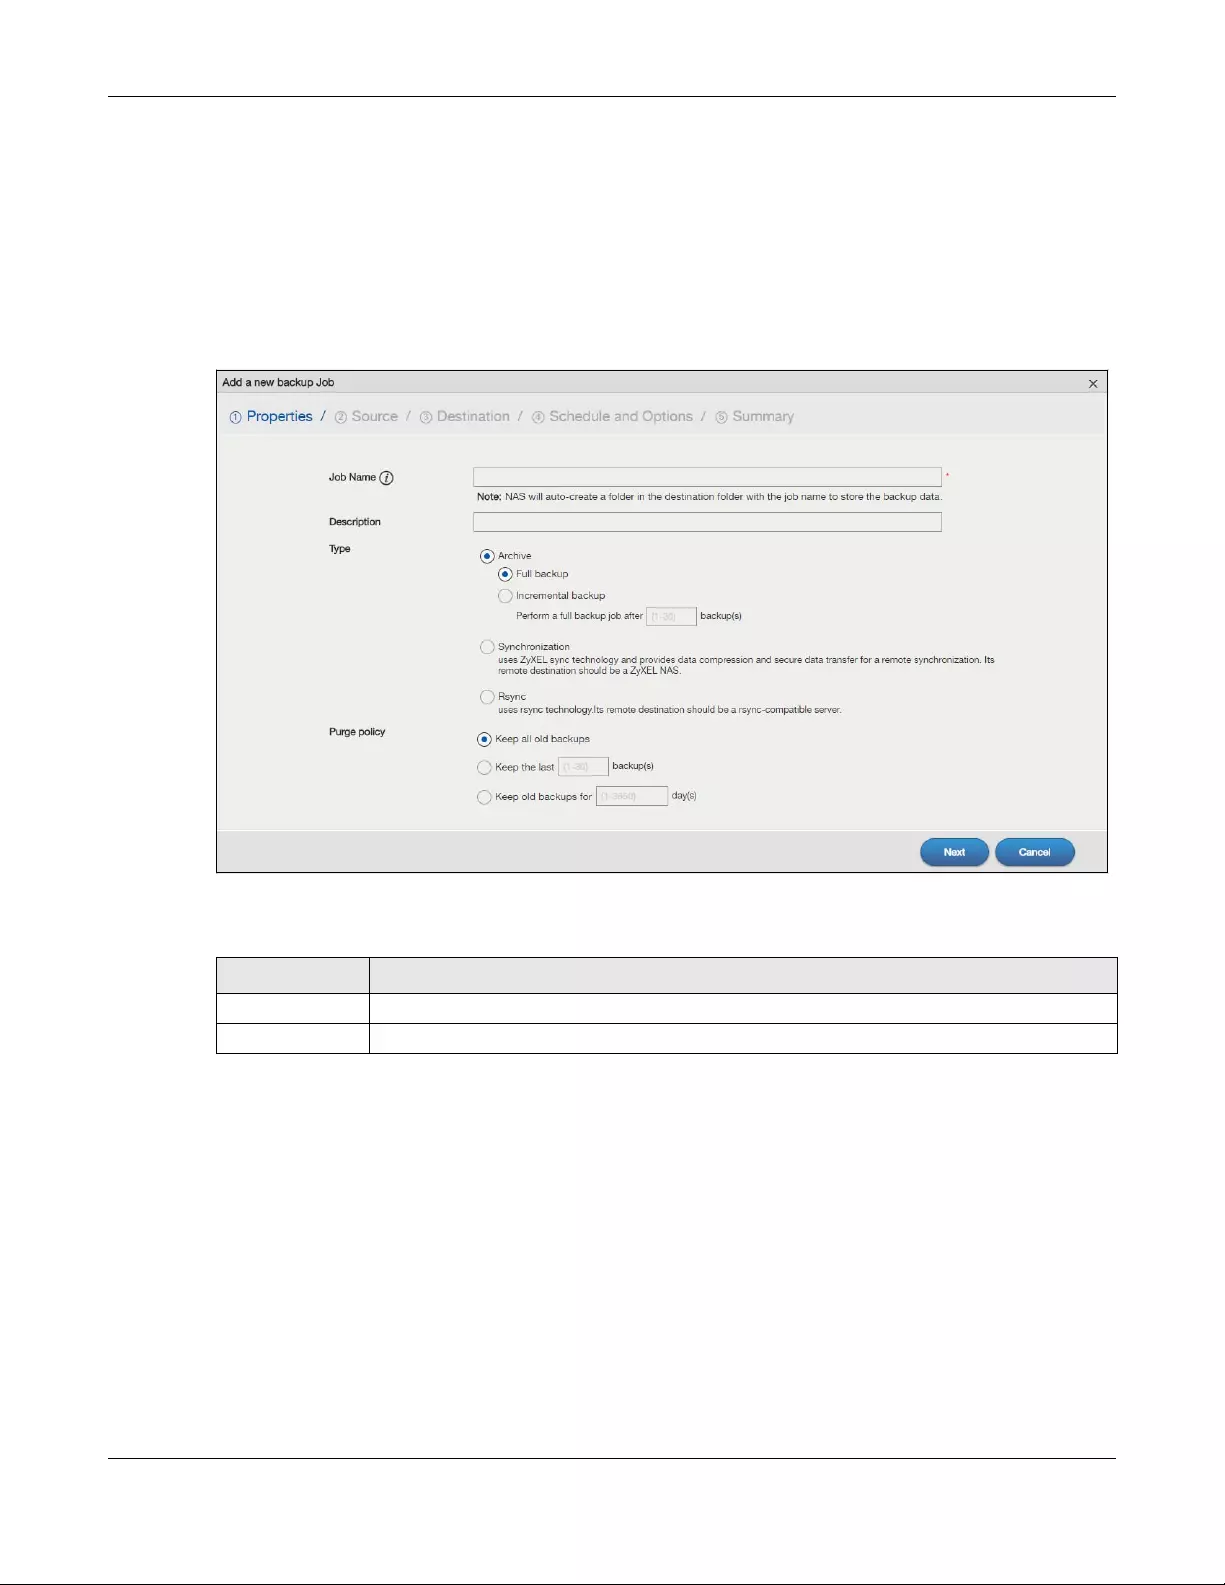
Chapter 16 Backup Planner
NAS Series User’s Guide
270
16.3.1 Add a new backup job
Click Add Job in the Backup Planner > Backup > Backup screen to create a backup job.
Step 1 Properties
Use this screen to specify the job information, backup type and purge policy.
Figure 216 Backup Planner > Backup: Add Job Step 1 Properties
The following table describes the labels in this screen.
Table 151 Backup Planner > Backup: Add Job Step 1 Properties
LABEL DESCRIPTION
Job Name Enter a name to identify the backup job.
Description Enter a short description (up to 100 keyboard characters) for the backup job.
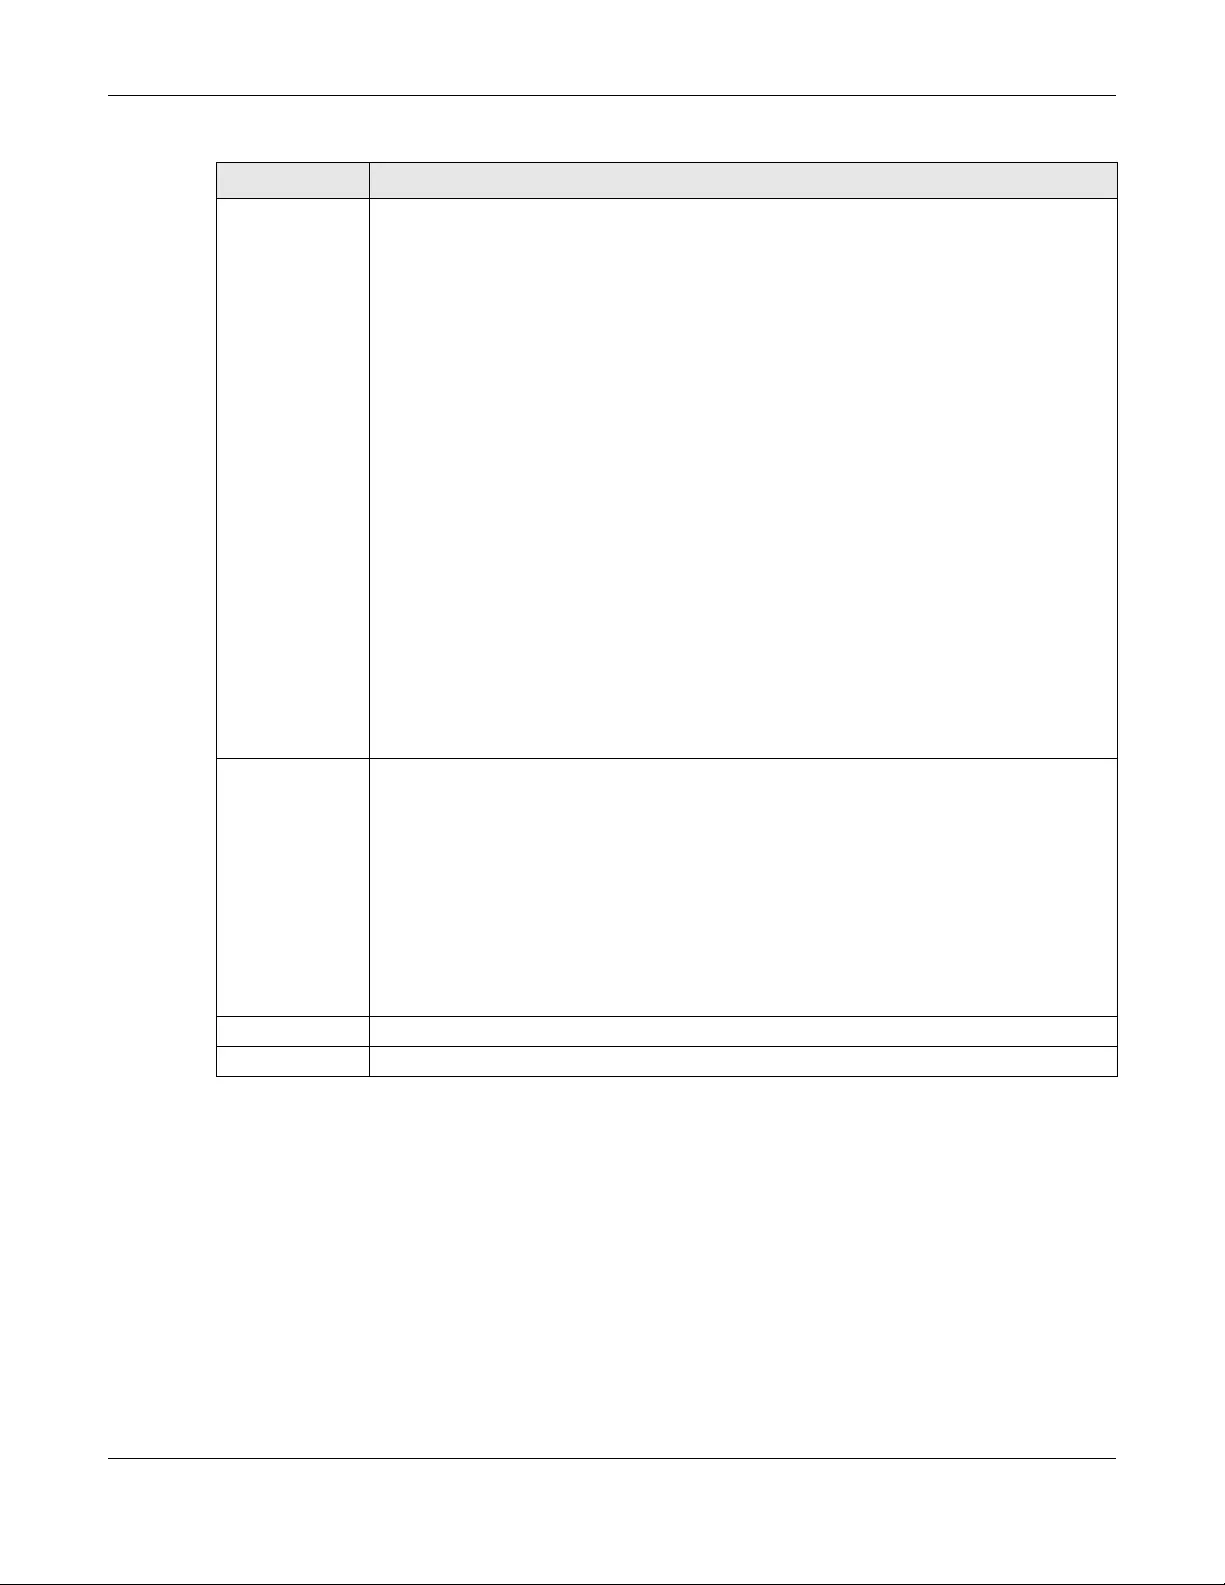
Chapter 16 Backup Planner
NAS Series User’s Guide
271
Step 2 Source
Use this screen to specify where the files you want to backup are located.
Type Choose the backup type the NAS implements for the backup job.
Archive — This is a backup of the source folder in an archive format. Once you backup your files
in the target folder, you cannot access the files individually unless you have the extracting tool
used by the NAS. If there are existing files in the target folder prior to the NAS’s backup job, the
files remain undisturbed. You can also choose between the following types of archive:
•Full — The NAS does a fresh backup each time. This provides the most protection but also
requires the most storage space.
•Incremental — The NAS backs up new or modified files from the source folder since the last
backup. The first backup is a full backup. You can also do a full backup after several
incremental backups. Enter how many incremental backups the NAS runs before it
performs a full backup of the source folder in the Perform a full backup job after n
backup(s) field. You must keep the latest full backup to be able to restore the files later.
Synchronization — This does a backup of individual files. If you use this type, you cannot use the
Restore feature of the NAS. You can also choose between the following types of
synchronization:
•Publish— The NAS does a backup of individual files to the target folder without overwriting
existing files in that folder. It makes a copy of the source files.
•Mirror — The NAS deletes all data in the target folder before running the backup. It makes
the target folder identical to the source folder.
Rsync — This synchronizes individual files to another device that supports rsync. Rsync is open
source and provides incremental file transfers. It only sends the differences in the files through
the connection so it brings the remote files into sync very quickly.
• The NAS deletes all data in the target folder before running the backup. It makes the target
folder identical to the source folder.
• If you use this type, you cannot use the Restore feature of the NAS.
Purge Policy This field is not available when you set the backup type to Synchronization or Rsync.
The NAS maintains the files that have been included in your backups. However to save hard
disk space, you can choose to delete files that have been included in previous backups.
•Select Keep all old backups to store all files that have been included in previous backups.
• If you want to store a certain number of backup files, select Keep the last n backups. Enter
a value (n) from 1 to 30 to specify how many backups the NAS stores. All backup files older
than the last one are deleted. You will not be able to recover files that existed (only) in
those previous backups. Select this if backup space is limited and recovery of old files is not
important.
• If you want to store all backups for a certain time period, select Keep old backups for n
day(s). Enter a value (n) from 1 to 3650 to specify how many days the NAS stores all backup
files. After this day has expired, all backup files will be deleted.
Next Click this to go to the next step.
Cancel Click this to close the screen without saving.
Table 151 Backup Planner > Backup: Add Job Step 1 Properties (continued)
LABEL DESCRIPTION
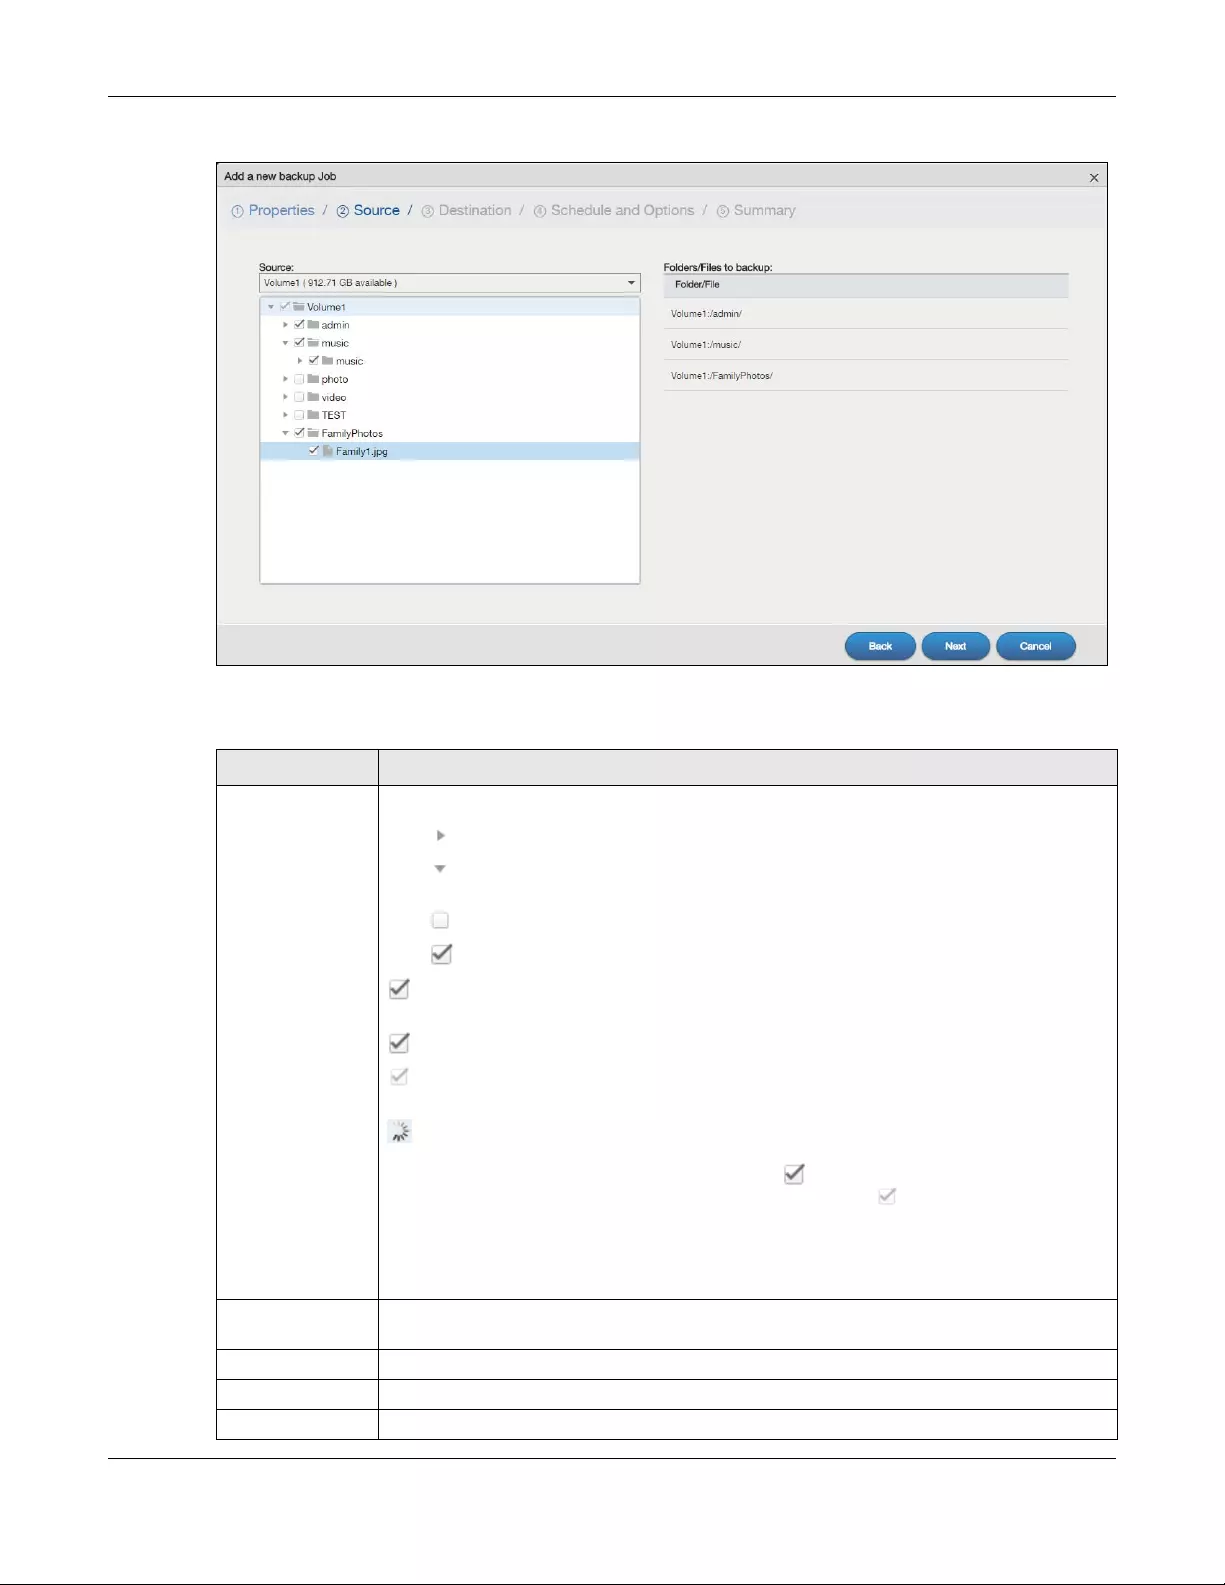
Chapter 16 Backup Planner
NAS Series User’s Guide
272
Figure 217 Backup Planner > Backup: Add Job Step 2 Source
The following table describes the labels in this screen.
Table 152 Backup Planner > Backup: Add Job Step 2 Source
LABEL DESCRIPTION
Source Select an (internal) volume and the folders and files to back up using this tree interface.
Click to browse through folders, sub-folders and files.
Click to close a folder in the tree. This is useful if there are many folders or files that you wish
to hide from view.
Click to select a folder or file to back up. This also selects all sub-folders and files.
Click to deselect the folder or file. This also deselects all sub-folders and files.
for a folder means all sub-folders and files and new folders/files added later will be backed
up.
for a file means the file will be backed up.
(a grayed out check box) for a folder means that only some sub-folders and files under the
folder will be backed up. Newly added folders/files will NOT be backed up.
means the file structure is still loading. Please wait for the folders/files to display.
Note: If you select to back up an entire folder and then de-select a sub-folder or
file within that folder, the main folder icon will turn and any new sub-
folders and files added to this main folder after the initial backup
configuration will NOT be backed up.
A list of your select folders and files displays below the selection fields.
Folders/Files to
backup
This shows the path of the backup source folder you selected.
Back Click this to go back to the previous screen.
Next Click this to go to the next screen.
Cancel Click this to close the screen without saving.
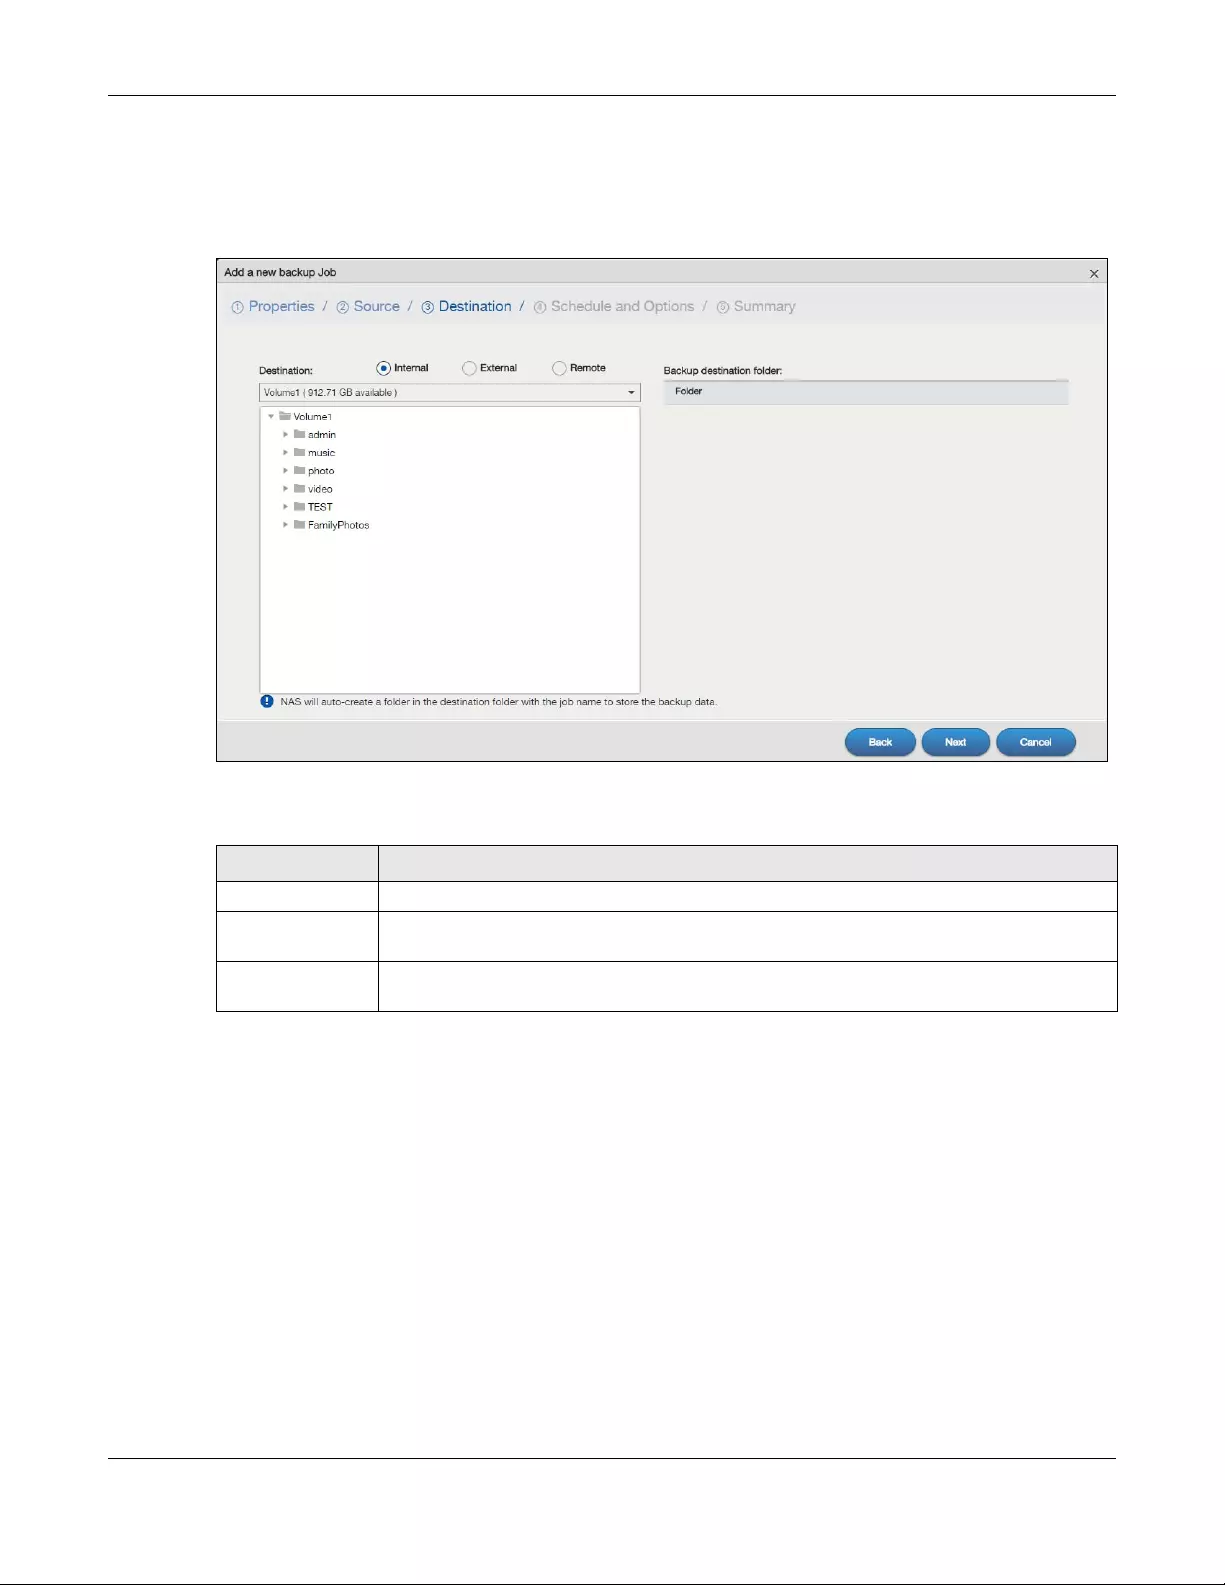
Chapter 16 Backup Planner
NAS Series User’s Guide
273
Step 3 Destination
Use this screen to set where you want the backup to be stored.
Figure 218 Backup Planner > Backup: Add Job Step 3 Destination
The following table describes the labels in this screen.
Table 153 Backup Planner > Backup: Add Job Step 3 Destination
LABEL DESCRIPTION
Destination Select the target folder where you want to place your backup.
Internal Select this if you want to place your backup in another volume in the NAS. Select an (internal)
volume and the folder where you want to place the backup.
External Select this if you have a USB hard disk connected to the NAS that you want to use for your
backup. Select the folder where you want to place the backup.
Chapter 16 Backup Planner
NAS Series User’s Guide
274
Step 4 Schedule and Options
Use this screen to specify the schedule for the backup job. The backup job automatically runs
according to the schedule that you set in this screen. You can also use this screen to specify
compression and encryption if you are doing an archive backup or a synchronization backup to a
remote target.
Remote Select this to back up to another device.
For Archive:
The remote device can be another NAS in the network. Fill in the following fields in order to be
able to access it.
• Remote NAS Address
• Username
•Password
•Share Name
Click Test Connection to see if your NAS can communicate with the remote device.
For Synchronization:
The remote device must be another NAS compatible with the NAS’s synchronization feature.
Fill in the following fields in order to be able to access it.
• Remote NAS Address
• Username (always “admin”)
• Remote Admin’s Password
Click Show target content to connect to the remote NAS so you can select the target share for
the backup.
For Rsync:
The remote device must be a NAS that supports rsync or a computer running the rsync utility.
Fill in the following fields in order to be able to access it.
• Remote NAS Address
• Username (always “admin”)
• Remote Admin’s Password
Click Show target content to connect to the remote NAS or computer so you can select the
target folder for the backup.
Backup
destination folder
This shows the path of the backup destination folder you selected.
Back Click this to go back to the previous screen.
Next Click this to go to the next screen.
Cancel Click this to close the screen without saving.
Table 153 Backup Planner > Backup: Add Job Step 3 Destination (continued)
LABEL DESCRIPTION
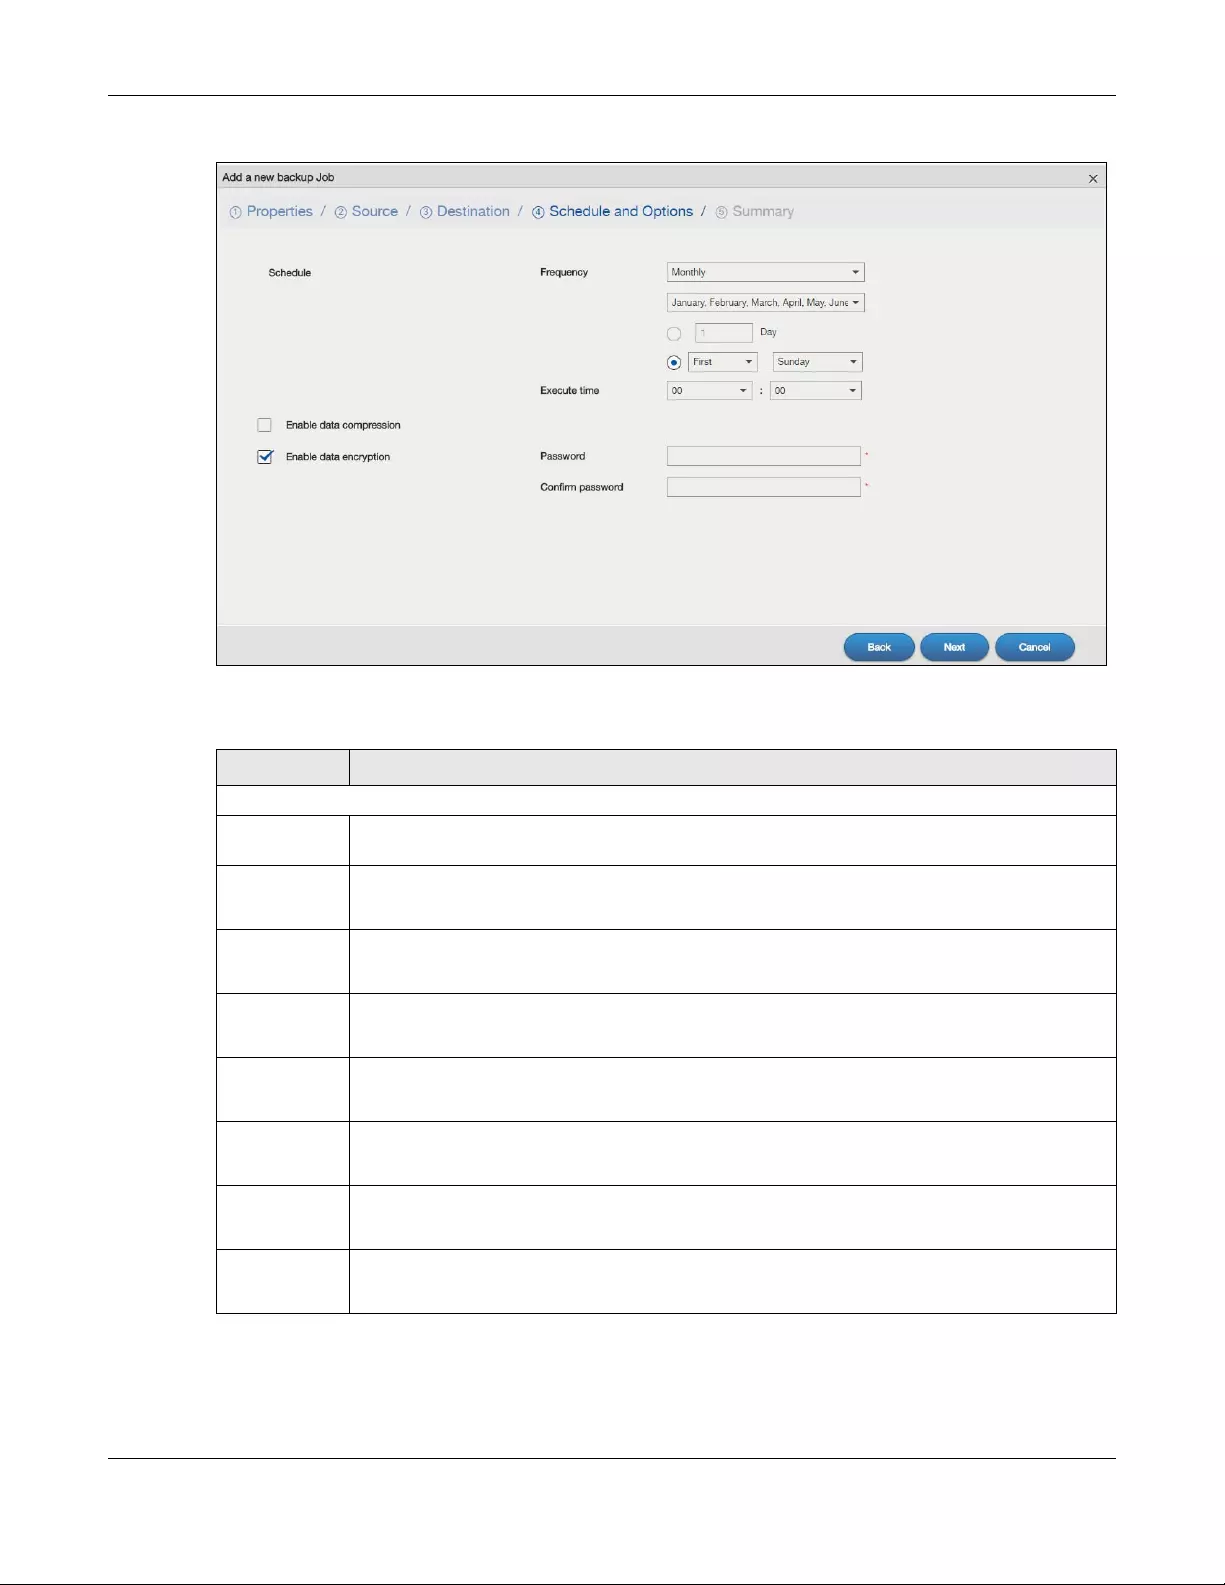
Chapter 16 Backup Planner
NAS Series User’s Guide
275
Figure 219 Backup Planner > Backup: Add Job Step 4 Schedule and Options
The following table describes the labels in this screen.
Table 154 Backup Planner > Backup: Add Job Step 4 Schedule and Options
LABEL DESCRIPTION
Schedule
Frequency Select from Hourly, Daily, Weekly and Monthly backup intervals. The screen changes depending
on the item you select.
Every n hours? This is only available if you selected Hourly as your backup frequency.
Specify every how many hours the NAS performs the backup job.
Execute time This is available if you selected Daily, Weekly or Monthly as your backup frequency.
Select the time in hour:minute format when you want the NAS to perform the backup job.
Every n day(s) This is only available if you selected Daily as your backup frequency.
Enter the interval between days when the NAS performs the backup job.
Every n
week(s)
This is only available if you selected Weekly as your backup frequency.
Enter the interval between weeks when NAS performs the backup job.
On This is only available if you selected Weekly as your backup frequency.
Enter the day of the week when you want the NAS to perform the backup job.
January ~
December
This is only available if you selected Monthly as your backup frequency.
Select the month(s) when you want the NAS to perform the backup job.
Day This is only available if you selected Monthly as your backup frequency.
Specify or select the day in a month when you want the NAS to perform the backup job.
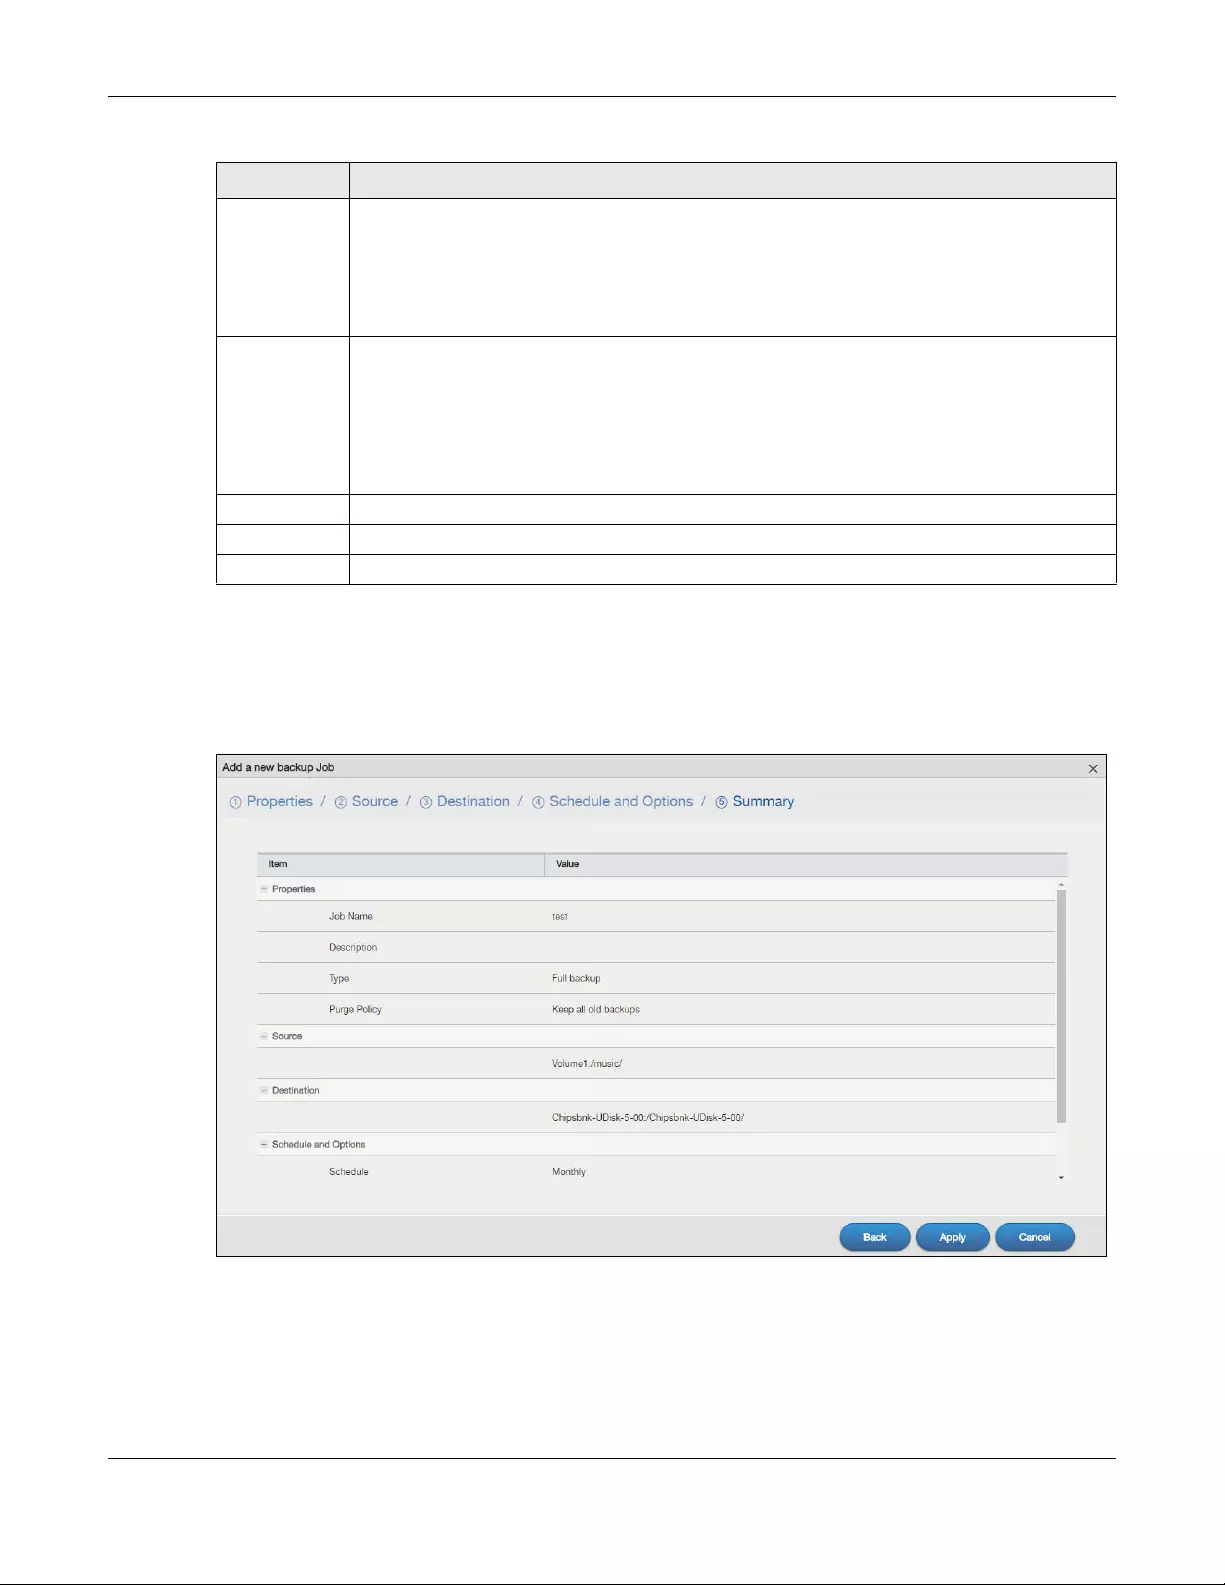
Chapter 16 Backup Planner
NAS Series User’s Guide
276
Step 5 Summary
Use this screen to review the settings you configured. Click Apply to complete the setup. Otherwise,
click Back to return to the previous screen, or click Cancel to close the screen without saving.
Figure 220 Backup Planner > Backup: Add Job Step 5 Summary
16.3.2 Edit Job Screens
Use this screen to edit an existing backup job. Some attributes of the backup job cannot be changed,
such as the name, backup type, source folder and so on.
Enable data
compression
Select this option if you want the NAS to compress the files for your backup. Otherwise, clear it.
In an Archive backup, compression is a method of packing computing files in a way that saves
hard disk space.
For a Synchronization backup (to a remote target), the source data will be compressed before
the transmission to reduce the transmission time. It is used in slow networks only.
Enable data
encryption
Select this option and enter a password if you want the NAS to encrypt the files for your backup.
Otherwise, clear it.
In an Archive backup, this means using a password to secure files.
For a Synchronization backup (to a remote target), this means securing the file transfer session.
However the final file stored on the remote NAS is unencrypted. This takes a long time. Make sure
you really need this feature before enabling it.
Back Click this to go back to the previous screen.
Next Click this to go to the next screen.
Cancel Click this to close the screen without saving.
Table 154 Backup Planner > Backup: Add Job Step 4 Schedule and Options
LABEL DESCRIPTION
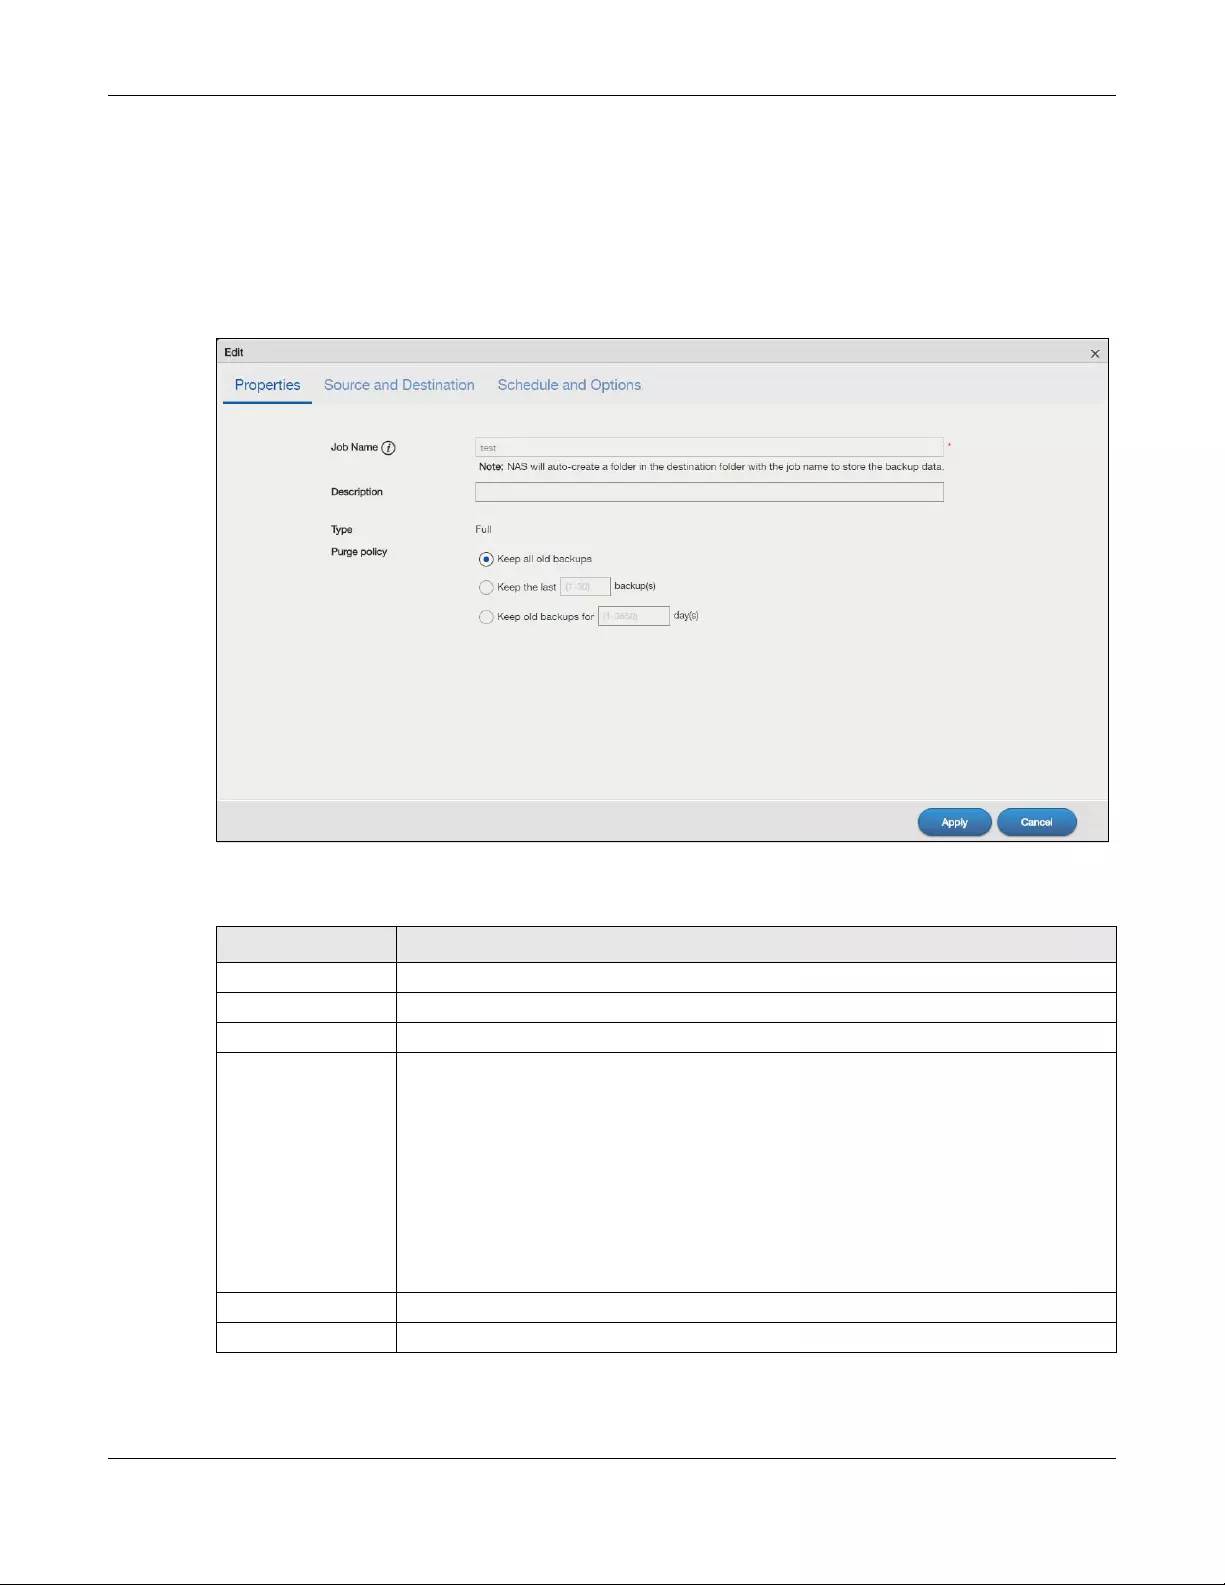
Chapter 16 Backup Planner
NAS Series User’s Guide
277
Select a backup job from the list in the Backup Planner > Backup screen and click Edit Job to open the
Edit Job screen.
Edit Job: Properties
Click the Properties tab to open the following screen.
Figure 221 Backup Planner > Backup > Edit Job: Properties
The following table describes the labels in this screen.
Table 155 Backup Planner > Backup > Edit Job: Properties
LABEL DESCRIPTION
Job Name This field is read-only and shows the name of the backup job.
Description Enter a short description for the backup job.
Type This field is read-only and shows the backup type.
Purge Policy The NAS maintains the files that have been included in your backups. However to save hard
disk space, you can choose to delete files that have been included in previous backups.
• Select Keep all old backup files to store all files that have been included in previous
backups.
• If you want to store a certain number of backup files, select Keep the last n backup(s).
Enter a value (n) from 1 to 30 to specify how many backups the NAS stores. All backup
files older than the last one are deleted. You will not be able to recover files that existed
(only) in those previous backups. Select this if backup space is limited and recovery of
old files is not important.
• If you want to store all backups for a certain time period, select Keep old backups for n
day(s). Enter a value (n) from 1 to 3650 to specify how many days the NAS stores all
backup files. After this day has expired, all backup files will be deleted.
Apply Click this to save your changes.
Cancel Click this to close the screen without saving.
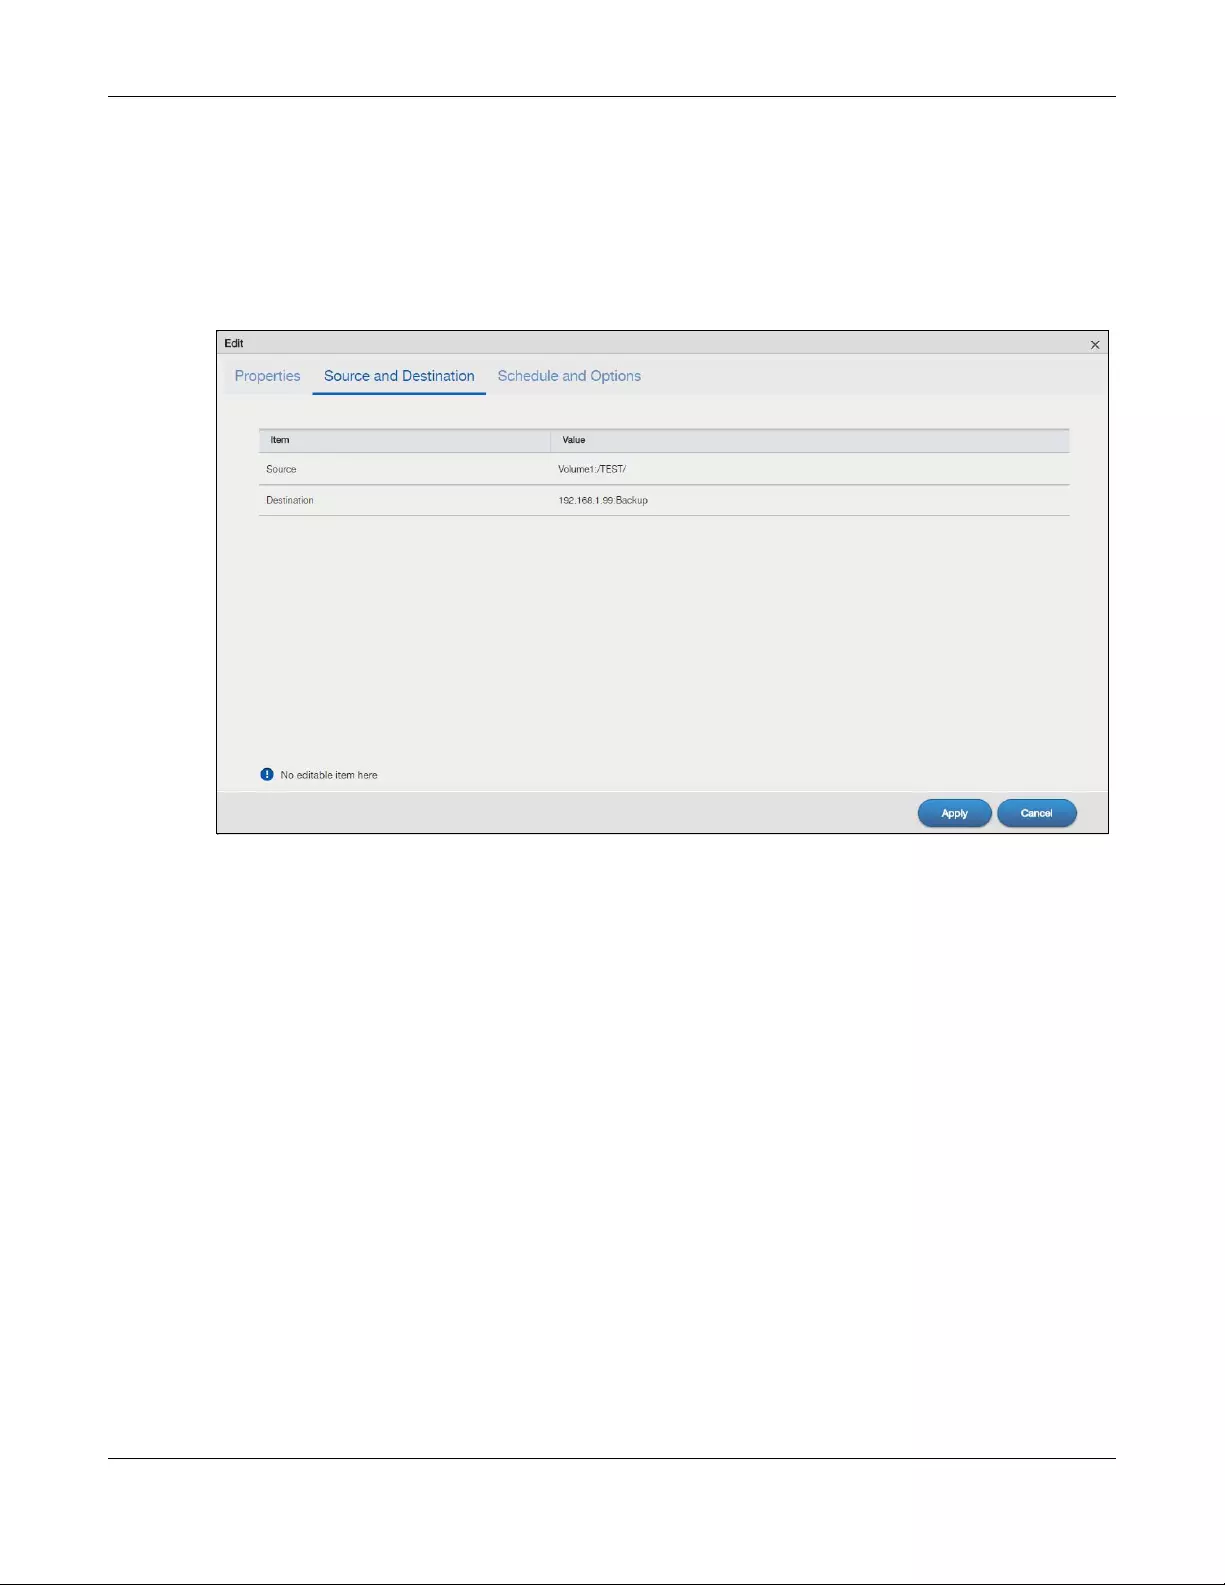
Chapter 16 Backup Planner
NAS Series User’s Guide
278
Edit Job: Source and Destination
Click the Source and Destination tab to open the following screen. This screen is read-only. It shows the
path of the source folder for backup and on which volume (whether internal or external) the backup
files are stored. If the target location is a remote NAS, this shows the remote IP address. Click Apply to
save your changes or click Cancel to close the screen without saving.
Figure 222 Backup Planner > Backup > Edit Job: Source and Destination
Edit Job: Schedule and Options
Use this screen to edit the schedule (and bandwidth) for the backup job.
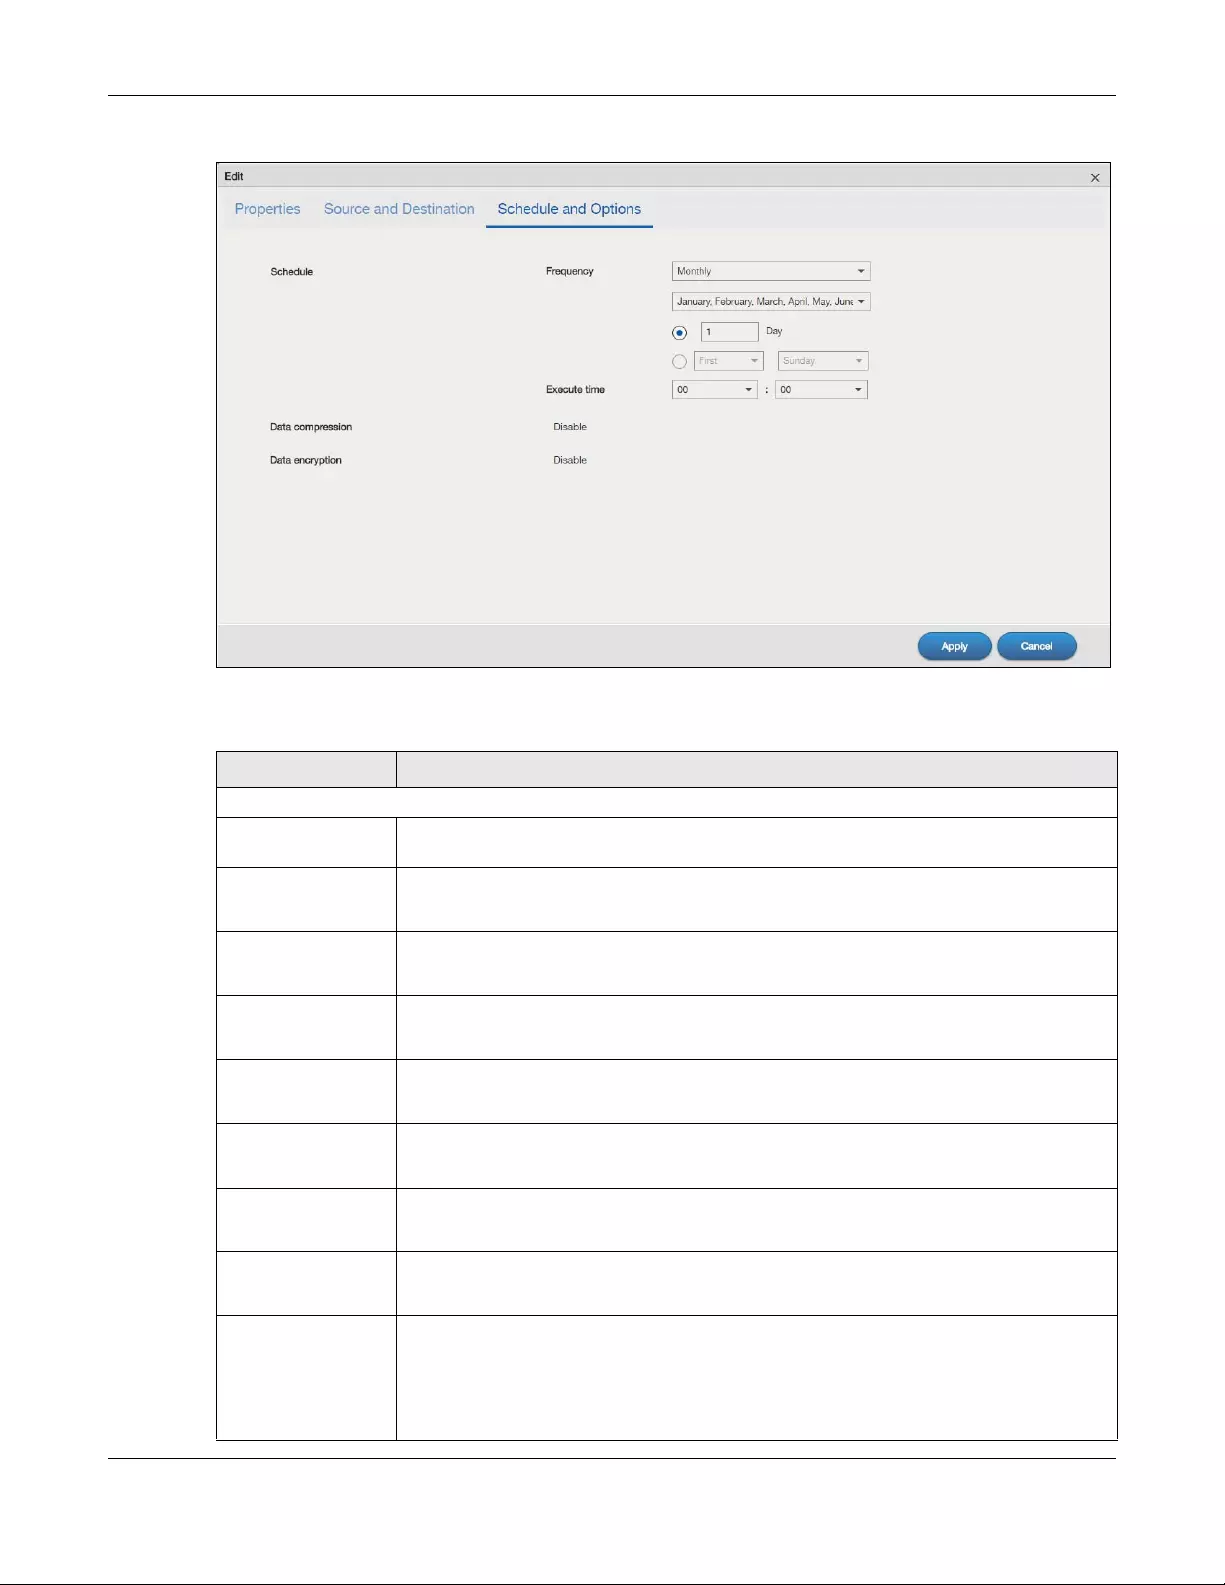
Chapter 16 Backup Planner
NAS Series User’s Guide
279
Figure 223 Backup Planner > Backup > Edit Job: Schedule and Options
The following table describes the labels in this screen.
Table 156 Backup Planner > Backup > Edit Job: Schedule and Options
LABEL DESCRIPTION
Schedule
Frequency Select from Hourly, Daily, Weekly and Monthly backup intervals. The screen changes
depending on the item you select.
Every n hours? This is only available if you selected Hourly as your backup frequency.
Specify every how many hours the NAS performs the backup job.
Execute time This is available if you selected Daily, Weekly or Monthly as your backup frequency.
Select the time in hour:minute format when you want the NAS to perform the backup job.
Every n day(s) This is only available if you selected Daily as your backup frequency.
Enter the interval between days when the NAS performs the backup job.
Every n week(s) This is only available if you selected Weekly as your backup frequency.
Enter the interval between weeks when NAS performs the backup job.
On This is only available if you selected Weekly as your backup frequency.
Enter the day of the week when you want the NAS to perform the backup job.
January ~
December
This is only available if you selected Monthly as your backup frequency.
Select the month(s) when you want the NAS to perform the backup job.
Day This is only available if you selected Monthly as your backup frequency.
Specify or select the day in a month when you want the NAS to perform the backup job.
Bandwidth This field is available only when the backup type is Synchronization or Rsync and the
backup target is a remote NAS.
For backups to a remote NAS, you can restrict the bandwidth to help prevent the backups
from using all of your network connection’s available bandwidth. This is more important
when backing up to a remote NAS or computer through the Internet.

Chapter 16 Backup Planner
NAS Series User’s Guide
280
16.3.3 Restore Screens
Use these screens to restore previous backups made with the NAS. Click Backup Planner > Backup >
Restore to open the following screen.
Click the Restore icon to create a restore job.
Figure 224 Backup Planner > Backup > Restore
Restore Job: Action
You can restore a previous backup by selecting a backup job configured on the NAS or the backup
file(s). Click Next to continue.
Data compression This field is read-only and shows whether the backup employs compression.
Compression reduces the size of the file that you want to back up. Backup is then faster, but
restoring may be slower, so if backup space is not a concern and recovery speed is, then
turn off compression.
Data encryption This field is read-only and shows whether the backup employs encryption.
You can have the NAS use a password to encrypt the backup files.
Apply Click this to save your changes.
Cancel Click this to close the screen without saving.
Table 156 Backup Planner > Backup > Edit Job: Schedule and Options (continued)
LABEL DESCRIPTION

Chapter 16 Backup Planner
NAS Series User’s Guide
281
Figure 225 Backup Planner > Backup > Restore
Restore Job: Step 1 Source
If you set the NAS to restore a backup based on the pre-configured backup job in the previous screen,
the following screen displays. Select a backup job’s name from the list and the time point at which the
backup job was done. Click Next to continue.
Figure 226 Backup Planner > Backup > Restore Job: Step 1 Source (Backup Job)
If the Enter Password screen displays, enter the password that you configured to encrypt the backup
files and click Apply.
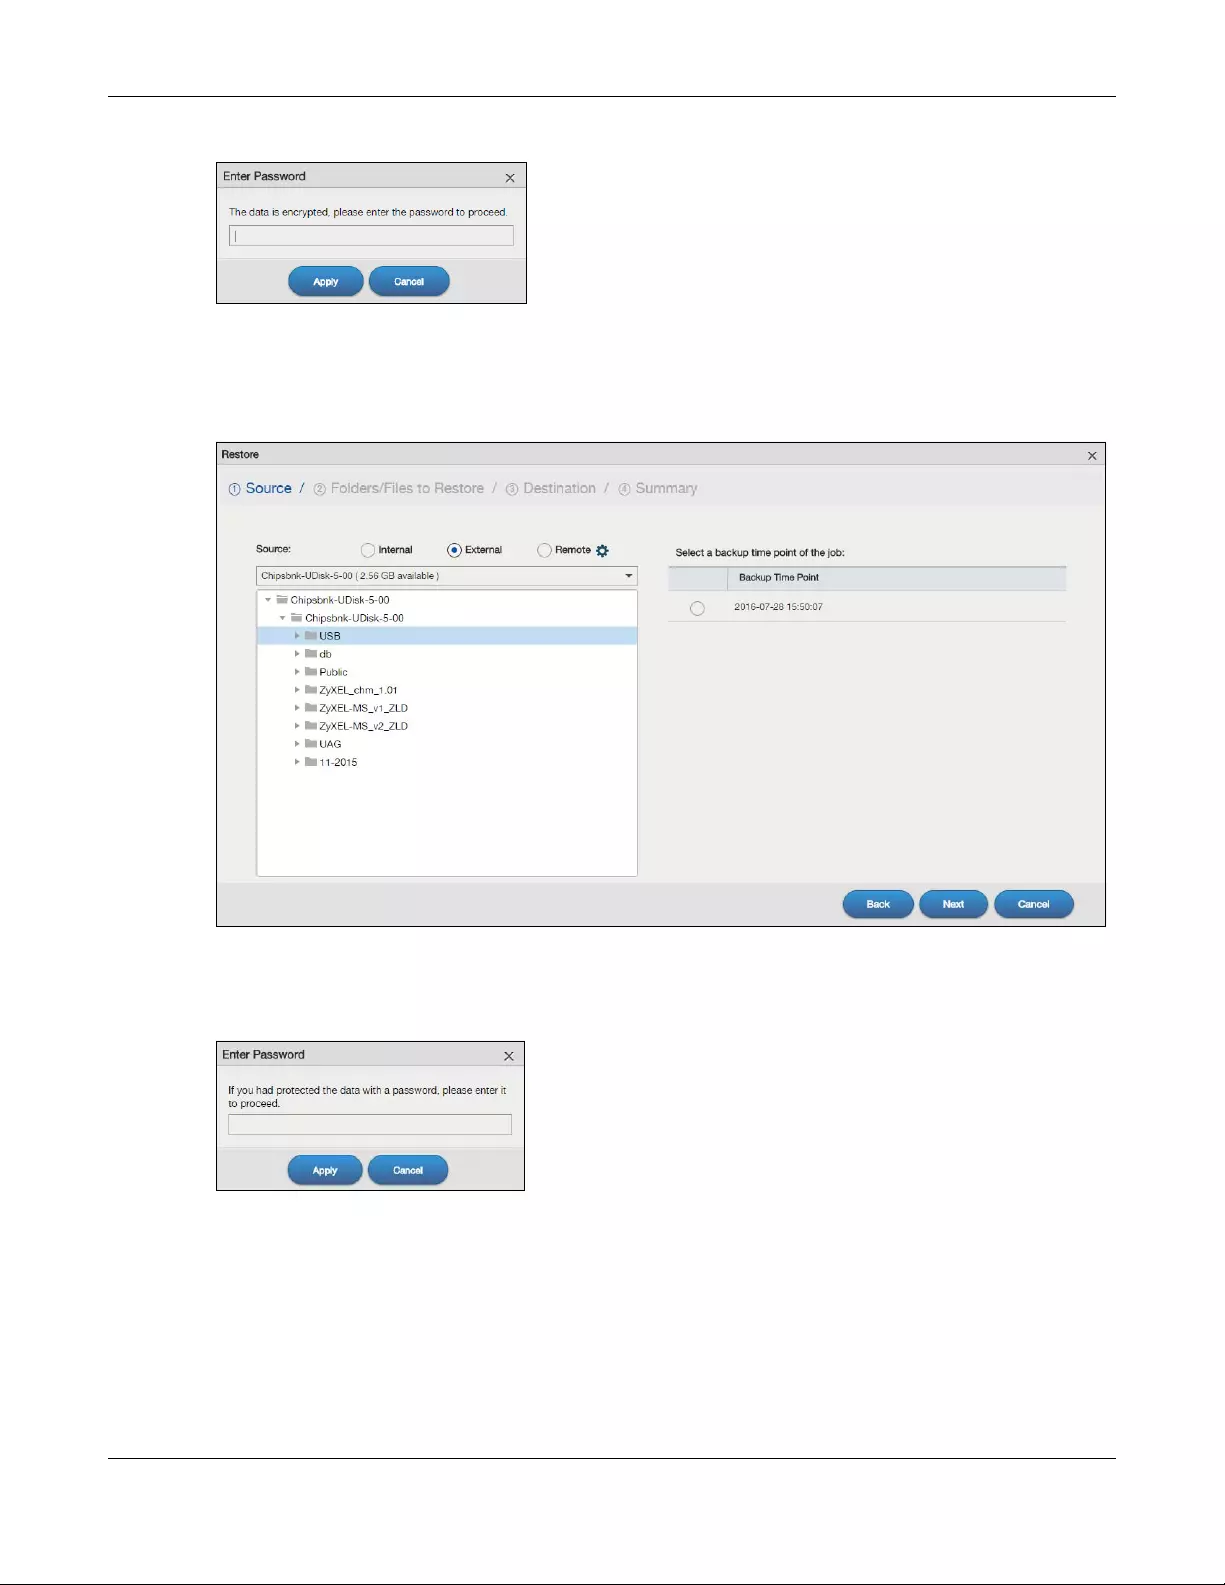
Chapter 16 Backup Planner
NAS Series User’s Guide
282
Figure 227 Backup Planner > Backup > Restore Job: Step 1 Source: Enter Password (Backup Job)
If you set the NAS to restore a backup based on the selected backup file(s) in the previous screen, the
following screen displays. Select the folder where the backup you want to restore is located and the
time point at which the backup job was done. Click Next to continue.
Figure 228 Backup Planner > Backup > Restore Job: Step 1 Source (Backup File)
A pop-up screen displays. Enter the password if you configured to encrypt the backup files and click
Apply. Otherwise, click Cancel to proceed.
Figure 229 Backup Planner > Backup > Restore Job: Step 1 Source: Enter Password (Backup File)
Restore Job: Step 2 Folders/Files to Restore
Select the backup files or the folder you want to restore. The screen shows the path of the file(s) or
folder(s) you selected. Click Next to continue.
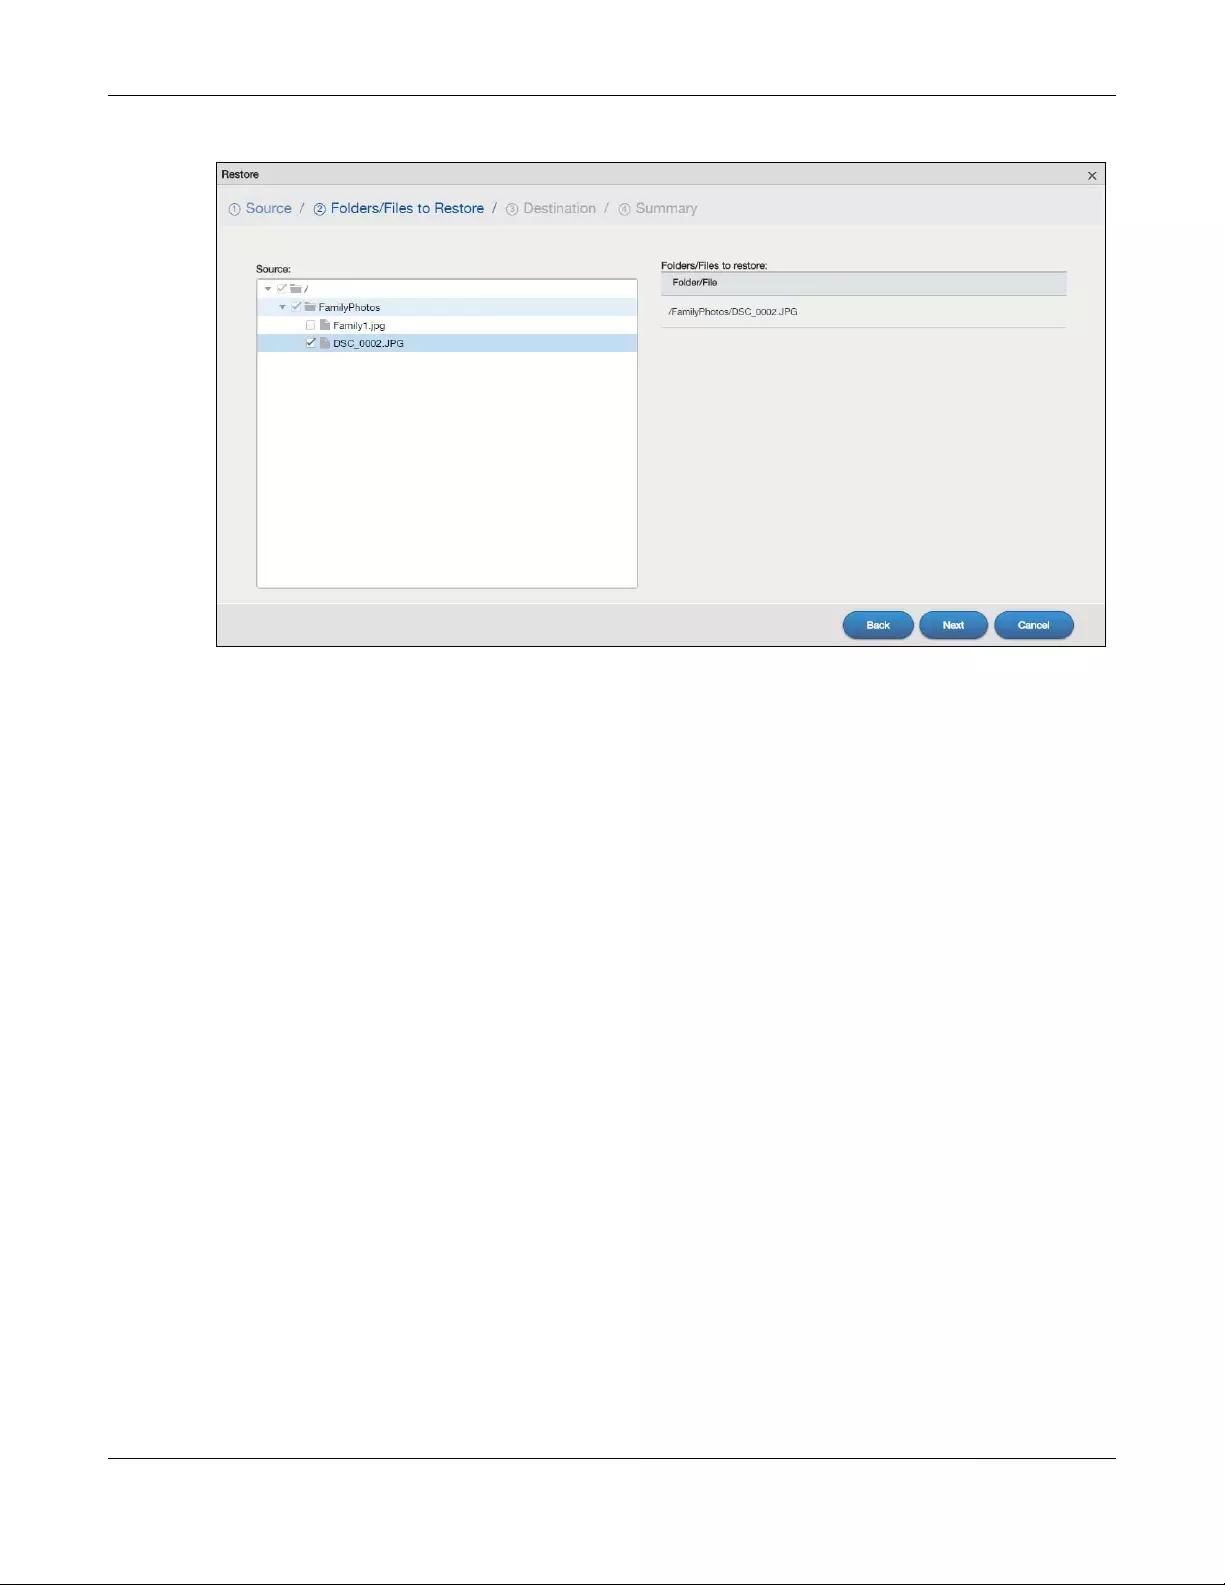
Chapter 16 Backup Planner
NAS Series User’s Guide
283
Figure 230 Backup Planner > Backup > Restore Job: Step 2 Folders/Files to Restore
Restore Job: Step 3 Destination
Select the location in the NAS where you want to restore your backup.
If you set the NAS to restore a backup based on the pre-configured backup job, you can either select
Original to restore the files to their original location in the NAS, or select Other location and choose a
folder where you want to place the restored files.
If you set the NAS to restore a backup based on the selected backup file(s), you just choose a folder
where you want to place the restored files.
The screen then shows the path of the folder you selected.
Click Next to continue.
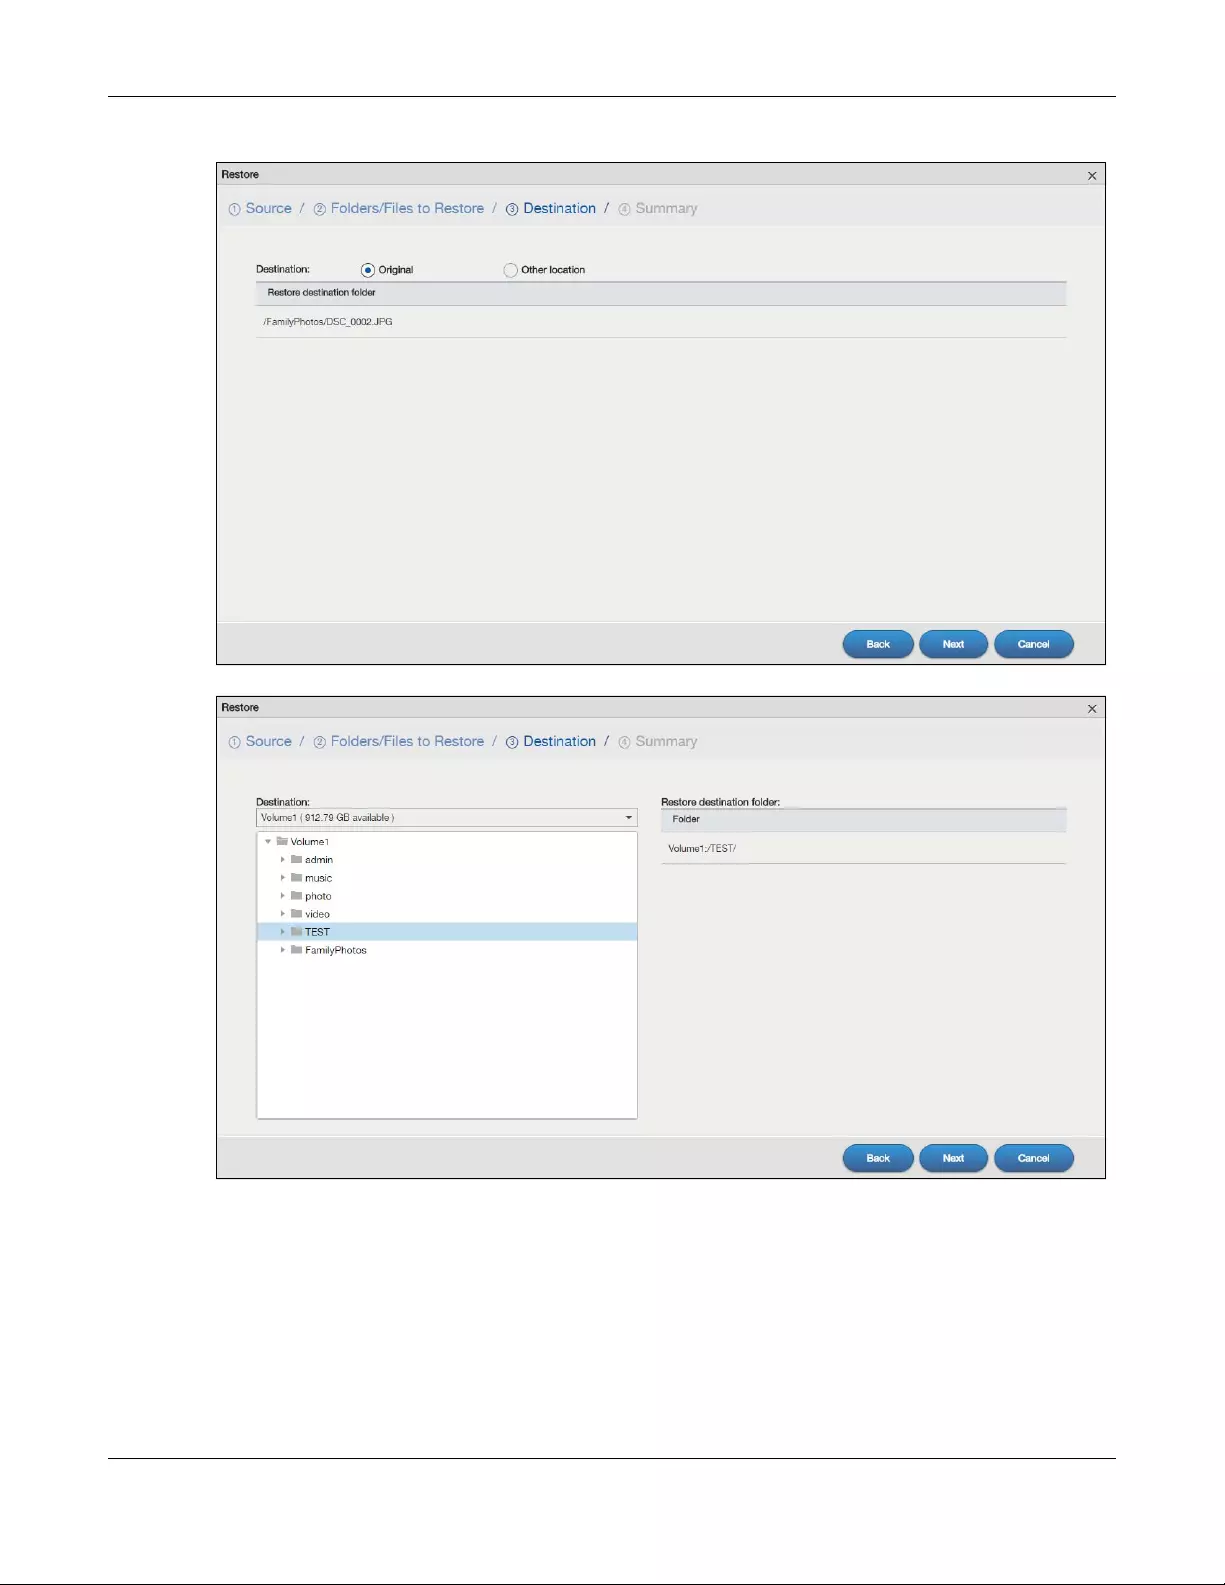
Chapter 16 Backup Planner
NAS Series User’s Guide
284
Figure 231 Backup Planner > Backup > Restore Job: Step 3 Destination (Backup Job)
Figure 232 Backup Planner > Backup > Restore Job: Step 3 Destination (Backup File)
Restore Job: Step 4 Summary
Use this screen to review the settings you configured. Click Apply to save your settings. Otherwise, click
Back to return to the previous screen, or click Cancel to close the screen without saving.
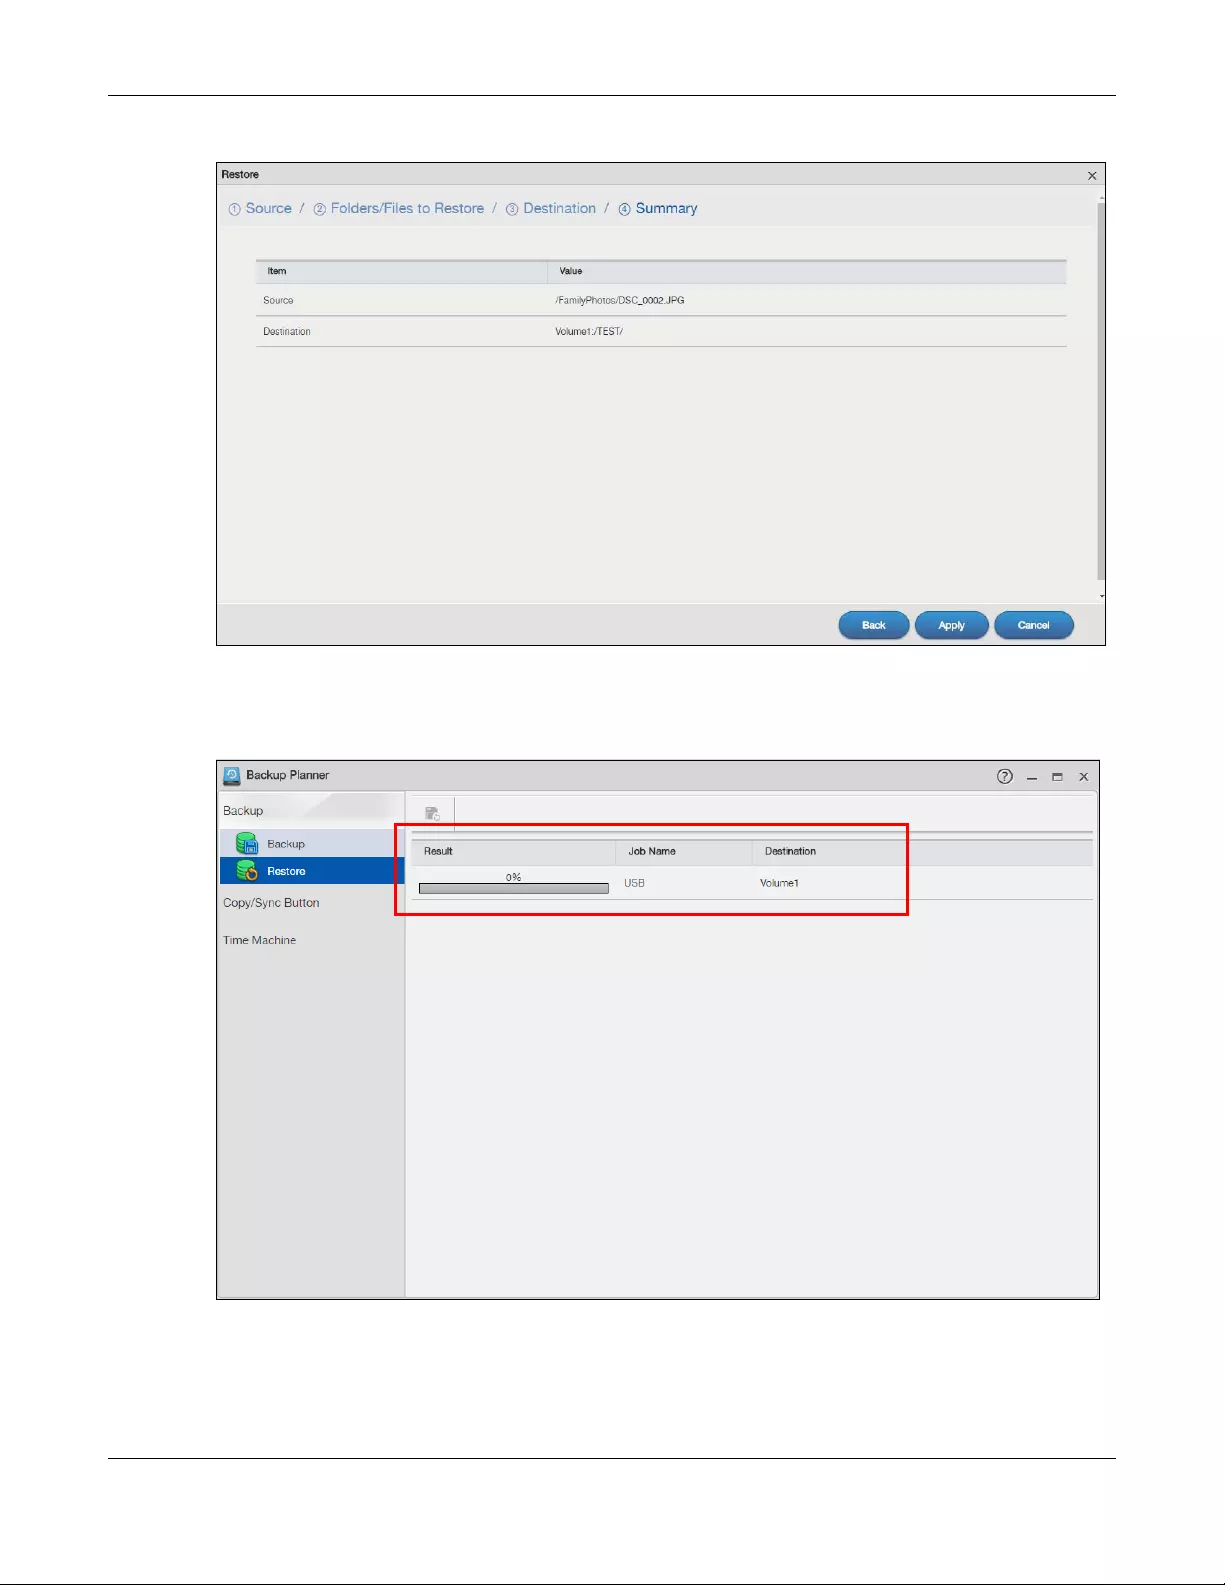
Chapter 16 Backup Planner
NAS Series User’s Guide
285
Figure 233 Backup Planner > Backup > Restore Job: Step 4 Summary
The restore progress and result display in the Restore screen. The related information will disappear right
after the specified backup is restored successfully.
Figure 234 Backup Planner > Backup > Restore: Result
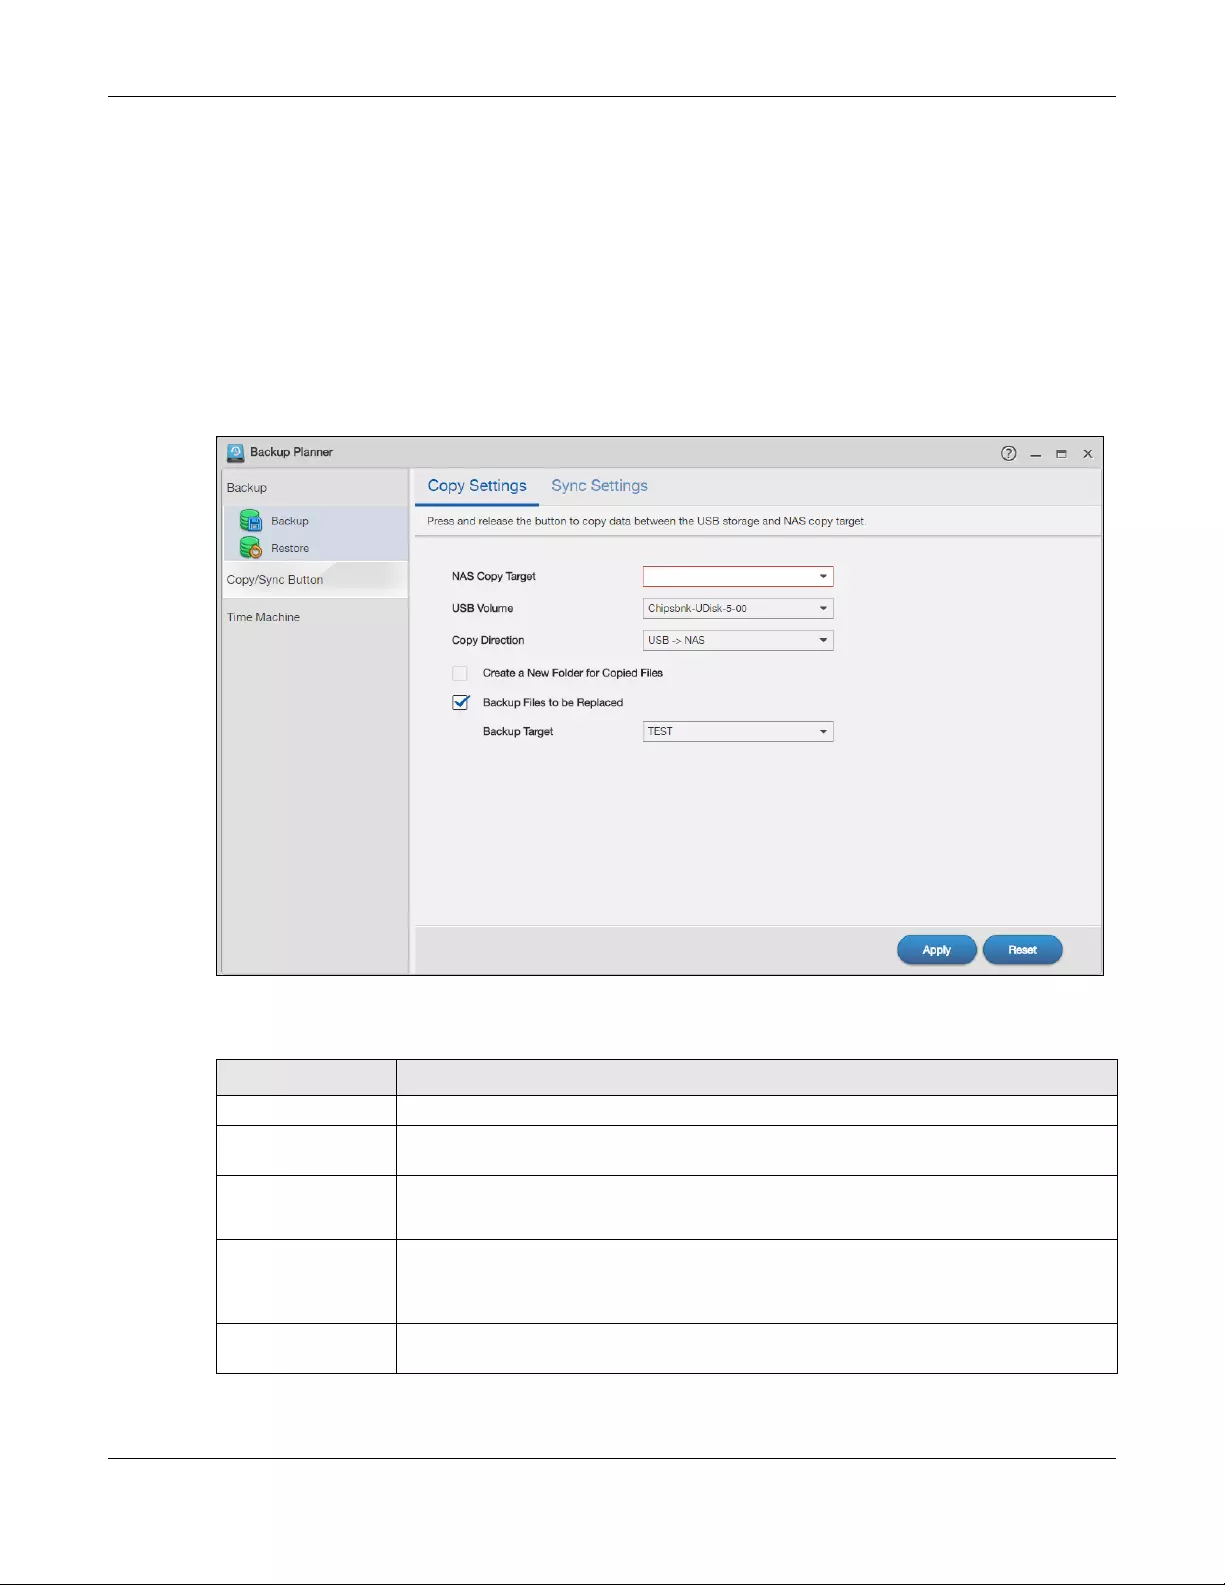
Chapter 16 Backup Planner
NAS Series User’s Guide
286
16.4 Copy/Sync Button Screens
The Copy/Sync button on the front panel allows you to copy or synchronize files between a connected
USB or SD device and the NAS. Use the Backup Planner > Copy/Sync Button screen to configure the
copy/sync settings.
16.4.1 Configure Copy Settings
Click Backup Planner > Copy/Sync Button > Copy Settings to open the following screen.
Figure 235 Backup Planner > Copy/Sync Button > Copy Settings
The following table describes the labels in this screen.
Table 157 Backup Planner > Copy/Sync Button > Copy Settings
LABEL DESCRIPTION
NAS Copy Target Select the NAS share to use with the copy function.
USB Volume If your USB or SD device has multiple partitions, select which partition to use with the copy
function.
Copy Direction Select USB -> NAS to copy files from your USB or SD device to the NAS.
Select NAS -> USB to copy files from the NAS to your USB or SD device.
Create a New Folder
for Copied Files
Select this option to place the copied files in a new folder.
The name of the folder created for the copied files consists of the date and time of the
copy in year_month_day_hour_minute_second format.
Backup Files to be
Replaced
This option is only available if you do not select Create a New Folder for Copied Files. Select
this option to save the files that will be replaced by the source files.
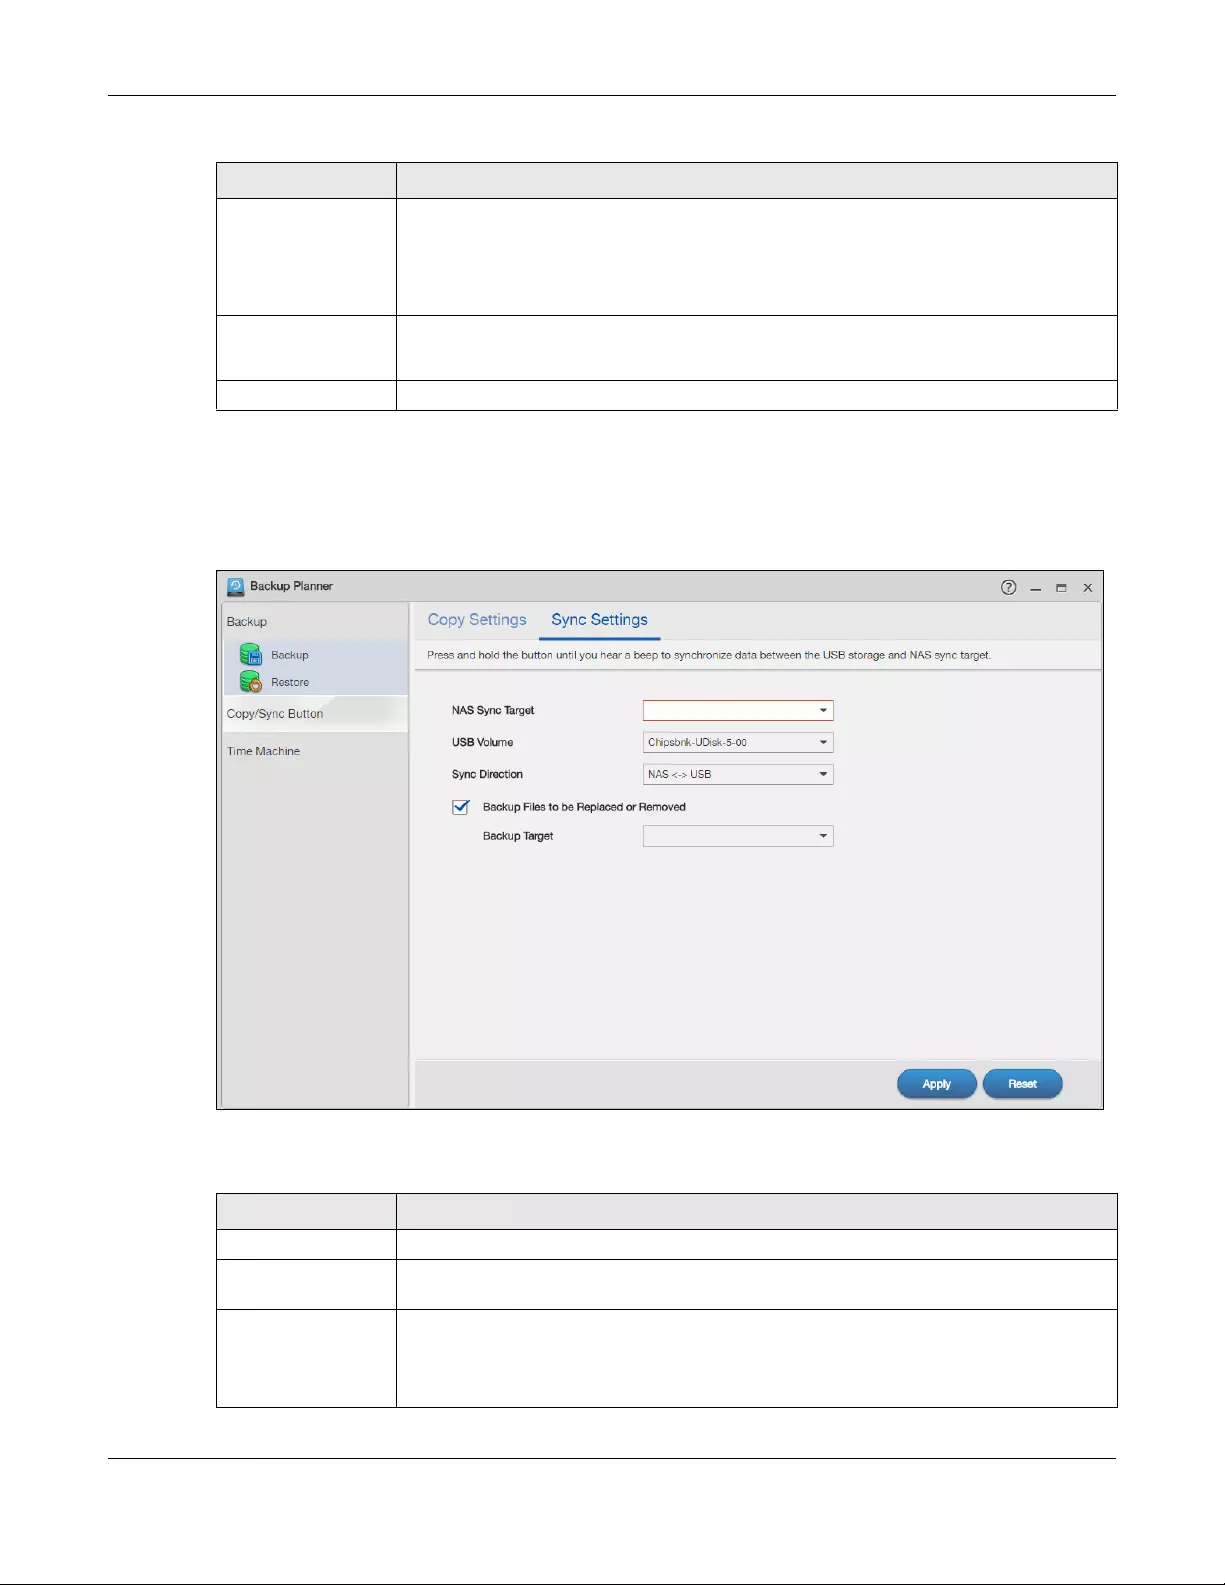
Chapter 16 Backup Planner
NAS Series User’s Guide
287
16.4.2 Sync Settings
Click Backup Planner > Copy/Sync Button > Sync Settings to open the following screen.
Figure 236 Backup Planner > Copy/Sync Button > Sync Settings
The following table describes the labels in this screen.
Backup Target Select a share in which to save the backup files.
Note: The NAS will not create a new folder to store the backup files. It is
recommended to create a specific share (such as “backup”) for backup
purposes.
Apply Click this to save your changes.
The configuration file is saved on the USB device.
Reset Click this to restore your previously saved settings.
Table 157 Backup Planner > Copy/Sync Button > Copy Settings (continued)
LABEL DESCRIPTION
Table 158 Backup Planner > Copy/Sync Button > Sync Settings
LABEL DESCRIPTION
NAS Sync Target Select the NAS share to use with the synchronization function.
USB Volume If your USB device has multiple partitions, select which partition to use with the
synchronization function.
Sync Direction Select USB -> NAS to synchronize files from your USB or SD device to the NAS.
Select NAS -> USB to synchronize files from the NAS to your USB or SD device.
Select NAS <-> USB to synchronize files in both directions simultaneously.
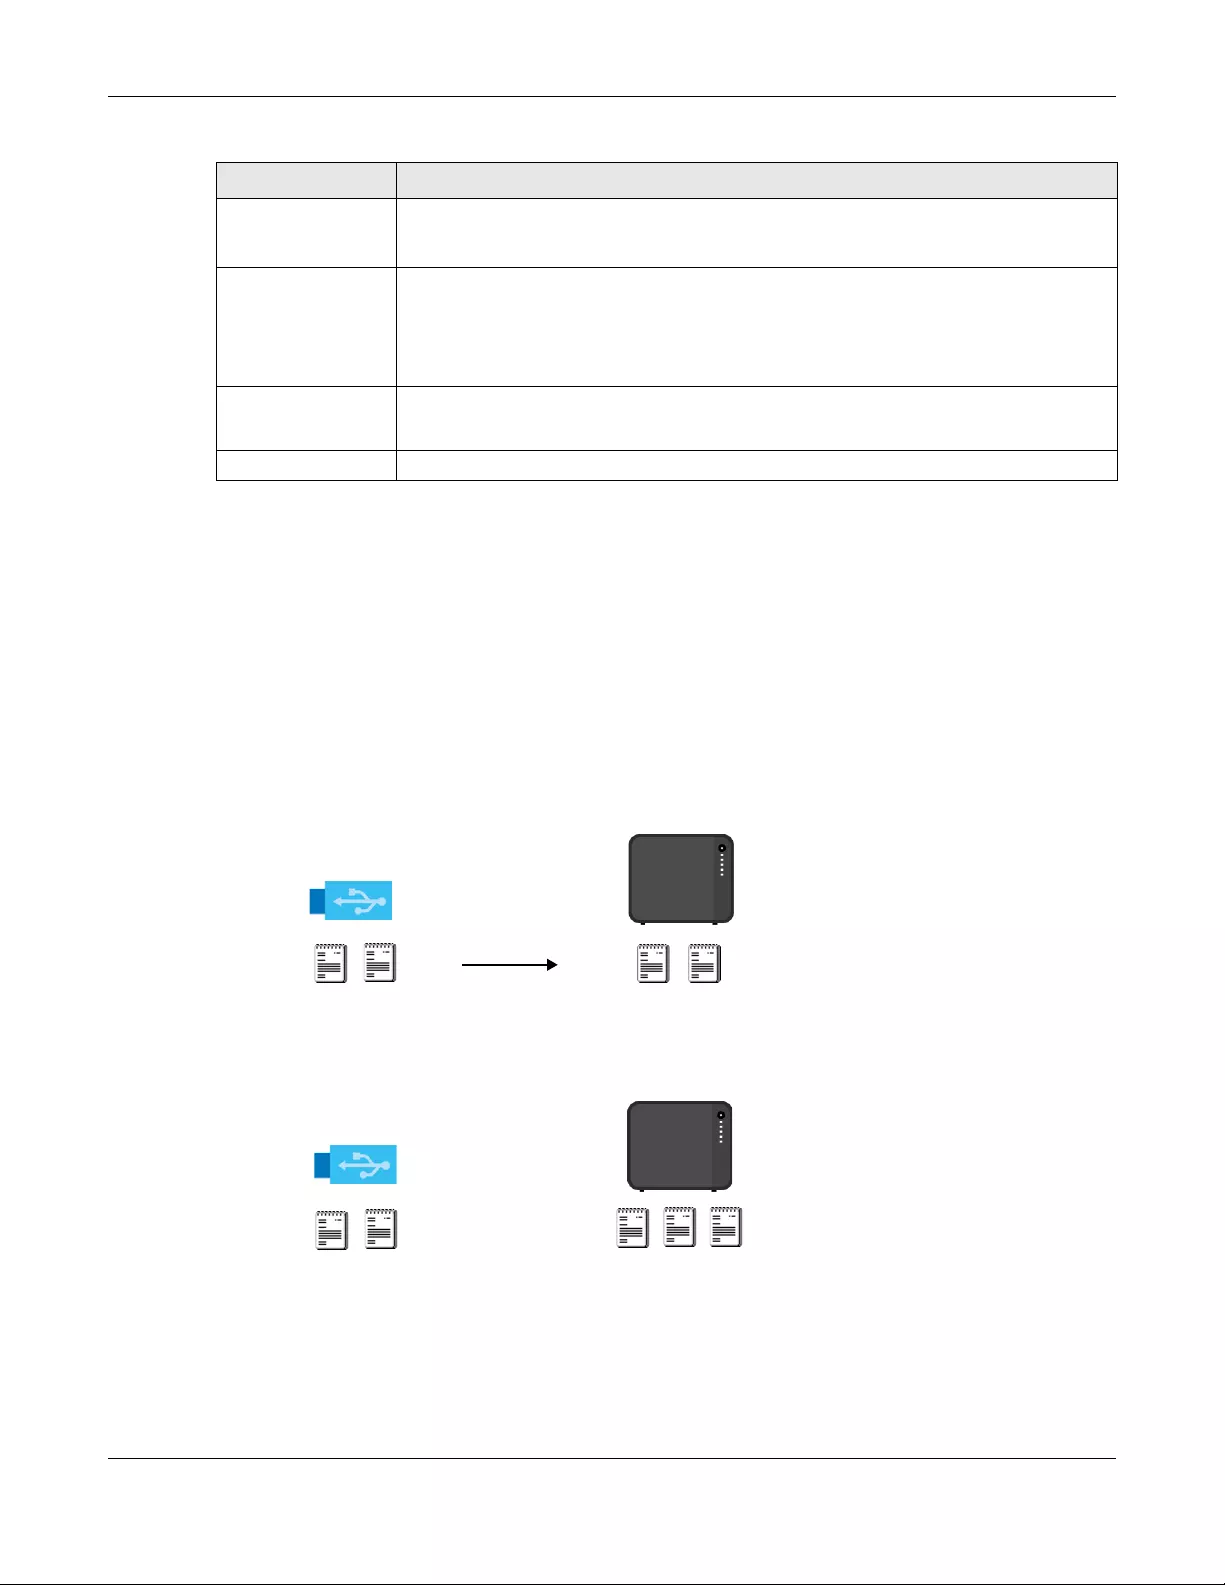
Chapter 16 Backup Planner
NAS Series User’s Guide
288
16.4.3 How to Copy Files
You can copy files from a USB device to the NAS or from the NAS to a USB device. Simply press and
release the COPY/SYNC button to start copying files. See Section 16.4 on page 286 for details about
configuring the copy settings.
The following figure illustrates how copying files works when you copy files from a USB device to the NAS.
The same concept applies when you copy files from the NAS to a USB device.
Figure 237 Copying Files Example
Both storage devices contain file A.
• A copy of files A and B from the USB device is transferred to the NAS.
• File A from the USB device replaces file A on the NAS.
Backup Files to be
Replaced or
Removed
Select this option to save the files that will be replaced by the source files.
Backup Target Select a share in which to save the backup files.
Note: The NAS will not create a new folder to store the backup files. It is
recommended to create a specific share (such as “backup”) for backup
purposes.
Apply Click this to save your changes.
The configuration file is saved on the USB device.
Reset Click this to restore your previously saved settings.
Table 158 Backup Planner > Copy/Sync Button > Sync Settings (continued)
LABEL DESCRIPTION
AC
Before Copy
After Copy
USB
NAS
AB
C
USB
NAS
AB AB

Chapter 16 Backup Planner
NAS Series User’s Guide
289
16.4.4 How to Synchronize Files
Synchronization makes the contents on the target device identical to the ones on the source device.
You can synchronize files from a USB device to the NAS or from the NAS to a USB device. In addition, you
may also synchronize files in both directions simultaneously.
Press and hold the COPY/SYNC button until you hear a beep to synchronize files. See Section 16.4 on
page 286 for details about configuring the synchronization settings.
USB -> NAS or USB <- NAS
When you synchronize files in one direction, contents on the source device replace the files on the
target device.
The following figure illustrates how synchronization works when you synchronize files from a USB device to
the NAS. The same concept applies when you synchronize files from the NAS to a USB device.
Figure 238 Synchronizing Files Example 1
Both storage devices contain A.
• A copy of files A and B from the USB device is transferred to the NAS.
• File A from the USB device replaces file A on the NAS.
• File C on the NAS is deleted.
USB <-> NAS
When you synchronize files in both directions simultaneously, both storage devices transfer unique files to
one another. Files with the same file name are synchronized according to their modification date/time.
The difference in modification time between the two files has to be greater than five minutes. More
recently modified files overwrite the older ones during synchronization.
AC
Before Sync
After Sync
USB
AB
USB
AB AB
NAS
NAS

Chapter 16 Backup Planner
NAS Series User’s Guide
290
The following figure illustrates how synchronization works when you synchronize files in both directions
simultaneously.
Figure 239 Synchronizing Files Example 2
A on the USB device and B on the NAS are modified more recently.
• File A from the USB device replaces file A on the NAS.
• File B from the NAS replaces file B on the USB device.
• A copy of file C from the USB device is transferred to the NAS.
• A copy of file D from the NAS is transferred to the USB device.
16.5 Time Machine Screen
Time Machine is a backup system provided by Mac OS X. It automatically backs up everything on your
Mac, including pictures, music, videos, documents, applications, and settings. This chapter helps you to
enable Time Machine in OS X to use your NAS as a backup volume.
Use the Time Machine screen to turn Time Machine support on or off, and designate the share for Time
Machine backups. See Section 4.3 on page 37 for an example about how to enable Time Machine on
the NAS and your Mac computer.
Click Backup Planner > Time Machine to open the following screen.
AB
Before Sync
After Sync
USB
AB
USB
CD
B
ABCD
DC
(new)
A
(new)
(new)
(new)
(new) (new)
NAS
NAS
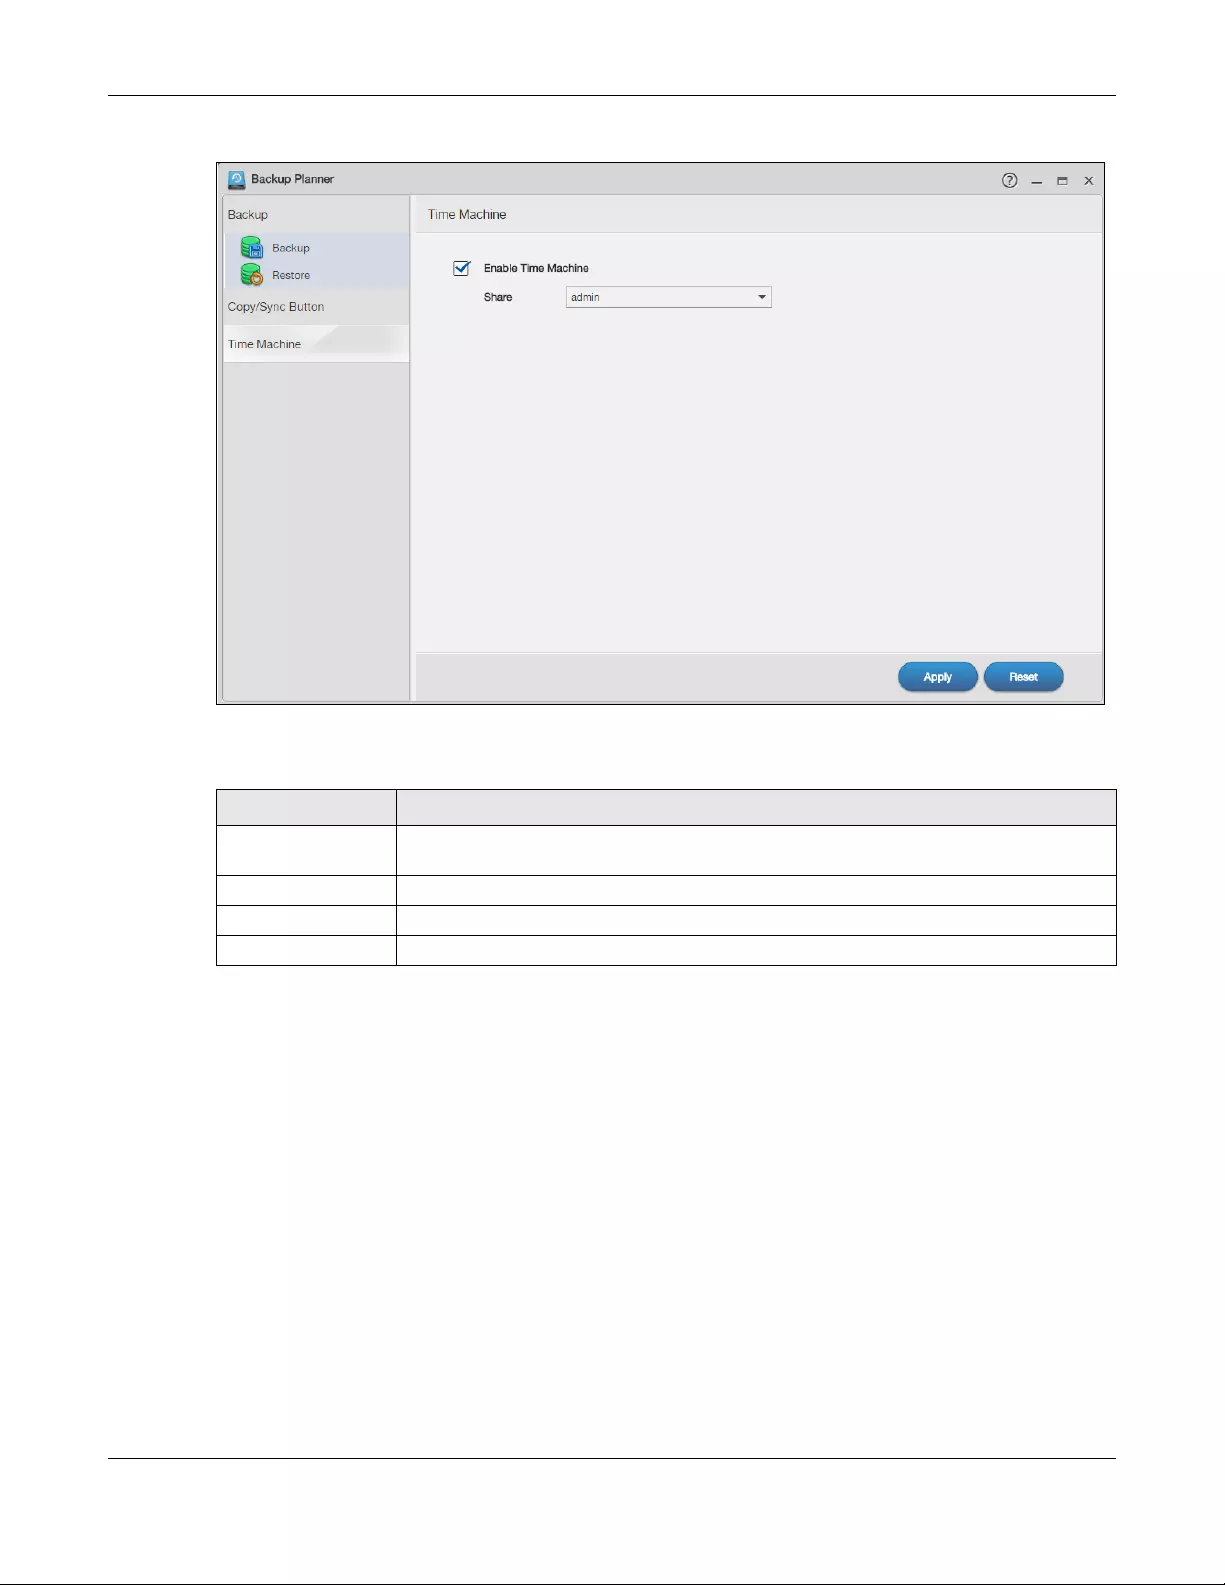
Chapter 16 Backup Planner
NAS Series User’s Guide
291
Figure 240 Backup Planner > Time Machine
The following table describes the labels in this screen.
Table 159 Backup Planner > Time Machine
LABEL DESCRIPTION
Enable Time
Machine
Select this to allow Macs to use Time Machine to back up to the NAS. Clear it to turn off
Time Machine support.
Share Select the share the NAS uses to store Time Machine backups.
Apply Click this to save your changes.
Reset Click this to restore the screen’s last-saved settings.

NAS Series User’s Guide
292
CHAPTER 17
File Browser, Photo, Music &
Video
17.1 Overview
This chapter introduces the File Browser, Photo, Music, and Video screens for sharing media files. It also
describes the Playzone Settings and Application Zone screens which are only available with user
accounts.
17.2 File Browser
Click File Browser on the Desktop to open the following screen in a new tab. Use the file browsing
screens to play, open, upload, and download files. A share is a set of user access permissions for a
specific folder on a volume (gives someone access to a folder). It is equivalent to the Windows concept
of a shared folder, but the access rights are independent of the folder (you configure the share and the
folder separately). You can map a share to a network drive for easy and familiar file transfer for Windows
users.
• A folder icon with a hand indicates a share.
• The administrator owns and manages the public shares.
• Double-click a media file to open it. Double-click other types of files to be able to save them.
• Click to the right of a file or folder name to select it.
• Use the [SHIFT] key to select a range of entries. Hold down the [CTRL] key to select multiple individual
entries.
• Drag and drop files to open a screen that lets you choose whether to copy or move them.
• You can upload files of up to 2 GB in size.
• You can download individual files of up to 4 GB in size with Mozilla Firefox and Internet Explorer 7 and
later or up to 2 GB in size with Internet Explorer 6.
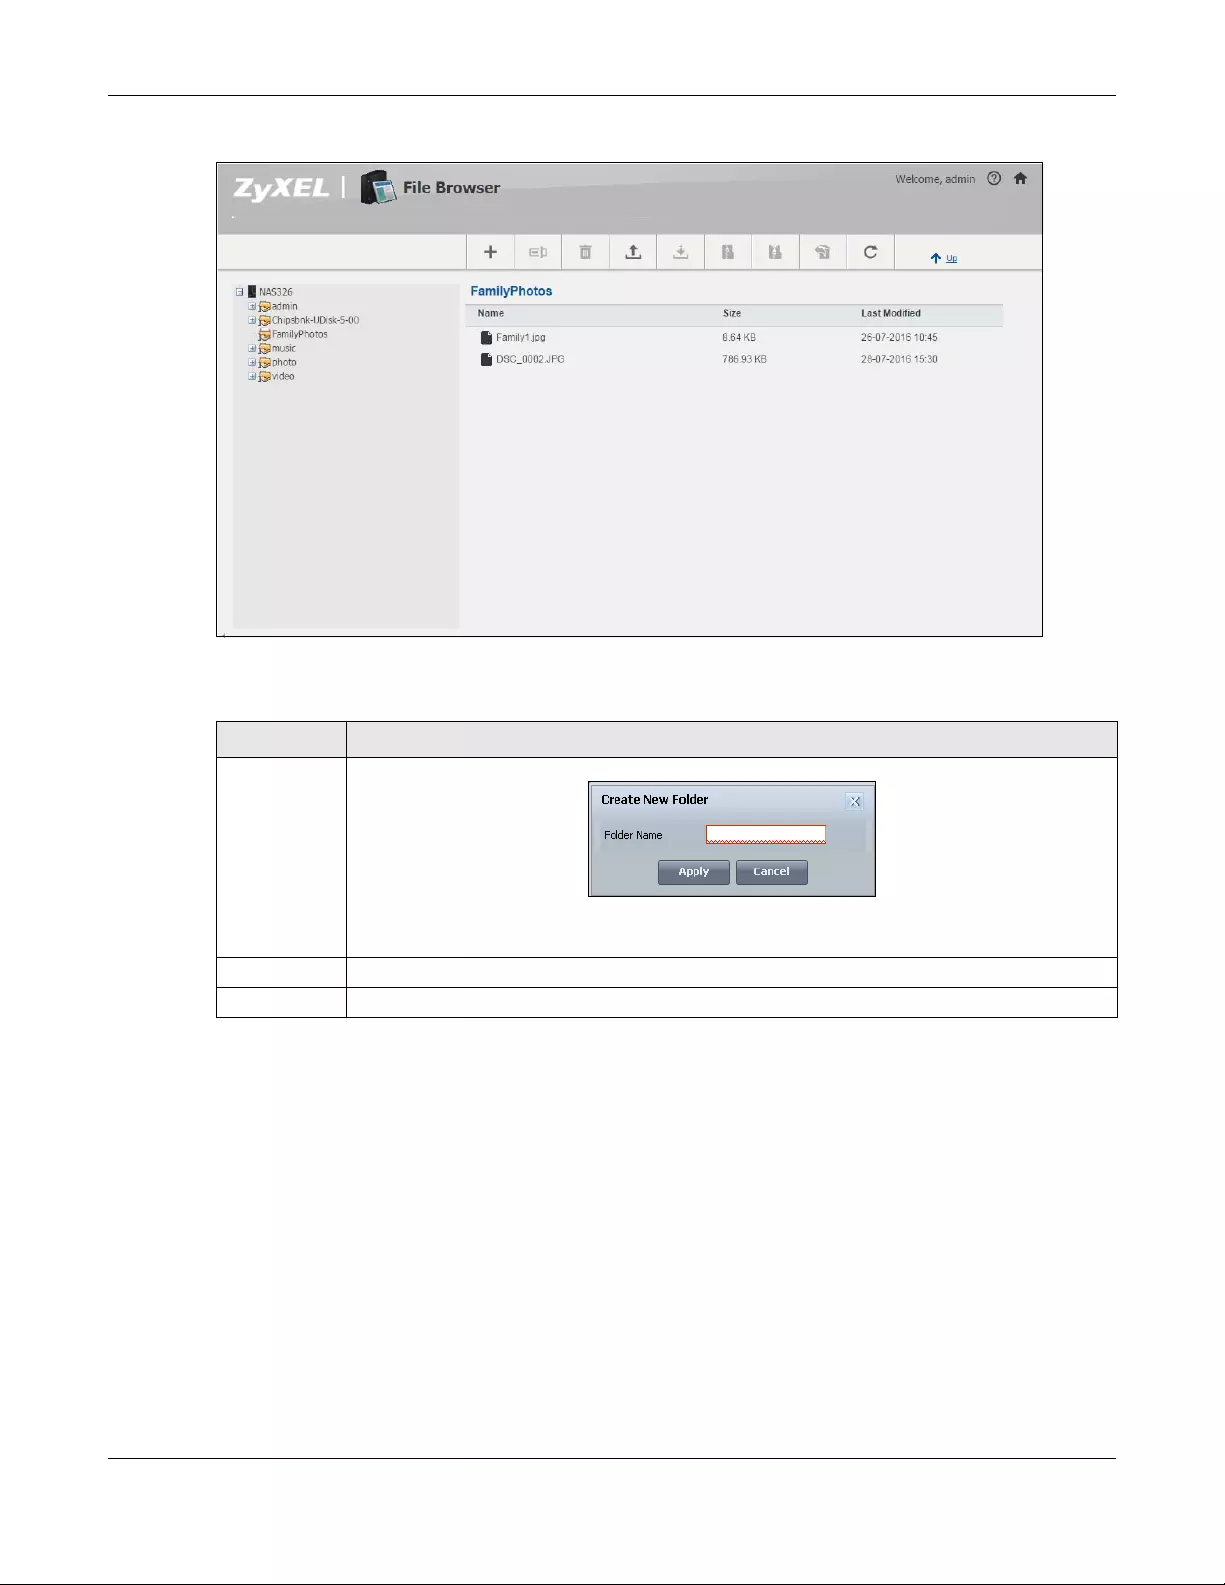
Chapter 17 File Browser, Photo, Music & Video
NAS Series User’s Guide
293
Figure 241 File Browser
The following table describes the labels in this screen.
Table 160 File Browser
LABEL DESCRIPTION
Create New
Folder
Click this to open the following screen where you can create a new folder within the share.
Specify a name to identify the folder. See Section 7.5.1 on page 120 for more information on folder
names. Click Apply to create a folder or click Cancel to exit this screen.
Rename Select a file or folder and click this to change its name.
Delete Select a file or folder and click this to delete it from the NAS.
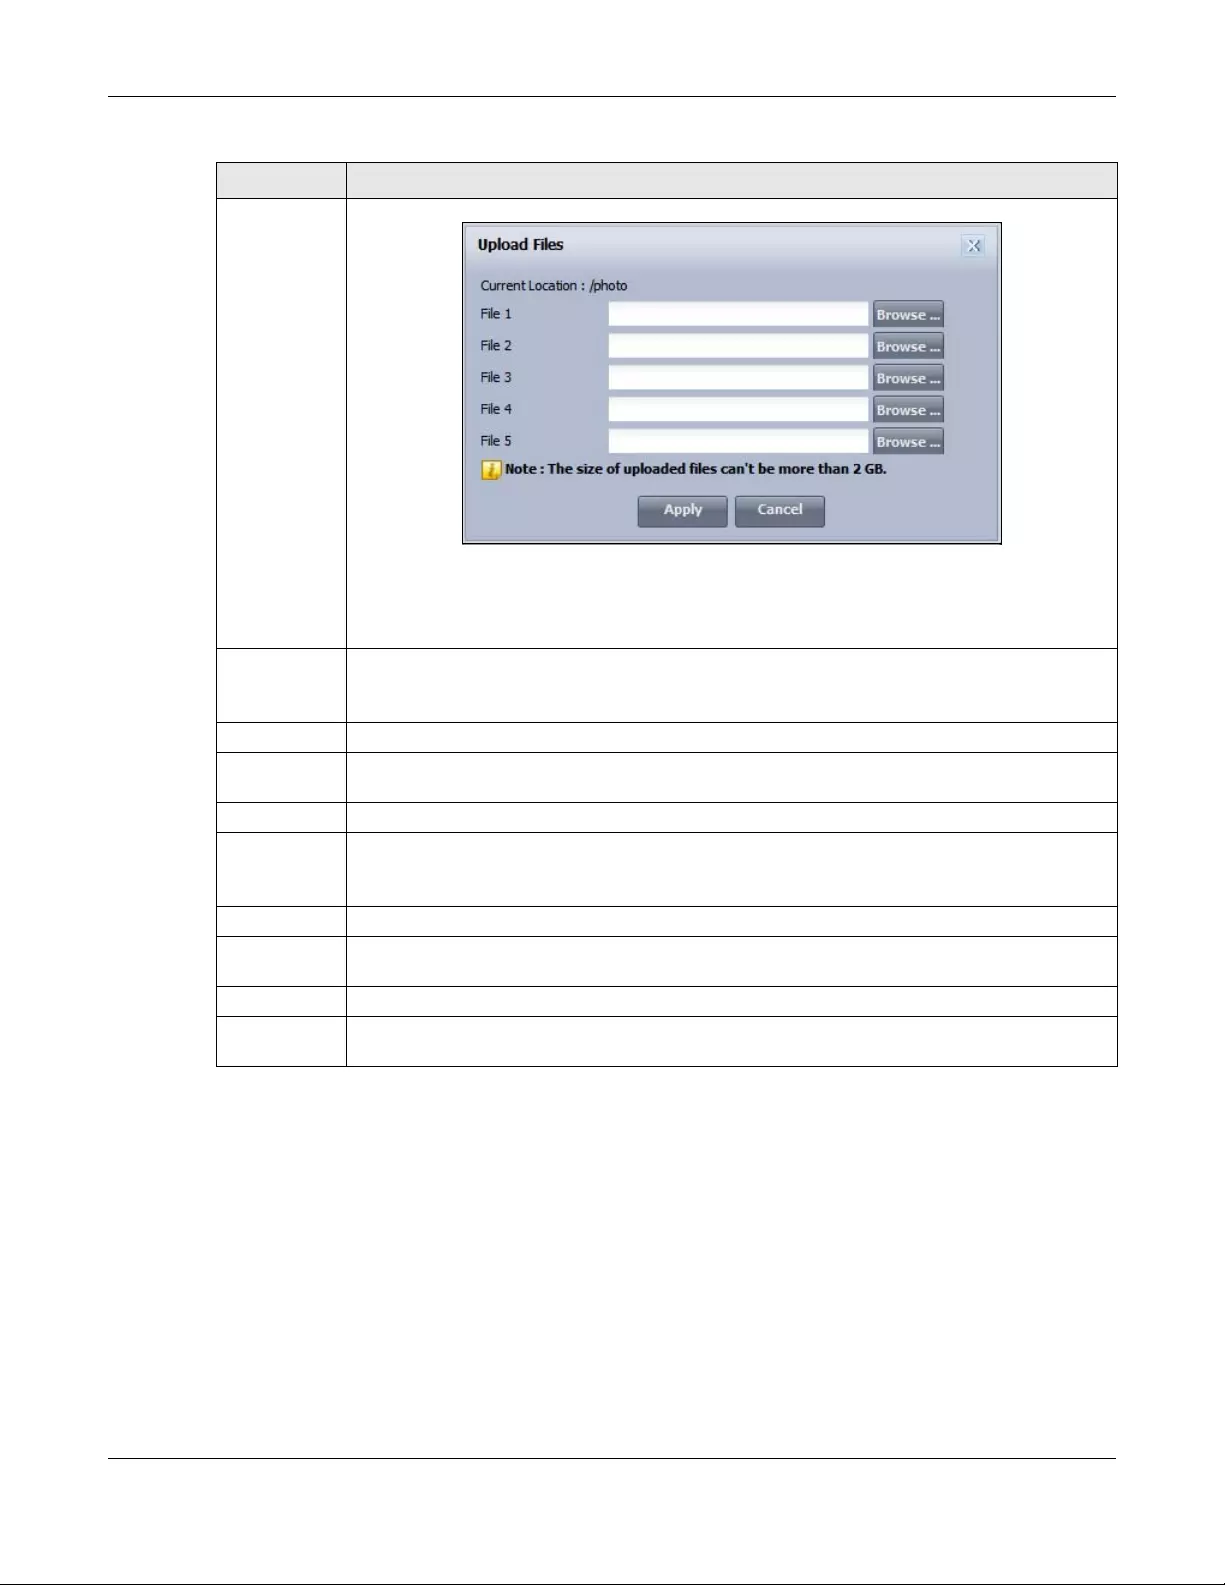
Chapter 17 File Browser, Photo, Music & Video
NAS Series User’s Guide
294
17.3 Photo
Click the Photo icon on the Desktop to open the photo folder in a new tab. Double-click the photo
folder to view photos in the shares that publish photos. The following figures show the files as thumbnail
and list views of files.
Upload Click this to open the following screen where you can add files to the share.
Use the Browse button to locate your file/s and click Apply to upload the file. Click Cancel to close
this screen.
Note: Do not refresh the screen while an upload is going on.
Download Select a file and click this to save the file to your computer.
Note: Do not refresh the screen while a download is going on.
Compress Select files or folders and click this to compress them into a zip file.
Decompress Select a zipped file and click this to create a folder named after the zip file and save the
decompressed files into the folder.
Restore When you are in a recycle bin folder, select a folder or file and click this to restore it.
Refresh Click this to update the information displayed in the screen.
Note: Do not refresh the screen while an upload or download is in progress.
Up Click this to go to the next higher layer in the share’s folder tree.
Name This column identifies the names of folders and files in the share. Click a file’s file name to open the
file or save it to your computer. Click a folder’s name to display the folder’s contents.
Size This column displays a file’s size in bytes.
Last Modified This column displays the last time the file or folder was changed (in year-month-day
hour:minute:second format).
Table 160 File Browser (continued)
LABEL DESCRIPTION
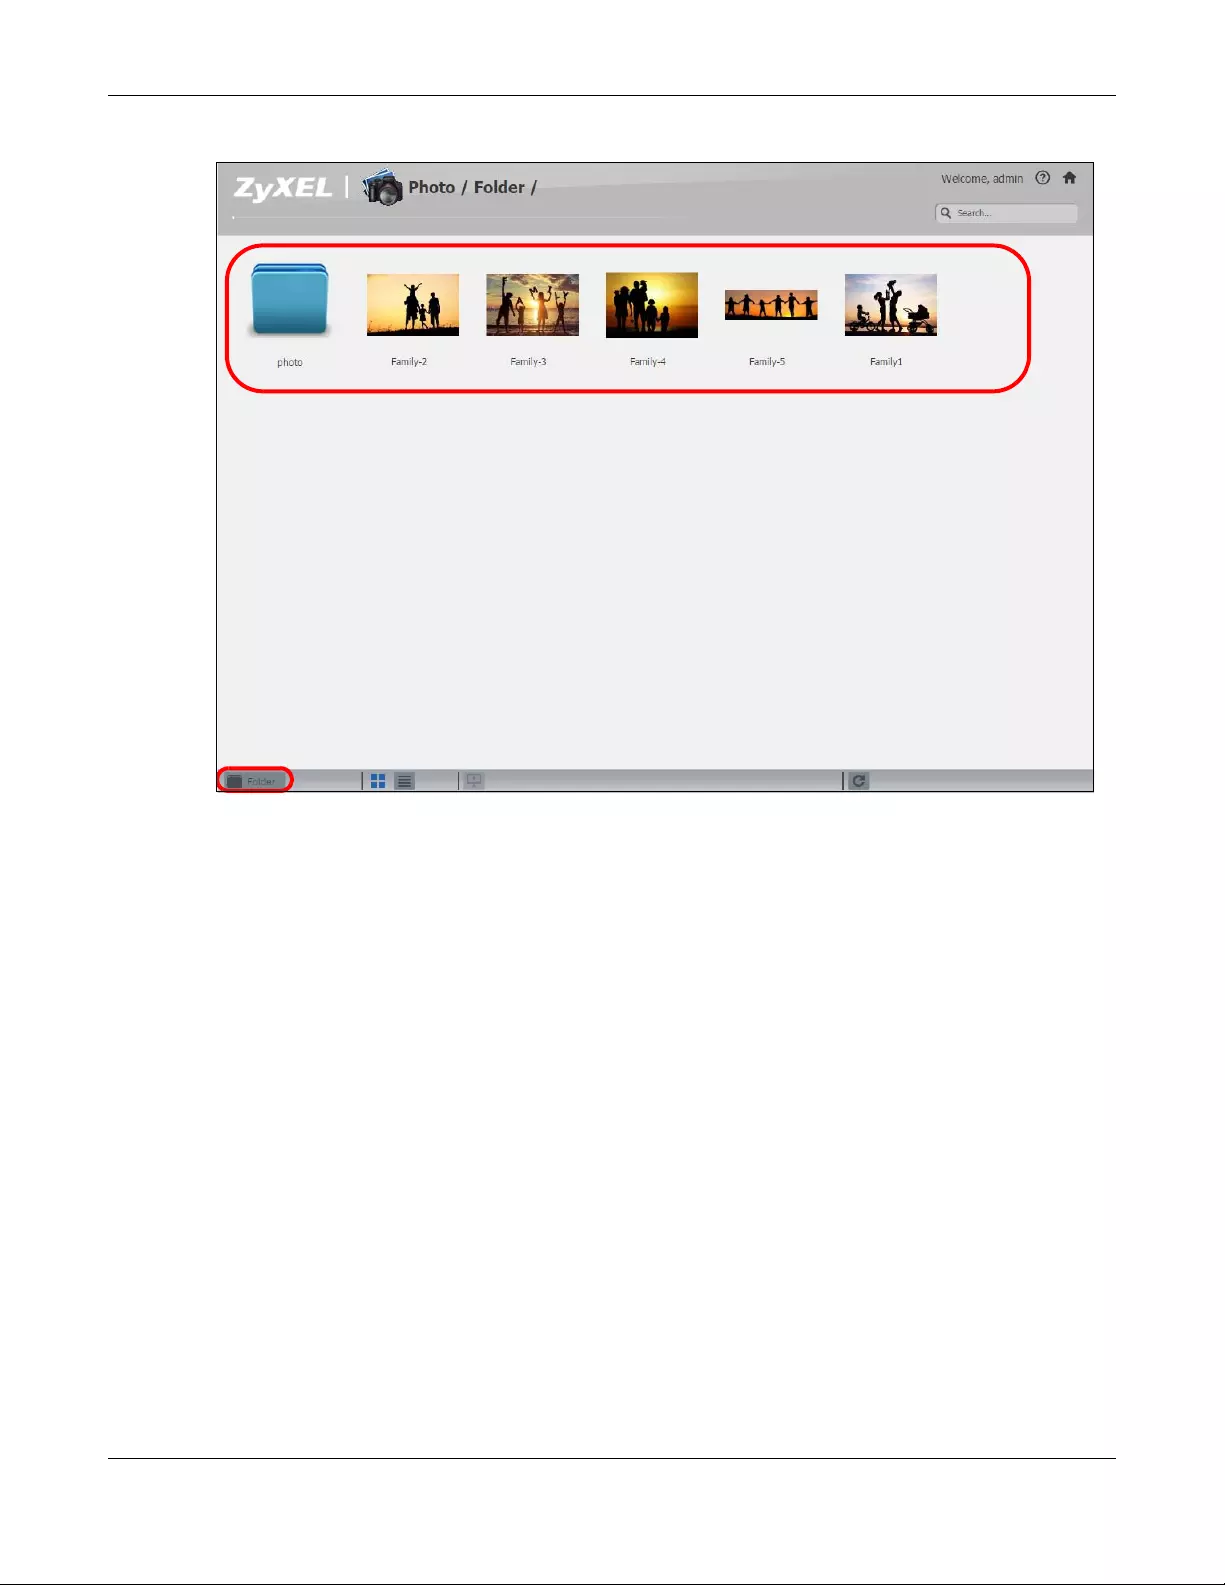
Chapter 17 File Browser, Photo, Music & Video
NAS Series User’s Guide
295
Figure 242 Photo (Thumbnail)
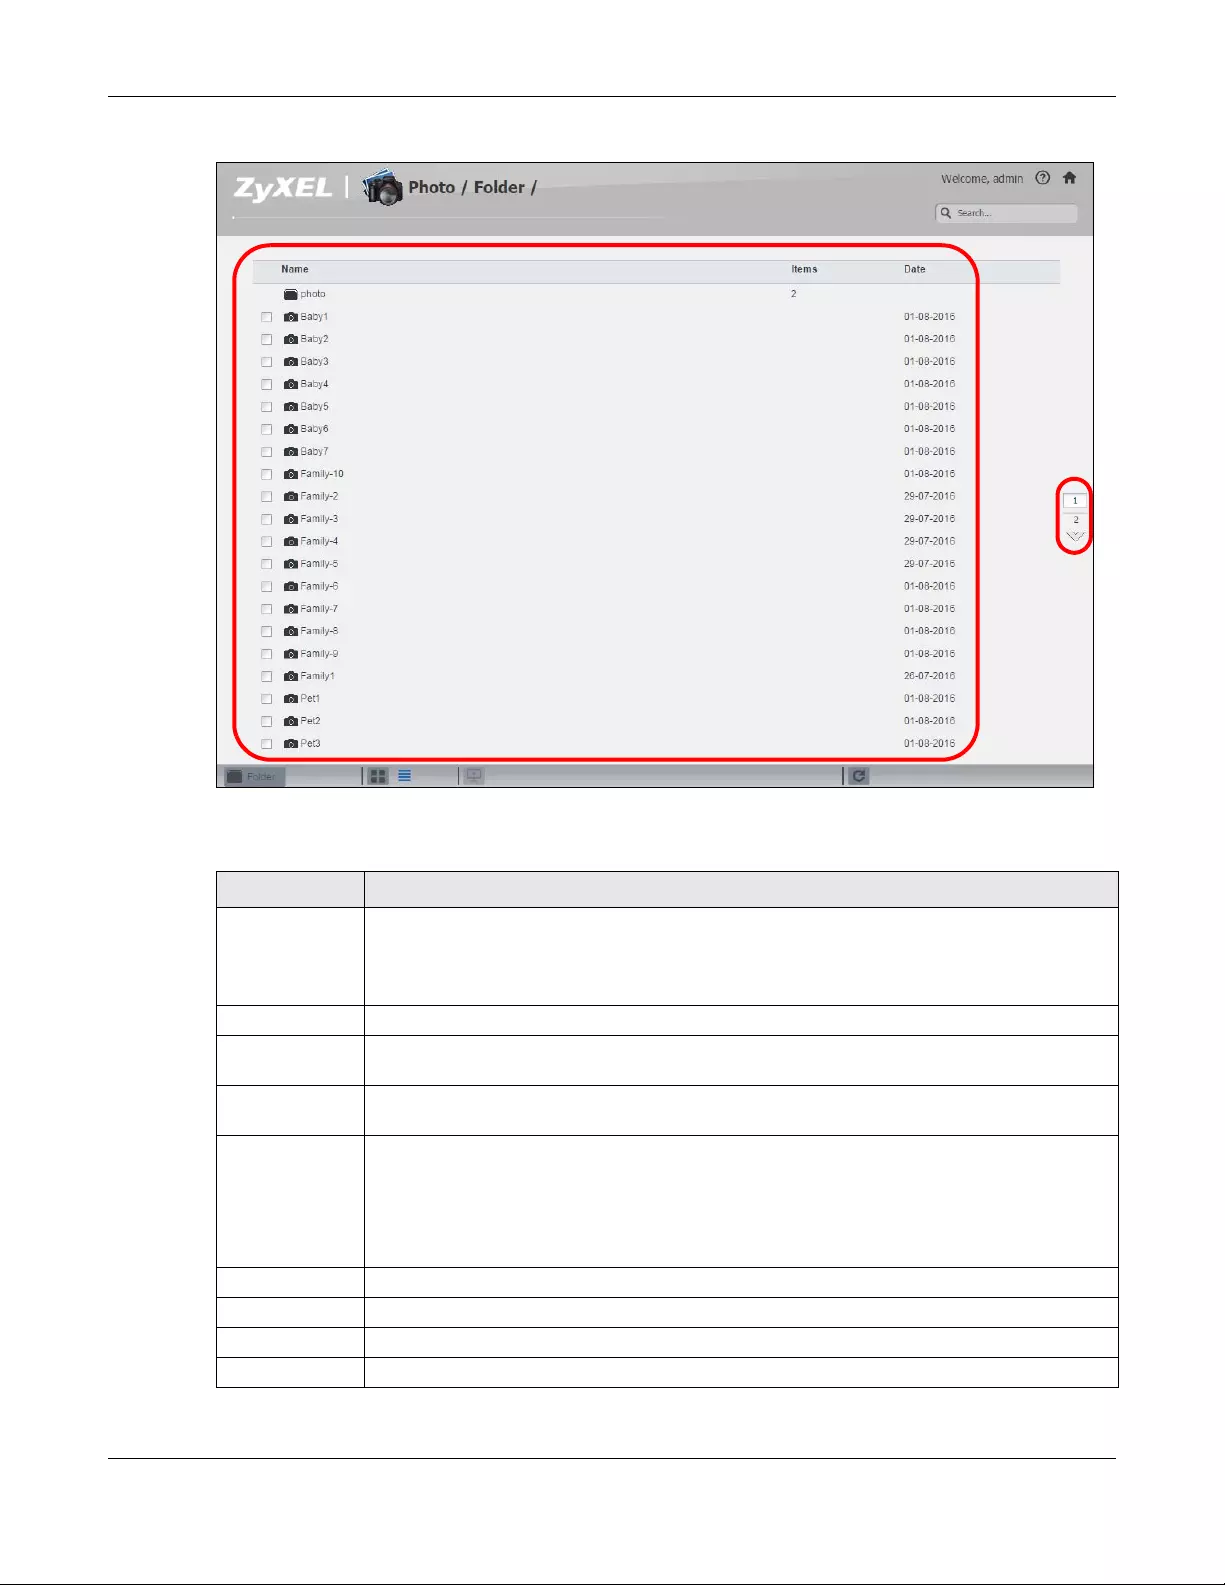
Chapter 17 File Browser, Photo, Music & Video
NAS Series User’s Guide
296
Figure 243 Photo (List)
The following table describes the labels in this screen.
Table 161 Photo Screen
LABEL DESCRIPTION
Zyxel The path of the current view.
Click an underlined link to go to that location in the path.
Music, Photo, or Video indicates the category of files.
Search Use this to look for a file by name.
A View files. Double-click an item to play it. You can also select check boxes for multiple items
when you display the files as a list.
B The current page and total number of pages displays when a category has multiple pages of
entries. Click an arrow or type a number to go to another page of entries.
C Select a view type for displaying folders and files:
Date — Sort photos by date.
All — Display all of the category’s files.
Folder — List the folders containing files.
Thumbnail Click this to view the files as thumbnails.
List Click this to view the files as a list.
Slideshow Click this to display files as a slideshow.
Refresh Click this to update the display in the screen.
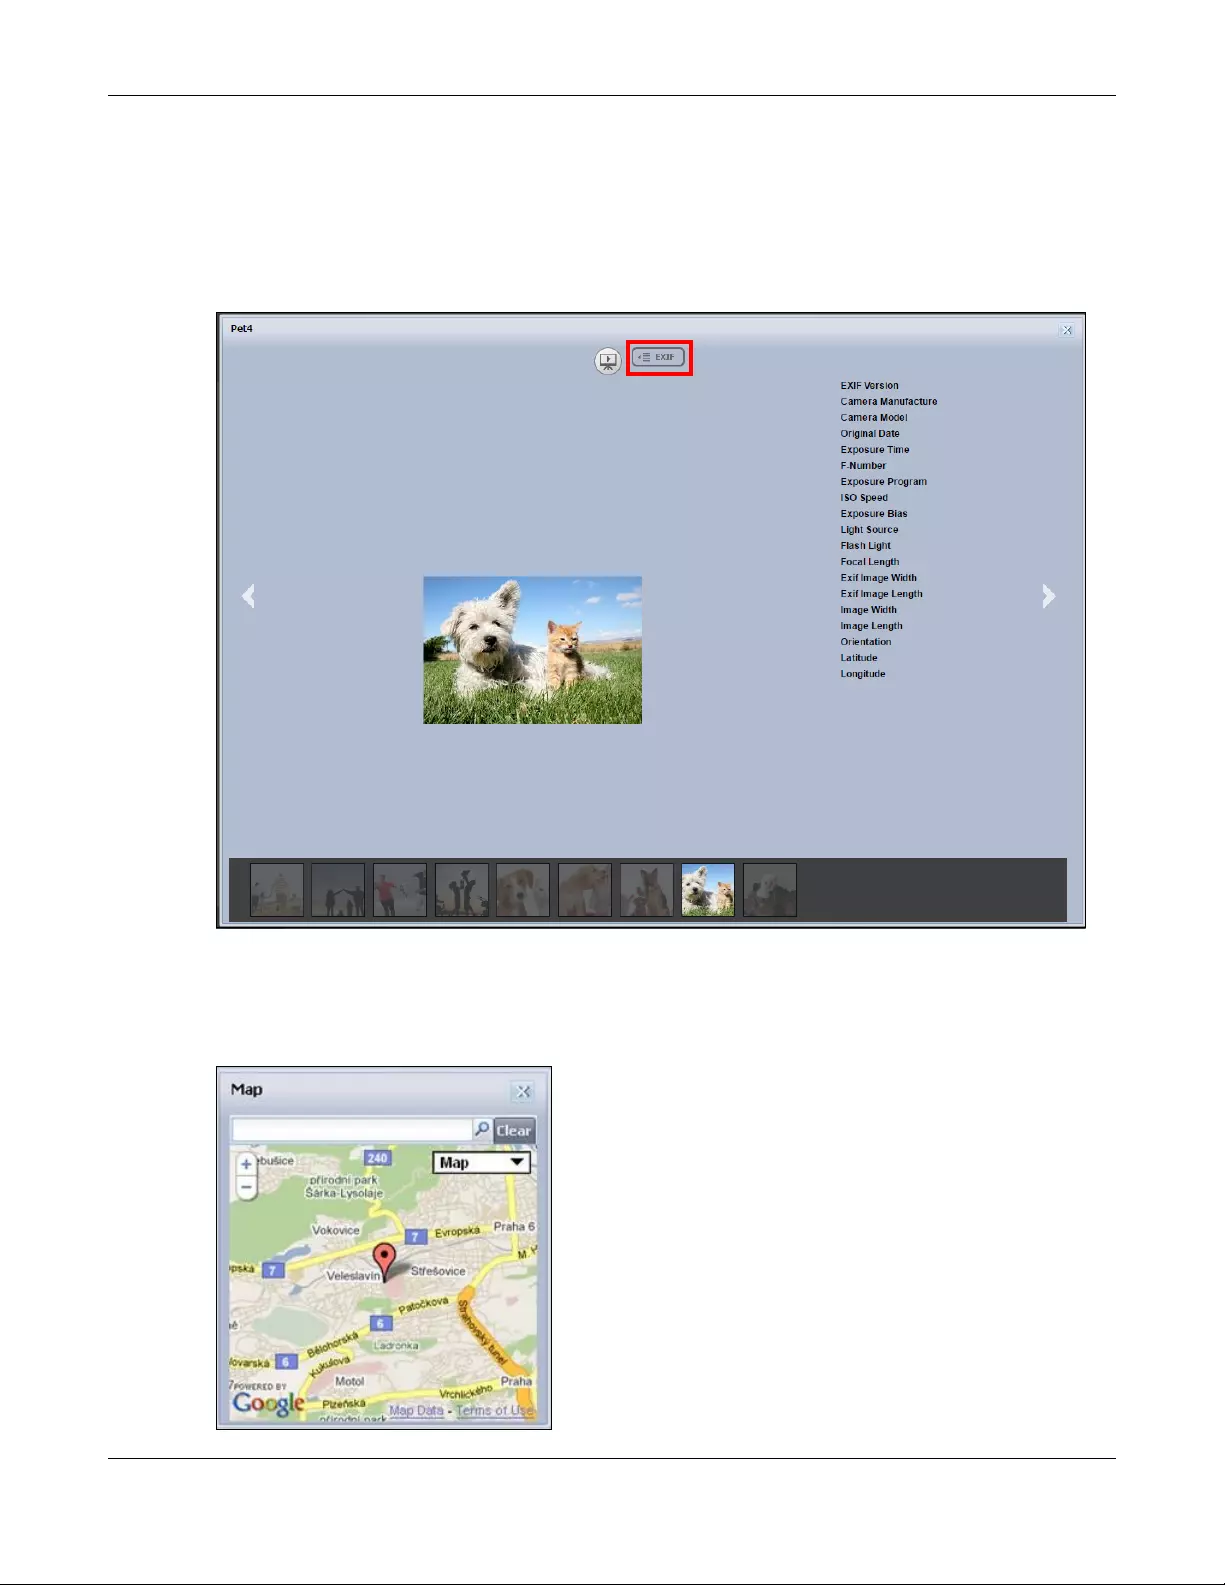
Chapter 17 File Browser, Photo, Music & Video
NAS Series User’s Guide
297
17.3.1 Exif and Google Maps (Photos)
Double-click a photo file to display it. Thumbnails of all photos in the view display across the bottom of
the screen. Click a photo’s EXIF button to display or hide the photo’s Exchangeable image file format
(Exif) data.
Figure 244 Exif Information
If a photo’s Exif data includes GPS location data, click the latitude or longitude link to display the
location in Google Maps. Click Clear to delete the markers of other photos and only display the current
photo’s marker.
Figure 245 Google Maps
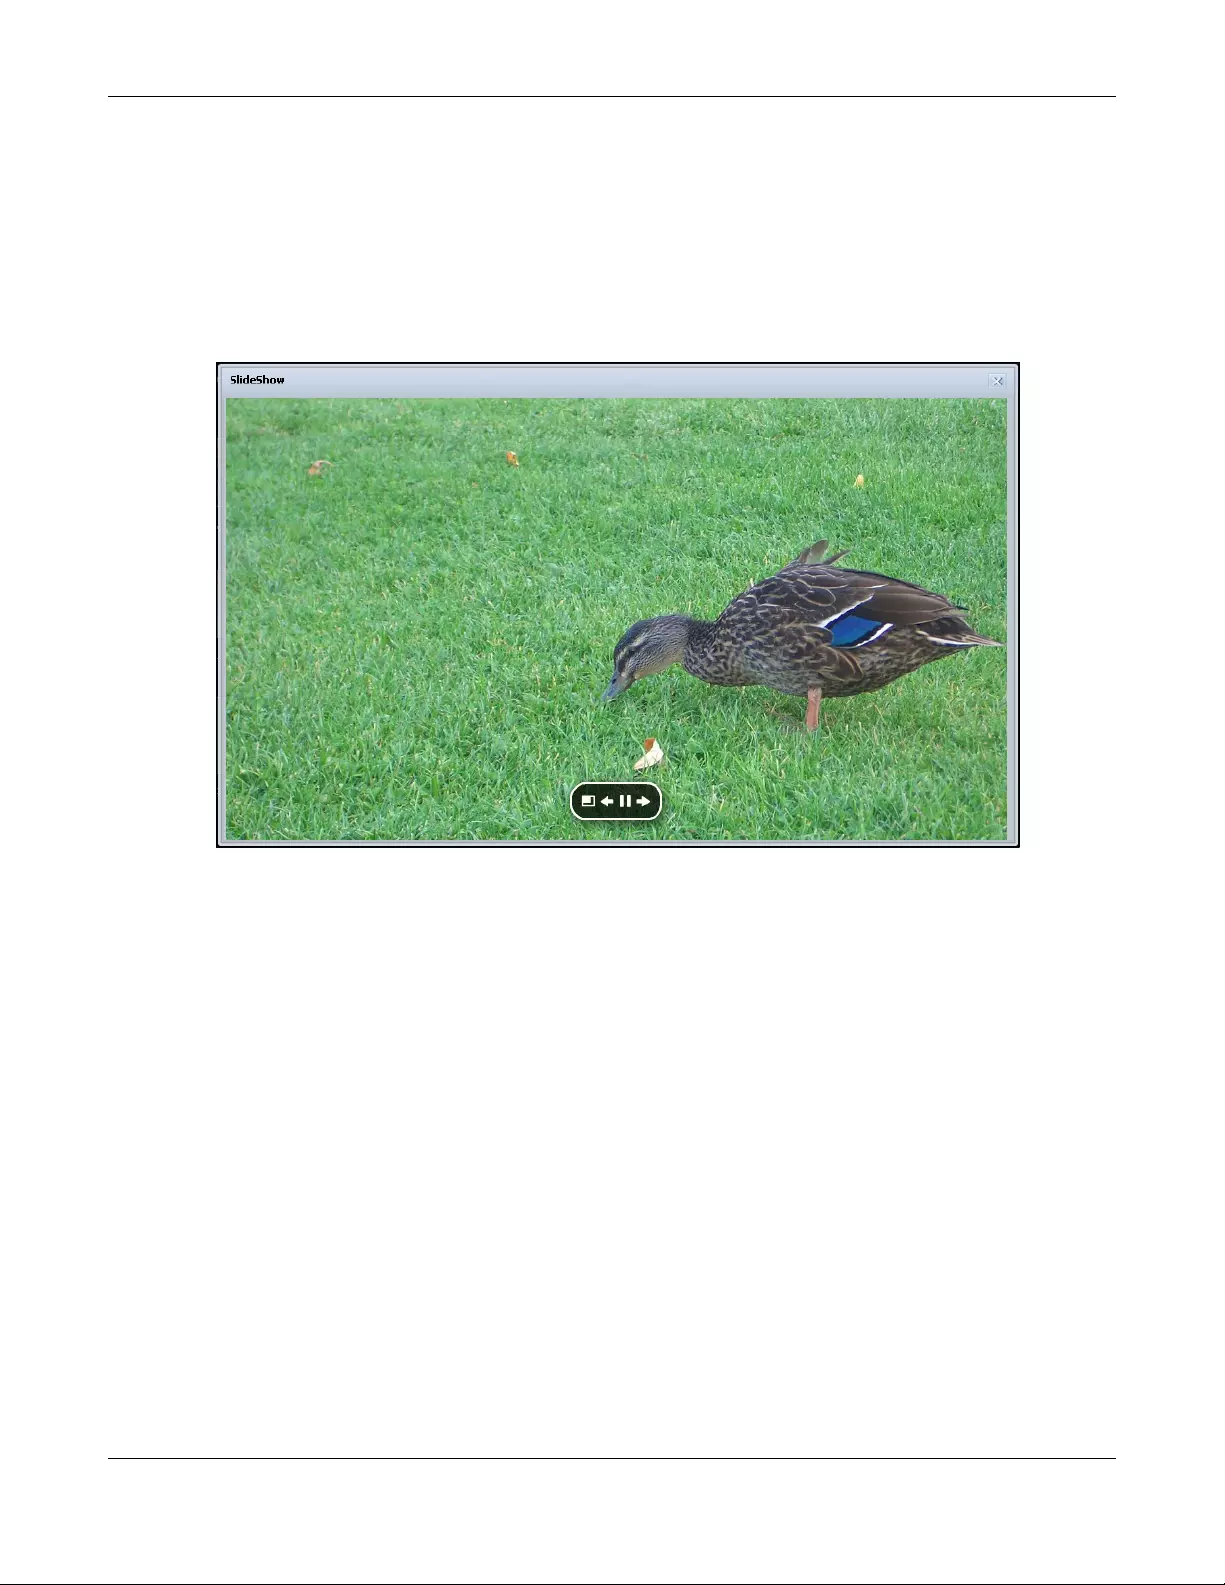
Chapter 17 File Browser, Photo, Music & Video
NAS Series User’s Guide
298
17.3.2 Slideshow (Photos)
In a Photo menu click the SlideShow button to display the menu’s files as a slideshow. Move your cursor
over the slideshow’s screen to display full screen, previous, pause, and next buttons for controlling the
slideshow.
Note: Your browser must have the Flash Player plug-in installed to view slideshows.
Figure 246 Slideshow
17.4 Music
Click the Music icon on the Desktop to open the music folder in a new tab. Double-click the music folder
to view and play music files in the shares that publish photos. The following figures show thumbnail and
list views of files.
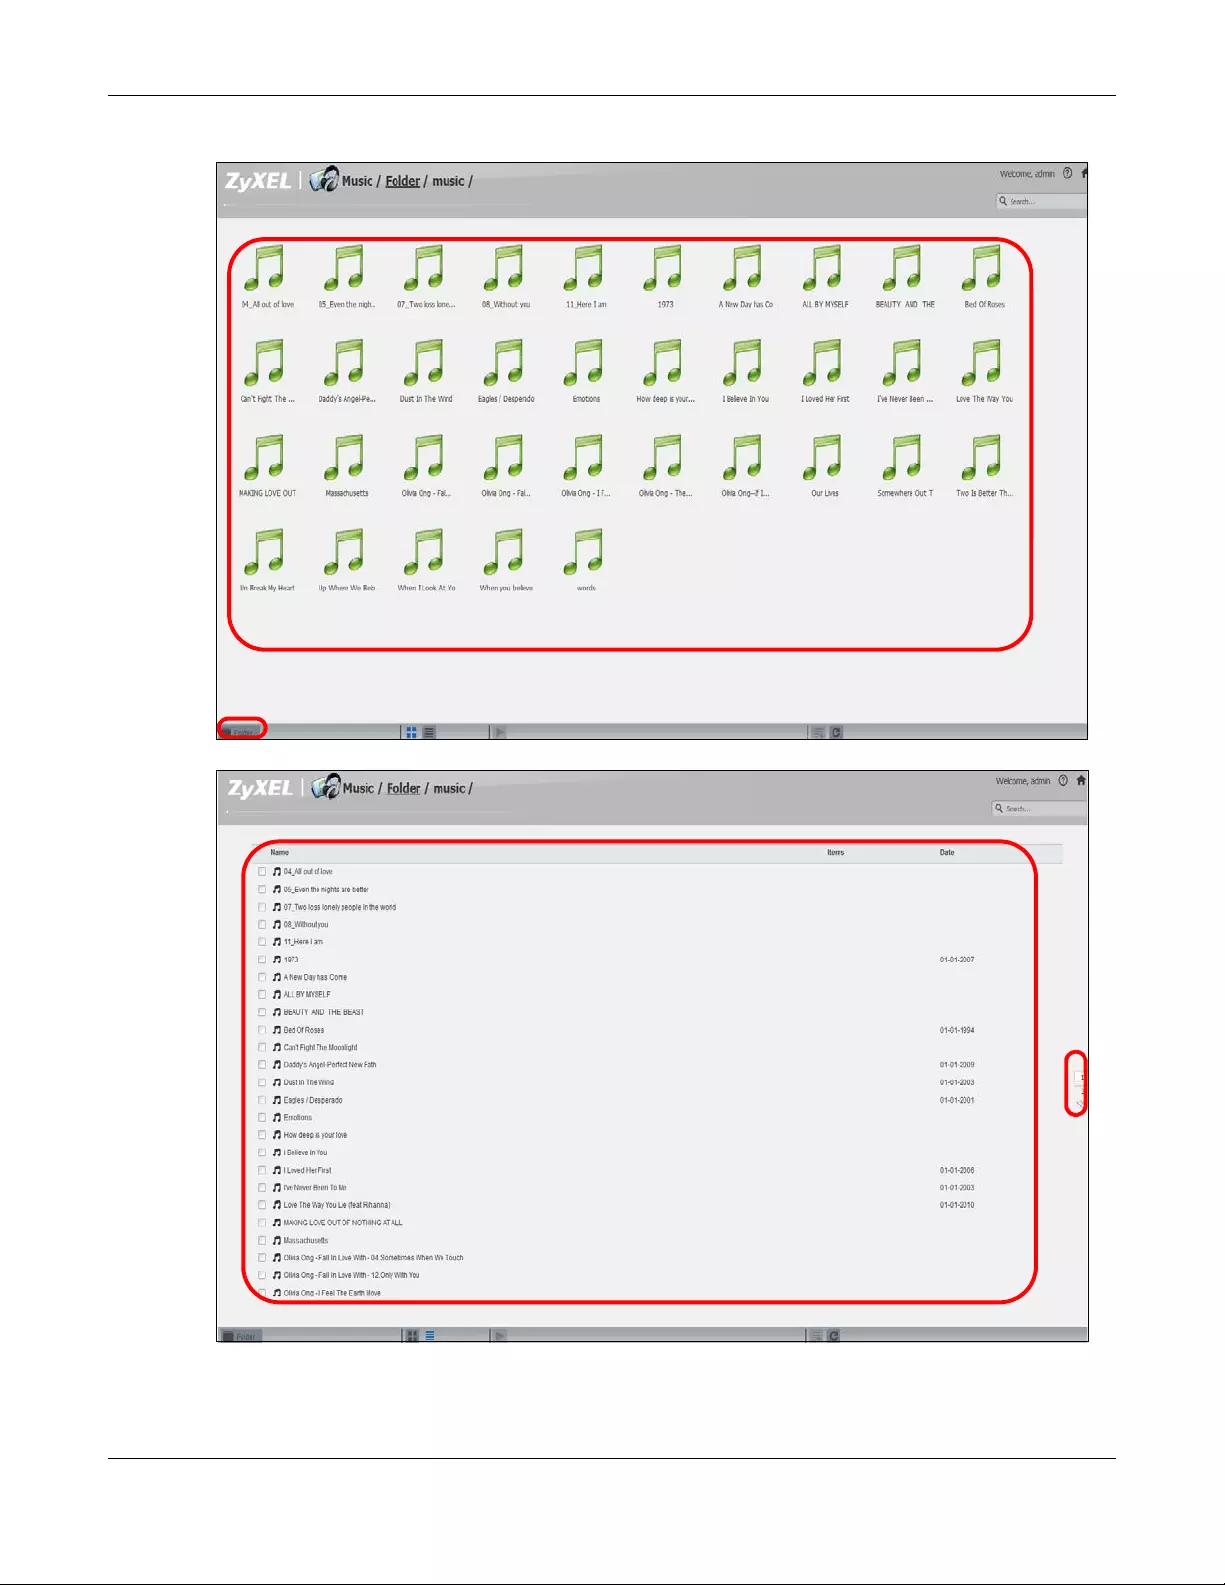
Chapter 17 File Browser, Photo, Music & Video
NAS Series User’s Guide
299
Figure 247 Music (Thumbnail)
Figure 248 Music (List)
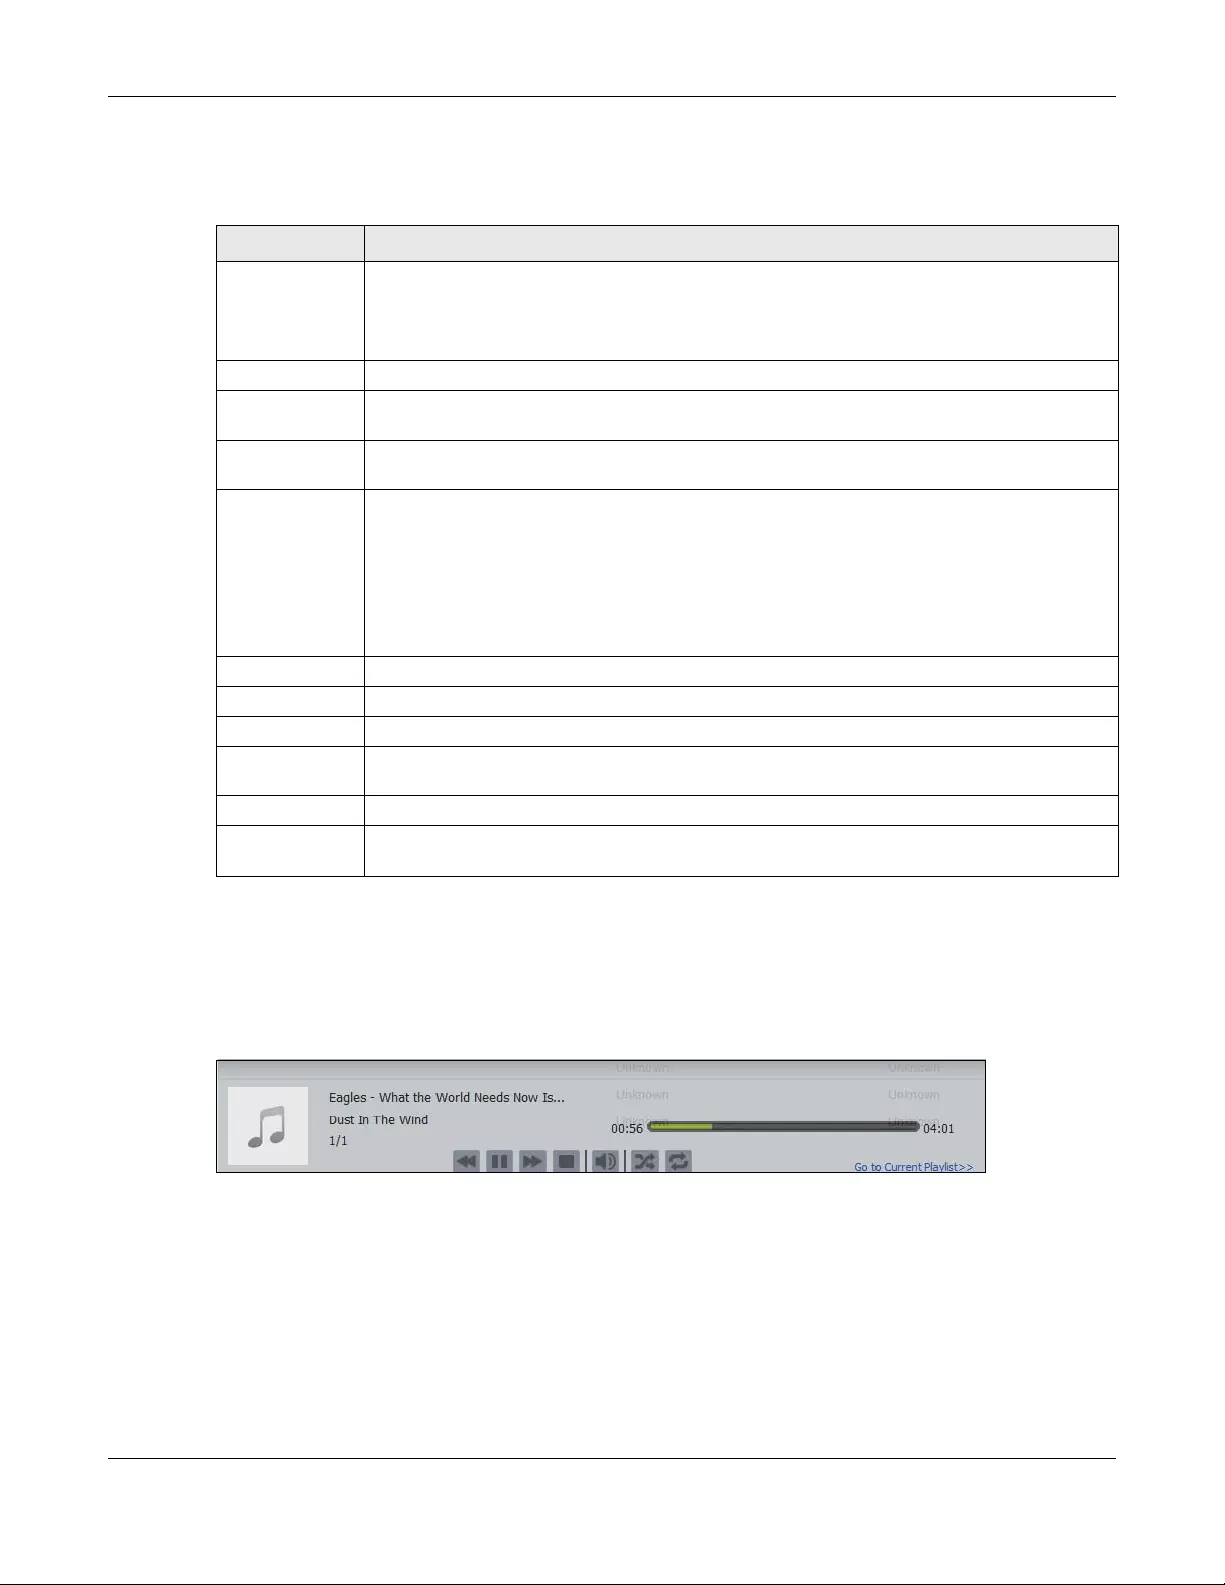
Chapter 17 File Browser, Photo, Music & Video
NAS Series User’s Guide
300
This table describes common labels in the Playzone media server screens. Not every item displays in
every screen.
17.4.1 Now Playing (Music)
A Now Playing link displays when a song is playing. Click it to display a panel like the following. This
screen displays the name of the current song and it’s play progress and lets you control the playback.
Figure 249 Now Playing
17.5 Video
Click the Video icon on the Desktop to open the video folder in a new tab. Double-click the video folder
to view and play video files in the shares that publish videos. The following figures show the thumbnail
and list views of files.
Table 162 Music Screen
LABEL DESCRIPTION
Zyxel The path of the current view.
Click an underlined link to go to that location in the path.
Music, Photo, or Video indicates the category of files.
Search Use this to look for a file by name.
A View files. Double-click an item to play it. You can also select check boxes for multiple items
when you display the files as a list.
B The current page and total number of pages displays when a category has multiple pages of
entries. Click an arrow or type a number to go to another page of entries.
C Select a view type for displaying folders and files:
Artist — Sort music by artist.
All — Display all of the category’s files.
Folder — List the folders containing music files.
Current Playlist — Show the playing and queued songs.
Thumbnail Click this to view the files as thumbnails.
List Click this to view the files as a list.
Play Click this to play the currently selected file. You can also double-click a file to play it.
Add to Current
Playlist
Click this to add the selected music file to the currently playing playlist.
Refresh Click this to update the display in the screen.
Now Playing This link is available when a song is playing. Click it to see details about the song that is currently
playing.
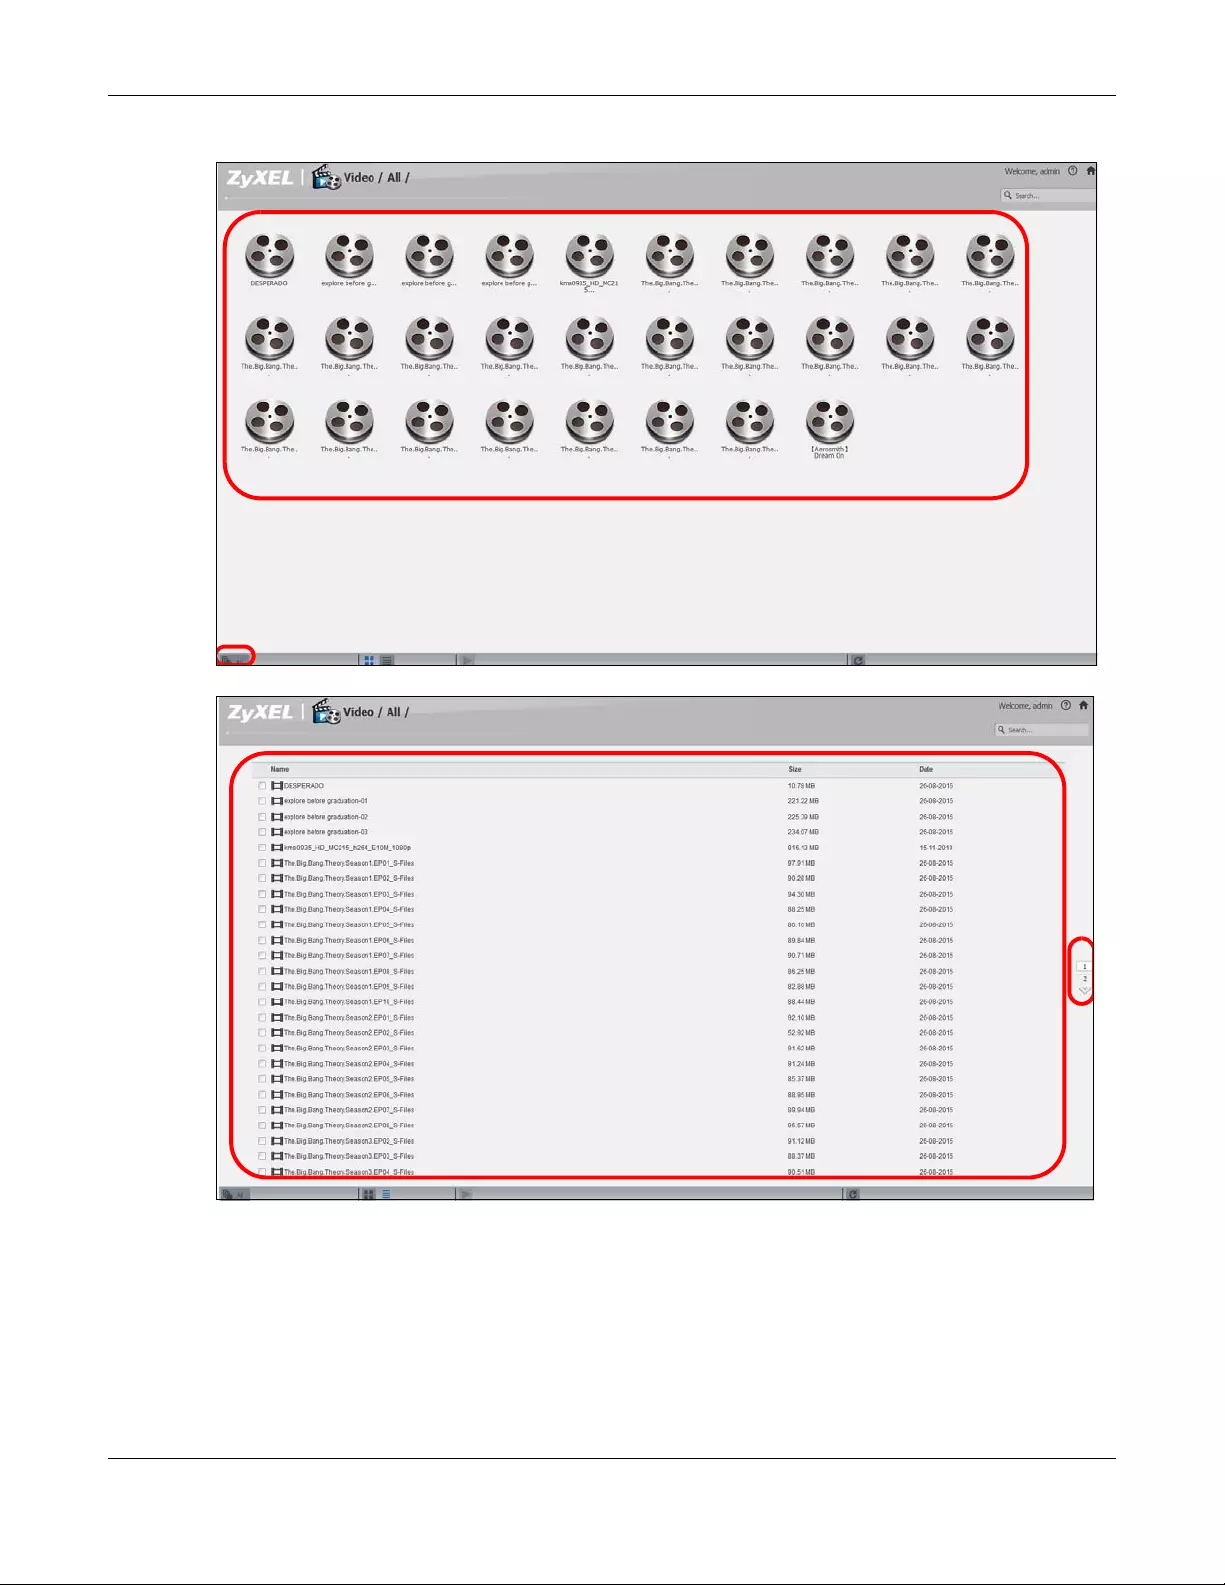
Chapter 17 File Browser, Photo, Music & Video
NAS Series User’s Guide
301
Figure 250 Video (Thumbnail)
Figure 251 Video (List)

Chapter 17 File Browser, Photo, Music & Video
NAS Series User’s Guide
302
The following table describes the labels in this screen.
17.6 Playzone Settings
The Playzone Settings screen is only available with user accounts. Click Playzone Settings to open the
following screen. Use this screen to change general Playzone screen settings.
Figure 252 Playzone Settings
Table 163 Video Screen
LABEL DESCRIPTION
Zyxel The path of the current view.
Click an underlined link to go to that location in the path.
Music, Photo, or Video indicates the category of files.
Search Use this to look for a file by name.
A View files. Double-click an item to play it. You can also select check boxes for multiple items
when you display the files as a list.
B The current page and total number of pages displays when a category has multiple pages of
entries. Click an arrow or type a number to go to another page of entries.
C Select a view type for displaying folders and files:
All — Display all of the category’s files.
Folder — List the folders containing music files.
Thumbnail Click this to view the files as thumbnails.
List Click this to view the files as a list.
Play Click this to play the currently selected file. You can also double-click a file to play it.
Refresh Click this to update the display in the screen.
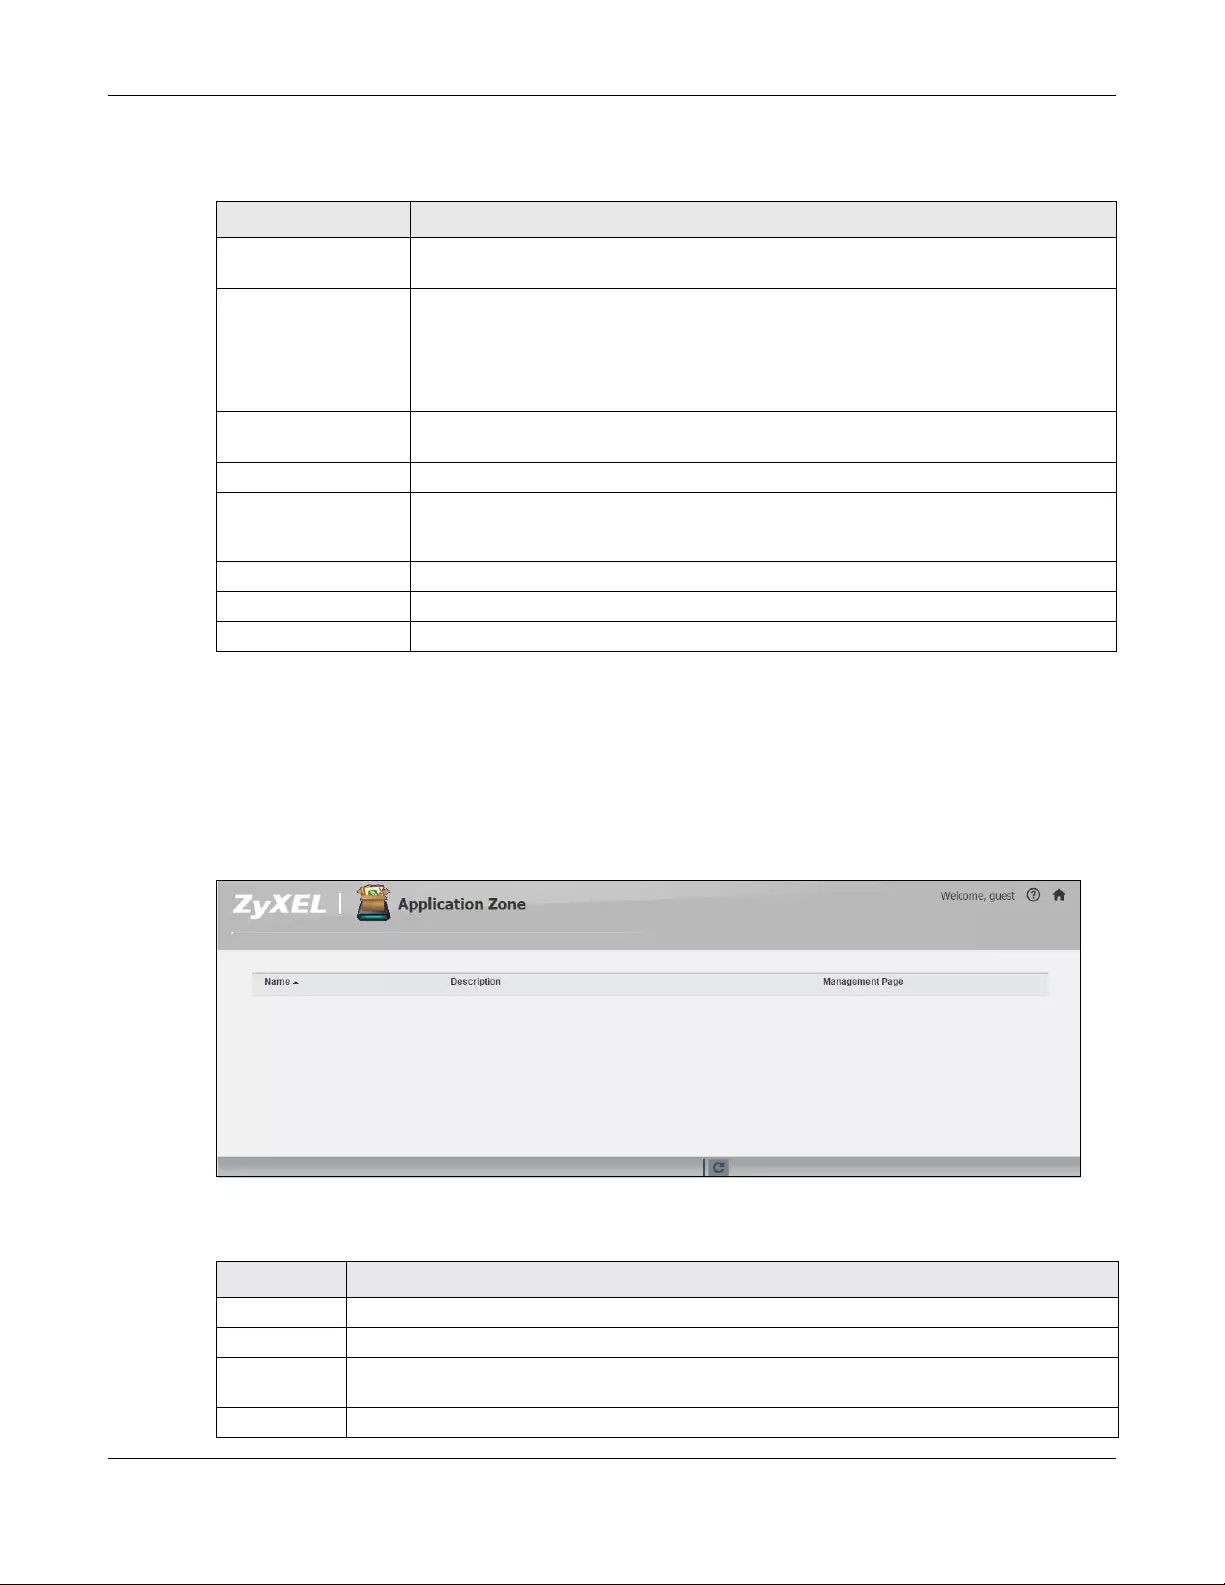
Chapter 17 File Browser, Photo, Music & Video
NAS Series User’s Guide
303
The following table describes the labels in this screen.
17.7 Application Zone
Normal users can click Application Zone to go to the management page of installed, non-built-in
packages.
Figure 253 Application Zone
The following table describes the labels in the this screen.
Table 164 Playzone Settings
LABEL DESCRIPTION
WMP This field displays “Installed” if you already have Windows Media Player installed or a link
for installing it if you do not already have it installed.
Double Click Behavior
Setting
Select Replace current playlist and start to play to have double clicking a song cause the
NAS to immediately stop any currently playing song and start playing the double-clicked
song.
Select Append to current playlist to have double clicking a song add a song to the end of
the current playlist.
Slide Effect Enable the Ken Burns effect to have the NAS automatically pan and zoom photos in
slideshows. Disable it to display photos in slideshows normally.
Slide Interval Select how long to display each image in a slideshow before changing to the next.
Video Playback Select Play Next to play the rest of the video files in a folder. So for example, a folder has
video files 1~10 and you play video 3. When video 3 finishes the device continues playing
the rest of the videos in the folder (4~10). It does not loop back and play videos 1 and 2.
Apply Click this to save your changes.
Reset Click this to refresh the screen.
Cancel Click this to exit the screen without saving your changes.
Table 165 Application Zone
LABEL DESCRIPTION
Name This is the name of the application.
Description This is a brief description of the application.
Management
Page
Click this link to go the application’s management page where you can configure settings for it.
Refresh Update the list of applications in the screen.
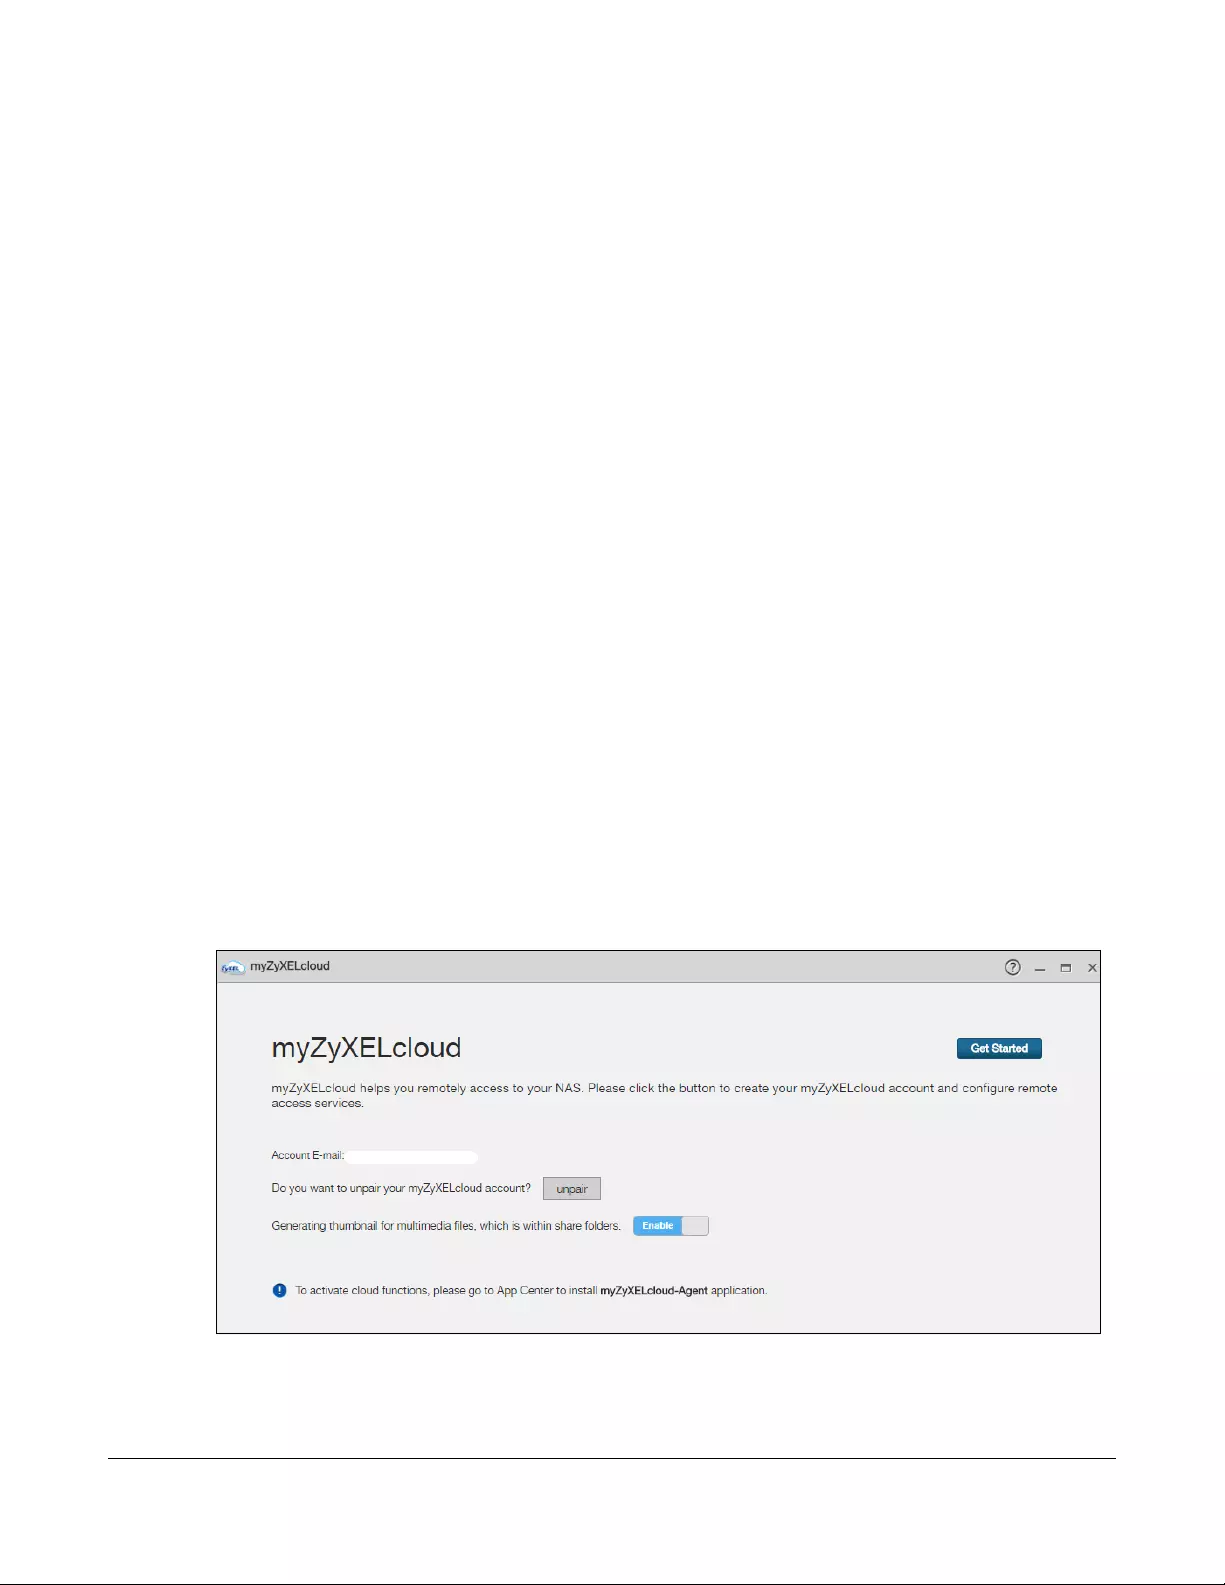
NAS Series User’s Guide
304
CHAPTER 18
Access Your Cloud Remotely
via myZyxelCloud and Zyxel
Drive App
Use the NAS to set up your own secure personal cloud. Keep your videos, photos, music, and files safely
at home and under your control. Access, share, and stream files from anywhere using your PC, Mac
computer, and mobile devices.
18.1 myZyxelCloud Service
Use the myZyxelCloud service at https://mycloud.zyxel.com to set up a free hostname like
name.zyxel.me and set the NAS to use it. This lets you easily access the NAS through the Internet. The
myZyxelcloud web portal also lets you monitor the NAS’s health from anywhere.
18.1.1 myZyxelCloud Screen
Click myZyxelCloud on the Desktop to display the following screen.
Figure 254 Desktop > myZyxelCloud

Chapter 18 Access Your Cloud Remotely via myZyxelCloud and Zyxel Drive App
NAS Series User’s Guide
305
The following table describes the labels in this screen.
18.1.2 Pair your NAS
After you click Get Started in the myZyxelCloud screen to create an account and sign in, follow the
steps below to pair the NAS and your myZyxelCloud account.
Step 1 Search Devices
Click the Search Devices tab to find your NAS from the search list, and click the Pair NAS with account
button to pair the NAS.
If there are more than one NAS in your network and you don’t know the MAC address of the NAS with
which you want to pair, click the Locate NAS button to locate it. The LED of the NAS for which you click
the Locate NAS button will start to blink for 30 seconds.
If your NAS is not in the list, you can click Manually Add to go to a screen, where you can enter the NAS’s
MAC address and serial number to find and display it in the list.
Table 166 Desktop > myZyxelCloud
LABEL DESCRIPTION
Get Started Click this to go to mycloud.zyxel.com to create a myZyxelcloud account and
configure remote access services.
Account E-mail This field displays the myZyxelcloud account paired with the NAS.
Do you want to unpair your
myZyxelCloud account?
Click unpair to remove the pairing between the NAS and the myZyxelCloud account
if you want to pair the NAS with a different myZyxelCloud account.
You have to pair the NAS and your myZyxelCloud account before performing the
unpair.
Generating thumbnail for
multimedia files, which is
within share folders.
Click Enable to create media files as thumbnails in shared folders. Otherwise, click
Disable.
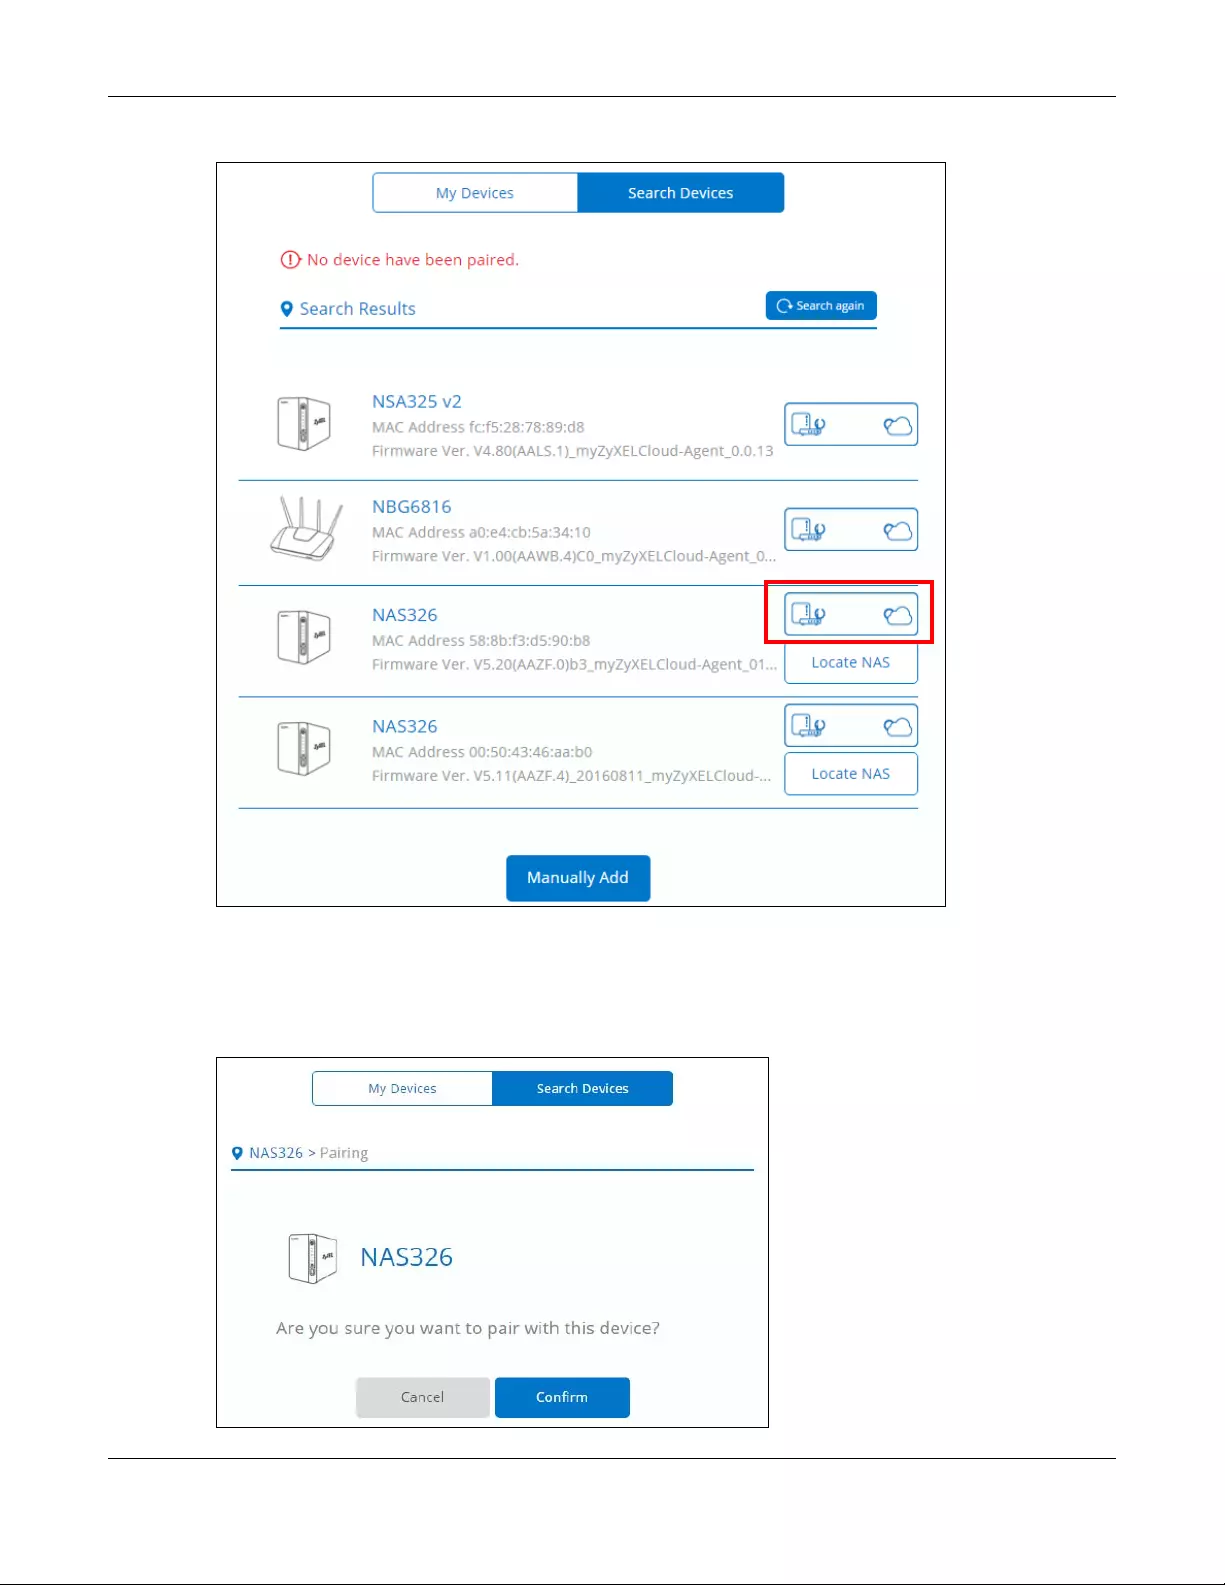
Chapter 18 Access Your Cloud Remotely via myZyxelCloud and Zyxel Drive App
NAS Series User’s Guide
306
Figure 255 myZyxelCloud > Search Devices
Step 2 Pairing
When the following Pairing screen displays, click Confirm to pair with your NAS.
Figure 256 myZyxelCloud > Pairing
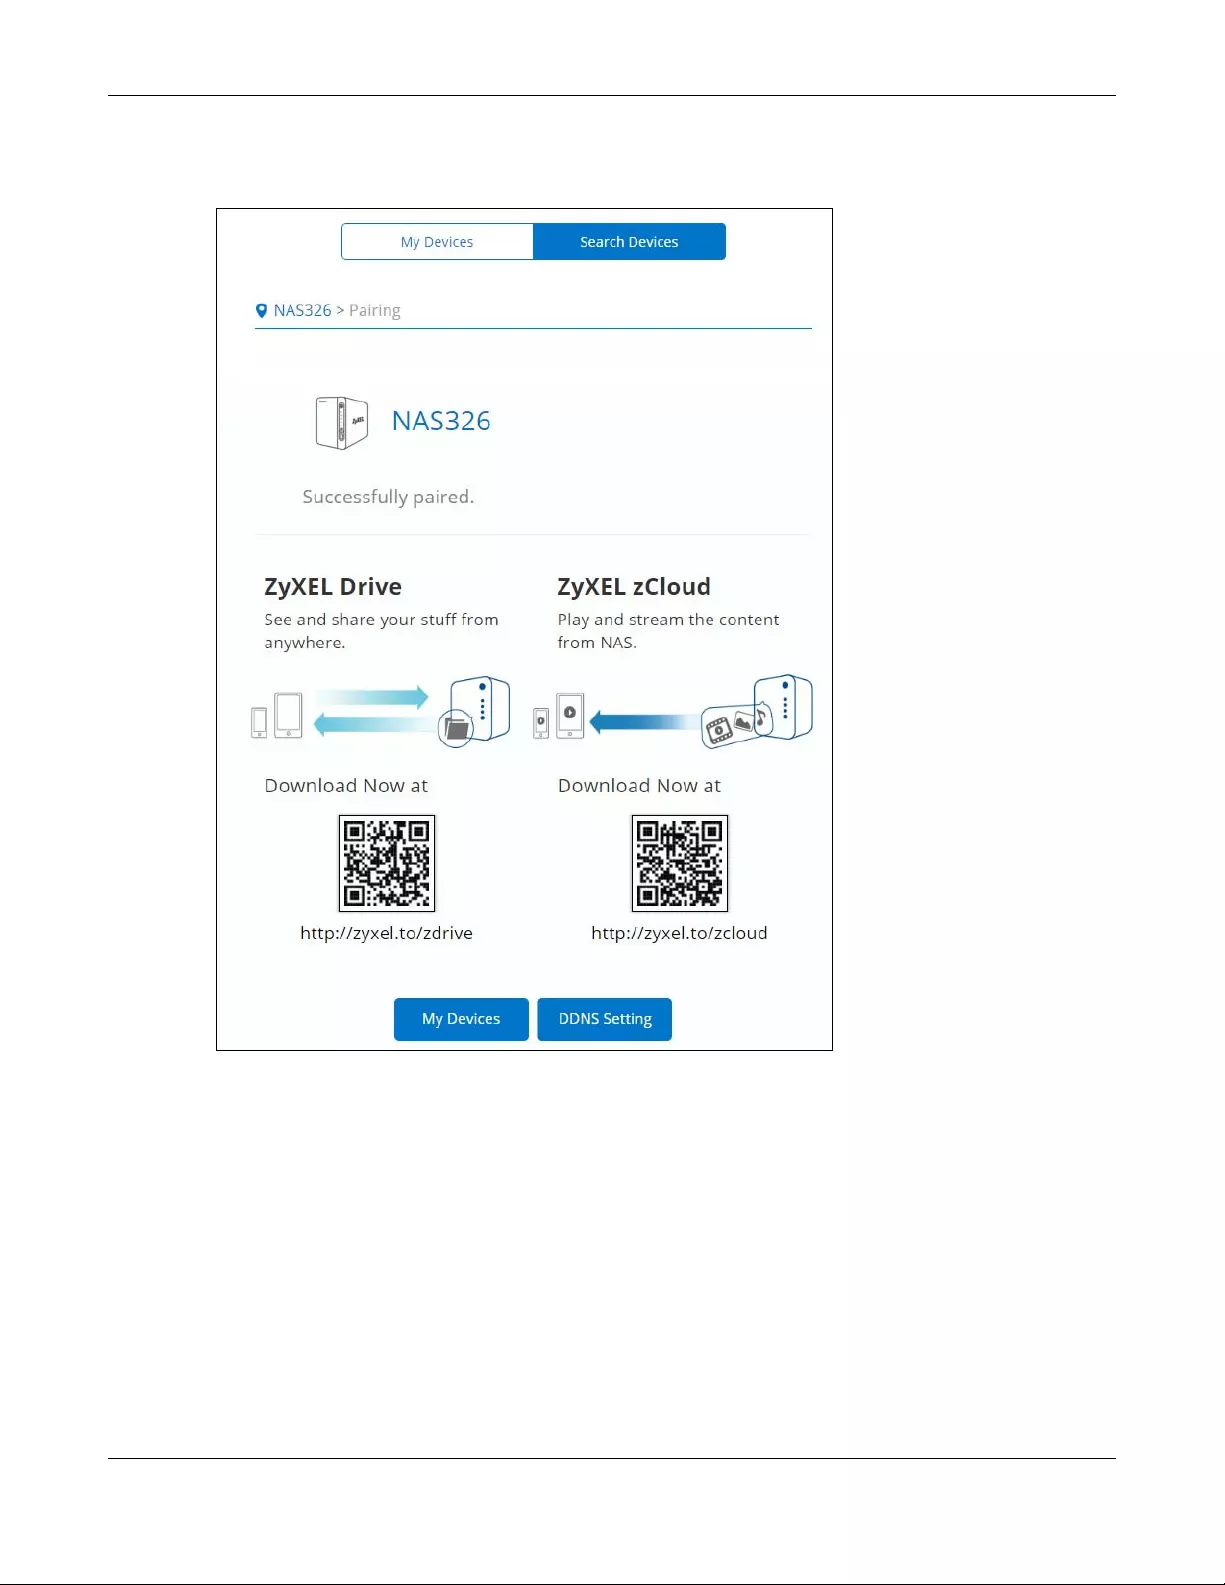
Chapter 18 Access Your Cloud Remotely via myZyxelCloud and Zyxel Drive App
NAS Series User’s Guide
307
When the NAS is successfully paired, the screen displays as shown next.
Figure 257 myZyxelCloud > Pairing: Successfully Paired
18.1.3 DDNS Setup
Use the free DDNS service to get a domain name mapped to the NAS’s IP address. With DDNS, you can
use the domain name to remotely access the NAS’s Web Configurator through the Internet.
Click DDNS Setting in the Successfully Paired screen or the DDNS Setup button in the My Devices screen
to set up a free hostname for the NAS. The DDNS Setting screen appears as shown next. Specify a host
name and click Submit to save your settings.
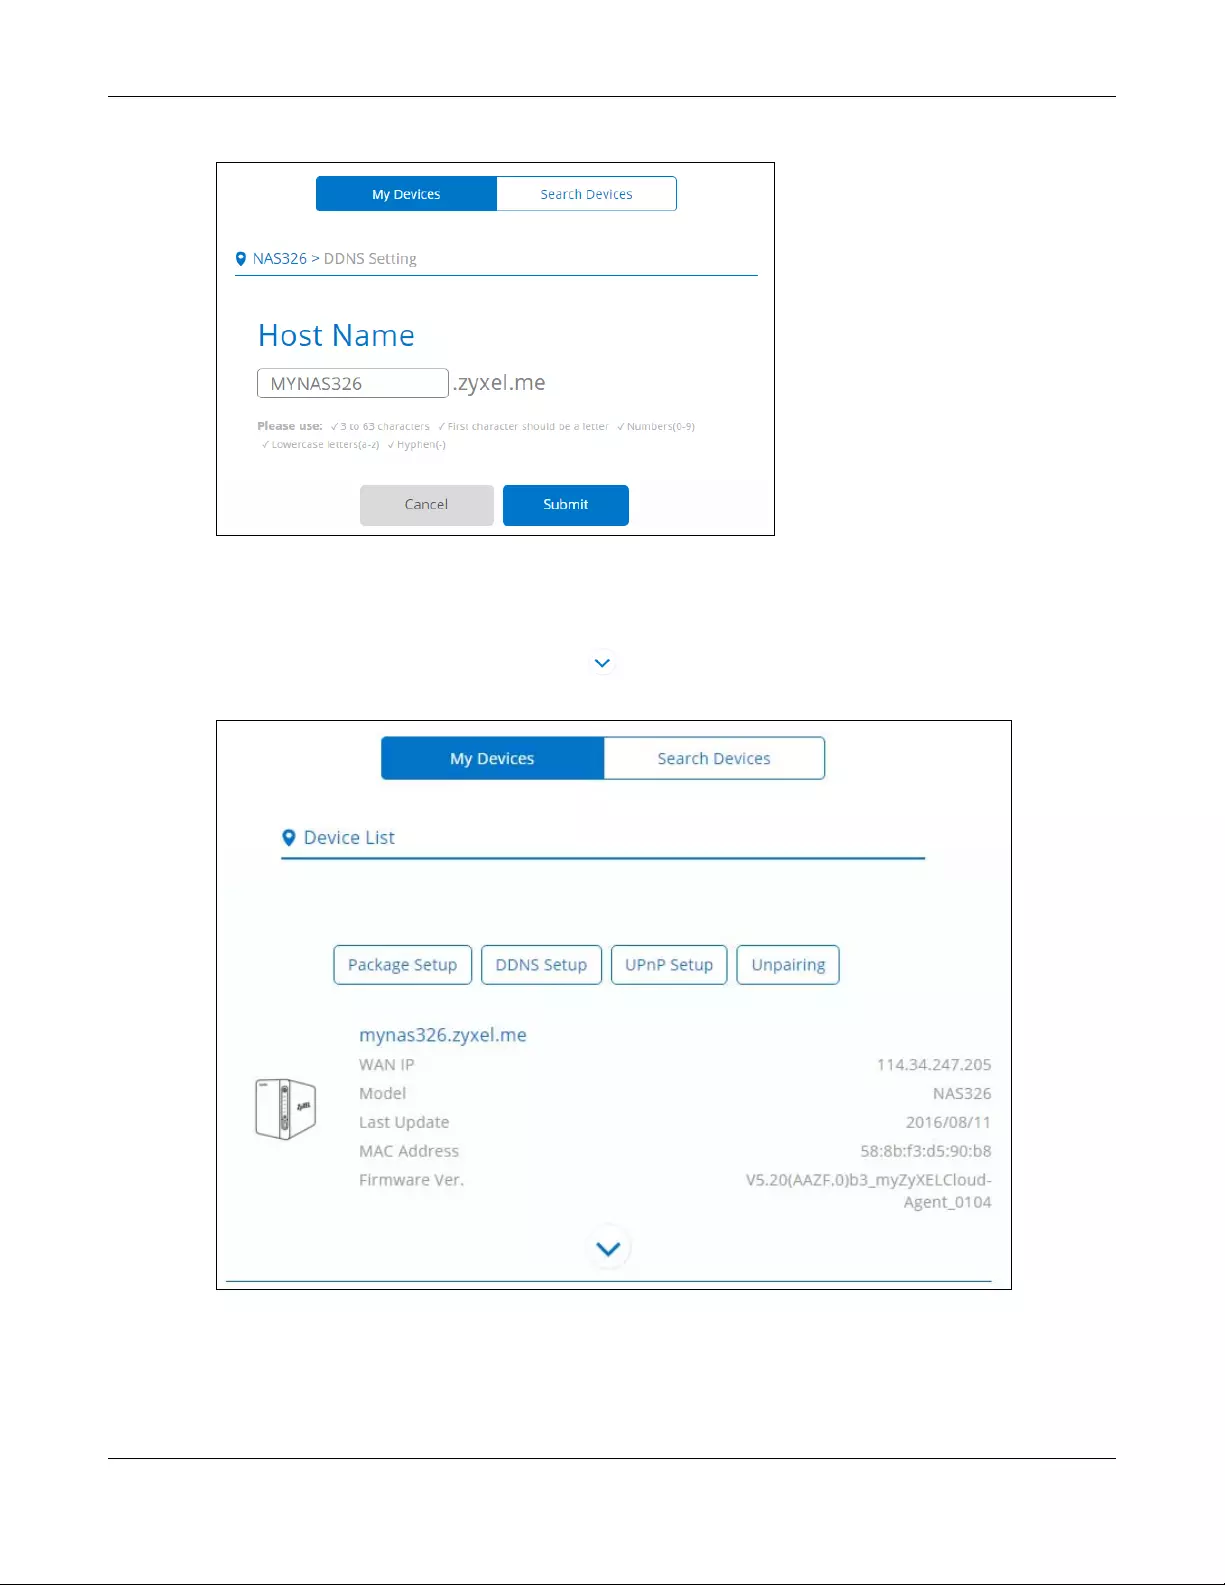
Chapter 18 Access Your Cloud Remotely via myZyxelCloud and Zyxel Drive App
NAS Series User’s Guide
308
Figure 258 myZyxelCloud > DDNS Setting
18.1.4 NAS Information
After setting up your NAS’s host name, the My Devices screen appears. Use this screen to view the NAS’s
information. You can click the arrow icon ( ) for more information.
Figure 259 myZyxelCloud > My Devices
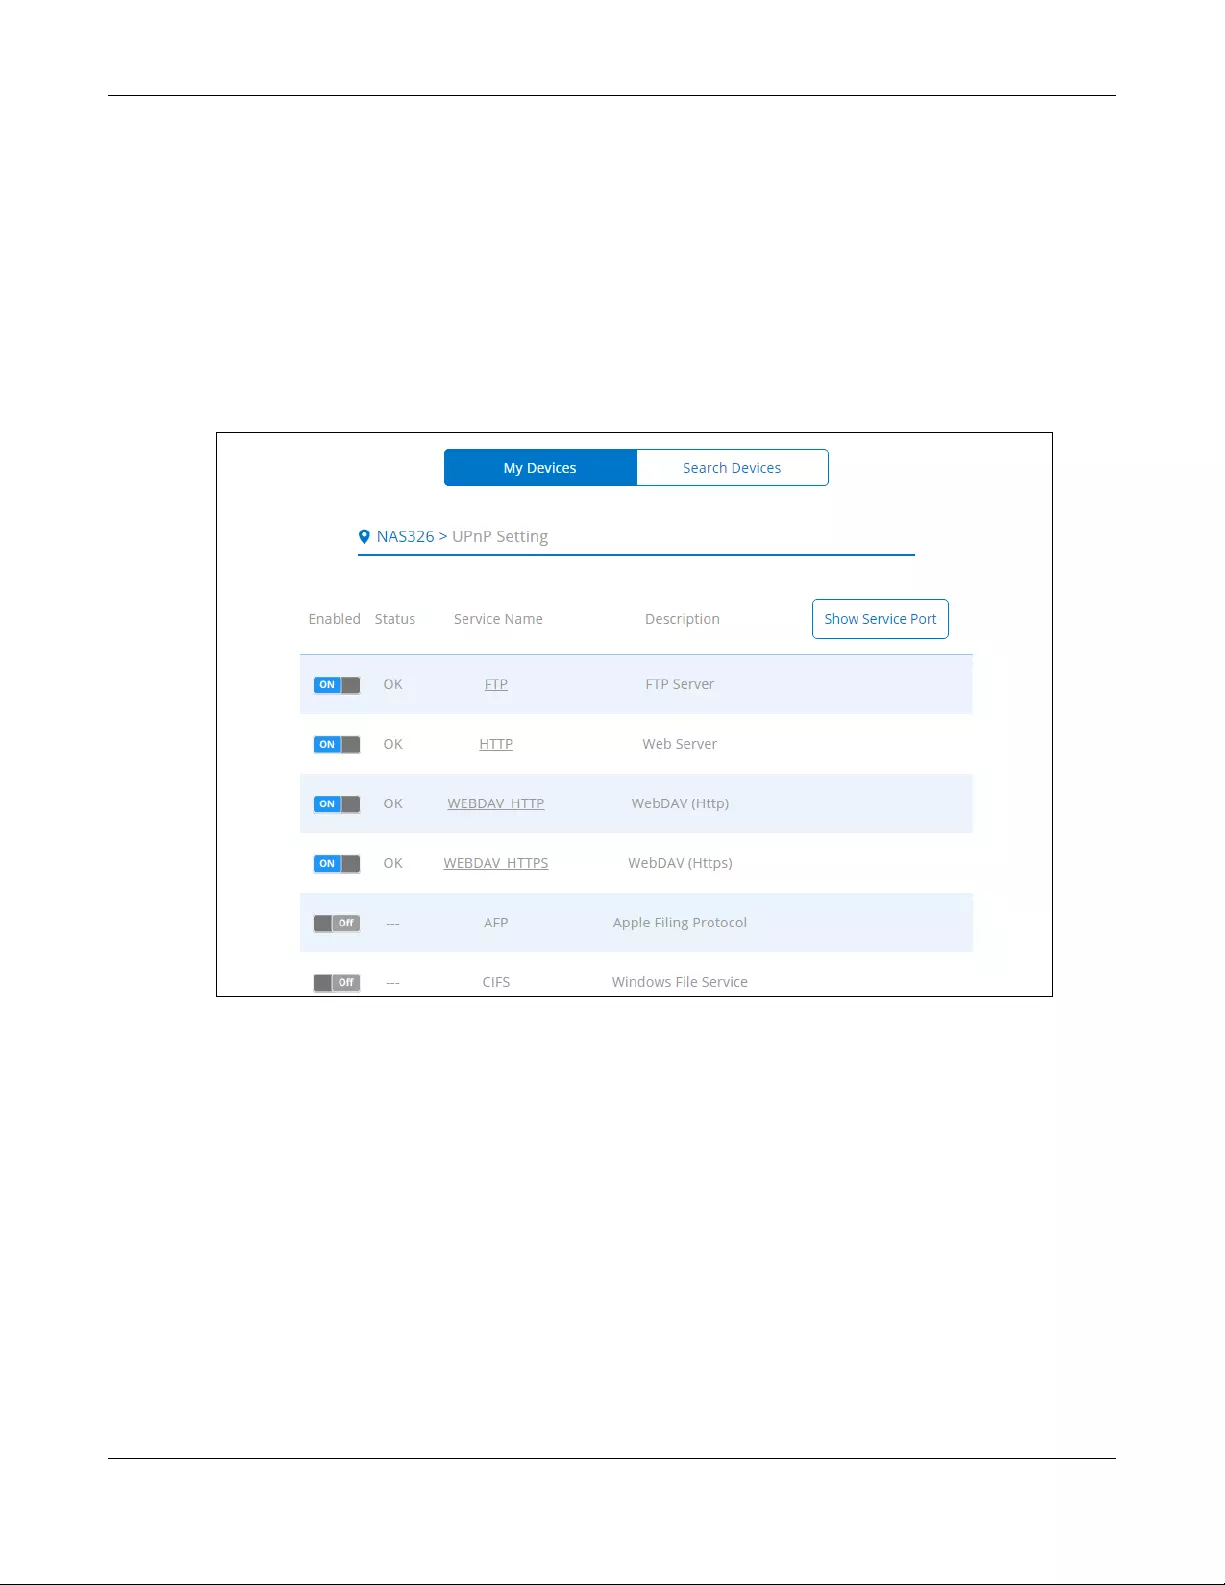
Chapter 18 Access Your Cloud Remotely via myZyxelCloud and Zyxel Drive App
NAS Series User’s Guide
309
18.1.5 UPnP Setup
Use this screen configure the UPnP settings your Internet gateway uses to allow access from the WAN
(Internet) to services on the NAS. You can also set which port Internet users need to use in order to
access a specific service on the NAS.
Note: To use UPnP port mapping, your Internet gateway must have UPnP enabled.
Click UPnP Setup in the My Devices screen to configure the Internet gateway’s firewall and Network
Address Translation (NAT) to allow access to the NAS from the Internet.
Figure 260 myZyxelCloud > UPnP Setting
Note: You can click Help to open a page about the myZyxelCloud screens.
18.2 Zyxel Drive
Use the Zyxel Drive app to stream or download photos, videos, and music to your Android or iOS phone
through the Internet. You can also upload files from your phone to the NAS.
After setting up the myZyxelCloud service, go to http://zyxel.to/zdrive to get the Zyxel Drive app for your
Android or iOS phone.
Log in, sign-up, and start playing.
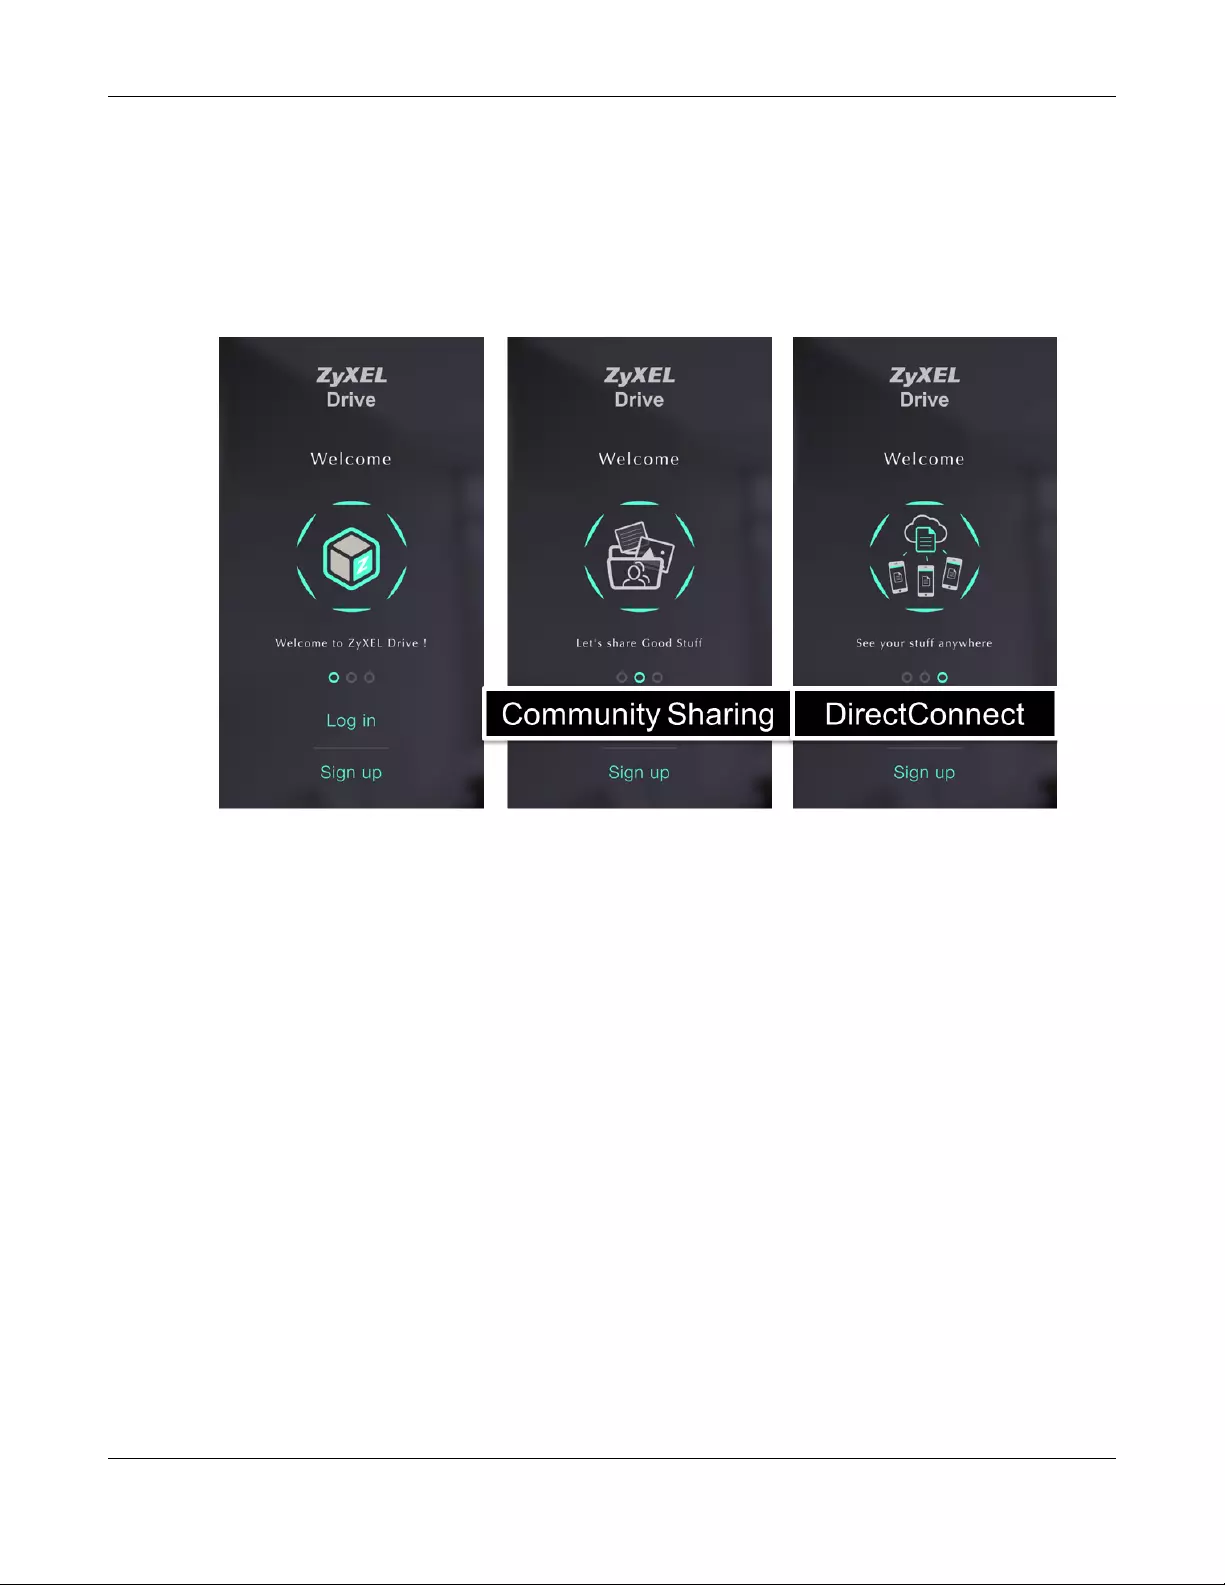
Chapter 18 Access Your Cloud Remotely via myZyxelCloud and Zyxel Drive App
NAS Series User’s Guide
310
18.2.1 Zyxel Drive Welcome
Community Sharing — Send invitation links to friends and family to conveniently share selected NAS
folders.
DirectConnect — Privately and securely access your NAS content from anywhere.
Figure 261 Zyxel Drive Welcome
18.2.2 NAS and File List
My own NAS — Access and share files from your own NAS.
Shared With Me — Access files on someone else’s NAS folder that they have shared with you.
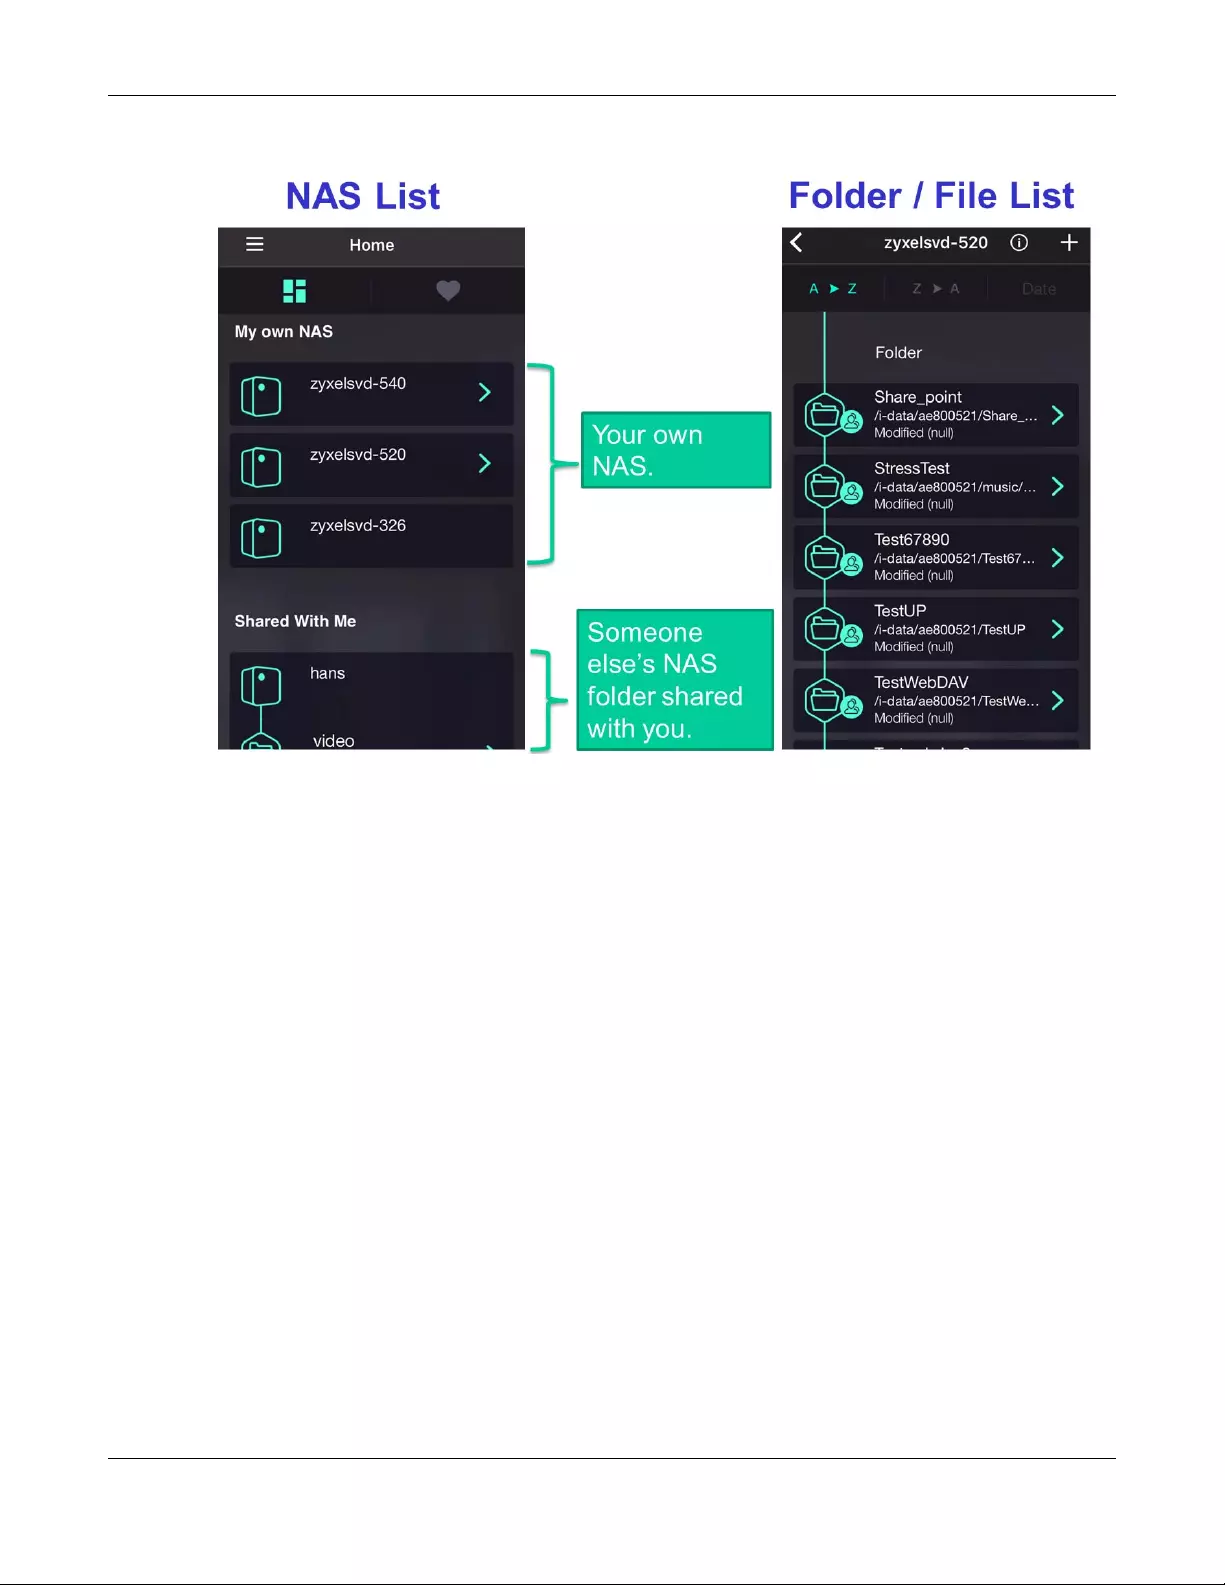
Chapter 18 Access Your Cloud Remotely via myZyxelCloud and Zyxel Drive App
NAS Series User’s Guide
311
Figure 262 NAS and File List
18.2.3 Uploading and Media Streaming
Use Zyxel Drive to upload photos and videos from your mobile device to the NAS. You can also stream
videos and music stored on the NAS.
This section uses the Zyxel Drive App screens for Android as an example. The screens may vary slightly for
iOS.
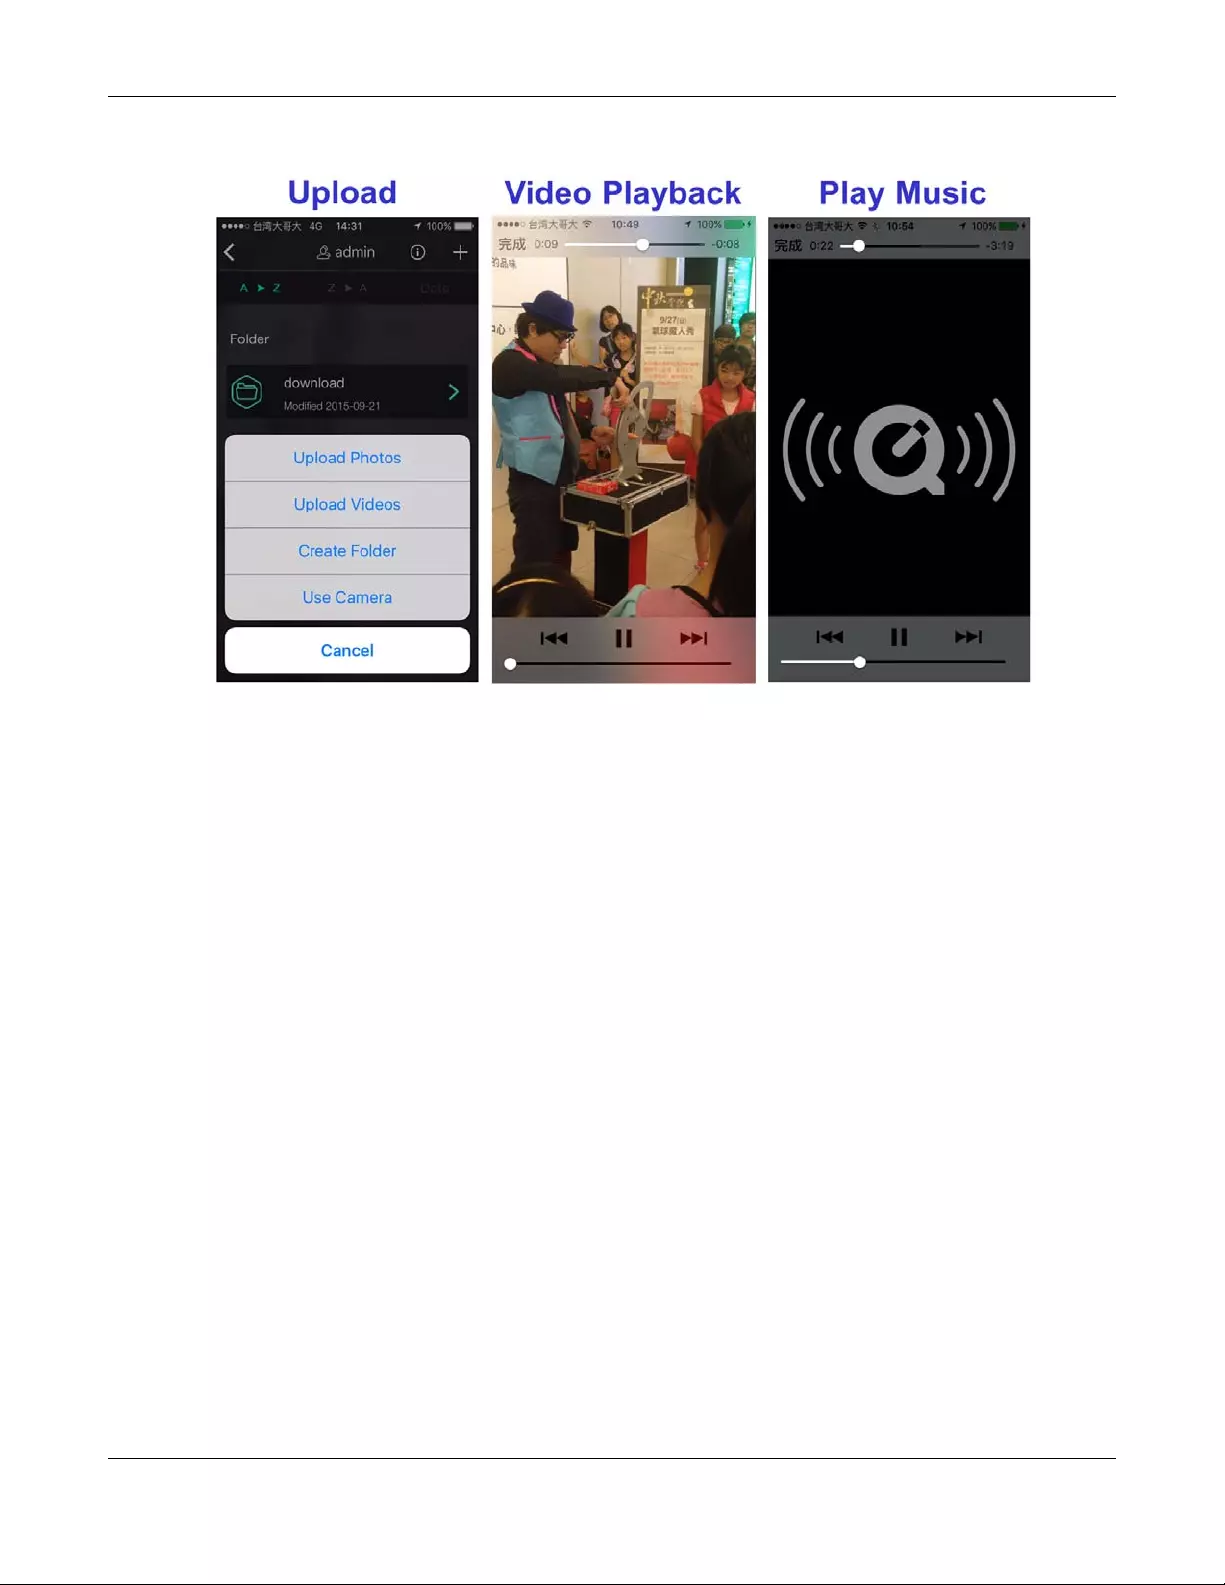
Chapter 18 Access Your Cloud Remotely via myZyxelCloud and Zyxel Drive App
NAS Series User’s Guide
312
Figure 263 Uploading and Media Streaming
18.2.4 Instant Upload
Instant Upload allows you to back up all of the photos and videos on your mobile device to the NAS
immediately.
Note: The Instant Upload function is available on the Zyxel Drive App 1.1 and later versions.
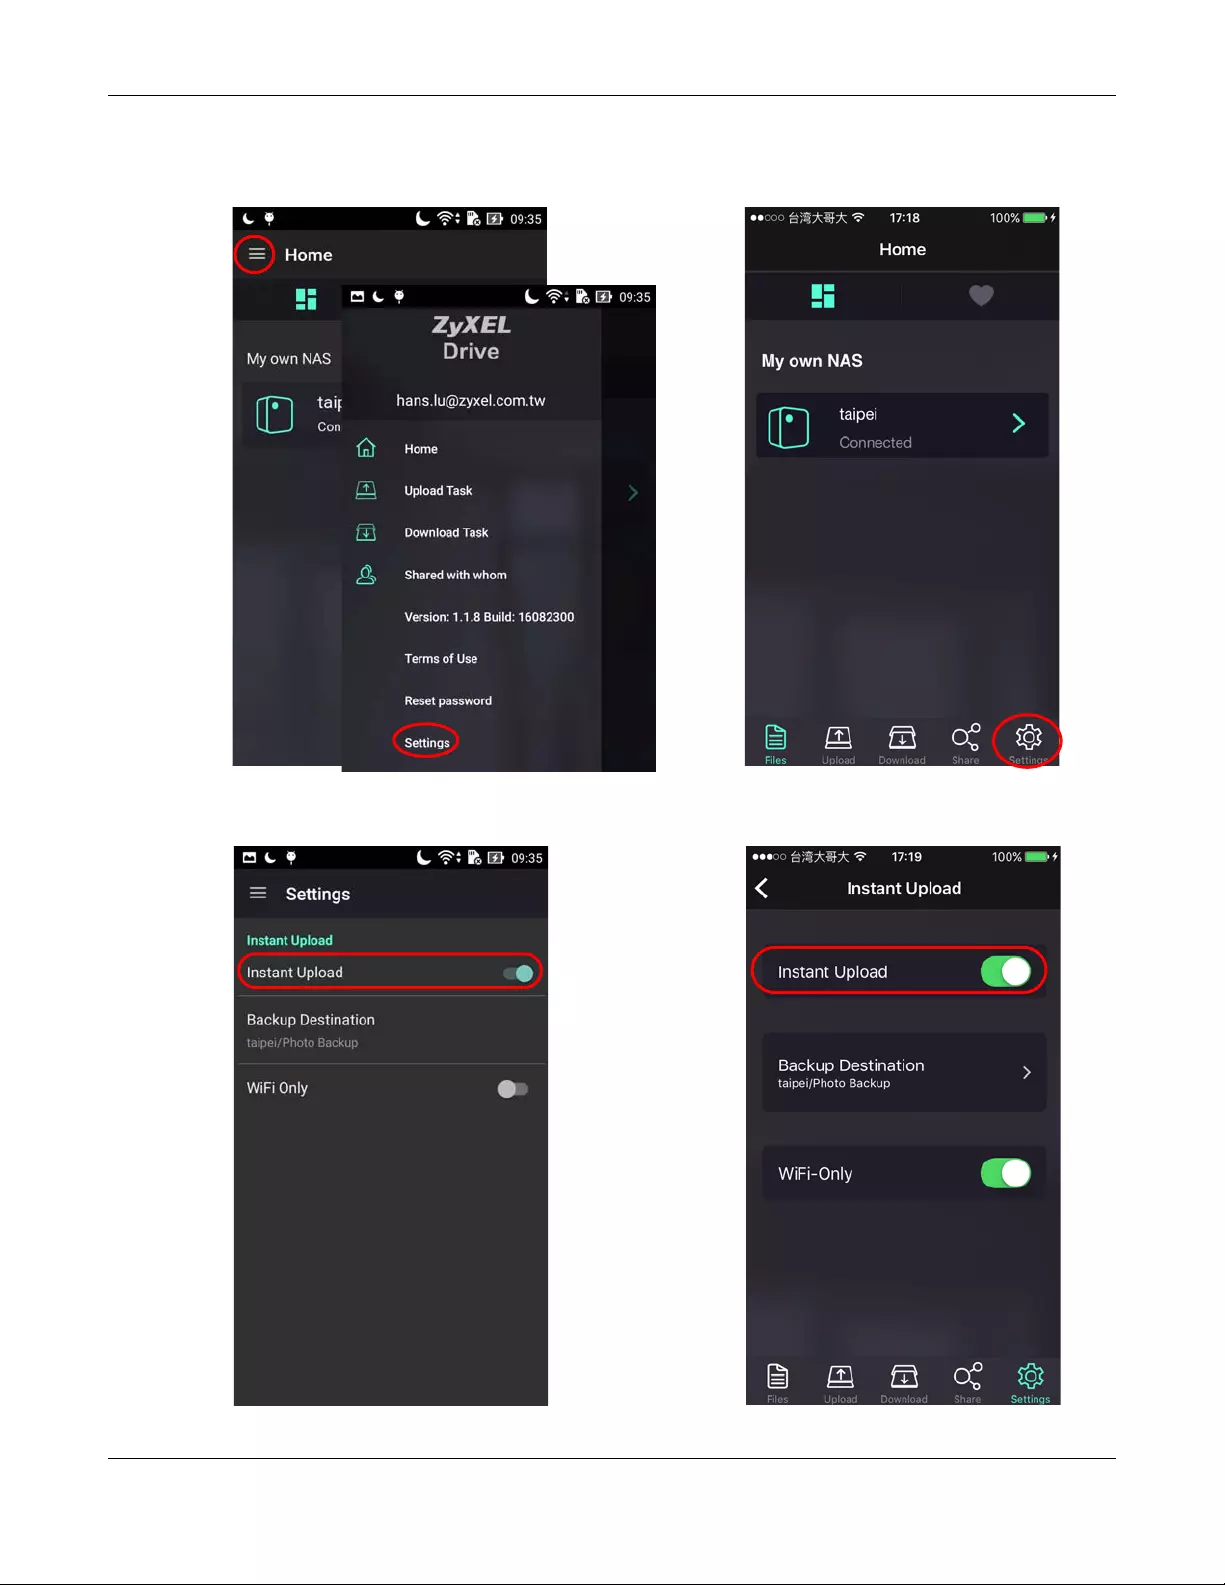
Chapter 18 Access Your Cloud Remotely via myZyxelCloud and Zyxel Drive App
NAS Series User’s Guide
313
Figure 264 Zyxel Drive: Home > Settings
Figure 265 Zyxel Drive: Enable Instant Upload
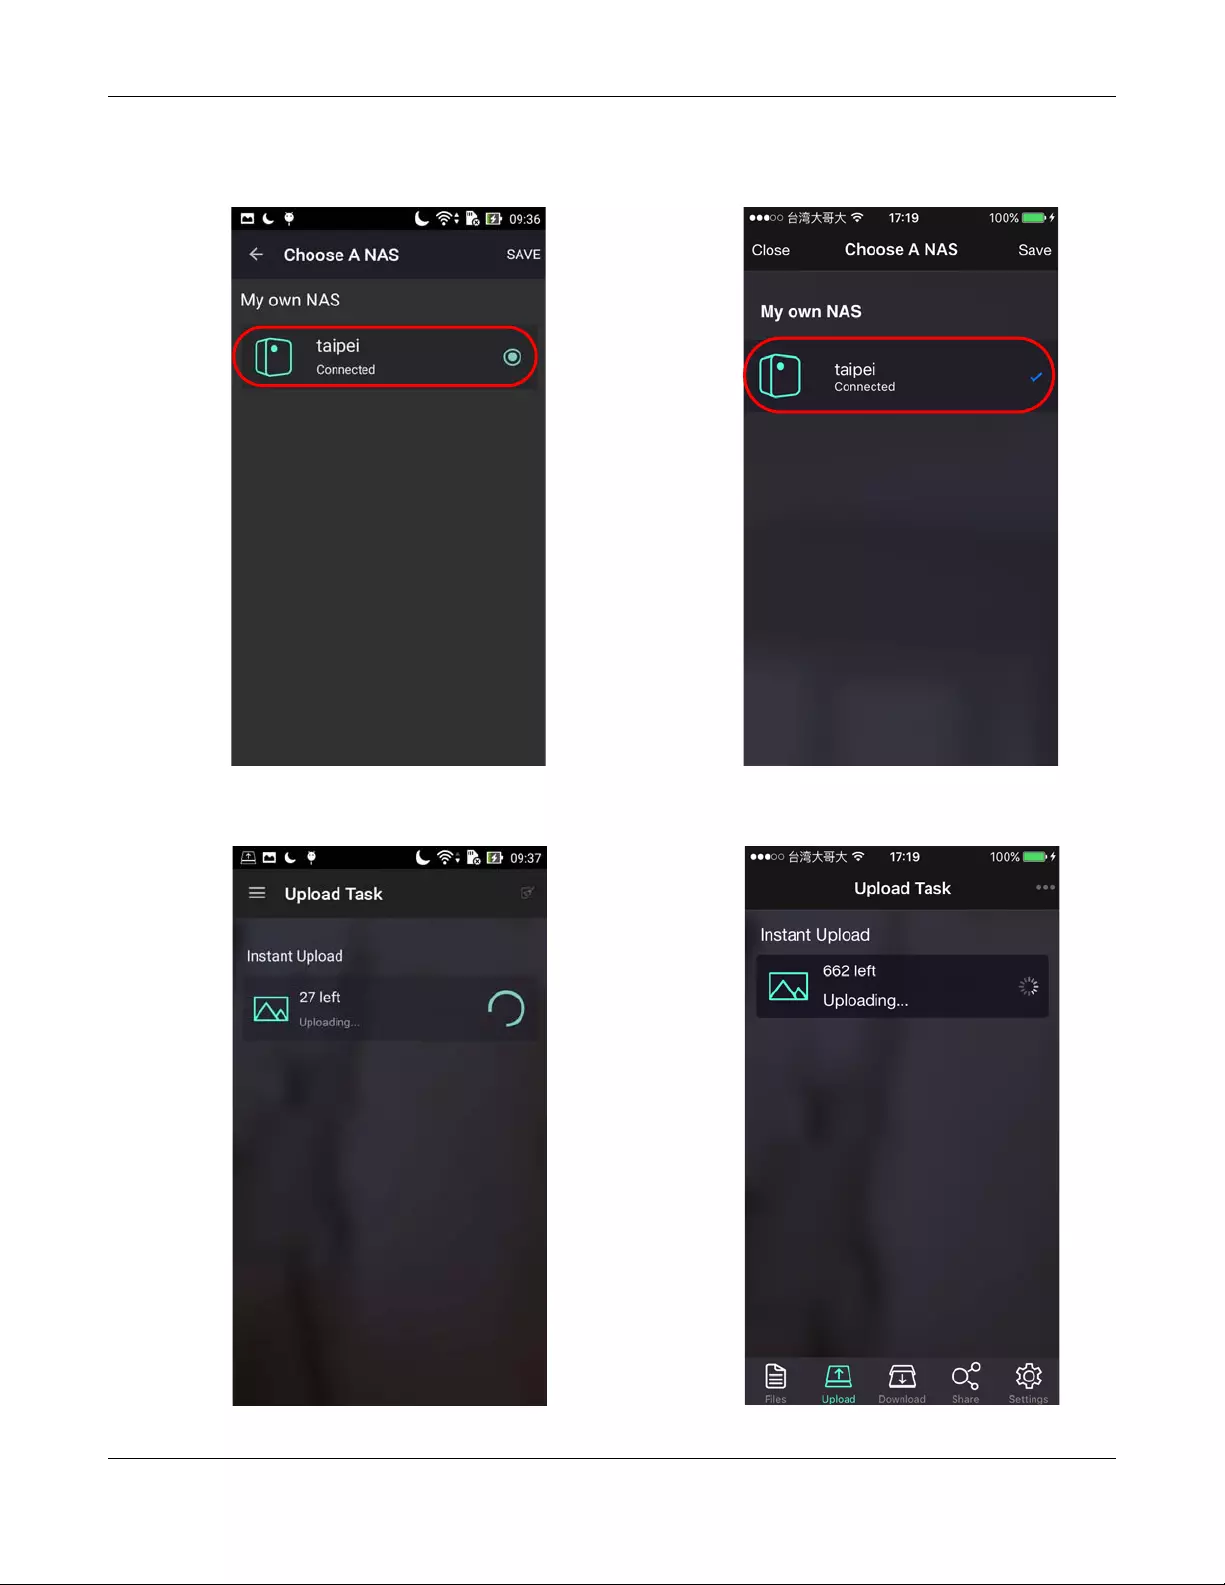
Chapter 18 Access Your Cloud Remotely via myZyxelCloud and Zyxel Drive App
NAS Series User’s Guide
314
Figure 266 Zyxel Drive: Select the NAS to which you want to upload photos and videos
Figure 267 Zyxel Drive: All photos and videos on the phone are copied to the NAS
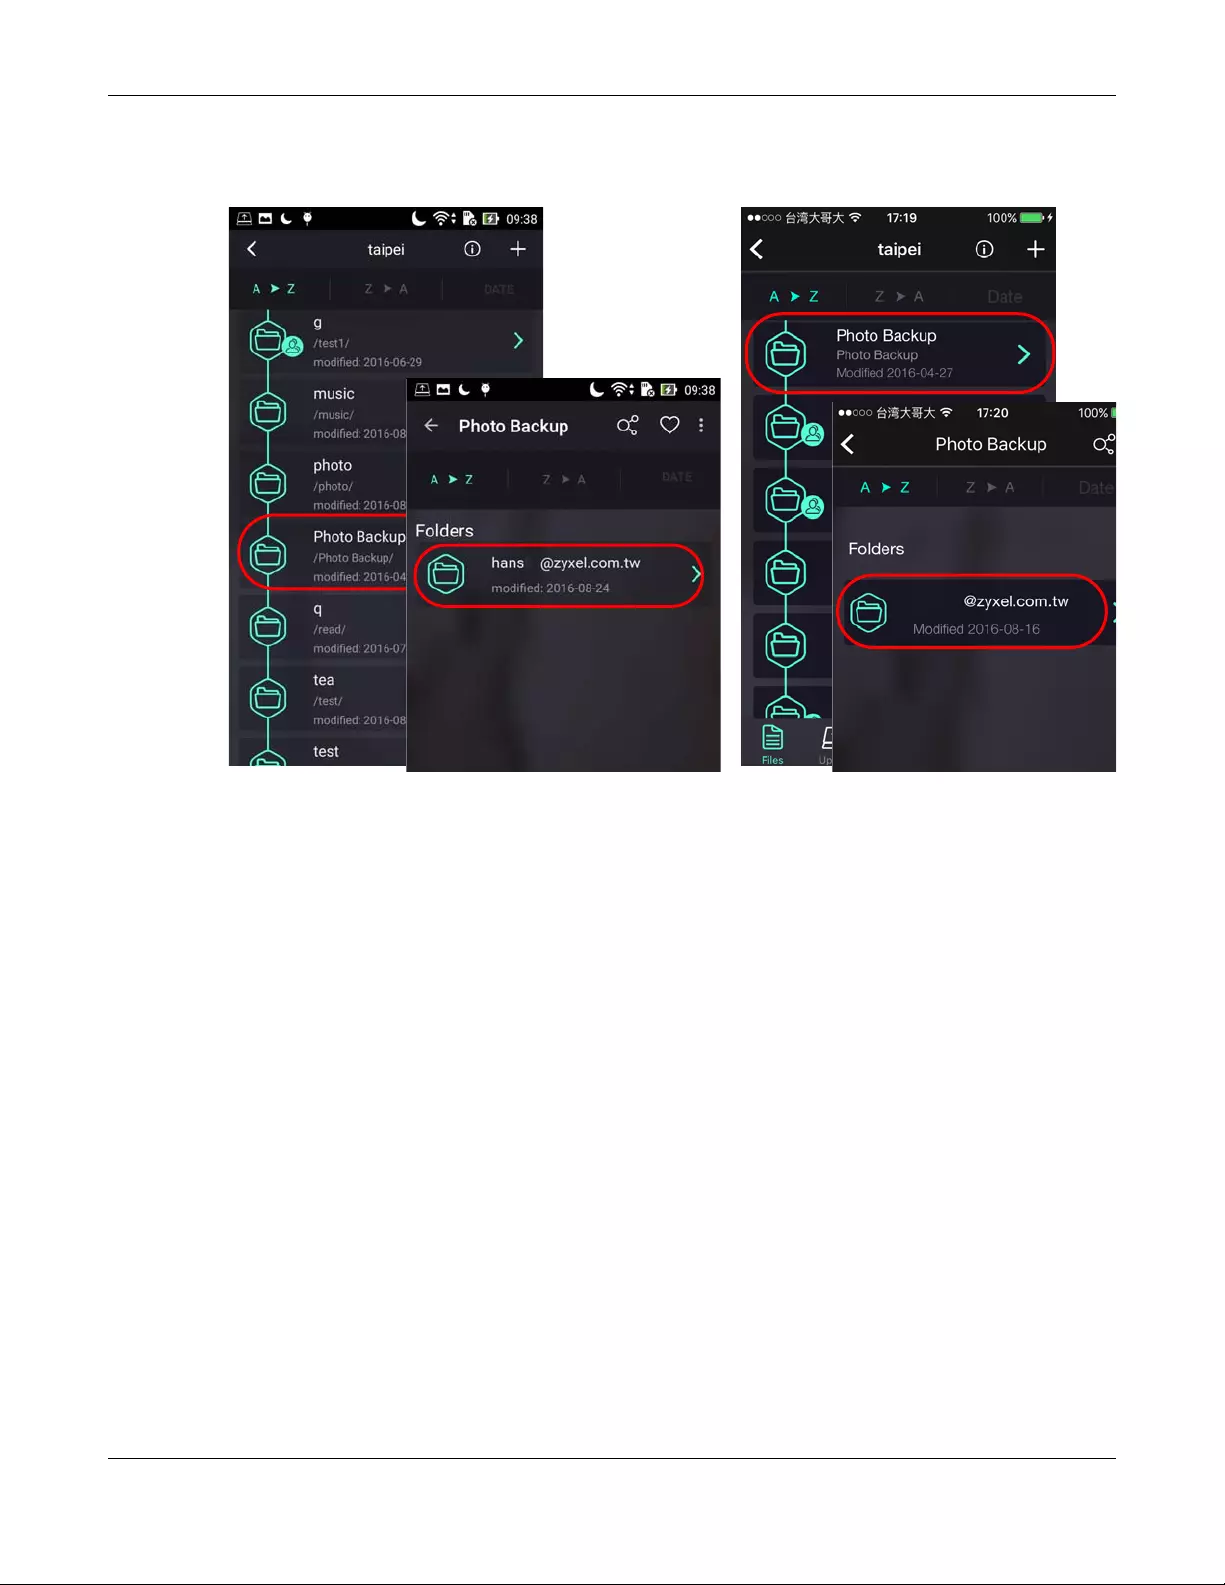
Chapter 18 Access Your Cloud Remotely via myZyxelCloud and Zyxel Drive App
NAS Series User’s Guide
315
Figure 268 Zyxel Drive: Files are backed up to the “Photo Backup” folder in the NAS
NAS Series User’s Guide
316
CHAPTER 19
Play Media Files on TVs Using
zCloud App
Zyxel zCloud app lets you play your favorite multimedia files on the NAS on your big screen TV. Use TV
streaming devices such as Apple TV, Google Chromecast, Roku 3, and Amazon Fire TV; or play files
directly on smart TVs like those from Samsung, LG and Sony.
• Browse your media contents from your NAS directly on your Android or iOS device.
• View photos stored on your NAS with the app’s built-in slideshow.
• Play music stored on your NAS.
• Watch videos stored on your NAS .
• Upload files from your Android device to your NAS.
• Upload photos and videos from your iOS device to your NAS.
• Browse and manage files stored on the NAS.
• Compatibility: Requires Android 4.0.3 or later or iOS 7 or 8.
19.1 Using zCloud
Install the zCloud app from Google Play or the Apple App store. Then tap the zCloud icon to open it.
Figure 269 zCloud Icon
The main menu displays.
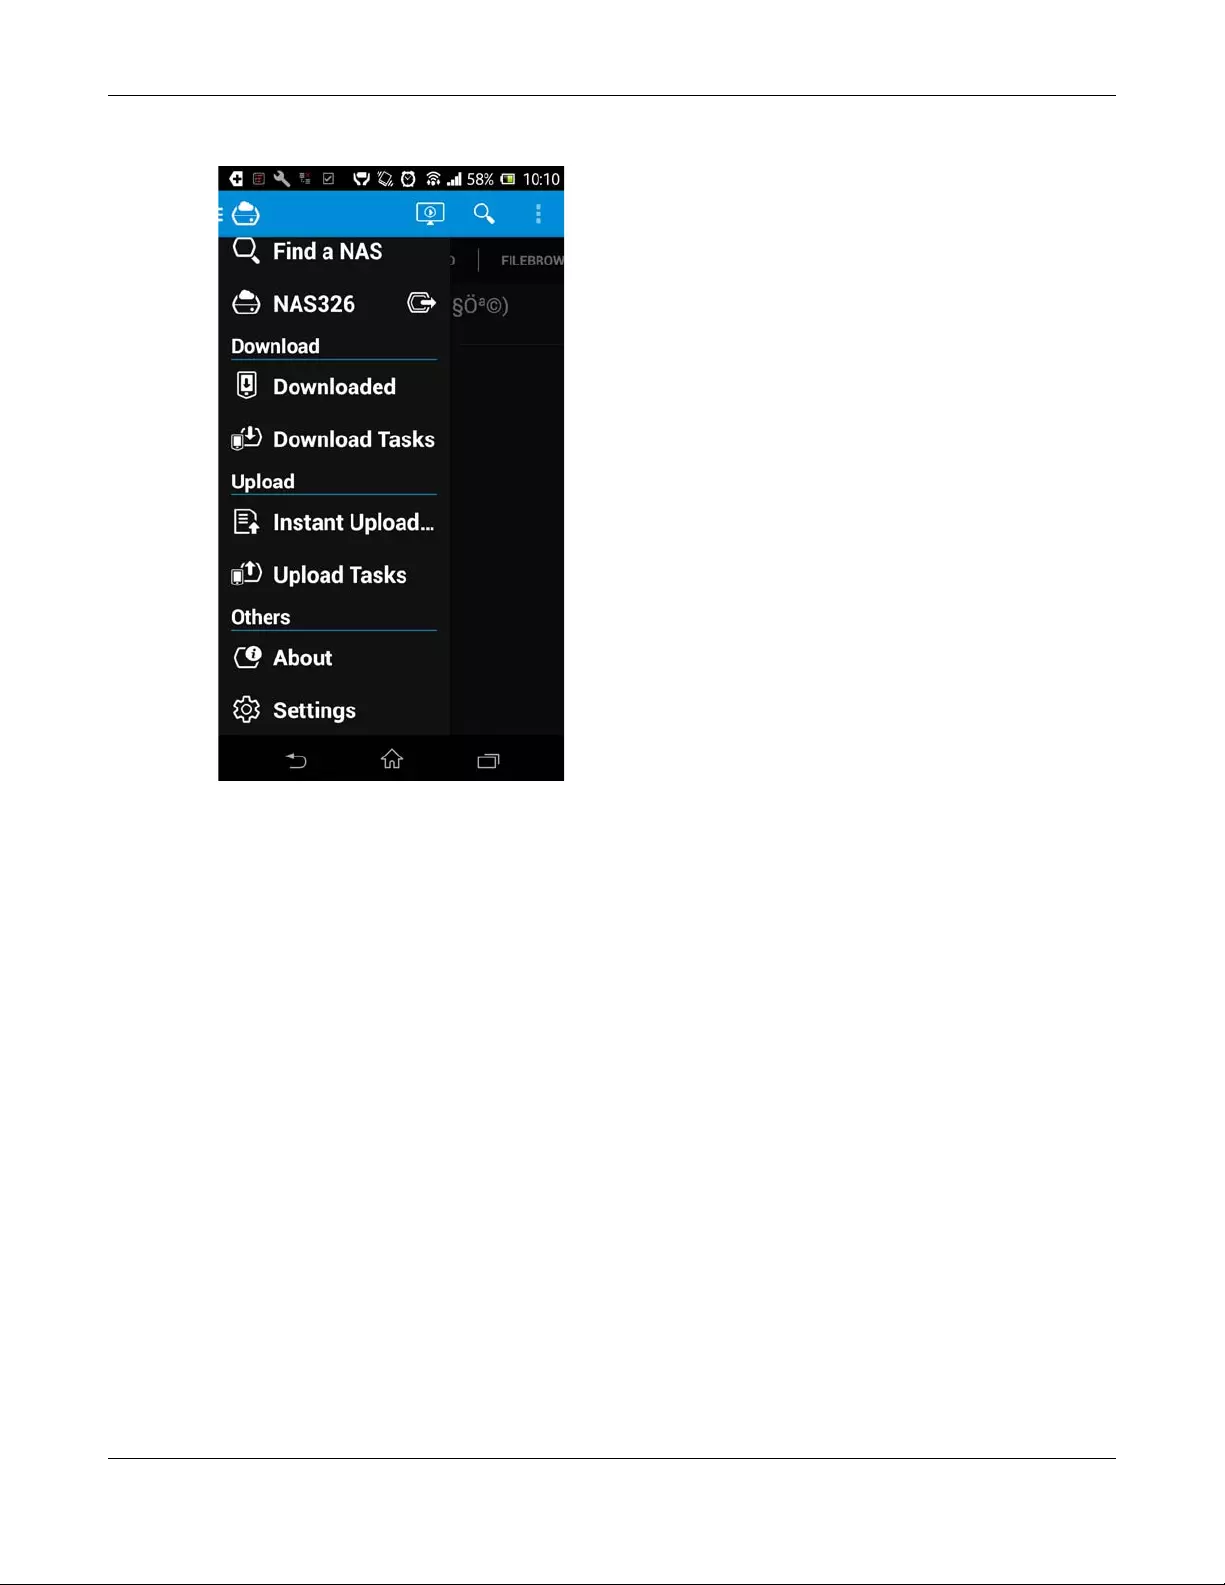
Chapter 19 Play Media Files on TVs Using zCloud App
NAS Series User’s Guide
317
Figure 270 zCloud Main Menus
Find a NAS — use your NAS’s IP address and your user name and password to connect to it.
NASxxx — access the NAS’s default photo, music, and video shares. You can play, download, upload
and manage files.
Download — access and manage files downloaded from the NAS to your Android or iOS device and
manage download tasks.
Upload — view and manage upload tasks.
Settings — view information about your phone’s internal storage and/or SD card, specify the folder to
which you want to put files downloaded from the NAS, use Instant Upload to back up all of the photos
and videos on your mobile device to the NAS immediately, and configure the slide interval and effect.
Note: The Instant Upload function is available on the zCloud App 2.2 and later versions.
19.2 zCloud TV Streaming
Here is an example of the zCloud app letting you choose a player to use to stream a video or photo on
your TV.
1Tap Find a NAS. If your NAS is not in the list, tap the Add a NAS icon and enter your NAS’s IP address and
your user name and password to connect to it. The next time you use the zCloud NAS media function
you can select the NAS from the list.
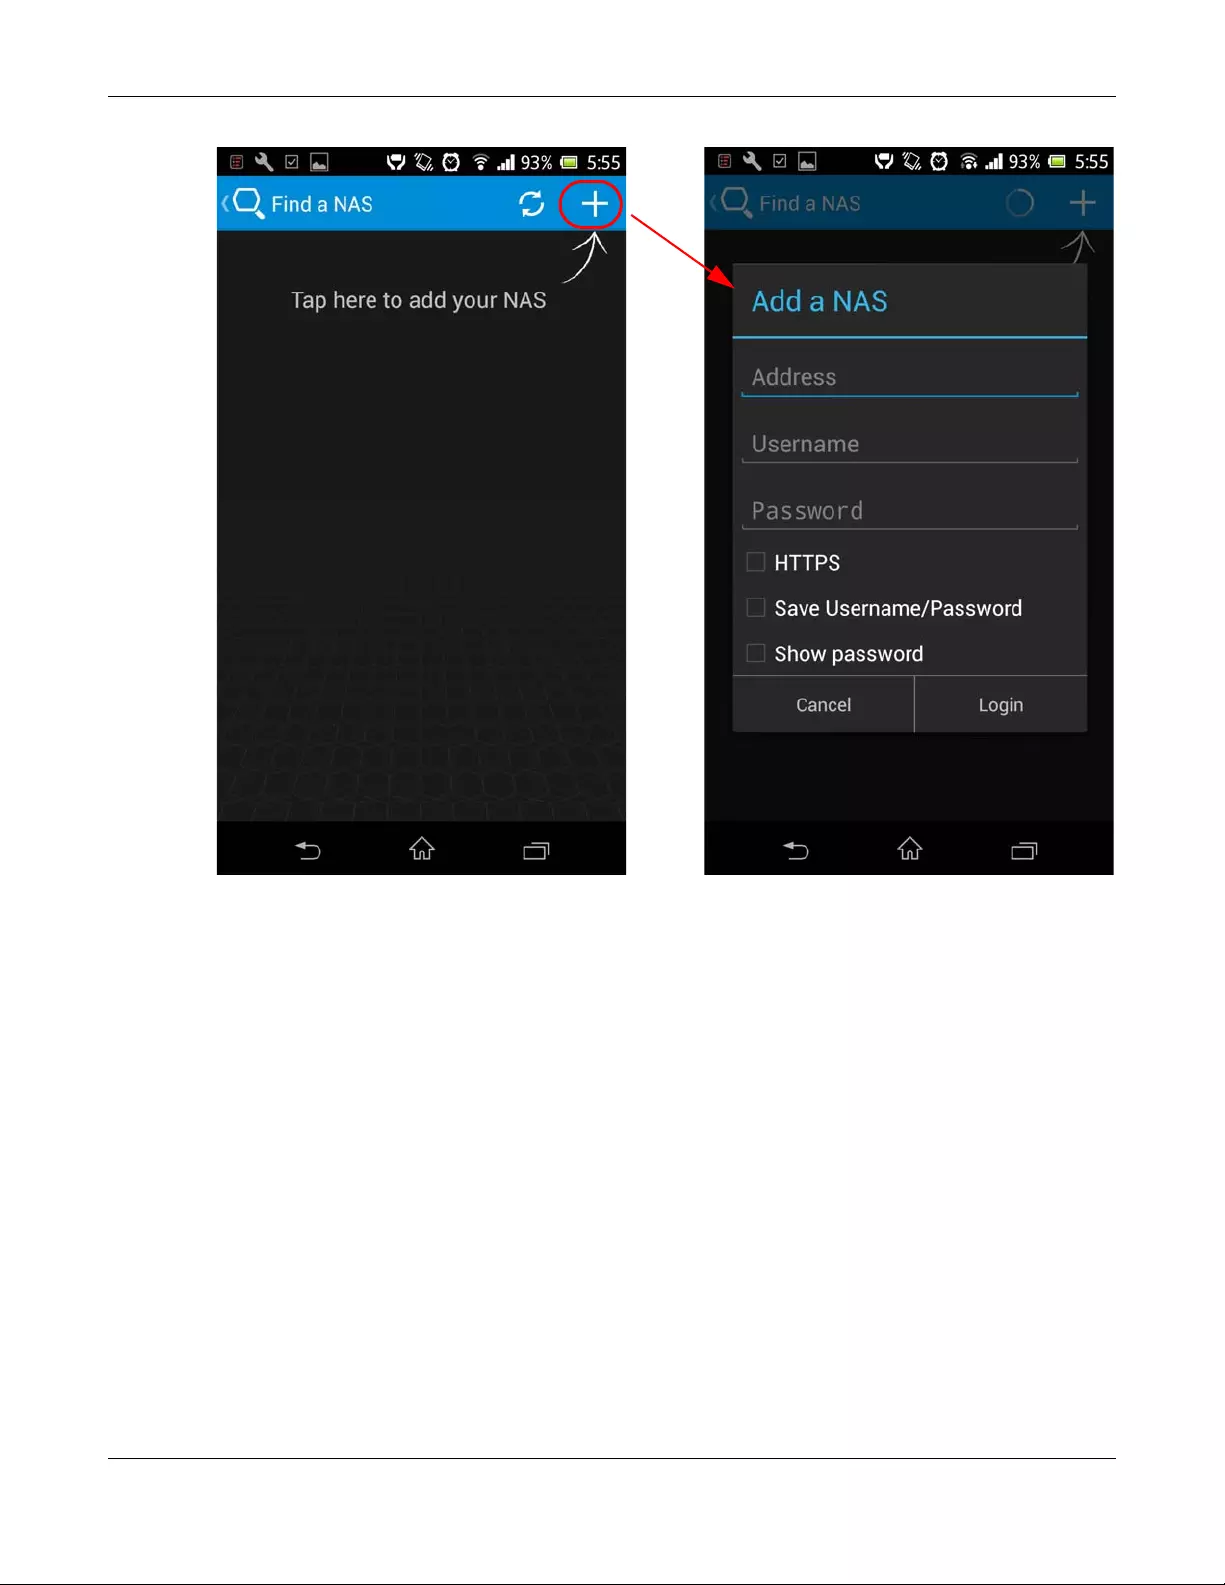
Chapter 19 Play Media Files on TVs Using zCloud App
NAS Series User’s Guide
318
2Go to the NAS’s published media files and tap the Remote Player icon to display a list of players that you
can use to play the files on your TV.

Chapter 19 Play Media Files on TVs Using zCloud App
NAS Series User’s Guide
319
3When you finish viewing the NAS’s media files you can press your mobile device’s menu button to get
the option to log out from the NAS (Logout).
19.3 zCloud Instant Upload
1Tap Settings and then turn on Instant Upload to upload music, photo, or video files from your mobile
device to the NAS. Select a destination folder on the NAS and the photos, music, or video files to
upload.
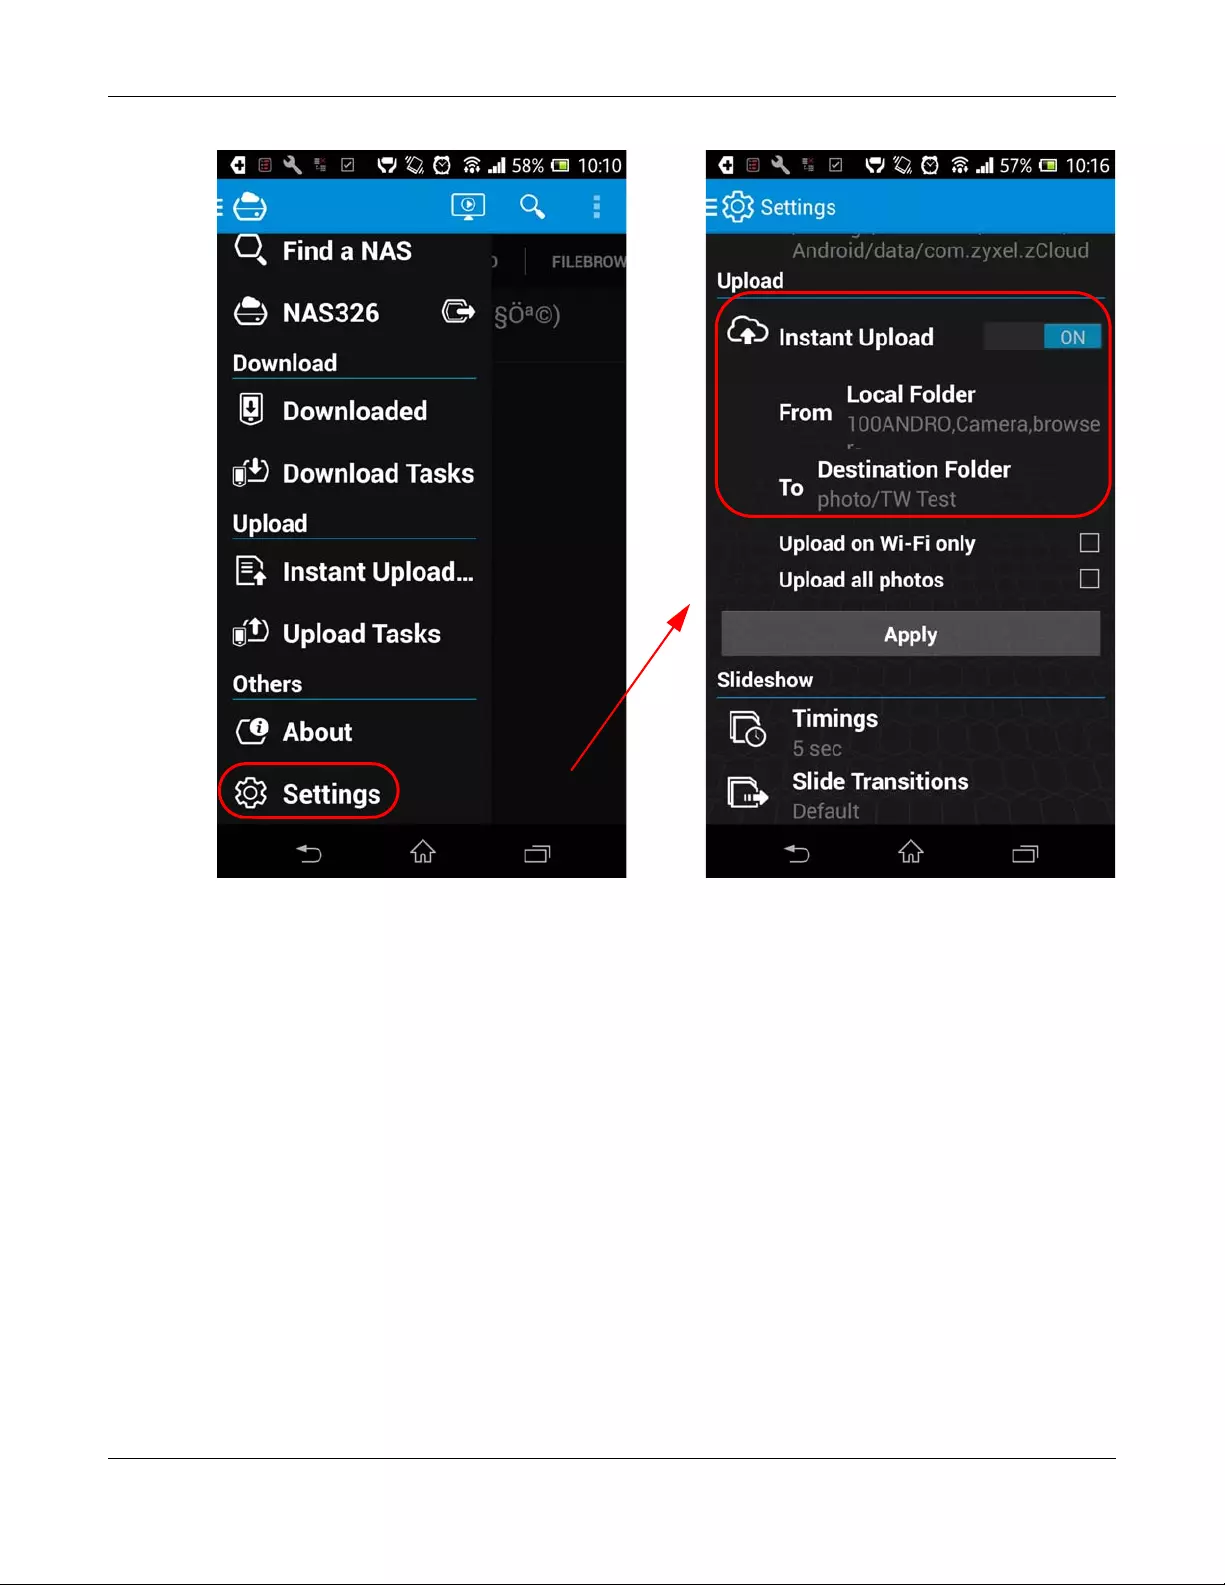
Chapter 19 Play Media Files on TVs Using zCloud App
NAS Series User’s Guide
320
2For example, if you selected Photo, select the folder containing the photos you want to upload to the
NAS.
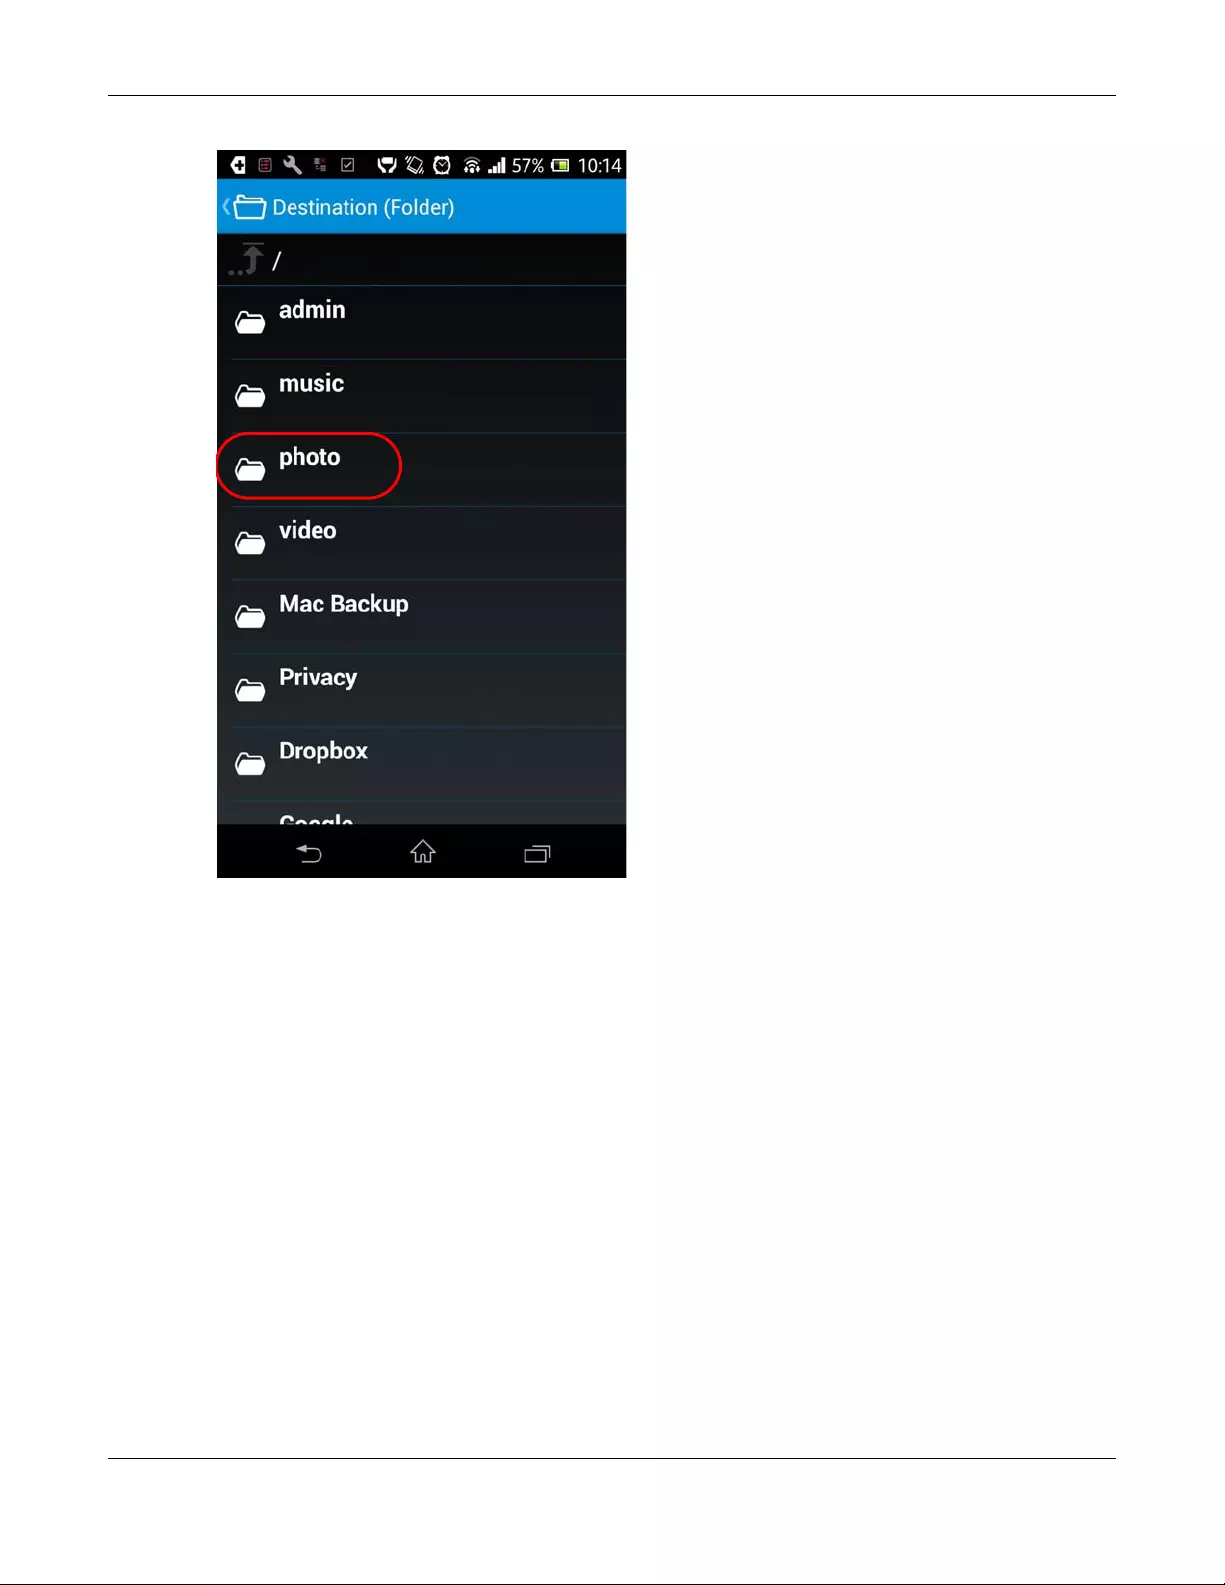
Chapter 19 Play Media Files on TVs Using zCloud App
NAS Series User’s Guide
321

NAS Series User’s Guide
322
CHAPTER 20
Troubleshooting
20.1 Troubleshooting Overview
This chapter offers some suggestions to solve problems you might encounter. The potential problems are
divided into the following categories.
•Power, Hardware, Connections, and LEDs
•NAS Starter Utility
•NAS Login and Access
•I Cannot Access The NAS
•Users Cannot Access the NAS
•External USB Drives
•Storage
•Firmware
•File Transfer
•Networking
•Some Features’ Screens Do Not Display
•Media Server Functions
•Download Service Functions
•Web Publishing
•Auto Upload
•App Center
•Backups
•Google Drive
20.2 Power, Hardware, Connections, and LEDs
The NAS PWR LED does not turn on (no LEDs are on).
• Make sure the NAS is turned on.
• Make sure you are using the power adaptor or cord included with the NAS.
• Make sure the power adaptor or cord is connected to the NAS and plugged in to an appropriate
power source. Make sure the power source is turned on.
• Turn the NAS off and on.

Chapter 20 Troubleshooting
NAS Series User’s Guide
323
• If the problem continues, contact the vendor.
An HDD LED is off.
The HDD LED is off when the NAS cannot detect a hard drive in the drive bay. Replace or install a hard
drive. See Installing or replacing a hard disk.
An HDD LED is red.
Red means that the NAS detected an error on the hard drive (like a bad sector for example). The NAS
automatically tries to recover a bad sector, but the LED stays red until the NAS restarts. Even if the hard
drive still functions, it is recommended that you replace it since errors are a sign that the hard drive may
fail soon. See Installing or replacing a hard disk.
Installing or replacing a hard disk.
Do not remove or install a hard disk while the NAS is turned on. The NAS
must be turned off before you remove or install the hard disk.
1Turn the NAS off, remove the front panel and make sure:
• there is a SATA I or SATA II (3.0 Gbit/s) compatible hard disk installed.
• the hard disk is installed correctly in the disk bay. Push the disk back into the NAS disk bay until the
hard disk is fitted snugly inside the NAS (see the NAS Quick Start Guide).
• the hard disk could be faulty. Try a different hard drive or test the original hard disk in a different
NAS or computer.
2If you had to replace the drive, turn on the NAS and go to the Storage Manager screen.
• If you have a RAID I volume click the Repair icon next to the new drive.
• If you are using RAID 0 you will need to recreate the whole volume. All of your data is lost.
• If you are using a single-disk JBOD volume, you need to create a new volume on the new drive.
• If you are using a two-disk JBOD volume, you need to create a whole new volume on both drives.
The LAN LED (by the LAN port) is off.
• Make sure the Ethernet cable is connected properly to the NAS and connected to another (Ethernet)
device. Make sure the other device is turned on. If it’s connected directly to a computer, make sure
that the computer network card is working (ping 127.0.0.1 on the computer).
• Use another Ethernet cable. If you’re connecting to a Gigabit Ethernet, make sure you’re using an 8-
wire Ethernet cable.

Chapter 20 Troubleshooting
NAS Series User’s Guide
324
• If the problem continues, contact the vendor.
See Table 2 on page 14 for a description of NAS LEDs.
The NAS turns off or reboots by itself.
Check the Control Panel > Maintenance > Power > Power Management screen. This is where you
configure power settings for the NAS, including power saving, UPS, power on/off during power failure
and power on/off schedule. The NAS may be set to turn off under certain conditions.
A power failure occurred while the NAS was downloading files.
• If power failure occurs during the active download period, the NAS will verify whether the
downloaded files were damaged.
• If a file is corrupted, the NAS will download the file again.
• If the file is intact but not completely downloaded, the NAS will resume the download task after it
restarts.
20.3 NAS Starter Utility
The NAS Starter Utility cannot discover my NAS.
• Close the NAS Starter Utility and reopen it.
• Check your hardware connections and make sure they are set up correctly.
• Only one instance of the NAS Starter Utility can run on your computer. Make sure you close any
duplicate windows for this application.
• Wait for the System LED to stop blinking before clicking Discover.
• Confirm that the computer running the NAS Starter Utility has a network connection. See the section
on the NAS’s LAN connection for related information.
• The computer running the NAS Starter Utility can only discover NASs in the same subnet. NASs
connected to the same switch or router as your NAS Starter Utility computer are usually in the same
subnet unless the router is doing subnetting or the switch is implementing VLAN.

Chapter 20 Troubleshooting
NAS Series User’s Guide
325
The NAS Starter Utility discovered my NAS but the status is always unreachable, even though I can
access it.
You may need to add the NAS Starter Utility to your software firewall’s allow list or lower your software
firewall or anti-virus scanner’s security level. Alternatively you may have to configure your software
firewall or other security software to allow UDP port 50127 traffic from the NAS. If there is a hardware
firewall between you and the NAS, configure it to allow UDP port 50127 traffic from the NAS.
I have at least two NASs in my network, how do I identify which one I want to configure in the NAS
Starter Utility screens.
If you have several NASs connected to your computer/network, give each a unique name. You may
have to disconnect all but one and use the NAS Starter Utility to rename it. Then connect another NAS
and rename it and continue to connect and rename the NASs one-by-one until they are all connected
and each has a unique name.
Alternatively, if you have a DHCP server on your network and you can access it’s list of assigned IP
addresses, you could see which IP address belongs to which NAS. You can check the MAC address of
your NAS by checking the attached sticker in the device housing.
20.4 NAS Login and Access
I forgot the server name of the NAS.
• The default server name is ‘NAS’ followed by the number of your model (‘NAS540’ for example).
• Use FindMe or the NAS Starter Utility to discover your NAS. If you have admin privileges, you can
directly change the IP address of the NAS using the NAS Starter Utility.
• If the server name has changed and you don’t have the NAS Starter Utility, see Section 2.2 on page
18 to use FindMe. Otherwise, see Section 1.7 on page 16 to use the RESET button to return to the
default setting.
I cannot get to the NAS login screen.
• Use FindMe or the NAS Starter Utility to discover your NAS. If you have admin privileges, you can
directly change the IP address of the NAS using the NAS Starter Utility.
• If you used the RESET button, the NAS may have a new IP address. Close and reopen the NAS Starter
Utility to discover the NAS.
• Make sure the NAS is turned on.

Chapter 20 Troubleshooting
NAS Series User’s Guide
326
• If you are trying to log in directly by typing the server name into your web browser’s address field,
make sure you are using the correct server name as the web site address.
• The default server name is ‘NAS’ followed by the number of your model (‘NAS540’ for example). If
you have changed the server name, use the new one.
• If the server name has been changed and you do not know the new server name, see the
troubleshooting suggestions for I forgot the server name of the NAS.
• If it still doesn’t work, try using the NAS Starter Utility.
• Check the hardware connections, and make sure the LEDs are behaving as expected. See the Quick
Start Guide and Table 2 on page 14.
• By default, the NAS gets an IP address automatically. The NAS assigns itself an IP address if no device
assigns one. If your computer is also set to get an IP address automatically, the computer and the
NAS can both assign themselves IP addresses and communicate. See Section 8.4 on page 130 if you
need to configure the NAS with a static IP address.
• If you are connecting to the NAS by its IP address, make sure you use the correct one.
• Make sure your computer’s IP address is in the same subnet as the NAS’s IP address. You can use the
NAS Starter Utility to find the NAS’s IP address. Skip this if you know that there are routers between your
computer and the NAS.
• Ping the NAS from your computer. Make sure your computer’s Ethernet adapter is installed and
functioning properly. In a (Windows) computer, click Start, (All) Programs, Accessories and then
Command Prompt. In the Command Prompt window, type “ping” followed by the NAS’s IP address
(use the NAS Starter Utility to find the NAS’s IP address if you don’t know it) and then press [ENTER].
• Make sure you are using Internet Explorer 6.0 (and later) or Firefox 1.07 (and later).
• Make sure your Internet browser does not block pop-up windows and has JavaScript and Java
enabled. With Internet Explorer 6, you may also have to enable scripting of safe ActiveX controls. See
Section 20.4.1 on page 326.
I forgot the password.
• The default password is 1234.
• If you have changed the password and forgotten it, you will have to reset the NAS.
20.4.1 Enabling Scripting of Safe ActiveX Controls
If pages of the web configurator do not display properly in Internet Explorer, check that scripting of safe
ActiveX controls is enabled.
1In Internet Explorer, click Tools, Internet Options and then the Security tab.
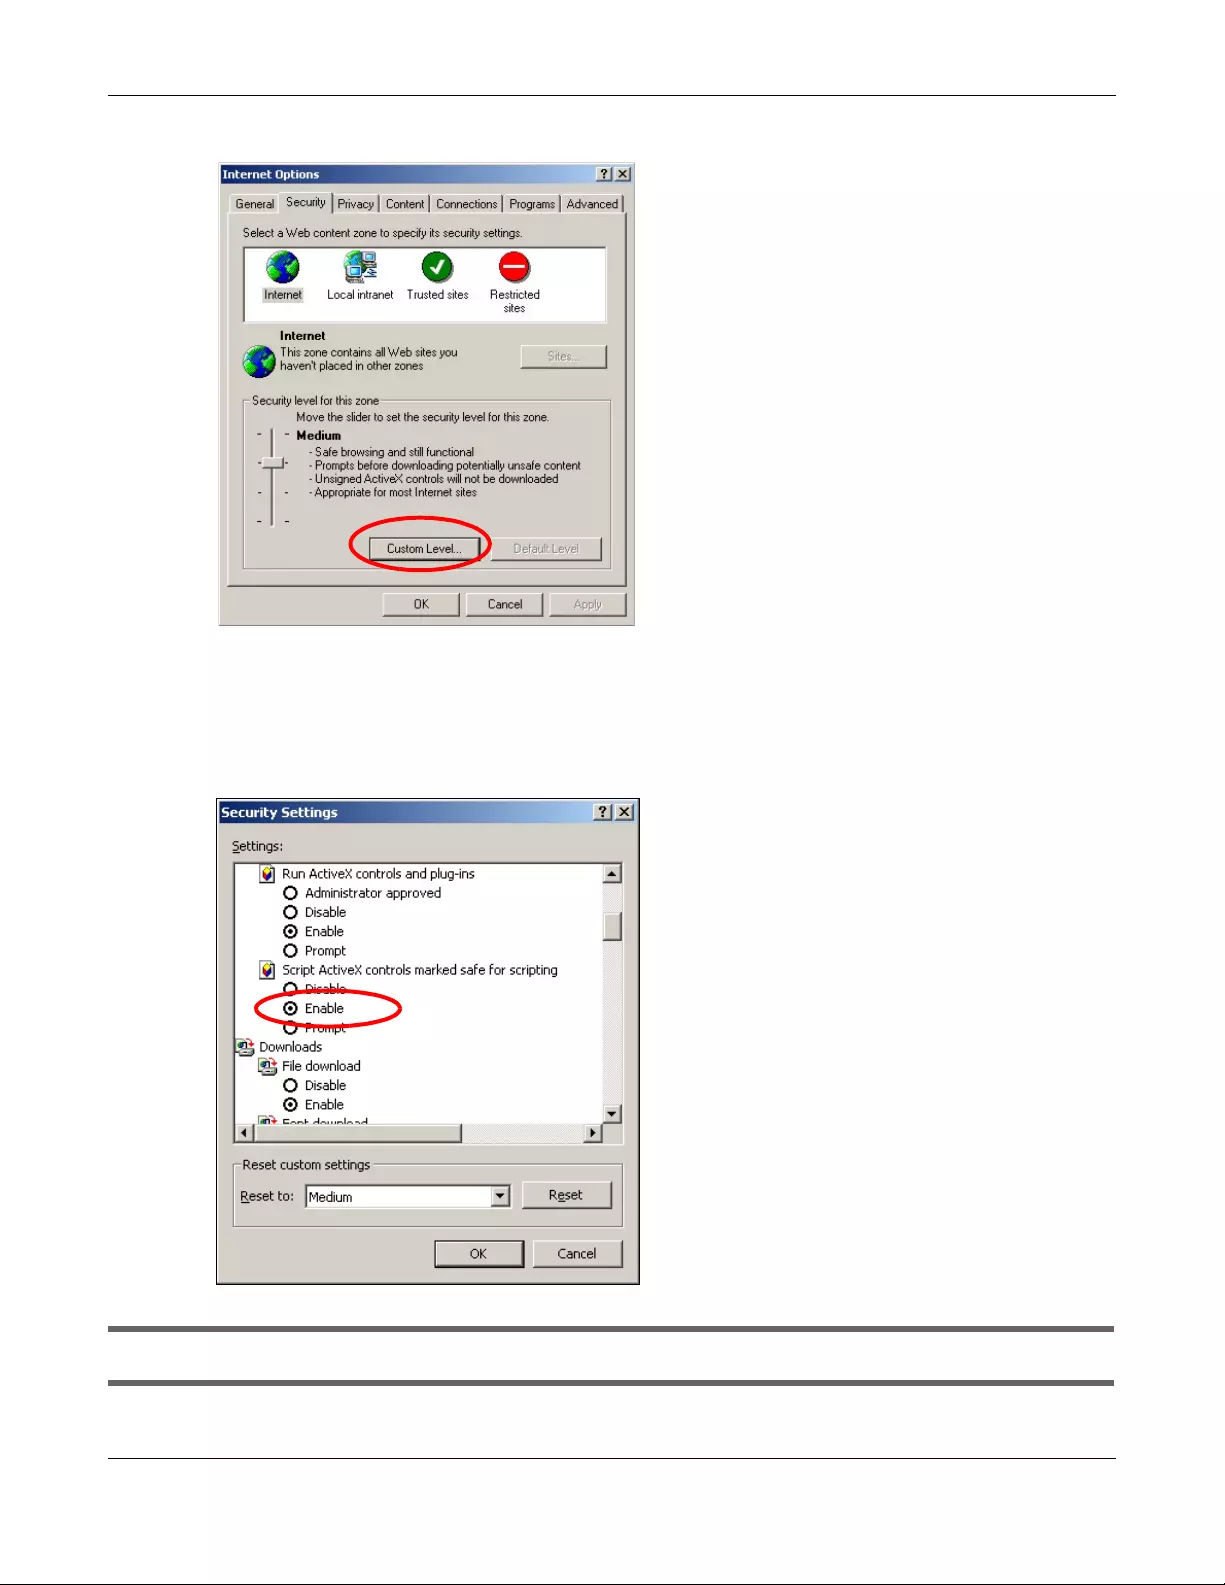
Chapter 20 Troubleshooting
NAS Series User’s Guide
327
Figure 271 Internet Options: Security
2Click the Custom Level… button.
3Under Script ActiveX controls marked safe for scripting, make sure that Enable is selected (the default).
4Click OK to close the window.
Figure 272 Security Settings — Script Safe ActiveX Controls
I can see the login screen, but I cannot log in to the NAS.

Chapter 20 Troubleshooting
NAS Series User’s Guide
328
• Make sure you have entered the username and password correctly. The default username is admin,
and the default password is 1234. These fields are case-sensitive, so make sure [Caps Lock] is not on.
• Turn the NAS off and on.
• If this does not work, see Section 1.7 on page 16 to reset the device.
I cannot see the multi-language web configurator screens while using Internet Explorer.
Use Section 20.4.1 on page 326 to enable the scripting of safe ActiveX controls.
The Web Configurator logs out by itself.
The web configurator management session automatically times out if it is left idle for 15 minutes. Simply
log back into the NAS if this happens to you.
20.5 I Cannot Access The NAS
I cannot access a share.
• Check that the NAS is turned on and connected to the network. Try to ping the NAS or use FindMe or
the NAS Starter Utility to discover it.
• Check that you entered your login name and password correctly.
• Check that the share exists and check its access settings.
• Check if the shared folder is a subfolder of another (parent) share. Check that the parent share’s
access rights do not conflict with the subfolder share. It is recommended that you do not create
subfolder shares.
• Check if there are any existing mapped network drives to the NAS. You may need to disconnect
existing mapped network drives as a new mapped network drive connection may use (different)
previously-saved login information. To do this, open Windows Explorer and click Tools > Disconnect
Mapped Network Drives.
• Check that the volume in which the share resides, exists and is not down or degraded. If it is down or
degraded, see Section 20.2 on page 322.
• Make sure you have the client for Microsoft networks installed and enabled in your network
connection’s properties.
• In Windows XP or 2000, click Start > Settings > Control Panel > Network Connections (Network and
Dial-up Connections in Windows 2000/NT) > Local Area Connection > Properties.
• Check that Client for Microsoft Networks is in the list of components and has its check box selected.

Chapter 20 Troubleshooting
NAS Series User’s Guide
329
20.6 Users Cannot Access the NAS
A local user cannot access a share.
• Check that the NAS is turned on and connected to the network. The local user should try to ping the
NAS or use the NAS Starter Utility to discover it.
• The local user should check that he entered his login name and password correctly.
• Check if the share exists and has the correct access settings for this user.
• Check the read/write permissions associated with specific files and/or folders. Account names added
to the list are linked to the files and folders that they are allowed to access, along with what kinds of
actions they are allowed to perform with those files and folders (delete, move, rename, and so on).
• The user’s computer may already be connected to another of the NAS’s shares using a different user
name and/or password. This can happen without the user realizing it if the user’s computer
automatically connects to a share at logon. Right-click any other connected shares and click
Disconnect. Then re-attempt to connect to the desired share.
• Check if the shared folder is a subfolder of another (parent) share. Check that the parent share’s
access rights do not conflict with the subfolder share. It is recommended that you do not create
subfolder shares.
• Check if the user belongs to a group with conflicting access rights. No Access always takes
precedence. If you allow a user Read/Write access to a share but set his group to No Access, then he
will NOT be able to access the share.
• The local user should check if there are any existing mapped network drives to the NAS. He may need
to disconnect existing CIFS connections as new CIFS connection may use previously-saved login
information that may be different to NAS login.
• Check that the array in which the share resides, exists and is not down or degraded. If the array is
down or degraded, see Section 20.2 on page 322.
• If the user is using DFS links, then he can only access the NAS using CIFS and not FTP.
• Check that the share has not been disabled.
I cannot import domain user or user group information even though testing of the connection to
the domain controller is OK.
• Check the NAS’s DNS setting. The DNS server the NAS is using must be able to resolve the domain
controller’s address. If the domain controller uses a private IP address, the NAS needs to use a private
DNS server. If the domain controller uses a public IP address, the NAS needs to use a public DNS
server.
• Leave the domain and re-join it.
A domain user can’t access a share.
In addition to the checks listed previously for local users, check that the domain controller is turned on
and connected to the network.

Chapter 20 Troubleshooting
NAS Series User’s Guide
330
A user can access a share but cannot access individual folders or files within the share.
• Check the read/write permissions associated with the share’s specific files and/or folders. Account
names added to the list are linked to the files and folders that they are allowed to access, along
with what kinds of actions they are allowed to perform with those files and folders (delete, move,
rename, and so on).
20.7 External USB Drives
The COPY LED is red.
Copying files to or from a USB device or SD card failed. The USB device or SD card may not be
compatible with the NAS. Try to save the files onto a computer and then from the computer to the NAS
(through the network connection).
20.8 Storage
Migrating from RAID 1 to RAID 5 did not expand the storage capacity.
The NAS normally expands the storage capacity by itself after rebuilding the RAID but may not if the NAS
rebooted during the RAID re-build.
After the re-build finishes, go to the Storage Manager screens and select the volume or disk group and
click Manage and use Expand the volume with unallocated disk space.
Replacing smaller disks in a RAID 1, RAID 5, or RAID 6 with larger capacity hard disks did not
expand the storage capacity.
The NAS normally expands the storage capacity by itself after rebuilding the RAID but may not if the NAS
rebooted during the RAID re-build.
After the re-build finishes, go to the Storage Manager screens and select the volume or disk group and
click Manage and use Expand the volume with unallocated disk space.

Chapter 20 Troubleshooting
NAS Series User’s Guide
331
20.9 Firmware
I want to know the firmware version on the NAS.
Go to the Status Center screen. The Firmware Version field shows you the current firmware version
running.
20.10 File Transfer
I want to transfer my file(s) from my local computer or storage device to the NAS.
• After you initialize your hard disk, you can directly access the folders in your NAS and transfer files in
the same way you transfer files in your local computer:
1On your Windows computer, open Windows Explorer or a web browser.
2Enter \\nas followed by the number of your model (540 for example) or the Server Name you assigned
the NAS. This shows you the folders in the NAS.
3Use drag-and-drop or copy-and-paste to transfer files over to your NAS.
• Use the COPY/SYNC button to transfer files from an external (USB) storage device to the NAS.
I want to transfer my file(s) from the NAS to my local computer or storage device.
• After you initialize your hard disk, you can directly access the folders in your NAS and transfer files in
the same way you transfer files in your local computer:
1On your Windows computer, open Windows Explorer or a web browser.
2Enter \\nas followed by the number of your model (540 for example) or the Server Name you assigned
the NAS. This shows you the folders in the NAS.
3Use drag-and-drop or copy-and-paste to transfer files from your NAS to your local computer’s folder or
your storage device.
• You can download the files from your NAS. Just click on the file(s) in the File Browser screen (Section
17.2 on page 292). Your computer will prompt you for the location where you want to save the file.

Chapter 20 Troubleshooting
NAS Series User’s Guide
332
20.11 Networking
I want to control who can access my folder(s)/file(s).
• If you are an administrator, you can configure a user’s access rights. Use the Shared Folders screens
(Section 7.5 on page 120) to do this.
•If you enabled Web Publishing for a folder, anyone on your network can play the media files in the
published shares. No user name and password or other form of security is used. The media server is
enabled by default with the video, photo, and music shares published.
One of the computers in my network cannot use the printer I connected to the NAS.
• You must install the printer driver on each computer that will use the printer.
• Check Section 20.4 on page 325 and check for related connectivity issues.
20.12 Some Features’ Screens Do Not Display
Many NAS features require a valid internal volume.
Features like the print server, download service, FTP and Windows/CIFS access will not work without a
valid internal volume. Make sure you have a volume on an internal disk and that the volume is in the
healthy state.
• Install an internal disk if one is not installed yet or has failed. See the Quick Start Guide for how to install
an internal disk.
• Create a new volume if you do not have one on the internal disk yet.
• Make sure the volume on the installed internal disk is in a healthy state.
I cannot use some applications in the Web Configurator.
• You can use the App Center screen (Chapter 13 on page 199) to install more applications from a web
location (specified in the firmware) to your NAS.
• If you have installed the application and can see the application’s configuration screen but still
cannot use it, check that you have Enabled the application.

Chapter 20 Troubleshooting
NAS Series User’s Guide
333
20.13 Media Server Functions
I set the media server function to publish a folder, but some of the files in the folder do not display
in the list on the media client.
Files with formats that are not supported on the media server may not display in the list. See page 345 for
the file formats that the media server supports.
I published a folder with the media server function, but the media client does not play some of
the files (or does not play them properly).
1Files with formats that are not supported on the media server may not display in the list. See page 345 for
the file formats that the media server supports.
2If you are using media client software, you may need to install codecs on your computer. Since the
media client software uses your computer’s installed codecs, files do not play if the required codec is
not installed on your computer.
3The media client may not support the file’s format.
iTunes does not display the names of all the music files I just put on the NAS.
1Make sure the files are a format supported by iTunes. See page 345.
2Go to Control Panel > Service > iTunes Server. Make sure the share containing the music files is published
and the iTunes server option is enabled.
3If an iTunes client is connected, the NAS’s iTunes server function scans the published media server folders
for files every three minutes. Leave iTunes connected to the NAS for three minutes. Then use the NAS’s
eject button (as shown next) to disconnect.
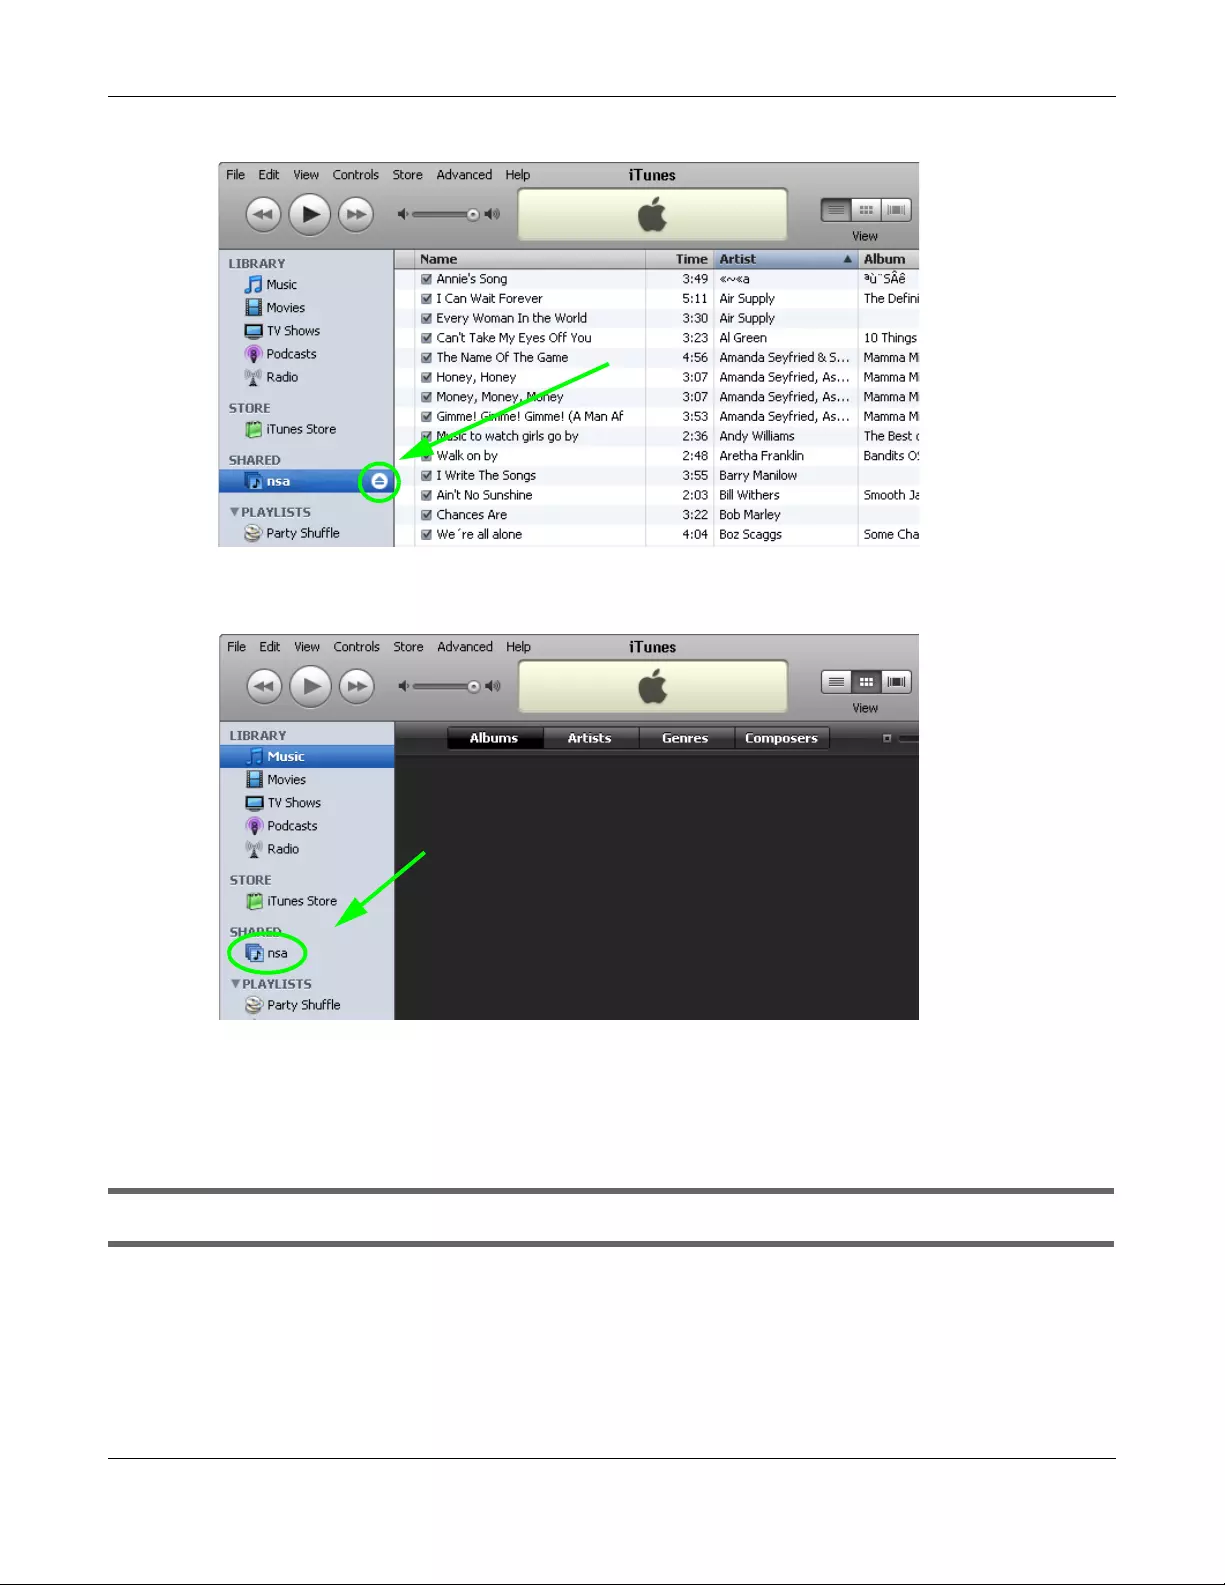
Chapter 20 Troubleshooting
NAS Series User’s Guide
334
Figure 273 iTunes Eject Button
4Then click the NAS’s link to reconnect.
Figure 274 iTunes Reconnected
5Another way to get the NAS’s iTunes server function to scan the published media server folders for files is
to go to Control Panel > Service > iTunes Server and disable and re-enable the iTunes server option. If
you uploaded many files, it may take awhile for the NAS to find and list all of them. Then try
reconnecting your iTunes client.
I cannot use iTunes to play files located on my NAS.
1Make sure the files are a format supported by iTunes. See page 345.
2If you have files from the iTunes Store that use DRM, you need to use your Apple account ID and
password to authorize other computers to play the files. Apple permits you to authorize up to five
computers at a time. To authorize a computer, open iTunes and click Store > Authorize Computer.

Chapter 20 Troubleshooting
NAS Series User’s Guide
335
3If you are connecting through a NAT router, make sure that TCP port 3689 and UDP port 5353 are open
for traffic on both the server and the client and all points in between (especially the NAT router). If your
router includes a firewall, make sure it also allows TCP port 3689 and UDP port 5353 traffic.
20.14 Download Service Functions
The download list items are missing after I removed a hard drive.
The NAS’s download list is stored on the system volume. If you have two JBOD volumes, it is possible to
remove one and still use the other. However if you remove the system volume, you may lose the
download list. With two JBOD volumes, the hard disk that was installed first is usually the system volume.
I cannot find the download files.
By default, the Download Service feature stores downloaded files as follows:
• P2P download jobs are stored in /*/incoming (where ‘*’ is a folder that you have set.)
• HTTP/FTP jobs are stored in /* (where ‘*’ is a folder that you have set.)
• All jobs triggered by RSS channels create the subfolder in /* using the channel name where it store
all files downloaded from that channel (where ‘*’ is a folder that you have set.)
Check your Preferences in the Download Service screen (Section 14.3 on page 236) to know or
configure where downloaded files are stored.
20.15 Web Publishing
A web-published share cannot be accessed by web browser from the Internet.
• Make sure the person trying to access the share is using the correct web address (and port number if
the NAS’s web publishing feature is not using port 80). See Web Publishing Port Number on page 176
for details.
• Make sure the publishing feature is turned on and the share is in the list of published shares.
• Make sure the person trying to access the share is using Internet Explorer 6.0 (and later) or Firefox 1.07
(and later).
• You need to use a public address to access the NAS’s web-published shares from the Internet. If your
NAS uses a private IP address, use the public IP address of your Internet gateway (firewall) and
configure NAT or port forwarding on your Internet gateway and possibly firewall rules in order to let
people access the NAS’s web-published shares from the Internet.

Chapter 20 Troubleshooting
NAS Series User’s Guide
336
• Make sure the firewall’s public IP address is static or that the firewall uses a Dynamic Domain Name
(DDNS).
• Web publishing uses TCP protocol and the port number you specify. Make sure there is not another
service using TCP protocol with the same port number.
• If Firefox access to the share does not work, check that you did not set the Web publishing feature to
use one of the following ports. (Firefox blocks these ports by default.)
• Make sure your ISP allows you to run a server and is not blocking the port number of the NAS’s web
publishing feature.
20.16 Auto Upload
The NAS does not automatically upload files to Flickr or YouTube.
1Make sure the NAS is connected to the Internet. See Section 8.4 on page 130 for details about testing
network connections.
2Click Control Panel > Maintenance > Log to check the NAS’s log for a message about the file.
2a If the log message displays “no such file or directory”, the file may have been removed from the
NAS. Make sure the file still exists in the watch folder.
Table 167 Ports Blocked By Default in Firefox
PORT SERVICE PORT SERVICE PORT SERVICE
1tcpmux 95supdup 513login
7 echo 101 hostriame 514 shell
9 discard 102 iso-tsap 515 printer
11 systat 103 gppitnp 526 tempo
13 daytime 104 acr-nema 530 courier
15 netstat 109 POP2 531 chat
17 qotd 110 POP3 532 netnews
19 chargen 111 sunrpc 540 uucp
20 ftp data 113 auth 556 remotefs
21 ftp control 115 sftp 563 NNTP+SSL
22 ssh 117 uucp-path 587 submission
23 telnet 119 NNTP 601 syslog
25 smtp 123 NTP 636 LDAP+SSL
37 time 135 loc-srv epmap 993 IMAP+SSL
42 name 139 netbios 995 POP3+SSL
43 nicname 143 IMAP2 2049 nfs
53 domain 179 BGP 4045 lockd
77 priv-rjs 389 LDAP 6000 X11
79 finger 465 SMTP+SSL
87 ttylink 512 print exec

Chapter 20 Troubleshooting
NAS Series User’s Guide
337
2b If the log message displays “filename is queued”, the file may still be waiting for auto upload.
Check the grace period setting in the service’s Configuration screen. You can set a smaller grace
period to shorten the queue time.
2c If you cannot find any log messages about the file:
•Make sure the Folder Watch List includes the folder containing the file. You can upload the file
to the watch folder again.
• Make sure the file’s format is supported by Flickr or YouTube. You can find the supported file
extensions in the Folder Watch List.
2d If the log message displays “not authorized yet”, check if you can enter the NAS’s Configuration
screen for the service. If you changed the password of your Flickr or YouTube account, you cannot
access the service’s Configuration screen, and the NAS cannot auto upload files. Make sure you
also update the account information in the NAS.
3Make sure the file size does not exceed the limit imposed by the service. At the time of writing, Flickr
restricts the file size to 10 MB, and YouTube restricts the file size to 100 MB.
4Make sure you did not exceed the service’s upload quota. Flickr and YouTube have different policies
about how much you can upload within a certain period, for example, 100 MB/week.
5The NAS may have temporarily failed to connect to the service. You can upload the file to the watch
folder again.
20.17 App Center
The NAS won’t install the package(s) I selected in the App Center screen.
• The web location of the package may be undergoing maintenance. Try again at a later time.
Upgrade the firmware of the NAS.
• If a new firmware is available, do an upgrade and try installing the package(s) again.
I want to know how my hard disk is performing.
Use S.M.A.R.T. (Self Monitoring, Analysis, and Reporting Technology) to monitor hard disks. It detects and
reports the reliability of hard disks using standard indicators, enabling administrators to anticipate
possible disk failures.
20.18 Backups
I cannot make a backup.

Chapter 20 Troubleshooting
NAS Series User’s Guide
338
• Check that enough space is available on the external disk. If there isn’t you may need to purge older
backups or delete other files on the backup USB disk or NAS.
•If you are using the Backup screen (Section 16.3 on page 268):
• You can look at the Backup screen’s Last Run Result display.
• If you’re backing up to another NAS or a computer, check that it allows the NAS to write files to it.
For a synchronization backup, the target must be another NAS or another compatible model.
• Check that the NAS is not performing another backup job. The schedule set for the backup jobs
queues backups when a different backup is already going on at the time a backup is scheduled.
The backup does not run at the time configured.
• Check that the correct time is configured on the NAS.
• Check that the NAS is able to access the time server from which it gets the time; see Section 9.5 on
page 149.
20.19 Google Drive
Google Drive stopped syncing.
1Make sure the NAS is connected to the Internet. See Section 8.4 on page 130 for details about testing
network connections.
2Check if you have exceeded the Google Drive account’s storage quota. You may need to:
• Delete unneeded files.
• Empty the Google Drive trash bin. Note, this permanently deletes everything in the bin, even if Google
moved it there without telling you (because you moved a file out of the local sync folder for
example).
• Upgrade the account’s capacity
3Click Maintenance > Log to check the NAS’s log messages. If a log message says you have exceeded
your storage quota on the NAS:
• Delete unneeded files.
• Clean out the recycle bin (see Section 7.5.6.1 on page 128).
• Increase the user’s quota on the volume containing the local sync folder (see Section 7.3.2 on page
107 or Section 7.3.3 on page 111).
4Check for any logs about removal of the user account. When you remove a user’s NAS account, the
NAS also removes the link to the user’s Google account. However the NAS keeps the data in the local
sync folder. Reconfigure a user account and link it to the Google account to let the user use Google
Drive again.

NAS Series User’s Guide
339
APPENDIX A
Customer Support
In the event of problems that cannot be solved by using this manual, you should contact your vendor. If
you cannot contact your vendor, then contact a Zyxel office for the region in which you bought the
device.
See https://www.zyxel.com/homepage.shtml and also
https://www.zyxel.com/about_zyxel/zyxel_worldwide.shtml for the latest information.
Please have the following information ready when you contact an office.
Required Information
• Product model and serial number.
• Warranty Information.
• Date that you received your device.
• Brief description of the problem and the steps you took to solve it.
Corporate Headquarters (Worldwide)
Taiwan
• Zyxel Communications Corporation
• http://www.zyxel.com
Asia
China
• Zyxel Communications (Shanghai) Corp.
Zyxel Communications (Beijing) Corp.
Zyxel Communications (Tianjin) Corp.
• https://www.zyxel.com/cn/zh/
India
•Zyxel Technology India Pvt Ltd
• https://www.zyxel.com/in/en/
Kazakhstan
•Zyxel Kazakhstan
• https://www.zyxel.kz

Appendix A Customer Support
NAS Series User’s Guide
340
Korea
• Zyxel Korea Corp.
• http://www.zyxel.kr
Malaysia
• Zyxel Malaysia Sdn Bhd.
• http://www.zyxel.com.my
Pakistan
• Zyxel Pakistan (Pvt.) Ltd.
• http://www.zyxel.com.pk
Philippines
• Zyxel Philippines
• http://www.zyxel.com.ph
Singapore
• Zyxel Singapore Pte Ltd.
• http://www.zyxel.com.sg
Taiwan
• Zyxel Communications Corporation
• https://www.zyxel.com/tw/zh/
Thailand
• Zyxel Thailand Co., Ltd
• https://www.zyxel.com/th/th/
Vietnam
• Zyxel Communications Corporation-Vietnam Office
• https://www.zyxel.com/vn/vi
Europe
Belarus
•Zyxel BY
• https://www.zyxel.by
Belgium
• Zyxel Communications B.V.
• https://www.zyxel.com/be/nl/

Appendix A Customer Support
NAS Series User’s Guide
341
• https://www.zyxel.com/be/fr/
Bulgaria
•Zyxel България
• https://www.zyxel.com/bg/bg/
Czech Republic
• Zyxel Communications Czech s.r.o
• https://www.zyxel.com/cz/cs/
Denmark
• Zyxel Communications A/S
• https://www.zyxel.com/dk/da/
Estonia
• Zyxel Estonia
• https://www.zyxel.com/ee/et/
Finland
• Zyxel Communications
• https://www.zyxel.com/fi/fi/
France
•Zyxel France
• https://www.zyxel.fr
Germany
•Zyxel Deutschland GmbH
• https://www.zyxel.com/de/de/
Hungary
• Zyxel Hungary & SEE
• https://www.zyxel.com/hu/hu/
Italy
• Zyxel Communications Italy
• https://www.zyxel.com/it/it/
Latvia
•Zyxel Latvia
• https://www.zyxel.com/lv/lv/

Appendix A Customer Support
NAS Series User’s Guide
342
Lithuania
•Zyxel Lithuania
• https://www.zyxel.com/lt/lt/
Netherlands
• Zyxel Benelux
• https://www.zyxel.com/nl/nl/
Norway
• Zyxel Communications
• https://www.zyxel.com/no/no/
Poland
• Zyxel Communications Poland
• https://www.zyxel.com/pl/pl/
Romania
• Zyxel Romania
• https://www.zyxel.com/ro/ro
Russia
• Zyxel Russia
• https://www.zyxel.com/ru/ru/
Slovakia
• Zyxel Communications Czech s.r.o. organizacna zlozka
• https://www.zyxel.com/sk/sk/
Spain
• Zyxel Communications ES Ltd
• https://www.zyxel.com/es/es/
Sweden
• Zyxel Communications
• https://www.zyxel.com/se/sv/
Switzerland
•Studerus AG
• https://www.zyxel.ch/de
• https://www.zyxel.ch/fr

Appendix A Customer Support
NAS Series User’s Guide
343
Turkey
• Zyxel Turkey A.S.
• https://www.zyxel.com/tr/tr/
UK
• Zyxel Communications UK Ltd.
• https://www.zyxel.com/uk/en/
Ukraine
•Zyxel Ukraine
• http://www.ua.zyxel.com
South America
Argentina
• Zyxel Communications Corporation
• https://www.zyxel.com/co/es/
Brazil
• Zyxel Communications Brasil Ltda.
• https://www.zyxel.com/br/pt/
Colombia
• Zyxel Communications Corporation
• https://www.zyxel.com/co/es/
Ecuador
• Zyxel Communications Corporation
• https://www.zyxel.com/co/es/
South America
• Zyxel Communications Corporation
• https://www.zyxel.com/co/es/
Middle East
Israel
• Zyxel Communications Corporation
• http://il.zyxel.com/

Appendix A Customer Support
NAS Series User’s Guide
344
Middle East
• Zyxel Communications Corporation
• https://www.zyxel.com/me/en/
North America
USA
• Zyxel Communications, Inc. — North America Headquarters
• https://www.zyxel.com/us/en/
Oceania
Australia
• Zyxel Communications Corporation
• https://www.zyxel.com/au/en/
Africa
South Africa
• Nology (Pty) Ltd.
• https://www.zyxel.com/za/en/

NAS Series User’s Guide
345
APPENDIX B
Product Specifications
See also Chapter 1 on page 13 for a general overview of the key features.
Supported Media Server Content Formats
The following describes the details about the files that the NAS media server can publish.
• Audio: LPCM (not supported as a file format), MP3, WMA, M4A, M4B, MP4, 3GP, WAV, OGG, FLAC,
AAC, MP2, AC3, MPA, MP1, AIF, ASF, FLV, DSD
• Images: JPEG, PNG, TIF, TIFF, BMP, GIF
• Video: WMV, MPEG2, MP1, MPG, SPTS, MP4, AVI, VOB, DivX, 3GP, VDR, MPE, DVR-MS, Xvid, M1V, M4V,
MOV, MPV, MKV, OGG, FLV, MTS
Note: Not all published file types can be viewed by all client applications.
Supported iTunes Server Content Formats
At the time of writing, the NAS supports iTunes publishing audio files of the following formats: mp3, m4a,
m4p, wav, and mp4.
NAS Series User’s Guide
346
APPENDIX C
Legal Information
Copyright
Copyright © 2018 by Zyxel Communications Corporation.
The contents of this publication may not be reproduced in any part or as a whole, transcribed, stored in a retrieval system, translated into any
language, or transmitted in any form or by any means, electronic, mechanical, magnetic, optical, chemical, photocopying, manual, or
otherwise, without the prior written permission of Zyxel Communications Corporation.
Published by Zyxel Communications Corporation. All rights reserved.
Disclaimer
Zyxel does not assume any liability arising out of the application or use of any products, or software described herein. Neither does it convey any
license under its patent rights nor the patent rights of others. Zyxel further reserves the right to make changes in any products described herein
without notice. This publication is subject to change without notice.
Regulatory Notice and Statement
UNITED STATES of AMERICA
The following information applies if you use the product within USA area.
FCC EMC Statement
• The device complies with Part 15 of FCC rules. Operation is subject to the following two conditions:
(1) This device may not cause harmful interference, and
(2) This device must accept any interference received, including interference that may cause undesired operation.
• Changes or modifications not expressly approved by the party responsible for compliance could void the user’s authority to operate the
device.
• This product has been tested and complies with the specifications for a Class B digital device, pursuant to Part 15 of the FCC Rules. These
limits are designed to provide reasonable protection against harmful interference in a residential installation. This device generates, uses, and
can radiate radio frequency energy and, if not installed and used according to the instructions, may cause harmful interference to radio
communications. However, there is no guarantee that interference will not occur in a particular installation.
• If this device does cause harmful interference to radio or television reception, which is found by turning the device off and on, the user is
encouraged to try to correct the interference by one or more of the following measures:
• Reorient or relocate the receiving antenna
• Increase the separation between the devices
• Connect the equipment to an outlet other than the receiver’s
• Consult a dealer or an experienced radio/TV technician for assistance
CANADA
The following information applies if you use the product within Canada area
Industry Canada ICES statement
CAN ICES-3 (B)/NMB-3(B)
EUROPEA N UNION
The following information applies if you use the product within the European Union.

Appendix C Legal Information
NAS Series User’s Guide
347
List of national codes
Safety Warnings
• Do not use this product near water, for example, in a wet basement or near a swimming pool.
• Do not expose your device to dampness, dust or corrosive liquids.
• Do not store things on the device.
• Do not obstruct the device ventilation slots as insufficient airflow may harm your device. For example, do not place the device in an
enclosed space such as a box or on a very soft surface such as a bed or sofa.
• Do not install, use, or service this device during a thunderstorm. There is a remote risk of electric shock from lightning.
• Connect ONLY suitable accessories to the device.
• Do not open the device or unit. Opening or removing covers can expose you to dangerous high voltage points or other risks.
• Only qualified service personnel should service or disassemble this device. Please contact your vendor for further information.
• Make sure to connect the cables to the correct ports.
• Place connecting cables carefully so that no one will step on them or stumble over them.
• Always disconnect all cables from this device before servicing or disassembling.
• Do not remove the plug and connect it to a power outlet by itself; always attach the plug to the power adaptor first before connecting it to
a power outlet.
• Do not allow anything to rest on the power adaptor or cord and do NOT place the product where anyone can walk on the power adaptor
or cord.
• Please use the provided or designated connection cables/power cables/ adaptors. Connect it to the right supply voltage (for example,
110V AC in North America or 230V AC in Europe). If the power adaptor or cord is damaged, it might cause electrocution. Remove it from the
device and the power source, repairing the power adapter or cord is prohibited. Contact your local vendor to order a new one.
• Do not use the device outside, and make sure all the connections are indoors. There is a remote risk of electric shock from lightning.
• CAUTION: Risk of explosion if battery is replaced by an incorrect type, dispose of used batteries according to the instruction. Dispose them at
the applicable collection point for the recycling of electrical and electronic devices. For detailed information about recycling of this
product, please contact your local city office, your household waste disposal service or the store where you purchased the product.
• The following warning statements apply, where the disconnect device is not incorporated in the device or where the plug on the power
supply cord is intended to serve as the disconnect device,
— For permanently connected devices, a readily accessible disconnect device shall be incorporated external to the device;
— For pluggable devices, the socket-outlet shall be installed near the device and shall be easily accessible.
Environment Statement
ErP (Energy-related Products)
Zyxel products put on the EU market in compliance with the requirement of the European Parliament and the Council published Directive 2009/
125/EC establishing a framework for the setting of ecodesign requirements for energy-related products (recast), so called as «ErP Directive
(Energy-related Products directive) as well as ecodesign requirement laid down in applicable implementing measures, power consumption has
satisfied regulation requirements which are:
• Network standby power consumption < 8W, and/or
• Off mode power consumption < 0.5W, and/or
• Standby mode power consumption < 0.5W.
(Wireless setting, please refer to «Wireless» chapter for more detail.)
European Union — Disposal and Recycling Information
The symbol below means that according to local regulations your product and/or its battery shall be disposed of separately from domestic
waste. If this product is end of life, take it to a recycling station designated by local authorities. At the time of disposal, the separate collection of
your product and/or its battery will help save natural resources and ensure that the environment is sustainable development.
COUNTRY ISO 3166 2 LETTER CODE COUNTRY ISO 3166 2 LETTER CODE
Austria AT Liechtenstein LI
Belgium BE Lithuania LT
Bulgaria BG Luxembourg LU
Croatia HR Malta MT
Cyprus CY Netherlands NL
Czech Republic CZ Norway NO
Denmark DK Poland PL
Estonia EE Portugal PT
Finland FI Romania RO
France FR Serbia RS
Germany DE Slovakia SK
Greece GR Slovenia SI
Hungary HU Spain ES
Iceland IS Switzerland CH
Ireland IE Sweden SE
Italy IT Turkey TR
Latvia LV United Kingdom GB
Appendix C Legal Information
NAS Series User’s Guide
348
Die folgende Symbol bedeutet, dass Ihr Produkt und/oder seine Batterie gemäß den örtlichen Bestimmungen getrennt vom Hausmüll entsorgt
werden muss. Wenden Sie sich an eine Recyclingstation, wenn dieses Produkt das Ende seiner Lebensdauer erreicht hat. Zum Zeitpunkt der
Entsorgung wird die getrennte Sammlung von Produkt und/oder seiner Batterie dazu beitragen, natürliche Ressourcen zu sparen und die Umwelt
und die menschliche Gesundheit zu schützen.
El símbolo de abajo indica que según las regulaciones locales, su producto y/o su batería deberán depositarse como basura separada de la
doméstica. Cuando este producto alcance el final de su vida útil, llévelo a un punto limpio. Cuando llegue el momento de desechar el
producto, la recogida por separado éste y/o su batería ayudará a salvar los recursos naturales y a proteger la salud humana y
medioambiental.
Le symbole ci-dessous signifie que selon les réglementations locales votre produit et/ou sa batterie doivent être éliminés séparément des ordures
ménagères. Lorsque ce produit atteint sa fin de vie, amenez-le à un centre de recyclage. Au moment de la mise au rebut, la collecte séparée
de votre produit et/ou de sa batterie aidera à économiser les ressources naturelles et protéger l’environnement et la santé humaine.
Il simbolo sotto significa che secondo i regolamenti locali il vostro prodotto e/o batteria deve essere smaltito separatamente dai rifiuti domestici.
Quando questo prodotto raggiunge la fine della vita di servizio portarlo a una stazione di riciclaggio. Al momento dello smaltimento, la raccolta
separata del vostro prodotto e/o della sua batteria aiuta a risparmiare risorse naturali e a proteggere l’ambiente e la salute umana.
Symbolen innebär att enligt lokal lagstiftning ska produkten och/eller dess batteri kastas separat från hushållsavfallet. När den här produkten når
slutet av sin livslängd ska du ta den till en återvinningsstation. Vid tiden för kasseringen bidrar du till en bättre miljö och mänsklig hälsa genom att
göra dig av med den på ett återvinningsställe.
台灣
安全警告 — 為了您的安全,請先閱讀以下警告及指示 :
• 請勿將此產品接近水、火焰或放置在高溫的環境。
• 避免設備接觸
— 任何液體 — 切勿讓設備接觸水、雨水、高濕度、污水腐蝕性的液體或其他水份。
— 灰塵及污物 — 切勿接觸灰塵、污物、沙土、食物或其他不合適的材料。
• 雷雨天氣時,不要安裝,使用或維修此設備。有遭受電擊的風險。
• 切勿重摔或撞擊設備,並勿使用不正確的電源變壓器。
• 若接上不正確的電源變壓器會有爆炸的風險。
• 請勿隨意更換產品內的電池。
• 如果更換不正確之電池型式,會有爆炸的風險,請依製造商說明書處理使用過之電池。
• 請將廢電池丟棄在適當的電器或電子設備回收處。
• 請勿將設備解體。
• 請勿阻礙設備的散熱孔,空氣對流不足將會造成設備損害。
• 請插在正確的電壓供給插座 ( 如 : 北美 / 台灣電壓 110V AC,歐洲是 230V AC)。
• 假若電源變壓器或電源變壓器的纜線損壞,請從插座拔除,若您還繼續插電使用,會有觸電死亡的風險。
• 請勿試圖修理電源變壓器或電源變壓器的纜線,若有毀損,請直接聯絡您購買的店家,購買一個新的電源變壓器。
• 請勿將此設備安裝於室外,此設備僅適合放置於室內。
• 請勿隨一般垃圾丟棄。
• 請參閱產品背貼上的設備額定功率。
• 請參考產品型錄或是彩盒上的作業溫度。
• 產品沒有斷電裝置或者採用電源線的插頭視為斷電裝置的一部分,以下警語將適用 :
— 對永久連接之設備, 在設備外部須安裝可觸及之斷電裝置;
— 對插接式之設備, 插座必須接近安裝之地點而且是易於觸及的。
About the Symbols
Various symbols are used in this product to ensure correct usage, to prevent danger to the user and others, and to prevent property damage.
The meaning of these symbols are described below. It is important that you read these descriptions thoroughly and fully understand the
contents.
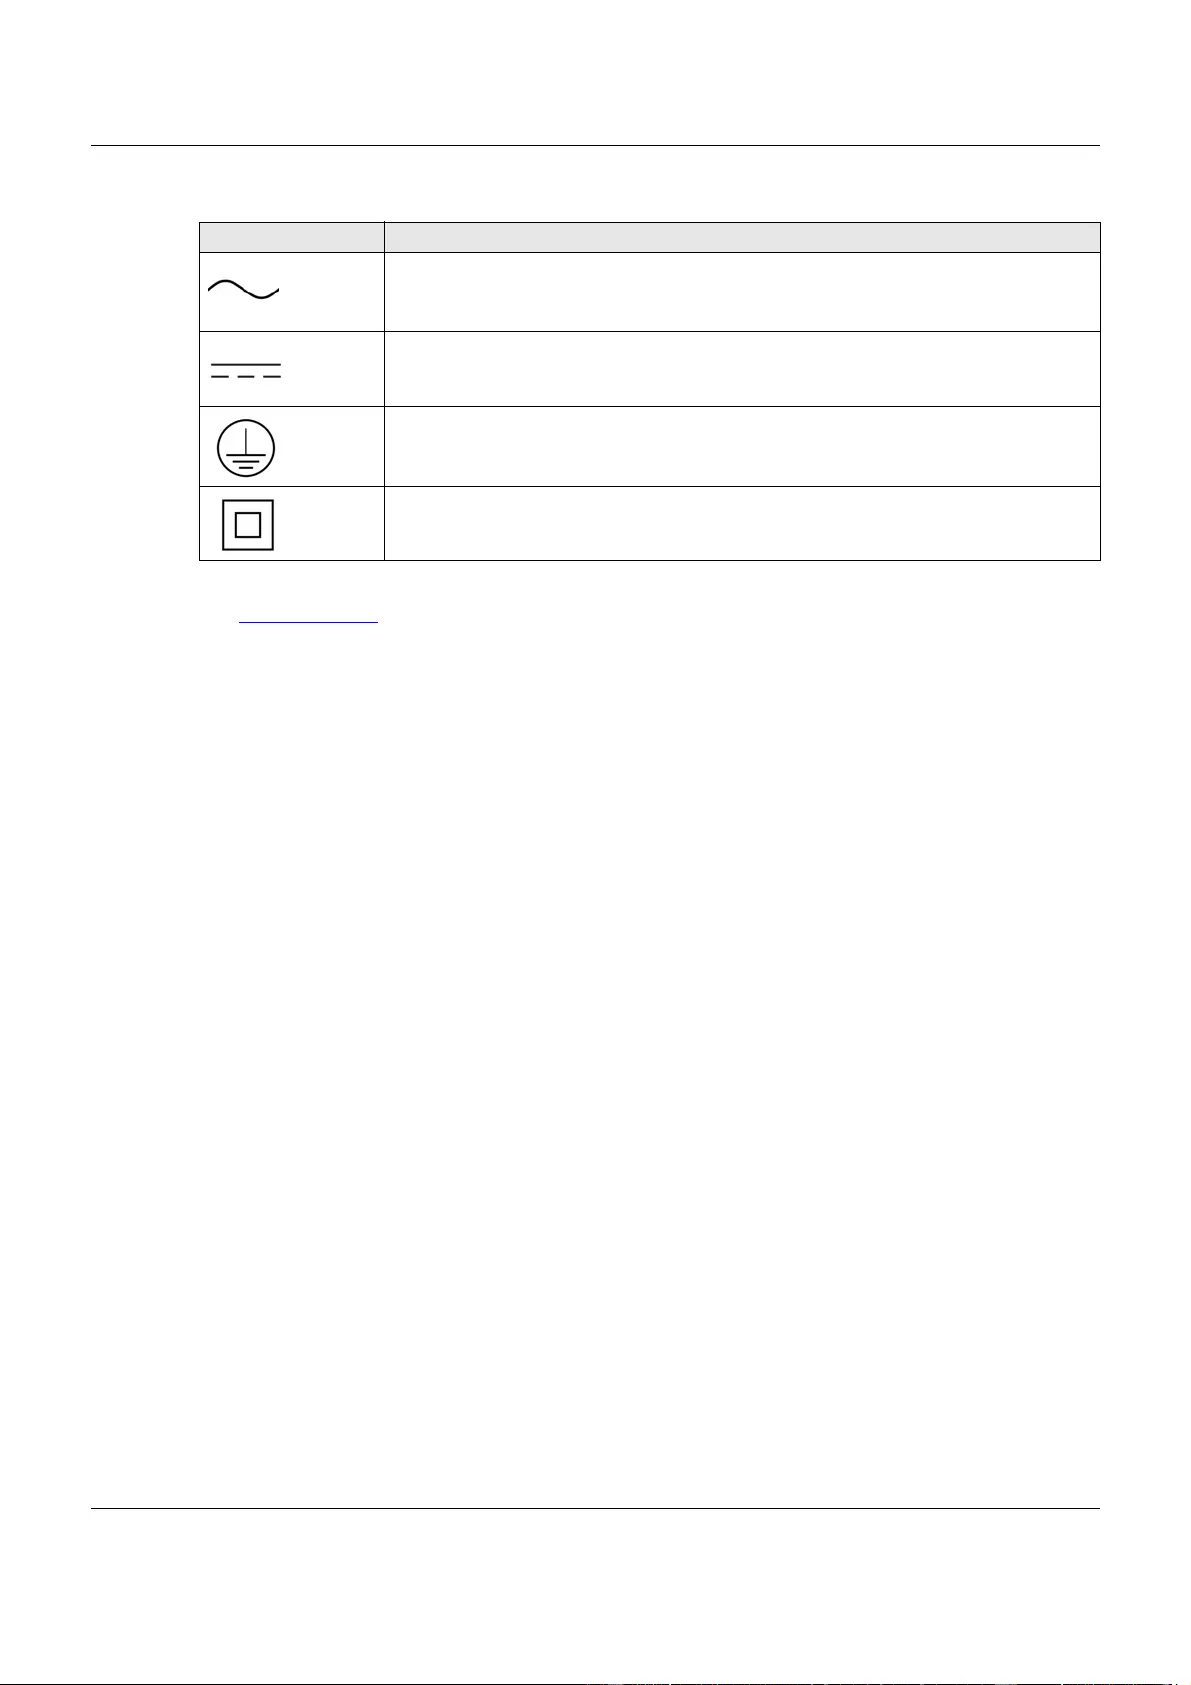
Appendix C Legal Information
NAS Series User’s Guide
349
Explanation of the Symbols
Viewing Certifications
Go to http://www.zyxel.com to view this product’s documentation and certifications.
Zyxel Limited Warranty
Zyxel warrants to the original end user (purchaser) that this product is free from any defects in material or workmanship for a specific period (the
Warranty Period) from the date of purchase. The Warranty Period varies by region. Check with your vendor and/or the authorized Zyxel local
distributor for details about the Warranty Period of this product. During the warranty period, and upon proof of purchase, should the product
have indications of failure due to faulty workmanship and/or materials, Zyxel will, at its discretion, repair or replace the defective products or
components without charge for either parts or labor, and to whatever extent it shall deem necessary to restore the product or components to
proper operating condition. Any replacement will consist of a new or re-manufactured functionally equivalent product of equal or higher value,
and will be solely at the discretion of Zyxel. This warranty shall not apply if the product has been modified, misused, tampered with, damaged by
an act of God, or subjected to abnormal working conditions.
Note
Repair or replacement, as provided under this warranty, is the exclusive remedy of the purchaser. This warranty is in lieu of all other warranties,
express or implied, including any implied warranty of merchantability or fitness for a particular use or purpose. Zyxel shall in no event be held
liable for indirect or consequential damages of any kind to the purchaser.
To obtain the services of this warranty, contact your vendor. You may also refer to the warranty policy for the region in which you bought the
device at http://www.zyxel.com/web/support_warranty_info.php.
Registration
Register your product online to receive e-mail notices of firmware upgrades and information at www.zyxel.com for global products, or at
www.us.zyxel.com for North American products.
Trademarks
ZyNOS (Zyxel Network Operating System) and ZON (Zyxel One Network) are registered trademarks of Zyxel Communications, Inc. Other
trademarks mentioned in this publication are used for identification purposes only and may be properties of their respective owners.
Open Source Licenses
This product contains in part some free software distributed under GPL license terms and/or GPL like licenses. Open source licenses are provided
with the firmware package. You can download the latest firmware at www.zyxel.com. To obtain the source code covered under those Licenses,
please contact support@zyxel.com.tw to get it.
SYMBOL EXPLANATION
Alternating current (AC):
AC is an electric current in which the flow of electric charge periodically reverses direction.
Direct current (DC):
DC if the unidirectional flow or movement of electric charge carriers.
Earth; ground:
A wiring terminal intended for connection of a Protective Earthing Conductor.
Class II equipment:
The method of protection against electric shock in the case of class II equipment is either double insulation or
reinforced insulation.

Index
NAS Series User’s Guide
350
Index
A
access rights
Flickr 258
YouTube 261
activation
download service 237
Flickr/YouTube 253
FTP 163
FTP Uploadr 262
recycle bins 123
web publishing 168
adding channels 249
Amazon Fire TV 316
anonymous FTP access 163
Apple TV 316
applications 158, 236, 252
adding channels 249
auto upload
Flickr/YouTube 252
COPY/SYNC button 286
configuration 286, 287
example 288
synchronization 289
download service 236, 249
activation 237
adding a task 239, 246
P2P download 240, 249
preferences 240
protection 250
URL 240
FTP 158, 162, 252
activation 163
anonymous access 163
media server 159
configuration 160
iTunes server 159, 174, 175
print server 176
configuration 172
name 172
web publishing 159, 175
activation 168
example 169
port number 176
authorization
Flickr 253, 254
YouTube 259
auto upload
Flickr/YouTube 252
activation 253
authorization 253, 259
configuration 257, 258, 259
FTP Uploadr
activation 262
bandwidth limit 266
configuration 263
server entry 263
grace period 258, 261, 266
B
backup 216, 231
backup files
restoring files by 267
backup settings 185, 186, 187
bandwidth limit 266
C
certificate
editing 156
certifications 347
viewing 349
Chromecast 316
CIFS 147
cloud storage 216, 231
collaboration 216
comparison table 12
configuration
COPY/SYNC button 286, 287
Flickr 257, 258
FTP Uploadr 263

Index
NAS Series User’s Guide
351
print server 172
recycle bins 128
YouTube 259
contact information 340
control panel 101, 129
COPY/SYNC button 15, 286
configuration 286, 287
example 288
synchronization 289
copyright 346
CPU
temperature 197
usage 197
creating
groups 114, 115, 116, 117
shares 121, 126
users 106, 107, 111
customer support 340
D
date 149
desktop 29
disclaimer 346
discovery 18
disk
S.M.A.R.T. attributes 77
displaying user information 112, 119, 127
DLNA 159, 174
DNS 129, 130
Domain Name System, see DNS
domain user
troubleshooting 329
troubleshooting share access 329
download period control 242
download service 236, 249
activation 237
adding a task 239, 246
download period control 242
P2P download
IP filtering 244, 245
protection 250
re-seeding 237
settings 242
torrent files 240, 249
preferences 240
URL, download service 240
downloading files 294
duplexing 97
E
Exchangeable image file format, see Exif
Exif 297
F
fan speed 197
file
troubleshooting access 330
file synchronization 216
File Transfer Protocol over Explicit TLS, see FTPES
File Transfer Protocol over TLS, see FTPS
files
downloading 294
uploading 294
FindMe 17
firmware, upgrading 151
Flickr 252
access rights 258
activation 253
authorization 253, 254
grace period 258
safety level 258
folder
troubleshooting access 330
folder creation 293
FTP 158, 162, 252
activation 163
anonymous access 163
FTP Uploadr
activation 262
bandwidth limit 266
configuration 263
grace period 266
server entry 263
FTPES 158
FTPS 252

Index
NAS Series User’s Guide
352
G
GMT 23, 149
Google Chromecast 316
Google Drive 216
Google Maps 297
GPS 297
grace period 258, 261, 266
groups
adding 114, 115, 116, 117
editing 115, 116, 117
names 113
H
hot spare 100
HTTPS 153, 166
I
icons
users 107
IP address 129
IP filtering 244, 245
iSCSI 79
iSCSI target 84
iTunes server 159, 161, 174, 175
J
JBOD 97
K
Ken Burns 303
L
lag, time 147
latitude 297
login 25
logs 181
longitude 297
LUN 79
M
maintenance 177
backup settings 185, 186, 187
logs 181
power management 177
failure 178
resume 178
schedule 180
UPS 178
reset 185, 186, 187
restoring settings 185, 186, 187
upgrading firmware 151
master browser 148
media server 159
configuration 160
iTunes server 159, 161, 175
rebuild database 159
share publish 160
status 159
Memopal 231
mirroring 97
myZyxelCloud 304
N
naming
server 148
shares 120
workgroup 148
NAS Starter Utility 17
network 101, 129
DNS 129, 130
IP address 129
PPPoE 129, 136, 144

Index
NAS Series User’s Guide
353
TCP/IP 130
O
one-way incremental backup 231
online backup 231
P
P2P download
IP filtering 244, 245
protection 250
re-seeding 237
settings 242
torrent files 240, 249
health 248
info-hash 248
trackers 248
parity 97
Play Next 303
port mapping 138
power button 14
power management 177
failure 178
resume 178
schedule 180
UPS 178
PPPoE 129, 136, 144
preferences, download service 240
print server 176
configuration 172
name 172
product registration 349
protection, download service 250
public key certificate
editing 156
publishing shares 160
R
RAID
background information 97
data protection 100
RAID 0 97
RAID 10 99
RAID 5 99
RAID 5 spare 100
rebuild media server database 159
recycle bins 128
activation 123
configuration 121, 127, 128
registration
product 349
reset 15, 185, 186, 187
restoring
by backup files 267
restoring settings 185, 186, 187
Roku 3 316
RSS 159, 236
S
S.M.A.R.T.
attributes 77
safety level, Flickr 258
schedule, power management 180
scheduling, download service 242
server
Syslog 172
TFTP 228
server entry, FTP Uploadr 263
server name 148
setup
COPY/SYNC button 286, 287
Flickr 257, 258
FTP Uploadr 263
media server 160
P2P download 242
print server 172
YouTube 259
share
troubleshooting local user access 329
share publishing 160
shares 292
adding 121, 126
downloading files 294
editing 126

Index
NAS Series User’s Guide
354
folder creation 293
names 120
recycle bins 121, 127, 128
activation 123
configuration 128
status 121
uploading files 294
smart TVs 316
SSL 153
certificate
editing 156
status
shares 121
volume 95
status center 196
storage 40
status 95
volumes 94
streaming 316
striping 97
synchronization 216, 286, 289
configuration 286, 287
directions 287
single direction 289
two directions 289
Syslog server 172
system
date/time 149
login 25
master browser 148
reset 15
server name 148
settings 147
time lag 147
workgroup name 148
T
target 84
TCP/IP 130
temperature
CPU 197
TFTP server 228
time 149
lag 147
server 150
zone 23, 149
Time Machine 290
TLS 158, 252
torrent files 240, 249
health 248
info-hash 248
trackers 248
trademarks 349
Transport Layer Security, see TLS
troubleshooting
domain user 329
domain user share access 329
file access 330
folder access 330
forgot password 325, 326
LED indicators 322
LAN 323
local user share access 329
login 328
media files 333
NAS Starter Utility 324
overview 322
user share access 328
web configurator access 326
two-way synchronization 216
U
Universal Plug and Play. See UPnP.
upgrading firmware 151
uploading files 294
UPnP 138
port mapping 138
UPS 178
URL 240
User Name 146
usernames 105
users
adding an account 106, 107, 111
displaying information 106, 112, 114, 119, 127
editing an account 107, 111
icons 107
usernames 105

Index
NAS Series User’s Guide
355
V
video category, YouTube 261
video playback 303
volume
RAID 1 98
volumes 94
status 95
W
warranty 349
note 349
web configurator 25
login 25
web publishing 159, 167, 175
activation 168
example 169
port number 176
troubleshooting 335
workgroup name 148
Y
YouTube 252
access rights 261
activation 253
authorization 259
configuration 259
grace period 261
video category 261
Z
zCloud 316
Zyxel Drive 309
Default Login Details
User’s Guide
NAS Series
Model: NAS326, NAS520, NAS540, and NAS542
Personal Cloud Storage
Ways to Find Your
NAS
Web Address http://(NAS Server Name)
http://(NAS IP Address)
User Name admin
Password 1234
FindMe
NAS Starter Utility
Version 5.21 Edition 3, 9/2019
Copyright © 2019 Zyxel Communications Corporation

IMPORTANT!
READ CAREFULLY BEFORE USE.
KEEP THIS GUIDE FOR FUTURE REFERENCE.
Screenshots and graphics in this book may differ slightly from what you see due to differences in your
product firmware or your computer operating system. Every effort has been made to ensure that the
information in this manual is accurate.
Related Documentation
•Quick Start Guide
The Quick Start Guide shows how to connect the NAS.
•More Information
Go to support.zyxel.com to find other information on the NAS
.
NAS Series User’s Guide
2

Document Conventions
Warnings and Notes
These are how warnings and notes are shown in this guide.
Warnings tell you about things that could harm you or your device.
Note: Notes tell you other important information (for example, other things you may need to
configure or helpful tips) or recommendations.
Syntax Conventions
• The NAS Series in this user’s guide may be referred to as the “NAS” in this guide.
• Product labels, screen names, field labels and field choices are all in bold font.
• A right angle bracket ( > ) within a screen name denotes a mouse click. For example, Network Setting
> Routing > DNS Route means you first click Network Setting in the navigation panel, then the Routing
sub menu and finally the DNS Route tab to get to that screen.
Icons Used in Figures
Figures in this user guide may use the following generic icons. The NAS icon is not an exact
representation of your device.
NAS Internet Laptop Computer
Switch Firewall Server
Desktop Computer Media Player USB Storage Drive
TV USB Hard Drive
NAS Series User’s Guide
3

Contents Overview
Contents Overview
Get to Know Your NAS …………………………………………………………………………………………………………. 13
Find and Access Your NAS …………………………………………………………………………………………………… 18
Web Configurator ………………………………………………………………………………………………………………… 26
Video Tutorials ……………………………………………………………………………………………………………………… 37
Storage Manager ………………………………………………………………………………………………………………… 41
Control Panel: Overview …………………………………………………………………………………………………….. 101
Control Panel: Privilege and Sharing …………………………………………………………………………………… 104
Control Panel: Network ………………………………………………………………………………………………………. 129
Control Panel: System ………………………………………………………………………………………………………… 147
Control Panel: Service ………………………………………………………………………………………………………… 158
Control Panel: Maintenance ……………………………………………………………………………………………… 177
Status Center ……………………………………………………………………………………………………………………… 196
App Center and Packages ………………………………………………………………………………………………… 199
Download Service ……………………………………………………………………………………………………………… 236
Upload Manager ……………………………………………………………………………………………………………….. 252
Backup Planner …………………………………………………………………………………………………………………. 267
File Browser, Photo, Music & Video ……………………………………………………………………………………… 292
Access Your Cloud Remotely via myZyxelCloud and Zyxel Drive App …………………………………. 304
Play Media Files on TVs Using zCloud App ………………………………………………………………………….. 316
Troubleshooting …………………………………………………………………………………………………………………. 322
NAS Series User’s Guide
4

Table of Contents
Table of Contents
Document Conventions …………………………………….. ………………………………………… … …………………..3
Contents Overview ……………………………………………………………………………………………………………..4
Table of Contents…………………………………………………………………………………………………………………5
Chapter 1
Get to Know Your NAS………………………………………………………………………………………………………..13
1.1 Overview ……………………………………………………………………………………………………………………….. 13
1.2 LEDs ……………………………………………………………………………………………………………………………….. 14
1.3 Hard Disks ………………………………………………………………………………………………………………………. 15
1.4 SD Card ………………………………………………………………………………………………………………………….. 15
1.5 Power Button ………………………………………………………………………………………………………………….. 15
1.6 COPY/SYNC Button ………………………………………………………………………………………………………… 16
1.7 RESET Button …………………………………………………………………………………………………………………… 16
Chapter 2
Find and Access Your NAS …………………………………………………………………………………………………18
2.1 Overview ……………………………………………………………………………………………………………………….. 18
2.2 FindMe …………………………………………………………………………………………………………………………… 18
2.3 NAS Starter Utility …………………………………………………………………………………………………………….. 19
2.3.1 NAS Seeker Screen ………………………………………………………………………………………………… 19
2.3.2 Main NAS Starter Utility Screen ……………………………………………………………………………….. 20
2.3.3 Directory of the NAS ………………………………………………………………………………………………. 22
2.3.4 Network Drive ………………………………………………………………………………………………………… 22
2.3.5 Configure System Settings ………………………………………………………………………………………. 23
Chapter 3
Web Configurator……………………………………………………………………………………………………………….26
3.1 Overview ……………………………………………………………………………………………………………………….. 26
3.2 Access the NAS Web Configurator …………………………………………………………………………………. 26
3.3 Desktop …………………………………………………………………………………………………………………………. 30
3.3.1 Status Zone …………………………………………………………………………………………………………….. 33
3.3.2 Switch between Desktop Pages …………………………………………………………………………….. 33
3.3.3 Group Icons …………………………………………………………………………………………………………… 34
3.3.4 Move Icons ……………………………………………………………………………………………………………. 36
Chapter 4
Video Tutorials……………………………………………………………………………………………………………………37
4.1 Overview ……………………………………………………………………………………………………………………….. 37
NAS Series User’s Guide
5

Table of Contents
4.2 Create a volume and copy files using Windows Explorer ………………………………………………… 37
4.3 Enable Time Machine on the NAS and your Mac computer ……………………………………………. 37
4.4 Back up files to the NAS using Windows File History ………………………………………………………….. 39
4.5 Restore a backup using Windows File History …………………………………………………………………… 40
4.6 Remotely access files on the NAS using WebDAV …………………………………………………………… 40
Chapter 5
Storage Manager……………………………………………………………………………………………………………….41
5.1 Overview ……………………………………………………………………………………………………………………….. 41
5.2 Storage Manager Overview ………………………………………………………………………………………….. 41
5.2.1 Internal Volumes Screen ………………………………………………………………………………………… 41
5.2.2 External Volumes Screen ………………………………………………………………………………………… 43
5.3 Internal Storage …………………………………………………………………………………………………………….. 43
5.3.1 Volume Screens …………………………………………………………………………………………………….. 45
5.3.2 Disk Group Screens ………………………………………………………………………………………………… 70
5.3.3 Hard Disk Screens ………………………………………………………………………………………………….. 74
5.4 iSCSI LUNs Screens ………………………………………………………………………………………………………….. 80
5.4.1 Create a New LUN …………………………………………………………………………………………………. 82
5.4.2 iSCSI Targets Screens …………………………………………………………………………………………….. 84
5.5 External Storage ……………………………………………………………………………………………………………… 94
5.5.1 What You Need to Know ……………………………………………………………………………………….. 94
5.5.2 External Storage Screens ………………………………………………………………………………………… 94
5.5.3 Format the External Volume …………………………………………………………………………………… 96
5.6 Technical Reference ………………………………………………………………………………………………………. 97
Chapter 6
Control Panel: Overview ………………………………………….. …. ………………………………………… ………..101
6.1 Overview ……………………………………………………………………………………………………………………… 101
6.2 Control Panel Overview ……………………………………………………………………………………………….. 101
Chapter 7
Control Panel: Privilege and Sharing ……………………………. … ………………………………………… …. ….104
7.1 Overview ……………………………………………………………………………………………………………………… 104
7.2 What You Can Do ………………………………………………………………………………………………………… 104
7.3 Users …………………………………………………………………………………………………………………………….. 104
7.3.1 Users Screen ………………………………………………………………………………………………………… 106
7.3.2 Add an Account ………………………………………………………………………………………………….. 107
7.3.3 Edit an Account …………………………………………………………………………………………………… 111
7.3.4 User Info ……………………………………………………………………………………………………………….. 112
7.4 Groups …………………………………………………………………………………………………………………………. 113
7.4.1 Groups Screen …………………………………………………………………………………………………….. 113
7.4.2 Add a Group ……………………………………………………………………………………………………….. 114
7.4.3 Edit a Group ………………………………………………………………………………………………………… 118
NAS Series User’s Guide
6

Table of Contents
7.4.4 Group Information ……………………………………………………………………………………………….. 119
7.5 Shared Folders ……………………………………………………………………………………………………………… 120
7.5.1 Share and Folder Names ………………………………………………………………………………………120
7.5.2 Shared Folders Screen …………………………………………………………………………………………. 120
7.5.3 Add a Share …………………………………………………………………………………………………………. 122
7.5.4 Edit a Share ………………………………………………………………………………………………………….. 126
7.5.5 Shared Folder Information ……………………………………………………………………………………. 127
7.5.6 Recycle Bin Screen ………………………………………………………………………………………………. 128
Chapter 8
Control Panel: Network ……………………………. … …. …. … ………………………………………… …. ……………129
8.1 Overview ……………………………………………………………………………………………………………………… 129
8.2 What You Can Do ………………………………………………………………………………………………………… 129
8.3 What You Need to Know ………………………………………………………………………………………………. 129
8.4 TCP/IP Screens ……………………………………………………………………………………………………………… 130
8.4.1 Configure General TCP/IP Settings ……………………………………………………………………….. 130
8.4.2 Configure Network Interface ………………………………………………………………………………… 131
8.4.3 Configure Web Configurator ………………………………………………………………………………… 136
8.4.4 Configure Network Diagnosis ……………………………………………………………………………….. 137
8.5 UPnP Port Mapping Screens ………………………………………………………………………………………….. 138
8.5.1 UPnP and the NAS’s IP Address …………………………………………………………………………….. 139
8.5.2 UPnP and Security ………………………………………………………………………………………………… 140
8.5.3 The NAS’s Services and UPnP ………………………………………………………………………………… 140
8.5.4 Configure UPnP Router …………………………………………………………………………………………. 140
8.5.5 Configure UPnP Port Mapping ……………………………………………………………………………… 141
8.6 Terminal Screen …………………………………………………………………………………………………………… 144
8.7 DyDNS Screen ……………………………………………………………………………………………………………… 145
Chapter 9
Control Panel: System……………………………………………………………………… … …………………………….147
9.1 Overview ……………………………………………………………………………………………………………………… 147
9.2 What You Can Do ………………………………………………………………………………………………………… 147
9.3 What You Need to Know ………………………………………………………………………………………………. 147
9.4 Server Name Screen ……………………………………………………………………………………………………. 148
9.5 Date/Time Screen …………………………………………………………………………………………………………. 149
9.5.1 Configure Date/Time ……………………………………………………………………………………………. 149
9.5.2 Configure Daylight Saving Time ……………………………………………………………………………. 150
9.6 FW Upgrade Screens ……………………………………………………………………………………………………. 151
9.6.1 Latest Firmware Check …………………………………………………………………………………………. 151
9.6.2 Manual Firmware Upgrade …………………………………………………………………………………… 152
9.7 SSL Screens ………………………………………………………………………………………………………………….. 153
9.7.1 Install System CA ………………………………………………………………………………………………….. 153
9.7.2 Modify the Existing Certificate ………………………………………………………………………………. 154
NAS Series User’s Guide
7

Table of Contents
9.7.3 Create a Certificate …………………………………………………………………………………………….. 155
Chapter 10
Control Panel: Service……………………………………….. … ………………………………………… …. ……………158
10.1 Overview ……………………………………………………………………………………………………………………. 158
10.2 What You Can Do ………………………………………………………………………………………………………. 158
10.3 What You Need to Know …………………………………………………………………………………………….. 158
10.4 Media Server Screens ……………………………………………………………………………………………….. 159
10.4.1 Media Server Share Publish Screen ……………………………………………………………………. 160
10.5 iTunes Server Screen …………………………………………………………………………………………………… 161
10.6 FTP Screens …………………………………………………………………………………………………………………. 162
10.6.1 General Settings …………………………………………………………………………………………………. 162
10.6.2 Transfer Settings ………………………………………………………………………………………………….. 163
10.6.3 Character Set …………………………………………………………………………………………………….. 165
10.7 WebDAV Screen …………………………………………………………………………………………………………. 165
10.7.1 How to Use NetDrive with the NAS ………………………………………………………………………. 166
10.8 Web Publishing Screens ………………………………………………………………………………………………. 167
10.8.1 Status …………………………………………………………………………………………………………………. 167
10.8.2 Share Publish ………………………………………………………………………………………………………. 168
10.8.3 How to Configure Web Publishing ………………………………………………………………………. 169
10.9 Print Server Screen ……………………………………………………………………………………………………… 171
10.9.1 Print Server Edit …………………………………………………………………………………………………… 172
10.10 Syslog Server Screen …………………………………………………………………………………………………. 172
10.11 Technical Reference …………………………………………………………………………………………………. 174
10.11.1 Share Media Files on Your Network …………………………………………………………………… 174
10.11.2 Web Publishing …………………………………………………………………………………………………. 175
10.11.3 Printer Sharing …………………………………………………………………………………………………… 176
Chapter 11
Control Panel: Maintenance……………………………………………………………………………………………..177
11.1 Overview ……………………………………………………………………………………………………………………. 177
11.2 What You Can Do ………………………………………………………………………………………………………. 177
11.3 Power Screens ……………………………………………………………………………………………………………. 177
11.3.1 Power Management …………………………………………………………………………………………..177
11.3.2 Power On/Off Schedule ………………………………………………………………………………………179
11.3.3 Add the Power Control Schedule ………………………………………………………………………. 180
11.4 Log Screen ………………………………………………………………………………………………………………… 181
11.4.1 Log Report Configuration Screen ……………………………………………………………………….. 182
11.4.2 Email Setting ………………………………………………………………………………………………………. 183
11.4.3 Report Setting …………………………………………………………………………………………………….. 184
11.4.4 Syslog Server Setting …………………………………………………………………………………………… 184
11.5 Configuration Backup Screens …………………………………………………………………………………… 185
11.5.1 Configuration Backup ………………………………………………………………………………………… 185
NAS Series User’s Guide
8

Table of Contents
11.5.2 Configuration Restore ………………………………………………………………………………………… 186
11.5.3 Factory Reset ……………………………………………………………………………………………………… 187
11.6 Technical Reference …………………………………………………………………………………………………… 188
11.6.1 Log Classes ………………………………………………………………………………………………………… 189
11.6.2 Log Severity Levels ……………………………………………………………………………………………… 189
11.6.3 Log Messages …………………………………………………………………………………………………….. 189
Chapter 12
Status Center……………………………………………………………………………………………………………………196
12.1 Overview ……………………………………………………………………………………………………………………. 196
12.1.1 System Information …………………………………………………………………………………………….. 196
12.1.2 Network ……………………………………………………………………………………………………………… 197
Chapter 13
App Center and Packages……………………………………………………………………………………………….199
13.1 About Packages …………………………………………………………………………………………………………. 199
13.1.1 Available Packages ……………………………………………………………………………………………. 199
13.2 App Center Screens ……………………………………………………………………………………………………. 200
13.2.1 Installed Applications …………………………………………………………………………………………. 201
13.2.2 Application Update ……………………………………………………………………………………………. 203
13.2.3 Browse All Apps ………………………………………………………………………………………………….. 204
13.3 AuroraSyncBackup ……………………………………………………………………………………………………… 205
13.3.1 How to check video backups …………………………………………………………………………….. 207
13.4 DropboxClient …………………………………………………………………………………………………………….. 208
13.4.1 Configure Account Setting …………………………………………………………………………………. 209
13.4.2 How to associate NAS share/account with Dropbox account …………………………….. 211
13.4.3 Configure Update Period …………………………………………………………………………………….215
13.5 GoogleDriveClient ……………………………………………………………………………………………………… 216
13.5.1 Configure Account Setting …………………………………………………………………………………. 216
13.5.2 How to link NAS account, share and Google account ……………………………………….. 218
13.5.3 Configure Update Period ……………………………………………………………………………………221
13.6 NFS …………………………………………………………………………………………………………………………….. 222
13.6.1 Add/Edit NFS Share …………………………………………………………………………………………….. 224
13.6.2 NFS Session …………………………………………………………………………………………………………. 226
13.7 PHP-MySQL-phpMyAdmin …………………………………………………………………………………………… 227
13.8 TFTP ……………………………………………………………………………………………………………………………. 228
13.9 pyLoad ……………………………………………………………………………………………………………………….. 230
13.10 Memopal ………………………………………………………………………………………………………………….. 231
13.10.1 Memopal Status ……………………………………………………………………………………………….. 231
13.10.2 Memopal Settings …………………………………………………………………………………………….. 232
13.11 ownCloud …………………………………………………………………………………………………………………. 234
Chapter 14
Download Service…………….. …. … …. ………………………………………… …………………………………………236
NAS Series User’s Guide
9

Table of Contents
14.1 Overview ……………………………………………………………………………………………………………………. 236
14.2 What You Need to Know …………………………………………………………………………………………….. 236
14.3 Download Service Screen …………………………………………………………………………………………… 236
14.3.1 Add a Download Task ………………………………………………………………………………………… 239
14.3.2 Configure General Download Settings ……………………………………………………………….. 240
14.3.3 Configure the P2P Download Settings ………………………………………………………………… 242
14.3.4 Configure the IP Filter Settings …………………………………………………………………………….. 244
14.3.5 Configure the Email notifications Settings ……………………………………………………………. 245
14.3.6 Select Files to Download …………………………………………………………………………………….. 246
14.3.7 Display the Task Information ………………………………………………………………………………..246
14.4 Download Notify Screen ……………………………………………………………………………………………… 248
14.5 Technical Reference …………………………………………………………………………………………………… 249
14.5.1 Download Service ………………………………………………………………………………………………. 249
14.5.2 P2P Download Security ………………………………………………………………………………………. 250
Chapter 15
Upload Manager………………………………………………………………………………………………………………252
15.1 Overview ……………………………………………………………………………………………………………………. 252
15.2 What You Can Do ………………………………………………………………………………………………………. 252
15.3 What You Need to Know …………………………………………………………………………………………….. 252
15.4 Flickr/YouTube Screen ………………………………………………………………………………………………… 253
15.4.1 Configure the Flickr Settings ………………………………………………………………………………… 253
15.4.2 Configure the YouTube Settings ………………………………………………………………………….. 259
15.5 FTP Uploadr Screen ……………………………………………………………………………………………………… 261
15.5.1 Add or Edit an FTP Server Entry ……………………………………………………………………………. 263
15.5.2 FTP Uploadr Preferences Screen …………………………………………………………………………. 263
Chapter 16
Backup Planner………………………………………………………………………………………………………………..267
16.1 About Backups …………………………………………………………………………………………………………… 267
16.1.1 Manage a USB Device and USB Backups ……………………………………………………………. 267
16.1.2 Remote Backups ………………………………………………………………………………………………… 267
16.1.3 Internal Backups …………………………………………………………………………………………………. 267
16.1.4 Cloud Backups …………………………………………………………………………………………………… 267
16.1.5 Synchronize Files …………………………………………………………………………………………………. 268
16.2 What You Can Do ………………………………………………………………………………………………………. 268
16.3 Backup Screens ………………………………………………………………………………………………………….. 268
16.3.1 Add a new backup job ……………………………………………………………………………………….270
16.3.2 Edit Job Screens …………………………………………………………………………………………………. 276
16.3.3 Restore Screens ………………………………………………………………………………………………….. 280
16.4 Copy/Sync Button Screens ………………………………………………………………………………………….. 286
16.4.1 Configure Copy Settings …………………………………………………………………………………….. 286
16.4.2 Sync Settings ………………………………………………………………………………………………………. 287
NAS Series User’s Guide
10

Table of Contents
16.4.3 How to Copy Files ………………………………………………………………………………………………. 288
16.4.4 How to Synchronize Files …………………………………………………………………………………….. 289
16.5 Time Machine Screen …………………………………………………………………………………………………. 290
Chapter 17
File Browser, Photo, Music & Video ……………………………………………………………………………………292
17.1 Overview ……………………………………………………………………………………………………………………. 292
17.2 File Browser ………………………………………………………………………………………………………………… 292
17.3 Photo ………………………………………………………………………………………………………………………….. 294
17.3.1 Exif and Google Maps (Photos) ………………………………………………………………………….. 297
17.3.2 Slideshow (Photos) ……………………………………………………………………………………………… 298
17.4 Music ………………………………………………………………………………………………………………………….. 298
17.4.1 Now Playing (Music) …………………………………………………………………………………………… 300
17.5 Video ………………………………………………………………………………………………………………………….. 300
17.6 Playzone Settings ………………………………………………………………………………………………………… 302
17.7 Application Zone ………………………………………………………………………………………………………… 303
Chapter 18
Access Your Cloud Remotely via myZyxelCloud and Zyxel Drive App……………………………….304
18.1 myZyxelCloud Service …………………………………………………………………………………………………. 304
18.1.1 myZyxelCloud Screen …………………………………………………………………………………………. 304
18.1.2 Pair your NAS ……………………………………………………………………………………………………… 305
18.1.3 DDNS Setup ………………………………………………………………………………………………………… 307
18.1.4 NAS Information …………………………………………………………………………………………………. 308
18.1.5 UPnP Setup …………………………………………………………………………………………………………. 309
18.2 Zyxel Drive …………………………………………………………………………………………………………………… 309
18.2.1 Zyxel Drive Welcome ………………………………………………………………………………………….. 310
18.2.2 NAS and File List ………………………………………………………………………………………………….. 310
18.2.3 Uploading and Media Streaming ……………………………………………………………………….. 311
18.2.4 Instant Upload ……………………………………………………………………………………………………. 312
Chapter 19
Play Media Files on TVs Using zCloud App… … …. …. … ………………………………………… …. …. ………..316
19.1 Using zCloud ……………………………………………………………………………………………………………….. 316
19.2 zCloud TV Streaming …………………………………………………………………………………………………… 317
19.3 zCloud Instant Upload ………………………………………………………………………………………………… 319
Chapter 20
Troubleshooting………………………………………………………………………………………………………………..322
20.1 Troubleshooting Overview …………………………………………………………………………………………… 322
20.2 Power, Hardware, Connections, and LEDs …………………………………………………………………… 322
20.3 NAS Starter Utility …………………………………………………………………………………………………………. 324
20.4 NAS Login and Access ………………………………………………………………………………………………… 325
NAS Series User’s Guide
11

Table of Contents
20.4.1 Enabling Scripting of Safe ActiveX Controls ………………………………………………………… 326
20.5 I Cannot Access The NAS ……………………………………………………………………………………………. 328
20.6 Users Cannot Access the NAS ……………………………………………………………………………………… 329
20.7 External USB Drives ………………………………………………………………………………………………………. 330
20.8 Storage ………………………………………………………………………………………………………………………. 330
20.9 Firmware …………………………………………………………………………………………………………………….. 331
20.10 File Transfer ……………………………………………………………………………………………………………….. 331
20.11 Networking ……………………………………………………………………………………………………………….. 332
20.12 Some Features’ Screens Do Not Display …………………………………………………………………….. 332
20.13 Media Server Functions ……………………………………………………………………………………………… 333
20.14 Download Service Functions ……………………………………………………………………………………… 335
20.15 Web Publishing ………………………………………………………………………………………………………….. 335
20.16 Auto Upload ……………………………………………………………………………………………………………… 336
20.17 App Center ………………………………………………………………………………………………………………. 337
20.18 Backups ……………………………………………………………………………………………………………………. 337
20.19 Google Drive …………………………………………………………………………………………………………….. 338
Appendix A Customer Support ……………………………………………………………………………………….. 339
Appendix B Product Specifications…………………………………………………………………………………. 345
Appendix C Legal Information ………………………………………………………………………………………… 346
Index……………………………………………………………………………………………………………………………….350
NAS Series User’s Guide
12

1.1 Overview
This User’s Guide covers the following models: NAS326, NAS520, NAS540, and NAS542.
Table 1 NAS Series Comparison Table
FEATURES NAS326 NAS520 NAS540 NAS542
RAM Size 512 MB DDR III 1 GB DDR III 1 GB DDR III 1 GB DDR III
Number of Hard Disk Bays 2 2 4 4
Supported RAID Types RAID0
Number of Ethernet Ports 1 2 2 2
Port Trunking Support No Yes Yes Yes
Number of USB Ports 2 (USB3.0)
Number of SD Card Slots N/A 1 1 1
CHAPTER 1
Get to Know Your NAS
RAID1
JBOD
BASIC
1 (USB2.0)
RAID0
RAID1
JBOD
BASIC
3 (USB3.0) 3 (USB3.0) 3 (USB3.0)
RAID0
RAID1
RAID5
RAID6
RAID10
JBOD
BASIC
RAID0
RAID1
RAID5
RAID6
RAID10
JBOD
BASIC
Use the NAS as your own personal cloud. Here are some key features:
• Start using Zyxel NAS instantly with FindMe — Use Zyxel FindMe to discover your NAS on your home
network and get in control in under 15 seconds. Then do an easy installation with no need to install a
NAS utility.
• Access and share files from your NAS wherever you are — Using the Zyxel Drive mobile app makes it
easy.
• Create a shared cloud space for people without a NAS — Provide your cloud space for your friends or
family members when you share a folder from the NAS with the Zyxel Drive mobile app. Your friends
and family members don’t need to purchase an additional NAS — just install the Zyxel Drive mobile
app on their mobile devices.
• Protect your data from drive failure — The NAS’s RAID 1 capability clones contents from one drive to
another. If a drive is damaged or corrupted, you still have another drive to restore from or use.
• Get up and running quickly with the easy-to-use in terface — The Zyxel NSM (NAS Station Management)
5.2 intelligent desktop provides a rich feature set of tools with an easy-to-understand GUI design to
help you get things done quickly. The multitasking capability through a multi-window interface
enables you to quickly get applications up and running.
• Check your NAS while you’re away — Even if you have several Zyxel NAS devices, visit the
myZyxelcloud Web portal from anywhere to see their health status at a glance.
• Stream multimedia contents to your big screen TV — Bring your favorite multimedia files on the NAS to
the big screen. Zyxel zCloud app lets you play your favorite videos, music, or photos on your big
screen with TV streaming devices such as Apple TV, Google Chromecast, Roku 3, and Amazon Fire TV;
or directly on smart TVs like those from Samsung and LG.
NAS Series User’s Guide
13
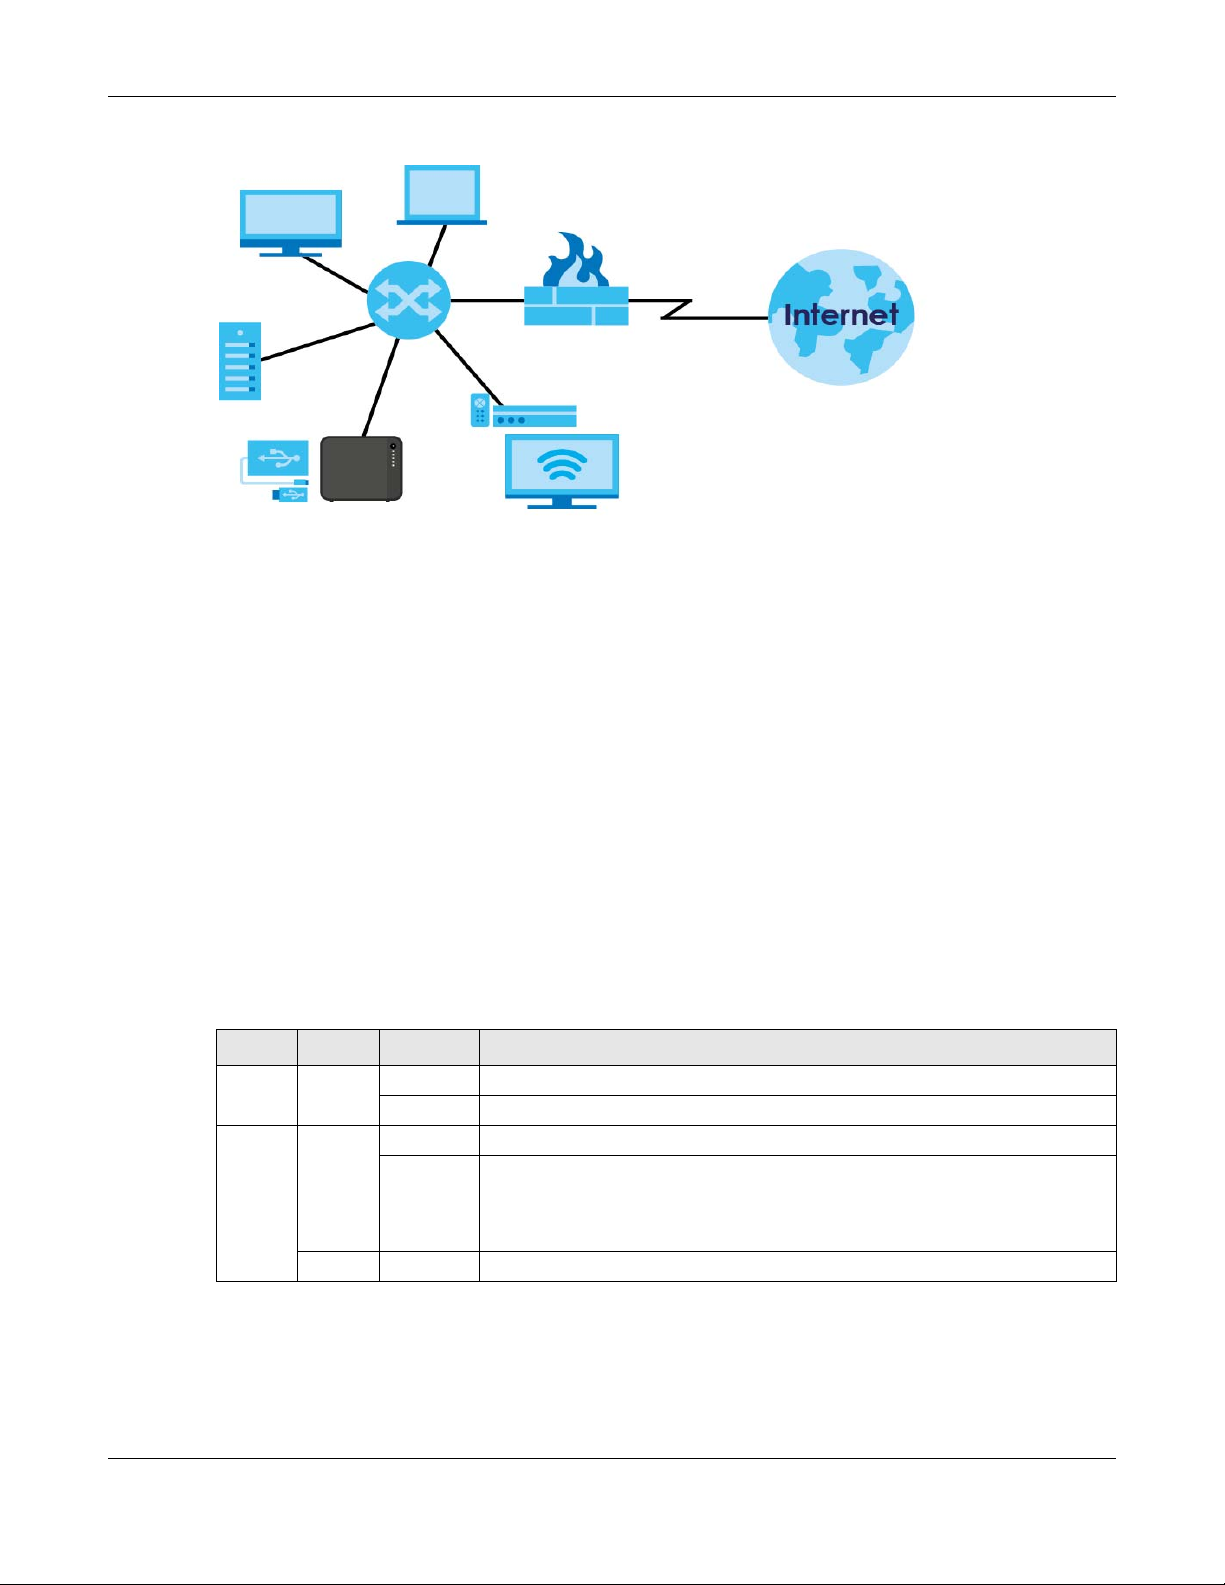
Chapter 1 Get to Know Your NAS
Figure 1 Example of the NAS in a Home Network
Above is the NAS in a home network. Users back up and share data on the NAS. The media player (A)
plays the NAS’s media files on the TV. A USB hard drive (B) provides extra storage space and files are
copied directly from the USB storage device to the NAS.
Place the NAS behind a firewall and/or IDP (Intrusion Detection and Prevention) device to protect it
from attacks from the Internet.
Refer to the Quick Start Guide for hardware connections and how to install and remove hard drives from
the disk trays.
Note: Turn off and disconnect the NAS before you install or remove the internal hard disk or
1.2 LEDs
This table describes the NAS’s LEDs.
Table 2 LEDs
LED COLOR STATUS DESCRIPTION
POWER White On The NAS is turned on and receiving power, or in the process of starting up.
SYSTEM White On The NAS has fully started and is operating normally.
disks.
Off The NAS is turned off.
Blinking The NAS is starting up or upgrading the firmware.
Note: Do not turn off the NAS while it is upgrading the firmware or you
may render it unusable.
Red On The NAS has a system error.
NAS Series User’s Guide
14

Chapter 1 Get to Know Your NAS
Table 2 LEDs (continued)
LED COLOR STATUS DESCRIPTION
HDD1/2 White On The hard disk drive is connected properly to the NAS. This LED stays on white
when the hard disk drive is in hibernation if you do not enable sleeping HDD LED
blinking.
Blinking The NAS is saving data to the hard disk drive.
Slow
Blinking
Red On The NAS detected an error on the hard disk drive (like a bad sector for example).
Off The NAS cannot detect a hard disk in the disk bay or the LED is disabled.
USB White On The NAS has a USB device installed.
Off There is no USB device installed or the NAS does not detect a USB connection.
COPY White On A USB or SD device is connected to the NAS and the NAS is ready to copy.
Blinking The NAS is copying or synchronizing files, or in the process of pairing with a
Red On Copying or synchronizing files to or from the USB or SD failed.
Off No USB/SD device is connected.
LAN /
LAN1 /
LAN2
Green On The NAS has a successful 10/100 Mbps Ethernet connection.
Blinking The 100M LAN is sending or receiving packets.
Off The NAS does not have a 10/100 Mbps Ethernet connection.
Amber On The NAS has a successful 1000 Mbps Ethernet connection.
Blinking The 1000 M LAN is sending or receiving packets.
Off The NAS does not have a 1000 Mbps Ethernet connection.
Sleeping HDD LED blinking is enabled and the hard disk drive is in hibernation.
The NAS automatically tries to recover a bad sector, but the LED stays red until
the NAS restarts.
myZyxelcloud account.
1.3 Hard Disks
The NAS has internal hard disk bays. Install SATA (Serial Advanced Technology Attachment) hard disks.
Note that the SATA hard disks are treated as internal or SATA volumes. Any hard disk connected to a USB
port is considered an external or USB volume.
1.4 SD Card
Use up to a 128 GB SDXC card with the front panel SD card slot. The SD card slot works with the COPY/
SYNC button (see Section 1.6 on page 16 for details).
1.5 Power Button
Use the power button on the front panel to turn the NAS on or off.
NAS Series User’s Guide
15

Chapter 1 Get to Know Your NAS
Press
1 Beep
2 Beeps
2 more seconds
Release for
3 seconds
Release for
software
shutdown
hardware
shutdown
Press
1 Beep
2 Beeps
IP Address
Password
Clear All Settings
5 more seconds
Release to
Release to Reset
Power On
• Press the power button for one second to turn on the NAS. When the system is on and ready, you will
hear one beep.
Power Off
Figure 2 Using the Power Button to Turn Off the NAS
• To have the NAS go through its normal software shutdown process and turn itself off, press the power
button until you hear one beep (after about three seconds), then release it.
• To perform a hardware shutdown and have the NAS immediately turn itself off without going through
the normal shutdown process, press the power button until you hear a second beep (after about five
seconds), then release it.
1.6 COPY/SYNC Button
Use the COPY/SYNC button on the front panel to copy or synchronize files between a connected USB or
SD device and the NAS. See Section 16.4 on page 286 for more details on how to configure the copy/
sync settings.
1.7 RESET Button
Use the RESET button on the rear panel to restore the NAS’s default settings.
Figure 3 The RESET Button
• Press the RESET button until you hear one beep (after about two seconds), then release it. You will
hear one more beep after you release the button.
This resets the NAS’s IP address and password to the default values.
NAS Series User’s Guide
16

Chapter 1 Get to Know Your NAS
• Press the RESET button until you hear two beeps. After the second beep, continue pressing the button
for five more seconds, then release it. You will hear three quick beeps after you release the button.
This resets the NAS to the factory default configuration. All settings you have configured on the NAS,
including IP address, password, user accounts, groups, and so on will be reset to the factory defaults.
The reset process does NOT affect the volume settings, nor data stored on the NAS.
You should periodically back up your configuration file to your computer (see Section 11.5 on page 185
for details about managing the NAS’s configuration file). You could then restore your configuration in
the event that you or someone else reset the NAS to the factory defaults.
Note: Keep the NAS in a secure location in order to prevent unauthorized reset of the device.
You may need to close and re-open the NAS Starter Utility to discover the NAS. This is because the NAS
automatically re-acquires IP address information, so its IP address may change. If no IP address
information is assigned, the NAS uses Auto-IP to assign itself an IP address and subnet mask. For example,
you could connect the NAS directly to your computer. If the computer is also set to get an IP address
automatically, the computer and the NAS will choose addresses for themselves and be able to
communicate.
NAS Series User’s Guide
17

Find and Access Your NAS
2.1 Overview
Use FindMe or the NAS Starter Utility to find and access the NAS and the files on it.
The NAS Starter Utility supports Windows XP, Windows Vista, Windows 7, and Windows 8. Click Help to
open a Web Help page about the NAS Starter Utility screens.
Note: Installing this version of the NAS Starter Utility uninstalls previous versions.
Note: Refer to the Quick Start Guide for your NAS’s hardware connections.
2.2 FindMe
CHAPTER 2
1 Make sure both the NAS and your computer are connected to a switch or router with Internet access.
2 Open your web browser and type «https://findme.zyxel.com» as the website address.
3 Click Find NAS to discover your NAS.
Figure 4 Find NAS
4 Press the Copy button on the NAS within 5 minutes.
Figure 5 Press the Copy button
5 Your NAS is now discovered. Click Admin Page to open the login screen.
NAS Series User’s Guide
18
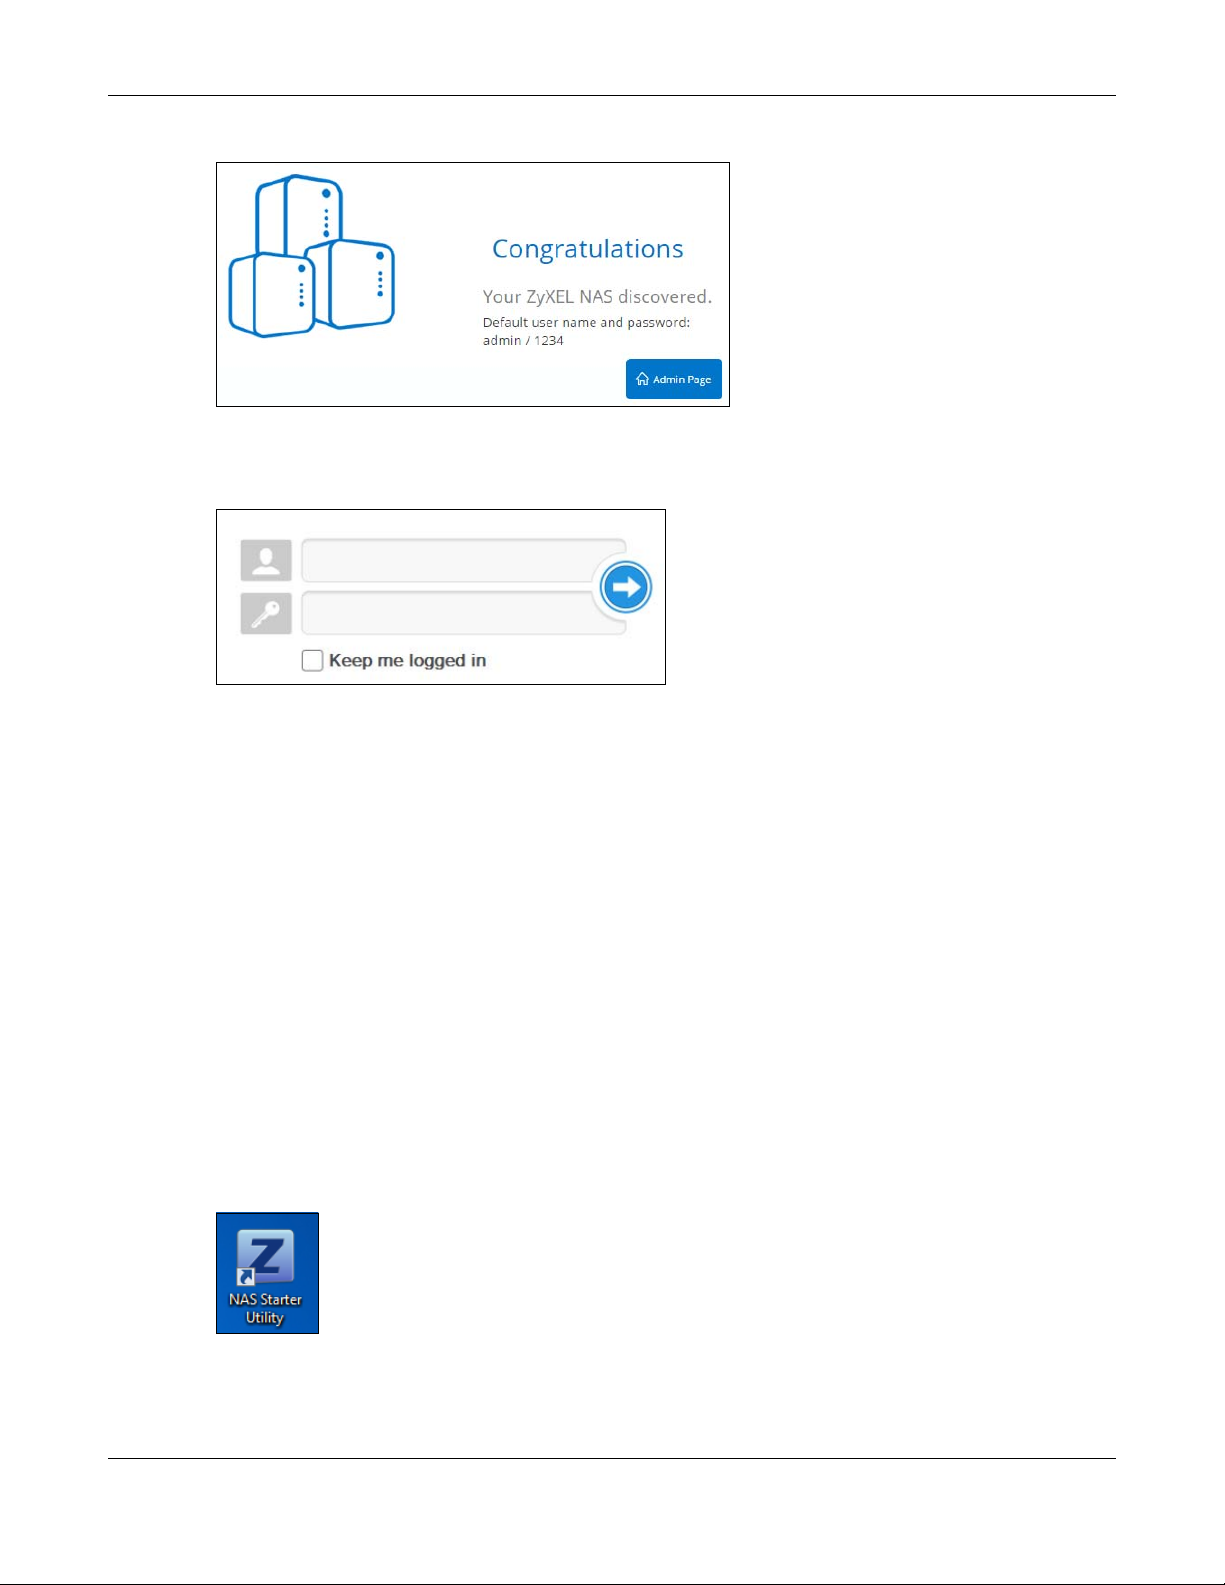
Chapter 2 Find and Access Your NAS
Figure 6 Congratulations
6 Use the default username “admin” and password “1234” to log in. See Chapter 3 on page 26 for more
on the web desktop.
Figure 7 NAS Login Screen
2.3 NAS Starter Utility
• The NAS Starter Utility broadcasts a request packet when you first run it. Each NAS has an NAS Starter
Utility Agent that always listens and responds to requests from the NAS Starter Utility. The NAS Starter
Utility receives the response packet that contains information, such as host name, IP, and so on.
• If you plan to use more than one NAS in your network, configure them with unique server names. This
enables you to identify each NAS in the NAS Starter Utility screens.
2.3.1 NAS Seeker Screen
Use this screen to view the NASs in your network. The NAS’s Server Name. The default is ‘NAS’ followed by
the number of your model (‘NAS540’ for example). See Section 2.3.5 on page 23 for how to change it to
a more recognizable one in your network.
Click the NAS Starter Utility icon on your desktop or in the Windows system tray to start the NAS Starter
Utility. Alternatively you can click Start > Programs > Zyxel > NAS Starter Utility.
Figure 8 NAS Starter Utility Desktop Icon
NAS Series User’s Guide
19

Chapter 2 Find and Access Your NAS
Figure 9 NAS Starter Utility Windows System Tray Icon
The first time you open the NAS Starter Utility the discovery screen appears as follows.
Figure 10 NAS Seeker
The following table describes the labels in this screen.
Table 3 NAS Seeker
LABEL DESCRIPTION
Connect Select a NAS and click this to connect to it.
Refresh Click this to refresh the screen. The NAS Starter Utility does not automatically refresh.
Status This shows whether the NAS is Online, Unreachable, Configuring, or Config Failed.
Server Name This is the server name you configured for the NAS. If you have more than one NAS in your
network, it is recommended that you give each one a unique name for identification
purposes.
IP Address This is the current IP address of the NAS.
2.3.2 Main NAS Starter Utility Screen
The main NAS Starter Utility screen displays after you select an NAS in the NAS Seeker screen.
NAS Series User’s Guide
20

Chapter 2 Find and Access Your NAS
Figure 11 NAS Starter Utility Main Screen
The following table describes the labels in this screen.
Table 4 NAS Starter Utility Main Screen
LABEL DESCRIPTION
? Click this to display the utility help.
Configuration Click this to configure system settings (see Section 2.3.5 on page 23).
NAS Seeker Click this to use the NAS Seeker screen (see Section 2.3.1 on page 19) to find and connect to
a different NAS on your network.
Server Name This is the server name you configured for the NAS. If you have more than one NAS in your
network, it is recommended that you give each one a unique name for identification
purposes.
IP Address This is the current IP address of the NAS.
MAC Address This is the NAS’s unique physical hardware address (MAC).
Firmware Version This shows the version of firmware the NAS is currently using.
Status This shows whether the NAS is Online, Uninitialized, Unreachable, Configuring, or Config
Failed.
Capacity This shows the NAS’s total, in-use, and remaining storage capacity.
DeskTop Click this button to go to the Web Configurator login screen (see Section 3.2 on page 26).
Network Drive Click this to add the NAS as a network drive in your computer’s Windows Explorer.
Shared Folder Click this to log into the NAS’s file directory in Windows Explorer.
myZyxelCloud Click this to go to mycloud.zyxel.com to set up a free DDNS hostname for the NAS so you can
connect to it easily from the Internet.
NAS Series User’s Guide
21

2.3.3 Directory of the NAS
In the main NAS Starter Utility screen click Shared Folder to log into the NAS’s file directory in Windows
Explorer. Enter the administrator user name and password and click Login.
Figure 12 Login
The utility opens the NAS’s directory in Windows Explorer.
Figure 13 Directory
Chapter 2 Find and Access Your NAS
2.3.4 Network Drive
In the main NAS Starter Utility screen click Network Drive to add the NAS as a network drive in your
computer’s Windows Explorer.
Enter your user name and password and click Login to be able to add the NAS’s shares to which you
have access as network drives. Otherwise select Guest and click Login to be able to add the NAS’s
public shares as network drives.
NAS Series User’s Guide
22
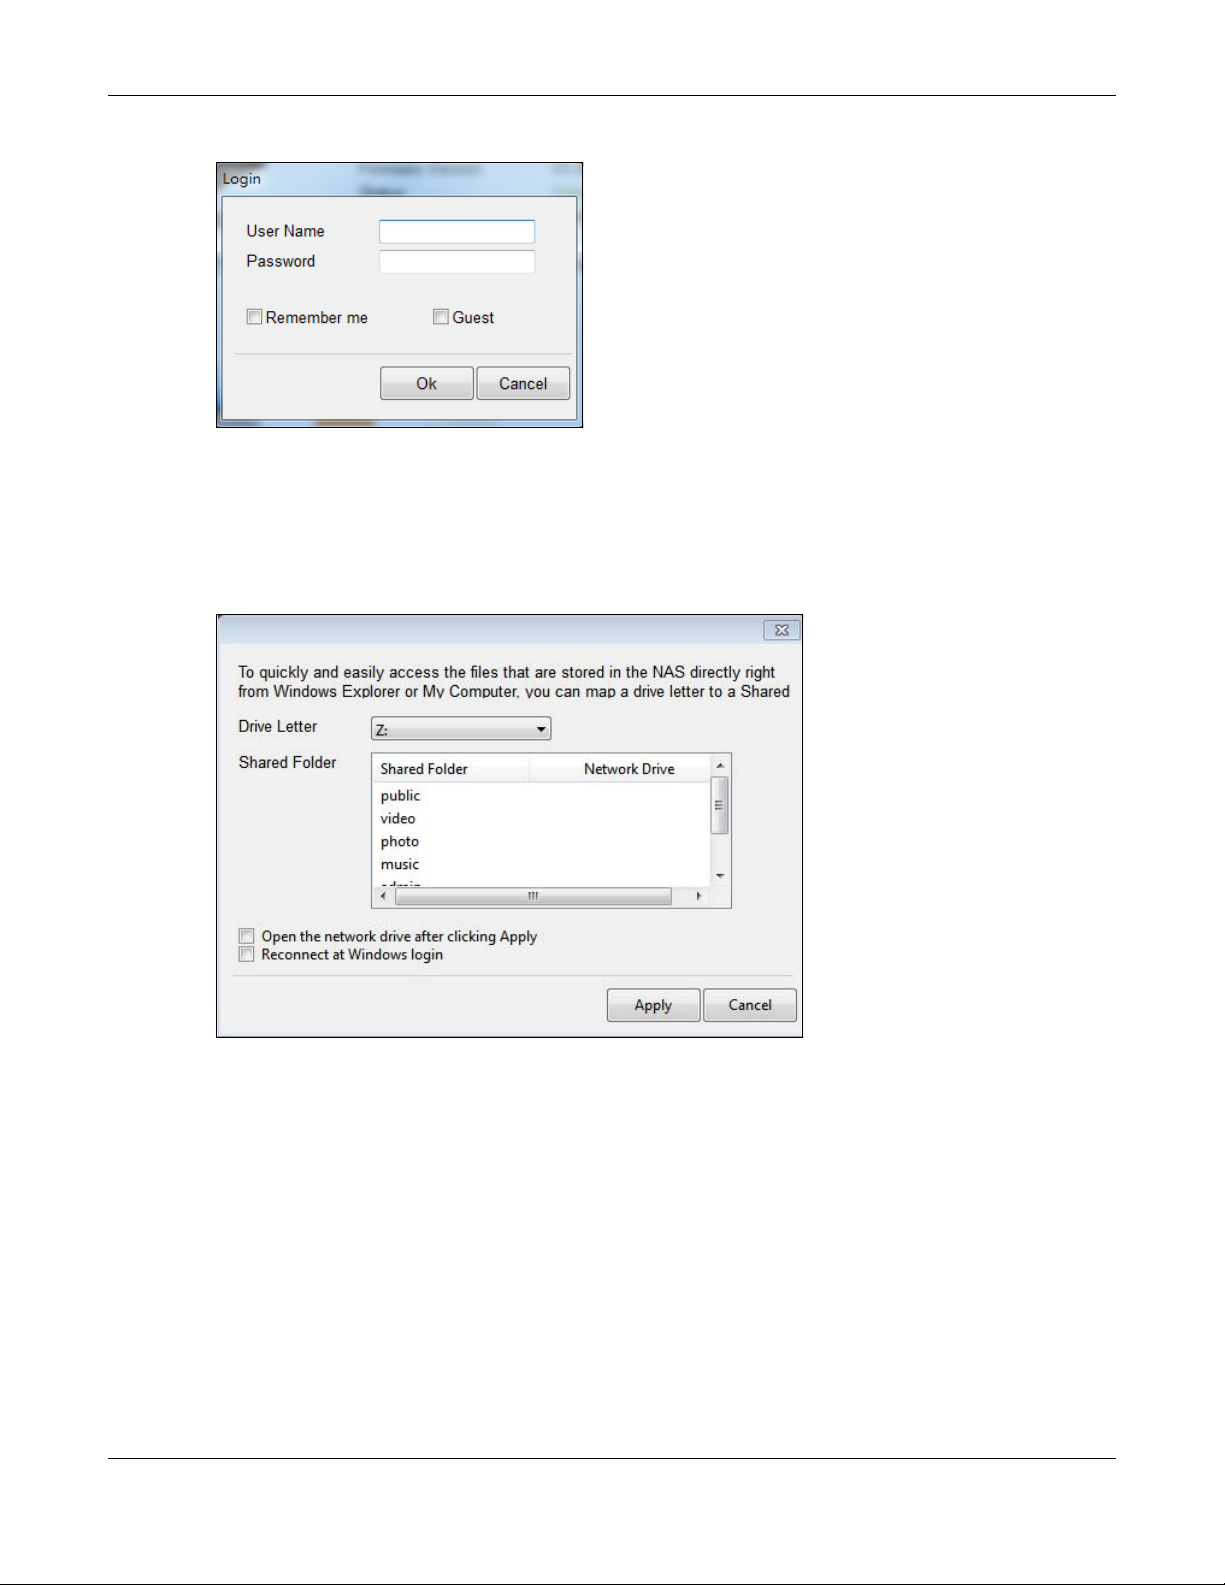
Chapter 2 Find and Access Your NAS
Figure 14 Login
Select a share on the NAS and the drive letter on your computer to which you want to map it. The shares
that each user can select to map depends on the user’s permissions. For example, if share1 is private to
user1, then only user1 is allowed to map share1. The table displays the NAS shares that are already
mapped to drive letters on your computer. After you click Apply you can see the new drive in Windows
Explorer (My Computer) where you can access and use it like your computer’s other drives.
Figure 15 Network Drive
2.3.5 Configure System Settings
Use these screens to be able to change the NAS’s server name, time zone, PPPoE, IP address, subnet
mask, default gateway, or DNS settings.
Click Configuration > System Setting in the main utility screen to display the following screen.
NAS Series User’s Guide
23
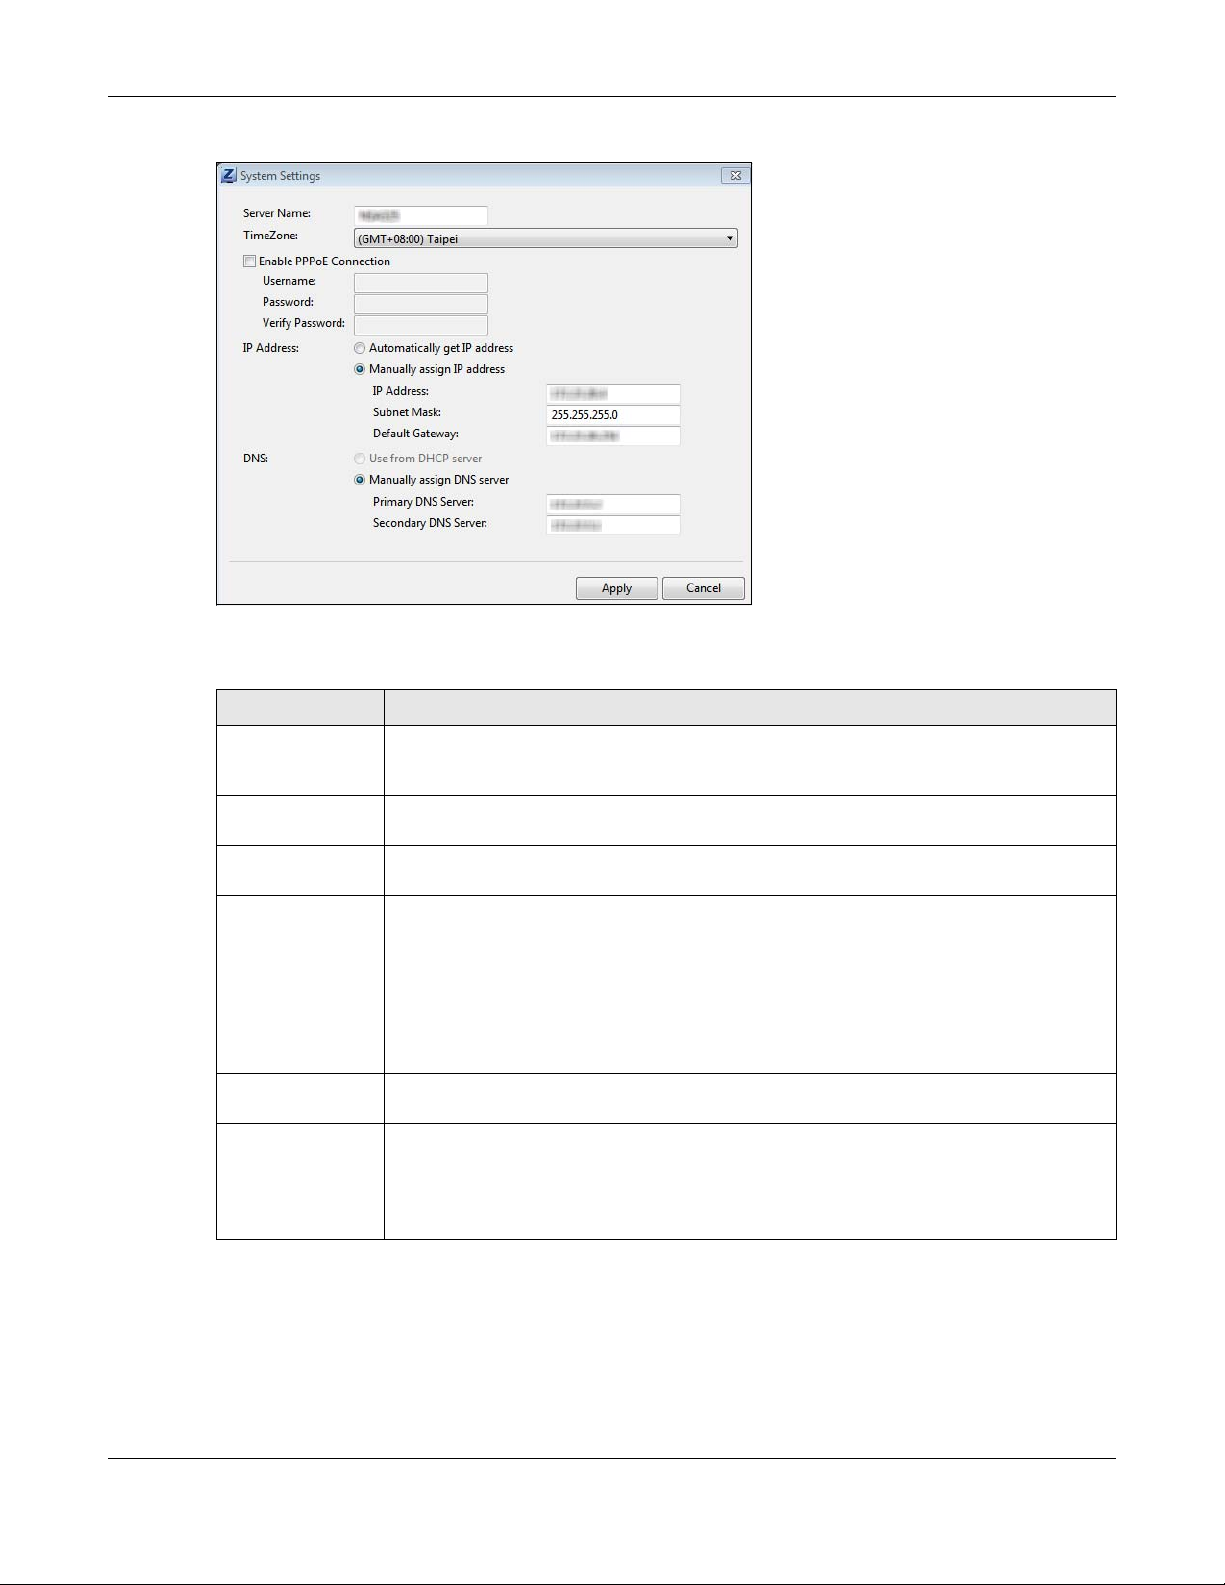
Chapter 2 Find and Access Your NAS
Figure 16 NAS Starter Utility > Configuration > System Setting
The following table describes the labels in this screen.
Table 5 NAS Starter Utility > Configuration > System Setting
LABEL DESCRIPTION
Server Name Specify a name to uniquely identify the NAS on your network. You can enter up to 15
Time Zone Choose the time zone of your location. This will set the time difference between your time
Enable PPPoE
Connection
IP Address Use these fields to configure the IP address of the LAN interface through which you are
Automatically get
IP address
Manually assign IP
address
alphanumeric characters with minus signs allowed but not as the last character. The name
must begin with an alphabetic character (a-z) and is case sensitive.
zone and Greenwich Mean Time (GMT).
Click this if your Internet connection requires you to enter a user name and password to
connect to the Internet. Enter your user name and password
connected to the NAS.
When the LAN interfaces are set to stand-alone, this configures the IP address of the LAN
interface in the same subnet as your computer. It configures LAN1 if both LAN interfaces are
in the same subnet as your computer.
If you use the administrator configuration screens to set the LAN interfaces to link
aggregation, this configures the IP address that both LAN interfaces share.
Select this if the NAS is automatically assigned an IP address from the ISP or a DHCP server in
your network.
Select this if you want to assign the NAS a fixed IP address, subnet mask and default
gateway.
Note: Do not configure an IP address that is already in use in your network. This
results to a network IP address conflict and makes the NAS inaccessible.
NAS Series User’s Guide
24
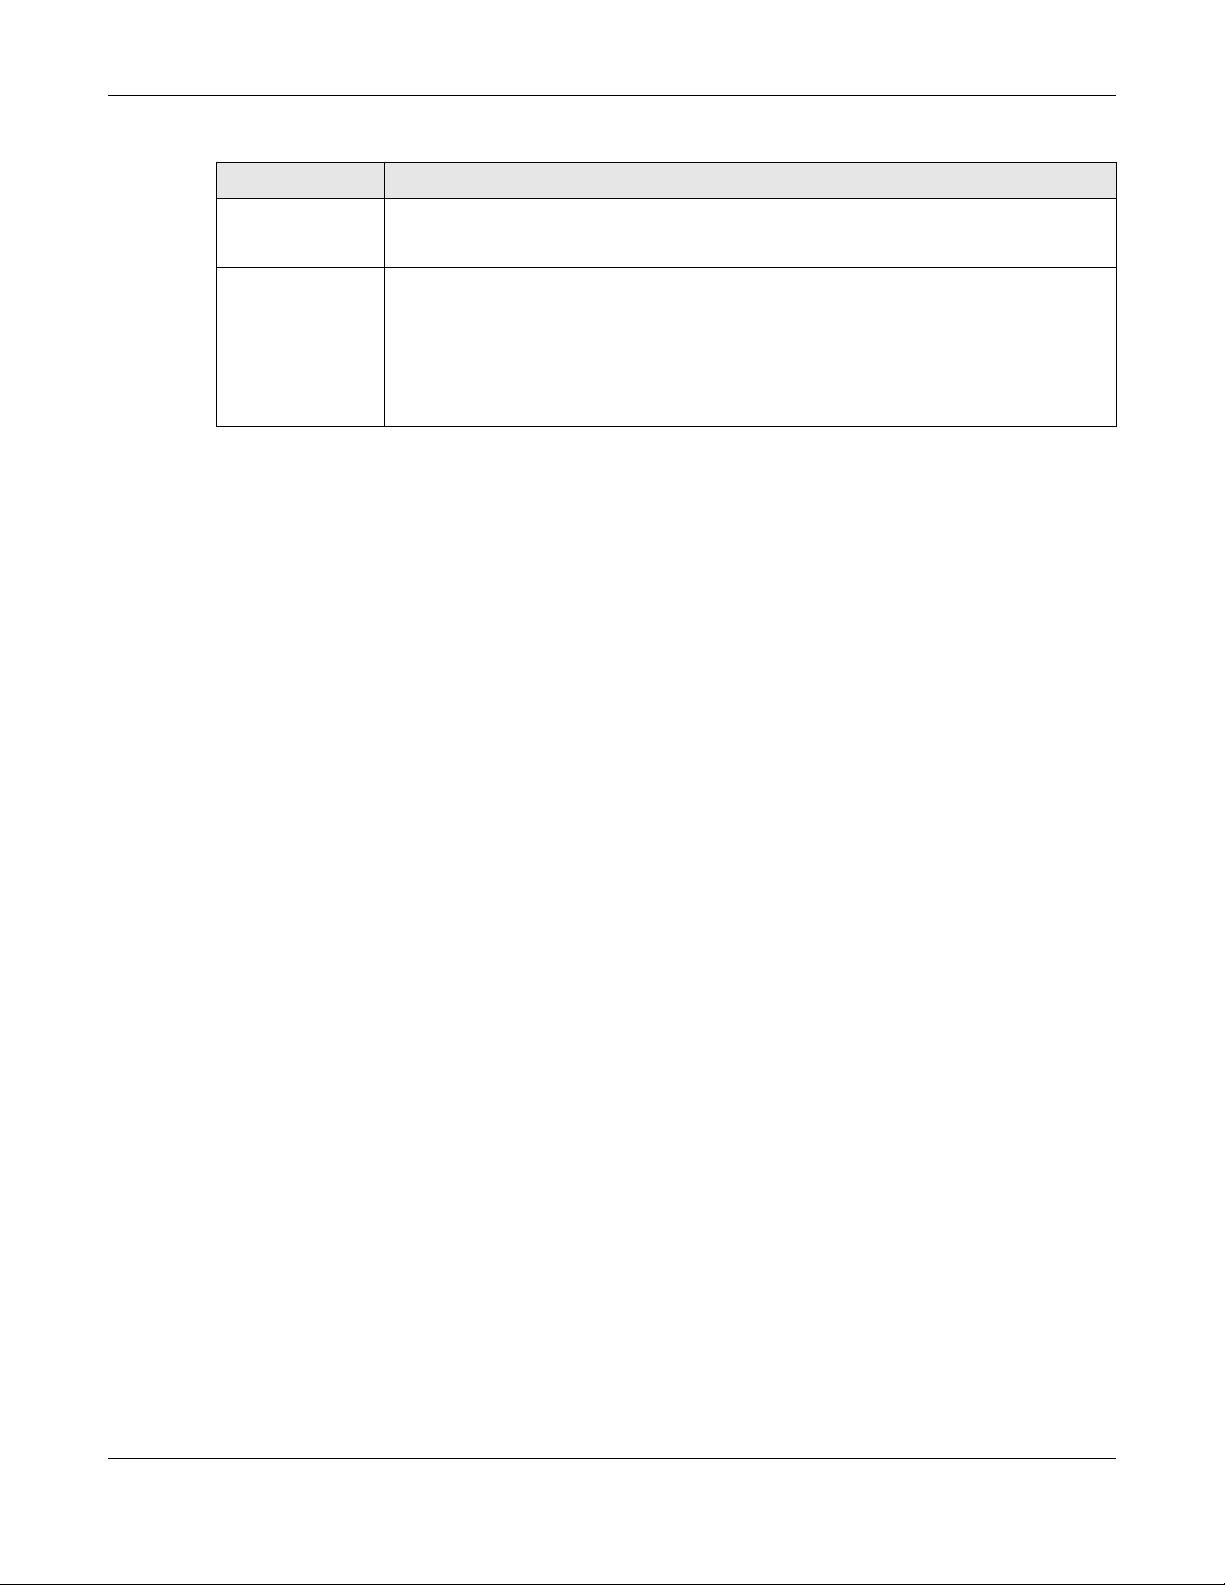
Chapter 2 Find and Access Your NAS
Table 5 NAS Starter Utility > Configuration > System Setting (continued)
LABEL DESCRIPTION
Use from DHCP
server
DNS Domain Name System (DNS) is for mapping a domain name to its corresponding IP address
Domain Name System (DNS) is for mapping a domain name to its corresponding IP address
and vice versa. Select this if the NAS is automatically given DNS information from the ISP or a
DHCP server in your network.
and vice versa.
Select Use from DHCP server if the NAS is automatically given DNS information from the ISP or
a DHCP server in your network.
Select Manually assign DNS server if you were given specific IP address(es) of the DNS
server(s). Enter the primary and secondary DNS in the corresponding fields.
NAS Series User’s Guide
25

3.1 Overview
This chapter describes how to access the NAS web configurator and provides an overview of its screens.
The web configurator is an HTML-based management interface that allows easy NAS setup and
management using an Internet browser.
Use Internet Explorer 11.0.9, Mozilla Firefox 31.0, Safari 5.1.7, Google Chrome 37.0.2, or later versions of
these browsers. The recommended screen resolution is 1440 by 900 pixels or higher.
In order to use the web configurator you need to allow:
• Web browser pop-up windows from your device. Web pop-up blocking is enabled by default in
Windows XP SP (Service Pack) 2.
• JavaScript (enabled by default).
CHAPTER 3
Web Configurator
3.2 Access the NAS Web Configurator
This guide uses the NAS326 screens as an example. The screens may vary slightly for different models.
1 Make sure your NAS is properly connected and that your computer is in the same subnet as the NAS
(refer to the Quick Start Guide or the appendices).
Open your web browser and type in the server name of the NAS. The default is “nas” followed by the
number of your model (“nas326” for example). Configure the server name of your NAS using the Control
Panel > System > Server Name screen (Section 9.4 on page 148) or the System Setting screen (Section
2.3.5 on page 23) of the NAS Starter Utility.
Figure 17 NAS URL
2 The default user name and password are “admin” and “1234” respectively. Enter your user name and
password. See Chapter 7 on page 104 for how to create other user accounts. If you use the option to
stay logged in (assuming you do not log out), make sure you keep your computer secure from
unauthorized access. Click the arrow to log in. Logging in with a (non-administrator) user account takes
you to a different Desktop screen (see Section 3.3 on page 30 for details).
NAS Series User’s Guide
26
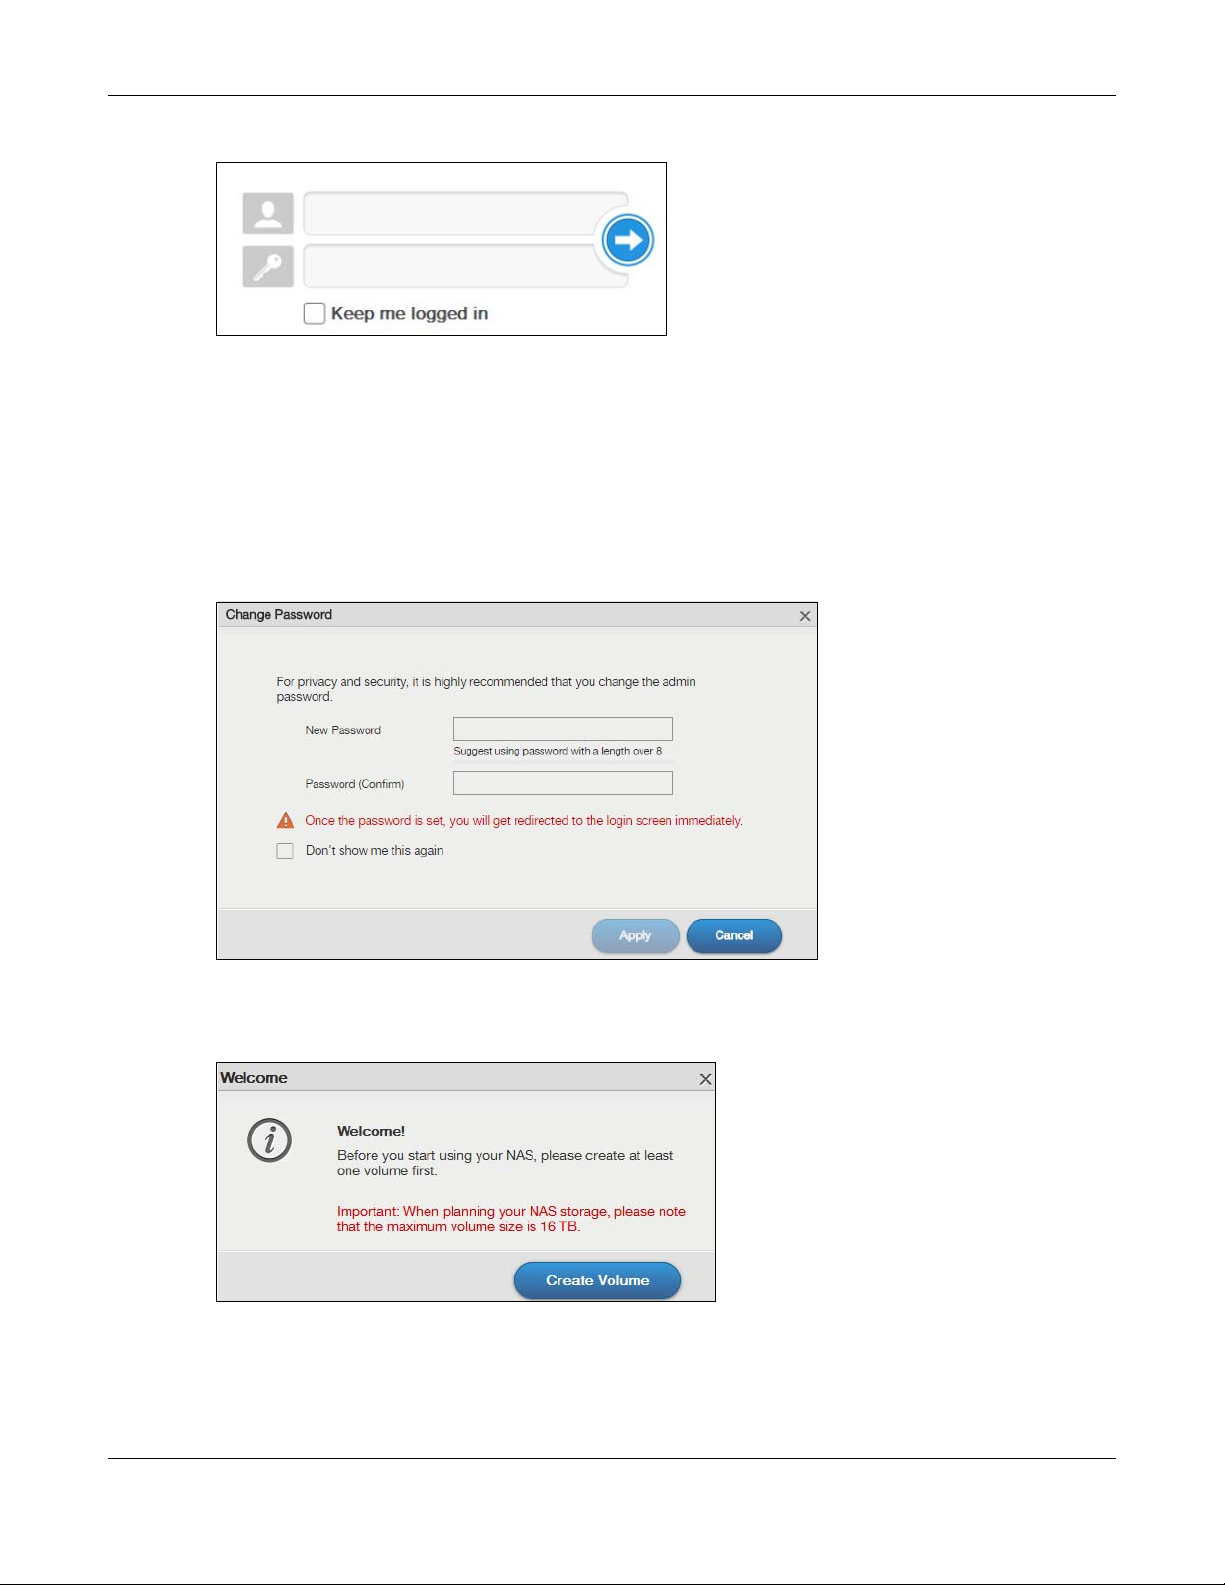
Chapter 3 Web Configurator
Figure 18 NAS Login Screen
Make sure you have a backup of any existing data in the hard disk
before installing it in the NAS. Creating a volume formats the hard disk
and deletes all data in the process.
3 You should see a screen asking you to change your password (highly recommended) as shown next.
Type a new password in the New Password field. Retype the password for confirmation in the Password
(Confirm) field. Click Cancel if you do not want to change the password this time. Click Apply to save
your changes back to the NAS.
Figure 19 Change Default Password Screen
4 This screen displays if you have not created a volume yet. Click Create Volume to make a volume or
click the x to close the screen to go to the Desktop (Section 3.3 on page 30).
Figure 20 Welcome Screen
5 Select Create single volume on RAID for a simple set up. Go to Section 5.3.1.1 on page 49 for details.
Select Create Multiple volumes on disk group to be able to create more than one storage volume. Go
to Section 5.3.1.7 on page 62 for details.
NAS Series User’s Guide
27
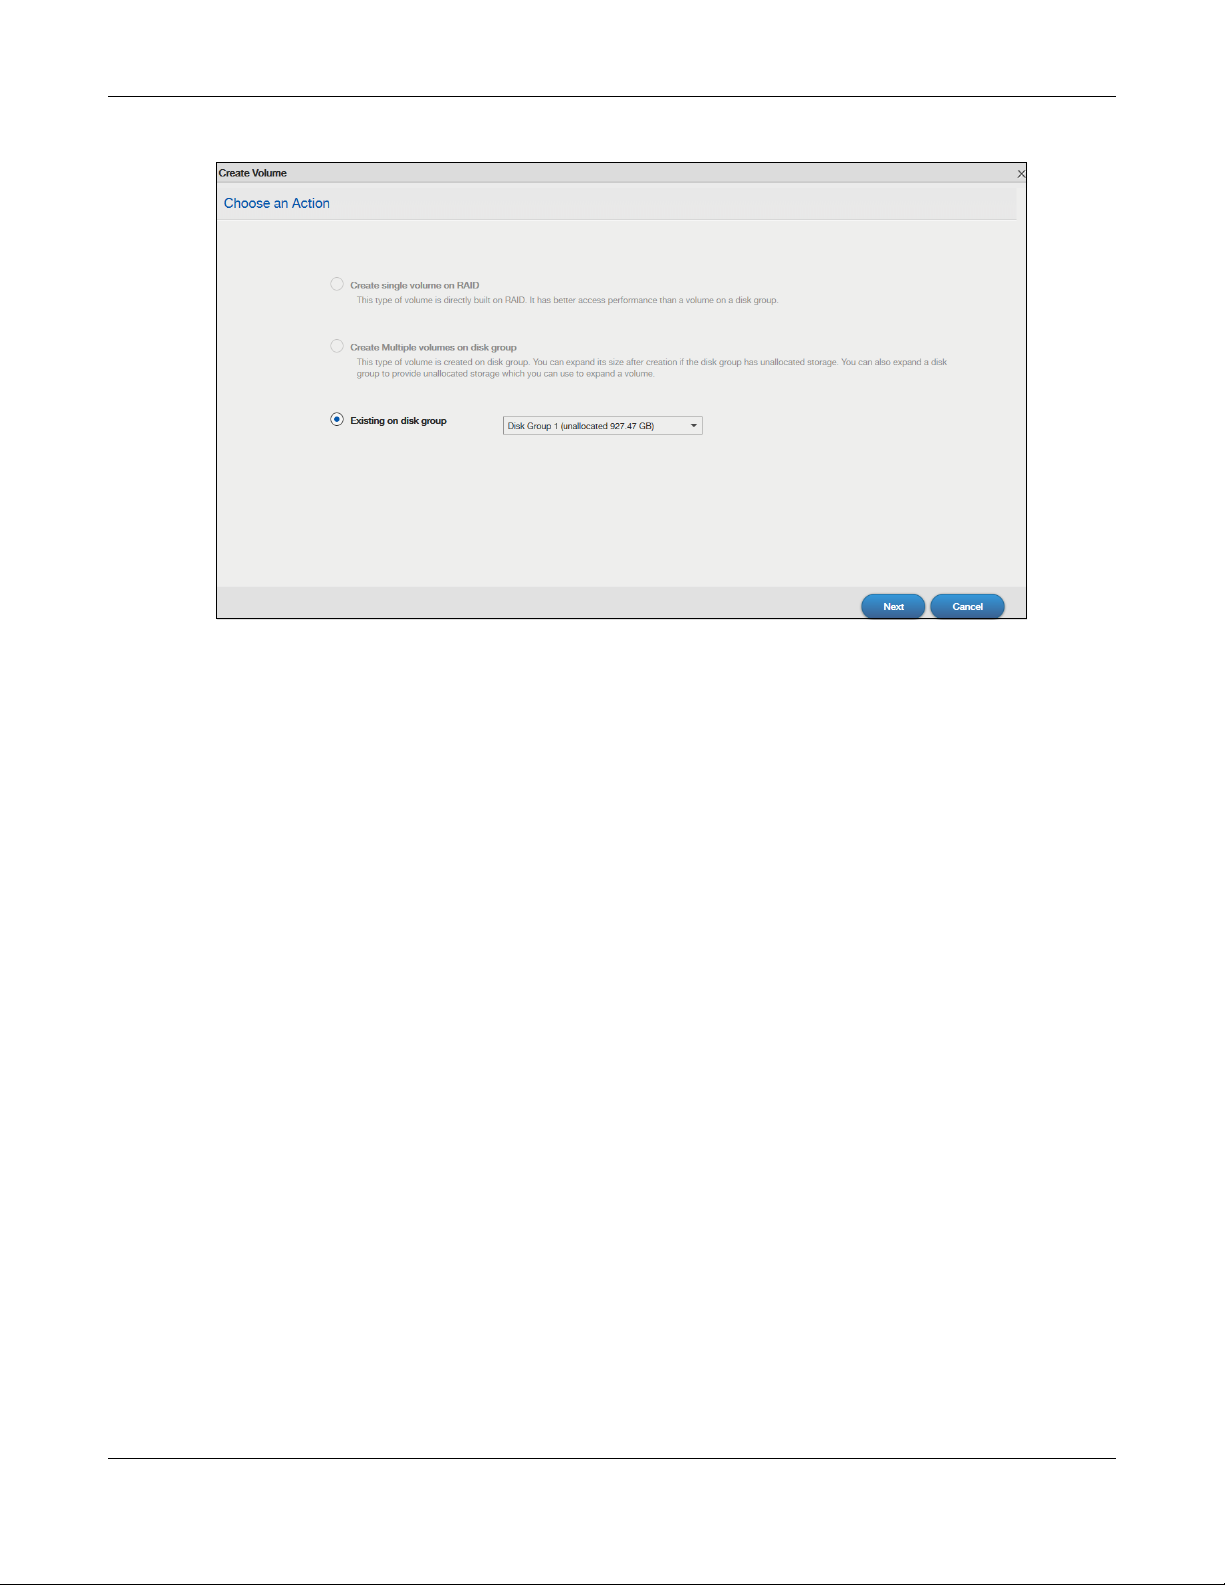
Chapter 3 Web Configurator
Figure 21 Create Volume
If you choose Existing on disk group, you will go to the screens below after clicking Next.
NAS Series User’s Guide
28
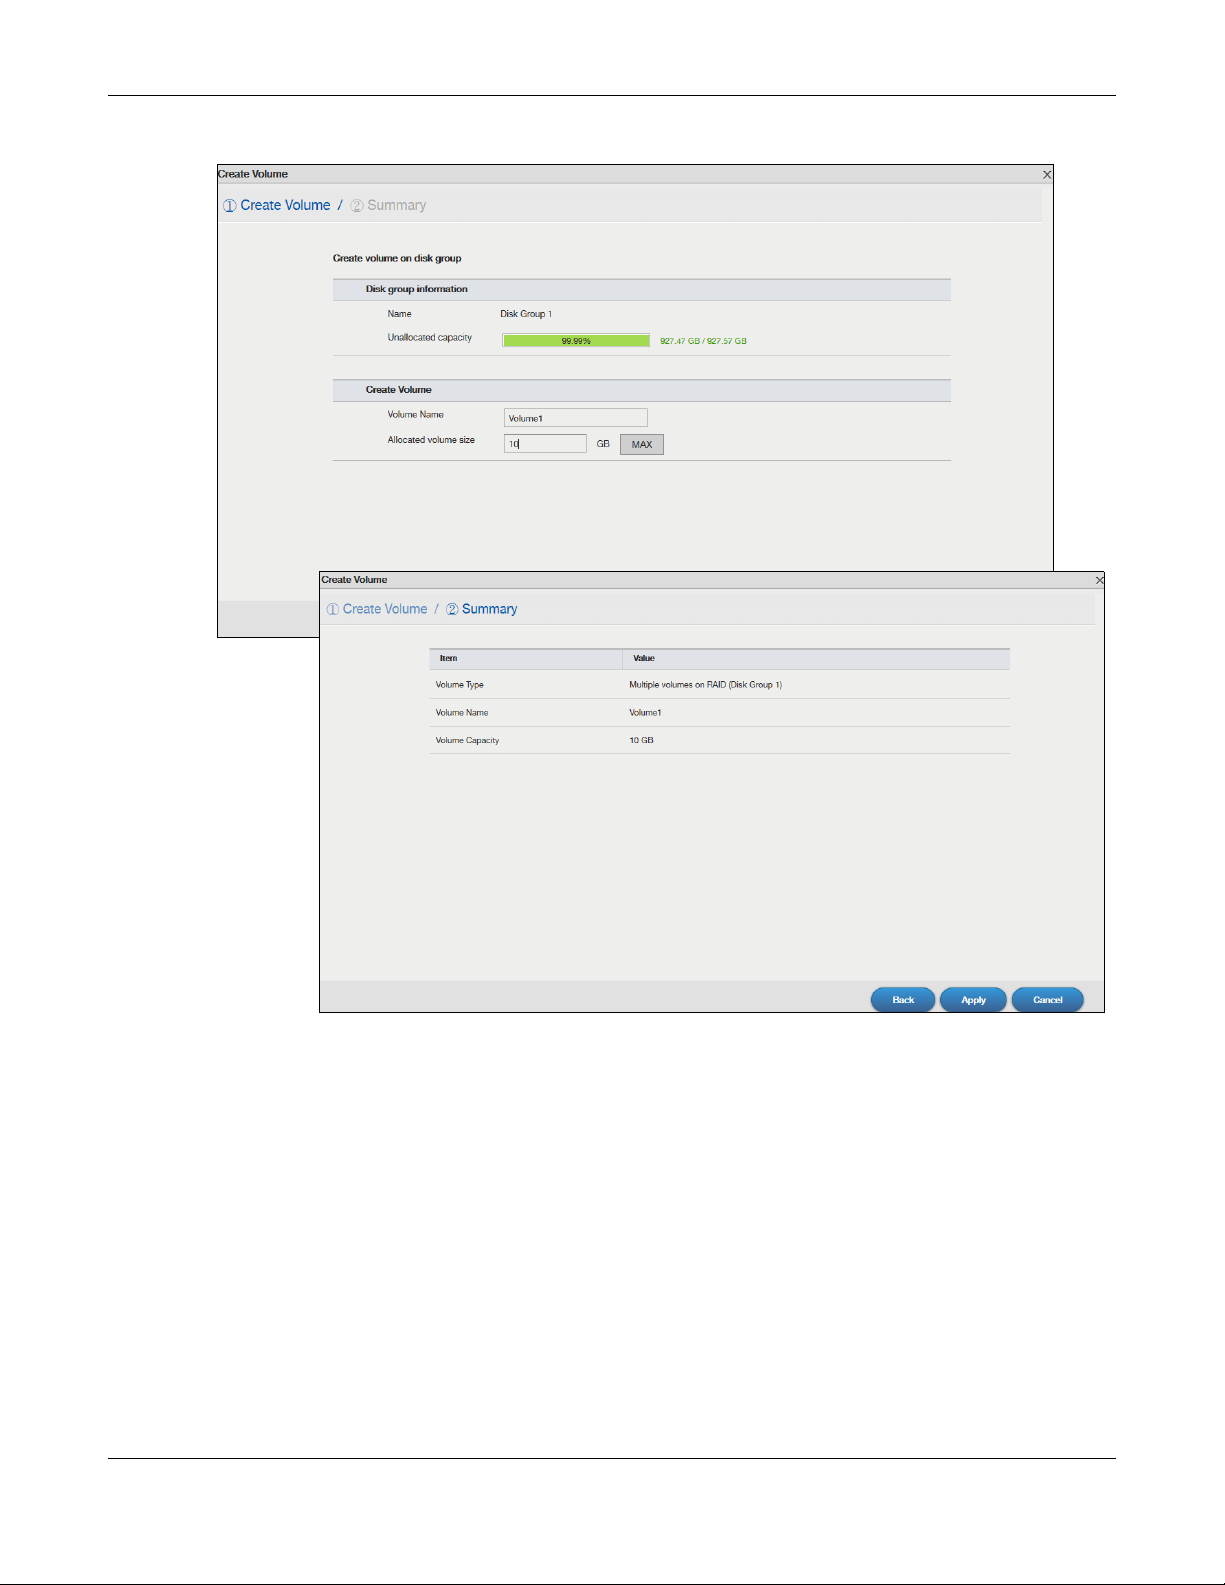
Figure 22 Existing on Disk Group
Chapter 3 Web Configurator
If this is the first time the NAS has created a volume, it needs to reboot after the volume is created. Click
Yes to reboot or No to go to the Desktop.
NAS Series User’s Guide
29
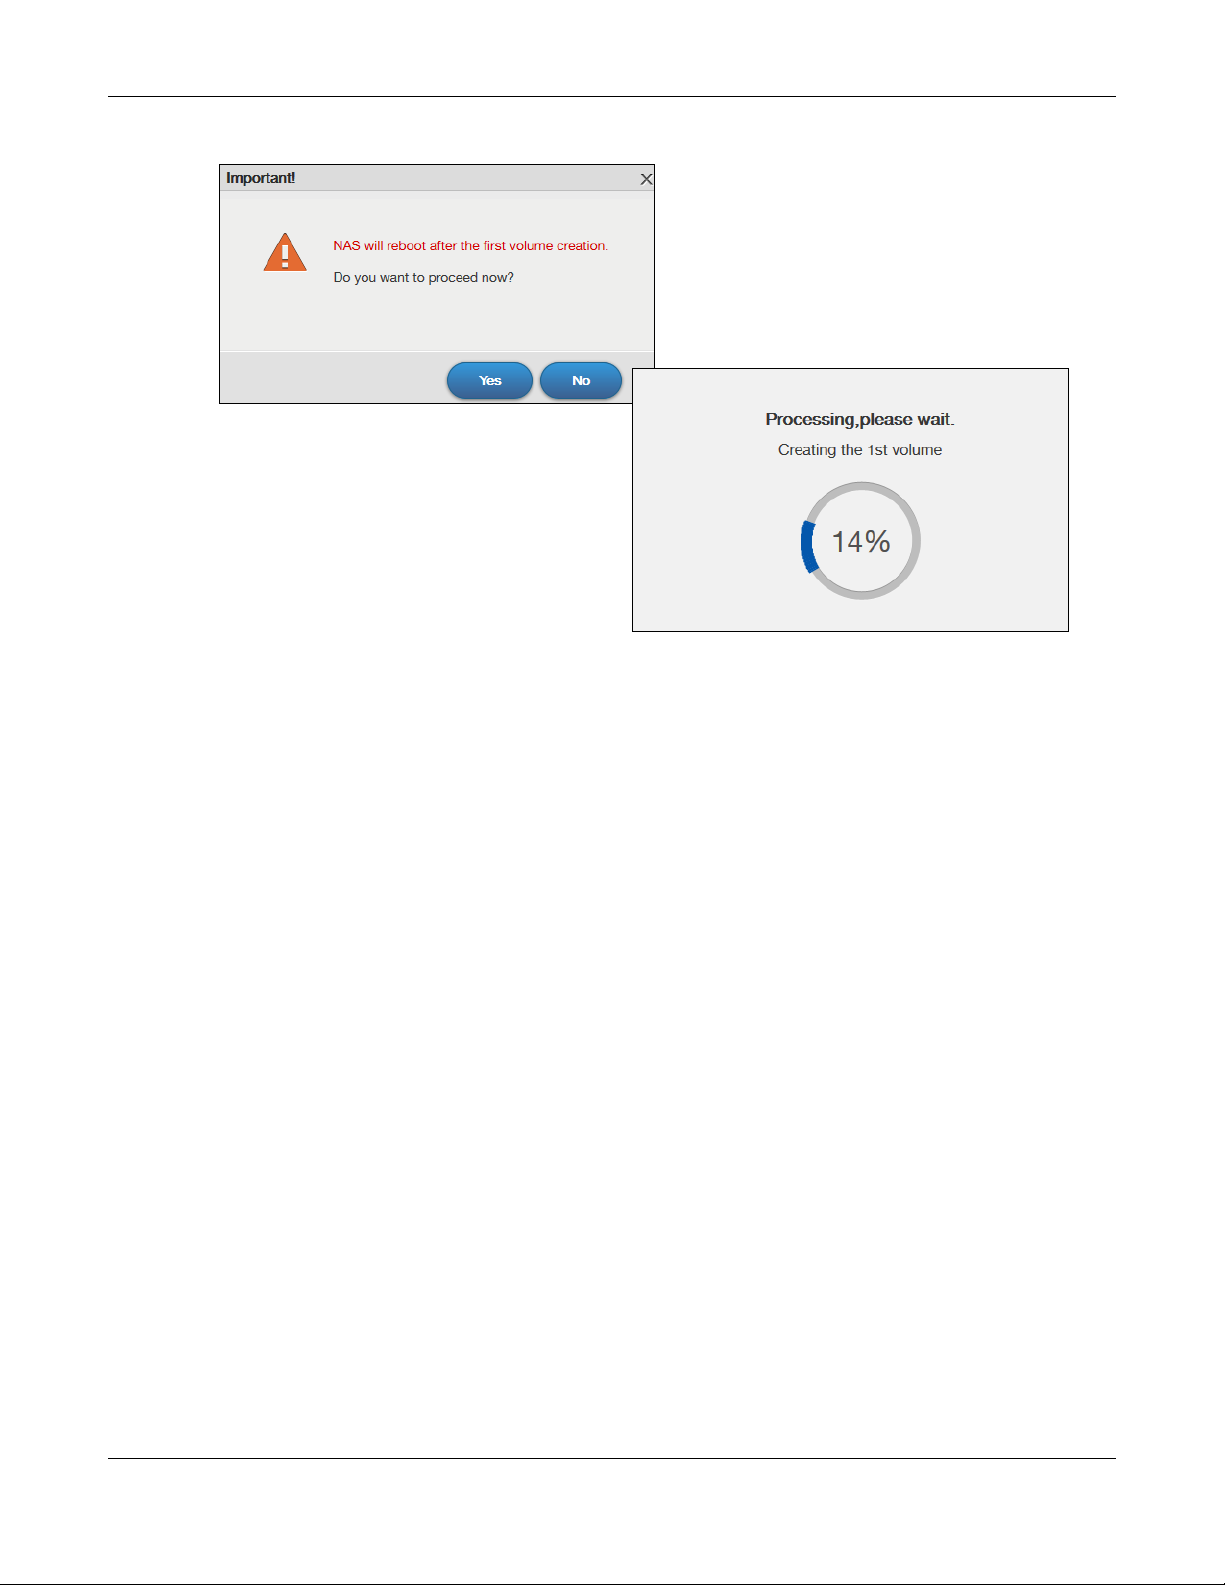
Figure 23 Reboot
Chapter 3 Web Configurator
3.3 Desktop
The Desktop screen displays after you log in. Hover your mouse over the heading bar icons to display
their names.
NAS Series User’s Guide
30
Loading…
Многие пользователи компьютера часто сталкиваются с проблемой нехватки места для хранения своих файлов. Устройство Zyxel nas326 представляет собой одно из решений данной проблемы. Благодаря имеющемуся в нем двухдисковому массиву, этот сетевой накопитель позволяет создать надежный и быстрый файловый сервер для хранения и обмена данными.
Настройка Zyxel nas326 не является сложной задачей. Для начала, необходимо подключить накопитель к сети, используя кабель Ethernet. После подключения, можно обратиться к документации к прибору, где подробно описаны все необходимые шаги для настройки.
В первую очередь, следует установить необходимое программное обеспечение на компьютер. Для этого достаточно скачать и установить утилиты Zyxel nas326 с официального сайта производителя. Далее, необходимо выполнить настройку пользователя и пароля для доступа к устройству.
После того, как пользовательские данные были заданы, можно приступить к настройке режима работы устройства. Накопитель поддерживает несколько режимов работы, включая режим RAID, который позволяет повысить надежность хранения данных. В завершение, стоит настроить сетевые параметры, чтобы у накопителя был доступ к интернету и другим компьютерам в сети.
Важно помнить, что настройка Zyxel nas326 требует внимательного чтения документации и последовательного выполнения всех инструкций. В случае возникновения трудностей, всегда можно обратиться к специалисту за помощью.
В результате выполнения всех указанных шагов, вы получите готовое к использованию устройство Zyxel nas326. Этот сетевой накопитель сможет обеспечить хранение данных различного объема, а также облегчить доступ к ним из любой точки сети. Пользуйтесь устройством с удовольствием!
Покупка устройства Zyxel nas326

Zyxel nas326 — это удобное и надежное сетевое хранилище данных, которое доступно для покупки. Оно позволяет организовать эффективную работу с файлами, обеспечивает высокую скорость передачи данных и поддерживает различные функции безопасности.
При покупке Zyxel nas326 обратите внимание на характеристики устройства. Оно предлагает максимальный объем хранилища до 20 ТБ, поддерживает RAID-массивы, имеет два слота для установки жестких дисков и оснащено двухъядерным процессором для обеспечения высокой производительности.
Данное устройство подходит для использования в домашней сети или в малом офисе, позволяя хранить и обмениваться файлами между несколькими компьютерами. Оно также поддерживает удаленный доступ к данным, что упрощает работу вне офиса.
Приобретая Zyxel nas326, убедитесь, что у вас есть все необходимые компоненты для его использования, включая жесткие диски. Также обратите внимание на гарантию производителя и условия возврата товара, чтобы быть уверенным в качестве приобретаемого устройства.
Распаковка и подключение к компьютеру
Перед началом настройки устройства Zyxel NAS326 необходимо осуществить его распаковку и подключение к компьютеру.
1. Распакуйте устройство из коробки и проверьте наличие всех комплектующих: самого NAS326, сетевого кабеля, блока питания и документации.
2. Подсоедините блок питания к NAS326 и вставьте его в розетку.
3. Подключите один конец сетевого кабеля к порту LAN устройства, а другой конец сетевого кабеля к Ethernet-порту вашего компьютера.
4. Включите компьютер и дождитесь его запуска.
5. Удостоверьтесь, что ваш компьютер настроен на автоматическое получение IP-адреса через DHCP.
6. Устройство Zyxel NAS326 готово к настройке и использованию. Вы можете продолжить с настройками посредством командного интерфейса или используя веб-интерфейс устройства.
Установка ПО и настройка сетевого подключения

Для начала настройки сетевого подключения на устройстве Zyxel nas326 необходимо установить соответствующее программное обеспечение (ПО). Для этого можно воспользоваться диском с установочным ПО, который обычно поставляется в комплекте с устройством. Если диск отсутствует, необходимо загрузить последнюю версию ПО с официального сайта производителя.
После установки ПО на компьютер необходимо подключить устройство Zyxel nas326 к сети. Для этого используется сетевой кабель, который необходимо подключить к одному из доступных портов Ethernet на задней панели устройства и к сетевому порту на сетевом коммутаторе или маршрутизаторе.
После подключения кабеля необходимо настроить сетевое подключение на компьютере. Для этого перейдите в настройки сети операционной системы и выберите соответствующий потому типу подключения (Ethernet). Установите автоматический режим получения IP-адреса (DHCP).
После успешного подключения компьютера и устройства Zyxel nas326 к сети, запустите установленное ПО. Программа автоматически определит устройство и предложит выполнить его настройку. Следуйте инструкциям программы, указывая необходимые параметры сети (например, адрес IP, маску подсети, шлюз и DNS-серверы).
После правильной настройки сетевого подключения вы сможете получить доступ к устройству Zyxel nas326 через локальную сеть и начать использовать его функциональные возможности.
Создание пользователей и установка прав доступа
Для обеспечения безопасности данных и контроля доступа к файлам на NAS326 необходимо создать пользователей и установить им соответствующие права доступа.
1. Войдите в административный интерфейс NAS326 через веб-браузер, используя IP-адрес вашего устройства.
2. Перейдите в раздел «Пользователи» и нажмите кнопку «Создать нового пользователя».
3. Задайте имя пользователя, пароль и описание. Вы можете также установить ограничения на использование дискового пространства и время доступа для каждого пользователя.
4. Чтобы установить права доступа, перейдите в раздел «Редактирование доступа» и выберите директорию или файл, к которым хотите предоставить доступ.
5. Нажмите на кнопку «Добавить» и выберите нужный пользователь из списка. Установите необходимые права доступа: чтение, запись или удаление файлов. Повторите этот шаг для каждой директории или файла, к которым требуется установить права доступа.
6. После настройки прав доступа сохраните изменения и закройте административный интерфейс.
Теперь пользователи смогут получить доступ к своим файлам на NAS326 только в соответствии с установленными правами доступа. Это позволит обеспечить безопасность данных и предотвратить несанкционированный доступ к важным файлам.
Настройка резервного копирования и синхронизации данных

Настройка резервного копирования и синхронизации данных на устройстве Zyxel NAS326 позволяет обеспечить надежную защиту и доступность важных файлов и документов. Это особенно важно для предотвращения потери данных в случае сбоя или ошибки системы.
Для начала настройки резервного копирования необходимо зайти в веб-интерфейс устройства NAS326. Для этого введите IP-адрес устройства в адресной строке браузера и авторизуйтесь с помощью логина и пароля.
После входа в веб-интерфейс выберите раздел «Резервное копирование» или «Backup», в зависимости от предлагаемого интерфейса устройства. Далее следует выбрать источник данных, который необходимо скопировать или синхронизировать.
Для создания резервной копии на внешний накопитель, подключите его к USB-порту устройства. Затем выберите этот накопитель в качестве целевого при выполнении операции резервного копирования.
Если требуется синхронизировать данные с другим NAS-устройством, введите его IP-адрес или имя устройства в соответствующем поле. Укажите необходимые параметры синхронизации, такие как направление и тип операции синхронизации.
После выбора всех необходимых параметров, нажмите кнопку «Сохранить» или «Применить», чтобы активировать настройки резервного копирования и синхронизации данных на устройстве Zyxel NAS326.
Настройка удаленного доступа через интернет
Для возможности удаленного доступа к вашему устройству NAS326 через интернет, необходимо выполнить несколько шагов:
- Удостоверьтесь, что ваш NAS326 подключен к роутеру и имеет доступ в Интернет.
- Настройте порт проброса на вашем роутере для установки соединения с NAS326. Рекомендуется выбрать непривилегированный порт (например, 8080), чтобы избежать конфликта с другими службами.
- Откройте веб-интерфейс NAS326, введя его IP-адрес в адресной строке браузера.
- Войдите в систему с помощью учетных данных администратора.
- Перейдите в раздел «Настройки системы» и выберите пункт «Удаленный доступ».
- Включите опцию «Включить удаленный доступ» и укажите порт, который вы пробросили на роутере.
- Настройте доступ к файлам и папкам, выбрав нужные опции в разделе «Общий доступ».
После завершения этих шагов вы сможете получить доступ к вашему NAS326 через Интернет с помощью внешнего IP-адреса вашего роутера и номера проброшенного порта. Не забудьте настроить соответствующие права доступа для пользователей, чтобы обеспечить безопасный удаленный доступ к вашим файлам.
Подключение других устройств к Zyxel nas326 и использование его функций

Zyxel nas326 – это настольный сетевой накопитель, который обеспечивает широкие возможности для подключения и использования других устройств. Включение и первоначальная настройка устройства достаточно проста, и после этого вы сможете подключить к нему различные устройства, такие как компьютеры, ноутбуки, планшеты и смартфоны.
Для подключения компьютера к Zyxel nas326 вам необходимо выполнить следующие шаги. Во-первых, включите сетевой накопитель и подключите его к вашему домашнему роутеру с помощью сетевого кабеля. Затем подключите компьютер к тому же роутеру по проводу или через Wi-Fi.
После того, как компьютер и Zyxel nas326 подключены к одной сети, вы сможете использовать различные функции сетевого накопителя. Например, вы сможете создавать сетевые шары и делиться файлами между компьютерами в сети. Вы также сможете настраивать планировщик задач, чтобы автоматически синхронизировать данные с другими устройствами или выполнять другие задачи по расписанию.
Зyxel nas326 также поддерживает функцию стриминга мультимедиа, что значительно расширяет его возможности. Вы сможете подключить вашу медиатеку на сетевом накопителе к телевизору, игровой приставке или другому устройству, поддерживающему потоковое воспроизведение мультимедиа. Таким образом, вы сможете смотреть фильмы, слушать музыку и просматривать фотографии с большого экрана, не переносив файлы на другое устройство.
Вопрос-ответ
Какой объем данных можно хранить на Zyxel nas326?
Объем данных, который можно хранить на Zyxel nas326, зависит от установленных жестких дисков. Максимальный объем данных составляет 32 ТБ (2 диска по 16 ТБ каждый). Однако, при использовании различных режимов RAID или объединения дисков в один массив, доступное пространство для хранения может быть немного меньше.
Какая операционная система используется на Zyxel nas326?
На Zyxel nas326 установлена операционная система Zyxel NAS OS. Эта операционная система разработана специально для сетевых накопителей и предоставляет различные функции и возможности для управления данными, обеспечения их безопасности и доступа к ним через локальную или удаленную сеть. Zyxel NAS OS имеет удобный и интуитивно понятный интерфейс, который позволяет пользователям легко управлять своими данными и настройками устройства.
Можно ли подключить USB-накопитель к Zyxel nas326?
Да, Zyxel nas326 поддерживает подключение USB-накопителей. Устройство имеет два порта USB 3.0, к которым можно подключить внешние жесткие диски, USB-флэшки и другие USB-устройства для расширения объема хранения данных или резервного копирования информации. После подключения USB-накопитель будет автоматически распознан Zyxel nas326, и вы сможете управлять данными на нем через веб-интерфейс устройства.
Создание собственного сервера домашнего хранилища данных позволяет упорядочить и хранить информацию у себя дома. Zyxel NAS326 — это один из наиболее популярных вариантов серверов домашнего хранения. Но как начать использование этого устройства?
В этой статье мы расскажем о том, как правильно настроить Zyxel NAS326, чтобы вы могли легко и удобно использовать его для хранения своих файлов, а также обмена ими с другими устройствами.
Не волнуйтесь, если вы не имеете опыта в настройке сетевых устройств: наша инструкция предназначена специально для новичков, и охватывает все основные шаги, необходимые для запуска Zyxel NAS326.
Содержание
- Преимущества использования Zyxel NAS326
- 1. Легкость в использовании
- 2. Безопасность данных
- 3. Возможности удаленного доступа
- 4. Широкий функционал
- 5. Низкая цена
- Подключение и настройка жестких дисков
- Подключение жестких дисков к Zyxel NAS326
- Настройка жестких дисков
- Важно знать
- Как подключить жесткий диск к Zyxel NAS326?
- 1. Подсоедините жесткий диск к Zyxel NAS326.
- 2. Подключите Zyxel NAS326 к сети.
- 3. Настройте жесткий диск в Zyxel NAS326.
- Как настроить режим RAID?
- Общая информация
- Настройка режима RAID на NAS326
- Выбор режима RAID
- Создание и управление пользователями
- Создание пользователя
- Управление пользователями
- Как создать нового пользователя?
- Шаг 1: Вход в систему
- Шаг 2: Создание пользователя
- Шаг 3: Подтверждение изменений
- Как назначить права доступа к файлам и папкам?
- Шаг 1: Зайти в меню управления доступом
- Шаг 2: Созадние групп
- Шаг 3: Создание пользователей
- Шаг 4: Назначение прав доступа
- Настройка сетевого соединения и доступа к данным
- 1. Настройка сетевого соединения
- 2. Настройка доступа к данным
- Как настроить сетевые настройки Zyxel NAS326?
- Шаг 1. Подключение к сети
- Шаг 2. Настройка сетевых параметров
- Как настроить доступ к файлам посредством Samba?
- Шаг 1: Установка Samba
- Шаг 2: Создание папки и настройка прав доступа
- Шаг 3: Настройка Samba
- Использование приложений
- File Station
- Download Station
- FTP сервер
- Как установить и настроить приложения на Zyxel NAS326?
- Шаг 1. Загрузка и установка приложений
- Шаг 2. Настройка установленного приложения
- Шаг 3. Выполнение задач с помощью установленного приложения
- Как использовать приложения для резервного копирования?
- Выбор приложения для резервного копирования
- Настройка приложения
- Запуск резервного копирования
- Мониторинг резервного копирования
- Обслуживание и обновление
- Резервное копирование данных
- Обновление системного ПО
- Обслуживание жестких дисков
- Редактирование пользователей и групп
- Мониторинг работы
- Как выполнить резервное копирование настроек и файлов?
- Резервное копирование настроек
- Резервное копирование файлов
- Как выполнить обновление Zyxel NAS326?
- Проверьте доступность обновлений
- Создайте резервную копию
- Загрузите обновление
- Обновите ПО устройства
- Вопрос-ответ
- Как подключить Zyxel NAS326 к сети?
- Как настроить доступ к Zyxel NAS326 из интернета?
- Как настроить RAID на Zyxel NAS326?
- Как настроить бэкап на Zyxel NAS326?
- Как создать сетевую папку на Zyxel NAS326?
- Как подключить устройство хранения на Zyxel NAS326?
- Как изменить пароль учетной записи на Zyxel NAS326?
Преимущества использования Zyxel NAS326
1. Легкость в использовании
Zyxel NAS326 – удобное и простое в использовании устройство. Его интерфейс понятен даже для начинающих пользователей, что позволяет быстро приобрести основные навыки.
2. Безопасность данных
Защита данных – один из важнейших аспектов в работе с цифровыми ресурсами. Zyxel NAS326 обеспечивает надежное хранение и защиту ваших данных, благодаря мультиуровневой системе шифрования.
3. Возможности удаленного доступа
Удаленный доступ – отличное решение для тех, кто хочет иметь свободу доступа к своим данным в любое время и из любой точки мира. С помощью Zyxel NAS326 можно управлять своими файлами даже находясь в другой стране.
4. Широкий функционал
Зyxel NAS326 имеет разнообразные функции, позволяющие решать многие задачи, связанные с хранением, обработкой и обменом файлами. Например, NAS326 поддерживает функцию FTP-сервера, благодаря которой можно заладить и скачивать файлы с устройства удаленно.
5. Низкая цена
Все преимущества Zyxel NAS326 доступны по приемлемой цене. Несмотря на множество полезных функций, этот NAS-устройство по цене конкурентов.
Подключение и настройка жестких дисков
Подключение жестких дисков к Zyxel NAS326
Для подключения жестких дисков к NAS326 необходимо:
- Выключить NAS326 и отключить его от электросети.
- Откройте крышку устройства и установите от 1 до 2 жестких дисков в отсеки для дисков.
- Подключите кабели SATA к жестким дискам.
- Закройте крышку устройства и подключите его к электросети.
Настройка жестких дисков
После успешного подключения жестких дисков к Zyxel NAS326, их нужно настроить:
- Зайдите в веб-интерфейс устройства NAT326.
- Перейдите на вкладку «Управление дисками».
- Выберите «Хранилище данных» и нажмите «Создать новое хранилище».
- Выберите желаемый режим работы для дисков и установите его параметры.
- Следуйте инструкциям на экране, чтобы завершить настройку.
Важно знать
При выборе режима работы диска, убедитесь, что знаете, какие функции доступны в выбранном режиме, чтобы избежать потери данных в случае сбоя жесткого диска. Рекомендуется настроить жесткие диски в режиме RAID.
Как подключить жесткий диск к Zyxel NAS326?
1. Подсоедините жесткий диск к Zyxel NAS326.
Прежде всего, необходимо подключить жесткий диск к устройству. Для этого откройте крышку на задней панели и вставьте жесткий диск в один из отсеков для дисков.
2. Подключите Zyxel NAS326 к сети.
Чтобы устройство стало доступным для работы, необходимо подключить его к сети. Для этого подсоедините кабель Ethernet к порту LAN на задней панели устройства и другой конец к вашему роутеру или коммутатору.
3. Настройте жесткий диск в Zyxel NAS326.
Чтобы начать использовать жесткий диск на Zyxel NAS326, необходимо зайти в веб-интерфейс. В адресной строке браузера введите IP-адрес устройства. Введите логин и пароль по умолчанию для входа в систему.
Далее необходимо установить параметры жесткого диска. Для этого зайдите в настройки системы и выберите раздел «Хранилище данных». Затем нажмите кнопку «Создать» и выберите жесткий диск, который вы подключили к устройству. Выберите параметры RAID и нажмите «Создать».
Теперь вы можете начать использовать свой жесткий диск на Zyxel NAS326.
Как настроить режим RAID?
Общая информация
RAID (Redundant Array of Independent Disks) – это технология объединения нескольких жестких дисков в единое хранилище данных. Она позволяет увеличить надежность и производительность системы, а также обеспечить восстановление данных в случае сбоя одного из дисков.
Настройка режима RAID на NAS326
1. Запустите программное обеспечение Zyxel NAS Starter Utility.
2. На вкладке «Мои устройства» выберите NAS326 и перейдите на вкладку «Хранилище».
3. Выберите режим RAID из списка: RAID 0, RAID 1, JBOD или Standard.
4. Если выбран режим RAID 0 или RAID 1, укажите диски, которые будут использоваться для настройки. Если выбран режим JBOD, указывать диски не нужно.
5. Нажмите кнопку «Создать» для завершения настройки.
Выбор режима RAID
RAID 0 – объединяет несколько дисков в единое хранилище без защиты данных. Производительность в данном режиме наивысшая, но при выходе из строя хотя бы одного диска теряются все данные.
RAID 1 – создает зеркальную копию данных на двух жестких дисках, обеспечивая повышенную защиту информации. Однако производительность при этом снижается по сравнению с RAID 0.
JBOD – это сокращение от «Just a Bunch Of Disks», или просто независимые диски. Каждый диск в этом режиме работает независимо, поэтому оптимальен для данных, которые не требуют высокой надежности и производительности.
Standard – это режим, который не объединяет диски в RAID, но позволяет использовать их в качестве независимых дисков.
Создание и управление пользователями
Создание пользователя
Для того чтобы создать нового пользователя на вашем Zyxel NAS326, выполните следующие действия:
- Зайдите в интерфейс управления.
- Перейдите в меню «Users».
- Нажмите на кнопку «Add».
- Заполните нужные поля, такие как имя пользователя, пароль, комментарий и др.
- Нажмите на кнопку «Apply».
После этого новый пользователь должен появиться в списке пользователей.
Управление пользователями
После того, как вы создали пользователя, вы можете управлять его доступом к файлам и функциям вашего Zyxel NAS326. Для этого выполните следующие действия:
- Выберите нужного пользователя в списке пользователей.
- Нажмите на кнопку «Edit».
- Выберите нужные опции доступа для данного пользователя, например, разрешения на чтение, запись, удаление файлов и др.
- Нажмите на кнопку «Apply».
Вы также можете создавать группы пользователей для более удобного управления правами доступа.
Как создать нового пользователя?
Чтобы создать нового пользователя в Zyxel NAS326, выполните следующие действия:
Шаг 1: Вход в систему
Откройте браузер и введите IP-адрес вашего устройства (обычно 192.168.1.1) в адресной строке. Введите свой логин и пароль для входа в систему.
Шаг 2: Создание пользователя
На главной странице выберите «Storage»> «User». Нажмите кнопку «Create» и введите данные нового пользователя: имя пользователя, пароль, домашний каталог и права доступа (чтение/запись/удаление).
Шаг 3: Подтверждение изменений
После заполнения всех необходимых полей и установки соответствующих привилегий, нажмите кнопку «Apply», чтобы сохранить изменения.
Вот и всё! Теперь вы создали нового пользователя в Zyxel NAS326 и ему были назначены соответствующие права доступа.
Как назначить права доступа к файлам и папкам?
Шаг 1: Зайти в меню управления доступом
Перейдите в интерфейс управления NAS326 через браузер, используя его IP-адрес.
Нажмите на вкладку «Приложения» и выберите «Управление доступом».
Шаг 2: Созадние групп
Создайте группы, в которые вы будете добавлять пользователей, которым назначите права доступа.
Для этого нажмите на кнопку «Создать группу» и укажите название группы и описание.
Шаг 3: Создание пользователей
Создайте пользователей и добавьте их в нужные группы.
Для этого нажмите на кнопку «Создать пользователя», укажите имя пользователя, пароль и выберите группу, в которую его добавите.
Шаг 4: Назначение прав доступа
Перейдите во вкладку «Управление доступом» и выберите нужную папку или файл, для которых нужно настроить права доступа.
Для каждого пользователя или группы, выберите необходимые права доступа: читать, записывать и удалять файлы.
Нажмите на кнопку «Применить», чтобы сохранить настройки.
Таким образом, вы успешно назначили права доступа к папкам и файлам на Zyxel NAS326.
Настройка сетевого соединения и доступа к данным
1. Настройка сетевого соединения
Перед началом работы с NAS326 необходимо настроить сетевое соединение. Подключите устройство к роутеру или коммутатору, используя сетевой кабель.
Затем войдите в настройки устройства через браузер, набрав в адресной строке IP-адреса вашего NAS326. По умолчанию он равен 192.168.1.1.
В настройках сети выберите «DHCP Client» для автоматической настройки сети или «Static IP» для ручной настройки.
2. Настройка доступа к данным
После настройки сетевого соединения, можно приступить к настройке доступа к данным на вашем NAS326.
Создайте новый пользовательский аккаунт и задайте ему пароль, чтобы защитить данные на вашем устройстве. Выберите разрешения, которые будут предоставлены пользователю для доступа к файлам на устройстве.
Вы можете создавать один или несколько публичных шар (Shared Folders), к которым будут иметь доступ все пользователи. Или же создать личные шары с разрешениями доступа только для определенных пользователей.
Для удобства можно настроить доступ к шарам через FTP-клиент или HTTP-сервер.
Как настроить сетевые настройки Zyxel NAS326?
Шаг 1. Подключение к сети
Для начала необходимо подключить NAS326 к вашей локальной сети. Для этого вам понадобятся сетевой кабель и доступ к вашему роутеру.
- Подключите один конец сетевого кабеля к порту LAN на вашем роутере.
- Подключите другой конец к порту LAN на задней панели NAS326.
- Включите устройство в электрическую сеть.
Шаг 2. Настройка сетевых параметров
Для доступа к NAS326 вам нужно знать его IP-адрес. Следуйте приведенным ниже инструкциям для настройки сетевых параметров устройства.
- Откройте веб-браузер и введите IP-адрес вашего роутера в адресной строке. Вам нужно будет войти в интерфейс управления своим роутером. Обычно для этого используется адрес 192.168.0.1 или 192.168.1.1.
- Найдите в настройках роутера список подключенных устройств или DHCP-клиентов. Устройство Zyxel NAS326 должно быть указано в этом списке.
- Найдите IP-адрес, присвоенный роутером устройству Zyxel NAS326, и запишите его.
- Введите IP-адрес, который вы записали, в вашем веб-браузере. Вам будет предложено ввести логин и пароль. Введите логин и пароль по умолчанию (admin и 1234), если вы не изменили его самостоятельно.
- Перейдите в раздел «Сеть», затем в «Настройка сети». Заполните поля «IP-адрес», «Маска подсети», «Шлюз по умолчанию» и «DNS-сервер», используя соответствующие параметры вашей сети. Сохраните изменения.
- Перезагрузите NAS326 для применения внесенных изменений.
Теперь вы можете получить доступ к NAS326 по его IP-адресу и начать использование.
Как настроить доступ к файлам посредством Samba?
Шаг 1: Установка Samba
Перед настройкой доступа к файлам посредством Samba на Zyxel NAS326 необходимо убедиться, что Samba установлена и работает корректно. Для этого зайдите в меню «Пакеты» в веб-интерфейсе Zyxel NAS326 и проверьте наличие пакета Samba. Если пакет не установлен, установите его с помощью кнопки «Установить».
Шаг 2: Создание папки и настройка прав доступа
Для настройки доступа к файлам посредством Samba необходимо создать общую папку и настроить права доступа к ней.
- Зайдите в меню «Ресурсы» в веб-интерфейсе Zyxel NAS326 и создайте новую общую папку.
- Выберите созданную папку, зайдите во вкладку «Доступ» и настройте права доступа таким образом, чтобы нужные пользователи имели доступ к этой папке.
Шаг 3: Настройка Samba
После того, как Samba установлена и создана общая папка с настроенными правами доступа, можно приступать к настройке Samba.
- Зайдите в меню «Сервисы» в веб-интерфейсе Zyxel NAS326 и выберите вкладку «Samba».
- Включите Samba, заполните поля «Имя группы», «Имя сервера» и «Описание».
- Добавьте общую папку, которую вы создали ранее, и настройте права доступа к ней.
После завершения этих шагов пользователи смогут подключаться к общей папке на Zyxel NAS326 посредством Samba.
Использование приложений
File Station
File Station — приложение для управления файлами. С помощью данного приложения можно создавать папки, переносить файлы между ними, делать резервные копии данных, удалять файлы.
Интерфейс приложения интуитивно понятен и прост в использовании. В верхней части экрана находятся кнопки для создания новой папки, создания нового файла, загрузки файлов и многие другие.
Также в File Station можно создавать сетевые шары и делиться файлами между пользователями или устройствами. Для этого нужно зайти во вкладку «Сетевые шары» и настроить доступы для пользователей.
Download Station
Download Station — приложение для скачивания файлов из Интернета. В данном приложении можно настроить загрузку торрент-файлов, файлов по протоколу FTP, HTTP и других.
Download Station поддерживает очередь загрузок, планирование времени загрузки, автоматическое удаление загруженных файлов, уведомления об окончании загрузок и многое другое.
Кроме того, в Download Station можно настроить подключение к Usenet серверам и загружать файлы с помощью новостных групп. Для этого нужно добавить аккаунты и сервера в настройках приложения.
FTP сервер
FTP сервер — приложение для доступа к файлам с помощью протокола FTP. Данное приложение позволяет настроить доступ к файлам на удаленном устройстве с помощью FTP клиента.
Для подключения к FTP серверу нужно указать IP адрес устройства, логин и пароль. Затем можно производить операции по копированию файлов с устройства на компьютер и наоборот.
FTP сервер Zyxel NAS326 поддерживает защиту передачи данных по SSL, а также может ограничивать доступ к файлам для разных пользователей с помощью настроек прав доступа.
Как установить и настроить приложения на Zyxel NAS326?
Шаг 1. Загрузка и установка приложений
Для установки приложений на Zyxel NAS326 необходимо:
- Зайти в меню настроек NAS326 через веб-интерфейс
- Перейти в раздел «Приложения»
- Нажать кнопку «Поиск» и выбрать нужное приложение из списка
- Нажать кнопку «Установить», подтвердить установку
Процесс установки приложения может занять несколько минут. После установки приложение будет доступно в разделе «Мои приложения».
Шаг 2. Настройка установленного приложения
Для настройки установленного приложения:
- Зайти в раздел «Мои приложения»
- Выбрать нужное приложение и нажать кнопку «Настроить»
- Внести настройки и сохранить изменения
Процесс настройки каждого приложения может отличаться, поэтому важно ознакомиться с документацией к приложению перед началом настройки.
Шаг 3. Выполнение задач с помощью установленного приложения
Чтобы выполнить задачи с помощью установленного приложения, необходимо:
- Зайти в раздел «Мои приложения»
- Выбрать нужное приложение и нажать кнопку «Запустить»
- Ввести настройки и запустить выполнение задачи
Опять же, процесс выполнения задач может отличаться в зависимости от приложения, используйте документацию в случае необходимости.
Как использовать приложения для резервного копирования?
Выбор приложения для резервного копирования
Перед тем, как начать использовать приложения для резервного копирования на Zyxel NAS326, необходимо выбрать подходящее приложение. В NAS326 уже установлено два приложения для резервного копирования — «Zyxel Backup» и «Time Machine». В зависимости от операционной системы и устройств, с которых вы хотите производить резервное копирование, нужно выбирать подходящее приложение.
Настройка приложения
После выбора подходящего приложения необходимо его настроить. В настройках приложения нужно указать, какие файлы и папки нужно резервировать, куда их сохранять, как часто запускать резервное копирование и другие параметры.
Запуск резервного копирования
После того, как приложение настроено, можно запустить резервное копирование. В зависимости от настроек приложения, оно может запускаться автоматически, по расписанию или вручную. Все файлы и папки, которые были указаны для резервирования, будут скопированы на Zyxel NAS326.
Мониторинг резервного копирования
Во время резервного копирования на Zyxel NAS326 можно мониторить процесс, чтобы убедиться, что все проходит гладко. Для этого можно использовать приложения управления и мониторинга, которые поставляются вместе с NAS326. В них можно увидеть какие файлы были скопированы, сколько времени заняло копирование и другую полезную информацию.
В итоге, использование приложений для резервного копирования на Zyxel NAS326 является очень удобным и надежным способом сохранения важной информации. Следуя нашей инструкции, вы сможете быстро и легко настроить приложения и начать производить резервное копирование.
Обслуживание и обновление
Резервное копирование данных
Для обеспечения безопасности данных рекомендуется регулярно создавать резервные копии. Для этого можно использовать встроенную функцию резервного копирования в Zyxel NAS326. Чтобы создать резервную копию, перейдите в меню «Служба» -> «Резервное копирование» и следуйте инструкциям.
Обновление системного ПО
Zyxel NAS326 включает функцию автоматического обновления системного ПО. При наличии доступных обновлений система сама оповестит вас и предложит установить обновления. Перед обновлением рекомендуется создать резервную копию данных.
Обслуживание жестких дисков
Жесткие диски нуждаются в регулярном обслуживании, чтобы работать эффективно и долго служить. В меню «Системные утилиты» можно выполнить проверку и дефрагментацию жестких дисков. Рекомендуется выполнять данную процедуру не менее одного раза в год.
Редактирование пользователей и групп
В меню «Системные настройки» -> «Пользователи и группы» можно заводить и редактировать пользователей и группы. При необходимости можно изменять права доступа к файлам и папкам, назначать пароли и т.д.
Мониторинг работы
Для контроля процессов и ресурсов можно использовать встроенный мониторинг системы в меню «Системные настройки» -> «Мониторинг». Здесь можно просмотреть текущую загрузку CPU и RAM, количество процессов и многое другое.
Как выполнить резервное копирование настроек и файлов?
Резервное копирование является важным аспектом поддержания безопасности и целостности данных и настроек на NAS326. В процессе работы с устройством важно регулярно выполнять резервное копирование, чтобы в случае сбоя или удаления данных можно было восстановить их с минимальными потерями.
Резервное копирование настроек
Для выполнения резервного копирования настроек необходимо зайти в меню «Настройки» и выбрать вкладку «Система». На данной странице необходимо выбрать опцию «Резервное копирование настроек» и задать параметры копирования. Настройки можно сохранить на USB-накопитель или на внутренний жесткий диск NAS326.
Резервное копирование файлов
Для выполнения резервного копирования файлов необходимо выбрать нужный раздел и выполнить копирование файлов на внешний жесткий диск или USB-накопитель. Для этого можно использовать встроенную утилиту «File Copy», в которой нужно выбрать источник и приемник копирования. Также можно настроить автоматическое копирование через задание в планировщике задач.
Важно следить за правильностью формирования бэкапов, а также регулярностью их выполнения, чтобы сократить время и расходы на восстановление данных, в случае возникновения непредвиденных обстоятельств.
Как выполнить обновление Zyxel NAS326?
Проверьте доступность обновлений
Перед тем, как обновлять ПО устройства, необходимо проверить доступность новых версий. Зайдите веб-интерфейс устройства, выберите вкладку «Настройки системы» и нажмите кнопку «Проверка обновлений».
Создайте резервную копию
Перед обновлением рекомендуется создать резервную копию важных данных. При обновлении может произойти сбой, и данные могут быть повреждены. Для создания резервной копии выберите вкладку «Настройки системы», затем «Резервное копирование» и настройте параметры копирования.
Загрузите обновление
Зайдите на сайт производителя, загрузите последнюю версию ПО для вашего устройства. Скачанное обновление необходимо сохранить на компьютере. Разархивируйте файл, если он был загружен в архиве.
Обновите ПО устройства
Зайдите веб-интерфейс устройства, выберите вкладку «Настройки системы», далее «Обновление ПО». Нажмите кнопку «Обзор» и выберите файл обновления, который вы загрузили на компьютер. Затем нажмите кнопку «Обновление» и дождитесь окончания процесса обновления.
После завершения обновления необходимо перезагрузить устройство. Для этого выберите в веб-интерфейсе вкладку «Настройки системы» и нажмите кнопку «Перезагрузка».
Обновление ПО — это важно для безопасности устройства и корректной работы функций. Не забывайте проверять наличие новых версий и выполнять обновление системы, как только появятся обновления.
Вопрос-ответ
Как подключить Zyxel NAS326 к сети?
Чтобы подключить Zyxel NAS326 к сети, необходимо подключить сетевой кабель от порта Ethernet на устройстве к маршрутизатору или коммутатору.
Как настроить доступ к Zyxel NAS326 из интернета?
Для настройки доступа к Zyxel NAS326 из интернета, вам нужно настроить динамический DNS и открыть порты на маршрутизаторе. Также вы должны настроить доступ к файлам на устройстве с помощью сетевой папки или FTP-сервера.
Как настроить RAID на Zyxel NAS326?
Для настройки RAID на Zyxel NAS326, вам нужно выбрать тип RAID, который наиболее подходит для ваших потребностей, и настроить с помощью встроенного веб-интерфейса. Вам также необходимо установить два жестких диска с идентичной емкостью.
Как настроить бэкап на Zyxel NAS326?
Для настройки бэкапа на Zyxel NAS326, вам нужно выбрать тип бэкапа, который наиболее подходит для ваших потребностей, и настроить с помощью встроенного веб-интерфейса. Вы можете выбрать один из многих поддерживаемых протоколов, таких как Rsync, FTP, USB-накопитель и др.
Как создать сетевую папку на Zyxel NAS326?
Чтобы создать сетевую папку на Zyxel NAS326, вам нужно зайти в веб-интерфейс устройства, выбрать «Папки», нажать на «Создать папку», ввести имя папки и выбрать тип доступа.
Как подключить устройство хранения на Zyxel NAS326?
Чтобы подключить устройство хранения на Zyxel NAS326, вы можете использовать один из различных интерфейсов, таких как USB или SATA. Подключите устройство хранения к соответствующему порту на устройстве, затем выполните настройки веб-интерфейса.
Как изменить пароль учетной записи на Zyxel NAS326?
Чтобы изменить пароль учетной записи на Zyxel NAS326, зайдите в веб-интерфейс устройства, выберите «Учетные записи», выберите учетную запись, которую вы хотите изменить, затем введите новый пароль и подтвердите его.