
Цифровое зарядное устройство Nitecore D4, представленное компанией NITECOREru — это практичное, небольшое по габаритам и совершенное по характеристикам с фирменным, продуманным до малейших деталей корпусом.
Nitecore D4 — универсальное интеллектуальное зарядное устройство, совместимое практически со всеми цилиндрическими аккумуляторами, тем самым устраняющее необходимость иметь несколько зарядных устройств. D4 автоматически распознает литий-ионные, никель-металл-гибридные и никель-кадмиевые аккумуляторы, а также возможна зарядка Литий-железо-фосфатных батареи через ручной выбор. Электронная схема интеллектуального зарядного устройства выбирает оптимальный режим зарядки (CC, CV и DV/DT) для данного аккумулятора, затем каждый из двух управляемых микрокомпьютером зарядных слотов контролирует и заряжает аккумулятор самостоятельно. Интегрированный цифровой LCD-дисплей четко отображает прогресс зарядки, напряжения, тока и времени, а функция интеллектуального автоматического выключения питания своевременно сработает, когда зарядка будет завершена.
Nitecore D4 — самое передовое в мире полностью автоматическое цифровое зарядное устройство. Вам нужно всего лишь подключить аккумулятор, а его определением и зарядкой автоматически займется D4!
Характеристики:
- Возможность зарядки 4-х аккумуляторов одновременно;
- Каждый из двух слотов проверяет элементы питания и заряжает их независимо от остальных;
- Совместим с литиевыми, никель-галоидными и никель-кадмиевыми аккумуляторами;
- Оптимизированное зарядное устройство разработано для IMR батарей;
- Встроенная ЖК-панель четко отображает параметры и прогресс зарядки;
- Две удобно расположенные боковые кнопки позволяют легко выбирать конкретные типы аккумуляторов и параметры зарядки;
- Интеллектуальная схема определяет тип батареи и статус еще до ввода автоматического режима заряда (CC, CV, DV / DT);
- Автоматически определяет статус заряда батареи и выбирает необходимое напряжение и режим зарядки (за исключением Литий-железофосфатных батарей, которые требуют ручной выбор);
- Совместимость с батареями малой емкости;
- Автоматическая остановка зарядки при полностью заряженном аккумуляторе;
- Система регулировки температуры для предотвращения перегрева;
- Изготовлен из прочного ABS (огнезащитный / огнестойкий);
- Защита от неправильной полярности.
Технические характеристики:
- Входное напряжение: 100-240 В переменного тока 50/60 Гц 0.25A (MAX), DC 12V 1A;
- Выходное напряжение: 4,2 В ± 1% / 3,7 ± 1% / 1,48 ± 1%;
- Выходной ток: 375mA x 4 / 750mA x 2;
- Совместимость с аккумуляторами: Li-Ion / IMR / LiFePO4: 26650, 22650, 18650, 17670, 18490, 1750 0, 18350, 16340 (RCR123), 14500, 10440 Ni-MH / Ni-Cd: AA, AAA, AAAA, C;
- Размеры: 143 мм × 74 мм × 36 мм;
- Вес: 168 г (без батарей и шнура питания).
Примечание:
D4 подходит для зарядки 3.7V литий-ионных аккумуляторов, 1.2V, никель-металл-гибридных / никель-кадмиевых аккумулятора и 3.2v литий-железо-фосфатных аккумуляторов. Смотрите описание размеров батарей выше.
Гарантия на зарядные устройства, аккумуляторы NL, и тактические кнопки 12 месяцев.
-
Артикул
11480
-
Серия
D
-
Модель
D4
-
Материал
ABS пластик
-
Назначение
Зарядное устройства Для аккумуляторов Li-Ion / IMR / LiFePO4/Ni-MH(NiCd
-
Комплектация
Зарядное устройство Nitecore Digicharger D4, сетевой кабель, инструкция пользователя, фирменная упаковка
-
Гарантия, месяцев
12
-
Количество слот
4
-
Количество батарей
4
-
Размер ДхШхВ, См
143 мм × 74 мм × 36 мм
-
Вес (нетто), Грамм
168 г (без батарей и шнура питания)
-
Защищенность
Защита от короткого замыкания / Защита от повышенного напряжения / Работа при минусовых температурах (-10°С)
-
Совместимо с:
17500 / 18650 / 26650 / RCR123 / 14500
-
Дисплей
OLED-дисплей
-
Входное напряжение, В
100-240 В переменного тока 50/60 Гц 0.25A (MAX), DC 12V 1A
-
Выходное напряжение, В
4,2 В ± 1% / 3,7 ± 1% / 1,48 ± 1%
-
Выходной ток, мА
375mA x 4 / 750mA x 2

-18-
-19-
(Русский) UMS4 Инструкция по эксплуатации
Инструкция по эксплуатации
Подключение к источнику питания:
подключите зарядное устройство UMS4 к внешнему источнику
питания (USB-адаптер, компьютер или другие зарядные USB-устройства) через USB-кабель для зарядки.
Установка аккумуляторов:
В зарядном устройстве UMS4 имеются 4 независимо контролируемых слота
зарядки. Вставьте аккумуляторы поддерживаемых типов в каждый слот в соответствии с обозначениями
полярности на слоте. После установки аккумулятора зарядное устройство UMS4 начинает зарядку и отображает
на ЖК-дисплее состояние аккумулятора — «Хорошее» или «Плохое», а также внутреннее сопротивление,
зарядный ток, напряжение, заряженную емкость и время зарядки.
Проверка аккумулятора и отчет об ошибке:
Зарядное устройство UMS4 имеет функции защиты от
обратной полярности и от короткого замыкания. Если аккумуляторы установлены с обратной полярностью или
закорочены, на ЖК-дисплее соответствующего слота отображается «EE EE», а индикатор уровня емкости будет
мигать, информируя об ошибке.
Интеллектуальная зарядка:
Зарядное устройство UMS4 выберет соответствующие зарядные токи на
основании интеллектуального определения типов и емкости аккумуляторов. Также возможен ручной выбор
зарядного тока. Зарядное устройство UMS4 совместимо с:
1) Li-ion аккумуляторы 3,6/3,7 В
2) Li-ion аккумуляторы 3,8 В (4,35±1% В при полной зарядке)
3) Ni-MH/Ni-Cd аккумуляторы 1,2 В
4) Аккумуляторы 3,2 В LiFePO4
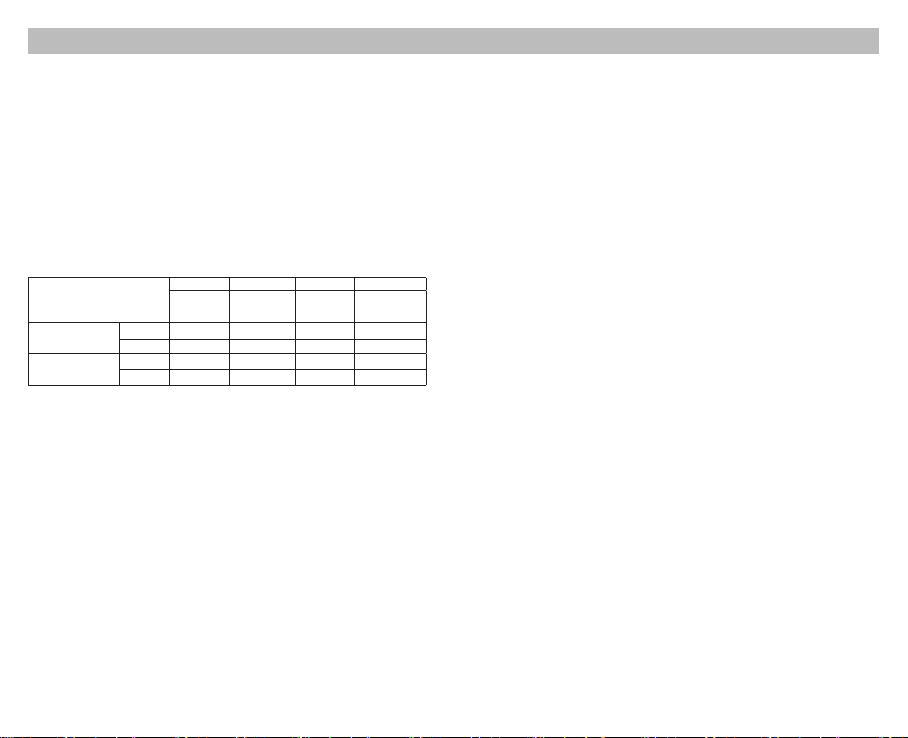
Установки по умолчанию
Настройки по умолчанию (не настроенные вручную) для зарядного устройства UMS4:
Тип и емкость аккумулятора
Стандартный режим
Режим быстрой зарядки
Зарядный ток
по умолчанию
Диапазон выбора
зарядного тока
Зарядный ток
по умолчанию
Диапазон выбора
зарядного тока
Аккумуляторы Li-ion
(4,2±1% В при полной
зарядке)
>1200 мАч
2000 мА*
300-2000 мА
2000 мА
300-2000 мА**
<1200 мАч
1000 мА
300-2000 мА
1000 мА
300-2000 мА
Аккумуляторы Ni-MH/
Ni-Cd (1,48±1% В при
полной зарядке)
AA/AAA
1000 мА
300-2000 мА
1000 мА
300-2000 мА
C/D
1000 мА
300-2000 мА
1000 мА
300-2000 мА
* При зарядке 1 или 2 аккумуляторов рекомендуется устанавливать их в слот 1 и слот 3 или в слот 2 и слот
4 для достижения более высокого значения тока по умолчанию – 2000 мА. Иначе ток зарядки по умолчанию
составляет 1000 мА.
** При зарядке 1 или 2 аккумуляторов рекомендуется устанавливать их в слот 1 и слот 3 или в слот 2 и слот
4 для достижения более широкого диапазона выбираемого зарядного тока 300-3000 мА. Иначе диапазон
выбираемого зарядного тока составляет 300-2000 мА.
Примечание:
Зарядное устройство UMS4 может автоматически выбирать режимы зарядки для аккумуляторов
Ni-MH/Ni-Cd и Li-ion 3,7 В. Для аккумуляторов LiFePO4 и Li-ion 3,8 В требуется ручная настройка напряжения
отключения зарядки. Для аккумулятора, длина которого составляет >60 мм (2,4 дюйма), зарядное устройство
UMS4 автоматически определяет его емкость как >1200 мАч.
Кнопочное управление
Во время процесса зарядки:
Короткое нажатие кнопки C циклически переключает режим зарядки двух слотов.
Короткое нажатие кнопки V циклически переключает отображение на ЖК-экране: состояние батареи,
внутреннее сопротивление, зарядный ток, напряжение аккумулятора, заряженная емкость и время зарядки.
Долгое нажатие кнопки C включает режим настройки зарядки.
Долгое нажатие кнопки V включает режим восстановления. (Только для полностью разряженных
аккумуляторов IMR)
После входа в режим настройки зарядки:
Короткое нажатие кнопки C переключает на другие параметры настройки (зарядный ток и напряжение отключения).
Каждое короткое нажатие кнопки V увеличивает зарядный ток с шагом 100 мА в режиме настройки тока; или
переключает различные типы аккумуляторов и показания напряжения при настройке напряжения отключения.
Долгое нажатие кнопки V устанавливает максимальную настройку зарядного тока.
Долгое нажатие кнопки C сохраняет настройки и выводит из режима настройки зарядки.
Примечание:
При отсутствии каких-либо действий в течение 10 секунд, происходит выход из режима
настройки зарядки без сохранения и возврат к предыдущим настройкам.
Настройки напряжения зарядки
Зарядное устройство UMS4 совместимо с аккумуляторами Li-ion 3,6/3,7 В и Ni-MH/Ni-Cd с автоматическим
определением и установкой подходящего напряжения зарядки. Для аккумуляторов LiFePO4 и Li-ion 3,8 В,
следует выполнить следующие шаги для настройки напряжения зарядки:
1. После того, как аккумулятор вставлен и начался процесс зарядки, коротко нажмите кнопку C, чтобы
выбрать нужный слот, и нажмите и удерживайте кнопку C, чтобы войти в режим настройки зарядки.
2. После входа в режим настройки зарядки, коротко нажмите кнопку C. Когда на экране отобразится
мигающий текст «CHG. MODE», коротко нажмите кнопку V, чтобы выбрать правильное напряжение зарядки
(3,7/4,2/4,3 В).
3. Для аккумуляторов LiFePO4 напряжение должно быть установлено на 3,7 В. Для аккумуляторов Li-ion 3,8 В
напряжение должно быть установлено на 4,3 В.
4. Когда настройка завершена, нажмите кнопку C, чтобы сохранить и выйти из режима настройки зарядки.
Настройки зарядного тока
Для настройки зарядного тока выполните следующие действия:
1. После того, как аккумулятор вставлен и начался процесс зарядки, коротко нажмите кнопку C, чтобы
выбрать нужный слот, и нажмите и удерживайте кнопку C, чтобы войти в режим настройки зарядки.
2. После входа в режим настройки зарядки на экране появится мигающий текст “CHG. STATUS”. Каждое
короткое нажатие кнопки V увеличивает зарядный ток с шагом 100 мА. Долгое нажатие кнопки V
устанавливает максимальную настройку.
3. Когда настройка завершена, нажмите кнопку C, чтобы сохранить и выйти из режима настройки зарядки.
ПРИМЕЧАНИЕ:
Если входная мощность недостаточна и установлен большой зарядный ток, зарядное
устройство автоматически интеллектуально установит и распределит ток в соответствии со входной мощностью.
(Дальнейшее объяснение опускается из-за его сложности для зарядных устройств с четырьмя слотами.)
Режим быстрой зарядки (QC)
В зарядном устройстве UMS4 имеется режим входа QC 2.0. Когда зарядное устройство питается от устройства,
поддерживающего QC, или подключено к адаптеру QC, на экране будет отображаться «Быстрая зарядка», а
максимальный выход на один слот достигает 3000 мА.
Автоматическое определение внутреннего сопротивления аккумулятора
Когда зарядное устройство UMS4 включено и установлен аккумулятор, он автоматически определит и
отобразит внутреннее сопротивление под “CHG. STATUS”. Если внутреннее сопротивление ниже 250 мОм, на
экране отобразится «Хорошее». Если оно выше 250 мОм, на экране отобразится «Плохое», чтобы указать, что
аккумулятор следует заменить.
Расчет заряженной емкости
Во время процесса зарядки система автоматически вычисляет и отображает заряженную емкость под “CHG. STATUS”.
Защита от короткого замыкания и обратной полярности
Если аккумуляторы вставлены с обратной полярностью или закорочены, экран будет мигать, отображая «EE EE».
Функция экономии электроэнергии
Если в течение 3 минут не будет никаких действий с кнопками или аккумуляторами, экран автоматически
выключится для экономии электроэнергии. Выполните любое действие, чтобы включить экран.
Активация полностью разряженных Li-ion аккумуляторов
Зарядное устройство UMS4 способно активировать полностью разряженные Li-ion аккумуляторы с защитной
схемой. После установки аккумулятора зарядное устройство UMS4 перед зарядкой проверит аккумулятор и
активирует его. Если аккумулятор определится как поврежденный, на экране появится надпись «EE EE».
Восстановление полностью разряженных аккумуляторов IMR
Если установлен полностью разряженный аккумулятор IMR, на экране появится надпись «EE EE». В этом случае
долгое нажатие кнопки V запустит режим восстановления. После этого будет продолжен процесс зарядки.
Аккумулятор следует заменить, если он не может быть восстановлен после нескольких попыток.
ПРИМЕЧАНИЕ:
При попытке активации аккумулятора IMR защита от обратной полярности временно
отключается. Убедитесь, что аккумуляторы вставлены правильно. Несоблюдение этого требования может
привести к пожару или взрыву.
Защита при превышении времени зарядки
Зарядное устройство UMS4 отдельно рассчитывает время зарядки каждого аккумулятора. Если время зарядки
превышает 20 часов в одном слоте, оно автоматически прекратит процесс зарядки этого слота и отобразит
END под “CHG. STATUS”. Это необходимо для предотвращения возможного перегрева или даже взрыва ввиду
проблем с качеством аккумулятора.
Зарядник UMS4 от Nitecore представляет собой усовершенствованную версию прибора Um4.

Он отличается от предшественника более высокой отдачей тока. У UMS4 этот показатель составляет 3000 мАч в одном разъеме, а у UM4 —1500 мАч.
5%скидка
Для читателей нашего блога
скидка 5% на весь
ассортимент
Ваш промокод:BLOGСмотреть все зарядные устройства
Описание
Корпус зарядного устройства выполнен из прочного огнеупорного поликарбоната, который отлично рассеивает тепло и препятствует перегреву. По его периметру размещены ребра охлаждения. Они тоже предотвращают перегрев прибора в процессе эксплуатации.

В зарядке предусмотрены 4 слота, которые совместимы с литий-ионными аккумуляторами 3,6 В, 3,7 В и 3,8 В, а также с Ni-MH/Ni-Cd 1,2 В и LiFePO4 3,2 В. Ее можно использовать для восстановления уровня энергии большинства популярных батарей.

Для каждого вида аккумулятора автоматически устанавливается необходимый объем. Процесс зарядки значительно ускорен по сравнению с предыдущими моделями бренда благодаря технологии Quick Charge 2.0.

Устройство способно подавать ток силой до 3 ампер на каждый слот. Кроме того, предусмотрена возможность одновременной зарядки двух аккумуляторов с силой тока 2 ампера на каждом канале. Можно использовать и все 4 слота при подаче 1 ампера на каждый из них.

Инновационная и функциональная зарядка UMS4 от Nitecore оснащена современным LCD-дисплеем, отображающим подробные характеристики процесса заряда. Благодаря высокому разрешению информация будет не только точной, но и красиво представленной.

В устройстве предусмотрена специальная программа, которая подходит для использования с аккумуляторами IMR-типа. Она контролирует весь процесс эксплуатации. Эта функция продлевает срок службы зарядки, так как гарантирует нахождение исходящего напряжения в безопасном диапазоне.

Также на дисплей выводится информация с рекомендацией о дальнейшем применении аккумулятора или его замене. Кроме того, на нем отображаются: ток заряда, напряжение аккумулятора, внутреннее сопротивление, время и объем выполненной зарядки, тип используемого аккумулятора, режим (CV, CC,dV/dt), выбранный слот и изображение объема в графическом формате.
Технические характеристики и комплектация
Зарядное устройство имеет габариты 159×107×41 мм и поставляется вместе с USB-кабелем, но без адаптера для сети 220 В. Упаковка фирменная, инструкция по использованию прилагается. Для подключения к источнику питания предусмотрен разъем USB.

Технические характеристики:
- материал корпуса — огнеупорный и прочный поликарбонат;
- USB-порт — встроенный;
- функционал быстрого заряда — Quick Charge 2.0;
- количество элементов питания, которые возможно зарядить одновременно — 4 штуки;
- ток — 3 000 мА на 1 канал;

- совместимость с аккумуляторами — Ni-MH / Ni-Cd и Li-ion;
- определение типа аккумулятора, установленного в конкретный слот — автоматическое;
- установка режима заряда — авто;
- дипслей — LCD с энергосбережением и отражением информации о процессе зарядки в режиме реального времени;

- установка зарядного тока — автоматическая;
- отключение питания после завершения зарядки — автоматическое;
- защита от короткого замыкания и обратной полярности — есть.

Функциональное и инновационное зарядное устройство UMS4 от Nitecore имеет прочный корпус, LCD-дисплей с высоким разрешением и оснащен возможностью быстрого заряда. Сочетание данных характеристик делает прибор отличным вариантом для одновременной подзарядки нескольких аккумуляторов различного типа.

Intelligent USB
UMS4
• Automatic and High-Speed Charging
• Real-time Information Display
• Over-Discharged Li-ion Battery Activation
and IMR Battery Restoration
Four-Slot Superb Charger

Contents
English
Español
Deutsch
Francais
Русский
日本語
한국어
Italiano
Română
简体中文
IMPORTANT NOTICE CONCERNING WARRANTY
SERVICE
Thank you for purchasing! Before using this charger, please nd your
verication code on the package box, and go to http://charger.nitecore.
com/validation (or scan the QR code beside the verification code to
visit on your mobile phone). Type in your verication code and personal
information as required, and submit the page. After verification,
Nitecore will send you a warranty service email. This email and your
registration email address are essential to your possible warranty
application. Before you complete the warranty service registration, you
cannot enjoy our warranty service for your purchase.
···········································
··········································
·········································
·········································
·········································
10
14
18
·············································
·············································
···········································
·········································
··········································
26
30
34
38
2
6
22
Features
• Intelligent USB Four-Slot Superb Charger
• QC 2.0 input available
• Capable of charging 4 batteries simultaneously and controlling each slot
independently
• Up to 3,000mA charging speed in a single slot
• Compatible with Li-ion and Ni-MH/Ni-Cd batteries with automatic detection
• Automatic detection of battery power level and automatic selection of the
appropriate voltage and charging mode (LiFePO4 and 3.8V Li-ion batteries
excluded)
• Automatic selection between 3 charging modes (CC, CV and -dV/dt)
• Energy-ecient LCD display for real-time charging information
• Capable of manually selecting the charging cut-o voltage and the charging
current
• Automatic detection of large/small capacity batteries and automatic selection
of appropriate charging current
• Automatic termination upon charging completion
• Reverse polarity protection and short circuit protection
• Over-discharged battery activation
• Li-ion battery restoration
• Overtime charging protection
• Automatic detection of battery internal resistance and display of battery health
• Made from durable and re-retardant PC materials
• Optimal heat dissipation design
• Certied by RoHS, CE, FCC and CEC
• Insured worldwide by Ping An Insurance (Group) Company of China, Ltd.
Accessories
USB Charging Cable
Specications
Input: DC 5V/2A 12V/1.5A
18W (MAX)
Output: 4.35V±1% / 4.2V±1% / 3.7V±1% / 1.48V±1%
Standard Mode: 2,000mA*1 (MAX), 1,000mA*2 (MAX),
500mA*4 (MAX)
Compatible with:
IMR/Li-ion/LiFePO4: 10440, 14500, 14650, 16500, 16340(RCR123), 16650, 17350,
17500, 17650, 17670, 17700, 18350, 18490, 18500, 18650,
18700, 20700, 21700, 22500, 22650, 25500, 26500, 26650, 26700
Ni-MH/Ni-Cd: AA, AAA, AAAA, C, D
Dimensions: 159mm×107mm×41mm (6.26”×4.21”×1.61”)
Weight: 255.4g (9.01oz) (Charging cable not included)
QC Mode: 3,000mA*1 (MAX), 2,000mA*2 (MAX), 1,000mA*4 (MAX)
-1-

(English) UMS4 User Manual
Operating Instructions
Connect to power source: connect the UMS4 to an external power source (a USB adapter, a computer or other
USB charging devices) via the USB charging cable.
Insert batteries: The UMS4 features 4 independently controlled charging slots. Insert batteries of supported types
into each slot according to the polarity marks on the slot. After battery installation, the UMS4 begins charging and
presents Battery Health by “Good” or “Poor”, Internal Resistance, Charging Current, Battery Voltage, Charged Volume
and Charging Time on the LCD screen.
Battery Inspection and Error Report: The UMS4 has reverse polarity protection and anti-short circuit function. If
there are batteries inserted with polar reversed or short-circuited, the LCD screen of relevant slot will indicate “EE EE”
and the power level display will ash to notify the user of an error.
Smart charging: The UMS4 can choose appropriate charging currents based on intelligent detection about battery
types and capacities. Manual charging current selection is also available. The UMS4 is compatible with:
1) 3.6V/3.7V Li-ion rechargeable batteries
2) 3.8V Li-ion rechargeable batteries (4.35V±1% when fully charged)
3) 1.2V Ni-MH/Ni-Cd rechargeable batteries
4) 3.2V LiFePO4 batteries
Default Settings
The default settings (not manually congured) for the UMS4 are:
Battery Type and Capacity
Li-ion batteries
(4.2V±1% when fully charged)
Ni-MH/Ni-Cd batteries
(1.48V±1% when fully charged)
* When charging 1 or 2 batteries, it is recommended to put them into Slot 1 and Slot 3, or into Slot 2 and Slot 4, to
achieve a higher default charging current of 2,000mA. Otherwise the default charging current is 1,000mA.
** When charging 1 or 2 batteries, it is recommended to put them into Slot 1 and Slot 3, or into Slot 2 and Slot 4,
to achieve a wider selectable range of charging current of 300mA-3,000mA. Otherwise the selectable range of
charging current is 300mA-2,000mA.
Note: The UMS4 can automatically select charging modes for Ni-MH/Ni-Cd batteries and 3.7V Li-ion batteries.
LiFePO4 batteries and 3.8V Li-ion batteries require manual settings on charging cut-o voltages. For the battery
whose length is >60mm (2.4”), the UMS4 automatically identies its capacity as >1,200mAh.
Button Operations
During the charging process:
Short press the C button to cycle through the charging status of the 4 slots.
Short press the V button to cycle through Battery Health, Internal Resistance, Charging Current, Battery Voltage,
Charged Volume and Charging time on the LCD screen.
Long press the C button to enter the Charging Setting Mode.
Long press the V button to enter Restoration Mode. (Only eective to over-discharged IMR batteries)
After entering the Charging Setting Mode:
Short press the C button to switch to dierent setting parameters (Charging Current and Cut-O Voltage).
Short press the V button to increase with a 100mA increment each time when setting the Charging Current; or to
switch to dierent battery types and voltage readings when setting the Cut-O Voltage.
Long press the V button to directly access the maximum setting when setting the Charging Current.
Long press the C button to save and exit the Charging Setting Mode.
Note: Perform no action in 10 seconds to exit the Charging Setting Mode without saving and return to the previous
settings.
Charging Voltage Settings
The UMS4 is compatible with 3.6V/3.7V Li-ion and Ni-MH/Ni-Cd batteries with automatic detection and adoption of the
suitable charging voltage. For LiFePO4 batteries and 3.8V Li-ion batteries, please follow the steps below for charging
voltage settings:
1. After the battery is inserted and the charging process begins, short press the C button to select the correct slot
and long press the C button to enter Charging Setting Mode.
>1,200 mAh 2,000mA* 300mA-2,000mA 2,000mA 300mA-3,000mA**
<1,200 mAh 1,000mA 300mA-2,000mA 1,000mA 300mA-2,000mA
AA/AAA 1,000mA 300mA-2,000mA 1,000mA 300mA-2,000mA
C/D 1,000mA 300mA-2,000mA 1,000mA 300mA-2,000mA
Standard Mode QC Mode
Default
Charging
Current
Selectable Range
of Charging
Current
Default
Charging
Current
Selectable Range of
Charging Current
-2- -3-
2. After entering Charging Setting Mode, short press the C button. When the screen shows the ashing text “CHG.
MODE”, short press the V button to select the correct charging voltage (3.7V/4.2V/4.3V).
3. For LiFePO4 batteries, the voltage needs to be set to 3.7V. For 3.8V Li-ion batteries, the voltage needs to be set to
4.3V.
4. When the setting is nalized, long press the C button to save and exit the Charging Setting Mode.
Charging Current Settings
Please follow the steps below for charging current settings:
1. After the battery is inserted and the charging process begins, short press the C button to select the correct slot
and long press the C button to enter Charging Setting Mode.
2. After entering Charging Setting Mode, the screen will show the ashing text “CHG. STATUS”. Short press the V
button to increase the charging current with a 100mA increment each time. Long press the V button to directly
access the maximum setting.
3. When the setting is nalized, long press the C button to save and exit the Charging Setting Mode.
Note: When the input power is insucient and a large charging current is set, the charger will automatically adopt
the intelligent current distribution according to the input power.
QC Charging Mode
The UMS4 is QC 2.0 input available. When the charger is powered by a QC supportive device or connected to a QC
adapter, the screen will show “Quick Charge” and the single slot max output will achieve 3,000mA.
Automatic Battery Internal Resistance Detection
When the UMS4 is on and the battery is installed, it will automatically detect and display the Internal Resistance
below the “CHG. STATUS”. When the Internal Resistance is below 250mΩ, it will show “Good” on the screen. When it
is above 250mΩ, it will show “Poor” on the screen to indicate that the battery should be replaced.
Charged Volume Calculation
During the charging process, the system will automatically calculate and display the Charged Volume below the “CHG.
STATUS”.
Anti-short Circuiting and Reverse Polarity Protection
If there are batteries inserted with polar reversed or short-circuited, the screen will ash to show “EE EE”.
Energy Saving Function
If there is no action to the buttons or batteries in 3 minutes, the screen will automatically go dim to save energy.
Perform any action to light up the screen.
Over-Discharged Li-ion Battery Activation
The UMS4 is capable of activating over-discharged Li-ion batteries with a protective circuit. After battery installation,
UMS4 will test and activate the battery before charging. When a battery is detected as damaged, the screen will show
“EE EE”.
Over-Discharged IMR Battery Restoration
When an over-discharged IMR battery is inserted, the screen will show “EE EE”. In this case, long press the V button
to enter Restoration Mode. After that, the charging process will continue. The battery should be replaced if it fails to
be restored after several attempts.
NOTE: When attempting to restore an IMR battery, reverse polarity protection is temporarily disabled. Please ensure
batteries are correctly inserted. Failing to do so may result in re or explosion.
Overtime Charging Protection
The UMS4 will separately calculate the charging time of each battery. When the charging time exceeds 20 hours in
one slot, it will automatically cease the charging process of this slot and display “END” below the “CHG. STATUS”. This
is to prevent possible overheat or even explosion due to battery quality issue.
Precautions
1. The charger is restricted to charging Li-ion, IMR, LiFePO4, Ni-MH/Ni-Cd rechargeable batteries only. DO NOT use
the charger with other types of batteries as this could result in battery explosion, cracking or leaking, causing
property damage and/or personal injury.
2. Moderate heat from this product is to be expected during the charging process, which is normal.
3. Ambient Temperature of Usage: -10~40℃ (14~104℉); Temperature of Storage: -20~60℃ (-4~140℉)

(English) UMS4 User Manual
4. Carefully read all labels on the device to ensure batteries are installed correctly.
5. Please connect this charger to power supplies with the input voltage stated in the specications of the user
manual. If the input voltage is too low or too high, it may lead to malfunctions, or even a re.
6. DO NOT charge batteries if there is any sign of faulty or short circuit.
7. The charger is only to be used by adults above 18 years old. Children under this age must be supervised by an
adult when using the charger.
8. DO NOT leave the product unattended while it is connected to a power supply. Unplug the product at any sign of
malfunction.
9. Please make sure the correct program and settings are chosen and set. Incorrect program or setting may damage
the charger, or cause re and explosion.
10. DO NOT attempt to charge primary cells such as Zinc-Carbon, Lithium, CR123A, CR2, or any other unsupported
chemistry due to risk of explosion and re.
11. DO NOT charge a damaged IMR battery as doing so may lead to charger short-circuit or even explosion.
12. DO NOT charge or discharge any battery having evidence of leakage, expansion/swelling, damaged outer wrapper
or case, color-change or distortion.
13. Use the original adapter and cord for power supply. To reduce the risk of damage to the power cord, ALWAYS pull
by the connector rather than the cord. DO NOT operate the charger if it appears damaged in any way.
14. DO NOT expose the device to direct sunlight, heating devices, open ames, or rain and snow environment; avoid
extreme high or extreme low ambient temperatures and sudden temperature changes.
15. Store the device in ventilated areas. DO NOT use the device in moist environment and keep away from any
combustible materials.
16. Avoid any shock or impact to the device.
17. DO NOT place any conductive or metal object in the device to avoid short circuiting and explosions.
18. DO NOT overcharge or over-discharge the batteries. Please recharge the battery as soon as the power runs out.
19. Unplug the device and remove all batteries when it is not in use.
20. DO NOT disassemble or modify the device as doing so will render the product warranty invalid. Please refer to the
warranty section in the manual for complete warranty information.
21. DO NOT misuse in any way! Use for intended purpose and function only.
Disclaimer
This product is globally insured by Ping An Insurance (Group) Company of China, Ltd. NITECORE shall not be
held responsible or liable for any loss, damage or claim of any kind incurred as a result of the failure to obey the
instructions provided in this user manual.
Warranty Details
Our authorized dealers and distributors are responsible for warranty service. Should any problem covered under
warranty occurs, customers can contact their dealers or distributors in regards to their warranty claims, as long as the
product was purchased from an authorized dealer or distributor. NITECORE’s Warranty is provided only for products
purchased from an authorized source. This applies to all NITECORE products. To be qualied for warranty, please refer
to the “IMPORTANT WARRANTY NOTICE” section on top to validate your product.
Any DOA / defective product can be exchanged for a replacement through a local distributor/dealer within the 15
days of purchase. After 15 days, all defective / malfunctioning NITECORE® products can be repaired free of charge
for a period of 12 months (1 year) from the date of purchase. Beyond 12 months (1 year), a limited warranty applies,
covering the cost of labor and maintenance, but not the cost of accessories or replacement parts.
The warranty is nullied if the product(s) is/are:
1. broken down, reconstructed and/or modied by unauthorized parties
2. damaged from wrong operations (i.e. reverse polarity installation, installation of non-rechargeable batteries or
failure to obey the warnings)
3. damaged by batteries leakage.
For the latest information on NITECORE
an email to service@nitecore.com.
※ All images, text and statements specied herein this user manual are for reference purpose only. Should any
discrepancy occur between this manual and information specied on www.nitecore.com, information on our ocial
website shall prevail. SYSMAX Innovations Co., Ltd. reserves the rights to interpret and amend the content of this
document at any time without prior notice.
®
products and services, please contact a local NITECORE® distributor or send
1. Charging Voltage
Lithium-ion (Li-ion) batteries have strict requirement on voltage control. Charging Li-ion batteries with electric voltage
beyond safety standard can lead to battery damage and explosion.
(1) 3.7V Li-ion Batteries / IMR Batteries
3.7V Li-ion batteries are the most common rechargeable Lithium batteries. The skins of these batteries are often
(2) 3.8V Li-ion Batteries
3.8V Li-ion batteries are comparatively rare. It usually has a 3.7V mark on its skin. Normally its seller will inform
(3) 3.2V LiFePO4 Batteries
3.2V LiFePO4 batteries have LiFePO4 and/or 3.2V marks on the skin. Be careful with this type of batteries. Without
2. Charging Current
For all rechargeable Lithium batteries (including Li-ion, IMR and LiFePO4 batteries), we suggest not using current
larger than 1C* for charging. For small capacity batteries, the charging current must be smaller than 1C.
* C=Capacity of a battery. For example, 1C in a 2600mAh rechargeable Lithium battery is 2.6A. 1C in a 3400mAh
rechargeable Lithium battery is 3.4A.
Excessively large charging current will lead to great amount of heat, and consequently battery damage and explosion.
Warning: Our chargers automatically judge and select charging current by the batteries’ length. For some
3. Precautions
(1) DO NOT short circuit the battery in any way.
(2) DO NOT use a 3.7V/3.8V Lithium battery when its voltage is lower than 2.8V, otherwise it can be over-discharged,
(3) We strongly recommend batteries with protective circuit. For batteries without protective circuit (such as IMR
(4) DO NOT discharge a battery with a discharging current larger than its maximum rated current.
4. Long-term Storage
The best storage voltage for 3.7V/3.8V rechargeable Lithium batteries is 3.7V. Voltage too low or too high can damage
your battery during storage. You can discharge a battery to 3.7V, or charge it to 3.7V in a charger before you keep it
in long-term storage.
Safety Instruction for Lithium-ion Batteries
marked with 3.6V/3.7V signs. If our chargers judge that an inserted battery is a Li-ion battery, the battery will be
automatically charged in 4.2V standard charging mode. You do not need extra voltage settings for these types of
batteries.
its buyer that it needs to be charged with 4.35V power. When charging this type of battery, please manually set
the charging voltage to 4.3V, otherwise the charger will charge at 4.2V by default, and cannot provide adequate
charging voltage.
manual setting, our chargers will charge this type of batteries with 4.2V, and will damage or even explode the
battery with excessive charging voltage. You need to manually set the charging voltage to 3.7V for safe charging.
long but small capacity batteries (i.e. 12650, 13650, 14650, 16650), please manually set appropriate
charging current (smaller than 1C).
and/or prone to explosion at next charging.
batteries), please stay alert for over-discharge and short circuit.
Validation code and QR code on package can be veried on NITECORE website.
The charger must be used with NITECORE’s ocial cords. Ocial cords are identied with clearly printed
NITECORE on the plug. During charging, third party cords can cause malfunction, overheat and even re
on the charger. Damages from using unocial cords cannot be covered by ocial warranty.
The charger is restricted to charging Li-ion, IMR, 3.2V LiFePO4, Ni-MH/Ni-Cd rechargeable batteries only.
DO NOT use the charger with other types of batteries as this could result in battery explosion, cracking or
leaking, causing property damage and/or personal injury.
-4- -5-
(Español) UMS4 Manual de usuario
Instrucciones de operación
Conexión a la fuente de alimentación: Conecte el UMS4 a una Fuente de alimentación externa (un adaptador
USB, una computadora o un dispositivo de carga USB) vía el cable de carga USB.
Colocación de baterías: El UMS tiene 4 bahías de carga controladas de forma independiente. Inserte las baterías
de los tipos soportados en cada bahía de acuerdo con las marcas de polaridad en la bahía. Después de colocar las
baterías, el UMS4 comenzará la carga y mostrará el estado de la batería como “Good” o “Poor” (Bueno o malo),
resistencia interna de la batería, corriente de carga, voltaje de la batería, volumen de carga y tiempo de carga en la
pantalla LCD.
Inspección de baterías y reporte de errores: El UMS4 tiene protección contra polaridad invertida y contra
cortocircuito. Si hay baterías insertadas con la polaridad invertida o en cortocircuito, la pantalla LCD de la ranura
correspondiente mostrará “EE EE” y el nivel de carga parpadeará para noticar al usuario sobre el error.
Carga inteligente: El UMS4 puede elegir la corriente de carga adecuada basado en la detección inteligente de los
tipos y capacidades de las baterías. También está disponible la selección manual de la corriente de carga. El UMS4 es
compatible con:
1) Baterías Li-ion 3.6V/3.7V recargables
2) Baterías Li-ion 3.8V recargables (4.35V±1% cuando está completamente cargada)
3) Baterías Ni-MH/Ni-Cd 1.2V recargables
4) Baterías 3.2V LiFePO4
Ajustes predeterminados
Los ajustes predeterminados (no congurados manualmente) para el UMS4 son:
Tipo de batería y capacidad
Baterías Li-ion
(4.2V±1% cuando está
completamente cargada)
Baterías Ni-MH/Ni-Cd
(1.48V±1% cuando está
completamente cargada)
* Cuando cargue 1 o 2 baterías, es recomendable ponerlas en las bahías 1 y 3, o en las bahías 2 y 4, para lograr una
corriente predeterminada más alta de 2,000mA. De lo contrario, la corriente predeterminada será de 1,000mA.
** Cuando cargue 1 o 2 baterías, es recomendable ponerlas en las bahías 1 y 3, o en las bahías 2 y 4 para lograr un
rango más amplio de corriente de carga seleccionable de 300mA-3,000mA. De lo contrario, el rango seleccionable de
corriente de carga será de 300mA-2,000mA.
Nota: El UMS4 puede seleccionar automáticamente el modo de carga para baterías Ni-MH/Ni-Cd y baterías Li-ion
3.7V. Baterías LiFePO4 y Li-ion 3.8V Li-ion requieren ajuste manual en el voltaje de corte de carga. Para baterías cuya
longitud es >60mm (2.4”), el UMS4 identica automáticamente su capacidad como >1,200mAh.
Operación de los botones
Durante el proceso de carga:
Presione brevemente el botón C para cambiar entre el estado de carga de las 42 ranuras.
Presione brevemente el botón V para cambiar entre estado de la batería, resistencia interna, corriente de carga,
voltaje de la batería, volumen cargado y tiempo de carga en la pantalla LCD.
Mantenga presionado el botón C para entrar al modo de conguración de carga.
Mantenga presionado el botón V para entrar al modo de restauración (Efectivo sólo para baterías IMR sobre
descargadas)
Después de entrar en el modo de ajuste de carga:
Presione brevemente el botón C para cambiar entre los diferentes parámetros de ajuste (Corriente de carga y Voltaje
de desconexión).
Presione brevemente el botón V para aumentar en 100mA cada vez que ajuste la corriente de carga; o para cambiar
entre distintos tipos de baterías y lecturas de voltaje cuando ajuste el voltaje de desconexión.
Mantenga presionado el botón V para entrar directamente a la conguración máxima cuando ajuste la corriente de carga.
Mantenga presionado el botón C para guardar y salir del modo de conguración de carga.
Nota: No realice ninguna acción por 10 segundos para salir del modo de conguración de carga sin guardar y
regresar a los ajustes previos.
Conguracióndelvoltajedecarga
El UMS4 es compatible con baterías Li-ion y Ni-MH/Ni-Cd de 3.6V/3.7V, detecta automáticamente y adopta el
voltaje de carga adecuado. Para baterías LiFePO4 y baterías Li-ion de 3.8V, por favor siga los pasos a continuación
mencionados para ajustar el voltaje de carga:
predeterminada
>1,200 mAh 2,000mA* 300mA-2,000mA 2,000mA 300mA-3,000mA**
<1,200 mAh 1,000mA 300mA-2,000mA 1,000mA 300mA-2,000mA
AA/AAA 1,000mA 300mA-2,000mA 1,000mA 300mA-2,000mA
C/D 1,000mA 300mA-2,000mA 1,000mA 300mA-2,000mA
Modo estándar Modo QC
Corriente
de carga
Rango
seleccionable de
corriente de carga
Corriente
de carga
predeterminada
Rango
seleccionable de
corriente de carga
-6- -7-
1. Después de insertar la batería y comenzar el proceso de carga, presione brevemente el botón C para seleccionar
la bahía correcta y mantenga presionado el botón C para entrar al modo de ajustes de carga.
2. Después de entrar en el modo de ajustes de carga, pulse brevemente el botón C. Cuando la pantalla muestra
el texto intermitente «CHG. MODE», pulse brevemente el botón V para seleccionar el voltaje de carga correcto
(3,7V/4,2V/4,3V).
3. Para las baterías LiFePO4, el voltaje necesita ser ajustado a 3.7V. Para las baterías Li-ion de 3,8 V, el voltaje debe
ajustarse a 4,3 V.
4. Cuando nalice la conguración, mantenga presionado el botón C para guardar y salir del modo de ajustes de
carga.
Conguracióndelacorrientedecarga
Por favor siga los pasos a continuación mencionados para ajustar la corriente de carga:
1. Después de insertar la batería y comenzar el proceso de carga, presione brevemente el botón C para seleccionar
la bahía correcta y mantenga presionado el botón C para entrar al modo de ajustes de carga.
2. Después de entrar en el modo de ajustes de carga, la pantalla mostrará el texto intermitente «CHG. STATUS».
Presione brevemente el botón V para aumentar la corriente de carga en 100 mA cada vez. Mantenga presionado
el botón V para acceder directamente a la conguración máxima.
3. Cuando termine la conguración, mantenga presionado el botón C para guardar y salir del modo de ajustes de
carga.
Nota: Cuando la potencia de entrada es insuciente y una corriente de carga alta es seleccionada, el cargador
automáticamente adoptará la distribución inteligente de corriente de acuerdo a la potencia de entrada.
Modo de carga QC
El UMS4 tiene una entrada QC 2.0 disponible. Cuando el cargador es alimentado por un dispositivo soportado por
QC o conectado a un adaptador QC, la pantalla mostrará “Quick Charge” y la salida máxima de una bahía alcanzará
3,000mA.
Detección automática de la resistencia interna de la batería
Cuando el UMS4 está encendido y la batería instalada, detectará automáticamente y mostrará la resistencia interna
debajo de “CHG. STATUS”. Cuando la Resistencia interna es menor a 250mΩ, mostrará “Good” en la pantalla. Cuando
es superior a 250mΩ, mostrará “Poor” en la pantalla para indicar que la batería debe ser reemplazada.
Cálculo del volumen de carga
Durante el proceso de carga, el sistema calculará y mostrará automáticamente el volumen cargado debajo de “CHG.
STATUS”.
Protección anti-cortocircuito y protección contra polaridad invertida
Si hay baterías insertadas con la polaridad invertida o en cortocircuito, la pantalla parpadeará y mostrará “EE EE”.
Función de ahorro de energía
Si no hay accionamiento de los botones o instalación de baterías en 3 minutos, la pantalla automáticamente se
obscurecerá para ahorrar energía. Realice cualquier acción para encender la pantalla.
Activación de baterías Li-ion sobre descargadas
El UMS4 es capaz de activar baterías Li-ion sobre descargadas con circuito de protección. Después de instalar la
batería, el UMS4 automáticamente probará y activará la batería antes de cargarla. Cuando detecta que una batería
está dañada, la pantalla mostrará “EE EE”.
Activación de baterías IMR sobre descargadas
Cuando una batería IMR sobre descargada es insertada, la pantalla mostrará “EE EE”. En este caso, mantenga
presionado el botón V para entrar al modo de restauración. Después de esto, el proceso de carga continuará. La
batería deberá ser reemplazada si la restauración falla después de varios intentos.
NOTA: Cuando intente restaurar una batería IMR, la protección contra polaridad invertida estará temporalmente
deshabilitada. Por favor asegúrese que las baterías están correctamente instaladas. De lo contrario podría producirse
un incendio o una explosión.
Protección contra sobretiempo de carga
El UMS4 calculará separadamente el tiempo de carga de cada batería. Cuando el tiempo de carga exceda 20 horas
en una bahía, esta automáticamente detendrá el proceso de carga de esa bahía y mostrará “END” debajo de “CHG.
STATUS”. Esto es para evitar un posible sobrecalentamiento o incluso una explosión debido a problemas de calidad de
las baterías.

(Español) UMS4 Manual de usuario
Precauciones
1. El cargador está restringido para cargar sólo baterías recargables Li-ion, IMR, LiFePO4, Ni-MH/Ni-Cd. NO utilice el
cargador con otro tipo de baterías ya que podría provocar una explosión de la batería, rotura o fuga de la batería,
causando daño a la propiedad y/o lesiones personales.
2. Es normal esperar un calentamiento moderado de este producto durante el proceso de carga.
3. Temperatura ambiente de uso: -10~40℃ (14~104℉); Temperatura de almacenamiento: -20~60℃ (-4~140℉)
4. Lea cuidadosamente todas las indicaciones en el dispositivo para asegurar que las baterías están instaladas
correctamente.
5. Por favor conecte el cargador a fuentes de alimentación con el voltaje de entrada especicado en el manual de
usuario. Si el voltaje de entrada es muy bajo o muy alto, puede provocar un mal funcionamiento, o incluso un
incendio.
6. NO cargue las baterías si hay signos de falla o corto circuito.
7. El cargador solo debe ser utilizado por mayores de 18 años. Los menores de edad deben ser supervisados por un
adulto cuando utilicen el cargador.
8. NO deje el producto desatendido cuando está conectado a una fuente de alimentación. Desconecte el product
ante cualquier signo de mal funcionamiento.
9. Por favor asegúrese de seleccionar el programa y conguración correctos. Un programa o una conguración
incorrecta pueden dañar el cargador, o causar un incendio o explosión.
10. NO intente cargar celdas primarias como Zinc-Carbón, Litio, CR123A, CR2, o cualquier otra química no soportada
debido al riesgo de explosión e incendio.
11. NO cargue baterías IMR dañadas, hacerlo puede provocar un corto circuito en el cargador o incluso una explosión,
12. NO cargue o descargue cualquier batería con evidencia de fuga, expansión/hinchazón, daño en la envoltura o
cuerpo, cambio de coloración o distorsión.
13. Utilice el adaptador y cable de alimentación originales. Para reducir el riesgo de daño al cable de alimentación,
SIEMPRE jale del conector en vez de jalar del cable. NO utilice el cargador si aparenta estar dañado en cualquier
forma.
14. NO exponga el dispositivo a la luz directa del sol, dispositivos de calefacción, amas, y ambientes con Lluvia
o nieve; evite temperaturas ambientes extremadamente altas o extremadamente bajas y cambios bruscos de
temperatura.
15. Almacene el dispositivo en áreas bien ventiladas. NO utilice el dispositivo en ambientes húmedos y manténgalo
alejado de materiales combustibles.
16. Evite cualquier golpe o impacto al dispositivo.
17. NO coloque ningún objeto conductor o metálico en el dispositivo para evitar corto circuito o explosiones.
18. NO sobrecargue o sobre descargue las baterías. Por favor recargue las baterías tan pronto como se acabe la
energía.
19. Desconecte el dispositivo y remueva todas las baterías cuando no esté en uso.
20. NO desarme o modique el dispositivo, ya que esto invalidará la garantía. Por favor consulte la sección de garantía
en el manual para información completa de la garantía.
21. ¡NO haga uso indebido de ninguna manera! Utilice sólo para el uso y la función previstos.
Renuncia de responsabilidad
Este producto está mundialmente asegurado por by Ping An Insurance (Group) Company of China, Ltd. NITECORE
no será responsable de ninguna pérdida, daño o reclamación de cualquier tipo incurrida como resultado del
incumplimiento de las instrucciones proporcionadas en este manual de usuario
Detalles de garantía
Nuestros distribuidores autorizados son responsables del servicio de garantía. Si se presenta un problema cubierto
bajo esta garantía, los clientes pueden ponerse en contacto con sus distribuidores respecto a sus reclamaciones de
garantía, siempre y cuando el producto se haya adquirido de un distribuidor autorizado. La garantía de NITECORE
sólo es válida para productos adquiridos de una fuente autorizada. Esto es válido para todos los productos NITECORE.
Para calicar para la garantía, por favor reérase a la sección «IMPORTANTE, AVISO DE GARANTÍA «sección arriba de
validar su producto.
Todo producto DOA / defectuoso puede ser reemplazado por medio de un distribuidor local en los primeros 15 días
después de la compra. Después de 15 días todos los productos NITECORE® defectuosos / con fallas pueden ser
reparados libre de costo durante un periodo de 12 meses (1 año) a partir de la fecha de adquisición. Después de los
12 meses (1 año) aplicará una garantía limitada, que cubre el costo de mano de obra y mantenimiento, más no el
costo de accesorios o recambio de piezas.
La garantía se invalidará si el(los) producto(s) está(n):
1. Roto(s), reconstruido(s) y/o modicado(s) por partes no autorizadas
2. Dañado(s) por mal uso/operación (por ejemplo, instalación con la polaridad invertida, instalación de baterías no
recargables o incumplimiento de las advertencias)
3. Dañados por fuga de baterías.
Para la información más reciente sobre productos y servicios de NITECORE
distribuidor local de NITECORE® o envíe un correo electrónico a service@nitecore.com
-8- -9-
®
favor de ponerse en contacto con un
※ Todas las imágenes, textos y declaraciones que se especican en este manual de usuario sólo sirven para nes de
referencia. En caso de que ocurra cualquier discrepancia entre este manual y la información especicada en www.
nitecore.com, la información en nuestro sitio web ocial prevalecerá. SYSMAX Innovations Co., Ltd. se reserva
el derecho de interpretar y complementar el contenido de este documento en cualquier momento sin previa
noticación.
Instrucciones de seguridad para baterías de iones de litio
1. Voltaje de carga
Las baterías de iones de litio (Li-ion) tienen requisitos estrictos en el control de voltaje. Cargar baterías Li-ion con
un voltaje eléctrico superior al estándar de seguridad puede provocar daños en la batería y explosión.
(1) Baterías Li-ion 3.7V / Baterías IMR
Las baterías Li-ion 3.7V son las baterías recargables más comunes. Las etiquetas de estas baterías suelen
estar marcadas con marcas de 3.6V/3.7V. Si nuestro cargador juzga que la batería instalada es una batería Liion, la batería automáticamente será carga en modo estándar 4.2V. No necesita hacer ajustes adicionales en
el voltaje para este tipo de baterías.
(2) Baterías Li-ion 3.8V
Las baterías Li-ion 3.8V son relativamente poco comunes. Normalmente tienen una marca de 3.7V en la
etiqueta. Normalmente el vendedor le informará al comprador que necesita ser cargada con una potencia de
4.35V. Cuando cargue este tipo de baterías, por favor seleccione manualmente el voltaje de carga a 4.3V, de
lo contrario el cargador cargará a 4.2V de forma predeterminada, y no proveerá el voltaje de carga adecuado.
(3) Baterías LiFePO4 3.2V
Las baterías LiFePO4 3.2V tienen marcas LiFePO4 y/o 3.2V en la etiqueta. Tenga cuidado con este tipo de
baterías. Sin selección manual, nuestros cargadores cargarán este tipo de baterías con 4.2V, y dañarán o
incluso podrían explotar las baterías por voltaje de carga excesivo. Necesita seleccionar manualmente el
voltaje de carga a 3.7V para una carga segura.
2. Corriente de carga
Para todas las baterías de litio recargables (incluidas las baterías Li-ion, IMR y LiFePO4), recomendamos no usar
corrientes mayores a 1C* para la carga. Para baterías de baja capacidad, la corriente de carga debe ser menor a
1C.
* C=Capacidad de la batería. Por ejemplo, 1C en una batería recargable de litio de 2600mAh es 2.4A. 1C en una
batería de litio recargable de 3400mAh es 3.4A.
Una corriente de carga excesivamente grande provocará una gran cantidad de calor, y consecuentemente daño en
la batería y explosión.
Advertencia: Nuestros cargadores automáticamente juzgan y seleccionan la corriente de carga por el largo de las
baterías. Para algunas baterías largas, pero de baja capacidad (por ejemplo, 12650, 13650, 14650, 16650), por favor
seleccione manualmente la corriente de carga adecuada (menor a 1C).
3. Precauciones
(1) NO provoque un corto circuito en la batería en cualquier forma.
(2) NO utilice una batería de litio 3.7V/3.8V cuando su voltaje sea menor a 2.8V, ya que puede sobre descargarse,
y/o ser propensa a explotar en la siguiente carga.
(3) Recomendamos ampliamente baterías con circuito de protección. En el caso de baterías sin circuito de
protección (como las baterías IMR), por favor esté alerta de no sobre descargarlas y cortocircuito.
(4) NO descargue una batería con una corriente de descarga mayor a su máxima corriente nominal.
4. Almacenamiento a largo plazo
El mejor voltaje de almacenamiento para baterías de litio recargables 3.7V/3.8V es de 3.7V. Voltajes muy bajos o
muy altos pueden dañar la batería durante el almacenamiento. Puede descargar la batería a 3.7V, o cargarla a 3.7V
en un cargador antes de almacenarla por largos periodos de tiempo.
El código de validación y el código QR en el paquete pueden ser vericados en el sitio web de Nitecore.
El cargador debe utilizarse con los cables ociales de NITECORE. Los cables ociales se pueden identicar
con la palabra NITECORE clara mente impresa en el enchufe. Durante la carga, los cables de terceros
pueden causar un mal funcionamiento, calentamiento e incluso fuego en el cargador. Daños causados por
utilizar cables no ociales no serán cubiertos por la garantía ocial. El cargador está restringido a cargar
sólo baterías Li-ion, IMR, 3.2V LiFePO4, Ni-MH/Ni-Cd recargables. NO utilice el cargador con otros tipos
de baterías ya que puede resultar en explosión de las baterías, ruptura o fugas, causando daño a la
propiedad y/o lesiones personales.

(Deutsch) UMS4 Benutzerhandbuch
Bedienungsanleitung
Anschließen an eine Stromquelle: Schließen Sie das UMS4 über das USB-Ladekabel an eine externe Stromquelle
(einen USB-Adapter, einen Computer oder andere USB-Ladegeräte) an.
Einsetzen der Akkus: Das UMS4 verfügt über 4 unabhängig gesteuerte Ladeschächte. Legen Sie die Akkus der
unterstützten Typen entsprechend den Polaritätsmarkierungen in den Ladeschacht ein. Nach dem Einsetzen der
Akkus beginnt das UMS4 mit dem Auaden und zeigt auf dem LCD-Display den Batteriestatus «Good» oder «Poor»,
Innenwiderstand, Ladestrom, Batteriespannung, Ladevolumen und Ladezeit an.
Akkuprüfung und Fehlermeldung: Das UMS4 hat einen Verpolungsschutz und eine Kurzschluss-Schutzfunktion.
Wenn Akkus eingelegt werden, deren Polarität verkehrt ist oder Akkus, die kurzgeschlossen sind, zeigt das LCDDisplay des betreenden Ladeschachts «EE EE» an und die Leistungsanzeige blinkt.
Intelligentes Laden: Das UMS4 kann anhand intelligenter Erkennung von Akkutypen und Kapazitäten geeignete
Ladeströme auswählen. Die manuelle Ladestromauswahl ist ebenfalls verfügbar. Das UMS4 ist kompatibel mit:
1) 3,6V / 3,7V Lithium-Ionen-Akkus
2) 3,8 V Li-Ionen-Akkus (4,35 V ± 1% wenn vollständig geladen)
3) 1,2 V Ni-MH/Ni-Cd-Akku
4) 3,2V LiFePO4 Batterien
Standard Einstellungen des UMS4
Akku Typ und Kapazität
Li-Ionen Akkus (4,2V ±
1%, wenn voll geladen)
Ni-MH/Ni-Cd Akkus (1,48V
± 1%, wenn voll geladen)
* Beim Laden von 1 oder 2 Akkus wird empfohlen, sie in Slot 1 und Slot 3 oder in Slot 2 und Slot 4 zu legen, um einen
höheren Standardladestrom von 2000mA zu erreichen. Anderenfalls beträgt der Standardladestrom 1000mA.
** Beim Laden von 1 oder 2 Akkus wird empfohlen, sie in Slot 1 und Slot 3 oder in Slot 2 und Slot 4 zu legen, um
einen größeren wählbaren Ladestrombereich von 300mA bis 3000mA zu erreichen. Ansonsten ist der wählbare Bereich
des Ladestroms 300mA-2000mA.
Hinweis: Das UMS4 kann automatisch die Lademodi für Ni-MH/Ni-Cd-Akkus und 3,7V Li-Ionen-Akkus auswählen.
LiFePO4-Batterien und 3,8V Li-Ionen-Akkus erfordern manuelle Einstellungen der Ladeschlussspannungen. Bei einem
Akku mit einer Länge von > 60mm erkennt das UMS4 automatisch eine Kapazität von > 1200 mAh.
Tastenfunktionen
Während des Ladevorgangs
Drücken Sie kurz die C-Taste, um den Ladestatus der 4 Ladeschächte anzuzeigen.
Drücken Sie kurz die V-Taste, um den Akkuzustand, den internen Widerstand, den Ladestrom, die Batteriespannung,
das Ladevolumen und die Ladezeit auf dem LCD-Bildschirm anzuzeigen.
Drücken Sie lange auf die C-Taste, um in den Modus für die Ladeeinstellung zu gelangen.
Drücken Sie lange die V-Taste, um in den Reaktivierungs-Mode zu gelangen. (Nur wirksam bei tiefentladenen IMRAkkus.)
Nach dem Aufrufen des Lademodus
Drücken Sie kurz die C-Taste, um zu verschiedenen Einstellparametern (Ladestrom und Ladeschlussspannung) zu
wechseln.
Drücken Sie kurz die V-Taste, um jedes Mal um 100 mA zu erhöhen, wenn Sie den Ladestrom einstellen. Wenn Sie die
Ladeschlussspannung einstellen, wechseln Sie so zwischen den Akkutypen und den Spannungswerten.
Halten Sie die Taste V gedrückt, um beim Einstellen des Ladestroms direkt auf die maximale Einstellung zuzugreifen.
Drücken Sie lange auf die C-Taste, um den Ladeeinstellungsmodus zu speichern und zu beenden.
Hinweis: Wenn Sie innerhalb von 10 Sekunden keine Aktion ausführen, wird der Ladeeinstellungsmodus ohne
Speichern verlassen und zu den vorherigen Einstellungen zurückgekehrt.
Ladespannung manuell einstellen
Das UMS4 ist kompatibel mit 3,6V / 3,7V Li-Ionen- und Ni-MH-/Ni-Cd-Akkus mit automatischer Erkennung und
Übernahme der passenden Ladespannung. Für LiFePO4-Akkus und 3,8V Li-Ionen-Akkus folgen Sie bitte den
nachstehenden Schritten für die Ladespannungs-Einstellungen:
1. Nachdem der Akku eingelegt ist und der Ladevorgang beginnt, drücken Sie kurz die C-Taste, um den richtigen
Ladeschacht auszuwählen. Drücken Sie lange die C-Taste, um den Ladeeinstellmodus aufzurufen.
2. Drücken Sie nach dem Aufrufen des Ladeeinstellungsmodus kurz die C-Taste. Wenn das Display den blinkenden
Text «CHG. MODE» anzeigt, drücken Sie kurz die Taste V, um die richtige Ladespannung (3,7V / 4,2V / 4,3V)
auszuwählen.
> 1200 mAh 2000mA* 300 mA — 2000 mA 2000 mA 300 mA — 3000 mA**
< 1200 mAh 1000mA 300 mA — 2000 mA 1000 mA 300 mA — 2000 mA
AA/AAA 1000mA 300 mA — 2000 mA 1000 mA 300 mA — 2000 mA
C/D 1000mA 300 mA — 2000 mA 1000 mA 300 mA — 2000 mA
(NICHT manuell eingestellt/verändert!)
Standard Mode QC Mode
Standard
Ladestrom
Manuelle
Einstellmöglichkeiten
Standard
Ladestrom
Manuelle
Einstellmöglichkeiten
-10- -11-
3. Bei LiFePO4-Akkus muss die Spannung auf 3,7V eingestellt werden. Bei 3,8V Li-Ionen-Akkus muss die Spannung
auf 4,3V eingestellt werden.
4. Wenn die Einstellung abgeschlossen ist, drücken Sie lange die C-Taste, um zu speichern und den
Ladeeinstellungsmodus zu beenden.
Ladestrom manuell einstellen
Befolgen Sie bitte die folgenden Schritte, um den Ladestrom einzustellen:
1. Nachdem der Akku eingelegt ist und der Ladevorgang beginnt, drücken Sie kurz die C-Taste, um den richtigen
Ladeschacht auszuwählen. Drücken Sie lange die C-Taste, um den Ladeeinstellmodus aufzurufen.
2. Nach dem Aufrufen des Ladeeinstellmodus wird auf dem Display der blinkende Text «CHG.STATUS» angezeigt.
Drücken Sie kurz die Taste V, um den Ladestrom jedes Mal um 100 mA zu erhöhen. Drücken Sie lange auf die
V-Taste, um direkt auf die maximale Einstellung zuzugreifen.
3. Wenn die Einstellung abgeschlossen ist, drücken Sie lange auf die C-Taste, um den Ladeeinstellungsmodus zu
speichern und zu beenden.
Hinweis: Wenn die Eingangsleistung nicht ausreicht und ein großer Ladestrom eingestellt ist, übernimmt das
Ladegerät automatisch die intelligente Stromverteilung entsprechend der Eingangsleistung.
QC Lademodus
Der UMS4 ist QC 2.0 kompatibel.
Wenn das Ladegerät an ein QC-unterstützendes Gerät oder an einen QC-Adapter angeschlossen wird, zeigt das
Display «Quick Charge» an und der maximale Ausgang des Einzel-Ladeschacht erreicht 3000 mA.
Automatische Akku-Innenwiderstandserkennung
Wenn das UMS4 eingeschaltet und der Akku eingesetzt ist, erkennt es automatisch den internen Widerstand und
zeigt dies unterhalb von «CHG. STATUS» auf dem Display an. Wenn der interne Widerstand unter 250 mΩ liegt, wird
auf dem Display «Good» angezeigt. Wenn der Wert über 250 mΩ liegt, wird auf dem Bildschirm «Poor» angezeigt, um
anzuzeigen, dass der Akku ersetzt werden muss.
Berechnung der geladenen Kapazität
Während des Ladevorgangs berechnet das System automatisch die geladene Kapazität und zeigt dies auf dem Display
unterhalb von «CHG. STATUS» an.
Anti-Kurzschluss- und Verpolungsschutz
Wenn Akkus eingelegt sind, deren Polarität verkehrt ist oder die kurzgeschlossen sind, blinkt das Display und zeigt «EE
EE» an.
Energiesparfunktion
Wenn die Tasten oder Akkus innerhalb von 3 Minuten nicht aktiviert wurden, wird das Display automatisch dunkel, um
Energie zu sparen. Führen Sie eine Aktion durch, um das Display wieder zu aktivieren.
Tiefentladene Li-Ionen-Akku-Reaktivierung
Das UMS4 kann tiefentladene Li-Ionen-Akkus mit Schutzschaltung reaktivieren. Nach dem Einsetzen des Akkus testet
und aktiviert das UMS4 den Akku vor dem Laden. Wenn ein Akku als beschädigt erkannt wird, zeigt das Display «EE
EE» an.
Tiefentladene IMR-Akku-Reaktivierung
Wenn ein tiefentladener IMR-Akku eingesetzt wurde, zeigt das Display «EE EE» an. In diesem Fall drücken Sie lange
die V-Taste, um in den Reaktivierungsmodus zu gelangen. Danach wird der Ladevorgang fortgesetzt. Der Akku sollte
ersetzt werden, wenn er nach mehreren Versuchen nicht reaktiviert werden kann.
HINWEIS: Beim Versuch einen IMR-Akku wiederherzustellen, ist der Verpolungsschutz vorübergehend deaktiviert.
Bitte stellen Sie sicher, dass die Akkus richtig eingelegt sind. Anderenfalls kann es zu einem Brand oder einer Explosion
kommen.
Zeitgesteuerter Überladeschutz
Das UMS4 berechnet separat die Ladezeit jedes Akkus. Wenn die Ladezeit 20 Stunden in einem Ladeschacht
überschreitet, wird automatisch der Ladevorgang dieses Ladeschachts beendet und im Display wird «END» unter
«CHG.STATUS» angezeigt. Dies dient dazu, eine Überhitzung oder sogar eine Explosion aufgrund von Problemen mit
der Akkuqualität zu verhindern.
Loading…
ManualsPro
Nitecore
NITECORE UMS4 Intelligent USB Four Slot Superb Charger User Manual
- June 10, 2024
- Nitecore
Table of Contents
- NITECORE UMS4 Intelligent USB Four Slot Superb Charger
- Features
- Accessories
- Specifications
- Operating Instructions
- Warranty Details
- Safety Instruction for Lithium-ion Batteries
- Precautions
- Read User Manual Online (PDF format)
- Download This Manual (PDF format)
NITECORE UMS4 Intelligent USB Four Slot Superb Charger
IMPORTANT NOTICE CONCERNING WARRANTY SERVICE
Thank you for purchasing! Before using this charger, please find your
verification code on the package box, and go to
http://charger.nitecore.com/validation (or scan the QR code beside the
verification code to visit on your mobile phone). Type in your verification
code and personal information as required, and submit the page. After
verification, Nitecore will send you a warranty service email. This email and
your registration email address are essential to your possible warranty
application. Before you complete the warranty service registration, you cannot
enjoy our warranty service for your purchase.
Features
- Intelligent USB Four-Slot Superb Charger
- QC 2.0 input available
- Capable of charging 4 batteries simultaneously and controlling each slot independently
- Up to 3,000mA charging speed in a single slot
- Compatible with Li-ion and Ni-MH/Ni-Cd batteries with automatic detection
- Automatic detection of battery power level and automatic selection of the appropriate voltage and charging mode (LiFePO4 and 3.8V Li-ion batteries excluded)
- Automatic selection between 3 charging modes (CC, CV and -dV/dt)
- Energy-efficient LCD display for real-time charging information
- Capable of manually selecting the charging cut-off voltage and the charging current
- Automatic detection of large/small capacity batteries and automatic selection of appropriate charging current
- Automatic termination upon charging completion
- Reverse polarity protection and short circuit protection
- Over-discharged battery activation
- Li-ion battery restoration
- Overtime charging protection
- Automatic detection of battery internal resistance and display of battery health
- Made from durable and fire-retardant PC materials
- Optimal heat dissipation design
- Certified by RoHS, CE, FCC and CEC
- Insured worldwide by Ping An Insurance (Group) Company of China, Ltd.
Accessories
USB Charging Cable
Specifications
- Input : DC 5V/2A 12V/1.5A 18W (MAX)
- Output : 4.35V±1% / 4.2V±1% / 3.7V±1% / 1.48V±1% QC Mode: 3,000mA1 (MAX), 2,000mA2 (MAX), 1,000mA4 (MAX) Standard Mode: 2,000mA1 (MAX), 1,000mA2 (MAX), 500mA4 (MAX) Compatible with: IMR/Li-ion/LiFePO4: 10440, 14500, 14650, 16500, 16340
- Compatible with: IMR/Li-ion/LiFePO4: 10440, 14500, 14650, 16500, 16340(RCR123), 16650, 17350, 17500, 17650, 17670, 17700, 18350, 18490, 18500, 18650, 18700, 20700, 21700, 22500, 22650, 25500, 26500, 26650, 26700
- Ni-MH/Ni-Cd : AA, AAA, AAAA, C, D
- Dimensions : 159mm×107mm×41mm (6.26”×4.21”×1.61”)
- Weight : 255.4g (9.01oz) (Charging cable not included)
Operating Instructions
Connect to power source: connect the UMS4 to an external power source (a USB
adapter, a computer or other USB charging devices) via the USB charging cable.
Insert batteries : The UMS4 features 4 independently controlled charging
slots. Insert batteries of supported types into each slot according to the
polarity marks on the slot. After battery installation, the UMS4 begins
charging and presents Battery Health by “Good” or “Poor”, Internal Resistance,
Charging Current, Battery Voltage, Charged Volume and Charging Time on the LCD
screen.
Battery Inspection and Error Report : The UMS4 has reverse polarity
protection and anti-short circuit function. If there are batteries inserted
with polar reversed or short-circuited, the LCD screen of relevant slot will
indicate “EE EE” and the power level display will flash to notify the user of
an error.
Smart charging : The UMS4 can choose appropriate charging currents based
on intelligent detection about battery types and capacities. Manual charging
current selection is also available. The UMS4 is compatible with:
- 3.6V/3.7V Li-ion rechargeable batteries
- 3.8V Li-ion rechargeable batteries (4.35V±1% when fully charged)
- 1.2V Ni-MH/Ni-Cd rechargeable batteries
- 3.2V LiFePO4 batteries
Default Settings
The default settings (not manually configured) for the UMS4 are:
Battery Type and Capacity
| Standard Mode| QC Mode
—|—|—
Default Charging Current| Selectable Range of Charging Current| Default
Charging Current| Selectable Range of Charging Current
Li-ion batteries (4.2V±1% when fully charged)| >1,200 mAh| 2,000mA*|
300mA-2,000mA| 2,000mA| 300mA-3,000mA**
<1,200 mAh| 1,000mA| 300mA-2,000mA| 1,000mA| 300mA-2,000mA
Ni-MH/Ni-Cd batteries (1.48V±1% when fully charged)| AA/AAA| 1,000mA|
300mA-2,000mA| 1,000mA| 300mA-2,000mA
C/D| 1,000mA| 300mA-2,000mA| 1,000mA| 300mA-2,000mA
- When charging 1 or 2 batteries, it is recommended to put them into Slot 1 and Slot 3, or into Slot 2 and Slot 4, to achieve a higher default charging current of 2,000mA. Otherwise the default charging current is 1,000mA.
- When charging 1 or 2 batteries, it is recommended to put them into Slot 1 and Slot 3, or into Slot 2 and Slot 4, to achieve a wider selectable range of charging current of 300mA-3,000mA. Otherwise the selectable range of charging current is 300mA-2,000mA.
Note : The UMS4 can automatically select charging modes for Ni-MH/Ni-Cd
batteries and 3.7V Li-ion batteries. LiFePO4 batteries and 3.8V Li-ion
batteries require manual settings on charging cut-off voltages. For the
battery whose length is >60mm (2.4”), the UMS4 automatically identifies its
capacity as >1,200mAh.
Button Operations
During the charging process:
- Short press the C button to cycle through the charging status of the 4 slots.
- Short press the V button to cycle through Battery Health, Internal Resistance, Charging Current, Battery Voltage,
- Charged Volume and Charging time on the LCD screen.
- Long press the C button to enter the Charging Setting Mode.
- Long press the V button to enter Restoration Mode. (Only effective to over-discharged IMR batteries)
After entering the Charging Setting Mode:
- Short press the C button to switch to different setting parameters (Charging Current and Cut-Off Voltage).
- Short press the V button to increase with a 100mA increment each time when setting the Charging Current; or to
- switch to different battery types and voltage readings when setting the Cut-Off Voltage.
- Long press the V button to directly access the maximum setting when setting the Charging Current.
- Long press the C button to save and exit the Charging Setting Mode.
Note : Perform no action in 10 seconds to exit the Charging Setting Mode
without saving and return to the previous settings.
Charging Voltage Settings
The UMS4 is compatible with 3.6V/3.7V Li-ion and Ni-MH/Ni-Cd batteries with
automatic detection and adoption of the suitable charging voltage. For LiFePO4
batteries and 3.8V Li-ion batteries, please follow the steps below for
charging voltage settings:
- After the battery is inserted and the charging process begins, short press the C button to select the correct slot and long press the C button to enter Charging Setting Mode.
- After entering Charging Setting Mode, short press the C button. When the screen shows the flashing text “CHG. MODE”, short press the V button to select the correct charging voltage (3.7V/4.2V/4.3V).
- For LiFePO4 batteries, the voltage needs to be set to 3.7V. For 3.8V Li-ion batteries, the voltage needs to be set to 4.3V.
- When the setting is finalized, long press the C button to save and exit the Charging Setting Mode
Charging Current Settings
Please follow the steps below for charging current settings:
- After the battery is inserted and the charging process begins, short press the C button to select the correct slot and long press the C button to enter Charging Setting Mode.
- After entering Charging Setting Mode, the screen will show the flashing text “CHG. STATUS”. Short press the V button to increase the charging current with a 100mA increment each time. Long press the V button to directly access the maximum setting.
- When the setting is finalized, long press the C button to save and exit the Charging Setting Mode.
Note : When the input power is insufficient and a large charging current
is set, the charger will automatically adopt the intelligent current
distribution according to the input power
QC Charging Mode
The UMS4 is QC 2.0 input available. When the charger is powered by a QC
supportive device or connected to a QC adapter, the screen will show “Quick
Charge” and the single slot max output will achieve 3,000mA.
Automatic Battery Internal Resistance Detection
When the UMS4 is on and the battery is installed, it will automatically detect
and display the Internal Resistance below the “CHG. STATUS”. When the Internal
Resistance is below 250mΩ, it will show “Good” on the screen. When it is above
250mΩ, it will show “Poor” on the screen to indicate that the battery should
be replaced.
Charged Volume Calculation
During the charging process, the system will automatically calculate and
display the Charged Volume below the “CHG. STATUS”.
Anti-short Circuiting and Reverse Polarity Protection
If there are batteries inserted with polar reversed or short-circuited, the
screen will flash to show “EE EE”.
Energy Saving Function
If there is no action to the buttons or batteries in 3 minutes, the screen
will automatically go dim to save energy. Perform any action to light up the
screen.
Over-Discharged Li-ion Battery Activation
The UMS4 is capable of activating over-discharged Li-ion batteries with a
protective circuit. After battery installation, UMS4 will test and activate
the battery before charging. When a battery is detected as damaged, the screen
will show “EE EE”.
Over-Discharged IMR Battery Restoration
When an over-discharged IMR battery is inserted, the screen will show “EE EE”.
In this case, long press the V button to enter Restoration Mode. After that,
the charging process will continue. The battery should be replaced if it fails
to be restored after several attempts.
NOTE : When attempting to restore an IMR battery, reverse polarity
protection is temporarily disabled. Please ensure batteries are correctly
inserted. Failing to do so may result in fire or explosion.
Overtime Charging Protection
The UMS4 will separately calculate the charging time of each battery. When the
charging time exceeds 20 hours in one slot, it will automatically cease the
charging process of this slot and display “END” below the “CHG. STATUS”. This
is to prevent possible overheat or even explosion due to battery quality
issue.
Precautions
- The charger is restricted to charging Li-ion, IMR, LiFePO4, Ni-MH/Ni-Cd rechargeable batteries only. DO NOT use the charger with other types of batteries as this could result in battery explosion, cracking or leaking, causing property damage and/or personal injury.
- Moderate heat from this product is to be expected during the charging process, which is normal.
- Ambient Temperature of Usage : -10~40℃ (14~104℉); Temperature of Storage: -20~60℃ (-4~140℉)
- Carefully read all labels on the device to ensure batteries are installed correctly.
- Please connect this charger to power supplies with the input voltage stated in the specifications of the user manual. If the input voltage is too low or too high, it may lead to malfunctions, or even a fire.
- DO NOT charge batteries if there is any sign of faulty or short circuit.
- The charger is designed for adults. Use of the charger by kids under age must be under supervision. Operation, using or cleaning of the charger may NOT be done by kids aged 8 years or younger.
- DO NOT leave the product unattended while it is connected to a power supply. Unplug the product at any sign of malfunction.
- Please make sure the correct program and settings are chosen and set. Incorrect program or setting may damage the charger, or cause fire and explosion.
- DO NOT attempt to charge primary cells such as Zinc-Carbon, Lithium, CR123A, CR2, or any other unsupported chemistry due to risk of explosion and fire.
- DO NOT charge a damaged IMR battery as doing so may lead to charger short-circuit or even explosion.
- DO NOT charge or discharge any battery having evidence of leakage, expansion/swelling, damaged outer wrapper or case, color-change or distortion.
- Use the original adapter and cord for power supply. To reduce the risk of damage to the power cord, ALWAYS pull by the connector rather than the cord. DO NOT operate the charger if it appears damaged in any way.
- DO NOT store or use the product in an environment where the temperature is extremely high / low or changes rapidly, or in a confined area with a high temperature.
- Store the device in ventilated areas. DO NOT use the device in moist environment and keep away from any combustible materials.
- Avoid any shock or impact to the device.
- DO NOT place any conductive or metal object in the device to avoid short circuiting and explosions.
- DO NOT overcharge or over-discharge the batteries. Please recharge the battery as soon as the power runs out.
- Unplug the device and remove all batteries when it is not in use.
- DO NOT disassemble or modify the device as doing so will render the product warranty invalid. Please refer to the warranty section in the manual for complete warranty information.
- DO NOT misuse in any way! Use for intended purpose and function only.
Disclaimer
This product is globally insured by Ping An Insurance (Group) Company of
China, Ltd. NITECORE shall not be held responsible or liable for any loss,
damage or claim of any kind incurred as a result of the failure to obey the
instructions provided in this user manual.
Warranty Details
Our authorized dealers and distributors are responsible for warranty service.
Should any problem covered under warranty occurs, customers can contact their
dealers or distributors in regards to their warranty claims, as long as the
product was purchased from an authorized dealer or distributor. NITECORE’s
Warranty is provided only for products purchased from an authorized source.
This applies to all NITECORE products. To be qualified for warranty, please
refer to the “IMPORTANT WARRANTY NOTICE” section on top to validate your
product. Any DOA / defective product can be exchanged for a replacement
through a local distributor/dealer within the 15 days of purchase. After 15
days, all defective / malfunctioning NITECORE® products can be repaired free
of charge for a period of 12 months (1 year) from the date of purchase. Beyond
12 months (1 year), a limited warranty applies, covering the cost of labor and
maintenance, but not the cost of accessories or replacement parts.
The warranty is nullified if the product(s) is/are:
- broken down, reconstructed and/or modified by unauthorized parties
- damaged from wrong operations (i.e. reverse polarity installation, installation of non-rechargeable batteries or failure to obey the warnings)
- damaged by batteries leakage.
For the latest information on NITECORE® products and services, please contact
a local NITECORE® distributor or send an email to
service@nitecore.com
All images, text and statements specified herein this user manual are for
reference purpose only. Should any discrepancy occur between this manual and
information specified on www.nitecore.com,
information on our official website shall prevail. SYSMAX Innovations Co.,
Ltd. reserves the rights to interpret and amend the content of this document
at any time without prior notice.
Safety Instruction for Lithium-ion Batteries
Charging Voltage
Lithium-ion (Li-ion) batteries have strict requirement on voltage control.
Charging Li-ion batteries with electric voltage beyond safety standard can
lead to battery damage and explosion.
-
3.7V Li-ion Batteries / IMR Batteries
3.7V Li-ion batteries are the most common rechargeable Lithium batteries. The
skins of these batteries are often marked with 3.6V/3.7V signs. If our
chargers judge that an inserted battery is a Li-ion battery, the battery will
be automatically charged in 4.2V standard charging mode. You do not need extra
voltage settings for these types of batteries. -
3.8V Li-ion Batteries
3.8V Li-ion batteries are comparatively rare. It usually has a 3.7V mark on
its skin. Normally its seller will inform its buyer that it needs to be
charged with 4.35V power. When charging this type of battery, please manually
set the charging voltage to 4.3V, otherwise the charger will charge at 4.2V by
default, and cannot provide adequate charging voltage. -
3.2V LiFePO4 Batteries
3.2V LiFePO4 batteries have LiFePO4 and/or 3.2V marks on the skin. Be careful
with this type of batteries. Without manual setting, our chargers will charge
this type of batteries with 4.2V, and will damage or even explode the battery
with excessive charging voltage. You need to manually set the charging voltage
to 3.7V for safe charging.
charging Current
For all rechargeable Lithium batteries (including Li-ion, IMR and LiFePO4
batteries), we suggest not using current larger than 1C* for charging. For
small capacity batteries, the charging current must be smaller than 1C.
C=Capacity of a battery. For example, 1C in a 2600mAh rechargeable Lithium
battery is 2.6A. 1C in a 3400mAh rechargeable Lithium battery is 3.4A.
Excessively large charging current will lead to great amount of heat, and
consequently battery damage and explosion.
Warning : Our chargers automatically judge and select charging current by
the batteries’ length. For some long but small capacity batteries (i.e. 12650,
13650, 14650, 16650), please manually set appropriate charging current
(smaller than 1C).
Precautions
- DO NOT short circuit the battery in any way.
- DO NOT use a 3.7V/3.8V Lithium battery when its voltage is lower than 2.8V, otherwise it can be over-discharged, and/or prone to explosion at next charging.
- We strongly recommend batteries with protective circuit. For batteries without protective circuit (such as IMR batteries), please stay alert for over-discharge and short circuit.
- DO NOT discharge a battery with a discharging current larger than its maximum rated current.
Long-term Storage
The best storage voltage for 3.7V/3.8V rechargeable Lithium batteries is 3.7V.
Voltage too low or too high can damage your battery during storage. You can
discharge a battery to 3.7V, or charge it to 3.7V in a charger before you keep
it in long-term storage. Validation code and QR code on package can be
verified on NITECORE website.
The charger must be used with NITECORE’s official cords. Official cords are
identified with clearly printed NITECORE on the plug. During charging, third
party cords can cause malfunction, overheat and even fire on the charger.
Damages from using unofficial cords cannot be covered by official warranty.
The charger is restricted to charging Li-ion, IMR, 3.2V LiFePO4, Ni-MH/Ni-Cd
rechargeable batteries only. DO NOT use the charger with other types of
batteries as this could result in battery explosion, cracking or leaking,
causing property damage and/or personal injury.
SYSMAX Innovations Co., Ltd. E-mail:
info@nitecore.com Web:
www.nitecore.com Address: Unit 6355, 5/F, No. 1021
Gaopu Road, Tianhe District, Guangzhou, 510653, Guangdong, China Manufacturer:
SYSMAX Power Technology, LLC Please find us on facebook: nitecorecharger
Read User Manual Online (PDF format)
Read User Manual Online (PDF format) >>
Download This Manual (PDF format)
Download this manual >>