
Руководство пользователя
AV-Ресивер
СОДЕРЖАНИЕ
ПЕРЕД ИСПОЛЬЗОВАНИЕМ ДАННОГО АППАРАТА
ФУНКЦИИ
НАЗВАНИЯ КОМПОНЕНТОВ И ИХ ФУНКЦИИ
ПОДГОТОВКА
ИСПОЛЬЗОВАНИЕ ЗВУКОВОГО ПОЛЯ
ВОСПРОИЗВЕДЕНИЕ
ПОЛЕЗНЫЕ ФУНКЦИИ
ПРОСЛУШИВАНИЕ В НЕСКОЛЬКИХ КОМНАТАХ (ЗОНАХ)
КОНФИГУРАЦИИ
ОБНОВЛЕНИЕ
УСТРАНЕНИЕ НЕИСПРАВНОСТЕЙ
ПРИЛОЖЕНИЕ

User Guide
EN

CONTENTS
CONTENTS
BEFORE USING THE UNIT 10
Read me first..…………………………………………………………………………….10
How to use this guide..………………………………………………………………………………………………………………………………………….10
Glossary.. …………………………………………………………………………………………………………………………………………………………….11
Checking the accessories..………………………………………………………………12
Checking the accessories..…………………………………………………………………………………………………………………………………….12
Using the remote control..………………………………………………………………14
Insert the batteries in the remote control.. …………………………………………………………………………………………………………….14
Operating range of the remote control..…………………………………………………………………………………………………………………15
FEATURES 16
What you can do with the unit..………………………………………………………..16
Useful applications..……………………………………………………………………..23
AV SETUP GUIDE..…………………………………………………………………………………………………………………………………………………23
MusicCast CONTROLLER..……………………………………………………………………………………………………………………………………..24
PART NAMES AND FUNCTIONS 25
Unit body..…………………………………………………………………………………25
Part names and functions of the front panel..…………………………………………………………………………………………………………25
Front display..………………………………………………………………………………………………………………………………………………………27
Part names and functions of the rear panel.. ………………………………………………………………………………………………………….32
Remote control..………………………………………………………………………….34
Part names and functions of the remote control.. …………………………………………………………………………………………………..34
PREPARATIONS 37
Before starting..…………………………………………………………………………..37
Names and functions of speakers.. ………………………………………………………………………………………………………………………..37
Flow of preparations.. …………………………………………………………………………………………………………………………………………..39
How to place speakers (speaker systems)..………………………………………….41
Speaker systems recommended to the unit (basic setup)..………………………………………………………………………………………41
Other speaker systems (basic setup).. ……………………………………………………………………………………………………………………43
Speaker systems using the unit’s internal amplifier (advanced setup).. ……………………………………………………………………58
2

CONTENTS
Connecting speakers..……………………………………………………………………65
Speaker requirements.. ………………………………………………………………………………………………………………………………………..65
Cable requirements..…………………………………………………………………………………………………………………………………………….66
How to connect speakers.. ……………………………………………………………………………………………………………………………………67
Connecting a TV.. …………………………………………………………………………70
HDMI connection with a TV..………………………………………………………………………………………………………………………………….70
HDMI connection with another TV or a projector..…………………………………………………………………………………………………..72
Connecting playback devices..…………………………………………………………73
HDMI connection with a video device such as a BD/DVD player..………………………………………………………………………………73
Connection other than HDMI with a playback device.. …………………………………………………………………………………………….74
Connecting the radio antennas..……………………………………………………….75
Connecting the FM antenna..…………………………………………………………………………………………………………………………………75
Connecting the AM antenna.. ………………………………………………………………………………………………………………………………..76
Connecting the DAB/FM antenna.. …………………………………………………………………………………………………………………………78
Preparing for connecting to a network..……………………………………………..79
Network connection of the unit.. …………………………………………………………………………………………………………………………..79
Connecting a network cable (wired connection).. …………………………………………………………………………………………………..80
Preparing wireless antennas (wireless connection)..……………………………………………………………………………………………….81
Connecting other devices..…………………………………………………………….. 82
Connecting an external power amplifier.. ………………………………………………………………………………………………………………82
Connecting a device compatible with the trigger function.. …………………………………………………………………………………….83
Operating the unit from another room (remote connection)..………………………………………………………………………………….84
Turning on the power of the unit.. ……………………………………………………. 86
Plugging in the power cable.. ………………………………………………………………………………………………………………………………..86
Setting the power to on/standby (Main zone).. ……………………………………………………………………………………………………….87
Selecting the menu language..…………………………………………………………88
Selecting the menu language.. ………………………………………………………………………………………………………………………………88
Setting MusicCast..……………………………………………………………………….89
What is MusicCast..……………………………………………………………………………………………………………………………………………….89
Using MusicCast CONTROLLER..…………………………………………………………………………………………………………………………….90
Adding the unit to the MusicCast network..…………………………………………………………………………………………………………….91
Using the MusicCast Surround function..……………………………………………. 92
Configuring wireless speakers..……………………………………………………………………………………………………………………………..92
Configuring the speaker settings..…………………………………………………….94
Flow of the speaker configurations..………………………………………………………………………………………………………………………94
Assigning speaker configuration.. ………………………………………………………………………………………………………………………….97
Optional measurement of YPAO..…………………………………………………………………………………………………………………………..98
Configuring the speaker settings automatically based on the YPAO measurement results..……………………………………..100
Error messages from YPAO.. ………………………………………………………………………………………………………………………………..108
Warning messages from YPAO..……………………………………………………………………………………………………………………………109
3

CONTENTS
ENJOYING SOUND 110
Enjoying sound field effects.. ………………………………………………………… 110
Selecting your favorite sound mode.. …………………………………………………………………………………………………………………..110
Playing back with surround effects optimized for the scene (SURROUND:AI)..…………………………………………………………111
Enjoying 3-dimentional sound fields.. ………………………………………………………………………………………………………………….112
Enjoying sound field effects optimized for the type of content..……………………………………………………………………………..113
Enjoying sound field effects without surround speakers (Virtual CINEMA DSP)..………………………………………………………116
Enjoying surround sound with 5 speakers placed in front (Virtual CINEMA FRONT)..……………………………………………….. 117
Enjoying surround sound with headphones (SILENT CINEMA).. ……………………………………………………………………………..118
Enjoying unprocessed playback..…………………………………………………….119
Enjoying original sound (straight decode)..…………………………………………………………………………………………………………..119
Enjoying multichannel playback without sound field effects (surround decoder).. ………………………………………………….120
Enjoying higher quality playback (Pure Direct).. ……………………………………………………………………………………………………121
Enjoying 3-dimensional sound..………………………………………………………122
Enjoying Dolby Atmos® and DTS:X™..…………………………………………………………………………………………………………………… 122
Enjoying favorite sound..………………………………………………………………123
Enjoying more powerful sound to the audio source (Compressed Music Enhancer)..……………………………………………….123
Enhancing the low-frequency range from the subwoofer.. …………………………………………………………………………………….124
Enjoying powerful sound at low volume.. …………………………………………………………………………………………………………….125
Making easy to hear the dialogue sounds..……………………………………………………………………………………………………………126
Enjoying bass sound with small speakers (Extra Bass).. …………………………………………………………………………………………127
Enjoying sound better..……………………………………………………………………………………………………………………………………….128
PLAYBACK 129
Basic playback procedure..……………………………………………………………129
Basic procedure for playing back video and music..……………………………………………………………………………………………… 129
Selecting an HDMI output jack.. …………………………………………………………………………………………………………………………..130
Item names and functions of the playback screen..……………………………………………………………………………………………….131
Item names and functions of the browse screen.. …………………………………………………………………………………………………132
Playing back TV audio.. ………………………………………………………………..133
Playback of TV audio with eARC/ARC..…………………………………………………………………………………………………………………. 133
Playback of TV audio with a digital optical cable.. …………………………………………………………………………………………………134
4

CONTENTS
Listening to the radio..…………………………………………………………………135
Preparing to listen to the radio.. ………………………………………………………………………………………………………………………….135
Listening to the radio.. ………………………………………………………………………………………………………………………………………..138
Displaying the Radio Data System information..……………………………………………………………………………………………………139
Displaying the DAB information.. …………………………………………………………………………………………………………………………140
Registering a radio station manually.. ………………………………………………………………………………………………………………….141
Registering FM radio stations automatically (Auto Preset).. …………………………………………………………………………………..142
Clearing preset stations.. …………………………………………………………………………………………………………………………………….143
Playing back music with the Bluetooth® connection.. …………………………… 144
Playback of Bluetooth® device music on the unit.. ………………………………………………………………………………………………..144
Playback of music using Bluetooth® speakers/headphones.. …………………………………………………………………………………145
Playing back music with AirPlay.. …………………………………………………… 146
Playback of music with AirPlay..…………………………………………………………………………………………………………………………..146
Playing back music stored on a USB flash drive..………………………………….147
Playback of USB flash drive content.. …………………………………………………………………………………………………………………..147
Playing back music stored on media servers (PCs/NAS)..………………………..149
Playback of music media servers (PCs/NAS).. ……………………………………………………………………………………………………….149
Listening to Internet radio..…………………………………………………………..150
Selecting an Internet radio station..……………………………………………………………………………………………………………………..150
Listening to music streaming services.. ……………………………………………. 151
Listening to a music streaming service.. ……………………………………………………………………………………………………………….151
USEFUL FUNCTIONS 152
Sleep timer function.. ………………………………………………………………….152
Setting the time of the sleep timer..……………………………………………………………………………………………………………………..152
SCENE function.. ………………………………………………………………………..153
Selecting the input source and favorite settings with one touch (SCENE).. ……………………………………………………………..153
Selecting a registered scene..………………………………………………………………………………………………………………………………154
Registering a scene.. …………………………………………………………………………………………………………………………………………..156
Shortcut function..……………………………………………………………………..157
Registering a favorite content as shortcut..…………………………………………………………………………………………………………..157
Recalling a registered content as shortcut.. ………………………………………………………………………………………………………….158
5

CONTENTS
ENJOYING IN MULTIPLE ROOMS (ZONES) 159
Preparing zones.. ……………………………………………………………………….159
Playback in multiple rooms (multi zone function).. ……………………………………………………………………………………………….159
Multi-zone configuration examples.. ……………………………………………………………………………………………………………………160
Connecting zone speakers..…………………………………………………………………………………………………………………………………162
Connecting an HDMI device in zone.. ……………………………………………………………………………………………………………………164
Operating zones..……………………………………………………………………….165
Turning on/off the power of zones..…………………………………………………………………………………………………………………….. 165
Basic procedure in zone..…………………………………………………………………………………………………………………………………….166
Other procedure in zone.. ……………………………………………………………………………………………………………………………………167
Enjoying the same source in multiple rooms (party mode)..…………………………………………………………………………………..168
CONFIGURATIONS 169
Configuring the unit..…………………………………………………………………..169
Using the menu.. ………………………………………………………………………………………………………………………………………………..169
Configuring playback settings for different playback sources (Option menu)..170
Basic operation of the Option menu.. …………………………………………………………………………………………………………………..170
Option menu items.. …………………………………………………………………………………………………………………………………………..171
Adjusting the tone of the audio output..……………………………………………………………………………………………………………….172
Configuring the volume automatically based on the YPAO measurement results..…………………………………………………..173
Adjusting the dialogue sounds.. …………………………………………………………………………………………………………………………..175
Adjusting the delay of the Lipsync function..…………………………………………………………………………………………………………178
Setting Compressed Music Enhancer..………………………………………………………………………………………………………………….179
Setting the high-resolution mode.. ………………………………………………………………………………………………………………………180
Correcting volume differences during playback.. ………………………………………………………………………………………………….181
Setting the use of Extra Bass.. ……………………………………………………………………………………………………………………………..183
Enabling the video signal processing..………………………………………………………………………………………………………………….184
Selecting a video source to be displayed with the selected audio source..………………………………………………………………185
Configuring the shuffle/repeat setting..………………………………………………………………………………………………………………..186
Adding a “NET RADIO” radio station to the “Favorites” folder.. ………………………………………………………………………………188
Removing a radio station from the “Favorites” folder.. ………………………………………………………………………………………….189
Checking the current status information..…………………………………………………………………………………………………………….190
6

CONTENTS
Configuring various functions (Setup menu)..……………………………………..191
Basic operation of the Setup menu..…………………………………………………………………………………………………………………….191
Setup menu items.. …………………………………………………………………………………………………………………………………………….193
Configuring the speaker settings.. ……………………………………………………………………………………………………………………….201
Configuring the sound settings.. ………………………………………………………………………………………………………………………….217
Configuring the scene settings.. …………………………………………………………………………………………………………………………..237
Configuring the video/HDMI settings.. ………………………………………………………………………………………………………………….239
Configuring the network settings..………………………………………………………………………………………………………………………. 250
Configuring the Bluetooth® settings.. …………………………………………………………………………………………………………………..259
Configuring the multi zone settings.. ……………………………………………………………………………………………………………………265
Configuring the system settings..………………………………………………………………………………………………………………………… 277
Configuring the unit’s settings by operation of the body front panel (Front
Display menu)..………………………………………………………………………….305
Basic operation of the Front Display menu.. …………………………………………………………………………………………………………305
Front Display menu items..………………………………………………………………………………………………………………………………….306
Adjusting the brightness of the front display.. ………………………………………………………………………………………………………307
Setting the power of each zone to on/standby.. ……………………………………………………………………………………………………308
Setting the use of the volume on the front panel..………………………………………………………………………………………………… 309
Setting the use of the input selector on the front panel.. ……………………………………………………………………………………….310
Setting the use of the scene key on the front panel.. ……………………………………………………………………………………………..311
Setting the use of the operation sound.. ………………………………………………………………………………………………………………312
Setting the use of the remote control.. …………………………………………………………………………………………………………………313
Selecting the remote control ID.. …………………………………………………………………………………………………………………………314
Setting information items to be skipped when operating SELECT/ENTER..……………………………………………………………..315
Restoring the default settings.. ……………………………………………………………………………………………………………………………316
Backing up and restoring all the settings.. ……………………………………………………………………………………………………………317
Updating the firmware..………………………………………………………………………………………………………………………………………318
Setting the use of Retail Demo Mode.. ………………………………………………………………………………………………………………….319
UPDATE 320
Updating the unit’s firmware..……………………………………………………….320
Firmware updates.. …………………………………………………………………………………………………………………………………………….320
Updating the unit’s firmware via the network..……………………………………………………………………………………………………..321
Updating the unit’s firmware using a USB flash drive..…………………………………………………………………………………………..323
7

CONTENTS
TROUBLESHOOTING 324
When any problem appears..………………………………………………………….324
If trouble occurs, first check the following:..………………………………………………………………………………………………………….324
Power, system, or remote control trouble..…………………………………………………………………………………………………………..325
Audio trouble..……………………………………………………………………………………………………………………………………………………335
Video trouble.. ……………………………………………………………………………………………………………………………………………………346
FM/AM radio trouble.. …………………………………………………………………………………………………………………………………………351
DAB radio trouble..…………………………………………………………………………………………………………………………………………….. 356
USB trouble.. ……………………………………………………………………………………………………………………………………………………..361
Network trouble.. ……………………………………………………………………………………………………………………………………………….365
Bluetooth® trouble.. ……………………………………………………………………………………………………………………………………………376
Error indications on the front display..……………………………………………..378
Error indications on the front display.. …………………………………………………………………………………………………………………378
APPENDIX 379
Care and cleaning..……………………………………………………………………..379
Care for the front panel..……………………………………………………………………………………………………………………………………..379
Connecting to a network wirelessly..………………………………………………..380
Selecting a wireless network connection method.. ……………………………………………………………………………………………….380
Setting up a wireless connection using the WPS button.. ………………………………………………………………………………………381
Setting up a wireless connection using an iPhone..………………………………………………………………………………………………. 382
Setting up a wireless connection by selecting from the list of available access points.. ……………………………………………383
Setting up a wireless connection manually..………………………………………………………………………………………………………… 384
Setting up a wireless connection using the WPS PIN code.. ……………………………………………………………………………………385
Using front presence speakers..………………………………………………………386
Front presence speaker layout..………………………………………………………………………………………………………………………….. 386
Installing the front presence speakers in Front Height position.. ……………………………………………………………………………387
Installing the front presence speakers in Overhead position.. ………………………………………………………………………………..388
Using Dolby Enabled speakers as the front presence speakers.. …………………………………………………………………………….389
Supported devices and file formats..………………………………………………..390
Supported Bluetooth® devices.. …………………………………………………………………………………………………………………………..390
Supported USB devices.. …………………………………………………………………………………………………………………………………….391
Supported file formats..………………………………………………………………………………………………………………………………………392
Zone output..…………………………………………………………………………….393
Multi-zone output..……………………………………………………………………………………………………………………………………………..393
Trademarks..…………………………………………………………………………….394
Trademarks.. ……………………………………………………………………………………………………………………………………………………..394
8

CONTENTS
Specifications.. …………………………………………………………………………. 396
Specifications.. …………………………………………………………………………………………………………………………………………………..396
Default settings..………………………………………………………………………..404
Default settings of the Option menu..…………………………………………………………………………………………………………………..404
Default settings of the Setup menu..…………………………………………………………………………………………………………………….405
Default settings of the Front Display menu.. …………………………………………………………………………………………………………410
9

BEFORE USING THE UNIT > Read me first
BEFORE USING THE UNIT
Read me first
How to use this guide
Thank you very much for purchasing a Yamaha product.
(
This unit is a product for enjoying video and music at home.
(
This guide explains preparations and operations for everyday users of the unit.
(
To use the unit safely and correctly, be sure to read this guide carefully before using it.
When reading this guide, mind the following items.
(
The illustrations of the main unit used in this guide are of the U.S.A. model, unless otherwise specified.
(
This guide mainly explains operations using the menu displayed on the TV.
(
This guide explains operations using the supplied remote control.
(
This guide describes all the “iPod touch”, “iPhone” and “iPad” as the “iPhone”. “iPhone” refers to “iPod
touch”, “iPhone” and “iPad”, unless otherwise specified.
(
Symbols and signal words in this guide
CAUTION:
Indicates precautions for the possibility of minor or moderate injury.
NOTICE:
Indicates precautions for use to avoid the possibility of malfunction/damage to the unit and unit’s data
loss.
NOTE:
Indicates instructions and supplementary explanations for optimum use.
[Search tag]:
Indicates a keyword used in searches. This serves as a link from “Quick Start Guide” to “User Guide”.
NOTE
Read “Safety Brochure” and “Quick Start Guide” first.
10

BEFORE USING THE UNIT > Read me first
Glossary
For a glossary of terms used in this guide, refer to the site below. There are explanations of terms and
technologies for this product and also for Yamaha AV products in general.
https://manual.yamaha.com/av/cm/glossary/
11

BEFORE USING THE UNIT > Checking the accessories
Checking the accessories
Checking the accessories
Check that the following accessories are supplied with the product.
£ AM antenna (Except for U.K., Europe, Russia and Australia models)
£ FM antenna (Except for U.K., Europe, Russia and Australia models)
* One of the above is supplied depending on the region of purchase.
£ DAB/FM antenna (U.K., Europe, Russia and Australia models)
£Power cable
* The supplied power cable varies depending on the region of purchase.
£ YPAO microphone
£Microphone base and Pole
12

BEFORE USING THE UNIT > Checking the accessories
* The microphone base and pole are used for angle/height measurement during YPAO.
£ Remote control
£ Batteries (AAA, LR03, UM-4) (x2)
£ Quick Start Guide
£ Safety Brochure
NOTE
Access the Yamaha Downloads site to download the latest Quick Start Guide.
http://download.yamaha.com/
13

BEFORE USING THE UNIT > Using the remote control
Using the remote control
Insert the batteries in the remote control
Insert the batteries the right way round.
14
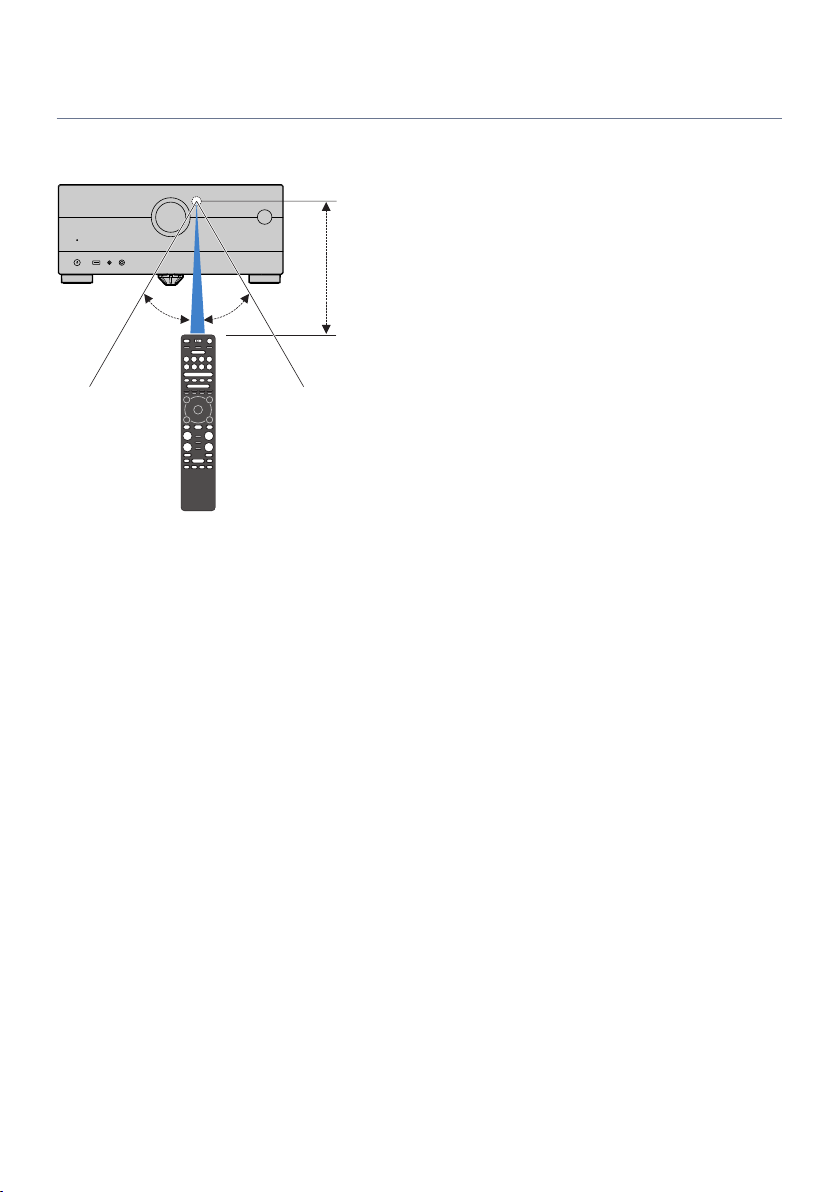
Within 6 m (20 ft)
30° 30°
BEFORE USING THE UNIT > Using the remote control
Operating range of the remote control
The operating range of the remote control is shown in the following figure.
Point the remote control at the remote control sensor on the unit.
15

FEATURES > What you can do with the unit
FEATURES
What you can do with the unit
Supporting various speaker system
According to the number of speakers that you are using, you can enjoy your favorite acoustic spaces in
various styles.
(
7.1/5.1.2-channel system
(
5.1.2-channel system
(
7.1-channel system
(
5.1-channel system
(
3.1.2-channel system
(
3.1-channel system
(
2.1-channel system
(
Virtual CINEMA FRONT
(
Multi zone function
(
Bi-amp connection
Related links
(
“Speaker systems recommended to the unit (basic setup)”(p.41)
(
“Other speaker systems (basic setup)”(p.43)
(
“Speaker systems using the unit’s internal amplifier (advanced setup)”(p.58)
16

FEATURES > What you can do with the unit
Automatically optimizing the speaker settings
YPAO function detects speaker connections, measures the distances from them to your listening positions
(measuring positions) by using YPAO microphone measurement, and then automatically optimizes the
speaker settings, such as volume balance and acoustic parameters, to suit your room (YPAO: Yamaha
Parametric room Acoustic Optimizer).
(
“Flow of the speaker configurations”(p.94)
17

FEATURES > What you can do with the unit
Enjoying sound field effects with much presence
The unit is equipped with a variety of sound programs and surround decoders that allow you to enjoy
playback sources with your favorite sound mode (such as sound field effect or stereo playback).
(
“Enjoying 3-dimentional sound fields”(p.112)
(
“Enjoying sound field effects optimized for the type of content”(p.113)
(
“Enjoying sound field effects without surround speakers (Virtual CINEMA DSP)”(p.116)
(
“Enjoying surround sound with headphones (SILENT CINEMA)”(p.118)
(
“Enjoying original sound (straight decode)”(p.119)
(
“Enjoying multichannel playback without sound field effects (surround decoder)”(p.120)
(
“Enjoying higher quality playback (Pure Direct)”(p.121)
(
“Enjoying bass sound with small speakers (Extra Bass)”(p.127)
(
“Enjoying more powerful sound to the audio source (Compressed Music Enhancer)”(p.123)
(
“Enjoying Dolby Atmos® and DTS:X™”(p.122)
18

FEATURES > What you can do with the unit
Wide variety of supported content via network
When the unit is connected to a network, you can enjoy the various kinds of content via network on the unit.
(
“Playback of music with AirPlay”(p.146)
(
“Playback of music media servers (PCs/NAS)”(p.149)
(
“Selecting an Internet radio station”(p.150)
(
“Listening to a music streaming service”(p.151)
19

FEATURES > What you can do with the unit
Playing back content of various devices
A number of HDMI jacks and various input/output jacks on the unit allow you to connect video devices (such
as BD/DVD players), audio devices (such as CD players), Bluetooth devices (such as smartphones), game
consoles, USB flash drives, and other devices. You can play back content of them or tune in to a radio station.
(
“Listening to the radio”(p.138)
(
“Playback of Bluetooth® device music on the unit”(p.144)
(
“Playback of USB flash drive content”(p.147)
20

FEATURES > What you can do with the unit
Useful functions
The unit is equipped with the various useful functions. The SCENE function allows you to select the input
source and settings registered to the corresponding scene, such as sound program and Compressed Music
Enhancer on/off, with just one touch. You can recall the registered content (such as music stored on media
servers and Internet radio stations) by selecting the shortcut number. When the unit is connected to an HDMI
Control-compatible TV with an HDMI cable, you can control the unit (such as power and volume) with TV
remote control operations.
(
“Selecting the input source and favorite settings with one touch (SCENE)”(p.153)
(
“Registering a favorite content as shortcut”(p.157)
(
“Playback of TV audio with eARC/ARC”(p.133)
21

FEATURES > What you can do with the unit
Supporting wireless speakers
The unit is equipped with the function connected with speakers wirelessly. You can enjoy audio played back
on the unit using Bluetooth speakers/headphones. Also, using devices that support the MusicCast Surround
function, the surround speakers and subwoofer can be wireless.
(
“Playback of music using Bluetooth® speakers/headphones”(p.145)
(
“Configuring wireless speakers”(p.92)
22

FEATURES > Useful applications
Useful applications
AV SETUP GUIDE
AV SETUP GUIDE is an application that assists you with cable connections between AV Receiver
and playback devices as well as AV Receiver setup. This app guides you through the various
settings such as speaker connections, TV and playback device connections and selecting the
speaker system.
For details, search for “AV SETUP GUIDE” on the App Store or Google Play.
23

FEATURES > Useful applications
MusicCast CONTROLLER
MusicCast CONTROLLER is an application that allows you to link a MusicCast compatible device to
other MusicCast compatible devices in other rooms and play them back simultaneously. This app
lets you use your smartphone or other mobile device instead of the remote control to easily select
music to play back as well as configure the unit and MusicCast compatible devices.
For details, search for “MusicCast CONTROLLER” on the App Store or Google Play.
24

PHONES
1 2 3 4
MENU(CONNECT)
SELECT/ENTER
RETURN
SCENE
USB YPAO
5V 1A
ZONE
SURROUND:AI
PURE DIRECT
PART NAMES AND FUNCTIONS > Unit body
PART NAMES AND FUNCTIONS
Unit body
Part names and functions of the front panel
The part names and functions of the front panel are as follows.
a
z (power)
Turns on/off (standby) the Main zone (p.87).
b
Standby indicator
Lights up when the unit is in standby mode under any of the following conditions.
(
HDMI Control is enabled (p.243)
(
Standby Through is enabled (p.248)
(
Network Standby is enabled (p.254)
(
Bluetooth Standby is enabled (p.261)
c
VOLUME
Adjusts the volume.
d
Remote control sensor
Receives remote control signals (infrared) (p.15).
e
Front display
Displays information and menu (p.27).
NOTE
Under the high or low temperature, the visibility of the character is sometimes deteriorated by the LCD characteristics. It is not
a malfunction.
25

PART NAMES AND FUNCTIONS > Unit body
f
Indicator
Lights up under the following condition.
SURROUND:AI
Lights up when the SURROUND:AI is working (p.111).
PURE DIRECT
Lights up when PURE DIRECT is working (p.121).
ZONE
Lights up when the zone output is enabled (p.165).
g
SELECT/ENTER
Selects the input source and operates the front display.
h
USB jack
For connecting a USB flash device (p.147).
i
YPAO jack
For connecting the supplied YPAO microphone (p.94).
j
PHONES jack
For connecting headphones.
k
Touch panel
For operation by a touch. The operation sound rings.
SCENE
Switches with one touch between multiple settings set using the SCENE function. Also, turns on the unit when it is in
standby mode (p.153).
RETURN
Operates the “Front Display” menu.
MENU (CONNECT)
Operates the “Front Display” menu.
Enters the MusicCast network addition and the wireless LAN setup by holding down for 5 seconds.
Related links
“Care for the front panel”(p.379)
26
PART NAMES AND FUNCTIONS > Unit body
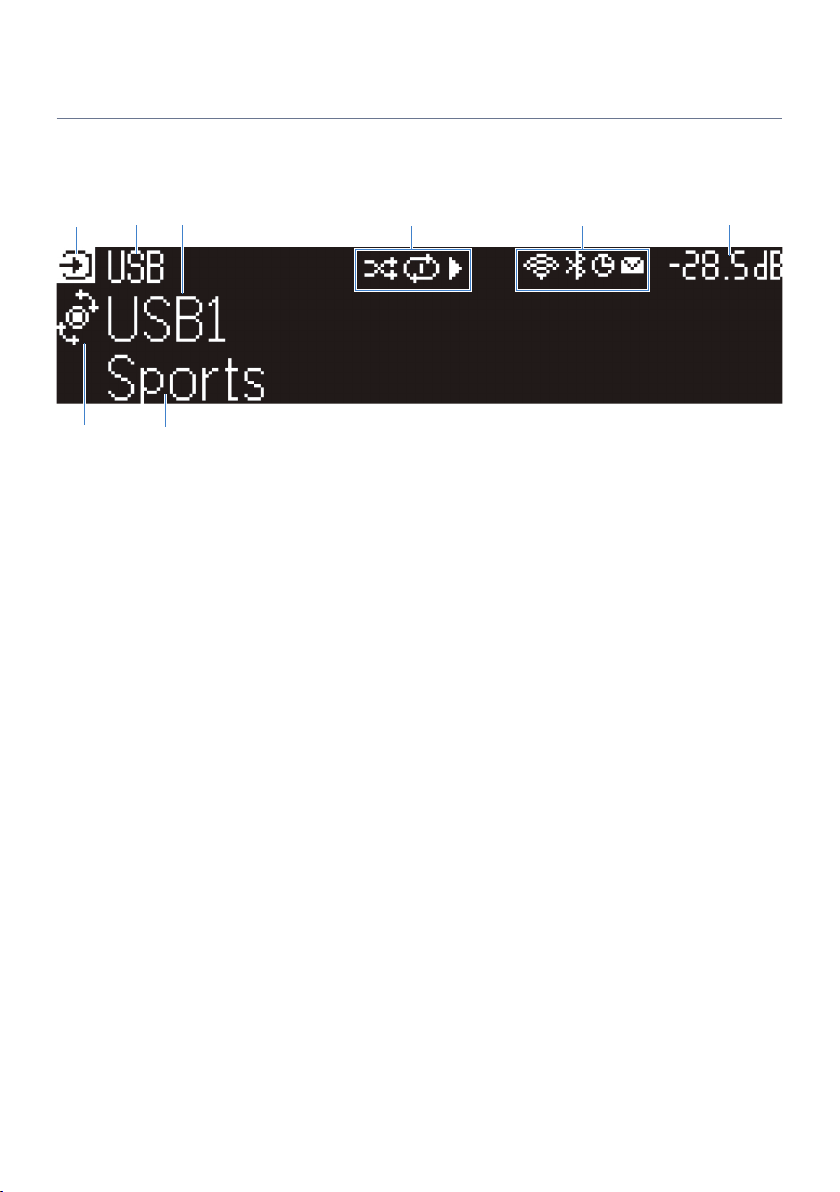
Front display
Part names and functions of the front display
The part names and functions of the front display are as follows.
a
Operation mode icon
Indicates the current mode of the front display (the input select mode or the info select mode).
b
Input default name
Displays the default name when you have renamed the input source name.
c
Main information
Displays information, such as the current input name, input information item, according to the mode of the front
display.
d
e
Play status icon
Shuffle
Lights up when the shuffle setting is turned on (p.186).
Repeat
Lights up when the repeat setting is turned on (p.187).
Playback/Pause/Stop
Lights up while the unit plays back a song, pauses or stops.
Status icon
Wireless LAN
Lights up while the unit is connected to a wireless network (p.380).
Bluetooth
Lights up while the unit is connected to a Bluetooth device (p.144).
Sleep timer
Lights up when the sleep timer is on (p.152).
Firmware update
Lights up when a firmware update is available via the network (p.320).
27

PART NAMES AND FUNCTIONS > Unit body
f
Volume
Indicates the current volume.
g
SELECT/ENTER indicator
Indicates the available SELECT/ENTER status (push or rotate) for the right display area.
h
Additional information
Displays the additional information of the current input such as Reception, DSP Program.
NOTE
(
Depending on the content of playback, the unit may not get its playback status correctly. For details on the playback status, refer
to the MusicCast CONTROLLER app or your playback software.
(
If the unit is the slave device of the MusicCast network, the playback status is displayed as follows, depending on the master
device.
(
Playback icon is lit up on the front display of the unit when the content of audio playback is selected as the input source of the
master device, and the master device pauses.
(
Playback icon is always lit up on the front display of the unit when “HDMI”, “AUDIO”, “PHONO”, “TV” or “TUNER” is selected as
the input source of the master device.
28
PART NAMES AND FUNCTIONS > Unit body
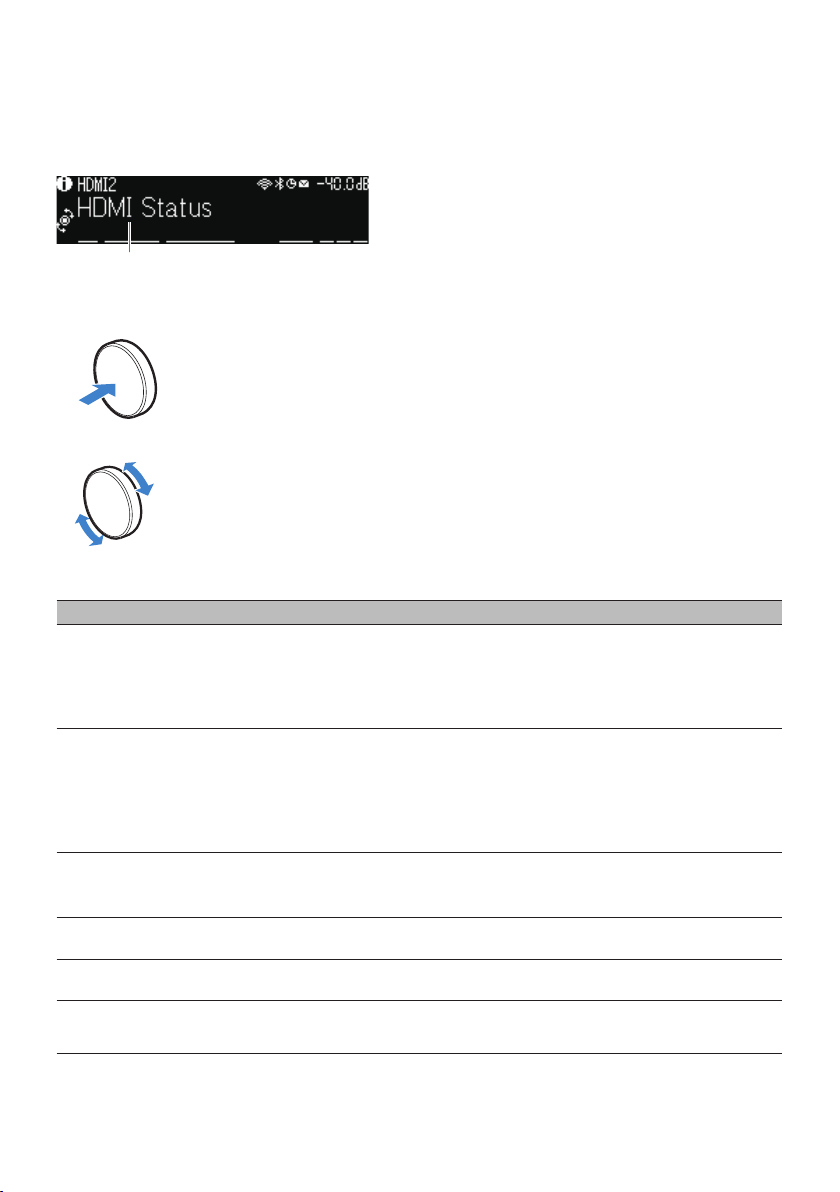
Selecting the input information displayed on the front display
The front display in the info select mode displays additional information related to the input source on the
front display.
Push SELECT/ENTER on the front panel to switch the front display to the info select mode. And rotate
SELECT/ENTER to select between the various items. The additional information is displayed under the item.
Displayed items vary depending on the input source.
Currently input source Displayed item
HDMI
AUDIO
PHONO
TV
TUNER (FM/AM)
TUNER (DAB)
SERVER
NET RADIO
Spotify
Deezer
DSP Program, Audio Decoder, Output Channel, HDMI Status, Zone Status, System Status
Reception, DSP Program, Audio Decoder, Output Channel, HDMI Status, Zone Status,
System Status
(U.K., Europe and Russia models only)
Radio Data System data is also available when the unit is tuned into a Radio Data System
broadcasting station. For details, see the following:
(
“Displaying the Radio Data System information”(p.139)
(U.K., Europe, Russia and Australia models only)
For details, see the following:
(
“Displaying the DAB information”(p.140)
Song, Artist, Album, IP Address, Ethernet MAC Address, Wi-Fi MAC Address, DSP Program,
Audio Decoder, Output Channel, HDMI Status, Zone Status, System Status
Station, IP Address, Ethernet MAC Address, Wi-Fi MAC Address, DSP Program, Audio
Decoder, Output Channel, HDMI Status, Zone Status, System Status, Song, Album
Track, Artist, Album, IP Address, Ethernet MAC Address, Wi-Fi MAC Address, DSP
Program, Audio Decoder, Output Channel, HDMI Status, Zone Status, System Status
29
PART NAMES AND FUNCTIONS > Unit body
Currently input source Displayed item
music streaming services
(with playback
information)
Song, Artist, Album, IP Address, Ethernet MAC Address, Wi-Fi MAC Address, DSP Program,
Audio Decoder, Output Channel, HDMI Status, Zone Status, System Status
AirPlay
music streaming services
(without playback
information)
Alexa
DSP Program, Audio Decoder, Output Channel, HDMI Status, Zone Status, System
Status, IP Address, Ethernet MAC Address, Wi-Fi MAC Address
MusicCast Link
Bluetooth
USB
Song, Artist, Album, DSP Program, Audio Decoder, Output Channel, HDMI Status, Zone
Status, System Status
NOTE
(
You can set “Information Skip” in the “Front Display” menu to skip information items on the front display.
(
When you have not operated SELECT/ENTER for a few seconds, the front display turns to the input select mode automatically.
Related links
“Setting information items to be skipped when operating SELECT/ENTER”(p.315)
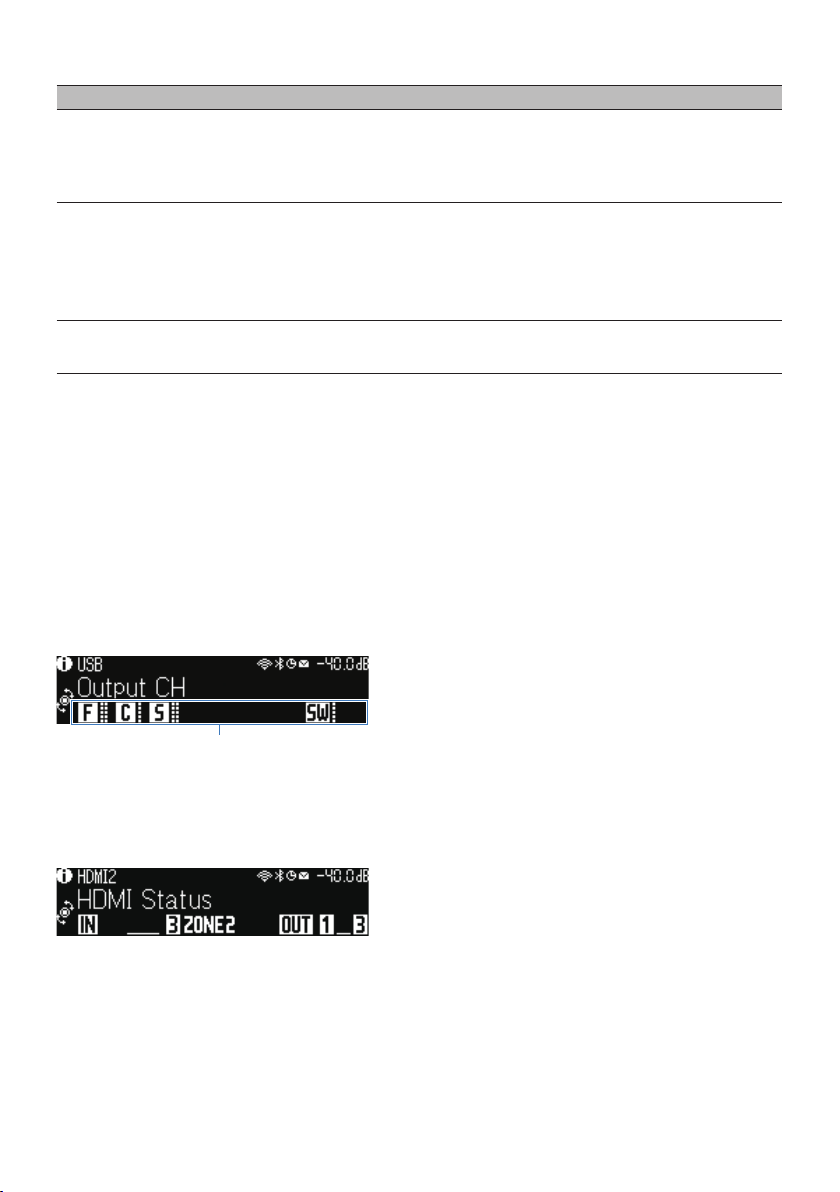
Output Channel
n
Information about speaker terminals that are currently outputting sound is displayed. No output is indicated
by an underscore.
HDMI Status
n
Information about the HDMI input jacks (connection) and the HDMI out jack (connection, destination) is
displayed. No connection is indicated by an underscore.
Zone Status
n
Information about the zone number or letter that is currently enabled is displayed. The disabled zone is
indicated by an underscore.
30
Loading…
View the manual for the Yamaha MusicCast Aventage RX-A4A here, for free. This manual comes under the category receivers and has been rated by 2 people with an average of a 8.9. This manual is available in the following languages: English. Do you have a question about the Yamaha MusicCast Aventage RX-A4A or do you need help?
Ask your question here
Yamaha MusicCast Aventage RX-A4A specifications
Below you will find the product specifications and the manual specifications of the Yamaha MusicCast Aventage RX-A4A.
The yamaha musiccast aventage rx-a4a is a 7.2 channel receiver that can deliver a power output of 110 W per channel between 20 — 20KHz at 8 Ohm and 165 W per channel at 1KHz at 8 Ohm. This surround receiver uses digital signal processing (DSP) technology and comes with a remote control. The receiver supports a wide range of audio formats, such as AAC, AIFF, DSD, FLAC, MP3, and WMA. It also includes an Audio Return Channel (ARC) and provides video upscaling capabilities.
The receiver has 7 HDMI inputs and 3 HDMI outputs, all with HDMI version 2.1 support, making it compatible with the latest video formats and providing superior image quality. The Yamaha MusicCast Aventage RX-A4A can upscale video signals to support resolutions of up to 8K.
The yamaha musiccast aventage rx-a4a is built with premium materials to ensure durability and longevity. Its compact design makes it easy to install and use. This receiver is an ideal audio accessory for those who enjoy high-quality sound and an immersive audio experience.
Overall, the Yamaha MusicCast Aventage RX-A4A is a powerful and versatile receiver that delivers excellent audio and video performance. Its wide range of audio formats support and HDMI version provides compatibility with the latest video formats. Its durability and compact design make it an ideal choice for anyone looking for a reliable and high-quality audio accessory.
Audio output channels
7.2 channels
Digital Signal Processing (DSP)
Yes
Audio formats supported
AAC, AIFF, DSD, FLAC, MP3, WMA
General
| Brand | Yamaha |
| Model | MusicCast Aventage RX-A4A | ARXA4ABLB |
| Product | receiver |
| EAN | 4957812661454 |
| Language | English |
| Filetype | User manual (PDF), Product Brochure (PDF) |
Audio
| Audio output channels | 7.2 channels |
| Power output per channel (20-20KHz@8 Ohm) | 110 W |
| Power output per channel (1KHz@8 Ohm) | 165 W |
| Receiver type | Surround |
| Audio D/A Converter (DAC) | 32-bit/384kHz |
| Pre-out channels | 7.1 |
Technical details
| Digital Signal Processing (DSP) | Yes |
| Remote control included | Yes |
| Product colour | Black |
| Audio decoders | DTS-HD Master Audio, DTS:X, Dolby Atmos, Dolby Digital Plus, Dolby Surround, Dolby TrueHD |
| Audio Return Channel (ARC) | Yes |
| HDMI version | 2.1 |
| HDCP | Yes |
| HDCP version | 2.3 |
| AirPlay | Yes |
| On Screen Display (OSD) | Yes |
| Auto standby | Yes |
| ECO mode | Yes |
| Apple docking | No |
| Display | — |
File formats
| Audio formats supported | AAC, AIFF, DSD, FLAC, MP3, WMA |
Video
Outputs
| Number of HDMI outputs | 3 |
| Headphone outputs | 1 |
| Remote (IR) output | 1 |
Inputs
| HDMI in | 7 |
| Digital audio optical in | 2 |
| Digital audio coaxial in | 1 |
| PC Audio in | Yes |
| Remote (IR) input | 1 |
| USB ports quantity | 1 |
Network
Radio
| Supported radio bands | AM, DAB, FM |
Power
| Power consumption (standby) | 0.4 W |
Weight & dimensions
| Width | 435 mm |
| Depth | 442 mm |
| Height | 191 mm |
| Weight | 16200 g |
Packaging content
Storage
| Card reader integrated | No |
Optical drive
| Optical drive included | No |
Ports & interfaces
| Speakers connectivity type | Banana connector |
| Connectivity technology | Wired & Wireless |
show more
Frequently Asked Questions
Can’t find the answer to your question in the manual? You may find the answer to your question in the FAQs about the Yamaha MusicCast Aventage RX-A4A below.
What is the weight of the Yamaha MusicCast Aventage RX-A4A?
The Yamaha MusicCast Aventage RX-A4A has a weight of 16200 g.
Can bluetooth devices of different brands be connected to each other?
Yes, bluetooth is a universal method that allows different devices equipped with bluetooth to connect to each other.
What is the height of the Yamaha MusicCast Aventage RX-A4A?
The Yamaha MusicCast Aventage RX-A4A has a height of 191 mm.
What is the width of the Yamaha MusicCast Aventage RX-A4A?
The Yamaha MusicCast Aventage RX-A4A has a width of 435 mm.
What is bluetooth?
Bluetooth is a way of exchanging data wirelessly between electronic devices via radio waves. The distance between the two devices that exchange data can in most cases be no more than ten metres.
What is the depth of the Yamaha MusicCast Aventage RX-A4A?
The Yamaha MusicCast Aventage RX-A4A has a depth of 442 mm.
What is HDMI?
HDMI stands for High-Definition Multimedia Interface. An HDMI cable is used to transport audio and video signals between devices.
When is my volume too loud?
A volume above 80 decibels can be harmful to hearing. When the volume exceeds 120 decibels, direct damage can even occur. The chance of hearing damage depends on the listening frequency and duration.
How can I best clean my receiver?
A slightly damp cleaning cloth or soft, dust-free cloth works best to remove fingerprints. Dust in hard-to-reach places is best removed with compressed air.
Wat is Dolby Atmos?
Dolby Atmos is a technology that ensures that the sound is reflected from the ceiling to where you are listening. This makes it possible to create a 5.1 effect with only 1 speaker.
Is the manual of the Yamaha MusicCast Aventage RX-A4A available in English?
Yes, the manual of the Yamaha MusicCast Aventage RX-A4A is available in English .
Is your question not listed? Ask your question here
Table of Contents
- Confirming accessories and preparing cables (not supplied)
- Accessories
- Connecting speakers/subwoofer
- Connecting external devices
- Connecting the FM/AM antennas or DAB/FM antenna
- Connecting the power cable to an AC wall outlet
- Turning on the unit
- Connecting to a network with the MusicCast CONTROLLER app
- Optimizing the speaker settings automatically (YPAO)
- Read User Manual Online (PDF format)
- Download This Manual (PDF format)
Quick Start Guide
AV Receiver RX-A4A
Manual Development Group © 2021 Yamaha Corporation
Published 03/2021 KSEM-A0
VDN9560
- Be sure to read the supplied “Safety Brochure” before using the unit.
- This document explains the basic speaker system setup and unit configuration.
RX-A4A
https://manual.yamaha.com/av/20/rxa4a/
This icon indicates that additional information can be found in the User
Guide.
AV
SETUP GUIDE
AV SETUP GUIDE is an app that guides you through the process of connecting a
TVplayback device, and speakers to the AV receiver. Search “AV SETUP GUIDE” on
the App Store or Google Play for details.
Confirming accessories and preparing cables (not supplied)

Accessories
- Remote control (×1)
- Batteries (AAA, LR03, UM-4) (×2)
- AM antenna (×1)1)
- FM antenna (×1)1) One of the above is supplied depending on the region of purchase.
- DAB/FM antenna 2)
- YPAO microphone (×1)
- Microphone base (×1) Pole (×1) Use to measure angle/height during YPAO
| 8. Power cable (×1) The supplied power cable varies depending on the region
of purchase.
• Quick Start Guide (this booklet)
• Safety Brochure 1)
1. Except for models for U.K., Europe, Russia, and Australia
1. Models for U.K., Europe, Russia, and Australia only Cables (not
supplied)
• Speaker cables (depending on the number of speakers)
• Audio pin cable (×1)
• HDMI cables (×3)
—|—
Connecting speakers/subwoofer
Positioning speakers for the 5.1.2-channel system


Precautions
• Do not prepare speaker cables in a place close to the unit.
Accidentally dropping wire strands into the unit’s interior could result in a
short circuit or malfunction of the unit.
Do not connect speaker cables improperly. Failure to observe this
precaution could cause a short circuit resulting in damage to, or
malfunctioning of, the unit or
speakers.
https://manual.yamaha.com/av/20/rxa4a/q1connectingsp.html
• Other speaker configurations
• Information regarding the speaker impedance
Connecting external devices

To play the TV sound through this unit, configure settings on both the unit
and TV.
https://manual.yamaha.com/av/20/rxa4a/q2connectingtv.html
Connecting the FM/AM antennas or DAB/FM antenna

|

—|—
Connecting the power cable to an AC wall outlet

Turning on the unit
-
Press

-
Select this unit as the input source on the TV.

If “Check SP Wires” is shown on the front display when the unit is turned on,
turn off the unit and be sure that speaker cables have not caused a short
circuit.
The network setting screen is displayed on the TV. Press (RETURN) to cancel
this screen and then go to step 7.
Connecting to a network with the MusicCast CONTROLLER app
-
Download the dedicated MusicCast CONTROLLER app to your mobile device on the App Store or Google Play.
-
Follow the app’s on-screen instructions to configure network settings.

Important notice regarding information security
Visit the website shown at right for details.
https://manual.yamaha.com/av/policy/mcc/
Optimizing the speaker settings automatically (YPAO)
The Yamaha Parametric room Acoustic Optimizer (YPAO) function detects speaker
connections measures the distances from them to your listening position(s),
and then automatically optimizes the speaker settings, such as volume balance
and acoustic parameters, to suit your room.

Note the following regarding YPAO measurement
• Do not let children or pets into the room as test tones are output at
high volume. (Test tone volume cannot be adjusted.)
- Turn on the subwoofer and set the volume to half. If the crossover frequency can be adjusted, set it to the maximum.
- Connect the YPAO microphone to the unit. The start-up screen is displayed on the TV. A
- Press (ENTER) on the remote control. The measurement will start in 10 seconds. It takes about 3 minutes to measure. The screen is displayed on the TV when the measurement finishes. Select “Measurement result” and press (ENTER) to display the measurement result if required. B
- Use the cursor keys (∧/∨) on the remote control to select “Save” and press (ENTER) on the remote control.
- Disconnect the YPAO microphone from the unit.

If an error message (such as ERROR 1) or warning
https://manual.yamaha.com/av/20/rxa4a/q3ypao.html
|
Playing a BD/DVD
-
Press SCENE 1.
HDMI1 is selected as the input source.
HDMI1 can also be selected using INPUT. -
Start playback on the BD/DVD player.
-
Adjust the volume using VOLUME.
—|—
SCENE function
https://manual.yamaha.com/av/20/rxa4a/q4scene.html

| Playing music files on a Bluetooth ® device
- Press BLUETOOTH.
- Select the unit from the available device list on the Bluetooth device.
- Select a music file and start playback on the Bluetooth device.
—|—
AirPlay
Click or tap the AirPlay icon in iTunes or on the iPhone, and select the unit
as the audio output destination to listen to music using the AirPlay function.
Read User Manual Online (PDF format)
Read User Manual Online (PDF format) >>
Download This Manual (PDF format)
Download this manual >>