
SERVICE MANUAL
n CONTENTS
SPECIFICATIONS……………………………………………………………………….. 3
PANEL LAYOUT………………………………………………………………………….. 5
CIRCUIT BOARD LAYOUT & WIRING……………………………………………. 7
BLOCK DIAGRAM……………………………………………………………………….. 8
DISASSEMBLY PROCEDURE………………………………………………………. 9
CIRCUIT BOARDS…………………………………………………………………….. 16
DMLCD Circuit Board Check Method……………………………………………. 22
TEST PROGRAM………………………………………………………………………. 23
BACKUP…………………………………………………………………………………… 30
INITIALIZATION…………………………………………………………………………. 31
SYSTEM BOOTING FLOW CHART……………………………………………… 32
PARTS LIST
OVERALL CIRCUIT DIAGRAM
PK
001996
2020.09
-A0
© 2020 Yamaha Corporation.
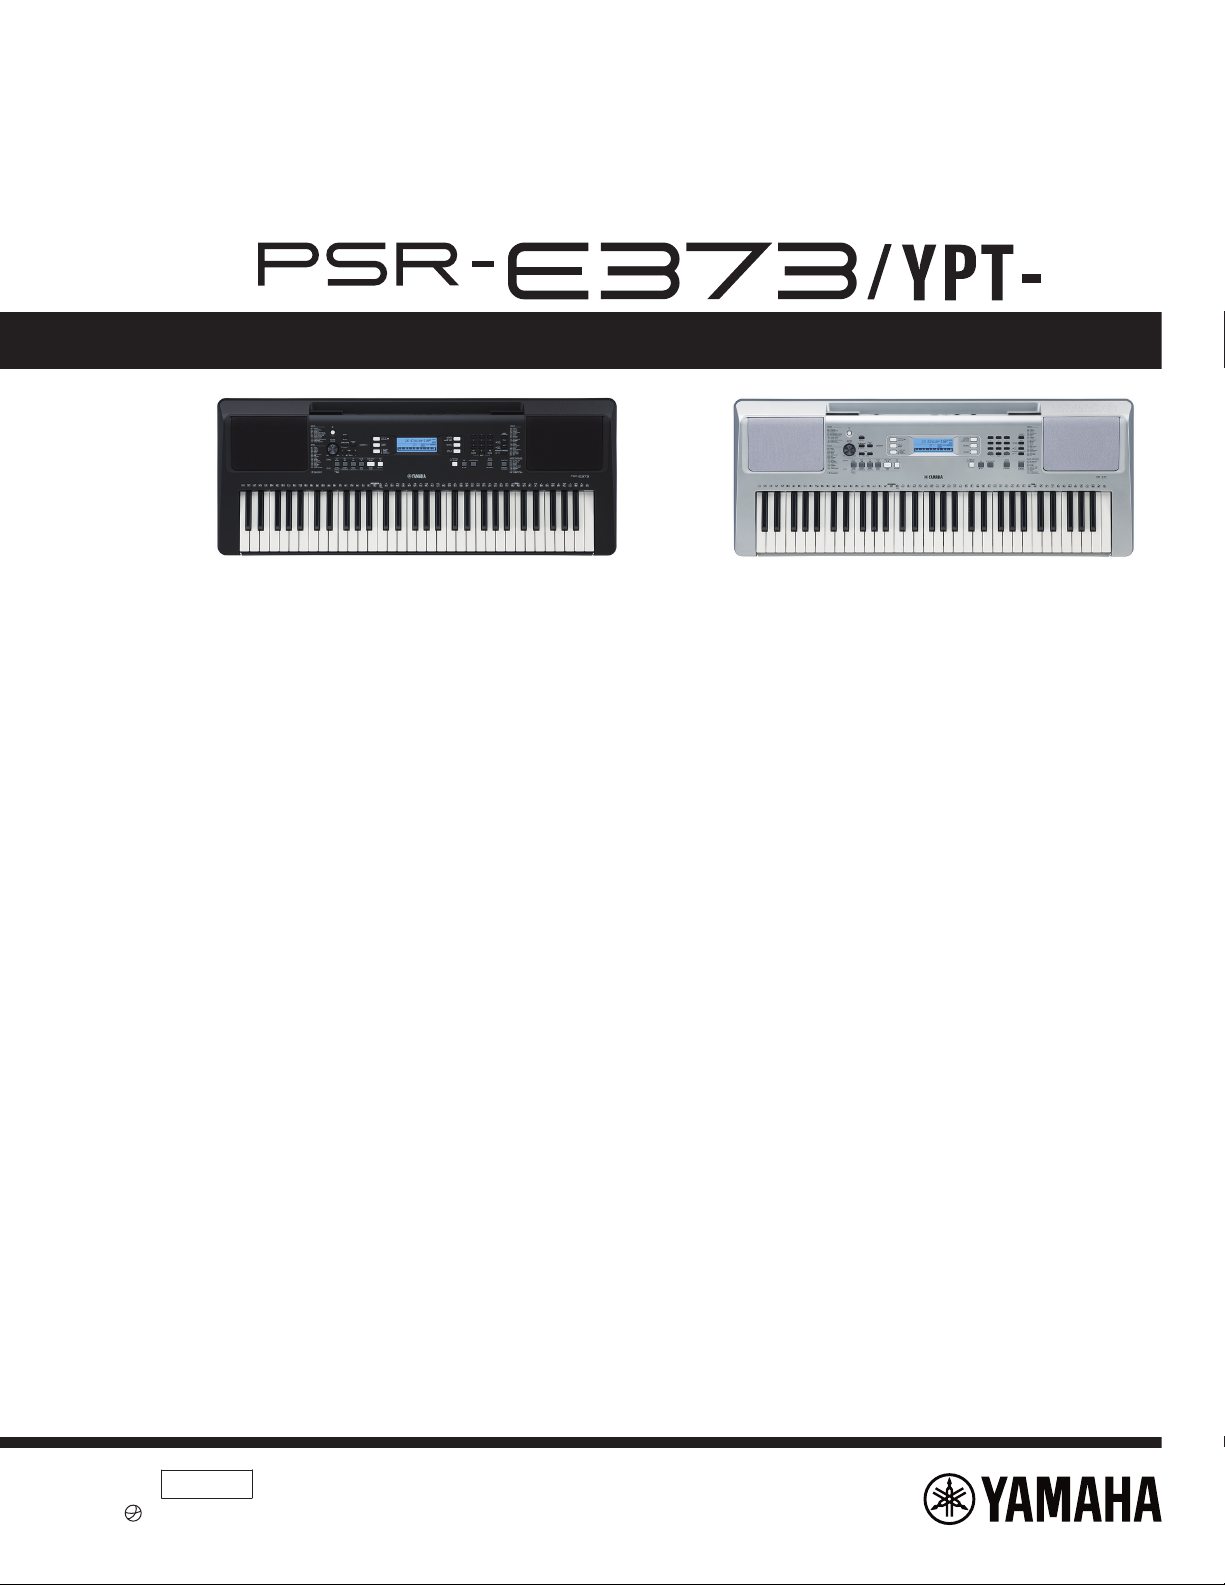
PSR-E373/YPT-370
IMPORTANT NOTICE
This manual has been provided for the use of authorized Yamaha Ret ailers and t heir service personnel. It has been assumed that basic
service procedures inherent to the industry, and more specically Yamaha Product s, are already known and understood by the users,
and have theref ore not been restated.
WARNING : Failure to follow appropriate servi ce and safe ty procedures when serv icing this product may result in personal injury,
destruction of expensive components and failure of t he product t o perform as specied. For these reasons, we advise
all Yamaha product owners that all service required should be performed by an aut horized Yamaha Retailer or the
appointed service representative.
IMPORTANT :
This presentat ion or sale of this manual to any individual or rm does not constitu te authorizat ion certication,
recognition of any applic able technical capabilit ies, or establish a principal-agent relationship of any form.
The data provided is believed to be accurate and applic able to the unit(s) indicated on the cover. The research engineering, and servi ce
departments of Yamaha are continually striving to improve Yamaha products. Modications are, therefore, inevitable and changes in
specication are subject to change without notice or obligation to retrot. Should any discrepancy appear to exist, please contact the
distributor’s Servic e Division.
WARNING : Static discharges can destroy expensive components. Discharge any static electricity your body may have accumulated
by grounding yourself to the ground bus in the unit (heavy gauge black wires connect to this bus.)
IMPORTANT : Turn the unit OFF during disassembly and parts replacement. Recheck all work before you apply power to the unit.
WARNING
Components having special characteristics are marked and must be replaced with parts having specication equal to those
originally installed.
Saving and backing up your data
Some data items are automatically saved as backup data in the internal memory even if you turn the power off. Saved
data may be lost due to malfunction or incorrect operation. Save important data to external device such as a computer.
1
.
I
M
P
O
R
T
A
N
T
N
O
T
I
C
E
2.SERVICE MANUAL
2
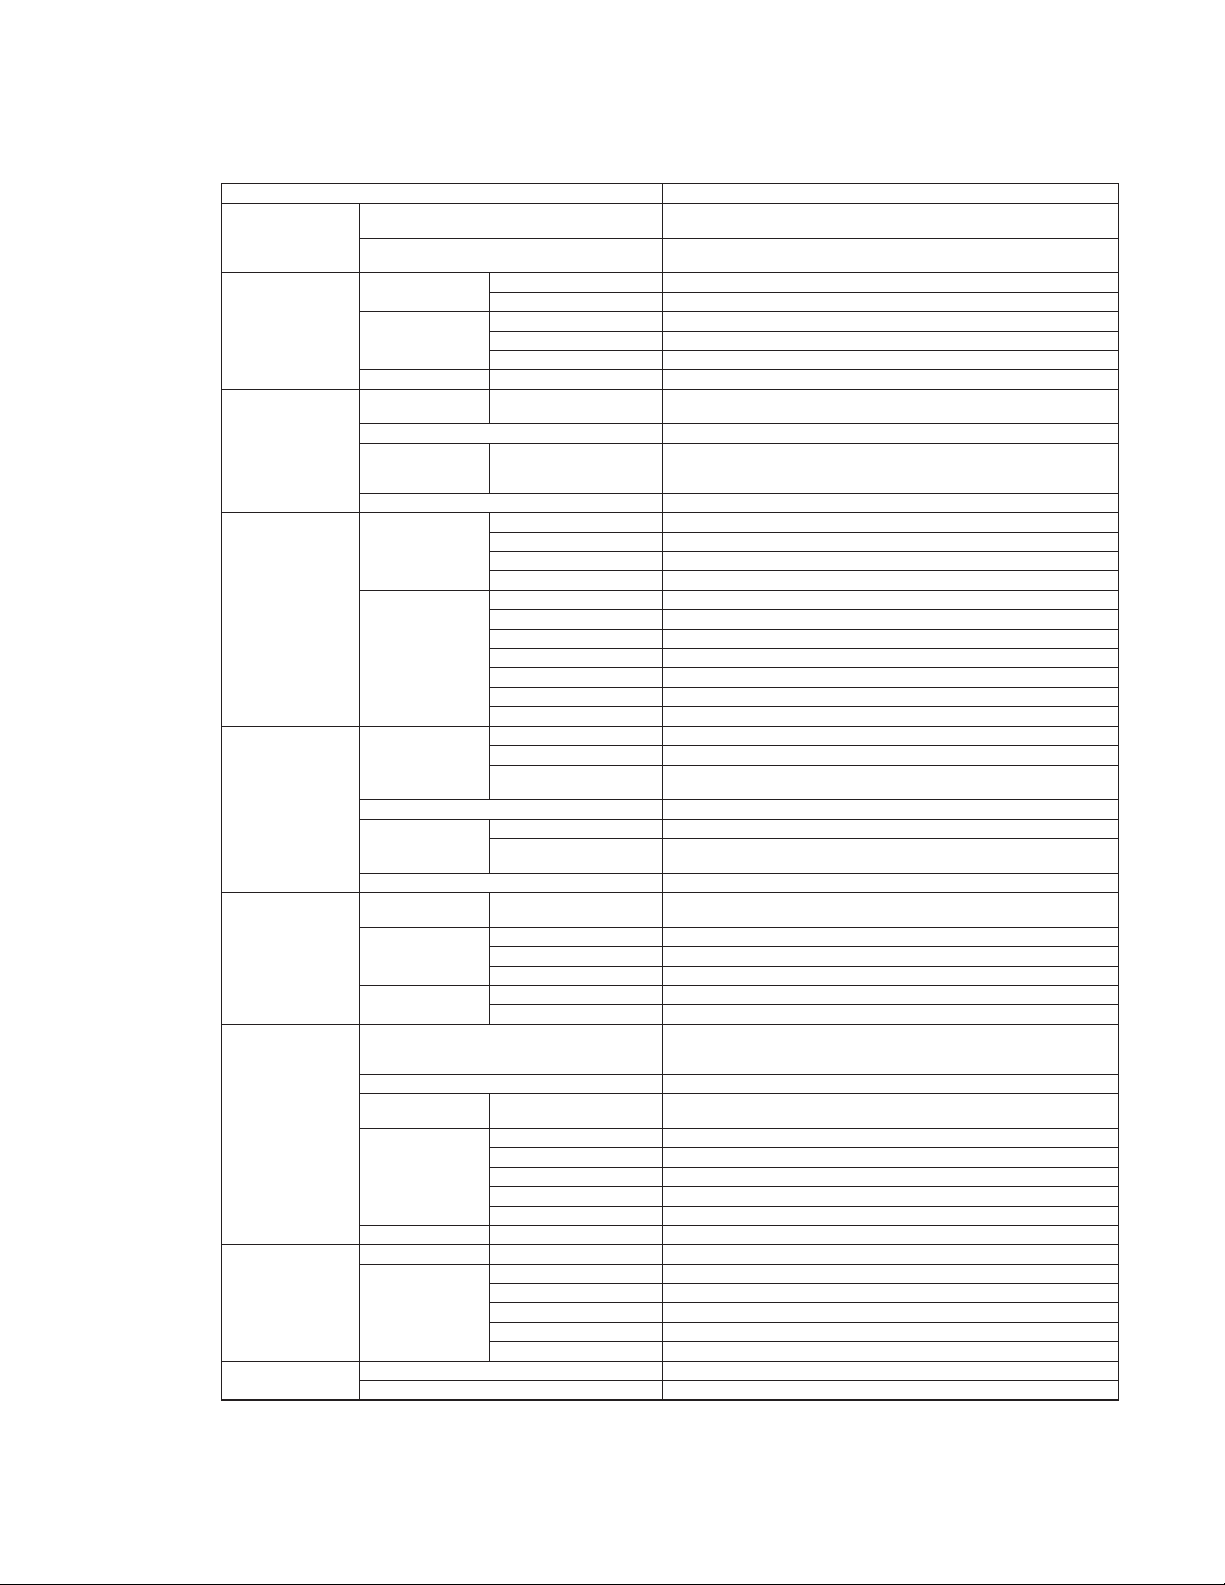
SPECIFICATIONS
Product Name Digital Keyboard
Size/Weight
Dimensions (W x D x H)
945 mm x 369 mm x 118 mm
(37-3/16” x 14-1/2” x 4-5/8”)
Weight
4.6 kg (10 lb 2 oz)
(not including batteries)
Control Interface
Keyboard
16syeK fo rebmuN
dexiF ,draH ,muideM ,tfoSesnopseR hcuoT
Display
DCLepyT
seYthgilkcaB
hsilgnEegaugnaL
hsilgnEegaugnaLlenaP
Voices
Tone Generation
Tone Generation
Technology
AWM Stereo Sampling
84).xam( ynohpyloP
Preset Number of Voices
622
(241 Panel Voices + 22 Drum
/SFX kits + 20 Arpeggio +
339 XGlite Voices)
etilGX/MGytilibitapmoC
Effects
Types
sepyt 83PSD
sepyt 21breveR
sepyt 5surohC
sepyt 6QE retsaM
Functions
seYlauD
seYtilpS
seYniatsuS
sepyt 62ynomraH
sepyt 051oiggeprA
seYrosserppuS ydoleM
)secioV etiL noitalucitrA repuS 11( seYnoitalucitrA
Accompaniment
Styles
Preset
502selytS fo rebmuN
regnif itluM ,drohC tramSgniregniF
Style Control
ACMP ON/OFF, SYNC START, START/STOP, INTRO/ENDING/rit.,
MAIN/
AUTO FILL
01selytS lanretxE
Other Features
071esabataD cisuM
One Touch Setting
(OTS)
Yes
)FFS( tamroF eliF elytSytilibitapmoC
Songs (MIDI)
Preset Number of Preset Songs
154
(including Touch Tutor: 10, Chord Study: 12, Chord Progression: 30)
Recording
5sgnoS fo rebmuN
2skcarT fo rebmuN
seton 000,01 .xorppAyticapaC ataD
Format
1 & 0 stamroF FMSkcabyalP
tamroF eliF lanigirOgnidroceR
Functions
Lesson
KEYS TO SUCCESS, Lesson 1–3 (Listening, Timing, Waiting),
Ph
rase Repeat, A-B Repeat, Chord Dictionary, Touch Tutor,
Chord Study, Chord Progression
oerets ,tib 61 ,zHk 1.44)TSOH OT BSU( oiduA BSU
Registration
Memory
9snottuB fo rebmuN
Overall Controls
seYemonorteM
082–11egnaR opmeT
21+ ot 0 ,0 ot 21- esopsnarT
)stnemercni zH 2.0 .xorppa( zH 0.354–0.044–0.724gninuT
seYouD
)nottuB dnarG elbatroP( seYnottuB ONAIPsuoenallecsiM
Storage and
Connectivity
BM 4.1 .xorppAyromeM lanretnIegarotS
Connecti
vity
V 21NI CD
Headphones/Output Standard stereo phone jack (PHONES/OUTPUT)
seYladeP niatsuS
)kcaj inim oeretS( seYNI XUA
seYTSOH OT BSU
Sound System
W 5.2 + W 5.2sreifilpmA
2 x mc 21srekaepS
n
PSR-E373/YPT-370
3
PSR-E373/YPT-370
* The contents of this manual apply to the latest specications as of the publishing date. To obtain the latest manual, access the Yamaha
website then download the manual le. Since specications, equipment or separately sold accessories may not be the same in every locale,
please check with your Yamaha dealer.
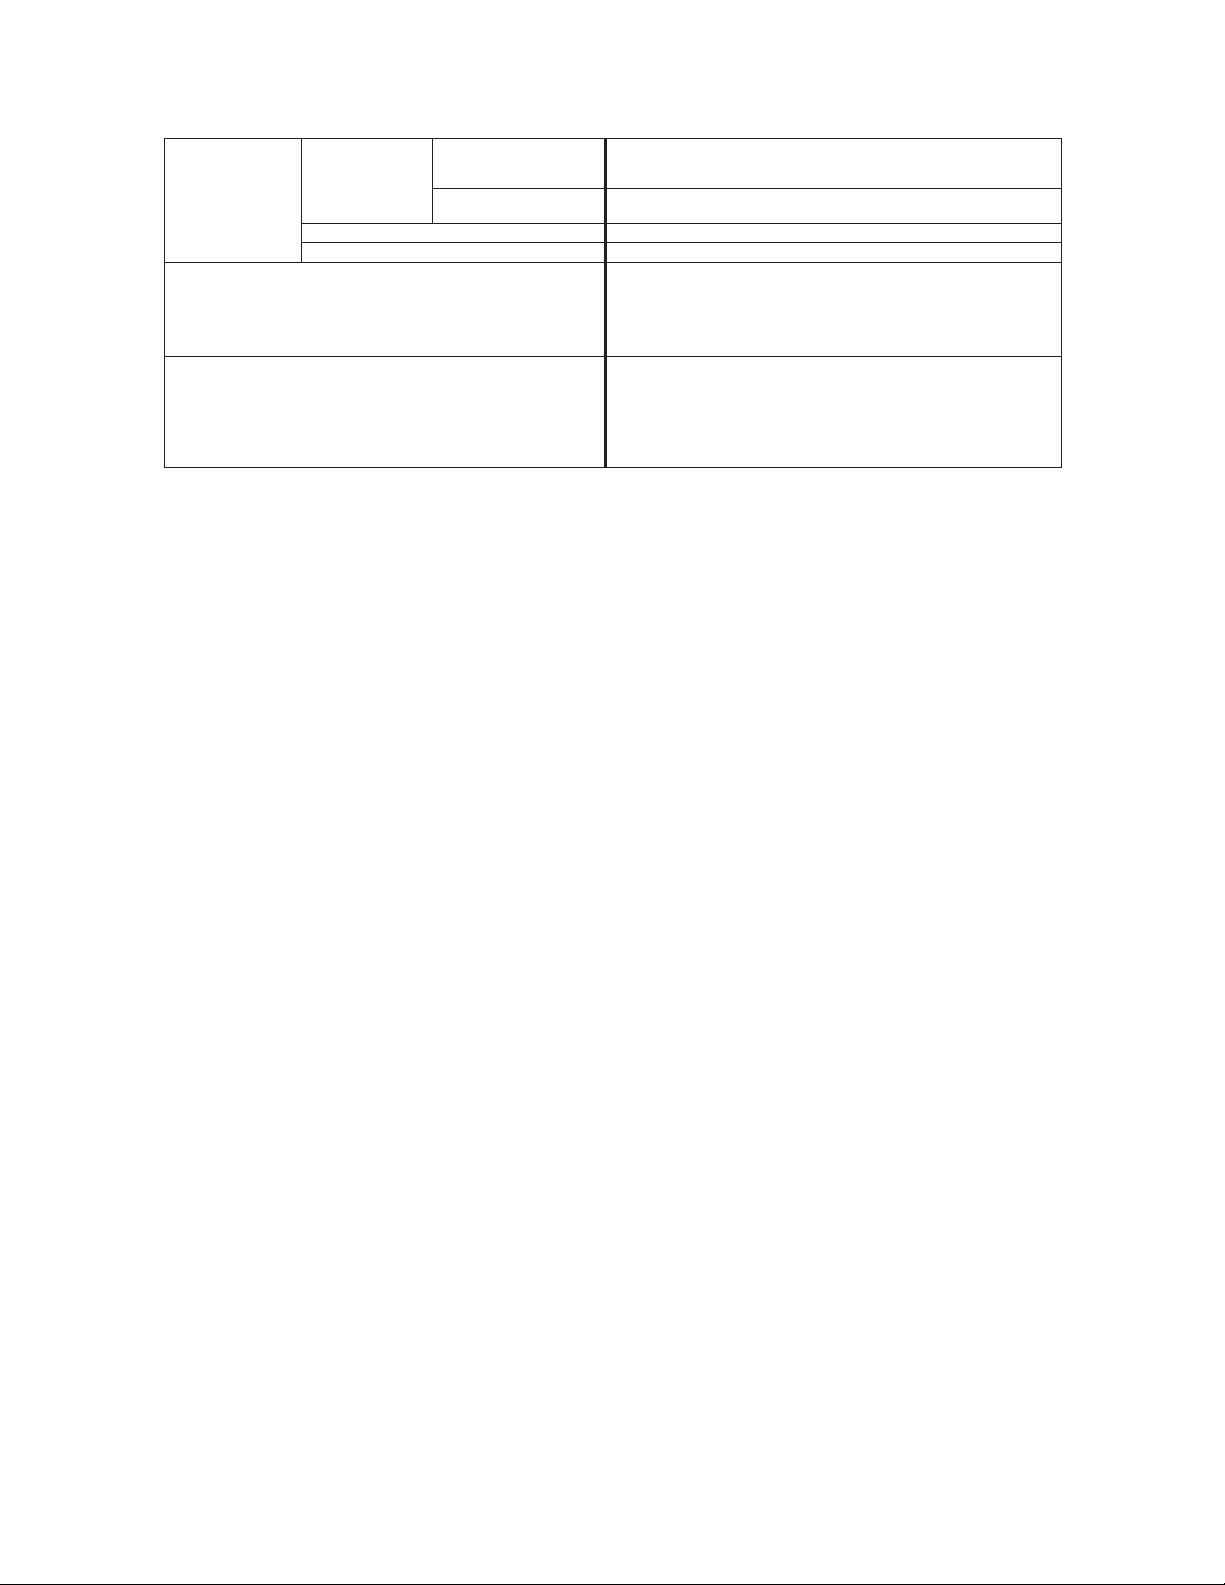
Power Supply
Power Supply
AC Adaptor
Users within U.S or Europe: PA-130 or an equivalent recommended
by Yamaha
Others: PA-3C,PA-130 or an equivalent recommended by Yamaha
Batteries
Six 1.
5 V “AA” size alkaline (LR6), manganese (R6) or
six 1.2 V “AA” size Ni-MH rechargeable batteries (HR6)
)rotpada CA 031-AP gnisu nehW( W 5noitpmusnoC rewoP
)tes eb nac emiT( seYffO rewoP otuA
Included Accessories
• Music rest
• Owner’s Manual
• AC adaptor *1 (PA-130 or an equivalent recommended by Yamaha)
• Online Member Product Registration
*1: May not be included depending on your particular area. Please check
with your Yamaha dealer.
Separately Sold Accessories
(
May not be available depending on your area.)
• AC adaptor:
Users within U.S or Europe: PA-130 or an equivalent recommended by
Yamaha
Others: PA-3C, PA-130 or an equivalent recommended by Yamaha
• Keyboard stand: L-2C
• Headphones: HPH-50/HPH-100/HPH-150
• Footswitch: FC4A/FC5
4
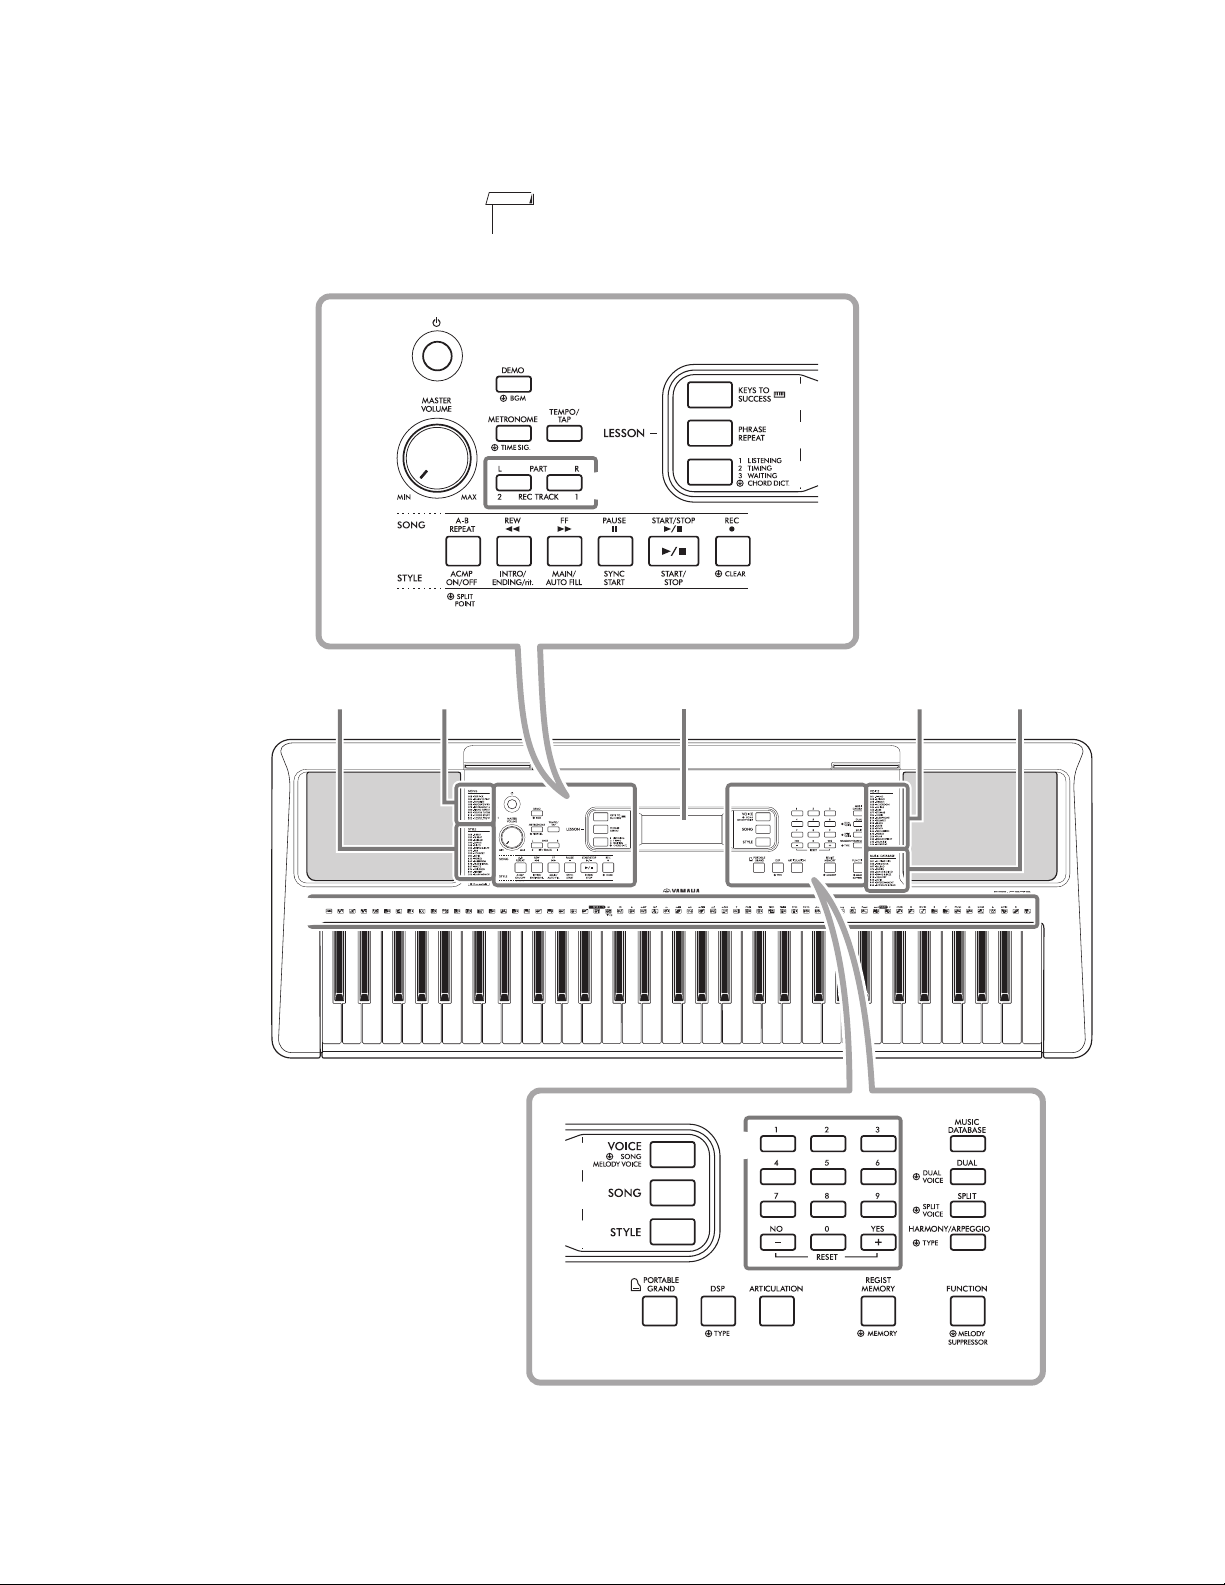
PANEL LAYOUT
Front Panel
6C5C4C3C2C1C
Song ListStyle List Display Voice List
Music
Database List
• The illustrations and displays as shown in this manual are based on the PSR-E373.
NOTE
❶
❸
❷
❹
❻
❺
❼
❽
❾
❿
⓫ ⓬ ⓭ ⓮ ⓯
⓰
⓱
⓲
⓳
⓴
n
PSR-E373/YPT-370
5
PSR-E373/YPT-370
[ ] (Standby/On) switch
[MASTER VOLUME] dial
[DEMO] button
[METRONOME] button
[TEMPO/TAP] button
PART
[L] button
[R] button
[REC TRACK 2] button
[REC TRACK 1] button
[KEYS TO SUCCESS] button
[PHRASE REPEAT] button
[1 LISTENING 2 TIMING 3 WAITING] button
[A-B REPEAT] button
[REW] button
[FF] button
[PAUSE] button
[ACMP ON/OFF] button
[INTRO/ENDING/rit.] button
[MAIN/AUTO FILL] button
[SYNC START] button
[START/STOP] button
[REC] button
[VOICE] button
[SONG] button
[STYLE] button
Number buttons [0]–[9], [+/YES], [-/NO]
[PORTABLE GRAND] button
[DSP] button
[A
RTICULATION] button
[REGIST MEMORY] button
[FUNCTION] button
[MUSIC DATABASE] button
[DUAL] button
[SPLIT] button
[HARMONY/ARPEGGIO] button
Drum illustrations for the Drum Kit
Each of these indicates the drum or percussion instrument
assigned to the corresponding key for “Standard Kit 1.”
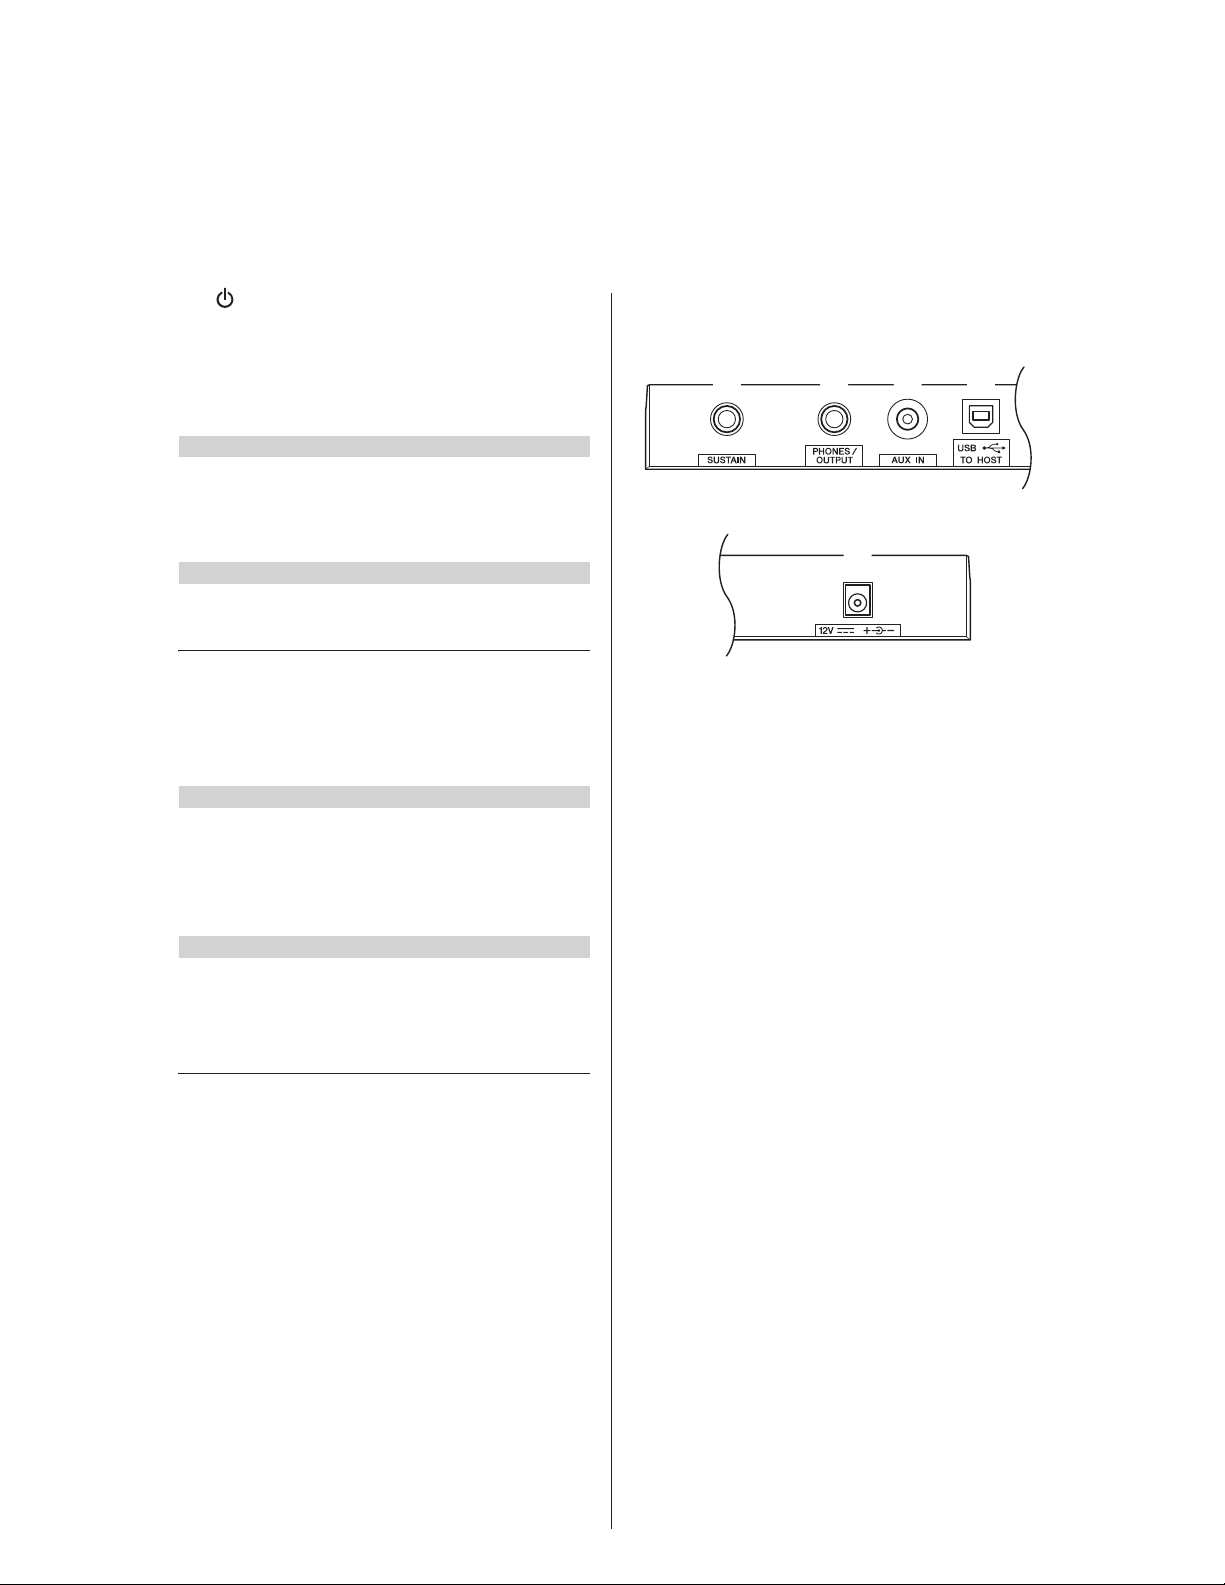
[SUSTAIN] jack
[PHONES/OUTPUT] jack
[AUX IN] jack
[USB TO HOST] terminal*
DC IN jack
In the Lesson mode
In the Recording mode
In the Song mode
In the Style mode
Rear Panel
❶
❷
❸
❹
❺
❻
❻
❼
❽
❾
❿
⓫
⓬
⓭
❿
⓫
⓬
⓭
⓮
⓯
⓰
⓱
⓲
⓳
⓴
6
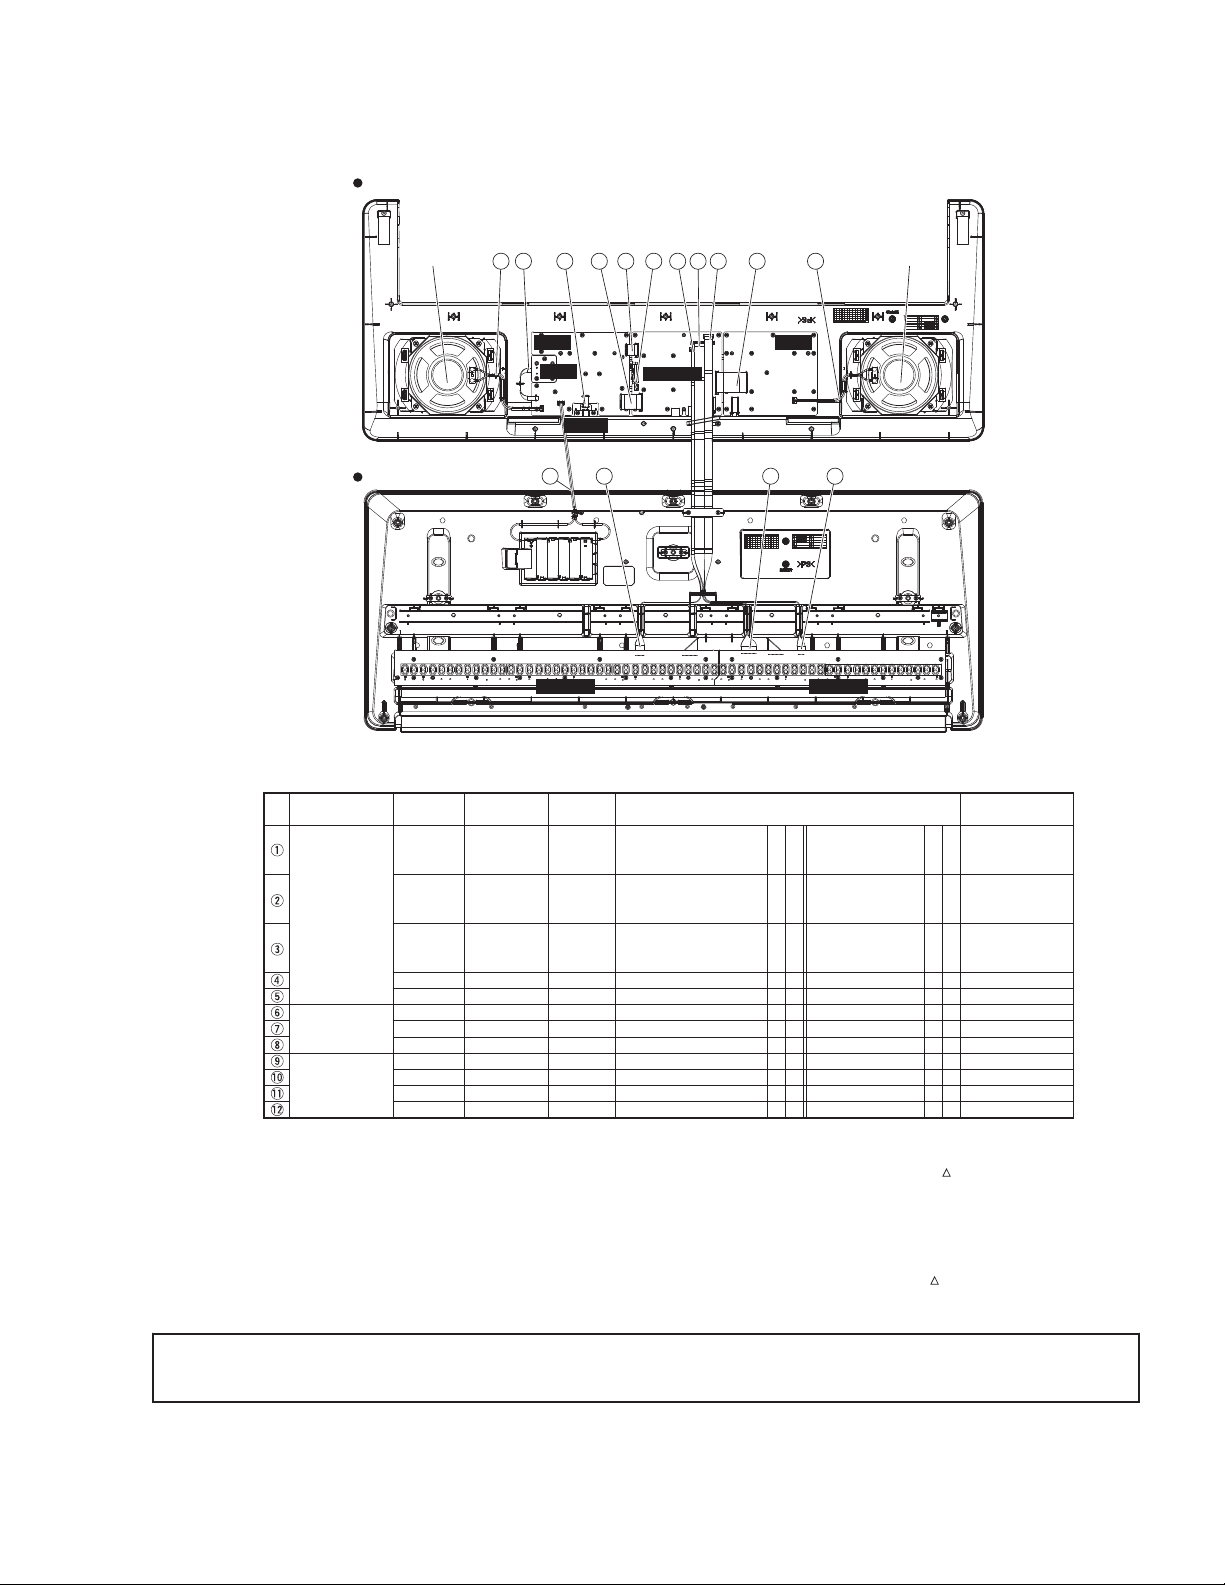
CIRCUIT BOARD LAYOUT & WIRING
DMLCD
PNL
MVR
PNR
811 56 12 7
61L-MK 61H-MK
DC-IN
2
4 13
1 23
WH050
WH040
WH030
WH020
WH010
500
500
350
250
230
220
210
(ZW76710)
(ZA17230)
(ZA18010)
(ZA18500)
(ZA17370)
(ZW81430)
(ZW81430)
(WE14140)
(VDM2390)
(ZW81320)
or
(ZZ74010)
(ZW81310)
or
(ZZ74000)
(ZW81300)
or
(ZZ73990)
DMLCD — CN302
MVR(PNL) — CN301
DMLCD — CN301
DMLCD — CN801
DC-IN(PNL) — CN102
PNR — CN202
PNL — CN107
DMLCD — CN303
PNL — CN103
DMLCD — CN501
DMLCD — CN502
15P L=100
3P L=100
8P L=50
11P L=75
4P L=50
2P L=165
2P L=165
2P L=70
3P L=240
7P L=550
5P L=620
PNR — CN201
PNL — CN105
PNL — CN106
PNL — CN104
PNL — CN101
61L-MK — CN05
61H-MK — CN02
SP1
SP1
BL
BATT
MK13
MK12
MK11 61H-MK — CN01 DMLCD — CN503 12P L=550*1
*1
*1
*2
*2
*2
*2
*3
*3
*3
*3
*3
*4
*4
*4
*5
*6
*7
*7
*8
*8
*8
*8
*8
*4
*4
*9
*4
*4
*4
*8
*4
*4
*4
*8
*1
*1
*4*1
*1
*1
*1
*1
*3
*1
*1
*1
*3
No.
9 10
LOWER CASE ASSEMBLY
SPEAKER (L) SPEAKER (R)
Destination RemarksUnit Name Location Parts No.
BACK-LIGHT ASSEMBLY
BATTERY TERMINAL (+/-)
Connection Method
*1: Installation
*2: Manual soldering
*3: Dip soldering
Connection Direction
Connector
Assembly
Table Wiring assemblies list
PNL and PNR
CIRCUIT BOARD
LOWER CASE
ASSEMBLY
UPPER CASE
ASSEMBLY
SPEAKER R
SPEAKER L
*4: Edge mark is adjusted to Pin 1 mark ( mark).
*5: Red wire is connected to (+) terminal. Black wire is
connected to (-) terminal.
*6: Eage mark is adjusted to + mark.
*7: Red wire is connected to (+) terminal. White wire is
connected to (-) terminal.
*8: Connected
*9: Red wire is adjusted to Pin 1 mark ( mark).
n
PSR-E373/YPT-370
* The parts with “( )” in “Part No.” are not available as spare parts.
Caution:
▪ Be sure to attach the removed filament tape just as it was before removal.
7
PSR-E373/YPT-370
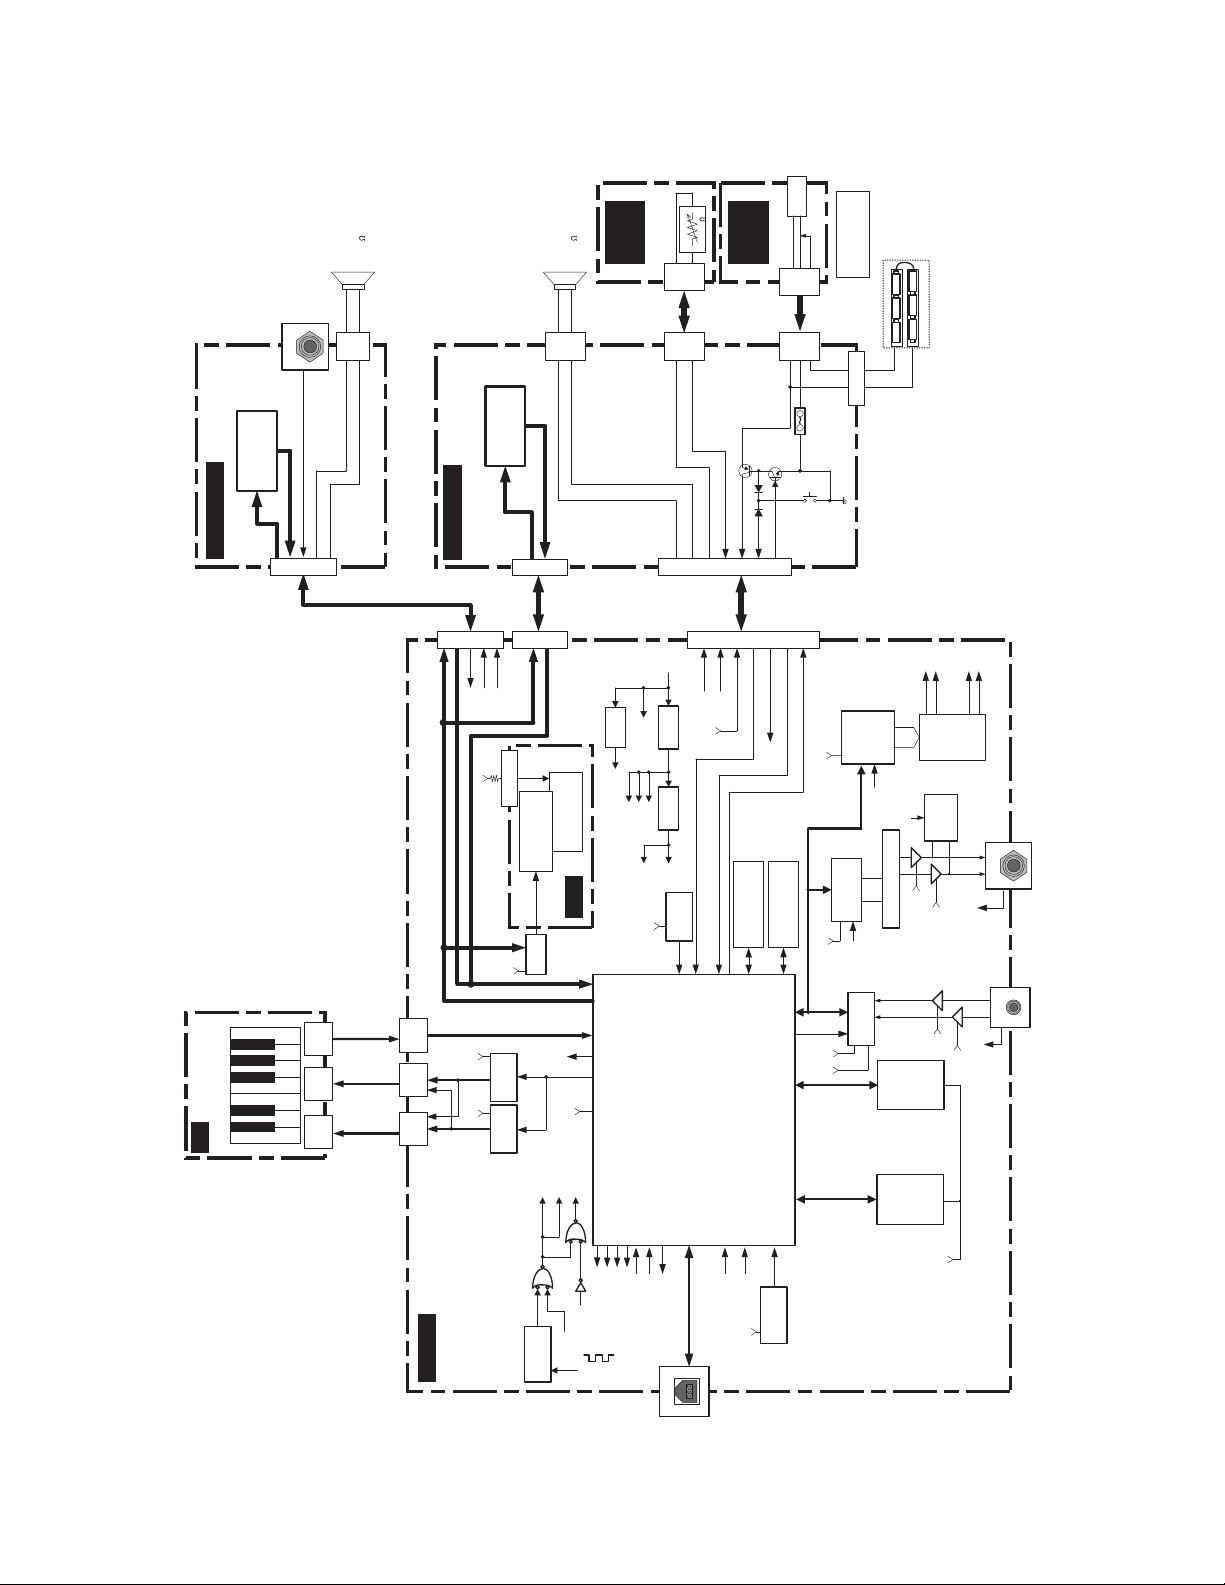
DMLCD
LCD
PNR (PN 2/4)
PNL (PN 1/4)
MK
DC-IN
(PN 4/4)
MVR
(PN 3/4)
CPU
SWX03S
RESONATOR QUARTZ
16.9344MHz
F Tolerance±50PPM
SDO1,SYSCLK
BCLK,WCLK
RESONATOR QUARTZ
48MHz
F Tolerance±50PPM
N[11-16],N[21-26]
ADC 24bit
PCM1803A
AUXIN-IN
PHONES
(Prog/WAV/
Backup)
SERIAL
NOR
512Mbit
*1
SDRAM
256Mbit
D.AMP
YDA176
FUNC_DP, FUNC_DM
VBUS, PULLUP_ENB
LC
Filter
DAC 24bit
AK4430
+3.3D +5A
AUX IN
AUXIN-IN
RC Filter
/HP-MUTE
HP-IN
SDI,SYSCLK
BCLK,WCLK
SDO0,SYSCLK
BCLK,WCLK
/DAMP-MUTE
+B
MVR
DECORDER
74LV138A
DECORDER
74LV138A
61KEY (16NS)
TOUCH RESPONSE
To Host
Full speed
SUSTAIN
GP_IN7
GP_INOUT24-31
MA0-12
MD0-15
WEN,RCLK
LDQM,UDQM,
RASN,CASN,
CS2N
GP_INOUT0-7
RS,ENB
SDI,SDO0,SDO1
SYSCK
BCLK,WCLK
RESN
KYB01-04
KYN11-16
KYN21-26
/PSWI
PSWO
AN0
HeartBeat
GP_INOUT35
GP_OUT1
/MUTE GP_INOUT34
GP_INOUT32/DAMP-MUTE
/DETECT-CHECK GP_INOUT33
+HP
+HP
CN503
(12P)
CN501
(7P)
CN502
(5P)
/PSWI
PSWO
CN1
(12P)
CN2
(5P)
CN5
(7P)
PVDD
+5A
+5A
+3.3D
GP_OUT5
/ADC_IC
FUNC_DP
FUNC_DM
VBUS
PULLUP_ENB
MUTE
Circuit
+3.3A
AN1
/HP-MUTE
XI
XO
UCLK_I
UCLK_O
+3.3D
SUSTAIN
Battery
Monitor
+B
STANDBY/ON
*More than 400ms
/PSWI
PSWO
+B
MVR
+3.3D
“AA”size,LR6 or equivalent batteries
+
—
Battery 1.5×6
SUSTAIN
PA[0-7]
PB[0-2]
RESET
+2.9V 54.8ms
+5D
PA[0-7]
PB[0-2]
PA[0-2]
PB[3-7]
PA[0-2]
PB[3-7]
AC adaptor
PA-130B or equivalent
DC-IN
+
—
MASTER
VOLUME
B 10K
BACK LIGHT
LED:1PC(WHITE)
LCD
DISPLAY
PA[0-7]
RS,ENB
+5D
+5D
COM[1-16]
SEG[1-40]
SPR+
SPR-
SPL+
SPL-
SPR+
SPR-
Lch
+
—
SPEAKER
Sustain
Rch
+
—
SW MATRIX
(
SW24 PCS )
SW MATRIX
( SW14 PCS )
SPEAKER
*1 correspond to 1Gbit
SPL+
SPL-
SPL+
SPL-
SPR+
SPR-
LCD
DRIVER
Error
Detection
HP-IN
/MUTE
/DETECT
HeartBeat
/DAMP-MUTE
/DETECT-CHECK
/HP-MUTE
IO00-IO03
CS0N, CLK0
WRH
WRL
WRB
/RES
CS52WRN
CS53WRN
GP_OUT7
CS51WRN
+3.3D
+B
+5D
+3.3A
+3.3V
REGULATOR
+5A
+3.3D
+5V
DC/DC
Ripple
Filter
PVDD
+HP
+5L
Internal Clock : 135.4752MHz
Master Clock : 67.7376MHz
(TYPE-B)
(stereo mini)
ADC/DAC/D.AMP
Audio Format:I2S
24bit 44.1kHz
+3.3D +3.3D
B[09-13]
B[01-08]
B[07-11]
B[01-07]
N[11-16],
N[21-26]
KYB[01-04]
6 /12cm
6 /12cm
CN303 (2P)
CN201 (15P)
CN202
(2P)
CN302 (15P)
CN301 (8P)
CN106 (8P)
CN107
(2P)
CN104 (11P)
CN105
(3P)
CN301
(3P)
CN801 (11P)
CN103 (3P)
CN102
(4P)
CN101
(4P)
CN401
JK701
JK201
JK201
VR301
JK101
FZ101
TR103
TR102
SW101
IC001
BLOCK DIAGRAM
n
8
[100]
[100]
[100]
[120]
[100A]
[100]
[A]
[A]
[A]
[A]
Bottom view
Top view
SP GRILLE ASSEMBLY
BATTERY COVER ASSEMBLY
SP GRILLE ASSEMBLY
VOLUME KNOB
DISASSEMBLY PROCEDURE
n
Caution:
▪ Be sure to attach the removed filament tape just as it was before removal.
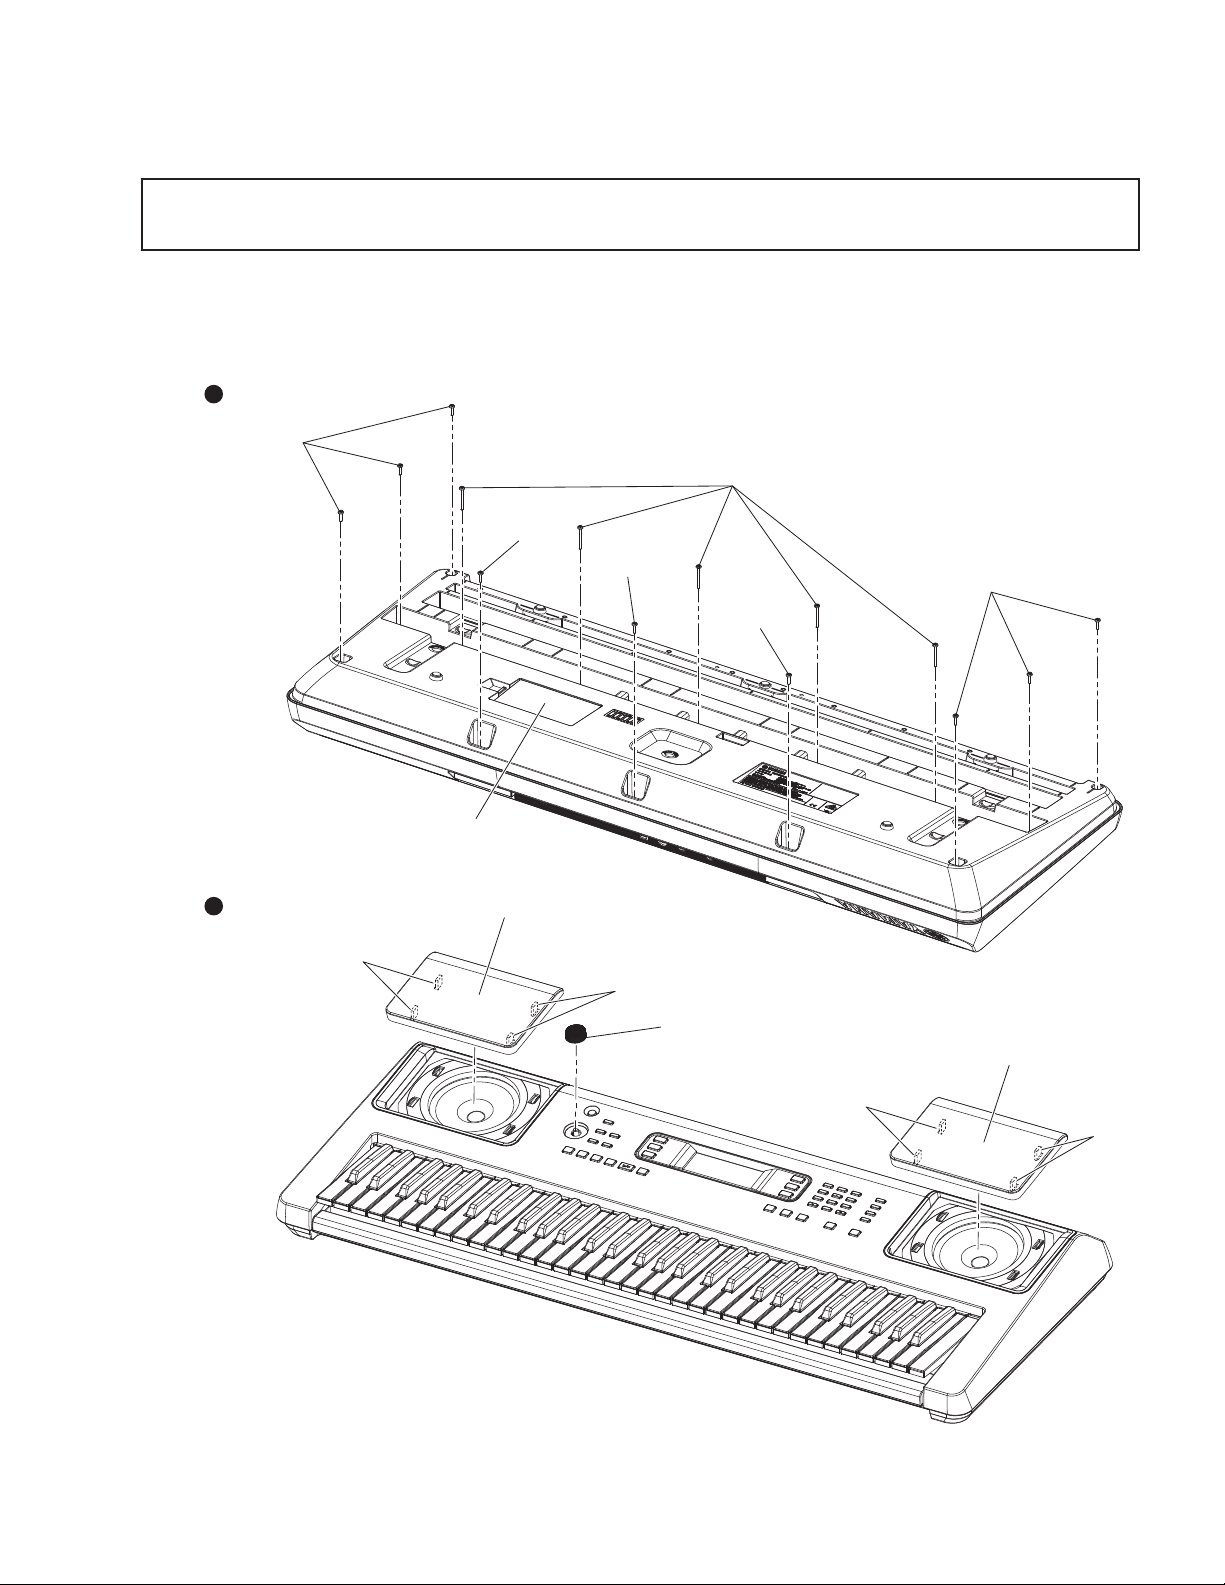
Lower Case Assembly (Time required: About 3 minutes)
1.
1. Remove the 5 screws marked [120] and the 9 screws marked [100]. The lower case assembly can then be removed. (Fig.1)
* When installing the lower case assembly, first tighten the screw marked [100A] and then the remaining screws. (Fig.1)
PSR-E373/YPT-370
Fig.1
9
PSR-E373/YPT-370
[380A]
[380A] [380A]
[380A]
[380B]
x2
[380C]
[370]
[370]
1
2
[380E] [380E]
[380E][380E]
[380D]
[380D]
[380D] [380D]
DC-IN
PNRDMLCDPNL
MVR
Bottom view
DMLCD
LCD display
BACK LIGHT ASSEMBLY
RUBBER CONNECTOR
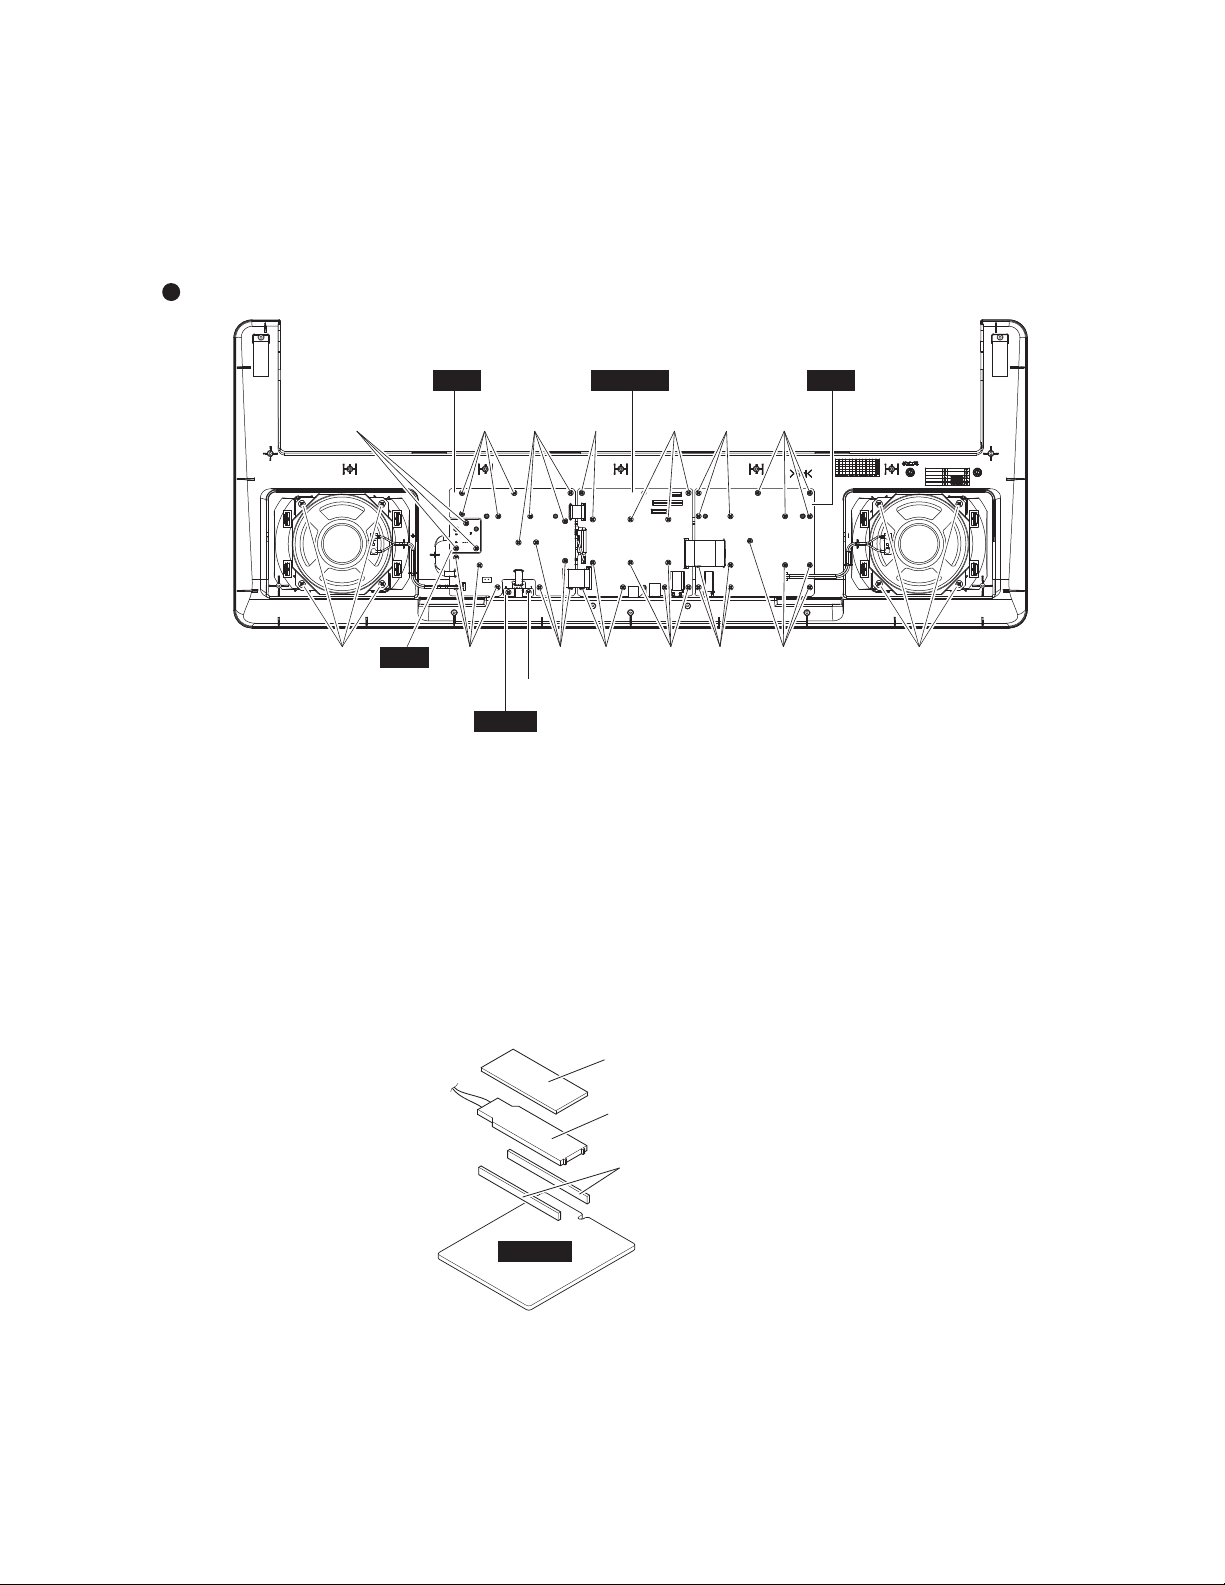
DMLCD Circuit Board (Time required: About 6 minutes)
2.
1. Remove the lower case assembly. (See procedure 1)
2. Remove the 12 screws [380A]. The DMLCD circuit board can then be removed. (Fig.2)
* When installing the DMLCD circuit board, tighten the screws 1 through 2 in numerical order. (Fig.2)
* After replacing the DMLCD circuit board, execute «Factory Reset» in the Test program.
3.
Fig.2
LCD (Time required: About 7 minutes)
1. Remove the lower case assembly. (See procedure 1)
2. Remove the DMLCD circuit board. (See procedure 2)
3. Remove the back light assembly. (Fig.3)
4. Remove the rubber connector. (Fig.3)
5. Remove the LCD display. (Fig.3)
* Avoid touching the conductive part of the rubber connector as much as possible. Should foreign matter or dirt adhere,
remove such contamination using adhesive tape or the like. Do not wipe off using solvents such as benzene or alcohol.
(Fig.3)
Fig.3
10

PNR Circuit Board, PNL Circuit Board, MVR Circuit Board, DC-IN Circuit Board
4.
1. Remove the lower case assembly. (See procedure 1)
l PNL, MVR Circuit Board (Time required: About 8 minutes)
1. Remove the 2 screws [380B]. The DC-IN circuit board can then be removed. (Fig.2)
2. Remove 3 screws [380C]. The MVR circuit board can then be removed. (Fig.2)
3. Remove the knob from the control panel surface. (Fig.1, Fig.4)
4. Remove the 16 screws marked [380D]. The PNL circuit board can then be removed. (Fig.2)
l PNR Circuit Board (Time required: About 6 minutes)
1. Remove 15 screws [380E]. The PNR circuit board can then be removed. (Fig.2)
PSR-E373/YPT-370
Fig.4
Speaker (Time required: About 4 minutes each)
5.
1. Remove the lower case assembly. (See procedure 1)
2. Remove the 4 screws marked [370]. The speaker can then be removed. (Fig.2)
* Remove the right and left speakers in the same way.
11

PSR-E373/YPT-370
Speaker Grille (Time required: About 4 minutes each)
6.
1. Remove the lower case assembly. (See procedure 1)
2. Release the 4 claws marked [A] of the SP grille. The SP grille can then be removed. (Fig.1)
* The right and left SP grilles can be removed in the same manner.
* SP grilles can be changed without removing the lower case assembly.
Tear the saran net. Release the 4 claws marked [A] of the SP grille by pushing them with the slotted screwdriver to inward.
Remove the SP grille. (Fig.5)
Fig.5
12
PSR-E373/YPT-370
[120A]
[120A]
[120A]
[120A]
[120A]
[120B]
C1
C3
B2
C4
B3
C6
Top view
KEYBOARD RUBBER
CONTACT
BOSS
16NS-C61
KEYBOARD
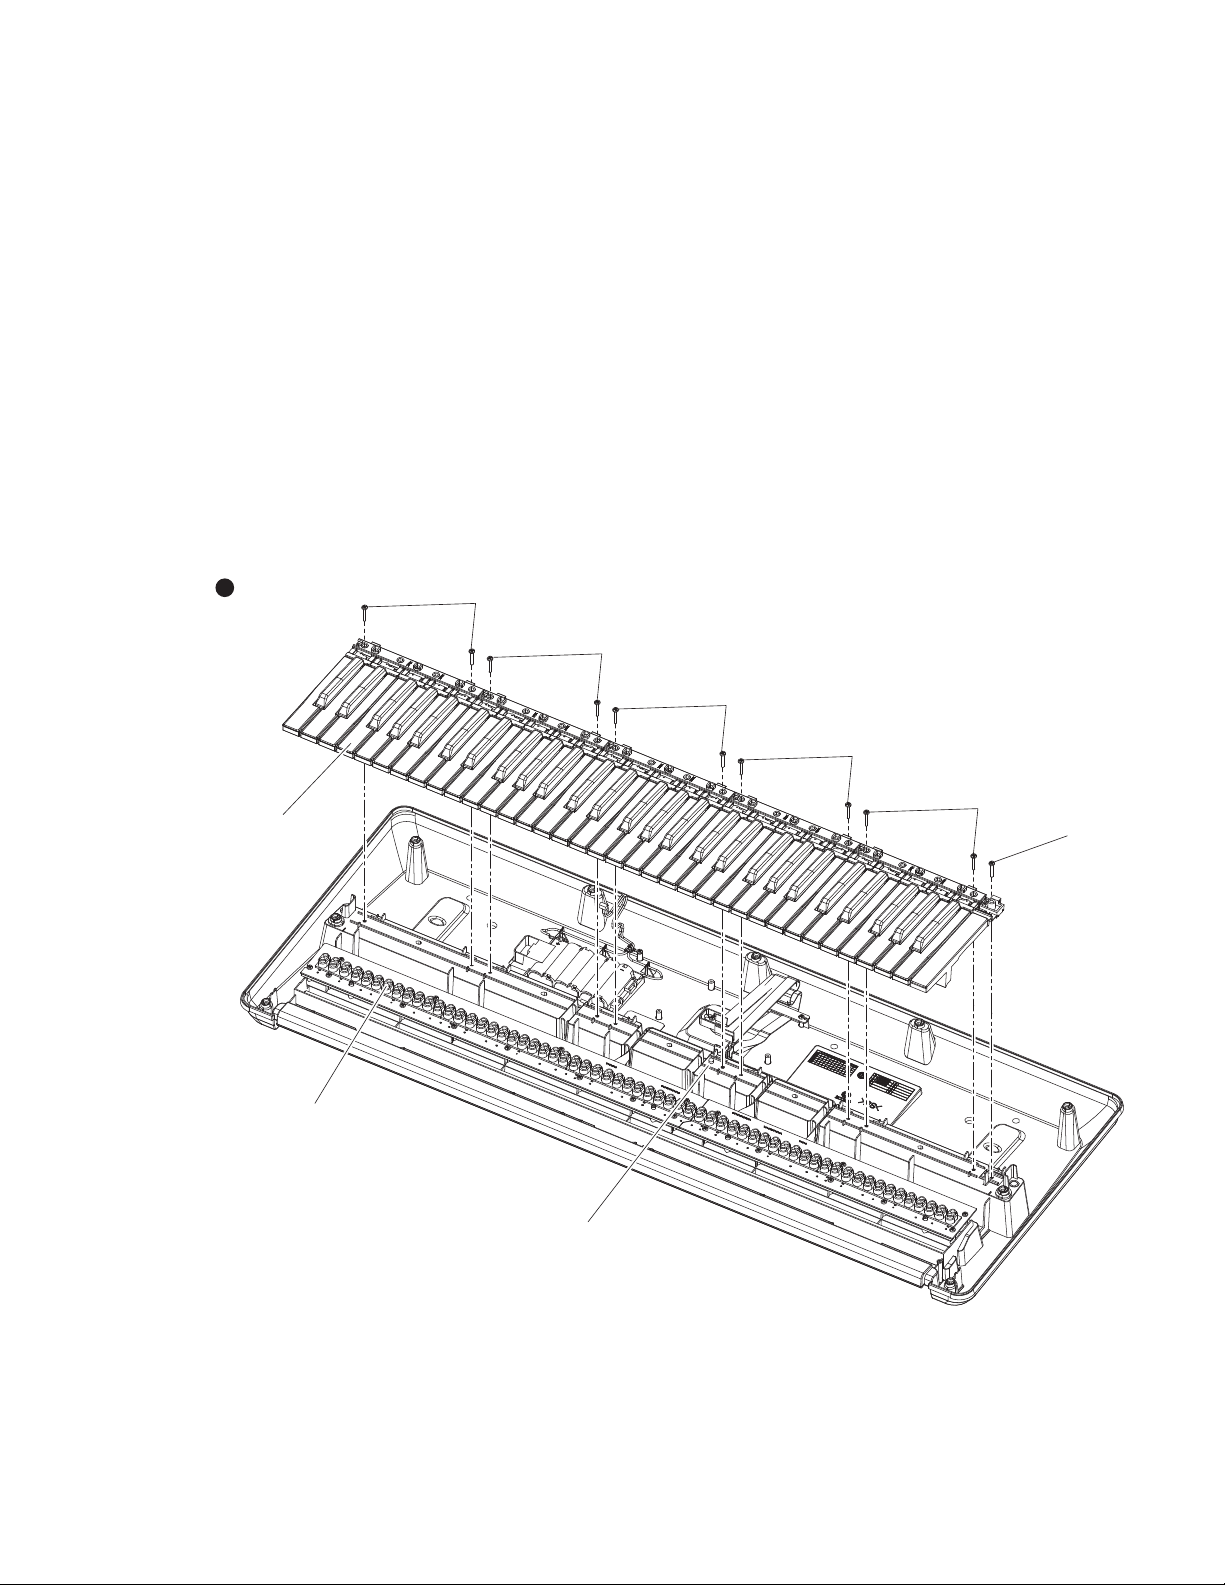
Disassembling the keyboard (time required: About 13 minutes)
7.
1. Remove the lower case assembly. (See procedure 1)
l White keys and black keys
1. The white and black keys are grouped in single octave sets starting from the left side and consist of a total of five sets.
Only the C6 white key, unlike the other keys, is not included in a set. (Fig.6)
2. To remove a set, remove the 2 each screws marked [120A]. The white and black keys in the set can then be removed.
(Fig.6)
When removing, unfasten the 2 hooks at the back of the black keys upward, and lift the white and black keys while
pulling them toward you a little. (Photo 1)
3. To remove the white key C6, remove the screw marked [120B], unhook as described in previous procedure, and pull out
toward you. (Fig.6)
* To reassemble after all white and black keys have been removed, first, mount by aligning the C3 to B3 white and black
keys with the boss, and then mount the remaining white and black keys. (Fig.6)
l Rubber contacts
1. Remove the white and black keys corresponding to the rubber contacts to be removed. (See Fig.6 and «●White keys and
black keys» in procedure 7)
2. Remove the respective rubber contacts. (Fig.6)
Fig.6
13
Loading…
Yamaha PSR-E373
1
Setting UpReferenceAppendix
Before using the instrument, be sure to read
“PRECAUTIONS” on pages 5-7.
View the manual for the Yamaha PSR-E373 here, for free. This user manual comes under the category keyboards and has been rated by 46 people with an average of a 8.7. This manual is available in the following languages: English. Do you have a question about the Yamaha PSR-E373?
Ask your question here
Index
- PRECAUTIONS
- About the Manuals
- Included Accessories
- Formats and functions
- Contents
- Setting Up
- Reference
- Appendix
Product Images (6)

Yamaha PSR-E373 specifications
Below you will find the product specifications and the manual specifications of the Yamaha PSR-E373.
The yamaha psr-e373 is a keyboard with 61 keys, buttons, and rotary controls for effective sound modulation. With a maximum polyphony of 48 notes, it provides high-quality sound for versatile musical compositions. Its sound effects include Chorus and Reverberation, while it can store a maximum of two songs in its music memory capacity. The keyboard boasts of 240 sound effect options, thus catering to a wide range of music genres. It also features a Duet function, which allows two people to play simultaneously.
This keyboard has built-in speakers and an interface that allows for a USB connection. Its dimensions are 945mm in width, 369mm in depth, and 118mm in height, and it has a weight of 4600g. The keyboard comes with a built-in display that provides easy navigation of its various features. It is an excellent option for beginners and professionals alike, providing an optimal playing experience and versatile musical output.
In summary, the Yamaha psr-e373 is a lightweight, durable, and versatile keyboard that comes with a range of sound effects and features to enable quality music creation. Its design makes it an ideal option for beginners, but it is also suitable for professionals looking for a reliable and durable piece. The keyboard’s USB interface enables easy connectivity, while its built-in speakers make it a complete package for those who don’t wish to invest in additional sound equipment.
MIDI-keyboard number of keys
61 keys
General
| Brand | Yamaha |
| Model | PSR-E373 | SPSRE373 |
| Product | keyboard |
| EAN | 4957812659703 |
| Language | English |
| Filetype | User manual (PDF) |
Keyboard
| MIDI-keyboard number of keys | 61 keys |
| Control type | Buttons, Rotary |
Technical details
| Product colour | Black |
| Maximum polyphony (notes) | 48 |
| Sound effects | Chorus, Reverberation |
| Music memory capacity (songs) | 2 |
| Sound effects quantity | 240 |
| Duet function | Yes |
| Built-in speaker(s) | Yes |
Ports & interfaces
| Interface | USB |
| DC-in jack | Yes |
| Headphone outputs | 1 |
Weight & dimensions
| Width | 945 mm |
| Depth | 369 mm |
| Height | 118 mm |
| Weight | 4600 g |
Display
| Built-in display | Yes |
| Display type | LCD |
Power
| Power source type | AC, DC |
| Power consumption (typical) | 5 W |
| Battery type | AA |
| Number of batteries supported | 6 |
Packaging content
show more
Frequently asked questions
Can’t find the answer to your question in the manual? You may find the answer to your question in the FAQs about the Yamaha PSR-E373 below.
What is the weight of the Yamaha PSR-E373?
The Yamaha PSR-E373 has a weight of 4600 g.
What is the height of the Yamaha PSR-E373?
The Yamaha PSR-E373 has a height of 118 mm.
What is the width of the Yamaha PSR-E373?
The Yamaha PSR-E373 has a width of 945 mm.
What is the depth of the Yamaha PSR-E373?
The Yamaha PSR-E373 has a depth of 369 mm.
How can I best clean my keyboard?
A slightly damp cleaning cloth or soft, dust-free cloth works best to remove fingerprints. Dust in hard-to-reach places is best removed with compressed air.
Is the manual of the Yamaha PSR-E373 available in English?
Yes, the manual of the Yamaha PSR-E373 is available in English .
Is your question not listed? Ask your question here
FAQ: Types of Manuals and Their Contents
Yamaha PSR-E373 Manuals come in various types, each serving a specific purpose to help users effectively operate and maintain their devices. Here are the common types of Yamaha PSR-E373 User Guides and the information they typically include:
- User Manuals: Provide comprehensive instructions on how to use the device, including setup, features, and operation. They often include troubleshooting tips, safety information, and maintenance guidelines.
- Service Instructions: Designed for technicians and repair professionals, these manuals offer detailed information on diagnosing and repairing issues with the device. They include schematics, parts lists, and step-by-step repair procedures.
- Installation Guides: Focus on the installation process of the device, providing detailed instructions and diagrams for proper setup. They are essential for ensuring the device is installed correctly and safely.
- Maintenance Manuals: Provide guidance on routine maintenance tasks to keep the device in optimal condition. They cover cleaning procedures, part replacements, and regular servicing tips.
- Quick Start Guides: Offer a concise overview of the essential steps needed to get the device up and running quickly. They are ideal for users who need immediate assistance with basic setup and operation.
Each type of Yamaha PSR-E373 instruction is designed to address specific needs, ensuring users have the necessary information to use, maintain, and repair their devices effectively.
Related Instructions for Yamaha PSR-E373:
1
UW500
Owner’s manual User Manual: Yamaha UW500 (C66978, Upd.Thu 01.2025)
55
1255
289
2
APD-1
Owner’s manual PDF Manual (@96XMKW), Yamaha APD-1 Other (Tue 10.2024)
4
482
82
3
FG720S
Owner’s manual Yamaha FG720S Guide (Owner’s manual), @83XZEU
2
679
163
4
VXS
Operation & user’s manual Yamaha Scooter Operation & user’s manual (File: yamaha-fx-sho-scooter-28, 18/11/2024)
28
702
134
5
TT-R
Owner’s manual User Manual: Yamaha TT-R (WD9WJ9, Upd.Thursday 05-12-2024)
100
775
140
7
YST-FSW150
Owner’s manual Yamaha YST-FSW150 Guide (Owner’s manual), @MFT74M
80
860
164
8
RX-Z11 — AV Receiver
Service manual RX-Z11 — AV Receiver Service manual — 4G7W1C
243
874
140
10
250GETO
Service manual Yamaha Outboard Motor Service manual (File: yamaha-250geto-service-manual-293, Wednesday 05-03-2025)
293
258
39
Musical Instrument Devices by Other Brands:
|
Bachmann RPT114 Owner’s Manual Bachmann RPT114 User Guide (Owner’s manual), @2U5DOF CAUTION 25 Dec 2024 | 33 |
|
|
Musicmakers BALLAD HARP KIT Assembly Instructions Manual Musicmakers Musical Instrument Assembly instructions manual (File: musicmakers-ballad-harp-kit-assembly-instructions-manual-32, 17/11/2024) BALLAD HARP KIT 17 Nov 2024 | 32 |
|
|
MOOV Travel Instructions MOOV Musical Instrument Instructions (File: moov-travel-instructions-2, Sat 03.2025) Instructions 29 Mar 2025 | 2 |
|
|
Adams GAT33 Manual Musical Instrument #653539 Manual 13 May 2025 | 18 |
Categories:
Exercise Bike
Av receiver
Generator
Digital sound projector
Acoustic guitar
Electronic keyboards
Yamaha PSR-E373 Drum Kit List
Drum Kit List
5 pages
MIDI Reference Guide
3 pages
Yamaha PSR-E373 Keyboard Specification
The Yamaha PSR-E373 is a versatile and feature-rich portable keyboard designed for both beginners and more experienced players. It features a 61-key touch-sensitive keyboard that responds dynamically to the player’s touch, allowing for expressive performances. The keyboard is equipped with Yamaha’s AWM (Advanced Wave Memory) Stereo Sampling technology, which provides a rich and authentic sound experience. The PSR-E373 offers a wide range of voices, with 622 high-quality instrument sounds covering various musical genres and styles, including pianos, strings, brass, and percussion.
The keyboard includes a comprehensive library of 205 accompaniment styles, enabling users to create full-sounding performances with automatic backing. For learning and practice, the PSR-E373 is equipped with Yamaha’s Education Suite, which provides interactive lessons and exercises. The instrument features a Duo mode, allowing two users to play simultaneously on the same keyboard, making it ideal for lessons and group practice.
Connectivity options include a USB-to-host port for MIDI and audio transfer, enabling integration with computers and mobile devices for music production and recording. The keyboard also supports battery operation for enhanced portability, alongside AC power supply. Additional features include a backlit LCD display for easy navigation and control, a headphone output for silent practice, and a range of effects such as reverb and chorus to enhance sound quality. The Yamaha PSR-E373 stands out with its combination of high-quality sounds, educational features, and user-friendly operation, making it a popular choice for aspiring musicians seeking a reliable and feature-packed keyboard.
Yamaha PSR-E373 Keyboard F.A.Q.
To transpose the keyboard, press the «Function» button, use the category buttons to navigate to the «Transpose» setting, and then use the «+» or «-» buttons to adjust the pitch up or down in semitones.
First, ensure that the keyboard is properly connected to a power source and turned on. Check the volume level and make sure that headphones are not plugged in if you want sound from the speakers. If the problem persists, try a factory reset.
To perform a factory reset, turn off the keyboard, press and hold the highest white key while turning the power back on. This will reset all settings to factory defaults.
Yes, you can connect the PSR-E373 to a computer using a USB-to-host cable. This allows you to use the keyboard as a MIDI controller with compatible software.
Press the «Record» button, select a track, and then press «Start/Stop» to begin recording. Play your music, and when finished, press «Start/Stop» again to stop recording.
Distorted sound may be due to high volume levels. Lower the master volume and check any connected devices for interference. Ensure the power adapter is the correct model and securely connected.
Press the «Dual» button to layer two voices on top of each other. Use the voice selection buttons to choose the primary and secondary voices you want to combine.
The arpeggiator automatically creates an arpeggio when you play a chord or note. To use it, press the «Arpeggio» button and select a pattern using the number buttons.
Turn off the keyboard, open the battery compartment on the underside, remove old batteries, and insert six new AA batteries, ensuring correct polarity. Close the compartment securely.
Keep the keyboard clean by dusting it regularly and avoid exposure to extreme temperatures and humidity. Use a soft cloth for cleaning and ensure all connections are secure. Store in a safe, dry place when not in use.