
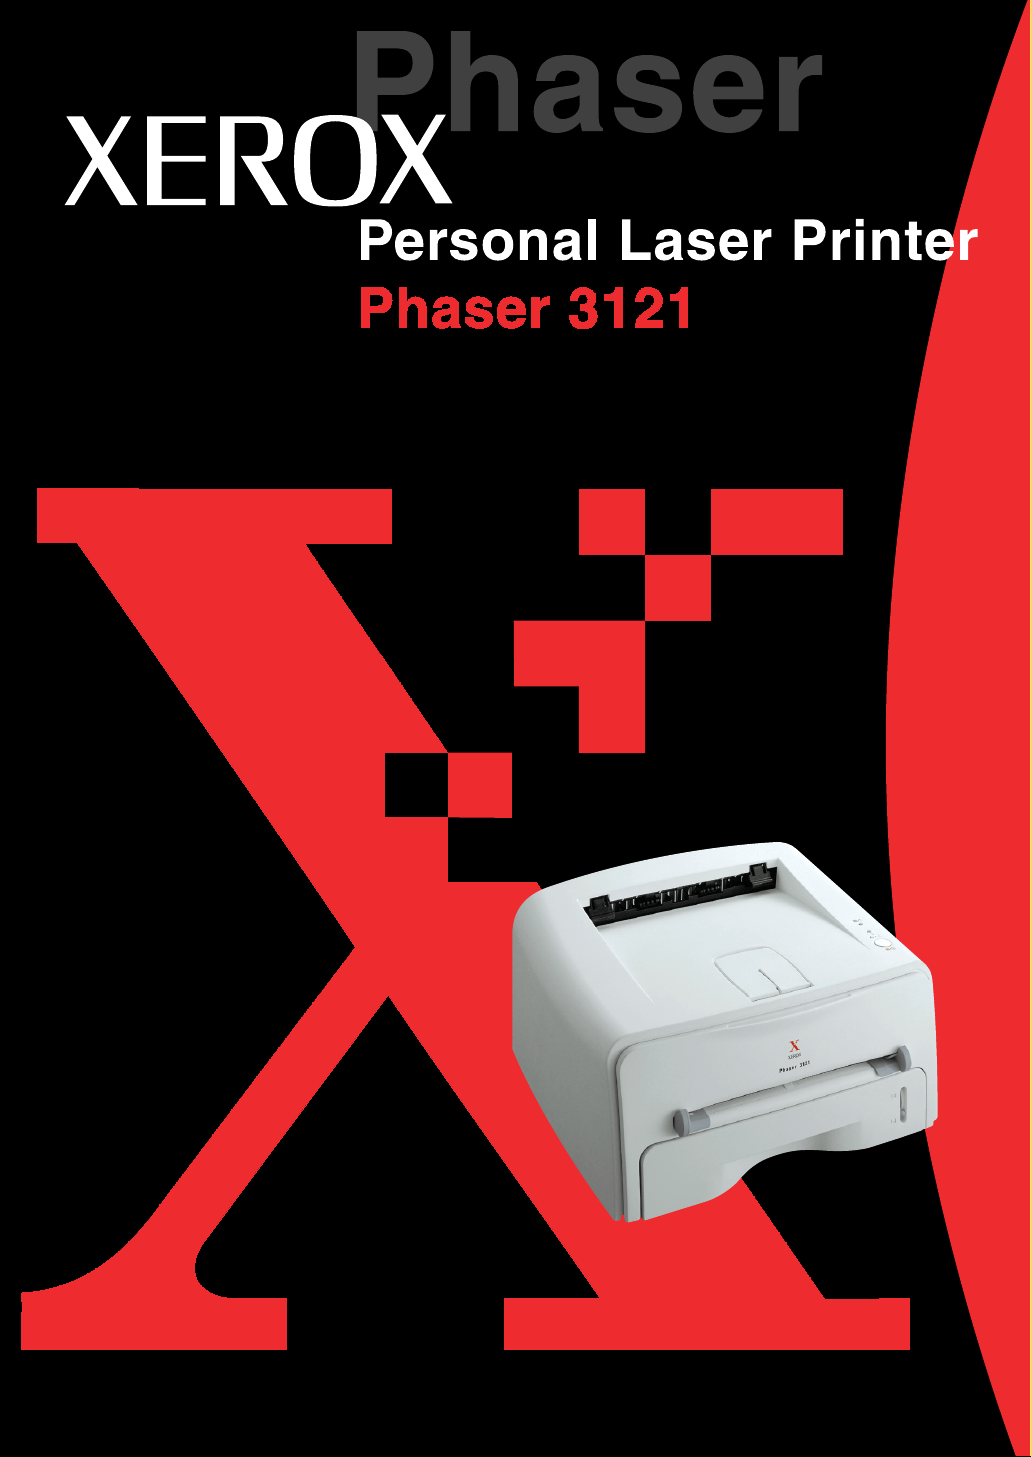
XEROX^^®®*^
Персональный лазерный принтер
Phaser 3121

Целью данного руководства является только предоставление информации. Вся
содержащаяся в нем информация может быть изменена без уведомления. Корпорация
Xerox не несет ответственности за ущерб, прямой или косвенный, понесенный в
результате использования данного руководства.
© 2003 Xerox Corporation. Все права защищены.
Phaser 3121 и логотип Xerox являются торговыми марками корпорации Xerox.
Centronics является товарным знаком Centronics Data Computer Corporation.
IBM and IBM PC являются товарными знаками International Business Machines
Corporation.
Microsoft, Windows, Windows 95, Windows 98, Windows Me, Windows NT 4.0, Windows
2000, Windows NT и Windows XP являются зарегистрированными товарными знаками
Micorsoft Corporation.
Все прочие марки и наименования продуктов являются товарными знаками
соответствующих компаний и организаций.

Содержание
Глава 1:
Введение
Специальные функции………………………………………………….. 1.2
Компоненты принтера…………………………………………………… 1.4
Вид спереди……………………………………………………………. 1.4
Вид изнутри …………………………………………………………… 1.5
Вид сзади……………………………………………………………….. 1.5
Расположение элементов панели управления………………. 1.6
ЖКИ В сети/Ошибка и Режим зкономии тонера………… 1.6
Кнопка Отмена……………………………………………………….. 1.7
Глава 2:
Установка принтера
Распаковка ………………………………………………………………….. 2.2
Выбор места ………………………………………………………….. 2.3
Установка тонер-картриджа………………………………………….. 2.4
Загрузка бумаги……………………………………………………………. 2.6
Изменение размера бумаги в лотке ………………………… 2.8
Подсоединие кабеля принтера …………………………………….. 2.9
Включение принтера…………………………………………………… 2.11
Печать демонстрационной страницы…………………………… 2.12
Установка программного обеспечения принтера …………. 2.13
Функции драйвера принтера………………………………….. 2.14
Установка программного обеспечения принтера
в ОС Windows……………………………………………………….. 2.15
II

Глава 3:
Материалы для печати
Выбор бумаги и других материалов ……………………………… 3.2
Размеры материалов и емкость………………………………. 3.3
Рекомендации по бумаге и специальным
материалам …………………………………………………………… 3.4
Выбор выводного лотка………………………………………………… 3.5
Печать в верхний выводной лоток
(лицевой стороной вниз)…………………………………………. 3.5
Печать в задний выводной лоток
(лицевой стороной вверх)……………………………………….. 3.6
Загрузка бумаги……………………………………………………………. 3.7
Использование лотка………………………………………………. 3.8
Использование ручного податчика…………………………… 3.8
Печать на конвертах ………………………………………………….. 3.10
Печать на наклейках…………………………………………………… 3.12
Печать на прозрачной пленке……………………………………… 3.13
Печать на картоне или
на материалах специальных размеров………………………… 3.15
Печать на печатных бланках……………………………………….. 3.16

Глава 4:
Задания печати
Печать документа ………………………………………………………… 4.2
Отмена задания печати ………………………………………….. 4.4
Использование настройки Избранное …………………….. 4.5
Использование справки…………………………………………… 4.5
Установка свойств принтера …………………………………………. 4.6
Использование режима экономии тонера ……………………… 4.8
Печать нескольких страниц на одном листе бумаги
(несколько страниц на стороне)…………………………………… 4.10
Масштабирование документа …………………………………….. 4.12
Умещение документа на бумаге выбранного размера … 4.13
Печать плакатов…………………………………………………………. 4.14
Задание свойств графики……………………………………………. 4.16
Печать водяных знаков……………………………………………….. 4.19
Использование существующего водяного знака……… 4.19
Создание водяного знака………………………………………. 4.20
Редактирование водяного знака……………………………. 4.21
Удаление водяного знака……………………………………… 4.21
Печать наложений………………………………………………………. 4.22
Что такое наложение?…………………………………………… 4.22
Создание нового страничного наложения ……………… 4.22
Использование страничного наложения ……………….. 4.24
Удаление страничного наложения ………………………… 4.25
Использование параметров вывода…………………………….. 4.26
Установка локально разделяемого принтера ………………. 4.28
Windows 9x/Me………………………………………………………. 4.28
Windows NT/2000/XP …………………………………………….. 4.29
Глава 5:
Обслуживание принтера
Обслуживание тонер-картриджа……………………………………. 5.2
Перераспределение тонера …………………………………… 5.3
Замена тонер-картриджа ………………………………………… 5.4
Чистка принтера ………………………………………………………….. 5.5
Чистка внешних поверхностей ……………………………….. 5.5
Чистка внутри принтера …………………………………………. 5.5
Расходные материалы и запасные части ……………………… 5.8
IV

Глава 6:
Устранение неполадок
Контрольный список устранения неполадок………………….. 6.2
Устранение общих неполадок печати……………………………. 6.3
Устранение замятий бумаги………………………………………….. 6.7
В области вывода бумаги………………………………………… 6.7
В области подачи бумаги ……………………………………….. 6.9
Около тонер-картриджа………………………………………….. 6.10
Как избежать замятий при печати на бумаге
размера A5…………………………………………………………….. 6.11
Как избежать замятий бумаги…………………………………. 6.12
Устранение неполадок, связанных с качеством печати . 6.12
Контрольный список качества печати …………………….. 6.12
Устранение неполадок, связанных с качеством
печати……………………………………………………………………. 6.13
Работа с сообщениями об ошибках………………………………. 6.18
Общие неполадки ОС Windows…………………………………….. 6.19
Общие неполадки ОС Linux………………………………………….. 6.20
Глава 7:
Приложение
Использование принтера в ОС Linux……………………………… 7.2
Установка драйвера принтера…………………………………. 7.2
Изменение метода подсоединения принтера…………… 7.6
Использование утилиты конфигурации …………………… 7.8
Изменение свойств LLPR ………………………………………. 7.10
Характеристики принтера……………………………………………… 7.12
Характеристики бумаги…………………………………………………. 7.13
Обзор…………………………………………………………………….. 7.13
Поддерживаемые типы бумаги ………………………………. 7.14
Рекомендации по использованию бумаги………………… 7.15
Характеристики бумаги ………………………………………….. 7.16
Емкость выводных лотков………………………………………. 7.16
Условия хранения принтера и бумаги……………………… 7.17
v

Окружающая среда и безопасность
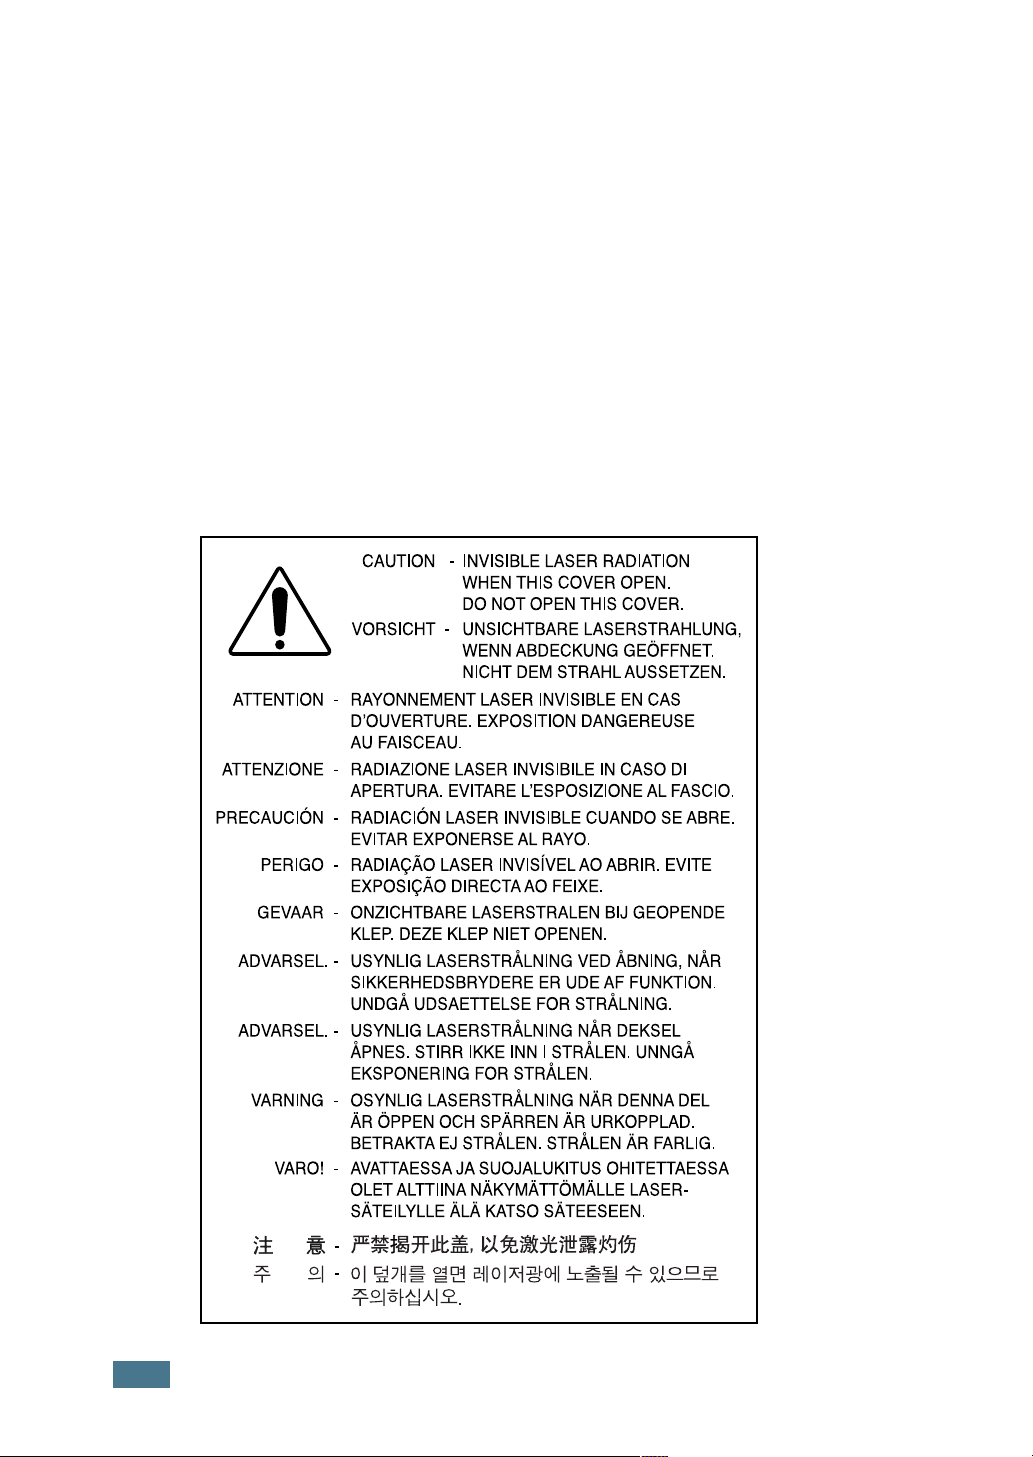
Заявление о безопасности лазера
Принтер сертифицирован в США на соответствие требованиям DHHS 21 CFR, глава 1,
подраздел “J”, для лазерных устройства Класса 1(1). Во всех прочих странах принтер
сертифицирован как лазерное устройство Класса I, соответствующее требованиям
IEC825/EN69825.
Лазерные устройства Класса I считаются безопасными. Лазерная система и принтер
устроены таким образом, что при обычной эксплуатации, обслуживании пользователем
или же во время предусмотренного ремонта человек никогда не подвергается
воздействию лазерной радиации выше уровня Класса I.
ПРЕДУПРЕЖДЕНИЕ
Ни в коем случае не эксплуатируйте и не обслуживайте принтер, если с блока
лазера/сканера удалена защитная крышка. Отраженные лучи, хотя они и невидимы,
могут повредить глаза.
При эксплуатации данного аппарата вы должны соблюдать основные меры
предосторожности для уменьшения риска пожара, электрошока и получения травм.
ATTENTION
ATTENZIONE
PRECAUClÓN
PERIGO
GEVAAR
ADVARSEL
ADVARSEL
VARNING
VARO!
CAUTION — INVISIBLE LASER RADIATION
WHEN THIS COVER OPEN.
DO NOT OPEN THIS COVER.
VORSICHT — UNSICHTBARE LASERSTRAHLUNG,
WENN ABDECKUNG GEÖFFNET.
NICHT DEM STRAHL AUSSETZEN.
RAYONNEMENT LASER INVISIBLE EN CAS
D’OUVERTURE. EXPOSITION DANGEREUSE
AU FAISCEAU.
RADIAZIONE LASER INVISIBILE IN CASO Dl
APERTURA. EVITARE L’ESPOSIZIONE AL FASCIO.
RADIAClÓN LASER INVISIBLE CUANDO SE ABRE.
EVITAR EXPONERSE AL RAYO.
RADIAÇÂO LASER INVISÌVELAO ABRIR. EVITE
EXPOSIÇÂO DIRECTAAO FEIXE.
ONZICHTBARE LASERSTRALEN BIJ GEOPENDE
KLEP. DEZE KLEP NIET OPENEN.
USYNLIG LASERSTRÂLNING VED ÂBNING, NÂR
SIKKERHEDSBRYDERE ER UDEAF FUNKTION.
UNDGÂ UDSAETTELSE FOR STRÂLNING.
USYNLIG LASERSTRÂLNING NÂR DEKSEL
ÂPNES. STIRR IKKE INN I STRÂLEN. UNNGÂ
EKSPONERING FOR STRÂLEN.
OSYNLIG LASERSTRÂLNING NÂR DENNA DEL
ÂR ÖPPEN OCH SPÂRREN ÂR URKOPPLAD.
BETRAKTA EJ STRÂLEN. STRÂLEN ÂR FARLIG.
AVATTAESSA JA SUOJALUKITUS OHITETTAESSA
OLET ALTTIINA NÂKYMÂTTÔMÂLLE LASER-
SÂTEILYLLE ÂLÂ KATSO SÄTEESEEN.
>± Ж —
ишшшт
¥ o| — 0| й7Цт gg S||0|Xilh0]|
^
vi

Озоновая безопасность
При обычной работе данный аппарат выделяет озон. Выделенный
озон не представляет опасности для оператора. Однако аппарат
рекомендуется эксплуатировать в хорошо проветриваемом
помещении.
При необходимости дополнительной информации об озоне
обратитесь к ближайшему дилеру компании Xerox.
Энергосбережение
в этом принтере применяется современная технология
энергосбережения, позволяющее сократить потребление
энергии, когда аппарат не используется активно.
Если принтер не получает данных длительное время,
потребление энергии автоматически снижается.
Символ “energy star” не является свидетельством одобрения
EPA какого-либо изделия или сервиса.
Радиочастотное излучение
Требования FCC (США)
Данное оборудование испытано и признано соответствующим ограничениям для
цифровых устройств Класса B, относящимся к Части 15 правил FCC. Эти ограничения
обеспечивают разумную защиту от вредного излучения при установке оборудования в
жилых помещениях. Данное оборудование генерирует, использует и может излучать
радиочастотную энергию, и при установке или использовании не в соответствии с
инструкциями может вызывать вредные помехи для радиосвязи. Однако нет гарантии,
что подобные помехи не будут возникать при какой-либо конкретной установке. Если это
оборудование все же вызывает помехи при радио- и телевизионном приеме (что можно
определить, выключив и вновь включив оборудование), пользователь может попытаться
устранить помехи одним из следующих способов:
1
перенаправить или переместить принимающую антенну;
2
увеличить расстояние между оборудованием и приемником;
3
подключить данное оборудование к сетевой розетке в другой электрической цепи
(отличной от цепи, к которой подключен приемник);
4
проконсультироваться с дилером или с опытным радиотехником.
ОСТОРОЖНО:
Изменения или модификации, явно не одобренные изготовителем,
отвечающим за соответствие, могут привести к отмене права пользователя на
эксплуатацию оборудования.
vii

Правила по радиопомехам для Канады
Это цифровое устройство не превышает ограничений Класса B для радиопомех ,
вызываемых цифровыми устройствами, как это определено в стандарте по
оборудованию, вызывающему помехи, “Цифровые устройства” ICES-003,
Промышленность и наука Канады.
Cet appareil numOrique respecte les limites de bruits radioOlectriques applicables aux appareils
numOriques de Classe B prescrites dans la norme sur le matériel brouilleur: ”Appareils
Numériques”, ICES-003 OdictOe par l’Industrie et Sciences Canada.
Заявление о соответствии (европейские страны)
Одобрения и сертификации
С €
Маркировка “CE” на данном аппарате обозначает Заявление о
соответствии Xerox Corporation. со следующими применимыми
директивами Европейского Союза 93/68/EEC, в соответствии с
датами:
1 января, 1995 г.: Директива Совета 73/23/EEC “Сближение законодательств государств-
членов в отношении оборудования низкого напряжения”.
1 января, 1996 г.: Директива Совета 89/336/EEC (92/31/EEC) “Сближение законодательств
государств-членов в отношении электромагнитной совместимости”.
Полный текст декларации, в котором приведены соответствующие Директивы и
упомянутые стандарты, можно получить у представителя корпорации Xerox Corporation.
ПРЕДУПРЕЖДЕНИЕ: Изменения или модификации данного оборудования, явно не
одобренные компанией Xerox Europe, могут привести к лишению пользователя права на
эксплуатацию данного оборудования. В целях обеспечения соответствия Директиве EMC
(89/336/EEC) для данного оборудования необходимо использовать экранированные
кабели.
ПРЕДУПРЕЖДЕНИЕ: Для того чтобы данное оборудование могло работать рядом с
промышленным, научным и медицинским оборудованием (ISM), может возникнуть
необходимость ограничить внешнее излучение оборудования ISM или предпринять
специальные меры по снижению его влияния.
ЗАМЕЧАНИЯ ПО БЕЗОПАСНОСТИ
Это устройство и его принадлежности фирмы XEROX производятся, тестируются и
сертифицируются в соответствии со строгими нормами безопасности, требованиями по
электромагнитные сигналам и установленным стандартам по условиям эксплуатации.
ПРЕДУПРЕЖДЕНИЕ.
Любое несанкционированное изменение, в том числе добавление новых функций или
подключение внешних устройств, может повлиять на сертификацию этого устройства.
За дополнительной информацией обращайтесь в представительство XEROX.
vili

Маркировка предупреждений
Все инструкции, содержащие предупреждения, расположенные на устройстве или
прилагающиеся к нему, должны быть следующими.
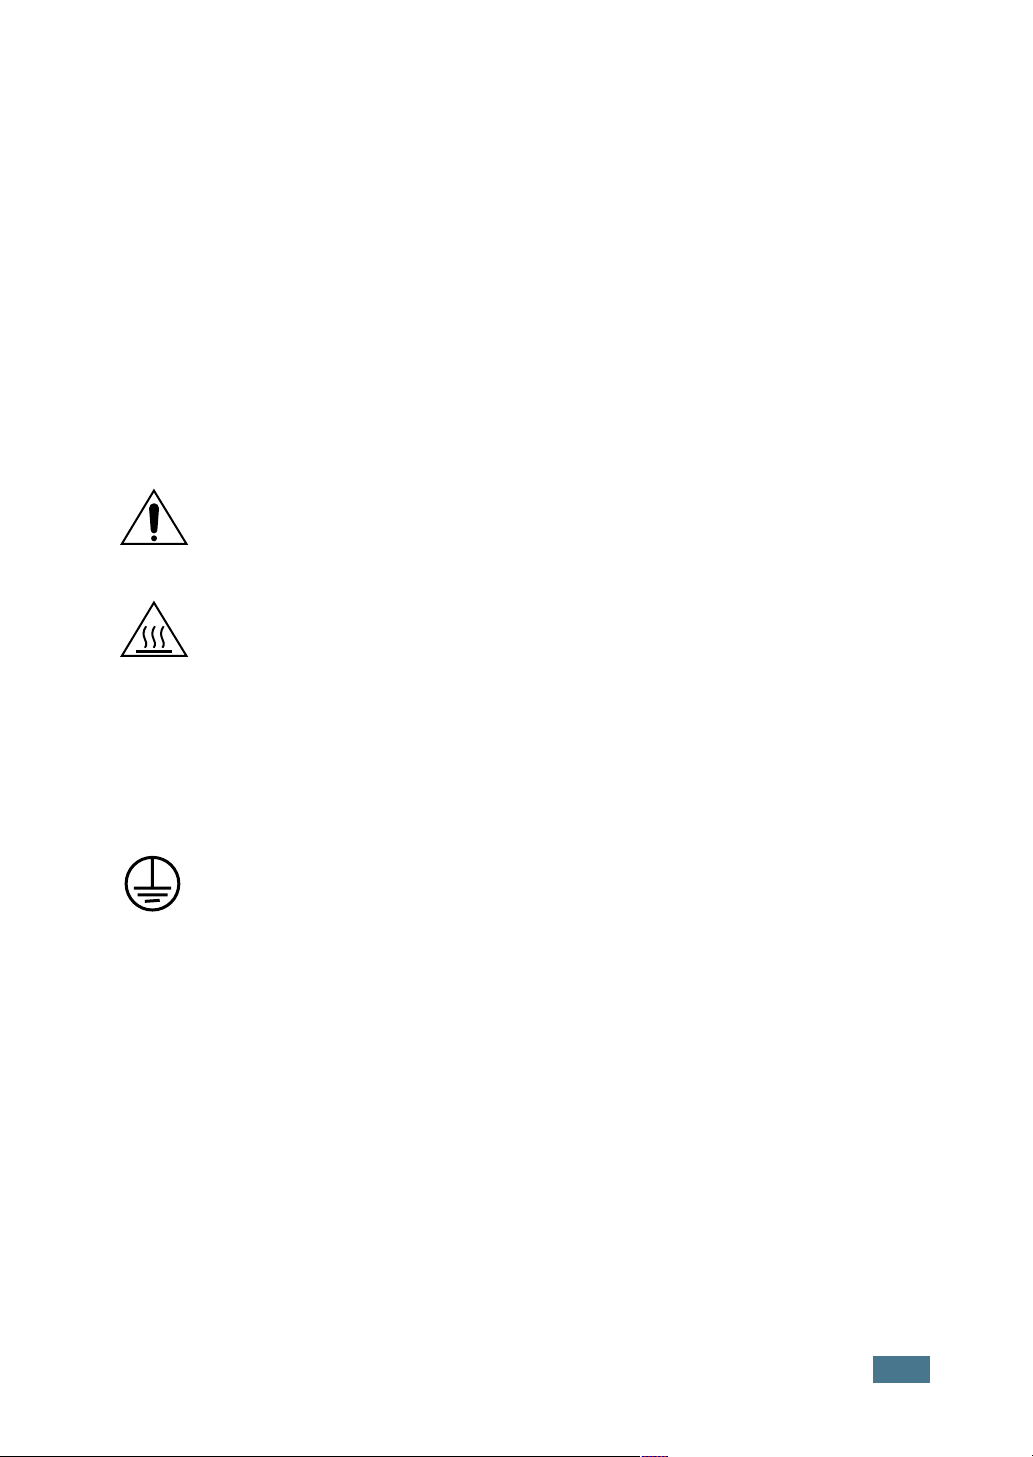
Это ПРЕДУПРЕЖДЕНИЕ указывает на области устройства, где можно
получить травму.
Это ПРЕДУПРЕЖДЕНИЕ указывает на поверхности, которые нагреваются и
/ / которых не следует касаться.
Электропитание
Параметры электропитания для этого устройства указаны на этикетке с техническими
данными. Если вы не уверены, что источник электропитания соответствует этим
требованиям, проконсультируйтесь у местного поставщика электроэнергии.
ПРЕДУПРЕЖДЕНИЕ
Устройство должно быть подключено к заземленной электросети.
Это устройство снабжено разъемом питания с заземленным контактом. Этот разъем
подходит только для заземленных электросетей. Это сделано в целях безопасности. Во
избежание поражения электрическим током попросите электрика заменить розетку, если
она не соответствует разъему. Никогда не используйте заземленный разъем адаптера
для подключения устройства к электророзетке, которая не имеет клеммы заземления.
Чтобы отключить электропитание от устройства, отсоедините кабель питания. Выньте
разъем из розетки электросети.
Вентиляция
Щели и отверстия в корпусе устройства служат для вентиляции. Не загораживайте
вентиляционные отверстия. Это может привести к перегреву оборудования.
Это оборудование не должно устанавливаться во встроенные ниши, если не
предусмотрена соответствующая вентиляция. Проконсультируйтесь с представителем
фирмы XEROX.
Не вставляйте никаких предметов в вентиляционные отверстия на устройстве.
x

05:20
Как подключить старый принтер к Windows 10?
18:14
Samsung не захватывает бумагу — замена ролика захвата принтера
09:45
Заправка картриджа Samsung ML 1710, 1520, SCX 4100, Xerox 3121 — плюс ремонт необычной неисправности
28:17
Разборка и профилактика принтера xerox Phaser 3121
01:03
Работа принтера Xerox 3121
23:43
Разборка профилактика печки xerox Phaser 3121.
01:11
Xerox Phaser 3121, драйвер на Windows 7
06:57
xerox phaser 3121 — TONER
Нажмите на кнопку для помощи
Перейти к контенту
Принтеры лазерные Xerox
- Размер инструкции: 2.40 Мб
- Формат файла: pdf
Если вы потеряли инструкцию от лазерного принтера Xerox Phaser 3121, можете скачать файл для просмотра на компьютере или печати.
Инструкция для лазерного принтера Xerox Phaser 3121 на русском языке. В руководстве описаны возможности и полезные функции, а также правила эксплуатации. Перед использованием внимательно ознакомьтесь с инструкцией.
Чтобы не читать всю инструкцию вы можете выполнить поиск по содержимому внутри инструкции и быстро найти необходимую информацию. Рекомендации по использованию помогут увеличить срок службы лазерного принтера Xerox Phaser 3121. Если у вас появилась проблема, то найдите раздел с описанием неисправностей и способами их решения. В нем указаны типичные поломки и способы их решения.
Xerox Phaser 3121 Printer Specification
The Xerox Phaser 3121 is a monochrome laser printer designed to meet the demands of small to medium-sized office environments. This printer boasts a print speed of up to 20 pages per minute, making it a reliable choice for fast-paced settings. With a first-page-out time of less than 10 seconds, it ensures minimal waiting time, enhancing productivity. The Phaser 3121 is equipped with a 150 MHz processor and 8 MB of RAM, which efficiently handles print jobs with moderate complexity. It offers a print resolution of up to 600 x 600 dpi, delivering crisp and clear text and graphics suitable for professional documents.
Connectivity options for the Xerox Phaser 3121 include a standard USB 2.0 interface, allowing for easy connection to a wide range of computers and operating systems. The printer is compatible with Windows and various Linux distributions, ensuring versatility in different IT environments. It features a 250-sheet input tray and a 50-sheet output tray, accommodating the needs of small office workflows. The manual feed slot supports various media types, including envelopes, labels, and transparencies, providing flexibility for diverse printing tasks.
The compact design of the Phaser 3121, with dimensions of approximately 14.1 x 14.5 x 8.1 inches, allows it to fit comfortably on most desktops, making it an ideal choice for offices with limited space. Its monthly duty cycle of up to 15,000 pages ensures durability and reliability for consistent use. The printer’s economical operation is further enhanced by its energy-saving features, aligning with modern demands for environmentally responsible office equipment. Overall, the Xerox Phaser 3121 combines efficiency, reliability, and ease of use, making it a suitable addition to any business environment seeking a dependable monochrome printing solution.
Xerox Phaser 3121 Printer F.A.Q.
To install the Xerox Phaser 3121 printer driver on Windows, download the driver from the Xerox website, run the installer, and follow the on-screen instructions to complete the installation. Ensure that the printer is connected to your computer.
If a paper jam occurs, turn off the printer and open the front cover. Carefully remove any jammed paper from the paper path. Make sure there are no torn pieces left inside. Close the cover and turn the printer back on.
If your printer is outputting blank pages, check if the toner cartridge is empty or improperly installed. Replace the cartridge if necessary and ensure it’s seated correctly. Also, verify that the correct paper size is selected in the printer settings.
To perform a factory reset, turn off the printer. Press and hold the ‘Cancel’ button while turning the printer back on. Release the button once the printer starts. This will reset the printer to its default settings.
Regular maintenance includes cleaning the paper path, rollers, and the printer’s exterior. Replace the toner cartridge when print quality declines and check for firmware updates periodically.
The Xerox Phaser 3121 does not support direct network connections as it is a personal printer. You can share it over a network by connecting it to a computer and sharing the printer through the operating system’s printer sharing feature.
Print speed issues can be caused by high-resolution settings or complex print jobs. Try reducing the print quality settings or splitting large documents into smaller sections. Also, ensure the printer is not in a power-saving mode.
The Xerox Phaser 3121 uses a specific toner cartridge model designed for this printer. Refer to the printer’s manual or the Xerox website for the exact model number for replacements.
To improve print quality, ensure the toner cartridge is not nearing its end of life, clean the printer’s rollers, and use high-quality paper. Adjust the print settings to a higher resolution if necessary.
Ensure that the printer is properly connected to the computer and powered on. Check the USB cable for damage and try a different port. Reinstall the printer driver if the issue persists.

This manual is provided for information purposes only. All information included herein
is subject to change without notice. Xerox Corporation is not responsible for any
damages, direct or indirect, arising from or related to use of this manual.
© 2003 Xerox Corporation. All rights reserved.
• Phaser 3121 and Xerox logo are trademarks of Xerox Corporation.
• Centronics is a trademark of Centronics Data Computer Corporation.
• IBM and IBM PC are trademarks of International Business Machines Corporation.
• Microsoft, Windows, Windows 95, Windows 98, Windows Me, Windows NT 4.0
Windows 2000 and Windows XP are registered trademarks of Micorsoft Corporation.
• All other brand or product names are trademarks of their respective companies or
organizations.
i

C
ONTENTS
Chapter 1:
Chapter 2:
NTRODUCTION
I
Special Features ………………………………………….. 1.2
Printer Components ……………………………………… 1.4
Front View …………………………………………….. 1.4
Inside View ……………………………………………. 1.5
Rear View ……………………………………………… 1.5
Understanding the Control Panel ………………………. 1.6
On Line/Error and Toner Save LEDs ………………. 1.6
Cancel button …………………………………………. 1.7
ETTING
S
Unpacking …………………………………………………. 2.2
Selecting a Location …………………………………. 2.3
Installing the Toner Cartridge ………………………….. 2.4
Loading Paper …………………………………………….. 2.6
Changing the Paper Size in the Tray ……………… 2.8
Connecting a Printer Cable ……………………………… 2.9
Turning the Printer on ………………………………….. 2.11
Printing a Demo Page …………………………………… 2.12
Installing Printer Software …………………………….. 2.13
Printer Driver Features …………………………….. 2.13
Installing Printer software in Windows ………….. 2.14
U
P
Y
OUR
RINTER
P
ii

Chapter 3:
Chapter 4:
U
SING
Choosing Paper and Other Materials ………………….. 3.2
Selecting the Output Location ………………………….. 3.5
Loading Paper …………………………………………….. 3.7
Printing on Envelopes …………………………………… 3.10
Printing on Labels ……………………………………….. 3.12
Printing on Transparencies …………………………….. 3.13
Printing on Card Stock or
Custom-sized Materials ………………………………… 3.15
Printing on Preprinted Paper …………………………… 3.16
RINTING
P
Printing a Document …………………………………….. 4.2
Setting Paper Properties ………………………………… 4.6
Using the Toner Save Mode …………………………….. 4.8
Printing Multiple Pages on One Sheet of Paper (N-Up Print-
ing) ………………………………………………………… 4.10
Scaling Your Document ………………………………… 4.12
Fitting Your Document to a Selected Paper Size …… 4.13
Printing Posters ………………………………………….. 4.14
Setting Graphic Properties …………………………….. 4.16
Printing Watermarks ……………………………………. 4.19
Printing Overlays ………………………………………… 4.22
Using Output Options …………………………………… 4.26
Setting Up Locally Shared Printer …………………….. 4.28
P
RINT
Sizes and Capacities ………………………………… 3.3
Guidelines for Paper and Special Materials ………. 3.4
Printing to the Top Output Tray
Printing to the Rear Output Tray (Face up) ……. 3.6
Using the Tray ………………………………………… 3.7
Using the Manual Feeder …………………………… 3.8
Canceling a Print Job ………………………………… 4.4
Using a Favorite Setting ……………………………. 4.5
Using Help …………………………………………….. 4.5
Using an existing Watermark ……………………… 4.19
Creating a Watermark ……………………………… 4.20
Editing a Watermark ……………………………….. 4.21
Deleting a Watermark ……………………………… 4.21
What is an Overlay? ………………………………… 4.22
Creating a New Page Overlay …………………….. 4.22
Using a Page Overlay ………………………………. 4.24
Deleting a Page Overlay …………………………… 4.25
Windows 9x/Me ……………………………………… 4.28
Windows NT/2000/XP ………………………………. 4.29
T
M
ASKS
ATERIALS
(Face down) …. 3.5
iii

Chapter 5:
Chapter 6:
M
AINTAINING
Maintaining the Toner Cartridge ……………………….. 5.2
Redistributing Toner …………………………………. 5.3
Replacing the Toner Cartridge …………………….. 5.4
Cleaning the Printer ……………………………………… 5.5
Cleaning the Outside ………………………………… 5.5
Cleaning the Inside ………………………………….. 5.5
Consumables and Replacement Parts ………………… 5.8
OLVING
S
Troubleshooting Checklist ………………………………. 6.2
Solving General Printing Problems …………………….. 6.3
Clearing Paper Jams ……………………………………… 6.7
In the Paper Exit Area ………………………………. 6.7
In the Paper Feed Area ……………………………… 6.9
Around the Toner Cartridge ……………………….. 6.10
Tips for Avoiding Paper Jams When Printing
on the A5-sized Paper ……………………………… 6.11
Tips for Avoiding Paper Jams ……………………… 6.12
Solving Print Quality Problems ………………………… 6.12
Print Quality Checklist ……………………………… 6.12
Solving Print Quality Problems ……………………. 6.13
Troubleshooting Error Messages ……………………… 6.18
Common Windows Problems ………………………….. 6.19
Common Linux Problems ………………………………. 6.20
P
Y
OUR
ROBLEMS
P
RINTER
iv
Chapter 7:
A
PPENDIX

Using Your Printer in Linux ……………………………… 7.2
Installing the Printer Driver ………………………… 7.2
Changing the Printer Connection Method ………… 7.6
Using the Configuration Tool ………………………. 7.8
Changing LLPR Properties …………………………. 7.10
Printer Specifications ……………………………………. 7.12
Paper Specifications …………………………………….. 7.13
Overview ……………………………………………… 7.13
Supported Sizes of Paper ………………………….. 7.14
Guidelines for Using Paper ………………………… 7.15
Paper Specifications ………………………………… 7.16
Paper Output Capacity ……………………………… 7.16
Printer and Paper Storage Environment ………… 7.17
v
Environmental and Safety Consideration
Laser Safety Statement
The printer is certified in the U.S. to conform to the requirements of DHHS 21 CFR,
chapter 1 Subchapter J for Class I(1) laser products, and elsewhere, is certified as a
Class I laser product conforming to the requirements of IEC825/RN69825.
Class I laser products are not considered to be hazardous. The laser system and
printer are designed so there is never any human access to laser radiation above a
Class I level during normal operation, user maintenance, or prescribed service
condition.
WARNING
Never operate or service the printer with the protective cover removed from Laser/
Scanner assembly. The reflected beam, although invisible, can damage your eyes.
When using this product, these basic safety precautions should always be followed to
reduce risk of fire, electric shock, and injury to persons:
vi
Ozone Safety
Power Saver
During normal operation, this machine produces ozone. The
ozone produced does not present a hazard to the operator.
However, it is advisable that the machine be operated in a well
ventilated area.
If you need additional information about ozone, please contact
your nearest Xerox dealer.
This printer contains advanced energy conservation
technology that reduces power consumption when it is not
in active use.
When the printer does not receive data for an extended
period of time, power consumption is automatically
lowered.
The energy star emblem does not represent EPA
endorsement of any product or service.
Recycling
Please recycle or dispose of the packaging material for this
product in an environmentally responsible manner.
Radio Frequency Emissions
FCC Regulations (USA)
This device has been tested and found to comply with the limits for a Class B digital
device, pursuant to Part 15 of the FCC rules. These limits are designed to provide
reasonable protection against harmful interference in a residential installation. This
equipment generates, uses and can radiate radio frequency energy and, if not
installed and used in accordance with the instructions, may cause harmful
interference to radio communications. However, there is no guarantee that
interference will not occur in a particular installation. If this equipment does cause
harmful interference to radio or television reception, which can be determined by
turning the equipment off and on, the user is encouraged to try to correct the
interference by one or more of the following measures:
1
Reposition the receiving antenna.
2
Increase the separation between the equipment and receiver.
vii

3
Connect the equipment into an outlet on a circuit different from that to which the
receiver is connected.
4
Consult the dealer or an experienced radio/TV technician for help.
CAUTION: Changes or modifications not expressly approved by the manufacturer
responsible for compliance could void the user’s authority to operate the equipment.
Canadian Radio Interference Regulations
This digital apparatus does not exceed the Class B limits for radio noise emissions
from digital apparatus as set out in the interference-causing equipment standard
entitled “Digital Apparatus”, ICES-003 of the Industry and Science Canada.
Cet appareil numérique respecte les limites de bruits radioélectriques applicables aux
appareils numériques de Classe B prescrites dans la norme sur le matériel brouilleur:
“Appareils Numériques”, ICES-003 édictée par l’Industrie et Sciences Canada.
Declaration of Conformity (European Countries)
Approvals and Certifications
The CE marking applied to this product symbolizes Xerox
Corporation. Declaration of Conformity with the following
applicable 93/68/EEC Directives of the European Union as of the
dates indicated:
January 1, 1995: Council Directive 73/23/EEC Approximation of the laws of the
member states related to low voltage equipment.
January 1, 1996: Council Directive 89/336/EEC (92/31/EEC), approximation of the
laws of the Member States related to electromagnetic compatibility.
A full declaration, defining the relevant Directives and referenced standards can be
obtained from your Xerox Corporation representative.
WARNING: Changes or modifications to this equipment not specifically approved by
Xerox Europe may void the user’s authority to operate this equipment. Shielded
cables must be used with this equipment to maintain compliance with the EMC
Directive (89/336/EEC).
WARNING: In order to allow this equipment to operate in proximity to Industrial,
Scientific and Medical (ISM) equipment, the external radiation from ISM equipment
may have to be limited or special mitigation measures taken
.
viii
SAFETY NOTES
This XEROX product and supplies are manufactured, tested and certified to strict
safety regulations, electromagnetic regulations and established environmental
standards.
WARNING: Any unauthorised alteration, which may include the addition of new
functions or connection of external devices, may impact the product certification.
Please contact your XEROX representative for more information.
Warning Markings
All warning instructions marked on or supplied with the product should be followed.
This WARNING alerts users to areas of the product where there is the
possibility of personal damage.
This WARNING alerts users to areas of the product where there are heated
surfaces, which should not be touched.
Electrical Supply
This product shall be operated from the type of electrical supply indicated on the
product’s data plate label. If you are not sure that your electrical supply meets the
requirements, please consult your local power company for advice.
WARNING
This product must be connected to a protective earth circuit.
This product is supplied with a plug that has a protective earth pin. This plug will fit
only into an earthed electrical outlet. This is a safety feature. To avoid risk of electric
shock, contact your electrician to replace the electrical outlet if you are unable to
insert the plug into it. Never use an earthed adapter plug to connect the product to
a electrical outlet that lacks an earth connection terminal.
To disconnect all electrical power to the product, the disconnect device is the power
cord. Remove the plug from the electrical outlet.
ix

Ventilation
Slots and openings in the product’s enclosure are provided for ventilation. Do not
block or cover the ventilation vents, as this could result in the product overheating.
This product should not be placed in a built-in installation unless proper ventilation is
provided, please contact your XEROX representative for advice.
Never push objects of any kind into the ventilation vents of the product.
Operator Accessible Areas
This product has been designed to restrict operator access to safe areas only.
Operator access to hazardous areas is restricted with covers or guards, which would
require a tool to remove. Never remove these covers or guards.
Maintenance
Any operator product maintenance procedures will be described in the user
documentation supplied with the product. Do not to carry out any maintenance on
the product, which is not described in the customer documentation.
Cleaning Your Product
Before cleaning this product, unplug the product from the electrical outlet. Always
use materials specifically designated for this product, the use of other materials may
result in poor performance and may create a hazardous situation. Do not use aerosol
cleaners, they may be flammable under certain circumstances.
For more information on Environment, Health and Safety in
relation to this XEROX product and supplies, please contact the
following customer help lines;
EUROPE: +44 1707 353434
USA: 1 800 8286571
CANADA: 1 800 8286571
x

1
I
NTRODUCTION
Congratulations on the purchase of your Printer!
This chapter includes:
• Special Features
• Printer Components
• Understanding the Control Panel
Special Features
Your new printer is equipped with special features that improve
the print quality, giving you a competitive edge. You can:
Print with excellent quality and high speed
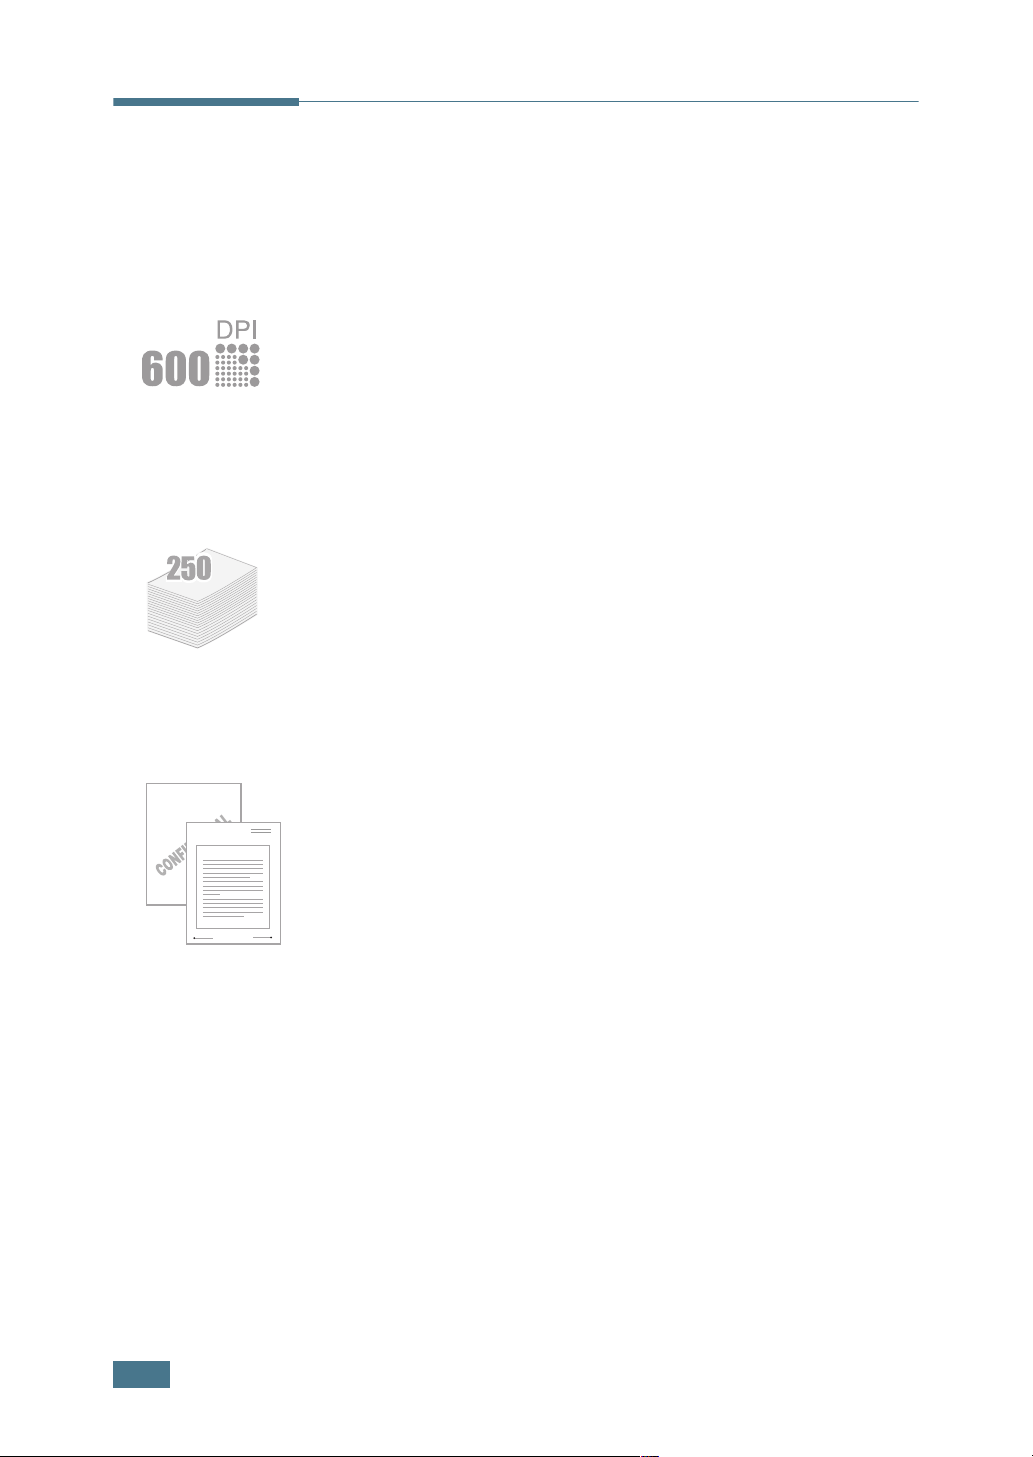
• You can print at 600 dots per inch (dpi). See page 4.16.
• Prints 17 pages-per-minute (Letter size),
16 pages-per-minute(A4 size).
Handle paper flexibly
• Standard 250-sheet tray and a 1-sheet Manual Feeder
support various sizes and types of paper.
Dear ABC
Regards
WORLD BEST
• Two output trays; select either the top output tray (facedown) or the rear output tray (face-up) for the most
convenient access.
Create professional documents
• You can customize your documents using Watermarks, such
as “Confidential.” See page 4.19.
• Print Posters. The text and pictures of each page of your
document are magnified and printed across the selected sheet
of paper. After the document has printed, trim off the white
edges of each sheet. Tape the sheets together to form a
poster. See page 4.14.
1.2
I
NTRODUCTION
Save your time and money
• Allows you to use the Toner Save mode to save toner. See
page 4.8.
• Allows you to print multiple pages on one single sheet of paper
to save paper (N-Up printing). See page 4.10.
• This printer meets Energy Star guidelines for energy
efficiency.
Print in various environments
• You can print in Windows 95/98/Me/NT 4.0/2000/XP.
• Your printer is compatible with Linux.
• Your printer comes with both the Parallel and the USB
interface.
1
I
NTRODUCTION
1.3
Printer Components
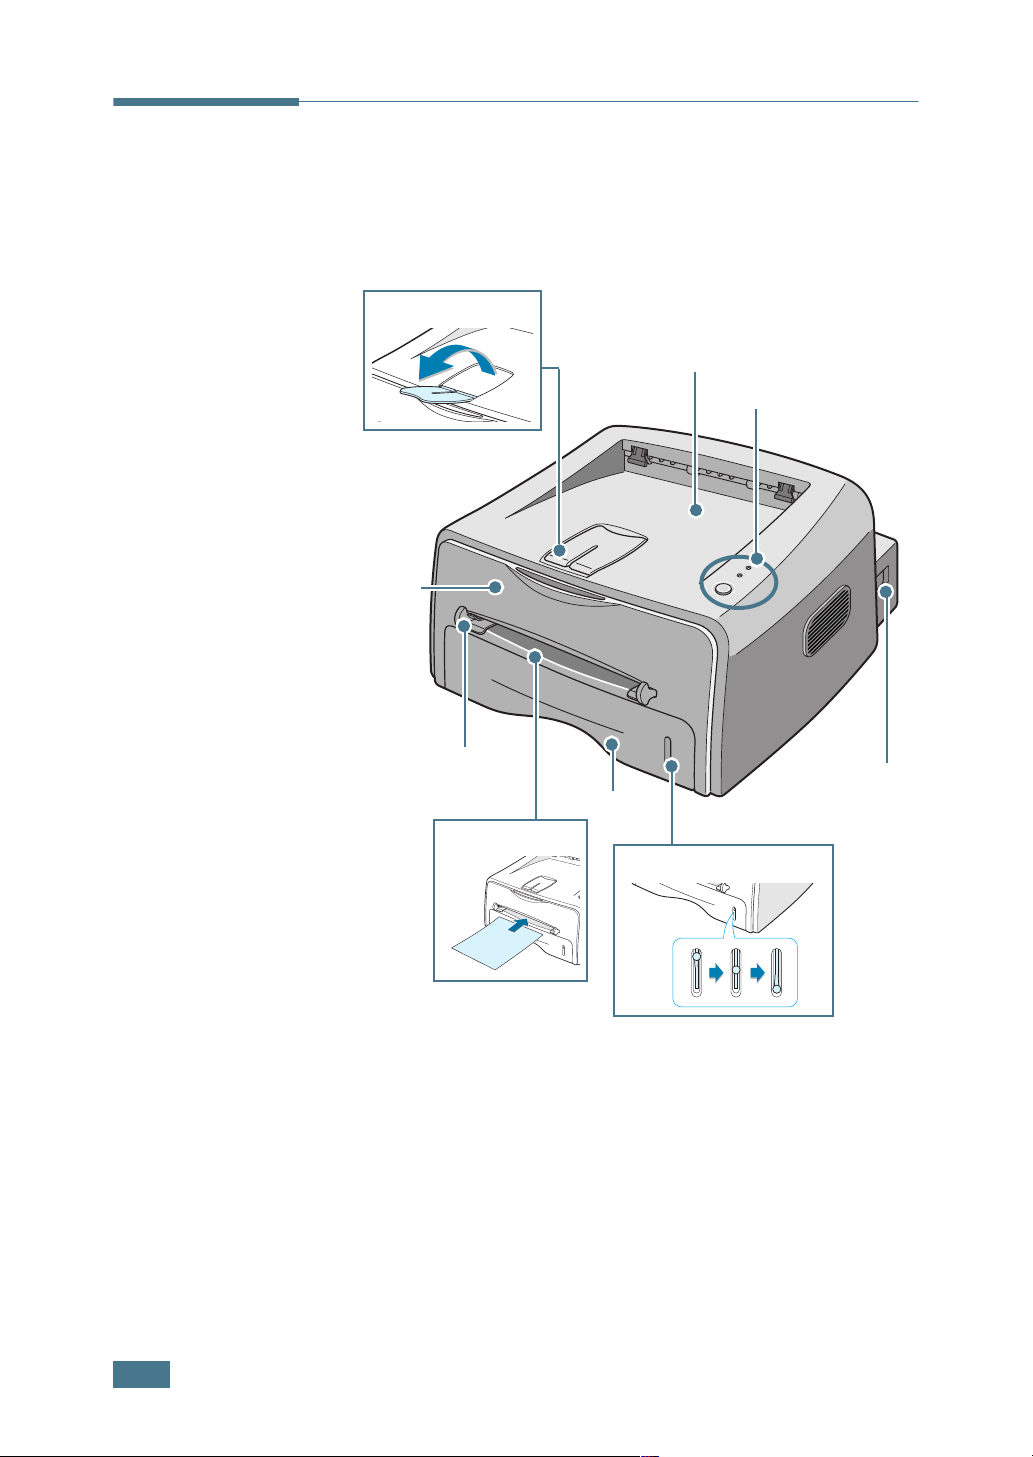
Front View
Output Support
Front
Cover
Top output tray
(Face down)
Control Panel
Manual Feeder guide
Power switch
Tray
Manual Feeder
1.4
I
NTRODUCTION
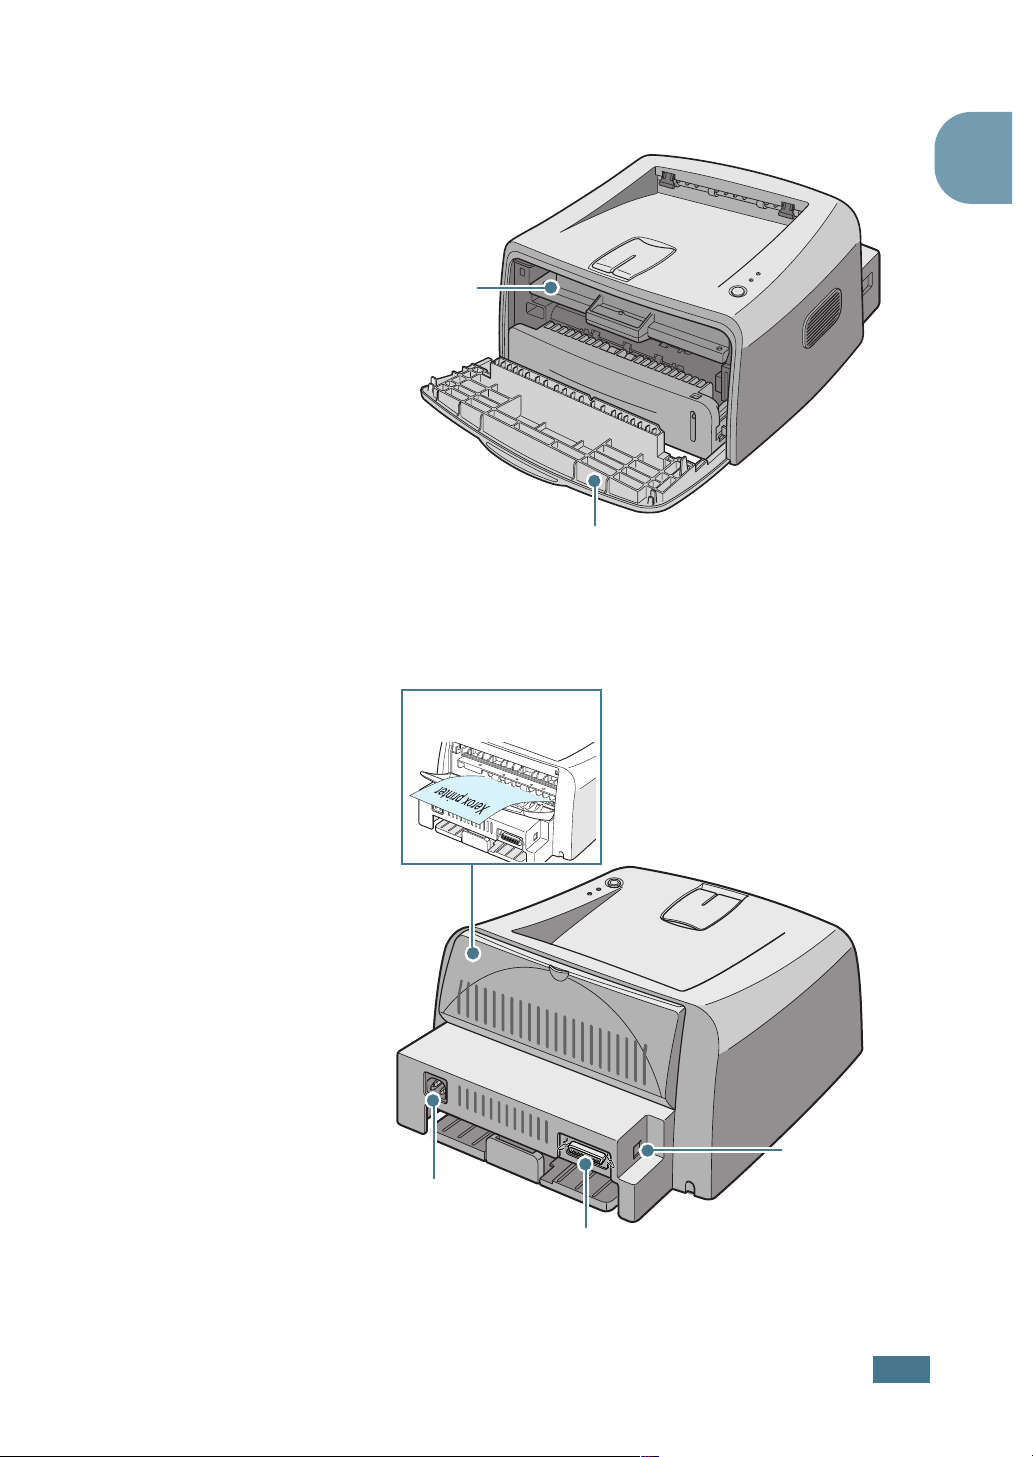
Inside View
Toner cartridge
Rear View
1
Front Cover
Rear output tray
(Face up)
Power receptacle
USB port
Parallel port
I
NTRODUCTION
1.5
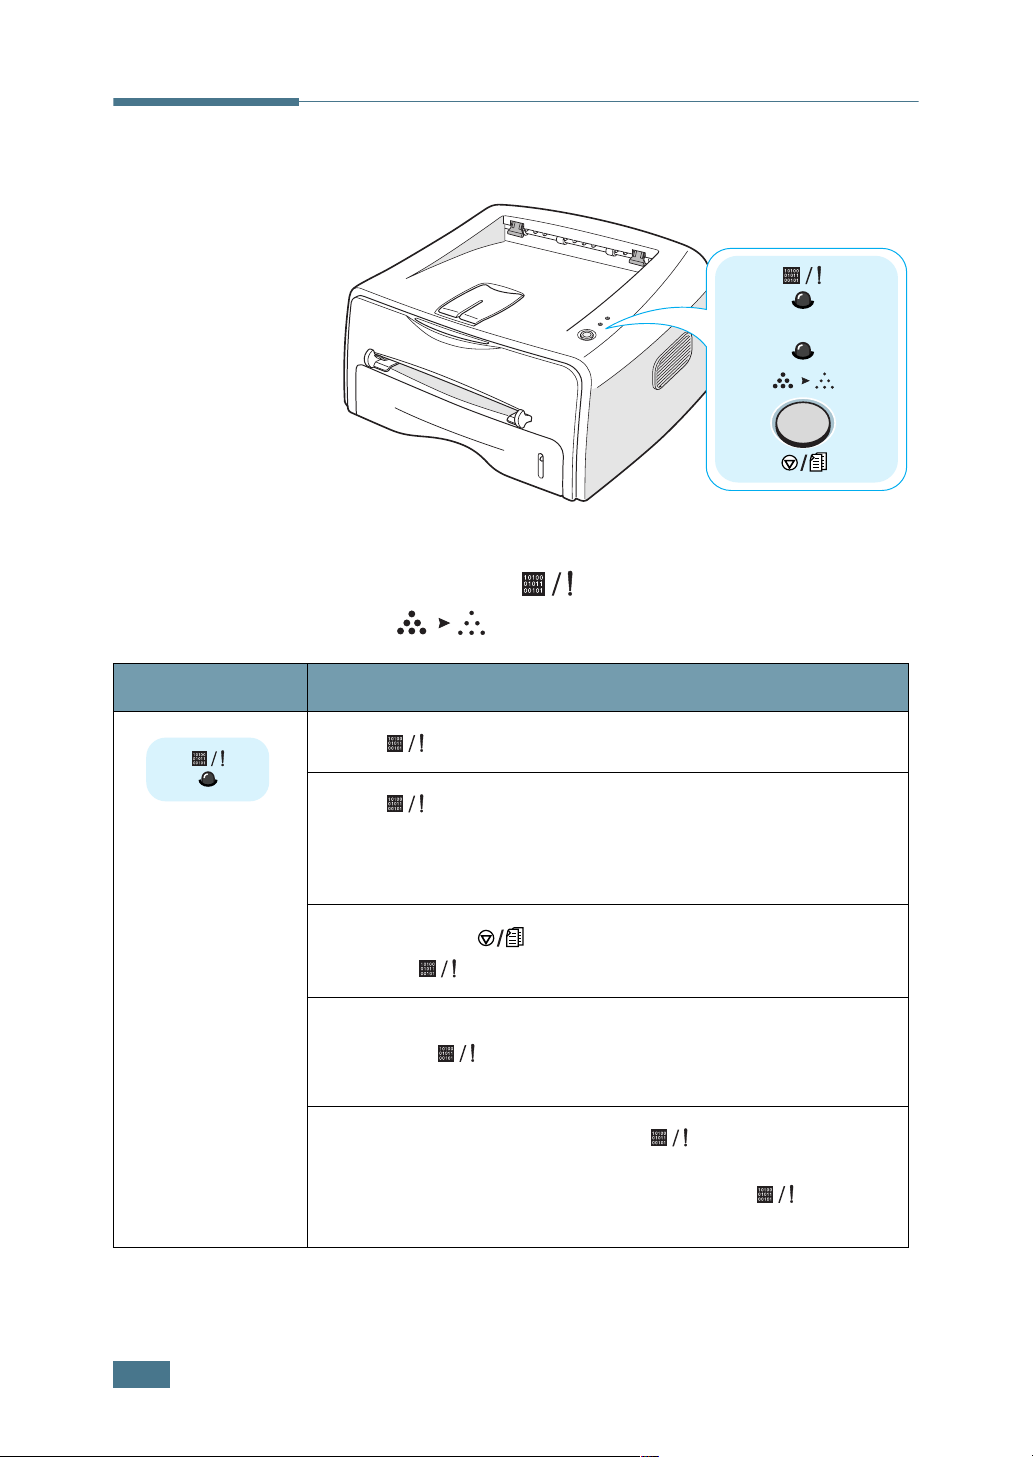
Understanding the Control Panel
On Line/Error( ) and Toner
Save( ) LEDs
LED Description
If the lights green, the printer is ready to print.
If the lights red, the printer is experiencing an error,
such as jammed paper, the open cover or the empty toner
cartridge. See “Troubleshooting Error Messages” on page
6.18.
If you press the button while the printer is receiving
data, the
In Manual Feed mode, if there is no paper in the Manual
Feeder, the LED blinks red. Load paper into the Manual
Feeder and the LED stops blinking.
If the printer is receiving data, the LED slowly blinks
green.
If the printer is printing the received data, the LED
blinks green fast.
LED blinks red to cancel printing.
1.6
I
NTRODUCTION
LED Description
If you press the button in Ready mode, this LED is on
and the Toner Save mode is enabled.
If you press this button once again, this LED is off and the
Toner Save mode is disabled.
If the and LEDs blink, your system has some
problems. To solve the problem, see “Troubleshooting Error
Messages” on page 6.18.
Cancel( ) button
Function Description
Printing demo page
Manual feeding
In Ready mode, press and hold this button for about 2
seconds until all LEDs blink slowly, and release.
Press this button each time you load a sheet of paper in the
manual feeder, when you select
from your software application. For detailed information,
see “Using the Manual Feeder” on page 3.8.
Manual Feed
for
Source
1
Cleaning inside
printer
Canceling print job
Toner Save mode
on/off
In Ready mode, press and hold this button for about 10
seconds until all LEDs turn on, and release. After cleaning
the printer, one cleaning sheet is printed.
Press this button during printing. The LED blinks
while the print job is cleared from both the printer and the
computer, and then return to Ready mode. This may take
some time depending on the size of the print job.
In Manual Feed mode, you can’t cancel the print job by
pressing this button. For detailed information, see “Using
the Manual Feeder” on page 3.8.
In Ready mode, press this button to turn the Toner Save
mode on or off.
For detailed information, see page 4.8.
I
NTRODUCTION
1.7

N
OTE
1.8
I
NTRODUCTION

2
Setting Up Your Printer
This chapter provides step by step information on setting up
your printer.
This chapter includes:
• Unpacking
• Installing the Toner Cartridge
• Loading Paper
• Connecting a Printer Cable
• Turning the Printer on
• Printing a Demo Page
• Installing Printer Software
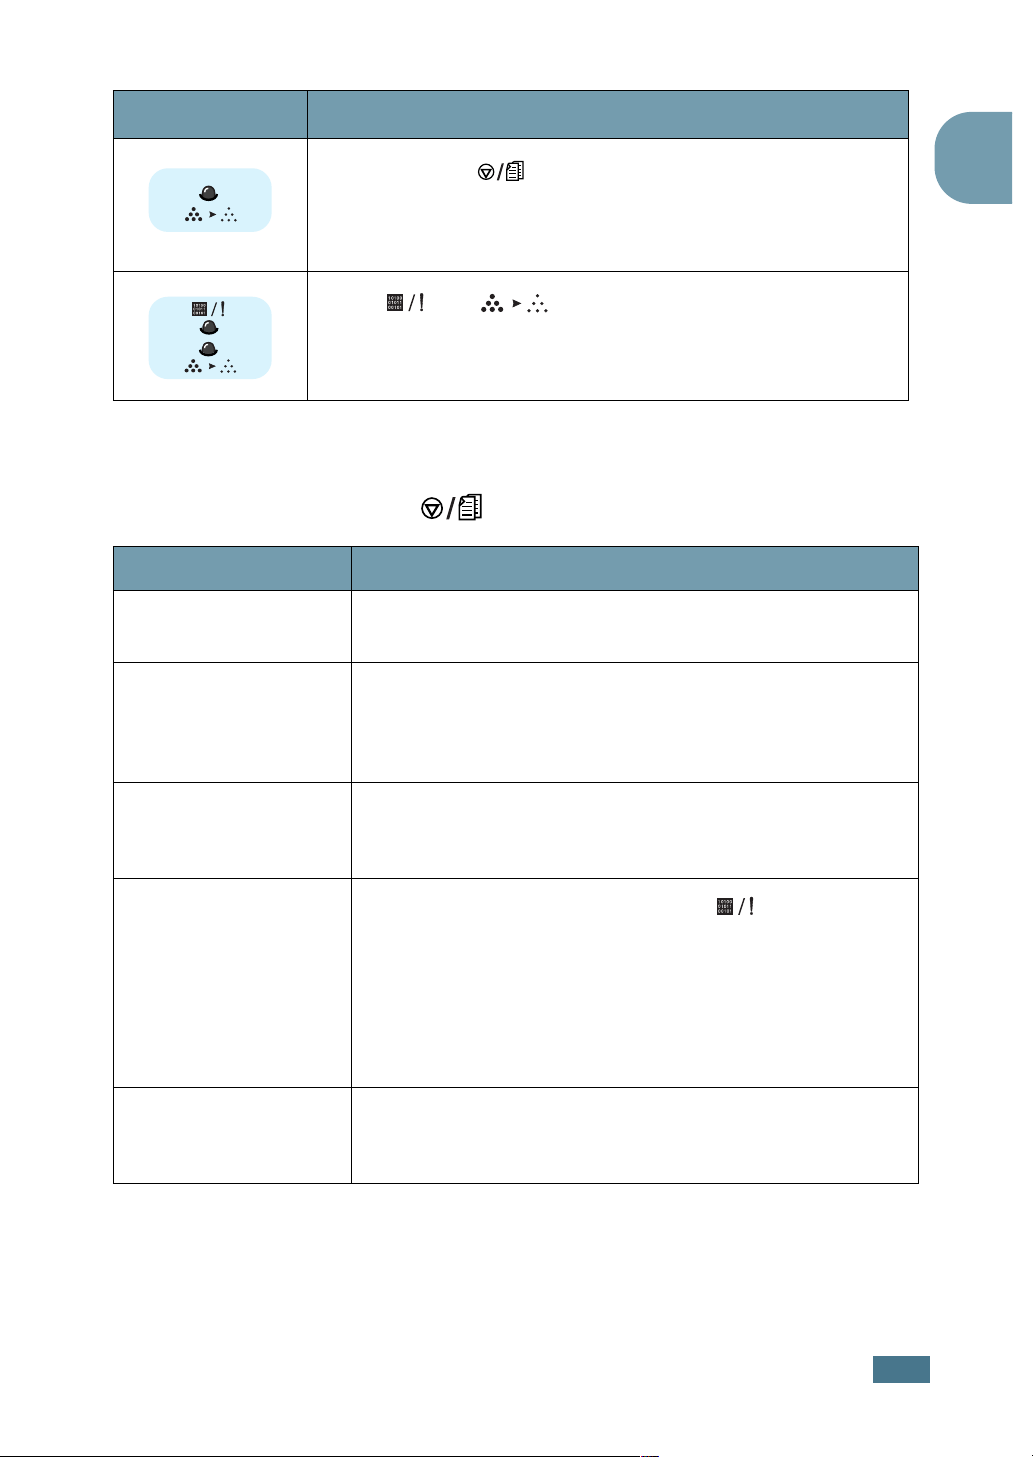
Unpacking
1
Remove the Printer and all accessories from the packing
carton. Make sure that the printer has been packed with the
following items:
Toner Cartridge Power Cord
USB Cable CD-ROM
Setup Guide
Notes:
• If any items are missing or damaged, notify your dealer
immediately.
• Components may differ from one country to another.
• The CD-ROM contains the printer driver, the User’s Guide, and
the Adobe Acrobat Reader program.
2
Carefully remove all of packing tapes from the printer.
Tape
2.2
S
ETTING UP YOUR PRINTER
Clearance
Space
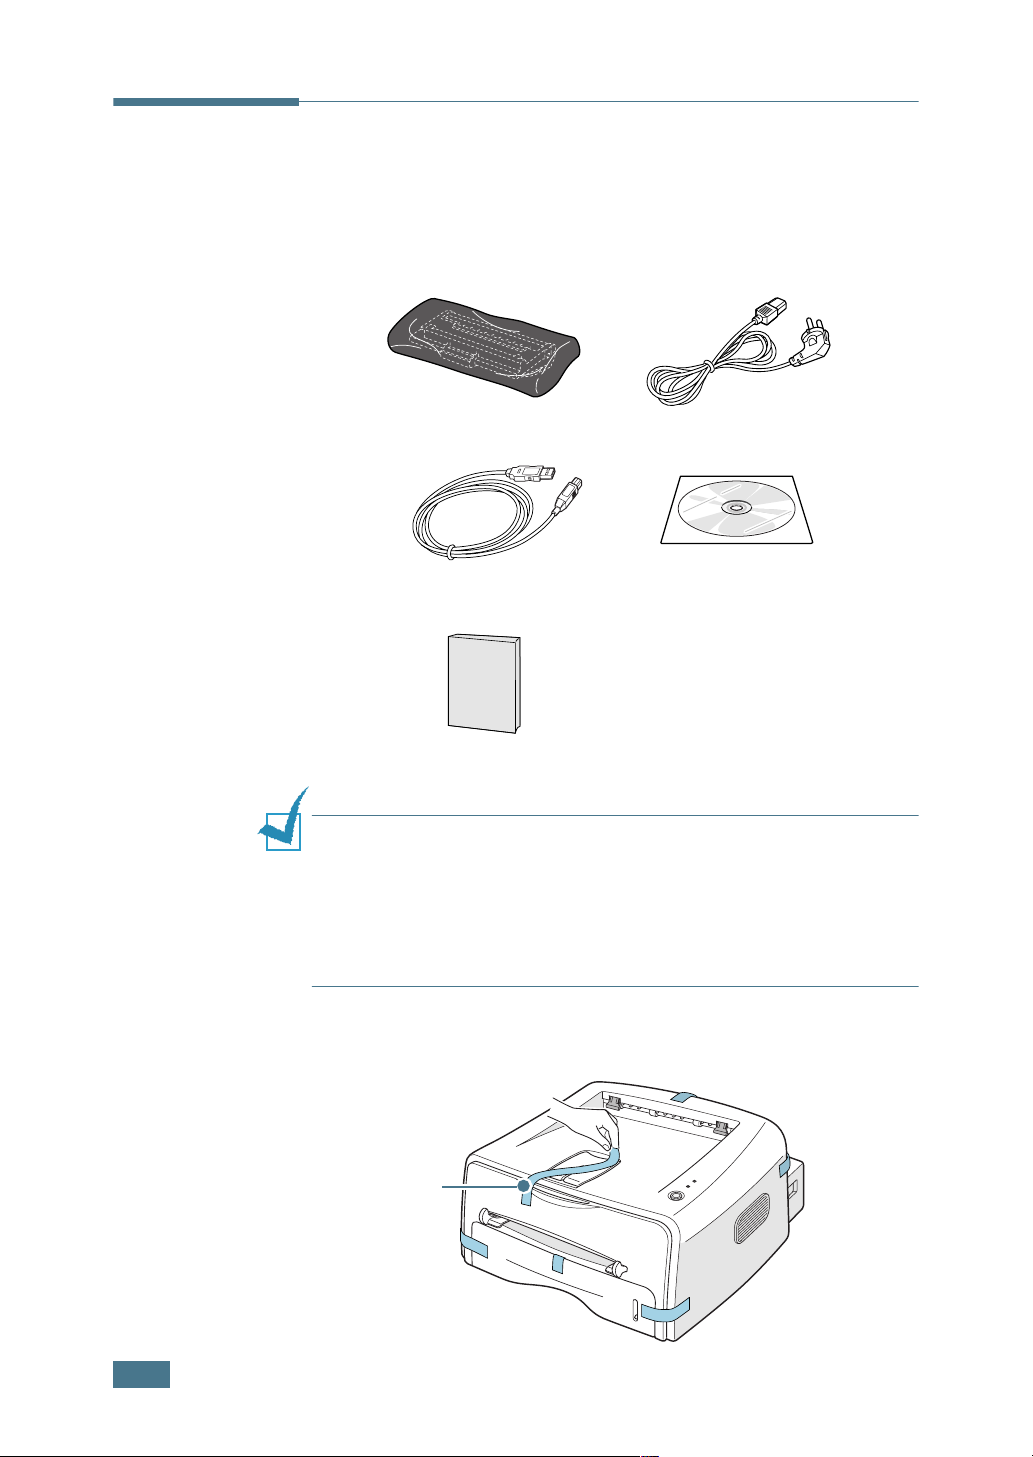
Selecting a Location
Select a level, stable place with adequate space for air
circulation. Allow extra space for opening covers and tray. The
area should be well-ventilated and away from direct sunlight or
sources of heat, cold, and humidity. See the image below for
clearance space. Do not place the printer close to the edge of
your desk or table!
100 mm
(3.9 in.)
2
100 mm
(3.9 in.)
482.6 mm(18.8 in.)
552 mm(21.7 in.)
100 mm
(3.9 in.)
954.6 mm(37.5 in.)
•Front: 482.6 mm (enough space so that tray can be
removed)
•Back: 100 mm (enough space to allow opening of the rear
out tray)
•Right: 100 mm (enough space for ventilation)
•Left: 100 mm
S
ETTING UP YOUR PRINTER
2.3
Installing the Toner Cartridge
1
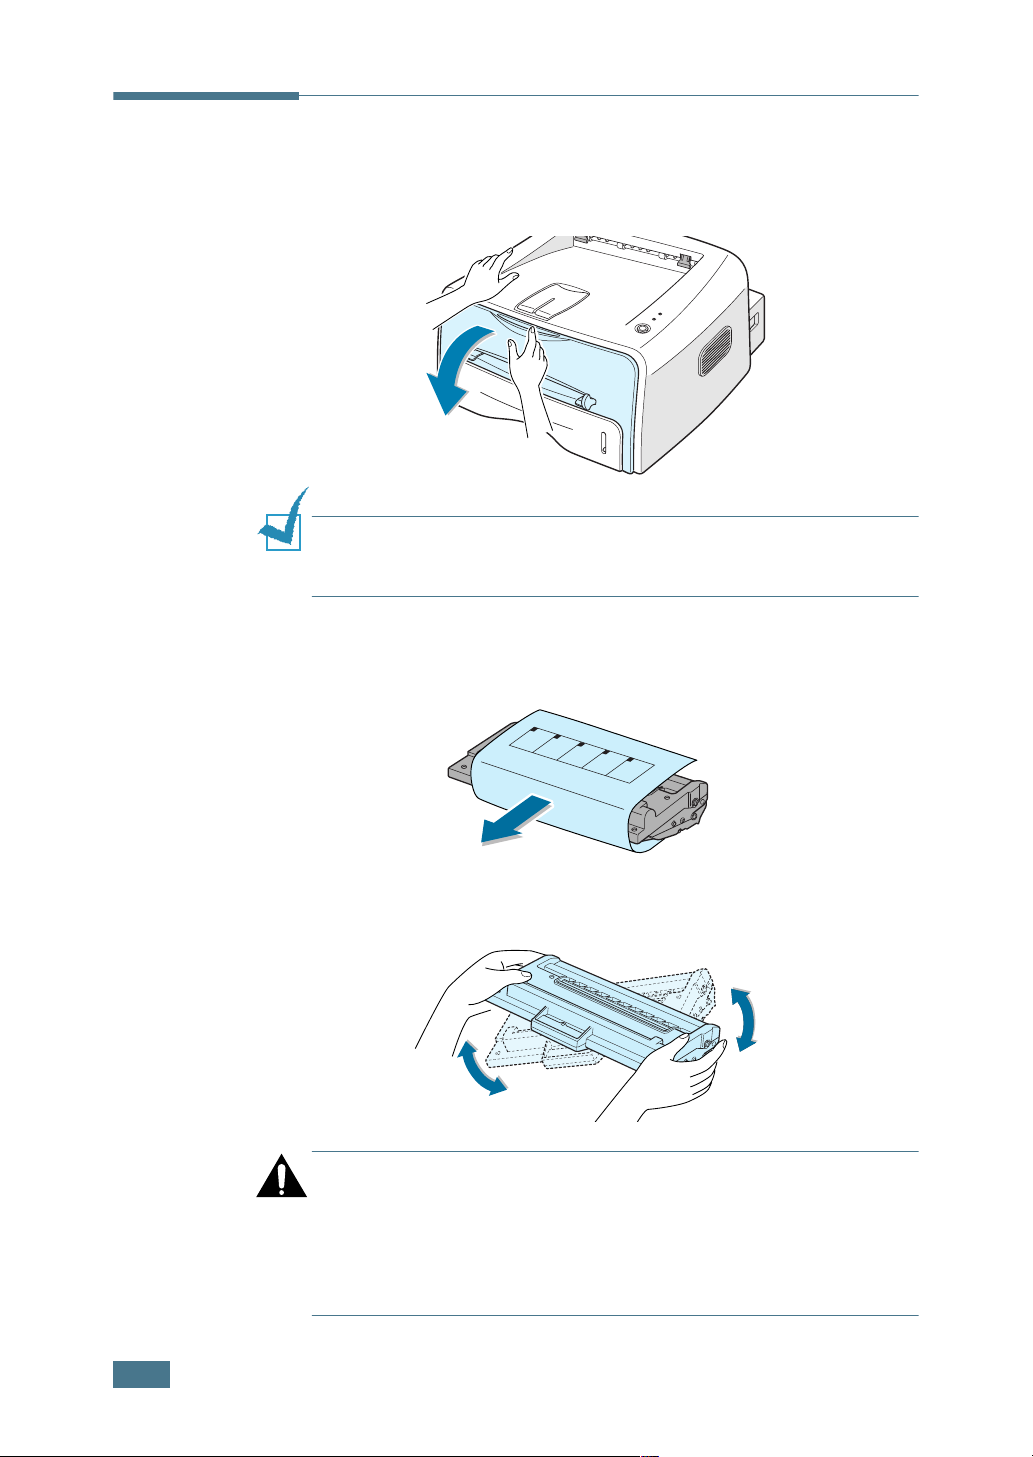
Grasp the front cover and pull it toward you to open.
Note: Because the printer is very light, it may be moved when you
use it; for example, when opening/closing the tray or installing/
removing the toner cartridge. Be careful not to move the printer.
2
Remove the toner cartridge from its bag and remove the
paper covering the cartridge.
2.4
3
Gently shake the cartridge from side to side to distribute
the toner evenly inside the cartridge.
CAUTION:
• To prevent damage, do not expose the toner cartridge to light for
more than a few minutes. Cover it with a piece of paper, if left
exposed for more than a few minutes.
• If toner gets on your clothing, wipe it off with a dry cloth and
wash clothing in cold water. Hot water sets toner into fabric.
S
ETTING UP YOUR PRINTER
4
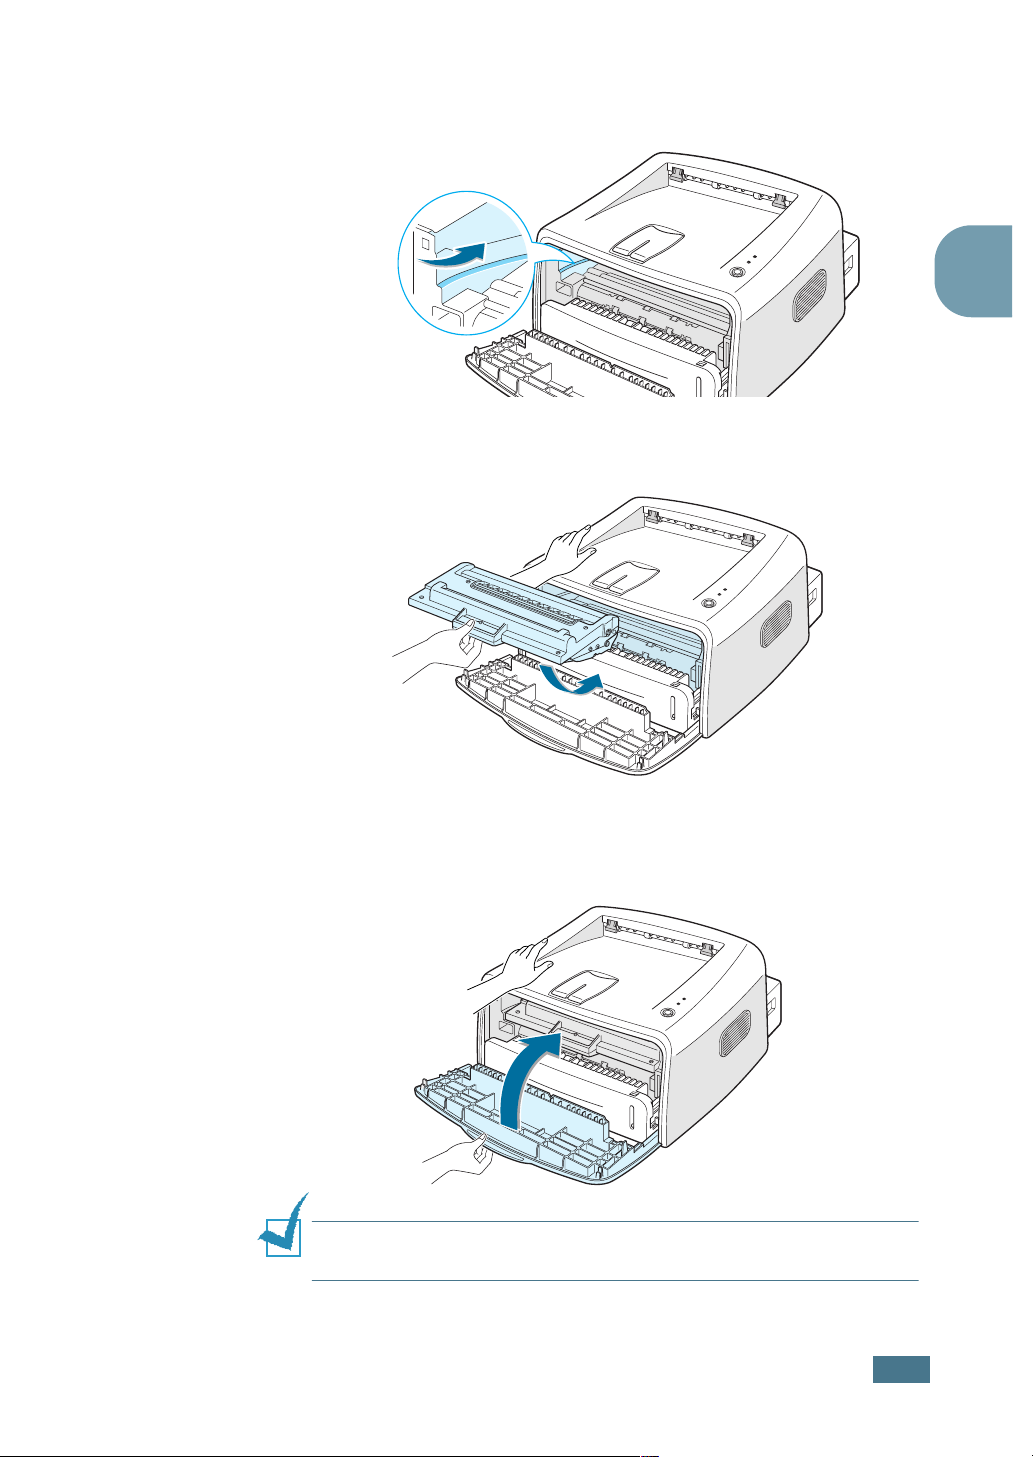
Locate the cartridge slots inside the printer, one on each
side.
5
Grasp the handle and insert the cartridge in the printer until
it snaps into place.
2
6
Close the front cover. Make sure that the cover is securely
closed. If the cover is not firmly closed, printing errors may
occur when you print.
Note: When printing text at 5% coverage, you can expect a toner
cartridge life of approximately 3,000 pages.
S
ETTING UP YOUR PRINTER
2.5
Loading Paper
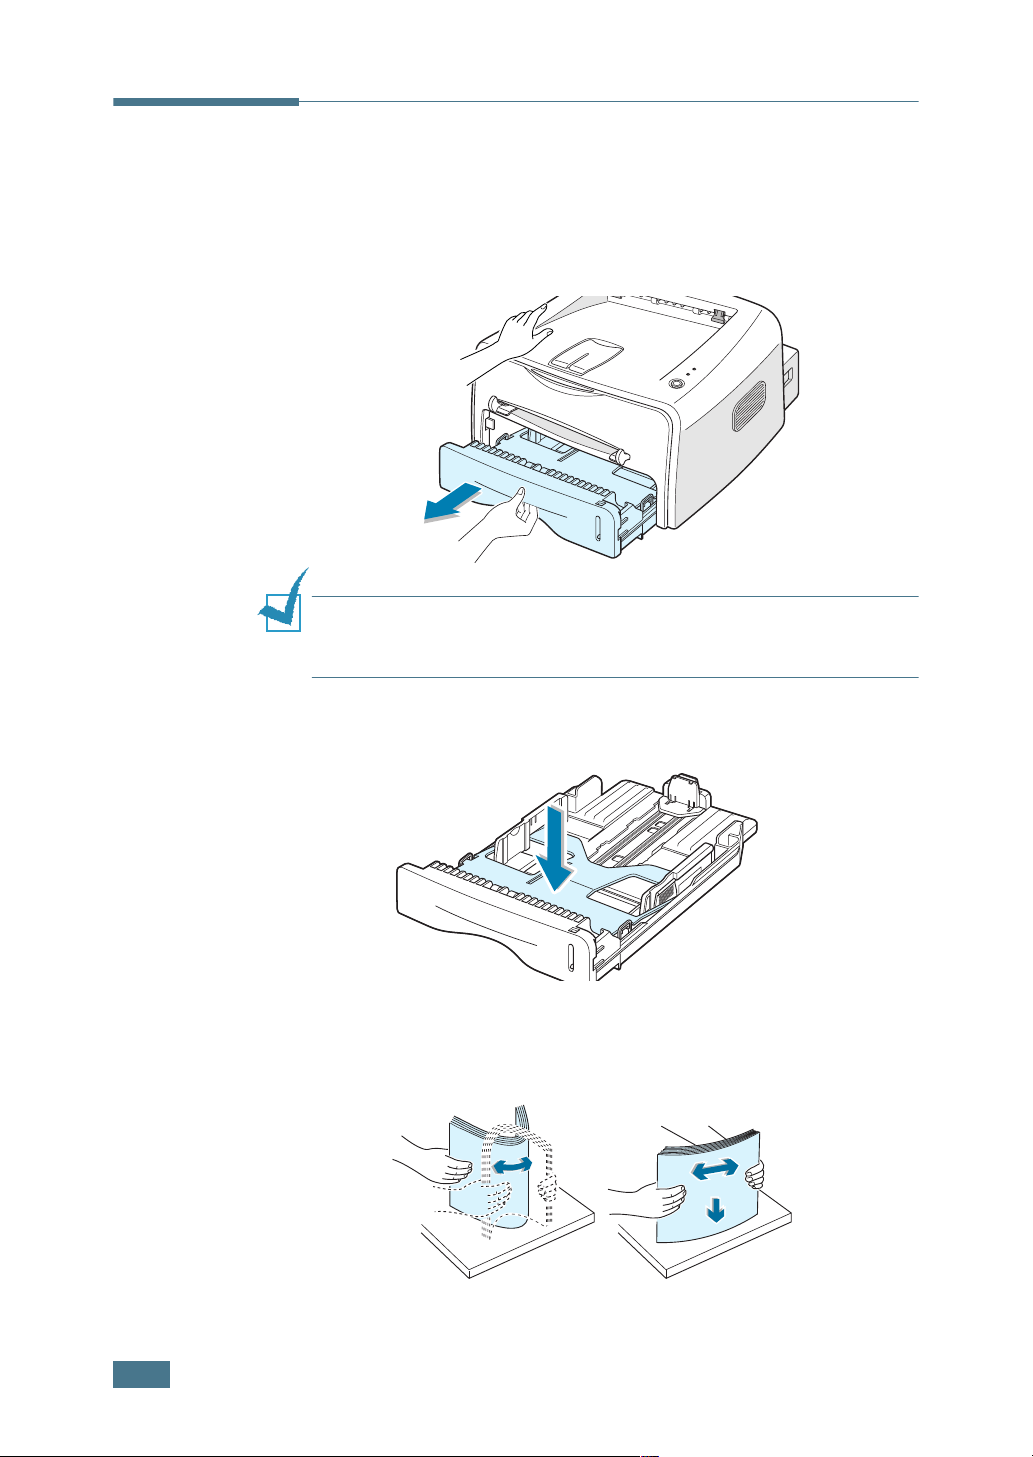
You can load approximately 250 sheets of paper in the tray.
1
Pull the tray out of the printer.
Note: Because the printer is very light, it may be moved when you
use it; for example, when opening/closing the tray or installing/
removing the toner cartridge. Be careful not to move the printer.
2
Push down the pressure plate until it locks in position.
3
Prepare a stack of paper for loading by flexing or fanning
them back and forth. Straighten the edges on a level
surface.
2.6
S
ETTING UP YOUR PRINTER

4
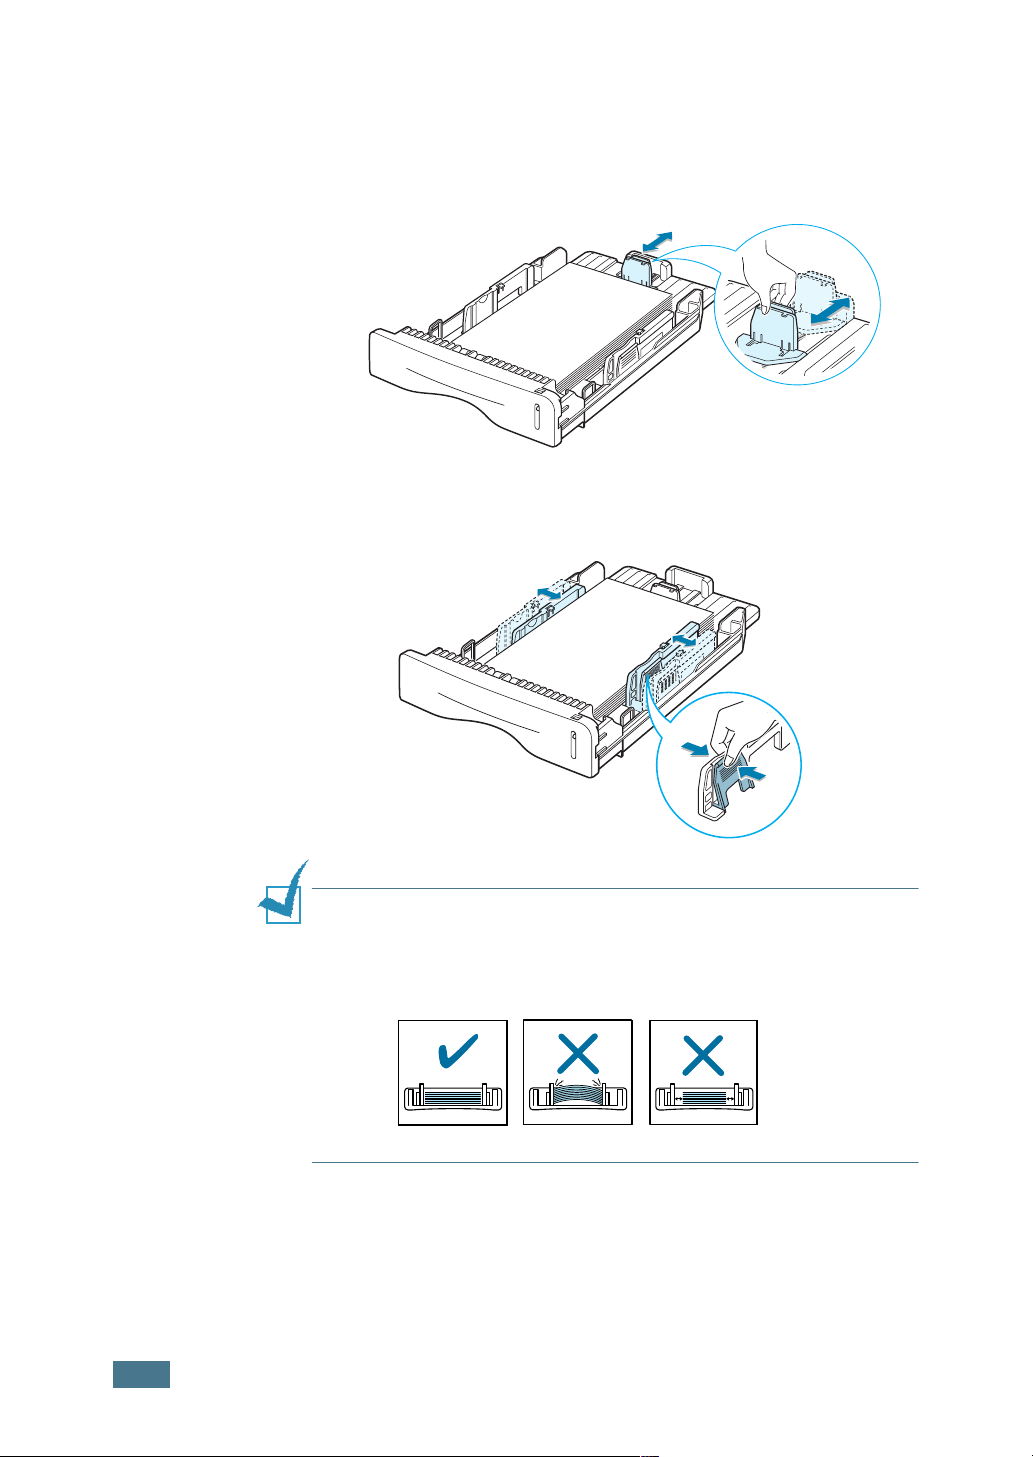
Load paper with the print side facing down.
Make sure that all four corners are flat in the tray.
5
Pay attention to the paper limit mark on the left inside wall
of the tray. Paper overloading may cause paper jams.
2
Note: If you want to change the paper size in the tray, see
“Changing the Paper Size in the Tray” on page 2.8.
6
Slide the tray back into the printer.
S
ETTING UP YOUR PRINTER
2.7
Changing the Paper Size in the Tray
1
Pinch the rear guide as shown below to adjust for the paper
length.
2
Pinch the side guide as shown and slide it to the left flush
against the paper.
2.8
Notes:
• Do not push the width guide far enough to cause the material to
warp.
• If you do not adjust the width guide, it may cause paper jam.
S
ETTING UP YOUR PRINTER
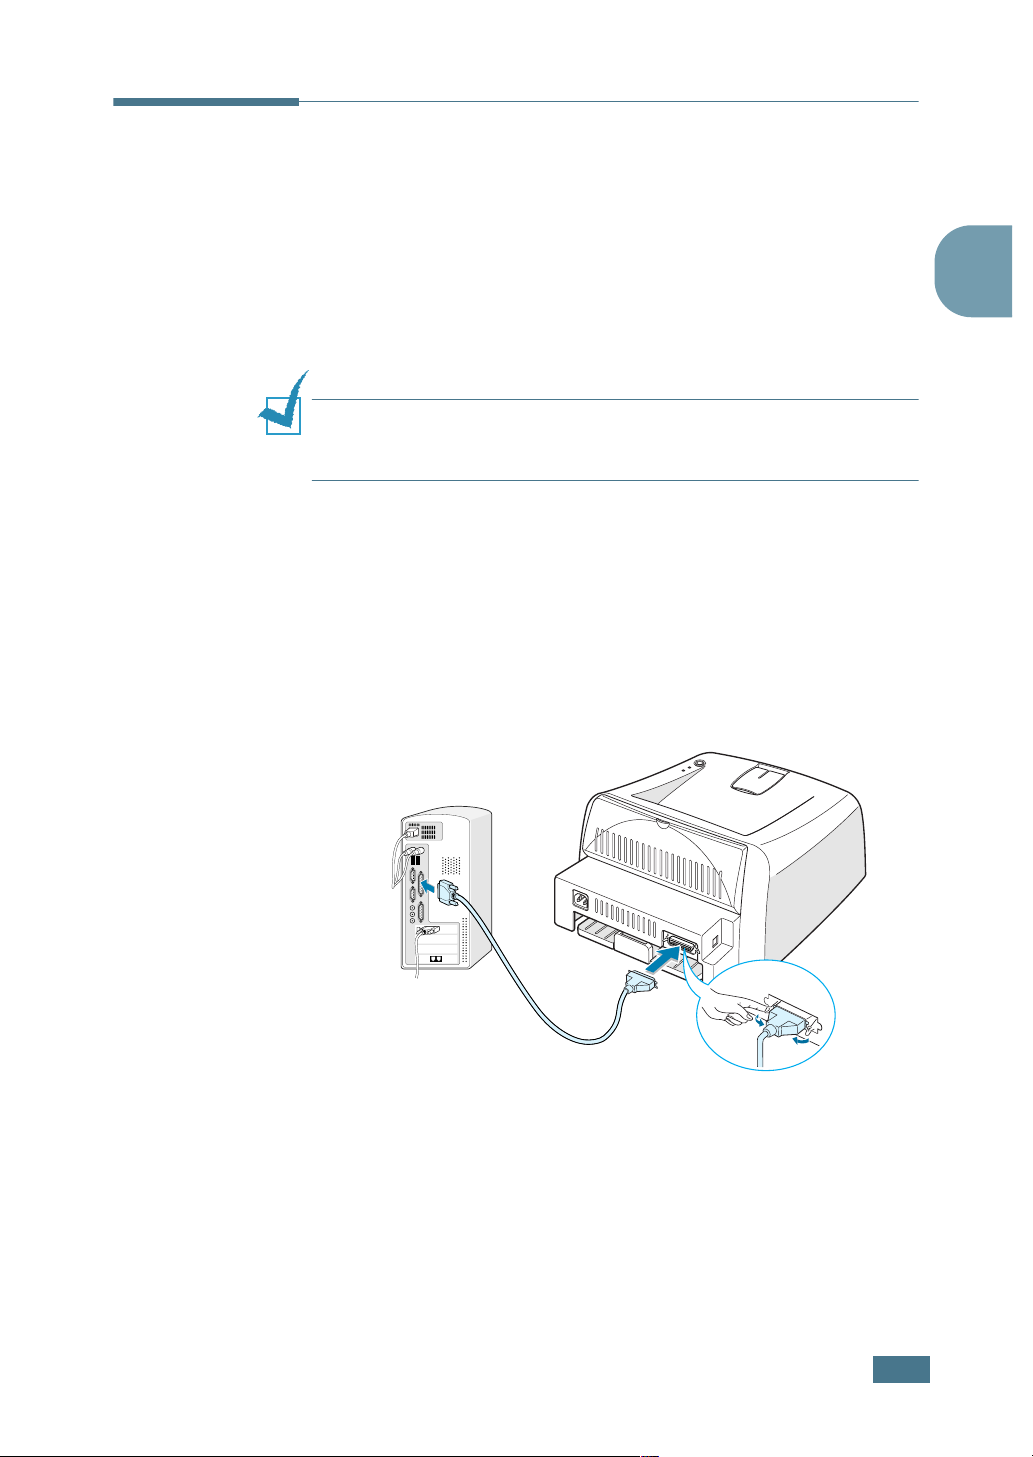
Connecting a Printer Cable
To print from your computer, you need to connect your printer
to your computer with either a parallel interface cable or a
Universal Serial Bus (USB) cable.
Using a Parallel Cable
Note: To connect the printer to the parallel port of the computer
requires a certified parallel cable. You will need to buy a IEEE1284
compliant cable.
1
Make sure that both the printer and the computer are
turned off.
2
Plug the parallel printer cable into the connector on the
back of the printer.
Push the metal clips down to fit inside the notches on the
cable plug.
2
To the parallel port on
your computer
3
Connect the other end of the cable to the parallel interface
port on your computer, and tighten the screws.
See your computer User’s Guide if you need help.
S
ETTING UP YOUR PRINTER
2.9
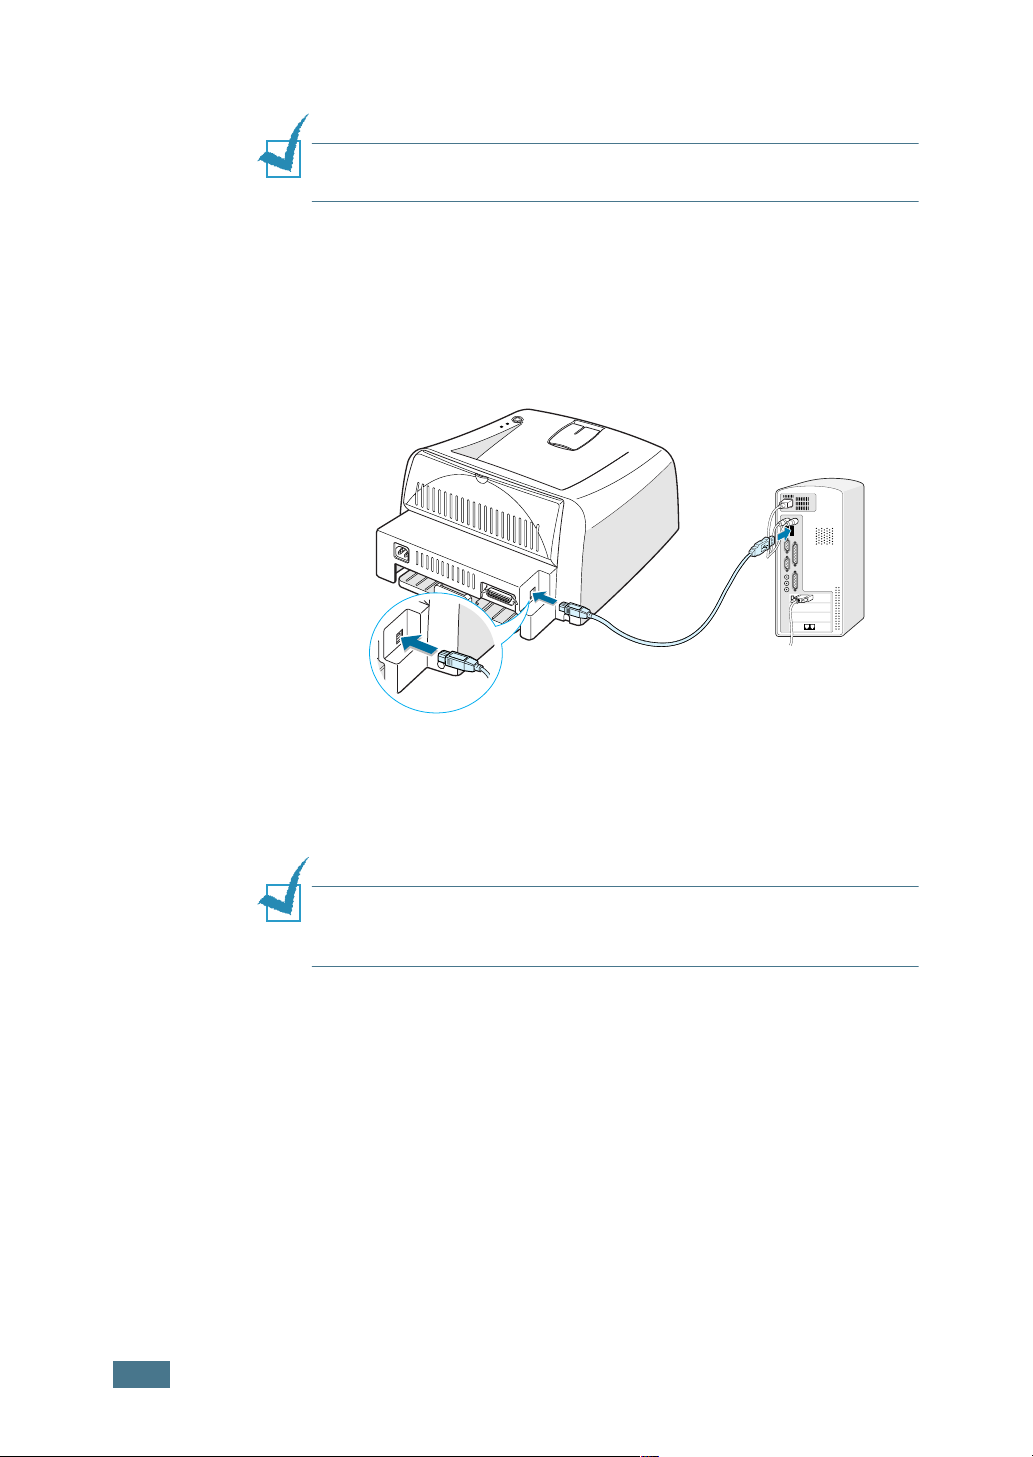
Using a USB Cable
Note: Connecting the printer to the USB port of the computer
requires a certified USB cable.
1
Make sure that both the printer and the computer are
turned off.
2
Plug the USB printer cable into the connector on the back of
the printer.
To the USB port on
your computer
3
Connect the other end of the cable to the USB port on your
computer.
See your computer User’s Guide if you need help.
Note: For using a USB cable, you must be running Windows 98/
Me/2000/XP. In Windows 98/Me, you must install the USB driver
to add the USB port. See page 2.15.
2.10
S
ETTING UP YOUR PRINTER
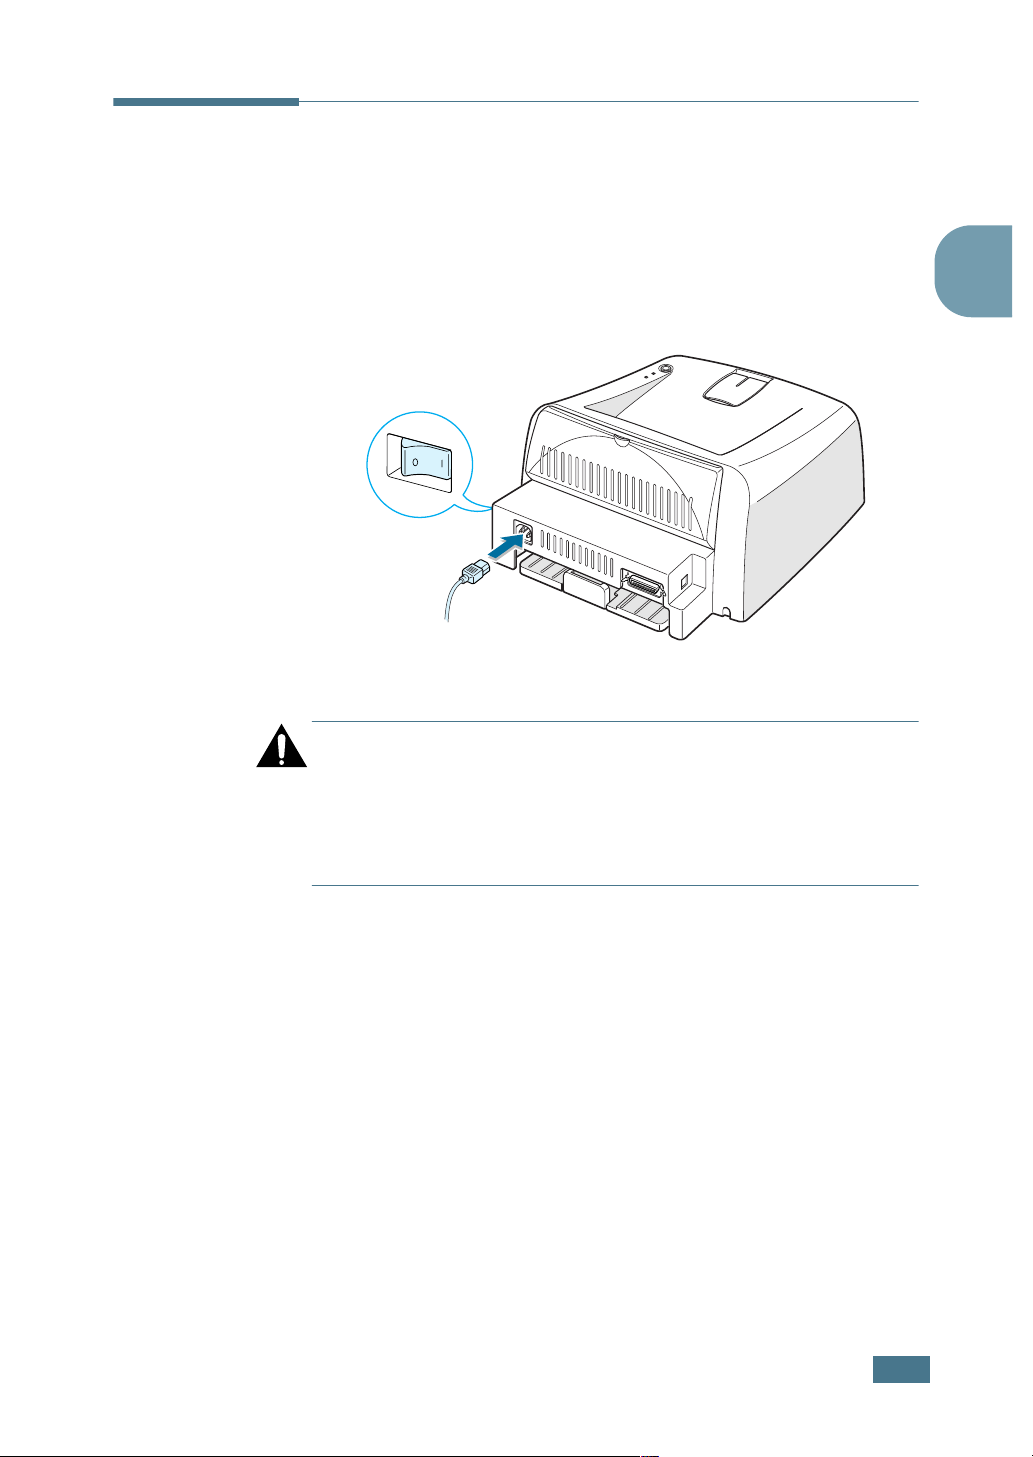
Turning the Printer on
1
Plug the power cord into the power receptacle on the back
of the printer.
2
Plug the other end into a properly grounded AC outlet and
turn on the printer using the power switch.
To the AC outlet
CAUTION:
• The fusing area at the rear portion of the inside of your printer is
hot when powered. Be careful not to be burned when accessing
this area.
• Do not disassemble the printer when it is powered. Doing so may
give you an electric shock.
2
S
ETTING UP YOUR PRINTER
2.11
Loading…
Страницы и текст этой инструкции
Инструкция лазерного принтера Xerox Phaser 3121
Информация отображена на картинке
Информация отображена на картинке
Информация отображена на картинке
Информация отображена на картинке
Как использовать наш сайт инструкций OnlineManuals.ru
Наша цель состоит в том, чтобы предоставить вам быстрый доступ к содержанию инструкции для лазерного принтера Xerox Phaser 3121.
С помощью онлайн просмотра, Вы можете быстро просмотреть содержимое инструкции и найти решение проблемы с лазерного принтера Xerox Phaser 3121.
Для Вашего удобства
Если листать руководство пользователя лазерного принтера Xerox Phaser 3121 прямо на сайте, не очень удобно для Вас, есть два возможных решения:
• Просмотр в полноэкранном режиме — легко просмотреть руководство пользователя (без загрузки его на свой компьютер), Вы можете использовать режим полноэкранного просмотра.
Для просмотра инструкции пользователя лазерного принтера Xerox Phaser 3121 на полном экране, используйте кнопку «Открыть в Pdf-viewer».
• Загрузка на компьютер — Вы можете также скачать Инструкция лазерного принтера Xerox Phaser 3121 на свой компьютер и сохранить его в файлах.
Многие люди предпочитают читать документы не на экране, а в печатной версии.
Возможность печати руководства пользователя также была предусмотрена на нашем сайте,
и вы можете использовать ее, нажав на иконку «печать» в Pdf-viewer.
Нет необходимости печатать все руководство лазерного принтера Xerox Phaser 3121, можно выбрать только нужные страницы инструкции.