
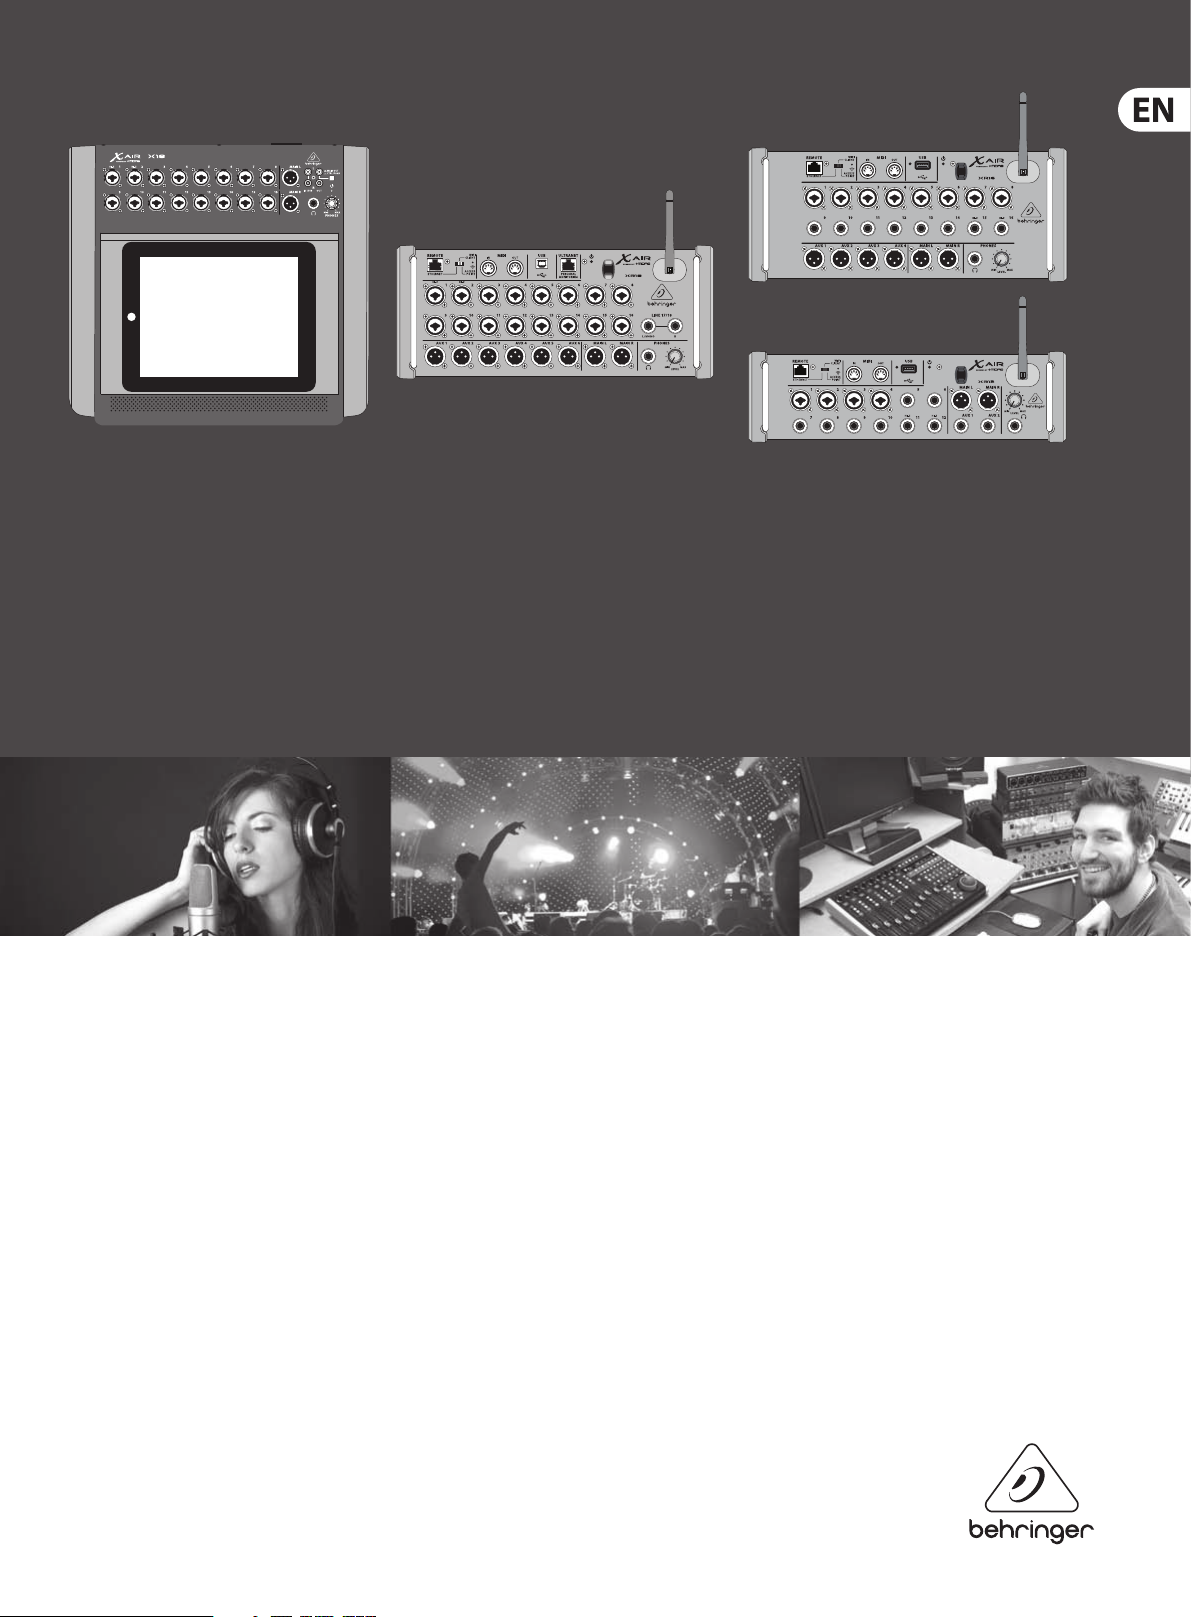
X AIR Android® приложение позволяет управлять всеми функциями микширования, обработки и эффектов цифровой серии смесителя X AIR BEHRINGER: с помощью планшетного ПК Android® или смартфон.
X AIR для Android® обеспечивает полный контроль за Х18, XR18, XR16 и XR12 смесителей. Пользовательский интерфейс настраивается либо для упрощенного доступа или редактирования на уровне экспертов (S / E), для смешивания 18 входных каналов до 12 автобусов. Контроль также предусмотрено 4 внутренних процессоров стерео эффектов — все из которых имеют критиками двигатель аудио-обработки BEHRINGER X32.
Приложение X AIR обеспечивает мобильность идти туда, куда вам нужно, чтобы получить максимальную отдачу от вашей системы, что позволит вам настроить ваш дом микс от любого сиденья или тонкой настройки миксов из на сцене. Так как смесители AIR X Все Behringer оснащены внутренние точки доступа, настройки приложения X AIR не может быть проще — просто выбрать сеть AIR X и подключить устройство Android® к нему. При открытии приложения, микшер AIR X будет отображаться как управляемый устройством, и даже позволит вам заблокировать устройство Android® к этому конкретному смесителем X AIR. Вы также можете запустить приложение AIR X в демо-режиме без подключения к BEHRINGER X смеситель серии AIR. Дополнительное оборудование не требуется, что делает X AIR Android® App идеальное решение для бесшовных приложений удаленного смешивания.
КЛЮЧЕВАЯ ОСОБЕННОСТЬ
— Контроль всех уровней ввода, вкл. Preamp Gain, Low Cut, фаза, Phantom, Stereo Link
— Канал управления Parametric EQ — тонкая настройка эквалайзера из любого места в комнате
— Настраиваемый RTA наложения на экранах редактирования эквалайзера, или отдельный большой экран анализатора
— Замеры Обзор — используете ли вы планшет или смартфон Android® удаленно или на консоли, все уровни с первого взгляда
— Шины управления уровнем посыла входных каналов удобно от их канала фейдеров
— Подробный предусилитель / Конфигурация, ворота, динамика, EQ и Bus Посылает страницы
— 4 Полный эффект редактирования экраны для Hall Reverb, Vintage Room Reverb, Delay модуляции и размерные хор, или более чем 50 других эффектов студийного качества
— Используйте одиночный режим шины передачи для персонального мониторинга приложений без риска повлиять на какой-либо другой путь прохождения сигнала
— Все входные каналы могут быть отнесены к одному из двух AutoMixing (совместного усиления) группы для проведения конференций или панельных дискуссий
— 4 Mute групп и 4 группы DCA действия пульта дистанционного управления из приложения
— 64 внутренних моментальных снимков X Air микшера могут быть отфильтрованы и напомнил мгновенно
— Опции USB Возврат маршрутизации к стерео AUX- и FX-возврат (X18 / XR18 только)
ИЗВЕСТНЫЕ ВОПРОСЫ
— Примечание: Начиная с версии 1.5, мы заканчиваем поддержку бывшего IDCA функции в пользу четырех новых Кормовой внутреннего DCAS. Внутренний DCAS вызывают способ более низкую сетевой трафик и улучшить отклик приложения, особенно при более удаленного управления клиентами (например, для персонального мониторинга) подключены к той же смеситель.
ТРЕБОВАНИЯ
— Совместимость с устройствами под управлением Android® Android® 4.0 или выше, дисплей размером более 5 «рекомендовал
— X AIR 1.5 требует серии X AIR микропрограммы смесителя v1.11 или выше, или могут быть использованы в демо-режиме
Product Manual
X AIR
XR18/X18/XR16/XR12
Digital Mixer Series for iPad/Android Tablets with Programmable MIDAS Preamps,
Integrated Wi Module and USB

2 X AIR User Manual
Table of Contents
Important Safety Instructions ……………………………….. 3
Legal Disclaimer ……………………………………………………. 3
Limited warranty …………………………………………………… 3
1. Introduction ……………………………………………………… 4
2. Callouts …………………………………………………………….. 5
2.1 X18/ XR18 Callouts ……………………………………………………… 5
2.2 XR16/XR12 Callouts …………………………………………………… 6
3. Hookup …………………………………………………………….. 7
3.1 X18/ XR18 H ook ups ……………………………………………………. 7
3.2 XR16/XR12 Hookups ……………………………………………….. 11
4. Network Connection ……………………………………….. 14
4.1 IP Address and DHCP ………………………………………………. 14
4.2 Ethernet/LAN …………………………………………………………… 14
4.3 Wi Client …………………………………………………………………. 14
4.4 Access Point ……………………………………………………………… 15
4.5 Getting Started………………………………………………………… 15
5. X AIR for iPad …………………………………………………… 16
5.1 Main Screen ……………………………………………………………… 16
6.5 EQ ………………………………………………………………………………. 21
6.6 Dynamics ………………………………………………………………….. 22
6.7 Sends …………………………………………………………………………. 22
6.8 Main …………………………………………………………………………… 22
6.9 Meters ………………………………………………………………………..23
6.10 Eect Rack ………………………………………………………………. 23
6.11 Snapshots ……………………………………………………………….. 23
6.12 Scenes and Shows …………………………………………………. 23
6.13 Routing ……………………………………………………………………. 23
6.14 Setup ……………………………………………………………………….. 24
7. X AIR for PC ……………………………………………………… 25
7.1 Main View and Mixer Tab ………………………………………..25
7.2 Channel Tab ………………………………………………………………25
7.3 Input Tab …………………………………………………………………… 26
7.4 Gate Tab …………………………………………………………………….. 26
7.5 EQ Tab ……………………………………………………………………….. 26
7.6 Comp Tab ………………………………………………………………….. 27
7.7 Sends Tab ………………………………………………………………….. 27
5.2 Input ………………………………………………………………………….. 16
5.3 Sends …………………………………………………………………………. 16
5.4 Gate …………………………………………………………………………… 17
5.5 Dynamics ………………………………………………………………….. 17
5.6 Channel EQ ………………………………………………………………. 18
5.7 Insert …………………………………………………………………………. 18
5.8 Presets ………………………………………………………………………. 18
5.9 Output ………………………………………………………………………. 18
5.10 Mete rs ……………………………………………………………………… 18
5.11 S ho w s ………………………………………………………………………. 18
5.12 Routing ……………………………………………………………………. 19
5.13 Eects………………………………………………………………………. 19
5.14 Setup ……………………………………………………………………….. 19
5.15 Main EQ …………………………………………………………………… 19
6. X AIR for Android ……………………………………………..20
6.1 Main View …………………………………………………………………. 20
6.2 Input ………………………………………………………………………….. 20
6.3 Cong ……………………………………………………………………….. 21
7.8 Main Tab …………………………………………………………………….27
7.9 FX Tab ………………………………………………………………………… 27
7.10 Meter Tab ………………………………………………………………… 28
7.11 Setup Menu …………………………………………………………….. 28
7.12 Snapshot Page………………………………………………………… 29
7.13 Utilities …………………………………………………………………….. 29
7.14 Auto Mix ………………………………………………………………….. 30
8. MIDI ………………………………………………………………… 31
9. Specications …………………………………………………..32
9.1 X18/XR18 Specications …………………………………………. 32
9.2 XR16/XR12 Specications ………………………………………..34
10. Eect Descriptions …………………………………………35
11. Instructional Videos ………………………………………. 42
12. Block Diagrams ………………………………………………43
12.1 X18/XR18 Block Diagram ………………………………………. 43
12.2 XR16/XR12 Block Diagram ……………………………………. 44
6.4 Gate …………………………………………………………………………… 21
3 X AIR User Manual
9. Do not defeat the safety purpose of the polarized
20. Please keep the environmental aspects of battery
Important Safety
Instructions
Terminals marked with this symbol carry
electrical current of su cient magnitude
to constitute risk of electric shock.
Use only high-quality professional speaker cables with
¼» TS or twist-locking plugs pre-installed. Allother
installation or modi cation should be performed only
by quali edpersonnel.
This symbol, wherever it appears,
alertsyou to the presence of uninsulated
dangerous voltage inside the
enclosure-voltage that may be su cient to constitute a
risk ofshock.
This symbol, wherever it appears,
alertsyou to important operating and
maintenance instructions in the
accompanying literature. Please read the manual.
Caution
To reduce the risk of electric shock, donot
remove the top cover (or the rear section).
No user serviceable parts inside. Refer servicing to
quali ed personnel.
Caution
To reduce the risk of re or electric shock,
do not expose this appliance to rain and
moisture. The apparatus shall not be exposed to dripping
or splashing liquids and no objects lled with liquids,
suchas vases, shall be placed on the apparatus.
Caution
These service instructions are for use
by quali ed service personnel only.
Toreduce the risk of electric shock do not perform any
servicing other than that contained in the operation
instructions. Repairs have to be performed by quali ed
servicepersonnel.
1. Read these instructions.
2. Keep these instructions.
3. Heed all warnings.
4. Follow all instructions.
5. Do not use this apparatus near water.
6. Clean only with dry cloth.
7. Do not block any ventilation openings. Install in
accordance with the manufacturer’s instructions.
8. Do not install near any heat sources such as
radiators, heat registers, stoves, or other apparatus
(including ampli ers) that produce heat.
or grounding-type plug. A polarized plug has two blades
with one wider than the other. A grounding-type plug
has two blades and a third grounding prong. The wide
blade or the third prong are provided for your safety. Ifthe
provided plug does not t into your outlet, consult an
electrician for replacement of the obsolete outlet.
10. Protect the power cord from being walked on or
pinched particularly at plugs, convenience receptacles,
and the point where they exit from the apparatus.
11. Use only attachments/accessories speci ed by
themanufacturer.
12. Use only with the
cart, stand, tripod, bracket,
or table speci ed by the
manufacturer, orsold with
the apparatus. When a cart
is used, use caution when
moving the cart/apparatus
combination to avoid
injury from tip-over.
13. Unplug this apparatus during lightning storms or
when unused for long periods of time.
14. Refer all servicing to quali ed service personnel.
Servicing is required when the apparatus has been
damaged in any way, such as power supply cord or plug
is damaged, liquid has been spilled or objects have fallen
into the apparatus, the apparatus has been exposed
to rain or moisture, does not operate normally, or has
beendropped.
15. The apparatus shall be connected to a MAINS socket
outlet with a protective earthing connection.
16. Where the MAINS plug or an appliance coupler is
used as the disconnect device, the disconnect device shall
remain readily operable.
17. Correct disposal of this
product: This symbol indicates
that this product must not be
disposed of with household
waste, according to the WEEE
Directive (2012/19/EU) and
your national law. This product
should be taken to a collection center licensed for the
recycling of waste electrical and electronic equipment
(EEE). The mishandling of this type of waste could have
a possible negative impact on the environment and
human health due to potentially hazardous substances
that are generally associated with EEE. At the same time,
your cooperation in the correct disposal of this product
will contribute to the e cient use of natural resources.
For more information about where you can take your
waste equipment for recycling, please contact your local
city o ce, or your household waste collection service.
18. Do not install in a con ned space, such as a book
case or similar unit.
19. Do not place naked ame sources, such as lighted
candles, on the apparatus.
disposal in mind. Batteries must be disposed-of at a
battery collection point.
21. Use this apparatus in tropical and/or
moderate climates.
LEGAL DISCLAIMER
MUSIC Group accepts no liability for any loss
which may be su ered by any person who relies
either wholly or in part upon any description,
photograph, or statement contained herein.
Technical speci cations, appearances and other
information are subject to change without notice.
All trademarks are the property of their respective
owners. MIDAS, KLARK TEKNIK, LAB GRUPPEN, LAKE,
TANNOY, TURBOSOUND, TC ELECTRONIC, TC HELICON,
BEHRINGER, BUGERA and DDA are trademarks
or registered trademarks of MUSIC Group IP Ltd.
© MUSIC Group IP Ltd. 2016 All rights reserved.
LIMITED WARRANTY
For the applicable warranty terms and conditions
and additional information regarding MUSIC Group’s
Limited Warranty, please see complete details online at
music-group.com/warranty.

4 X AIR User Manual
1. Introduction
Congratulations on your purchase of the new Behringer X AIR series digital mixer.
These mixers oer plenty of analog I/O for most per formances in a very compact
form factor that is easy to transport, but doesn’t sacrice any mixing power.
Withhigh-end features taken from the agship X32 mixer, such as MIDASdesigned preamps, high-quality eects, P-16 monitoring on the X18/XR18,
and USB recording capability, these consoles far outper form their size.
Mixing live shows can now be done from anywhere in the venue thanks to the
wireless control options that allow all software functions to be controlled from
an iPad*, Android* tablet or PC. While a dedicated ex ternal router can be used,
itis not necessary thanks to the integrated Wi module. This allows monitors
to be adjusted while standing on stage, and the main mix to be per fected from
anywhere in the crowd.
In addition to dedicated aux buses for monitoring, the X AIR has 4 studio-quality
stereo eects processors. In fact, these are the same great eects found in the
acclaimed X32 mixer, including legendary reverb, echo and chorus algorithms.
Not just a live sound tool, the X18 and XR18 feature an 18×18 USB audio/MIDI
interface, and the XR12 and XR16 allow 2-track stereo recording. This makes
for a great mobile recording device, home studio interface, and enables live
performances to be multitracked for later mixing.
Continue through this manual to learn all about the functionality of your mixer,
as well as the X AIR software.
*iPad is a trade mark of Apple Inc. Andr oid is a trademark of G oogle Inc. iPad and And roid tablet are not inc luded.
5 X AIR User Manual
2. Callouts
2.1 X18/XR18 Callouts
(10) (12)(11) (13) (9) (14)
(1)
(8) (9) (10) (11) (12) (14)
ETHER NET
ACCESS
POINT
USB REMOTE
WIFI CLI ENT
(13)
MIDI
PERSON AL
INOUT
MONITO RING
ULTRANET
(4)(3)(2)
(6) (7)
(15)
5
6
AUX SEN DS
(5)
143
2
(1)
(15) (2) (6)
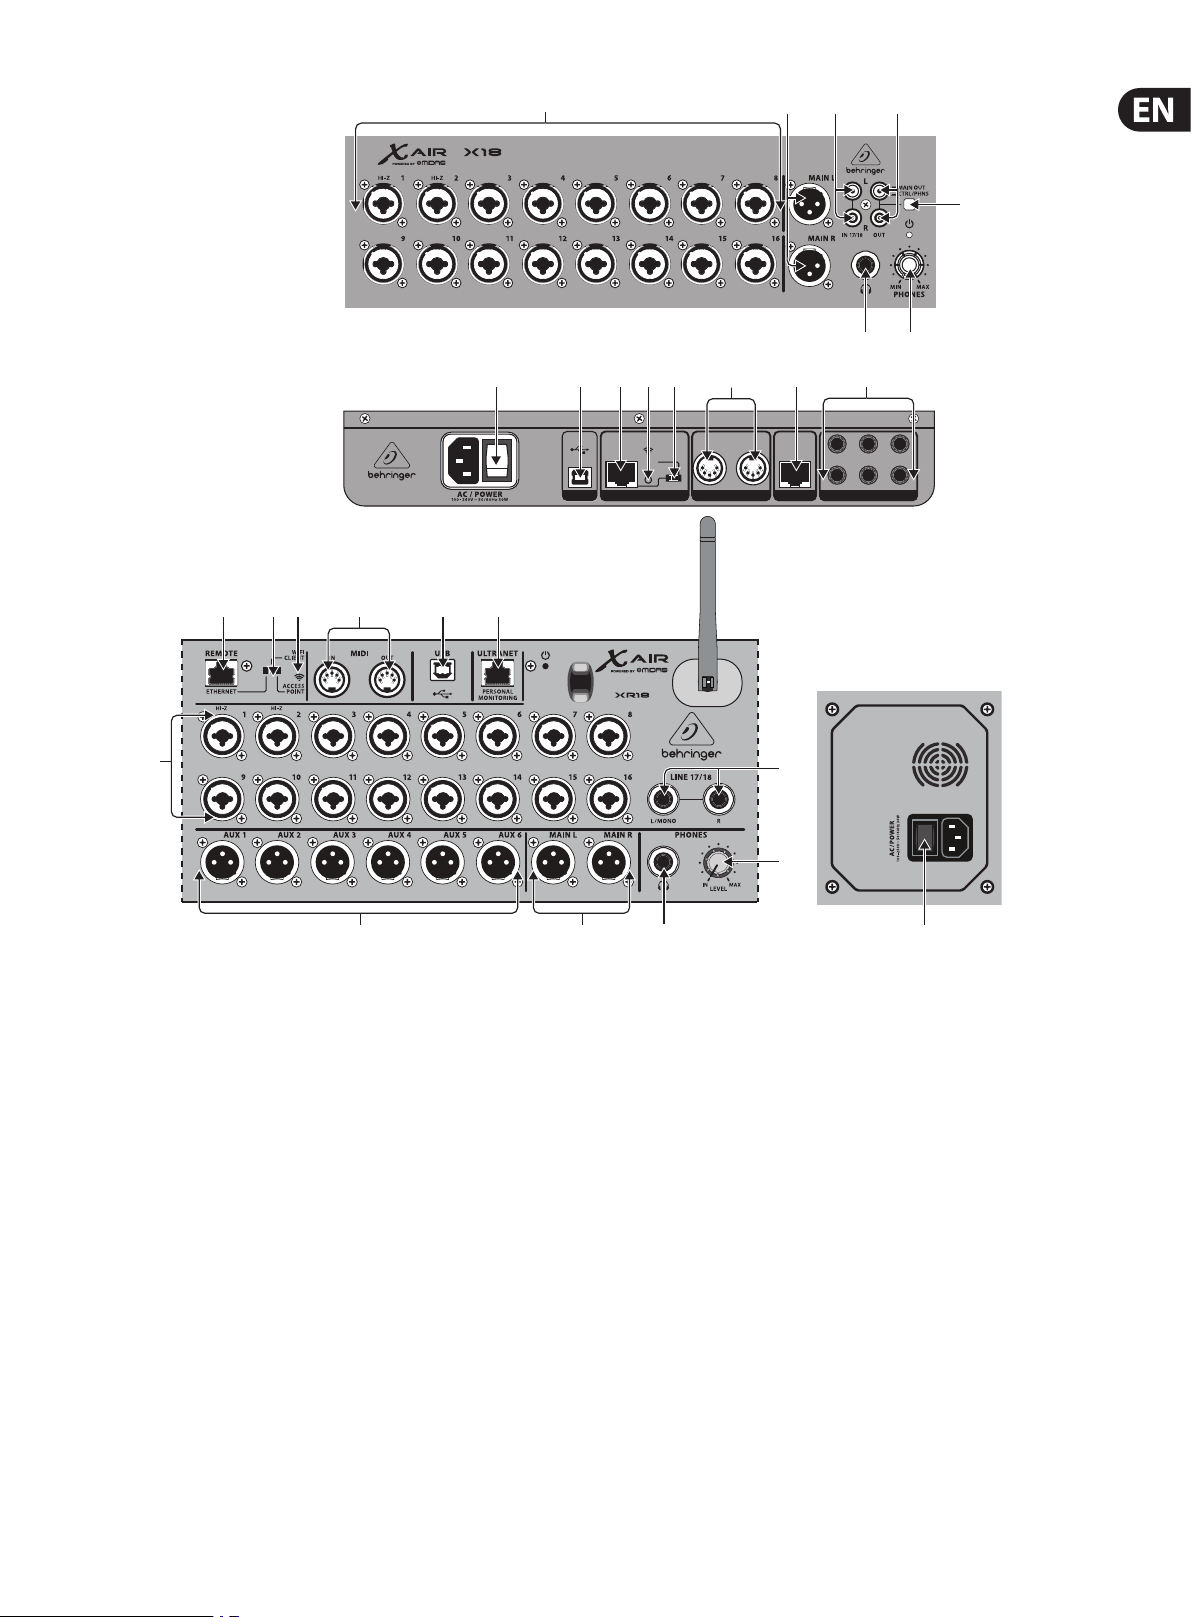
(1) INPUTS accept balanced and unbalanced XLR and ¼» plugs. Inputs 1 and 2
have high-impedance preamps for direct connection of guitars and basses.
(2) OUT L & R jacks send the main mix signal to PA or monitor speakers via
XLRcables.
(3) RCA IN jacks (X18 only) accept unbalanced RCA cables for connecting MP3
players, external mixers, iPad, etc. These inputs have limited processing
compared to the other input channels.
(4) RCA OUT jacks (X18 only) send either the main mix signal or headphone
signal via unbalanced RCA cables to a pair of active studio monitors.
(5) CONTROL ROOM button (X18 only) determines whether the main mix or
headphone/solo signal is routed to the RCA OUT jacks.
(6) HEADPHONE jack accepts a ¼» TRS plug for connecting a pair of headphones.
(7) PHONES LEVEL knob determines the output of the headphones jack.
(8) POWER switch turns the power on and o . The LED on the main input panel
will light when the unit is powered on.
(9) USB port (type B) accepts a USB cable for connection to a computer for
multi-channel audio and MIDI recording. Up to 18 audio channels can
be simultaneously recorded, and 18 channels are available for playback.
Themixer application allows assignment of channels for recording and
playback. 16 channels of MIDI I/O can also be transmit ted on the same
USB connection. Check the product page on music-group.com to download
(16)
(7)
(8)
the required Windows* multi-channel driver. The interface is compatible
with CoreAudio on Mac* computers, and to ALSA/Jack on Linux* computers.
(10) ETHERNET port allows the mixer to be controlled via LAN or connected
Wirouter.
(11) RESET button resets the console to default network parameters when held
for 2 seconds. When held for 10 seconds, all console functions are reset to
factory default status.
(12) REMOTE switch selects between Ethernet, Wi client, or Access Point.
Seethe Network Connection chapter for details.
(13) MIDI IN/OUT jacks send and receive MIDI signals to and from external
equipment. See the MIDI Implementation chart for details.
(14) ULTRANET port allows connection of BEHRINGER P16-M personal monitoring
mixers or P16-D distribution hubs.
(15)
AUX SEND jacks send your monitor mixes to active stage monitors or headphone
mixers. The XR18 uses XLR connectors, while the X18 uses balanced ¼» jacks.
(16) Inputs 17 and 18 (XR18 only) accept balanced ¼ » cables for connecting
line-level sources. These inputs have limited processing compared to the
other input channels.
*Mac is a trade mark of Apple Inc. Wind ows is either a regis tered trademar k or trademark of Mic rosoft
Corporat ion in the United State s and/or other countri es. Linux is the reg istered tradema rk of Linus Torvalds in th e
U.S. and other cou ntries

6 X AIR User Manual
2.2 XR16/XR12 Callouts
(6)
(7)
(1) (2)
(3)
(8)
(4)(3)(2)(1)
(5)
(9) (10) (11)
(5)(4)
(9)
(6)
(7) (8)
(1) ETHERNET port allows the mixer to be controlled via LAN or connected
Wirouter.
(2) REMOTE switch selects between Ethernet, Wi client, or Access Point.
Seethe Network Connection chapter for details.
(3) RESET button resets the console to default network parameters when held
for 2 seconds. When held for 10 seconds, all console functions are reset to
factory default status.
(4) MIDI IN/OUT jacks send and receive MIDI signals to and from external
equipment. See the MIDI Implementation chart for details.
(11)
(10)
(12)
(7) ¼» inputs accept balanced or unbalanced ¼» plugs. Channel 15 and 16 on
the XR16 (channel 11 and 12 on the XR12) accept high impedance sources for
direct connec tion of guitars and basses.
(8) AUX SEND jacks send your monitor mixes to stage monitors or headphone
mixers. The XR16 uses XLR connectors while the XR12 uses balanced
¼»jacks.
(9) MAIN L/R jacks send the main mix signal to PA or monitor speakers via
XLRcables.
(10) HEADPHONE jack accepts a ¼» TRS plug for connecting a pair of headphones.
(5) USB port (type A) accepts a ash drive for le storage, stereo recordings and
playback. The red LED nex t to it indicates le access. Do not remove the USB
ash drive while it is lit!
(6) XLR COMBO jacks accept balanced and unbalanced XLR and ¼» plugs.
(11) PHONES LEVEL knob determines the output of the headphones jack.
(12) POWER switch turns the mixer on and o . The front panel LED will light
when the unit is powered on.
7 X AIR User Manual
3. Hookup
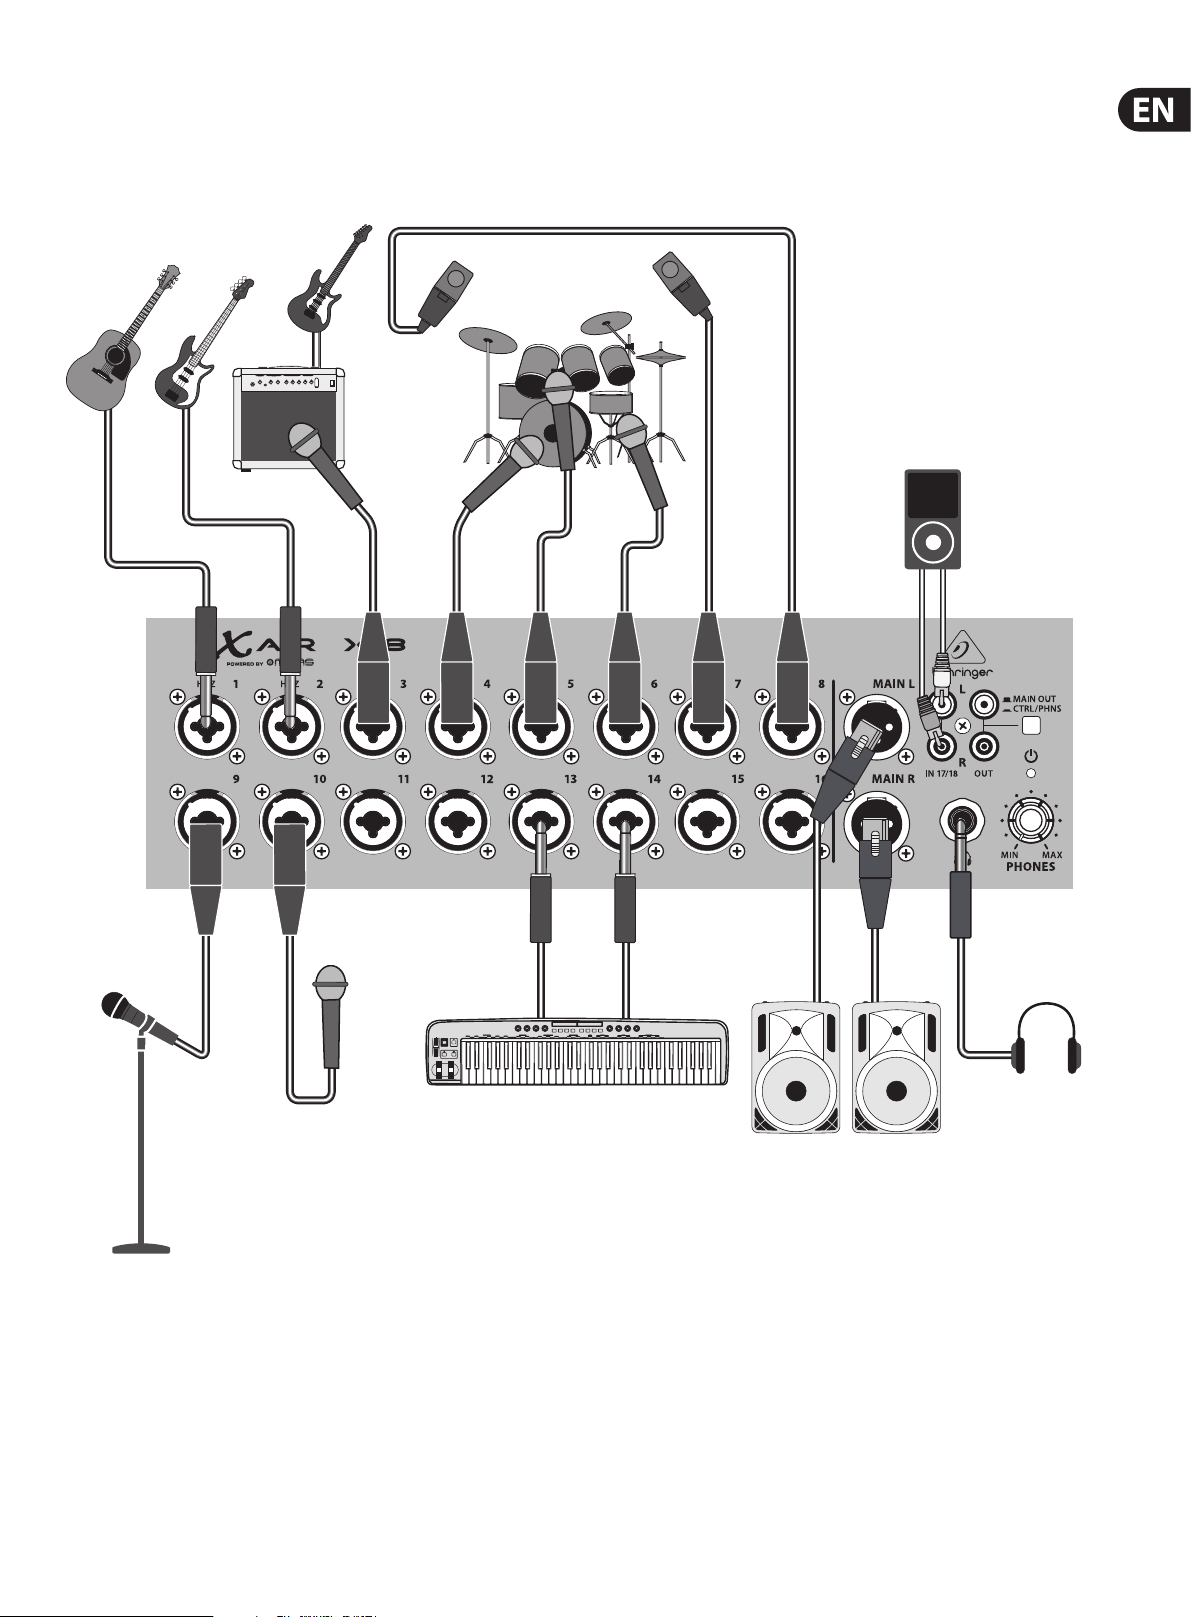
3.1 X18/XR18 Hookups
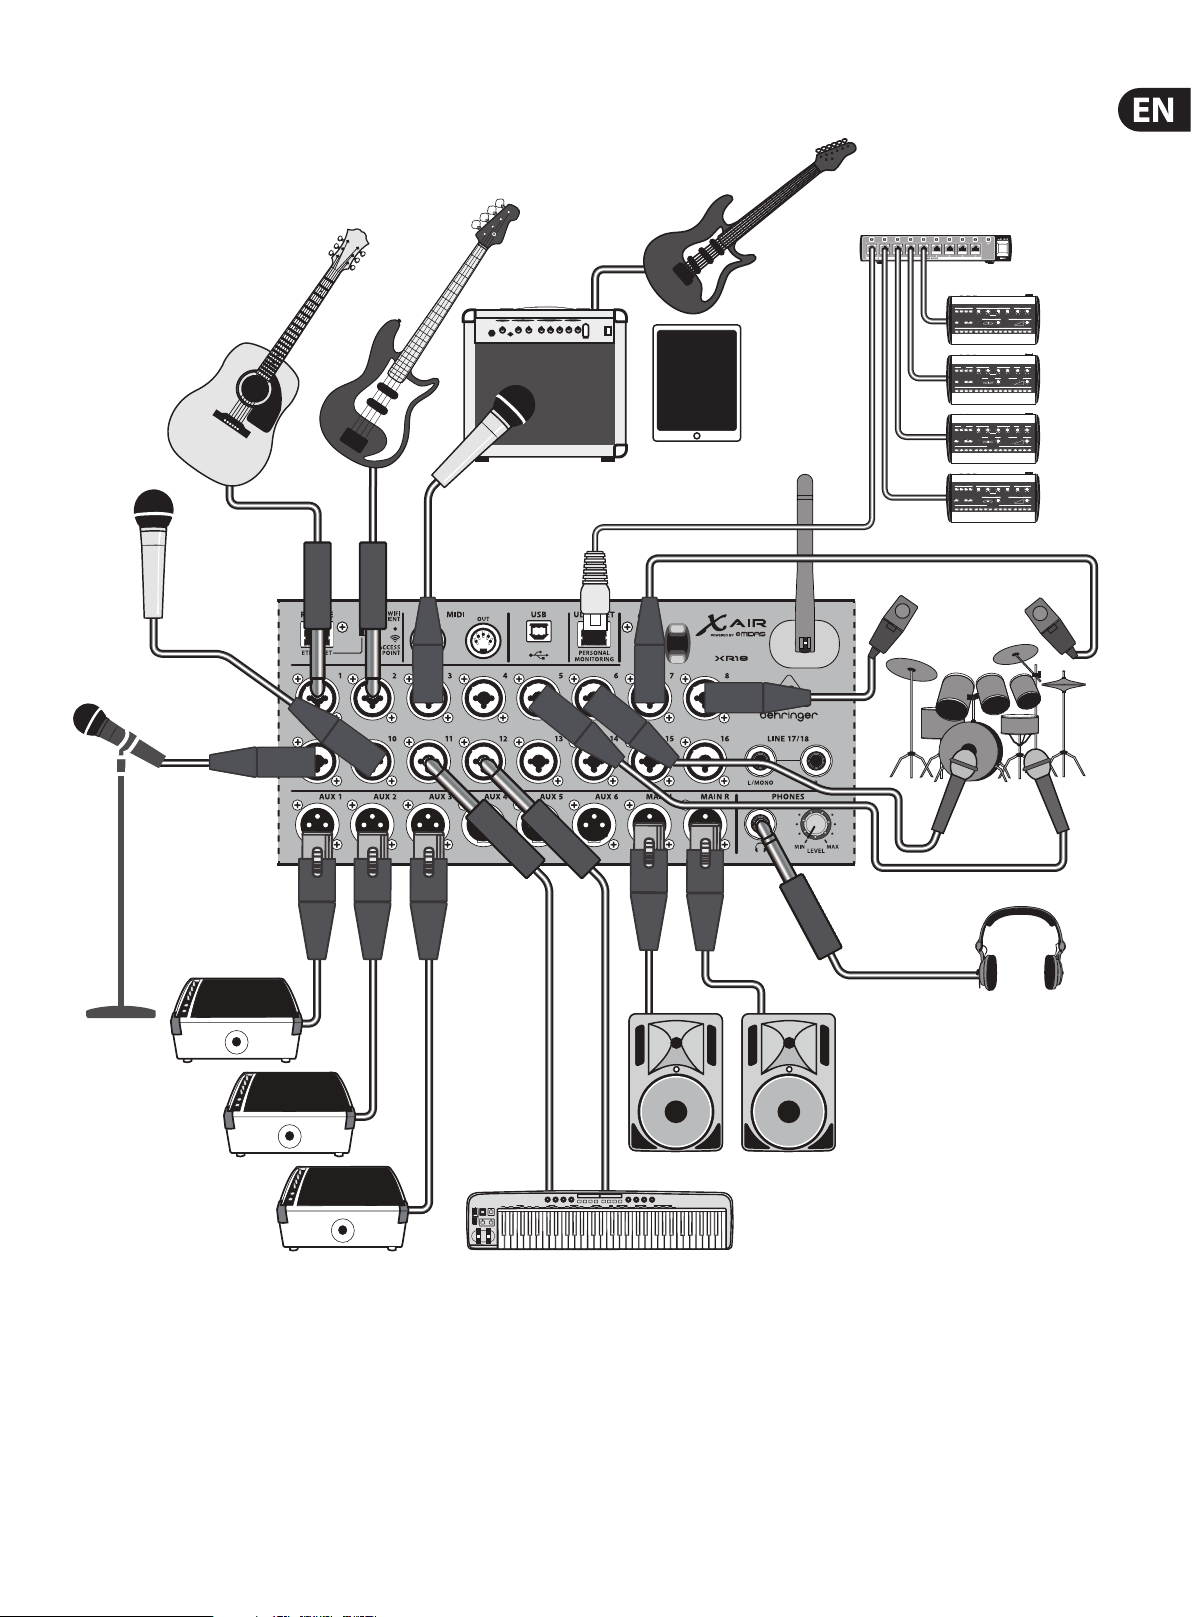
3.1.1 X18 recording with iPad
BUGERA V22
MP3 Player
XM8500
Keyboard
HPS3000
B215D active loudspeakers

8 X AIR User Manual
iPad for remote control
iPad with camera
connection kit
for multi-track
recording
up to 18 tracks
Laptop for additional remote control
Wireless router (optional)
USB REM OTE
ETH ERNE T
ACCE SS
POI NT
WIFI C LIE NT
F1320D active monitors
INOUT
MIDI
PERS ONAL
MONI TORIN G
ULTRAN ET
5
6
AUX SE NDS
P16-D
1
3
4
2
P16-M
9 X AIR User Manual
3.1.2 XR18 live performance
P16-D
XM8500
BUGERA V22
iPad for wireless control
P16-M
HPX6000
F1320D Active Monitors
B215D active loudspeakers
Keyboard
10 X AIR User Manual
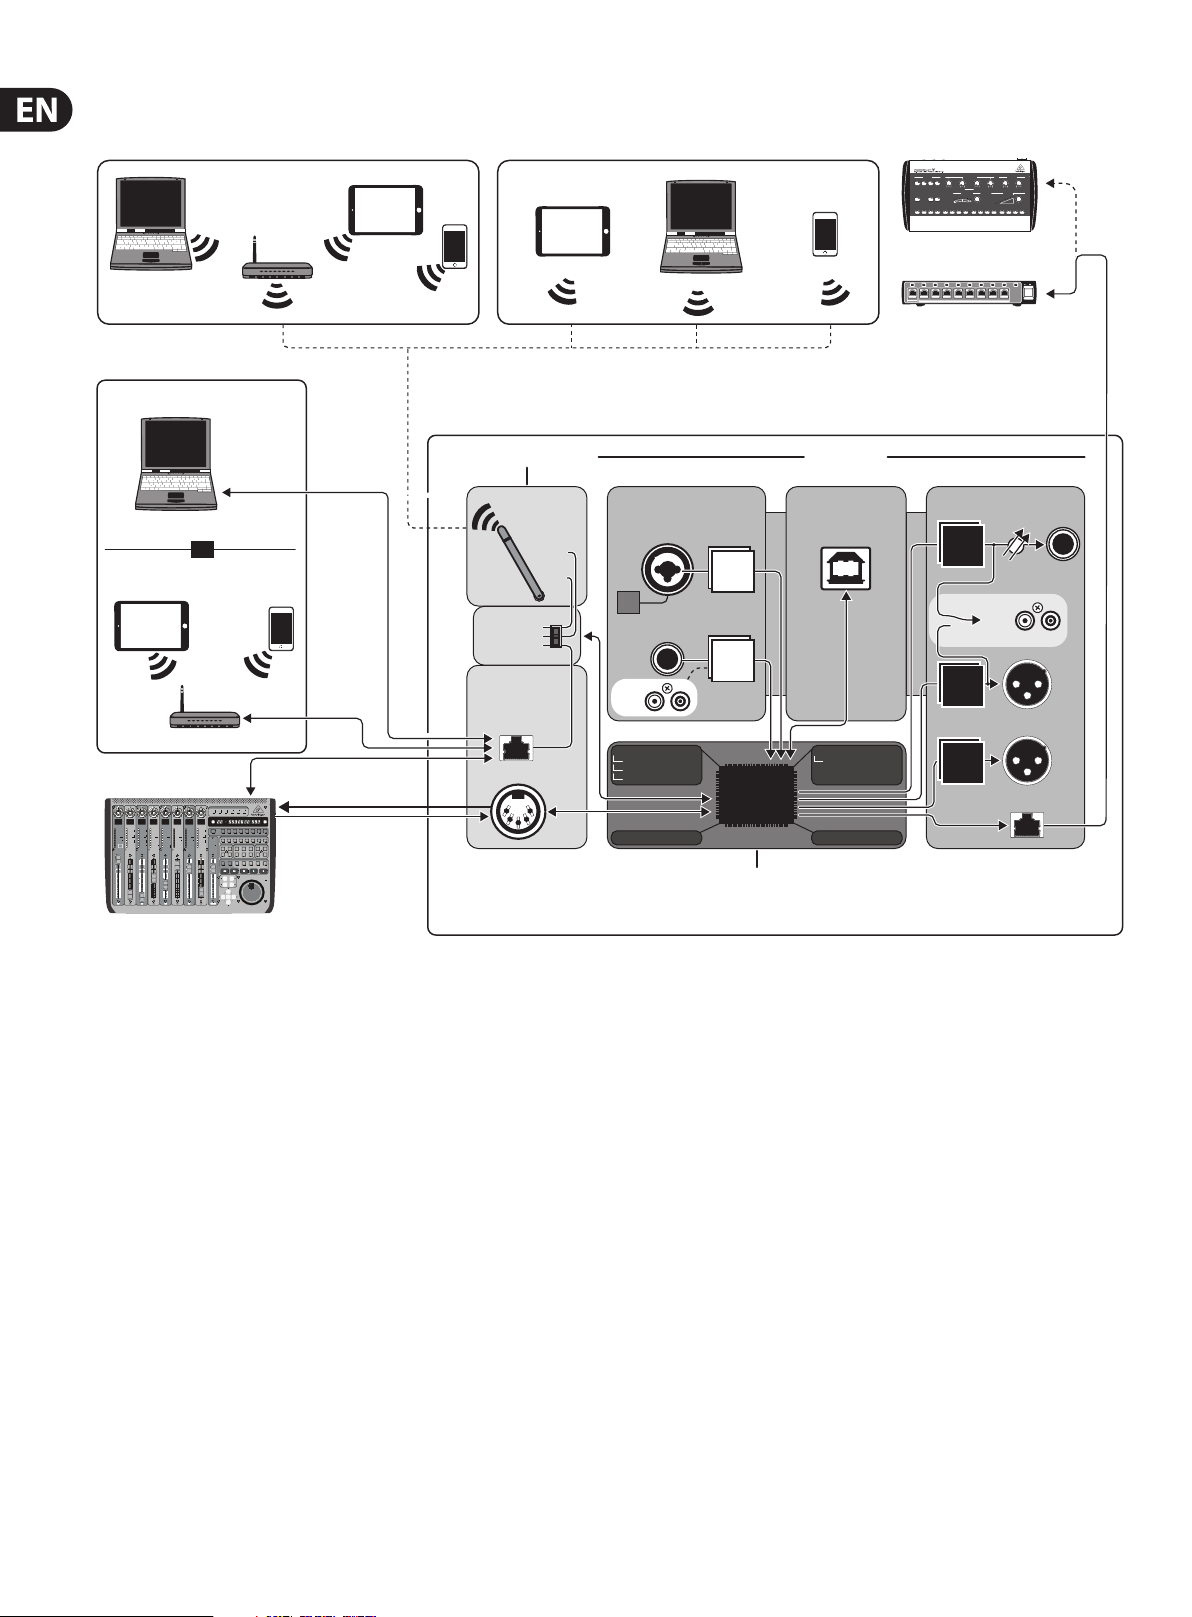
WIFI CLIENT mode (Mobile Devices with Wifi)
ACCESS POINT mode (Mobile Devices with Wifi)
3.1.3 X18/XR18 System Overview
Mac/Win/Linux
ETHERNET mode
Computer with Ethernet port
CAT-5 cable
Mac/Win/Linux
or
Mobile Devices with Wifi
iOS/Android
Router
X-TOUCH
Router
CAT-5 cable
or any other MIDI /
Mackie Control
compatible Controller
iOS/Android
iOS/Android Android
WIRELESS CONTROL
WIFI
CLIENT*
ACCESS
POINT*
ACCESS POINT
WIFI CLIENT
ETHERNET
WIRED CONTROL
ETHERNET
MIDI I/O
*WIFI CLIENT mode:
— available channels: 1-11
*ACCESS POINT mode:
— available channels: 1-11
— max. 4 Wifi clients
— performance limited by Wifi bandwidth
Mac/Win/Linux
AUDIO I/OMIXER CONTROL
AUDIO INPUTS USB AUDIO
MIC/LINE IN
CH. 1-16
Hi-Z
CH.1-2
LINE IN
CH. 17-18
XR18:
X18:
DSP-MIXER CH.
MONO IN 1-16
USB/AUX IN (STEREO)
FX RETURN 1-4 (STEREO)
ADCs
ADCs
AUDIO IN/OUT
CH. 1-18
DSP-MIXER BUSES
AUX /
GROUP SEND 1-6
DSP
4 STEREO FX SLOTS RTA METER
DSP ENGINE
P16-M
P16-D
AUDIO OUTPUTS
DACs
CTRL/PHONES
MAIN OUT L/R
DACs
DACs
PHONES STEREO
LEVEL
X18:
MAIN OUT L-R
AUX SEND 1-6
ULTRANET OUT
CH. 1-16
X18/XR18
or
11 X AIR User Manual
3.2 XR16/XR12 Hookups
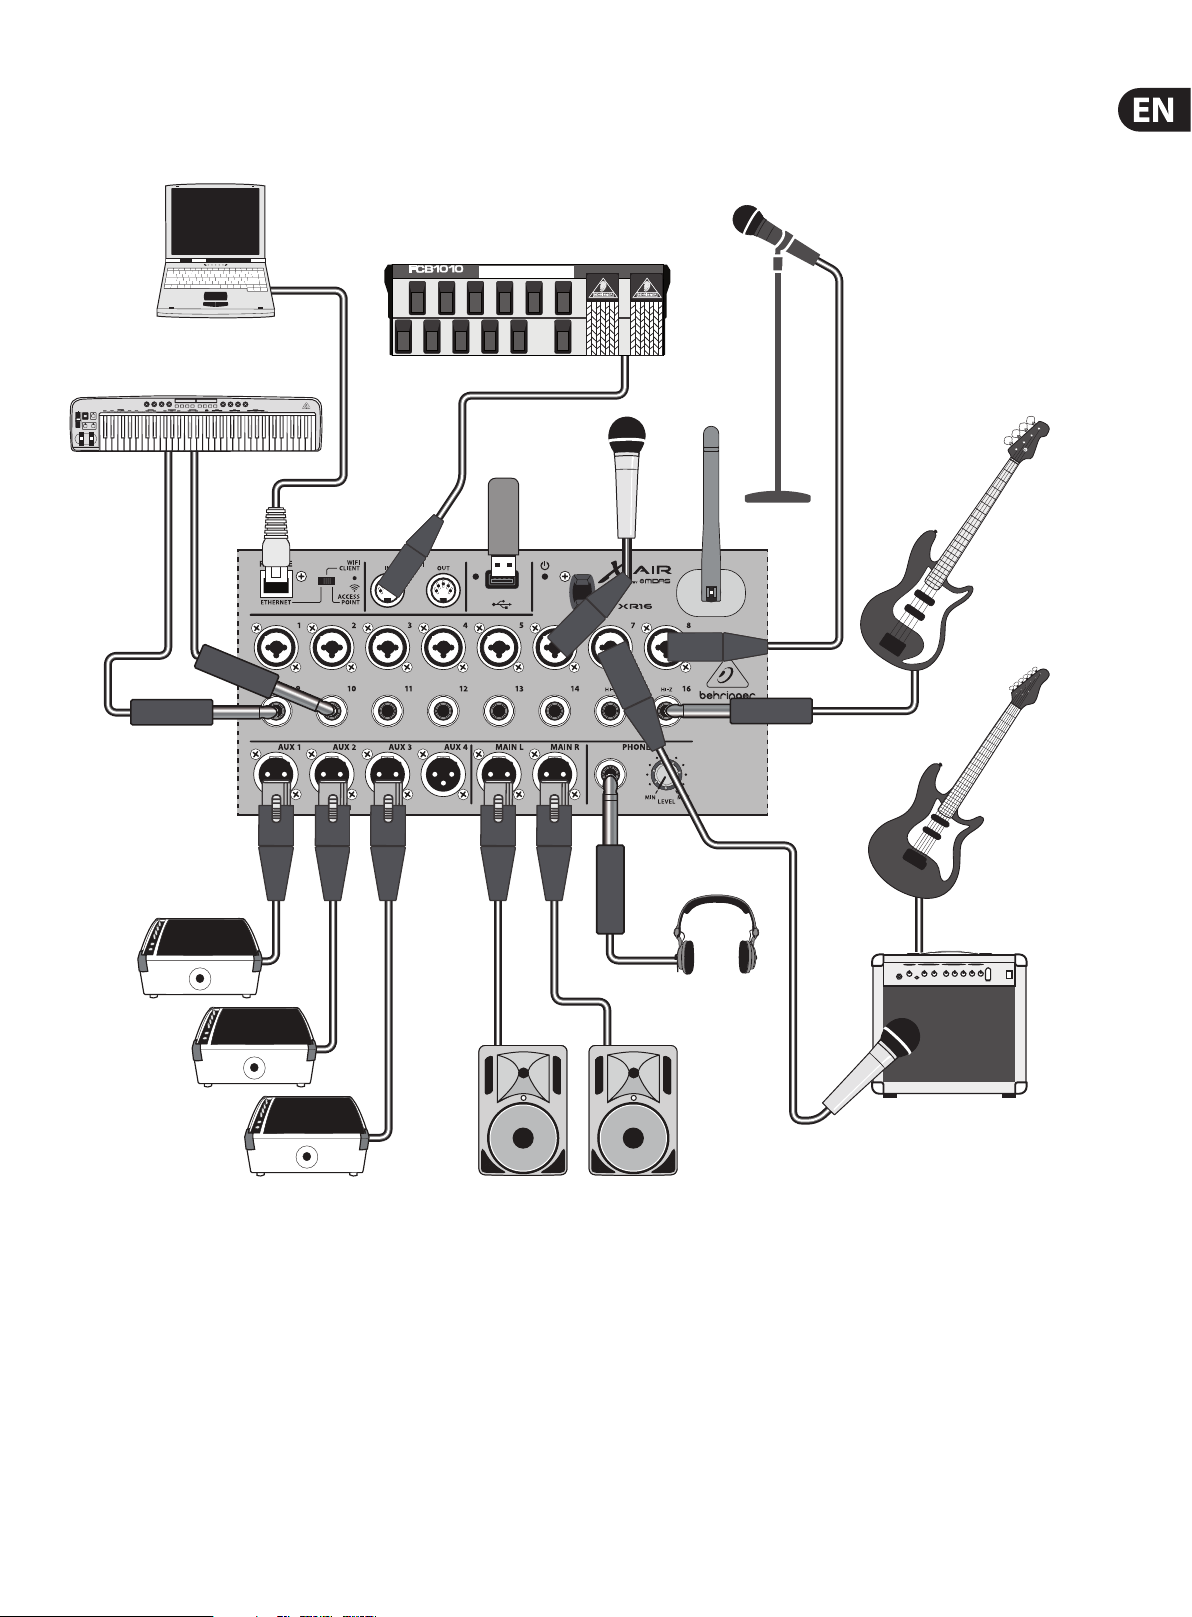
3. 2.1 XR16 club performance
Laptop for wired or
wireless control
Keyboard
FCB1010 MIDI Controller
USB
Flash Drive
XM8500
TRS
HPX6000
BUGERA V22
B215D active loudspeakersF1320D Active Monitors
12 X AIR User Manual
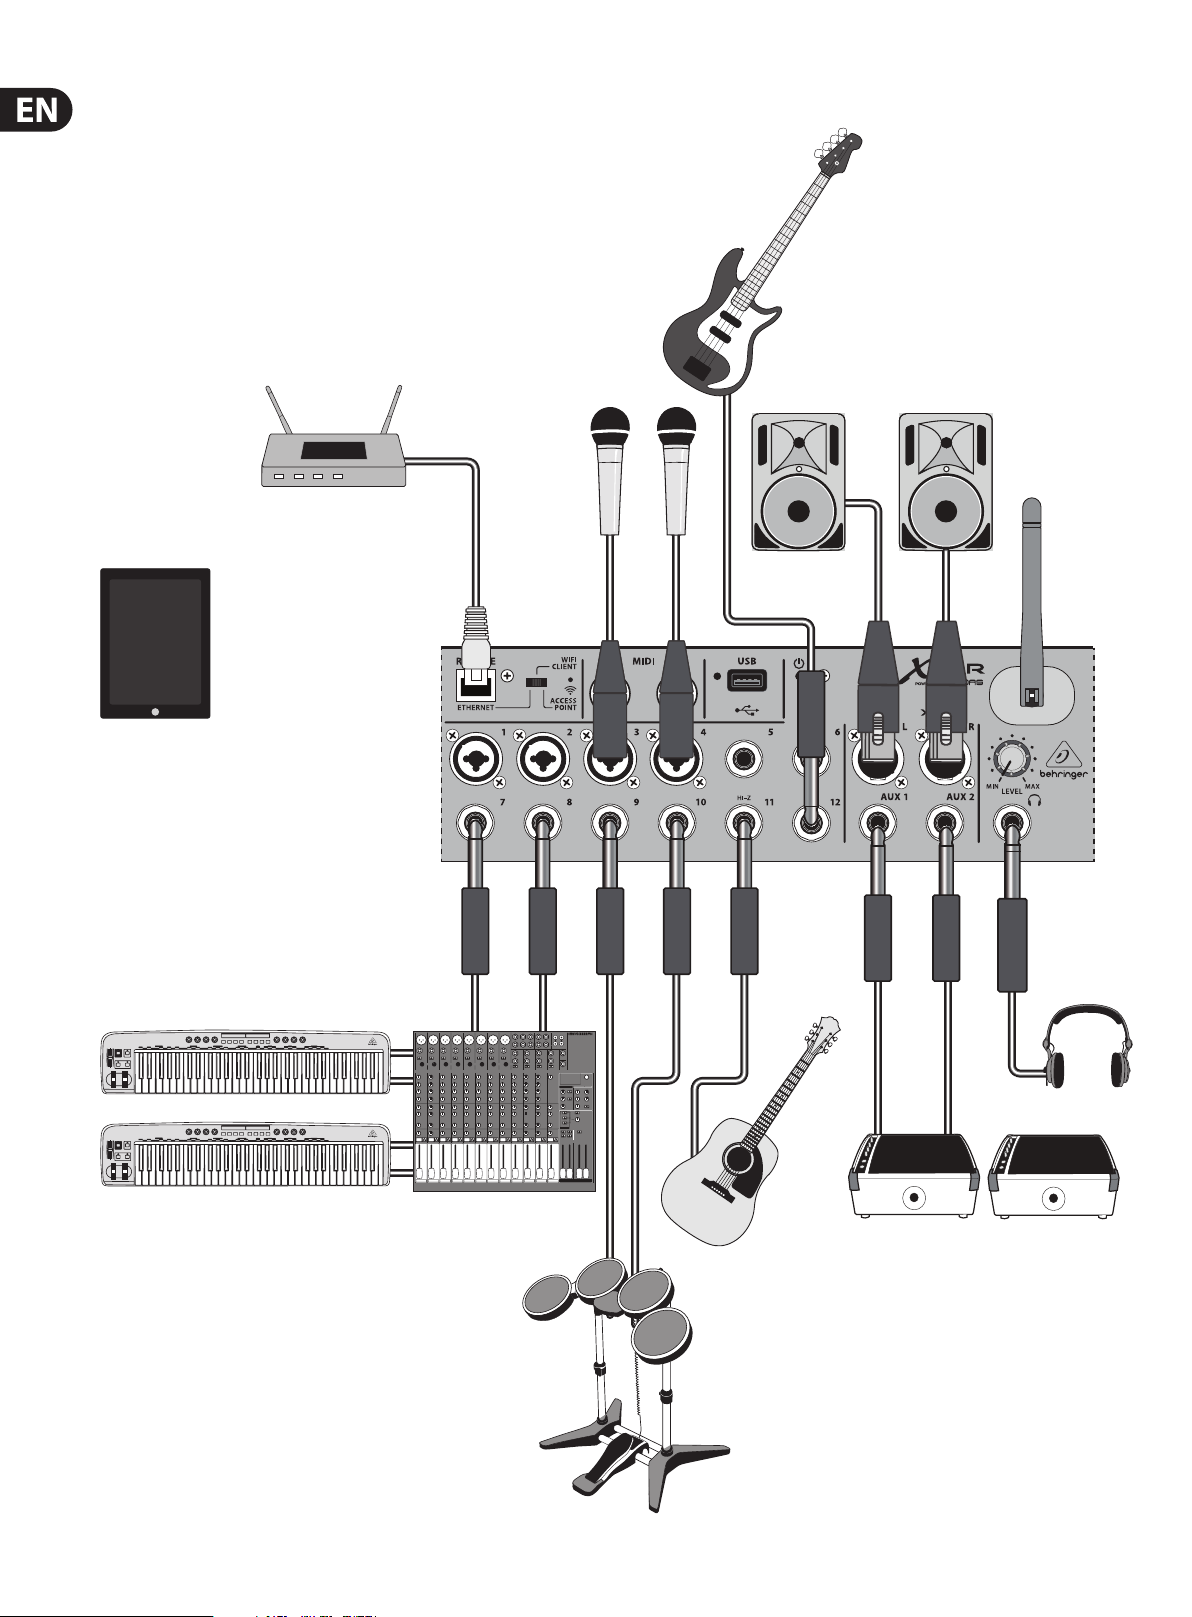
3.2.2 XR12 with Sub Mixer
Wireless router
(optional)
B215D active
loudspeakers
iPad for remote control
Keyboard
Keyboard
TRS
HPX6000
QX2222USB
F1320D active monitors
E-Drums

13 X AIR User Manual
WIFI CLIENT mode (Mobile Devices with Wifi)
ACCESS POINT mode (Mobile Devices with Wifi)
3.2.3 XR16/XR12 System Overview
Router
iOS/Android
Mac/Win/Linux
ETHERNET mode
Computer with Ethernet port
CAT-5
cable
Mac/Win/Linux
or
Mobile Devices with Wifi
iOS/Android
Router
CAT-5 cable
X-TOUCH
iOS/Android Android
WIRELESS
CONTROL
ACCESS POINT
WIFI CLIENT
ETHERNET
WIFI
CLIENT*
ACCESS
POINT*
Mac/Win/Linux
WIRED CONTROL
ETHERNET
MIDI I/O
*WIFI CLIENT mode:
or any other MIDI /
Mackie Control
compatible Controller
— available channels: 1-11
*ACCESS POINT mode:
— available channels: 1-11
— max. 4 Wifi clients
— bandwidth limited by Wifi adapter
AUDIO INPUTS
MIC/LINE IN
XR16: CH. 1-8
XR12: CH. 1-4
LINE IN
XR16: CH. 9-16
XR12: CH. 5-12
Hi-Z
XR16: CH. 15-16
XR12: CH. 11-12
DSP-MIXER CH.
DSP-MIXER CH.
MONO IN 1-16
MONO IN 1-16*
USB/AUX IN (STEREO)
USB/AUX IN (STEREO)
FX RETURN 1-4 (STEREO)
FX RETURN 1-4 (STEREO)
4 STEREO FX SLOTS
4 STEREO FX SLOTS
*XR12:
CH. 13-16 fed by any IN 1-12
(Signal Split, e.g. for
monitoring with different EQ)
ADCs
ADCs
DSP
DSP ENGINE
AUDIO I/OMIXER CONTROL
USB RECORDER
STEREO REC
(VARIOUS SOURCES)
STEREO PLAY
(SPECIFIC “USB”
STEREO
INPUT CHANNEL)
DSP-MIXER BUSES
DSP-MIXER BUSES
PRE-DEFINED AS SUBGROUPS*
PRE-DEFINED AS SUBGROUPS*
XR12: BUSES 3/4/5/6
XR12: BUSES 3/4/5/6
XR16: BUSES 5/6
XR16: BUSES 5/6
RTA METER
*PRE-DEFINED BUSES
Also used for monitoring
AUDIO OUTPUTS
PHONES STEREO
DACs
MAIN OUT L-R
DACs
XR16:
AUX SEND 1-4
DACs
XR12:
AUX SEND 1-2
XR16/XR12
LEVEL
14 X AIR User Manual
4. Network Connection
The X AIR mixers oer convenient digital control of the various mixing functions
in three dierent ways — via Ethernet LAN, or wirelessly as a Wi Client or as an
Access Point. Selection is made with the REMOTE switch. You may view or change
the network preferences for these on any of the X AIR remote control applications
on the ’Setup/Network’ page.
4.1 IP Address and DHCP
Depending on the connection scenario, the X AIR mixers oer up to 3 options
for connecting a tablet or PC for software control – DHCP Client, DHCP Server,
andxed IP operation. Connection is achieved dierently depending on
whichoption you choose:
DHCP Client mode is available in Ethernet LAN or Wi Client operation.
Themixerwill automatically request an IP lease from the DHCP server that
ownsthe IPaddresses in the network to which you are tr ying to connect.
DHCP Server (DHCPS) is optionally available for Ethernet LAN connec tions and
is standard in Access Point operation. The mixer will own the IP addresses
and provide IP leases to devices requesting access to that network. The mixer
will always use IP address 192.168.1.1 and assign IP addresses 192.168.1.101 –
192.16 8.1.132 to it s c lie nt s.
Static IP is available for Ethernet LAN and Wi Client operation. The mixer will
use the xed (static) IP address, subnet mask and gateway that you specify for
registering on the network. Make sure that the addresses you specify manually
are not conicting with any other addresses on the same network. We generally
recommend using the DHCP mode, unless you have a very specic reason to set
itup manually.
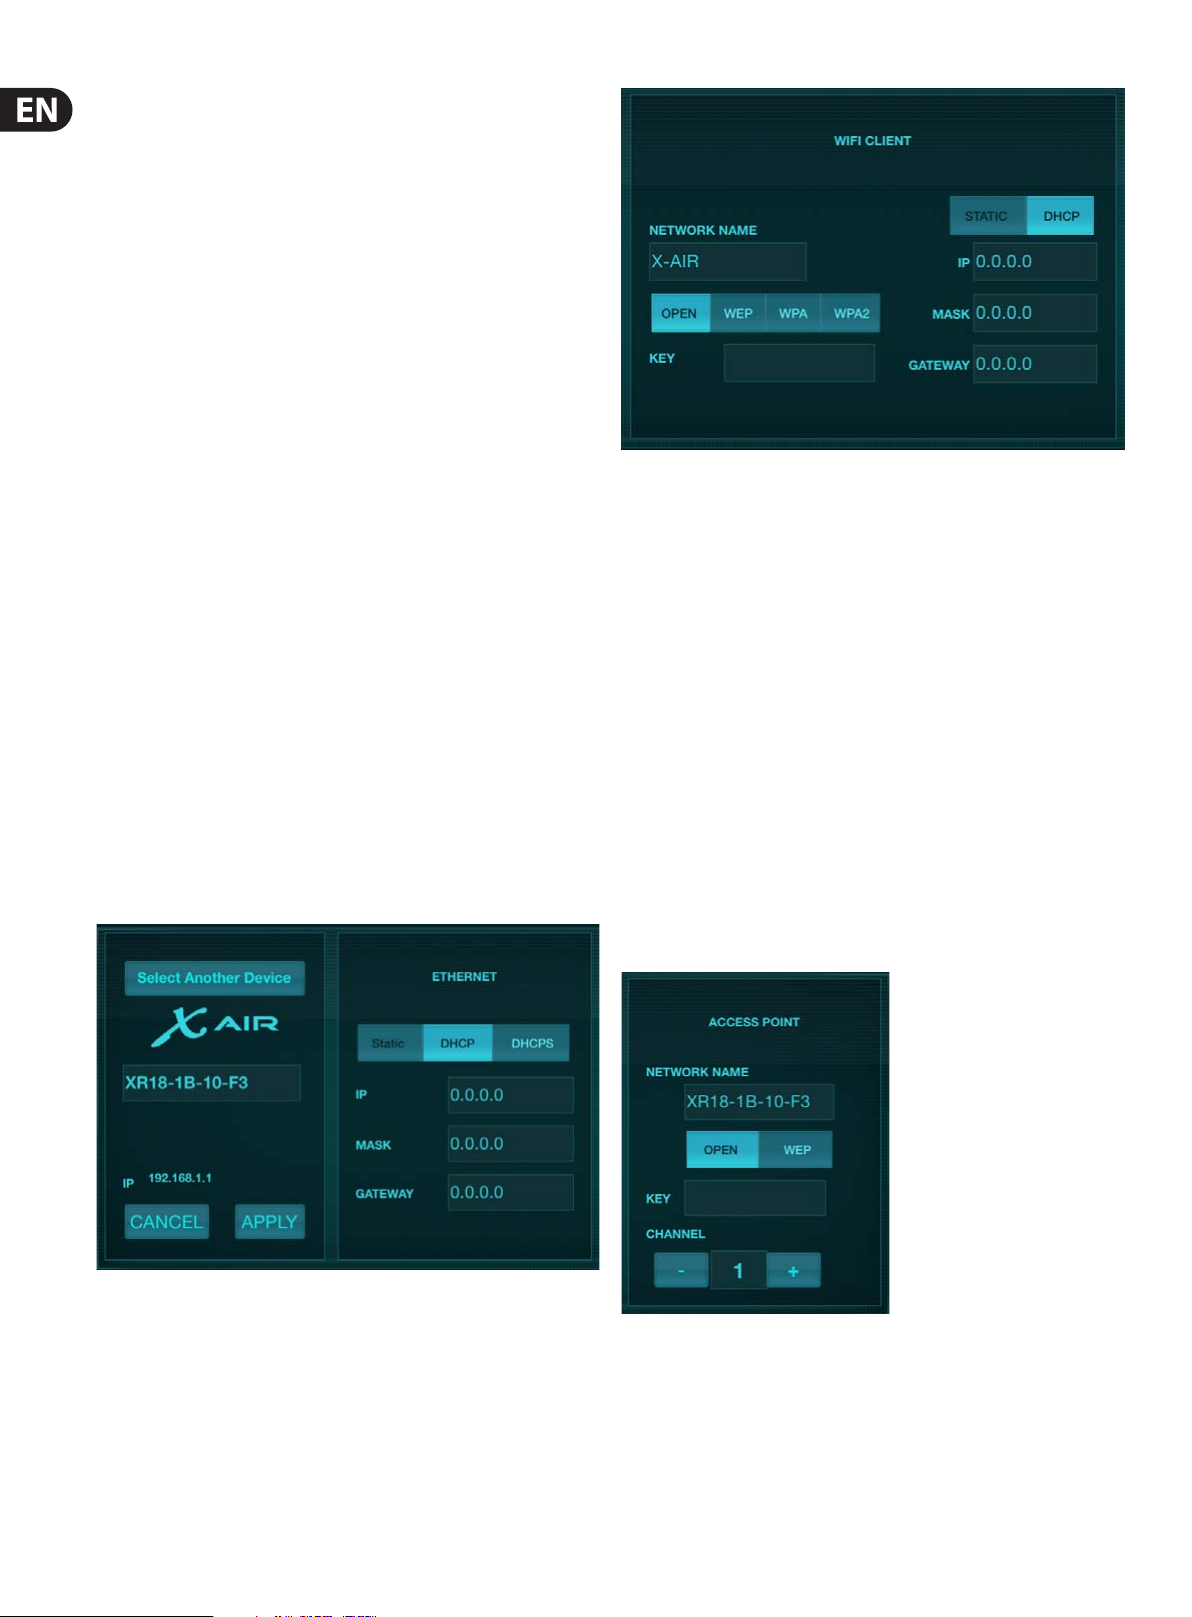
Wi Client setup screen
4.3 Wi Client
This mode supports DHCP Client (default) and xed IP operation. The X AIR mixers
can support WEP, WPA and WPA2 security mechanisms in Wi Client mode and
works on Wi channels 1-11.
Correct SSID (network name) and password need to be supplied to connect to an
existing network. WEP passwords have to be either 5 characters or 13 characters
long. If the supplied SSID and password are incorrect, the mixer cannot be
accessed. In this case the networking parameters have to be reset and another
connection mode has to be used to regain access.
Note: Changing parameters of the currently selected connection mode
will disconnect the software from the console. If the console is erroneously
congured for a xed IP address that is incompatible with the network it is
connected to, the console will be inaccessible. In this case, one of the other
two connection modes can be used to regain access and amend the settings.
If that does not work, hold the Reset button for 2 seconds to return to default
networksettings.
Mixer name and Ethernet setup screen
4.2 Ethernet/LAN
The Ethernet connection mode may be used for conguration of the
WiClientmode. While being connec ted in Ethernet mode, the X AIR mixer can
scan the available wireless networks and display their SSID network names,
eldstrength and security method. By selecting the preferred wireless network,
this information can be copied to the applications’ Wi Client setup page
automatically. You will then be prompted to ll in the security password of that
network. After switching from Ethernet to Wi Client mode, the mixer should
connect to the selected wireless network automatically, and will be displayed by
remote applications on any device connected to the same network.
Access Point s etup screen
This mode supports DHCP Client (default), DHCP Server, and xed IP operation.
Note that if the mixer is connected to a network where no DHCP server is
present, the mixer will generate an automatic IP address (range 169.254.1.0–
169.254.254.255). There are no security options for LAN connections,
soanydevice in that network may take control of connected X AIR consoles.
Whenconnecting via LAN/Ethernet to a Wi router, make sure the security
settings of that router prevent unauthorized access.
Loading…
Скачать
Quick Start Guide
(Visit behringer.com for Full Manual)
X AIR X18/XR18
18-Channel, 12-Bus Digital Mixer for iPad/Android Tablets with 16 Programmable
MIDAS Preamps, Integrated Wifi Module and Multi-Channel USB Audio Interface
На чтение3 мин
Опубликовано
Обновлено
Программа X Air Edit является одним из самых мощных и удобных инструментов для управления цифровыми микшерными пультами серии X Air от Behringer. Она предоставляет полный доступ к всем функциям и настройкам пульта, позволяя управлять звуком и миксом в реальном времени.
В этой статье мы рассмотрим подробные инструкции по установке и настройке X Air Edit на компьютере с операционной системой Windows. Вы узнаете, как правильно подключить пульт к компьютеру, как настроить сетевое соединение и какие параметры нужно указать в программе для корректной работы.
Мы также покажем вам, как использовать основные функции X Air Edit, включая настройку звуковых эффектов, регулировку громкости и баланса звука, создание и сохранение сценариев для различных мероприятий. Вы освоите все необходимые навыки для эффективного использования этой программы и достижения высококачественного звучания в любом музыкальном проекте или событии.
Руководство по настройке и использованию X Air Edit для Windows на русском языке
Шаг 1: Загрузка и установка X Air Edit
Перейдите на официальный веб-сайт Behringer и найдите страницу загрузки X Air Edit. Скачайте установочный файл и запустите его после завершения загрузки. Следуйте инструкциям мастера установки, чтобы установить X Air Edit на свой компьютер.
Шаг 2: Подключение к смесителю
Подсоедините компьютер к смесителю X Air Series с помощью Ethernet-кабеля. Убедитесь, что смеситель и компьютер находятся в одной локальной сети.
Шаг 3: Запуск X Air Edit
После завершения установки запустите X Air Edit, найдите ярлык на рабочем столе или в меню «Пуск».
Шаг 4: Подключение к смесителю
В главном окне X Air Edit нажмите на кнопку «Connect» (Подключиться) в верхнем правом углу. X Air Edit автоматически обнаружит доступные смесители в вашей локальной сети. Выберите нужный смеситель из списка и нажмите кнопку «Connect».
Шаг 5: Настройка смесителя
После успешного подключения к смесителю вы сможете настроить различные параметры, такие как громкость каналов, эквалайзеры и эффекты. Используйте интерфейс X Air Edit для изменения настроек и прослушивания результатов.
Шаг 6: Сохранение и загрузка настроек
Когда вы закончите настройку смесителя, вы можете сохранить текущие настройки в файл для дальнейшего использования. Вы также можете загрузить ранее сохраненные настройки смесителя. Для этого используйте соответствующие функции в меню X Air Edit.
Теперь у вас есть полное руководство по настройке и использованию X Air Edit для Windows на русском языке. Наслаждайтесь работой с вашим смесителем X Air Series!
Установка и предварительные настройки X Air Edit
Перед началом использования программы X Air Edit для Windows на русском языке необходимо выполнить несколько шагов предварительных настроек.
Шаг 1: Скачать и установить X Air Edit
Для начала необходимо загрузить программу X Air Edit для Windows на русском языке с официального сайта производителя. После загрузки запустите установочный файл и следуйте инструкциям на экране, чтобы завершить установку программы.
Шаг 2: Подключение к сети Wi-Fi микшера X Air
Подключите ваше устройство (компьютер или планшет) к той же Wi-Fi сети, к которой подключен микшер X Air. Убедитесь, что оба устройства находятся в одной локальной сети.
Шаг 3: Запуск X Air Edit
После установки программы, найдите ярлык X Air Edit на вашем компьютере и запустите приложение. На экране появится главное окно программы.
Шаг 4: Подключение к микшеру X Air
В главном окне X Air Edit найдите иконку, обозначающую подключение к микшеру. Нажмите на нее, чтобы открыть окно настроек подключения.
Шаг 5: Настройка подключения
В окне настроек подключения введите IP-адрес микшера X Air, который можно найти в его сетевых настройках. После ввода IP-адреса нажмите кнопку «Подключиться», чтобы установить соединение с микшером.
Поздравляю! Теперь X Air Edit полностью настроен и готов к использованию. Вы можете начать управлять микшером X Air с помощью этого приложения на вашем компьютере.
Основные функции и возможности X Air Edit
С помощью X Air Edit вы можете:
- Управлять микшерами на расстоянии: X Air Edit позволяет вам подключаться к смесителю через Wi-Fi или Ethernet и управлять им из любого места в пределах сети. Вы можете регулировать громкость, панораму и другие параметры каждого канала, а также включать и отключать эффекты.
- Создавать и сохранять сцены: X Air Edit позволяет вам создавать сцены — наборы предустановок смесителя, которые вы можете сохранить и загрузить в любой момент. Это позволяет вам быстро переключаться между различными настройками в зависимости от потребностей вашего выступления или записи.
- Просматривать и редактировать эффекты: X Air Edit предоставляет вам доступ ко всем встроенным эффектам вашего смесителя. Вы можете просматривать и редактировать параметры каждого эффекта, а также применять их к отдельным каналам или мастер-выходу.
- Записывать и воспроизводить микшерный сеанс: X Air Edit позволяет вам записывать все события и настройки вашего смесителя, а также воспроизводить их позже. Это может быть полезно, если вы хотите сохранить свои выступления или использовать их для звукозаписи.
Все эти функции делают X Air Edit идеальным инструментом для аудиоинженеров, музыкантов и звуковых продюсеров, которые хотят иметь полный контроль над своим звуковым оборудованием.