
Основная инструкция по эксплуатации HD Видеокамера Номер мод…
Hc-x800ee, Основная инструкция по эксплуатации, Hd видеокамера Чат поддержки
- Изображение
- Текст
Основная инструкция по эксплуатации
HD Видеокамера
Номер модели
HC-X800EE
Перед пользованием прочтите, пожалуйста, эту инструкцию полностью.
Более подробные инструкции по эксплуатации данного
устройства приведены в документе “Инструкции по
эксплуатации (формат PDF)” на поставляемом в комплекте
компакт-диске. Для прочтения установите его на ПК.
VQT4E69
until
2012/1/31
HC-X800_EG-VQT4E69_rus.book 1 ページ 2012年1月16日 月曜日 午後2時39分

2
VQT4E69 (RUS)
∫ Об аккумуляторах
Используйте только рекомендуемые
принадлежности.
≥ Всегда используйте фирменный мини-
кабель Panasonic HDMI (RP-CDHM15,
RP-CDHM30: дополнительно).
∫ Идентификационная
маркировка изделия
Информация для вашей
безопасности
ПРЕДУПРЕЖДЕНИЕ:
Для уменьшения риска пожара,
поражения электрическим током или
повреждения изделия:
≥ Берегите устройство от воздействия
дождя, влажности, капель и брызг.
≥ Не ставьте на это устройство
емкости с водой, например, вазы.
≥ Рекомендуется пользоваться только
рекомендуемыми
принадлежностями.
≥ Не снимайте крышки.
≥ Не ремонтируйте устройство
самостоятельно. Доверьте
обслуживание квалифицированному
персоналу.
ПРЕДОСТЕРЕЖЕНИЕ!
Для уменьшения риска пожара,
поражения электрическим током или
повреждения изделия:
≥ Не устанавливайте и не помещайте
данное устройство в книжный или
встроенный шкаф, или в иное
ограниченное пространство.
Убедитесь, что для устройства
имеется достаточная вентиляция.
≥ Не закрывайте вентиляционные
отверстия устройства газетами,
скатертями, шторами и подобными
предметами.
≥ Не помещайте источники открытого
огня, такие как горящие свечи, на
устройство.
Устанавливайте данное устройство
таким образом, чтобы при
возникновении неполадок имелась
возможность мгновенного отключения
кабеля питания переменного тока от
розетки.
Предупреждение
Риск пожара, взрыва и ожогов.
Запрещается разбирать, нагревать
свыше 60 oC или сжигать.
ВНИМАНИЕ
≥ При неправильной установке
аккумуляторной батареи имеется
риск взрыва. Замену аккумуляторной
батареи производите с
использованием батареи типа,
рекомендованного изготовителем.
≥ Если вы собираетесь утилизировать
аккумуляторную батарею, узнайте в
местных органах власти или у
дилера, как следует поступать с
отходами такого типа.
Изделие
Расположение
HD видеокамера
Крепление
аккумулятора
Адаптер
переменного тока
Низ
HC-X800_EG-VQT4E69_rus.book 2 ページ 2012年1月16日 月曜日 午後2時39分

3
(RUS) VQT4E69
-Если вы увидите такой символ-
∫ На что необходимо обратить
внимание при использовании
Храните данное устройство как можно
дальше от источников электромагнитного
излучения (например, микроволновых
печей, телевизоров, видеоигр и т.д.).
≥ При использовании данного устройства,
размещенного на телевизоре или
вблизи него, снимки и/или звуки
данного устройства могут искажаться
под действием электромагнитных волн.
≥ Не пользуйтесь данным устройством
вблизи сотовых телефонов, так как это
может привести к помехам, отрицательно
влияющим на снимки и/или звук.
≥ Снятые данные могут повреждаться или
изображения могут искажаться сильными
магнитными полями, создаваемыми
динамиками или крупными двигателями.
≥ Электромагнитное излучение, создаваемое
микропроцессорами, может отрицательно
влиять на данное устройство, вызывая
искажение изображений и/или звука.
≥ Если на данное устройство негативно
влияет электромагнитное
оборудование, и данное устройство
прекращает нормальную работу,
выключите его, извлеките аккумулятор
или отключите адаптер переменного
тока. Затем снова вставьте аккумулятор
или подключите адаптер переменного
тока и включите данное устройство.
Не используйте данное устройство
возле радиопередатчиков или
высоковольтных линий.
≥ Если вы производите съемку возле
радиопередатчиков или высоковольтных
линий, на записанные изображения
и/или звук могут накладываться помехи.
О подключении к ПК
≥ Не используйте другие кабели USB,
кроме входящего в комплект поставки.
∫ Сведения о форматах записи
видеоизображения
Можно выбрать форматы записи AVCHD*
или iFrame для записи видео данной
камерой.
* Совместимость с AVCHD 3D или
AVCHD Progressive (1080/50p).
AVCHD 3D:
Можно записывать впечатляющие
реалистичные 3D-изображения с
качеством Full HD.
Для просмотра Full HD изображения в
режиме 3D необходим 3D-совместимый
телевизор, поддерживающий формат
чередования кадров.
AVCHD Progressive:
Можно записывать 2D-изображения в
наиболее высоком качестве (1080/50p).
iFrame:
Это формат записи для просмотра или
редактирования Mac (iMovie’11). С
помощью iMovie’11 видео iFrame можно
импортировать быстрее, чем видео
AVCHD. Кроме того, размер
импортируемого файла видео iFrame
будет меньше файла видео AVCHD.
≥ Не совместимо с видео, записанным в
формате AVCHD.
Информация по обращению с
отходами для стран, не входящих
в Европейский Союз
Действие этого символа
распространяется только
на Европейский Союз.
Если Вы собираетесь
выбросить данный
продукт, узнайте в
местных органах власти
или у дилера, как следует
поступать с отходами
такого типа.
HC-X800_EG-VQT4E69_rus.book 3 ページ 2012年1月16日 月曜日 午後2時39分

4
VQT4E69 (RUS)
∫ Ответственность за
записанное содержание
Panasonic не несет ответственности за
прямой либо косвенный ущерб,
вызванный любого рода проблемами,
приводящий к потере записанного или
редактируемого содержимого, а также не
дает гарантий на какое-либо содержимое,
если запись или редактирование не
выполняются надлежащим образом.
Аналогично, вышесказанное применимо
также в случае любого ремонта камеры.
∫ О конденсации (при
запотевании объектива
объектива или монитора
ЖКД)
Конденсация происходит, когда
окружающая температура или влажность
изменяются, как описано ниже.
Остерегайтесь конденсации, поскольку
она вызывает появление пятен на
объективе или мониторе ЖКД, плесени
или приводит к сбоям в работе камеры.
∫ Карты, которые можно
использовать с данным
устройством
Карты памяти SD, SDHC и SDXC
≥ Карты памяти емкостью 4 ГБ или более
без логотипа SDHC или карты памяти
емкостью 48 ГБ или более без логотипа
SDXC не основаны на технических
характеристиках карт памяти SD.
≥ Более подробная информация о картах
SD приведена нас странице 10.
∫ В настоящей инструкции по
эксплуатации
≥ Карта памяти SD, карта памяти SDHC и
карта памяти SDXC обозначены в
документе как “карта SD”.
≥ Функции, которые можно использовать
в режиме записи видео:
Функции, которые можно использовать
в режиме записи снимков:
≥ Данную функцию можно использовать в
режиме воспроизведения:
Данную функцию можно использовать в
режиме воспроизведения (только для
видео):
Данную функцию можно использовать в
режиме воспроизведения (только для
фотографий):
≥ Одна или несколько сцен, записанных в
формате 1080/50p, 1080/50i, AVCHD 3D
или формате горизонтальной
стереопары ([SbS 3D]): сцена(-ы)
AVCHD
≥ Страницы для справки обозначаются
стрелкой, например: l 00
HC-X800_EG-VQT4E69_rus.book 4 ページ 2012年1月16日 月曜日 午後2時39分
5
(RUS) VQT4E69
Информация для вашей
безопасности …………………………………….2
Принадлежности ……………………………….6
Подготовка
Питание ……………………………………………..7
Как вставлять/извлекать
аккумулятор ………………………………….7
Зарядка аккумулятора …………………..8
Время зарядки и записи…………………9
Подготовка карт SD………………………….10
Карты, которые можно
использовать с данным
устройством ………………………………..10
Как вставлять/извлекать карту
SD ……………………………………………… 11
Включение/выключение камеры …….12
Выбор режима …………………………………12
Использование сенсорного
экрана ……………………………………………..13
О сенсорном меню ………………………14
Установка даты и времени ………………15
Основные сведения
Интеллектуальный автоматический
режим ………………………………………………16
Съемка фильмов …………………………….17
Фотосъемка……………………………………..17
Воспроизведение видео/
стоп-кадров ……………………………………..18
Просмотр видео/снимков на ТВ ……19
Использование экрана меню …………..20
Выбор языка ……………………………….20
Использование масштабирования ….21
Форматирование ……………………………..21
Прочее
Технические характеристики …………..22
Об авторском праве ………………………..26
Чтение инструкции по эксплуатации
(формат PDF) …………………………………..27
Оглавление
HC-X800_EG-VQT4E69_rus.book 5 ページ 2012年1月16日 月曜日 午後2時39分
6
VQT4E69 (RUS)
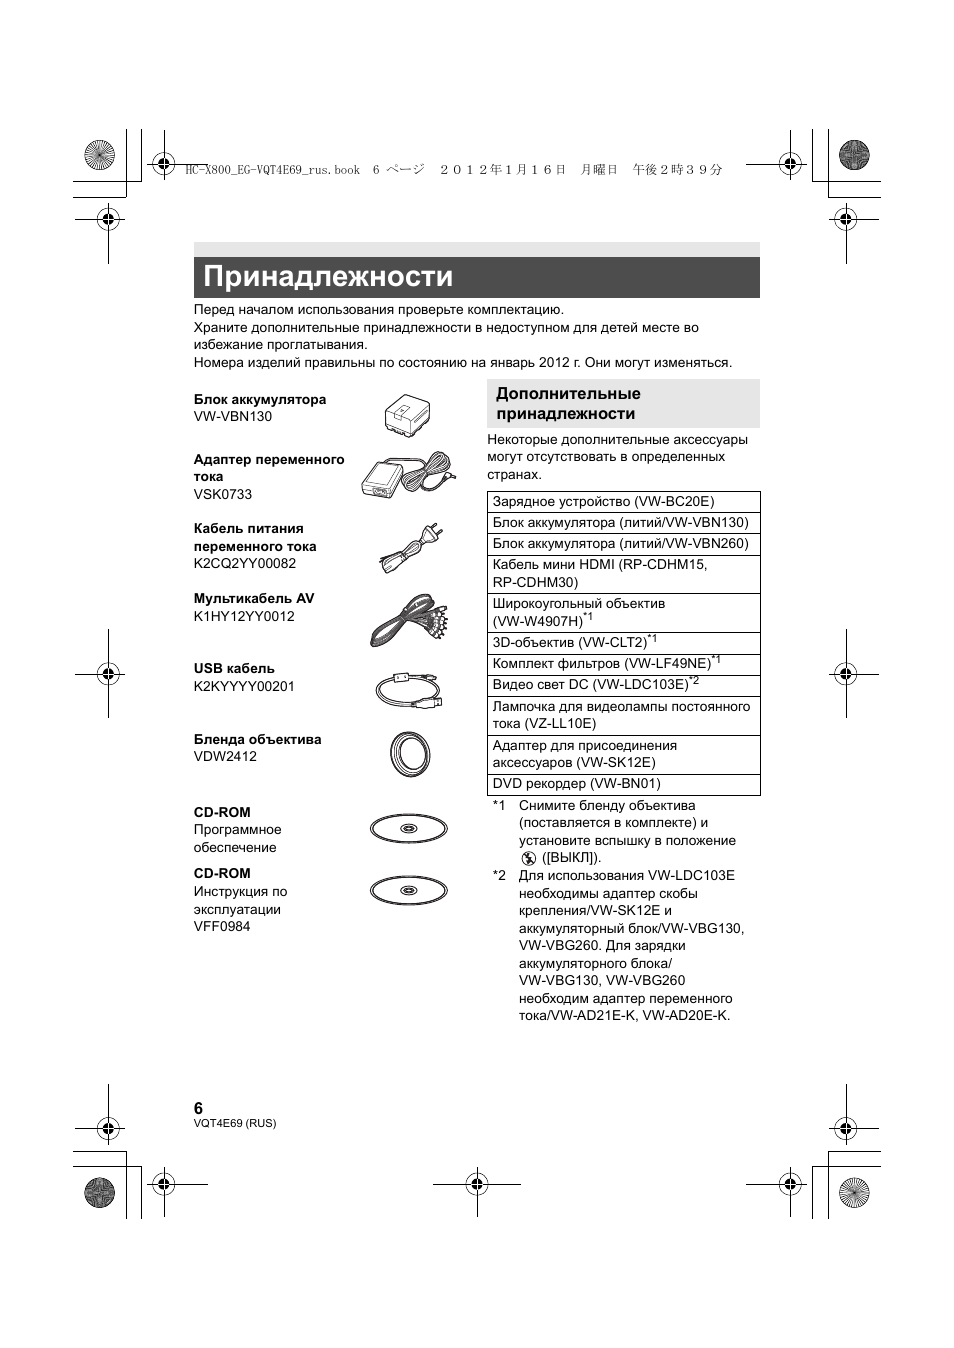
Перед началом использования проверьте комплектацию.
Храните дополнительные принадлежности в недоступном для детей месте во
избежание проглатывания.
Номера изделий правильны по состоянию на январь 2012 г. Они могут изменяться.
Некоторые дополнительные аксессуары
могут отсутствовать в определенных
странах.
Принадлежности
Блок аккумулятора
VW-VBN130
Адаптер переменного
тока
VSK0733
Кабель питания
переменного тока
K2CQ2YY00082
Мультикабель AV
K1HY12YY0012
USB кабель
K2KYYYY00201
Бленда объектива
VDW2412
CD-ROM
Программное
обеспечение
CD-ROM
Инструкция по
эксплуатации
VFF0984
Дополнительные
принадлежности
Зарядное устройство (VW-BC20E)
Блок аккумулятора (литий/VW-VBN130)
Блок аккумулятора (литий/VW-VBN260)
Кабель мини HDMI (RP-CDHM15,
RP-CDHM30)
Широкоугольный объектив
(VW-W4907H)
*1
3D-объектив (VW-CLT2)
*1
Комплект фильтров (VW-LF49NE)
*1
Видео свет DС (VW-LDC103E)
*2
Лампочка для видеолампы постоянного
тока (VZ-LL10E)
Адаптер для присоединения
аксессуаров (VW-SK12E)
DVD рекордер (VW-BN01)
*1 Снимите бленду объектива
(поставляется в комплекте) и
установите вспышку в положение
([ВЫКЛ]).
*2 Для использования VW-LDC103E
необходимы адаптер скобы
крепления/VW-SK12E и
аккумуляторный блок/VW-VBG130,
VW-VBG260. Для зарядки
аккумуляторного блока/
VW-VBG130, VW-VBG260
необходим адаптер переменного
тока/VW-AD21E-K, VW-AD20E-K.
HC-X800_EG-VQT4E69_rus.book 6 ページ 2012年1月16日 月曜日 午後2時39分
7
(RUS) VQT4E69
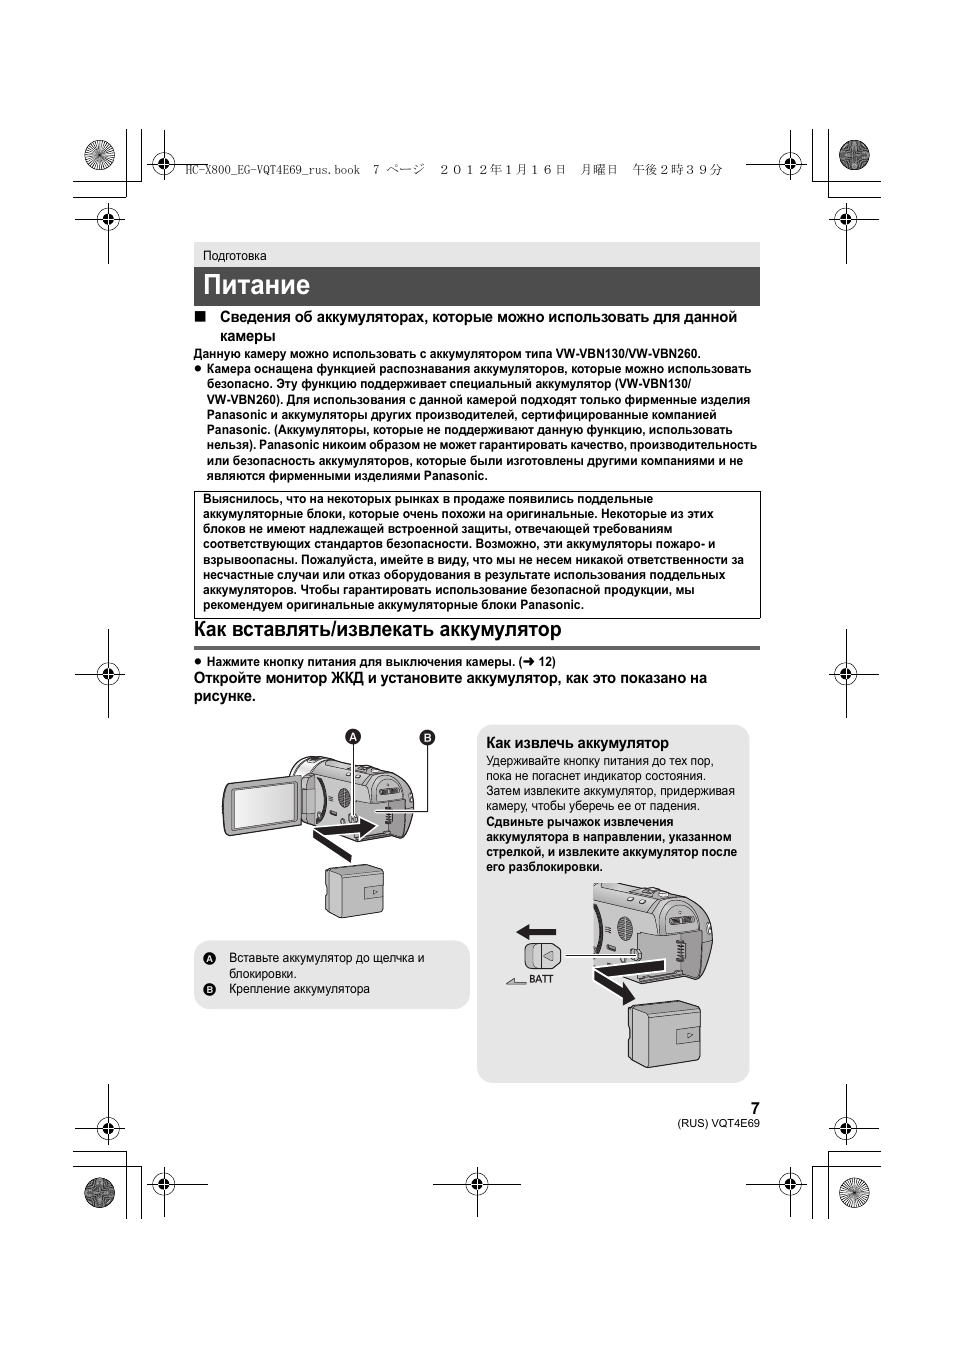
∫ Сведения об аккумуляторах, которые можно использовать для данной
камеры
Данную камеру можно использовать с аккумулятором типа VW-VBN130/VW-VBN260.
≥ Камера оснащена функцией распознавания аккумуляторов, которые можно использовать
безопасно. Эту функцию поддерживает специальный аккумулятор (VW-VBN130/
VW-VBN260). Для использования с данной камерой подходят только фирменные изделия
Panasonic и аккумуляторы других производителей, сертифицированные компанией
Panasonic. (Аккумуляторы, которые не поддерживают данную функцию, использовать
нельзя). Panasonic никоим образом не может гарантировать качество, производительность
или безопасность аккумуляторов, которые были изготовлены другими компаниями и не
являются фирменными изделиями Panasonic.
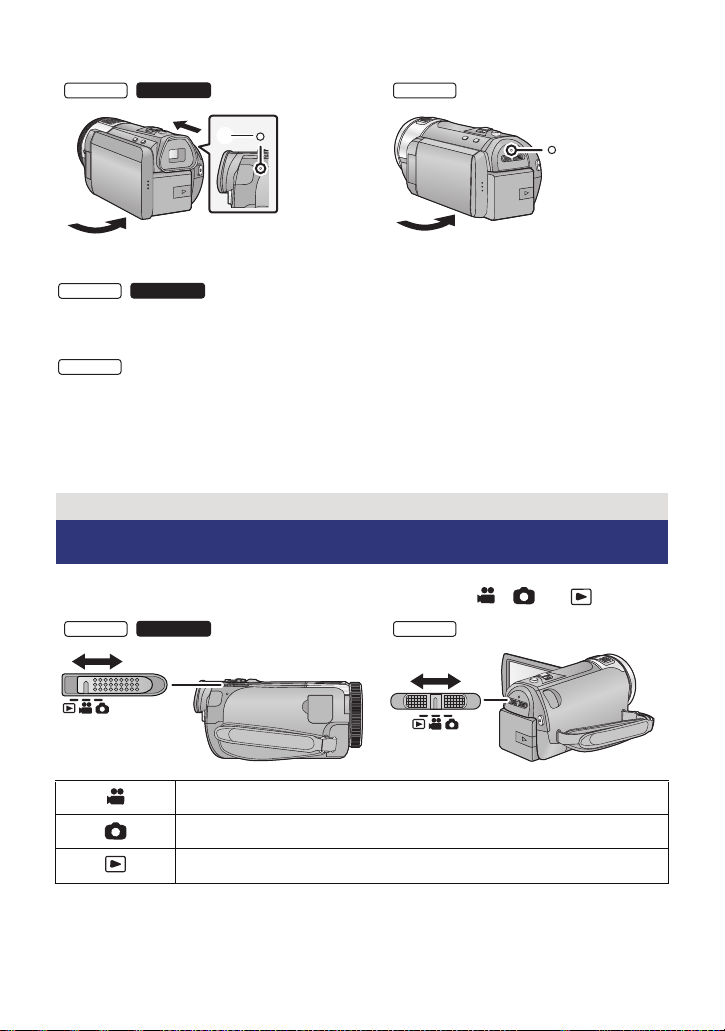
Как вставлять/извлекать аккумулятор
≥ Нажмите кнопку питания для выключения камеры. (
l 12)
Откройте монитор ЖКД и установите аккумулятор, как это показано на
рисунке.
Подготовка
Питание
Выяснилось, что на некоторых рынках в продаже появились поддельные
аккумуляторные блоки, которые очень похожи на оригинальные. Некоторые из этих
блоков не имеют надлежащей встроенной защиты, отвечающей требованиям
соответствующих стандартов безопасности. Возможно, эти аккумуляторы пожаро- и
взрывоопасны. Пожалуйста, имейте в виду, что мы не несем никакой ответственности за
несчастные случаи или отказ оборудования в результате использования поддельных
аккумуляторов. Чтобы гарантировать использование безопасной продукции, мы
рекомендуем оригинальные аккумуляторные блоки Panasonic.
Как извлечь аккумулятор
Удерживайте кнопку питания до тех пор,
пока не погаснет индикатор состояния.
Затем извлеките аккумулятор, придерживая
камеру, чтобы уберечь ее от падения.
Сдвиньте рычажок извлечения
аккумулятора в направлении, указанном
стрелкой, и извлеките аккумулятор после
его разблокировки.
BATT
A Вставьте аккумулятор до щелчка и
блокировки.
B Крепление аккумулятора
HC-X800_EG-VQT4E69_rus.book 7 ページ 2012年1月16日 月曜日 午後2時39分
8
VQT4E69 (RUS)
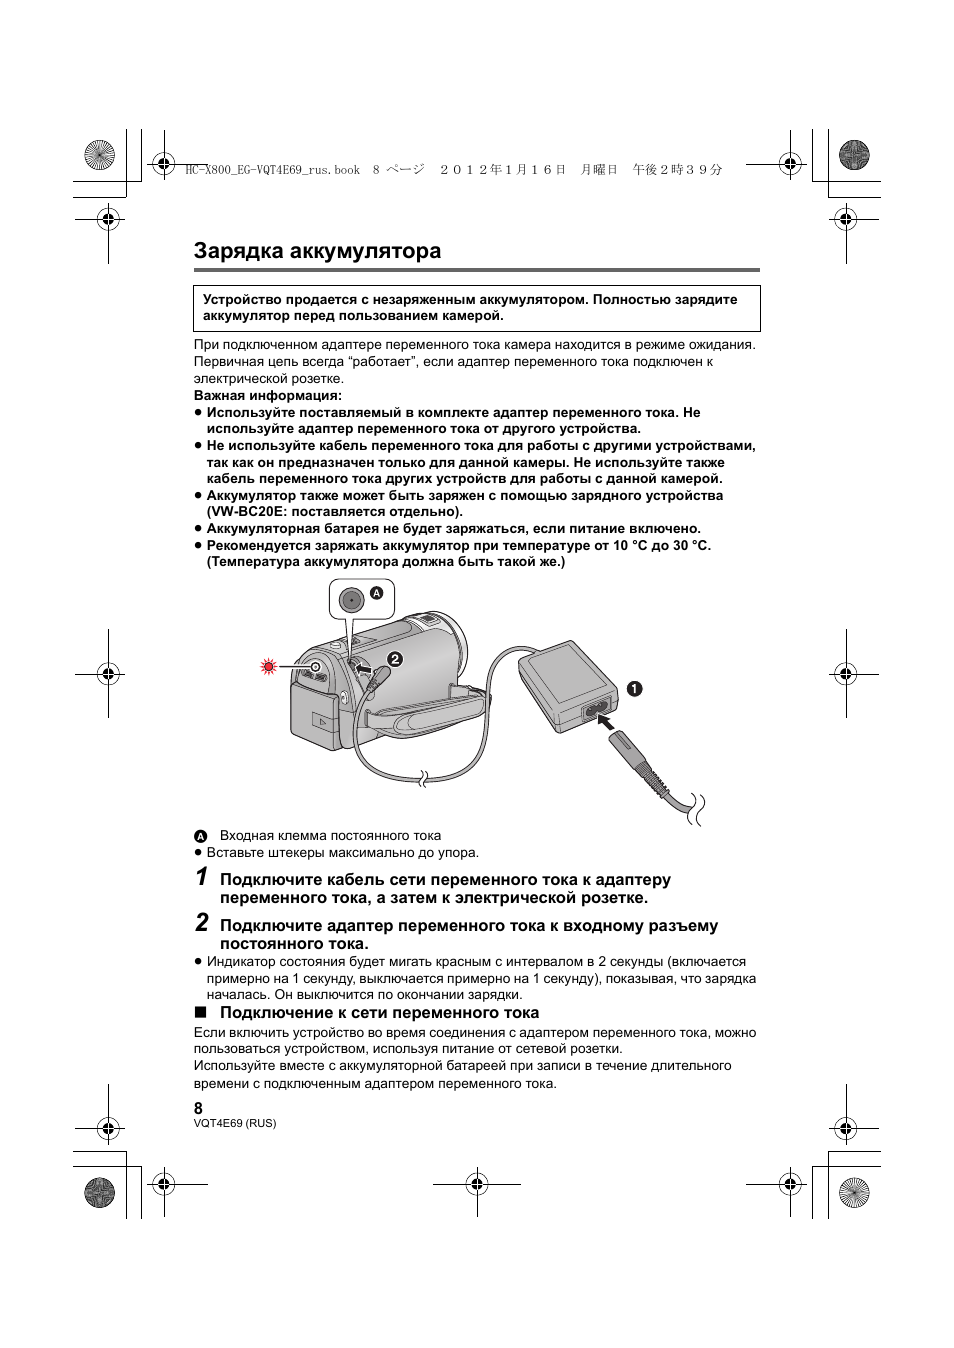
Зарядка аккумулятора
При подключенном адаптере переменного тока камера находится в режиме ожидания.
Первичная цепь всегда “работает”, если адаптер переменного тока подключен к
электрической розетке.
Важная информация:
≥ Используйте поставляемый в комплекте адаптер переменного тока. Не
используйте адаптер переменного тока от другого устройства.
≥ Не используйте кабель переменного тока для работы с другими устройствами,
так как он предназначен только для данной камеры. Не используйте также
кабель переменного тока других устройств для работы с данной камерой.
≥ Аккумулятор также может быть заряжен с помощью зарядного устройства
(VW-BC20E: поставляется отдельно).
≥ Аккумуляторная батарея не будет заряжаться, если питание включено.
≥ Рекомендуется заряжать аккумулятор при температуре от 10 °C до 30 °C.
(Температура аккумулятора должна быть такой же.)
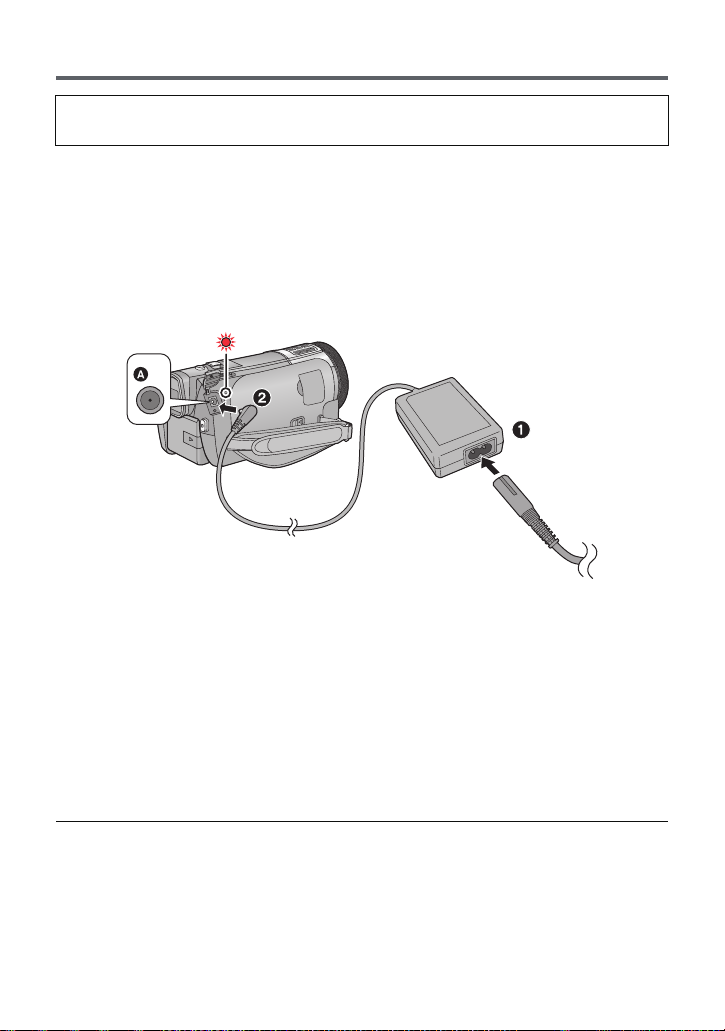
A Входная клемма постоянного тока
≥ Вставьте штекеры максимально до упора.
1
Подключите кабель сети переменного тока к адаптеру
переменного тока, а затем к электрической розетке.
2
Подключите адаптер переменного тока к входному разъему
постоянного тока.
≥ Индикатор состояния будет мигать красным с интервалом в 2 секунды (включается
примерно на 1 секунду, выключается примерно на 1 секунду), показывая, что зарядка
началась. Он выключится по окончании зарядки.
∫ Подключение к сети переменного тока
Если включить устройство во время соединения с адаптером переменного тока, можно
пользоваться устройством, используя питание от сетевой розетки.
Используйте вместе с аккумуляторной батареей при записи в течение длительного
времени с подключенным адаптером переменного тока.
Устройство продается с незаряженным аккумулятором. Полностью зарядите
аккумулятор перед пользованием камерой.
HC-X800_EG-VQT4E69_rus.book 8 ページ 2012年1月16日 月曜日 午後2時39分
9
(RUS) VQT4E69
≥ Не используйте любые другие адаптеры переменного тока, за исключением входящего в
комплект.
≥ Рекомендуется использовать аккумуляторы Panasonic (
l 6).
≥ При использовании других аккумуляторов мы не можем гарантировать качество изделия.
≥ Не нагревайте и не подвергайте воздействию огня.
≥ Не оставляйте одну или несколько аккумуляторных батарей в автомобиле под прямыми
солнечными лучами на длительное время при закрытых дверях и окнах.
≥ Перезаряжаемый аккумулятор может перезаряжаться около 500 раз.
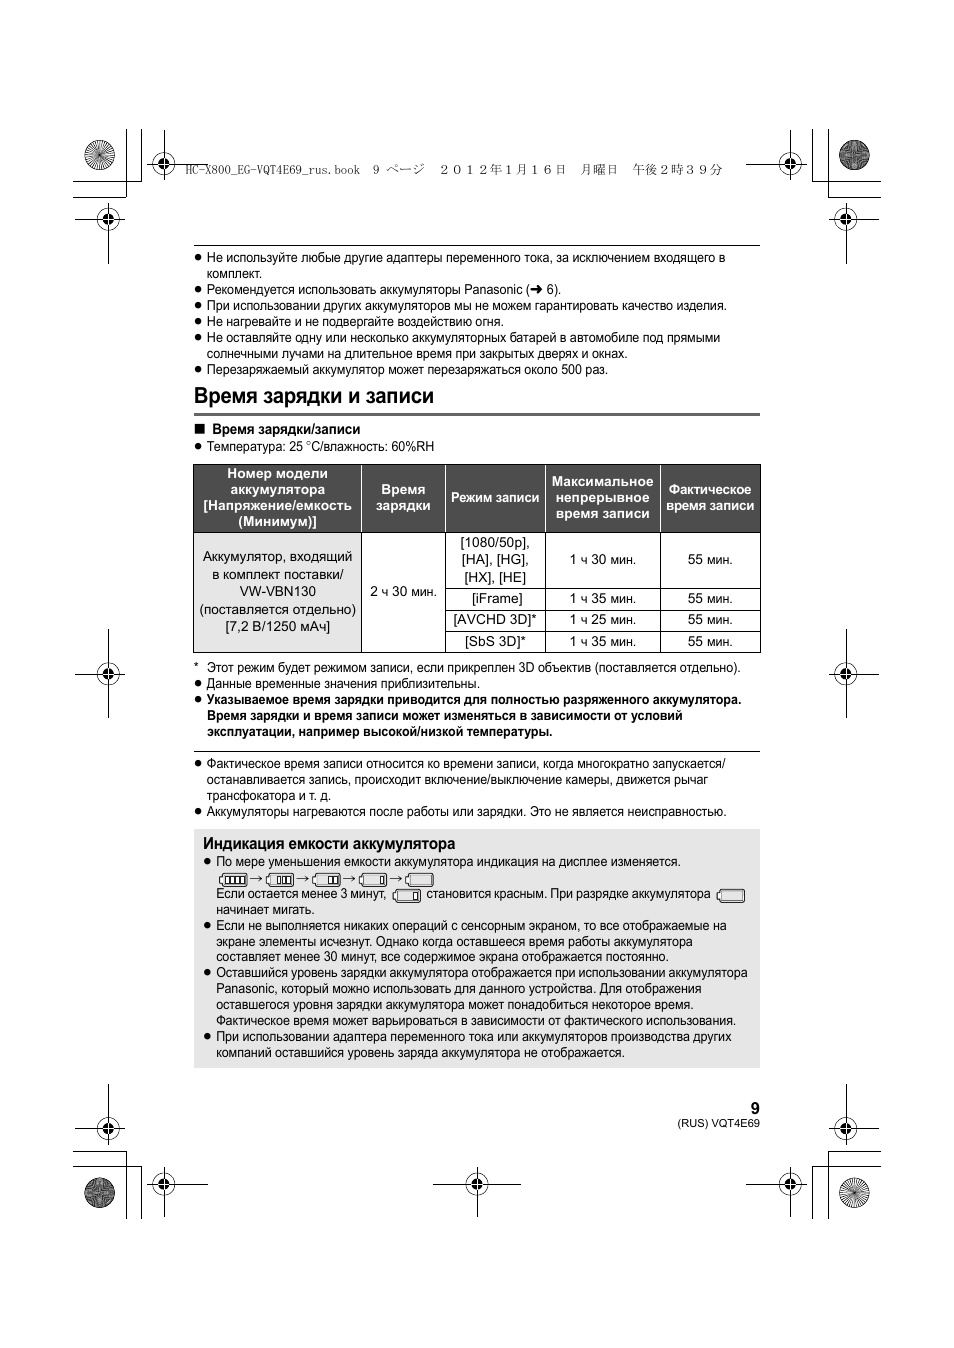
Время зарядки и записи
∫ Время зарядки/записи
≥ Температура: 25 oC/влажность: 60%RH
* Этот режим будет режимом записи, если прикреплен 3D объектив (поставляется отдельно).
≥ Данные временные значения приблизительны.
≥ Указываемое время зарядки приводится для полностью разряженного аккумулятора.
Время зарядки и время записи может изменяться в зависимости от условий
эксплуатации, например высокой/низкой температуры.
≥ Фактическое время записи относится ко времени записи, когда многократно запускается/
останавливается запись, происходит включение/выключение камеры, движется рычаг
трансфокатора и т. д.
≥ Аккумуляторы нагреваются после работы или зарядки. Это не является неисправностью.
Номер модели
аккумулятора
[Напряжение/емкость
(Минимум)]
Время
зарядки
Режим записи
Максимальное
непрерывное
время записи
Фактическое
время записи
Аккумулятор, входящий
в комплект поставки/
VW-VBN130
(поставляется отдельно)
[7,2 В/1250 мАч]
2 ч 30 мин.
[1080/50p],
[HA], [HG],
[HX], [HE]
1 ч 30 мин.
55 мин.
[iFrame]
1 ч 35 мин.
55 мин.
[AVCHD 3D]*
1 ч 25 мин.
55 мин.
[SbS 3D]*
1 ч 35 мин.
55 мин.
Индикация емкости аккумулятора
≥ По мере уменьшения емкости аккумулятора индикация на дисплее изменяется.
#
#
#
#
Если остается менее 3 минут,
становится красным. При разрядке аккумулятора
начинает мигать.
≥ Если не выполняется никаких операций с сенсорным экраном, то все отображаемые на
экране элементы исчезнут. Однако когда оставшееся время работы аккумулятора
составляет менее 30 минут, все содержимое экрана отображается постоянно.
≥ Оставшийся уровень зарядки аккумулятора отображается при использовании аккумулятора
Panasonic, который можно использовать для данного устройства. Для отображения
оставшегося уровня зарядки аккумулятора может понадобиться некоторое время.
Фактическое время может варьироваться в зависимости от фактического использования.
≥ При использовании адаптера переменного тока или аккумуляторов производства других
компаний оставшийся уровень заряда аккумулятора не отображается.
HC-X800_EG-VQT4E69_rus.book 9 ページ 2012年1月16日 月曜日 午後2時39分
10
VQT4E69 (RUS)
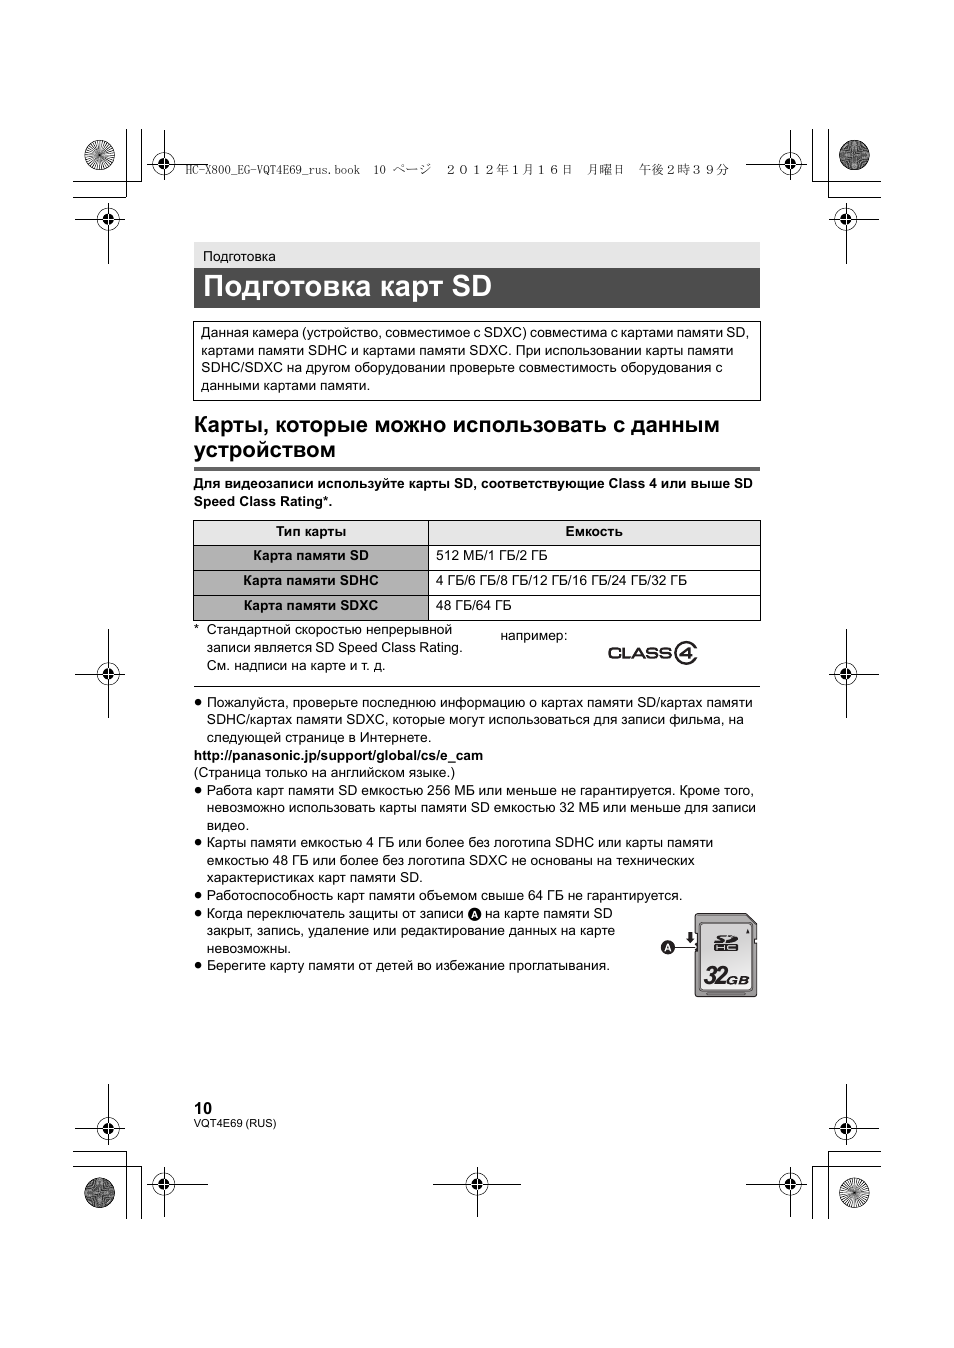
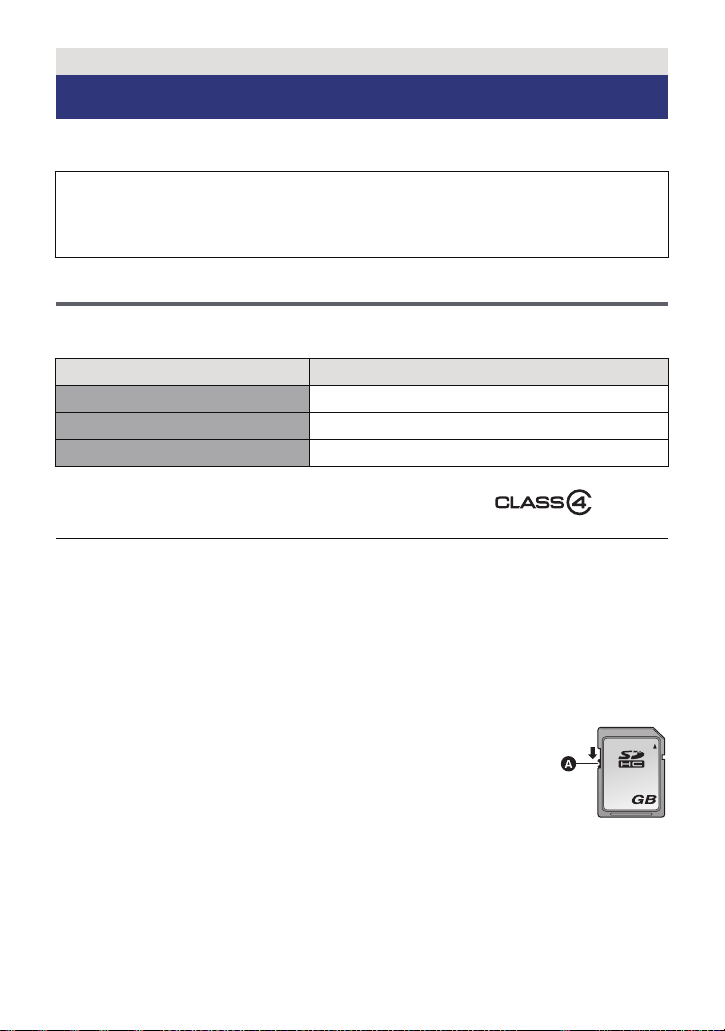
Карты, которые можно использовать с данным
устройством
Для видеозаписи используйте карты SD, соответствующие Class 4 или выше SD
Speed Class Rating*.
* Стандартной скоростью непрерывной
записи является SD Speed Class Rating.
См. надписи на карте и т. д.
≥ Пожалуйста, проверьте последнюю информацию о картах памяти SD/картах памяти
SDHC/картах памяти SDXC, которые могут использоваться для записи фильма, на
следующей странице в Интернете.
http://panasonic.jp/support/global/cs/e_cam
(Страница только на английском языке.)
≥ Работа карт памяти SD емкостью 256 МБ или меньше не гарантируется. Кроме того,
невозможно использовать карты памяти SD емкостью 32 МБ или меньше для записи
видео.
≥ Карты памяти емкостью 4 ГБ или более без логотипа SDHC или карты памяти
емкостью 48 ГБ или более без логотипа SDXC не основаны на технических
характеристиках карт памяти SD.
≥ Работоспособность карт памяти объемом свыше 64 ГБ не гарантируется.
≥ Когда переключатель защиты от записи A на карте памяти SD
закрыт, запись, удаление или редактирование данных на карте
невозможны.
≥ Берегите карту памяти от детей во избежание проглатывания.
Подготовка
Подготовка карт SD
Данная камера (устройство, совместимое с SDXC) совместима с картами памяти SD,
картами памяти SDHC и картами памяти SDXC. При использовании карты памяти
SDHC/SDXC на другом оборудовании проверьте совместимость оборудования с
данными картами памяти.
Тип карты
Емкость
Карта памяти SD
512 МБ/1 ГБ/2 ГБ
Карта памяти SDHC
4 ГБ/6 ГБ/8 ГБ/12 ГБ/16 ГБ/24 ГБ/32 ГБ
Карта памяти SDXC
48 ГБ/64 ГБ
например:
32
HC-X800_EG-VQT4E69_rus.book 10 ページ 2012年1月16日 月曜日 午後2時39分
31:36
ВИДЕОКАМЕРА Panasonic HC-V800 ► ПОДРОБНЫЙ ОБЗОР
06:54
Видеокамера Panasonic HC-X800
04:43
Test Panasonic HC-X800
27:36
СРАВНЕНИЕ ВИДЕОКАМЕР PANASONIC HC-V760 и HC-V800 ► ЧТО КУПИТЬ? ПЛЮСЫ и МИНУСЫ!
12:12
Panasonic HC X800 обзор FULL HD видеокамеры.Мысля от Эдгара
10:44
Цифровая камера Panasonic HC-X800.Чем я снимаю.
07:25
Тестируем видеокамеру Panasonic HC-V800
24:43
Panasonic HC V-800 Новинка 2018 года! Обзор режимов съёмки. Тест.
Нажмите на кнопку для помощи
Operating Instructions
High Definition Video Camera
Model No. HC-X900
Before use, please read these instructions completely.
HC-X900M
HC-X800
VQT4D05

Information for Your Safety
∫ About the recording format for
recording motion pictures
You can select from AVCHD* or iFrame
recording formats to record motion pictures
using this unit. (l 59)
* It is compatible with AVCHD 3D or AVCHD
Progressive (1080/50p).
AVCHD 3D:
It is possible to record powerful, life-like 3D
full high definition images.
A 3D compatible television compatible to the
frame sequential format is required to view
the 3D full high definition images. (l 109,
114)
AVCHD Progressive:
It is possible to record 2D image in the
highest quality (1080/50p) for this unit.
iFrame:
This is a recording format suitable for
viewing or editing on Mac (iMovie’11). Using
iMovie’11, iFrame motion pictures can be
imported faster than AVCHD motion
pictures. Also, the imported file size of
iFrame motion pictures will be smaller than
that of AVCHD motion pictures.
≥ It is not compatible with motion pictures
recorded in AVCHD format.
∫ Indemnity about recorded
content
Panasonic does not accept any
responsibility for damages directly or
indirectly due to any type of problems that
result in loss of recording or edited content,
and does not guarantee any content if
recording or editing does not work properly.
Likewise, the above also applies in a case
where any type of repair is made to the unit
(including any other non-built-in memory
related component).
∫ Handling of built-in memory
[HC-X900M]
This unit is equipped with the built-in
memory. When using this component, pay
attention to the following points.
Back up data periodically.
The built-in memory is temporary storage. In
order to avoid erasing data due to static
electricity, electromagnetic waves,
breakage, and failures, back up the data to a
PC or DVD disc. (l 120, 134)
≥
Access lamp [ACCESS] (l7) illuminates
while the SD card or built-in memory is
being accessed (initialization, recording,
playback, deleting etc.). Do not perform the
following operations when the lamp
illuminates. It may damage the built-in
memory or cause a malfunction in the unit.
jTurn the unit off (remove the battery)
jInsert and remove the USB cable
jExpose the unit to vibrations or shock
≥ About disposing of or giving away this unit.
(l 158)
— 2 —

∫ /
About Condensation
(When the lens, the viewfinder
or LCD Monitor is fogged up)
Condensation occurs when the ambient
temperature or humidity changes. Be careful
of condensation since it causes lens,
viewfinder and LCD monitor stains, fungus
and camera malfunction.
≥ For more details about the cause and
action required for condensation, refer to
page 162.
∫
HC-X800
About Condensation
(When the lens or LCD Monitor
is fogged up)
Condensation occurs when the ambient
temperature or humidity changes. Be careful
of condensation since it causes lens and
LCD monitor stains, fungus and camera
malfunction.
≥ For more details about the cause and
action required for condensation, refer to
page 162.
∫ Cards that you can use with
this unit
SD Memory Card, SDHC Memory Card
and SDXC Memory Card
≥ 4 GB or more Memory Cards that do not
have the SDHC logo or 48 GB or more
Memory Cards that do not have the SDXC
logo are not based on SD Memory Card
Specifications.
≥ Refer to page 15 for more details on SD
cards.
∫ For the purposes of these
operating instructions
≥ SD Memory Card, SDHC Memory Card
and SDXC Memory Card are referred to
as the “SD card”.
≥ Functions that can be used for Motion
Picture Recording Mode:
Functions that can be used for Still Picture
Recording Mode:
≥ Function that can be used for the
Playback Mode:
Function that can be used for the
Playback Mode (
Function that can be used for the
Playback Mode (still pictures only):
≥ Scene(s) recorded in 1080/50p, 1080/50i,
AVCHD 3D or side-by-side ([SbS 3D]):
AVCHD scene(s)
≥ Pages for reference are indicated by an
arrow, for example: l 00
These operating instructions are designed
for use with models ,
be slightly different from the original.
≥ The illustrations used in these operating
instructions show model ,
however, parts of the explanation refer to
different models.
≥ Depending on the model, some functions
are not available.
≥ Features may vary, so please read
carefully.
≥ Not all models may be available
depending on the region of purchase.
motion picture only
and . Pictures may
HC-X800
):
— 3 —

Contents
Information for Your Safety………………….2
Preparation
Names and Functions of Main Parts …….6
Power supply……………………………………. 10
Inserting/removing the battery……….. 10
Charging the battery ……………………. 11
Charging and recording time …………. 12
Recording to a card ………………………….. 15
Cards that you can use
with this unit ……………………………….. 15
Inserting/removing an SD card………. 16
Turning the unit on/off ………………………. 17
Selecting a mode ………………………………18
Preparation of the LCD monitor/
Viewfinder [HC-X900/HC-X900M]………..19
How to use the touch screen …………….. 19
About the Touch Menu …………………. 20
Setting date and time………………………… 21
Basic
Before recording ………………………………. 22
Selecting a media to record
[HC-X900M]……………………………………….23
Recording motion pictures ……………….. 24
Recording still pictures …………………….. 26
Recording still pictures
in Motion Picture Recording Mode…. 27
Intelligent Auto Mode ……………………….. 28
Motion picture/Still picture playback ….30
Using the menu screen …………………….. 33
Using the quick menu ………………….. 33
Using the Setup Menu ………………………. 34
Using with the remote control
[HC-X900/HC-X900M]…………………………43
Operation of direction buttons/
OK button …………………………………… 44
Advanced (Recording)
Using the zoom ………………………………… 45
Ring zoom [HC-X900/HC-X900M]…. 45
Zoom ratio during the Still Picture
Recording Mode …………………………. 46
Image Stabilizer Function …………………. 46
1080/50p recording …………………………… 47
Recording with the Touch function……. 48
Touch function icons ……………………. 48
Recording functions
of operation icons ……………………………. 51
Operation icons…………………………… 51
Recording functions of menus………….. 57
Manual recording……………………………… 74
White Balance …………………………….. 76
Manual shutter speed/
iris adjustment …………………………….. 77
Recording with Manual Focus ………. 78
Recording 3D image …………………………. 80
Advanced (Playback)
Playback Operations …………………………84
Motion picture playback
using operation icon…………………….. 84
Creating still picture
from motion picture ……………………… 85
Highlight & Time Frame Index ………. 85
Repeat Playback…………………………. 86
Resuming the previous playback…… 86
Zooming in on a still picture during
playback (Playback zoom) ……………. 87
Various playback functions ………………. 88
Playing back motion pictures/
still pictures by date …………………….. 88
Highlight Playback ………………………. 89
Changing the playback settings and
playing back the slide show………….. 94
— 4 —

Deleting scenes/still pictures ……………. 96
Deleting part of a scene (AVCHD) …. 98
Dividing a scene (AVCHD)……………. 99
Dividing a scene to partially delete
(iFrame/MP4) ……………………………. 100
Deleting personal information ……… 101
Protecting scenes/still pictures…….. 101
Relay scene combining [HC-X900M]…102
Watching Video/
Pictures on your TV ………………………… 103
Connecting with
a HDMI mini cable……………………… 105
Listening in 5.1 channel sound
(AVCHD) [HC-X900/HC-X900M]….. 106
Connecting with
the AV multi cable ……………………… 106
Playback using VIERA Link …………….. 107
3D image playback
[HC-X900/HC-X900M]……………………….109
Viewing with 3D compatible TV……. 109
Viewing on the LCD monitor ……….. 112
Converting and playing back
2D (3D) images as 3D (2D)…………. 112
Adjusting 3D effect of
the 3D image …………………………….. 113
3D image playback [HC-X800] …………. 114
Converting and playing back
2D images as 3D ………………………. 116
Adjusting 3D effect of
the 3D image …………………………….. 116
With a PC
What you can do with a PC ……………… 134
End User License Agreement……… 136
Operating environment …………………… 137
Installation ……………………………………… 140
Connecting to a PC ………………………… 141
About the PC display …………………. 143
Starting HD Writer AE 4.1………………… 144
Reading the operating instructions
of the software applications ………… 144
If using Mac ……………………………………. 144
Others
Indications ……………………………………… 146
Messages ………………………………………. 149
About recovery ………………………….. 150
Troubleshooting …………………………….. 151
Cautions for use …………………………….. 157
About copyright……………………………… 163
Recording modes/approximate
recordable time ………………………………. 164
Approximate number of recordable
pictures………………………………………….. 165
Optional accessories ………………………167
Copy/Dubbing
Copying between SD card and
Built-in Memory [HC-X900M]……………. 117
Connecting a DVD burner to copy to/
play back a disc ………………………………120
Preparing for copying/
playing back ……………………………… 120
Copying to discs………………………… 122
Playing back the copied disc……….. 125
Managing the copied disc …………… 126
Dubbing with a Blu-ray disc recorder,
video devices, etc……………………………127
3D image storage ……………………………. 131
— 5 —
Preparation
AV MULTI
10
11
12
13
16
14
17
18
15
879
4563
21
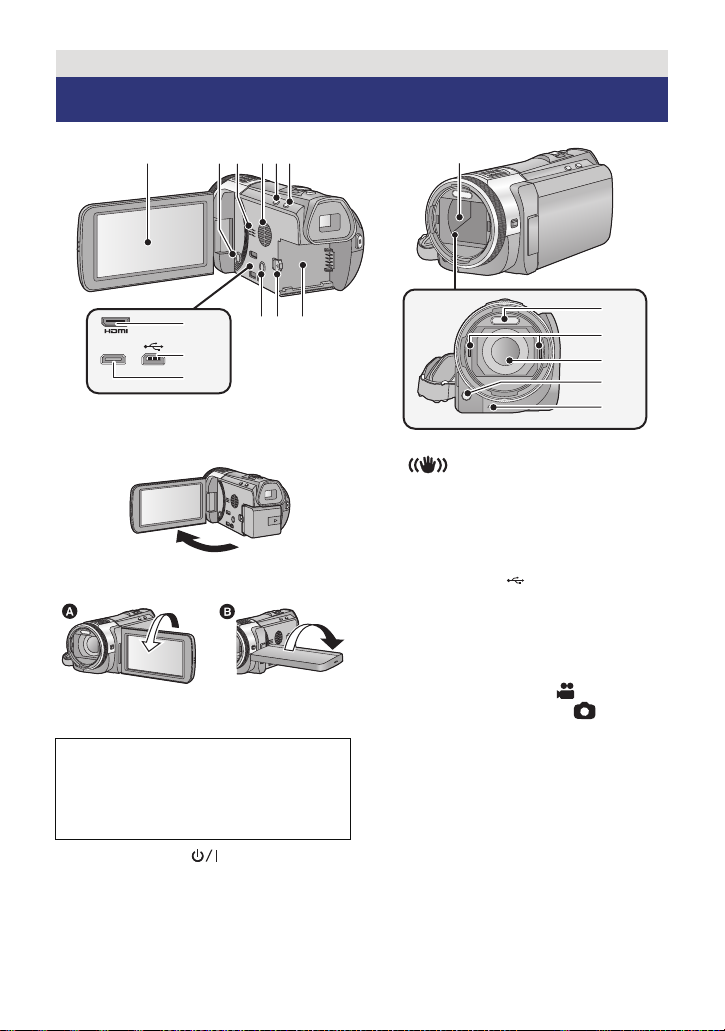
Names and Functions of Main Parts
1 LCD monitor (Touch screen) (l 19)
≥ It can open up to 90o.
≥ It can rotate up to 180o A towards the lens
or 90o B towards the opposite direction.
Due to limitations in LCD production
technology, there may be some tiny bright
or dark spots on the LCD monitor screen.
However, this is not a malfunction and
does not affect the recorded picture.
2 Power button [ ] (l 17)
3 Speaker
4 Inlet (cooling fan) (l 22)
5 Intelligent auto/Manual button
[iA/MANUAL] (l 28, 74)
6 Optical image stabilizer button
[ O.I.S.] (l 46)
7 1080/50p button [1080/50p] (l 47)
8 Battery release lever [BATT] (l 10)
9 Battery holder (l 10)
10 HDMI mini connector [HDMI]
(l 103, 107)
11 USB terminal [ ] (l 121, 127, 141)
12 AV multi connector [AV MULTI]
(l 103, 130)
≥ Use the AV multi cable (only the supplied
cable).
13 Lens cover
≥ The lens cover opens in Motion
Picture Recording Mode or Still
Picture Recording Mode. (l 18)
14 Built-in flash (l 54)
15 3D Conversion Lens attachment part
(concave) (l 80)
16 Lens (LEICA DICOMAR)
≥ Please refer to page 22 for details about
attaching the lens hood.
17 AF assist lamp (l 73)
18 Recording lamp (l 38)
— 6 —
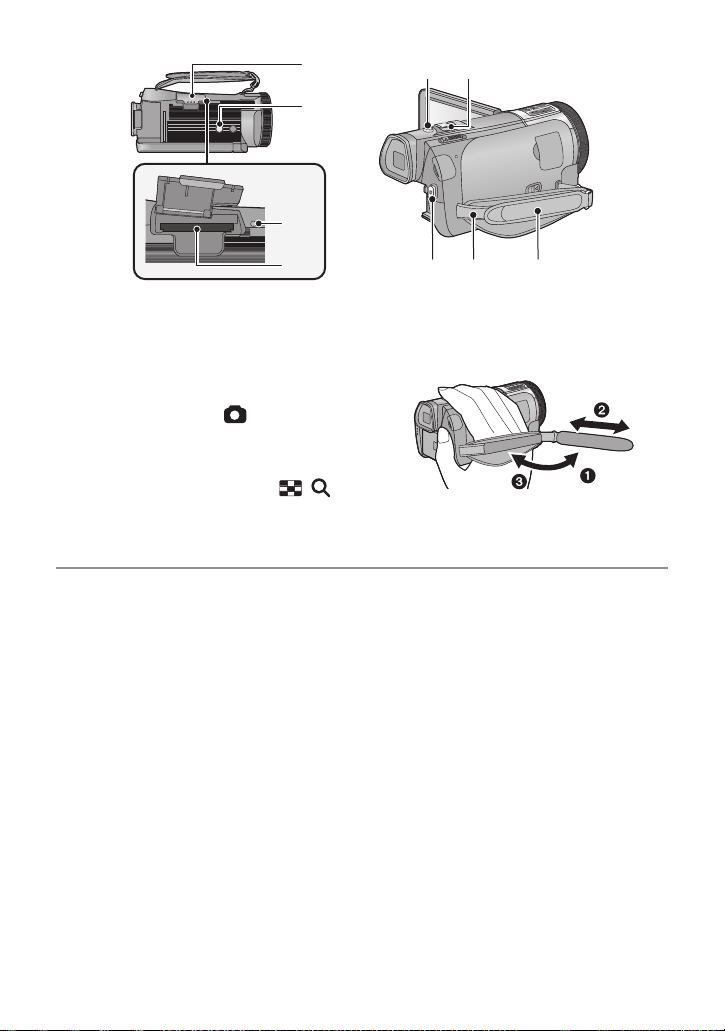
19 SD card cover (l 16)
21
22
20
19
2423
25 26 27
20 Tripod receptacle
≥ If you attach a tripod which has 5.5 mm
screw or larger, it may damage this unit.
21 Access lamp [ACCESS] (l 16)
22 Card slot (l 16)
23 Photoshot button [ ] (l 26)
24 Zoom lever [W/T] (In Motion Picture
Recording Mode or Still Picture
Recording Mode) (l 45)
Thumbnail display switch [ / ]/
Volume lever [sVOLr] (In Playback
Mode) (l 31)
25 Recording start/stop button (l 24)
26 Shoulder strap fixture
27 Grip belt
Adjust the length of the grip belt so that it fits
your hand.
1 Flip the belt.
2 Adjust the length.
3 Replace the belt.
— 7 —
HC-X900
MIC
34
35
38
37
28
29
30
31
32
33
36
/
28 Status indicator (l 17)
29 Internal microphones
30 Multi manual ring (l 74, 78)
31 Shoe adaptor mounting part (l 167)
32 Shoe adaptor cover (l 167)
33 Shoe adaptor release lever
[SHOE ADAPTOR RELEASE] (l 167)
34 Microphone terminal [MIC]
≥ A compatible plug-in powered microphone
can be used as an external microphone.
≥ Audio will be stereo (2 ch) with the
external microphone input.
≥ (Microphone input level
meter) is displayed when the external
microphone is connected. (l 67)
≥ When the unit is connected with the AC
adaptor, sometimes noise may be heard
depending on the microphone type. In this
case, please switch to the battery for the
power supply and the noise will stop.
35 Headphone terminal [ ] (l 56)
≥ Excessive sound pressure from
earphones and headphones can cause
hearing loss.
≥ Listening at full volume for long periods
may damage the user’s ears.
36 DC input terminal [DC IN] (l 11)
≥ Do not use any other AC adaptors except
the supplied one.
37 Mode switch (l 18)
38 Viewfinder (l 19)
Due to limitations in LCD production
technology, there may be some tiny bright
or dark spots on the viewfinder screen.
However, this is not a malfunction and
does not affect the recorded picture.
39 Eyepiece corrector dial (l 19)
40 Camera function button
[CAMERA FUNCTION] (l 74)
41 Remote control sensor (l 44)
— 8 —

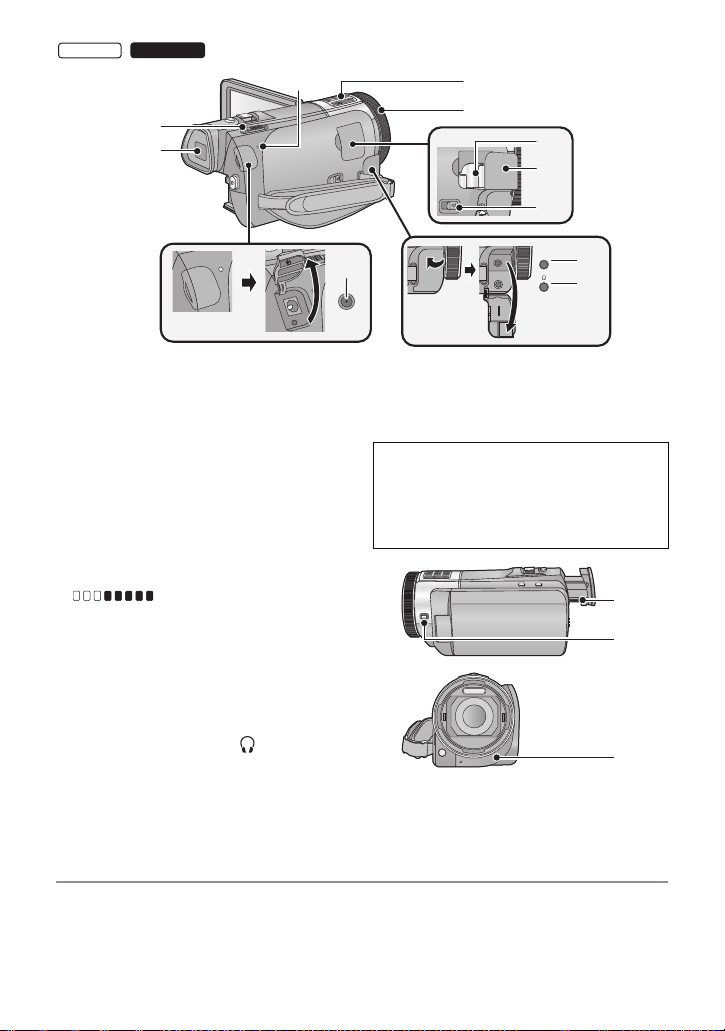
HC-X800
42
43
44
42 Internal microphones
43 Status indicator (l 17)
44 Mode switch (l 18)
45 DC input terminal [DC IN] (l 11)
≥ Do not use any other AC adaptors except
the supplied one.
45
— 9 —
Preparation
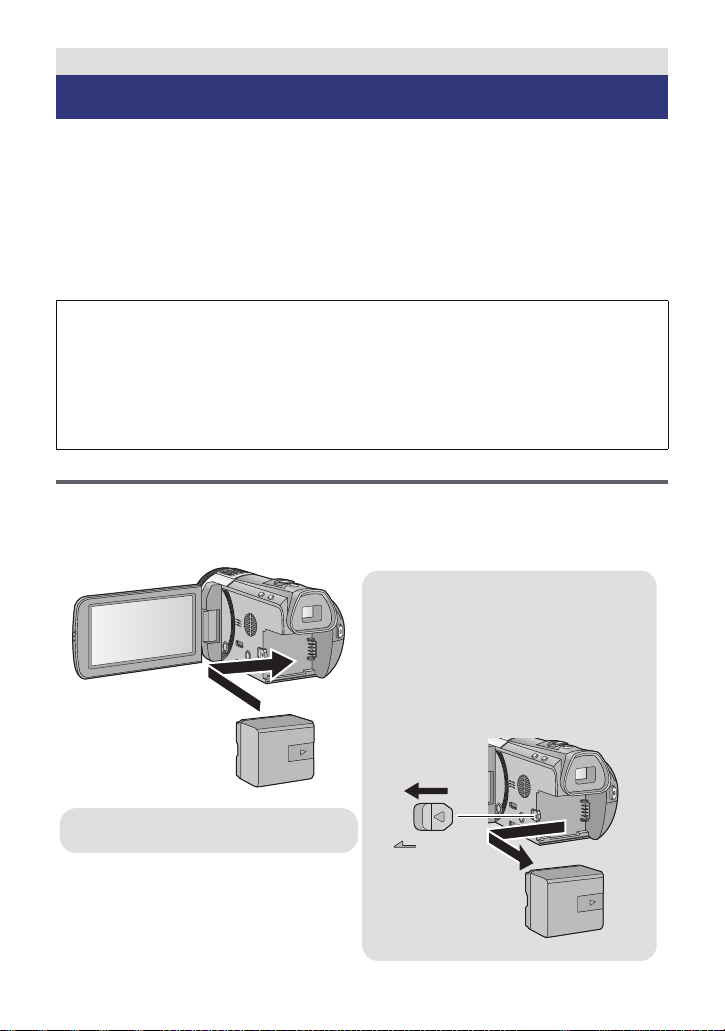
s
Removing the battery
Be sure to hold down the power button
until the status indicator goes off. Then
remove the battery while supporting the
unit to prevent it from dropping.
Move the battery release lever in the
direction indicated by the arrow and
remove the battery when unlocked.
Insert the battery until it clicks and locks.
Power supply
∫ About batteries that you can use with this unit
The battery that can be used with this unit is VW-VBN130/VW-VBN260.
≥ The unit has a function for distinguishing batteries which can be used safely. The
dedicated battery (VW-VBN130/VW-VBN260) supports this function. The only
batteries suitable for use with this unit are genuine Panasonic products and
batteries manufactured by other companies and certified by Panasonic. (Batteries
which do not support this function cannot be used). Panasonic cannot in any way
guarantee the quality, performance or safety of batteries which have been
manufactured by other companies and are not genuine Panasonic products.
It has been found that counterfeit battery packs which look very similar to the
genuine product are made available to purchase in some markets. Some of these
battery packs are not adequately protected with internal protection to meet the
requirements of appropriate safety standards. There is a possibility that these
battery packs may lead to fire or explosion. Please be advised that we are not liable
for any accident or failure occurring as a result of use of a counterfeit battery pack.
To ensure that safe products are used we would recommend that a genuine
Panasonic battery pack is used.
Inserting/removing the battery
≥ Press the power button to turn off the unit. (l 17)
Open the LCD monitor and install the battery by inserting it in the
direction shown in the figure.
— 10 —
Charging the battery
When this unit is purchased, the battery is not charged. Charge the battery fully
before using this unit for the first time.
The unit is in the standby condition when the AC adaptor is connected. The primary circuit is
always “live” as long as the AC adaptor is connected to an electrical outlet.
Important:
≥ Use the supplied AC adaptor. Do not use the AC adaptor of another device.
≥ Do not use the AC cable with any other equipment as it is designed only for this unit.
Also, do not use the AC cable from other equipment with this unit.
≥ The battery will not be charged if the unit is turned on.
≥ It is recommended to charge the battery in a temperature between 10 °C and 30 °C.
(The battery temperature should also be the same.)
A DC input terminal
≥ Insert the plugs as far as they will go.
1 Connect the AC cable to the AC adaptor, then the AC outlet.
2 Connect the AC adaptor to the DC input terminal.
≥
The status indicator will flash red at an interval of 2 seconds (approximately 1 second on, 1 second
off), indicating that charging has begun. It will turn off when the charging is completed.
∫ Connecting to the AC outlet
If you turn on the unit while connecting with the AC adaptor, you can use the unit with power
supplied from the outlet.
When recording for a long time, keep the AC adaptor connected and use it together with the
battery.
≥ If the status indicator flashes at a particularly fast or slow rate, refer to page 159.
≥ We recommend using Panasonic batteries (l 12, 13).
≥ If you use other batteries, we cannot guarantee the quality of this product.
≥ Do not heat or expose to flame.
≥ Do not leave the battery(ies) in a car exposed to direct sunlight for a long period of time
with doors and windows closed.
— 11 —

Charging and recording time
∫ Charging/Recording time
≥ Temperature: 25 oC/humidity: 60%RH
≥ /
HC-X900
When using the viewfinder (times in parentheses are when using the LCD monitor)
HC-X900/HC-X900M
Battery model number
[Voltage/Capacity
(minimum)]
Supplied battery/
VW-VBN130 (optional)
[7.2 V/1250 mAh]
VW-VBN260 (optional)
[7.2 V/2500 mAh]
Charging
time
2h30min
4h30min
Recording
mode
[1080/50p],
[AVCHD 3D]*
[HA], [HG],
[HX], [HE]
[iFrame],
[SbS 3D]*
[1080/50p],
[AVCHD 3D]*
[HA], [HG],
[HX], [HE]
[iFrame]
[SbS 3D]*
Maximum
continuous
recordable time
1h25min
(1h15min)
1h30min
(1h20min)
1h35min
(1h20min)
3h5min
(2h45min)
3h15min
(2h50min)2h(1h45min)
3h20min
(2h55min)2h(1h45min)
3h15min
(2h55min)2h(1h45min)
Actual
recordable
time
55 min
(45 min)
55 min
(50 min)
55 min
(50 min)
1h55min
(1h40min)
— 12 —

HC-X800
Battery model number
[Voltage/Capacity
(minimum)]
Supplied battery/
VW-VBN130 (optional)
[7.2 V/1250 mAh]
VW-VBN260 (optional)
[7.2 V/2500 mAh]
* This will be the recording mode when the 3D Conversion Lens (optional) is attached.
≥ These times are approximations.
≥ The indicated charging time is for when the battery has been discharged completely.
Charging time and recordable time vary depending on the usage conditions such as
high/low temperature.
Charging
time
2h30min
4h30min
Recording
mode
[1080/50p],
[HA], [HG],
[HX], [HE]
[iFrame] 1h35min 55min
[AVCHD 3D]* 1 h 25 min 55 min
[SbS 3D]* 1 h 35 min 55 min
[1080/50p],
[AVCHD 3D]*
[HA], [HG],
[HX], [HE]
[iFrame],
[SbS 3D]*
Maximum
continuous
recordable time
1h30min 55min
3h5min 1h55min
3h15min 2h
3h20min 2h
recordable
Actual
time
— 13 —

≥ The actual recordable time refers to the recordable time when repeatedly starting/stopping
recording, turning the unit on/off, moving the zoom lever etc.
≥ The batteries heat up after use or charging. This is not a malfunction.
Battery capacity indication
≥ The display changes as the battery capacity reduces.
####
If there is less than 3 minutes remaining, then will become red. If the battery
discharges, then will flash.
≥ Screen display will disappear when no touch operation is performed. However, it will be
constantly displayed when the remaining battery time becomes less than 30 minutes.
≥ The remaining battery capacity is displayed when using the Panasonic battery that you
can use for this unit. The actual time can vary depending on your actual use.
≥ When using the AC adaptor or batteries made by other companies, the remaining
battery capacity will not be shown.
— 14 —
Preparation
Recording to a card
The unit can record still pictures or motion pictures to an SD card or built-in memory. To
record to an SD card, read the following.
This unit (an SDXC compatible device) is compatible with SD Memory Cards, SDHC
Memory Cards and SDXC Memory Cards. When using an SDHC Memory Card/SDXC
Memory Card with other equipment, check the equipment is compatible with these
Memory Cards.
Cards that you can use with this unit
Use SD cards conforming to Class 4 or higher of the SD Speed Class Rating* for
motion picture recording.
Card type Capacity
SD Memory Card 512 MB/1 GB/2 GB
SDHC Memory Card 4 GB/6 GB/8 GB/12 GB/16 GB/24 GB/32 GB
SDXC Memory Card 48 GB/64 GB
* SD Speed Class Rating is the speed
standard regarding continuous writing.
Check via the label on the card, etc.
≥
Please confirm the latest information about SD Memory Cards/SDHC Memory Cards/SDXC
Memory Cards that can be used for motion picture recording on the following website.
http://panasonic.jp/support/global/cs/e_cam
(This website is in English only.)
≥ Operation of the SD Memory Card 256 MB or less is not guaranteed. Also, the SD Memory
Card 32 MB or less cannot be used for the motion picture recording.
≥ 4 GB or more Memory Cards that do not have the SDHC logo or 48 GB or more Memory
Cards that do not have the SDXC logo are not based on SD Memory Card Specifications.
≥ The operation of Memory Cards exceeding 64 GB cannot be guaranteed.
≥ When the write-protect switch A on SD card is locked, no recording,
deletion or editing will be possible on the card.
≥ Keep the Memory Card out of reach of children to prevent swallowing.
e.g.:
— 15 —
Inserting/removing an SD card
When using an SD card not from Panasonic, or one previously used on other equipment,
for the first time on this unit, format the SD card. (l 41) When the SD card is formatted, all
of the recorded data is deleted. Once the data is deleted, it cannot be restored.
Caution:
Check that the access lamp has gone off.
1 Open the SD card cover and
insert (remove) the SD card
into (from) the card slot.
≥ Face the label side B in the direction
shown in the illustration and press it
straight in as far as it will go.
≥ Press the centre of the SD card and then
pull it straight out.
2 Press the C
part of the SD
card cover and
close the SD
card cover.
≥ Securely close it until it clicks.
Access lamp [ACCESS] A
≥ When this unit is accessing the SD
card or built-in memory, the access
lamp lights up.
≥ Do not touch the terminals on the back of
the SD card.
≥ Do not apply strong shocks, bend, or drop
the SD card.
≥ Electrical noise, static electricity or the
failure of this unit or the SD card may
damage or erase the data stored on the
SD card.
≥ When the card access lamp is lit, do not:
jRemove the SD card
jTurn the unit off
jInsert and remove the USB cable
jExpose the unit to vibrations or shock
Performing the above while the lamp is on
may result in damage to data/SD card or
this unit.
≥ Do not expose the terminals of the SD
card to water, dirt or dust.
≥ Do not place SD cards in the following
areas:
jIn direct sunlight
jIn very dusty or humid areas
jNear a heater
jLocations susceptible to significant
difference in temperature (condensation
can occur.)
jWhere static electricity or
electromagnetic waves occur
≥ To protect SD cards, return them to their
cases when you are not using them.
≥ About disposing of or giving away the SD
card. (l 161)
— 16 —
Preparation
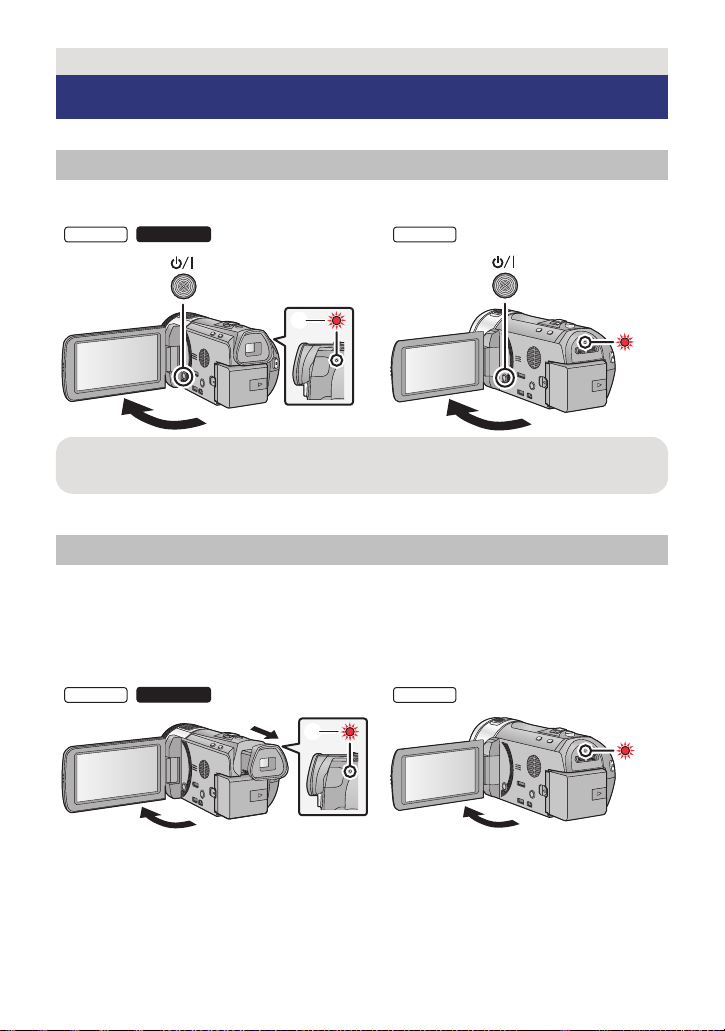
Turning the unit on/off
You can turn the unit on and off using the power button, the LCD monitor or the viewfinder.
Turning the unit on and off with the power button
Open the LCD monitor and press the power button to turn on the unit.
HC-X900
To turn off the unit
Hold down the power button until the status indicator goes off.
A The status indicator lights on.
Turning the unit on and off with the LCD monitor/viewfinder
Opening the LCD monitor or extending the viewfinder turns on the unit. Closing the LCD
monitor/viewfinder turns off the unit.
During general use, you may find it convenient to turn the unit on/off using the LCD
monitor or viewfinder.
∫ To turn on the unit
HC-X900
/
/
HC-X800
HC-X800
A The status indicator lights on.
— 17 —
∫ To turn off the unit
/
B The status indicator goes off.
HC-X900
≥ The unit will not turn off unless the LCD monitor is closed and the viewfinder is retracted.
≥ The unit will not turn off while recording motion pictures even if the LCD monitor is closed
≥ The unit will not turn off while recording motion pictures even if the LCD monitor is closed.
≥ In the following cases, opening the LCD monitor or extending the viewfinder does not turn
/
and the viewfinder is retracted.
on the unit. Press the power button to turn on the unit.
jWhen the unit is originally purchased
jWhen you have turned off the unit using the power button
Preparation
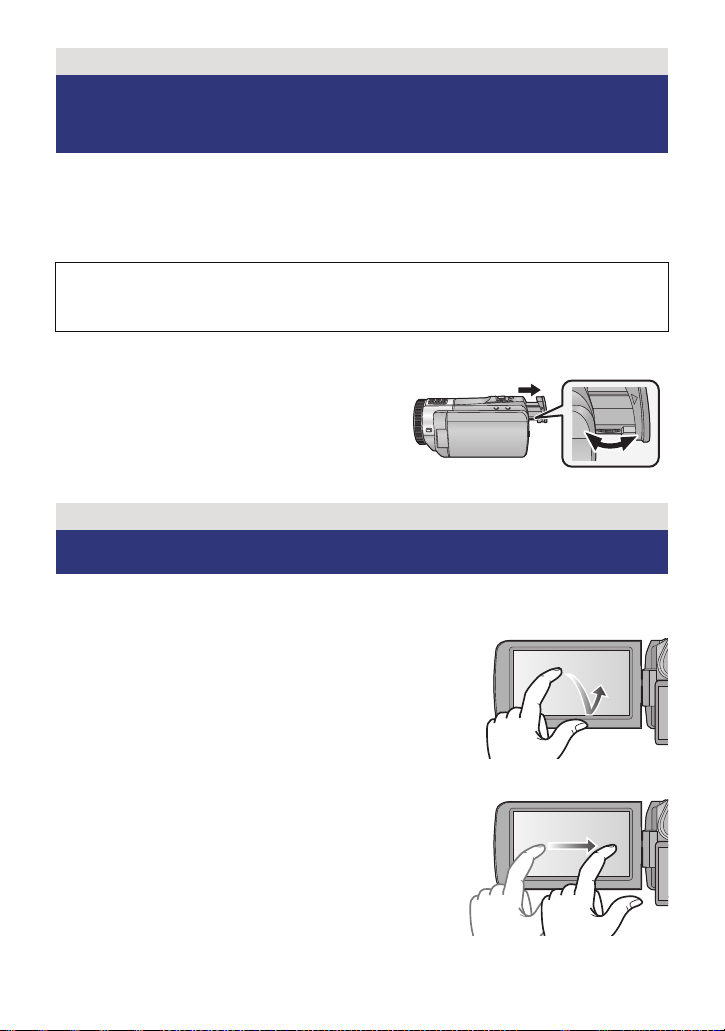
Selecting a mode
Change the mode to recording or playback.
Operate the mode switch to change the mode to , or .
HC-X900
/
HC-X800
Motion Picture Recording Mode (l 24)
Still Picture Recording Mode (l 26)
Playback Mode (l 30, 84)
— 18 —
Preparation
Preparation of the LCD monitor/
Viewfinder
The viewfinder is turned off and the LCD monitor is turned on when the LCD monitor is
opened.
The viewfinder is turned on when the LCD monitor is closed and the viewfinder is extended.
≥ Live image recording or 3D recordings can be viewed in 3D on the LCD monitor. (l 80,
109)
There are differences in the way that different people experience 3D images. Check
from a position directly in front of and at around 25 cm from the LCD monitor,
where you can easily see picture.
∫ To adjust the image in the viewfinder
Adjust to make the image clear by
rotating the eyepiece corrector dial.
≥ Extend the viewfinder and close the LCD monitor
to turn on the viewfinder.
Preparation
[HC-X900/HC-X900M]
How to use the touch screen
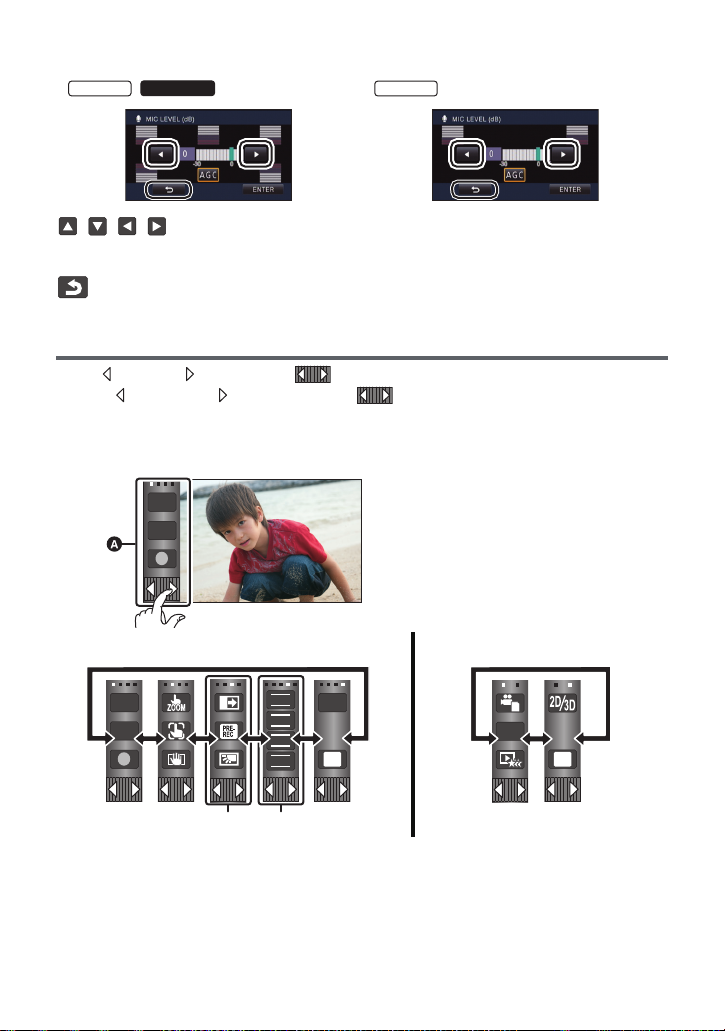
You can operate by directly touching the LCD monitor (touch screen) with your finger.
∫ Touch
Touch and release the touch screen to select icon or
picture.
≥ Touch the centre of the icon.
≥ Touching the touch screen will not operate while you are
touching another part of the touch screen.
∫ Slide while touching
Move your finger while pressing on the touch screen.
— 19 —
∫ About the operation icons
T
W
FOCUS
WB
SHTR
IRIS
MENU
Q.
MENU
/
///:
These icons are used to switch the menu and thumbnail display page, for item
selection and setting etc.
:
Touch to return to the previous screen such as when setting menus.
About the Touch Menu
Touch (left side)/ (right side) of on the Touch Menu to switch the operation icons.
Touch (left side)/ (right side) of on the Touch Menu.
≥ It is also possible to switch the operation icons by sliding the Touch Menu right or left while
touching it.
A Touch Menu
T
W
Recording Mode Playback Mode
* Above image is example of display for HC-X900/HC-X900M.
B Operation icons to display can be changed. (l 38)
C Displayed only during the Manual Mode. (l 74)
— 20 —
∫ To display the Touch Menu
Display of the Touch Menu will disappear when no
touch operation is performed for a specific period
of time. To display it again, touch .
≥ Do not touch on the LCD monitor with hard pointed tips, such as ball point pens.
Preparation
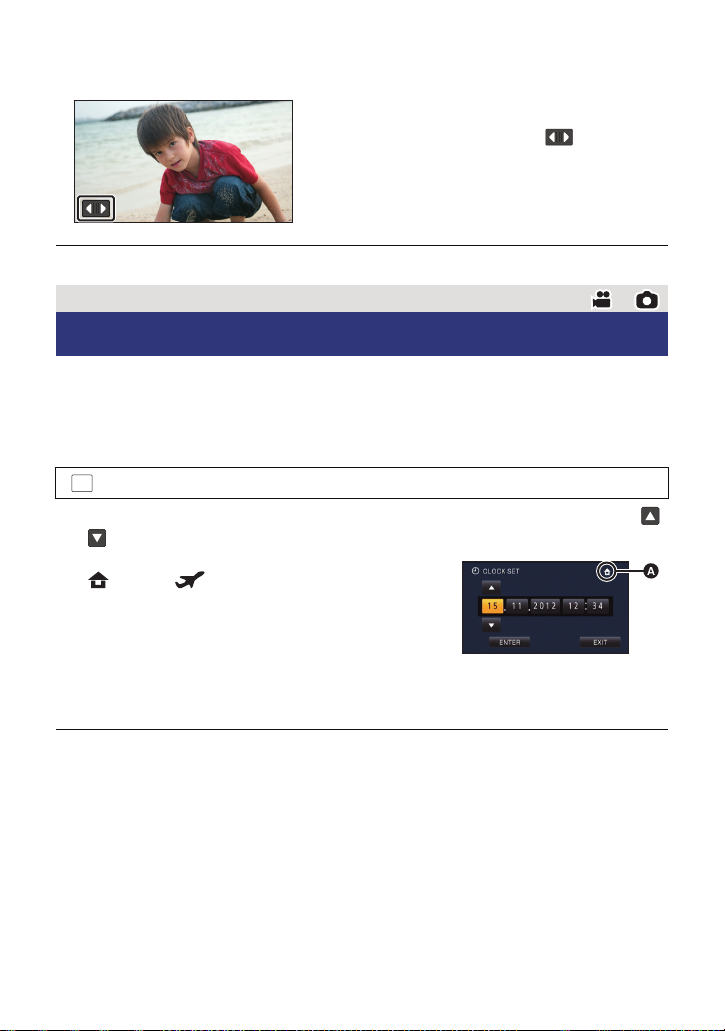
Setting date and time
When the unit is turned on for the first time, a message asking you to set the date and time
will appear.
Select [YES] and perform Steps 2 to 3 below to set the date and time.
1 Select the menu. (l 33)
: [SETUP] # [CLOCK SET]
2 Touch the date or time to be set, then set the desired value using /
.
A Displaying the World time setting (l 34):
[HOME]/ [DESTINATION]
≥ The year can be set between 2000 and 2039.
≥ The 24-hour system is used to display the time.
3 Touch [ENTER].
≥ A message prompting for World Time setting may be
displayed. Perform the World Time setting by touching the screen. (l 34)
≥ Touch [EXIT] to complete the setting.
≥ The date and time function is driven by a built-in lithium battery.
≥ If the time display becomes [- -], the built-in lithium battery needs to be charged. To
recharge the built-in lithium battery, connect the AC adaptor or attach the battery to this
unit. Leave the unit as it is for approx. 24 hours and the battery will maintain the date and
time for approx. 6 months. (The battery is still being recharged even if the unit is off.)
— 21 —
Basic
Before recording
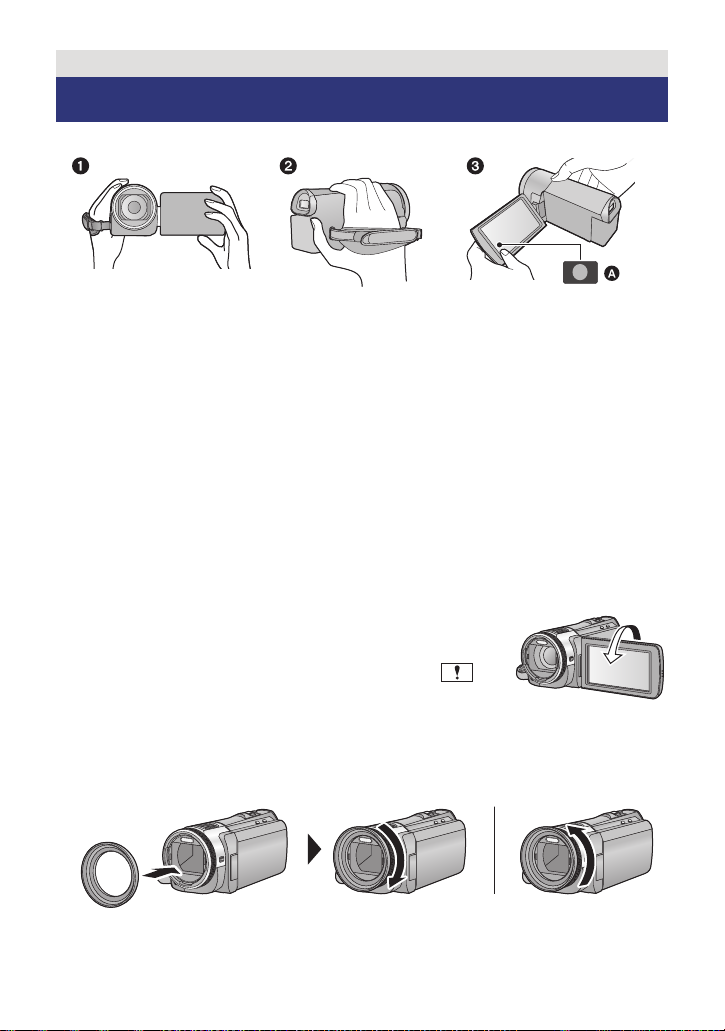
∫ Basic camera positioning
1 Hold the unit with both hands.
2 Put your hand through the grip belt.
3 It is convenient to use the recording button icon A when holding the unit at waist level.
≥ When recording, make sure your footing is stable and there is no danger of colliding with
another person or object.
≥ When you are outdoors, record pictures with the sunlight behind you. If the subject is
backlit, it will become dark in the recording.
≥ Keep your arms near your body and separate your legs for better balance.
≥ Do not cover the microphones or the cooling fan inlet with your hand etc.
∫ Basic motion picture recording
≥ The unit should normally be held steady when recording.
≥ If you move the unit when recording, do so slowly, maintaining a constant speed.
≥ The zoom operation is useful for recording subjects you cannot get close to, but overuse of
zoom in and zoom out can make the resulting motion picture less enjoyable to watch.
∫ Recording yourself
Rotate the LCD monitor towards the lens side.
≥ The image is horizontally flipped as if you see a mirror image.
(However the image recorded is the same as a normal recording.)
≥ Only some indications will appear on the screen. When
appears, return the direction of the LCD monitor to normal
position and check the warning/alarm indication. (l 149)
∫ Attaching/Removing the lens hood
This will reduce the extra light entering the lens in bright sunlight or backlight etc., making it
possible to take clearer pictures.
A Attaching the lens hood
B Removing the lens hood
— 22 —
≥ If you use the Filter Kit (optional), the Conversion Lens (optional) or the 3D Conversion
Lens (optional), remove the lens hood.
Basic
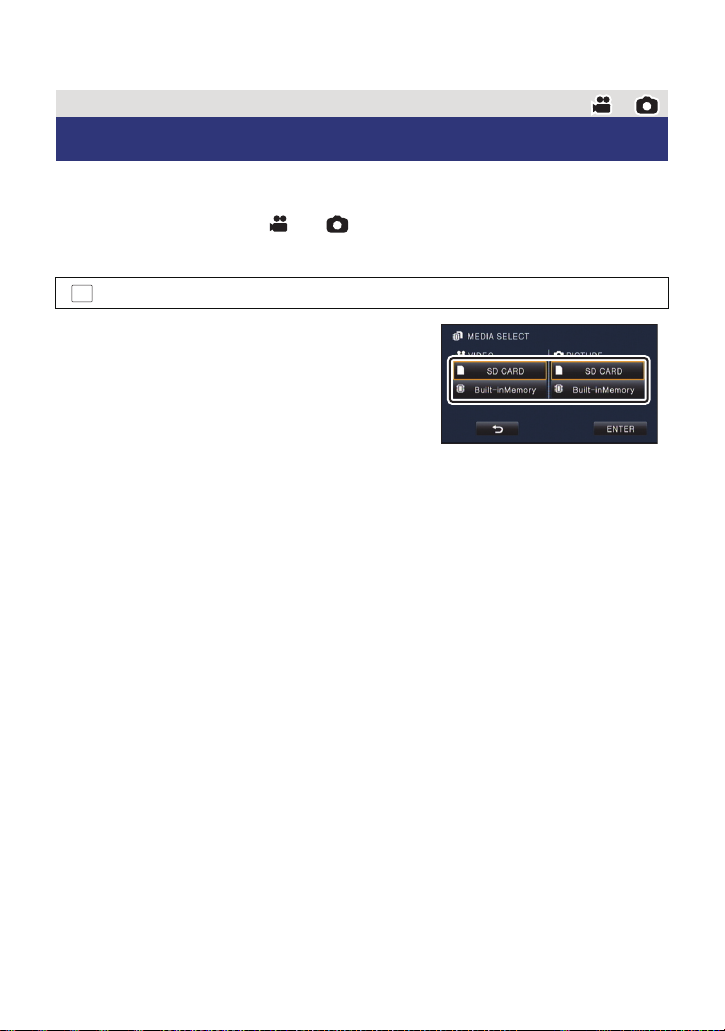
Selecting a media to record [HC-X900M]
The card and built-in memory can be selected separately to record motion pictures or still
pictures.
1 Change the mode to or .
2 Select the menu. (l 33)
MENU
: [MEDIA SELECT]
3 Touch the media to record motion
pictures or still pictures.
≥ The media is selected separately to motion pictures
or still pictures is highlighted in yellow.
4 Touch [ENTER].
— 23 —
Basic
0h00m00s0h00m00s0h00m00s
R 1h20mR 1h20mR 1h20m
Recording motion pictures
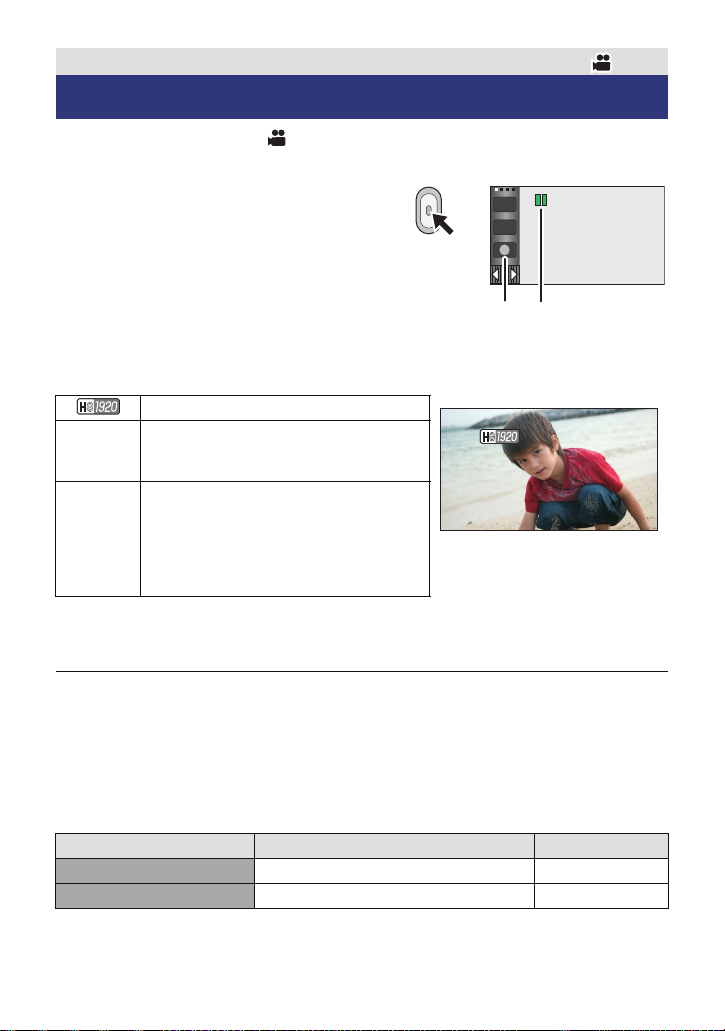
1 Change the mode to . (l 18)
2 Open the LCD monitor or extend the viewfinder.
3 Press the recording start/stop button
to start recording.
A Recording button icon
B When you begin recording, ; changes to ¥.
4 Press the recording start/stop button
again to pause recording.
≥ Recording can also be started/stopped by touching the recording button icon. This icon
functions in the same manner as the recording start/stop button.
∫ Screen indications in the Motion Picture Recording Mode
Recording mode
R 1h20m
0h00m00s
≥ Screen display will disappear when no touch operation is performed for a specific period of
time. To display it again, touch the screen. (l 34)
It will be constantly displayed when the remaining recordable time becomes less than 30 minutes.
≥
Approximate remaining recordable time
≥ When the remaining time is less than
1 minute, R 0h00m flashes red.
Recording time elapsed
≥ “h” is an abbreviation for hour, “m” for
minute and “s” for second.
≥ Each time the unit is put into recording
pause, the counter display will be reset
to 0h00m00s.
T
W
≥ To change the recording format, change the Recording Mode (l 59) or press and
hold the 1080/50p button. (l 47)
≥ Still pictures can be recorded while recording the motion picture. (l 27)
≥ The images recorded between pressing the recording start/stop button to start recording
and pressing it again to pause recording become one scene.
When you record with the [REC MODE] set to [iFrame], the scenes longer than
approximately 20 minutes will be automatically divided. (Recording will continue.)
≥ (Maximum recordable scenes of a single SD card or built-in memory)
Recording formats [1080/50p], [HA], [HG], [HX], [HE] [iFrame]
Recordable scenes Approx. 3900 Approx. 89100
Different dates (l 88) Approx. 900 Approx. 900
≥ Maximum number of recordable scenes and maximum number of different dates will be
less than above table when there are both iFrame scenes and still pictures recorded on an
SD card or the built-in memory.
— 24 —

≥ /
HC-X900
While recording is in progress, the recording will not stop even if the LCD monitor is closed
and the viewfinder is retracted.
While recording is in progress, the recording will not stop even if the LCD monitor is closed.
≥ /
Put the unit in Pause mode when connecting or disconnecting an external microphone with
the MIC terminal.
≥ Please refer to page 164 for detail about the approximate recordable time.
About the compatibility of the recorded motion pictures
When motion picture is recorded in AVCHD 3D format
≥ Only motion pictures recorded with the recording format set to AVCHD 3D are
supported by AVCHD 3D compatible equipment.
≥ It is still possible to play back when the motion picture is dubbed to an AVCHD
compatible equipment, but the 3D motion picture recorded on this unit will be converted
to a 2D motion picture. It is not possible to restore the converted 2D motion picture
back to a 3D motion picture.
≥ It is not always possible to play back motion pictures recorded with the recording
format set to AVCHD 3D on AVCHD 3D compatible equipment or AVCHD compatible
equipment. In such a case, play back on this unit instead.
When motion picture is recorded in AVCHD Progressive format
≥ Only motion pictures recorded with the recording format set to AVCHD Progressive are
supported by AVCHD Progressive compatible equipment.
≥ It is not always possible to play back motion pictures recorded with the recording
format set to AVCHD Progressive on AVCHD Progressive compatible equipment. In
such a case, play back on this unit instead.
When motion picture is recorded in AVCHD format
≥ Only motion pictures recorded with the recording format set to AVCHD are supported
by AVCHD compatible equipment. Images cannot be played with equipment that does
not support AVCHD (ordinary DVD recorders). Confirm that your equipment supports
AVCHD by referring to the operating instructions.
≥ It is not always possible to play back motion pictures recorded with the recording
format set to AVCHD on AVCHD compatible equipment. In such a case, play back on
this unit instead.
When motion picture is recorded in iFrame format
≥ You can play back on Mac (iMovie’11).
≥ It is not compatible with motion pictures recorded in AVCHD format.
≥ It is not always possible to play back motion pictures recorded with the recording
format set to iFrame on iFrame compatible equipment. In such a case, play back on
this unit instead.
— 25 —
Basic
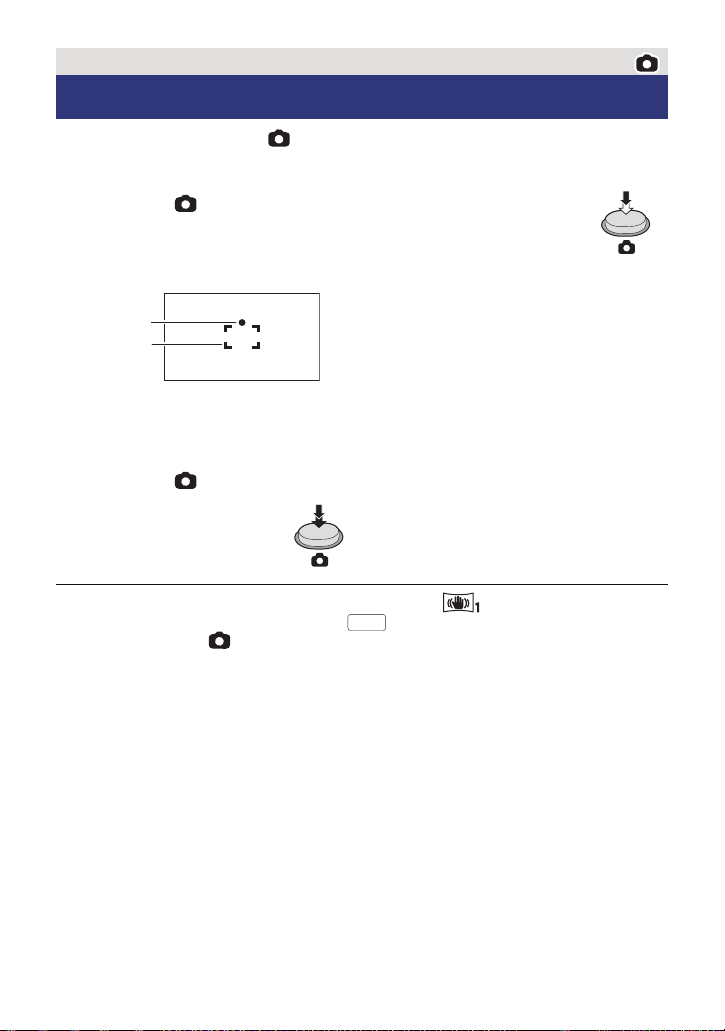
Recording still pictures
1 Change the mode to . (l 18)
2 Open the LCD monitor or extend the viewfinder.
3 Press the button halfway. (For Auto Focus only)
Focus indication:
A Focus indication
± (The white lamp flashes.):
Focusing
¥ (The green lamp lights up.):
When in focus
No mark:
When focusing is unsuccessful.
B Focus area (area inside brackets)
4 Press the button fully.
≥ If you set the Optical Image Stabilizer function (l 46) to ([MODE1]), then the Image
Stabilizer function will be more effective. ( (MEGA Optical Image Stabilizer) will be
displayed when the button is pressed halfway.)
≥ The AF assist lamp lights in dark places.
≥ Using a flash or tripod is recommended when recording still pictures in dark places
because the shutter speed becomes slow.
≥ You can also take a picture just by touching the subject to focus. (Touch Shutter: l 50)
≥ To print a picture, save the picture to the SD card (l 117) and print using a PC or a printer.
— 26 —

∫ About the screen indications in Still Picture Recording
R3000
M
16
Still picture operation indicator (l 146)
Remaining number of still pictures
≥ Flashes in red when [0] appears.
Size of still pictures (l 70)
M
16
MEGA Optical Image Stabilizer (l 26) ≥ Screen display will disappear
Optical Image Stabilizer (l 46)
AF assist lamp (l 73)
ß Flash (l 54)
ßj Flash level (l 54)
Red-eye Reduction (l 54)
when no touch operation is
performed for a specific period
of time. To display it again,
touch the screen.
≥ It will be constantly displayed
when the remaining number of
still pictures that can be
recorded becomes 200 or less.
∫ About the focus indication
≥ The focus indication indicates the status of the Auto Focus.
≥ The focus indication does not appear in Manual Focus Mode.
≥ The focus indication does not appear or has difficulty focusing in the following cases.
jWhen close subjects and far subjects are included in the same scene
jWhen the scene is dark
jWhen there is a bright part in the scene
jWhen the scene is filled with only horizontal lines
∫ About the focusing area
When there is a contrasting object ahead or behind the subject in the focus area, the subject
may not be focused. If so, move the contrasting object out of the focus area.
≥ Focus area is not displayed in the following conditions.
jWhen the Intelligent Auto Mode (Portrait) is used
jWhen AF/AE tracking is used
jWhen the Extra Optical Zoom is used
jWhen the unit determines that the AF assist lamp is necessary
Recording still pictures in Motion Picture Recording Mode
You can record still pictures even in Motion Picture Recording Mode.
¬ Change the mode to .
Press the button fully (press to the bottom) to take the picture.
≥ It is possible to record still pictures while recording motion pictures.
(Simultaneous recording)
≥ Remaining number of recordable pictures is displayed while still pictures
are being recorded.
≥ Built-in flash, Red-eye Reduction, Self-timer (l 55) do not work.
≥ While recording motion pictures or during the PRE-REC operation, image quality is
different from ordinary still pictures so that motion picture recording takes preference over
still picture recording.
— 27 —
≥ If simultaneous recording is used while recording a motion picture, the recordable time
Intelligent auto/Manual button
Press this button to switch Intelligent Auto
Mode/Manual Mode.
≥ Please refer to page 74 about Manual Mode.
remaining will shorten. If the unit is turned off or the mode switch operated, the recordable
time remaining may lengthen.
Basic
Intelligent Auto Mode
The following modes (appropriate for the condition) are set just by pointing the unit to what
you want to record.
Mode Effect
Portrait Faces are detected and focused automatically, and the
Scenery The whole landscape will be recorded vividly without whiting
*1
Spotlight Very bright object is recorded clearly.
*1
Low light It can record very clearly even in a dark room or twilight.
*2
Night portrait A subject and the background are recorded with near real-life
*2
Night scenery You can record night scenery vividly by slowing the shutter
*2
Macro This allows recording at very close proximity to the object of
*1
Normal In modes other than those described above, the contrast is
*2
*1 In Motion Picture Recording Mode only
*2 In Still Picture Recording Mode only
brightness is adjusted so it is recorded clearly.
out the background sky, which may be very bright.
brightness.
speed.
recording.
adjusted to give a clear picture.
— 28 —

≥ Depending on the recording conditions, the unit may not enter the desired mode.
4)
5)
6)
7)

10 000K
9 000K
8 000K
7 000K
6 000K
5 000K
4 000K
3 000K
2 000K
2)
1)
3)
9)
≥ In the Portrait, Spotlight and Low Light Mode, the face will be surrounded by white frame
when detected. In the Portrait Mode, a subject that is bigger and close to centre of the
screen will be surrounded by an orange frame. (l 63)
≥ Using a tripod is recommended in Night Portrait and Night Scenery Mode.
≥ Faces cannot be detected depending on the recording conditions, such as when faces are
of certain sizes or at certain tilts or when digital zoom is used.
∫ Intelligent Auto Mode
When switching to Intelligent Auto Mode, the Auto White Balance and Auto Focus operate
and automatically adjust the colour balance and focusing.
Depending on the brightness of the subject etc., the aperture and shutter speed are
automatically adjusted for an optimum brightness.
≥ Colour balance and focus may not be adjusted automatically depending on light sources or
scenes. If so, manually adjust these settings. (l 76, 78)
Automatic White Balance
The illustration shows the range over which Automatic White Balance functions.
1) The effective range of Automatic White Balance
adjustment on this unit
2) Blue sky
3) Cloudy sky (rain)
4) Sunlight
5) White fluorescent lamp
6) Halogen light bulb
7) Incandescent light bulb
Sunrise or sunset
9) Candlelight
If the Automatic White Balance is not functioning normally,
adjust the White Balance manually. (l 76)
Auto Focus
The unit focuses automatically.
≥ Auto Focus does not work correctly in the following situations. Record pictures in the
Manual Focus Mode. (l 78)
jRecording distant and close-up objects at the same time
jRecording a subject behind dirty or dusty window
jRecording a subject that is surrounded by objects with glossy surfaces or by highly
reflective objects
— 29 —
Basic
Motion picture/Still picture playback
1 Change the mode to . (l 18)
2 Touch the play mode select icon A. (l 20)
3 /
Select the still picture B or the recording
format of the motion picture C you wish
to play back.
HC-X900M
Select the media type D and then select
the still picture B or the recording format
of the motion picture C you wish to play
back.
≥ Touch [ENTER].
≥ The icon is displayed in the thumbnail display when the item for motion picture is touched.
( , , , , , , )
≥ is displayed on the 1080/50p scene, (Blue) is displayed on the AVCHD 3D scene
50p
and is displayed on the side-by-side scene by touching [ALL AVCHD].
3D
4 Touch the scene or the still picture to be
played back.
≥ It will switch to the screen displaying and thumbnail
scroll lever E when no operation is performed for
approximately 5 seconds on the thumbnail display
screen.
For details about deleting, refer to page 96.
≥ To display the next (previous) page:
jSlide the thumbnail display upward (downward) while touching it.
jTouch (up)/ (down) on the thumbnail scroll lever.
— 30 —
Loading…
Manual
View the manual for the Panasonic HC-X800 here, for free. This user manual comes under the category camcorders and has been rated by 5 people with an average of a 8.1. This manual is available in the following languages: English. Do you have a question about the Panasonic HC-X800?
Ask your question here
Frequently asked questions
Can’t find the answer to your question in the manual? You may find the answer to your question in the FAQs about the Panasonic HC-X800 below.
What is the weight of the Panasonic HC-X800?
The Panasonic HC-X800 has a weight of 345 g.
What is the height of the Panasonic HC-X800?
The Panasonic HC-X800 has a height of 68 mm.
What is the width of the Panasonic HC-X800?
The Panasonic HC-X800 has a width of 63 mm.
What is the depth of the Panasonic HC-X800?
The Panasonic HC-X800 has a depth of 134 mm.
What is the screen size of the Panasonic HC-X800?
The screen size of the Panasonic HC-X800 is 3 «.
How much storage capacity does the Panasonic HC-X800 have?
The Panasonic HC-X800 has — GB storage capacity.
What does the abbreviation ‘MP’ stand for?
MP stands for MegaPixels.
What is a megapixel?
The number of megapixels denotes how many pixels there are in the sensor. 1 megapixel equals 1 million pixels. The more pixels, the higher the potential image quality.
Is the manual of the Panasonic HC-X800 available in English?
Yes, the manual of the Panasonic HC-X800 is available in English .
Is your question not listed? Ask your question here
Инструкция по эксплуатации
HD Видеокамера
Номер модели HC-X900
HC-X900M
HC-X810
HC-X800
Перед использованием этого изделия, пожалуйста, внимательно прочитайте данные
инструкции и сохраните это руководство для дальнейшего использования.
VQT4V66-1

Информация для вашей безопасности
∫ Сведения о форматах записи
∫ Обращение со встроенной
видеоизображения
памятью [HC-X900M]
Можно выбрать форматы записи AVCHD*
Данная камера оборудована встроенной
или iFrame для записи видео данной
памятью. При использовании данного
камерой. (l 59)
компонента обратите внимание на
* Совместимость с AVCHD 3D или
следующее.
AVCHD Progressive (1080/50p).
Регулярно создавайте резервные
AVCHD 3D:
копии данных.
Можно записывать впечатляющие
Встроенная память является временным
реалистичные 3D-изображения с
хранилищем. Во избежание стирания
качеством Full HD.
данных ввиду статического электричества,
Для просмотра Full HD изображения в
электромагнитных волн, поломок и отказов
режиме 3D необходим 3D-совместимый
сохраняйте резервные копии данных на
телевизор, поддерживающий формат
ПК или диске DVD. (
l
120, 134)
чередования кадров. (l 109, 114)
≥
Индикатор доступа [ACCESS] (
l
7)
светится во время обращения к карте SD
AVCHD Progressive:
или встроенной памяти (инициализация,
Можно записывать 2D-изображения в
запись, воспроизведение, удаление и
наиболее высоком качестве (1080/50p)
т.д.). Не выполняйте следующие
для данного устройства.
операции, когда индикатор светится. Это
iFrame:
может привести к поломке встроенной
Это формат записи для просмотра или
памяти или неисправности камеры.
редактирования Mac (iMovie’11). С помощью
jВыключите питание камеры (выньте
iMovie’11 видео iFrame можно импортировать
аккумулятор)
быстрее, чем видео AVCHD. Кроме того,
jНе вставляйте и не извлекайте
размер импортируемого файла видео iFrame
соединительный кабель USB
будет меньше файла видео AVCHD.
jНе подвергайте камеру вибрации или
≥ Не совместимо с видео, записанным в
ударам
формате AVCHD.
≥ Об утилизации или передаче данной
∫ Ответственность за
камеры. (l 158)
записанное содержание
Panasonic не несет ответственности за
прямые либо косвенные повреждения,
вызванные любого рода проблемами,
приводящие к потере записанного или
редактируемого содержимого, а также не
дает гарантий на какое—либо содержимое,
если запись или редактирование не
выполняются надлежащим образом.
Аналогично, вышесказанное применимо
также в случае любого ремонта камеры
(включая любой другой компонент,
связанный с не в
строенной памят
ью).
— 2 —
∫ В настоящей инструкции по
∫
HC-X900
/
HC-X900M
эксплуатации
Информация о конденсации
≥ Карта памяти SD, карта памяти SDHC и
(когда затуманивается
карта памяти SDXC обозначены в
объектив, видоискатель или
документе как “карта SD”.
монитор ЖКД)
≥ Функции, которые можно использовать
Конденсация происходит, когда
в режиме записи видео:
окружающая температура или влажность
Функции, которые можно использовать
изменяются. Остерегайтесь конденсации,
в режиме записи снимков:
поскольку она вызывает появление пятен,
≥ Данную функцию можно использовать в
плесени на объективе, видоискателе и
режиме воспроизведения:
мониторе ЖКД или неисправностей в
Данную функцию можно использовать в
работе камеры.
режиме воспроизведения (
только для
≥ Подробную информацию о причинах
видео
):
конденсации и принятии необходимых
Данную функцию можно использовать в
мер см. на стр. 162.
режиме воспроизведения (только для
фотографий):
∫ /
HC-X810 HC-X800
≥ Одна или несколько сцен, записанных в
Информация о конденсации
формате 1080/50p, 1080/50i, AVCHD 3D
(когда затуманивается
или формате горизонтальной
объектив или монитор ЖКД)
стереопары ([SbS 3D]): сцена(-ы)
Конденсация происходит, когда
AVCHD
окружающая температура или влажность
≥ Страницы для справки обозначаются
изменяются. Остерегайтесь конденсации,
стрелкой, например: l 00
поскольку она вызывает появление пятен,
Данная инструкция по эксплуатации
плесени на объективе и мониторе ЖКД
составлена для моделей ,
или неисправностей в работе камеры.
, и .
≥ Подробную информацию о причинах
Иллюстрации могут незначительно
конденсации и принятии необходимых
отличаться от оригинала.
мер см. на стр. 162.
≥ Иллюстрации, использованные в
∫ Карты, которые можно
данной инструкции по эксплуатации,
использовать с данным
отображают модель , однако
устройством
части объяснения относятся и к
другим моделям.
Карты памяти SD, SDHC и SDXC
≥ В зависимости от модели некоторые
≥ Карты памяти емкостью 4 ГБ или более
функции не подключены.
без логотипа SDHC или карты памяти
≥ Параметры могут отличаться, поэтому
емкостью 48 ГБ или более без логотипа
внимательно читайте инструкцию.
SDXC не основаны на технических
≥ Не все модели мо
гут быт
ь доступны, в
характеристиках карт памяти SD.
зависимости от региона покупки.
≥ Более подробная информация о картах
SD приведена нас странице 15.
— 3 —
HC-X900
HC-X900M
HC-X810 HC-X800
HC-X900

Оглавление
Информация для вашей
безопасности ……..………………..………..…. 2
Дополнительно (Запись)
Подготовка
Использование масштабирования…. 45
Кольцо трансфокатора
[HC-X900/HC-X900M] …….……..……. 45
Названия и функции основных
Коэффициент масштабирования
компонентов …….…..…………..………..…….6
в режиме записи стоп—кадров …….. 46
Питание….………………..………..………….... 10
Функция стабилизатора
Как вставлять/извлекать
изображения ……………..……………..…….. 46
аккумулятор ………..……..……………… 10
Запись 1080/50p….……..………………..….. 47
Зарядка аккумулятора ……..………… 11
Запись с помощью сенсорных
Время зарядки и записи…………..…. 12
кнопок ……………..…………..………..……….. 48
Запись на карту …….………..…………..….. 15
Сенсорные кнопки.…..…………..……. 48
Карты, которые можно
Назначение значков функцийпри
использовать с данным
записи ……………..…………..………..……….. 51
устройством ……..…………..………..…. 15
Значки функций ..……..………..………. 51
Как вставлять/извлекать
Функции записи меню….…………..…….. 57
карту SD …………..…………..………..…. 16
Запись вручную …………..…………..…….. 74
Включение/выключение камеры ……. 17
Баланс белого ….…..………………..…. 76
Выбор режима .……..………..…………..….. 18
Ручная настройка скорости
Подготовка монитора ЖКД/
затвора/диафрагмы …………..………. 77
видоискателя [HC-X900/HC-X900M]….19
Запись при ручной фокусировке…. 78
Использование сенсорного
Запись 3D изображений….……..……….. 80
экрана .……..………..…………..………………. 19
О сенсорном меню ………..…………... 20
Установка даты и времени …..………....21
Дополнительно
(Воспроизведение)
Основные сведения
Операции воспроизведения ..…..…….. 84
Перед началом записи ……………………. 22
Воспроизведение видео с
Выбор носителя для записи
использованием значка
[HC-X900M]….……..……..…………..……..….23
операции…….………..…………..………. 84
Съемка фильмов ….…………..………..…..24
Создание стоп—кадра из
Фотосъемка………..…………..……………....26
видеоизображения…..…………..……. 85
Запись стоп—кадров в режиме
Покадровый указатель
записи видео…….………..…………..…. 27
выделенного и времени………..……. 85
Интеллектуальный автоматический
Повтор воспроизведения.…..………. 86
режим ..…..………………..………..………….... 28
Возобновление предыдущего
Воспроизведение видео/
воспроизведения……..…………..……. 86
стоп—кадров …………..…………..………..….. 30
Оптическое увеличение
Использование экрана меню…….…....33
стоп—кадра во время
Использование быстрого меню..…. 33
воспроизведения
Использование меню настроек ………. 34
(масштабирование при
Использование пульта
воспроизведении) ……………..………. 87
дистанционного управления
Различные функции
[HC-X900/HC-X900M]…..……….……………43
воспроизведения….…..…………..……….. 88
Пользование кнопками
Воспроизведение видео/
направления/кнопкой OK .………..…. 44
стоп—кадров по дате……………..……. 88
— 4 —

Воспроизведение наиболее
Подготовка к копированию/
ярких моментов …..…………..………... 89
воспроизведению …….………..…….. 120
Изменение настройки
Копирование на диски ……..…….... 122
воспроизведения и показ
Воспроизведение
слайдов .………..…………..……………… 94
скопированного диска…………..….. 125
Удаление сцен/стоп—кадров….………....96
Управление диском, на который
Удаление части сцены (AVCHD) …. 98
выполнено копирование…….…….. 126
Разделение сцен (AVCHD)………….. 99
Дублирование с помощью
Разделение сцены для
рекордера дисков Blu-ray, видео
частичного удаления
устройств и т.п.…..……..………………..… 127
(iFrame/MP4) ..…..…………..……….... 100
Сохранение 3D-изображения………… 131
Удаление личной информации …. 101
Защита сцен/стоп—кадров …………. 101
С ПК
Объединение сцены, записанной
с задержкой [HC-X900M] …….………..… 102
Просмотр видео/снимков на ТВ ..….. 103
Как можно использовать ПК ….……… 134
Подключение с помощью мини—
Лицензионное соглашение с
кабеля HDMI …….…………..……….... 105
конечным пользователем …..…….. 136
Прослушивание звука в
Операционная среда .…..…………..…… 137
формате 5.1 (AVCHD)
Инсталляция.…..…………..………..……… 140
[HC-X900/HC-X900M]……..……….... 106
Подключение к персональному
Подключение с по
мощью
компьютеру ……..………..…………..……… 141
мультикабеля AV ………..……………. 106
О дисплее ПК ..………..…………..….. 143
Воспроизведение с
Включение HD Writer AE 4.1 ……..…… 144
использованием VIERA Link …..…….. 107
Чтение инструкции по
Воспроизведение 3D-изображения
эксплуатации программных
[HC-X900/HC-X900M]…..……….………….109
приложений ……..…..…………..…….. 144
Просмотр на 3D-совместимом
При использовании Mac …………..…… 144
телевизоре …..…..…………..……….... 109
Просмотр на мониторе ЖКД..……. 112
Прочее
Преобразование и
воспроизведение изображений
Обозначения .…..…………..………..……… 146
2D (3D) как изображений
Сообщения .…..…………..………………..… 149
3D (2D) ..…………..…………..……….... 112
О восстановлении ………………….... 150
Регулировка 3D эффекта
Поиск и устранение
3D-изображений .………..………….... 113
неисправностей ………..…………..……… 151
Воспроизведение 3D-изображения
На что необходимо обратить
[HC-X810/HC-X800]…..……….……………. 114
внимание при использовании.……… 157
Преобразование и
Об авторском праве ….…………..……… 163
воспроизведение
Режимы записи/приблизительное
2D-изображений как 3D ……………. 116
возможное время записи..………..…… 164
Регулировка 3D эффекта
Приблизительное количество
3D-изображений .………..………….... 116
записываемых кадров …………..……… 165
Дополнительные
Копирование/
принадлежности…………..…………..…… 167
дублирование
Копирование данных между
картой SD и встроенной памятью
[HC-X900M]….……..……………..…………... 117
Подключение DVD рекордера для
копирования на диск/
воспроизведения с диска.…………..… 120
— 5 —
-
Страница 1
Operating Instructions High Definit ion V ideo Camer a Model N o. HC-X900 HC-X900M HC-X800 Before us e, please re ad these inst ructions completely . VQT4C83 until 2012/1/31 Model number s uffix “EB ” denotes UK model. HC-X900&X900M&X800EB-VQ T4C83_mst.book 1 ページ 2012年1月1 6日 月曜日 午後 1時29分[…]
-
Страница 2
2 VQT4C83 Dear Customer , We woul d like to tak e this oppor tunity to thank you f or purchasing t his Panasonic Hig h Defi niti on Video Cam era. Pleas e re ad these Op erating Inst ructions caref ully and keep th em hand y for future referenc e. Please note t hat the actua l contr ols and componen ts, men u items, etc. of your High Definition Vi […]
-
Страница 3
3 VQT4C83 Before use Remove the conn ector co ver . How to re place the fu se The locatio n of the fuse dif fer ac cording to the type of AC main s plug (figur es A and B). Confirm the AC main s plug fitted an d follow the instruc tions below . Illustrat ions may d iffer from actu al AC mains plug. 1. Open the fu se cover with a screwdrive r . 2. R[…]
-
Страница 4
4 VQT4C83 ∫ EMC Electric a nd magnetic comp atibili ty This symbol (CE) is loc ated on the ratin g plat e. ∫ Product id entification m arking ∫ Informatio n for Users on Collection an d Disposa l of Old Equipment an d used Batterie s These symbols on the products, packaging, and/ or accompanying documents mean that used electrical and electro[…]
-
Страница 5
5 VQT4C83 ∫ About the reco rding format for recording motion pictures Y ou can select from A VCHD* or iFrame recording format s to r ecord mot ion pic tures using thi s unit. ( l 64) * It is compatible with A VCHD 3D or A VCHD Progre ssive (1080/ 50p). A VCHD 3D: It is possible t o record powerful, lif e-like 3D full high definit ion images. A 3D[…]
-
Страница 6
6 VQT4C83 ∫ / About Condensa tion (When the le ns, the viewfin der or LCD Monitor is fogg ed up) Condensat ion occu rs when the am bient temperat ure or hu midity chan ges. Be c areful of conde nsation sinc e it causes lens , viewfinde r and LCD monito r stains, fun gus and camera malfun ction. ≥ For more det ails about t he cause and action re[…]
-
Страница 7
7 VQT4C83 Preparatio n Basic Advanc ed (Recording ) Copy/Dub bing With a P C Others Ad vanc ed (Playback) Infor mation for Y our Sa fety ……. …….. ……. 2 Accessori es …….. …… …… …….. …… ……. …. 10 Prep aration Names and F unctions of Main Parts ….. 1 1 Power su pply.. …….. ……… …….. ……… ……[…]
-
Страница 8
8 VQT4C83 Delet ing scen es/still p ictures ……….. ….. 9 9 Deleting p art of a scene (A VCHD) …….. ……….. ………….. …….. 101 Dividing a scene (A VCHD) ……… ….. 102 Dividing a scene to partially dele te (iFram e/MP4 ) .. …….. …….. ……… ….. .. 103 Delet ing pe rsonal infor mation ……. .. 10 4 Protecti[…]
-
Страница 9
9 VQT4C83 ∫ Sales and Su pport Information Customer Communic ations Centre ≥ For custo mers within th e UK: 0844 844 3899 ≥ For custo mers within Ir eland: 01 289 8333 ≥ For further support on your pro duct, plea se v isit our webs ite: www .p anasonic. co.uk Direct Sales at Panasonic UK ≥ Order acc essory and consu mable items for your p[…]
-
Страница 10
10 VQT4C83 Check the ac cessories bef ore using th is unit. Keep the ac cessories out of reach of chil dren to prevent swallowing. Product numbers correc t as of Jan . 2012. These may be s ubject to chan ge. Accessories Battery p ack VW-VBN1 30 AC adaptor VSK07 33 AC cable K2CT3 YY00034 Remote c ontrol (Battery built-i n) (supplied for H C-X900 and[…]
-
Страница 11
11 VQT4C83 1 LCD monitor (T ouch screen) ( l 24) ≥ It can ope n up to 90 o . ≥ It ca n rot ate up to 18 0 o A t owards the lens or 90 o B towards the opposite dire ction. 2 Power button [ ] ( l 22) 3 Spea ker 4 I nlet (c ool in g f an) ( l 27 ) 5 Intelligent auto/Manual button [iA/MANUAL] ( l 33, 79 ) 6 Op tical im age stabiliz er but ton [ O.I[…]
-
Страница 12
12 VQT4C83 19 SD card cover ( l 21 ) 20 T ri pod recept acle ≥ If you att ach a tripod which has 5.5 mm screw or larger , it may damage this unit . 21 Access lamp [ACCESS ] ( l 21) 22 Card s lot ( l 21) 23 Photoshot button [ ] ( l 31 ) 24 Zoom lever [W/T] (In Motion Picture Recording Mod e or Still Picture Recording Mode) ( l 50 ) Thumbnail di sp[…]
-
Страница 13
13 VQT4C83 / 28 Sta tus indica tor ( l 22) 29 Intern al microphones 30 Multi manu al ring ( l 79 , 82) 31 Shoe ada ptor mounting part ( l 169) 32 Shoe adapto r cover ( l 169) 33 Shoe adapto r rele ase lever [SHOE ADAPTOR RELEASE] ( l 169) 34 Microphone term inal [MIC] ≥ A compatible plug-in powered microph one can be used a s an e xternal microph[…]
-
Страница 14
14 VQT4C83 42 Intern al microphones 43 Sta tus indica tor ( l 22) 44 Mode switch ( l 23) 45 DC input terminal [DC IN] ( l 16) ≥ Do not use any ot her AC adaptors except the suppl ied one. HC-X800 43 44 42 45 HC-X900&X900M&X800EB-VQ T4C83_mst.book 14 ページ 2012年1月1 6日 月曜日 午後 1時29分[…]
-
Страница 15
15 VQT4C83 ∫ About batteries that you can use with th is unit The battery that can be used with this unit is VW-VBN1 30/VW-VBN260. ≥ The unit has a function for distinguishing b atteries which can be used safely . The dedicated battery (VW-VBN130/VW-VBN2 60) supports this function. The only batteries suitable for use with this un it are genuine[…]
-
Страница 16
16 VQT4C83 Charging the battery The unit is in the s tandb y conditi on when th e AC adap tor is conn ected. The primar y circuit is always “live” as long as the AC adaptor is connected to an ele ctrical outlet. Important: ≥ Use the supplie d AC adaptor . Do not use the AC a daptor of another dev ice. ≥ Do not use the AC cable with any othe[…]
-
Страница 17
17 VQT4C83 Charging and recording time ∫ Chargin g/Recordin g time ≥ T emper ature: 25 o C/humidit y: 60%RH ≥ / When using the v iewfinde r (times in parent heses are when us ing the LCD monito r) HC-X900/HC-X900M Battery model numbe r [V oltage/Capacity (minimum)] Charging time Recording mode Max imum continuous record able t ime Act ual rec[…]
-
Страница 18
18 VQT4C83 * This will be the record ing mode when the 3D Conv ersion Lens (op tional) is att ached. ≥ These times are approximatio ns. ≥ The indica ted cha rging time i s for wh en the batter y has been d ischarged completel y . Charging time and recordable time va ry depending on the usage conditions such as high/low temperature. HC-X800 Batt[…]
-
Страница 19
19 VQT4C83 ≥ The actual re cordable time ref ers to the reco rdable time when re peatedly st arting/ stopping recording , turning th e unit on/of f, moving the zoom lever etc. ≥ The ba tteries heat u p aft er use or cha rging. This is n ot a malfunc tion. Battery cap acity indication ≥ The dis play changes as the battery ca pacit y reduces. #[…]
-
Страница 20
20 VQT4C83 The unit can re cord still pictures or motion pict ures to an SD card or bui lt-in memory . T o record to an SD card, read the fo llowing. Cards that you can use w ith this unit Use SD cards confor ming to Class 4 or hig her of the SD Spee d Class Rating* for motion pi cture recor ding. * SD S peed Class Rating is the speed standar d reg[…]
-
Страница 21
21 VQT4C83 Inserting/removing an SD c ard Caution: Check tha t the a ccess lamp h as gone of f. 1 O pen the SD card cov er and inse rt (r emove ) the S D card into (from) the card slot. ≥ Face the label sid e B in the direction shown in the ill ustrati on and press it straight in as far as it will go. ≥ Press the c entre of th e SD card and the[…]
-
Страница 22
22 VQT4C83 Y ou can t urn the unit o n and off using the power butt on, t he LCD monit or or the vi ewfinder . Open the LCD mo nitor and pre ss the power bu tton to turn on the unit. A The status indicato r lights on. Opening th e LCD monitor or ext ending th e viewfinder turns on the unit. Closing the LCD monit or/vi ewfind er tur ns off th e unit[…]
-
Страница 23
23 VQT4C83 ∫ T o turn off the un it B The sta tus indicato r goes of f. / ≥ The unit will not turn of f unless the LCD monitor is closed and the viewfinder is retracted. ≥ The unit will not turn of f while record ing motion pictur es even if the LCD monitor is closed and the viewfi nder is retract ed. ≥ The unit will not turn of f while rec[…]
-
Страница 24
24 VQT4C83 The viewfind er is turned of f and the LCD monit or is turned on when th e LCD monitor is opened. The viewfind er is turned on whe n the LCD monitor is clos ed and the viewf inder is extend ed. ≥ Live image record ing or 3D recordin gs can be viewed in 3D on the LCD monit or . ( l 84 , 1 12) ∫ T o adjust the image in the viewfi nder […]
-
Страница 25
25 VQT4C83 ∫ About the operation icons ///: These icons are us ed to switch the me nu and thumbnail di splay page, for item selecti on and setting etc. : T ouch to return to the prev ious screen such as when sett ing menus. About the T ouch Menu T ouch (lef t side) / (right side ) of on the T ouch Menu to switch the operat ion icons . T ouch (lef[…]
-
Страница 26
26 VQT4C83 ∫ T o display the T ouch Menu ≥ Do not touc h on the LCD monitor with hard pointed tip s, such as ball po int pens. When th e unit is turne d on for the fi rst time, a mes sage asking you to set the date and ti me will appear . Select [YES] and perfor m S tep s 2 to 3 below to set the dat e and time . 1 Sele ct the m enu. ( l 38 ) 2 […]
-
Страница 27
27 VQT4C83 ∫ Basi c cam era p ositi onin g 1 Hold the unit with bot h hands. 2 Put your hand th rough th e grip belt. 3 It is convenie nt to use th e recording button icon A when holding the un it at waist level . ≥ When record ing, make sure your f ooting is stab le and there is no danger of colliding with another per son or obj ect. ≥ When […]
-
Страница 28
28 VQT4C83 ≥ If you use the F ilter Kit (option al), the Convers ion Lens (option al) or the 3D Conver sion Lens (opt ional), remove th e lens hood. The card and built-in memory can be selected separat ely to record motion picture s or still pictures. 1 Chan ge the m ode to or . 2 Sele ct the m enu. ( l 38 ) 3 T ouc h the media t o record mo tion[…]
-
Страница 29
29 VQT4C83 1 Chan ge the m ode to . ( l 23) 2 O pen the LC D monitor or e xtend the vi ewfinder . 3 Pr ess the rec ording st art /stop button to st art recording. A Recording butt on icon B When you b egin r ecording, ; changes to ¥ . 4 Pr ess the rec ording st art /stop button again t o pa use record ing. ≥ Recording can al so be st arted/sto p[…]
-
Страница 30
30 VQT4C83 ≥ / While recor ding is in progre ss, the recordin g will not stop even if t he LCD monitor is closed and the viewfi nder is retract ed. While reco rding is in p rogress, the recording wi ll not stop e ven if the L CD monitor is closed. ≥ / Put the un it in Pause mode when connect ing or discon necting an external micro phone with th[…]
-
Страница 31
31 VQT4C83 1 Chan ge the m ode to . ( l 23) 2 O pen the LC D monitor or e xtend the vi ewfinder . 3 Pres s the button halfway . (For Auto Focus only) 4 Pres s the button fully . ≥ If you set the Optical Image S tabilizer f unction ( l 51) to ([MODE1] ), the n the Image S tabi lizer function will be more effective. ( (MEGA Optical Image S tabilize[…]
-
Страница 32
32 VQT4C83 ∫ About the screen indic ations in Still Pictu re Recor ding ∫ About the focus indica tion ≥ The focus indication indicates th e status of the Auto Focus . ≥ The focus indication does not appear in Manu al Focus Mode. ≥ The foc us indicat ion d oes not a ppear or has dif fic ulty foc using in the follo wing cases . j When close[…]
-
Страница 33
33 VQT4C83 ≥ If simult aneous record ing is used while recording a motion pic ture, the rec ordable time remaining will sh orten. If the uni t is turned of f or the mode swi tch operated, t he recordable time remai ning may lengthen. The followi ng modes (appropria te for the condi tion ) are set jus t by pointi ng the unit to what you want t o r[…]
-
Страница 34
34 VQT4C83 ≥ Depending on t he recording cond itions, the unit may not enter t he desired mode . ≥ In the Portrai t, S potlight an d Low Light Mode, the face will be surro unded by white frame when detec ted. In th e Portrait Mod e, a subjec t that is big ger and clos e to centre of the screen will b e surrounded by an orang e fram e. ( l 68) ?[…]
-
Страница 35
35 VQT4C83 1 Chan ge the m ode to . ( l 23) 2 T ouc h the play mo de select i con A . ( l 25) 3 / Select the still pictur e B or the recording format of the m otion picture C you wish to play bac k. Select the m edia type D a nd then select the still picture B or the recording format of the motion picture C you wish to play back. ≥ T ouch [ ENTER[…]
-
Страница 36
36 VQT4C83 5 Sele ct the p layback ope ration by touch ing the o peration icon. ≥ Slide show will be played back only in 2D or only in 3D. It will play back in 2D if the still picture at the start of the slide show is 2D (3D still pictures are converted to 2D st ill pictures and played back), and it wi ll play back in 3D if i t is 3D (2D still pi[…]
-
Страница 37
37 VQT4C83 ≥ The elap sed time fo r playback indica tion will be res et to 0h00m0 0s each scene. ≥ When playing back with [ALL A VCHD] selected, the screen may become black momenta rily at the ti me the scene switches . Motion pi cture comp atib ility ≥ This unit is based on A VCHD 3D/A VCHD Progressive/A VCHD. A VCHD 3D for mat ≥ Video si […]
-
Страница 38
38 VQT4C83 ≥ T ouch (lef t sid e)/ (right side ) of on the T ouch Menu to display . ( l 25) 1 T ouc h . 2 T ouc h the top menu A . 3 T ouc h the submen u B . ≥ Next (p revious) page can be display ed by touching / . 4 T ouc h the des ired item to enter the setting. 5 T ouc h [EXIT] to exit th e menu setting. ∫ About guide display After touchi[…]
-
Страница 39
39 VQT4C83 ≥ The items displayed differ depending on the position or settings of the mode switch. Select the menu. Set the dis play method for the scree n information display . Please ref er to page 26. It is possible t o display and rec ord the time at the travel destin ation by select ing your home region and th e travel destination . 1 T ou ch[…]
-
Страница 40
40 VQT4C83 ≥ When the home reg ion is set f or the first time , the scr een for selecting ho me/trav el destina tion appears af ter setting the home region succes sively . If the home region has already bee n set once , execute t he menu operatio n for S tep 1. 5 (Only when setting the r egion of your travel destina tion) T o uch / to select your[…]
-
Страница 41
41 VQT4C83 Please ref er to page 108. When about 5 minute s have p assed without any operat ion, this unit automatic ally turns of f to save ba ttery lif e. ≥ This unit will not automatically tu rn off even if the [ECONOMY (BA TT)] is set to [ ON] in following case s: j Using the AC adaptor* j Using the USB cable for PC, DVD burner etc. j P RE-RE[…]
-
Страница 42
42 VQT4C83 ≥ Change the mode to or . 1 S et [QUICK S T ART] to [ON]. 2 Close the LCD monitor and retract the vi ewfinder . The status indica tor A fla shes gree n and the unit goe s into Quick S tart S tandby Mode. ≥ The len s cover does n ot clos e. 3 Op en the LCD monitor or extend the viewfinder . The status indica tor A light s red and the […]
-
Страница 43
43 VQT4C83 Please ref er to page 48. / The recordin g lamp lights up during reco rding and flashes when the unit rece ives a signal from the remot e control or when the Self- timer is counting down. The recordin g lamp lights up during reco rding and flas hes when the Self- timer i s counting down. When this is se t to [OFF], it doe s not light du […]
-
Страница 44
44 VQT4C83 This makes it easie r to view the LCD monitor in br ight places inc luding out doors. ≥ These settings will not af fect the images actually recorded. ≥ It is possi ble to set from th e quick menu. ( l 38) * It i s not displ ayed in the Manu al Mo de or in the Pla yback M ode. ≥ / When the AC adapt or is in use, the LCD monitor is s[…]
-
Страница 45
45 VQT4C83 Please ref er to page 108. Please ref er to page 1 10 . Please ref er to page 107. Please ref er to page 1 13. Please ref er to page 1 17 . Set to [Y ES] for changing the menu settin gs back to th e defaul t conditio n. ≥ Sett ings fo r [MEDIA SELEC T] * , [CLOCK SET] and [LA NGUAGE] wi ll not b e change d. * For users who ha ve / , th[…]
-
Страница 46
46 VQT4C83 Please be aware that if a medi um is formatted, then all the dat a recorded on the medium will be erased and cannot be restored. Back up important data on a PC, DVD disc etc. ( l 123, 136) ≥ When for matting is compl ete, touc h [EXIT] to exit the message screen. ≥ Perform a phy sical fo rmatting of the SD card when the SD card is to[…]
-
Страница 47
47 VQT4C83 ≥ The SD card requir es some space to store informat ion and manage s ystem files, so the actual usable sp ace is s lightly les s than t he indic ated val ue. The usab le sp ace is gene rally calculate d as 1 GB=1,000, 000,000 b ytes. The capac ities of t his unit, PCs and softwa re are expres sed as 1 GB=1,0 24 k 1,02 4 k 1,024=1,0 73[…]
-
Страница 48
48 VQT4C83 Select the menu. 1 Power on/off button [ ] Unit can b e turn ed on /off when the LCD monito r is op ened or the vi ewfin der is extend ed. ≥ Unit canno t be turned on by th e power on/ off button when 36 hours have passed afte r the unit is turned of f. Press the power button on the unit an d turn the unit back on. ≥ Unit canno t be […]
-
Страница 49
49 VQT4C83 ∫ Remote control usable range A Remote control sensor Dista nce: Wi thin a pprox. 5 m Angle: App rox. 10 o up and 15 o down, lef t, and right ≥ The re mote con trol is in tended for in door operation . Outdo ors or under stro ng light, the unit may not operate properly eve n within the usab le ranges. Operation of direction buttons/O[…]
-
Страница 50
50 VQT4C83 A Zoom bar ≥ Maximum zoom ratio for re cording moti on pictures can be s et with [ZOOM MODE]. ( l 63) ≥ Y o u can als o zoom by simpl y touchi ng the LC D moni tor. (T ou ch Zoo m: l 53) ∫ About the zoo m bar The zoom bar is disp layed during the z oom operation . ∫ About the zoo m speed The zoom speed will be faster in the order[…]
-
Страница 51
51 VQT4C83 Zoom ratio during the S till Picture Re cording Mode The zoom ratio can be exp anded up to 25 k without degrading the pi cture quality for th e S till Picture Recording Mode. (Ext ra Optical Zoom) ≥ Extra o ptical zoom r atio v aries dependin g on th e setti ng of [PICT URE SIZE] and [ASPECT RA TIO]. ( l 75, 76) ≥ If you ta ke your f[…]
-
Страница 52
52 VQT4C83 ∫ Changing Ima ge S t abilizer Mode (Motion Picture Recording Mode) When set to [ ON], you can furt her improve imag e stabilization for recordi ng while walking, or holding the unit and recording a dis tant su bject with zoom. ≥ This func tion’s default s etting is [ON]. (Still P icture Recording Mode) ≥ Please refer t o page 55[…]
-
Страница 53
53 VQT4C83 Y ou can record us ing convenie nt functions just by the ea sy operation of touching the screen. 1 T ouc h (lef t side)/ (right si de) of on the T ouch Me nu to display T ouch function icons. ( l 25) 2 T ouc h the T ouch func tion icon. (e.g. A F/AE t racking) ≥ T o canc el, touc h the T ouc h func tion icon again. (Optica l Image S t […]
-
Страница 54
54 VQT4C83 It is possibl e to set the focus and exposure to the subject specified on the touch screen. The focus and exposur e will keep follo wing the sub ject aut omaticall y even if i t moves. (Dynamic tracki ng) 1T o u c h . ≥ When [F ACE RECOG . ] ( l 66) is [ON] and a regis tered face is det ected, the t arget is automa tica lly lock ed. 2 […]
-
Страница 55
55 VQT4C83 In Motion Picture Recording Mode, you can further improve optical image stabilization by touching and holding . With this function, you can further reduce t he effect s of the shake th at tends to occur when using zoom. 1 P ress the Optical Image S tabilizer button to turn the image st abilizer on. 2 T ouch and hold . ≥ Icon is display[…]
-
Страница 56
56 VQT4C83 Select the operation icons to add dif ferent effe cts to th e images to be recor ded. 1 T ouc h (lef t side)/ (right si de) of on the T ouch Me nu to display the operation ico ns. ( l 25 ) 2 T ouc h an opera tion icon. (e.g. P RE-R EC) ≥ Select the op eration ico n again to cancel t he function. ≥ Refer to the respectiv e pages for c[…]
-
Страница 57
57 VQT4C83 When you st art rec ording, the im age/audi o gradually appears . (Fade in) When you p ause recordin g, the image/audio gr adually disappear s. (Fade out ) ≥ The Fade sett ing is cancelled when the recor ding stop s. ∫ T o select the colour fo r fade in/out ≥ The thumbnails of scenes recorde d using fade in be come black (or white)[…]
-
Страница 58
58 VQT4C83 ≥ After setting PRE-REC, if recording star ts in less than 3 seconds, motion pictures taken 3 seconds before pressing the recording start/stop button cannot be recorded. ≥ Images displ ayed on the thumbn ail during playbac k will differ from the motion pi ctures display ed at the st art of playback . When a sm iling face is detected […]
-
Страница 59
59 VQT4C83 When th e butt on is pr essed, t he flas h is act ivated and t he pictur e wil l be record ed. Use the Built -in flash in order to re cord stil l pictures in dark pla ces. The icon cha nges each time it is touched. ß ([ON]) # ß A ([AUTO]) # ([OFF]) ≥ The unit au tomatica lly determine s if the flash is necessary even when it has been[…]
-
Страница 60
60 VQT4C83 This is for recording still picture s using the timer . The icon cha nges each time it is touched. Ø 10 (Records aft er 10 seconds) # Ø 2 (Records af ter 2 second s) # set tin g cancell ed ≥ When the button is pressed, a stil l picture is recorded aft er the Ø 10 o r Ø 2 dis play and the rec ording lamp flas hes for th e time which[…]
-
Страница 61
61 VQT4C83 Y ou can check if t he imag e is level whil e recording or playing back motion pictures and still pictu res. Th e func tion can a lso b e used to estima te the b alance of the c omp osition. The icon cha nges each time it is touched. # # # Setting canc elled ≥ It is possi ble to set from th e quick menu. ( l 38) ≥ The guideli nes do […]
-
Страница 62
62 VQT4C83 When you r ecord image s in diff erent si tuations , this mode automatic ally set s optimum sh utter speeds a nd ape rtures. ≥ (Spor t s/Portr ait/Sof t skin/S pot light/S now/Beach /Sunset /Scenery) j The shutter speed is 1/6 or more in S till Pictu re Recording Mode . ≥ (Sun set/Lo w light) j The shutter speed is 1/25 or more in Mo[…]
-
Страница 63
63 VQT4C83 ≥ (Sof t skin) j If the background or anything els e in the scene ha s colours similar to the skin colou r , they will also be s moothed. j If the brightness is insuff icient, the effect may no t be clear . j If you record a person in the dist ance, the fa ce may not be recorded cl early . In this case, cancel So ft Skin Mode or zoom i[…]
-
Страница 64
64 VQT4C83 Switch th e picture qualit y and recording f ormat of the motion pictures to be recorded. *1 Recording will have highe r quality in the orde r of [HA], [HG], [HX] and [HE]. *2 It can recor d with hi ghest qual ity image in this uni t. *3 iFrame is a f ormat suit able for Mac ( iMovie’1 1). It is rec ommended fo r when using a Mac . *4 […]
-
Страница 65
65 VQT4C83 ≥ Maximum recordab le time is 12 hours . ≥ S till picture recording cannot be used. ≥ Recording mod e cannot be changed whe n the Interva l Recording is set . ≥ If you turn of f the unit or change t he mode to , this functi on is cancelled . ≥ The shorte st motion pict ure recordin g time is 1 second. ≥ Colour bal ance and fo[…]
-
Страница 66
66 VQT4C83 ≥ S till picture s are recorded to the SD card after Rela y Recording. ≥ is display ed on t he thumb nail d isplay duri ng th e playba ck of t he scene tha t was relay — recorded on the b uilt-in memo ry . Face Recogn ition is a func tion for find ing faces th at resemble f aces which have alr eady been registe red and automat ically[…]
-
Страница 67
67 VQT4C83 Entering text ≥ The charac ters can be c onveniently inp ut witho ut moving the curs or when the [ Auto Curso r Posit ion] is set to [ ON]. ( l 45) ≥ A maximum of 9 charac ters can be en tered. 4 T ouch [ENTER] to end registrati on. ≥ T ouch [ EXIT]. ∫ Changing the information of a registered person 1 S elect the menu. 2 T ouch t[…]
-
Страница 68
68 VQT4C83 ∫ Cancelling a registered pers on 1 S elect the menu. ≥ T ouchi ng [DE LETE ALL] cancel s all the regis tered p eople. 2 (When [DELETE] is selec ted) T o uch the person to cancel. ≥ When touche d, the p erson is s elected and is displayed. T o ca ncel the selec ted perso n, touch aga in. ≥ T ouch [ ENTER]. ≥ Since Fa ce Reco gn[…]
-
Страница 69
69 VQT4C83 ∫ Prioritised face framing Prioritis ed face fr aming is displayed as orang e fr ames. Focus and adjustment of brightness will be pe rformed a gainst th e prioritised face framing. ≥ Prioritis ed face framing is only display ed with Portrait Mode in the Intelli gent Auto Mode. ≥ The white frame is for face detec tion only . ≥ Foc[…]
-
Страница 70
70 VQT4C83 Recording motion p ictures with mor e vivid colours, using x .v .Colour ™ techno logy . ≥ Switch to Manual Mode. ( l 79) ≥ Set [REC M ODE] t o [HA], [HG], [HX], [HE] or [1080 /50p] . ( l 64) ≥ For more realisti c colours, use a n HDMI mini cable ( optional) with a T V that support s the x.v .Colour ™ . ≥ When conn ecting this[…]
-
Страница 71
71 VQT4C83 ≥ / If wind sound cannot be reduc ed with the wind no ise can celler f unction alone, set [ BASS SETT ING] to [LOW CUT]. ( l 73) Recording set ting of the built-in microphon e can be adjusted . ≥ If you wish to record higher qualit y sound and maint ain realism eve n when zooming in, for inst ance, when reco rding a music recit al, w[…]
-
Страница 72
72 VQT4C83 / When record ing, the input level from th e built-in micr ophones and the external mic rophone terminal can be adj uste d. When record ing, the input level from th e built-i n microphones can be adjuste d. 1 S elect the menu. ≥ It is possible t o select the set ting fr om the quick menu in Manu al Mode. ( l 38) The microphon e level r[…]
-
Страница 73
73 VQT4C83 ≥ / When [MIC SETUP] is [ZOOM MIC], the volume will be differe nt depending on the zoom rate. When [ZOOM MIC] is [ON], the volume will be different depending on the zo om rate. ≥ / When [MIC SETUP ] is se t to [ST EREO M IC] or exte rnal mi cropho ne input is us ed, th e sound is st ereo (2 ch) and only t he front-lef t and fr ont-ri[…]
-
Страница 74
74 VQT4C83 Parts where white satur ation (colo ur saturat ion) is likely to occur (extrem ely brightly lit o r shiny parts) are displayed with diagona l lines (zebra pa ttern). ≥ Switch to Manual Mode. ( l 79) ≥ Y ou can re cord an image wit h little white saturatio n if y ou manually adj ust the shut ter speed or brightness (I ris/Gain) ( l 81[…]
-
Страница 75
75 VQT4C83 The hi gher the number of pix els, the higher the c larity of the pictur e when printi ng. ≥ The number of recording pixel s that can be s et changes dep ending on sele cted screen aspect rat io. ( l 76) ∫ Picture s ize and Maximum zoom rati o * Extra optic al zoom cannot be used. The max imum zoom magnific ation is 12 k . : [RECOR D[…]
-
Страница 76
76 VQT4C83 ∫ Picture size in Motion Pic ture Recordi ng Mode ≥ Change the mode to . ≥ This func tion’ s defaul t settings ar e in S ti ll Picture Record ing Mode and in Motion Picture Re cording Mo de. ≥ The re cording wil l become lon ger depen ding on the rec ording pix els. ≥ Please ref er to page 166 about the nu mber of recordable […]
-
Страница 77
77 VQT4C83 Recording is don e continuou sly at the rate of 50 still pictures per secon d. Use this funct ion to record an object with fast movement. 1 S elect the menu. 2 P ress the button. ≥ flashes in r ed dur ing reco rding. ≥ First pre ss the but ton halfw ay , th en press it full y to set the focu s and record. It w ill automati cally focu[…]
-
Страница 78
78 VQT4C83 Illuminat ing the subject makes it easier for the camera to focus when recording in low light conditi ons that mak e focusing diff icult. ≥ Switch to Manual Mode. ( l 79) ≥ The avai lable dist ance of the AF as sist lamp is appr ox. 1.5 m. ≥ A conversion lens (optional) can block the AF assist lamp, and it will become harder to adj[…]
-
Страница 79
79 VQT4C83 The operatio n sequence di ffer s for the LCD monitor and vie wfinder . ≥ The Manual Foc us, White Balance, Shutter Speed, Brightness (Iris and Gain) settings are ret ained when you cha nge betwe en Motion Pict ure Recor ding Mode and Still Pi cture Reco rding M ode. ∫ T o switch to Manual Mo de / Press the iA/MANUAL button or the CA[…]
-
Страница 80
80 VQT4C83 ∫ / When using the viewfin der 1 Pr ess the CA MERA FUNCTIO N button to sele ct the desir ed item. ≥ Selected item changes whenever t he CAMERA FUNCTION button is pressed. 2 Rot a te the multi m anual ring to select the setting a nd press the CAMERA FUNCTION button to enter the se tting. ≥ Zoom operat ion cannot be don e using the […]
-
Страница 81
81 VQT4C83 ∫ T o set the Whi te Balanc e manually 1 Select , fill the screen wi th a white sub ject. 2 T ouch and set the blinking . ≥ / When using t he viewfinde r , press and hold the CAMERA FUNCTION button. ≥ When the screen turns black instantly and the display stop s flashi ng and then l ight s con stant ly , the sett ing i s complete. ?[…]
-
Страница 82
82 VQT4C83 ≥ When sett ing both the shut ter speed and the iris/g ain value, s et the shutt er speed and th en set the iris /gain value. Manual shu tter speed adjus tment ≥ When the shut ter speed is set lower than 1/12 in the S till Pict ure Recording Mode , using a tripod is re commended. Als o, White Balance cannot be set. The shut ter speed[…]
-
Страница 83
83 VQT4C83 1 (When MF assist function is used) Select the m enu. ≥ T ouch to displ ay the Man ual icon . 2 T ouc h [FOCUS]. 3 T ouc h [MF] to chan ge to Manua l Focus. ≥ MF appears on th e screen. 4 / Adjust the foc us by rot ating the multi manual ring. Adj ust th e focu s by t ouch ing / . ≥ T ouch [FOCUS] t o end t he adjus tment. The in-f[…]
-
Страница 84
84 VQT4C83 With the 3D Conversion Lens (optional) att ached, you can record life-like and powerf ul 3D image. T o view 3D image, a telev ision that supports 3D is required. ≥ In the unit, the recordabl e 3D images are A VCHD 3D format or si de-by-side forma t (2- scr een str uctu re). ≥ Life-like a nd powerful 3D ful l high defi nition imag e c[…]
-
Страница 85
85 VQT4C83 4 T ouc h [EXIT] to end th e adjustm ent. ≥ / Display of the LCD monitor is switch ed to 3D. ≥ When re-at tachi ng the 3D Conve rsion L ens or af ter an i mpact etc., it is recommended that you perfo rm the adjust ment again. 5 (Whe n recording mot ion pictur es) Press the recording sta rt/stop butto n to st art re cording. ( l 29) ?[…]
-
Страница 86
86 VQT4C83 ∫ Functions th at canno t be used durin g 3D recordi ng When rec ording wit h th e 3D Conv ersion L ens, you cannot use cer tai n functio ns. *1 The Optical Imag e S tabiliz er and Optical Image S t abilizer Lock can be used. *2 This can be used whe n the LCD monito r is display ing in 2D. *3 Only the Digi tal Zoo m (up to 1.5 k ) can […]
-
Страница 87
87 VQT4C83 Motion picture playback using operation icon For det ails on the basic playback operations , refer to p age 35. Advanced (Playba ck) Playback Operations Playback ope ration Playbac k display Operatin g step s Fast forward/ rewin d playback During Play back T ouch 5 duri ng playback to fast forward. (T ouch 6 to rew ind.) ≥ The fast fo […]
-
Страница 88
88 VQT4C83 Creating still picture from motion picture A single fra me from the recorded moti on picture can be saved as a sti ll picture. 3D still pi ctures are cre ated from t he scenes recor ded in 3D, and 2D still pict ures are crea ted from the scenes recorded in 2D. ( (1920 k 1080) still pic tures will be recorded f or the A VCHD scenes and iF[…]
-
Страница 89
89 VQT4C83 ≥ When select [F ACE], it will select the portio n for which Face Recognition was perf ormed from th e scen es judge d to be clearly record ed. This will then be dis played as a thumb nail. ≥ A portion judg ed to be clearl y recorded will be detected and di splayed in thumb nail if you select [ HIGHLIG HT]. 3 (When [MINUTES] is selec[…]
-
Страница 90
90 VQT4C83 Zooming in on a sti ll picture during play back (Playback zoom ) Y ou can zoom in by touchi ng a still pi cture durin g playback. 1 T ouc h and hold the p art you wish to zo om in on during still pic ture playback. ≥ The still pic ture is zoomed in the fo llowing order: k 1 # k 2 # k 4. T ouch and ho ld the screen to zoom in from the n[…]
-
Страница 91
91 VQT4C83 Playing bac k motion pictur es/still pictures by dat e The scene s or the still pic tures record ed on the same day can be pla yed back in su ccession . 1 T ouc h the date se lect ico n. ( l 25) 2 T ouc h the playbac k date. The scene s or the still pic tures record ed on the date selected are dis played a s thumbnail s. 3 T ouc h the sc[…]
-
Страница 92
92 VQT4C83 Highlight Playback Part that was recognised as clearly record ed is extracted from a lon g recording, and it can be played back or stor ed in a short time with eff ects and music added. It is also possi ble to create an original Highl i ght Playback by checkin g your favouri te scene s and se tting u p to extract those scenes. ≥ Highli[…]
-
Страница 93
93 VQT4C83 It is possible t o enjoy the Highlight Playback with yo ur favourite ef fect by setting up the combinat ion of an image ef fect and music. 1 T ouch [CUSTOM]. 2 T ou ch [EFFEC T SETUP] or [MUSIC SEL ECT]. 3 (W hen [EFFECT SETUP] is selected) T o uch the desired effect. ≥ When [EFF ECT S ETUP] is chan ged, [MUSIC S ELEC T] will be set th[…]
-
Страница 94
94 VQT4C83 ∫ Scen e set ting 1 (O nly when Highlight Playback is start ed from [ALL A VC HD]) T o uch the recording format of the scene to play back. 2 T ouch [SELEC T DA TE] or [S ELECT SCE NES]. 3 (W hen [SELECT DA T E] is selected) T o uch the date to be played back. ≥ A maximu m of 7 days can be selected. ≥ When touc hed, the dat e is sel[…]
-
Страница 95
95 VQT4C83 T o clear the favourite scenes from the thumbnail di splay 1 T ouch [Reset]. 2 T ouch [RES ET ALL] or [RE SET SELE CTED]. ≥ The check on all the f avourite scenes will be cleared when [RESET ALL] is selected . 3 (W hen [RESET SELECTED] is selected in step 2) T o uch the scene to b e cleared. 4 T ouch [YES]. ∫ Pla ying back th e favo […]
-
Страница 96
96 VQT4C83 ∫ Setting up the title 1 T ouch / and select your favo urite title sheet. ≥ T itle and date will not be displayed when [NONE] is selected . 2 T ouch [TITLE]. 3 E nter the title. ≥ Input method is same operation as for the face recognition. ( l 66) ≥ T ouch [Enter] af ter ent ering the titl e. ≥ A maximum of 18 chara cters can b[…]
-
Страница 97
97 VQT4C83 Changing the playback settings and play ing back the slide show 1 T ouc h . ( l 25) 2 (Only when you would like to change the settings) T ouch [SET] to se lect the item to change. 3 (When [DA TE SETUP ] is selected) T ouch the pla yback date. (When [ PLA Y BACK S ETUP ] is selected) T ouch [3D (NO EFFECT)] o r [2D]. (When [ SLIDES I NTER[…]
-
Страница 98
98 VQT4C83 (When [MUSIC SEL ECT] is selected) T ouch the des ired sound. ≥ T o adjust the volume of mus ic during play back of the slide show or audio tes ting, operate the volume lever . ( l 36) ≥ T ouch [ ENTER]. (T o test the m usic audio) T ouch [ST ART] and st art the audio testin g. ≥ T ouch t he other music opt ion to chan ge the music[…]
-
Страница 99
99 VQT4C83 ¬ Change t he mode to . ∫ T o delete the scene or still picture b eing played bac k T ouch while scenes or sti ll pictures to be deleted are being pl ayed back. ∫ T o delete sc enes or still p ictures from the thumbnail di splay ≥ Switch the thumbnail display of the scenes or stil l pictur es to delete. ( l 35) ≥ The T ouch Menu[…]
-
Страница 100
100 VQT4C83 When you stop deleti ng hal fway T ouch [ CANCEL] while deleti ng. ≥ The scenes or s till pictu res that have already been de leted when the deletion is cancelle d cannot be r estored. T o complet e editing T ouch [ Return]. ≥ Y ou can also delet e scenes by tou ching , selecting [EDIT SCEN E] # [DELETE] # [ALL SC ENES ], [ MUL TI ][…]
-
Страница 101
101 VQT4C83 Deleting p art of a scene (A V CHD) Unnecessary part of an A VCHD scene can be deleted. The deleted scen es cannot be restored. ≥ Change the mode to and touch the play mode s elect icon. Then, s elect the A VCHD scene. ( l 35) 1 Sele ct the m enu. 2 T ouc h the scene with a p art to del ete. 3 Slid e while touch ing the two top an d b[…]
-
Страница 102
102 VQT4C83 Dividing a scene (A VCHD) It is possible to divide an A VCHD scene. Any unwant ed part s in the scen e can be delete d after dividing . ≥ Change the mode to and touch the play mode s elect icon. Then, s elect the A VCHD scene. ( l 35) 1 Sele ct the m enu. 2 T ouc h the scene to be divided . 3 T ouc h to set the divi ding point. ≥ It[…]
-
Страница 103
103 VQT4C83 Dividing a sce ne to p arti ally delete (iFrame/ MP4) Divide t he iFrame s cenes o r scenes saved in MP4, a nd del ete unne cessary p arts . This divide s the recorded scenes in two and de letes the front half or ba ck half. The scene s that were delete d aft er divisi on cannot be reco vered. ≥ Change the mode to and touch the play m[…]
-
Страница 104
104 VQT4C83 Deleting personal information Deletes Face Recogniti on information from scen es in which faces were recognised . ≥ Change the mode to and touch the play mode s elect icon. Then, s elect the A VCHD scene. ( l 35) ≥ Face Recog nition inform ation is not re corded in the scen es recorded in iFrame or the scenes sav ed as MP4. 1 Sele c[…]
-
Страница 105
105 VQT4C83 Y ou can com bin e the re layed sc ene ( l 65) in the built-in memory and the continued scene in th e SD card to be one into th e SD card. ≥ Change the mode to and touch the play mode s elect icon. Then, s elect the A VCHD scene. ( l 35) 1 Ins ert the SD ca rd that w as used for R elay R ecording. 2 Sele ct the m enu. 3 Whe n the co n[…]
-
Страница 106
106 VQT4C83 ≥ Use the A V multi cab le (supplie d) or HDMI min i cable (op tional) a nd check the o utput settings . ( l 108, 109) ≥ HDMI is t he inter face for digita l devices . If yo u connect this unit to a HDMI comp atible h igh defini tion TV and then play back the rec orded hi gh definitio n images, you ca n enjoy them in high resolutio […]
-
Страница 107
107 VQT4C83 ≥ Check th at the plugs are ins erted as f ar as they go. ≥ Always use a gen uine Panasonic HDMI mini cable (RP -CDHM15, RP-CDHM30: optional). ≥ Do not use any ot her A V multi cables except th e supplied one. ≥ When con necting t o the c omponent terminal of the TV , the yellow plug of t he A V multi ca ble is not requi red. ?[…]
-
Страница 108
108 VQT4C83 ∫ T o display the on-screen in formation o n the TV / When the EXT DISPLA Y button o n the remote control is pr essed, the informati on display ed on the screen (o peration icon and time code etc. ) can be disp layed/no t displayed on t he TV . ≥ It will not display when the unit is turned of f. When the menu s etting is cha nged, t[…]
-
Страница 109
109 VQT4C83 Listening in 5.1 channe l sound (A VCHD) [HC-X900/HC-X900M] Y ou still can listen to the 5.1 channel sound recorded from the internal microphones when this unit is connected to the 5.1 channel compatible A V amplifier or TV using the HDMI mini cable. Please read the A V amplif ier and TV operating instruction s for how to connect this u[…]
-
Страница 110
11 0 VQT4C83 ¬ Change t he mode to . 1 Sele ct the m enu. ≥ If you are not usi ng VIE RA Link , set to [OF F]. 2 Conn ect this u nit to a Panas onic TV comp atible with VIERA Lin k with a HDMI mini cable. A HDMI mini cable (option al) B Panasoni c TV compatibl e with VIERA Link ≥ It is recommen ded to connect this unit to an HDMI t erminal oth[…]
-
Страница 111
111 VQT4C83 3 O perate with th e remote control for th e TV . 1) Press the button up, down, lef t or right to select a scene or still picture to be played back, and then p res s the butt on in the cent re t o set it. 2) Activat e the o peration icons that ar e dis played o n TV scre en with the re mote co ntrol fo r the TV . A Operation icons B Dis[…]
-
Страница 112
11 2 VQT4C83 The scene s or still pictures rec orded in 3D can be pla yed back as 3D image on the LCD monito r of this unit, or by connecti ng this unit to the 3D compat ible TV . It is also possible to convert t he scenes and still pictures recorded in 2D to 3D and play back. Vie wing with 3D c omp atible TV Connect the unit to a 3D comp atible te[…]
-
Страница 113
11 3 VQT4C83 3 (When playing back scenes or still pictures on the 3D compatible television compatible to the frame sequential format) Select the m enu. ≥ This can be set by attaching t he 3D Conversion Len s (optional ) to this unit durin g the Recording Mode. ≥ When the used TV is not compat ible with the frame sequ ential forma t, it will not[…]
-
Страница 114
11 4 VQT4C83 ≥ The recordi ng screen for 3D Recor ding Mode can be displayed in 3D on a 3D- compatible TV when the 3D Conversion Lens (optional) is att ached to this unit. ≥ If your telev ision does not switch to a 3D image, make the nec essary sett ings on the TV . (For f urther d etails, please read the operatin g inst ructions for the TV .) […]
-
Страница 115
11 5 VQT4C83 Vie wing on the LCD monitor ¬ Change the mode to an d touch the play mode select icon. Then, set to [ALL A VCHD], [A VCHD 3D], [SbS 3D] or . ( l 35) ≥ When [ALL A VCHD] is s elect ed, (Blue) is displayed in the thumbna il display at playback for the s cenes recorded in A VCHD 3D, is displayed in the thumbnail display at playba ck fo[…]
-
Страница 116
11 6 VQT4C83 2 T ouc h [3D]. ≥ [2D/3D] is displayed only durin g the Playba ck Mode. 3 T ouc h the scenes or still p ictures to be p layed back . ∫ T o convert to 3 D (2D) image while playing back 1 P lay back the scenes or still pictures. 2T o u c h ( ) . ≥ Images recorded in 2D (3 D) are converted and played b ack as 3D (2D). ≥ It will pl[…]
-
Страница 117
11 7 VQT4C83 Connect the unit to a 3D comp atible telev ision usi ng a HDMI mini cable (opt ional) and pl ay back scenes or s till pictur es recorded in 3D to enjoy life-like and powerful 3D full high defini tion images . ≥ 3D full high definit ion image can be enjoye d by pl aying back the imag e recorded in A VCHD 3D on a 3D compat ible TV that[…]
-
Страница 118
11 8 VQT4C83 4 Play back scenes or sti ll pictures recorded in 3D. ≥ Playback switches between 3D im age and 2D image aut omaticall y . ≥ If your telev ision does not switch to a 3D image, make the nec essary sett ings on the TV . (For f urther d etails, please read the operatin g inst ructions for the TV .) ≥ The recordi ng screen for 3D Rec[…]
-
Страница 119
11 9 VQT4C83 Converting and playing ba ck 2D images a s 3D Y ou can conn ect this u nit to 3D comp atible TV , con vert th e scenes an d still pict ures recorded in 2D (conventi onal image) t o 3D and play back. ¬ Change the mode to an d touch the play mode select icon. Then, select the A V CHD scene or set to . ( l 35) Setti ng with the T ouc h M[…]
-
Страница 120
120 VQT4C83 Motion p ictures or st ill pictures recorded with this unit can be copied between an SD card inserted in this unit an d a built-in memory . ∫ Check th e used sp ace o f the cop y destination It is possi ble to check t he used spa ce of the SD card or built-in memory by [MEDIA ST A TUS] ( l 47). ≥ By displayi ng in 1 scene or touchin[…]
-
Страница 121
121 VQT4C83 3 T ouc h desired items follow ing the scr een displa y . ≥ It will return to the pre v ious step by touching . ≥ (When [SELE CT SCENES] is sele cted) When touched, the scene/ still picture is select ed and the indication appear s on the thumbnail. T ouch the scene/still pict ure again to canc el t he operation . ≥ (When [SELECT D[…]
-
Страница 122
122 VQT4C83 ≥ When the Disc Play back is selecte d while a DVD burner (opti onal) i s connected, menus are no t displ ayed. ≥ Depending on t he following co nditions, th e time it take s for copying may be longer . j The number of recorded sce nes is large. j The temperature of the unit is hig h. ≥ If some mo tion pi ctures or still p ictures[…]
-
Страница 123
123 VQT4C83 Copy/Dubbi ng Motion p ictures or still pictures re corded with this unit can be copied to a DVD disc by connecti ng a DVD bu rner (opti onal) to t his unit using a USB Con nection Ca ble (suppl ied with DVD burner) . The copied DVD disc can also be played back. ≥ Please rea d the operating ins tructions of the DVD burner f or how to […]
-
Страница 124
124 VQT4C83 1 Conn ect the AC a daptor (supplie d with DVD burner) to the DVD burner . ≥ Y ou cannot su pply power to the DVD burn er from thi s unit. 2 Conn ect this u nit to the AC ada ptor and chang e the mode t o . 3 Conn ect this unit to the DVD b urner with the USB Conn ection Cable (supplied with DVD burner). A USB Connection Cab le (suppl[…]
-
Страница 125
125 VQT4C83 Copying to discs ≥ Y ou cannot copy from multiple SD cards to 1 disc. (Y ou can addi tionally copy onl y to a DVD-RAM.) ≥ Y ou cannot copy motion pictures t ogether with still pictu res or motion pictur es in a different pict ure q ualit y (A VCHD pictur e qua lity and c onven tiona l nor mal pi ctur e qual ity) to th e sa me disc .[…]
-
Страница 126
126 VQT4C83 Import ant Noti ce ≥ When connecting an optional DVD burner and this unit for copying a disc , do not insert a disc with re corded motion picture s in high definition picture quality into devices that do not support the A VCHD format. In some cases t he disc may get stuck in the device. The disc will not play back on devices that do n[…]
-
Страница 127
127 VQT4C83 ≥ The disc t hat was copi ed to can be played back by connecting this unit and a DVD burner . ≥ Do not turn of f this unit or the DVD burne r or disconn ect the USB Connect ion Cable while copying. Al so, do not shake this unit or the DVD burne r . ≥ It is i mpossible to s top copy ing hal fway . ≥ The order in which t he scenes[…]
-
Страница 128
128 VQT4C83 Managing the copied dis c ≥ Connect this unit to t he DVD burner and then touch [PLA Y DISC]. ( l 124) ∫ Formatting dis cs This is for initializing DVD-RAM, DVD-RW and +RW discs. Please b e aware that if a dis c is formatted , then all the da ta re corded on the disc will be erased. Back up important dat a on a PC etc. ≥ When for […]
-
Страница 129
129 VQT4C83 ∫ Check before dubbing Check the equi pment used f or dubbing . * Some equipment may not be compat ible with high-def inition (A VCHD) picture quality . In such a c ase, connect wit h the A V multi cable and dub with st andard pic ture qua lity . ( l 132) ≥ For the pos itions of the SD ca rd slot, USB terminal , or t erminal for con[…]
-
Страница 130
130 VQT4C83 ∫ T o dub using e quipment with a n SD card slot Y ou can d ub by directly i nserting an SD card. ≥ T o copy scenes or still pictures from the built- in memory to an SD card, see page 120. ∫ T o dub using equip ment with a USB terminal Y ou can d ub by connect ing a USB cable. ≥ Use the AC adap tor to free y ou from worryin g ab[…]
-
Страница 131
131 VQT4C83 2 T ouc h [RECORDER] on the sc reen of this u nit. ≥ When you se lect an option ot her than [R ECORDER], recon nect the USB cable. ≥ / When using the batt ery , the LCD monitor turns of f af ter abou t 5 seconds. T ouch the sc reen to turn th e LCD monitor on. 3 T ouch the me dia you wis h to dub. ≥ When using the batt ery , the L[…]
-
Страница 132
132 VQT4C83 ∫ Dubbing using equipment w ithout an SD card slot o r a USB terminal, or using a v ideo dev ice Y ou can dub by connect ing a n A V multi c able. ≥ Images are dubbed in standard quality . ≥ Use the AC adap tor to free y ou from worryin g about the batt ery running down . ≥ Change the mode to . 1 C onnect this u nit to a v ideo […]
-
Страница 133
133 VQT4C83 Y ou can st ore 3D imag e with a DVD bu rner , a vide o device or a PC. ≥ Please refer t o page 123 fo r det ails about copy ing with a DVD bur ner . ∫ Copying unalt ered as 3 D images Recording forma t: [High Definition] ≥ Scenes recorde d in [A VCHD 3D] are converted , copied, and saved as 2D image. Image will be recorde d in 10[…]
-
Страница 134
134 VQT4C83 ∫ Dubbing in st a ndard picture q uality ≥ Please ref er to page 132 for det ails about du bbing in st andard pict ure quality . Copying un alter ed as 3D motion pict ure / When [2D/3D DISPL A Y ] is [2D/ 3D] or [3D] , the 3D motion picture is recor ded in side-b y-side forma t. ≥ The scenes recorded in 2D will be recorded as 2D i[…]
-
Страница 135
135 VQT4C83 ≥ Please refer t o page 136 fo r det ails about copy ing with HD W riter AE 4.1. When you use HD W rite r AE 4.1 to handle scenes recorde d in 3D, the followin g operati ons are p ossible. j Copying data to a PC (Scenes rec orded in 3D will be copied unal tered as 3D moti on picture.) j Copying in Blu-ray disc or A VCHD format (Scenes[…]
-
Страница 136
136 VQT4C83 HD Wr iter AE 4.1 Y ou can copy the motion/still pict ure data to the HDD of PCs or write to media like Blu-ray discs, DVD discs or SD cards using HD Writer AE 4.1, the sof tware installed in the supplied CD-ROM. Refer t o the o perating instruct ions of HD Writer AE 4.1 (PDF file) f or det ails on how to use it. ∫ Smart Wizard The Sm[…]
-
Страница 137
137 VQT4C83 ≥ It is possible to play b ack still pictures on a PC using a image viewer st andard to Wind ows or commerci ally available imag e browsing sof tware, and copy still pictur es to a PC using Windows Ex plorer. ≥ Please refer t o page 145 fo r det ails about usin g a Mac. ≥ It is imposs ible to write data to this unit f rom a P C. ?[…]
-
Страница 138
138 VQT4C83 End User Licens e Agreement Before opening th e CD-ROM package, please r ead the fo llowing. Y ou ( “Licens ee”) are granted a l icense for t he Software d efined in this End User Licen se Agreem ent (“Agr eement”) on condit ion that yo u agree to the terms and condit ions of th is Agreem ent. Art icle 1 Licens e License e is gr[…]
-
Страница 139
139 VQT4C83 ≥ Even if the sys tem requiremen ts mention ed in these ope rating instru ctions are ful filled, some PCs canno t be used. ≥ A CD-ROM drive is necessary to install the su pplied softw are application s. (A compatibl e Blu-ray disc/DVD wri ter drive and media are nec essary for writing to a Blu -ray disc/DV D.) ≥ Operatio n is not […]
-
Страница 140
140 VQT4C83 T o use 3D playback func tion * Make sure that you are using the latest version of a video card driv er . ≥ Supplied CD-ROM is available for Windows only . ≥ Input is not supported in langu ages other than English, Ge rman, French, Simpli fied Chinese and Russ ian. ≥ Operatio n cannot be guaran teed on all Bl u-ray disc/DVD drives[…]
-
Страница 141
141 VQT4C83 ∫ T o use the HD Writer AE 4.1 Y ou will need a high perf ormance PC dep ending on t he functi ons to be used. It may not proper ly play back or prope rly opera te depen ding on the e nvironment of t he PC us ed. Ref er to the oper ating env ironment and notes. ≥ Operatio n during the play back may become slow if the CPU or memory i[…]
-
Страница 142
142 VQT4C83 When installing the software, log on to your computer as the Administrator or with a user name wi th equiv alent au thorizat ion. (I f you do not h ave aut horizatio n to d o thi s, consult your manager .) ≥ Before st artin g the inst allation, close all appl ications that are runn ing. ≥ Do not perfor m any other operat ions on you[…]
-
Страница 143
143 VQT4C83 1 Conn ect this u nit to the AC ada ptor . ≥ Use the AC adap tor to free y ou from worryin g about the batt ery running down . ≥ Connect wit h the AC adapto r when using the Con version Ass ist Functi on. 2 T urn on the unit. ≥ This functio n is availabl e in all modes. 3 Conn ect this u nit to a PC. ≥ The USB function selection[…]
-
Страница 144
144 VQT4C83 About the PC display When the unit is connecte d to a PC, it is recogn ised as an ext ernal driv e. ≥ Removable disk (Ex ample: ) is d isplayed in [Compu ter]. Example fo lder struct ure of an SD card: Example fol der struct ure of built-i n memory : The following dat a will be recorded. 1 MPO syste m/JPEG sy stem s till pictur es (up[…]
-
Страница 145
145 VQT4C83 ≥ T o use th e softw are, log on as an Ad ministrat or or as user name fo r stan dard user acc ount (only f or Windows 7 /Windows Vist a). The sof tware canno t be used with t he user name for a gues t accou nt. (On the PC) Select [St art] # [All Programs] # [Pana soni c] # [HD Writer AE 4.1] # [HD Writer AE]. ≥ For details on how t[…]
-
Страница 146
146 VQT4C83 ∫ Operat ing enviro nment ≥ Even if the sys tem requiremen ts mention ed in these ope rating instru ctions are ful filled, some PCs canno t be used. ≥ The USB equip ment operate s with the driver installed as stand ard in the OS. ≥ Supplied CD-ROM is available for Windows only . ∫ Copying still pictures o n PC 1 C onnect this […]
-
Страница 147
147 VQT4C83 *1 only *2 only *3 only ∫ Recording indi cations Other s Indications Motion Picture Recordi ng Mode S till Picture Recording Mode HC-X900 HC-X900M HC-X800 +6 dB 0h00m00s R 1h20m 1h30m 1 / 100 OPEN MF 15. 1 1. 2012 12:34 0dB 1h30m 1 / 100 OPEN MF 15. 1 1. 2012 12:34 0dB 16 M MEGA PRE-REC R 3000 99% ↑ 3D A ////// // Intell[…]
-
Страница 148
148 VQT4C83 //// / / / / / // Number of recording pixels f or still pictu res ( l 32, 75 , 77, 88) In Playbac k Mode, th e picture si ze is not displayed for still pictures recor ded with other produc ts that have dif ferent pict ure sizes from t he sizes shown abov e. Ø 10/ Ø 2 Self- timer Recording ( l 60 ) MEGA OIS ( l 31) B Zebra ( l 74) 99% […]
-
Страница 149
149 VQT4C83 ∫ Playback i ndications ∫ Indication o f connect ion to other device s ∫ Confirmato ry indications ∫ Confirmato ry indications when a DVD burner is connected 1 / ; / 5 // 6 // 7 / 8 / 9 / : / D / E / ;1 / 2; Display during pla yback ( l 35, 87) 0h00m00s P layba ck Time ( l 35 ) No.10 Scene Number Repeat P layback ( l 89) Resume […]
-
Страница 150
150 VQT4C83 Major conf irmation/er ror message s to be indicate d on the screen in t ext. * onl y Other s Messages HC-X900M PERIODICALL Y MAKE BACK UP OF DA T A IN BUIL T-I N MEMOR Y . * We recomme nd backing up import an t recorded motion pictures and still pictu res periodical ly to a PC, DVD disc et c. to protec t it. ( l 123, 136) This messa ge[…]
-
Страница 151
151 VQT4C83 About recovery If faulty management inf ormation i s found, the mes sages may appear an d a repai r is performed. (Repa iring may tak e time depending on the error .) ≥ is displaye d when abnormal manage ment informat ion is dete cted when the scen es are dis played in t humbnai l. ≥ Use a suff iciently charged bat tery or the AC ad[…]
-
Страница 152
152 VQT4C83 ∫ It is not a malfunction in following cases Other s T roubleshoot ing A clicking sound is heard when the un it is shaken . ≥ This is the sou nd of t he lens moving and is not a defect. This sound wil l no longer be heard when the unit is turned on and chan ge the mode to or . Objec t seems to be warpe d. ≥ Object seems to be warp[…]
-
Страница 153
153 VQT4C83 This unit cannot be operated though it is tur ned o n. This unit does no t operate normally . ≥ Remove the bat tery o r AC a daptor , wait ab out 1 min ute and t hen re connect the b attery or AC adaptor . Then about 1 minu te later , turn on the unit again. (Co nducting the abov e operation while the media is being accesse d may da m[…]
-
Страница 154
154 VQT4C83 Colou r balanc e of imag es is stra nge when record ing in a place such as a gym nasi um. ≥ In a place with multip le light sources , such as a gymnasium or a hall, set the Wh ite Balan ce se tting to (Indoor mode 2). If y ou cannot record clearly with th e (Indoor mode 2), set it to (Manual adjus tment mode) . ( l 80) Colour or brigh[…]
-
Страница 155
155 VQT4C83 With othe r prod ucts Problem Check points Although this unit is corr ectl y conne cted to a TV , images ca nnot be seen. The im ages are squeezed horizontally . ≥ Please read the operat ing instru ctions of your TV and select t he channel t hat matches t he input used for the connect ion. ≥ Change t he [T V ASPECT] sett ing to matc[…]
-
Страница 156
156 VQT4C83 With a PC Problem Check points When co nnected b y the USB cable, this unit is not detected by the PC. ≥ Aft er re-inser ting the SD car d into the unit, re connect the supplie d USB cable. ≥ Select anot her USB te rminal on the PC. ≥ Check t he operat ing env ironment. ( l 139, 146) ≥ Connect the supplied USB ca ble again af te[…]
-
Страница 157
157 VQT4C83 ∫ If A VCHD scenes do not change smoo thly when p layed back on another d evice The images may be still for several seconds at the joins between the scenes if the foll owing operation s are performe d when multiple sce nes have bee n continuous ly played back us ing another un it. ≥ Just how smoothly the scenes will be play ed back […]
-
Страница 158
158 VQT4C83 Keep this unit as fa r away as possib le from electromagne tic equipment (such as microw ave ovens, TVs, video games etc.) . ≥ If you use t his unit on to p of or near a TV , the pictures and/or sound on this unit may be disrupt ed by electroma gnetic wave radi atio n. ≥ Do not use th is unit near cell phones because doin g so may r[…]
-
Страница 159
159 VQT4C83 Do not use the unit for surveill ance purposes or othe r business uses. ≥ This unit was des igned for con sumer intermitt ent use. It was not intend ed for continu ous use, or for any in dustrial or commercial appli cation result ing in prolong ed use. ≥ In certa in situ ations, con tinuous use c ould cause the uni t to overhe at an[…]
-
Страница 160
160 VQT4C83 Prep are sp are b atteries when going out for recor ding. ≥ Prep are batte ries enough to las t for 3 to 4 time s the per iod you ar e plan ning to record for. Cold places such as a ski resort can shor ten recordi ng time. If you drop the batt ery accid ent ally , check to see if t he ter minals a re damaged. ≥ Atta ching a battery […]
-
Страница 161
161 VQT4C83 About 3D r ecording Att ach the 3D Conver sion Lens secur ely . It mu st not b e us ed with an in secure attac hmen t. Do not use the 3D Conversi on Lens without adjusting it first. ≥ It will not be possib le to record 3D image correctly , and this ma y lead to tire dness or discomfort. ≥ When you re-a ttac h the 3D Conversion Lens […]
-
Страница 162
162 VQT4C83 When disposing of or giving away the SD car d, note t hat: ≥ Formatting and deletion of this unit or computer only changes the file management informati on and does not complete ly delete th e data in th e SD card. ≥ It is recommen ded that the SD card is physicall y destroy ed or the SD c ard is physicall y formatted using this uni[…]
-
Страница 163
163 VQT4C83 After y ou ha ve se t up t he F ace Re cogn ition function, perso nal informatio n will be held in this unit and inc luded in recorde d images. ≥ When th e unit is se rvic ed, o r gi ven aw ay/ disposed of , the per sonal inform ation should be del eted in the int erest s of prot ecting per sonal i nfor mation . ( l 104) Indem nity ?[…]
-
Страница 164
164 VQT4C83 ∫ Carefully obser ve copyright laws Recordi ng of pre-recor ded tap es or discs or other pu blished or broadcast material for purposes other than yo ur own private use ma y infrin ge copy right la ws. Even for the purpose of pri vate use, recording of cert ain mat erial ma y be restrict ed. ∫ Licenses ≥ SDXC Logo is a tra demark o[…]
-
Страница 165
165 VQT4C83 ≥ SD cards are o nly mentione d with thei r main memory size. The st ated times ar e th e approxima te recordable ti mes for continu ous recording . A Favours image qua lity B Favours Recording time ≥ If recordi ng for lo ng periods, p repare ba tter ies for 3 or 4 t imes the p eriod you wish to record for . ( l 17, 1
 ≥ The def[…]
 -
Страница 166
166 VQT4C83 ≥ SD cards are only mentioned with their main memory si ze. The st ated number is the approxima te number of record able pictur es. Other s Approximate n umber of recordable pictures Picture si ze 4480 k 3360 3392 k 2544 2784 k 2088 640 k 480 Aspect r atio [4:3] SD c ard 4G B 450 800 1200 28 000 16 GB 1900 33 00 500 0 1 18000 64 GB 75[…]
-
Страница 167
167 VQT4C83 When recording 3D still picture ≥ The number of recordable pictures depends on the subject being recorded. ≥ When record ing a 3D still pictur e, the equivalen t 2D still pictur e is recorded as well; therefo re, the number of recordabl e pictures wi ll be reduced accordi ngly . ≥ Maximum number of recordable pictures tha t can be[…]
-
Страница 168
168 VQT4C83 Product numbers correc t as of Jan . 2012. Th ese may be su bject t o chan ge. Some opti onal a cces sorie s may not be av ailabl e in some coun tries . Other s Optional acc essories Battery charger (VW- BC20EB) Battery pack (lit hium/VW-VBN1 30) Battery pack (lit hium/VW-VBN2 60) HDMI mini cable (RP-CDHM15, RP-CDHM30) Wide con version […]
-
Страница 169
169 VQT4C83 ∫ / Att aching the optional accessor ies on the shoe adaptor 1 Open the sh oe adaptor c over . 2 Attach the s hoe adap tor to this unit. ≥ Attach the optio nal ac cesso ries on the shoe a daptor . ≥ When removing the shoe adap tor , slide the SHO E ADAPT OR RELE ASE leve r , and remov e the shoe ad aptor while s liding the lever .[…]
-
Страница 170
170 VQT4C83 High Definition Video Camera Inform ation for your safety Other s S pecification s Power sou rce: DC 9.3 V (Wh en using AC a daptor) DC 7. 2 V (Whe n usin g batter y) Power cons umption: Recording; / 8.9 W 7.9 W Charging; / 10.3 W 10.1 W Motion picture re cording format: [A VCHD ]; A VCHD format version 2.0 compliant (A V CHD 3D/Progres[…]
-
Страница 171
171 VQT4C83 Recording m edia: SD Memo ry Card (F A T 12 and FA T16 syst em compliant) SDHC Memory Card (F A T32 syst em compliant) SDXC Memo ry Card (exF A T system compliant) Refer to pa ge 20 for det ails on SD cards usab le in this unit. Built-in memory ; 32 GB Image sens or: 1/4.1 t ype (1 /4.1 z ) 3MOS image sensor T ota l; 3050 K k 3 Effectiv[…]
-
Страница 172
172 VQT4C83 Spea ker: 1 round speaker , dynamic type White b alanc e adjust ment: Auto track ing white balanc e system St andard ill umination: 1,400 lx Minimum required i llumination: Approx. 1.6 lx (1/25 wit h Low Light mod e in the Scene Mod e) Appr ox. 1 l x wit h the Co lour N ight Vi ew fu nctio n A V multi connector video output level: Compo[…]
-
Страница 173
173 VQT4C83 AC adaptor Inform ation for your safety ∫ 3D Conversion Lens (optional ) Mass: Approx. 425 g [wit hout batt ery (supplied ) and an SD card (opt ional)] Approx. 425 g [wit hout ba ttery (s upplied) ] Approx. 345 g [wit hout batt ery (supplied ) and an SD card (opt ional)] Mass in operation: Approx. 485 g [wit h battery (s upplied) and […]
-
Страница 174
174 VQT4C83 Index ∫ Numeri cs 1080/50p recordin g . . . . . . . . . . . . . . . 52 2D/3D display . . . 85, 1 12, 1 15, 1 19, 134 3D Conversi on Lens setup . . . . . . . . . . 84 3D image storage . . . . . . . . . . . . . . . 133 3D output . . . . . . . . . . . . . . . . . . . . . 1 13 3D playback/viewing . . . . . 1 12, 1 17, 161 3D recordin g . […]
-
Страница 175
175 VQT4C83 Intelligent exposure . . . . . . . . . . . . . . . 60 Interva l record ing . . . . . . . . . . . . . . . . . 64 Iris . . . . . . . . . . . . . . . . . . . . . . . . . . . 81 ∫ L Language . . . . . . . . . . . . . . . . . . . . . . 47 LCD monitor . . . . . . . . . . . . . 1 1, 27, 16 2 LCD set . . . . . . . . . . . . . . . . . . . . . […]
-
Страница 176
Pursuant to at the directive 2004/108/EC, article 9(2) Panasonic Testing Centre Panasonic Marketing Europe GmbH Winsbergring 15, 22525 Hamburg, Germany Panasonic Corporation Web site: http://panasonic.net © Panasonic Corporation 2012 VQT4C83 F0112SL0 ( 2100 ) B EU HC-X900&X900M&X800EB-VQ T4C83_mst.book 176 ペー ジ 2012年[…]