
-
Consumer services
>
-
User manual, instruction for use
>
-
Linen Care
>
-
Steam iron
>
User manual and frequently asked questions Ultragliss
Ultra-easy ironing
Fast and Easy ironing
Avoid unwanted creases when going back and forth on your linen. We designed the Durilium® 360° soleplate to smoothly and efficiently iron in all directions.
In addition Ultragliss is built to make ironing easy thanks to: our best in glide Durilium technology coating invented by Tefal, a powerful shot of steam, a high power and the anti drip function.
Reference : FV4887D0
Frequent questions
No, leave the iron to cool down before putting it away and follow the 4 tips: empty out the water remaining in the tank, set the thermostat to the minimum, close the steam control and stand it upright or place it on the base (depending model).
Choose a board that is height-adjustable to adjust it to your height. It should be steady and robust so that you can place the ironing appliance on it.
The board should be perforated to allow the steam to pass through the fibres of the fabric to soften it and make ironing easier. The ironing board cover should also be suitable to allow the flow of steam through.
There could be several reasons for this:
• You are not using the right type of water (Refer to the FAQ «What water should I use for ironing?»).
• You have used a starch type product on your laundry (Always spray to the reverse side of the fabric to be ironed and clean your iron afterwards).
• Fibers from clothes have been trapped in the holes in the iron and have become carbonised.
• The clothes have not been rinsed enough and there is detergent left on them or you have ironed a new item of clothing before washing it.
• See the instructions for use to find out what type of water is appropriate and clean the soleplate from time to time with a damp sponge.
It is essential to select the right ironing temperature.
Your iron has a built-in thermostat controlling the temperature very precisely over the entire surface of the soleplate. The thermostat dial contains international markers with dots corresponding to three ironing temperatures.
Make sure that you use the right temperature for your clothes:
• Marker with 1 dot for synthetic fabrics.
• Marker with 2 dots for wool and silk.
• Marker with 3 dots for cotton and linen.
• Don’t use the Boost steam button intensively. Wait few seconds between each use.
• The temperature button must be placed on Steam area (between 2 dots and MAX).
• Use steam only when the iron is hot (the light must be off).
This function allows you to iron fabrics in situ or on a hanger.
To do this, set the iron temperature button to the maximum position.
• Leave the item on a hanger and gently pull the fabric with one hand.
• Press the steam control button intermittently and move the iron from top to bottom.
As the steam produced is very hot, it softens the fibres and removes creases.
Note: Never use the vertical steam function on an item being worn by anyone.
Yes and you do not need to fill the tank with water. Set the variable steam control to Dry and set the temperature to suit the type of material (care points •, ••, •••).
At the end of your ironing session, we would suggest that once your iron has cooled down, you should wipe over the soleplate and around the steam holes to remove any burned fibers that may have started collecting around the steam holes.
If it has not been used for a long time (for example several weeks), use it over the sink for a few minutes to remove any residue that could stain your laundry.
No, you must always unplug the iron before filling it.
To avoid damaging the soleplate, follow this advice:
• Always place your iron on its heel rest or its base (depending on model).
• Avoid ironing over abrasive items (buttons, zip fastenings, etc.).
• Never clean your iron’s soleplate with abrasive or metallic pads.
Shiny marks can appear on some fabrics, especially on dark coloured fabrics. We would advise ironing dark clothes inside out and using the correct temperature.
If ironing mixed-fibre fabrics, set the temperature for the most fragile fibre.
Important: The iron takes longer to cool down than to heat up. We recommend that you start with fabrics to be ironed at a low temperature.
To fill the tank, the cursor must be positioned on the “STOP” setting (crossed-out steam symbol).

* Depending on model
Your appliance has been designed to work with tap water. However, it is necessary to regularly perform self-cleaning of the steam generator chamber in order to remove limescale.
If your water is very hard, we recommend that you use a maximum of 50% untreated tap water and 50% distilled water available in most shops.
Never use water containing additives (starch, perfume, aromatic substances, softener, etc.), condensation water (e. g. clothes dryer water, refrigerator water, air conditioner water, rainwater), pure demineralized water or distilled water from store. These contain organic waste or minerals that condense under the influence of heat and cause spitting, brown dripping or premature aging of your device.
If your iron has an anti-calc system, you should clean the anti-calc valve once a month.
To do this:
• Unplug the iron and leave it to cool for 30-45 minutes.
• Empty the water and remove the valve, holding it by the top.
• Let the anti-calc valve soak for 4 hours in a glass of natural lemon juice or citric acid, then thoroughly rinse the anti-calc valve under tap water.
• Reposition the anti-calc valve into your iron. Warning! Never touch the end of the anti-calc valve.
Firstly, fill the iron tank to MAX with water.
Set the thermostat control to Max and the steam control on DRY and switch on.
Place the iron on its heel and leave to heat up for around 5 minutes.
Unplug the iron then hold your iron horizontally above the sink.
Remove the anti-scale valve (or set the control to self-clean/autoclean depending on the model). Steam, water and scale deposits will leave the steam chamber through the steam holes and the iron will be clean.
At the end of the operation, push the anti-calc valve back into position. When your iron is cold, you will also be able to use your vacuum to gently suction limescale and dirt that may have clogged the holes in the soleplate.
Four good tips:
After use, empty the tank, close the steam control, set the thermostat to minimum and stand the iron upright or place it on the base (depending on model).
Cleaning:
Use a damp soft cloth to wipe your iron and never use cleaners or solvents.
If your iron has an auto-clean function, refer to the instruction manual before using it.
Tips:
• Always use untreated water in your iron. If your water is very hard, we recommend you use a mix of 50% untreated tap water and 50% distilled water.
• Avoid placing your iron on sharp objects such as zip fasteners and metal buttons.
• Do not put your iron down flat on rough surfaces.
You must take precautions so that using your iron is risk-free.
• Above all, never leave a hot iron unattended.
This is not only to avoid overheating of the iron or the surface on which it is placed but also to ensure that no-one gets burned. If safety is one of your main concerns, choose an iron that has an automatic cut-off function.
Never leave a hot iron within reach of children or pets who risk knocking it over and injuring themselves.
• Like any electrical appliance, never put your iron in water.
• Do not use an iron that has fallen down or has a damaged power cord. If you have the slightest doubt concerning the condition of your iron, contact the Service Centre.
• Always unplug your iron before leaving it, cleaning it or filling it with water (unless it is a model that has a removable water tank). Regularly check the water level to ensure that there is always enough.
Never use any descaling agent or vinegar when rinsing the boiler: they could damage it.
• Self-cleaning: heat the iron, unplug it, remove the anti-calc valve and spray the iron over the sink.
• Cleaning the anti-calc valve: Remove the antiscale valve and soak the valve in a cup of white vinegar or plain lemon juice for 4 hours.
It is not designed for the water to be removed completely. It is okay to use or store the iron even with a small amount of water remaining. When storing, please remove as much water as possible and store in an upright position.
• The Durillium soleplate:
Regularly clean the soleplate with a damp, non metallic washing up pad. For easier, non-corrosive cleaning of your iron’s soleplate, use a damp sponge on the soleplate while it is still warm.
If cleaning dirt off is an issue, use the stick which is made specifically for cleaning the Durillium soleplates.
• The stainless soleplate:
Clean the soleplate of your iron when it is cool with a damp cloth or a non-abrasive sponge.
• The autoclean soleplate:
It is recommended that you use a soft damp cloth on the warm soleplate, in order not to damage the surface.
Warning: The use of iron cleaner will cause damage to your soleplate’s autoclean coating.
Gently shake your iron to reactivate it, the lights should start to flash and then the product should start to heat up.
3 possible causes:
• There is no power in the mains socket: check that the plug is properly connected, or try to plug the iron into a different socket.
• Temperature control set too low: set the temperature control to a higher temperature.
• The automatic electronic cut-out* is active: move your iron.
* depending on model
Always set your iron to the ‘No Steam’ function before you start to fill.
Some irons (depending on model) can produce steam when set on the One dot setting. However, the majority of our irons will only produce steam when set on the 2 dot or 3 dot setting. When you look on your iron’s thermostat dial you will notice that the 2 dot and 3 dot settings have a shaded background, this indicates that the iron will produce steam when the dial is set inside this shaded area.
Not all of the steam holes release steam, the smaller holes on the soleplate that look like they might be steam holes are actually designed to assist soleplate glide ability.
There is not enough water in the tank. Fill it up with the quantity indicated in the instructions for use and push spray button several times to fill the system complete.
All irons contain a thermostat light. It is normal for the thermostat to turn on and off. It indicates the thermostat is working and your soleplate is being maintained at the desired temperature. If the auto-off light blinks, you must disengage the auto-off function. This is done by gently shaking the iron which will allow the iron to reheat.
When heating your iron for the first time, you may notice a small amount of odour and smoke, this is simply the engineering residues from the manufacturing process burning off. These are harmless and will quickly disappear.
It is normal. Your iron generates a lot of steam; this steam is condensing on the board. Some waterdrops could appeared underneath the ironing board and fall on the flooring.
Your iron has been stored horizontally, without draining the water tank and with the selector placed on steam position. When you store your iron horizontally, check that the tank is empty and the selector on «DRY» position.
Check the following points:
• The tank is empty or almost empty: add more water.
• The selected temperature is too low and does not allow steam to be produced: set the thermostat to the steam zone (between 2 dots and MAX).
• If your iron has a Dry/Steam control: set it to the Steam position.
• Scale has built up in your iron: descale it.
• Your iron has an intelligent system (a moving sensor) which temporarily stops steam being released when the iron is not moving, even when it is placed horizontally. This function eliminates wasted steam while you are handling the clothes.
Please check the following points:
• The tank is empty or almost empty: add more water.
• The selected temperature is too low to use this function: set the thermostat to the zone between 3 dots and MAX.
The «supersteam» or «turbo» function should not be used intensively – wait a few seconds between pressing the button.
You are filling the tank with the «Dry/Steam» control set to Steam – it needs to be in the «Dry» position.
Or, you have over-filled your iron – do not go beyond the «MAX» level on the tank.
Some laundry starches and synthetic fibres may stick to the surface of the iron. Please clean the Iron’s surface.
This is probably crystallized calcium chlorohypochlorite. Carry out the self-cleaning instructions in the instruction manual two or three times. If that hasn’t resolved the problem, it may be that your iron needs repair. Please contact the service centre.
The internal parts may make metallic noises with the change in temperature. There is nothing wrong with it.
After following the instructions in the user manual for starting the appliance, make sure that your electrical socket is working by plugging another appliance. If it still does not work, do not try to dismantle or repair the appliance yourself, instead, take it to an approved repair centre
Do not use your appliance. To avoid any danger, have it replaced by an approved repair centre.
The electronic system cuts the power and the auto-stop light flashes if the iron is not moved for more than 8 minutes (on its heel rest or base) or is left flat for more than 30 seconds. To turn the iron back on, gently shake it until the light goes out.
This may be due to the use of chemical descaling agents or additives in the water for ironing. Never use this type of product in the water tank (see our recommendations regarding water to be used). Some residues could also been present in the steam chamber or on the soleplate; use the self cleaning function (Depending model). All linen, especially new garments, must be washed and rinsed thoroughly to remove any soap and chemical deposits before you iron them. If these are not removed by washing they may appear later out of the soleplate in the form of small brown or white spots or streaks on your linen.
Use the right temperatures on the thermostat for the right fabrics. A reason for sticking may be the use of starch. If you want to use starch, simply spray it on the reverse side of the garment, so that there is no contact between the soleplate and the starch. Clean the soleplate from rubber prints of fabric. (Which always must be ironed on reverse side of the rubber prints.)
The anti-calc collector is a scale collector which automatically collects the scale which forms inside your iron. The amount of scale collected depends on the hardness of your water.
This system prevents the soleplate from clogging. Its active coating eliminates fibres and impurities that often become stuck to the plate and end up reducing its glide.
The higher the wattage, the faster the iron will reach the desired temperature.
Your appliance contains valuable materials which can be recovered or recycled. Leave it at a local civic waste collection point.
Please go to the “Accessories” section of the website to easily find whatever you need for your product.
Find more detailed information in the Guarantee section of this website.
If you believe that one part is missing, please call Consumer Services Center and we will help you find a suitable solution.
-
Warranty
View the product warranty conditions
-
Contact
Our advisors are at your service.
со с
^ о
кхо (О
3
о
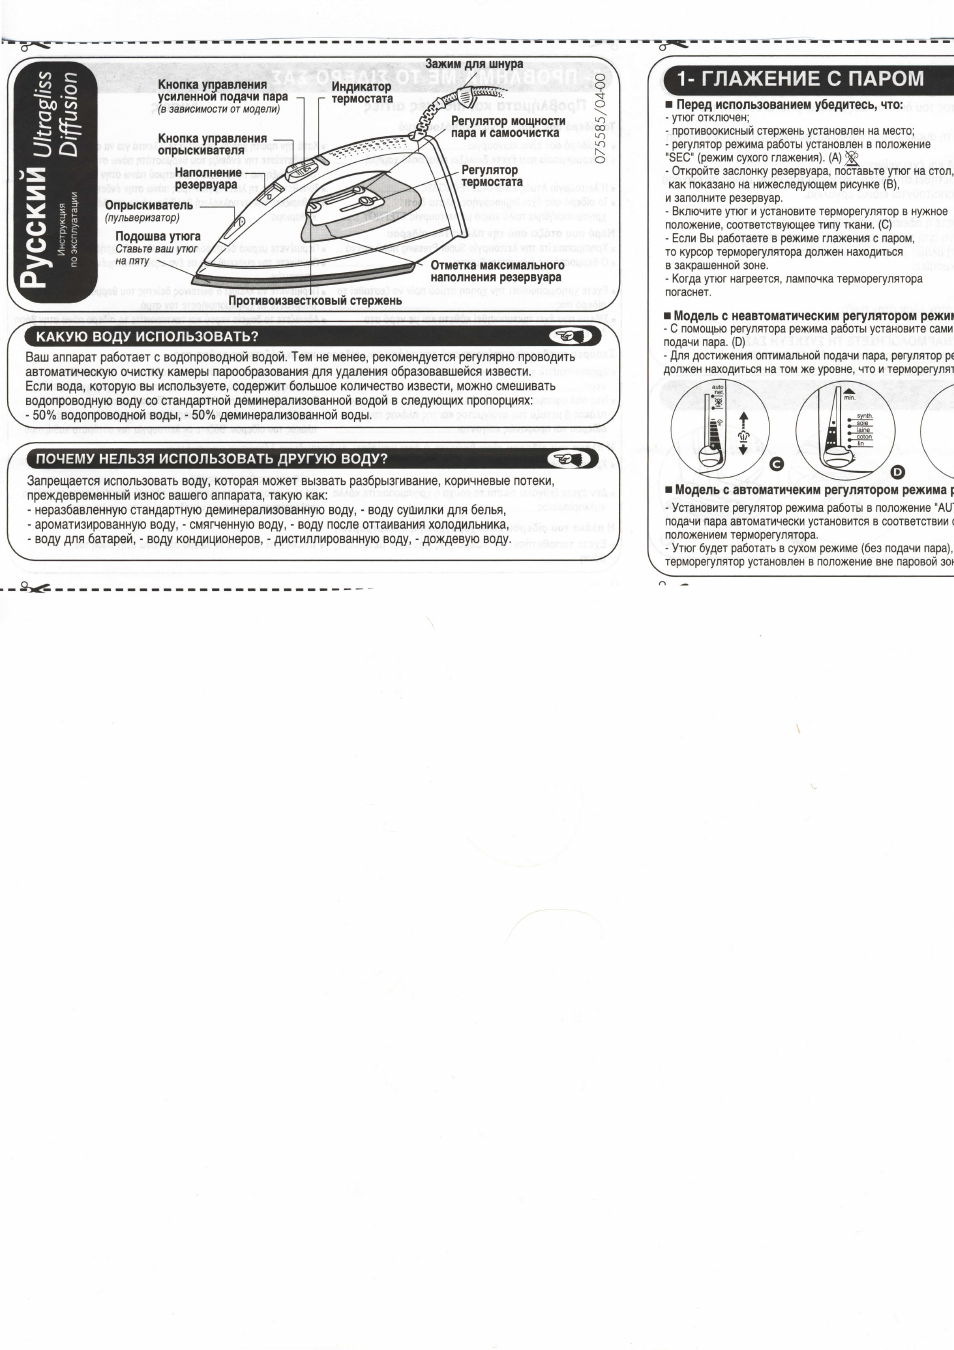
Индикатор
термостата
Опрыскиватель
(пульверизатор)
Подошва утюга
Ставьте ваш утюг
на пяту
Кнопка yпJ)aвлeния
усиленной подачи пара
(в зависимости от модели)
Кнопка управления —
опрыскивателя
Наполнение
резервуара
Зажим для шнура
Регулятор мощности
пара и самоочистка
Регулятор
термостата
Отметка максимального
наполнения резервуара
о
9
о
ю
Г\
о
Противоизвестковый стержень
КАКУЮ ВОДУ ИСПОЛЬЗОВАТЬ?
Ваш аппарат работает с водопроводной водой. Тем не менее, рекомендуется регулярно проводить
автоматическую очистку камеры парообразования для удаления образовавшейся извести.
Если вода, которую вы используете, содержит большое количество извести, можно смешивать
водопроводную воду со стандартной деминерализованной водой в следующих пропорциях:
— 50% водопроводной воды, — 50% деминерализованной воды.
ПОЧЕМУ НЕЛЬЗЯ ИСПОЛЬЗОВАТЬ ДРУГУЮ ВОДУ?
Запрещается использовать воду, которая может вызвать разбрызгивание, коричневые потеки,
преждевременный износ вашего аппарата, такую как:
— неразбавленную стандартную деминерализованную воду, — воду сушилки для белья,
— ароматизированную воду, — смягченную воду, ■ воду после оттаивания холодильника,
— воду для батарей, — воду кондиционеров, — дистиллированную воду, — дождевую воду.
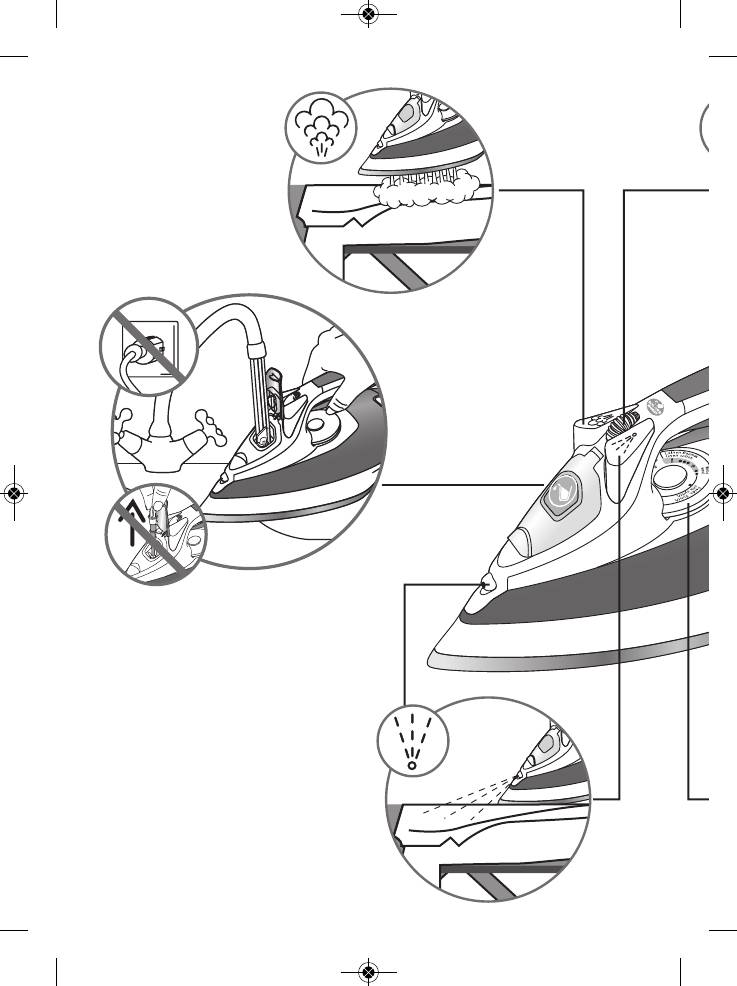
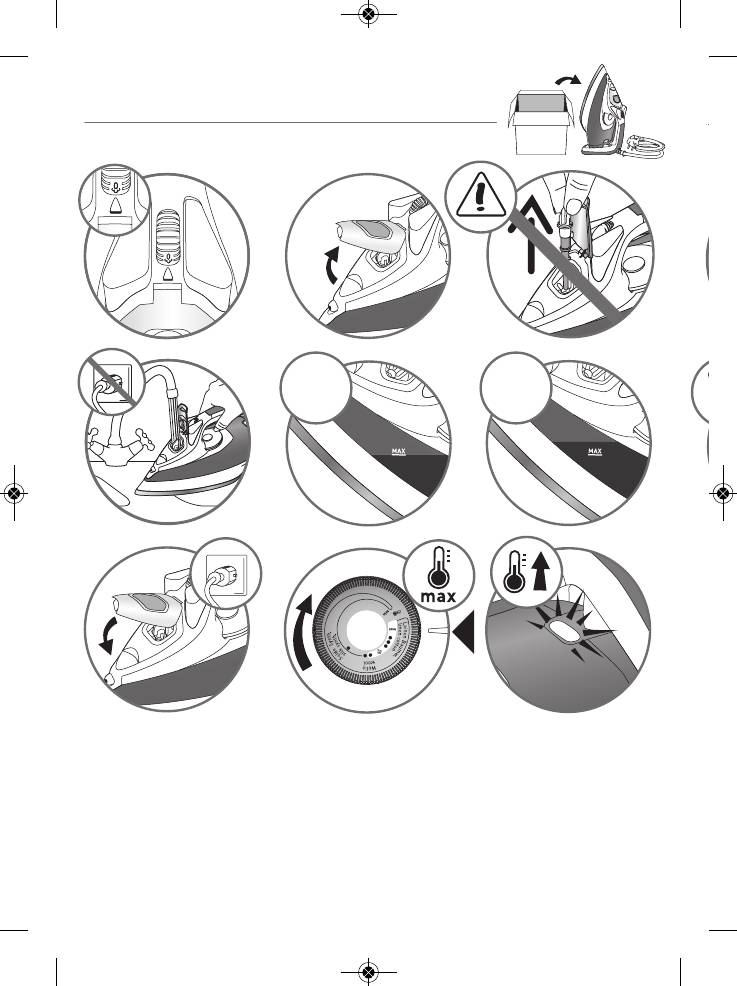
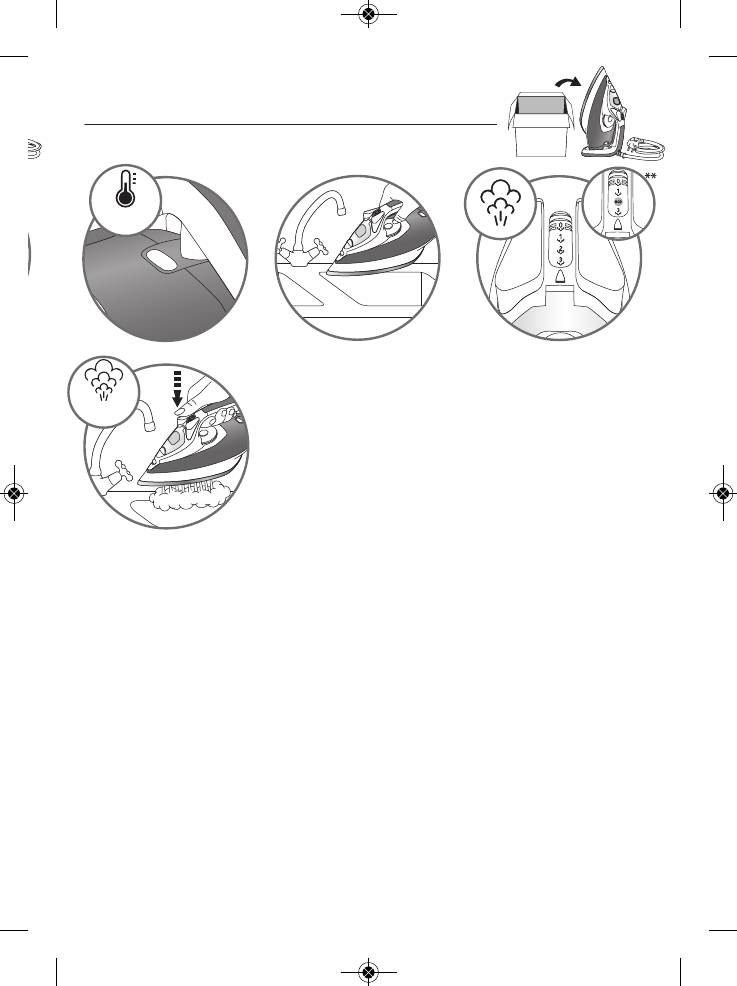
1- ГЛАЖЕНИЕ С ПАРОМ
■ Перед использованием убедитесь, что:
— утюг отключен;
— противоокисный стержень установлен на место;
— регулятор режима работы установлен в положение
«SEC (режим сухого глажения). (А) ^
— Откройте заслонку резервуара, поставьте утюг на стол,
как показано на нижеследующем рисунке (В),
и заполните резервуар.
— Включите утюг и установите терморегулятор в нужное
положение, соответствующее типу ткани. (С)
— Если Вы работаете в режиме глажения с паром,
то курсор терморегулятора должен находиться
в закрашенной зоне.
— Когда утюг нагреется, лампочка терморегулятора
погаснет.
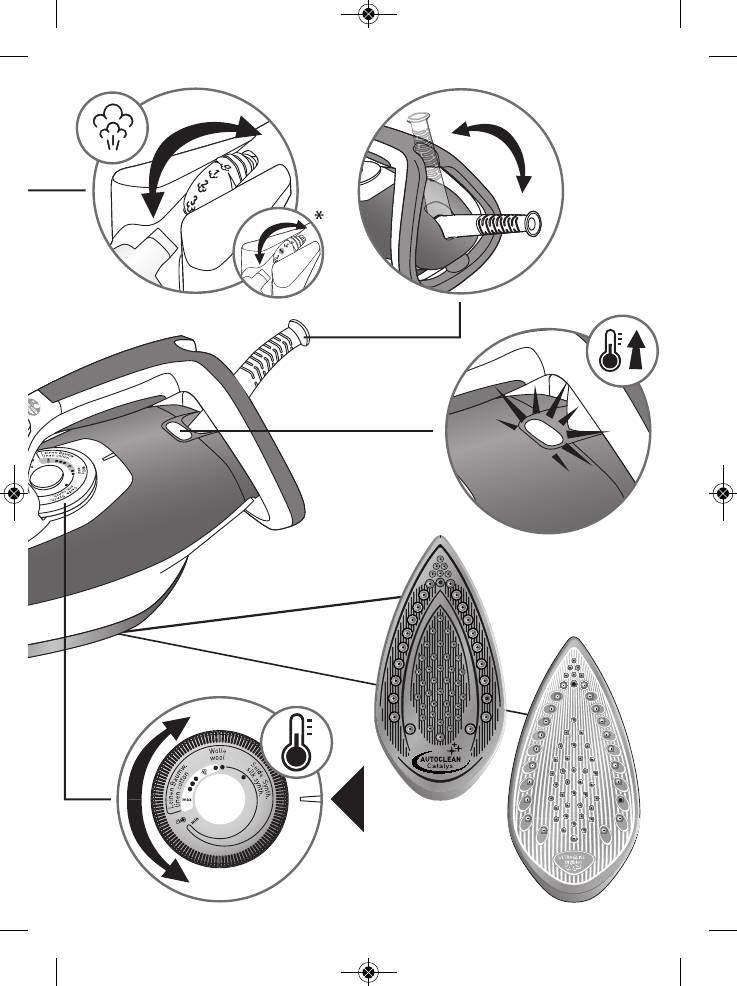
■ Модель с неавтоматическим регулятором режима работы
— С помощью регулятора режима работы установите сами необходимый режим
подачи пара. (О)
— Для достижения оптимальной подачи пара, регулятор режима работы
должен находиться на том же уровне, что и терморегулятор.
auto
1
д
if
t
1
i
^ X /
à дТ/* I
1
*
coton
1
1
♦ / \
«» / \
<S?
J aUto
\
■ Модель с автоматичеким регулятором режима работы
— Установите регулятор режима работы в положение «AUTO» (Е), режим
подачи пара автоматически установится в соответствии с выбраным
положением терморегулятора.
— Утюг будет работать в сухом режиме (без подачи пара), если
терморегулятор установлен в положение вне паровой зоны.
Противокапельная система (в зависимости от модели)
— Противокапельная система препятствует вытеканию воды из утюга до тех пор,
пока температура нагрева утюга не будет достаточной для того, чтобы обеспечить
оптимальную подачу пара.
При разглаживании всех тканей, кроме льна, хлопка, шерсти, держите утюг^
на расстоянии нескольких сантиметров от ткз14и, чтобы не сжечь ее. ,,
,
■ Использование распрыскивателя
— Распрыскиватель можно использовать как
для сухого глажения, так и для глажения с
паром (при условии,
что в резервуаре есть вода). (К)
— Нажмите на кнопку распрыскивателя.
■ Глажение с усиленной подачей пара
(в зависимости от модели) («зирегргевзтд»)
— Для получения повышенного расхода пара следует
импульсным движением нажать на кнопку усиленной подачи
пара («8ирегргезз1пд») (6).
Подождите некоторое время перед повторной операцией.
■ Вертикальное раглаживание (в зависимости от модели)
— Установите регулятор в максимальное положение. (Н)
— Повесьте одежду на вешалку-плечики и слегка натяните ткань одной рукой.
— Утюг должен быть в вертикальном положении и слегка наклонен вперед. Нажмите на
кнопку усиленной подачи пара («зирегргезз1пд») импульсным движением и разглаживайте
ткань сверху вниз, (и)
Выбор температуры глажения и режима подачи пара
тип
ТКАНИ
ПОЛОЖЕНИЕ РУЧКИ УПРАВЛЕНИЯ ТЕРМОСТАТА
Синтетические ткани
Ацетат, Акрил, Полиамид
Полиэстер
Вискоза
Шелк
•
Шерсть
Хлопок, Лен
■ • • ■
Практические советы;
Тип ткани и температуре глажения:
^
•
Ваш утюг быстро нагревается: начинайте гладить ткань с низкой температурой глажения, затем
переходите на глажение тканей с более выской температурой.
•
Если вы понижаете температуру термостата, подождите, пока загорится сигнальнаШ лампочка,
прежде чем продолжать глажение.
■
Для смешанных фибровых тканей, отрегулируйте термостат на глажение ткани с самой низкой
температурой.
Практические советы:
При первом использовании придется, возможно, подождать несколько
секунд
после выключения термостата, чтобы получить пар.
•
Если вы используете крахмал: Наносите его на обратную сторону белья. Очищайте подошву
утюга.
‘ Внимание: перед чисткой отключите утюг и дайте ему охладат^^^ I
2 — СУХОЕ ГЛАЖЕНИЕ
• Установите регулятор режима работы
в положение «SEC». (F) ^
• Вы можете гладить, когда сигнальная
лампочка термостата погаснет.

3 — УХОД
■ Подошва утюга
• Рекомендуется регулярно чистить подошву утюга, проводя по ней мягким влажным
тампоном, пока она еще теплая. При использовании крахмала рекомендуется распылять
его на ткань и как можно чаще протирать подошву утюга мягким влажным тампоном. Ме
рекомендуется использовать горизонтальную металлическую подставку для утюга, так
как это может повредить его подошву. Следует устанавливать утюг вертикально на пяту.
■ Противоокисный стержень
Перед любыми рперациями по уходу или по
чистке убедитесь, что
— утюг выключен;
— подошва утюга остыла.
Не рекомендуется использовать чистящие
порошки и порошки очистки от накипи.
Рекомендуется чистить один раз в месяц противоокисный стержень.
Отключите утюг.
Вылейте воду из резервуара.
Установите регулятор режима работы в положение для сухого глажения («SEC»). Ж
Нажимая на противоокисный стержень, поверните его против часовой ст[^лки. (L)
Когда стержень разблокируется, ослабьте нажатие.
Стержень при этом приподнимется из своего гнезда.
Достаньте стержень из его гнезда, не касаясь его
конца.
• Опустите конец стержня в белый уксус или
натуральный лимонный сок на 4 часа. (М)
^
^
____________ • Промойте стержень в проточной воде и установите
^(0
его на место, поворачивая его по часовой стрелке. (N
-Внишнив: прибор не будет работа1^ б^противоо(шсного;отержня.
м
Система самоочистки
• Рекомендуется пользоваться системой самоочистки не реже одного раза в месяц.
• Если модель оснащена противокапельной системой, то рекомендуется пользоваться системой
самоочистки последовательно два раза в месяц.
• Отключите утюг.
• Установите регулятор режима работы в режим сухого глажения (положение «SEC»). ^
• Заполните резервуар водопроводной водой до максимальной отметки и установите терморегулятор
в положение «LIN •••».
• Включите утюг и подождите пока погаснет лампочка терморегулятора.
• Отключите утюг и держите его над раковиной, затем установите регулятор режима работы
в режим самоочистки (отметка
«AUTONET»).
(О)
• Пока регулятор режима работы находится в том же положемии, аккуратно потрясите утюг,
чтобы из него вытекла вода.
Ч. • Когда подошва утюга немного остынет, протрите ее мягкой тканью.
МЕРЫ ПРЕДОСТОРОЖНОСТИ
•
Внимание! Убедитесь, что напряжение в Вашей сети соответствует напряжению утюга (220-240 В).
• Неправильное подключение утюга может привести к его полному повреждению, гарантия при этом
снимается.
• Для включения утюга розетка с заземлением обязательна. Используйте удлинители только
двухполюсного типа 10 А с заземляющим приводом.
• В случае износа питающего кабеля, его необходимо заменить на абсолютно идентичный кабель в
специализированной сервисной службе, так как для его замены потребуются специальные инструменты.
• Не погружайте утюг в воду.
• Выключайте утюг при заливании и выливании воды.
• В случае падения утюга, не пользуйтесь им без проверки у специалиста, так как внешне невидимые
повреждения могут создать угрозу Вашей безопасности.
• Подошва утюга может быть очень сильно нагрета, поэтому:
— не прикасайтесь к нагретой подошве утюга;
— не убирайте утюг до его охлаждения
— не оставляйте утюг во включенном состоянии без присмотра;
— держите утюг подальше от детей.
НИКОГДА НЕ РАЗБИРАЙТЕ УТЮГ САМОСТОЯТЕЛЬНО:
.
обращайтесь
в
пункты
сервисного
обслуживания
4 — ХРАНЕНИЕ
• Отключите утюг и подождите пока он остынет.
• Вылейте воду из резервуара, установив
регулятор режима работы в режим сухого
глажения (отметка «ВЕС’).(Р)^
• Обмотайте шнур вокруг пяты утюга
и закрепите конец шнура фиксатором. (О)
• Храните утюг в вертикальном положении,
установив его на пяту.

МЕРЫ ПРЕДОСТОРОЖНОСТИ
[I)
• Внимание! Убедитесь, что напряжение в Вашей сети соответствует напряжению утюга (220-240 В).
• Неправильное подключение утюга может привести к его полному повреждению, гарантия при этом
снимается.
• Для включения утюга розетка с заземлением обязательна. Используйте удлинители только
двухполюсного типа 10 А с заземляющим приводом.
• В случае износа питающего кабеля, его необходимо заменить на абсолютно идентичный кабель в
специализированной сервисной службе, так как для его замены потребуются специальные инструменты.
• Не погружайте утюг в воду.
• Выключайте утюг при заливании и выливании воды.
• В случае падения утюга, не пользуйтесь им без проверки у специалиста, так как внешне невидимые
повреждения могут создать угрозу Вашей безопасности.
• Подошва утюга может быть очень сильно нагрета, поэтому:
— не прикасайтесь к нагретой подошве утюга;
— не убирайте утюг до его охлаждения
— не оставляйте утюг во включенном состоянии без присмотра;
— держите утюг подальше от детей.
НИКОГДА НЕ РАЗБИРАЙТЕ УТЮГ САМОСТОЯТЕЛЬНО:
.
обращайтесь
в
пункты
сервисного
обслуживания
4 — ХРАНЕНИЕ
• Отключите утюг и подождите пока он остынет.
• Вылейте воду из резервуара, установив
регулятор режима работы в ^жим сухого
глажения (отметка «ЗЕС»).(Р)^
• Обмотайте шнур вокруг пяты утюга
и закрепите конец шнура фиксатором. (О)
• Храните утюг в вертикальном положении,
установив его на пяту.
4 — ВОЗМОЖНЫЕ ПРОБЛЕМЫ
Неполадки и возможные причины
Способ устранения
Незначительное количество или отсутствие пара
■ Ваш утюг новый………………………………………………………………. ■ При первом использовании подождите 2 минуты для
получения пара.
■ Выбранная температура слишком низкая………………………….. ■ Установите ручку термостата на «, ••• или МАКС, а
ручку регулировки пара — на окрашенную зону. (
■ Ручка управления подачей пара находится в положении ■ Установите ручку управления подачей пара в положение
БЕЗ
ПАРА…………………………………………………………………………. АВТО.
■ Большое количество накипи или утюг слишком долго
■ Очистите противоизвестковую кассету и выполните
использовался
БЕЗ
ПАРА…………………………………………………. самоочистку.
Вода вытекает из отверстий в подошве
■ Вы слишком часто используете кнопку «суперпар»………………
■ Соблюдайте интервал в несколько секунд между
каждым использованием.
■ Термостат отрегулирован неправильно……………………………… ■ Обратитесь в улолномоченный сервисный центр.
■ Вы используете пар при недостаточно нагретом утюге…
■ Для появлехия пара подождите, пока сигнальная
•
лампочка погаснет.
Коричневые подтеки вытекают из подошвы и пачкают белье
■ Вы используете химические средства для удаления
■ Выполните самоочистку и следуйте нашим
накипи или неразбавленную деминерализованную воду…
рекомендациям (см. параграф »Какую воду можно
использовать».
■ «Ворсинки» белья забиваются в отверстия подошвы или
■ Очистите подошву неметаллической губкой. Время от
скапливаются между корпусом утюга и подошвой и
времени продувайте отверстия подошвы. Выполните
обугливаются………………………………………………… самоочистку.
Грязная или коричневая подошва, которая пачкает белье
■ Вы гладите при слишком высокой температуре…………………. ■ Очистите подошву. См. параграф «Регулировка
температуры».
■ Вы недостаточно прополоскали белье или используете ■ Очистите подошву. Наносите крахмал на обратную
крахмал……………………………………………………… сторону белья.
Подошва поцарапана или повреждена
■ Вы ставили утюг горизонтально на металлическую
■ Всегда ставьте утюг на его пяту,
подставку ……………………………………………………………………………

04:01
Утюг Tefal — разочарование года!
21:59
Утюг Тефаль. Как разобрать, почистить, починить
14:40
Разборка и ремонт утюга TEFAL
19:18
Ремонт утюга Tefal,-ЗА ЧТО МЫ ПЛАТИМ В СЕРВИСАХ?\Repair of iron Tefal,-FOR WHAT WE PAY IN SERVICE
04:26
Ремонт утюга tefal supergliss 40
02:09
Разборка утюга TEFAL SUPERGLISS 3810
04:16
Tefal Ultragliss 80 FV4680 — steam iron — Ultragliss Diffusion sole plate unboxing and instructions
Нажмите на кнопку для помощи
Раздел: Бытовая, кухонная техника, электроника и оборудование
Тип: Утюг
Характеристики, спецификации
Вид гарантии:
гарантийный талон
Потребляемая мощность:
2400 Вт
Мощность подачи пара:
до 40 г/мин
Вертикальное отпаривание:
Да
Противокапельная система:
Да
Подошва утюга:
UltraGliss Diffusion
Инд. готовности к работе:
Да
Насадка для деликатных тканей:
Да
Длина сетевого шнура:
1.9 м
Инструкция к Утюгу Tefal ULTRAGLISS FV4887D0
EN
CS
ULTRAGLISS
HU
SK
HR
SL
RO
SR
BG
PL
TR
UK
ET
LV
LT
RU
www.tefal.com
1800129822_FV48XXD0_FTJ_110x154 18/06/13 11:16 Page1
EN Depending on model • CS Podle modelu •
*
HU ModelltŒl függŒen • SK V závislosti od
modelu • HR Ovisno o modelu • SL Podle
modelu • RO În func—ie de model •
SR Prema modelu • BG В зависимст от
моделиа • PL Zaleķznie od modelu • TR
modele
göre
• UK Зaлежно вiд моделі • ET talla
puhastus • LV Pamatnes têrêéana • LT pagal
modelį • RU
в зависимости от модели
2
1800129822_FV48XXD0_FTJ_110x154 18/06/13 11:16 Page2
3
1800129822_FV48XXD0_FTJ_110x154 18/06/13 11:16 Page3
First use*
*CS První pouÏití • HU ElsŒ használat • SK Prvé pouÏitie • HR Prva uporaba • SL Prva uporaba
• RO Prima utilizare • SR Prva upotreba • BG Първа употреба • PL Pierwsze u˝ycie • TR ‹lk
kullanım • UK Перед першим використанням • ET esmane kasutamine • LV Pirma\
izmantoéana • LT Pirmąkartą naudojant • RU Первое использование
4
1800129822_FV48XXD0_FTJ_110x154 18/06/13 11:16 Page4
First use*
EN Depending on model • CS Podle modelu • HU ModelltŒl függŒen • SK V závislosti od modelu • HR Ovisno o modelu • SL Podle
**
modelu • RO În func—ie de model • SR Prema modelu • BG В зависимст от моделиа • PL Zaleķznie od modelu • TR
modele göre
•
UK Зaлежно вiд моделі • ET talla puhastus • LV Pamatnes têrêéana • LT pagal modelį • RU
в зависимости от модели
5
1800129822_FV48XXD0_FTJ_110x154 18/06/13 11:16 Page5
Оглавление
Аннотация для Утюга Tefal ULTRAGLISS FV4887D0 в формате PDF
Топ 10 инструкций
Другие инструкции
Код: 108709
Извините, товара сейчас нет в наличии
Бесплатная доставка
по Красноярску
Извините, товара сейчас нет в наличии
Новости интернет-магазина «Лаукар»:
Дополнительная информация в категории Утюг:
В интернет-магазине бытовой техники «Лаукар» Вы можете скачать инструкцию к товару Утюг Tefal Ultragliss Anti-Calc FV4964E0 совершенно бесплатно.
Все инструкции, представленные на сайте интернет-магазина бытовой техники «Лаукар», предоставляются производителем товара.
Перед началом использования товара рекомендуем Вам ознакомиться с инструкцией по применению.
Для того чтобы скачать инструкцию, Вам необходимо нажать на ссылку «скачать инструкцию», расположенную ниже, а в случае, если ссылки нет,
Вы можете попробовать обратиться к данной странице позднее,
возможно специалисты интернет-магазина бытовой техники «Лаукар» еще не успели загрузить для скачивания инструкцию к товару:
Утюг Tefal Ultragliss Anti-Calc FV4964E0.

Фирма-производитель оставляет за собой право на внесение изменений в конструкцию, дизайн и комплектацию товара: Утюг Tefal Ultragliss Anti-Calc FV4964E0. Пожалуйста, сверяйте информацию о товаре с информацией на
официальном сайте компании производителя.