
INTERFACE INFORMATION
You may check device information, control the printer, and start printing projects using the touch screen on the right side of SLASH 2 PLUS.
MAIN INTERFACE
There are three main functions: Print /Tools/Settings.
PRINT WITH USB FLASH DRIVE
Insert a Flash Drive to the USB port at right side of printer. Click PRINT menu, then click USB DISK icon. You will see a list of slice files in flash drive. Choose and click a slice file you want to print and click PRINT button, the printer will step into normal printing program.
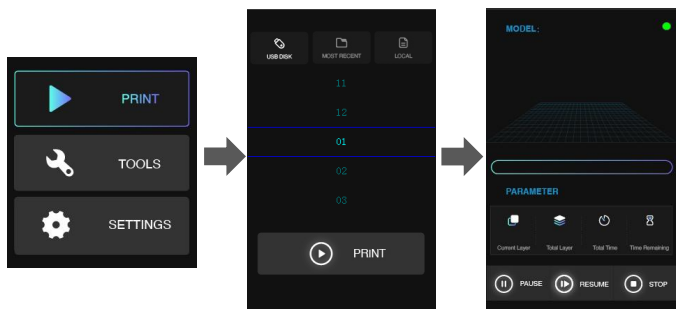
In this interface, you may check the preview and printing parameters of the print. Also you may pause/resume or stop the printing program by click the buttons at bottom.
PRINT RECALL
The last file printed on the printer will be shown in the MOST RECENT interface. You may print a model second time very expediently with this function
PRINT LOCAL FILES
SLASH 2 PLUS can receive the sliced files from PC via Wi-Fi and store in local memory. You can find the file in LOCAL menu (Note: it can only memory one slice file). Choose the file in this interface and click PRINT button to start printing.
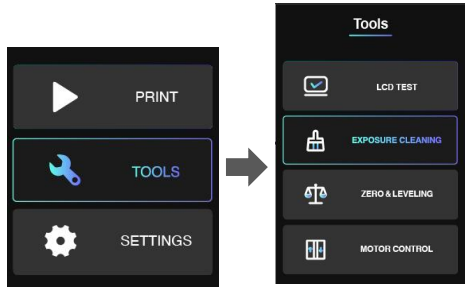
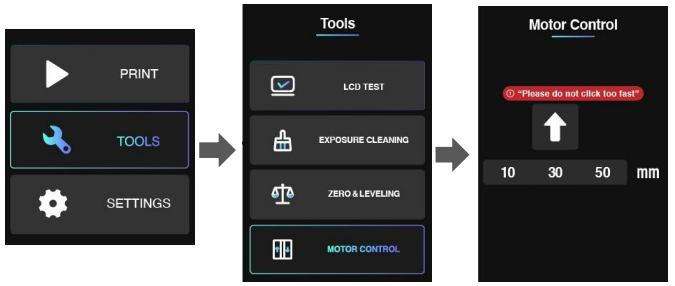
TOOLS
LCD TEST
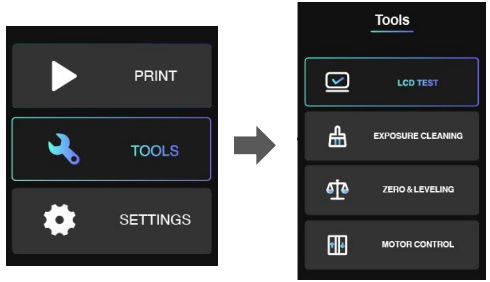
Click LCD TEST you will see the UNIZ Logo appears on the LCD screen. If the logo can be shown completely and there is no any flicker, that means the LCD screen is in good condition.
EXPOSURE CLEANING
When a failed print occurs and there are some residues left in the bottom of Resin Tank. You could use EXPOSURE CLEANING function to clean the residues. The printer will cure the whole screen and make residues adhere on solidified piece. After that, please wear nitrile gloves and take the solidified piece out.
RESET Z-AXIS ZERO POSITION AND LEVELING BUILD PLATFORM
If you change for a new Build Platform or the printing model may not stick onto the Platform, please reset z-axis zero position and leveling the Build platform. You could use an A4 paper and the Cross Screwdriver sent with your printer.
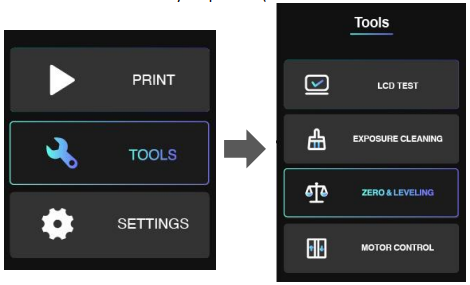
After leveling, please put the A4 paper under Build Platform and reset again. It finishes if you may feel the frictional force between Platform and A4 paper.
MOTOR CONTROL
If you want to control Build Platform to move upwards manually, you could enter MOTOR CONTROL menu. Choose a distance (10/30/50mm) first, and then click the Arrow. Please do not click too fast and take an eye to watch the distance between Platform and top position.
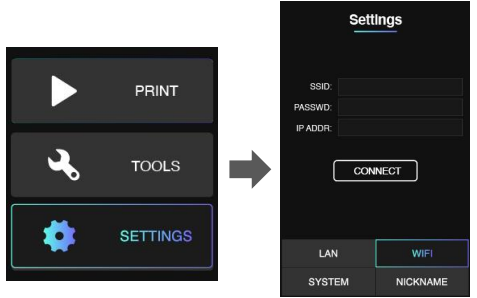
SETTINGS
SET LAN
You could connect the printer with your router via Ethernet cable. Go the SETTINGS menu. Click LAN button. Set to AUTO mode on. The printer will get IP address automatically. Click CONNECT button.
If you set AUTO mode off, you need to type IP address, Netmask, Gateway, DNS manually. Then click CONNECT button. When you could see the Ethernet icon at right top of interface, it means the printer in connected with network.

SET WIFI
You could connect the printer with your router via WiFi. Go the SETTINGS menu. Click WiFi button. Click SSID, there will be a list of available WiFi. Choose the WiFi network and enter password. Click CONNECT button. When you see the IP address is shown, it means the printer is connected well with WiFi network. There should be a WiFi icon appearing at right top of this interface.
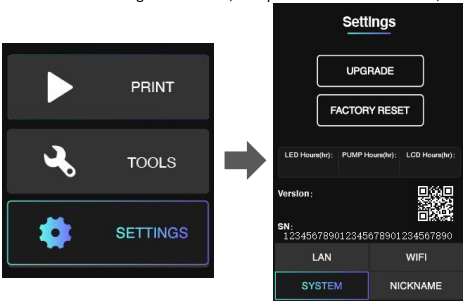
UPGRATE FIRMWARE OR FACTORY RESET
Enter SETTINGS menu and click SYSTEM button, you will find the SN number. You could scan the QR coder to get SN number as well.
You could find total working hours of LED, Pump and LCD in this interface, too.
SET PRINTER NICKNAME
Enter SETTINGS menu and click NICKNAME button, you could set your own printer alias here.
MORE DETAILS
1. There is an indicator light on the main interface and printing interface.
Staying in green means the printer is ready for printing.
Blinking in green means the print is in progress.
Blinking in red means the print program is stopping and the platform is moving upwards.
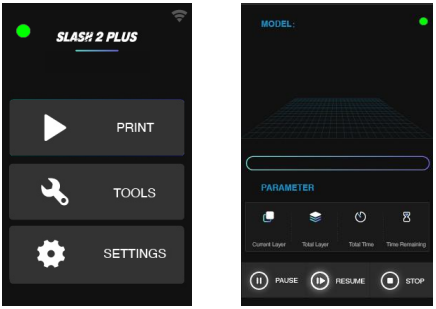
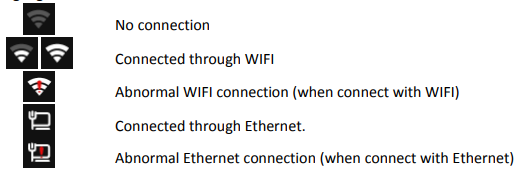
2. While the printer is connected with internet through Wi-Fi, the icon on the right-up side will turn to highlighted state.
Uniz SLASH 2 Manuals come in various types, each serving a specific purpose to help users effectively operate and maintain their devices. Here are the common types of Uniz SLASH 2 User Guides and the information they typically include:
- User Manuals: Provide comprehensive instructions on how to use the device, including setup, features, and operation. They often include troubleshooting tips, safety information, and maintenance guidelines.
- Service Instructions: Designed for technicians and repair professionals, these manuals offer detailed information on diagnosing and repairing issues with the device. They include schematics, parts lists, and step-by-step repair procedures.
- Installation Guides: Focus on the installation process of the device, providing detailed instructions and diagrams for proper setup. They are essential for ensuring the device is installed correctly and safely.
- Maintenance Manuals: Provide guidance on routine maintenance tasks to keep the device in optimal condition. They cover cleaning procedures, part replacements, and regular servicing tips.
- Quick Start Guides: Offer a concise overview of the essential steps needed to get the device up and running quickly. They are ideal for users who need immediate assistance with basic setup and operation.
Each type of Uniz SLASH 2 instruction is designed to address specific needs, ensuring users have the necessary information to use, maintain, and repair their devices effectively.
Uniz SLASH 2 3D Printers PDF User Guides and Manuals for Free Download: Found (1) Manuals for Uniz SLASH 2 Device Model (Operation & User’s Manual)
Uniz SLASH 2 Operation & User’s Manual
Details:
- Manufacturer: Uniz
- Product Name/ID: Uniz SLASH 2 / #1981608
- Category: 3D Printers
- File Path: uniz/slash-2_1981608.pdf
- Last Updated: 19 May 2025
- Description: The Uniz SLASH 2 manual is designed to help you understand your device fully, with comprehensive instructions on initial setup, feature exploration, and effective troubleshooting methods.
- Document Type: User Manual
- Pages: 88
Download PDF
Read Online
The Uniz SLASH 2 is a remarkable addition to the world of 3D printing, combining advanced technology with user-friendly features to deliver exceptional results. This printer stands out for its high-speed printing capabilities and its innovative approach to curing resin, making it a game-changer for hobbyists and professionals alike. In this review, I’ll delve into the various aspects of the Uniz SLASH 2, exploring its design, performance, and overall value for money.
One of the key highlights of the Uniz SLASH 2 is its sleek and modern design. The printer boasts a robust build quality with an aluminum frame that enhances stability during the printing process. It features a large color touchscreen that makes navigation intuitive, allowing users to easily access settings and monitor prints in real-time. The printer’s compact size means it can fit comfortably in a variety of working environments, from small studios to larger workshops.
When it comes to performance, the Uniz SLASH 2 excels in several areas:
- Speed: One of the most impressive features is its rapid printing speed. The printer uses a unique layer curing system that can produce high-quality prints quickly, significantly reducing wait times compared to traditional resin printers.
- Accuracy: The SLASH 2 delivers remarkable precision, with a layer resolution that ensures fine details are captured, making it ideal for intricate designs and functional parts.
- Versatility: It supports a wide range of resins, giving users the flexibility to experiment with different materials based on their project needs.
The setup process for the Uniz SLASH 2 is straightforward, especially for those familiar with 3D printing. The assembly is minimal, and the printer comes partly pre-assembled, which is a great convenience. Additionally, the detailed instructions provided in the user manual make the commissioning process smooth. Once you’ve completed the setup, the printer is ready to go in no time, allowing users to jump straight into their creative projects.
Another noteworthy aspect is the software that comes with the Uniz SLASH 2. It includes a user-friendly slicing program that simplifies the process of preparing 3D models for printing. The software provides various customization options, allowing users to adjust print settings to achieve the desired results. Furthermore, it supports popular file formats, making it compatible with most 3D modeling software.
However, no product is without its challenges. Some users may find the initial cost of materials for the Uniz SLASH 2 higher than that of FDM printers. Additionally, the maintenance of a resin printer can be more intensive, as proper handling and cleaning of the resin is essential to ensure optimal performance and longevity of the machine.
In conclusion, the Uniz SLASH 2 stands out in the competitive landscape of 3D printers, merging speed, precision, and ease of use into a single package. Its design and performance make it suitable for both beginners and experienced users looking to elevate their 3D printing experience. While the upfront investment might be higher than some alternatives, the return in quality and efficiency truly makes this printer a worthy consideration for anyone serious about 3D printing. Overall, the Uniz SLASH 2 receives a strong recommendation for those seeking cutting-edge technology paired with practical application.
Table of Contents
- Whimsical Raps WSLASH2 Uniz Slash 2 Plus 3D Printer
- Product Information
- Product Usage Instructions
- POWER CONSUMPTION
- FUTURE UPDATES
- W/Del
- W/Syn
- W/Tape
- Engines & The Launcher
- UP/DOWN
- LOOP
- PLAY
- RECORD
- References
- Read User Manual Online (PDF format)
- Download This Manual (PDF format)
Whimsical Raps WSLASH2 Uniz Slash 2 Plus 3D Printer
Product Information
Specifications
- Power Consumption: 59mA @ +12V, 13mA @ -12V
W/ – Personalities
W/ is a versatile product that offers three different personalities, each
focused on enhancing the power of an existing instrument:
- W/Tape: This personality allows forself-referential recording and playback, ideal for dense layering.
- W/Del: W/Del leverages the manipulation methods of W/Tape while exploring microsound possibilities. It offers a flexible delay line that can delay up to 4 seconds at full quality or stretch out to a minute with degraded time stretching. It also includes an exciter for Karplus-Strong strings.
- W/Syn: W/Syn presents a duality of rapid polyphony and structured FM exploration. It hides four 2-op-FM voices that can be controlled with a single GATE and PITCH control.
It offers waveshaping capabilities with RAMP and CURVE, as well as frequency
modulation for complex timbres.
Product Usage Instructions
Power Connection
Connect the power supply to the module using the provided cable.
Ensure that the red stripe (-12v) is facing towards the center of the module
where “power” is printed.
Firmware Update
To update the firmware of W/, follow these steps:
- Hold down the “record” button.
- Engage power to your case.
- Play the firmware update as audio to the IN port.
For the latest improvements and full instructions, visit
github.com/whimsicalraps/wslash.
W/Del – Delay Line
W/Del offers a flexible delay line with various controls:
- TIME: Adjusts the delay time from short to long.
- FEEDBACK: Controls the amount of feedback in the delay loop.
- MIX: Adjusts the balance between the dry and delayed signals.
- OUT: Outputs the delayed signal.
- Filter: An adjustable lowpass filter in the feedback loop.
- FREEZE: Locks in the current buffer for wavetable time-stretching.
- Z-1: Zoom controls for dynamic buffer manipulation.
W/Syn – FM Voices
W/Syn provides four 2-op-FM voices with various controls:
- PITCH: Controls the pitch of the FM voices.
- FM index: Adjusts the amount of frequency modulation applied to the voices.
- FM env: Controls the envelope of the frequency modulation.
- RAMP: Waveshaping control for saw/tri/ramp waveforms.
- CURVE: Waveshaping control for sine/tri/square waveforms.
- TIME: Controls the dynamics of the voices.
- SYMMETRY: Adjusts the symmetry of the envelope.
- OUT: Outputs the combined voices.
Remote Control and Additional Interfaces
W/ can be remote-controlled using the II interface, which offers expanded
panel possibilities when controlled by monome & our crow module or monome’s
teletype.
Frequently Asked Questions (FAQ)
Q: How much power does W/ consume?
A: W/ consumes 59mA at +12V and 13mA at -12V.
Q: How can I update the firmware of W/?
A: To update the firmware, hold down the “record” button while engaging
power to your case. Then, play the firmware update as audio to the IN port.
For detailed instructions, visit
github.com/whimsicalraps/wslash.
Q: What are the different personalities of W/?
A: W/ has three different personalities:
- W/Tape: Self-referential recording and playback for dense layering.
- W/Del: Flexible delay line with various time stretching and modulation capabilities.
- W/Syn: Rapid polyphony and structured FM exploration with waveshaping controls.
Music, is sounds, are vibrations, as waves, of energy. One can wait all day
for the perfect wave, though it may never come. In these ebbing moments we
live inside of memories gone past.
These tiny histories aren’t meant for books, nothing but personal fragments.
Instead we capture these energetic wavings. Within W/.
PERSONALITIES
Three ways of being, singularly focused on multiplying the power of an
existing instrument. W/Tape expands your system through self-referential
recording & playback,geared toward dense layering. W/Del leverages W/Tape
manipulation methods, while zooming in to microsound possibilities. W/Syn
presents a duality of rapid polyphony and structured FM exploration, draping
harmonic textures behind your sound stage.
These three worlds are navigated from the Launcher.
Accessible at any time for rapid context shifts, along with the simplest of
preset systems.
With its diminutive interface, remote-control with II is a natural choice for
W/. There is a rich interface for all three engines provided, expanding the
panel-possibilities when controlled by monome & our crow module, or monome’s
teletype.
POWER CONSUMPTION
- 59mA @ +12V
- 13mA @ -12V
- Red Stripe (-12v) toward center of module where‘power’ is printed.
FUTURE UPDATES
W/ has grown over the years taking it’s two-point-oh form in early 2021. To
update in the present future, hold record while engaging power to your case.
Then play the update as audio to IN.
For the latest improvements and full instructions, visit:
github.com/whimsicalraps/wslash
W/Del
A flexible delay line is a core element of many electronic music techniques.
Short to long, and all the time between. W/Del can delay up to 4 seconds at
full quality, or stretch out to a minute with degraded time stretching. Zoomed
in, the delay approaches 1ms for allkinds of pitch effects like chorus &
flange, and includes an exciter for Karplus-Strong strings.
Classical TIME, FEEDBACK, and MIX controls are familiar along with an
adjustable lowpass FILTER in the feedback loop. Integrated MOD-ulation opens
up vibrato and broken tape sounds, plus FREEZE locks in the current buffer for
giant wavetable time-stretching.
TAP tempo, and direct LOOPing are available, while the new ZOOM controls allow
dynamic buffer manipulation.
Halve and double delay times in recursively nested loop slices.

W/Syn
Polyphony in a modular context is a can of worms, but sometimes faking it is
just as satisfying as the real thing. W/Syn hides away four, 2-op-FM voices,
accessible with a single GATE and PITCH(v8) control. Rapid arpeggios and long
envelope tails will build ringing harmonic timbres.
Similar to JUST FRIENDS, waveshaping is performed by RAMP (saw/tri/ramp), and
CURVE (sine/tri/square), extended by tightly coupled frequency modulation. The
modulator generates sine waves with pitch directly related to the carrier. Set
the ratio with NUMerator and DENOMinator for controlled yet complex timbres.
All voices pass through a Lowpass-Gate for dynamics control, struck by a
vactrol-style GATE, highly sensitive to pulse-width for velocity control.
Stretch & shape notes with TIME & SYMMETRY, applying the envelope to FM amount
for brassy attacks. All voices are finally squished together with an output
compressor ensuring smooth density.

W/Tape
The original idea for a tiny tape recorder with overdubbable hours remains
compel-ling and herewith. Three hours, tied start to end in a giant loop— it’s
enough to get lost in, and then find a new, or old, self. Recording is
typically presented as a productive act, but not here. W/Tape defines the
archive as an ephemeral entity; a medium to be manipulated in realtime in the
most cavalier way. A history to be revisited and revised.
W/Tape is modelled after an open reel Tape Machine. A motor pushes and pulls
the tape across the erase/playback/record heads, while impossibly instant
tape-splic-ing forms dynamic loops. Separating these three elements of loop,
play, and record enables a tiny interface to cover a great deal of functional
ground.
play
Press play. The tape will move, and recorded vibrations can be heard. Press
again to stop. Reverse is a first-class citizen of W/Tape, distinguished only
by the colour of pulsing play light. Playback speed can be increased and
decreased in steps of half or double, slowing down to glittering low-quality
sparkles. Tape motion can be encouraged by the toggle, nudged faster or slower
while the tape is playing, or full fast-forward/rewind when stopped.
record
Sound-on-sound recording is fundamental to W/Tape, always adding new sound to
existing recordings. Press to punch-in and again to punch-out. Recording is
independent of playback, so try dragging the tape with FF/RWD while engaged.
When you want to cut away sounds, enable the erase head to record over
previous material. Erase-strength can be set in-between overdub & overwrite,
enabling gradually decaying sounds. Echo-mode extends this technique for loops
by switching the play-head before the erase-head, hearing old sounds one last
time.
loop
Dynamic loop markers allow for rapid alternation between sketchpad and
structured musical phrases. Set loops from the panel, or with a smartly
quantized voltage trigger. Any captured loop time can be expanded or shrunk by
a factor of 2, with context-aware nesting, for sequential fixed-time loops, or
‘90s techno risers.
Engines & The Launcher
LOADING ENGINES
When you start W/ you’ll be running the W/Tape engine, with it’s hours of
malleable media. Once it’s time to explore the other possibilities of W/Del
and W/Syn, you’ll need to access the Launcher:
Sequentially, press and hold:
record + play + loop
The toggle lights will charge up, then start flashing. Release, and you’re in
the Launcher. The yellow record light will be throbbing, indicating W/Tape
mode. The three engines are selected by the buttons, with a mnemonic light
pattern per mode:
- loop : W/Del play : W/Syn record : W/Tape
Once you’ve selected a new engine, hold Down and wait for the lights to charge
after which your new engine will run.
Exit the launcher without change by pressing Up.
PRESETS: W/Del & W/Syn
W/Del and W/Syn don’t save changes by default. When you turn on your case, the
most recent engine will be loaded with the default settings.
Both W/Del and W/Syn have a single preset which will override the defaults on
load. Once you’ve found a sound you want to retain:
Open the launcher
White light will throb (ready to save) Hold Down to save
If you’ve been experimenting but want to return to your saved preset:
Open the launcher
Press the current engine’s key White light will go dim
Hold Down to reload your preset
Perhaps your tired of the preset and want to start from scratch:
Open the launcher
Press the current engine 3 times White light will flicker
Hold Down to clear and load defaults
A CLEAN TAPE: W/Tape
From time to time you may desire to clear the tape, abandoning any prior
record-ings. The command is the same as return-ing to the default preset
(Del/Syn):
Open the launcher
Tap record 3 times quickly record’s white light will flash Hold Down to clear
the tape
W/Del

W/Syn

UP/DOWN
While stopped: SEEK
Up fast-forward with acceleration Down rewind with acceleration While playing:
NUDGE Up speed up, accelerating to 1.5x Down slow down, decelerating to 0.75x
THIS & THAT
Hold record while inserting a patch cable to display current routing:
- Select routing with buttons
- Confirm with Down
- Cancel with Up
LOOP
Lights off indicates no current loop To set a loop, play the tape then:
Press loop to set the start point Press loop again to set the end-point Now
you’re looping:
Reset to the start by pressing loop Clear a loop by holding loop
Change loop size:
- 2x size: Hold loop then press Up
- 1/2x size: Hold loop then press Down
- NB: Release loop first to avoid reset
THIS & THAT
LOOP: Clock Quantized Looping
Attach a trigger or cycling-sig-nal at the loop-rate. Press loop to arm
looping. The next CV events set start & end points. Further CV events reset
the loop
LOOP+PLAY: Monitor level
Acts as a VCA over signal from IN to OUT. Through-zero.
PLAY
Press play to start playback
White = forward. Yellow = reverse
Speed indicated by pulsing
Press play again to stop (lights off)
Direction:
- Forward: Hold Up then press play Reverse: Hold Down then press play
Speed Modifier:
- 2x Speed: Hold play then press Up
- 1/2x Speed: Hold play then press Down
THIS & THAT
-
PLAY (yellow): Linear Speed
Directly control tape speed. Negative values go through-zero to reverse
speeds. -
PLAY (white): Expo Speed v8
Modify current tape speed such that 1V = 2x speed (1octave higher). Requires
PLAY state.
PLAY+RECORD: Input Gain
Set volume of signal going to tape machine. Attach an envelope!
RECORD
Toggle recording on/off with record
- Erase Strength: Hold Up/Down to set
- record + Up: Stronger (overwrite)
- record + Down: Weaker (sound-on-sound)
THIS & THAT
RECORD: Gain & Erase Macro
0V = No recording
+ve fades toward current record setting. -ve same as +ve but with opposite
erase-strength.
References
- GitHub: Let’s build from here · GitHub
Read User Manual Online (PDF format)
Read User Manual Online (PDF format) >>
Download This Manual (PDF format)
Download this manual >>
3D принтер Uniz Slash 2 один из самых быстрых настольных 3D принтеров сегодня, последняя модель 2020 года, только сейчас в ограниченном количестве, позволяет напечатать 8 полноценных зубных челюстных половинок за 40 минут, невероятная скорость печати сочетается с потрясающей точностью 10 мкм, толщина при которой не видно стыков, все это доступно вам в купе с американским качеством сборки.
Использует ЖК-стереолитографию, подойдет для стоматологии и ювелирного дела на уровне профессионального пользования, позволит вам печатать постоянные и временные коронки и импланты и имеет open free mode, позволяющий работать со всеми производителями и типами полимеров.
Принтер поддерживает технологию печати 1 кнопкой и систему комплексной засветки остатков полимерной смолы на ванне, позволяющей избавиться от излишков и остатков полимера проще, быстрее и удобнее. Одной из ключевых особенностей данных принтер является недорогие оригинальные расходные компоненты, начиная от стандартных abs/pla материалов, заканчивая биосовместимыми и ультра прочными выжигаемыми.
Компании удалось добиться уникальной технологии производства ванн для принтера, средний срок ванны в среднем в 50 раз больше, чем у аналога. Обновленная версия позволяет помимо сверхвысокой точности, сочетать ее с невероятной скоростью, специализированно подготовлен для производства — конвеера элайнеров.
Вы можете купить 3D принтер Uniz Slash 2 в нашем офисе в Москве, с гарантией и доставкой по России от официального дилера.