
A guide to uninstall UHF reader configurator from your system
UHF reader configurator is a Windows application. Read more about how to remove it from your PC.
The Windows version was developed by Smartec.
Additional info about Smartec can be read here.
Please follow http://smartec-security.com/ if you want to read more on UHF reader configurator on Smartec’s page.
Usually the UHF reader configurator program is to be found in the C:\Program Files\Smartec\UHF reader configurator folder, depending on the user’s option during setup.
The complete uninstall command line for UHF reader configurator is C:\ProgramData\Caphyon\Advanced Installer\{74F9BBF2-D466-4759-80F1-1A75939708FB}\UHFReaderConfigurator.exe /i {74F9BBF2-D466-4759-80F1-1A75939708FB} AI_UNINSTALLER_CTP=1.
The program’s main executable file is called UHFReaderConfigurator.exe and it has a size of 175.01 KB (179208 bytes).
The following executables are contained in UHF reader configurator. They take 175.01 KB (179208 bytes) on disk.
- UHFReaderConfigurator.exe (175.01 KB)
The current page applies to UHF reader configurator version 1.0.0 alone.
Click on the links below for other UHF reader configurator versions:
- 1.0.2
Many files, folders and Windows registry data can be left behind when you remove UHF reader configurator from your PC.
Directories left on disk:
- C:\Users\%user%\AppData\Local\VirtualStore\Program Files (x86)\Smartec\UHF reader configurator
- C:\Users\%user%\AppData\Roaming\Smartec\UHF reader configurator 1.0.0
- C:\Users\%user%\AppData\Roaming\Smartec\UHF reader configurator 1.0.2
The files below were left behind on your disk by UHF reader configurator’s application uninstaller when you removed it:
- C:\Users\%user%\AppData\Local\VirtualStore\Program Files (x86)\Smartec\UHF reader configurator\logs\2024-12-28.log
- C:\Users\%user%\AppData\Local\VirtualStore\Program Files (x86)\Smartec\UHF reader configurator\logs\2025-01-14.log
- C:\Users\%user%\AppData\Local\VirtualStore\Program Files (x86)\Smartec\UHF reader configurator\logs\2025-01-15.log
- C:\Users\%user%\AppData\Local\VirtualStore\Program Files (x86)\Smartec\UHF reader configurator\logs\2025-04-08.log
A way to erase UHF reader configurator from your computer with Advanced Uninstaller PRO
UHF reader configurator is a program released by Smartec.
Sometimes, computer users decide to remove this program. This can be difficult because doing this by hand takes some skill regarding Windows program uninstallation. One of the best SIMPLE approach to remove UHF reader configurator is to use Advanced Uninstaller PRO. Here is how to do this:
1. If you don’t have Advanced Uninstaller PRO already installed on your PC, install it. This is a good step because Advanced Uninstaller PRO is one of the best uninstaller and general tool to take care of your computer.
DOWNLOAD NOW
- navigate to Download Link
- download the program by pressing the green DOWNLOAD NOW button
- set up Advanced Uninstaller PRO
2. Run Advanced Uninstaller PRO. Take your time to admire Advanced Uninstaller PRO’s interface and wealth of tools available. Advanced Uninstaller PRO is a very useful system utility.
3. Press the General Tools category

4. Press the Uninstall Programs tool

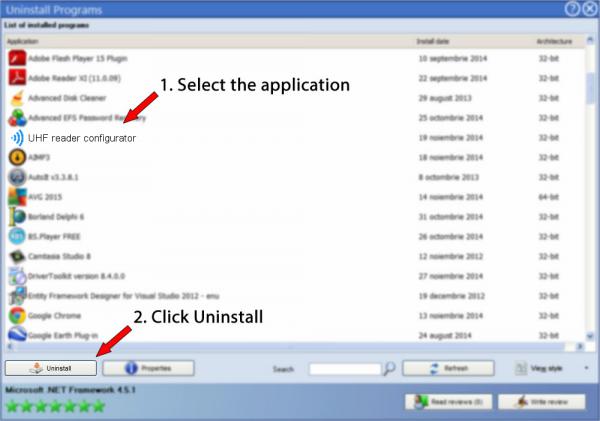
5. A list of the programs existing on the PC will appear
6. Scroll the list of programs until you locate UHF reader configurator or simply activate the Search feature and type in «UHF reader configurator». If it is installed on your PC the UHF reader configurator app will be found automatically. Notice that when you select UHF reader configurator in the list of programs, some data regarding the program is shown to you:
- Star rating (in the lower left corner). This explains the opinion other people have regarding UHF reader configurator, from «Highly recommended» to «Very dangerous».
- Reviews by other people — Press the Read reviews button.
- Technical information regarding the application you are about to remove, by pressing the Properties button.
For example you can see that for UHF reader configurator:
- The software company is: http://smartec-security.com/
- The uninstall string is: C:\ProgramData\Caphyon\Advanced Installer\{74F9BBF2-D466-4759-80F1-1A75939708FB}\UHFReaderConfigurator.exe /i {74F9BBF2-D466-4759-80F1-1A75939708FB} AI_UNINSTALLER_CTP=1
7. Click the Uninstall button. A confirmation dialog will come up. accept the removal by pressing the Uninstall button. Advanced Uninstaller PRO will uninstall UHF reader configurator.
8. After removing UHF reader configurator, Advanced Uninstaller PRO will ask you to run an additional cleanup. Press Next to start the cleanup. All the items that belong UHF reader configurator which have been left behind will be detected and you will be able to delete them. By uninstalling UHF reader configurator with Advanced Uninstaller PRO, you can be sure that no registry items, files or directories are left behind on your computer.
Your PC will remain clean, speedy and ready to serve you properly.
Disclaimer
The text above is not a piece of advice to remove UHF reader configurator by Smartec from your computer, nor are we saying that UHF reader configurator by Smartec is not a good application for your PC. This text only contains detailed info on how to remove UHF reader configurator in case you want to. Here you can find registry and disk entries that other software left behind and Advanced Uninstaller PRO stumbled upon and classified as «leftovers» on other users’ computers.
Last update on: 2022-10-04 09:39:04.360
Зачем?
UHF Reader позволяет обеспечить контроль за метками на расстоянии до 10 метров, что дает интересные перспективы различного использования. Самый очевидный – это контроль пропуска автотранспорта. Но можно придумать и более экзотичные варианты: контроль за оборудованием в гараже/сарае. Едва ли воришка додумается, что к велосипеду (чемодану с инструментом) приклеен RFID tag и он способен сообщить о своем отбытии за пределы наблюдаемого периметра.
NodeJS + RaspberryPI – гибкий и дешевый сервер обработки данных и управления периферией.
Оборудование
Я взял на тесты CF-RU5109 (CHAFON), поддерживающий соединение по RS232, RS485, Wiegand, TCP. (TCP мне нужен только для удобства тестирования оборудования)
Страница модели — CF-RU5109
Метки — rfid gen2 uhf paper tag with Alien H3 chip
Дальность считывания. Эксперименты показали, что считывание зависит от активности метки (ее перемещении в пространстве). Пассивно лежащая метка считывается уверенно на расстоянии 3 метра, слабо двигающаяся — 5-5.5 метров, на расстоянии 8 метров приходилось активно размахивать рукой. У моего ридера встроенная антенна на 9dbi.


Софт
К Ридеру прилагается SDK, подробное описание команд, несколько тестовых программ под Windows. Я использую этот софт только, чтобы попробовать поработать с Ридером, — в работе с NodeJS нам от него ничего не нужно.
Подключаем к Node
tcpclient.prototype.Start = function () {
  client = new net.Socket();
  client.setEncoding('ascii');
  client.connect(6000, '192.168.0.190', function() {
  });
    client.on('connect', function(data) {
      console.log('UHF reader connected');
      var bytes = Buffer.from([0x04, 0xff, 0x21, 0x19, 0x95], "ascii");
      client.write(bytes);

    client.on('data', function(data) {
        console.log('UHF reader respond:');
        var buffer = Buffer.from(data, "ascii");
        console.log(buffer);
      });
    });
    client.on('close', function() {
      console.log('UHF reader - connection closed');
    });

    client.on('error', function(err) {
      console.log(err)
    });
};
tcpclient.prototype.Write = function (req) {
  var bytes = new Buffer(req, "ascii");
  console.log(bytes);
  client.write(bytes);
};
Из мануала. Командный блок структурирован так:
Len, Adr, Cmd, Data[], LSB-CRC16, MSB-CRC16
Последние два байта – это контрольная сумма CRC16, с полиномом 0x8408, стартовым числом 0xFFFF. Байты выводятся в обратном порядке. Производитель любезно предоставил код на Си для расчета, а я его переписал на JS (см. ниже).
Соответственно, [0x04, 0xff, 0x21, 0x19, 0x95] – это команда с запросом статуса ридера по дефолтному адресу FF. 04-длина, 21-команда, 19 и 95 – CRC16 checksum.
var PRESET_VALUE = 0xFFFF;
var POLYNOMIAL = 0x8408;
var CRC16 = function (pucY) {
  var uiCrcValue = PRESET_VALUE;
  for(var i = 0; i < pucY.length; i++){
    uiCrcValue = uiCrcValue ^ (pucY[i]);
    for(var j = 0; j < 8; j++){
      if(uiCrcValue & 0x0001){
        uiCrcValue = (uiCrcValue >> 1) ^ POLYNOMIAL;
      } else {
        uiCrcValue = (uiCrcValue >> 1);
      }
    }
  }
  var buf = Buffer.from(uiCrcValue.toString(16), 'hex');
  buf = Buffer.from([buf[1], buf[0]], 'hex');
  return buf;
};
//CRC16([0x04, 0xff, 0x21]);  //returns <Buffer 19 95>
Примеры команд
Inventory – запрос на однократное считывание карты. Действует в режиме Answer-mode
req =[0x04, 0x00, 0x01, 0xdb, 0x4b];
tcpClient.Write(req);
Если метка в зоне видимости, то мы получим ответ
UHF reader respond:
<Buffer 13 00 01 01 01 0c 62 00 51 79 17 19 00 04 05 60 5b 28 2f 24>
62 00 51 79 17 19 00 04 05 60 5b 28 – это тег метки.
Переключение режимов работы ридера
Answer-mode: [0x0a, 0x00, 0x35, 0x00, 0x02, 0x01, 0x00, 0x01, 0x00, 0x2a, 0x9f]
Scan/ Active mode: [0x0a, 0x00, 0x35, 0x01, 0x02, 0x01, 0x00, 0x01, 0x00, 0x01, 0x9b]. В этом режиме ридер постоянно опрашивает метки и отдает их теги.
Что дальше?
А дальше, если требуется простое решение, то либо пишем код, который с периодичностью отправляет команду 0х01 (Inventory). Метки в зоне видимости отдают свои теги, мы сверяем их с БД и инициируем соответствующие действия. Или пишем код, который в режиме постоянного сканирования ждет попадания метки в зону видимости и реагирует событием.
ГлавнаяПоддержкаФайловый архивZKTecoУтилиты ZKTecoУтилита для настройки считывателя UHF
- Обновлено: 18 июня 2019
- Версия: 1.10
- Автор: ZKTeco
- Лицензия: Для зарегистрированных пользователей
Описание
Для начала работы распакуйте архив и запустите утилиту UHF Demo V1.10.exe
Пример работы утилиты рассмотрен в ролике: https://www.youtube.com/watch?v=1lrGRs6gKgs
Использование UHF-метода
В TRASSIR СКУД возможно организовать работу с UHF-меткам в качестве идентификатора.
В частности, такое решение можно использовать для обеспечения автоматического проезда автотранспорта на объектах где не получается организовать распознавание номеров или существуют требования по многофакторной аутентификации.
Для реализации подобного решения кроме непосредственно самих UHF-меток потребуются: настольный считыватель (для заведения меток в систему и назначения соответствующим пользователям) и уличный считыватель размещаемый возле точки доступа (для считывания UHF-меток закрепленных на автомобиле).
Настройка настольного считывателя
В качестве настольного считывателя была протестирована работа с UR20RW.
Оборудование подключается через USB к рабочему месту с операционной системой Windows.
Скопируйте и распакуйте архив. Запустите утилиту UHF Card Issuer-v2.10.
Нажмите кнопку Connect, чтобы подключить устройство, а затем нажмите Read Configuration. Программа выведет текущие настройки считывателя. Убедитесь, что в параметре Output Format выставлен нужный формат Wiegand. Нажмите Save Changes и DisConnect. Можно начинать работу с устройством.
Для добавления карты персоне в TRASSIR СКУД в профиле персоны выберете идентификатор «Карта», и выберете способ «Без считывателя (Ручной ввод)». Поставьте курсор в поле ввода и поднесите UHF-метку к считывателю. Идентификационный номер метки запишется в ячейку. Нажмите сохранить.
Настройка уличного считывателя
В качестве уличного считывателя была протестирована работа с UHF5 Pro.
Подайте питание на устройство и подключите через USB к рабочему месту с операционной системой Windows.
Скопируйте и распакуйте архив. Запустите утилиту UHF Demo-UN-V3.09.


Нажмите кнопку Connect, чтобы подключить устройство, а затем нажмите Read Configuration. Программа выведет текущие настройки считывателя. Убедитесь, что на вкладке Wiegand Settings в параметре WG Mode выставлен нужный формат Wiegand, а в параметре Wiegand Output Settings выставлено значение Forward Output. Во вкладке System Settings выставите галочку Wiegand Mode для параметра Reader Output Mode. Нажмите Save Changes и DisConnect. Считыватель настроен, его можно отсоединять от компьютера.
Разместите устройство там, где оно будет эксплуатироваться и подключите к контроллеру через разъемы Wiegand.