
интернет:настройка_роутера_tp-link_archer_c50
Содержание
Настройка роутера TP-LINK Archer C50
Подключение роутера
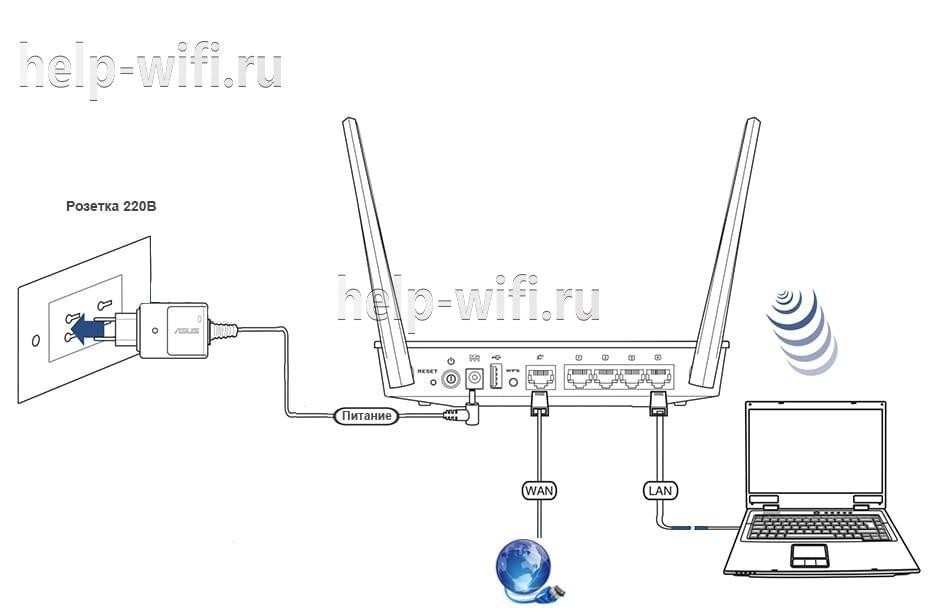
Подключаем роутер к розетке питания, затем берем комплектный патчкорд
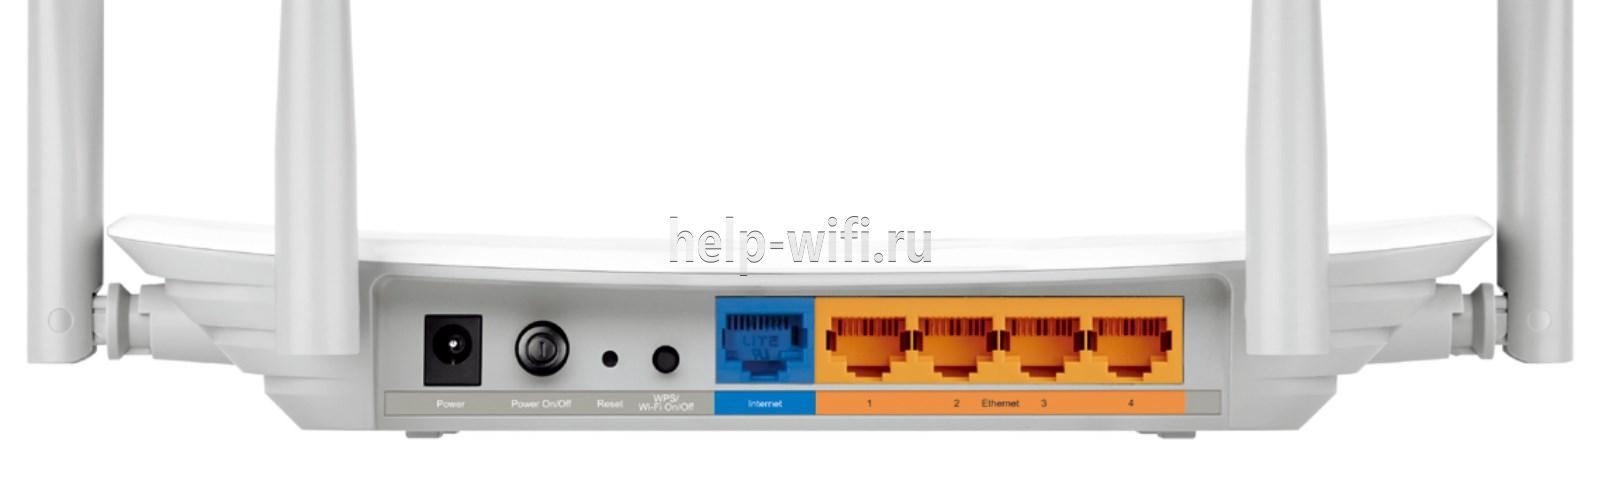
и вставляем его в любой разъем, помеченный как «LAN 1,2,3 или 4 (блок портов помечен желтым цветом)» с обратной стороны роутера, другой конец подсоединяем в сетевую карту Вашего компьютера. Кабель провайдера подсоединяем в разъем INTERNET помечен на роутере синим цветом.
Настройка сетевого соединения на компьютере
Настройка роутера:
Открываем любой браузер и в адресной строке набираем: tplinkwifi.net или «192.168.0.1»
В появившемся окошке вводим имя пользователя и пароль (login и password) посмотреть их можно на стикере приклеенном с нижней стороны роутера — обычно по умолчанию логин: admin, пароль: admin

нажимаем кнопку Вход и попадаем в WEB-интерфейс роутера

нажимаем в вертикальном меню слева пункт Сеть

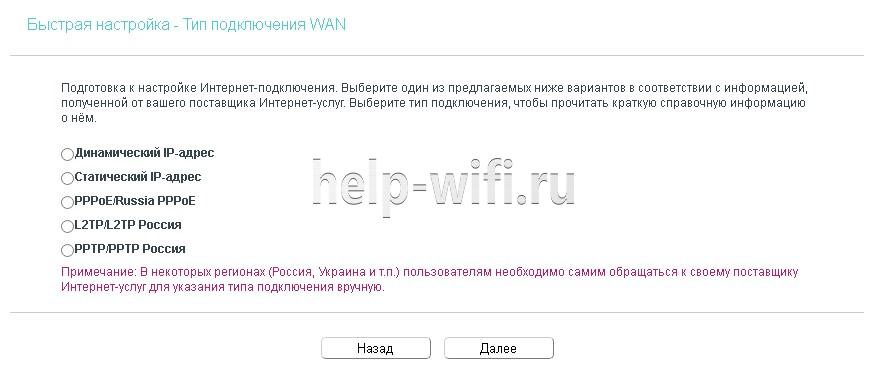
затем в выпадающем меню пункт WAN, после этого нам нужно выбрать тип соединения, в сети «Инфолинк» используется чаще Dinamic IP или Динамический IP.

После убедитесь, что все верно и нажимайте кнопку Сохранить.
В некоторых населенных пунктах используется ручной ввод сетевых реквизитов. Для этого необходимо выбрать тип подключения “Использовать следующий ip адрес / Статический IP / Static IP / или похожие варианты” и заполнить все необходимые поля.
Настройка беспроводной сети
Теперь настроим и зашифруем нашу беспроводную сеть.
Для этого нам нужно перейти в левом вертикальном меню в пункт Беспроводной режим и в выпадающем меню выбрать Настройки беспроводного режима

Здесь мы можем присвоить имя нашей беспроводной сети. Для этого в поле Имя сети нужно вписать имя сети, которое Вы хотели бы присвоить.
Если Вы не уверены в своих знаниях, пункты меню идущие ниже следует оставить по умолчанию.
Нажимаем кнопку Сохранить.
Теперь нам нужно зашифровать нашу беспроводную сеть, для того, чтобы только Вы или Ваши доверенные люди могли ей пользоваться.
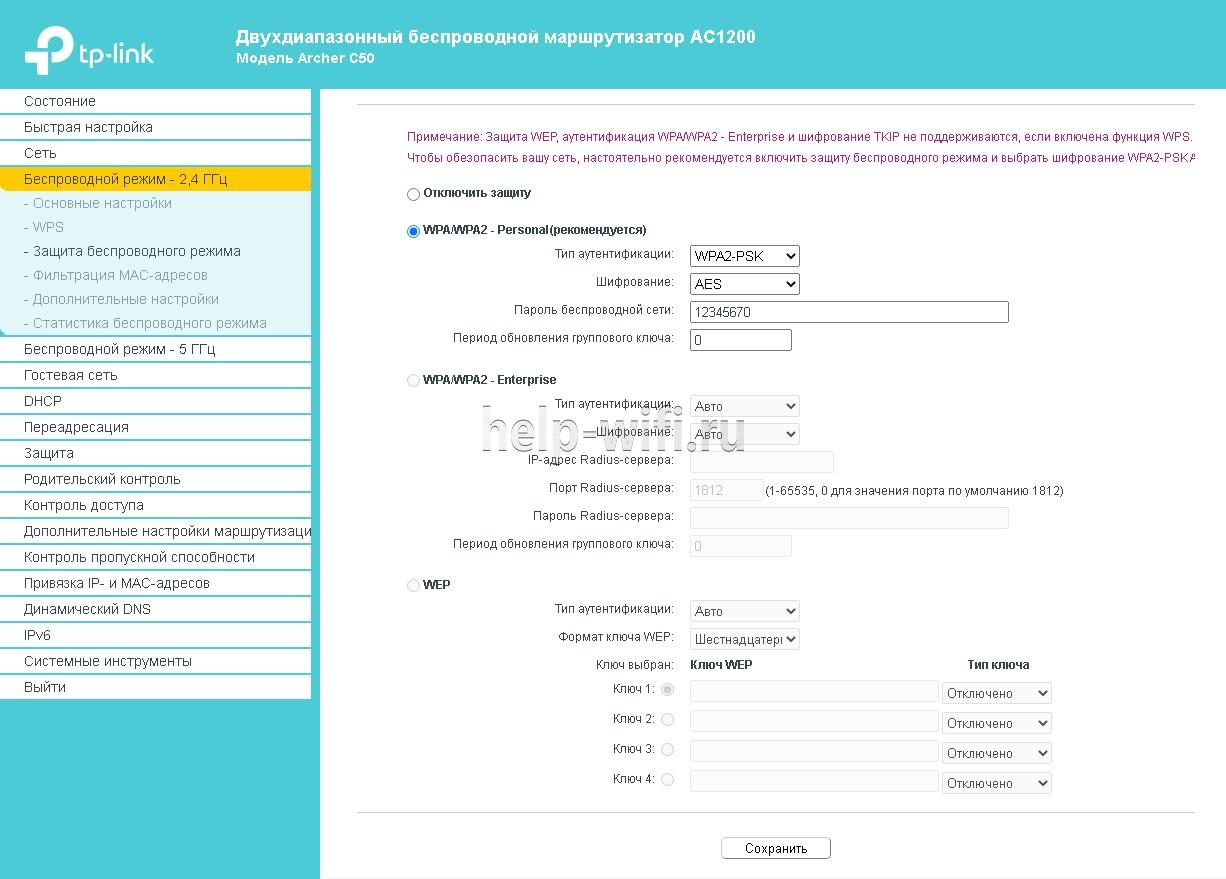
В левом вертикальном меню переходим в пункт Защита беспроводного режима

Тут мы можем выбрать тип шифрования и назначить пароль для нашей сети.
Выбираем тип шифрования (настоятельно рекомендуется) WPA2-PSK, затем вводим пароль в поле Пароль беспроводной сети и нажимаем кнопку Сохранить.
Вот и все, наш роутер настроен для работы в сети «Инфолинк»
P.S. Внимательно смотрите на скриншоты в инструкции, на них показана рабочая конфигурация для нашей сети, т.е. 100% с такими настройками Ваш роутер будет работать.
Краткая инструкция по подключению к Wi-Fi
В правом нижнем углу (возле индикатора времени и даты) есть индикатор Wi-Fi соединения

Жмем по нему левой кнопкой мыши и видим список доступных сетей

Выбираем из них ту, которую Вы создали и нажимаем «Подключение»
Спустя некоторое время появится окно с просьбой ввести пароль

Вводим пароль в поле «Ключ сети» и дублируем его в поле «Подтверждение ключа»
Далее нажимаем кнопку «Подключить»
Некоторое время Ваш компьютер будет получать IP адрес от роутера и, после, Вы подключены к Wi-Fi соединению
интернет/настройка_роутера_tp-link_archer_c50.txt · Последние изменения: 2025/02/24 09:08 — admin

Виталий Леонидович Черкасов
Системный администратор, инженер компьютерных систем.
Задать вопрос
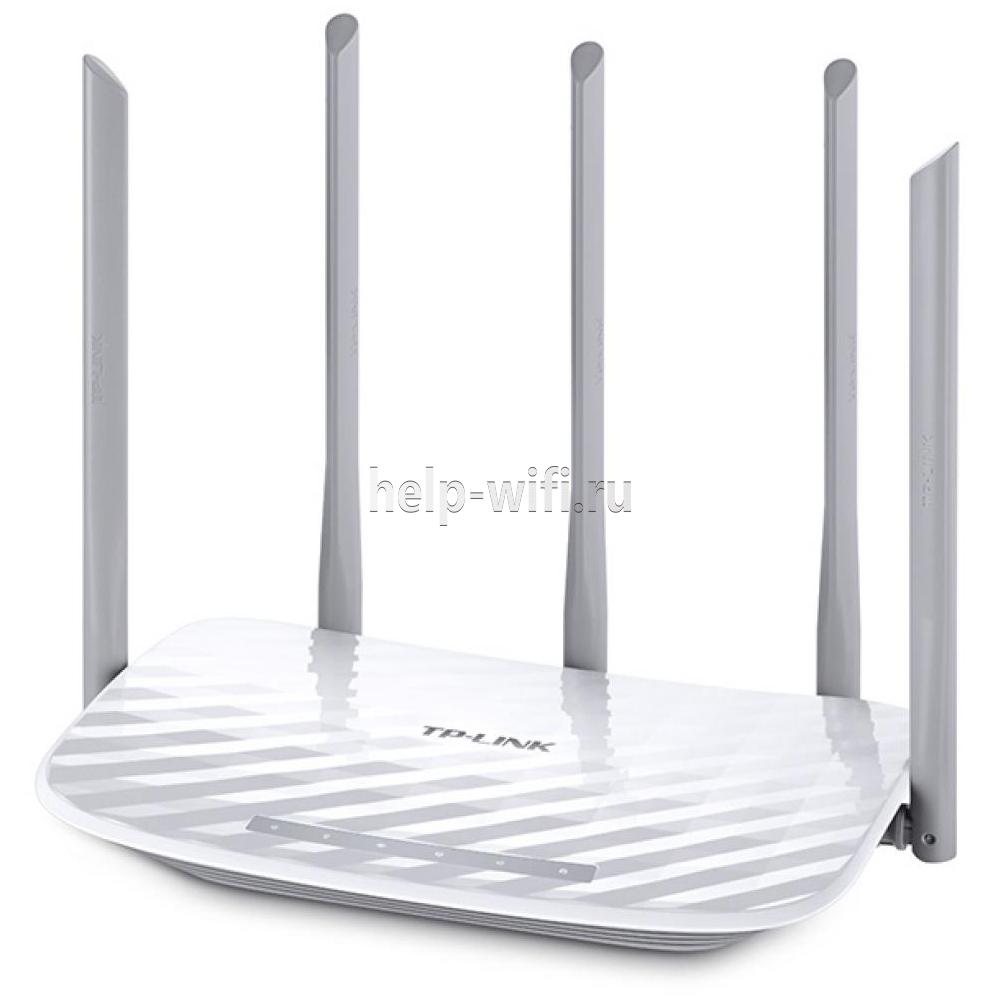
Двухдиапазонный Wi-Fi роутер TP Link Archer C50 V4 поддерживает новый скоростной беспроводной стандарт 802.11ас. Его настройку легко выполнить не только привычным способом, но и при помощи мобильного приложения TP-LINK Tether. Об этом мы подробно расскажем в статье. А сначала сделаем небольшой обзор опций этого роутера.
Содержание
- Особенности и технические характеристики
- Индикаторы и разъемы
- Подключение
- Вход в настройки роутера
- Автоматическая настройка
- Ручная настройка
- Настройка через мобильное приложение
- Подключение и параметры Wi-Fi
- Настройка IP TV
- Смена пароля
- Режим повторителя
- Обновление прошивки
- Сброс настроек
- Отзывы
Особенности и технические характеристики
Основные технические характеристики роутера Archer C50 V4:
- стандарты сети Wi-Fi:
диапазон 5 ГГц: 802.11ac/n/a;
диапазон 2,4 ГГц: 802.11 n/b/g; - количество портов LAN: 4;
- количество портов WAN: 1;
- скорость портов LAN: до 100 Мбит/сек;
- скорость портов WAN: до 100 Мбит/сек;
- скорость Wi-Fi:
диапазон 5 ГГц: 867 Мбит/сек;
диапазон 2,4 ГГц: 300 Мбит/сек; - количество антенн: 4 фиксированные;
- цена: 1850 до 2220 руб.

Существуют четыре аппаратные версии маршрутизатора Archer C50 АС1200. В этой статье представлен обзор новейшей, четвертой версии (V4). Эти устройства по техническим характеристикам практически полностью совпадают с wi-fi роутерами предыдущей модификации (V3).
Роутеры версии V2, в отличие от рассматриваемого гаджета Archer C50 V4, имеют только две наружные антенны. Кроме того, у них разный веб-интерфейс для настроек. Первая модификация этого роутера уже снята с производства.
Удобство и простота настройки
9
Другая модель той же марки, которая поддерживает стандарт 802.11ас, – TP-Link Archer C5.
Индикаторы и разъемы
На передней панели роутера Арчер присутствуют светодиоды, которые сигнализируют о состоянии гаджета. Перечислим их в том порядке, как они расположены, слева направо.
- Индикатор «Power» светится, когда питание включено и роутер работает. Если он мигает, значит, роутер запускается или прошивка обновляется.
- Светодиод «2,4 Wireless» горит, когда работает беспроводная сеть в диапазоне 2,4 ГГц.
- Индикатор «5 Wireless» включен, когда Wi-Fi сеть в диапазоне 5 ГГц активна.
- Светодиод «Ethernet» сигнализирует о подключении устройства к одному из портов LAN.
- Индикатор «Internet» может светиться двумя цветами. Если он зеленый, то Интернет активен, если желтый, то кабель подключен к соответствующему порту, но Интернет недоступен.
- Светодиод «WPS» мигает, когда соединение устанавливается. После того, как произошло подключение, индикатор будет гореть, не мигая, еще 5 минут и после этого погаснет.

На задней панели TP Link Archer C50 расположены следующие разъемы, кнопки и порты:
- Разъем «Power» предназначен для подключения маршрутизатора к источнику питания через прилагаемый адаптер.
- Кнопка «Power On/Off» используется для того, чтобы включить или выключить маршрутизатор.
- С помощью кнопки «Reset» можно выполнить сброс настроек роутера до заводских.
- Следующая кнопка «WPS/Wi-Fi» предназначена для подключения и отключения устройств, работающих по протоколу WPS.
- Далее идет порт «Internet», в который нужно вставить сетевой кабель Интернет-провайдера.
- Следующие 4 порта «Ethernet» могут быть использованы для подключения компьютеров или других проводных сетевых устройств к маршрутизатору.
Подключение
Роутер TP Link Archer C50 подключается в следующем порядке:
- сначала к порту WAN («Internet») подключаем сетевой кабель от компании, предоставляющей услуги доступа к Интернету;
- подключаем маршрутизатор к ПК кабелем через разъемы RJ45;
- включаем адаптер питания сначала в разъем роутера, а потом в электрическую сеть;
- нажимаем кнопку «Power On/Off».
Вход в настройки роутера
Для того, чтобы попасть в настройки маршрутизатора, можно использовать любой веб-браузер. Для этого нужно набрать в адресной строке http://tplinkwifi.net и войти в систему, используя имя пользователя и пароль, которые вы установили ранее.
Если вы еще не успели поменять данные для входа, то используется логин и пароль admin, установленные по умолчанию.

Автоматическая настройка
Чтобы воспользоваться функцией быстрой настройки, нужно зайти в настройки роутера. После этого:
- В левом меню выбираем строку «Быстрая настройка» и жмем «Далее» в появившемся окне.

- В новом окне можно попытаться выбрать своего Интернет-провайдера. Если он отсутствует, то поставьте галочку в поле «Я не нашел подходящих настроек».

- Если вы не нашли своего поставщика Интернет-услуг, то в следующем окне нужно будет выбрать тип подключения. Данная информация предоставляется провайдером.
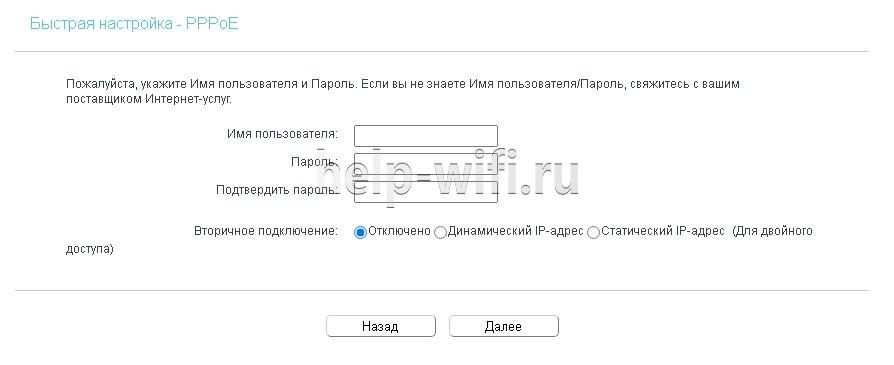
- Если вы выбрали один из наиболее распространенных типов соединения РРРоЕ, то в появившемся окне вам нужно будет ввести имя пользователя и пароль (два раза).
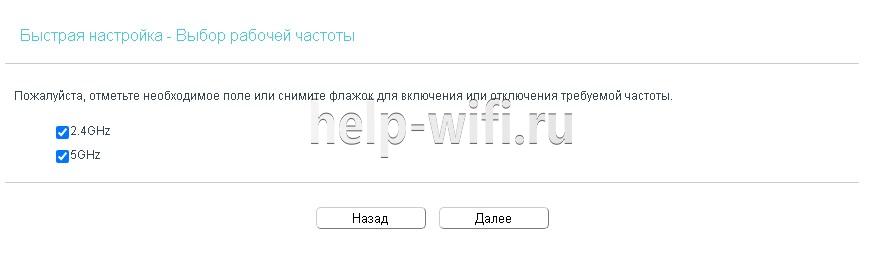
- В новом окне необходимо выбрать диапазоны, на которых будет работать Wi-Fi сеть. Можно выбрать одну из частот или обе.
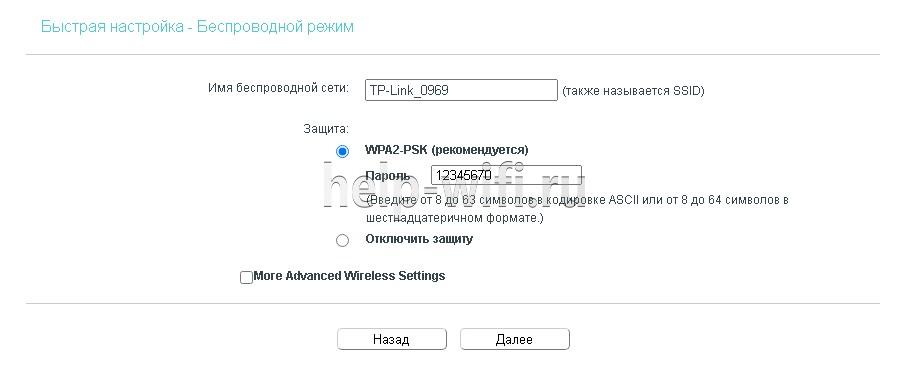
- В следующем окне требуется ввести SSID (имя сети) и пароль.
- В следующем окне показаны все настройки, которые были сделаны, их нужно проверить и нажать «Сохранить».

- После этого появится окно завершения настроек, здесь нажмите «Сохранить», Настройка для роутера TP Link Archer c50 завершена.

Ручная настройка
Чтобы произвести ручную настройку роутера TP Link Archer C50 AC1200, нужно в левом меню выбрать «Сеть» и кликнуть по строке «WAN». В новом окне нужно выбрать тип подключения и ввести данные.
Строку «Динамический IP» нужно выбрать, если поставщик Интернет предоставляет услугу DHCP, то есть автоматически выдает IP адрес. Выберите этот тип подключения, и маршрутизатор автоматически получит параметры IP от вашего провайдера.

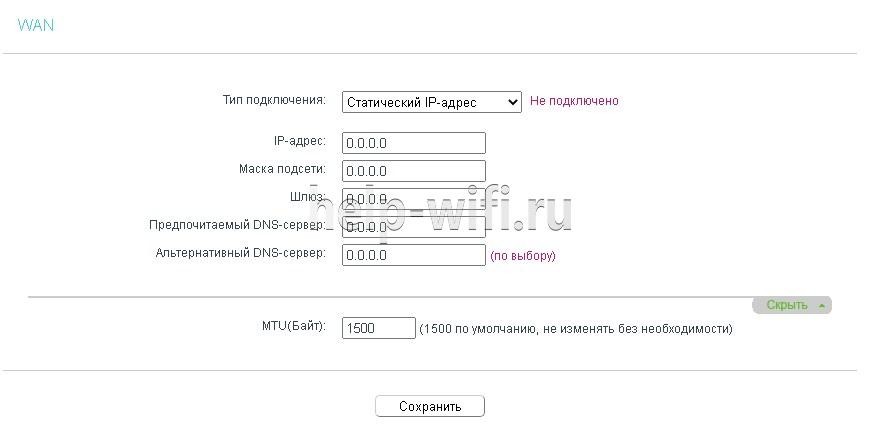
Если ваш провайдер предоставляет статический или фиксированный IP-адрес, маску подсети, шлюз по умолчанию и настройку DNS, выберите пункт «Статический IP-адрес». После этого введите все предоставленные данные в соответствующие поля.
Если ваш Интернет-провайдер использует для соединения один из протоколов РРРоЕ, L2TP или PPTP, то в большинстве случаев нужно просто ввести имя пользователя и пароль.

Настройка через мобильное приложение
Компания TP-Link создала приложение Tether, которое упрощает настройку роутера со смартфона. Существуют версии этого ПО как для устройств, работающих под управлением Android, так и iOS.
Чтобы установить эту программу, нужно зайти в Apple App Store (для iOS гаджетов) или Google Play (для Android устройств), и установить приложение TP-Link Tether. После завершения инсталляции надо подключить мобильный телефон к Wi-Fi сети и запустить приложение Tether. В окне программы выберите модель используемого роутера, введите логин и пароль и войдите в настройки.
Подключение и параметры Wi-Fi
В роутере TP Link Archer C50 настройка вайфай в разных диапазонах производится отдельно. Чтобы изменить настройки Wi-Fi, нужно зайти в один из пунктов меню «Беспроводной режим – 2,4 ГГц» или «Беспроводной режим – 5 ГГц». В появившемся окне нужно ввести SSID (имя) беспроводной сети. А также можно изменить режим работы, канал и ширину канала.

Чтобы выполнить настройку безопасности, требуется войти в подменю «Защита беспроводного режима». Здесь нужно выбрать тип аутентификации, шифрование и задать пароль беспроводной сети.
Настройка IP TV
Чтобы настроить функцию IP TV, нужно кликнуть по строке слева «Сеть», и выбрать подменю «IPTV». В появившемся окне нужно выбрать версию протокола IGMP (Internet Group Management Protocol) v2 или v3. После этого выбрать режим, который рекомендует поставщик услуг.

Смена пароля
Изменить пароль администратора можно, зайдя в подменю «Пароль», которое находится слева в меню «Системные инструменты». Здесь сначала требуется ввести старое имя пользователя и пароль, а потом новый логин и пароль. После этого нажмите кнопку «Сохранить».

Режим повторителя
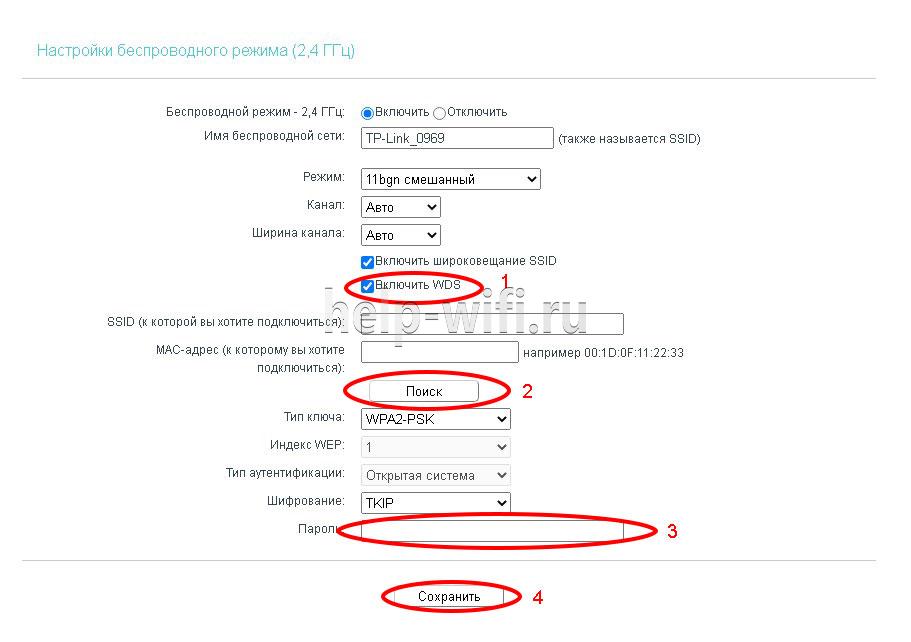
Чтобы включить режим повторителя, нужно в окне настроек беспроводного режима поставить галочку в строке «Включить WDS». Дальше нужно:
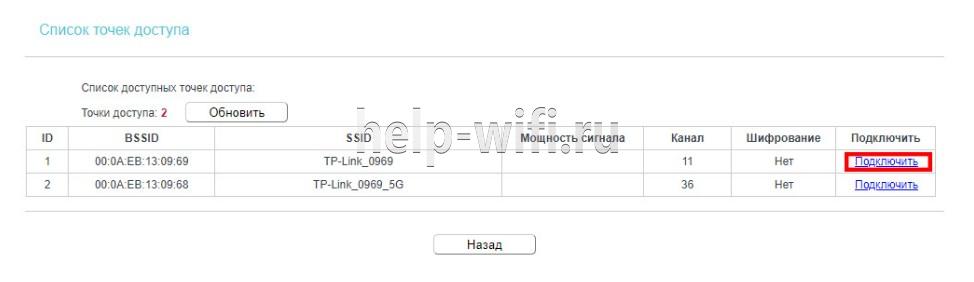
- запустить поиск при помощи соответствующей кнопки;
- в появившемся окне с сетями выбрать интересующую вас;
- ввести пароль, установленный на маршрутизаторе, к которому вы хотите подключиться;
- сохранить сделанные изменения.
Обновление прошивки
Перед тем, как приступить к обновлению прошивки, требуется скачать файл с последним программным обеспечением с сайта компании-производителя.
После этого в левом меню нужно кликнуть по строке «Системные инструменты» и зайти в подменю «Обновление встроенного ПО». В появившемся окне кликните по кнопке «Выберите файл» и укажите нужный файл с прошивкой и нажмите кнопку «Обновить».

Сброс настроек
Существует два варианта сброса настроек роутера до заводских.
- На задней панели маршрутизатора есть кнопка «Reset». Ее нужно нажать и удерживать в течении 5-10 секунд.
- В панели настроек в меню «Системные инструменты» есть подменю «Заводские настройки». При его выборе появится окно, в котором нужно нажать кнопку «Восстановить», чтобы настройки маршрутизатора вернулись к заводским.

Отзывы
Мы проанализировали плюсы и минусы модели, опираясь на отзывы покупателей.
4 антенны обеспечивают хорошую дальнобойность;
Хорошая скорость за сравнительно небольшие деньги;
Удобная настройка маршрутизатора с мобильного телефона благодаря фирменной программе TP-Link Tether.
Часто пропадает сеть;
В версиях V3 и V4 отсутствует USB порт;
Маркое глянцевое покрытие корпуса.

User Guide
AC1200 Wireless Dual Band Router
REV4.0.0 1910012347

Contents
About This Guide ……………………………………………………………………………………………1
Chapter 1. Get to Know About Your Router . . . . . . . . . . . . . . . . . . . . . . . . . . . 2
1. 1. Product Overview. . . . . . . . . . . . . . . . . . . . . . . . . . . . . . . . . . . . . . . . . . . . . . . . . . . . . . . . . . . . 3
1. 2. Panel Layout. . . . . . . . . . . . . . . . . . . . . . . . . . . . . . . . . . . . . . . . . . . . . . . . . . . . . . . . . . . . . . . . . 3
1. 2. 1. Top View . . . . . . . . . . . . . . . . . . . . . . . . . . . . . . . . . . . . . . . . . . . . . . . . . . . . . . . . . . . . . . 3
1. 2. 2. The Back Panel. . . . . . . . . . . . . . . . . . . . . . . . . . . . . . . . . . . . . . . . . . . . . . . . . . . . . . . . 4
Chapter 2. Connect to the Internet . . . . . . . . . . . . . . . . . . . . . . . . . . . . . . . . . . .6
2. 1. Position Your Router . . . . . . . . . . . . . . . . . . . . . . . . . . . . . . . . . . . . . . . . . . . . . . . . . . . . . . . . . 7
2. 2. Connect Your Router. . . . . . . . . . . . . . . . . . . . . . . . . . . . . . . . . . . . . . . . . . . . . . . . . . . . . . . . . 7
Chapter 3. Log In. . . . . . . . . . . . . . . . . . . . . . . . . . . . . . . . . . . . . . . . . . . . . . . . . . . 10
Chapter 4. Configure the Router in Wireless Router Mode . . . . . . . . . . 12
4. 1. Status . . . . . . . . . . . . . . . . . . . . . . . . . . . . . . . . . . . . . . . . . . . . . . . . . . . . . . . . . . . . . . . . . . . . . . 13
4. 2. Quick Setup . . . . . . . . . . . . . . . . . . . . . . . . . . . . . . . . . . . . . . . . . . . . . . . . . . . . . . . . . . . . . . . . 14
4. 3. Operation Mode . . . . . . . . . . . . . . . . . . . . . . . . . . . . . . . . . . . . . . . . . . . . . . . . . . . . . . . . . . . . 15
4. 3. 1. Wireless Router Mode . . . . . . . . . . . . . . . . . . . . . . . . . . . . . . . . . . . . . . . . . . . . . . . . 15
4. 3. 2. Access Point Mode. . . . . . . . . . . . . . . . . . . . . . . . . . . . . . . . . . . . . . . . . . . . . . . . . . . 15
4. 4. Network . . . . . . . . . . . . . . . . . . . . . . . . . . . . . . . . . . . . . . . . . . . . . . . . . . . . . . . . . . . . . . . . . . . . 16
4. 4. 1. WAN. . . . . . . . . . . . . . . . . . . . . . . . . . . . . . . . . . . . . . . . . . . . . . . . . . . . . . . . . . . . . . . . 16
4. 4. 2. LAN. . . . . . . . . . . . . . . . . . . . . . . . . . . . . . . . . . . . . . . . . . . . . . . . . . . . . . . . . . . . . . . . 22
4. 4. 3. IPTV. . . . . . . . . . . . . . . . . . . . . . . . . . . . . . . . . . . . . . . . . . . . . . . . . . . . . . . . . . . . . . . . 22
4. 4. 4. MAC Clone . . . . . . . . . . . . . . . . . . . . . . . . . . . . . . . . . . . . . . . . . . . . . . . . . . . . . . . . . . . 23
4. 5. Dual Band Selection . . . . . . . . . . . . . . . . . . . . . . . . . . . . . . . . . . . . . . . . . . . . . . . . . . . . . . . . 24
4. 6. Wireless (2.4GHz or 5GHz) . . . . . . . . . . . . . . . . . . . . . . . . . . . . . . . . . . . . . . . . . . . . . . . . . . 24
4. 6. 1. Wireless Settings . . . . . . . . . . . . . . . . . . . . . . . . . . . . . . . . . . . . . . . . . . . . . . . . . . . . 24
4. 6. 2. WPS. . . . . . . . . . . . . . . . . . . . . . . . . . . . . . . . . . . . . . . . . . . . . . . . . . . . . . . . . . . . . . . . 26
4. 6. 3. Wireless Security . . . . . . . . . . . . . . . . . . . . . . . . . . . . . . . . . . . . . . . . . . . . . . . . . . . . 28
4. 6. 4. Wireless Schedule . . . . . . . . . . . . . . . . . . . . . . . . . . . . . . . . . . . . . . . . . . . . . . . . . . . 30
4. 6. 5. Wireless MAC Filtering . . . . . . . . . . . . . . . . . . . . . . . . . . . . . . . . . . . . . . . . . . . . . . . 30
4. 6. 6. Wireless Advanced. . . . . . . . . . . . . . . . . . . . . . . . . . . . . . . . . . . . . . . . . . . . . . . . . . . 32
4. 6. 7. Wireless Statistics . . . . . . . . . . . . . . . . . . . . . . . . . . . . . . . . . . . . . . . . . . . . . . . . . . . 33
4. 7. Guest Network. . . . . . . . . . . . . . . . . . . . . . . . . . . . . . . . . . . . . . . . . . . . . . . . . . . . . . . . . . . . . . 33

4. 8. DHCP. . . . . . . . . . . . . . . . . . . . . . . . . . . . . . . . . . . . . . . . . . . . . . . . . . . . . . . . . . . . . . . . . . . . . . . 35
4. 8. 1. DHCP Settings . . . . . . . . . . . . . . . . . . . . . . . . . . . . . . . . . . . . . . . . . . . . . . . . . . . . . . . 35
4. 8. 2. DHCP Client List . . . . . . . . . . . . . . . . . . . . . . . . . . . . . . . . . . . . . . . . . . . . . . . . . . . . . 36
4. 8. 3. Address Reservation . . . . . . . . . . . . . . . . . . . . . . . . . . . . . . . . . . . . . . . . . . . . . . . . . 37
4. 9. Forwarding . . . . . . . . . . . . . . . . . . . . . . . . . . . . . . . . . . . . . . . . . . . . . . . . . . . . . . . . . . . . . . . . . 37
4. 9. 1. Virtual Server . . . . . . . . . . . . . . . . . . . . . . . . . . . . . . . . . . . . . . . . . . . . . . . . . . . . . . . . 38
4. 9. 2. Port Triggering . . . . . . . . . . . . . . . . . . . . . . . . . . . . . . . . . . . . . . . . . . . . . . . . . . . . . . . 39
4. 9. 3. DMZ. . . . . . . . . . . . . . . . . . . . . . . . . . . . . . . . . . . . . . . . . . . . . . . . . . . . . . . . . . . . . . . . 40
4. 9. 4. UPnP. . . . . . . . . . . . . . . . . . . . . . . . . . . . . . . . . . . . . . . . . . . . . . . . . . . . . . . . . . . . . . . . 41
4. 10. Security . . . . . . . . . . . . . . . . . . . . . . . . . . . . . . . . . . . . . . . . . . . . . . . . . . . . . . . . . . . . . . . . . . . . 42
4. 10. 1. Basic Security . . . . . . . . . . . . . . . . . . . . . . . . . . . . . . . . . . . . . . . . . . . . . . . . . . . . . . 42
4. 10. 2. Advanced Security. . . . . . . . . . . . . . . . . . . . . . . . . . . . . . . . . . . . . . . . . . . . . . . . . . 43
4. 10. 3. Local Management . . . . . . . . . . . . . . . . . . . . . . . . . . . . . . . . . . . . . . . . . . . . . . . . . 45
4. 10. 4. Remote Management . . . . . . . . . . . . . . . . . . . . . . . . . . . . . . . . . . . . . . . . . . . . . . . 45
4. 11. Parental Controls . . . . . . . . . . . . . . . . . . . . . . . . . . . . . . . . . . . . . . . . . . . . . . . . . . . . . . . . . . . 46
4. 12. Access Control . . . . . . . . . . . . . . . . . . . . . . . . . . . . . . . . . . . . . . . . . . . . . . . . . . . . . . . . . . . . . 47
4. 13. Advanced Routing . . . . . . . . . . . . . . . . . . . . . . . . . . . . . . . . . . . . . . . . . . . . . . . . . . . . . . . . . . 50
4. 13. 1. Static Route List . . . . . . . . . . . . . . . . . . . . . . . . . . . . . . . . . . . . . . . . . . . . . . . . . . . . 50
4. 13. 2. System Routing Table . . . . . . . . . . . . . . . . . . . . . . . . . . . . . . . . . . . . . . . . . . . . . . . 51
4. 14. Bandwidth Control . . . . . . . . . . . . . . . . . . . . . . . . . . . . . . . . . . . . . . . . . . . . . . . . . . . . . . . . . . 52
4. 14. 1. Control Settings . . . . . . . . . . . . . . . . . . . . . . . . . . . . . . . . . . . . . . . . . . . . . . . . . . . . 52
4. 14. 2. Rule List . . . . . . . . . . . . . . . . . . . . . . . . . . . . . . . . . . . . . . . . . . . . . . . . . . . . . . . . . . . . 52
4. 15. IP & MAC Binding . . . . . . . . . . . . . . . . . . . . . . . . . . . . . . . . . . . . . . . . . . . . . . . . . . . . . . . . . . . 53
4. 15. 1. Binding Settings . . . . . . . . . . . . . . . . . . . . . . . . . . . . . . . . . . . . . . . . . . . . . . . . . . . . 53
4. 15. 2. ARP List . . . . . . . . . . . . . . . . . . . . . . . . . . . . . . . . . . . . . . . . . . . . . . . . . . . . . . . . . . . . 54
4. 16. Dynamic DNS. . . . . . . . . . . . . . . . . . . . . . . . . . . . . . . . . . . . . . . . . . . . . . . . . . . . . . . . . . . . . . . 55
4. 17. IPv6 . . . . . . . . . . . . . . . . . . . . . . . . . . . . . . . . . . . . . . . . . . . . . . . . . . . . . . . . . . . . . . . . . . . . . . . . 57
4. 17. 1. IPv6 Status . . . . . . . . . . . . . . . . . . . . . . . . . . . . . . . . . . . . . . . . . . . . . . . . . . . . . . . . . 57
4. 17. 2. IPv6 WAN . . . . . . . . . . . . . . . . . . . . . . . . . . . . . . . . . . . . . . . . . . . . . . . . . . . . . . . . . . . 58
4. 17. 3. IPv6 LAN. . . . . . . . . . . . . . . . . . . . . . . . . . . . . . . . . . . . . . . . . . . . . . . . . . . . . . . . . . . . 62
4. 18. System Tools . . . . . . . . . . . . . . . . . . . . . . . . . . . . . . . . . . . . . . . . . . . . . . . . . . . . . . . . . . . . . . . 63
4. 18. 1. Time Settings . . . . . . . . . . . . . . . . . . . . . . . . . . . . . . . . . . . . . . . . . . . . . . . . . . . . . . . 63
4. 18. 2. LED Control. . . . . . . . . . . . . . . . . . . . . . . . . . . . . . . . . . . . . . . . . . . . . . . . . . . . . . . . . 64
4. 18. 3. Feedback . . . . . . . . . . . . . . . . . . . . . . . . . . . . . . . . . . . . . . . . . . . . . . . . . . . . . . . . . . . 64
4. 18. 4. Diagnostic . . . . . . . . . . . . . . . . . . . . . . . . . . . . . . . . . . . . . . . . . . . . . . . . . . . . . . . . . . 65
4. 18. 5. Firmware Upgrade . . . . . . . . . . . . . . . . . . . . . . . . . . . . . . . . . . . . . . . . . . . . . . . . . . 66
4. 18. 6. Factory Defaults . . . . . . . . . . . . . . . . . . . . . . . . . . . . . . . . . . . . . . . . . . . . . . . . . . . . 67
4. 18. 7. Backup & Restore . . . . . . . . . . . . . . . . . . . . . . . . . . . . . . . . . . . . . . . . . . . . . . . . . . . 67
4. 18. 8. Reboot . . . . . . . . . . . . . . . . . . . . . . . . . . . . . . . . . . . . . . . . . . . . . . . . . . . . . . . . . . . . . 68

4. 18. 9. Password . . . . . . . . . . . . . . . . . . . . . . . . . . . . . . . . . . . . . . . . . . . . . . . . . . . . . . . . . . . 69
4. 18. 10. System Log . . . . . . . . . . . . . . . . . . . . . . . . . . . . . . . . . . . . . . . . . . . . . . . . . . . . . . . 69
4. 18. 11. Statistics . . . . . . . . . . . . . . . . . . . . . . . . . . . . . . . . . . . . . . . . . . . . . . . . . . . . . . . . . . 70
4. 19. Log Out. . . . . . . . . . . . . . . . . . . . . . . . . . . . . . . . . . . . . . . . . . . . . . . . . . . . . . . . . . . . . . . . . . . . . 71
Chapter 5. Configure the Router in Access Point Mode . . . . . . . . . . . . . 72
5. 1. Status . . . . . . . . . . . . . . . . . . . . . . . . . . . . . . . . . . . . . . . . . . . . . . . . . . . . . . . . . . . . . . . . . . . . . . 73
5. 2. Quick Setup . . . . . . . . . . . . . . . . . . . . . . . . . . . . . . . . . . . . . . . . . . . . . . . . . . . . . . . . . . . . . . . . 74
5. 3. Operation Mode . . . . . . . . . . . . . . . . . . . . . . . . . . . . . . . . . . . . . . . . . . . . . . . . . . . . . . . . . . . . 74
5. 3. 1. Wireless Router Mode. . . . . . . . . . . . . . . . . . . . . . . . . . . . . . . . . . . . . . . . . . . . . . . . 74
5. 3. 2. Access Point Mode. . . . . . . . . . . . . . . . . . . . . . . . . . . . . . . . . . . . . . . . . . . . . . . . . . . 75
5. 4. Network . . . . . . . . . . . . . . . . . . . . . . . . . . . . . . . . . . . . . . . . . . . . . . . . . . . . . . . . . . . . . . . . . . . . 75
5. 5. Dual Band Selection . . . . . . . . . . . . . . . . . . . . . . . . . . . . . . . . . . . . . . . . . . . . . . . . . . . . . . . . 76
5. 6. Wireless (2.4GHz or 5GHz) . . . . . . . . . . . . . . . . . . . . . . . . . . . . . . . . . . . . . . . . . . . . . . . . . . 77
5. 6. 1. Wireless Settings . . . . . . . . . . . . . . . . . . . . . . . . . . . . . . . . . . . . . . . . . . . . . . . . . . . . 77
5. 6. 2. WPS. . . . . . . . . . . . . . . . . . . . . . . . . . . . . . . . . . . . . . . . . . . . . . . . . . . . . . . . . . . . . . . . 77
5. 6. 3. Wireless Security . . . . . . . . . . . . . . . . . . . . . . . . . . . . . . . . . . . . . . . . . . . . . . . . . . . . 79
5. 6. 4. Wireless Schedule . . . . . . . . . . . . . . . . . . . . . . . . . . . . . . . . . . . . . . . . . . . . . . . . . . . 81
5. 6. 5. Wireless MAC Filtering . . . . . . . . . . . . . . . . . . . . . . . . . . . . . . . . . . . . . . . . . . . . . . . 82
5. 6. 6. Wireless Advanced. . . . . . . . . . . . . . . . . . . . . . . . . . . . . . . . . . . . . . . . . . . . . . . . . . . 83
5. 6. 7. Wireless Statistics . . . . . . . . . . . . . . . . . . . . . . . . . . . . . . . . . . . . . . . . . . . . . . . . . . . 85
5. 6. 8. Throughput Monitor . . . . . . . . . . . . . . . . . . . . . . . . . . . . . . . . . . . . . . . . . . . . . . . . . . 85
5. 7. Guest Network. . . . . . . . . . . . . . . . . . . . . . . . . . . . . . . . . . . . . . . . . . . . . . . . . . . . . . . . . . . . . . 86
5. 8. DHCP. . . . . . . . . . . . . . . . . . . . . . . . . . . . . . . . . . . . . . . . . . . . . . . . . . . . . . . . . . . . . . . . . . . . . . . 87
5. 8. 1. DHCP Settings . . . . . . . . . . . . . . . . . . . . . . . . . . . . . . . . . . . . . . . . . . . . . . . . . . . . . . . 88
5. 8. 2. DHCP Client List . . . . . . . . . . . . . . . . . . . . . . . . . . . . . . . . . . . . . . . . . . . . . . . . . . . . . 89
5. 8. 3. Address Reservation . . . . . . . . . . . . . . . . . . . . . . . . . . . . . . . . . . . . . . . . . . . . . . . . . 89
5. 9. System Tools . . . . . . . . . . . . . . . . . . . . . . . . . . . . . . . . . . . . . . . . . . . . . . . . . . . . . . . . . . . . . . . 90
5. 9. 1. Time Settings . . . . . . . . . . . . . . . . . . . . . . . . . . . . . . . . . . . . . . . . . . . . . . . . . . . . . . . . 90
5. 9. 2. LED Control . . . . . . . . . . . . . . . . . . . . . . . . . . . . . . . . . . . . . . . . . . . . . . . . . . . . . . . . . . 91
5. 9. 3. Feedback . . . . . . . . . . . . . . . . . . . . . . . . . . . . . . . . . . . . . . . . . . . . . . . . . . . . . . . . . . . . 92
5. 9. 4. Diagnostic . . . . . . . . . . . . . . . . . . . . . . . . . . . . . . . . . . . . . . . . . . . . . . . . . . . . . . . . . . . 92
5. 9. 5. Firmware Upgrade. . . . . . . . . . . . . . . . . . . . . . . . . . . . . . . . . . . . . . . . . . . . . . . . . . . . 94
5. 9. 6. Factory Defaults . . . . . . . . . . . . . . . . . . . . . . . . . . . . . . . . . . . . . . . . . . . . . . . . . . . . . 94
5. 9. 7. Backup & Restore . . . . . . . . . . . . . . . . . . . . . . . . . . . . . . . . . . . . . . . . . . . . . . . . . . . . 95
5. 9. 8. Reboot . . . . . . . . . . . . . . . . . . . . . . . . . . . . . . . . . . . . . . . . . . . . . . . . . . . . . . . . . . . . . . . 95
5. 9. 9. Password . . . . . . . . . . . . . . . . . . . . . . . . . . . . . . . . . . . . . . . . . . . . . . . . . . . . . . . . . . . . 96
5. 9. 10. System Log. . . . . . . . . . . . . . . . . . . . . . . . . . . . . . . . . . . . . . . . . . . . . . . . . . . . . . . . . 97

5. 9. 11. Statistics . . . . . . . . . . . . . . . . . . . . . . . . . . . . . . . . . . . . . . . . . . . . . . . . . . . . . . . . . . . 97
5. 10. Log Out. . . . . . . . . . . . . . . . . . . . . . . . . . . . . . . . . . . . . . . . . . . . . . . . . . . . . . . . . . . . . . . . . . . . . 98
FAQ ……………………………………………………………………………………………………………….. 99
About This Guide
This guide is a complement to Quick Installation Guide. The Quick Installation Guide
provides instructions for quick internet setup, while this guide contains details of each
function and demonstrates how to configure them.
When using this guide, please notice that features of the router may vary slightly
depending on the model and software version you have, and on your location, language,
and internet service provider. All screenshots, images, parameters and descriptions
documented in this guide are used for demonstration only.
Conventions
In this guide the following conventions are used:
Convention Description
Underlined
Teal
>
Note:
Tips:
Underlined words or phrases are hyperlinks. You can click to redirect to a website or a
specific section.
Contents to be emphasized and texts on the web page are in teal, including the menus,
items, buttons and so on.
The menu structures to show the path to load the corresponding page. For example,
Advanced > Wireless > MAC Filtering means the MAC Filtering function page is under the
Wireless menu that is located in the Advanced tab.
Ignoring this type of note might result in a malfunction or damage to the device.
Indicates important information that helps you make better use of your device.
More Info
The latest software, management app and utility are available from the Download
Center at www.tp-link.com/support.
The Quick Installation Guide can be found where you find this guide or inside the
package of the router.
Specifications can be found on the product page at http://www.tp-link.com.
A Technical Support Forum is provided for you to discuss our products at
http://forum.tp-link.com.
Our Technical Support contact information can be found at the Contact Technical
Support page at www.tp-link.com/support.
1

Chapter 1
Get to Know About Your
Router
This chapter introduces what the router can do and shows its appearance.
It contains the following sections:
• Product Overview
• Panel Layout

Chapter 1
Get to Know About Your Router
1. 1. Product Overview
The TP-Link router is designed to fully meet the need of Small Office/Home Office
(SOHO) networks and users demanding higher networking performance. The powerful
antennas ensure continuous Wi-Fi signal to all your devices while boosting widespread
coverage throughout your home, and the built-in Ethernet ports supply high-speed
connection to your wired devices.
Moreover, it is simple and convenient to set up and use the TP-Link router due to its
intuitive web interface and the powerful Tether app.
1. 2. Panel Layout
1. 2. 1. Top View
The router’s LEDs (view from left to right) are located on the front panel. You can check
the router’s working status by following the LED Explanation table.
3
Chapter 1
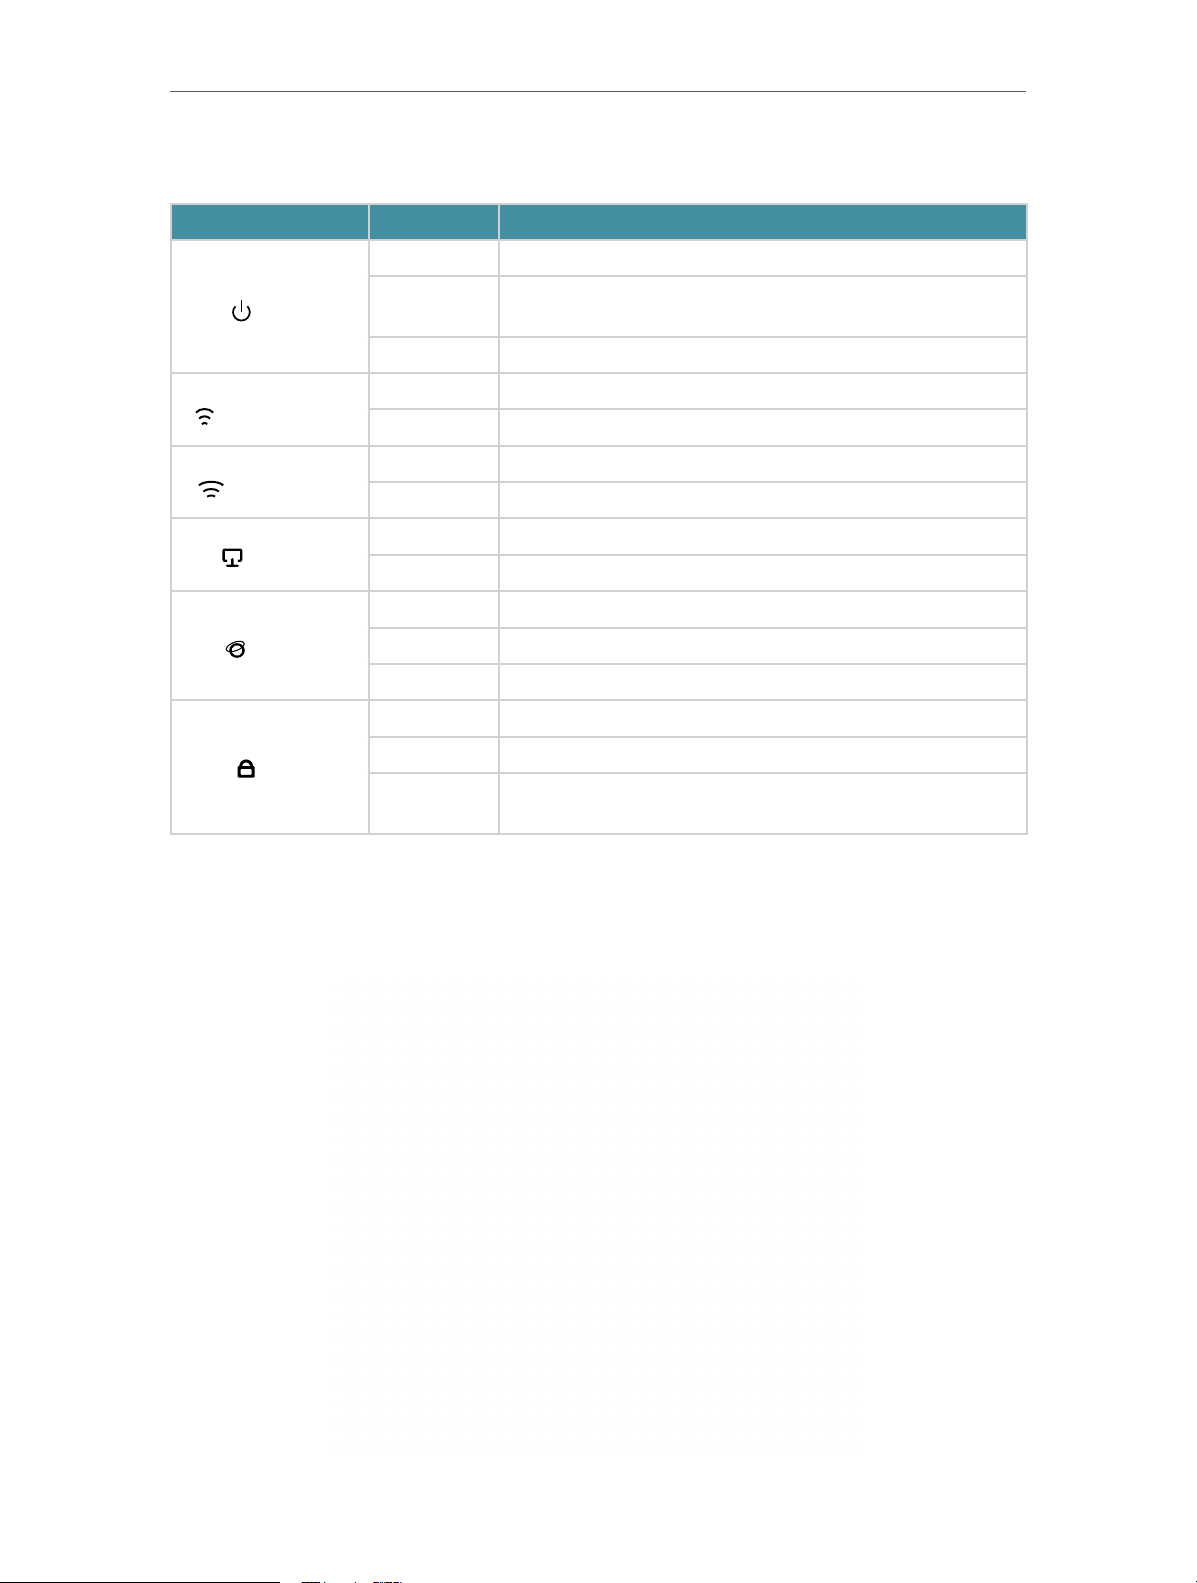
LED Explanation
Name Status Indication
Get to Know About Your Router
On The system has started up successfully.
(Power)
(2.4GHz Wireless)
(5GHz Wireless)
(Ethernet)
(Internet)
(WPS)
Flashing
Off Power is off.
On The 2.4GHz wireless band is enabled.
Off The 2.4GHz wireless band is disabled.
On The 5GHz wireless band is enabled.
Off The 5GHz wireless band is disabled.
On At least one Ethernet port is connected to a powered-on device.
Off No Ethernet port is connected to a powered-on device.
Green On Internet service is available.
Orange On The router’s Internet port is connected, but the internet is not available.
Off The router’s Internet port is not connected.
On A WPS connection is established.
Flashing A WPS connection is in progress. This may take up to 2 minutes.
Off
The system is starting up or firmware is being upgraded. Do not
disconnect or power off your router.
A WPS connection has been established for more than 5 minutes or
WPS connection failed.
1. 2. 2. The Back Panel
4

Chapter 1
Get to Know About Your Router
The following parts (view from left to right) are located on the rear panel.
Item Description
Power Port For connecting the router to a power socket via the provided power adapter.
Power On/Off Button Press this button to power on or off the router.
Reset Button
Wi-Fi/WPS Button
Internet Port For connecting to a DSL/Cable modem, or an Ethernet port.
Ethernet Ports (1/2/3/4) For connecting your PCs or other wired network devices to the router.
Antennas
Press and hold this button for 2 seconds until all LEDs turn off to reset the router to
its factory default settings.
Press this button for 1 second, and immediately press the WPS button on your
device. The WPS LED of the router should change from flashing to solid on, indicating
successful WPS connection.
Press and hold this button for about 3 seconds to turn on or off the wireless function
of your router.
Used for wireless operation and data transmitting. Upright them for the best Wi-Fi
performance.
5

Chapter 2
Connect to the Internet
This chapter contains the following sections:
• Position Your Router
• Connect Your Router

Chapter 2 Connect to the Internet
2. 1. Position Your Router
• The product should not be located in a place where it will be exposed to moisture or
excessive heat.
• Place the router in a location where it can be connected to multiple devices as well as
to a power source.
• Make sure the cables and power cord are safely placed out of the way so they do not
create a tripping hazard.
• The router can be placed on a shelf or desktop.
• Keep the router away from strong devices with strong electromagnetic interference,
such as Bluetooth devices, cordless phones and microwaves.
2. 2. Connect Your Router
This mode enables multiple users to share internet connection via ADSL/Cable Modem.
1. Follow the steps below to connect your router.
If your internet connection is through an Ethernet cable directly from the wall instead
of through a DSL / Cable / Satellite modem, connect the Ethernet cable to the router’s
Internet port, and then follow Step 4 and 5 to complete the hardware connection.
Power adapter
Power adapter
Router
Internet
1
2
Modem
4
3
1 ) Turn off the modem, and remove the backup battery if it has one.
2 ) Connect the modem to the router’s Internet port with an Ethernet cable.
3 ) Turn on the modem, and then wait about 2 minutes for it to restart.
7
Chapter 2 Connect to the Internet
Connections are available
Wireless Network Connection
4 ) Connect the power adapter to the router and turn on the router.
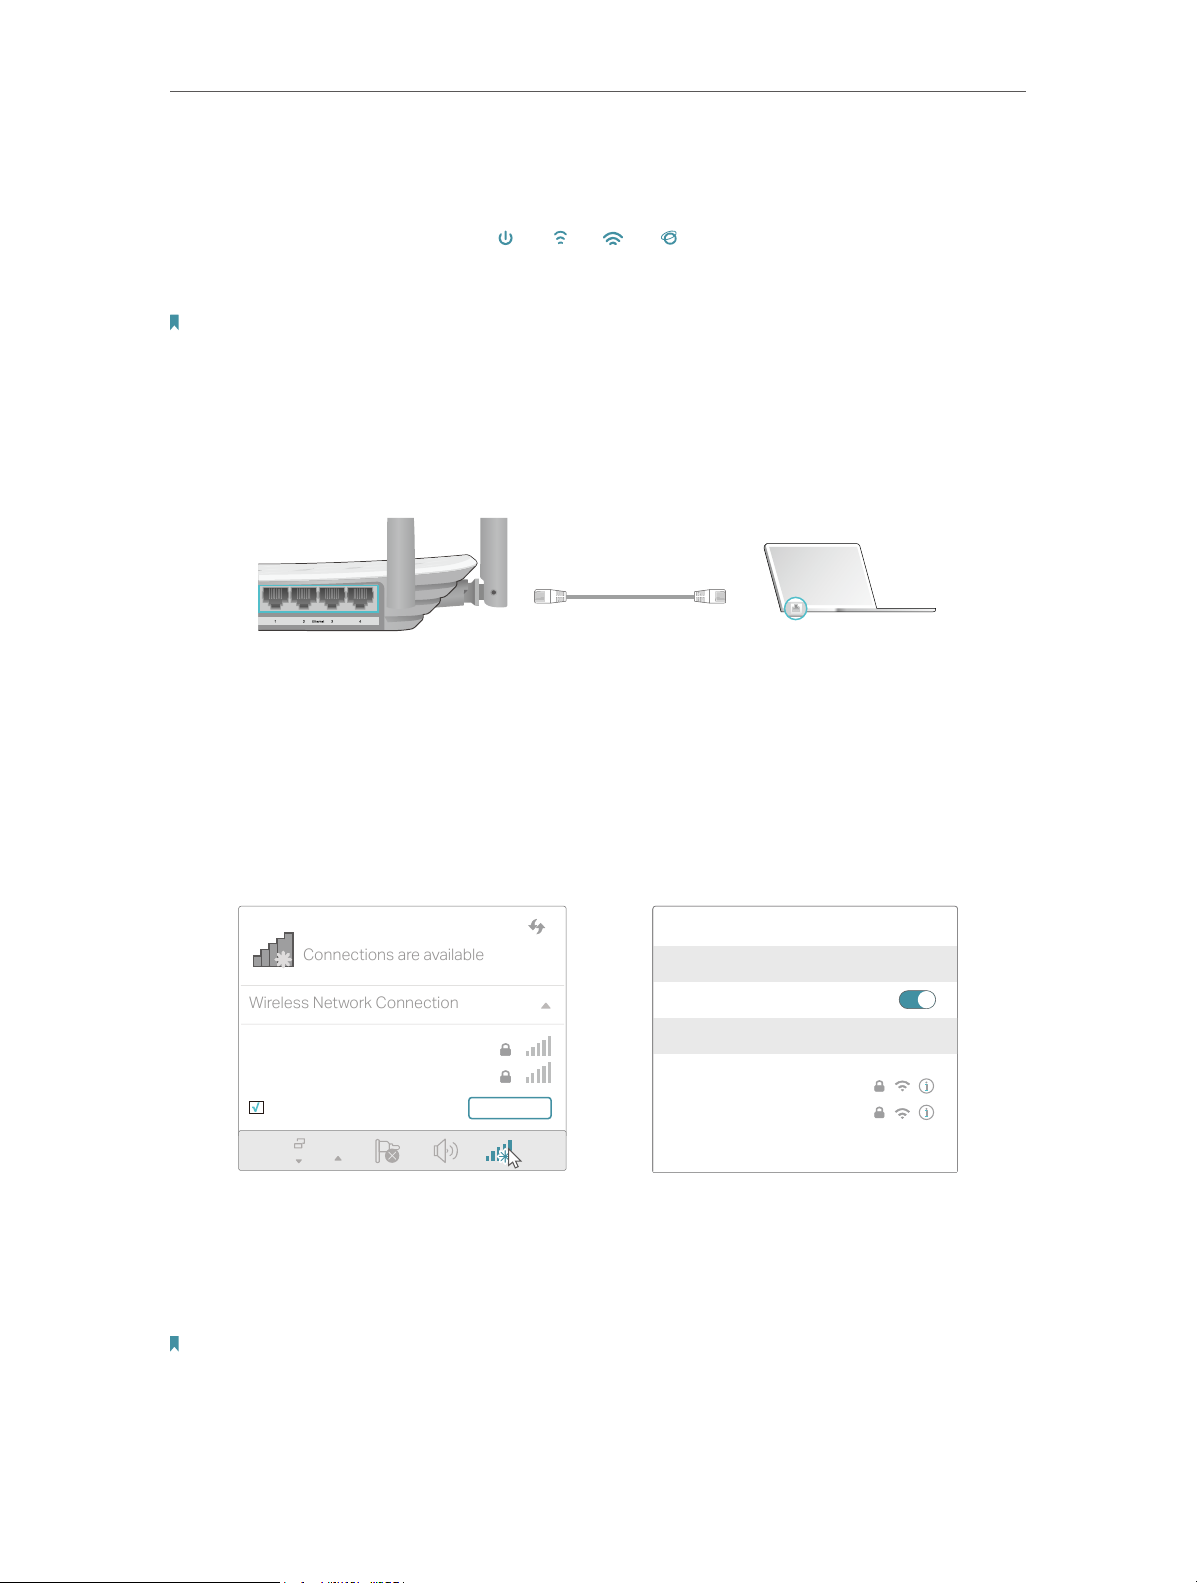
5 ) Verify that the hardware connection is correct by checking these LEDs.
Power
2.4G
On
On
Note:
If the 2.4G and 5G Wi-Fi LEDs are off, press and hold the Wi-Fi/WPS button on the rear panel for about 3 seconds, then
release the button. Both LEDs will turn on.
Internet
5G
On
On
2. Connect your computer to the router.
• Method 1: Wired
Turn off the Wi-Fi on your computer and connect the devices as shown below.
Ethernet cable
• Method 2: Wirelessly
1 ) Find the SSID (Network Name) and Wireless Password printed on the label at
the bottom of the router.
2 ) Click the network icon of your computer or go to Wi-Fi Settings of your smart
device, and then select the SSID to join the network.
Smart DeviceComputer
Wi-Fi
TP-Link_XXXX
TP-Link_XXXX_5G
Connect automatically Connect
OR
< Settings
Wi-Fi
CHOOSE A NETWORK…
TP-Link_XXXX
TP-Link_XXXX_5G
Other…
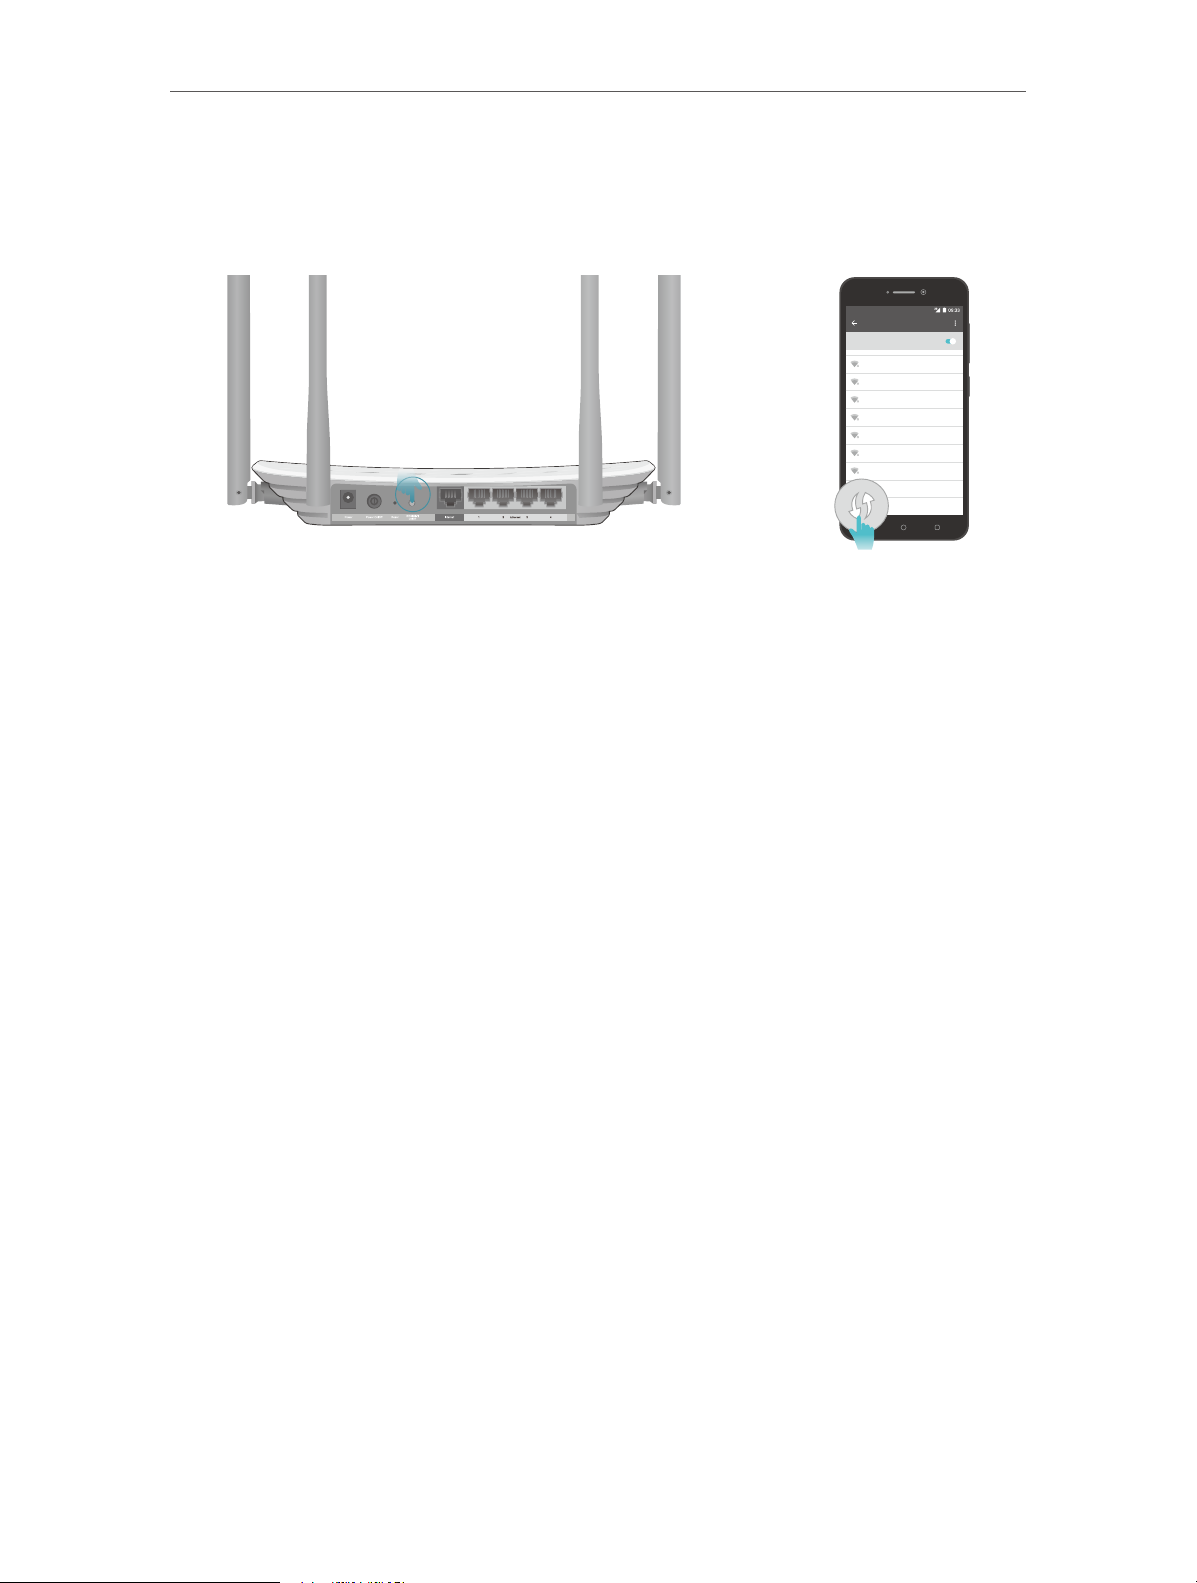
• Method 3: Use the WPS button
Wireless devices that support WPS, including Android phones, tablets and most USB
network cards, can be connected to your router through this method ( not supported
by iOS devices).
Note:
The WPS function cannot be configured if the wireless function of the router is disabled. Also, the WPS function will be
disabled if your wireless encryption is WEP. Please make sure the wireless function is enabled and is configured with the
appropriate encryption before configuring the WPS.
8
Chapter 2 Connect to the Internet
1 ) Tab the WPS icon on the device’s screen. Here we take an Android phone as an
example.
2 ) Immediately press the WPS button on your router.
WLAN
On
TP-LINK
YSL
David
Hotdog
Ts_5G
Sunny
Close to
Test
9

Chapter 3
Log In
This chapter introduces how to log in to the web management page of router.

Chapter 3
Log In
With the web management page, it is easy to configure and manage the router. The web
management page can be used on any Windows, Macintosh or UNIX OS with a Web
browser, such as Microsoft the Internet Explorer, Mozilla Firefox or Apple Safari.
Follow the steps below to log in to your router.
1. Set up the TCP/IP Protocol in Obtain an IP address automatically mode on your computer.
2. Visit http://tplinkwifi.net, and log in with the username and password you set for the router.
The default one is admin (all lowercase) for both username and password.
Note:
If the login window does not appear, please refer to the FAQ section.
3. For security purposes, go to System Tools > Password and create a new username and
password for future logins.
11

Chapter 4
Configure the Router in
Wireless Router Mode
This chapter presents how to configure the various features of the router working as a
wireless router.
It contains the following sections:
• Status
• Quick Setup
• Operation Mode
• Network
• Dual Band Selection
• Wireless (2.4GHz or 5GHz)
• Guest Network
• DHCP
• Forwarding
• Security
• Parental Controls
• Access Control
• Advanced Routing
• Bandwidth Control
• IP & MAC Binding
• Dynamic DNS
• IPv6
• System Tools
• Log Out

Chapter 4 Congure the Router in Wireless Router Mode
4. 1. Status
1. Visit http://tplinkwifi.net, and log in with the username and password you set for the
router.
2. Go to Status. You can view the current status information of the router.
• Firmware Version — The version information of the router’s firmware.
• Hardware Version — The version information of the router’s hardware.
• LAN — This field displays the current settings of the LAN, and you can configure them
on the Network > LAN page.
• MAC address — The physical address of the router.
• IP address — The LAN IP address of the router.
• Subnet Mask — The subnet mask associated with the LAN IP address.
• Wireless 2.4GHz/5GHz — This field displays the basic information or status of the
wireless function, and you can configure them on the Wireless > Basic Settings page.
• Operation Mode — The current wireless working mode in use.
13

Chapter 4 Congure the Router in Wireless Router Mode
• Wireless Radio — Indicates whether the wireless radio feature of the Router is
enabled or disabled.
• Name(SSID) — The SSID of the Router.
• Mode — The current wireless mode which the router works on.
• Channel — The current wireless channel in use.
• Channel Width — The current wireless channel width in use.
• MAC Address — The physical address of the router.
• WDS Status — The status of the WDS connection is displayed.
• WAN — This field displays the current settings of the WAN, and you can configure them
on the Network > WAN page.
• MAC Address — The physical address of the Internet port.
• IP Address — The current WAN (Internet) IP Address. This field will be blank
or 0.0.0.0 if the IP Address is assigned dynamically and there is no internet
connection.
• Subnet Mask — The subnet mask associated with the WAN IP Address.
• Default Gateway — The Gateway currently used is shown here. When you use
Dynamic IP as the internet connection type, click Renew or Release here to
obtain new IP parameters dynamically from the ISP or release them.
• DNS Server — The IP addresses of DNS (Domain Name System) server.
• System Up Time — The length of the time since the router was last powered on or
reset.
Click Refresh to get the latest status and settings of the router.
4. 2. Quick Setup
1. Visit http://tplinkwifi.net, and log in with the username and password you set for the
router.
2. Go to Quick Setup.
3. Click Next to start. Then follow the step-by-step instructions to connect your router
to the internet.
14
Chapter 4 Congure the Router in Wireless Router Mode
4. 3. Operation Mode
The router supports two operation modes: Wireless Router mode and Access Point
mode.
4. 3. 1. Wireless Router Mode
The default Wireless Router mode is required most commonly. In this mode, the device
enables multiple users to share the internet connection via ADSL/Cable Modem.
For hardware connection, refer to Connect Your Router.
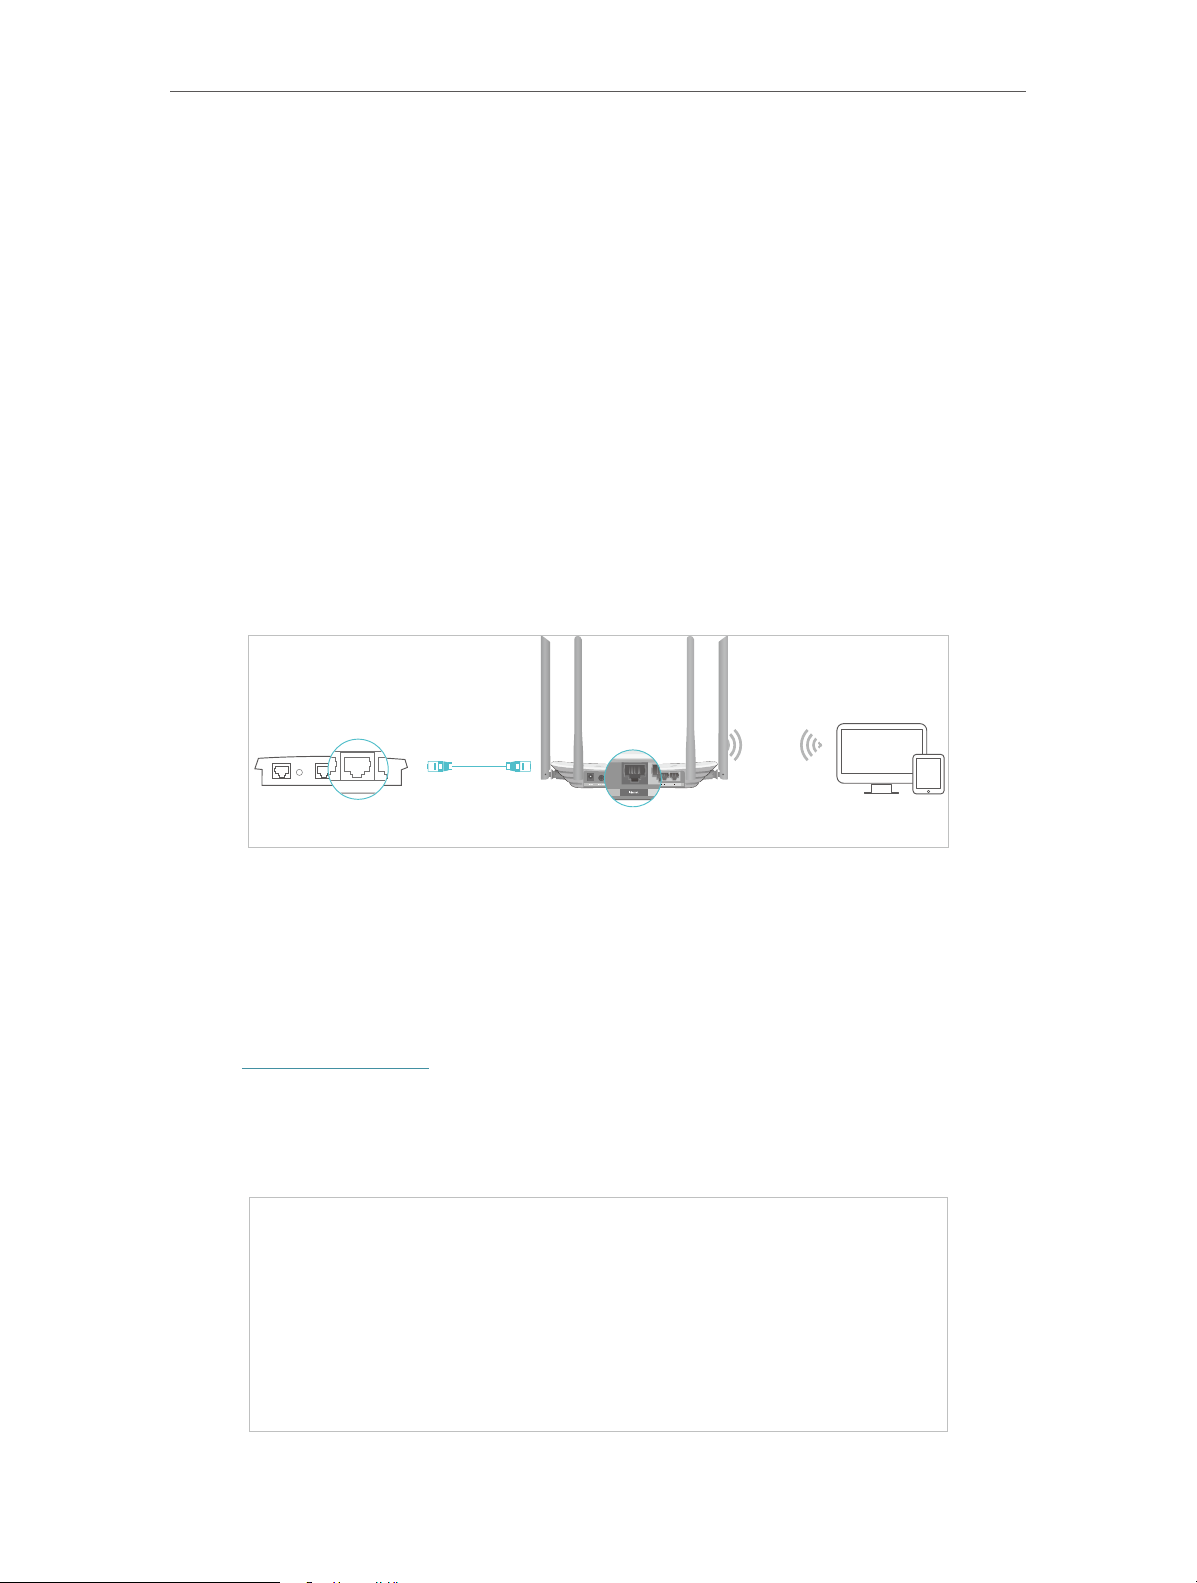
4. 3. 2. Access Point Mode
In this mode, this device can be connected to a wired network and transform the wired
access into wireless one. If you already have a wired router, you can use this mode.
Ethernet4Ethernet3Ethernet1Ethernet2Internet
DevicesRouterWired Router
1. Find the router’s Internet port, and connect it to the Ethernet port (LAN port) of your
existing wired router. Then connect the power adapter and turn on the router.
2. Connect your computer to the router via an Ethernet cable or wirelessly by using the
SSID (network name) and Wireless Password printed on the label at the bottom of the
router. For details, refer to Connect Your Router.
3. Visit http://tplinkwifi.net, and log in with the username and password you set for the
router.
4. Go to Operation Mode.
5. Select the Access Point mode and click Save.
15

Chapter 4 Congure the Router in Wireless Router Mode
4. 4. Network
4. 4. 1. WAN
1. Visit http://tplinkwifi.net, and log in with the username and password you set for the
router.
2. Go to Network > WAN.
3. Configure the IP parameters of the LAN and click Save.
Dynamic IP
If your ISP provides the DHCP service, please select Dynamic IP, and the router will
automatically get IP parameters from your ISP.
Click Renew to renew the IP parameters from your ISP.
Click Release to release the IP parameters.
• MTU Size — The normal MTU (Maximum Transmission Unit) value for most Ethernet
networks is 1500 Bytes. It is not recommended that you change the default MTU size
unless required by your ISP.
• Get IP with Unicast — A few ISPs’ DHCP servers do not support the broadcast
applications. If you cannot get the IP address normally, you can choose this option. (It
is rarely required.)
• Set DNS server manually — If your ISP gives you one or two DNS addresses, select Set
DNS server manually and enter the primary and secondary addresses into the correct
fields. Otherwise, the DNS servers will be assigned automatically from your ISP.
• Host Name — This option specifies the name of the router.
Static IP
If your ISP provides a static or fixed IP address, subnet mask, default gateway and DNS
setting, please select Static IP.
16

Chapter 4 Congure the Router in Wireless Router Mode
• IP Address — Enter the IP address in dotted-decimal notation provided by your ISP.
• Subnet Mask — Enter the subnet mask in dotted-decimal notation provided by your
ISP. Normally 255.255.255.0 is used as the subnet mask.
• Gateway — Enter the gateway IP address in dotted-decimal notation provided by your
ISP.
• Primary/Secondary DNS Server — (Optional) Enter one or two DNS addresses in
dotted-decimal notation provided by your ISP.
• MTU (Bytes) — The normal MTU (Maximum Transmission Unit) value for most Ethernet
networks is 1500 Bytes. It is not recommended that you change the default MTU size
unless required by your ISP.
PPPoE
If your ISP provides PPPoE connection, select PPPoE.
• Username/Password — Enter the user name and password provided by your ISP. These
fields are case-sensitive.
• Confirm Password — Enter the password provided by your ISP again to ensure the
password you entered is correct.
• Secondary Connection — It’s available only for PPPoE connection. If your ISP provides
an extra connection type, select Dynamic IP or Static IP to activate the secondary
connection.
17

Chapter 4 Congure the Router in Wireless Router Mode
• Connection Mode
• Always On — In this mode, the internet connection will be active all the time.
• Connect on Demand — In this mode, the internet connection can be terminated
automatically after a specified inactivity period (Max Idle Time) and be reestablished when you attempt to access the internet again. If you want to keep
your internet connection active all the time, please enter 0 in the Max Idle Time
field. Otherwise, enter the number of minutes you want to have elapsed before
your internet access disconnects.
• Connect Manually — You can click Connect/Disconnect to connect/disconnect
immediately. This mode also supports the Max Idle Time function as Connect
on Demand mode. The internet connection can be disconnected automatically
after a specified inactivity period (Max Idle Time) and not be able to re-establish
when you attempt to access the internet again.
• Authentication Type — Choose an authentication type.
Note:
Sometimes the connection cannot be terminated although you have specified the Max Idle Time because
some applications are visiting the internet continually in the background.
If you want to do some advanced configurations, please click Advanced.
• Service Name/Server Name — The service name and server name should not be
configured unless you are sure it is necessary for your ISP. In most cases, leaving
these fields blank will work.
• MTU (Bytes) — The default MTU size is 1480 bytes. It is not recommended that you
change the default MTU size unless required by your ISP.
• ISP Specified IP Address — If your ISP does not automatically assign IP addresses to
the router, please select Use IP address specified by ISP and enter the IP address
provided by your ISP in dotted-decimal notation.
• Detect Online Interval — The router will detect Access Concentrator online at every
interval. The default value is 0. You can input the value between 0 and 120. The value
0 means no detect.
18

Chapter 4 Congure the Router in Wireless Router Mode
• Primary DNS/Secondary DNS — If your ISP does not automatically assign DNS
addresses to the router, please select Set DNS server manually and enter the IP
address in dotted-decimal notation of your ISP’s primary DNS server. If a secondary
DNS server address is available, enter it as well.
L2TP
If your ISP provides L2TP connection, please select L2TP.
• Username/Password — Enter the user name and password provided by your ISP. These
fields are case-sensitive.
• Addressing Type — Choose the addressing type given by your ISP, either Dynamic IP
or Static IP. Click the Connect button to connect immediately. Click the Disconnect
button to disconnect immediately.
• MTU(Bytes) — The default MTU size is “1460” bytes, which is usually fine. It is not
recommended that you change the default MTU Size unless required by your ISP.
• Enable IGMP Proxy — IGMP (Internet Group Management Protocol) is used to manage
multicasting on TCP/IP net works. Some ISPs use IGMP to perform remote configuration
for client devices, such as the modem router. The default value is enabled, and if you
are not sure, please contact your ISP or just leave it.
• Connection Mode
• Always On — In this mode, the internet connection will be active all the time.
• Connect on Demand — In this mode, the internet connection can be terminated
automatically after a specified inactivity period (Max Idle Time) and be reestablished when you attempt to access the internet again. If you want to keep
19

Chapter 4 Congure the Router in Wireless Router Mode
your internet connection active all the time, please enter 0 in the Max Idle Time
field. Otherwise, enter the number of minutes you want to have elapsed before
your internet access disconnects.
• Connect Manually — You can click Connect/Disconnect to connect/disconnect
immediately. This mode also supports the Max Idle Time function as Connect
on Demand mode. The internet connection can be disconnected automatically
after a specified inactivity period (Max Idle Time) and not be able to re-establish
when you attempt to access the internet again.
Note:
Sometimes the connection cannot be terminated although you have specified the Max Idle Time because some
applications are visiting the internet continually in the background.
PPTP
If your ISP provides PPTP connection, please select PPTP.
• Username/Password — Enter the user name and password provided by your ISP. These
fields are case-sensitive.
• Addressing Type — Choose the addressing type given by your ISP, either Dynamic IP
or Static IP. Click the Connect button to connect immediately. Click the Disconnect
button to disconnect immediately.
• MTU(Bytes) — The default MTU size is “1460” bytes, which is usually fine. It is not
recommended that you change the default MTU Size unless required by your ISP.
20

Chapter 4 Congure the Router in Wireless Router Mode
• Connection Mode
• Always On — In this mode, the internet connection will be active all the time.
• Connect on Demand — In this mode, the internet connection can be terminated
automatically after a specified inactivity period (Max Idle Time) and be reestablished when you attempt to access the internet again. If you want to keep
your internet connection active all the time, please enter 0 in the Max Idle Time
field. Otherwise, enter the number of minutes you want to have elapsed before
your internet access disconnects.
• Connect Manually — You can click Connect/Disconnect to connect/disconnect
immediately. This mode also supports the Max Idle Time function as Connect
on Demand mode. The internet connection can be disconnected automatically
after a specified inactivity period (Max Idle Time) and not be able to re-establish
when you attempt to access the internet again.
Note:
Sometimes the connection cannot be terminated although you have specified the Max Idle Time because some
applications are visiting the internet continually in the background.
BigPond Cable
If your ISP provides BigPond cable connection, please select BigPond Cable.
• Username/Password — Enter the user name and password provided by your ISP. These
fields are case-sensitive.
• Auth Server — Enter the authenticating server IP address or host name.
• Auth Domain — Type in the domain suffix server name based on your location.
• MTU(Bytes) — The default MTU size is 1480 bytes. It is not recommended that you
change the default MTU size unless required by your ISP.
21

Chapter 4 Congure the Router in Wireless Router Mode
• Connection Mode
• Always On — In this mode, the internet connection will be active all the time.
• Connect on Demand — In this mode, the internet connection can be terminated
automatically after a specified inactivity period (Max Idle Time) and be reestablished when you attempt to access the internet again. If you want to keep
your internet connection active all the time, please enter 0 in the Max Idle Time
field. Otherwise, enter the number of minutes you want to have elapsed before
your internet access disconnects.
• Connect Manually — You can click Connect/Disconnect to connect/disconnect
immediately. This mode also supports the Max Idle Time function as Connect
on Demand mode. The internet connection can be disconnected automatically
after a specified inactivity period (Max Idle Time) and not be able to re-establish
when you attempt to access the internet again.
4. 4. 2. LAN
1. Visit http://tplinkwifi.net, and log in with the username and password you set for the
router.
2. Go to Network > LAN.
3. Configure the IP parameters of the LAN and click Save.
• MAC Address — The physical address of the LAN ports. The value can not be changed.
• IP Address — Enter the IP address in dotted-decimal notation of your router.
• Subnet Mask — An address code that determines the size of the network. Normally
255.255.255.0 is used as the subnet mask.
Note:
• If you have changed the IP address, you must use the new IP address to log in.
• If the new IP address you set is not in the same subnet as the old one, the IP address pool in the DHCP
Server will be configured automatically, but the Virtual Server and DMZ Host will not take effect until they
are re-configured.
4. 4. 3. IPTV
1. Visit http://tplinkwifi.net, and log in with the username and password you set for the
router.
22

Chapter 4 Congure the Router in Wireless Router Mode
2. Go to Network > IPTV.
3. Configure IPTV settings and click Save.
• IGMP Snooping — IGMP snooping is designed to prevent hosts on a local network from
receiving traffic for a multicast group they have not explicitly joined. IGMP snooping
is especially useful for bandwidth-intensive IP multicast applications such as IPTV.
• IGMP Proxy — Select to enable IGMP Proxy.
• IGMP Version — Select the IGMP(Internet Group Management Protocol) Proxy Version,
either V2 or V3, according to your ISP.
• IPTV — Select to enable the IPTV feature.
• Mode — Select the appropriate mode according to your ISP.
• LAN 1/2/3/4 — Assign your LAN port to whether function as the Internet supplier or as
the IPTV supplier.
4. 4. 4. MAC Clone
1. Visit http://tplinkwifi.net, and log in with the username and password you set for the
router.
2. Go to Network > MAC Clone.
3. Configure the WAN MAC address and click Save.
• WAN MAC Address — This field displays the current MAC address of the Internet
port. If your ISP requires you to register the MAC address, please enter the correct
23

Chapter 4 Congure the Router in Wireless Router Mode
MAC address in this field. Click Restore Factory MAC to restore the MAC address of
Internet port to the factory default value.
• Your PC’s MAC Address — This field displays the MAC address of the PC that is
managing the router. If the MAC address is required, you can click Clone MAC Address
and this MAC address will be filled in the WAN MAC Address field.
Note:
• You can only use the MAC Address Clone function for PCs on the LAN.
• If you have changed the WAN MAC address when the WAN connection is PPPoE, it will not take effect
until the connection is re-established.
4. 5. Dual Band Selection
1. Visit http://tplinkwifi.net, and log in with the username and password you set for the
router.
2. Go to Dual Band Selection.
3. Select the working radio band as needed and click Save.
4. 6. Wireless (2.4GHz or 5GHz)
4. 6. 1. Wireless Settings
1. Visit http://tplinkwifi.net, and log in with the username and password you set for the
router.
2. Go to Wireless > Basic Settings.
3. Configure the basic settings for the wireless network and click Save.
24

Chapter 4 Congure the Router in Wireless Router Mode
• Wireless — Enable or disable wireless network.
• Wireless Network Name — Enter a value of up to 32 characters. The same Name (SSID)
must be assigned to all wireless devices in your network.
• Mode — You can choose the appropriate “Mixed” mode.
• Channel — This field determines which operating frequency will be used. The default
channel is set to Auto. It is not necessary to change the wireless channel unless you
notice interference problems with another nearby access point.
• Channel Width — This field determines which operating frequency will be used. It is not
necessary to change the wireless channel unless you notice interference problems
with another nearby access point. If you select auto, then AP will choose the best
channel automatically.
• Enable SSID Broadcast — If enabled, the router will broadcast the wireless network
name (SSID).
• Enable WDS — You can select this to enable WDS Bridging, with this function, the router
can bridge two or more WLANs.
NOTE: If this checkbox is selected, you had better make sure the following settings
are correct.
• SSID (to be bridged) — The SSID of the AP your Router is going to connect to as a
client. You can also use the scan function to select the SSID to join.
• MAC Address (to be bridged) — The MAC Address of the AP your Router is going to
connect to as a client. You can also use the scan function to select the MAC Address
to join.
• Scan — Click this button, you can search the AP which runs in the current channel.
25
Loading…
- Частным лицам
- Помощь и поддержка
- домашний билайн
- домашний интернет
- Настройка роутера
- TP-Link Archer C50
|
Имя беспроводной сети (SSID) по умолчанию |
Диапазон 2.4 ГГц; TP-LINK_XXXXXX (где X — последовательность символов) Диапазон 5 ГГц; TP-LINK_XXXXXX_5G (где X — последовательность символов) |
|
Пароль для беспроводной сети (Wi-Fi) по умолчанию |
Указан на дне роутера |
|
Адрес роутера |
192.168.0.1 |
|
Доступ на web-интерфейс |
логин admin |
|
Официальный сайт |
Подключите кабель, который вам провели в квартиру наши монтажники в порт WAN, а компьютер подключите в любой из LAN портов. Вы так же можете соединить ваш ПК с роутером по беспроводной сети, но на первичном этапе настройки лучше использовать кабель.

Если при попытке открыть страницу авторизации видите настройки роутера, следуйте пошаговой инструкции и установите пароль администратора, а если система потребует — название и пароль Wi-Fi-сети. Примените настройки. Затем снова попробуйте открыть страницу авторизации по инструкции ниже.
Попробуйте открыть любую страницу в браузере или введите в адресную строку login.beeline.ru или 83.102.180.167 — откроется страница авторизации, на которой вводим «Логин» — имя пользователя по договору (089/085) — и нажимаем «Войти».

После чего появится поле для ввода пароля. Вводим постоянный пароль от логина (договора) и нажимаем «Войти».

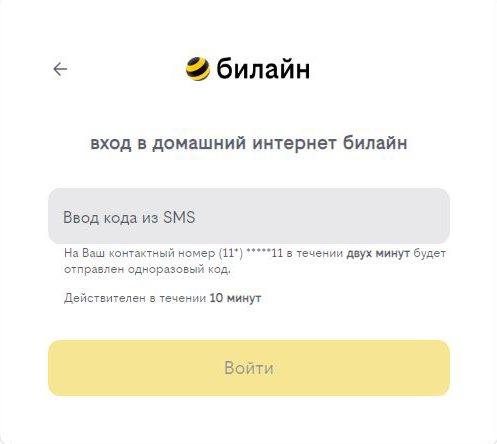
Если не помните текущий пароль, воспользуйтесь услугой «Получить одноразовый код для авторизации»: на номер для смс-уведомлений поступит код — введите его в поле «Код из SMS» и нажмите «Войти».
Появится окно с уведомлением, что вход выполнен.

Подождите 10 минут и затем попробуйте воспользоваться интернетом. Если не сработало, перезагрузите роутер и повторите попытку.
Используйте аппаратный сброс настроек, если требуется настроить устройство заново (удалить все пользовательские настройки), нет доступа к веб-странице интерфейса настроек роутера, после настройки роутера интернет-соединение не установилось или пароль доступа к нему был утерян.
Внимание! При выполнении аппаратного сброса настроек все пользовательские установки будут сброшены на заводские параметры!
На корпусе устройства имеется углубленная кнопка СБРОС (RESET, RESTORE), позволяющая сбросить настройки на заводские установки. Кнопку СБРОС (RESET, RESTORE) вы сможете найти на той же стороне корпуса роутера, где располагаются остальные разъемы и кнопки. В редких случаях кнопка может располагаться на дне роутера.
Для того, чтобы сбросить настройки роутера на заводские установки выполните следующие действия:
Включите питание роутера и дождитесь полной загрузки устройства. Нажмите кнопку СБРОС (RESET, RESTORE), используя заостренный тонкий предмет (например, скрепку) и удерживайте 30 секунд, затем отпустите кнопку.
После этого роутер перезагрузится с установками по умолчанию (заводскими настройками) и потребуется повторная его настройка.
После настройки роутера проверьте работу Интернета, открыв любую Web-страницу
Тарифы на Домашний интернет в Москве
для дома 200 Акция ›
200
Мбит/с
Wi-Fi-роутер
не входит в тариф
В тариф не входит Wi-Fi-роутер. Вы можете взять Wi-Fi-роутер в аренду за 100,00 ₽/мес!
для дома 500 Акция ›
500
Мбит/с
Wi-Fi-роутер
не входит в тариф
В тариф не входит Wi-Fi-роутер. Вы можете взять Wi-Fi-роутер в аренду за 100,00 ₽/мес!
для игр Акция ›
600
Мбит/с
Wi-Fi-роутер
не входит в тариф
В тариф не входит Wi-Fi-роутер. Вы можете взять Wi-Fi-роутер в аренду за 100,00 ₽/мес!
Домашний интернет с ТВ и мобильной связью ещё выгоднее
Настройка роутера
Видеоинструкции
Возможно, Вам будет интересна статья «Как поменять пароль от cети Wi-Fi?»
Настройка роутера
- Подключите интернет-кабель к роутеру в разъём «WAN» синего цвета. Другим кабелем подключите компьютер к роутеру. Для этого один конец кабеля установите в сетевую карту ПК, другой — в любой разъём «LAN».
- Для настройки мы рекомендуем проводное подключение, однако Вы можете подключить устройство к беспроводной сети Wi-Fi с заводскими параметрами: имя и пароль обычно указаны на стикере внизу роутера.
- При необходимости Вы можете сбросить настройки роутера до заводских длительным нажатием (±10 секунд) на кнопку [Reset] на его корпусе. Вы увидите, что он перезагрузится.
- Для настройки роутера и работы с ним Вы можете использовать приложение «TP-Link Tether» от производителя. Скачать можно здесь — на Android и на iOS.
- Откройте веб-браузер на Вашем компьютере:
- Введите вручную в адресной строке браузера IP-адрес маршрутизатора — чаще всего по умолчанию установлен адрес 192.168.1.1. Нажмите клавишу [Enter].
- Откроется окно авторизации — введите логин и пароль. По умолчанию на роутерах TP-Link установлены значения admin/admin.
- Нажмите «Вход»:
- Откройте раздел «Сеть», в нём найдите вкладку «WAN».
- Настройте «Тип подключения WAN: Динамический IP». Остальные настройки выставить автоматические:

- TP-Link Archer C50 работает на двух диапазонах частот — 2.4 и 5 ГГц. Во вкладке «Выбор рабочей частоты» выберите «Использовать одновременно частоту 2.4 ГГц и 5 ГГц (802.11a/b/g/n/ac)»:

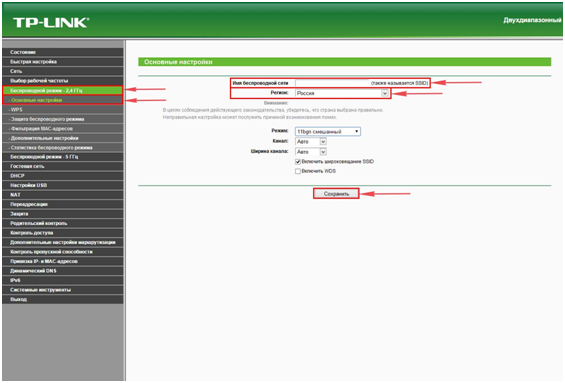
- Перейдите во вкладку «Беспроводной режим – 2.4 ГГц».
- Выберите «Основные настройки».
- В поле «Имя беспроводной сети» придумайте и введите имя для Вашей сети Wi-Fi.
- Небольшой совет: в названии сети укажите частоту, на которой она действует (например, «wifi 2.4»).
- Выберите «Регион: Россия».
- Нажмите «Сохранить»:
- Во вкладке «Защита беспроводного режима» выберите тип шифрования «WPA/WPA2-Personal».
- Установите «Тип аутентификации: WPA2-PSK».
- Установите «Шифрование: AES».
- В строке «Пароль беспроводной сети» придумайте и введите пароль для Вашей сети:
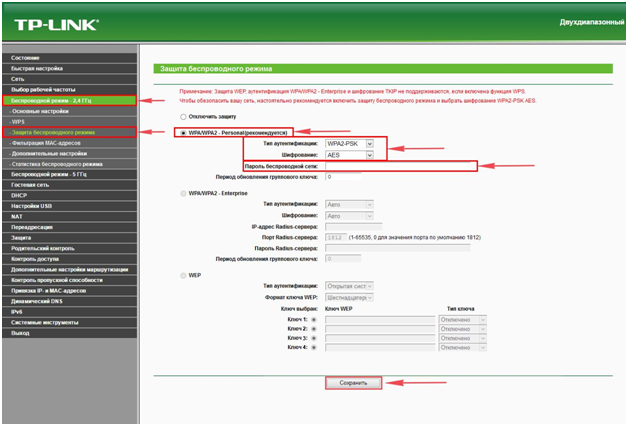
- Мы рекомендуем задать пароль в формате «номер договора дважды», чтобы его было легче восстановить в случае утери (например, для договора №777 паролем будут шесть цифр — 777777).
-
Нажмите «Сохранить».
-
Перейдите во вкладку «Беспроводной режим – 5 ГГц» и настройте его по аналогии с пунктами 11-18.
-
Остаётся авторизоваться в Личном кабинете, чтобы привязать MAC-адрес Вашего роутера к IP-адресу. Вы увидите сообщение о том, что конфигурация компьютера изменилась и необходимо подождать — в течение 10 минут Интернет заработает.
Видеоинструкции
Как узнать пароль от Wi-Fi?
Как настроить роутер?