
Instruction manual and user guide for
Microlife BP A50
23 pages of detailed instruction manual and user guide of exploitation in Russian in English
Europe / Middle-East / Africa
Microlife AG
Espenstrasse 139
9443 Widnau / Switzerland
Tel. +41 / 71 727 70 30
Fax +41 / 71 727 70 39
Email admin@microlife.ch
www.microlife.com
Asia
Microlife Corporation.
9F, 431, RuiGang Road, NeiHu
Taipei, 114, Taiwan, R.O.C.
Tel. 886 2 8797-1288
Fax
.
886 2 8797-1283
Email service@microlife.com.tw
www.microlife.com
North / Central / South America
Microlife USA, Inc.
1617 Gulf to Bay Blvd., 2nd Floor Ste A
Clearwater, FL 33755 / USA
Tel. +1 727 442 5353
Fax +1 727 442 5377
Email msa@microlifeusa.com
www.microlife.com
IB BP A
50 Var5 4011
Microlife BP A50
EN
Ä 1
LV
Ä 8
LT
Ä 14
EE
Ä 20
RU
Д 26

AL AT
Microlife BP A50
Guarantee Card
BP A50
Name of Purchaser / Nom de l’acheteur / Naam koper / Inköparens
namn / Ostajan nimi /
Forhandlers navn / Kjøpers navn / Pircēja
vārds / Pirkėjo pavardė / Ostja nimi / Ф.И.О. покупателя / Name
des Käufers
Serial Number / Numéro de série / Serienummer / Serie-
nummer / Sarjanumero / Serienummer / Serienummer /
Sērijas
numurs / Serijos numeris / Seerianumber / Серийный номер /
Serien-Nr.
Date of Purchase / Date d’achat / Datum van aankoop / Inköpsdatum
/ Ostopäivämäärä /
Købsdato / Kjøpsdato / Legādes datums /
Pardavimo data / Ostukuupäev / Дата покупки / Kaufdatum
Specialist Dealer / Revendeur / Specialist Dealer / Återförsäljare /
Alan kauppias / Specialforhandler / Spesialist forhandler /
Speciālists — pārstāvis / Pardavusi įstaiga / Ametlik müügiesindaja /
Специализированный дилер / Fachhändler

1
BP A50
EN
Display
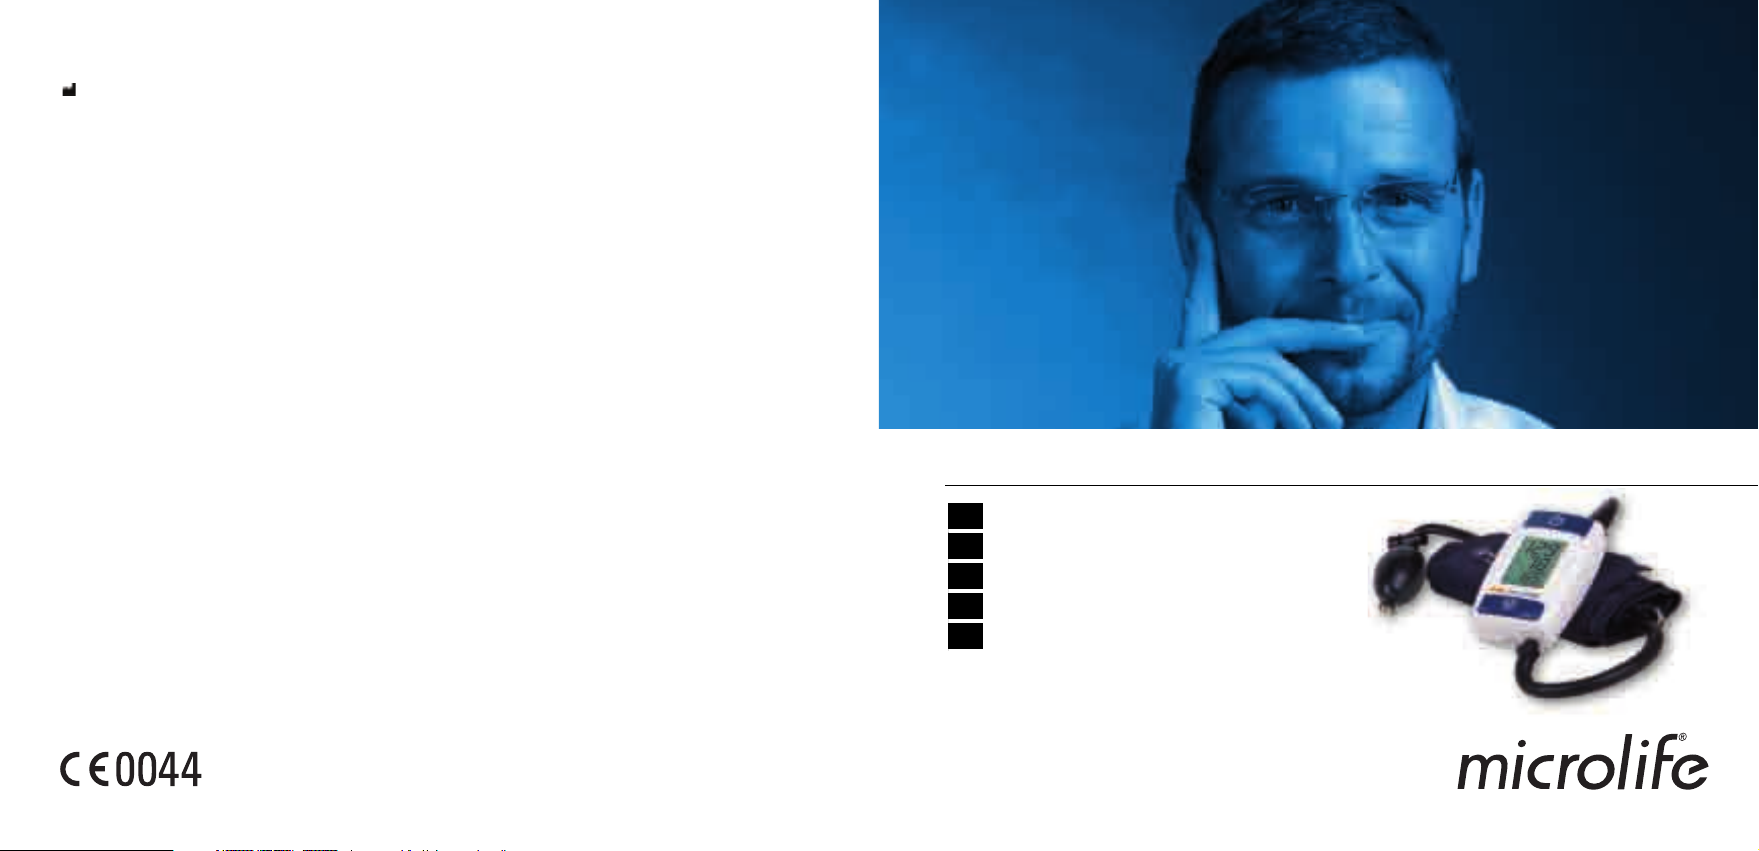
Dear Customer,
Your new Microlife blood pressure monitor is a reliable medical
instrument for taking measurements on the upper arm. It is simple
to use, accurate and comes highly recommended for blood pres-
sure monitoring in your home. This instrument was developed in
collaboration with physicians and clinical tests proving its
measurement accuracy to be very high.*
Please read through these instructions carefully so that you under-
stand all functions and safety information. We want you to be
happy with your Microlife product. If you have any questions, prob-
lems or want to order spare parts, please contact Microlife-
Customer Service. Your dealer or pharmacy will be able to give you
the address of the Microlife dealer in your country. Alternatively,
visit the Internet at www.microlife.com where you will find a
wealth of invaluable information on our products.
Stay healthy – Microlife AG!
* This instrument uses the same measuring technology as the
«BP 3BTO-H» model tested according to the protocol of the Euro-
pean Society for Hypertension (ESH).
Microlife BP A50
EN
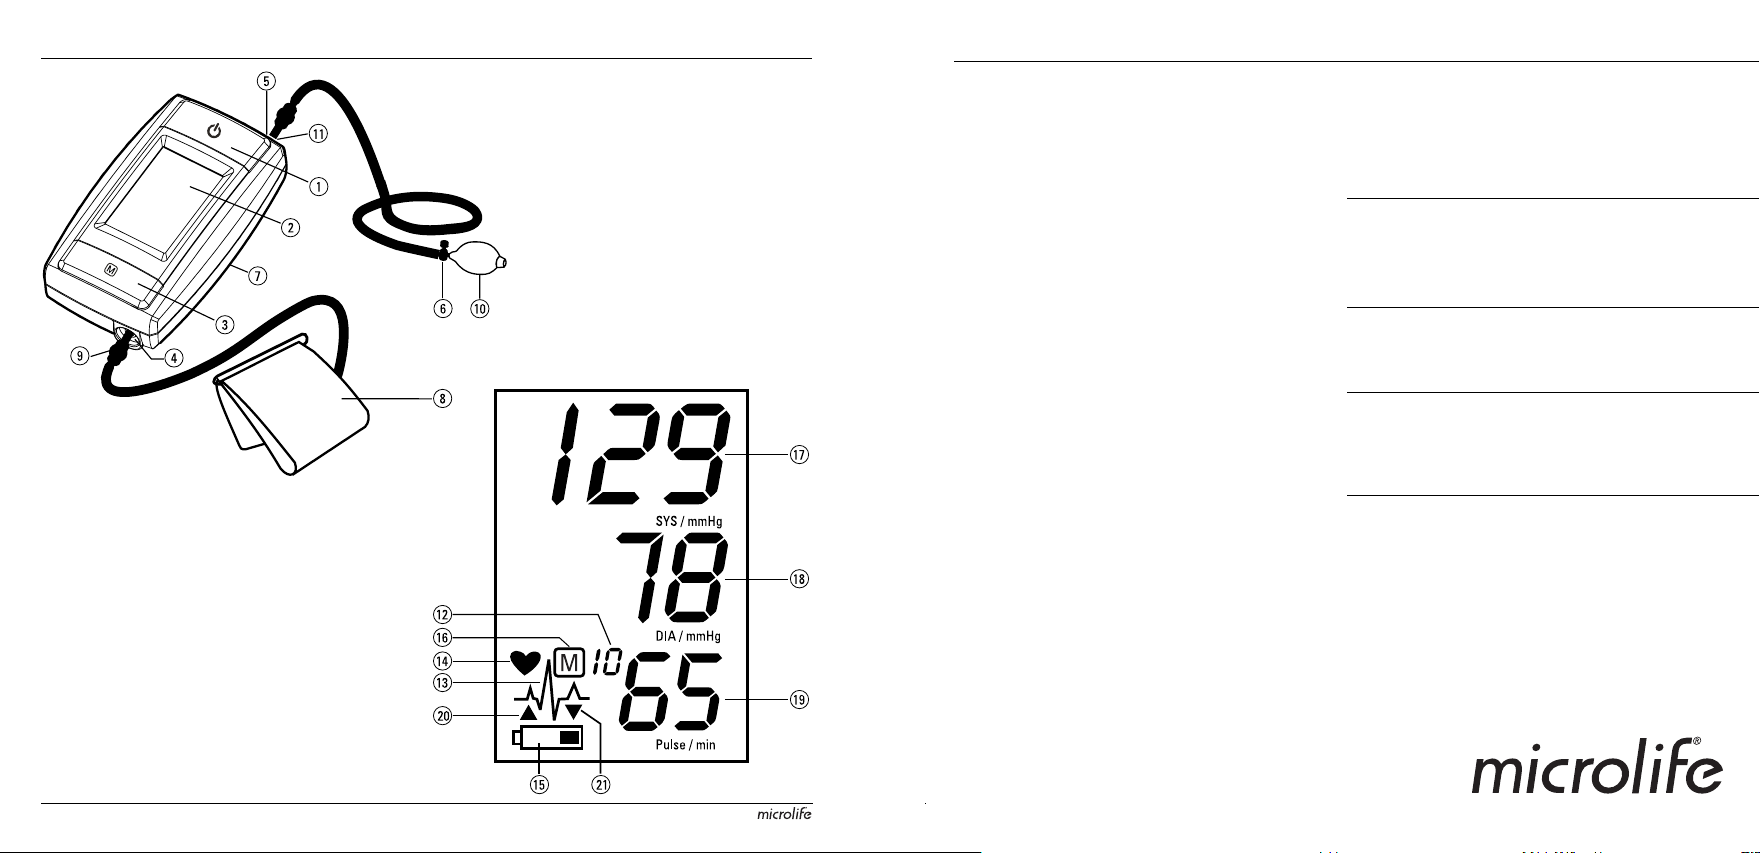
1 ON/OFF Button
2 Display
3 M-Button (Memory)
4 Cuff Socket
5 Pump Ball Socket
6 Quick-acting Discharge Valve
7 Battery Compartment
8 Cuff
9 Cuff Connector
AT Pump Ball
AK Pump Ball Connector
AL Memory Number
AM Heart Arrhythmia Indicator
AN Pulse Rate
AO Battery Display
AP Stored Value
AQ Systolic Value
AR Diastolic Value
AS Pulse
BT Air Pump-up
BK Air Discharge
Read the instructions carefully before using this device.
Type BF applied part

2
Table of Contents
1. Important Facts about Blood Pressure and Self-Measure-
ment
• How do I evaluate my blood pressure?
2. Using the Instrument for the First Time
• Inserting the batteries
• Selecting the correct cuff
• Connecting the pump ball
3. Taking a Blood Pressure Measurement using this
Instrument
4. Appearance of the Heart Arrhythmia Indicator for early
Detection
5. Data Memory
• Viewing the stored values
• Memory full
• Clearing all values
6. Battery Indicator and Battery change
• Low battery
• Flat battery – replacement
• Which batteries and which procedure?
• Using rechargeable batteries
7. Error Messages
8. Safety, Care, Accuracy Test and Disposal
• Safety and protection
• Instrument care
• Accuracy test
• Disposal
9. Guarantee
10. Technical Specifications
Guarantee Card (see Back Cover)
1. Important Facts about Blood Pressure and Self-
Measurement
• Blood pressure is the pressure of the blood flowing in the
arteries generated by the pumping of the heart. Two values, the
systolic (upper) value and the diastolic (lower) value, are
always measured.
• The instrument also indicates the pulse rate (the number of
times the heart beats in a minute).
• Permanently high blood pressure values can damage
your health and must be treated by your doctor!
• Always discuss your values with your doctor and tell him/her if
you have noticed anything unusual or feel unsure. Never rely
on single blood pressure readings.
• Enter your readings in the enclosed blood pressure diary. This
will give your doctor a quick overview.
• There are many causes of excessively high blood pressure
values. Your doctor will explain them in more detail and offer
treatment where appropriate. Besides medication, relaxation
techniques, weight loss and exercise can also lower your blood
pressure.
• Under no circumstances should you alter the dosages of
any drugs prescribed by your doctor!
• Depending on physical exertion and condition, blood pressure is
subject to wide fluctuations as the day progresses. You should
therefore take your measurements in the same quiet
conditions and when you feel relaxed! Take at least two
measurements per day, one in the morning and one in the
evening.
• It is quite normal for two measurements taken in quick succes-
sion to produce significantly different results.
• Deviations between measurements taken by your doctor or in
the pharmacy and those taken at home are quite normal, as
these situations are completely different.
• Several measurements provide a much clearer picture than
just one single measurement.
• Leave a small break of at least 15 seconds between two
measurements.
• If you are pregnant, you should monitor your blood pressure
very closely as it can change drastically during this time!

How do i evaluate my blood pressure, Using the instrument for the first time, Inserting the batteries
Selecting the correct cuff, Connecting the pump ball Support chat
- Image
- Text
3
BP A50
EN
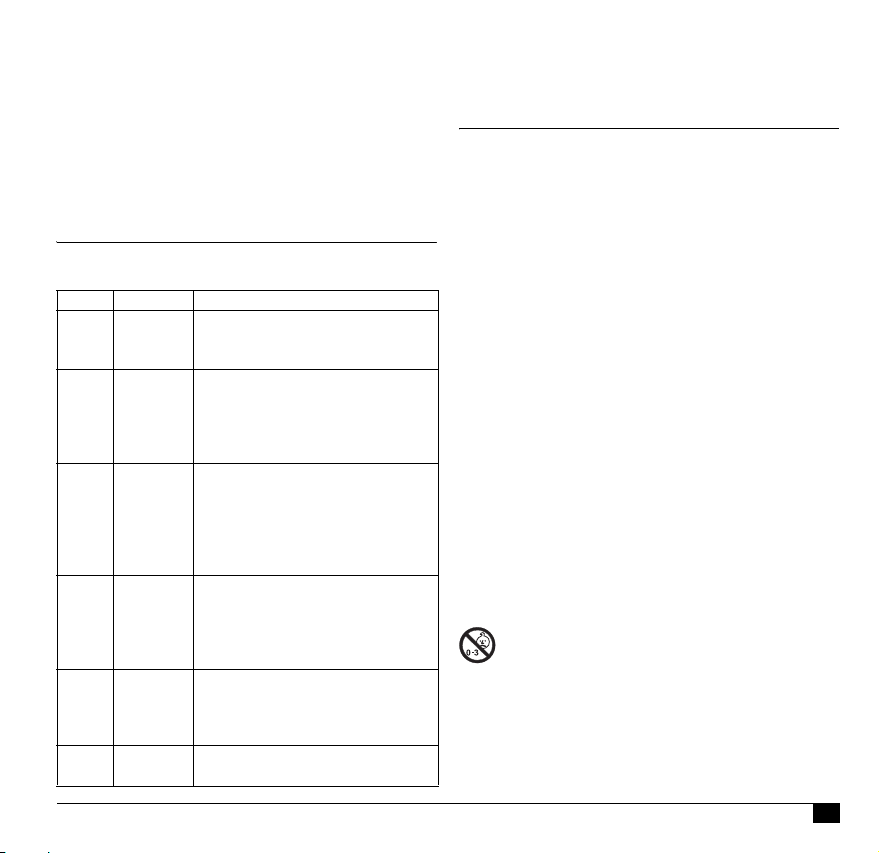
How do I evaluate my blood pressure?
The higher value is the one that determines the evaluation.
Example: a readout value between 150/85 or 120/98 mmHg indi-
cates «blood pressure too high».
2. Using the Instrument for the First Time
Inserting the batteries
After you have unpacked your device, first insert the batteries. The
battery compartment
7 is at the back of the device. Insert the
batteries (2 x size AAA 1,5 V), thereby observing the indicated
polarity.
Selecting the correct cuff
Microlife offers 3 different cuff sizes: S, M and L. Select the cuff size
to match the circumference of your upper arms (measured by close
fitting in the centre of the upper arm). M is the correct size for most
people.
Connecting the pump ball
Connect the pump ball
AT to the instrument by firmly inserting the
connector
AK into the pump ball socket 5.
3. Taking a Blood Pressure Measurement using this
Instrument
• If you suffer from an irregular heartbeat (arrhythmia, see
«Section 4.»), measurements taken with this instrument should
only be evaluated after consultation with your doctor.
• The pulse display is not suitable for checking the
frequency of heart pacemakers!
Table for classifying blood pressure values in adults in accordance
with the World Health Organisation (WHO) in 2003. Data in mmHg.
Range
Systolic Diastolic Recommendation
blood pressure too low
z 100
z 60
Consult your doctor
1. blood pressure optimum 100 — 120 60 — 80
Self-check
2. blood pressure normal
120 — 130 80 — 85
Self-check
3. blood pressure slightly
high
130 — 140 85 — 90
Consult your doctor
4. blood pressure too high 140 — 160 90 — 100
Seek medical advice
5. blood pressure far too
high
160 — 180 100 — 110 Seek medical advice
6. blood pressure danger-
ously high
180
y
110
y
Urgently seek
medical advice!
Cuff size
for circumference of upper arm
S
17 — 22 cm (6.75 — 8.75 inches)
M
22 — 32 cm (8.75 — 12.5 inches)
L
32 — 42 cm (12.5 — 16.5 inches)
)
Only use Microlife cuffs.
X
Contact Microlife Service if the enclosed cuff
8 does not fit.
X
Connect the cuff to the instrument by inserting the cuff
connector
9 into the cuff socket 4 as far as it will go.
Checklist for taking a reliable measurement
1.
Avoid activity, eating or smoking immediately before the
measurement.
2.
Sit down for at least 5 minutes before the measurement and
relax.
3.
Always measure on the same arm (normally left).
4.
Remove close-fitting garments from the upper arm. To avoid
constriction, shirt sleeves should not be rolled up — they do
not interfere with the cuff if they are laid flat.
5.
Always ensure that the cuff is positioned correctly, as shown
in the pictures illustrated on the short instruction card.
• Fit the cuff closely, but not too tight.
• Make sure that the cuff is 2 cm (0.75 inch) above your
elbow with the tube on the inside of your arm.
• Support your arm so it is relaxed.
• Ensure that the cuff is at the same height as your heart.
6.
Switch on the instrument and wait until «0» appears in the
display and the arrow «
S» BT starts to flash.
7.
Take the pump ball in your free hand (the arm you are not
measu-ring from) and pump up the cuff. Watch the pressure
indication in the display and pump approx. 40 mmHg higher
than the expected systolic value (the upper value). If you have
not pumped enough, a flashing arrow «
S» BT will appear
telling you to pump higher.
8.
After pumping, the measurement is taken automatically.
Relax, do not move and do not tense your arm muscles until
the measu-rement result is displayed. Breathe normally and
do not talk.

Data memory, Viewing the stored values, Memory full
Clearing all values, Battery indicator and battery change, Low battery, Flat battery — replacement, Which batteries and which procedure, Using rechargeable batteries Support chat
- Image
- Text
4
4. Appearance of the Heart Arrhythmia Indicator for
early Detection
This symbol
AM indicates that certain pulse irregularities were
detected during the measurement. In this case, the result may
deviate from your normal blood pressure – repeat the measure-
ment. In most cases, this is no cause for concern. However, if the
symbol appears on a regular basis (e.g. several times a week with
measurements taken daily) we advise you to tell your doctor.
Please show your doctor the following explanation:
5. Data Memory
At the end of each measurement, this instrument automatically
stores the result.
Viewing the stored values
Press the M-button
3 briefly, when the instrument is switched
off. The display first shows the last stored result.
Pressing the M-button again displays the previous value. Pressing
the M-button repeatedly enables you to move from one stored
value to another.
Memory full
Clearing all values
6. Battery Indicator and Battery change
Low battery
When the batteries are approximately ¾ empty the battery symbol
AO will flash as soon as the instrument is switched on (partly filled
battery displayed). Although the instrument will continue to
measure reliably, you should obtain replacement batteries.
Flat battery – replacement
When the batteries are flat, the battery symbol
AO will flash as
soon as the instrument is switched on (flat battery displayed). You
cannot take any further measurements and must replace the
batteries.
Which batteries and which procedure?
Using rechargeable batteries
You can also operate this instrument using rechargeable batteries.
9.
During the measurement, the heart symbol
AN flashes in the
display and a beep sounds every time a heartbeat is detected.
10. The result, comprising the systolic
AQ and the diastolic AR
blood pressure and the pulse
AS is displayed and longer beep
is heard. Note also the explanations on further displays in this
booklet.
11. When the measurement has finished, press the quick-acting
discharge valve
6 in order to release any remaining air in
the cuff. Remove the cuff.
12. Switch off the instrument. (The monitor does switch off auto-
matically after approx. 1 min.).
)
You can interrupt the measurement at any time by pressing
the quick-acting discharge valve
6 (e.g. if you feel uneasy
or notice an unpleasant pressure sensation).
Information for the doctor on frequent appearance of the
Arrhythmia indicator
This instrument is an oscillometric blood pressure monitor that
also analyses pulse frequency during measurement. The instru-
ment is clinically tested.
The arrhythmia symbol is displayed after the measurement, if pulse
irregularities occur during measurement. If the symbol appears
more frequently (e.g. several times per week on measurements
performed daily) we recommend the patient to seek medical advice.
The instrument does not replace a cardiac examination, but
serves to detect pulse irregularities at an early stage.
ƽ
When the memory has stored 14 results, the memory is full.
From this point onwards, a new measured value is stored by
overwriting the oldest value.
ƽ
All memory data are cleared when batteries are taken out
of the instrument.
1. Open the battery compartment
7 at the back of the instrument.
2. Replace the batteries – ensure correct polarity as shown by the
symbols in the compartment.
)
Use 2 new, long-life 1.5V, size AAA batteries.
)
Do not use batteries beyond their date of expiry.
)
Remove batteries if the instrument is not going to be used
for a prolonged period.
)
Only use «NiMH» type reusable batteries.

Error messages, Safety, care, accuracy test and disposal, M safety and protection
Instrument care, Accuracy test Support chat
- Image
- Text
5
BP A50
EN
7. Error Messages
If an error occurs during the measurement, the measurement is
interrupted and an error message, e.g. «ERR 3», is displayed.
* Please consult your doctor, if this or any other problem occurs repeat-
edly.
8. Safety, Care, Accuracy Test and Disposal
ƽ
Safety and protection
Instrument care
Clean the instrument only with a soft, dry cloth.
Accuracy test
We recommend this instrument is tested for accuracy every
2 years or after mechanical impact (e.g. being dropped). Please
contact Microlife-Service to arrange the test (see foreword).
)
Batteries must be removed and recharged when the flat
battery symbol appears. They should not remain inside the
instrument as they may become damaged (total discharge
as a result of low use of the instrument, even when
switched off).
)
Always remove the rechargeable batteries if you do not
intend to use the instrument for a week or more.
)
Batteries cannot be charged in the blood pressure monitor.
Recharge batteries in an external charger and observe the
information regarding charging, care and durability.
Error
Description Potential cause and remedy
«ERR 1» Signal too
weak
The pulse signals on the cuff are too weak.
Re-position the cuff and repeat the measure-
ment.*
«ERR 2» Error signal
During the measurement, error signals
were detected by the cuff, caused for
instance by movement or muscle tension.
Repeat the measurement, keeping your
arm still.
«ERR 3» No pressure
in the cuff
An adequate pressure cannot be gener-
ated in the cuff. A leak may have occurred.
Check that cuff and pump ball are correctly
connected and that the cuff is not fitted too
loosely. Replace the batteries if necessary.
Repeat the measurement.
«ERR 5» Abnormal
result
The measuring signals are inaccurate and
no result can therefore be displayed. Read
through the checklist for performing reliable
measurements and then repeat the
measurement.*
«HI»
Pulse or cuff
pressure too
high
The pressure in the cuff is too high (over
300 mmHg) OR the pulse is too high (over
200 beats per minute). Relax for 5 minutes
and repeat the measurement.*
«LO»
Pulse too
low
The pulse is too low (less than 40 beats per
minute). Repeat the measurement.*
)
If you think the results are unusual, please read through the
information in «Section 1.» carefully.
• This instrument may be used only for the purpose described in
this booklet. The manufacturer cannot be held liable for damage
caused by incorrect application.
• This instrument comprises sensitive components and must be
treated with caution. Observe the storage and operating condi-
tions described in the «Technical Specifications» section!
• Protect it from:
− water and moisture
− extreme temperatures
− impact and dropping
− contamination and dust
− direct sunlight
− heat and cold
• The cuffs are sensitive and must be handled with care.
• Only pump up the cuff once fitted.
• Do not use the instrument close to strong electromagnetic fields
such as mobile telephones or radio installations.
• Do not use the instrument if you think it is damaged or notice
anything unusual.
• Never open the instrument.
• If the instrument is not going to be used for a prolonged period
the batteries should be removed.
• Read the additional safety instructions in the individual sections
of this booklet.
Ensure that children do not use the instrument unsuper-
vised; some parts are small enough to be swallowed.

6
Disposal
9. Guarantee
This instrument is covered by a 3 year guarantee from the date of
purchase. The guarantee is valid only on presentation of the guar-
antee card completed by the dealer (see back) confirming date of
purchase or the receipt.
Please contact Microlife-Service (see foreword).
10. Technical Specifications
This device complies with the requirements of the Medical Device
Directive 93/42/EEC.
Technical alterations reserved.
Batteries and electronic instruments must be disposed of in
accordance with the locally applicable regulations, not with
domestic waste.
• Batteries, cuff and wearing parts are not included.
• Opening or altering the instrument invalidates the guarantee.
• The guarantee does not cover damage caused by improper
handling, discharged batteries, accidents or non-compliance
with the operating instructions.
Operating tempera-
ture:
10 — 40 °C / 50 — 104 °F
15 — 95 % relative maximum humidity
Storage tempera-
ture:
-20 — +55 °C / -4 — +131 °F
15 — 95 % relative maximum humidity
Weight:
320 g (including batteries)
Dimensions:
99 x 55 x 32 mm
Measuring proce-
dure:
oscillometric, corresponding to Korotkoff
method: Phase I systolic, Phase V diastolic
Measurement range: 20 — 280 mmHg – blood pressure
40 — 200 beats per minute – pulse
Cuff pressure display
range:
0 — 299 mmHg
Resolution:
1 mmHg
Static accuracy:
pressure within ± 3 mmHg
Pulse accuracy:
± 5 % of the readout value
Voltage source:
2 x 1.5 V Batteries; size AAA
Reference to
standards:
EN 1060-1 /-3 /-4; IEC 60601-1;
IEC 60601-1-2 (EMC)


8
Displejs
Cien./god. lietotāj!
Jūsu jaunais Microlife asinsspiediena mērītājs ir uzticams
medicīnas instruments asinsspiediena mērīšanai uz augšdelma.
Tas ir vienkārši un ērti lietojams, precīzs un ļoti ieteicams
asinsspiediena mērīšanai mājas apstākļos. Šis instruments tika
izstrādāts sadarbībā ar mediķiem, un klīniskie testi ir pierādījuši,
ka tā mērīšanas precizitāte ir ļoti augsta.*
Lūdzu, uzmanīgi izlasiet šo instrukciju, lai izprastu visas funkcijas
un drošības informāciju. Mēs vēlamies, lai Jūs būtu apmierināts ar
Microlife izstrādājumu. Ja Jums ir kādi jautājumi, problēmas vai ja
vēlaties pasūtīt rezerves daļas, lūdzu, sazinieties ar Microlife
klientu servisu. Ierīces pārdevējs vai aptiekārs palīdzēs Jums
noskaidrot Microlife izplatītāja adresi Jūsu valstī. Jūs varat arī
apmeklēt tīmekļa vietni www.microlife.lv, kur Jūs varēsiet atrast
plašu un vērtīgu informāciju par mūsu produktiem.
Lai Jums laba veselība – Microlife AG!
* Šajā instrumentā ir izmantota tā pati mērīšanas tehnoloģija, kas
apbalvotajā «BP 3BTO-H» modelī, kas pārbaudīts saskaņā ar
Eiropas hipertonijas sabiedrības (EHS) protokolu.
Microlife BP A50
LV
1
Poga ON/OFF (IESLĒGT/IZSLĒGT)
2
Displejs
3
Poga M (ATMIŅA)
4
Aproces kontaktligzda
5
Sūkņa apaļā kontaktligzda
6
Ātrais gaisa atbrīvošanas vārsts
7
Bateriju nodalījums
8
Aproce
9
Aproces savienotājs
AT
Lodveida sūknis
AK
Lodveida sūkņa savienotājs
AL
Atmiņā saglabājamo rezultātu skaits
AM
Sirds aritmijas indikators
AN
Pulsa biežums
AO
Bateriju displejs
AP
Saglabātie mērījumi
AQ
Sistoliskais asinsspiediens
AR
Diastoliskais asinsspiediens
AS
Pulss
BT
Gaisa iesūknēšana
BK
Gaisa atbrīvošana
Pirms šīs ierīces izmantošanas uzmanīgi izlasiet
norādījumus.
Aizsardzības klase: BF

04:55
Измеритель артериального давления Микролайф модель ВР N1 Basic
02:27
Тонометр полуавтоматический на плечо Microlife BP A50 (Микролайф БП А50)
02:36
Измеритель артериального давления Microlife ВР A 50 Плюс полуавтоматический
02:53
Методика измерения давления полуавтоматическим тонометром. На примере Microlife A50
19:15
Ремонт тонометра Microlife BP A 50 хаотичность показаний.
03:23
Tensiometrul Microlife BP A50
05:40
Ремонт тонометра Microlife BP А 50 выдаёт ошибку.
Press the button for help
Europe / Middle-East / Africa
Microlife AG
Espenstrasse 139
9443 Widnau / Switzerland
Tel. +41 / 71 727 70 30
Fax +41 / 71 727 70 39
Email admin@microlife.ch
www.microlife.com
Asia
Microlife Corporation.
9F, 431, RuiGang Road, NeiHu
Taipei, 114, Taiwan, R.O.C.
Tel. 886 2 8797-1288
Fax.886 2 8797-1283
Email service@microlife.com.tw
www.microlife.com
North / Central / South America
Microlife USA, Inc.
1617 Gulf to Bay Blvd., 2nd Floor Ste A
Clearwater, FL 33755 / USA
Tel. +1 727 442 5353
Fax +1 727 442 5377
Email msa@microlifeusa.com
www.microlife.com
Microlife BP A50
EN Ä 1
LV Ä 8
LT Ä 14
EE Ä 20
RU Ä 26
IB BP A50 Var5 4011
Microlife BP A50
Guarantee Card BP A50
Name of Purchaser / Nom de l’acheteur / Naam koper / Inköparens
namn / Ostajan nimi / Forhandlers navn / Kjøpers navn / Pircēja
vārds / Pirkėjo pavardė / Ostja nimi / Ф.И.О. покупателя /
des Käufers
Serial Number / Numéro de série / Serienummer / Serienummer / Sarjanumero / Serienummer / Seri enummer / Sērijas
numurs / Serijos numeris / Seerianumber / Серийный номер /
Serien-Nr.
Date of Purchase / Date d’achat / Datum van aankoop /
/ Ostopäivämäärä / Købsdato / Kjøpsdato / Legādes datums /
Pardavimo data / Ostukuupäev / Дата покупки / Kaufdatum
Specialist Dealer / Revendeur / Specialist Dealer /
Alan kauppias / Specialforhandler / Spesialist forhandler /
Speciālists — pārstāvis / Pardavusi įstaiga / Ametlik müügiesindaja /
Специализированный дилер / Fachhändler
Name
Inköpsdatum
Återförsäljare /

Microlife BP A50
1
ON/OFF Button
2
Display
3
M-Button (Memory)
4
Cuff Socket
5
Pump Ball Socket
6
Quick-acting Discharge Valve
7
Battery Compartment
8
Cuff
9
Cuff Connector
AT
Pump Ball
AK
Pump Ball Connector
Display
AL
Memory Number
AM
Heart Arrhythmia Indicator
AN
Pulse Rate
AO
Battery Display
AP
Stored Value
AQ
Systolic Value
AR
Diastolic Value
AS
Pulse
BT
Air Pump-up
BK
Air Discharge
EN
Dear Customer,
Your new Microlife blood pressure monitor is a reliable medical
instrument for taking measurements on the upper arm. It is simple
to use, accurate and comes highly recommended for blood pressure monitoring in your home. This instrument was developed in
collaboration with physicians and clinical tests proving its
measurement accuracy to be very high.*
Please read through these instructions carefully so that you understand all functions and safety information. We want you to be
happy with your Microlife product. If you have any questions, problems or want to order spare parts, please contact MicrolifeCustomer Service. Your dealer or pharmacy will be able to give you
the address of the Microlife dealer in your country. Alternatively,
visit the Internet at www.microlife.com where you will find a
wealth of invaluable information on our products.
Stay healthy – Microlife AG!
* This instrument uses the same measuring technology as the
«BP 3BTO-H» model tested according to the protocol of the European Society for Hypertension (ESH).
Read the instructions carefully before using this device.
Type BF applied part
EN
1BP A50

Table of Contents
1. Important Facts about Blood Pressure and Self-Measurement
• How do I evaluate my blood pressure?
2. Using the Instrument for the First Time
• Inserting the batteries
• Selecting the correct cuff
• Connecting the pump ball
3. Taking a Blood Pressure Measurement using this
Instrument
4. Appearance of the Heart Arrhythmia Indicator for early
Detection
5. Data Memory
• Viewing the stored values
• Memory full
• Clearing all values
6. Battery Indicator and Battery change
• Low battery
• Flat battery – replacement
• Which batteries and which procedure?
• Using rechargeable batteries
7. Error Messages
8. Safety, Care, Accuracy Test and Disposal
• Safety and protection
• Instrument care
• Accuracy test
• Disposal
9. Guarantee
10. Technical Specifications
Guarantee Card (see Back Cover)
1. Important Facts about Blood Pressure and SelfMeasurement
•
Blood pressure is the pressure of the blood flowing in the
arteries generated by the pumping of the heart. Two values, the
systolic (upper) value and the diastolic (lower) value, are
always measured.
•
The instrument also indicates the pulse rate (the number of
times the heart beats in a minute).
•
Permanently high blood pressure values can damage
your health and must be treated by your doctor!
•
Always discuss your values with your doctor and tell him/her if
you have noticed anything unusual or feel unsure. Never rely
on single blood pressure readings.
•
Enter your readings in the enclosed blood pressure diary. This
will give your doctor a quick overview.
•
There are many causes of excessively high blood pressure
values. Your doctor will explain them in more detail and offer
treatment where appropriate. Besides medication, relaxation
techniques, weight loss and exercise can also lower your blood
pressure.
•
Under no circumstances should you alter the dosages of
any drugs prescribed by your doctor!
•
Depending on physical exertion and condition, blood pressure is
subject to wide fluctuations as the day progresses. You should
therefore take your measurements in the same quiet
conditions and when you feel relaxed! Take at least two
measurements per day, one in the morning and one in the
evening.
•
It is quite normal for two measurements taken in quick succession to produce significantly different results.
•
Deviations between measurements taken by your doctor or in
the pharmacy and those taken at home are quite normal, as
these situations are completely different.
•
Several measurements provide a much clearer picture than
just one single measurement.
•
Leave a small break of at least 15 seconds between two
measurements.
•
If you are pregnant, you should monitor your blood pressure
very closely as it can change drastically during this time!
2
•
If you suffer from an irregular heartbeat (arrhythmia, see
«Section 4.»), measurements taken with this instrument should
only be evaluated after consultation with your doctor.
•
The pulse display is not suitable for checking the
frequency of heart pacemakers!
How do I evaluate my blood pressure?
Table for classifying blood pressure values in adults in accordance
with the World Health Organisation (WHO) in 2003. Data in mmHg.
Range Systolic Diastolic Recommendation
blood pressure too low z 100 z 60 Consult your doctor
1. blood pressure optimum 100 — 120 60 — 80 Self-check
2. blood pressure normal 120 — 130 80 — 85 Self-check
3. blood pressure slightly
high
4. blood pressure too high 140 — 160 90 — 100 Seek medical advice
5. blood pressure far too
high
6. blood pressure dangerously high
130 — 140 85 — 90 Consult your doctor
160 — 180 100 — 110 Seek medical advice
180 y 110 y Urgently seek
medical advice!
The higher value is the one that determines the evaluation.
Example: a readout value between 150/85 or 120/98 mmHg indicates «blood pressure too high».
2. Using the Instrument for the First Time
Inserting the batteries
After you have unpacked your device, first insert the batteries. The
battery compartment
2
batteries (
polarity.
Selecting the correct cuff
Microlife offers 3 different cuff sizes: S, M and L. Select the cuff size
to match the circumference of your upper arms (measured by close
fitting in the centre of the upper arm). M is the correct size for most
people.
Cuff size for circumference of upper arm
S 17 — 22 cm (6.75 — 8.75 inches)
M 22 — 32 cm (8.75 — 12.5 inches)
L 32 — 42 cm (12.5 — 16.5 inches)
x size
7
is at the back of the device. Insert the
AAA
1,5 V), thereby observing the indicated
Only use Microlife cuffs.
)
X
Contact Microlife Service if the enclosed cuff 8 does not fit.
X
Connect the cuff to the instrument by inserting the cuff
connector 9 into the cuff socket 4 as far as it will go.
Connecting the pump ball
Connect the pump ball AT to the instrument by firmly inserting the
connector AK into the pump ball socket 5.
3. Taking a Blood Pressure Measurement using this
Instrument
Checklist for taking a reliable measurement
1. Avoid activity, eating or smoking immediately before the
measurement.
2.
Sit down for at least 5 minutes before the measurement and
relax.
3. Always measure on the same arm (normally left).
4. Remove close-fitting garments from the upper arm. To avoid
constriction, shirt sleeves should not be rolled up — they do
not interfere with the cuff if they are laid flat.
5. Always ensure that the cuff is positioned correctly, as shown
in the pictures illustrated on the short instruction card.
• Fit the cuff closely, but not too tight.
• Make sure that the cuff is 2 cm (0.75 inch) above your
elbow with the tube on the inside of your arm.
• Support your arm so it is relaxed.
• Ensure that the cuff is at the same height as your heart.
6. Switch on the instrument and wait until «0» appears in the
display and the arrow «S» BT starts to flash.
7.
Take the pump ball in your free hand (the arm you are not
measu-ring from) and pump up the cuff. Watch the pressure
indication in the display and pump approx. 40 mmHg higher
than the expected systolic value (the upper value). If you have
not pumped enough, a flashing arrow «
telling you to pump higher.
8. After pumping, the measurement is taken automatically.
Relax, do not move and do not tense your arm muscles until
the measu-rement result is displayed. Breathe normally and
do not talk.
S» BT
will appear
EN
3BP A50
9.
During the measurement, the heart symbol AN flashes in the
display and a beep sounds every time a heartbeat is detected.
10.
The result, comprising the systolic AQ and the diastolic AR
blood pressure and the pulse
is heard. Note also the explanations on further displays in this
booklet.
11. When the measurement has finished, press the quick-acting
discharge valve 6 in order to release any remaining air in
the cuff. Remove the cuff.
12. Switch off the instrument. (The monitor does switch off automatically after approx. 1 min.).
You can interrupt the measurement at any time by pressing
)
the quick-acting discharge valve 6 (e.g. if you feel uneasy
or notice an unpleasant pressure sensation).
AS
is displayed and longer beep
4. Appearance of the Heart Arrhythmia Indicator for
early Detection
This symbol AM indicates that certain pulse irregularities were
detected during the measurement. In this case, the result may
deviate from your normal blood pressure – repeat the measurement. In most cases, this is no cause for concern. However, if the
symbol appears on a regular basis (e.g. several times a week with
measurements taken daily) we advise you to tell your doctor.
Please show your doctor the following explanation:
Information for the doctor on frequent appearance of the
Arrhythmia indicator
This instrument is an oscillometric blood pressure monitor that
also analyses pulse frequency during measurement. The instrument is clinically tested.
The arrhythmia symbol is displayed after the measurement, if pulse
irregularities occur during measurement. If the symbol appears
more frequently (e.g. several times per week on measurements
performed daily) we recommend the patient to seek medical advice.
The instrument does not replace a cardiac examination, but
serves to detect pulse irregularities at an early stage.
5. Data Memory
At the end of each measurement, this instrument automatically
stores the result.
4
Viewing the stored values
Press the M-button 3 briefly, when the instrument is switched
off. The display first shows the last stored result.
Pressing the M-button again displays the previous value. Pressing
the M-button repeatedly enables you to move from one stored
value to another.
Memory full
When the memory has stored 14 results, the memory is full.
From this point onwards, a new measured value is stored by
overwriting the oldest value.
Clearing all values
All memory data are cleared when batteries are taken out
of the instrument.
6. Battery Indicator and Battery change
Low battery
When the batteries are approximately ¾ empty the battery symbol
AO will flash as soon as the instrument is switched on (partly filled
battery displayed). Although the instrument will continue to
measure reliably, you should obtain replacement batteries.
Flat battery – replacement
When the batteries are flat, the battery symbol AO will flash as
soon as the instrument is switched on (flat battery displayed). You
cannot take any further measurements and must replace the
batteries.
1. Open the battery compartment 7 at the back of the instrument.
2. Replace the batteries – ensure correct polarity as shown by the
symbols in the compartment.
Which batteries and which procedure?
Use 2 new, long-life 1.5V, size AAA batteries.
)
Do not use batteries beyond their date of expiry.
)
Remove batteries if the instrument is not going to be used
)
for a prolonged period.
Using rechargeable batteries
You can also operate this instrument using rechargeable batteries.
Only use «NiMH» type reusable batteries.
)
Batteries must be removed and recharged when the flat
)
battery symbol appears. They should not remain inside the
instrument as they may become damaged (total discharge
as a result of low use of the instrument, even when
switched off).
Always remove the rechargeable batteries if you do not
)
intend to use the instrument for a week or more.
Batteries cannot be charged in the blood pressure monitor.
)
Recharge batteries in an external charger and observe the
information regarding charging, care and durability.
7. Error Messages
If an error occurs during the measurement, the measurement is
interrupted and an error message, e.g. «ERR 3», is displayed.
Error Description Potential cause and remedy
«
ERR 1
» Signal too
weak
«
ERR 2
» Error signal During the measurement, error signals
ERR 3
» No pressure
«
in the cuff
ERR 5
» Abnormal
«
result
«HI» Pulse or cuff
pressure too
high
LO
»Pulse too
«
low
The pulse signals on the cuff are too weak.
Re-position the cuff and repeat the measurement.*
were detected by the cuff, caused for
instance by movement or muscle tension.
Repeat the measurement, keeping your
arm still.
An adequate pressure cannot be generated in the cuff. A leak may have occurred.
Check that cuff and pump ball are correc tly
connected and that the cuff is not fitted too
loosely. Replace the batteries i f necessary.
Repeat the measurement.
The measuring signals are inaccurate and
no result can therefore be displayed. Read
through the checklist for performing reliable
measurements and then repeat the
measurement.*
The pressure in the cuff is too high (over
300 mmHg) OR the pulse is too high (over
200 beats per minute). Relax for 5 minutes
and repeat the measurement.*
The pulse is too low (less than 40 beats per
minute). Repeat the measurement.*
* Please consult your doctor, if this or any other problem occurs repeatedly.
If you think the results are unusual, please read through the
)
information in «Section 1.» carefully.
8. Safety, Care, Accuracy Test and Disposal
Safety and protection
•
This instrument may be used only for the purpose described in
this booklet. The manufacturer cannot be held liable for damage
caused by incorrect application.
•
This instrument comprises sensitive components and must be
treated with caution. Observe the storage and operating conditions described in the «Technical Specifications» section!
•
Protect it from:
− water and moisture
− extreme temperatures
− impact and dropping
− contamination and dust
− direct sunlight
− heat and cold
•
The cuffs are sensitive and must be handled with care.
•
Only pump up the cuff once fitted.
•
Do not use the instrument close to strong electromagnetic fields
such as mobile telephones or radio installations.
•
Do not use the instrument if you think it is damaged or notice
anything unusual.
•
Never open the instrument.
•
If the instrument is not going to be used for a prolonged period
the batteries should be removed.
•
Read the additional safety instructions in the individual sections
of this booklet.
Ensure that children do not use the instrument unsupervised; some parts are small enough to be swallowed.
Instrument care
Clean the instrument only with a soft, dry cloth.
Accuracy test
We recommend this instrument is tested for accuracy every
2 years or after mechanical impact (e.g. being dropped). Please
contact Microlife-Service to arrange the test (see foreword).
EN
5BP A50
Disposal
Batteries and electronic instruments must be disposed of in
accordance with the locally applicable regulations, not with
domestic waste.
9. Guarantee
This instrument is covered by a 3 year guarantee
purchase. The guarantee is valid only on presentation of the guarantee card completed by the dealer (see back) confirming date of
purchase or the receipt.
•
Batteries, cuff and wearing parts are not included.
•
Opening or altering the instrument invalidates the guarantee.
•
The guarantee does not cover damage caused by improper
handling, discharged batteries, accidents or non-compliance
with the operating instructions.
Please contact Microlife-Service (see foreword).
from the date of
10. Technical Specifications
Operating temperature:
Storage temperature:
Weight: 320 g (including batteries)
Dimensions: 99 x 55 x 32 mm
Measuring proce-
dure:
Measurement range: 20 — 280 mmHg – blood pressure
Cuff pressure display
range: 0 — 299 mmHg
Resolution: 1 mmHg
Static accuracy: pressure within ± 3 mmHg
Pulse accuracy: ± 5 % of the readout value
Voltage source: 2 x 1.5 V Batteries; size AAA
Reference to
standards:
This device complies with the requirements of the Medical Device
Directive 93/42/EEC.
Technical alterations reserved.
6
10 — 40 °C / 50 — 104 °F
15 — 95 % relative maximum humidity
-20 — +55 °C / -4 — +131 °F
15 — 95 % relative maximum humidity
oscillometric, corresponding to Korotkoff
method: Phase I systolic, Phase V diastolic
40 — 200 beats per minute – pulse
EN 1060-1 /-3 /-4; IEC 60601-1;
IEC 60601-1-2 (EMC)

EN
7BP A50
Microlife BP A50
1
Poga ON/OFF (IESLĒGT/IZSLĒGT)
2
Displejs
3
Poga M (ATMIŅA)
4
Aproces kontaktligzda
5
Sūkņa apaļā kontaktligzda
6
Ātrais gaisa atbrīvošanas vārsts
7
Bateriju nodalījums
8
Aproce
9
Aproces savienotājs
AT
Lodveida sūknis
AK
Lodveida sūkņa savienotājs
Displejs
AL
Atmiņā saglabājamo rezultātu skaits
AM
Sirds aritmijas indikators
AN
Pulsa biežums
AO
Bateriju displejs
AP
Saglabātie mērījumi
AQ
Sistoliskais asinsspiediens
AR
Diastoliskais asinsspiediens
AS
Pulss
BT
Gaisa iesūknēšana
BK
Gaisa atbrīvošana
LV
Cien./god. lietotāj!
Jūsu jaunais Microlife asinsspiediena mērītājs ir uzticams
medicīnas instruments asinsspiediena mērīšanai uz augšdelma.
Tas ir vienkārši un ērti lietojams, precīzs un ļoti ieteicams
asinsspiediena mērīšanai mājas apstākļos. Šis instruments tika
izstrādāts sadarbībā ar mediķiem, un klīniskie testi ir pierādījuši,
ka tā mērīšanas precizitāte ir ļoti augsta.*
Lūdzu, uzmanīgi izlasiet šo instrukciju, lai izprastu visas funkcijas
un drošības informāciju. Mēs vēlamies, lai Jūs būtu apmierināts ar
Microlife izstrādājumu. Ja Jums ir kādi jautājumi, problēmas vai ja
ties pasūtīt r
vēla
klientu servisu. Ierīces pārdevējs vai aptiekārs palīdzēs Jums
noskaidrot Microlife izplatītāja adresi Jūsu valstī. Jūs varat arī
apmeklēt tīmekļa vietni www.microlife.lv, kur Jūs varēsiet atrast
plašu un vērtīgu informāciju par mūsu produktiem.
Lai Jums laba veselība – Microlife AG!
* Šajā instrumentā ir izmantota tā pati mērīšanas tehnoloģija, kas
apbalvotajā «BP 3BTO-H» modelī, kas pārbaudīts saskaņā ar
Eiropas hipertonijas sabiedrības (EHS) protokolu.
ezerves daļas, lūdzu, sazinieties ar Microlife
Pirms šīs ierīces izmantošanas uzmanīgi izlasiet
norādījumus.
Aizsardzības klase: BF
8
Loading…
Microlife BP A50
Europe / Middle-East / Africa
Microlife AG
Espenstrasse 139
9443 Widnau / Switzerland
Tel. +41 / 71 727 70 30
Fax +41 / 71 727 70 39
Email admin@microlife.ch
www.microlife.com
Asia
Microlife Corporation.
9F, 431, RuiGang Road, NeiHu
Taipei, 114, Taiwan, R.O.C.
Tel. 886 2 8797-1288
Fax.886 2 8797-1283
Email service@microlife.com.tw
www.microlife.com
North / Central / South America
Microlife USA, Inc.
1617 Gulf to Bay Blvd., 2nd Floor Ste A
Clearwater, FL 33755 / USA
Tel. +1 727 442 5353
Fax +1 727 442 5377
Email msa@microlifeusa.com
www.microlife.com
IB BP A50 Var5 4011
EN Ä 1
LV Ä 8
LT Ä 14
EE Ä 20
RU Ä 26
Инструкция
Посмотреть инструкция для Microlife BP A50 бесплатно. Руководство относится к категории сфигмоманометры, 2 человек(а) дали ему среднюю оценку 8.5. Руководство доступно на следующих языках: русский, английский. У вас есть вопрос о Microlife BP A50 или вам нужна помощь?
Задайте свой вопрос здесь
Содержание
- 1. Important Facts about Blood Pressure and Self- Measurement
- 2. Using the Instrument for the First Time
- 3. Taking a Blood Pressure Measurement using this Instrument
- 4. Appearance of the Heart Arrhythmia Indicator for early Detection
- 5. Data Memory
- 6. Battery Indicator and Battery change
- 7. Error Messages
- 8. Safety, Care, Accuracy Test and Disposal
- 9. Guarantee
- 10. Technical Specifications
- 1. Svarîgi fakti par asinsspiedienu un tâ noteik²anu, pa²am veicot mçrîjumu
- 2. Instrumenta izmanto²ana pirmo reizi
- 3. Asinsspiediena mçrî²ana, izmantojot ²o instrumentu
- 4. Sirds aritmijas indikatora parâdî²anâs savlaicîgas atklâ²anas nolûkâ
- 5. Datu atmiòa
- 6. Bateriju râdîtâjs un bateriju nomaiòa
- 7. Kïûdas ziòojumi
- 8. Dro²îba, kop²ana, precizitâtes tests un likvidç²ana
- 9. Garantija
- 10. Tehniskâs specifikâcijas
- 1. Svarbi informacija apie kraujospûdá ir savaranki²kà jo matavimà
- 2. Naudojimasis prietaisu pirmà kartà
- 3. Kraujospûd io matavimas
- 4. Ãirdies aritmijos indikatorius
- 5. Atminties funkcija
- 6. Baterijø bûklës indikatorius ir baterijø keitimas
- 7. Klaidø prane²imai
- 8. Atsargumo priemonës, prie iûra, tikslumo patikrinimas, utilizavimas
- 9. Garantija
- 10. Techninës specifikacijos
- 1. Oluline teave vererõhu ja iseendal vererõhu mõõtmise kohta
- 2. Aparaadi esmakordne kasutus
- 3. Selle aparaadiga vererõhu mõõtmine
- 4. Südamerütmihäire indikaatori ilmumine varaseks hoiatuseks
- 5. Andmemälu
- 6. Patarei indikaator ja patareide vahetus
- 7. Veateated
- 8. Ohutus, hooldus, täpsustest ja käitlus
- 9. Garantii
- 10. Tehnilised andmed
- 1. ÂàæíàØ èíôî²ìàöèØ îá à²òå²èàëüíîì äàâëåíèè è ñàìîñòîØòåëüíîå èçìå²åíèå
- 2. Èñïîëüçîâàíèå ï²èáî²à â ïå²âûé ²àç
- 3. Âûïîëíåíèå èçìå²åíèé à²òå²èàëüíîãî äàâëåíèØ ï²è ïîìîùè ï²èáî²à
- 4. ÏîØâëåíèå èíäèêàòî²à à²èòìèè ñå²äöà íà ²àííåé ñòàäèè
- 5. ÏàìØòü äëØ õ²àíåíèØ äàííûõ
- 6. Èíäèêàòî² ²àç²Øäà áàòà²åé è èõ çàìåíà
- 7. ÑîîáùåíèØ îá îøèáêàõ
- 8. Òåõíèêà áåçîïàñíîñòè, óõîä, ï²îâå²êà òî÷íîñòè è óòèëèçàöèØ
- 9. Ãà²àíòèØ
- 10. Òåõíè÷åñêèå õà²àêòå²èñòèêè
Изображения продукта (2)

Технические характеристики Microlife BP A50
Ниже вы найдете технические характеристики изделия и руководства по эксплуатации Microlife BP A50.
Microlife BP A50 — спфигмоманометр, который предназначен для измерения артериального давления у людей. Это надежное устройство, которое позволяет быстро и точно измерить показатели давления. Изготовленный из премиальных материалов, он обладает прочной и долговечной конструкцией.
Специально разработанный для использования дома, этот сфигмоманометр легкий и удобный в использовании. Он имеет большой и четкий дисплей, что позволяет легко читать показатели давления. Кроме того, Microlife BP A50 оснащен функцией автоматического отключения, что продлевает срок службы батареи.
Это устройство имеет возможность сохранять и отображать результаты последних измерений, что позволяет отслеживать изменения в течение времени. Сфигмоманометр также обладает функцией аритмии, которая предупреждает о неправильном сердечном ритме во время измерения.
Microlife BP A50 легко настраивается для каждого пользователя. Он может хранить до 99 памятей и имеет возможность для двух пользователей, что делает его идеальным для использования с семейными членами или партнерами.
В целом, Microlife BP A50 является надежным и точным инструментом для измерения артериального давления. Он обеспечивает легкое и удобное использование, имеет большой дисплей и функциональность, необходимую для отслеживания изменений давления с течением времени. Благодаря своей прочной конструкции, этот сфигмоманометр также гарантирует долгий срок службы.
Главная
Часто задаваемые вопросы
Не можете найти ответ на свой вопрос в руководстве? Вы можете найти ответ на свой вопрос ниже, в разделе часто задаваемых вопросов о Microlife BP A50.
Как правильно разместить манжету на моем руке для точных показаний?
Наденьте манжету на верхнюю часть руки, примерно на 2-3 сантиметра выше локтя, убедившись, что она плотно облегает, но не слишком тесно.
Как правильно накачать манжету, чтобы получить точное измерение артериального давления?
Нажмите кнопку «Старт» на сфигмоманометре, чтобы начать накачку, и убедитесь, что давление достаточно для окклюзии лучевой артерии, но не слишком сильное.
Какие шаги мне следует соблюдать, чтобы обеспечить правильное измерение моего кровяного давления?
Сядьте в спокойное положение, ноги плоско на земле и спина упирается, избегайте разговоров или движений во время измерения, и убедитесь, что ваша рука находится на уровне сердца.
Что мне делать, если мой сфигмоманометр показывает сообщение об ошибке?
Проверьте, чтобы манжета была правильно подключена, при необходимости отрегулируйте позиционирование манжеты и убедитесь, что батареи имеют достаточную мощность. Если проблема сохраняется, проконсультируйтесь с медицинским специалистом или свяжитесь с службой поддержки клиентов.
Как я могу интерпретировать показания давления крови, отображаемые сфигмоманометром Microlife BP A50?
Сфигмоманометр будет предоставлять два значения: систолическое давление (более высокое число) и диастолическое давление (более низкое число). Нормальное артериальное давление для взрослых обычно составляет около 120/80 миллиметров ртутного столба (мм рт.ст.), однако важно проконсультироваться с медицинским работником, чтобы правильно интерпретировать ваши индивидуальные показатели и обсудить любые проблемы.
Что такое систолическое давление?
Систолическое давление — это высший показатель тонометра. Систолическое давление означает давление в артериях во время сокращения сердечной мышцы.
Какой показатель считается нормой артериального давления?
Нормой артериального давления считается показатель 120/80 мм ртутного столба.
Что означает диастолическое давление?
Диастолическое давление — это низший показатель тонометра. Диастолическое давление означает давление между ударами сердечной мышцы.
Инструкция Microlife BP A50 доступно в русский?
Да, руководствоMicrolife BP A50 доступно врусский .
Не нашли свой вопрос? Задайте свой вопрос здесь
-
Contents
-
Table of Contents
-
Bookmarks
-
Русский
-
1 Важная Информация Об Артериальном Давлении И
-
2 Использование Прибора В Первый Раз
-
Подбор Подходящей Манжеты
-
Подсоединение Нагнетателя Воздуха
-
3 Выполнение Измерений Артериального Давления При
-
Как Отменить Сохранение Результата
-
-
4 Появление Индикатора Аритмии Пульса На Ранней Стадии
-
5 Появление Индикатора Гипертензии
-
6 Память
-
Просмотр Сохраненных Величин
-
Quick Links
Europe / Middle-East / Africa
Microlife AG
Espenstrasse 139
9443 Widnau / Switzerland
Tel. +41 / 71 727 70 30
Fax +41 / 71 727 70 39
Email admin@microlife.ch
www.microlife.com
Asia
Microlife Corporation.
9F, 431, RuiGang Road, NeiHu
Taipei, 11492, Taiwan, R.O.C.
Tel. +886 2 8797-1288
Fax +886 2 8797-1283
Email service@microlife.com.tw
www.microlife.com
North / Central / South America
Microlife USA, Inc.
1617 Gulf to Bay Blvd., 2nd Floor Ste A
Clearwater, FL 33755 / USA
Tel. +1 727 442 5353
Fax +1 727 442 5377
Email msa@microlifeusa.com
www.microlife.com
www.microlife.by
www.microlife.bg
www.microlife.com
IB BP N1 Basic BY-V3 2314
Microlife BP A50
1
EN
8
RU
14
BG