
1 инструкция
- Домашние кинотеатры Pioneer
2A-10-S
1 инструкция
- Домашние кинотеатры Pioneer
3A-20-K
1 инструкция
- Домашние кинотеатры Pioneer
4A-20-S
1 инструкция
- Домашние кинотеатры Pioneer
5A-30-K
1 инструкция
- Домашние кинотеатры Pioneer
6A-30-S
1 инструкция
- Домашние кинотеатры Pioneer
7AS-WL200
1 инструкция8AS-WL300
1 инструкция
- Начало работы, Ethernet dc 5 v wps, As-wl300
2 страницы
9BCS-212
1 инструкция
- Bcs-414, Bcs-212
72 страницы
10BCS-303
1 инструкция
- Bcs-707, Bcs-303
66 страниц
11BCS-414
1 инструкция
- Bcs-414, Bcs-212
72 страницы
12BCS-707
1 инструкция
- Bcs-707, Bcs-303
66 страниц
13BCS-717
1 инструкция
- Bcs-717
76 страниц
14BCS-FS500
1 инструкция
- Домашние кинотеатры Pioneer
56 страниц
15BCS-FS505
1 инструкция
- Bcs-fs505
52 страницы
16BDP-140
3 инструкции
- Домашние кинотеатры Pioneer
64 страницы - Домашние кинотеатры Pioneer
44 страницы - About default password of this unit, Über das standard-passwort dieses geräts, Il password predefinito di quest’unità
1 страница
17BDP-150
2 инструкции
- Bdp-150
22 страницы - Домашние кинотеатры Pioneer
60 страниц
18BDP-150-K
2 инструкции
- Bdp-150
22 страницы - Домашние кинотеатры Pioneer
60 страниц
19BDP-150-S
3 инструкции
- Bdp-150
22 страницы - Домашние кинотеатры Pioneer
60 страниц - Bdp-150
52 страницы
20BDP-160-K
1 инструкция
- Bdp-160
60 страниц
21BDP-160-S
1 инструкция
- Bdp-160
60 страниц
22BDP-333
1 инструкция
- Домашние кинотеатры Pioneer
64 страницы
23BDP-440
3 инструкции
- Домашние кинотеатры Pioneer
64 страницы - Домашние кинотеатры Pioneer
44 страницы - About default password of this unit, Über das standard-passwort dieses geräts, Il password predefinito di quest’unità
1 страница
24BDP-450-K
1 инструкция
- Bdp-450
60 страниц
25BDP-LX53
1 инструкция
- Домашние кинотеатры Pioneer
64 страницы
26BDP-LX54
1 инструкция
- Домашние кинотеатры Pioneer
22 страницы
27BDP-LX55
1 инструкция
- Bdp-lx55
53 страницы
28BDP-LX70A
1 инструкция
- Домашние кинотеатры Pioneer
64 страницы
29CP-81B-K
1 инструкция
- Домашние кинотеатры Pioneer
2 страницы
30CU-R9
1 инструкция
- Cu-r9, A/b/c
2 страницы
31DCS-202K
2 инструкции
- Dcs-202k, Dcs-404k
40 страниц - Dcs-414k, Dcs-202k, Dcs-404k
48 страниц
32DCS-222
1 инструкция
- Xv-dv222, S-dv222
52 страницы
33DCS-232
1 инструкция
- Установка ресивера оуо/со, Ri——— in
2 страницы
34DCS-240
3 инструкции
- Установка ресивера оуо/со, Ri——— in
2 страницы - Домашние кинотеатры Pioneer
44 страницы - Установка ресивера оуо/со о
2 страницы
35DCS-313
1 инструкция
- Xw-dv515
60 страниц
36DCS-323
1 инструкция
- Домашние кинотеатры Pioneer
30 страниц
37DCS-333
1 инструкция
- Установка ресивера оуо/со
2 страницы
38DCS-340
2 инструкции
- Домашние кинотеатры Pioneer
28 страниц - Установка ресивера оуо/со
2 страницы
39DCS-360
2 инструкции
- Dcs-353, Dcs-360
44 страницы - Установка ресивера dvd/cd, Front center surround sub woofer
2 страницы
40DCS-363
1 инструкция
- Домашние кинотеатры Pioneer
20 страниц
41DCS-365K
1 инструкция
- Dcs-365k, Dcs-375k
50 страниц
42DCS-375K
1 инструкция
- Dcs-365k, Dcs-375k
50 страниц
43DCS-385K
1 инструкция
- Dcs-385k, Dcs-395k
44 страницы
44DCS-395K
1 инструкция
- Dcs-385k, Dcs-395k
44 страницы
45DCS-404K
2 инструкции
- Dcs-202k, Dcs-404k
40 страниц - Dcs-414k, Dcs-202k, Dcs-404k
48 страниц
46DCS-414K
1 инструкция
- Dcs-414k, Dcs-202k, Dcs-404k
48 страниц
47DCS-424
1 инструкция
- Домашние кинотеатры Pioneer
30 страниц
48DCS-515
1 инструкция
- Xw-dv515
60 страниц
49DCS-525
1 инструкция
- Xv-dv525, S-dv525, Xw-dv525 xw-dv1ws
50 страниц
50DCS-585K
1 инструкция
- Dcs-585k, Dcs-590k
40 страниц
51DCS-590K
1 инструкция
- Dcs-585k, Dcs-590k
40 страниц
52DCS-595K
1 инструкция
- Dcs-595k
63 страницы
53DCS-FS303K
1 инструкция
- Dcs-fs303k
48 страниц
54DV-2010
1 инструкция
- Домашние кинотеатры Pioneer
16 страниц
55DV-2010K
1 инструкция
- Домашние кинотеатры Pioneer
16 страниц
56DV-2020
2 инструкции
- Перед началом работы, Названия деталей и функции, Воспроизводимые диски и файлы
2 страницы - Перед началом работы, Названия деталей и функции, Воспроизводимые диски и файлы
2 страницы
57DV-2022
2 инструкции
- Перед началом работы, Названия деталей и функции, Воспроизводимые диски и файлы
2 страницы - Перед началом работы, Названия деталей и функции, Воспроизводимые диски и файлы
2 страницы
58DV-2042K
2 инструкции
- Список исправлений, Комплект поставки, Подключения
1 страница - Домашние кинотеатры Pioneer
12 страниц
59DV-2240
2 инструкции
- Домашние кинотеатры Pioneer
12 страниц - Список исправлений, Комплект поставки, Подключения
1 страница
60DV-2242
2 инструкции
- Список исправлений, Комплект поставки, Подключения
1 страница - Домашние кинотеатры Pioneer
12 страниц
61DV-2650-S
1 инструкция
- Dvd проигрыватель, Инструкция по эксплуатации
54 страницы
62DV-2750-S
1 инструкция
- DVD-проигрыватели Pioneer
16 страниц
63DV-2850-S
1 инструкция
- Dv-380, Dv-2850
48 страниц
64DV-3022KV
2 инструкции
- Перед началом работы, Названия деталей и функции, Воспроизводимые диски и файлы
2 страницы - Перед началом работы, Названия деталей и функции, Воспроизводимые диски и файлы
2 страницы
65DV-320-K
2 инструкции
- Домашние кинотеатры Pioneer
36 страниц - Домашние кинотеатры Pioneer
10 страниц
66DV-320-S
2 инструкции
- Домашние кинотеатры Pioneer
36 страниц - Домашние кинотеатры Pioneer
10 страниц
67DV-360-K
1 инструкция
- Dvd проигрыватель, Инструкция по эксплуатации
54 страницы
68DV-360-S
1 инструкция
- Dvd проигрыватель, Инструкция по эксплуатации
54 страницы
69DV-370-K
1 инструкция
- DVD-проигрыватели Pioneer
16 страниц
70DV-370-S
1 инструкция
- DVD-проигрыватели Pioneer
16 страниц
71DV-430V
1 инструкция
- Dv-430v, Перед началом работы, Меры предосторожности
2 страницы
72DV-464-K
1 инструкция
- Dvd проигрыватель, Инструкция по эксплуатации
54 страницы
73DV-464-S
1 инструкция
- Dvd проигрыватель, Инструкция по эксплуатации
54 страницы
74DV-470-K
1 инструкция
- DVD-проигрыватели Pioneer
16 страниц
75DV-500K-S
1 инструкция
- Домашние кинотеатры Pioneer
47 страниц
76DV-575A-K
1 инструкция
- Dv-575a
35 страниц
77DV-575A-S
1 инструкция
- Dv-575a
35 страниц
78DVR-220-S
1 инструкция
- Dvd-рекордер, Инструкции по эксплуатации
99 страниц
79DVR-3100-S
1 инструкция
- Домашние кинотеатры Pioneer
80 страниц
80DVR-520H-S
1 инструкция
- Домашние кинотеатры Pioneer
99 страниц
81DVR-540HX-S
1 инструкция
- Домашние кинотеатры Pioneer
79 страниц
82DVR-545HX-S
1 инструкция
- Домашние кинотеатры Pioneer
162 страницы
83DVR-550H-S
1 инструкция
- Dvr-550h-s
142 страницы
84F-F3-J
1 инструкция
- F-f3
14 страниц
85HTP-071
2 инструкции
- Htp-071, S-22w-p, S-11-p
10 страниц - Htp-071
11 страниц
86KRP-500A
2 инструкции
- Домашние кинотеатры Pioneer
401 страница - Домашние кинотеатры Pioneer
111 страниц
87KRP-500ABG
2 инструкции
- Домашние кинотеатры Pioneer
401 страница - Домашние кинотеатры Pioneer
111 страниц
88KRP-500AW
2 инструкции
- Домашние кинотеатры Pioneer
401 страница - Домашние кинотеатры Pioneer
111 страниц
89KRP-600A
2 инструкции
- Домашние кинотеатры Pioneer
401 страница - Домашние кинотеатры Pioneer
111 страниц
90LX01
1 инструкция
- Домашние кинотеатры Pioneer
179 страниц
91LX01BD
1 инструкция
- Система домашнего кинотеатра с поддержкой blu-ray
116 страниц
92LX03
1 инструкция
- Домашние кинотеатры Pioneer
88 страниц
93LX03BD
1 инструкция
- Домашние кинотеатры Pioneer
102 страницы
94MCS-737
1 инструкция
- Домашние кинотеатры Pioneer
84 страницы
95MCS-838
1 инструкция
- Домашние кинотеатры Pioneer
84 страницы
96MEP-7000
2 инструкции
- Mep-7000
6 страниц - Домашние кинотеатры Pioneer
266 страниц
97N-30-K
4 инструкции
- Домашние кинотеатры Pioneer
29 страниц - Домашние кинотеатры Pioneer
19 страниц - Домашние кинотеатры Pioneer
30 страниц - Домашние кинотеатры Pioneer
1 страница
98N-30-S
4 инструкции
- Домашние кинотеатры Pioneer
29 страниц - Домашние кинотеатры Pioneer
19 страниц - Домашние кинотеатры Pioneer
30 страниц - Домашние кинотеатры Pioneer
1 страница
99N-50-K
5 инструкций
- Домашние кинотеатры Pioneer
29 страниц - Домашние кинотеатры Pioneer
19 страниц - Домашние кинотеатры Pioneer
30 страниц - Домашние кинотеатры Pioneer
1 страница - Домашние кинотеатры Pioneer
17 страниц
100N-50-S
5 инструкций
- Домашние кинотеатры Pioneer
29 страниц - Домашние кинотеатры Pioneer
19 страниц - Домашние кинотеатры Pioneer
30 страниц - Домашние кинотеатры Pioneer
1 страница - Домашние кинотеатры Pioneer
17 страниц
101NS-DV990
1 инструкция
- Домашние кинотеатры Pioneer
96 страниц
102P1-K
2 инструкции
- Xc-p01, Xc-p01dab, S/-k
21 страница - Xc-p01, Xc-p01dab, S/-k
20 страниц
103P1-S
2 инструкции
- Xc-p01, Xc-p01dab, S/-k
21 страница - Xc-p01, Xc-p01dab, S/-k
20 страниц
104P1DAB-K
2 инструкции
- Xc-p01, Xc-p01dab, S/-k
21 страница - Xc-p01, Xc-p01dab, S/-k
20 страниц
105P1DAB-S
2 инструкции
- Xc-p01, Xc-p01dab, S/-k
21 страница - Xc-p01, Xc-p01dab, S/-k
20 страниц
106PD-10-K
1 инструкция
- Домашние кинотеатры Pioneer
16 страниц
107PD-10-S
1 инструкция
- Домашние кинотеатры Pioneer
16 страниц
108PD-30-K
1 инструкция
- Домашние кинотеатры Pioneer
16 страниц
109PD-30-S
1 инструкция
- Домашние кинотеатры Pioneer
16 страниц
110PDK-TS25
1 инструкция
- Телевизоры Pioneer
12 страниц
111PDP-4280XA
1 инструкция
- Домашние кинотеатры Pioneer
64 страницы
112PDP-4280XD
1 инструкция
- Домашние кинотеатры Pioneer
70 страниц
113PDP-428XD
1 инструкция
- Домашние кинотеатры Pioneer
88 страниц
114PDP-435FDE
1 инструкция
- Pdp-435fde
48 страниц
115PDP-435HDE
1 инструкция
- Система плазменного дисплея
58 страниц
116PDP-435XDE
1 инструкция
- Система плазменного дисплея
58 страниц
117PDP-436XDE
1 инструкция
- Домашние кинотеатры Pioneer
60 страниц
118PDP-505FDE
1 инструкция
- Pdp-435fde
48 страниц
119PDP-505XDE
1 инструкция
- Система плазменного дисплея
58 страниц
120PDP-5080XA
1 инструкция
- Домашние кинотеатры Pioneer
64 страницы
121PDP-5080XD
1 инструкция
- Домашние кинотеатры Pioneer
70 страниц
122PDP-508XD
1 инструкция
- Домашние кинотеатры Pioneer
88 страниц
123PDP-615EX
1 инструкция
- Pdp-615ex
100 страниц
124PDP-LX5080D
1 инструкция
- Домашние кинотеатры Pioneer
78 страниц
125PDP-LX508D
1 инструкция
- Домашние кинотеатры Pioneer
78 страниц
126PDP-LX5090
2 инструкции
- Домашние кинотеатры Pioneer
326 страниц - Домашние кинотеатры Pioneer
58 страниц
127PDP-LX5090H
2 инструкции
- Домашние кинотеатры Pioneer
423 страницы - Домашние кинотеатры Pioneer
99 страниц
128PDP-LX6080D
1 инструкция
- Домашние кинотеатры Pioneer
78 страниц
129PDP-LX608D
1 инструкция
- Домашние кинотеатры Pioneer
78 страниц
130PDP-LX6090
2 инструкции
- Домашние кинотеатры Pioneer
326 страниц - Домашние кинотеатры Pioneer
58 страниц
131PDP-LX6090H
2 инструкции
- Домашние кинотеатры Pioneer
423 страницы - Домашние кинотеатры Pioneer
99 страниц
132PDP-S40B
1 инструкция
- Pdp-s40b
8 страниц
133PDP-S40S
1 инструкция
- Pdp-s40s
8 страниц
134PDP-S50
1 инструкция
- Pdp-s50
8 страниц
135PDP-S59
1 инструкция
- Pdp-s59
8 страниц
136PDP-SX4280D
1 инструкция
- Домашние кинотеатры Pioneer
70 страниц
137PDP-SX5080D
1 инструкция
- Домашние кинотеатры Pioneer
70 страниц
138PDX-Z9
1 инструкция
- Pdx-z9
44 страницы
139RCS-515H
1 инструкция
- Домашние кинотеатры Pioneer
152 страницы
140RCS-515H-K
1 инструкция
- Домашние кинотеатры Pioneer
152 страницы
141RCS-55
1 инструкция
- Домашние кинотеатры Pioneer
104 страницы
142RCS-LX60
1 инструкция
- Авто видеорегистраторы Pioneer
109 страниц
143S-H710V
1 инструкция
- S-h710v, Pyccкий, Перед эксплуатацией
2 страницы
144S-W250S-W
1 инструкция
- Активный сабвуфер
12 страниц
145SBX-N500
1 инструкция
- Руководство по быстрой настройке, Также прочтите указания на задней стороне, Подключение телевизора, плеера и других устройств
2 страницы
146SBX-N700
1 инструкция
- Руководство по быстрой настройке, Также прочтите указания на задней стороне, Подключение телевизора, плеера и других устройств
2 страницы
147SC-1223-K
1 инструкция
- Домашние кинотеатры Pioneer
83 страницы
148SC-1223-S
1 инструкция
- Домашние кинотеатры Pioneer
83 страницы
149SC-2022-K
1 инструкция
- Домашние кинотеатры Pioneer
118 страниц
150SC-2023-K
1 инструкция
- Домашние кинотеатры Pioneer
125 страниц
151SC-2023-S
1 инструкция
- Домашние кинотеатры Pioneer
125 страниц
152SC-LX56-K
1 инструкция
- Домашние кинотеатры Pioneer
132 страницы
153SC-LX56-S
1 инструкция
- Домашние кинотеатры Pioneer
132 страницы
154SC-LX57-K
1 инструкция
- Домашние кинотеатры Pioneer
140 страниц
155SC-LX58-K
2 инструкции
- Домашние кинотеатры Pioneer
141 страница - Домашние кинотеатры Pioneer
156SC-LX58-S
2 инструкции
- Домашние кинотеатры Pioneer
141 страница - Домашние кинотеатры Pioneer
157SC-LX71
2 инструкции
- Домашние кинотеатры Pioneer
28 страниц - Домашние кинотеатры Pioneer
84 страницы
158SC-LX72
3 инструкции
- Домашние кинотеатры Pioneer
148 страниц - Домашние кинотеатры Pioneer
159SC-LX73
2 инструкции
- Домашние кинотеатры Pioneer
129 страниц - Домашние кинотеатры Pioneer
110 страниц
160SC-LX75
2 инструкции
- Домашние кинотеатры Pioneer
142 страницы - Домашние кинотеатры Pioneer
62 страницы
161SC-LX76-K
1 инструкция
- Домашние кинотеатры Pioneer
125 страниц
162SC-LX76-S
1 инструкция
- Домашние кинотеатры Pioneer
125 страниц
163SC-LX77-K
1 инструкция
- Домашние кинотеатры Pioneer
126 страниц
164SC-LX77-S
1 инструкция
- Домашние кинотеатры Pioneer
126 страниц
165SC-LX78-K
2 инструкции
- Домашние кинотеатры Pioneer
- Домашние кинотеатры Pioneer
103 страницы
166SC-LX78-S
2 инструкции
- Домашние кинотеатры Pioneer
- Домашние кинотеатры Pioneer
103 страницы
167SC-LX81
2 инструкции
- Домашние кинотеатры Pioneer
28 страниц - Домашние кинотеатры Pioneer
84 страницы
168SC-LX82
2 инструкции
- Домашние кинотеатры Pioneer
148 страниц - Домашние кинотеатры Pioneer
169SC-LX83
2 инструкции
- Домашние кинотеатры Pioneer
129 страниц - Домашние кинотеатры Pioneer
110 страниц
170SC-LX85
2 инструкции
- Домашние кинотеатры Pioneer
142 страницы - Домашние кинотеатры Pioneer
62 страницы
171SC-LX86-K
1 инструкция
- Домашние кинотеатры Pioneer
125 страниц
172SC-LX86-S
1 инструкция
- Домашние кинотеатры Pioneer
125 страниц
173SC-LX87-K
1 инструкция
- Домашние кинотеатры Pioneer
126 страниц
174SC-LX87-S
1 инструкция
- Домашние кинотеатры Pioneer
126 страниц
175SC-LX88-K
2 инструкции
- Домашние кинотеатры Pioneer
- Домашние кинотеатры Pioneer
103 страницы
176SC-LX88-S
2 инструкции
- Домашние кинотеатры Pioneer
- Домашние кинотеатры Pioneer
103 страницы
177SC-LX90
1 инструкция
- Sc -lx9 0
100 страниц
178SE-A611
1 инструкция
- Se-a611, Корпорация пайонир, Pioneer corporation
1 страница
179SE-A611TV
1 инструкция
- Se-a, Корпорация пайонир, Stereo headphones / casque stéréo
1 страница
180SE-CL501T
1 инструкция
- Домашние кинотеатры Pioneer
2 страницы
181SE-D10C-W
1 инструкция
- Se-d10c-w
182SE-M631TV
1 инструкция
- Se-m, Stereo headphones / casque stéréo, Pioneer corporation корпорация пайонир
183STZ-D10S-L
1 инструкция
- Stz-d10t stz-d10s
34 страницы
184STZ-D10T-G
1 инструкция
- Stz-d10t stz-d10s
34 страницы
185STZ-D10Z-R
1 инструкция
- Stz-d10z
30 страниц
186VSX-1018AH-S
2 инструкции
- Домашние кинотеатры Pioneer
37 страниц - Vsx-1018ah
86 страниц
187VSX-1019AH-K
1 инструкция
- Домашние кинотеатры Pioneer
110 страниц
188VSX-1019AH-S
1 инструкция
- Домашние кинотеатры Pioneer
110 страниц
189VSX-1021
2 инструкции
- Домашние кинотеатры Pioneer
27 страниц - Домашние кинотеатры Pioneer
99 страниц
190VSX-1025-K
1 инструкция
- Ресиверы и усилители Pioneer
20 страниц
191VSX-1122-K
1 инструкция
- Домашние кинотеатры Pioneer
114 страниц
192VSX-1123-K
1 инструкция
- Домашние кинотеатры Pioneer
60 страниц
193VSX-2016AV-S
1 инструкция
- Домашние кинотеатры Pioneer
80 страниц
194VSX-2020-K
2 инструкции
- Домашние кинотеатры Pioneer
99 страниц - Домашние кинотеатры Pioneer
54 страницы
195VSX-2021
2 инструкции
- Домашние кинотеатры Pioneer
116 страниц - Домашние кинотеатры Pioneer
56 страниц
196VSX-322-K
1 инструкция
- Vsx-322
31 страница
197VSX-323-K
1 инструкция
- Vsx-423, Vsx-323, K/-s
10 страниц
198VSX-329-K
1 инструкция
- Vsx-424, Vsx-329
41 страница
199VSX-415-S
1 инструкция
- Домашние кинотеатры Pioneer
40 страниц
200VSX-417-K
1 инструкция
- Домашние кинотеатры Pioneer
37 страниц
201VSX-417-S
1 инструкция
- Домашние кинотеатры Pioneer
37 страниц
202VSX-421
1 инструкция
- Vsx-421
34 страницы
203VSX-422-K
1 инструкция
- Vsx-422, K /-s
36 страниц
204VSX-422-S
1 инструкция
- Vsx-422, K /-s
36 страниц
205VSX-423-K
1 инструкция
- Vsx-423, Vsx-323, K/-s
10 страниц
206VSX-423-S
1 инструкция
- Vsx-423, Vsx-323, K/-s
10 страниц
207VSX-424-K
1 инструкция
- Vsx-424, Vsx-329
41 страница
208VSX-515-S
1 инструкция
- Домашние кинотеатры Pioneer
40 страниц
209VSX-521
1 инструкция
- Vsx-521
40 страниц
210VSX-527-K
1 инструкция
- Vsx-827, Vsx-527, K /-s
20 страниц
211VSX-527-S
1 инструкция
- Vsx-827, Vsx-527, K /-s
20 страниц
212VSX-528-K
1 инструкция
- Vsx-828, Vsx-528, K/-s
63 страницы
213VSX-528-S
1 инструкция
- Vsx-828, Vsx-528, K/-s
63 страницы
214VSX-529-K
1 инструкция
- Vsx-824, Vsx-529, K /-s
58 страниц
215VSX-529-S
1 инструкция
- Vsx-824, Vsx-529, K /-s
58 страниц
216VSX-817-K
1 инструкция
- Домашние кинотеатры Pioneer
37 страниц
217VSX-817-S
1 инструкция
- Домашние кинотеатры Pioneer
37 страниц
218VSX-818V-S
1 инструкция
- Vsx-918v, Vsx-818v
73 страницы
219VSX-821
1 инструкция
- Vsx-826, Vsx-821
56 страниц
220VSX-824-K
1 инструкция
- Vsx-824, Vsx-529, K /-s
58 страниц
221VSX-826
1 инструкция
- Vsx-826, Vsx-821
56 страниц
222VSX-827-K
1 инструкция
- Vsx-827, Vsx-527, K /-s
20 страниц
223VSX-827-S
1 инструкция
- Vsx-827, Vsx-527, K /-s
20 страниц
224VSX-828-K
1 инструкция
- Vsx-828, Vsx-528, K/-s
63 страницы
225VSX-828-S
1 инструкция
- Vsx-828, Vsx-528, K/-s
63 страницы
226VSX-915-S
1 инструкция
- Домашние кинотеатры Pioneer
48 страниц
227VSX-916-K
1 инструкция
- Ресиверы и усилители Pioneer
44 страницы
228VSX-918V-K
1 инструкция
- Vsx-918v, Vsx-818v
73 страницы
229VSX-918V-S
1 инструкция
- Vsx-918v, Vsx-818v
73 страницы
230VSX-921
2 инструкции
- Домашние кинотеатры Pioneer
27 страниц - Домашние кинотеатры Pioneer
99 страниц
231VSX-922-K
1 инструкция
- Домашние кинотеатры Pioneer
114 страниц
232VSX-922-S
1 инструкция
- Домашние кинотеатры Pioneer
114 страниц
233VSX-923-K
1 инструкция
- Домашние кинотеатры Pioneer
60 страниц
234VSX-923-S
1 инструкция
- Домашние кинотеатры Pioneer
60 страниц
235VSX-924-K
1 инструкция
- Домашние кинотеатры Pioneer
111 страниц
236VSX-AX2AV-S
1 инструкция
- Ресиверы и усилители Pioneer
61 страница
237VSX-C100-K
1 инструкция
- Vsx-c100
60 страниц
238VSX-C100-S
1 инструкция
- Vsx-c100
60 страниц
239VSX-LX53
2 инструкции
- Домашние кинотеатры Pioneer
99 страниц - Домашние кинотеатры Pioneer
54 страницы
240VSX-LX55
2 инструкции
- Домашние кинотеатры Pioneer
116 страниц - Домашние кинотеатры Pioneer
56 страниц
241VSX-S300
1 инструкция
- Vsx-s300, K/-s
36 страниц
242VSX-S300-S
1 инструкция
- Vsx-s300, K/-s
36 страниц
243VSX-S310-K
1 инструкция
- Vsx-s510, Vsx-s310, K /-s
28 страниц
244VSX-S310-S
1 инструкция
- Vsx-s510, Vsx-s310, K /-s
28 страниц
245VSX-S500
1 инструкция
- Vsx-s500, K/-s
56 страниц
246VSX-S500-S
1 инструкция
- Vsx-s500, K/-s
56 страниц
247VSX-S510-K
1 инструкция
- Vsx-s510, Vsx-s310, K /-s
28 страниц
248X-CM31-K
1 инструкция
- X-cm31, K/-w/-t/-r
36 страниц
249X-CM31-R
1 инструкция
- X-cm31, K/-w/-t/-r
36 страниц
250X-CM31-T
1 инструкция
- X-cm31, K/-w/-t/-r
36 страниц
251X-CM31-W
1 инструкция
- X-cm31, K/-w/-t/-r
36 страниц
252X-EM11
1 инструкция
- X-em21 x-em11
90 страниц
253X-EM12
1 инструкция
- X-em22 x-em12
72 страницы
254X-EM21
1 инструкция
- X-em21 x-em11
90 страниц
255X-EM22
1 инструкция
- X-em22 x-em12
72 страницы
256X-HM50-K
2 инструкции
- X-hm50, K/-s
90 страниц - X-hm50, K/-s
70 страниц
257X-HM50-S
2 инструкции
- X-hm50, K/-s
90 страниц - X-hm50, K/-s
70 страниц
258X-HM70-K
1 инструкция
- Notice for users, Avis aux utilisateurs, Nota para los usuarios
2 страницы
259X-HM70-S
1 инструкция
- Notice for users, Avis aux utilisateurs, Nota para los usuarios
2 страницы
260X-HM71-K
1 инструкция
- Xc-hm81, X-hm81, X-hm71
43 страницы
261X-HM71-S
1 инструкция
- Xc-hm81, X-hm81, X-hm71
43 страницы
262X-HM81-K
1 инструкция
- Xc-hm81, X-hm81, X-hm71
43 страницы
263X-HM81-S
1 инструкция
- Xc-hm81, X-hm81, X-hm71
43 страницы
264X-SMC01-K
1 инструкция
- X-smc01, X-smc01bt
40 страниц
265X-SMC01BT-K
1 инструкция
- X-smc01, X-smc01bt
40 страниц
266X-SMC01BT-S
1 инструкция
- X-smc01, X-smc01bt
40 страниц
267X-SMC1-K
1 инструкция
- X-smc1, K/-s
156 страниц
268X-SMC1-S
1 инструкция
- X-smc1, K/-s
156 страниц
269X-SMC11-S
1 инструкция
- X-smc22, X-smc11
38 страниц
270X-SMC22-S
1 инструкция
- X-smc22, X-smc11
38 страниц
271X-SMC3-K
2 инструкции
- X-smc3, K / — s
70 страниц - ディスクの挿入について, Inserting a disc, Insertion d’un disque
2 страницы
272X-SMC3-S
2 инструкции
- X-smc3, K / — s
70 страниц - ディスクの挿入について, Inserting a disc, Insertion d’un disque
2 страницы
273X-SMC5-K
1 инструкция
- ディスクの挿入について, Inserting a disc, Insertion d’un disque
2 страницы
274X-SMC5-S
1 инструкция
- ディスクの挿入について, Inserting a disc, Insertion d’un disque
2 страницы
275X-SMC55-S
1 инструкция
- X-smc55
45 страниц
276XC-HM70-K
1 инструкция
- Notice for users, Avis aux utilisateurs, Nota para los usuarios
2 страницы
277XC-HM70-S
1 инструкция
- Notice for users, Avis aux utilisateurs, Nota para los usuarios
2 страницы
278XC-HM81-K
1 инструкция
- Xc-hm81, X-hm81, X-hm71
43 страницы
279XC-HM81-S
1 инструкция
- Xc-hm81, X-hm81, X-hm71
43 страницы
280XV-DV333
1 инструкция
- Домашние кинотеатры Pioneer
28 страниц
281XV-DV340
1 инструкция
- Домашние кинотеатры Pioneer
28 страниц
282XW-BTS3-K
2 инструкции
- Xw-bts3, K/-w
65 страниц - Xw-bts3, K/-w
88 страниц
283XW-BTS3-W
2 инструкции
- Xw-bts3, K/-w
65 страниц - Xw-bts3, K/-w
88 страниц
284XW-BTSA1-K
1 инструкция
- Домашние кинотеатры Pioneer
2 страницы
285XW-BTSA1-N
1 инструкция
- Домашние кинотеатры Pioneer
2 страницы
286XW-BTSA1-W
1 инструкция
- Домашние кинотеатры Pioneer
2 страницы
287XW-LF1-K
2 инструкции
- Xw-lf3, Xw-lf1
124 страницы - Xw-lf3, Xw-lf1
124 страницы
288XW-LF1-L
2 инструкции
- Xw-lf3, Xw-lf1
124 страницы - Xw-lf3, Xw-lf1
124 страницы
289XW-LF1-W
2 инструкции
- Xw-lf3, Xw-lf1
124 страницы - Xw-lf3, Xw-lf1
124 страницы
290XW-LF3-K
3 инструкции
- Xw-lf3, Xw-lf1
124 страницы - Xw-lf3, Xw-lf1
124 страницы
291XW-LF3-T
3 инструкции
- Xw-lf3, Xw-lf1
124 страницы - Xw-lf3, Xw-lf1
124 страницы
292XW-NAC1
1 инструкция
- Xw-nac1
24 страницы
293XW-NAC3-K
1 инструкция
- Xw-nac3, K /-w /-r
152 страницы
294XW-NAC3-R
1 инструкция
- Xw-nac3, K /-w /-r
152 страницы
295XW-NAC3-W
1 инструкция
- Xw-nac3, K /-w /-r
152 страницы
296XW-NAS3
1 инструкция
- Xw-nas3
70 страниц
297XW-NAS5-K
1 инструкция
- Xw-nas5
89 страниц
298XW-NAS5-R
1 инструкция
- Xw-nas5
89 страниц
299XW-NAS5-S
1 инструкция
- Xw-nas5
89 страниц
300XW-NAS5-W
1 инструкция
- Xw-nas5
89 страниц
301XW-NAV1-K
1 инструкция
- Xw-nav1, Xw-nav1k
152 страницы
302XW-NAV1K-K
1 инструкция
- Xw-nav1, Xw-nav1k
152 страницы
303XW-SMA1-K
4 инструкции
- Краткое руководство пользователя, Power on input network input volume, R-tte-24l_b1_en
2 страницы - Xw-sma1 xw-sma3 xw-sma4
40 страниц - Домашние кинотеатры Pioneer
5 страниц - Домашние кинотеатры Pioneer
304XW-SMA1-W
4 инструкции
- Краткое руководство пользователя, Power on input network input volume, R-tte-24l_b1_en
2 страницы - Xw-sma1 xw-sma3 xw-sma4
40 страниц - Домашние кинотеатры Pioneer
5 страниц - Домашние кинотеатры Pioneer
305XW-SMA3-K
5 инструкций
- Краткое руководство пользователя, Power on input network input volume, R-tte-24l_b1_en
2 страницы - Xw-sma1 xw-sma3 xw-sma4
40 страниц - Домашние кинотеатры Pioneer
5 страниц - Домашние кинотеатры Pioneer
- Pчсский, Удаление батареи
2 страницы
306XW-SMA3-W
5 инструкций
- Краткое руководство пользователя, Power on input network input volume, R-tte-24l_b1_en
2 страницы - Xw-sma1 xw-sma3 xw-sma4
40 страниц - Домашние кинотеатры Pioneer
5 страниц - Домашние кинотеатры Pioneer
- Pчсский, Удаление батареи
2 страницы
307XW-SMA4-K
4 инструкции
- Краткое руководство пользователя, Power on input network input volume, R-tte-24l_b1_en
2 страницы - Xw-sma1 xw-sma3 xw-sma4
40 страниц - Домашние кинотеатры Pioneer
5 страниц - Домашние кинотеатры Pioneer


Если вы желаете утилизировать данное
изделие, не выбрасывайте его вместе с
обычным бытовым мусором. Существует
отдельная система сбора использованных
электронных изделий в соответствии с за-
конодательством, которая предполагает со-
ответствующее обращение, возврат и
переработку.
Частные лица в странах Евросоюза, Швей-
царии и Норвегии могут бесплатно возвра-
щать использованные электронные
изделия в специализированные пункты
приема или в магазин (при покупке анало-
гичного нового устройства).
Если Ваша страна не указана в приведен-
ном выше перечне, обращайтесь в органы
местного управления за инструкциями по
правильной утилизации продукта.
Тем самым Вы обеспечите утилизацию
Вашего изделия с соблюдением обязатель-
ных процедур по обработке, утилизации и
вторичной переработке и, таким образом,
предотвратите потенциальное негативное
воздействие на окружающую среду и здо-
ровье людей.
Сведения об этом устройстве
Частоты тюнера в этом устройстве рас-
пределены для использования в Западной
Европе, Азии, на Ближнем Востоке, в
Африке и Океании. При использовании в
других регионах качество приема может
быть плохим. Функция RDS (радиове-
щательная система передачи информа-
ции) доступна только в регионах, в которых
имеются FM-станции, передающие сигна-
лы RDS.
ВНИМАНИЕ
! Не допускайте попадания жидкости на
данное устройство. Это может повлечь по-
ражение электрическим током. Кроме того,
попадание жидкости в устройство может
стать причиной его выхода из строя,
перегрева и появления дыма.
! “ЛАЗЕРНЫЙ ПРОДУКТ КЛАССА 1”
Это изделие оснащено лазерным диодом
класса выше 1. В целях обеспечения пол-
ной безопасности не снимайте какие-либо
крышки и не пытайтесь проникнуть внутрь
изделия. Ремонт должен выполняться ква-
лифицированным специалистом.
! Pioneer CarStereo-Pass предназначен для
использования только в Германии.
! Держите это руководство под рукой в
качестве справочника по правилам эк-
сплуатации и мерам предосторожности.
! Всегда сохраняйте уровень громкости до-
статочно низким, чтобы Вы могли слышать
звуки снаружи машины.
! Оберегайте это устройство от воздействия
влажности.
! При отключении или разряде батареи пам-
ять предварительных настроек будет
стерта и потребуется ее повторное про-
граммирование.
О формате WMA
Логотип Windows Media™, напечатанный
на коробке, указывает на возможность вос-
произведения данных в формате WMA.
Windows Media
и логотип Windows являют-
ся товарными знаками или зарегистриро-
ванными товарными знаками Microsoft
Corporation
в Соединенных Штатах и/или
других странах.
Перед началом эксплуатации
Ru
5
Раздел
01
Ру
сский

! Это устройство может неверно вос-
производить некоторые файлы форма-
та WMA в зависимости от приложений,
использованных для их записи.
О формате MP3
Поставка этого изделия дает право только
на его частное и некоммерческое исполь-
зование и не предоставляет лицензии и не
подразумевает право использования этого
изделия в любых коммерческих (т.е. прино-
сящих прибыль) прямых трансляциях
(
телевизионных, спутниковых, кабельных
и/или любых других), вещании/потоковой
передаче через Интернет, локальных сетях
и/или других сетях или в других электрон-
ных системах распространения, таких как
системы платного аудио и аудио по запро-
су. Для такого использования необходима
специальная лицензия. Для получения до-
полнительной информации посетите
http://www.mp3licensing.com.
О формате AAC
Данное устройство может воспроизводить
файлы AAC, преобразованные с помощью
iTunes
®
.
iTunes
является товарным знаком компа-
нии Apple Inc., зарегистрированным в США
и других странах.
Совместимость с портативными
аудиоплеерами
! Сведения об типе портативного USB
аудиоплеера/запоминающего устрой-
ства USB необходимо уточнить у произ-
водителя устройства.
Данное устройство поддерживает следую-
щие типы запоминающих устройств/фор-
маты файлов:
— Портативные аудиоплееры и запоми-
нающие устройства USB стандарта
MSC (Mass Storage Class)
— Воспроизведение файлов формата
MP3, WMA, AAC
и WAV
Подробнуюинформациюо поддерживае-
мых форматах см. в
Совместимость USB
аудиоплеера/запоминающего устройства
USB
на стр. 65.
Поддержка iPod
®
С помощьюданного устройства можно
управлять плеером iPod и воспроизводить
записанные на нем композиции.
! Данное устройство может управлять
следующими моделями iPod.
— iPod nano
— iPod пятого и более позднего поколе-
ния
Для оптимальной работы рекомендует-
ся использовать последнюю версию ПО
для iPod.
! Для подключения iPod с разъемом Dock
Connector
требуется соответствующий
USB
кабель.
! Интерфейсный кабель Pioneer CD-IU50
можно приобрести отдельно. За допол-
нительной информацией обращайтесь к
Вашему дилеру.
! С помощьюданного устройства можно
управлять ранними моделями iPod, ис-
пользуя адаптер Pioneer iPod (на-
пример, CD-IB100N). В этом случае
большинство функций аналогичны
функциям iPod, подключенного через
интерфейс USB данного устройства.
Однако функции, относящиеся к вос-
произведениюаудиокниг и подкастов,
будут недоступны.
Подробнее об использовании адаптера
iPod
смотрите в
Воспроизведение музы-
ки на iPod на стр. 44.
! iPod является товарным знаком компа-
нии Apple Inc., зарегистрированным в
США и других странах.
ВНИМАНИЕ
! Pioneer не несет ответственности за
потерюданных на портативном USB
аудиоплеере/запоминающем устройстве
USB,
даже если эти данные будут потеря-
ны во время использования данного ус-
тройства.
Перед началом эксплуатации
Ru
6
Раздел
01

Посетите наш сайт 7, В случае возникновения неполадок 7, Защита вашего устройства от кражи 7
Снятие передней панели 7, Посетите наш сайт, В случае возникновения неполадок, Защита вашего устройства от кражи, Перед началом эксплуатаци Чат поддержки
- Изображение
- Текст
! Pioneer не несет ответственности за
потерюданных на iPod, даже если эти
данные будут потеряны во время исполь-
зования данного устройства.
Посетите наш сайт
Посетите наш сайт:
http://www.pioneer-rus.ru
! Зарегистрируйте приобретенное
изделие. Мы сохраним сведения о
Вашей покупке, что поможет Вам ссы-
латься на эту информациюв случае
страхового требования по причине
потери или кражи.
! Самуюсвежуюинформациюо Pioneer
Corporation
можно получить на нашем
веб-сайте.
В случае возникновения
неполадок
При неполадках в работе этого изделия
свяжитесь с торговым представителем
компании-производителя или с ближайшим
сервисным пунктом Pioneer.
Защита Вашего устройства
от кражи
В целях предотвращения кражи переднюю
панель можно снимать.
! Если не отсоединить переднюю панель
от основного устройства в течение пяти
секунд после выключения зажигания ав-
томобиля, раздастся предупреждающий
сигнал.
! Вы можете отключить предупреждаю-
щий сигнал. См. раздел
Включение
предупреждающего сигнала на стр. 37.
Важно
! Соблюдайте осторожность при снятии и
установке передней панели.
! Оберегайте переднюю панель от сильных
ударов.
! Предохраняйте переднюю панель от воз-
действия прямого солнечного света и вы-
соких температур.
Снятие передней панели
1
Нажмите OPEN, чтобы открыть
переднюю панель.
2
Возьмитесь за левую сторону
передней панели и осторожно потяните
ее наружу.
Старайтесь избегать чрезмерного сдавли-
вания передней панели, не роняйте ее на
пол, берегите от воды или других жидко-
стей во избежание необратимых по-
вреждений.
3
Поместите переднюю панель в за-
щитный футляр, предназначенный для
безопасного хранения.
Перед началом эксплуатации
Ru
7
Раздел
01
Ру
сский

Установка передней панели 8, О демонстрационном режиме 8, Использование и уход за пультом
Дистанционного управления 8, Установка батарейки 8, О демонстрационном режиме, Перед началом эксплуатации Чат поддержки
- Изображение
- Текст
Установка передней панели
% Для повторной установки передней
панели приложите ее к основному ус-
тройству и прочно защелкните в фикса-
торах держателя.
О демонстрационном режиме
Данное устройство имеет функциюдемон-
страции функциональных возможностей.
Важно
Красный провод (ACC) этого устройства необ-
ходимо подсоединить к контакту, обеспечи-
вающему включение/выключение зажигания.
Если этого не сделать, то аккумуляторная ба-
тарея автомобиля может разрядиться.
Режим демонстрации
функциональных возможностей
Режим демонстрации функциональных
возможностей включается автоматически
при повороте ключа зажигания в положе-
ние ACC или ON при отключенном питании
устройства. При нажатии DISP во время
демонстрации функциональных возможно-
стей этот режим отключается. Нажмите
кнопку DISP ещё раз для повторного запус-
ка режима. Следует помнить, что работа
режима демонстрации функциональных
возможностей при выключенном двигателе
может привести к излишнему расходу за-
ряда аккумуляторной батареи.
Использование и уход за
пультом дистанционного
управления
Установка батарейки
Выдвиньте лоток на задней стороне пульта
дистанционного управления и вставьте ба-
тарейку, соблюдая полярность контактов
(+)
и (–).
! При первом использовании извлеките
пленку, край которой выступает из
лотка.
ПРЕДУПРЕЖДЕНИЕ
Храните батарейки в недоступном для детей
месте. При случайном проглатывании бата-
рейки немедленно обратитесь к врачу.
ВНИМАНИЕ
! Используйте одну литиевуюбатарейку
CR2025 (3 V).
! Если пульт дистанционного управления не
используется в течение месяца или более,
извлеките из него батарейку.
! При несоблюдении правил замены ба-
тареек возникает опасность взрыва. За-
меняйте батарейку только батарейкой того
же или аналогичного типа.
! Избегайте соприкосновения батарейки с
металлическими предметами.
! Не храните батарейку вместе с металличе-
скими предметами.
! В случае протечки батарейки тщательно
протрите пульт дистанционного управле-
ния и вставьте в него новуюбатарейку.
Перед началом эксплуатации
Ru
8
Раздел
01

! При утилизации использованных батареек
соблюдайте законодательство и другие
правила в сфере охраны окружающей
среды, действующие в Вашей стране/
регионе.
Использование пульта
дистанционного управления
Направьте пульт дистанционного управле-
ния в сторону передней панели.
! На прямом солнечном свету пульт ди-
станционного управления может не ра-
ботать надлежащим образом.
Важно
! Запрещается хранить пульт дистанционно-
го управления в местах с высокой
температурой или на прямом солнечном
свету.
! Не роняйте пульт дистанционного управле-
ния на пол, где он может застрять под
педальютормоза или акселератора.
Перед началом эксплуатации
Ru
9
Раздел
01
Ру
сский

Управление данным устройством, Описание элементов устройства 10, Основное устройство 10
Описание элементов устройства Чат поддержки
- Изображение
- Текст
Описание элементов
устройства
Основное устройство
1
Кнопка SRC/OFF
Это устройство включается при выборе
источника сигнала. Нажмите, чтобы
перебрать все доступные источники сиг-
нала.
2
Кнопка DISP/BACK/SCROLL
Нажмите, чтобы выбрать различные
режимы дисплея.
Чтобы пролистать текстовуюинформа-
цию, нажмите и удерживайте кнопку.
При работе с менюнажмите для возвра-
та к предыдущему экрану.
При работе с менюнажмите и удержи-
вайте в нажатом положении для возвра-
та к главному меню.
3 MULTI-CONTROL
Сдвиньте, чтобы произвести ручнуюна-
стройку с поиском, ускореннуюперемот-
ку вперед, назад и использовать
функции поиска дорожки. Также исполь-
зуется для управления функциями.
Поверните, чтобы увеличить или умень-
шить громкость.
4
Кнопка S.Rtrv
Нажмите, чтобы включить или выклю-
чить функциютехнологии преобразова-
ния звука Sound Retriever.
5
Кнопка OPEN
Нажмите, чтобы открыть переднюю
панель.
6
Кнопка LIST
Нажмите, чтобы выбрать (в зависимости
от источника сигнала) отображение на
дисплее списка названий дисков, списка
названий дорожек, списка папок, списка
файлов или списка каналов предва-
рительной настройки.
7
Кнопка TA/NEWS
Нажмите, чтобы включить или выклю-
чить функцию TA. Нажмите и удержи-
вайте, чтобы включить или выключить
функциюНОВОСТИ.
8
Кнопка MUTE
Нажмите, чтобы выключить звук. Чтобы
включить звук, нажмите еще раз.
9
Кнопка RPT/LOCAL
Нажмите для выбора диапазона повтор-
ного воспроизведения при использова-
нии CD, USB или iPod.
1
3
b
2
4
5
a
9
8 7
6
Управление данным устройством
Ru
10
Раздел
02

14:21
Настройки PIONEER DEH P6000UB
07:56
настройка CD/MP3-ресивер с USB Pioneer DEH-P7150UB
09:31
PIONEER DEH — P6000UB connected(HDD,IPod,PSP,CD)
04:00
Pioneer DEH — 6000UB «Golfinho»
Нажмите на кнопку для помощи
CD RDS RECEIVER
ORDER NO.
CRT4036
DEH-P6000UB/XN/EW5
DEH-P6000UB
This service manual should be used together with the following manual(s):
Model No. Order No. Mech.Module Remarks
CX-3240 CRT4050
S10.5COMP2-iPod/USB
CD Mech. Module : Circuit Descriptions, Mech. Descriptions, Disassembly
/XN/EW5
For details, refer to «Important Check Points for Good Servicing».
PIONEER CORPORATION 4-1, Meguro 1-chome, Meguro-ku, Tokyo 153-8654, Japan
PIONEER ELECTRONICS (USA) INC. P.O. Box 1760, Long Beach, CA 90801-1760, U.S.A.
PIONEER EUROPE NV Haven 1087, Keetberglaan 1, 9120 Melsele, Belgium
PIONEER ELECTRONICS ASIACENTRE PTE. LTD. 253 Alexandra Road, #04-01, Singapore 159936
PIONEER CORPORATION 2007
K-ZZW. OCT. 2007 Printed in Japan
1234
SAFETY INFORMATION
CAUTION
A
This service manual is intended for qualified service technicians; it is not meant for the casual do-it-yourselfe.
Qualified technicians have the necessary test equipment and tools, and have been trained to properly and safely repair
complex products such as those covered by this manual.
Improperly performed repairs can adversely affect the safety and reliability of the product and may void the warranty.
If you are not qualified to perform the repair of this product properly and safely, you should not risk trying to do so
and refer the repair to a qualified service technician.
— Safety Precautions for those who Service this Unit.
When checking or adjusting the emitting power of the laser diode exercise caution in order to get safe, reliable
results.
B
Caution:
1. During repair or tests, minimum distance of 13 cm from the focus lens must be kept.
2. During repair or tests, do not view laser beam for 10 seconds or longer.
CAUTION:
USE OF CONTROLS OR ADJUSTMENTS OR PERFORMANCE OF PROCEDURES OTHER THAN THOSE
SPECIFIED HEREIN MAY RESULT IN HAZARDOUS RADIATION EXPOSURE.
C
CLASS 1
LASER PRODUCT
D
WARNING!
The AEL (accessible emission level )of the laser power output is less than CLASS 1
but the laser component is capable of emitting radiation exceeding the limit for
CLASS 1.
A specially instructed person should do servicing operation of the apparatus.
E
Laser diode characteristics
Wave length : 785 nm to 814 nm
Maximum output : 1 190 W(Emitting period : unlimited)
Additional Laser Caution
Transistors Q101 in PCB drive the laser diodes.
When Q101 is shorted between their terminals, the laser diodes will radiate beam.
F
If the top cover is removed with no disc loaded while such short-circuit is continued,
the naked eyes may be exposed to the laser beam.
2
1234
DEH-P6000UB/XN/EW5

5 678
CAUTION
Danger of explosion if battery is incorrectly replaced.
Replaced only with the same or equivalent type recommended by the manufacture.
Discord used batteries according to the manufacture’s instructions.
A
B
C
D
E
56
DEH-P6000UB/XN/EW5
F
7
8
3

1234
[Important Check Points for Good Servicing]
In this manual, procedures that must be performed during repairs are marked with the below symbol.
Please be sure to confirm and follow these procedures.
A
B
C
D
1. Product safety
Please conform to product regulations (such as safety and radiation regulations), and maintain a safe servicing environment by
following the safety instructions described in this manual.
1 Use specified parts for repair.
Use genuine parts. Be sure to use important parts for safety.
2 Do not perform modifications without proper instructions.
Please follow the specified safety methods when modification(addition/change of parts) is required due to interferences such as
radio/TV interference and foreign noise.
3 Make sure the soldering of repaired locations is properly performed.
When you solder while repairing, please be sure that there are no cold solder and other debris.
Soldering should be finished with the proper quantity. (Refer to the example)
4 Make sure the screws are tightly fastened.
Please be sure that all screws are fastened, and that there are no loose screws.
5 Make sure each connectors are correctly inserted.
Please be sure that all connectors are inserted, and that there are no imperfect insertion.
6 Make sure the wiring cables are set to their original state.
Please replace the wiring and cables to the original state after repairs.
In addition, be sure that there are no pinched wires, etc.
7 Make sure screws and soldering scraps do not remain inside the product.
Please check that neither solder debris nor screws remain inside the product.
8 There should be no semi-broken wires, scratches, melting, etc. on the coating of the power cord.
Damaged power cords may lead to fire accidents, so please be sure that there are no damages.
If you find a damaged power cord, please exchange it with a suitable one.
9 There should be no spark traces or similar marks on the power plug.
When spark traces or similar marks are found on the power supply plug, please check the connection and advise on secure
connections and suitable usage. Please exchange the power cord if necessary.
a Safe environment should be secured during servicing.
When you perform repairs, please pay attention to static electricity, furniture, household articles, etc. in order to prevent injuries.
Please pay attention to your surroundings and repair safely.
2. Adjustments
To keep the original performance of the products, optimum adjustments and confirmation of characteristics within specification.
Adjustments should be performed in accordance with the procedures/instructions described in this manual.
3. Lubricants, Glues, and Replacement parts
Use grease and adhesives that are equal to the specified substance.
E
Make sure the proper amount is applied.
4. Cleaning
For parts that require cleaning, such as optical pickups, tape deck heads, lenses and mirrors used in projection monitors, proper
cleaning should be performed to restore their performances.
5. Shipping mode and Shipping screws
To protect products from damages or failures during transit, the shipping mode should be set or the shipping screws should be
installed before shipment. Please be sure to follow this method especially if it is specified in this manual.
F
4
1234
DEH-P6000UB/XN/EW5

5 678
CONTENTS
SAFETY INFORMATION …………………………………………………………………………………………………………………….2
1. SERVICE PRECAUTIONS………………………………………………………………………………………………………………..6
1.1 SERVICE PRECAUTIONS………………………………………………………………………………………………………….6
1.2 NOTES ON SOLDERING……………………………………………………………………………………………………………6
2. SPECIFICATIONS……………………………………………………………………………………………………………………………7
2.1 SPECIFICATIONS ……………………………………………………………………………………………………………………..7
2.2 DISC/CONTENT FORMAT ………………………………………………………………………………………………………….8
2.3 PANEL FACILITIES ……………………………………………………………………………………………………………………9
2.4 CONNECTION DIAGRAM…………………………………………………………………………………………………………12
3. BASIC ITEMS FOR SERVICE…………………………………………………………………………………………………………13
3.1 CHECK POINTS AFTER SERVICING ………………………………………………………………………………………..13
3.2 PCB LOCATION ………………………………………………………………………………………………………………………13
3.3 JIGS LIST ……………………………………………………………………………………………………………………………….14
4. BLOCK DIAGRAM …………………………………………………………………………………………………………………………16
5. DIAGNOSIS ………………………………………………………………………………………………………………………………….19
5.1 OPERATIONAL FLOWCHART…………………………………………………………………………………………………..19
5.2 ERROR CODE LIST…………………………………………………………………………………………………………………20
5.3 CONNECTOR FUNCTION DESCRIPTION …………………………………………………………………………………22
6. SERVICE MODE……………………………………………………………………………………………………………………………23
6.1 CD TEST MODE………………………………………………………………………………………………………………………23
7. DISASSEMBLY……………………………………………………………………………………………………………………………..25
8. EACH SETTING AND ADJUSTMENT………………………………………………………………………………………………30
8.1 CD ADJUSTMENT …………………………………………………………………………………………………………………..30
8.2 CHECKING THE GRATING AFTER CHANGING THE PICKUP UNIT …………………………………………….31
8.3 PCL OUTPUT CONFIRMATION ………………………………………………………………………………………………..33
9. EXPLODED VIEWS AND PARTS LIST …………………………………………………………………………………………….34
9.1 PACKING………………………………………………………………………………………………………………………………..34
9.2 EXTERIOR(1)………………………………………………………………………………………………………………………….36
9.3 EXTERIOR(2)………………………………………………………………………………………………………………………….38
9.4 CD MECHANISM MODULE ………………………………………………………………………………………………………40
10. SCHEMATIC DIAGRAM………………………………………………………………………………………………………………..42
10.1 OVERALL CONNECTION DIAGRAM(GUIDE PAGE)………………………………………………………………….42
10.2 KEYBOARD UNIT ………………………………………………………………………………………………………………….48
10.3 CD MECHANISM MODULE(GUIDE PAGE)……………………………………………………………………………….50
10.4 WAVEFORMS………………………………………………………………………………………………………………………..56
11. PCB CONNECTION DIAGRAM ……………………………………………………………………………………………………..60
11.1 TUNER AMP UNIT …………………………………………………………………………………………………………………60
11.2 KEYBOARD UNIT…………………………………………………………………………………………………………………..64
11.3 CD CORE UNIT(S10.5COMP2-iPod)………………………………………………………………………………………..66
11.4 PANEL UNIT ………………………………………………………………………………………………………………………….68
12. ELECTRICAL PARTS LIST……………………………………………………………………………………………………………69
A
B
C
D
56
DEH-P6000UB/XN/EW5
E
F
7
8
5

1234
1. SERVICE PRECAUTIONS
1.1 SERVICE PRECAUTIONS
A
1. You should conform to the regulations governing
the product (safety, radio and noise, and other
regulations), and should keep the safety during
servicing by following the safety instructions
described in this manual.
2. Before disassembling the unit, be sure to turn off
the power. Unplugging and plugging the connectors
during power-on mode may damage the ICs inside
the unit.
3. To protect the pickup unit from electrostatic discharge
B
during servicing, take an appropriate treatment
(shorting-solder) by referring to «the DISASSEMBLY».
4. After replacing the pickup unit, be sure to check the
grating.
5. Be careful in handling ICs. Some ICs such as MOS
type are so fragile that they can be damaged by
electrostatic induction.
C
1.2 NOTES ON SOLDERING
D
For environmental protection, lead-free solder is used on the printed circuit boards mounted in this unit.
Be sure to use lead-free solder and a soldering iron that can meet specifications for use with lead-free solders for repairs
accompanied by reworking of soldering.
Compared with conventional eutectic solders, lead-free solders have higher melting points, by approximately 40 C.
Therefore, for lead-free soldering, the tip temperature of a soldering iron must be set to around 373 C in general, although
the temperature depends on the heat capacity of the PC board on which reworking is required and the weight of the tip of
the soldering iron.
Compared with eutectic solders, lead-free solders have higher bond strengths but slower wetting times and higher melting
E
temperatures (hard to melt/easy to harden).
The following lead-free solders are available as service parts:
Parts numbers of lead-free solder:
GYP1006 1.0 in dia.
GYP1007 0.6 in dia.
GYP1008 0.3 in dia.
F
6
1234
DEH-P6000UB/XN/EW5

5 678
2. SPECIFICATIONS
2.1 SPECIFICATIONS
A
B
C
D
E
56
DEH-P6000UB/XN/EW5
F
7
8
7

1234
2.2 DISC/CONTENT FORMAT
A
B
C
D
E
F
8
1234
DEH-P6000UB/XN/EW5

5 678
2.3 PANEL FACILITIES
A
B
C
D
E
56
DEH-P6000UB/XN/EW5
F
7
8
9

1234
A
B
C
D
E
F
10
1234
DEH-P6000UB/XN/EW5
5 678
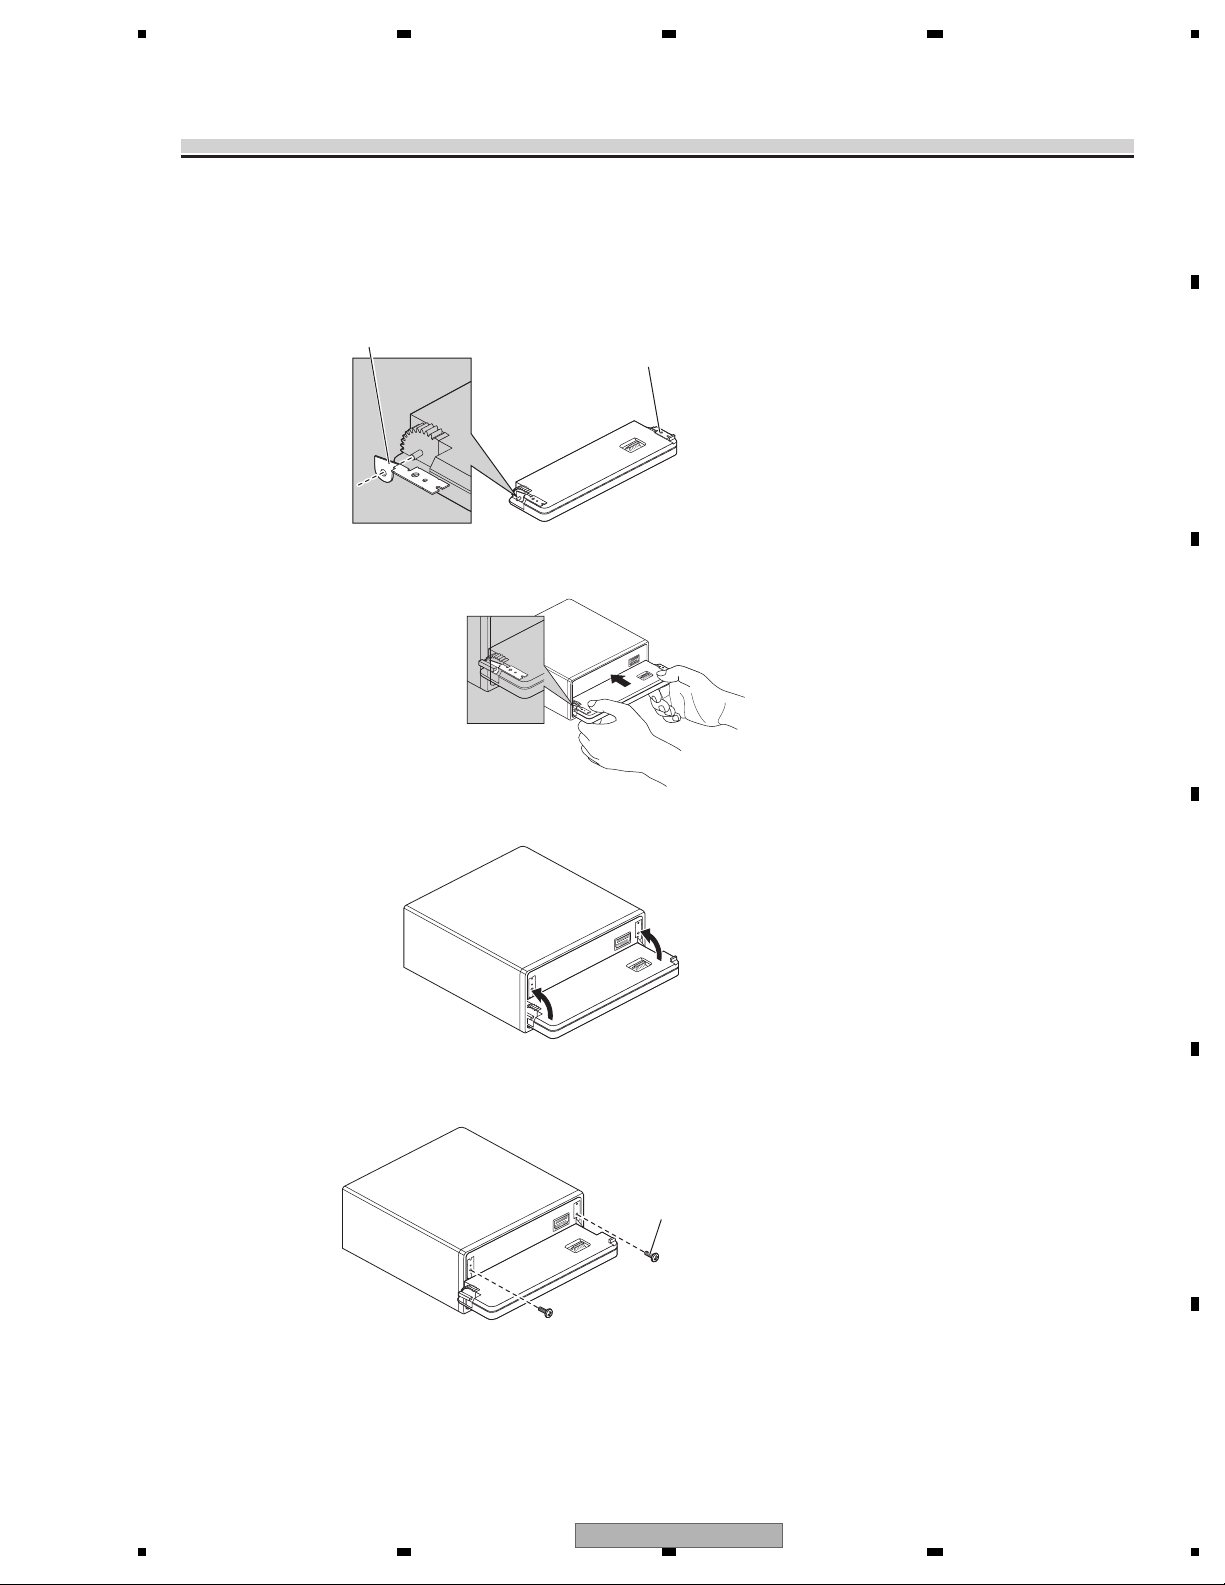
Fixing the front panel
If you do not operate the removing and attaching the front panel function, use the supplied
fixing screws and holders to fix the front panel to this unit.
1. Attach the holders to both sides of the front panel.
Holder
CND1249
2. Replace the front panel to the unit.
Holder
CND1250
A
B
C
3.
Flip the holders into upright positions.
4. Fix the front panel to the unit using fixing screws.
Fixing Screw
BPZ20P060FTB
D
E
56
DEH-P6000UB/XN/EW5
F
7
8
11

1234
2.4 CONNECTION DIAGRAM
A
B
C
D
E
F
12
1234
DEH-P6000UB/XN/EW5
5 678
3. BASIC ITEMS FOR SERVICE
3.1 CHECK POINTS AFTER SERVICING
To keep the product quality after servicing, please confirm following check points.
1 Confirm whether the customer complain has
been solved.
If the customer complain occurs with the
specific media, use it for the operation check.
2 CD Play back a CD.
(Track search)
3 FM/AM tuner Check FM/AM tuner action.
(Seek, Preset)
Switch band to check both FM and AM.
4 Check whether no disc is inside the product. The media used for the operating check must
See the table below for the items to be checked regarding audio:
Item to be checked regarding audio
Distortion
Noise
Volume too low
Volume too high
Volume fluctuating
Sound interrupted
demrifnocebotmetIserudecorP.oN
The customer complain must not be
reappeared.
Display, audio and operations must be
normal.
No malfunction on display, audio and
operation.
Display, audio and operations must be
normal.
be ejected.
receiving it for service.
A
B
retfaecnaraeppastinotridrosehctarcsoNkcehcecnaraeppA5
C
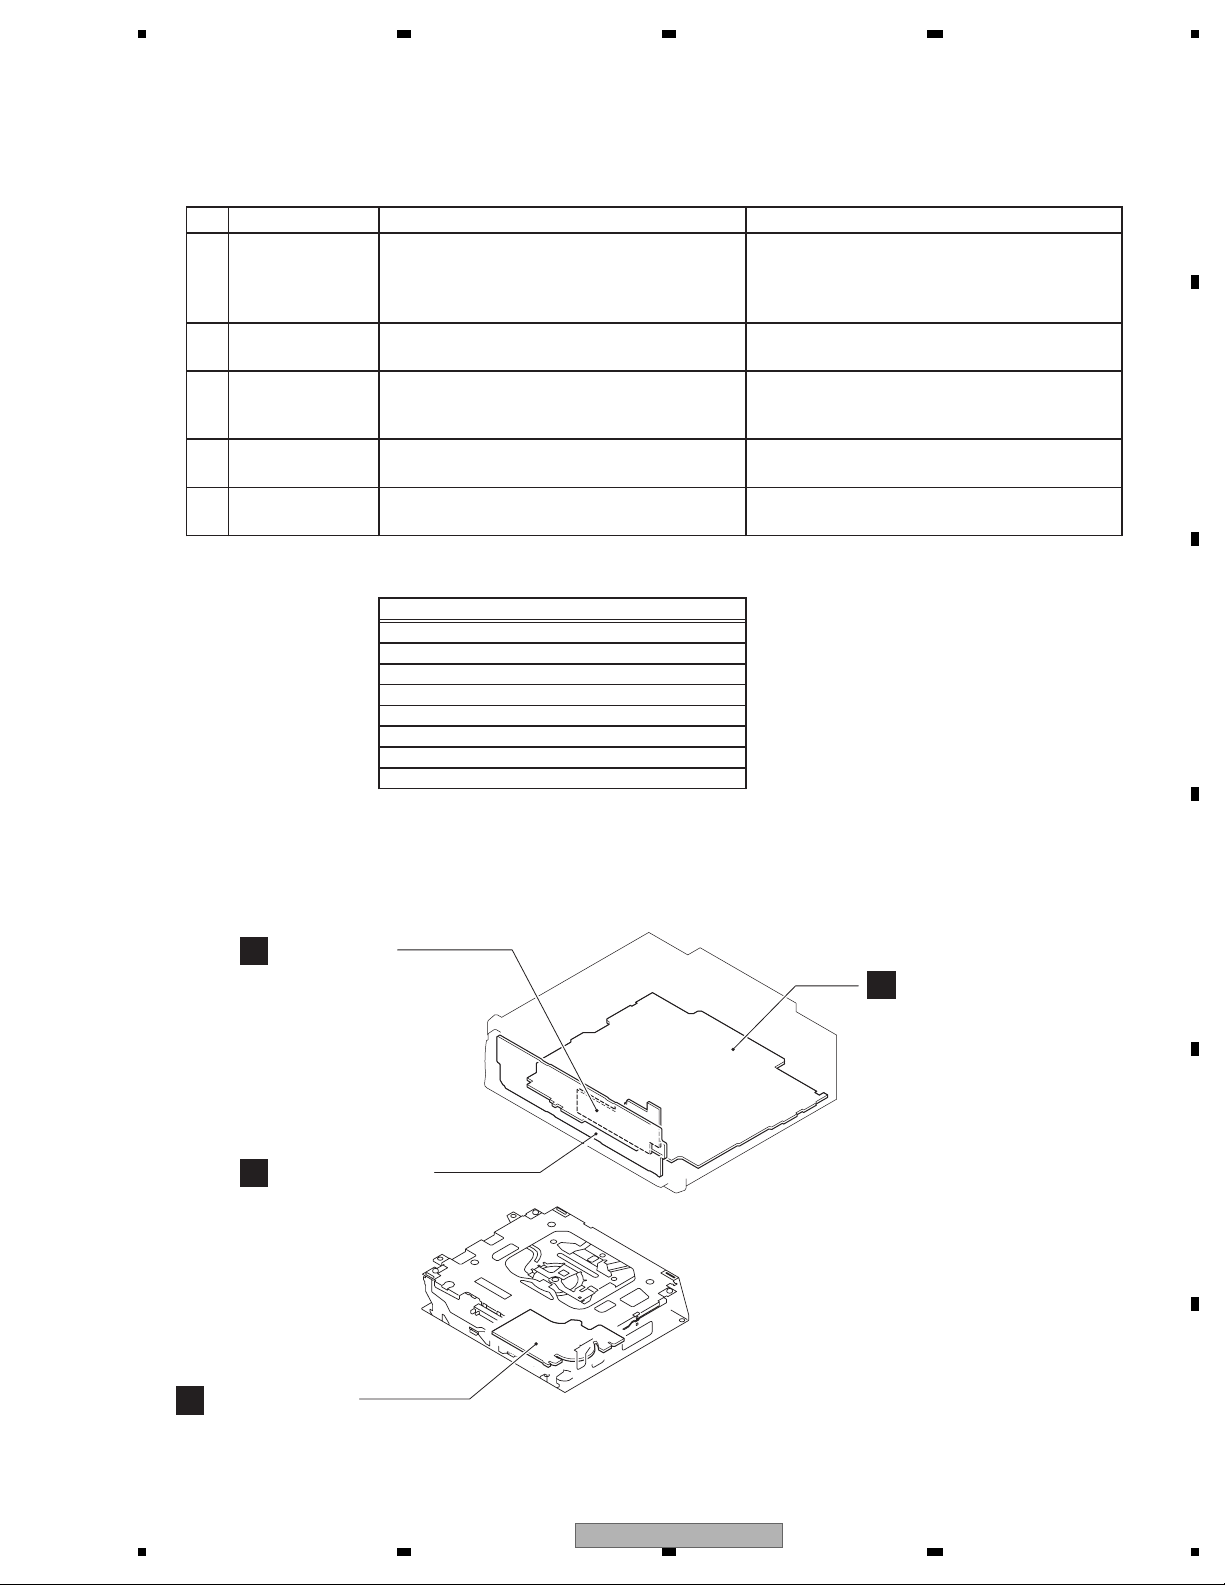
3.2 PCB LOCATION
Panel Unit
C
Keyboard Unit
B
CD Core Unit
D
(S10.5COMP2-iPod)
Tuner Amp Unit
A
Unit Number : QWM3010
Unit Name : Tuner Amp Unit
Unit Number :
Unit Name : Keyboard Unit
Unit Number : CWM8758
Unit Name : Panel Unit
Unit Number : CWX3526
Unit Name : CD Core Unit
(S10.5COMP2-iPod)
D
E
F
56
DEH-P6000UB/XN/EW5
7
8
13
1234
3.3 JIGS LIST
— Jigs List
A
Name
Test Disc
L.P.F.
— Grease List
B
Name
m
Grease
Grease
Jig No.
No.
TCD-782
Grease No.
rease No.
GEM1024
GEM1045
emarks
Remarks
Checking the grating
Checking the grating (Two pieces)
emarks
Remarks
CD Mechanism Module
CD Mechanism Module
C
Before shipping out the product, be sure to clean the
following portions by using the prescribed cleaning
tools:
Portions to be cleaned Cleaning tools
CD pickup lenses
Cleaning liquid : GEM1004
Cleaning paper : GED-008
D
E
F
14
1234
DEH-P6000UB/XN/EW5

5 678
A
B
C
D
E
56
DEH-P6000UB/XN/EW5
F
7
8
15
1234
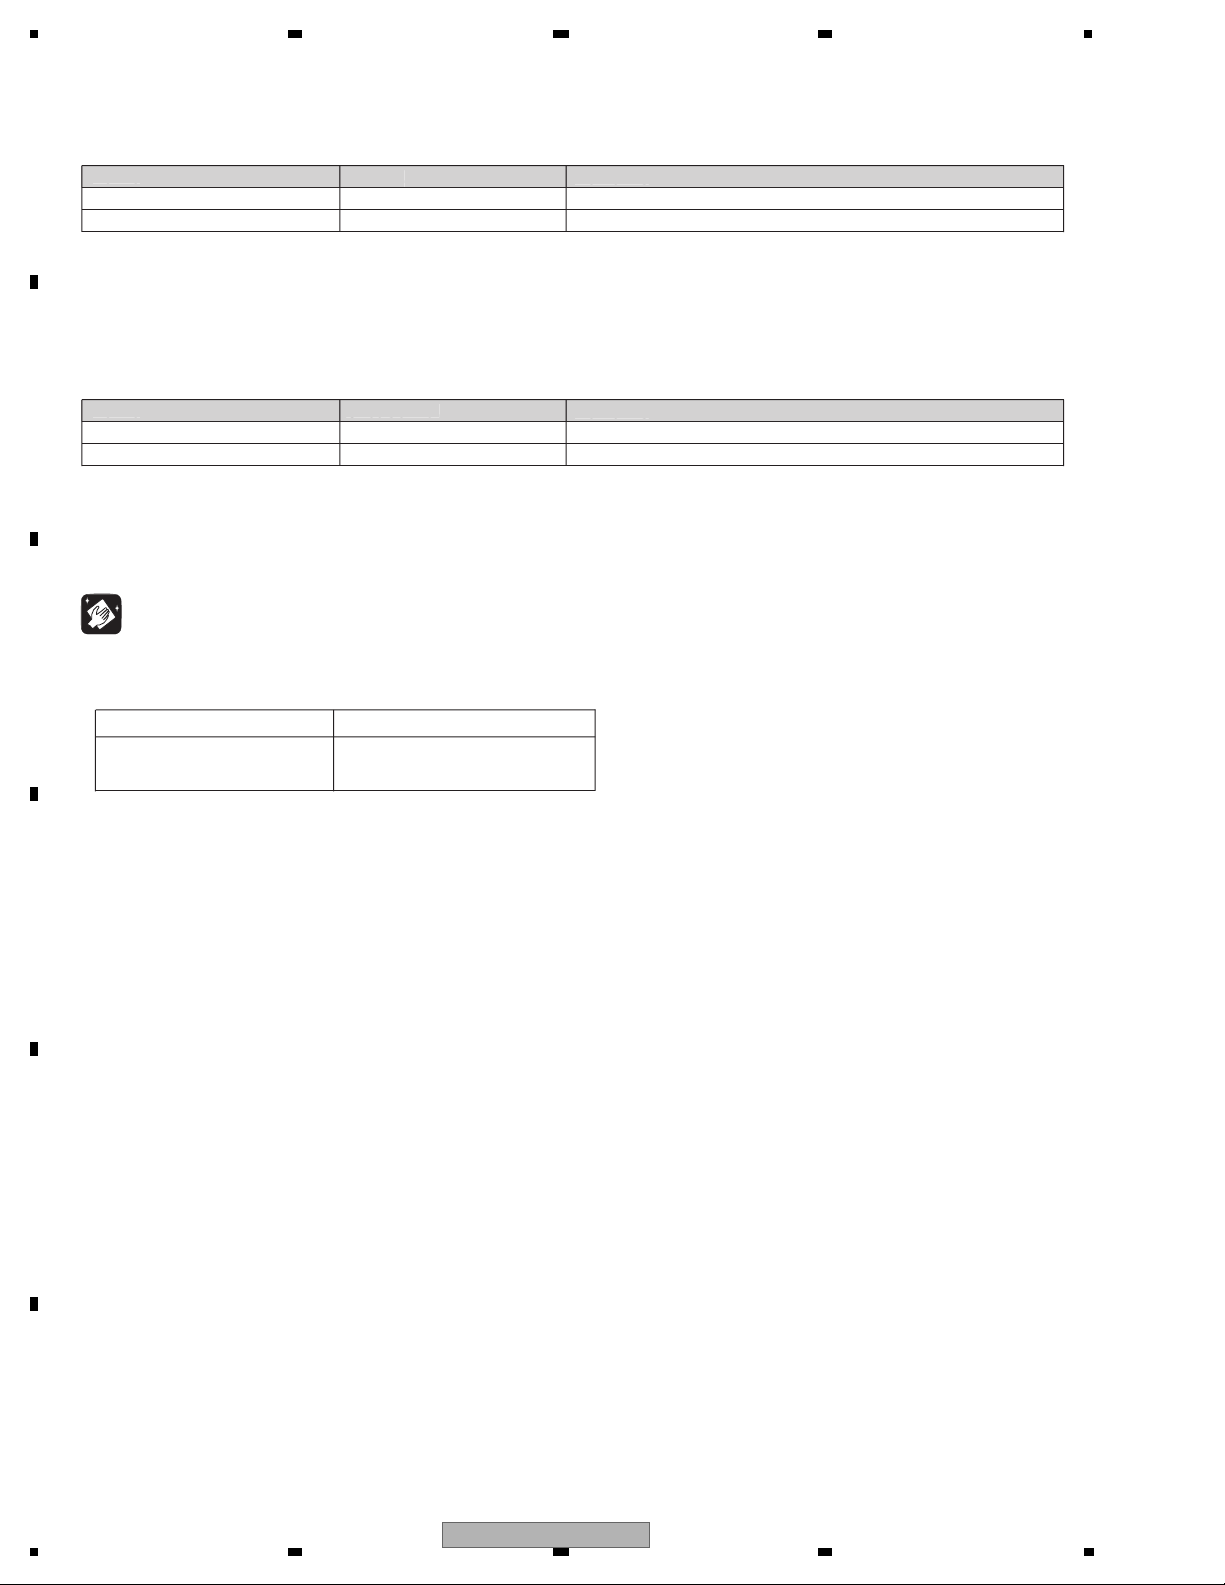
4. BLOCK DIAGRAM
A
A
TUNER AMP UNIT
FM/AM TUNER UNIT
VDD
LDET
LDET
TUNPDI
DO
RDS_CK
RDS_DATA
RDS_LOCK
TUNPCK
TUNPDO
76 13 5 1098 11 14 18192021
NC
CE2
ROM_VDD
DI
SL
CK
CE1
RDS_HSLK
B
C
D
PICKUP UNIT
(P10.5)(SERVICE)
LASER
DIODE
MONITOR
E
F
DIODE
LOAD/
ANTENNA
HOLOGRAM
UNIT
FOCUS ACT.
TRACKING ACT.
SPINDLE
MOTOR
CARRIAGE
MOTOR
VDD_3.3
5V t 3.3V
3.3V
IP-BUS
AUX
WIRE
REMOTE
VDD2
CN701
DP
DM
LOUT
VDD
/RESET
VD
IC 5
IC 4
3.3V t 2.5V
3.3V
16
17
13
9
8
2
1
CN151
USB
Rch
Lch
TX
RX
RX2
SYSTEM
CONTROLLER
IC 601(2/2)
IPPW
PEG402A8
ASENBO
KEYD
KEYAD
SYNC
USBCTL
FLG
DSENS
CDRST
VDCONT
24
23
TUNL
CDL
BUS+L
BUS-L
AUXL
AUXG
46
SYSPW
39
MUTE
48
OELPW
68
AMPPW
50
FLPILM
8
EJTIN
IL
Q8
49
ILMPW
36
DIM
VDD
47
SWVDD
33
DPDT
34
KYDT
91
CSENS
IC 2
2.5V
DET, FM MPX,
RDS DECODER
2.5V
BUSBUS+
Q101
BUP
VOUT
IC521
R5523N001B
IP-BUS DRIVER
IC101
HA12241FP
5
BUS-
6
BUS+ ROUT
STBY
BUP
4
VIN
1
EN
3
FLG
TX
1
DIN1
2
RX
8
8
IPPW
USB5V
REGULATOR
IC501
BD9781HFP
1
VIN
2
SW
5
FB
6
INV
DSENS
S801
28
27
19
52
38
32
92
7
26
EN
22
23
9
6
5
4
3
2
1
1
2
3
4
3
7
CN101
AUXL
AUXG
KEYD
KEYAD
CN521
VBUS
D-
D+
CN701
DP
DM
CDL
7
BUSL+
11
BUSL-
5
1
8
Q102
5
VDD 3.3V REGULATOR
CDVDD
CDRST
VD
3
NJM2885DL1-33
BRST,BRXEN,BSRQ,BDATA,BSCK
VD 7.5V REGULATOR
Q751
11
12
18
19
IC780
Q752
1
VDD
21
BUP
20
IC 3 EEPROM
5.0V
OSC
LPF
ANT401
1
2,3
LD-
15
MD
5
VREF
FOM
FOP
2
TOP
1
TOM
LD+
14
M
M
AM ANT
1
FM ANT
3
CD CORE UNIT(S10.5COMP2-iPod)
D
CN101
15
5
88
FOM
33
FOP
2
TOP
1
TOM
44
14
S904
12EJ
iPod CP
IC205
341S2094
Q101
ATT
ATT
ANT adj
S905
8EJ
FMRF
FMRF
RF adj
RF-AMP, CD DECODER,
MP3/WMA DECODER,
DIGITAL SERVO / DATA PROCESSOR CPU,
USB HOST CONTROLLER
CD
TD,FD
SD,MD
22
LOEJ
21
CLCONT
9
CONT
S901
HOME
CPRDY,CPRST
SDA,SCL
141
142
133
28
20
41
10
12
11
14
13
16
15
18
17
REFO
VDD2
FOM
FOP
TOP
TOM
SOP
SOM
LCOP
LCOM
AC,BD,E,F
DRIVER
IC301
BA5839FP
S903
DSCSNS
MIXER, IF AMP
RFGND
OSCGND
DGND
IC201
USBXTAL
/USBXTAL
/PUEN
LOUT
/ADENA
/RESET
XTAL
/XTAL
VDSENS
AUDIOGNDNCVCC
1
2
VCC
39
5
DP
4
DM
55
VDD
VDD2
VDD3
17
16
50
52
11
212 1522 16 4 17
LD
PD
REFOUT
PE5611B
LOEJ
CLCONT
CONT
8
12EJ
7
8EJ
DSCSNS
9
HOME
IC 1
3.3V
T51
CF52
X205
48MHz
Q102
BRST,BRXEN,BSRQ
BDATA,BSCK
VD
X201
16.93MHz
Q201
VD
16
1234
DEH-P6000UB/XN/EW5

5 678
A
Rch
24
Lch
23
SYSTEM
CONTROLLER
IC 601(2/2)
W
PEG402A8
ENBO
YD
YAD
NC
BCTL
NS
RST
CONT
SYSPW
MUTE
OELPW
AMPPW
FLPILM
EJTIN
ILMPW
SWVDD
DPDT
KYDT
CSENS
CN301
SWL
Q303
Q302
5
FL
6
CN981
BUP
16
ACC
14
ILL
12
TEL
9
GND
15
FL- FL2
7
FL+ FL1
5
RL- RL2
8
RL+ RL1
6
BEM
11
KEYBOARD UNIT
V1901
OEL UNIT
REGS
VAH
VDD
7
13
Q1902
16
6
RCA OUT
BACK
UP
ILM
GND
VKH
B.UP
B.REM
B.
REM
ACC
ACC
GND
B
ILL
TEL
C
FL-
FL+
RL-
RL+
RR
RR
+
FR
FR
+
FL
FL
+
—
D
RL
RL
+
—
E
F
ILM SENS
Q931
23
21
3
5
21
20
19
10
18
5.1V
SIRX
SCL
XCMD
XI
XRES
MUTE
B
3.3V
ILLUMI
3
1
SWL
MUTING
Q381
7
VCC
16
VREF
10
REM
12
DPDT
13
KYDT
3.3V REGULATOR
FL
VDD
MUTE
Q351
E-MUTE
Q391
IC431
NJM2885DL1-33
ROTARY COMMANDER
S1906
10
1
Phase_B
Phase_A
19
9
4
6
XIN
ROT1
ROT0
KEY/OEL CONTROLLER
PEG411A
13
X1901
10.000MHz
XOUT
IC1902
14
12
Q921
VDD REGULATOR
Q901
Q902
B SENS
A SENS
TEL MUTE
Q951
POWER AMP
IC 351
FLIN
PAL007C
RLIN
STBYMUTE
22 4
BUP
VCC
18
17
15
ADKEY2
ADKEY1
ADKEY0
6,20
VCC
B.REM
25
KEY MATRIX
S1901,S1902,S1904,
S1903,S1905,S1908,
2
DOUT
1
DCLK
20
XCMD
14
NCLK
11
XREST
BUP
BUP
FL-
FL+
RL-
RL+
S1907,S1909
S1910
BZ601
BUZZER
24
SYSTEM
IC 601(1/2)
PEG402A8
DALMON
BSENS
ASENS
1
4
1
PANEL UNIT
CN1801
ILM+
9
SWVDD
11
OPT IN
DPDT
3
KYDT
5
OEL+B
8
CSENS
10
PEE
13
XIN
X601
11
15.00MHz
XOUT
45
16
73
51
ISENS
40
TELIN
BUP
BUP
OEL14V
5.1V
IC1901
GP1UX51RK
REMOTE CONTROL
SENSOR
CE2
63
64
66
67
65
72
95
75
76
71
74
1
10
12
Pre/SW_L
10
Front_L
11
Rear_L
SYS +B REGULATOR
VCC
6,7
DC/DC CONVERTER
6
8
S1970
9
EJECT
7
2
11
14
CN1951
CN1950
TUNPCE2
TUNPCE1
TUNPDI
TUNPDO
TUNPCK
LDET
SL
RDSSDT
RDS57K
RCK
RDSSLK
RESET
2
NJM2388F84
IC561
NJM2360M
4
2
10
8
CONTROLLER
IC911
C
CE1
TUNPDI
TUNPDO
TUNPCK
LDET
SL
Q401
RDSDATA
RDSHSLK
Q402
RDSCK
RDSLOCK
RESET
2
VDD
TUNL
CDL
BUS+L
BUS-L
AUXL
AUXG
VST,VCK,VDT
46
39
48
68
BUP
50
8
ILM CONTROL
BUP
Q823
49
36
DIM
SWVDD
VDD
47
33
34
91
IC651
S-80835CNMC-B8U
ELECTRONIC VOLUME/
SOURCE SELECTOR
6
IN2_L
7
IN1_L
3
IN4+_L
IC201
4
IN4-_L
PML018A
2
IN5+_L
1
IN5-_L
Q562
CN801
FILM+
Q801
FILM-
EJSW
DGND
Q821
ILM+
Q822
SWVDD
Q891
Q892
DPDT
KYDT
OEL14V
CSENS
Q561
565
8
9
7
2
11
14
10 10 5
44 3
56
DEH-P6000UB/XN/EW5
7
8
17
1234
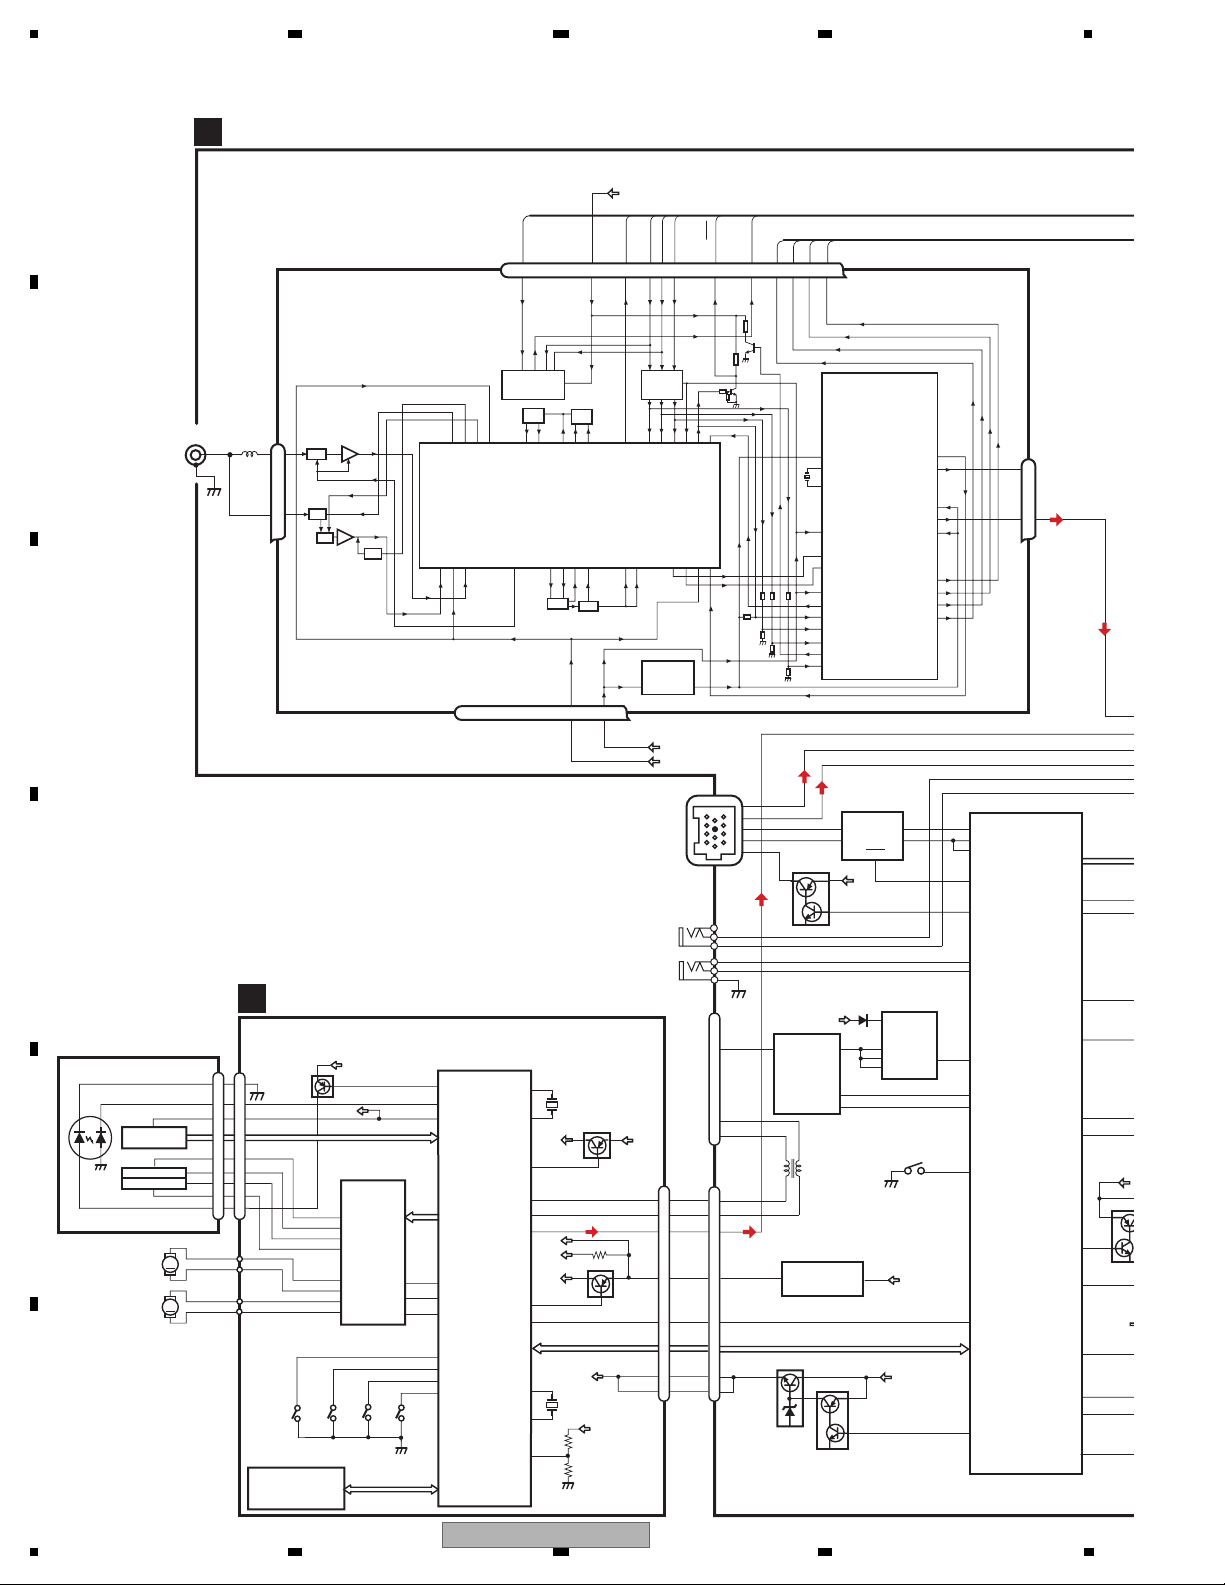
— FM/AM Tuner Unit
A
7 6 13 5 10 9 8 11 14 18 19 20 21
NC
CE2
ROM_VDD
DI
SL
CK
CE1
LDET
DO
RDS_CK
RDS_DATA
RDS_LOCK
RDS_HSLK
3.3V
IC 5
t
5V
3.3V
IC 4
t
3.3V 2.5V
2.5V
IC 2
2.5V
DET, FM MPX,
RDS DECODER
AM ANT
1
AT T
FM ANT
3
B
C
No. Symbol I/O Explain
AT T
ANT adj
FMRF
FMRF
RF adj
IC 3 EEPROM
5.0V
OSC
LPF
IC 1
3.3V
MIXER, IF AM P
T51
CF52
RFGND
OSCGND
DGND
212 1522 16 4 17
AUDIOGNDNCVCC
VDD_3.3
1 AMANT I AM antenna input AM antenna input high impedance AMANT pin is connected with
an all antenna by way of 4.7 µH. (LAU type inductor) A series circuit
including an inductor and a resistor is connected with RF ground for
the countermeasure against the hum of power transmission line.
2 RFGND RF ground Ground of antenna block
3 FMANT I FM antenna input Input of FM antenna 75 Surge absorber
(DSP-201M-S00B)is necessary.
4 VCC power supply The power supply for analog block. D.C 8.4 V ± 0.3 V
5 SL O signal level Output of FM/AM signals level
6 CE2 I chip enable-2 Chip enable for EEPROM ”Low” active
7 NC non connection Not used
D
8 CE1 I chip enable-1 Chip enable for AF•RF ”High” active
9 CK I clock Clock
10 DI I data in Data input
11 LDET O lock detector “Low” active
12 OSCGND osc ground Ground of oscillator block
13 ROM_VDD power supply Power supply for EEPROM pin 13 is connected with a power supply of
micro computer.
14 DO O data out Data output
15 DGND digital ground Ground of digital block
16 NC non connection Not used
17 VDD_3.3 power supply The power supply for digital block. 3.3 V ± 0.2 V
18 RDS_CK O RDS clock Output of RDS clock(2.5 V)
19 RDS_DATA O RDS data Output of RDS data(2.5 V)
E
20 RDS_LOCK O RDS lock Output unit “High” active(2.5 V) (RDS_LOCK turns over by the
external transistor . “Low” active)
21 RDS_HSLK O RDS high speed Output unit “High” active(2.5 V)(RDS_HSLK turns over by the
lock external transistor. “Low” active)
22 AUDIOGND audio ground Ground of audio block
23 L ch O L channel output FM stereo “L-ch” signal output or AM audio output
24 R ch O R channel output FM stereo “R-ch” signal output or AM audio output
Rch
24
Lch
23
F
18
1234
DEH-P6000UB/XN/EW5
5 678
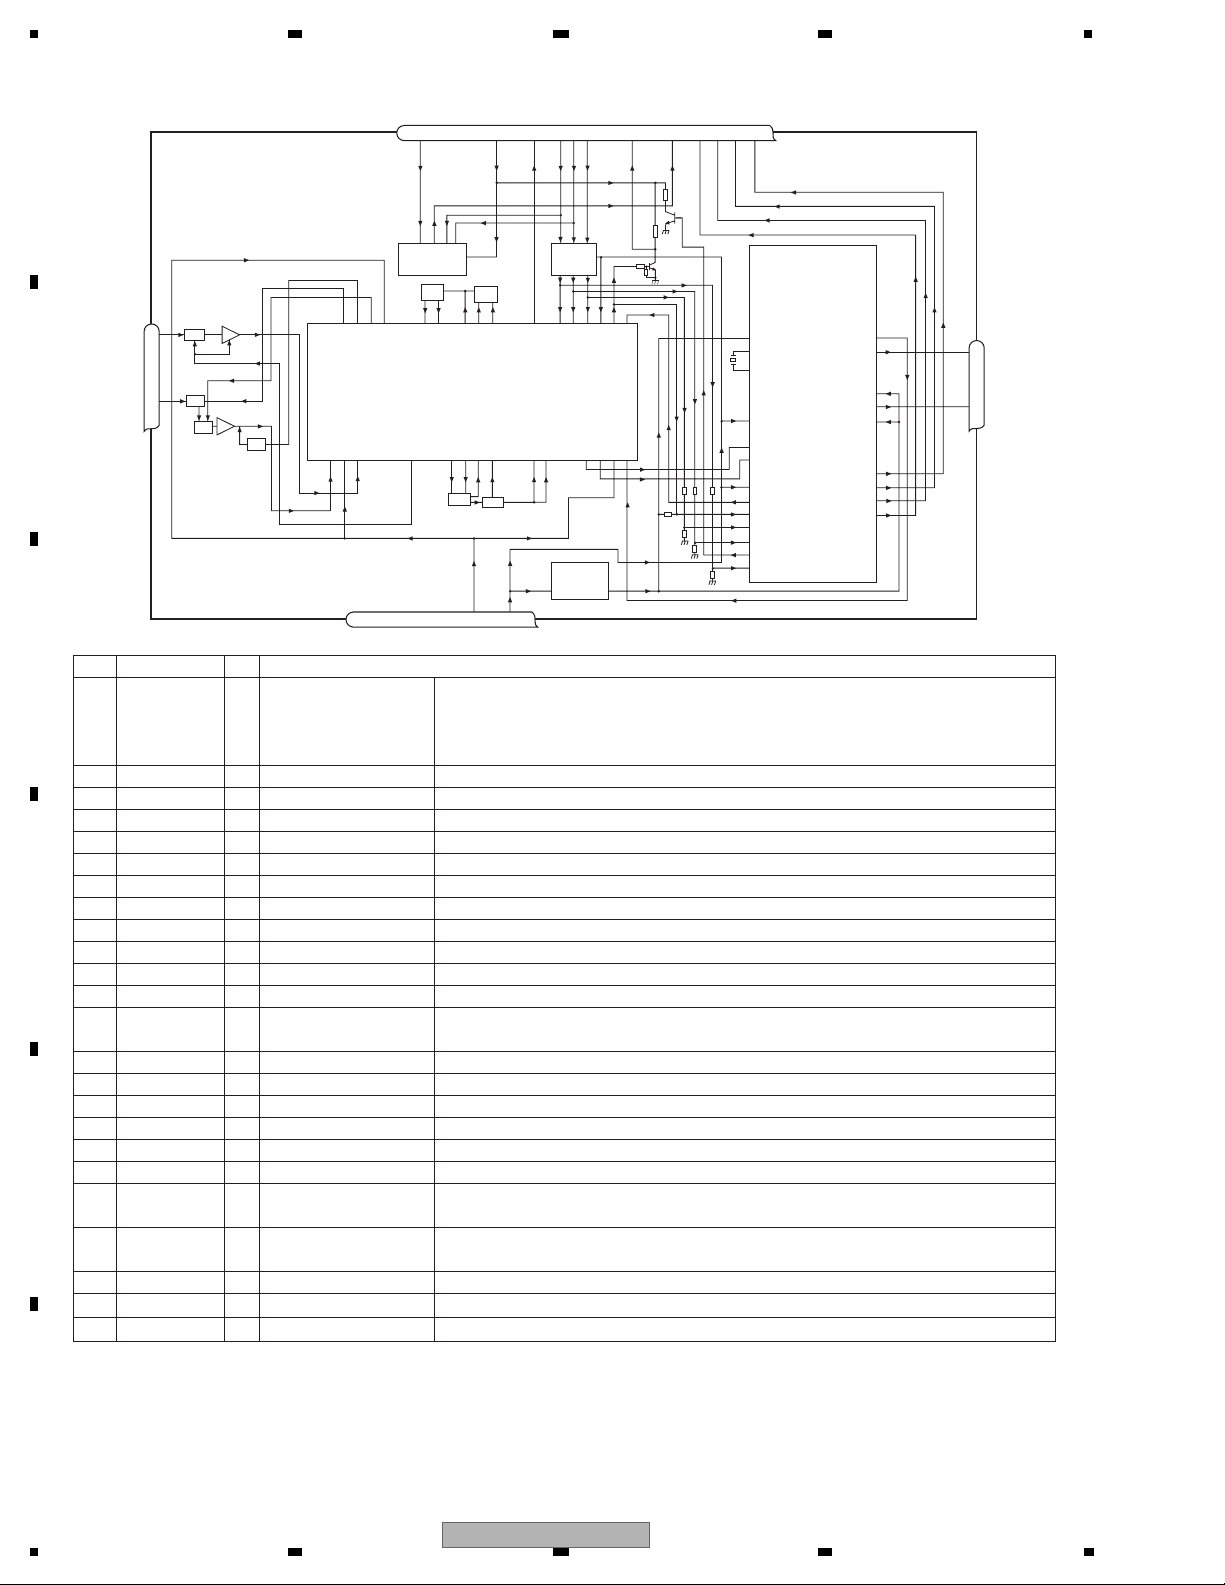
5. DIAGNOSIS
5.1 OPERATIONAL FLOWCHART
Power ON
Vcc = 5 V
Pin14
BSENS
Pin16
BSENS = L
ASENS
Pin73
ASENS = L
DSENS
Pin9
DSENS = L
A
B
ASENBO<-H
Pin38
CSENS
Pin91
2 V < CSENS < 3 V
Starts
communication
with Grille
microcomputer.
SWVDD<-H
Pin47
Source keys
operative
Source ON
C
— 2 V < CSENS < 3 V
Last source returns.
CD loading functions are available.
Keys except for EJECT key are not available.
D
300 ms
300 ms
In case of the above signal, the communication
with Grille microcomputer may fail.
If the time interval is not 300 msec, the oscillator
may be defective.
E
SYSPW<-H
Pin46
Completes power-on operation.
(After that, proceed to each source operation)
DEH-P6000UB/XN/EW5
56
F
7
8
19

1234
5.2 ERROR CODE LIST
— CD Error Messages
A
If a CD is not operative or stopped during operation due to an error, the error mode is turned on and cause(s) of
the error is indicated with a corresponding number. This arrangement is intended at reducing nonsense calls from
the users and also for facilitating trouble analysis and repair work in servicing.
(1) Basic Indication Method
1) When SERRORM is selected for the CSMOD (CD mode area for the system), error codes are written to DMIN
(minutes display area) and DSEC (seconds display area). The same data is written to DMIN and DSEC. DTNO
remains in blank as before.
B
Depending on display capability of LCD used, display will vary as shown below. xx contains the error number.
8-digit display 6-digit display 4-digit display
ERROR-xx ERR-xx E-xx
(2) Error Code List
2) Head unit display examples
Code
10
C
Class Displayed error code Description of the code and potential cause(s)
Electricity Carriage Home NG CRG can’t be moved to inner diameter.
SERVO LSI Com-
CRG can’t be moved from inner diameter.
munication Error → Failure on home switch or CRG move mechanism.
Communication error between microcomputer and SERVO LSI.
11 Electricity Focus Servo NG Focusing not available.
→ Stains on rear side of disc or excessive vibrations on REWRITABLE.
12 Electricity Spindle Lock NG Spindle not locked. Sub-code is strange (not readable).
Subcode NG → Failure on spindle, stains or damages on disc, or excessive vibrations.
A disc not containing CD-R data is found.
Turned over disc are found, though rarely.
CD signal error.
D
17 Electricity Setup NG AGC protection doesn’t work. Focus can be easily lost.
→ Damages or stains on disc, or excessive vibrations on REWRITABLE.
30 Electricity Search Time Out Failed to reach target address.
→ CRG tracking error or damages on disc.
44 Electricity ALL Skip Skip setting for all track.
(CD-R/RW)
50
Mechanism
CD On Mech Error Mechanical error during CD ON.
→ Defective loading motor, mechanical lock and mechanical sensor.
A0 System Power Supply NG Power (VD) is ground faulted.
→ Failure on SW transistor or power supply (failure on connector).
E
Remarks: Mechanical errors are not displayed (because a CD is turned o in these errors).
Unreadable TOC does not constitute an error. An intended operation continues in this case.
Upper digits of an error code are subdivided as shown below:
1x: Setup relevant errors, 3x: Search relevant errors, Ax: Other errors.
F
20
1234
DEH-P6000UB/XN/EW5

5 678
iPod error
STOP
ERROR-11
ERROR-21
ERROR-A0
USB error
NO AUDIO
TRK SKIPPED
PROTECT
N/A USB
CHK USB
No songs in the current list
Communication failure
Old version of the iPod
iPod is not charged but operates
correctly.
No songs in the USB device
USB memory with security enabled is
connected
The connected USB device contains
WMA files that are protected by DRM
All the files in the USB device are
protected by DRM
The connected USB device is not
supported by this unit
The USB connector or the USB cable is
short-circuited
The connected USB device consumes
more than 500 mA
(max. allowable current)
Selected m3u playlist cannot be played
back
All the files on the selected m3u playlist
are protected by DRM
ActionCauseMessage
Transfer the songs to the iPod.No songs in the iPodNO SONGS
Select a list that contains the songs.
Disconnect the cable from the iPod. Once the iPod
main menu is displayed, connect the cable again.
Reset the iPod.
Update the iPod version.
Reset the iPod.iPod failureERROR-30
Check if the connection cable for the iPod shorted out.
After checking, switch the ignition key or disconnect the
iPod and connect again.
ActionCauseMessage
Transfer the songs to the USB device.
Follow the USB memory instructions to disable the
security.
Play an audio file not protected by DRM.
Transfer the songs not protected by DRM to the USB
device.
Connect a USB device that is compliant as a Mass
Storage Class.
Confirm the USB connector or the USB cable.
Confirm the USB device.
Select another playlist.N/A PLAYLIST
A
B
C
D
56
DEH-P6000UB/XN/EW5
E
F
7
8
21

1234
5.3 CONNECTOR FUNCTION DESCRIPTION
A
1. BUS+
2. GND
3. GND
IP-BUS INPUT
4. NC
5. BUS-
6. GND
7. BUS L+
111098
765
4321
8. ASENB
SUBWOOFER
OUTPUT
B
C
FRONT
OUTPUT
ANTENNA
9. BUS R+
10. BUS R-
11. BUS L-
USB
AUX IN
AUX IN
W/R
WIRED REMOTE INPUT
9
7
5
3
1
8
6
4
2
1 FR+
2 RR+
3 FR4 RR-
D
5 FL+
6 RL+
7 FL8 RL-
E
11
10
12
9 MUTE
10 NC
11 B.REM
12 ILM
13 NC
14 ACC
15 GND
16 B.UP
13 15
14 16
F
22
1234
DEH-P6000UB/XN/EW5
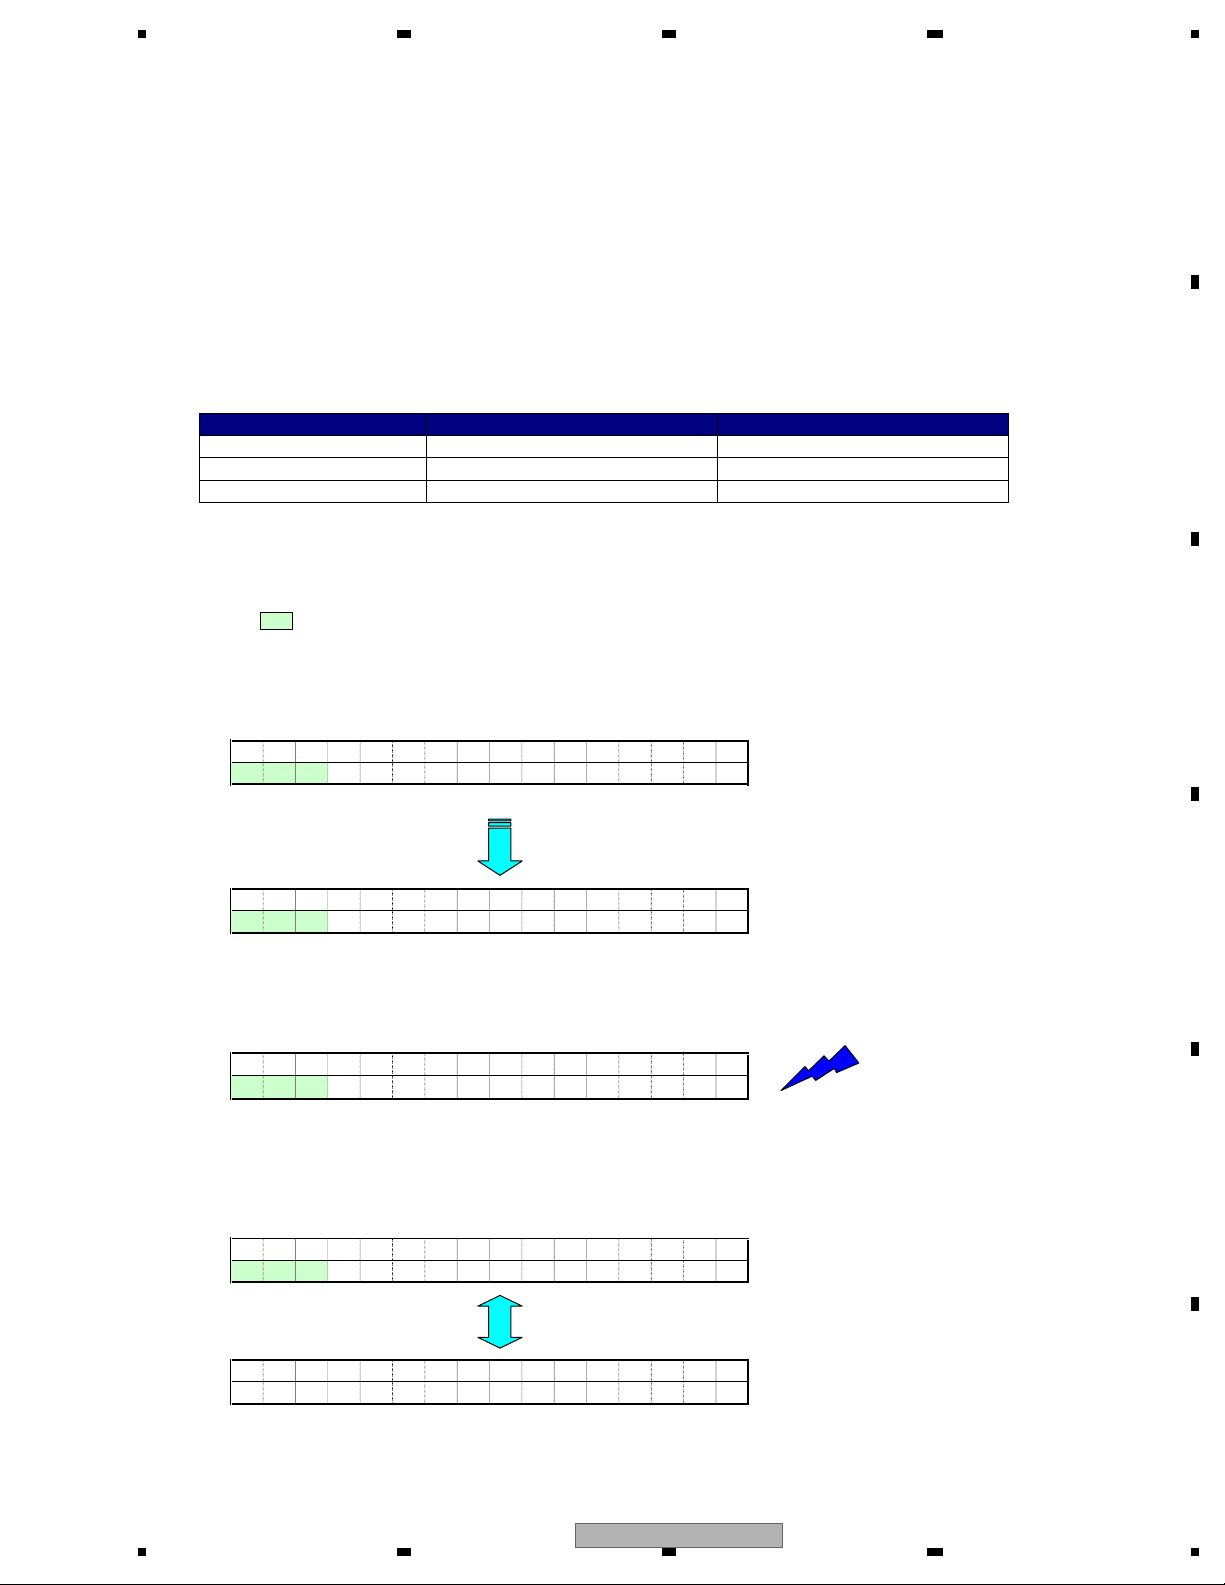
5 678
6. SERVICE MODE
6.1 CD TEST MODE
During pressing the «SOURCE» and «RPT» keys simultaneously, perform the reset-start, then turn ON
the CD to enter the CDS test mode.
• How to issue the 1 — 6 keys in the 08 model’s slave test:
The specification of the 08 model does not include the 1 — 6 keys issuance function for H/U and the remote control unit.
Therefore, in order to issue commands in a slave test, use the direct FUNCTION keys alternatively to enable the equal
key command sending function to the existing models.
Outline) Use the direct FUNCTION keys to display, select, or issue the KEY 1 — 6.
<Direct FUNCTION keys and corresponding functions>
Direct FUNCTION key Normal mode Slave test mode
A Selecting a key command
B
C Switching a screen
S.Rtrv
RDM Issuing a key command
RPT
• For convenience, a name of each direct FUNCTION key is shown as «A», «B», and «C».
• How to issue the 1 — 6 keys for the CDS source:
(The areas below are overwritten and displayed on character strings for the normal mode display.)
1 During the slave test mode, the key name «K1» is shown at the left by default.
In this condition, press the A key to toggle K1 — K6, and select a command to be sent to the slave.
A
B
C
COMPACT D I S C
K1 ! T -!! !!!!
• The one-line model shows only the bottom
column.
DNOCESETUNIMKRTREDLOF
A key
COMPACT D I S C
K6 T
! -!! !!!!
2 During the K1 — K6 key names are displayed, press the B key and issue the selected command.
COMPACT D I S C
K1 T
! -!! !!!!
Send a key command selected
by pressing the KEY 1.
B key
3 Press the C key to change display/non-display of key names.
When the non-display mode is selected for the K1 — K6 key names, «A key» and «B key» are invalid.
COMPACT D I S C
K1 T
! -!! !!!!
C key
D
E
COMPACT D I S C
F -! T
! -!! !!!!
DEH-P6000UB/XN/EW5
56
• Pressing the A key or B key does not work.
7
8
F
23
Loading…
Скачать
Operation Manual
Manual de instrucciones
CD RDS RECEIVER
REPRODUCTOR DE CD CON RECEPTOR RDS
DEH-P6000UB
English
Español
-
Page 1: Pioneer DEH-P6000UB
Operation Manual Manual de instrucciones CD RDS RECEIVER REPRODUCT OR DE CD CON RECEPTOR RDS DEH-P6000UB English Español[…]
-
Page 2: Pioneer DEH-P6000UB
Thank you for buying this P ioneer product. Please read through these operating instructions so you will know how to operate your model properly. A fter you have finished reading the instructions, k eep this man- ual in a safe place for future r eference. Before Y ou Start About this unit 5 Visit our website 6 In case of trouble 6 P rotecting your […]
-
Page 3: Pioneer DEH-P6000UB
– Recalling equalizer curves 27 – Adjusting equalizer cur ves 27 – Fine-adjusting equalizer curve 27 Adjusting loudness 28 Using subwoofer output 28 – Adjusting subwoofer settings 28 Using the high pass filter 29 Boosting the bass 29 Adjusting source levels 29 Initial Settings Adjusting initial settings 30 Setting the clock 30 T urning the […]
-
Page 4: Pioneer DEH-P6000UB
– Using the Phone Book 43 – Using the Call History 44 – Making a call by entering phone number 44 – Clearing memory 44 – Setting automatic rejecting 45 – Setting automatic answering 45 – Switching the ring tone 45 – Echo canceling and noise reduction 45 Multi-CD Player 45 – Basic Operations 45 – Using CD TEXT functions 45 – In[…]
-
Page 5: Pioneer DEH-P6000UB
If you want to dispose this product, do not mix it with general household waste. There is a se- parate collection system for used electronic products in accordance with legislation that re- quires proper treatment, recovery and recy- cling. Private households in the member states of the EU, in Switzerland and Nor way may return their used electroni[…]
-
Page 6: Pioneer DEH-P6000UB
About AAC This unit plays back AAC files encoded by iT unes ® . iT unes is a trademark of Apple Inc., registered in the U.S. and other countries. Portable audio player compatibility ! Inquire at the manufacturer about your USB portable audio player/USB memor y . This unit corresponds to the following. — USB MSC (Mass Storage Class) compliant por[…]
-
Page 7: Pioneer DEH-P6000UB
2 Grip the left side of the front panel and pull it gently outward. T ake care not to grip it too tightly or to drop the front panel and protect it from contact with water or other fluids to prevent perma- nent damage. 3 Put the front panel into the provided protective case for safe keeping. Attaching the front panel % Reattach the front panel by h[…]
-
Page 8: Pioneer DEH-P6000UB
Using the remote control P oint the remote control in the direction of the front panel to operate. ! The remote control may not function prop- erly in direct sunlight. Important ! Do not store the remote control in high tem- peratures or direct sunlight. ! Do not let the remote control fall onto the floor , where it may become jammed under the brak[…]
-
Page 9: Pioneer DEH-P6000UB
What ’ s What Head unit 1 SRC/OFF button This unit is turned on by selecting a source. Press to cycle through all the available sources. 2 DISP/BACK/SCROLL button Press to select different displays. Press and hold to scroll the text information. Press to return to the previous display when operating the menu. Press and hold to return to the main […]
-
Page 10: Pioneer DEH-P6000UB
b BAND/ESC button Press to select among three FM bands and MW/L W bands. Press to return to the ordinar y display when operating menu. Remote control Operation is the same as when using the but- tons on the head unit. c VOLUME buttons Press to increase or decrease the volume. d a / b / c / d buttons Press to perform manual seek tuning, fast forward[…]
-
Page 11: Pioneer DEH-P6000UB
9 LOC indicator Appears when local seek tuning is on. a 5 (stereo) indicator Appears when the selected frequency is being broadcast in stereo. b T A indicator Appears when T A (traffic announcement standby) function is on. c TP indicator Appears when a TP station is tuned in. d (shuffle) indicator Appears when shuffle function is on while iP od sou[…]
-
Page 12: Pioneer DEH-P6000UB
! Charging the portable audio player using car ’ s DC power source while connecting it to AUX input may generate noise. In this case, stop charging. ! External unit refers to a P ioneer product (such as ones available in the future) that, although incompatible as a source, enables control of basic functions with this unit. T wo external units can[…]
-
Page 13: Pioneer DEH-P6000UB
# Y ou can also store the frequency in memor y by pushing and holding MUL TI-CONTROL right. 3 Use MUL TI-CONTROL to select the de- sired station. T urn to change the station. Press to select. # Y ou can also change the station by pushing MUL TI-CONTROL up or down. # T o return to the ordinar y display , press BAND/ESC or LIST . # If you do not oper[…]
-
Page 14: Pioneer DEH-P6000UB
1 Use MUL TI-CONTROL to select AF in the function menu. 2 Press MUL TI-CONTROL to tur n AF on. # T o turn off, press MUL TI-CONTROL again. Notes ! Only RDS stations are tuned in during seek tuning or BSM when AF is on. ! When you recall a preset station, the tuner may update the preset station with a new fre- quency from the station ’ s AF list. […]
-
Page 15: Pioneer DEH-P6000UB
Notes ! Y ou can also turn this function on or off in the menu that appears by using MUL TI-CONTROL . ! The system switches back to the original source following traffic announcement recep- tion. ! Only TP and enhanced other network ’ s TP sta- tions are tuned in during seek tuning or BSM when T A is on. Using PTY functions Y ou can tune in a sta[…]
-
Page 16: Pioneer DEH-P6000UB
POPULAR POP MUS P opular music ROCK MUS Contemporar y modern music EASY MUS Easy listening music OTH MUS Non-categorized music JAZZ Jazz COUNTRY Country music NA T MUS National music OLDIES Oldies, golden oldies FOLK MUS Folk music CLASSICS L. CLASS Light classical music CLASSIC Classical music OTHERS EDUCA TE Educational programs DRAMA Radio plays[…]
-
Page 17: Pioneer DEH-P6000UB
# This operation is available only when playing CD-EXTRA or MIXED-MODE CDs. # If you have switched between compressed audio and CD-DA, playback starts at the first track on the disc. Notes ! The built-in CD player can play back audio CD and compressed audio recorded on a CD- ROM. (Refer to page 54 for files that can be played back.) ! Read the prec[…]
-
Page 18: Pioneer DEH-P6000UB
# Y ou can also change the track title by pushing MUL TI-CONTROL up or down. # Y ou can also play the track by pushing MUL TI-CONTROL right. # T o return to the ordinary display, press BAND/ESC or LIST . # If you do not operate the list within about 30 seconds, the display automatically returns to the ordinary display. Selecting files from the file[…]
-
Page 19: Pioneer DEH-P6000UB
# When FOLDER (folder repeat) is selected, it is not possible to play back a subfolder of that folder . Note Y ou can also perform this operation in the menu that appears by using MUL TI-CONTROL . Playing tracks in random order T racks in a selected repeat range are played in random order . % Press RDM to tur n random play on. T racks play in a ran[…]
-
Page 20: Pioneer DEH-P6000UB
6 After entering the title, press and hold MUL TI-CONTROL to store it in memory . Notes ! Titles remain in memory, even after the disc is removed from the unit, and are recalled when the disc is reinserted. ! After data for 48 discs are stored in the mem- ory, data for a new disc overwrites the oldest one. ! If you connect a multi-CD player , you c[…]
-
Page 21: Pioneer DEH-P6000UB
Displaying text information of an audio file % Press DISP to select the desired text in- formation. For WMA/MP3/AAC discs Play time — folder name and file name — artist name and track title — artist name and album title — album title and track title — track title and play time — comment and play time — bit rate and play time For WA V […]
-
Page 22: Pioneer DEH-P6000UB
! T o return to the ordinary display, press BAND/ESC . ! If you select another folder during repeat play, the repeat play range changes to ALL . ! If you per form track search or fast for ward/re- verse during TRACK , the repeat play range changes to FOLDER . ! When FOLDER is selected, it is not possible to play back a subfolder of that folder . ! […]
-
Page 23: Pioneer DEH-P6000UB
2 Use MUL TI-CONTROL to select a cate- gory . T urn to change the categor y; press to select. PLA YLISTS (playlists) — ARTISTS (artists) — ALBUMS (albums) — SONGS (songs) — PODCASTS (podcasts) — GENRES (genres) — COMPOSERS (composers) — AUDIOBOOKS (audiobooks) List for the selected categor y is displayed. # P ress and hold LIST displa[…]
-
Page 24: Pioneer DEH-P6000UB
Function name Operation REPEA T Refer to Selecting a repeat play range on page 18. However , the repeat play ranges you can select are dif- ferent from that of the built-in CD player . The repeat play ranges of the iPod are: ! ONE – Repeat the current song ! ALL – Repeat all songs in the selected list P AUSE Refer to P ausing playback on page 1[…]
-
Page 25: Pioneer DEH-P6000UB
This unit ’ s iP od function can be operated from your iP od. Sound can be heard from car ’ s speaker , and operation can be conducted from your iP od. ! While this function is in use, even if the ignition key is turned off , iP od is not turned off . T o turn off power , operate the iPod. 1 Press iPod and hold to switch the con- trol mode. # E[…]
-
Page 26: Pioneer DEH-P6000UB
Introduction of audio adjustments 1 Press MUL TI-CONTROL to display the main menu. 2 Use MUL TI-CONTROL to select AUDIO. T urn to change the menu option. Press to se- lect. 3 T ur n MUL TI-CONTROL to select the audio function. T urn MUL TI-CONTROL to switch between the audio functions in the following order . FADER/BALANCE (balance adjustment) — […]
-
Page 27: Pioneer DEH-P6000UB
Using the equalizer The equalizer lets you adjust the equalization to match the car ’ s interior acoustic charac ter- istics as desired. Recalling equalizer curves There are six stored equalizer cur ves which you can easily recall at any time. Here is a list of the equalizer cur ves. Display Equalizer curve POWERFUL Powerful NA TURAL Natural VOCA[…]
-
Page 28: Pioneer DEH-P6000UB
4 T ur n MUL TI-CONTROL to adjust the se- lected segement. Band LOW (low) — MID (mid) — HI (high) F requency Low: 40HZ — 80HZ — 100HZ — 160HZ Mid: 200HZ — 500HZ — 1KHZ — 2KHZ High: 3KHZ — 8KHZ — 10KHZ — 12KHZ Q factor 2N — 1N — 1W — 2W # Y ou can also per form the same operations by pushing MUL TI-CONTROL up or down. Adj[…]
-
Page 29: Pioneer DEH-P6000UB
Using the high pass filter When you do not want low sounds from the subwoofer output frequency range to play from the front or rear speakers, turn on the HPF (high pass filter). Only frequencies higher than those in the selected range are output from the front or rear speakers. 1 Use MUL TI-CONTROL to select HPF. 2 Press MUL TI-CONTROL to display t[…]
-
Page 30: Pioneer DEH-P6000UB
Adjusting initial settings 1 Press SRC and hold until the unit turns off. 2 Press MUL TI-CONTROL and hold until CLOCK SET appears in the display . 3 T ur n MUL TI-CONTROL to select one of the initial settings. CLOCK SET (clock) — OFF CLOCK (off clock) — FM STEP (FM tuning step) — AUTO PI (auto PI seek) — W ARNING TONE (warning tone) — AUX[…]
-
Page 31: Pioneer DEH-P6000UB
Switching Auto PI Seek The unit can automatically search for a differ- ent station with the same programming, even during preset recall. 1 Use MUL TI-CONTROL to select AUTO PI. 2 Press MUL TI-CONTROL to tur n Auto PI seek on. # T o turn Auto PI seek off , press MUL TI-CONTROL again. Switching the warning tone If the front panel is not detached from[…]
-
Page 32: Pioneer DEH-P6000UB
When REAR SP (rear speaker setting) is se- lected. REAR SP :SUB W (subwoofer) — REAR SP :FULL (full-range speaker) When PREOUT (RCA output setting) is se- lected. PREOUT :SUB W (subwoofer) — PREOUT :REAR (full-range speaker) # When no subwoofer is connected to the rear output, select REAR SP :FULL . # When a subwoofer is connected to the rear o[…]
-
Page 33: Pioneer DEH-P6000UB
1 Use MUL TI-CONTROL to select PIN CODE INPUT. 2 Press MUL TI-CONTROL to display the setting mode. # P ress BACK to return to the previous display . 3 T ur n MUL TI-CONTROL to select a num- ber . # Y ou can also per form the same operations by pushing MUL TI-CONTROL up or down. 4 Press MUL TI-CONTROL to move the cur- sor to the next position. # Y o[…]
-
Page 34: Pioneer DEH-P6000UB
Using the AUX source Up to two auxiliar y devices such as VCR or portable devices (sold separately) can be con- nected to this unit. When connected, auxiliar y devices are automatically read as AUX sources and assigned to AUX1 or AUX2 . The relation- ship between AUX1 and AUX2 sources is ex- plained below . About AUX1 and AUX2 There are two methods[…]
-
Page 35: Pioneer DEH-P6000UB
Basic operation F unctions allocated to the following opera- tions are different depending on the con- nected external unit. For details concerning functions, refer to the connected external unit ’ s owner ’ s manual. % Press BAND/ESC. % Press and hold BAND/ESC. % Push MUL TI-CONTROL left or right. % Push and hold MUL TI-CONTROL left or right f[…]
-
Page 36: Pioneer DEH-P6000UB
Playing songs on iPod Basic operation Y ou can use this unit to control an inter face adapter for iPod, which is sold separately . % Fast forward or reverse Push and hold MUL TI-CONTROL left or right for about one second and release. % Select a track Push MUL TI-CONTROL left or right. Notes ! Read the precautions for iP od on page 54. ! While iP od[…]
-
Page 37: Pioneer DEH-P6000UB
Playing songs in a random order (shuf fle) % Press RDM repeatedly to select the de- sired setting. ! SONGS – Play back songs in the selected list in random order . ! ALBUMS – Play back songs from a ran- domly selected album in order . ! OFF – Cancel random play . # T o turn shuffle off, press RDM again. Note Y ou can also perform this operati[…]
-
Page 38: Pioneer DEH-P6000UB
3 T ur n MUL TI-CONTROL to select the function. CONNECTION OPEN (connection open) — DISCONNECT AUDIO (disconnect audio) — PLA Y (Play) — STOP (Stop) — P AUSE (pause) — DEVICE INFO (device information) P AUSE is the same as that of the built-in CD player . (Refer to P ausing playback on page 19.) # Y ou can also per form the same operation[…]
-
Page 39: Pioneer DEH-P6000UB
Displaying BD (Bluetooth Device) address 1 Use MUL TI-CONTROL to select DEVICE INFO in the function menu. 2 Press MUL TI-CONTROL to display the setting mode. 3 Use MUL TI-CONTROL to select the de- sired setting. T urn to change the setting. DEVICE NAME (Device name) — BD ADDRESS (BD (Bluetooth Device) address) Bluetooth T elephone Basic Operation[…]
-
Page 40: Pioneer DEH-P6000UB
Making a phone call V oice recognition 1 Press BAND/ESC and hold until VOICE DIAL appears in the display . VOICE DIAL appears in the display. When VOICE DIAL ON is displayed, voice recogni- tion function is now ready. # If your cellular phone does not feature voice recognition function, NO VOICE DIAL appears in the display and opearation is not ava[…]
-
Page 41: Pioneer DEH-P6000UB
! DISCONNECT PHONE (disconnect phone) ! SET PHONE (registering phone) ! CLEAR MEMOR Y (clear memory) ! NUMBER DIAL (call by entering number) If connected but not registered yet The following functions cannot be operated. ! SEARCH PHONE (search and connect) ! CONNECTION OPEN (connection open) ! CONNECT PHONE (connect phone) ! CLEAR MEMOR Y (clear me[…]
-
Page 42: Pioneer DEH-P6000UB
Disconnecting a cellular phone 1 Use MUL TI-CONTROL to select DISCONNECT PHONE in the function menu. Device name of the connected phone appears in the display . 2 Press MUL TI-CONTROL to disconnect a cellular phone from this unit. After disconnection is completed, DISCONNECTED is displayed. Registering a connected cellular phone 1 Use MUL TI-CONTRO[…]
-
Page 43: Pioneer DEH-P6000UB
# Y ou can also per form the same operations by pushing MUL TI-CONTROL up or down. # If the assignment is empty , NO DA T A is dis- played and operation is not possible. 4 Press MUL TI-CONTROL to connect the selected cellular phone. While connecting, CONNECTING is displayed. After the connection is completed, CONNECTED is displayed. Connecting to a[…]
-
Page 44: Pioneer DEH-P6000UB
Using the Call History Important Be sure to park your vehicle and apply the park- ing brake when per forming this operation. The 12 most recent calls made (dialled), re- ceived and missed, are stored in the Call His- tor y . Y ou can browse the Call Histor y and call numbers from it. 1 Press LIST to display the list. 2 T ur n MUL TI-CONTROL to sele[…]
-
Page 45: Pioneer DEH-P6000UB
6 Press MUL TI-CONTROL to clear the memory . While clearing, CLEARING is displayed. After the data on the selected item is cleared, CLEARED is displayed. Setting automatic rejecting 1 Use MUL TI-CONTROL to select REFUSE CALLS in the function menu. 2 Press MUL TI-CONTROL to tur n auto- matic call rejection on. # T o turn automatic call rejection off[…]
-
Page 46: Pioneer DEH-P6000UB
1 Press MUL TI-CONTROL to display the main menu. 2 Use MUL TI-CONTROL to select FUNCTION. T urn to change the menu option. Press to se- lect. 3 T ur n MUL TI-CONTROL to select the function. REPEA T (repeat play) — RANDOM (random play) — SCAN (scan play) — P AUSE (pause) — COMP/DBE (compression and DBE) — ITS PLA Y (ITS play) — ITS MEMOR[…]
-
Page 47: Pioneer DEH-P6000UB
Using ITS playlists ITS (instant track selection) lets you make a playlist of favorite tracks from the multi-CD player magazine. After you have added your fa- vorite tracks to the playlist, you can turn on ITS play and play just those selections. Y ou can use ITS to enter and play back up to 99 tracks per disc from up to 100 discs (with the disc ti[…]
-
Page 48: Pioneer DEH-P6000UB
Erasing a CD from your ITS playlist Y ou can delete all tracks of a CD from your ITS playlist if ITS play is off. 1 Play the CD that you want to delete. 2 Use MUL TI-CONTROL to select ITS MEMORY in the function menu. 3 Press MUL TI-CONTROL to display the setting mode. 4 Press MUL TI-CONTROL to select DELETE. All tracks on the currently playing CD a[…]
-
Page 49: Pioneer DEH-P6000UB
% Seek tuning Push and hold MUL TI-CONTROL left or right for about one second and release. Notes ! Band can be selected from TV -1 or TV -2 . ! Y ou can cancel seek tuning by pushing MUL TI-CONTROL left or right. ! If you push and hold MUL TI-CONTROL left or right, you can skip stations. Seek tuning starts as soon as you release MUL TI-CONTROL . St[…]
-
Page 50: Pioneer DEH-P6000UB
Error messages When you contact your dealer or your nearest Pioneer Service Center , be sure to have the error message recorded. Built-in CD Player Message Cause Action ERROR-11, 12, 17, 30 Dirty disc Clean disc. ERROR-11, 12, 17, 30 Scratched disc Replace disc. ERROR-10, 11, 12, 15, 17, 30, A0 Electrical or me- chanical Switch the ignition key , o[…]
-
Page 51: Pioneer DEH-P6000UB
iPod Message Cause Action ERROR-19 Communication failure Disconnect the cable from iPod. Once iPod main menu is displayed, connect the cable again. Reset the iPod. iP od failure Disconnect the cable from iPod. Once iPod main menu is displayed, connect the cable again. Reset the iPod. N/A USB Old version of iP od Update the iPod version. iP od failu[…]
-
Page 52: Pioneer DEH-P6000UB
! Road shocks may interrupt disc playback. ! Read the precautions for discs before using them. Dual Discs ! Dual Discs are two-sided discs that have a recordable CD for audio on one side and a recordable DVD for video on the other . ! Since the CD side of Dual Discs is not phy- sically compatible with the general CD standard, it may not be possible[…]
-
Page 53: Pioneer DEH-P6000UB
! This unit can play back files in the USB porta- ble audio player/USB memory that is USB Mass Storage Class. However , copyright pro- tected files that are stored in above-mentioned USB devices cannot be played back. (If the iP od is connected to this unit, file playback condition depends on the iPod specificatio ns.) ! Y ou cannot connect a USB p[…]
-
Page 54: Pioneer DEH-P6000UB
1 Create the file name including numbers that specify the playback sequence (e.g., 001xxx.mp3 and 099yyy .mp3). 2 P ut those files into a folder . 3 Record the folder containing files into the USB device. However , depending on the system environ- ment, you cannot specify the file playback sequence. iPod About handling the iPod ! Do not leave the i[…]
-
Page 55: Pioneer DEH-P6000UB
Example of a hierarchy : F older : Compressed audio file 1 2 3 4 5 6 L e v e l 1 L e v e l 2 L e v e l 3 L e v e l 4 ! This unit assigns folder numbers. The user cannot assign folder numbers. ! F older hierarchy is allowed up to eight tiers. However , a practical hierarchy of folder is less than two tiers. ! Up to 99 folders on a disc can be played[…]
-
Page 56: Pioneer DEH-P6000UB
Specifications General Po w e r s o u r c e ……………………….. 14.4 V DC (10.8 V to 15.1 V allowable) Grounding system ………………. N e g a tive type Max. current consumption …………………………………………….. 10.0 A Dimensions (W × H × D): DIN Chassis ………………… 1 7 8 m m × 5 0 m m × 1 6 2 mm N o[…]
-
Page 57: Pioneer DEH-P6000UB
Gracias por haber comprado este producto P ioneer . Lea con detenimiento esta s instrucciones sobre el funciona miento del aparato, para utilizarlo correctame nte. Una vez que las haya leído, conser ve este manual en un lugar seguro para consultas futu ras. Antes de comenzar Acerca de esta unidad 60 Visite nuestro sitio W eb 61 En caso de problema[…]
-
Page 58: Pioneer DEH-P6000UB
Ajustes de audio Introducción a los ajustes de audio 84 Uso del ajuste del balance 84 Uso del ecualizador 85 – Recuperación de las curvas de ecualización 85 – Ajuste de las cur vas de ecualización 85 – Ajuste preciso de la cur va de ecualización 85 Ajuste de la sonoridad 86 Uso de la salida de subgraves 86 – Configuración de los ajust[…]
-
Page 59: Pioneer DEH-P6000UB
– Introducción a las funciones avanzadas 100 – Conexión de un teléfono móvil 101 – Desconexión de un teléfono móvil 101 – Registro de un teléfono móvil conectado 102 – Eliminación de un teléfono registrado 102 – Conexión a un teléfono móvil registrado 102 – Uso del Directorio de teléfonos 103 – Uso del Historial de ll[…]
-
Page 60: Pioneer DEH-P6000UB
Si desea deshacerse de este producto, no lo mezcle con los residuos generales de su hogar . De conformidad con la legislación vi- gente, existe un sistema de recogida distinto para los productos electrónicos que requieren un procedimiento adecuado de tratamien to, recuperación y reciclado. Las viviendas privadas en los estados miem- bros de la U[…]
-
Page 61: Pioneer DEH-P6000UB
Acerca de MP3 La venta de este producto sólo otorga una li- cencia para su uso privado, no comercial. No otorga ninguna licencia ni concede ningún derecho a utilizar este producto en transmisio- nes comerciales (es decir , lucrativas) en tiem- po real (terrestres, vía satélite, por cable y/o por cualquier otro medio), transmisiones/ streaming p[…]
-
Page 62: Pioneer DEH-P6000UB
http://www.pioneer .es ! Registre su producto. Conser varemos los datos de su compra archivados para que pueda consultar esta información en caso de que deba efectuar una reclamación a la compañía de seguros por pérdida o robo. ! En nuestro sitio Web ofrecemos la informa- ción más reciente acerca de Pioneer Corporation. En caso de problemas […]
-
Page 63: Pioneer DEH-P6000UB
Modo de demostración de características La demostración de características se inicia automáticamente cuando se apaga la unidad mientras el contacto de arranque está en ACC o en ON. Presione el botón DISP durante la de- mostración de características para cancelar este modo de demostración. Vuelva a presio- nar DISP para comenzar . Recuerde[…]
-
Page 64: Pioneer DEH-P6000UB
Qué es cada cosa Unidad principal 1 Botón SRC/OFF Esta unidad se enciende al seleccionar una fuente. Presione este botón para visualizar todas las fuentes disponibles. 2 Botón DISP/BACK/SCROLL Presione este botón para seleccionar las di- ferentes pantallas. Manténgalo presionado para desplazarse por la información de texto. Presione este bot[…]
-
Page 65: Pioneer DEH-P6000UB
Cuando utilice el iPod, presione este botón para reproducir todas las pistas en orden aleatorio. Mantenga presionado para cambiar el modo de control cuando utilice un iP od co- nectado al conector USB de la unidad. Si utiliza el iP od con un adaptador de inter- faz (CD-IB100 N ), presione para cambiar la función de selección aleatoria. b Botón […]
-
Page 66: Pioneer DEH-P6000UB
5 Indicador d Aparece cuando existe un nivel, carpeta o menú inferior . 6 Indicador (intérprete) Aparece cuando se muestra el nombre del artista del disco (pista) en la sección princi- pal de la pantalla. Aparece durante la búsqueda precisa del in- térprete en la función de exploración del iP od. 7 Indicador (disco) Aparece cuando se muestra[…]
-
Page 67: Pioneer DEH-P6000UB
Funciones básicas Encendido y apagado Encendido de la unidad % Presione SRC para encender la unidad. Apagado de la unidad % Mantenga presionado OFF hasta que se apague la unidad. Selección de una fuente Puede seleccionar una fuente que desee escu- char . P ara cambiar al reproductor de CD incor- porado, cargue un disco en la unidad (consulte la p[…]
-
Page 68: Pioneer DEH-P6000UB
Sintonizador Funciones básicas % Seleccione una banda Presione BAND/ESC . # P uede seleccionar la banda entre FM1 , FM2 , FM3 o MW/L W . % Sintonización manual (paso a paso) Pulse MUL TI-CONTROL izquierda o derecha. % Sintonización por búsqueda Presione MUL TI-CONTROL y mantenga pre- sionado hacia la izquierda o hacia la derecha durante cerca d[…]
-
Page 69: Pioneer DEH-P6000UB
3 Haga girar MUL TI-CONTROL para selec- cionar la función. BSM (memoria de las mejores emisoras) — REGIONAL (regional) — LOCAL (sintonización por búsqueda local) — PTY SEARCH (selección de tipo de programa) — TRAFFIC (espera por anuncio de tráfico) — AF (búsqueda de fre- cuencias alternativas) — NEWS (interrupción por programa de[…]
-
Page 70: Pioneer DEH-P6000UB
! Durante la búsqueda de AF , el sonido podría interrumpirse temporalmente. ! La función AF se puede activar y desactivar in- dependientemente en cada banda FM. Uso de la búsqueda PI Si el sintonizador no puede encontrar una emisora adecuada o el estado de la recepción empeora, la unidad buscará automáticamente otra emisora con la misma prog[…]
-
Page 71: Pioneer DEH-P6000UB
! Sólo se sintonizan las emisoras TP y las emi- soras TP de otra red realzada durante la sinto- nización por búsqueda o BSM cuando la función T A está activada. Uso de las funciones PTY Se puede sintonizar una emisora usando la in- formación PTY (tipo de programa). Búsqueda de una emisora RDS por información PTY Se pueden buscar tipos gener[…]
-
Page 72: Pioneer DEH-P6000UB
Lista PTY Generales Específico Tipo de programa NEWS/INFO NEWS Noticias AFFAIRS T emas de actualidad INFO Información general y consejos SPORT Programas deportivos WEA THER Informes del tiempo/ información meteoro- lógica FINANCE Informes del mercado de valores, comercio, transacciones, etc. POPULAR POP MUS Música popular ROCK MUS Música mode[…]
-
Page 73: Pioneer DEH-P6000UB
Reproductor de CD incorporado Funciones básicas % Abrir la carátula. Presione OPEN . Aparece la ranura de inserción de discos. Ranura de inserción de discos Botón EJECT # Cuando inserte un disco, coloque el lado de la etiqueta hacia arriba. # P ara evitar fallos en el funcionamiento, asegú- rese de que ningún objeto metálico entre en con- t[…]
-
Page 74: Pioneer DEH-P6000UB
Para discos CD TEXT Tiempo de reproducción — nombre del intér- prete del disco y título de la pista — nombre del intérprete del disco y título del disco — título del disco y título de la pista — nombre del intér- prete de la pista y título de la pista — título de la pista y tiempo de reproducción Para discos WMA/MP3/AAC Tiempo […]
-
Page 75: Pioneer DEH-P6000UB
2 Utilice MUL TI-CONTROL para seleccio- nar el nombre del archivo desea do (o de la carpeta deseada). Haga girar el control para cambiar el nombre del archivo o carpeta. — tras seleccionar un archivo, presione para reproducirlo. — presione para ver una lista de archivos (o carpetas) de una carpeta seleccionada. — presione y mantenga presionad[…]
-
Page 76: Pioneer DEH-P6000UB
Reproducción de las pistas en orden aleatorio Las pistas de una gama de repetición seleccio- nada se reproducen en orden aleatorio. % Presione RDM para activar la reproduc- ción aleatoria. Las pistas se reproducirán en orden aleatorio. # V uelva a pulsar RDM para desactivar la repro- ducción aleatoria. Nota T ambién puede activar o desactivar[…]
-
Page 77: Pioneer DEH-P6000UB
4 Gire MUL TI-CONTROL para seleccionar una letra del alfabeto. # T ambién puede realizar estas operaciones pul- sando MUL TI-CONTROL arriba o abajo. 5 Presione MUL TI-CONTROL para despla- zar el cursor hacia el siguiente carácter . 6 Una vez introducido el título, mantenga presionado MUL TI-CONTROL para almace- narlo en la memoria. Notas ! Los t[…]
-
Page 78: Pioneer DEH-P6000UB
! Si se conecta un reproductor de audio portátil USB/memoria USB a esta unidad, la fuente cambia a USB automáticamente. Si no utiliza un dispositivo USB, desconéctelo de esta uni- dad. Según el dispositivo USB conectado, co- locar la llave de encendido en posición de activación mientras el dispositivo USB esté conectado a esta unidad puede c[…]
-
Page 79: Pioneer DEH-P6000UB
Nombre de la función Operación REPEA T Consulte Selección de una gama de repetición de r epro- ducción en la página 75. Sin embargo, las gamas de repetición para la repro- ducción que puede selec- cionar son diferentes a las del reproductor de CD in- corporado. Las gamas de repetición para el reproduc- tor de audio portátil USB/ memoria U[…]
-
Page 80: Pioneer DEH-P6000UB
Para reproducir canciones en el iPod P ara obtener detalles sobr e iP od compatibles, consulte Compatibilidad con iP od ® en la página 61. Funciones básicas % Avance rápido o retroceso Presione MUL TI-CONTROL y mantenga pre- sionado hacia la izquierda o hacia la derecha durante cerca de un segundo y luego suelte. % Selección de una pista (cap?[…]
-
Page 81: Pioneer DEH-P6000UB
# P ara volver a la visualización normal, presione BAND/ESC o LIST . # Si no se utiliza la lista en unos 30 segundos, la pantalla volverá automáticamente a la visuali- zación normal. Visualización de información de texto en el iPod % Presione DISP para seleccionar la infor- mación de texto deseado. Tiempo de reproducción — nombre del arti[…]
-
Page 82: Pioneer DEH-P6000UB
! Cuando CONTROL está activado, sólo se po- drán utilizar CONTROL y SOUND RETRIEVER . Reproducción de las canciones en orden aleatorio (shuffle) 1 Utilice MUL TI-CONTROL para seleccio- nar SHUFFLE en el menú de funciones. 2 Presione MUL TI-CONTROL para mostrar el modo de ajuste. 3 Utilice MUL TI-CONTROL para seleccio- nar el ajuste deseado. Ha[…]
-
Page 83: Pioneer DEH-P6000UB
2 Ponga en funcionamiento el iPod co- nectado para seleccionar una canción y re- producirla. Nota T ambién puede activar o desactivar esta función en el menú que aparece mediante el MUL TI-CONTROL . Cambio de la velocidad del audiolibro Mientras escucha un audiolibro en el iPod, puede modificar la velocidad de reproducción. 1 Utilice MUL TI-CO[…]
-
Page 84: Pioneer DEH-P6000UB
Introducción a los ajustes de audio 1 Presione MUL TI-CONTROL para visuali- zar el menú principal. 2 Utilice MUL TI-CONTROL para seleccio- nar AUDIO. Haga girar el control para cambiar la opción de menú. Presione para seleccionar . 3 Haga girar MUL TI-CONTROL para selec- cionar la función de audio. Haga girar MUL TI-CONTROL para cambiar entre […]
-
Page 85: Pioneer DEH-P6000UB
Uso del ecualizador El ecualizador le permite ajustar la ecuali za- ción de acuerdo con las características acústi- cas del interior del automóvil. Recuperación de las curvas de ecualización Hay seis tipos de curvas de ecualización me- morizadas que se pueden recuperar con facili- dad en cualquier momento. A continuación se ofrece una lista[…]
-
Page 86: Pioneer DEH-P6000UB
3 Presione MUL TI-CONTROL para seleccio- nar el segmento que desea ajustar . Presione MUL TI-CONTROL varias veces para cambiar el segmento en el siguiente orden: Banda — F recuencia — F actor Q 4 Haga girar MUL TI-CONTROL para ajustar el segmento seleccionado. Banda LOW (bajo) — MID (medio) — HI (alto) F recuencia Baja: 40HZ — 80HZ — 10[…]
-
Page 87: Pioneer DEH-P6000UB
Uso del filtro de paso alto Si no desea que se generen los sonidos bajos de la gama de frecuencias de salida de sub- graves a través de los altavoces delanteros o traseros, active el filtro de paso alto (HPF). Sólo las frecuencias más altas que aquellas en la gama seleccionada se generan a través de los altavoces delanteros o traseros. 1 Utilic[…]
-
Page 88: Pioneer DEH-P6000UB
Configuración de los ajustes iniciales 1 Presione y mantenga presionado SRC hasta que se apague la unidad. 2 Mantenga presionado MUL TI-CONTROL hasta que CLOCK SET aparezca en la panta- lla. 3 Haga girar MUL TI-CONTROL para selec- cionar uno de los ajustes iniciales. CLOCK SET (reloj) — OFF CLOCK (reloj apaga- do) — FM STEP (paso de sintonía […]
-
Page 89: Pioneer DEH-P6000UB
1 Utilice MUL TI-CONTROL para seleccio- nar FM STEP. 2 Presione MUL TI-CONTROL para mostrar el modo de ajuste. # P resione BACK para volver a la visualización anterior . 3 Haga girar MUL TI-CONTROL para selec- cionar el paso de sintonía de FM. Al hacer girar MUL TI-CONTROL se cambiará el paso de sintonía de FM entre 50 kHz y 100 kHz mientras la[…]
-
Page 90: Pioneer DEH-P6000UB
Ajuste de la salida posterior y del controlador de subgraves La salida posterior de esta unidad (salida de cables de altavoces traseros y salida RCA pos- terior) se puede usar para la conexión de alta- voces de toda la gama ( REAR SP :FULL / PREOUT :REAR ) o subgraves ( REAR SP :SUB W / PREOUT :SUB W ). Si se cambia el ajuste de la salida posterio[…]
-
Page 91: Pioneer DEH-P6000UB
! T ambién puede activar o desactivar la demos- tración de características, presionando DISP mientras la unidad está apagada. P ara obte- ner más detalles, consulte Acerca del modo demo en la página 62. Cambio del desplazamiento continuo Si la función de desplazamiento continuo está activada (ON), la información de texto grabada se desplaz[…]
-
Page 92: Pioneer DEH-P6000UB
Visualización de la versión del sistema del adaptador Bluetooth para tareas de reparación Si se produce un fallo de funcionamiento del adaptador de conexión de Bluetooth y debe ponerse en contacto con un concesionario para que realice la reparación, es posible que tenga que indicar la versión del sistema y la versión del módulo Bluetooth de[…]
-
Page 93: Pioneer DEH-P6000UB
Uso de la fuente AUX En esta unidad, se pueden conectar hasta dos dispositivos auxiliares como VCR o dispositi- vos portátiles (se venden por separado). Cuan- do están conectados, los dispositivos auxiliares se identifican automáticamente como fuentes AUX y se asignan a AUX1 o AUX2 . La relación entre las fuentes AUX1 y AUX2 se explica a contin[…]
-
Page 94: Pioneer DEH-P6000UB
Selección de la unidad exter na como fuente % Presione SRC para seleccionar EXTERNAL como la fuente. Funcionamiento básico Las funciones asignadas a las siguientes ope- raciones varían dependiendo de la unidad ex- terna conectada. P ara obtener más información sobre las funciones, consulte el manual de instrucciones de la unidad externa conect[…]
-
Page 95: Pioneer DEH-P6000UB
Para reproducir canciones en el iPod Funcionamiento básico P uede utilizar esta unidad para controlar un adaptador de inter faz para iP od, que se vende por separado. % Avance rápido o retroceso Presione MUL TI-CONTROL y mantenga pre- sionado hacia la izquierda o hacia la derecha durante cerca de un segundo y luego suelte. % Selección de una pis[…]
-
Page 96: Pioneer DEH-P6000UB
! P ara volver al menú principal, presione duran- te varios segundos BACK . ! P ara volver a la visualización normal, presione BAND/ESC . ! Si no se utiliza ninguna función en aprox. 30 segundos, la pantalla volverá automáticamen- te a la visualización normal. Reproducción de las canciones en orden aleatorio (shuffle) % Presione RDM repetida[…]
-
Page 97: Pioneer DEH-P6000UB
Notas ! P ara obtener más información, consulte el manual de instrucciones del adaptador Blue- tooth. Esta sección proporciona información básica sobre las funciones del reproductor de audio Bluetooth con esta unidad que difieren ligeramente o son un resumen de las instruc- ciones incluidas en el manual de funciona- miento del adaptador Blueto[…]
-
Page 98: Pioneer DEH-P6000UB
Nota Antes de que pueda utilizar algunos reproducto- res de audio, es necesario que introduzca el códi- go PIN en esta unidad. Si su reproductor requiere un código PIN para establecer una conexión, lo- calice el código en el reproducto r o en su docu- mentación. Consulte Introducción del código PIN para la conexión inalámbrica Bluetooth en[…]
-
Page 99: Pioneer DEH-P6000UB
Configuración de la función manos libres Antes de poder hacer uso de la función manos libres, deberá configurar la unidad para su utilización con el teléfono móvil. Esto conlleva establecer una conexión inalámbrica Bluetooth entre esta unidad y su teléfono, re- gistrar su teléfono en esta unidad, y ajustar el nivel de volumen. 1 Conexió[…]
-
Page 100: Pioneer DEH-P6000UB
Manejo de una llamada en espera % Atender una llamada en espera Cuando entre una llamada, presione MUL TI-CONTROL . # T ambién puede realizar esta operación presio- nando MUL TI-CONTROL arriba. % Finalización de todas las llamadas Pulse MUL TI-CONTROL hacia abajo. % Cambio entre los autores de llamadas en espera Pulse MUL TI-CONTROL . # T ambié[…]
-
Page 101: Pioneer DEH-P6000UB
! Si el teléfono móvil está conectad o a esta uni- dad mediante tecnología inalámbrica Blue- tooth con HSP (Perfil de audífono), no se podrá seleccionar CLEAR MEMOR Y y NUMBER DIAL . ! Si no utiliza funciones diferentes a SEARCH PHONE , CONNECTION OPEN , CONNECT PHONE , PH BOOK TRANSFER , DISCONNECT PHONE , NUMBER DIAL y CLEAR MEMOR Y en uno[…]
-
Page 102: Pioneer DEH-P6000UB
Registro de un teléfono móvil conectado 1 Utilice MUL TI-CONTROL para seleccio- nar SET PHONE en el menú de funciones. 2 Presione MUL TI-CONTROL para mostrar el modo de ajuste. 3 Haga girar MUL TI-CONTROL para selec- cionar la asignación de registro. P1 (teléfono de usuario 1) — P2 (teléfono de usuario 2) — P3 (teléfono de usuario 3) —[…]
-
Page 103: Pioneer DEH-P6000UB
4 Presione MUL TI-CONTROL para co- nectar el teléfono móvil seleccionado. Mientras se realiza la conexión, se mostrará CONNECTING . Una vez completada la cone- xión, aparece CONNECTED . Conexión automática a un teléfono registrado 1 Utilice MUL TI-CONTROL para seleccio- nar AUTO CONNECT en el menú de funcio- nes. 2 Presione MUL TI-CONTROL […]
-
Page 104: Pioneer DEH-P6000UB
8 Presione MUL TI-CONTROL para hacer una llamada. # P resione MUL TI-CONTROL y mantenga pre- sionado para cambiar a la pantalla de elimina- ción del directorio de teléfonos. P ara obtener más información, consulte Borrar memoria en esta pá- gina. Uso del Historial de llamadas Importante Asegúrese de estacionar el vehículo y poner el freno de[…]
-
Page 105: Pioneer DEH-P6000UB
3 Haga girar MUL TI-CONTROL para selec- cionar un alimento. PHONE BOOK (directorio de teléfonos) — MISSED (historial de llamadas perdidas) — DIALLED (historial de llamadas marcadas) — RECEIVED (historial de llamadas recibidas) — ALL (borrar toda la memoria) # Si desea borrar todo el Directorio de teléfonos y la lista del historial de llam[…]
-
Page 106: Pioneer DEH-P6000UB
% Avance rápido o retroceso Presione MUL TI-CONTROL y mantenga pre- sionado hacia la izquierda o hacia la derecha durante cerca de un segundo y luego suelte. % Selección de una pista Pulse MUL TI-CONTROL izquierda o derecha. Notas ! Mientras el reproductor de CD múltiple realiza las funciones preparatorias, se visualiza READY . ! Si aparece un m[…]
-
Page 107: Pioneer DEH-P6000UB
P AUSE Consulte Pa u s a d e l a r e p r o — ducción en la página 76. TITLE INPUT Consulte Introducción de tí- tulos de discos en la página 76. Notas ! T ambién se puede seleccionar la función pre- sionando FUNCTION en el mando a distancia. ! P ara volver a la pantalla anterior , presione BACK . ! P ara volver al menú principal, presione du[…]
-
Page 108: Pioneer DEH-P6000UB
Reproducción de la lista de reproducción ITS La reproducción ITS le permite escuchar las pistas que ha introducido en su lista de repro — ducción ITS. Cuando activa la reproducción ITS, se comenzarán a reproducir las pistas de la lista de reproducción ITS en el reproductor de CD múltiple. 1 Seleccione la gama de repetición. 2 Utilice MUL T[…]
-
Page 109: Pioneer DEH-P6000UB
Introducción de títulos de discos Utilice la función de introducción de títulos de discos para almacenar hasta 100 títulos de CD (con la lista de reproducción ITS) en el repro- ductor de CD múltiple. Cada título puede tener una longitud de hasta 10 caracteres. P ara obtener más información sobre el funcio- namiento, consulte Introducció[…]
-
Page 110: Pioneer DEH-P6000UB
! Mantenga presionado MUL TI-CONTROL iz- quierda o derecha para saltar las emisoras. La sintonización por búsqueda comienza inme- diatamente después de que suelte MUL TI-CONTROL . Almacenamiento y recuperación de emisoras Se pueden almacenar con facilidad hasta 12 emisoras para recuperarlas posteriormente. ! Se pueden almacenar en la memoria 12[…]
-
Page 111: Pioneer DEH-P6000UB
Mensajes de error Cuando contacte con su proveedor o con el ser vicio técnico Pioneer más cercano, asegú- rese de haber anotado el mensaje de error . Reproductor de CD incorporado Mensaje Causa Acción ERROR-11, 12, 17, 30 Disco sucio Limpie el disco. ERROR-11, 12, 17, 30 Disco rayado Reemplace el disco. ERROR-10, 11, 12, 15, 17, 30, A0 Problema[…]
-
Page 112: Pioneer DEH-P6000UB
CHECK USB El conector USB o el cable USB está cortocircui- tado. V erifique que no esté enganchado en algo ni dañado el conector USB o el cable USB. El reproductor de audio portátil USB/memoria USB conectado consume más de 500 mA (corrien- te máxima admi- sible). Desconecte el re- productor de audio portátil USB/me- moria USB y no lo utilice[…]
-
Page 113: Pioneer DEH-P6000UB
! No toque la super ficie grabada de los dis- cos. ! Almacene los discos en sus cajas cuando no los utilice. ! Evite dejar discos en ambientes excesiva- mente calientes o expuestos a la luz solar directa. ! No fije etiquetas, no escriba ni aplique sus- tancias químicas en la super ficie de los discos. ! P ara limpiar un CD, pásele un paño suave […]
-
Page 114: Pioneer DEH-P6000UB
! F recuencia de muestreo: 16 kHz a 48 kHz (LPCM), 22,05 kHz a 44,1 kHz (MS ADPCM) Reproductor de audio USB/ memoria USB Compatibilidad del reproductor de audio USB/memoria USB ! V ersión USB: 2.0, 1.1 y 1.0 ! V elocidad de transferenc ia de datos USB: velocidad total ! Clase USB: Dispositivo MSC (Clase de al- macenamiento masivo) ! Protocolo: bul[…]
-
Page 115: Pioneer DEH-P6000UB
! Puede producirse una pequeña demora cuando se inicie la reproducción de archi- vos de audio en un reproductor de audio portátil USB/memoria USB con numerosas jerarquías de carpetas. ! No conecte otro dispositivo que no sea un reproductor de audio portátil USB/memoria USB. ! Las operaciones pueden variar según el tipo de reproductor de audio[…]
-
Page 116: Pioneer DEH-P6000UB
Archivos de audio comprimidos en el disco ! Según la versión del Windows Media Player utilizada para codificar los archivos WMA, es posible que no se visualicen correcta- mente los nombres de álbumes y demás in- formación de texto. ! La reproducción de archivos WMA/AAC co — dificados con datos de imagen puede tar- dar varios minutos en comenz[…]
-
Page 117: Pioneer DEH-P6000UB
П Р С Т У Ф Х Ц Ч Ш , Щ Ъ Ы Ь Э Ю Я Información adicional Es 117 Apéndice Español[…]
-
Page 118: Pioneer DEH-P6000UB
Especificaciones Generales Fu e n t e d e a l i m e n t a c i ó n …….. 14,4 V CC (10,8 V a 15,1 V permisible) Sistema de conexión a tierra …………………………………………….. T i p o n e g a tivo Consumo máximo de corriente …………………………………………….. 10,0 A Dimensiones (An × Al × Pr): DIN B a s […]
-
Page 119: Pioneer DEH-P6000UB
Sintonizador de MW Gama de frecuencias ………… 5 3 1 k H z a 1 6 0 2 k H z ( 9 k H z ) Sensibilidad utilizable ……….. 1 8 µ V ( S e ñ a l / r u i d o : 2 0 d B ) R e l a c i ó n d e s e ñ a l a r u i d o …. 65 d B (red IEC -A) Sintonizador de L W Gama de frecuencias ………… 1 5 3 k H z a 28 1 k H z Sensibilidad utilizable …..[…]
-
Page 120: Pioneer DEH-P6000UB
PIONEER CORPORA TION 4-1, MEGURO 1-CHOME, MEGURO-KU T OKY O 153-8654, JAP AN PIONEER ELECTRONICS (USA) INC. P .O. Bo x 1540, Long Beach, California 90801-1540, U.S.A. TEL: (800) 421-1404 PIONEER EUROPE NV Haven 1087, K eetberglaan 1, B-9120 Melsele, Belgium TEL: (0) 3/570.05.11 PIONEER ELECTRONICS ASIACENTRE PTE. L TD. 253 Alexandra Road, #04-01, S[…]