
Displayed below is the user manual for F4-210 by TerraMaster which is a product in the NAS & Storage Servers category.
This manual has pages.

TerraMaster NAS
Model: F4-210
Fundamentals and Preliminaries
Copyright © 2019 TerraMaster All Rights Reserved.
Data Storage Master

Contents
2. Hardware Installation
3. Software Installation
4. Initialisation
1
2
5
7
1. Overview 2
5. Getting Started 11
Model:F4-210
2. Hardware Installation
1. Overview
A TNAS product includes hardware, operating systems (OS), and other auxiliary applications. Therefore, you
should carefully read the instructions prior to operation. For any questions, please visit the “Help”
section at TerraMaster’s official website, or contact our technical support team at sales@terra-master.com.
Once you receive your new TNAS, please check to ensure that the package includes the items detailed
below. If any items are missing, please contact the reseller immediately.
Once you receive your new TerraMaster TNAS product, please install and set up your TNAS according to the
“Quick Installation Guide”.
Please note that given our commitment to the continuous improvement of our products, their
appearances, designs, and specifications may be subject to change without prior notification.
Finally, the images and illustrations in this instruction manual may be slightly different from the actual
product, and so please always refer to the actual product.
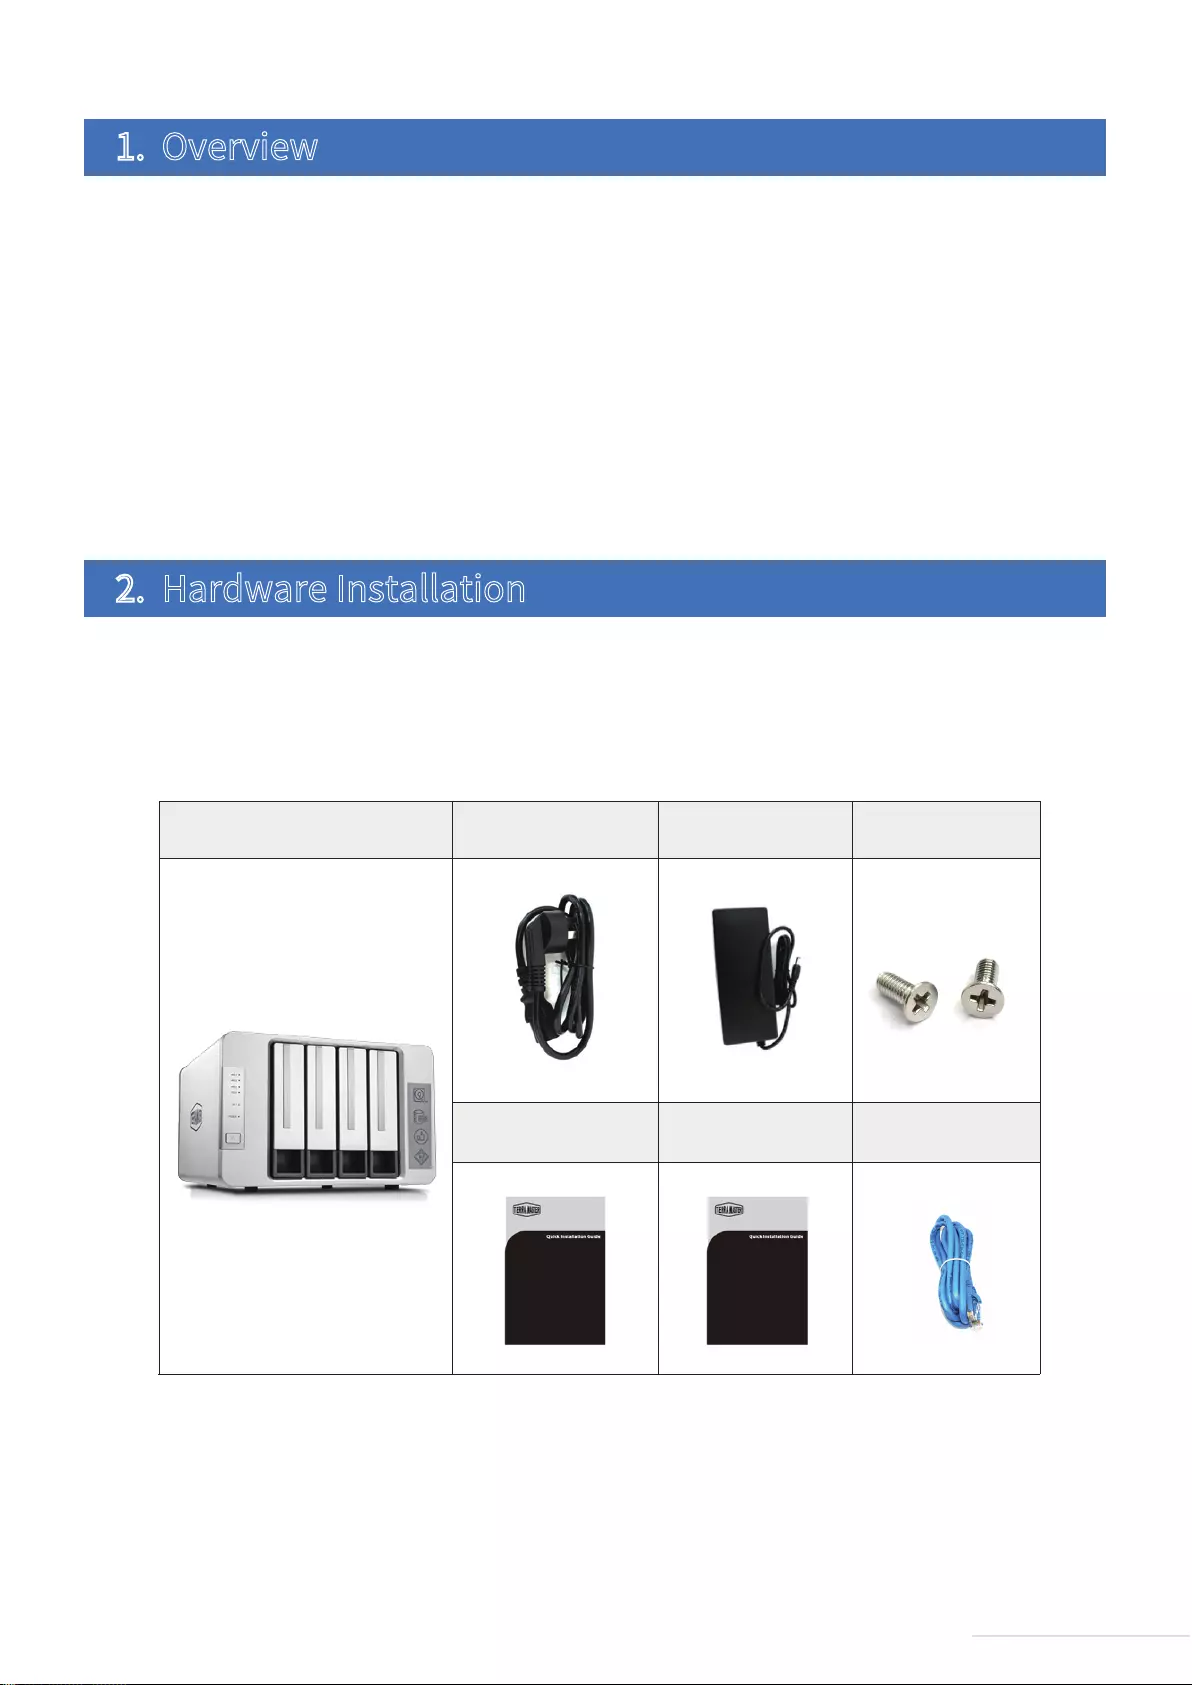
2.1 Package List
2
Model:F4-210
TNAS unit X 1 Power core X 1 Power adaptor X 1 Several screws
Installation guide X 1 Network core X 1
Product brochure
(optional)
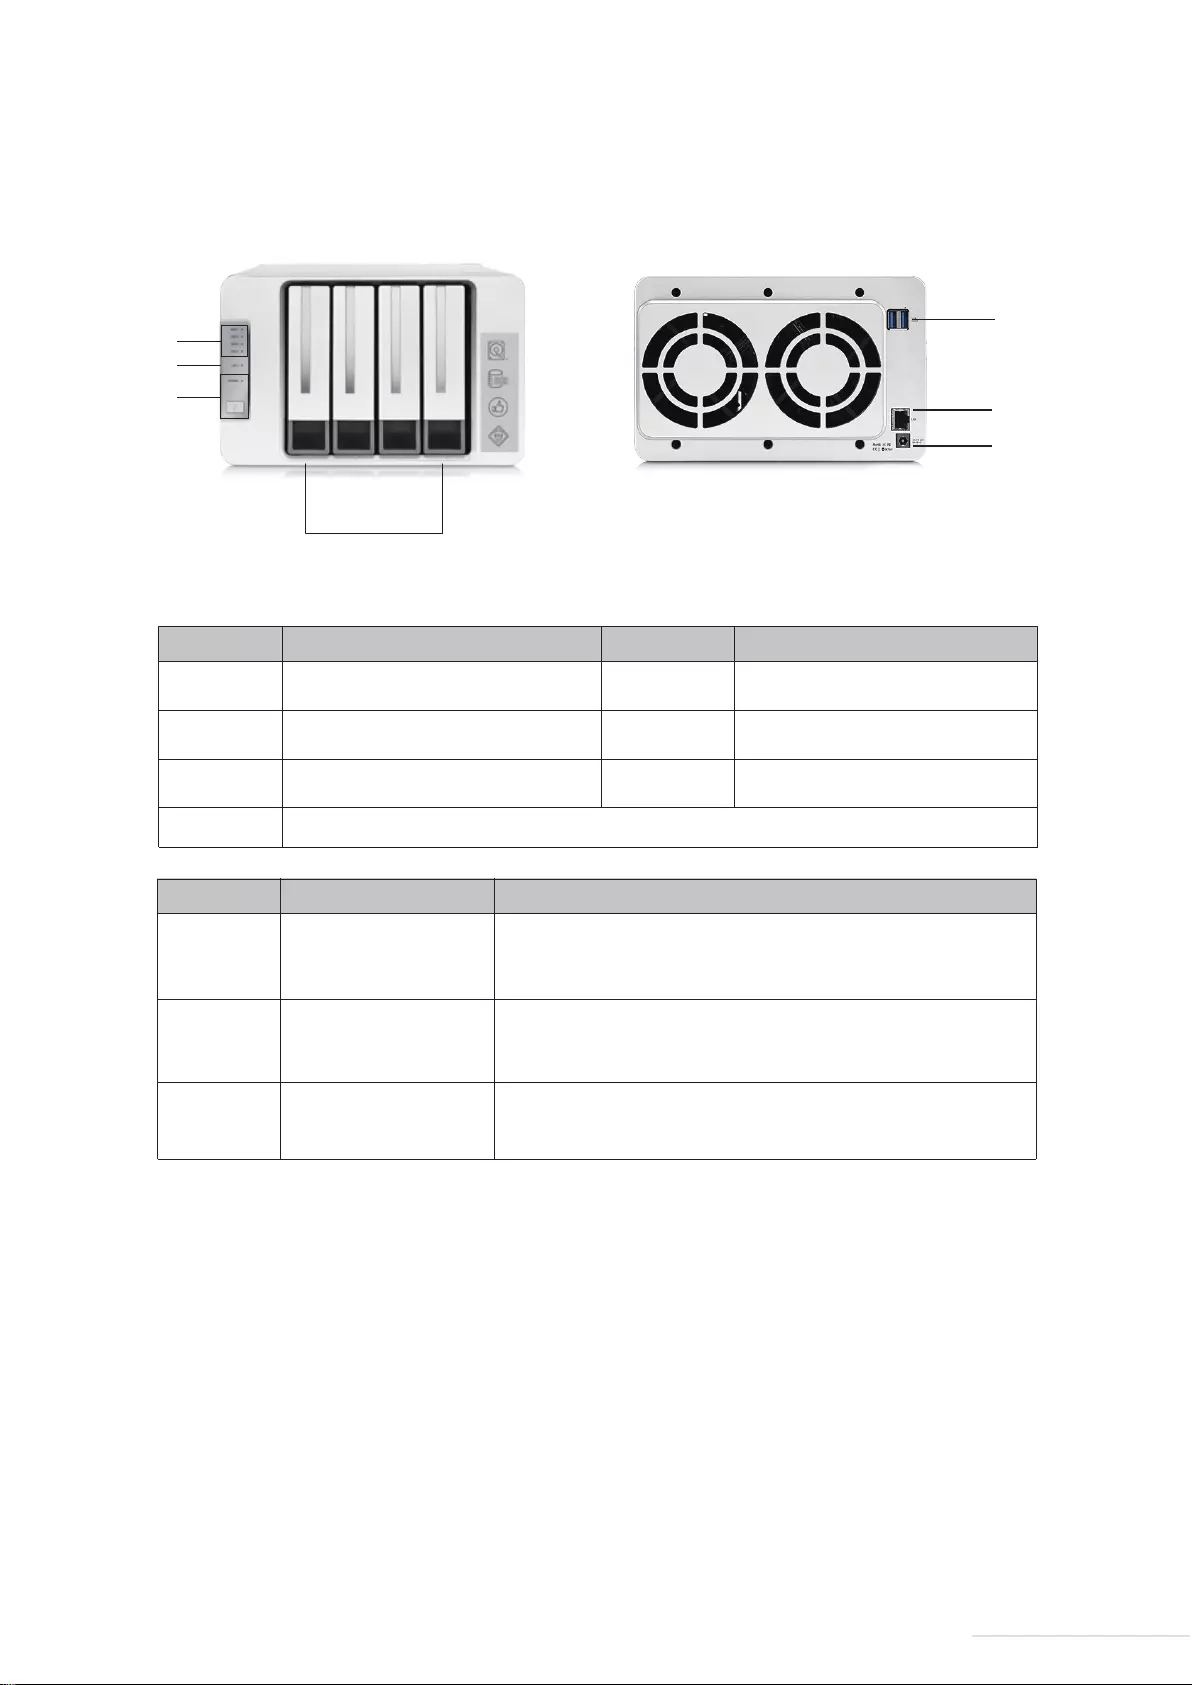
Panel Illustration: Rear Cover Illustration:
2.2 Appearance
⑤
⑥
⑦
SN Description
Item
Power interface
USB 3.0 host (×2)
Network interface
DC 12V power input
NOTE: Do not use a third-party power adaptor.
Use to connect USB storage device or USB wireless adaptor
1000M/100M bps network interface
①
②
③
④
SN
⑤
⑥
⑦
SN
Item Item
Hard drive tray
Network indicator
Power switch/Power indicator
Hard drive indicator
Power interface
USB 3.0 host interface (×2)
Network interface
3
Model:F4-210
②
①
③
④
⑤
⑦
⑥

A TNAS may be installed with or without a hard drive, since different models are available for purchase. If
you purchase a TNAS without a hard drive, you should purchase a hard drive separately. Only after hard
drives have been installed and initialised can the TNAS be used.
Please refer to the “Quick Installation Guide” to complete hard drive installation.
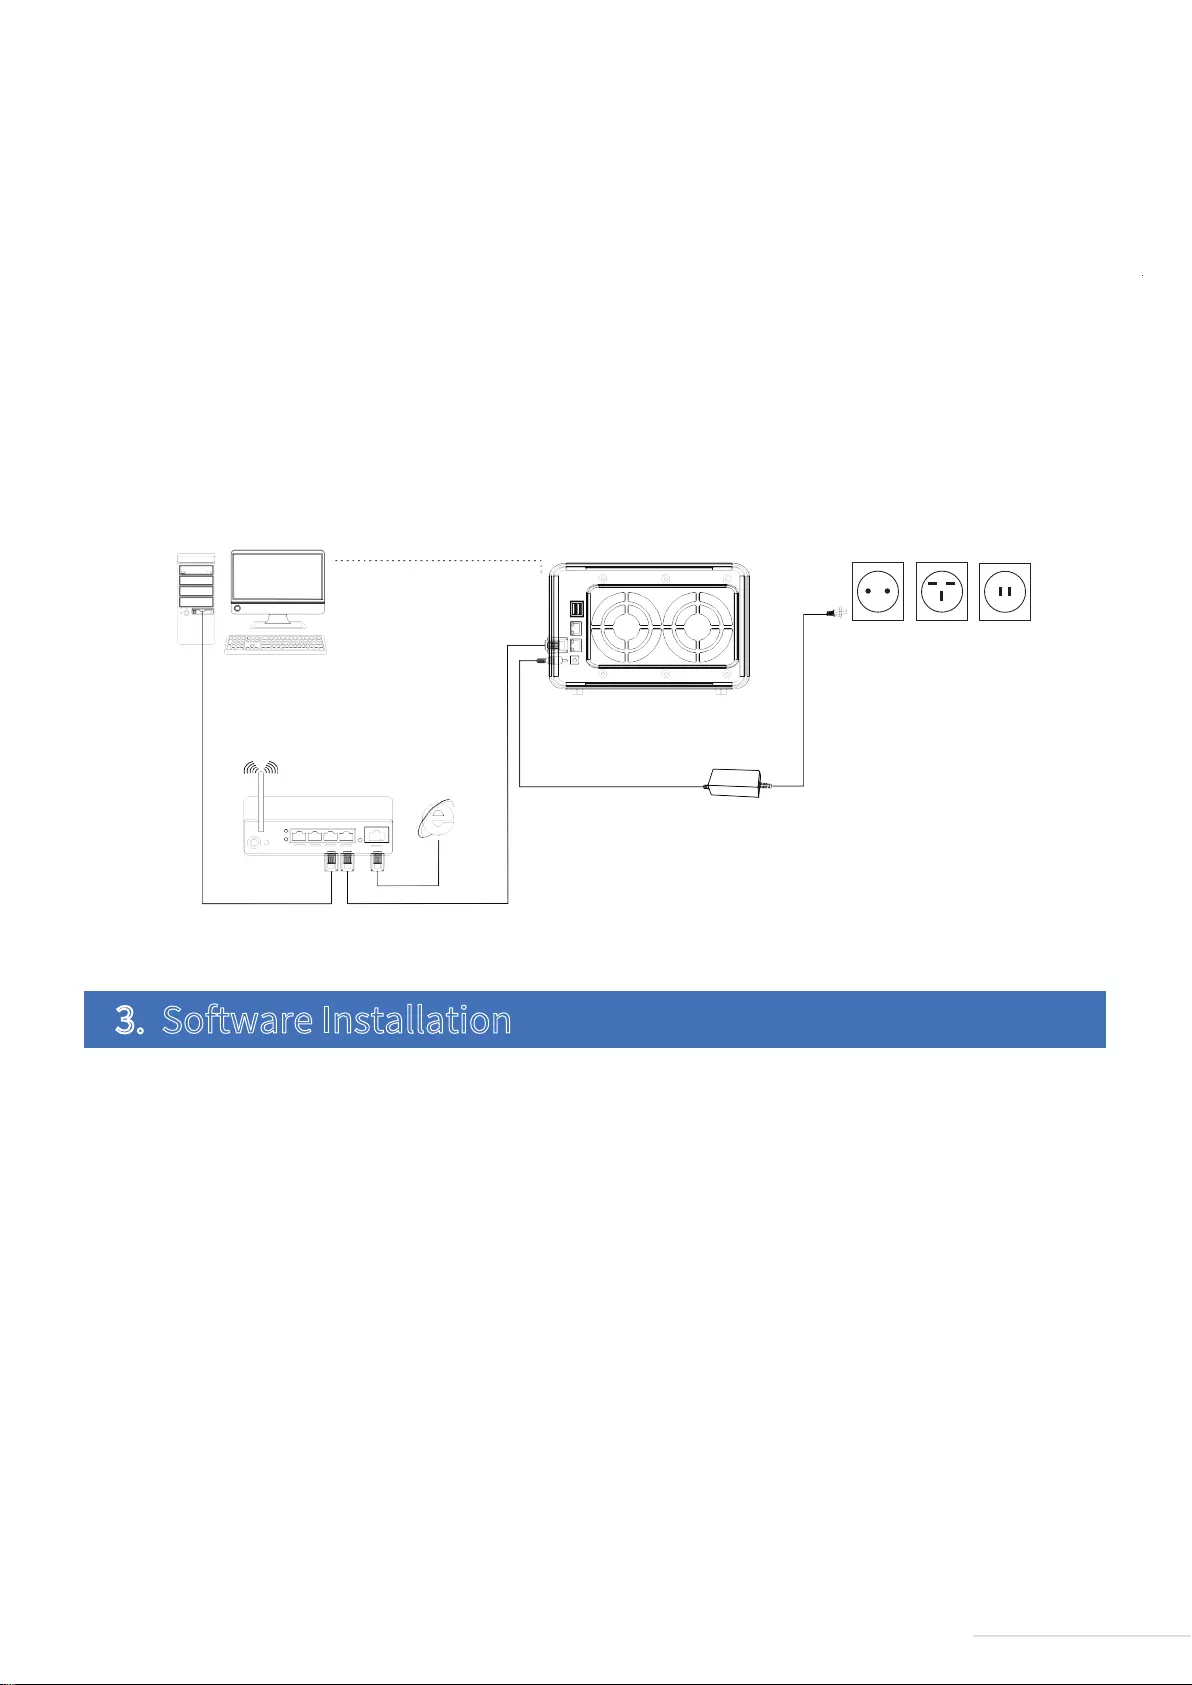
Therefore, to complete the connection, please follow the instructions below:
Step 1:
Connect TNAS to the network using a network cable. The possible network devices that TNAS can connect
to can be routers, hubs, network switching.
Step 2:
Connect TNAS to a power supply using the supplied power adapter (Warning: Please do not use a third-party
power adapter. If you do, the device may sustain severe damage, and in extreme cases, damage to the
physical body can occur).
TNAS should be installed with hard drives of the following type: firstly, 2.5/3.5 inch SATA hard drive; or
secondly, 2.5 SATA SSDs. TNAS is a durable storage device, which means that in order to operate for long
periods of time, high-quality hard drives are required. Therefore, please visit TerraMaster’s official
website to read our “Hard Drive Compatibility” guide, and then select the correct hard drive for your
TNAS.
2.3 Indicators and Buzzers
2.4 Hard Drive Installation
Before it can function properly, your TNAS device needs to be connected to the network and powered on.
2.5 Connection
②
③
④
SN Description
Indicator
Hard drive indicator
Power indicator
LAN network indicator
Green: Normal operation status
Green (flickering): Reading/writing data
Off: No hard drive detected
On: Power on
Off: Power off
Green: Network connection is normal
Off: Network disconnected
Buzzer Sound Description
Short beeps
Long beeps
1. Booting complete
2. System shutting down
An exception has occurred on the system. Please log in to
TOS to fix the exception and turn off the buzzer manually.
4
Model:F4-210
Step 3:
Press the power button to power on TNAS.
Step 4:
If the hardware indicator is always red, this indicates that the hard drive is functioning abnormally. The
hard drive may be damaged, or the hard drive may not be compatible with the TNAS device. If this
happens, please re-install or replace the hard drive and try again.
Step 5:
If the hard drive indicators and network indicators display a normal connection, your TNAS hardware is
ready.
To ensure that TNAS functions properly, please install some necessary software.
TNAS PC is a desktop application designed for TNAS devices. It helps you to quickly search, log in, or set up
your TNAS. The application is available in both Mac OS and Windows OS versions.
1. Visit www.terra-master.com and click “Download”
2. Select your TNAS model
3. Locate TNAS PC using the download checklist
4. Choose a version that works for you and click “Download”
5. Install the TNAS PC application you just downloaded onto your computer
Please follow the instructions below to download the TNAS PC application:
3.1 TNAS PC
3. Software Installation
5
Model:F4-210
Computer
Router Network
Power
F4-210 Power
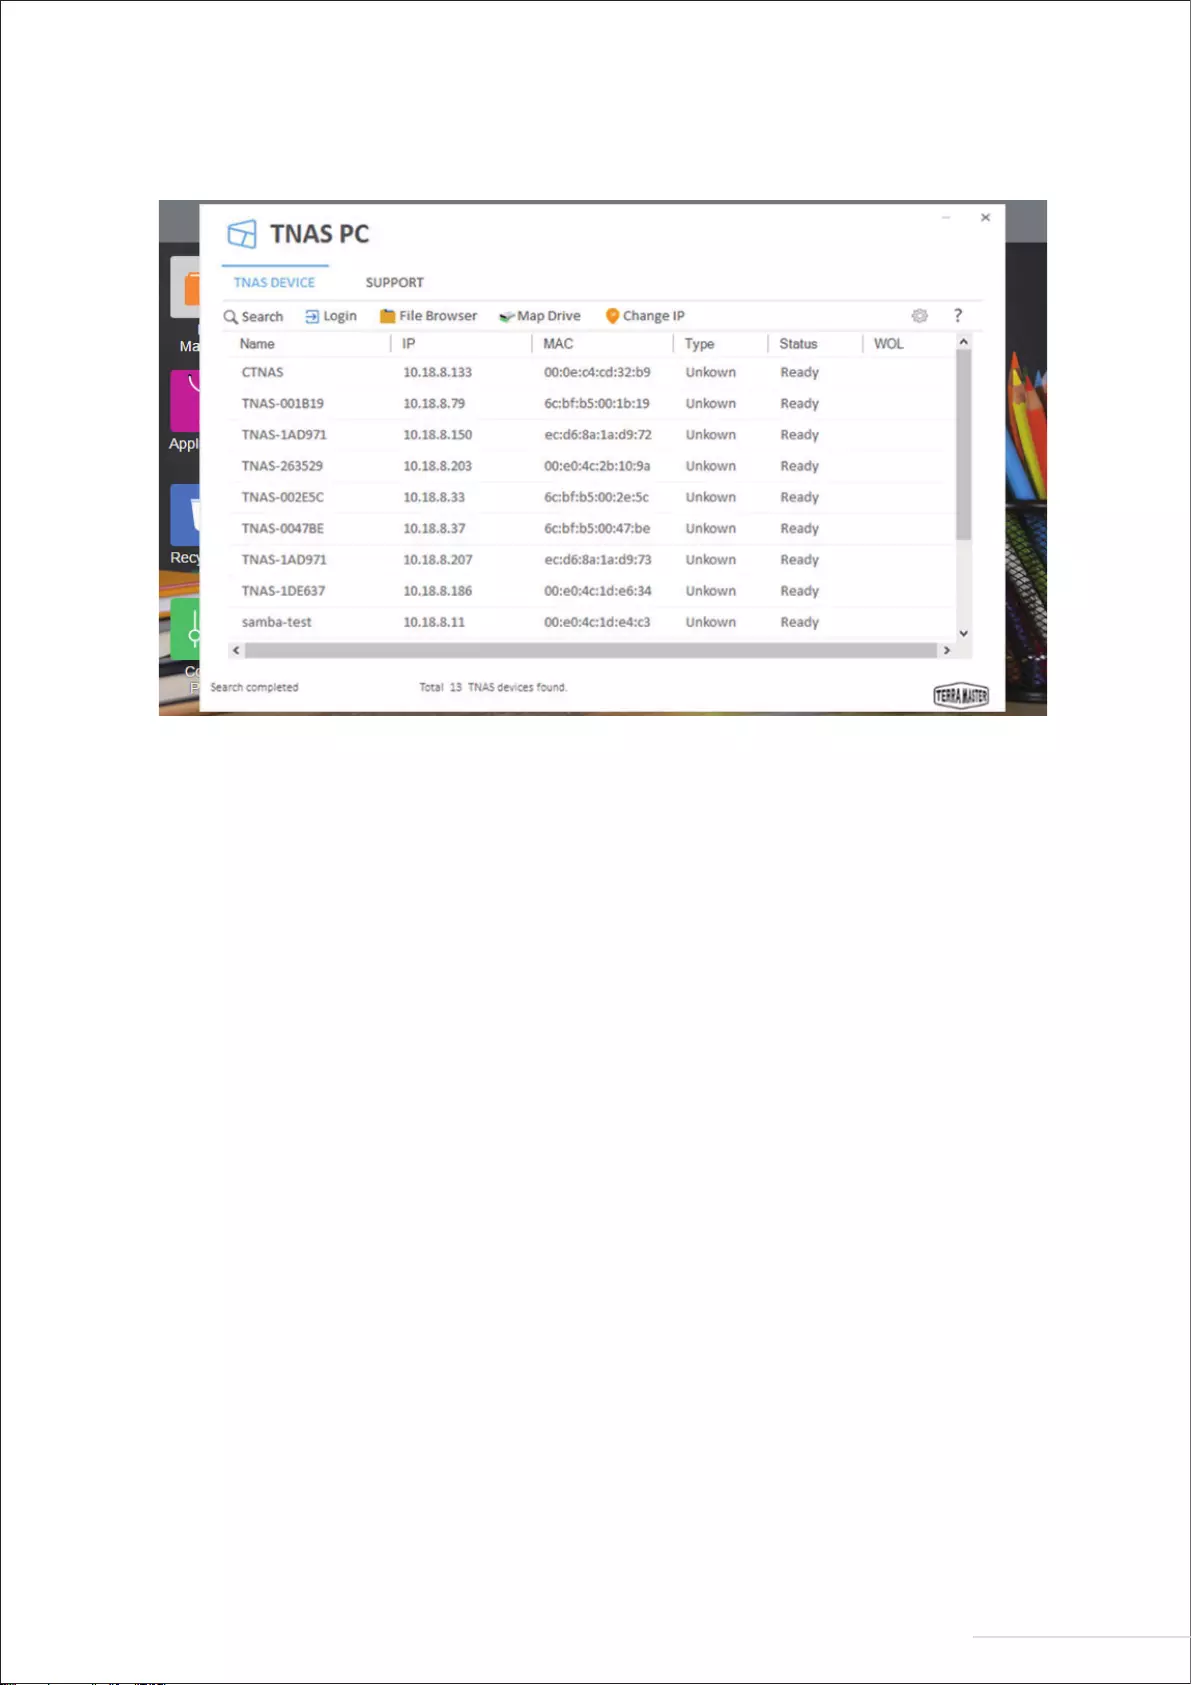
Search:
You can access your TNAS device only after it has been found on the network. To search for your TNAS
device, click the “Search” button (Note: You can only search when TNAS and your computer are on the
same sub-network).
Login:
To log in to TNAS’s advanced settings menu (TOS), select your TNAS and click “Login” (Note: Only users
with administrator privileges can use TOS’s advanced features).
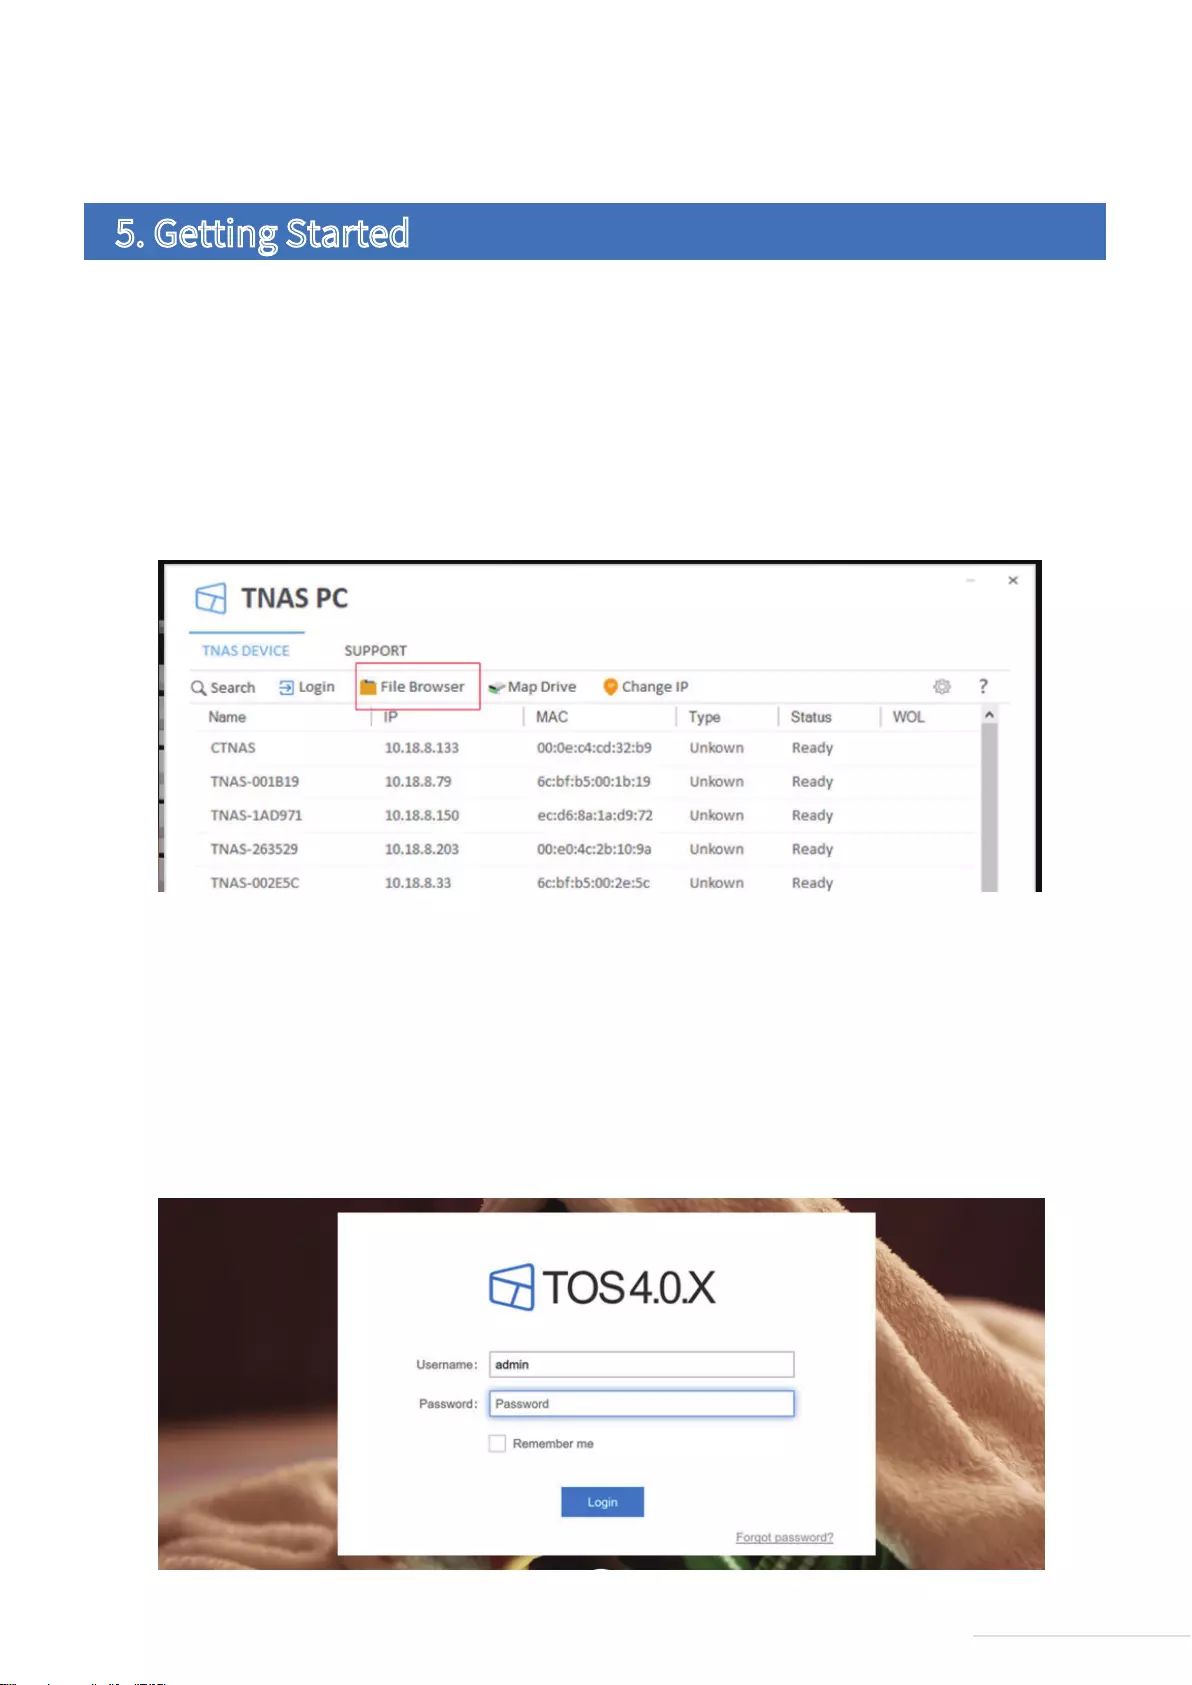
File Browser:
If you need to browse files in TNAS or write data to the device, select your TNAS in the menu and click “File
Browser” (Note: At this point, you need to have a username and password).
Map Drive:
By mapping your drive, you can simplify file management by creating a shortcut to frequently used folders.
To create a mapped drive, select your TNAS and click “Map Drive” (Note: The Mac OS version of TNAS PC
does not have this feature).
Change IP:
You can use the “Change IP” option to manually change your TNAS IP address. You may need to do this if
your TNAS IP address conflicts with the network IP address segment. Otherwise, TNAS will be inaccessible.
TerraMaster’s Operating System (TOS) was specially developed for TNAS.
The following are the core features of TNAS PC
3.2 TOS
6
Model:F4-210
To access files via mobile devices (e.g., iOS or Android devices), please download the TNAS mobile app to
your mobile device.
To download the iOS and Android versions of TNAS mobile, you can search for «TNAS mobile» in the App
Store and Google Play, respectively. Alternatively, visit the “Download” on TerraMaster’s official website
to download the app of android version for free (Note: Your username and password are required to use our
app, so please remember to obtain these details from your TNAS administrator).
Scan the QR code to download the TNAS mobile app
Newly purchased TNAS devices must be initialised prior to use. In the process of initialisation, TOS will be
installed onto your TNAS. Please see the section on “Initialisation” for an operation guide to TOS
installation. You can also update your TOS software at any time after completing initialisation.
Your newly purchased TNAS must be initialised prior to use. However, before you initialise your device, please ensure the
following: (1) That your TNAS hardware is installed properly; and (2) That you have installed the TNAS PC desktop application
on your computer.
3.3 TNAS Mobile App
4.Initialisation
7
Model:F4-210

Step 1: Search for TNAS Devices
Before initialising your device, you need to find your TNAS device on the network. To find your TNAS, open the
TNAS PC desktop application on your computer and click “Search”.
Step 2: Start Initialisation
Select your TNAS from the search list and click “Login”. If your TNAS is not initialised, you will be redirected
to the initialisation page. Please Click “Start” to initiate the initialisation process.
8
Model:F4-210
Step 3: Hard Drive Detection
If the installed hard drive is detected by TNAS, bootstrap initialisation will automatically proceed to the next
step. If the hard drive is not installed, please install the hard drive and click “Recheck”. Since TNAS
supports hard drive hot swap, the hard drive can be directly installed without having to turn the power off.
After TOS installation is complete, TNAS will take several minutes to restart. Please wait patiently for this
process to finish. Once TNAS has restarted successfully, you will be guided to the next step.
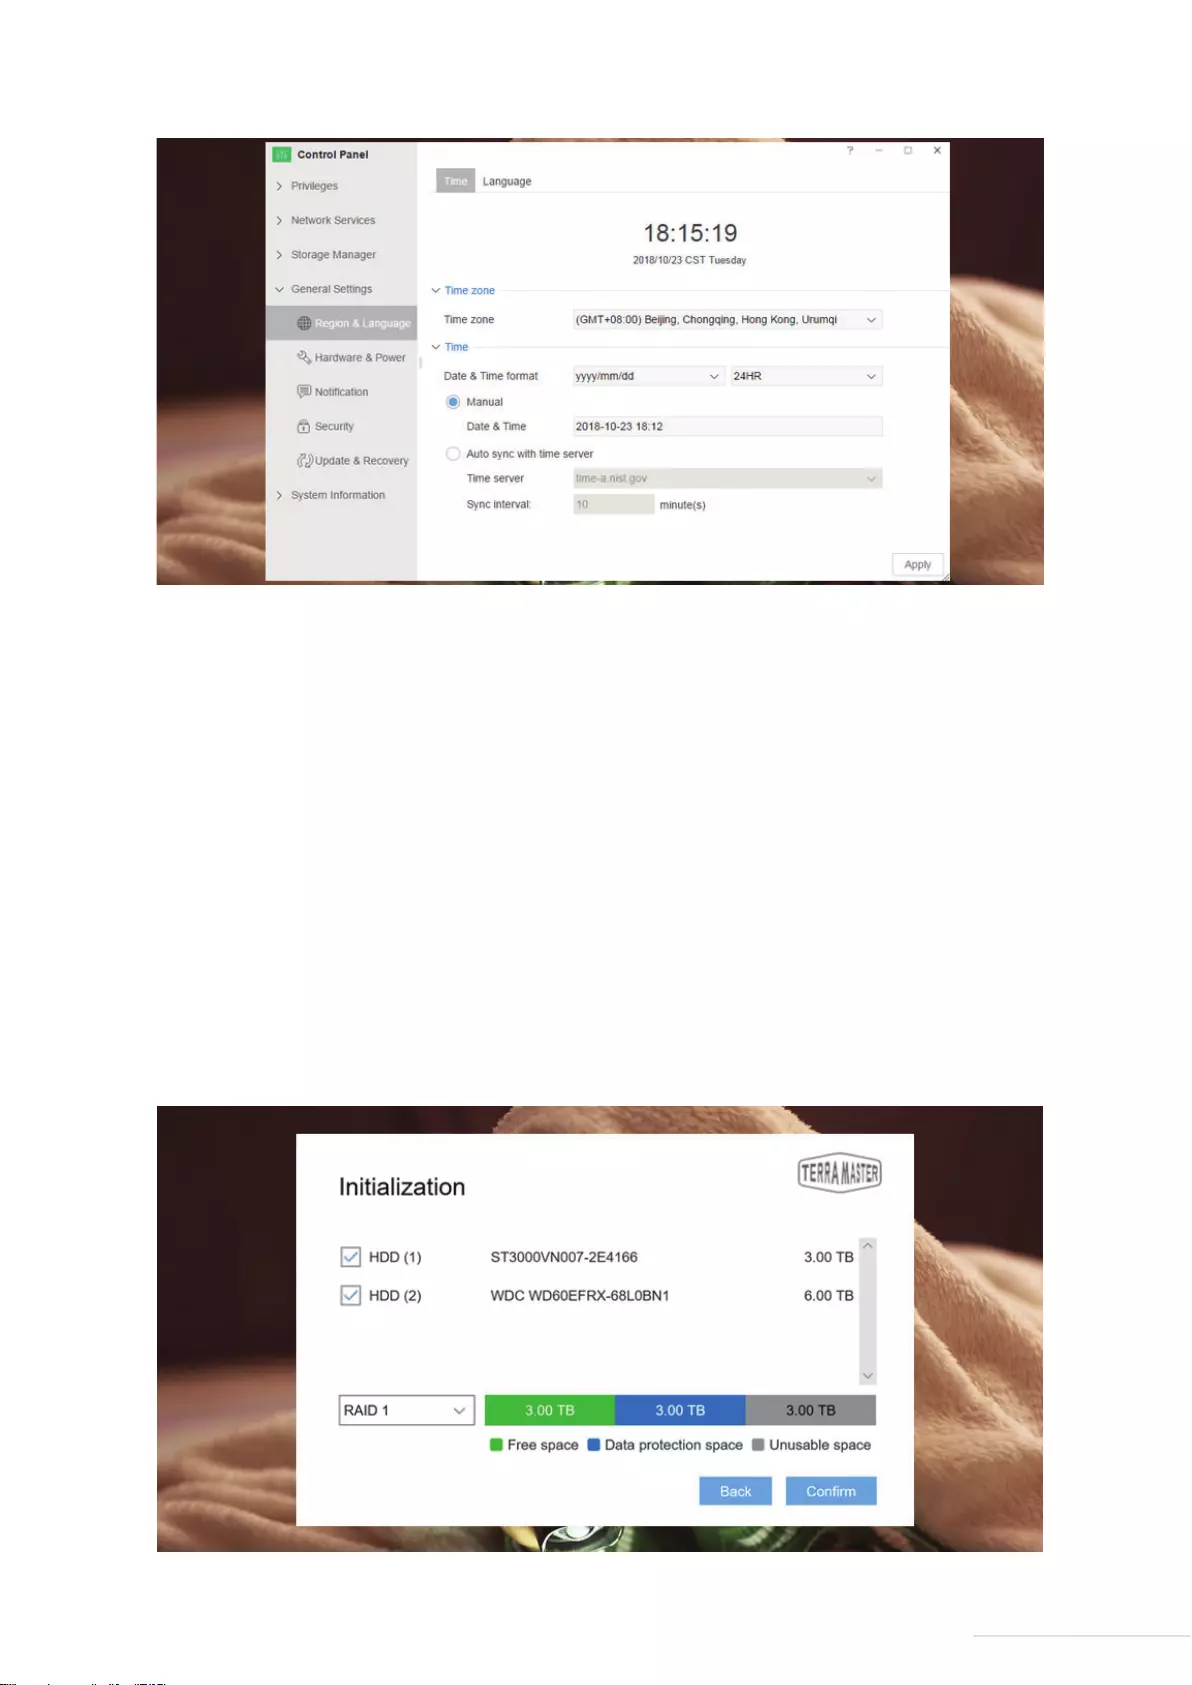
Step 6: Basic Settings
Complete the basic settings for TNAS according to the instructions. This will involve setting a password,
inputting device name, selecting your time zone, and clicking “Next”.
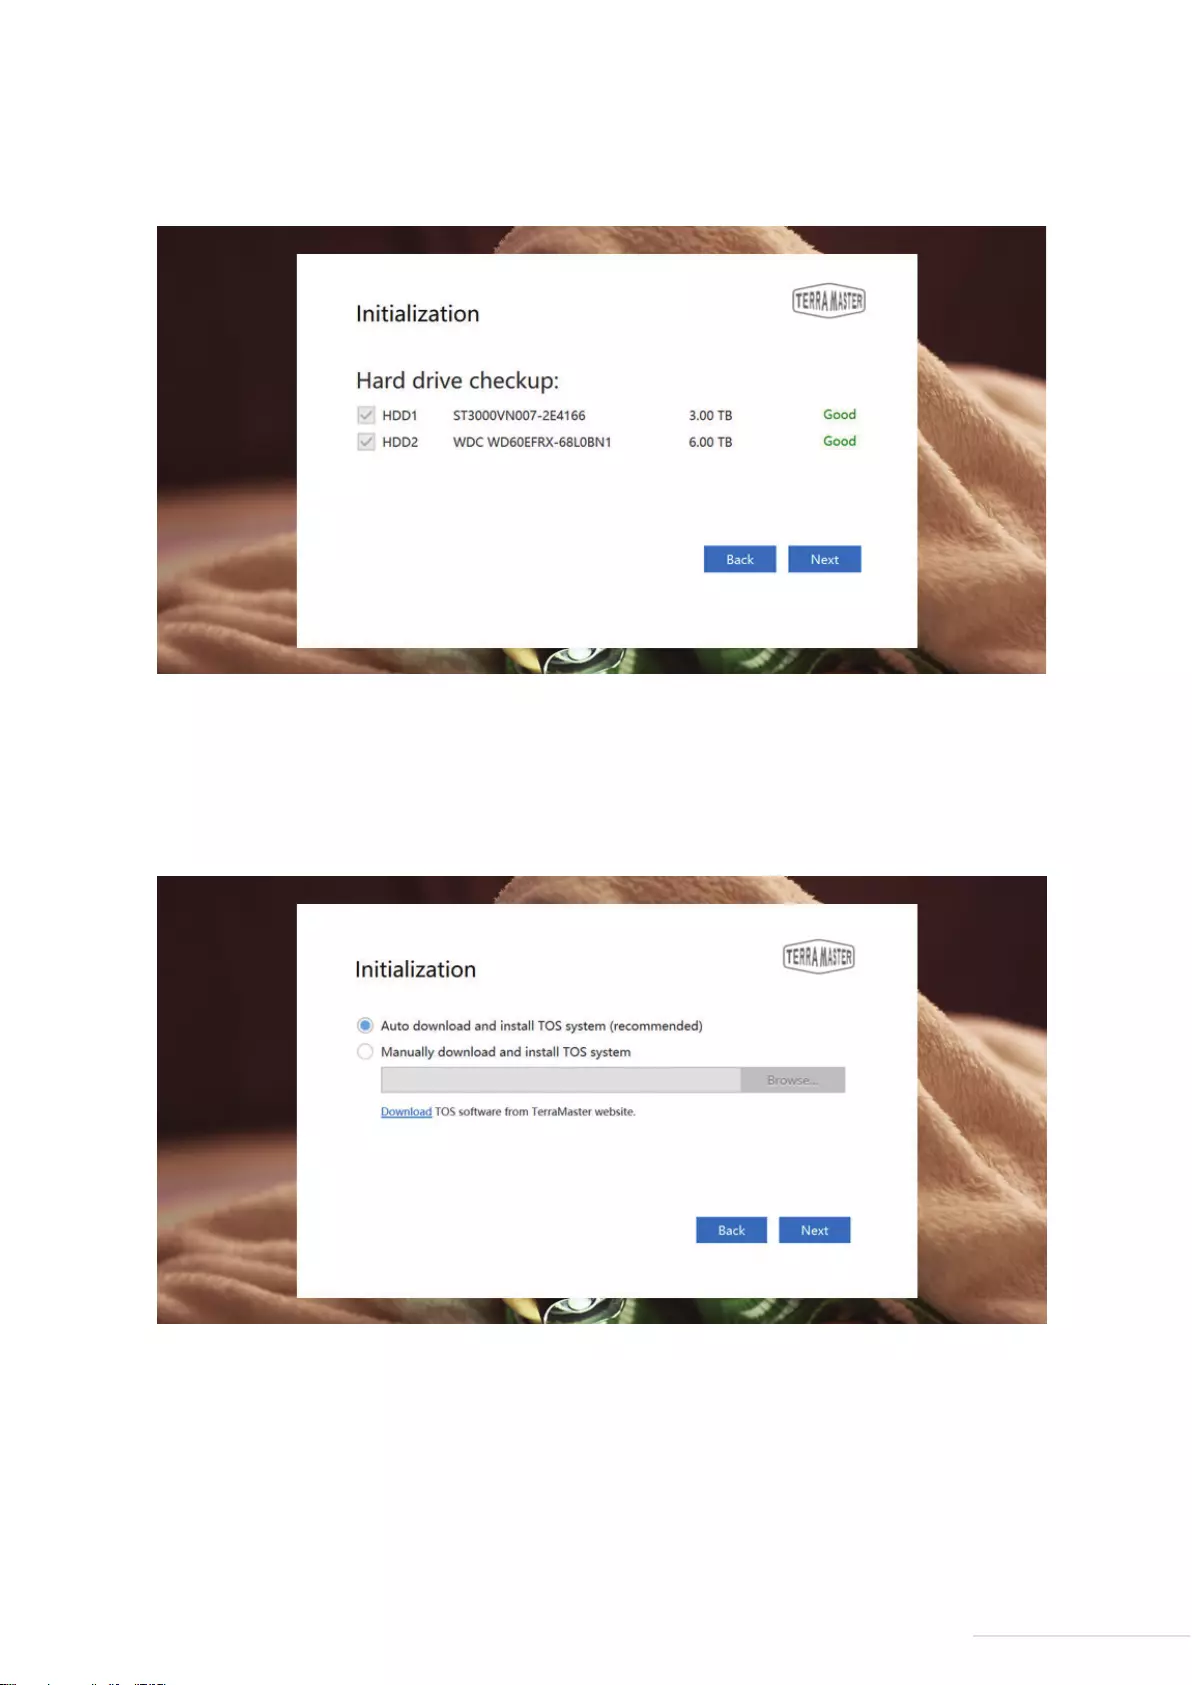
Step 4: Hard Drive Check-Up
Your TNAS will assess the health status of the hard drive. If the health status is good, please click “Next”. If
the test results indicate a risk, we recommend that you replace the abnormal hard drive.
Step 5: Install TOS
Follow the page prompts to install TOS. If your TNAS is connected to the Internet, we recommend that you
choose the “Online Install” option. Otherwise, choose the “Manual Install” option. If you select
“Manual Install”, please visit TerraMaster’s website to download the TOS software package from the
“Download” before you process the installation.
9
Model:F4-210
Step 7: Administrator Settings
Please set the administrator password and complete the administrator security mailbox (this is used for
administrator authentication) (Note: It is extremely important that you take care when completing this step.
If the administrator loses their password, completing the administrator security mailbox will allow them to
reset their password). Afterwards, click “Send Code”, and the security mailbox will receive an email with a
verification code. Please log in to the security mailbox in order to obtain your code, and then complete the
administrator settings.
Step 8: Create RAID
Please select the RAID type, and then select the hard drive you intend to use to create RAID and click Confirm.
There are two file systems to choose from: EXT 4 and Btrfs. The system default file format is Btrfs. If you need
to modify the file format, go to the control panel of TOS. When the RAID has been created, hard drive
formatting will occur. Therefore, please back your data up in advance (Note: Please take a moment to wait for
hard drive formatting to finish. When you see “Congratulations! Initialisation is complete!”, this indicates
that your TNAS is ready for use).
10
Model:F4-210
As a final note, if you receive an error message stating that the number of hard drives you have picked does
not match the RAID type you have selected, please reset your settings.
This section provides a quick overview of your TNAS device’s core functions.
To store files to TNAS, the most convenient and efficient way is to use the Samba file service (for Windows OS
users) or the AFS file service (for Mac OS Users).
To use these services, select your TNAS from the menu in TNAS PC and click “File Browser”. Then, enter
your username and password, and you will be able to access the file browsing page. There, you can copy,
delete, and edit your files. This feature is used on Windows OS and Mac OS in the same way.
For added efficiency, you can also map your drive to display frequently accessed folders or to create quick
links. This method is only applicable to windows OS users, Mac OS users create shortcuts in a slightly different
way, please visit the TOS Help for more details.
If you need to use the advanced settings features (e.g., to create users, manage permissions, monitor system
resources, or to install applications), please log in to TOS. Only users with administrator privileges can use
TOS’s advanced features.
5.1 Save Files to TNAS
5.2 Advanced Settings
5. Getting Started
11
Model:F4-210
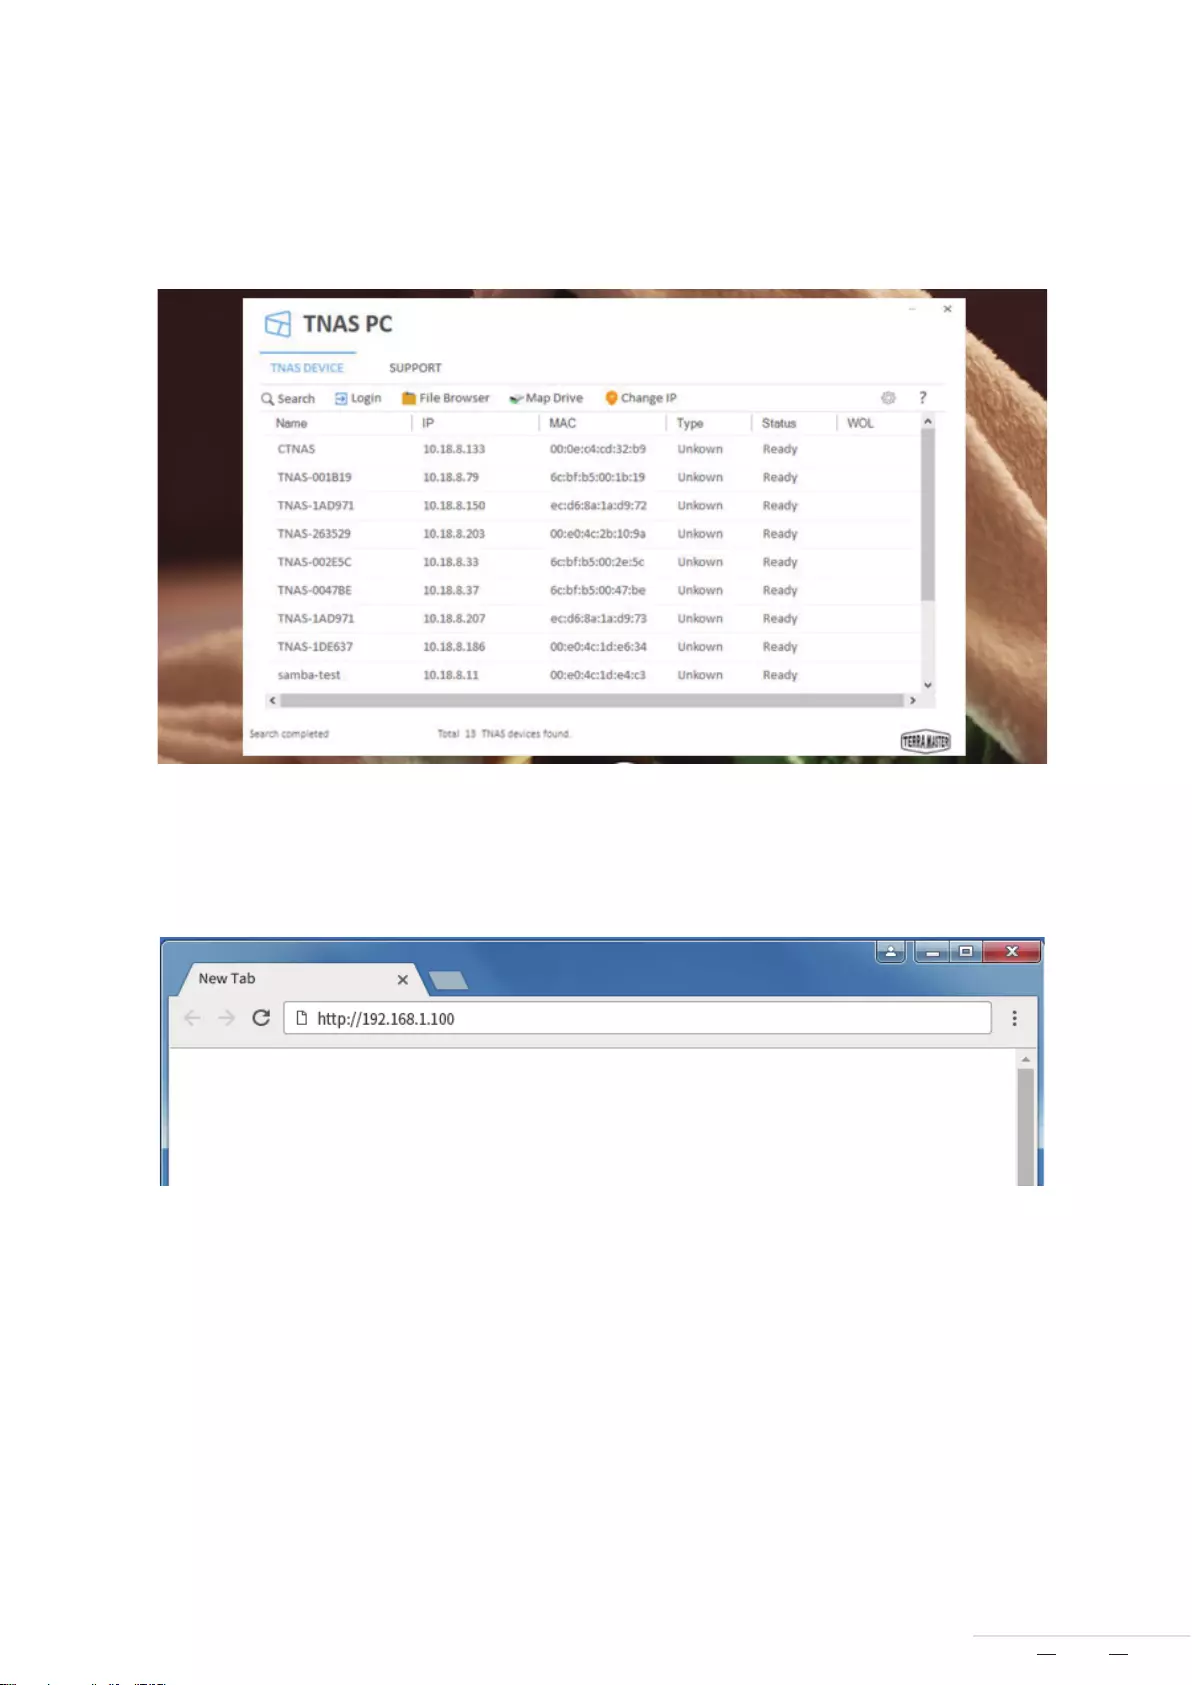
1. Via TNAS PC
Run the TNAS PC application on your computer, select your TNAS from list, and click “Login”.
2. Via the TNAS IP address
Input the TNAS IP address (e.g., http://192.168.1.100) in your web browser’s address bar and press “Enter”
(Note: You can obtain your TNAS IP address from the TNAS PC desktop application).
You can log in to TOS in two ways:
END
12
Model:F4-210
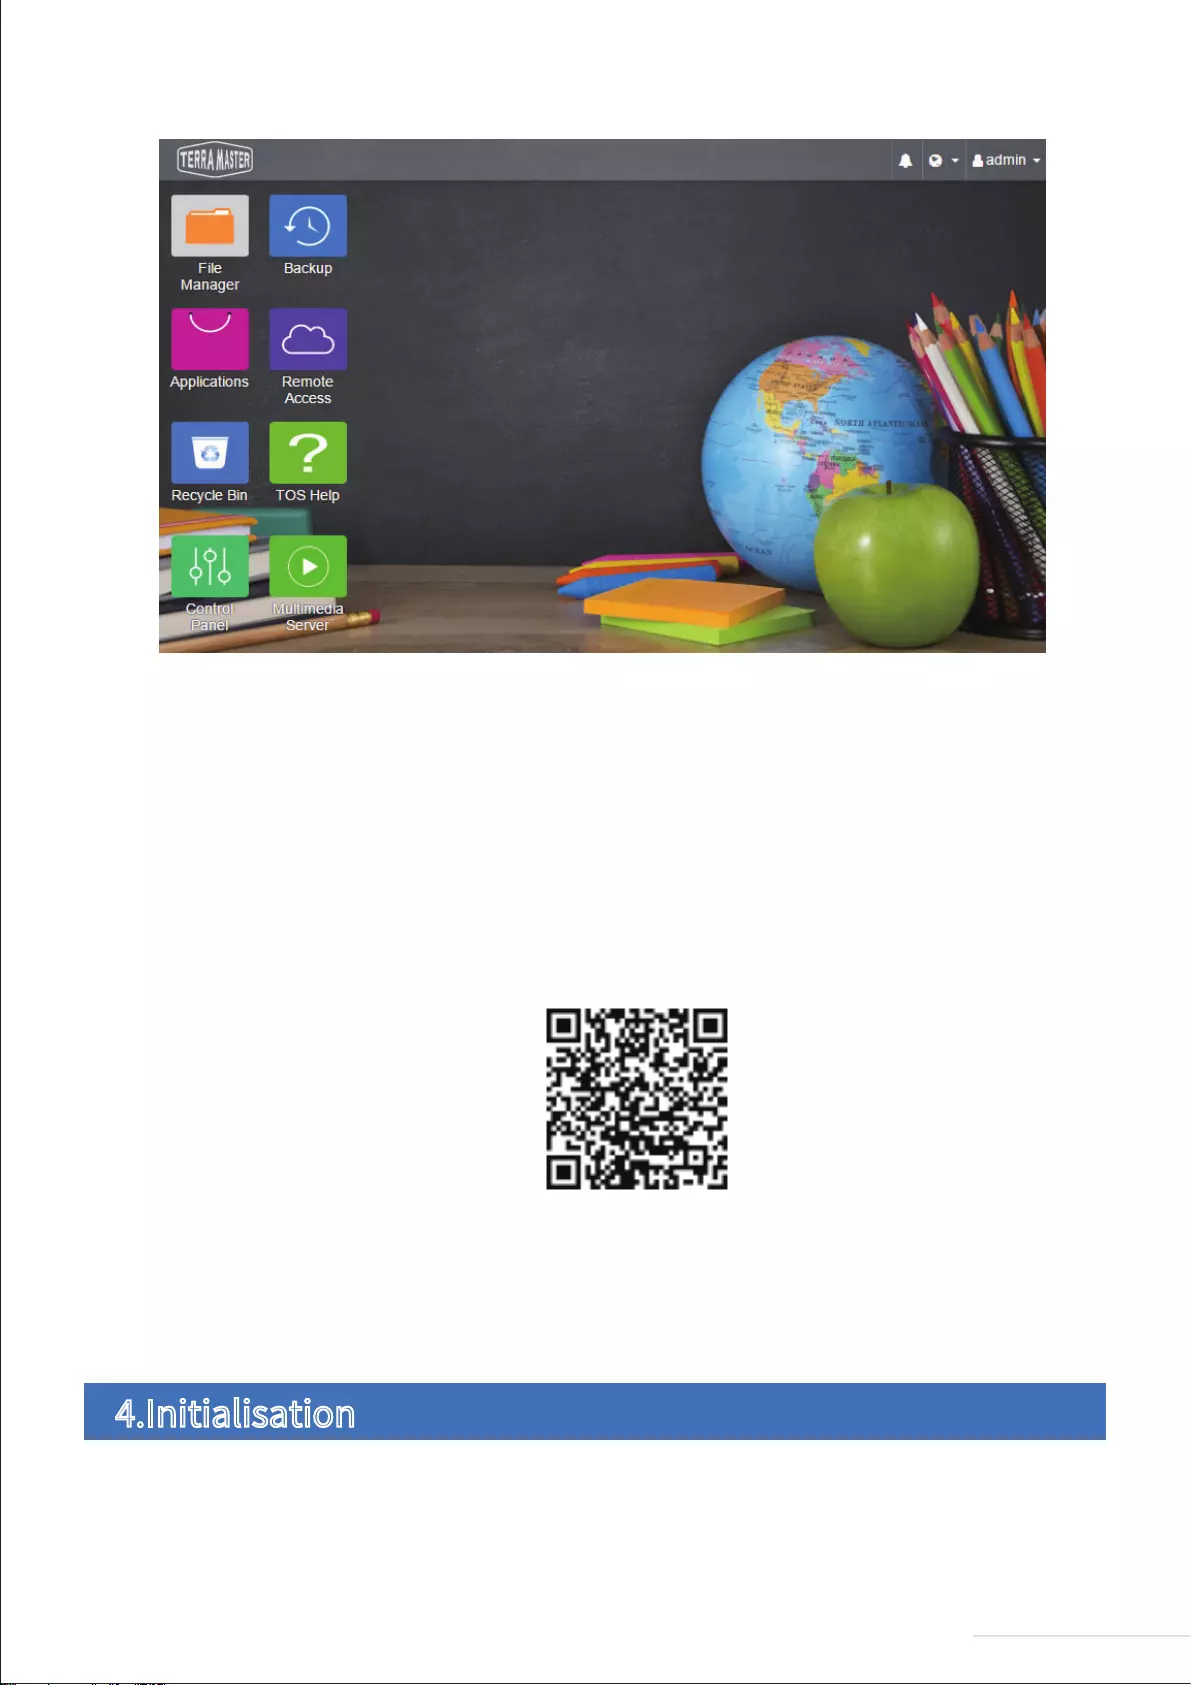
TOS has many advanced features and it is also equipped with its own app store. There, you can download
various applications in the marketplace for both home and business purposes.
For more information about TOS’s functions and operating instructions, please refer to “TOS Help” (Note:
You can find “TOS Help” from the TOS desktop).
TerraMaster F4-210
Model: F4-210
Fundamentals and Preliminaries
Copyright © 2019 TerraMaster All Rights Reserved.
Data Storage Master
Manual
View the manual for the TerraMaster F4-210 here, for free. This manual comes under the category servers and has been rated by 2 people with an average of a 7.8.
This manual is available in the following languages: English. Do you have a question about the TerraMaster F4-210 or do you need help?
Ask your question here
Product Images (10)

TerraMaster F4-210 specifications
Below you will find the product specifications and the manual specifications of the TerraMaster F4-210.
The TerraMaster F4-210 is a server that allows for the efficient management and storage of data. Boasting a total installed storage capacity of 0 TB, this server comes without any storage drives installed initially. However, it has the capability to support up to 4 storage drives, including both HDD and SSD types, with a maximum supported storage capacity of 64 TB. The supported storage drive interfaces include Serial ATA, ensuring seamless connectivity and transmission of data.
In terms of RAID support, the TerraMaster F4-210 offers a range of options, including RAID levels 0, 1, 5, 6, and 10. This allows for various configurations to achieve the desired level of data redundancy and performance optimization. Additionally, online RAID migration is supported, enabling users to adapt and modify their RAID setup without compromising data integrity or availability.
With its design and build quality, this server prioritizes reliability and longevity. The sturdy construction and selection of premium materials ensure the durability of the TerraMaster F4-210 over time. Additionally, the server supports storage drive sizes of both 2.5 inches and 3.5 inches, providing flexibility in terms of drive compatibility.
Overall, the TerraMaster F4-210 is a versatile and adaptable server that offers extensive storage options and RAID support. Its compatibility with both HDD and SSD storage drives further enhances its flexibility and performance capabilities. Whether for personal or professional use, this server provides a reliable and durable solution for managing and storing valuable data.
Total installed storage capacity
0 TB
Ethernet LAN (RJ-45) ports
1
General
| Brand | TerraMaster |
| Model | F4-210 | F4-210 |
| Product | server |
| EAN | 6939236139625, 6939236140225 |
| Language | English |
| Filetype | User manual (PDF) |
Storage
| Total installed storage capacity | 0 TB |
| Storage drives installed | No |
| Installed storage drive type | No |
| Number of storage drives installed | 0 |
| Number of storage drives supported | 4 |
| Supported storage drive types | HDD & SSD |
| Maximum supported storage capacity | 64 TB |
| Storage drive interface | — |
| Supported storage drive interfaces | Serial ATA |
| Storage drive capacity | 0 GB |
| Storage drive size | — « |
| Storage drive sizes supported | 2.5, 3.5 « |
| RAID support | Yes |
| RAID levels | 0, 1,5, 6,10 |
| Online RAID migration | Yes |
| Hot-swap drive bays | Yes |
| Supported file systems | BTRFS, FAT32, HFS+, NTFS, ext3, ext4 |
Processor
| Processor family | Realtek |
| Processor model | RTD1296 |
| Processor frequency | 1.4 GHz |
| Processor cores | 4 |
Memory
| Internal memory type | — |
| Internal memory | 2 GB |
| Maximum RAM supported | 2 GB |
Network
| Ethernet LAN | Yes |
| Ethernet LAN data rates | 1000 Mbit/s |
| iSCSI support | Yes |
| Supported network protocols | CIFS/SAMBA, NFS, FTP, TFTP, HTTPS, SSH, iSCSI, SNMP, SMTP |
| Dynamic DNS (DDNS) | Yes |
Ports & interfaces
| Ethernet LAN (RJ-45) ports | 1 |
| USB 2.0 ports quantity | 0 |
| USB port | Yes |
| USB 3.2 Gen 1 (3.1 Gen 1) Type-A ports quantity | 2 |
| Fiber ports quantity | 0 |
Design
| Chassis type | Desktop |
| Cooling type | Active |
| Product color | Gray |
| Number of fans | 2 fan(s) |
| Fan diameter | 80 mm |
| Fan diameter 2 | 80 mm |
| LED indicators | HDD, LAN, Power |
| Built-in display | No |
Performance
| Type | NAS |
| Device class | Home & Home Office |
| Backup function | Yes |
| Backup features | Cloud, USB drive |
| Multilingual support | Yes |
| Number of users | 128 user(s) |
| Noise level | 19.8 dB |
| Third-party support | Yes |
| Snapshot | Yes |
| Management protocols | SNMP |
| Security algorithms | AES, HTTPS, SNMP, SSH |
| Access Control List (ACL) | Yes |
| Web-based management | Yes |
| On/off switch | Yes |
| Browser supported | Google Chrome 48, Microsoft Internet Explorer 9, Mozilla Firefox 30, Apple Safari 4.5 |
| System log | Yes |
| Hot spare | Yes |
| S.M.A.R.T. support | Yes |
| Share folder | 128 |
| Universal Plug and Play (UPnP) | Yes |
Software
| Operating system installed | — |
| Windows operating systems supported | Yes |
| Linux operating systems supported | Yes |
| Mac operating systems supported | Yes |
Power
| Power supply location | External |
| Power supply unit (PSU) capacity | 90 W |
| Power consumption (typical) | 25.6 W |
| Number of power supply units | 1 |
| AC input voltage | 100-240 V |
| AC input frequency | 50 — 60 Hz |
| Output voltage | 12 V |
Weight & dimensions
| Width | 225 mm |
| Height | 227 mm |
| Depth | 136 mm |
| Weight | 2250 g |
| Package width | 275 mm |
| Package depth | 186 mm |
| Package height | 300 mm |
| Package weight | 3500 g |
Packaging content
| External power adapter | Yes |
| Cables included | AC, LAN (RJ-45) |
Operational conditions
| Operating temperature (T-T) | 5 — 40 °C |
| Operating relative humidity (H-H) | 5 — 95 % |
| Storage temperature (T-T) | -20 — 60 °C |
Sustainability
| Sustainability certificates | RoHS |
Other features
| Certification | FCC, CE, CCC, KC |
| Yes |
show more
Frequently Asked Questions
Can’t find the answer to your question in the manual? You may find the answer to your question in the FAQs about the TerraMaster F4-210 below.
My TerraMaster F4-210 server is not powering on when I press the power button. What could be the issue?
Ensure that the power cable is securely plugged into the server and the power outlet. Check if the power outlet is functional by connecting another device. If the problem persists, it may be a power supply issue that requires professional assistance.
What steps should I follow to set up a RAID configuration on my TerraMaster F4-210 server?
Firstly, access the server’s BIOS settings and enable RAID mode. Then, select the appropriate RAID level (e.g., RAID 0, 1, 5) and configure the desired settings like stripe size or hot spare options. After saving the changes, proceed with initializing and formatting the drives within the RAID management interface provided by the server’s operating system.
I am unable to access my TerraMaster F4-210 server remotely. How can I troubleshoot this connectivity issue?
Begin by confirming that your server is connected to a reliable network with a valid IP address. Check if any firewall or router settings are blocking the required ports for remote access. Additionally, verify that the necessary network protocols, such as SSH or FTP, are correctly configured on the server. Finally, ensure that you have a stable internet connection from the device you are attempting to access the server with.
The fan on my TerraMaster F4-210 server is making unusually loud noises. What should I do?
Start by checking if any obstructions are blocking the fan vents and remove them if present. Dust can accumulate within the fan, inhibiting its performance, so clean it carefully using compressed air or a soft brush. If the noises persist, the fan might be defective and require replacement. Contact the manufacturer’s support for further assistance.
I accidentally deleted some important data from my TerraMaster F4-210 server. How can I recover it?
Firstly, immediately stop all write operations on the server to minimize the chance of data overwriting. Check if your server has a built-in backup feature and attempt to restore the deleted files from the backup. If not, consider utilizing professional data recovery software or contacting a data recovery specialist. Remember that the success of data recovery depends on various factors, so it’s always recommended to regularly backup your important files to prevent such situations.
Does the TerraMaster F4-210 have any storage drives installed?
No, the TerraMaster F4-210 does not have any storage drives installed.
How many storage drives can the TerraMaster F4-210 support?
The TerraMaster F4-210 can support up to 4 storage drives.
Does the TerraMaster F4-210 support HDD and SSD storage drive types?
Yes, the TerraMaster F4-210 supports both HDD and SSD storage drive types.
Can the TerraMaster F4-210 perform online RAID migration?
Yes, the TerraMaster F4-210 can perform online RAID migration.
What file systems are supported by the TerraMaster F4-210?
The TerraMaster F4-210 supports BTRFS, FAT32, HFS+, NTFS, ext3, and ext4 file systems.
What is the weight of the TerraMaster F4-210?
The TerraMaster F4-210 has a weight of 2250 g.
What is the height of the TerraMaster F4-210?
The TerraMaster F4-210 has a height of 227 mm.
What is the width of the TerraMaster F4-210?
The TerraMaster F4-210 has a width of 225 mm.
What is the depth of the TerraMaster F4-210?
The TerraMaster F4-210 has a depth of 136 mm.
What certifications does the TerraMaster F4-210 have?
The TerraMaster F4-210 has the following certifications: FCC, CE, CCC, KC.
What does the download speed on the internet depend on?
The download speed on the internet depends on the type of connection you have. If you have a 25 Mb/s connection this means that theoretically you should be able to download 25 MB per second.
Is the manual of the TerraMaster F4-210 available in English?
Yes, the manual of the TerraMaster F4-210 is available in English .
Is your question not listed? Ask your question here
FAQ: Types of Manuals and Their Contents
TerraMaster F4-210 Manuals come in various types, each serving a specific purpose to help users effectively operate and maintain their devices. Here are the common types of TerraMaster F4-210 User Guides and the information they typically include:
- User Manuals: Provide comprehensive instructions on how to use the device, including setup, features, and operation. They often include troubleshooting tips, safety information, and maintenance guidelines.
- Service Instructions: Designed for technicians and repair professionals, these manuals offer detailed information on diagnosing and repairing issues with the device. They include schematics, parts lists, and step-by-step repair procedures.
- Installation Guides: Focus on the installation process of the device, providing detailed instructions and diagrams for proper setup. They are essential for ensuring the device is installed correctly and safely.
- Maintenance Manuals: Provide guidance on routine maintenance tasks to keep the device in optimal condition. They cover cleaning procedures, part replacements, and regular servicing tips.
- Quick Start Guides: Offer a concise overview of the essential steps needed to get the device up and running quickly. They are ideal for users who need immediate assistance with basic setup and operation.
Each type of TerraMaster F4-210 instruction is designed to address specific needs, ensuring users have the necessary information to use, maintain, and repair their devices effectively.
Related Instructions for TerraMaster F4-210:
2
D8 Thunderbolt 3
Operation & user’s manual TerraMaster Storage Operation & user’s manual (File: terramaster-d8-thunderbolt-3-operation-user-s-manual-9, Wed 01.2025)
9
1371
302
6
D2 Thunderbolt3
8
206
44
8
NAS U8-111
Quick start manual PDF User Manual (@44J1B6), TerraMaster NAS U8-111 Server (06th Dec 2024)
13
1371
302
10
D5-300C
Operation & user’s manual TerraMaster Storage Operation & user’s manual (File: terramaster-d5-300c-operation-user-s-manual-9, 21st Oct 2024)
9
50
10
Storage Devices by Other Brands:
|
Western Digital My Passport WDBAAB3200ACH Quick Start My Passport WDBAAB3200ACH (Storage ePDF User Manual, #C94APK) My Passport 21 Feb 2025 | 2 |
|
|
Quantum DXi4601 User Essentials DXi4601 User essentials — 52MX7R User Essentials 02 Nov 2024 | 2 |
|
|
Lexar PLATINUM II MEMORY STICK PRO DUO Datasheet PLATINUM II MEMORY STICK PRO DUO (Storage ePDF Guide, #S5A4Z4) HIGH PERFORMANCE 04 Oct 2024 | 1 |
|
|
Aegis PFS-10 Owner’s Manual PDF Guide (@UWOB4K), Aegis PFS-10 Storage (Sun 10.2024) PFS-10 PFS-20 PFS-30 13 Oct 2024 | 4 |
Categories:
Storage
Network Storage Server
Enclosure
На обзоре сетевое хранилище TerraMaster F4-210 для семейного досуга или небольшого офиса. Обеспечивает доступ к файлам со всех компьютеров и мобильных устройств пользователей. Помогает защитить данные — настроим зеркалирование и поломка диска не приведет к потере информации.
Файлы всегда под рукой
Содержание
- Файлы всегда под рукой
- Распаковка и осмотр TerraMaster F4-210
- Элегантное и компактное устройство
- Разъемы, индикаторы, охлаждение
- Что внутри у TerraMaster F4-210
- Блок питания
- Программное обеспечение — TOS с поддержкой приложений
- RAID — защитим данные или повысим скорость
- Тестирование TerraMaster F4-210
- Основные характеристики TerraMaster F4-210
- Выводы
Сегодня ценность файлов зачастую намного превосходит стоимость накопителя. В особенности, если речь идет о корпоративных данных или рабочих проектах сотрудника на удаленке и фрилансе. Нельзя допускать, чтобы важные файлы были в единственном экземпляре. Важно наладить резервное копирование.
Самым простым способом защиты данных является установка NAS-сервера. Информация на дисках такого сетевого хранилища не пострадает при программных сбоях компьютера, останется в целости после переустановки Windows. Настроим RAID-массив и данные будут дублироваться. Один диск вышел из строя — невелика беда. Видео, фотографии, рабочие проекты останутся на втором. Ставим новый диск и продолжаем работать.

При наличии NAS файлы всегда доступны с любого из устройств пользователя. Например, сломался настольный ПК — продолжим работу на ноутбуке. Проверим, подходит ли сетевое хранилище TerraMaster F4-210 для типичных задач современного домашнего или малого офиса.
По опыту знаю, многим сегодня необходим сервер. Но останавливает сложность настройки. К тому же, не каждая компания может позволить себе штатного ИТ-специалиста. С TerraMaster F4-210 таких проблем не будет. С настройкой TOS (операционной системы файлового хранилища) справится каждый, у кого есть опыт работы с операционной системой компьютера — например, с Windows.
Распаковка и осмотр TerraMaster F4-210
Внутри крафтовой транспортировочной коробки находится вторая — почти такая же, но поменьше, где и находятся оборудование и аксессуары:
- TerraMaster F4-210 — NAS с четырьмя лотками для дисков.
- Техническая документация.
- Блок питания (адаптер) с электрическим шнуром.
- Крепежи под 2,5-дюймовые диски.
- Наклейки, на которых можем указать объем и модель накопителя.
- Мягкие прокладки.
- Две дополнительные ножки.
Элегантное и компактное устройство
Начнем с дизайна, ведь не каждого устроит техника, которая не вписывается в интерьер квартиры и выглядит как промышленное оборудование. В данном плане у TerraMaster F4-210 всё в полном порядке — приятный серебристый мини-сервер, который отлично смотрится на столе. Корпус металлический — изготовлен из алюминия. Не тяжелый (2,250 кг) и компактный (2,27 см x 2,25 см x 13,6 см) — подойдет пользователю, у которого мало свободного места для установки оборудования.
Разъемы, индикаторы, охлаждение
По центру лицевой панели располагаются четыре отсека для дисков — HDD или SSD. Левее индикаторы: для каждого диска от HDD 1 до HDD 4, а также — локальной сети (LAN) и питания (POWER). Под индикаторами находится серебристая кнопка питания.

NAS устойчив на столе благодаря четырем мягким продолговатым антивибрационным ножкам. Устройство слегка приподнято, поэтому воздух свободно циркулирует у днища, на которое нанесена вентиляционная перфорация. Логотип TerraMaster на боковых панелях стал хорошо узнаваемым — продукты бренда пользуются заслуженно высокой репутацией как у компаний, так и у домашних пользователей. Обеспечивают надежное хранение файлов по вполне разумной цене.
На задней панели — две круглые решетки. Под ними — вентиляторы: два 80-миллиметровых. Отметим, что при тестировании в жаркий августовский день сетевое хранилище не перегревалось, что говорит о том, что система охлаждения спроектирована грамотно и справляется со своей задачей.

Справа находятся разъемы. Прежде всего два быстрых порта USB 3.0. Предусмотрен Ethernet-разъем (маркирован как LAN). Под Ethernet-портом — круглое гнездо для подключения блока питания.

Что внутри у TerraMaster F4-210
Заглянем внутрь корпуса NAS. Пайка аккуратная. Компоненты нигде не перекошены и не смещены. Добротная заводская сборка, достойная одного из ведущих производителей решений для хранения. Предусмотрен компактный аккуратный радиатор. Большая часть корпуса изначально пустая, поскольку представляет собой каркас для установки дисков — жестких или твердотельных. Оперативная память (2 ГБ) распаяна на системной плате. Слотов под оперативную память нет — увеличить ОЗУ не получится.
Модель базируется на процессоре ARM, что накладывает определенные ограничения. Часть программного обеспечения будет недоступна — предназначена только моделей на базе платформы Intel. Версия TOS 5 для ARM отсутствует, поэтому придется довольствоваться TOS 4.
Блок питания
Питается сетевое хранилище от бытовой электрической сети через 72-ваттный блок питания EDACPOWER ELEC., который входит в комплект поставки:
- на входе переменный ток 100—240 В, 2.0 А, 50—60 Гц;
- на выходе постоянный ток 12 В, 6.0 А, 72 Вт;
- модель EA10682U-120.

Настроим доступ к данным через интернет. Очень полезная фишка — покажем фотографии из отпуска друзьям или свежие наработки заказчикам, коллегам или руководству компании. Причем, файлы находятся на дисках сетевого хранилища и не занимают места в накопителе смартфона.
На сегодня TerraMaster F4-210 — модель начального уровня, поскольку выпущена в 2021 году. Подходит на роль первого NAS для дома или офиса благодаря привлекательной цене, особенно если покупать на вторичном рынке. Современный четырехдисковый аналог, TerraMaster F4-423, «Блог системного администратора» также рассмотрел:
На борту F4-423 уже есть два 2,5-гигабитных порта, а в корпусе — слот NVMe m.2 под кэш. Поэтому производительность будет выше: с применением Link Aggregation пропускная способность — до 5 Гбит/с. Операционная система TOS 5 превосходит TOS 4 по функциональности и удобству работы. И процессор заметно быстрее.
Программное обеспечение — TOS с поддержкой приложений
Данный NAS работает под управлением TOS 4.2.41. Обновление до TOS 5 не поддерживается, что следует учитывать.

Прежняя версия операционной системы довольно удобна и функциональна. Обладает достаточным набором возможностей, справится с большинством задач пользователя, который устанавливает NAS впервые.
Командная строка не требуется. Перед вами классический графический рабочий стол. Пользователю доступна встроенная информация об использовании железа — процессора, оперативной памяти и хранилища данных.
Расширим функциональность с помощью сторонних приложений. Можем, например, установить сервер Plex, почтовый сервер и веб-сервер. Таким образом, NAS может применяться для хостинга сайта вашей компании или личного ресурса. Для TOS создано немало программ, которые позволяют редактировать и просматривать файлы.
К примеру, текстовый редактор и просмотрщик RDF могут работать на самом сервере. Для скачивания торрентов можем использовать популярный клиент Transmission. Есть опция синхронизации с диском Google. Выбор ПО широкий и практически каждый найдет нужные приложения под свои задачи.

RAID — защитим данные или повысим скорость
Поддержка RAID-массивов — полезная фишка данного хранилища. Выберем, что важнее — больше объема под данные и выше скорость или защита данных (дублирование). Выбрем Single, если нужен только один диск. Установим JBOD и для нас все диски массива станут одним большим томом. Не забываем, что на аппаратном уровне данные будут храниться на разных дисках. RAID 0 подходит, когда надо повысить скорость чтения и записи. Данные разделяются на фрагменты и записываются на разные диски одновременно. Есть ощутимый минус — при поломке одного диска теряются все данные.

RAID 1 — зеркалирование: данные дублируются на двух дисках. Каждый накопитель массива — точная копия другого. Вышел из строя диск — файлы в сохранности на втором. Минус — места под данные вдвое меньше. Для RAID 5 нужны минимум три диска. Часть каждого используется для хранения сведений о контрольной сумме (проверка на ошибки). При отказе одного из дисков данные можно восстановить с остальных. RAID 6 подобен, но нужно минимум четыре диска. Такой массив устойчив к отказу двух дисков.
RAID 10 — комбинация RAID 1 и RAID 0. Данные одновременно зеркалируются. К тому же разделяются на две (или более) группы дисков (обычно, по два диска в каждой). Скорость выше, если выйдут из строя по одному диску в каждой группе, информацию можно восстановить.
Для тестирования скорости выбран RAID 0 (самый производительный). При использовании NAS для хранения ценных данных желательно настроить RAID 1.
Тестирование TerraMaster F4-210
Проведем замеры скорости. Перед тестированием в NAS были установлены высокопроизводительные твердотельные диски — два Samsung SSD 870 EVO, вместительностью в 250 гигабайт каждый. Тип пула хранения — RAID 0. Поэтому ни накопители, ни массив не стали «узкими местами». Результаты:
- чтение — 110,5 МБ/с;
- запись — 87,2 МБ/с.

Хорошая производительность, которая полностью соответствует потребностям большинства пользователей.
Основные характеристики TerraMaster F4-210
Процессор:
- Модель — четырехъядерный Realtek RTD1296.
- Тактовая частота — 1,4 ГГц.
- Архитектура — ARM V8 (64-разрядная).
Главные спецификации NAS:
- Оперативная память — 2 ГБ (не расширяемая).
- Максимальный суммарный объем дисков — 72 ТБ (четыре диска по 18 ТБ).
- Поддержка накопителей данных — 3,5″ HDD, 2,5″ жесткие или твердотельные диски.
- Совместимые операционные системы компьютера — Windows, macOS, Linux.
- Файловые системы — EXT4 (на внутренних дисках), EXT3/EXT4/NTFS/FAT32/HFS+ (на внешних дисках).
Выводы
Если вы устанавливаете NAS-сервер впервые и особых требований к хранилищу нет, то TerraMaster F4-210 подойдет. Решение обеспечивает высокую скорость передачи данных, вмещает десятки терабайт информации (зависит от объема дисков), поддерживает до четырех накопителей. Достаточно для малой компании. Хорошо справится с ролью хранилища файлов всей семьи.
Апгрейду модель не подлежит — оперативной памяти добавить не сможем, как и установить новую версию ОС. Базируется на ARM, поэтому некоторые приложения недоступны. Впрочем, для многих пользователей данные моменты некритичны, поскольку нужна только продвинутая и более функциональная замена внешним дискам.
У вас есть личный сервер? Напишите в комментариях.
5
2
голоса
Рейтинг статьи