
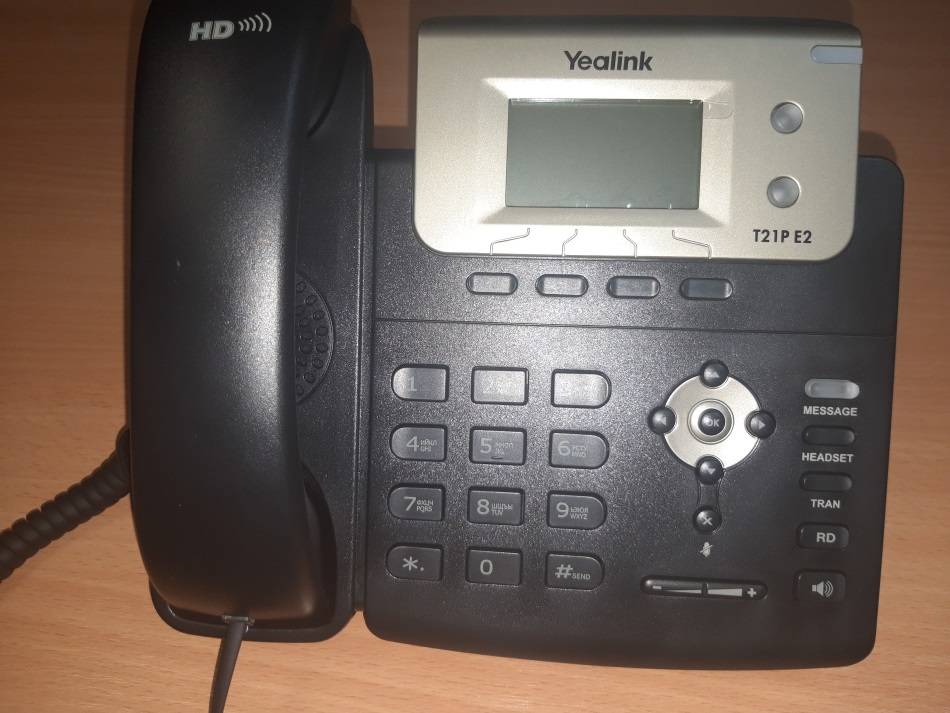
Анонс: В данной статье проведем настройку Yelink Sip-t21-E2, а так же его прошьем и рассмотрим дебаг. Описание: Модель Yealink Sip-t21P-E2 является улучшенной версией Yealink Sip-t21P и ее главные отличия от предыдущей модели в следующем: Улучшено качество передачи голоса Добавлены подсветка экрана и подписи программируемых кнопок на экране Телефон стал поддерживать технологию PoE (Power over Ethernet), […]
Анонс: В
данной статье проведем настройку Yelink Sip-t21-E2, а так же его прошьем и рассмотрим дебаг.
Описание:
Модель Yealink Sip-t21P-E2 является
улучшенной версией Yealink Sip-t21P и ее главные отличия от предыдущей модели в
следующем:
- Улучшено качество передачи
голоса - Добавлены подсветка экрана и
подписи программируемых кнопок на экране - Телефон стал поддерживать
технологию PoE (Power over Ethernet), - Кнопки световой индикации
стали двухцветными, которые удобно использовать в режиме BLF
Настройка:
Проводить настройку будем на asterisk с веб интерфейсом FreePBX.
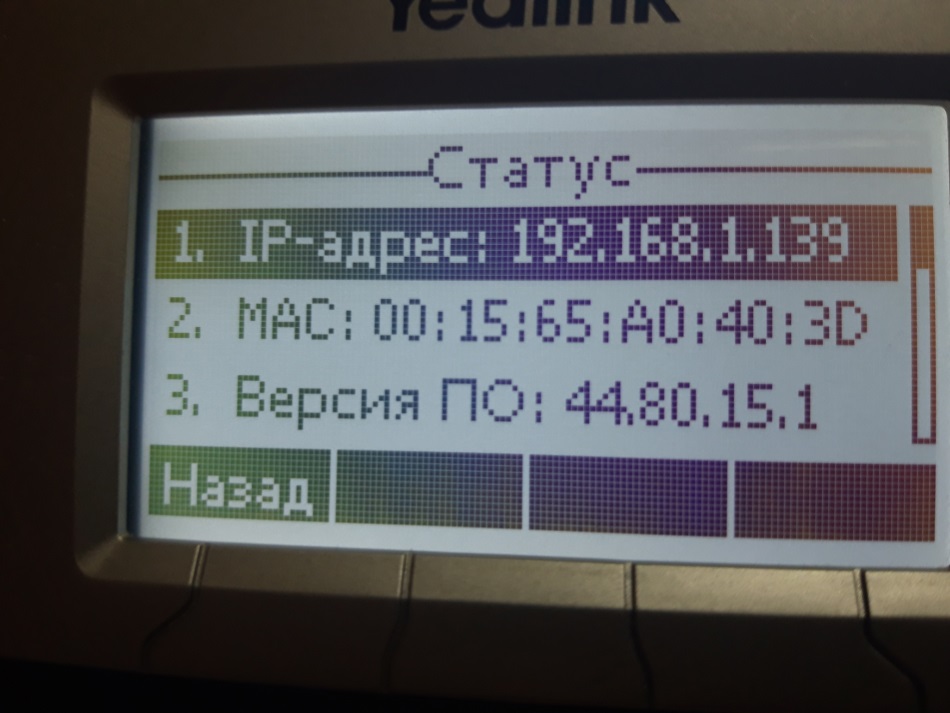
Для того, чтоб узнать ip-адрес нажмите кнопку [OK] для перехода в меню «Статус» где вы найдете ip-адрес телефона. После чего, чтоб попасть на web-интерфейс введите этот ip-адрес в строку веб-браузера. К примеру: http://192.168.0.101
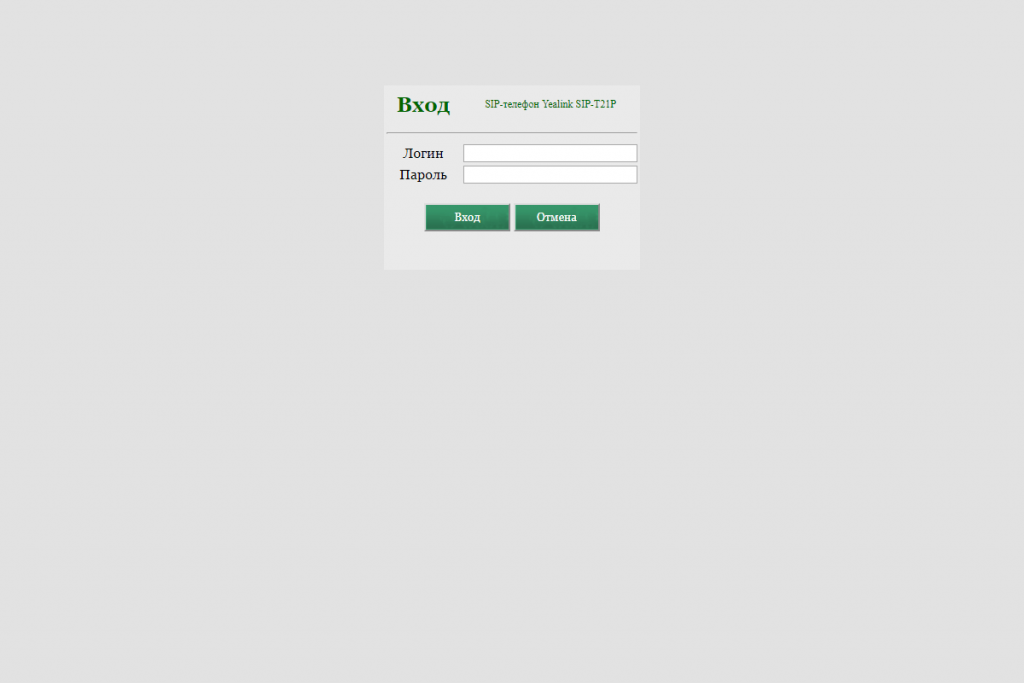
Стандартный логин и пароль от данного устройства admin/admin.
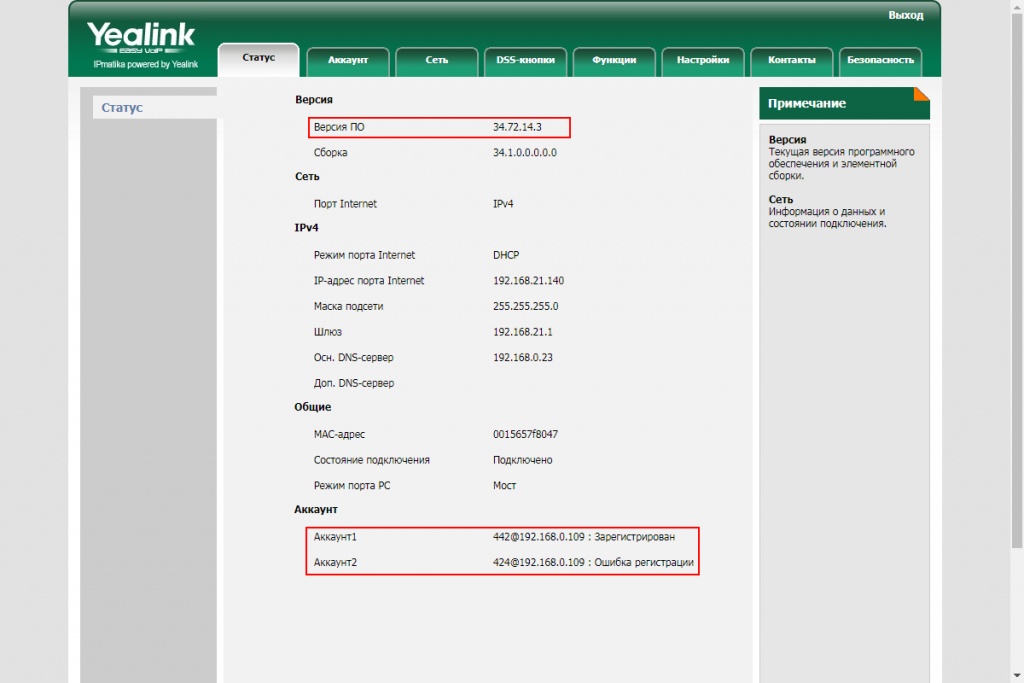
Сразу после входа на web-интерфейс вы попадете во вкладку «Статус» где можно
посмотреть, к примеру, версию программного обеспечения и статус регистрации
аккаунтов.
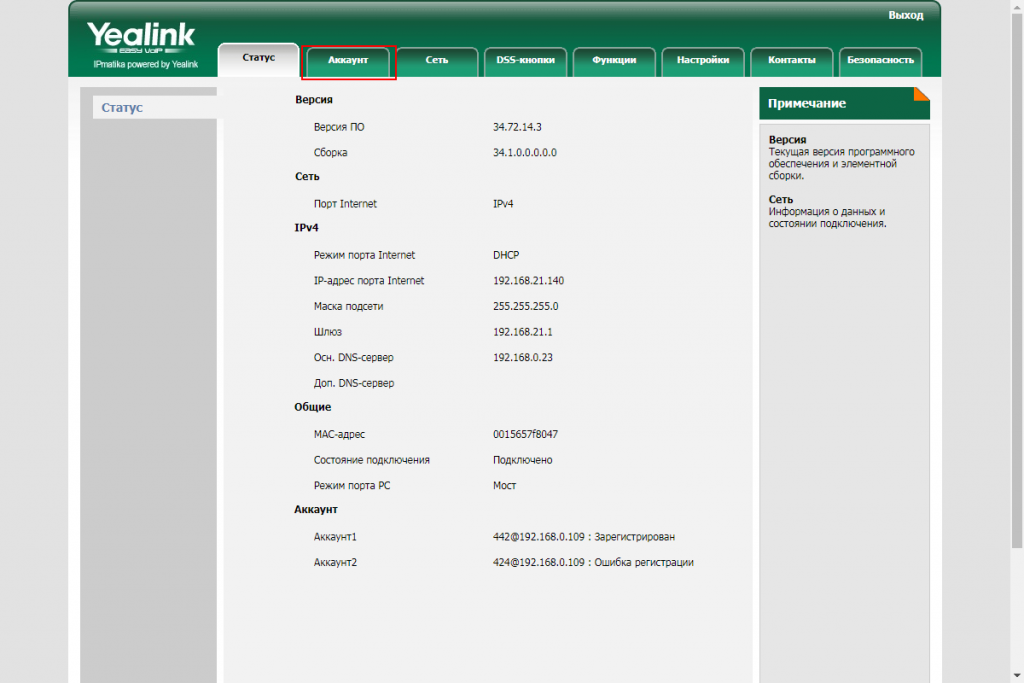
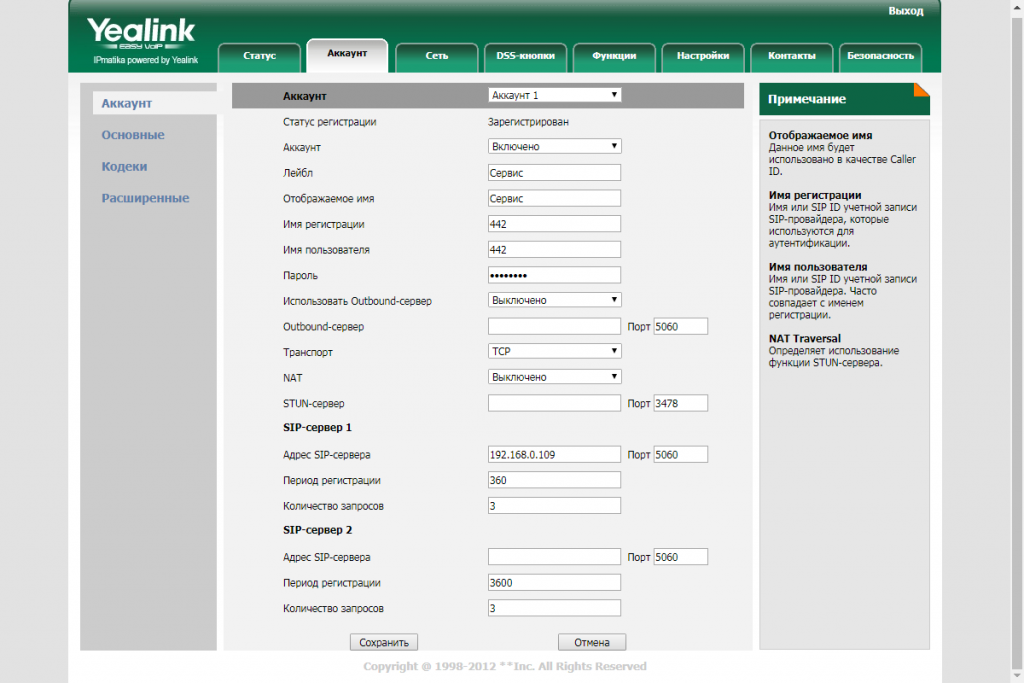
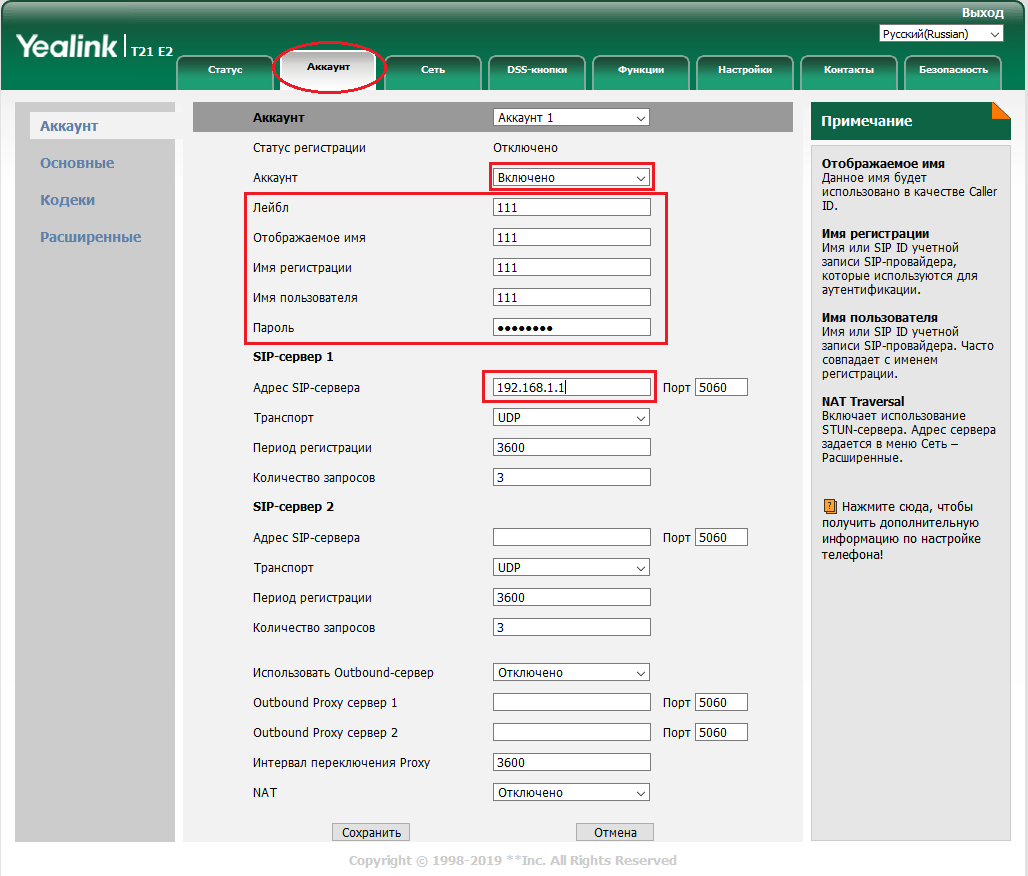
Для начала настройки переходим во вкладку «Аккаунт».
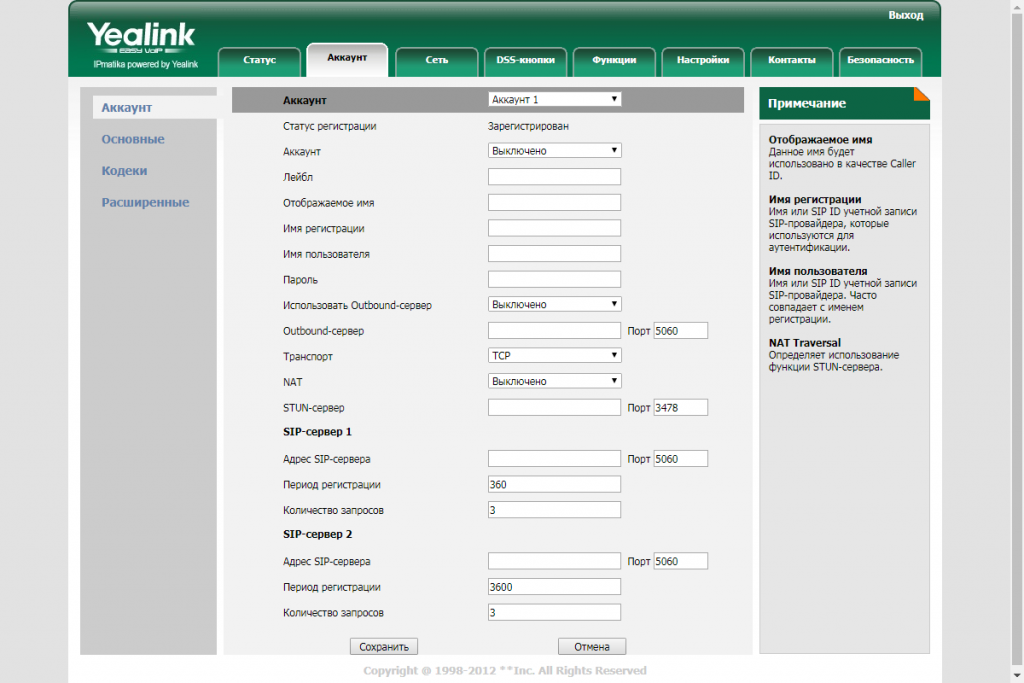
Для того, чтоб зарегистрировать
телефон достаточно заполнить следующие пункты:
- Аккаунт: выбираем один из двух аккаунтов для регистрации, а так же не забываем «включить» регистрацию после заполнения настроек.
- Лейб: Это название учетной записи, которое отображается на дисплее телефона
- Отображаемое имя: Используется в качестве Caller ID
- Имя регистрации: Идентификационное имя (часто совпадает с именем пользователя)
- Имя пользователя: SIP-номер учетной записи. Совпадает с номером extensions в настройках ATC
- Пароль: Пароль учетной записи (совпадает с полем secret на АТС)

- Адрес SIP-сервера: IP-адрес вашей АТС
Заполняем пункты:
После чего применяем настройки и переходим на вкладку «Кодеки». В нашем случае мы используем только PCMA, PCMU и G729, остальные отключаем.
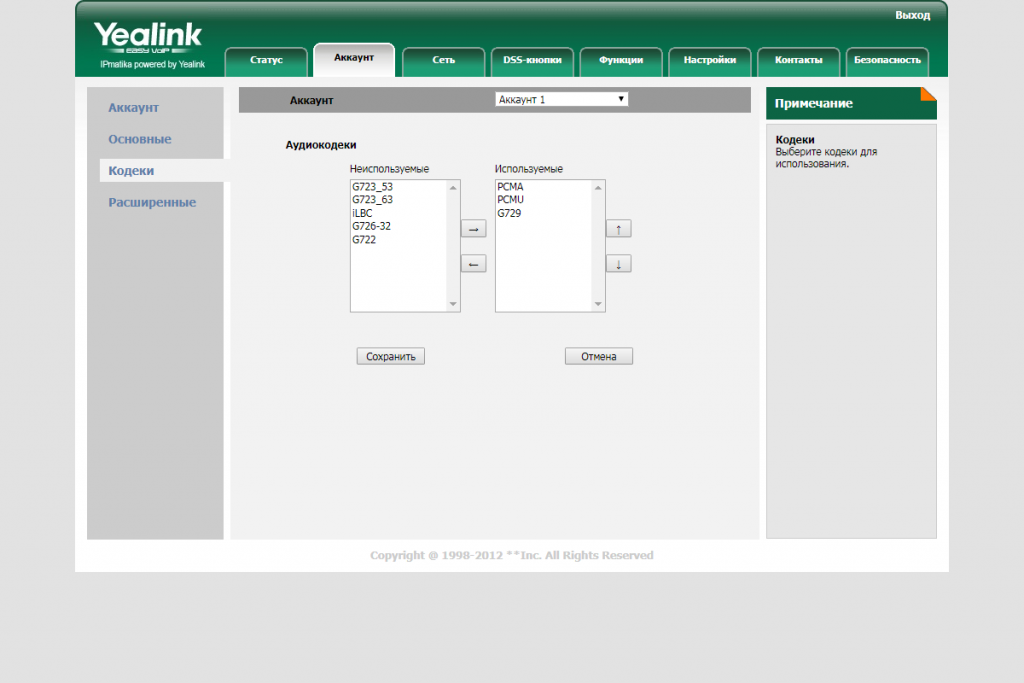
Так же сохраняем настройки и переходим во вкладку «Расширенные».
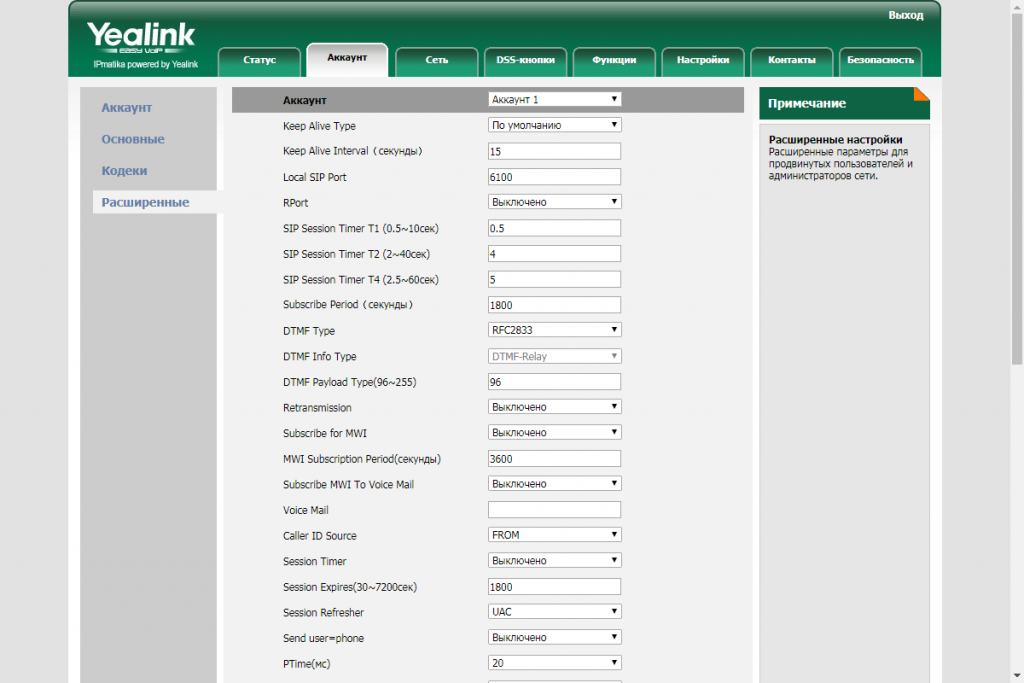
Здесь собраны специфичные настройки,
которые настраиваются индивидуально или же, чаще всего, оставляются стандартными.
Стандартных настроек в подавляющем количестве случаев достаточно для нормальной
работы телефонного аппарата и мы их изменять не будем.
Так же кроме перечисленных настроек следует обратить внимание на пункт «DSS-кнопки»
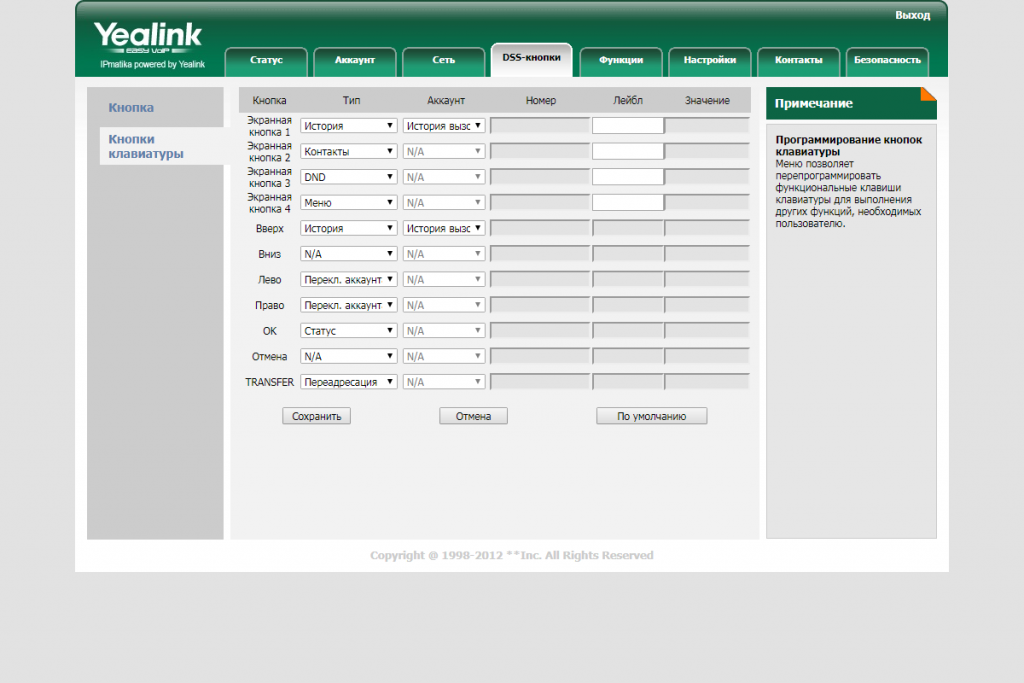
Вкладка DSS-кнопки позволяет полностью сконфигурировать
функционал всех кнопок телефона (не считая цифровой клавиатуры и регулятора
громкости), назначив на каждую клавишу любую из доступных функций из следующего
списка: Быстрый набор, Прямой захват, Групповой захват, PTT, Локальная группа контактов, XML-группа контактов, XML-браузер, История, Меню, Переадресация, DND, Возврат вызова, SMS, SMS, XML-книга, Статус, Локальная книга, Смена пользователя,
Преднастройка, Блокировка, Контакты.
В завершении осталось только установить время и дату. Данный пункт находится в «Настройки».
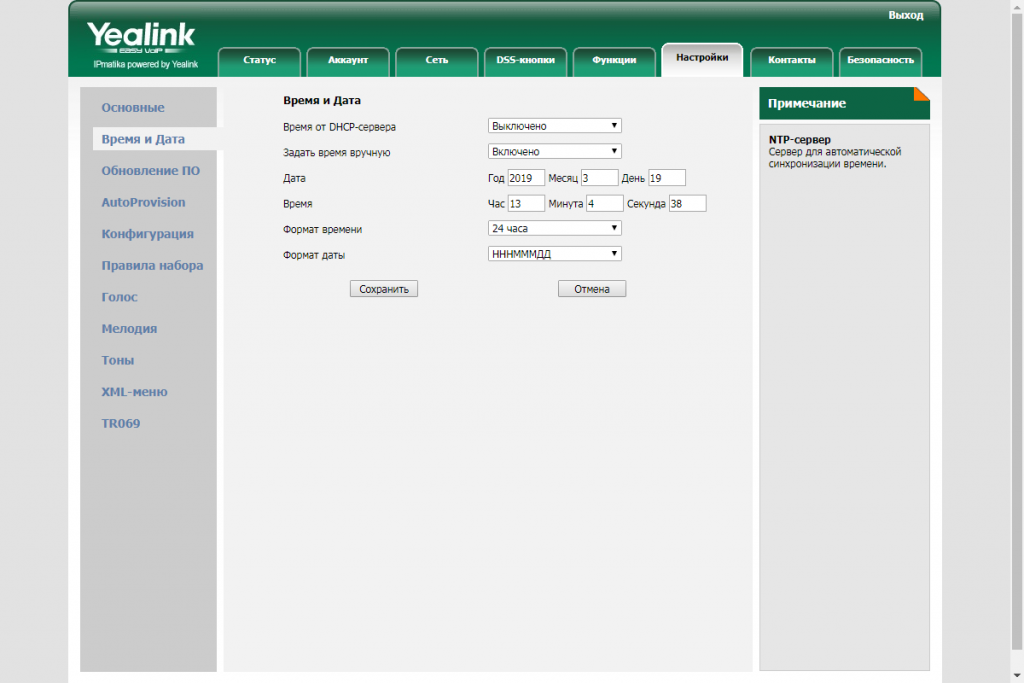
Можно настроить автоматическую
настройку время и даты (В таком случае телефон будет получать время от DHCP-сервера) или же задать время вручную.
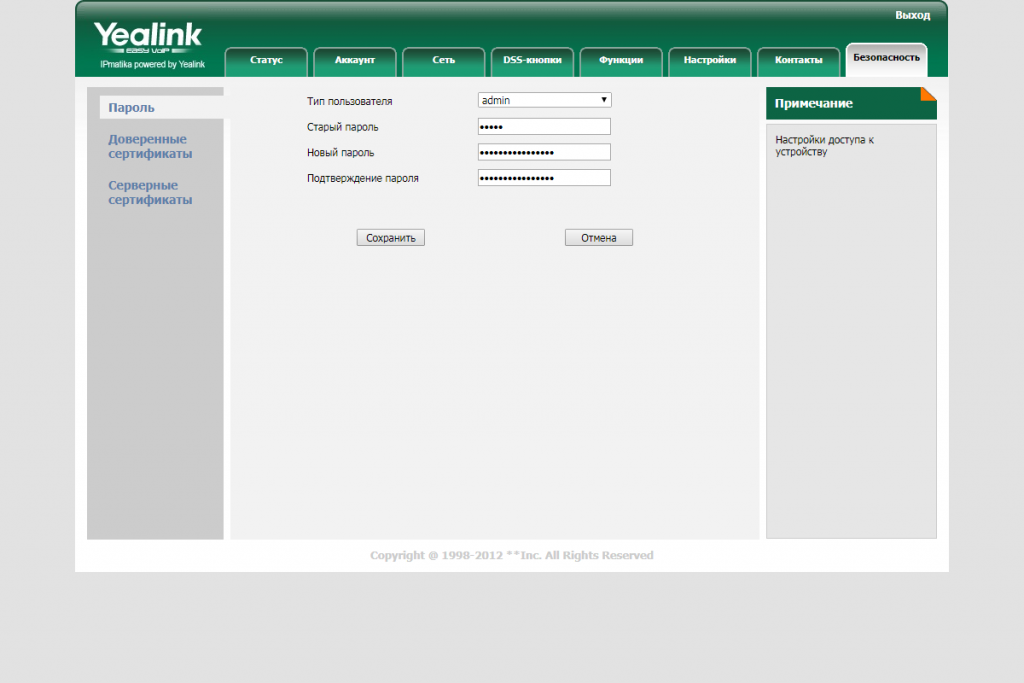
Смена пароля, конечно, не обязательный пункт в настройке телефона, но мы рекомендуем сменить дефолтную комбинацию на что-то другое т.к различные стандартные комбинации логин/пароль давно известны и при взломе будет не сложно подобрать пароль.
Прошивка:
Скачать новую версию прошивки можно по
следующей ссылке ftp://81.88.82.57/Yealink
После перейдите на вкладку «Настройки». Выбирете в списке пункт «Обновление ПО».
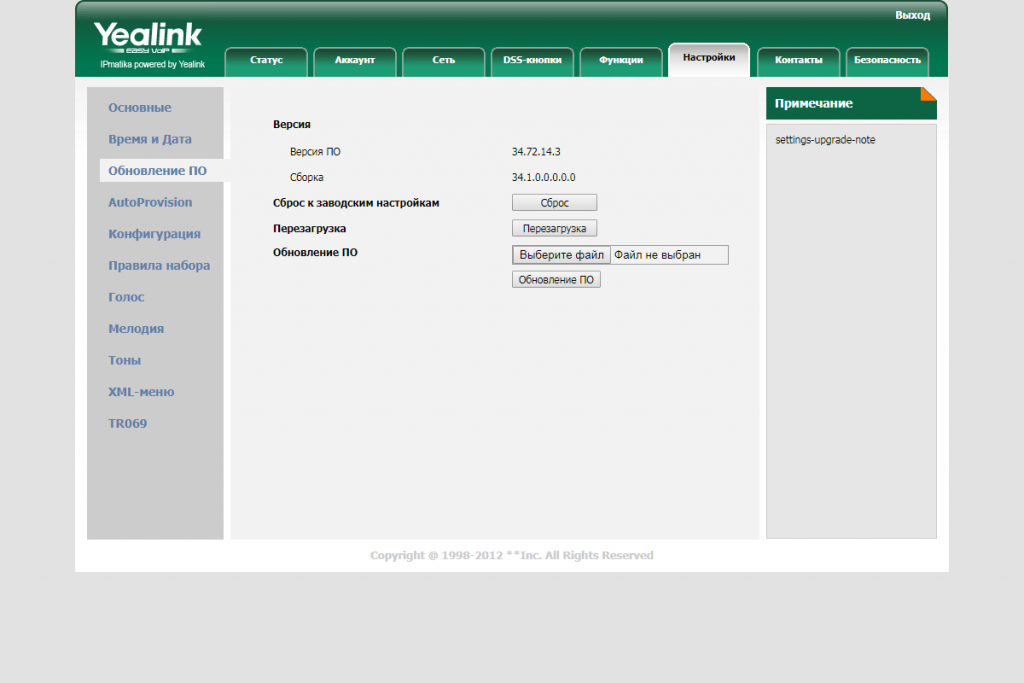
Далее необходимо выбрать уже скаченную
прошивку и нажать на кнопку «Обновление ПО». Перед обновлением вас попросят
подтвердить действие. Соглашаемся и ожидаем окончания обновления после которого
телефон перезагрузится.
На этом статья по настройке данного
телефонного аппарата закончена.
Описание
VoIP-телефон Yealink SIP-T21P E2 станет идеальным выбором для конференций!
Модель оснащена протоколом связи SIP — у вас будет возможность общаться через интернет между компьютерами.
Идентификатор входящего вызова позволит заранее узнать, кто хочет до вас дозвониться.
Благодаря функции «громкая связь» вы сможете разговаривать, не поднимая трубки.
Общие характеристики
Поддержка SIP
есть, подключение к нескольким серверам
Подключение гарнитуры
есть
Все характеристики
Не является публичной офертой
Информация о товаре носит справочный характер и не является публичной офертой. Характеристики, комплект поставки и внешний вид товара могут отличаться от указанных или быть изменены производителем без предварительного уведомления. Перед покупкой проверяйте информацию на официальном сайте производителя.
Если вы заметили ошибку или неточность в описании товара, пожалуйста, выделите часть текста с ошибкой и нажмите кнопку «Сообщить об ошибке».
Отзывов пока нет
Будьте первым, кто напишет отзыв о товаре, и получите бонусы
|
Инструкция YEALINK SIP-T21P E2 для устройства телефон проводной содержит страницы на русском языке. Размер файла: 1.26 MB. Состоит из 8 стр. Вы можете скачать pdf файл этой инструкции: Скачать PDF
1 Packaging Contents T21P E 2 Комплектация Установка телефона Гарантийный талон Ethernet-кабель Провод для подключения трубки Краткое руководство Адаптер питания Подставка SIP-телефон Трубка A B 1 2 1. Прикрепите подставку как показано на рисунке: Установка на столе Крепление на стене 2. Подключите трубку и/или гарнитуру как показано на рисунке: Примечание: гарнитура в комплект поставки не входит |
Для настройки телефона вам необходимо знать сервер, логин и пароль сотрудника.
Всё это можно узнать на странице редактирования сотрудника.

Обратите внимание, что «Пароль» скрыт у созданного сотрудника и его невозможно узнать, если вы не записали его раннее или же не получили в приветственном письме. Если пароль утерян, то вы можете изменить его прямо здесь, но обратите внимание, что если вы уже настраивали для этого сотрудника софтфон или настольный телефон, в связи с чем требуется изменить в прошлых устройствах пароль, чтобы не прервать их работу.
1. Подготовка SIP-телефона.
Перед подключением аппарата изучите «Краткое руководство», которое идет в комплекте с SIP-телефоном. «Краткое руководство» также можно скачать на сайте www.ipmatika.ru. Затем подключите SIP-телефон к питанию и IP-сети.
Совет:
• Используйте адаптер питания от производителя. Используя другой адаптер питания, Вы можете повредить SIP-телефон.
• Если ваша IP-сеть поддерживает технологию PoE (Power over Ethernet), то к «Yealink SIP-T21P E2» и к «Yealink SIP-T21 E2» запрещено подключать адаптер питания.
2. Настройка SIP-телефона.
Данный SIP-телефон может быть настроен с помощью клавиатуры телефона (см «Краткое руководство» поставляемое в комплекте с телефоном). В нашем Руководстве подробней рассмотрим настройку SIP-телефона через веб-интерфейс.
Перед началом настройки, необходимо узнать IP-адрес SIP-телефона. Нажмите на SIP-телефоне клавишу «OK». Запишите IP-адрес SIP-телефона. Для входа в веб-интерфейс введите этот адрес в строку веб-браузера (например: 192.168.0.104). Откроется веб-страница, введите Логин/пароль. По умолчанию это: admin/admin.
Совет:
Чтобы зайти в веб-интерфейс SIP-телефона убедитесь, что Ваш компьютер (на котором открываете веб-интерфейс SIP-телефона) находится с телефоном в одной локальной сети (для примера, 192.168.0.x). Проконсультируйтесь с администратором сети или с технической поддержкой Вашего Интернет-провайдера.
Выберете закладку «Аккаунт», затем Аккаунт 1 (или Аккаунт 2). Заполните поля как в примере ниже (см табл. 2.1, рис. 2.1.1 и рис. 2.1.2).
Таблица 2.1.
Название поля
Значение для поля
Комментарии
Аккаунт
Включено
Имя регистрации
ivano.ivanov
Имя Сотрудника (name)
Имя пользователя
ivano.ivanov
Имя Сотрудника (name)
Пароль
test123
Пароль Сотрудника
Адрес SIP-сервера
newinterface.megapbx.ru
Ваш Домен (совпадает с веб-адресом вашей Виртуальной АТС)
Рис. 2.1.1. Настройка вашего SIP-телефона.
Рис 2.1.2. Ввод Логин и Пароля Сотрудника.
После заполнения этих полей нажмите «Сохранить». Произойдёт сохранение настроек и регистрация вашего SIP-телефона.
3. Успешная настройка.
Если настройка произведена верно, то
1) в верхней части веб-страницы напротив поля «Статус регистрации» будет написано «Зарегистрировано»;
2) на экране вашего SIP-телефона появится Имя Сотрудника («ivano.ivanov» в примере) и не перечеркнутый (цельный) символ телефонного аппарата (см рис 2.1.4).
Рис. 2.1.4. Значок успешной регистрации на экране SIP-телефона.
Инструкция использования телефона Yealink SIP-T21P

Данный текст является ознакомительным фрагментом.
Читайте также
SIP-телефоны Yealink
SIP-телефоны Yealink
SIP-телефоны Yealink отличает:• относительно невысокие цены• высокое качество связи за счет использования качественных голосовых процессоров• приятный внешний вид, удобная и качественная клавиатура• наличие качественной громкой связи• возможность
Настройка телефона Yealink SIP-T19P
Настройка телефона Yealink SIP-T19P
Цена: 88,5 USD(рекомендованная розничная)• Высококачественная громкая связь с подавлением эха• Поддержка Paging и Intercom• Подключение гарнитуры через RJ9• Питание от 220В или PoE (1.3–2.6 Вт)• Подключение ПК через телефон• Одна учетная запись
Настройка телефона Yealink SIP-T21P
Настройка телефона Yealink SIP-T21P
Цена: 112,1 USD(рекомендованная розничная)• Высококачественная громкая связь с подавлением эха• Поддержка Paging и Intercom• Подключение гарнитуры через RJ9• Питание от 220В или PoE (1.4–2.6 Вт)• Подключение ПК через телефон• Две учетных записи SIP, две
Настройка телефона Yealink SIP-T22P
Настройка телефона Yealink SIP-T22P
Цена: 127 USD(рекомендованная розничная)• Высококачественная громкая связь с подавлением эха• Поддержка Paging и Intercom• Подключение гарнитуры через RJ9• Питание от 220В или PoE (1.6–2.8 Вт)• Подключение ПК через телефон (в режиме моста или
Настройка телефона Yealink SIP-T26P
Настройка телефона Yealink SIP-T26P
Цена: 190 USD(рекомендованная розничная)• Высококачественная громкая связь с подавлением эха• Поддержка Paging и Intercom• Подключение гарнитуры через RJ9• Питание от 220В или PoE (1.2–2.5 Вт)• Подключение ПК через телефон (в режиме моста или
Настройка телефона Yealink SIP-T28P
Настройка телефона Yealink SIP-T28P
Цена: 234 USD(рекомендованная розничная)• Высококачественная громкая связь с подавлением эха• Поддержка Paging и Intercom• Подключение гарнитуры через RJ9• Питание от 220В или PoE (1.2–2.7 Вт)• Подключение ПК через телефон (в режиме моста или
Модуль Yealink EXP38
Модуль Yealink EXP38
Шесть модулей и телефон предоставляют 238 кнопок BLF двухцветной индикации.
Цена: 128 USD(рекомендованная
Модуль Yealink EXP39
Модуль Yealink EXP39
Наличие LCD экрана избавляет от необходимости перепечатывать вкладыши для кнопок. Шесть модулей и телефон предоставляют 130 двухцветных индикаторов BLF, с функцией перелистывания – 238 абонентов.
Цена: 199 USD(рекомендованная
Настройка телефона Yealink SIP-T41P
Настройка телефона Yealink SIP-T41P
Цена: 148,8 USD(рекомендованная розничная)• Высококачественная громкая связь с подавлением эха• Поддержка Paging и Intercom• Подключение гарнитуры через RJ9• Питание от 220В или PoE (2.8–4.4 Вт)• Подключение ПК через телефон• Три учетных записи SIP, 6
Настройка телефона Yealink SIP-T42G
Настройка телефона Yealink SIP-T42G
Цена: 180,9 USD(рекомендованная розничная)• Высококачественная громкая связь с подавлением эха• Поддержка Paging и Intercom• Подключение гарнитуры через RJ9• Питание от 220В или PoE (2.8–4.4 Вт)• Подключение ПК через телефон• Три учетных записи SIP, 6
Адаптер Yealink EHS36
Адаптер Yealink EHS36
Использование адаптера EHS36 позволяет подключать к телефонам Yealink SIP-T26P, SIP-T28P, SIP-T41P, SIP-T42G, SIP-T46G, SIP-T48G профессиональные беспроводные и проводные гарнитуры как стерео, так и моно.
Цена: 58,4 USD(рекомендованная
Настройка телефона Yealink SIP-T46G
Настройка телефона Yealink SIP-T46G
Цена: 286,2 USD(рекомендованная розничная)• Высококачественная громкая связь с подавлением эха• Поддержка Paging и Intercom• Подключение гарнитуры через RJ9• Питание от 220В или PoE (2.8–4.5 Вт)• Подключение ПК через телефон• Шесть учетных записей SIP, 10
Модуль Yealink EXP40
Модуль Yealink EXP40
Цена: 147,6 USD(рекомендованная розничная)Наличие у модуля EXP40 LCD экрана избавляет от необходимости перепечатывать вкладыши для кнопок BLF. Шесть модулей и телефон предоставляют 130 двухцветных индикаторов BLF, с функцией перелистывания – быстрый доступ к вызову
Настройка телефона Yealink SIP-T48G
Настройка телефона Yealink SIP-T48G
Цена: 370,8 USD(рекомендованная розничная)• Высококачественная громкая связь с подавлением эха• Поддержка Paging и Intercom• Подключение гарнитуры через RJ9• Питание от 220В или PoE (2.4-10.8 Вт)• Подключение ПК через телефон• Шесть учетных записей SIP, до
Модуль Yealink EXP40
Модуль Yealink EXP40
Цена: 147,6 USD(рекомендованная розничная)Наличие у модуля EXP40 LCD экрана избавляет от необходимости перепечатывать вкладыши для кнопок BLF. Шесть модулей EXP40 совместно с телефоном предоставляют 149 двухцветных индикаторов BLF, с функцией перелистывания – быстрый
Вопросы по телефонам Yealink
Вопросы по телефонам Yealink
Почему телефон пишет «No Service»?
Телефон пишет сообщение «No Service», когда не настроен SIP-аккаунт.Выполните одно из следующих действий:• убедитесь, что аккаунты успешно зарегистрировались на телефоне Меню – > Статус – > Далее… – >
Инструкция YEALINK SIP-T23G на русском языке в формате pdf для устройства: телефон проводной. Прочитайте инструкцию для ознакомления с функциями и условиями эксплуатации, характеристиками и способами исправления неисправностей. Данное руководство пользователя поможет использовать весь функционал изделия и увеличит срок службы при условии соблюдения всех правил изложенных в документе.
- Производитель: Yealink
В т.ч. НДС 20%
Характеристики
Описание
Активное продвижение товаров и услуг, анализ требований современного потребителя, повышение эффективности ведения бизнеса — всё это невозможно представить без налаженной системы коммуникации на предприятии. Сотрудники должны иметь постоянную возможность обмениваться информацией, передавать важные сведения, связываться с потенциальными и действующими клиентами. Это непрерывный процесс, требующий использования высокотехнологичных инструментов. Ярким примером может служить новая модель стационарного телефона Yealink SIP-T21P E2. Несмотря на широкий функционал устройства, который будет подробно описан ниже, а также стильный дизайн и долговечную конструкцию, продукт сохраняет доступную стоимость, за что ещё больше ценится многочисленными покупателями на мировом и российском рынках.
К отличительным особенностям данной модели можно отнести ряд дополнений к предыдущему поколению телефонов SIP-T21P. Теперь устройство обладает усовершенствованным чипсетом и более мощным процессором для улучшенной производительности. Также производитель добавил подсветку LCD-экрана с разрешением 132 х 64, изменил цвет корпуса и внедрил возможность питания по системе PoE (Power over Ethernet). Телефон в отличие от многих других моделей товарной линейки компании имеет 2 SIP-аккаунта.
Стационарный телефон Yealink SIP-T21P E2 содержит в себе простор для качественной и эффективной коммуникации. Это обуславливает большое количество функций:
- Запись в телефонную книгу до 1000 контактов, поделённых на 5 групп. Загрузка и выгрузка контактной информации на другой носитель. Интеграция удалённых телефонных справочников, содержащих до 2000 записей. Хранение истории вызовов до 100 элементов. Интеллектуальный поиск по справочнику.
- Регулировка громкости вызова, выбор мелодии звонка.
- Режим телефонной конференции, интерком-вызовы (в том числе и групповые разговоры Paging), горячая линия, автоответчик, переадресация, автодозвон, функции удержания и ожидания, голосовая почта, отправка и получение SIP SMS.
- Интеграция с популярными платформами для голосовой связи, например: BroadSoft, Genesys. Поддержка системы Yealink RPS (Redirection and Provisioning Service).
- Быстрый и ускоренный набор номера телефона для экономии времени.
Производитель гарантирует максимально качественный и чистый звук благодаря внедрению в аппарат инновационных систем. К ним относятся:
- AEC — технология подавления эха;
- AGC — программная настройка уровня чувствительности микрофона;
- CNG — генератор комфортного шума;
- VAD — система распознавания голосовых волн;
- PLC — отметка ликвидации пакета с медиа-информацией.
Навигация по меню телефона осуществляется полностью на русском языке, однако при необходимости можно использовать и английскую раскладку клавиатуры.
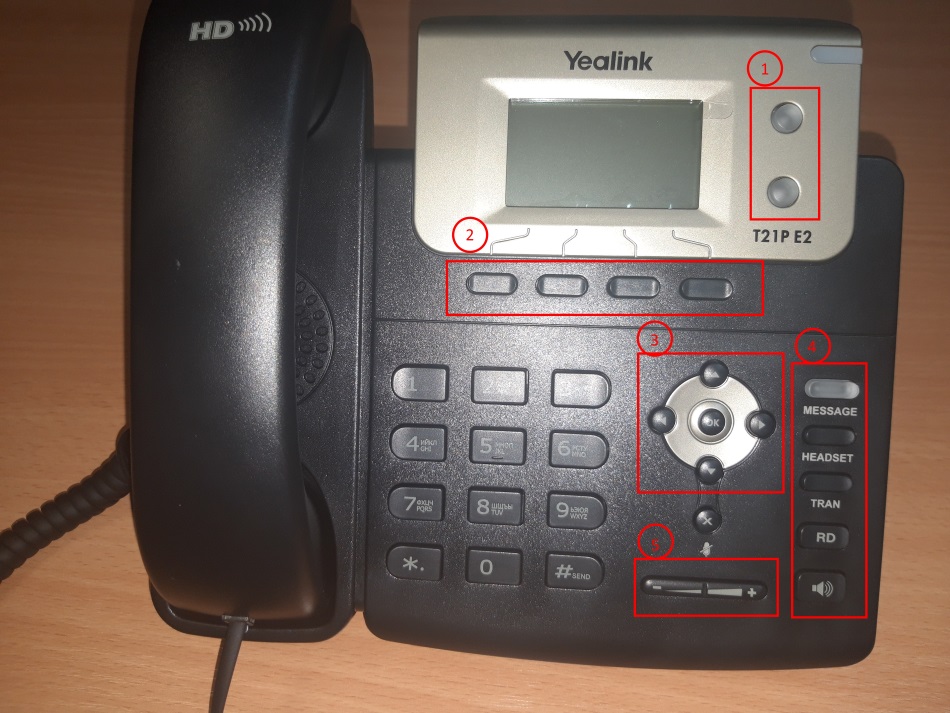
Корпус серого цвета с деталями в бежевом оттенке снабжён панелями с необходимыми клавишами. Четыре контекстно-зависимые, шесть навигационных и одна функциональная кнопка с возможностью перепрограммирования под индивидуальные нужды. Ещё пять клавиш не поддаются перепрограммированию: из них четыре функциональные: для активации голосовой почты, включения гарнитуры, совершения повторного вызова и громкой связи; а также одна светодиодная с активным доступом к голосовой почте.
Yealink SIP-T21P E2 — это гармоничное сочетание цены и качества, которое полностью подтверждается во время эксплуатации. Большой популярностью продукт пользуется не только при установке в колл-центрах: его активно приобретают крупные компании и мелкие фирмы с различной направленностью деятельности. Это эффективное решение для качественной связи с клиентской базой и между сотрудниками.
Продолжаем цикл статей по обзору и настройке IP-телефонов Yealink. Следующим решили осветить аппарат Yealink SIP-T21P (и его родного брата Yealink SIP-T21). По своим характеристикам и внешнему виду телефоны идентичны, с одним лишь отличием — модель SIP-T21P поддерживает питание по технологии PoE, что отмечается буквой «P» в ее названии. Несмотря на это отличие, обе модели поставляются со штатным блоком питания. Поэтому SIP-T21P можно смело рассматривать как дальновидный вариант — если в будущем компания решит перейти на PoE-технологии, то телефон менять не придется.
Заметим
Не забываем, что для подачи электричества на телефонный аппарат Yealink SIP-T21P E2 с поддержкой PoE, необходимо, чтобы в наличии был специальный свитч с PoE-питанием. Без него телефон не будет получать питание через витую пару.
Помогите с настройкой
Внешний вид и функционал
Телефон Yealink SIP-T21P — отлично подойдет любому сотруднику офиса, как модель со слегка расширенными возможностями в сравнении с более простыми линейками, или как бюджетный вариант для руководителя небольшой компании.
Телефон имеет набор стандартных функциональных клавиш, а также приятное дополнение — BLF клавиши.
- 2 настраиваемые BLF клавиши, к которым можно привязать множество функций, таких как: быстрый дозвон, быстрый трансфер/переадресация, отображение статуса абонента и многие другие;
- 4 контекстно-зависимые функциональные клавиши. Эти кнопки меняют свою функцию в зависимости от состояния, в котором находится телефон — состояние «покоя» (стандартное), при входящем звонке, при активном разговоре, при исходящем звонке, при наборе номера, при навигации по меню и настройкам;
- Клавиши навигации по меню и кнопка ОК;
- Фиксированные функциональные клавиши — голосовая почта, переключение на гарнитуру, трансфер звонка, список последних 100 набранных номеров, громкая связь;
- Клавиши регулирования громкости.
Настройка телефона
Благодаря удобному и понятному интерфейсу настройка телефонов Yealink занимает считанные минуты.
Прежде всего, необходимо зайти в веб-интерфейс телефона по его IP-адресу, узнать который можно, нажав кнопку OK. После чего, на экране откроется меню «Статус», где и будет показан адрес.
Вводим этот адрес в любом браузере компьютера, подключенного к этой же сети. Далее указываем стандартный логин и пароль: admin/admin.
Попав в режим настроек телефона, можно приступить к тем самым настройкам. В первую очередь подключаем телефон к офисной АТС или провайдеру IP-телефонии. Для этого на верхней панели выбираем вкладку «Аккаунт» и указываем следующие параметры:
- Лейбл — будет отображаться на экране телефона. Значение произвольное, это может быть ваше имя или внутренний номер в АТС;
- Отображаемое имя — будет отображаться у другого абонента вашей офисной АТС при звонке с этого аппарата. Значение также произвольное, для удобства стоит указать либо внутренний номер, либо должность, либо имя;
- Имя регистрации и пароль — ваши логин и пароль на АТС или сервере провайдера телефонии. Значения строгие, по нему будет проходить авторизация на сервере;
- АдресSIP-сервера — IP-адрес сервера АТС или провайдера, к которому будет подключаться аппарат.
Заполнив необходимые поля, в поле аккаунт выбираем значение «Включено», и внизу экрана нажимаем «Сохранить». Если все данные были введены верно, то строка «Статус регистрации» будет отображать значение «Зарегистрировано».
На этом основные настройки аппарата закончены. Приступаем к дополнительным возможностям и повышению комфорта использования.

В закладке DSS-кнопки можно настроить BLF клавиши под необходимые функции. Тип действия выбирается из списка, значения и лейбл заполняются в соответствии. В данном примере мы настроили первую кнопку на быстрый дозвон часто набираемого номера, а вторую на трансфер звонка на другого менеджера.
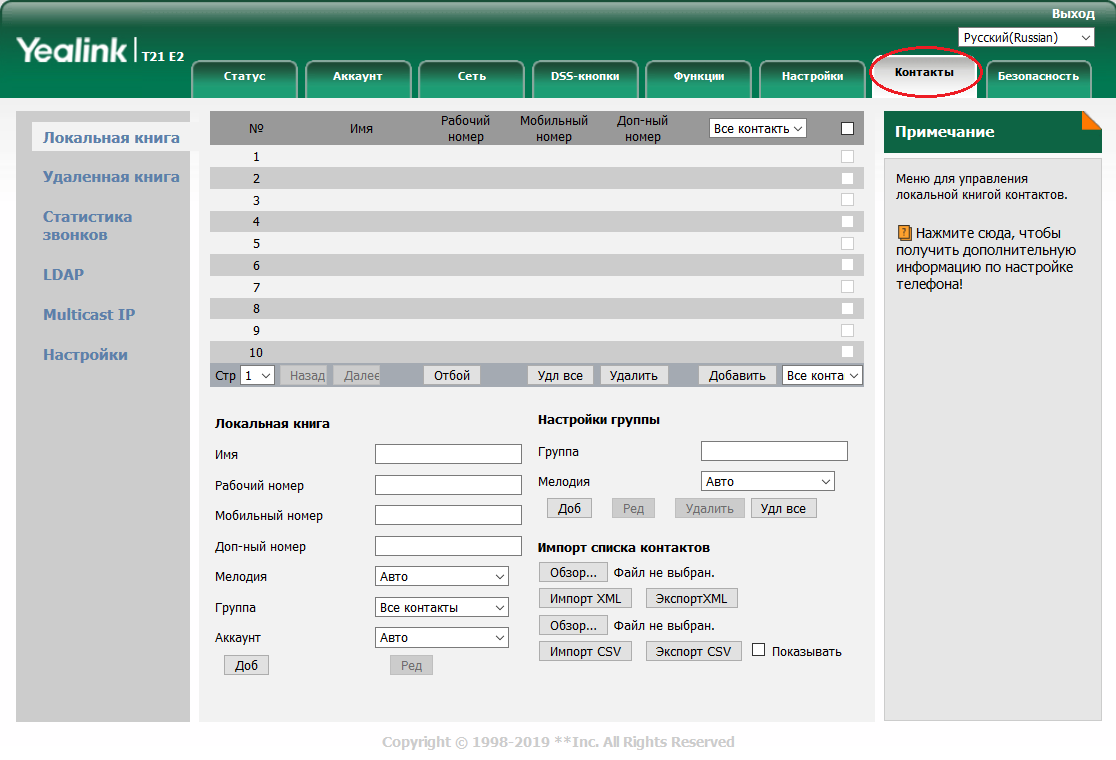
Телефон без встроенной книги контактов неудобен, это факт. Настоятельно рекомендуем воспользоваться книгой контактов, в будущем поможет сохранить огромное количество времени. В закладках выбираем «Контакты» и добавляем номера телефонов.
Контакты можно группировать и присваивать различные мелодии (которые, кстати, можно загружать на аппарат самостоятельно). Можно автоматизировать этот процесс с помощью импорта XML или CSV списка контактов. Для каждого контакта можно привязать до 3 номеров. Чтобы добавить контакты, не обязательно заходить в веб-интерфейс, это можно сделать и на самом аппарате, но занимает это немного больше времени.
Как подключить наушники к ip телефону Yealink T21 E2?
Иногда для удобства пользования телефоном и для освобождения рук, требуется подключение к телефону гарнитуры. Yealink SIP T21 E2 предоставляет такую возможность. Для этого необходимо выбрать и купить телефонные наушники с разъёмом RJ9 и подключить их в соответствующий разъём на торце телефона (обозначено соответствующей иконкой).
Для активации работы наушников телефон следует перевести в режим работы с гарнитурой, нажам на клавиатуре соответствующую клавишу.
После выполнения этих процедур вы комфортно сможете работать с гарнитурой освободив свои руки.
Резюме
Yealink SIP-T21P соответствует требованиям современного офисного работника. Он удобен в использовании, надежен и практичен. Если вы задумываетесь о приобретении SIP-аппаратов для своего офиса и готовы вложить несколько больше, чем того требуют самые бюджетные варианты, то стоит присмотреться к этой модели.
«>


Hereby, Yealink Network Technology CO., LTD. declares that this phone is in conformity
with the essential requirements and other relevant provisions of the CE, FCC.
Copyright © 2015 YEALINK NETWORK TECHNOLOGY CO., LTD
Copyright © 2015 Yealink Network Technology CO., LTD. All rights reserved. No parts of this
publication may be reproduced or transmitted in any form or by any means, electronic or
mechanical, photocopying, recording, or otherwise, for any purpose, without the express written
permission of Yealink Network Technology CO., LTD. Under the law, reproducing includes
translating into another language or format.
When this publication is made available on media, Yealink Network Technology CO., LTD. gives
its consent to downloading and printing copies of the content provided in this file only for private
use but not for redistribution. No parts of this publication may be subject to alteration,
modification or commercial use. Yealink Network Technology CO., LTD. will not be liable for any
damages arising from use of an illegally modified or altered publication.
THE SPECIFICATIONS AND INFORMATION REGARDING THE PRODUCTS IN THIS GUIDE ARE
SUBJECT TO CHANGE WITHOUT NOTICE. ALL STATEMENTS, INFORMATION, AND
RECOMMENDATIONS IN THIS GUIDE ARE BELIEVED TO BE ACCURATE AND PRESENTED
WITHOUT WARRANTY OF ANY KIND, EXPRESS OR IMPLIED. USERS MUST TAKE FULL
RESPONSIBILITY FOR THEIR APPLICATION OF PRODUCTS.
YEALINK NETWORK TECHNOLOGY CO., LTD. MAKES NO WARRANTY OF ANY KIND WITH
REGARD TO THIS GUIDE, INCLUDING, BUT NOT LIMITED TO, THE IMPLIED WARRANTIES OF
MERCHANTABILITY AND FITNESS FOR A PARTICULAR PURPOSE. Yealink Network Technology
CO., LTD. shall not be liable for errors contained herein nor for incidental or consequential
damages in connection with the furnishing, performance, or use of this guide.
This device is marked with the CE mark in compliance with EC Directives 2006/95/EC and 2004/108/EC.
This device is compliant with Part 15 of the FCC Rules. Operation is subject to the following two conditions:
1. This device may not cause harmful interference, and
2. This device must accept any interference received, including interference that may cause undesired
operation.
To avoid the potential effects on the environment and human health as a result of the
presence of hazardous substances in electrical and electronic equipment, end users of
electrical and electronic equipment should understand the meaning of the crossed-out
wheeled bin symbol. Do not dispose of WEEE as unsorted municipal waste and have to
collect such WEEE separately.
Note: This device is tested and complies with the limits for a Class B digital device, pursuant to Part 15 of the
FCC Rules. These limits are designed to provide reasonable protection against harmful interference in a
residential installation. This equipment generates, uses, and can radiate radio frequency energy and, if not
installed and used in accordance with the instructions, may cause harmful interference to radio
communications. However, there is no guarantee that interference will not occur in a particular installation. If
this equipment does cause harmful interference to radio or television reception, which can be determined
by turning the equipment off and on, the user is encouraged to try to correct the interference by one or more
of the following measures:
1. Reorient or relocate the receiving antenna.
2. Increase the separation between the equipment and receiver.
3. Connect the equipment into an outlet on a circuit different from that to which the receiver is connected.
4. Consult the dealer or an experience radio/TV technician for help.
We are striving to improve our documentation quality and we appreciate your feedback. Email
your opinions and comments to DocsFeedback@yealink.com.

Yealink SIP-T21(P) E2 IP phone firmware contains third-party software under the GNU General Public License
(GPL). Yealink uses software under the specific terms of the GPL. Please refer to the GPL for the exact terms
and conditions of the license.
The original GPL license, source code of components licensed under GPL and used in Yealink products can
be downloaded online:
http://www.yealink.com/GPLOpenSource.aspx?BaseInfoCateId=293&NewsCateId=293&CateId=293.
Note
Shared Line, Network Directory and Network Call Log features are hidden for IP phones
Please contact
your system administrator for more information.
About This Guide
Thank you for choosing the SIP-T21(P) E2 IP phone, exquisitely designed to provide
business telephony features, such as Call Hold, Call Transfer, Busy Lamp Field, Multicast
Paging and Conference over an IP network. The difference between the SIP-T21 E2 and
SIP-T21P E2 IP phones is that only SIP-T21P E2 supports PoE.
This guide provides everything you need to quickly use your new phone. First, verify
with your system administrator that the IP network is ready for phone configuration. Also
be sure to read the Packaging Contents and Regulatory Notices sections in this guide
before you set up and use the SIP-T21(P) E2 IP phone.
in neutral firmware, which are designed for the BroadWorks environment.
Topics provided in this guide include:
Chapter 1 Overview
Chapter 2 Getting Started
Chapter 3 Customizing Your Phone
Chapter 4 Basic Call Features
Chapter 5 Advanced Phone Features
v

User Guide for the SIP-T21(P) E2 IP Phone
vi

Table of Contents
About This Guide ……………………………………………………………. v
In This Guide …………………………………………………………………………………………………………. v
Table of Contents …………………………………………………………… vii
Overview ………………………………………………………………………. 1
Hardware Component Instructions ………………………………………………………………………… 1
Icon Instructions …………………………………………………………………………………………………….. 3
LED Instructions ……………………………………………………………………………………………………… 4
User Interfaces ……………………………………………………………………………………………………… 5
Phone User Interface ………………………………………………………………………………………….. 6
Web User Interface …………………………………………………………………………………………….. 6
Documentations ……………………………………………………………………………………………………. 8
Getting Started ………………………………………………………………. 9
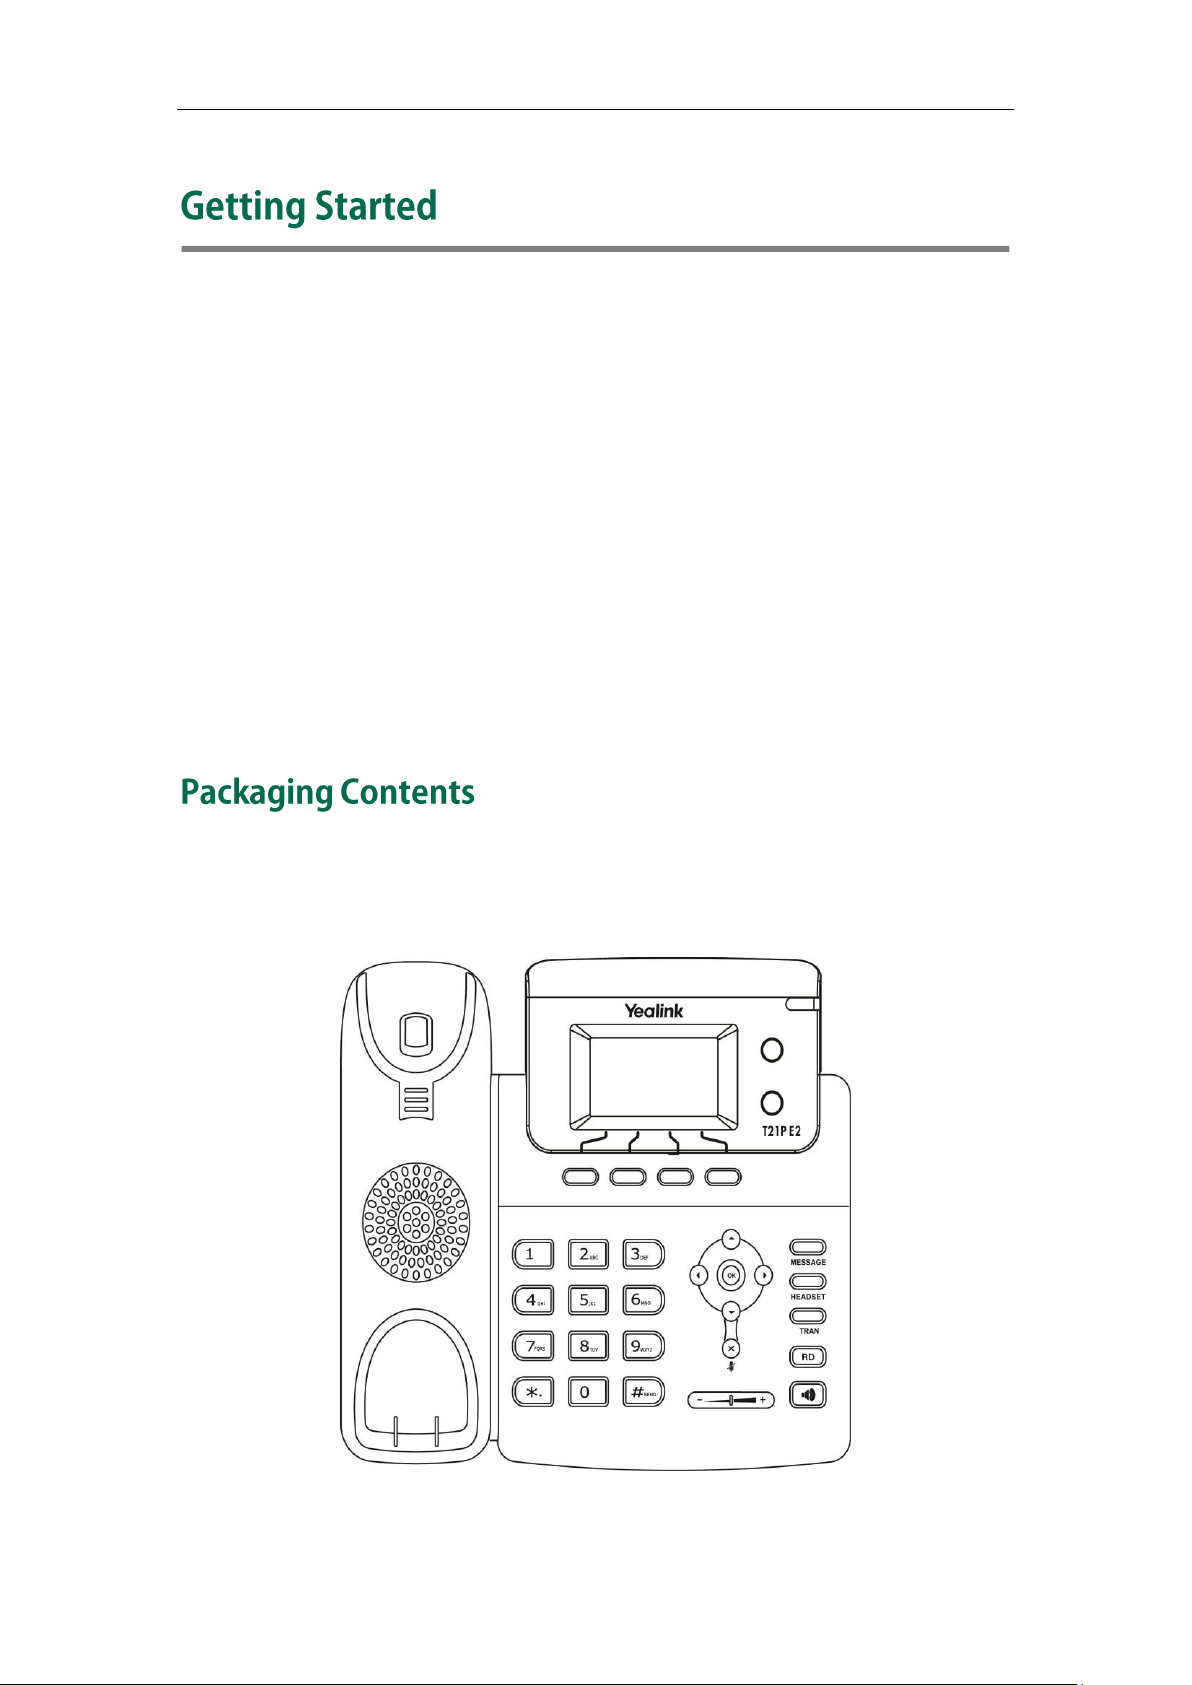
Packaging Contents ………………………………………………………………………………………………. 9
Optional Accessories ……………………………………………………………………………………….. 10
Phone Installation ………………………………………………………………………………………………… 11
Phone Initialization ………………………………………………………………………………………………. 13
Phone Status ……………………………………………………………………………………………………….. 13
Basic Network Settings ………………………………………………………………………………………… 15
Registration …………………………………………………………………………………………………………. 17
Idle Screen ………………………………………………………………………………………………………….. 17
Customizing Your Phone ………………………………………………… 19
General Settings …………………………………………………………………………………………………. 19
Contrast ……………………………………………………………………………………………………………. 19
Backlight ………………………………………………………………………………………………………….. 20
Language …………………………………………………………………………………………………………. 20
Time & Date ……………………………………………………………………………………………………… 21
Administrator Password ……………………………………………………………………………………. 23
Key as Send ……………………………………………………………………………………………………… 24
Phone Lock ……………………………………………………………………………………………………….. 24
Audio Settings …………………………………………………………………………………………………….. 27
Volume …………………………………………………………………………………………………………….. 27
Ring Tones ………………………………………………………………………………………………………… 27
vii

User Guide for the SIP-T21(P) E2 IP Phone
Contact Management …………………………………………………………………………………………. 30
Directory…………………………………………………………………………………………………………… 30
Local Directory …………………………………………………………………………………………………. 31
Blacklist ……………………………………………………………………………………………………………. 41
Remote Phone Book ………………………………………………………………………………………….. 43
Call History Management …………………………………………………………………………………… 45
System Customizations ………………………………………………………………………………………… 47
Logo Customization ………………………………………………………………………………………….. 47
Headset Use …………………………………………………………………………………………………….. 48
DSS Keys ………………………………………………………………………………………………………….. 50
Account Management ……………………………………………………………………………………… 59
Dial Plan …………………………………………………………………………………………………………… 60
Emergency Number ………………………………………………………………………………………….. 66
Live Dialpad …………………………………………………………………………………………………….. 67
Hotline ……………………………………………………………………………………………………………… 68
Basic Call Features ……………………………………………………….. 69
Placing Calls ……………………………………………………………………………………………………….. 69
Answering Calls ………………………………………………………………………………………………….. 71
Ending Calls ………………………………………………………………………………………………………… 73
Redialing Numbers ……………………………………………………………………………………………… 73
Recent Call In Dialing ………………………………………………………………………………………….. 74
Auto Answer ……………………………………………………………………………………………………….. 75
Auto Redial ………………………………………………………………………………………………………….. 76
Call Completion ………………………………………………………………………………………………….. 77
ReCall …………………………………………………………………………………………………………………. 78
Call Mute …………………………………………………………………………………………………………….. 79
Call Hold/Resume ………………………………………………………………………………………………… 79
Do Not Disturb (DND) ………………………………………………………………………………………….. 80
Call Forward ……………………………………………………………………………………………………….. 83
Call Transfer ………………………………………………………………………………………………………… 90
Call Waiting ………………………………………………………………………………………………………… 91
Conference …………………………………………………………………………………………………………. 92
Local Conference ……………………………………………………………………………………………… 92
Network Conference ………………………………………………………………………………………… 93
Call Park ……………………………………………………………………………………………………………… 94
Call Pickup ………………………………………………………………………………………………………….. 96
Anonymous Call ………………………………………………………………………………………………… 101
Anonymous Call Rejection …………………………………………………………………………………. 102
Advanced Phone Features …………………………………………….105
Busy Lamp Field (BLF) ……………………………………………………………………………………….. 105
BLF List ………………………………………………………………………………………………………………. 107
viii

Table of Contents
Call Recording …………………………………………………………………………………………………… 109
Hot Desking ………………………………………………………………………………………………………. 111
Intercom ……………………………………………………………………………………………………………. 113
Outgoing Intercom Calls …………………………………………………………………………………. 113
Incoming Intercom Calls …………………………………………………………………………………. 113
Using Intercom ……………………………………………………………………………………………….. 115
Multicast Paging ………………………………………………………………………………………………… 115
Sending RTP Stream ……………………………………………………………………………………….. 116
Receiving RTP Stream ……………………………………………………………………………………… 118
Using Multicast Paging ……………………………………………………………………………………. 120
Music on Hold ……………………………………………………………………………………………………. 121
Automatic Call Distribution (ACD)………………………………………………………………………. 122
Messages ………………………………………………………………………………………………………….. 124
Short Message Service (SMS) ………………………………………………………………………… 124
Voice Mail ………………………………………………………………………………………………………. 126
Message Waiting Indicator (MWI) ………………………………………………………………….. 128
Troubleshooting ……………………………………………………………131
Regulatory Notices ……………………………………………………….141
Service Agreements ………………………………………………………………………………………….. 141
Limitations of Liability ………………………………………………………………………………………… 141
Safety Instructions ……………………………………………………………………………………………… 141
Appendix A — Time Zones ………………………………………………143
Index …………………………………………………………………………..145
ix

User Guide for the SIP-T21(P) E2 IP Phone
x

Overview
This chapter provides the overview of the SIP-T21(P) E2 IP phone. Topics include:
Hardware Component Instructions
Icon Instructions
LED Instructions
User Interfaces
Documentations
If you require additional information or assistance with your new phone, contact your
system administrator.
The main hardware components of the SIP-T21(P) E2 IP phone are the LCD screen and
the keypad.
1
User Guide for the SIP-T21(P) E2 IP Phone
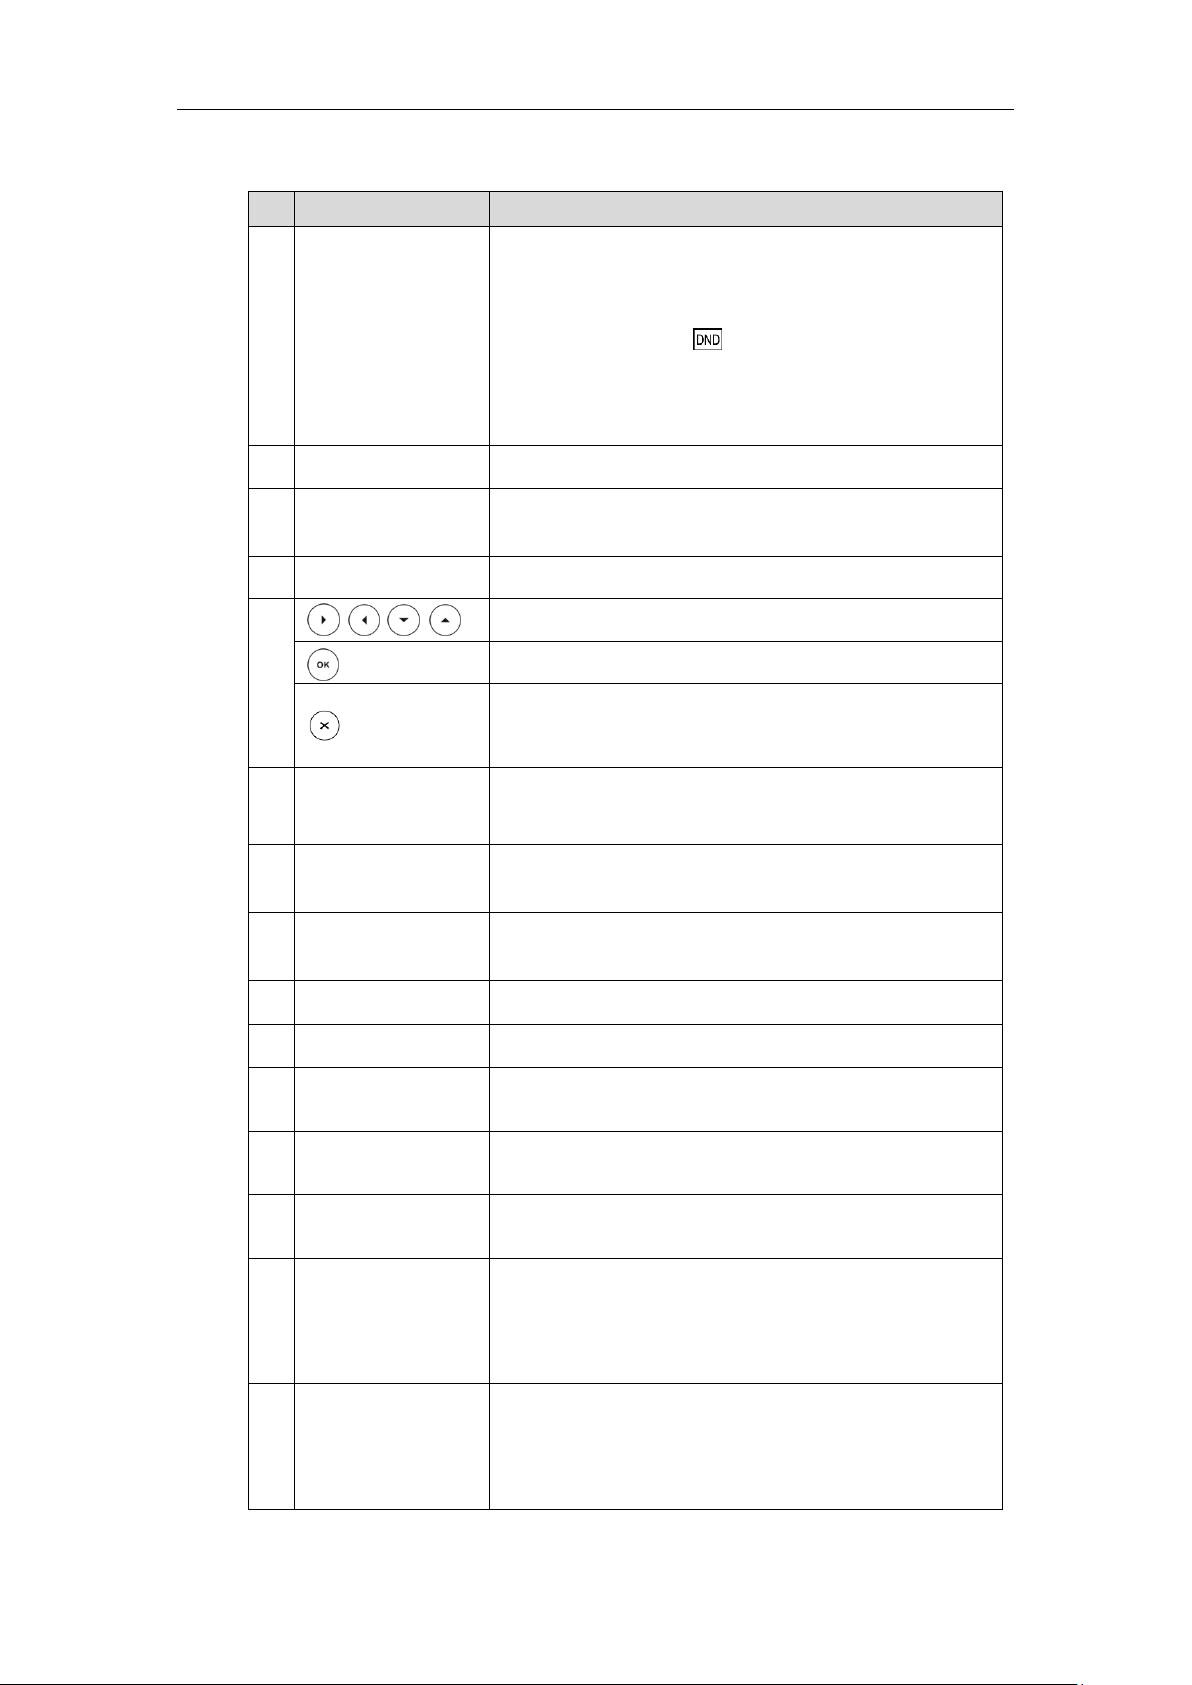
Shows information about calls, messages, soft keys,
time, date and other relevant data:
• Call information—caller ID, call duration
• Icons (for example, )
• Missed call text or second incoming caller information
• Prompt text (for example, «Saving config file!»)
• Time and date
Indicates phone power status and phone status.
Use these keys to activate up to two accounts and assign
various features.
Label automatically to identify their context-sensitive
Scroll through the displayed information.
Confirms actions or answers incoming calls.
Cancels actions, rejects incoming calls, mutes or
un-mutes calls.
Indicates and accesses voice mails.
Toggles the headset mode.
Transfers a call to another party.
Redials a previously dialed number.
Toggles the hands-free speakerphone mode.
Adjusts the volume of the handset, headset, speaker,
and ringer.
Provides the digits, letters and special characters in
context-sensitive applications.
Provides ringer and hands-free (speakerphone) audio
output.
Picking up the handset from the handset cradle, the
hookswitch bounces and the phone connects to the line,
laying the handset down on the handset cradle, the
phone disconnects from the line.
Secures the handset in the handset cradle when the IP
phone is mounted vertically. For more information on
how to adjust the hookswitch tab, refer to
Yealink Wall
Mount Quick Installation Guide for Yealink IP Phones
.
Hardware component instructions of the SIP-T21(P) E2 IP phone are:
2
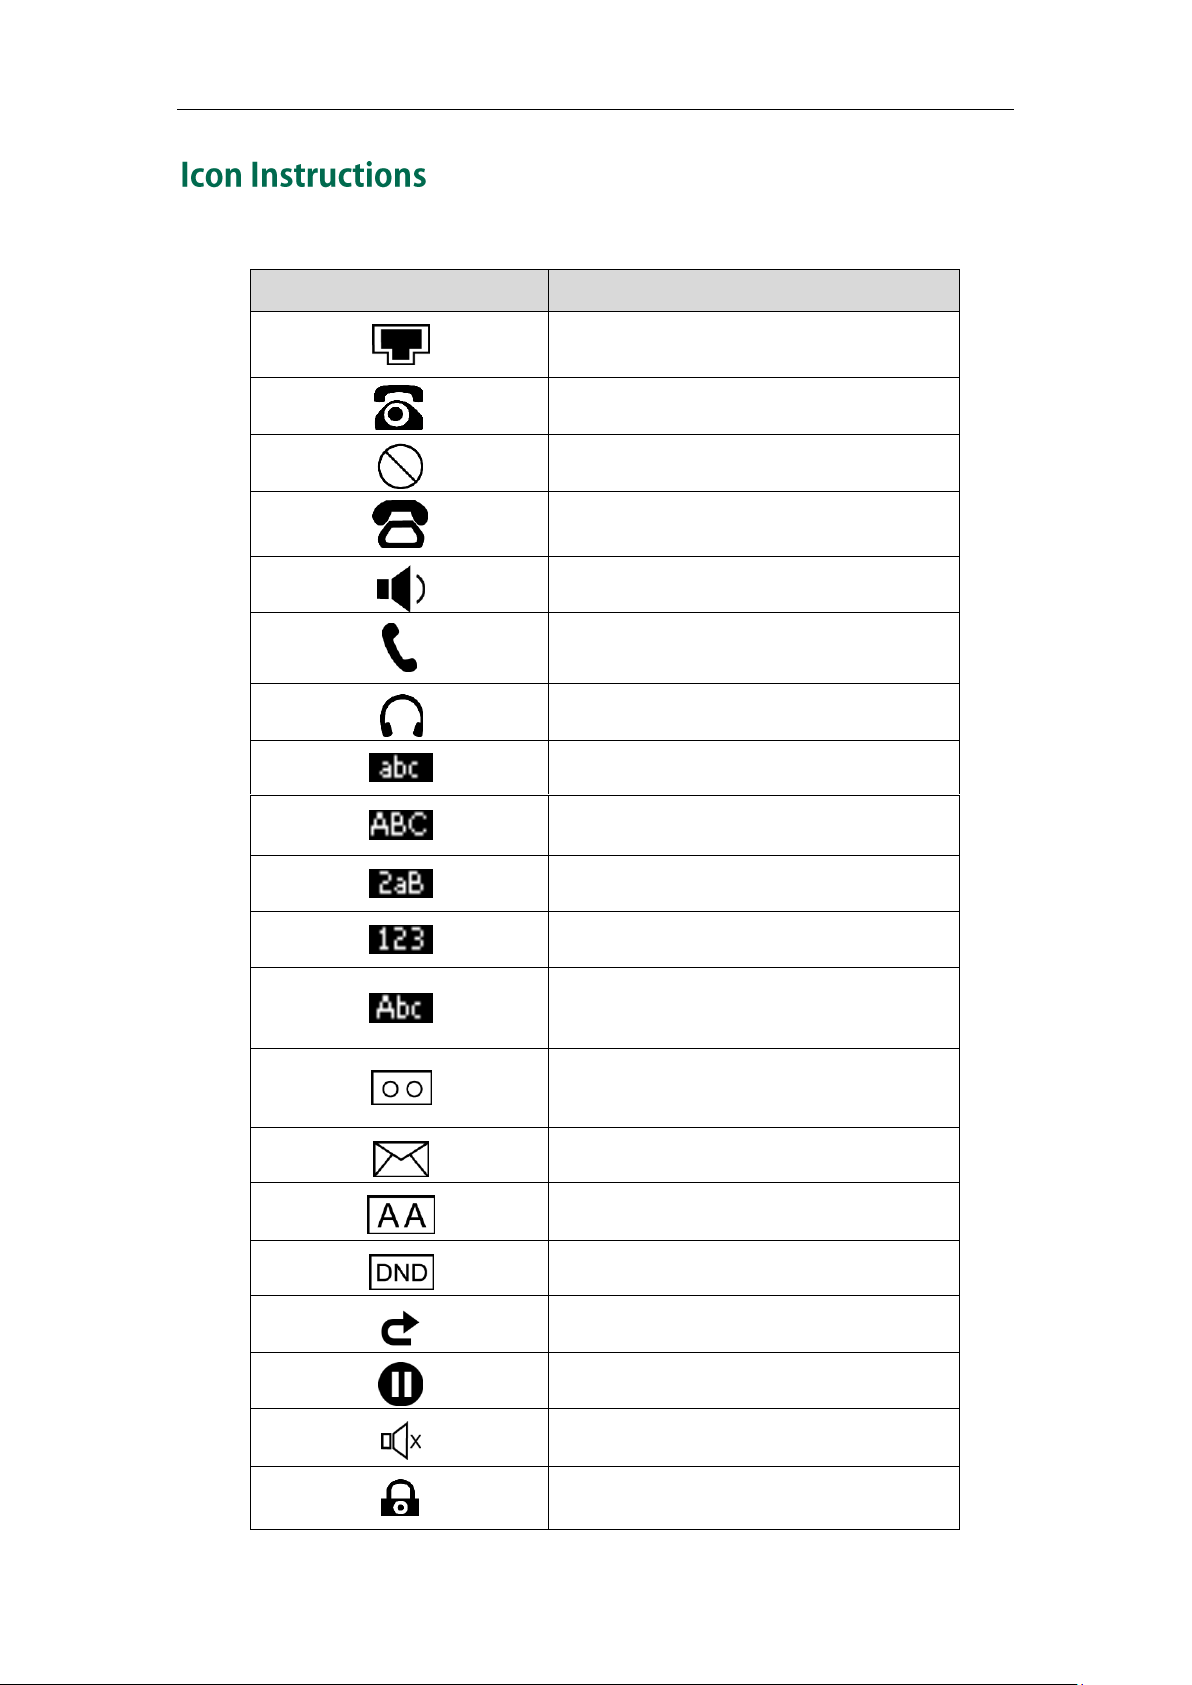
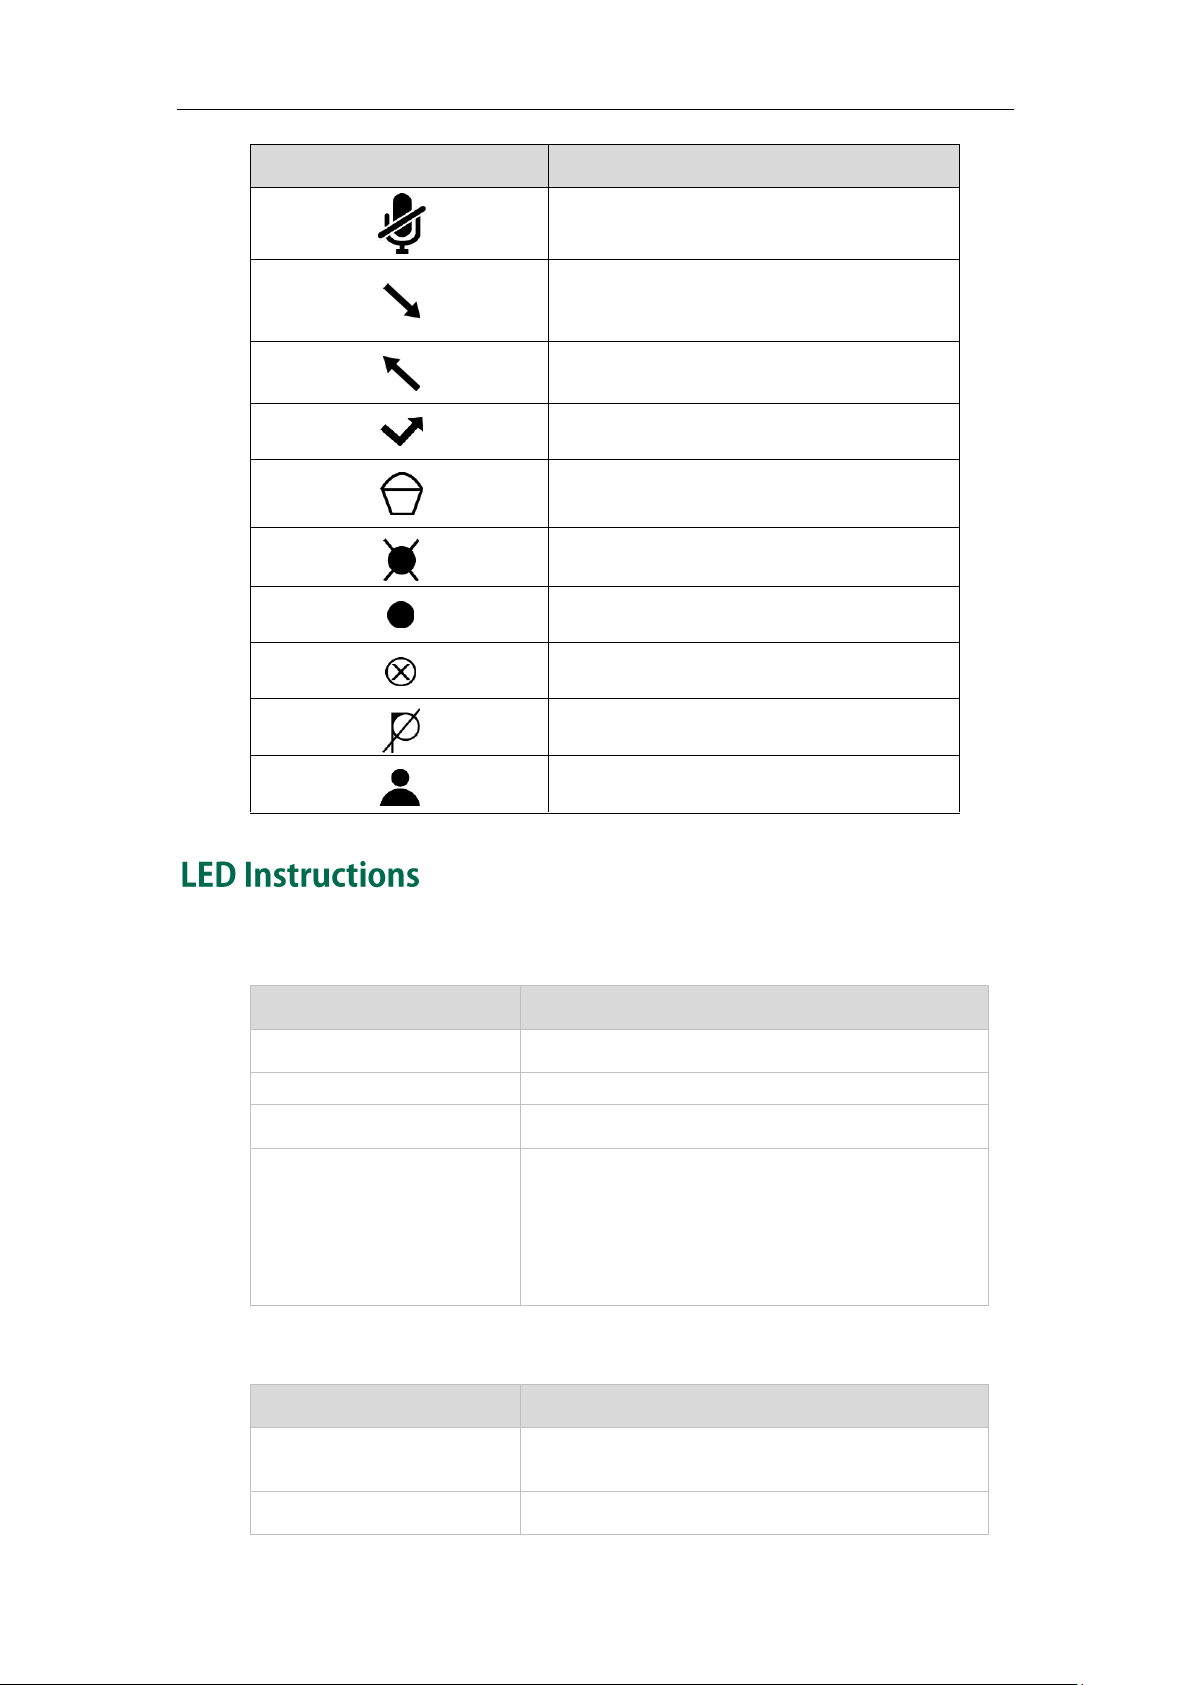
Icons appearing on the LCD screen are described in the following table:
Hands-free speakerphone mode
Handset mode
Headset mode
Multi-lingual lowercase letters input mode
Multi-lingual uppercase letters input mode
Multi-lingual uppercase and lowercase
letters input mode
Call Forwarded/Forwarded Calls
Overview
3
User Guide for the SIP-T21(P) E2 IP Phone
Received Calls
Placed Calls
A call cannot be recorded
Recording starts successfully
Recording cannot be started
Recording cannot be stopped
The phone is initializing.
Fast flashing red (300ms)
The phone receives a voice mail or text message.
The phone is powered off.
The phone is idle.
The phone is busy.
The call is placed on hold or is held.
The call is muted.
The line is seized.
The line is in conversation.
The line receives an incoming call.
Power Indicator LED
Line key LED
4
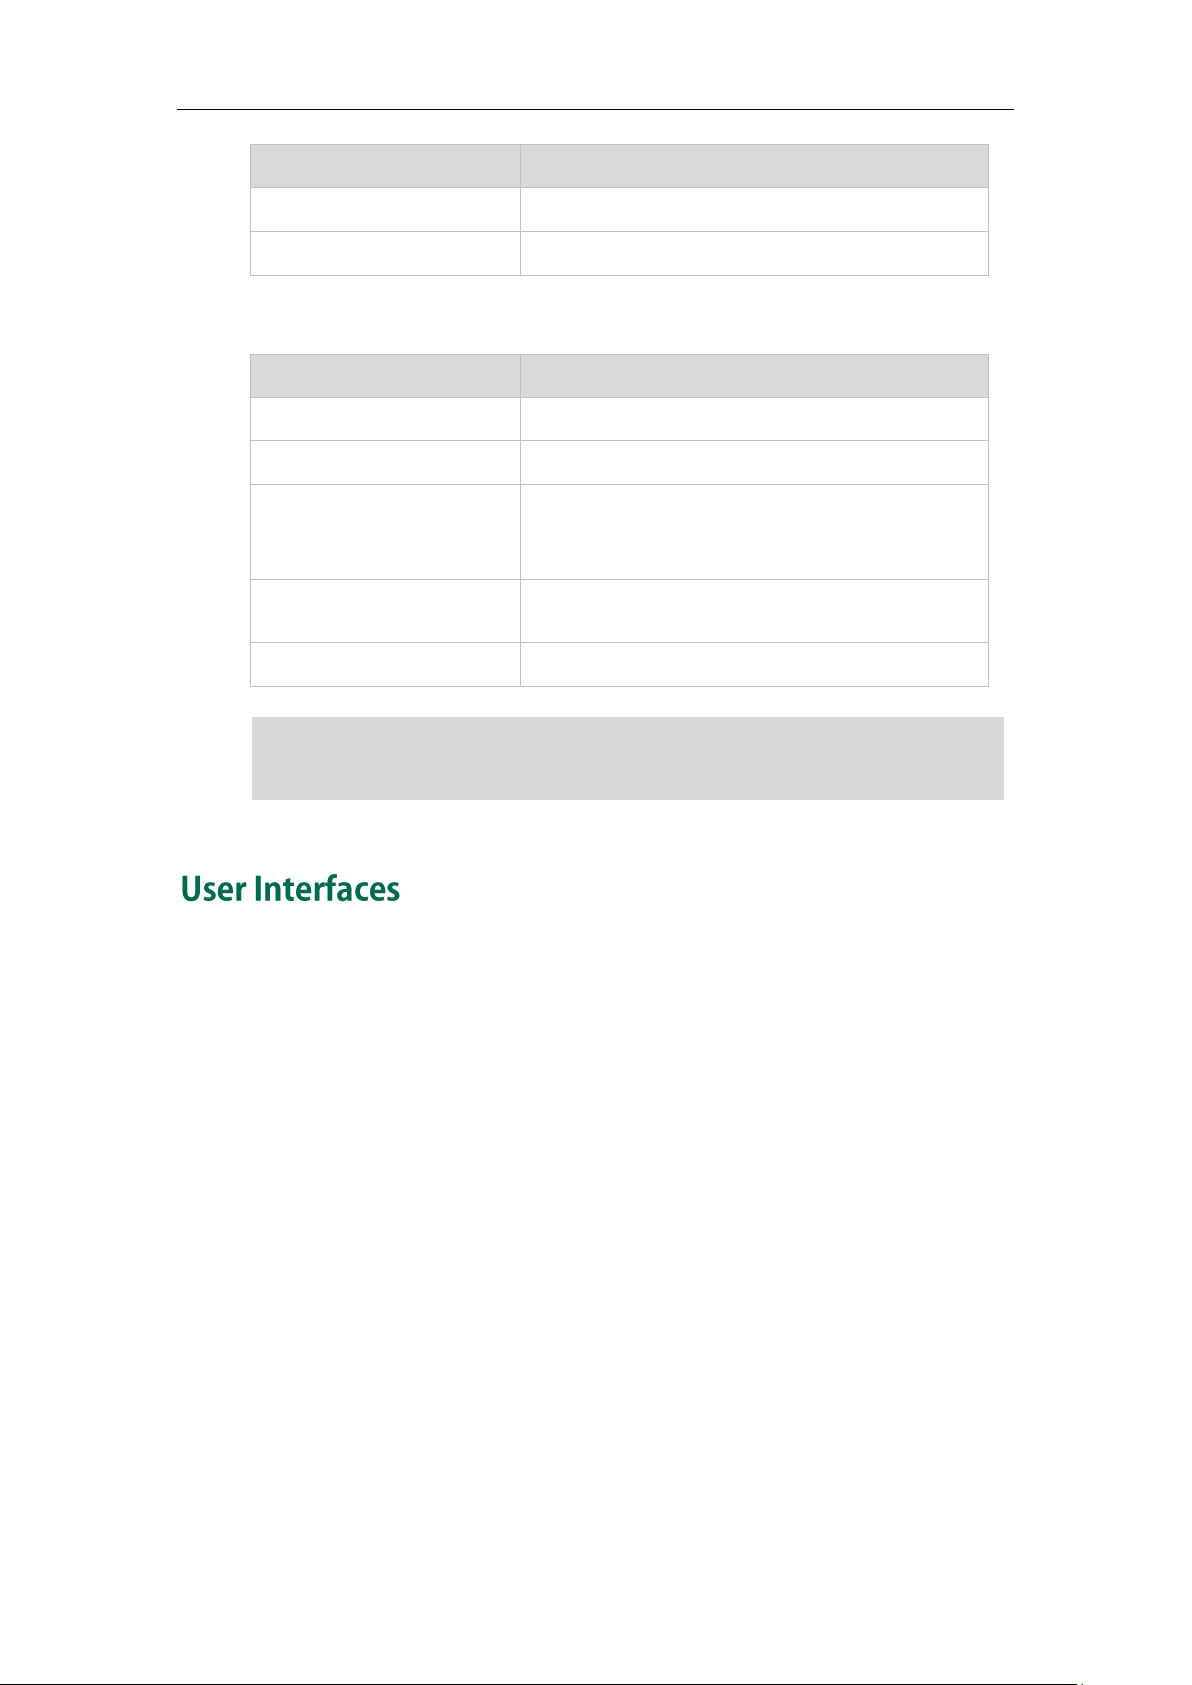
The call is placed on hold.
Line key LED (configured as a BLF key or BLF List key)
The monitored user is idle.
Fast flashing red (200ms)
The monitored user receives an incoming call.
The monitored user is busy.
The monitored user’s conversation is placed on
hold (This LED status requires server support).
The call is parked against the monitored user’s
phone number.
The monitored user does not exist.
The above introduces the default LED status. The statuses of the power indicator LED and
Yealink_SIP-T2_Series_T4_Series_IP_Phones_Administrator_Guide.
Overview
Note
BLF key are configurable via web user interface. For more information, refer to
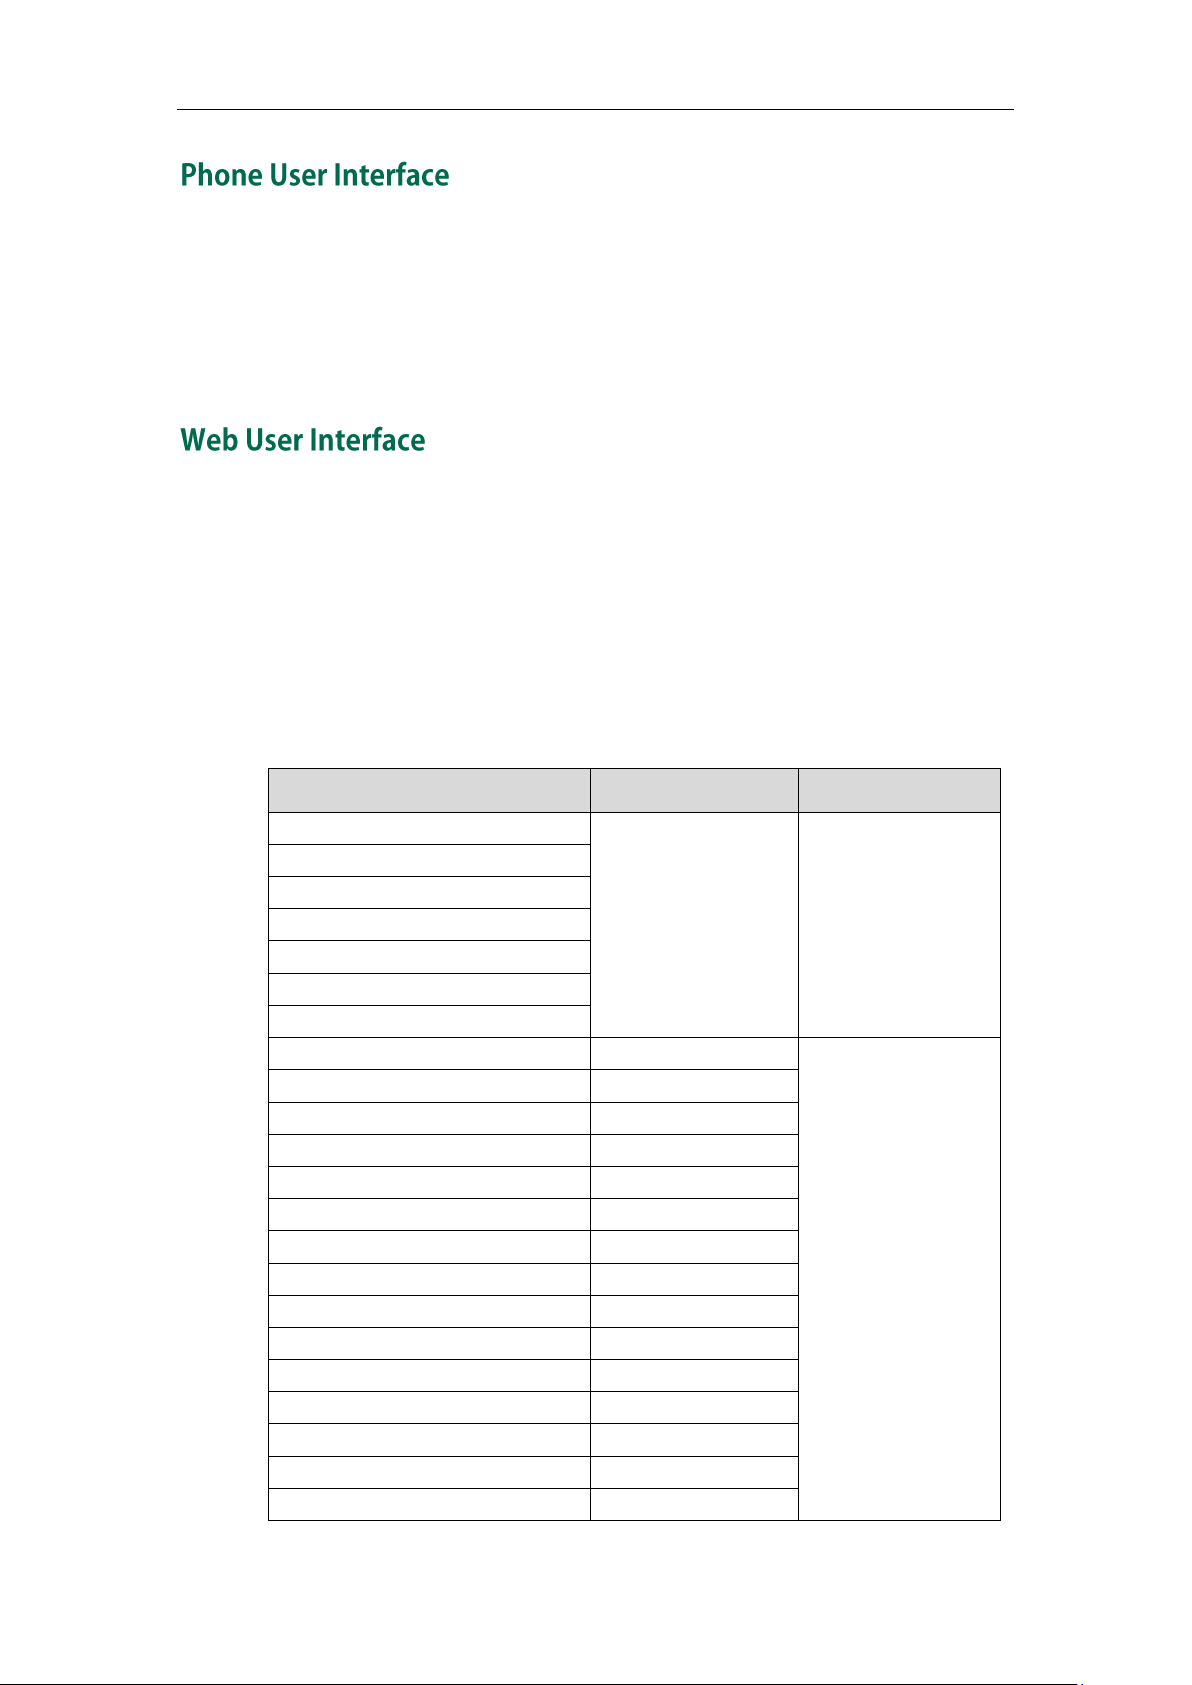
Two ways to customize configurations of your SIP-T21(P) E2 IP phone:
The user interface on the IP phone.
The user interface in a web browser on your PC.
The hardware components keypad and LCD screen constitute the phone user interface,
which allows the user to execute all call operation tasks and basic configuration
changes directly on the phone. In addition, you can use the web user interface to
access all configuration settings. In many cases, either the phone user interface and/or
the web user interface interchangeably. However, in some cases, it is only possible to
use one or the other interface to operate the phone and change settings.
5
User Guide for the SIP-T21(P) E2 IP Phone
Phone User Interface
Web User Interface
—Call History Management
You can customize your phone by pressing the Menu soft key to access the phone user
interface. The Advanced Settings option is only accessible to the administrator, and the
default administrator password is “admin” (case-sensitive). For more information on
customizing your phone with the available options from the phone user interface, refer
to Customizing Your Phone on page 19.
In addition to the phone user interface, you can also customize your phone via web user
interface. In order to access the web user interface, you need to know the IP address of
your new phone. To obtain the IP address, press the OK key on the phone. Enter the IP
address (e.g., http://192.168.0.10 or 192.168.0.10) in the address bar of web browser on
your PC. The default administrator user name and password are both “admin”
(case-sensitive).
The options you can use to customize the IP phone via phone user interface and/or via
web user interface are listed in the following table:
6

Overview
—Anonymous Call Rejection
—Automatic Call Distribution (ACD)
7

User Guide for the SIP-T21(P) E2 IP Phone
Basic call features and
phone customizations
Phone/Web user
interface settings
Basic call features and
advanced phone
features
The table above lists most of the feature options. Please refer to the relevant sections for
more information.
Note
The following table shows documentations available for the SIP-T21(P) E2 IP phone.
8
Getting Started
This chapter provides basic installation instructions and information for obtaining the
best performance with the SIP-T21(P) E2 IP phone. Topics include:
Packaging Contents
Phone Installation
Phone Initialization
Phone Status
Basic Network Settings
Registration
Idle Screen
If you require additional information or assistance with your new phone, contact your
system administrator.
The following components are included in your SIP-T21(P) E2 IP phone package:
SIP-T21(P) E2 IP Phone
9
User Guide for the SIP-T21(P) E2 IP Phone
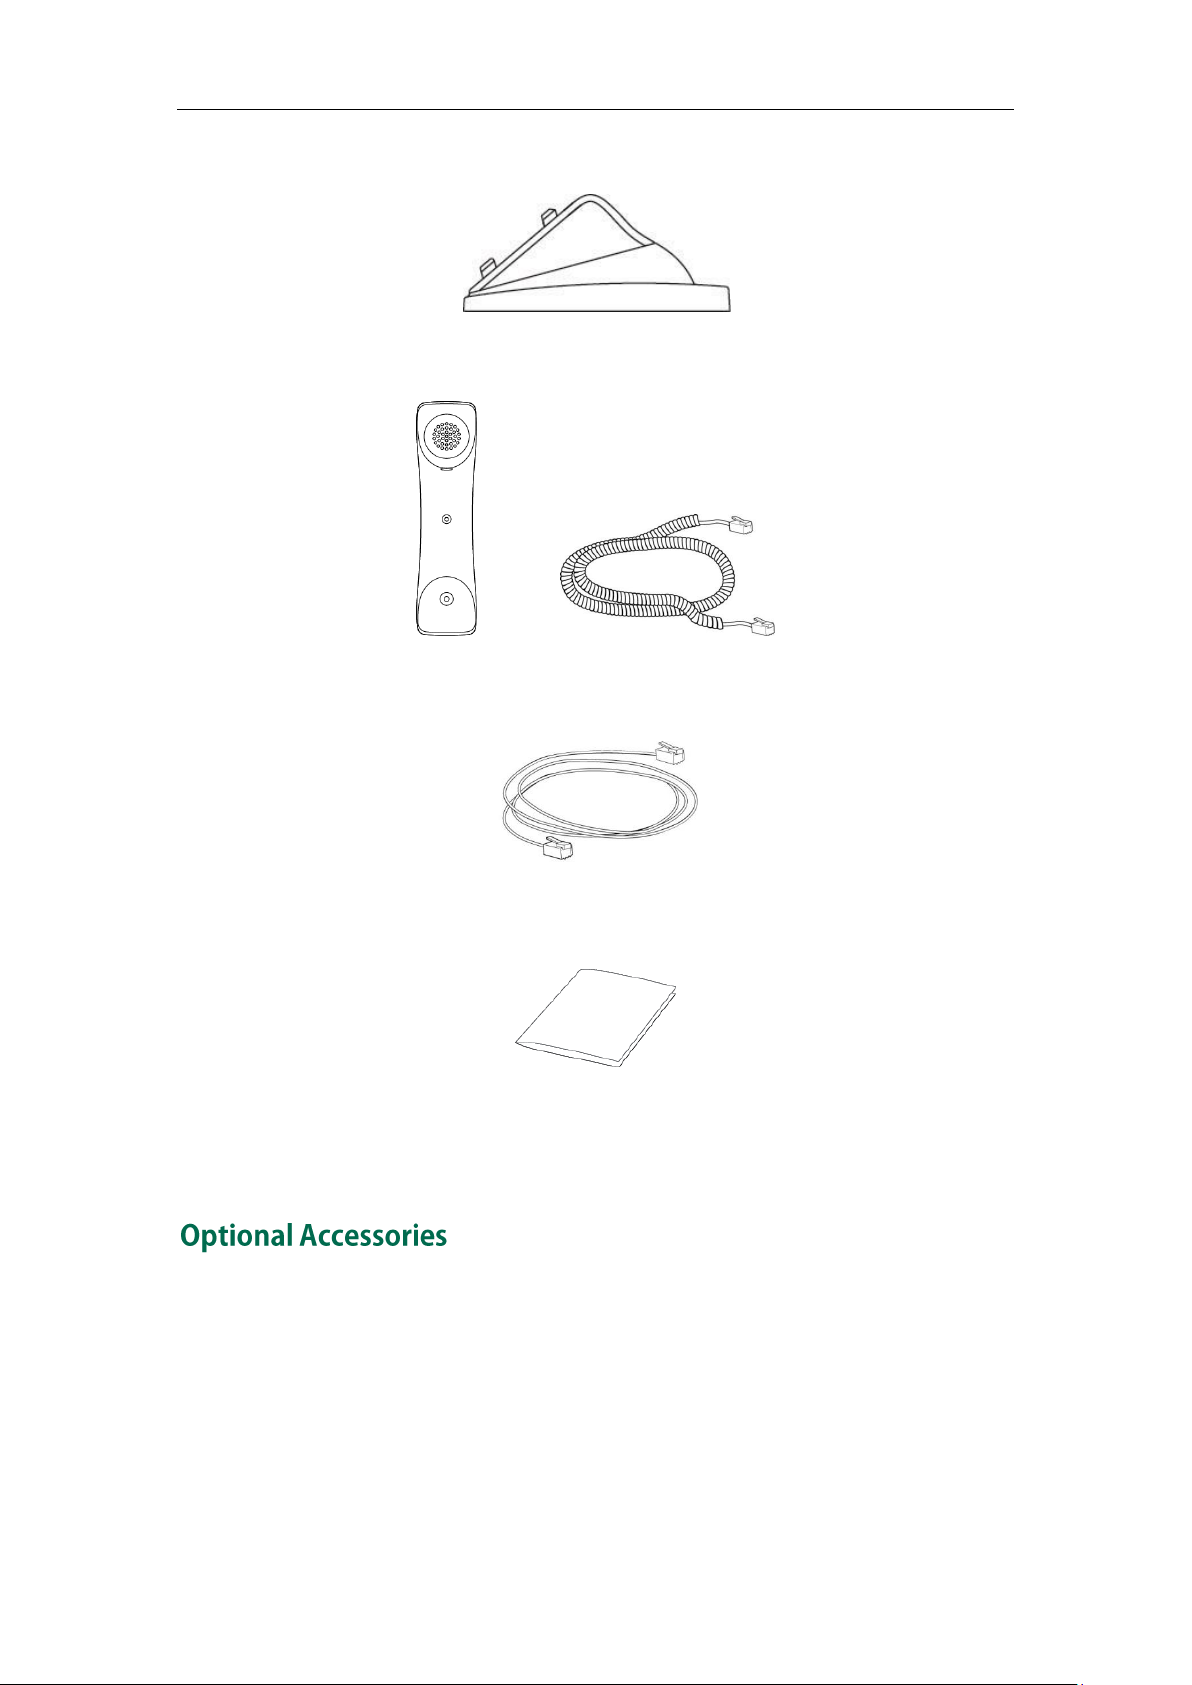
Phone Stand
Handset & Handset Cord
Ethernet Cable
Quick Start Guide
Check the list before installation. If you find anything missing, contact your system
administrator.
10
The following items are optional accessories for your SIP-T21(P) E2 IP phone. You need to
purchase them separately if required.
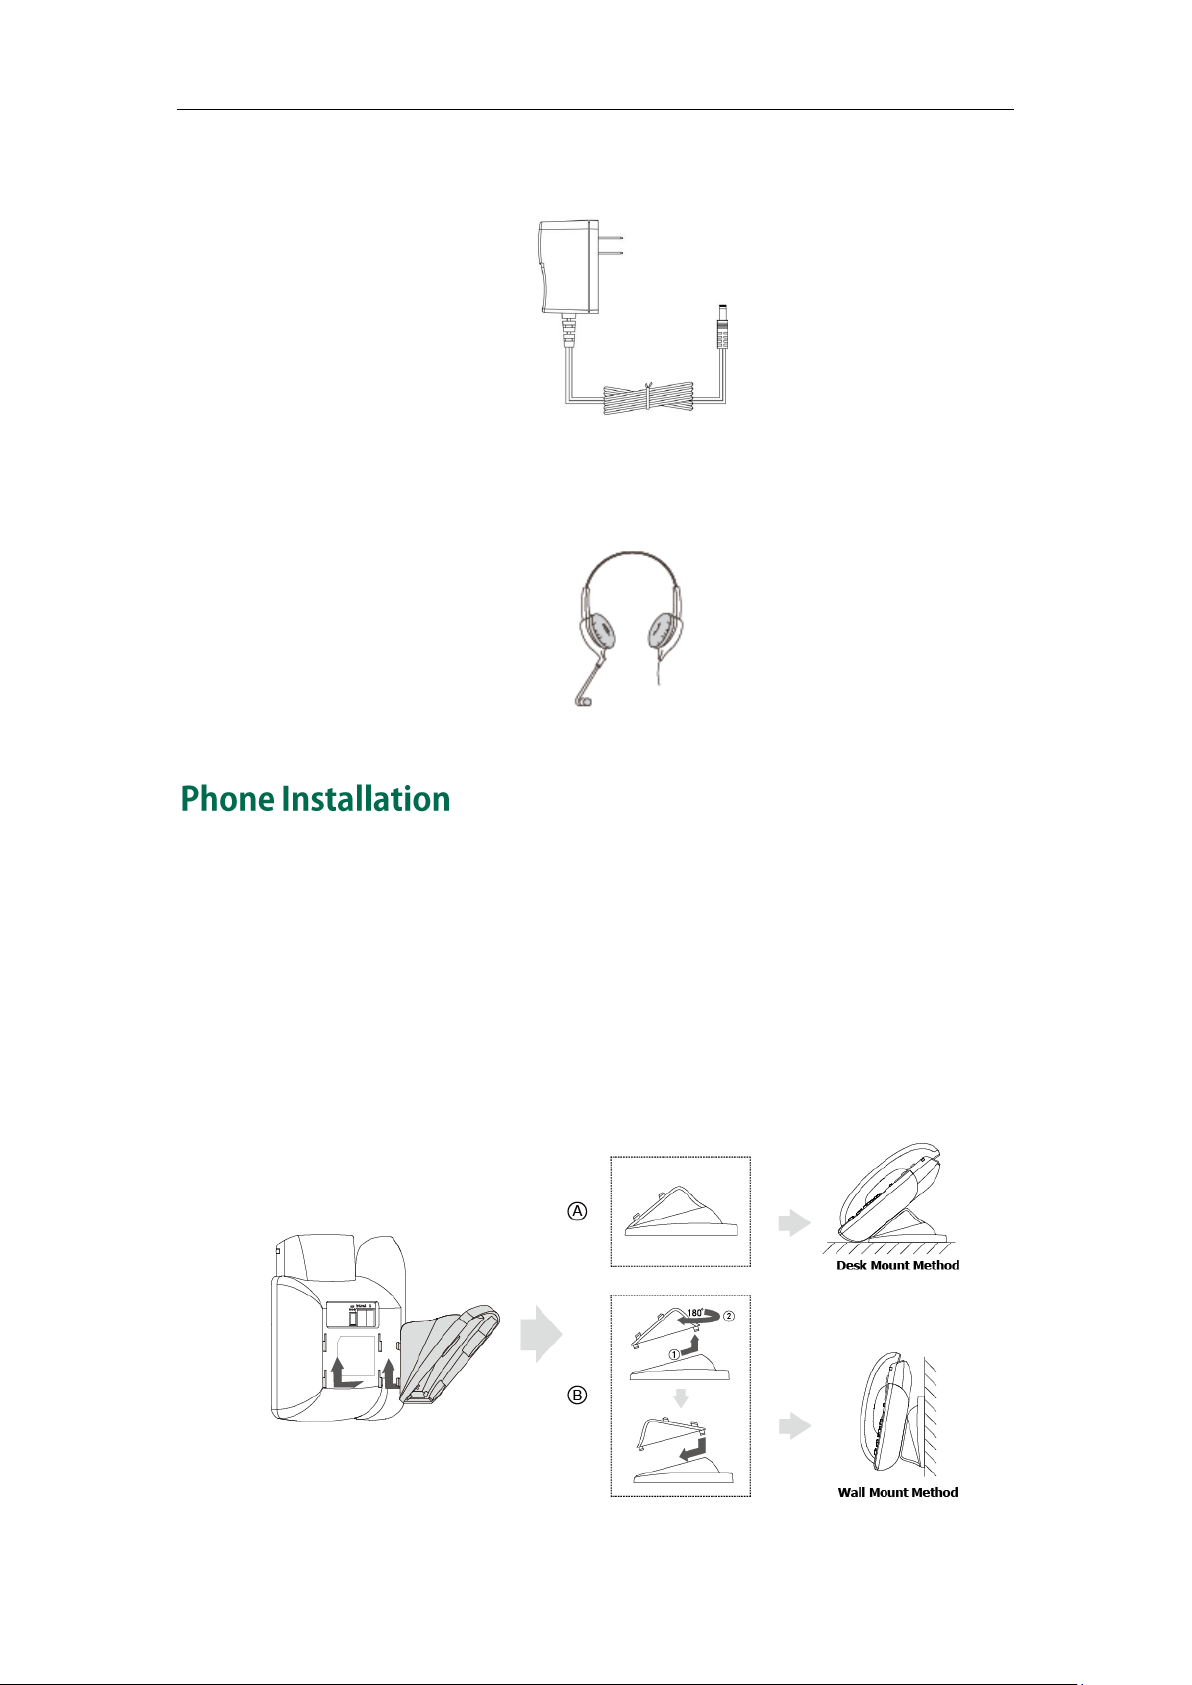
Power Adapter
Headset
Getting Started
If your phone is already installed, proceed to Phone Initialization on page 13.
This section introduces how to install the phone:
1) Attach the stand
2) Connect the handset and optional headset
3) Connect the network and power
1) Attach the stand
11
User Guide for the SIP-T21(P) E2 IP Phone
PoE is not applicable to the SIP-T21 E2 IP phone.
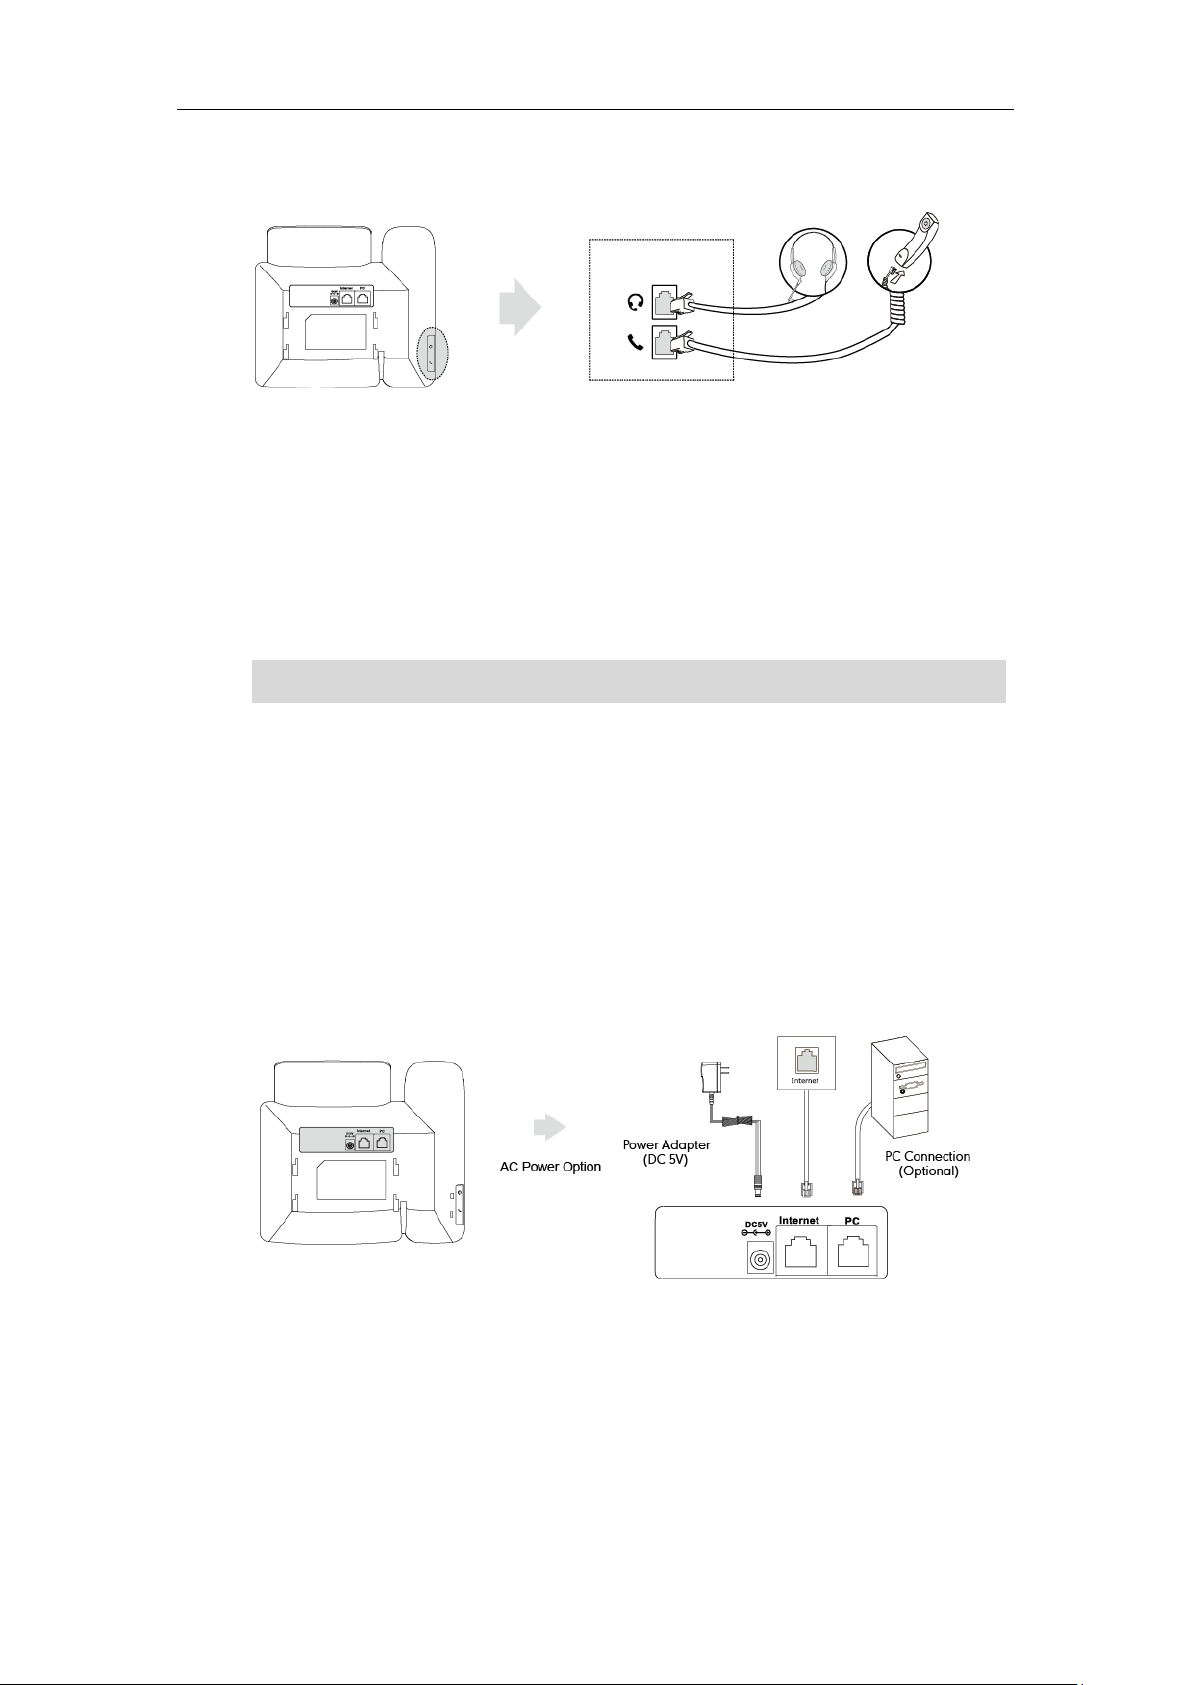
2) Connect the handset and optional headset
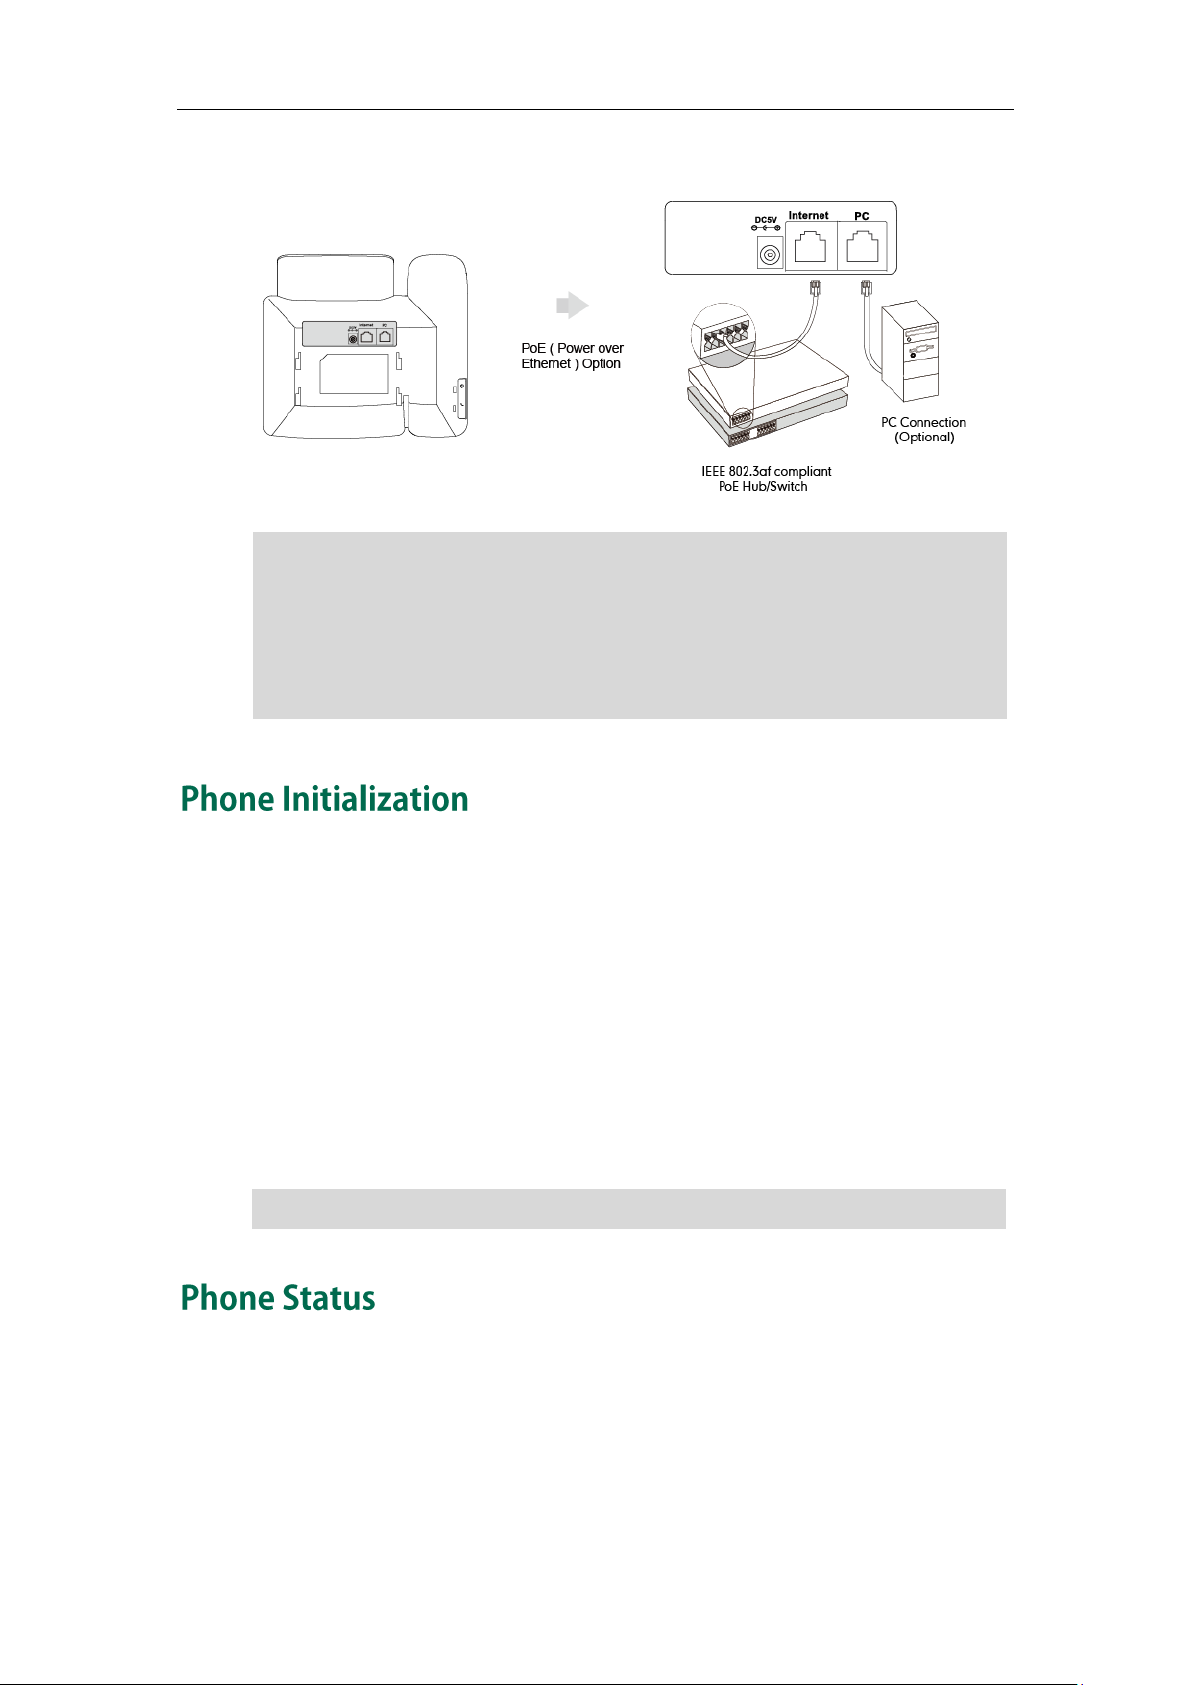
3) Connect the network and power
You have two options for power and network connections. Your system administrator will
advise you which one to use.
AC power
Power over Ethernet (PoE)
Note
AC Power
To connect the AC power:
1. Connect the DC plug on the power adapter to the DC5V port on the phone and
connect the other end of the power adapter into an electrical power outlet.
2. Connect the included or a standard Ethernet cable between the Internet port on
the phone and the one on the wall or switch/hub device port.
Power over Ethernet
With the included or a regular Ethernet cable, the SIP-T21P E2 IP phone can be powered
from a PoE-compliant switch or hub.
To connect the PoE for the SIP-T21P E2 IP phone:
1. Connect the Ethernet cable between the Internet port on the phone and an
12
Note
If in-line power is provided, you don’t need to connect the phone to the power adapter.
If your network does not use DHCP, proceed to Basic Network Settings on page 15.
Getting Started
available port on the in-line power switch/hub.
Make sure the switch/hub is PoE-compliant.
The phone can also share the network with another network device such as a PC
(personal computer). This is an optional connection.
Important! Do not remove power from the phone while it is updating firmware and
Note
After your phone is powered on, the system boots up and performs the following steps:
Automatic Phone Initialization
The phone finishes the initialization by loading the saved configuration. The LCD screen
displays “Welcome Initializing…please wait” during this process.
DHCP (Dynamic Host Configuration Protocol)
The phone attempts to contact a DHCP server in your network to obtain valid IPv4
network settings (e.g., IP address, subnet mask, default gateway address and DNS
address) by default.
You can view phone status via phone user interface or web user interface.
Available information of phone status includes:
Network status (e.g., IPv4 Status, IPv6 Status, IP Mode and MAC address).
Phone status (e.g., Product Name, Hardware, Firmware, Product ID, MAC address
and Device Cert).
13
User Guide for the SIP-T21(P) E2 IP Phone
You can view device certificate status via phone user interface only.
Account status (e.g., register status of SIP accounts).
Note
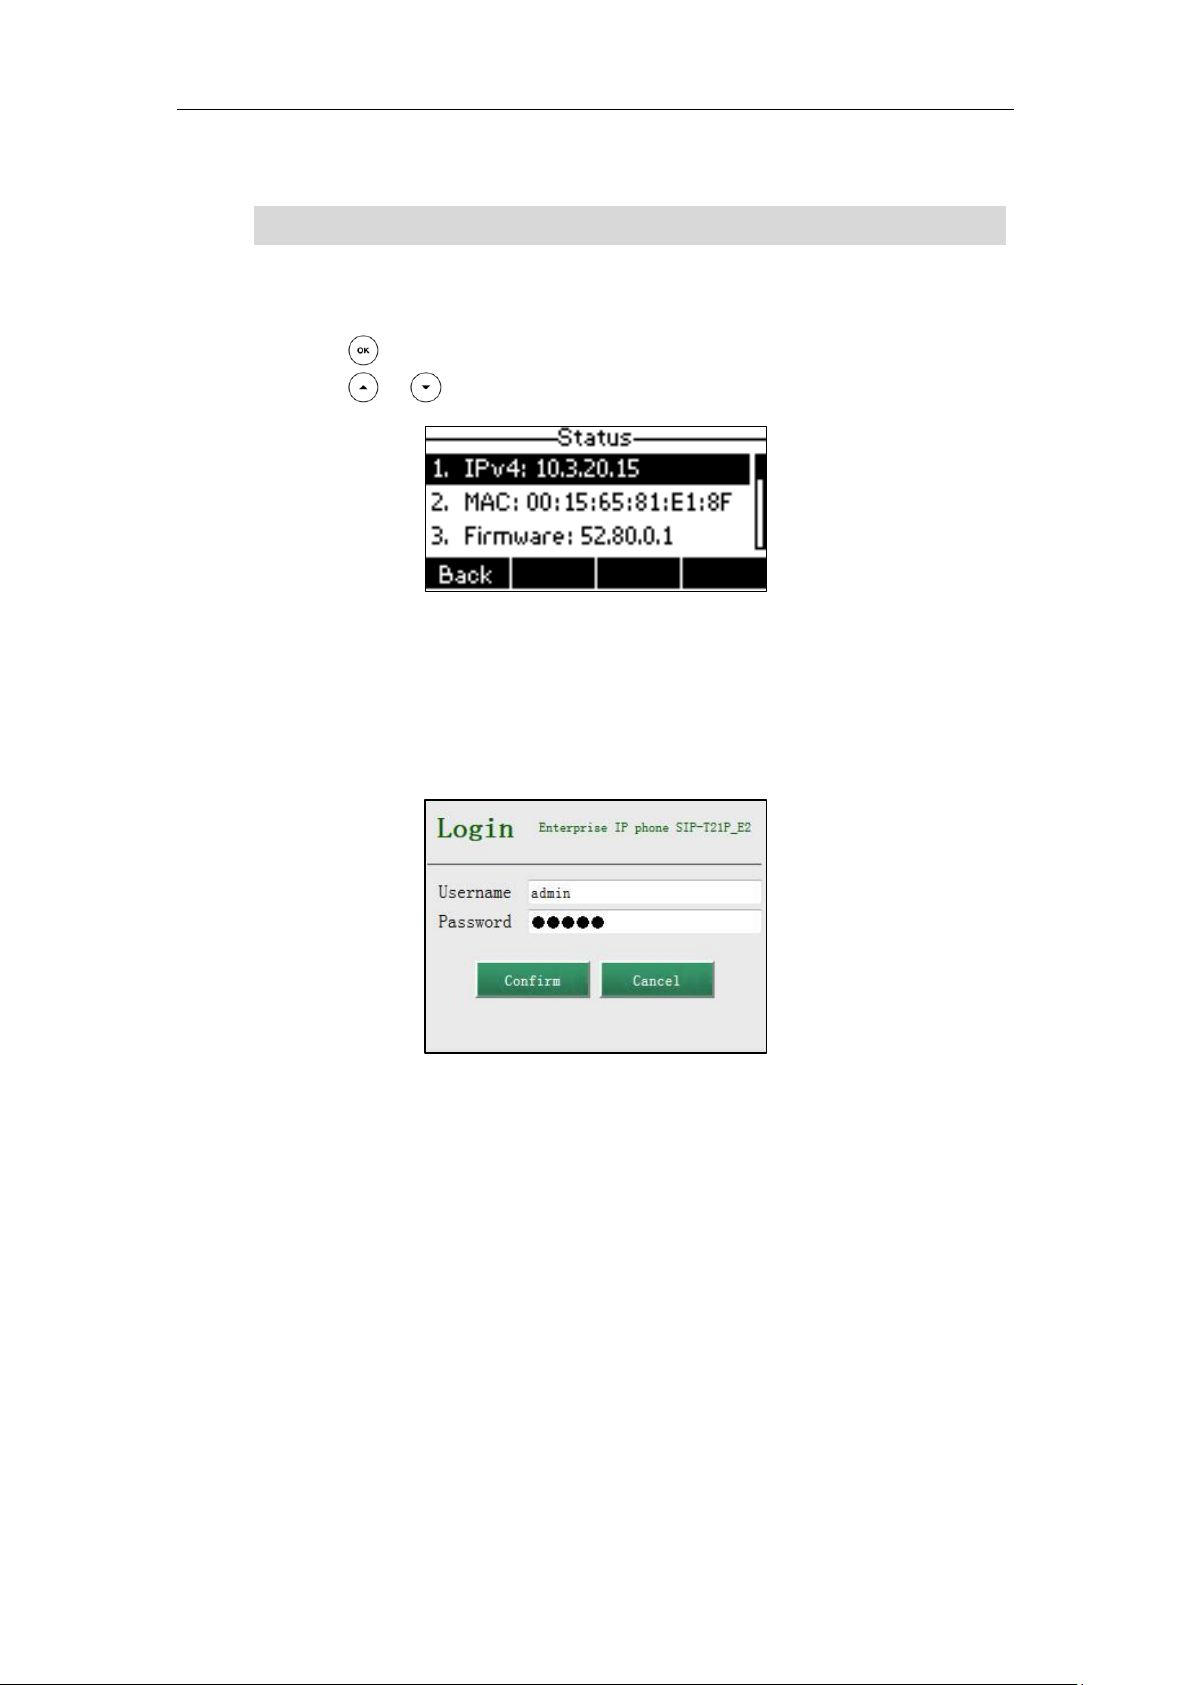
To view the phone status via phone user interface:
1. Press , or press Menu->Status.
2. Press or to scroll through the list and view the specific information.
To view the phone status via web user interface:
1. Open a web browser of your computer.
2. Enter the IP address in the browser’s address bar, and then press Enter.
3. Enter the user name (admin) and password (admin) in the login page.
4. Click Confirm to login.
14
Getting Started
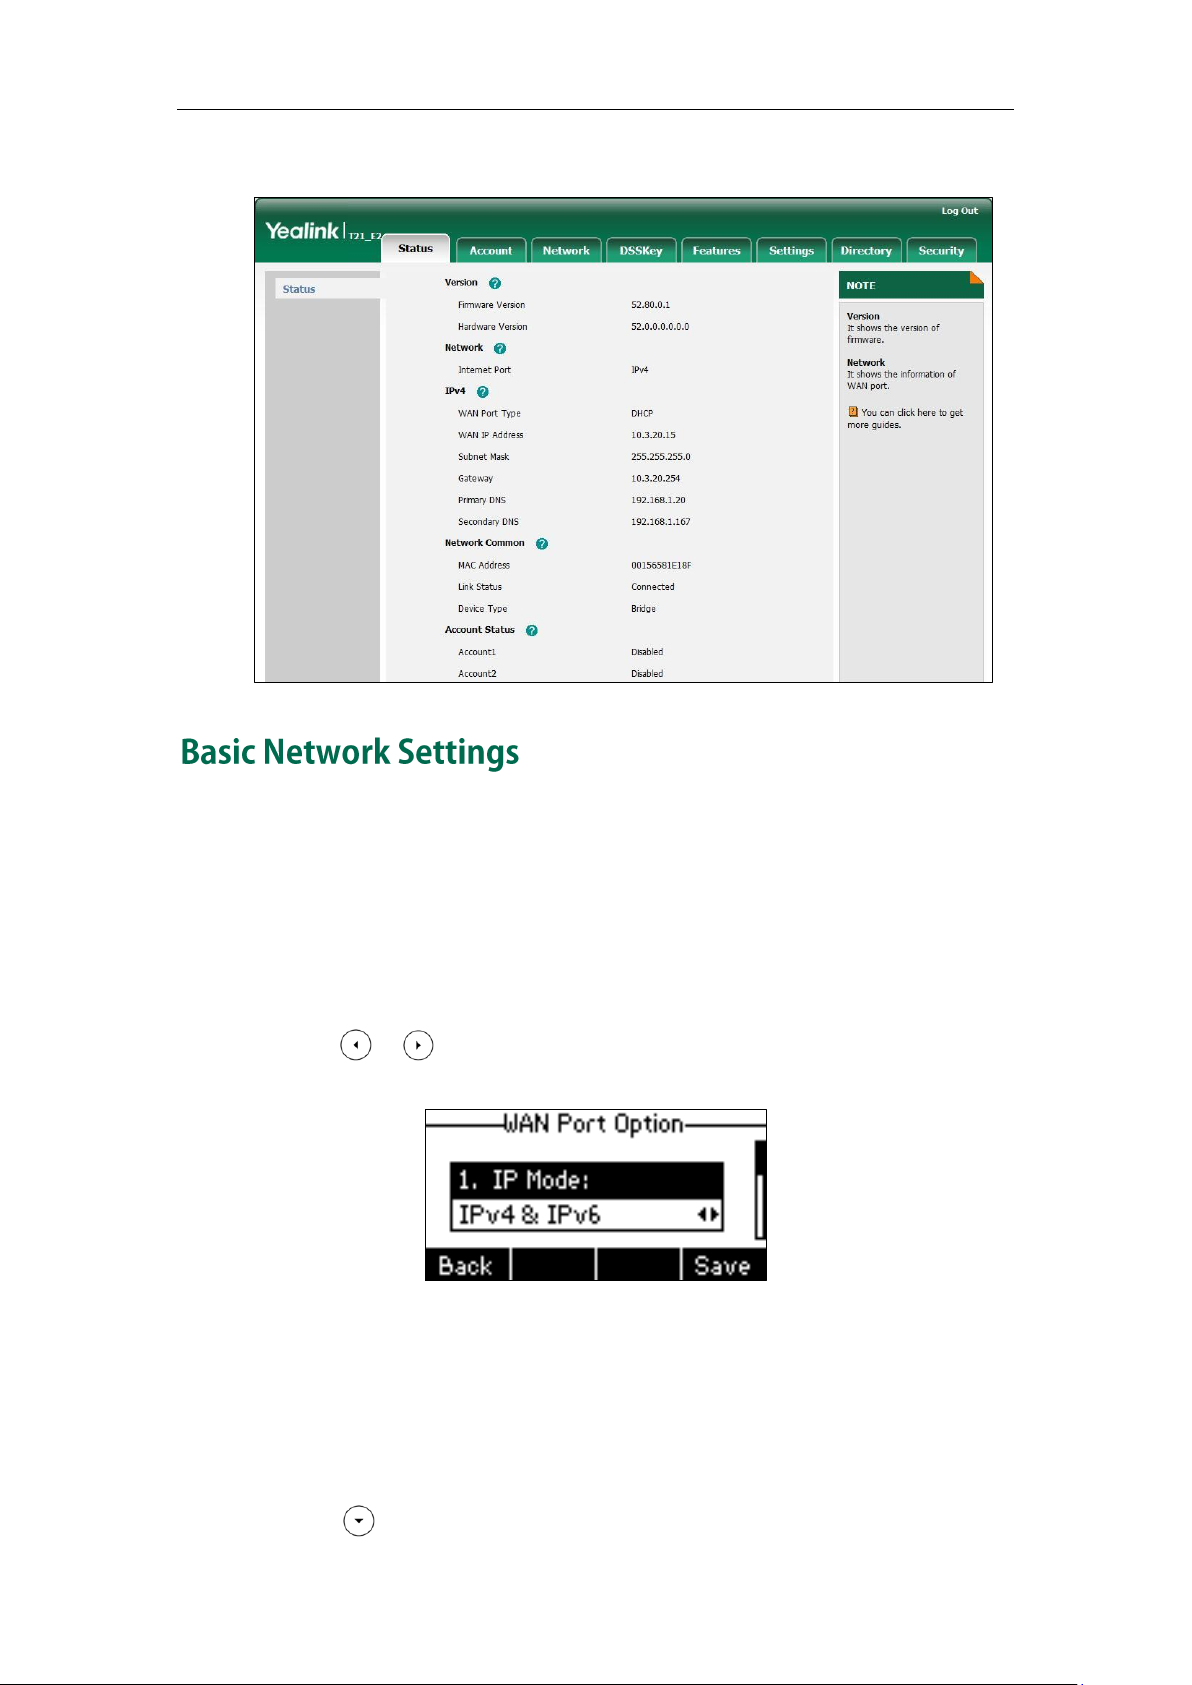
The phone status is displayed on the first page of the web user interface.
If your phone cannot contact a DHCP server for any reason, you need to configure
network settings manually. The IP phone can support either or both IPv4 and IPv6
addresses.
To configure the IP address mode via phone user interface:
1. Press Menu->Settings->Advanced Settings (default password: admin)
->Network->WAN Port.
2. Press or , or the Switch soft key to select IPv4, IPv6 or IPv4 & IPv6 from the IP
Mode field.
3. Press the Save soft key to accept the change or the Back soft key to cancel.
To configure a static IPv4 address via phone user interface:
1. Press Menu->Settings->Advanced Settings (default password: admin)
->Network->WAN Port.
Make sure that the IP address mode is configured as IPv4 or IPv4 & IPv6.
2. Press to select the IPv4 and then press the Enter soft key.
15
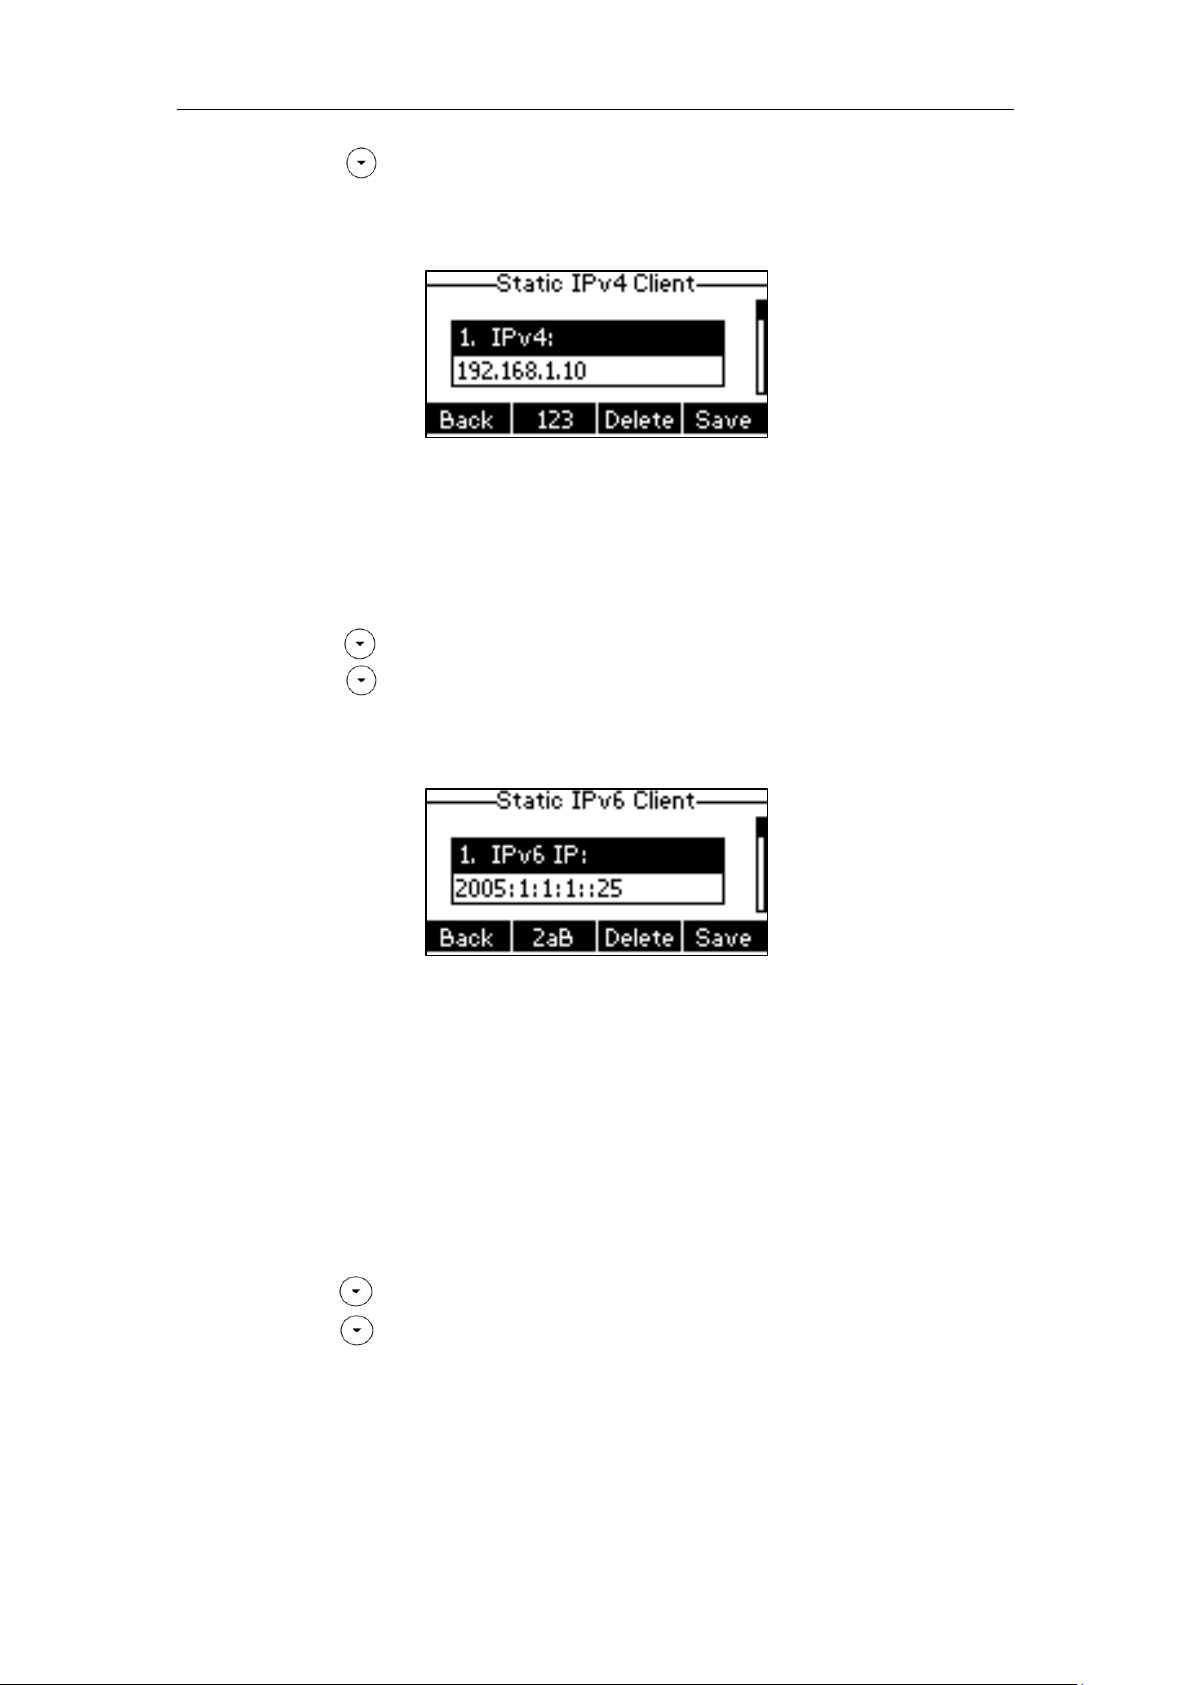
User Guide for the SIP-T21(P) E2 IP Phone
3. Press to select Static IPv4 Client and then press the Enter soft key.
4. Enter the desired values in the IPv4, Subnet Mask, Default Gateway, IPv4 Pri.DNS
and IPv4 Sec.DNS fields respectively.
5. Press the Save soft key to accept the change or the Back soft key to cancel.
To configure a static IPv6 address via phone user interface:
1. Press Menu->Settings->Advanced Settings (default password: admin)
->Network->WAN Port.
2. Press to select IPv6 and then press the Enter soft key.
3. Press to select Static IPv6 Client and then press the Enter soft key.
4. Enter the desired values in the IPv6 IP, IPv6 IP Prefix, Default Gateway, IPv6 Pri.DNS
and IPv6 Sec.DNS fields respectively.
5. Press the Save soft key to accept the change or the Back soft key to cancel.
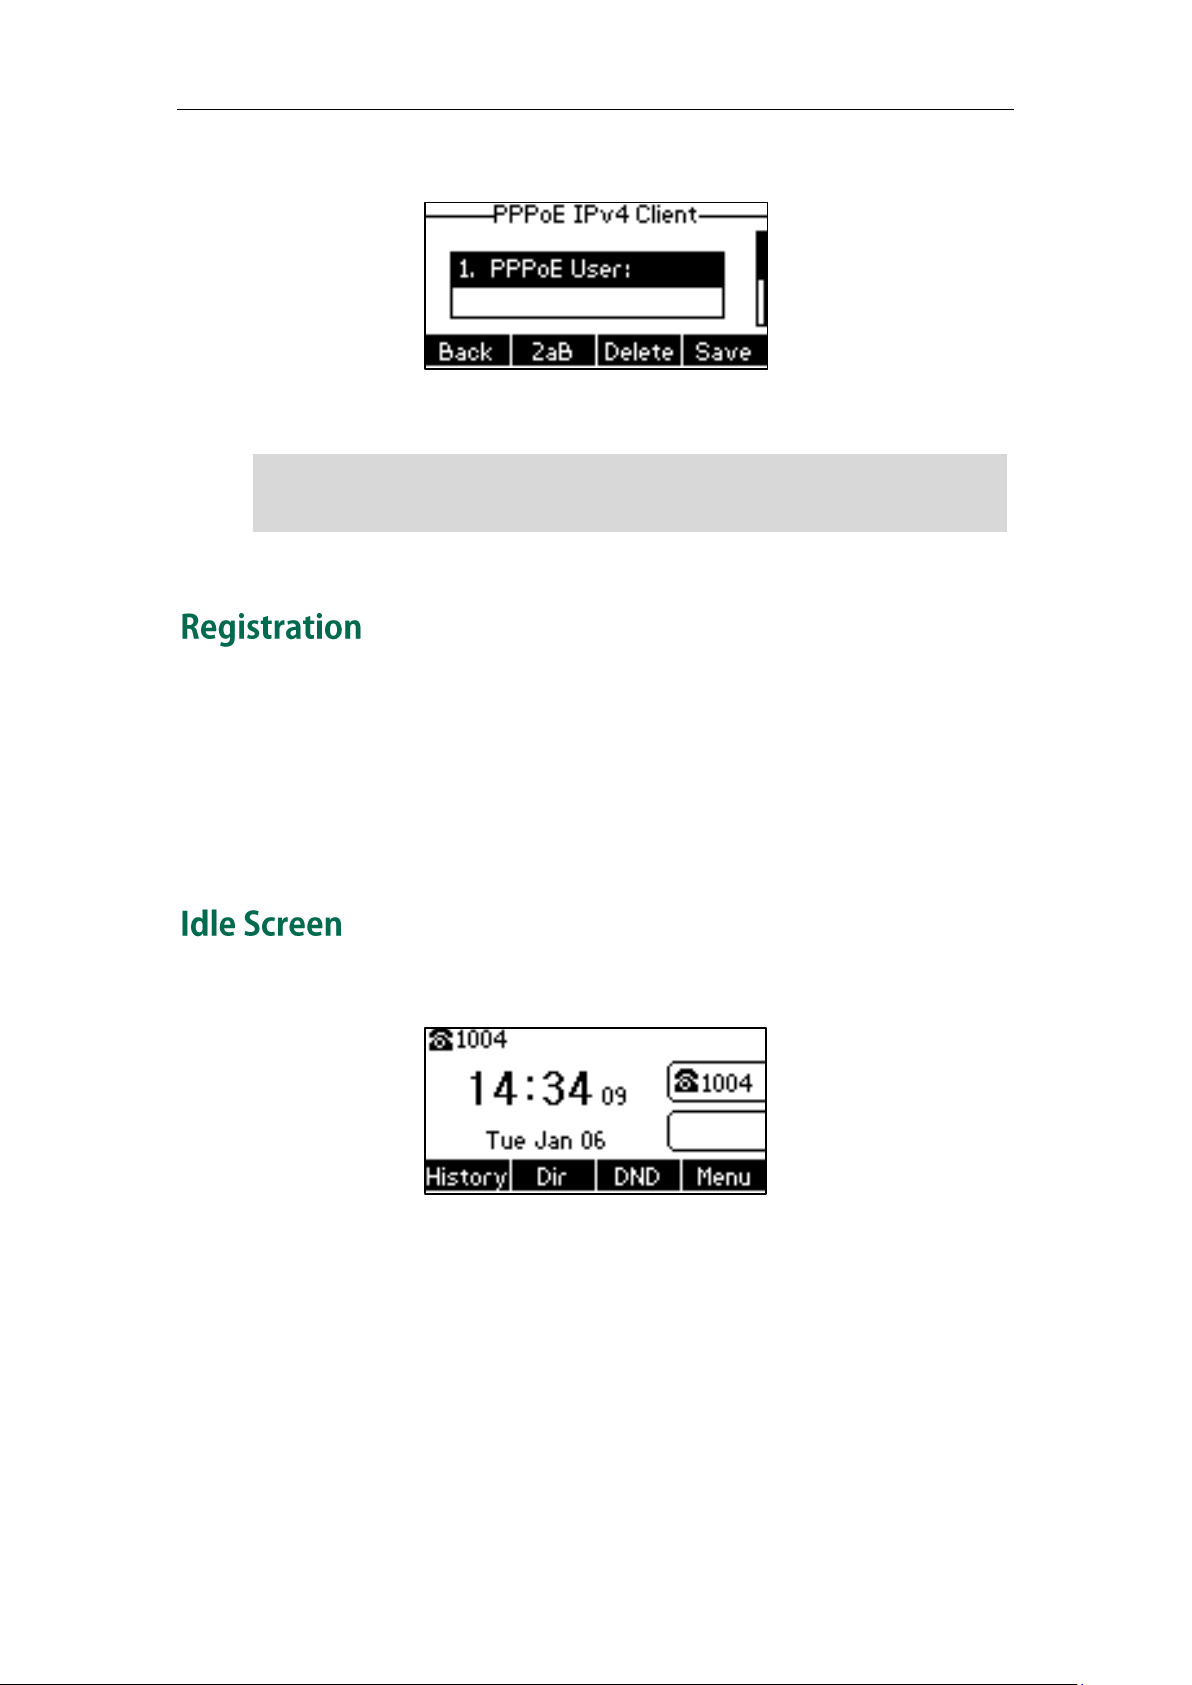
If you are using an xDSL modem, you can connect your phone to the Internet via PPPoE
mode. Set the WAN port as a PPPoE port. The PPPoE port will perform a PPP negotiation
to obtain the IP address. Contact your system administrator for the PPPoE user name
and password.
To configure PPPoE via phone user interface:
1. Press Menu->Settings->Advanced Settings (default password: admin)
->Network->WAN Port.
16
2. Press to select IPv4 and then press the Enter soft key.
3. Press to select PPPoE IPv4 Client and then press the Enter soft key.
Note
Wrong network settings may result in inaccessibility of your phone and may also have an
contact your system administrator.
Getting Started
5. Enter the user name and password in the corresponding fields.
6. Press the Save soft key to accept the change or the Back soft key to cancel.
impact on your network performance. For more information on these parameters,
Generally, your phone will be deployed with multiple other phones. In this case, your
system administrator will configure the phone parameters beforehand, so that after you
start up your phone, the phone will be registered and ready for use. The SIP-T21(P) E2 IP
phone supports up to 2 accounts. If your phone is not registered, you may have to
register it. For more information on how to register your phone, refer to Account
Management on page 59.
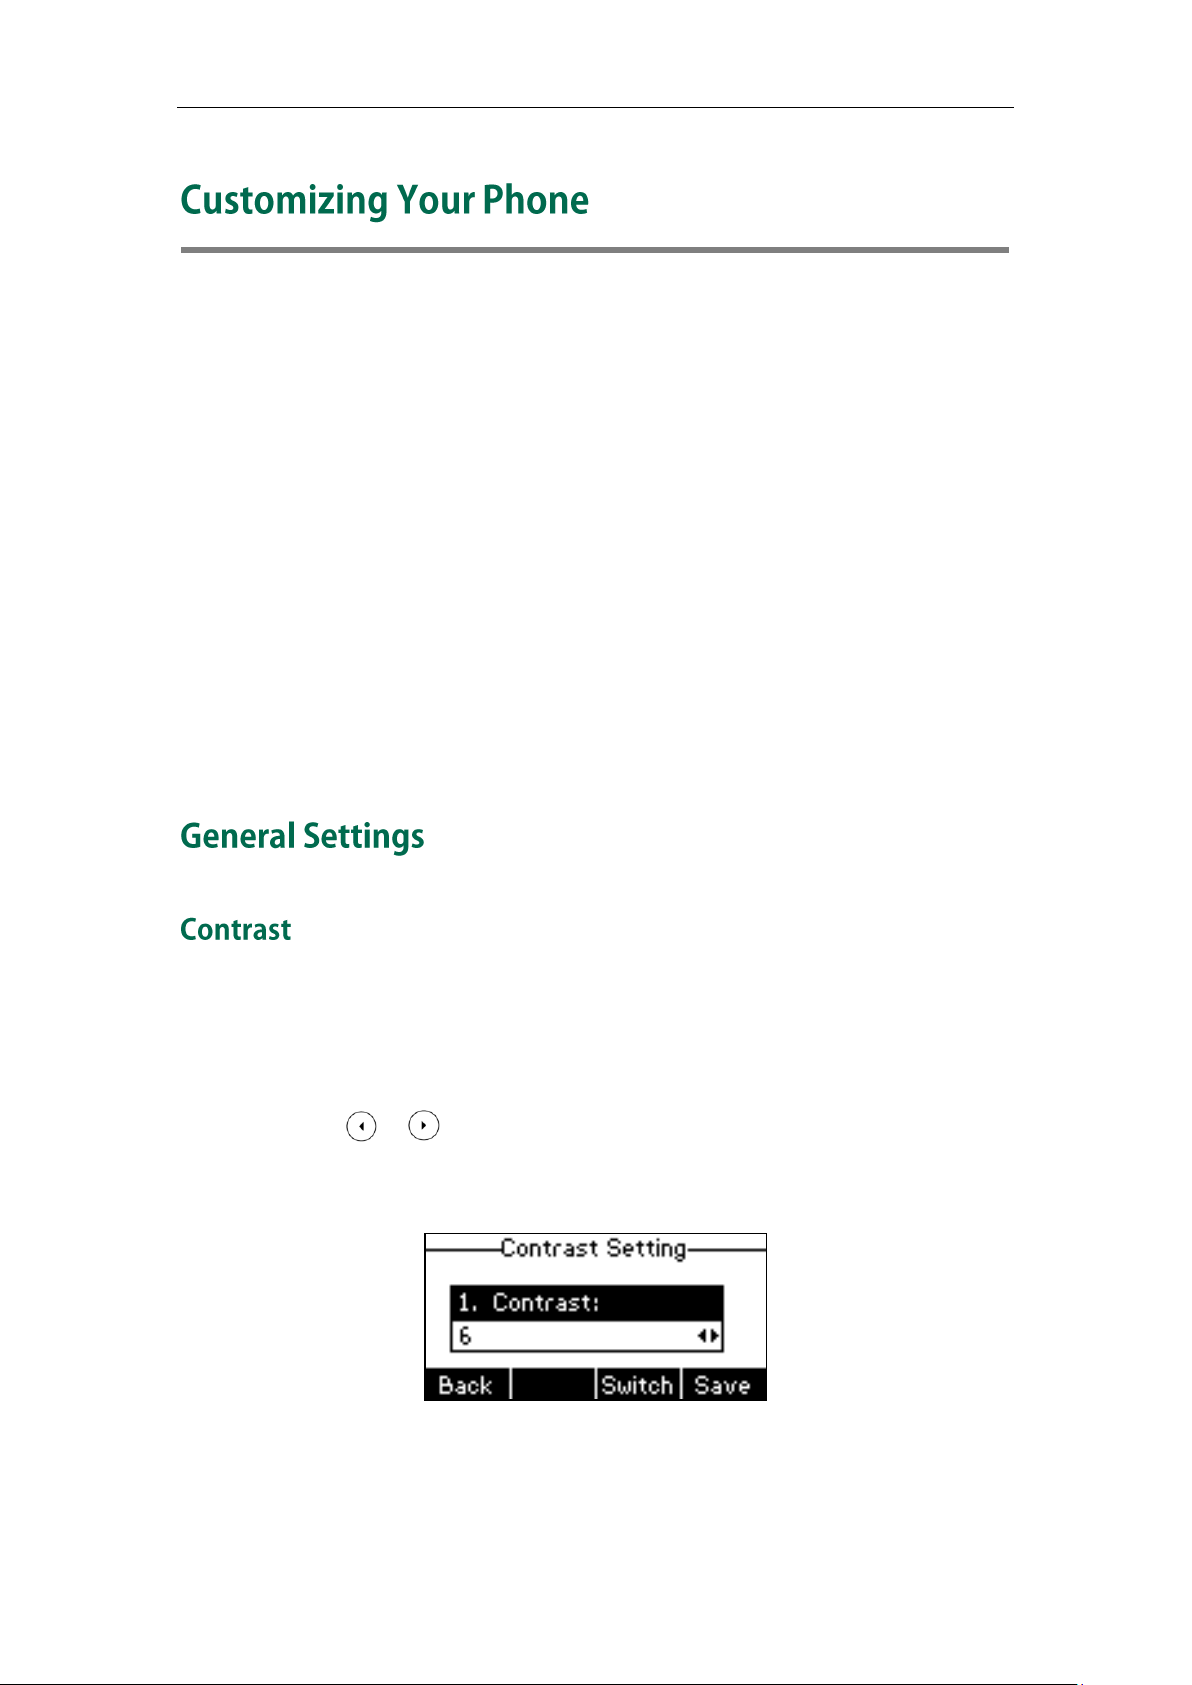
If the phone has successfully started up, the idle LCD screen will be displayed as below.
The idle screen displays the label of current account, time and date, and four soft keys.
17

User Guide for the SIP-T21(P) E2 IP Phone
18
Customizing Your Phone
You can customize your SIP-T21(P) E2 IP phone by personally configuring certain settings,
for example, contrast, language and time & date. You can add contacts to the phone’s
local directory manually or from call history. You can also personalize different ring
tones for different callers.
This chapter provides basic operating instructions for customizing your phone. Topics
include:
General Settings
Audio Settings
Contact Management
Call History Management
System Customizations
If you require additional information or assistance with your new phone, contact your
system administrator.
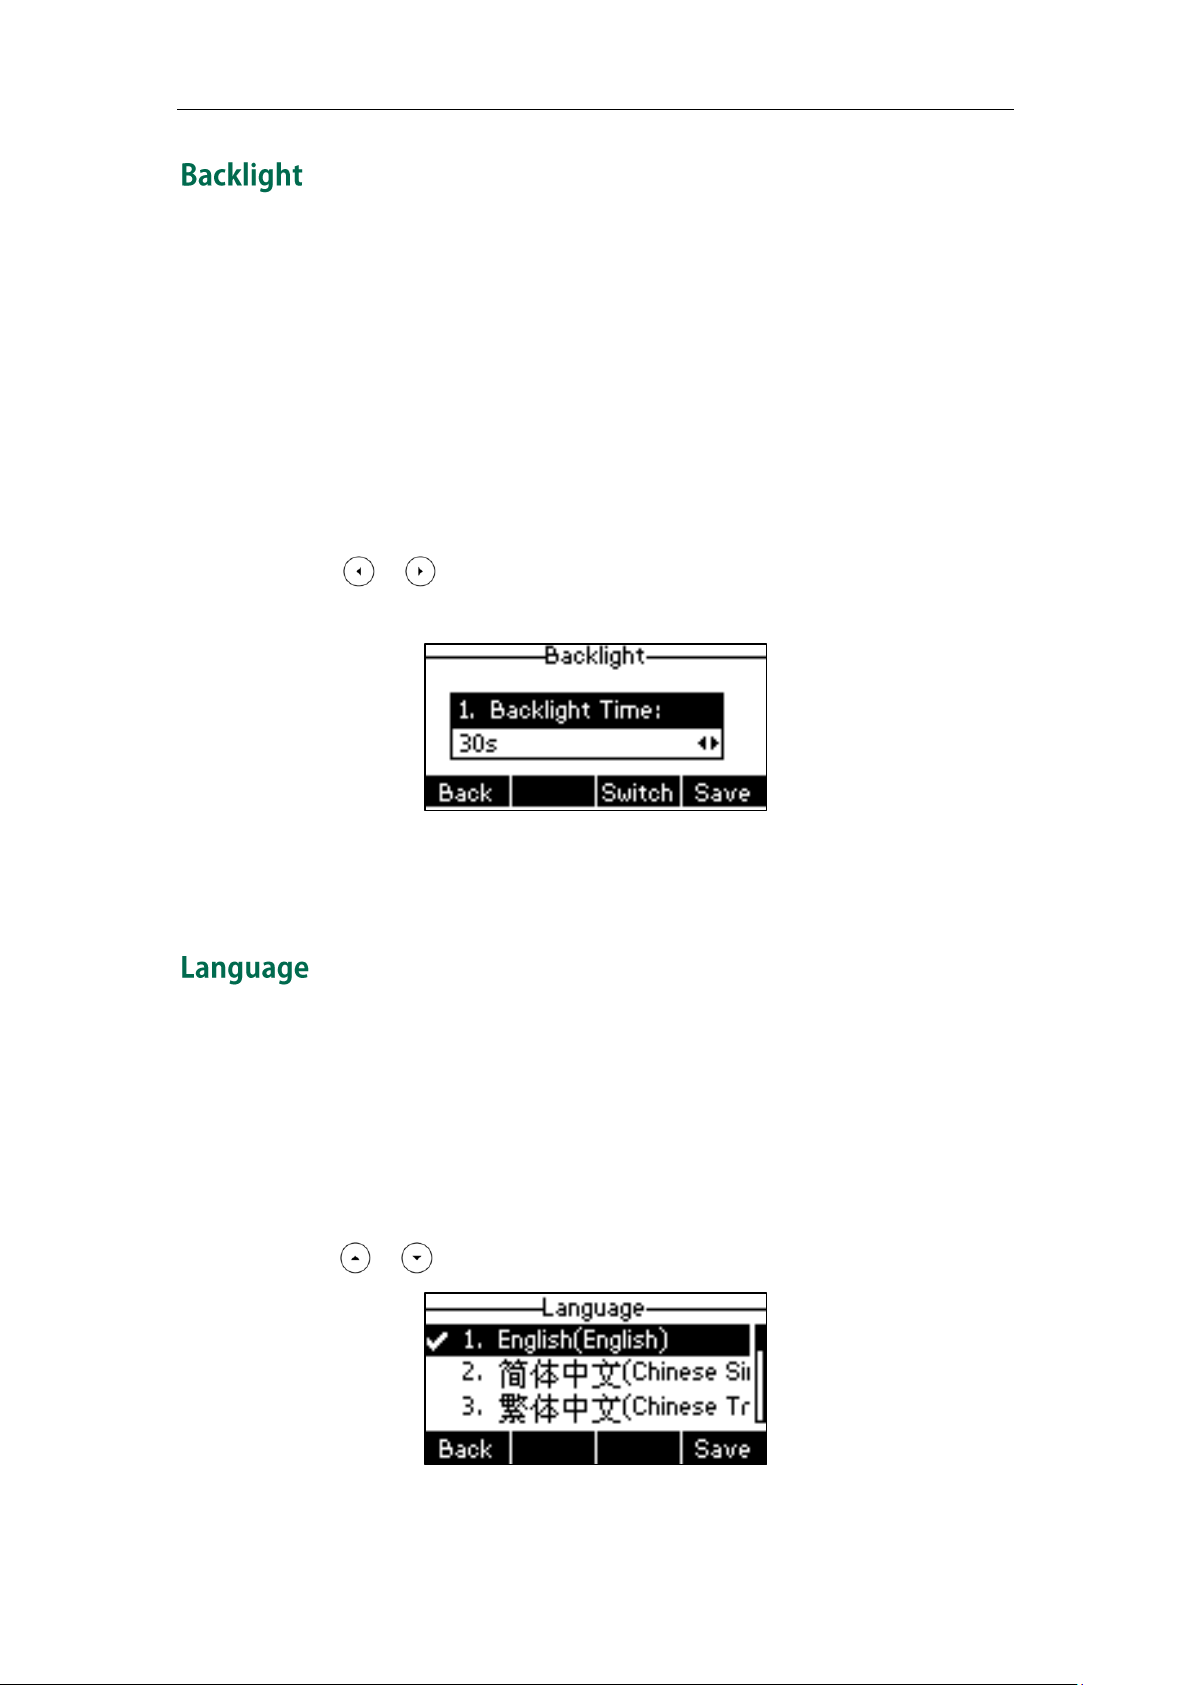
You can configure the LCD screen contrast of SIP-T21(P) E2 to a comfortable level.
To configure the contrast via phone user interface:
1. Press Menu->Settings->Basic Settings->Display->Contrast.
2. Press or , or the Switch soft key to increase or decrease the intensity of
contrast.
The default contrast level is 6.
3. Press the Save soft key to accept the change or the Back soft key to cancel.
Contrast is configurable via web user interface at the path Settings->Preference.
19
User Guide for the SIP-T21(P) E2 IP Phone
You can configure the backlight to adjust the brightness of the LCD screen. Backlight
status on the LCD screen can be configured from the following options:
Always On: Backlight is on permanently.
Always Off: Backlight is off permanently.
15s, 30s, 60s, 120s, 300s, 600s or 1800s: Backlight is turned off when the phone is
inactive after the designated time (in seconds).
To configure the backlight via phone user interface:
1. Press Menu->Settings->Basic Settings->Display>Backlight.
2. Press or , or the Switch soft key to select the desired type from the
Backlight Time field.
3. Press the Save soft key to accept the change or the Back soft key to cancel.
Backlight is configurable via web user interface at the path Settings->Preference.
The default language of the phone user interface is English. If the language of your web
browser is not supported by the phone, the web user interface will use English by
default. You can change the language for the phone user interface and the web user
interface respectively.
To change the language for the phone user interface:
1. Press Menu->Settings->Basic Settings->Language.
2. Press or to select the desired language.
20
3. Press the Save soft key to accept the change.
Loading…
-
Page 2
Copyright © 2015 YEALINK NETWORK TECHNOLOGY CO., LTD Copyright © 2015 Yealink Network Technology CO., LTD. All rights reserved. No parts of this publication may be reproduced or transmitted in any form or by any means, electronic or mechanical, photocopying, recording, or otherwise, for any purpose, without the express written permission of Yealink Network Technology CO., LTD. -
Page 3
Do not dispose of WEEE as unsorted municipal waste and have to collect such WEEE separately. We are striving to improve our documentation quality and we appreciate your feedback. Email your opinions and comments to DocsFeedback@yealink.com. -
Page 4
Yealink SIP-T21(P) E2 IP phone firmware contains third-party software under the GNU General Public License (GPL). Yealink uses software under the specific terms of the GPL. Please refer to the GPL for the exact terms and conditions of the license. -
Page 5
Thank you for choosing the SIP-T21(P) E2 IP phone, exquisitely designed to provide business telephony features, such as Call Hold, Call Transfer, Busy Lamp Field, Multicast Paging and Conference over an IP network. The difference between the SIP-T21 E2 and SIP-T21P E2 IP phones is that only SIP-T21P E2 supports PoE. -
Page 6
User Guide for the SIP-T21(P) E2 IP Phone LED Instructions on page Web User Interface on page Call Forward on page … -
Page 7: Table Of Contents
Table of Contents About This Guide …………..v In This Guide ……………………. v Summary of Changes ………………….v Changes for Release 80, Guide Version 80.60 ………….. v Table of Contents …………..vii Overview ……………… 1 Hardware Component Instructions ………………1 Icon Instructions ……………………
-
Page 8: Table Of Contents
User Guide for the SIP-T21(P) E2 IP Phone Volume ……………………..29 Ring Tones ……………………29 Contact Management ………………….. 31 Directory……………………… 31 Local Directory …………………… 33 Blacklist ……………………..43 Remote Phone Book ………………….45 Call History Management ………………..47 System Customizations …………………. 49 Logo Customization ………………….
-
Page 9: Table Of Contents
Table of Contents Busy Lamp Field (BLF) ………………… 105 BLF List ……………………..107 Call Recording ……………………109 Hot Desking ……………………111 Intercom ……………………..112 Outgoing Intercom Calls ………………..112 Incoming Intercom Calls ………………..113 Using Intercom ………………….114 Multicast Paging ………………….. 115 Sending RTP Stream …………………
-
Page 10
User Guide for the SIP-T21(P) E2 IP Phone… -
Page 11: Overview
Overview This chapter provides the overview of the SIP-T21(P) E2 IP phone. Topics include: Hardware Component Instructions Icon Instructions LED Instructions User Interfaces Documentations If you require additional information or assistance with your new phone, contact your system administrator.
-
Page 12
Secures the handset in the handset cradle when the IP phone is mounted vertically. For more information on ⑮ Hookswitch Tab Yealink Wall how to adjust the hookswitch tab, refer to Mount Quick Installation Guide for Yealink IP Phones… -
Page 13
Overview Icons appearing on the LCD screen are described in the following table: Icon Description Network is unavailable The private line registers successfully Register failed Registering The shared/bridged line registers successfully Hands-free speakerphone mode Handset mode Headset mode Multi-lingual lowercase letters input mode Multi-lingual uppercase letters input mode Alphanumeric input mode Numeric input mode… -
Page 14
User Guide for the SIP-T21(P) E2 IP Phone Icon Description Call Hold Ringer volume is 0 Phone Lock Call Mute Received Calls Placed Calls Missed Calls Recording box is full A call cannot be recorded Recording starts successfully Recording cannot be started Recording cannot be stopped The contact icon The ACD state is available… -
Page 15
Overview Power Indicator LED LED Status Description Solid red The phone is initializing. Fast flashing red (300ms) The phone is ringing. Slow flashing red (1s) The phone receives a voice mail or text message. The phone is powered off. The phone is idle. The phone is busy. -
Page 16
User Guide for the SIP-T21(P) E2 IP Phone Line key LED (associated with a shared line) The local SCA phone indicates the phone is involved in a SCA call, while the monitoring SCA phone indicates the phone is not involved in the SCA call. LED Status Description The shared line is idle. -
Page 17: User Interfaces
Overview Two ways to customize configurations of your SIP-T21(P) E2 IP phone: The user interface on the IP phone. The user interface in a web browser on your PC. The hardware components keypad and LCD screen constitute the phone user interface, which allows the user to execute all call operation tasks and basic configuration changes directly on the phone.
-
Page 18
User Guide for the SIP-T21(P) E2 IP Phone Options Phone User Interface Web User Interface —Backlight √ —Language √ —Time & Date √ —Administrator Password √ —Key as Send √ —Phone Lock √ —Ring Tones √ —Contact Management —Directory —Local Directory √… -
Page 19: Documentations
Basic call features On the website/In Quick Start Guide and phone English the package customizations Phone/Web user interface settings User Guide Basic call features On the website English and advanced phone features Note You can also download the latest documentations online: http://support.yealink.com/documentFront/forwardToDocumentDetailPage?documentId=…
-
Page 20
User Guide for the SIP-T21(P) E2 IP Phone… -
Page 21: Getting Started
Getting Started This chapter provides basic installation instructions and information for obtaining the best performance with the SIP-T21(P) E2 IP phone. Topics include: Packaging Contents Phone Installation Phone Initialization Phone Status Basic Network Settings Registration …
-
Page 22: Optional Accessories
User Guide for the SIP-T21(P) E2 IP Phone Phone Stand Handset & Handset Cord Ethernet Cable Quick Start Guide Check the list before installation. If you find anything missing, contact your system administrator. The following items are optional accessories for your SIP-T21(P) E2 IP phone. You need to purchase them separately if required.
-
Page 23
Getting Started Power Adapter Headset If your phone is already installed, proceed to Phone Initialization on page 16. This section introduces how to install the phone: 1) Attach the stand 2) Connect the handset and optional headset 3) Connect the network and power… -
Page 24
Connect the network and power You have two options for power and network connections. Your system administrator will advise you which one to use. AC power Power over Ethernet (PoE) Note PoE is not applicable to the SIP-T21 E2 IP phone. -
Page 25: Power Over Ethernet
Getting Started AC Power To connect the AC power: Connect the DC plug on the power adapter to the DC5V port on the phone and connect the other end of the power adapter into an electrical power outlet. Connect the included or a standard Ethernet cable between the Internet port on the phone and the one on the wall or switch/hub device port.
-
Page 26: Phone Initialization
User Guide for the SIP-T21(P) E2 IP Phone After your phone is powered on, the system boots up and performs the following steps: Automatic Phone Initialization The phone finishes the initialization by loading the saved configuration. The LCD screen displays “Welcome Initializing…please wait” during this process. DHCP (Dynamic Host Configuration Protocol) The phone attempts to contact a DHCP server in your network to obtain valid IPv4 network settings (e.g., IP address, subnet mask, default gateway address and DNS…
-
Page 27
Getting Started Enter the user name (admin) and password (admin) in the login page. Click Confirm to login. The phone status is displayed on the first page of the web user interface. If your phone cannot contact a DHCP server for any reason, you need to configure network settings manually. -
Page 28
User Guide for the SIP-T21(P) E2 IP Phone Press , or the Switch soft key to select IPv4, IPv6 or IPv4 & IPv6 from the IP Mode field. Press the Save soft key to accept the change or the Back soft key to cancel. To configure a static IPv4 address via phone user interface: Press Menu->Settings->Advanced Settings (default password: admin) ->Network->WAN Port. -
Page 29
Getting Started If you are using an xDSL modem, you can connect your phone to the Internet via PPPoE mode. Set the WAN port as a PPPoE port. The PPPoE port will perform a PPP negotiation to obtain the IP address. Contact your system administrator for the PPPoE user name and password. -
Page 30: Idle Screen
User Guide for the SIP-T21(P) E2 IP Phone The idle screen displays the label of current account, time and date, and four soft keys.
-
Page 31: Customizing Your Phone
Customizing Your Phone You can customize your SIP-T21(P) E2 IP phone by personally configuring certain settings, for example, contrast, language and time & date. You can add contacts to the phone’s local directory manually or from call history. You can also personalize different ring tones for different callers.
-
Page 32: Backlight
User Guide for the SIP-T21(P) E2 IP Phone You can configure the backlight to adjust the brightness of the LCD screen. Backlight status on the LCD screen can be configured from the following options: Always On: Backlight is on permanently. …
-
Page 33: Time & Date
Customizing Your Phone Text displayed on the phone user interface will change to the selected language. To change the language for the web user interface: Click on Settings->Preference. Select the desired language from the pull-down list of Language. Click Confirm to accept the change. Text displayed on the web user interface will change to the selected language.
-
Page 34
User Guide for the SIP-T21(P) E2 IP Phone Enter the domain names or IP addresses of SNTP server in the NTP Server1 and NTP Server2 fields respectively. Press , or the Switch soft key to select the desired value from the Daylight Saving field. -
Page 35: Administrator Password
Customizing Your Phone There are 7 available date formats. For example, for the date format “WWW DD MMM”, “WWW” represents the abbreviation of the weekday, “DD” represents the two-digit day, and “MMM” represents the first three letters of the month. The date formats available: Date Format Example (2015-05-16)
-
Page 36: Phone Lock
User Guide for the SIP-T21(P) E2 IP Phone You can set the “#” or “*” to perform as a send key while dialing. To configure key as send via phone user interface: Press Menu->Features->Key as send. Press , or the Switch soft key to select # or * from the Key as send field, or select Disabled to disable this feature.
-
Page 37
Customizing Your Phone To activate the phone lock via phone user interface: Press Menu->Settings->Advanced Settings (default password: admin) ->Phone Lock. Press , or the Switch soft key to select Enabled from the Lock Enable field. Press , or the Switch soft key to select the desired type from the Lock Type field. -
Page 38
User Guide for the SIP-T21(P) E2 IP Phone respectively. Press the Save soft key to accept the change or the Back soft key to cancel. Note The unlock PIN length must be within 15 digits. To unlock the phone via phone user interface: Press any locked key, the LCD screen prompts “Unlock PIN”. -
Page 39: Volume
Customizing Your Phone Press the Save soft key to accept the change. Phone lock is configurable via web user interface at the path Features->Phone Lock. You can press the Volume key to adjust the ringer volume when the phone is idle. You can also press the Volume key to adjust the receiver volume of currently engaged audio devices (handset, speakerphone or headset) when the phone is in use.
-
Page 40
User Guide for the SIP-T21(P) E2 IP Phone To select a ring tone for the phone via phone user interface: Press Menu->Settings->Basic Settings->Sound->Ring Tones->Common. Press to select the desired ring tone. Press the Save soft key to accept the change or the Back soft key to cancel. A ring tone for the phone is configurable via web user interface at the path Settings->Preference->Ring Type. -
Page 41: Directory
Customizing Your Phone In the Upload Ringtone field, click Browse to locate a ring tone (the file format must be *.wav) file from your local system. Click Upload to upload the file. Note The priority of ring tone for an incoming call on the phone is as follows: Contact ring tone (refer to Adding Contacts) >Group ring tone (refer to…
-
Page 42
User Guide for the SIP-T21(P) E2 IP Phone To remove a list from the Enabled column, select the desired list and then click To adjust the display order of enabled lists, select the desired list and then click The LCD screen displays the list(s) in the adjusted order. Click Confirm to accept the change. -
Page 43: Local Directory
Customizing Your Phone The built-in phone directory can store the names and phone numbers of your contacts. You can store up to 1000 contacts and 48 groups in your phone’s local directory. You can add new groups and contacts, edit, delete or search for a contact, or simply dial a contact number from the local directory.
-
Page 44
User Guide for the SIP-T21(P) E2 IP Phone To edit a group in the local directory: Press the Dir soft key. The IP phone enters the local directory directly as there is only Local Directory enabled in the directory by default. If Local Directory is removed from the , press Menu->Directory->Local directory… -
Page 45: Adding Contacts Manually
Customizing Your Phone The IP phone enters the local directory directly as there is only Local Directory enabled in the directory by default. If Local Directory is removed from the , press Menu->Directory->Local directory Directory to enter the local directory. Select the desired group.
-
Page 46
User Guide for the SIP-T21(P) E2 IP Phone The IP phone enters the local directory directly as there is only Local Directory enabled in the directory by default. If Local Directory is removed from the , press Menu->Directory->Local directory Directory to enter the local directory. Select the desired contact group and then press the Enter soft key. -
Page 47
Customizing Your Phone Press the Option soft key, and then select Add to Contacts. Press the OK soft key, and then edit the contact name. Press the Save soft key to accept the change. The entry is successfully saved to the local directory. Adding Contacts from Remote Phone Book To add a contact to the local directory from remote phone book: Press Menu->Directory->Remote Phone Book. -
Page 48
User Guide for the SIP-T21(P) E2 IP Phone Directory to enter the local directory. Select the desired contact group and then press the Enter soft key. Press to highlight the desired contact. Press the Option soft key, and then select Detail. Press to highlight the contact information and then edit. -
Page 49
Customizing Your Phone Delete All. To place a call to a contact from the local directory: Press the Dir soft key. The IP phone enters the local directory directly as there is only Local Directory enabled in the directory by default. If Local Directory is removed from the , press Menu->Directory->Local directory… -
Page 50
User Guide for the SIP-T21(P) E2 IP Phone Directory to enter the local directory. Press the Search soft key. Enter a few continuous characters of the contact name or continuous numbers of the contact number (office, mobile or other number) using the keypad. The contacts whose name or phone number matches the characters entered will appear on the LCD screen. -
Page 51
Customizing Your Phone The LCD screen will display search results in the adjusted order. Click Confirm to accept the change. Note Search source list in dialing is configurable via web user interface only. To search for a contact in the enabled search source lists: Pick up the handset, press the speakerphone or press the line key. -
Page 52
User Guide for the SIP-T21(P) E2 IP Phone You can manage your phone’s local directory via phone user interface or web user interface. But you can only import or export the contact list via web user interface. To import an XML file of contact list via web user interface: Click on Directory->Local Directory. -
Page 53: Blacklist
Customizing Your Phone Select the contact information you want to import into the local directory from the pull-down list of Index. At least one item should be selected to be imported into the local directory. Click Import to complete importing the contact list. To export a contact list via web user interface: Click on Directory->Local Directory.
-
Page 54
User Guide for the SIP-T21(P) E2 IP Phone Enter the name and the office, mobile or other numbers in the corresponding fields. Press , or the Switch soft key to select the desired account from the Account field. If Auto is selected, the phone will use the default account when placing calls to the contact from the blacklist directory. -
Page 55: Remote Phone Book
Customizing Your Phone You can add new contacts to the local directory, search for a contact, or simply dial a contact number from the remote phone book. You can configure your new phone to access up to 5 remote phone books. For the access URL of the remote phone book, contact your system administrator.
-
Page 56
User Guide for the SIP-T21(P) E2 IP Phone Press the Back soft key to back to the previous screen. To search for a contact in the remote phone book: Press Menu->Directory->Remote Phone Book. If Remote Phone Book is added to the directory, press Dir->Remote Phone Book to enter the remote phone book. -
Page 57
Customizing Your Phone Enter the desired refresh period in the Update Time Interval(Seconds) field. The default value is 21600 seconds. Click Confirm to accept the change. The SIP-T21(P) E2 IP phone maintains call history lists of Placed calls, Received calls, Missed calls and Forwarded calls. -
Page 58
User Guide for the SIP-T21(P) E2 IP Phone Press to select the desired entry. Press the Option soft key, and then select Detail. The detailed information of the entry appears on the LCD screen. To place a call from the call history list: Press the History soft key. -
Page 59
Customizing Your Phone The LCD screen prompts «Delete all the call records?». Press the OK soft key to confirm the deletion or the Cancel soft key to cancel. You can upload your custom logo which will be shown on the idle screen. To upload a custom logo via web user interface: Click on Features->General Information. -
Page 60: Headset Use
User Guide for the SIP-T21(P) E2 IP Phone Click Confirm to accept the change. Note custom logo, you can click Delete item will appear after you upload a Delete to delete the custom logo. The logo file format must be *.dob, contact your system administrator for more information.
-
Page 61
Customizing Your Phone Select Enabled from the pull-down list of Headset Prior. Click Confirm to accept the change. To use headset prior feature, you should activate the headset mode in advance: Physically connect the headset. Press to activate the headset mode. Note If headset prior is enabled, the headset mode will not be deactivated until you press the HEADSET… -
Page 62: Dss Keys
User Guide for the SIP-T21(P) E2 IP Phone To enable dual headset via web user interface: Click on Features->General Information. Select Enabled from the pull-down list of Dual-Headset. Click Confirm to accept the change. Note Dual headset is configurable via web user interface only. There are two types of DSS keys: Line Keys and Programable Keys.
-
Page 63
Customizing Your Phone (Optional.) Select the desired line from the Account ID field. (Optional.) Enter the corresponding value in the Value field. (Optional.) Enter the corresponding value in the Extension field. Press the Save soft key to accept the change or the Back soft key to cancel. Line key is configurable via web user interface at the path DSSKey->Line Key. -
Page 64
User Guide for the SIP-T21(P) E2 IP Phone Line You can use this key feature to accept incoming calls, place active calls on hold or resume a held call. It performs in the same way as a hard line key. Type (Line) Dependencies: Account ID (the account this feature will be applied to) -
Page 65
Customizing Your Phone their own group. Type (Key Event) Dependencies: Key Type (GPickup) Account ID (the account this feature will be applied to) Value (the group pickup feature code) Usage: Press the DSS key on your phone when a phone number in the group receives an incoming call. -
Page 66
User Guide for the SIP-T21(P) E2 IP Phone Type (Key Event) Dependencies: Key Type (XML Group) PhoneBook (the remote group name you want to access if remote phone book is configured) Usage: Press the DSS key to access the remote group specified in the PhoneBook field. XML Browser You can use this key feature to quickly access a XML browser. -
Page 67
Customizing Your Phone Key Type (FWD) Value (the number you want to forward to) Usage: Press the DSS key to forward an incoming call to the number specified in the Value field. Note If the Value field is left blank, the DSS key performs the same as the soft key when receiving an incoming call. -
Page 68
User Guide for the SIP-T21(P) E2 IP Phone (DND) on page 81. Type (Key Event) Dependencies: Key Type (DND) Usage: When DND is in phone mode: Press the DSS key to activate DND. Press the DSS key again to deactivate DND. When DND is in custom mode: Press the DSS key to access the custom DND screen. -
Page 69
Customizing Your Phone Usage: Press the DSS key to access the zero touch screen. Press the OK soft key within a few seconds. Configure the network parameters in the corresponding fields. Press the Next soft key. Configure the auto provision parameters in the corresponding fields. Press the OK soft key. -
Page 70
User Guide for the SIP-T21(P) E2 IP Phone Customize specific features for these keys. (Optional.) Enter a string that will appear on the LCD screen in the Label field. Label is configurable only when customizing SoftKey 1-4. Click Confirm to accept the change. You can click Reset to default to reset custom settings to defaults. -
Page 71
Customizing Your Phone To register an account via phone user interface: Press Menu->Settings->Advanced Settings (default password: admin) ->Accounts. Select the desired account and then press the Enter soft key. Select Enabled from the Active Line field. Enter the desired values in Label, Display Name, Register Name, User Name, Password and SIP Server1/2 fields respectively. -
Page 72: Dial Plan
User Guide for the SIP-T21(P) E2 IP Phone You can configure multiple line keys to associate with an account. This enhances call visualization and simplifies call handling. Incoming calls to this account will be distributed evenly among the available line keys. Outgoing calls will be distributed similarly.
-
Page 73
Customizing Your Phone The “$” should be followed by the sequence number of a parenthesis. The “$” plus the sequence number means the whole character or characters placed in the parenthesis. The number directs to the right parenthesis when there are more than one. Example: A replace rule configuration, Prefix: «001(xxx)45(xx)», Replace: «9001$145$2». -
Page 74
User Guide for the SIP-T21(P) E2 IP Phone When you enter the number “1” using the keypad and then press the Send soft key, the phone will dial out “1234” instead. Note The valid values of Account field can be one or two digits between 1 and 2. Each digit must be separated by a comma. -
Page 75
Customizing Your Phone For more information on the valid values of Account field, refer to Replace Rule page 63. Click Add to add the dial-now rule. When you enter the number “123” using the keypad, the phone will dial out “123” automatically without pressing any key. -
Page 76
User Guide for the SIP-T21(P) E2 IP Phone Enter the time between 1 and 14 (seconds) in the Time-Out for Dial-Now Rule field. Click Confirm to accept the change. Delay time for dial-now rule is configurable via web user interface only. Note Area codes are also known as Numbering Plan Areas (NPAs). -
Page 77
Customizing Your Phone For more information on the valid values of Account field, refer to Replace Rule page 63. Click Confirm to accept the change. Note The default value of minimum and maximum length is 1 and 15 respectively. Area code is configurable via web user interface only. You can block some specific numbers (up to 10) from being dialed on your phone. -
Page 78: Emergency Number
User Guide for the SIP-T21(P) E2 IP Phone For more information on the valid values of Account field, refer to Replace Rule page 63. Click Confirm to add the block out number. Note Block out number is configurable via web user interface only. Public telephone networks in countries around the world have a single emergency telephone number (emergency services number), that allows a caller to contact local emergency services for assistance when necessary.
-
Page 79: Live Dialpad
Customizing Your Phone For multiple numbers, enter a comma between every two emergency numbers. The default emergency numbers are 112, 911 and 110. Click Confirm to accept the change. Note Emergency number is configurable via web user interface only. You can enable live dialpad feature on the SIP-T21(P) E2 IP phone, which enables the IP phone to automatically dial out a phone number without pressing the send key.
-
Page 80: Hotline
User Guide for the SIP-T21(P) E2 IP Phone Click Confirm to accept the change. Note Live dialpad is configurable via web user interface only. You can dial a hotline number immediately upon lifting the handset, pressing the Speakerphone key or the line key. You can also configure a delay, and then the phone will dial out the hotline number automatically after the designated period of time.
-
Page 81: Basic Call Features
Basic Call Features The SIP-T21(P) E2 IP phone is designed to be easily used like a regular phone on a public switched telephone network (PSTN). You can place calls, answer calls, transfer a call to someone else, or conduct a conference call. This chapter provides basic operating instructions for the SIP-T21(P) E2 IP phone.
-
Page 82
User Guide for the SIP-T21(P) E2 IP Phone Using the speakerphone Using the headset You can also dial the number first, and then choose the way you want to speak to the other party. You can also search and dial a contact from call history, local directory or remote phone book. -
Page 83
Basic Call Features To place a call using the headset: Do one of the following: With the optional headset connected, press to activate the headset mode. Press the line key to obtain a dial tone. Enter the desired number using the keypad. Press , or the Send soft key. -
Page 84
User Guide for the SIP-T21(P) E2 IP Phone When you are not in another call, you can answer a call in one of three ways: Using the handset Using the speakerphone Using the headset Note You can reject incoming calls by pressing the Reject soft key or the X key. You can also activate Do Not Disturb mode to ignore all incoming calls without ring on your phone. -
Page 85: Recent Call In Dialing
Basic Call Features The incoming call is answered and the original call is placed on hold. Press to access the new call. Press or the Answer soft key. The incoming call is answered and the original call is placed on hold. To end a call: Do one of the following: If you are using the handset, press the EndCall soft key or hang up the handset.
-
Page 86: Auto Answer
User Guide for the SIP-T21(P) E2 IP Phone Select Enabled from the pull-down list of Recent Call In Dialing. Click Confirm to accept the change. Note Recent call in dialing is configurable via web user interface only. To view placed calls list when the phone is in the pre-dialing screen: Pick up the handset, press the speakerphone or press the line key.
-
Page 87: Auto Redial
Basic Call Features Press , or the Switch soft key to select Enabled from the Status field. Press the Save soft key to accept the change or the Back soft key to cancel. icon appears on the LCD screen. Auto answer is configurable via web user interface at the path Account->Basic. Note Auto answer is only applicable when there is no other call in progress on the phone.
-
Page 88: Call Completion
User Guide for the SIP-T21(P) E2 IP Phone Press the Save soft key to accept the change or the Back soft key to cancel. Auto redial is configurable via web user interface at the path Features->General Information. To use auto redial: When the called party is busy, the LCD screen prompts the following: Press the OK soft key to activate auto redial.
-
Page 89: Recall
Basic Call Features Call completion is configurable via web user interface at the path Features->General Information. To use call completion: When the called party is busy, the following prompt will appear on the LCD screen of the phone: Press the OK soft key, the phone returns to the idle screen and call completion is activated.
-
Page 90: Call Mute
User Guide for the SIP-T21(P) E2 IP Phone Press , or the Switch soft key to select ReCall from the Key Type field. Press the Save soft key to accept the change or the Back soft key to cancel. Recall key is configurable via web user interface at the path DSSKey->Line Key. You can mute the microphone of the active audio device during an active call so that the other party cannot hear you.
-
Page 91
Basic Call Features The line key LED flashes green. The LCD screen indicates that the call is on hold. Note The phone will beep softly every 30 seconds to remind you that you still have a call on hold. To resume a held call: Press the Resume soft key. -
Page 92
User Guide for the SIP-T21(P) E2 IP Phone To configure the DND mode via web user interface: Click on Features->Forward & DND. In the DND block, mark the desired radio box in the Mode field. Click Confirm to accept the change. Note DND mode is configurable via web user interface only. -
Page 93
Basic Call Features Incoming calls will be rejected automatically and «n New Missed Call(s)» («n» indicates the number of missed calls)will appear on the LCD screen. Note When DND and busy forward are enabled in phone mode, calls will be sent to the configured destination number. -
Page 94: Call Forward
User Guide for the SIP-T21(P) E2 IP Phone Incoming calls on the specific line will be rejected automatically, and the LCD screen will prompt «n New Missed Call(s)» («n» indicates the number of missed calls). Note When DND and busy forward are both enabled for a specific account, calls to the specific account will be sent to the configured destination number.
-
Page 95
Basic Call Features For multiple numbers, enter a comma between every two numbers. Click Confirm to accept the change. When DND is enabled on the phone, the phone can still receive incoming calls from the numbers specified in the DND Authorized Numbers field. Note DND authorized number is configurable via web user interface only. -
Page 96
User Guide for the SIP-T21(P) E2 IP Phone You can enable/disable call forward for the phone system, or you can customize call forward for each or all accounts. Two call forward modes: Phone (default): Call forward is effective for the phone system. … -
Page 97
Basic Call Features Depending on your selection: a.) If you select Always Forward: 1) Press , or the Switch soft key to select Enabled from the Always Forward field. 2) Enter the destination number you want to forward all incoming calls to in the Forward to field. -
Page 98
User Guide for the SIP-T21(P) E2 IP Phone before forwarding from the After Ring Time field. The default ring time is 12 seconds. 4) (Optional.) Enter the no answer forward on code or off code respectively in the On Code or Off Code field. Press the Save soft key to accept the change or the Back soft key to cancel. -
Page 99
Basic Call Features The LCD screen prompts “Copy to all lines?”. 3) Press the OK soft key to accept the change or the Cancel soft key to cancel. b.) If you select Busy Forward, you can enable it for a specific account. 1) Press , or the Switch soft key to select Enabled from the Busy Forward field. -
Page 100
User Guide for the SIP-T21(P) E2 IP Phone c.) If you select No Answer Forward, you can enable it for a specific account. 1) Press , or the Switch soft key to select Enabled from the No Answer Forward field. 2) Enter the destination number you want to forward all unanswered incoming calls to in the Forward to field. -
Page 101
Basic Call Features To configure the forward authorized numbers via web user interface: Click on Features->Forward & DND. Select Enabled from the pull-down list of Forward Emergency. Enter the numbers in the Forward Authorized Numbers field. For multiple numbers, enter a comma between every two numbers. Click Confirm to accept the change. -
Page 102: Call Transfer
User Guide for the SIP-T21(P) E2 IP Phone Press to select the desired account and then press the Enter soft key. Press to select the desired forwarding type and then press the Enter soft key. Press , or the Switch soft key to select Disabled to disable the call forward.
-
Page 103: Call Waiting
Basic Call Features Do one of the following: Press the Dir soft key, and then select Local Directory. Select the desired group and search for the contact (Directory should be configured in advance. Refer Directory on page for more information). Press the Dir soft key, and then select History.
-
Page 104: Conference
User Guide for the SIP-T21(P) E2 IP Phone when there is an active call on the phone. You can also enable or disable the phone to play a warning tone when receiving another call. To configure call waiting via phone user interface: Press Menu->Features->Call Waiting.
-
Page 105: Network Conference
Basic Call Features parties in the conference. You can press to see all parties in the conference. To join two calls in a conference: Place two calls using two different accounts on the phone (for example, place the first call using account 1, and then place the second call using account 2). Press to select the call for conference and ensure that the call is active (for example, select the call on account 1).
-
Page 106
User Guide for the SIP-T21(P) E2 IP Phone To configure network conference via web user interface: Click on Account->Advanced. Select the desired account from the pull-down list of Account. Select Network Conference from the pull-down list of Conference Type. Enter the conference URI (e.g., conference@example.com) in the Conference URI field. -
Page 107: Call Park
Basic Call Features You can use call park feature to place a call on hold, and then retrieve the call from another phone in the system (for example, a phone in another office or conference room). You can park an active call by pressing the call park key on the phone. If the call is parked successfully, the response is either a voice prompt confirming that the call was parked, or a visible prompt on the LCD screen.
-
Page 108: Call Pickup
User Guide for the SIP-T21(P) E2 IP Phone The system establishes call between phone C and B. Note The call park code and call park retrieve code are predefined on the system server. Contact your system administrator for more information. If the parked call is not retrieved within a period of time assigned by the system, the phone performing call park will receive call back.
-
Page 109
Basic Call Features To configure the directed call pickup code on a per-line basis via web user interface: Click on Account->Advanced. Select the desired account from the pull-down list of Account. Enter the directed call pickup code in the Directed Call Pickup Code field. Click Confirm to accept the change. -
Page 110: Group Call Pickup
User Guide for the SIP-T21(P) E2 IP Phone You can also configure a DSS key as a direct pickup key via phone user interface or web user interface. Once configured, you can pick up a call by pressing the directed pickup key directly.
-
Page 111
Basic Call Features Enter the group call pickup code in the Group Call Pickup Code field. Click Confirm to accept the change. To pick up a call in the group: Pick up the handset, press the speakerphone or press the line key. The GPickup soft key appears on the LCD screen. -
Page 112: Anonymous Call
User Guide for the SIP-T21(P) E2 IP Phone You can use anonymous call to block your identify and phone number from appearing to the called party when you call someone. For example, you want to call to consult some services, but don’t want to be harassed. Anonymous call is configurable on a per-line basis.
-
Page 113: Anonymous Call Rejection
Basic Call Features The LCD screen of phone B prompts an incoming call from anonymity. You can use anonymous call rejection to reject incoming calls from anonymous callers. Anonymous call rejection automatically rejects incoming calls from callers who deliberately block their identities and numbers from being displayed. Anonymous call rejection is configurable on a per-line basis.
-
Page 114
User Guide for the SIP-T21(P) E2 IP Phone… -
Page 115: Led Instructions On
Advanced Phone Features This chapter provides operating instructions for the advanced features of the SIP-T21(P) E2 IP phone. Topics include: Busy Lamp Field (BLF) BLF List Call Recording Hot Desking Intercom Multicast Paging Music on Hold …
-
Page 116
User Guide for the SIP-T21(P) E2 IP Phone Press , or the Switch soft key to select BLF from the Type field. Press , or the Switch soft key to select the desired line from the Account ID field. Enter the phone number or extension you want to monitor in the Value field. (Optional.) Enter the Directed Call Pickup Code in the Extension field. -
Page 117: Blf List
Advanced Phone Features The BLF key LED flashes red. The caller ID appears on the LCD screen (if enabled). In the following figure, the LCD screen shows an incoming call from 2500 on the monitored line. Note If your phone is locked and the type of the phone lock is configured as Function Keys or All Keys, you cannot use the DPickup, Send, NewCall and Cancel soft keys until unlocked.
-
Page 118
User Guide for the SIP-T21(P) E2 IP Phone in and set up a conference call. Before barging in an active call, ensure that the barge-in code has been configured in advance. If the BLF list barge in code is not configured, the phone will place a call to the monitored user instead of barging in an active call of the monitored user when you press the BLF List key. -
Page 119: Call Recording
Advanced Phone Features You can receive a visual or/and an audio alert (if enabled) on your phone when the monitored user receives an incoming call. For more information, refer to Busy Lamp Field (BLF) on page Note The pickup code is used in the following order of preference: BLF List Pickup Code (Account->Advanced)>Directed Call Pickup Code (Account->Advanced)>Directed Call Pickup Code (Features->Call Pickup).
-
Page 120
User Guide for the SIP-T21(P) E2 IP Phone Press , or the Switch soft key to select URL Record from the Type field. Enter the URL (e.g., http://10.1.2.224/phonerecording.cgi) in the Value field. Press the Save soft key to accept the change or the Back soft key to cancel. Record and URL record keys are configurable via web user interface at the path DSSKey->Line Key. -
Page 121: Hot Desking
Advanced Phone Features You can listen to the recordings stored on your server system. For example, you can dial an access code to listen to the recordings. Note The way in which you listen to the recordings may be different depending on the server. Contact your system administrator for more information.
-
Page 122: Intercom
User Guide for the SIP-T21(P) E2 IP Phone The LCD screen prompts the following warning: Press the OK soft key, registration configurations of all accounts on the phone will be cleared immediately. The login wizard will be displayed as below: Enter the login information in each field.
-
Page 123: Incoming Intercom Calls
Advanced Phone Features Press , or the Switch soft key to select Intercom from the Type field. Select the desired line from the Account ID field. Enter the target extension number in the Value field. Press the Save soft key to accept the change or the Back soft key to cancel. Intercom key is configurable via web user interface at the path DSSKey->Line Key.
-
Page 124
User Guide for the SIP-T21(P) E2 IP Phone Intercom Mute You can mute or un-mute the phone’s microphone for intercom calls automatically. If Intercom Mute is enabled, the microphone will be muted for intercom calls. If Intercom Mute is disabled, the microphone will work for intercom calls. Intercom Mute is disabled by default. -
Page 125: Multicast Paging
Advanced Phone Features the speakerphone mode by default. To end the intercom call, press the intercom key again or the EndCall soft key. You can use multicast paging to quickly and easily broadcast time sensitive announcements to users who are listening to a specific multicast group. You can configure a multicast paging key or the paging list key on the phone, which allows you to send a Real Time Transport Protocol (RTP) stream to the pre-configured multicast address(es) without involving SIP signaling.
-
Page 126
User Guide for the SIP-T21(P) E2 IP Phone Press , or the Switch soft key to select Paging List from the Key Type field. Press the Save soft key to accept the change or the Back soft key to cancel. Paging list key is configurable via web user interface at the path DSSKey->Line Key. -
Page 127
Advanced Phone Features Press the Option soft key and then select Delete. The LCD screen prompts “Delete selected paging group?”. Press the OK soft key to accept the change or the Cancel soft key to cancel. If you want to delete all paging groups, you can press the Del All soft key. You can also configure the phone to use a default codec for sending multicast RTP stream via web user interface. -
Page 128
User Guide for the SIP-T21(P) E2 IP Phone You can configure the phone to receive a Real Time Transport Protocol (RTP) stream from the pre-configured multicast address(es) without involving SIP signaling. You can specify up to 10 multicast addresses that the phone listens to on the network. How the phone handles incoming multicast paging calls depends on Paging Barge and Paging Priority Active parameters configured via web user interface. -
Page 129
Advanced Phone Features Label will appear on the LCD screen when receiving the multicast RTP stream. Click Confirm to accept the change. Note The priorities of listening addresses are predefined: 1 with the highest priority, 10 with the lowest. Multicast listening addresses are configurable via web user interface only. To configure paging barge and paging priority active features via web user interface: Click on Directory->Multicast IP. -
Page 130
User Guide for the SIP-T21(P) E2 IP Phone To send RTP stream via a multicast paging key when the receiver’s phone is idle: Press the multicast paging key when the phone is idle. The phone sends RTP to a preconfigured multicast address (IP: Port). Both the sender’s and receiver’s phones play a warning tone and the receiver automatically answers the multicast RTP session in the speakerphone mode. -
Page 131: Music On Hold
Advanced Phone Features To resume the held multicast RTP session, press the Resume soft key. The multicast RTP session is established again. To end the multicast RTP session, press the EndCall soft key. Music on hold (MoH) is the business practice of playing recorded music to fill the silence that would be heard by the party placed on hold.
-
Page 132
User Guide for the SIP-T21(P) E2 IP Phone ACD is often used in offices for customer service, such as call center. The ACD system handles large volumes of incoming calls from callers who have no need to talk to a specific person but who require assistance from any of multiple persons at the earliest opportunity. -
Page 133
Advanced Phone Features After configuring an ACD key, you can press the ACD key to log into the ACD system After logging in, you are ready to receive calls from the . You can press the ACD system ACD key to show your current ACD user status. You can press the Avail/Unavail soft key to change your ACD user status. -
Page 134
User Guide for the SIP-T21(P) E2 IP Phone line key 2 for the account 4603_1, phone C registers the account 4604. To configure the auto linekeys feature via web user interface: Click on Features-> General Information. Select Enabled from the pull-down list of Auto LineKeys. Auto LineKeys is you can automatically assign multiple DSS keys with enabled,… -
Page 135
Advanced Phone Features To configure the shared line settings and the number of line key on phone A via web user interface: Register the primary account 4603. Click on Advanced, and then select Shared Call Appearance from the pull-down list of Shared Line. Enter the desired number in the Number of line key field. -
Page 136
User Guide for the SIP-T21(P) E2 IP Phone The default value is 1. In this example, the value is set to 2. Click Confirm to accept the change. The phone A will automatically configure the line keys from the first unused DSS key, according to the configured number in the Number of line key field. -
Page 137
Advanced Phone Features (Enter the primary account 4603 in the Register Name field.) Click on Advanced, and then select Shared Call Appearance from the pull-down list of Shared Line. Enter the desired number in the Number of line key field. This field appears only if Auto Linekeys is enabled. -
Page 138
User Guide for the SIP-T21(P) E2 IP Phone The default value is 1. In this example, the value is set to 2. Click Confirm to accept the change. The phone B will automatically configure the line keys from the first unused DSS key, according to the configured number in the Number of line key field. -
Page 139
Advanced Phone Features Select Private Hold from the Unselected Softkeys column and then click The Private Hold appears in the Selected Softkeys column. Click Confirm to accept the change. To configure a private hold key via phone user interface: Press Menu->Features->DSS Keys. Select the desired DSS key. -
Page 140
User Guide for the SIP-T21(P) E2 IP Phone Enter the call pull feature access code (e.g., *11) in the Call Pull Feature Access Code field. Click Confirm to accept the change. The phone will dial out “*11” automatically when you press the CallPull soft key. This section provides you with detailed information on using the SIP-T21(P) E2 IP phone in a SCA Hybrid Key System scenario. -
Page 141
Advanced Phone Features To place a call on the shared line: Do one of following: Enter the desired number using the keypad when the phone is idle. Press , or the Send soft key. The phone will dial the entered number using the first line key. Press the line key when the phone is idle to enter the pre-dialing screen. -
Page 142
You can answer the incoming call on either phone A or phone B. The LCD screen of phone A displays the information of the incoming call (e.g., ”Incoming call: 4604 Yealink”). Note Make sure call waiting feature is enabled on phone A. For more information, refer to… -
Page 143
Advanced Phone Features To place a call on public hold: Press the Hold soft key on phone A when party A and party C are talking. The line key LEDs on phone A slow flash green and phone B slow flash red when the shared line call is placed on hold. -
Page 144
User Guide for the SIP-T21(P) E2 IP Phone Long press the desired line key. The Cancel, CallPull, NewCall and Retrieve soft keys appear on the LCD screen. Press the Retrieve soft key to retrieve the call. The conversation is established between phone B and phone C, phone A disconnects the call. -
Page 145
Advanced Phone Features key, the conference call is ended. You can also press the line key with the solid red LED indicator on phone B to set up a conference call with the other parties in the active call. If phone A has more than one call, do the following: Long press the desired line key on phone B. -
Page 146
User Guide for the SIP-T21(P) E2 IP Phone To retrieve a call from another shared phone: If there is an active call between phone A and phone C, do the following: Long press the desired line key on phone B. The Cancel, CallPull, NewCall and Barge In soft keys appear on the LCD screen of phone B. -
Page 147
Advanced Phone Features Any IP phone can be used to originate or receive calls on the bridged line. An incoming call to the BLA number can be presented to multiple phones in the group simultaneously. The incoming call can be answered on any IP phone of the group but not all. You can share a BLA number on two or more phones. -
Page 148
User Guide for the SIP-T21(P) E2 IP Phone To register account and configure BLA feature on phone A via web user interface: Register the account 14019833020. Click on Advanced, and then select Draft BLA from the pull-down list of Shared Line. -
Page 149
Advanced Phone Features Click Confirm to accept the change. To register account and configure BLA feature on phone B via web user interface: Register the account 10462190020. Click on Advanced, and then select Draft BLA from the pull-down list of Shared Line. -
Page 150
User Guide for the SIP-T21(P) E2 IP Phone Enter the desired number in the BLA Number field. Click Confirm to accept the change. This section provides you with detailed information on using the SIP-T21(P) E2 IP phone in a BLA scenario. In a BLA scenario, the status of the line key LED which associates with a bridged line will change. -
Page 151
Advanced Phone Features Press the line key when the phone is idle to enter the pre-dialing screen. Enter the desired number using the keypad and press , or the Send soft key. The phone will dial the entered number. To place multiple calls on the bridged line: You can have more than one call on the bridged line. -
Page 152: Messages
User Guide for the SIP-T21(P) E2 IP Phone The line key LEDs on phone A slow flash green and phone B slow flash red when the bridged line call is placed on hold. If there is a held call between phone A and phone C, you can retrieve a held call on either phone A or phone B.
-
Page 153
Advanced Phone Features You can store text messages in your phone’s Inbox, Sentbox, Outbox or Draftbox. Each of the boxes can store up to 100 text messages. If the number of the text messages in one box is more than 100, the phone will directly delete the oldest text message in the box. -
Page 154
User Guide for the SIP-T21(P) E2 IP Phone To reply a text message: Press Menu->Message->Text Message->Inbox. Select the desired message and press the Reply soft key. Compose the new text message. You can press the abc soft key to change the input mode. -
Page 155: Voice Mail
Advanced Phone Features You can leave voice mails for someone else using the SIP-T21(P) E2 IP phone. You can also listen to voice mails that are stored in a voice mailbox. When receiving a new voice mail, the phone will play a warning tone, and the power indicator LED will slow flash red. The LCD screen will prompt that the phone receives a new message with the number of waiting voice mails (e.g., 34 new Voice Mail) and display an icon.
-
Page 156: Message Waiting Indicator (Mwi)
User Guide for the SIP-T21(P) E2 IP Phone To listen to voice mails: When the LCD screen prompts that the phone receives a new voice mail and the power indicator LED slow flashes red, you can press or the Connect soft key to dial out the voice mail access code.
-
Page 157
Advanced Phone Features Period of MWI subscription. The IP phone sends a MWI Subscription Period refresh SUBSCRIBE request before initial SUBSCRIBE expiration. Enable or disable a subscription to the voice mail number for MWI service. Subscribe MWI to Voice Mail To use this feature, you should also configure the voice mail number. -
Page 158
User Guide for the SIP-T21(P) E2 IP Phone Select the desired account from the pull-down list of Account. Select Enabled from the pull-down list of Subscribe for MWI. Select Enabled from the pull-down list of Subscribe MWI To Voice Mail. Enter the desired voice mail number in the Voice Mail field. -
Page 159: Troubleshooting
Troubleshooting This chapter provides general troubleshooting information to help you solve the problems you might encounter when using your SIP-T21(P) E2 IP phone. If you require additional information or assistance with your new phone, contact your system administrator. Why is the LCD screen blank? Ensure that the phone is properly plugged into a functional AC outlet.
-
Page 160
User Guide for the SIP-T21(P) E2 IP Phone How to obtain the MAC address of a phone when the phone is not powered on? Three ways to obtain the MAC address of a phone: You can ask your supplier for the shipping information sheet which includes MAC … -
Page 161
Troubleshooting Activation/Deactivation on page 50. Check that the headset volume is adjusted to an appropriate level. Refer to Volume on page 29. What is the difference between user name, register name and display name? Both user name and register name are defined by the server. A user name is used to identify the account while a register name matched with a password is used for authentication if the server requires. -
Page 162
User Guide for the SIP-T21(P) E2 IP Phone How to change the user password? To change the user password via web user interface: Click on Security->Password. Select user from the pull-down list of User Type. Enter the new user password in the New Password field and Confirm Password field. -
Page 163
Troubleshooting Select the desired value (Optional or Compulsory) from the pull-down list of RTP Encryption(SRTP). Click Confirm to accept the change. Note SRTP is not available on all servers. Contact your system administrator for more information. SRTP is configurable via web user interface only. How to reboot the phone? To reboot the phone via web user interface: Click on Settings->Upgrade. -
Page 164
User Guide for the SIP-T21(P) E2 IP Phone How to export PCAP trace? We may need you to provide a PCAP trace to help analyze your problem. To export a PCAP trace via web user interface: Click on Settings->Configuration. Click Start to begin capturing signal traffic. Recreate the error to be documented in the trace. -
Page 165
Troubleshooting Mark the Local radio box in the Export System Log field. Click Export to open file download window, and then save the file to your local system. You can also export the system log to the syslog server. Contact your system administrator for more information. -
Page 166
User Guide for the SIP-T21(P) E2 IP Phone How to reset the phone? Reset the phone to factory configurations after you have tried all troubleshooting suggestions but do not solve the problem. You need to note that all customized settings will be overwritten after reset. -
Page 167: Regulatory Notices
Without prior written consent, no organization or individual is permitted to make any change to the structure or the safety design of the device. Yealink is under no circumstance liable to consequences or legal issues caused by such changes.
-
Page 168
User Guide for the SIP-T21(P) E2 IP Phone Please place no heavy objects on the device in case of damage and deformation caused by the heavy load. Keep at least 10 cm between the device and the closest object for heat … -
Page 169: Appendix A — Time Zones
Appendix A-Time Zones Time Zone Time Zone Name Samoa US-Hawaii-Aleutian, US-Alaska-Aleutian -9:30 French Polynesia US-Alaska Time Canada(Vancouver,Whitehorse), Mexico(Tijuana,Mexicali), US-Pacific Time Canada(Edmonton,Calgary), Mexico(Mazatlan,Chihuahua), US-MST no DST, US-Mountain Time Canada-Manitoba(Winnipeg), Chile(Easter Islands), Mexico(Mexico City,Acapulco), US-Central Time Bahamas(Nassau), Canada(Montreal,Ottawa,Quebec), Cuba(Havana), US-Eastern Time -4:30 Venezuela(Caracas) Canada(Halifax,Saint John), Chile(Santiago), Paraguay(Asuncion), UK(Falkland Islands),…
-
Page 170
User Guide for the SIP-T21(P) E2 IP Phone Time Zone Time Zone Name +9:30 Australia(Adelaide), Australia(Darwin) Australia(Brisbane), Australia(Hobart), Australia(Sydney,Melboume,Canberra), Russia(Vladivostok) +10:30 Australia(Lord Howe Islands) New Caledonia(Noumea), Russia(Srednekolymsk Time) +11:30 Norfolk Island New Zealand(Wellington,Auckland), Russia(Kamchatka Time) +12:45 New Zealand(Chatham Islands) Tonga(Nukualofa) +13:30 Chatham Islands Kiribati… -
Page 171: Bridged Line Appearance (Bla)
Index Dial Plan About This Guide Directory Account Management Dual Headset Account Registration Do Not Disturb (DND) Adding Contacts Documentations Adding Groups DSS Keys Administrator password Anonymous Call Anonymous Call Rejection Answering Calls Editing Contacts Area Code Editing Groups Attaching Stand Emergency Number Audio Settings Ending Calls…
-
Page 172
User Guide for the SIP-T21(P) E2 IP Phone Messages Time and Date Message Waiting Indicator Time Zones Multicast Paging Troubleshooting Music on Hold Voice Mail Network Conference Volume Network Connection No answer Forward Warranty Web User Interface Outgoing Intercom Calls WEEE Warning Overview Optional Accessories…
|
Инструкция YEALINK SIP-T21P E2 для устройства телефон проводной содержит страницы на русском языке. Размер файла: 1.26 MB. Состоит из 8 стр. Вы можете скачать pdf файл этой инструкции: Скачать PDF 1 Packaging Contents T21P E 2 Комплектация Установка телефона Гарантийный талон Ethernet-кабель Провод для подключения трубки Краткое руководство Адаптер питания Подставка SIP-телефон Трубка A B 1 2 1. Прикрепите подставку как показано на рисунке: Установка на столе Крепление на стене 2. Подключите трубку и/или гарнитуру как показано на рисунке: Примечание: гарнитура в комплект поставки не входит |
- Manuals
- Brands
- Yealink Manuals
- IP Phone
- SIP-T21(P) E2
Manuals and User Guides for Yealink SIP-T21(P) E2. We have 12 Yealink SIP-T21(P) E2 manuals available for free PDF download: Administrator’s Manual, User Manual, Manual, Getting Started, Quick Start Manual, Quick Installation Manual, Quick Reference Manual
Инструкция использования телефона Yealink SIP-T21P
Данный текст является ознакомительным фрагментом.
Читайте также
SIP-телефоны Yealink
SIP-телефоны Yealink
SIP-телефоны Yealink отличает:• относительно невысокие цены• высокое качество связи за счет использования качественных голосовых процессоров• приятный внешний вид, удобная и качественная клавиатура• наличие качественной громкой связи• возможность
Настройка телефона Yealink SIP-T19P
Настройка телефона Yealink SIP-T19P
Цена: 88,5 USD(рекомендованная розничная)• Высококачественная громкая связь с подавлением эха• Поддержка Paging и Intercom• Подключение гарнитуры через RJ9• Питание от 220В или PoE (1.3–2.6 Вт)• Подключение ПК через телефон• Одна учетная запись
Настройка телефона Yealink SIP-T21P
Настройка телефона Yealink SIP-T21P
Цена: 112,1 USD(рекомендованная розничная)• Высококачественная громкая связь с подавлением эха• Поддержка Paging и Intercom• Подключение гарнитуры через RJ9• Питание от 220В или PoE (1.4–2.6 Вт)• Подключение ПК через телефон• Две учетных записи SIP, две
Настройка телефона Yealink SIP-T22P
Настройка телефона Yealink SIP-T22P
Цена: 127 USD(рекомендованная розничная)• Высококачественная громкая связь с подавлением эха• Поддержка Paging и Intercom• Подключение гарнитуры через RJ9• Питание от 220В или PoE (1.6–2.8 Вт)• Подключение ПК через телефон (в режиме моста или
Настройка телефона Yealink SIP-T26P
Настройка телефона Yealink SIP-T26P
Цена: 190 USD(рекомендованная розничная)• Высококачественная громкая связь с подавлением эха• Поддержка Paging и Intercom• Подключение гарнитуры через RJ9• Питание от 220В или PoE (1.2–2.5 Вт)• Подключение ПК через телефон (в режиме моста или
Настройка телефона Yealink SIP-T28P
Настройка телефона Yealink SIP-T28P
Цена: 234 USD(рекомендованная розничная)• Высококачественная громкая связь с подавлением эха• Поддержка Paging и Intercom• Подключение гарнитуры через RJ9• Питание от 220В или PoE (1.2–2.7 Вт)• Подключение ПК через телефон (в режиме моста или
Модуль Yealink EXP38
Модуль Yealink EXP38
Шесть модулей и телефон предоставляют 238 кнопок BLF двухцветной индикации.
Цена: 128 USD(рекомендованная
Модуль Yealink EXP39
Модуль Yealink EXP39
Наличие LCD экрана избавляет от необходимости перепечатывать вкладыши для кнопок. Шесть модулей и телефон предоставляют 130 двухцветных индикаторов BLF, с функцией перелистывания – 238 абонентов.
Цена: 199 USD(рекомендованная
Настройка телефона Yealink SIP-T41P
Настройка телефона Yealink SIP-T41P
Цена: 148,8 USD(рекомендованная розничная)• Высококачественная громкая связь с подавлением эха• Поддержка Paging и Intercom• Подключение гарнитуры через RJ9• Питание от 220В или PoE (2.8–4.4 Вт)• Подключение ПК через телефон• Три учетных записи SIP, 6
Настройка телефона Yealink SIP-T42G
Настройка телефона Yealink SIP-T42G
Цена: 180,9 USD(рекомендованная розничная)• Высококачественная громкая связь с подавлением эха• Поддержка Paging и Intercom• Подключение гарнитуры через RJ9• Питание от 220В или PoE (2.8–4.4 Вт)• Подключение ПК через телефон• Три учетных записи SIP, 6
Адаптер Yealink EHS36
Адаптер Yealink EHS36
Использование адаптера EHS36 позволяет подключать к телефонам Yealink SIP-T26P, SIP-T28P, SIP-T41P, SIP-T42G, SIP-T46G, SIP-T48G профессиональные беспроводные и проводные гарнитуры как стерео, так и моно.
Цена: 58,4 USD(рекомендованная
Настройка телефона Yealink SIP-T46G
Настройка телефона Yealink SIP-T46G
Цена: 286,2 USD(рекомендованная розничная)• Высококачественная громкая связь с подавлением эха• Поддержка Paging и Intercom• Подключение гарнитуры через RJ9• Питание от 220В или PoE (2.8–4.5 Вт)• Подключение ПК через телефон• Шесть учетных записей SIP, 10
Модуль Yealink EXP40
Модуль Yealink EXP40
Цена: 147,6 USD(рекомендованная розничная)Наличие у модуля EXP40 LCD экрана избавляет от необходимости перепечатывать вкладыши для кнопок BLF. Шесть модулей и телефон предоставляют 130 двухцветных индикаторов BLF, с функцией перелистывания – быстрый доступ к вызову
Настройка телефона Yealink SIP-T48G
Настройка телефона Yealink SIP-T48G
Цена: 370,8 USD(рекомендованная розничная)• Высококачественная громкая связь с подавлением эха• Поддержка Paging и Intercom• Подключение гарнитуры через RJ9• Питание от 220В или PoE (2.4-10.8 Вт)• Подключение ПК через телефон• Шесть учетных записей SIP, до
Модуль Yealink EXP40
Модуль Yealink EXP40
Цена: 147,6 USD(рекомендованная розничная)Наличие у модуля EXP40 LCD экрана избавляет от необходимости перепечатывать вкладыши для кнопок BLF. Шесть модулей EXP40 совместно с телефоном предоставляют 149 двухцветных индикаторов BLF, с функцией перелистывания – быстрый
Вопросы по телефонам Yealink
Вопросы по телефонам Yealink
Почему телефон пишет «No Service»?
Телефон пишет сообщение «No Service», когда не настроен SIP-аккаунт.Выполните одно из следующих действий:• убедитесь, что аккаунты успешно зарегистрировались на телефоне Меню – > Статус – > Далее… – >
Инструкция по настройке Yealink SIP T21
-
Если вам в руки попал ненастроенный ip-телефон, то этот пункт инструкции вы можете пропустить. Однако если вы уверены, что этот ip-телефон уже где-то использовался, то его лучше всего сбросить на заводские настройки. Чтобы сбросить телефон на заводские настройки, на телефоне требуется нажать кнопку Меню
Войдя в Меню управление осуществляется кнопкой ОК и стрелками Вверх и Вниз
В Меню выбираем пункт 3. Настройки и нажимаем ОК
Выбираем 2. Система
В поле пароль вводим: admin и нажимаем ОК
Это делается при помощи клавиатуры телефона, буквы подписаны на клавишах, чтобы в вести букву, которая на клавише значится второй или третьей, нужно нажать на клавишу соответственно 2 или 3 раза подряд. Так для того чтобы ввести букву i-нужно 3 раза подряд нажать на кнопку 4, а чтоб ввести n-2 раза нажать кнопку 6.
В этом списке выбираем 6. Сброс настроек и ждем, когда телефон перезагрузится.
2)Имея в наличии ip-телефон с заводскими настройками, подключаем сетевой кабель в «Internet»
3) IP-адрес телефон по умолчанию получает по DHCP (автоматически). Посмотреть полученный IP-адрес можно нажав на кнопку ОК.
4)После того как ip-телефон подключен к сети и мы узнали его ip-адрес, в любом браузере вводим в адресную строку http:/// (например : http://10.0.2.41/ или http://192.168.1.15/ ). Вы должны увидеть подобное окно:
Для входа вводим логин: admin пароль: admin
Попадаем в Web-интерфейс телефона
Сверху страницы выбираем вкладку Аккаунт.
Для начала нужно перевести Акканту во включенное положение.
Далее нужно заполнить следующие поля:
В поле «Отображаемое имя» вводим то, что хотим чтоб отражалось на дисплее.
В поле «Имя регистрации» вводим SIP Auth ID.
В поле «Имя пользователя» вводим Sip User Id.
В поле «Пароль»вводим SIP password.
В колонке SiP-сервер 1, в поле «Адрес SiP-сервера» вводим sip.new-tc.ru (в случае если вы пользуетесь нашей сетью)
Если все прошло успешно, то вы увидите в поле «Статус регистрации» значение «Зарегистрирован».
Для настройки второго аккаунта, в поле «Аккаунт» нужно выбрать значение «Аккаунт 2».
Далее во вкладке Аккаунт выбираем вложение слева Кодеки.
Далее нам нужно выставить кодеки, для обработки голосового потока. Наиболее приоритетным кодеком необходимо выставить PCMA, так как он обеспечивает наилучшее качество звука при полосе пропускания около 100кбитс на один разговор. PCMU стоит оставить вторым приоритетом, так как этот кодек хоть и дает качество звука, сравнимое с PCMA, но является менее распространенным в России и Европе
G729 является кодеком с наименьшей требуемой пропускной способностью ( примерно 30 кбитс ) однако он более чувствителен к потерям на канале, потребляет больше ресурсов устройства и выдает наихудшее качество звука. Кодек G723 хоть и обладает наименьшей пропускной способностью (около 28 кбитс) желательно не использовать вообще из-за наиболее низкого качества звука.
Поэтому для получения наилучшего качества телефонии. Расставим кодеки в следующем порядке:
- PCM A
- PCM U
- G729
Остальные кодеки использовать не будем.
Далее идем во вкладку Расширенные.
В поле «Early Media» ставим положение Включено.
Эта функция позволяет прослушать статусные сообщения от мобильных операторов.
В целях безопасности рекомендуется сменить стандартный пароль для доступа в Web-интерфейс это можно сделать, войдя во вкладку Безопасность.
Как настроить Yealink T19P E2 для работы с Asterisk
Проводной телефон Yealink T19P E2 имеет удобный процесс настройки (намного проще, удобнее и понятнее, чем SIP телефоны Panasonic)
1. Достаем из коробки, подключаем в розетку и в локальную сеть
Для настройки телефона будет достаточно достать из коробки только собственно телефон (телефонная трубка необязательна) и блок питания.
Также телефон необходимо подключить к локальной сети, LAN-порт находится сзади. Кабель локальной сети подключается к порту названному «internet».
* Второй порт «PC» расположенный рядом, предназначен для подключения компьютера, если вы планируете использовать единственный кабель для подключения и телефона, и компьютера. Это удобно, если количество LAN-розеток ограничено в вашем офисе и встроенный swith в телефоне позволяет обойтись единственной LAN-розеткой для телефона и компьютера.
2. Находим IP адрес
Узнать какой IP-адрес выдан телефону очень просто — нужно нажать:
Меню -> Статус
3. Настраиваем через WEB-интерфейс логин, пароль и адрес сервера Asterisk
Так как web-интерфейс на аппаратах Yealink всегда включен, то вы можете сразу приступить к настройки телефона через браузер.
Вводим IP-адрес телефона в браузер на компьютере (в нашем примере адрес телефона 192.168.0.75).
Логин и пароль от web-интерфейса для SIP-телефона Yealink T19P E2 по умолчанию такие:
Логин: admin
Пароль: admin
Далее переходим на вкладку Аккаунт
и в настройках задаём параметры SIP-аккаунта для связи с сервером Asterisk.
В параметрах Имя регистрации
и Имя пользователя
указываем внутренний номер телефона (например, 26), который нужно настроить для этого телефонного аппарата.
В поле Пароль
указываем пароль от SIP-аккаунта.
В параметрах Адрес SIP-сервера
задаем адрес сервера Asterisk (например, 192.168.1.11).
Если телефоны будут находиться в одной локальной сети, то указываем внутренний адрес сервера Asterisk.
* Если телефоны будут находиться на удаленных объектах (за NAT), то указываем внешний адрес сервера Asterisk (никаких других настроек со стороны аппарата Yealink T19P E2
при работе за NAT не требуется).
Ждем кнопку Сохранить
.
4. Проверяем связь с Asterisk
Проверить зарегистрировался ли телефон на сервере Asterisk очень просто. Для этого не нужно переходить на другую вкладку, достаточно посмотреть на первую строчку Статус регистрации
. После сохранения настроек телефону требуется несколько секунд для регистрации, после этого появляется надпись Зарегистрировано
.
Также можно визуально проверить на самом телефонном аппарате. Главный экран успешно зарегистрированного Yealink T19P E2 выглядит так (в нашем случае цифра 26 в левом верхнем углу):
Инструкция YEALINK SIP-T23G на русском языке в формате pdf для устройства: телефон проводной. Прочитайте инструкцию для ознакомления с функциями и условиями эксплуатации, характеристиками и способами исправления неисправностей. Данное руководство пользователя поможет использовать весь функционал изделия и увеличит срок службы при условии соблюдения всех правил изложенных в документе.
- Производитель: Yealink
В т.ч. НДС 20%
Характеристики
Описание
Активное продвижение товаров и услуг, анализ требований современного потребителя, повышение эффективности ведения бизнеса — всё это невозможно представить без налаженной системы коммуникации на предприятии. Сотрудники должны иметь постоянную возможность обмениваться информацией, передавать важные сведения, связываться с потенциальными и действующими клиентами. Это непрерывный процесс, требующий использования высокотехнологичных инструментов. Ярким примером может служить новая модель стационарного телефона Yealink SIP-T21P E2. Несмотря на широкий функционал устройства, который будет подробно описан ниже, а также стильный дизайн и долговечную конструкцию, продукт сохраняет доступную стоимость, за что ещё больше ценится многочисленными покупателями на мировом и российском рынках.
К отличительным особенностям данной модели можно отнести ряд дополнений к предыдущему поколению телефонов SIP-T21P. Теперь устройство обладает усовершенствованным чипсетом и более мощным процессором для улучшенной производительности. Также производитель добавил подсветку LCD-экрана с разрешением 132 х 64, изменил цвет корпуса и внедрил возможность питания по системе PoE (Power over Ethernet). Телефон в отличие от многих других моделей товарной линейки компании имеет 2 SIP-аккаунта.
Стационарный телефон Yealink SIP-T21P E2 содержит в себе простор для качественной и эффективной коммуникации. Это обуславливает большое количество функций:
- Запись в телефонную книгу до 1000 контактов, поделённых на 5 групп. Загрузка и выгрузка контактной информации на другой носитель. Интеграция удалённых телефонных справочников, содержащих до 2000 записей. Хранение истории вызовов до 100 элементов. Интеллектуальный поиск по справочнику.
- Регулировка громкости вызова, выбор мелодии звонка.
- Режим телефонной конференции, интерком-вызовы (в том числе и групповые разговоры Paging), горячая линия, автоответчик, переадресация, автодозвон, функции удержания и ожидания, голосовая почта, отправка и получение SIP SMS.
- Интеграция с популярными платформами для голосовой связи, например: BroadSoft, Genesys. Поддержка системы Yealink RPS (Redirection and Provisioning Service).
- Быстрый и ускоренный набор номера телефона для экономии времени.
Производитель гарантирует максимально качественный и чистый звук благодаря внедрению в аппарат инновационных систем. К ним относятся:
- AEC — технология подавления эха;
- AGC — программная настройка уровня чувствительности микрофона;
- CNG — генератор комфортного шума;
- VAD — система распознавания голосовых волн;
- PLC — отметка ликвидации пакета с медиа-информацией.
Навигация по меню телефона осуществляется полностью на русском языке, однако при необходимости можно использовать и английскую раскладку клавиатуры.
Корпус серого цвета с деталями в бежевом оттенке снабжён панелями с необходимыми клавишами. Четыре контекстно-зависимые, шесть навигационных и одна функциональная кнопка с возможностью перепрограммирования под индивидуальные нужды. Ещё пять клавиш не поддаются перепрограммированию: из них четыре функциональные: для активации голосовой почты, включения гарнитуры, совершения повторного вызова и громкой связи; а также одна светодиодная с активным доступом к голосовой почте.
Yealink SIP-T21P E2 — это гармоничное сочетание цены и качества, которое полностью подтверждается во время эксплуатации. Большой популярностью продукт пользуется не только при установке в колл-центрах: его активно приобретают крупные компании и мелкие фирмы с различной направленностью деятельности. Это эффективное решение для качественной связи с клиентской базой и между сотрудниками.
Продолжаем цикл статей по обзору и настройке IP-телефонов Yealink. Следующим решили осветить аппарат Yealink SIP-T21P (и его родного брата Yealink SIP-T21). По своим характеристикам и внешнему виду телефоны идентичны, с одним лишь отличием — модель SIP-T21P поддерживает питание по технологии PoE, что отмечается буквой «P» в ее названии. Несмотря на это отличие, обе модели поставляются со штатным блоком питания. Поэтому SIP-T21P можно смело рассматривать как дальновидный вариант — если в будущем компания решит перейти на PoE-технологии, то телефон менять не придется.
Заметим
Не забываем, что для подачи электричества на телефонный аппарат Yealink SIP-T21P E2 с поддержкой PoE, необходимо, чтобы в наличии был специальный свитч с PoE-питанием. Без него телефон не будет получать питание через витую пару.
Помогите с настройкой
Внешний вид и функционал
Телефон Yealink SIP-T21P — отлично подойдет любому сотруднику офиса, как модель со слегка расширенными возможностями в сравнении с более простыми линейками, или как бюджетный вариант для руководителя небольшой компании.
Телефон имеет набор стандартных функциональных клавиш, а также приятное дополнение — BLF клавиши.
- 2 настраиваемые BLF клавиши, к которым можно привязать множество функций, таких как: быстрый дозвон, быстрый трансфер/переадресация, отображение статуса абонента и многие другие;
- 4 контекстно-зависимые функциональные клавиши. Эти кнопки меняют свою функцию в зависимости от состояния, в котором находится телефон — состояние «покоя» (стандартное), при входящем звонке, при активном разговоре, при исходящем звонке, при наборе номера, при навигации по меню и настройкам;
- Клавиши навигации по меню и кнопка ОК;
- Фиксированные функциональные клавиши — голосовая почта, переключение на гарнитуру, трансфер звонка, список последних 100 набранных номеров, громкая связь;
- Клавиши регулирования громкости.
Настройка телефона
Благодаря удобному и понятному интерфейсу настройка телефонов Yealink занимает считанные минуты.
Прежде всего, необходимо зайти в веб-интерфейс телефона по его IP-адресу, узнать который можно, нажав кнопку OK. После чего, на экране откроется меню «Статус», где и будет показан адрес.
Вводим этот адрес в любом браузере компьютера, подключенного к этой же сети. Далее указываем стандартный логин и пароль: admin/admin.
Попав в режим настроек телефона, можно приступить к тем самым настройкам. В первую очередь подключаем телефон к офисной АТС или провайдеру IP-телефонии. Для этого на верхней панели выбираем вкладку «Аккаунт» и указываем следующие параметры:
- Лейбл — будет отображаться на экране телефона. Значение произвольное, это может быть ваше имя или внутренний номер в АТС;
- Отображаемое имя — будет отображаться у другого абонента вашей офисной АТС при звонке с этого аппарата. Значение также произвольное, для удобства стоит указать либо внутренний номер, либо должность, либо имя;
- Имя регистрации и пароль — ваши логин и пароль на АТС или сервере провайдера телефонии. Значения строгие, по нему будет проходить авторизация на сервере;
- АдресSIP-сервера — IP-адрес сервера АТС или провайдера, к которому будет подключаться аппарат.
Заполнив необходимые поля, в поле аккаунт выбираем значение «Включено», и внизу экрана нажимаем «Сохранить». Если все данные были введены верно, то строка «Статус регистрации» будет отображать значение «Зарегистрировано».
На этом основные настройки аппарата закончены. Приступаем к дополнительным возможностям и повышению комфорта использования.
В закладке DSS-кнопки можно настроить BLF клавиши под необходимые функции. Тип действия выбирается из списка, значения и лейбл заполняются в соответствии. В данном примере мы настроили первую кнопку на быстрый дозвон часто набираемого номера, а вторую на трансфер звонка на другого менеджера.
Телефон без встроенной книги контактов неудобен, это факт. Настоятельно рекомендуем воспользоваться книгой контактов, в будущем поможет сохранить огромное количество времени. В закладках выбираем «Контакты» и добавляем номера телефонов.
Контакты можно группировать и присваивать различные мелодии (которые, кстати, можно загружать на аппарат самостоятельно). Можно автоматизировать этот процесс с помощью импорта XML или CSV списка контактов. Для каждого контакта можно привязать до 3 номеров. Чтобы добавить контакты, не обязательно заходить в веб-интерфейс, это можно сделать и на самом аппарате, но занимает это немного больше времени.
Как подключить наушники к ip телефону Yealink T21 E2?
Иногда для удобства пользования телефоном и для освобождения рук, требуется подключение к телефону гарнитуры. Yealink SIP T21 E2 предоставляет такую возможность. Для этого необходимо выбрать и купить телефонные наушники с разъёмом RJ9 и подключить их в соответствующий разъём на торце телефона (обозначено соответствующей иконкой).
Для активации работы наушников телефон следует перевести в режим работы с гарнитурой, нажам на клавиатуре соответствующую клавишу.
После выполнения этих процедур вы комфортно сможете работать с гарнитурой освободив свои руки.
Резюме
Yealink SIP-T21P соответствует требованиям современного офисного работника. Он удобен в использовании, надежен и практичен. Если вы задумываетесь о приобретении SIP-аппаратов для своего офиса и готовы вложить несколько больше, чем того требуют самые бюджетные варианты, то стоит присмотреться к этой модели.
«>