
-
Consumer services
>
-
User manual, instruction for use
>
-
Electrical Cooking
>
-
Deep Fryer
>
User manual and frequently asked questions Oleoclean Snack
Keep your oil clean for longer, always ready for delicious fried snacks
The Tefal Oleoclean Snack is an exceptional deep fryer that produces mouth-watering fries and other delicious snacks, with a patented filtration system that keeps oil clean longer and ready for use next time in a removable oil box. A compact design with a large capacity—with a skimmer replacing the traditional basket to produce more food with less oil—comes together with an ultra-resistant ceramic coating for delicious snacks fried to perfection.
Reference : FF245E10
Frequent questions
Battered food should not be put into the basket directly. The batter will wrap around the basket coils and get stuck.
Lower the basket into the oil first. Wearing gloves when placing battered food directly in oil.
The fryer cooks all types of food: vegetables, meat, fish, seafood, fruits. You can prepare desserts with your fryer: fritters, doughnuts, fruit.
Store the oil in the fryer with the lid closed, thereby keeping it fresh and clean. If the fryer will not be used for a long time, store the oil in a separate container and clean the fryer.
Never mix different oils together as each type of oil has a different frying temperature, which can cause the oils to emulsify and boil over during cooking.
The heating time will vary depending on the model and size. Whether you have a fixed bowl model or a removable bowl can make a difference. The average time for all should be between 10 and 18 minutes. The temperature indicator light will be on while the fryer is heating up. The light will go off when the fryer has reached temperature.
Metallic charcoal filters should be changed between 35 to 50 frying sessions, depending on model (the saturation indicator shows when the filter needs to be changed). Foam filters should be changed after 20 frying sessions. If you are frying fish we recommend using a separate filter and changing the oil after use. Waterclean filters made of carbon fibres should be washed after 80 uses (it regenerates after each wash). The Pure Air system is a permanent system that does not need to be replaced.
The oil in your fryer must be changed after 10 uses, as a minimum. Sunflower oil and groundnut oil must be changed after 5 uses or if you hear a popping sound (this means that there is water in the oil). To extend the life of the oil, filter it regularly. You may need to change it more often if frying fish, seafood or battered foods.
Oil should be strained and or filtered (by using paper filters or a filtering pot or a skimmer) after it cools and after each use. This will keep the oil from early contamination. Oil used for fish should be stored separately.
a) The oil is not hot enough. If you have an adjustable thermostat be sure it is set at the proper setting for the food you are cooking. If your unit does not have an adjustable thermostat, be sure the light on the fryer has gone off, this tells you that the oil is ready for frying.
b) Too much food is in the basket. Fry the food in smaller quantities (particularly frozen foods) for better results.
c) You did not cook the food long enough. Increase cooking time by a few minutes, lift basket to check for crispness.
a) The fryer was filled beyond the maximum level (either with oil or with food in the frying basket). Check the oil level. The bowl is marked with a minimum and a maximum level.
b) Wet food has been dropped into the oil. Dry the food completely or remove any loose ice from frozen foods before frying.
Use a fat content recommended for frying. For best results we recommend unsaturated vegetable oil.
Never mix different types of oil in your fryer, they may have different boiling points.
If you use solid vegetable fat:
• cut it into pieces and melt it in a bowl (at 150 °C) before putting it into your fryer.
• never melt solid fat in the basket of your fryer.
Never put solid fat directly into the frying basket.
Unpleasant odours can be due to aged oil and/or a saturated filter that needs to be changed. Change oil or filter or both.
Wipe the window with a little lemon juice or cut a potato in half and wipe this over the window before cooking.
Depending on the model:
a) Exterior Basket Control (allows you to lower food into the hot oil with the lid closed to prevent splashing).
b) Cool Touch Exterior.
c) Sealed Locking Lid with one-touch automatic opening.
d) Your fryer is equipped with thermal limiter to prevent overheating (dry-boil). This limiter is resettable for semi-pro models. If the appliance is not working, check to ensure that the limiter has not been triggered.
The fryer tank should be cold and filled before use, and the appliance should be unplugged.
After a few uses, you should adjust the level. Always do this with the appliance unplugged and cold.
Never use the fryer without oil or without cooking fat.
There are usually two markers in the tank: minimum and maximum. See the instructions for use.
In any case, do not exceed the maximum level, and do not add less oil than the minimum level indicated.
• As soon as the oil is heated to the proper frying temperature (Pilot light off).
• Selected models include a multi-position thermostat that lets you choose between various cooking temperatures. The lower position regulates the oil at around 170°C / 338°F, the higher position at 190°C / 374°F. The lower setting may be used when cooking delicate foods that do not stand up well under higher temperatures (mushrooms, some types of fish). The higher setting will provide excellent results when deep-frying chips, meat, prepared frozen foods, vegetables etc.
Put the foods in the basket in accordance with the maximum fill mark set forth in the instructions.
To get even better tasting food, we recommend filling to the half-way level rather than the maximum fill mark.
We recommend limiting the cooking temperature for potatoes to 170°C (338ºF).
• Let the fryer cool completely.
• Pour the oil into a separate container. This is a good time to strain the oil or replace it with new oil.
• Remove the filters and the lid from the fryer (see specific model instructions). The lid should be cleaned with hot soapy water and dried thoroughly. Some lids can be cleaned in a dishwasher (see specific model instructions).
• Change the filter (see specific model instructions).
• The removable bowl (on selected models) should be cleaned with hot soapy water and dried thoroughly. Do not use abrasives. Removable bowls are also dishwasher safe. Do not forget to drain your valve if it is equipped with a filtration system.
• Fixed bowls will need to be wiped out with paper towels to clean out as much oil residue as possible. Never immerse the fryer, cord or plug in water. You can place the fryer in a dry sink and fill the fryer halfway with water and a little washing up liquid. A non-abrasive sponge or kitchen brush can be used to scrub down the inside. Make sure the water does not overflow onto the outside of the fryer or over the heating element.
• Pour the water out and rinse just the inside, dry thoroughly.
• The outside of all fryers can be wiped down with a damp sponge. This is recommended after each use.
Regularly change the oil (8–10 uses).
Remove the burned particles at the bottom of the fryer (cooking residue) after each use in order to keep the oil in better condition for longer.
Regularly change (*according to model) or clean the filter: if this is not done, the filter will become clogged and prevent water from draining off during use.
Regularly clean your fryer according to the precautions for use in the instructions.
Put the used oil in an air-tight container and dispose of it (consult your local recycling service as waste collection and infrastructure differ from one region to another. The ability to process recyclables varies depending on the local recycling service).
Do not empty it in the sink.
Water and oil are not miscible: if they mix and overheat, the sudden evaporation of water can cause the oil to splatter.
If the fryer makes a noise, this indicates that there is water in it. The noise is caused by the water evaporating.
As soon as you hear these popping noises, please change the oil. If you do not change the oil, it may start to splatter.
‒ In semi-professional models, a safety device is activated if the fryer heats without oil.
• Leave the product to cool down.
• Use the RESET function on the base unit.
‒ Conventional cool wall fryers do not have a RESET function. Please take your product to one of our approved repair services.
• The lid is not properly closed, make sure it is properly locked.
For removable lids, make sure the hinges are properly sealed.
• The gasket may be damaged. Contact an Approved Service Centre to get a replacement.
The battery is flat. Replace it.
After following the instructions in the user manual for starting the appliance, make sure that your electrical socket is working by plugging another appliance. If it still does not work, do not try to dismantle or repair the appliance yourself, instead, take it to an approved repair centre
Do not use your appliance. To avoid any danger, have it replaced by an approved repair centre.
• Chips made with fresh potatoes:
— Put the fresh, uncooked chips in boiling water to remove the starch and stop them from sticking together.
— Dry them with a tea towel, then put them on to cook in the basket for 8 minutes. Take them out and wait for the fryer to reach the right temperature, then put the basket of cooked chips into the fryer for two or three minutes to brown them.
• For frozen chips, never add the chips directly to the basket or into the fryer. Remove as much ice as possible and dry them with a tea towel before putting them in the boiling oil.
• For other types of food to be evenly cooked, cut them into pieces that are not too large and the same size.
• Add the salt or seasoning to accompany the fried food at a distance from the fryer to avoid it falling inside.
Electric fryers are controlled by a thermostat which is designed to keep the oil at the right temperature to avoid it overheating and igniting, which makes them safer. Most deep fat fryers also feature a thermal safety cut-out system to stop it working if it gets too hot. Other safety features include viewing windows so the cooking food is visible, cool walls to keep the outsides from getting too hot, and locking lids that prevent oil from splashing out while cooking and reducing the risks of spills if a fryer is knocked.
Too much water may have collected in the oil.
It is essential to dry the food completely and remove any ice from frozen foods before cooking.
If there is too much water in the oil, the water will boil and force its way to the surface, making the oil spit.
Peanut oil has a lower smoking point than most vegetable oils, so it may slightly smoke at frying temperatures. It also imparts a slight flavour that may or may not be desirable.
Battered food should not be put into the basket directly. The batter will wrap around the basket coils and get stuck.
Water and oil are not miscible: if they mix and overheat, the sudden evaporation of water can cause the oil to splatter.
Always remove the excess water from foods before frying to ensure that the amount of water in the oil is kept to a minimum.
Never pour food (in particular frozen food) directly into the basket or over the fryer, as the ice will introduce water into the oil.
Do not cover the frying basket with the lid after use, as this can produce condensation in the fryer.
Do not allow condensation from the lid to drip into the fryer.
Never store or use the fryer outside, as this produces condensation.
The fryer should never operate with fat levels exceeding the maximum fill mark, because that will cause overflows.
Remove the excess fat using a ladle.
Your appliance contains valuable materials which can be recovered or recycled. Leave it at a local civic waste collection point.
Please go to the “Accessories” section of the website to easily find whatever you need for your product.
Find more detailed information in the Guarantee section of this website.
If you believe that one part is missing, please call Consumer Services Center and we will help you find a suitable solution.
-
Warranty
View the product warranty conditions
-
Contact
Our advisors are at your service.
S.A. SEB SELONGEY CEDEX • RC. DIJON B 302 412 226 • REF. 5066547
1 —
*
selon modèle, je nach Modell, niet op alle modellen aanwezig, a seconda del modello,
según modelo, conforme o modelo, bazı modellerde, afhængig af model, beroende på
modell, kun på noen modeller, mallista riippuen,
·Ó¿ÏÔÁ· Ì ÙÔ ÌÔÓÙ¤ÏÔ
, в зависимости от
модели
, w zależności od modelu,podle modelu, podl’a modelu, modelltől függően,
спорeд модeла
,
*

Min. 0,2 L
0,5 L
Max. 1 L
Min. 180 g
445 g
Max. 890 g
2 —
0,2 L 0,5 L
0,5 L 1 L
Max 600 g
300 g
Max 600 g
300 g
1
2
5 —
1 l 600 g 190° 9 — 10 min 190° 7 — 8 min
1 l 300 g 170° 5 — 6 min 170° 5 — 6 min
1 l 350 g 180° 14 — 15 min 190° 15 — 16 min
0,5 l 180 g 170° 4 — 5 min 190° 4 — 5 min
0,5 l 150 g 190° 1 min
— —
0,5 l 120 g 150° 4 — 5 min 190° 4 — 5 min
0,5 l 170 g 160° 4 — 5 min 190° 5 — 6 min
0,5 l 120 g 170° 8 — 9 min 190° 8 — 9 min
0,5 l 120 g 170° 5 — 6 min 190° 5 — 6 min
0,2 l 100 g 170° 3 — 4 min 190° 3 — 4 min
0,2 l 150g 170° 5 — 6 min 190° 5 — 6 min
0,2 l 120 g 170° 4 — 5 min 190° 4 — 5 min
0,2 l 160 g 170° 4 — 5 min 190° 5 — 6 min
2 h
OK

Protection de l’environnement
Votre appareil est prévu pour fonctionner durant de longues années. Toutefois, le jour où vous envisagez de
remplacer votre appareil, n’oubliez pas de penser à la contribution que vous pouvez apporter à la protection de
l’environnement.
Avant mise au rebut de votre appareil, la pile du minuteur doit être retirée et déposée dans un centre de collecte
spécialisé ou un centre de service agréé (selon modèle).
Les Centres de Services agréés vous reprendront vos appareils usagés afin de procéder à leur destruction dans le
respect des règles de l’environnement.
Consignes de sécurité
Cet appareil est conforme aux règles de sécurité et
conditions en vigueur ainsi qu’aux :
— Directive électromagnétique 89/336/CEE
modifiée par la directive 93/68/CEE.
— Directive Basse Tension 72/23/ CEE modifiée par
la directive 93/68/CEE.
• Vérifier que la tension du réseau correspond bien
à celle indiquée sur l’appareil (courant alternatif).
• Compte tenu de la diversité des normes en
vigueur, si l’appareil est utilisé dans un autre pays
que celui de l’achat, le faire vérifier par une station
service agréée.
• Utiliser une surface de travail stable, plane, à l’abri
des projections d’eau.
• Ne jamais laisser l’appareil fonctionner sans
surveillance. Ne pas le laisser à la portée des
enfants.
• Ne pas laisser pendre le cordon.
• Toujours brancher l’appareil sur une prise reliée à
la terre.
• N’utiliser pas de rallonge. Si vous en prenez la
responsabilité, n’utiliser qu’une rallonge en bon
état réliée à la terre et adaptée à la puissance de
l’appareil.
• Ne pas débrancher l’appareil en tirant sur le
cordon.
• Ne pas utiliser l’appareil si :
— celui-ci ou son cordon est défectueux,
— l’appareil est tombé et présente des
détériorations visibles ou des anomalies de
fonctionnement.
Dans ces cas, l’appareil doit être envoyé à une
Station de Service agréée la plus proche de votre
domicile. Ne démonter jamais l’appareil vousmême.
• Si le câble d’alimentation est endommagé, il doit
être remplacé par le fabricant, son service aprèsvente ou une personne de qualification similaire
afin d’éviter tout danger.
• Cet appareil électrique fonctionne à des
températures élevées qui peuvent provoquer des
brûlures. Malgré la haute protection thermique ne
touchez pas les surfaces chaudes de l’appareil
(filtre, hublot, parties métalliques apparentes…).
• Toujours débrancher l’appareil :
— aussitôt après utilisation,
— pour le déplacer,
— avant chaque entretien ou nettoyage.
• Ne jamais plonger l’appareil dans l’eau !
• Ne faites pas fonctionner l’appareil à proximité de
matériaux inflammables (stores, rideaux…), ni à
proximité d’une source de chaleur extérieure
(gazinière, plaque chauffante…).
• Ne pas déplacer l’appareil contenant des liquides
ou des aliments chauds.
• Cet appareil a été conçu pour un usage
domestique uniquement, toute utilisation
professionnelle, non appropriée ou non conforme
au mode d’emploi n’engage ni la responsabilité, ni
la garantie du constructeur.
• Respecter les quantités mini et maxi d’huile.
• Ne surcharger pas votre panier, respecter les
quantités limites de sécurité.
• Ne brancher jamais votre friteuse vide (sans
matière grasse).
• Les temps de cuisson sont donnés à titre indicatif.
• La matière grasse doit être filtrée régulièrement et
changée toutes les 8 à 12 utilisations.
• Ne mélanger pas plusieurs sortes de matières
grasses.
• Si vous utilisez une matière grasse solide,
coupez-la en morceaux et faites-la fondre à feux
doux dans un récipient à part puis versez-la
lentement dans la cuve. Ne jamais mettre la
matière grasse solide directement dans la cuve ou
le panier sinon l’appareil risque d’être détérioré.
• Si vous avez une cuve amovible, ne jamais la
retirer lorsque votre friteuse est en
fonctionnement.
• Si vous avez un filtre anti-odeur amovible, le
changer toutes les 10 à 15 utilisations (filtre
mousse) ou toutes les 30 à 40 utilisations
(cartouche avec témoin de saturation).
• Pour tout problème, contacter votre service aprèsvente ou l’adresse internet groupeseb.com.
• Nous vous recommandons de :
— Contrôler la cuisson : ne mangez pas de
nourriture brûlée ni rôtie mais dorée.
— Nettoyer votre huile après chaque utilisation pour
éviter que les résidus ne brûlent et changez la
régulièrement.
— Avoir un régime équilibré et varié comportant
beaucoup de fruits et de légumes.
• Pour une cuisson correcte et rapide, nous vous
recommandons de limiter la quantité de frites à
1/2 panier par bain.
3147•Consigne Sec.-M01 3/03/03 17:12 Page 1

Safety instructions
This appliance complies with the safety regulations
and conditions in effect, and with the following:
— Household appliance directive 89/336/CEE
modified by directive 93/68/CEE
— Low Voltage Directive 72/23/CEE modified by
directive 93/68/CEE.
• Check that the power supply voltage corresponds to
that shown on the appliance (alternating current).
• Given the diverse standards in effect, if the
appliance is used in a country other than that in
which it is purchased, have it checked by an
approved service centre.
• Use a flat and stable work surface, away from any
water splashes.
• Never leave the appliance in operation unattended.
Keep away from children.
• Do not leave the cord hanging.
• Always plug the appliance into an earthed socket.
• Do not use an extension lead. If you accept
liability for doing so, only use an extension lead
which is in good condition, has an earthed plug
and is suited to the power of the appliance.
• Do not unplug the appliance by pulling on the cord.
• Do not use the appliance if:
— the appliance or the cord is damaged.
— the appliance has fallen or shows visible
damage or does not work properly.
In the event of the above, the appliance must be
sent to an approved Service Centre. Do not take
the appliance apart yourself.
• If the power supply cable is damaged, it must be
replaced by the manufacturer, an authorised
service centre or a similarly qualified person in
order to avoid any danger.
• This electrical equipment operates at high
temperatures which may cause burns. Despite the
high heat protection, do not touch the apparent
metal parts, filter or window…
• Always unplug the appliance:
— immediately after use,
— when moving it,
— prior to any cleaning or maintenance.
• Never immerse the appliance in water !
• Do not switch on the appliance near to flammable
materials (blinds, curtains…) or close to an
external heat source (gas stove, hot plate etc.).
• Do not move the appliance when it is full of
liquids or hot foods.
• This appliance is designed for domestic use only.
In case of professional use, inappropriate use or
failure to comply with the instructions, the
manufacturer accepts no responsibility and the
guarantee does not apply.
• The oil level must always be between the min and
max markers.
• Do not overfill the basket, never exceed the
maximum capacity.
• Never plug in the deep fryer without oil or fat inside.
• Cooking times are given as an indication only.
• The oil must be filtered regularly and changed
after every 8 — 12 uses.
• Do not mix different types of oil.
• If you use solid vegetable fat, cut it into pieces
and melt it over a slow heat in a separate pan
beforehand, then slowly pour it into the deep fryer
bowl. Never put fat directly into the deep fryer
bowl or fryer basket as this will lead to
deterioration of the appliance.
• If you have a removable bowl, never take it out
when the fryer is switched on.
• If you have a removable anti-odour filter, change it
after every 10 — 15 uses (foam filter) or after 30 40 uses (cartridge with saturation indicator).
• For any problems contact our after sales services
or our internet site groupeseb.com.
• We recommend you to:
— Control the cooking: neither eat brown nor
roasted but golden food.
— Clean your oil after every use to avoid that
residues burn and change it regularly.
— Eat a balanced and varied diet which includes
plenty of fruits and vegetables.
• For a good and fast cooking, we recommend you
to limit the quantity of chips at 1/2 basket per
bath.
Wiring instructions UK only
WARNING:
This appliance must be earthed.
Important: the wires in this cord are coloured in
accordance with the following codes:
Green and Yellow: Earth
Blue: Neutral
Brown: Live
Connect the Green/Yellow wire to the terminal in the
plug marked “E” (or by the earth symbol) or coloured
Green or coloured Green and Yellow. Connect the
Brown wire to the terminal in the plug marked “L” or
coloured Red. Connect the Blue wire to the terminal
in the plug marked “N” or coloured Black. A 13 amp
fuse should be fitted when the appliance is connected
to a BS 1363 plug. Seek professional advice if you
are unsure of the correct procedure for the above.
Voltage
This appliance is designed to run on 230 — 240 volts
AC only. Check that the mains supply corresponds to
that shown on the rating plate of the appliance. If the
appliance is to be used in any country other than that of
purchase, it should be checked by an approved Service
Dealer. Standards can vary from country to country.
About your factory fitted plug
(supplied with certain models only)
The cord is already fitted with a plug incorporating a
13 amp fuse. If the plug does not fit your socket
outlet, see next paragraph.
Should you need to replace the fuse in the plug supplied,
a 13 amp approved BS 1362 fuse must be used.
The fuse cover is an important part of the plug.
Please ensure that it is always refitted. If you lose this
cover please do not use the plug.
If the plug supplied does not fit your socket outlet, it
should be removed from the mains cord and disposed
of safely. The flexible cord insulation should be
stripped back as appropriate and a suitable alternative
plug fitted. The replacement plug must be equipped
with a 13 amp fuse.
Important: If the electrical cord of this appliance is
damaged, it must only be replaced by an authorised
Service Dealer. The safety of this appliance complies
with the technical regulations and standards in force.
3147•Consigne Sec.-M01 3/03/03 17:12 Page 2
Loading…
15
E
NG
Read and follow carefully the instructions for use.
Protection of the environment
•Your appliance has been designed to work for many years. However, when finally you
decide to replace your deep fryer, do not forget to think of what you can do to help to
protect the environment by disposing of it at your local waste disposal centre.
•This appliance complies with current safety
regulations and requirements as well as
directives:
— 89/336/CEE modified by 93/68/CEE
— 73/23/CEE modified by 93/68/CEE
•This electrical appliance operates at high
temperatures which may cause burns.
Despite the high heat protection of the deep
fryer, do not touch the apparent metal parts.
•Do not leave the appliance switched on
while unattended.
•The basket handle may become hot after
prolonged use.
•Use and store it out of children’s reach.
•Never insert any object between the
removable body and the bottom of the
equipment.
•Always plug in the appliance at an earthed
power socket.
•Do not use an extension lead. If you accept
liability for doing so, only use an extension
lead which is in good condition, has an
earthed plug, and is suited to the power of
the equipment.
•Check that the mains voltage corresponds
with that shown on the appliance
(alternating current only).
•If the appliance is used in a country other
than that of purchase, have it checked by an
Approved Service Centre.
•Never use or plug in your appliance if:
— its power cord is faulty or damaged,
— the appliance has been dropped,
— it has visible damage or operating faults.
In such cases, to avoid any danger contact
our Approved Service Centre to have the
appliance repaired, as special tools are
needed. Never dismantle the appliance
yourself. This will negate the guarantee.
•If the power cord is damaged, it must be
replaced by an authorised service centre, in
order to avoid any danger.
•In the event of fire, never try to extinguish
the flames with water. Close the lid. Smother
the flames with a damp cloth.
•Do not switch on the appliance near to
inflammable materials (blinds, curtains, etc.)
or close to an external heat source (gas
stove, hotplate, etc.)
•Before plugging the fryer into the mains,
insert the connector to the back of the
electrical base.
•Never immerse the electrical base and cord
in water.
•This product has been designed for
domestic use only. Any commercial use,
inappropriate use or failure to comply with
the instructions, the manufacturer accepts
no responsibility and the guarantee will not
apply.
Important: if the electrical cord of this
appliance is damaged, it must only be
replaced by an authorised Service Dealer. The
safety of this appliance complies with the
technical regulations and standards in force.
•If you have any product problems or
queries, please contact our Customer
Relations Team first for expert help and
advice.
H
ELPLINE:
0845 602 1454 — UK
(01) 4751947 — Ireland
or consult our website — www.tefal.co.uk
Safety instructions

S.A.S. SEB SELONGEY CEDEX • RC. DIJON B 302 412 226 • REF. 5068417
FR Participons à la protection de l’environnement !
Votre appareil contient de nombreux matériaux valorisables
ou recyclables.
Confiez celui-ci dans un point de collecte ou à défaut dans un
centre service agréé pour que son traitement soit effectué.
GB-IE Environnement protection first !
Your appliance contains valuable materials which can be
recovered or recycled.
Leave it at a collection point.
BE Participons à la protection de l’environnement !
Votre appareil contient de nombreux matériaux valorisables
ou recyclables.
Confiez celui-ci dans un point de collecte ou à défaut dans un
centre service agréé pour que son traitement soit effectué.
Samen het milieu beschermen !
Uw toestel bevat meerdere recycleerbare materialen
Breng deze naar een containerpark of naar een erkend service
center, bevoegd voor de recyclage.
NL Wees vriendelijk voor het milieu !
Uw apparaat bevat materialen die geschikt zijn voor
hergebruik.
Lever het in bij het milieustation in uw gemeente of bij onze
technische dienst.
DE—AT Denken Sie an den Schutz der Umwelt !
Ihr Gerät enthält wertvolle Rohstoffe, die wieder verwertet
werden können.
Geben Sie Ihr Gerät deshalb bitte bei einer Sammelstelle Ihrer
Stadt oder Gemeinde ab.
S.A.S. SEB SELONGEY CEDEX RC. DIJON B 302 412 226 REF. 5068417
FR Participons la protection de lenvironnement !
Votre appareil contient de nombreux matriaux valorisables ou recyclables.
Confiez celui-ci dans un point de collecte ou dfaut dans un centre service agr pour que son traitement soit effectu.
GB-IE Environnement protection first !
Your appliance contains valuable materials which can be recovered or recycled.
Leave it at a collection point.
BE Participons la protection de lenvironnement !
Votre appareil contient de nombreux matriaux valorisables ou recyclables.
Confiez celui-ci dans un point de collecte ou dfaut dans un centre service agr pour que son traitement soit effectu.
Samen het milieu beschermen !
Uw toestel bevat meerdere recycleerbare materialen Breng deze naar een containerpark of naar een erkend service
center, bevoegd voor de recyclage.
NL Wees vriendelijk voor het milieu !
Uw apparaat bevat materialen die geschikt zijn voor hergebruik.
Lever het in bij het milieustation in uw gemeente of bij onze technische dienst.
DE-AT Denken Sie an den Schutz der Umwelt !
Ihr Gert enthlt wertvolle Rohstoffe, die wieder verwertet werden knnen.
Geben Sie Ihr Gert deshalb bitte bei einer Sammelstelle Ihrer Stadt oder Gemeinde ab.
www.groupeseb.com
Friteuse Fryer Fritteuse Mode demploi Instructions for use Gebruiksaanwijzing Gebrauchsanweisung
English . . . . . . . . . . . . . . . . . . . . 14
Description . . . . . . . . . . . . . . . . . . . . . .14 Protection of the environment . . . . . . .15 Safety instructions . . . . . . . . . . . . . . . .15 Helpline . . . . . . . . . . . . . . . . . . . . . . . . .15 Before first use . . . . . . . . . . . . . . . . . . .16 Preparation for use . . . . . . . . . . . . . . . .17
Cooking . . . . . . . . . . . . . . . . . . . . . . . . .19 Table of cooking times . . . . . . . . . . . . .20 Some recipes . . . . . . . . . . . . . . . . . . . .21 Maintenance . . . . . . . . . . . . . . . . . . . . .22 Practical advices in case of difficulties . . . . . . . . . . . . . . .25
Nederlands . . . . . . . . . . . . . . 26
Beschrijving van het apparaat . . . . . .26 Bescherming van het milieu . . . . . . . .27 Veiligheidsvoorschriften . . . . . . . . . . . .27 Vr het eerste gebruik . . . . . . . . . . . 28 Voorbereiding . . . . . . . . . . . . . . . . . . . .29 Het voedsel voorbereiden . . . . . . . . . .30
Het frituren . . . . . . . . . . . . . . . . . . . . . .31 Frituurtabellen . . . . . . . . . . . . . . . . . . . .32 Enkele recepten . . . . . . . . . . . . . . . . . .33 Onderhoud . . . . . . . . . . . . . . . . . . . . . .34 Advies in geval van problemen . . . . . .37
Francais . . . . . . . . . . . . . . . . . . . 2
Description . . . . . . . . . . . . . . . . . . . . . . .2 Protection de lenvironnement . . . . . . .3 Consignes de Scurit . . . . . . . . . . . . . .3 Avant la premire utilisation . . . . . . . . . 4 Prparation . . . . . . . . . . . . . . . . . . . . . . .5 Cuisson . . . . . . . . . . . . . . . . . . . . . . . . . .7
Tableaux de cuisson . . . . . . . . . . . . . . . .8 Quelques recettes . . . . . . . . . . . . . . . . .9 Entretien . . . . . . . . . . . . . . . . . . . . . . . .10 Conseils pratiques en cas de difficults . . . . . . . . . . . . . . .13
Deutsch . . . . . . . . . . . . . . . . . . 38
Gertebeschreibung . . . . . . . . . . . . . .38 Hinweise zum Umweltschutz . . . . . . . .39 Sicherheitshinweise . . . . . . . . . . . . . . .39 Vor dem ersten Gebrauch . . . . . . . . . . 40 Vorbereitung . . . . . . . . . . . . . . . . . . . . .41 Frittierzeiten . . . . . . . . . . . . . . . . . . . . .43
Frittiertabelle . . . . . . . . . . . . . . . . . . . . .44 Einige Rezepte . . . . . . . . . . . . . . . . . . .45 Pflege . . . . . . . . . . . . . . . . . . . . . . . . . .46 Praktische Ratschlge im Fall von Problemen . . . . . . . . . . . .49
1
3
5
2
4
6
8
7
9
11
10
12
14
16
18
19
20
21
13
15
17
F Description
Filtration, vidange et stockage automatique de lhuile SNACK OLEOCLEAN est quip dun systme exclusif et brevet de filtration et de vidange automatique, adapt tous les types de matires grasses alimentaires. La vidange de lhuile est automatique et totalement scuritaire. Grce la filtration automatique, votre matire grasse est propre et dure plus longtemps
pour une friture plus saine. Dbarrasse des rsidus de friture, elle dgage moins dodeurs.
Le stockage de votre matire grasse dans le bac huile OIL BOX vous permet de prserver le got de vos aliments (frites, poisson, beignets) et de ne pas mlanger les saveurs.
Nettoyage ultra facile SNACK OLEOCLEAN est facile manipuler et dmonter. Toutes les pices passent au lave-vaisselle lexception de la base lectrique et du
cordon. Grce la filtration et au stockage de lhuile, SNACK OLEOCLEAN est vide de son huile
et passe compltement au lave vaisselle aprs chaque cuisson. Propre comme neuve aprs chaque utilisation.
Niveau dhuile variable SNACK OLEOCLEAN est idale pour varier les plaisirs. Utilisez la juste quantit dhuile pour chacune de vos prparations. Vous pouvez lutiliser comme une pole frire avec un volume dhuile situ entre 0,2 l et
0,5 l et en friteuse avec un volume situ entre 0,5 l et 1 l.
1. Bouchon de filtre 2. Filtre anti-odeur lavable 3. Couvercle 4. Poigne douverture du
couvercle 5. Panier 6. Poigne du panier 7. Patte daccrochage du panier
en position haute 8. Friteuse avec cuve anti-
adhsive 9. Repres du remplissage de
cuve : 0,2 l / 0,5 l / 1 l 10. Poigne de transport 11. Grille fixe de filtration de la
matire grasse
12. Bouton douverture du couvercle
13. Voyant de temprature 14. Base lectrique de
commande 15. Thermostat lectronique /
interrupteur. 16. Minuteur (selon modle) 17. Cordon amovible
OIL BOX 18. Couvercle 19. Bac huile 20. Axe de vidange 21. Poignes de transport
Lisez le mode demploi et suivez attentivement les instructions dutilisation.
3
FProtection de lenvironnement Votre appareil est prvu pour fonctionner durant de longues annes. Toutefois, le
jour o vous envisagerez de remplacer votre friteuse, noubliez pas de penser la contribution que vous pouvez apporter la protection de lenvironnement.
Avant mise au rebut de votre friteuse, la pile du minuteur doit tre retire par un Centre Service agr.
Les Centres de Services agrs vous reprendront vos appareils usags afin de procder leur destruction dans le respect des rgles de lenvironnement.
Cet appareil est conforme aux rgles de scurit et conditions en vigueur ainsi quaux Directives : — 89/336/CEE modifie par 92/61/CEE. — 73/23/ CEE modifie par 93/68/CEE.
Vrifier que la tension du rseau correspond bien celle indique sur lappareil (courant alternatif).
Compte tenu de la diversit des normes en vigueur, si lappareil est utilis dans un autre pays que celui de lachat, le faire vrifier par une station service agre.
Utiliser une surface de travail stable, plane, labri des projections deau.
Ne jamais laisser lappareil fonctionner sans surveillance. Ne pas le laisser la porte des enfants.
Ne pas laisser pendre le cordon. Toujours brancher lappareil sur une prise
relie la terre. Insrer le cordon amovible sur la base
lectrique de commande avant de brancher lappareil la prise murale.
Ne pas dbrancher lappareil en tirant sur le cordon.
Ne pas utiliser lappareil si : — celui-ci ou son cordon est dfectueux, — lappareil est tomb et prsente des dtriorations visibles ou des anomalies de fonctionnement. Dans ce cas, lappareil doit tre envoy une Station de Service agre la plus proche de votre domicile.
Cet appareil fonctionne des tempratures leves qui peuvent provoquer des brlures. Malgr la haute protection thermique ne touchez pas les surfaces chaudes de lappareil (filtre, hublot).
Si le cble dalimentation est endommag, il doit tre remplac par le fabricant, son service aprs-vente ou une personne de qualification similaire afin dviter tout danger.
Toujours dbrancher lappareil : — aussitt aprs utilisation, — pour le dplacer, — avant chaque entretien ou nettoyage.
Ne jamais plonger la base lectrique et le cordon dans leau !
Ne pas dplacer lappareil contenant des liquides ou des aliments chauds.
Ne tentez jamais de retirer la friteuse de la base lectrique lorsquelle est en fonctionnement.
Cet appareil a t conu pour un usage domestique uniquement, toute utilisation professionnelle, non approprie ou non conforme au mode demploi nengage ni la responsabilit, ni la garantie du constructeur.
Consignes de scurit
4
F
1
2
Avant la premire utilisation
Dmontage Ouvrez le couvercle en appuyant sur le
bouton douverture puis soulevez-le laide de sa poigne.
Retirez le couvercle. Retirez le panier.
Nettoyage Nettoyez toutes les pices (sauf la base
lectrique et le cordon). Le bac huile, la friteuse, le couvercle, le panier et sa poigne passent au lave vaisselle ou peuvent tre nettoys avec une ponge non-abrasive et du liquide vaisselle.
Schez.
Mettez en place le couvercle. Enlevez le bouchon de filtre. Placez le filtre. Replacez le bouchon de filtre.
Placez la friteuse sur la base lectrique de commande.
1 2
Aprs chaque nettoyage, appuyez sur le bouton rouge situ sous la friteuse afin de laisser chapper l’eau reste dans la cuve.
clic !
1 2 3
Nimmergez jamais la base lectrique et le cordon.
Dballage Dballez lappareil et enlevez tous les autocollants.
Assemblez la poigne du panier et le panier.
OK
5
FPrparation
1 L
0,2 L
Utilisation de matire grasse Remplissez la cuve de matire grasse. Utilisez une matire grasse alimentaire
liquide recommande pour la friture : tournesol, arachide, olive, ppin de raisin, palme
Si vous utilisez une matire grasse solide : — coupez-la en morceaux et faites-la fondre dans la friteuse une temprature de 150C, — ne faites jamais fondre la matire grasse solide dans le panier.
Suivez les recommandations du fabricant pour la temprature de cuisson.
Vous avez la possibilit dajuster le niveau dhuile de 0,2 l 1 l en fonction des aliments (voir tableau de cuisson p. 8).
Ne mlangez pas diffrentes natures de matire grasse.
Respectez les niveaux mini (0,2 l) et maxi (1 l) . Vrifiez avant chaque cuisson et rectifiez si ncessaire.
N’utilisez pas le panier avec un niveau d’huile infrieur 0,5 l.
Prchauffez Fermez le couvercle. Placer le cordon amovible sur la base
lectrique. Branchez.
Rglez le thermostat sur la position correspondant votre prparation (voir tableau page 8).
La friteuse est en chauffe et le voyant de temprature est allum.
Ne branchez pas la friteuse quand elle est sans matire grasse.
Ne laissez pas la friteuse sans surveillance.
Volume dhuile Matire grasse solide
1 l 890 g
0,5 l 445 g
0,2 l 180 g
Placez la friteuse : — sur un plan stable, — labri des projections deau ou dune source de chaleur, — hors de porte des enfants.
6
F
1
2
3
Prparation Prparez le panier Essuyez les aliments. Garnissez le panier. Rduisez les quantits pour les surgels.
Plongez le panier Lorsque lhuile a atteint la bonne
temprature, le voyant lumineux steint.
Ouvrez le couvercle et placez le panier en position haute.
Refermez le couvercle. Descendez lentement le panier dans la
cuve.
Le minuteur signale la fin du temps de cuisson mais narrte pas lappareil.
Rglez le temps de cuisson (selon modle) Appuyez sur le bouton du minuteur
pour rgler le temps minute par minute. Relchez. Le temps slectionn (en
minutes) saffiche et le dcompte commence.
En cas derreur ou pour effacer le temps slectionn, maintenez le bouton enfonc pendant 2 secondes .
Pour arrter la sonnerie, appuyez sur le bouton.
Retirez la glace des surgels et schez bien les aliments.Frites fraches ou surgeles
Quantit limite de scurit 600 g Quantit maximale recommande 300 g
Coupez les aliments de la mme taille pour quils cuisent de faon homogne. Evitez les morceaux trop pais.
Pour une deuxime cuisson Rectifiez le niveau de matire grasse si
ncessaire. Attendez que la temprature soit
atteinte.
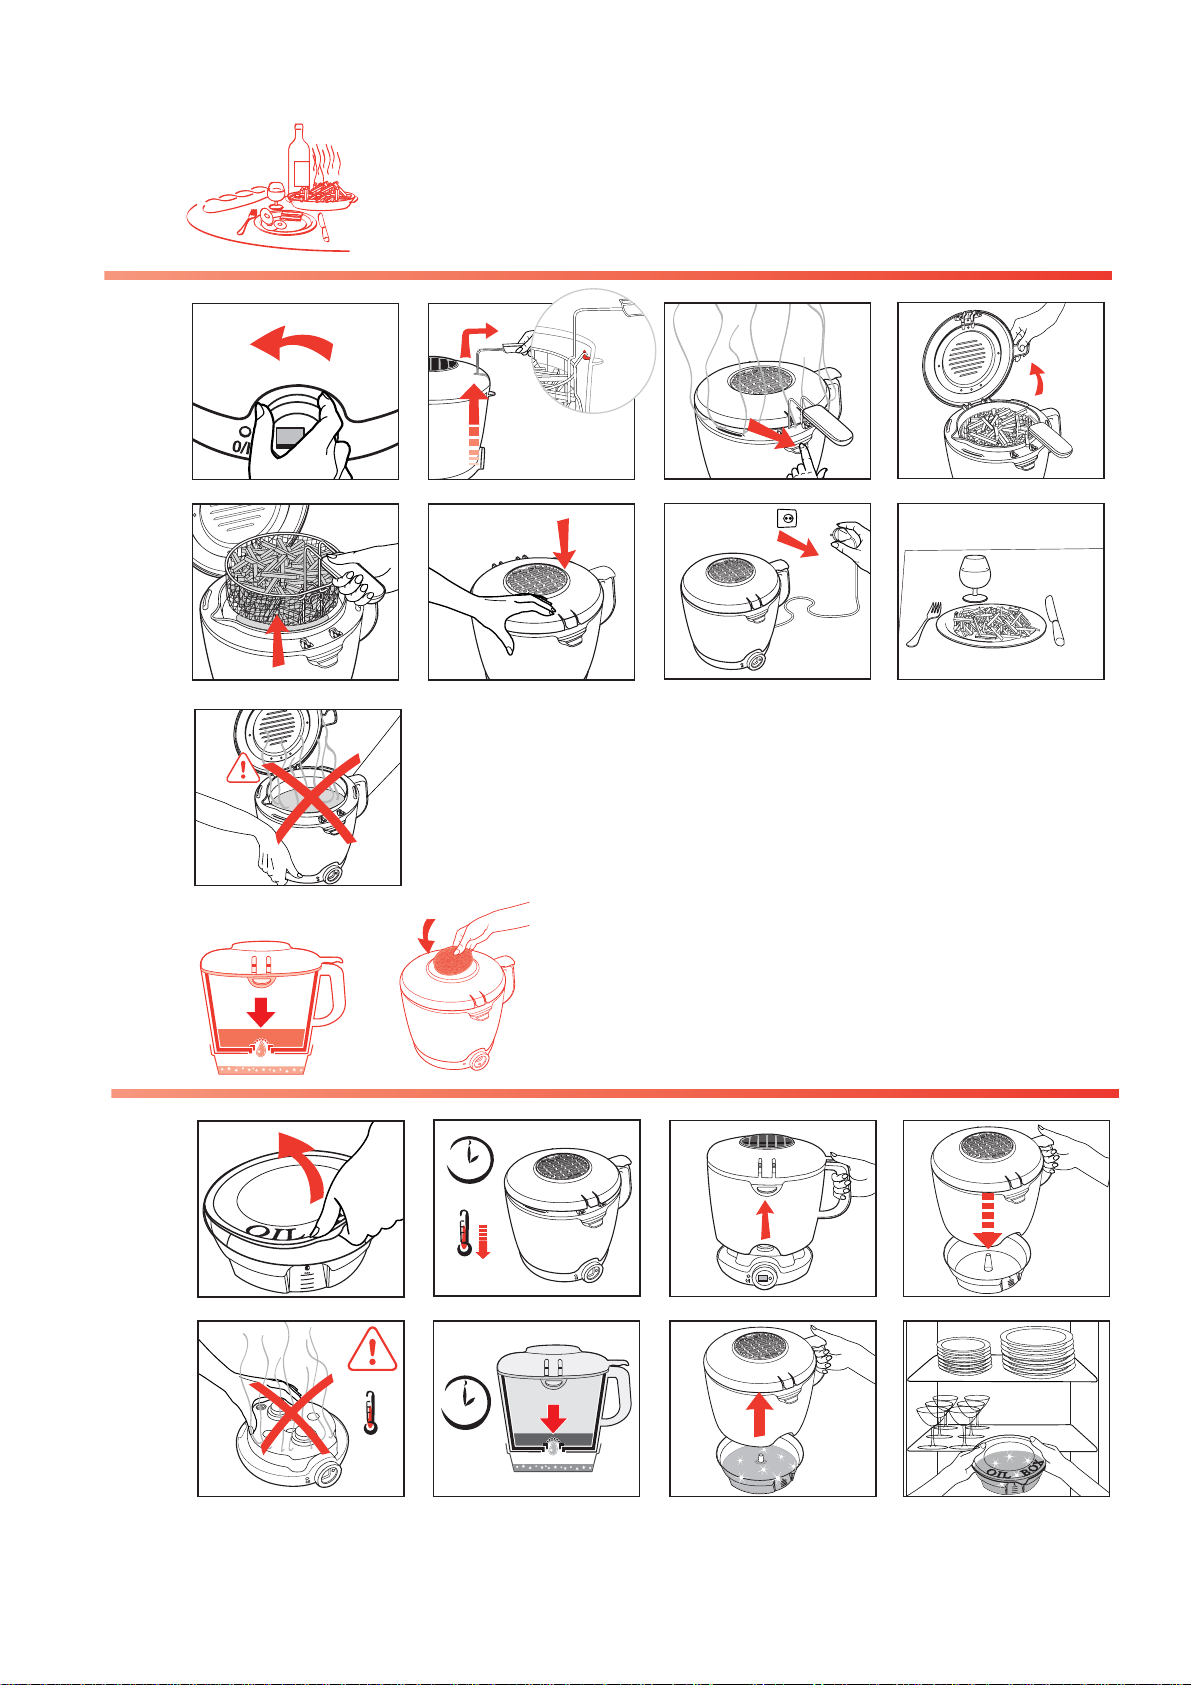
Retirez les aliments Remontez le panier en le plaant en
position haute.
Dverrouillez le couvercle en appuyant sur le bouton douverture pour laisser chapper la vapeur.
Soulevez le couvercle laide de la poigne douverture.
Sortez le panier. Refermez le couvercle. Servez.
7
FCuisson Attention : Ne placez pas la main au-dessus du filtre. La vapeur dgage en cours de cuisson est brlante.
Ne mlangez pas diffrentes natures de matire grasse.
Arrtez lappareil La dernire friture termine, placez le
thermostat lectronique / interrupteur sur la position O/I.
Dbranchez lappareil. Pour dplacer la friteuse, utilisez la
poigne prvue cet effet. Pour vidanger et filtrer la matire grasse
reportez-vous au chapitre Entretien.
Ne dplacez jamais la friteuse avec de la matire grasse chaude ou avec le couvercle ouvert.
Surveillez la cuisson En cours de cuisson, il est normal que
le voyant de temprature sallume et steigne.
1
2 Pour avoir des fritures bien croustillantes, ouvrez le couvercle aprs gouttage. Salez et poivrez en dehors de la friteuse pour prserver la matire grasse.
1
2
3
8
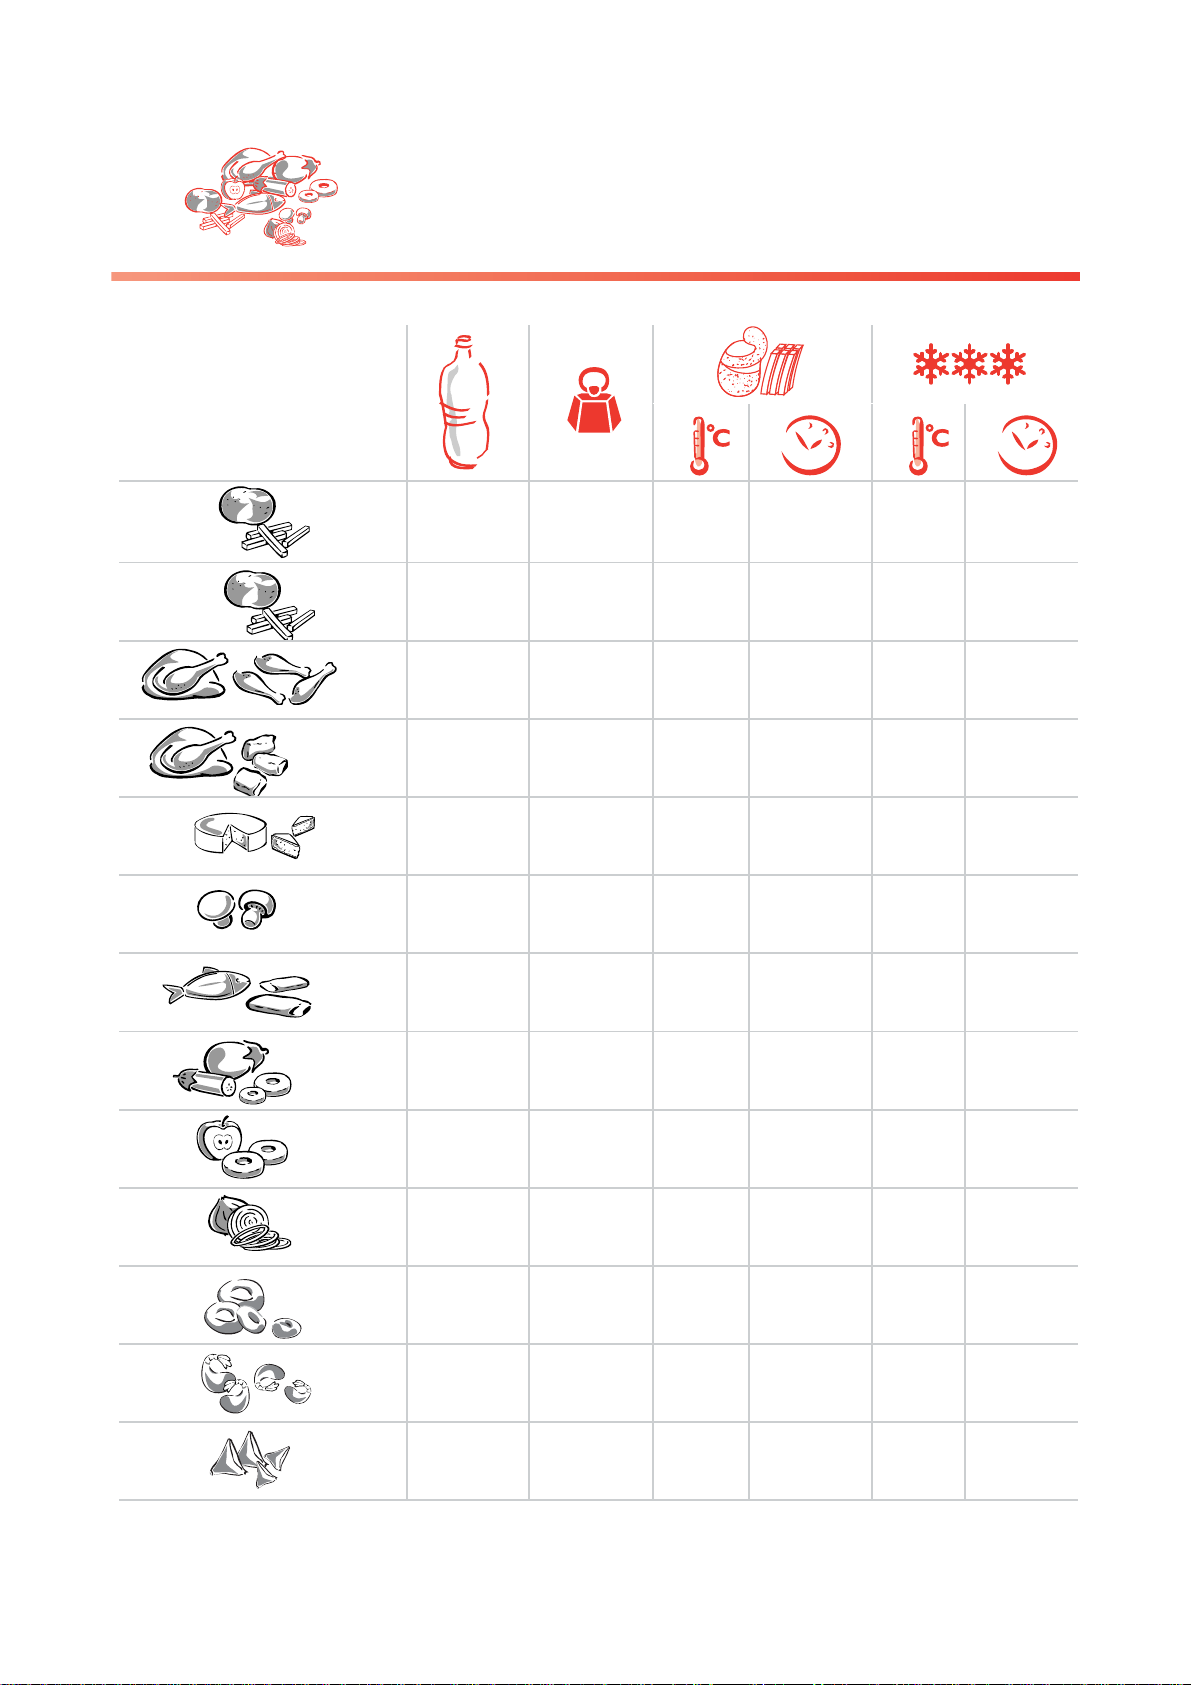
F Cuisson Tableaux de cuisson
Les temps de cuisson, la temprature slectionne et la quantit de matire grasse sont donns titre indicatif, ils peuvent varier en fonction des quantits, de la taille des morceaux et du got de chacun.
Quantit Aliments frais Aliments surgels
Frites (Quantit limite de scurit) 1 l 600 g 190C 11 — 13 min 190C 12 — 14 min
Frites (Quantit max. recommande) 1 l 300 g 170C 8 — 10 min 170C 9 — 11 min
Frites 1 l 150 g 170C 6 — 7 min 170C 5 — 6 min
Pilons de Poulet 1 l 350 g 180C 14 — 15 min 190C 15 — 16 min
Nuggets de volailles 0,5 l 6 — 7 p 170C 4 — 5 min 190C 4 — 5 min
Nuggets de poissons 0,5 l 6 — 7 p 170C 4 — 5 min 190C 4 — 5 min
Camembert frit 0,5 l 150 g 190C 1 min — — Champignons frits 0,5 l 120 g 150C 4 — 5 min 190C 4 — 5 min
Poisson pan (cabillaud) 0,5 l 170 g 160C 4 — 5 min 190C 5 — 6 min
Beignets de lgumes (courgettes) 0,5 l 120 g 170C 8 — 9 min 190C 8 — 9 min
Tempura 0,5 l 210 g 190C 2 — 3 min 190C 4 — 5 min
Beignets de fruits (pommes) 0,5 l 120 g 170C 5 — 6 min 190C 5 — 6 min
Acras 0,5 l 180 g 170C 6 — 7 min 190C 4 — 5 min
Nems 0,5 l 200 g 170C 4 — 5 min 190C 5 — 6 min
Oignons frits 0,2 l 100 g 170C 3 — 4 min 190C 3 — 4 min
Beignets de calamars 0,2 l 5 — 6 p 170C 5 — 6 min 190C 5 — 6 min
Beignets de crevettes 0,2 l 5 — 6 p 170C 4 — 5 min 190C 4 — 5 min
Samosas de poulet / lgumes 0,2 l 4 p 170C 4 — 5 min 190C 5 — 6 min
Btonnets de mozzarella 0,2 l 5 — 6 p 190C 40 — 50 sec — —
Nous vous recommandons de : — limiter la temprature de cuisson 170C spcialement pour les pommes de terre, — utiliser le panier pour cuire les frites, — contrler la cuisson : ne pas manger les aliments frits lorsquils sont brls et prfrer une friture lgrement dore, — filtrer l’huile aprs chaque utilisation pour viter que les rsidus ne brlent et la changer rgulirement, — avoir un rgime quilibr et vari comportant au moins 5 fruits et lgumes par jour, — stocker les pommes de terre au-dessus de 8C. La plonge d’un panier plein fait baisser trs rapidement la temprature de l’huile. Lors de la cuisson, celle- ci ne dpasse jamais 175C mme si le thermostat est rgl sur 190C (= temprature stabilise avant plonge).
Prparation 1 Battez l’oeuf, incorporez leau glace puis la farine. Cette
pte est liquide, c’est ce qui la rend plus lgre. Trempez les lgumes ou le poisson.
2 Faites-les frire 190C rapidement pendant que la pte est froide.
Ide Vous pouvez utiliser d’autres types de farine. Trempez-les dans de la sauce de soja assaisonne de radis noir et de gingembre.
Tempura Ingrdients 1 oeuf, 40 cl deau glace, 250 g de farine de bl complet, Lgumes : brocoli, chou-fleur, poivron, oignon, courgette, aubergine ou tout type de filet de poisson et crevette.
2 3 minutes 0,5 l
0,2 l
0,5 l
9
F
La friture permet de varier les plaisirs. Les aliments peuvent tre frits naturellement, avec panure ou enrobage.
Quelques recettes
Prparation 1 Battez les oeufs puis incorporez le lait. 2 Dcoupez la mozzarella en btonnets. Roulez chaque
btonnet dans la farine. Puis plongez-les dans la prparation. Enrobez-les de chapelure.
3 Faites-les frire 190C.
Ide Chaque btonnet peut tre envelopp avec du jambon prosciutto avant lenrobage. Vous pouvez galement enrober tous types de fromage (camembert, brie)
Btonnets de Mozzarella Ingrdients 250 g de mozzarella, 2 oeufs, 10 cl de lait, Farine pour lenrobage, 500 g de chapelure assaisonne avec 1/2 cuillre caf de : romarin, basilic, sel et poivre.
Prparation 1 Battez les ufs, ajoutez le sucre, le jus de pomme, les
pices puis la farine. 2 Pelez, videz et dcoupez les pommes en huit morceaux.
Plongez plusieurs morceaux dans la pte. 3 Faites-les frire un par un 180C.
Ide Saupoudrez de sucre ou de cannelle juste aprs cuisson. Pour les adultes, ajoutez un verre de Calvados dans la pte. Vous pouvez galement faire des beignets avec toutes sortes de fruits (ananas, bananes, poires)
Beignets de pommes Ingrdients 2 ufs, 125 g de sucre, 1 cuillre caf de levure chimique, 15 cl de jus de pomme, 1/2 cuillre caf de cannelle, 1/4 cuillre caf de macis ou de muscade, 250 g de farine, 3 4 pommes.
20 30 secondes
2 3 minutes
Filtrez la matire grasse Pour votre scurit, le produit assure automatiquement la filtration de toutes les matires grasses (liquides ou solides).
Une fois la friture termine, laissez refroidir la matire grasse environ 2 heures.
Retirez le couvercle du bac huile OIL BOX.
Retirez la friteuse de sa base lectrique de commande.
Placez la friteuse sur le bac huile en veillant bien engager la friteuse sur laxe de vidange. La filtration dure environ 1 heure.
10
F Entretien Assurez-vous que le bac huile est vide avant de vidanger la cuve.
Si vous utilisez de la matire grasse solide, n’attendez pas quelle commence figer pour placer la friteuse sur le bac huile.
Ne mettez jamais votre main sous la friteuse ou sur la base lectrique car elles sont encore trs chaudes.
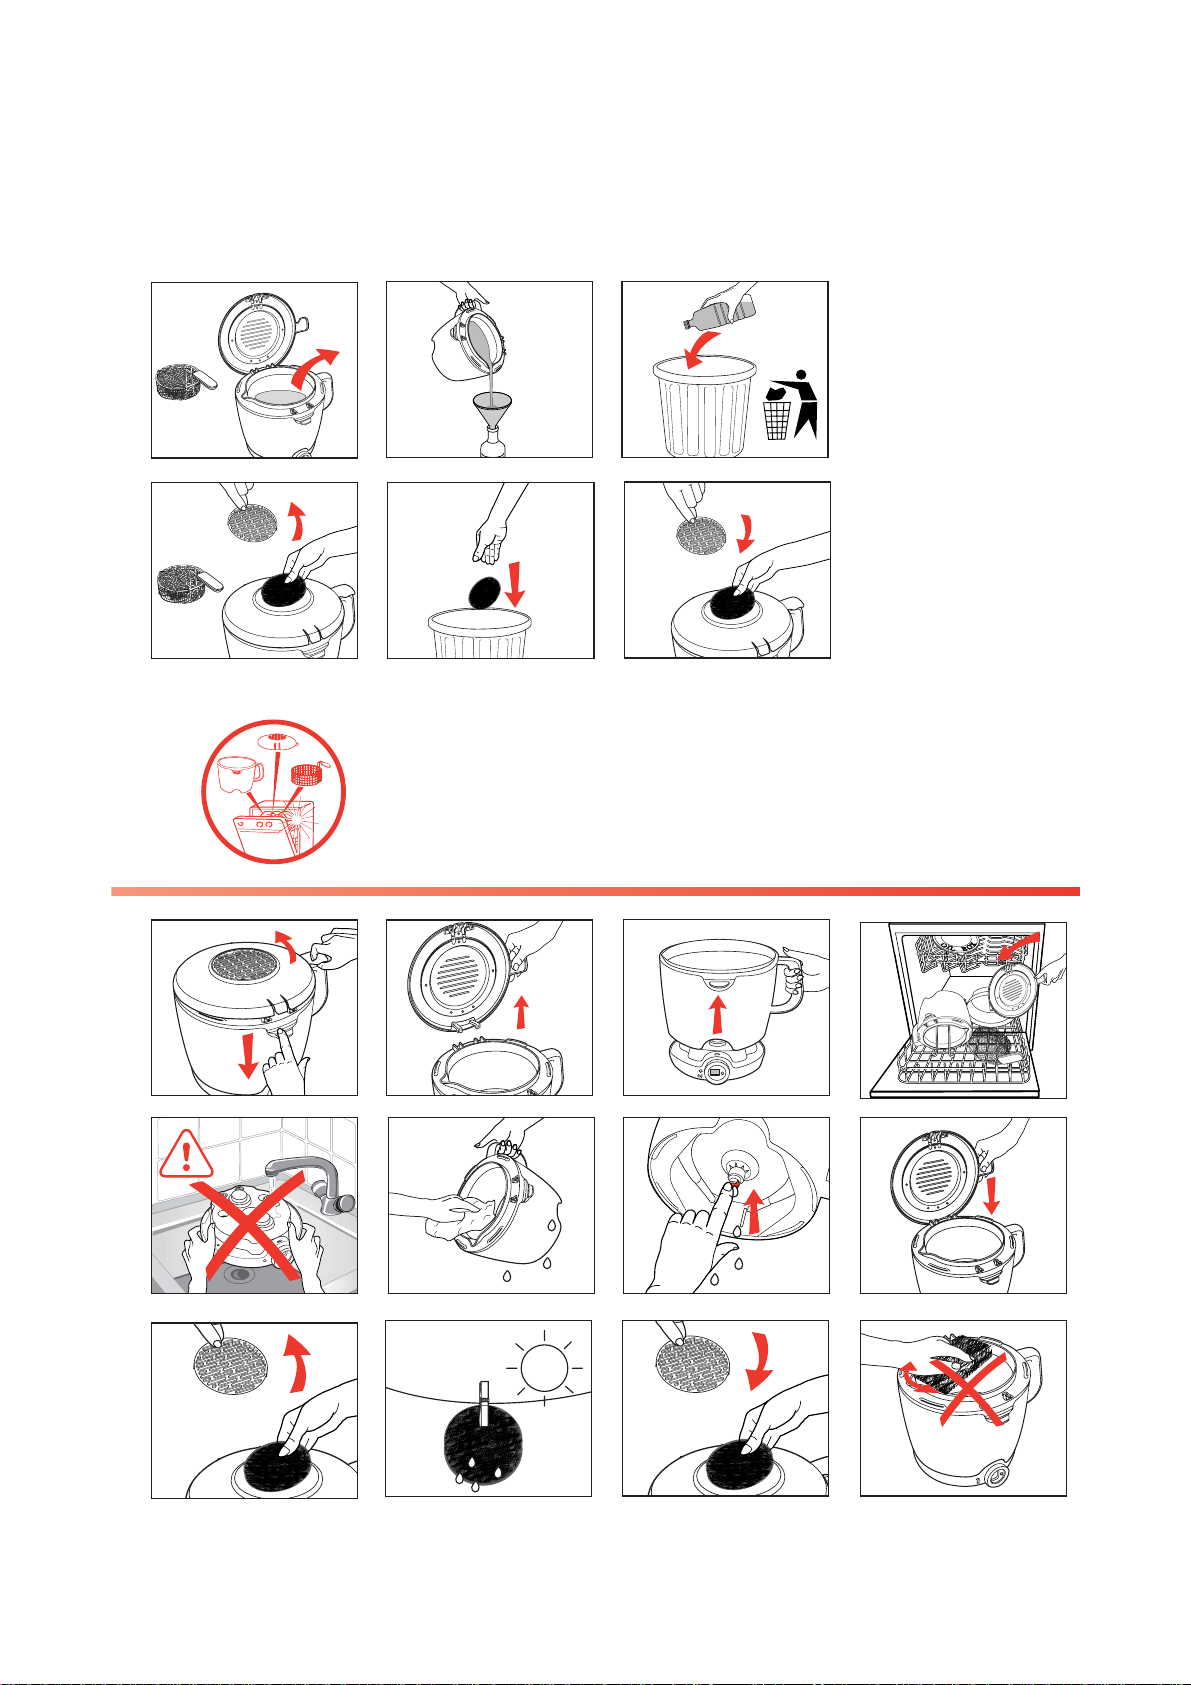
Filtrez la matire grasse aprs chaque friture. Les dbris qui se dtachent des aliments ont tendance brler et entranent une altration plus rapide du corps gras, et la longue des risques dinflammation.Stockez le bac huile
Retirez la friteuse du bac huile OIL BOX aprs vous tre assur que la matire grasse a t compltement vide. La matire grasse est filtre et prte tre rutilise.
Replacez le couvercle du bac huile OIL BOX.
Transportez le bac huile laide des poignes.
Rangez-le dans un endroit sec, tempr et labri de la lumire.
11
F
Nettoyez la friteuse SNACK OLEOCLEAN, propre comme
neuve aprs chaque utilisation. Elle se nettoie compltement et trs
facilement aprs chaque cuisson.
Vous pouvez mettre tous les lments au lave-vaisselle lexception de la base lectrique et du cordon. Vous pouvez galement les nettoyer avec une ponge non abrasive et du liquide vaisselle.
Pour une meilleure filtration des odeurs, nous vous recommandons de retirer le filtre anti-odeur du couvercle et de le laver seul.
Aprs chaque nettoyage, appuyez sur le bouton rouge situ sous la friteuse afin de laisser chapper l’eau reste dans la cuve.
Nettoyez rgulirement la base lectrique laide dun chiffon. Il est possible de trouver quelques gouttes dhuile au centre de la base lectrique.
La friteuse est quipe dune cuve anti- adhsive : Le brunissement et les rayures qui peuvent apparatre la suite dune longue utilisation ne prsentent pas dinconvnient. Nous garantissons que le revtement anti-adhsif est CONFORME A LA REGLEMENTATION concernant les matriaux en contact avec les aliments.
Evitez de dformer la cuve par des chocs ou des chutes.
Ne tordez pas, ne forcez pas les broches de connexion situes sous la cuve.
Ne dmontez pas la grille fixe de filtration.
Entretien Nutilisez jamais de produits agressifs ou abrasifs.
Ne mettez jamais la base lectrique et le cordon au lave-vaisselle ou sous leau.
Pour conserver plus longtemps les qualits anti- adhsives, nutilisez aucun ustensile mtallique.
Avant de remplir la friteuse, vrifiez que le bouton rouge est revenu dans la bonne position.
Assurez-vous que le filtre anti-odeur est sec avant cuisson.
OK
12
F
Rutilisez la matire grasse Pour lhuile : Retirez le couvercle du bac huile puis
videz lhuile dans la cuve.
Pour la matire grasse solide : Retirez le couvercle du bac huile. Dmoulez la matire grasse laide dun
couteau non pointu. Coupez-la en morceaux puis faites-la
fondre dans la friteuse une temprature de 150C (ne la faites jamais fondre dans le panier).
Entretien
2 1
Renouvelez la matire grasse Ne versez pas la matire grasse usage
dans lvier. Laissez-la refroidir et mettez-la avec les ordures mnagres.
Changez la matire grasse toutes les 10 12 utilisations maximum. Une matire grasse propre conserve la qualit gustative des aliments et leur lgret.
1 2
Changez le filtre anti-odeur (rf XA 500010 / XA 500011)
Enlevez le bouchon de filtre. Retirez le filtre. Changez le filtre. Replacez le bouchon de filtre.
Pour une bonne efficacit du filtre, changez-le toutes les 80 cuissons.
Ne mettez jamais le bac huile au micro-ondes.
La cuve fuit. Sil sagit de quelques gouttes au centre de la base lectrique, reportez-vous la page 11. Pour une fuite plus importante, contactez votre Centre de Service agr le plus proche.
Le repre correspondant 1 l de remplissage de la cuve a t dpass.
Respectez le niveau maxi de remplissage de cuve. Nettoyez la friteuse avant toute autre utilisation.
Il restait de lhuile dans lOIL BOX. Videz lOIL BOX avant de vidanger la friteuse. Nettoyez la friteuse avant toute autre utilisation.
13
FConseils pratiques en cas de difficults
Le cordon amovible nest pas insr sur la base lectrique.
Insrez le cordon amovible sur la base lectrique de commande avant de brancher lappareil la prise murale.
Lappareil nest pas branch ou le bouton de thermostat est en position arrt O/I.
Branchez lappareil ou placez le bouton de thermostat sur la temprature souhaite.
Larrt scurit est activ. Revenez sur la position O/I, puis placez le bouton de thermostat sur la temprature souhaite.
La friteuse est mal engage sur la base lectrique de commande.
Vrifiez quil ny a pas de corps trangers entre la friteuse et la base lectrique.
Le filtre anti-odeur est satur. Remplacez le filtre (80 utilisations). La matire grasse est dgrade. Changez le bain de friture (10 12 utilisations). La matire grasse nest pas approprie. Utilisez une matire grasse vgtale pour une friture de bonne
qualit.
Le couvercle est mal ferm. Assurez-vous du bon verrouillage du couvercle.
Le repre correspondant 1 l de remplissage de la cuve a t dpass.
Vrifiez le niveau du bain (1 l) et enlevez le surplus.
Le panier est trop plein ou dform. Vrifiez que le panier nest pas trop rempli. Changez votre panier.
Mlange dhuile et/ou de graisses diffrentes. Jetez la matire grasse et nettoyez la cuve. Remplissez la cuve avec une seule nature de matire grasse.
Les aliments sont humides ou contiennent trop deau (ex : surgels).
Retirez la glace des surgels et schez bien les aliments. Descendez trs lentement le panier.
Ils sont trop pais et contiennent beaucoup deau. A titre dessai, prolongez le temps de cuisson. Trop daliments sont cuits la fois et le bain de
cuisson nest plus la bonne temprature. Faites frire les aliments en petites quantits (surtout les
surgels). La temprature du bain de friture peut tre
insuffisante: le thermostat est mal rgl. Rglez le thermostat sur la temprature conseille.
La matire grasse est trop chaude. Attendez que la matire grasse refroidisse (environ 2h). La friteuse est mal positionne sur le bac huile. Replacez la friteuse correctement. La grille de filtration est bouche ou colmate. Videz la cuve dans un rcipient laide du bec verseur et
nettoyez la grille avec une brosse non mtallique et de l’eau chaude additionne de liquide vaisselle. Appuyez ensuite sur le bouton rouge situ sous la friteuse pour laisser chapper l’eau et les dchets.
Le minuteur ne fonctionne plus (selon modle) : la pile est usage
Faites-la changer au Centre de Service agr.
Le voyant de temprature ne sallume jamais. Contactez votre Centre de Service agr le plus proche.
Toute intervention doit tre effectue uniquement par un Centre Service agr avec des pices dtaches dorigine.
Dgagement de mauvaises odeurs
Une grande quantit de vapeur schappe autour du couvercle
Les aliments ne dorent pas et restent mous
La cuve ne vidange pas
Autres problmes
Si le problme persiste, consultez votre revendeur ou un Centre de Service agr.
La friteuse touche lhuile sur lOIL BOX (trop dhuile dans lOIL BOX)
Fuites dhuile
Le bain de friture dborde
La friteuse ne chauffe pas Problmes et causes possibles Solutions
14
ENG Description
Filtration, drainage and automatic storage of oil/fat Your fryer is fitted with an exclusive and patented system for filtration and automatic drainage, suitable for most types of oils and fats used for cooking. The drainage of oil is completely automatic and safe. The automatic patented filtration system ensures your oil/fat stays clean and lasts
longer for healthier frying. No crumbs guarantees less odours. The OIL BOX container enables you to store your oil or fat and keep it until you next
want to use it and avoid any transfer of flavours.
Ultra easy cleaning Your fryer is easy to handle and to dismantle. All the pieces (except the electrical base and the cord) are dishwasher safe Thanks to the patented automatic filtration and oil storage system, your fryer can go into
the dishwasher after each use. Clean as new after each use.
Variable oil level Your fryer is ideal for various dishes. Adjust the right oil quantity for each type of food. You can use it as a frying pan with an oil level between 0.2 l and 0.5 l and as a fryer with
an oil level between 0.5 l and 1 l.
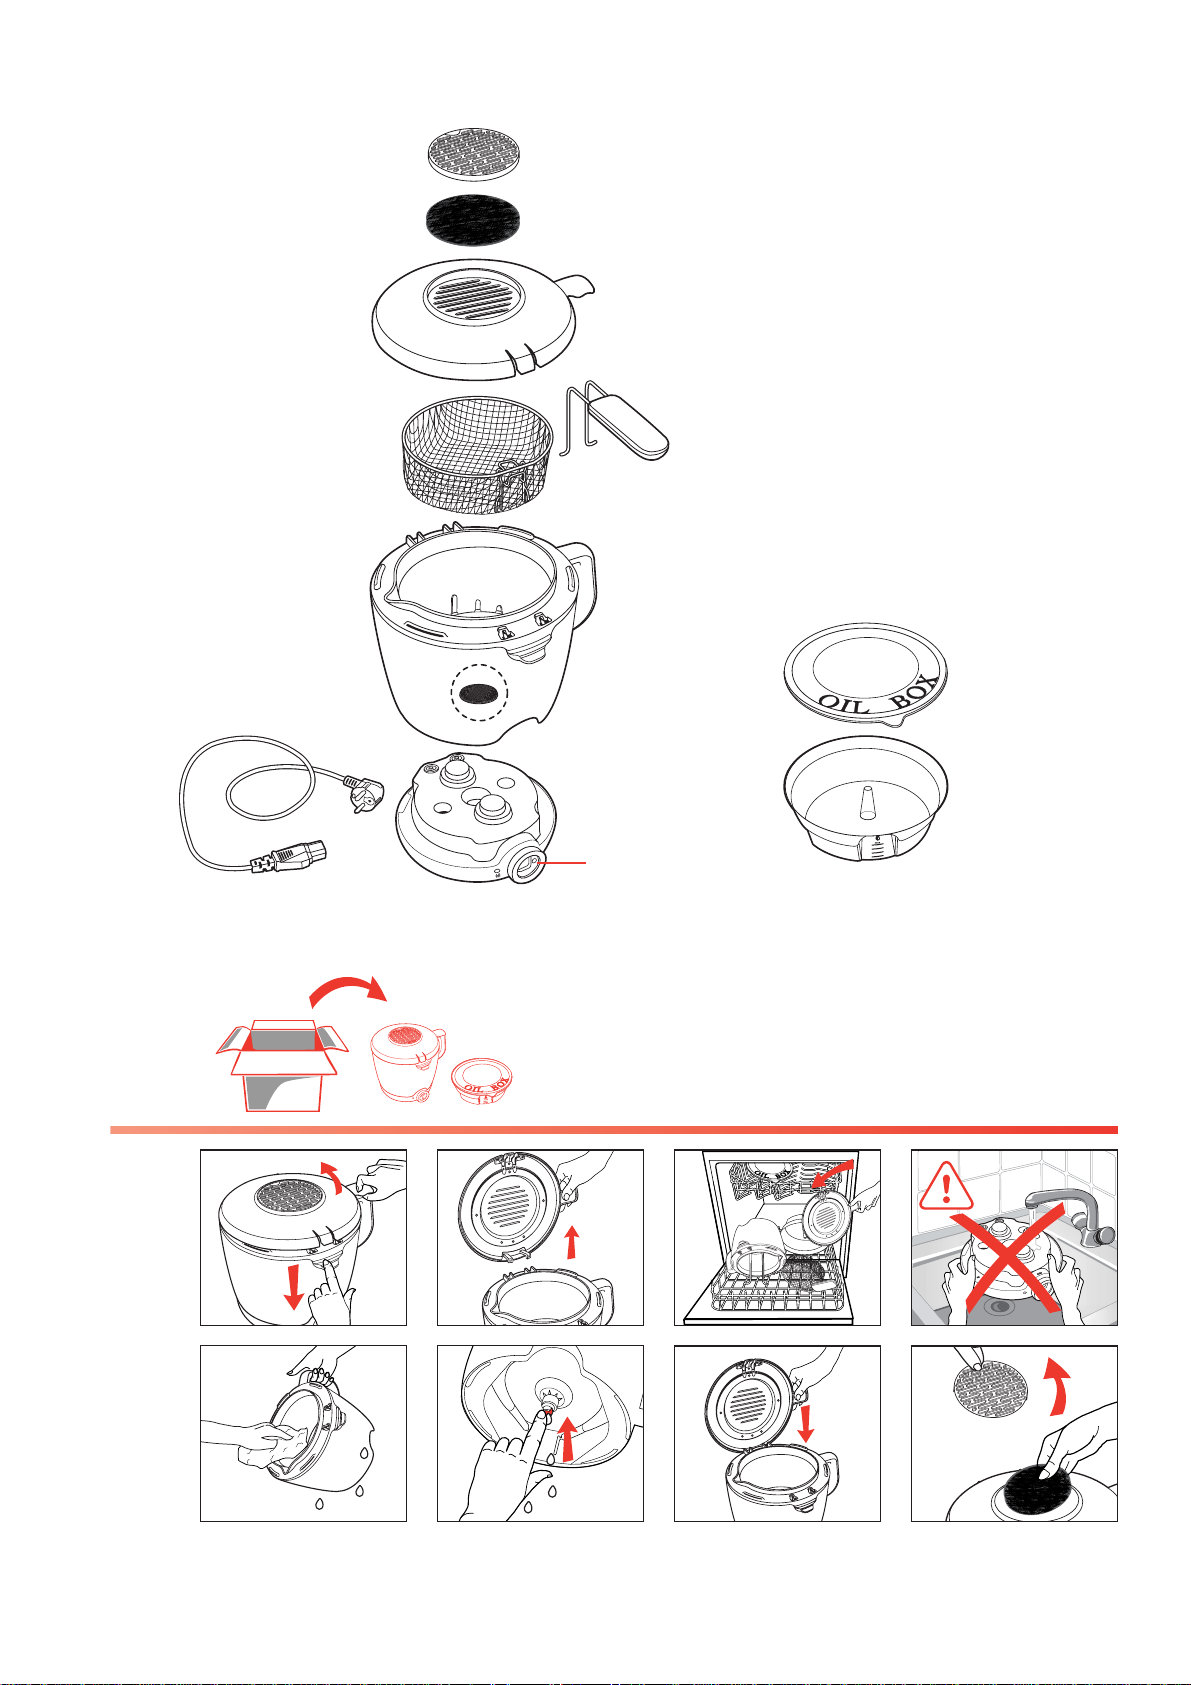
1. Filter cover 2. Washable anti-odour filter 3. Lid 4. Lid opening handle 5. Basket 6. Basket handle 7. Basket high position 8. Fryer with non-stick bowl 9. Bowl fill level marks :
0.2 l / 0.5 l / 1 l 10. Carrying handle 11. Fixed oil filter grid 12. Lid opening button
13. Temperature light 14. Electrical control base 15. Thermostat control / ON/OFF
position 16. Timer (depending on model) 17. Removable cord connector
OIL BOX 18. Lid 19. Container 20. Draining pin 21. Carrying handle
15
ENG
Read and follow carefully the instructions for use.
Protection of the environment Your appliance has been designed to work for many years. However, when finally you
decide to replace your deep fryer, do not forget to think of what you can do to help to protect the environment by disposing of it at your local waste disposal centre.
This appliance complies with current safety regulations and requirements as well as directives: — 89/336/CEE modified by 93/68/CEE — 73/23/CEE modified by 93/68/CEE
This electrical appliance operates at high temperatures which may cause burns. Despite the high heat protection of the deep fryer, do not touch the apparent metal parts.
Do not leave the appliance switched on while unattended.
The basket handle may become hot after prolonged use.
Use and store it out of childrens reach. Never insert any object between the
removable body and the bottom of the equipment.
Always plug in the appliance at an earthed power socket.
Do not use an extension lead. If you accept liability for doing so, only use an extension lead which is in good condition, has an earthed plug, and is suited to the power of the equipment.
Check that the mains voltage corresponds with that shown on the appliance (alternating current only).
If the appliance is used in a country other than that of purchase, have it checked by an Approved Service Centre.
Never use or plug in your appliance if: — its power cord is faulty or damaged, — the appliance has been dropped, — it has visible damage or operating faults. In such cases, to avoid any danger contact our Approved Service Centre to have the appliance repaired, as special tools are needed. Never dismantle the appliance yourself. This will negate the guarantee.
If the power cord is damaged, it must be replaced by an authorised service centre, in order to avoid any danger.
In the event of fire, never try to extinguish the flames with water. Close the lid. Smother the flames with a damp cloth.
Do not switch on the appliance near to inflammable materials (blinds, curtains, etc.) or close to an external heat source (gas stove, hotplate, etc.)
Before plugging the fryer into the mains, insert the connector to the back of the electrical base.
Never immerse the electrical base and cord in water.
This product has been designed for domestic use only. Any commercial use, inappropriate use or failure to comply with the instructions, the manufacturer accepts no responsibility and the guarantee will not apply.
Important: if the electrical cord of this appliance is damaged, it must only be replaced by an authorised Service Dealer. The safety of this appliance complies with the technical regulations and standards in force.
If you have any product problems or queries, please contact our Customer Relations Team first for expert help and advice.
HELPLINE: 0845 602 1454 — UK (01) 4751947 — Ireland or consult our website — www.tefal.co.uk
Safety instructions
16
ENG
Never immerse the electrical base and cord in water.
After cleaning, press on the red button under the fryer to release any water in the bowl.
1
2
Before first use Unpacking Unpack the appliance and remove all the stickers.
Dismantling Open the lid by pressing the button,
then lift it using its handle Remove the lid. Take out the basket.
Cleaning Clean all parts (except the electrical
base and the cord). The OIL BOX, the fryer body, the lid, the basket and its handle are dishwasher safe or can be cleaned with a sponge and washing-up liquid.
Dry them. Attach the handle to the basket.
Replace the lid. Remove the filter cover. Put the filter into place. Put back the filter cover.
Place the fryer on the electrical base.
OK
click!
1 2 3
1 2
17
ENGPreparation for use
1 L
0.2 L
Oil to use Fill the bowl with oil. Use an oil recommended for deep
frying. For best results we recommend blended vegetable oil. For sunflower oil, groundnut, oil, or soya oil, ensure the oil is changed after every 5 uses.
If you use solid vegetable fat : — cut it into pieces and melt it in the bowl at 150C, — never melt solid fat in the basket.
Follow the manufacturers cooking recommendations.
You have the possibility of frying your food with 0.2 litres of fat/oil to 1 litre of fat/oil depending on type of food (see cooking tables p. 20).
Lard or dripping should not be used under any circumstances and may cause overflowing, smoking or risk of fire. For traditional UK style deep fried foods, especially chips, we do not recommend using olive oil.
Do not mix different types of fat/oil.
Adjust the oil level depending on type of food. Do not exceed the quantity corresponding to the marks 1 l . Never use less than 0.2 l.
Do not use the basket if you use less than 0.5 l.
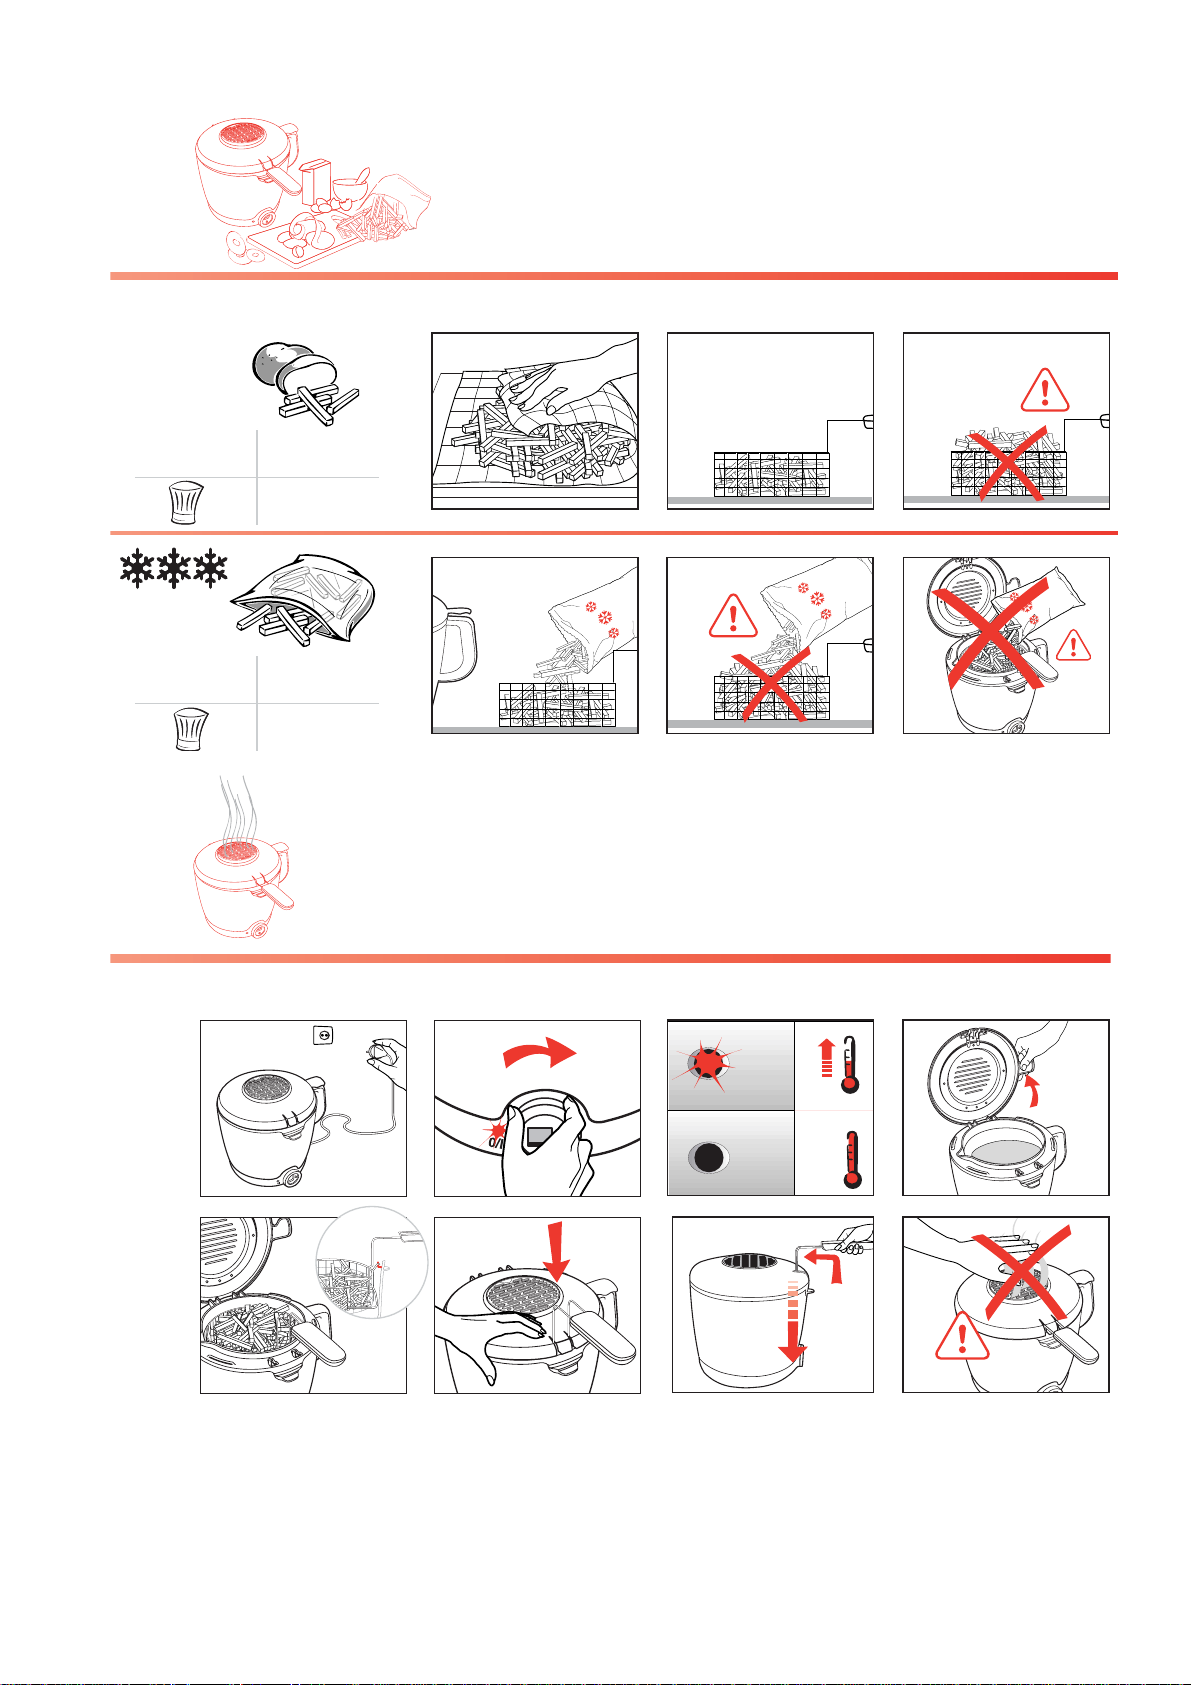
Preheating Close the lid. Insert the connector into the back of the
electrical base. Plug in the fryer.
Set the thermostat according to the food you are frying (see cooking tables p. 20)
The fryer heats up and the temperature light comes on.
Never plug in the deep fryer without oil/fat inside.
Before plugging the fryer into the mains, insert the connector into the back of the electrical base. Do not leave the deep fryer unattended. Do not let the power cord hang down
Volume of oil Solid fat
1 l 890 g
0.5 l 445 g
0.2 l 180 g
Place the fryer: — on a flat, stable, heat-resistant surface, — where the lid can open fully and away from overhead cupboards, — away from water splashes or heat sources, — out of the reach of children.
18
ENG
1
2
3
Preparation for use Preparing food for frying Remove excess moisture (water and
ice) from the food. No matter what the recipe, food must
be perfectly dry : this will prevent overflowing and extend the life of the oil. When dishes include raw potatoes (chips, crisps and potato straws), wash them in cold water to get rid of the starch. This will stop them from sticking together. Dry them carefully and thoroughly with paper kitchen towel. Before cooking, remove any ice crystals on the food by shaking the basket of food to be fried over the sink.
Fill the basket. Reduce food quantity for frozen food.
Lowering the basket When the oil has reached the right
temperature, the light goes out. Open the lid and place the basket in the
high position. Close the lid. Slowly lower the basket.
The timer does not switch off the fryer.
Remove excess ice from frozen food before frying by shaking the basket of food to be fried over the sink.
Set the cooking time (depending on model) Press on the timer button to set the time
minute by minute. Release. The selected time (in minutes)
is displayed and the countdown starts. In case of a mistake or to delete the
selected time, hold the button down for 2 seconds.
To stop the timer ringing signal, press on the button.
Keep out of reach of children.
Cut food to the same size so that it cooks evenly. Avoid using pieces that are too thick.
Fresh or frozen chips
Maximum quantity 600 g Recommended max. quantity 300 g
19
ENG
While cooking During cooking, it is normal for the
temperature light to go on and off.
For a second frying Correct the level of oil if necessary, with
the same type of oil. Wait until the temperature light goes out
before lowering the second batch of food.
Taking food out Raise the basket resting it on the high
position.
Open the lid by pushing on the opening button to let steam out.
Raise the lid using the lid handle.
Take out the basket Close the lid. Serve.
Cooking Warning : do not place your hand above the filter. The steam is very hot Do not remove the lid during cooking.
Do not mix different types of oil.
Stopping the appliance Once frying is completed, place the
thermostat/control button on to the position O/I.
Unplug the appliance. To move the fryer, use the carrying
handles. For filtering and draining the fat, see the
chapter on Maintenance.
Never move the fryer with hot oil or fat inside.
1
2 Season food with salt and pepper once out of the fryer to avoid getting it into the oil/fat.
1
2
3
20
ENG Cooking Cooking times The cooking times and the quantities of oil are only a
guide, they may vary depending on quantities, size of pieces and personal taste.
5 — 6 min
Cooks tips: When cooking battered food and doughnuts, remove the wire basket to prevent food sticking to it. Take great care when handling the food and use tongs. Gradually place the food into the hot oil, submerging it an inch at a time to prevent it from sinking straight away.
We recommend you to: — limit the quantity and the temperature at 170C especially for potatoes, — use the basket for french fries, — control the cooking : only eat golden brown fried food not burnt food, — filter the oil after every use to avoid burnt crumbs and change it regularly, — have a balanced and varied diet which includes 5 portions of fruit and vegetables daily, — store your fresh potatoes in a room above 8C. For good quality and fast cooking, we recommend that you limit the quantity of chips to 1/2 a basket per fry. For a larger quantity of food or potatoes, the temperature is dropping very fast just after having plunged the basket . While cooking, this temperature is not above 175C even if the thermostat is at the 190C (= Stabilized Temperature before plunging).
Quantity Fresh foods Frozen foods
Chips — Maximum quantity 1 l 600 g 190C 11 — 13 min 190C 12 — 14 min
Chips — Recommended max. quantity 1 l 300 g 170C 8 — 10 min 170C 9 — 11 min
Fried Chicken Drumstick 1 l 350 g 180C 14 — 15 min 190C 15 — 16 min
American style thin cut chips 1 l 350 g — — 190C 8 — 10 min
Scotch eggs 1 l 2 p 170C 6 — 8 min — —
Chicken nuggets 0.5 l 6 — 7 p 170C 4 — 5 min 190C 4 — 5 min
Breaded Fish Nuggets 0.5 l 6 — 7 p 170C 4 — 5 min 190C 4 — 5 min
Breaded Camembert wedges 0.5 l 150 g 170C 1 min — — Fried whole mushrooms 0.5 l 120 g 170C 4 — 5 min 190C 4 — 5 min
Breaded plaice fillet (small size) 0.5 l 170 g 170C 4 — 5 min 190C 5 — 6 min
Vegetables fritters (zucchini) 0.5 l 120 g 170C 8 — 9 min 190C 8 — 9 min
Tempura 0.5 l 210 g 170C 2 — 3 min 190C 4 — 5 min
Apple fritters 0.5 l 120 g 170C 5 — 6 min 190C 5 — 6 min
Ring doughnuts 0.5 l 4 p 170C 5 — 7 min — —
Breaded or Battered Onion rings 0.2 l 100 g 170C 3 — 4 min 190C 3 — 4 min
Battered Large Prawns 0.2 l 5 — 6 p 170C 5 — 6 min 190C 5 — 6 min
Breaded scampi 0.2 l 16 p 190C 4 — 5 min 190C 4 — 5 min
Samosas 0.2 l 4 p 170C 4 — 5 min 190C 5 — 6 min
Mozzarella sticks 0.2 l 5 — 6 p 190C 40 — 50 sec — —
Chips 1 l 150 g 170C 6 — 7 min 170C
21
ENG
Chinese Spicy Prawns
Preparation 1 Beat the egg, stir in the ice water then beat in the
wholemeal flour. This batter is quite liquid compared to other batters but thats what makes it lighter. Dip the vegetables or fish in the batter.
2 Fry them in batches at 190C while the batter is still cold.
Idea This will work with other types of flour. Dip in the soy sauce flavoured with daikon radish and ginger.
Tempura Ingredients 1 egg 400 ml iced water 250 g wholemeal flour Vegetables: broccoli, cauliflower, red or green peppers, onions, courgettes, aubergines, any fillets of fish or prawns.
2 to 3 minutes 0.5 l
0.2 l
0.5 l
Frying adds variety. Food can be fried naturally, with breadcrumbs or in batter.
Some recipes
Preparation 1 Beat the egg. 2 Cut the mozzarella into sticks. Roll each stick in the flour,
then dip in the beaten egg and finally coat them with the breadcrumbs.
3 Fry them at 190C
Idea Before coating, each stick can be wrapped with Proscuitto ham. Use any type of cheese (camembert, brie, cheddar).
Mozzarella sticks Ingredients 250 g Mozzarella 2 eggs 100 ml milk plain flour for coating 500 g fresh breadcrumbs mixed with half teaspoon dired rosemary or basil, salt and pepper
Preparation 1 Coat the prawns in the cornflour. Shake to remove the
excess. 2 Then dip into beaten egg and finally coat in the
breadcrumbs. 3 Fry them in batches at 180C.
Idea Instead of prawns use pieces of monkfish fillet.
Ingredients 500 g cooked extra large prawns or tiger prawns 100 g cornflour 2 beaten eggs 175 g fresh white breadcrumbs mixed with 1 teaspoon Chinese Five Spice Powder wedges of lemon to serve
20 to 30 secondes
2 to 3 minutes