
System Component
Operating Instructions
Model No. SC-EH790
SC-EH590
The illustration shows SC-EH790 for the United Kingdom and Eastern Europe.
EB EP GN
Note
“EB” on the outer packaging indicates the
United Kingdom.
Before connecting, operating or adjusting
this product, please read these instructions
completely. Please keep this manual for future reference.
RQT6866-B
Dear customer
www.panasonic.co.uk (for UK customers only)
≥ Order accessory and consumable items for your
product with ease and confidence by telephoning our
Customer Care Centre Mon–Friday 9:00am–5:30pm.
(Excluding public holidays.)
≥ Or go on line through our Internet Accessory ordering
application.
≥ Most major credit and debit cards accepted.
≥ All enquiries transactions and distribution facilities are
provided directly by Panasonic UK Ltd.
≥ It couldn’t be simpler!
Customer Care Centre
For UK customers: 08705 357357
For Republic of Ireland customers: 01 289 8333
Technical Support
For UK customers: 0870 1 505610
This Technical Support Hot Line number is for
Panasonic PC software related products only.
For Republic of Ireland, please use the Customer Care
Centre number listed above for all enquiries.
For all other product related enquiries, please use the
Customer Care Centre numbers listed above.
DANGER
INVISIBLE LASER RADIATION WHEN OPEN.
AVOID DIRECT EXPOSURE TO BEAM.
ADVARSEL
USYNLIG LASERSTRÅLING VED ÅBNING, NÅR SIKKERHEDSAFBRYDERE
ER UDE AF FUNKTION. UNDGÅ UDSÆTTELSE FOR STRÅLING.
VARO!
AVATTAESSA JA SUOJALUKITUS OHITETTAESSA OLET ALTTIINA
NÄKYMÄTÖNTÄ LASERSÄTEILYLLE. ÄLÄ KATSO SÄTEESEEN.
VARNING
OSYNLIG LASERSTRÅLNING NÄR DENNA DEL ÄR ÖPPNAD OCH
SPÄRREN ÄR URKOPPLAD. BETRAKTA EJ STRÅLEN.
ADVARSEL
USYNLIG LASERSTRÅLING NÅR DEKSEL ÅPNES OG SIKKERHEDSLÅS
BRYTES. UNNGÅ EKSPONERING FOR STRÅLEN.
VORSICHT
UNSICHTBARE LASERSTRAHLUNG, WENN ABDECKUNG GEÖFFNET.
NICHT DEM STRAHL AUSSETZEN.
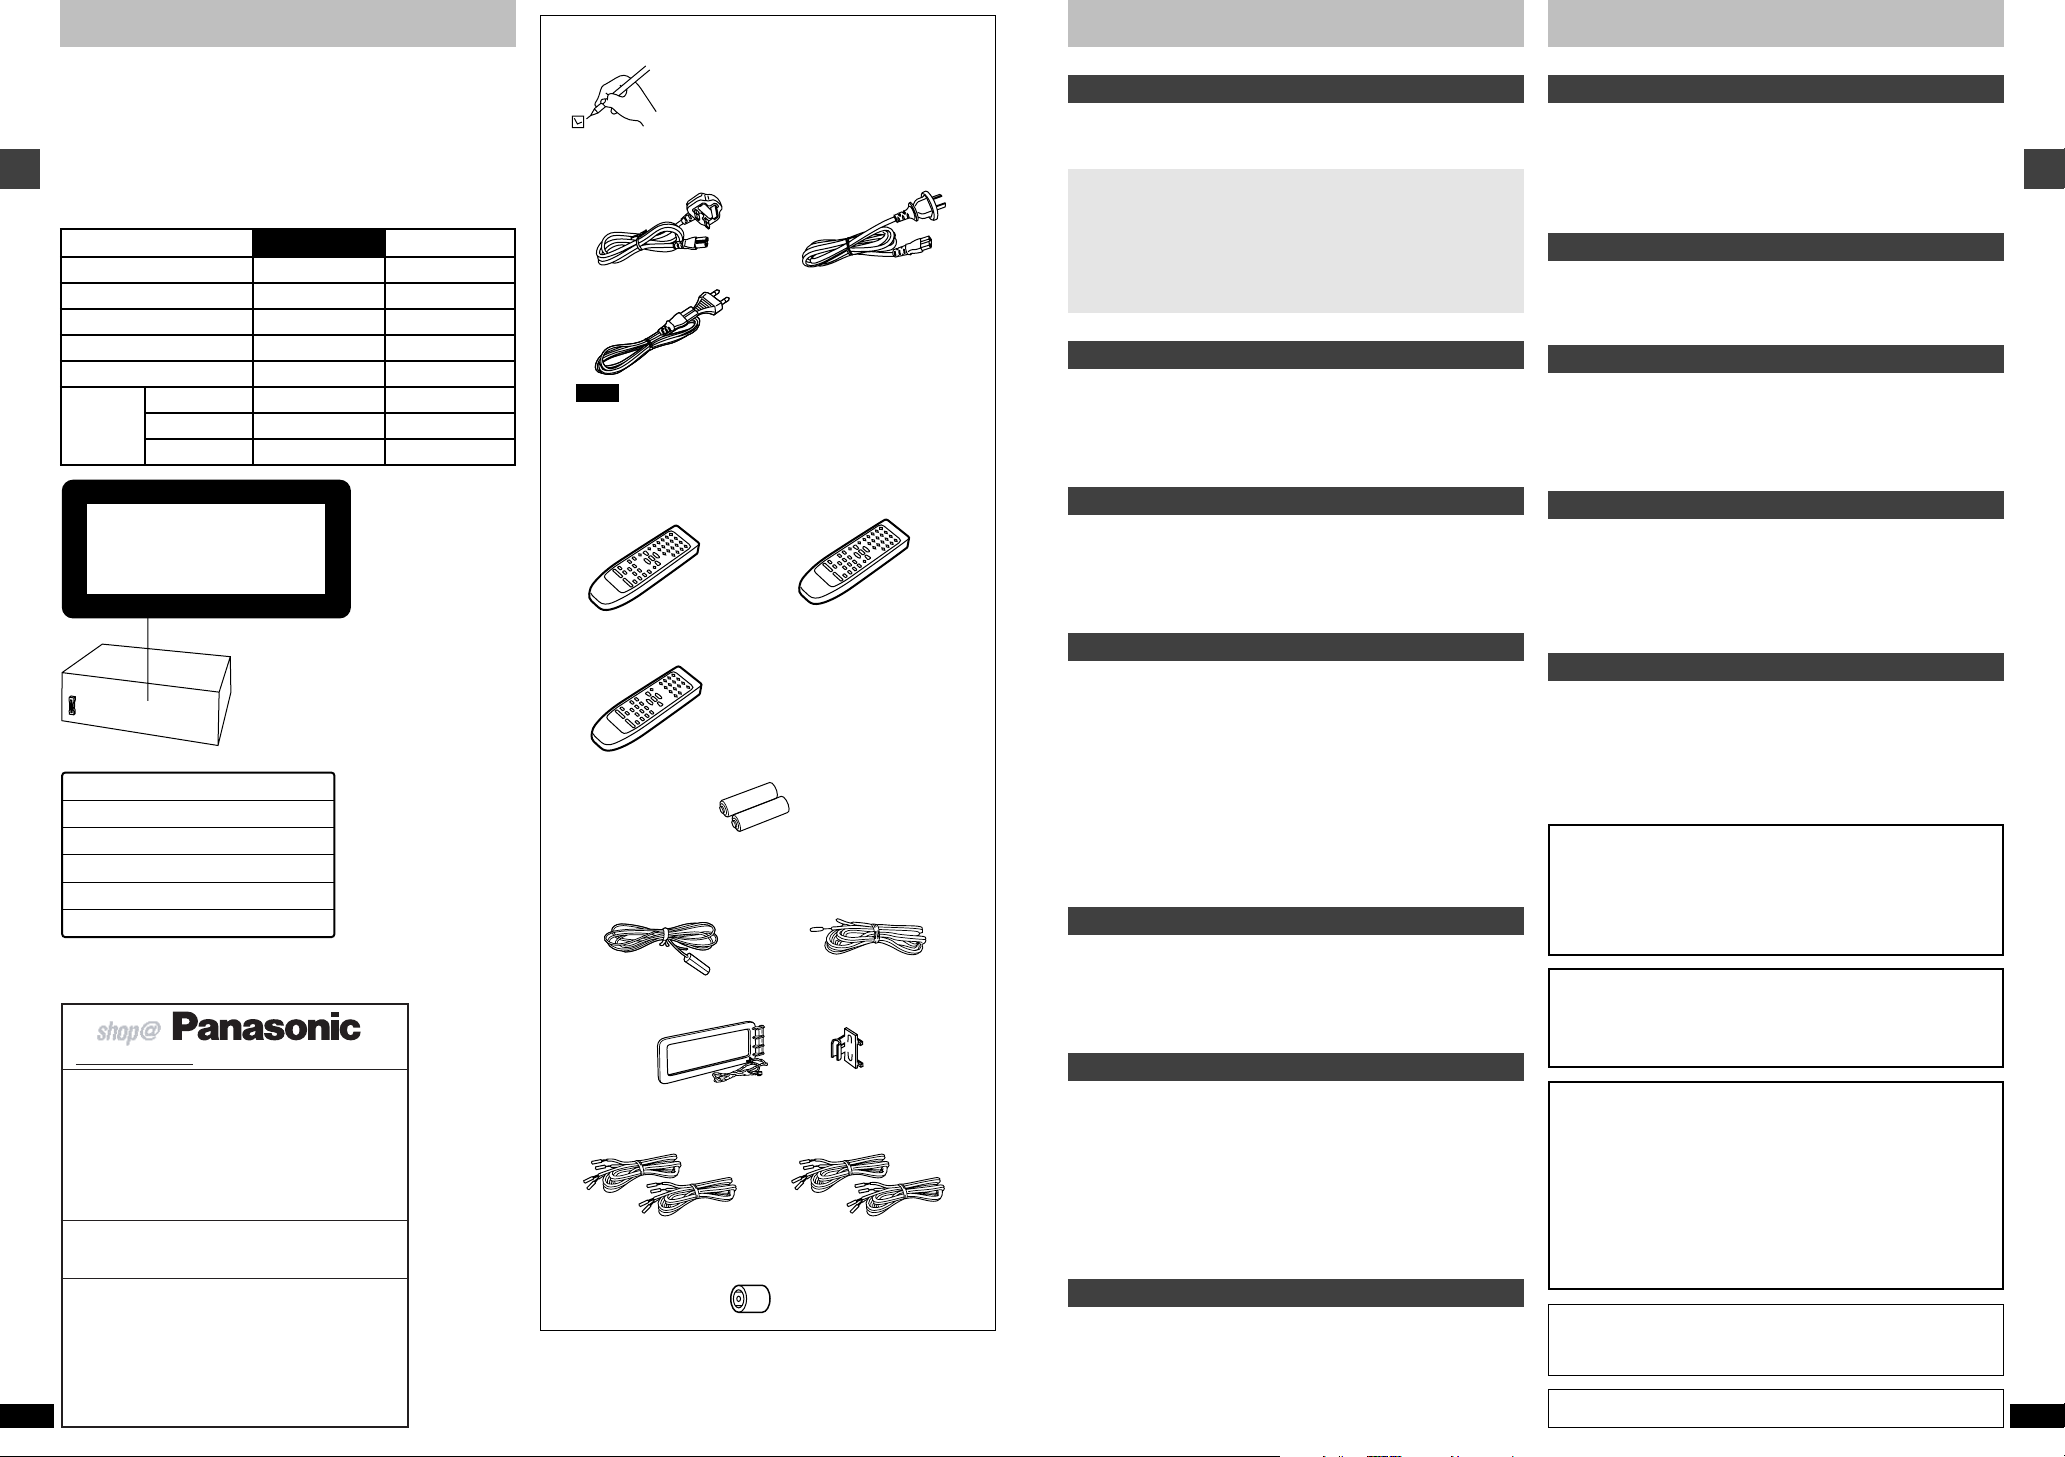
Supplied accessories
Table of contents
Safety precautions
Thank you for purchasing this product.
For optimum performance and safety, please read these instructions carefully.
These operating instructions are applicable to the following systems.
These operating instructions, however, fundamentally explain the operation
of system SC-EH790.
[EH790]: indicates a function which can be enjoyed with SC-EH790 only.
[EH590]: indicates a function which can be enjoyed with SC-EH590 only.
System
Sound processor
Before use
Tuner / amplifier
CD changer
CD player
Cassette deck
Speakers Center
Front
Surround
SC-EH790
SH-EH790
SA-EH790
SL-EH790
—
RS-DV290
SB-DV290
SB-PC95
SB-PS95
CD changer or CD player
(Back of product)
(Inside of product)
For United Kingdom and Republic of Ireland
RQT6866
2
SC-EH590
SH-EH590
SA-EH590
—
SL-EH590
RS-DV290
SB-EH590
—
—
Please check and identify the supplied
accessories.
Use numbers indicated in parentheses when
asking for replacement parts.
∏ AC mains lead . . . . . . . . . . . . . . . . . . . . . . . . . . . . . . . . . . . . . . 1
For the United Kingdom For Australia and N.Z.
(RJA0053-3X) (RJA0035-2X)
For Eastern Europe
(RJA0019-2X)
Note
The included AC mains lead is for use with this unit only. Do not use
it with other equipment.
∏ Remote control . . . . . . . . . . . . . . . . . . . . . . . . . . . . . . . . . . . . . 1
[EH790] for the United Kingdom [EH790] for Australia and N.Z.
and Eastern Europe (EUR7702280)
(EUR7702270)
[EH590]
(EUR7702070)
∏ Remote control batteries . . . . . . . . . . . . . . . . . . . . . . . . . . . . . 2
∏ FM indoor antenna . . . . . . . . . . . . . . . . . . . . . . . . . . . . . . . . . . 1
For the United Kingdom For Australia and N.Z.
and Eastern Europe (RSA0006-J)
(RSA0007)
∏ AM loop antenna set . . . . . . . . . . . . . . . . . . . . . . . . . . . . . . . . . 1
(RSA0022-L)
∏ Speaker leads
(REE1234) . . . . . . . . . . . . . . 2 (REE1233) . . . . . . . . . . . . . . 2
(Red/Black) (Gray/Blue)
∏ Antenna plug adaptor . . . . . . . . . . . . . . . . . . . . . . . . . . . . . . . . 1
Only for the United Kingdom
(SJP9009)
Before use
Safety precautions . . . . . . . . . . . . . . . . . . . . . . . . . . . . . . . . . 3
Caution for AC Mains Lead . . . . . . . . . . . . . . . . . . . . . . . . . . 4
Simple set-up and play
Locating . . . . . . . . . . . . . . . . . . . . . . . . . . . . . . . . . . . . . 5
Speaker leads . . . . . . . . . . . . . . . . . . . . . . . . . . . . . . . . 6
Antennas . . . . . . . . . . . . . . . . . . . . . . . . . . . . . . . . . . . . 7
Flat cables and AC mains lead . . . . . . . . . . . . . . . . . . 7
Listening to a CD . . . . . . . . . . . . . . . . . . . . . . . . . . . . . 8
Control guide and preparatory steps
Front panel controls . . . . . . . . . . . . . . . . . . . . . . . . . . . . . . . 09
The remote control . . . . . . . . . . . . . . . . . . . . . . . . . . . . . . . . 11
Turning DEMO off . . . . . . . . . . . . . . . . . . . . . . . . . . . . . . . . . 12
Setting the time . . . . . . . . . . . . . . . . . . . . . . . . . . . . . . . . . . . 12
Basic operations
CDs . . . . . . . . . . . . . . . . . . . . . . . . . . . . . . . . . . . . . . . . . . . . . 13
The radio: manual tuning . . . . . . . . . . . . . . . . . . . . . . . . . . 17
The radio: preset tuning . . . . . . . . . . . . . . . . . . . . . . . . . . . 18
Cassette tapes . . . . . . . . . . . . . . . . . . . . . . . . . . . . . . . . . . . 19
Changing sound field and quality
Boosting the super woofer . . . . . . . . . . . . . . . . . . . . . . . . . 20
Using the super sound equalizer . . . . . . . . . . . . . . . . . . . . 20
Changing sound field and quality . . . . . . . . . . . . . . . . . . . 20
Using the acoustic image equalizer (AI EQ) . . . . . . . . . . . . . . . . . . . 21
Using the manual equalizer (M.EQ) . . . . . . . . . . . . . . . . . . . . . . . . . . 22
Enjoying surround sound . . . . . . . . . . . . . . . . . . . . . . . . . . 23
6CH DISCRETE INPUT . . . . . . . . . . . . . . . . . . . . . . . . . . . . . . . . . . 24
DOLBY PRO LOGIC . . . . . . . . . . . . . . . . . . . . . . . . . . . . . . . . . . . . . 24
SUPER SURROUND . . . . . . . . . . . . . . . . . . . . . . . . . . . . . . . . . . . . 24
Speaker level adjustments . . . . . . . . . . . . . . . . . . . . . . . . . . . . . . . . . 25
Surround effects . . . . . . . . . . . . . . . . . . . . . . . . . . . . . . . . . . 26
Recording operations
Before recording (Deck 2 only) . . . . . . . . . . . . . . . . . . . . . . 28
Recording CDs . . . . . . . . . . . . . . . . . . . . . . . . . . . . . . . . . . . 29
Recording the radio . . . . . . . . . . . . . . . . . . . . . . . . . . . . . . . 30
Tape-to-tape recording . . . . . . . . . . . . . . . . . . . . . . . . . . . . 30
Timer operations and convenient functions
Using the timers . . . . . . . . . . . . . . . . . . . . . . . . . . . . . . . . . . 31
Changing the sound range display . . . . . . . . . . . . . . . . . . 34
Muting the volume . . . . . . . . . . . . . . . . . . . . . . . . . . . . . . . . 34
Using headphones . . . . . . . . . . . . . . . . . . . . . . . . . . . . . . . . 34
Enjoying karaoke (For Australia and N.Z.) . . . . . . . . . . . . . . 35
External unit connections . . . . . . . . . . . . . . . . . . . . . . . . . . 36
Optional antenna connections . . . . . . . . . . . . . . . . . . . . . . 37
Using other equipment . . . . . . . . . . . . . . . . . . . . . . . . . . . . 37
References
Troubleshooting guide . . . . . . . . . . . . . . . . . . . . . . . . . . . . 38
Maintenance . . . . . . . . . . . . . . . . . . . . . . . . . . . . . . . . . . . . . 39
Cassette tape selection and care . . . . . . . . . . . . . . . . . . . . 39
Technical specifications . . . . . . . . . . . . . . . . . . . Back cover
Placement
Set the unit up on an even surface away from direct sunlight, high temperatures, high humidity, and excessive vibration. These conditions can
damage the cabinet and other components, thereby shortening the unit’s
service life.
Place it at least 15 cm away from wall surfaces to avoid distortion and
unwanted acoustical effects.
Do not place heavy items on the unit.
Voltage
Do not use high voltage power sources. This can overload the unit and
cause a fire.
Do not use a DC power source. Check the source carefully when setting
the unit up on a ship or other place where DC is used.
AC mains lead protection
Ensure the AC mains lead is connected correctly and not damaged. Poor
connection and lead damage can cause fire or electric shock. Do not pull,
bend, or place heavy items on the lead.
Grasp the plug firmly when unplugging the lead. Pulling the AC mains
lead can cause electric shock.
Do not handle the plug with wet hands. This can cause electric shock.
Foreign matter
Do not let metal objects fall inside the unit. This can cause electric shock
or malfunction.
Do not let liquids get into the unit. This can cause electric shock or
malfunction. If this occurs, immediately disconnect the unit from the power
supply and contact your dealer.
Do not spray insecticides onto or into the unit. They contain flammable
gases which can ignite if sprayed into the unit.
Service
Do not attempt to repair this unit by yourself. If sound is interrupted,
indicators fail to light, smoke appears, or any other problem that is not
covered in these instructions occurs, disconnect the AC mains lead and
contact your dealer or an authorized service center. Electric shock or
damage to the unit can occur if the unit is repaired, disassembled or
reconstructed by unqualified persons.
Extend operating life by disconnecting the unit from the power source if it
is not to be used for a long time.
CAUTION!
THIS PRODUCT UTILIZES A LASER.
USE OF CONTROLS OR ADJUSTMENTS OR PERFORMANCE OF PROCEDURES OTHER THAN THOSE SPECIFIED HEREIN MAY RESULT IN HAZARDOUS RADIATION EXPOSURE.
DO NOT OPEN COVERS AND DO NOT REPAIR YOURSELF. REFER SERVICING TO QUALIFIED PERSONNEL.
WARNING:
TO REDUCE THE RISK OF FIRE, ELECTRIC SHOCK OR PRODUCT DAMAGE,
DO NOT EXPOSE THIS APPARATUS TO RAIN, MOISTURE, DRIPPING OR
SPLASHING AND THAT NO OBJECTS FILLED WITH LIQUIDS, SUCH AS
VASES, SHALL BE PLACED ON THE APPARATUS.
CAUTION!
≥DO NOT INSTALL OR PLACE THIS UNIT IN A BOOKCASE, BUILT-IN
CABINET OR IN ANOTHER CONFINED SPACE. ENSURE THE UNIT IS WELL
VENTILATED. TO PREVENT RISK OF ELECTRIC SHOCK OR FIRE HAZARD
DUE TO OVERHEATING, ENSURE THAT CURTAINS AND ANY OTHER
MATERIALS DO NOT OBSTRUCT THE VENTILATION VENTS.
≥DO NOT OBSTRUCT THE UNIT’S VENTILATION OPENINGS WITH NEWS-
PAPERS, TABLECLOTHS, CURTAINS, AND SIMILAR ITEMS.
≥DO NOT PLACE SOURCES OF NAKED FLAMES, SUCH AS LIGHTED CAN-
DLES, ON THE UNIT.
≥DISPOSE OF BATTERIES IN AN ENVIRONMENTALLY FRIENDLY
MANNER.
This product may receive radio interference caused by mobile telephones during use. If such interference is apparent, please increase separation between the product and the mobile telephone.
THIS UNIT IS INTENDED FOR USE IN MODERATE CLIMATES.
Before use
RQT6866
3
Caution for AC Mains Lead
Fuse cover
Figure A
Figure B
Fuse
(5 ampere)
Fuse
(5 ampere)
Figure A
Figure B
(For United Kingdom)
(“EB” area code model only)
For your safety, please read the following text carefully.
This appliance is supplied with a moulded three pin mains
plug for your safety and convenience.
A 5-ampere fuse is fitted in this plug.
Should the fuse need to be replaced please ensure that
Before use
the replacement fuse has a rating of 5-ampere and that it
is approved by ASTA or BSI to BS1362.
Check for the ASTA mark m or the BSI mark o on the
body of the fuse.
If the plug contains a removable fuse cover you must ensure that it is refitted when the fuse is replaced.
If you lose the fuse cover the plug must not be used until a
replacement cover is obtained.
A replacement fuse cover can be purchased from your
local dealer.
CAUTION!
IF THE FITTED MOULDED PLUG IS UNSUITABLE FOR THE SOCKET OUTLET IN YOUR
HOME THEN THE FUSE SHOULD BE REMOVED AND THE PLUG CUT OFF AND DISPOSED OF SAFELY.
THERE IS A DANGER OF SEVERE ELECTRICAL SHOCK IF THE CUT OFF PLUG
IS INSERTED INTO ANY 13-AMPERE
SOCKET.
If a new plug is to be fitted please observe the wiring code
as stated below.
If in any doubt please consult a qualified electrician.
IMPORTANT
The wires in this mains lead are coloured in accordance
with the following code:
Blue: Neutral, Brown: Live.
As these colours may not correspond with the coloured
markings identifying the terminals in your plug, proceed
as follows:
The wire which is coloured Blue must be connected to the
terminal which is marked with the letter N or coloured
Black or Blue.
The wire which is coloured Brown must be connected to
the terminal which is marked with the letter L or coloured
Brown or Red.
RQT6866
4
WARNING: DO NOT CONNECT EITHER WIRE TO THE
EARTH TERMINAL WHICH IS MARKED WITH THE
LETTER E, BY THE EARTH SYMBOL n OR COLOURED GREEN OR GREEN/YELLOW.
THIS PLUG IS NOT WATERPROOF—KEEP DRY.
Before use
Remove the connector cover.
How to replace the fuse
The location of the fuse differ according to the type of AC
mains plug (figures A and B). Confirm the AC mains plug
fitted and follow the instructions below.
Illustrations may differ from actual AC mains plug.
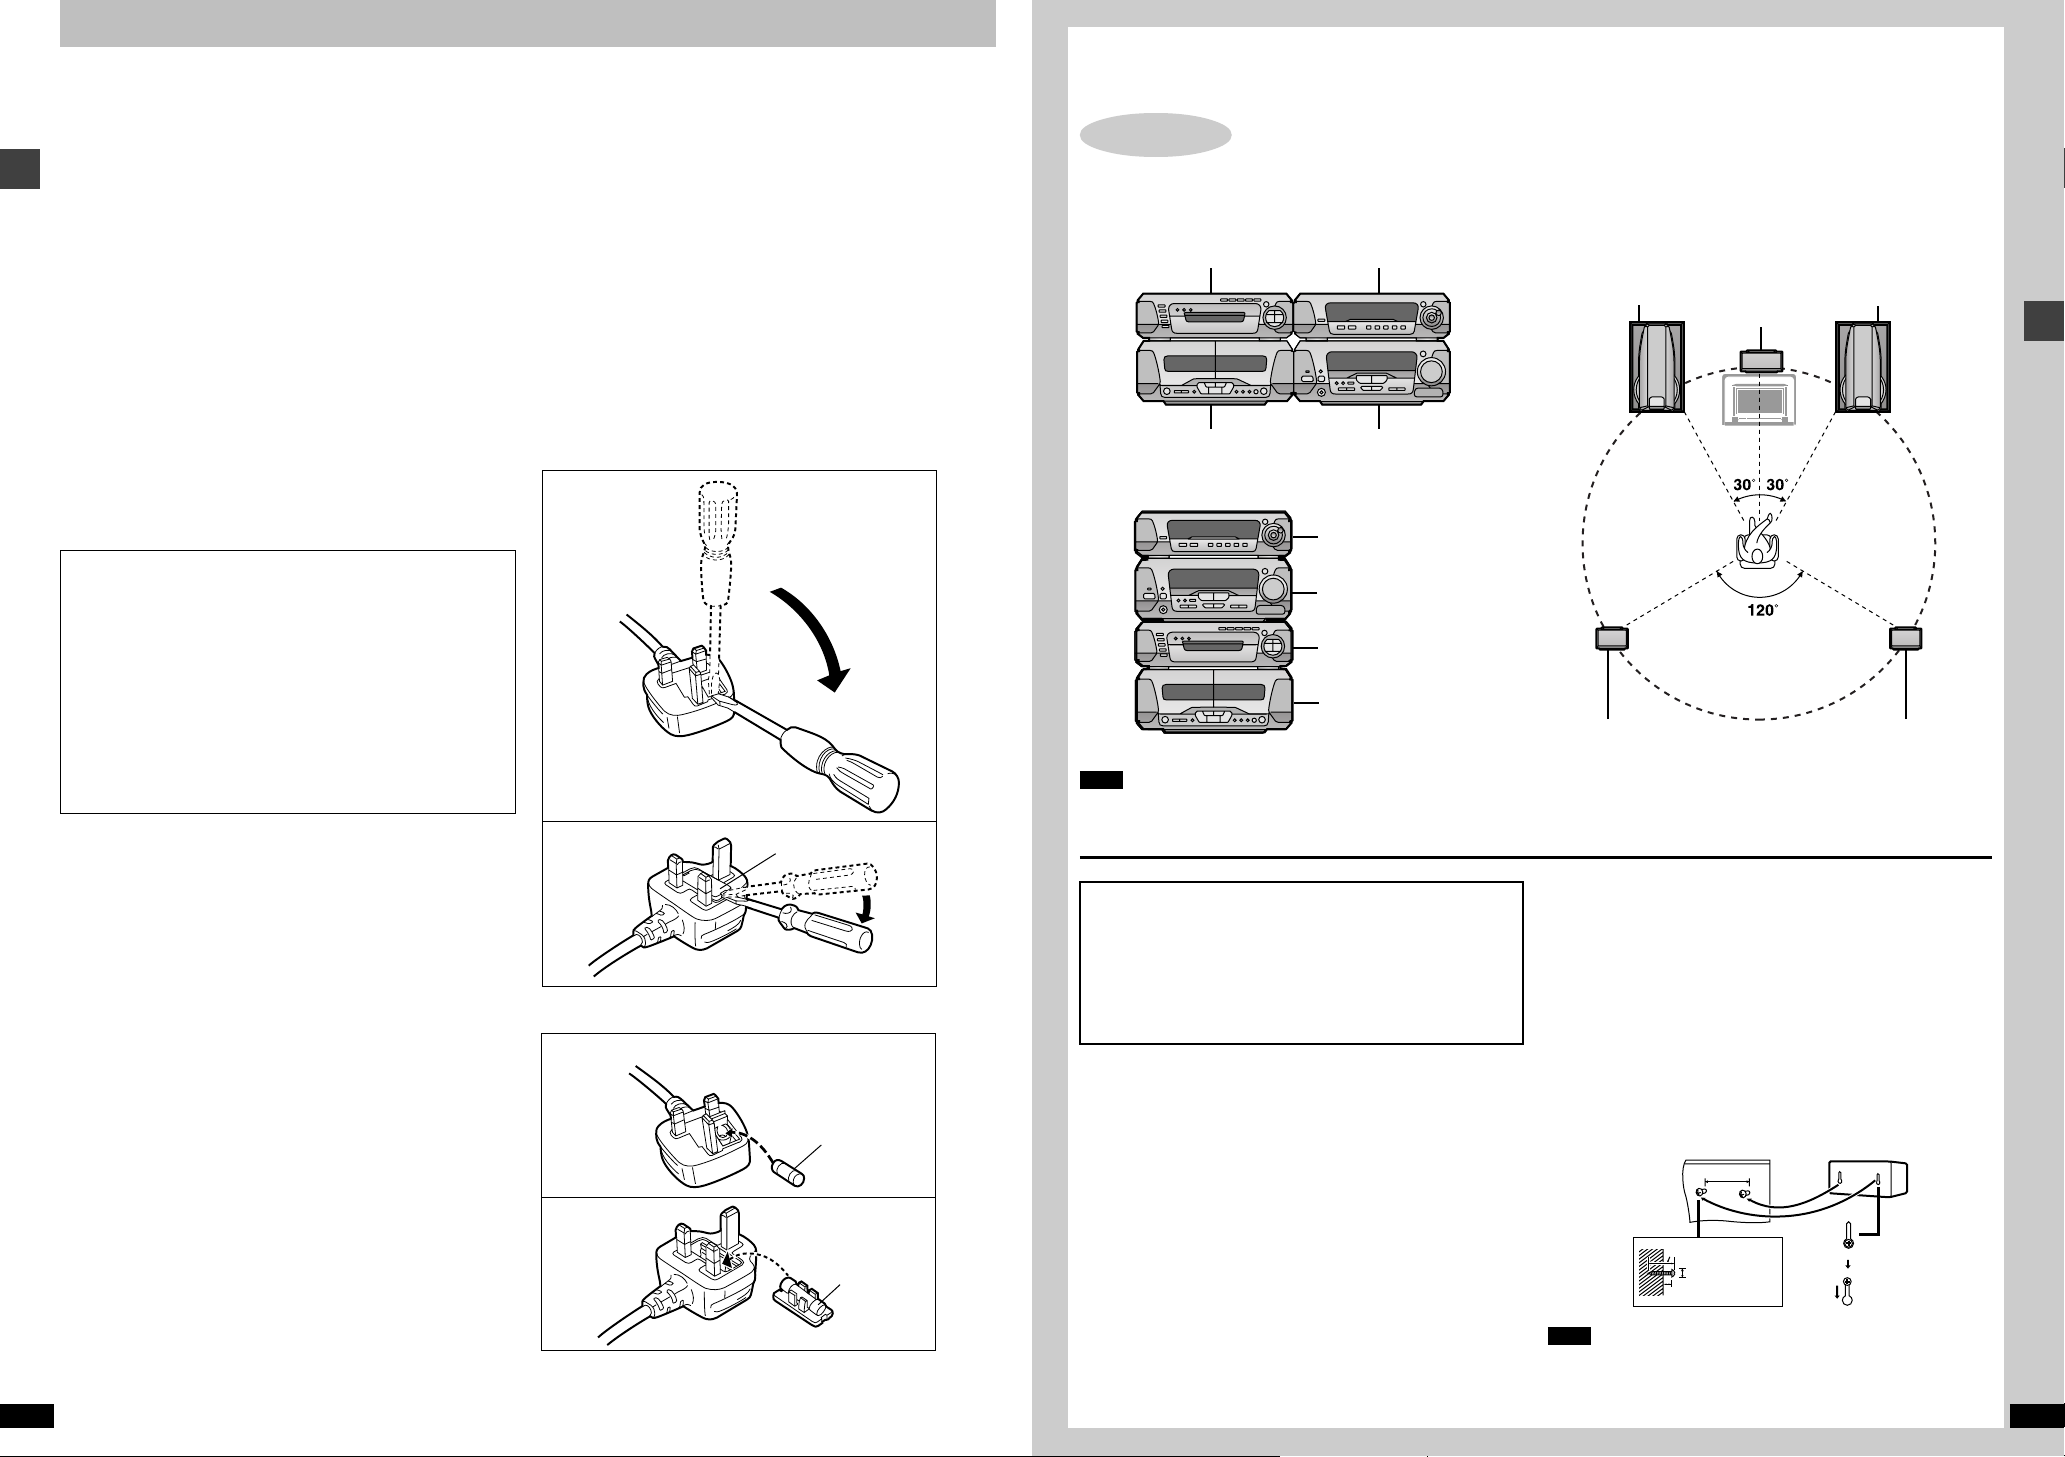
1. Open the fuse cover with a screwdriver.
2. Replace the fuse and close or attach the fuse cover.
Simple set-up and play
STEP
Components
Note
Do not put the CD changer or CD player on the top
of the tuner/amplifier. Heat can damage your CDs.
Caution
≥Use the speakers only with the recommended system.
Failure to do so may lead to damage to the amplifier and/or the
speakers, and may result in the risk of fire.
Consult a qualified service person if damage has occurred or if
you experience a sudden change in performance.
≥Do not attempt to attach these speakers to walls using methods
other than those described in this manual.
Notes on speaker use
∫ You can damage your speakers and shorten their useful life if you play
sound at high levels over extended periods.
∫ Reduce the volume in the following cases to avoid damage.
≥When playing distorted sound.
≥When the speakers are receiving howling from a microphone
(for Australia and N.Z.) or record player, noise from FM broadcasts,
or continuous signals from an oscillator, test disc, or electronic
instrument.
≥When adjusting the sound quality.
≥When turning the unit on or off.
If irregular colouring occurs on your television
These speakers are designed to be used close to a television, but the
picture may be affected with some televisions and set-up combinations.
If this occurs, turn the television off for about 30 minutes.
The television’s demagnetizing function should correct the problem.
If it persists, move the speakers further away from the television.
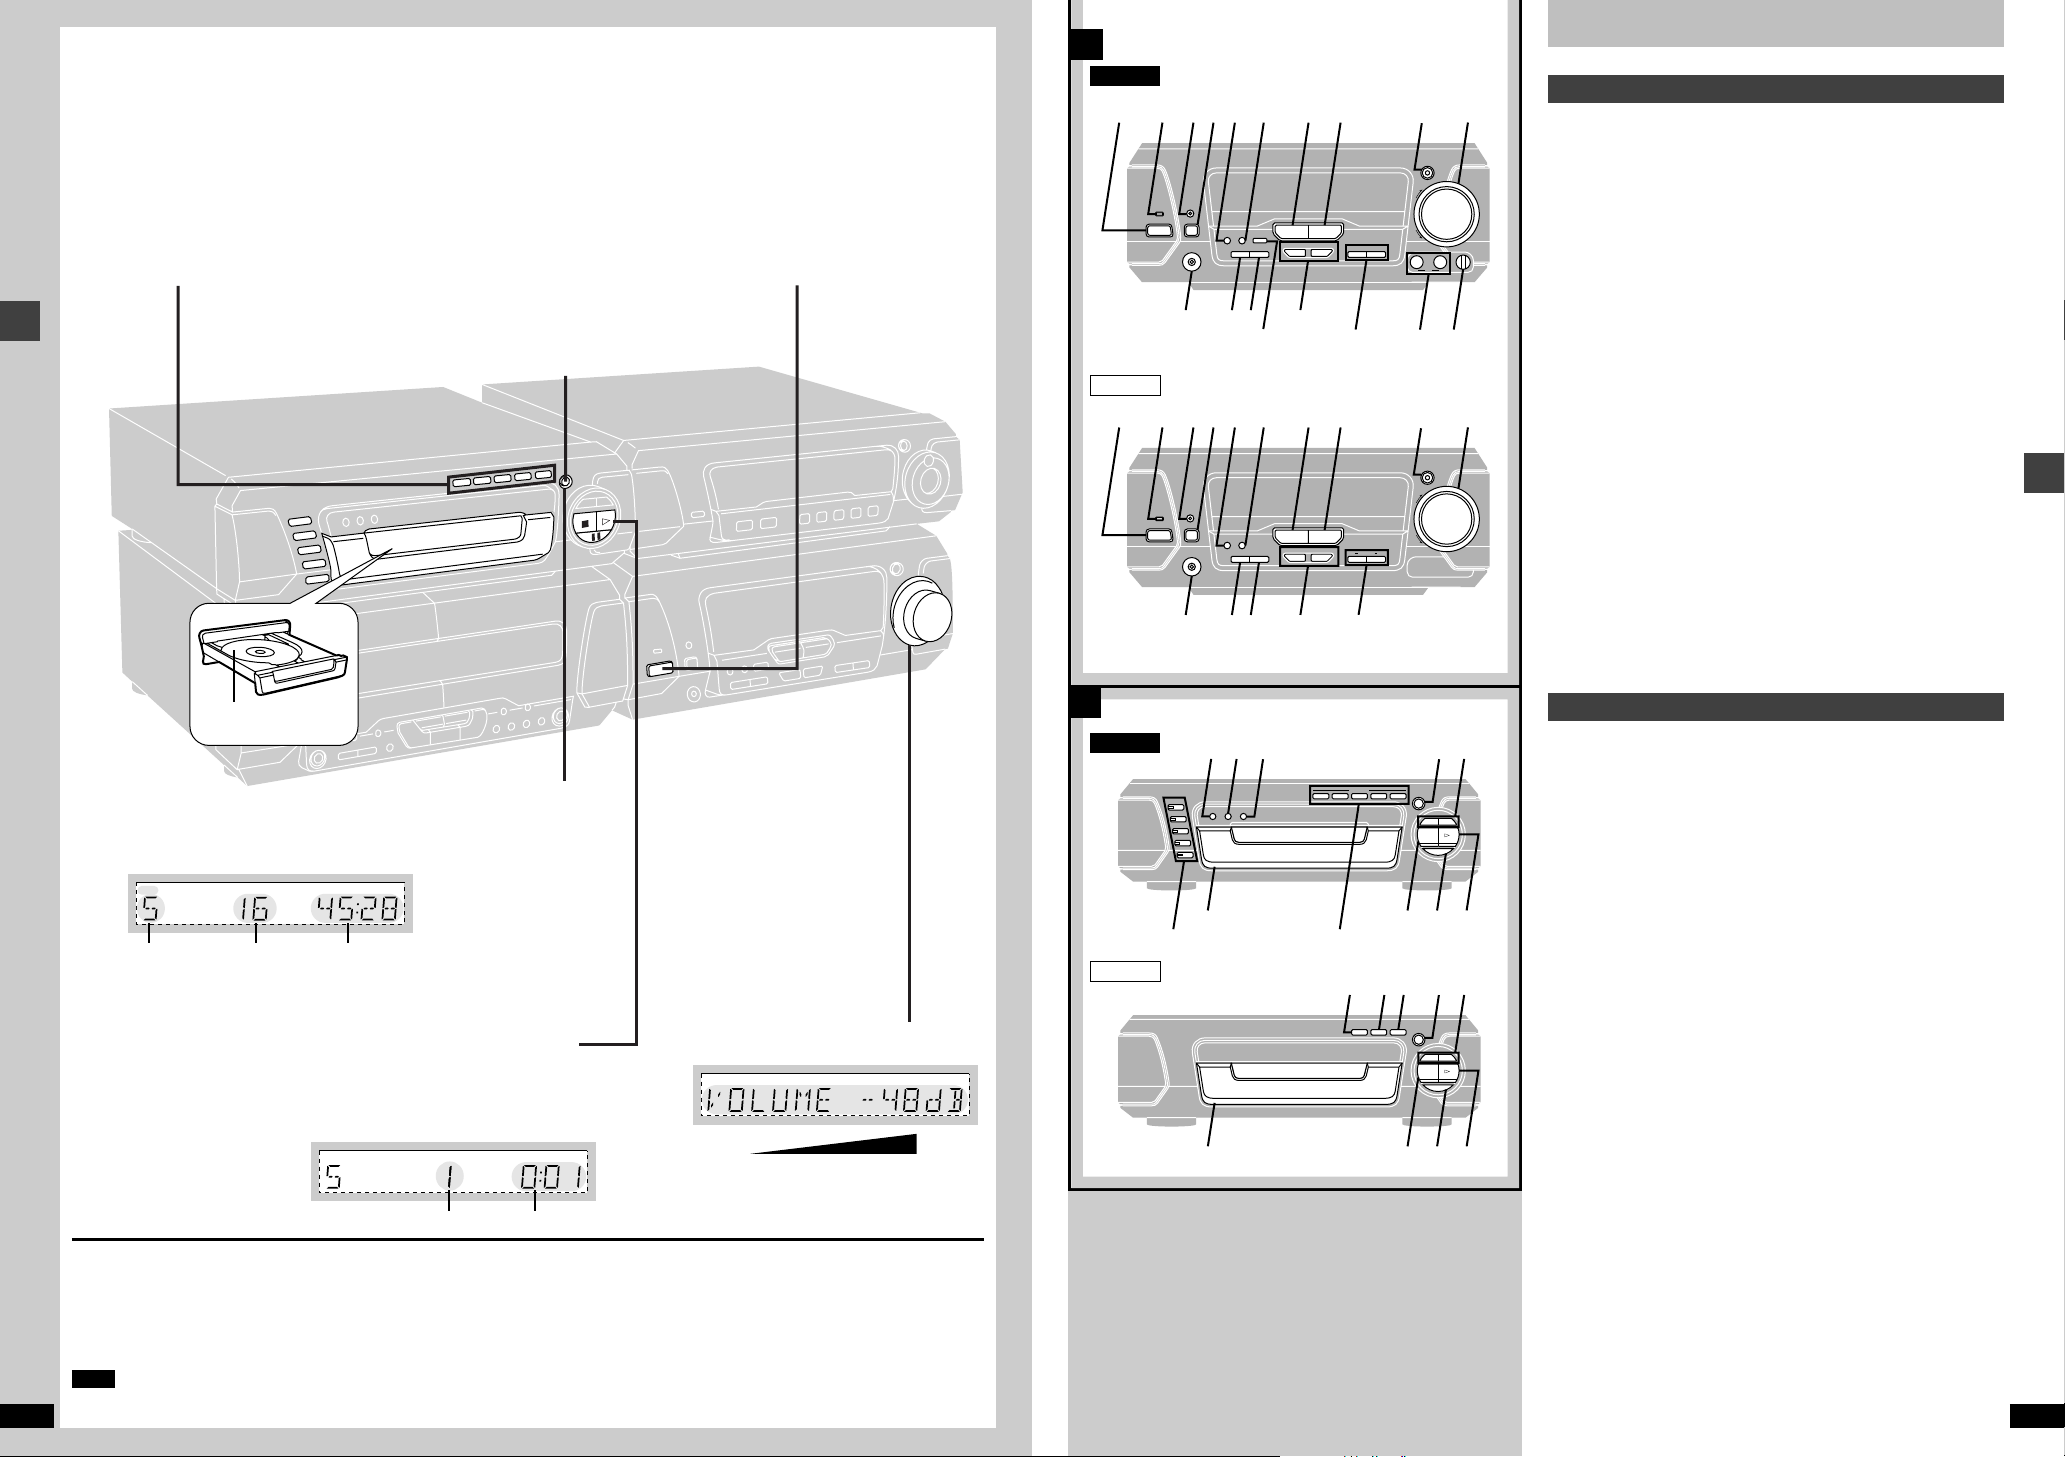
1
CD changer or
CD player
Cassette deck Tuner/amplifier
Locating
Sound processor
Sound processor
Tuner/amplifier
CD changer or CD player
Cassette deck
The illustrations show SC-EH790 for the United Kingdom and Eastern Europe.
Speakers
Optimum location
Distance: A=B=C=D=E
Front speaker (left) Front speaker (right)
[EH790]
Surround speaker (left)
Use only the supplied speakers.
Using other speakers can damage the unit and sound quality will be negatively affected.
Front speakers
Left and right front speakers are exactly same.
Surround speakers
Place either side of the listening position, or slightly to the rear, about 1
meter higher than ear level with the Technics logo facing toward the
listening position.
The effect varies with the type of music and the music source.
If you are unable to position the surround speakers as recommended
You can put them near the front speakers and still achieve a surround-like
effect (➡ page 26, VIRTUAL REAR SURROUND).
Attaching to a wall
Set the speaker onto screws and slide through bracket to lock into
position.
Note
The wall or pillar on which the speakers are to be attached should be
capable of supporting 5 kg per screw.
[EH790]
Center speaker
[EH790]
Surround speaker (right)
70 mm
30– 35 mm
7.5–9.5 mm
7–9 mm
Simple set-up and play
RQT6866
5
CENTER
SURROUND
R
L
LF
HF
LF
HF
R
L
(8™)
(6™)(8™)
(6™)
HF
LF
Simple set-up and play
STEP
2
[EH790]
Surround and center speakers
Right
Simple set-up and play
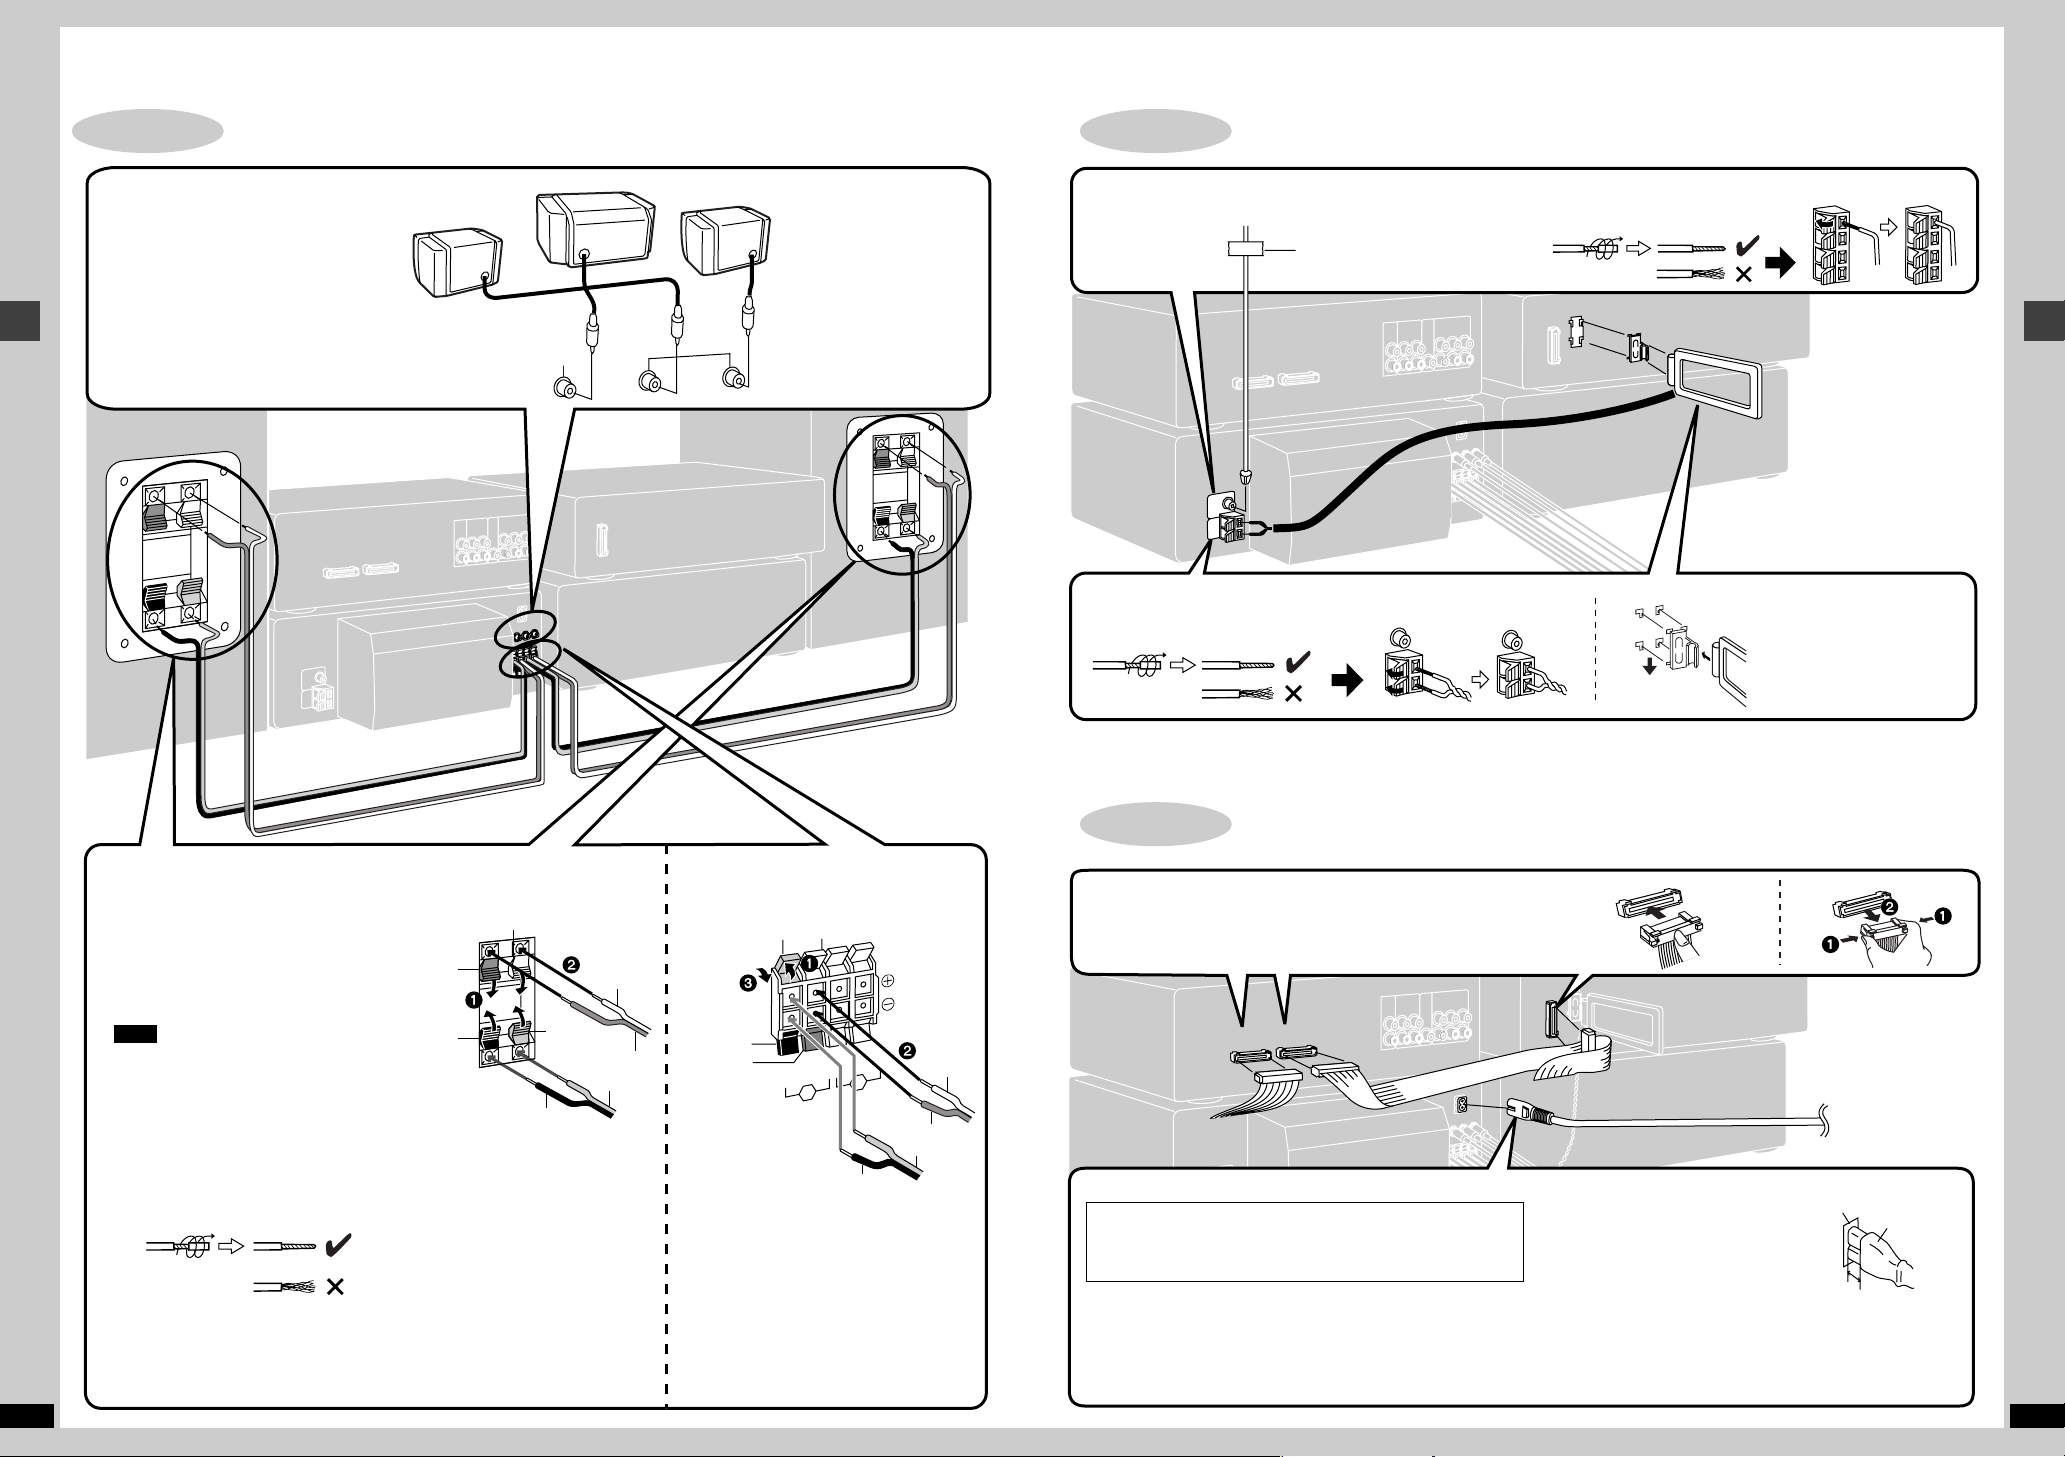
Speaker leads
Surround speaker
(right)
The illustrations show SC-EH790 for the United Kingdom and Eastern Europe.
Do not connect the AC mains lead until all other connections are complete.
Center speaker
Surround speaker (left)
Left
STEP
3
Antennas
FM indoor antenna
Fix the other end of the antenna where reception is best.
Adhesive tape
AM indoor antenna
Twist the vinyl tip and pull off.
For Australia and N.Z.
Twist the vinyl tip and pull off.
Simple set-up and play
Keep loose antenna cord away
from other wires and cords.
6
Front speaker
Connect the leads to the terminals of the
same colour.
LF and HF stand for low frequency and high
frequency.
Connect the left (L) side in the same
way.
Note
≥Never short-circuit positive (r) and nega-
tive (s) speaker wires.
≥Be sure to connect only positive (red or
grey) wires to positive (r) terminals and
negative (black or blue) wires to negative
(s) terminals.
Incorrect connection can damage the
speakers.
RQT6866
Twist the vinyl tip and pull off.
Speaker side Tuner/amplifier side
Blue
Black
Grey
Red
Grey
Red
Blue
Black
Blue
Black
Red
Grey
Black
Red
Grey
Blue
STEP
4
Flat cables and AC mains lead
Flat cables
Keep the cables as flat as possible against the back of the unit.
Connect the connectors to the terminals of the same colour.
Incorrect connection can damage the unit.
AC mains lead
(For the United Kingdom only)
BE SURE TO READ THE CAUTION FOR THE AC
MAINS LEAD ON PAGE 4 BEFORE CONNECTION.
Connecting Disconnecting
To household
mains socket
Insertion of connector
Even when the connector is perfectly inserted, depending on the type of inlet
used, the front part of the connector may
jut out as shown in the drawing.
However there is no problem using the unit.
For your reference:
Information you enter into the unit’s memory, except for time, remains
intact for up to two weeks after the mains lead is disconnected.
Appliance inlet
Connector
Approx. 6 mm
RQT6866
7
A
B
EH790
EH590
EH790
EH590
Í
Í/I
CLOCK/
TIMER
X
TUNING
W
PHONES
TUNING MODE SET KARAOKE ECHO
12
MIC
MIC VOL
MIN MAX
INPUT SELECTOR TUNER/BAND
DIGITAL
S.WOOFER
VOLUME
UP
DOWN
FM AUTO/
MONO
6CH
DISCRETE INPUT
F
PLAY/FREC
1 2 345 6 7 8 9
:
;<=
>
?B
RANDOM REPEAT EDIT
OPEN/CLOSE
∫
<
;
D
EF
G
H
I
J
K
Í
Í
/I
CLOCK/
TIMER
X
TUNING
W
F
PLAY/FREC
PHONES
TUNING MODE SET
INPUT SELECTOR TUNER/BAND
DIGITAL
S.WOOFER
VOLUME
UP
DOWN
FM AUTO/
MONO
DISP MODE
RDS
PTYPS
1 2 345 6 7 8 9
:
;
<
=
@A
>
@
L
1
DISC
RANDOM
2
3
4
5
DISC 1DISC
2
DIRECT OPEN
DISC 3DISC 4DISC
5
OPEN/CLOSE
∫
5/9
6
REPEAT
EDIT
<
;
L
DE
M
F
G
H
I
JK
N
sDEMO
sDEMO
/9
5/9
6
/9
C
Simple set-up and play —
The illustrations show SC-EH790 for the United Kingdom and Eastern Europe.
2
[EH790]
Press DIRECT OPEN [DISC1]–
[DISC5] and insert a CD.
[EH590]
Press [<, OPEN/CLOSE] and insert a CD.
Simple set-up and play
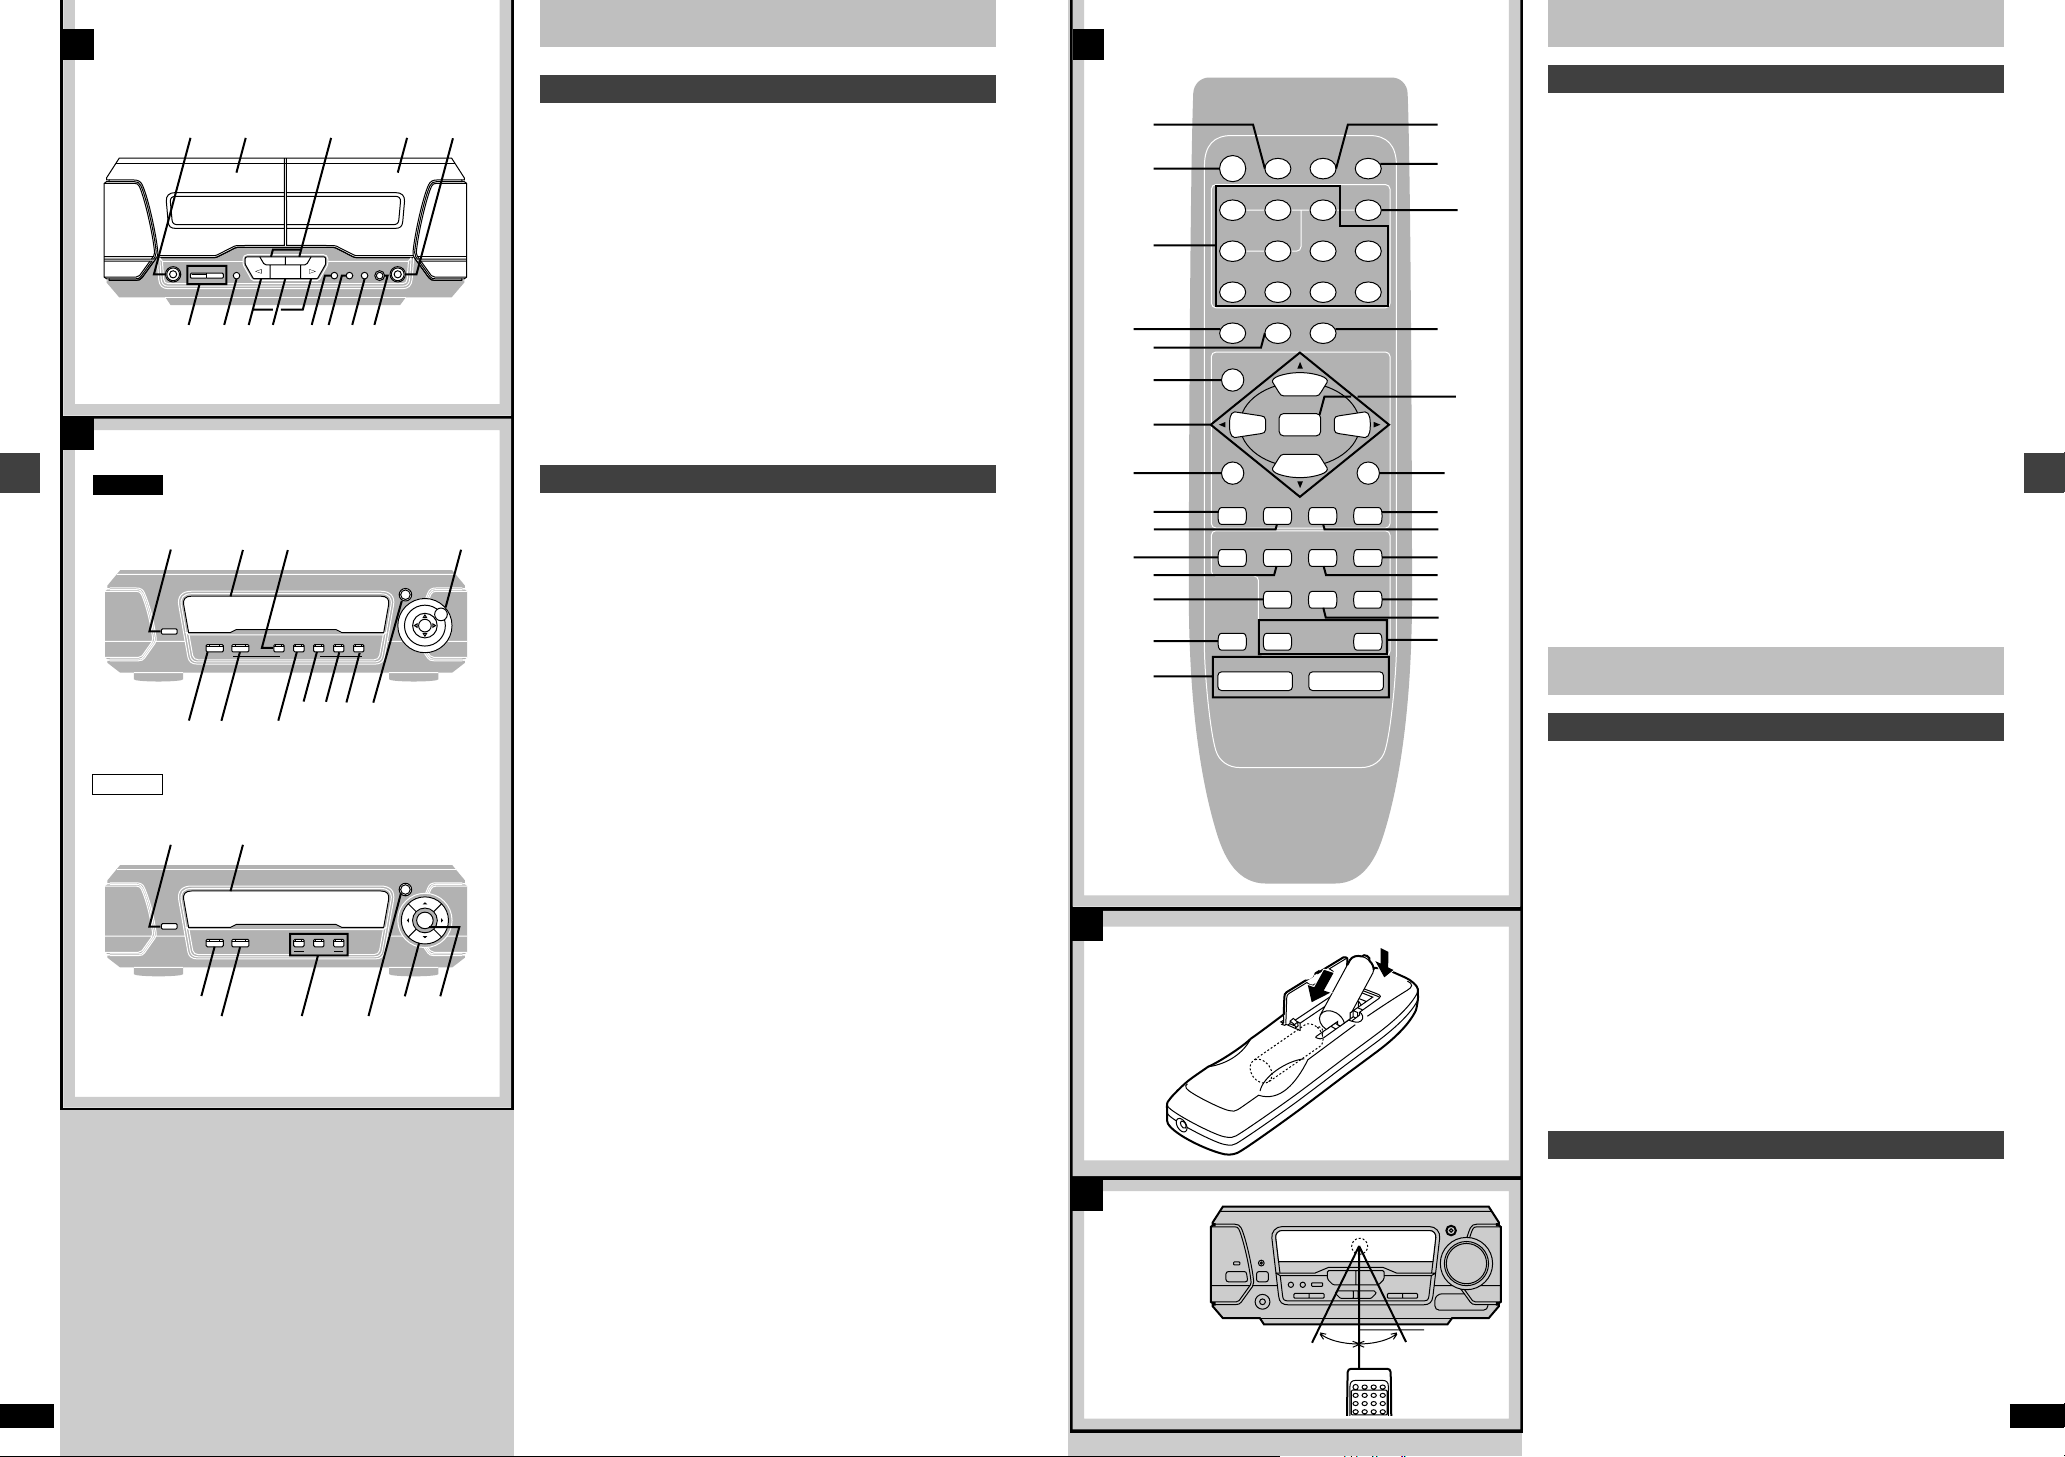
Front panel controls
Listening to a CD —
Tuner/amplifier
A
ª
1
Press [Í/I] to turn the unit on.
1 Standby/on switch (Í/I) . . . . . . . . . . . . . . . . . . . . . . . . . . . . . . . . . 8
Press to switch the unit from on to standby mode or vice versa. In
standby mode, the unit is still consuming a small amount of power.
2 Standby indicator (Í)
When the unit is connected to the AC mains supply, this indicator lights
up in standby mode and goes out when the unit is turned on.
3 Play timer/record timer button and indicator
(FPLAY/FREC) . . . . . . . . . . . . . . . . . . . . . . . . . . . . . . . . . . . . 31, 32
4 Clock/timer button (CLOCK/TIMER) . . . . . . . . . . . . . . . . 12, 31, 32
5 Demo button (–DEMO) . . . . . . . . . . . . . . . . . . . . . . . . . . . . . . . . . 12
6 FM mode button (FM AUTO/MONO) . . . . . . . . . . . . . . . . . . . . . . . 17
7 Source input button (INPUT SELECTOR) . . . . . . . . . . . . . . . . . . 37
8 Tuner/band button (TUNER/BAND) . . . . . . . . . . . . . . . . . . . . . . . 17
9 Digital super woofer button and indicator
(DIGITAL S.WOOFER) . . . . . . . . . . . . . . . . . . . . . . . . . . . . . . . . . . 20
: Volume control (VOLUME) . . . . . . . . . . . . . . . . . . . . . . . . . . . . . . . 8
; Headphone jack (PHONES) . . . . . . . . . . . . . . . . . . . . . . . . . . . . . 34
< Tuning mode button (TUNING MODE) . . . . . . . . . . . . . . . . . . . . . 17
= Set button (SET) . . . . . . . . . . . . . . . . . . . . . . . . . . . . . . . . . . . 12, 18
> Tuning buttons (X, W TUNING) . . . . . . . . . . . . . . . . . . . . . . . 12, 17
? [EH790]
6ch discrete input button (6CH DISCRETE INPUT) . . . . . . . . . . . 24
@ [EH790\for\the\United\Kingdom\and\Eastern\Europe\
[EH590]
RDS display mode button (RDS, PS–DISP MODE–PTY) . . . . . . 17
[EH790\for\Australia\and\N.Z.\
A Karaoke and echo buttons (KARAOKE, ECHO) . . . . . . . . . . . . . 35
B Microphone jacks (1–MIC– 2) . . . . . . . . . . . . . . . . . . . . . . . . . . . . 35
C Microphone volume control (MIC VOL) . . . . . . . . . . . . . . . . . . . . 35
8
Label must face upward.
3
Press [<, OPEN/CLOSE] to close the tray.
[EH790] Repeat steps 2 and 3 to load the other trays.
Displayed when the unit is in CD mode.
e.g. CD (CD-DA)
[EH790]
Disc number
of tracks
4
Total playing timeTotal number
Press [!] to start play.
[EH790]
Play starts from the first track on the disc in
the play position and finishes at the end of
the last track on the final disc (see below).
You can start play from another disc by
pressing [DISC, 1– 5].
To stop the disc
Press [∫].
To pause play
Press [;] during play. The “!” indicator flashes.
Press [;] or [!] to resume play.
Note
RQT6866
[EH790]
You can not change CDs in other trays while a disc is playing.
Track number Elapsed play time
Final disc [EH790]
For example, if play starts from disc 4, disc 3 will be the final disc.
Order of progression: Disc 4>5>1>2>3
“NO DISC” is displayed
When the unit is in CD mode but a disc isn’t in the play position
(SC-EH790) or in the player (SC-EH590).
§
5
Adjust the volume.
The disc in the play position is ready to play immediately when you
press [!].
CD changer/CD player
B
ª
D Random play button (RANDOM) . . . . . . . . . . . . . . . . . . . . . . . . . 16
E Repeat play button (REPEAT) . . . . . . . . . . . . . . . . . . . . . . . . . . . 16
F CD edit button (EDIT) . . . . . . . . . . . . . . . . . . . . . . . . . . . . . . . . . . 29
G Disc tray open/close button (<, OPEN/CLOSE) . . . . . . . . . . . . . . 8
H Skip/search buttons (4, 5) . . . . . . . . . . . . . . . . . . 13
Control guide and preparatory steps
I Disc tray
J Stop button (∫) . . . . . . . . . . . . . . . . . . . . . . . . . . . . . . . . . . . . . . . . 8
K Pause button (;) . . . . . . . . . . . . . . . . . . . . . . . . . . . . . . . . . . . . . . 8
L Play button and indicator (!) . . . . . . . . . . . . . . . . . . . . . . . . . . . . 8
The colour of the indicator depends on the operation taking place.
If stopped: orange
If playing: green
If paused: flashes
[EH790]
M Disc select buttons and indicators (DISC, 1–5) . . . . . . . . . . . . . . 8
Green: Indicates that the tray is ready to play its CD or to be opened.
N Disc direct open buttons . . . . . . . . . . . . . . . . . . . . . . . . . . . . . . . . 8
(DIRECT OPEN, DISC 1–DISC 5)
§
RQT6866
9
A
B
C
30x 30x
7m
Ai
KARAOKE
ECHO
DIGITAL
S.WOOFER
AV EFFECT
Í
SLEEP
CH SELECT
PROGRAM
1
23
4
56
7
890
CANCEL
DISC
VCR/AUX/
6CH INPUT
TAPE/
DECK 1/2
SUPER
SOUND EQ
TUNER/
BAND
2/;
1
∫
MUTING
s
VOLUME
r
EQ
Î
PRO LOGIC
SUPER SRND
TEST
p
q
r
9
l
kc
}
1
^
m
n
o
:
v
d
w†
8
s
t~
u
y
e
z
SUPER
3D AI EQ
1
—
+
—
+
2
|
°
x
Aj
4
5
{
S10/-/—
CD
DISPLAY
X
sALBUM
W
A
B
EH790
EH590
DSP CONTROL
DISPLAY MODE
OFF/ON
SUPER
3D AI EQ
MULTI JOG
SEAT
POSITION
SUPER
SOUND EQ
MULTI REAR
SURROUND
VIRTUAL REAR
SURROUND
CENTER
FOCUS
SUPER
SURROUND
ÎPRO LOGIC
]
^_
`a
b
d
e
\
MANUAL EQ
FLAT
M1 M3M2
DISPLAY MODE
MULTI
CONTROL
EQ
SUPER
SOUND EQ
AI EQ
^
j
g
]
h
k
i
c
f
COUNTER
RESET
DISPLAY
DECK 1/2
<
OPEN
<
OPEN
DOLBY NR
∫
56
REV MODE TAPE EDIT
µ
REC
PAUSE
O
P
QR
S
T
U
VW
X
Y
Z
\
[
Control guide and preparatory steps
Front panel controls
Cassette deck
A
ª
O Deck 1 cassette holder open button (< OPEN) . . . . . . . . . . . . . 19
P Deck 1
Q Fast forward/rewind, TPS buttons (6, 5) . . . . . . . . . . . . . . . 19
R Deck 2
S Deck 2 cassette holder open button (< OPEN) . . . . . . . . . . . . . 19
T Counter reset, display buttons
(COUNTER, RESET, DISPLAY) . . . . . . . . . . . . . . . . . . . . . . . . . . 28
U Deck 1/deck 2 select button (DECK 1/2) . . . . . . . . . . . . . . . . . . . 19
V Playback buttons and indicators («, !) . . . . . . . . . . . . . . . . . . . 19
The colour of the indicators depends on the operation taking place.
If stopped, fast forwarding or rewinding: orange
If playing or recording: green
While carrying out TPS or recording is on standby: flashes
W Stop button (∫) . . . . . . . . . . . . . . . . . . . . . . . . . . . . . . . . . . . . . . . 19
X Dolby noise reduction button (DOLBY NR) . . . . . . . . . . . . . . . . . 19
Y Reverse mode button (REV MODE) . . . . . . . . . . . . . . . . . . . . . . . 19
Z Tape edit button (TAPE EDIT) . . . . . . . . . . . . . . . . . . . . . . . . . . . . 30
[ Record pause button (¥ REC PAUSE) . . . . . . . . . . . . . . . . . . . . 29
Sound processor
B
ª
\ Display mode button (DISPLAY MODE) . . . . . . . . . . . . . . . . . . . 34
] Display
^ Super sound EQ button (SUPER SOUND EQ) . . . . . . . . . . . . . . 20
[EH790]
_ Jog control and joystick (2, 1, 3, 4, MULTI JOG) . . . . . . . . . 20
` Virtual rear surround button and indicator
(VIRTUAL REAR SURROUND) . . . . . . . . . . . . . . . . . . . . . . . . . . . 26
a Multi rear surround button and indicator
(MULTI REAR SURROUND) . . . . . . . . . . . . . . . . . . . . . . . . . . . . . 26
b Seat position button and indicator (SEAT POSITION) . . . . . . . . 27
c Super 3D AI EQ button (SUPER 3D AI EQ) . . . . . . . . . . . . . . . . . 21
d DOLBY PRO LOGIC button and indicator
(ÎPRO LOGIC, OFF/ON) . . . . . . . . . . . . . . . . . . . . . . . . . . . . . . . 24
e Super surround button and indicator
(SUPER SURROUND) . . . . . . . . . . . . . . . . . . . . . . . . . . . . . . . . . . 24
f Center focus button and indicator
(CENTER FOCUS) . . . . . . . . . . . . . . . . . . . . . . . . . . . . . . . . . . . . . 26
[EH590]
g Multi control buttons
(2, 1, 3, 4, MULTI CONTROL) . . . . . . . . . . . . . . . . . . . . . . . . . 21
h EQ button (EQ) . . . . . . . . . . . . . . . . . . . . . . . . . . . . . . . . . . . . . . . 20
i AI EQ button (AI EQ) . . . . . . . . . . . . . . . . . . . . . . . . . . . . . . . . . . . 21
j Manual EQ buttons (M1, M2, M3) . . . . . . . . . . . . . . . . . . . . . . . . . 22
k Flat button (FLAT) . . . . . . . . . . . . . . . . . . . . . . . . . . . . . . . . . . . . . 20
The illustration shows the remote control for SC-EH790
for Australia and N.Z.
R6, AA, UM-3
Front panel controls
Remote control
A
ª
Buttons such as 1 function in the same way as the controls on the main
unit.
l Sleep timer button (SLEEP) . . . . . . . . . . . . . . . . . . . . . . . . . . . . . 33
m Numbered buttons (1–9, 0, S10/-/—) . . . . . . . . . . . . . . . . . . . . . . . 15
n Cursor buttons (2, 1, 3, 4) . . . . . . . . . . . . . . . . . . . . . . . . . 25, 26
o Tape select, deck 1/deck 2 select button
(TAPE/DECK 1/2) . . . . . . . . . . . . . . . . . . . . . . . . . . . . . . . . . . . . . . 19
p CD pause/tape reverse playback button (2/;) . . . . . . . . . . . 8, 19
q Muting button (MUTING) . . . . . . . . . . . . . . . . . . . . . . . . . . . . . . . . 34
r Program button (PROGRAM) . . . . . . . . . . . . . . . . . . . . . . . . . . . . 15
s Cancel button (CANCEL) . . . . . . . . . . . . . . . . . . . . . . . . . . . . . . . 15
t CD button (CD) . . . . . . . . . . . . . . . . . . . . . . . . . . . . . . . . . . . . 15, 16
u CD play/tape forward playback button (1) . . . . . . . . . . . . . . 15, 19
v CD/tape stop button (∫) . . . . . . . . . . . . . . . . . . . . . . . . . . . . . 15, 19
w CD skip/search, tape fast forward/rewind buttons
(4, 5) . . . . . . . . . . . . . . . . . . . . . . . . . . . . . . . . 13, 19
x EQ button (EQ) . . . . . . . . . . . . . . . . . . . . . . . . . . . . . . . . . . . . . . . 20
[EH790]
y Input select button (VCR/AUX/6CH INPUT) . . . . . . . . . . . . . . 24, 37
z Disc button (DISC) . . . . . . . . . . . . . . . . . . . . . . . . . . . . . . . . . . . . 15
{ AV effect button (AV EFFECT) . . . . . . . . . . . . . . . . . . . . . . . . . . . 26
| Test button (TEST) . . . . . . . . . . . . . . . . . . . . . . . . . . . . . . . . . . . . 25
} Channel select button (CH SELECT) . . . . . . . . . . . . . . . . . . . . . . 25
~ Display button (DISPLAY) . . . . . . . . . . . . . . . . . . . . . . . . . . . . . . 14
† Album skip buttons (X, W –ALBUM) . . . . . . . . . . . . . . . . . . . . . . 13
[EH590]
° AUX button (AUX) . . . . . . . . . . . . . . . . . . . . . . . . . . . . . . . . . . . . . 37
The remote control
Batteries
B
ª
≥Insert so the poles (i and j) match those in the remote control.
≥Do not use rechargeable type batteries.
Do not;
≥mix old and new batteries.
≥use different types at the same time.
≥heat or expose to flame.
≥take apart or short circuit.
≥attempt to recharge alkaline or manganese batteries.
≥use batteries if the covering has been peeled off.
≥keep together with metallic objects such as necklaces.
Mishandling of batteries can cause electrolyte leakage which can damage
items the fluid contacts and may cause a fire.
If electrolyte leaks from the batteries, consult your dealer.
Wash thoroughly with water if electrolyte comes in contact with any part of
your body.
Remove if the remote control is not going to be used for a long period of
time. Store in a cool, dark place.
Replace if the unit does not respond to the remote control even when held
close to the front panel.
Control guide and preparatory steps
10
RQT6866
Tuner/amplifier
Use
C
ª
Aim at the sensor, avoiding obstacles, at a maximum range of 7 meters
directly in front of the unit.
≥Keep the transmission window and the unit’s sensor free from dust.
≥Operation can be affected by strong light sources, such as direct sunlight,
and the glass doors on cabinets.
Do not;
≥put heavy objects on the remote control.
≥take the remote control apart.
≥spill liquids onto the remote control.
RQT6866
11
B
1
2
3
123
Í/I
CLOCK/
TIMER
SET
SET
1
2
1
2
A
sDEMO
s
DEMO
TUNING
Control guide and preparatory steps
[A] Turning DEMO off
A demonstration of the display is shown if you have not set the
clock.
You can reduce the power consumed in standby mode by turning
the demonstration off.
While the unit is on:
Press and hold [–DEMO] until “NO DEMO” is
displayed.
Each time you press and hold the button:
NO DEMO (off)bDEMO (on)
ªB Setting the time
This is a 24-hour clock.
The example shows how to set the clock for 16:25 (4:25 p.m.).
1 Press [Í/I] to turn the unit on.
2 1 Press [CLOCK/TIMER] to display “CLOCK”.
Each time you press the button:
CLOCK>FPLAY>FREC>Original display
^————————————————————}
2 Within 5 seconds
Press [SET].
3 1 Press [TUNING (X or W)] to set the time.
The time display can be changed in one minute units by tapping
the buttons, and quickly by holding down the buttons.
2 Press [SET].
The time is set and the original display is restored.
Displaying the clock
Press [CLOCK/TIMER].
The clock is shown for about 5 seconds.
Reset the clock regularly to maintain accuracy.
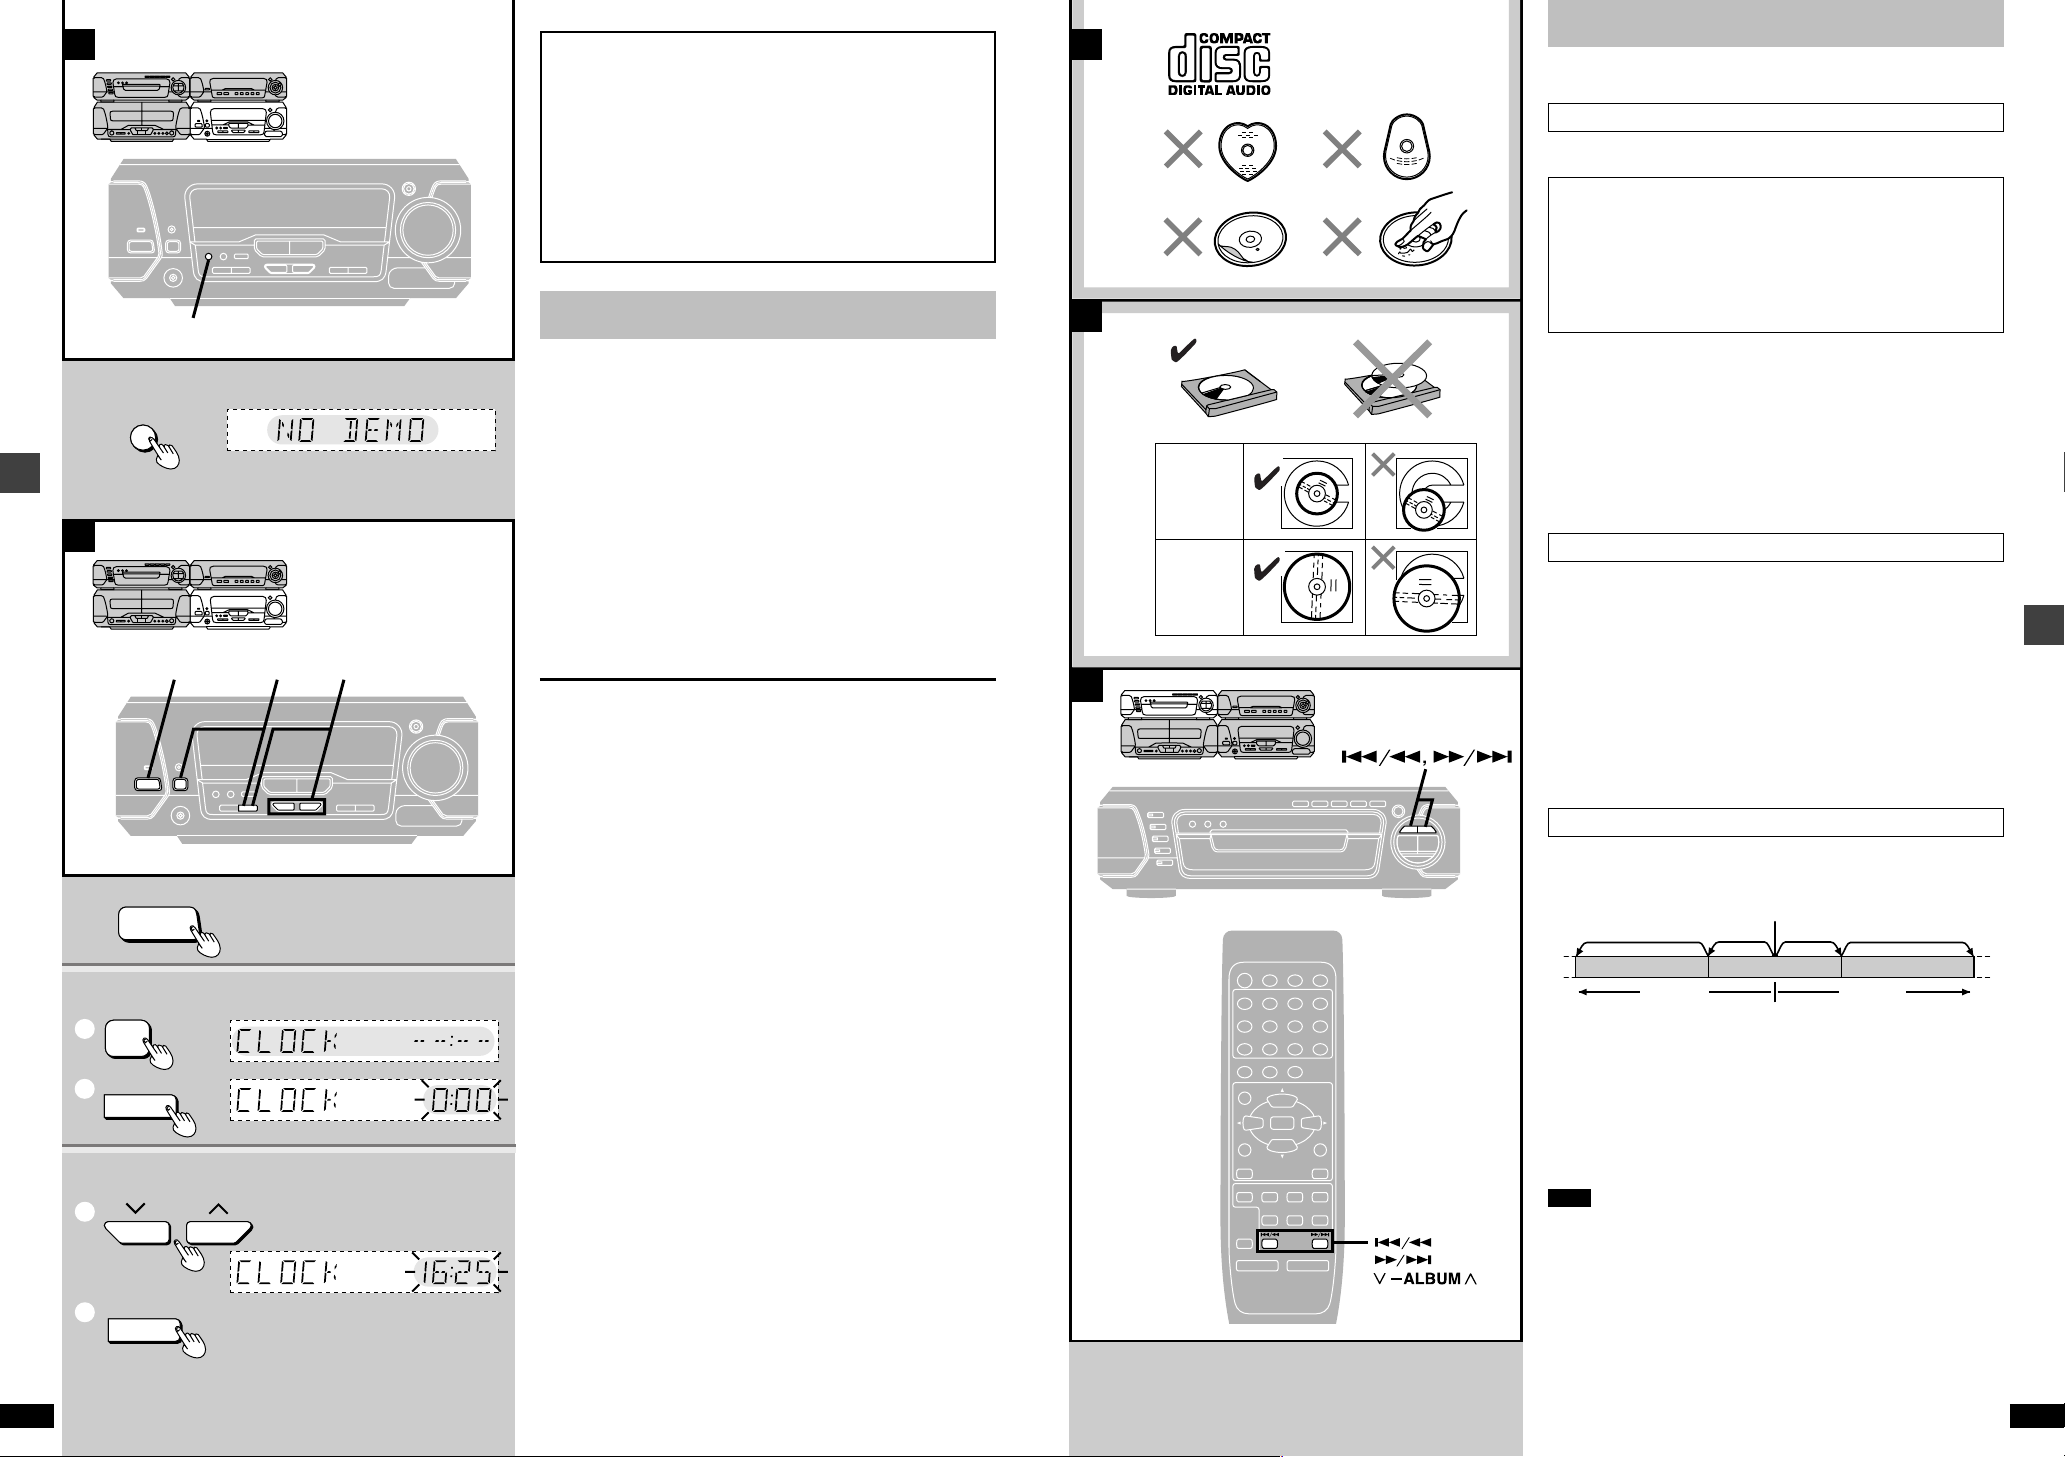
8 cm CD
12 cm CD
CDs
See page 8 for basic CD play.
CD selection
ªA
Choose discs with this mark (a).
Note on CD-R and CD-RW
This unit can play CD-R/RW (audio recording disc) recorded with
CD-DA, WMA (SC-EH790) or MP3 (SC-EH790). Finalize§ the disc
after recording.
§A process that allows play on compatible equipment.
[EH790]
See page 14 for details about WMA and MP3.
Do not;
≥use irregularly shaped discs (b).
≥attach extra labels and stickers.
≥use discs with labels and stickers that are coming off or with adhesive
exuding from under labels and stickers (c).
≥attach scratch-proof covers or any other kind of accessory.
≥write anything on the CD.
≥clean CDs with liquids. (Wipe with a soft, dry cloth.)
≥use CDs printed with label printers available on the market.
To prevent damage
ªB
Always observe the following points.
≥Load only 1 CD per tray (d).
≥Load CDs as shown in figure (e).
An adaptor is not needed with 8 cm CDs (singles).
≥Set the system on a flat, level surface.
≥Always unload all CDs before moving the system.
Do not;
≥set it on top of magazines, inclined surfaces, etc.
≥move the system while tray is opening/closing, or when loaded.
≥put anything except CDs in trays.
≥use cleaning CDs or CDs which are badly warped or cracked.
Skipping and searching through tracks
ªC
Basic operations
12
RQT6866
Skipping tracks
Press [4] (backward), or [5] (forward).
Current position
TwiceOnceTwice
RQT6866
Í
1
4
7
TEST
3D AI
CH SELECT
SUPER
SOUND EQ
VCR/AUX/
6CH INPUT
MUTING
Î
j
PROGRAM
SLEEP
CANCEL
23
S10/-/—
56
890
PRO LOGIC
SUPER SRND
EQ
AV EFFECT
S.WOOFER
TAPE/
TUNER/
CD
DECK 1/2
DISPLAY
2/;
X
sALBUM
W
VOLUME
i
DISC
DIGITAL
BAND
1∫
Once
Track
Track Track
Skipping albums [EH790] (WMA/MP3 only)
Press and hold [4] (backward), or [5] (forward) on the main
unit.
Press and hold [–ALBUM (X or W)] on the remote control.
Searching through tracks
During play
Press and hold [4] (backward), or [5] (forward).
Note
≥Skipping is done in the selected order in program play (➡ page 15).
≥You cannot skip to tracks already played in random play
(➡ page 16).
≥You can search only within tracks in program and random play.
[EH790] (WMA/MP3 only)
≥You cannot search through tracks.
13

1
3
4
DIGITAL
S.WOOFER
AV EFFECT
Í
SLEEP
CH SELECT
3D AI
PROGRAM
1
23
4
56
7
890
CANCEL
DISC
VCR/AUX/
6CH INPUT
TAPE/
DECK 1/2
SUPER
SOUND EQ
TUNER/
BAND
2/;
MUTING
s
VOLUME
r
EQ
Î
PRO LOGIC
SUPER SRND
TEST
1
2
3
4
CANCEL
CD
DISPLAY
∫
DISC
PRGM
1
23
4
56
7
890
PROGRAM
1
1
∫
j
S10/-/—
CD
DISPLAY
XsALBUMW
S10/-/—
2
EH790
DISC
1
23
4
5
1
2
DISC
DISC
X
sALBUM
W
DISC
ALBUM
A
B
2
DISC
PRGM
EH790
PRGM
EH590
DIGITAL
S.WOOFER
AV EFFECT
SLEEP
CH SELECT
3D AI
PROGRAM
1
23
4
56
7
890
CANCEL
DISC
VCR/AUX/
6CH INPUT
TAPE/
DECK 1/2
SUPER
SOUND EQ
TUNER/
BAND
2/;
1∫
MUTING
j
VOLUME
i
EQ
Î
PRO LOGIC
SUPER SRND
TEST
DISPLAY
Í
CD
DISPLAY
X
sALBUM
W
S10/-/—
DISPLAY
d
DISC
c
a
DISC
ALBUM
b
CDs
001
root
004track.wma
001album
004track.wma
005track.wma
006track.wma
002album
003album 007track.mp3
008track.mp3
009track.mp3
010track.mp3
011track.mp3
012track.mp3
013track.mp3
CDs
Basic operations
14
RQT6866
Disc number Album number Track number
Disc number Track number Elapsed play time
[EH790] (WMA/MP3 only)
Changing the display
Remote control only
During play
Press [DISPLAY].
The display will change as follows.
[>[a] Disc number, album number and track number
l;
l>[b] Track name (Example: Track name is “LOVE”.)
l;
l>[c] Album name (Example: Album name is “ABC”.)
l;
{=[d] Disc number, track number and elapsed play time (Normal display)
To display the root (names of albums above the current one)
Press and hold [DISPLAY] during play.
“ROOT”, name(s) of album(s) above the current one, current album name
and track name scroll across the display.
Root also appears when you move to another track (only when the display
mode [b] or [c] above is selected).
Note
The unit displays up to 12 characters each for album/track name.
WMA and MP3 information
≥Discs must conform to ISO9660 level 1 or 2 (except for extended formats).
≥This unit is compatible with multi-session but if there are a lot of sessions it
takes more time for play to start. Keep the number of sessions to a minimum to avoid this.
Notes on WMA only
≥Noise may occur when playing WMA files.
≥When creating a WMA disc, ensure the copyright feature is off.
Notes on MP3 only
≥This unit is not compatible with ID3 tags.
≥This unit is not compatible with files with a sampling rate of 32 kHz.
≥If you play an MP3 track that includes still picture data, it will take some
time before the music itself starts playing and the elapsed time will not be
displayed during this time. Even after the track starts, the correct play time
will not be displayed.
Order of play
Naming folders and files
Prefix folder and file names with 3-digit
numbers in the order you want to play
them.
Extension
(or.WMA)
The extension for MP3 is “.mp3” or
“.MP3”.
MPEG Layer-3 audio decoding technology licensed from Fraunhofer IIS and Thomson multimedia.
Windows Media, and the Windows logo
are trademarks, or registered trademarks of Microsoft Corporation in the
United States and/or other countries.
WMA is a compression format developed by Microsoft Corporation. It
achieves the same sound quality as
MP3 with a file size that is smaller than
that of MP3.
Programmed
track no.
Programmed
track no.
Programmed order
Programmed order
Program play
Select up to 24 tracks to play in the order you choose.
Remote control only
Preparation: Press [CD] to put the unit in CD mode.
[EH790] (WMA/MP3 only)
You can use program play only within a disc in the play position tray. Ensure a WMA/MP3 disc is in the play position tray.
1 Press [PROGRAM].
2 [EH790]
[A] For CD (CD-DA)
1 Press [DISC].
Within 10 seconds or so
2
Press [1]-[5] to select the disc.
[B] For WMA/MP3
Press and hold [–ALBUM (X or W)] to select the
album.
3 Select the track with the numbered buttons.
To select a 2-digit number
e.g. To select track 21, press [S10/-/—]>[2]>[1]
To select a 3-digit number [EH790]
e.g. To select track 123, press [S10/-/—]>[S10/-/—]>[1]>[2]>[3]
[EH790]
Alternatively, press [4] or [5 ] then press
[PROGRAM].
Repeat steps 2 through 3 (SC-EH790) or step 3 (SC-EH590) to program
additional tracks in the required order.
4 Press [1].
To cancel
Press [∫] while stopped.
[EH590] Alternatively, press [PROGRAM].
All the tracks are canceled.
“FULL” is displayed
If 24 tracks have been programmed.
“––:––” is displayed if;
≥total playing time for the tracks is over 99 minutes and 59 seconds.
≥a track numbered 25 or over was programmed.
≥a disc not in playing position was programmed (SC-EH790).
≥a WMA/MP3 disc was programmed (SC-EH790).
Tracks can still be programmed and played.
To check the contents of the program
1 Press [DISPLAY] (SC-EH790) or [CANCEL] (SC-EH590).
2 Press [4] or [5]. Each time you press the button, the
contents of the program are displayed.
3 [EH590] After the playing time appears on the display, press [CANCEL].
To add to the end of the program
Repeat steps 2 and 3 (SC-EH790) or step 3 (SC-EH590).
To cancel tracks
The last track
(SC-EH790)
A particular track
All tracks
To program the track you are listening to CD (CD-DA) only
Press [PROGRAM]. The program mode engages and the current track is
automatically recorded as program No. 1.
Press [CANCEL].
1. Press [DISPLAY] (SC-EH790) or
[CANCEL] (SC-EH590).
2. Select the track with [4] or
[5] then press [CANCEL].
3. [EH590] Press [CANCEL] again.
Cancel program play (see above).
Basic operations
RQT6866
15

A
B
1
2
3
4
231 4
FM AUTO/
MONO
Í/I
RDS
PS-DISP MODE-PTY
MHz
TUNED
MHz
ST
RDS PS
RDS
PTY
MONO
MHz
DISP MODE
RDS
PTYPS
TUNER/BAND
FM AUTO/
MONO
TUNING MODE
VOLUME
UP
DOWN
— dB
MIN
0 dB
MAX
TUNING
B
C
A
1
3
EH790
EH790
EH790
EH590
DISC
1
23
4
56
7
890
1
23
4
5
EH790
EH590
DISC
DISC
RANDOM
DISC
INPUT SELECTOR
RANDOM REPEAT
!
RANDOM REPEAT
!
1
2
EH590
DISC
DISC
RANDOM
RANDOM
REPEAT
REPEAT
Í
Î
PRO LOGIC
S10/-/—
S10/-/—
CD
DISPLAY
2
X
sALBUM
W
DISC
ALBUM
EH790
2/;
1
∫
XsALBUMW
2
Basic operations
SLEEP
PROGRAM
23
1
56
4
890
7
SUPER SRND
TEST
3D AI
EQ
CH SELECT
SUPER
SOUND EQ
TAPE/
VCR/AUX/
6CH INPUT
DECK 1/2
MUTING
VOLUME
CANCEL
DISC
AV EFFECT
DIGITAL
S.WOOFER
TUNER/
BAND
1
3
CD
CDs
Preparation: Press [CD] on the remote control or [INPUT SELECTOR] on
A
ª
[EH790]
Starts normal play from a selected track on a selected disc to the last track
of the final disc (➡ page 8).
[EH590]
Starts normal play from a selected track to the last track.
Remote control only
the tuner/amplifier to select “CD”.
Direct access play
1 [EH790]
1 Press [DISC].
2 Within 10 seconds or so
Press [1]-[5] to select the disc.
2 [EH790] (WMA/MP3 only)
Press and hold [–ALBUM (X or W)] to select the
album.
3 Select the track with the numbered buttons.
To select a 2-digit number
e.g. To select track 21, press [S10/-/—]>[2]>[1]
To select a 3-digit number [EH790]
e.g. To select track 123, press [S10/-/—]>[S10/-/—]>[1]>[2]>[3]
[EH790]
Alternatively, press [4] or [5].
Random play
B
ª
[EH790]
Plays the tracks on all discs once each in random order.
(For WMA/MP3, you cannot use random play.)
[EH590]
Plays the tracks once each in random order.
Press [RANDOM].
To cancel
Press [RANDOM].
“RANDOM” goes out.
For your reference:
In the program play mode (➡ page 15), the programmed tracks are played
randomly.
Repeat play
C
ª
[EH790]
Repeats all tracks on all discs or all programmed tracks.
[EH590]
Repeats all tracks or programmed tracks.
Press [REPEAT] before or during play.
The radio: manual tuning
Radio stations can be tuned manually by selecting the station’s frequency
or they can be preset into channels to make it easy to tune (➡ page 18).
Preparation: Press [Í/I] to turn the unit on.
1 Press [TUNER/BAND] to select FM or AM.
Each time you press the button: FMbAM
2 Press [TUNING MODE] to select “MANUAL”.
Each time you press the button: MANUALbPRESET
3 Press [TUNING (X or W)] to tune in the desired
broadcast.
If you press and hold [TUNING (X or W)] for a moment, the frequency
starts changing automatically. It stops when a station is found.
It may also stop if there is outside interference. Press and hold
[TUNING (X or W)] again to restart. You can also stop the frequency
changing by pressing [TUNING (X or W)].
“TUNED” is displayed when a radio station is tuned.
“ST” is displayed when a stereo FM broadcast is being received.
4 Adjust the volume.
If noise is excessive in FM
ªA
Press [FM AUTO/MONO] to display “MONO”.
This mode improves sound quality if reception is weak for some reason but
broadcasts are heard in monaural.
Press [FM AUTO/MONO] again to cancel the mode. “MONO” goes out.
MONO is also canceled if the frequency is changed.
Turn off “MONO” for normal listening. Stereo and monaural broadcasts are
automatically played as they are received.
Stations can be preset in monaural. Carry out presetting manually
(➡ page 18).
RDS broadcasting
ªB
[EH790\for\the\United\Kingdom\and\Eastern\Europe\
[EH590]
This unit can display the text data transmitted by the radio data system
(RDS) available in some areas.
If the station you are listening to is transmitting RDS signals, “RDS” will light
up on the display.
Displaying the text data
Press [PS-DISP MODE] to display a station name.
Press [DISP MODE-PTY] to display a program type.
Each time you press the button:
Frequency displaybPS or PTY display
Note
RDS displays may not be available if reception is poor.
§
“M.O.R M”=“Middle of the road music”
Basic operations
16
RQT6866
To cancel
Press [REPEAT].
“`” goes out.
To repeat only your favourite track(s)
1 Program the track(s) you want (➡ page 15).
2 Press [REPEAT] and make sure “`” is displayed.
3 Press [!]. Play will start.
NEWS
AFFAIRS
INFO
SPORT
EDUCATE
DRAMA
CULTURE
SCIENCE
PTY displays
VARIED
POP M
ROCK M
M.O.R M
LIGHT M
CLASSICS
OTHER M
WEATHER
§
FINANCE
CHILDREN
SOCIAL A
RELIGION
PHONE IN
TRAVEL
LEISURE
JAZZ
COUNTRY
NATIONAL
OLDIES
FOLK M
DOCUMENT
TEST
ALARM
RQT6866
17

A
B
1
2
3
4
5
DECK 1/2
DOLBY NR
REV MODE
<
OPEN
76
114
∫
6
, 5
23
DECK 1/2
Í/I
5
VOLUME
UP
DOWN
— dB
MIN
0 dB
MAX
NR
1
Î
NR
Î
2
1
Î
NR
DECK 1 DECK 2
The radio: preset tuning
A
B
C
1
2
3
MHz
SET
SET
SET
2
3
4
TUNER/
BAND
s
VOLUME
r
1
23
4
56
7
890
3
2, 4
1
3
2
SETTUNING MODE
Í
TUNING
S10/-/—
CD
DISPLAY
X
sALBUM
W
S10/-/—
Cassette tapes
Basic operations
CH SELECT
SOUND EQ
VCR/AUX/
6CH INPUT
MUTING
Í
SLEEP
PROGRAM
CANCEL
23
DISC
1
56
4
890
7
PRO LOGIC
TEST
SUPER SRND
3D AI
EQ
SUPER
AV EFFECT
DIGITAL
S.WOOFER
TUNER/
TAPE/
BAND
DECK 1/2
1∫
2/;
45
VOLUME
s
r
Preset channel
There are two methods of presetting stations.
Automatic presetting: The stations the tuner can receive are preset.
Manual presetting: You can select the stations to preset and the order
There are 39 channels available for presetting.
Automatic presetting
A
ª
Do the following once each for FM and AM.
Preparation: Tune to the frequency presetting is to begin at (➡ page 17).
they are preset in.
Hold down [SET].
Release the button when “AUTO MEMORY” appears.
The tuner presets all the stations it can receive into the channels in ascending order. FM stations are preset into channels 1 to 39, and AM stations are
preset into channels 21 to 39.
“SET OK” is shown when presetting is complete and the last station to be
preset is played.
“ERROR” is displayed if the tuner doesn’t receive any stations. Do presetting manually if this happens (see below).
Note
AM stations replace any FM channels that were preset in channels 21
to 39.
Manual presetting
B
ª
Preset the stations one at a time.
1 Tune to the required station.
2 Press [SET].
3 Press [TUNING (X or W)] to select a channel.
4 Press [SET].
The station occupying a channel is erased if another station is preset in that
channel.
Forward side
Tape facing down
See page 39 for tape selection.
Preparation: Press [Í/I] to turn the unit on.
1 Press [< OPEN] on deck 1 or deck 2 and insert
the cassette.
Close the holder by hand.
2 Press [DOLBY NR] to select Dolby NR on
(“ÎNR” appears) or off.
3 Press [REV MODE] to select the reverse mode.
Each time you press the button:
b: One side is played.
d: Both sides are played.
f: Both sides are played 8 times each.
4 Press [«] (reverse side) or [!] (forward side).
Play begins and the indicator changes to green.
5 Adjust the volume.
To stop the tape
Press [∫].
[A] To change the deck to be used
Press [DECK 1/2] to select the deck you want to play.
To listen to 2 tapes consecutively
Insert a tape into each deck and select “f”. Both tapes will be played
8 times each.
Finding a place on a tape
ªB
To fast-forward and rewind
Press [6] or [5] while the tape is stopped.
To find the beginning of a track (TPS: Tape program sensor)
Press [6] or [5] during play.
Selecting channels
C
ª
Preparation: Press [Í] to turn the unit on.
On the remote control
1 Press [TUNER/BAND].
Tape direction
2 Press the numbered buttons to select the
channel.
For channels 1 to 9 press the corresponding number.
For channels 10 or over press [S10/-/—], then the two digits.
e.g. To select channel 21: [S10/-/—]>[2]>[1]
3 Adjust the volume.
On the main unit
1 Select “PRESET” with [TUNING MODE].
2 Press [TUNING (X or W)] to select the channel.
Play resumes from the beginning.
Tape direction rewind fast-forward
!65
«56
≥Each deck’s play direction is stored in the system’s memory.
≥You can fast-forward or rewind the tape while you are playing or recording
a tape in another deck.
Press [DECK 1/2] to switch to the deck not playing, and then press
[6] or [5]. After the above operation, be sure to press [DECK 1/2] to
reselect the deck playing.
Note
TPS may not operate correctly in the following situations:
If the interval between tracks is less than 4 seconds.
If there is noise between tracks.
If there are silent parts within tracks.
Dolby noise reduction
Dolby NR reduces “hissing” when playing tapes. It increases the high frequency region when recording and then reduces it in playback. Use the
same system during playback and recording. This unit has Dolby B NR
which reduces noise to a third.
Prerecorded cassettes and equipment marked “ÎNR” use Dolby B NR.
Manufactured under license from Dolby Laboratories.
“Dolby” and the double-D symbol are trademarks of Dolby
Laboratories.
Basic operations
18
RQT6866
RQT6866
19

EH790
EH590
1, 3
3
1
2
FLAT
MULTI JOG
EH790
SUPER
3D AI EQ
EH590
AI EQ
1
2
3
EH790
EH790
EH590
MULTI
CONTROL
MULTI JOG
HEAVY
SOFT
SHARP
LIGHT
EH790
DIGITAL
S. WOOFER
SUPER
SOUND EQ
MULTI JOG
EH590
SUPER
SOUND EQ
EQ
FLAT
A
B
C
EH790 EH590
SUPER
SOUND EQ
SUPER
SOUND EQ
MULTI JOG
DIGITAL
S.WOOFER
EQ
EH790 EH590
ªA Boosting the super woofer
Changing sound field and quality
Boosting the super woofer adds power to the bass.
Press [DIGITAL S.WOOFER].
The indicator turns green.
Each time you press the button:
MID (medium)>MAX (high)>cancel (off)
^—————————————————}
There is only one level when listening through headphones.
To cancel
Press [DIGITAL S.WOOFER] to turn the indicator off.
ªB Using the super sound equalizer
Turning on the super sound equalizer gives you a more powerful sound.
Press [SUPER SOUND EQ].
The indicator turns green.
To cancel
Press [SUPER SOUND EQ] so the indicator turns orange (SC-EH790) or
turns off (SC-EH590).
ªC Changing sound field and quality
[EH790]
Turn [MULTI JOG] to select a setting.
Each time you turn:
HEAVY: Adds punch to rock.
CLEAR: Clarifies higher sounds.
SOFT: For background music
HALL: Expands sound to make you feel like you were in a hall.
AI-EQ: Adjust sound with the acoustic image equalizer (➡ page 21).
M.EQ: Create your own effects (➡ page 22).
FLAT: Canceled (no effect is added).
[EH590]
Press [EQ] to select a setting.
Each time you press the button:
HEAVY: Adds punch to rock.
CLEAR: Clarifies higher sounds.
SOFT: For background music
Using the acoustic image equalizer (AI EQ)
Achieve subtle sound quality settings with the soft, sharp, heavy, and light
coordinates.
1 [EH790]
Turn [MULTI JOG] to select “AI EQ”.
[EH590]
Press [AI EQ] to select “AI EQ”.
The indicator turns green.
2 [EH790]
Press [SUPER 3D AI EQ] to select the surround
level.
Each time you press the button:
AI EQ>SUPER 3D AI 1>SUPER 3D AI 2
^———————————————————-}
SUPER 3D AI 1: Adds a surround effect to the AI EQ.
SUPER 3D AI 2: Adds a stronger surround effect to the AI EQ.
3 Change the sound quality with [2, 1, 3, 4].
Adjust softness and sharpness with [2, 1].
Adjust heaviness and lightness with [3, 4].
The original display is restored on the display panel in about
5 seconds.
To cancel
[EH790] Turn [MULTI JOG] to select “FLAT”.
[EH590] Press [FLAT]. The indicator turns off.
The changes you make are stored and automatically recalled the next time
you select AI EQ.
Note
[EH790]
≥Turn off the effect if sound quality reduces when using SUPER 3D AI EQ
with a source.
≥You cannot select “SUPER 3D AI 1” or “SUPER 3D AI 2” while:
≥Using a surround system (➡ page 23)
≥Karaoke mode is on (SC-EH790 for Australia and N.Z. only ➡ page 35)
≥Listening to the radio
≥Using headphones
Changing sound field and quality
RQT6866
20
On the remote control
Press [EQ].
To cancel
[EH790] Turn [MULTI JOG] to select “FLAT”.
[EH590] Press [FLAT].
Note
[EH790]
Turn off the effect if sound quality reduces when using HALL with a source.
Changing sound field and quality
RQT6866
21

MULTI JOG
EH790
EH790 EH590
MULTI
CONTROL
MULTI JOG
EH590
M1 M3M2
LOW HIGHMID
1
2
1,2
1
2
EH790
EH590
FLAT
Changing sound field and quality
Using the manual equalizer (M.EQ)
Create your own sound quality effects.
SC-EH590 has three manual equalizers.
1 [EH790]
Turn [MULTI JOG] to select “MANUAL”.
[EH590]
Press [M1], [M2], or [M3] to select the equalizer
you want to set.
The indicator turns green.
2 Change the sound quality with [2, 1, 3, 4].
1 Select the sound range to be adjusted with [2] or [1].
2 Adjust the level with [3] or [4].
Repeat step 2 to set the desired sound quality.
The original display is restored on the display panel in about
5 seconds.
To cancel
[EH790] Turn [MULTI JOG] to select “FLAT”.
[EH590] Press [FLAT]. The indicator turns off.
Note
The changes you make are stored and automatically recalled the next time
you select the manual equalizer.
Enjoying surround sound
[EH790]
The following chart gives a summary of this unit’s surround features. It also shows additional effects that can be used to enhance your enjoyment.
Note
≥All the features are only effective if speakers are used. No discernible
effect will be heard through headphones.
≥You may experience a reduction in sound quality when these surround
systems and effects are used with some sources. If this occurs, turn the
surround system or effect off.
When you turn on one of the surround systems, the indicator for the
additional effects you can use also light.
Surround system Features Software
≥Use this input selector to enjoy
5.1 channel sources (e.g. Dolby Digital or
6CH
DISCRETE
INPUT
➡➡
(
➡ page 24)
➡➡
DOLBY PRO
LOGIC
(➡ page 24)
DTS) played on a DVD player with
5.1 channel output and a built in Dolby
Digital/DTS decoder (➡ page 36 for
connection, page 24 for operation).
≥Connect a subwoofer (not included) to
the SUBWOOFER terminal to enhance
the surround effect (➡ page 36).
≥This unit has built-in Dolby Pro Logic
circuitry so you can enjoy Dolby
Surround.
≥Dolby Pro Logic is a decoding system that
was developed to get a better sense of
presence from sources encoded with
Dolby Surround. The feeling of position
has been improved by the addition of a
separate center speaker channel.
≥If your DVD player only has 2-channel
output, you can still enjoy surround
sound when playing 5.1 channel software
by using Dolby Pro Logic.
“DTS”, “DTS Digital Surround” and “DTS Digital Out” are registered trademarks of Digital Theater Systems, Inc.
Manufactured under license from Dolby Laboratories.
“Dolby”, “Pro Logic” and the double-D symbol are trademarks of
Dolby Laboratories.
Additional effects
See below for details.
DVDs encoded with Dolby Digital or
DTS can be identified with these
marks.
See the manual for the equipment you
have connected for details on the
types of software you can use.
Software encoded with Dolby
Surround can be identified with this
mark.
≥DVD
≥Laser Disc
≥Video tape
≥CD
A Center focus
B Virtual rear surround
C Multi rear surround
D Seat position
A Center focus
B Virtual rear surround
C Multi rear surround
D Seat position
Changing sound field and quality
RQT6866
22
≥This mode adds surround effects to
movie software that hasn’t been recorded
SUPER
SURROUND
(➡ page 24)
MOVIE
MUSIC
with the above systems.
≥In MOVIE mode you can adjust the
volume of the surround speakers to get
the best surround effect.
This mode adds surround effects to stereo
sources.
Additional effects
A Center focus
≥This mode makes it seem like the
sound from the center speaker is
coming from within the television.
≥The center speaker should be placed
above the television.
(➡ page 26)
B Virtual rear surround
(➡ page 26)
≥This mode is useful if you have to
place your surround speakers near
the front speakers due to the layout
of your room.
≥This mode makes it seem like the
sound from the surround speakers is
coming from behind you.
Virtual speakers
Any stereo sound source except for
the radio.
≥Video tape
≥CD
≥Tape
C Multi rear surround
(➡ page 26)
This mode makes it seem like there
are multiple surround speakers in your
room, increasing the cinema-like
atmosphere.
D Seat position (➡ page 27)
This mode helps maintain the sound
position even if the listening position
itself is changed.
B Virtual rear surround
C Multi rear surround
D Seat position
Changing sound field and quality
Virtual speakers
RQT6866
23

TEST
CH SELECT
3, 4
CD
DISPLAY
XsALBUMW
S10/-/—
Enjoying surround sound
1
1
1
1
INPUT SELECTOR
SUPER SURROUND
6CH
DISCRETE INPUT
ÎPRO LOGIC
OFF/ON
A
B
C
SUPER
SURROUND
Enjoying surround sound
[EH790]
See page 25 for speaker level adjustments.
6CH DISCRETE INPUT
A
ª
Preparation: Connect a DVD player with a built in Dolby Digital or DTS
decoder (➡ page 36).
1 Press [6CH DISCRETE INPUT].
2 Playback a Dolby Digital or DTS source.
On the remote control
Press [VCR/AUX/6CH INPUT] to select “6CH INPUT”.
To cancel
Press [INPUT SELECTOR] to select another source.
Note
You cannot record or enjoy karaoke (For Australia and N.Z.) when you are
using 6CH DISCRETE INPUT. To record or enjoy karaoke with DVDs,
ensure the DVD player is also connected to the AUX (DVD) terminals and
select “AUX (DVD)” with [INPUT SELECTOR] (➡ page 37).
DOLBY PRO LOGIC
B
ª
1 Press [Î PRO LOGIC, OFF/ON].
The indicator turns green.
2 Playback a Dolby Surround source.
To cancel
Press [Î PRO LOGIC, OFF/ON] so the indicator turns off.
SUPER SURROUND
C
ª
Press [SUPER SURROUND] and select “MOVIE” or
“MUSIC”.
The indicator turns green.
Each time you press the button:
MUSIC>MOVIE>STEREO SOUND (off)
^————————————————-}
Í
SLEEP
PROGRAM
CANCEL
23
1
4
7
Î
TEST
SUPER
3D AI EQ
CH SELECT
SUPER
SOUND EQ
VCR/AUX/
6CH INPUT
DECK 1/2
45
MUTING
sr
DISC
56
890
PRO LOGIC
SUPER SRND
EQ
AV EFFECT
DIGITAL
S.WOOFER
TAPE/
TUNER/
BAND
∫
1
2/;
VOLUME
[EH790]
Speaker level adjustments
6CH DISCRETE INPUT, DOLBY PRO LOGIC
If the level of the speakers appears to be different while listening to a
source, adjust the level of the speakers to the same apparent level.
6CH DISCRETE INPUT: Adjust while listening to a surround source.
If your DVD player is able to output a test signal,
you can use it instead of playing a source.
DOLBY PRO LOGIC: Adjust while listening to a test signal.
Preparation: Set the volume level of the front speakers normally used for
enjoying the source.
Remote control only
1 6CH DISCRETE INPUT
Press [CH SELECT] to select the speaker.
The speaker channel changes each time you press the button.
DOLBY PRO LOGIC
Press [TEST].
A test signal is output from each speaker in order.
To stop the test signal, press [TEST] again.
Lch: Front left
Cch: Center
Rch: Front right
RSch: Right surround
LSch: Left surround
SWch: Subwoofer (6CH DISCRETE INPUT; only when connected)
≥The surround channel for Dolby Pro Logic is monaural so the indicator
appears as “Sch” instead.
2 Press [3] (to increase level) or [4] (to decrease level).
SUPER SURROUND
While playing a source
1. Press [CH SELECT].
2. Press [3] (to increase level) or [4] (to decrease level).
Changing sound field and quality
RQT6866
24
To cancel
Press [SUPER SURROUND] to select “STEREO SOUND”.
The indicator turns off.
Changing sound field and quality
RQT6866
25

1
2
SEAT
POSITION
MULTI JOG
1
2
DIGITAL
S.WOOFER
AV EFFECT
SLEEP
CH SELECT
PROGRAM
1
23
4
56
7
890
CANCEL
DISC
VCR/AUX/
6CH INPUT
TAPE/
DECK 1/2
SUPER
SOUND EQ
TUNER/
BAND
MUTING
VOLUME
EQ
SUPER SRND
TEST
Î
PRO LOGIC
Í
sr
45
2/;
1
∫
SUPER
3D AI EQ
1
234
CD
DISPLAY
XsALBUMW
S10/-/—
A
B
C
CENTER
FOCUS
VIRTUAL REAR
SURROUND
MULTI REAR
SURROUND
VIRTUAL REAR
SURROUND
CENTER
FOCUS
MULTI REAR
SURROUND
DIGITAL
S.WOOFER
AV EFFECT
SLEEP
CH SELECT
PROGRAM
1
23
4
56
7
890
CANCEL
DISC
VCR/AUX/
6CH INPUT
TAPE/
DECK 1/2
SUPER
SOUND EQ
TUNER/
BAND
MUTING
VOLUME
EQ
SUPER SRND
TEST
Î
PRO LOGIC
Í
sr
45
2/;
1
∫
SUPER
3D AI EQ
3
2
1
CD
DISPLAY
XsALBUMW
S10/-/—
Surround effects
Surround effects
[EH790]
These effects can be used with the surround systems described on page 24.
Refer to the chart on page 23 for details on which effects can be used.
These effects are available when the corresponding indicators are alight.
CENTER FOCUS
ªA
Press [CENTER FOCUS].
The indicator turns green.
To cancel
Press [CENTER FOCUS] so the indicator turns orange.
On the remote control
1 Press [AV EFFECT].
2 Press [2] or [1] so the CENTER FOCUS indicator flashes.
3 Press [3] (ON) or [4] (OFF).
VIRTUAL REAR SURROUND
ªB
Press [VIRTUAL REAR SURROUND].
The indicator turns green.
To cancel
Press [VIRTUAL REAR SURROUND] so the indicator turns orange.
On the remote control
1 Press [AV EFFECT].
2 Press [2] or [1] so the VIRTUAL REAR SURROUND indicator
flashes.
3 Press [3] (ON) or [4] (OFF).
MULTI REAR SURROUND
ªC
[EH790]
SEAT POSITION
1 Press [SEAT POSITION].
The indicator flashes green.
2 While the indicator is flashing (within 10 seconds)
Adjust the seat position with [2, 1, 3, 4].
The indicator flashes for 10 seconds then lights green.
To cancel
1. Press [SEAT POSITION] so the indicator flashes.
2. Press [SEAT POSITION] again while the indicator is flashing so it turns
orange.
On the remote control
1 Press [AV EFFECT].
2 Press [2] or [1] so the SEAT POSITION indicator flashes.
3 Press [3] (ON).
4 Adjust the seat position with [2, 1,3, 4] .
To turn it off, after steps 1 and 2 press [4] so the indicator turns orange.
Note
≥The seat position is remembered by the unit and is reactivated when you
turn seat position on again.
≥When used with virtual rear surround, seat position is changed in
3 horizontal steps.
Changing sound field and quality
Press [MULTI REAR SURROUND].
The indicator turns green.
To cancel
Press [MULTI REAR SURROUND] so the indicator turns orange.
On the remote control
1 Press [AV EFFECT].
2 Press [2] or [1] so the MULTI REAR SURROUND indicator
flashes.
3 Press [3] (ON) or [4] (OFF).
(On the sound processor)
Changing sound field and quality
26
RQT6866
RQT6866
27

1
2
3
B
EH790
EH590
EH790
EH590
A
B
∫
1
2
DISC1–5
EDIT
3
∫
3
∫
∫
¥
REC
PAUSE
EDIT
EDIT
EDIT
NR
Î
2
REC
2
EDIT
REC
D
1
2
3
C
AAB
COUNTER
RESET
1
COUNTER
DISPLAY
COUNTER
RESET
DISPLAY
DECK 1/2
6
3
425
132
<
OPEN
DOLBY NR
REV MODE
Tab for side B Tab for side A
To re-record
Normal tape High-position tape
Recording operations
A
Side A
A
Discrimination hole
Forward side
Tape facing down
Before recording (Deck 2 only)
See page 39 for tape selection.
Note
[EH790]
You cannot record when [6CH DISCRETE INPUT] is selected.
Volume, sound quality and surround effects have no effect on
recording. Sound quality and surround effects are automatically set
to flat when recording.
Recording CDs
Preparation:
≥Do the preparatory steps (➡ page 28).
≥Insert the CD(s) you want to record (➡ page 8).
≥[EH790]
Press [DISC, 1–5] on the CD changer to select the disc where you want to
start recording, then press [∫] to stop the disc.
Normal recording
A
ª
1 Press [«] (reverse side) or [!] (forward side) then [∫] to
To display the tape counter while recording
ªA
Press [COUNTER DISPLAY].
The counter is displayed for about 5 seconds.
≥Press [COUNTER RESET] to reset the counter.
≥To display or reset the tape counter for deck 1, first press [DECK 1/2].
Erasing recordings
ªB
1 Press [INPUT SELECTOR] to select “TAPE”.
2 Insert the recorded tape into deck 2.
3 Press [DOLBY NR] so the “Î NR” indicator goes out.
4 Select the reverse mode.
5 Press [¥ REC PAUSE].
6 Press [«] or [!].
Erasure prevention
ªC
The illustration shows how to remove the tabs to prevent recording. To
record on the tape again, cover as shown, being careful not to cover the
high position discrimination hole.
Your attention is drawn to the fact that recording pre-recorded tapes
or discs or other published or broadcast material may infringe copyright laws.
Preparatory steps
D
ª
Do these steps before each recording.
Wind up the leader tape so recording can begin immediately.
1 Press [< OPEN] on deck 2 and insert the
cassette.
Close the holder by hand.
set the tape direction.
2 Press [¥ REC PAUSE].
The deck goes into the recording standby mode and the indicator “«”
or “!” starts flashing.
3 Press [!] on the CD changer or CD player.
Recording starts automatically.
4 seconds after the CD(s) finishes, the deck goes into the recording
standby mode.
To stop recording
EITHER
Press [∫] on the CD changer or CD player.
The deck goes into the recording standby mode 4 seconds later.
OR
Press [∫] on the deck.
Recording stops immediately but the CD continues to play.
To record programmed tracks
Program tracks before step 1 (➡ page 15).
One touch CD editing
B
ª
This function makes it easier for you to record from discs.
≥When recording, if a track is cut off in the middle at the end of the front
side, it is recorded from the beginning on the reverse side.
(Ensure the reverse mode “d” is selected. )
≥At the end of the reverse side recording stops and the current track will be
interrupted.
After pressing [«] or [!] then [∫] on the cassette deck to set the tape
direction,
Press [EDIT].
Recording starts. In the meantime, “CD EDIT” will scroll across the display.
After edit-recording has finished, the cassette deck automatically stops.
2 Press [DOLBY NR] to select Dolby NR on
(“ÎNR” appears) or off.
(➡ “Dolby noise reduction”, page 19)
3 Press [REV MODE] to select the reverse mode.
Each time you press the button:
b: One side only records.
d and f: Both sides record (forward >reverse).
“f” automatically changes to “d” when [¥ REC PAUSE], [EDIT]
or [TAPE EDIT] is pressed.
To stop editing
Press [∫] on the CD changer or CD player.
The cassette deck also stops. “EDIT OUT” scrolls across the display.
To edit programmed tracks
Program the tracks (➡ page 15) and press [EDIT].
Recording operations
28
RQT6866
RQT6866
29

1
2
3
1
2
1
2
a
b
c
d
23
FPLAY/FREC
1
CLOCK/
TIMER
SET
SET
Í/I
F
PLAY
F
PLAY
F
PLAY
MHz
F
PLAY
F
PLAY
F
PLAY
CH
F
PLAY
F
PLAY
TUNING
1
2
B
A
2
3
¥
REC
PAUSE
DECK 1/2
1
2
∫
∫
21
23
∫
MHz
NR
Î
2
NR
Î
1 2
TAPE EDIT
REC
REC
TUNED
ªA Recording the radio
Preparation: Do the preparatory steps (➡ page 28).
1 Tune to the required station.
(➡ page 17 or 18)
2 Press [¥ REC PAUSE].
The deck goes into the recording standby mode and the play indicator
“»” or “!” starts flashing.
3 Press [«] (reverse side) or [!] (forward side) to start
recording.
Using the timers
The play timer
This timer starts play of the selected source at the selected time.
The example shows settings for preset radio channel 1 to play between
6:30 and 7:40 at j48 dB.
Preparation: Turn the unit on, set the time (➡ page 12), preset radio
stations if you want the timer to start playing the radio
(➡ page 18).
1 1 Press [CLOCK/TIMER] to select “FPLAY”.
Each time you press the button:
CLOCK>FPLAY>FREC>Original display
^————————————————————}
2 Press [SET] within 3 seconds.
1 Press [TUNING (X or W)] to select the condi-
tion required and
2 Press [SET].
a Start time
b Finish time
c Source
TUNER()CD()TAPE
^——————————J
Insert a CD or tape if you select these sources.
If you select TUNER
Select a preset channel.
d Volume
The play timer is now on standby. The display shows each condition
again then restores the original display.
To stop recording
Press [∫].
To temporarily stop recording
Press [¥ REC PAUSE].
The deck goes into recording standby mode.
To resume recording press [«] or [!] with the flashing indicator.
2 Follow these steps to set items a to d.
ªB Tape-to-tape recording
Preparation:
≥Do the preparatory steps 1 and 3 (➡ page 28).
≥Insert the tape to be recorded in deck 1.
1 Set the tape direction on both decks.
1 Press [DECK 1/2] to select “DECK 2”.
2 First press [«] or [!], and then [∫].
Repeat steps 1 and 2 for deck 1.
2 Press [TAPE EDIT] to start recording.
The indicator “»” or “!” shows deck 2 direction.
If either deck 1 or deck 2 stops, the other deck also stops.
3 Press [Í/I] to turn the unit off.
To stop recording
Press [∫].
Both decks will stop.
To enjoy another source while recording
Start playing the other sound source.
You can change the volume level and tone quality without affecting the
recording.
Note
The recording level and the noise reduction effect of the original (playback)
tape will be recorded on the new tape.
FPLAY/FREC indicator remains illuminated to show the play (or
record) timer is on.
The timer starts at the set time with the volume increasing gradually to the
set level.
To cancel the timer
Press [FPLAY/FREC] so “FPLAY” goes out.
Each time you press the button:
FPLAY>FREC>FPLAY FREC>Light off (OFF)
^—————————————————————}
The play timer will be canceled, but the settings stay in the
memory.
For your reference:
When you insert cassettes in decks 1 and 2, deck 1 has priority.
Recording operations
RQT6866
30
Timer operations and convenient functions
RQT6866
31

B
A
FPLAY/FREC
CLOCK/
TIMER
SLEEP
SLEEP
DIGITAL
S.WOOFER
AV EFFECT
Í
SLEEP
CH SELECT
3D AI
PROGRAM
1
23
4
56
7
890
CANCEL
DISC
VCR/AUX/
6CH INPUT
TAPE/
DECK 1/2
SUPER
SOUND EQ
TUNER/
BAND
2/;
1∫
MUTING
45
j
VOLUME
i
EQ
Î
PRO LOGIC
SUPER SRND
TEST
SLEEP
CD
DISPLAY
XsALBUMW
S10/-/—
1
2
4
24
3
FPLAY/FREC
1
1
2
1
2
F
REC
MHz
F
REC
F
REC
F
REC
F
REC
CH
CLOCK/
TIMER
SET
SET
Í/I
a
b
c
F
REC
TUNING
Using the timers
Using the timers
Timer operations and convenient functions
The record timer
This timer records the radio at the set time.
The example shows settings for recording preset channel 1 from 18:30
to 19:30.
Preparation: Turn the unit on, set the time (➡ page 12), preset radio
stations (➡ page 18).
1 1 Press [CLOCK/TIMER] to select “FREC”.
Each time you press the button:
CLOCK>FPLAY>FREC>Original display
^————————————————————}
2 Press [SET] within 3 seconds.
2 Follow these steps to set items a, b and c.
1 Press [TUNING (X or W)] to select the condi-
tion required and
2 Press [SET].
a Start time
b Finish time
c Preset channel
The record timer is now on standby. The display shows each condition again then restores the original display.
3 Prepare for recording.
1 Insert a tape into deck 2.
2 Select the Dolby NR mode.
3 Select the reverse mode.
4 Select the tape direction.
4 Press [Í/I] to turn the unit off.
FPLAY/FREC indicator remains illuminated to show the record (or
play) timer is on.
Recording starts 30 seconds before the set time with the volume muted
during the set time.
The play and record timers
A
ª
Turning the timers on and off
The timers come on at the set times if the FPLAY/FREC indicator is on.
They can be turned on and off by pressing [FPLAY/FREC].
Checking the timers
Press [CLOCK/TIMER] to select “FPLAY” (or “FREC”).
The timer conditions are shown in the following order:
Play timer:
Start time>Finish time>Source>Volume
Record timer:
Start time>Finish time>Selected radio station
The timers can be checked even if the unit is off.
Playing the unit after the timers are set
The unit can be used after the timers are set. Make sure the unit is off before
the set start time.
Note
≥If you turn the unit off and on again while a timer is functioning, the finish
time setting will not be activated.
≥If the unit is on, the timer will not function. The system must be in the
standby mode.
≥This system retains the ON/OFF time settings until you make a new
setting. If you make a new ON time setting, you must make a new OFF
time setting.
≥Do not turn DEMO on after setting a timer. The timers will not work while
DEMO is on.
The sleep timer
B
ª
Remote control only
This timer turns the unit off after a set time.
While playing a source
Press [SLEEP] to select the time (minutes).
Each time you press the button:
SLEEP 30 ———)SLEEP 60 ———)SLEEP 90
^——SLEEP OFF(—SLEEP 120(—}
To cancel the timer
Press [FPLAY/FREC] so “FREC” goes out.
Each time you press the button:
FPLAY>FREC>FPLAY FREC>Light off (OFF)
^—————————————————————}
The record timer will be canceled, but the settings stay in the
memory.
To cancel the sleep timer
Press [SLEEP] to select “SLEEP OFF”.
“SLEEP” goes out.
To confirm the remaining time
(While the timer is functioning)
Press [SLEEP].
The remaining time is shown for about 5 seconds.
To change the setting
Press [SLEEP] to display the remaining time, then press again to select the
required time.
Using the timers together
Any of the timers can be used together, but ensure the unit is off before the
start time for the record and play timers.
Timer operations and convenient functions
32
RQT6866
RQT6866
33

A
1
3
ECHO 1-MIC-2
13
KARAOKE
V.MUTE
MONO L
MIC VOL
MIN MAX
ECHO
VOLUME
UP
DOWN
MONO
R
ECHO
A
DISPLAY MODE
DISPLAY MODE
B
C
DIGITAL
S.WOOFER
AV EFFECT
SLEEP
CH SELECT
3D AI
PROGRAM
1
23
4
56
7
890
CANCEL
DISC
VCR/AUX/
6CH INPUT
TAPE/
DECK 1/2
SUPER
SOUND EQ
TUNER/
BAND
2/;
1∫
MUTING
45
j
VOLUME
i
EQ
Î
PRO LOGIC
SUPER SRND
TEST
VOLUME
MUTING
MUTING
PHONES
a
b
c
Í
CD
DISPLAY
X
sALBUM
W
S10/-/—
(On the sound processor)
ªA Changing the sound range display
The sound processor shows the level of each sound range with the three
types of display described below.
Press [DISPLAY MODE].
The spectrum display will change as follows.
[a] Normal display
This display indicates the strength of the sound in each tonal range.
[b] Peak-hold display
The peak sound value of each sound range is held on the display for
about one second after it occurs.
[c] Aurora display
The peak sound value of each sound range is displayed in inverted
form.
ªB Muting the volume
Remote control only
Press [MUTING].
Volume is reduced to minimum.
To cancel
Press [MUTING] again.
“MUTING” goes out and the volume is restored.
To cancel from the tuner/amplifier, turn [VOLUME] to minimum (–– dB),
then raise it to the required level.
Muting is also canceled when the unit is turned off.
ªC Using headphones (not included)
Reduce the volume before connection.
Avoid listening for prolonged periods of time to prevent hearing damage.
Plug type: 3.5 mm stereo
Original display
Enjoying karaoke (For Australia and N.Z.)
You can do karaoke with CDs and tapes.
Preparation:
Lower the volume with [MIC VOL] and connect the microphone.
Use a dynamic microphone.
Plug type: 6.3 mm monaural
1 Press [KARAOKE] to select a voice mode.
Each time you press the button:
MONO L>MONO R>VOICE MUTE>off (Normal)
^—————————————————————}
≥Karaoke CDs and tapes
MONO L: Only left channel sound (No vocal)
MONO R: Only right channel sound (Vocal)
Select no vocal for karaoke. Vocal and no vocal may be reversed.
≥Normal music CDs and tapes
VOICE MUTE: Voice mute (Lowers vocal volume)
2 Start playing the CD or tape.
3 Adjust the main volume and microphone volume.
To cancel
Press [KARAOKE] to clear the display.
To record your performance
Start recording in deck 2 and then start singing.
Ensure the voice mode is set to off (at step 2 above) when playing the
recording.
Note
The karaoke modes cannot be used with the radio, SUPER 3D AI EQ, 6CH
DISCRETE INPUT or surround effects.
When using the VOICE MUTE function
≥Voice mute may not function sufficiently or noise may interfere when using
the following software.
≥Monaural software
≥Software with few musical instruments, including classic music and
poetry recitations
≥Software with duets or strong choruses
≥VOICE MUTE reduces the level of the vocals but does not cancel them
out completely.
Using the echo effect
ªA
Press [ECHO].
Each time you press the button:
ECHO 1>ECHO 2>ECHO 3>OFF
^—————————————————-}
Timer operations and convenient functions
RQT6866
34
Timer operations and convenient functions
RQT6866
35

B
C
A
EXT
LOOP
75
h
AM ANT
FM ANT
75
h
FM ANT
GND
EXT
LOOP
AM ANT
A
A
15mm
30mm
EXT
LOOP
AM ANT
5–12m
1,
∫
A
1
2
4
3
A
B
C
D
AUDIO
L/R OUT
AUDIO
OUT
AUDIO
IN
AUDIO
OUT
A
AUX
VCR
(EXT)
OUT IN
L
R
AUX
(DVD)
DVD 6ch INPUT
CENTER
SUBWOOFER
L
L
R
L
R
R
SURROUND FRONT
AUX
(DVD)
SURROUND L/R
FRONT L/R
L/R OUT
(MIX)
CENTER
SUBWOOFER
L
R
L
R
DVD player with 5.1ch output
Sound processor
Sound processor
DVD player/Laser disc player
(without 5.1ch output), etc.
Timer operations and convenient functions
Video cassette recorder
DVD player/Laser disc player/
Video cassette recorder, etc.
Sound processor
Sound processor
External unit connections
≥Turn off all units before making connections.
≥Refer to the manual of the other unit for details.
(Cables and equipment not included.)
Stereo phono cable (not included)
White
Red
Connections to SC-EH790
[A] DVD player with 5.1ch output
This unit has the input terminals for 5.1ch surround systems but it
does not have the decoders necessary to play them back. The DVD
player should have these decoders and 5.1ch output.
To record sound from the DVD player
Connect to AUX (DVD).
Subwoofer
The included front speakers have superwoofers, but you can enhance surround sound from a unit connected to DVD 6ch INPUT by
connecting another subwoofer to SUBWOOFER terminal.
[B] DVD player/Laser disc player (without 5.1ch
output), etc.
This unit has Dolby Pro Logic circuitry. The sound will be reproduced
with the same powerful stereophonic effects found in movie theaters.
[C] Video cassette recorder
You can enjoy the sound from your video cassette recorder.
Connections to SC-EH590
[D] DVD player/Laser disc player/Video cassette
recorder, etc.
You can enjoy the sound from your DVD player/Laser disc player/
Video cassette recorder, etc.
Tuner/amplifier
For the United Kingdom and
Eastern Europe
FM outdoor antenna
For the United Kingdom only
Use the antenna plug adaptor
included.
For Australia and N.Z.
1 Remove a piece of the outer vinyl.
2 Twist the shield braid to expose the
core wire.
Shield braid Core wire
75 ™ coaxial cable
(not included)
AM loop antenna
AM outdoor antenna
Optional antenna connections
Use outdoor antennas if radio reception is poor.
FM outdoor antenna
ªA
≥Disconnect the FM indoor antenna.
≥The antenna should be installed by a competent technician.
AM outdoor antenna
ªB
Run a piece of vinyl wire horizontally across a window or other convenient
location.
Leave the loop antenna connected.
Note
Disconnect the antenna when the unit is not in use.
Do not use the antenna during an electrical storm.
ªC Using other equipment
Listening to an external source
1 Press [INPUT SELECTOR] to select the external
source.
Each time you press the button:
[EH790]
TUNER>CD>TAPE>VCR (EXT)>AUX (DVD)
^————————————————————-}
[EH590]
TUNER>CD>TAPE>AUX
^—————————————}
On the remote control
Press [VCR/AUX/6CH INPUT] (SC-EH790) or [AUX] (SC-EH590).
2 Operate the unit.
See the unit’s manual for details on operation and connection.
[EH790]
To enjoy Dolby Digital and DTS
➡ page 24
Recording an external source
1 Press [INPUT SELECTOR] to select the external
source.
2 Select Dolby NR and reverse mode.
(➡ page 28)
3 Press [¥ REC PAUSE].
4 Press [«] or [!] to start recording.
5 Start the source to be recorded.
See the unit’s manual for details on operation and connection.
To stop recording
Press [∫] on the deck.
To temporarily stop recording
Press [¥ REC PAUSE].
The deck goes into the recording standby mode.
To resume recording press [«] or [!] with the flashing indicator.
Timer operations and convenient functions
36
RQT6866
Recording onto an external unit
[EH790]
Connect the external unit to VCR (EXT) OUT.
Select the source to be recorded with [INPUT SELECTOR].
Start recording on the external unit and start playing the source to be
recorded.
RQT6866
37

Troubleshooting guide
Before requesting service, make the below checks. If you are in doubt about some of the check points, or if the remedies indicated in the chart do not solve
the problem, consult your dealer for instructions.
Reference pages are shown as black circled numbers 6.
Common Problems
No sound.
Sounds unfixed, reversed or
come from one speaker only.
Humming heard during play.
“ERROR” is displayed.
“U70” is displayed.
“F60” is displayed.
“––:––” appears on the display.
The display starts up even after
the unit is turned off.
The CD changer or CD player
The display is wrong or play
won’t start.
[EH790]
“TAKE OUT/DISC” appears on
the display.
Listening to the radio
Noise is heard.
The stereo indicator flickers or
doesn’t light.
Sound is distorted.
A beat sound is heard.
Turn the volume up.
Switch off the unit, determine and correct the cause, then switch the unit on. Causes include shorting of the
positive and negative speaker wires, straining of the speakers through excessive volume or power, and using
the unit in a hot environment.
Check the speaker connections. 6
An AC mains lead or fluorescent light is near the cables. Keep other appliances and leads away from this
unit’s cables.
If possible in your area, turn the AC mains lead’s plug or connector over to reverse the lead’s polarity.
Incorrect operation performed. Read the instructions and try again.
Connect the flat cables firmly. If “U70” remains on the display, contact the dealer.
There is a problem with the amplifier. Consult your dealer.
You plugged the AC mains lead in for the first time or there was a power failure recently.
Set the time. <
The demonstration feature (–DEMO) is on. Turn it off if it is not required. <
The disc may be upside down. 8
Wipe the disc.
Replace the disc if it is scratched, warped, or nonstandard.
Condensation may have formed in the changer or player due to a sudden change in temperature.
Wait about an hour for it to clear and try again.
There is a problem with the CD mechanism. (A power failure may have occurred.)
The tray will open automatically. Remove the CD from the tray, and after ensuring there is no CD in the tray,
close it. The unit will make the disc changing noises for a few moments and then it should operate normally.
Use an outdoor antenna. U
Turn the TV off or separate it from the unit.
The cassette deck
Poor quality sound.
Recording is not possible.
“DECK NO TAPE” is displayed
during “One touch editing”.
“DECK CHANGE TAPE” is
displayed during “One touch
editing”.
Clean the heads. W
Check the Dolby NR setting. C
If the erasure prevention tabs have been removed, cover the holes with adhesive tape. L
Load a cassette into deck 2. L
If the erasure prevention tabs have been removed, cover the holes with adhesive tape. L
When there is a television set nearby
The picture on the TV
disappears or stripes appear on
the screen.
The location and orientation of the antenna are incorrect. If you are using an indoor antenna, change to an
outdoor antenna.
The TV antenna wire is too close to the unit. Separate the antenna wire of the TV set from the system.
The remote control
The remote control doesn’t
work.
All components are required to service the system. If service is ever necessary, bring the entire system.
Maintenance
If the surfaces are dirty
To clean this unit, wipe with a soft, dry cloth.
≥Never use alcohol, paint thinner or benzine to clean this unit.
≥Before using chemically treated cloth, read the instructions that came with
the cloth carefully.
For a cleaner crisper sound
Clean the heads regularly to assure good quality playback and recording.
Use a cleaning tape (not included).
Check the batteries are inserted correctly. ;
Replace the batteries if they are worn.
Cassette tape selection and care
The unit can correctly play or record on the following types. It identifies the
type automatically.
Normal position/TYPE I ✔
High position/TYPE II ✔
Metal position/TYPE IV ✔
≥Tapes exceeding 100 minutes are thin and can break or get caught in the
mechanism.
≥Tape slack can get caught up in the mechanism and should be taken up
before the tape is played.
≥Endless tapes can get caught up in the deck’s moving parts if used incor-
rectly. Use tapes appropriate to this unit’s auto-reverse mechanism.
A low hum is heard during AM
broadcasts.
The correct AM frequency can’t
be tuned in.
References
RQT6866
38
Separate the antenna from other cables and leads.
Change the frequency step. Hold [TUNER/BAND] down for 10 seconds to change the step to 9 kHz.
References
RQT6866
39

Technical specifications
SOUND PROCESSOR
∫ EQ/SFP section
MANUAL GEQ
5-Band EQ
Center frequency 70/300/1 k/3.15 k/10 k Hz
Level control n2.0, 4.0, 6.0 dB
EQ/Space mode [EH790]
4 modes HEAVY, CLEAR, SOFT, HALL
EQ mode [EH590]
3 modes HEAVY, CLEAR, SOFT
SUPER 3D AI EQ [EH790]
3 modes AI EQ, SUPER 3D AI 1, SUPER 3D AI 2
∫ Pre-amplifier section
Input sensitivity/impedance
VCR (EXT) [EH790] 250 mV/15 k≠
AUX(DVD) [EH790] 250 mV/15 k≠
AUX [EH590] 250 mV/15 k≠
Output level [EH790]
VCR REC OUT 150 mV/1.5 k≠
∫ DOLBY PRO LOGIC section [EH790]
PRO LOGIC mode SURROUND
CENTER mode NORMAL
DELAY TIME 20 ms (Fixed)
∫ AV SURROUND section [EH790]
AV surround mode
∫ DSP CONTROL section
DSP control mode SUPER SOUND EQ
∫ Spectrum analyzer section
Display mode NORMAL, PEAKHOLD, AURORA
∫ General
Dimensions (WtHtD) [EH790] 293k89k270 mm
Mass [EH790] 1.5 kg
SUPER SURROUND (MUSIC, MOVIE)
[EH790] VIRTUAL REAR SURROUND
[EH790] CENTER FOCUS
[EH790] MULTI REAR SURROUND
[EH790] SEAT POSITION
[EH590] 293k89k269 mm
[EH590] 1.4 kg
TUNER AMPLIFIER
∫ Amplifier section [EH790]
Power output (L/R both channel driven)
Stereo Mode
DIN 1 kHz THD 1 %/6 ≠ (High) 2k25 W
100 Hz THD 1 %/8 ≠ (Low) 2k45 W
RMS 1 kHz THD 10 %/6 ≠ (High) 2k35 W
100 Hz THD 10 %/8 ≠ (Low) 2k65 W
PRO LOGIC mode
DIN
FRONT 1 kHz THD 1 %/6 ≠ (High) 2k25 W
100 Hz THD 1 %/8 ≠ (Low) 2k45 W
SURROUND 1 kHz THD 1 %/8 ≠ 2k30 W
CENTER 1 kHz THD 1 %/8 ≠ 60 W
RMS
FRONT 1 kHz THD 10 %/6 ≠ (High) 2k35 W
100 Hz THD 10 %/8 ≠ (Low) 2k65 W
SURROUND 1 kHz THD 10 %/8 ≠ 2k40 W
CENTER 1 kHz THD 10 %/8 ≠ 80 W
PMPO 1 kHz/High 6 ≠, Low 8 ≠,
CENT. 8 ≠, SURR. 8 ≠ 3000 W
Total harmonic distortion
Rated power at 1 kHz 1 % (6 ≠)
Half power at 1 kHz 0.1 % (6 ≠)
Load impedance
FRONT (High) 6 ≠
FRONT (Low) 8 ≠
SURROUND 8 ≠
CENTER 8 ≠
DIGITAL S. WOOFER
Center frequency 60 Hz
LEVEL (VOL s20 dB) MID i3 dB/MAX i6 dB
∫ Amplifier section [EH590]
Power output (L/R both channel driven)
DIN 1 kHz THD 1 %/6 ≠ (High) 2k25 W
100 Hz THD 1 %/8 ≠ (Low) 2k65 W
RMS 1 kHz THD 10 %/6 ≠ (High) 2k35 W
100 Hz THD 10 %/8 ≠ (Low) 2k85 W
Total harmonic distortion
Rated power at 1 kHz 1 % (6 ≠)
Half power at 1 kHz 0.1 % (6 ≠)
Load impedance Main (High) 6 ≠
DIGITAL S. WOOFER
Center frequency 60 Hz
LEVEL (VOL s20 dB) MIDi3 dB/MAXi6 dB
Main (Low) 8 ≠
∫ FM tuner section
Frequency range 87.50– 108.00 MHz
Sensitivity 1.8 ¨V (IHF usable)
S/N 26 dB 1.5 ¨V
S/N MONO 70 dB (75 dB, IHF)
Antenna terminal(s) 75 ≠ (unbalanced)
∫ AM tuner section
Frequency range 522–1629 kHz (9 kHz steps)
Sensitivity (S/N 20 dB) 500 ¨V/m
∫ Timer section
Clock Quartz-lock type
Function Play timer (1 time, daily),
Setting intervals (Play/Rec)
1 minute–23 hours 59 minutes (1 min intervals)
∫ General
Power supply
(For the United Kingdom, Australia and N.Z.)
(For Eastern Europe) AC 230 V 50 Hz
Power consumption [EH790] 190 W
Standby 0.5 W
Dimensions (WtHtD) 293k118.5k345 mm
Mass [EH790] 5.2 kg
CD PLAYER
∫ Discs played (8 cm or 12 cm)
[EH790] CD-R/RW (CD-DA, WMA, MP3 formatted discs)
∫ Pickup
Wavelength 780 nm
∫ General
Dimensions (WtHtD) [EH790] 293k89k288 mm
Mass [EH790] 2.2 kg
CASSETTE DECK
Deck system Stereo cassette deck
Track system 4 track, 2 channel
Recording system AC bias
Erasing system AC erase
Heads
Motors
Tape speed 4.8 cm/s
Wow and flutter 0.16 % (WRMS)
Fast forward and rewind times
Frequency response (Dolby NR off)
S/N
Input sensitivity and impedance
Output voltage and impedance
∫ General
Dimensions (WtHtD) 294k118.5k281 mm
Mass 2.1 kg
[EH590] CD-R/RW (CD-DA formatted discs)
Bias frequency 100 kHz
Deck 1
(Playback head) Permalloy head
Deck 2
(Recording/Playback head) Permalloy head
(Erasing head) Double gap ferrite head
Deck 1, 2 Capstan drive DC servo motor
Approx. 110 seconds with C-60 cassette tape
TYPE I (NORMAL) 20 Hz–16 kHz (DIN)
TYPE II (HIGH) 20 Hz–16 kHz (DIN)
TYPE IV (METAL) 20 Hz–16 kHz (DIN)
(Signal levelumax recording level, TYPE II type tape)
NR off 56 dB (A weighted)
Dolby B NR on 66 dB (A weighted)
REC (IN) 150 mV/23 k≠
PLAY (OUT) 280 mV/360 ≠
520–1630 kHz (10 kHz steps)
Sleep (120 min, 30 min intervals)
(0.05 MHz steps)
Rec timer (1 time, daily),
AC 230– 240 V 50 Hz
[EH590] 160 W
[EH590] 5.0 kg
CD (CD-DA)
[EH590] 293k89k268 mm
[EH590] 1.6 kg
FRONT SPEAKER
Type 3 way, 3 speakers, Bassreflex
Speaker(s)
Super woofer 17 cm cone type
Woofer 12 cm cone type
Tweeter [EH790] 6 cm ring shaped dome type
Impedance High 6 ≠, Low 8 ≠
Input power (Music) High 60 W, Low 120 W
Output sound pressure level [EH790] 87 dB/W (1.0 m)
Crossover frequency [EH790] 120 Hz, 4 kHz
Frequency range [EH790] 42 Hz– 50 kHz (j16 dB)
∫ General
Dimensions (WtHtD) 240k412k259 mm
Mass 5.8 kg
CENTER SPEAKER [EH790]
Type 2 way, 3 speakers, Bassreflex
Speaker
Woofer(t2) 8 cm cone type
Tweeter 6 cm cone type
Impedance 8 ≠
Input power (Music) 160 W
Output sound pressure level 86 dB/W (1.0 m)
Crossover frequency 4 kHz
Frequency range 100 Hz– 22 kHz (j16 dB)
∫ General
Dimensions (WtHtD) 190k99k166 mm
Mass 1.8 kg
SURROUND SPEAKER [EH790]
Type 1 way, 1 speaker, Closed
Speaker
Full range 8 cm cone type
Impedance 8 ≠
Input power (Music) 70 W
Output sound pressure level 84 dB/W (1.0 m)
Frequency range 130 Hz– 20 kHz (j16 dB)
∫ General
Dimensions (WtHtD) 140k99k118 mm
Mass 0.9 kg
Note
1. Specifications are subject to change without
[EH590] 6 cm cone type
[EH590] 84 dB/W (1.0 m)
[EH590] 150 Hz, 4 kHz
46 Hz–36 kHz (j10 dB)
[EH590] 42 Hz– 22 kHz (j16 dB)
46 Hz– 20 kHz (j10 dB)
115 Hz–20 kHz (j10 dB)
150 Hz–18 kHz (j10 dB)
notice.
Mass and dimensions are approximate.
2. Total harmonic distortion is measured by the
digital spectrum analyzer.
3. “Low” and “High” stand for low frequency and
high frequency.
Matsushita Electric Industrial Co., Ltd.
Web Site: http://www.panasonic.co.jp/global/
p
RQT6866-B
F1202YW0
Loading…
Инструкция и руководство для
Technics SC-EH790 RU
10 страниц подробных инструкций и пользовательских руководств по эксплуатации на русском
Компонентная система
Systém komponentù
Zestaw ztozony z oddzielnych
elementów
Инструкция по эксплуатации
Nàvod к obsluze
Instrukcja obslugi
Model No
SC-EH790
SC-EH590
Teclinìcs’
Ha рисунках показана модель SC-EH790.
Na obràzku je model SC-EH790,
Na ilustracji pokazano zestaw SC-EH790,
DIGITAL AUDIO
EP
Перед подключением, работой или
регулировкой
данного
аппарата
прочтите, пожалуйста, эту инструкцию
полностью.
Сохраните, пожалуйста, эту инструкцию.
Drive nez zacnete jakékoii zapojovàni, oper-
ace nebo nastavovàni tohoto vyrobku, pros-
■ tudujte si prosim ceiy tento nàvod.
Uschovejte si prosim tento nàvod к obsluze.
Przed uruchomieniem sprz^tu prosimy о
dokiadne zapoznanie si§ z trescià nìniejszej
instrukcji.
Prosimy о zachowanie niniejszej instrukcji
obstugi,
Nintejsza instrukcja zosta+a opracowana na
podstawie orygìnalnej publikacji firmy
MATSUSHITA ELECTRIC INDUSTRIAL
CO., LTD.
RQT6867-R

Прилагаемые принадлежности/Dodävane
ph’slusenstvi/Wyposazenie standardowe
Пожалуйста, проверьте и идентифицируйте
прилагаемые принадлежности.
Prosim, zkontrolujte а identifikujte pfislusenstvi
dodävane s pristrojem.
Sprawdz kompletnosc wyposazenia i zidentyfikuj
poszczegölne jego elementy.
[~J Сетевой шнур …………………………………………………………….. 1
Sitovy privod………………………………………………………………….. 1
Kabel sieciowy ……………………………………………………………….1
U
П
П
Пульт ДУ………………………………………………………………………. 1
Dálkové oviádání……………………………………………………………. 1
Nadajnik zdalnego sterowania…………………………………………..1
Idilli (EUR7702270) EH^ (EUR7702070)
Батарейки для пульта ДУ………………………………………………. 2
Baterie pro dálkové oviádání……………………………………………. 2
Bateríe do nadajnika zdalnego sterowania………………………….2
Комнатная FM-антенна ………………………………………………… 1
VKV pokojová anténa……………………………………………………… 1
Antena wewn^trzna FM ………………………………………………….. 1
Рамочная АМ-антенна в сборе……………………………………….1
АМ rámová anténa…………………………………………………………..1
Elementy anteny p^tlowej AM……………………………………………1
Шнуры динамиков
Reproduktorové kabely
Kable gtosnikowe
(Красный*Черный) ………. 2
(Cerveny«Cerny)…………… 2
(Czerwono’Czarny)………… 2
(Серый*Голубой)…………2
(Sedy*Modry)……………… 2
(Szaro’Niebiesko)……….. 2
Уважаемый покупатель
Благодарим Вас за то, что Вы приобрели эту систему.
Чтобы получить оптимальное качество работы системы и обеспечить
безопасность, пожалуйста, внимательно прочитайте эту инструкцию.
Настоящая инструкция применима к нижеперечисленным системам.
Наиболее полно данная инструкция описывает работу системы
5С-ЕН790.
обозначает функцию, имеющуюся
т о л ь к о н а
аппарате
5С-ЕН790.
IЕН590
; обозначает функцию, имеющуюся только на аппарате
ЗС-ЕН590.
Система
SC-EH790
SC-EH590
Звуковой процессор
SH-EH790
SH-EH590
Т юнер/уси л ител ь
SA-EH790
SA-EH590
CD-ченджер
SL-EH790
—
CD-плейер
—
SL-EH590
Кассетная дека
RS-DV290
RS-DV290
Динамик
Передний
SB-DV290
SB-EH590
Центральный
SB-PC95
—
Окружающего
звучания
SB-PS95
—
Содержание
Меры безопасности……………………………………………………. 4
Простая установка и воспроизведение
Расположение………………………………………………… 6
Шнуры динамиков…………………………………………. 8
Антенна………………………………………………………….. 10
Плоские кабели и сетевой шнур…………………….10
Прослушивание CD……………………………………….. 12
Органы управления на лицевой панели …………………. 14
Отключение режима DEMO……………………………………….. 16
Пульт ДУ……………………………………………………………………. 18
Установка времени …………………………………………………… 18
Компакт-диски…………………………………………………………… 20
Радио: ручная настройка………………………………………….. 28
Радио: настройка с предустановкой………………………… 30
Кассеты ……………………………………………………………………. 32
Усиление звучания супервуфера…………………………….. 34
Использование суперзвука эквалайзера…………………. 34
Управление звуковыми эффектами и качеством
звука………………………………………………………………………. 34
Использование эквалайзера акустического образа
{Al EQ)…………………………………………………………………. 36
Использование ручного эквалайзера (M.EQ) ………. 36
Использование эффекта окружающего звучания … 38
6СН DISCRETE INPUT……………………………………………… 42
DOLBY PRO LOGIC…………………………………………………. 42
SUPER SURROUND…………………………………………………. 42
Регулировка уровня громкости динамиков………….. 42
Эффекты окружающего звучания……………………………. 44
Перед началом записи (Только дека 2)……………………. 46
Запись с компакт-дисков………………………………………….. 48
Запись радиопередач ………………………………………………. 50
Перезапись кассет…………………………………………………….. 50
Использование таймеров ………………………………………… 52
Режимы работы дисплея визуализации частотного
диапазона ……………………………………………………………… 58
Приглушение звука ………………………………………………….. 58
Использование наушников………………………………………. 58
Подсоединения внешнего аппарата…………………………..
60
Дополнительные подсоединения антенны……………… 62
Использование другого оборудования……………………. 62
Диагностика неисправностей…………………………………… 64
Уход…………………………………………………………………………… 65
Выбор кассеты и уход за ней…………………………………… 65
Технические характеристики……………………………………..
70

Меры безопасности, Предостережение, Предупреждение
Bezpecnostni, Upozornëni, Nebezpeci, Pozor, Bezpecnostni upozornëni, Размещение, Напряжение Чат поддержки
- Изображение
- Текст
Меры безопасности
Размещение
Установите
систему
на
горизонтальной
поверх
ности,
где
она
не
будет
подвергаться
воздействию
прямых
солнечных
лучей,
высокой
температуры,
высокой
влажности,
а
также
сильной
вибрации.
Такие воздействия могут повредить корпус и прочие
компоненты
системы,
тем
самым
сократив
срок
службы аппарата.
Чтобы
избежать
искажений
звука
и
нежелатель
ных
акустических
эффектов,
установите
аппарат
не
менее чем в 15 см от стен.
Не ставьте на аппарат тяжелые предметы.
Напряжение
Не
используйте
источники
питания
высокого
напряжения.
Это
может
привести
к
перегрузке
аппарата и возгоранию.
Не
используйте
источники
питания
постоянного
тока.
Тщательно
проверьте
источник
питания
прежде, чем установить аппарат на корабле или в
другом
месте,
где
использчются
источники
постоян
ного тока.
Меры предосторожности при
обращении с сетевым
шнуром
Убедитесь
в
том,
что
сетевой
шнур
правильно
подсоединен
и
не
поврежден.
Неплотное
подсое
динение
и
повреждения
шнура
могут
привести
к
возгоранию или электрошоку. Не дергайте и не сги
байте
сетевой
шнур,
не
кладите
на
него
тяжелые
предметы.
При
отсоединении
от
розетки
крепко
удерживайте
штепсельную
вилку.
Дергая
за
сетевой
шнур, Вы можете получить электрошок.
Не
прикасайтесь
к
штепсельной
вилке
влажными
руками. Это может привести к электрошоку.
Посторонние предметы
Не
позволяйте
попадать
внутрь
аппарата
каким-
либо
металлическим
предметам.
Это
может
привести к электрошоку или поломке аппарата.
Не
проливайте
внутрь
аппарата
какую-либо
жидкость.
Это
может
привести
к
электрошоку
или
поломке
аппарата.
Если
это
слчцилось
немедленно
отсоедините
аппарат
от
источника
питания
и
свяжитесь с Вашим дилером.
Не
распыляйте
инсектициды
на
аппарат
или
поблизости
от
него.
В
их
состав
входят
воспламеняющиеся
газы,
попадание
которых
на
аппарат может привести к возгоранию.
Техобслуживание
Не
пытайтесь
самостоятельно
чинить
аппарат.
Если
аппарат
не
воспроизводит
звук,
индикаторы
не
загораются,
идет
дым,
либо
Вы
столкнулись
с
другой
проблемой,
не
упомянутой
в
настоящей
ин
струкции, то отсоедините сетевой шнур и свяжитесь
с
Вашим
дилером
или
с
авторизованным
сер-
висцентром.
Если
ремонт,
разборка
или
переделка
аппарата
производятся
некомпетентнь[ми
лицами,
то
это
может
привести
к
поражению
электротоком
или к возгоранию.
Если
аппарат
длительное
время
не
используется,
то
отсоединяйте
его
от
источника
питания—это
продлевает срок службы аппарата.
Это
изделие
может
принимать
радио
помехи,
обусловленные
переносными
телефонами.
Если
такие
помехи
являются
очевидными,
увеличьте,
пожалуйста,
расстояние
между
изделием
и
переносным телефоном.
ЭТОТ
АППАРАТ
ПРЕДНАЗНАЧЕН
ДЛЯ
ИСПОЛЬЗОВАНИЯ
В
КЛИМАТЕ
СРЕДНЕЙ
ПОЛОСЫ.
Для России
ИНФОРМАЦИЯ О
(цУ
СЕРТИФИКАЦИИ
ПРОДУКЦИИ
BZ02
ПРЕДОСТЕРЕЖЕНИЕ!
в
этом
УСТРОЙСТВЕ ИСПОЛЬЗУЕТСЯ
ЛАЗЕР.
ПРИМЕНЕНИЕ РЕГУЛИРОВОК И НА
СТРОЕК,
ОТЛИЧНЫХ
ОТ
НИ
ЖЕОПИСАННЫХ, МОЖЕТ ПРИВЕСТИ К
ОПАСНОМУ ЛАЗЕРНОМУ ОБЛУЧЕНИЮ.
НЕ
ОТКРЫВАЙТЕ
КРЫШКУ
И
НЕ
ПРОИЗВОДИТЕ
РЕМОНТ
САМИ—
ЛУЧШЕ ПОРУЧИТЬ ЭТО КВАЛИФИЦИ
РОВАННОМУ СПЕЦИАЛИСТУ.
ПРЕДУПРЕЖДЕНИЕ:
для
УМЕНЬШЕНИЯ
РИСКА
ВОЗНИ
КНОВЕНИЯ
ПОЖАРА,
ПОРАЖЕНИЯ
ЭЛЕКТРИЧЕСКИМ
ТОКОМ
ИЛИ
ПОВРЕЖДЕНИЯ
ИЗДЕЛИЯ
НЕ
ПОДВЕРГАЙТЕ
ДАННЫЙ
АППАРАТ
ВОЗДЕЙСТВИЮ
ДОЖДЯ,
ВЛАГИ,
БРЫЗГ ИЛИ КАПЕЛЬ, И НЕ СТАВЬТЕ
НА
А П П А Р А Т
П Р Е Д М Е Т Ы ,
НАПОЛНЕННЫЕ
ЖИДКОСТЯМИ,
ТАКИЕ, КАК ВАЗЫ.
ПРЕДОСТЕРЕЖЕНИЕ!
• НЕ СЛЕДУЕТ УСТАНАВЛИВАТЬ ИЛИ
РАЗМЕЩАТЬ ДАННЫЙ АППАРАТ В
КНИЖНОМ
ШКАФУ,
ВСТРОЕННОМ
Ш К А Ф У
И Л И
Д Р У Г О М
ОГРАНИЧЕННОМ
ПРОСТРАНСТВЕ
ДЛЯ
ТОГО,
ЧТОБЫ
СОХРАНИТЬ
УСЛОВИЯ ХОРОШЕЙ ВЕНТИЛЯЦИИ.
УДОСТОВЕРЬТЕСЬ, ЧТО ШТОРЫ И
ДРУГИЕ ПОДОБНЫЕ ПРЕДМЕТЫ НЕ
ПРЕПЯТСТВУЮТ НОРМАЛЬНОЙ ВЕ
НТИЛЯЦИИ ДЛЯ ПРЕДОТВРАЩЕНИЯ
Р И С К А
П О Р А Ж Е Н И Я
Э Л Е К
ТРИЧЕСКИМ
ТОКОМ
ИЛИ
ВОЗ
НИКНОВЕНИЯ
П О Ж А Р А
ИЗ-ЗА
ПЕРЕГРЕВА.
• НЕ ЗАКРЫВАЙТЕ ВЕНТИЛЯЦИОН
НЫЕ
О Т В Е Р С Т И Я
А П П А Р А Т А
ГАЗЕТАМИ, СКАТЕРТЯМИ, ШТОРАМИ
И ПОДОБНЫМИ ПРЕДМЕТАМИ.
•НЕ
РАЗМЕЩАЙТЕ
НА
А П П А Р А Т
ИСТОЧНИКИ ОТКРЫТОГО ПЛАМЕНИ,
ТАКИЕ, КАК ГОРЯЩИЕ СВЕЧИ.
• В Ы Б Р А С Ы В А Й Т Е Б А Т А Р Е И В
М У С О Р ,
У Ч И Т Ы В А Я
О Х Р А Н У
ОКРУЖАЮЩЕЙ СРЕДЫ.
Для России
“Установленный
производителем
в
порядке
п.
2 ст. 5 Федерального Закона РФ “О защите прав
потребителей”
срок
службы
изделия
равен
7
годам
с
даты
производства
при
условии,
что
изделие
используется
в
строгом
соответствии
с
настоящей
инструкцией
по
эксплуатации
и
применимыми техническими стандартами.»
Пример маркировки;
ОО1АООООООО
Элементы кода:
3- ий символ—год изготовления
(1-2001 г., 2-2002 г.. 3-2003 г., …);
4- ый символ—месяц изготовления
{А-январь, В-февраль, 1-дека6рь)
Расположение маркировки:
Задняя, нижняя или боковая панель устройства
Мацушита Электрик Индастриал Ко., Лтд.
1006 Кадома, Осака, Япония
Основной аппарат:
Сделано в Японии
Динамик:
Сделано в Малайзии
Bezpecnostni
upozornëni
Umisténi pfistroje
Umistête pfistroj na vodorovnou piochou podlozku,
pokud mozno vzdàlenou od tepelnÿch zdroju, slunecniho
zâfeni a chrarite jej pfed nadmérnÿm vlhkem, prachem a
silnÿmi vibracemi. Toto prostredi by mohio poskodit
skfinku pfistroje nebo dalsi komponenty, které by mohly
zkrétit zivotnosl ceiého zafizeni.
Zafizeni umistête nejméné 15 cm od stény, abyste
pfedesii zkresleni a necekanÿm zvukovÿm efektum.
Na pfistroj nepokiâdejte zàdné tézké pfedméty.
Napèti
Nepouzivejte
prò
napàjeni
zàsuvky
s
vysokym
napètim. То muze vést к pfetizeni pfistroje a byt pficinou
pozàru.
Pro
napàjeni
pfistroje
nikdy
nepouzivejte
stej-
nosmèrnou sit. Peclivè provètte po pfemistèni pfistroje
na nové misto, zda neni napàjeci elektrickà sit stejnos-
mérna.
Ochrana sitového privodu
Pfesvèdete se, ze je sitovy pfivod fàdné zasunut do
zàsuvky, a ze neni poskozen. Nedokonalé pfipojeni a
poskozeni pfivodu mùze byt pficinou pozàru nebo ürazu
elektrickym proudem. Za pfivod netahejle, nekrut’te jej a
nepokiâdejte na nèj tézké pfedméty.
Pfi vytahovàni ze zàsuvky vzdy pevné uchopte vidiici
pfivodu. Tahàni za pfivod mùze byt pficinou ürazu ele
ktrickym proudem.
Nedotykejte se pfivodu mokryma rukama. Mùze to byt
pficinou ürazu elektrickym proudem.
Cizi pfedméty
Zabrafite vmknuti kovovych pfedmètù dovnitf pfistroje.
Mùze se to stàt pficinou ùrazu elektrickym proudem
nebo nespràvné funkee.
Zabrante vniknuti kapaliny do pfistroje. Muze se lo stàt
pficinou ùrazu elektrickym proudem nebo nespràvné
funkee. Pokud к tomu jiz doslo, okamzité pfistroj odpojte
od sitè a obralìe se na odborny servis.
Na pfistroj nebo v jeho blizkosti nerozprasujte zàdné
insekìicidy. Obsahuji hoflavy plyn, ktery by ve styku s
pfistrojem mohi vzplanout.
Servis
Nepokousejte se sami pfistroj opravovat. Pokud pfes-
tane hràt nebo pfestane svitit displej nebo se zacne vy-
vijet kouf, nebo se vyskytne jiny problém, ktery neni pop-
sàn V tornio nàvodu, obrafte se na autorizovany odborny
servis. Pokud se pokusite sami o opravo, mùze dojit k
ùrazu elektrickym proudem nebo dalsimu poskozeni
pfistroje. Proto nenechàvejte pristroj rozebirat, upravo-
vat nebo opravovat nekvalifikovanou osobou.
Pokud pfistroj nebudete delsi dobu pouzivat, jehoziv-
otnost se prodlouzi, jestlize jej odpojite od sitè.
Tento vyrobek mùze byt bèhem pouzivani
rusen ràdiovou interferenci, kteràjezpùsobe-
na mobtinim telefonem. Jestlize к takovéto
interferenci dojde, zajistète prosim vétsi
vzdàlenost mezi timto vyrobkem a mobilnim
telefonem.
TENTO PRISTROJ JE KONSTRUOVAN
PRO POUZITÌ V MÌRNÉM KLIMATU.
NEBEZPECI!
PRI ODKRYTOVÀNÌ A ODJISTÉNÌ BEZ-
PECNOSTNÌCH SPÌNACÙ HROZÌ NEBE-
ZPECÌ NEVIDITELNÉHO LASEROVÉHO
ZÀRENÌ. CHRANTE SE PRED PRÎMŸM
ZÀSAHEM LASEROVŸM PAPRSKEM.
POZOR!
V PRÌSTROJI JE VYSOKÉ NAPÉTÌ. PRED
ODEJMUTÌM KRYTU NUTNO VYJMOUT
VIOLICI SÌtOVÉHO PRÌVODU ZE ZÀSU
VKY.

I расположение, Пункт, Используйте только прилагаемые динамики
Примечания относительно использования динамиков, Если на вашем телевизоре нарушилась цветопередача, Динамики передние, Динамики окружаю� Чат поддержки
- Изображение
- Текст
Простая установка и воспроизведение
I
Расположение
Пункт
Компоненты
0 СО-ченджер/СО-плейер © Звуковой процессор
© Кассетная дека
© Тюнер/усилитель
© Звуковой процессор
© Тюнер/усилитель
0
СО-ченджер/СО-плеиер
0
Кассетная дека
Примечание
Не ставьте СО-ченджер или СО-плейер на
тюнер/усилитель. Тепло может привести к
повреждению Ваших компакт-дисков.
На рисунках показана модель 8С-ЕН790.
Динамики
Оптимальное расположение
Расстояние: А=В=С=0=Е
0
Передний динамик ЬяагАян
0
Передний динамик
(левый)
© Центральный (правый)
© Динамик
окружающего
звучания
(правый)
Используйте только прилагаемые динамики.
Использование других динамиков может повредить аппарат и
негативно сказаться на качестве звучания.
■asriiiii
0 Динамик
окружающего
звучания (левый)
Предостережение
• Используйте эти громкоговорители только с реко
мендуемой системой.
Несоблюдение
этого
требования
может
вызвать
повреждение усилителя и/или громкоговорителей и
может привести к пожару.
Если произошло повреждение, или Вы заметили внезапное
изменение характера работы, прокон-сультируйтесь с
квалифицированным сервисным специалистом.
• Не пытайтесь произвести настенную установку дина
миков какимлибо иным способом, кроме описан
ного в данной инструкф^^
Примечания относительно использования динамиков
■ Вы можете повредить Ваши динамики и уменьшить срок их
службы, если Вы воспроизводите звук на высоком уровне
громкости в течение продолжительного периода времени.
■ Уменьшите громкость в следующих случаях, чтобы избежать
повреждения.
• Когда воспроизводится искаженный звук.
• Когда динамики принимают “завывание ‘ от проигрывателя
грампластинок, шум от ЕМ радиовещания, или непрерывные
сигналы от осциллятора, тестового диска или электронного
инструмента.
• Когда регулируется качество звука.
• Когда аппарат включается или выключается.
Если на Вашем телевизоре нарушилась цветопередача
Передние и центральный динамики сконструированы для
возможности близкого использования к телевизору, но при
использовании некоторых телевизоров и комбинаций установки
возможно воздействие на изображение.
Если это произойдет, выключите телевизор приблизительно
на 30 минут.
Функция размагничивания экрана ТВ должна устранить
проблему. Если проблема не устраняется, то переместите
динамики немного дальше от телевизора.
Динамики передние
Левый и правый передние динамики идентичны.
Динамики окружающего звучания
Расположите динамики окружающего звучания по сторонам от
точки прослушивания либо чуть позади нее, в 1 метре над
уровнем прослушивания. Разместите динамики так, чтобы
логотип Technics был обращен к слушателю.
Эффект в некоторой степени меняется в зависимости от типа
музыки и источника звука.
Если Вам не удается расположить динамики окружающего
звучания согласно рекомендациям
Вы можете установить их рядом с передними динамиками, не
потеряв при этом эффект окружающего звучания (^ стр. 44,
VIRTUAL REAR SURROUND),
Крепление на стене
Установите динамик на винтах и затем сдвиньте его вниз, чтобы
зафиксировать его положение.
Примечание
Стена или колонна, к которым крепятся динамики, должна
выдерживать вес, равный 5 кг на шуруп.

Простая установка и воспроизведение
2
Пункта
Шнуры динамиков
На рисунках показана модель 8С-ЕН790,
Не подсоединяйте сетевой шнур прежде, чем закон
чите все остальные подсоединения.
ЕН790
Центральный динамик и
динамики
окружающего
звучания
@ Динамик
окружающего
звучания (правый)
® Центральный динамик © Динамик окружающего
звучания(левый)
Передние динамики
Шнуры следует подсоединять к
разъемам соответствующего цвета.
Сокращения ЕР и НР обозначают
низкую частоту и высокую частоту.
Подсоедините левую сторону (Ц тем
же способом.
Примечание
•Никогда
не
закорачивайте
положительные (+) и отрицательные
(—) шнуры динамиков.
•Обязательно
подсоединяйте
к
положительным (+) разъемам только
положительные (красные или серые)
шнуры,
а
к
отрицательным
(-)
разъемам —только отрицательные
(голубые или черные).
Неправильное подсоединение может
привести к повреждению динамиков.
© Зачистите их концы от изоляции.
Сторона динамика
©Серый
©Голубой
©Черный
©Серый
©Голубой
©Красный
©Черный
® Сторона тюнера/усилителя
©Красный ©Серый
©Черный —ч
©Голубой———
^
НГ/Ъп
иг .
(8|и
©Голубой
©Красный
©Черный

Простая установка и воспроизведение, Пункт 3 антенна, Пункт плоские кабели и сетевой шнур
Плоские кабели, Сетевой шнур, Установка соединителя в гнездо, Для справки, J сетевой шнур, Плоские кабели и сетевой шнур, Простая установка и Чат поддержки
- Изображение
- Текст
Простая установка и воспроизведение
Пункт
3
Антенна
4
Пункт
Плоские кабели и сетевой шнур
_
^
(с) Подсоединение
Плоские кабели
^
Кабели по возможности должны быть прижаты к задней панели аппарата.
Подсоедините штекеры к разъемам того же цвета.
Неправильное подсоединение может привести к повреждению динамиков.
о
Сетевой шнур
Установка соединителя в гнездо
Даже если соединитель полностью
вставлен в гнездо, то в зависимости
от типа гнезда часть соединителя
может выступать как это показано
на рисунке.
Однако это не вызывает никаких
проблем
с
использованием
устройства.
Гнездо для
кабеля
Сединитель
К
Приблизительно
6 мм
Примечание
Прилагаемый сетевой шнур предназначен только для использо
вания с данным аппаратом. Не используйте его с другим
оборудованием.
Для справки:
При отсоединении сетевого шнура запрограммированные дан
ные, за исключением установок времени, сохраняются в памяти
аппарата до двух недель.

Ен790, Ен590, Чтобы остановить воспроизведение диска
Чтобы временно приостановить воспроизведение, Последний диск lasmiin, На дисплее появилась индикация “no disc, Простая установка и воспроизведе Чат поддержки
- Изображение
- Текст
Простая установка и воспроизведение
—
Прослушивание CD —
2
На рисунках показана модель SC-EH790.
ЕН790
Нажмите кнопку DIRECT OPEN
[DISC 1]-[DISC 5] и загрузите CD.
ЕН590
1
Нажмите кнопку [(!)/!],
чтобы включить аппарат.
Нажмите кнопку [ii^, OPEN/CLOSE] и загрузите CD.
3
© Этикетка должна
быть сверху.
Нажмите кнопку [А, ОРЕМ/СЕОЗЕ],
чтобы закрыть дисковую карусель.
■ ^¡№111
Повторите пункты 2 и 3, чтобы загрузить другие лотки.
Высвечивается, когда аппарат находится в режиме СО.
Пример СО (СО-ОА)
: с
: _ (
т
1 1 . .
I и
LJ
С •
О О
I -I I- и
4
© ВЩЗ
© Общее © Суммарное время
Номер диска количество воспроизведения
треков
Нажмите кнопку [>], чтобы начать
воспроизведение.
Воспроизведение начинается с первого трека диска в
активном лотке и заканчивается последним треком
последнего диска (см. ниже).
Нажав одну из кнопок [OISC, 1-5], Вы можете начать
воспроизведение с желаемого диска.
5
Отрегулируйте уровень
громкости.
П I I I
h ‘I Г
и I- и I I I-
U G
..I Т1
I
и и ±1
-dB
MIN
OdB
MAX
nn
UU
© Номер трека © Время с начала воспроизведения
Чтобы остановить воспроизведение диска
Нажмите кнопку [■].
Чтобы временно приостановить воспроизведение
Во время воспроизведения нажмите кнопку [II].
Начнет мигать индикатор “Г>”.
Нажмите кнопку [II] или кнопку [>], чтобы возобновить воспро
изведение.
Примечание
Во время воспроизведения CD невозможно менять компакт-
аиски в другцх лотках.
Последний диск lasMiin
Например, если воспроизведение началось с диска 4, то послед
ним станет диск 3.
Порядок следования: Диск 4^5^1 ^2^3
На дисплее появилась индикация “NO DISC”
Это означает, что аппарат находится в режиме воспроизведения
CD, но в активном лотке ‘ (SC-EH790) или в плейере (SC-EH590)
не загружен CD.
Когда Вы нажмете кнопку [[>], диск в позиции воспроизведения
готов к немедленному воспроизведению.

□
EH790
EH590
Органы управления на лицевой панели
А Тюнер/усилитель
ф Включатель питания standby/on ((Ь/1)…………………………………………12
Нажмите включатель, чтобы переключить аппарат из режима
“включено»’ в режим ожидания и наоборот. В режиме ожидания
аппарат тем не менее потребляет небольшое количество
электроэнергии.
(
2
) Индикатор режима ожидания ((]))
Если аппарат подключен к сети переменного тока, то этот ин
дикатор горит в режиме ожидания и гаснет при включении ап
парата.
ф Кнопка и индикатор таймера воспроизведения/
таймера записи {©PLAY/©REC)………………………………………….. 52,54
(4) Кнопка часов/таймера (CLOCK/TIMER)……………………………18,52,54
®
Кнопка демонстрации (-DEMO)……………………………………………….. 16
(6) Кнопка выбора режима FM (FM AUTO/MONO)………………………….28
ф
Кнопка выбора входного источника (INPUT SELECTOR) . . . . 62
(6) Кнопка выбора тюнера/диапазона (TUNER/BAND)……………………28
ф Кнопка и индикатор цифрового супервуфера
(DIGITAL S.WOOFER)……………………………………………………………… 34
@ Регулятор уровня громкости (VOLUME) …………………………………. 12
ф
Гнездо наушников (PHONES)…………………………………………………..58
@
Кнопка выбора режима настройки (TUNING MODE)………………….28
ф
Кнопка установки (SET) ……………………………………………………. 18,30
@ Кнопки настройки (v, л TUNING) ………………………………………… 18,28
ф lasriiiil
Кнопка 6-канального дискретного входа
(6СН DISCRETE INPUT)……………………………………………………………42
ф Кнопки выбора режима индикации RDS
(RDS, PS-DISP MODE-PTY)………………………………………………………28
@
Кнопка режима произвольного воспроизведения
(RANDOM)………………………………………………………………………………. 26
@ Кнопка повтора (REPEAT)………………………………………………………. 26
(ф Кнопка монтажа CD (EDIT)……………………………………………………… 48
ф
Кнопка открывания/закрывания дисковой карусели
(А, OPEN/CLOSE) …………………………………………………………………… 12
ф
Кнопки пропуска/поиска (!◄◄/◄◄, ►►/►►!)…………………………20
@
Дисковая карусель
Кнопка остановки (■) ………………………………………………………………. 12
(g) Кнопка паузы (II)…………………………………………………………………….. 12
(g) Кнопка и индикатор воспроизведения
(Г>)………………………. 12
Цвет индикатора зависит от режима работы аппарата.
В режиме остановки;
о р а н ж е в ы й
В режиме воспроизведения: зеленый
В режиме паузы: индикатор мигает
(g) Кнопки и индикаторы выбора диска (DISC, 1-5)………………………….12
Зеленый: указывает на то, что карусель готова к воспроиз
ведению установленного в ней диска или готова к
открыванию.
@
Кнопки непосредственного открывания дисковой
карусели (DIRECT OPEN, DISCI-DISC 5)…………………………………..12
Кассетная дека
(g) Кнопка открывания кассетоприемника деки 1 (^ OPEN) … 32
g) Кассетоприемник деки 1
g Кнопки ускоренной перемотки вперед/назад, TPS
(◄◄, ►►) ………………………………………………………………………………32
g Кассетоприемник деки 2
g Кнопка открывания кассетоприемника деки 2 (^ OPEN) … 32
g Кнопки сброса счетчика и дисплея
(COUNTER, RESET, DISPLAY) ……………………………………………….. 46
g
Кнопка выбора деки 1/деки 2 (DECK 1/2)………………………………….32
@) Кнопки и индикаторы воспроизведения (<1, Г>) ……………………… 32
Цвет индикаторов зависит от режима работы аппарата.
В режиме остановки, перемотки вперед или назад: оранжевый
В режиме воспроизведения или записи: зеленый
В режиме TPS или записи в режиме ожидания: индикатор мигает
g
Кнопка остановки (■) ……………………………………………………………… 32
g
Кнопка системы шумоподавления Dolby (DOLBY NR) . . . . 32
g
Кнопка выбора режима реверса (REV MODE)…………………………. 32
g
Кнопка монтажа ленты (ТАРЕ EDIT)……………………………………….. 50
g
Кнопка паузы во время записи (# REC PAUSE)……………………….. 48

□
EH790
EH590
Иллюстрация
показывает
пульт
дистанционного
управления для модели SC-EH790.
^ Blf ЕР SROGfiA* САНСа.
О О а О-
2 SI otsc
О О О О
4
8,8
■ О О О О
¿ о б о
(В-
ШШ
6
Ì————— о
1
fv-MBIMAf
1
————-к
————
f
ч
‘ » » f ‘ б
)
( , , ) г
1
-DEMO
………………..
о
-DEMO
h f П
TI Г h ‘I П
I
‘I U
J.(
l_ )
I u
Органы управления на лицевой панели
А Звуковой процессор
® Кнопка выбора режима дисплея (DISPLAY MODE)……………………… 58
@ Дисплей
(§) Кнопка суперзвука эквалайзера (SUPER SOUND EQ)……………….. 34
@ Челночный регулятор управления и джойстик
(◄, ►, А, ▼, MULTI JOG)………………………………………………………….34
@) Кнопка и индикàтop режима виртуального окружающего
звучания (VIRTUAL REAR SURROUND)…………………………………….44
@ Кнопка и индикатор режима множественного тылового
звучания (MULTI REAR SURROUND)……………………………………….. 44
® Кнопка и индикатор положения прослушивания
(SEAT POSITION)……………………………………………………………………. 44
®
Кнопка суперзвука 3D Al EQ (SUPER 3D Al EQ). …. ……………….36
® Кнопка и индикатор режима DOLBY PRO LOGIC
(□□ PRO LOGIC, OFF/ON)………………………………………………………… 42
® Кнопка и индикатор окружающего звчцания режима
(SUPER SURROUND)………………………………………………………………. 42
® Кнопка и индикатор режима центрального
фокусирующего звучания (CENTER FOCUS)……………………………. 44
ЁН590
(g) Многофункциональные
КНОПКИ
{◄,►, А, Т, MULTI CONTROL)— 36
(g) Кнопка выбора эквалайзера (EQ)…………………………………………….34
@ Кнопка Al EQ (Al EQ)………………………………………………………………. 36
(g) Кнопки ручного эквалайзера (М1, М2, М3)………………………………. 36
®
Кнопка плоской характеристики (FLAT)…………………………………… 34
В Пульт ДУ
Кнопки такие как О выполняют те же функции, что и органы
управления на основном аппарате.
Кнопка таймера сна (SLEEP) ……………………………………………………56
(g) Кнопки с цифрами (1-9, О, ^10/-/—)………………………………………….. 24
{g Кнопки курсора (◄, ►, А, Т)…………………………………………………. 42, 44
(g) Кнопка выбора кассеты и выбора деки 1/деки 2
(TAPE/DECK1/2)……………………………………………………………………….32
0 Кнопка паузы CD/воспроизведения кассеты в
обратном направлении (◄/!!) …………………………………………….. 12,32
@ Кнопка приглушения звука (MUTING)……………………………………….58
0
Кнопка программирования (PROGRAM) …………………………………. 24
i|4} Кнопка отмены (CANCEL)………………………………………………………..24
0 Кнопка выбора компакт-диска в качестве источника
(CD) ……………………………………………………………………………………24,26
(§) Кнопка воспроизведения CD/воспроизведения
кассеты вперед (►) …………………………………………………………… 12,32
@ Кнопка остановки CD/кассеты (■)……………………………………….. 12,32
0 Кнопки пропуска/поиска CD, быстрой перемотки
кассеты вперед/назад (l◄◄/^^’^, ►►/►►!)………………………..20, 32
0 Кнопка выбора эквалайзера (EQ)……………………………………………….. 34
@
Кнопки выбора входа (VCR/AUX/6CH INPUT) ……………………. 42, 62
0
Кнопка выбора диска (DISC) ………………………………………………….. 24
@
Кнопка выбора аудио/видеоэффектов (AV EFFECT) ………………. 44
@ Кнопка тестирования (TEST)……………………………………………………42
@)
Кнопка выбора
канала (СН SELECT) …………………. 42
@ Кнопка дисплея (DISPLAY)………………………………………………………22
@ Кнопки пропуска альбома (v, л-ALBUM)………………………………….. 20
EH590 I
@) Кнопка внешнего источника (AUX)………………………………………….. 62
Q Отключение режима DEMO
Если часы не установлены, то дисплей находится в режиме
демонстрации.
Вы можете сократить потребление электроэнергии в режиме
ожидания, выключив функцию демонстрации.
При включенном аппарате:
Нажмите кнопку [-DEMO] и удерживайте ее до тех пор,
пока на дисплее не появится индикация “NO DEMO’’.
При каждом нажатии и удержании этой кнопки индикация из
меняется следующим образом:
N0 DEMO (откл.):;10ЕМО (вкл.)

Пульт ду, А батарейки, В использование
Установка времени, 1 нажмите кнопку [с!)/1], чтобы включить аппарат, 2 © нажмите кнопку [clock/timer], чтобы, Выбрать индикацию “clock, Нажмите кнопку [set Чат поддержки
- Изображение
- Текст
□
1
сЬ/|
‘ г 1
П
г
L 1_
и
1_ 1 ‘
J
Г 1 П г L’
L и и 1 — 1 ‘
\ __
_____
_ ММ II
U
UU
и Г
_____ /________ у
3
®
TUNING /\
7
_ _. _ ————————
I I I Н I ‘
_ (I. — .J L ‘
1_ 1_ и 1_ I ‘
I UI
______ ^
______________________ /_________ ^
SET
%
Пульт ДУ
А Батарейки
• Поместите батарейки в пульт ДУ, соблюдая полярность {+ и ~).
• Не используйте батареи перезаряжаемого типа.
Не:
•устанавливайте вместе старые и новые батарейки;
•устанавливайте вместе батарейки разных типов;
•подвергайте батарейки воздействию высоких температур или
открытого пламени;
• разбирайте и не закорачивайте батарейки;
• пытайтесь перезаряжать щелочные или марганцевые батарейки;
• используйте батарейки со снятой наружной оболочкой;
•храните вместе с металлическими предметами, такими, как
ожерелья.
Неправильное обращение с батарейками может послужить причиной
утечки из них электролита, что, в свою очередь, может повредить
детали аппарата и привести к возгоранию.
В случае утечки электролита из батареек проконсультируйтесь с
Вашим дилером.
В случае попадания электролита на кожу тщательно промойте это
место водой.
Вынимайте батарейки из пульта ДУ, если Вы не собираетесь
использовать его в течение длительного времени. Храните
батарейки в прохладном темном месте.
Замените батарейки, если управление аппаратом с помощью пульта
ДУ становится невозможным даже с близкого расстояния.
В Использование
Направляйте пульт ДУ непосредственно на сенсор сигнала ДУ,
избегая препятствий, с расстояния макс. 7 метров.
• Окно излучателя пульта ДУ и сенсор сигнала ДУ на основном
аппарате должны быть незапыленными.
• Возможно неправильное срабатывание пульта ДУ, если окно
излучателя подвергается сильному световому воздействию,
например, попаданию на него прямых солнечных лучей или
отражению света от стеклянных дверец шкафов.
Не:
• ставьте тяжелые предметы на пульт ДУ;
• разбирайте пульт ДУ;
• допускайте попадания на пульт ДУ жидкостей.
Установка времени
Встроенные часы работают в 24-часовом формате.
Ниже приведен пример установки часов на 16:25 (4:25 после
полудня).
1
Нажмите кнопку [с!)/1], чтобы включить
аппарат.
2
© Нажмите кнопку [CLOCK/TIMER], чтобы
выбрать индикацию “CLOCK”.
при каждом нажатии кнопки индикация изменяется
следующим образом:
CLOCK————>©PLAY——— >©REC
^—Первоначальная индикация*—!
(2)
В течение 5 сек
Нажмите кнопку [SET].
3
©Нажимайте кнопку [TUNING (v или л)],
чтобы установить нужное время.
Однократное нажатие этой кнопки изменяет показания
времени на одну минуту, а удержание кнопки нажатой
быстро изменяет показания времени.
© Нажмите кнопку [SET].
время установлено, и на дисплее вновь изображается первоначаль
ная индикация.
Отображение часов
Нажмите кнопку [С10СКЛ»1МЕВ].
Индикация времени появляется примерно на 5 секунд.
Регулярно выполняйте повторную установку часов дия достижения
точности.

10:01
Technics sc-eh770 — ПОЧЕМУ НИКТО ЕГО НЕ ЖЕЛАЕТ КУПИТЬ???
31:29
Technics SC EH750 — что может старенький музцентр
15:22
90-е Возвращаются я купил Technics
09:29
Про «аудиопроцессор» в муз центрах Technics
22:40
Technics SC-EH790. Обзор мощного старичка.
22:48
Обзор музыкального центра Technics SC-EH790 Japan 5.1
24:57
Обзор музыкального центра Technics SC-EH790 Japan 5.1
29:49
Музыкальный центр Technics
Нажмите на кнопку для помощи
TECHNICS SL-EH790E
Type: (PDF)
Size
4.2 MB
Page
44
Category
AUDIO
SERVICE MANUAL
If you get stuck in repairing a defective appliance
download
this repair information for help. See below.
Good luck to the repair!
Please do not offer the downloaded file for sell only
use it for personal usage!
Looking for similar technics manual?
Document preview [1st page]

Click on the link for free download!
Document preview [2nd page]

Click on the link for free download!
Please tick the box below to get download link:
- Also known:
TECHNICS SLEH-790E SLEH790E SLEH 790 SL EH790E SL-EH790E
- If you have any question about repairing write your question to the Message board. For this no need registration.
- If the site has helped you and you also want to help others, please Upload a manual, circuit diagram or eeprom that is not yet available on the site.
Have a nice Day! - See related repair forum topics below. May be help you to repair.
Warning!
If you are not familiar with electronics, do not attempt to repair!
You could suffer a fatal electrical shock! Instead, contact your nearest service center!
Note! To open downloaded files you need acrobat reader or similar pdf reader program. In addition,
some files are archived,
so you need WinZip or WinRar to open that files. Also some files are djvu so you need djvu viewer to open them.
These free programs can be found on this page: needed progs
If you use opera you have to disable opera turbo function to download file!
If you cannot download this file, try it with CHROME or FIREFOX browser.
Relevant AUDIO forum topics:
vadmalacka varga jano és akinek nem nullás a vércsoportja ne szóljon hozzá.
Tiszteletem.
A kérdés a címben, mi okozhatja ezt? SVI3205 rendben, a baj hogy nincs fenéklemez amit levennék, hogy többet tudjak mérni. Ezért kérdezem hátha valaki megmondja hova nyúljak.
Üdv H-D
Kedves szakik, kaptam egy a címben említett erősítőt, amelynek első megitélésre végfog gondja volt megrendeltem bele a 2db új végfokot és olyat produkál hogy bekapcsolás után elkezd búgni majd kb 10mp eltelte után a erősebben kezd és a hangszórók membránja kifelé mozdul, tovább nem mertem bekapcsolva hagyni, de hangot nem ad ki hiába kötöttem a bemenetére jelet, nem találkoztam ég efféle jelenséggel, ha valaki tudna segíteni ebben azt szivesen venném.
Sziasztok!
Tud segíteni valaki abban, hogy hol lehet beszerezni Technics deck-hez fogaskereket RDG5772ZC cikkszámmal rendelkezik, a Panasonik-kal is egyezik.Sajnos rendelni már nem lehet. Ez az a kerék, amelyik kifogazódik és ezért a szalagot nem viszi. Magyarul a közlőkerék. A 3D nyomtató korában ez megoldható lenne, de ki tudja megcsinálni? Mintát tudok küldeni.Szerintem igény lenne rá.
Kösz: hidysze
Szevasztok.
A fent készülék egyik csatornájának vég és meghajtó fokozata eléggé elszenesedett.
A helyreálitás során a rajz szerint TH 301 poziciószámu thermisztor is sérült.Látszik a bevonat alatt a fémréteg.
Nem tudom eldönteni jó e ? A rajz nem jelöli a tipust. Beforrasztva mérve az ellenálását 4.4 Kohm.
A másik csatorna már volt javitva ott egy 2.2 kOhm-os ellenálás van helyette betéve.
Szerintetek mit lehetne oda tenni a helyére, illetve mi lehet az eredeti érték?
Üdv.
Similar manuals:
If you want to join us and get
repairing help
please sign in or sign up by completing a simple electrical test
or write your question to the Message board without registration.
You can write in English language into the forum (not only in Hungarian)!
E-Waste Reduce
Скачать
EB EP GN
The illustration shows SC-EH790 for the United Kingdom and Eastern Europe.
Note
“EB” on the outer packaging indicates the
United Kingdom.
Before connecting, operating or adjusting
this product, please read these instructions
completely. Please keep this manual for fu-
ture reference.
RQT6866-B
System Component
Operating Instructions
Model No.
SC-EH790
SC-EH590
Technics SC-EH790
EB EP GN
The illustration shows SC-EH790 for the United Kingdom and Eastern Europe.
Note
“EB” on the outer packaging indicates the
United Kingdom.
Before connecting, operating or adjusting
this product, please read these instructions
completely. Please keep this manual for fu-
ture reference.
RQT6866-B
System Component
Operating Instructions
Model No. SC-EH790
SC-EH590
View the manual for the Technics SC-EH790 here, for free. This manual comes under the category hi-fi systems and has been rated by 6 people with an average of a 8.9.
This manual is available in the following languages: English. Do you have a question about the Technics SC-EH790 or do you need help?
Ask your question here
Product Images (1)
Technics SC-EH790 specifications
Below you will find the product specifications and the manual specifications of the Technics SC-EH790.
The Technics SC-EH790 is a hi-fi system known for its audio performance and functionality. This system offers a wide range of features that cater to music enthusiasts and audiophiles.
The SC-EH790 includes a CD player that supports various disc formats, allowing users to enjoy their favorite music collections without any hassle. It also has a built-in tuner, enabling easy access to FM and AM radio stations. The system is equipped with dual cassette decks, enabling users to play and record their favorite tapes.
To enhance the audio experience, the SC-EH790 features a powerful amplifier that delivers clear and dynamic sound reproduction. The system includes a subwoofer output, providing additional bass for a more immersive listening experience.
The SC-EH790 also comes with a remote control, allowing users to conveniently operate the system from a distance. This remote control provides easy access to various functions and settings.
In terms of connectivity, the SC-EH790 offers multiple options. It includes an auxiliary input, enabling users to connect external devices such as smartphones or MP3 players. The system also has RCA input and output ports, providing flexibility for connecting to other audio devices.
Overall, the Technics SC-EH790 is a versatile hi-fi system that offers a range of features to enhance the audio experience. Whether it’s playing CDs, tapes, or tuning in to the radio, this system provides reliable performance for music enthusiasts seeking quality sound.
General
Frequently Asked Questions
Can’t find the answer to your question in the manual? You may find the answer to your question in the FAQs about the Technics SC-EH790 below.
How do I set up and connect the Technics SC-EH790 to my audio devices?
To set up the SC-EH790, first ensure that the power cord is properly connected to a power outlet. Then, connect your audio devices such as a CD player, TV, or smartphone using the appropriate audio cables. Make sure to select the corresponding input source on the SC-EH790 to enjoy your desired audio.
How can I adjust the bass and treble levels to personalize my listening experience?
To adjust the bass and treble levels on the SC-EH790, locate the equalizer settings. Within the settings, you can find options to increase or decrease the bass and treble levels according to your preference. Experiment with these settings until you achieve the desired sound quality.
Is it possible to connect external speakers or subwoofers to enhance the audio output?
Yes, it is possible to connect external speakers or a subwoofer to the Technics SC-EH790. Look for the audio output ports on the back panel of the system and connect the additional speakers or subwoofer using the appropriate cables. Once connected, you may need to adjust the settings on the system to ensure proper sound distribution.
How do I program and use the timer function on the Technics SC-EH790?
To program and use the timer function on the SC-EH790, locate the timer settings in the system menu. Within these settings, you can set the specific time for the system to turn on or off automatically, allowing you to wake up to your favorite music or fall asleep while listening. Follow the on-screen prompts to successfully program and utilize this convenient feature.
Can I fine-tune the volume levels for each connected audio source individually?
Yes, the Technics SC-EH790 provides the option to adjust the volume levels for each connected audio source individually. Within the system settings, navigate to the audio settings or input settings. Here, you should find options to fine-tune the volume levels for each specific input source, ensuring a balanced and consistent audio experience across your various devices.
Can bluetooth devices of different brands be connected to each other?
Yes, bluetooth is a universal method that allows different devices equipped with bluetooth to connect to each other.
What is bluetooth?
Bluetooth is a way of exchanging data wirelessly between electronic devices via radio waves. The distance between the two devices that exchange data can in most cases be no more than ten metres.
What is HDMI?
HDMI stands for High-Definition Multimedia Interface. An HDMI cable is used to transport audio and video signals between devices.
When is my volume too loud?
A volume above 80 decibels can be harmful to hearing. When the volume exceeds 120 decibels, direct damage can even occur. The chance of hearing damage depends on the listening frequency and duration.
How can I best clean my hi-fi system?
A slightly damp cleaning cloth or soft, dust-free cloth works best to remove fingerprints. Dust in hard-to-reach places is best removed with compressed air.
Wat is Dolby Atmos?
Dolby Atmos is a technology that ensures that the sound is reflected from the ceiling to where you are listening. This makes it possible to create a 5.1 effect with only 1 speaker.
Is the manual of the Technics SC-EH790 available in English?
Yes, the manual of the Technics SC-EH790 is available in English .
Is your question not listed? Ask your question here