
English Manual
Ditto X2 Looper

Important safety instructions 1
EMC / EMI 2
Explanation of graphic symbols 2
About this manual 3
Introduction 3
Setup 4
Setup examples 5
Inputs, outputs, controls 10
1. Power input 10
2. Audio inputs 10
3. Audio outputs 10
4. LOOP footswitch and LED 10
5. FX footswitch and LED 10
6. Loop / backing track level
control knob 10
7. Store / Delete / Backing
track level switch 10
8. FX selector switch 10
9. USB port 10
Creating loops 11
Storing, importing and exporting loops 14
Jam Track Central tracks 17
Using effects 18
Bypass modes 20
Frequently asked questions 20
Footswitch LED state reference 21
Updating the firmware 22
Changing the batteries 22
Technical specifications 23
Getting support 23
Product Ditto X2 Looper
Product (firmware) version 1.0
Document English Manual
Document version / date 2014-01-16
Ditto X2 Looper English Manual a

Important safety instructions
Important safety instructions
1. Read these instructions.
2. Keep these instructions.
3. Heed all warnings.
4. Follow all instructions.
5. Do not use this apparatus near water.
6. Clean only with a dry cloth.
7. Do not block any ventilation openings. In-
stall in accordance with the manufacturer’s
instructions.
8. Do not install near any heat sources such
as radiators, heat registers, stoves, or other
apparatus (including amplifiers) that produce heat.
9. Do not defeat the safety purpose of the po-
larized or grounding-type plug. A polarized
plug has two blades with one wider than
the other. A grounding-type plug has two
blades and a third grounding prong. The
wide blade or the third prong is provided for
your safety. If the provided plug does not fit
into your outlet, consult an electrician for
replacement of the obsolete outlet.
10. Protect the power cord from being walked
on or pinched, particularly at plugs, convenience receptacles, and the point where
they exit from the apparatus.
11. Only use attachments/accessories speci-
fied by the manufacturer.
12. Use only with a cart, stand, tripod,
bracket, or table specified by the
manufacturer, or sold with the apparatus. When a cart is used, use
caution when moving the cart/apparatus
combination to avoid injury from tip-over.
13. Unplug this apparatus during lightning
storms or when unused for long periods of
time.
14. Refer all servicing to qualified service personnel. Servicing is required when the apparatus has been damaged in any way,
such as power-supply cord or plug is damaged, liquid has been spilled or objects
have fallen into the apparatus, the apparatus has been exposed to rain or moisture,
does not operate normally, or has been
dropped.
Caution
You are cautioned that any change or modifications not expressly approved in this manual
could void your authority to operate this equipment.
Service
– All service must be performed by qualified
personnel.
Warning
– To reduce the risk of fire or electric shock, do
not expose this apparatus to rain or moisture
and objects filled with liquids, such as vases,
should not be placed on this apparatus.
– Do not install this device in a confined space.
Ditto X2 Looper English Manual 1
Explanation of graphic symbols
EMC / EMI
Electromagnetic compatibility /
Electromagnetic interference
This equipment has been tested and found to
comply with the limits for a Class B digital device, pursuant to part 15 of the FCC rules.
These limits are designed to provide reasonable
protection against harmful interference in residential installations. This equipment generates,
uses and can radiate radio frequency energy
and, if not installed and used in accordance with
the instructions, may cause harmful interference
to radio communications. However, there is no
guarantee that interference will not occur in a
particular installation.
If this equipment does cause harmful interference to radio or television reception, which can
be determined by turning the equipment off and
on, the user is encouraged to try to correct the
interference by one or more of the following
measures:
For customers in Canada
This Class B digital apparatus complies with Canadian ICES-003.
Cet appareil numérique de la classe B est
conforme à la norme NMB-003 du Canada.
Explanation of
graphic symbols
The lightning bolt triangle is used to
alert the user to the presence of uninsulated “dangerous voltages” within
the unit’s chassis that may be of sufficient magnitude to constitute a risk of
electric shock to humans.
The exclamation point triangle is used
to alert the user to presence of important operating and service instructions
in the literature accompanying the
product.
– Reorient or relocate the receiving antenna.
– Increase the separation between the equip-
ment and receiver.
– Connect the equipment into an outlet on a cir-
cuit different from that to which the receiver is
connected.
– Consult the dealer or an experienced ra-
dio / TV technician for help.
Ditto X2 Looper English Manual 2

Introduction
About this manual
This manual will help you learn understanding
and operating your TC product.
This manual is only available as a PDF download
from the TC Electronic website.
Of course, you can print this manual, but we encourage you to use the PDF version, which has
both internal and external hyperlinks. For example, clicking the TC Electronic logo in the upper
left corner of each page will take you to the table
of contents.
To get the most from this manual, please read it
from start to finish, or you may miss important
information.
To download the most current version of this
manual, visit tcelectronic.com/support/manuals/
Enjoy your TC product!
Introduction
Ditto X2 Looper is the logical heir to the looping
throne after the smash hit Ditto Looper. It houses
all the features that made the original Ditto Looper such a runaway hit – and then some!
New to Ditto X2 Looper is a user interface sporting two footswitches. The FX footswitch allows
you to trigger two types of loop effects: “Re-
verse” and “Half speed”. This second foot-
switch can also be used as a dedicated stop
switch – allowing you to stop and delete loops on
stage more effectively. You can export and im-
port loops to and from your PC or Mac, allowing
you to use your creations in your DAW or prepare
complex backing tracks for use on stage. Last
but not least, Ditto X2 Looper features stereo
inputs and outputs
Of course, Ditto X2 Looper sports the same features that made the original Ditto such a success:
– five minutes of looping time,
– unlimited overdubs,
– overdub undo/redo,
– true-bypass, analog dry-through design and
– 24 bit uncompressed high quality audio.
Ditto X2 Looper English Manual 3
Setup
Setup
Ready…
The Ditto X2 Looper box should contain the following items:
– 1 Ditto X2 Looper pedal
– 2 rubber feet for “non-velcro” pedalboard
mounting
– 1 USB cable (for transferring loops from and
to a computer and for updating the pedal
firmware)
– 1 “Quick Start Guide” sheet
– 1 TC Electronic sticker
– 1 leaflet about TC’s guitar FX product range
Inspect all items for signs of transit damage. In
the unlikely event of transit damage, inform the
carrier and supplier.
If damage has occurred, keep all packaging as it
can be used as evidence of excessive handling
force.
Set…
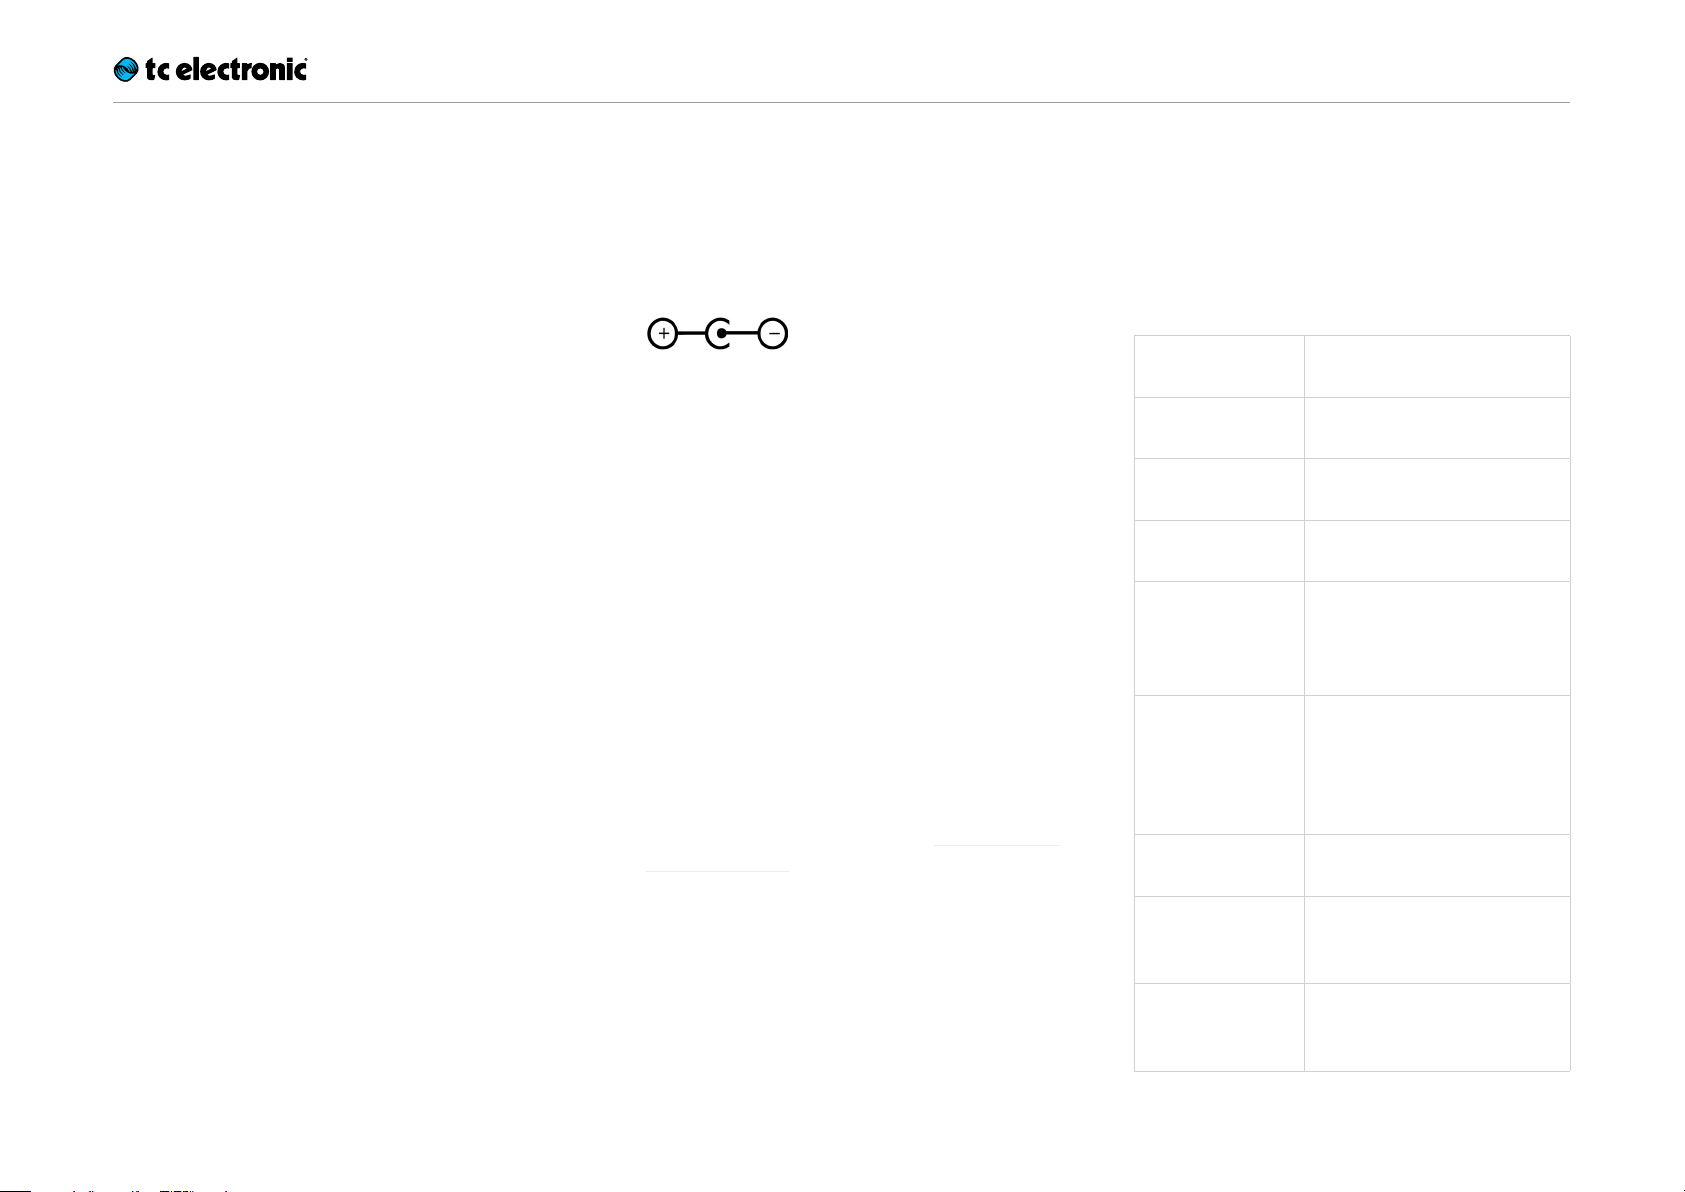
– Connect a 9V power supply delivering a mini-
mum of 150 mA with the following symbol to
the DC input socket of Ditto X2 Looper.
! Please note that Ditto X2 Looper does not
come with a power supply.
– Plug the power supply into a power outlet.
– Alternatively, you can operate Ditto X2 Looper
using one or two 9V batteries.
Ditto X2 Looper has two battery slots. You
can operate the pedal using only one battery,
but using two batteries will prolong operation
time.
– Connect your instrument to the MONO input
jack on the rear of the pedal using a ¼“ jack
cable. You can also feed the pedal with a stereo signal by using both INPUT jacks.
– Connect the MONO output jack on the rear
of the pedal to your amplifier using a ¼“ jack
cable. You can also send a stereo signal from
the pedal to the next device in the signal chain
by using both OUTPUT jacks.
For more complex setups, see “Setup exam-
ples” on page 5.
Let’s get loopin’!
If you are in a hurry, chances are you’ll find what
you’re looking for in this overview.
Operation
Power up
Ditto X2 Looper
Record Tap the LOOP footswitch
Switch to
playback
Undo / Redo last
recording
Stop Double-tap the LOOP foot-
Stop & clear the
loop
Resume
playback
Connect a power supply or insert a battery.
once.
Tap the LOOP footswitch
again.
Press and hold the LOOP footswitch.
switch or
Tap the FXfootswitch (FX selector has to be set to “Stop”)
Double-tap and hold the LOOP
footswitch or
Tap and hold the FXfootswitch
(FX selector has to be set to
“Stop”)
Tap the LOOP footswitch
again.
Engage
Reverse effect
Engage
½ Speed effect
Ditto X2 Looper English Manual 4
Tap the FXfootswitch
(FX selector has to be set to
“Reverse”)
Tap the FXfootswitch
(FX selector has to be set to
“½ Speed”)
Setup examples
Setup examples
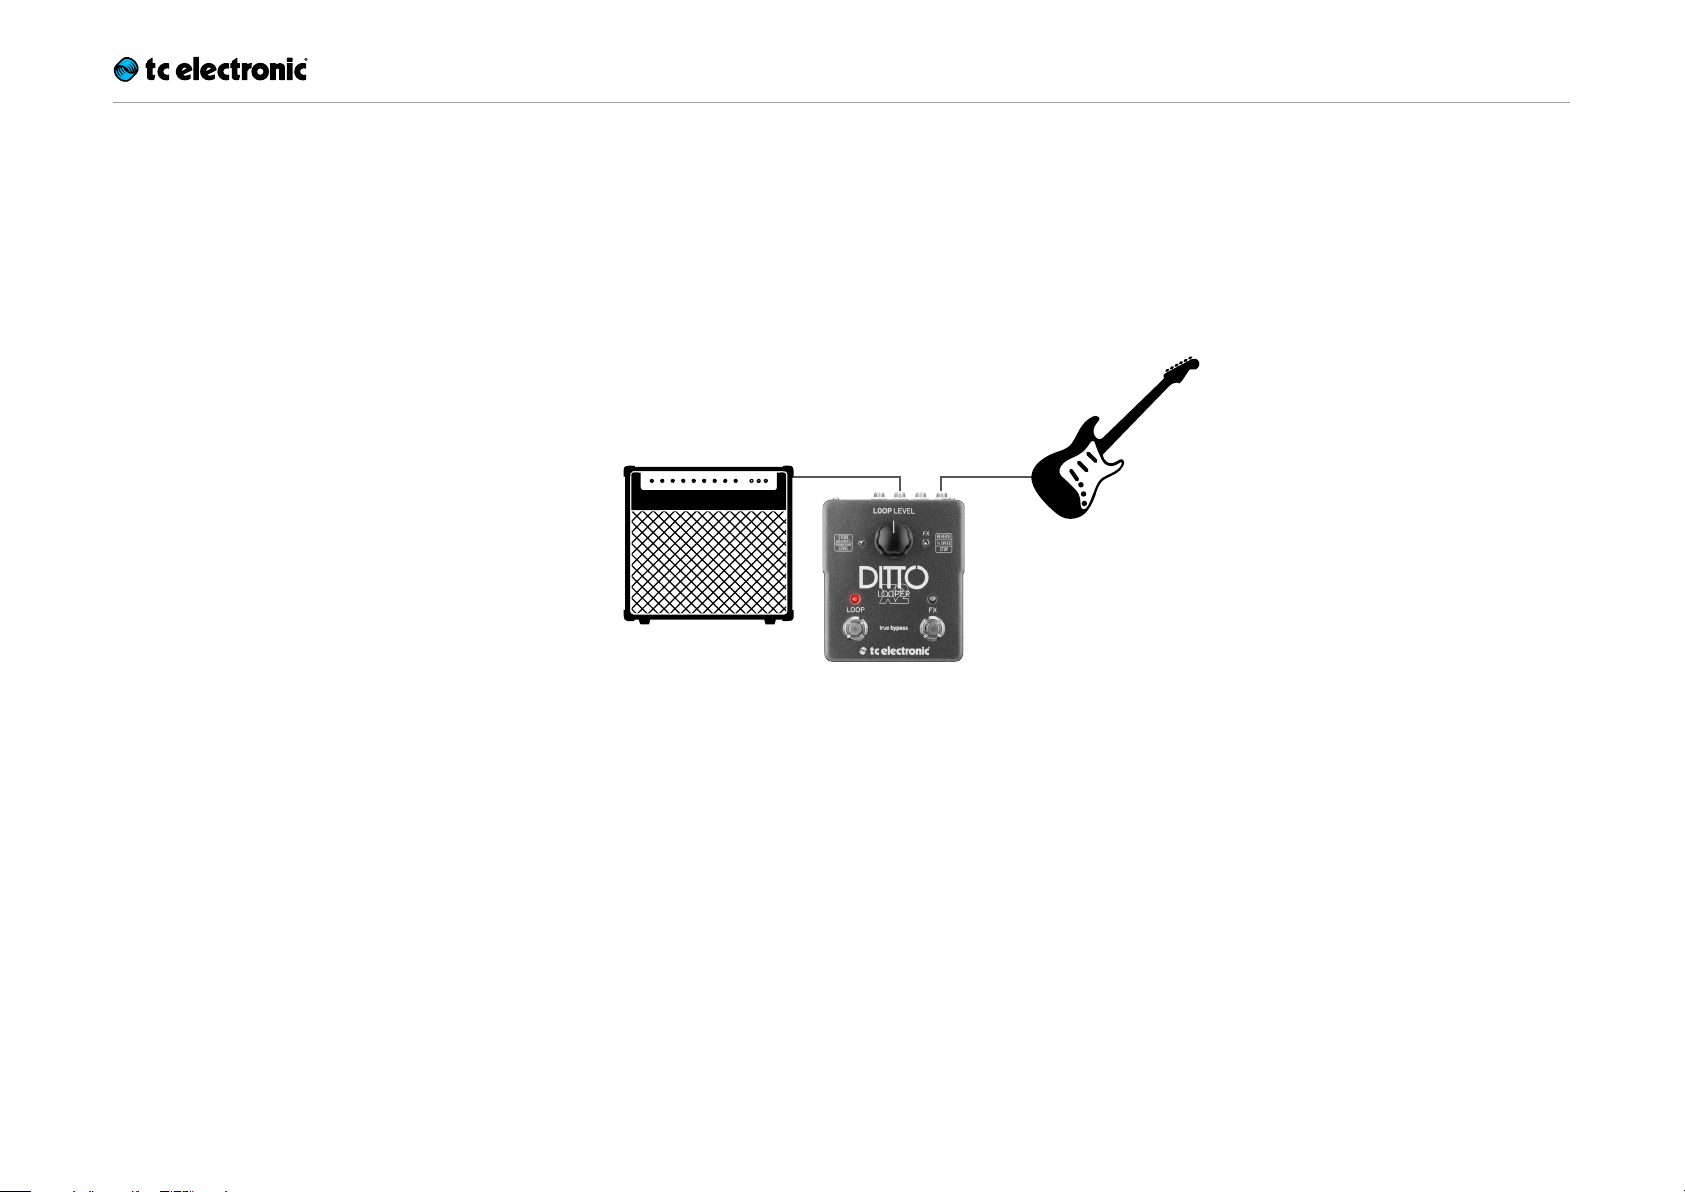
Setup example 1:
Basic looping – no effects
This is the most basic mono setup: your instrument, Ditto X2 Looper and your amp.
Input
Combo
Ditto X2 Looper English Manual 5
Setup examples
Setup example 2:
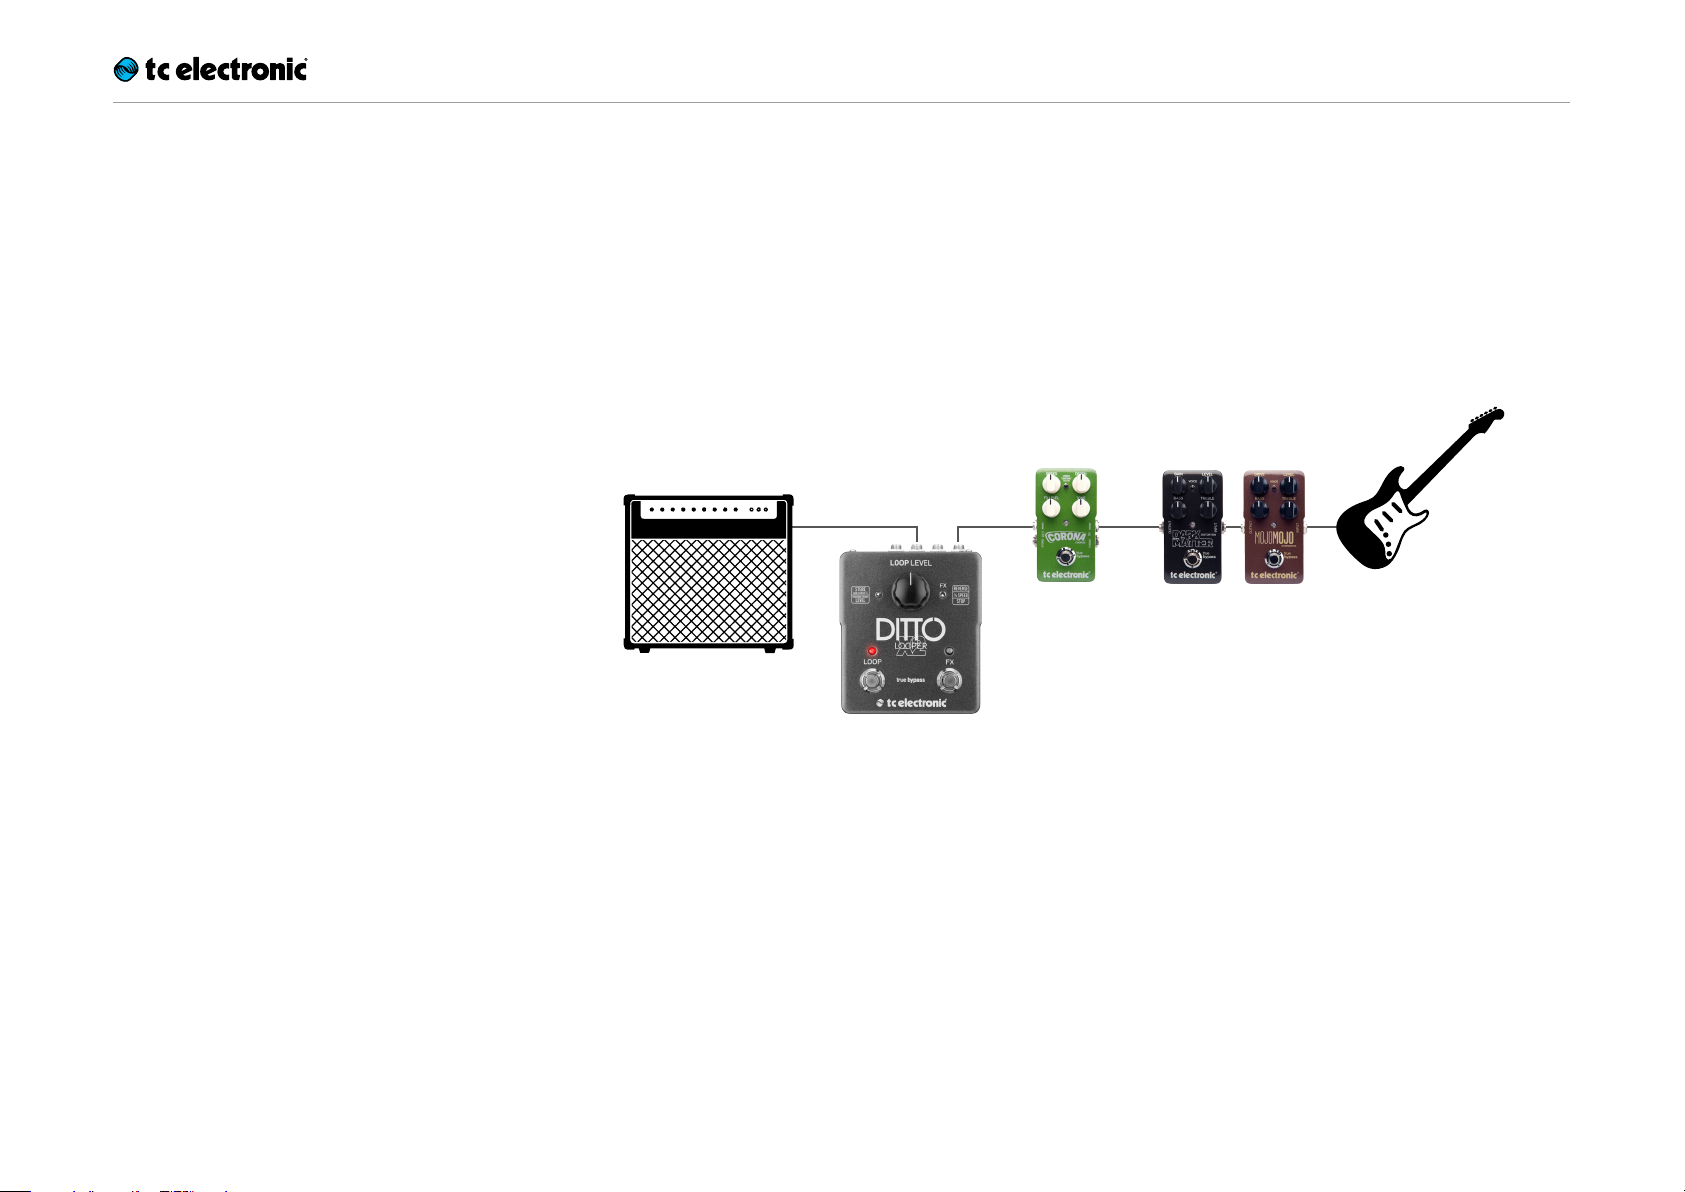
Ditto X2 Looper and effects
Place your effects before Ditto X2 Looper. This
will allow you to create and record different
sounds within the same looping session simply
by switching your effects on and off.
Input
Combo
Modulation
Pedals
Drive
Pedals
Ditto X2 Looper English Manual 6
Loading…
TC Electronic Ditto X2 Looper
(EN)
Controls
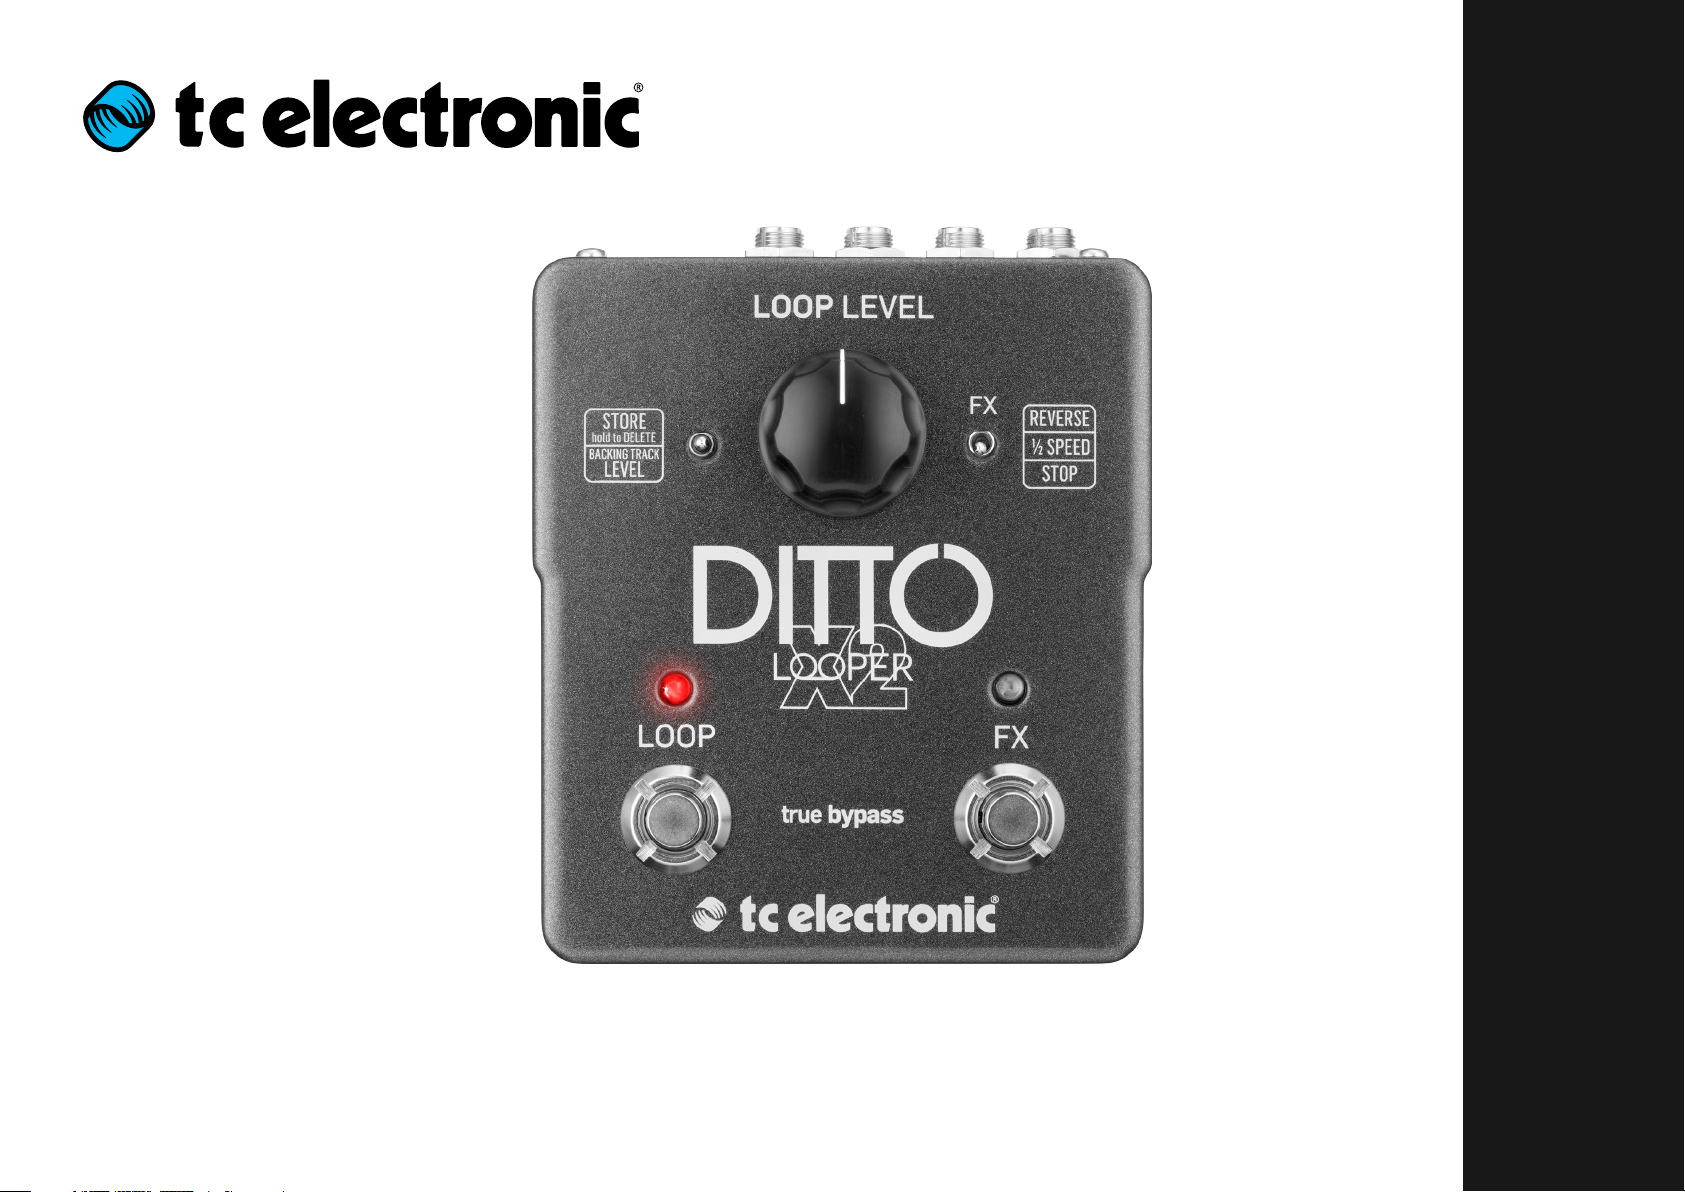
(1) Power input — The power input of this pedal is a standard 5.5 / 2.1 mm DC plug (centre = negative). To power up your pedal, connect a power supply to its power input socket. Ditto X2 Looper requires a 9 V power supply providing 100 mA or more (not supplied). To minimize hum, use a power supply with isolated outputs. You can also run Ditto X2 Looper using batteries. (2) Audio inputs — This pedal has two standard ¼» jack TS inputs for stereo operation. If your signal source is mono (e.g. a regular guitar or a mono eect pedal), connect it to the MONO input.(3) Audio outputs — This pedal has two standard ¼» TS outputs for stereo operation. If the next device in the signal chain is mono, connect it to the MONO output.(4) LOOP footswitch and LED — Use this footswitch to control all loop-related functions of the pedal (record, playback, undo/ redo, clear).(5) FX footswitch and LED — Use this footswitch to either control one of Ditto X2 Looper’s built-in eects or to stop loop playback. The assignment of this footswitch is determined by the setting of the FX selector switch. (6) Loop / backing track level control knob — Use the LOOP LEVEL control knob to control the level of your loops. Use the LOOP LEVEL control knob while holding down the Store / Backing track level switch to control the level of your backing track.(7) Store / Delete / Backing track level switch
• • To store the current loop as a backing track,
nudge this switch up.
• • To delete the stored loop/backing track,
hold this switch in the up position for three seconds.
• • To set the level of the backing track, turn the
Loop level control knob while holding this switch in the down position. (8) FX selector switch — Use this switch to determine the function of the FX footswitch. Available settings are:
• • Reverse: FX footswitch toggles the Reverse
eect on and o.
• • ½ Speed: FX footswitch toggles the Half
speed eect on and o.
• • Stop: FX footswitch acts as a dedicated
stop footswitch. (9) USB port — Connect Ditto X2 Looper to a computer to transfer loops between your computer and Ditto X2 Looper. If there should be rmware updates for this device, they can also be installed using the USB port.
Quick Start Guide
Highly Intuitive Looper Pedal with Dedicated Stop Button and Loop Eects
(3) (1) (9)(2)
(8)
(6)
(7)
(5)(4)
(3) (1) (9)(2)
(8)
(6)
(7)
(5)(4)
Manual
View the manual for the TC Electronic Ditto X2 Looper here, for free. This manual comes under the category not categorized and has been rated by 1 people with an average of a 7.5.
This manual is available in the following languages: English. Do you have a question about the TC Electronic Ditto X2 Looper or do you need help?
Ask your question here
Product Images (2)

TC Electronic Ditto X2 Looper specifications
Below you will find the product specifications and the manual specifications of the TC Electronic Ditto X2 Looper.
The TC Electronic Ditto X2 Looper is a versatile audio looping pedal that offers a wide range of features. Its compact design makes it easy to transport and use in various musical settings. The pedal has dedicated footswitches for looping, stopping, and undo/redo functions, providing intuitive control over the loop creation process.
With up to five minutes of looping time, the Ditto X2 allows musicians to create complex and layered soundscapes. It also features loop decay and loop level controls, which enable users to fine-tune the loop playback dynamics. Additionally, the pedal has a built-in effects loop that allows for the integration of external effects pedals into the looping process.
The Ditto X2 Looper is equipped with true bypass, ensuring that the signal remains clean and unaffected when the pedal is not in use. It can be powered using a standard 9V power supply or a battery, providing flexibility in various performance situations.
This looping pedal is highly regarded for its simplicity and ease of use. It offers an intuitive layout with clear, LED indicator lights that provide visual feedback on the looping status. This makes it suitable for both seasoned musicians and beginners looking to explore the world of looping.
Overall, the TC Electronic Ditto X2 Looper is a reliable and versatile tool for musicians who want to add creativity and depth to their performances. Its robust construction and intuitive design make it a popular choice among musicians of all skill levels.
General
Frequently Asked Questions
Can’t find the answer to your question in the manual? You may find the answer to your question in the FAQs about the TC Electronic Ditto X2 Looper below.
How do I connect the TC Electronic Ditto X2 Looper to my guitar amplifier?
Connect the «output» jack of the looper to the «input» jack of your guitar amplifier using a standard 1/4″ instrument cable.
Why is there no sound coming out of the looper?
Make sure your guitar is plugged into the «input» jack of the looper, and that the looper is powered on. Also, check that the «output» jack is connected to your amplifier. If the issue persists, verify that the volume level on both your guitar and amplifier are turned up appropriately.
How do I record a loop on the Ditto X2 Looper?
Press the footswitch once to start recording your loop. The LED indicator will turn red, indicating that it is recording. Play your desired musical phrase or riff, and press the footswitch again to stop recording.
Can I overdub or layer multiple loops on the Ditto X2 Looper?
Yes, you can overdub loops. Once you have recorded your initial loop, press the footswitch again during playback to enter overdub mode. Play along with your original loop, and the Ditto X2 Looper will add the new layer to the existing loop.
How do I delete a loop that I no longer want on the Ditto X2 Looper?
Press and hold the footswitch for a few seconds to erase the currently saved loop. You will see the LED indicator blinking rapidly, confirming the deletion. Repeat this process if you have multiple loops saved that you wish to remove.
Is the manual of the TC Electronic Ditto X2 Looper available in English?
Yes, the manual of the TC Electronic Ditto X2 Looper is available in English .
Is your question not listed? Ask your question here

Setup
Ditto X2 Looper English Manual 4
Setup
Ready…
The Ditto X2 Looper box should contain the fol-
lowing items:
– 1
Ditto X2 Looper pedal
– 2
rubber feet
for “non-velcro” pedalboard
mounting
– 1
USB cable
(for transferring loops from and
to a computer and for updating the pedal
firmware)
– 1
“Quick Start Guide”
sheet
– 1
TC Electronic sticker
– 1 leaflet about TC’s guitar FX product range
Inspect all items for signs of transit damage. In
the unlikely event of transit damage, inform the
carrier and supplier.
If damage has occurred, keep all packaging as it
can be used as evidence of excessive handling
force.
Set…
– Connect a 9V power supply delivering a mini-
mum of 150 mA with the following symbol to
the DC input socket of Ditto X2 Looper.
! Please note that Ditto X2 Looper does not
come with a power supply.
– Plug the power supply into a power outlet.
– Alternatively, you can operate Ditto X2 Looper
using one or two 9V batteries.
Ditto X2 Looper has two battery slots. You
can operate the pedal using only one battery,
but using two batteries will prolong operation
time.
– Connect your instrument to the MONO input
jack on the rear of the pedal using a ¼“ jack
cable. You can also feed the pedal with a ste-
reo signal by using both INPUT jacks.
– Connect the MONO output jack on the rear
of the pedal to your amplifier using a ¼“ jack
cable. You can also send a stereo signal from
the pedal to the next device in the signal chain
by using both OUTPUT jacks.
For more complex setups, see “Setup exam-
ples” on page 5.
Let’s get loopin’!
If you are in a hurry, chances are you’ll find what
you’re looking for in this overview.
Operation
Power up
Ditto X2 Looper
Connect a power supply or in-
sert a battery.
Record
Tap the LOOP footswitch
once.
Switch to
playback
Tap the LOOP footswitch
again.
Undo / Redo last
recording
Press and hold the LOOP foot-
switch.
Stop
Double-tap the LOOP foot-
switch or
Tap the FX footswitch (FX se-
lector has to be set to “Stop”)
Stop & clear the
loop
Double-tap and hold the LOOP
footswitch or
Tap and hold the FX footswitch
(FX selector has to be set to
“Stop”)
Resume
playback
Tap the LOOP footswitch
again.
Engage
Reverse effect
Tap the FX footswitch
(FX selector has to be set to
“Reverse”)
Engage
½ Speed effect
Tap the FX footswitch
(FX selector has to be set to
“½ Speed”)
Controls
(1) Power input — The power input of this pedal is a standard 5.5 / 2.1 mm DC plug
(centre = negative). To power up your pedal, connect a power supply to its power
input socket. Ditto X2 Looper requires a 9 V power supply providing 100 mA or
more (not supplied). To minimize hum, use a power supply with isolated outputs.
You can also run Ditto X2 Looper using batteries.
(2) Audio inputs — This pedal has two standard ¼» jack TS inputs for stereo
operation. If your signal source is mono (e.g. a regular guitar or a mono eect
pedal), connect it to the MONO input.
(3) Audio outputs — This pedal has two standard ¼» TS outputs for stereo operation.
If the next device in the signal chain is mono, connect it to the MONO output.
(4) LOOP footswitch and LED — Use this footswitch to control all loop-related
functions of the pedal (record, playback, undo/ redo, clear).
(5) FX footswitch and LED — Use this footswitch to either control one of Ditto
X2 Looper’s built-in eects or to stop loop playback. The assignment of this
footswitch is determined by the setting of the FX selector switch.
(6) Loop / backing track level control knob — Use the LOOP LEVEL control knob
to control the level of your loops. Use the LOOP LEVEL control knob while
holding down the Store / Backing track level switch to control the level of
your backing track.
(7) Store / Delete / Backing track level switch
• To store the current loop as a backing track, nudge this switch up.
• To delete the stored loop/backing track, hold this switch in the up position for
three seconds.
• To set the level of the backing track, turn the Loop level control knob while
holding this switch in the down position.
(8) FX selector switch — Use this switch to determine the function of the FX
footswitch. Available settings are:
• Reverse: FX footswitch toggles the Reverse eect on and o.
• ½ Speed: FX footswitch toggles the Half speed eect on and o.
• Stop: FX footswitch acts as a dedicated stop footswitch.
(9) USB port — Connect Ditto X2 Looper to a computer to transfer loops between
your computer and Ditto X2 Looper. If there should be rmware updates for this
device, they can also be installed using the USB port.
(3) (1) (9)(2)
(8)
(6)
(7)
(5)(4)
Quick Start Guide
DITTO X2 LOOPER
Highly Intuitive Looper Pedal with Dedicated Stop Button and Loop Eects
Ready…
The Ditto X2 Looper box should contain the fol-
lowing items:
Ditto X2 Looper pedal
– 1
– 2
rubber feet
for «non-velcro» pedalboard
mounting
– 1
USB cable
(for transferring loops from and
to a computer and for updating the pedal
firmware)
– 1
«Quick Start Guide»
sheet
TC Electronic sticker
– 1
– 1 leaflet about TC’s guitar FX product range
Inspect all items for signs of transit damage. In
the unlikely event of transit damage, inform the
carrier and supplier.
If damage has occurred, keep all packaging as it
can be used as evidence of excessive handling
force.
Ditto X2 Looper English Manual
Set…
– Connect a 9V power supply delivering a mini-
mum of 100 mA with the following symbol to
the DC input socket of Ditto X2 Looper.
! Please note that Ditto X2 Looper does not
come with a power supply.
– Plug the power supply into a power outlet.
– Alternatively, you can operate Ditto X2 Looper
using one or two 9V batteries.
Ditto X2 Looper has two battery slots. You
can operate the pedal using only one battery,
but using two batteries will prolong operation
time.
– Connect your instrument to the MONO input
jack on the rear of the pedal using a ¼» jack
cable. You can also feed the pedal with a ste-
reo signal by using both INPUT jacks.
– Connect the MONO output jack on the rear
of the pedal to your amplifier using a ¼» jack
cable. You can also send a stereo signal from
the pedal to the next device in the signal chain
by using both OUTPUT jacks.
For more complex setups, see «Setup exam-
ples» on page 5.
Let’s get loopin’!
If you are in a hurry, chances are you’ll find what
you’re looking for in this overview.
Operation
Power up
Connect a power supply or in-
Ditto X2 Looper
sert a battery.
Record
Tap the LOOP footswitch
once.
Switch to
Tap the LOOP footswitch
playback
again.
Undo / Redo last
Press and hold the LOOP foot-
recording
switch.
Stop
Double-tap the LOOP foot-
switch or
Tap the FX footswitch (FX se-
lector has to be set to «Stop»)
Stop & clear the
Double-tap and hold the LOOP
loop
footswitch or
Tap and hold the FX footswitch
(FX selector has to be set to
«Stop»)
Resume
Tap the LOOP footswitch
playback
again.
Engage
Tap the FX footswitch
Reverse effect
(FX selector has to be set to
«Reverse»)
Engage
Tap the FX footswitch
½ Speed effect
(FX selector has to be set to
«½ Speed»)
Setup
4