
DR-05X
Linear PCM Recorder
REFERENCE MANUAL
D01353820A

Table of Contents
1 – Introduction …………………………………………………………..4
Features ……………………………………………………………………………………..4
Conventions used in this manual …………………………………………. 4
Trademarks and copyrights …………………………………………………… 4
About microSD cards ……………………………………………………………… 5
Precautions for use ……………………………………………………………… 5
2 – Names and Functions of Parts …………………………………6
Front ………………………………………………………………………………………….. 6
Front panel ………………………………………………………………………………..7
Rear panel ………………………………………………………………………………… 7
Left side …………………………………………………………………………………….. 8
Right side ………………………………………………………………………………….. 8
Bottom………………………………………………………………………………………. 8
Home Screen ……………………………………………………………………………. 9
Recording screen ……………………………………………………………………10
Playback Control screen ………………………………………………………..11
Menu item list …………………………………………………………………………11
Using the menu ………………………………………………………………………13
Basic operation ……………………………………………………………………….13
3 – Preparation …………………………………………………………. 14
Preparing the power supply …………………………………………………14
Using AA batteries ……………………………………………………………..14
Using an AC adapter (sold separately) ……………………………14
Using USB bus power ………………………………………………………..14
Turning the power on and off (standby mode) …………………15
Turning the unit on ……………………………………………………………15
Turning the unit off (standby) ………………………………………….15
Resume function ………………………………………………………………..15
Setting the date and time …………………………………………………….16
Inserting and removing microSD cards ………………………………17
Inserting microSD cards ……………………………………………………17
Removing cards ………………………………………………………………….17
Preparing microSD cards for use ………………………………………….17
Using the built-in speaker …………………………………………………….18
Connecting monitoring equipment ……………………………………18
4 – Recording …………………………………………………………… 20
Setting file format, sampling frequency, type and
maximum file size …………………………………………………………………..20
Setting where files are saved………………………………………………..21
Making input settings ……………………………………………………………21
Placing the unit and making connections …………………………22
Recording with the built-in mics ……………………………………..22
Recording with external mics (MIC IN)……………………………22
Recording an external device (EXT IN) ……………………………22
Adjusting the input level ………………………………………………………22
Manually adjusting the input level …………………………………22
Using the LEVEL MODE function……………………………………..24
Recording ………………………………………………………………………………..25
Recording playback and input sounds together
(overdubbing) …………………………………………………………………………25
Select the file you want to overdub ………………………………..25
Selecting file format ………………………………………………………….25
Simultaneous listening to playback and input sound
(MONITOR MIX) ………………………………………………………………….25
Adjusting the input level ………………………………………………….26
TASCAM DR-05X
2
Conducting overdubbing …………………………………………………27
Recording automatically (AUTO REC) ………………………………….27
Continuing to record in a new file (track incrementing) ….28
Manual track incrementation during recording ……………28
Automatic track incrementation by file size ………………….28
Capturing a few seconds before starting recording
(PRE REC)………………………………………………………………………………….29
Self-timer …………………………………………………………………………………29
Using tone output ………………………………………………………………….30
Setting the AUTO TONE …………………………………………………….30
Setting the AUTO TONE length ………………………………………..30
Adjusting the AUTO TONE volume ………………………………….30
Recording duration ………………………………………………………………..31
5 – Working with Files and Folders (BROWSE screen) ….. 32
Screen navigation…………………………………………………………………..32
Icons on the BROWSE screen ……………………………………………….32
File operations ………………………………………………………………………..32
Folder operations …………………………………………………………………..33
Creating a new folder …………………………………………………………….33
6 – Playback……………………………………………………………… 34
Adjusting the playback volume …………………………………………..34
Setting the playback area (AREA) ………………………………………..34
Selecting a folder for the playback area (1)………………………..35
Selecting a folder for the playback area (2)………………………..35
Using the playlist ……………………………………………………………………36
Adding files to the playlist ………………………………………………..36
Editing the playlist …………………………………………………………….36
Selecting files for playback (skipping) ………………………………..37
Playing recordings …………………………………………………………………37
Pausing ………………………………………………………………………………..37
Stopping ……………………………………………………………………………..37
Searching backward and forward …………………………………..37
Repeat playback (REPEAT) …………………………………………………….37
Special playback control functions ……………………………………..38
Playback Control screen ……………………………………………………38
Loop playback of a selection ……………………………………………38
Changing the playback speed (VSA) ………………………………39
Setting the playback equalizer …………………………………………….39
Increasing the perceived overall sound pressure to
enhance listenability (LEVEL ALIGN)……………………………………40
Using the jump function ……………………………………………………….40
Setting the jump back time ……………………………………………..41
Setting the jump forward time ………………………………………..41
7 – Quick Operations ………………………………………………… 42
Features of the QUICK button ………………………………………………42
Quick menu …………………………………………………………………………….43
Deleting files …………………………………………………………………………..43
Dividing the selected file (DIVIDE) ………………………………………43
Overwrite recording ………………………………………………………………44
Selecting a file to overwrite record …………………………………44
Activating overwrite recording mode…………………………….44
Conducting overwrite recording …………………………………….44
Checking the result of recording …………………………………….44
Undoing and redoing ……………………………………………………….44
Ending overwrite recording mode ………………………………….44

Table of Contents
Transcribing recorded files (DICTATION PLAY)…………………..45
Enabling DICTATION PLAY mode …………………………………….45
Adjusting the playback equalization ………………………………45
Changing the playback position ……………………………………..45
Changing the playback volume and speed …………………..45
Exiting DICTATION PLAY mode ………………………………………..45
8 – Mark functions ……………………………………………………. 46
Adding marks manually ………………………………………………………..46
Adding marks automatically to a recording ………………………46
Moving to mark positions …………………………………………………….46
Clearing marks ………………………………………………………………………..46
9 – Using the effects …………………………………………………. 47
Setting the effect ……………………………………………………………………47
Effects Preset List ……………………………………………………………………47
10 – Tuning an instrument ………………………………………… 48
Using the tuner ………………………………………………………………………48
Setting the tuner………………………………………………………………..48
Tuning a musical instrument ……………………………………………48
Adjusting the input level for tuning ……………………………….48
11 – USB Connections ……………………………………………….. 49
Powering the unit with USB bus power ……………………………..49
Using as an SD card reader …………………………………………………..49
Disconnecting the unit from a computer …………………………..50
Transferring files from a computer ………………………………………50
Using as a USB audio interface …………………………………………….50
Setting the connected device type …………………………………51
Connecting …………………………………………………………………………51
12 – Settings and Information …………………………………… 52
Viewing information (INFORMATION) …………………………………..52
File information page (FILE) ……………………………………………52
Card information page ……………………………………………………..52
System information page …………………………………………………52
System Settings ………………………………………………………………………53
Setting the automatic power saving function ………………53
Setting the backlight …………………………………………………………53
Adjusting the display contrast …………………………………………53
Setting the battery type ……………………………………………………53
Set the language ………………………………………………………………..53
Restoring the factory settings ………………………………………….54
Formatting microSD cards ……………………………………………….54
Completely formatting SD cards ……………………………………..54
Setting the file name format ………………………………………………..55
File name format ………………………………………………………………..55
Setting the WORD item …………………………………………………….55
13 – Messages ………………………………………………………….. 56
14 – Troubleshooting ……………………………………………….. 58
15 – Specifications ……………………………………………………. 59
General …………………………………………………………………………………….59
Input/output ratings ……………………………………………………………..59
Analog audio input/output ratings ………………………………..59
Control input/output ratings …………………………………………..59
Audio performance ……………………………………………………………….59
Other specifications ……………………………………………………………….59
Dimensional drawings …………………………………………………………..61
TASCAM DR-05X
3
1 – Introduction
Features
Compact audio recorder that uses microSD/microSDHC/
i
microSDXC cards as recording media
High-performance stereo unidirectional microphone pair
i
44.1/48/96 kHz, 16/24-bit, linear PCM (WAV format)
i
recording possible
BWF format WAV files supported
i
32–320kbps MP3 format recording possible (compatible
i
with v2.4 ID3 tags)
Overdubbing allows playback and input signals to be
i
mixed and recorded together as a new file
Built-in 0.3 W mono output speaker
i
Built-in effect (reverb) can be used during recording and
i
playback
Automatic recording function starts recording automati-
i
cally when a set sound input level is detected
When a maximum file size set in advance is reached, a
i
new file can be started automatically without interrupting
recording
QUICK button provides easy access to various functions
i
Track incrementing function allows a recording to be split
i
by creating a new file when desired
Pre-recording function allows the unit to record 2 seconds
i
of sound before recording is activated
Automatic peak reduction function automatically reduces
i
the level suitably when the input level is too high
Automatic level control can increase or decrease the
i
recording volume when the input sound is too quiet or
loud
Limiter function automatically reduces the level suitably in
i
parts when the input level is too high
Low cut filter convenient for reducing low-frequency noise
i
VSA function can change playback speed in a range from
i
50-200% (0.5 to 2.0 in 0.1 increments) of normal without
changing pitch
Repeat playback and IN-OUT loop playback functions
i
PB CONT button opens screen for playback speed and
i
IN-OUT loop settings
Tuner function to tune musical instruments
i
Self-timer function to start recording after a set period of
i
time.
Jump function that moves backward or forward a small
i
amount during playback or when paused (DICTATION PLAY
mode only)
Playlist function
i
DIVIDE function allows files to be split where desired (only
i
for WAV files)
MARK function convenient for moving to specific locations
i
Playback equalizer function and level alignment function to
i
enhance the perceived overall sound pressure
File name format can be set to use a user-defined word or
i
the date
Resume function to memorize the playback position before
i
the unit is turned off.
TASCAM DR-05X
4
3.5mm (1/8”) jack for external stereo microphone input
i
(provides plug-in power) or external stereo line input
3.5mm (1/8”) line/headphone output jack
i
128×64-pixel LCD with backlight
i
micro-B type USB 2.0 port
i
Operates on 2 AA batteries, a TASCAM PS-P520E AC adapter
i
(sold separately) or USB bus power
Tripod attachment screw hole
i
USB audio interface functions
i
Dictation playback mode
i
Overwrite recording function
i
Conventions used in this manual
The following conventions are used in this manual.
When we refer to a button or connector or control on the
i
DR-05X, the typeface looks like this: MENU.
When we show messages, for example, that appear on the
i
unit’s display, the typeface looks like this: ON.
We abbreviate “microSD memory card” as “microSD card”.
i
Words that appear on the computer display are shown in
i
quotation marks like this: “DR-05X”.
Additional information is provided as necessary in tips,
i
notes and cautions.
TIP
These are tips about how to use the unit.
NOTE
Notes provide additional explanations for special situations.
CAUTION
Failure to follow these instructions could result in damage
to equipment or lost recording data, for example.
V
CAUTION
Failure to follow these instructions could result in injury.
Trademarks and copyrights
TASCAM is a registered trademark of TEAC Corporation.
i
The microSDXC Logo is a trademark of SD-3C, LLC.
i
The MPEG Layer-3 audio coding technology is licensed
i
from Fraunhofer IIS and Thomson.
Supply of this product does not convey a license nor imply
i
any right to distribute MPEG Layer-3 compliant content
created with this product in revenue-generating broadcast
systems (terrestrial, satellite, cable and/or other distribution
channels), streaming applications (via Internet, intranets
and/or other networks), other content distribution systems
(pay-audio or audio-on-demand applications and the like)
or on physical media (compact discs, digital versatile discs,
semiconductor chips, hard drives, memory cards and the
like). An independent license for such use is required. For
details, please visit http://mp3licensing. com.
Other company names, product names and logos in this
i
document are the trademarks or registered trademarks of
their respective owners.
Information is given about products in this manual
only for the purpose of example and does not indicate
any guarantees against infringements of third-party
intellectual property rights and other rights related
to them. TEAC Corporation will bear no responsibility
for infringements on third-party intellectual property
rights or other liabilities that occur as a result of the
use of this product.
Properties copyrighted by third parties cannot be
used for any purpose other than personal enjoyment
and the like without the permission of the right
holders recognized by copyright law. Always use this
equipment properly.
TEAC Corporation will bear no responsibility for rights
infringements committed by users of this product.
About microSD cards
This unit uses microSD cards for recording and playback.
A list of microSD cards that have been confirmed for use
with this unit can be found on the TEAC Global Site (http://
teac-global.com). Check the page for this product. You can
also contact TASCAM customer support service.
1 – Introduction
Precautions for use
microSD cards are delicate media.
In order to avoid damaging a card or the card slot, please take
the following precautions when handling them.
Do not leave them in extremely hot or cold places.
i
Do not leave them in extremely humid places.
i
Do not let them get wet.
i
Do not put things on top of them or twist them.
i
Do not hit them.
i
Do not remove or insert them during recording, playback,
i
data transmission or other access.
Always put memory cards in cases when transporting
i
them.
TASCAM DR-05X
5
2 – Names and Functions of Parts
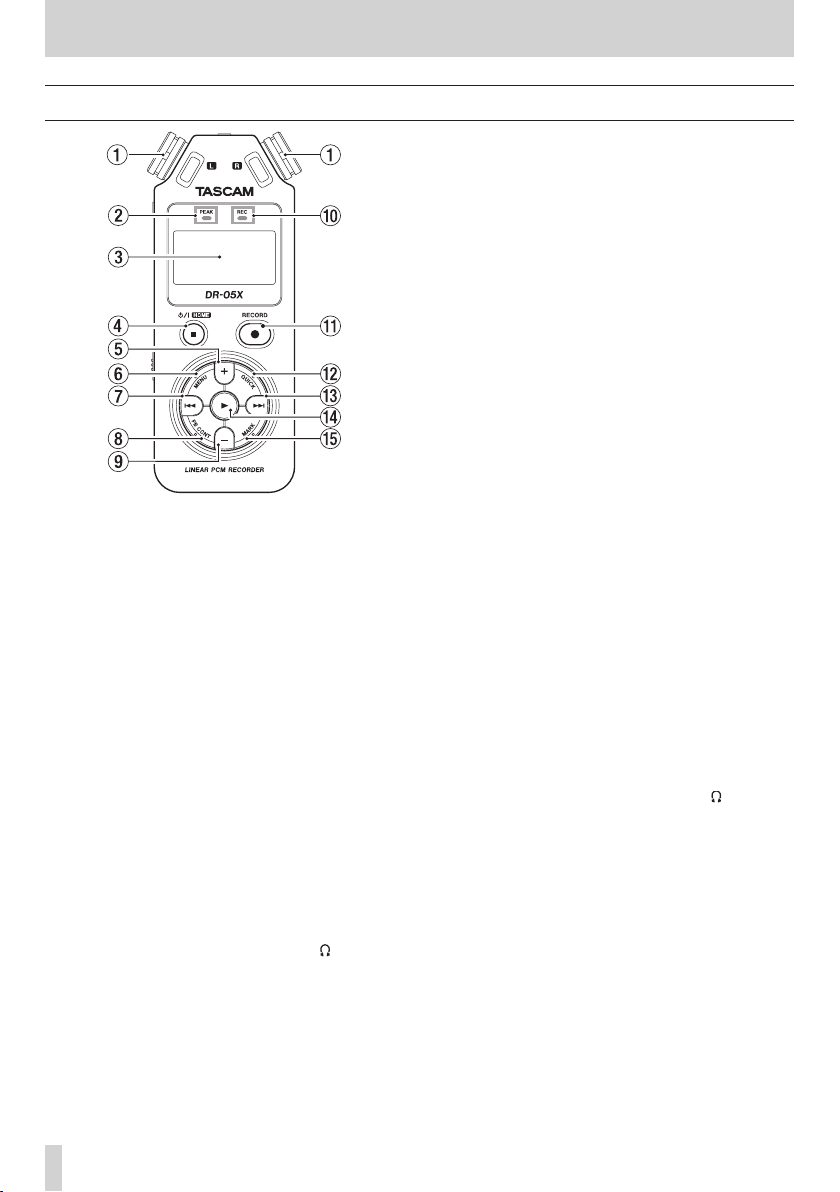
Front
6 MENU button
When the Home Screen is open, press this to open the
MENU screen.
Press this button to return to the MENU screen from the
various setting screens.
When the IN and OUT points are set in the track and the
Playback Control screen is open, press this to turn loop
playback on or off.
7 . button
Press to return to the beginning of a track that is playing
or stopped in the middle.
When IN and OUT points are set between the current
position and the end of the track, press this button to skip
to those points.
Press when a track is stopped at its beginning to skip to
the beginning of the previous track.
Press and hold to search backwards.
Press this button while pressing and holding the MARK
button to return to the previous mark.
On the setting screens, use this button to move the cursor
left. Use this button to answer “NO” to a confirmation
1 Built-in stereo microphone
This is a stereo pair of unidirectional electret condenser
mics.
If you connect an external microphone or external input
to the MIC/EXT IN jack between the mics, the built-in mic
pair becomes inactive.
2 PEAK indicator
Lights when the input volume is too high.
3 Display
Displays a variety of information.
4 ¤ (HOME) [8] button
Press during playback to pause playback at the current
position. Press when paused to return to the beginning of
the track.
Press when recording or in recording standby to stop
recording.
When any other screen is open, press to return to the
Home Screen.
Press and hold to turn the unit on and off (put into
standby).
5 + button
When the Home or TUNER screen is open, press to increase
the output level from the built-in speaker or /LINE OUT
jack. During adjustment, a volume indicator will appear in
a pull-up window.
When the Playback Control screen is open, press to
increase the playback speed.
When a setting screen is open, use this button to change
the setting of the selected item.
TASCAM DR-05X
6
message.
On the BROWSE screen, press this button to move up a
level.
Press when recording or in recording standby to decrease
the input level from the built-in microphone or MIC/EXT
IN jack. During adjustment, a pull-up with meters showing
the input level will appear at the bottom of the display.
8 PB CONT button
This button activates the Playback Control screen.
When the Playback Control screen is open, press to return
to the Home screen.
Press during recording standby to turn off the self-timer
function or change the time period.
9 — button
When the Home or TUNER screen is open, press to decrease
the output level from the built-in speaker or /LINE OUT
jack.
During adjustment, a volume indicator will appear in a
pull-up window.
When the Playback Control screen is open, press to
increase the playback speed.
When a setting screen is open, use this button to change
the setting of the selected item.
0 REC indicator
This flashes during recording standby.
This lights while recording.
q RECORD [0] button
When stopped, press this button to put the unit into
recording standby. The REC indicator will start to blink. If
INPUT is ON on the MONITOR MIX screen, a pop-up menu to
set whether overdubbing is ON/OFF will open.
When in standby, press to start recording. The REC
indicator will light when recording.
When recording, press to pause recording.

2 – Names and Functions of Parts
w QUICK button
When playing back, stopped, paused or in recording
standby when the Home Screen is open or when the
Playback Control screen is open, press this button to
display the Quick menu. The functions shown depend on
the state of the unit when the button is pressed.
Stopped: DELETE, DIVIDE and LEVEL ALIGN functions
i
for the current song
Playing back or on Playback Control screen: LEVEL
i
ALIGN
Recording standby: LEVEL MODE
i
When recording, press this button to increment the track,
dividing the recording by creating a new file.
When the BROWSE screen or PLAYLIST screen is open,
press this button to open or close the pop-up menu for
file/folder operations.
e / button
Press this button during playback or when playback is
stopped to skip to the beginning of the next track.
When IN and OUT points are set between the current
position and the end of the track, press this button to skip
to those points.
Press and hold to search forward.
On the setting screens, use this button to move the cursor
right. Use this to confirm the selection of a setting item or
to answer “YES” to a confirmation message.
Press this button while pressing and holding the MARK
button to move to the next mark.
On the BROWSE screen, press this button to move down a
level. If a file is selected, the file is loaded, the Home Screen
reopens and the unit stops.
Press this button during recording or recording standby
to increase the input level from the built-in microphone
or MIC/EXT IN jack. During adjustment, a pull-up with
meters showing the input level will appear at the bottom
of the display.
r 7 button
When the Home Screen is open and playback is stopped,
press to start playback.
During playback, press this button to start jump-back
playback.
When a file or folder is selected on the BROWSE screen,
press this button to return to the Home Screen and play
the file or the first file in the folder from the beginning.
t MARK button
Use to add marks manually during recording and playback.
Press when stopped at a mark location to delete that mark.
Press the . or / button while pressing and holding
this button to move to the previous or next mark, respectively. When the Playback Control screen is open, use this
button to set the IN (start) and OUT (end) points of the
interval that you want to set for loop playback.
When the IN and OUT points are already set, press this
button to cancel loop playback and clear the IN and OUT
points.
Front panel
y Strap holder
Use this to attach a strap.
Rear panel
u MIC/EXT IN jack
Use this input jack to connect a stereo mini-jack microphone or an external input device. This supports plug-in
power.
The built-in mic is disabled when an external mic is
connected to the MIC/EXT IN jack.
TASCAM DR-05X
7
2 – Names and Functions of Parts
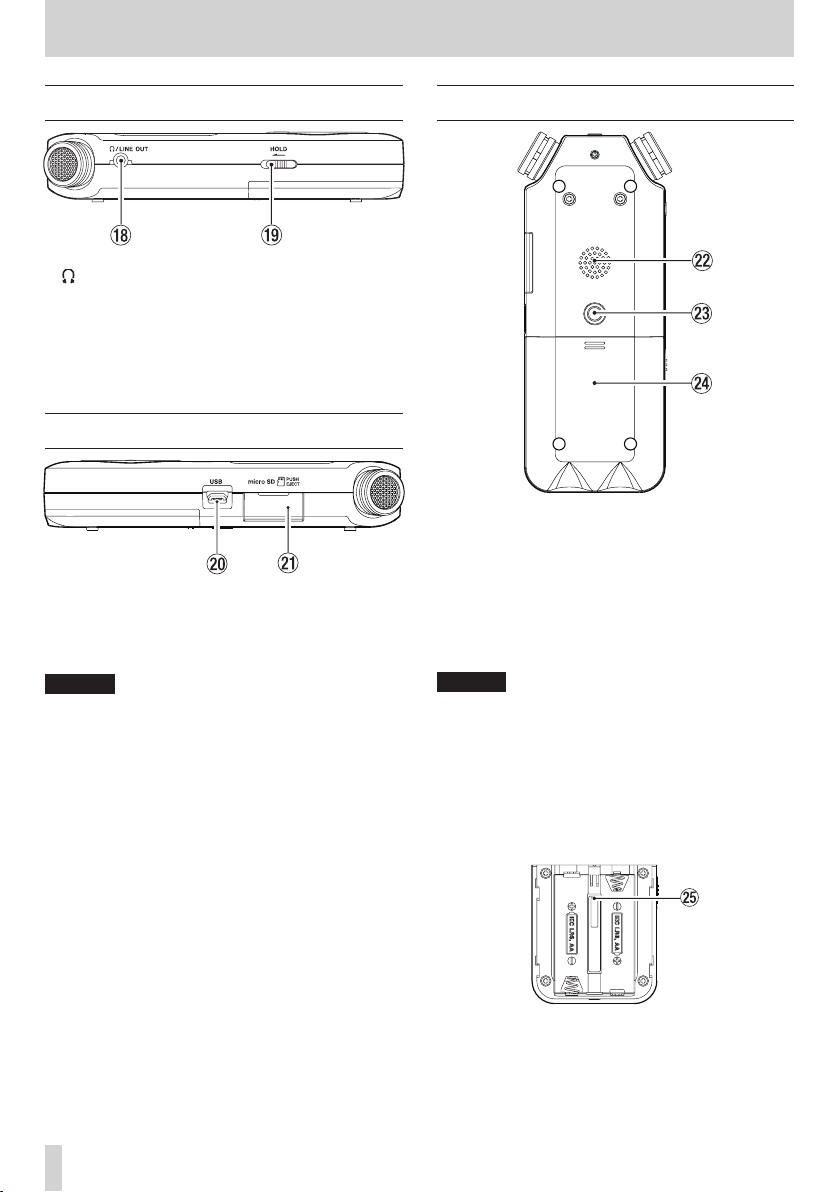
Left side
i /LINE OUT jack
Use this to connect headphones or the line input jack of
other equipment using a stereo mini-jack cable.
o HOLD switch
Shift to the left end (in the direction of the arrow) to
engage the hold function.
No buttons can be used when HOLD is active.
Right side
p USB por t
This is a micro-B USB port.
Use a USB cable (A to Micro-B) to connect the unit to a
computer. (see «11 – USB Connections» on page 49)
CAUTION
The unit should be connected directly to the computer,
not through a USB hub.
a microSD card slot
Use this slot to insert and remove microSD cards.
Bottom
s Mono speaker
Use this built-in speaker to listen to recordings.
Sound is not output during recording, when the unit is
in recording standby, when headphones are connected,
when the speaker is disabled, or when the Monitor Mix
function is enabled.
d Tripod attachment screw thread (1/4-inch)
Use this to attach the unit to a tripod or mic stand.
CAUTION
Ensure the tripod or microphone stand screws are securely
i
fastened to prevent the unit from falling off.
When attaching this unit to a tripod or microphone stand,
i
be sure to place it on a level surface.
f Battery compartment cover
g Battery compar tment
Install batteries (2 AA) in this compartment to power the
unit. (see «Using AA batteries» on page 14)
TASCAM DR-05X
8

Home Screen
Home Screen when in ordinary operation mode
1 Playback speed status
One of the following icons appears according to the
playback speed setting.
Icon Playback speed
×1.0
×1.1 – ×2.0
×0.5 – ×0.9
Playback speed not controllable
2 Monitor Mix function status
This shows whether the Monitor Mix function is on or off.
Monitor Mix off
Monitor Mix on
3 Effect status
Shows whether the effect function is ON or OFF.
: Built-in effect off
: Built-in effect on
4 Speaker status
: Speaker output off
:
Speaker output on
5 Remaining battery charge/power supply status
A battery icon appears when power is supplied by
batteries.
When batteries are being used, a battery icon shows the
amount of power remaining in bars ( , , ).
The batteries are almost dead and the power will soon
turn off (standby) if the icon with no bars appears.
When using a TASCAM PS-P520E AC adapter (sold
separately) or USB bus power, appears.
NOTE
Sometimes a “Battery Low” warning appears when
recording or conducting other demanding operations
even when battery power remains.
6 Recorder operation status
This icon shows the recorder operation status.
2 – Names and Functions of Parts
Icon Explanation
Stopped
8
Paused
79
Playing back
7
Searching forward
,
Searching backward
m
Skipping to the beginning of the next file
/
Skipping to the beginning of the current or
.
previous file
7 Playback position display
The current playback position is shown by a bar. As
playback progresses, the bar extends from the left.
8 Playback level meters
These show the levels of the input and playback signals.
When the Monitor Mix function is ON, the level of the
combined input and playback sounds is shown.
9 Playback file name
The name or tag information of the file currently in play is
displayed.
The ID3 tag information is displayed instead when
included in the MP3 file.
NOTE
ID3 tag information contains titles and artist names, which
can be stored in MP3 files.
0 Elapsed time
Shows the elapsed time (hours: minutes: seconds) of the
currently playing track.
q Remaining time message
Shows the remaining playback time of the current track
(hours: minutes: seconds).
w Peak value in decibels (dB)
The maximum level that occurs in a fixed period of time is
displayed digitally.
e Playback area
This shows the current playback file area.
: All files in the MUSIC folder
: All files in the selected folder
: All files added to the playlist
r Playback file number/total number of files
This shows the current file number and total number of
files in the playback area.
t Output volume status
This shows the output volume status.
TASCAM DR-05X
9
2 – Names and Functions of Parts
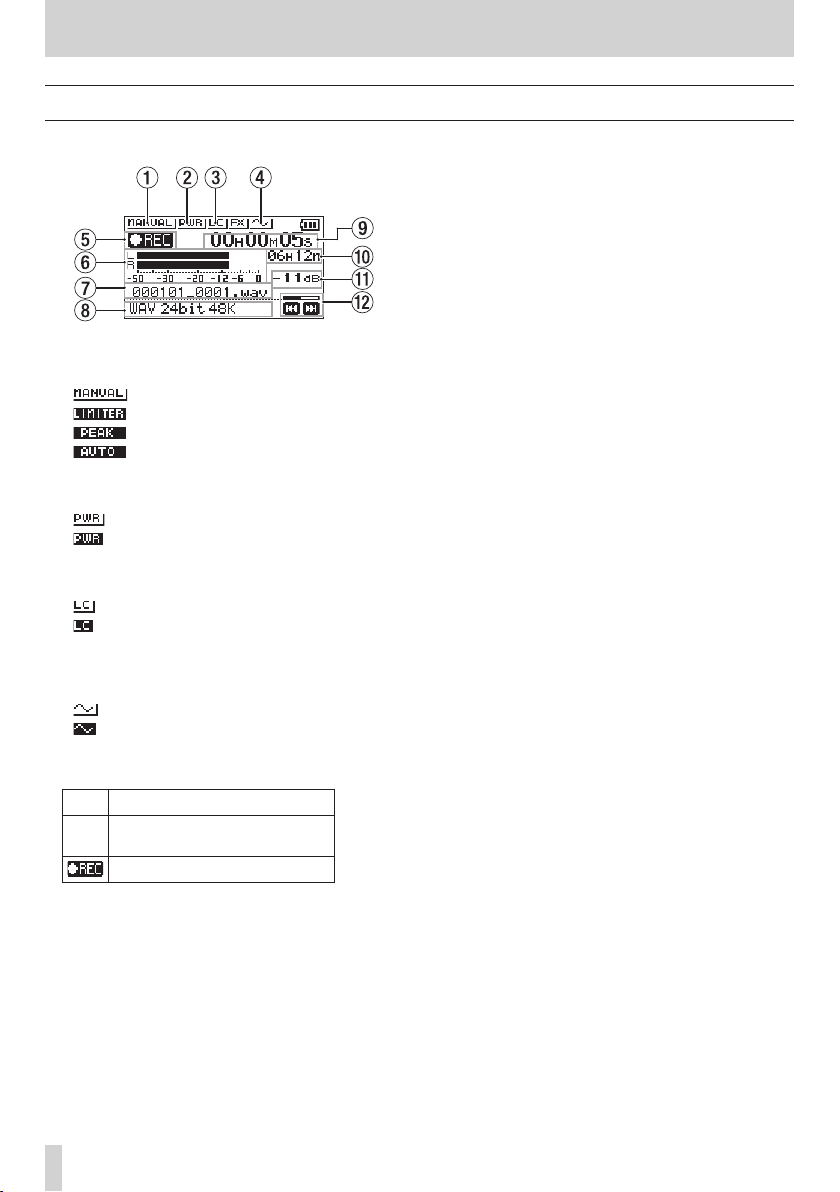
Recording screen
The recording screen shown below appears when recording
or in recording standby.
1 Level mode setting status
This icon shows the level mode function setting.
: MANUAL
: LIMITER
: PEAK REDUCTION
: AUTO
2 Plug-in power status
This shows whether plug-in power is on or off.
Plug-in power off
Plug-in power on
3 Low cut filter status
This shows whether the low cut filter is on or off.
Low cut filter off
Low cut filter on
4 AUTO TONE setting status
This icon shows whether the AUTO TONE function is on or
off.
: AUTO TONE off
: AUTO TONE on
5 Recording status
This icon shows the recorder operation status.
Icon Explanation
Recording paused (recording
09
standby)
Recording
9 Elapsed recording time
The elapsed recording time of the file appears as hours:
minutes: seconds.
0 Remaining recording time
When stopped, this shows the remaining time (hours:
minutes) of the microSD card. When the remaining
recording time becomes less than one minute, only
seconds will be shown.
q
Peak value in decibels (dB)
Peak input level values are shown in decibels.
w Recording level status
This shows the recording level status.
6 Recording level meters
These show the input signal levels.
When overdubbing, the levels of the mixed input and
playback sounds are shown.
7 Recording file name
The file name that will automatically be given to the
recorded file is shown.
8 Recording format
This shows the file recording format and sampling
frequency.
TASCAM DR-05X
10
2 – Names and Functions of Parts
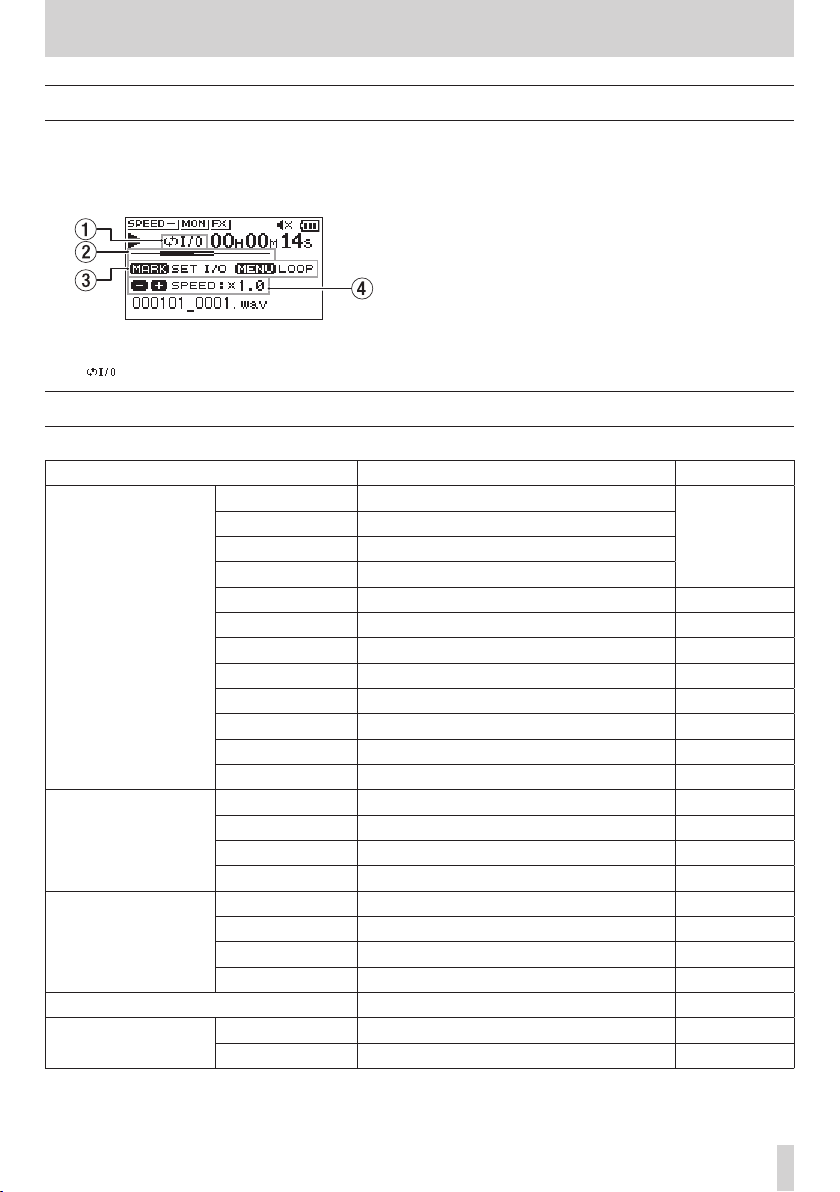
Playback Control screen
During playback or when stopped, press the PB CONT button
to open the Playback Control screen.
Recording is not possible when this screen is open.
.
and / buttons to skip to IN/OUT points and the file
beginning/end. You cannot skip to the previous or next file.
Use the
1 Loop playback status
The icon appears when loop playback is enabled.
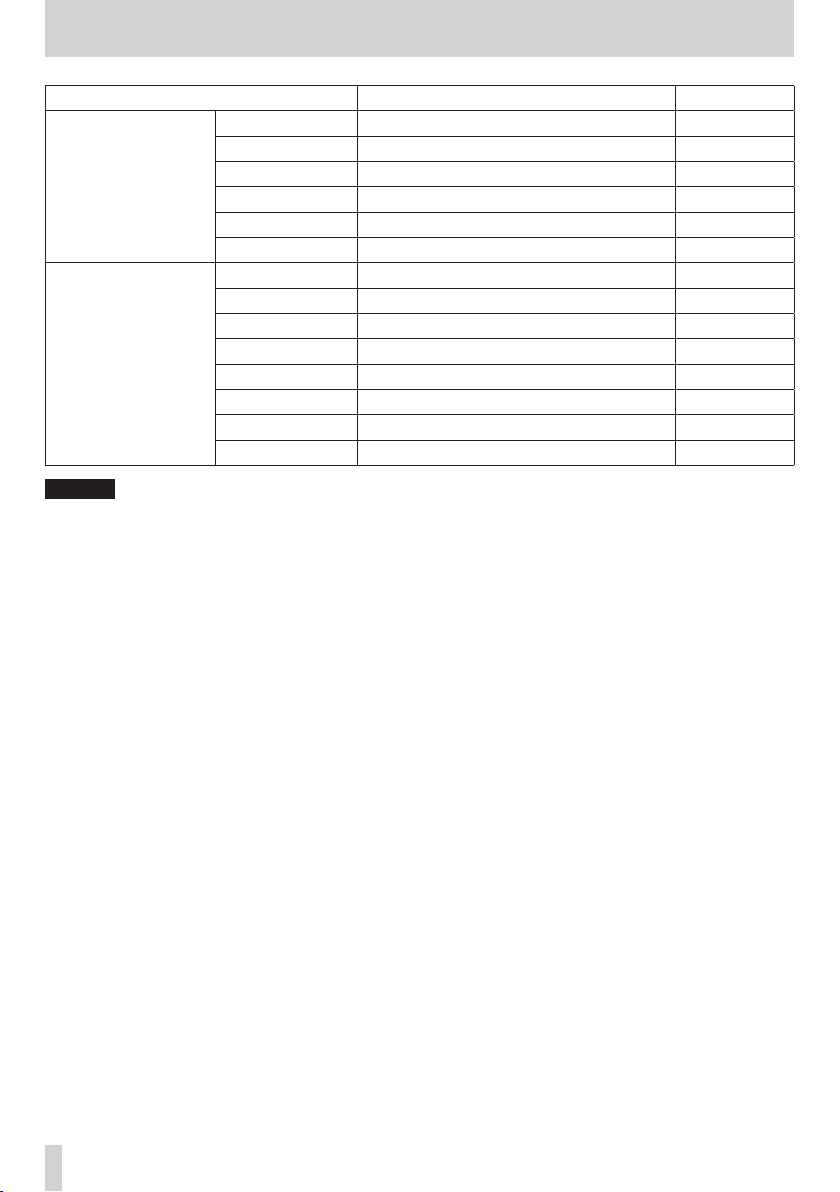
Menu item list
Press the MENU button to open the MENU screen. The menu items are as follows.
Menu item Function Page
Set the recording format
Set the sampling frequency
Set stereo or mono file
Set the maximum file size
Set plug-in power see page 21
Set the low-cut filter see page 21
Set the pre-recording function see page 29
Set tone output see page 30
Set the length of the output tone see page 30
Set the volume of tone output see page 30
Set the auto-recording function mode see page 27
Set the auto-recording start level see page 27
Set the playback area see page 34
Set the repeat playback function see page 37
Set the jump back function see page 41
Set the jump forward function see page 41
Set the level mode function see page 24
Turn the built-in speaker on/off see page 18
Set the playback equalization see page 39
Set the output level alignment function see page 40
Work with files and folders on the SD card see page 32
Select the SD card reader mode see page 49
Make USB audio interface settings see page 50
REC SETTING
PLAY SETTING
I/O SETTING
BROWSE
USB
FORMAT
SAMPLE
CHANNEL
SIZE
MIC POWER
LOW CUT
PRE REC
AUTO TONE
TONE SECS
TONE VOL
MODE
LEVEL
AREA
REPEAT
JUMP BACK
JUMP FWD
LEVEL MODE
SPEAKER
PLAYEQ
LEVEL ALIGN
SD CARD READER
AUDIO I/F
2 Playback position
The current playback position is shown by a bar. As
playback progresses, the bar extends from the left.
3 Available buttons
The buttons available in the Playback Control screen are as
follows.
MARK: Creates or deletes an IN or OUT point.
MENU: Turn loop playback ON or OFF.
4 Playback speed
Playback speed as compared with the normal speed is
shown. VSA appears on the left when variable speed
audition, which allows tempo to be changed without
changing pitch, is enabled.
see page 20
TASCAM DR-05X
11
2 – Names and Functions of Parts
Menu item Function Page
INFORMATION
MONITOR MIX
OTHERS
SYSTEM
CAUTION
When recording or in recording standby, only the following screens and items are shown.
i
REC SETTING screen: MIC POWER, LOW CUT and AUTO REC items (AUTO REC setting cannot be changed)
MONITOR MIX screen: INPUT and PB INPUT items (INPUT setting cannot be changed)
EFFECT screen: all items
When the Playback Control screen is open, pressing the MENU button will not open the MENU screen. This turns the loop
i
playback function on/off. (see «Loop playback of a selection» on page 38)
TUNER
EFFECT
FILE NAME
DATE/TIME
AUTO OFF
BACKLIGHT
CONTRAST
BATTERY TYPE
LANGUAGE
INITIALIZE
QUICK FORMAT
FULL FORMAT
Information about the file, microSD card, and system
Set the monitor mix function see page 25
Use the tuner
Make effect settings see page 47
Set the recording file name see page 55
Set the date and time used by the unit see page 16
Set the automatic power saving function see page 53
Set the backlight see page 53
Adjust the display contrast see page 53
Set the type of batteries. see page 53
Set the language shown on the display see page 53
Restore the default settings see page 54
Format an SD card see page 54
Completely format an SD card see page 54
see page 52
see page 48
TASCAM DR-05X
12
2 – Names and Functions of Parts
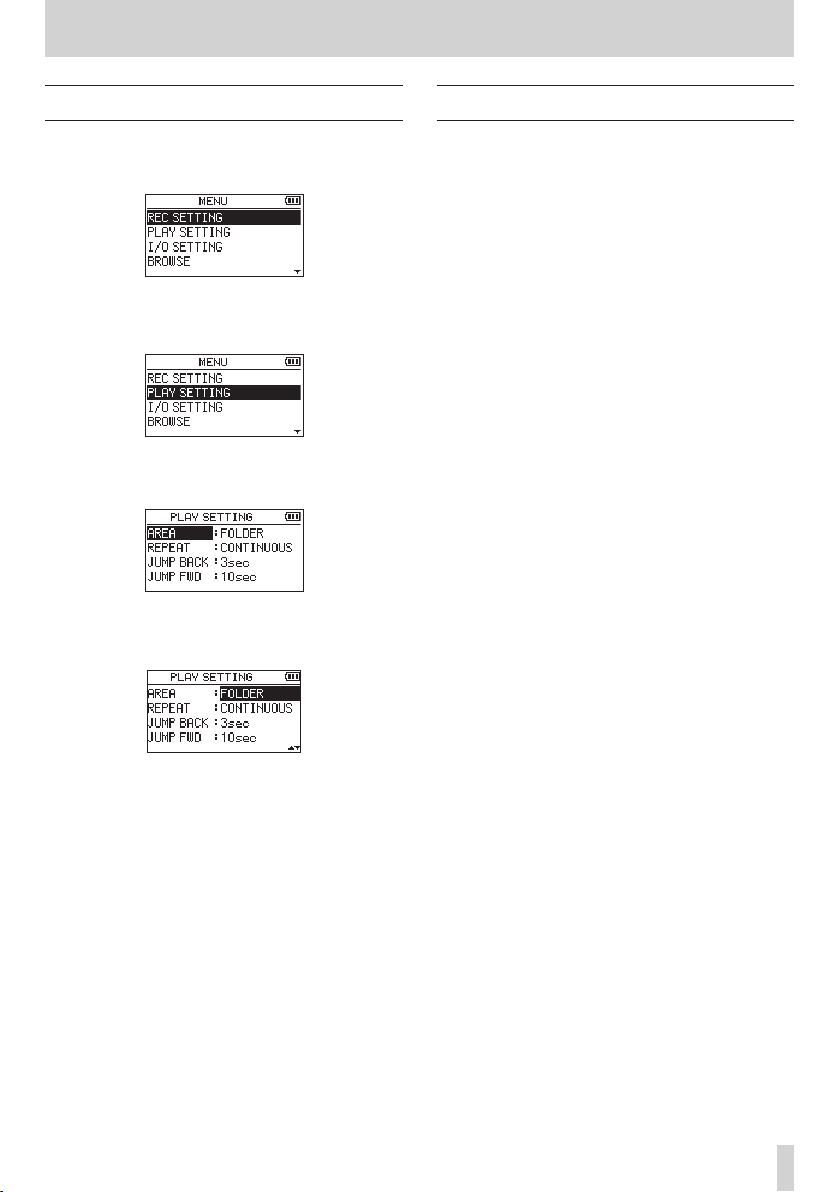
Using the menu
We will explain this by showing how to set the playback area
as an example.
Press the MENU button to open the MENU screen.
1.
Use the + or – button to select a menu item (highlighted),
2.
and use the 7 button to move to various settings
screens.
Example: PLAY SETTING screen
Use the + or – button to select (highlight) a menu item
3.
to set.
Example: AREA is selected.
Use the / or 7 button to move the cursor to
4.
highlight the value of the setting.
Use the + or – button to change the setting.
5.
Press the . button to set a different item in the same
6.
menu.
This enables selection of a different item. Use the + or −
button to select another item to set.
Repeat step 3 to 6 as necessary to set other items.
7.
Press the MENU button to open the MENU (or OTHERS)
8.
screen. To return to the Home screen, press the ¤
(HOME) [8] button.
Basic operation
Use the following buttons to operate the various screens.
MENU button
This opens the MENU screen.
PB CONT button
This opens the Playback Control screen.
¤ (HOME)[8] button
When a settings screen is open, press the ¤ (HOME) [8]
button to return to the Home Screen.
7 button
Use to confirm the various setting items.
/ button
Use this to move the cursor (highlighted area) right on the
screen and to open folders on the BROWSE screen.
Use this to answer “YES” to a pop-up confirmation
message.
. button
Use this to move the cursor (highlighted area) left on the
screen and to close folders on the BROWSE screen.
Use this to answer “NO” to a confirmation pop-up message.
+ button
Use this to move the cursor (highlighted area) up on the
screen and to increase values.
– button
Use this to move the cursor (highlighted area) down on
the screen and to decrease values.
QUICK button
This opens the Quick menu.
The content differs according to the recorder status and
operation mode.
TASCAM DR-05X
13
3 – Preparation
Preparing the power supply
This unit can operate on two AA batteries, using a TASCAM
PS-P520E AC adapter (sold separately) or using a commercially-available USB cable (USB bus power).
Alkaline or Ni-MH batteries can be used.
To use USB bus power, see «Powering the unit with USB bus
power» on page 49.
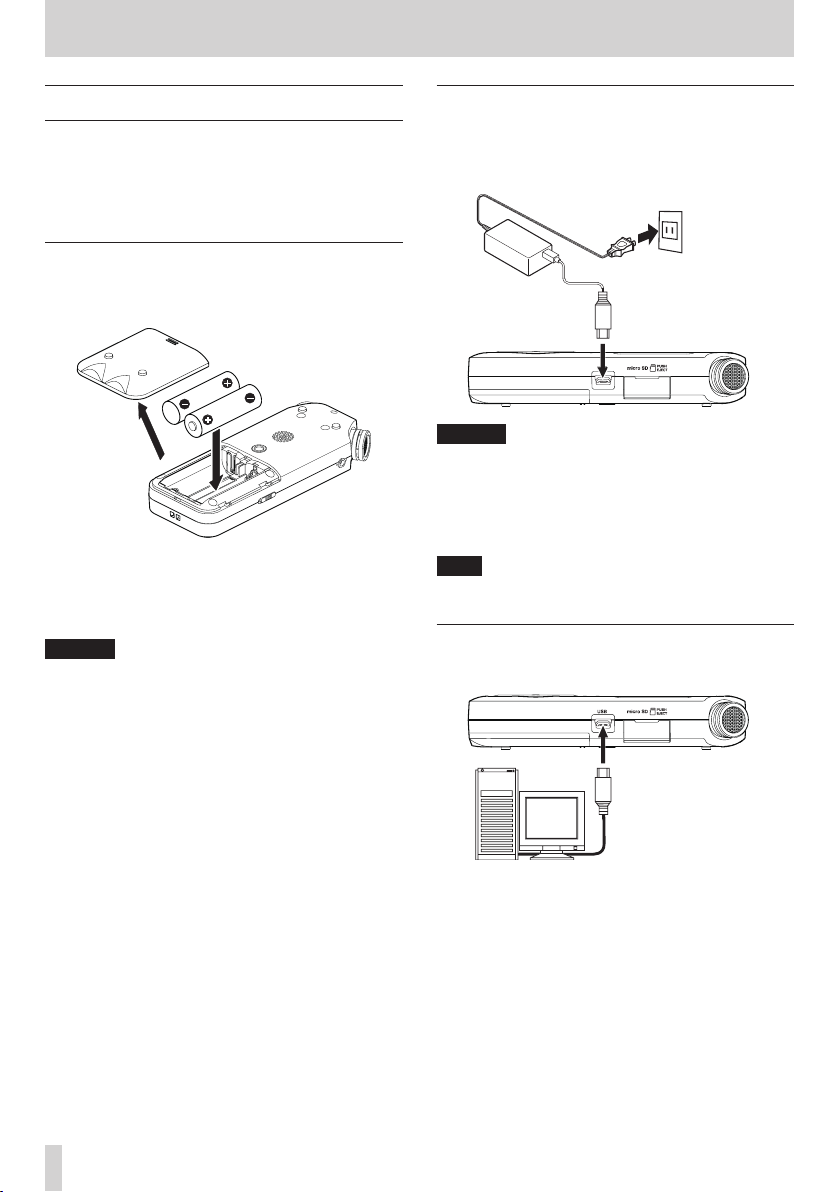
Using AA batteries
Open the battery compartment cover on the back of the
unit. Fit two AA batteries to the + and – marks shown in the
compartment, and close the battery compartment cover.
When using AA batteries, set the type of battery in order to
accurately show the amount of power remaining and allow
the unit to accurately determine whether power is available
for proper operation. (see «Setting the battery type» on page
53)
CAUTION
Do not use manganese dry cell batteries.
i
This unit cannot recharge Ni-MH batteries. Use a commer-
i
cially available recharger.
The included alkaline batteries are for confirming
i
operation of the unit and might not last very long.
Using an AC adapter (sold separately)
As shown in the illustration, connect a TASCAM PS-P520E AC
adapter (sold separately) to the unit’s USB port and charge
the unit.
TASCAM PS-P520E (sold separately)
AC outlet
Micro-B USB plug
CAUTION
Never use any adapter other than the designated
i
PS-P520E AC adapter. Use of a different adapter could
cause malfunction, fire or electric shock.
Noise may occur when recording with a microphone if the
i
unit is too close to the AC adapter. In such a case, keep
sufficient distance between the AC adapter and the unit.
NOTE
When both batteries are installed and the AC adapter is
connected, power will be supplied from the AC adapter.
Using USB bus power
Use the commercially-available USB cable to connect the unit
and the computer as illustrated below.
Computer
Micro-B USB plug
TASCAM DR-05X
14
USB
See «Powering the unit with USB bus power» on page 49.
3 – Preparation
Turning the power on and off (standby
mode)
V
CAUTION
Do not wear connected headphones when turning the
unit on or off (putting it in standby). Noise could damage
the headphone driver unit or harm your hearing.
CAUTION
The unit enters standby mode if turned off when the unit
i
is operating on AC power supplied through an AC adapter
(TASCAM PS-P520E, sold separately) or bus power from a
computer USB port.
Turn down the volume of the monitoring system
i
connected to the unit before turning the unit on/off
(standby).
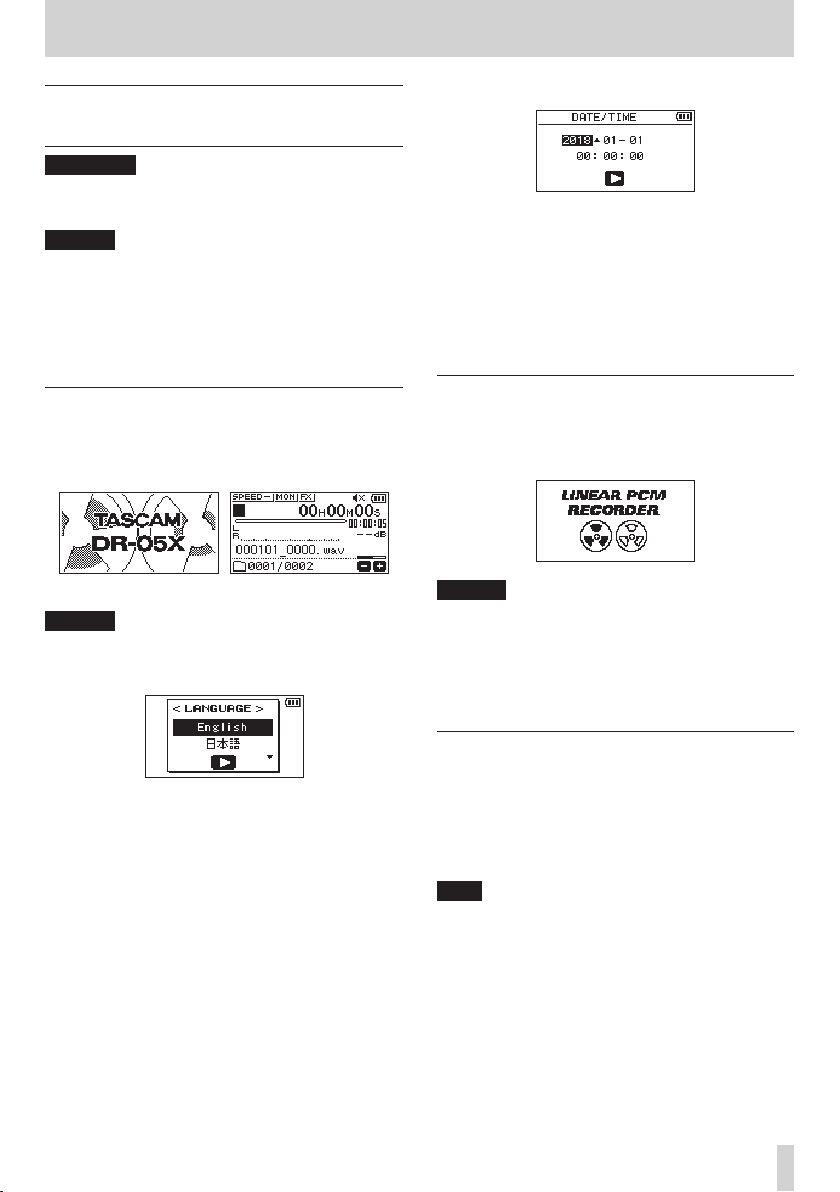
Turning the unit on
When the unit is off (in standby), press and hold the ¤
(HOME) [8] button until the TASCAM DR-05X start-up screen
is shown on the display.
The Home Screen appears after the unit starts up.
Start-up screen Home Screen
CAUTION
The first time a new unit is turned on after purchase, the
following settings must be made.
1) A screen to set the display language will open.
2) A screen for setting the built-in clock will open.
Press the .or / button to move the cursor
(highlighted area), and use the + or − button to change
values.
Press the 7 button to fix the settings.
The start-up screen is displayed, and then the Home
screen appears after the unit has started up.
Date/time adjustment may be skipped (and made later)
by pressing the 7 button. (see «Setting the date and
time» on page 16)
Turning the unit off (standby)
Press and hold the ¤ (HOME) [8] button until LINEAR PCM
RECORDER appears on the display.
The unit turns off (puts it in standby) after it completes its
shutdown process.
CAUTION
Always use the ¤ (HOME) [8] button to shut down the
unit.
Do not remove the batteries or disconnect the power
cable (TASCAM PS-P520E AC adapter or USB cable) while
the unit is on. If power is interrupted, the unit cannot shut
down properly and all recordings, settings and other data
will be lost. Lost data and settings cannot be restored.
Press the + or − button to move the cursor and select
(highlight) the language to be shown on the display.
Options
English: use English
日本語 : use Japanese
Français: use French
Español: use Spanish
Deutsch: use German
Italiano: use Italian
Português: use Portuguese
Русский
中文 : use Chinese
한글 : use Korean
After selection, press the 7 button to confirm it.
You can change this setting with the SYSTEM screen
LANGUAGE item. (see «Set the language» on page 53)
: use Russian
Resume function
The unit has a resume function. When turned on, the unit
locates to the position (time) where it was when turned off
previously.
If the 7 button is pressed after start-up, the track the unit
was playing when turned off previously resumes playing from
the position (time) where it was before the unit was turned
off.
NOTE
The required data are stored on the microSD card. The
resume function does not work if the card is exchanged or
formatted.
TASCAM DR-05X
15
3 – Preparation
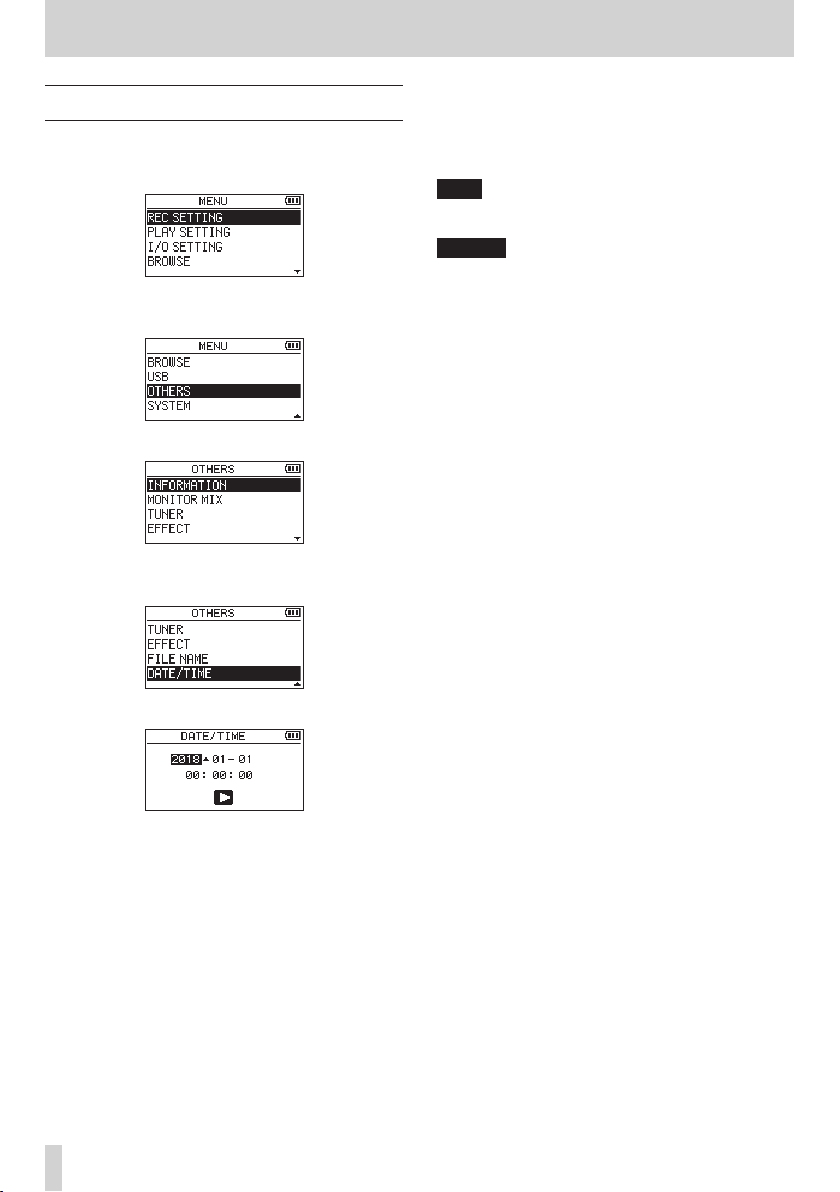
Setting the date and time
The DR-05X uses its internal clock to record the date and time
to the recorded files.
Press the MENU button to open the MENU screen.
1.
Use the + or – button to select (highlight) OTHERS and
2.
press the 7 button.
The OTHERS screen opens.
Use the + or – button to select the DATE/TIME menu
3.
item, and press the 7 button.
Press the .or / button to move the cursor
4.
(highlighted area), and use the + or − button to change
values.
Press the 7 button to confirm the change and return to
5.
the OTHERS screen.
NOTE
You can set the unit to automatically add the date to file
names. (see «Setting the file name format» on page 55)
CAUTION
The date and time setting can be retained for only a few
minutes when power is not supplied from batteries, a
dedicated AC adapter (TASCAM PS-P520E; sold separately)
or USB bus power.
When using batteries, we recommend replacing them
before they are completely dead.
The DATE/TIME screen opens.
TASCAM DR-05X
16

3 – Preparation
Inserting and removing microSD cards
Inserting microSD cards
Open the microSD slot cover on the right side.
1.
Insert the microSD Card into the slot as shown in the
2.
following illustration until it clicks into place.
Removing cards
Open the microSD slot cover on the right side.
1.
Press the microSD card in gently and then release it to
2.
allow it to come out.
Preparing microSD cards for use
In order to use a microSD card in this unit, you must format it
first.
Confirm that a microSD card is installed and turn the
1.
power ON.
The following message appears when a new card or a
2.
card formatted for use with another device is installed in
the unit.
Press the 7 button to start formatting.
3.
CAUTION
Formatting a card erases all the data on it.
When formatting ends, the Home Screen opens. You can
4.
also reformat the card in this unit at any time.
CAUTION
When formatting a card, the unit should be operating on
power supplied by a PS-P520E adapter (sold separately),
computer USB bus power or batteries with sufficient
remaining power.
CAUTION
Do not remove the microSD card from the unit when it is
i
connected to a computer by USB.
The DR-05X is compatible with microSD/microSDHC/
i
microSDXC standards.
A list of microSD cards that have been confirmed for use
i
with this unit can be found on the TEAC Global Site (http://
teac-global.com).
TASCAM DR-05X
17
3 – Preparation
Using the built-in speaker
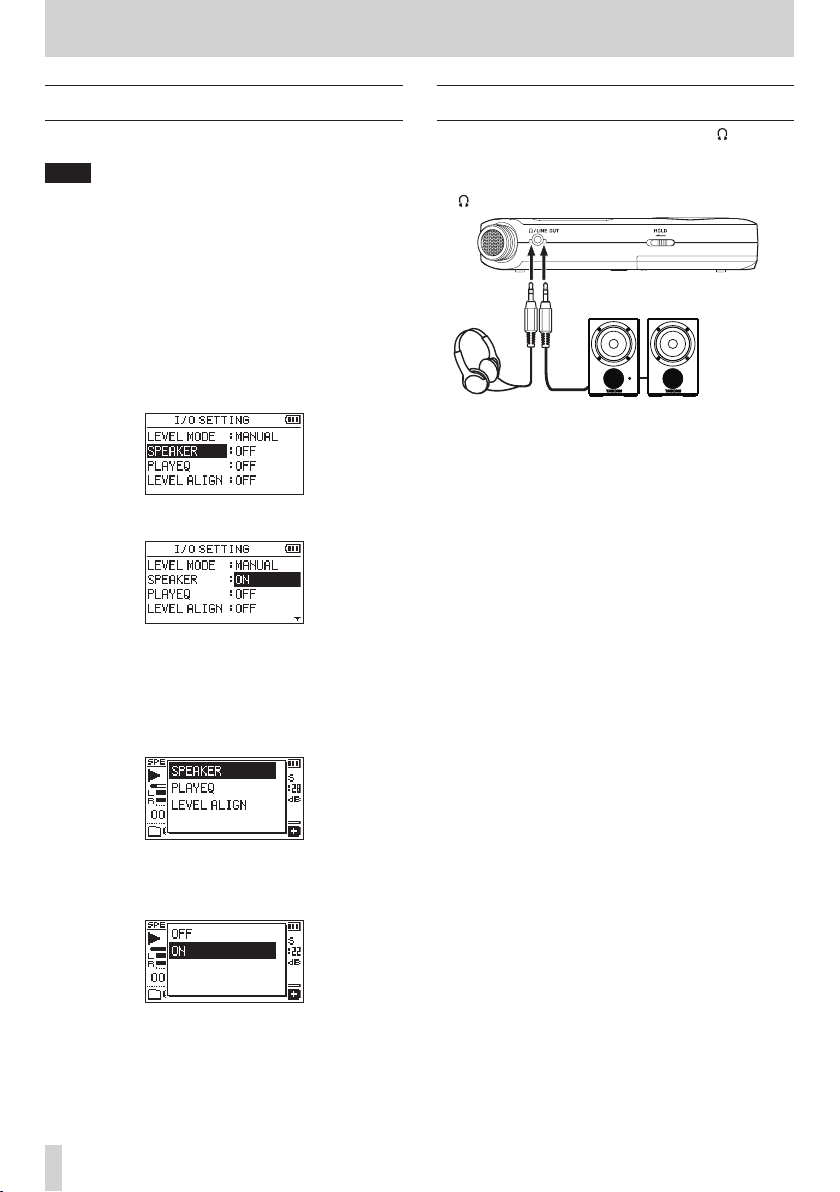
To listen to the playback sound from the built-in speaker, turn
on the SPEAKER item on the I/O SETTING screen.
NOTE
Even if SPEAKER is enabled, the unit will not play through
the speaker when the unit is recording sound, in recording
standby or muted with headphones or an external speaker
system connected.
Operation from the MENU screen
Press the MENU button to open the MENU screen.
1.
Use the + or – button to select (highlight) the I/O
2.
SETTING and press the 7 button.
The I/O SETTING screen will open.
Use the + or − button to select (highlight) the SPEAKER
3.
item and press the ENTER/MARK button.
Use the + or – button to select ON.
4.
After completing the setting, press the ¤ (HOME) [8]
5.
button to return to the Home Screen.
Operation from the Quick menu
During playback when the Home Screen is open, press
1.
the QUICK button to open the Quick menu.
Connecting monitoring equipment
To listen with headphones, connect them to the /LINE OUT
jack.
To listen with an external monitoring system (powered
monitor speakers or an amplifier and speakers), connect it to
the /LINE OUT jack.
Headphones
Powered monitor speaker
or
an amplifier and speaker
Use the + or − button to select (highlight) the SPEAKER
2.
item and press the 7 button.
The SPEAKER screen will open.
Options: OFF (default), ON
Use the + or − button to select (highlight) a setting, and
3.
press the 7 button to enable it and return to the HOME
Screen.
TASCAM DR-05X
18

3 – Preparation
TASCAM DR-05X
19
Loading…
Tascam DR-05x Owner’s Manual
Tascam DR-05x Specification
The Tascam DR-05X is a compact and versatile handheld digital audio recorder designed for musicians, journalists, and sound designers seeking high-quality audio recording in a portable format. It features dual omnidirectional condenser microphones capable of handling sound pressure levels up to 125 dB SPL, ensuring clear and distortion-free recordings even in loud environments. The device supports WAV/BWF format up to 24-bit/96 kHz and MP3 format for extended recording times. Its intuitive interface is complemented by a backlit LCD screen, making it easy to navigate settings and monitor levels in various lighting conditions.
In terms of connectivity, the DR-05X includes a 3.5mm stereo line-in and mic/line input with plug-in power, allowing for external microphone use. It also has a USB 2.0 port for file transfer and can function as a USB audio interface, providing two inputs and outputs for computer-based recording. The recorder operates on two AA batteries, offering up to 17.5 hours of operation time, or it can be powered via USB bus power for extended sessions.
The DR-05X includes features such as overdubbing, variable speed playback, and a built-in tuner and metronome, making it a versatile tool for musicians. Additionally, its dictation mode with speed control and voice emphasis is ideal for transcribing interviews or meetings. Automatic level functions like peak reduction and limiter ensure optimal recording levels, while a microSD/SDHC/SDXC card slot provides ample storage capacity. The Tascam DR-05X combines professional-grade audio quality with user-friendly features, making it a valuable asset for a wide range of audio recording applications.
Tascam DR-05x F.A.Q.
To format the microSD card on the Tascam DR-05X, go to the Menu, select ‘Browse’, then ‘Card’, and choose ‘Format’. Confirm the action when prompted.
To switch between recording formats, press the Menu button, navigate to ‘Rec Settings’, and select ‘Format’. Choose between WAV or MP3 according to your needs.
Ensure that the batteries are correctly inserted and charged. If using USB power, check the cable connection and try a different USB port.
Use the low-cut filter feature by accessing ‘Rec Settings’ in the Menu and enabling ‘Low Cut’. This reduces low-frequency noise from sources like air conditioning.
Yes, connect the DR-05X to your computer via USB and set the USB mode to ‘Audio I/F’ in the Menu to use it as an audio interface.
The Tascam DR-05X supports microSD cards up to 128GB. Use a Class 10 or higher card for optimal performance.
Download the latest firmware from Tascam’s website, copy it to the root directory of your microSD card, and follow the update instructions in the ‘System’ menu.
Yes, the DR-05X supports overdubbing. Select ‘Overdub’ in the Menu under ‘Rec Settings’ to layer new recordings over existing ones.
Use a soft, dry cloth to clean the exterior. Avoid using any solvents or water. Dust off the device gently to prevent any damage.
Press the ‘Rec’ button once to enter standby mode, then use the ‘Level’ buttons to adjust the input gain manually.
- May 15, 2024
- TASCAM
Table of Contents
- TASCAM DR-05X Linear PCM Recorder
- Product Information
- Product Usage Instructions
- IMPORTANT SAFETY PRECAUTIONS
- IMPORTANT SAFETY INSTRUCTIONS
- Introduction
- Items included with this product
- Names and Functions of Parts
- Making preparations
- Screen overview
- Using the menu
- Recording
- Playing recordings
- Using as an audio interface
- Troubleshooting
- Specifications
- WARRANTY
- Read User Manual Online (PDF format)
- Download This Manual (PDF format)
TASCAM DR-05X Linear PCM Recorder

Product Information
Specifications:
- Model: DR-05X
- Type: Linear PCM Recorder
- Manufacturer: TEAC CORPORATION
- Country of Manufacture: China
Product Usage Instructions
Important Safety Precautions:
Before using the device, please read and adhere to the following safety
precautions:
- Read and keep the user manual for future reference.
- Follow all safety warnings provided.
- Avoid using the device near water to prevent damage.
- Clean the device only with a dry cloth.
- Ensure proper ventilation by not blocking any openings.
- Avoid placing the device near heat sources to prevent overheating.
- Do not tamper with the electrical plug for safety purposes.
- Take caution when using earphones or headphones to prevent hearing loss.
- If experiencing issues, contact TEAC for service and avoid using the product until repaired.
Product Operation:
To operate the DR-05X Linear PCM Recorder, follow these steps:
- Ensure the device is powered on by pressing the appropriate button.
- Use the menu options to adjust settings such as recording quality, input levels, and playback options.
- Press the record button to start recording audio.
- Press stop to end the recording session.
- You can playback recorded audio using the playback controls on the device.
Maintenance:
To maintain your DR-05X recorder, follow these guidelines:
- Regularly clean the device with a dry cloth to prevent dust buildup.
- Avoid exposing the device to extreme temperatures or humidity.
- Store the recorder in a safe place when not in use to prevent damage.
Frequently Asked Questions (FAQ):
-
Q: How do I transfer recordings from the DR-05X to my computer?
A: You can transfer recordings by connecting the recorder to your computer
using a USB cable and accessing the files through file explorer or audio
software. -
Q: Can I use external microphones with the DR-05X?
A: Yes, you can connect external microphones to the DR-05X using the
appropriate input jack for enhanced recording quality. -
Q: How long is the battery life of the DR-05X?
A: The battery life varies based on usage, but on average, the DR-05X can
provide several hours of continuous recording.
TASCAM is a trademark of TEAC CORPORATION, registered in the U.S. and other
countries. microSDXC Logo is a trademark of SD-3C, LLC.
- MPEG Layer-3 audio coding technology licensed from Fraunhofer IIS and Thomson. Supply of this product does not convey a license nor imply any right to distribute MPEG Layer-3 compliant content created with this product in revenue-generating broadcast systems (terrestrial, satellite, cable, and/or other distribution channels), streaming applications (via the Internet, intranets, and/or other networks), other content distribution systems (pay-audio or audio-on-demand applications and the like) or on physical media (compact discs, digital versatile discs, semiconductor chips, hard drives, memory cards and the like). An independent license for such use is required. For details, please visit http://mp3licensing.com.
- ASIO is a trademark and software of Steinberg Media Technologies GmbH.
- Microsoft, Windows, Windows Vista, and Windows Media are either registered trademarks or trademarks of Microsoft Corporation in the United States and/or other countries.
- Apple, Mac, Mac OS, macOS, iPad, iPod touch, Lightning, App Store, and iTunes are trademarks of Apple Inc.
- IOS is a trademark or registered trademark of Cisco in the U.S. and other countries and is used under license.
- Other company names, product names, and logos in this document are the trademarks or registered trademarks of their respective owners.
IMPORTANT SAFETY PRECAUTIONS
For U.S.A.
INFORMATION TO THE USER
This equipment has been tested and found to comply with the limits for a Class
B digital device, according to Part 15 of the FCC Rules. These limits are
designed to provide reasonable protection against harmful interference in a
residential installation. This equipment generates, uses, and can radiate
radio frequency energy and, if not installed and used under the instruction
manual, may cause harmful interference to radio communications. However, there
is no guarantee that interference will not occur in a particular installation.
If this equipment does cause harmful interference to radio or television
reception, which can be determined by turning the equipment off and on, the
user is encouraged to try to correct the interference by one or more of the
following measures.
- Reorient or relocate the receiving antenna.
- Increase the separation between the equipment and the receiver.
- Connect the equipment to an outlet on a circuit different from that to which the receiver is connected.
- Consult the dealer or an experienced radio/TV technician for help.
CAUTION
Changes or modifications to this equipment not expressly approved by TEAC
CORPORATION for compliance could void the user’s authority to operate this
equipment.
For Canada
- THIS CLASS B DIGITAL APPARATUS COMPLIES WITH CANADIAN ICES-003.
- CET APPAREIL NUMERIQUE DE LA CLASSE B EST CONFORME A LA NORME NMB-003 DU CANADA.
Supplier’s Declaration of Conformity
- Model Number: DR-05X
- Trade Name: TASCAM
- Responsible party: TEAC AMERICA, INC.
- Address: 10410 Pioneer Blvd., Unit #1, Santa Fe Springs, California 90670, U.S.A
- Telephone number: 1-323-726-0303
This device complies with Part.15 of FCC Rules.
Operation is subject to the following two conditions:
- This device may not cause interference, and
- This device must accept any interference, including interference that may cause undesired operation.
IMPORTANT SAFETY INSTRUCTIONS
- Read these instructions.
- Keep these instructions.
- Heed all warnings.
- Follow all instructions.
- Do not use this apparatus near water.
- Clean only with a dry cloth.
- Do not block any ventilation openings. Install per the manufacturer’s instructions.
- Do not install near any heat sources such as radiators, heat registers, stoves, or other apparatus (including amplifiers) that produce heat.
- Do not defeat the safety purpose of the polarized or grounding-type plug. A polarized plug has two blades one wider than the other. A grounding-type plug has two blades and a third grounding prong. The wide blade or the third prong is provided for your safety. If the provided plug does not fit into your outlet, consult an electrician for the replacement of the obsolete outlet.
- Protect the power cord from being walked on or pinched particularly at plugs, convenience receptacles, and the point where they exit from the apparatus.
- Only use attachments/accessories specified by the manufacturer.
- Use only with the cart, stand, tripod, bracket, or table specified by the manufacturer, or sold with the apparatus. When a cart is used, use caution when moving the cart/apparatus combination to avoid injury from tip-over.
- Unplug this apparatus during lightning storms or when unused for long periods.
- Refer all servicing to qualified service personnel. Servicing is required when the apparatus has been damaged in any way, such as power-supply cord or plug is damaged, liquid has been spilled or objects have fallen into the apparatus, the apparatus has been exposed to rain or moisture, does not operate normally, or has been dropped.
- The apparatus draws nominal non-operating power from the AC outlet with its POWER or STANDBY/ON switch not in the ON position.
- The mains plug is used as the disconnect device, the disconnect device shall remain readily operable.
- Caution should be taken when using earphones or headphones with the product because excessive sound pressure (volume) from earphones or headphones can cause hearing loss.
- If you are experiencing problems with this product, contact TEAC for a service referral. Do not use the product until it has been repaired.
WARNING
To prevent possible hearing damage, do not listen at high volume levels for
long periods.
CAUTION
- Do not expose this apparatus to drips or splashes.
- Do not place any objects filled with liquids, such as vases, on the apparatus.
- Do not install this apparatus in a confined space such as a bookcase or similar unit.
- The apparatus should be located close enough to the AC outlet so that you can easily grasp the power cord plug at any time.
- If the product uses batteries (including a battery pack or installed batteries), they should not be exposed to sunshine, fire or excessive heat.
- CAUTION for products that use replaceable lithium batteries: there is a danger of explosion if a battery is replaced with an incorrect type of battery. Replace only with the same or equivalent type.
- Installed batteries subjected to extremely low air pressure may result in an explosion or the leakage of flammable liquid or gas.
CAUTIONS ABOUT BATTERIES
This product uses batteries. Misuse of batteries could cause a leak, rupture
or other trouble. Always abide by the following precautions when using
batteries.
- Never recharge non-rechargeable batteries. The batteries could rupture or leak, causing fire or injury.
- When installing batteries, pay attention to the polarity indications (plus/minus (+/-) orientation), and install them correctly in the battery compartment as indicated. Putting them backward could make the batteries rupture or leak, causing fire, injury, or stains around them.
- When you store or dispose of batteries, isolate their terminals with insulation tape or something like that to prevent them from contacting other batteries or metallic objects.
- When throwing used batteries away, follow the disposal instructions indicated on the batteries and the local disposal laws.
- Do not use batteries other than those specified. Do not mix and use new and old batteries or different types of batteries together. The batteries could rupture or leak, causing fire, injury, or stains around them.
- Do not carry or store batteries together with small metal objects. The batteries could short, causing a leak, rupture, or other trouble.
- Do not heat or disassemble batteries. Do not put them in fire or water. Batteries could rupture or leak, causing fire, injury, or stains around them.
- If the battery fluid leaks, wipe away any fluid on the battery case before inserting new batteries. If the battery fluid gets in an eye, it could cause a loss of eyesight. If fluid does enter an eye, wash it out thoroughly with clean water without rubbing the eye and then consult a doctor immediately. If the fluid gets on a person’s body or clothing, it could cause skin injuries or burns. If this should happen, wash it off with clean water and then consult a doctor immediately.
- The unit power should be off when you install and replace batteries.
- Remove the batteries if you do not plan to use the unit for a long time. Batteries could rupture or leak, causing fire, injury, or stains around them. If the battery fluid leaks, wipe away any fluid on the battery compartment before inserting new batteries.
- Do not disassemble a battery. The acid inside the battery could harm skin or clothing.
For European Customers
Disposal of electrical and electronic equipment
- All electrical and electronic equipment should be disposed of separately from the municipal waste stream via designated collection facilities appointed by the government or the local authorities.
- By disposing of the electrical and electronic equipment correctly, you will help save valuable resources and prevent any potential negative effects on human health and the environment.
- Improper disposal of waste equipment can have serious effects on the environment and human health as a result of the presence of hazardous substances in electrical and electronic equipment.
- The crossed-out wheeled dust bin symbol indicates that electrical and electronic equipment must be collected and disposed of separately from household waste.
- The return and collection systems are available to the end users. For more detailed information about the disposal of old electrical and electronic equipment, please contact your city office, waste disposal service, or the shop where you purchased the equipment.
Disposal of batteries and/or accumulators
-
Waste batteries and/or accumulators should be disposed of separately from the municipal waste stream via designated collection facilities appointed by the government or the local authorities.
-
By disposing of waste batteries and/or accumulators correctly, you will help save valuable resources and prevent any potential negative effects on human health and the environment.
-
Improper disposal of waste batteries and/or accumulators can have serious effects on the environment and human health as a result of the presence of hazardous substances in batteries and/or accumulators.
-
The crossed-out wheeled dust bin symbol indicates that batteries and/or accumulators must be collected and disposed of separately from household waste.
If the battery or accumulator contains more than the specified values of lead
(Pb), mercury (Hg), and/or cadmium (Cd) defined in the Battery Directive
(2006/66/EC), then the chemical symbols for lead (Pb), mercury (Hg) and/or
cadmium (Cd) will be indicated beneath the crossed out wheeled dust bin
symbol. -
The return and collection systems are available to the end users. For more detailed information about the disposal of waste batteries and/or accumulators, please contact your city office, waste disposal service, or the shop where you purchased them.
Introduction
- Thank you very much for purchasing the TASCAM DR-05X Linear PCM Recorder.
- Before using this unit, read this owner’s manual carefully so that you will be able to use it correctly and enjoy working with it for many years. After you have finished reading this manual, please keep it in a safe place for future reference.
Note about the Reference Manual
- This Owner’s Manual explains the main functions of this unit. Please see the Reference Manual for information about all the unit’s functions.
- You can also download this Owner’s Manual and the Reference Manual from the TEAC Global Site (https://teac-global.com/).
Items included with this product
This product includes the following items. Take care when opening the package
to avoid damaging the items. Keep the packing materials for transportation in
the future. Please contact the store where you purchased this unit if any of
these items are missing or have been damaged during transportation.
- Main unit………………………………………………………………………………. × 1
- AA alkaline batteries…………………………………………………………… × 2
- Owner’s Manual (this document) including warranty…… × 1
- TASCAM ID registration guide…………………………………………… × 1
Precautions for placement and use
- The environmental temperature operating range of this unit is 0–40°C (32–104°F).
- Do not install this unit in the following types of locations. Doing so could degrade the sound quality and/or cause malfunctions.
- Places with significant vibrations
- Near windows or other places exposed to direct sunlight
- Near heaters or other extremely hot places
- Extremely cold places
- Places with bad ventilation or high humidity
- Very dusty locations
- Places exposed directly to rain or other water
- If this unit is placed near a power amplifier or other device with a large transformer, it could cause a hum. If this occurs, increase the distance between this unit and the other device.
- This unit could cause color irregularities on a TV screen or noise from a radio if used nearby. If this occurs, use this unit farther away.
- This unit might produce noise if a mobile phone or other wireless device is used nearby to make calls or send or receive signals. If this occurs, increase the distance between this unit and those devices or turn them off.
- To enable good heat dissipation, do not place anything on top of this unit.
- Do not place this unit on top of a power amplifier or other device that generates heat.
Beware of condensation
Condensation could occur if the unit is moved from a cold place to a warm
place, it is used immediately after a cold room has been heated or it is
otherwise exposed to a sudden temperature change. To prevent this, or if this
occurs, let the unit sit for one or two hours at the new room temperature
before using it.
Cleaning the unit
Use a dry soft cloth to wipe the unit clean. Do not wipe with chemical
cleaning cloths, thinner, alcohol, or other chemical agents. Doing so could
damage the surface or cause discoloration.
About microSD cards
A list of SD cards that have been confirmed for use with this unit can be
found on our website. Please access a product page of this product from the
TEAC Global Site (https://teac-global.com) to find the list or contact the
TASCAM customer support service.
Using the TEAC Global Site
- You can download updates for this unit from the TEAC Global Site: https://teac-global.com/.
- In the TASCAM Downloads section, select the desired language to open the Downloads website page for that language.
About TASCAM customer support service
- TASCAM products are supported and warrantied only in their country/region of purchase.
- To receive support after purchase, on the TASCAM Distributors list page of the TEAC Global Site (https://teac-global.com/), search for the local company or representative for the region where you purchased the product and contact that organization.
- When making inquiries, the address (URL) of the shop or web shop where it was purchased and the purchase date are required. Moreover, the warranty card and proof of purchase might also be necessary.
Names and Functions of Parts
Top panel
-
Built-in stereo microphone
-
PEAK indicator
Lights when the recording level is too high -
Display
-
/I (HOME) [ ] button
Press to stop, turn the power on/off ( /I) and open the Home screen HOME) -
+ button
Plus/up -
MENU button
Open Menu screen -
button
Search backward/left/cancel -
PB CONT button
Open the Playback Control screen -
− button
Minus/down -
REC indicator
Shows recording status -
RECORD [ ] button
Recording -
QUICK button
Open the quick menu -
/ button
Search forward/right/confirm -
button
Play/confirm -
MARK button
Set/clear marks
Front panel -
Strap attachment
Rear panel
-
MIC/EXT IN jack
Mic/external input jack
Left side panel -
/LINE OUT jack
Headphone/line output jack -
HOLD switch
Set hold function
Right side panel -
USB port
-
microSD card slot
Bottom Panel -
Mono speaker
-
Tripod attachment screw thread (1/4-inch)
-
Battery compartment
Making preparations
Installing batteries
While pressing the battery compartment cover on the back of the unit, slide it
open. Then, install batteries.
NOTE
The included alkaline batteries are for confirming the operation of the unit.
For this reason, they might not last very long.
TIP
The TASCAM PS-P520U AC adapter can also be used with this unit.
Inserting microSD cards (sold separately)
- Open the microSD slot cover on the right side.
- Insert the microSD Card (sold separately) into the slot as shown in the illustration until it clicks into place.
Turning the unit on
-
Slide the HOLD switch in the direction of the arrow to unlock it.
TIP
By sliding it toward HOLD, button operations can be disabled, preventing
misoperation during recording. -
Press and hold the / (HOME) [ ] button until the TASCAM DR-05X start-up screen is shown on the display.
Start-up screen
The first time the power is turned on after purchase, setting screens as the
following will open.
Formatting cards
Press the button to execute.
CAUTION
- Execution of formatting erases all data currently on the card.
- This message will not appear for cards that have already been formatted.
Setting the language
Select the language used for menus and messages.
Use the + and − buttons to select the language, and press the button to
confirm.
DATE/TIME
Set the date and time.
- Use the and buttons to move the cursor, and use the + and − buttons to change the date and time.
- Press the button to confirm.
TIP
The language and date/time settings can be changed later from the menu.
Screen overview
When stopped or playing back
- Playback speed status
- Input mix function status
- Effect status
- Speaker status
- Remaining battery charge/power supply status
- Playback status
- Playback position
- Playback level meters
- Playback file name
- Elapsed time
- Remaining time
- Peak value (decibels)
- Playback area
- Playback file number/total number of files
- Output volume status
When recording or in recording standby
- Level mode setting status
- Plug-in power status
- Low-cut filter status
- Tone output setting status
- Recording status
- Recording level meters
- Recording file name
- Recording format
- Elapsed recording time
- Remaining recording time
- Peak value (decibels)
- Recording level status
Use the menu to change various settings, including recording, playback and
system settings, and to execute various functions.
-
Press the MENU button.
The MENU screen will open. -
Use the + and − buttons to select the menu item, and press .
The setting screen will open. -
Use the + and − buttons to select the setting item, and press . Settings can now be changed and functions executed.
-
Use the + and − buttons to change the setting.
NOTE
- Press the MENU button to return to the previous screen.
- To return to the Home screen, press the /I (HOME) [ ] button.
Recording
-
Point the built-in mic towards the sound to be recorded.
-
Press the RECORD [ ] button to enter the recording standby. Recording standby will start will appear on the display, and the REC indicator will blink.
-
Adjust the recording level.
Adjust the built-in mic orientation and distance from the sound source as well
as the input level so that the recording level meters stay near −12 dB at the
peak input level.
Use the and buttons to adjust the input level. -
Press the RECORD [ ] button to start recording. Recording will start, will appear on the display, and the REC indicator will light.
-
Press the /I (HOME) [ ] button to stop recording. Recording stops and appears on the display.
Using the low-cut filter
Noise from air conditioning and other sources can be reduced when recording.
- When in recording standby, press the QUICK button. This opens the Quick menu.
- Use the + and − buttons to select the LOW CUT, and press . The setting screen for the low-cut filter will open.
- Options: OFF, 40Hz, 80Hz, 120Hz, 220Hz
- Use the + and − buttons to select the setting, and press . This changes the setting and returns to the Quick menu screen.
- Press the / (HOME)[ ] button. The Home screen will reopen.
Setting the limiter
This can help prevent sound from becoming distorted when loud noises are input
suddenly during recording.
- When in recording standby, press the QUICK button. This opens the Quick menu.
- Use the + and − buttons to select LEVEL MODE, and press . This opens the Level Mode setting screen.
- Options: MANUAL (default), LIMITER, PEAK REDUCTION, AUTO
- Use the + and − buttons to select the setting, and press . This changes the setting and returns to the Quick menu screen.
- Press the /I (HOME)[ ] button. The Home screen will reopen.
Playing recordings
-
Select a file, and press the button to start playback.
Playback starts and appears on the display. -
Adjust the volume.
Use the + and − buttons to change the output volume. -
Press the /I (HOME) [ ] button to stop playback. Playback stops and appears on the display.
Listening with headphones
Connect headphones to the /LINE OUT jack on this unit.
Operations during playback
Selecting files
-
Press the MENU button.
The MENU screen will open. -
Use the + and − buttons to select BROWSE, and press . The Browse screen will open.
-
Use the + and − buttons to select a file, and press . The Home screen will reopen.
TIP
Press the button to start playback and return to the Home screen.
Deleting files
- To delete a file, select it using the or button or the BROWSE screen.
- While the Home Screen is open when stopped, press the QUICK button to open the Quick menu.
- Use the + or − button to select DELETE.
- Press the buttons to open a confirmation screen for file deletion.
To delete the file, press the button. To cancel deletion, press the button.
Changing the playback speed
- Press the PB CONT button. The Playback Control screen will open.
- Use the + and − buttons to change the playback speed.
The playback speed can be adjusted in a range from 50% (0.5) to 200% (2.0).
Using I/O loop playback
Use this function to repeat playback between two set points (IN and OUT).
-
Press the PB CONT button.
The Playback Control screen will open. -
Press the button to start playback.
-
Press the MARK button to set the IN (starting) point.
-
Press the MARK button to set the OUT (ending) point. When the OUT point is set, the I/O loop playback will start.
TIP
During I/O loop playback, press the MENU button to end I/O loop playback while
retaining the set IN and OUT points. -
Press the MARK button to clear the IN and OUT points.
Using as an audio interface
By connecting this unit to a computer (Windows/Mac) or iOS device, you can use
it as an audio interface.
Preparation
-
Use a USB cable to connect the unit to a computer, and turn the unit on. The USB CONNECT screen will open.
NOTE- With Windows, an ASIO driver for the DR-X series can be used. Check the page for this product on the TASCAM website (https://tascam.com/us/) for details.
- With a Mac, the standard OS driver will be used, so there is no need to install any software.
- Lightning to USB Camera Adapter, for example, is necessary to connect to an iOS device.
-
Use the + and − buttons to select AUDIO I/F, and press .
The AUDIO I/F screen will open.
Connection
-
Select the type of connected device.
-
Options: PC/Mac (default), iOS
NOTE -
When PC/Mac is selected, the unit with operate on bus power from the computer.
-
If the connected device type is iOS, this unit will operate on batteries.
-
-
Set the sampling rate.
- Options: 44.1k, 48k (default)
-
Select Exec at the CONNECT item.
When the unit connects with the external device, the USB AUDIO I/F screen will
open.
Monitoring
- Press the MENU button. The MENU screen will open.
- Selecting the monitored signal.
Options
- PC/Mac (default): Monitor the playback sound from the PC or Mac.
- DIRECT: Monitor the input sound without latency.
NOTE
- The meters can be used to check the playback sound of the external device.
- Sound will not be output from the speaker.
- Use headphones to hear the sound.
Disconnecting
-
Press the MENU button.
The MENU screen will open. -
Select Exec at the DISCONNECT item.
Troubleshooting
If you are having trouble with the operation of this unit, please try the
following before seeking repair. If these measures do not solve the problem,
please contact the store where you purchased this unit or TASCAM customer
support service.
The power will not turn ON.
- Confirm that batteries are installed correctly.
- Confirm that the HOLD switch is not set.
The unit turns off automatically.
- Check the automatic power-saving function setting. Set it to “Off” to prevent the power from turning off automatically. See “Setting the automatic power saving function” in “13 − Settings and Information” of the Reference Manual.
The microSD card is not recognized.
- Confirm that the microSD card is inserted completely.
No sound is output or sound is not output from the speaker.
- Confirm that the output volume is not lowered it too much.
- Confirm that the speaker setting is on. Even if the speaker setting is on, sound will not be output from the speaker when headphones are connected or when the unit is recording or in recording standby.
Recording is not possible.
- Confirm that the REC indicator is lit. If the REC indicator is blinking, the unit is in recording standby.
- Check the remaining available recording time shown on the Recording screen.
The recorded sound is quiet or distorted.
- Check the input level setting.
The unit is not recognized by a computer connected using a USB cable.
- Confirm that the connected computer uses a compatible operating system.
- The USB function used must be selected from the menu to enable a computer to recognize this unit.
- Confirm that the USB cable is not designed only for charging.
- Confirm that the connection is not being made through a USB hub.
Sound skips or noise occurs when in USB audio interface mode.
For Windows
- Performance options Select “Adjust for best performance”.
- Power options Select “High performance”.
- Use an ASIO driver for the DR-X series. Check the page for this product on the TASCAM website (https://tascam.com/us/) for details.
The wrong language was set accidentally.
- After pressing the /I (HOME) [ ] button to turn the unit off, press the /I (HOME) [ ] button while pressing and holding the MENU button.
- The language selection menu will appear, and you will be able to select the language.
Specifications
Ratings
Recording media
- microSD card (64 MB – 2 GB)
- microSDHC card (4 GB – 32 GB)
- microSDXC card (48GB – 128GB)
Recording/playback formats
- WAV: 44.1/48/96 kHz, 16/24 bit
- MP3: 44.1/48 kHz, 32/64/96/128/192/256/320 kbps
Number of channels
- 2 channels (stereo)
Inputs and outputs
-
MIC/EXT IN jack (can provide plug-in power)
- Connector: 1/8” (3.5mm) stereo mini jack
-
/LINE OUT jack
Connector: 1/8” (3.5mm) stereo mini jack -
Built-in speaker
0.3W (mono)
Control input/output ratings
USB port
- Connector type: Micro-B
- Format: USB 2.0 HIGH SPEED mass storage class
Audio performance
Frequency response
-
20 Hz – 20 kHz +0/−1 dB
(MIC/EXT IN to LINE OUT, 44.1 kHz sampling frequency, JEITA) -
20 Hz – 22 kHz +0/−1 dB
(MIC/EXT IN to LINE OUT, 48 kHz sampling frequency, JEITA) -
20 Hz – 40 kHz +0/−1.5 dB
(MIC/EXT IN to LINE OUT, 96 kHz sampling frequency, JEITA)
Total harmonic distortion
- 0.01% or less
(MIC/EXT IN to LINE OUT, 44.1/48/96 kHz sampling frequency, JEITA*)
S/N ratio
- 94 dB or higher
(MIC/EXT IN to LINE OUT, 44.1/48/96 kHz sampling frequency, JEITA*)
Note) JEITA: Conforming to JEITA CP-2150
Recording times
| File format (recording setting) | Capacity |
|---|
4 GB
WAV 16-bit (STEREO)| 44.1 kHz| 6:44:00
WAV 24-bit (STEREO)| 96 kHz| 2:04:00
MP3 (STEREO/MONO)
320 kbps
| 44.1 kHz
48 kHz
| 29:48:00
- The recording times shown above are estimates. They might differ depending on the microSD/microSDHC/microSDXC card in use.
- The recording times shown above are not continuous, but rather they are the total possible recording times for the microSD/microSDHC/microSDXC card.
Other specifications
Power
- 2 AA batteries (alkaline or NiMH)
- USB bus power from a computer
- AC adapter (TASCAM PS-P520U, sold separately)
Power consumption
1.7 W (maximum)
Battery operation time (continuous operation)
- Using alkaline batteries (EVOLTA)
| Format | Operation time | Note |
|---|
Recording
| WAV, 44.1kHz,
16-bit
| About 17.5 hours| With built-in stereo mic input
Playback| WAV, 44.1kHz,
16-bit
| About 16.5 hours| Using built-in speaker
- Recording: JEITA recording time
- Playback: JEITA music playback time
Using NiMH battery (Eneloop)
| Format| Operation time|
Note
—|—|—|—
Recording| WAV, 44.1kHz, 16-bit| About 14.5 hours| With a built-in stereo mic
input
Playback| WAV, 44.1kHz, 16-bit| About 15 hours| Using built-in speaker
- Recording: JEITA recording time
- Playback: JEITA music playback time
NOTE
The battery operation times (during continuous operation) could vary depending
on the media being used.
Dimensions (W × H × D)
61 x 141 x 26mm (2.4” x 5.55” x 1.02”)
Weight
- 119 g (4.2 oz) (not including batteries)
- 165 g (5.82 oz) (including batteries)
Operating temperature range
0°C – 40°C (32°F – 104°F)
- Illustrations in this manual might differ in part from the actual product.
- Specifications and external appearance might be changed without notification to improve the product.
- Detailed specifications are provided in the Reference Manual.
WARRANTY
In the United States
This warranty gives you specific legal rights and you may also have other
rights which vary from state to state. This warranty is only valid within the
country the unit was originally purchased.
WHAT IS COVERED AND WHAT IS NOT COVERED
Except as specified below, this warranty covers all defects in materials and
workmanship in this product. The following are not covered by the warranty:
- Damage to or deterioration of the external cabinet.
- Damage resulting from accident, misuse, abuse or neglect.
- Damage resulting from failure to perform basic daily maintenance and/or calibration or otherwise resulting from failure to follow instructions contained in your owner’s manual.
- Damage occurring during shipment of the product. (Claims must be presented to the carrier)
- Damage resulting from repair or attempted repair by anyone other than TEAC or an authorized TASCAM service station.
- Damage resulting from causes other than product defects, including lack of technical skill, competence, or experience of the user.
- Damage to any unit that has been altered or on which the serial number has been defaced, modified or is missing.
WHO IS COVERED UNDER THE WARRANTY
This warranty may be enforced only by the original purchaser. This warranty is
not valid if the product was purchased through an unauthorized dealer.
LENGTH OF WARRANTY
All parts except heads and disk drives are warranted for one (1) year from the
date of original purchase. Heads and disk drives are warranted for ninety (90)
days from the date of original purchase. Labor is warranted for ninety (90)
days from the date of the original purchase.
WHAT WE WILL PAY FOR
We will pay all labor and material expenses for items covered by the warranty.
Payment of shipping charges is discussed in the next section of this warranty.
HOW YOU CAN GET WARRANTY SERVICE
Your unit must be serviced by an authorized TASCAM service station in the
United States. (This warranty is not enforceable outside the U.S.) If you are
unable to locate an authorized TASCAM service station in your area, please
contact us. We either will refer you to an authorized service station or
instruct you to return the unit to the factory. Whenever warranty service is
required, you must present a copy of the original dated sales receipt from an
Authorized TASCAM Dealer.
You must pay any shipping charges if it is necessary to ship the product to
service. However, if the necessary repairs are covered by the warranty, we
will pay return surface shipping charges to any destination within the United
States.
LIMITATION OF IMPLIED WARRANTIES
Any implied warranties, INCLUDING WARRANTIES OF MERCHANTABILITY AND FITNESS
FOR A PARTICULAR PURPOSE, are limited in duration to the length of this
warranty.
EXCLUSION OF DAMAGES
TEAC’s liability for any defective product is limited to repair or replacement
of the product, at TEAC’s option. TEAC shall not be liable for:
- Damages based upon inconvenience, loss of use of the product, loss of time interrupted operation or commercial loss; or
- Any other damages, whether incidental, consequential, or otherwise.
Some states do not allow limitations on how long an implied warranty lasts
and/or do not allow the exclusion or limitation of incidental or consequential
damages, so the above limitations and exclusions may not apply to you.
To locate an Authorized Service Center in Your Area
CALL 1-323-726-0303
Europe
This product is subject to the legal warranty regulations of the country of
purchase. In case of a defect or a problem, please contact the dealer where
you bought the product.

Read User Manual Online (PDF format)
Read User Manual Online (PDF format) >>
Download This Manual (PDF format)
Download this manual >>
Цифровой аудио рекордер и USB аудио интерфейс Tascam DR-05X является отличным портативным решением для высококачественной записи с массой полезных функций. Пара конденсаторных микрофонов работает с высокими уровнями звукового давления до 125 дБ, захватывая каждую деталь. Tascam DR-05X превосходный выбор для записи встреч, музыки, аудио для видео, диктовки и многого другого.

Обновленная компоновка DR-05X обеспечивает быстрое и легкое функционирование одним большим пальцем. Такие операции, как запись, настройка уровней, удаление плохих дублей и добавление маркеров, выполняются одним нажатием кнопки.

Меню дисплея DR-05X поддерживает многоязычный пользовательский интерфейс (10 языков): Английский / испанский / французский / итальянский / немецкий / русский / китайский / корейский / японский / португальский.
Рекордер DR-05X питается от двух батареек формата AA. Используя встроенные микрофоны при записи в стандартном 2-канальном формате WAV, 44,1 кГц / 16-бит — запись составит около 17,5 часов (с щелочными батареями), кроме того, поддерживается USB питание для сверх-длительного функционирования.

Подключаясь к ПК в режиме USB аудио интерфейса, DR-05X становится мощным, но в то же время легким в использовании инструментом для закадровой работы, живого стриминга, подкастинга и написания песен со звуком студийного качества. Встроенные микрофоны работают так же, как USB микрофоны — без сложной установки драйверов.

Функция Auto tone обеспечивает легкую настройку для редактирования фильмов на месте, что идеально для DSLR фильммейкинга. Встроенный тон-генератор способен воспроизводить различные тембры, облегчая создание и распознавание треков. Для подключения используйте специальный набор аксессуаров (AK-DR11C).

В дополнение к способности четкого захвата записи голосов, DR-05X оснащен такими функциями, как Jump back (отскакивание), переменной скоростью и настройкой эквалайзера.
Функция автоматической записи определяет уровень входящего звукового сигнала и автоматически начинает запись. Кроме того, функция предварительной записи (до 2 секунд) обеспечивает надежную защиту, даже если вы немного запоздали с нажатием на кнопку Record.
Функция подавления пиков (Peak reduction) делает уровень записи оптимальным даже в тех записях, которые предполагают наличие перегруза. Быстрое меню позволяет выбрать часто используемые параметры при записи и воспроизведении. Такие, например, как автоматическая установка уровня или лимитер (установка предела).
Если вам не нравится последняя часть фразы, которую вы только что записали, или вы передумали и желаете перефразировать дикторский текст, режим перезаписи — это именно то, что вам нужно. Данный режим позволит выполнить запись с заданной точки, а редактирование доступно с одним уровнем отмены.
Функция наложения позволяет накладывать записи во время воспроизведения записанного файла. Это позволит вам записать другие части музыкального произведения, таких как гитарное соло поверх записи, сделанной в репетиционной студии. Наложение создает новый файл, оставив оригинальный файл неизменным, что дает возможность его легко переписать.
Благодаря увеличенной емкости для карт microSDXC (до 128 ГБ), DR-05X может записывать буквально целыми днями напролет. Запись стерео файла в CD качестве 44,1 кГц / 16-бит вместит максимум 192 часа записи, в режиме MP3 / 320 kbps — до 896 часов записи.
Особенности
• Встроенные стерео всенаправленные конденсаторные микрофоны
• Поддержка множества языковых меню (ENG / FRA / DEU / ITA / ESP / RUS / PRT / JPN / CHI / KOR)
• Функция перезаписи c одним уровнем для отмены
• Функционирует, как USB аудио интерфейс (2 входа / 2 выхода) для записи на Mac, PC или iOS
• Режим диктовки, предназначенный для записи и транскрипции голосов
• Эффект реверберации для вокального и инструментального резонанса
• Функция автоматической записи, определяющая уровень входящего звукового сигнала с автоматическим началом записи
• Работает с высокими уровнями звукового давления — до 125 дБ
• Функция подавления пиков
• Функция записи по таймеру
• Плавная регулировка усиления
• Три уровня НЧ фильтра (40/80/120Гц)
• Функция изменения скорости (VSA) для регулировки скорости в промежутке от 0,5 до 2,0 (с шагом 0,1)
• Функция Level Align (выравнивание уровня) — выравнивает уровни громкости
• Настройка эквалайзера для регулировки качества воспроизводимого звука
• Функции деления и удаления
• Функция создания лупа и повторного воспроизведения
• Функция Resume (возобновление) сохраняет последнюю позицию воспроизведения перед выключением устройства
• Функция Jump back (отскакивание) и воспроизведение (от 1 до 10 секунд с шагом в 1 секунду, 10 секунд, 20 секунд, 30 секунд)
• Кнопка меню QUICK для быстрого доступа к различным функциям
• Высококачественная 96 кГц / 24-битная WAV/BWF линейная PCM запись и возможность длительной записи в формате MP3
• Поддержка карт памяти — microSD / microSDHC / microSDXC (до 128 ГБ)
• Функция маркировки, которая может установить до 99 точек для одной дорожки. Информация о маркировке может использоваться с BWF-совместимым софтом
• Аудио файлы, созданные на компьютерах, могут быть воспроизведены (только в форматах, совместимых с этим продуктом)
• Встроенный монофонический динамик мощностью 0,3 Вт
• 2-х секундный буфер предварительной записи
• При достижении заданного максимального размера файла, создается новый файл для продолжения записи
• Трек инкремент создает новые файлы в произвольных ячейках в ходе записи
• Выбор формата имени файла в виде установленного пользователем слова или даты
• Первые шесть символов наименования файла для записи могут быть свободно установлены
• Функция плейлист
• Хроматический тюнер для настройки музыкальных инструментов
• Стерео мини джек для внешних стерео микрофонов (обеспечивает plug-in питание) / внешний линейный вход
• Выходной разъем для наушников (он же используется в качестве стерео мини линейного выхода)
• Графический ЖК-дисплей 128 × 64 пикселей с подсветкой
• Высокоскоростная передача файлов на компьютер возможна при использовании USB 2.0
• Питание от 2 батареек типа АА, от шины USB или от дополнительного адаптера переменного тока (PS-P520E)
• Винтовое отверстие для установки на штатив
Спецификация
Носители записи: Карта microSD (64 МБ — 3 ГБ), карта microSDHC (4 ГБ — 32 ГБ), карта microSDXC (до 128 ГБ)
Файловая система: FAT16 / 32, exFAT
• Формат звукозаписывающего файла
• WAV / BWF
Частота дискретизации: 44,1k / 48k / 96 кГц
Бит-глубина: 16/24-бит
• MP3
Частота дискретизации: 44,1 кГц / 48 кГц
Бит-скорость при записи: 32k / 64k / 96k / 128k / 192k / 256k / 320k bps
Бит-скорость воспроизведения: 32k — 320k bps, VBR, ID3TAG версия 2.4
• Количество каналов: 2-канала (стерео) / 1-канал (моно)
• Управление скоростью воспроизведения: 0,5 — 2,0 (с шагом 0,1) * только 44,1 k / 48 кГц
• Встроенный микрофон: Всенаправленный, стерео
• MIC/EXT вход
Разъем: 1/8″ (3,5 мм) стерео мини джек (небалансный, Plug-in питание)
Номинальный входной уровень: –20 дБВ
Максимальный входной уровень: –4 дБВ
Входное сопротивление: 18 кОм или более (PLUG IN PWR: OFF) / 2 кОм или более (PLUG IN PWR: ON)
• PHONES/LINE выход
Разъем: 1/8″ (3,5 мм) стерео мини джек (небалансный)
• Для LINE соединения
Номинальный выходной уровень: –14 дБВ (нагрузка 10 кОм)
Максимальный выходной уровень: + 2 дБВ (нагрузка 10 кОм)
Выходное сопротивление: 12 Ом
• Для подключения наушников
Максимальная выходная мощность: 20 мВт + 20 мВт (нагрузка 32 Ом)
• USB
Разъем: USB микро B-типа
Формат: высокоскоростной USB2.0
• Встроенный динамик: 0,3 Вт, моно
• НЧ фильтр: 40 / 80 / 120 Гц
• Хроматический тюнер: C1 — B6, A4 = 435 Гц — 445 Гц (с шагом 1 Гц)
• Эффекты: 6 пресетов (Hall 1, Hall 2, Room, Studio, Plate 1, Plate 2)
• Винтовое отверстие для установки на штатив: 1/4″
• Питание: 2 батарейки АА, питание по шине USB, 100 — 240 В переменного тока (дополнительный AC адаптер)
• Потребляемая мощность: 1,7 Вт (макс.)
• Время работы от батарей (запись)
Щелочные (EVOLTA): приблизительно 17,5 часов (2 канала WAV, 44,1 кГц, 16 бит, с использованием встроенного микрофона, JEITA)
• Никель-металл-гидридные (Eneloop): приблизительно 15,5 часов (2 канала WAV, 44,1 кГц, 16 бит, с использованием встроенного микрофона, JEITA)
• Размеры (Ш х В х Г): 61 x 141 x 26 мм
• Вес: 116 г
• Поддерживаемые ОС: Windows 10 (обновление за октябрь 2020 г), Windows 10 (обновление за май 2020 г), Windows 8.1, Windows 7 / macOS Big Sur, macOS Catalina, macOS Mojave, macOS High Sierra (10.13), macOS Sierra (10.12) / iPadOS 14, iOS 14, iPadOS, iOS 13, iOS 12,
iOS 11
Tascam DR-05X
Printed in China
ENGLISH
FRANÇAIS
ESPAÑOL
DEUTSCH
ITALIANO
RUSSIAN
OWNER’S MANUAL
MODE D’EMPLOI
MANUAL DEL USUARIO
BEDIENUNGSANLEITUNG
MANUALE DI ISTRUZIONI
РУКОВОДСТВО ПОЛЬЗОВАТЕЛЯ
日本語
取扱説明書
Linear PCM Recorder
TEAC CORPORATION
https://tascam.jp/jp/
Phone: +81-42-356-9143
1-47 Ochiai, Tama-shi, Tokyo 206-8530 Japan
TEAC AMERICA, INC.
https://tascam.com/us/
Phone: +1-323-726-0303
10410 Pioneer Blvd., Unit #1 and #4, Santa Fe Springs, CA 90640, U.S.A.
TEAC UK Ltd.
https://www.tascam.eu/en/
Phone: +44-1923-797205
Meridien House, 69-71 Clarendon Road, Watford, Herts, WD17 1DS, Unit—
ed Kingdom
TEAC EUROPE GmbH
https://www.tascam.eu/en/
Phone: +49-611-71580
Bahnstrasse 12, 65205 Wiesbaden-Erbenheim, Germany
TEAC SALES & TRADING(SHENZHEN) CO., LTD
Phone: +86-755-88311561~2
Room 817, Block A, Hailrun Complex, 6021 Shennan Blvd., Futian District,
Shenzhen 518040, China
1018.MA-2692A
Инструкция
Посмотреть инструкция для Tascam DR-05X бесплатно. Руководство относится к категории диктофоны, 12 человек(а) дали ему среднюю оценку 8.5. Руководство доступно на следующих языках: русский, английский. У вас есть вопрос о Tascam DR-05X или вам нужна помощь?
Задайте свой вопрос здесь
Изображения продукта (6)

Технические характеристики Tascam DR-05X
Ниже вы найдете технические характеристики изделия и руководства по эксплуатации Tascam DR-05X.
В настоящее время голосовые записи являются неотъемлемой частью многих областей деятельности, и именно поэтому Tascam DR-05X является прекрасным выбором для этих целей. Записывая на флэш-карты, в том числе microSD, microSDHC и microSDXC, данная модель оснащена встроенной памятью вместимостью 128 ГБ, что делает ее весьма практичной. При битрейте 320000 Кбит/с и количестве каналов 2, данная модель способна предоставлять качественный звук, который позволит лучше слышать и разбирать диалоги. Tascam DR-05X имеет встроенный микрофон, который обладает хорошей чувствительностью и направленностью, что позволяет записывать звук со всех сторон. Наличие входа для микрофона с импедансом 18000 Ω делает данную модель подходящей для записи живых музыкальных выступлений или подкастов. Tascam DR-05X также оснащен встроенным динамиком мощностью 40 мВт, что позволяет воспроизводить прослушиваемый звук. Данная модель также имеет интерфейс USB, что обеспечивает возможность передачи записи на компьютер для последующей обработки. Сочетание высокой функциональности, качественных материалов и удобного дизайна делают Tascam DR-05X превосходным выбором для тех, кто ищет надежный голосовой рекордер для своих нужд.
Поддерживаемые типы носителей
Флэш-карта
Диапазон частот
44100 — 96000 Hz
Скорость цифрового потока
320000 кбит/с
Линейный вход микрофона
Да
Главная
| Бренд | Tascam |
| Модель | DR-05X | DR-05X |
| Изделие | диктофон |
| EAN | 4907034130726 |
| Язык | русский, английский |
| Тип файла | Руководство пользователя (PDF) |
Устройства хранения данных
| Поддерживаемые типы носителей | Флэш-карта |
| Совместимые карты памяти | MicroSD (TransFlash), MicroSDHC, MicroSDXC |
| Объем встроенной памяти | 128 GB |
Аудио
| Диапазон частот | 44100 — 96000 Hz |
| Встроенный микрофон | Да |
| Максимальное время записи | 17.5 h |
| Режимы записи | — |
| Поддерживаемые форматы аудио | MP3, WAV |
| Сoотношение «сигнал/помеха» (SNR) | 92 dB |
Технические характеристики
| Скорость цифрового потока | 320000 кбит/с |
| Количество каналов | 2 канала |
| Тип микрофона | Всенаправленная |
| Максимальный уровень входного сигнала | -4 dBV |
| Входное сопротивление микрофона | 18000 Ω |
| Мощность динамика | 0.3 W |
| Поддерживается монтаж на штатив | Да |
| Цвет товара | Черный |
| Дисплей с задней подсветкой | Да |
Порты и интерфейсы
| Линейный вход микрофона | Да |
| Интерфейс | USB |
| Тип USB коннектора | Micro-USB B |
| Количество портов USB 2.0 | 1 |
Акустика
| Выходная мощность | 40 mW |
| Встроенные колонки | Да |
| Число встроенных динамиков | 1 |
Экран
| Встроенный экран | Да |
| Цвет подсветки | Синий |
Батарея
| Совместимые размеры батареи | AA |
| Число поддерживаемых батарей | 2 |
Вес и размеры
| Ширина | 61 mm |
| Глубина | 26 mm |
| Высота | 141 mm |
| Вес | 116 g |
Радио
программное обеспечение
| Поддерживаемые операционные системы Windows | Windows 10, Windows 7, Windows 8.1 |
| Совместимость с Mac | Да |
| Поддерживаемые операционные системы Mac | Mac OS X 10.12 Sierra, Mac OS X 10.13 High Sierra, Mac OS X 10.14 Mojave |
показать больше
Часто задаваемые вопросы
Не можете найти ответ на свой вопрос в руководстве? Вы можете найти ответ на свой вопрос ниже, в разделе часто задаваемых вопросов о Tascam DR-05X.
Какой вес Tascam DR-05X?
Tascam DR-05X имеет вес 116 g.
Какая высота Tascam DR-05X?
Tascam DR-05X имеет высоту 141 mm.
Какая ширина Tascam DR-05X?
Tascam DR-05X имеет ширину 61 mm.
Какая толщина Tascam DR-05X?
Tascam DR-05X имеет толщину 26 mm.
Какой тип USB-подключения Tascam DR-05X имеет?
Tascam DR-05X имеет Micro-USB B подключение.
Инструкция Tascam DR-05X доступно в русский?
Да, руководствоTascam DR-05X доступно врусский .
Не нашли свой вопрос? Задайте свой вопрос здесь