

Multi Channel AV
Receiver
3-284-083-42(1)
Operating Instructions
STR-DG520
©2008 Sony Corporation

WARNING
To reduce the risk of fire or electric
shock, do not expose this apparatus to
rain or moisture.
To prevent fire, do not cover the ventilation of the
apparatus with newspapers, table-cloths, curtains,
etc. And don’t place lighted candles on the
apparatus.
To prevent fire or shock hazard, do not place objects
filled with liquids, such as vases, on the apparatus.
Do not install the appliance in a confined space, such
as a bookcase or built-in cabinet.
Install this system so that the power cord can be
unplugged from the wall socket immediately in the
event of trouble.
Batteries or batteries installed apparatus shall not be
exposed to excessive heat such as sunshine, fire or
the like.
For customers in Europe
Disposal of Old Electrical &
Electronic Equipment
(Applicable in the European
Union and other European
countries with separate
collection systems)
This symbol on the product or on its packaging
indicates that this product shall not be treated as
household waste. Instead it shall be handed over to
the applicable collection point for the recycling of
electrical and electronic equipment. By ensuring this
product is disposed of correctly, you will help
prevent potential negative consequences for the
environment and human health, which could
otherwise be caused by inappropriate waste
handling of this product. The recycling of materials
will help to conserve natural resources. For more
detailed information about recycling of this product,
please contact your local Civic Office, your
household waste disposal service or the shop where
you purchased the product.
Disposal of waste batteries
(applicable in the European
Union and other European
countries with separate
collection systems)
This symbol on the battery or on the packaging
indicates that the battery provided with this product
shall not be treated as household waste.
By ensuring these batteries are disposed of correctly,
you will help prevent potentially negative
consequences for the environment and human health
which could otherwise be caused by inappropriate
waste handling of the battery. The recycling of the
materials will help to conserve natural resources.
In case of products that for safety, performance or
data integrity reasons require a permanent
connection with an incorporated battery, this battery
should be replaced by qualified service staff only.
To ensure that the battery will be treated properly,
hand over the product at end-of-life to the applicable
collection point for the recycling of electrical and
electronic equipment.
For all other batteries, please view the section on
how to remove the battery from the product safely.
Hand the battery over to the applicable collection
point for the recycling of waste batteries.
For more detailed information about recycling of
this product or battery, please contact your local
Civic Office, your household waste disposal service
or the shop where you purchased the product.
Notice for the customer in the
countries applying EU Directives
The manufacturer of this product is Sony
Corporation, 1-7-1 Konan Minato-ku Tokyo,
108-0075 Japan. The Authorized Representative for
EMC and product safety is Sony Deutschland
GmbH, Hedelfinger Strasse 61, 70327 Stuttgart,
Germany. For any service or guarantee matters
please refer to the addresses given in separate
service or guarantee documents.
GB
2
About This Manual
• The instructions in this manual are for model
STR-DG520. Check your model number by
looking at the lower right corner of the front panel.
In this manual, models of area code CEL is used
for illustration purposes unless stated otherwise.
Any difference in operation is clearly indicated in
the text, for example, “Models of area code CEL
only”.
• The instructions in this manual describe the
controls on the supplied remote. You can also use
the controls on the receiver if they have the same
or similar names as those on the remote.
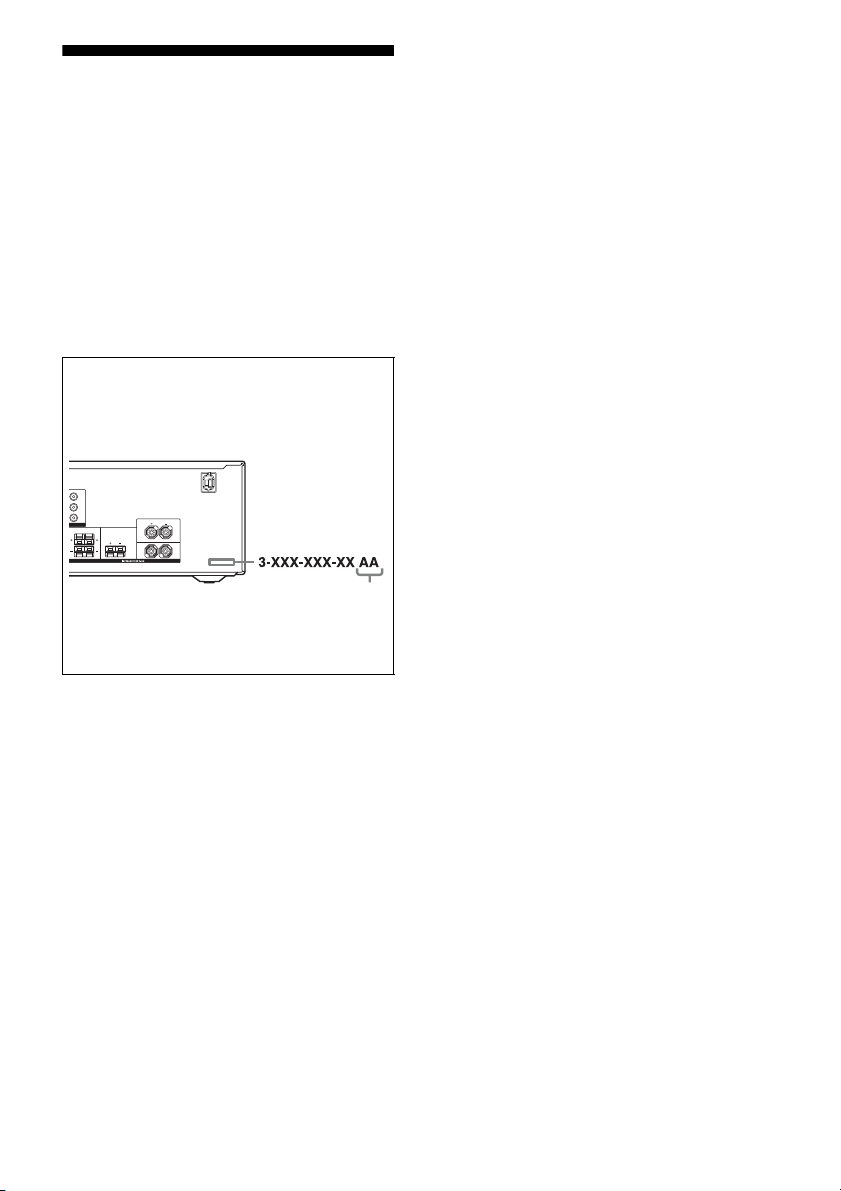
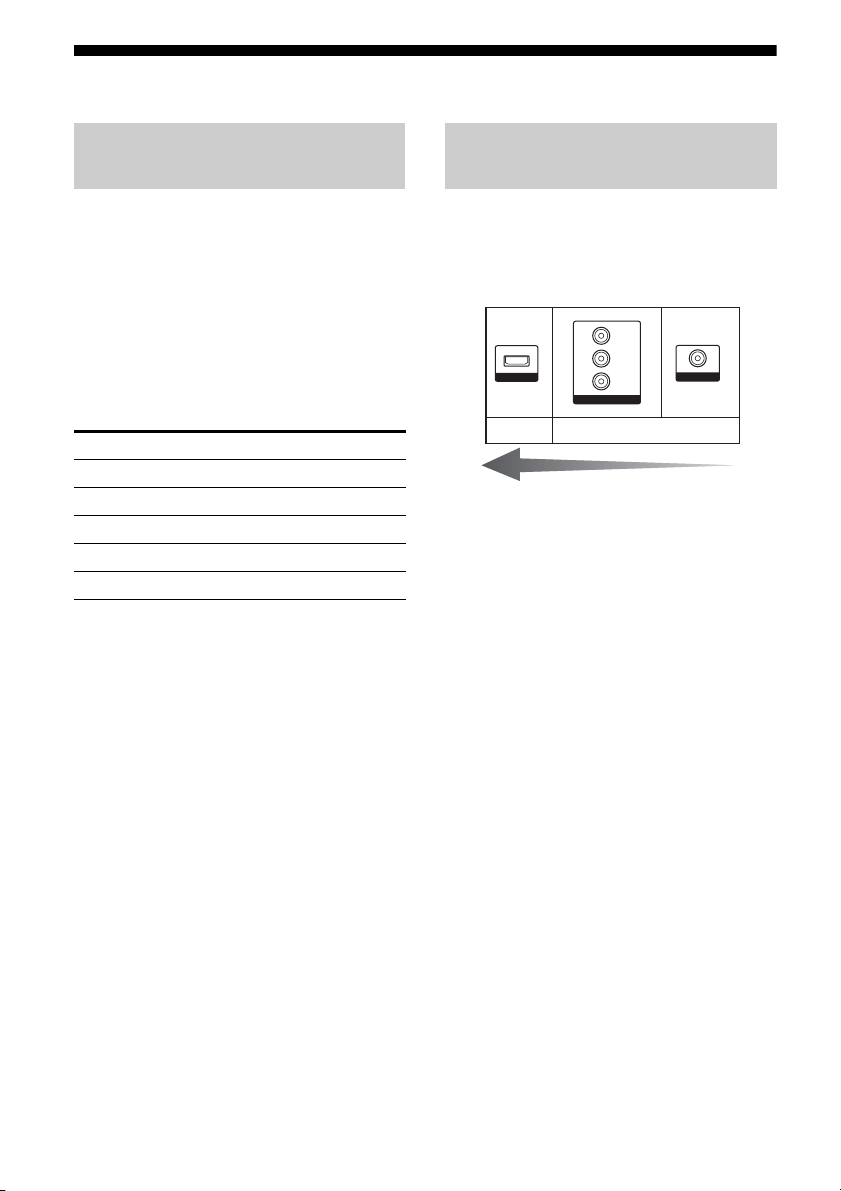
About area codes
The area code of the receiver you purchased is
shown on the lower right portion of the rear panel
(see the illustration below).
MONITOR OUT
Y
P
B/CB
PR/C
R
VIDEO
SURROUND CENTER
LR
Any differences in operation, according to the area
code, are clearly indicated in the text, for example,
“Models of area code AA only”.
SPEAKERS
FRONT
L
R
Area code
This receiver incorporates Dolby* Digital and Pro
Logic Surround and the DTS** Digital Surround
System.
* Manufactured under license from Dolby
Laboratories.
Dolby, Pro Logic, and the double-D symbol are
trademarks of Dolby Laboratories.
** Manufactured under license under U.S. Patent
#’s: 5,451,942; 5,956,674; 5,974,380; 5,978,762;
6,487,535 & other U.S. and worldwide patents
issued & pending. DTS and DTS Digital
Surround are registered trademarks and the DTS
logos and Symbol are trademarks of DTS, Inc.
© 1996-2007 DTS, Inc. All Rights Reserved.
This receiver incorporates High-Definition
Multimedia Interface (HDMI
TM
) technology.
HDMI, the HDMI logo and High-Definition
Multimedia Interface are trademarks or registered
trademarks of HDMI Licensing LLC.
GB
3

Table of Contents
Getting Started
Description and location of parts……………….5
1: Installing speakers ……………………………..13
2: Connecting speakers…………………………..14
3a: Connecting the audio components………15
3b: Connecting the video components ……..16
4: Connecting the antennas (aerials)…………24
5: Preparing the receiver and the remote…..25
6: Calibrating the appropriate settings
automatically
(AUTO CALIBRATION)…………………..26
7: Adjusting the speaker levels and
balance (TEST TONE) ………………………30
Playback
Selecting a component……………………………31
Listening/Watching a component …………….32
Amplifier Operations
Navigating through menus………………………34
Adjusting the level (LEVEL menu)…………. 37
Adjusting the tone (TONE menu) ……………38
Settings for the surround sound
(SUR menu)……………………………………..38
Settings for the tuner (TUNER menu)………39
Settings for the audio (AUDIO menu)………39
Settings for the system (SYSTEM menu) …40
Calibrating the appropriate settings
automatically (A. CAL menu) …………….44
Enjoying Surround Sound
Enjoying Dolby Digital and DTS Surround
sound (AUTO FORMAT DIRECT)……. 44
Selecting a pre-programmed sound field…. 46
Using only the front speakers
(2CH STEREO) ………………………………. 48
Listening to the sound without any
adjustment (ANALOG DIRECT) ………. 49
Resetting sound fields to the initial
settings …………………………………………… 49
Tuner Operations
Listening to FM/AM radio…………………….. 50
Presetting radio stations ………………………… 51
Using the Radio Data System (RDS)………. 54
(Models of area code CEL, CEK, ECE
only)
Other Operations
Switching between digital and analog
audio (INPUT MODE) …………………….. 55
Enjoying the DIGITAL MEDIA PORT
(DMPORT) …………………………………….. 56
Naming inputs……………………………………… 58
Changing the display ……………………………. 58
Using the Sleep Timer ………………………….. 59
Recording using the receiver………………….. 59
Using the Remote
Changing button assignments ………………… 60
Additional Information
Glossary ……………………………………………… 61
Precautions………………………………………….. 62
Troubleshooting …………………………………… 63
Specifications………………………………………. 67
Index ………………………………………………….. 69
GB
4
3
Getting Started
Getting Started
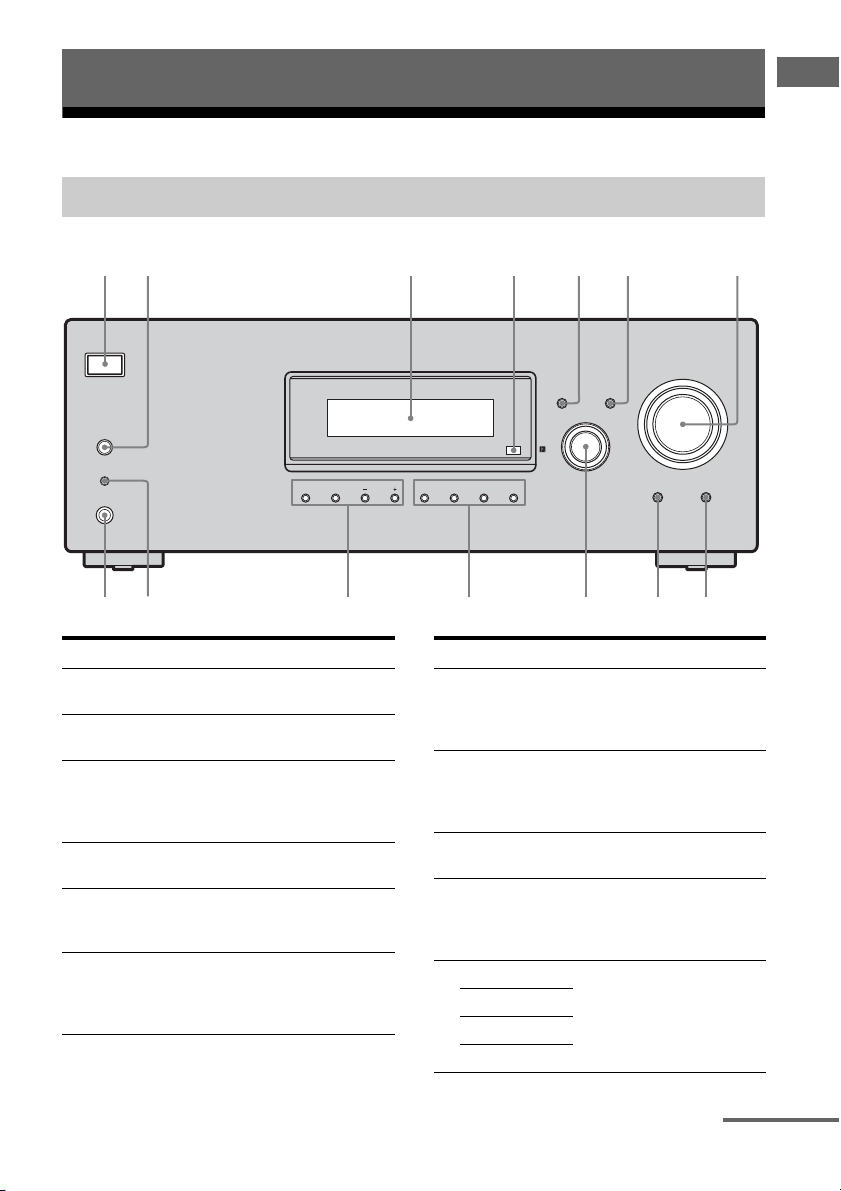
Description and location of parts
Front panel
?/1
DISPLAY INPUT MODE
SPEAKERS
(ON/OFF)
AUTO CAL MIC
PHONES
Name Function
A ?/1
(on/standby)
B SPEAKERS
(ON/OFF)
C Display The current status of the
Press to turn the receiver on
or off (page 25, 32, 33, 49).
Press to turn the speaker
system on or off (page 14).
MEMORY/
ENTER
TUNING
MODE
TUNING
2CH A.F.D. MOVIE MUSIC
Name Function
G MASTER
VOLUME
H MUTING Press to turn off the sound
selected component or a list
of selectable items appears
D Remote
sensor
E DISPLAY Press to select information
here (page 7).
Receives signals from remote
commander.
displayed on the display
I ANALOG
DIRECT
J INPUT
SELECTOR
(page 54, 58).
F INPUT MODE Press to select the input mode
when the same components
are connected to both digital
and analog jacks (page 55).
K 2CH Press to select a sound field
A.F.D.
MOVIE
INPUT SELECTOR
Turn to adjust the volume
level of all speakers at the
same time (page 30, 31, 32,
33).
temporarily.
Press MUTING again to
restore the sound (page 31).
Press to listen to high quality
analog sound (page 49).
Turn to select the input
source to play back (page 31,
32, 33, 49, 50, 52, 53, 55, 58,
59).
(page 44).
MUSIC
ANALOG
DIRECT
MASTER VOLUME
MUTING
89qf qd q;qs qa
continued
GB
5

Name Function
L MEMORY/
ENTER
TUNING
MODE
TUNING +/–
M AUTO CAL
MIC jack
N PHONES jack Connects to headphones
Press to operate the tuner
(FM/AM) (page 50).
Connects to the supplied
optimizer microphone for the
Auto Calibration function
(page 27).
(page 64).
GB
6
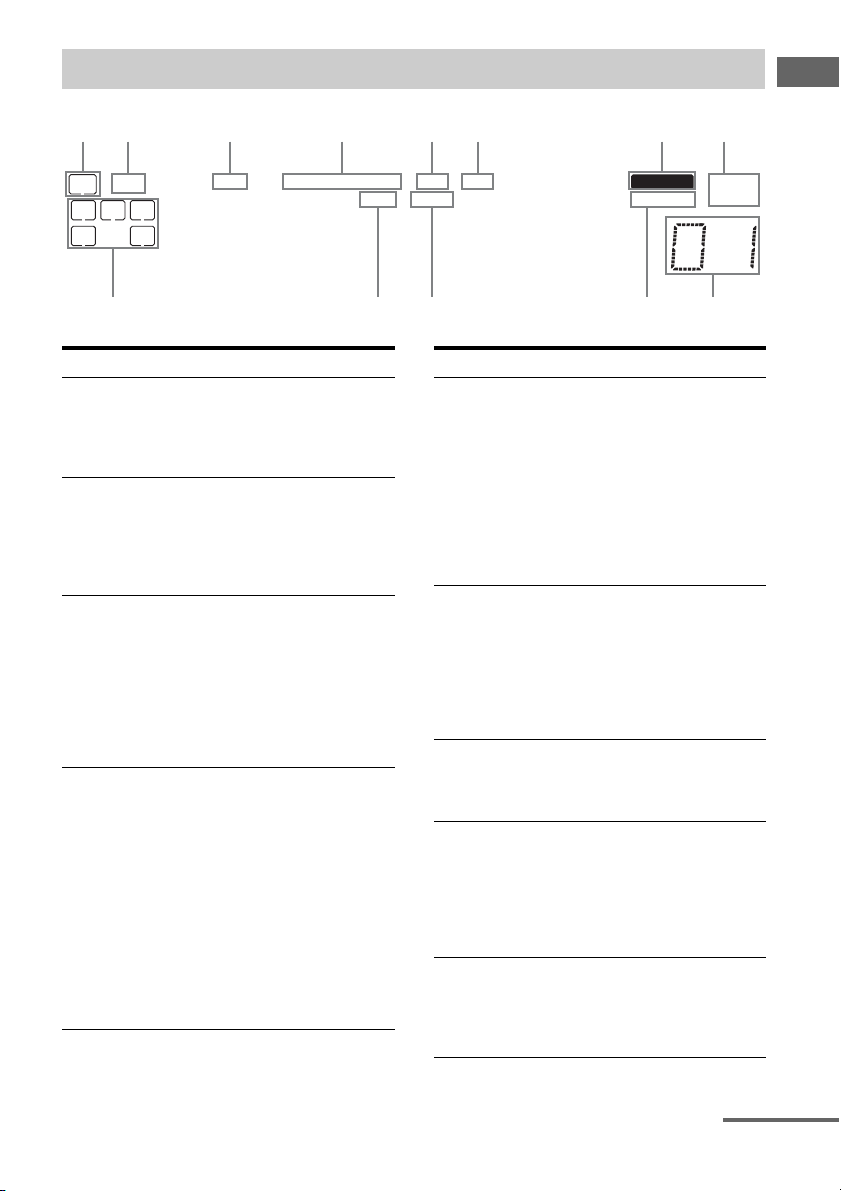
About the indicators on the display
Getting Started
D
LFE
SW
LCR
SL S SR
;
Name Function
A SW Lights up when sub woofer
B LFE Lights up when the disc being
C ; D Lights up when the receiver is
D ; PL/
; PLII
selection is set to “YES” (page
40) and the audio signal is
output from the SUB
WOOFER jack.
played back contains an LFE
(Low Frequency Effect)
channel and the LFE channel
signal is actually being
reproduced.
decoding Dolby Digital
signals.
Note
When playing a Dolby Digital
format disc, be sure that you
have made digital connections
and that INPUT MODE is set
to “AUTO” (page 55).
“; PL” lights up when the
receiver applies Pro Logic
processing to 2 channel signals
in order to output the center and
surround channel signals.
“; PLII” lights up when the
Pro Logic II Movie/Music
decoder is activated.
However, these indicators do
not light up if both the center
and surround speakers are set to
“NO” (page 36) and you select
a sound field using the A.F.D.
button.
;
PLII
PL OPT DTS MEMORY RDS ST
;
Name Function
E OPT Lights up when BD input is
F DTS Lights up when the receiver is
G MEMORY Lights up when a memory
H Tu ner
indicators
I Preset
station
indicators
selected. However,
“UNLOCK” appears on the
display if no digital signal is
input through the OPTICAL
jack. “OPT” also lights up
when SAT input is selected if
INPUT MODE is set to
“AUTO” and the source signal
is a digital signal being input
through the OPTICAL jack.
decoding DTS signals.
Note
When playing a DTS format
disc, be sure that you have
made digital connections and
that INPUT MODE is set to
“AUTO” (page 55).
function, such as Preset
Memory (page 52), etc., is
activated.
Lights up when using the
receiver to tune in radio
stations (page 50), etc.
Note
“RDS” appears for models of
area code CEL, CEK, ECE
only.
Lights up when using the
receiver to tune in radio
stations you have preset. For
details on presetting radio
stations, see page 51.
MONOD.RANGECOAXHDMI
9q;qaqsqd
continued
GB
7

Name Function
J D.RANGE Lights up when dynamic range
K COAX Lights up when DVD input is
L HDMI Lights up when the receiver
M Playback
channel
indicators
L
R
C
SL
SR
S
compression is activated (page
35).
selected. However,
“UNLOCK” appears on the
display if no digital signal is
input through the COAXIAL
jack.
recognizes a component
connected via a HDMI IN jack
(page 17).
The letters (L, C, R, etc.)
indicate the channels being
played back. The boxes around
the letters vary to show how the
receiver downmixes the source
sound (based on the speaker
settings).
Front Left
Front Right
Center (monaural)
Surround Left
Surround Right
Surround (monaural or the
surround components obtained
by Pro Logic processing)
Example:
Recording format (Front/
Surround): 3/2.1
Output channel: When
surround speakers are set to
“NO” (page 36)
Sound Field: A.F.D. AUTO
SW
LCR
SL SR
GB
8
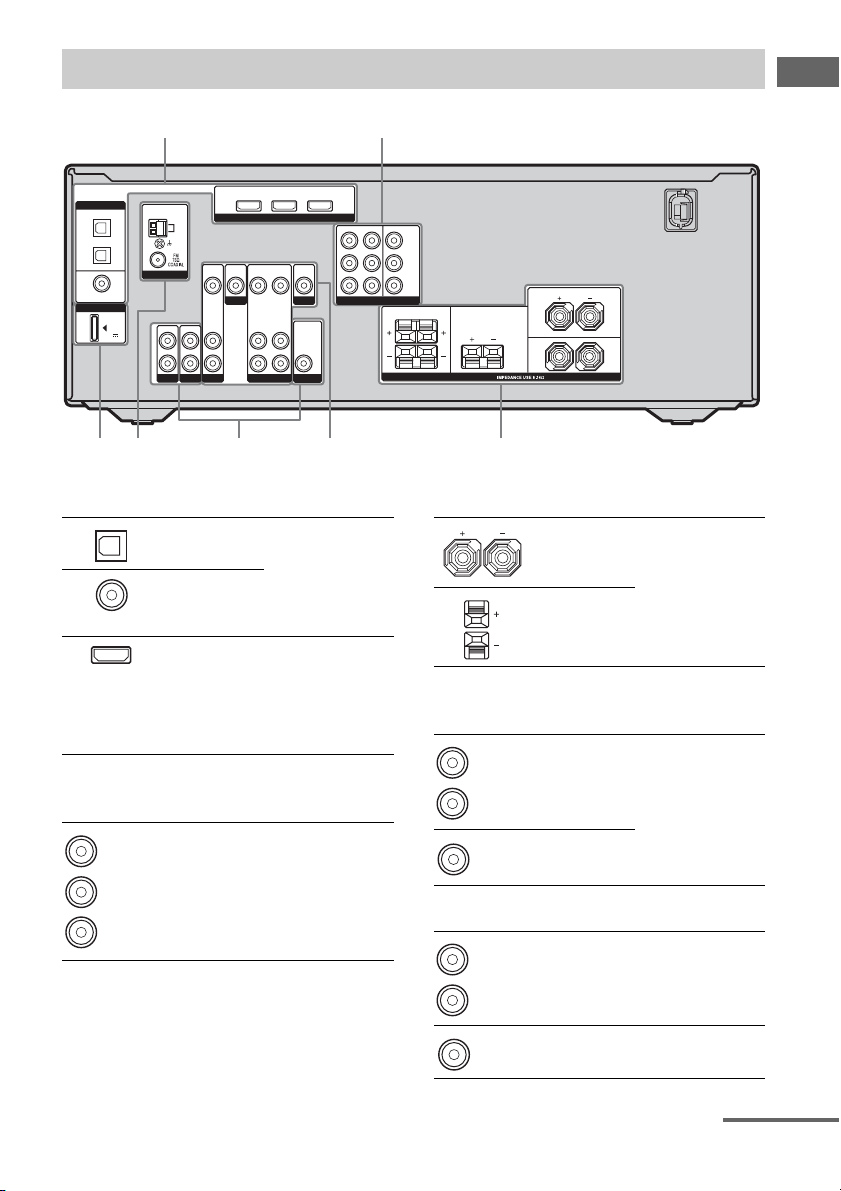
Rear panel
Getting Started
DIGITAL
OPTICAL
BD
IN
SAT
IN
DVD
IN
COAXIAL
DMPORT
DC5V
0.7A MAX
ANTENNA
IN
L
R
SA-CD/CDINTV
AM
DVD IN BD IN OUT
VIDEO
VIDEO
VIDEO
IN
IN
OUT
DVD
AUDIO
AUDIO
OUT
IN
SAT VIDEO
HDMI
VIDEO
AUDIO
IN
IN
VIDEO
OUT
MONITOR
AUDIO
OUT
SUB WOOFER
SAT IN
457 6
A DIGITAL INPUT/OUTPUT section
OPTICAL
IN jacks
COAXIAL IN
jack
HDMI IN/
OUT jacks*
Connects to a DVD
player, etc. The
COAXIAL jack
provides a better
sound quality (page
17, 20, 22).
Connects to a DVD
player or a Blu-ray
disc player. The
image and the
sound are output to
a TV (page 17).
B COMPONENT VIDEO INPUT/
OUTPUT section
Green
(Y)
Blue
B/CB)
(P
Red
R/CR)
(P
COMPONENT
VIDEO
INPUT/
OUTPUT
jacks*
Connects to a DVD
player, TV, or a
satellite tuner. You
can enjoy high
quality image (page
19, 20, 22).
DVD IN MONITOR OUT
COMPONENT VIDEO
SURROUND CENTER
Y
P
B/CB
PR/C
R
LR
SPEAKERS
FRONT
L
R
3
C SPEAKERS section
Connects to
speakers (page 14).
D VIDEO/AUDIO INPUT/OUTPUT
section
White (L)
Red (R)
Yellow
AUDIO IN/
OUT jacks
VIDEO IN/
OUT jacks*
Connects to video
and audio jacks of a
VCR, a DVD
player, etc. (page
19–23).
E AUDIO INPUT section
White (L)
Red (R)
AUDIO IN
jacks
Connects to a Super
Audio CD player,
CD player, etc.
(page 15).
Black
AUDIO OUT
jack
Connects to a sub
woofer (page 14).
continued
GB
9
F ANTENNA section
FM
ANTENNA
jack
AM
ANTENNA
terminals
Connects to the FM
wire antenna
(aerial) supplied
with this receiver
(page 24).
Connects to the AM
loop antenna
(aerial) supplied
with this receiver
(page 24).
G DMPORT
DMPORT
jack
* You can watch the selected input image when you
connect the HDMI OUT or MONITOR OUT jack
to a TV or projector (page 17, 19).
Connects to a
DIGITAL MEDIA
PORT adapter
(page 56).
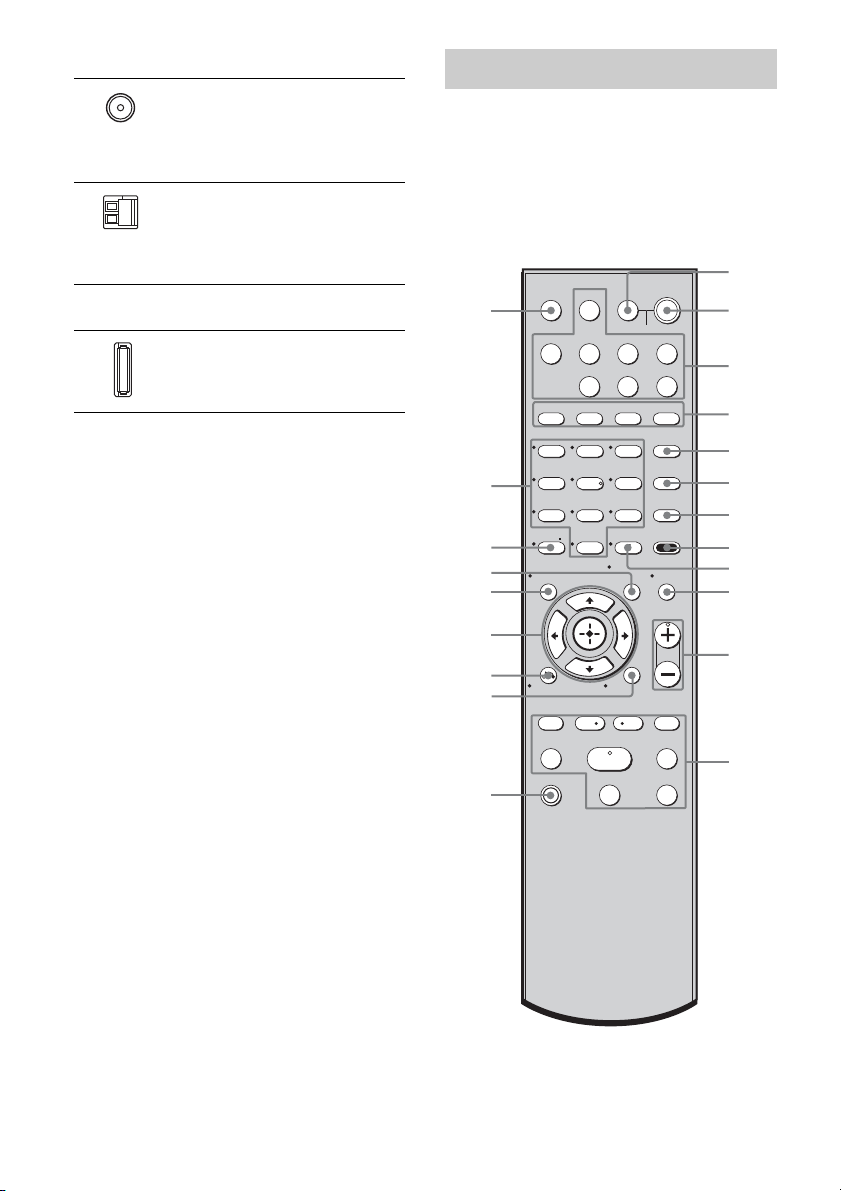
Remote commander
You can use the supplied remote to operate the
receiver and to control the Sony audio/video
components that the remote is assigned to
operate (page 60).
RM-AAU020
1
2
3
4
5
6
7
8
9
q;
qa
qs
wa
w;
ql
qk
qj
qh
qg
qf
qd
TV INPUT
SLEEP DMPORT
VIDEO BD DVD SAT
2CH A.F.D.
123
46
78
>10/
—
CLEAR
DISPLAY MUTING
RETURN/EXIT
TV CH –
PRESET –
.
TUNING –
TV
TV
?/1
?/1
?/1
AV
SYSTEM STANDBY
SA-CD/CD
TV TUNER
MOVIE MUSIC
DVD/BD
MENU
5
0/10
REPLAY ADVANCE
<
D.SKIP
D.TUNING
9
MEMORY AMP MENU
ENTER
TOOLS/
OPTIONS
TV VOL
MASTER VOL
MENU/HOME
TV CH +
PRESET +
<
>
TUNING +
HmM
FM MODE
x
X
10
GB
Name Function
A TV ?/1
(on/standby)
AV ?/1
(on/standby)
B ?/1
(on/standby)
C Input buttons Press one of the buttons to
D 2CH Press to select a sound field.
A.F.D.
MOVIE
MUSIC
E DVD/BD
MENU
D.SKIP Press to skip a disc when
F
G D.TUNING Press to enter direct tuning
Press TV ?/1 and TV (M) at
the same time to turn the TV
on or off.
Press to turn on or off the
Sony audio/video components
that the remote is assigned to
operate (page 60).
If you press ?/1 (B) at the
same time, it will turn off the
receiver and other
components (SYSTEM
STANDBY).
Note
The function of the AV ?/1
switch changes automatically
each time you press the input
buttons (C).
Press to turn the receiver on or
off.
To turn off all components,
press ?/1 and AV ?/1 (A) at
the same time (SYSTEM
STANDBY).
select the component you
want to use. When you press
any of the input buttons, the
receiver turns on. The buttons
are factory assigned to control
Sony components.
You can change the button
assignments following the
steps in “Changing button
assignments” on page 60.
Press to display the menu of
the DVD or Blu-ray disc on
the TV screen. Then, use V, v,
B, b and (P) to perform
menu operations.
using a multi-disc changer.
mode.
Name Function
H AMP MENU Press to display the menu of
I MEMORY Press to store a station.
ENTER Press to enter the value after
J MUTING Press to turn off the sound
K TV VOL
a)
+
/–
MASTER
a)
VOL +
L ./>
REPLAY /
ADVANCE
m/M
a)b)
H
b)
X
b)
x
the receiver. Then, use V, v,
B, b and (P) to perform
menu operations.
selecting a channel, disc or
track using the numeric
buttons of the TV, VCR or
satellite tuner.
temporarily.
Press MUTING again to
restore the sound.
Press MUTING and TV (M)
at the same time to activate
the TV’s muting function.
Press TV VOL +/– and TV
(M) at the same time to adjust
the TV volume level.
Press to adjust the volume
/–
level of all speakers at the
same time.
b)
Press to skip a track of the CD
player, DVD player or Bluray disc player.
<
Press to replay the previous
<
scene or fast forward the
current scene of the VCR,
DVD player or Blu-ray disc
player.
b)
Press to
– search tracks in the forward/
reverse direction of the
DVD player.
– start fast forward/rewind of
the VCR, CD player or Bluray disc player.
Press to start playback of the
VCR, CD player, DVD player
or Blu-ray disc player.
Press to pause playback or
recording of the VCR, CD
player, DVD player or Bluray disc player. (Also starts
recording with components in
recording standby.)
Press to stop playback of the
VCR, CD player, DVD player
or Blu-ray disc player.
Getting Started
continued
11
GB

Name Function
FM MODE Press to select the FM
TV CH +/– Press TV CH +/– and TV (M)
PRESET +/– Press to select
TUNING +/– Press to scan a station.
M TV Press TV and the button you
N MENU/HOME Press to display the menu of
O RETURN/
EXIT O
P
,
V/v/B/b
monaural or stereo reception.
at the same time to select
preset TV channels.
– preset stations.
– preset channels of the VCR
or satellite tuner.
want at the same time to
activate the buttons with
orange printing.
the VCR, DVD player,
satellite tuner or Blu-ray disc
player on the TV screen.
Press MENU/HOME and TV
(M) at the same time to
display the TV’s menu.
Then, use V, v, B, b and
(P) to perform menu
operations.
Press to
– return to the previous menu.
– exit the menu while the
menu or on-screen guide of
the VCR, DVD player,
satellite tuner or Blu-ray disc
player is displayed on the
TV screen.
Press RETURN/EXIT O and
TV (M) at the same time to
return to the previous menu or
exit the TV’s menu while the
menu is displayed on the TV
screen.
After pressing DVD/BD
MENU (E), AMP MENU
(H) or MENU/HOME (N),
press V, v, B or b to select the
settings. Then, press to
enter the selection if you have
pressed DVD/BD MENU or
MENU/HOME previously.
Press also to enter the
selection of the receiver, VCR,
satellite tuner, CD player,
DVD player or Blu-ray disc
player.
Name Function
Q DISPLAY Press to select information
R TOOLS/
OPTIONS
S -/— Press to select the channel
x
>10/
CLEAR Press to clear a mistake when
T Numeric
buttons
(number 5
displayed on the TV screen of
the VCR, satellite tuner, CD
player, DVD player or Bluray disc player.
Press DISPLAY and TV (M)
at the same time to display
TV’s information on the TV
screen.
Press to display and select the
options of the DVD player or
Blu-ray disc player.
Press TOOLS/OPTIONS and
TV (M) at the same time to
display options applicable to
the Sony TV.
entry mode, either one or two
digit of the VCR.
Press -/— and TV (M) at the
same time to select the
channel entry mode, either
one or two digits of the TV.
Press to select
– track numbers over 10 of the
VCR, satellite tuner or CD
player.
– channel numbers of the
Digital CATV terminal.
you press the incorrect
numeric button.
Press to
– preset/tune to preset
a)
)
stations.
– select track numbers of the
CD player, DVD player or
Blu-ray disc player. Press 0/
10 to select track number 10.
– select channel numbers of
the VCR or satellite tuner.
Press the numeric buttons and
TV (M) at the same time to
select the TV channels.
12
GB

Name Function
U TV INPUT Press TV INPUT and TV (M)
SLEEP Press to activate the Sleep
a)
The numb er 5, MASTER VOL +, TV VOL +, and
H buttons have tactile dots. Use the tactile dots
as references when operating the receiver.
b)
This button is also available for DIGITAL
MEDIA PORT adapter operation. For details on
the function of the button, see the operating
instructions supplied with the DIGITAL MEDIA
PORT adapter.
at the same time to select the
input signal (TV input or
video input).
Timer function and the
duration which the receiver
turns off automatically.
Notes
• Some functions explained in this section may not
work depending on the model.
• The above explanation is intended to serve as an
example only. Therefore, depending on the
component, the above operation may not be
possible or may operate differently than described.
1: Installing speakers
This receiver allows you to use a 5.1 channel
system (5 speakers and one sub woofer).
To fully enjoy theater-like multi channel
surround sound requires five speakers (two
front speakers, a center speaker, and two
surround speakers) and a sub woofer (5.1
channel).
Example of a 5.1 channel
speaker system configuration
Getting Started
AFront speaker (left)
BFront speaker (right)
CCenter speaker
DSurround speaker (left)
ESurround speaker (right)
FSub woofer
Tip
Since the sub woofer does not emit highly
directional signals, you can place it wherever you
want.
13
GB
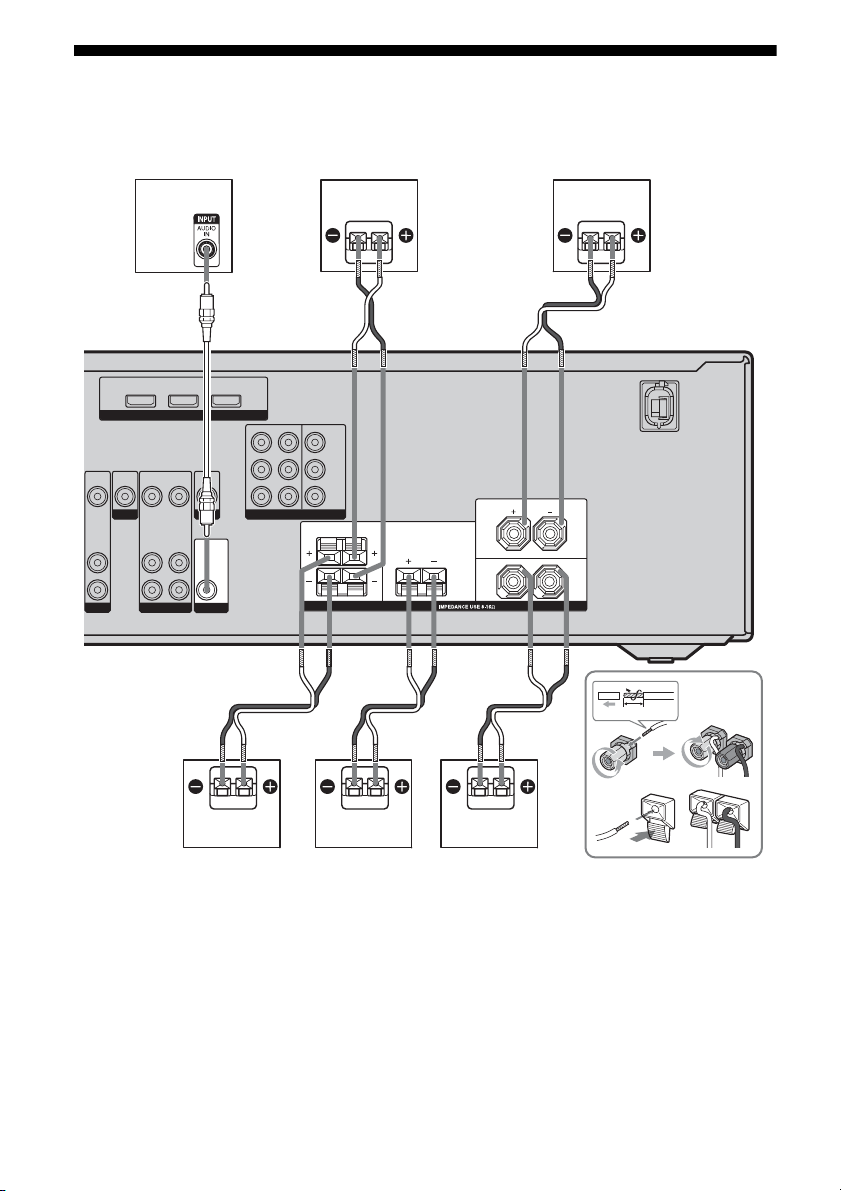
2: Connecting speakers
Before connecting cords, make sure to
disconnect the AC power cord (mains lead).
DVD IN BD IN OUT
VIDEO
VIDEO
VIDEO
IN
OUT
IN
DVD
AUDIO
AUDIO
OUT
IN
SAT VIDEO
F
A
HDMI
VIDEO
AUDIO
IN
IN
VIDEO
OUT
MONITOR
AUDIO
OUT
SUB WOOFER
B
DVD IN MONITOR OUT
SAT IN
COMPONENT VIDEO
Y
P
B/CB
PR/C
R
SURROUND
R
L
D
B
CENTER
SPEAKERS
A
FRONT
L
R
10 mm
CBE
A Monaural audio cord (not supplied)
B Speaker cords (not supplied)
AFront speaker (left)
BFront speaker (right)
CCenter speaker
DSurround speaker (left)
ESurround speaker (right)
FSub woofer*
GB
14
* When you connect a sub woofer with an auto
standby function, turn off the function when
watching movies. If the auto standby function is
set to on, it turns to standby mode automatically
based on the level of the input signal to a sub
woofer, then sound may not be output.
Note
You can turn on or off the speaker system with the
SPEAKERS (ON/OFF) button (page 5).
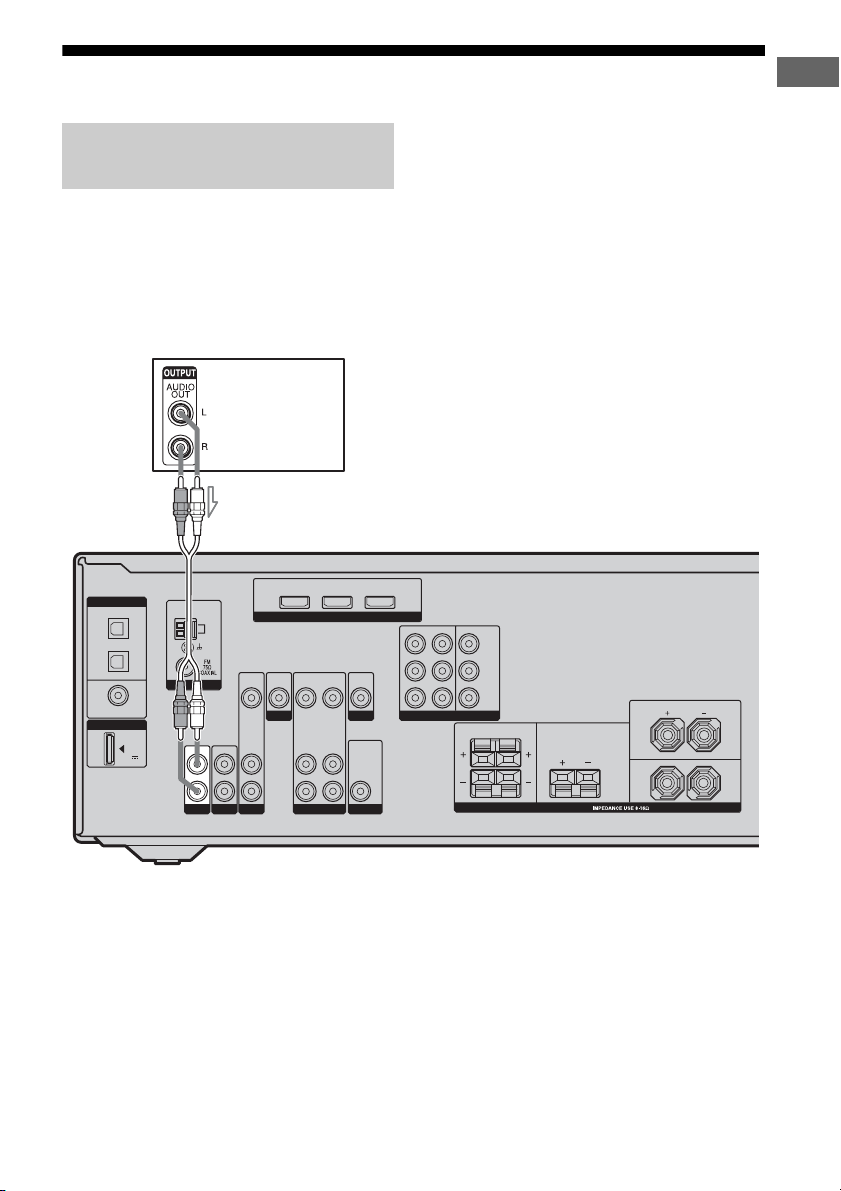
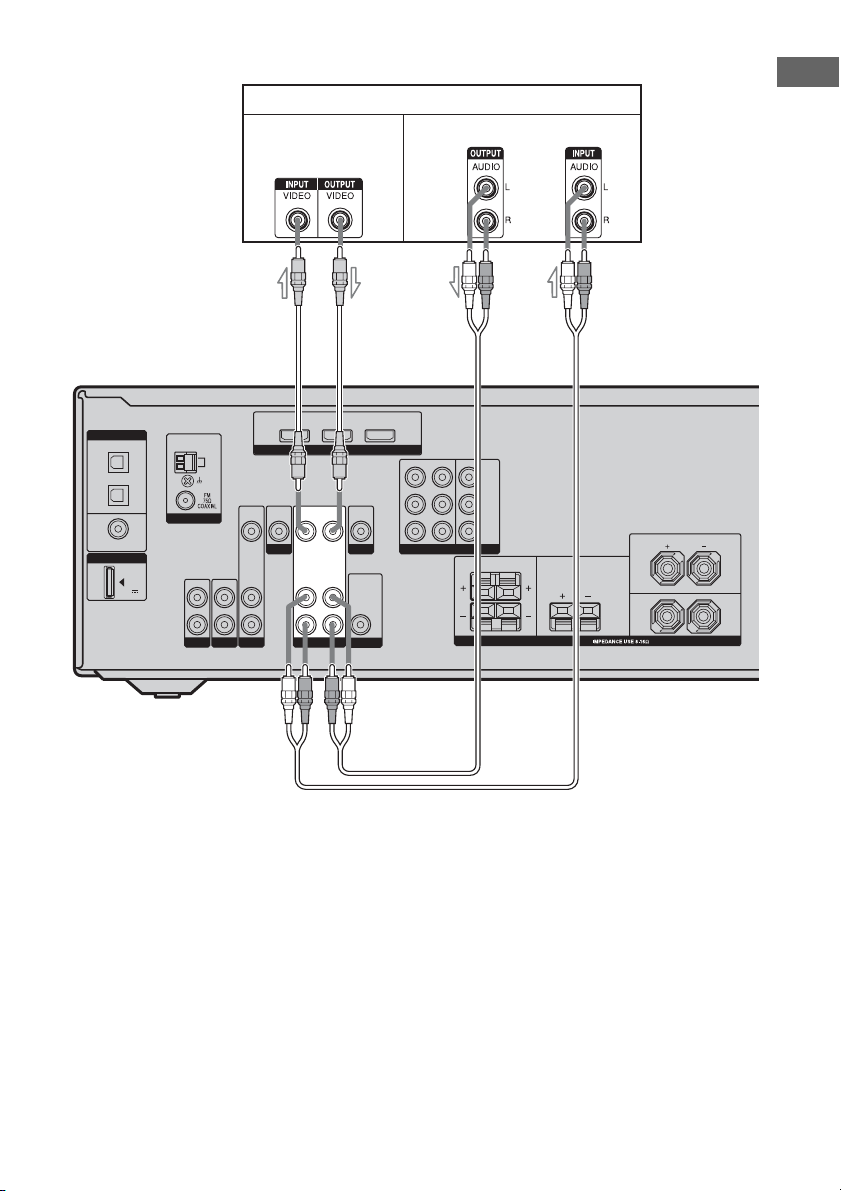
3a: Connecting the audio components
Before connecting cords, make sure to
Connecting a Super Audio CD/
CD player
The following illustration shows how to
connect a Super Audio CD/CD player.
After connecting your Super Audio CD/CD
player, proceed to “3b: Connecting the video
components” (page 16) or “4: Connecting the
antennas (aerials)” (page 24).
Super Audio CD
player/CD player
A
disconnect the AC power cord (mains lead).
Getting Started
DIGITAL
OPTICAL
BD
IN
SAT
IN
DVD
IN
COAXIAL
DMPORT
DC5V
0.7A MAX
ANTENNA
IN
L
R
SA-CD/CD
AM
IN
TV
DVD IN BD IN OUT
VIDEO
VIDEO
IN
IN
DVD
AUDIO
IN
SAT VIDEO
A Audio cord (not supplied)
VIDEO
OUT
AUDIO
OUT
HDMI
VIDEO
IN
AUDIO
IN
VIDEO
OUT
MONITOR
AUDIO
OUT
SUB WOOFER
DVD IN MONITOR OUT
SAT IN
COMPONENT VIDEO
Y
P
B/CB
PR/C
R
SURROUND CENTER
LR
SPEAKERS
FRONT
L
R
GB
15
3b: Connecting the video components
How to connect your
components
This section describes how to connect your
video components to this receiver. Before you
begin, refer to “Component to be connected”
below for the pages which describe how to
connect each component.
After connecting all your components,
proceed to “4: Connecting the antennas
(aerials)” (page 24).
Component to be connected
Component Page
With HDMI jack 17
TV 19
DVD player/DVD recorder 20
Satellite tuner/Set-top box 22
VCR 23
Video input/output jacks to be
connected
The image quality depends on the connecting
jack. Refer to the illustration that follows.
Select the connection according to the jacks on
your components.
Y
PB/C
HDMI
B
PR/C
R
COMPONENT VIDEO
Digital Analog
High quality image
VIDEO
16
GB
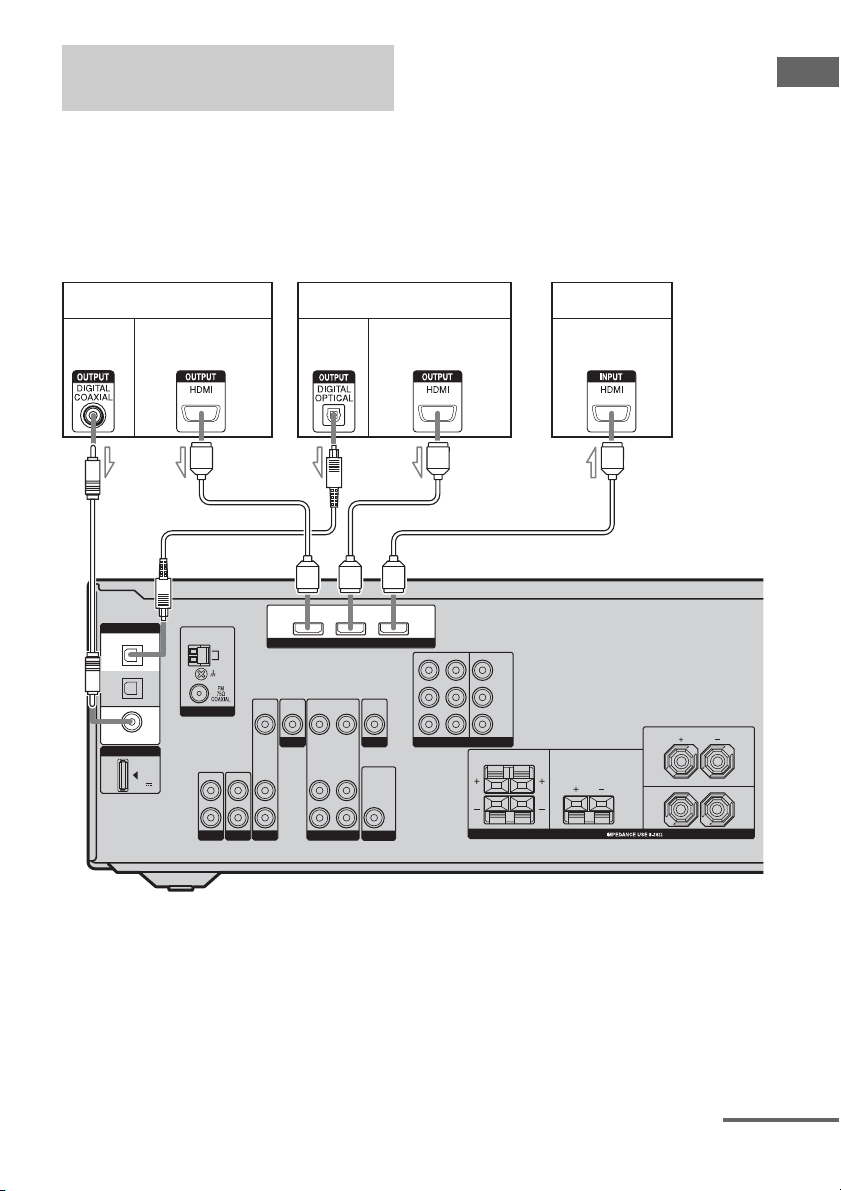
Connecting components with
HDMI jacks
HDMI is the abbreviated name for HighDefinition Multimedia Interface. It is an
interface which transmits video and audio
signals in digital format.
Before connecting cables, make sure to
disconnect the AC power cord (mains lead).
Getting Started
Audio
signals
OPTICAL
COAXIAL
DVD player
DIGITAL
BD
IN
SAT
IN
DVD
IN
DMPORT
DC5V
0.7A MAX
Audio/video
signals
B
AM
ANTENNA
IN
L
R
SA-CD/CDINTV
Audio
signals
DVD IN BD IN OUT
VIDEO
VIDEO
VIDEO
IN
OUT
IN
DVD
AUDIO
AUDIO
OUT
IN
SAT VIDEO
Blu-ray disc player TV, etc.
Audio/video
signals
Audio/video
signals
BA
HDMI
VIDEO
IN
AUDIO
IN
VIDEO
OUT
MONITOR
AUDIO
OUT
SUB WOOFER
DVD IN MONITOR OUT
SAT IN
COMPONENT VIDEO
Y
P
B/CB
PR/C
R
SURROUND CENTER
LR
SPEAKERS
BC
FRONT
L
R
A Coaxial digital cord (not supplied)
B HDMI cable (not supplied)
We recommend that you use a Sony HDMI cable.
C Optical digital cord (not supplied)
continued
17
GB

Notes on HDMI connections
• The sound is output from the TV speaker
only when a playback component and this
receiver, as well as this receiver and the TV
are connected via the HDMI jack. To output
the sound from the speakers and to take
advantage of the multi channel surround
sound, be sure to
– connect the digital audio jacks on the
playback component to the receiver.
– turn off TV’s volume or activate the TV’s
muting function.
• The multi/stereo area audio signals of a
Super Audio CD are not output.
• Video signals input to the HDMI IN jack can
only be output from the HDMI OUT jack.
The input video signals cannot be output
from the VIDEO OUT jacks, or MONITOR
OUT jacks.
• Check the setup of the connected component
if an image is poor or the sound does not
come out of a component connected via the
HDMI cable.
• This receiver may not be able to transfer
video or audio signals with certain types of
components.
• Refer to the operating instructions of each
component connected for details.
Notes
• Be sure to turn on the receiver when the video and
audio signals of a playback component are being
output to a TV via the receiver. Unless the power is
turned on, neither video nor audio signals will be
transmitted.
• When connecting optical digital cords, insert the
plugs straight in until they click into place.
• Do not bend or tie optical digital cords.
Tip
All the digital audio jacks are compatible with
32 kHz, 44.1 kHz, 48 kHz, and 96 kHz sampling
frequencies.
GB
18
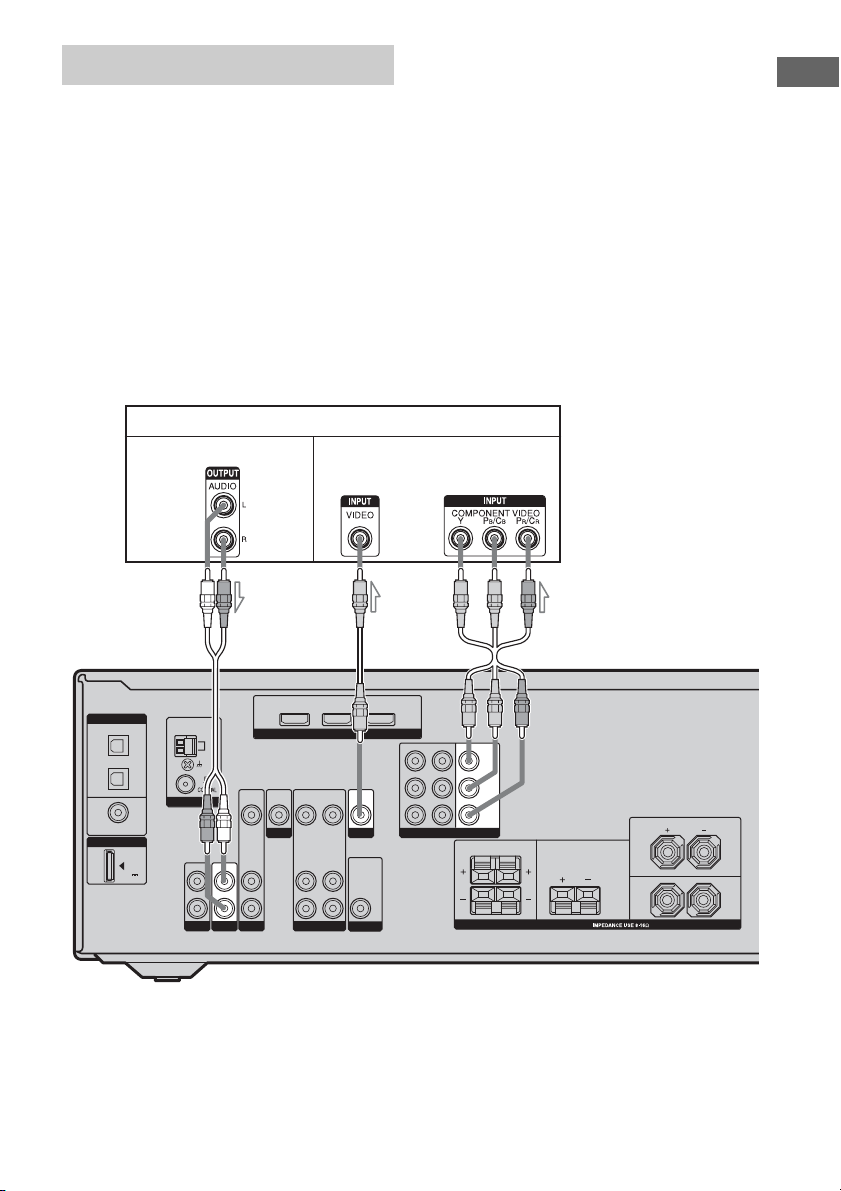
Connecting a TV
The image from a video component connected
to this receiver can be displayed on a TV
screen.
It is not necessary to connect all the cords.
Connect audio and video cords according to
the jacks of your components.
Before connecting cords, make sure to
disconnect the AC power cord (mains lead).
TV
Audio signals Video signals
AB C
Note
Be sure to turn on the receiver when the video and
audio signals of a playback component are being
output to a TV via the receiver. Unless the power is
turned on, neither video nor audio signals will be
transmitted.
Tips
• You can watch the selected input image when you
connect the MONITOR OUT or HDMI OUT jack
to a TV or projector.
• To output the sound of the TV from the speakers
connected to the receiver, be sure to:
– connect the audio output jacks of the TV to the
TV AUDIO IN jacks of the receiver.
– turn off TV’s volume or activate the TV’s muting
function.
Getting Started
DIGITAL
OPTICAL
BD
IN
SAT
IN
DVD
IN
COAXIAL
DMPORT
DC5V
0.7A MAX
ANTENNA
IN
L
R
SA-CD/CD
AM
IN
TV
DVD IN BD IN OUT
VIDEO
VIDEO
VIDEO
IN
OUT
IN
DVD
AUDIO
AUDIO
OUT
IN
SAT VIDEO
HDMI
VIDEO
IN
AUDIO
IN
VIDEO
OUT
MONITOR
AUDIO
OUT
SUB WOOFER
A Audio cord (not supplied)
B Video cord (not supplied)
C Component video cord (not supplied)
SAT IN DVD IN
MONITOR OUT
COMPONENT VIDEO
Y
P
B/CB
PR/C
R
SURROUND CENTER
LR
SPEAKERS
FRONT
L
R
GB
19
Connecting a DVD player/DVD
recorder
The following illustration shows how to
connect a DVD player/DVD recorder.
It is not necessary to connect all the cords.
Connect audio and video cords according to
the jacks of your components.
Before connecting cords, make sure to
disconnect the AC power cord (mains lead).
Connecting a DVD player
DVD playe r
Audio signals Video signals
AB C
Notes
• To input multi channel digital audio from the DVD
player, set the digital audio output setting on the
DVD player. Refer to the operating instructions
supplied with the DVD player.
• As this receiver does not have analog audio input
jacks for DVD, connect your DVD player to the
DIGITAL COAXIAL DVD IN jack on the
receiver. To output sound from the front left/right
speakers only, press 2CH.
Tip
All the digital audio jacks are compatible with
32 kHz, 44.1 kHz, 48 kHz, and 96 kHz sampling
frequencies.
DIGITAL
OPTICAL
BD
IN
SAT
IN
DVD
IN
COAXIAL
DMPORT
DC5V
0.7A MAX
ANTENNA
IN
L
R
SA-CD/CDINTV
AM
DVD IN BD IN OUT
VIDEO
VIDEO
VIDEO
IN
OUT
IN
DVD
AUDIO
AUDIO
OUT
IN
SAT VIDEO
HDMI
VIDEO
IN
AUDIO
IN
VIDEO
OUT
MONITOR
AUDIO
OUT
SUB WOOFER
A Coaxial digital cord (not supplied)
B Video cord (not supplied)
C Component video cord (not supplied)
GB
20
SAT IN
DVD IN MONITOR OUT
COMPONENT VIDEO
Y
P
B/CB
PR/C
R
SURROUND CENTER
LR
SPEAKERS
FRONT
L
R
Connecting a DVD recorder
DIGITAL
OPTICAL
BD
IN
SAT
IN
DVD
IN
COAXIAL
DMPORT
DC5V
0.7A MAX
ANTENNA
IN
L
R
SA-CD/CDINTV
DVD recorder
Getting Started
Video signals Audio signals
BA
DVD IN BD IN OUT
VIDEO
DVD
HDMI
VIDEO
VIDEO
IN
OUT
IN
AUDIO
AUDIO
OUT
IN
VIDEO
VIDEO
OUT
MONITOR
AUDIO
OUT
SUB WOOFER
SAT IN
DVD IN MONITOR OUT
COMPONENT VIDEO
Y
P
B/CB
PR/C
R
SURROUND CENTER
LR
SPEAKERS
FRONT
L
R
AM
VIDEO
IN
AUDIO
IN
SAT
A Video cord (not supplied)
B Audio cord (not supplied)
Notes
• Be sure to change the factory setting of the VIDEO
input button on the remote so that you can use the
button to control your DVD recorder. For details,
see “Changing button assignments” (page 60).
• You can also rename the VIDEO input so that it
can be displayed on the receiver’s display. For
details, see “Naming inputs” (page 58).
21
GB
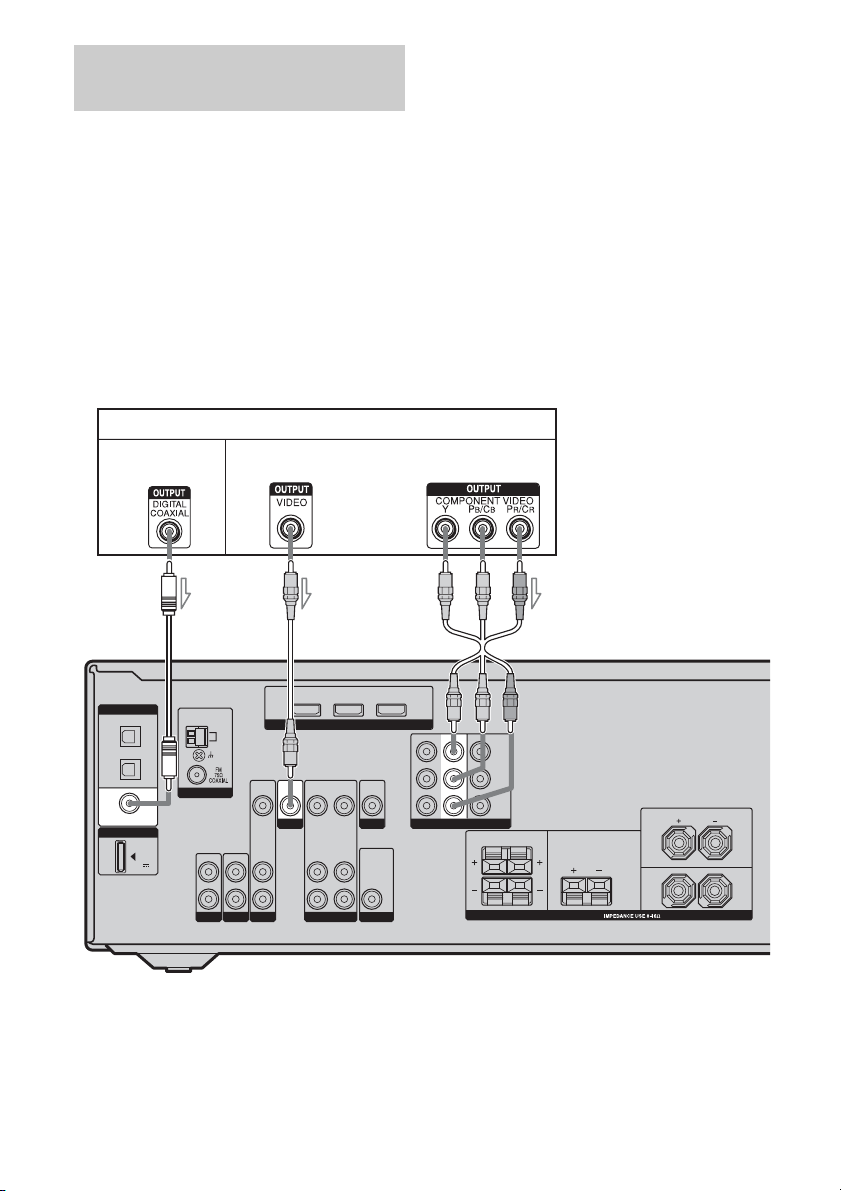
Connecting a satellite tuner/
set-top box
Notes
• When connecting optical digital cords, insert the
plugs straight in until they click into place.
• Do not bend or tie optical digital cords.
The following illustration shows how to
connect a satellite tuner or a set-top box.
It is not necessary to connect all the cords.
Connect audio and video cords according to
the jacks of your components.
Tip
All the digital audio jacks are compatible with
32 kHz, 44.1 kHz, 48 kHz, and 96 kHz sampling
frequencies.
Before connecting cords, make sure to
disconnect the AC power cord (mains lead).
Satellite tuner/set-top box
Audio signals Video signals
AB C D
DIGITAL
OPTICAL
BD
IN
SAT
IN
DVD
IN
COAXIAL
DMPORT
DC5V
0.7A MAX
AM
ANTENNA
IN
L
R
SA-CD/CDINTV VIDEO
DVD IN BD IN OUT
VIDEO
VIDEO
IN
IN
DVD
AUDIO
IN
SAT
VIDEO
OUT
AUDIO
OUT
HDMI
VIDEO
AUDIO
IN
IN
VIDEO
OUT
MONITOR
AUDIO
OUT
SUB WOOFER
A Audio cord (not supplied)
B Optical digital cord (not supplied)
C Video cord (not supplied)
D Component video cord (not supplied)
GB
22
SAT IN DVD IN MONITOR OUT
COMPONENT VIDEO
Y
P
B/CB
PR/C
SURROUND CENTER
R
LR
SPEAKERS
FRONT
L
R
Loading…
72 страницы подробных инструкций и пользовательских руководств по эксплуатации на русском
51
RU
Про
слуши
ва
ни
е об
ъемн
ог
о
зв
у
к
а
Объемный звук
Dolby Digital и DTS
(AUTO FORMAT DIRECT)
Режим Auto Format Direct (A.F.D.)
обеспечивает звук более высокого
качества и позволяет выбрать режим
декодирования для прослушивания
2-канального стереозвука в
многоканальном формате.
Нажимая кнопку A.F.D.,
выберите желаемое звуковое
поле.
Для получения дополнительной
информации см. раздел “Типы режима
A.F.D.” (стр. 52).
Прослушивание
объемного звука
1
2
3
VIDEO
BD
DVD
SAT
2CH
A.F.D.
MOVIE
MUSIC
DVD/BD
MENU
SA-CD/CD
TV
TUNER
A.F.D.
продолжение следует

52
RU
Типы режима A.F.D.
При подключении сабвуфера
Ресивер генерирует низкочастотный
сигнал и выводит его через сабвуфер
при отсутствии сигнала LFE, который
является низкочастотным звуковым
эффектом, выводящимся через
сабвуфер в 2-канальный сигнал.
Примечание
Эта функция не работает в следующих
случаях:
– если выбран параметр ANALOG DIRECT;
– при вводе сигналов с частотой
дискретизации более 48 кГц.
Режим A.F.D.
[Отображение на
дисплее]
Многоканальный
звук после
декодирования
Эффект
A.F.D. AUTO
[A.F.D. AUTO]
(Автоматическое
определение)
Звук выводится в том виде, в котором он был записан
(закодирован), без дополнительных эффектов
объемного звучания. Однако при отсутствии сигналов
LFE этот ресивер будет генерировать
низкочастотный сигнал для вывода через сабвуфер.
PRO LOGIC
[DOLBY PL]
4-канальный
Выполняется декодирование Dolby Pro Logic. Звук
источника, записанный в 2-канальном формате,
декодируется в 4.1-канальный формат.
PRO LOGIC II
MOVIE
[PLII MV]
5-канальный
Выполняется декодирование в режиме Dolby Pro
Logic II Movie. Эта установка идеально подходит для
фильмов, закодированных в формате Dolby Surround.
Кроме того, этот режим позволяет воспроизводить
звук в 5.1-канальном формате при просмотре
дублированных или старых фильмов.
PRO LOGIC II
MUSIC
[PLII MS]
5-канальный
Выполняется декодирование в режиме Dolby Pro
Logic II Music. Этот параметр идеально подходит для
обычных стереоисточников, например компакт-
дисков.
MULTI STEREO
[MULTI ST.]
(Многоканальный
стереозвук)
2-канальные сигналы (левый и правый) выводятся их
всех громкоговорителей. Однако звук может не
выводиться через определенные громкоговорители в
зависимости от их установок.

53
RU
Про
слуши
ва
ни
е об
ъемн
ог
о
зв
у
к
а
Выбор
предварительно
запрограммирован-
ного звукового поля
Можно получить дополнительные
ощущения от прослушивания
объемного звука, просто выбрав одно
из звуковых полей, предварительно
запрограммированных в ресивере. С их
помощью, находясь дома, можно
получить эффект прослушивания
мощного звука, как в кинотеатре или
концертном зале.
Нажмите несколько раз кнопку
MOVIE, чтобы выбрать нужное
звуковое поле для просмотра
фильмов, или кнопку MUSIC —
для прослушивания музыки.
Для получения дополнительной
информации см. раздел “Типы
доступных звуковых полей” (стр. 54).
1
2
3
4
6
2CH
A.F.D.
MOVIE
MUSIC
D.SKIP
DVD/BD
MENU
SA-CD/CD
TV
TUNER
5
MUSIC
MOVIE
2CH
A.F.D.
продолжение следует

54
RU
Типы доступных звуковых полей
* Данное звуковое поле можно выбрать, только если наушники подсоединены к ресиверу.
Звуковое
поле для
Звуковое поле
[Отображение на
дисплее]
Эффект
Фильмов
CINEMA STUDIO EX A
DCS [C.ST.EX A]
Воспроизводится звуковая среда киностудии Sony
Pictures Entertainment “Cary Grant Theater”. Этот
стандартный режим превосходно подходит для
просмотра почти любого типа фильма.
CINEMA STUDIO EX B
DCS [C.ST.EX B]
Воспроизводится звуковая среда киностудии Sony
Pictures Entertainment “Kim Novak Theater”. Этот
режим превосходно подходит для просмотра научно-
фантастических или приключенческих фильмов с
большим количеством звуковых эффектов.
CINEMA STUDIO EX C
DCS [C.ST.EX C]
Воспроизводится звуковая среда тонателье Sony
Pictures Entertainment. Этот режим превосходно
подходит для просмотра мюзиклов или фильмов, в
которых звучит музыка, исполняемая оркестром.
Музыки
PORTABLE AUDIO
ENHANCER
[PORTABLE]
Воспроизводится чистый четкий звук с переносного
аудиоустройства. Данная модель идеально подходит
для воспроизведения музыки в формате MP3 и в
других форматах сжатия.
HALL [HALL]
Воспроизводится акустика классического
концертного зала.
JAZZ CLUB [JAZZ]
Воспроизводится акустика джаз-клуба.
LIVE CONCERT
[CONCERT]
Воспроизводится акустика концертного зала на 300
мест.
Наушников*
HEADPHONE 2CH
[HP 2CH]
Этот режим выбирается автоматически, если в 2-
канальном режиме (стр. 55) или режиме A.F.D. (стр.
52) используются наушники. Стандартные 2-
канальные стереоисточники полностью игнорируют
обработку звуковых полей, и звук любого
многоканального объемного формата декодируется в
2-канальный.
HEADPHONE DIRECT
[HP DIR]
Аналоговые сигналы выводятся без цифровой
обработки тембром, звуковым полем и т.п.
HEADPHONE
THEATER DCS
[HP THEA]
Этот режим выбирается автоматически, если
выбрано звуковое поле для фильма или музыки и
используются наушники. Благодаря этому режиму,
при прослушивании через наушники у слушателя
создается впечатление, как будто он находится в
кинотеатре.

Использование только передних, Громкоговорителей (2ch stereo), Использование только передних громкоговорителей
2ch stereo), Нажмите кнопку 2ch Чат поддержки
- Изображение
- Текст
55
RU
Про
слуши
ва
ни
е об
ъемн
ог
о
зв
у
к
а
Примечания
•Эффекты виртуальных громкоговорителей
могут вызвать увеличение шума в
воспроизводимом сигнале.
•Если выбрано звуковое поле, которое
использует виртуальные
громкоговорители, будет невозможно
услышать звук, идущий непосредственно из
громкоговорителей объемного звучания.
•Эта функция не работает в следующих
случаях:
– если выбран параметр ANALOG
DIRECT;
– при вводе сигналов с частотой
дискретизации более 48 кГц.
•Если выбрано одно из следующих звуковых
полей и в меню SYSTEM для всех
громкоговорителей установлено значение
“LARGE”, звук через сабвуфер не
выводится. Однако звук будет выводиться
через сабвуфер, если
– входной цифровой сигнал содержит
сигналы LFE;
– для передних громкоговорителей и
громкоговорителей объемного звучания
выбрано значение “SMALL”;
– выбрано звуковое поле для фильма.
– выбрано переносное аудиоустройство.
Советы
•Формат кодирования программы DVD
и т.п. можно определить по логотипу на
упаковке.
•Для звуковых полей с пометками DCS
используется технология DCS. См.
“Глоссарий” (стр. 71).
Отключение эффекта
объемного звучания для
фильмов и музыки
Нажмите кнопку 2CH для выбора “2CH
ST.” или нажмите кнопку A.F.D. и
удерживайте ее до тех пор, пока не
будет выбрано значение “A.F.D.
AUTO”.
Использование
только передних
громкоговорителей
(2CH STEREO)
В этом режиме ресивер выводит звук
только через передние
громкоговорители (левый и правый).
Звук через сабвуфер не выводится.
Стандартные 2-канальные
стереоисточники полностью
игнорируют обработку звуковых полей,
и звук любого многоканального
объемного формата декодируется в
2-канальный.
Нажмите кнопку 2CH.
Примечание
В режиме 2CH STEREO звук через сабвуфер
не выводится. Для прослушивания 2-
канальных стереоисточников через правый и
левый передние громкоговорители и
сабвуфер выберите “A.F.D. AUTO” (стр. 52).
1
2
3
4
6
2CH
A.F.D.
MOVIE
MUSIC
D.SKIP
DVD/BD
MENU
SA-CD/CD
TV
TUNER
5
2CH

Звук без преобразований (analog direct), Звук без преобразований (analog, Direct)
Восстановление исходных установок для, Звуковых полей, Звук без преобразований, Analog direct), Отключение analog direct, Нажмите кнопку analog direct на реси Чат поддержки
- Изображение
- Текст
56
RU
Звук без
преобразований
(ANALOG DIRECT)
Можно переключить звук, входящий
через выбранный вход, на
двухканальный аналоговый вход. Эта
функция обеспечивает
высококачественное звучание
аналоговых источников.
С помощью этой функции можно
настраивать только уровень громкости
и баланс передних громкоговорителей.
1
Поверните переключатель
INPUT SELECTOR на
ресивере, чтобы выбрать
вход, через который входит
звук для прослушивания в
аналоговом режиме.
Можно также использовать кнопки
ввода на пульте дистанционного
управления.
2
Нажмите кнопку ANALOG
DIRECT на ресивере.
Выводится аналоговый звук.
Отключение ANALOG DIRECT
Нажмите кнопку ANALOG DIRECT на
ресивере еще раз.
Можно также нажать любую кнопку
звукового поля.
Примечание
Если подключены наушники, на дисплее
отображается надпись “HP DIR”.
Восстановление
исходных установок
для звуковых полей
Для выполнения этих действий следует
использовать кнопки на ресивере.
1
Нажмите кнопку ?/1, чтобы
выключить питание.
2
Удерживая кнопку 2CH
нажатой, нажмите кнопку
?
/1.
На дисплее появится надпись “S.F.
CLR.”, и для всех звуковых полей
будут восстановлены исходные
установки.
?/1
SPEAKERS
(ON/OFF)
PHONES
MEMORY/
ENTER
TUNING
MODE
TUNING
2CH
A.F.D.
MOVIE
MUSIC
ANALOG
DIRECT
MUTING
INPUT SELECTOR
AUTO CAL MIC
DISPLAY
INPUT MODE
MASTER VOLUME
1 2
Кнопки звукового
поля
?/1
SPEAKERS
(ON/OFF)
PHONES
MEMORY/
ENTER
TUNING
MODE
TUNING
2CH
A.F.D.
MOVIE
MUSIC
ANALOG
DIRECT
MUTING
INPUT SELECTOR
AUTO CAL MIC
DISPLAY
INPUT MODE
MASTER VOLUME
1,2
2

Функции тюнера, Прослушивание радиопередач в диапазонах fm и am, Прослушивание радиопередач в
Диапазонах fm и am, Автоматическая настройка, Нажмите кнопку tuning + или tuning, Функ ции тю нера Чат поддержки
- Изображение
- Текст
57
RU
Функ
ции
тю
нера
Прослушивание
радиопередач в
диапазонах FM и AM
С помощью встроенного тюнера можно
прослушивать радиопрограммы в
диапазонах FM и AM. Перед
использованием убедитесь, что антенны
FM и AM подключены к ресиверу
(стр. 26).
Совет
Как показано в следующей таблице, шаг
прямой настройки изменяется в зависимости
от кода региона. Для получения
дополнительной информации о коде региона
см. стр. 3.
1
Нажмите несколько раз
кнопку TUNER, чтобы
выбрать диапазон FM или
AM.
2
Нажмите кнопку TUNING +
или TUNING –
.
Нажмите кнопку TUNING + для
поиска от низких до высоких
радиочастот, от высоких до низких —
кнопку TUNING –.
Ресивер прекращает поиск каждый
раз, когда принимает
радиостанцию.
Функции тюнера
Код региона
FM
AM
CEL, CEK, ECE, AU,
TW
50 кГц
9 кГц
Автоматическая
настройка
1
2
3
4
6
7
8
0/10
ENTER
9
VIDEO
BD
DVD
SAT
2CH
A.F.D.
RETURN/EXIT
TV CH –
PRESET –
TV CH +
PRESET +
TUNING –
TV
TUNING +
FM MODE
REPLAY ADVANCE
MENU/HOME
MOVIE
MUSIC
MEMORY AMP MENU
CLEAR
TOOLS/
OPTIONS
DISPLAY
MUTING
MASTER VOL
TV VOL
D.SKIP
D.TUNING
DVD/BD
MENU
SA-CD/CD
TV
TUNER
—
.
H
m
M
X
x
<
<
>
5
>10/
2
1
FM MODE
продолжение следует

Прямая настройка, Использование элементов управления на ресивере, Нажмите кнопку d.tuning
Нажмите номерные кнопки, чтобы ввести частоту, Нажмите кнопку enter Чат поддержки
- Изображение
- Текст
58
RU
Использование элементов
управления на ресивере
1
Поверните переключатель INPUT
SELECTOR, чтобы выбрать диапазон
FM или AM.
2
Нажмите несколько раз кнопку
TUNING MODE для выбора
“AUTO T.”.
3
Нажмите кнопку TUNING + или
TUNING –.
Низкое качество приема
стереосигнала в диапазоне
FM
Если качество приема стереосигнала в
диапазоне FM низкое и на дисплее
мигает надпись “ST”, выберите
монофонический режим, чтобы снизить
искажение звука.
Нажимайте кнопку FM MODE до тех
пор, пока на дисплее не отобразится
индикация “MONO”.
Для возврата в режим стерео
нажимайте кнопку FM MODE до тех
пор, пока с дисплея не исчезнет
индикация “MONO”.
Введите частоту станции с помощью
номерных кнопок.
1
Нажмите несколько раз
кнопку TUNER, чтобы
выбрать диапазон FM или
AM.
Можно также использовать INPUT
SELECTOR на ресивере.
2
Нажмите кнопку D.TUNING.
3
Нажмите номерные кнопки,
чтобы ввести частоту.
Пример 1: FM 102,50 МГц
Выберите 1
b 0 b 2 b 5 b 0
Пример 2: AM 1350 кГц
Выберите 1
b 3 b 5 b 0
При настройке станции в диапазоне
AM отрегулируйте направление
рамочной антенны AM, чтобы
обеспечить оптимально
качественный прием сигнала.
4
Нажмите кнопку ENTER.
Можно также использовать
MEMORY/ENTER на ресивере.
Прямая настройка
1
2
3
4
6
7
8
0/10
ENTER
9
VIDEO
BD
DVD
SAT
2CH
A.F.D.
MOVIE
MUSIC
MEMORY AMP MENU
CLEAR
D.SKIP
D.TUNING
DVD/BD
MENU
SA-CD/CD
TV
TUNER
—
5
>10/
1
2
4
3

Предварительная настройка радиостанций, Предварительная настройка, Радиостанций
Если не удается настроиться на станцию, Функ ции тю нера Чат поддержки
- Изображение
- Текст
59
RU
Функ
ции
тю
нера
Если не удается настроиться
на станцию
Убедитесь, что радиочастота введена
правильно. Если нет, повторите
действия с 2 по 4. Если все еще не
удается настроиться на станцию, значит,
такая радиочастота не используется в
данной области.
Предварительная
настройка
радиостанций
Можно запрограммировать до 30
станций в диапазоне FM и 30 станций в
диапазоне AM. После этого можно
будет без труда настроить часто
прослушиваемые радиостанции.
1
Нажмите несколько раз
кнопку TUNER, чтобы
выбрать диапазон FM или
AM.
Можно также использовать INPUT
SELECTOR на ресивере.
Предварительная
настройка радиостанций
1
2
3
4
6
7
8
0/10
ENTER
9
VIDEO
BD
DVD
SAT
2CH
A.F.D.
RETURN/EXIT
TV CH –
PRESET –
TV CH +
PRESET +
TUNING –
TUNING +
REPLAY ADVANCE
MENU/HOME
MOVIE
MUSIC
MEMORY AMP MENU
CLEAR
TOOLS/
OPTIONS
DISPLAY
MUTING
MASTER VOL
TV VOL
D.SKIP
D.TUNING
DVD/BD
MENU
SA-CD/CD
TV
TUNER
—
.
H
m
M
<
<
>
5
>10/
1
3,5
PRESET
+/–
4
продолжение следует

60
RU
2
Настройте радиостанцию,
предварительную настройку
которой необходимо
выполнить с помощью
функций автоматической
настройки (стр. 57) или
прямой настройки (стр. 58).
Переключите режим приема FM
при необходимости (стр. 58).
3
Нажмите кнопку MEMORY.
Можно также использовать
MEMORY/ENTER на ресивере.
На несколько секунд загорится
индикатор “MEMORY”.
Выполните действия 4 и 5 перед тем,
как погаснет индикация
“MEMORY”.
4
Нажмите номерные кнопки
для выбора номера
предустановленной станции.
Можно также несколько раз
нажать кнопку PRESET + или
PRESET –, чтобы
выбрать предварительно
настроенный номер.
Если индикация “MEMORY”
погаснет пред тем, как будет
выбран номер предварительной
установки, еще раз выполните
действия, начиная с пункта 3.
5
Нажмите кнопку ENTER.
Можно также испольэовать
MEMORY/ENTER на ресивере.
Станция будет сохранена в памяти
под выбранным номером
предварительной установки.
Если индикация “MEMORY”
погаснет пред тем, как будет нажата
кнопка ENTER, еще раз выполните
действия, начиная с пункта 3.
6
Повторяйте действия
пунктов с 1 по 5 для
предварительной установки
другой станции.
1
Нажмите несколько раз
кнопку TUNER, чтобы
выбрать диапазон FM или
AM.
Настройка на
предварительно
установленные станции
1
2
3
4
6
7
8
0/10
ENTER
9
VIDEO
BD
DVD
SAT
2CH
A.F.D.
RETURN/EXIT
TV CH –
PRESET –
TV CH +
PRESET +
REPLAY ADVANCE
MENU/HOME
MOVIE
MUSIC
MEMORY AMP MENU
CLEAR
TOOLS/
OPTIONS
DISPLAY
MUTING
MASTER VOL
TV VOL
D.SKIP
D.TUNING
DVD/BD
MENU
SA-CD/CD
TV
TUNER
—
.
<
<
>
5
>10/
2
1
ENTER
Номерные
кнопки

07:41
Обзор ресивера SONY STR DG510
04:13
Sony STR-DG520 HDMI 5.1 Home Theater
03:30
Sony Digital Audio/Video Control Center — SONY STR-DG520
02:12
Sony STR-DG510 5.1 SONY SS-F6000P
01:33
SONY STR-DG520 multi channel AV Receiver
Нажмите на кнопку для помощи
Sony STR-DG520 Operating Instructions
Operating Instructions
64 pages
en
Quick Setup Guide
2 pages
Sony STR-DG520 Specification
The Sony STR-DG520 is a 5.1-channel audio-video receiver designed to enhance home entertainment experiences with high-quality sound and versatile connectivity options. It supports a total power output of 500 watts, delivering 100 watts per channel, which ensures robust audio performance for a variety of speaker setups. The receiver’s audio decoding capabilities include Dolby Digital, Dolby Pro Logic II, and DTS, providing immersive surround sound for movies, music, and games.
The STR-DG520 features a range of connectivity options to accommodate various audio and video sources. It includes three HDMI inputs and one HDMI output, allowing seamless integration with high-definition devices such as Blu-ray players, gaming consoles, and streaming devices. Additionally, it offers multiple component and composite video inputs, along with digital coaxial and optical audio inputs, ensuring compatibility with both modern and legacy components.
The receiver supports pass-through of 1080p video signals via HDMI, maintaining the high-definition quality of connected sources. It also includes a digital cinema auto calibration system, which optimizes speaker settings based on room acoustics for an enhanced listening experience. The front-panel design includes easy-to-use controls and a clear display for accessible operation.
The Sony STR-DG520 emphasizes ease of use with its intuitive setup process and included remote control, facilitating straightforward configuration and daily use. Its sleek, modern design complements a variety of home theater setups, making it an ideal choice for users seeking a reliable and versatile receiver to power their entertainment systems.
Sony STR-DG520 F.A.Q.
To connect your speakers to the Sony STR-DG520, first ensure the receiver is turned off. Connect the speaker wires to the appropriate terminals on the back of the receiver, matching the positive (+) and negative (-) terminals on both the receiver and the speakers.
If there is no sound, check that the receiver is not in mute mode and the volume is turned up. Ensure all speaker wires are properly connected and that the correct input source is selected. If the issue persists, try using different cables or inputs.
To reset the Sony STR-DG520, turn off the receiver. Press and hold the «Power» button for about five seconds until «CLEARING» appears on the display. The receiver will reset to its factory settings.
Connect the supplied FM and AM antennas to the receiver. Use the «Tuner» button to select FM or AM, then use the tuning buttons to find your desired station. You can preset stations by pressing and holding the preset buttons.
To clean your Sony STR-DG520, use a soft, dry cloth. Avoid using chemicals or abrasives. Ensure vents are clear of dust and obstructions. Regularly check connections and cables for wear.
Yes, you can connect a turntable to the Sony STR-DG520. If your turntable has a built-in preamp, connect it to an analog audio input. If not, you’ll need an external phono preamp between the turntable and the receiver.
Ensure the remote has fresh batteries and is pointed directly at the receiver. Use the remote to control power, volume, and input selection. Refer to the manual for specific button functions and programming instructions.
Ensure the receiver is in a well-ventilated area and not covered. Check for dust accumulation in vents. Avoid stacking other electronics on top. If overheating persists, consider using an external cooling fan.
Use the «Sound Field» settings to select modes such as «Cinema Studio» or «Dolby Pro Logic» to enhance home theater audio. Adjust speaker levels and distances in the receiver’s setup menu for balanced sound.
Yes, connect your TV’s audio output to the receiver’s input using either optical, coaxial, or analog cables. Select the appropriate input on the receiver to hear TV audio through your speakers.

model name1[STR-DG520]
[3-284-083-11(1)]
ocuments and
\Desktop\JC071253_3284083111DG520_US\3284083111\US01COV_STR-DG520-U.fm]
masterpage:Right
©2008 Sony Corporation
3-284-083-11(1)
Multi Channel AV
Receiver
Operating Instructions
STR-DG520
Скачать
©2008 Sony Corporation
3-284-083-42(1)
Multi Channel AV
Receiver
Operating Instructions
STR-DG520