
Домашняя
Аудиосистема
Домашня
Аудіосистема
Инструкция по
эксплуатации
Інструкція з
експлуатації
RU
UA
MHC-V82D/MHC-V72D
ПРЕДУПРЕЖДЕНИЕ
Для предотвращения возгорания
не накрывайте вентиляционное
отверстие устройства газетами,
скатертями, шторами и т. п.
Не подвергайте устройство
воздействию источников открытого
огня (например, зажженных свечей).
Для предотвращения возгорания
или поражения электрическим
током не допускайте попадания
и разбрызгивания жидкости на
устройство и не ставьте на корпус
устройства предметы, содержащие
жидкость, например, цветочные
вазы.
Так как основной штекер
используется для отсоединения
блока от сети электропитания,
подключайте блок к расположенной
в легкодоступном месте розетке
электросети. В случае нарушения
нормальной работы блока
незамедлительно отсоедините
основной штекер питания от
розетки электросети.
Не устанавливайте устройство в
тесных местах, таких как книжные
полки или встроенные шкафы.
Пока блок включен в розетку
электросети, он остается
подключенным к сети
электропитания, даже если питание
на самом блоке выключено.
Для использования только в
помещениях.
Следующая информация
относится только к
оборудованию,
приобретенному в странах/
регионах, где действуют
Директивы по ЭМС.
Данное оборудование прошло
проверку и признано находящимся
в допустимых пределах,
установленных Директивой по ЭМС,
при использовании кабеля длиной
менее 3 метров.
ВНИМАНИЕ
При использовании батареек
неверного типа существует
опасность взрыва.
Не подвергайте батарейки или
устройства с установленными
батарейками чрезмерному
нагреванию, например, при
воздействии солнечных лучей или
источников огня.
ВНИМАНИЕ
Использование оптических
приборов с данным устройством
вредно для зрения.
Утилизация
использованных
элементов питания
и отслужившего
электрического и
электронного
оборудования
(Директива
применима в
странах Евросоюза
и других странах,
где действуют
системы
раздельного сбора
отходов)
RU
2
Импортер на территории стран
Таможенного союза
АО «Сони Электроникс», Россия,
123103, Москва, Карамышевский
проезд, 6
Класс защиты от поражения
электрическим током II
Дата производства может быть
указана на самом продукте и/или
этикетке со штрихкодом на
картонной коробке.
Например: XX-XXXX
Первые две цифры означают
месяц, а последние четыре цифры
означают год.
Эта домашняя аудиосистема
предназначена для использования в
следующих целях:
• Воспроизведение источников
музыки/видео на дисках или
устройствах USB
• Передача музыки на устройства
USB
• Прослушивание радиостанций
• Прослушивание звука с
телевизора
• Потоковая передача музыки с
устройства BLUETOOTH
• Проведение общественных
мероприятий с функциями
проводного и беспроводного
объединения аудиосистем Party
Chain
Транспортировать в
оригинальной упаковке, во время
транспортировки не бросать,
оберегать от падений, ударов, не
подвергать излишней вибрации.
Реализацию осуществлять в
соответствии с действующими
требованиями законодательства.
Отслужившее изделие
утилизировать в соответствии с
действующими требованиями
законодательства.
Если неисправность не удается
устранить следуя данной
инструкции — обратитесь в
ближайший авторизованный SONY
центр по ремонту и обслуживанию.
Для покупателей в
Казахстане
Организация, уполномоченная
принимать претензии от
потребителей на территории
Казахстана:
АО «Сони Электроникс»
Представительство в Казахстане,
050010, Республика Казахстан,
г. Алматы, пр. Достык, дом 117/7
Информация о лицензии и
торговой марке
• является торговой маркой
DVD Format/Logo Licensing
Corporation.
• Логотип “DVD+RW”, “DVD-RW”,
“DVD+R”, “DVD-R”, “DVD VIDEO”
и “CD” являются торговыми
марками.
• WALKMAN® и логотип WALKMAN®
— зарегистрированные торговые
марки Sony Corporation.
• Технология кодирования
аудиосигнала и патенты MPEG
Layer-3 используются по лицензии
Fraunhofer IIS и Thomson.
RU
3

• Windows Media является
зарегистрированной торговой
маркой или торговой маркой
Microsoft Corporation в США и/или
других странах.
• Данное изделие защищено
определенными правами
на интеллектуальную
собственность Microsoft
Corporation. Использование
или распространение такой
технологии, кроме как в данном
изделии, запрещено без
наличия лицензии корпорации
Microsoft или уполномоченного
подразделения Microsoft.
• Данная система поддерживает
технологию Dolby* Digital.
* Произведено по лицензии Dolby
Laboratories. Dolby, Dolby Audio
и символ с двойной буквой D
являются торговыми марками
Dolby Laboratories.
• Данная система поддерживает
технологию мультимедийного
интерфейса высокой четкости
High-Definition Multimedia
Interface (HDMI™). Термины HDMI
и HDMI High-Definition Multimedia
Interface и Логотип HDMI
являются товарными знаками или
зарегистрированными товарными
знаками HDMI Licensing
Administrator, Inc. в Соединенных
Штатах и других странах.
• “BRAVIA” является торговой
маркой Sony Corporation.
• LDAC™ и логотип LDAC являются
торговыми марками Sony
Corporation.
• Словесная марка и логотип
BLUETOOTH® являются
зарегистрированными торговыми
марками, принадлежащими
Bluetooth SIG, Inc., любое их
использование Sony Corporation
лицензировано. Все остальные
торговые марки и торговые
наименования являются
собственностью соответствующих
владельцев.
• N-Mark является торговой
маркой или зарегистрированной
торговой маркой NFC Forum, Inc. в
США и других странах.
• Android, Google Play и логотип
Google Play являются торговыми
марками Google LLC.
• Apple, логотип Apple, iPhone,
iPod и iPod touch являются
товарными знаками Apple Inc.,
зарегистрированными в США и
других странах. App Store является
знаком обслуживания Apple Inc.
• Использование значка
“Изготовлено для Apple” означает,
что аксессуар разработан
специально для подключения
к продуктам Apple, указанным
в значке, и сертифицирован
разработчиком на соответствие
стандартам качества Apple.
Apple не несет ответственности
за работу этого устройства или
его соответствие стандартам
безопасности и нормативным
требованиям.
• СОГЛАСНО ЛИЦЕНЗИИ НА
ПОРТФЕЛЬ ПАТЕНТОВ НА
ИСПОЛЬЗОВАНИЕ ТЕХНОЛОГИИ
ВИЗУАЛИЗАЦИИ MPEG4 РАЗРЕШАЕТСЯ ЧАСТНОЕ
И НЕКОММЕРЧЕСКОЕ
ИСПОЛЬЗОВАНИЕ ПОКУПАТЕЛЕМ
ДАННОГО ПРОДУКТА ДЛЯ
RU
4

(i) КОДИРОВАНИЯ ВИДЕО
ИЗОБРАЖЕНИЯ В
СООТВЕТСТВИИ С ВИЗУАЛЬНЫМ
СТАНДАРТОМ MPEG-4 (ВИДЕО
MPEG-4)
И/ИЛИ
(ii) ДЛЯ РАСКОДИРОВАНИЯ ВИДЕО
MPEG-4, ЗАКОДИРОВАННОГО
ПОКУПАТЕЛЕМ В ЧАСТНЫХ
И НЕКОММЕРЧЕСКИХ ЦЕЛЯХ,
И/ИЛИ ПРИОБРЕТЕННОГО
У ПОСТАВЩИКА
ВИДЕОМАТЕРИАЛОВ,
ИМЕЮЩЕГО ЛИЦЕНЗИЮ НА
ПОСТАВКУ ВИДЕО MPEG-4.
ЛЮБОЕ ДРУГОЕ ИСПОЛЬЗОВАНИЕ
НЕ ПРЕДУСМОТРЕНО И НЕ
РАЗРЕШЕНО. ДОПОЛНИТЕЛЬНУЮ
ИНФОРМАЦИЮ ОТНОСИТЕЛЬНО
ИСПОЛЬЗОВАНИЯ В
РЕКЛАМНЫХ, ВНУТРЕННИХ И
КОММЕРЧЕСКИХ ЦЕЛЯХ, А ТАКЖЕ
ЛИЦЕНЗИРОВАНИЯ, МОЖНО
ПОЛУЧИТЬ У КОМПАНИИ MPEG LA,
L.L.C.
HTTP://WWW.MPEGLA.COM
• Все прочие торговые марки
являются торговыми марками
соответствующих владельцев.
• В данном руководстве символы ™
и ® не указаны.
••
В данном руководстве
содержится описание
использования пульта
дистанционного управления,
но некоторые функции могут
выполняться с помощью
органов управления на
основном блоке, которые имеют
аналогичные или похожие
названия.
••
Значки, подобные ,
расположенные в верхней части
каждого пояснения, обозначают
тип носителя, который может
использоваться с описанной
функцией.
••
Некоторые иллюстрации
представлены как
концептуальные изображения
и могут отличаться от реальных
изделий.
••
Пункты, отображенные на
экране телевизора, могут
различаться в зависимости от
региона.
••
Установка по умолчанию
подчеркнута.
••
На экране телевизора
появится текст, заключенный
в квадратные скобки ([—]), а на
дисплее — текст, заключенный в
двойные кавычки (“—”).
О данном руководстве
••
В данном руководстве
приведены инструкции для
моделей MHC-V82D и
MHC-V72D. В данном
руководстве в иллюстративных
целях использована модель
MHC-V82D, если нет оговорок.
RU
5
Оглавление
О данном руководстве ……..5
Распаковка ……………………….9
Воспроизводимые диски
или файлы на дисках/
устройстве USB ………………… 9
Веб-сайты с
совместимыми
устройствами ………………….12
Указатель компонентов и
регуляторов …………………….13
Подготовка к
эксплуатации
Подключение устройства …18
Установка элементов
питания …………………………..19
Перенос основного
блока …………………………….. 20
Изменение цветовой
системы …………………………. 20
Выполнение быстрой
настройки ……………………… 20
Выключение
демонстрации …………………21
Воспроизведение с
диска/устройства USB
Основное
воспроизведение ………….. 22
Другие операции
воспроизведения ………….. 23
Использование режима
воспроизведения ………….. 26
RU
6
Ограничение
воспроизведения с диска
(Родительский
контроль) ………………………. 27
Просмотр информации о
диске и устройстве USB ….. 28
Использование меню
настройки ……………………… 29
Передача USB
Передача музыки …………… 34
Стирание аудиофайлов
или папок на устройстве
USB ………………………………… 36
Тюнер
Прослушивание
радиопередач ……………….. 37
Подключение
BLUETOOTH
Потоковая передача
музыки с устройства с
BLUETOOTH …………………….38
Сопряжение этой системы
с устройством
BLUETOOTH …………………….39
Прослушивание музыки с
сопряженного устройства
BLUETOOTH …………………….40
Подключение данной
системы к нескольким
устройствам BLUETOOTH
(подключение нескольких
устройств) ……………………….41

Подключение к
устройствам BLUETOOTH
одним касанием с
помощью NFC ………………… 42
Настройка аудиокодеков
BLUETOOTH …………………….43
Настройка режима
ожидания BLUETOOTH ……. 43
Включение и выключение
сигнала BLUETOOTH ……….. 44
Управление
приложениями
Управление системой с
помощью приложений
“Sony | Music Center” и
“Fiestable” ……………………….44
Достижение и публикация
рейтинга Тусовщики, а
также получение
дополнительных бонусов
(функция Король
вечеринок) …………………….. 46
Использование функции
управления голосом с
помощью приложения
“Fiestable” ……………………….46
Создание атмосферы
вечеринки с помощью
приложения “Fiestable” ….. 47
Контроль по HDMI
Использование функции
Контроль по HDMI …………..48
Функция управления
жестами
Управление
воспроизведением,
DJ Effect, Sampler и
режимом караоке …………..50
Управление высотой тона
голоса или звука
источника музыки ………….. 52
Выключение органов
управления на основном
блоке на короткий период
времени (Party Lock) ……….53
Регулировка звука
Настройка звука …………….. 54
Создание собственного
звукового эффекта ………….54
Прослушивание,
используя несколько
систем
Использование функции
проводного объединения
аудиосистем Party Chain …. 56
Использование функции
беспроводного
объединения аудиосистем
Party Chain ……………………… 58
Беспроводное
прослушивание музыки
при использовании двух
систем (функция
добавления
громкоговорителя) ………….61
RU
7

Караоке
Подпевание: Караоке …….. 63
Прослушивание звука
гитары ……………………………64
Другие операции
Игра на барабане (Taiko) …65
Наслаждение музыкой с
подсветкой (Party Light/
Speaker Light) …………………. 67
Использование таймера
отключения …………………….68
Использование голосовых
указаний ………………………..68
Использование
дополнительных
устройств ……………………….69
Отключение органов
управления основного
блока (Запрет детям) ……… 69
Настройка функции
автоматического
перехода в режим
ожидания ………………………. 70
Включение встроенной
демонстрации звука ………. 70
Выполняется обновление
программного
обеспечения ………………….. 70
Дополнительная
информация
Поиск и устранение
неисправностей ………………71
Меры
предосторожности …………84
Технические
характеристики ……………… 87
Список кодов
родительского контроля/
региона ………………………….90
Список кодов языков ……….91
RU
8

Распаковка
••
Данный основной блок
(MHC-V82D или MHC-V72D) (1)
••
Пульт дистанционного
управления (3В пост. тока)
(RMT-AM420U) (1)
••
Батарейки типа R03 (1,5 Впост.
тока) (размер AAA)* (2)
* Год и месяц истечения
срока годности указаны на
отрицательном полюсе элемента.
••
Внешняя FM-антенна (1)
••
Шнур питания переменного тока
(Изготовлено во Вьетнаме) (1)
Примечание
Распаковка коробки и переноска
основного блока должны
осуществляться двумя лицами.
Падение блока может привести
к травмированию людей и/или
повреждению имущества.
Воспроизводимые
диски или файлы на
дисках/устройстве
USB
Диски, доступные для
воспроизведения
••
DVD VIDEO
••
DVD-R/-RW в формате DVD
VIDEO или режиме видео
••
DVD+R/+RW в формате DVD
VIDEO
••
VIDEO CD (диски версии 1.0, 1.1
и 2.0)
••
Super VCD
••
CD-R/-RW/-ROM в формате
VIDEO CD или Super VCD
••
AUDIO CD
••
CD-R/-RW в формате AUDIO CD
••
CD-R/-RW/-ROM в формате
DATACD
MP3 (.mp3)
.m4v)
соответствующий требованиям
ISO 9660
1)
, содержащий файлы
2)3)
, MPEG4 (.mp4/
3)4)
, Xvid (.avi), а также
5)
уровня 1/уровня 2 или
Joliet (расширенный формат).
••
DVD-R/-RW/-ROM/+R/+RW
в формате DATA DVD
содержащий файлы MP3
2)3)
(.mp3)
.m4v)
, MPEG4 (.mp4/
3)4)6)
, Xvid (.avi)
1)
,
6)7)
, а также
соответствующий формату
UDF (Universal Disk Format —
универсальный формат диска).
Воспроизводимые файлы на
устройстве USB
••
Музыка:
Файлы MP3 (.mp3)
WMA (.wma)
(.m4a/.mp4/.3gp)
WAV(.wav)
••
Видео:
Файлы MPEG4 (.mp4/.m4v)
файлы Xvid (.avi)
1)
DATA CD/DATA DVD, созданные
в формате Packet Write, а также
которые не были корректно закрыты,
не будут воспроизводиться.
2)
MP3 (MPEG 1 Audio Layer 3) —
стандартный формат, определенный
ISO/MPEG для сжатых аудиоданных.
Файлы MP3 должны иметь формат
MPEG 1 Audio Layer 3. Аудиофайл MP3
PRO может воспроизводиться как
файл MP3.
3)
Файлы с защитой авторских прав
(Управление цифровыми правами)
не могут воспроизводиться этой
системой.
4)
Файлы MPEG4 должны быть записаны
в формате MP4. Поддерживаются
следующие видео- и аудиокодеки:
— Видеокодек: Простой профиль
MPEG4 (AVC не поддерживается.)
— Аудиокодек: AAC-LC (HE-AAC не
поддерживается.)
3)8)
, файлы AAC
3)
6)7)
2)3)
, файлы
3)9)
, файлы
3)4)6)
,
RU
9

5)
Логический формат файлов
или папок на дисках CD-ROM,
определенный ISO (International
Organization for Standardization —
Международная организация по
стандартизации).
6)
Видеофайлы, которые имеют размер
больше 720 (ширина) × 576 (высота)
пикселей, а также с большим
соотношением высоты к ширине не
могут воспроизводиться.
7)
Файлы формата Xvid длительностью
более 2 часов, а также файл,
который был объединен с двумя
или более файлами Xvid, не могут
воспроизводиться.

Файл WMA, имеющий формат WMA
DRM, WMA Lossless или WMA PRO, не
может воспроизводиться.
9)
Файл AAC в формате AAC DRM
и AAC Lossless, а также который
закодирован с частотой 96кГц, не
может воспроизводиться.
Примечание
••
Система попытается
воспроизвести любые данные
с вышеперечисленными
расширениями, даже если они не
имеют поддерживаемый формат.
Воспроизведение этих данных может
привести к генерации громкого шума
и повредить вашу акустическую
систему.
••
Невозможно воспроизвести
следующие диски/файлы:
— Совместимые с режимом CPRM
(Content Protection for Recordable
Media — Защита содержимого
записываемых носителей) DVD-R/
-RW, записанные в программах
Copy-Once (однократное
копирование)
— Диски нестандартной формы
(например, в виде сердца,
квадрата, звезды и т.п.)
— Диски с клейкой лентой, бумагой
или наклейками, прикрепленными
к ним
— Зашифрованные файлы или
защищенные паролем.
RU
10
Примечания для CD-R/-RW и
DVD-R/-RW/+R/+RW
••
В некоторых случаях диски
CD-R/-RW и DVD-R/-RW/+R/+RW
не могут воспроизводиться в
этой системе из-за качества
записи, физического состояния
диска или характеристик
записывающего устройства
и авторского программного
обеспечения. Более
подробную информацию см. в
инструкциях по эксплуатации
записывающего устройства.
••
Некоторые функции
воспроизведения могут не
работать с частью дисков
DVD+R/+RW, даже если они
были финализированы
должным образом. В этом
случае используйте стандартное
воспроизведение.
Примечания о дисках
••
Это устройство предназначено
для воспроизведения дисков,
соответствующих требованиям
стандарта Compact Disc (CD).
••
Диски DualDisc и некоторые
музыкальные диски,
закодированные с помощью
технологии защиты авторских
прав, не соответствуют
стандарту (CD). Поэтому эти
диски не могут быть совместимы
с этим изделием.
Примечание для
многосессионных дисков
Эта система способна
воспроизводить
продолжительные сеансы на
диске, на котором они записаны
в формате, совпадающем с
форматом первого сеанса.
Однако, воспроизведение не
гарантируется.

Примечание к операциям
воспроизведения дисков DVD
VIDEO и VIDEO CD
Некоторые операции
воспроизведения дисков DVD
VIDEO или VIDEO CD могут быть
преднамеренно ограничены
производителями программного
обеспечения. Поэтому некоторые
функции воспроизведения могут
быть недоступны. Обязательно
прочитайте инструкцию по
эксплуатации к дискам DVD VIDEO
или VIDEO CD.
Примечания к
воспроизводимым файлам
••
Запуск воспроизведения может
занять больше времени, если:
•—
DATA CD/DATA DVD/
устройство USB записаны с
использованием сложной
древовидной структуры.
•—
аудиофайлы или видеофайлы
в другой папке только что
воспроизводились.
•—
на устройстве USB находится
много папок или файлов.
••
Данная система может
воспроизводить диски DATA CD/
DATA DVD или устройства USB в
следующих случаях:
•—
глубина до 8 папок
•—
до 300 папок
•—
до 999 файлов на диске
•—
до 2000 файлов на устройстве
USB
•—
до 650 файлов в папке
Эти количества могут отличаться
в зависимости от конфигурации
файла или папки.
••
Папки, не содержащие
аудиофайлы или видеофайлы,
пропускаются.
••
Файлы, переданные таким
устройством, как компьютер,
могут не воспроизводиться
в порядке, в котором они
передавались.
••
Порядок воспроизведения
может не соответствовать
исходному в зависимости от
программного обеспечения,
использующегося для создания
аудиофайлов или видеофайлов.
••
Совместимость со всеми
программами кодировки/
записи поддерживаемых
форматов, устройствами записи
и носителями записей не
гарантируется.
••
В зависимости от файла Xvid,
изображение может быть
нечетким или пропадать звук.
Примечания для устройств
USB
••
Данная система не гарантирует
работу со всеми устройствами
USB.
••
Не соединяйте систему
и устройство USB через
концентратор USB.
••
При нескольких подключенных
устройствах USB, при
выполнении системой операций
может иметь место задержка.
••
Последовательность
воспроизведения системой
может отличаться от
последовательности
воспроизведения на
подключенном устройстве USB.
••
Перед использованием
устройства USB убедитесь, что
на нем отсутствуют зараженные
вирусами файлы.
11
RU

Веб-сайты с
совместимыми
устройствами
Посетите указанные ниже вебсайты с последней информацией
о совместимых устройствах USB и
BLUETOOTH.
Для покупателей в Америке:
<https://www.sony.com/am/
support>
Для покупателей в странах
Европы:
<https://www.sony.eu/support>
Для покупателей в других
странах/регионах:
<https://www.sony-asia.com/
support>
Совместимые модели iPhone/
iPod
Система совместима с iOS версии
10.0 или позднее.
Ниже представлены
совместимые модели iPhone/
iPod. Перед использованием
данного устройства с системой
необходимо обновить
программное обеспечение
iPhone/iPod до последней версии.
••
iPhone X
••
iPhone 8 Plus
••
iPhone 8
••
iPhone 7 Plus
••
iPhone 7
••
iPhone SE
••
iPhone 6s Plus
••
iPhone 6s
••
iPhone 6 Plus
••
iPhone 6
••
iPhone 5s
••
iPod touch (6-го поколения)
12
RU
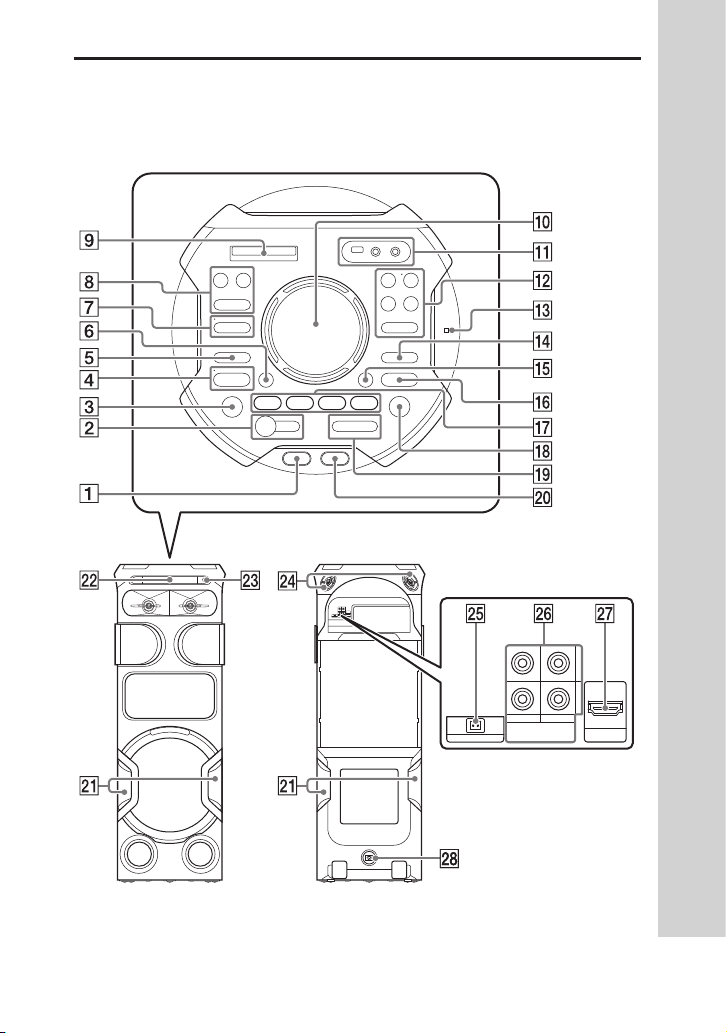
Указатель компонентов и регуляторов
Основной блок
Вид сверху
Фронтальный Вид сзади
13
RU
(питание)
Нажмите, чтобы включить
систему или перевести ее в
режим ожидания.
(воспроизведение)
(стр.22, 40, 70)
(стоп) (стр. 22, 25,
35, 37, 69)
FUNCTION (стр. 19, 22,
37, 39, 40, 69)
Индикатор BLUETOOTH
(стр.38)
BLUETOOTH (стр. 40, 59,
61)
PAIRING (стр. 39)
FIESTA (стр.54)
GESTURE ON/OFF (стр.50,
52)
Индикатор MEGA BASS
(стр.54)
MEGA BASS (стр. 54)
WIRELESS PARTY CHAIN
(стр.59, 60)
PARTY LIGHT (стр.67)
PARTY CHAIN (стр.57)
Дисплей
Датчик GESTURE CONTROL
(стр. 50, 51, 66)
Крышка USB/MIC (стр. 34,
63, 64)
(USB) (REC/PLAY)
Порт
(стр.22, 34)
Гнездо MIC1 (стр.63)
Гнездо MIC2/GUITAR
(стр.63, 64)
VOICE CHANGER (стр.64)
Индикатор GUITAR
(стр.63, 64)
GUITAR (стр. 63, 64)
VOCAL FADER (стр.63)
MIC/GUITAR LEVEL +/–
(стр.63, 64)
MIC ECHO (стр.63)
(N-Mark) (стр. 42)
(папка) +/– (стр.23)
SOUND FIELD (стр.54)
VOLUME +/–
Отрегулируйте громкость.
PLAYBACK (стр. 50)
DJ (стр. 50)
SAMPLER (стр. 50)
KARAOKE (стр. 50)
(открыть/закрыть)
(стр.22)
14
RU
/ (предыдущий/
следующий) (стр.22)
TUNING +/– (стр. 37)
TAIKO (стр. 65, 66)
Party Light (стр. 67)
Избегайте попадания в глаза
прямых лучей от подсветки,
когда включена функция
подсветки.
Лоток для диска
Датчик дистанционного
управления (стр.19)
Высокочастотный динамик
Л/П, задний
Поддерживает технологию
360° Live Sound,
обеспечивая различное
звуковое давление по
сравнению с фронтальными
громкоговорителями.
FM ANTENNA terminal
(стр.18)
Гнезда AUDIO/PARTY CHAIN
IN (TV) L/R (стр.18, 56,
69)
Гнезда AUDIO/PARTY CHAIN
OUT L/R (стр.18, 56)
Разъем HDMI OUT (TV) ARC
(стр18)
Гнезда AC IN (стр.18)
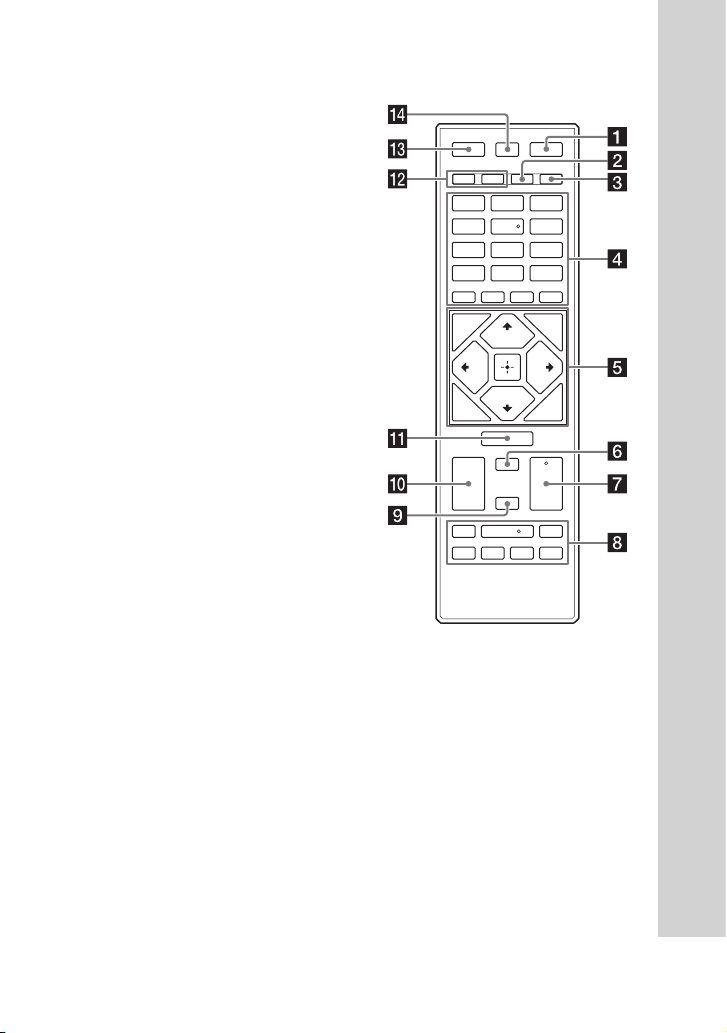
Пульт дистанционного
управления
(питание)
Нажмите, чтобы включить
систему или перевести ее в
режим ожидания.
PLAY MODE (стр. 26, 35)
REPEAT/FM MODE (стр.27,
38)
Номерные кнопки (0 – 9)
(стр.22, 23, 25, 28,
30, 38)
1)2)
MEGA BASS (стр.54)
15
RU

REC TO USB (стр.35)
MEDIA MODE (стр.22)
SUBTITLE (стр.24)
2)
AUDIO
(стр.24)
(громкость) +/–
Отрегулируйте громкость.
2)
/ (ускоренная
прокрутка назад/вперед)
(стр.23)
ANGLE (стр.24)
SCORE (стр.64)
VOICE CHANGER (стр.64)
MIC LEVEL+/– (стр.63)
VOCAL FADER (стр.63)
MIC ECHO (стр.63)
(папка) +/– (стр.23)
KEY CONTROL / (стр.64)
DVD TOP MENU (стр.23)
DVD/TUNER MENU
(стр.23, 38)
1)
CLEAR
(стр.24)
RETURN (стр.23)
1)
SETUP
(стр.29)
OPTIONS (стр.34, 36,
43, 51, 54, 58,
68, 70)
/ / /
Выбор пунктов меню.
(ввод)
Ввод/подтверждение
настроек.
SEARCH (стр. 23, 24)
/ (медленная
прокрутка назад/вперед)
(стр.23)
TUNING+/– (стр.37)
(воспроизведение)
(стр.22)
/ (предыдущий/
следующий) (стр.22)
PRESET+/– (стр.38)
(пауза) (стр.22)
(стоп) (стр.22, 25,
35, 37)
SHIFT
Удерживайте нажатой
для активации кнопок,
отпечатанных розовым
цветом.
SOUND FIELD +/– (стр.54)
FUNCTION (стр.19, 22,
37, 69 )
PARTY LIGHT (стр.21,
67)
LIGHT MODE (стр.67)
DISPLAY (стр.21, 29,
37, 39)
2)
16
DISPLAY1) (стр.28)
RU

SLEEP (стр. 68)
1)
Эта кнопка отпечатана розовым
цветом. Для использования данной
кнопки удерживайте нажатой SHIFT
(), а затем нажмите эту кнопку.
2)
Номерная кнопка 5/AUDIO, кнопки
+ и имеют тактильную точку.
Используйте тактильную точку в
качестве ориентира при управлении
системой.
17
RU
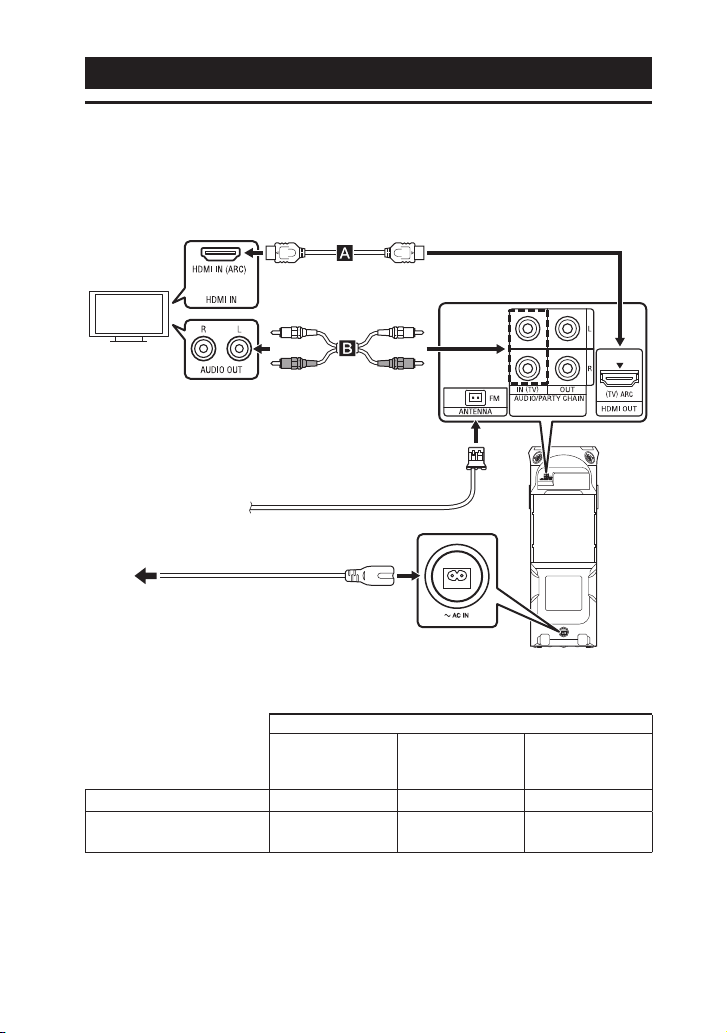
Подготовка к эксплуатации
Подключение устройства
Подключите кабель перед подключением шнура питания переменного
тока.
Высокоскоростной кабель HDMI
с Ethernet (не входит в комплект)
Телевизор
1)
или
Аудиокабель
(не входит в комплект)
3)
Шнур питания переменного
4)
(входит в комплект)
тока
К электрической розетке
Внешняя FM-антенна
(входит в комплект)
Выберите любой способ подключения в соответствии с гнездами/
разъемом телевизора.
Доступные входные гнезда/разъем телевизора
Разъем HDMI с
функцией
1)
“ARC”
Разъем HDMI
без функции
“ARC”
Просмотр видео –
Для прослушивания
звука телевизора
1)
Функция “Реверсивный звуковой канал (ARC)” позволяет выводить с телевизора
звук на систему с интерфейсом HDMI. Для получения сведений о настройке
функции ARC см. [AUDIO RETURN CHANNEL] (стр.33). Чтобы проверить
телевизор на совместимость с функцией ARC, см. инструкцию по эксплуатации,
поставляемую в комплекте с телевизором.
RU
18
2)
Без разъема
HDMI
2)
Для прослушивания звука
телевизора, нажимайте кнопку
FUNCTION, пока не будет выбран
пункт “TV”.
3)
Растяните антенну горизонтально.
Чтобы избежать возникновения
помех, держите антенну на удалении
от шнура питания переменного тока
и кабеля USB.
4)
Подсоедините шнур питания
переменного тока. Демонстрация
запустится автоматически. При
нажатии (питание) для включения
системы демонстрация прекратится.
Примечание
••
Не подключайте данную систему к
телевизору через видеодеку.
••
Если аудиосигнал, поступающий на
разъем HDMI OUT (TV) ARC системы,
не является 2-канальным линейным
сигналом PCM, на дисплее основного
блока отображаются сообщения
“CODE 01” и “SGNL ERR” (стр.79).
Советы
••
Также можно прослушивать звук с
аудио-/видеооборудования через
систему (стр.69).
••
Также можно подключить входные
аудиогнезда дополнительного
оборудования (VCR и т.д.) к гнездам
AUDIO/PARTY CHAIN OUT L/R. Для
получения подробной информации
см. инструкции по эксплуатации
оборудования.
••
Можно использовать функцию
проводного объединения
аудиосистем Party Chain, подключив
другую аудиосистему к данной
системе (стр. 56).
••
Если при подключении
дополнительного оборудования
уровень вывода звука низок,
выполните настройку параметров
аудиовыхода на подключенном
оборудовании. Это приведет к
повышению уровня выходного
сигнала. Для получения подробной
информации см. инструкции по
эксплуатации оборудования.
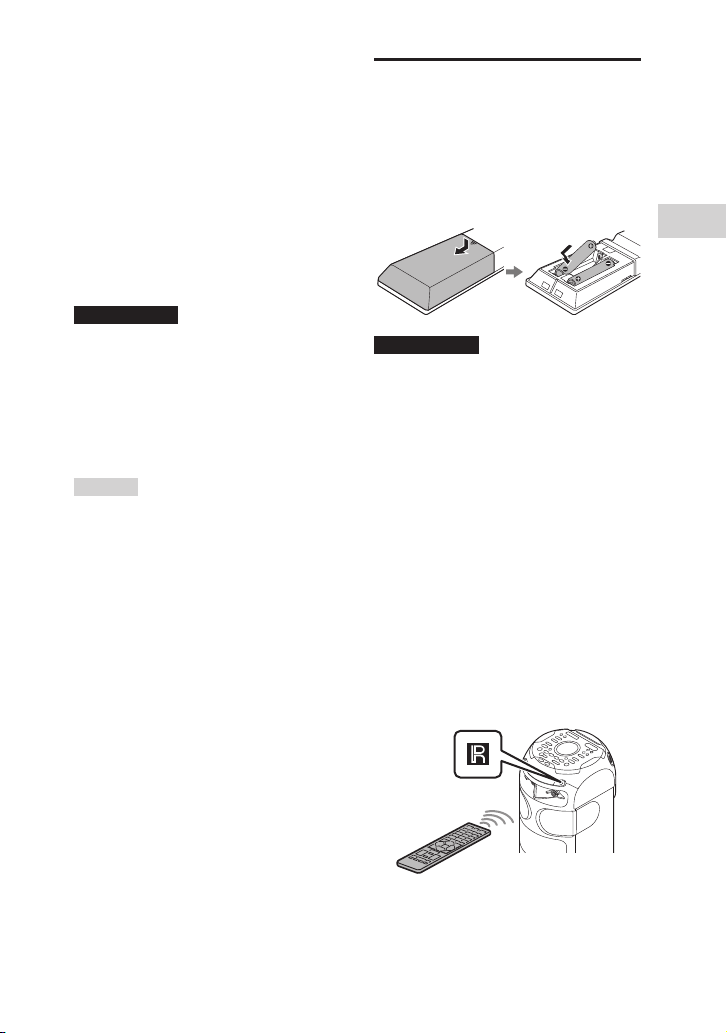
Установка элементов
питания
Вставьте две входящие в комплект
батарейки типа R03 (размер AAA)
в соответствии с показанной ниже
полярностью.
Примечание
••
Не вставляйте старые элементы
питания вместе с новыми и элементы
питания разных типов.
••
Если пульт дистанционного
управления не планируется
использовать в течение длительного
времени, извлеките элементы
питания, чтобы предотвратить
возможное повреждение пульта,
вызванное утечкой внутреннего
вещества элементов питания и
коррозией.
Управление системой с
помощью пульта
дистанционного управления
Направьте пульт дистанционного
управления на датчик
дистанционного управления
системой основного блока.
Подготовка к эксплуатации
19
RU
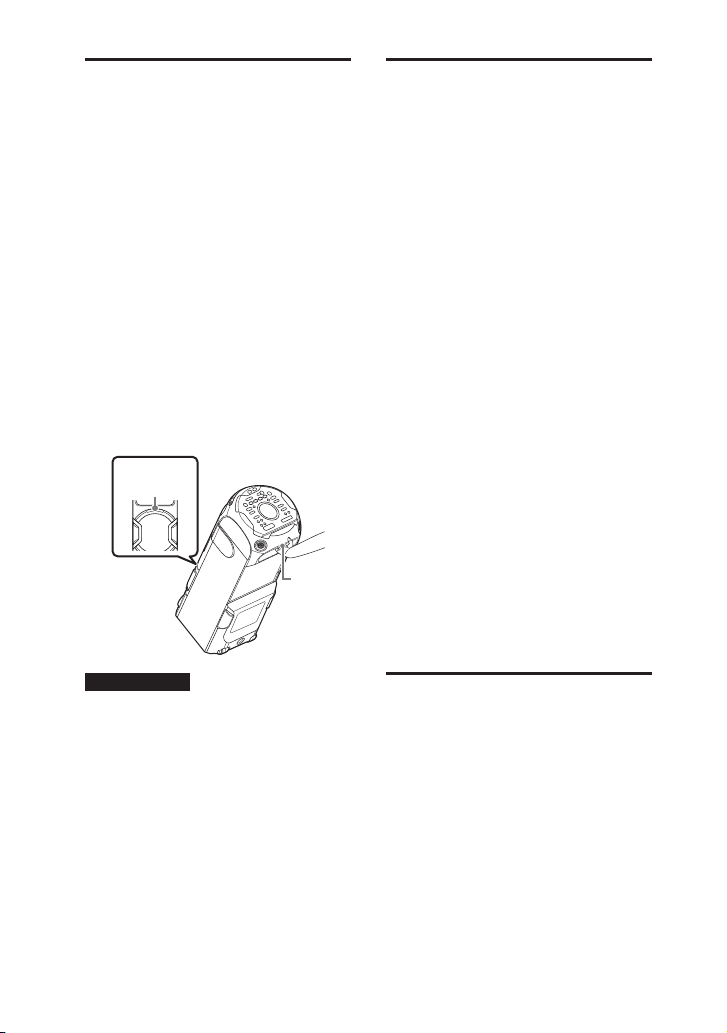
Перенос основного
блока
Основной блок оснащен
роликами, с помощью которых его
можно катить.
Ролики можно использовать
только на ровных поверхностях.
На неровных поверхностях
переноска основного блока
должна осуществляться двумя
лицами за специальные рукоятки.
Во избежание травмирования
людей и/или повреждения
имущества важно правильно
удерживать основной блок при
переноске.
Перед перемещением основного
блока отсоедините все кабели.
Рукоятка
(Фронтальный)
Рукоятка
(сзади)
Изменение цветовой
системы
(Кроме моделей для Латинской
Америки, стран Европы и России)
Выберите цветовую систему в
зависимости от цветовой системы
вашего телевизора.
При каждом выполнении
описанной ниже процедуры,
цветовая система изменяется
следующим образом:
NTSC PAL
Для выполнения данной
операции используйте органы
управления на основном блоке.
1 Нажмите для включения
системы.
2 Коснитесь несколько раз
FUNCTION для выбора
“DVD/CD”.
3 Коснитесь и удерживайте
MICECHO и MEGA BASS более
3 секунд.
На дисплее отобразится “NTSC”
или “PAL”.
20
RU
Примечание
••
Соблюдайте осторожность при
переноске основного блока по
наклонной поверхности.
••
Не переносите основной блок с
сидящим на нем человеком, грузом
и т. д .
••
Во время переноса берегите
основной блок от детей.
Выполнение быстрой
настройки
Перед использованием системы
можно выполнить минимальные
основные настройки в режиме
быстрой настройки.
1 Включите телевизор и
выберите входной сигнал в
соответствии с
подключением.
2 Нажмите для включения
системы.
3 Нажмите несколько раз
FUNCTION для выбора
“DVD/CD”.
В нижней части экрана
телевизора отобразится
сообщение [Press ENTER to run
QUICK SETUP.].
На экране отобразится
сообщение после первого
включения или выполнения
[СБРОС] (см. “Возврат настройки
меню настройки к значениям по
умолчанию” на стр. 82).
4 Нажмите , не вставляя диск.
На экране телевизора
отобразится [LANGUAGE SETUP].
Отображаемые пункты могут
отличаться в зависимости от
страны или региона.
LANGUAGE SETUP
:
OSD
MENU
:
AUDIO
:
SUBTITLE
:
ENGLISH
ENGLISH
CHINESE 2
THAI
1CHINESE
5 Нажмите несколько раз /
для выбора языка, а затем
нажмите .
а экране телевизора отобразится
[НАСТРОЙКА ВИДЕО].
Для ручного изменения
настроек
См. “Использование меню
настройки” (стр.29).
Выйти из режима быстрой
настройки
Удерживайте нажатой SHIFT, а
затем нажмите SETUP.
Выключение
демонстрации
При выключенной системе
нажмите DISPLAY несколько раз,
пока демонстрация не будет
выключена (режим
энергосбережения).
Дисплей и подсветка выключаются
для сбережения электроэнергии.
Для включения демонстрации
нажмите еще раз DISPLAY.
Для отключения подсветки во время
демонстрации нажмите PARTY
LIGHT.
Подготовка к эксплуатации
6 Нажмите несколько раз /
для выбора настройки,
соответствующей типу
телевизора, а затем нажмите
.
После того, как на экране
телевизора отобразится
сообщение [БЫСТРАЯ НАСТРОЙКА
ЗАВЕРШЕНА.], система будет
готова к воспроизведению.
21
RU
Воспроизведение с
диска/устройства USB
Основное
воспроизведение
Список совместимых устройств
USB см. в главе “Веб-сайты с
совместимыми устройствами”
(стр.12).
(В данной системе можно
использовать устройства iPhone/
iPod только через соединение
BLUETOOTH.)
1 Нажмите несколько раз
FUNCTION для выбора
“DVD/CD” или “USB”.
2 Подготовьте источник
воспроизведения.
Для режима DVD/CD:
Коснитесь на основном блоке,
чтобы открыть лоток для диска и
вставить в него диск этикеткой
вверх.
Повторно коснитесь на
основном блоке, чтобы закрыть
лоток для дисков.
Не нажимайте на лоток для диска,
чтобы закрыть его, поскольку это
может привести к нарушению
работоспособности.
Для режима USB:
Нажмите для снятия крышки
USB/MIC, а затем подключите
устройство USB к порту
основном блоке.
RU
22
(USB) на
Примечание
Можно использовать переходник
USB (не входит в комплект) для
подключения устройства USB к
основному блоку, если устройство
USB не может быть вставлено в порт
(USB).
3 (Только )
Нажмите несколько раз
MEDIA MODE для выбора
[МУЗЫКА] или [VIDEO].
4 Нажмите , чтобы начать
воспроизведение.
Другие операции
В зависимости от типа диска или
файла, эта функция может не
работать.
Операция Действия
Прекращение
воспроизведения
Пауза в
воспроизведении
Возобновление воспроизведения
или возврат к
нормальному
воспроизведению
Отмена точки
возобновления воспроизведения
Выбор
дорожки,
файла,
раздела или
сцены
Нажмите .
Нажмите .
Нажмите .
Нажмите дважды.
Во время
воспроизведения
нажмите или
.
Или удерживая SHIFT,
нажмите номерные
кнопки, а затем
нажмите
.
Операция Действия
Выбор папки Нажмите несколько
Отображение
названия DVD
Отображение
меню DVD
Быстрое
определение
нужного
места при
ускоренной
прокрутке
вперед или
назад (поиск
с захватом)
Покадровый
просмотр
(замедленное
воспроизведение)
раз +/–.
Нажмите DVD TOP
MENU.
Нажмите DVD/TUNER
MENU.
Во время
воспроизведения
нажмите или .
При каждом нажатии
или скорость
воспроизведения
меняется.
Нажмите , зачем
нажмите
При каждом нажатии
или скорость
воспроизведения
меняется.
или .
Воспроизведение от
определенного файла
1 Нажмите несколько раз MEDIA
MODE для выбора [МУЗЫКА]
или [VIDEO].
2 Нажмите SEARCH, чтобы
отобразить список папок на
экране телевизора.
3 Нажмите несколько раз /
для выбора необходимой
папки.
4 Нажмите , чтобы отобразить
список файлов на экране
телевизора.
Для возврата к списку папок
нажмите RETURN.
5 Нажмите несколько раз /
для выбора необходимого
файла, а затем нажмите .
Другие операции
воспроизведения
В зависимости от типа диска или
файла, эта функция может не
работать.
Поиск определенной
дорожки
Удерживая SHIFT, нажмите
номерные кнопки, чтобы
выбрать необходимую дорожку,
а затем нажмите .
Поиск определенного
названия/раздела/сцены/
дорожки/индекса
1 Нажмите SEARCH во время
воспроизведения несколько
раз, чтобы выбрать режим
поиска.
2 Удерживая SHIFT, нажмите
номерные кнопки, чтобы
ввести номер названия,
раздела, сцены, дорожки или
индекса, а затем нажмите .
Начинается воспроизведение.
Примечание
••
Для дисков VIDEO CD с контролем
воспроизведения (PBC) нажмите
SEARCH для поиска сцены.
••
Для дисков VIDEO CD без контроля
воспроизведения (PBC) нажмите
SEARCH для поиска дорожки и
индекса.
Воспроизведение с диска/устройства USB
RU
23
Поиск определенного места с
использованием временного
кода
Выбор настройки субтитров
1 Нажмите SEARCH во время
воспроизведения несколько
раз, чтобы выбрать режим
поиска по времени.
2 Удерживая SHIFT, нажмите
номерные кнопки, чтобы
ввести временной код, а затем
нажмите .
Пример: Для поиска сцены со
временем 2 часа, 10 минут и
20секунд удерживайте SHIFT и
нажмите 2, 1, 0, 2, 0 ([2:10:20]).
При ошибке удерживайте SHIFT и
нажмите CLEAR, чтобы удалить
номер.
Для поиска используйте меню
DVD
1 Нажмите DVD/TUNER MENU.
2 Нажмите / / / или,
удерживая SHIFT, нажмите
номерные кнопки, чтобы
выбрать название или элемент
для воспроизведения, а затем
нажмите .
Изменение ракурсов
Во время воспроизведения
нажмите несколько раз ANGLE,
чтобы выбрать необходимый
ракурс.
RU
24
Во время воспроизведения
нажмите несколько раз SUBTITLE
для выбора нужного языка
субтитров или их отключения.
Изменение языка/звука
Во время воспроизведения
нажмите несколько раз AUDIO
для выбора требуемого
аудиоформата или режима.
DVD VIDEO
Можно выбрать аудиоформат или
язык, когда источник содержит
несколько аудиоформатов или
многоязычные аудиодорожки.
Если отображаются 4 цифры,
они обозначают код языка.
Чтобы узнать, какому языку
соответствует код, см. “Список
кодов языков” (стр. 91). Если
один и тот же язык отображен
более двух раз, диск DVD
VIDEO записан в нескольких
аудиоформатах.
VIDEO CD/AUDIO CD/
аудиофайл
Можно изменить уровень
громкости.
••
[СТЕРЕО]: Стереозвук.
••
[1\Л]/[2\П]: Монофонический
звук левого или правого канала.
SUPER VIDEO CD
••
[1:СТЕРЕО]: Стереозвук
аудиодорожки 1.

••
[1:1\Л]/[1:2\П]: Монофонический
звук левого или правого канала
аудиодорожки 1.
••
[2:СТЕРЕО]: Стереозвук
аудиодорожки 2.
••
[2:1\Л]/[2:2\П]: Монофонический
звук левого или правого канала
аудиодорожки 2.
Воспроизведение VIDEO CD с
помощью функций PBC
Можно использовать меню PBC
(контроль воспроизведения) для
пользования интерактивными
функциями VIDEO CD (VIDEO CD
версии 2.0 и Super VCD).
1 Нажмите для
воспроизведения VIDEO CD с
помощью функций PBC.
На экране телевизора появится
меню PBC.
2 Удерживая SHIFT, нажмите
номерные кнопки, чтобы
выбрать номер необходимого
элемента, а затем нажмите .
3 Продолжите
воспроизведение в
соответствии с инструкциями
меню.
Примечание
Воспроизведение с контролем
отменяется при активации повторного
воспроизведения.
Отмена воспроизведения с
контролем
1 Нажмите или или,
удерживая SHIFT, нажмите
номерные кнопки для выбора
дорожки, воспроизведение
которой остановлено.
2 Нажмите или .
Воспроизведение начнется с
выбранной дорожки.
Воспроизведение с диска/устройства USB
Возврат к воспроизведению с
контролем
Нажмите дважды, а затем
нажмите .
Возобновление
воспроизведения для
нескольких дисков
Система может сохранять точки
возобновления воспроизведения
для 6 дисков и возобновлять
воспроизведение при повторной
вставке каждого из этих
дисков. При сохранении точки
возобновления воспроизведения
для 7-го диска, точка
возобновления воспроизведения
для первого диска будет удалена.
Для активации данной функции
установите пункт [ВОЗОБН.
ВОСПР. МНОГОДИСК.] в меню
[НАСТРОЙКА СИСТЕМЫ] в
состояние [ВКЛ] (стр.32).
Примечание
Для воспроизведения с начала диска
нажмите дважды, а затем нажмите
.
25
RU
Использование
режима
воспроизведения
Воспроизведение в
последовательном или
произвольном порядке
(обычное воспроизведение/
воспроизведение в
произвольном порядке)
При остановленном
воспроизведении нажмите
несколько раз PLAY MODE.
Во время воспроизведения
диска
••
[ДИСК]: Воспроизведение диска.
••
[ПАПКА]*: Воспроизведение
всех совместимых файлов из
указанной папки на диске.
••
[ДИСК (ПРОИЗВОЛЬНОЕ ВОСПР)]:
Воспроизведение в
произвольном порядке всех
аудиофайлов на диске.
••
[ПАПКА (ПРОИЗВОЛЬНОЕ
ВОСПР)]*: Воспроизведение в
произвольном порядке всех
аудиофайлов в указанной папке
на диске.
* Не может выбираться для AUDIO CD.
Во время воспроизведения с
устройства USB
••
[ОДНО УСТРОЙСТВО USB]:
Воспроизведение с устройства
USB.
RU
26
••
[ПАПКА]: Воспроизведение
всех совместимых файлов из
указанной папки на устройстве
USB.
••
[ОДНО УСТР. USB (ПРОИЗВ.
ВОСПР)]: Воспроизведение в
произвольном порядке всех
аудиофайлов на устройстве USB.
••
[ПАПКА (ПРОИЗВОЛЬНОЕ
ВОСПР)]: Воспроизведение в
произвольном порядке всех
аудиофайлов в указанной папке
на устройстве USB.
Примечание
••
При установке параметра [ДИСК]
или [ОДНО УСТРОЙСТВО USB] для
обычного воспроизведения на
дисплее отключаются индикаторы
“FLDR” и “SHUF”.
••
Индикатор “FLDR” начинает
светиться, когда для обычного
воспроизведения выбран параметр
[ПАПКА].
••
Индикатор “SHUF” начинает
светиться, когда для
воспроизведения в произвольном
порядке выбран параметр [ДИСК
(ПРОИЗВОЛЬНОЕ ВОСПР)] или [ОДНО
УСТР. USB (ПРОИЗВ. ВОСПР)].
••
При установке параметра
[ПАПКА (ПРОИЗВОЛЬНОЕ ВОСПР)] для
воспроизведения в произвольном
порядке на дисплее начинают
светиться индикаторы “FLDR” и
“SHUF”.
••
Воспроизведение в произвольном
порядке не может применяться к
видеофайлам.
••
Воспроизведение в произвольном
порядке отменяется:
— открытии лотка для диска.
— выполняется синхронизированная
передача.
— изменяется установка режима
MEDIA MODE.
••
Воспроизведение в произвольном
порядке может быть отменено, когда
выбирается папка или дорожка для
воспроизведения.
Повторное воспроизведение
(повторное
воспроизведение)
Нажмите несколько раз REPEAT.
В зависимости от типа диска или
файла, некоторые параметры
могут быть недоступны.
••
[ВЫКЛ]: Повторное
воспроизведение не
осуществляется.
••
[ВСЕ]: Повторяются все дорожки
или файлы в выбранном
режиме воспроизведения.
••
[ДИСК]: Повторяется все
содержимое (только DVD VIDEO
и VIDEO CD).
••
[ГЛАВА]: Повторяется текущее
название (только DVD VIDEO).
••
[РАЗДЕЛ]: Повторяется текущий
раздел (только DVD VIDEO).
••
[ДОРОЖКИ]: Повторяется
текущая дорожка.
••
[ФАЙЛ]: Повторяется текущий
видеофайл.
Отмена повторного
воспроизведения
Нажмите несколько раз REPEAT
для выбора [ВЫКЛ].
Примечание
••
Индикатор “ ” начинает
светиться, когда для повторного
воспроизведения выбран параметр
[ВСЕ] или [ДИСК].
••
Индикатор “ ” начинает
светиться, когда для повторного
воспроизведения выбран параметр
[ГЛАВА], [РАЗДЕЛ], [ДОРОЖКИ] или
[ФАЙЛ].
••
Нельзя осуществить повторное
воспроизведение с VIDEO CD во
время воспроизведения с контролем.
••
В зависимости от DVD VIDEO
невозможно осуществить повторное
воспроизведение.
••
Повторное воспроизведение
отменяется при:
— открытии лотка для диска.
— выключении системы (только для
DVD VIDEO и VIDEO CD).
— переключении функции (только
для DVD VIDEO и VIDEO CD).
— выполняется синхронизированная
передача.
— изменяется установка режима
MEDIA MODE.
Ограничение
воспроизведения с
диска (Родительский
контроль)
Можно ограничить
воспроизведение DVD VIDEO в
соответствии с предварительно
заданным уровнем. Эпизоды
могут быть пропущены или
заменены другими эпизодами.
1 При остановленном
воспроизведении
удерживайте нажатой SHIFT, а
затем нажмите SETUP.
2 Нажмите несколько раз /
для выбора [НАСТРОЙКА
СИСТЕМЫ], а затем нажмите
.
3 Нажмите несколько раз /
для выбора [ДОСТУП], а затем
нажмите .
Воспроизведение с диска/устройства USB
27
RU
4 Удерживая SHIFT, нажмите
номерные кнопки, чтобы
ввести или повторно указать
4-значный пароль, а затем
нажмите
.
5 Нажмите несколько раз /
для выбора [СТАНДАРТНЫЙ],
а затем нажмите
6 Нажмите несколько раз /
для выбора географического
региона в качестве уровня
ограничения
воспроизведения, а затем
нажмите
Регион выбран.
При выборе [ДРУГИЕ] введите
код региона для необходимого
географического региона в
соответствии с “Список кодов
родительского контроля/
региона” (стр. 90). Удерживая
SHIFT, нажмите номерные кнопки.
.
7 Нажмите несколько раз /
для выбора [УРОВЕНЬ], а
затем нажмите
8 Нажмите несколько раз /
для выбора необходимого
уровня, а затем нажмите
Чем ниже значение, тем строже
ограничение.
Выключение функции
родительского контроля
Установите параметр [УРОВЕНЬ] в
состояние [ВЫКЛ] в шаге 8.
Воспроизведение диска с
установленной функцией
родительского контроля
1 Вставьте диск и нажмите
На экране телевизора
отображается окно для ввода
пароля.
RU
28
2 Удерживая SHIFT, нажмите
номерные кнопки, чтобы
ввести или повторно указать
4-значный пароль, а затем
нажмите .
Система начнет воспроизведение.
.
Если вы забыли пароль
Извлеките диск и повторите шаги
1 по 3 раздела “Ограничение
воспроизведения с диска
(Родительский контроль)”
(стр.27).
Удерживая SHIFT, нажмите
номерные кнопки, чтобы ввести
пароль “199703”, а затем нажмите
.
Следуя инструкциям на экране,
введите новый 4-значный пароль.
Затем повторно вставьте диск и
нажмите .
Повторно введите новый пароль.
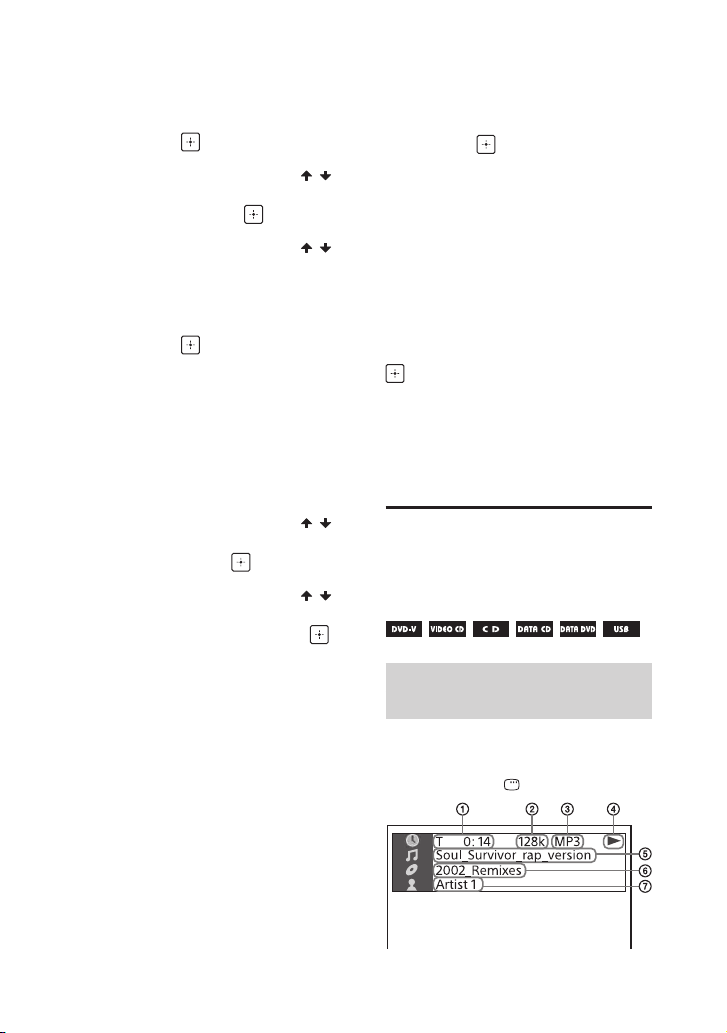
Просмотр
.
информации о диске
и устройстве USB
Информация отображается
на экране телевизора
Во время воспроизведения
удерживайте SHIFT и нажмите
несколько раз DISPLAY.
.
.
Информация о
воспроизведении
Время воспроизведения и
оставшееся время
Скорость передачи данных
Тип носителя
Статус воспроизведения
Название
файла
Название альбома1)/
название папки
1)
/дорожка/имя
2)
2)
/номер
раздела/числовой индекс
Имя исполнителя
1)2)
Отображается при
воспроизведении
аудиофайла.
1)
Если аудиофайл имеет тег ID3,
система отобразит название
альбома/заголовок/имя
исполнителя из информации,
содержащейся в теге ID3. Система
может поддерживать теги ID3 вер.
1.0/1.1/2.2/2.3.
2)
Если имя содержит символы, которые
не могут быть отображены, эти
символы будут отображаться как “_”.
Примечание
••
В зависимости от воспроизводимого
источника, некоторая информация
или символы могут не отображаться.
••
В зависимости от режима
воспроизведения, отображаемая
информация может отличаться.
Информация на дисплее
•—
Имя файла, имя папки
•—
Название, исполнитель и
информация о альбоме
Примечание
••
Название диска или название
дорожки может не отображаться в
зависимости от типа символов.
••
Время воспроизведения
аудиофайлов и видеофайлов может
отображаться неправильно.
••
Прошедшее время воспроизведения
аудиофайла, закодированного с
помощью VBR (переменный поток
данных), отображается некорректно.
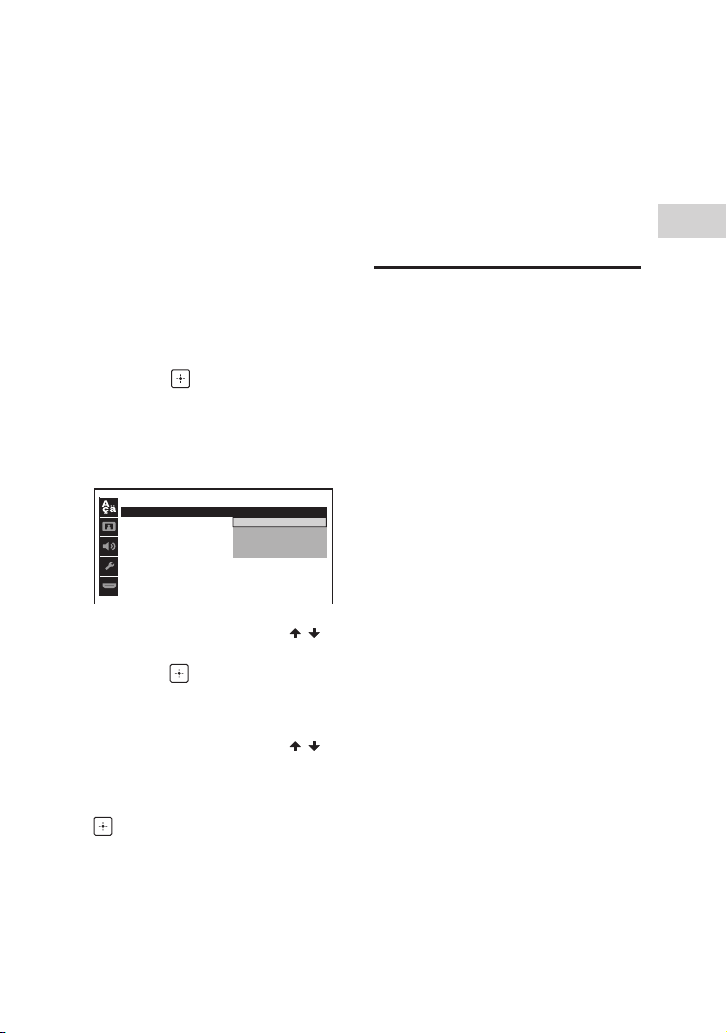
Использование меню
настройки
Отображаемые пункты могут
отличаться в зависимости от
страны или региона.
Примечание
Настройки воспроизведения,
сохраненные на диске, являются
более приоритетными по сравнению
с настройками меню настройки.
Следовательно, некоторые настройки
меню настройки могут не выполняться.
1 Если воспроизведение
остановлено в режиме DVD/
CD или USB, удерживайте
SHIFT и нажмите SETUP.
На экране телевизора
отобразится меню настройки.
Воспроизведение с диска/устройства USB
Нажмите несколько раз DISPLAY,
когда система включена.
Вы можете просмотреть
следующую информацию:
•—
Время воспроизведения/
оставшееся время
воспроизведения дорожки,
название, раздел
•—
Номер сцены
2 Нажмите несколько раз /
для выбора необходимого
пункта настройки, а затем
нажмите .
3 Нажмите несколько раз /
для выбора необходимого
элемента, а затем нажмите .
29
RU
4 Нажмите несколько раз /
для выбора нужной
настройки, а затем нажмите
.
Параметр выбран и настройка
завершена.
Настройка
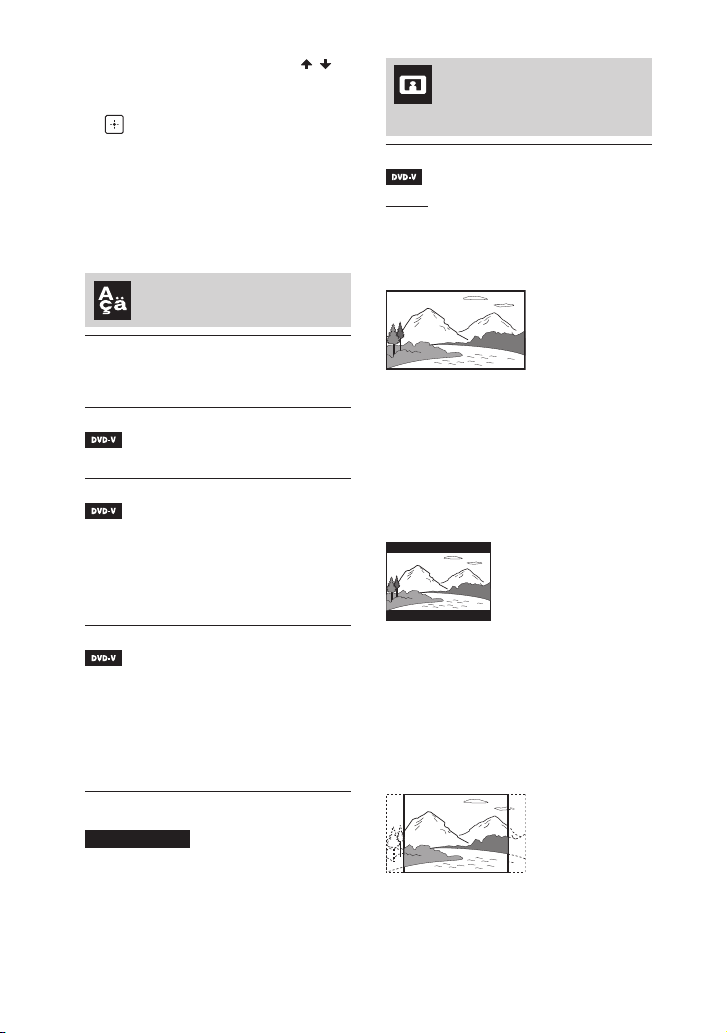
телевизионного экрана
– [НАСТРОЙКА ВИДЕО]
[ТИП ЭКРАНА]
Выход из меню
Удерживайте нажатой SHIFT, а
затем нажмите SETUP.
Настройка языка
– [НАСТРОЙКА ЯЗЫКОВ]
[ЭКРАН]
Установка языка отображения на
дисплее.
[МЕНЮ]
Установка языка для меню DVD.
[ЗВУК]
Переключение языка звуковой
дорожки.
При выборе параметра
[ОРИГИНАЛ] выбирается
приоритетный язык на диске.
[СУБТИТРЫ]
Переключение языка субтитров.
При выборе параметра
[КАК И ЗВУК] язык субтитров
изменяется в соответствии с
языком, выбранным для звуковой
дорожки.
[16:9]: Выберите этот
параметр при подключении к
широкоэкранному телевизору
или телевизору с функцией
широкоэкранного режима.
[4:3]: Выберите этот параметр при
подключении к широкоэкранному
телевизору с экраном формата 4:3
без функции широкоэкранного
режима. Отображение
широкоэкранного изображения с
черными полосами вверху и внизу
экрана.
[4:3 СКАH]: Выберите этот
параметр при подключении к
широкоэкранному телевизору с
экраном формата 4:3 без функции
широкоэкранного режима.
Отображение изображения в
полную высоту по всему экрану с
обрезанными сторонами.
Примечание
При выборе [ДРУГИЕ] в [МЕНЮ],
[ЗВУК], и [СУБТИТРЫ] введите код
языка, выбранный в “Список кодов
языков” (стр. 91), с помощью
номерных кнопок.
RU
30
Loading…

MHC—V82D/MHC—V72D
MHC-V82D/MHC-V72D.GB.5-000-538-13(1)
Home Audio System
Operating Instructions
Getting Started
Disc/USB Playback
USB Transfer
Tuner
BLUETOOTH Connection
Apps Control
Control for HDMI
Gesture Control
Sound Adjustment
Multiple Systems
Playback
Karaoke
Other Operations
Additional Information

2GB
MHC-V82D/MHC-V72D.GB.5-000-538-13(1)
WARNING
To reduce the risk of fire, do not
cover the ventilation opening of
the appliance with newspapers,
tablecloths, curtains, etc.
Do not expose the appliance to naked
flame sources (for example, lighted
candles).
To reduce the risk of fire or electric
shock, do not expose this appliance
to dripping or splashing, and do not
place objects filled with liquids, such as
vases, on the appliance.
As the main plug is used to disconnect
the unit from the mains, connect the
unit to an easily accessible AC outlet.
Should you notice an abnormality in
the unit, disconnect the main plug
from the AC outlet immediately.
Do not install the appliance in a
confined space, such as a bookcase or
built-in cabinet.
The unit is not disconnected from the
mains as long as it is connected to the
AC outlet, even if the unit itself has
been turned off.
Indoor use only.
The following information is only
applicable to equipment sold in
countries/regions comply to EMC
regulation.
This equipment has been tested
and found to comply with the limits
set out in the EMC regulation using
a connection cable shorter than
3meters.
CAUTION
Risk of explosion if the battery is
replaced by an incorrect type.
Do not expose batteries or appliances
with battery-installed to excessive
heat, such as sunshine and fire.
CAUTION
The use of optical instruments with
this product will increase eye hazard.
For customers in Europe
This appliance is classified as a CLASS1
LASER product under IEC 60825-1:2007
and IEC 60825-1:2014. This marking is
located on the rear exterior.
Disposal of waste batteries
and electrical and electronic
equipment (applicable in the
European Union and other
countries with separate
collection systems)
This symbol on the
product, the battery or on
the packaging indicates
that the product and the
battery shall not be
treated as household
waste. On certain batteries this symbol
might be used in combination with a
chemical symbol. The chemical symbol
for lead (Pb) is added if the battery
contains more than 0.004% lead. By
ensuring that these products and
batteries are disposed of correctly, you
will help to prevent potentially
negative consequences for the
environment and human health which
could be caused by inappropriate
waste handling. The recycling of the
materials will help to conserve natural
resources. In case of products that for
safety, performance or data integrity
reasons require a permanent
connection with an incorporated
battery, this battery should be replaced
by qualified service staff only. To
ensure that the battery and the
electrical and electronic equipment

3GB
MHC-V82D/MHC-V72D.GB.5-000-538-13(1)
will be treated properly, hand over
these products at end-of-life to the
appropriate collection point for the
recycling of electrical and electronic
equipment. For all other batteries,
please view the section on how to
remove the battery from the product
safely. Hand the battery over to the
appropriate collection point for the
recycling of waste batteries. For more
detailed information about recycling of
this product or battery, please contact
your local Civic Office, your household
waste disposal service or the shop
where you purchased the product or
battery.
Notice for customers: the
following information is only
applicable to equipment sold
in countries applying EU
directives
This product has been manufactured
by or on behalf of Sony Corporation.
EU Importer: Sony Europe Limited.
Inquiries to the EU Importer or related
to product compliance in Europe
should be sent to the manufacturer’s
authorized representative, Sony
Belgium, bijkantoor van Sony Europe
Limited, Da Vincilaan 7-D1, 1935
Zaventem, Belgium.
Hereby, Sony Corporation declares that
this equipment is in compliance with
Directive 2014/53/EU.
The full text of the EU declaration of
conformity is available at the following
internet address:
http://www.compliance.sony.de/
The validity of the CE marking is
restricted to only those countries
where it is legally enforced, mainly in
the countries EEA (European Economic
Area) and Switzerland.
This radio equipment is intended to
be used with the approved version(s)
of software that are indicated in
the EU Declaration of Conformity.
The software loaded on this radio
equipment is verified to comply with
the essential requirements of the
Directive 2014/53/EU.
You can check the software version
by pressing OPTIONS, then select
“SYSTEM” – “VERSION” using / and
.
This Home Audio System is designed
to be used for the following purposes:
•Playing back music/video sources
on discs or USB devices
•Transferring music to USB devices
•Listening to radio stations
•Listening to TV sound
•Streaming music from BLUETOOTH
devices
•Enjoying social gatherings with the
Wired Party Chain and Wireless
Party Chain functions
For customers in Australia and
India
Disposal of old
electrical &
electronic
equipment
(applicable in the
European Union and
other countries with
separate collection
systems)
4GB
MHC-V82D/MHC-V72D.GB.5-000-538-13(1)
For customers in the United
Arab Emirates
This appliance is classified as a CLASS1
LASER product under IEC 60825-1:2007
and IEC 60825-1:2014. This marking is
located on the rear exterior.
License and Trademark Notice
• is a trademark of DVD Format/
Logo Licensing Corporation.
•“DVD+RW”, “DVD-RW”, “DVD+R”,
“DVD-R”, “DVD VIDEO”, and the “CD”
logos are trademarks.
•WALKMAN® and WALKMAN® logo
are registered trademarks of Sony
Corporation.
•MPEG Layer—3 audio coding
technology and patents licensed
from Fraunhofer IIS and Thomson.
•Windows Media is either a
registered trademark or trademark
of Microsoft Corporation in
the United States and/or other
countries.
•This product is protected by
certain intellectual property rights
of Microsoft Corporation. Use or
distribution of such technology
outside of this product is prohibited
without a license from Microsoft or
an authorized Microsoft subsidiary.
•This system incorporates Dolby*
Digital.
* Manufactured under license from
Dolby Laboratories. Dolby, Dolby
Audio, and the double-D symbol are
trademarks of Dolby Laboratories.
•This system incorporates High-
Definition Multimedia Interface
(HDMI™) technology. The terms
HDMI and HDMI High-Definition
Multimedia Interface, and the HDMI
Logo are trademarks or registered
trademarks of HDMI Licensing
Administrator, Inc. in the United
States and other countries.
•“BRAVIA” is a trademark of Sony
Corporation.
•LDAC™ and LDAC logo are
trademarks of Sony Corporation.
•The BLUETOOTH® word mark and
logos are registered trademarks
owned by the Bluetooth SIG, Inc.
and any use of such marks by Sony
Corporation is under license. Other
trademarks and trade names are
those of their respective owners.
•The N-Mark is a trademark or
registered trademark of NFC Forum,
Inc. in the United States and in other
countries.
•Android, Google Play, and the
Google Play logo are trademarks of
Google LLC.
•Apple, the Apple logo, iPhone, iPod,
and iPod touch are trademarks of
Apple Inc., registered in the U.S.
and other countries. App Store
is a service mark of Apple Inc.,
registered in the U.S. and other
countries.
5GB
MHC-V82D/MHC-V72D.GB.5-000-538-13(1)
•Use of the Made for Apple badge
means that an accessory has been
designed to connect specifically to
the Apple product(s) identified in
the badge, and has been certified
by the developer to meet Apple
performance standards. Apple is not
responsible for the operation of this
device or its compliance with safety
and regulatory standards.
•THIS PRODUCT IS LICENSED UNDER
THE MPEG-4 VISUAL PATENT
PORTFOLIO LICENSE FOR THE
PERSONAL AND NON-COMMERCIAL
USE OF A CONSUMER FOR
(i) ENCODING VIDEO IN
COMPLIANCE WITH THE MPEG-4
VISUAL STANDARD (“MPEG-4
VIDEO”)
AND/OR
(ii) DECODING MPEG-4 VIDEO THAT
WAS ENCODED BY A CONSUMER
ENGAGED IN A PERSONAL AND
NON-COMMERCIAL ACTIVITY
AND/OR WAS OBTAINED FROM
A VIDEO PROVIDER LICENSED TO
PROVIDE MPEG-4 VIDEO.
NO LICENSE IS GRANTED OR SHALL
BE IMPLIED FOR ANY OTHER
USE. ADDITIONAL INFORMATION
INCLUDING THAT RELATING TO
PROMOTIONAL, INTERNAL AND
COMMERCIAL USES AND LICENSING
MAY BE OBTAINED FROM MPEG LA,
L.L.C.
HTTP://WWW.MPEGLA.COM
•All other trademarks are trademarks
of their respective owners.
•In this manual, ™ and ® marks are
not specified.
About this manual
••The instructions in this manual
are for models MHC-V82D and
MHC-V72D. In this manual, the
MHC-V82D is used for illustration
purpose unless stated otherwise.
••This manual mainly explains
operations using the remote
control, but the same operations
can also be performed using the
controls on the unit having the
same or similar names.
••Icons, such as , listed at the
top of each explanation indicate
the type of media that can be used
with the function being explained.
••Some illustrations are presented
as conceptual drawings, and
may be different from the actual
products.
••The items displayed on the TV
screen may vary depending on
the area.
••The default setting is underlined.
••The text enclosed in bracket ([—])
appears on the TV screen, and the
text enclosed in double quotation
mark (“—”) appears on the display.

MHC-V82D/MHC-V72D.GB.5-000-538-13(1)
6GB
Table of Contents
About this manual …………….. 5
Unpacking …………………………9
Playable discs or files on
discs/USB device ……………….9
Websites for compatible
devices ……………………………. 11
Guide to parts and
controls ……………………………12
Getting Started
Hooking up the system ………17
Inserting batteries …………….18
Carrying the unit ……………….18
Changing the color system …19
Performing the quick
setup ……………………………….19
Turning off the
demonstration ………………… 20
Disc/USB Playback
Basic playback …………………20
Other playback operations …21
Using play mode ……………… 23
Restricting playback of the
disc (Parental Control) ………. 25
Viewing information of a
disc and USB device …………. 26
Using the Setup Menu ……… 26
USB Transfer
Transferring music ……………30
Erasing audio files or folders
on the USB device ……………. 32
Tuner
Listening to the radio ……….. 33
BLUETOOTH Connection
Streaming music from a
BLUETOOTH device ………….. 34
Pairing this system with a
BLUETOOTH device ………….. 34
Listening to music on a
paired BLUETOOTH device … 36
Connecting this system with
multiple BLUETOOTH
devices (Multi-device
connection) ……………………..36
One Touch BLUETOOTH
Connection by NFC ………….. 37
Setting the BLUETOOTH
audio codecs ……………………38
Setting the BLUETOOTH
standby mode …………………. 38
Turning on or off the
BLUETOOTH signal …………… 39

MHC-V82D/MHC-V72D.GB.5-000-538-13(1)
7GB
Apps Control
Operating the system using
“Sony | Music Center” and
“Fiestable” apps ………………. 39
Achieving and sharing a
Party People ranking and
getting bonus features
(Party King) ………………………40
Using Voice Control via
“Fiestable” ………………………..41
Creating party lighting
atmosphere via “Fiestable” …41
Control for HDMI
Using the Control for HDMI
function ………………………….. 42
Gesture Control
Operating playback, DJ
Effect, sampler, and
karaoke …………………………..44
Controlling the pitch of your
voice or music source ……….45
Deactivating the controls on
the unit for a short time
(Party Lock) …………………….. 47
Sound Adjustment
Adjusting the sound ………… 47
Creating your own sound
effect ……………………………… 48
Multiple Systems
Playback
Enjoying Wired Party Chain
function …………………………..49
Enjoying Wireless Party
Chain function ………………….51
Listening to music
wirelessly with two systems
(Speaker Add function) …….. 53
Karaoke
Singing along: Karaoke ……..54
Enjoying sound from a
guitar ……………………………… 55
Other Operations
Playing the drum (Taiko) …… 56
Enjoying music with the
illumination (Party Light/
Speaker Light) …………………. 58
Using the Sleep Timer ……….58
Using the Voice Guidance …. 59
Using optional equipment … 59
Deactivating the controls on
the unit (Child Lock) ………….60
Setting the automatic
standby function………………60
Listening to built-in sound
demonstration …………………60
Updating the software ……… 60

MHC-V82D/MHC-V72D.GB.5-000-538-13(1)
8GB
Additional Information
Troubleshooting ……………….61
Precautions ………………………71
Specifications ………………….. 73
Parental Control area code
list………………………………….. 75
Language code list ………….. 76

MHC-V82D/MHC-V72D.GB.5-000-538-13(1)
9GB
Unpacking
••This unit (MHC-V82D or
MHC-V72D) (1)
••Remote control (DC 3 V) (1)
••R03 (DC 1.5 V) (size AAA) batteries
(2)
••FM lead antenna (aerial) (1)
••AC power cord (mains lead) (1)
••AC plug adaptor* (1) (supplied only
for certain areas)
* This plug adaptor is not for the use in
Chile, Paraguay and Uruguay. Use this
plug adaptor in the countries/regions
where it is necessary.
Note
When unpacking the carton, be sure that
two people handle the unit. Dropping the
unit may cause personal injury and/or
property damage.
Playable discs or files
on discs/USB device
Playable discs
••DVD VIDEO
••DVD-R/-RW in DVD VIDEO format
or video mode
••DVD+R/+RW in DVD VIDEO format
••VIDEO CD (Ver. 1.0, 1.1, and 2.0
discs)
••Super VCD
••CD-R/-RW/-ROM in VIDEO CD
format or super VCD format
••AUDIO CD
••CD-R/-RW in AUDIO CD format
••CD-R/-RW/-ROM in DATA CD1)
format that contains the MP3 files
(.mp3)2)3), MPEG4 files (.mp4/
.m4v)3)4), Xvid files (.avi) and
conforms to ISO 96605) Level 1/
Level 2 or Joliet (extended format).
••DVD-R/-RW/-ROM/+R/+RW in
DATA DVD1) format that contains
the MP3 files (.mp3)2)3), MPEG4
files (.mp4/.m4v)3)4)6), Xvid files
(.avi)6)7) and conforms to UDF
(Universal Disk Format).
Playable files on USB device
••Music:
MP3 files (.mp3)2)3), WMA files
(.wma)3)8), AAC files (.m4a/.mp4/
.3gp)3)9), WAV files (.wav)3)
••Video:
MPEG4 files (.mp4/.m4v)3)4)6), Xvid
files (.avi)6)7)
1) DATA CD/DATA DVD that is created
in Packet Write format or which has
not been correctly finalized cannot be
played back.
2) MP3 (MPEG 1 Audio Layer 3) is a
standard format defined by ISO/MPEG
for compressed audio data. MP3 files
must be in MPEG 1 Audio Layer 3 format.
The MP3 PRO audio file can be played
back as MP3 file.
3) Files with copyright protection (Digital
Rights Management) cannot be played
back by the system.
4) MPEG4 files must be recorded in MP4
file format. Supported video codec and
audio codec are as follows:
— Video codec: MPEG4 Simple Profile
(AVC is not supported.)
— Audio codec: AAC-LC (HE-AAC is not
supported.)
5) A logical format of files and folders on
CD-ROMs, defined by ISO (International
Organization for Standardization).
6) Video files which is larger than 720
(width) × 576 (height) pixels or with a
high width to length ratio cannot be
played back.
7) Xvid files that are longer than 2 hours or
the file has been combined from two or
more Xvid files may not be played back.
WMA file in WMA DRM, WMA Lossless,
or WMA PRO format cannot be played
back.

MHC-V82D/MHC-V72D.GB.5-000-538-13(1)
10GB
9) AAC file in AAC DRM and AAC Lossless
format or which is encoded at 96 kHz
cannot be played back.
Note
••The system will attempt to play back
any data with the extensions above,
even if it is not in the supported format.
Playing this data may generate a
loud noise which could damage your
speaker system.
••You cannot play back the following
discs/files:
— CPRM (Content Protection for
Recordable Media) compatible
DVD-R/-RW recorded in Copy-Once
programs
— A disc that has a non-standard shape
(e.g., heart, square, star)
— A disc that has adhesive tape, paper,
or a sticker attached to it
— Files that are encrypted or protected
by passwords.
Notes on CD-R/-RW and
DVD-R/-RW/+R/+RW
••In some cases, a CD-R/-RW and
DVD-R/-RW/+R/+RW cannot
be played back on this system
due to the recording quality or
physical condition of the disc, or
the characteristics of the recording
device and authoring software.
For more information, refer to
the operating instructions of the
recording device.
••Some playback functions may not
work with some DVD+Rs/+RWs,
even if they have been correctly
finalized. In this case, view the disc
by normal playback.
Notes on discs
••This product is designed to play
back discs that conform to the
Compact Disc (CD) standard.
••DualDisc and some music discs
encoded with copyright protection
technologies do not conform to
the CD standard. Therefore, these
discs may not be compatible with
this product.
Note on multisession disc
This system can play back
continuous sessions on a disc when
they are recorded in the same
format as the first session. However,
the playback is not guaranteed.
Note on DVD VIDEO and VIDEO
CD playback operations
Some playback operations for
a DVD VIDEO or VIDEO CD may
be intentionally restricted by
software producers. Therefore,
some playback features may not
be available. Be sure to read the
operating instructions of the DVD
VIDEO or VIDEO CD.
Notes on playable files
••Playback may take a longer time
to start when:
•—a DATA CD/DATA DVD/USB
device is recorded with a
complicated tree structure.
•—the audio files or video files in
another folder have just been
played back.
•—many folders or files on the USB
device.
••The system can play back a DATA
CD/DATA DVD or a USB device in
the following conditions:
•—Up to a depth of 8 folders
•—Up to 300 folders
•—Up to 999 files in a disc
•—Up to 2,000 files in a USB device
•—Up to 650 files in a folder

MHC-V82D/MHC-V72D.GB.5-000-538-13(1)
11GB
These numbers may vary
depending on the file or folder
configuration.
••Folders that have no audio files or
video files are skipped.
••Files transferred by a device such
as a computer may not be played
back in the order in which they
were transferred.
••The playback order may not be
applicable depending on the
software used for creating the
audio file or video file.
••Compatibility with all encoding/
writing software of the supported
formats, recording devices,
and recording media cannot be
guaranteed.
••Depending on the Xvid file, the
picture may be unclear or the
sound may skip.
Notes about USB devices
••This system is not guaranteed to
operate with all USB devices.
••Do not connect the system and
the USB device through a USB hub.
••With some connected USB
devices, there may be a delay
before an operation is performed
by this system.
••The playback order for the system
may differ from the playback order
of the connected USB device.
••Before using a USB device, make
sure that no virus-ridden files are
on the USB device.
Websites for
compatible devices
Check the websites below for the
latest information about compatible
USB and BLUETOOTH devices.
For customers in Americas:
<https://www.sony.com/am/
support>
For customers in Europe:
<https://www.sony.eu/support>
For customers in other countries/
regions:
<https://www.sony-asia.com/
support>
Compatible iPhone/iPod models
The system is compatible with iOS
10.0 or later.
The compatible iPhone/iPod models
are as follows. Update your iPhone/
iPod with the latest software before
using with the system.
••iPhone X
••iPhone 8 Plus
••iPhone 8
••iPhone 7 Plus
••iPhone 7
••iPhone SE
••iPhone 6s Plus
••iPhone 6s
••iPhone 6 Plus
••iPhone 6
••iPhone 5s
••iPod touch (6th generation)

MHC-V82D/MHC-V72D.GB.5-000-538-13(1)
12GB
Guide to parts and controls
Unit
Top
Front Rear
MHC-V82D/MHC-V72D.GB.5-000-538-13(1)
13GB
(power)
Press to turn on the system, or
set it to standby mode.
(play) (page 20, 21,
36, 60)
• (stop) (page 21, 23,
31, 33, 60)
FUNCTION (page 17, 20,
33, 35, 36, 59)
BLUETOOTH indicator
(page34)
BLUETOOTH (page 36,
51, 53)
PAIRING (page 35)
FIESTA (page47)
GESTURE ON/OFF
(page44, 46)
MEGA BASS indicator
(page47)
MEGA BASS (page 47)
WIRELESS PARTY CHAIN
(page51, 52)
PARTY LIGHT (page58)
PARTY CHAIN (page50)
Display
GESTURE CONTROL sensor
(page 44, 45, 56)
USB/MIC cover (page 31,
54, 55)
(USB) (REC/PLAY) port
(page20, 31)
MIC1 jack (page54)
MIC2/GUITAR jack
(page54, 55)
VOICE CHANGER (page55)
GUITAR indicator (page54,
56)
GUITAR (page 54, 56)
VOCAL FADER (page55)
MIC/GUITAR LEVEL +/–
(page54, 55)
MIC ECHO (page54)
(N-Mark) (page 37)
(folder) +/– (page21)
SOUND FIELD (page47)
VOLUME +/–
Adjust the volume.
PLAYBACK (page 44)
DJ (page 44)
SAMPLER (page 44)
KARAOKE (page 44)
(open/close) (page20)

MHC-V82D/MHC-V72D.GB.5-000-538-13(1)
14GB
/ (previous/next)
(page21)
TUNING +/– (page 33)
TAIKO (page 56, 57)
Party Light (page 58)
Do not look directly at the
light-emitting part when the
illumination is turned on.
Disc tray
Remote control sensor
(page18)
Tweeter L/R Rear
Generates 360° Live Sound
with a different sound pressure
compared to the front speaker
units.
FM ANTENNA terminal
(page17)
AUDIO/PARTY CHAIN IN (TV)
L/R jacks (page17, 49,
59)
AUDIO/PARTY CHAIN OUT L/R
jacks (page17, 49)
HDMI OUT (TV) ARC connector
(page17)
AC IN jack (page17)
Remote control
(power)
Press to turn on the system, or
set it to standby mode.
PLAY MODE (page 23,
31)
REPEAT/FM MODE
(page24, 33)
Numeric (0 – 9) buttons1)2)
(page21, 22, 23,
25, 27, 34)
MEGA BASS (page47)

MHC-V82D/MHC-V72D.GB.5-000-538-13(1)
15GB
REC TO USB (page31)
MEDIA MODE (page20)
SUBTITLE (page22)
AUDIO2) (page22)
ANGLE (page22)
SCORE (page55)
VOICE CHANGER (page55)
MIC LEVEL+/– (page54,
55)
VOCAL FADER (page55)
MIC ECHO (page54)
(folder) +/– (page21)
KEY CONTROL /
(page55)
DVD TOP MENU (page21)
DVD/TUNER MENU
(page21, 34)
CLEAR1) (page22)
RETURN (page21)
SETUP1) (page26)
OPTIONS (page30, 32,
38, 45, 48, 50,
59, 60)
/ / /
Select the menu items.
(enter)
Enter/confirm the settings.
SEARCH (page 21, 22)
(volume) +/–2)
Adjust the volume.
/ (fast reverse/fast
forward) (page21)
/ (slow back/slow
forward) (page21)
TUNING+/– (page33)
(play)2) (page20, 21)
/ (previous/next)
(page21)
PRESET+/– (page34)
(pause) (page21)
(stop) (page21, 23,
31, 33)
SHIFT
Hold down to activate the
buttons printed in pink.
SOUND FIELD +/– (page47)
FUNCTION (page17, 20,
33, 59)
PARTY LIGHT (page20,
58)
LIGHT MODE (page58)
DISPLAY (page20, 26,
33, 35)
DISPLAY1) (page26)
SLEEP (page 58)
1) This button is printed in pink. To use this
button, hold down SHIFT () button
and press this button.

MHC-V82D/MHC-V72D.GB.5-000-538-13(1)
16GB
2) The numeric button 5/AUDIO, +
and buttons have a tactile dot. Use
the tactile dot as a reference when
operating the system.

Getting Started
MHC-V82D/MHC-V72D.GB.5-000-538-13(1)
17GB
Getting Started
Hooking up the system
Be sure to make cable connections before connecting the AC power cord
(mains lead).
High Speed HDMI Cable
with Ethernet (not supplied)
Audio cable
(not supplied)
AC power cord (mains lead)4)
(supplied)
TV
To wall outlet
or
FM lead antenna (aerial)3)
(supplied)
1)
Select the connection methods according to the jacks/connector on your TV.
Available input jacks/connector on your TV
HDMI connector
with “ARC”1)
HDMI connector
without “ARC”
Without HDMI
connector
To watch video –
To listen to TV sound2)
1) The Audio Return Channel (ARC) function enables the TV to output sound through the
system with just an HDMI cable connection. To set the ARC function on this system, see
[AUDIO RETURN CHANNEL] (page30). To check the compatibility of your TV’s ARC
function, refer to the operating instructions supplied with your TV.
2) To listen to TV sound, press FUNCTION repeatedly to select “TV”.
3) Extend the antenna (aerial) horizontally. Keep the antenna (aerial) away from the AC
power cord (mains lead) and the USB cable to avoid picking up noise.
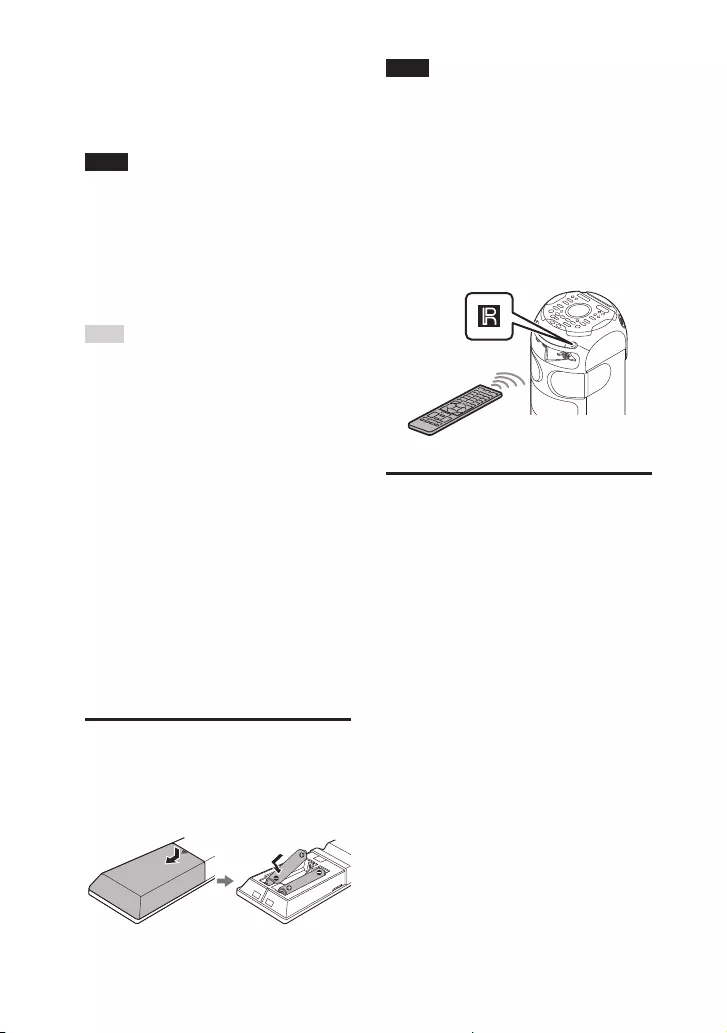
MHC-V82D/MHC-V72D.GB.5-000-538-13(1)
18GB
4) Connect the AC power cord (mains
lead) last. The demonstration starts
automatically. If you press (power) to
turn on the system, the demonstration
ends.
Note
••Do not connect this system to the TV
through the video deck.
••When the audio signals input to the
HDMI OUT (TV) ARC connector of the
system are other than 2-channel Linear
PCM signals, the messages “CODE 01”
and “SGNL ERR” appear on the display
of the unit (page66).
Hint
••You can also enjoy the sound of audio/
video equipment via the system
(page59).
••You can also connect the audio input
jacks of an optional equipment (VCR,
etc.) to the AUDIO/PARTY CHAIN
OUT L/R jacks. For details, refer to
the operating instructions of your
equipment.
••You can enjoy the Wired Party Chain
function by connecting another audio
system to this system (page 49).
••If the audio output level from the
system is low when connecting the
optional equipment, try adjusting
the audio output settings on the
connected equipment. It may improve
the audio output level. For details, refer
to the operating instructions of your
equipment.
Inserting batteries
Insert the two supplied R03 (size
AAA) batteries, matching the
polarities shown below.
Note
••Do not mix an old battery with a new
one or mix different types of batteries.
••If you do not use the remote control
for a long period of time, remove the
batteries to avoid damage from battery
leakage and corrosion.
To operate the system using the
remote control
Point the remote control at the unit’s
remote control sensor.
Carrying the unit
The unit has caster wheels so that
you can roll it easily.
The caster wheels can be used only
on flat surfaces. Lift the unit by two
people on uneven surfaces using
the handles on the unit. Correct
hand placement while carrying
the unit is very important to avoid
personal injury and/or property
damage.
Before carrying the unit, disconnect
all the cables.
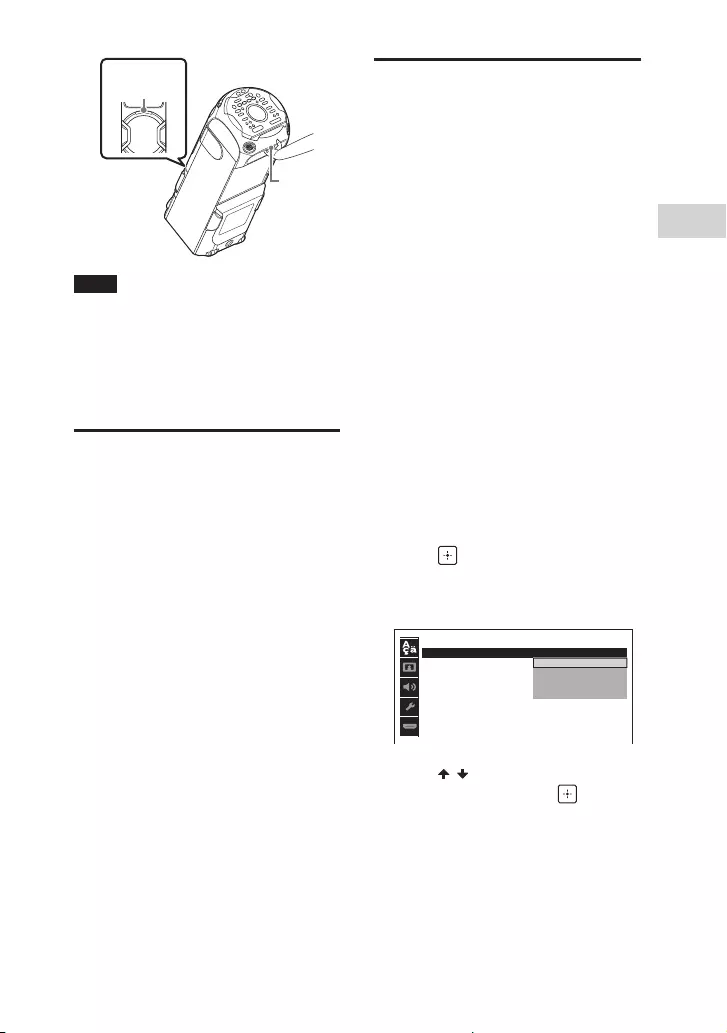
Getting Started
MHC-V82D/MHC-V72D.GB.5-000-538-13(1)
19GB
Handle
(front)
Handle
(rear)
Note
••Exercise extreme caution when carrying
the unit on a slope.
••Do not carry the unit with a person,
luggage, etc. on it.
••Do not let children or infants be near
when carrying the unit.
Changing the color
system
(Except for Latin American,
European, and Russian models)
Set the color system depending on
the color system of your TV.
Each time you perform the
procedure below, the color system
changes as follows:
NTSC PAL
Use the controls on the unit to
perform this operation.
1 Press to turn on the system.
2 Touch FUNCTION repeatedly to
select “DVD/CD”.
3 Touch and hold MIC ECHO and
MEGA BASS for more than
3seconds.
“NTSC” or “PAL” appears on the
display.
Performing the quick
setup
Before using the system, you
can make the minimum basic
adjustments in the quick setup.
1 Turn on your TV and select the
input according to the
connection.
2 Press to turn on the system.
3 Press FUNCTION repeatedly to
select “DVD/CD”.
The guide message [Press ENTER to
run QUICK SETUP.] appears at the
bottom of the TV screen.
The guide message appears when
you turn on the system for the first
time or after performing [RESET]
(see “Returning the setup menu
settings to the default” on
page69).
4 Press without loading a disc.
[LANGUAGE SETUP] appears on the
TV screen. Displayed items may vary
depending on country or region.
LANGUAGE SETUP
OSD
:
MENU
:
AUDIO
:
SUBTITLE
:
ENGLISH
ENGLISH
1CHINESE
CHINESE 2
THAI
5 Press / repeatedly to select a
language, then press .
[VIDEO SETUP] appears on the TV
screen.

MHC-V82D/MHC-V72D.GB.5-000-538-13(1)
20GB
6 Press / repeatedly to select
the setting that matches your
TV type, then press .
After [QUICK SETUP is complete.]
appears on the TV screen, the
system is ready for playback.
To change the setting manually
See “Using the Setup Menu”
(page26).
To quit the quick setup
Hold down SHIFT and press SETUP.
Turning off the
demonstration
While the system is turned off,
press DISPLAY repeatedly until the
demonstration is turned off
(Power Saving Mode).
The display and the illumination are
turned off to conserve power.
To turn on the demonstration, press
DISPLAY again.
To turn off the illumination during
demonstration, press PARTY LIGHT.
Disc/USB Playback
Basic playback
For compatible USB devices, see
“Websites for compatible devices”
(page11).
(You can use your iPhone/iPod
with this system via BLUETOOTH
connection only.)
1 Press FUNCTION repeatedly to
select “DVD/CD” or “USB”.
2 Prepare the playback source.
For DVD/CD function:
Touch on the unit to open the
disc tray and load a disc with the
label facing up on the disc tray.
Touch on the unit again to close
the disc tray.
Do not forcibly push the disc tray to
close it as this may cause a
malfunction.
For USB function:
Push to open the USB/MIC cover,
then connect a USB device to the
(USB) port on the unit.
Note
You can use a USB adaptor (not
supplied) to connect the USB device
to the unit if the USB device cannot be
plugged into the (USB) port.
3 ( only)
Press MEDIA MODE repeatedly
to select [MUSIC] or [VIDEO].
4 Press to start playback.

Disc/USB Playback
MHC-V82D/MHC-V72D.GB.5-000-538-13(1)
21GB
Other operations
Depending on the disc or file, the
function may not work.
To Do this
Stop playback Press .
Pause
playback
Press .
Resume
playback or
return to
normal
playback
Press .
Cancel the
resume point
Press twice.
Select a track,
file, chapter, or
scene
Press or
during playback.
Or, hold down SHIFT
and press the numeric
buttons, then press
.
Select a folder Press +/–
repeatedly.
Display the
DVD title
Press DVD TOP MENU.
View DVD
menu
Press DVD/TUNER
MENU.
Locate a point
quickly in fast
forward or fast
reverse (Lock
Search)
Press or
during playback.
Each time you press
or , the
playback speed
changes.
Watch frame
by frame
(Slow-motion
Play)
Press , then press
or .
Each time you press
or , the playback
speed changes.
To play from a specific file
1 Press MEDIA MODE repeatedly to
select [MUSIC] or [VIDEO].
2 Press SEARCH to display the
folder list on the TV screen.
3 Press / repeatedly to select
the folder you want.
4 Press to display the file list on
the TV screen.
To return to folder list, press
RETURN.
5 Press / repeatedly to select
the file you want, then press .
Other playback
operations
Depending on the disc or file, the
function may not work.
Searching a specific track
Hold down SHIFT and press the
numeric buttons to select the track
you want, then press .
Searching a specific title/
chapter/scene/track/index
1 Press SEARCH repeatedly during
playback to select the search
mode.

MHC-V82D/MHC-V72D.GB.5-000-538-13(1)
22GB
2 Hold down SHIFT and press the
numeric buttons to enter the
title, chapter, scene, track, or
index number you want, then
press .
Playback starts.
Note
••For VIDEO CD with PBC playback, press
SEARCH to search the scene.
••For VIDEO CD without PBC playback,
press SEARCH to search the track and
index.
To search for a particular point
using the time code
1 Press SEARCH repeatedly during
playback to select the time
search mode.
2 Hold down SHIFT and press the
numeric buttons to enter the
time code, then press .
Example: To find a scene at 2 hours,
10 minutes, and 20 seconds, hold
down SHIFT and press 2, 1, 0, 2, 0
([2:10:20]).
If you make a mistake, hold down
SHIFT and press CLEAR to cancel the
number.
To search using the DVD menu
1 Press DVD/TUNER MENU.
2 Press / / / , or hold down
SHIFT and press the numeric
buttons, to select the title or item
you want, then press .
Changing the camera angles
Press ANGLE repeatedly during
playback to select the camera
angle you want.
Selecting the subtitle setting
Press SUBTITLE repeatedly during
playback to select the subtitle
language you want or turn off the
subtitle.
Changing the language/sound
Press AUDIO repeatedly during
playback to select the audio
format or mode you want.
DVD VIDEO
You can select audio format
or language when the source
contains multiple audio formats or
multilingual audio.
When 4 digits are displayed, they
indicate a language code. See
“Language code list” (page76)
to confirm which language the
code represents. When the same
language is displayed two or more
times, the DVD VIDEO is recorded in
multiple audio formats.
VIDEO CD/AUDIO CD/audio file
You can change the sound output.
••[STEREO]: The stereo sound.
••[1/L]/[2/R]: The monaural sound
of the left or right channel.
Disc/USB Playback
MHC-V82D/MHC-V72D.GB.5-000-538-13(1)
23GB
SUPER VIDEO CD
••[1:STEREO]: The stereo sound of
audio track 1.
••[1:1/L]/[1:2/R]: The monaural
sound of the left or right channel
of audio track 1.
••[2:STEREO]: The stereo sound of
audio track 2.
••[2:1/L]/[2:2/R]: The monaural
sound of the left or right channel
of audio track 2.
Playing a VIDEO CD with PBC
functions
You can use the PBC (Playback
Control) menu to enjoy the
interactive features of VIDEO CD
(VIDEO CD Version 2.0 and Super
VCD).
1 Press to play a VIDEO CD
with PBC functions.
The PBC menu appears on the TV
screen.
2 Hold down SHIFT and press the
numeric buttons to select the
item number you want, then
press .
3 Continue playback according to
the instructions on the menu.
Note
PBC playback is canceled when Repeat
Play is activated.
To cancel PBC playback
1 Press or , or hold down
SHIFT and press the numeric
buttons, to select a track when
playback is stopped.
2 Press or .
Playback starts from the selected
track.
To return to PBC playback
Press twice, then press .
Multi-disc resume play
This system can store playback
resume points for up to 6 discs and
resumes playback when you insert
the same disc again. If you store a
playback resume point for the 7th
disc, the resume point for the first
disc will be deleted.
To activate this function, set [MULTI-
DISC RESUME] in [SYSTEM SETUP] to
[ON] (page29).
Note
To play back from the beginning of the
disc, press twice, then press .
Using play mode
Playing in sequential order or
random order (Normal Play/
Shuffle Play)
When playback is stopped, press
PLAY MODE repeatedly.
When playing a disc
••[DISC]: Plays the disc.
••[FOLDER]*: Plays all playable files
in the specified folder on the disc.
••[DISC (SHUFFLE)]: Shuffles all
audio files on the disc.
MHC-V82D/MHC-V72D.GB.5-000-538-13(1)
24GB
••[FOLDER (SHUFFLE)]*: Shuffles all
audio files in the specified folder
on the disc.
* Cannot be selected for AUDIO CD.
When playing a USB device
••[ONE USB DEVICE]: Plays the USB
device.
••[FOLDER]: Plays all playable files
in the specified folder on the USB
device.
••[ONE USB DEVICE (SHUFFLE)]:
Shuffles all audio files on the USB
device.
••[FOLDER (SHUFFLE)]: Shuffles all
audio files in the specified folder
on the USB device.
Note
••“FLDR” and “SHUF” light off on the
display when Normal Play is set to
[DISC] or [ONE USB DEVICE].
••“FLDR” lights up on the display when
Normal Play is set to [FOLDER].
••“SHUF” lights up on the display when
Shuffle Play is set to [DISC (SHUFFLE)] or
[ONE USB DEVICE (SHUFFLE)].
••“FLDR” and “SHUF” lights up on the
display when Shuffle Play is set to
[FOLDER (SHUFFLE)].
••Shuffle Play cannot be performed for
video files.
••Shuffle Play is canceled when you:
— open the disc tray.
— perform Synchronized Transfer.
— change the MEDIA MODE setting.
••Shuffle Play may be canceled when you
select a folder or a track to play back.
Playing repeatedly (Repeat
Play)
Press REPEAT repeatedly.
Depending on the disc or file, some
settings may not be available.
••[OFF]: Does not play back
repeatedly.
••[ALL]: Repeats all tracks or files in
the selected play mode.
••[DISC]: Repeats all contents (DVD
VIDEO and VIDEO CD only).
••[TITLE]: Repeats the current title
(DVD VIDEO only).
••[CHAPTER]: Repeats the current
chapter (DVD VIDEO only).
••[TRACK]: Repeats the current track.
••[FILE]: Repeats the current video
file.
To cancel Repeat Play
Press REPEAT repeatedly to select
[OFF].
Note
••“” lights up on the display when
Repeat Play is set to [ALL] or [DISC].
••“” lights up on the display when
Repeat Play is set to [TITLE], [CHAPTER],
[TRACK] or [FILE].
••You cannot perform Repeat Play with
VIDEO CD during PBC playback.
••Depending on the DVD VIDEO, you
cannot perform Repeat Play.
••Repeat Play is canceled when you:
— open the disc tray.
— turn off the system (DVD VIDEO and
VIDEO CD only).
— change the function (DVD VIDEO and
VIDEO CD only).
— perform Synchronized Transfer.
— change the MEDIA MODE setting.
Disc/USB Playback
MHC-V82D/MHC-V72D.GB.5-000-538-13(1)
25GB
Restricting playback of
the disc (Parental
Control)
You can restrict playback of
DVD VIDEOs according to a
predetermined level. Scenes may be
skipped or replaced with different
scenes.
1 When playback is stopped, hold
down SHIFT and press SETUP.
2 Press / repeatedly to select
[SYSTEM SETUP], then press .
3 Press / repeatedly to select
[PARENTAL CONTROL], then
press .
4 Hold down SHIFT and press the
numeric buttons to enter or
re-enter your 4-digit password,
then press .
5 Press / repeatedly to select
[STANDARD], then press .
6 Press / repeatedly to select a
geographic area as the playback
limitation level, then press .
The area is selected.
When you select [OTHERS], enter
the area code for the geographic
area you want according to the
“Parental Control area code list”
(page75) by holding down SHIFT
and press the numeric buttons.
7 Press / repeatedly to select
[LEVEL], then press .
8 Press / repeatedly to select
the level you want, then press
.
The lower the value, the stricter the
limitation.
To turn off the parental control
function
Set [LEVEL] to [OFF] in step 8.
To play back a disc for which the
parental control is set
1 Load the disc and press .
The display for entering your
password appears on the TV screen.
2 Hold down SHIFT and press the
numeric buttons to enter or
re-enter your 4-digit password,
then press .
The system starts playback.
If you forget your password
Remove the disc and repeat steps 1
to 3 of “Restricting playback of the
disc (Parental Control)” (page25).
Hold down SHIFT and press
the numeric buttons to enter a
password “199703”, then press .
Follow the on-screen instructions
and enter a new 4-digit password.
Then, reload the disc and press .
You need to enter your new
password again.

MHC-V82D/MHC-V72D.GB.5-000-538-13(1)
26GB
Viewing information of
a disc and USB device
Information on the TV screen
Hold down SHIFT and press
DISPLAY repeatedly during
playback.
Playback information
Playing time and remaining time
Bit rate
Media type
Playback status
Title1)/track/file name2)
Album name1)/folder name2)/
chapter number/index
number
Artist name1)2)
Appears when playing an audio
file.
1) If an audio file has an ID3 tag, the
system will display an album name/
title name/artist name from the ID3 tag
information. The system can support
ID3 ver 1.0/1.1/2.2/2.3.
2) If the name contains characters which
cannot be displayed, those characters
will be displayed as “_”.
Note
••Depending on the source being played,
some information or characters cannot
be displayed.
••Depending on the play mode, the
information displayed may be different.
Information on the display
Press DISPLAY repeatedly when
the system is turned on.
You can view the information as
follows:
•—Playing time/remaining time of
track, title, chapter
•—Scene number
•—File name, folder name
•—Title, artist and album information
Note
••The disc name or track name may
not be displayed depending on the
characters.
••Playing time of audio files and video
files may not be displayed correctly.
••The elapsed playing time for an audio
file encoded using a VBR (variable bit
rate) is not displayed correctly.
Using the Setup Menu
Displayed items vary depending on
the country or region.
Note
Playback settings stored in the disc take
priority over the setup menu settings.
Therefore, some of the setup menu
settings may not be performed.
1 When playback is stopped in
DVD/CD or USB function, hold
down SHIFT and press SETUP.
The setup menu appears on the TV
screen.

Disc/USB Playback
MHC-V82D/MHC-V72D.GB.5-000-538-13(1)
27GB
2 Press / repeatedly to select
the setup item you want, then
press .
3 Press / repeatedly to select
the item you want, then press
.
4 Press / repeatedly to select
the setting you want, then press
.
The setting is selected and setup is
completed.
To exit the menu
Hold down SHIFT and press SETUP.
Setting the language
– [LANGUAGE SETUP]
[OSD]
Sets the language of the on-screen
display.
[MENU]
Sets the language for the DVD
menu.
[AUDIO]
Switches the language of the sound
track.
When you select [ORIGINAL], the
language given priority in the disc is
selected.
[SUBTITLE]
Switches the language of the
subtitle.
When you select [AUDIO FOLLOW],
the language for the subtitles
changes according to the language
you selected for the sound track.
Note
If you select [OTHERS] in [MENU],
[AUDIO], and [SUBTITLE], enter a
language code from the “Language
code list” (page76) using the numeric
buttons.
Setting the TV screen
– [VIDEO SETUP]
[TV TYPE]
[16:9]: Selects this when you
connect a wide-screen TV or a TV
with a wide-mode function.
[4:3 LETTER BOX]: Selects this
when you connect a 4:3 screen TV
that does not have a wide-mode
function. Displays a wide picture
with black bands on the top and
bottom.
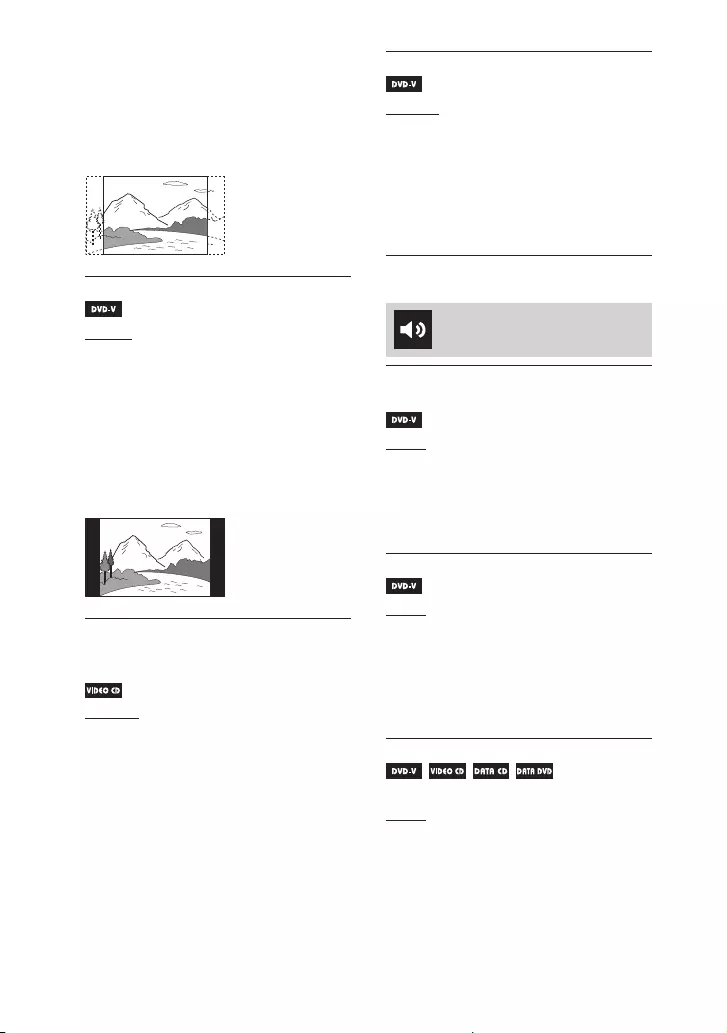
MHC-V82D/MHC-V72D.GB.5-000-538-13(1)
28GB
[4:3 PAN SCAN]: Selects this
when you connect a 4:3 screen TV
that does not have a wide-mode
function. Displays a full-height
picture on the entire screen, with
trimmed sides.
[4:3 OUTPUT]
[FULL]: Selects this when you
connect a TV with a wide-mode
function. Displays a 4:3 screen
picture in 16:9 aspect ratio even on a
wide-screen TV.
[NORMAL]: Changes the picture size
to fit the screen size with the original
picture aspect ratio. Displays black
bands on the left and right side if
you display a 4:3 screen picture.
[COLOR SYSTEM(VIDEO CD)]
(Except for Latin American,
European, and Russian models)
[AUTO]: Outputs the video signal
according to the color system of the
disc. Select this setting if your TV
uses a DUAL system.
[PAL]: Outputs the video signal in
PAL system.
[NTSC]: Outputs the video signal in
NTSC system.
For details, see “Changing the color
system” (page19).
[PAUSE MODE]
[AUTO]: The picture, including
subjects that move dynamically, is
output with no jitter. Normally select
this setting.
[FRAME]: The picture, including
subjects that do not move
dynamically, is output in high
resolution.
Setting the audio options
– [AUDIO SETUP]
[AUDIO DRC]
(Dynamic Range Compression)
[OFF]: Off.
[STANDARD]: Selects this when
watching movies at low volume
late at night. The dynamic range
is compressed as intended by the
recording engineer.
[TRACK SELECTION]
[OFF]: No priority given.
[AUTO]: Gives priority to the sound
track which contains the highest
number of channels when you play
back a DVD VIDEO on which multiple
audio formats (PCM, MPEG audio, or
Dolby Digital) are recorded.
[A/V SYNC]
(Video files only)
[OFF]: Does not adjust.
[ON]: Adjusts the delay between
picture and sound when the sound
does not synchronize with the
displayed picture.

Disc/USB Playback
MHC-V82D/MHC-V72D.GB.5-000-538-13(1)
29GB
[DOWNMIX]
[NORMAL]: Outputs multi-channel
audio into a 2-channel stereo signal.
[DOLBY SURROUND]: Outputs
multi-channel audio into a
2-channel surround signal.
Setting the system
– [SYSTEM SETUP]
[SCREEN SAVER]
[ON]: The screen saver image
appears if you do not operate the
system for about 15 minutes. Press
+/– to exit the screen saver.
[OFF]: Off.
[BACKGROUND]
[JACKET PICTURE]: The jacket
picture (still picture) recorded on the
disc appears in the background.
[GRAPHICS]: A preset picture
stored in the system appears in the
background.
[BLUE]: The background color is
blue.
[BLACK]: The background color is
black.
[PARENTAL CONTROL]
Sets the playback restrictions. For
details, see “Restricting playback
of the disc (Parental Control)”
(page25).
[MULTI-DISC RESUME]
[ON]: Stores the resume playback
point in the memory for up to
6discs.
[OFF]: Playback starts at the resume
playback point only for the current
disc in the system.
[RESET]
Returns the setup menu settings to
the default settings. For details, see
“Returning the setup menu settings
to the default” (page69).
Setting the HDMI options
– [HDMI SETUP]
[HDMI RESOLUTION]
Selects the TV output resolution
when the TV is connected via HDMI
cable.
[AUTO(1920×1080p)]: Outputs
video signals according to the
resolution of the TV.
[1920×1080i]/[1280×720p]/
[720×480p]1)/[720×480/576p]2):
Outputs video signals according to
the selected resolution setting.
1) For Latin American models only.
2) For other models.
[YCBCR/RGB(HDMI)]
[YCBCR]: Outputs YCBCR video
signals.
[RGB]: Outputs RGB video signals.
[AUDIO(HDMI)]
[AUTO]: Outputs audio signals in
original format from HDMI OUT (TV)
ARC connector.
[PCM]: Outputs 2-channel Linear
PCM signals from HDMI OUT (TV)
ARC connector.
[CONTROL FOR HDMI]
[ON]: The Control for HDMI function
is enabled. You can operate
mutually between system and TV
connected with an HDMI cable.
[OFF]: Off.
MHC-V82D/MHC-V72D.GB.5-000-538-13(1)
30GB
[AUDIO RETURN CHANNEL]
Set this function when the system
is connected to a TV’s HDMI IN
connector that is compatible
with Audio Return Channel. This
function is available when you set
[CONTROL FOR HDMI] to [ON].
[ON]: You can listen to TV sound
from the speakers of the system.
[OFF]: Off.
[STANDBY LINKED TO TV]
This function is available when you
set [CONTROL FOR HDMI] to [ON].
[AUTO]: When you turn off the TV,
the system turns off automatically in
the following conditions:
•—While playing video in DVD/CD or
USB function.
•—When the audio playback is
stopped in DVD/CD or USB
function.
•—When TV function is selected.
[ON]: The system turns off
automatically when you turn off the
TV regardless of the function.
[OFF]: The system does not turn off
when you turn off the TV.
USB Transfer
Transferring music
You can transfer music from a disc
(AUDIO CD or MP3 disc only) to a
USB device connected to the (USB)
port.
The audio format of files transferred
by this system is MP3.
For compatible USB devices, see
“Websites for compatible devices”
(page11).
(You can use your iPhone/iPod
with this system via BLUETOOTH
connection only.)
Note
••Do not remove the USB device during
transfer operation. Doing so may
corrupt the data on the USB device or
damage the USB device itself.
••MP3 files are transferred with the same
bit rate as the original files.
••When transferring from AUDIO CD,
you may select the bit rate before
transferring.
••USB transfer operation is prohibited
when the disc tray is opened.
Note on copyright-protected content
The transferred music is limited to private
use only. Use of the music beyond this
limit requires permission of the copyright
holders.
To select the bit rate
You can select a higher bit rate to
transfer music with better quality.
1 Press OPTIONS.
2 Press / repeatedly to select
“BIT RATE”, then press .
USB Transfer
MHC-V82D/MHC-V72D.GB.5-000-538-13(1)
31GB
3 Press / repeatedly to select
the bit rate you want, then press
.
••“128 KBPS”: Encoded MP3 files
have smaller file size and lower
audio quality.
••“256 KBPS”: Encoded MP3 files
have bigger file size but higher
audio quality.
To exit the options menu, press
OPTIONS.
Transferring music from a disc
••Synchronized Transfer: Transfer all
tracks or MP3 files from a disc to
USB device.
••REC1 Transfer: Transfer a single
track or MP3 file during playback.
1 Push to open the USB/MIC
cover, then connect a
transferable USB device to the
(USB) port on the unit.
Note
You can use a USB adaptor (not
supplied) to connect the USB device
to the unit if the USB device cannot be
plugged into the (USB) port.
2 Press FUNCTION repeatedly to
select “DVD/CD”, then load a
disc.
3 Prepare the sound source.
Synchronized Transfer:
If the system starts playback
automatically, press twice to stop
the playback fully.
When playback is stopped, press
PLAY MODE repeatedly to select the
play mode you want.
Note
If you start transferring in Shuffle Play
or Repeat Play, the selected play mode
changes to Normal Play automatically.
REC1 Transfer:
Select the track or MP3 file you want
to transfer, then start playback.
4 Press REC TO USB.
“PUSH ENTER” appears on the
display.
5 Press .
The transfer starts, then “DO NOT
REMOVE” appears on the display.
Do not remove the USB device until
the transfer is complete.
When the transfer is complete, the
system performs as follows:
Synchronized Transfer:
The disc stops automatically.
REC1 Transfer:
The disc continues to play the next
track or file.
To stop transfer
Press .
Notes on transfer
••You cannot transfer MP3 files on a UDF
(Universal Disk Format) formatted disc
to the USB device.
••While transferring, no sound is output.
••CD-TEXT information is not transferred
to the created MP3 files.
••The transfer stops automatically if:
— the USB device runs out of space
during transfer.
— the number of audio files or folders
on the USB device reaches the limit
that the system can recognize.
••If a folder or file that you are trying
to transfer already exists on the
USB device with the same name, a
sequential number is added after the
name without overwriting the original
folder or file.

MHC-V82D/MHC-V72D.GB.5-000-538-13(1)
32GB
••You cannot perform the following
operations during transfer:
— Eject the disc.
— Select another track or file.
— Pause playback or find a point in the
track or file.
— Change the function.
••When transferring music to a
WALKMAN® using “Media Manager for
WALKMAN”, be sure to transfer in MP3
format.
••When connecting a WALKMAN® to the
system, be sure to connect after the
display “Creating Library” or “Creating
Database” on the WALKMAN® has
disappeared.
Folder and file generation
rules
Maximum number of MP3 files
that can be generated
••298 folders
••650 files in a folder
••650 files in REC1-CD or REC1-MP3
folder.
These numbers may vary depending
on the file or folder configuration.
When transferring to a USB device,
a “MUSIC” folder is created directly
below “ROOT”. Folders and files are
generated within this “MUSIC” folder
according to the transfer method
and source as follows:
Synchronized Transfer
When transferring all tracks
from an AUDIO CD
Folder name: “CDDA0001”*
File name: “TRACK001”*
When transferring MP3 files
from a disc
Folder name: Same as the source
File name: Same as the source
REC1 Transfer
When transferring a track from
an AUDIO CD
Folder name: “REC1-CD”
File name: “TRACK001”*
When transferring an MP3 file
from a disc
Folder name: “REC1-MP3”
File name: Same as the source
* Folder and file numbers are assigned
serially thereafter.
Erasing audio files or
folders on the USB
device
1 Press FUNCTION repeatedly to
select “USB”.
2 Press MEDIA MODE repeatedly
to select [MUSIC].
3 When playback is stopped,
press OPTIONS.
4 Press / repeatedly to select
“ERASE”, then press .
The folder list is displayed on the TV
screen.
5 Press / repeatedly to select a
folder, then press .
The file list is displayed on the TV
screen.

Tuner
MHC-V82D/MHC-V72D.GB.5-000-538-13(1)
33GB
6 Press / repeatedly to select
an audio file you want to erase,
then press .
If you want to erase all the audio
files in the folder, select [ALL
TRACKS] on the list.
“FOLDER ERASE” or “TRACK ERASE”
and “PUSH ENTER” appear on the
display.
To cancel erase operations, press .
7 Press .
“COMPLETE” appears on the display.
To exit the options menu, press
OPTIONS.
Note
••You can erase the supported audio file,
MP4 format file, and 3GP format file
only.
••You cannot erase audio files or folders
when Shuffle Play has been selected.
Set the play mode to Normal Play
before erasing.
••Erase operation is prohibited when the
disc tray is opened.
••Do not remove the USB device during
erase operations.
Tuner
Listening to the radio
1 Press FUNCTION repeatedly to
select “TUNER FM”.
2 Tune to a station.
For automatic scanning:
Hold down TUNING+/– until the
frequency begins to change on the
display.
Scanning stops automatically when
a station is tuned in. “ST” (for FM
stereo programs only) lights up on
the display.
If scanning does not stop, press
to stop scanning. Then, perform
manual tuning (below).
For manual tuning:
Press TUNING+/– repeatedly to tune
to the station you want.
Note
When you tune to an FM station that
provides RDS services, information such
as the service name or station name is
provided by broadcasts. You can check
the RDS information by pressing DISPLAY
repeatedly.
Hint
To reduce static noise on a weak FM
stereo station, press FM MODE repeatedly
until “ST” lights off on the display. You will
lose the stereo effect, but reception will
improve.
MHC-V82D/MHC-V72D.GB.5-000-538-13(1)
34GB
Presetting radio stations
You can store up to 20 FM stations
as your favorite stations.
1 Tune to the station you want.
2 Press DVD/TUNER MENU.
3 Press / repeatedly to select
the preset number you want,
then press .
“COMPLETE” appears on the display
and the station is stored.
If another station is already
assigned to the selected preset
number, that station is replaced by
the new one.
To listen to the preset station
Press PRESET+/– repeatedly to
select the preset number you want.
Alternatively, hold down SHIFT and
press the numeric buttons, then
press .
BLUETOOTH Connection
Streaming music from a
BLUETOOTH device
Supported BLUETOOTH version,
profiles and codecs
For details, see “BLUETOOTH
section” (page74).
Compatible BLUETOOTH devices
For details, see “Websites for
compatible devices” (page11).
About the BLUETOOTH
indicator
The BLUETOOTH indicator on the
unit lights up or flashes in blue to
show the BLUETOOTH status.
••Flashes slowly: System is ready for
pairing
••Flashes quickly: During pairing
••Lights up: Connection is
established
Pairing this system
with a BLUETOOTH
device
Pairing is an operation where
BLUETOOTH devices register with
each other beforehand. Once a
pairing operation is performed, it
does not need to be performed
again.

BLUETOOTH Connection
MHC-V82D/MHC-V72D.GB.5-000-538-13(1)
35GB
If your device is an NFC-compatible
BLUETOOTH device, the manual
pairing procedure is not necessary.
(See “One Touch BLUETOOTH
Connection by NFC” (page37).)
1 Place the BLUETOOTH device
within 1meter from the unit.
2 Touch FUNCTION on the unit
repeatedly to select
“BLUETOOTH”.
Note
••When there is no pairing information
on the system (for example, when
you use the BLUETOOTH function
for the first time after purchase),
“PAIRING” flashes on the display and
the system enters the pairing mode.
Proceed to step 4.
••If the system is connected to
a BLUETOOTH device, touch
BLUETOOTH on the unit to
disconnect the BLUETOOTH device.
3 Touch and hold PAIRING on
the unit for 3seconds or more.
“PAIRING” flashes on the display.
4 Turn on the BLUETOOTH
function on the BLUETOOTH
device and perform the pairing
procedure.
For details, refer to the operating
instructions of your BLUETOOTH
device.
5 Select the system’s name (for
example, “MHC-V82D”) on the
display of the BLUETOOTH
device.
Perform this step within 5 minutes,
otherwise pairing will be canceled.
In this case, repeat from step 3.
Note
If passkey is required on the
BLUETOOTH device, enter “0000”.
“Passkey” may be called “Passcode”,
“PIN code”, “PIN number”, or
“Password”.
6 Establish connection with the
BLUETOOTH device.
When pairing is completed and the
BLUETOOTH connection is
established, BLUETOOTH device
name appears on the display.
Depending on the BLUETOOTH
device, connection may start
automatically after pairing is
completed.
You can check the BLUETOOTH
device address by pressing DISPLAY
repeatedly.
Note
You can pair up to 8 BLUETOOTH devices.
If the 9th BLUETOOTH device is paired, the
oldest paired device will be deleted.
To cancel the pairing operation
Touch and hold PAIRING on the
unit for 3seconds or more until “BT
AUDIO” appears on the display.
To erase pairing information
You can erase all pairing information
by resetting the system. See
“Resetting the system” (page 69).
Note
After you reset the system, it may not be
able to connect with your iPhone/iPod. In
this case, delete the pairing information
of the system on your iPhone/iPod, then
perform the pairing operation again.

MHC-V82D/MHC-V72D.GB.5-000-538-13(1)
36GB
Listening to music on a
paired BLUETOOTH
device
Before playing music, check that
the BLUETOOTH function of the
BLUETOOTH device is turned on.
Once the system and the
BLUETOOTH device are connected,
you can control playback by
pressing , , , / and
/.
1 Touch FUNCTION on the unit
repeatedly to select
“BLUETOOTH”.
2 Touch BLUETOOTH or on the
unit.
The system connects to the last
connected BLUETOOTH device. The
device name appears on the
display.
Perform the BLUETOOTH connection
from the BLUETOOTH device if the
device is not connected.
3 Touch to start playback.
Depending on the BLUETOOTH
device, you may need to:
— touch twice.
— start playing an audio source on
the BLUETOOTH device.
4 Adjust the volume.
Adjust the volume of the
BLUETOOTH device first. If the
volume level is still too low, adjust
the volume level on the system.
To terminate the BLUETOOTH
connection
Touch BLUETOOTH on the unit. “BT
AUDIO” appears on the display.
Depending on the BLUETOOTH
device, the BLUETOOTH connection
may be terminated automatically
when you stop playback.
Connecting this system
with multiple
BLUETOOTH devices
(Multi-device
connection)
You can connect up to three
BLUETOOTH devices to the system
at the same time with A2DP/AVRCP
connection.
To pair with the second or third
device
Repeat steps 1 to 6 of “Pairing this
system with a BLUETOOTH device”
(page 34).
To switch the playback source
During playback from a connected
BLUETOOTH device, start playback
on another connected BLUETOOTH
device. The system will output
the sound from the most recent
playback device.
Note
••Operations may vary depending on
the BLUETOOTH device. A BLUETOOTH
device may not be connectable
depending on the combination of
the devices. For details, refer to the
operating instructions of the device.

BLUETOOTH Connection
MHC-V82D/MHC-V72D.GB.5-000-538-13(1)
37GB
••If you try to connect a 4th BLUETOOTH
device, the oldest playback device will
be disconnected.
••Depending on the BLUETOOTH device,
you may not be able to make three
BLUETOOTH connections at the same
time.
••You cannot establish a multi-device
connection when using the Wireless
Party Chain function or Speaker Add
function.
To disconnect any BLUETOOTH
device from a multi-device
connection
Terminate the BLUETOOTH
connection on the BLUETOOTH
device which you want to
disconnect.
To disconnect all BLUETOOTH
devices from a multi-device
connection
Touch BLUETOOTH on the unit.
One Touch BLUETOOTH
Connection by NFC
When you touch the system with an
NFC-compatible BLUETOOTH device,
the system automatically:
•—turns on in the BLUETOOTH
function.
•—completes the pairing and
BLUETOOTH connection.
Compatible BLUETOOTH
devices
BLUETOOTH devices with a built-
in NFC function (OS: Android™ 4.1
or later)
Note
Depending on your NFC-compatible
BLUETOOTH device, you may need to turn
on the NFC function in advance.
For details, refer to the operating
instructions of the BLUETOOTH device.
1 Touch the BLUETOOTH device to
the N-Mark on the unit until the
BLUETOOTH device responds to
the system.
Complete the connection by
following the instructions displayed
on the BLUETOOTH device.
When the BLUETOOTH connection is
established, the BLUETOOTH device
name appears on the display.
2 Start playback of an audio
source on the BLUETOOTH
device.
For details, refer to the operating
instructions of your BLUETOOTH
device.
Hint
If pairing and the BLUETOOTH connection
fail, do the following:
— Remove the case from the BLUETOOTH
device if using a commercially
available case.
— Touch the BLUETOOTH device to the
N-Mark on the unit again.
To terminate the BLUETOOTH
connection
Touch the BLUETOOTH device to the
N-Mark on the unit again.
MHC-V82D/MHC-V72D.GB.5-000-538-13(1)
38GB
Setting the BLUETOOTH
audio codecs
You can enable AAC, LDAC or SBC
codec reception from BLUETOOTH
device. AAC/LDAC can be selected
only when the BLUETOOTH device
supports AAC/LDAC.
1 Press OPTIONS.
2 Press / repeatedly to select
“BT CODEC”, then press .
3 Press / repeatedly to select
the setting, then press .
••“AUTO”: Enable reception in AAC
or LDAC codec format.
••“SBC”: Receive in SBC codec
format.
To exit the options menu, press
OPTIONS.
Note
••You can enjoy high quality sound if AAC
or LDAC is selected. If you cannot listen
to AAC or LDAC sound from your device
or the sound is interrupted, select “SBC”.
••If you change this setting while the
system is connected to a BLUETOOTH
device, the BLUETOOTH device will
be disconnected. To connect to the
BLUETOOTH device, perform the
BLUETOOTH connection again.
Hint
LDAC is an audio coding technology
developed by Sony that enables the
transmission of High-Resolution (Hi-Res)
Audio content, even over a BLUETOOTH
connection. Unlike other BLUETOOTH
compatible coding technologies
such as SBC, it operates without any
down-conversion of the Hi-Res Audio
content1), and allows approximately
three times more data2) than those
other technologies to be transmitted
over a BLUETOOTH wireless network
with unprecedented sound quality, by
means of efficient coding and optimized
packetization.
1) Excluding DSD format contents.
2) In comparison with SBC (Subband
Coding) when the bitrate of 990 kbps
(96/48 kHz) or 909 kbps (88.2/44.1 kHz)
is selected.
Setting the BLUETOOTH
standby mode
The BLUETOOTH standby mode
enables the system to turn on
automatically when you establish
a BLUETOOTH connection from a
BLUETOOTH device.
1 Press OPTIONS.
2 Press / repeatedly to select
“BT STBY”, then press .
3 Press / repeatedly to select
the setting, then press .
••“ON”: The system turns on
automatically even when the
system is in standby mode.
••“OFF”: Off.
To exit the options menu, press
OPTIONS.

Apps Control
MHC-V82D/MHC-V72D.GB.5-000-538-13(1)
39GB
Turning on or off the
BLUETOOTH signal
You can connect to the system from
a paired BLUETOOTH device when
the system’s BLUETOOTH signal is
set to on. The BLUETOOTH signal is
turned on by default.
Touch and hold + and MEGA
BASS on the unit for about
3seconds.
“BT ON” or “BT OFF” appears on the
display.
Note
••You cannot perform the following
operations when BLUETOOTH signal is
set to off:
— Pair and/or connect with BLUETOOTH
device.
— Use “Sony | Music Center” app.
— Change the BLUETOOTH audio
codecs.
••If you touch the N-Mark on the unit with
an NFC-compatible BLUETOOTH device
or set the BLUETOOTH standby mode to
on, the BLUETOOTH signal will be set to
on automatically.
Apps Control
Operating the system
using “Sony | Music
Center” and “Fiestable”
apps
You can operate the system
using the free apps “Sony |
Music Center” and “Fiestable”
on your smartphone/iPhone.
“Sony | Music Center” and “Fiestable”
are available on both Google Play
and the App Store.
Before you start
1 Search for “Sony | Music Center”
or scan the two-dimensional
code below. Then, download the
app on your smartphone/
iPhone.
2 Search for “Fiestable”, then
download the app.

MHC-V82D/MHC-V72D.GB.5-000-538-13(1)
40GB
Operating the system using
the apps
1 Establish a BLUETOOTH
connection between the system
and your smartphone/iPhone
(page 34).
2 Launch “Sony | Music Center”.
“Sony | Music Center” app allows
you to:
••change function of the system.
••control playback of disc/USB
device.
••tune to an FM station.
••browse music content of disc/
USB device.
••view information of disc, USB
device, and FM station.
••adjust volume.
••change sound settings, DJ Effect,
and illumination.
••control multiple systems when
using the Wireless Party Chain or
Speaker Add function.
To use “Fiestable” app, touch
“Fiestable” icon on the “Sony |
Music Center” screen.
“Fiestable” app allows you to:
••operate DJ Effect.
••change illumination.
••enjoy Motion Control function.
••use Karaoke features.
Note
••If the “Sony | Music Center” app does
not work properly, touch BLUETOOTH on
the unit to terminate the BLUETOOTH
connection, then perform the
BLUETOOTH connection again so that
the BLUETOOTH connection functions
normally.
••Refer to “Sony | Music Center” Help for
more details.
http://info.vssupport.sony.net/help/
••The specifications and design of the
application may change without notice.
Achieving and sharing
a Party People ranking
and getting bonus
features (Party King)
The system has a unique feature
that automatically records your
system usage.
Based on your usage, the system
will rank you a Party People ranking
according to predefined criteria.
The more frequently you use the
system, the higher a ranking you will
achieve.
Once you have achieved a certain
Party People ranking, you can share
your achievement through social
media.
The system will also award your
achievements with bonus features.
Note
To use this feature, make sure “Sony|
Music Center” and “Fiestable” apps
(page39) have been installed on your
device.

Apps Control
MHC-V82D/MHC-V72D.GB.5-000-538-13(1)
41GB
1 Establish a BLUETOOTH
connection between the system
and your device (page 34).
2 Launch “Sony | Music Center”
and touch the “Fiestable” icon.
You can check your current ranking,
explore bonus features and also
find out how to achieve next
ranking.
Using Voice Control via
“Fiestable”
You can operate the system by
speaking preset voice commands
that appear on your smartphone/
iPhone screen.
Note
••Supported languages are as follows:
English/Brazilian Portuguese/French/
German/Italian/Polish/Russian/
Spanish
••If your smartphone/iPhone is set to an
unsupported language, the list of preset
voice commands will be displayed in
English.
1 Establish a BLUETOOTH
connection between the system
and your smartphone/iPhone
(page34).
Make sure your smartphone/
iPhone is connected to the Internet.
2 Launch “Sony | Music Center”
and touch the “Fiestable” icon.
3 Touch “Voice Control via
Fiestable”.
The preset voice commands appear
on the app screen.
4 Touch the microphone icon on
the app screen.
The system is muted. Speak into the
microphone of your smartphone/
iPhone. Your voice will be sent to an
online speech to text conversion
service. When the conversion
completes, the command will be
sent back to the system. Muting is
canceled and the system will
respond according to the command.
Note
The Voice Control via “Fiestable” does not
work in the following cases:
— When the system is a Party Guest in
the Wired Party Chain function.
— During the Taiko game.
— The built-in sound demonstration is
turned on.
— When you open the disc tray.
— During USB transfer or erase
operations.
— When the online speech to text
conversion service is not available,
terminated or the connection failed.
— When your smartphone/iPhone
microphone is being used by other
application.
Creating party lighting
atmosphere via
“Fiestable”
You can synchronize the screen
illumination and flash light of
multiple smartphones/iPhone using
this function.
1 Turn on the illumination of the
system (page 58).
2 Start playing the music.

MHC-V82D/MHC-V72D.GB.5-000-538-13(1)
42GB
3 Turn on the BLUETOOTH
function on your smartphone/
iPhone.
Note
••BLUETOOTH connection is not
required unless you are using
multiple systems. If you want to
synchronize your smartphone/
iPhone with a specific system,
establish a BLUETOOTH connection
between your smartphone/iPhone
and that system (page 34).
Otherwise, proceed to step 4 and
your smartphone/iPhone will
synchronize with the nearest system.
••Make sure to turn on the location
service on your smartphone/iPhone.
4 Launch “Fiestable” and touch
“Party Light via Fiestable”.
All smartphone/iPhone screen
illumination and flash light flashes
synchronously.
Control for HDMI
Using the Control for
HDMI function
Connecting a TV compatible with
the Control for HDMI function* by
HDMI cable (High Speed HDMI Cable
with Ethernet, not supplied) enables
you to easily operate the device by a
TV remote control.
* Control for HDMI is a standard used
by CEC (Consumer Electronics Control)
for allowing HDMI (High-Definition
Multimedia Interface) devices to control
each other.
Note
This function may work with devices
other than those manufactured by Sony,
but operation is not guaranteed.
Preparing to use the Control for
HDMI function
Hold down SHIFT and press SETUP,
then set [HDMI SETUP]– [CONTROL
FOR HDMI] to [ON] (page29). The
default setting is [ON].
Enable the Control for HDMI function
settings for the TV connected to the
system.
Hint
If you enable the Control for HDMI
(“BRAVIA” sync) function when using a
TV manufactured by Sony, the Control
for HDMI function of the system is also
enabled automatically. When settings are
completed, “COMPLETE” appears on the
display.

Control for HDMI
MHC-V82D/MHC-V72D.GB.5-000-538-13(1)
43GB
System Power Off function
When you turn off the TV, the system
will turn off automatically.
Hold down SHIFT and press SETUP,
then set [HDMI SETUP] – [STANDBY
LINKED TO TV] to [ON] or [AUTO]
(page30). The default setting is
[AUTO].
Note
The connected device may not turn off
depending on the status of the device.
System Audio Control function
If you turn on the system while you
are watching the TV, the TV sound
will be output from the speakers
of the system. The volume of the
system can be adjusted using the
TV’s remote control.
If the TV sound was output from the
speakers of the system the previous
time you watched the TV, the system
will be turned on automatically
when you turn on the TV again.
Operations can also be made by the
TV’s menu. For details, refer to the
operating instructions of your TV.
Note
••The system’s volume level is displayed
on the TV screen depending on the TV.
It may differ from the volume level on
the display.
••Depending on the settings of the TV,
the System Audio Control function may
not be available. For details, refer to the
operating instructions of your TV.
Audio Return Channel
If the system is connected to a TV’s
HDMI IN connector compatible with
Audio Return Channel, you can listen
to TV sound from the speakers of
the system without connecting an
audio cable (not supplied).
Hold down SHIFT and press SETUP,
then set [HDMI SETUP] – [AUDIO
RETURN CHANNEL] to [ON]
(page30). The default setting is
[ON].
Note
If the TV is not compatible with Audio
Return Channel, an audio cable (not
supplied) needs to be connected
(page17).
One-Touch Play function
When you press in DVD/CD or
USB function, the TV is turned on
automatically. The TV’s input is
switched to the HDMI input which
the system is connected.
Note
Depending on the TV, the beginning part
of content being played may not play
correctly.
Remote Easy Control
You can select the system by the
SYNC MENU button on the TV
remote control and operate the
system.
This function can be used if the TV
supports the link menu. For details,
refer to the operating instructions of
your TV.
Note
••In the TV’s link menu, the system is
recognized by the TV as “Player”.
••Some operations may not be available
with some TVs.
Language Follow
When you change the language
for the on-screen display of the
TV, the system’s on-screen display
language is also changed.

MHC-V82D/MHC-V72D.GB.5-000-538-13(1)
44GB
Gesture Control
Operating playback, DJ
Effect, sampler, and
karaoke
You can control the operations
for PLAYBACK, DJ, SAMPLER and
KARAOKE mode by swiping your
hand over the GESTURE CONTROL
sensor on the unit.
Use the controls on the unit to
perform this operation.
1 Touch GESTURE ON/OFF
repeatedly to select “GESTURE1”.
The GESTURE CONTROL lights up.
2 Touch PLAYBACK, DJ, SAMPLER
or KARAOKE to select the mode
you want.
For PLAYBACK mode, touch
FUNCTION repeatedly to select the
function you want.
3 Swipe your hand over the
GESTURE CONTROL sensor.
For PLAYBACK mode:
You can control basic playback
when playing music from a disc,
USB device, or BLUETOOTH device.
To Swipe in this
direction
Go backward
Go forward
Play
Stop
Increase volume
Reduce volume
For DJ mode:
You can select a DJ Effect to create a
party atmosphere.
To Swipe in this
direction
Select FLANGER1)
Select ISOLATOR2)
Select WAH3)
Select PAN4)
Increase the level
of the selected
effect
Reduce the level
of the selected
effect
1) Creates a deep flanging effect that is
similar to the roar of a jet plane.
2) Isolates a specific frequency band
by adjusting the other frequency
bands. For example, when you want
to focus on vocals.
3) Create a special effect of “Wah-wah”
sound by moving the frequency of a
filter up and down automatically.
4) Create a feeling that the sound
is moving around the speakers
between left and right channels.
For SAMPLER mode:
To output Swipe in this
direction
“Come On!”
“Let’s Go!”
Reggae Horn
sound
Phaser sound
Scratch sound
Audience sound

Gesture Control
MHC-V82D/MHC-V72D.GB.5-000-538-13(1)
45GB
For KARAOKE mode:
You can operate the following
karaoke features.
To Swipe in this
direction
Reduce the pitch
of music ()
Increase the pitch
of music ()
Increase the
microphone
volume
Reduce the
microphone
volume
Output hand
clapping sound
Output booing
sound
To adjust the level of the
sampler
1 Press OPTIONS on the remote
control.
2 Press / on the remote control
repeatedly to select “SAMPLER”,
then press .
3 Press / on the remote control
repeatedly to adjust the sampler
level, then press .
To exit the options menu, press
OPTIONS.
To turn off the DJ mode
Swipe your hand over the GESTURE
CONTROL sensor in the same
direction as in step 3 of “Operating
playback, DJ Effect, sampler, and
karaoke” (page44).
To deactivate the Gesture
Control
Touch GESTURE ON/OFF repeatedly
to select “OFF”.
The GESTURE CONTROL lights off.
Note
••Do not touch or contact to the GESTURE
CONTROL sensor when you perform the
swiping motion.
••The DJ Effect is automatically turned off
when you:
— deactivate the Gesture Control.
— change the mode to PLAYBACK/
SAMPLER/KARAOKE.
— turn off the system.
— change the function.
— activate or deactivate the Wired Party
Chain and Wireless Party Chain
function.
— change the sound field.
— use the Vocal Fader.
— change the key (Key Control).
••If you activate the DJ Effect during
transferring, the sound effect will not be
transferred onto the USB device.
Controlling the pitch of
your voice or music
source
You can have fun listening to your
voice or music at different pitch by
using this function.
Use the controls on the unit to
perform this operation.
Controlling the pitch of your
voice
1 Touch GUITAR on the unit
repeatedly until GUITAR
indicator lights off.

MHC-V82D/MHC-V72D.GB.5-000-538-13(1)
46GB
2 Push to open the USB/MIC
cover, then connect an optional
microphone to MIC1 or MIC2/
GUITAR jack on the unit.
3 Touch GESTURE ON/OFF
repeatedly to select
“GESTURE2”.
The GESTURE CONTROL lights up.
“MIC PITCH CONTROL” appears on
the display after 2 seconds.
4 Start singing or speaking into
the microphone.
5 Move your hand up or down
over the GESTURE CONTROL
sensor.
The pitch of your voice changes
accordingly.
Controlling the pitch of the
music source
Note
Make sure you disconnect the
microphone from the system.
1 Touch GESTURE ON/OFF
repeatedly to select
“GESTURE2”.
The GESTURE CONTROL lights up.
“MUSIC PITCH CONTROL” appears
on the display after 2 seconds.
2 Start playing the music.
3 Move your hand up or down
over the GESTURE CONTROL
sensor.
The pitch of the music changes
accordingly.
Notes on pitch control
••Do not touch or contact to the
GESTURE CONTROL sensor when
you move your hand up or down
over it.
••Other Gesture Control motions do
not work in “GESTURE2” mode.
••The “GESTURE2” mode is
automatically turned off when
you:
•—activate the Taiko mode.
•—change the mode to PLAYBACK/
SAMPLER/KARAOKE/DJ.
•—turn on the DJ Effect.
•—turn on the guitar mode.1)
•—select “FIESTA”/“MOVIE1”/
“MOVIE2”/“DRAMA/NEWS”/
“GAME” sound field.2)
•—turn on Virtual Football mode.2)
•—turn off the system.
•—change the function.
••The pitch of your voice or the
music returns to default when you
move your hand away from the
GESTURE CONTROL sensor.
1) During “MIC PITCH CONTROL” mode
only.
2) During “MUSIC PITCH CONTROL” mode
only.
To deactivate the Gesture
Control
Touch GESTURE ON/OFF repeatedly
to select “OFF”.
The GESTURE CONTROL lights off.

Sound Adjustment
MHC-V82D/MHC-V72D.GB.5-000-538-13(1)
47GB
Deactivating the
controls on the unit for
a short time (Party
Lock)
You can deactivate the controls
(except ) on the unit for
30seconds to wipe the touch panel.
To use this function, make sure
“GESTURE1” mode has been
selected (page 44).
Hold your hand above GESTURE
CONTROL sensor on the unit for
more than 5 seconds.
“PARTY LOCK ON” appears on the
display.
To turn off the Party Lock function, hold
your hand above GESTURE CONTROL
sensor on the unit for more than
5seconds until “PARTY LOCK OFF”
appears on the display.
Note
While the party lock is applied, the touch
panel indications of the unit are turned
off.
Sound Adjustment
Adjusting the sound
Reinforcing bass sound and
creating more powerful sound
Press MEGA BASS repeatedly to
select “BASS ON”.
The MEGA BASS indicator lights up.
To cancel, press MEGA BASS again.
Selecting a sound field
Press SOUND FIELD +/– (or touch
SOUND FIELD on the unit)
repeatedly to select the sound
field you want.
To cancel, press SOUND FIELD +/– (or
touch SOUND FIELD on the unit)
repeatedly to select “FLAT”.
To select FIESTA sound field
directly
Touch FIESTA on the unit.
This setting reproduces the sound
effect of a party hall.
To select the Virtual Football
mode
Note that you can only select Virtual
Football mode during AUDIO IN and
TV functions.
Press SOUND FIELD +/– repeatedly
while watching a football match
broadcast.
••“ON NARRATION”: You can enjoy an
immersive feeling of being in a
football stadium through enhanced
stadium cheers.

MHC-V82D/MHC-V72D.GB.5-000-538-13(1)
48GB
••“OFF NARRATION”: You can enjoy a
more immersive feeling of being in a
football stadium by minimizing the
volume level of narration in addition
to the enhancement of cheers.
Note
••If you hear unnatural sounds in the
content when “OFF NARRATION”
is selected, “ON NARRATION” is
recommended.
••This feature does not support monaural
sound.
Creating your own
sound effect
You can raise or lower the levels
of specific frequency bands, then
store the setting in the memory as
“CUSTOM EQ”.
1 Press OPTIONS.
2 Press / repeatedly to select
“CUSTOM EQ”, then press .
3 Press / repeatedly to adjust
the equalizer level or surround
setting, then press .
4 Repeat step 3 to adjust the level
of other frequency bands and
surround effect.
To exit the options menu, press
OPTIONS.
To select the custom equalizer
setting
Press SOUND FIELD +/– (or touch
SOUND FIELD on the unit) repeatedly
to select “CUSTOM EQ”.

MHC-V82D/MHC-V72D.GB.5-000-538-13(1)
Multiple Systems Playback
49GB
Multiple Systems Playback
Enjoying Wired Party Chain function
You can connect multiple audio systems in a chain to create a more exciting
party environment and to produce higher sound output.
One activated system in the chain serves as the Party Host and shares music
with other systems (Party Guests).
Example: When using this system as the Party Host
1 Set up a Wired Party Chain by connecting all the systems using audio
cables (not supplied).
First system
(this system)
Second system
Last system2)
1)
Continue the
connection until
the last system
1) Connect this cable only if the last system is equipped with Wired Party Chain
function.
2) If one of the systems is not equipped with Wired Party Chain function
••Connect the system which is not equipped with Wired Party Chain function at
the last system, otherwise the chain will stop at that system. Be sure to select the
Audio In function on this last system.
••You must select the first system as Party Host so that all systems are playing the
same music when Wired Party Chain function is activated.
MHC-V82D/MHC-V72D.GB.5-000-538-13(1)
50GB
2 Plug in the AC power cord
(mains lead) and turn on all the
systems.
3 Adjust the volume on each
system.
4 Touch FUNCTION repeatedly on
the Party Host to select the
function you want.
If all the systems are equipped with
the Wired Party Chain function, do
not select the AUDIO IN function. If
you select this function, sound
cannot be output.
5 Start playing the music, then
touch PARTY CHAIN on the Party
Host.
“PARTY CHAIN” appears on the
display. The Party Host starts the
Wired Party Chain, and other
systems become Party Guests
automatically.
“WIRED P.CHAIN” lights up on the
display of Party Host and Party
Guests.
Note
••Depending on the total unit of systems
you have connected, Party Guests may
take some time to start playing the
music.
••Changing the volume level and sound
effect on the Party Host will not affect
the output on the Party Guests.
••The Party Guest continues playing the
music source as Party Host even when
you change the function on Party Guest.
However, you can adjust the volume
and change the sound effect on Party
Guest.
••When you use the microphone or play
the guitar on Party Host, the sound will
not be output from Party Guests.
••When one of the systems in the chain
is performing USB transfer, wait for the
system to complete or stop the transfer
before you activate the Wired Party
Chain function.
••For detailed operation on other
systems, refer to the operating
instructions of the systems.
To select a new Party Host (when
all the systems are equipped
with the Wired Party Chain
function)
Repeat steps 4 and 5 on the system
to be used as a new Party Host. The
current Party Host becomes Party
Guest automatically.
Note
••You can select another system as the
new Party Host only after the Wired
Party Chain function of all the systems
in the Chain has been activated.
••If the selected system does not become
a new Party Host after a few seconds,
repeat steps 4 and 5.
To deactivate the Wired Party
Chain
Touch PARTY CHAIN on the Party
Host.
“LEAVE PARTY” appears on the
display.
Note
If the Wired Party Chain function is not
deactivated after a few seconds, touch
PARTY CHAIN on the Party Host again.
Setting a Wired Party Chain
sound mode
You can set a sound mode when
the Wired Party Chain function is
activated.
1 Press OPTIONS.
2 Press / repeatedly to select
“P CHAIN MODE”, then press .

MHC-V82D/MHC-V72D.GB.5-000-538-13(1)
Multiple Systems Playback
51GB
3 Press / repeatedly to select
the mode you want, then press
.
••“STEREO”: Outputs the stereo
sound.
••“RIGHT CH”: Outputs the
monaural sound of the right
channel.
••“LEFT CH”: Outputs the monaural
sound of the left channel.
To exit the options menu, press
OPTIONS.
Enjoying Wireless Party
Chain function
You can connect multiple audio
systems in a chain via BLUETOOTH
connection if all the systems are
equipped with the Wireless Party
Chain function. This function allows
you to create a more exciting party
environment and to produce higher
sound output without a cable
connection.
Note that you can only play back
audio source from a BLUETOOTH
device.
The first system in the chain to
be activated becomes the Party
Host and shares music with other
systems (Party Guests).
Example: When using this system as
the Party Host
1 Turn on all the systems.
2 Set the first system as the Party
Host.
Touch BLUETOOTH on the unit to
select the BLUETOOTH function.
Connect the BLUETOOTH device
to the system via BLUETOOTH
connection.
Touch WIRELESS PARTY CHAIN
on the unit.
“CHAINING” flashes on the
display. The system enters the
Wireless Party Chain setup
mode.
When the system entered Wireless
Party Chain setup mode, connection
to the BLUETOOTH device is
terminated automatically.
3 Set the second system as a Party
Guest.
Touch BLUETOOTH on the
second system to select the
BLUETOOTH function.
Touch WIRELESS PARTY CHAIN
on the second system.
The second system becomes a
Party Guest.
“P.CHAIN” lights up on the
display.
Note
The Wireless Party Chain function is
canceled in the following conditions:
— There is no operation within
1minute after the Party Host is set
in step 2.
— WIRELESS PARTY CHAIN is touched
again on the Party Host before step
3 is completed.
4 Set the third or additional
systems as Party Guests.
Repeat step 3.
Note
Connect the third or additional
systems within 30 seconds of
connecting the previous system.
“P.CHAIN” flashes on the display of the
Party Host during these 30seconds.
After 30 seconds, the system cannot
be connected.

MHC-V82D/MHC-V72D.GB.5-000-538-13(1)
52GB
5 Wait 30 seconds after the last
Party Guest is connected.
“P.CHAIN” stops flashing on the
display of the Party Host and the
BLUETOOTH device reconnects to
the Party Host.
6 Start playback on the connected
BLUETOOTH device.
7 Adjust the volume on the Party
Host.
The volume on the Party Guests will
be adjusted accordingly. If you want
to adjust the volume on a particular
Party Guest, adjust the volume on
that Party Guest.
Note
••When you watch video on your
BLUETOOTH device during Wireless
Party Chain function, there may be a
delay between the audio and video.
••You cannot select another system as
the new Party Host while the Wireless
Party Chain is activated.
••When you use the microphone or play
the guitar on Party Host, the sound will
not be output from Party Guests.
••Sleep Timer and automatic standby
functions are not available on Party
Guests.
••For detailed operation on other
systems, refer to the operating
instructions of the systems.
Hint
To add new Party Guests after Wireless
Party Chain has already been established,
touch and hold WIRELESS PARTY CHAIN
on the Party Host, then repeat step 3.
To deactivate the Wireless Party
Chain
Touch WIRELESS PARTY CHAIN on
the Party Host.
Note
When you change the function or turn off
the Party Host, the Wireless Party Chain is
also deactivated.
To make a Party Guest leave the
Wireless Party Chain
Touch WIRELESS PARTY CHAIN on
the Party Guest which want to leave.
Note
When you change the function or turn
off a particular Party Guest, that Party
Guest leaves the Wireless Party Chain
connection.
Synchronization of settings in a
Wireless Party Chain
When a Wireless Party Chain has
been established, the following
settings on the Party Host and Party
Guests are changed:
••If MEGA BASS and illumination
settings are changed on the Party
Host, the settings on Party Guests
are also changed.
••DJ Effect and Karaoke settings
such as Vocal Fader and Key
Control are turned off on both
Party Host and Party Guests.
••Sound field settings return to
defaults on both Party Host and
Party Guests.
••When the Party Host is turned off,
the Party Guests are also turned
off.

MHC-V82D/MHC-V72D.GB.5-000-538-13(1)
Multiple Systems Playback
53GB
Listening to music
wirelessly with two
systems (Speaker Add
function)
To use this function, two same
model systems are required.
By connecting two systems via
BLUETOOTH connection, you can
enjoy music in a more powerful way.
In the following steps, the two
systems are described as “Host
system” and “Guest system”.
Note
••To use this function, make sure “Sony |
Music Center” app (page 39) has
been installed to your BLUETOOTH
device.
••Be sure that the BLUETOOTH device
has paired with both Host system and
Guest system. For details on the pairing
operation, see “Pairing this system with
a BLUETOOTH device” (page 34).
1 Place two systems of the same
model within 1 meter of each
other.
2 Turn on Host system and Guest
system.
3 Touch BLUETOOTH on Host
system and Guest system to
select the BLUETOOTH function.
“BLUETOOTH” appears on the
display.
4 Connect Host system and a
BLUETOOTH device via
BLUETOOTH connection
(page34).
5 Launch “Sony | Music Center”
and follow the on-screen
instructions to setup the
Speaker Add for Host system
and Guest system.
“HOST” appears on the display of
Host system, and “GUEST” appears
on the display of Guest system.
6 Set the output mode using
“Sony | Music Center” on your
BLUETOOTH device.
••“Double Mode”: Outputs the
stereo sound from both systems.
••“Stereo mode — right”: Outputs
the monaural sound of the right
channel from Host system, and
the left channel from Guest
system.
••“Stereo mode — left”: Outputs the
monaural sound of the left
channel from Host system, and
the right channel from Guest
system.
7 Start playback on the
BLUETOOTH device, and adjust
the volume.
For details, see “Listening to music
on a paired BLUETOOTH device”
(page36).
Note
••When you use the microphone or play
the guitar on Host system, the sound
will not be output from Guest system.
••The following operations do not work
on Guest system when using Speaker
Add:
— Sleep Timer
— Automatic standby function
— Child Lock
— Gesture Control
— Party Lock
— Vocal Fader, Key Control, and Score
Mode
— Controlling the system using remote
control

MHC-V82D/MHC-V72D.GB.5-000-538-13(1)
54GB
Synchronization of settings with
Speaker Add
••When a Speaker Add connection
has been established, the
following settings on the Guest
system are synchronized with
those on the Host system:
•—Volume
•—MEGA BASS
•—Sound field and Custom EQ
•—DJ Effect
•—Illumination
••When the settings above are
changed on either Host system or
Guest system, the settings on the
other system are synchronized.
••When Host system is turned off,
Guest system also turns off.
To deactivate the Speaker Add
function
Use “Sony | Music Center” and
follow the on-screen instructions.
Note
If you reset one of the two systems while
using the Speaker Add function, make
sure to turn off the other system.
Hint
••If you do not deactivate the function,
the system will try to re-establish the
most recent connection the next time
you turn on the system.
••Switch to SBC codec when using the
Speaker Add function. For details, see
“Setting the BLUETOOTH audio codecs”
(page 38).
Karaoke
Singing along: Karaoke
Preparing for Karaoke
1 Press MIC LEVEL– repeatedly to
reduce the microphone volume
level.
Alternatively, touch MIC/GUITAR
LEVEL– on the unit repeatedly.
2 Touch GUITAR on the unit
repeatedly until GUITAR
indicator lights off.
3 Push to open the USB/MIC
cover, then connect an optional
microphone to MIC1 or MIC2/
GUITAR jack on the unit.
Connect another optional
microphone if you want to sing in
duet.
4 Start playing the music and
adjust the microphone volume.
Press MIC ECHO repeatedly to
adjust the echo effect.
5 Start singing along with the
music.
Note
••If howling occurs, the system will
automatically reduce the microphone
sound for a few seconds.
••If howling continues, do the following:
— Move the microphone away from the
system.
— Change the direction of the
microphone.
— Press MIC LEVEL– repeatedly.
— Press MIC ECHO repeatedly to adjust
the echo level.

MHC-V82D/MHC-V72D.GB.5-000-538-13(1)
Karaoke
55GB
••Microphone sound will not be
transferred to the USB device during
USB transfer.
••You cannot adjust the microphone
volume level using the VOLUME +/– on
the unit or +/– on the remote control.
Press MIC LEVEL+/– repeatedly to adjust
the microphone volume level.
••When using the Wireless Party Chain
or Speaker Add function, sound from
the microphone is only output from
the system to which the microphone is
connected.
••If the sound through the microphone
is extremely loud, it may be distorted.
Press MIC LEVEL– repeatedly to reduce
the microphone volume.
Reducing the vocal sound
(Vocal Fader)
You can reduce the sound of the
vocal in stereo source.
Press VOCAL FADER repeatedly to
select “ON V FADER”.
To cancel Vocal Fader effect, press
VOCAL FADER repeatedly to select
“OFF”.
Changing the key (Key Control)
Press KEY CONTROL /•to suit
your vocal range.
Activating the Karaoke scoring
mode (Score Mode)
You only can use scoring function
when the microphone is connected.
Your score is calculated from a scale
of 0 to 99 by comparing your voice
with the music source.
1 Start playing the music.
2 Press SCORE before singing a
song.
3 After singing for more than a
minute, press SCORE again to
view your score.
Changing your voice
(Voice Changer)
You can change your voice when
you talk or sing into microphone.
Press VOICE CHANGER repeatedly
to change your voice effect.
To turn off the Voice Changer
Press VOICE CHANGER repeatedly to
select “OFF”.
Enjoying sound from a
guitar
You can listen to the sound from the
guitar by connecting a guitar to the
MIC2/GUITAR jack on the unit.
You can also play the guitar and sing
along by connecting a microphone
to the MIC1 jack on the unit.
Your guitar sound can be changed
by selecting the guitar effect.
1 Touch MIC/GUITAR LEVEL – on
the unit repeatedly to reduce
the guitar volume level.
2 Push to open the USB/MIC cover
on the unit.
3 Use an instrument cable (not
supplied) to connect a guitar
(not supplied) to MIC2/GUITAR
jack on the unit.

MHC-V82D/MHC-V72D.GB.5-000-538-13(1)
56GB
4 Touch GUITAR on the unit
repeatedly to select the guitar
effect.
GUITAR indicator lights up.
••“CLEAN”: Original guitar sound.
Recommended for electric guitar
or electro-acoustic guitar.
••“O DRIVE”: Distorted sound
similar to an overdriven guitar
amplifier. Recommended for
electric guitar.
••“BASS”: Original guitar sound.
Recommended for bass guitar.
5 Start playing the guitar and
adjust the guitar volume.
The guitar sound is output from the
system.
Note
••Howling may occur when using electro-
acoustic guitar with “O DRIVE” effect.
Touch MIC/GUITAR LEVEL – on the unit
repeatedly to reduce the guitar volume.
Otherwise, change to the other guitar
effect.
••Before disconnecting the guitar from
the system, touch MIC/GUITAR LEVEL–
on the unit repeatedly to reduce the
guitar volume.
To turn off the guitar mode
Touch GUITAR on the unit repeatedly
until the GUITAR indicator lights off.
Other Operations
Playing the drum
(Taiko)
You can play a virtual drum by using
the top panel of the system as a
drum pad.
Note
••Tap the top panel using your hands
gently. Do not use other items, such as a
stick as it will scratch the surface of the
top panel.
••The pressure you apply when tapping
the top panel will not affect the volume
level in the Taiko mode.
••When you activate the Taiko mode,
the Taiko volume follows the current
system’s volume level.
••During the Taiko mode, the controls on
the unit are deactivated except and
TAIKO buttons. Use the buttons on the
remote control to change the function
or volume of the music source.
1 Press TAIKO on the unit
repeatedly to select “TAIKO”.
The top panel lights up in 4 different
colors according to zone.
2 Tap on zone 1, 2, 3 or 4 or swipe
your hand over the GESTURE
CONTROL sensor.
Available swiping motions:
••Right to left ( )
••Left to right ( )
••Bottom to top ( )

MHC-V82D/MHC-V72D.GB.5-000-538-13(1)
Other Operations
57GB
••Top to bottom ( )
3 Swipe your hand over the
GESTURE CONTROL sensor in a
clockwise ( ) or anticlockwise
() direction to adjust the drum
sound volume.
Playing the Taiko game
In this game, you need to tap the
top panel according to the lighting
guide pattern that appears on
the surrounding of the GESTURE
CONTROL sensor. Your score is
calculated from a scale of 0 to 100
based on the number of correct
actions performed.
Lighting
guide
1 Press TAIKO on the unit
repeatedly until “GAME 5”
flashes on the display.
The system counts down in
5seconds and the game starts
when “START” flashes on the
display.
2 Tap zone 1, 2, 3 or 4 according to
the lighting guide pattern.
The lighting guide will flash 3 times.
You need to tap the correct zone on
the third time it flashes.
Example:
Tap!
1st flash:
Green
2nd flash:
Green
3rd flash:
Blue
Make sure you tap on the correct
zone at the exact moment when the
lighting guide flashes in blue.
Lighting guide
pattern
Zone you need
to tap
1
2
3
4
3 Continue to play the game for
50 seconds.
The score appears on the display
after you completed the game.
To deactivate Taiko game
Press TAIKO on the unit repeatedly
until the lighting guide lights off.
Competing in Taiko game using
“Fiestable” (Taiko Game
Ranking)
You can play Taiko game and
compete with other players to
achieve top 10 ranking.
1 Establish a BLUETOOTH
connection between the system
and your smartphone/iPhone
(page 34).

MHC-V82D/MHC-V72D.GB.5-000-538-13(1)
58GB
2 Launch “Sony | Music Center”
and touch the “Fiestable” icon.
3 Touch “Taiko Game Ranking”.
The current leaderboard is
displayed on the smartphone/
iPhone screen.
4 Touch “Play” and start playing
the Taiko game.
Perform Step 2 and 3 of “Playing the
Taiko game” (page 57).
Once the game is completed, your
score will be shown on the
smartphone/iPhone screen. If your
score is in the top 10 ranking, the
app will prompt you to input your
name. The name is limited to only 16
alphanumeric characters.
Then, your ranking will be
displayed.
To reset the ranking
Touch “RESET” on the app screen.
Note
••If you activate the Taiko game using the
TAIKO button on the unit, your score will
not be recorded in the ranking.
••If your score is 0, it will not be ranked.
••The Taiko Game Ranking does not work
in the following cases:
— If you activate Taiko game using the
TAIKO button on the unit.
— When you open the disc tray.
— During USB transfer or erase
operations.
••The Taiko Game Ranking is
automatically turned off when:
— You press TAIKO on the unit.
— BLUETOOTH is disconnected.
— You receive an incoming call.
Enjoying music with the
illumination (Party
Light/Speaker Light)
1 Press PARTY LIGHT repeatedly
during playback to select “LED
ON”.
2 Press LIGHT MODE repeatedly to
select the illumination mode
you want.
The illumination mode is different
when Wireless Party Chain or
Speaker Add function is activated.
To turn off the illumination
Press PARTY LIGHT repeatedly to
select “LED OFF”.
Note
••Do not look directly at the light-emitting
part when the illumination is turned on.
••If the illumination brightness is glaring,
switch on the room lights or turn off the
illumination.
••You can turn on or off the illumination
when demonstration is turned on.
Using the Sleep Timer
The system turns off automatically
after the preset time.
Press SLEEP repeatedly to select
the time you want.
To cancel Sleep Timer, press SLEEP
repeatedly to select “OFF”.
Hint
To check the remaining time before the
system turns off, press SLEEP.
MHC-V82D/MHC-V72D.GB.5-000-538-13(1)
Other Operations
59GB
Using the Voice
Guidance
IMPORTANT: THE VOICE GUIDANCE
FOR THIS SYSTEM IS ONLY
AVAILABLE IN ENGLISH.
1 Press OPTIONS.
2 Press / repeatedly to select
“VOICE GUIDANCE”, then press
.
3 Press / to select “ON”, then
press .
The Voice Guidance is activated.
To exit the options menu, press
OPTIONS.
Depending on the status of the
system, the voice guidance outputs
from the system as follows:
••When setting the system to the
pairing mode: “BLUETOOTH
pairing”
••When connected to a BLUETOOTH
device: “BLUETOOTH connected”
••When disconnected from a
BLUETOOTH device: “BLUETOOTH
disconnected”
••When the settings are completed
for the Speaker Add function:
“Double mode”
••When setting the output mode
during the Speaker Add function:
“Left/Right/Double mode”
To deactivate the Voice Guidance
Select “OFF” in step 3.
To adjust the level of the Voice
Guidance
1 Press OPTIONS.
2 Press / repeatedly to select
“SAMPLER”, then press .
3 Press / repeatedly to adjust
the Voice Guidance level, then
press .
To exit the options menu, press
OPTIONS.
Note
••The Voice Guidance volume level
change according to the system’s
volume level. However, in some cases,
the Voice Guidance volume level may
not change.
••In some cases, there may be a delay
in Voice Guidance output or the Voice
Guidance may not work.
Using optional
equipment
1 Press – repeatedly until “VOL
MIN” appears on the display.
2 Use an audio cable (not
supplied) to connect audio
output jacks of an optional
equipment to AUDIO/PARTY
CHAIN IN (TV) L/R jacks on the
unit.
3 Press FUNCTION repeatedly to
select “AUDIO IN”.
4 Start playing the connected
equipment.
5 Press + repeatedly to adjust
the volume.
Note
The system may enter standby mode
automatically if the volume level of the
connected equipment is too low. Adjust
the volume level of the equipment.
To turn off automatic standby function,
see “Setting the automatic standby
function” (page60).
MHC-V82D/MHC-V72D.GB.5-000-538-13(1)
60GB
Deactivating the
controls on the unit
(Child Lock)
You can deactivate the controls
(except ) on the unit to prevent
misoperation by children.
Touch and hold on the unit for
more than 5 seconds.
“CHILD LOCK ON” appears on the
display.
To turn off the Child Lock function,
touch and hold on the unit for more
than 5seconds until “CHILD LOCK OFF”
appears on the display.
Note
••Child Lock function will be turned off
automatically when you disconnect the
AC power cord (mains lead).
••Child Lock function cannot be activated
when you open the disc tray.
Setting the automatic
standby function
The system enters standby mode
automatically in about 15 minutes
when there is no operation or audio
signal output.
By default, the automatic standby
function is turned on.
1 Press OPTIONS.
2 Press / repeatedly to select
“AutoSTBY”, then press .
3 Press / repeatedly to select
“ON” or “OFF”, then press .
To exit the options menu, press
OPTIONS.
Note
••“AutoSTBY” flashes on the display about
2 minutes before entering standby
mode.
••The automatic standby function does
not work in the following cases:
— During tuner function.
— When the Sleep Timer is activated.
— When microphone or guitar is
connected.
— When the system is a Party Guest in
the Wireless Party Chain function or
the Guest system in the Speaker Add
function.
Listening to built-in
sound demonstration
Touch and hold on the unit for
more than 2 seconds.
The built-in sound demonstration is
played back.
To stop the demonstration, touch on
the unit.
Updating the software
The software of this system may be
updated in the future.
You can update your system’s pre-
installed software from the websites
below.
Follow the online instructions to
update the software.
For customers in Americas:
<https://www.sony.com/am/
support>
For customers in Europe:
<https://www.sony.eu/support>
For customers in other countries/
regions:
<https://www.sony-asia.com/
support>
MHC-V82D/MHC-V72D.GB.5-000-538-13(1)
Additional Information
61GB
Additional Information
Troubleshooting
Should you encounter a problem
with your system, find your problem
in the troubleshooting checklist
below and take the corrective
action.
If the problem persists, consult your
nearest Sony dealer.
Note that if the service personnel
changes some parts during repair,
these parts may be retained.
If error code and “CHECK
MANUAL” flashes on the
display
See the following table for the
corrective action.
Error code Corrective action
“PROTECT2” Contact your nearest
Sony dealer.
“PROTECT3”/
“PROTECT4”/
“PROTECT6”
Immediately unplug
the AC power cord
(mains lead), and
check if anything is
blocking the
ventilation openings
of the unit.
After you have
checked and found
no problems,
reconnect the AC
power cord (mains
lead), and turn on
the system.
If the issue persists,
contact your nearest
Sony dealer.
General
The power does not turn on.
••Check that the AC power cord
(mains lead) is connected securely.
The system has entered standby
mode.
••This is not a malfunction. The
system enters standby mode
automatically in about 15 minutes
when there is no operation or
audio signal output (page60).
There is no sound.
••Adjust the volume.
••Check the connection of the
optional equipment, if any
(page59).
••Turn on the connected equipment.
••Unplug the AC power cord (mains
lead), then plug in the AC power
cord (mains lead) again and turn
on the system.
There is severe hum or noise.
••Move the system away from
sources of noise.
••Connect the system to a different
wall outlet.
••Install a noise filter (not supplied)
to the AC power cord (mains lead).
••Turn off surrounding electrical
equipment.
••The noise generated by the
cooling fans of the system may be
heard when the system is turned
on. This is not a malfunction.
••Move the unit away from the neon
signs or fluorescent light.
The remote control does not
function.
••Remove the obstacles between
the remote control and the unit.
••Move the remote control closer to
the unit.

MHC-V82D/MHC-V72D.GB.5-000-538-13(1)
62GB
••Point the remote control at the
unit’s sensor.
••Replace the batteries (R03/size
AAA).
••Move the unit away from the
fluorescent light.
The color irregularity on a TV
screen persists.
••Turn off the TV, then turn it on
after 15 to 30 minutes. If the color
irregularity still persists, place the
system farther away from the TV.
“CHILD LOCK” appears when you
use any control on the unit.
••Set the Child Lock function to off
(page60).
A clicking sound is heard when the
system is turned on.
••This is the operating sound and it
occurs when the system is turned
on or off, for example. This is not a
malfunction.
Disc/USB playback
The disc tray does not open and
“LOCKED” appears on the display.
••Consult your nearest Sony dealer
or local authorized Sony service
facility.
The disc tray does not close.
••Load the disc correctly.
The disc does not eject.
••You cannot eject the disc during
Synchronized Transfer or REC1
Transfer. Press to cancel the
transfer, then touch on the unit
to eject the disc.
••Consult your nearest Sony dealer.
Playback does not start.
••Wipe the disc clean (page71).
••Reload the disc.
••Load the disc that this system can
play back (page9).
••Remove the disc and wipe away
the moisture on the disc, then
leave the system turned on for
a few hours until the moisture
evaporates.
••The DVD VIDEO with unsupported
region code was loaded.
••Turn off the system and reconnect
the USB device, then turn on the
system.
••Check the information on the
website about compatible USB
devices (page11).
The sound skips during disc
playback.
••Wipe the disc clean (page71).
••Reload the disc.
••Move the unit to a place with no
vibration.
Playback does not start from the
first track/file.
••Set the play mode to Normal Play
(page23).
••Resume Play has been selected on
the disc. Press twice. Then, press
to start playback.
You cannot perform some
functions such as Stop, Lock
Search, Slow-motion Play, Repeat
Play, or Shuffle Play.
••Depending on the disc, you may
not be able to do some of the
operations above. Refer to the
operating instructions supplied
with the disc.
Files cannot be played back.
••The data is not stored in the
supported format.
••Make sure you have selected
the correct MEDIA MODE setting
before playback.

MHC-V82D/MHC-V72D.GB.5-000-538-13(1)
Additional Information
63GB
••USB devices formatted with file
systems other than FAT16 or FAT32
are unsupported.*
••If you use a partitioned USB
device, only files on the first
partition can be played back.
* This system supports FAT16 and FAT32,
but some USB devices may not support
all of these FAT. For details, refer to the
operating instructions of each USB
device or contact the manufacturer.
The folder name, track name, file
name and ID3 tag characters do
not appear properly.
••The ID3 version is not in Version 1
(1.0/1.1) or Version 2 (2.2/2.3).
••The data stored in the USB
device may have been corrupted,
perform the transfer again.
••The character codes that can be
displayed by this system are as
follows:
•—Upper cases (A to Z)
•—Numbers (0 to 9)
•—Symbols (< > * +, [ ] \ _)
Other characters appear as “_”.
There is no sound during USB
playback.
••The USB device is not connected
correctly. Turn off the system and
reconnect the USB device, then
turn on the system and check if
“USB” appears on the display.
There is noise, skipping, or
distorted sound during USB
playback.
••You are using an unsupported USB
device. Check the information on
the website about compatible USB
devices (page11).
••Turn off the system and reconnect
the USB device, then turn on the
system.
••The music data itself contains
noise, or the sound is distorted.
Noise may have entered during
the transfer process. Delete the
file, and try transfer again.
••The bit rate used in encoding an
audio file was low. Send an audio
file with higher bit rate to the USB
device.
“READING” is displayed for an
extended time, or it takes a long
time before playback starts.
••The reading process can take a
long time in the following cases.
•—There are many folders or files
on the USB device (page10).
•—The file structure is extremely
complex.
•—The memory capacity is
excessive.
•—The internal memory is
fragmented.
“NO FILE” appears on the display.
••The system has entered the
software update mode, and
all controls (except ) are
deactivated. Press on the unit to
cancel the software update.
“OVER CURRENT” appears on the
display.
••A problem has been detected
with the level of electrical current
from the (USB) port. Turn off
the system and remove the USB
device from the port. Make sure
there is no problem with the USB
device. If this display pattern
persists, contact your nearest Sony
dealer.
The USB device is not recognized.
••Turn off the system and reconnect
the USB device, then turn on the
system.

MHC-V82D/MHC-V72D.GB.5-000-538-13(1)
64GB
••Check the information on the
website about compatible USB
devices (page11).
••The USB device is not working
properly. Refer to the operating
instructions of the USB device on
how to deal with this problem.
There is no picture.
••Check that the system is
connected securely.
••If the HDMI cable is damaged,
replace it with a new one.
••Make sure you connect the unit to
the HDMI input connector on your
TV (page17).
••Make sure you turn on the TV and
operate the TV correctly.
••Make sure you select the input
according to the connection on
the TV so that you can view the
pictures from the system.
••(Except for Latin American,
European, and Russian models)
Make sure you set the color
system correctly, according to your
TV’s color system.
Picture noise appears.
••Wipe the disc clean (page71).
••If video signal from your system
has to go through your VCR to
your TV, the copy-protection
applied to some DVD VIDEO
programs could affect the picture
quality.
••(Except for Latin American,
European, and Russian models)
Set the color system to match your
TV (page 19, 28).
The aspect ratio of the TV screen
cannot be changed.
••The aspect ratio is fixed on your
DVD VIDEO and video file.
••Depending on the TV, you may not
be able to change the aspect ratio.
The language for sound track,
subtitles, or camera angles cannot
be changed.
••Multilingual tracks, multilingual
subtitles, or multi-angles are not
recorded on the DVD VIDEO being
played back.
••The DVD VIDEO prohibits changing
the setting.
The subtitles cannot be turned off.
••The DVD VIDEO prohibits turning
off subtitles.
USB transfer
Transferring results in an error.
••You are using an unsupported USB
device. Check the information on
the website about compatible USB
devices (page11).
••The USB device is not formatted
correctly. Refer to the operating
instructions of the USB device on
how to format.
••Turn off the system and remove
the USB device. If the USB device
has a power switch, turn the USB
device off and on again after
removing it from the system. Then,
perform the transfer again.
••If the transfer and erase
operations are repeated multiple
times, the file structure within the
USB device becomes fragmented.
Refer to the operating instructions
of the USB device on how to deal
with this problem.
••The USB device was disconnected
or the power was turned off
during transfer. Delete the
partially-transferred file, and
perform the transfer again. If this
does not fix the problem, the USB
device may be broken. Refer to the
operating instructions of the USB
device on how to deal with this
problem.

MHC-V82D/MHC-V72D.GB.5-000-538-13(1)
Additional Information
65GB
Audio files or folders on the USB
device cannot be erased.
••Check if the USB device is write-
protected.
••The USB device was disconnected
or the power was turned off
during the erase operation. Delete
the partially-erased file. If this
does not fix the problem, the USB
device may be broken. Refer to the
operating instructions of the USB
device on how to deal with this
problem.
Tuner*
There is severe hum or noise, or
stations cannot be received.
••Connect the antenna properly.
••Change antenna location and
its orientation to obtain good
reception.
••Turn off nearby electrical
equipment.
* Radio may not be received depending
on the radio wave conditions or the
housing environment in your area.
BLUETOOTH connection
Pairing cannot be performed.
••Move the BLUETOOTH device
closer to the system.
••Pairing may not be possible if
other BLUETOOTH devices are
present around the system.
In this case, turn off the other
BLUETOOTH devices.
••Make sure to enter the correct
passkey when selecting the
system’s name (this system) on
the BLUETOOTH device.
The BLUETOOTH device cannot
detect the system, or “BT OFF”
appears on the display.
••Set the BLUETOOTH signal to “BT
ON” (page39).
Connection is not possible.
••The BLUETOOTH device you
attempted to connect does not
support the A2DP profile, and
cannot be connected with the
system.
••Enable the BLUETOOTH function of
the BLUETOOTH device.
••Establish a connection from the
BLUETOOTH device.
••The pairing registration
information has been erased.
Perform the pairing operation
again.
The sound skips or fluctuates, or
the connection is lost.
••The system and the BLUETOOTH
device are too far apart.
••If there are obstacles between
the system and your BLUETOOTH
device, remove or avoid the
obstacles.
••If there is equipment that
generates electromagnetic
radiation, such as a wireless LAN,
other BLUETOOTH device, or a
microwave oven nearby, move
them away.
The sound of your BLUETOOTH
device cannot be heard on this
system.
••Increase the volume on your
BLUETOOTH device first, then
adjust the volume using +/–.
There is severe hum, noise, or
distorted sound.
••If there are obstacles between
the system and your BLUETOOTH
device, remove or avoid the
obstacles.

MHC-V82D/MHC-V72D.GB.5-000-538-13(1)
66GB
••If there is equipment that
generates electromagnetic
radiation, such as a wireless LAN,
other BLUETOOTH device, or a
microwave oven nearby, move
them away.
••Turn down the volume of the
connected BLUETOOTH device.
Apps Control
Voice Control does not work
properly.
••Speak closer to your smartphone/
iPhone microphone.
••Speak clearly at a slower speed.
••Reduce the surrounding noise.
Control for HDMI (“BRAVIA”
Sync)
The system does not turn on even
when the TV is turned on.
••Hold down SHIFT and press
SETUP, then set [HDMI SETUP]–
[CONTROL FOR HDMI] to [ON]
(page 29). The TV must support
the Control for HDMI function
(page 42). For details, refer to
the operating instructions of your
TV.
••Check the speaker settings of the
TV. The system power syncs with
the speaker settings of the TV.
For details, refer to the operating
instructions of your TV.
••If the sound was output from the
TV’s speakers the previous time,
the system does not turn on even
when the TV is turned on.
The system turns off when the TV
is turned off.
••The [STANDBY LINKED TO TV]
in [HDMI SETUP] is set to [ON]
(page30), the system turns off
automatically when you turn off
the TV regardless of the input.
The system does not turn off even
when the TV is turned off.
••To turn the system off
automatically regardless of the
input when you turn off the TV, set
[STANDBY LINKED TO TV] to [ON]
(page 30). The TV must support
the Control for HDMI function
(page42). For details, refer to
the operating instructions of your
TV.
There is no picture/sound when
connected to the HDMI OUT (TV)
ARC connector.
••Change the setting in [HDMI
SETUP] – [HDMI RESOLUTION]. The
problem may be solved.
••The equipment connected to the
HDMI OUT (TV) ARC connector
does not conform to the audio
signal format. In this case, set
[HDMI SETUP] – [AUDIO(HDMI)] to
[PCM] (page 29).
••Try the following:
•—Turn the system off and on
again.
•—Turn the connected equipment
off and on again.
•—Disconnect then connect the
HDMI cable again.
No TV sound is heard from the
system. “CODE 01” and “SGNL ERR”
appear on the display.
••This system supports 2-channel
Linear PCM formats only. Check
the audio output setting on the
TV and change it to PCM output
mode if automatic mode is
selected. For details, refer to the
operating instructions of your TV.
••Check that the speaker output
setting on the TV is set to use
external speakers.

MHC-V82D/MHC-V72D.GB.5-000-538-13(1)
Additional Information
67GB
No TV sound is output from the
system.
••Check the type and connection of
the HDMI cable or audio cable that
is connected to the system and
the TV (page 17).
••If your TV is compatible with
Audio Return Channel, make
sure the system is connected
to an ARC-compatible HDMI IN
connector of the TV (page 17).
If sound is still not output or if
sound is interrupted, connect
an audio cable (not supplied),
hold down SHIFT and press
SETUP, then set [HDMI SETUP]–
[AUDIO RETURN CHANNEL] to
[OFF] (page 30).
••If your TV is not compatible with
Audio Return Channel, TV sound
will not be output from the system
even if the system is connected
to the TV’s HDMI IN connector. To
output TV sound from the system,
connect an audio cable (not
supplied) (page 17).
••Change the function of the system
to “TV” (page 17).
••Increase the volume on the
system.
••Depending on the order in which
you turn on the TV or system first,
the system may be muted and
“” (muting) lights up on display
of the unit. If this happens, turn on
the TV first, then the system.
••Set the speakers setting of the TV
(BRAVIA) to Audio System. Refer to
the operating instructions of your
TV on how to set the TV.
The sound is output from both the
system and the TV.
••Mute the sound of the system or
the TV.
••Change the speaker output on the
TV to TV speaker or Audio System.
The Control for HDMI function
does not work properly.
••Check the connection with the
system (page 17).
••Enable the Control for HDMI
function on the TV. For details,
refer to the operating instructions
of your TV.
••Wait a while, then try again. If you
unplug the system, it will take
a while before operations can
be made. Wait for 15 seconds or
longer, then try again.
••Make sure the TV connected to
the system support the Control for
HDMI function.
••The type and number of devices
that can be controlled by the
Control for HDMI function is
restricted by the HDMI CEC
standard as follows:
•—Recording devices (Blu-ray Disc
recorder, DVD recorder, etc.): up
to 3 devices
•—Playback devices (Blu-ray Disc
Player, DVD player, etc.): up to
3devices (this system uses one
of them)
•—Tuner-related devices: up to
4devices
•—Audio system (receiver/
headphone): up to 1 device
(used by this system)
Gesture Control
The Gesture Control cannot be
activated.
••Touch GESTURE ON/OFF
repeatedly until GESTURE
CONTROL lights up.
••Make sure the Child Lock function
is not activated (page 60).

MHC-V82D/MHC-V72D.GB.5-000-538-13(1)
68GB
The Gesture Control does not
operate properly.
••Move your hand closer to
GESTURE CONTROL sensor when
you perform the swiping motion.
••Perform the swiping motion at a
slower speed.
••Select the correct mode
(PLAYBACK, DJ, SAMPLER or
KARAOKE) before you start using
the Gesture Control (page44).
••Install a noise filter (not supplied)
to the AC power cord (mains lead).
••Turn off surrounding electrical
equipment.
“PARTY LOCK” appears when you
use any control on the unit.
••Set the Party Lock function to off
(page 47).
Multiple systems playback
Wired Party Chain function cannot
be activated.
••Check the connections
(page49).
••Make sure the audio cables are
connected correctly.
“PARTY CHAIN” is flashing on the
display.
••You cannot select AUDIO IN
function if you connect the
last system to the first system
(page49) during Wired Party
Chain function. Select other
function (page 50).
••Touch PARTY CHAIN on the unit.
••Turn off the system, then turn it
on again.
Wired Party Chain function does
not work properly.
••Turn off the system. Then, turn
it on again to activate the Wired
Party Chain function.
BLUETOOTH device cannot be
connected to the system during
Wireless Party Chain function.
••After connecting all the systems,
perform the pairing and
connecting operations between
the BLUETOOTH device and the
Party Host.
BLUETOOTH device cannot be
connected to the system during
Speaker Add function.
••After connecting two same model
systems, perform the pairing and
connecting operations between
the BLUETOOTH device and the
Host system.
Karaoke
There is no microphone sound.
••Adjust the microphone volume
level.
••Make sure the microphone is
connected to the MIC1 or MIC2/
GUITAR jack on the unit correctly.
••Make sure the microphone is
turned on.
There is acoustic feedback.
••Reduce the volume.
••Move the microphone and guitar
away from the system or change
the direction of the microphone.
The sound loses stereo effect
during playback.
••Turn off the Vocal Fader
(page55).
••Make sure the system is
connected properly.

MHC-V82D/MHC-V72D.GB.5-000-538-13(1)
Additional Information
69GB
Resetting the system
If the system still does not operate
properly, reset the system to factory
default settings.
Use the controls on the unit to
perform this operation.
1 Unplug the AC power cord (mains
lead), then plug it back in.
2 Press to turn on the system.
3 Touch and hold GUITAR and
MEGA BASS for about 3 seconds.
“RESET” appears on the display.
After the reset completes, the
system automatically reboots. Press
to turn on the system.
All BLUETOOTH pairing information
and user-configured settings, such
as preset radio stations are reset to
factory default setting (except for
some setup menu settings).
To reset all setup menu settings, see
“Returning the setup menu settings
to the default” (page 69).
Returning the setup menu
settings to the default
You can return the setup
menu settings (except for
[PARENTAL CONTROL] settings) to
the default settings.
1 Hold down SHIFT and press
SETUP.
The setup menu appears on the TV
screen.
2 Press / repeatedly to select
[SYSTEM SETUP], then press .
3 Press / repeatedly to select
[RESET], then press .
4 Press / repeatedly to select
[YES], then press .
It takes a few seconds to complete.
Do not press while resetting the
system.
Self-diagnosis function
When the self-diagnosis function is
activated, a service number appears
on the TV screen or the display.
The service number consists of an
alphabet and numerals (e.g. C 13 50).
See the following table for the cause
and corrective action.
First 3
characters of
the service
number
Cause and corrective
action
C 13 This disc is dirty.
••Clean the disc with a
soft cloth (page71).
C 31 The disc is not inserted
correctly.
••Turn off the system,
then turn it on again.
Then re-insert the disc
correctly.
E XX
(XX is a
number)
To prevent a
malfunction, the system
has performed the
self-diagnosis function.
••Contact your nearest
Sony dealer or local
authorized Sony service
facility and give the
5-character service
number.
Example: E 61 10

MHC-V82D/MHC-V72D.GB.5-000-538-13(1)
70GB
Messages
One of the following messages may
appear or flash on the display during
operation.
CANNOT PLAY
••A disc that cannot be played back
was inserted.
••A DVD VIDEO with unsupported
region code was loaded.
CODE 01/SGNL ERR
An unsupported audio signal is
input from the connected TV’s HDMI
IN (ARC) connector (page 66).
DATA ERROR
••The file is created in unsupported
format.
••The file extensions does not match
the file format.
DEVICE ERROR
The USB device could not be
recognized or an unknown device is
connected.
DEVICE FULL
The memory of the USB device is
full.
ERASE ERROR
Erase of audio files or folders on the
USB device failed.
FATAL ERROR
The USB device was removed during
transfer or erase operation, and may
have been damaged.
FOLDER FULL
You cannot transfer onto the USB
device because the number of
folders has reached its maximum.
NoDEVICE
No USB device is connected or
unsupported device is connected.
NO DISC
There is no disc in the unit.
NO MUSIC
No supported audio files exist in the
playback source.
NO SUPPORT
An unsupported USB device is
connected, or the USB device is
connected through a USB hub.
NO VIDEO
No supported video files exist in the
playback source.
NOT USE
You tried to perform a specific
operation under conditions where
that operation is prohibited.
OVER CURRENT
An over current from the (USB)
port was detected.
PROTECT
The USB device is write-protected.
PUSH STOP
You tried to perform an operation
that can be performed only when
the playback is stopped.
READING
The system is reading information
of the disc or USB device. Some
operations are not available.
REC ERROR
The transfer did not start, stopped
partway, or otherwise could not be
performed.
TRACK FULL
You cannot transfer onto the USB
device because the number of files
has reached its maximum.

MHC-V82D/MHC-V72D.GB.5-000-538-13(1)
Additional Information
71GB
Precautions
When carrying the unit
To avoid damaging the disc
mechanism, perform the following
procedure before carrying the unit.
Use the controls on the unit to
perform this operation.
1 Press to turn on the system.
2 Touch FUNCTION repeatedly to
select “DVD/CD”.
3 Remove the disc.
Touch to open and close the disc
tray.
Wait until “NO DISC” appears on the
display.
4 Press to turn off the system.
5 Unplug the AC power cord (mains
lead).
Notes on discs
••Before playing, wipe the disc with a
cleaning cloth from the center outward
to the edge.
••Do not clean discs with solvents, such
as benzine, thinner, or commercially
available cleaners or anti-static spray
intended for vinyl LPs.
••Do not expose discs to direct sunlight
or heat sources such as hot air ducts,
nor leave them in a car parked in direct
sunlight.
On safety
••Completely disconnect the AC power
cord (mains lead) from the wall outlet
(mains) if it is not going to be used
for an extended period of time. When
unplugging the system, always grip the
plug. Never pull the cord itself.
••Should any solid object or liquid get
into the system, unplug the system, and
have it checked by qualified personnel
before operating it again.
••AC power cord (mains lead) must be
changed only at the qualified service
shop.
On handling the system
••Do not splash water on the unit
on purpose. Dust and drip proof
performance is improved by the flat
top structure of the unit, but this is not
guaranteed for all the situations. If you
accidentally splash liquid on the unit,
wipe off immediately.
••To maintain the dust and drip proof
performance, make sure all the covers
of the jacks/port/terminal are securely
closed.
On placement
••Do not place the system in an inclined
position or in locations that are
extremely hot, cold, dusty, dirty, or
humid or lacking adequate ventilation,
or subject to vibration, direct sunlight or
a bright light.
••Be careful when placing the system
on surfaces that have been specially
treated (for example, wax, oil, polish) as
staining or discoloration of the surface
may result.
••If the system is brought directly from
a cold to a warm location or is placed
in a very damp room, moisture may
condense on the lens inside the unit,
and cause the system to malfunction.
In this situation, remove the disc, and
leave the system turned on for about an
hour until the moisture evaporates.
On heat buildup
••Heat buildup on the unit during
operation is normal and is not a cause
for alarm.
••Do not touch the cabinet if it has been
used continuously at a high volume
because the cabinet may have become
hot.
••Do not obstruct the ventilation holes.

MHC-V82D/MHC-V72D.GB.5-000-538-13(1)
72GB
On the speaker system
The built-in speaker system is not
magnetically shielded, and the picture on
nearby TV sets may become magnetically
distorted. In this situation, turn off the
TV, wait 15 to 30 minutes, and turn it back
on. If there is no improvement, move the
system far away from the TV.
IMPORTANT NOTICE
Caution: If you leave a still video
image or on-screen display image
displayed on your TV for an extended
period of time via this system, you
risk permanent damage to your TV
screen. Projection TVs are especially
susceptible to this.
Cleaning the cabinet
Clean this system with a soft cloth slightly
moistened with a mild detergent solution.
Do not use any type of abrasive pad,
scouring powder, or solvent, such as
thinner, benzine, or alcohol.
On BLUETOOTH communication
••BLUETOOTH devices should be used
within approximately 10 meters
(unobstructed distance) of each
other. The effective communication
range may become shorter under the
following conditions:
— When a person, metal object, wall
or other obstruction is between
the devices with a BLUETOOTH
connection.
— Locations where a wireless LAN is
installed.
— Around microwave ovens that are
in use.
— Locations where other
electromagnetic waves are
generated.
••BLUETOOTH devices and wireless LAN
(IEEE 802.11b/g/n) equipment use the
same frequency band (2.4GHz). When
using your BLUETOOTH device near
a device with wireless LAN capability,
electromagnetic interference may
occur. This could result in lower data
transfer rates, noise, or inability to
connect. If this happens, try the
following remedies:
— Use this system at least 10 meters
away from the wireless LAN
equipment.
— Turn off the power of the wireless
LAN equipment when using your
BLUETOOTH device within 10 meters.
— Use this system and BLUETOOTH
device as closer to each other as
possible.
••The radio waves broadcast by this
system may interfere with the operation
of some medical devices. Since this
interference may result in malfunction,
always turn off the power on this
system and BLUETOOTH device in the
following locations:
— In hospitals, on trains, in airplanes,
at gas stations, and any place where
flammable gases may be present.
— Near automatic doors or fire alarms.
••This system supports security
functions that comply with BLUETOOTH
specifications to ensure secure
connections during communication
using BLUETOOTH technology. However,
this security may be insufficient
depending on the setting contents
and other factors, so always be careful
when performing communication using
BLUETOOTH technology.
••Sony cannot be held liable in any way
for damages or other loss resulting
from information leaks during
communication using BLUETOOTH
technology.
••BLUETOOTH communication is not
necessarily guaranteed with all
BLUETOOTH devices that have the same
profile as this system.

MHC-V82D/MHC-V72D.GB.5-000-538-13(1)
Additional Information
73GB
••BLUETOOTH devices connected with
this system must comply with the
BLUETOOTH specification prescribed
by the Bluetooth SIG, Inc., and must
be certified to comply. However, even
when a device complies with the
BLUETOOTH specification, there may
be cases where the characteristics or
specifications of the BLUETOOTH device
make it impossible to connect, or may
result in different control methods,
display or operation.
••Noise may occur or the audio may
cut off depending on the BLUETOOTH
device connected with this system,
the communications environment, or
surrounding conditions.
Specifications
Speaker section
MHC—V82D
Speaker system:
5-way, Double Bass Reflex
Speaker unit:
Tweeter L/R Front: 50 mm, cone
type
Tweeter L/R Rear: 50 mm, cone
type
Midrange L/R (Upper): 100 mm,
cone type
Midrange L/R (Lower): 120 mm,
cone type
Woofer: 300 mm, cone type
MHC—V72D
Speaker system:
4-way, Double Bass Reflex
Speaker unit:
Tweeter L/R Front: 50 mm, cone
type
Tweeter L/R Rear: 50 mm, cone
type
Midrange L/R: 120 mm, cone type
Woofer: 300 mm, cone type
Inputs
AUDIO/PARTY CHAIN IN (TV) L/R:
Voltage 2 V, impedance
24kilohms
TV (ARC):
Supported audio signal:
2-channel Linear PCM
MIC1:
Sensitivity 1 mV, impedance
10kilohms
MIC2/GUITAR:
Sensitivity 1 mV, impedance
10kilohms (When guitar mode is
turned off.)
Sensitivity 200 mV, impedance
250 kilohms (When guitar mode is
turned on.)
Outputs
AUDIO/PARTY CHAIN OUT L/R:
Voltage 2 V, impedance 1kilohm
HDMI OUT (TV) ARC:
Supported audio signal:
2-channel Linear PCM (up to
48kHz), Dolby Digital
HDMI section
Connector:
Type A (19pin)
Disc player section
System:
Compact disc and digital audio
and video system
Laser Diode Properties
Emission Duration: Continuous
Laser Output*: Less than 44.6 μW
* This output is the value
measurement at a distance of
200 mm from the objective lens
surface on the Optical Pick-up
Block with 7 mm aperture.
Frequency response:
20Hz – 20kHz

MHC-V82D/MHC-V72D.GB.5-000-538-13(1)
74GB
Video color system format:
Latin American models:
NTSC
Other models:
NTSC and PAL
USB section
Supported USB device:
Mass Storage Class
Maximum current:
1A
(USB) port:
Type A
FM tuner section
FM stereo, FM superheterodyne tuner
Antenna:
FM lead antenna
Tuning range:
87.5MHz – 108.0MHz (50kHz
step)
BLUETOOTH section
Communication system:
BLUETOOTH Standard version 4.2
Output:
BLUETOOTH Standard Power
Class 2
Maximum output power:
<9.5 dBm
Maximum number of devices to be
registered:
8 devices
Maximum number of simultaneous
connection (Multipoint):
3 devices
Maximum communication range:
Line of sight approx. 10 m1)
Frequency band:
2.4 GHz band (2.4000 GHz –
2.4835GHz)
Modulation method:
FHSS (Freq Hopping Spread
Spectrum)
Compatible BLUETOOTH profiles2):
A2DP (Advanced Audio
Distribution Profile)
AVRCP (Audio Video Remote
Control Profile)
SPP (Serial Port Profile)
Supported codecs:
SBC (Subband Codec)
AAC (Advanced Audio Coding)
LDAC
1) The actual range will vary depending
on factors such as obstacles between
devices, magnetic fields around a
microwave oven, static electricity,
reception sensitivity, antenna’s
performance, operating system,
software application, etc.
2) BLUETOOTH standard profiles
indicate the purpose of BLUETOOTH
communication between devices.
NFC section
Frequency band:
13.56 MHz
Supported audio formats
Supported bit rate and sampling
frequencies:
MP3:
32/44.1/48kHz, 32 kbps –
320kbps (VBR)
AAC:
44.1 kHz, 48 kbps – 320kbps
(CBR/VBR)
WMA:
44.1 kHz, 48 kbps – 192 kbps
(CBR/VBR)
WAV:
44.1/48 kHz (16 bit)

MHC-V82D/MHC-V72D.GB.5-000-538-13(1)
Additional Information
75GB
Supported video formats
Xvid:
Video codec: Xvid video
Bit rate: 4.854 Mbps (MAX)
Resolution/Frame rate:
720 × 480, 30 fps
720 × 576, 25 fps (except for Latin
American models)
Audio codec: MP3
MPEG4:
File format: MP4 File Format
Video codec: MPEG4 Simple
Profile (AVC is not compatible.)
Bit rate: 4 Mbps
Resolution/Frame rate:
720 × 480, 30 fps
720 × 576, 25 fps (except for Latin
American models)
Audio codec: AAC-LC (HE-AAC is
not compatible.)
DRM: Not compatible
General
Power requirements:
AC 120 V – 240 V, 50/60 Hz
Power consumption:
MHC-V82D: 190 W
MHC-V72D: 120 W
Power consumption (at the Power
Saving mode):
0.5 W (When “BT STBY” is set to
“OFF” and [CONTROL FOR HDMI]
is set to [OFF].)
2 W* (When “BT STBY” is set to
“ON” and [CONTROL FOR HDMI] is
set to [ON].)
Dimensions (W/H/D) (Approx.):
MHC-V82D:
370 mm × 1,060 mm × 427 mm
MHC-V72D:
370 mm × 930 mm × 427 mm
Mass (Approx.):
MHC-V82D: 26.0 kg
MHC-V72D: 21.6 kg
Operating temperature:
5 °C to 35 °C
* The power consumption of the system
will be less than 0.5 W when there is no
HDMI connection and “BT STBY” is set
to “OFF”.
Design and specifications are subject
to change without notice.
Parental Control area
code list
Code Area Code Area
2044 Argentina 2304 Korea
2047 Australia 2363 Malaysia
2046 Austria 2362 Mexico
2057 Belgium 2376 Netherlands
2070 Brazil 2390 New Zealand
2079 Canada 2379 Norway
2090 Chile 2427 Pakistan
2092 China 2424 Philippines
2115 Denmark 2436 Portugal
2165 Finland 2489 Russia
2174 France 2501 Singapore
2109 Germany 2149 Spain
2248 India 2499 Sweden
2238 Indonesia 2086 Switzerland
2254 Italy 2528 Thailand
2276 Japan 2184 United Kingdom

MHC-V82D/MHC-V72D.GB.5-000-538-13(1)
76GB
Language code list
The language spellings conform to the ISO 639:1988 (E/F) standard.
Code Language Code Language Code Language Code Language
1027 Afar 1186 Scots Gaelic 1350 Malayalam 1513 Siswati
1028 Abkhazian 1194 Galician 1352 Mongolian 1514 Sesotho
1032 Afrikaans 1196 Guarani 1353 Moldavian 1515 Sundanese
1039 Amharic 1203 Gujarati 1356 Marathi 1516 Swedish
1044 Arabic 1209 Hausa 1357 Malay 1517 Swahili
1045 Assamese 1217 Hindi 1358 Maltese 1521 Tamil
1051 Aymara 1226 Croatian 1363 Burmese 1525 Telugu
1052 Azerbaijani 1229 Hungarian 1365 Nauru 1527 Tajik
1053 Bashkir 1233 Armenian 1369 Nepali 1528 Thai
1057 Byelorussian 1235 Interlingua 1376 Dutch 1529 Tigrinya
1059 Bulgarian 1239 Interlingue 1379 Norwegian 1531 Turkmen
1060 Bihari 1245 Inupiak 1393 Occitan 1532 Tagalog
1061 Bislama 1248 Indonesian 1403 (Afan) Oromo 1534 Setswana
1066 Bengali; Bangla 1253 Icelandic 1408 Oriya 1535 Tonga
1067 Tibetan 1254 Italian 1417 Punjabi 1538 Turkish
1070 Breton 1257 Hebrew 1428 Polish 1539 Tsonga
1079 Catalan 1261 Japanese 1435 Pashto; Pushto 1540 Tatar
1093 Corsican 1269 Yiddish 1436 Portuguese 1543 Twi
1097 Czech 1283 Javanese 1463 Quechua 1557 Ukrainian
1103 Welsh 1287 Georgian 1481
Rhaeto-Romance
1564 Urdu
1105 Danish 1297 Kazakh 1482 Kirundi 1572 Uzbek
1109 German 1298 Greenlandic 1483 Romanian 1581 Vietnamese
1130 Bhutani 1299 Cambodian 1489 Russian 1587 Volapük
1142 Greek 1300 Kannada 1491 Kinyarwanda 1613 Wolof
1144 English 1301 Korean 1495 Sanskrit 1632 Xhosa
1145 Esperanto 1305 Kashmiri 1498 Sindhi 1665 Yoruba
1149 Spanish 1307 Kurdish 1501 Sangho 1684 Chinese
1150 Estonian 1311 Kirghiz 1502 Serbo-Croatian 1697 Zulu
1151 Basque 1313 Latin 1503 Singhalese 1703 Not specified
1157 Persian 1326 Lingala 1505 Slovak
1165 Finnish 1327 Laothian 1506 Slovenian
1166 Fiji 1332 Lithuanian 1507 Samoan
1171 Faroese 1334
Latvian; Lettish
1508 Shona
1174 French 1345 Malagasy 1509 Somali
1181 Frisian 1347 Maori 1511 Albanian
1183 Irish 1349 Macedonian 1512 Serbian

MHC-V82D/MHC-V72D.GB.5-000-538-13(1)

MHC-V82D/MHC-V72D.GB.5-000-538-13(1)

MHC-V82D/MHC-V72D.GB.5-000-538-13(1)

MHC-V82D/MHC-V72D.GB.5-000-538-13(1)
©2019 Sony Corporation Printed in Malaysia 5-000-538-13(1)
Код: 113270
Извините, товара сейчас нет в наличии
Бесплатная доставка
по Красноярску
Извините, товара сейчас нет в наличии
Новости интернет-магазина «Лаукар»:
Дополнительная информация в категории Музыкальный центр:
В интернет-магазине бытовой техники «Лаукар» Вы можете скачать инструкцию к товару Музыкальный центр Sony MHC-V72D совершенно бесплатно.
Все инструкции, представленные на сайте интернет-магазина бытовой техники «Лаукар», предоставляются производителем товара.
Перед началом использования товара рекомендуем Вам ознакомиться с инструкцией по применению.
Для того чтобы скачать инструкцию, Вам необходимо нажать на ссылку «скачать инструкцию», расположенную ниже, а в случае, если ссылки нет,
Вы можете попробовать обратиться к данной странице позднее,
возможно специалисты интернет-магазина бытовой техники «Лаукар» еще не успели загрузить для скачивания инструкцию к товару:
Музыкальный центр Sony MHC-V72D.

Фирма-производитель оставляет за собой право на внесение изменений в конструкцию, дизайн и комплектацию товара: Музыкальный центр Sony MHC-V72D. Пожалуйста, сверяйте информацию о товаре с информацией на
официальном сайте компании производителя.
Sony MHC-V72D
MHC-V82D/MHC-V72D
MHC-V82D/MHC-V72D.RU.5-000-543-51(1)
Инструкция по
эксплуатации
Інструкція з
експлуатації
RU
UA
Домашняя
Аудиосистема
Домашня
Аудіосистема
Инструкция
Посмотреть инструкция для Sony MHC-V72D бесплатно. Руководство относится к категории колонки, 9 человек(а) дали ему среднюю оценку 8.2. Руководство доступно на следующих языках: русский. У вас есть вопрос о Sony MHC-V72D или вам нужна помощь?
Задайте свой вопрос здесь
Изображения продукта (6)

Ниже вы найдете технические характеристики изделия и руководства по эксплуатации Sony MHC-V72D.
НАБОР ЗВУКОВОЙ СИСТЕМЫ Sony MHC-V72D
Аудиовходы (левый и правый): 1
Количество портов USB 2.0: 1
Технология подключения: Проводное и беспроводное
FM-радио: Да
Аудиовыход: 1
Вход микрофона: Да
Количество выходов HDMI: 1
Эквалайзер: Да
Аудиодекодеры: Dolby Digital
Тип управления: Сенсорное
Таймер сна: Да
Энергопотребление в режиме ожидания: 0,5 Вт
Технология ближней связи (NFC): Да
Профили Bluetooth: A2DP, AVRCP, SPP
Набор активной звуковой системы Sony MHC-V72D предоставляет высококачественное звучание и функциональность.
Система имеет один аудиовход (левый и правый) и один порт USB 2.0 для удобного подключения устройств. Набор поддерживает проводное и беспроводное подключение, что обеспечивает удобство использования.
В наборе имеется FM-радио, позволяющее слушать любимые радиостанции. Также имеется один аудиовыход и вход для микрофона, что идеально подходит для караоке или проведения мероприятий.
Система оборудована одним выходом HDMI, что позволяет подключать ее к другим аудиовизуальным устройствам. Эквалайзер позволяет настраивать звук в соответствии с предпочтениями слушателя.
Система имеет аудиодекодер Dolby Digital, который обеспечивает высокое качество звука и является стандартным в мире развлечений.
Управление осуществляется сенсорным вводом, что обеспечивает удобство и простоту.
Набор поддерживает функцию таймера сна, что позволяет установить время автоматического выключения.
Система расходует меньше энергии в режиме ожидания, всего 0,5 Вт, что является экологически эффективным.
Технология ближней связи NFC позволяет быстро и легко устанавливать соединение с помощью совместимых устройств.
Sony MHC-V72D – набор активной звуковой системы, предлагающий множество возможностей и обеспечивающий высокое качество звучания.
Типы дисков (воспроизведение)
CD, CD-R, CD-RW, DVD, DVD+R, DVD+R DL, DVD+RW, DVD-R, DVD-RW
Количество портов USB 2.0
1
Аудио декодеры
Dolby Digital
Потребляемая мощность (в режим ожидания)
0.5 W
Главная
| Бренд | Sony |
| Модель | MHC-V72D | MHCV72D |
| Изделие | колонка |
| EAN | 4548736089990, 4548736090002 |
| Язык | русский |
| Тип файла | Руководство пользователя (PDF) |
Прочие свойства
| Типы дисков (воспроизведение) | CD, CD-R, CD-RW, DVD, DVD+R, DVD+R DL, DVD+RW, DVD-R, DVD-RW |
| Аудио вход (Л/П) | 1 |
| FM радио | Да |
| Выход аудио | 1 |
| Количество HDMI выходов | 1 |
| Эквалайзер | Да |
| Тип управления | Сенсорный |
| Таймер засыпания | Да |
| Технология NFC | Да |
| Профили Bluetooth | A2DP, AVRCP, SPP |
| РЧ диапазон | 87.5 — 108 MHz |
| Типы дисков (воспроизведение) | CD, CD-R, CD-RW, DVD, DVD+R, DVD+R DL, DVD+RW, DVD-R, DVD-RW |
| FM радио | Да |
| Профили Bluetooth | A2DP, AVRCP, SPP |
| Вуфер | Да |
Порты и интерфейсы
| Количество портов USB 2.0 | 1 |
| Технология подключения | Проводной и беспроводной |
| Линейный вход микрофона | Да |
| Bluetooth | Да |
| Аудио вход (Л/П) | 1 |
| Количество портов USB 2.0 | 1 |
| Выход аудио | 1 |
| Линейный вход микрофона | Да |
| Технология NFC | Да |
Аудио
| Аудио декодеры | Dolby Digital |
| Поддерживаемые форматы аудио | MP3 |
| Номинальная RMS-мощность | — W |
Энергопитание
| Потребляемая мощность (в режим ожидания) | 0.5 W |
| Потребляемая мощность (в режим ожидания) | 0.5 W |
Акустика
| Твитер | Да |
| Вуфер | Да |
| диаметр верхнечастотного динамика | 50 mm |
| Количество твитеров | 4 |
| Диаметр низкочастотного динамика | 300 mm |
| диаметр среднечастотного динамика | 120 mm |
| Количество среднечастотных динамиков | 2 |
| Количество вуферов | 1 |
| Тип колонок | — |
| Выходные звуковые каналы | — канала |
| Размещение колонок | Floor, Tabletop/bookshelf |
| Количесво драйверов | — |
Вес и размеры
| Ширина | 370 mm |
| Глубина | 427 mm |
| Высота | 930 mm |
| Вес | 21600 g |
| Ширина | 370 mm |
| Глубина | 427 mm |
| Высота | 930 mm |
| Вес | 21600 g |
Содержимое упаковки
| Пульт дистанционного управления | Да |
| Пульт дистанционного управления | Да |
Производительность
| Рекомендованное применение | Сцена |
| Цвет товара | Черный |
| Поддерживаемые форматы аудио | MP3 |
Эргономика
| Эквалайзер | Да |
| Таймер засыпания | Да |
Мультимедиа
| Аудио декодеры | Dolby Digital |
| диаметр верхнечастотного динамика | 50 mm |
| Диаметр низкочастотного динамика | 300 mm |
| диаметр среднечастотного динамика | 120 mm |
| Тип колонок | — |
| Номинальная RMS-мощность | — W |
Технические характеристики
Дизайн
Сеть
показать больше
Часто задаваемые вопросы
Не можете найти ответ на свой вопрос в руководстве? Вы можете найти ответ на свой вопрос ниже, в разделе часто задаваемых вопросов о Sony MHC-V72D.
Какой вес Sony MHC-V72D?
Sony MHC-V72D имеет вес 21600 g.
Могут ли устройства разных марок подключаться друг к другу при помощи Bluetooth?
Да, Bluetooth — универсальный метод, позволяющий различным устройствам, оснащенным Bluetooth, подключаться друг к другу.
Какая высота Sony MHC-V72D?
Sony MHC-V72D имеет высоту 930 mm.
Какая ширина Sony MHC-V72D?
Sony MHC-V72D имеет ширину 370 mm.
Что такое Bluetooth?
Bluetooth — это способ обмена данными по беспроводной сети между электронными устройствами с помощью радиоволн. Расстояние между двумя устройствами обменивающимися данными в большинстве случаев составляет не более десяти метров.
Какая толщина Sony MHC-V72D?
Sony MHC-V72D имеет толщину 427 mm.
Когда звук считается слишком громким?
Уровень звука выше 80 децибел может нанести вред слуху. Уровень звука выше 120 децибел может нанести прямое повреждение слуху. Вероятность повреждения слуха зависит от частоты и продолжительности прослушивания.
Что такое Dolby Atmos?
Dolby Atmos — это технология, которая обеспечивает отражение звука от потолка к месту нахождения слушателя. Это позволяет создать эффект 5.1 при помощи всего лишь одного динамика.
Инструкция Sony MHC-V72D доступно в русский?
Да, руководствоSony MHC-V72D доступно врусский .
Не нашли свой вопрос? Задайте свой вопрос здесь
WARNING
To reduce the risk of fire, do not
cover the ventilation opening of
the appliance with newspapers,
tablecloths, curtains, etc.
Do not expose the appliance to naked
flame sources (for example, lighted
candles).
To reduce the risk of fire or electric
shock, do not expose this appliance
to dripping or splashing, and do not
place objects filled with liquids, such as
vases, on the appliance.
As the main plug is used to disconnect
the unit from the mains, connect the
unit to an easily accessible AC outlet.
Should you notice an abnormality in
the unit, disconnect the main plug
from the AC outlet immediately.
Do not install the appliance in a
confined space, such as a bookcase or
built-in cabinet.
The unit is not disconnected from the
mains as long as it is connected to the
AC outlet, even if the unit itself has
been turned off.
Indoor use only.
The following information is only
applicable to equipment sold in
countries/regions comply to EMC
regulation.
This equipment has been tested
and found to comply with the limits
set out in the EMC regulation using
a connection cable shorter than
3 meters.
CAUTION
Risk of explosion if the battery is
replaced by an incorrect type.
Do not expose batteries or appliances
with battery-installed to excessive
heat, such as sunshine and fire.
2
GB
CAUTION
The use of optical instruments with
this product will increase eye hazard.
For customers in Europe
This appliance is classified as a CLASS 1
LASER product under IEC 60825-1:2007
and IEC 60825-1:2014. This marking is
located on the rear exterior.
Disposal of waste batteries
and electrical and electronic
equipment (applicable in the
European Union and other
countries with separate
collection systems)
This symbol on the
product, the battery or on
the packaging indicates
that the product and the
battery shall not be
treated as household
waste. On certain batteries this symbol
might be used in combination with a
chemical symbol. The chemical symbol
for lead (Pb) is added if the battery
contains more than 0.004% lead. By
ensuring that these products and
batteries are disposed of correctly, you
will help to prevent potentially
negative consequences for the
environment and human health which
could be caused by inappropriate
waste handling. The recycling of the
materials will help to conserve natural
resources. In case of products that for
safety, performance or data integrity
reasons require a permanent
connection with an incorporated
battery, this battery should be replaced
by qualified service staff only. To
ensure that the battery and the
electrical and electronic equipment