
3-042-774-12(1)
English Français Deutsch
FM Stereo/SW/MW/LW
PLL Synthesized Receiver
Operating Instructions
Mode d’emploi
Bedienungsanleitung
ICF-SW35
Sony Corporation © 1999 Printed in China
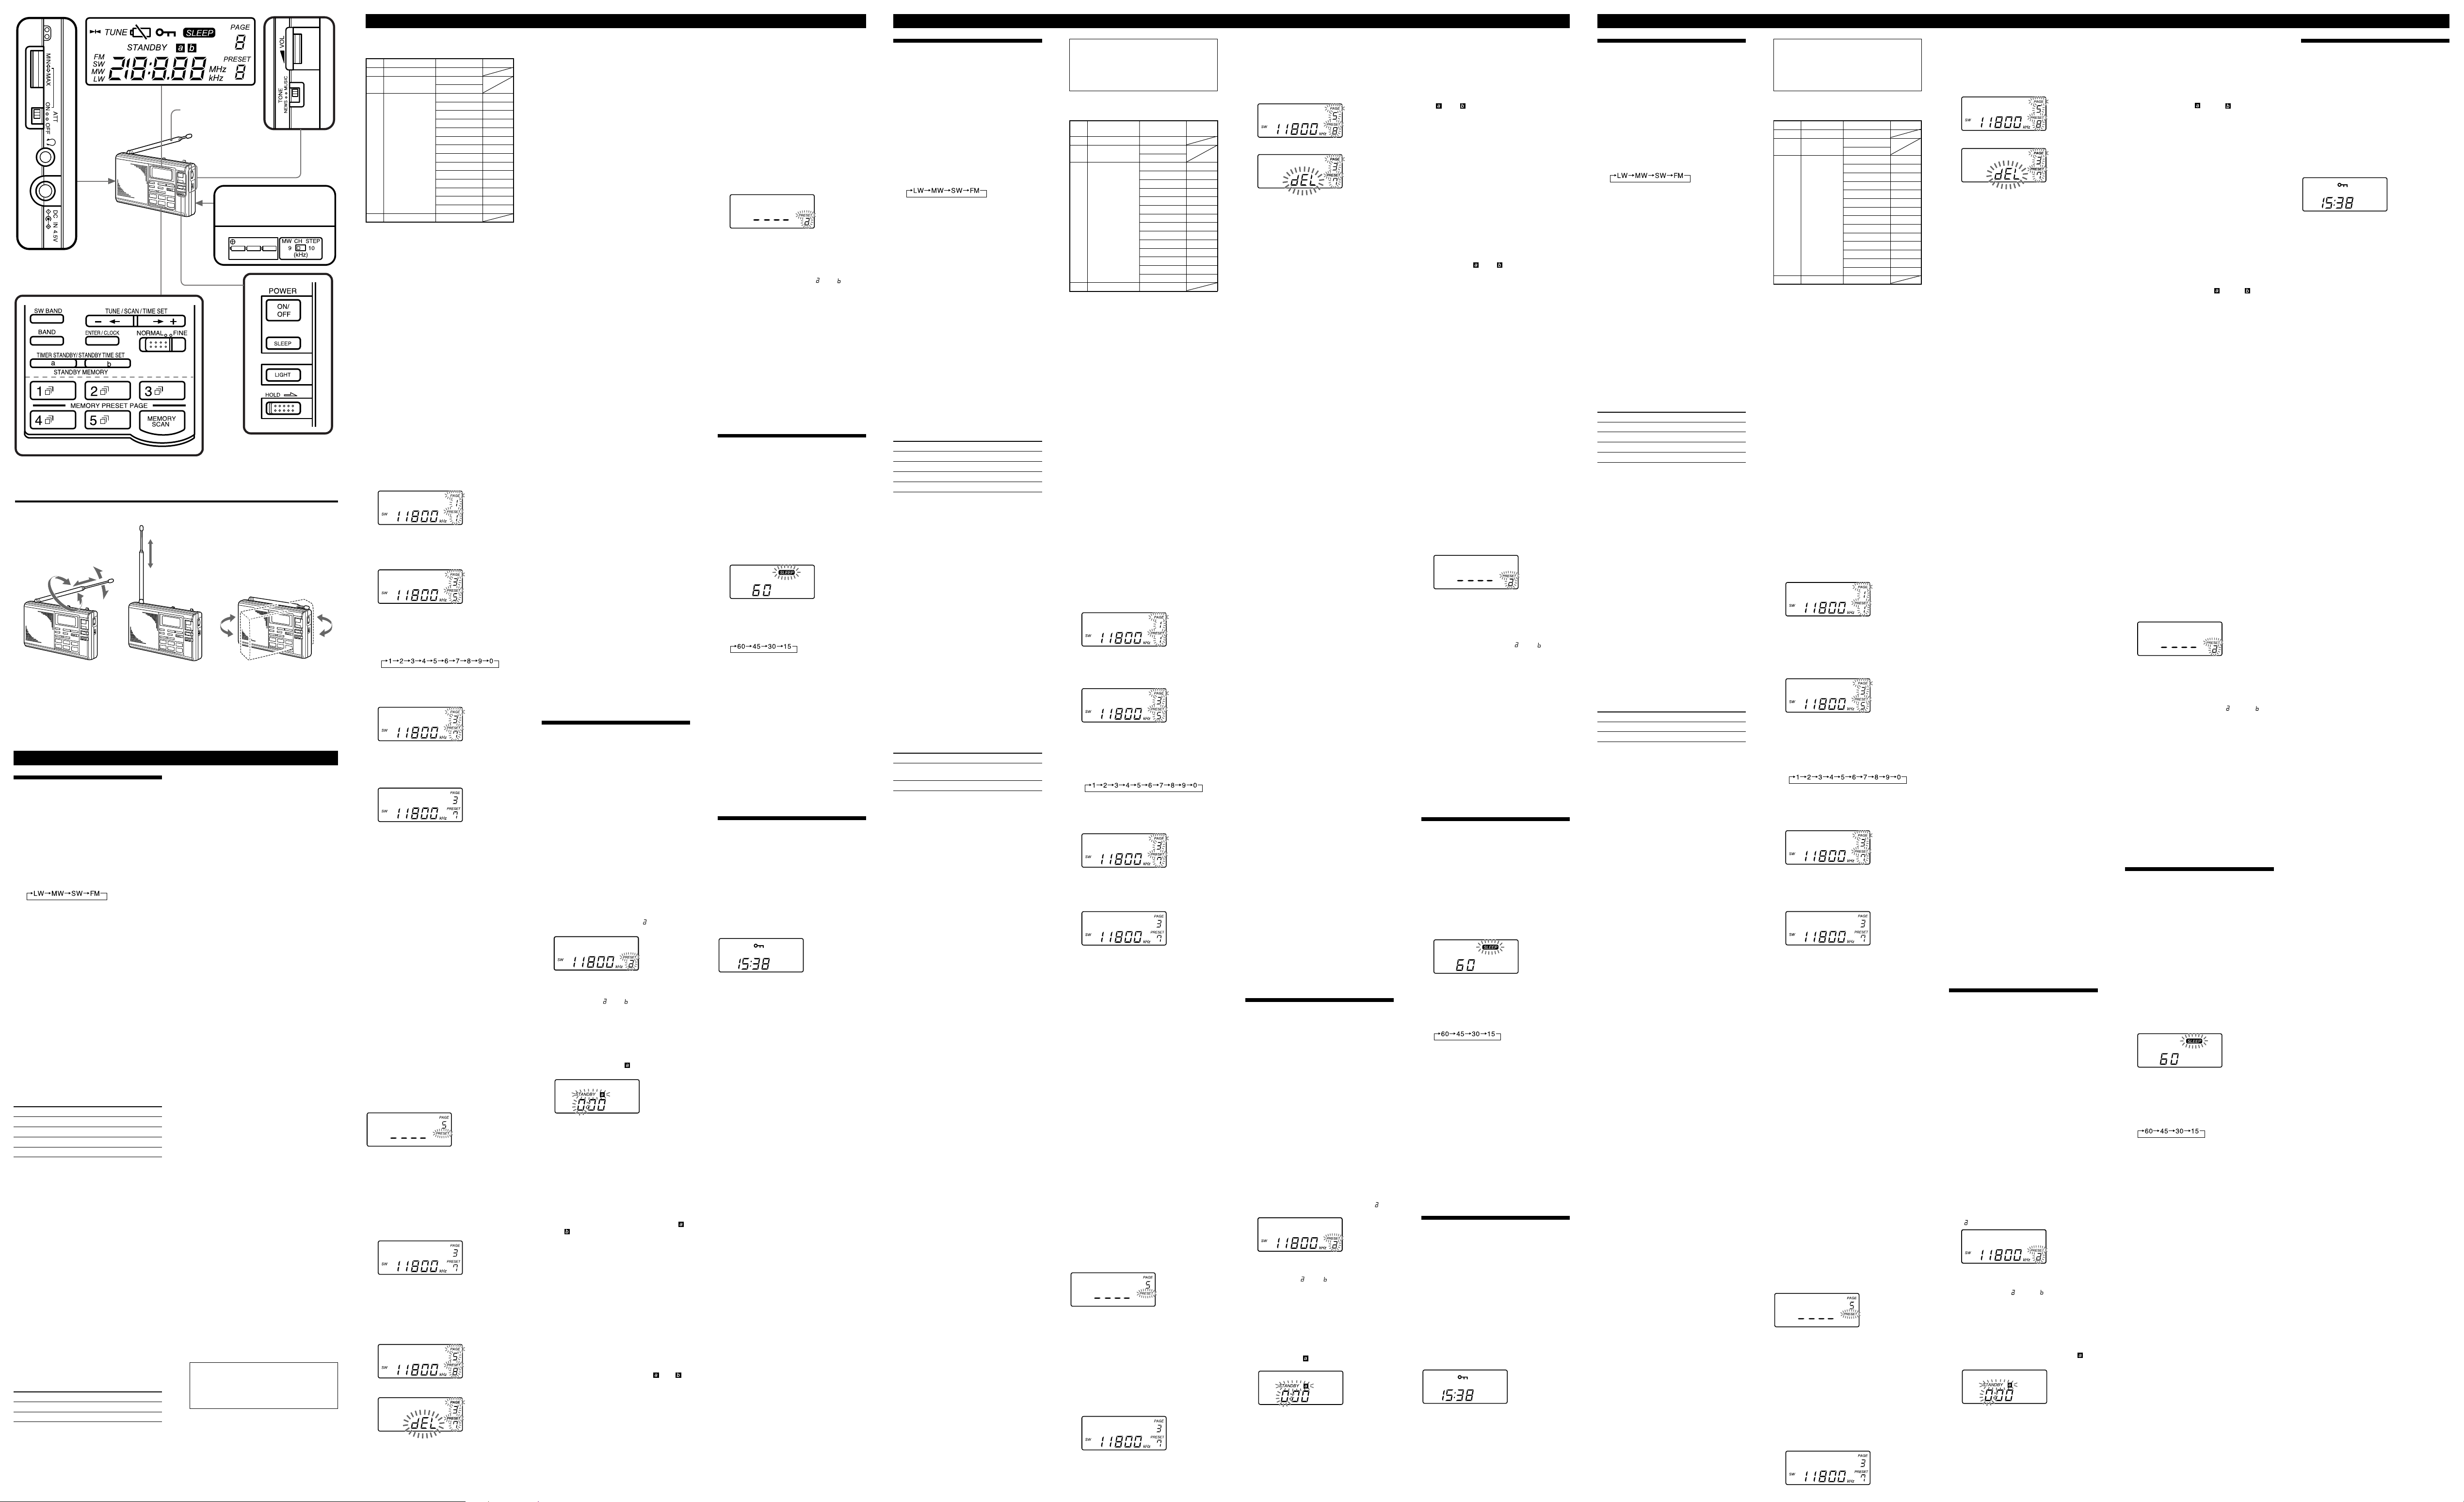
Display
Afficheur
Display
ENTER/CLOCK
Battery compartment
Logement des piles
Batteriefachdeckel
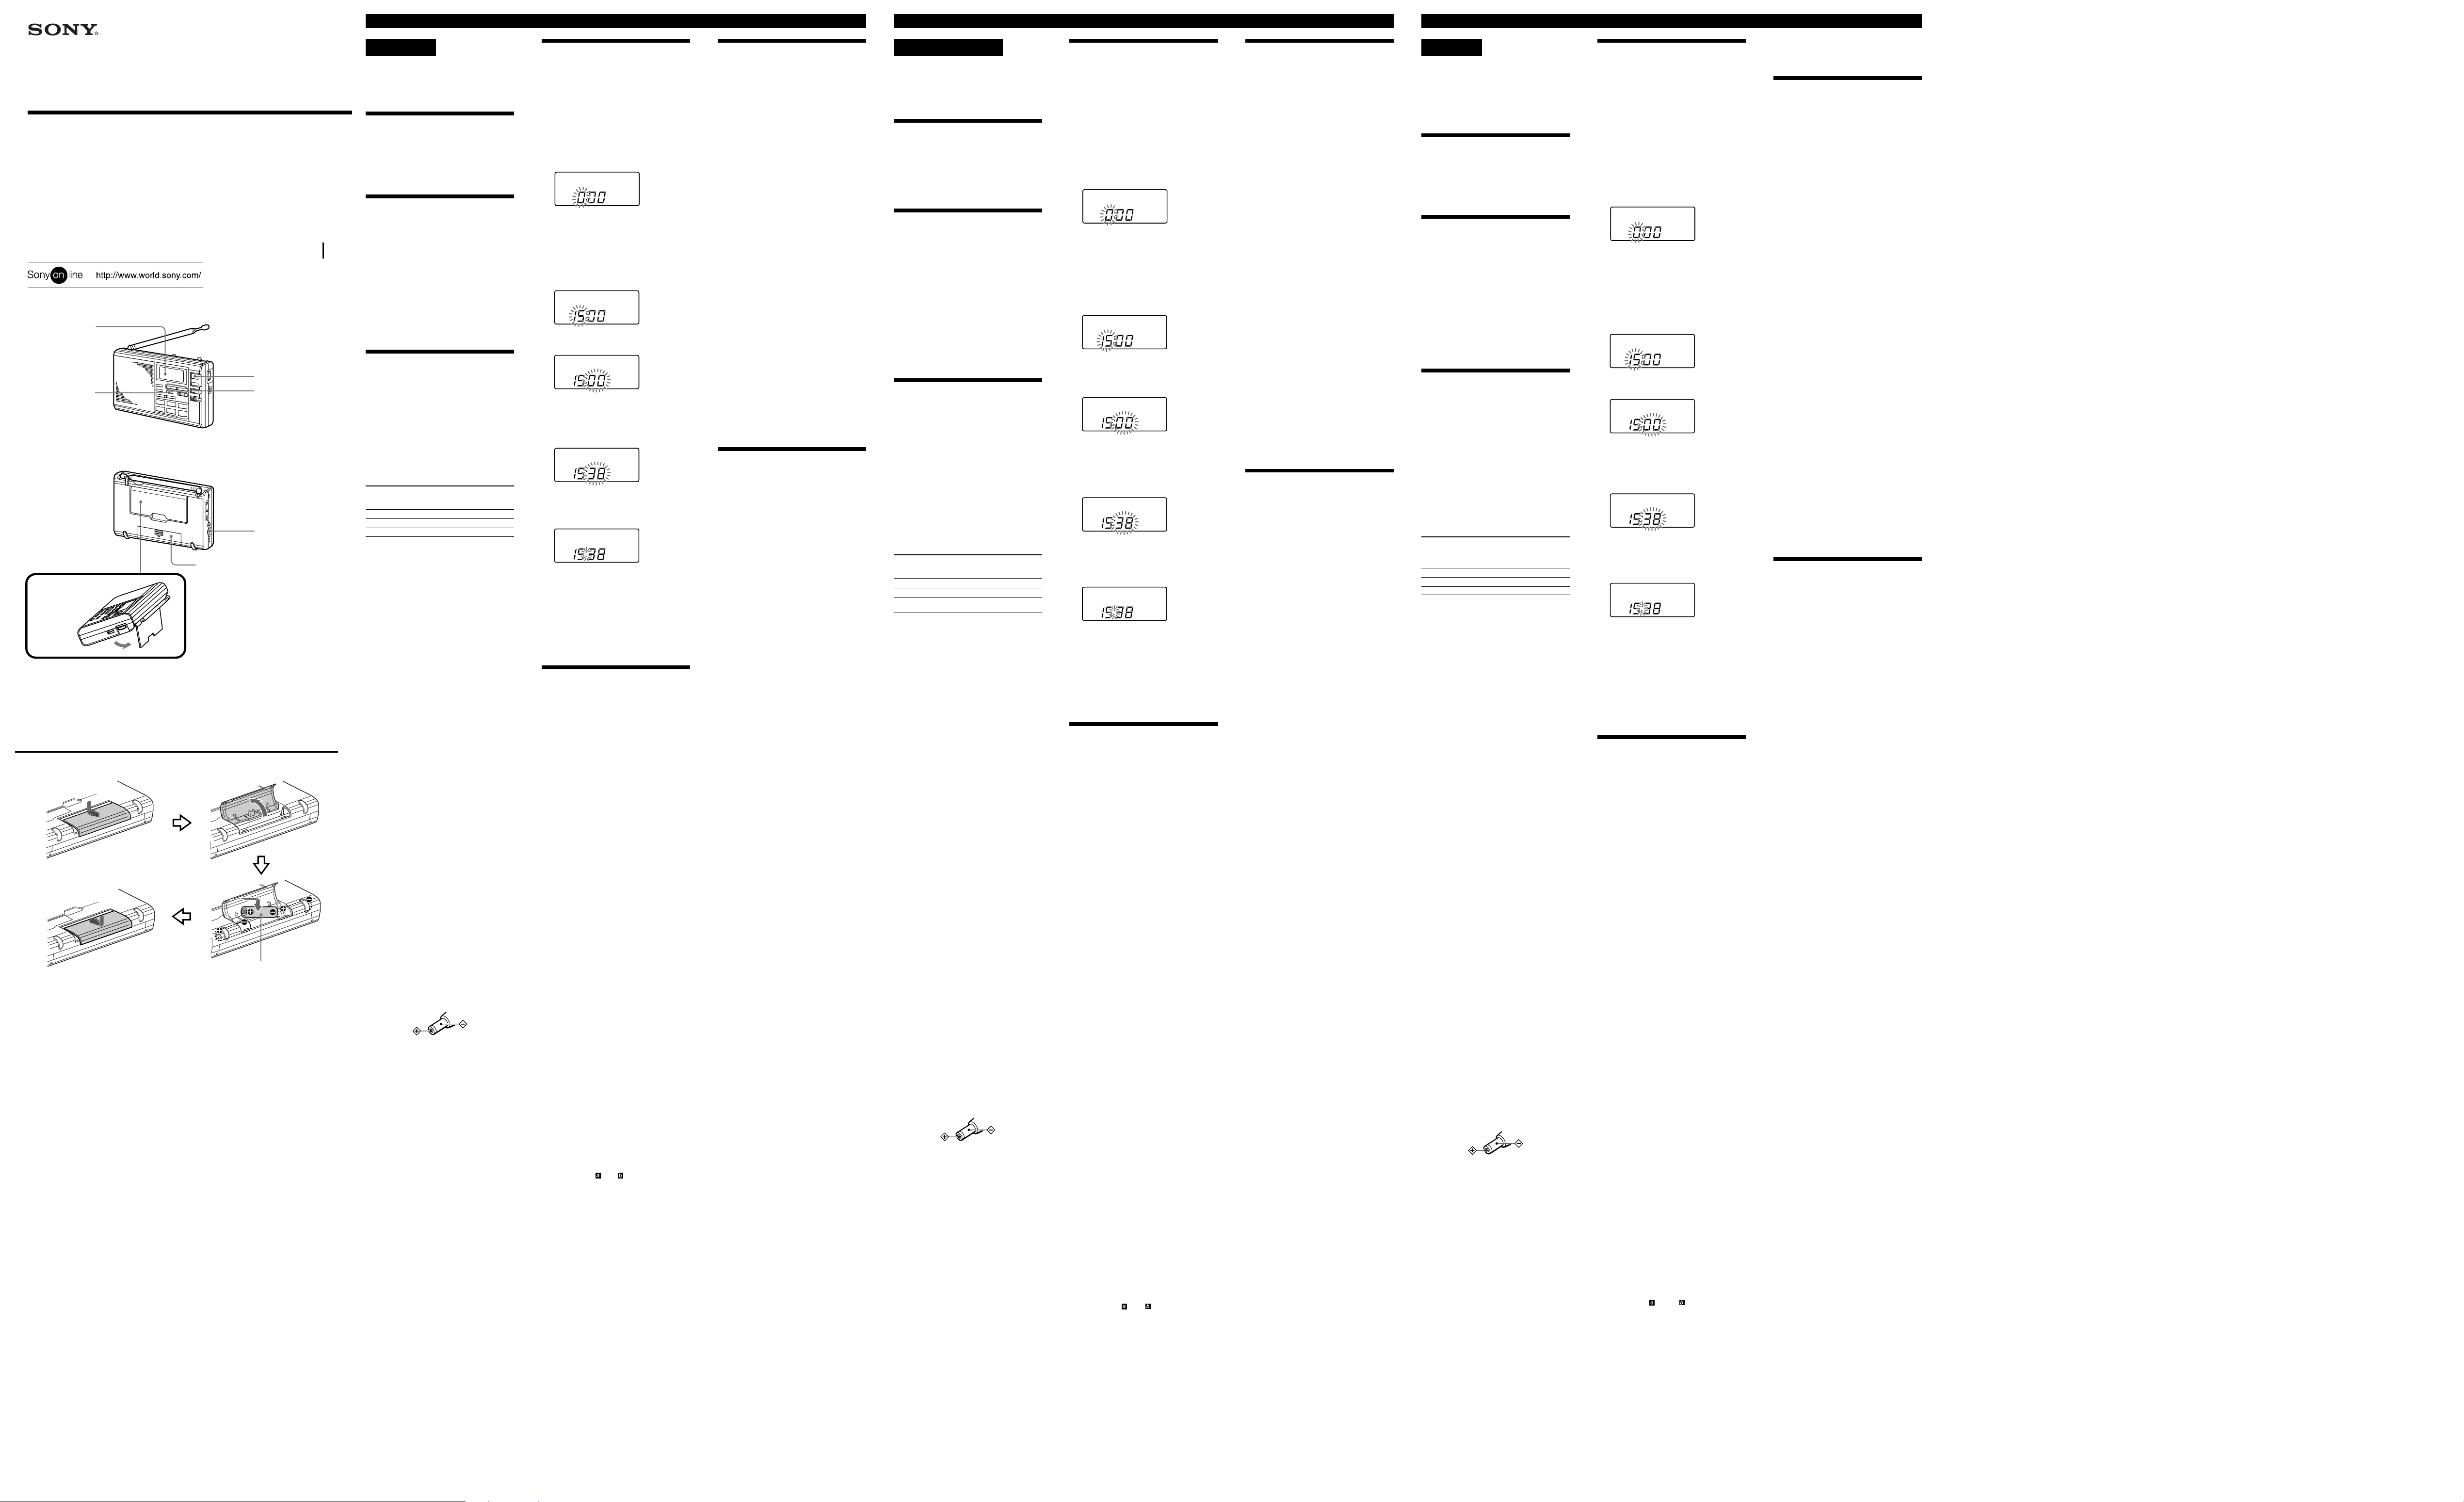
Insert the # side of the battery first.
Insérez le côté # de la pile en premier.
Batterie mit der # Seite zuerst
einlegen.
A
Stand
Support
Ständer
Rear
Arrière
Rückseite
POWER ON/OFF
TUNE/SCAN/TIME SET
TT
tt
–
T,
t +
TT
tt
DC IN 4.5 V
WARNING
To prevent fire or shock hazard, do not
expose the unit to rain or moisture.
To avoid electrical shock, do not open the
cabinet. Refer servicing to qualified personnel
only.
Before You Begin
Thank you for choosing the Sony world band
receiver! The world band receiver will give you
many hours of reliable service and listening
pleasure.
Please read these instructions thoroughly before
operating the world band receiver, and retain
them in a handy place for future reference.
Features
• FM stereo/SW/MW/LW portable receiver
with worldwide band coverage
• PLL (Phase Locked Loop) synthesizer system
• Presetting of up to 10 stations on each memory
preset page for quick tuning (50 stations in
total)
• Memory scan tuning of stations memorized on
a memory preset page
• Standby timer function to receive your favorite
broadcast at the desired time
• Scan tuning to automatically scan the stations
• Sleep timer to turn off the radio automatically
after the sleep timer setting (60, 45, 30 or 15
minutes) is reached
• Clock function
• FM stereo reception through stereo
headphones (not supplied)
Choosing Power Source
Installing Batteries (See fig.
1 Open the lid of the battery
compartment at the rear of the unit.
2 Install three R6 (size AA) batteries with
the + and – poles facing the correct way
and then close the lid.
“0:00” flashes on the display after you first install
the batteries. To stop flashing, set the clock. (See
“Setting the Clock”.)
Battery Life (approximate hours)
Sony R6 Sony LR6
(size AA) alkaline
FM reception 17 46
SW reception 12 33
LW/MW reception 12 33
Knowing when to replace the
batteries
When the batteries become weak, “E” flashes
on the display. When the batteries are completely
exhausted, “E” lights on the display and the
power is turned off.
When “E” lights, replace all the batteries with
new ones.
When you replace the batteries
Replace the batteries within 60 seconds while the
power is turned off. If you do not perform any
operation for 60 seconds, the clock and standby
settings will be deleted. However, the stations
you preset will remain.
After the batteries are replaced, press ON/OFF
to turn the indication off.
Using Other Power
Sources
The internal batteries are automatically
disconnected when the AC power adaptor or the
car battery cord is connected to the DC IN 4.5 V
jack for external power source.
House current
Connect the Sony AC power adaptor (not
supplied) to the DC IN 4.5 V jack firmly, and
plug it into a wall outlet.
Car battery
For use on a 12/24 V car battery, connect the
Sony car battery cord (not supplied) to the DC IN
4.5 V jack. For details, refer to the operating
instructions of the car battery cord.
Notes on external power sources
• When operating the unit with an external
power source, do not remove the batteries.
These batteries serve to backup settings stored
to memory. Since batteries discharge in this
case as well, we recommend changing them
about once a year.
• Before connecting and disconnecting the
external power source plug, be sure to turn off
the radio. Otherwise, “E” may be displayed.
When this occurs, turn on the radio so that
“E” disappears.
• When operating the unit with the internal
batteries, remove the AC power adaptor or car
battery cord from the wall outlet or car battery
and the DC IN 4.5 V jack. Make sure that the
plug of the external power source is
disconnected before operating the unit.
• Use the recommended Sony AC power
adaptor* or car battery cord* only. The polarity
of the plugs of other manufacturers may be
different. Failure to use the recommended AC
power adaptor or car battery cord may cause
the unit to malfunction.
* For details on the optional AC power adaptor
or car battery cord, see “Specifications”.
A
(size AA)
Setting the Clock
Set the time when the radio is turned off.
Set the time after you first install the batteries or
the clock setting is erased. At this time “0:00”
flashes.
The clock operates in the 24-hour system.
“0:00” = midnight
“12:00” = noon
Setting the clock
1 Press and hold ENTER/CLOCK until
you hear a beep. The hour indication
starts flashing.
TT
2 Press –
SCAN/TIME SET to display the correct
hour.
The hour increases by pressing
decreases by pressing –
increase or decrease the hour, keep
TT
–
T hold down.
TT
You hear a double-beep when “0” is
displayed.
3 Press and hold ENTER/CLOCK again
until you hear a beep.
tt
T or
t + under TUNE/
TT
tt
tt
t +, and
tt
TT
T. To continuously
TT
tt
t + or
tt
Precautions
• Operate the unit only on 4.5 V DC. For battery
operation, use three R6 (size AA) batteries. For
AC operation, use only the recommended AC
power adaptor.
• The unit is not disconnected from the AC
power source (mains) as long as it is connected
to a wall outlet, even if the unit itself has been
turned off.
• Use the unit within a temperature range of 0˚C
to 40˚C (32˚F to 104˚F). If it is used in
temperatures outside this range, an irregular
display may appear. If it is used in
temperatures lower than this range, the display
may change very slowly. These irregularities
will disappear and there will be no damage to
the unit when it is used in its recommended
temperature range.
• Do not leave the unit in a location near heat
sources, or in a place subject to direct sunlight,
sand, excessive dust or mechanical shock.
• The nameplate indicating operating voltage,
etc. is located on the rear exterior.
• Should any solid object or liquid fall into the
unit, disconnect the AC power adaptor and
remove the batteries, and have the unit
checked by qualified personnel before
operating it any further. Make sure that no
liquid or foreign material enters the DC IN 4.5
V jack of the unit. This may lead to the
malfunction of the unit.
• Since a strong magnet is used for the speaker,
keep personal credit cards, etc., using magnetic
coding away from the unit.
• When the casing becomes soiled, clean it with a
soft dry cloth moistened with mild detergent
solution. Never use abrasive cleansers or
chemical solvents, as they may deform the
casing.
• In vehicles or buildings, radio reception may
be difficult or subject to interference. Try
listening near a window.
Service and repair
)
TT
4 Press –
minute.
To continuously increase or decrease the
minute, keep
You hear a double-beep when the “00” is
displayed.
tt
T or
t + to display the correct
TT
tt
tt
t + or –
tt
TT
T hold down.
TT
When sending in your unit for service and
repair, take note of your important settings in the
memory. These settings are sometimes erased
from memory, depending on the type of repair
necessary.
If you have any questions or problems
concerning your unit, please consult the nearest
Sony dealer.
Specifications
Circuit system
FM: Super heterodyne
5 Press and hold ENTER/CLOCK until
you hear a double-beep.
The colon “:” starts flashing and the clock
operates.
Note
If you leave the radio for one minute with no
operation, the clock setting will be aborted and
the unit will return to the previous mode. In this
case, repeat the procedure from step 1 to
complete the clock setting.
To cancel the clock setting
Press ON/OFF to turn on the radio, and then
turn it off. The unit will return to the previous
mode.
Troubleshooting
Should any problem persist after you have made
the following checks, consult your nearest Sony
dealer.
There is no sound output.
• VOL (volume) is turned down completely.
• The stereo headphones are plugged in.
• The batteries are inserted with the + and –
poles facing the wrong way.
Radio disconnects, even if you press
POWER.
• The batteries are inserted with the + and –
poles facing the wrong way.
• The batteries are exhausted (“E” flashes or
lights).
• The AC power adaptor or car battery cord is
disconnected.
Sound quality is unsatisfactory, or
reception is poor or cannot be
received.
• Weak batteries (“E” flashes).
• Tuning and antenna orientation requires
further adjustment.
• The radio signal is weak. Listen to the radio
near a window when in a vehicle or building.
• ATT switch is set to ON. Set it to OFF, or
adjust the ATT control.
Stations cannot be stored to
memory.
• Press ENTER/CLOCK for at least two seconds
and press the desired MEMORY PRESET
PAGE to select the preset number.
The preset station cannot be
received during preset tuning.
• VOL (volume) is turned down completely.
• The number selected for the preset station is
incorrect. Select the correct number assigned to
the desired preset station.
• The preset stations have been erased from
memory. Store the station to memory again.
Scan tuning does not work.
• NORMAL/FINE switch is set to FINE. Set it to
NORMAL.
Memory scan tuning does not work.
• You did not select a page number by pressing
MEMORY PRESET PAGE. Press the desired
MEMORY PRESET PAGE, then press
MEMORY SCAN.
• The scanned page has only one preset station.
Scanning does not stop.
• The ATT switch is set to ON. Set it to OFF, or
adjust the ATT control.
The radio is not turned on when the
preset standby time is reached.
• VOL (volume) is turned down completely.
• “STANDBY” , “
• The hold function is operating.
• The preset standby time hase been erased from
memory because the batteries were not
replaced within one minute after being
removed from the unit. Store the standby time
to memory again.
The buttons and controls are not
operating.
• The hold function is operating and “-” lights
on the display. Slide HOLD to the left until
“-” disappears from the display.
The display is dim.
• The unit is being used in extremely high or low
temperatures, or in a place subject to excessive
moisture.
The display shows no indication.
• The batteries are inserted with the + and –
poles facing the wrong way.
• The batteries have run down.
” or “ ” is not displayed.
LW/MW/SW: Dual conversion super
heterodyne
Frequency range
FM: 76.00-108.00 MHz
SW: 2250-26100 kHz
MW: 530-1710 kHz
LW: 150-285 kHz
Speaker
Approx. 66 mm (2 1⁄8 in.) diameter, 8 Ohms
Maximum output
240 mW (at 10% harmonic distortion)
Output
i (headphones) jack (ø3.5 mm stereo mini jack)
16 Ohms
Power requirements
DC 4.5 V, three R6 (size AA) batteries
External power source
DC IN 4.5 V
Dimensions
Approx. 168 × 106 × 35 mm (W × H × D)
5
⁄8 × 4 1⁄4 × 1 7⁄16 in.) incl. projecting parts
(6
Mass
Approx. 405 g (14.3 oz.) incl. batteries
Supplied Accessories
Carrying case (1)
Short wave guide (1)
Optional Accessories
AC power adaptor
AC-E45 HG
Car battery cord
SW/MW/LW wide-range antenna
AN-1, AN-102
SW active antenna
AN-LP1
Design and specifications are subject to change
without notice.
The AC power adaptor’s operating voltage
varies depending upon the country in which it is
sold. Buy the AC power adaptor in the country
you intend to use it.
Your Sony dealer may not handle all of the above
listed optional accessories. Please ask your dealer
for detailed information on the optional
accessories available in your country.
AVERTISSEMENT
Afin d’éviter tout risque d’incendie et
d’électrocution, ne pas exposer cet appareil à
la pluie ni à l’humidité.
Afin d’éviter tout choc électrique, ne pas
ouvrir le coffret. Pour toute réparation, faire
appel à un professionnel uniquement.
Informations
préliminaires
Merci pour l’achat de ce récepteur mondial Sony!
Ce récepteur vous offrira de nombreuses heures
d’écoute agréable en toute fiabilité.
Avant d’utiliser ce récepteur mondial, veuillez
lire attentivement ces instructions et les
conserver pour toute référence future.
Caractéristiques
• Récepteur FM stéréo/OC/PO/GO portable à
couverture de gammes mondiale
• Système de synthétiseur PLL (Phase Locked
Loop)
• Préréglage de 10 stations au maximum sur
chaque page de préréglage pour un accord
rapide (en tout 50 stations)
• Balayage des stations mémorisées sur une page
de préréglage
• Préréglage de l’heure de réception d’une
émission
• Balayage des stations pour l’accord d’une
station précise
• Minuterie sommeil pour l’extinction
automatique de la radio après l’écoulement
d’un certain temps (60, 45, 30 ou 15 minutes)
• Fonction d’horloge
• Réception FM stéréo par un casque stéréo (non
fourni)
Sélection de la source
d’alimentation
Mise en place des piles
(Voir fig. A)
1 Ouvrez le couvercle du logement des
piles à l’arrière de l’appareil.
2 Installez trois piles R6 (format AA) en
respectant les pôles + et –, puis fermez
le couvercle.
“0:00” clignote sur l’afficheur lorsque les piles
sont en place. Pour arrêter le clignotement,
réglez l’horloge. (Voir “Réglage de l’horloge”.)
Autonomie des piles (approximative
en heures)
Sony R6 Sony LR6
(format AA) alcalines
Réception FM 17 46
Réception OC (SW) 12 33
Réception GO (LW)/
PO (MW)
12 33
Quand faut-il remplacer les piles ?
Lorsque les piles sont faibles, “E” clignote sur
l’afficheur. Lorsqu’elles sont complètement
vides, “E” s’allume sur l’afficheur et
l’alimentation est coupée.
Lorsque “E” s’allume, remplacez toutes les
piles par des neuves.
Lorsque vous remplacez les piles
Remplacez les piles en l’espace de 60 secondes
après la coupure de l’alimentation. Si vous ne les
remplacez pas en 60 secondes, les réglages de
l’horloge et de l’heure de mise en marche seront
supprimés. Toutefois, les stations resteront
préréglées.
Après le remplacement des piles, appuyez sur
ON/OFF pour éteindre l’indication.
Utilisation d’autres
sources d’alimentation
Les piles internes sont automatiquement
déconnectées lorsque l’adaptateur secteur ou le
cordon allume-cigares de la voiture est raccordé
à la prise DC IN 4.5 V pour l’alimentation
externe du récepteur.
Courant secteur
Raccordez un adaptateur secteur Sony (non
fourni) à la prise DC IN 4.5 V et branchez-le
ensuite sur une prise secteur.
Batterie de voiture
Pour utiliser l’appareil sur une batterie de
voiture de 12/24 volts, raccordez cordon allumecigares Sony (non fourni) à la prise DC IN 4.5 V.
Pour les détails, consultez les instructions du
cordon allume-cigares.
Remarques sur les sources
d’alimentation externe
• Lorsque vous faites fonctionner l’appareil sur
une source d’alimentation externe, ne retirez
pas les piles. Les préréglages sont conservés en
mémoire par ces piles. Comme les piles se
déchargent malgré tout, il est conseillé de les
remplacer une fois par an.
• Avant de brancher et de débrancher la fiche de
la source d’alimentation externe, n’oubliez pas
d’éteindre la radio, sinon, “E” risque
d’apparaître sur l’afficheur. Le cas échéant,
allumez la radio pour que “E” disparaisse.
• Lorsque vous faites fonctionner l’appareil sur
les piles internes, enlevez l’adaptateur secteur
ou le cordon allume-cigares de la prise secteur
et de la prise DC IN 4.5 V. Assurez-vous que la
fiche de la source d’alimentation externe est
débranchée avant d’utiliser l’appareil.
• Utilisez l’adaptateur secteur* ou le cordon
allume-cigares* recommandés par Sony
uniquement. La polarité des fiches des autres
fabricants peut être différente. L’emploi de tout
autre adaptateur secteur ou cordon allumecigares peut entraîner un mauvais
fonctionnement.
* Pour les détails sur l’adaptateur secteur ou sur
le cordon allume-cigares en option, voir les
“Spécifications”.
(format AA)
Réglage de l’horloge
Réglez l’heure lorsque la radio est éteinte.
L’heure doit être réglée après la première
installation des piles ou lorsque les réglages de
l’horloge ont été effacés. Dans ce cas, “0:00”
clignote.
L’horloge fonctionne sur 24 heures.
“0:00” = minuit
“12:00” = midi
Réglage de l’horloge
1 Appuyez sur ENTER/CLOCK et
maintenez la pression jusqu’à ce qu’un
bip soit audible. L’indication des heures
se met à clignoter.
TT
2 Appuyez sur –
SCAN/TIME SET pour afficher les
heures correctes.
Les heures augmentent lorsque vous
appuyez sur
vous appuyez sur –
diminuer en continu les heures, maintenez la
pression sur –
Vous entendez un double bip lorsque “0” est
affiché.
tt
t + et elles diminuent lorsque
tt
TT
T ou
TT
3 Appuyez une nouvelle fois sur
ENTER/CLOCK et maintenez la
pression jusqu’à ce que vous entendiez
un bip.
4 Appuyez sur –
afficher les minutes correctes.
Pour augmenter ou diminuer en continu les
minutes, maintenez la pression sur –
tt
t +.
tt
Vous entendez un double bip lorsque “00”
est affiché.
5 Appuyez sur ENTER/CLOCK et
maintenez la pression jusqu’à ce que
vous entendiez un double bip.
Les deux points “:” se mettent à clignoter et
l’horloge fonctionne.
Remarque
Si vous n’effectuez pas les opérations en l’espace
d’une minute, le réglage de l’horloge sera
invalidé et l’appareil reviendra au mode
antérieur. Dans ce cas, répétez l’opération depuis
l’étape 1 pour refaire le réglage.
Pour annuler le réglage de l’horloge
Appuyez sur ON/OFF pour allumer puis pour
éteindre la radio. L’appareil reviendra au mode
antérieur.
tt
T ou
t + sous TUNE/
TT
tt
TT
T. Pour augmenter ou
TT
tt
t +.
tt
TT
tt
T ou
t + pour
TT
tt
TT
T ou
TT
Dépannage
En cas de problème, lisez les points suivants et si
vous ne pouvez pas résoudre le problème,
consultez le revendeur Sony le plus proche.
Aucun son.
• Le volume (touche VOL) est complètement
réduit.
• Un casque stéréo est branché sur l’appareil.
• Les pôles des piles + et – sont mal orientés.
La radio est déconnectée, même
lorsque vous appuyez sur POWER.
• Les pôles des piles + et – sont mal orientés.
• Les piles sont épuisées (“E” clignote ou est
allumé).
• L’adaptateur secteur ou le cordon allumecigares est débranché.
Qualité du son ou réception
médiocre, ou réception impossible.
• Piles faibles (“E” clignote).
• La station et l’orientation de l’antenne doivent
ajustées plus précisément.
• Le signal radio est faible. Ecoutez la radio près
d’une fenêtre lorsque vous êtes dans un
véhicule ou un immeuble.
• Le commutateur ATT est réglé sur ON. Réglezle sur OFF ou ajustez la commande ATT.
Impossible de prérégler des
stations.
• Appuyez sur ENTER/CLOCK pendant au
moins deux secondes, puis appuyez sur la
touche MEMORY PRESET PAGE souhaitée
pour sélectionner un numéro de page de
préréglage.
La station préréglée ne peut pas
être reçue lors de l’accord de
stations préréglées.
• Le volume (touche VOL) est complètement
réduit.
• Le numéro de station préréglée sélectionné
n’est pas correct. Sélectionnez le numéro où la
station a été préréglée.
• Les stations préréglées ont été effacées de la
mémoire. Préréglez une nouvelle fois les
stations.
Le balayage des stations ne
fonctionne pas.
• Le commutateur NORMAL/FINE est réglé sur
FINE. Réglez-le sur NORMAL.
Le balayage des stations préréglées
ne fonctionne pas.
• Vous n’avez pas sélectionné de numéro de
page en appuyant sur MEMORY PRESET
PAGE. Appuyez sur la touche MEMORY
PRESET PAGE souhaitée, puis appuyez sur
MEMORY SCAN.
• La page balayée ne contient qu’une station.
Le balayage ne s’arrête pas.
• Le commutateur ATT est réglé sur ON. Réglezle sur OFF ou ajustez la commande ATT.
La radio ne s’allume pas lorsque
l’heure de mise en marche est
atteinte.
• Le volume (touche VOL) est complètement
réduit.
• “STANDBY”, “
• La fonction de verrouillage est validée.
• L’heure de mise en marche a été effacée de la
mémoire parce que les piles n’ont pas été
remplacées en l’espace d’une minute. Préréglez
à nouveau l’heure.
” ou “ ” n’est pas affiché.
Précautions
• Faites fonctionner l’appareil sur le courant
continu de 4,5 V seulement. Pour le
fonctionnement sur piles, utilisez trois piles R6
(format AA). Pour le fonctionnement sur le
courant secteur, utilisez uniquement
l’adaptateur secteur recommandé.
• Cet appareil n’est pas isolé de la source
d’alimentation secteur tant qu’il est raccordé à
une prise secteur, même s’il a été éteint.
• Utilisez l’appareil à une température comprise
entre 0°C et 40°C. Si vous l’utilisez hors de
cette plage, l’affichage ne sera pas normal. Si
vous l’utilisez à une température inférieure,
l’affichage réagira très lentement. Ces
anomalies disparaîtront sans que l’appareil ne
soit endommagé lorsque vous l’utiliserez dans
la plage de températures recommandée.
• Ne laissez pas l’appareil près d’une source de
chaleur ou à un endroit exposé à la lumière
directe du soleil, au sable, à une poussière
excessive ou à un choc mécanique.
• La plaque signalétique indiquant la tension de
fonctionnement et d’autres informations
importantes se trouve à l’arrière de l’appareil, à
l’extérieur.
• Si un liquide ou un solide tombe dans
l’appareil, débranchez l’adaptateur secteur et
retirez les piles, puis faites contrôler l’appareil
par un professionnel avant de le réutiliser.
Veillez à ce qu’aucun liquide ou aucune
matière étrangère n’entre dans la prise DC IN
4.5 V de l’appareil. L’appareil risque sinon de
ne plus fonctionner correctement.
• Comme un aimant puissant est utilisé pour le
haut-parleur, ne laissez pas de cartes de crédit,
etc. à code magnétique près de l’appareil.
• Lorsque le coffret est sale, nettoyez-le avec un
chiffon et doux, imprégné d’une solution
neutre de détergent. N’utilisez jamais de
tampons abrasifs ni de solvants chimiques, car
le coffret pourrait être endommagé.
• Dans les véhicules ou immeubles, la réception
radio peut être difficile ou perturbée par des
interférences. Essayez d’écouter près d’une
fenêtre.
Service et réparation
Avant d’envoyer votre appareil en réparation,
prenez soin de noter les préréglages que vous
jugez importants. Ces préréglages sont parfois
effacés de la mémoire lors des réparations.
Pour toute question ou difficulté concernant
votre appareil, veuillez consulter le revendeur
Sony le plus proche.
Spécifications
Système de circuit
FM : Super hétérodyne
GO/PO/OC : Super hétérodyne à double
conversion
Plage de fréquences
FM : 76,00-108,00 MHz
OC : 2250-26100 kHz
PO : 530-1710 kHz
GO : 150-285 kHz
Haut-parleur
Env. 66 mm de diamètre, 8 ohms
Puissance maximale
240 mW (à 10% de distorsion harmonique)
Sortie
Prise i (casque) (minijack stéréo ø3,5 mm)
16 ohms
Alimentation
CC 4,5 V, trois piles R6 (format AA)
Source d’alimentation externe
Prise DC IN 4.5 V
Dimensions
Env. 168 × 106 × 35 mm (L × H × P) projections
comprises
Masse
Env. 405 g avec les piles
Accessoires fournis
Etui de transport (1)
Guide des ondes courtes (1)
Accessoires en option
Adaptateur secteur
AC-E45HG
Cordon allume-cigares
Antenne longue portée OC/PO/GO
AN-1, AN-102
Antenne active OC
AN-LP1
La conception et les spécifications peuvent être
modifiées sans préavis.
La tension de fonctionnement de l’adaptateur
secteur varie selon le pays où il est
commercialisé. Achetez l’adaptateur secteur dans
le pays où il sera utilisé.
Votre revendeur Sony peut ne pas avoir en stock
tous les accessoires mentionnés ci-dessus.
Veuillez le consulter pour les détails au sujet des
accessoires en option, commercialisés dans votre
pays.
Les touches et les commandes ne
fonctionnent pas.
• La fonction de verrouillage est validée et “-”
s’allume sur l’afficheur. Poussez HOLD vers la
gauche jusqu’à ce que “-” disparaisse de
l’afficheur.
L’afficheur est sombre.
• L’appareil est utilisé à des températures
extrêmement élevées ou basses, ou à un endroit
exposé à une humidité excessive.
Vorsicht
Um Feuergefahr und die Gefahr eines
elektrischen Schlages zu vermeiden, setzen
Sie das Gerät weder Regen noch sonstiger
Feuchtigkeit aus.
Um einen elektrischen Schlag zu vermeiden,
öffnen Sie das Gehäuse nicht. Überlassen Sie
Wartungsarbeiten stets nur qualifiziertem
Fachpersonal.
Vor dem Betrieb
Wir beglückwünschen Sie zu Ihrem neuen
Weltempfänger und sind überzeugt davon, dass
Sie lange Freude an diesem zuverlässigen Gerät
haben werden.
Bevor Sie das Gerät in Betrieb nehmen, lesen Sie
diese Anleitung sorgfältig durch. Bewahren Sie
sie zum späteren Nachschlagen gut auf.
Einstellen der Uhr
Wenn die Batterien zum allerersten Mal
eingelegt werden oder die Uhrzeit aus
irgendwelchen Gründen gelöscht wurde, blinkt
„0:00“ und die Uhrzeit muss eingestellt werden.
Schalten Sie das Gerät aus, bevor Sie mit dem
Einstellen der Uhrzeit beginnen.
Die Uhr arbeitet mit einem 24-Stunden-System.
„0:00“ = Mitternacht
„12:00“ = Mittag
So wird die Uhr
eingestellt
1 Halten Sie ENTER/CLOCK gedrückt,
bis ein Piepton zu hören ist. Die
Uhrzeitanzeige beginnt dann zu
blinken.
Merkmale
• Weltempfänger mit den Wellenbereichen UKW
(Stereo)/KW/MW/LW.
• PLL-Synthesizersystem (Phase Locked Loop).
• 5 Speicherseiten (MEMORY PRESET PAGE)
mit Platz für jeweils 10 Sender (insgesamt sind
also 50 Sender speicherbar).
• Automatischer Speichersuchlauf.
• Standby-Timer zum automatischen Empfang
des gewünschten Senders zur
vorprogrammierten Zeit.
• Automatischer Sendersuchlauf.
• Sleep-Timer schaltet das Radio automatisch
nach der eingestellten Zeitspanne (60, 45, 30
oder 15 Minuten) aus.
• Uhrzeitanzeige.
• UKW-Stereoempfang über Kopfhörer (nicht
mitgeliefert).
Stromquellen
Einlegen der Batterien
(Siehe Abb. A)
1 Öffnen Sie den Batteriefachdeckel an
der Rückseite des Geräts.
2 Legen Sie drei Mignonzellen (R6/
Größe AA) mit richtiger Polarität (+/–)
ein, und schließen Sie den Deckel.
Wenn Sie die Batterien zum ersten Mal eingelegt
haben, blinkt die Anzeige „0:00“ im Display.
Stellen Sie dann die Uhr ein, damit das Blinken
aufhört. (Siehe „Einstellen der Uhr“.)
Lebensdauer der Batterie
(ungefähre Angaben in Stunden)
Sony Batterie Sony
R6 Alkalibatterie
(Größe AA) LR6
UKW-Empfang 17 46
KW-Empfang 12 33
MW/LW-Empfang 12 33
Wann müssen die Batterien
gewechselt werden?
Wenn die Batterien fast leer sind, blinkt „E“ im
Display. Sind die Batterien ganz leer, leuchtet
„E“ ständig und das Gerät schaltet sich aus.
Wechseln Sie die Batterien aus, wenn „E“
ständig leuchtet.
Hinweis zum Batteriewechsel
Wechseln Sie die Batterien bei ausgeschaltetem
Gerät innerhalb von 60 Sekunden aus. Wenn Sie
länger als 60 Sekunden keine Bedienung am
Gerät vornehmen, werden die Uhr- und die
Standby-Timer-Einstellungen gelöscht. Die
gespeicherten Sender bleiben jedoch erhalten.
Drücken Sie nach dem Batteriewechsel die Taste
ON/OFF, um die Anzeige auszuschalten.
Die
Stromversorgungsmöglichkeiten
Das Gerät kann entweder extern oder mit den
internen Batterien betrieben werden. Wenn Sie
den Netzadapter oder das Autobatteriekabel an
die DC IN 4.5 V-Buchse anschließen, werden die
internen Batterien automatisch abgeschaltet.
Netzbetrieb
Schließen Sie den Sony Netzadapter (nicht
mitgeliefert) an die DC IN 4.5 V-Buchse und an
eine Wandsteckdose an.
Betrieb an Autobatterie
Zum Betrieb an einer 12-V- oder 24-VAutobatterie schließen Sie das Sony
Autobatteriekabel (nicht mitgeliefert) an die DC
IN 4.5 V-Buchse an. Einzelheiten entnehmen Sie
bitte der Anleitung des Autobatteriekabels.
Hinweise zur externen
Stromversorgung
• Auch wenn das Gerät extern mit Strom
versorgt wird, sollten die internen Batterien
eingesetzt bleiben, da sie den Speicher des
Geräts versorgen. Spätestens nach einem Jahr
sind die internen Batterien leer und sollten
ausgewechselt werden.
• Schalten Sie das Gerät aus, wenn Sie die
externe Stromquelle anschließen oder
abtrennen. Ansonsten erscheint
möglicherweise „E“ im Display. Schalten Sie
in einem solchen Fall das Gerät wieder ein, so
dass die Anzeige „E“ erlischt.
• Wenn Sie das Gerät mit den internen Batterien
betreiben wollen, trennen Sie den Netzadapter
zuerst von der Wandsteckdose bzw. das
Autobatteriekabel zuerst von der Autobatterie
ab, bevor Sie das Adapterkabel von der DC IN
4.5 V-Buchse abtrennen. Solange das
Adapterkabel noch in die DC IN 4.5 V-Buchse
eingesteckt ist, kann das Gerät nicht mit den
internen Batterien betrieben werden.
• Verwenden Sie nur den empfohlenen
Netzadapter oder das empfohlene Sony
Autobatteriekabel. Andere Netzadapter* und
andere Autobatteriekabel* können aufgrund
unterschiedlicher elektrischer Daten und
unterschiedlicher Steckerpolarität zu
Beschädigungen des Geräts führen.
* Einzelheiten zum getrennt erhältlichen
Netzadapter und Autobatteriekabel finden Sie
im Abschnitt „Technische Daten“.
(Größe AA)
2 Drücken Sie die Taste –
(unter der Markierung TUNE/SCAN/
TIME SET), um die Stunden
einzustellen.
Mit
mit –
oder
Stundenziffern schneller.
Bei Erreichen von „0“ sind zwei Pieptöne zu
hören.
3 Halten Sie ENTER/CLOCK erneut
gedrückt, bis ein Piepton zu hören ist.
4 Drücken Sie –
Minuten einzustellen.
Wenn Sie –
ändern sich die Minutenziffern schneller.
Bei Erreichen von „00“ sind zwei Pieptöne zu
hören.
5 Halten Sie ENTER/CLOCK erneut
gedrückt, bis zwei Pieptöne zu hören
sind.
Der Doppelpunkt („:“) beginnt zu blinken,
und die Uhr nimmt den Betrieb auf.
Hinweis
Wenn Sie länger als eine Minute keine Taste
drücken, schaltet das Gerät vom UhrzeitEinstellmodus in den vorausgegangenen Modus
zurück. In einem solchen Fall müssen Sie erneut
mit Schritt 1 beginnen.
So können Sie den UhrzeitEinstellmodus verlassen
Schalten Sie das Radio durch Drücken von ON/
OFF einmal ein und dann wieder aus. Es schaltet
dann vom Uhrzeit-Einstellmodus in den
vorausgegangenen Modus zurück.
Störungsüberprüfungen
Gehen Sie bei einer Störung die folgende
Zusammenstellung durch. Lässt sich die Störung
nicht beheben, wenden Sie sich an den nächsten
Sony Händler.
Kein Ton.
• VOL (Lautstärke) ist ganz zurückgeregelt.
• Ein Stereokopfhörer ist angeschlossen.
• Die Batterien sind mit falscher Polarität (+/–)
eingelegt.
Bei Drücken von POWER ist kein Ton
zu hören.
• Die Batterien sind mit falscher Polarität (+/–)
eingelegt.
• Die Batterien sind erschöpft („E“ blinkt oder
leuchtet).
• Der Netzadapter oder das Autobatteriekabel ist
abgetrennt.
Schlechte Tonqualität, schwacher
oder gar kein Empfang.
• Die Batterien sind erschöpft („E“ blinkt).
• Es ist nicht richtig abgestimmt und/oder die
Antenne ist nicht optimal ausgerichtet.
• Das Empfangssignal ist zu schwach. Wenn Sie
sich in einem Fahrzeug oder Gebäude
befinden, halten Sie das Radio in die Nähe
eines Fensters.
• Der ATT-Schalter steht auf ON. Stellen Sie ihn
auf OFF oder justieren Sie den ATT-Regler ein.
Sender lassen sich nicht speichern.
• Nachdem die ENTER/CLOCK-Taste
mindestens 2 Sekunden gedrückt wurde, muss
mit MEMORY PRESET PAGE die gewünschte
Stationsnummer gewählt werden.
Der gewünschte Sender kann nicht
aus dem Speicher abgerufen
werden.
• VOL (Lautstärke) ist ganz zurückgeregelt.
• Es wurde eine falsche Stationsnummer
gewählt. Wählen Sie die Nummer des
gewünschten Senders.
• Die Senderspeicherungen wurden gelöscht.
Speichern Sie die Sender neu ab.
Der Sendersuchlauf findet den
gewünschten Sender nicht.
• Der NORMAL/FINE-Schalter steht auf FINE.
Stellen Sie ihn auf NORMAL.
Der Speichersuchlauf funktioniert
nicht.
• Es wurde keine Stationsnummer durch
Drücken von MEMORY PRESET PAGE
gewählt. Drücken Sie eine dieser Tasten und
dann MEMORY SCAN.
• Auf der gewählten Seite ist nur ein einziger
Sender gespeichert.
Der Suchlauf stoppt nicht.
• Der ATT-Schalter steht auf ON. Stellen Sie ihn
auf OFF oder justieren Sie den ATT-Regler ein.
Der Standby-Timer schaltet das
Radio nicht zur programmierten Zeit
ein.
• VOL (Lautstärke) ist ganz zurückgeregelt.
• „STANDBY“, „ “ oder „ “ wird nicht
angezeigt.
• Die Sperrfunktion ist aktiviert.
• Die Standby-Timer-Zeit wurde wurden
gelöscht, da der Batteriewechsel länger als eine
Minute dauerte. Programmieren Sie die
Standby-Timer-Zeit nochmals.
Die Bedienungselemente arbeiten
nicht.
• Die Sperrfunktion ist aktiviert („-“ erscheint
im Display). Schieben Sie HOLD nach links, so
dass „-“ erlischt.
Das Display ist dunkel.
• Die Umgebungstemperaturen sind sehr hoch
oder sehr niedrig, oder die Luftfeuchtigkeit ist
extrem hoch.
TT
tt
T oder
t +
TT
tt
tt
t + erhöhen sich die Stundenziffern,
tt
TT
T verringern sie sich. Wenn Sie –
TT
tt
t + gedrückt halten, ändern sich die
tt
TT
tt
T oder
t +, um die
TT
tt
TT
tt
T oder
t + gedrückt halten,
TT
tt
TT
T
TT
Keine Anzeige im Display.
• Die Batterien sind mit falscher Polarität (+/–)
eingesetzt.
• Die Batterien sind leer.
Sicherheitshinweise
• Betreiben Sie das Gerät mit 4,5 V
Gleichspannung (zwei Mignonzellen (R6/
Größe AA). Für Netzbetrieb verwenden Sie nur
den mitgelieferten Netzadapter. Ein anderer
Adapter darf nicht verwendet werden.
• Das Gerät ist auch im ausgeschalteten Zustand
nicht vollständig vom Stromnetz getrennt,
solange der Netzstecker noch an einer
Wandsteckdose angeschlossen ist.
• Verwenden Sie das Gerät nur bei
Temperaturen zwischen 0 °C und 40 °C. Bei
höheren Temperaturen zeigt das Display die
Frequenz möglicherweise nicht oder nicht
richtig an, bei niedrigeren Temperaturen
ändert sich die Anzeige möglicherweise
langsam. Wenn das Gerät wieder innerhalb des
vorgeschriebenen Temperaturbereichs
betrieben wird, verschwinden diese
Symptome.
• Legen Sie das Gerät nicht in die Nähe von
Wärmequellen wie Heizungen oder
Warmluftauslässen und auch nicht an Plätze,
die direktem Sonnenlicht, starker
Staubentwicklung, mechanischen Vibrationen
oder Stößen ausgesetzt sind.
• Das Typenschild mit der Betriebsspannung
und anderen wichtigen Informationen befindet
sich an der Rückseite.
• Sollte ein Fremdkörper oder Flüssigkeit in das
Gerät gelangen, trennen Sie den Netzadapter
ab, nehmen Sie die Batterien heraus und lassen
Sie das Gerät von Fachpersonal überprüfen,
bevor Sie es weiter verwenden. Achten Sie
sorgfältig darauf, dass kein Fremdkörper und
keine Flüssigkeit in die DC IN 4.5 V-Buchse
gelangen, da es sonst zu Störungen kommen
kann.
• Halten Sie Kreditkarten mit Magnetcodierung
und Uhren mit Federwerk vom Gerät fern, da
diese Teile von den starken
Lautsprechermagneten beschädigt werden
können.
• Wenn das Gehäuse verschmutzt ist, reinigen
Sie es mit einem weichen, leicht mit mildem
Haushaltsreiniger angefeuchteten Tuch.
Scharfe Reiniger und chemische Lösungsmittel
dürfen nicht verwendet werden, da sie das
Gehäuse angreifen.
• In Fahrzeugen und Gebäuden kann der
Empfang schwach und verrauscht sein.
Betreiben Sie das Gerät dann möglichst in der
Nähe eines Fensters.
Service und Reparatur
Notieren Sie sich wichtige Speicherungen, bevor
Sie das Gerät in eine Service- oder
Reparaturwerkstatt schicken. Abhängig von der
erforderlichen Reparatur werden die
Speicherungen möglicherweise gelöscht.
Bei weiterführenden Fragen wenden Sie sich
bitte an den nächsten Sony Händler.
Technische Daten
Schaltungsauslegung
UKW: Superhet
LW/MW/KW: Doppelsuperhet
Frequenzgang
UKW: 76,00 — 108,00 MHz
KW: 2250 — 26100 kHz
MW: 530 — 1710 kHz
LW: 150 — 285 kHz
Lautsprecher
ca. 66 mm Durchmesser, 8 Ohm
Max. Ausgangsleistung
240 mW (bei 10% Klirrgrad)
Ausgangsbuchse
i (Kopfhörerbuchse), Stereo-Minibuchse
(Ø 3,5 mm), 16 Ohm
Stromversorgung
4,5 V Gleichspannung, drei Mignonzellen (R6/
Größe AA)
Externe Stromversorgung
Über DC IN 4.5 V-Buchse
Abmessungen
ca. 168 × 106 × 35 mm, einschl. vorspringender
Teile
Gewicht
ca. 405 g, einschl. Batterien
Mitgeliefertes Zubehör
Tragetasche (1)
Kurzwellenhandbuch (1)
Sonderzubehör
Netzadapter
AC-E45HG
Autobatteriekabel
KW/MW/LW-Breitbandantenne
AN-1, AN-102
KW-Aktivantenne
AN-LP1
Änderungen, die dem technischen Fortschritt
dienen, bleiben vorbehalten.
Die Betriebsspannung des Netzadapters hängt
von dem Land ab, in dem Sie ihn gekauft haben.
Kaufen Sie den Netzadapter in dem Land, in
dem Sie das Gerät betreiben wollen.
Möglicherweise führt Ihr Händler nicht alle oben
aufgeführten Sonderzubehörteile. Er wird Ihnen
gerne genauere Informationen darüber geben,
welche Teile in Ihrem Land erhältlich sind.
Aucune indication n’apparaît sur
l’afficheur.
• Les pôles des piles + et – sont mal orientés.
• Les piles sont épuisées.
B
FM
UKW
English
Operating the Radio
Before operating the radio, make sure of your
location. In some countries, the MW channel step
must be changed. (For details, see “Changing the
MW channel step”.)
Manual Tuning
1 Press ON/OFF to turn on the radio.
2 Press BAND to select the band. Each
press changes the display as follows:
A double-beep sounds when you select LW.
(The last frequency selected in each band
appears on the display.)
TT
3 When you select SW: press –
under TUNE/SCAN/TIME SET while
pressing SW BAND to select a meter
band. See “Scan Tuning” for details on
the meter band.
When you select LW, MW and FM, follow
the step 4.
4 Tune into the desired station by
TT
pressing –
A double-beep sounds when the minimum
frequency of each band is received during
tuning. When a broadcast is received,
“p TUNE” is displayed on the display.
T or
TT
tt
t +.
tt
5 Turn the VOL (volume) to adjust the
volume.
About frequency step
The frequency step used by pressing –
under TUNE/SCAN/TIME SET can be changed
with the NORMAL/FINE.
Band NORMAL FINE
LW 9 kHz 1 kHz
MW 9 kHz/10 kHz* 1 kHz
SW 5 kHz 1 kHz
FM 0.05 MHz 0.05 MHz
* See “Changing the MW channel step” for
details on the MW channel step.
• Scan tuning is started by keeping –
tt
t + hold down while NORMAL is selected.
tt
(See “Scan tuning”.)
• The frequency changes continuously by
keeping –
is selected. If you stop pressing –
the frequency stops changing.
To turn off the radio
Press ON/OFF.
To enjoy FM stereo reception
Plug the stereo headphones (not supplied) into
the i (headphones) jack.
When listening to news
Set the TONE selector to NEWS for optimum
results. Vocal output will be sharper and clearer.
When listening to music, set the TONE selector
to MUSIC for optimum results.
Changing the MW channel step
This radio’s frequency channel step in the MW
band is set to 9 kHz/10 kHz before the radio is
shipped from the factory. The default setting
varies depending on the country where the radio
is sold. Change the MW channel step when
listening in countries in these regions.
Area channel step
North/South America 10 kHz
Other countries 9 kHz
TT
tt
T or
t + hold down while FINE
TT
tt
T or
TT
TT
T or
TT
TT
T or
TT
TT
T or
TT
tt
t +
tt
tt
t +
tt
tt
t +,
tt
Telescopic antenna
Antenne télescopique
Teleskopantenne
Inside of the battery compartment
Intérieur du logement de piles
Im Batteriefach
SW
OC
KW
MW/LW
PO/GO
1 Press ON/OFF to turn off the radio.
2 Remove the batteries from the unit.
3 Change the position of the MW CH
STEP in the battery compartment to the
desired channel step.
4 Install the batteries and press ON/OFF.
Notes
• Completely perform steps 2 to 4 within 60
seconds. If you do not perform the operations
in 60 seconds, the clock setting will be erased.
• Reception of around 10250 kHz and 20500 kHz
may be difficult because of spurious internal
signals generated by the built-in oscillators.
Scan Tuning
Use scan tuning to automatically scan the
stations in the frequency range of a broadcast
band.
1 Press ON/OFF to turn on the radio.
2 Press BAND to select the band.
If you select SW, select the meter band too.
3 Set NORMAL/FINE to NORMAL.
TT
4 Press and hold –
TUNE/SCAN/TIME SET. Release the
button when the frequency indication
starts changing.
Scan tuning will begin within the frequency
range table in the “Frequency range”, and
pause automatically for about three seconds
when a station is received.
5 When the radio tunes into the desired
station, press –
scanning.
Until you press –
continue. If necessary, tune the station more
precisely by pressing either –
• The unit scans the frequencies in descending
order when you hold down –
seconds or more, and in ascending order when
you hold down
• To change the scanning direction, hold down
either –
direction for two seconds or more. This is
convenient when, for example, you want to
return to the previous reception after the unit
has resumed scanning.
• When scanning MW broadcasts at night when
reception is intense, or when scanning under
prevailing interference, the scanning will pause
frequently. If it occurs, switch the ATT switch
to ON and adjust sensitivity with the ATT
control (see “Controlling scan pauses”, below).
Under normal conditions, set the ATT switch
to OFF.
Controlling scan pauses–using the
ATT switch and the ATT control
Use the ATT (attenuator) switch and the ATT
control to control reception sensitivity when the
scanning pauses frequently or scanning under
prevailing interference. Under normal
conditions, set the ATT switch to OFF (i.e., with
maximum sensitivity).
The ATT control is activated when the ATT
switch is switched to ON. Turn the ATT control
toward MAX to reduce sensitivity. The radio will
skip weak signals and stop at only strong ones.
Note
If the ATT control is turned too for toward
MAX, the radio will not stop at any weak
signals at all. Set the ATT switch to OFF if
you do not need to use the attenuator.
tt
t + for two seconds or more.
tt
TT
tt
T or
t + opposite to the current
TT
tt
tt
T or
t + under
TT
tt
TT
tt
T or
t + again to stop
TT
tt
TT
tt
T or
t +, scan tuning will
TT
tt
TT
T and
TT
TT
T for two
TT
tt
t +.
tt
English Français Deutsch
TT
Frequency range (LW, MW, SW: kHz,
FM: MHz)
Band
Frequency range
LW 150-285 153-279
MW 530-1710 531-1710*
SW 2250-2550 120 m
2250-26100 5900-6250 49 m
FM 76,00-108,00 76,00-108,00
*1The LW and MW frequency ranges are the
same as the scan tuning range when
NORMAL/FINE is set to NORMAL.
2
9 kHz channel step
*
3
10 kHz channel step
*
*1Scan tuning range
2
3
530-1710*
3150-3450 90 m
3850-4050 75 m
4700-5100 60 m
7100-7400 41 m
9400-10000 31 m
11500-12150 25 m
13500-13900 22 m
15000-15900 19 m
17450-18000 16 m
18850-19100 15 m
21450-21950 13 m
25600-26100 11 m
Meter band
Preset Tuning
You can preset up to 10 stations on each
MEMORY PRESET PAGE (50 stations in total.)
Once you preset a station to memory, you can
receive the broadcast merely by pressing
MEMORY PRESET PAGE.
The page number is displayed as 1-5, the preset
number is displayed as 1-0. (0 indicates 10.)
To preset stations
1 Tune into the station you want to
preset.
Refer to “Manual Tuning” or “Scan Tuning”
for more details.
2 Press and hold ENTER/CLOCK down
until you hear a beep.
Page number 1 and preset number 1 flash
when you are presetting a station for the first
time or when you have preset 50 stations. In
other cases, the number flashes as follows:
Page number: the smallest page number
Preset number: the smallest preset number
among the pages that have a
free preset number
that has not been preset in
the page displayed above.
3 Press the desired page number of
MEMORY PRESET PAGE.
For example, press page number 3. The
display changes as illustrated below.
4 Press the number under the MEMORY
PRESET PAGE you have selected
repeatedly to display the desired preset
number.
The preset number changes as follows:
A double-beep sounds when the display
returns to “1”.
For example, select preset number 7. The
display changes as illustrated below.
5 Press ENTER/CLOCK until a double-
beep sounds.
The page number and the preset number stop
flashing.
Note
If you leave the radio for 30 seconds with no
operation while the page number and preset
number are flashing, the unit returns to the
previous mode.
To change the preset station
Follow the same procedure to store a new station
to the selected preset number. The previous
preset station is overwritten by the new preset
station.
To interrupt and cancel presetting
Press ON/OFF to turn off the radio, and then
press it again to turn the unit on. The unit
returns to the previous mode.
Tuning into a preset station
1 Press ON/OFF to turn on the radio.
2 Press MEMORY PRESET PAGE
repeatedly to display the desired preset
number. Numbers that have not been
preset cannot be displayed. A doublebeep sounds if the smallest preset
number is selected.
3 Turn VOL (volume) to adjust the
volume.
Note
A double-beep sounds and the display changes
as illustrated below for about three seconds
when you select a page number that has no
preset station, and then returns to the previous
mode.
Deleting a preset station
Preset tuning works faster if you delete
unnecessary preset stations as deleted preset
stations are not selected during tuning.
1 Press ON/OFF to turn on the radio.
2 Press MEMORY PRESET PAGE
repeatedly to display the preset number
you want to delete.
3 Press and hold ENTER/CLOCK down
until “dEL” flashes.
“dEL” flashes on the display by keeping
ENTER/CLOCK held down longer while the
page number and preset number are flashing.
While these numbers are flashing, the radio
stands by for presetting the station.
m
4 Press ENTER/CLOCK again until a
double-beep sounds.
The page number and preset number
disappear from the display.
Note
If you leave the radio for 30 seconds with no
operation while the page number, preset number
and “dEL” are flashing, the unit returns to the
previous mode.
To interrupt and cancel deleting
Press ON/OFF to turn off the radio, and then
press it again to turn the unit on. The unit
returns to the previous mode.
Memory Scan Tuning
Use memory scan tuning to scan the preset
stations automatically in one page.
1 Press ON/OFF to turn on the radio.
2 Press the page number of MEMORY
PRESET PAGE you want to scan.
3 Press MEMORY SCAN.
Scanning stops when the radio receives a
preset station in the page. If you want to
select other preset stations, press MEMORY
SCAN again. The preset numbers have not
been preset will be skipped.
• Scanning works faster if you preset frequencies
in descending or ascending order in preset
number orders.
To interrupt and cancel memory
scan tuning
Press MEMORY SCAN during memory scan
tuning.
When preset stations cannot be
received by memory scan tuning
A double-beep sounds and scanning stops when
the first preset number you start scanning is
returned to.
For example: you scan page 1 that has stations
preset to preset numbers 2, 4, 6 and 8, and start
scanning from preset number 6. A double-beep
sounds when 6 is returned to.
• When scanning MW broadcasts at night when
reception is intense, or scanning under
prevailing interference, scanning will pause
frequently. If it occurs, switch the ATT switch
to ON and adjust sensitivity with the ATT
control (see “Controlling scan pauses”). Under
normal conditions, use the radio with the ATT
switch set to OFF.
Improving Reception
(See fig. B)
Adjusting the antenna
FM : Extend the telescopic antenna and adjust
the direction and angle for the best
reception.
SW : Extend the telescopic antenna to its full
length and set it vertically.
MW, LW :Rotate the unit horizontally for
Using an external antenna
Use the wide-range antenna AN-1, AN-102 or
the SW active antenna AN-LP1 (not supplied).
For details, refer to the operating instructions of
the each antenna.
Notes
• Keep the unit and antenna away from
• Retract the telescopic antenna when using an
• Set up the external antenna as far away from
• Note that the SW active antenna AN-LP1 may
optimum reception. A ferrite bar
antenna is built in the unit.
fluorescent lights, TVs, computers, and other
equipment which may generate noise.
external antenna.
the street as possible.
not function as usual when it is connected to
this radio and memory scan tuning is in use.
This is because AN-LP1 selects frequencies by
the antenna controller.
Setting the Standby
Time
Standby function
You can turn on the radio and tune into your
favourite station at the desired time.
• Before you set standby, make sure that the
radio’s clock setting is correct.
• Two standby times can be stored to STANDBY
MEMORY a and b.
• Before you set the standby time, adjust VOL
(volume) to set the volume when the radio is
turned on.
1 Receive the desired broadcast station.
2 Press ENTER/CLOCK until you hear a
beep.
The page number and preset number start
flashing.
3 Press STANDBY MEMORY a or b.
For example, when you press STANDBY
MEMORY a, “PRESET” and “
flashing.
4 Press ENTER/CLOCK until you hear a
double-beep.
“PRESET” and “ ” or “ ” light.
5 Press ON/OFF to turn off the radio.
6 Press STANDBY MEMORY a or b until
you hear a beep.
For example, when you press STANDBY
MEMORY a:
The display returns to the clock setting
display, “STANDBY”, “
indication start flashing.
TT
7 Press –
tt
T or
t + under TUNE/
TT
tt
SCAN/TIME SET to set the hour.
8 Press STANDBY MEMORY a or b you
selected in step 6 until you hear a beep.
The hour is set, and the minute starts
flashing.
TT
9 Press –
10
Press STANDBY MEMORY a or b you
selected in step 6 until you hear a
double-beep.
The minute is set, and “STANDBY” and “ ”
or “ ” light.
When the standby time is reached
The radio turns on and “SLEEP” is displayed.
The unit will turn off automatically after about
60 minutes.
When you have set STANDBY
MEMORY a and b
If the second preset standby time is reached
while the first standby time is operating, the
most recent standby time will have priority over
the other and the radio will tune into the
appropriate station. If you have set STANDBY
MEMORY a and b to the same time, STANDBY
MEMORY a will have priority.
To cancel the standby function
Press STANDBY MEMORY a or b with the radio
turned off so that “STANDBY” and “ ” or “ ”
are cleared from the display.
Be sure to release the button within one second.
If the button is pressed continuously, the radio
enters the standby setting mode.
To cancel temporarily the standby
function
Slide HOLD in the direction of the arrow with
the radio turned off to make “-” appear. When
the hold is canceled and “-” disappears, the
standby function is operational. (see “Using
Other Functions”)
tt
T or
t + to set the minute.
TT
tt
” start
” and the hour
Notes
• Once a standby time is set, the radio turns on at
the preset standby time everyday unless the
standby setting is canceled.
• The standby function activates even while you
are listening to other stations.
Activating the Alarm
To activate the alarm instead of the radio at the
desired time, delete the station assigned to either
STANDBY MEMORY a or b as necessary.
1 Press ON/OFF to turn on the radio.
2 Press STANDBY MEMORY a or b.
The radio receives the preset station. If there
is no preset station, a double-beep sounds
and the display changes as illustrated below.
In this case, perform the step 5.
3 Press and hold ENTER/CLOCK down
until “dEL” flashes.
4 Press ENTER/CLOCK again until a
double-beep sounds.
The display “PRESET” and “ ” or “ ” will
disappear. (See “Preset tuning-Deleting a
preset station”.)
5 Perform steps 5 to 10 of the procedure
described in “Setting the Standby
Time”.
When the standby time is reached and the
standby is activated, the alarm sounds. The
unit then turns off automatically after 60
minutes.
To stop the alarm
Press any button except LIGHT.
Notes
• The alarm volume is not adjustable.
• When the standby time is reached while you
are listening to the radio, the radio turns off
and the alarm sounds.
Setting the Sleep
Timer
Sleep Timer Function
Enjoy falling asleep to the radio using sleep
timer. The radio turns off automatically after the
sleep timer setting (60, 45, 30 or 15 minutes) is
reached.
1 Press SLEEP.
The sleep timer setting of “60” minutes is
displayed and “SLEEP” flashes.
The radio turns on if it was turned off.
2 Press SLEEP repeatedly to select the
desired sleep timer setting while
“SLEEP” is flashing.
Each press changes the display as follows:
A double-beep sounds when the display
returns to “60”. “SLEEP” lights three seconds
after you select the sleep timer setting while
“SLEEP” is flashing. After the sleep timer
indication disappears and the frequency
indication appears, the sleep timer activates.
3 Tune into the desired station, and
adjust the VOL (volume).
The radio will turn off automatically after the
sleep timer setting is reached.
To turn off the radio before the
sleep timer setting is reached
Press ON/OFF.
To reset or extend the sleep timer
setting
Press SLEEP again and select the desired sleep
timer setting.
Using Other Functions
Hold Function
When the hold function is used, the buttons are
not operational. Use the hold function to prevent
accidental operation.
The hold function can also be used to
temporarily cancel the standby function.
To use the hold function
Slide HOLD in the direction of the arrow.
“-” appears on the display and all buttons are
no longer operational.
To cancel the hold function
Slide HOLD in the opposite direction of the
arrow. “-” disappears from the display.
Light Function
Press LIGHT to turn on the light for about 20 to
30 seconds to view the display in the dark.
Fonctionnement de
la radio
Avant de faire fonctionner la radio, vérifiez le
lieu d’utilisation. Dans certains pays, l’intervalle
des canaux PO devra être changé. (Pour les
détails, voir “Changement de l’intervalle des
canaux PO”.)
Accord manuel
1 Appuyez sur ON/OFF pour allumer la
radio.
2 Appuyez sur BAND pour sélectionner
une gamme. A chaque pression, la
gamme change de la façon suivante :
Un double bip retentit lorsque vous
sélectionnez LW.
(La dernière fréquence sélectionnée de
chaque gamme apparaît sur l’afficheur.)
3 Lorsque vous sélectionnez SW :
appuyez sur –
SCAN/TIME SET tout en tenant SW
BAND enfoncée pour sélectionner une
gamme métrique. Voir “Accord par
balayage” pour les détails sur la gamme
métrique.
Lorsque vous sélectionnez LW, MW et FM,
suivez l’étape 4.
4 Accordez la station souhaitée en
appuyant sur –
Un double bip retentit lorsque la fréquence
inférieure de chaque gamme est atteinte lors
de l’accord. Lorsqu’une émission est reçue,
“p TUNE” apparaît sur l’afficheur.
5 Tournez VOL (volume) pour régler le
volume.
A propos de l’intervalle des
fréquences
L’intervalle de fréquences utilisé lorsque vous
appuyez sur –
TIME SET peut être changé avec la touche
NORMAL/FINE.
Gamme NORMAL FINE
GO (LW) 9 kHz 1 kHz
PO (MW) 9 kHz/10 kHz* 1 kHz
OC (SW) 5 kHz 1 kHz
FM 0,05 MHz 0,05 MHz
* Voir “Changement de l’intervalle des canaux
PO” pour les détails sur le changement de
l’intervalle des canaux PO.
• Le balayage commence au moment où vous
appuyez sur –
est sélectionné. (Voir “Accord par balayage”.)
• La fréquence change en continu si vous
maintenez la pression sur –
lorsque FINE est sélectionné. Lorsque vous
cessez d’appuyer sur –
fréquence ne change pas.
Pour éteindre la radio
Appuyez sur ON/OFF.
Pour écouter des émissions FM en
stéréo
Branchez un casque stéréo (non fourni) sur la
prise i (casque).
Pour écouter les informations
Réglez le sélecteur TONE sur NEWS pour
obtenir un son optimal. Les voix seront plus
aiguës et nettes. Pour écouter de la musique,
réglez le sélecteur TONE sur MUSIC.
Changement de l’intervalle des
canaux PO
L’intervalle des canaux de fréquence radio sur la
gamme PO a été réglé sur 9 kHz/10 kHz en
usine. Le réglage par défaut dépend du pays de
commercialisation du récepteur. Changez
l’intervalle des canaux PO de la façon suivante.
Zone Intervalle des canaux
Amérique du Nord/
Sud
Autres pays 9 kHz
1 Appuyez sur ON/OFF pour éteindre la
radio.
2 Retirez les piles de l’appareil.
3 Changez la position de MW CH STEP
dans le logement des piles.
4 Remettez les piles et appuyez sur ON/
OFF.
Remarques
• Effectuez les étapes 2 à 4 en l’espace de 60
secondes, sinon les réglages de l’horloge seront
supprimés.
• La réception autour de 10250 kHz et de 20500
kHz peut être difficile à cause de signaux
parasites internes générés par les oscillateurs
intégrés.
Accord par balayage
Utilisez cette fonction pour accorder une
fréquence d’une gamme.
1 Appuyez sur ON/OFF pour allumer la
radio.
2 Appuyez sur BAND pour sélectionner
une gamme.
Si vous sélectionnez SW, choisissez aussi la
gamme métrique.
3 Réglez NORMAL/FINE sur NORMAL.
4 Appuyez sur –
SCAN/TIME SET et maintenez la
pression. Relâchez la touche lorsque
l’indication de la fréquence change.
Le balayage de la gamme de fréquences
indiquée dans la “Plage de fréquences”
commence et lorsqu’une station est reçue, il
s’arrête automatiquement accordée pendant 3
secondes environ sur la station reçue.
5 Lorsque la station souhaitée est
accordée, appuyez une nouvelle fois
TT
sur –
T ou
TT
balayage.
Tant que vous n’appuyez pas sur –
tt
t +, le balayage continue. Si la réception
tt
n’est pas très bonne, accordez la station plus
précisément en appuyant sur –
• Les fréquences seront balayées dans le sens
descendant si vous appuyez sur –
au moins deux secondes et dans l’ordre
ascendant si vous appuyez sur
au moins deux secondes.
• Pour changer le sens du balayage, appuyez au
moins deux secondes sur –
sens opposé du sens de balayage actuel. Ceci
est pratique si vous voulez revenir par exemple
à la station précédente après la reprise du
balayage.
• Lors du balayage d’émissions PO la nuit,
lorsque la réception est intense, ou lors du
balayage dans un lieu exposé à des
interférences, le balayage fera fréquemment
des pauses. Si le cas se présente, réglez le
commutateur ATT sur ON et ajustez la
sensibilité avec la commande ATT (voir
“Contrôle des pauses du balayage”, cidessous). Lorsque les conditions d’écoute sont
normales, réglez le commutateur ATT sur OFF.
Contrôle des pauses du balayage
avec le commutateur ATT et la
commande ATT
Utilisez le commutateur ATT (atténuateur) et la
commande ATT pour contrôler la sensibilité de
la réception lorsque le balayage fait souvent des
pauses ou si les interférences sont importantes.
Dans les conditions normales, réglez le
commutateur ATT sur OFF (sensibilité
maximale).
La commande ATT est activée lorsque le
commutateur ATT est commuté sur ON.
Tournez la commande ATT vers MAX pour
réduire la sensibilité. Les signaux faibles seront
ignorés et seules les stations puissantes seront
accordées.
TT
tt
T ou
t + sous TUNE/
TT
tt
TT
tt
T ou
t +.
TT
tt
TT
tt
T ou
t + sous TUNE/SCAN/
TT
tt
TT
tt
T ou
t + lorsque NORMAL
TT
tt
TT
T ou
TT
TT
T ou
TT
TT
tt
T ou
t + sous TUNE/
TT
tt
tt
t + pour arrêter le
tt
TT
T ou
TT
tt
t +
tt
tt
t +, la
tt
10 kHz
TT
T ou
TT
TT
tt
T ou
t +.
TT
tt
TT
T pendant
TT
tt
t + pendant
tt
tt
t +, dans le
tt
Remarque
Si la commande ATT est trop tournée vers
MAX, les stations aux signaux faibles ne
seront pas du tout accordées. Réglez le
commutateur ATT sur OFF si vous n’avez
pas besoin d’utiliser l’atténuateur.
Plage de fréquences (GO, PO, OC :
kHz, FM : MHz)
Gamme
Plage de Plage d’accord Gamme
fréquences*1par balayage métrique
GO 150-285 153-279
PO 530-1710 531-1710*
OC 2250-2550 120 m
2250-26100 5900-6250 49 m
FM 76,00-108,00 76,00-108,00
*1Les plages de fréquences GO et PO sont les
mêmes que la plage d’accord par balayage
lorsque NORMAL/FINE est réglé sur
NORMAL.
2
Intervalle des canaux de 9 kHz
*
*3Intervalle des canaux de 10 kHz
2
3
530-1710*
3150-3450 90 m
3850-4050 75 m
4700-5100 60 m
7100-7400 41 m
9400-10000 31 m
11500-12150 25 m
13500-13900 22 m
15000-15900 19 m
17450-18000 16 m
18850-19100 15 m
21450-21950 13 m
25600-26100 11 m
Accord d’une station
préréglée
Vous pouvez prérégler 10 stations sur chaque
touche MEMORY PRESET PAGE (50 stations en
tout). Lorsqu’une station a été préréglée, il suffit
d’appuyer sur MEMORY PRESET PAGE pour la
recevoir.
Le numéro de page est indiqué par 1-5 et le
numéro de préréglage par 1-0 (0 indiquant 10).
Pour prérégler une station
1 Accordez la station que vous voulez
prérégler.
Reportez-vous à “Accord manuel” ou à
“Accord par balayage” pour de plus amples
informations à ce sujet.
2 Appuyez sur ENTER/CLOCK jusqu’à
ce que vous entendiez un bip.
Le numéro de page 1 et le numéro de
préréglage 1 clignotent la première fois que
vous préréglez une station ou lorsque 50
stations ont été préréglées. Dans les autres
cas, le numéro clignote comme suit.
Numéro de page : le plus petit numéro de
Numéro de préréglage :
3 Appuyez sur le numéro MEMORY
PRESET PAGE souhaité.
Par exemple, appuyez sur le numéro de page
3. L’afficheur change de la façon suivante.
4 Appuyez de façon répétée sur le
numéro MEMORY PRESET PAGE que
vous avez sélectionné pour afficher le
numéro de préréglage souhaité.
Le numéro de préréglage change de la façon
suivante :
Un double bip retentit lorsque l’affichage
revient à “1”.
Par exemple, sélectionnez le numéro de
préréglage 7. L’affichage change de la façon
suivante.
5 Appuyez sur ENTER/CLOCK jusqu’à
ce qu’un double bip retentisse.
Le numéro de page et le numéro de
préréglage cessent de clignoter.
Remarque
Si vous n’effectuez aucune opération dans les 30
secondes où le numéro de page et le numéro de
préréglage clignotent, l’appareil reviendra au
mode antérieur.
Pour changer une station préréglée
Procédez de la même façon pour prérégler une
nouvelle station sur le numéro de page
sélectionné. La station préréglée antérieurement
sur ce numéro sera remplacée par la nouvelle
station.
Pour interrompre et annuler un
préréglage
Appuyez sur ON/OFF pour arrêter la radio et
appuyez une nouvelle fois dessus pour la
rallumer. L’appareil revient au mode antérieur.
Pour accorder une station préréglée
1 Appuyez sur ON/OFF pour allumer la
radio.
2 Appuyez de façon répétée sur
MEMORY PRESET PAGE pour afficher
le numéro de préréglage souhaité. Les
numéros qui n’ont pas été préréglés ne
peuvent pas être affichés. Un double
bip retentit si le plus petit numéro de
préréglage est sélectionné.
3 Tournez VOL (volume) pour ajuster le
volume.
Remarque
Un double bip retentit et l’affichage change de la
façon suivante pendant trois seconde s lorsque
vous sélectionnez un numéro de page qui ne
contient pas de station, puis l’appareil revient au
mode antérieur.
Suppression d’une station préréglée
L’accord des stations sera plus rapide si vous
supprimez les stations préréglées inutilisées, car
elles ne seront pas sélectionnées lors de l’accord.
1 Appuyez sur ON/OFF pour allumer la
radio.
2 Appuyez de façon répétée sur
MEMORY PRESET PAGE pour afficher
le numéro de préréglage que vous
voulez supprimer.
page parmi les pages
ayant un numéro de
préréglage libre
le plus petit numéro qui
n’a pas encore été préréglé
sur cette page sur la page
affichée ci-dessus.
3 Appuyez sur ENTER/CLOCK jusqu’à
ce que “dEL” clignote.
“dEL” clignote sur l’afficheur si vous
maintenez ENTER/CLOCK plus longtemps
enfoncée quand le numéro de page et le
numéro de préréglage clignotent. Lorsque ces
numéros clignotent, la radio se met en attente
de préréglage de la station.
m
4 Appuyez une nouvelle fois sur
ENTER/CLOCK jusqu’à ce qu’un
double bip retentisse.
Le numéro de page et le numéro de
préréglage disparaissent de l’afficheur.
Remarque
Si vous n’effectuez aucune opération dans les 30
secondes où le numéro de page, le numéro de
préréglage et “dEL” clignotent, l’appareil
reviendra au mode antérieur.
Pour interrompre et annuler la
suppression
Appuyez sur ON/OFF pour éteindre la radio,
puis appuyez une nouvelle fois pour la rallumer.
L’appareil revient au mode antérieur.
Accord par balayage des
stations préréglées
Utilisez cette fonction pour que toutes les
stations préréglées sur une page soient
automatiquement balayées.
1 Appuyez sur ON/OFF pour allumer la
radio.
2 Appuyez sur MEMORY PRESET PAGE
le numéro de page de que vous voulez
balayer.
3 Appuyez sur MEMORY SCAN.
Le balayage s’arrête lorsque la radio reçoit
une station préréglée sur cette page. Si vous
voulez sélectionner d’autres stations,
appuyez une nouvelle fois sur MEMORY
SCAN. Les numéros de préréglage qui ne
contiennent pas de stations sont ignorés.
• Le balayage sera plus rapide si vous préréglez
les fréquences dans l’ordre ascendant ou
descendant sur les numéros de préréglage.
Pour interrompre et annuler l’accord
par balayage des stations préréglées
Appuyez sur MEMORY SCAN pendant le
balayage.
Si l’accord par balayage des stations
préréglées ne fonctionne pas
Un double bip retentira et le balayage s’arrête
quand le premier numéro de préréglage où le
balayage a commencé est atteint.
Par exemple, lorsque vous balayez la page 1 qui
contient des stations préréglées sur les numéros
2, 4, 6 et 8, et commencez le balayage par le
numéro préréglé 6, un double bip retentira
lorsque la station 6 sera à nouveau accordée.
• Lors du balayage d’émissions PO la nuit,
lorsque la réception est intense, ou lors du
balayage dans un lieu exposé à des
interférences, le balayage fera fréquemment
des pauses. Si le cas se présente, réglez le
commutateur ATT sur ON et ajustez la
sensibilité avec la commande ATT (voir
“Contrôle des pauses de balayage”). Lorsque
les conditions d’écoute sont normales, réglez le
commutateur ATT sur OFF.
Amélioration de la
réception (Voir fig. B)
Réglage de l’antenne
FM : Déployez l’antenne télescopique et ajustez-
en la direction et l’angle pour améliorer la
réception.
OC : Déployez l’antenne télescopique
complètement et mettez-la à la verticale.
PO/GO : Tournez l’appareil à l’horizontale
jusqu’à ce que la réception soit
optimale. Une barre de ferrite servant
d’antenne se trouve à l’intérieur de
l’appareil.
Utilisation d’une antenne autonome
Utilisez une antenne longue portée AN-1, AN102 ou une antenne active OC AN-LP1 (non
fournies). Pour les détails, consultez le mode
d’emploi de chaque antenne.
Remarques
• Eloignez l’appareil et l’antenne des lampes à
fluorescence, des téléviseurs, des ordinateurs et
de tout appareil pouvant générer du bruit.
• Rentrez l’antenne télescopique lorsque vous
utilisez une antenne autonome.
• Installez l’antenne autonome le plus loin
possible de la route.
• L’antenne active OC AN-LP1 peut ne pas
fonctionner normalement si elle est raccordée à
cette radio lorsque l’accord par balayage de la
mémoire est utilisé. C’est parce que l’antenne
AN-LP1 sélectionne les fréquences par le
contrôleur d’antenne.
Réglage de l’heure
de mise en marche
Fonction d’attente
La radio peut être allumée et votre station
favorite automatiquement accordée à l’heure
voulue.
• Avant de mettre l’appareil en attente, assurezvous que le réglage de l’horloge est correct.
• Vous pouvez mémoriser deux heures de mise
en marche dans STANDBY MEMORY a et b.
• Avant de régler l’heure, ajustez VOL (volume)
pour ajuster le volume auquel la station sera
accordée.
1 Accordez la station souhaitée.
2 Appuyez sur ENTER/CLOCK jusqu’à
ce que vous entendiez un bip.
Le numéro de page et le numéro de
préréglage se mettent à clignoter.
3 Appuyez sur STANDBY MEMORY a
ou b.
Par exemple, lorsque vous appuyez sur
STANDBY MEMORY a, “PRESET” et “ ” se
mettent à clignoter.
4 Appuyez sur ENTER/CLOCK jusqu’à
ce que vous entendiez un double bip.
“PRESET” et “ ” ou “ ” s’allument.
5 Appuyez sur ON/OFF pour éteindre la
radio.
6 Appuyez sur STANDBY MEMORY a
ou b jusqu’à ce que vous entendiez un
bip.
Par exemple, lorsque vous appuyez sur
STANDBY MEMORY a : l’affichage revient à
l’affichage du réglage de l’heure,
“STANDBY”, “
se mettent à clignoter.
7 Appuyez sur –
SCAN/TIME SET pour régler les
heures.
8 Appuyez sur STANDBY MEMORY a
ou b, selon la mémoire sélectionnée à
l’étape 6, jusqu’à ce que vous entendiez
un bip.
Les heures sont réglées et les minutes se
mettent à clignoter.
” et l’indication de l’heure
TT
tt
T ou
t + sous TUNE/
TT
tt
9 Appuyez sur –
les minutes.
10
Appuyez sur STANDBY MEMORY a
ou b, selon la mémoire sélectionnée à
l’étape 6, jusqu’à ce que vous entendiez
un double bip.
Les minutes sont réglées et “STANDBY” et
“ ” ou “ ” s’allument.
Lorsque l’heure de mise en marche
est atteinte
La radio s’allume et “SLEEP” apparaît.
L’appareil s’arrêtera automatiquement au bout
de 60 minutes environ.
Lorsque vous avez réglé STANDBY
MEMORY a et b
Si la seconde heure de mise en marche est
atteinte lorsque la minuterie de la première
fonctionne, l’heure la plus récente aura priorité
sur l’autre et la station appropriée sera accordée.
Si vous avez réglé STANDBY MEMORY a et b
sur la même heure, STANDBY MEMORY a aura
la priorité.
Pour annuler la fonction d’attente
Appuyez sur STANDBY MEMORY a ou b
lorsque la radio est éteinte de sorte que
“STANDBY” et “
l’afficheur.
Veillez à relâcher la touche en une seconde. Si
vous appuyez plus longtemps sur la touche, la
radio se mettra en mode de réglage de l’heure de
mise en marche.
Pour annuler temporairement la
fonction d’attente
Poussez HOLD dans le sens de la flèche lorsque
la radio est éteinte de sorte que “-” apparaisse.
Lorsque cette fonction est annulée et que “-”
disparaît, la fonction d’attente est opérationnelle.
(Voir “Utilisation d’autres fonctions”.)
Remarques
• Lorsqu’une heure de mise en marche est réglée,
la radio s’allume chaque jour à cette heure tant
que la fonction d’attente n’est pas annulée.
• La fonction d’attente s’active même si vous
écoutez une autre station.
Déclenchement de la
sonnerie
Pour déclencher la sonnerie au lieu de la radio à
l’heure souhaitée, supprimez la station affectée à
STANDBY MEMORY a ou b.
1 Appuyez sur ON/OFF pour allumer la
radio.
2 Appuyez sur STANDBY MEMORY a
ou b.
La radio reçoit la station préréglée. S’il n’y a
pas de station préréglée, un double bip
retentira et l’afficheur changera de la façon
suivante.
Dans ce cas, effectuez l’étape 5.
3 Appuyez sur ENTER/CLOCK jusqu’à
ce que “dEL” clignote.
4 Appuyez une nouvelle fois sur
ENTER/CLOCK jusqu’à ce qu’un
double bip retentisse.
L’indication “PRESET” et “ ” ou “ ”
disparaît. (Voir “Accord d’une station
préréglée – Suppression d’une station
préréglée”.)
5 Effectuez les étapes 5 et 10 de la
procédure décrite dans “Réglage de
l’heure de mise en marche”.
Lorsque l’heure de mise en marche est
atteinte et que la fonction d’attente est
activée, la sonnerie retentit. L’appareil
s’éteindra automatiquement 60 minutes plus
tard.
Pour arrêter la sonnerie
Appuyez sur une touche quelconque sauf
LIGHT.
Remarques
• Le volume de la sonnerie n’est pas réglable.
• Si l’heure de mise en marche est atteinte
lorsque vous écoutez la radio, celle-ci
s’éteindra et la sonnerie retentira.
Réglage de la
minuterie d’arrêt
Minuterie sommeil
Vous pouvez vous endormir en musique si vous
utilisez la minuterie d’arrêt. La radio s’éteindra
automatique après l’écoulement du temps
préréglé (60, 45, 30 ou 15 minutes).
1 Appuyez sur SLEEP.
Le réglage de la minuterie d’arrêt “60”
apparaît et “SLEEP” clignotet.
La radio s’allume si elle était éteinte.
2 Appuyez de façon répétée sur SLEEP
pour sélectionner le réglage de
minuterie souhaité pendant que
“SLEEP” clignote.
A chaque pression, l’affichage change de la
façon suivante :
Un double bip retentit lorsque l’affichage
revient à “60”. “SLEEP” s’allume dans les
trois secondes qui suivent la sélection du
réglage de la minuterie d’arrêt pendant que
“SLEEP” clignote. La minuterie d’arrêt est
activée lorsque l’indication du temps
disparaît et l’indication de la fréquence
apparaît.
3 Accordez la station souhaitée et ajustez
VOL (volume).
La radio s’éteindra automatiquement après
l’écoulement du temps préréglé.
Pour arrêter la radio avant que le
temps de la minuterie ne soit écoulé
Appuyez sur ON/OFF .
Pour réinitialiser ou prolonger le
réglage de la minuterie d’arrêt
Appuyez une nouvelle fois sur SLEEP et
sélectionnez le réglage de minuterie souhaité.
Utilisation d’autres
fonctions
Fonction de verrouillage
Lorsque vous utilisez cette fonction, les touches
ne sont plus opérationnelles. Utilisez cette
fonction pour éviter un enclenchement accidentel
des touches.
La fonction de verrouillage peut aussi être
utilisée pour annuler temporairement la fonction
d’attente.
Pour utiliser la fonction de
verrouillage
Poussez HOLD dans le sens de la flèche.
“-” apparaît sur l’afficheur et toutes les
touches sont inactives.
Pour annuler la fonction de
verrouillage
Poussez HOLD dans le sens opposé à la flèche.
“-” disparaît de l’afficheur.
Fonction d’éclairage
Appuyez sur LIGHT pour allumer l’éclairage
pendant 20 à 30 secondes environ et voir
l’affichage dans l’obscurité.
tt
T ou
t + pour régler
TT
tt
” ou “ ” disparaissent de
Betrieb des Radios
In einigen Ländern, müssen Sie das MWAbstimmraster umstellen. (Siehe hierzu „Ändern
des MW-Abstimmrasters“.)
Manuelles Abstimmen
1 Drücken Sie ON/OFF, um das Radio
einzuschalten.
2 Wählen Sie mit BAND den
gewünschten Wellenbereich. Bei
Drücken dieser Taste ändert sich die
Anzeige in der folgenden Reihenfolge:
Bei Wahl von LW sind zwei Pieptöne zu
hören. (Nach der Wahl eines Wellenbereichs
erscheint zunächst die Frequenz, auf die
zuletzt abgestimmt war.)
3 Wenn Sie SW (KW) gewählt haben:
Halten Sie SW BAND gedrückt, und
wählen Sie dann mit –
(unter der Markierung TUNE/SCAN/
TIME SET) das gewünschte Meterband.
Einzelheiten zu Meterband finden Sie
unter „Automatische Sendersuchlauf“.
Wenn Sie LW, MW oder FM (UKW) gewählt
haben, fahren Sie mit Schritt 4 fort.
4 Stimmen Sie mit –
den gewünschten Sender ab.
Wenn die niedrigste Frequenz des
Wellenbereichs erreicht wird, ertönen zwei
Pieptöne. Wenn ein Sender empfangen wird,
erscheint „p TUNE“ im Display.
5 Stellen Sie mit VOL die Lautstärke ein.
Das Abstimmschraster
TT
Mit –
T oder
TT
TUNE/SCAN/TIME SET) können Sie zwischen
Normalabstimmung (NORMAL) und
Feinabstimmung (FINE) umschalten.
Wellenbereich NORMAL FINE
LW 9 kHz 1 kHz
MW 9 kHz/10 kHz* 1 kHz
KW (SW) 5 kHz 1 kHz
UKW (FM) 0,05 MHz 0,05 MHz
* Einzelheiten zum Abstimmraster finden Sie
unter „Ändern des MW-Abstimmrasters“.
• Wenn NORMAL gewählt ist und –
tt
t + gedrückt gehalten wird, setzt der
tt
automatische Sendersuchlauf ein. (Siehe
„Automatischer Sendersuchlauf“.)
• Wenn FINE gewählt ist und –
gedrückt gehalten wird, ändert sich die
Frequenz kontinuierlich. Beim Loslassen der
Taste bleibt die momentane Frequenz
eingestellt.
Zum Ausschalten des Radios
Drücken Sie ON/OFF.
Für UKW-Stereoempfang
Schließen Sie einen Stereokopfhörer (nicht
mitgeliefert) an die i-Buchse an.
Bei Nachrichtensendungen
Stellen Sie den TONE-Wähler auf NEWS. Die
Sprecherstimme ist dann besser verständlich. Bei
Musik sollte der TONE-Wähler dagegen auf
MUSIC stehen, um eine bessere Klangqualität zu
erhalten.
Ändern des MW-Abstimmrasters
Je nach dem Land, in dem Sie das Gerät gekauft
haben, ist das Abstimmraster werksseitig auf 9
kHz oder 10 kHz voreingestellt. Wenn Sie das
Gerät in einem anderen Land verwenden, muss
das Raster eventuell wie folgt umgestellt werden.
Land Raster
Nord-/Südamerika 10 kHz
Andere Länder 9 kHz
1 Drücken Sie ON/OFF, um das Radio
auszuschalten.
2 Nehmen Sie die Batterien heraus.
3 Stellen Sie den im Batteriefach
befindlichen MW CH STEP-Schalter auf
das gewünschte Raster.
4 Legen Sie die Batterien wieder ein, und
drücken Sie ON/OFF.
Hinweise
• Führen Sie die Schritte 2 bis 4 innerhalb von 60
Sekunden aus. Wenn Sie länger als 60
Sekunden lang keine Bedienung vornehmen,
wird die Uhrzeit gelöscht.
• Auf den Frequenzen 10250 kHz und 20500 kHz
kann der Empfang durch Oberwellen des
eingebauten Oszillators gestört sein.
Automatischer
Sendersuchlauf
Der momentan gewählte Wellenbereich kann
automatisch nach Sendern abgesucht werden.
1 Drücken Sie ON/OFF, um das Radio
einzuschalten.
2 Wählen Sie mit BAND den
Wellenbereich.
Bei SW (KW) müssen Sie außerdem das
gewünschte Meterband wählen.
3 Stellen Sie NORMAL/FINE auf
NORMAL.
4 Halten Sie –
Markierung TUNE/SCAN/TIME SET)
gedrückt, bis der Suchlauf einsetzt.
Lassen Sie die Taste dann los.
Wenn ein Sender gefunden ist, stoppt der
Suchlauf 3 Sekunden lang. Die
Suchlaufbereiche finden Sie im Abschnitt
„Frequenzbereiche“.
5 Wenn der gewünschte Sender
gefunden ist, drücken Sie –
tt
t + erneut, um den Suchlauf zu
tt
stoppen.
Wenn Sie –
der Suchlauf automatisch fortgeführt.
Nachdem der Suchlauf einen Sender
gefunden hat, können Sie durch kurzes
Drücken von –
Feinabstimmung vornehmen.
• Wenn Sie –
wird der Suchlauf in Richtung niedrigerer
Frequenzen ausgeführt. Bei Drücken von
erfolgt der Suchlauf in Richtung höherer
Frequenzen.
• Wenn Sie die Suchlaufsrichtung umkehren
wollen, halten Sie die andere Taste (–
tt
t +) mindestens 2 Sekunden lang gedrückt.
tt
So können Sie beispielsweise zum vorherigen
Sender zurückkehren, wenn der Suchlauf
bereits den nächsten Sender aufgesucht hat.
• Bei nächtlichem MW-Empfang und bei starken
Interferenzstörungen stoppt der Suchlauf
möglicherweise an sehr vielen Frequenzen.
Stellen Sie in einem solchen Fall den ATTSchalter auf ON, und stellen Sie dann mit dem
ATT-Regler eine geeignete Empfindlichkeit ein
(siehe den folgenden Abschnitt „Einstellen der
Empfangsempfindlichkeit“). Im Normalfall
sollte der ATT-Schalter jedoch auf OFF stehen.
Einstellen der
Empfangsempfindlichkeit mit dem
ATT-Schalter und dem ATT-Regler
Wenn sehr viele Sender empfangbar oder viele
Interferenzstörungen vorhanden sind, können
Sie mit dem ATT-Schalter und dem ATT-Regler
die Empfindlichkeit reduzieren, so dass der
Suchlauf nicht an zu vielen Frequenzen stoppt.
Im Normalfall sollte der ATT-Schalter jedoch auf
OFF stehen (maximale Empfindlichkeit).
Wenn der ATT-Schalter auf ON steht, wir der
ATT-Regler aktiviert. Wird der ATT-Regler in
Richtung MAX gedreht, reduziert sich die
Empfindlichkeit, so dass der Suchlauf nur noch
an den stärkeren Sendern stoppt.
TT
tt
T oder
t +
TT
tt
TT
tt
T oder
t + auf
TT
tt
tt
t + (unter der Markierung
tt
TT
T oder
TT
TT
tt
T oder
t +
TT
tt
TT
tt
T oder
t + (unter der
TT
tt
TT
T oder
TT
TT
tt
T oder
t + nicht drücken, wird
TT
tt
TT
tt
T oder
t + eine
TT
tt
TT
T länger als 2 Sekunden drücken,
TT
tt
t +
tt
TT
T bzw.
TT
Hinweis
Wenn der ATT-Regler ganz auf MAX gestellt
wird, stoppt der Suchlauf überhaupt nicht
mehr. Ist keine Reduzierung der
Empfindlichkeit erforderlich, stellen Sie den
ATT-Schalter auf OFF.
Frequenzbereiche (LW, MW, SW
(KW): kHz, FM (UKW): MHz)
Wellenbereich
Empfangsbereich
LW 150-285 153-279
MW 530-1710 531-1710*
SW 2250-2550 120 m
2250-26100 5900-6250 49 m
FM 76,00-108,00 76,00-108,00
*1Wenn NORMAL/FINE auf NORMAL steht,
stimmen die LW- und MW-Frequenzbereiche
mit den Suchlaufbereichen überein.
2
*
Bei 9-kHz-Abstimmraster
3
Bei 10-kHz-Abstimmraster
*
*1Suchlaufbereich
2
3
530-1710*
3150-3450 90 m
3850-4050 75 m
4700-5100 60 m
7100-7400 41 m
9400-10000 31 m
11500-12150 25 m
13500-13900 22 m
15000-15900 19 m
17450-18000 16 m
18850-19100 15 m
21450-21950 13 m
25600-26100 11 m
Meterband
Sendervorwahl
Auf jeder Speicherseite (MEMORY PRESET
PAGE) können 10 Sender gespeichert werden.
Insgesamt lassen sich also 50 Sender speichern.
Die gespeicherten Sender können jederzeit
bequem mit den MEMORY PRESET PAGETasten abgerufen werden.
Der Speicher besitzt die Seitennummern 1 bis 5
und die Stationsnummern 1 bis 0 (0 steht für 10).
Speichern von Sendern
1 Stimmen Sie auf den gewünschten
Sender ab.
Siehe hierzu den Abschnitt „Manuelles
Abstimmen“ oder „Automatischer
Sendersuchlauf“.
2 Halten Sie ENTER/CLOCK gedrückt,
bis ein Piepton zu hören ist.
Die Speicherseitennummer 1 und die
Stationsnummer blinken, wenn Sie zum
ersten Mal einen Sender speichern oder wenn
bereits 50 Sender gespeichert sind. In allen
anderen Fällen blinken folgende Nummern:
Speicherseitennummer:
Stationsnummer:Die kleinste
3 Wählen Sie durch Drücken einer
MEMORY PRESET PAGE-Taste die
Seite, auf der der Sender gespeichert
werden soll.
Wenn Sie beispielsweise die Taste 3 drücken,
erscheint im Display folgende Anzeige:
4 Drücken Sie dieselbe MEMORY
PRESET PAGE-Taste wiederholt, um
die gewünschte Stationsnummer zu
wählen.
Die Stationsnummer ändert sich in der
folgenden Reihenfolge:
Wenn die Anzeige auf „1“ zurückschaltet, ist
ein Piepton zu hören.
Wird beispielsweise Stationsnummer 7
gewählt, erscheint im Display die folgende
Anzeige:
5 Drücken Sie ENTER/CLOCK, bis zwei
Pieptöne zu hören sind.
Seiten- und Stationsnummer hören auf zu
blinken.
Hinweis
Wenn bei blinkender Seiten- und
Stationsnummer länger als 30 Sekunden keine
Taste gedrückt wird, schaltet das Gerät in den
vorausgegangenen Modus zurück.
So können Sie die Speicherung einer
Stationsnummer ändern
Wiederholen Sie den obigen Vorgang, um einen
neuen Sender unter der Stationsnummer zu
speichern. Der alte Sender wird dabei durch den
neuen überschrieben.
So können Sie den Speichervorgang
abbrechen und verlassen
Schalten Sie das Radio mit ON/OFF aus und
wieder ein. Es befindet sich dann im vorherigen
Modus.
Abrufen eines gespeicherten
Senders
1 Drücken Sie ON/OFF, um das Radio
einzuschalten.
2 Wählen Sie durch wiederholtes
Drücken der betreffenden MEMORY
PRESET PAGE-Taste die gewünschte
Stationsnummer. Die Nummern, unter
denen Sender gespeichert sind,
erscheinen nacheinander. Wenn die
kleinste Nummer erreicht wird, sind
zwei Pieptöne zu hören.
3 Stellen Sie mit VOL die Lautstärke ein.
Hinweis
Wenn Sie eine Seitennummer wählen, die keine
Speicherung enthält, sind zwei Pieptöne zu
hören und die Anzeige ändert sich wie in der
folgenden Abbildung gezeigt. Nach drei
Sekunden schaltet das Gerät in den
vorausgegangenen Modus zurück.
So können Sie einen gespeicherten
Sender löschen
Es empfiehlt sich, nicht benötigte Sender zu
löschen, da sich dann der gewünschte Sender
schneller finden lässt.
1 Drücken Sie ON/OFF, um das Radio
einzuschalten.
2 Wählen Sie durch wiederholtes
Drücken der MEMORY PRESET PAGETaste die Stationsnummer, die Sie
löschen wollen.
Die kleinste
Speicherseitennummer mit
freier Stationsnummer
Stationsnummer, die noch
auf der Seite frei ist.
3 Halten Sie ENTER/CLOCK gedrückt,
bis „dEL“ blinkt.
Bei längerem Drücken von ENTER/CLOCK
während des Blinkens der Seiten- und
Stationsnummer blinkt „dEL“ im Display.
Während diese Nummern blinken, ist das
Gerät speicherbereit.
m
4 Drücken Sie ENTER/CLOCK
wiederholt, bis zwei Pieptöne zu hören
sind.
Seiten- und Stationsnummer erlöschen.
Hinweis
Wenn länger als 30 Sekunden keine Taste
gedrückt wird, während Seitennummer,
Stationsnummer und „dEL“ blinken, schaltet das
Gerät in den vorausgegangenen Modus zurück.
So können Sie den Löschvorgang
abbrechen und verlassen
Schalten Sie das Radio mit ON/OFF einmal aus
und wieder ein. Es schaltet dann in den
vorausgegangenen Modus zurück.
Automatischer
Speichersuchlauf
Die auf einer Seite gespeicherten Sender können
automatisch nacheinander abgerufen werden.
1 Drücken Sie ON/OFF, um das Radio
einzuschalten.
2 Drücken Sie die MEMORY PRESET
PAGE-Taste der Seitennummer, die
durchlaufen werden soll.
3 Drücken Sie MEMORY SCAN.
Wenn der Suchlauf auf der betreffenden Seite
einen Sender gefunden hat, stoppt er. Durch
erneutes Drücken von MEMORY SCAN
können Sie den Suchlauf fortsetzen. Nicht
belegte Stationsnummern werden
übersprungen.
• Der Suchlauf beschleunigt sich, wenn die die
Sender in der Reihenfolge der Frequenzen
gespeichert worden sind.
So können Sie den Speichersuchlauf
abbrechen und verlassen
Drücken Sie bei aktiviertem Speichersuchlauf die
Taste MEMORY SCAN.
Hinweis zum Speichersuchlauf
Wenn die Stationsnummer, an der der Suchlauf
gestartet wurde, wieder erreicht wird, sind zwei
Pieptöne zu hören.
Beispiel: Auf der Speicherseite 1 sind die
Nummern 2, 4, 6 und 8 belegt und der Suchlauf
wird mit Seitennummer 6 gestartet. In diesem
Fall ertönen zwei Pieptöne, sobald der Suchlauf
die Nummer 6 wieder erreicht hat.
• Nachts arbeitet der Suchlauf manchmal auf
Grund starker Sendersignale und
Interferenzstörungen im MW-Bereich nicht
optimal. Stellen Sie in einem solchen Fall den
ATT-Schalter auf ON und reduzieren Sie mit
dem ATT-Regler die Empfindlichkeit (siehe
«Einstellen der Empfangsempfindlichkeit»). Im
Normalfall sollte der ATT-Schalter jedoch auf
OFF stehen.
Für optimalen Empfang
(Siehe Abb. B)
Ausrichten der Antenne
FM (UKW): Ziehen Sie die Teleskopantenne ganz
SW (KW): Ziehen Sie die Teleskopantenne ganz
MW, LW: Drehen Sie das Gerät um die
Verwendung einer Außenantenne
An das Gerät können die Breitbandantennen
AN-1 und AN-102 oder die KW-Aktivantenne
AN-LP1 (nicht mitgeliefert) angeschlossen
werden. Einzelheiten entnehmen Sie bitte der
Bedienungsanleitung der Antenne.
Hinweise
• Halten Sie das Gerät und die Antenne von
Leuchtstoffröhren, Fernsehern, Computern
und anderen Geräten, von denen
Störstrahlungen ausgehen, fern.
• Schieben Sie die Teleskopantenne zurück,
wenn Sie eine Außenantenne angeschlossen
haben.
• Stellen Sie die Außenantenne an eine möglichst
weit von befahrenen Straßen entfernte Stelle.
• Wenn Sie den Speichersuchlauf verwenden,
arbeitet die KW-Aktivantenne AN-LP1
möglicherweise nicht einwandfrei, da bei
dieser Antenne die Frequenzwahl über die
Antennen-Steuereinheit erfolgt.
heraus, und justieren Sie Richtung
und Winkel auf optimalen Empfang
ein.
heraus, und stellen Sie sie senkrecht.
vertikale Achse, bis der Empfang
optimal ist. In diesem Wellenbereich
arbeitet die eingebaute
Ferritstabantenne.
Einstellen des
Standby-Timers
Die Standby-Timer-Funktion
Der Standby-Timer schaltet das Radio zu einer
voreingestellten Zeit automatisch ein und stimmt
auf den voreingestellten Sender ab.
• Vergewissern Sie sich, dass die Uhr des Radios
richtig eingestellt ist, bevor Sie den StandbyTimer programmieren.
• Der Standby-Timer besitzt die beiden
Programmplätze STANDBY MEMORY a und
b.
• Stellen Sie an VOL die Lautstärke ein, bevor Sie
die Standby-Timer-Zeit programmieren.
1 Stimmen Sie auf den gewünschten
Sender ab.
2 Drücken Sie ENTER/CLOCK, bis ein
Piepton zu hören ist.
Die Seiten- und Stationsnummer beginnt zu
blinken.
3 Drücken Sie STANDBY MEMORY a
oder b.
Wenn Sie beispielsweise STANDBY
MEMORY a drücken, beginnt „PRESET“ und
“ zu blinken.
„
4 Drücken Sie ENTER/CLOCK, bis zwei
Pieptöne zu hören sind.
„PRESET“ und „ “ oder „ “ leuchten.
5 Drücken Sie ON/OFF, um das Radio
auszuschalten.
6 Drücken Sie STANDBY MEMORY a
oder b, bis ein Piepton zu hören ist.
Wenn Sie beispielsweise STANDBY
MEMORY a drücken, erscheint im Display
die Uhreinstellanzeige. „STANDBY“, „
und die Zeitanzeige blinken.
TT
7 Drücken Sie –
T oder
TT
t t
t + (unter der
t t
Markierung TUNE/SCAN/TIME SET),
um die Stunden einzustellen.
8 Drücken Sie die Taste STANDBY
MEMORY a oder b (je nachdem, welche
Taste Sie im Schritt 6 gedrückt haben),
bis ein Piepton zu hören ist.
Die Minutenziffern beginnen zu blinken.
“
TT
9 Drücken Sie –
T oder
TT
t t
t +, um die
t t
Minuten einzustellen.
10
Drücken Sie die Taste STANDBY
MEMORY a oder b (je nachdem, welche
Taste Sie im Schritt 6 gedrückt haben),
bis ein zwei Pieptöne zu hören ist.
Die Minutenziffern werden gespeichert.
„STANDBY“ und „ “ bzw. „ “ leuchten
nun.
Wenn die Standby-Timer-Zeit
erreicht ist
Das Radio schaltet sich ein, und „SLEEP“
erscheint.
Nach etwa 60 Minuten schaltet sich das Radio
automatisch wieder aus.
Wenn sowohl STANDBY MEMORY a
als auch b programmiert wurden
Wenn die zweite Standby-Timer-Zeit erreicht
wird, während der erste Standby-Timer noch
aktiv ist, schaltet das Radio auf den Sender des
zweiten Standby-Timers um. Wurde für
STANDBY MEMORY a und b dieselbe Zeit
programmiert, besitzt STANDBY MEMORY a
Priorität.
Zum Abschalten des Standby-TimerFunktion
Drücken Sie bei ausgeschaltetem Radio die Taste
STANDBY MEMORY a oder b, so dass die
Anzeigen „STANDBY“ und „
erlöschen.
Die Taste muss innerhalb von einer Sekunde
wieder losgelassen werden. Wenn Sie die Taste
länger drücken, schaltet das Gerät in den
Standby-Timer-Einstellmodus.
“ bzw. „ “
Zum vorübergehenden Abschalten
der Standby-Timer-Funktion
Schieben Sie bei ausgeschaltetem Radio den
HOLD-Schalter in Pfeilrichtung, so dass „-“
erscheint. Wenn Sie HOLD in die andere
Richtung zurückschieben, so dass „-“ erlischt,
wird der Standby-Timer wieder aktiviert. (Siehe
auch „Verwendung anderer Funktionen“.)
Hinweise
• Wenn Sie den Standby-Timer einmal
programmiert haben, wird das Radio so lange
jeden Tag zur programmierten Zeit
eingeschaltet, bis Sie die Standby-TimerFunktion abschalten.
• Der Standby-Timer funktioniert auch, wenn Sie
gerade einen anderen Sender hören.
Aktivieren des
Alarmtons
Wenn der Standby-Timer statt des Radios einen
Alarmton aktivieren soll, löschen Sie den
programmierten Sender von STANDBY
MEMORY a bzw. b.
1 Drücken Sie ON/OFF, um das Radio
einzuschalten.
2 Drücken Sie STANDBY MEMORY a
oder b.
Der gespeicherte Sender wird empfangen.
Wenn kein Sender gespeichert ist, ertönen
zwei Pieptöne und die Anzeige im Display
ändert sich wie folgt. Fahren Sie in diesem
Fall mit Schritt 5 fort.
3 Halten Sie ENTER/CLOCK gedrückt,
bis „dEL“ blinkt.
4 Drücken Sie ENTER/CLOCK erneut,
bis zwei Pieptöne zu hören sind.
Die Anzeige „PRESET“ und „ “ bzw. „ “
erlischt. (Siehe „Sendervorwahl – So können
Sie einen gespeicherten Sender löschen“.)
5 Führen Sie die Schritte 5 bis 10 des
Abschnitts „Einstellen des StandbyTimers“ aus.
Wenn die programmierte Standby-Timer-Zeit
erreicht ist, ertönt der Alarmton. Nach etwa
60 Minuten schaltet sich das Gerät wieder
aus.
Zum Abschalten des Alarmtons
Drücken Sie eine beliebige Taste außer LIGHT.
Hinweise
• Die Alarmton-Lautstärke kann nicht geändert
werden.
• Wenn Sie bei Erreichen der Standby-Timer-Zeit
gerade Radio hören, verstummt das Radio und
statt dessen ist der Alarmton zu hören.
Einstellen des SleepTimers
Die Sleep-TimerFunktion
Mit der Sleep-Timer-Funktion können Sie in der
Gewissheit einschlafen, dass sich das Radio
automatisch nach der programmierten
Zeitspanne (60, 45, 30 oder 15 Minuten)
ausschaltet.
1 Drücken Sie SLEEP.
Der Sleep-Timer ist zunächst auf 60 Minuten
eingestellt. Im Display erscheint „60”,
darüber blinkt die Anzeige „SLEEP”.
Wenn das Radio ausgeschaltet war, schaltet
es sich ein.
2 Drücken Sie bei blinkender Anzeige
„SLEEP“ die Taste SLEEP wiederholt,
um die Sleep-Timer-Zeitspanne
einzustellen.
Dabei ändert sich die Anzeige im Display in
der folgenden Reihenfolge:
Wenn die Anzeige auf „60“ zurückkehrt, sind
zwei Pieptöne zu hören. Drei Sekunden nach
Einstellen der Sleep-Timer-Zeitspanne
(wäherend „SLEEP” blinkt) leuchtet „SLEEP”
konstant auf. Sobald im Display statt der
Sleep-Timer-Anzeige die Frequenz erscheint,
ist der Sleep-Timer aktiviert.
3 Stimmen Sie auf den gewünschten
Sender ab, und stellen Sie an VOL die
Lautstärke ein.
Das Radio schaltet sich automatisch nach der
programmierten Sleep-Timer-Zeitspanne aus.
So können Sie das Radio bei
aktiviertem Sleep-Timer vorzeitig
ausschalten
Drücken Sie ON/OFF.
So können Sie die Sleep-TimerZeitspanne nachträglich ändern
Drücken Sie SLEEP erneut, um die gewünschte
neue Zeitspanne zu wählen.
Verwendung
anderer Funktionen
Die Sperrfunktion
Mit der Sperrfunktion können Sie die Tasten des
Radios desaktivieren, so dass sie nicht
versehentlich verstellt werden können.
Außerdem dient diese Funktion zum temporären
Abschalten der Standby-Timer-Funktion.
So wird die Sperrfunktion aktiviert
Schieben Sie HOLD in Pfeilrichtung.
Das Symbol „-“ im Display weist nun darauf
hin, dass alle Tasten gesperrt sind.
So wird die Sperrfunktion
abgeschaltet
Schieben Sie HOLD in entgegengesetzte
Pfeilrichtung, so dass „-“ erlischt.
Aktivieren der
Beleuchtung
Durch Drücken von LIGHT wird das Display
etwa 20 bis 30 Sekunden lang beleuchtet, so dass
Sie die Anzeigen auch nachts sehen können.
3-042-774-51(1)
FM Stereo/SW/MW/LW
PLL Synthesized Receiver
Operating Instructions
Инструкция по эксплуатации
Használati Útmutató
ICF-SW35
Sony Corporation © 2000 Printed in China
WARNING
To prevent fire or shock hazard, do not
expose the unit to rain or moisture.
To avoid electrical shock, do not open the
cabinet. Refer servicing to qualified personnel
only.
Before You Begin
Thank you for choosing the Sony world band
receiver! The world band receiver will give you
many hours of reliable service and listening
pleasure.
Please read these instructions thoroughly before
operating the world band receiver, and retain
them in a handy place for future reference.
Features
• FM stereo/SW/MW/LW portable receiver
with worldwide band coverage
• PLL (Phase Locked Loop) synthesizer system
• Presetting of up to 10 stations on each memory
preset page for quick tuning (50 stations in
total)
• Memory scan tuning of stations memorized on
a memory preset page
• Standby timer function to receive your favorite
broadcast at the desired time
• Scan tuning to automatically scan the stations
• Sleep timer to turn off the radio automatically
after the sleep timer setting (60, 45, 30 or 15
minutes) is reached
• Clock function
• FM stereo reception through stereo
headphones (not supplied)
Choosing Power Source
Installing Batteries
(See fig. A)
1
Open the lid of the battery
compartment at the rear of the unit.
2
Install three R6 (size AA) batteries with
the + and – poles facing the correct way
and then close the lid.
“0:00” flashes on the display after you first install
the batteries. To stop flashing, set the clock. (See
“Setting the Clock”.)
Battery Life (approximate hours)
Sony R6
Sony LR6
(size AA)
alkaline
(size AA)
FM reception
17
46
SW reception
12
33
LW/MW reception
12
33
Knowing when to replace the
batteries
When the batteries become weak, “E” flashes
on the display. When the batteries are completely
exhausted, “E” lights on the display and the
power is turned off.
When “E” lights, replace all the batteries with
new ones.
When you replace the batteries
Replace the batteries within 60 seconds while the
power is turned off. If you do not perform any
operation for 60 seconds, the clock and standby
settings will be deleted. However, the stations
you preset will remain.
After the batteries are replaced, press ON/OFF
to turn the indication off.
Using Other Power
Sources
The internal batteries are automatically
disconnected when the AC power adaptor or the
car battery cord is connected to the DC IN 4.5 V
jack for external power source.
House current
Connect the Sony AC power adaptor (not
supplied) to the DC IN 4.5 V jack firmly, and
plug it into a wall outlet.
Car battery
For use on a 12/24 V car battery, connect the
Sony car battery cord (not supplied) to the DC IN
4.5 V jack. For details, refer to the operating
instructions of the car battery cord.
Notes on external power sources
• When operating the unit with an external
power source, do not remove the batteries.
These batteries serve to backup settings stored
to memory. Since batteries discharge in this
case as well, we recommend changing them
about once a year.
• Before connecting and disconnecting the
external power source plug, be sure to turn off
the radio. Otherwise, “E” may be displayed.
When this occurs, turn on the radio so that
“E” disappears.
• When operating the unit with the internal
batteries, remove the AC power adaptor or car
battery cord from the wall outlet or car battery
and the DC IN 4.5 V jack. Make sure that the
plug of the external power source is
disconnected before operating the unit.
• Use the recommended Sony AC power
adaptor* or car battery cord* only. The polarity
of the plugs of other manufacturers may be
different. Failure to use the recommended AC
power adaptor or car battery cord may cause
the unit to malfunction.
* For details on the optional AC power adaptor
or car battery cord, see “Specifications”.
Setting the Clock
Set the time when the radio is turned off.
Set the time after you first install the batteries or
the clock setting is erased. At this time “0:00”
flashes.
The clock operates in the 24-hour system.
“0:00” = midnight
“12:00” = noon
Setting the clock
1
Press and hold ENTER/CLOCK until
you hear a beep. The hour indication
starts flashing.
2
Press –
T
T
T
T
T or t
t
t
t
t + under TUNE/
SCAN/TIME SET to display the correct
hour.
The hour increases by pressing t
t
t
t
t +, and
decreases by pressing –
T
T
T
T
T. To continuously
increase or decrease the hour, keep t
t
t
t
t + or
– T
T
T
T
T hold down.
You hear a double-beep when “0” is
displayed.
3
Press and hold ENTER/CLOCK again
until you hear a beep.
4
Press –
T
T
T
T
T or t
t
t
t
t + to display the correct
minute.
To continuously increase or decrease the
minute, keep t
t
t
t
t + or – T
T
T
T
T hold down.
You hear a double-beep when the “00” is
displayed.
5
Press and hold ENTER/CLOCK until
you hear a double-beep.
The colon “:” starts flashing and the clock
operates.
Note
If you leave the radio for one minute with no
operation, the clock setting will be aborted and
the unit will return to the previous mode. In this
case, repeat the procedure from step 1 to
complete the clock setting.
To cancel the clock setting
Press ON/OFF to turn on the radio, and then
turn it off. The unit will return to the previous
mode.
Troubleshooting
Should any problem persist after you have made
the following checks, consult your nearest Sony
dealer.
There is no sound output.
• VOL (volume) is turned down completely.
• The stereo headphones are plugged in.
• The batteries are inserted with the + and –
poles facing the wrong way.
Radio disconnects, even if you press
POWER.
• The batteries are inserted with the + and –
poles facing the wrong way.
• The batteries are exhausted (“E” flashes or
lights).
• The AC power adaptor or car battery cord is
disconnected.
Sound quality is unsatisfactory, or
reception is poor or cannot be
received.
• Weak batteries (“E” flashes).
• Tuning and antenna orientation requires
further adjustment.
• The radio signal is weak. Listen to the radio
near a window when in a vehicle or building.
• ATT switch is set to ON. Set it to OFF, or
adjust the ATT control.
Stations cannot be stored to
memory.
• Press ENTER/CLOCK for at least two seconds
and press the desired MEMORY PRESET
PAGE to select the preset number.
The preset station cannot be
received during preset tuning.
• VOL (volume) is turned down completely.
• The number selected for the preset station is
incorrect. Select the correct number assigned to
the desired preset station.
• The preset stations have been erased from
memory. Store the station to memory again.
Scan tuning does not work.
• NORMAL/FINE switch is set to FINE. Set it to
NORMAL.
Memory scan tuning does not work.
• You did not select a page number by pressing
MEMORY PRESET PAGE. Press the desired
MEMORY PRESET PAGE, then press
MEMORY SCAN.
• The scanned page has only one preset station.
Scanning does not stop.
• The ATT switch is set to ON. Set it to OFF, or
adjust the ATT control.
The radio is not turned on when the
preset standby time is reached.
• VOL (volume) is turned down completely.
• “STANDBY” , “ ” or “ ” is not displayed.
• The hold function is operating.
• The preset standby time hase been erased from
memory because the batteries were not
replaced within one minute after being
removed from the unit. Store the standby time
to memory again.
The buttons and controls are not
operating.
• The hold function is operating and “-” lights
on the display. Slide HOLD to the left until
“-” disappears from the display.
The display is dim.
• The unit is being used in extremely high or low
temperatures, or in a place subject to excessive
moisture.
The display shows no indication.
• The batteries are inserted with the + and –
poles facing the wrong way.
• The batteries have run down.
Precautions
• Operate the unit only on 4.5 V DC. For battery
operation, use three R6 (size AA) batteries. For
AC operation, use only the recommended AC
power adaptor.
• The unit is not disconnected from the AC
power source (mains) as long as it is connected
to a wall outlet, even if the unit itself has been
turned off.
• Use the unit within a temperature range of 0˚C
to 40˚C (32˚F to 104˚F). If it is used in
temperatures outside this range, an irregular
display may appear. If it is used in
temperatures lower than this range, the display
may change very slowly. These irregularities
will disappear and there will be no damage to
the unit when it is used in its recommended
temperature range.
• Do not leave the unit in a location near heat
sources, or in a place subject to direct sunlight,
sand, excessive dust or mechanical shock.
• The nameplate indicating operating voltage,
etc. is located on the rear exterior.
• Should any solid object or liquid fall into the
unit, disconnect the AC power adaptor and
remove the batteries, and have the unit
checked by qualified personnel before
operating it any further. Make sure that no
liquid or foreign material enters the DC IN 4.5
V jack of the unit. This may lead to the
malfunction of the unit.
• Since a strong magnet is used for the speaker,
keep personal credit cards, etc., using magnetic
coding away from the unit.
• When the casing becomes soiled, clean it with a
soft dry cloth moistened with mild detergent
solution. Never use abrasive cleansers or
chemical solvents, as they may deform the
casing.
• In vehicles or buildings, radio reception may
be difficult or subject to interference. Try
listening near a window.
Service and repair
When sending in your unit for service and
repair, take note of your important settings in the
memory. These settings are sometimes erased
from memory, depending on the type of repair
necessary.
If you have any questions or problems
concerning your unit, please consult the nearest
Sony dealer.
Specifications
Circuit system
FM: Super heterodyne
LW/MW/SW: Dual conversion super
heterodyne
Frequency range
FM: 76.00-108.00 MHz
SW: 2250-26100 kHz
MW: 530-1710 kHz
LW: 150-285 kHz
Speaker
Approx. 66 mm (2
1
⁄
8
in.) diameter, 8
Ω
Maximum output
240 mW (at 10% harmonic distortion)
Output
i
(headphones) jack (ø 3.5 mm stereo mini jack)
16
Ω
Power requirements
DC 4.5 V, three R6 (size AA) batteries
External power source
DC IN 4.5 V
Dimensions
Approx. 168
Ч
106
Ч
35 mm (W
×
H
×
D)
(6
5
⁄
8
Ч
4
1
⁄
4
Ч
1
7
⁄
16
in.) incl. projecting parts
Mass
Approx. 405 g (14.3 oz.) incl. batteries
Supplied Accessories
Carrying case (1)
Short wave guide (1)
Optional Accessories
AC power adaptor
AC-E45 HG
Car battery cord
SW/MW/LW wide-range antenna
AN-1, AN-102
SW active antenna
AN-LP1
Design and specifications are subject to change
without notice.
The AC power adaptor’s operating voltage
varies depending upon the country in which it is
sold. Buy the AC power adaptor in the country
you intend to use it.
Your Sony dealer may not handle all of the above
listed optional accessories. Please ask your dealer
for detailed information on the optional
accessories available in your country.
A
Insert the # side of the battery first.
Сперва вставьте сторону батарейки #.
Az elem # oldalát helyezze be először.
Stand
Подставка
Állvány
Display
Дисплей
Kijelző
ENTER/CLOCK
POWER ON/OFF
TUNE/SCAN/TIME SET
– T
T
T
T
T, t
t
t
t
t +
DC IN 4.5 V
Battery compartment
Батарейный отсек
Elemtartó rekesz
Rear
Задняя сторона
Hátoldal
ПРЕДУПРЕЖДЕНИЕ
Для предотвращения пожара или
электрического удара не подвергайте
аппарат воздействию дождя или влаги.
Во избежание поражения электрическим
током не открывайте корпус. За
техобслуживанием обращайтесь только к
квалифицированному обслуживающему
персоналу.
Перед началом
эксплуатации
Спасибо за выбор радиоприемника с
мировым диапазоном частот фирмы Sony!
Радиоприемник с мировым диапазоном
частот предоставят Вам много часов
надежной работы и удовольствия от
прослушивания.
Перед эксплуатацией радиоприемника с
мировым диапазоном частот, пожалуйста,
внимательно прочитайте данную инструкцию
по эксплуатации и сохраняйте ее в легко
доступном месте для дальнейших справок.
Характерные
особенности
• Портативный радиоприемник ЧМ-стерео/
КВ/СВ/ДВ с мировым охватом диапазона
частот
• Синтезаторная система ФАПЧ (фазовой
автоподстройки частоты)
• Предварительная установка до 10 станций
на каждой странице памяти
предварительной установки для быстрой
настройки (50 станций в целом)
• Поисковая настройка из памяти станций,
запомненных на каждой странице памяти
предварительной установки
• Функция готовности таймера для приема
Ваших любимых радиопередач в желаемое
время
• Поисковая настройка для автоматического
сканирования станций
• Таймер сна для автоматического
выключения радиоприемника по истечении
времени таймера сна (60, 45, 30 или 15
минут)
• Функция часов
• Стереофонический прием ЧМ через
стереофонические головные телефоны (не
прилагаются)
Выбор истчника
питания
Вставка батареек
(см. рис. A)
1
Откройте крышку батарейного
отсека на задней стороне аппарата.
2
Вставьте три батарейки R6 (размера
АА) с правильным направлением
полюсов + и – и закройте крышку.
Индикация “0:00” будет мигать на дисплее
после того, как Вы впервые вставите
батарейки. Для прекращения мигания
установите часы. (См. раздел “Установка
часов”.)
Срок службы батареек
(приблизительное время в часах)
Батарейки
Щелочные
Sony R6
батарейки
(размера АА) Sony LR6
(размера АА)
Прием ЧМ (FM)
17
46
Прием КВ (SW)
12
33
Прием ДВ (LW)/СВ (MW)
12
33
Как узнать когда заменять батарейки
Когда батарейки станут слабыми, индикация
“E” будет мигать на дисплее. Если
батарейки полностью разрядятся, индикация
“E” загорится на дисплее и питание
выключится.
Когда загорится индикация “E”, замените
все батарейки на новые.
При замене батареек
Замените батарейки в пределах 60 секунд
при выключенном питании. Если Вы не
выполните никакой операции в течение 60
секунд, часы и установки режима ожидания
будут отменены. Однако предварительо
установленные станции сохранятся в памяти.
После замены батареек нажмите ON/OFF
для выключения индикации.
Использование других
источников питания
Внутренние батарейки автоматически
отключаются, если сетевой адаптер
переменного тока или шнур автомобильного
аккумулятора будет подсоединен к гнезду
DC IN 4.5 V для использования внешнего
источника питания.
Сетевое питание
Подсоедините сетевой адаптер переменного
тока (не прилагается) к гнезду постоянного
тока DC IN 4.5 V и включите его в стенную
розетку.
Автомобильный аккумулятор
Для использования 12/24 В автомобильного
аккумулятора подсоедините шнур
автомобильного аккумулятора Sony (не
прилагается) к гнезду DC IN 4.5 V. Для
получения подробностей обращайтесь к
инструкции по эксплуатации шнура
автомобильного аккумулятора.
Примечания к внешним источникам
питания
• При эксплуатации аппарата от внешнего
источника питания не удаляйте батарейки.
Эти батарейки служат для резервного
питания установок, хранимых в памяти. Так
как в таком случае батарейки все же будут
разряжаться, мы рекомендуем заряжать их
один раз в год.
• Перед подсоединением или отсоединением
разъема внешнего источника питания
обязательно выключите радиоприемник. В
противном случае может быть отображена
индикация “E”. Если такое случится
включите радиоприемник так, чтобы
индикация “E” исчезла.
• При эксплуатации аппарата от внутренних
бтараеек отсоедините сетевой адаптер
переменного тока или шнур автомобильного
аккумулятора от стенной розетки или
автомобильного аккумулятора и от гнезда
DC IN 4.5 V. Убедитесь, что разъем
внешнего источника питания отсоединен
перед эксплуатацией аппарата.
• Используйте только рекомендуемый
сетевой адаптер переменного тока* или
шнур автомобильного аккумулятора*.
Полярность разъемов других
производителей может быть другой. Не
выполнение рекомендаций по
использованию сетевого адаптера
переменного тока или шнура
автомобильного аккумулятора может
привести к неисправности аппарата.
* Подробности относительно отдельно
приобретаемого сетевого адаптера
переменного тока или шнура
автомобильного аккумулятора см. в
разделе “Технические характеристики”.
Установка часов
Установите время при выключенном
радиоприемнике.
Установите время после вставки батареек в
первый раз, или если установка часов будет
стерта из памяти. В то время будет мигать
индикация “0:00”.
Часы работают в 24-часовой системе.
“0:00” = полночь
“12:00” = полдень
Установка часов
1
Нажимайте ENTER/CLOCK до тех
пор, пока Вы не услышите
зуммерный сигнал. Индикация часа
будет мигать.
2
Нажимайте – T
T
T
T
T или t
t
t
t
t + под TUNE/
SCAN/TIME SET для отображения
правильного часа.
Час увеличивается путем нажатия t
t
t
t
t + и
уменьшается путем нажатия –
T
T
T
T
T. Для
непрерывного увеличения или
уменьшения часа держите t
t
t
t
t + или – T
T
T
T
T в
нажатом состоянии.
Когда будет отображена индикация “0”,
Вы услышите двойной зуммерный сигнал.
3
Нажмите и держите ENTER/CLOCK
снова до тех пор, пока Вы не
услышите зуммерный сигнал.
4
Нажимайте –
T
T
T
T
T или t
t
t
t
t + для
отображения правильных минут.
Для непрерывного увеличения или
уменьшения минут держите t
t
t
t
t + или – T
T
T
T
T
в нажатом состоянии.
Когда будет отображена индикация “00”,
Вы услышите двойной зуммерный сигнал.
5
Наимайте ENTER/CLOCK до тех пор,
пока Вы не услышите двойной
зуммерный сигнал.
Двоеточие “:” начнет мигать, и часы
заработают.
Примечание
Если Вы оставите радиоприемник на одну
минуту без выполнения никакой операции,
установка часов будет прервана, и аппарат
вернется к предыдущему режиму. В таком
случае повторите процедуру с пункта 1 для
завершения установки.
Для отмены установки часов
Нажмите ON/OFF для включения
радиоприемника, а затем выключите его.
Аппарат вернется к предыдущему режиму.
Отыскание
неисправностей
Если какая-либо проблема все еще остается
после того, как Вы выполнили следующие
проверки, обратитесь к Вашему ближайшему
дилеру Sony.
Нет выходного звука.
• VOL (громкость) полностью понижена.
• Подключены стереофонические головные
телефоны.
• Батарейки вставлены полюсами + и –,
обращенными в неправильном
направлении.
Радиоприемник не включается, даже
если Вы нажимаете POWER.
• Батарейки вставлены полюсами + и –,
обращенными в неправильном
направлении.
• Батарейки разрядились (индикация “E”
мигает или горит).
• Отсоединен сетевой адаптер переменного
тока или шнур автомобильного
аккумулятора.
Качество звука
неудовлетворительно, или
радиоприем плохой, или сигнал не
может быть принят.
• Слабые батарейки (мигает индикация “E”).
• Настройка и положение антенны требуют
дальнейшей регулировки.
• Слабый аудиосигнал. Слушайте
радиоприемник возле окна при нахождении
в автомобиле или здании.
• Выключатель АТТ установлен в положение
ON. Установите его в положение OFF или
отрегулируйте регулятор АТТ.
Станции не могут быть сохранены в
памяти.
• Нажмите ENTER/CLOCK по меньшей мере
на две секунды и нажмите на желаемую
кнопку MEMORY PRESET PAGE для
выбора номера предварительной
установки.
Предварительно установленная
станция не может быть принята во
время настройки предварительно
установленной станции.
• VOL (громкость) полностью понижена.
• Номер, выбранный для предварительно
установленной станции, является
неправильным. Выберите правильный
номер, присвоенный желаемой
предварительно установленной станции.
• Предварительно установленные станции
были стерты из памяти. Снова сохраните
станцию в памяти.
Не работает поисковая настройка.
• Переключатель NORMAL/FINE установлен
в положение FINE. Установите его в
положение NORMAL.
Не работает поисковая настройка из
памяти.
• Вы не выбрали номер страницы нажатием
MEMORY PRESET PAGE. Нажмите
желаемую кнопку MEMORY PRESET PAGE,
а затем нажмите MEMORY SCAN.
• Сканируемая страница имеет только одну
предварительно установленную станцию.
Сканирование не прекращается.
• Выключатель АТТ установлен в положение
ON. Установите его в положение OFF или
отрегулируйте регулятор АТТ.
Радиоприемник не включается по
достижении предварительного
установленного времени ожидания.
• VOL (громкость) полностью понижена.
• Не отображается индикация “STANDBY”,
“ ” или “ ”.
• Задействована функция блокировки.
• Предварительно установленное время
ожидания было стерто из памяти
вследствие того, что батарейки не были
заменены в пределах одной минуты после
удаления их из аппарата. Сохраните время
ожидания в памяти снова.
Кнопки и регуляторы не
функционируют.
• Задействована функция блокировки и
индикация “-” высвечивается на дисплее.
Передвиньте HOLD влево так, чтобы
индикация “-” исчезла с дисплея.
Тусклый дисплей.
• Аппарат используется при чрезвычайно
высокой или низкой температуре, или в
слишком влажном месте.
На дисплее нет никакой индикации.
• Батарейки вставлены полюсами + и –,
обращенными в неправильном
направлении.
• Батарейки разрядились.
Предосторожности
• Эксплуатируйте аппарат только от 4,5 В
постоянного тока. Для эксплуатации от
батареек используйте три батарейки R6
(размера АА). Для эксплуатации от
переменного тока используйте только
рекомендуемый сетевой адаптер
переменного тока.
• Данный аппарат не отключается от
источника питания переменного тока
(электрической сети) до тех пор, пока он
подсоединен к стенной розетке, даже если
сам аппарат будет выключен.
• Используйте аппарат в пределах
температурного диапазона от 0°С до 40°С
(от 32°F до 104°F). Если он используется
при температуре за пределами данного
диапазона, то на дисплее может появится
неправильная индикация. Если он
используется при температуре ниже
данного диапазона, то индикация может
изменяться очень медленно. Эти
нарушения исчезнут и никакого
повреждения аппарата не случится, когда
он будет использоваться в рекомендуемом
температурном диапазоне.
• Не оставляйте аппарат возле источников
тепла или в месте, подверженном
воздействию прямого солнечного света,
песка чрезмерного запыления или
механической вибрации.
• Именная табличка с указанием рабочего
напряжения и т.д. находится на задней
стороне аппарата.
• Если какие-нибудь твердые предметы или
жидкость попали в аппарат, то отсоедините
сетевой адаптер переменного тока и
удалите батарейки, а затем проверьте
аппарат у квалифицированного
обслуживающего персонала перед
дальнейшим его использованием.
Убедитесь, что жидкость или посторонний
предмет не попали в гнездо DC IN 4.5 V
данного аппарата. Это может привести к
неисправности аппарата.
• Так как для громкоговорителя
используется сильный магнит, храните
персональные кредитные карточки и т.п.,
использующие магнитынй код, подальше от
аппарата.
• Если корпус станет грязным, очистите его с
помощью мягкой ткани, смоченной в
растворе умеренного моющегосредства.
Никогда не используйте абразивные
очистители или химические растворители,
так как они могут повредить корпус.
• В автомобилях или зданиях радиоприем
может быть затруднен или зашумлен.
Попробуйте слушать возле окна.
Техническое обслуживание и ремонт
Если Вы отправляете Ваш аппарат для
технического обслуживания и ремонта,
возьмите на заметку Ваши важные установки
в памяти. Эти установки иногда могут быть
стерты из памяти, в зависимости от типа
требуемого ремонта.
Если у Вас есть какие-либо вопросы или
проблемы относительно Вашего аппарата,
консультируйтесь, пожалуйста, у Вашего
ближайшего дилера Sony.
Технические
характеристики
Система цепи
ЧМ (FM): Супергетеродинная система
ДВ (LW)/СВ (MW)/КВ (SW):
Супергетеродинная система
двойного преобразования
Диапазон частот
ЧМ (FM): 76,00 – 108,00 МГц
КВ (SW): 2250 – 26100 кГц
СВ (MW): 530 – 1710 кГц
ДВ (LW): 150 – 285 кГц
Громкоговоритель
Приблиз. 66 мм диам., 8
Ω
Максимальная выходная мощность
240 мВт (при 10% нелиных искажениях)
Выход
Гнездо i (головных телефонов) (
ø 3,5 мм
стереофоническое минигнездо) 16
Ω
Требования к питанию
4,5 В пост. тока, три батарейки R6 (размера
АА)
Внешний источник питания
Гнездо DC IN 4.5 V
Размеры
Приблиз. 168
Ч
106
Ч
35 мм (ш/в/г), включая
выступающие части
Масса
Приблиз. 405 г, включая батарейки
Прилагаемые принадлежности
Футляр для переноски (1)
Справочник по коротким волнам (1)
Дополнительные принадлежности
Сетевой адаптер переменного тока
АС-Е45HG
Шнур автомобильного аккумулятора
Антенна широкого диапазона частот
КВ (SW)/СВ (MW)/ДВ (LW)
AN-1, AN-102
Активная антенна КВ (SW)
AN-LP1
Конструкция и технические характеристики
могут быть изменены без уведомления.
Рабочее напряжение сетевого адаптера
переменного тока отличается в
зависимости от страны, где он продается.
Покупайте, пожалуйста сетевой адаптер
переменного тока в стране, где Вы
намереваетесь его использовать.
Ваш дилер Sony может не иметь всех
вышеупомянутых дополнительных
принадлежностей. Обращайтесь,
пожалуйста, к дилеру за подробной
информацией относительно
дополнительных принадлежностей,
имеющихся в продаже в Вашей стране.
Стереофонический ЧМ (FM)/КВ (SW)/СВ
(MW)/ДВ (LW) синтезаторный
радиоприемник с системой ФАПЧ.
Сделано в Китае
English
Русский
Magyar
FIGYELEM
A tűz vagy áramütés veszélyének elkerülése
végett ne tegye ki a készüléket eső vagy
nedvesség hatásának.
Az áramütés elkerülése végett ne nyissa ki a
készülékdobozt. Javítást csak képzett
szakemberrel végeztessen.
Használatbavétel előtt
Köszönjük, hogy a Sony világvevő rádióját
választotta! A világvevő rádió sok, kellemes,
rádióhallgatással eltöltött órát fog biztosítani Ön
számára.
A világvevő rádió használatbavétele előtt kérjük,
olvassa át ezt a használati útmutatót és őrizze
meg könnyen hozzáférhető helyen, mert a
jövőben még szüksége lehet rá.
Jellemzők
• FM sztereó/SW(RH)/MW(KH)/LW(HH) sávú,
hordozható világvevő rádió
• PLL (fázishurok vezérelt) szintézeres rendszer
• 10 állomás programozási lehetősége
memórialaponként, a gyors hangolás
érdekében (összesen 50 állomás)
• Memóriapásztázásos hangolás az egyes
memórialapokon beprogramozott állomások
behangolására
• Készenléti időzítő funkció, hogy Ön a kívánt
időben meg tudja hallgatni kedvenc műsorait
• Pásztázásos hangolás az állomások
automatikus behangolására
• Elalvási időzítő, amely a beállított idő elteltével
(60, 45, 30 vagy 15 perc) magától kikapcsolja a
készüléket
• Óra funkció
• FM sztereó vétel sztereó fejhallgatón (nem
mellékelt) keresztül
AZ ÁRAMFORRÁS
KIVÁLASZTÁSA
Az elemek behelyezése
(lásd
A ábra)
1
Nyissa ki a készülék hátoldalán
található elemtartó rekesz fedelét.
2
Helyezzen be három R6-os (AA méret)
elemet ügyelve arra, hogy a + és
–
pólusok elhelyezése megfelelő legyen,
majd zárja be a fedelet.
Amikor először tesz elemet a készülékbe,
“
0:00
”
villog a kijelzőn. Állítsa be az órát és a villogás
megszűnik. (Lásd
“
Az óra beállítása
”
.)
Elem élettartama (hozzávetőleges
óraszám)
Sony R6
Sony alkáli LR6
(AA méret)
(AA méret)
URH (FM) vétel
17
46
RH (SW) vétel
12
33
HH (LW)/KH (MW)vétel 12
33
Mikor kell kicserélni az elemeket
Amikor az elemek kezdenek lemerülni,
“
E
”
jel
villog a kijelzőn. Amikor teljesen lemerültek az
elemek,
“
E
”
jel világít a kijelzőn és a készülék
kikapcsol.
Amikor a
“
E
”
jel világít, cserélje ki az elemeket.
Amikor elemet cserél
Az elemeket a készülék kikapcsolt állapotában
és 60 másodpercen belül kell kicserélni. Ha 60
másodpercig semmilyen műveletet nem hajt
végre a készüléken, az óra és a készenléti
beállítás törlődik a memóriából. A
beprogramozott állomások adatai azonban
változatlanok maradnak.
Elemcsere után az ON/OFF gomb
megnyomásával kapcsolja ki az indikátort.
Egyéb áramforrások
használata
Ha a készülék DC IN 4.5V bemenetéhez külső
áramforrásként szolgáló hálózati adaptert vagy
gépkocsi akkumulátor kábelt csatlakoztat, a
belső elemek automatikusan lekapcsolódnak.
Hálózati áram
Csatlakoztassa a Sony hálózati adaptert (nem
mellékelt) a készülék DC IN 4.5V bemenetéhez
és a fali konnektorhoz.
Gépkocsi akkumulátor
Ha a készüléket 12/24 V-os gépkocsi
akkumulátorról kívánja üzemeltetni,
csatlakoztassa a Sony gépkocsi akkumulátor
kábelt a DC IN 4.5V bemenethez. További
információ a gépkocsi akkumulátor kábel
használati útmutatójában található.
Megjegyzések a külső áramforrásokkal
kapcsolatban
• Ha külső áramforrásról használja a készüléket,
ne távolítsa el az elemeket. Ezek az elemek
biztosítják a memóriában tárolt adatok
védelmét. Mivel az elemek ebben az esetben is
elhasználódnak, évenkénti cseréjüket
javasoljuk.
• Mielőtt összekapcsolja a készüléket a külső
áramforrással, vagy lekapcsolja azt róla,
kapcsolja ki a rádiót. Ha nem teszi ezt,
“
E
”
jel
jelenhet meg a kijelzőn. Ha ilyet tapasztal,
kapcsolja be a rádiót, hogy a
“
E
”
jel eltűnjön a
kijelzőről.
• Ha a készüléket elemekről kívánja üzemeltetni,
húzza ki a hálózati adaptert a hálózatból, a
gépkocsi akkumulátor kábelt a
csatlakozójából, valamint ezek dugaszát a
készülék DC IN 4.5 V bemenetéből. A készülék
használata előtt a külső áramforrások dugaszát
feltétlenül húzza ki a készülékből.
• Csak a javasolt Sony hálózati adaptert* vagy
gépkocsi akkumulátor kábelt* használja. Más
gyártó csatlakozó dugójának polaritása eltérő
lehet. Ha nem a javasol hálózati adaptert vagy
gépkocsi akkumulátor kábelt használja, ez a
készülék hibás működéséhez vezethet.
* Az opcionális hálózati adapter és gépkocsi
akkumulátor kábel adatai a
“
Műszaki adatok
”
címszó alatt találhatók.
Az óra beállítása
Az órát akkor kell beállítani, amikor a rádió ki van
kapcsolva. Az órát az első elemek
behelyezésekor és akkor kell beállítani, ha az
órabeállítás törlődik a memóriából. Ekkor
“
0:00
”
villog a kijelzőn.
Az óra 24-órás kijelzéssel működik-
“
0:00
”
= éjfél
“
12:00
”
= dél
Az óra beállítása
1
Addig tartsa lenyomva az ENTER/
CLOCK gombot, amíg hangjelzést nem
hall. Az órák számjegye villog a
kijelzőn.
2
A megfelelő óra számjegy
megjelenítésére nyomja meg a TUNE/
SCAN/TIME SET alatt található –
T
T
T
T
T
vagy t
t
t
t
t + gombot.
Az órák számjegye a t
t
t
t
t + megnyomására
növekszik, a –
T
T
T
T
T megnyomására pedig
csökken. A óra számjegy folyamatos
növelésére vagy csökkentésére tartsa
lenyomva a t
t
t
t
t + vagy – T
T
T
T
T gombot.
Amikor a kijelzőn
“
0
”
jelenik meg, kettős
hangjelzés hallható.
3
Addig tartsa ismét lenyomva az
ENTER/CLOCK gombot, amíg
hangjelzést nem hall.
4
A megfelelő perc számjegy
megjelenítésére nyomja meg a –
T
T
T
T
T
vagy
t
t
t
t
t + gombot.
A perc számjegy folyamatos növelésére vagy
csökkentésére tartsa lenyomva a t
t
t
t
t + vagy –
T
T
T
T
T gombot.
Amikor a kijelzőn
“
00
”
jelenik meg, kettős
hangjelzés hallható.
5
Addig tartsa lenyomva az ENTER/
CLOCK gombot, amíg kettős
hangjelzést nem hall.
A kettőspont
“
:
”
villogni kezd, az óra
működése elindul.
Megjegyzés
Ha a rádión egy percig semmilyen műveletet
nem hajt végre, az órabeállítás megszakad és a
készülék visszakapcsol a korábbi üzemmódba.
Ebben az esetben az órabeállítás műveletét az 1.
lépéstől kezdve meg kell ismételni.
Az órabeállítás műveletének
megszakítása
Az ON/OFF gomb megnyomásával kapcsolja be,
majd ki a rádiót. A készülék visszakapcsol a
korábbi üzemmódba.
Hibakeresési tanácsadó
Ha a hiba az alábbi ellenőrzési folyamat
befejezése után is fennáll, forduljon a
legközelebbi Sony márkakereskedőhöz.
Nincs hang.
• A VOL (hangerő) szabályozó minimumra van
állítva.
• Sztereó fejhallgató van csatlakoztatva a
készülékhez.
• Az elemek helytelen + és
–
polaritással lettek
behelyezve a készülékbe.
A POWER gomb megnyomása ellenére
nem kapcsol be a rádió.
• Az elemek helytelen + és
–
polaritással lettek
behelyezve a készülékbe.
• Lemerültek az elemek (
“
E
”
jel villog vagy
világít a kijelzőn).
• Megszakadt a hálózati adapter vagy a
gépkocsi akkumulátor kábel csatlakozása.
Rossz a hangminőség, gyenge vagy
lehetetlen a vétel.
• Gyengék az elemek (
“
E
”
jel villog a kijelzőn).
• A hangolás vagy az antenna helyzete további
beállítást igényel.
• Gyenge a rádiójel. Gépkocsiban vagy
épületben ablak közelében hallgassa a rádiót.
• Az ATT kapcsoló ON állásban van. Állítsa OFF
helyzetbe a kapcsolót vagy állítsa be az ATT
szabályozót.
Nem lehet beprogramozni az
állomásokat a memóriába.
• Legalább két másodpercig tartsa lenyomva az
ENTER/CLOCK gombot és ezután nyomja meg
a megfelelő MEMORY PRESET PAGE gombot,
hogy kiválassza a programszámot.
A beprogramozott állomást nem lehet
behangolni a programozott hangolás
során.
• A VOL (hangerő) szabályozó minimumra van
állítva.
• Helytelen programszámot választott. Válassza
a kívánt beprogramozott állomásnak megfelelő
programszámot.
• A beprogramozott állomás törlődött a
memóriából. Programozza be újra az állomást.
Nem működik a pásztázó hangolás.
• FINE állásban van a NORMAL/FINE kapcsoló.
Állítsa át NORMAL helyzetbe a kapcsolót.
Nem működik a memóriapásztázó
hangolás.
• Nem választott memórialapot a MEMORY
PRESET PAGE megnyomásával. Nyomja meg a
kiválasztott MEMORY PRESET PAGE gombot,
majd nyomja meg a MEMORY SCAN-t.
• A pásztázott oldalon csak egy állomás van
beprogramozva.
Nem áll meg a pásztázás.
• Az ATT kapcsoló ON állásban van. Állítsa OFF
helyzetbe a kapcsolót vagy állítsa be az ATT
szabályozót.
A rádió nem kapcsol be a beállított
időben.
• A VOL (hangerő) szabályozó minimumra van
állítva.
• Nem látható
“
STANDBY
”
,
“ ”
vagy
“ ”
a
kijelzőn.
• Be van kapcsolva a tartó funkció.
• Mivel az elemek nem lettek kivételük után egy
percen belül kicserélve, a beállított időpont
törlődött a készülék memóriájából.
Programozza be újra az időpontot.
Nem működnek a kapcsolók és a
szabályozók.
• Be van kapcsolva a tartó funkció és
“
—
”
jel
látható a kijelzőn. Csúsztassa el balra a HOLD
kapcsolót, hogy a
“
—
”
jel eltűnjön a kijelzőről.
Halvány a kijelző.
• A készüléket nagyon meleg, nagyon hideg
vagy nagyon párás helyen használta.
Nem látható semmi a kijelzőn.
• Az elemek helytelen + és
–
polaritással lettek
behelyezve a készülékbe.
• Teljesen lemerültek az elemek.
Biztonsági
óvintézkedések
• Kizárólag 4,5 V-os egyenáramról működtesse
a készüléket. Elemről történő üzemeltetéshez
három R6-os (AA méret) elem szükséges.
Hálózatról történő üzemeltetéshez csak a
javasolt hálózati adaptert használja.
• A készülék addig nincs lekapcsolva a
váltóáramú áramforrásról (hálózatról), amíg a
hálózati zsinór be van dugva a konnektorba,
még akkor sem, ha maga a készülék
kikapcsolt állapotban van.
• Használja a készüléket 0
°
C
–
40
°
C közötti
hőmérsékletű környezetben. Ha ezen
hőmérsékleti tartományon kívül eső
környezetben használja a készüléket, a kijelzőn
zavar keletkezhet. Ha a környezet hidegebb, a
kijelző nagyon lassan változik. Ha a készüléket
a javasolt hőmérsékleti tartományon belüli
környezetben működteti, a zavar megszűnik és
a készülék nem károsodik.
• Ne hagyja a készüléket hőforrások közelében,
közvetlen napsugárzásnak,
homokszennyeződésnek, porszennyeződésnek
és mechanikai behatásnak kitett helyen.
• A tápfeszültséget stb. adatot feltüntető címke
a készülék hátoldalán található.
• Ha bármilyen szilárd vagy folyékony anyag
kerülne a készülék belsejébe, húzza ki a
hálózati adaptert, távolítsa el az elemeket a
készülékből és a további használat előtt
ellenőriztesse képzett szakemberrel a
berendezést. Ügyeljen arra, hogy se folyadék,
se idegen anyag ne kerülhessen a DC IN 4.5 V
dugaljba. Ez a készülék hibás működését
okozhatja.
• Mivel a hangszóróban erős mágnes található,
mágneskódot tartalmazó hitel és bankkártyáit,
stb. tartsa távol a berendezéstől.
• Ha a készülék külső burkolata elszennyeződik,
tisztításához gyenge tisztítószerrel enyhén
benedvesített puha ruhát használjon. Soha ne
használjon súrolószert vagy kémiai oldószert,
mert ezek károsíthatják a készülékdobozt.
• Gépjárművekben és épületekben a rádióvétel
nehéz lehet vagy interferencia keletkezhet.
Ilyen esetben az ablak közelében hallgassa a
készüléket.
Szerviz és javítás
Ha készülékét szervizelteti vagy javításra küldi,
készítsen feljegyzést a memória fontos
beállításairól. Ezek az adatok a szükséges
javítástól függően törlődhetnek a készülék
memóriájából.
Ha bármilyen kérdése vagy problémája adódik
készülékével kapcsolatban, kérjük forduljon a
legközelebbi Sony márkakereskedőhöz.
Műszaki adatok
Áramköri rendszer
URH (FM): szuperheterodin
HH (LW)/KH (MW)/RH (SW): duálkonverziós
szuperheterodin
Frekvenciatrartomány
URH (FM): 76,00-108,00 MHz
RH (SW): 2250-26100 kHz
KH (MW): 530-1710 kHz
HH (LW): 150-285 kHz
Hangszóró
Kb. 66 mm átm., 8
Ω
Maximális kimenő teljesítmény
240 mW (10% harmonikus torzításnál)
Kimenet
i
(fejhallgató) csatlakozó (3,5 mm ø sztereó
minijack), 16
Ω
Tápfeszültség
4,5 V-os egyenáram, három R6-os (AA méret)
elem
Külső áramforrás
DC IN 4.5V
Méretek
Kb. 168
Ч
106
Ч
35 mm (szélesség
×
magasság
×
mélység) a kiálló részekkel együtt
Tömeg
Kb. 405 g (elemekkel együtt)
Mellékelt tartozékok
Hordtáska (1)
Rövidhullámú segédkönyv (1)
Opcionális tartozékok
Hálózati adapter
AC-E45HG
Gépkocsi akkumulátor kábel
RH (SW)/KH (MW)/HH (LW) széles spektrumú
antenna
AN-1, AN-102
RH (SW) aktív antenna
AN-LP1
A formaterv és a műszaki adatok
változtatásának jogát minden külön értesítés
nélkül fenntartjuk.
A hálózati adapter tápfeszültsége attól függően
változhat, hogy melyik országban vásárolja a
berendezést. Abban az országban vásárolja meg
a hálózati adaptert, amelyik országban használni
akarja a készüléket.
Az Ön Sony márkakereskedője nem biztos, hogy
minden, fent felsorolt tartozékkal rendelkezik.
Kérjük, forduljon márkakereskedőjéhez
információért az Ön országában kapható
opcionális tartozékokkal kapcsolatban.
Operating the Radio
Before operating the radio, make sure of your
location. In some countries, the MW channel step
must be changed. (For details, see “Changing the
MW channel step”.)
Manual Tuning
1
Press ON/OFF to turn on the radio.
2
Press BAND to select the band. Each
press changes the display as follows:
A double-beep sounds when you select LW.
(The last frequency selected in each band
appears on the display.)
3
When you select SW: press –
T
T
T
T
T or t
t
t
t
t +
under TUNE/SCAN/TIME SET while
pressing SW BAND to select a meter
band. See “Scan Tuning” for details on
the meter band.
When you select LW, MW and FM, follow
the step 4.
4
Tune into the desired station by
pressing –
T
T
T
T
T or t
t
t
t
t +.
A double-beep sounds when the minimum
frequency of each band is received during
tuning. When a broadcast is received,
“p TUNE” is displayed on the display.
5
Turn the VOL (volume) to adjust the
volume.
About frequency step
The frequency step used by pressing –
T
T
T
T
T or t
t
t
t
t +
under TUNE/SCAN/TIME SET can be changed
with the NORMAL/FINE.
Band
NORMAL
FINE
LW
9 kHz
1 kHz
MW
9 kHz/10 kHz*
1 kHz
SW
5 kHz
1 kHz
FM
0.05 MHz
0.05 MHz
* See “Changing the MW channel step” for
details on the MW channel step.
• Scan tuning is started by keeping –
T
T
T
T
T or
t
t
t
t
t + hold down while NORMAL is selected.
(See “Scan tuning”.)
• The frequency changes continuously by
keeping –
T
T
T
T
T or t
t
t
t
t + hold down while FINE
is selected. If you stop pressing –
T
T
T
T
T or t
t
t
t
t +,
the frequency stops changing.
To turn off the radio
Press ON/OFF.
To enjoy FM stereo reception
Plug the stereo headphones (not supplied) into
the i (headphones) jack.
When listening to news
Set the TONE selector to NEWS for optimum
results. Vocal output will be sharper and clearer.
When listening to music, set the TONE selector
to MUSIC for optimum results.
Changing the MW channel step
This radio’s frequency channel step in the MW
band is set to 9 kHz/10 kHz before the radio is
shipped from the factory. The default setting
varies depending on the country where the radio
is sold. Change the MW channel step when
listening in countries in these regions.
Area
channel step
North/South America
10 kHz
Other countries
9 kHz
Frequency range (LW, MW, SW: kHz,
FM: MHz)
Band Frequency range*
1
Scan tuning range Meter band
LW
150-285
153-279
MW
530-1710
531-1710*
2
530-1710*
3
SW
2250-2550
120 m
3150-3450
90 m
3850-4050
75 m
4700-5100
60 m
2250-26100
5900-6250
49 m
7100-7400
41 m
9400-10000
31 m
11500-12150
25 m
13500-13900
22 m
15000-15900
19 m
17450-18000
16 m
18850-19100
15 m
21450-21950
13 m
25600-26100
11 m
FM
76,00-108,00
76,00-108,00
*
1
The LW and MW frequency ranges are the
same as the scan tuning range when
NORMAL/FINE is set to NORMAL.
*
2
9 kHz channel step
*
3
10 kHz channel step
Preset Tuning
You can preset up to 10 stations on each
MEMORY PRESET PAGE (50 stations in total.)
Once you preset a station to memory, you can
receive the broadcast merely by pressing
MEMORY PRESET PAGE.
The page number is displayed as 1-5, the preset
number is displayed as 1-0. (0 indicates 10.)
To preset stations
1
Tune into the station you want to
preset.
Refer to “Manual Tuning” or “Scan Tuning”
for more details.
2
Press and hold ENTER/CLOCK down
until you hear a beep.
Page number 1 and preset number 1 flash
when you are presetting a station for the first
time or when you have preset 50 stations. In
other cases, the number flashes as follows:
Page number: the smallest page number
among the pages that have a
free preset number
Preset number: the smallest preset number
that has not been preset in
the page displayed above.
3
Press the desired page number of
MEMORY PRESET PAGE.
For example, press page number 3. The
display changes as illustrated below.
4
Press the number under the MEMORY
PRESET PAGE you have selected
repeatedly to display the desired preset
number.
The preset number changes as follows:
A double-beep sounds when the display
returns to “1”.
For example, select preset number 7. The
display changes as illustrated below.
5
Press ENTER/CLOCK until a double-
beep sounds.
The page number and the preset number stop
flashing.
Note
If you leave the radio for 30 seconds with no
operation while the page number and preset
number are flashing, the unit returns to the
previous mode.
To change the preset station
Follow the same procedure to store a new station
to the selected preset number. The previous
preset station is overwritten by the new preset
station.
To interrupt and cancel presetting
Press ON/OFF to turn off the radio, and then
press it again to turn the unit on. The unit
returns to the previous mode.
Tuning into a preset station
1
Press ON/OFF to turn on the radio.
2
Press MEMORY PRESET PAGE
repeatedly to display the desired preset
number. Numbers that have not been
preset cannot be displayed. A double-
beep sounds if the smallest preset
number is selected.
3
Turn VOL (volume) to adjust the
volume.
Note
A double-beep sounds and the display changes
as illustrated below for about three seconds
when you select a page number that has no
preset station, and then returns to the previous
mode.
Deleting a preset station
Preset tuning works faster if you delete
unnecessary preset stations as deleted preset
stations are not selected during tuning.
1
Press ON/OFF to turn on the radio.
2
Press MEMORY PRESET PAGE
repeatedly to display the preset number
you want to delete.
3
Press and hold ENTER/CLOCK down
until “dEL” flashes.
“dEL” flashes on the display by keeping
ENTER/CLOCK held down longer while the
page number and preset number are flashing.
While these numbers are flashing, the radio
stands by for presetting the station.
m
4
Press ENTER/CLOCK again until a
double-beep sounds.
The page number and preset number
disappear from the display.
Note
If you leave the radio for 30 seconds with no
operation while the page number, preset number
and “dEL” are flashing, the unit returns to the
previous mode.
To interrupt and cancel deleting
Press ON/OFF to turn off the radio, and then
press it again to turn the unit on. The unit
returns to the previous mode.
Memory Scan Tuning
Use memory scan tuning to scan the preset
stations automatically in one page.
1
Press ON/OFF to turn on the radio.
2
Press the page number of MEMORY
PRESET PAGE you want to scan.
3
Press MEMORY SCAN.
Scanning stops when the radio receives a
preset station in the page. If you want to
select other preset stations, press MEMORY
SCAN again. The preset numbers have not
been preset will be skipped.
• Scanning works faster if you preset frequencies
in descending or ascending order in preset
number orders.
To interrupt and cancel memory
scan tuning
Press MEMORY SCAN during memory scan
tuning.
When preset stations cannot be
received by memory scan tuning
A double-beep sounds and scanning stops when
the first preset number you start scanning is
returned to.
For example: you scan page 1 that has stations
preset to preset numbers 2, 4, 6 and 8, and start
scanning from preset number 6. A double-beep
sounds when 6 is returned to.
• When scanning MW broadcasts at night when
reception is intense, or scanning under
prevailing interference, scanning will pause
frequently. If it occurs, switch the ATT switch
to ON and adjust sensitivity with the ATT
control (see “Controlling scan pauses”). Under
normal conditions, use the radio with the ATT
switch set to OFF.
Improving Reception
(See fig. B)
Adjusting the antenna
FM : Extend the telescopic antenna and adjust
the direction and angle for the best
reception.
SW : Extend the telescopic antenna to its full
length and set it vertically.
MW, LW : Rotate the unit horizontally for
optimum reception. A ferrite bar
antenna is built in the unit.
Using an external antenna
Use the wide-range antenna AN-1, AN-102 or
the SW active antenna AN-LP1 (not supplied).
For details, refer to the operating instructions of
the each antenna.
Notes
• Keep the unit and antenna away from
fluorescent lights, TVs, computers, and other
equipment which may generate noise.
• Retract the telescopic antenna when using an
external antenna.
• Set up the external antenna as far away from
the street as possible.
• Note that the SW active antenna AN-LP1 may
not function as usual when it is connected to
this radio and memory scan tuning is in use.
This is because AN-LP1 selects frequencies by
the antenna controller.
Setting the Standby
Time
Standby function
You can turn on the radio and tune into your
favourite station at the desired time.
• Before you set standby, make sure that the
radio’s clock setting is correct.
• Two standby times can be stored to STANDBY
MEMORY a and b.
• Before you set the standby time, adjust VOL
(volume) to set the volume when the radio is
turned on.
1
Receive the desired broadcast station.
2
Press ENTER/CLOCK until you hear a
beep.
The page number and preset number start
flashing.
3
Press STANDBY MEMORY a or b.
For example, when you press STANDBY
MEMORY a, “PRESET” and “ ” start
flashing.
4
Press ENTER/CLOCK until you hear a
double-beep.
“PRESET” and “ ” or “ ” light.
5
Press ON/OFF to turn off the radio.
6
Press STANDBY MEMORY a or b until
you hear a beep.
For example, when you press STANDBY
MEMORY a:
The display returns to the clock setting
display, “STANDBY”, “ ” and the hour
indication start flashing.
7
Press –
T
T
T
T
T or t
t
t
t
t + under TUNE/
SCAN/TIME SET to set the hour.
8
Press STANDBY MEMORY a or b you
selected in step 6 until you hear a beep.
The hour is set, and the minute starts
flashing.
9
Press –
T
T
T
T
T or t
t
t
t
t + to set the minute.
10
Press STANDBY MEMORY a or b you
selected in step 6 until you hear a
double-beep.
The minute is set, and “STANDBY” and “ ”
or “ ” light.
When the standby time is reached
The radio turns on and “SLEEP” is displayed.
The unit will turn off automatically after about
60 minutes.
When you have set STANDBY
MEMORY a and b
If the second preset standby time is reached
while the first standby time is operating, the
most recent standby time will have priority over
the other and the radio will tune into the
appropriate station. If you have set STANDBY
MEMORY a and b to the same time, STANDBY
MEMORY a will have priority.
To cancel the standby function
Press STANDBY MEMORY a or b with the radio
turned off so that “STANDBY” and “ ” or “ ”
are cleared from the display.
Be sure to release the button within one second.
If the button is pressed continuously, the radio
enters the standby setting mode.
To cancel temporarily the standby
function
Slide HOLD in the direction of the arrow with
the radio turned off to make “-” appear. When
the hold is canceled and “-” disappears, the
standby function is operational. (see “Using
Other Functions”)
Notes
• Once a standby time is set, the radio turns on at
the preset standby time everyday unless the
standby setting is canceled.
• The standby function activates even while you
are listening to other stations.
Activating the Alarm
To activate the alarm instead of the radio at the
desired time, delete the station assigned to either
STANDBY MEMORY a or b as necessary.
1
Press ON/OFF to turn on the radio.
2
Press STANDBY MEMORY a or b.
The radio receives the preset station. If there
is no preset station, a double-beep sounds
and the display changes as illustrated below.
In this case, perform the step 5.
3
Press and hold ENTER/CLOCK down
until “dEL” flashes.
4
Press ENTER/CLOCK again until a
double-beep sounds.
The display “PRESET” and “ ” or “ ” will
disappear. (See “Preset tuning-Deleting a
preset station”.)
5
Perform steps 5 to 10 of the procedure
described in “Setting the Standby
Time”.
When the standby time is reached and the
standby is activated, the alarm sounds. The
unit then turns off automatically after 60
seconds.
To stop the alarm
Press any button except LIGHT.
Notes
• The alarm volume is not adjustable.
• When the standby time is reached while you
are listening to the radio, the radio turns off
and the alarm sounds.
Setting the Sleep
Timer
Sleep Timer Function
Enjoy falling asleep to the radio using sleep
timer. The radio turns off automatically after the
sleep timer setting (60, 45, 30 or 15 minutes) is
reached.
1
Press SLEEP.
The sleep timer setting of “60” minutes is
displayed and “SLEEP” flashes.
The radio turns on if it was turned off.
2
Press SLEEP repeatedly to select the
desired sleep timer setting while
“SLEEP” is flashing.
Each press changes the display as follows:
A double-beep sounds when the display
returns to “60”. “SLEEP” lights three seconds
after you select the sleep timer setting while
“SLEEP” is flashing. After the sleep timer
indication disappears and the frequency
indication appears, the sleep timer activates.
3
Tune into the desired station, and
adjust the VOL (volume).
The radio will turn off automatically after the
sleep timer setting is reached.
To turn off the radio before the
sleep timer setting is reached
Press ON/OFF.
To reset or extend the sleep timer
setting
Press SLEEP again and select the desired sleep
timer setting.
Using Other Functions
Hold Function
When the hold function is used, the buttons are
not operational. Use the hold function to prevent
accidental operation.
The hold function can also be used to
temporarily cancel the standby function.
To use the hold function
Slide HOLD in the direction of the arrow.
“-” appears on the display and all buttons are
no longer operational.
To cancel the hold function
Slide HOLD in the opposite direction of the
arrow. “-” disappears from the display.
Light Function
Press LIGHT to turn on the light for about 20 to
30 seconds to view the display in the dark.
B
FM
ЧМ
URH
SW
КВ
RH
MW/LW
СВ/ДВ
KH/HH
1
Press ON/OFF to turn off the radio.
2
Remove the batteries from the unit.
3
Change the position of the MW CH
STEP in the battery compartment to the
desired channel step.
4
Install the batteries and press ON/OFF.
Notes
• Completely perform steps 2 to 4 within 60
seconds. If you do not perform the operations
in 60 seconds, the clock setting will be erased.
• Reception of around 10250 kHz and 20500 kHz
may be difficult because of spurious internal
signals generated by the built-in oscillators.
Scan Tuning
Use scan tuning to automatically scan the
stations in the frequency range of a broadcast
band.
1
Press ON/OFF to turn on the radio.
2
Press BAND to select the band.
If you select SW, select the meter band too.
3
Set NORMAL/FINE to NORMAL.
4
Press and hold –
T
T
T
T
T or t
t
t
t
t + under
TUNE/SCAN/TIME SET. Release the
button when the frequency indication
starts changing.
Scan tuning will begin within the frequency
range table in the “Frequency range”, and
pause automatically for about three seconds
when a station is received.
5
When the radio tunes into the desired
station, press –
T
T
T
T
T or t
t
t
t
t + again to stop
scanning.
Until you press –
T
T
T
T
T or t
t
t
t
t +, scan tuning will
continue. If necessary, tune the station more
precisely by pressing either –
T
T
T
T
T and t
t
t
t
t +.
• The unit scans the frequencies in descending
order when you hold down –
T
T
T
T
T for two
seconds or more, and in ascending order when
you hold down t
t
t
t
t + for two seconds or more.
• To change the scanning direction, hold down
either –
T
T
T
T
T or t
t
t
t
t + opposite to the current
direction for two seconds or more. This is
convenient when, for example, you want to
return to the previous reception after the unit
has resumed scanning.
• When scanning MW broadcasts at night when
reception is intense, or when scanning under
prevailing interference, the scanning will pause
frequently. If it occurs, switch the ATT switch
to ON and adjust sensitivity with the ATT
control (see “Controlling scan pauses”, below).
Under normal conditions, set the ATT switch
to OFF.
Controlling scan pauses–using the
ATT switch and the ATT control
Use the ATT (attenuator) switch and the ATT
control to control reception sensitivity when the
scanning pauses frequently or scanning under
prevailing interference. Under normal
conditions, set the ATT switch to OFF (i.e., with
maximum sensitivity).
The ATT control is activated when the ATT
switch is switched to ON. Turn the ATT control
toward MAX to reduce sensitivity. The radio will
skip weak signals and stop at only strong ones.
Note
If the ATT control is turned too for toward
MAX, the radio will not stop at any weak
signals at all. Set the ATT switch to OFF if
you do not need to use the attenuator.
Inside of the battery compartment
Внутри батарейного отсека
Az elemtartó rekesz belseje
English
Эксплуатация
радиоприемника
Перед началом эксплуатации радиоприемника
подтвердите Ваше местонахождения. В
некоторых странах канальный шаг должен быть
изменен. (Подробности см. в разделе
“Изменение канального шага MW”.)
Ручная настройка
1
Нажмите ON/OFF для включения
радиоприемника.
2
Нажмите BAND для выбора полосы
частот. Каждое нажатие изменяет
индикацию следующим образом:
Двойной зуммерный сигнал прозвучит.
когда Вы выберете LW.
(Выбранная последней частота каждого
диапазона появляется на дисплее.)
3
Есди Вы выберете SW: нажмите
– T
T
T
T
T или t
t
t
t
t + под TUNE/SCAN/TIME
SET во время нажатия SW BAND
для выбора метровой полосы
частот. См. раздел “Поисковая
настройка” для получения
подробностей относительно
метровой полосы частот.
Если Вы выберете LW, MW или FM,
следуйте пункту 4.
4
Выполните настройку на желаемую
станцию путем нажатия –
T
T
T
T
T или t
t
t
t
t +.
Двойной зуммерный сигнал прозвучит,
когда во время настройки будет принята
минимальная частота каждой полосы
частот. Когда будет принята
радиопередача, индикация “p TUNE”
появится на дисплее.
5
Поверните VOL (громкость) для
регулировки громкости.
Относительно шага частоты
Используемый шаг частоты может быть
изменен путем нажатия –
T
T
T
T
T или t
t
t
t
t + под
TUNE/SCAN/TIME SET между NORMAL/FINE.
Полоса частот NORMAL
FINE
LW
9 кГц
1 кГц
MW
9 кГц/10 кГц* 1 кГц
SW
5 кГц
1 кГц
FM
0,05 МГц
0,05 МГц
* См. раздел “Изменение канального шага
MW” для получения подробностей
относительно канального шага MW.
• Поисковая настройка начинается путем
удерживания –
T
T
T
T
T или t
t
t
t
t + в нажатом
состоянии при выборе NORMAL. (См.
раздел “Поисковая настройка”.)
• Частота последовательно изменяется
путем удерживания –
T
T
T
T
T или t
t
t
t
t + в
нажатом состоянии при выборе FINE.
Когда вы перестанете нажимать –
T
T
T
T
T или
t
t
t
t
t +, частота перестанет изменяться.
Для выключения радиоприемника
Нажмите ON/OFF.
Для наслаждения стереофоническим
приемом FM
Подключите стереофонические головные
телефоны (не прилагаются) к гнезду i
(головных телефонов).
При прослушивании новостей
Установите селектор TONE в положение
NEWS для получения оптимальных
результатов. Вокальный выходной сигнал
будет четким и ясным. При прослушивании
музыки установите селектор TONE в
положение MUSIC для получения
оптимальных результатов.
Изменение канального шага MW
Канальный шаг частоты данного
радиоприемника для полосы частот MW
установлен на 9 кГц/10 кГц перед отправкой
радиоприемника с завода-изготовителя.
Установка по умолчанию различается в
зависимости от страны продажи данного
радиоприемника. Измените канальный шаг
MW при прослушивании в странах,
находящихся в следующих регионах.
Регион
Канальный шаг
Северная/Южная Америка
10 кГц
Другие страны
9 кГц
1
Нажмите ON/OFF для выключения
радиоприемника.
2
Выньте батарейки из аппарата.
3
Измените положение MW CH STEP в
батарейном отсеке для установки
нужного диапазона.
4
Установите батарейки и нажмите
ON/OFF.
Примечания
• Завершите выполнение пунктов 2 — 4 в
пределах 60 секунд. Если Вы не выполните
никакой операции в течение 60 секунд,
установка часов будет стерта из памяти.
• Прием вблизи частот 10250 кГц и 20500 кГц
может быть затруднен из-за паразитных
сигналов, генерируемых встроенными
генераторами.
Поисковая настройка
Используйте поисковую настройку для
автоматического поиска станций в частотном
диапазоне вещательной полосы частот.
1
Нажмите ON/OFF.
2
Нажмите BAND для выбора полосы
частот.
Если Вы выбираете SW, то также
выберите метровую полосу частот.
3
Установите NORMAL/FINE в
положение NORMAL.
4
Нажмите и держите –
T
T
T
T
T или t
t
t
t
t +
под TUNE/SCAN/TIME SET.
Отпустите кнопку, когда индикация
частоты начнет изменяться.
Поисковая настройка начнется в
пределах диапазона частот, указанном в
таблице “Диапазон частот” и
автоматически остановится
приблизительно на трехсекундную паузу,
когда будет принята станция.
5
Когда радиоприемник настроится на
желаемую станцию, снова нажмите
– T
T
T
T
T или t
t
t
t
t + для остановки
сканирования.
До тех пор пока Вы не нажмете –
T
T
T
T
T или
t
t
t
t
t +, поисковая настройка будет
продолжаться. В случае необходимости,
выполните более точную настройку на
станцию путем нажатия –
T
T
T
T
T и t
t
t
t
t +.
• Аппарат будет сканировать частоты в
нисходящем порядке, если Вы держите
нажатой кнопку –
T
T
T
T
T в течение двух секунд
или более, и в восходящем порядке, если
Вы держите нажатой кнопку t
t
t
t
t + в течение
двух секунд или более.
• Для изменения направления сканирования
держите нажатой кнопку –
T
T
T
T
T или t
t
t
t
t + в
противоположном от текущего направлении
в течении двух секунд или более. Это будет
удобно, если Вы, например, захотите
вернуться к предыдущей принятой частоте
после того, как аппарат снова начнет
сканирование.
• При сканировании вещательных станций
MW в ночное время, когда принимаемый
сигнал будет сильным, или при
сканировании с превалированием
интерференции, сканирование будет часто
останавливаться на паузу. Если такое
случится, установите выключатель АТТ в
положение ON и отрегулируйте
чувствительность с помощью регулятора
АТТ (см. раздел “Регулировка пауз
сканирования”, приведенный ниже). В
обычных условиях устанавливайте
выключатель АТТ в положение OFF.
Регулировка пауз сканирования —
использование выключателя АТТ и
регулятора АТТ
Используйте выключатель АТТ (аттенюатор)
и регулятор АТТ для регулировки
чувствительности, когда сканирование часто
останавливается на паузу или при
сканировании с превалированием
интерференции. В обычных условиях
устанавливайте выключатель АТТ в
положение OFF (например, для
максимальной чувствительности).
Регулятор АТТ активизируется, когда
выключатель АТТ установлен в положение
ON. Поворачивайте регулятор АТТ в
направлении МАХ для снижения
чувствительности. Радиоприемник будет
пропускать слабые сигналы и
останавливаться только при приеме сильных.
Примечание
Если регулятор АТТ повернуть слишком
сильно в направлении МАХ,
радиоприемник не будет останавливаться
при приеме слабых сигналов вообще.
Установите выключатель АТТ в
положение OFF, если Вам не требуется
использовать аттенюатор.
Диапазон частот (LW, MW, SW: кГц, FM: МГц)
Полоса
Диапазон
Диапазон
Метровая
частот
частот*
1
поисковой
полоса
настройки
частот
LW
150-285
153-279
MW
530-1710
531-1710*
2
530-1710*
3
SW
2250-2550
120 M
3150-3450
90 M
3850-4050
75 M
4700-5100
60 M
2250-26100
5900-6250
49 M
7100-7400
41 M
9400-10000
31 M
11500-12150
25 M
13500-13900
22 M
15000-15900
19 M
17450-18000
16 M
18850-19100
15 M
21450-21950
13 M
25600-26100
11 M
FM
76,00-108,00
76,00-108,00
*
1
Диапазоны частот LW и MW будут
одинаковыми для диапазона поисковой
настройки, когда переключатель NORMAL/
FINE установлен в положение NORMAL.
*
2
Канальный шаг 9 кГц
*
3
Канальный шаг 10 кГц
Настройка
предварительно
установленных станций
Вы можете выполнить предварительную
настройку до 10 станций на каждую страницу
MEMORY PRESET PAGE (50 станций в
целом). Если выполнили предварительую
установку станции в памяти, Вы можете
просто принять ее вещательный сигнал путем
нажатия MEMORY PRESET PAGE.
Номер страницы отображается как 1-5, а
номер предварительной установки
отображается как 1-0. (о указывает 10)
Для предварительной установки
станций
1
Настройтесь на станцию,
предварительную установку которой
Вы хотите выполнить.
Обращайтесь к разделам “Ручная
настройка” или “Поисковая настройка”
для получения подробностей.
2
Нажмите и держите в нажатом
состоянии ENTER/CLOCK до тех
пор, пока Вы не услышите
зуммерный сигнал.
Номер страницы 1 и номер
предварительной установки 1 будут
мигать, когда Вы выполняете
предварительную установку станции в
первый раз или когда Вы уже выполнили
предварительную установку 50 станций.
В других случаях номера будут мигать
следующим образом:
Номер страницы:
наименьший номер страницы
среди страниц, которые имеют
свободный номер
предварительной установки.
Номер предварительной установки:
наименьший номер
предварительной установки,
который не был предварительно
установлен на странице,
отображенной выше.
3
Нажмите желаемый номер страницы
из MEMORY PRESET PAGE.
Например, нажмите номер страницы 3.
Дисплей изменится, как показано на
рисунке ниже.
4
Повторно нажимайте номер под
страницей MEMORY PRESET PAGE,
которую Вы выбрали, для
отображения желаемого номера
предварительной установки.
Номер предварительной установки
изменяется следующим образом:
Двойной зуммерный сигнал прозвучит,
когда дисплей вернется к номеру “1”.
Например, выберите номер предвари-
тельной установки 7. Дисплей изменится,
как показано на рисунке ниже.
5
Нажимайте ENTER/CLOCK до тех
пор, пока не прозвучит двойной
зуммерный сигнал.
Номер страницы и номер предвари-
тельной установки перестанут мигать.
Примечание
Если Вы оставите радиоприемник на 30
секунд без выполнения никакой операции в
то время, когда номер страницы и номер
предварительной установки будут мигать,
аппарат вернется к предыдущему режиму.
Для замены предварительно
установленной станции
Следуйте такой же процедуре для
сохранения новой станции под выбранным
номером предварительной установки. Ранее
предварительно установленная станция
будет замещена новой предварительно
установленной станцией.
Для прерывания и отмены
предварительной установки
Нажмите кнопку ON/OFF для выключения
радиоприемника, а затем снова нажмите ее
для включения аппарата. Аппарат вернется к
предыдущему режиму.
Настройка на предварительно
установленную станцию
1
Нажмите ON/OFF для включения
радиоприемника.
2
Повторно нажимайте MEMORY
PRESET PAGE для отображения
желаемого номера предварительной
установки. Номера, под которыми не
было выполнено предварительной
установки, не могут быть
отображены. Двойной зуммерный
сигнал прозвучит, если будет
Telescopic antenna
Телескопическая
антенна
Teleszkópantenna
выбран наименьший номер
предварительной установки.
3
Поверните VOL (громкость) для
регулировки громкости.
Примечание
Прозвучит двойной зуммерный сигнал, и
дисплей изменится, как показано на рисунке
ниже приблизительно на три секунды, когда
Вы выберете номер страницы, которая не имеет
предварительно установленной станции, а
затем возвратится к предыдущему режиму.
Удаление предварительно
установленной станции
Настройка предварительно установленных
станций будет функционировать быстрее,
если Вы удалите ненужные предварительно
установленные станции, потому что
удаленные предварительно установленные
станции не выбираются во время настройки.
1
Нажмите ON/OFF для включения
радиоприемника.
2
Повторно нажимайте MEMORY
PRESET PAGE для отображения
номера предварительной установки,
которую Вы хотите удалить.
3
Нажмите и держите в нажатом
состоянии ENTER/CLOCK до тех
пор, пока индикация “dEL” не начнет
мигать.
Индикация “dEL” будет мигать на
дисплее, если удерживать кнопку ENTER/
CLOCK дольше в то время, как номер
страницы и номер предварительной
установки будут мигать. Когда мигают эти
номера, радиоприемник будет в режиме
ожидания для предварительной
установки станции.
m
4
Снова нажмите кнопку ENTER/
CLOCK до тех пор, пока не
прозвучит двойной зуммерный
сигнал.
Номер страницы и номер предвари-
тельной установки исчезнут с дисплея.
Примечание
Если Вы оставите радиоприемник на 30
секунд без выполнения никакой операции в
то время, когда номер страницы, номер
предварительной установки и индикация
“dEL” будут мигать, аппарат вернется к
предыдущему режиму.
Для прерывания и отмены удаления
Нажмите кнопку ON/OFF для выключения
радиоприемника, а затем снова нажмите ее
для включения аппарата. Аппарат вернется к
предыдущему режиму.
Поисковая настройка из
памяти
Используйте поисковую настройку из памяти
для автоматического сканирования
предварительно установленных станций на
одной странице.
1
Нажмите ON/OFF для включения
радиоприемника.
2
Нажмите номер страницы MEMORY
PRESET PAGE, которую Вы хотите
просканировать
3
Нажмите MEMORY SCAN.
Сканирование прекратится, когда
радиоприемник примет предварительно
установленную станцию на странице.
Если Вы хотите выбрать другие
предварительно установленные станции,
снова нажмите MEMORY SCAN. Номера
предварительных установок под
которыми не было выполнено предвари-
тельной установки будут пропущены.
• Сканирование функционирует быстрее,
если Вы предварительно устанавливаете
частоты в нисходящем или восходящем
порядке по порядку номеров
предварительной установки.
Для прерывания и отмены
поисковой настройки из памяти
Нажмите MEMORY SCAN во время
поисковой настройки из памяти.
Если предварительно
установленные станции не могут
быть приняты с помощью поисковой
настройки из памяти
Прозвучит двойной зуммерный сигнал и
сканирование прекратится, когда оно
вернется к первому номеру предварительной
установвки, с которого Вы начали
сканирование.
Например: Вы сканируете страницу 1,
которая содержит станции, предварительно
установленные под номерами
предварительной установки 2, 4, 6 и 8, и
начинаете сканирование с номера
предварительной установки 6. Двойной
зуммерный сигнал прозвучит, когда
сканирование вернется к номеру 6.
• При сканировании вещательных станций
MW в ночное время, когда принимаемый
сигнал будет сильным, или при
сканировании с превалированием
интерференции, сканирование будет часто
останавливаться на паузу. Если такое
случится, установите выключатель АТТ в
положение ON и отрегулируйте
чувствительность с помощью регулятора
АТТ (см. раздел “Регулировка пауз
сканирования”). В обычных условиях
устанавливайте выключатель АТТ в
положение OFF.
Улучшение приема
(см. рис. B)
Регулировка антенны
FM:
Удлините телескопическую
антенну и отрегулируйте угол и
направление для получения
наилучшего приема.
SW:
Удлините телескопическую
антенну на всю ее полную длину и
установите ее вертикально.
MW, LW: Поворачивайте аппарат
горизонтально для нахождения
оптимального приема. Ферритовая
стержневая антенна встроена в
аппарат.
Использование внешней антенны
Используйте антенну широкого диапазона
частот AN-1, AN-102 или активную антенну
SW AN-LP1 (не прилагается).
Для получения подробностей обращайтесь к
инструкции по эксплуатации антенны.
Примечания
• Держите аппарат и антенну подальше от
люминесцентных ламп, телевизоров,
компьютеров и другой аппаратуры, которая
может генерировать помехи.
• Втяните телескопическую антенну при
использовании внешней антенны.
• Установите внешнюю антенну как можно
дальше от улицы.
• Примите во внимание, что активная
антенна SW AN-LP1 может не
функционировать как обычно, когда она
подсоединена к данному радиоприемнику
во время использования поисковой
настройки из памяти. Это происходит,
потому что AN-LP1 выбирает частоты с
помощью контроллера антенны.
English
Русский
Magyar
Установка времени
ожидания
Функция ожидания
Вы можете включить радиоприемник и
выполнить настройку на Вашу любимую
станцию в желаемое время.
• Перед установкой режима ожидания
убедитесь, что часы радиоприемника
установлены правильно.
• Два времени ожидания может быть сохранено
в памяти STANDBY MEMORY a и b.
• Перед установкой времени ожидания
отрегулируйте VOL (громкость) для
установки громкости, с которой включится
радиоприемник.
1
Выполните прием желаемой
вещательной станции.
2
Нажимайте ENTER/CLOCK до тех
пор, пока Вы не услышите
зуммерный сигнал.
Номер страницы и номер
предварительной установки начнут
мигать.
3
Нажмите STANDBY MEMORY a или
b.
Например, если Вы нажимаете STANDBY
MEMORY a, индикации “PRESET” и “ ”
начинают мигать.
4
Нажимайте ENTER/CLOCK до тех
пор, пока Вы не услышите двойной
зуммерный сигнал.
Индикации “PRESET” и “ ” или “ ” будут
гореть.
5
Нажмите ON/OFF для выключения
радиоприемника.
6
Нажимайте STANDBY MEMORY a
или b до тех пор, пока Вы не
услышите зуммерный сигнал.
Например, если Вы нажимаете STANDBY
MEMORY a: Дисплей возвратится к
индикации установки часов, а индикации
“STANDBY”, “ ” и часа начнут мигать.
7
Нажмите –
T
T
T
T
T или t
t
t
t
t + под TUNE/
SCAN/TIME SET для установки часа.
8
Нажимайте STANDBY MEMORY a
или b, смотря что Вы выбрали в
пункте 6, до тех пор, пока не
услышите зуммерный сигнал.
Час будет установлен и индикация минут
начнет мигать.
9
Нажмите –
T
T
T
T
T или t
t
t
t
t + для
установки минут.
10
Нажимайте STANDBY MEMORY a
или b, смотря что Вы выбрали в
пункте 6, до тех пор, пока не
услышите двойной зуммерный
сигнал.
Минуты будут установлены, и индикации
“STANDBY
” и “ ” или “ ” будут гореть.
Когда будет достигнуто время
ожидания
Радиоприемник включится и отобразится
индикация “SLEEP”. Радиоприемник
выключится автоматически приблизительно
через 60 минут.
Если Вы установили STANDBY
MEMORY a и b
Если второе предварительно установленное
время ожидания будет достигнуто в процессе
работы первого времени ожидания, то самое
последнее время ожидания имеет приоритет
на другим временем, и радиоприемник
настроится на соответствующую станцию.
Если Вы установили STANDBY MEMORY a и
b на одно и то же время, то STANDBY
MEMORY a будет иметь приоритет.
Для отмены функции ожидания
Нажмите STANDBY MEMORY a или b при
выключенном радиоприемнике так, чтобы
индикации “STANDBY” и “ ” или “ ” исчезли
с дисплея.
Обязательно отпустите кнопку в пределах
одной секунды. Если кнопка нажимается
продолжительно, радиоприемник войдет в
режим установки времени ожидания.
Для временной отмены функции
ожидания
Передвиньте HOLD в направлении стрелки
при выключенном радиоприемнике, так,
чтобы появилась индикация “-”. Когда
блокировка будет отменена и индикация “-”
исчезнет, функция ожидания опять станет
рабочей. (См. раздел “Использование других
функций”)
Примечания
• Когда время ожидания будет установлено,
радиоприемник будет включаться в
предварительно установленное время
ожидания каждый день, если функция
ожидания не будет отменена.
• Функция ожидания активизируется, даже
когда Вы прослушиваете другие станции.
Активизация сигнализации
Для активизации сигнализации вместо
радиоприемника в желаемое время отмените
станцию, назначенную на STANDBY
MEMORY a или b, если это требуется.
1
Нажмите ON/OFF для включения
радиоприемника.
2
Нажмите STANDBY MEMORY a или b.
Радиоприемник примет предварительно
установленную станцию. Если нет ни
одной предварительно установленной
станции, прозвучит двойной зуммерный
сигнал, и дисплей изменится как
показано на рисунке ниже.
В таком случае выполняйте пункт 5.
3
Нажмите и держите ENTER/CLOCK
в нажатом состоянии до тех пор,
пока индикация “dEL” не начнет
мигать.
4
Нажимайте ENTER/CLOCK снова до
тех пор, пока не прозвучит двойной
зуммерный сигнал.
Индикации “PRESET” и “ ” или “ ”
исчезнут с дисплея. (См. “Настройка
предварительно установленных станций –
Отмена предварительно установленной
станции”.)
5
Выполните пункты с 5 по 10
процедуры, описанной в разделе
“Установка времени готовности”.
Когда будет достигнуто время ожидания
и активизирована функция ожидания,
будет звучать сигнализация. Затем
аппарат выключится автоматически
через 60 секунд.
Для остановки сигнализации
Нажмите любую кнопку, за исключением LIGHT.
Примечания
• Громкость сигнализации невозможно
отрегулировать.
• Когда время ожидания будет достигнуто в
процессе прослушивания радиоприемника,
радиоприемник выключится и будет
звучать сигнализация.
A rádió használata
A rádió használatbavétele előtt kérjük,
tájékozódjon földrajzi helyzetéről. Néhány
országban módosítani kell az MW
csatornaléptetést. (Részleteket lásd
“
Az MW
csatornaléptetés módosítása
”
)
Kézi hangolás
1
Az ON/OFF megnyomásával kapcsolja
be a rádiót.
2
A BAND megnyomásával válassza ki a
hullámsávot. A gomb minden egyes
megnyomása az alábbi sorrendben
változtatja a kijelzőt:
Az LW kiválasztását kettős hangjelzés jelzi.
(Az egyes sávokon az utoljára kiválasztott
frekvencia jelenik meg a kijelzőn.)
3
Ha az SW sávot választja: A méteres
sáv kiválasztása végett lenyomva
tartott SW BAND gomb mellett nyomja
meg a TUNE/SCAN/TIME SET alatt
található –
T
T
T
T
T vagy t
t
t
t
t + gombot.
A méteres sávval kapcsolatos
információt a
“
Pásztázó hangolás
”
címszó alatt találja.
Ha az LW, MW vagy FM sávot választja,
folytassa a 4. műveleti lépéssel.
4
A –
T
T
T
T
T vagy t
t
t
t
t + gombbal hangolja be
a kívánt állomást.
Ha hangolás során eléri a sáv alsó
frekvenciaértékét, kettős hangjelzés hallható.
Ha a készülék vehető állomáshoz ér, a
kijelzőn
“
p TUNE
”
üzenet jelenik meg.
5
A VOL (hangerő) elforgatásával állítsa
be a hangerőt.
A frekvencialéptetésről
A TUNE/SCAN/TIME SET alatt található –
T
T
T
T
T
vagy t
t
t
t
t + gomb megnyomására bekövetkező
frekvencialéptetés a NORMAL/FINE
szabályozóval változtatható.
Sáv
NORMAL
FINE
LW
9 kHz
1 kHz
MW
9 kHz/10 kHz*
1 kHz
SW
5 kHz
1 kHz
FM
0,05 MHz
0,05 MHz
* Az MW csatornaléptetéssel kapcsolatos
részletes információ
“
Az MW csatornaléptetés
módosítása
”
címszó alatt található.
• NORMAL beállítás esetén a pásztázó
hangolás a –
T
T
T
T
T vagy t
t
t
t
t + lenyomva
tartásával indul. (Lásd
“
Pásztázó hangolás
”
.)
• FINE beállítás esetén a –
T
T
T
T
T vagy t
t
t
t
t +
lenyomva tartása folyamatosan változtatja a
frekvenciát. Ha felengedi a –
T
T
T
T
T vagy t
t
t
t
t +
gombot, a frekvencia változása megáll.
A rádió kikacsolása
Nyomja meg az ON/OFF gombot.
Hogy az FM sztereó adás nagyobb
élményt nyújtson Önnek
Csatlakoztasson sztereó fejhallgatót (nem
mellékelt) a i (fejhallgató) kimenethez.
Ha híreket hallgat
Az optimális érthetőség érdekében állítsa a
TONE kapcsolót NEWS helyzetbe. Az emberi
hang így élesebben és tisztábban hallható. Ha
zenét hallgat, a legjobb hangzás érdekében
állítsa a TONE kapcsolót MUSIC helyzetbe.
Az MW csatornaléptetés módosítása
Az MW sávon a rádió csatornaléptetése 9 kHz/
10 kHz frekvencia között változtatható. Az
alapbeállítás attól függ, hogy a rádió hol kerül
kereskedelmi forgalomba. Módosítsa az MW
csatornaléptetést attól függően, hogy melyik
országban hallgatja a rádiót.
Régió
Csatornaléptetés
Észak-/Dél-Amerika
10 kHz
Többi ország
9 kHz
1
Az ON/OFF gomb megnyomásával
kapcsolja ki a rádiót.
2
Vegye ki az elemeket a készülékből.
3
Az elemtartó rekeszben található MW
CH STEP kapcsolót állítsa a kívánt
csatornaléptetésnek megfelelő állásba.
4
Helyezze vissza az elemeket és nyomja
meg az ON/OFF gombot.
Megjegyzések
• A 2-4. műveleti lépést 60 másodpercen belül
hajtsa végre. Ha 60 másodpercen belül nem
fejezi be a műveletet, az óra beállítása törlődik
a memóriából.
• A 10250 kHz és 20500 kHz körüli vétel a
beépített rezgőkörök által keltett zavaró jelek
miatt nehézségekbe ütközhet.
Pásztázó hangolás
A pásztázó hangolás az adott sáv
frekvenciatartományán belüli adók automatikus
behangolására szolgál.
1
Az ON/OFF gomb megnyomásával
kapcsolja be a rádiót.
2
A BAND megnyomásával válassza ki a
hullámsávot.
Ha az SW sávot választja, a méteres sávot is
ki kell választania.
3
Állítsa a NORMAL/FINE kapcsolót
NORMAL helyzetbe.
4
Tartsa lenyomva a TUNE/SCAN/TIME
SET alatt található –
T
T
T
T
T vagy t
t
t
t
t +
gombot. Ha a frekvenciakijelzés változni
kezd, engedje fel a gombot.
A pásztázó hangolás a
“
Frekvenciatartomány
”
címszó alatt található frekvenciatartományon
belül pásztázza végig a sávot, és körülbelül
három másodpercre megáll, ha vehető
állomáshoz ér.
5
Ha a rádió behangolja a kívánt állomást,
a –
T
T
T
T
T vagy t
t
t
t
t + gomb ismételt
megnyomásával állítsa meg a pásztázást.
Amíg meg nem nyomja a –
T
T
T
T
T vagy t
t
t
t
t +
gombot, folytatódik a pásztázó hangolás. Ha
szükséges, a –
T
T
T
T
T vagy t
t
t
t
t + gomb
megnyomásával még pontosabban hangolja
be az állomást.
• Ha a –
T
T
T
T
T gombot két másodpercnél tovább
tartja lenyomva, a készülék lefelé pásztázza
végig a frekvenciasávot, ha pedig a t
t
t
t
t +
gombot tartja lenyomva két másodpercnél
tovább, a pásztázás felfelé halad.
• Ha meg kívánja változtatni a pásztázás irányát,
két másodpercnél tovább tartsa lenyomva a
folyamatban lévő pásztázással ellentétes
irányú –
T
T
T
T
T vagy t
t
t
t
t + gombot. Ez akkor
kényelmes, ha például vissza kíván térni az
előző állomáshoz, miután a készülék ismét
folytatni kezdte a pásztázást.
• Ha este pásztázza az MW állomásokat, amikor
intenzív a vétel, vagy ha a pásztázás közben
jelentős interferenciajelenség áll fenn, a
folyamat sűrűn megáll. Ha ilyet tapasztal,
állítsa az ATT kapcsolót ON helyzetbe és állítsa
be az ATT szabályozót (lásd
“
A pásztázási
szünetek szabályozása
”
alább). Normál
körülmények között állítsa az ATT kapcsolót
OFF helyzetbe.
A pásztázási szünetek szabályozása — az ATT
kapcsoló és az ATT szabályozó használata
Ha gyakoriak a pásztázási szünetek, vagy ha a
pásztázás közben jelentős interferenciajelenség
áll fenn, az ATT (csillapító) kapcsoló és az ATT
szabályozó segítségével állítsa be a vételi
érzékenységet. Normál körülmények között
állítsa az ATT kapcsolót OFF helyzetbe (pl.
maximális szenzitivitás).
Az ATT szabályozó akkor kapcsol be, ha ON
helyzetbe állítja az ATT kapcsolót. Ha csökkenteni
akarja az érzékenységet, fordítsa az ATT
szabályozót a MAX jel felé. A rádió átugorja a
gyenge jeleket és csak az erős szignálnál áll meg.
Megjegyzés
Ha az ATT szabályozót túlságosan a MAX jel
felé fordítja, a rádió egyetlen gyenge jelnél
sem áll meg. Ha nem kívánja használni a
csillapítót, állítsa OFF helyzetbe az ATT
kapcsolót.
Frekvenciatartomány (LW, MW, SW:
kHz, FM: MHz)
Sáv
Frekvencia
Pásztázó hangolási Méteres
tartomány*
1
tartomány
sáv
LW
150-285
153-279
MW
530-1710
531-1710*
2
530-1710*
3
SW
2250-2550
120 m
3150-3450
90 m
3850-4050
75 m
4700-5100
60 m
2250-26100
5900-6250
49 m
7100-7400
41 m
9400-10000
31 m
11500-12150
25 m
13500-13900
22 m
15000-15900
19 m
17450-18000
16 m
18850-19100
15 m
21450-21950
13 m
25600-26100
11 m
FM
76,00-108,00
76,00-108,00
*
1
Ha a NORMAL/FINE kapcsoló NORMAL
állásban van, az LW és MW
frekvenciatartománya megegyezik a pásztázó
hangolási tartománnyal.
*
2
9 kHz-es csatornaléptetés
*
3
10 kHz-es csatornaléptetés
Programozott hangolás
Minden egyes MEMORY PRESET PAGE
memórialapra maximum 10 állomás
programozható be (összesen 50 állomás). Ha
egyszer egy állomást beprogramoz a készülék
memóriájába, egyszerűen a MEMORY PRESET
PAGE gomb megnyomásával be tudja hangolni
az állomást. A memórialapok száma 1-5-ig
jelenik meg a kijelzőn, a programszámok pedig
1-0 formában jelenítődnek meg (a 0 jelöli a 10-et).
Az állomások beprogramozása
1
Hangoljon rá arra az állomásra, amelyet
be kíván programozni.
További információ, lásd
“
Kézi hangolás
”
vagy
“
Pásztázó hangolás
”
2
Addig tartsa lenyomva az ENTER/
CLOCK gombot, amíg hangjelzést nem
hall.
Amikor először programoz be állomást, vagy
amikor már 50 állomást programozott be, az
1-es memórialap és az 1-es programszám
villog a kijelzőn. Egyéb esetekben a számok
az alábbiak szerint villognak:
Memórialap száma: a legkisebb számú
memórialap száma,
amelyen még üres hely
található.
Programszám:
a legkisebb sorszámú
üres programszám a
fenti memórialapon.
3
Nyomja meg a kívánt memórialapnak
megfelelő MEMORY PRESET PAGE
gombot.
Például, nyomja meg a 3-as gombot. A
kijelző az alábbi ábra szerint változik.
4
Többször nyomja meg az Ön által
választott MEMORY PRESET PAGE
alatti számot, hogy a kívánt
programszám megjelenjen a kijelzőn.
A programszám az alábbi sorrendben
változik:
Amikor a kijelző visszatér az
“
1
”
megjelenítéséhez, kettős hangjelzés hallható.
Például, a kiválasztott programszám a 7-es.
A kijelző az alábbi ábra szerint változik.
5
Addig tartsa lenyomva az ENTER/
CLOCK gombot, amíg kettős
hangjelzést nem hall.
A memórialap szám és a programszám
villogása megáll.
Megjegyzés
Ha a memórialap szám és a programszám
villogása alatt 30 másodpercig nem hajt végre
semmilyen műveleti lépést a rádión, a készülék
visszatér a korábbi üzemmódba.
A beprogramozott állomás megváltoztatása
A fentiekkel azonos műveleti lépésekkel
programozza be az új állomást a kívánt
programszámra. A korábban beprogramozott
állomás adatai felülíródnak és az új állomás
adatai kerülnek a helyükre.
A programozás megszakítása és törlése
Az ON/OFF gomb megnyomásával kapcsolja ki
a rádiót, majd a gomb ismételt megnyomásával
kapcsolja be ismét a készüléket. A készülék
visszatér a korábbi üzemmódba.
A beprogramozott állomás behangolása
1
Az ON/OFF gomb megnyomásával
kapcsolja be a rádiót.
2
A MEMORY PRESET PAGE többszöri
megnyomásával jelenítse meg a kívánt
programszámot. Azok a számok,
amelyekre nem lett állomás
beprogramozva, nem jeleníthetők meg.
Ha a legkisebb programszám jelenítődik
meg, kettős hangjelzés hallható.
3
A VOL (hangerő) elforgatásával állítsa
be a hangerőt.
Megjegyzés
Ha olyan memórialapot választ, amelyre nem lett
állomás beprogramozva, kettős hangjelzést hall
és a kijelző körülbelül három másodpercre az
alábbi ábrának megfelelően változik meg, majd
visszatér a korábbi üzemmódba.
Beprogramozott állomás törlése
A programozott hangolás gyorsabbá válik, ha
törli a szükségtelen beprogramozott állmásokat,
mivel hangolás során a törölt állomások nem
választódnak ki.
1
Az ON/OFF gomb megnyomásával
kapcsolja be a rádiót.
2
A MEMORY PRESET PAGE többszöri
megnyomásával jelenítse meg a törölni
kívánt programszámot.
3
Addig tartsa lenyomva az ENTER/
CLOCK gombot, amíg
“
dEL
”
felirat nem
kezd el villogni a kijelzőn.
A
“
dEL
”
akkor kezd el villogni a kijelzőn, ha
az ENTER/CLOCK gombot hosszabban
tartja lenyomva, mialatt a memórialap száma
és a programszám villog a kijelzőn. Amíg
ezek a számok villognak, a rádió az
állomások beprogramozására áll készen.
m
4
Addig tartsa ismét lenyomva az
ENTER/CLOCK gombot, amíg kettős
hangjelzést nem hall.
A memórialap száma és a programszám
eltűnik a kijelzőről.
Megjegyzés
Ha a memórialap szám és a programszám, valamint
a
“
dEL
”
felirat villogása alatt 30 másodpercig nem
hajt végre semmilyen műveleti lépést a rádión, a
készülék visszatér a korábbi üzemmódba.
A törlés megszakítása és törlése
Az ON/OFF gomb megnyomásával kapcsolja ki
a rádiót, majd a gomb ismételt megnyomásával
kapcsolja be ismét a készüléket. A készülék
visszatér a korábbi üzemmódba.
Memóriapásztázó hangolás
A memóriapásztázó hangolás segítségével a
memórialapra beprogramozott állomások
automatikusan behangolódnak.
1
Az ON/OFF gomb megnyomásával
kapcsolja be a rádiót.
2
Nyomja meg a pásztázni kívánt MEMORY
PRESET PAGE memórialap számát.
3
Nyomja meg a MEMORY SCAN gombot.
Ha a készülék a memórialapon beprogramozott
állomáshoz ér, a pásztázás megáll. Ha másik
beprogramozott állomást kíván kiválasztani,
ismét nyomja meg a MEMORY SCAN gombot.
Az üres programszámokat a készülék átugorja.
• A pásztázás gyorsabb, ha az állomásokat
frekvenciájuk szerint emelkedő, vagy csökkenő
sorrendben programozza be az egymás utáni
programszámokra.
A memóriapásztázó hangolás
megszakítása vagy törlése
A memóriapásztázó hangolás közbe nyomja
meg a MEMORY SCAN gombot.
Ha a memóriapásztázó hangolás során a
beprogramozott állomások nem foghatók
Ha a készülék visszatér ahhoz az állomáshoz,
amellyel a pásztázást kezdte, kettős hangjelzés
hallható és a pásztázás megáll.
Például: az 1-es memórialapot pásztázza,
amelyen a 2-es, 4-es, 6-os és 8-as
programszámra van állomás beprogramozva és
a pásztázást a 6-os programszámtól indítja. A
kettős hangjelzés akkor szólal meg, amikor a
készülék visszatér a 6-os programszámhoz.
• Ha este pásztázza az MW állomásokat, amikor
intenzív a vétel, vagy ha a pásztázás közben
jelentős interferenciajelenség áll fenn, a
folyamat sűrűn megáll. Ha ilyet tapasztal,
állítsa az ATT kapcsolót ON helyzetbe és állítsa
be az ATT szabályozót (lásd
“
A pásztázási
szünetek szabályozása
”
alább). Normál
körülmények között állítsa az ATT kapcsolót
OFF helyzetbe.
A vétel javítása
(Lásd
B ábra)
Az antenna beállítása
FM:
Húzza ki a teleszkópantennát és állítsa
be annak irányát és szögét úgy, hogy
legjobb legyen a vétel.
SW:
Teljesen húzza ki a teleszkópantennát
és állítsa függőleges helyzetbe.
MW, LW: Vízszintesen elforgatva állítsa a
készüléket abba a helyzetbe,
amelyikben legjobb a vétel. A ferritrúd
antenna a készülék belsejébe van
beépítve.
Külső antenna használata
Használja az AN-1, AN-102 típusú széles
spektrumú, vagy az AN-LP1 típusú aktív SW
antennát (nem mellékelt). Részletes információt
az antennák használati útmutatóiban talál.
Megjegyzések
• A készüléket és az antennát tartsa távol neon
fényforrásoktól, TV készülékektől,
számítógépektől és minden olyan egyéb
berendezéstől, amelyek elektromos zajt
kelthetnek.
• Ha külső antennát használ, tolja össze a
teleszkópantennát.
• A külső antennát a lehető legtávolabb helyezze
el az utcától.
• Felhívjuk figyelmét, hogy az AN-LP1 típusú
aktív SW antenna csatlakoztatása esetén a
készülék memóriapásztázó hangolása nem
biztos, hogy a szokásos módon működik. Ez
azért van, mert az AN-LP1 a frekvenciákat
saját antennavezérlője által választja ki.
A készenléti időpont
beállítása
Készenléti funkció
Lehetőség van arra, hogy a kívánt időben a rádió
bekapcsoljon és behangolja kedvenc állomását.
• Mielőtt készenléti üzemmódba kapcsolja a
készüléket, ellenőrizze, hogy pontos-e az óra
beállítása.
• A készülék STANDBY MEMORY a és b
memóriahelyére két készenléti időpontot lehet
beprogramozni.
• A készenléti időpont beprogramozása előtt
állítsa a VOL (hangerő) szabályozót arra a
hangerőre, amelyen a bekapcsolás után
szeretné hallgatni a rádiót
1
Hangoljon rá a hallgatni kívánt állomásra.
2
Addig tartsa lenyomva az ENTER/CLOCK
gombot, amíg hangjelzést nem hall.
A memórialap szám és a programszám
villogni kezd a kijelzőn.
3
Nyomja meg a STANDBY MEMORY a
vagy b gombot.
Például, ha a STANDBY MEMORY a gombot
nyomja meg,
“
PRESET
”
és
“ ”
kezd el
villogni a kijelzőn.
4
Addig tartsa lenyomva az ENTER/
CLOCK gombot, amíg kettős
hangjelzést nem hall.
A kijelzőn világít a
“
PRESET
”
“ ”
vagy
“ ”
felirat.
5
Az ON/OFF gomb megnyomásával
kapcsolja ki a rádiót.
6
Addig tartsa lenyomva a STANDBY
MEMORY a vagy b gombot, amíg
hangjelzést nem hall.
Például, ha a STANDBY MEMORY a gombot
nyomja meg:
A készülék megjeleníti az órabeállítás
kijelzését és a
“
STANDBY
”
, az
“ ”
és az órák
számjegye kezd el villogni a kijelzőn.
7
Az TUNE/SCAN/TIME SET alatt
található –
T
T
T
T
T vagy t
t
t
t
t + gombbal
állítsa be az órák számjegyét.
8
Addig tartsa lenyomva a 6. lépésben
kiválasztott STANDBY MEMORY a vagy
b gombot, amíg hangjelzést nem hall.
Az órák számjegye beállítódott és a percek
számjegye kezd el villogni a kijelzőn.
9
A –
T
T
T
T
T vagy t
t
t
t
t + gombbal állítsa be a
percek számjegyét.
10
Addig tartsa lenyomva a 6. lépésben
kiválasztott STANDBY MEMORY a
vagy b gombot, amíg kettős
hangjelzést nem hall.
A percek számjegye beállítódott és a
“
STANDBY
”
,
“ ”
vagy
“ ”
felirat világít a kijelzőn.
Amikor eljön a beállított készenléti
időpont
A rádió bekapcsol és a kijelzőn
“
SLEEP
”
felirat
jelenik meg.
A készülék körülbelül 60 perc után magától
kikapcsol.
Ha a STANDBY MEMORY a-t és b-t is
beállította
Ha a második beprogramozott készenléti
időpont az első időzítő működése alatt jön el, a
korábbi időpontnak van elsőbbsége és a rádió
behangolja a megfelelő állomást. Ha a
STANDBY MEMORY a és b azonos időpontra
van beállítva, a STANDBY MEMORY a-nak van
elsőbbsége.
A készenléti üzemmód kikapcsolása
A rádió kikapcsolt állapotában nyomja meg a
STANDBY MEMORY a vagy b gombot, hogy a
kijelzőről eltűnjön a
“
STANDBY
”
és az
“ ”
vagy
“ ”
kijelzés.
A gombot egy másodpercen belül engedje fel.
Ha a gombot folyamatosan lenyomva tartja, a
rádió a készenléti üzem beállítási módjába
kapcsol át.
A készenléti üzemmód átmeneti
kikapcsolása
A rádió kikapcsolt állapotában csúsztassa el a
nyíllal jelzett irányba a HOLD kapcsolót, hogy a
kijelzőn megjelenjen a
“
—
”
szimbólum. Amikor
kikapcsolja a tartó funkciót és a
“
—
”
jel eltűnik a
kijelzőről, visszakapcsol a készenléti üzemmód.
(Lásd
“
Egyéb funkciók használata
”
.)
Megjegyzések
• Ha beállítja a készenléti időpontot, a rádió a
beprogramozott időpontban minden nap
bekapcsol mindaddig, amíg nem törli a
készenléti beállítást.
• A készenléti funkció akkor is működik, ha Ön
közben másik adót hallgat.
A figyelmeztető
hangjelzés bekapcsolása
Ha a rádió helyett a kívánt időpontban a
figyelmeztető hangjelzést kívánja bekapcsolni,
szükség szerint törölje a STANDBY MEMORY a
vagy b pozícióra beállított állomást.
1
Az ON/OFF gomb megnyomásával
kapcsolja be a rádiót.
2
Nyomja meg a STANDBY MEMORY a
vagy b gombot.
A rádió veszi a beprogramozott állomást. Ha
nincs állomás beprogramozva, kettős
hangjelzés hallható és a kijelző az alábbi
ábra szerint változik. Ebben az esetben
hajtsa végre az 5. műveleti lépést.
3
Addig tartsa lenyomva az ENTER/
CLOCK gombot, amíg a
“
dEL
”
felirat
villogni nem kezd a kijelzőn.
4
Ismét nyomja meg az ENTER/CLOCK
gombot, amíg kettős hangjelzést nem
hall.
A kijelzőről eltűnik a
“
PRESET
”
“ ”
vagy
“ ”
felirat. (Lásd
“
Programozott hangolás —
Beprogramozott állomás törlése
”
)
5
Hajtsa végre a
“
A készenléti időpont
beállítása
”
címszó alatt leírt művelet
lépéseit 5-10-ig.
Ha a készenléti időpont elérkezik, az időzítő
bekapcsol és megszólal a figyelmeztető
hangjelzés. A készülék 60 másodperc után
magától kikapcsol.
A figyelmeztető hangjelzés kikapcsolása
A LIGHT gomb kivételével bármelyik gomb
megnyomása kikapcsolja a figyelmeztető
hangjelzést.
Megjegyzések
• A figyelmeztető hangjelzés hangereje nem
változtatható.
• Ha a készenléti időpont elérésekor Ön rádiót
hallgat, a rádió kikapcsol és megszólal a
figyelmeztető hangjelzés.
Az elalvási időzítő
bekapcsolása
Elalvási időzítő funkció
Az elalvási időzítő segítségével élvezheti az
elalvás előtti rádiózás örömeit. A rádió az elalvási
időzítőn beállított idő (60, 45, 30 vagy 15 perc)
után magától kikapcsol.
1
Nyomja meg a SLEEP gombot.
Megjelenik az elalvási időzítő beállítása
“
60
”
,
és
“
SLEEP
”
felirat villog a kijelzőn.
Ha a rádió ki volt kapcsolva, bekapcsol a
készülék.
2
Az elalvási időzítőt a
“
SLEEP
”
felirat
villogása közben, a SLEEP gomb
többszöri megnyomásával állítsa be.
A gomb minden egyes megnyomására a
kijelző az alábbi sorrendben változik.
Ha a kijelző visszatér a
“
60
”
-as beállításhoz,
kettős hangjelzés hallható. Miután a
“
SLEEP
”
felirat villogása alatt beállította az elalvási
időzítőt, a
“
SLEEP
”
felirat még 3
másodpercig világít. Amikor az elalvási
időzítő indikátora eltűnik és a kijelzőn a
frekvencia kijelzése jelenik meg, aktiválódik
az elalvási időzítő.
3
Hangolja be a kívánt állomást és a VOL
(hangerő) szabályozóval állítsa be a
hangerőt.
Amint eltelt az elalvási időzítőn beállított idő,
a készülék magától kikapcsol.
A rádió kikapcsolása az elalvási
időzítőn beállított idő eltelte előtt
Nyomja meg az ON/OFF gombot.
Az elalvási időzítő visszaállítása vagy
beállításának meghosszabbítása
Újra nyomja meg a SLEEP gombot és válassza
ki az elalvási időzítő megfelelő beállítását.
Egyéb funkciók
használata
Tartó funkció
Ha be van kapcsolva a tartó funkció, a készülék
gombjai nem működnek. A tartó funkció a
véletlenszerű működtetés megelőzésére szolgál.
A hold funkció a készenléti üzemmód átmeneti
kikapcsolására is szolgál.
A tartó funkció használata
Csúsztassa el a nyíl irányába a HOLD kapcsolót.
A kijelzőn
“
—
”
szimbólum jelenik meg és a
készülék gombjai nem működnek.
A tartó funkció kikapcsolása
Csúsztassa el a nyíllal ellentétes irányába a
HOLD kapcsolót. A kijelzőről eltűnik a
“
—
”
szimbólum.
Világítási funkció
Nyomja meg a LIGHT gombot és 20 — 30
másodpercre bekapcsol a kijelző megvilágítása,
így sötétben is látja a kijelzőt.
Установка таймера сна
Функция таймера сна
Наслаждайтесь засыпанием под работу
радиоприемника с использованием таймера
сна. Радиоприемник выключится
автоматически по истечении установленного
времени таймера сна (60, 45, 30 или 15 минут).
1
Нажмите SLEEP.
Установка таймера сна “60” минут будет
отображена и индикация “SLEEP” будет
мигать.
Радиоприемник включится, если он был
выключен.
2
Повторно нажимайте SLEEP для
выбора желаемой установки
таймера сна во время мигания
индикации “SLEEP”.
Каждое нажатие изменяет дисплей
следующим образом:
Двойной зуммерный сигнал прозвучит,
когда дисплей вернется к отображению
“60”. Индикация “SLEEP” будет гореть в
течение 3 секунд после того, как Вы
выберете установку таймера сна во
время мигания индикации “SLEEP”. После
того как индикация таймера сна исчезнет
и появится индикация частоты, таймер
сна будет активизирован.
3
Выполните настройку на желаемую
станцию и отрегулирутйе VOL
(громкость).
Радиоприемник выключится
автоматически по истечении
установленного времени таймера сна.
Для выключения радиоприемника
до истечения установленного
времени таймера сна
Нажмите ON/OFF.
Для переустановки или продления
установки таймера сна
Нажмите SLEEP снова. Затем выберите
желаемую установку таймера сна.
Использование
других функций
Функция блокировки
При использовании функции блокировки
кнопки не будут работать. Используйте
функцию блокировки для предотвращения
случайного срабатывания.
Функция блокировки также может быть
использована лоя временной отмены
функции ожидания.
Для использования функции
блокировки
Передвиньте HOLD в направлении стрелки.
Индикация “-” появится на дисплее и все
кнопки больше не будут функционировать.
Для отмены функции блокировки
Передвиньте HOLD в противоположном
направлении стрелке. Индикация “-”
исчезнет с дисплея.
Функция подсветки
Нажмите LIGHT для включения подсветки
приблизительно на 20 – 30 секунд для
просмотра дисплея в темных условиях.
Sony ICF-SW35 v2 Operating Instructions
Sony ICF-SW35 Specification
The Sony ICF-SW35 is a compact and versatile portable world band receiver designed for avid radio enthusiasts and travelers. It features a comprehensive frequency range, covering AM, FM, and shortwave bands, allowing users to access a wide array of global broadcasts. The receiver is equipped with a digital frequency readout, ensuring precise tuning and ease of use. Its dual conversion system enhances sensitivity and selectivity, providing clear reception even in areas with high signal interference. The device is powered by four AA batteries, offering portability and convenience for on-the-go listening. An external AC adapter can also be used for stationary operation.
The ICF-SW35 includes 30 station memory presets, enabling quick access to favorite stations and simplifying the tuning process. The direct tuning keypad allows for easy frequency entry, while the manual tuning knob provides traditional control over station selection. An integrated sleep timer and alarm function further enhance its utility, making it suitable for bedside use. The receiver’s compact design, measuring approximately 7.5 x 4.75 x 1.5 inches and weighing around 1.1 pounds, makes it easy to carry and handle. An integrated telescopic antenna and a built-in ferrite bar antenna optimize reception across different bands. The 3.5mm headphone jack offers private listening options, while the built-in speaker delivers clear audio output. The Sony ICF-SW35’s combination of portability, comprehensive band coverage, and user-friendly features makes it a valuable tool for enthusiasts seeking reliable global radio access.
Sony ICF-SW35 F.A.Q.
To reset the Sony ICF-SW35, remove the batteries, press and hold the power button for 10 seconds, then reinsert the batteries.
Check if the batteries are properly inserted and have sufficient charge. If using the AC adapter, ensure it is correctly plugged in.
Extend the antenna fully and try repositioning it for better signal reception. You can also try moving to a location with fewer obstructions.
Press the ‘Alarm’ button, use the tuning buttons to set the desired time, and press ‘Enter’ to confirm. Ensure the alarm switch is set to ‘On’.
Tune to the desired station, then press and hold the ‘Memory’ button until the preset number flashes. Use the tuning buttons to select a preset number and press ‘Enter’.
Press and hold the ‘Time Set’ button while using the tuning buttons to adjust the hours and minutes. Release the ‘Time Set’ button to confirm.
Check the volume level and ensure it is not set too high. Also, verify if the batteries need replacing or if there is interference from other electronic devices.
Press the ‘Band’ button to cycle through AM, FM, and SW bands. The current band will be displayed on the screen.
Ensure the volume is turned up and that headphones are not plugged into the headphone jack, which will mute the speaker.
Lower the volume, turn off the radio when not in use, and use the AC adapter when possible to conserve battery power.
3-042-774-12(1)
FM Stereo/SW/MW/LW PLL Synthesized Receiver
Operating InstructionsMode d’emploiBedienungsanleitung
ICF-SW35
Sony Corporation © 1999 Printed in China
Display
Afficheur
Display
|
POWER ON/OFF |
||
|
ENTER/CLOCK |
TUNE/SCAN/TIME SET |
|
|
– T, t + |
||
DC IN 4.5 V
Battery compartment
Logement des piles
Batteriefachdeckel
Stand
Support
Ständer
A
Rear
Arrière
Rückseite
Insert the # side of the battery first. Insérez le côté # de la pile en premier. Batterie mit der # Seite zuerst einlegen.
English
WARNING
To prevent fire or shock hazard, do not expose the unit to rain or moisture.
To avoid electrical shock, do not open the cabinet. Refer servicing to qualified personnel only.
Before You Begin
Thank you for choosing the Sony world band receiver! The world band receiver will give you many hours of reliable service and listening pleasure.
Please read these instructions thoroughly before operating the world band receiver, and retain them in a handy place for future reference.
Features
•FM stereo/SW/MW/LW portable receiver with worldwide band coverage
•PLL (Phase Locked Loop) synthesizer system
•Presetting of up to 10 stations on each memory preset page for quick tuning (50 stations in total)
•Memory scan tuning of stations memorized on a memory preset page
•Standby timer function to receive your favorite broadcast at the desired time
•Scan tuning to automatically scan the stations
•Sleep timer to turn off the radio automatically after the sleep timer setting (60, 45, 30 or 15 minutes) is reached
•Clock function
•FM stereo reception through stereo headphones (not supplied)
Choosing Power Source
Installing Batteries (See fig. A)
1Open the lid of the battery compartment at the rear of the unit.
2Install three R6 (size AA) batteries with the + and – poles facing the correct way and then close the lid.
“0:00” flashes on the display after you first install the batteries. To stop flashing, set the clock. (See “Setting the Clock”.)
Battery Life (approximate hours)
|
Sony R6 |
Sony LR6 |
|
|
(size AA) |
alkaline |
|
|
(size AA) |
||
|
FM reception |
17 |
46 |
|
SW reception |
12 |
33 |
|
LW/MW reception |
12 |
33 |
Knowing when to replace the batteries
When the batteries become weak, “E” flashes on the display. When the batteries are completely exhausted, “E” lights on the display and the power is turned off.
When “E” lights, replace all the batteries with new ones.
When you replace the batteries
Replace the batteries within 60 seconds while the power is turned off. If you do not perform any operation for 60 seconds, the clock and standby settings will be deleted. However, the stations you preset will remain.
After the batteries are replaced, press ON/OFF to turn the indication off.
Using Other Power Sources
The internal batteries are automatically disconnected when the AC power adaptor or the car battery cord is connected to the DC IN 4.5 V jack for external power source.
House current
Connect the Sony AC power adaptor (not supplied) to the DC IN 4.5 V jack firmly, and plug it into a wall outlet.
Car battery
For use on a 12/24 V car battery, connect the Sony car battery cord (not supplied) to the DC IN
4.5V jack. For details, refer to the operating instructions of the car battery cord.
Notes on external power sources
•When operating the unit with an external power source, do not remove the batteries. These batteries serve to backup settings stored to memory. Since batteries discharge in this case as well, we recommend changing them about once a year.
•Before connecting and disconnecting the external power source plug, be sure to turn off the radio. Otherwise, “E” may be displayed. When this occurs, turn on the radio so that “E” disappears.
•When operating the unit with the internal batteries, remove the AC power adaptor or car battery cord from the wall outlet or car battery and the DC IN 4.5 V jack. Make sure that the plug of the external power source is disconnected before operating the unit.
•Use the recommended Sony AC power adaptor* or car battery cord* only. The polarity of the plugs of other manufacturers may be different. Failure to use the recommended AC power adaptor or car battery cord may cause the unit to malfunction.
*For details on the optional AC power adaptor or car battery cord, see “Specifications”.
Setting the Clock
Set the time when the radio is turned off.
Set the time after you first install the batteries or the clock setting is erased. At this time “0:00” flashes.
The clock operates in the 24-hour system. “0:00” = midnight
“12:00” = noon
Setting the clock
1Press and hold ENTER/CLOCK until you hear a beep. The hour indication starts flashing.
2Press – T or t + under TUNE/ SCAN/TIME SET to display the correct hour.
The hour increases by pressing t +, and decreases by pressing – T. To continuously increase or decrease the hour, keep t + or
–T hold down.
You hear a double-beep when “0” is displayed.
3Press and hold ENTER/CLOCK again until you hear a beep.4Press – T or t + to display the correct minute.
To continuously increase or decrease the minute, keep t + or – T hold down. You hear a double-beep when the “00” is displayed.
5Press and hold ENTER/CLOCK until you hear a double-beep.
The colon “:” starts flashing and the clock operates.
Note
If you leave the radio for one minute with no operation, the clock setting will be aborted and the unit will return to the previous mode. In this case, repeat the procedure from step 1 to complete the clock setting.
To cancel the clock setting
Press ON/OFF to turn on the radio, and then turn it off. The unit will return to the previous mode.
Troubleshooting
Should any problem persist after you have made the following checks, consult your nearest Sony dealer.
There is no sound output.
•VOL (volume) is turned down completely.
•The stereo headphones are plugged in.
•The batteries are inserted with the + and – poles facing the wrong way.
Radio disconnects, even if you pressPOWER.
•The batteries are inserted with the + and – poles facing the wrong way.
•The batteries are exhausted (“E” flashes or lights).
•The AC power adaptor or car battery cord is disconnected.
Sound quality is unsatisfactory, or reception is poor or cannot be received.
•Weak batteries (“E” flashes).
•Tuning and antenna orientation requires further adjustment.
•The radio signal is weak. Listen to the radio near a window when in a vehicle or building.
•ATT switch is set to ON. Set it to OFF, or adjust the ATT control.
Stations cannot be stored to memory.
•Press ENTER/CLOCK for at least two seconds and press the desired MEMORY PRESET PAGE to select the preset number.
The preset station cannot be received during preset tuning.
•VOL (volume) is turned down completely.
•The number selected for the preset station is incorrect. Select the correct number assigned to the desired preset station.
•The preset stations have been erased from memory. Store the station to memory again.
Scan tuning does not work.
•NORMAL/FINE switch is set to FINE. Set it to
NORMAL.
Memory scan tuning does not work.
•You did not select a page number by pressing MEMORY PRESET PAGE. Press the desired MEMORY PRESET PAGE, then press
MEMORY SCAN.
•The scanned page has only one preset station.
Scanning does not stop.
•The ATT switch is set to ON. Set it to OFF, or adjust the ATT control.
The radio is not turned on when the preset standby time is reached.
•VOL (volume) is turned down completely.
•“STANDBY” , “” or “” is not displayed.
•The hold function is operating.
•The preset standby time hase been erased from memory because the batteries were not replaced within one minute after being removed from the unit. Store the standby time to memory again.
The buttons and controls are not operating.
•The hold function is operating and “—” lights on the display. Slide HOLD to the left until “—” disappears from the display.
The display is dim.
•The unit is being used in extremely high or low temperatures, or in a place subject to excessive moisture.
The display shows no indication.
•The batteries are inserted with the + and – poles facing the wrong way.
•The batteries have run down.
Precautions
•Operate the unit only on 4.5 V DC. For battery operation, use three R6 (size AA) batteries. For AC operation, use only the recommended AC power adaptor.
•The unit is not disconnected from the AC power source (mains) as long as it is connected to a wall outlet, even if the unit itself has been turned off.
•Use the unit within a temperature range of 0˚C to 40˚C (32˚F to 104˚F). If it is used in temperatures outside this range, an irregular display may appear. If it is used in temperatures lower than this range, the display may change very slowly. These irregularities will disappear and there will be no damage to the unit when it is used in its recommended temperature range.
•Do not leave the unit in a location near heat sources, or in a place subject to direct sunlight, sand, excessive dust or mechanical shock.
•The nameplate indicating operating voltage, etc. is located on the rear exterior.
•Should any solid object or liquid fall into the unit, disconnect the AC power adaptor and remove the batteries, and have the unit checked by qualified personnel before operating it any further. Make sure that no liquid or foreign material enters the DC IN 4.5 V jack of the unit. This may lead to the malfunction of the unit.
•Since a strong magnet is used for the speaker, keep personal credit cards, etc., using magnetic coding away from the unit.
•When the casing becomes soiled, clean it with a soft dry cloth moistened with mild detergent solution. Never use abrasive cleansers or chemical solvents, as they may deform the casing.
•In vehicles or buildings, radio reception may be difficult or subject to interference. Try listening near a window.
Service and repair
When sending in your unit for service and repair, take note of your important settings in the memory. These settings are sometimes erased from memory, depending on the type of repair necessary.
If you have any questions or problems concerning your unit, please consult the nearest Sony dealer.
Specifications
Circuit system
FM: Super heterodyne
LW/MW/SW: Dual conversion super heterodyne
Frequency range
FM: 76.00-108.00 MHz
SW: 2250-26100 kHz
MW: 530-1710 kHz
LW: 150-285 kHz
Speaker
Approx. 66 mm (2 1⁄8 in.) diameter, 8 Ohms
Maximum output
240 mW (at 10% harmonic distortion)
Output
i(headphones) jack (ø3.5 mm stereo mini jack)
16 Ohms
Power requirements
DC 4.5 V, three R6 (size AA) batteries
External power source
DC IN 4.5 V
Dimensions
Approx. 168 × 106 × 35 mm (W × H × D) (6 5⁄8 × 4 1⁄4 × 1 7⁄16 in.) incl. projecting parts
Mass
Approx. 405 g (14.3 oz.) incl. batteries
Supplied Accessories
Carrying case (1)
Short wave guide (1)
Optional Accessories
AC power adaptor
AC-E45 HG
Car battery cord
SW/MW/LW wide-range antenna
AN-1, AN-102
SW active antenna
AN-LP1
Design and specifications are subject to change without notice.
The AC power adaptor’s operating voltage varies depending upon the country in which it is sold. Buy the AC power adaptor in the country you intend to use it.
Your Sony dealer may not handle all of the above listed optional accessories. Please ask your dealer for detailed information on the optional accessories available in your country.
Français
AVERTISSEMENT
Afin d’éviter tout risque d’incendie et d’électrocution, ne pas exposer cet appareil à la pluie ni à l’humidité.
Afin d’éviter tout choc électrique, ne pas ouvrir le coffret. Pour toute réparation, faire appel à un professionnel uniquement.
Informations préliminaires
Merci pour l’achat de ce récepteur mondial Sony! Ce récepteur vous offrira de nombreuses heures d’écoute agréable en toute fiabilité.
Avant d’utiliser ce récepteur mondial, veuillez lire attentivement ces instructions et les conserver pour toute référence future.
Caractéristiques
•Récepteur FM stéréo/OC/PO/GO portable à couverture de gammes mondiale
•Système de synthétiseur PLL (Phase Locked Loop)
•Préréglage de 10 stations au maximum sur chaque page de préréglage pour un accord rapide (en tout 50 stations)
•Balayage des stations mémorisées sur une page de préréglage
•Préréglage de l’heure de réception d’une émission
•Balayage des stations pour l’accord d’une station précise
•Minuterie sommeil pour l’extinction automatique de la radio après l’écoulement d’un certain temps (60, 45, 30 ou 15 minutes)
•Fonction d’horloge
•Réception FM stéréo par un casque stéréo (non fourni)
Sélection de la source d’alimentation
Mise en place des piles
(Voir fig. A)
1Ouvrez le couvercle du logement des piles à l’arrière de l’appareil.
2Installez trois piles R6 (format AA) en respectant les pôles + et –, puis fermez le couvercle.
“0:00” clignote sur l’afficheur lorsque les piles sont en place. Pour arrêter le clignotement, réglez l’horloge. (Voir “Réglage de l’horloge”.)
Autonomie des piles (approximative en heures)
|
Sony R6 |
Sony LR6 |
||
|
(format AA) |
alcalines |
||
|
(format AA) |
|||
|
Réception FM |
17 |
46 |
|
|
Réception OC (SW) |
12 |
33 |
|
|
Réception GO (LW)/ |
12 |
33 |
|
|
PO (MW) |
|||
Quand faut-il remplacer les piles ?
Lorsque les piles sont faibles, “E” clignote sur l’afficheur. Lorsqu’elles sont complètement vides, “E” s’allume sur l’afficheur et l’alimentation est coupée.
Lorsque “E” s’allume, remplacez toutes les piles par des neuves.
Lorsque vous remplacez les piles
Remplacez les piles en l’espace de 60 secondes après la coupure de l’alimentation. Si vous ne les remplacez pas en 60 secondes, les réglages de l’horloge et de l’heure de mise en marche seront supprimés. Toutefois, les stations resteront préréglées.
Après le remplacement des piles, appuyez sur ON/OFF pour éteindre l’indication.
Utilisation d’autres sources d’alimentation
Les piles internes sont automatiquement déconnectées lorsque l’adaptateur secteur ou le cordon allume-cigares de la voiture est raccordé
àla prise DC IN 4.5 V pour l’alimentation externe du récepteur.
Courant secteur
Raccordez un adaptateur secteur Sony (non fourni) à la prise DC IN 4.5 V et branchez-le ensuite sur une prise secteur.
Batterie de voiture
Pour utiliser l’appareil sur une batterie de voiture de 12/24 volts, raccordez cordon allume- cigares Sony (non fourni) à la prise DC IN 4.5 V. Pour les détails, consultez les instructions du cordon allume-cigares.
Remarques sur les sources d’alimentation externe
•Lorsque vous faites fonctionner l’appareil sur une source d’alimentation externe, ne retirez pas les piles. Les préréglages sont conservés en mémoire par ces piles. Comme les piles se déchargent malgré tout, il est conseillé de les remplacer une fois par an.
•Avant de brancher et de débrancher la fiche de la source d’alimentation externe, n’oubliez pas d’éteindre la radio, sinon, “E” risque d’apparaître sur l’afficheur. Le cas échéant, allumez la radio pour que “E” disparaisse.
•Lorsque vous faites fonctionner l’appareil sur les piles internes, enlevez l’adaptateur secteur ou le cordon allume-cigares de la prise secteur et de la prise DC IN 4.5 V. Assurez-vous que la fiche de la source d’alimentation externe est débranchée avant d’utiliser l’appareil.
•Utilisez l’adaptateur secteur* ou le cordon allume-cigares* recommandés par Sony uniquement. La polarité des fiches des autres fabricants peut être différente. L’emploi de tout autre adaptateur secteur ou cordon allume- cigares peut entraîner un mauvais fonctionnement.
*Pour les détails sur l’adaptateur secteur ou sur le cordon allume-cigares en option, voir les “Spécifications”.
Réglage de l’horloge
Réglez l’heure lorsque la radio est éteinte. L’heure doit être réglée après la première installation des piles ou lorsque les réglages de l’horloge ont été effacés. Dans ce cas, “0:00” clignote.
L’horloge fonctionne sur 24 heures. “0:00” = minuit
“12:00” = midi
Réglage de l’horloge
1Appuyez sur ENTER/CLOCK et maintenez la pression jusqu’à ce qu’un bip soit audible. L’indication des heures se met à clignoter.
2Appuyez sur – T ou t + sous TUNE/ SCAN/TIME SET pour afficher les heures correctes.
Les heures augmentent lorsque vous appuyez sur t + et elles diminuent lorsque vous appuyez sur – T. Pour augmenter ou diminuer en continu les heures, maintenez la pression sur – T ou t +.
Vous entendez un double bip lorsque “0” est affiché.
3Appuyez une nouvelle fois sur ENTER/CLOCK et maintenez la pression jusqu’à ce que vous entendiez un bip.
4Appuyez sur – T ou t + pour afficher les minutes correctes.
Pour augmenter ou diminuer en continu les minutes, maintenez la pression sur – T ou t +.
Vous entendez un double bip lorsque “00” est affiché.
5Appuyez sur ENTER/CLOCK et maintenez la pression jusqu’à ce que vous entendiez un double bip.
Les deux points “:” se mettent à clignoter et l’horloge fonctionne.
Remarque
Si vous n’effectuez pas les opérations en l’espace d’une minute, le réglage de l’horloge sera invalidé et l’appareil reviendra au mode antérieur. Dans ce cas, répétez l’opération depuis l’étape 1 pour refaire le réglage.
Pour annuler le réglage de l’horloge
Appuyez sur ON/OFF pour allumer puis pour éteindre la radio. L’appareil reviendra au mode antérieur.
Dépannage
En cas de problème, lisez les points suivants et si vous ne pouvez pas résoudre le problème, consultez le revendeur Sony le plus proche.
Aucun son.
•Le volume (touche VOL) est complètement réduit.
•Un casque stéréo est branché sur l’appareil.
•Les pôles des piles + et – sont mal orientés.
La radio est déconnectée, même lorsque vous appuyez sur POWER.
•Les pôles des piles + et – sont mal orientés.
•Les piles sont épuisées (“E” clignote ou est allumé).
•L’adaptateur secteur ou le cordon allume- cigares est débranché.
Qualité du son ou réception médiocre, ou réception impossible.
•Piles faibles (“E” clignote).
•La station et l’orientation de l’antenne doivent ajustées plus précisément.
•Le signal radio est faible. Ecoutez la radio près d’une fenêtre lorsque vous êtes dans un véhicule ou un immeuble.
•Le commutateur ATT est réglé sur ON. Réglez- le sur OFF ou ajustez la commande ATT.
Impossible de prérégler des stations.
•Appuyez sur ENTER/CLOCK pendant au moins deux secondes, puis appuyez sur la touche MEMORY PRESET PAGE souhaitée pour sélectionner un numéro de page de préréglage.
La station préréglée ne peut pas être reçue lors de l’accord de stations préréglées.
•Le volume (touche VOL) est complètement réduit.
•Le numéro de station préréglée sélectionné n’est pas correct. Sélectionnez le numéro où la station a été préréglée.
•Les stations préréglées ont été effacées de la mémoire. Préréglez une nouvelle fois les stations.
Le balayage des stations ne fonctionne pas.
•Le commutateur NORMAL/FINE est réglé sur FINE. Réglez-le sur NORMAL.
Le balayage des stations préréglées ne fonctionne pas.
•Vous n’avez pas sélectionné de numéro de page en appuyant sur MEMORY PRESET PAGE. Appuyez sur la touche MEMORY PRESET PAGE souhaitée, puis appuyez sur
MEMORY SCAN.
•La page balayée ne contient qu’une station.
Le balayage ne s’arrête pas.
•Le commutateur ATT est réglé sur ON. Réglez- le sur OFF ou ajustez la commande ATT.
La radio ne s’allume pas lorsque l’heure de mise en marche est atteinte.
•Le volume (touche VOL) est complètement réduit.
•“STANDBY”, “” ou “” n’est pas affiché.
•La fonction de verrouillage est validée.
•L’heure de mise en marche a été effacée de la mémoire parce que les piles n’ont pas été remplacées en l’espace d’une minute. Préréglez à nouveau l’heure.
Les touches et les commandes ne fonctionnent pas.
•La fonction de verrouillage est validée et “—” s’allume sur l’afficheur. Poussez HOLD vers la gauche jusqu’à ce que “—” disparaisse de l’afficheur.
L’afficheur est sombre.
•L’appareil est utilisé à des températures extrêmement élevées ou basses, ou à un endroit exposé à une humidité excessive.
Aucune indication n’apparaît sur l’afficheur.
Précautions
•Faites fonctionner l’appareil sur le courant continu de 4,5 V seulement. Pour le fonctionnement sur piles, utilisez trois piles R6 (format AA). Pour le fonctionnement sur le courant secteur, utilisez uniquement l’adaptateur secteur recommandé.
•Cet appareil n’est pas isolé de la source d’alimentation secteur tant qu’il est raccordé à une prise secteur, même s’il a été éteint.
•Utilisez l’appareil à une température comprise entre 0°C et 40°C. Si vous l’utilisez hors de cette plage, l’affichage ne sera pas normal. Si vous l’utilisez à une température inférieure, l’affichage réagira très lentement. Ces anomalies disparaîtront sans que l’appareil ne soit endommagé lorsque vous l’utiliserez dans la plage de températures recommandée.
•Ne laissez pas l’appareil près d’une source de chaleur ou à un endroit exposé à la lumière directe du soleil, au sable, à une poussière excessive ou à un choc mécanique.
•La plaque signalétique indiquant la tension de fonctionnement et d’autres informations importantes se trouve à l’arrière de l’appareil, à l’extérieur.
•Si un liquide ou un solide tombe dans l’appareil, débranchez l’adaptateur secteur et retirez les piles, puis faites contrôler l’appareil par un professionnel avant de le réutiliser. Veillez à ce qu’aucun liquide ou aucune matière étrangère n’entre dans la prise DC IN 4.5 V de l’appareil. L’appareil risque sinon de ne plus fonctionner correctement.
•Comme un aimant puissant est utilisé pour le haut-parleur, ne laissez pas de cartes de crédit, etc. à code magnétique près de l’appareil.
•Lorsque le coffret est sale, nettoyez-le avec un chiffon et doux, imprégné d’une solution neutre de détergent. N’utilisez jamais de tampons abrasifs ni de solvants chimiques, car le coffret pourrait être endommagé.
•Dans les véhicules ou immeubles, la réception radio peut être difficile ou perturbée par des interférences. Essayez d’écouter près d’une fenêtre.
Service et réparation
Avant d’envoyer votre appareil en réparation, prenez soin de noter les préréglages que vous jugez importants. Ces préréglages sont parfois effacés de la mémoire lors des réparations.
Pour toute question ou difficulté concernant votre appareil, veuillez consulter le revendeur Sony le plus proche.
Spécifications
Système de circuit
FM : Super hétérodyne
GO/PO/OC : Super hétérodyne à double conversion
Plage de fréquences
FM : 76,00-108,00 MHz
OC : 2250-26100 kHz
PO : 530-1710 kHz
GO : 150-285 kHz
Haut-parleur
Env. 66 mm de diamètre, 8 ohms
Puissance maximale
240 mW (à 10% de distorsion harmonique)
Sortie
Prise i (casque) (minijack stéréo ø3,5 mm)
16ohms
Alimentation
CC 4,5 V, trois piles R6 (format AA)
Source d’alimentation externe
Prise DC IN 4.5 V
Dimensions
Env. 168 × 106 × 35 mm (L × H × P) projections comprises
Masse
Env. 405 g avec les piles
Accessoires fournis
Etui de transport (1)
Guide des ondes courtes (1)
Accessoires en option
Adaptateur secteur
AC-E45HG
Cordon allume-cigares
Antenne longue portée OC/PO/GO
AN-1, AN-102
Antenne active OC
AN-LP1
La conception et les spécifications peuvent être modifiées sans préavis.
La tension de fonctionnement de l’adaptateur secteur varie selon le pays où il est commercialisé. Achetez l’adaptateur secteur dans le pays où il sera utilisé.
Votre revendeur Sony peut ne pas avoir en stock tous les accessoires mentionnés ci-dessus. Veuillez le consulter pour les détails au sujet des accessoires en option, commercialisés dans votre pays.
Deutsch
Vorsicht
Um Feuergefahr und die Gefahr eines elektrischen Schlages zu vermeiden, setzen Sie das Gerät weder Regen noch sonstiger Feuchtigkeit aus.
Um einen elektrischen Schlag zu vermeiden, öffnen Sie das Gehäuse nicht. Überlassen Sie Wartungsarbeiten stets nur qualifiziertem Fachpersonal.
Vor dem Betrieb
Wir beglückwünschen Sie zu Ihrem neuen Weltempfänger und sind überzeugt davon, dass Sie lange Freude an diesem zuverlässigen Gerät haben werden.
Bevor Sie das Gerät in Betrieb nehmen, lesen Sie diese Anleitung sorgfältig durch. Bewahren Sie sie zum späteren Nachschlagen gut auf.
Merkmale
•Weltempfänger mit den Wellenbereichen UKW (Stereo)/KW/MW/LW.
•PLL-Synthesizersystem (Phase Locked Loop).
•5 Speicherseiten (MEMORY PRESET PAGE) mit Platz für jeweils 10 Sender (insgesamt sind also 50 Sender speicherbar).
•Automatischer Speichersuchlauf.
•Standby-Timer zum automatischen Empfang des gewünschten Senders zur vorprogrammierten Zeit.
•Automatischer Sendersuchlauf.
•Sleep-Timer schaltet das Radio automatisch nach der eingestellten Zeitspanne (60, 45, 30 oder 15 Minuten) aus.
•Uhrzeitanzeige.
•UKW-Stereoempfang über Kopfhörer (nicht mitgeliefert).
Stromquellen
Einlegen der Batterien
(Siehe Abb. A)
1Öffnen Sie den Batteriefachdeckel an der Rückseite des Geräts.
2Legen Sie drei Mignonzellen (R6/ Größe AA) mit richtiger Polarität (+/–) ein, und schließen Sie den Deckel.
Wenn Sie die Batterien zum ersten Mal eingelegt haben, blinkt die Anzeige „0:00“ im Display. Stellen Sie dann die Uhr ein, damit das Blinken aufhört. (Siehe „Einstellen der Uhr“.)
Lebensdauer der Batterie (ungefähre Angaben in Stunden)
|
Sony Batterie |
Sony |
|
|
R6 |
Alkalibatterie |
|
|
(Größe AA) |
LR6 |
|
|
(Größe AA) |
||
|
UKW-Empfang |
17 |
46 |
|
KW-Empfang |
12 |
33 |
|
MW/LW-Empfang |
12 |
33 |
Wann müssen die Batterien gewechselt werden?
Wenn die Batterien fast leer sind, blinkt „E“ im Display. Sind die Batterien ganz leer, leuchtet „E“ ständig und das Gerät schaltet sich aus. Wechseln Sie die Batterien aus, wenn „E“ ständig leuchtet.
Hinweis zum Batteriewechsel
Wechseln Sie die Batterien bei ausgeschaltetem Gerät innerhalb von 60 Sekunden aus. Wenn Sie länger als 60 Sekunden keine Bedienung am Gerät vornehmen, werden die Uhr- und die Standby-Timer-Einstellungen gelöscht. Die gespeicherten Sender bleiben jedoch erhalten. Drücken Sie nach dem Batteriewechsel die Taste ON/OFF, um die Anzeige auszuschalten.
Die Stromversorgungsmöglichkeiten
Das Gerät kann entweder extern oder mit den internen Batterien betrieben werden. Wenn Sie den Netzadapter oder das Autobatteriekabel an die DC IN 4.5 V-Buchse anschließen, werden die internen Batterien automatisch abgeschaltet.
Netzbetrieb
Schließen Sie den Sony Netzadapter (nicht mitgeliefert) an die DC IN 4.5 V-Buchse und an eine Wandsteckdose an.
Betrieb an Autobatterie
Zum Betrieb an einer 12-V- oder 24-V- Autobatterie schließen Sie das Sony Autobatteriekabel (nicht mitgeliefert) an die DC IN 4.5 V-Buchse an. Einzelheiten entnehmen Sie bitte der Anleitung des Autobatteriekabels.
Hinweise zur externenStromversorgung
•Auch wenn das Gerät extern mit Strom versorgt wird, sollten die internen Batterien eingesetzt bleiben, da sie den Speicher des Geräts versorgen. Spätestens nach einem Jahr sind die internen Batterien leer und sollten ausgewechselt werden.
•Schalten Sie das Gerät aus, wenn Sie die externe Stromquelle anschließen oder abtrennen. Ansonsten erscheint möglicherweise „E“ im Display. Schalten Sie in einem solchen Fall das Gerät wieder ein, so dass die Anzeige „E“ erlischt.
•Wenn Sie das Gerät mit den internen Batterien betreiben wollen, trennen Sie den Netzadapter zuerst von der Wandsteckdose bzw. das Autobatteriekabel zuerst von der Autobatterie ab, bevor Sie das Adapterkabel von der DC IN 4.5 V-Buchse abtrennen. Solange das Adapterkabel noch in die DC IN 4.5 V-Buchse eingesteckt ist, kann das Gerät nicht mit den internen Batterien betrieben werden.
•Verwenden Sie nur den empfohlenen Netzadapter oder das empfohlene Sony Autobatteriekabel. Andere Netzadapter* und andere Autobatteriekabel* können aufgrund unterschiedlicher elektrischer Daten und unterschiedlicher Steckerpolarität zu Beschädigungen des Geräts führen.
*Einzelheiten zum getrennt erhältlichen Netzadapter und Autobatteriekabel finden Sie im Abschnitt „Technische Daten“.
Einstellen der Uhr
Wenn die Batterien zum allerersten Mal eingelegt werden oder die Uhrzeit aus irgendwelchen Gründen gelöscht wurde, blinkt „0:00“ und die Uhrzeit muss eingestellt werden. Schalten Sie das Gerät aus, bevor Sie mit dem Einstellen der Uhrzeit beginnen.
Die Uhr arbeitet mit einem 24-Stunden-System. „0:00“ = Mitternacht
„12:00“ = Mittag
So wird die Uhr eingestellt
1Halten Sie ENTER/CLOCK gedrückt, bis ein Piepton zu hören ist. Die Uhrzeitanzeige beginnt dann zu blinken.
2Drücken Sie die Taste – T oder t + (unter der Markierung TUNE/SCAN/ TIME SET), um die Stunden einzustellen.
Mit t + erhöhen sich die Stundenziffern, mit – T verringern sie sich. Wenn Sie – T oder t + gedrückt halten, ändern sich die Stundenziffern schneller.
Bei Erreichen von „0“ sind zwei Pieptöne zu hören.
3Halten Sie ENTER/CLOCK erneut gedrückt, bis ein Piepton zu hören ist.4Drücken Sie – T oder t +, um die Minuten einzustellen.
Wenn Sie – T oder t + gedrückt halten, ändern sich die Minutenziffern schneller. Bei Erreichen von „00“ sind zwei Pieptöne zu hören.
5Halten Sie ENTER/CLOCK erneut gedrückt, bis zwei Pieptöne zu hören sind.
Der Doppelpunkt („:“) beginnt zu blinken, und die Uhr nimmt den Betrieb auf.
Hinweis
Wenn Sie länger als eine Minute keine Taste drücken, schaltet das Gerät vom Uhrzeit- Einstellmodus in den vorausgegangenen Modus zurück. In einem solchen Fall müssen Sie erneut mit Schritt 1 beginnen.
So können Sie den Uhrzeit-Einstellmodus verlassen
Schalten Sie das Radio durch Drücken von ON/ OFF einmal ein und dann wieder aus. Es schaltet dann vom Uhrzeit-Einstellmodus in den vorausgegangenen Modus zurück.
Störungsüberprüfungen
Gehen Sie bei einer Störung die folgende Zusammenstellung durch. Lässt sich die Störung nicht beheben, wenden Sie sich an den nächsten Sony Händler.
Kein Ton.
•VOL (Lautstärke) ist ganz zurückgeregelt.
•Ein Stereokopfhörer ist angeschlossen.
•Die Batterien sind mit falscher Polarität (+/–) eingelegt.
Bei Drücken von POWER ist kein Ton zu hören.
•Die Batterien sind mit falscher Polarität (+/–) eingelegt.
•Die Batterien sind erschöpft („E“ blinkt oder leuchtet).
•Der Netzadapter oder das Autobatteriekabel ist abgetrennt.
Schlechte Tonqualität, schwacher oder gar kein Empfang.
•Die Batterien sind erschöpft („E“ blinkt).
•Es ist nicht richtig abgestimmt und/oder die Antenne ist nicht optimal ausgerichtet.
•Das Empfangssignal ist zu schwach. Wenn Sie sich in einem Fahrzeug oder Gebäude befinden, halten Sie das Radio in die Nähe eines Fensters.
•Der ATT-Schalter steht auf ON. Stellen Sie ihn auf OFF oder justieren Sie den ATT-Regler ein.
Sender lassen sich nicht speichern.
•Nachdem die ENTER/CLOCK-Taste mindestens 2 Sekunden gedrückt wurde, muss mit MEMORY PRESET PAGE die gewünschte Stationsnummer gewählt werden.
Der gewünschte Sender kann nicht aus dem Speicher abgerufen werden.
•VOL (Lautstärke) ist ganz zurückgeregelt.
•Es wurde eine falsche Stationsnummer gewählt. Wählen Sie die Nummer des gewünschten Senders.
•Die Senderspeicherungen wurden gelöscht. Speichern Sie die Sender neu ab.
Der Sendersuchlauf findet den gewünschten Sender nicht.
•Der NORMAL/FINE-Schalter steht auf FINE. Stellen Sie ihn auf NORMAL.
Der Speichersuchlauf funktioniert nicht.
•Es wurde keine Stationsnummer durch Drücken von MEMORY PRESET PAGE gewählt. Drücken Sie eine dieser Tasten und dann MEMORY SCAN.
•Auf der gewählten Seite ist nur ein einziger Sender gespeichert.
Der Suchlauf stoppt nicht.
•Der ATT-Schalter steht auf ON. Stellen Sie ihn auf OFF oder justieren Sie den ATT-Regler ein.
Der Standby-Timer schaltet das Radio nicht zur programmierten Zeit ein.
•VOL (Lautstärke) ist ganz zurückgeregelt.
•„STANDBY“, „“ oder „“ wird nicht angezeigt.
•Die Sperrfunktion ist aktiviert.
•Die Standby-Timer-Zeit wurde wurden gelöscht, da der Batteriewechsel länger als eine Minute dauerte. Programmieren Sie die Standby-Timer-Zeit nochmals.
Die Bedienungselemente arbeiten nicht.
•Die Sperrfunktion ist aktiviert („—“ erscheint im Display). Schieben Sie HOLD nach links, so dass „—“ erlischt.
Das Display ist dunkel.
•Die Umgebungstemperaturen sind sehr hoch oder sehr niedrig, oder die Luftfeuchtigkeit ist extrem hoch.
Keine Anzeige im Display.
•Die Batterien sind mit falscher Polarität (+/–) eingesetzt.
•Die Batterien sind leer.
Sicherheitshinweise
•Betreiben Sie das Gerät mit 4,5 V Gleichspannung (zwei Mignonzellen (R6/ Größe AA). Für Netzbetrieb verwenden Sie nur den mitgelieferten Netzadapter. Ein anderer Adapter darf nicht verwendet werden.
•Das Gerät ist auch im ausgeschalteten Zustand nicht vollständig vom Stromnetz getrennt, solange der Netzstecker noch an einer Wandsteckdose angeschlossen ist.
•Verwenden Sie das Gerät nur bei Temperaturen zwischen 0 °C und 40 °C. Bei höheren Temperaturen zeigt das Display die Frequenz möglicherweise nicht oder nicht richtig an, bei niedrigeren Temperaturen ändert sich die Anzeige möglicherweise langsam. Wenn das Gerät wieder innerhalb des vorgeschriebenen Temperaturbereichs betrieben wird, verschwinden diese Symptome.
•Legen Sie das Gerät nicht in die Nähe von Wärmequellen wie Heizungen oder Warmluftauslässen und auch nicht an Plätze, die direktem Sonnenlicht, starker Staubentwicklung, mechanischen Vibrationen oder Stößen ausgesetzt sind.
•Das Typenschild mit der Betriebsspannung und anderen wichtigen Informationen befindet sich an der Rückseite.
•Sollte ein Fremdkörper oder Flüssigkeit in das Gerät gelangen, trennen Sie den Netzadapter ab, nehmen Sie die Batterien heraus und lassen Sie das Gerät von Fachpersonal überprüfen, bevor Sie es weiter verwenden. Achten Sie sorgfältig darauf, dass kein Fremdkörper und keine Flüssigkeit in die DC IN 4.5 V-Buchse gelangen, da es sonst zu Störungen kommen kann.
•Halten Sie Kreditkarten mit Magnetcodierung und Uhren mit Federwerk vom Gerät fern, da diese Teile von den starken Lautsprechermagneten beschädigt werden können.
•Wenn das Gehäuse verschmutzt ist, reinigen Sie es mit einem weichen, leicht mit mildem Haushaltsreiniger angefeuchteten Tuch.
Scharfe Reiniger und chemische Lösungsmittel dürfen nicht verwendet werden, da sie das Gehäuse angreifen.
•In Fahrzeugen und Gebäuden kann der Empfang schwach und verrauscht sein. Betreiben Sie das Gerät dann möglichst in der Nähe eines Fensters.
Service und Reparatur
Notieren Sie sich wichtige Speicherungen, bevor Sie das Gerät in eine Service- oder Reparaturwerkstatt schicken. Abhängig von der erforderlichen Reparatur werden die Speicherungen möglicherweise gelöscht.
Bei weiterführenden Fragen wenden Sie sich bitte an den nächsten Sony Händler.
Technische Daten
Schaltungsauslegung
UKW: Superhet
LW/MW/KW: Doppelsuperhet
Frequenzgang
UKW: 76,00 — 108,00 MHz
KW: 2250 — 26100 kHz
MW: 530 — 1710 kHz
LW: 150 — 285 kHz
Lautsprecher
ca. 66 mm Durchmesser, 8 Ohm
Max. Ausgangsleistung
240 mW (bei 10% Klirrgrad)
Ausgangsbuchse
i(Kopfhörerbuchse), Stereo-Minibuchse (Ø 3,5 mm), 16 Ohm
Stromversorgung
4,5 V Gleichspannung, drei Mignonzellen (R6/ Größe AA)
Externe Stromversorgung
Über DC IN 4.5 V-Buchse
Abmessungen
ca. 168 × 106 × 35 mm, einschl. vorspringender Teile
Gewicht
ca. 405 g, einschl. Batterien
Mitgeliefertes Zubehör
Tragetasche (1)
Kurzwellenhandbuch (1)
Sonderzubehör
Netzadapter
AC-E45HG
Autobatteriekabel
KW/MW/LW-Breitbandantenne
AN-1, AN-102
KW-Aktivantenne
AN-LP1
Änderungen, die dem technischen Fortschritt dienen, bleiben vorbehalten.
Die Betriebsspannung des Netzadapters hängt von dem Land ab, in dem Sie ihn gekauft haben. Kaufen Sie den Netzadapter in dem Land, in dem Sie das Gerät betreiben wollen.
Möglicherweise führt Ihr Händler nicht alle oben aufgeführten Sonderzubehörteile. Er wird Ihnen gerne genauere Informationen darüber geben, welche Teile in Ihrem Land erhältlich sind.