


Sony Ericsson W995 Walkman™
Данное руководство опубликовано компанией
Sony Ericsson Mobile Communications AB или
местным филиалом компании без каких-либо
обязательств. Компания Sony Ericsson Mobile
Communications AB оставляет за собой право без
дополнительного уведомления вносить в данное
руководство изменения, связанные с
совершенствованием оборудования и
программного обеспечения, а также при
обнаружении неточностей и опечаток. Все эти
изменения будут внесены в новую редакцию
руководства.
С сохранением всех прав.
© Sony Ericsson Mobile Communications AB,
2009 г.
Номер публикации: 1225-4652.1
Внимание! Некоторые из услуг и функций,
описанных в данном руководстве,
поддерживаются не всеми сетями и/или
поставщиками услуг и не во всех регионах.
Без ограничений можно пользоваться
международным номером экстренной
помощи 112. Информацию о доступности и
стоимости требуемой услуги или функции
можно получить у поставщика услуг.
Перед началом работы с телефоном
обязательно ознакомьтесь с разделом Важная
информация.
Данный мобильный телефон позволяет
загружать, хранить и пересылать
дополнительное содержимое, например,
мелодии сигнала вызова. Использование такого
содержимого может быть ограничено или
запрещено в силу законных прав третьих сторон,
включая (но не ограничиваясь этим)
ограничения, налагаемые действующим
законодательством по защите авторских прав.
Ответственность за использование
дополнительного содержимого, загружаемого в
телефон, а также пересылаемого из телефона,
целиком возлагается на владельца телефона (но
не на компанию Sony Ericsson). Перед
использованием какого-либо дополнительного
содержимого необходимо убедиться в наличии
надлежащих лицензий либо иных разрешений.
Компания Sony Ericsson не гарантирует точности,
целостности или качества никакого
дополнительного содержимого и другого
содержимого сторонних изготовителей.
Компания Sony Ericsson ни при каких
обстоятельствах не несет никакой
ответственности за неправильное
использование дополнительного содержимого и
другого содержимого сторонних изготовителей.
Smart-Fit Rendering является торговой маркой
или зарегистрированной торговой маркой
компании ACCESS.
Bluetooth является торговой маркой или
зарегистрированной торговой маркой
корпорации Bluetooth SIG; эта торговая марка
используется компанией Sony Ericsson на
основании лицензии.
Логотип с шариком, SensMe, PlayNow, MusicDJ,
PhotoDJ, TrackID и VideoDJ являются торговыми
марками или зарегистрированными торговыми
марками корпорации Sony Ericsson Mobile
Communications AB.
В TrackID™ используется программное
обеспечение Gracenote Mobile MusicID™.
Gracenote и Gracenote Mobile MusicID являются
торговыми марками или зарегистрированными
торговыми марками корпорации Gracenote.
WALKMAN, логотип WALKMAN, Sony, Memory
Stick Micro™, M2™ и Media Go являются
торговыми марками или зарегистрированными
торговыми марками корпорации Sony.
PictBridge является торговой маркой или
зарегистрированной торговой маркой
корпорации Canon Kabushiki Kaisha.
4
Это Интернет-версия документа. © Печать разрешена только для частного использования.

Wi-Fi является торговой маркой или
зарегистрированной торговой маркой группы Wi-
Fi Alliance.
DLNA является торговой маркой или
зарегистрированной торговой маркой Digital
Living Network Alliance.
Google™, Google Maps™, YouTube и логотип
YouTube являются торговыми марками или
зарегистрированными торговыми марками
корпорации Google.
PLAYSTATION является торговой маркой или
зарегистрированной торговой маркой
корпорации Sony Computer Entertainment.
Wayfinder и Wayfinder Navigator являются
торговыми марками или зарегистрированными
торговыми марками корпорации Wayfinder
Systems AB.
SyncML является торговой маркой или
зарегистрированной торговой маркой Open
Mobile Alliance LTD.
Ericsson является торговой маркой или
зарегистрированной торговой маркой
корпорации Telefonaktiebolaget LM Ericsson.
Adobe Photoshop Album Starter Edition является
торговой маркой или зарегистрированной
торговой маркой корпорации Adobe Systems в
США и/или других странах.
Microsoft, ActiveSync, Windows, Outlook, Windows
Media и Vista являются зарегистрированными
торговыми марками или торговыми марками
корпорации Microsoft в США и/или других
странах/регионах.
Метод ввода текста T9™ является торговой
маркой или зарегистрированной торговой маркой
компании Tegic Communications. Метод ввода
текста Т9™ защищен следующими патентами:
Патенты США №№ 5818437, 5953541, 5187480,
5945928 и 6011554; патенты Канады патент
Великобритании № 1331057; стандартный патент
Гонконга № 2238414B; патент республики
Сингапур № HK0940329; № 51383; патент
Евросоюза № 0 842 463 (96927260.8) DE/DK, FI,
FR, IT, NL, PT, ES, SE, GB; на прочие патенты
поданы заявки в различных странах мира.
Данное изделие защищено определенными
правами на интеллектуальную собственность
корпорации Microsoft. Использование и
распространение этой технологии вне изделия
запрещено без лицензии корпорации Microsoft.
Владельцы содержимого применяют технологию
управления цифровыми правами Windows Media
(WMDRM) для защиты своей интеллектуальной
собственности, включая авторские права. Для
доступа к содержимому, защищенному
системой WMDRM, в данном устройстве
используется программное обеспечение
WMDRM. Если программное обеспечение
WMDRM не сможет обеспечить защиту
содержимого, владельцы содержимого имеют
право потребовать от корпорации Microsoft
аннулирования функций программного
обеспечения, которые позволяют использовать
систему WMDRM для воспроизведения или
копирования защищенного содержимого. Такое
аннулирование на влияет на незащищенное
содержимое. При загрузке лицензий на
защищенное содержимое пользователь
соглашается с тем, что корпорация Microsoft
имеет право прилагать к лицензии список
аннулирования. Владельцы содержимого имеют
право потребовать от пользователя выполнить
обновление программного обеспечения WMDRM
для обеспечения доступа к предоставляемому
им содержимому. При отказе от обновления
пользователь лишается возможности доступа к
содержимому, для которого требуется
обновление.
Данное изделие предоставляется по лицензии
портфеля патентов визуальных технологий
MPEG-4 и AVC для личного и некоммерческого
использования потребителем для (i)
кодирования видеоданных в соответствии с
видеостандартом MPEG-4 (“MPEG-4-видео”) или
5
Это Интернет-версия документа. © Печать разрешена только для частного использования.

AVC (“AVC-видео”) и/или (ii) декодирования
видеоданных MPEG-4 или AVC, закодированных
потребителем в рамках личной или
некоммерческой деятельности и/или полученных
от поставщика видеосодержимого на основании
лицензии компании MPEG LA на предоставление
видеопродукции MPEG-4 и/или AVC. Лицензия не
предоставляется и не подразумевает какое-либо
иное использование. Дополнительную
информацию, в том числе информацию по
рекламному, служебному и коммерческому
применению и лицензированию, можно получить
в компании с ограниченной ответственностью
MPEG LA. См. http://www.mpegla.com. Технология
декодирования аудиоданных MPEG Layer-3
предоставляется по лицензии компаний
Fraunhofer IIS и Thomson.
Java, JavaScript и все торговые марки и логотипы
на основе Java являются торговыми марками или
зарегистрированными торговыми марками
корпорации Sun Microsystems в США и других
странах.
Лицензионное соглашение конечного
пользователя на продукт Sun Java Platform, Micro
Edition.
1. Ограничения. Программное обеспечение
является конфиденциальной и охраняемой
законом об авторском праве информацией
корпорации Sun, поэтому право собственности на
все копии программного обеспечения
принадлежит корпорации Sun и/или держателям
ее лицензий. Пользователь не имеет права
модифицировать, декомпилировать,
дизассемблировать, расшифровывать,
извлекать содержимое или иным образом
вскрывать программный код программного
обеспечения. Запрещается сдавать в аренду,
передавать другим лицам и выдавать
сублицензии на Программное обеспечение как
целиком, так и частично.
2. Ограничение экспорта. Программное
обеспечение, включая технические данные,
подпадает под действие экспортного
законодательства США, включая Закон комиссии
по экспорту США и связанные с ним нормативные
документы, а также под действие импортно-
экспортных законодательных актов в других
странах. Пользователь обязуется строго
соблюдать все такие законодательные акты и
подтверждает, что он несет ответственность за
получение лицензий на экспорт, реэкспорт и
импорт Программного обеспечения.
Запрещается загрузка или иные способы
экспорта и реэкспорта (i) на Кубу, в Ирак, Иран,
Северную Корею, Ливию, Судан, Сирию, всем
гражданам и резидентам этих стран (список
стран может периодически пересматриваться), а
также в любые страны, в отношении которых
имеются ограничения на экспорт из США; (ii) всем
субъектам, включенным в Черные списки
Министерства финансов США и Министерства
торговли США. 3. Ограниченные права.
Использование, копирование и раскрытие
правительственными организациями США
подпадает под ограничения, изложенные в
статьях “Права в области технической
информации и программного обеспечения” в
документах DFARS 252.227-7013(c) (1) и FAR
52.227-19(c) (2) (в зависимости от того, что
применимо).
Ограниченные права. Использование,
копирование и разглашение государственными
органами США подпадает под ограничения,
изложенные в статьях “Права в области
технической информации и программного
обеспечения” в документах DFARS
252.227-7013(c) (1) (ii) и FAR 52.227-19(c) (2) (в
зависимости от того, что применимо).
Другие упомянутые здесь изделия и названия
компаний могут быть торговыми марками
соответствующих владельцев.
6
Это Интернет-версия документа. © Печать разрешена только для частного использования.

Любые права, не переданные явно настоящим
документом, сохраняются.
Все иллюстрации приведены в качестве примера
и могут несколько отличаться от реального
телефона.
Обозначения
В данном руководстве используются
следующие обозначения:
Примечание
Совет
Предупреждение
>
С помощью клавиши выбора или
джойстика выделите в списке и
выберите. См. раздел Работа с
меню на стр. 15.
Начало работы
Сборка
Перед включением телефона
необходимо установить в телефон
SIM-карту и аккумулятор.
Установка SIM-карты
1
Разблокируйте фиксатор панели
аккумуляторного отсека.
2
Снимите панель аккумуляторного
отсека.
3
Вставьте SIM-карту в держатель
(позолоченными контактами вниз).
Начало работы
7
Это Интернет-версия документа. © Печать разрешена только для частного использования.

Установка аккумулятора
1
Вставьте аккумулятор в телефон
(этикеткой вверх, контакты
аккумулятора обращены к контактам
в телефоне).
2
Установите панель аккумуляторного
отсека на место и зафиксируйте ее.
Включение телефона
Включение телефона
1
Нажмите и удерживайте нажатой
клавишу .
2
Введите PIN-код для SIM-карты
(если требуется) и выберите
OK
.
3
Выберите язык.
4
Для установки основных параметров
и просмотра полезных советов
выполняйте инструкции мастера
настройки.
Для исправления ошибки при вводе
PIN-кода нажмите
.
SIM-карта
SIM-карта (модуль идентификации
абонента), предоставляемая
оператором сотовой сети, содержит
информацию об абонентской
8
Начало работы
Это Интернет-версия документа. © Печать разрешена только для частного использования.

подписке. Перед установкой и
извлечением SIM-карты
обязательно выключите телефон и
отсоедините от него зарядное
устройство.
Скопируйте контакты на SIM-карту
перед ее извлечением из другого
телефона. См. раздел Копирование
имен и номеров на SIM-карту на
стр. 23.
PIN-код
PIN-код (персональный
идентификационный номер)
требуется для активизации услуг и
функций в телефоне. PIN-код
предоставляется оператором
сотовой сети. При вводе PIN-кода
цифры отображается на экране
звездочками (*), за исключением
случая, когда PIN-код начинается с
тех же цифр, что и номер службы
экстренной помощи (например 112
или 911). Это позволяет набрать и
вызвать номер службы экстренной
помощи без ввода PIN-кода.
При вводе неверного PIN-кода три
раза подряд SIM-карта блокируется.
См. раздел Блокировка SIM-карты на
стр. 80.
Режим ожидания
После включения телефона и ввода
PIN на экране отображается
название оператора сотовой сети.
Такое состояние телефона
называется режимом ожидания.
Телефон готов к работе.
Использование других сетей
Посылка и прием вызовов, передача
сообщений и данных, а также
использование Интернет-услуг за
пределами зоны обслуживания
домашней сети (режим роуминга)
обычно оплачиваются по
повышенным тарифам.
Дополнительную информацию
можно получить у оператора сотовой
сети.
Справка
В дополнение к данному руководству
в сети Интернет по адресу
www.sonyericsson.com/support
можно найти руководства по
использованию различных функций
телефона и другую полезную
информацию.
Кроме того, справочная информация
содержится в телефоне.
Начало работы
9
Это Интернет-версия документа. © Печать разрешена только для частного использования.

Доступ к руководству
пользователя
•
Выберите
Меню
>
Параметры
>
Справка
польз.
>
Руководство польз.
.
Просмотр полезных советов и
подсказок
•
Выберите
Меню
>
Параметры
>
Справка
польз.
>
Советы
.
Просмотр информации о функциях
•
Выделите функцию и выберите
Инф.
(если это меню доступно). В
некоторых случаях функция
Инф.
отображается в меню
Функц.
.
Просмотр демонстрационного
клипа
•
Выберите
Меню
>
Развлечения
>
Демонстрация
.
Проверка состояния памяти
•
Нажмите
, затем нажмите и
удерживайте нажатой клавишу
регулировки громкости. На экране
отображается информация о
телефоне, состоянии памяти и
аккумулятора.
Зарядка аккумулятора
В новом телефоне аккумулятор
заряжен не полностью.
Для зарядки аккумулятора
1
Подсоедините зарядное устройство
к телефону. Для полной зарядки
аккумулятора требуется примерно
2,5 часа. Нажмите любую клавишу
для включения экрана.
2
Отсоедините зарядное устройство,
отогнув штекер вверх.
Во время зарядки телефон можно
использовать. Аккумулятор можно
заряжать в любое время и в течение
любого времени (как больше, так и
меньше 2,5 часов). Прерывание
зарядки не приводит к повреждению
аккумулятора.
10
Начало работы
Это Интернет-версия документа. © Печать разрешена только для частного использования.

10:18
Видео обзор Sony ericsson w995 от◄ Quke.ru ►
14:55
Посылка из Китая. Восстановленный Sony Ericsson W995
04:31
Sony Ericsson W995 Review
02:18
Обзор Sony Ericsson W995
33:17
Aliexpress распаковка Sony Ericsson W995
08:09
Посылка из Китая #5 Aliexpress Sony Ericsson W995
10:01
Видео обзор SONY ERICSSON W995 (ОРИГИНАЛ) — Купить в Украине | vgrupe.com.ua
10:23
Прошивка Sony Ericsson W995
Нажмите на кнопку для помощи

Contents
Getting started………………….5
Assembly……………………………………..5
Turning on the phone…………………….6
Help…………………………………………….7
Charging the battery……………………..7
Phone overview…………………………….9
Menu overview*…………………………..11
Navigation………………………………….13
Memory……………………………………..14
Phone language………………………….15
Entering text……………………………….15
Calling…………………………….16
Making and receiving calls……………16
Contacts…………………………………….18
Speed dial………………………………….21
More calling features……………………21
Walkman™ …………………….25
Headphones……………………………….25
Media player keys……………………….26
Walkman™ player……………………….26
PlayNow™………………………………….30
TrackID™ ………………………………….30
Online music and video clips………..30
This is an Internet version of this publication. © Print only for private use.
Video player……………………………….31
Radio ………………………………………..31
MusicDJ™………………………………….32
Record sound …………………………….32
Imaging ………………………….33
Using the camera………………………..33
More camera features………………….34
Viewing and tagging photos…………35
Using photos………………………………36
Working with photos……………………36
Sending content to a Web site………37
Printing photos……………………………38
Transferring and
handling content……………..39
Handling content in the phone………39
Sending content to another
phone………………………………………..39
Using a USB cable………………………40
Transferring content to and from
a computer…………………………………40
Phone name……………………………….41
Using Bluetooth™ wireless
technology………………………………….41
Backing up and restoring……………..43
1

Messaging………………………44
Text and picture messages…………..44
Conversations…………………………….46
Voice messages………………………….46
Email………………………………………….46
Instant messaging ………………………48
Internet ………………………….50
Bookmarks…………………………………50
History pages……………………………..50
More browser features…………………50
Internet security and certificates……51
Web feeds………………………………….51
YouTube™…………………………………53
Wi-Fi™………………………………………53
DLNA™……………………………………..54
GPS……………………………….54
Using GPS………………………………….54
Google Maps™ for mobile……………55
Driving directions………………………..55
More GPS features………………………55
Synchronising…………………58
Synchronising using a computer…..58
Synchronising using an Internet
service……………………………………….59
More features………………….59
Flight mode………………………………..59
Update Service……………………………59
Alarms……………………………………….60
Calendar…………………………………….61
Notes…………………………………………62
Tasks…………………………………………62
Profiles………………………………………62
Time and date…………………………….63
Theme……………………………………….63
Main menu layout………………………..63
Ringtones…………………………………..63
Screen orientation……………………….64
Games……………………………………….64
Applications……………………………….64
Integrated stand………………………….65
Locks…………………………………………66
IMEI number……………………………….67
Troubleshooting………………67
Common questions……………………..67
Error messages…………………………..70
Index………………………………72
2
This is an Internet version of this publication. © Print only for private use.

Sony Ericsson W995/W995a/W995u
Walkman™
This User guide is published by Sony Ericsson
Mobile Communications AB or its local affiliated
company, without any warranty. Improvements and
changes to this User guide necessitated by
typographical errors, inaccuracies of current
information, or improvements to programs and/or
equipment, may be made by Sony Ericsson Mobile
Communications AB at any time and without notice.
Such changes will, however, be incorporated into
new editions of this User guide.
All rights reserved.
©Sony Ericsson Mobile Communications AB, 2009
Publication number: 1225-2146.1
Attention: Some of the services and features
described in this User guide are not supported by
all networks and/or service providers in all areas.
Without limitation, this applies to the GSM
International Emergency Number 112. Please
contact your network operator or service provider
to determine availability of any specific service or
feature and whether additional access or usage
fees apply.
Please read the Important information before you
use your mobile phone.
Your mobile phone has the capability to download,
store and forward additional content, e.g. ringtones.
The use of such content may be restricted or
prohibited by rights of third parties, including but not
limited to restriction under applicable copyright
laws. You, and not Sony Ericsson, are entirely
responsible for additional content that you
download to or forward from your mobile phone.
Prior to your use of any additional content, please
verify that your intended use is properly licensed or
is otherwise authorized. Sony Ericsson does not
guarantee the accuracy, integrity or quality of any
additional content or any other third party content.
Under no circumstances will Sony Ericsson be liable
in any way for your improper use of additional
content or other third party content.
Smart-Fit Rendering is a trademark or a registered
trademark of ACCESS Co., Ltd.
Bluetooth is a trademark or a registered trademark
of Bluetooth SIG Inc. and any use of such mark by
Sony Ericsson is under license.
The Liquid Identity logo, SensMe, PlayNow,
MusicDJ, PhotoDJ, TrackID and VideoDJ are
trademarks or registered trademarks of
Sony Ericsson Mobile Communications AB.
TrackID™ is powered by Gracenote Mobile
MusicID™. Gracenote and Gracenote Mobile
MusicID are trademarks or registered trademarks of
Gracenote, Inc.
WALKMAN, WALKMAN logo, Sony, Memory Stick
Micro™, M2™ and Media Go are trademarks or
registered trademarks of Sony Corporation.
PictBridge is a trademark or registered trademark of
Canon Kabushiki Kaisha Corporation.
Wi-Fi is a trademark or a registered trademark of the
Wi-Fi Alliance.
DLNA is a trademark or registered trademark of the
Digital Living Network Alliance.
Google™, Google Maps™, YouTube and the
YouTube logo are trademarks or registered
trademarks of Google, Inc.
PLAYSTATION is a trademark or registered
trademark of Sony Computer Entertainment, Inc.
Wayfinder and Wayfinder Navigator are trademarks
or registered trademarks of Wayfinder Systems AB.
SyncML is a trademark or registered trademark of
Open Mobile Alliance LTD.
Ericsson is a trademark or registered trademark of
Telefonaktiebolaget LM Ericsson.
Adobe Photoshop Album Starter Edition is a
trademark or registered trademark of Adobe
Systems Incorporated in the United States and/or
other countries.
This is an Internet version of this publication. © Print only for private use.
3

Microsoft, ActiveSync, Windows, Outlook, Windows
Media and Vista are registered trademarks or
trademarks of Microsoft Corporation in the United
States and/or other countries.
T9™ Text Input is a trademark or a registered
trademark of Tegic Communications. T9™ Text
Input is licensed under one or more of the following:
U.S. Pat. Nos. 5,818,437, 5,953,541, 5,187,480,
5,945,928, and 6,011,554; Canadian Pat. No.
1,331,057, United Kingdom Pat. No. 2238414B;
Hong Kong Standard Pat. No. HK0940329; Republic
of Singapore Pat. No. 51383; Euro.Pat. No. 0 842
463(96927260.8) DE/DK, FI, FR, IT, NL, PT, ES, SE,
GB; and additional patents are pending worldwide.
This product is protected by certain intellectual
property rights of Microsoft. Use or distribution of
such technology outside of this product is prohibited
without a license from Microsoft.
Content owners use Windows Media digital rights
management technology (WMDRM) to protect their
intellectual property, including copyrights. This
device uses WMDRM software to access WMDRMprotected content. If the WMDRM software fails to
protect the content, content owners may ask
Microsoft to revoke the software’s ability to use
WMDRM to play or copy protected content.
Revocation does not affect unprotected content.
When you download licenses for protected content,
you agree that Microsoft may include a revocation
list with the licenses. Content owners may require
you to upgrade WMDRM to access their content. If
you decline an upgrade, you will not be able to
access content that requires the upgrade.
This product is licensed under the MPEG-4 visual
and AVC patent portfolio licenses for the personal
and non-commercial use of a consumer for (i)
encoding video in compliance with the MPEG-4
visual standard («MPEG-4 video») or the AVC
standard («AVC video») and/or (ii) decoding MPEG4 or AVC video that was encoded by a consumer
engaged in a personal and non-commercial activity
and/or was obtained from a video provider licensed
by MPEG LA to provide MPEG-4 and/or AVC video.
No license is granted or shall be implied for any other
use. Additional information including that relating to
promotional, internal and commercial uses and
licensing may be obtained from MPEG LA, L.L.C.
See http://www.mpegla.com. MPEG Layer-3 audio
decoding technology licensed from Fraunhofer IIS
and Thomson.
Java, JavaScript and Java-based trademarks and
logos are trademarks or registered trademarks of
Sun Microsystems, Inc. in the U.S. and other
countries.
End-user license agreement for Sun Java Platform,
Micro Edition.
1. Restrictions: Software is confidential copyrighted
information of Sun and title to all copies is retained
by Sun and/or its licensors. Customer shall not
modify, decompile, disassemble, decrypt, extract,
or otherwise reverse engineer Software. Software
may not be leased, assigned, or sublicensed, in
whole or in part.
2. Export Regulations: Software including technical
data, is subject to U.S. export control laws, including
the U.S. Export Administration Act and its
associated regulations, and may be subject to
export or import regulations in other countries.
Customer agrees to comply strictly with all such
regulations and acknowledges that it has the
responsibility to obtain licenses to export, re-export,
or import Software. Software may not be
downloaded, or otherwise exported or re-exported
(i) into, or to a national or resident of, Cuba, Iraq, Iran,
North Korea, Libya, Sudan, Syria (as such listing may
be revised from time to time) or any country to which
the U.S. has embargoed goods; or (ii) to anyone on
the U.S. Treasury Department’s list of Specially
Designated Nations or the U.S. Commerce
Department’s Table of Denial Orders. 3. Restricted
rights: Use, duplication or disclosure by the United
States government is subject to the restrictions as
4
This is an Internet version of this publication. © Print only for private use.
set forth in the Rights in Technical Data and
Computer Software Clauses in DFARS
252.227-7013(c) (1) and FAR 52.227-19(c) (2) as
applicable.
Restricted Rights: Use, duplication or disclosure by
the United States government is subject to the
restrictions as set forth in the Rights in Technical
Data and Computer Software Clauses in DFARS
252.227-7013(c) (1) (ii) and FAR 52.227-19(c) (2) as
applicable.
Other product and company names mentioned
herein may be the trademarks of their respective
owners.
Any rights not expressly granted herein are reserved.
All illustrations are for illustration only and may not
accurately depict the actual phone.
Instruction symbols
These symbols may appear in the User
guide.
Note
Tip
Warning
> Use a selection or navigation key to
scroll and select. See Navigation on
page 13.
Getting started
Assembly
Before you start using your phone, you
need to insert a SIM card and the
battery.
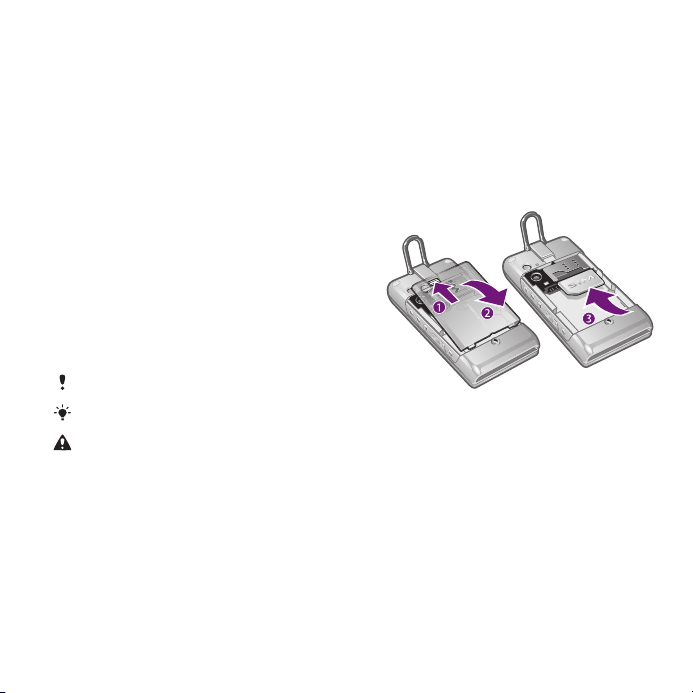
To insert the SIM card
1
Unlock the battery cover lock.
2
Remove the battery cover.
3
Slide the SIM card into its holder with
the gold-coloured contacts facing
down.
This is an Internet version of this publication. © Print only for private use.
Getting started 5
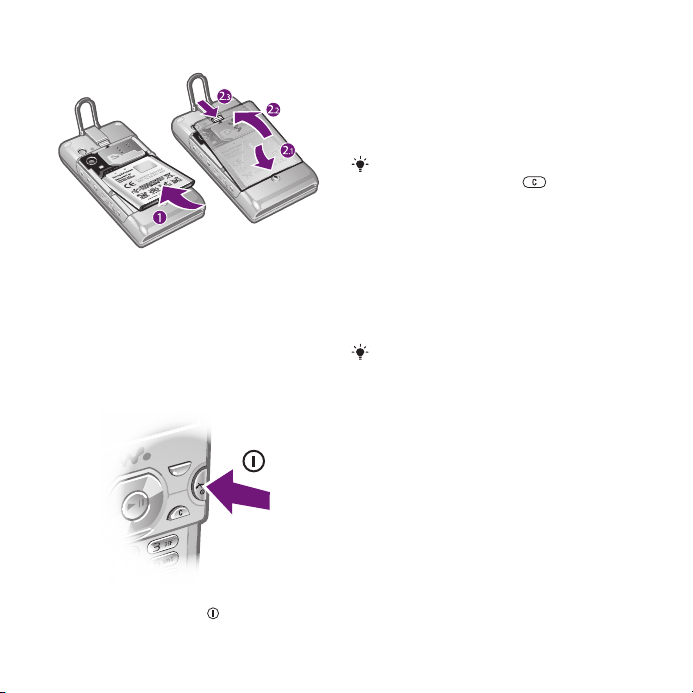
To insert the battery
1
Insert the battery with the label side up
and the connectors facing each other.
2
Attach the battery cover and lock it.
Turning on the phone
To turn on the phone
1
Press and hold down
.
2
Enter your SIM card PIN, if requested,
and select OK.
3
Select a language.
4
Follow the instructions to use the setup
wizard for basic settings and useful
tips.
If you want to correct a mistake when you
enter your PIN, press .
SIM card
The SIM (Subscriber Identity Module)
card, which you get from your network
operator, contains information about
your subscription. Always turn off your
phone and detach the charger before
you insert or remove the SIM card.
You can save contacts on the SIM card
before you remove it from your phone.
See To copy names and numbers to the
SIM card on page 20.
PIN
You may need a PIN (Personal
Identification Number) to activate the
services and functions in your phone.
Your PIN is supplied by your network
operator. Each PIN digit appears as *,
unless it starts with emergency number
digits, for example, 112 or 911. You can
6 Getting started
This is an Internet version of this publication. © Print only for private use.

see and call an emergency number
without entering a PIN.
If you enter the wrong PIN three times in
a row, the SIM card is blocked. See SIM
card lock on page 66.
Standby
After you have turned on your phone
and entered your PIN, the name of the
network operator appears. This view is
called standby. Your phone is now
ready for use.
Using other networks
Making and receiving calls, using
messaging, and data transfer, for
example, Internet-based services,
outside your home network (roaming),
may incur additional costs. Contact
your operator for more information.
Help
In addition to this User guide, Feature
guides and more information are
available at
www.sonyericsson.com/support.
Help and information are also available
in your phone.
To access the User guide
•
Select Menu > Settings > User help >
User guide.
To view tips and tricks
•
Select Menu > Settings > User help >
Tips and tricks.
To view information about functions
•
Scroll to a function and select Info, if
available. In some cases, Info appears
under Options.
To view the phone demonstration
•
Select Menu > Entertainment > Demo
tour.
To view the phone status
•
Press
key. Phone, memory and battery
information is shown.
and then press the volume
Charging the battery
The phone battery is partly charged
when you buy it.
This is an Internet version of this publication. © Print only for private use.
Getting started 7
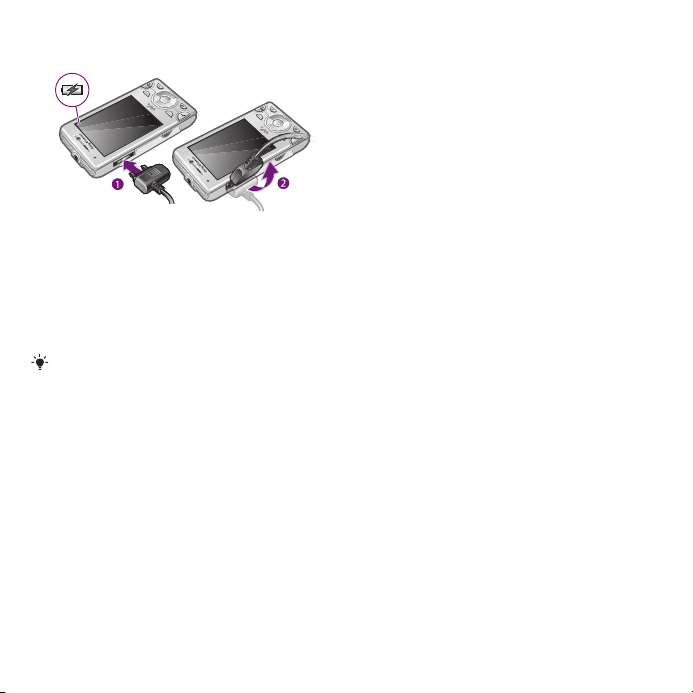
To charge the battery
1
Connect the charger to the phone. It
takes approximately 2.5 hours to fully
charge the battery. Press a key to view
the screen.
2
Remove the charger by tilting the plug
upwards.
You can use your phone while it is
charging. You can charge the battery at
any time and for more or less than 2.5
hours. You can interrupt the charging
without damaging the battery.
8 Getting started
This is an Internet version of this publication. © Print only for private use.
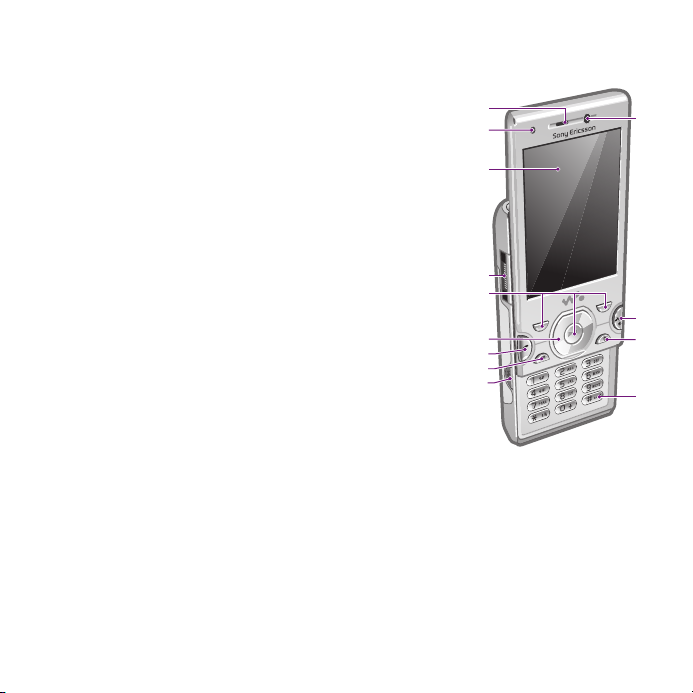
Phone overview
10
8
7
2
3
4
1
5
6
9
11
12
13
1 Ear speaker
2 Screen light sensor
3 Screen
4 Connector for charger, handsfree and USB cable
5 Selection keys
6 Navigation key
7 Call key
8 Activity menu key
9 Walkman™ key
10 Video call camera
11 End, On/off key
12 C key (Clear)
13 Silent key
This is an Internet version of this publication. © Print only for private use.
Getting started 9
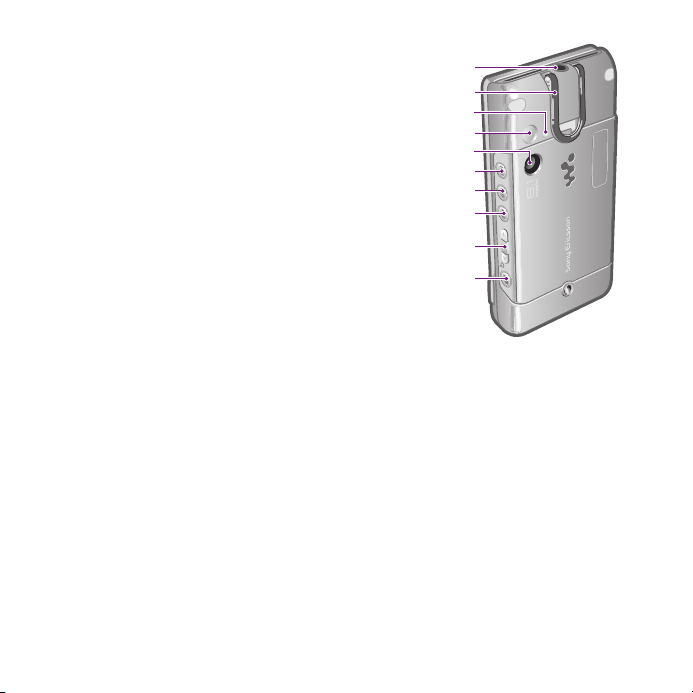
14 Audio jack for headphones
14
15
17
19
20
21
22
23
18
16
15 Integrated stand
16 Screen light sensor
17 Flash
18 Main camera
19 Media player key — previous/rewind
20 Media player key — play/pause
21 Media player key — next/fast forward
22 Volume, digital zoom
23 Camera key
10 Getting started
This is an Internet version of this publication. © Print only for private use.

Menu overview*
PlayNow™
Camera
Location services
Google Maps
Navigation
Tracker
My favourites
Status info
Settings
Calls**
All
Answered
Dialled
Missed
Internet
Messaging
Write new
Inbox/Conversations
Messages
Email
IM
Call voicemail
This is an Internet version of this publication. © Print only for private use.
Contacts
Myself
New contact
Organiser
File manager **
Alarms
Applications
Video call
Calendar
Tasks
Notes
Synchronisation
Timer
Stopwatch
Light
Calculator
Code memo
Entertainment
Online services
Online services
TrackID™
Games
VideoDJ™
PhotoDJ™
MusicDJ™
Remote control
Record sound
Demo tour
Media
Photo
Music
Video
Games
Web feeds
Settings
WALKMAN
Settings
General
Profiles
Time & date
Language
Update service
Voice control
New events
Shortcuts
Flight mode
Security
Setup wizard
Accessibility
Phone status
Master reset
Sounds & alerts
Ring volume
Ringtone
Silent mode
Increasing ring
Vibrating alert
Message alert
Key sound
Display
Wallpaper
Main menu layout
Getting started 11

Theme
Startup screen
Screen saver
Clock size
Brightness
Edit line names
Calls
Speed dial
Smart search
Divert calls
Switch to line 2
Manage calls
Time & cost
Show/hide my no.
Handsfree
Open to answer
Close to end call
Connectivity
Wi-Fi
Bluetooth
USB
Phone name
Network sharing
Synchronisation
Device management
Mobile networks
Data communication
Internet settings
Streaming settings
Message settings
SIP settings
Accessories
User help
User guide
Settings download
Basic setup
Tips and tricks
* Some menus are operator-,
network- and subscriptiondependent.
** You can use the navigation
key to scroll between tabs in
submenus. For more
information, see Navigation
on page 13.
12 Getting started
This is an Internet version of this publication. © Print only for private use.
Navigation
To access the main menu
•
When Menu appears on the screen,
press the centre selection key to select
Menu.
•
If Menu does not appear on the screen,
press
selection key to select Menu.
To navigate the phone menus
•
Press the navigation key , , or to
move through the menus.
To select actions on the screen
•
Press the left, centre or right selection
key.
To view options for an item
•
Select Options to, for example, edit.
To end a function
•
Press
To return to standby
•
Press .
, and then press the centre
.
To navigate your media
1
Select Menu > Media.
2
Scroll to a menu item and press .
3
To go back, press .
To delete items
•
Press to delete items such as
numbers, letters, pictures and sounds.
Tabs
Tabs may be available. For example,
Calls have tabs.
To scroll between tabs
•
Press the navigation key or .
Shortcuts
You can use keypad shortcuts to go
directly to functions from standby.
To use navigation key shortcuts
•
Press , , or to go directly to a
function.
To edit a navigation key shortcut
1
Select Menu > Settings > General >
Shortcuts.
2
Scroll to an option and select Edit.
This is an Internet version of this publication. © Print only for private use.
Getting started 13

3
Scroll to a menu option and select
Shortc..
Main menu shortcuts
Menu numbering starts from the top left
icon and moves across and then down
row by row.
To go directly to a main menu item
•
Select Menu and press
– , ,
or .
The Main menu layout must be set to
Grid. See To change the main menu
layout on page 63.
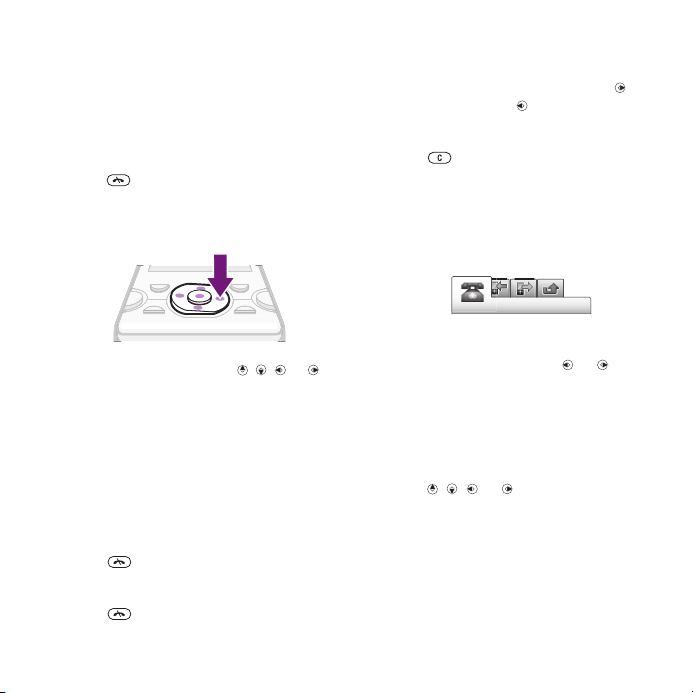
Activity menu
The activity menu gives you quick
access to:
•
New events – missed calls and new
messages.
•
Running apps – applications that are
running in the background.
•
My shortcuts – add your favourite
functions to access them quickly.
•
Internet – quick access to the
Internet.
To open the activity menu
•
Press
.
Memory
You can save content on the memory
card, in the phone memory and on the
SIM card. Photos and music are saved
on the memory card, if a memory card
is inserted. If not, or if the memory card
is full, photos and music are saved in
the phone memory. Messages and
contacts are saved in the phone
memory, but you can choose to save
them on the SIM card.
Memory card
You may have to purchase a memory card
separately.
Your phone supports Memory Stick
Micro™ (M2™) memory card adding
more storage space to your phone. It
can also be used as a portable memory
card with other compatible devices.
You can move content between a
memory card and the phone memory.
See Handling content in the phone on
page 39.
14 Getting started
This is an Internet version of this publication. © Print only for private use.

To insert a memory card
•
Remove the battery cover and insert
the memory card with the goldcoloured contacts facing up.
To remove a memory card
•
Remove the battery cover and press
the edge of the memory card to release
and remove it.
Phone language
You can select a language to use in
your phone.
To change the phone language
1
Select Menu > Settings > General >
Language > Phone language.
2
Select an option.
Entering text
You can use multitap text input or T9™
Text Input to enter text. The T9 Text
Input method uses a built-in dictionary.
To change text input method
•
When you enter text, press and hold
down
To shift between capitals and lowercase letters
•
When you enter text, press .
To enter numbers
•
When you enter text, press and hold
down – .
To enter full stops and commas
•
When you enter text, press .
To enter a symbol
1
When you enter text, select Options >
Add symbol.
2
Scroll to a symbol and select Insert.
To enter text using T9™ Text Input
1
Select, for example, Menu >
Messaging > Write new > Message.
.
This is an Internet version of this publication. © Print only for private use.
Getting started 15

2
If is not displayed, press and hold
down to change to T9 Text Input.
3
Press each key only once, even if the
letter you want is not the first letter on
the key. For example, to write the word
“Jane”, press , , , . Write
the whole word before looking at the
suggestions.
4
Use or to view suggestions.
5
Press to accept a suggestion.
To enter text using multitap
1
From standby select, for example,
Menu > Messaging > Write new >
Message.
2
If is displayed, press and hold down
to change to multitap text input.
3
Press – repeatedly until the
desired letter appears.
4
When a word is written, press to
add a space.
To add words to the built-in dictionary
1
When you enter text using T9 Text
Input, select Options > Spell word.
2
Write the word using multitap input and
select Insert.
Calling
Making and receiving calls
You need to turn on your phone and be
within range of a network.
To make a call
1
Enter a phone number (with
international country code and area
code, if applicable).
2
Press .
You can call numbers from your contacts
and call list. See Contacts on page 18,
and Call list on page 18.
To end a call
•
Press .
To make international calls
1
Press and hold down until a “+”
sign appears.
2
Enter the country code, area code
(without the first zero) and phone
number.
3
Press .
To re-dial a number
•
When Retry? appears select Yes.
Do not hold your phone to your ear when
waiting. When the call connects, your
phone gives a loud signal.
16 Calling
This is an Internet version of this publication. © Print only for private use.

To answer a call
•
Press .
To reject a call
•
Press .
To change the ear speaker volume
during a call
•
Press the volume key up or down.
To mute the microphone during a call
1
Press and hold down
2
Press and hold down again to
.
resume.
To turn on the loudspeaker during a
call
•
Press SpkrOn.
Do not hold your phone to your ear when
using the loudspeaker. This could
damage your hearing.
To view missed calls
•
Press to open the call list.
Networks
Your phone switches automatically
between GSM and 3G (UMTS)
networks depending on availability.
Some network operators allow you to
switch networks manually.
To switch networks manually
1
Select Menu > Settings > Connectivity >
Mobile networks > GSM/3G networks.
2
Select an option.
Emergency calls
Your phone supports international
emergency numbers, for example, 112
or 911. You can normally use these
numbers to make emergency calls in
any country, with or without the SIM
card inserted, if you are within range of
a network.
In some countries, other emergency
numbers may also be promoted. Your
network operator may therefore have
saved additional local emergency
numbers on the SIM card.
To make an emergency call
•
Enter 112 (the international emergency
number) and press .
To view your local emergency
numbers
1
Select Menu > Contacts.
2
Scroll to New contact and select
Options > Special numbers >
Emergency nos..
This is an Internet version of this publication. © Print only for private use.
Calling 17

Video call
You can share experiences with friends
and family as they happen or save them
to share later. You see the person you
are talking to on your screen. The other
person sees what is on your camera.
Before making video calls
3G (UMTS) service is available when
appears. To make a video call, both
parties on the call must have a 3G
(UMTS) phone subscription that
supports 3G (UMTS) service and 3G
(UMTS) coverage.
To make a video call
1
Enter a phone number (with
international country code and area
code, if applicable).
2
Select Options > Make video call.
To use the zoom with an outgoing
video call
•
Press or .
To share photos and videos during a
video call
1
During a video call, press to switch
to the video share mode tab.
2
Scroll to a video clip or photo and
select Share.
To view video call options
•
During the call, select Options.
Call list
You can view information about recent
calls.
To call a number from the call list
1
Press
2
Scroll to a name or a number and press
and scroll to a tab.
.
Contacts
You can save names, phone numbers
and personal information in Contacts.
Information can be saved in the phone
memory or on the SIM card.
You can synchronise your contacts using
the Sony Ericsson PC Suite.
Default contacts
You can choose which contact
information is shown as default. If
Phone contacts is selected as default,
your contacts show all the information
saved in Contacts. If you select SIM
contacts as default, your contacts
show names and numbers saved on
the SIM card.
To select default contacts
1
Select Menu > Contacts.
18 Calling
This is an Internet version of this publication. © Print only for private use.

2
Scroll to New contact and select
Options > Advanced > Default contacts.
3
Select an option.
Phone contacts
Phone contacts can contain names,
phone numbers and personal
information. They are saved in the
phone memory.
To add a phone contact
1
Select Menu > Contacts.
2
Scroll to New contact and select Add.
3
Enter the name and select OK.
4
Scroll to New number: and select Add.
5
Enter the number and select OK.
6
Select a number option.
7
Scroll between the tabs and add
information to the fields.
8
Select Save.
Calling contacts
To call a contact
1
Select Menu > Contacts.
2
Scroll to a contact and press .
To go directly to the contacts list
•
Press and hold down – .
To call with Smart search
1
Press – to enter a sequence of
(at least two) digits. All entries which
match the sequence of digits or
corresponding letters are shown in a
list.
2
Scroll to a contact or a phone number
and press .
To turn on or off Smart search
1
Select Menu > Settings > Calls > Smart
search.
2
Select an option.
Editing contacts
To add information to a phone
contact
1
Select Menu > Contacts.
2
Scroll to a contact and select Options >
Edit contact.
3
Scroll between the tabs and select
Add or Edit.
4
Select an option and an item to add or
edit.
5
Select Save.
If your subscription supports Calling Line
Identification (CLI) service, you can
assign personal ringtones and pictures to
contacts.
To copy names and numbers to
phone contacts
1
Select Menu > Contacts.
2
Scroll to New contact and select
Options > Advanced > Copy from SIM.
This is an Internet version of this publication. © Print only for private use.
Calling 19

3
Select an option.
To copy names and numbers to the
SIM card
1
Select Menu > Contacts.
2
Scroll to New contact and select
Options > Advanced > Copy to SIM.
3
Select an option.
When you copy all contacts from your
phone to the SIM card, all existing SIM
card information is replaced.
To automatically save names and
phone numbers on the SIM card
1
Select Menu > Contacts.
2
Scroll to New contact and select
Options > Advanced > Auto save on
SIM.
3
Select an option.
To save contacts on a memory card
1
Select Menu > Contacts.
2
Scroll to New contact and select
Options > Advanced > Back up to m.
card.
SIM contacts
SIM contacts can contain names and
numbers only. They are saved on the
SIM card.
To add a SIM contact
1
Select Menu > Contacts.
2
Scroll to New contact and select Add.
3
Enter the name and select OK.
4
Enter the number and select OK.
5
Select a number option and add more
information, if available.
6
Select Save.
Deleting contacts
To delete all contacts
1
Select Menu > Contacts.
2
Scroll to New contact and select
Options > Advanced > Delete all
contacts.
3
Select an option.
Contact memory status
The number of contacts you can save
in your phone or on the SIM card
depends on available memory.
To view contact memory status
1
Select Menu > Contacts.
2
Scroll to New contact and select
Options > Advanced > Memory status.
Myself
You can enter information about
yourself and, for example, send your
business card.
To enter Myself information
1
Select Menu > Contacts.
20 Calling
This is an Internet version of this publication. © Print only for private use.

2
Scroll to Myself and select Open.
3
Scroll to an option and edit the
information.
4
Select Save.
To add your own business card
1
Select Menu > Contacts.
2
Scroll to Myself and select Open.
3
Scroll to My contact info and select
Add > Create new.
4
Scroll between the tabs and add
information to the fields.
5
Enter the information and select Save.
Groups
You can create a group of phone
numbers and email addresses from
Phone contacts to send messages to.
See Messaging on page 44. You can
also use groups (with phone numbers)
when you create accepted callers lists.
See Accept calls on page 24.
To create a group of numbers and
email addresses
1
Select Menu > Contacts.
2
Scroll to New contact and select
Options > Groups.
3
Scroll to New group and select Add.
4
Enter a name for the group and select
Continue.
5
Scroll to New and select Add.
6
For each contact phone number or
email address you want to mark, scroll
to it and select Mark.
7
Select Continue > Done.
Speed dial
Speed dialling lets you select nine
contacts that you can dial quickly from
standby. The contacts can be saved in
positions 1-9.
To add contacts to speed dial
numbers
1
Select Menu > Contacts.
2
Scroll to New contact and select
Options > Speed dial.
3
Scroll to a position number and select
Add.
4
Select a contact.
To speed dial
•
Enter the position number and press
.
More calling features
Voicemail
If your subscription includes an
answering service, callers can leave a
voicemail message when you cannot
answer a call.
This is an Internet version of this publication. © Print only for private use.
Calling 21

To enter your voicemail number
1
Select Menu > Messaging > Messages
> Settings > the Message settings tab >
Voicemail number.
2
Enter the number and select OK.
To call your voicemail service
•
Press and hold down
.
Voice control
By creating voice commands you can:
•
Voice dial – call someone by saying
their name
•
Answer and reject calls when you
use a handsfree
To record a voice command using
voice dialling
1
Select Menu > Settings > General >
Voice control > Voice dialling > Activate.
2
Select Yes > New voice command and
select a contact. If the contact has
more than one number, select the
number to add the voice command to.
3
Record a voice command such as
“John mobile.”
4
Follow the instructions that appear.
Wait for the tone and say the command
to record. The voice command is
played back to you.
5
If the recording sounds OK, select Yes.
If not, select No and repeat steps 3 and
4.
Voice commands are saved in the phone
memory only. They cannot be used in
another phone.
To voice dial
1
Press and hold down a volume key.
2
Wait for the tone and say a recorded
name, for example “John mobile.” The
phone plays the name back to you and
connects the call.
Diverting calls
You can divert calls, for example, to an
answering service.
When Restrict calls is used, some divert
call options are not available. See
Restricted dialling on page 24.
To divert calls
1
Select Menu > Settings > Calls > Divert
calls.
2
Select a call type and a divert option.
3
Select Activate.
4
Enter the number to divert calls to and
select OK.
More than one call
You can handle more than one call at a
time. For example, you can put an
22 Calling
This is an Internet version of this publication. © Print only for private use.

ongoing call on hold, while you make or
answer a second call. You can also
switch between the two calls. You
cannot answer a third call without
ending one of the first two calls.
Call waiting
You will hear a beep if you receive a
second call while call waiting is active.
To activate call waiting
•
Select Menu > Settings > Calls >
Manage calls > Call waiting > Activate.
To make a second call
1
During the call, press
. This puts the
ongoing call on hold.
2
Select Options > Add call.
3
Enter the number to call and press
.
To answer a second call
•
During the call, press . This puts the
ongoing call on hold.
To reject a second call
•
During the call, press and continue
with the ongoing call.
To end an ongoing call and answer a
second call
•
During the call, select Replace active
call.
Handling two voice calls
You can have calls ongoing and on
hold at the same time.
To switch between two calls
•
During the call, press .
To join two calls
•
During the call, select Options > Join
calls.
To connect two calls
•
During the call, select Options >
Transfer call. You are disconnected
from both calls.
To end an ongoing call and return to
the call on hold
•
First press
and then .
Conference calls
With a conference call, you can have a
joint conversation with up to five
people.
To add a new participant
1
During the call, press . This puts the
joined calls on hold.
2
Select Options > Add call.
3
Enter the number to call and press
.
4
Select Options > Join calls to add the
new participant.
This is an Internet version of this publication. © Print only for private use.
Calling 23
Loading…
Contents
Getting started………………….5
Assembly……………………………………..5
Turning on the phone…………………….6
Help…………………………………………….7
Charging the battery……………………..7
Phone overview…………………………….9
Menu overview*…………………………..11
Navigation………………………………….13
Memory……………………………………..14
Phone language………………………….15
Entering text……………………………….15
Calling…………………………….16
Making and receiving calls……………16
Contacts…………………………………….18
Speed dial………………………………….21
More calling features……………………21
Walkman™ …………………….25
Headphones……………………………….25
Media player keys……………………….26
Walkman™ player……………………….26
PlayNow™………………………………….30
TrackID™ ………………………………….30
Online music and video clips………..30
Video player……………………………….31
Radio ………………………………………..31
MusicDJ™………………………………….32
Record sound …………………………….32
Imaging ………………………….33
Using the camera………………………..33
More camera features………………….34
Viewing and tagging photos…………35
Using photos………………………………36
Working with photos……………………36
Sending content to a Web site………37
Printing photos……………………………38
Transferring and
handling content……………..39
Handling content in the phone………39
Sending content to another
phone………………………………………..39
Using a USB cable………………………40
Transferring content to and from
a computer…………………………………40
Phone name……………………………….41
Using Bluetooth™ wireless
technology………………………………….41
Backing up and restoring……………..43
1
This is an Internet version of this publication. © Print only for private use.
- Topics
- manualsbase, manuals,
- Collection
- manuals_sony; manuals; additional_collections
- Language
- English
- Item Size
- 42.1M
- Addeddate
- 2020-06-21 19:56:59
- Identifier
- manualsbase-id-62456
- Identifier-ark
- ark:/13960/t4dp30z06
- Ocr
- ABBYY FineReader 11.0 (Extended OCR)
- Page_number_confidence
- 100.00
- Ppi
- 600
- Scanner
- Internet Archive Python library 1.9.3
plus-circle Add Review
plus-circle Add Review
comment
Reviews
There are no reviews yet. Be the first one to
write a review.
110
Views
DOWNLOAD OPTIONS
download 1 file
ABBYY GZ download
Temporarily Unavailable
DAISY
For users with print-disabilities
Temporarily Unavailable
EPUB
download 1 file
FULL TEXT download
download 1 file
ITEM TILE download
download 1 file
PAGE NUMBERS JSON download
download 1 file
PDF download
download 1 file
SINGLE PAGE PROCESSED JP2 ZIP download
download 1 file
TORRENT download
download 12 Files
download 6 Original
SHOW ALL
IN COLLECTIONS
Manuals: Sony
The Manual Library
Additional Collections
Uploaded by
chris85
on