

Руководство
пользователя
NPD5154-00 RU

Руководство пользователя
Авторское право
Авторское право
Настоящая публикация не может полностью или частично воспроизводиться, сохраняться в поисковой
системе либо передаваться в любом виде или с помощью любых электронных, механических,
фотокопировальных или иных средств без предварительного письменного разрешения корпорации Seiko
Epson. В отношении использования содержащейся здесь информации патентные обязательства не
применяются. Не допускается никакой ответственности за повреждения, произошедшие в результате
использования приведенной в настоящем документе информации. Сведения, представленные здесь,
предназначены только для использования с изделиями компании Epson. Компания Epson не несет
ответственности за использование этой информации при использовании других изделий.
Ни компания Seiko Epson Corporation, ни ее дочерние предприятия не несут ответственности перед
покупателем данного изделия или третьими сторонами за убытки, потери, затраты или расходы,
понесенные покупателем или третьими сторонами в результате несчастных случаев, неправильного
использования и нарушения условий эксплуатации данного изделия, а также модификации, ремонта или
изменения данного изделия или (за исключением США) несоблюдения инструкций по эксплуатации и
техническому обслуживанию, выпущенных компанией Seiko Epson Corporation.
Ни компания Seiko Epson Corporation, ни ее дочерние предприятия не несут ответственности за
повреждения или неисправности, произошедшие в результате использования каких-либо функций или
продуктов, за исключением помеченных знаками Original Epson Products (Оригинальные продукты
компании Epson) или Epson Approved Products (Продукты, сертифицированные компанией Epson).
Компания Seiko Epson Corporation не несет ответственности за повреждения в результате
электромагнитных помех из-за использования интерфейсных кабелей, не помеченных знаком Epson
Approved Products.
© 2014 Seiko Epson Corporation. All rights reserved.
Содержание данного руководства и технических спецификаций продукта может быть изменено без
предварительного уведомления.
2

Руководство пользователя
Торговые марки
Торговые марки
❏ EPSON® — зарегистрированный товарный знак, а EPSON EXCEED YOUR VISION или EXCEED YOUR
VISION — товарный знак Seiko Epson Corporation.
❏
Microso
❏ Adobe
❏ Apple
❏ Intel
❏ EPSON Scan Soware is based in part on the work of the Independent JPEG Group.
❏ libti
Copyright © 1988-1997 Sam Leer
Copyright © 1991-1997 Silicon Graphics, Inc.
Permission to use, copy, modify, distribute, and sell this soware and its documentation for any purpose is
hereby granted without fee, provided that (i) the above copyright notices and this permission notice appear in
all copies of the soware and related documentation, and (ii) the names of Sam Leer and Silicon Graphics
may not be used in any advertising or publicity relating to the soware without the specic, prior written
permission of Sam
THE SOFTWARE IS PROVIDED “AS-IS” AND WITHOUT WARRANTY OF ANY KIND, EXPRESS,
IMPLIED OR OTHERWISE, INCLUDING WITHOUT LIMITATION, ANY WARRANTY OF
MERCHANTABILITY OR FITNESS FOR A PARTICULAR PURPOSE.
IN NO EVENT SHALL SAM LEFFLER OR SILICON GRAPHICS BE LIABLE FOR ANY SPECIAL,
INCIDENTAL, INDIRECT OR CONSEQUENTIAL DAMAGES OF ANY KIND, OR ANY DAMAGES
WHATSOEVER RESULTING FROM LOSS OF USE, DATA OR PROFITS, WHETHER OR NOT ADVISED
OF THE POSSIBILITY OF DAMAGE, AND ON ANY THEORY OF LIABILITY, ARISING OUT OF OR IN
CONNECTION WITH THE USE OR PERFORMANCE OF THIS SOFTWARE.
, Windows®, and Windows Vista® are registered trademarks of
®
, Adobe Reader®, and Acrobat® are registered trademarks of Adobe Systems Incorporated.
®
, ColorSync®, and Macintosh® and Mac OS® are registered trademarks of Apple Inc.
®
is a registered trademark of Intel Corporation.
®
and Silicon Graphics.
Leer
Microso
Corporation.
❏ Примечание: Используемые здесь названия прочих продуктов приведены исключительно в целях
идентификации и могут являться товарными марками соответствующих владельцев. Epson отрицает
владение любыми правами на эти марки.
3

Руководство пользователя
Содержание
Содержание
Авторское право
Торговые марки
О данном руководстве
Общие сведения о руководствах…………..6
Символы и обозначения………………..6
Описания в этом руководстве…………….6
Обозначение операционных систем……….. 7
Важные указания
Важные инструкции по безопасности……….8
Ограничения на копирование…………….8
Общая информация о сканере
Наименование и функции деталей…………10
Кнопки и индикаторы…………………12
Размещение сканера в стоячем положении. . . . . 13
Размещение оригиналов
Размещение документов и фотографий……..15
Размещение больших или толстых документов. . 17
Размещение оригиналов в сканере,
находящемся в стоячем положении………..18
Сканирование
Сканирование с помощью кнопки сканера. . . . . 21
Изменение параметров кнопок сканера по
умолчанию……………………….22
Сканирование с помощью EPSON Scan……..23
Запуск EPSON Scan………………… 23
Сканирование в режиме Автоматический
режим………………………….26
Сканирование в режиме Офисный режим…29
Сканирование в режиме Простой режим….31
Сканирование в режиме
Профессиональный режим…………..34
Параметры настройки изображения……..36
Сканирование с помощью Easy Photo Scan. . . . . 40
Сканирование с использованием
специальных возможностей сканера и ПО. . . . . 43
Работа с устройством в режиме
копирования……………………..43
Сканирование в PDF-файл…………….44
Сканирование в облачную службу или
другие назначения………………….49
Обслуживание
Очистка сканера……………………..52
Транспортировка сканера………………53
Сведения о приложении
EPSON Scan………………………..55
Запуск EPSON Scan…………………55
Доступ к справке по EPSON Scan………..55
Easy Photo Scan………………………55
Запуск Easy Photo Scan……………….56
Доступ к справке по Easy Photo Scan……..56
Copy Utility…………………………56
Запуск Copy Utility………………….56
Доступ к справке по Copy Utility………..56
Epson Event Manager…………………..57
Запуск Epson Event Manager……………57
Доступ к справке по Epson Event Manager. . . . 57
EPSON
Проверка и установка приложений………..58
Удаление приложений…………………59
Обновление приложений……………….60
Soware
Запуск EPSON Soware Updater. . . . . . . . . . . . 57
Проверка приложений для Windows……..58
Проверка приложений в Mac OS X……… 58
Установка приложений……………… 58
Удаление приложений для Windows………59
Удаление приложений в Mac OS X……….60
Updater………………..57
Решение проблем
Неполадки в работе устройства…………..62
Индикатор работы мигает…………….62
Сканер не включается……………….62
Проблемы при сканировании……………63
Невозможно запустить EPSON Scan…….. 63
Нажатие на кнопку сканера не приводит к
запуску нужного приложения………….63
4

Руководство пользователя
Содержание
Невозможно отсканировать изображения
в режиме предварительного просмотра
эскизов………………………….63
Возникают проблемы при настройке
области сканирования в режиме
предварительного просмотра эскизов…….64
Невозможно отсканировать несколько
изображений одновременно………….. 64
Невозможно сканировать в
Автоматический режим………………64
Сканирование занимает слишком много
времени…………………………64
Проблемы с отсканированным изображением. . 65
Края оригинала не сканируются……….. 65
Вместо отсканированного изображения
получаются только несколько точек…….. 65
На отсканированном изображении
постоянно появляется линия или линия
точек………………………….. 65
Прямые линии изображения получаются
ступенчатыми……………………. 65
Все изображение расплывчато………….66
Цветные пятна на краях изображения или
цвета искажены……………………66
Отсканированное изображение слишком
темное………………………….66
Изображение с обратной стороны
оригинала появляется на
отсканированном изображении…………67
Появление муара на сканированном
изображении……………………..67
Символы не распознаются надлежащим
образом при преобразовании
изображения в текст, доступный для
редактирования (OCR)……………… 68
Цвета на отсканированном изображении
отличаются от цветов оригинала………..68
Изображения повернуты неверно……….69
Соответствие стандартам и
допускам
Стандарты и разрешения для модели,
продаваемой в США…………………. 73
Стандарты и разрешения для модели,
продаваемой в Европе…………………73
Стандарты и разрешения для модели
продаваемой в Австралии………………73
Помощь
Веб-сайт технической поддержки………… 74
Обращение в службу технической
поддержки Epson…………………….74
Перед обращением в компанию Epson…….74
Помощь пользователям в Европе………..75
Помощь пользователям в Тайване……….75
Помощь пользователям в Австралии……..76
Помощь пользователям в Сингапуре……..76
Помощь пользователям в Таиланде………77
Помощь пользователям во Вьетнаме……..77
Помощь пользователям в Индонезии……. 77
Помощь пользователям в Гонконге………78
Помощь пользователям в Малайзии…….. 78
Помощь пользователям в Индии………..79
Помощь пользователям на Филиппинах. . . . . 80
Технические характеристики
Общие характеристики сканера…………..71
Размеры…………………………..71
Электрические характеристики…………..71
Характеристики окружающей среды……….72
Характеристики интерфейса…………….72
Требования к системе………………… 72
5

Руководство пользователя
О данном руководстве
О данном руководстве
Общие сведения о руководствах
Последние версии перечисленных ниже руководств доступны на веб-сайте поддержки Epson.
http://www.epson.eu/Support (для стран Европы)
http://support.epson.net/ (для стран за пределами Европы)
❏ Руководство по установке (напечатанные версии руководств)
Содержит информацию об установке устройства и установке приложения.
❏ Руководство пользователя (руководство в цифровом виде)
Содержит инструкции по использованию, обслуживанию устройства и устранению соответствующих
неисправностей.
Помимо приведенных выше руководств можно просмотреть справку, включенную в различные
приложения Epson.
Символы и обозначения
Предостережение:
!
Инструкции, которые необходимо тщательно соблюдать во избежание телесных повреждений.
Важно:
c
Инструкции, которые необходимо соблюдать во избежание повреждения оборудования.
Примечание:
Предоставляет дополнительную и справочную информацию.
&
Соответствующая информация
Ссылки на связанные разделы.
Описания в этом руководстве
❏ Снимки экрана приложений взяты из ОС Windows 8.1 или Mac OS X v10.9.x. Содержимое этих экранов
различается в зависимости от модели устройства и ситуации.
❏ Иллюстрации, используемые в этом руководстве, предназначены исключительно для справки.
Несмотря на то, что они незначительно отличаются от фактического устройства, методы выполнения
действий остаются такими же.
6

Руководство пользователя
О данном руководстве
Обозначение операционных систем
Windows
В д ан н ом р уко в од с тв е т ак ие те рм и ны , к ак Win d ow s 8 . 1, Win d o w s 8, Wi nd o ws 7 , Wi n dow s Vi st a и Wi n dow s
XP, используются по отношению к следующим операционным системам. Кроме того, термин Windows
используется по отношению ко всем версиям.
❏ Операционная система
❏ Операционная система Microso® Windows® 8
❏ Операционная система Microso® Windows® 7
❏ Операционная система
❏ Операционная система Microso® Windows® XP
❏ Операционная система Microso® Windows® XP Professional x64
Mac OS X
В данном руководстве термин Mac OS X v10.9.x используется по отношению к OS X Mavericks, а термин
Mac OS X v10.8.x — к OS X Mountain Lion. Кроме того, термин Mac OS X используется по отношению к Mac
OS X v10.9.x, Mac OS X v10.8.x, Mac OS X v10.7.x, Mac OS X v10.6.x.
Microso®
Microso®
Win d o ws ® 8 .1
Win d o ws Vis ta ®
7

Руководство пользователя
Важные указания
Важные указания
Важные инструкции по безопасности
Прочитайте все эти инструкции и следуйте всем указаниям и предупреждениям на устройстве.
❏ Размещайте устройство на плоской устойчивой поверхности, которая шире основания устройства в
любом направлении. При установке устройства около стены оставляйте между ним и стеной
промежуток не менее 10 см. Устройство не будет работать правильно, если оно установлено под углом
или качается.
❏ Поставьте устройство вблизи от компьютера, чтобы не натягивать интерфейсный кабель. Не
устанавливайте и не храните устройство на открытом воздухе, в сильно загрязненных или запыленных
местах, рядом с источниками воды и тепла, в местах, подверженных ударам, вибрации или резким
изменениям температуры или влажности, при высокой температуре или влажности, на прямом
солнечном свете или под сильными источниками света.
❏ Не работайте с устройством с мокрыми руками.
❏ Кабель USB следует прокладывать в местах, где он не будет истираться, изнашиваться, сплющиваться,
скручиваться и подвергаться порезам. Не ставьте предметы на шнуры питания и следите за тем, чтобы
на шнуры питания не наступали и не переезжали их. С особой внимательностью необходимо следить за
отсутствием сгибов на конце шнура.
❏ При подключении данного продукта к компьютеру или другому устройству с помощью кабеля
убедитесь в правильности ориентации разъемов. Каждый разъем можно подключить лишь одним
способом. Если вставить разъем неправильно, можно повредить оба устройства, соединенные кабелем.
❏ Не разбирайте, не вносите изменения и не пытайтесь починить устройство или его принадлежности
своими силами, кроме способов, явно описанных в прилагаемом руководстве.
❏ Не вставляйте предметы в любые отверстия устройства, так как они могут прикоснуться к точкам
высокого напряжения и вызвать короткое замыкание. Остерегайтесь поражения электрическим током.
❏ В следующих случаях следует отключить устройство и кабель USB и отдать устройство на
обслуживание квалифицированному сотруднику: в устройство попала жидкость; устройство уронили
или его корпус поврежден; устройство работает неправильно или заметно снизилась
производительность. (Не пытайтесь сделать регулировки, которые не описаны в инструкции по
эксплуатации).
Ограничения на копирование
Пользователи сканера обязаны выполнять следующие ограничения, чтобы гарантировать ответственное
и законное использование устройства.
Копирование следующих документов преследуется по закону:
❏ Банковские векселя, денежные знаки, рыночные государственные ценные бумаги, правительственные
и муниципальные долговые обязательства.
❏ Непогашенные почтовые марки, проштампованные почтовые открытки и другие официальные
почтовые предметы.
❏ Правительственные гербовые марки и ценные бумаги, выпущенные в ходе судопроизводства.
Копирование следующих документов требует осторожности:
8

Руководство пользователя
Важные указания
❏ Частные реализуемые ценные бумаги (акции, векселя, чеки и т. д.), ежемесячные пропуска,
концессионные документы и т. д.
❏ Паспорта, водительские удостоверения, свидетельства о пригодности, дорожные пропуска, акцизные
марки, билеты и т. д.
Примечание:
Копирование следующих документов может преследоваться по закону.
Ответственное использование материалов, защищенных авторским правом:
Устройства могут быть неправомерно использованы для копирования защищенных авторским правом
материалов. Если у вас нет разрешения уполномоченного лица, то перед копированием опубликованных
материалов необходимо получить разрешение у владельца авторских прав.
Ограничение на дизассемблирование и декомпиляцию:
Запрещается дизассемблировать, декомпилировать и использовать другие способы получения исходного
кода любого программного обеспечения, поставляемого вместе с устройством.
9
Руководство пользователя
Общая информация о сканере
Общая информация о сканере
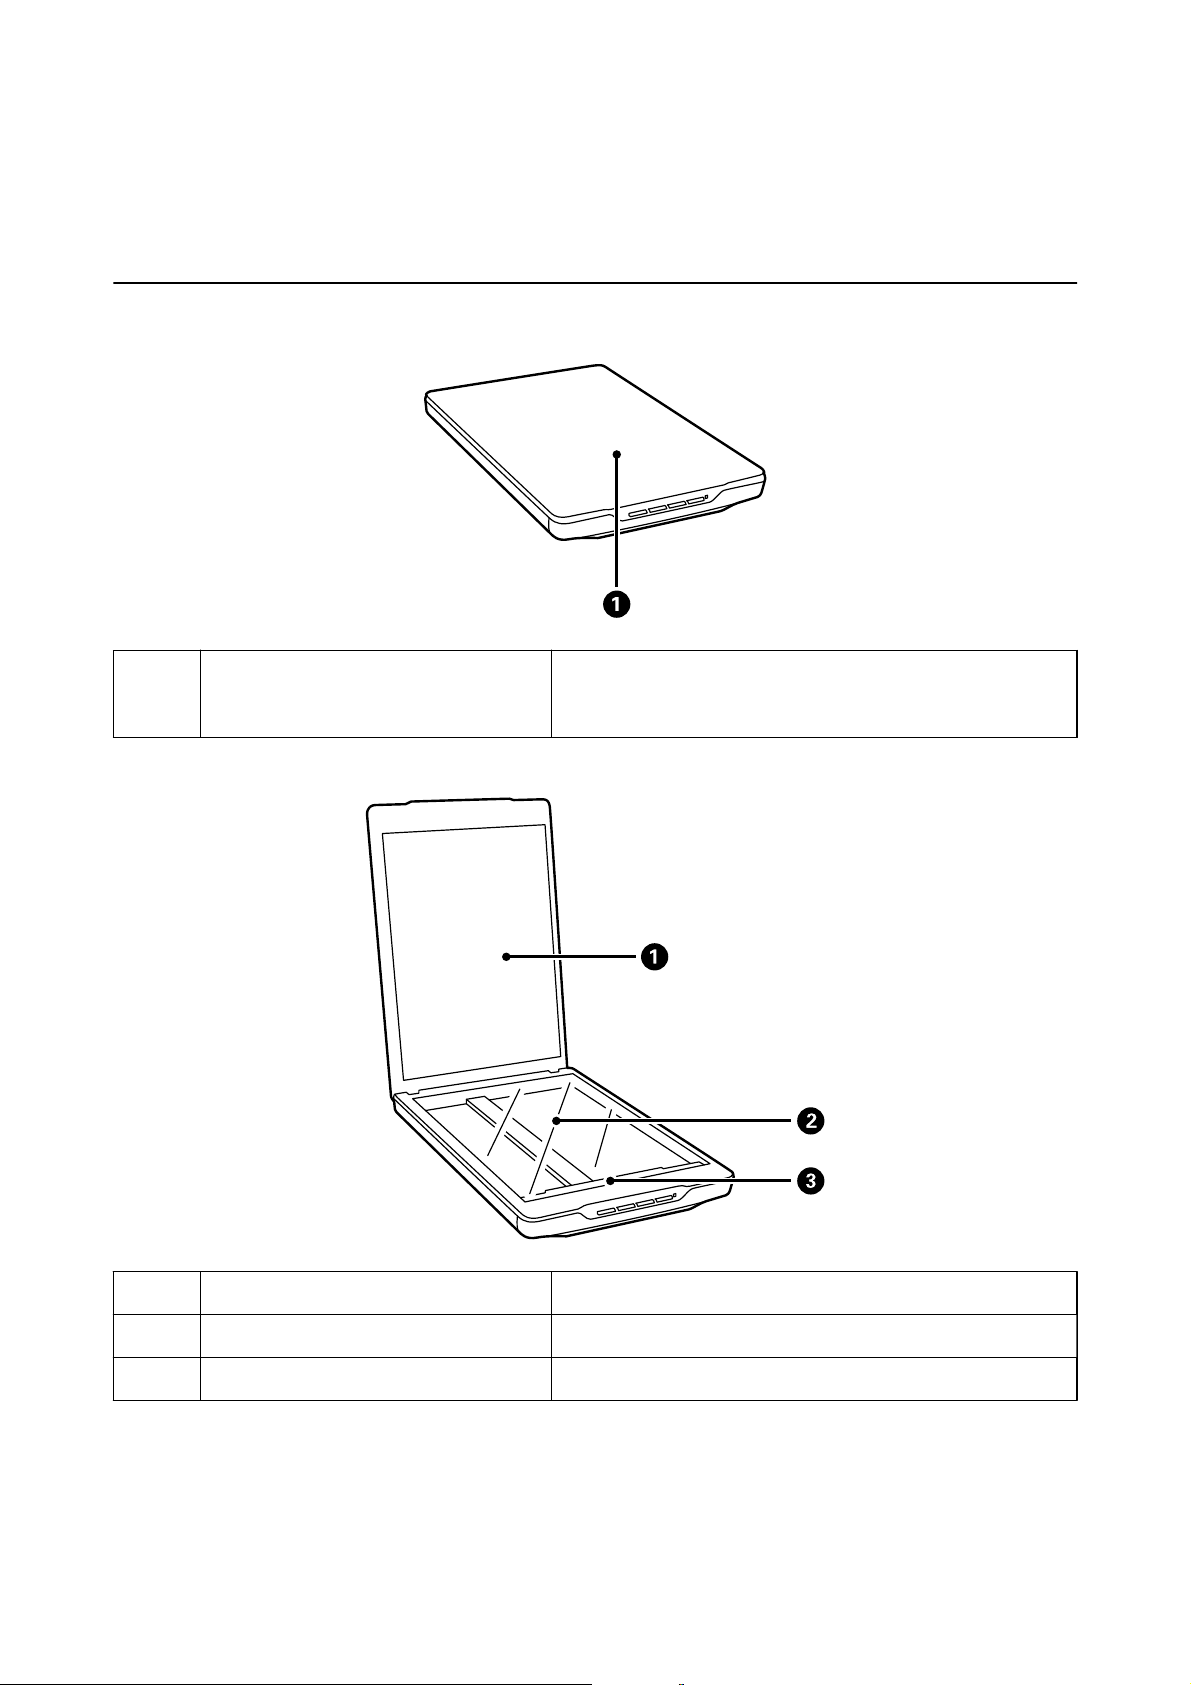
Наименование и функции деталей
A
Крышка сканера Блокирует внешний свет, удерживая документ прижатым к
стеклу сканера. Снимайте ее при сканировании толстых или
больших документов.
A
B
C
Подложка для сканирования Закрепляет документы при сканировании.
Стекло сканера На нем следует размещать документы.
Каретка Датчик, который сканирует документы.
10
Руководство пользователя
Общая информация о сканере
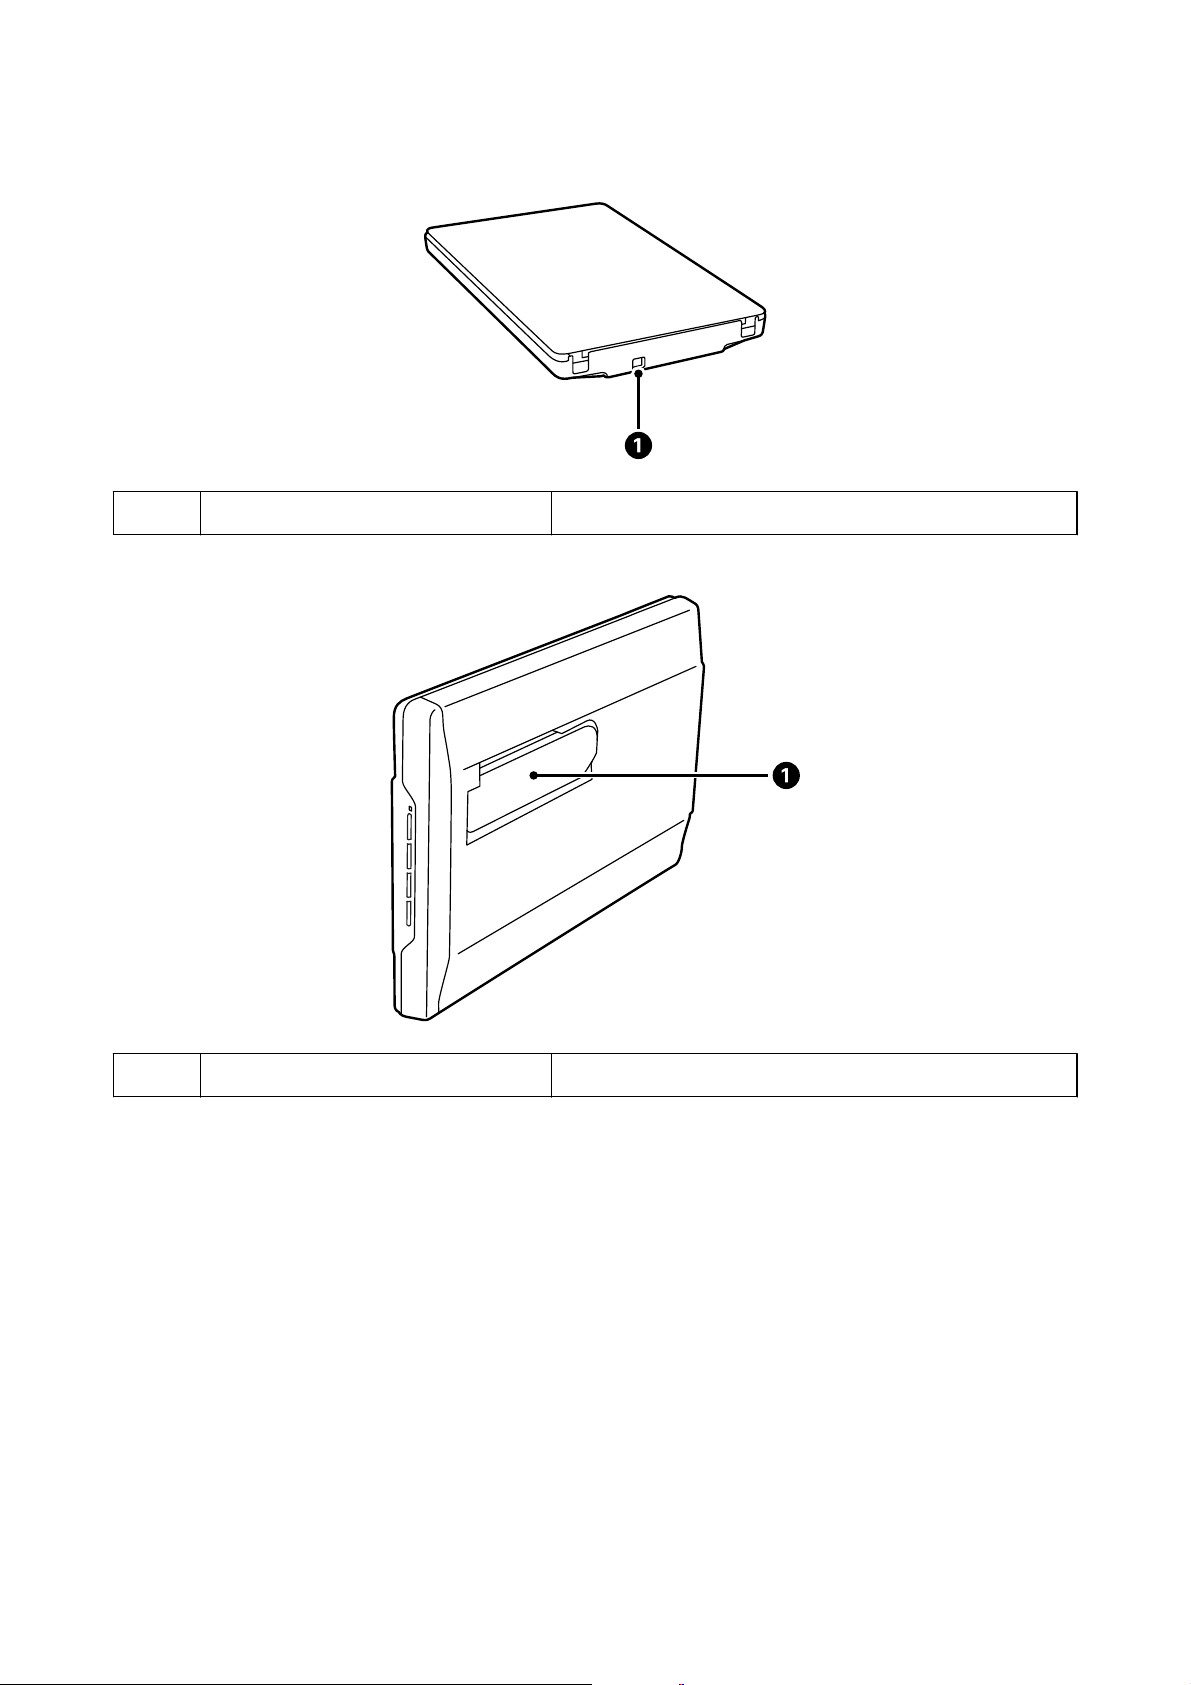
A
A
Разъем USB Служит для подсоединения кабеля USB.
Стенд сканера Используется для сканирования в стоячем положении.
11
Руководство пользователя
Общая информация о сканере
Кнопки и индикаторы
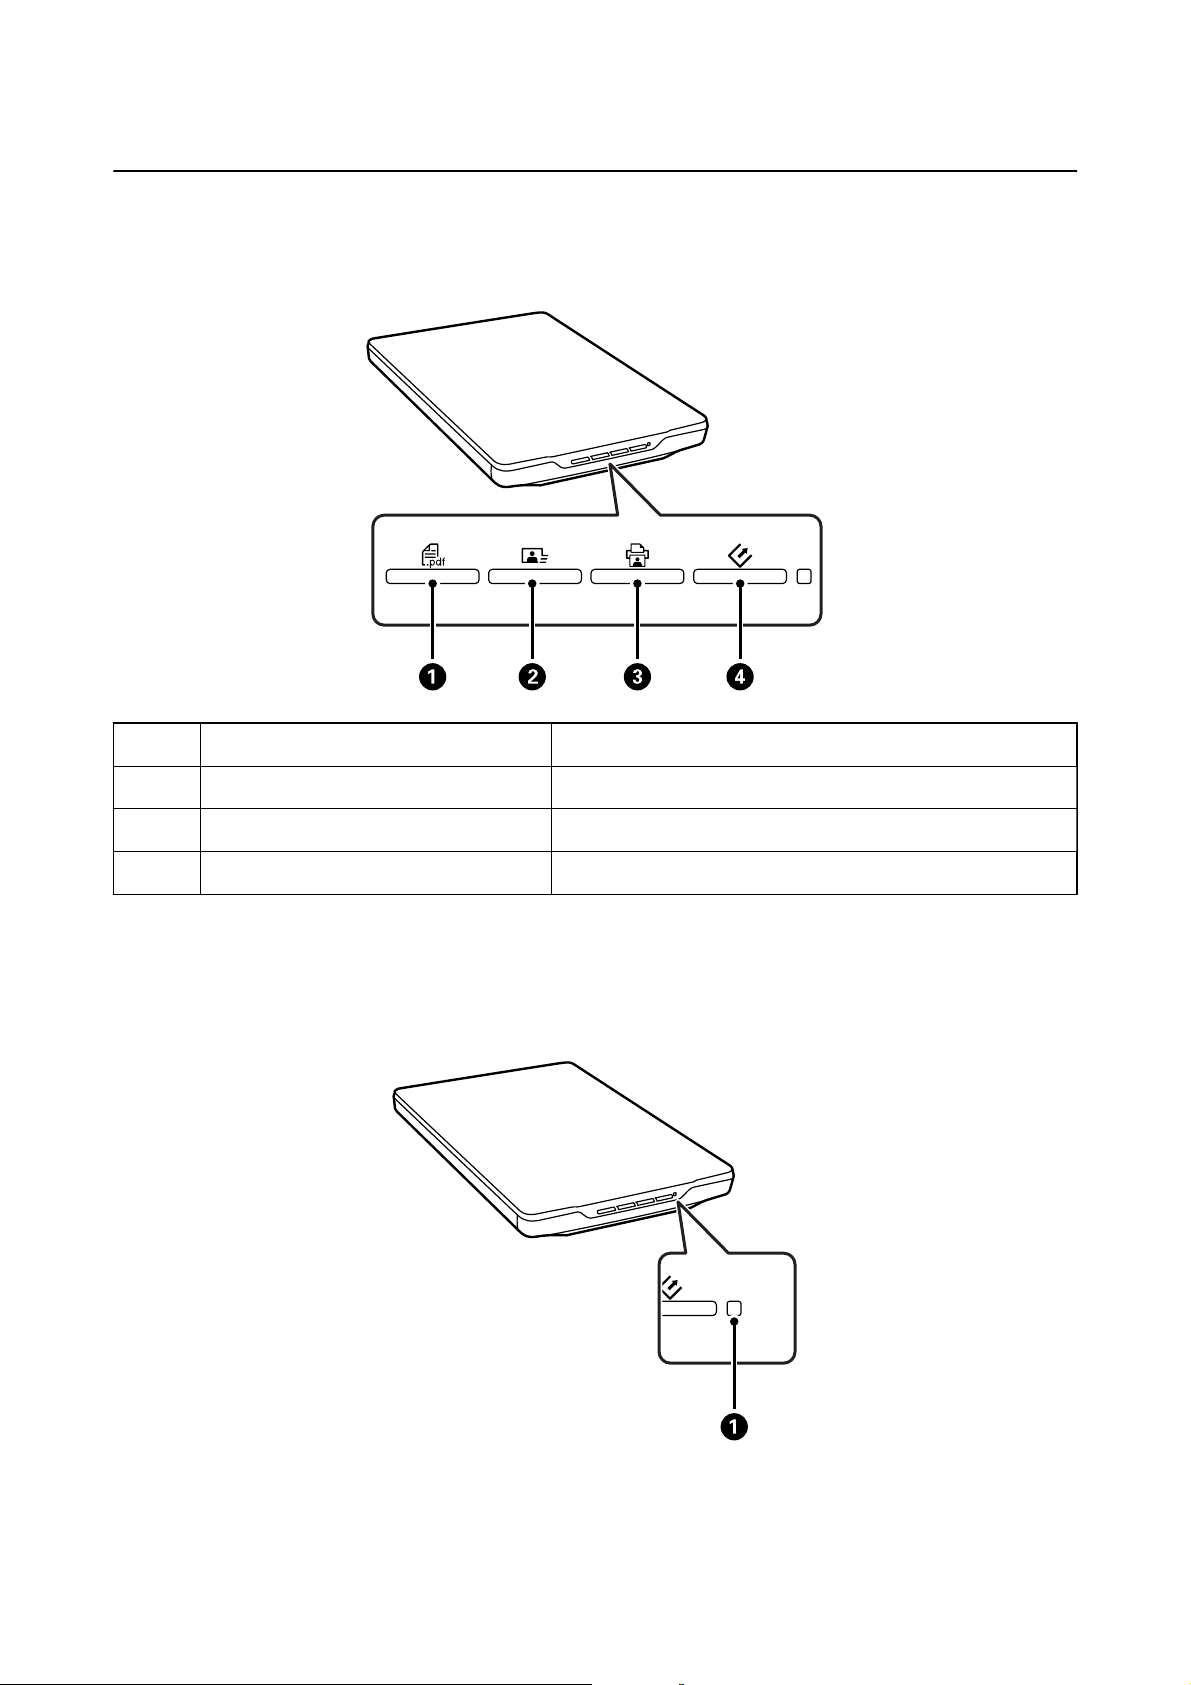
Кнопки
A
B
C
D
Примечание:
Можно изменить приложения по умолчанию и действия, запускаемые каждой кнопкой на сканере.
Кнопка PDF
Кнопка «Отправить» Запускает Easy Photo Scan.
Кнопка «Копировать» Запускает Copy Utility.
Кнопка «Пуск» Запускает EPSON Scan.
Отображает окно Скан. в PDF.
Индикаторы
12
Руководство пользователя
Индикатор Статус индикатора Значение
Общая информация о сканере
A
Индикаторы состояния Вкл. Готов сканировать изображения
Мигание Происходит инициализация или
сканирование
Быстрое мигание Ошибка
Выкл. Сканер выключен
Соответствующая информация
& «Сканирование с помощью кнопки сканера» на стр. 21
& «Индикатор работы мигает» на стр. 62
& «Изменение параметров кнопок сканера по умолчанию» на стр. 22
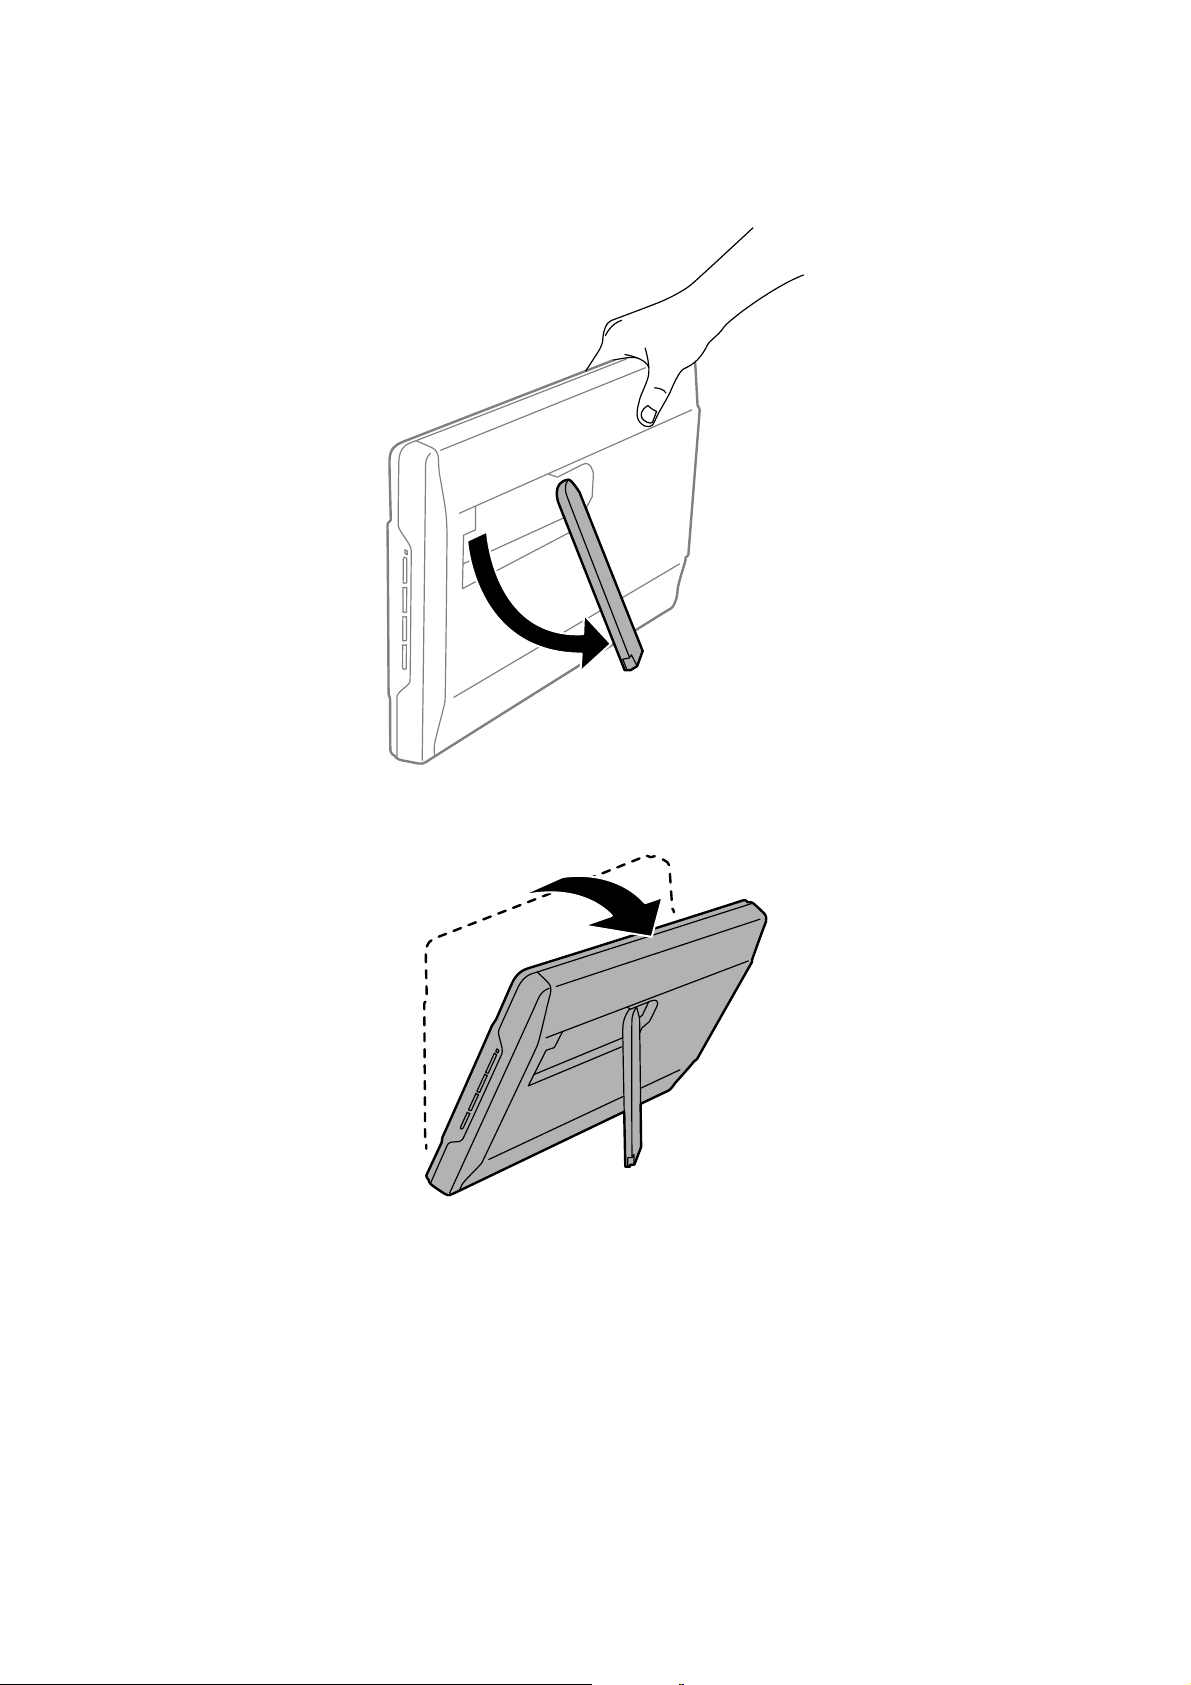
Размещение сканера в стоячем положении
Сканер можно эксплуатировать в стоячем положении.
1. Поставьте сканер вертикально.
13
Руководство пользователя
Общая информация о сканере
2. Выдвиньте стенд сканера с тыльной части до щелчка.
3. Наклоните сканер вниз, пока он не коснется плоской поверхности.
Соответствующая информация
& «Размещение оригиналов в сканере, находящемся в стоячем положении» на стр. 18
14
Руководство пользователя
Размещение оригиналов
Размещение оригиналов
Важно:
c
❏ Не кладите тяжелые предметы на стекло сканера, а также не нажимайте на него слишком сильно.
❏ Угол открытия крышки сканера не должен превышать 100 градусов. Это может повредить шарнир.
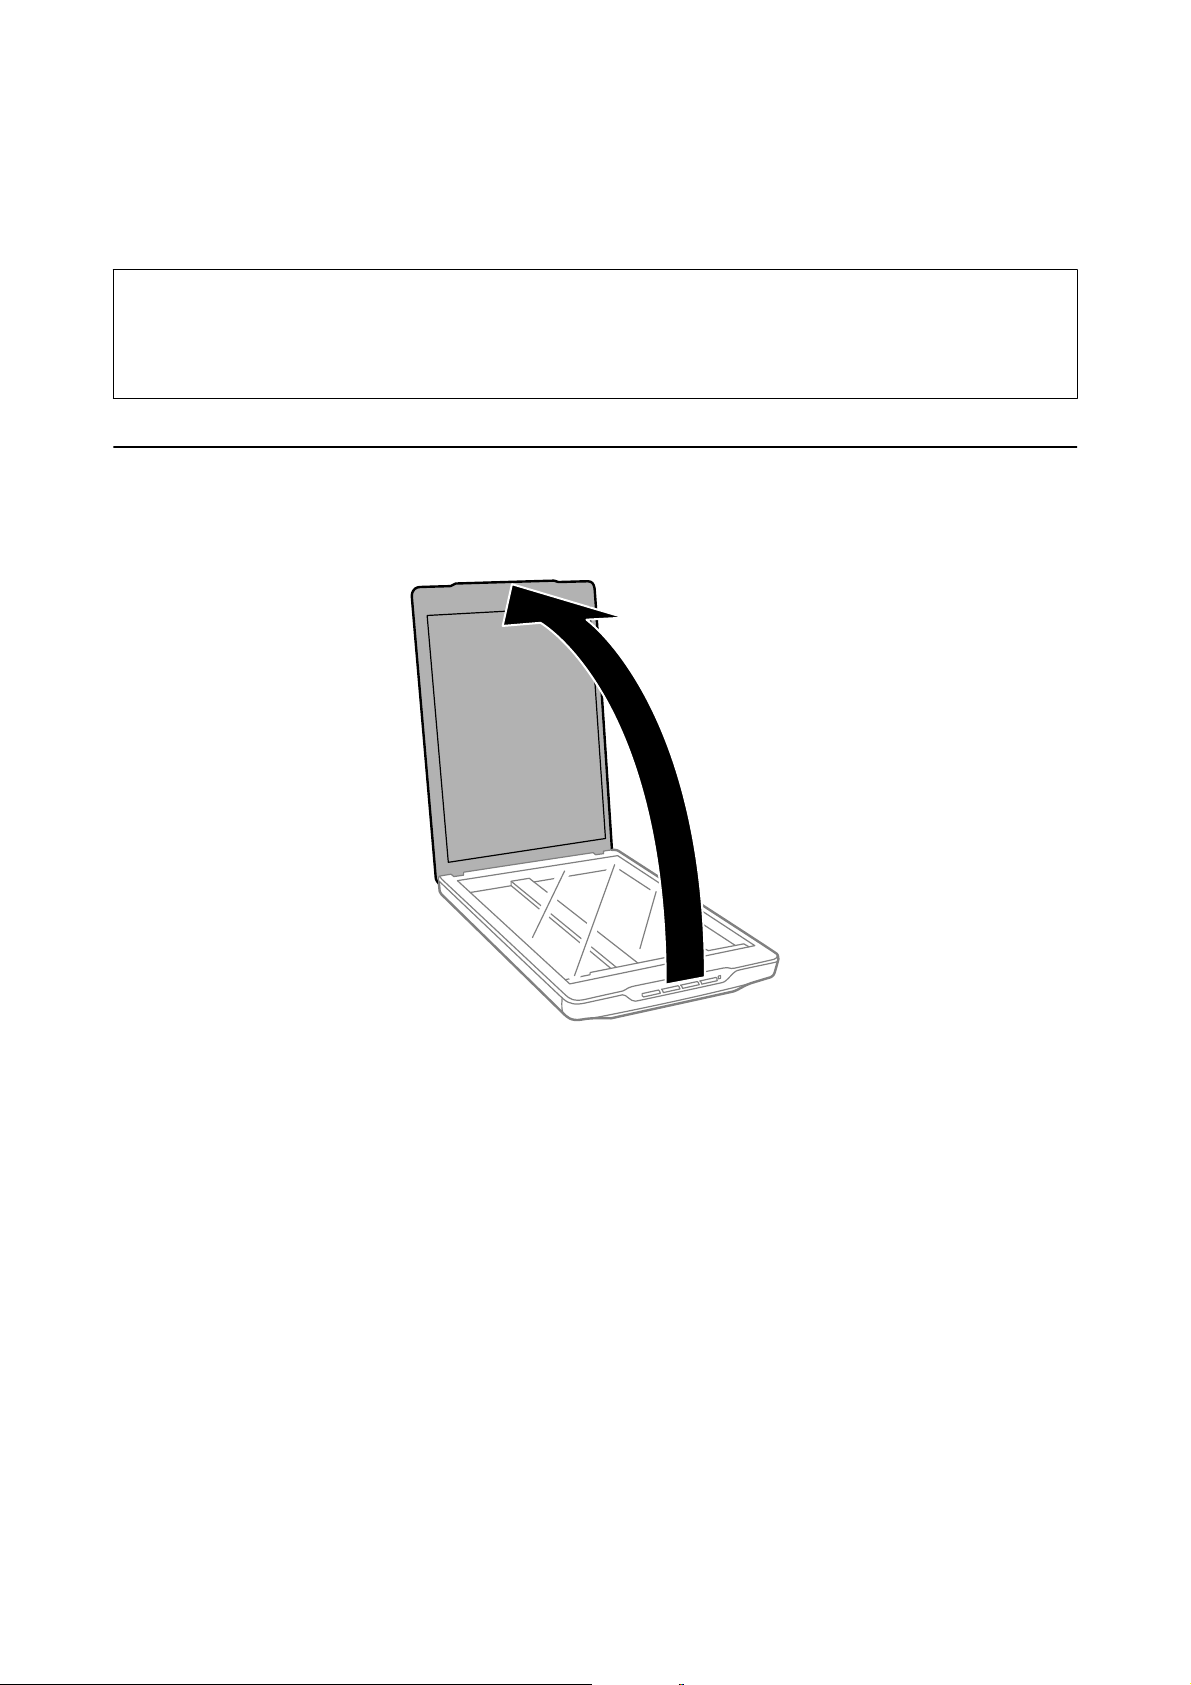
Размещение документов и фотографий
1.
Поднимите крышку сканера.
15
Руководство пользователя
Размещение оригиналов
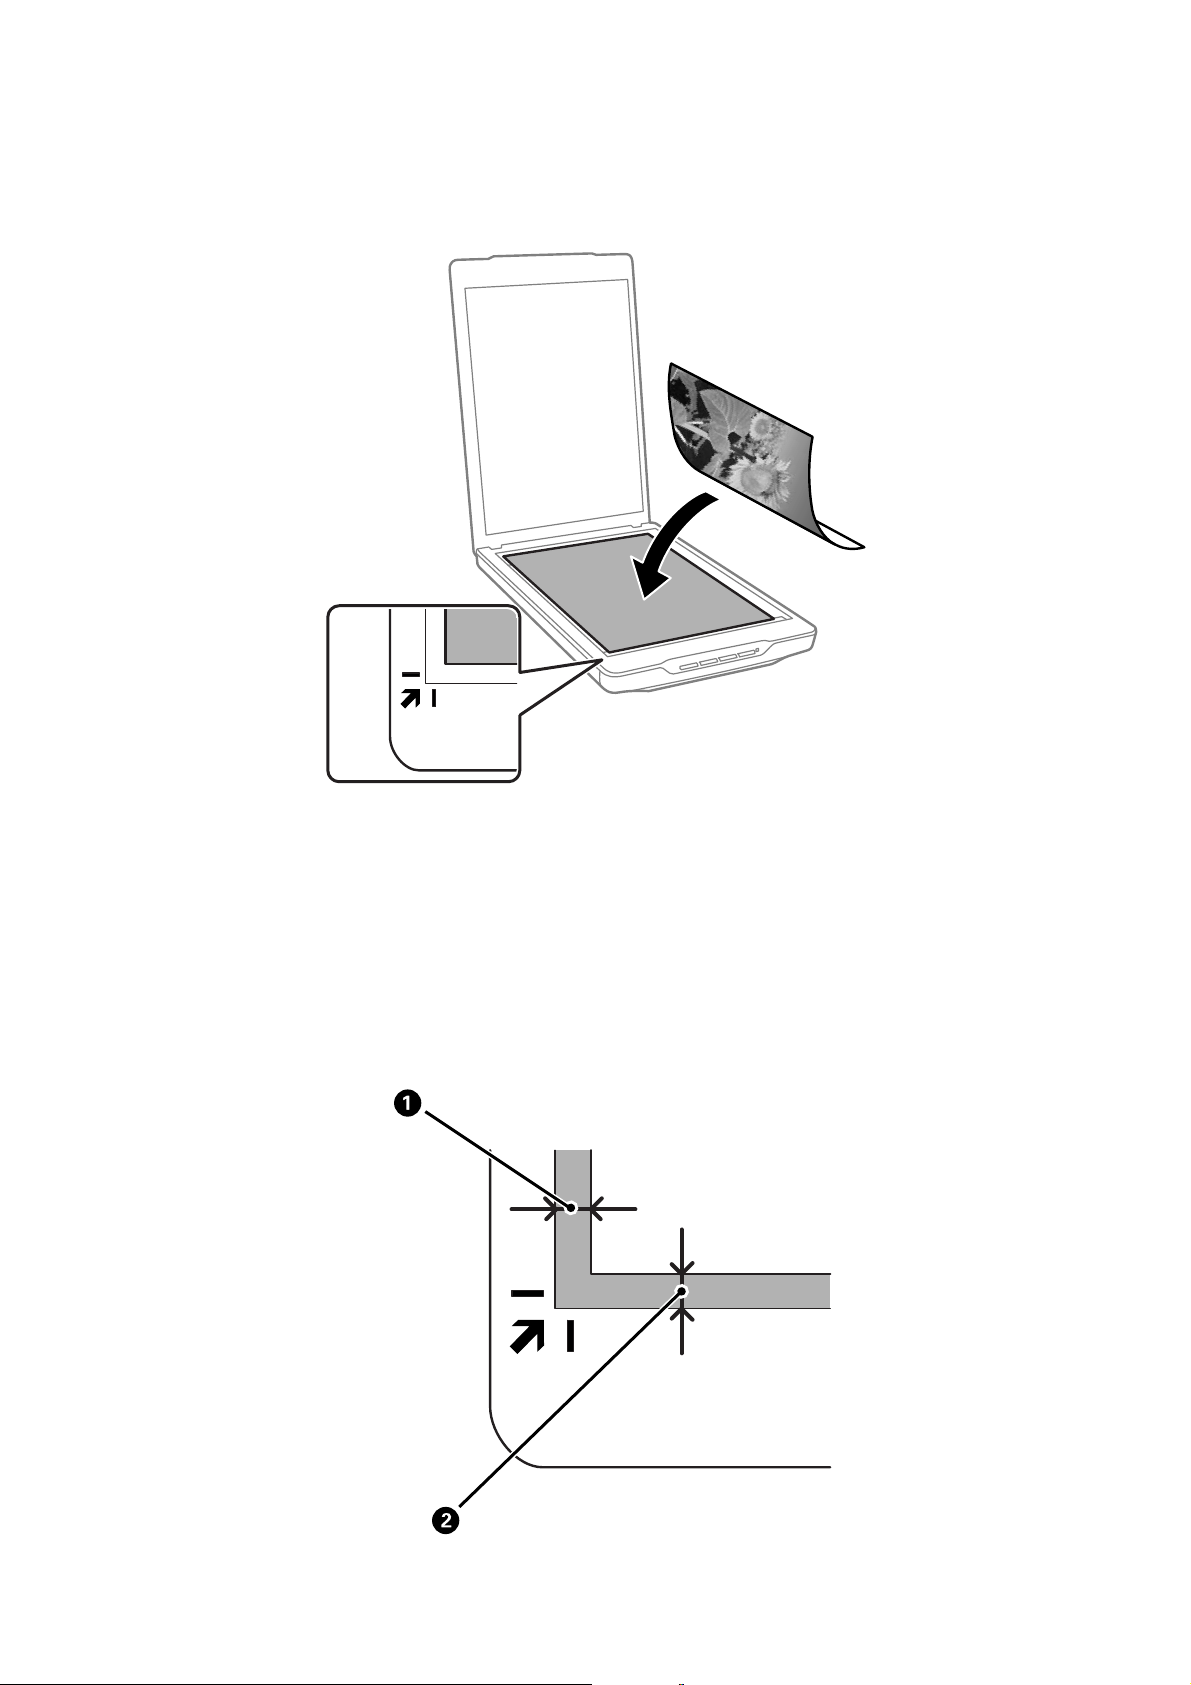
2. Поместите документ или фотографию лицевой стороной на стекло сканера, чтобы верхний угол
стороны, которую следует отсканировать, прилегал к углу сканера рядом с отметкой в виде стрелки.
Примечание:
❏ Если вы сканируете несколько фотографий, расположите их на расстоянии не менее 20 мм (0.8 дюйма)
друг от друга.
❏ Можно избежать обрезки, передвинув документ примерно на 2.5 мм (0.1 дюйма) в сторону от верхнего
края и боковых краев, что показано с помощью значений
❏ При сканировании в режиме Автоматический режим или использовании предварительного просмотра
эскизов в другом режиме EPSON Scan можно избежать обрезки, передвинув документ примерно на6.0 мм
(0.24 дюйма) в сторону от верхнего края и боковых краев, что показано с помощью значений
следующем рисунке.
и B на следующем рисунке.
A
и B на
A
16
Руководство пользователя
Размещение оригиналов
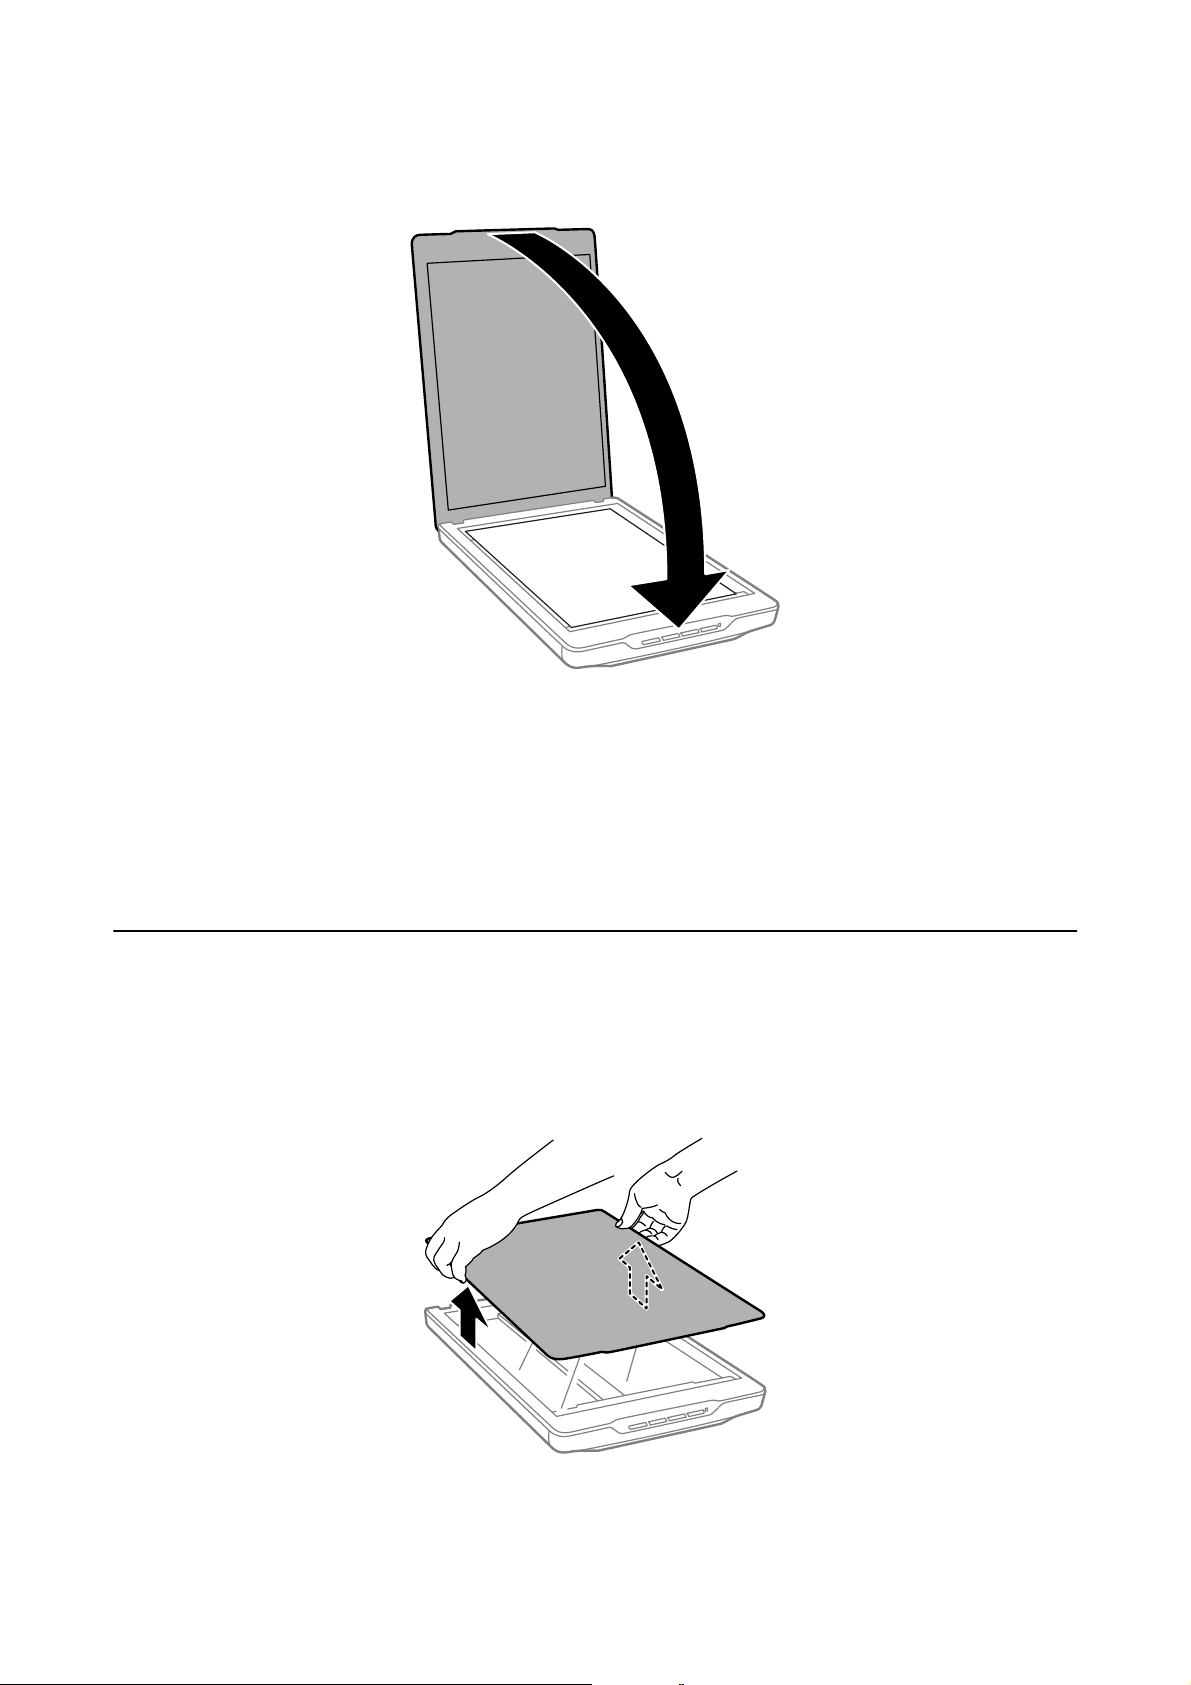
3. Осторожно закройте крышку, чтобы не сдвинуть документ.
Примечание:
❏ Всегда поддерживайте чистоту стекла сканера.
❏ Не оставляйте оригиналы на стекле сканера на длительный срок, чтобы они не прилипли.
Соответствующая информация
& «Сканирование» на стр. 21
Размещение больших или толстых документов
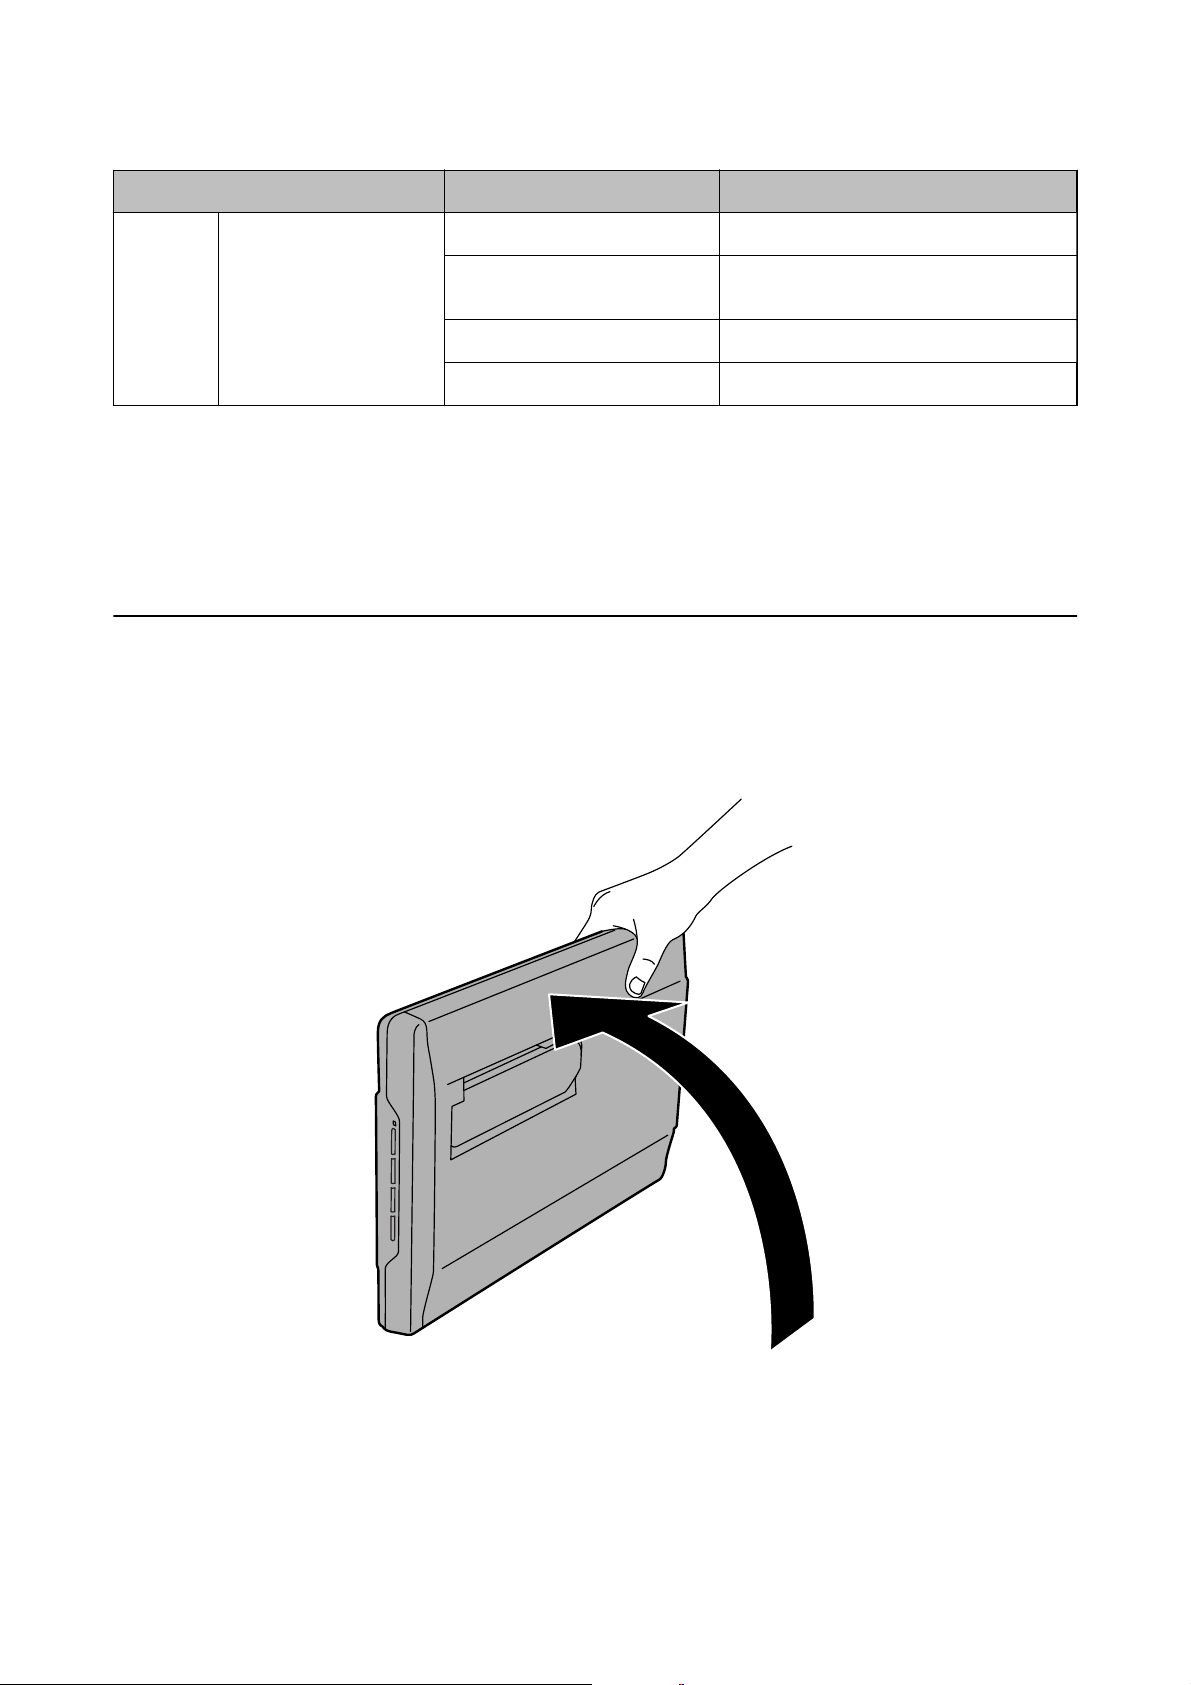
При сканировании объемных или больших документов крышку сканера можно снять.
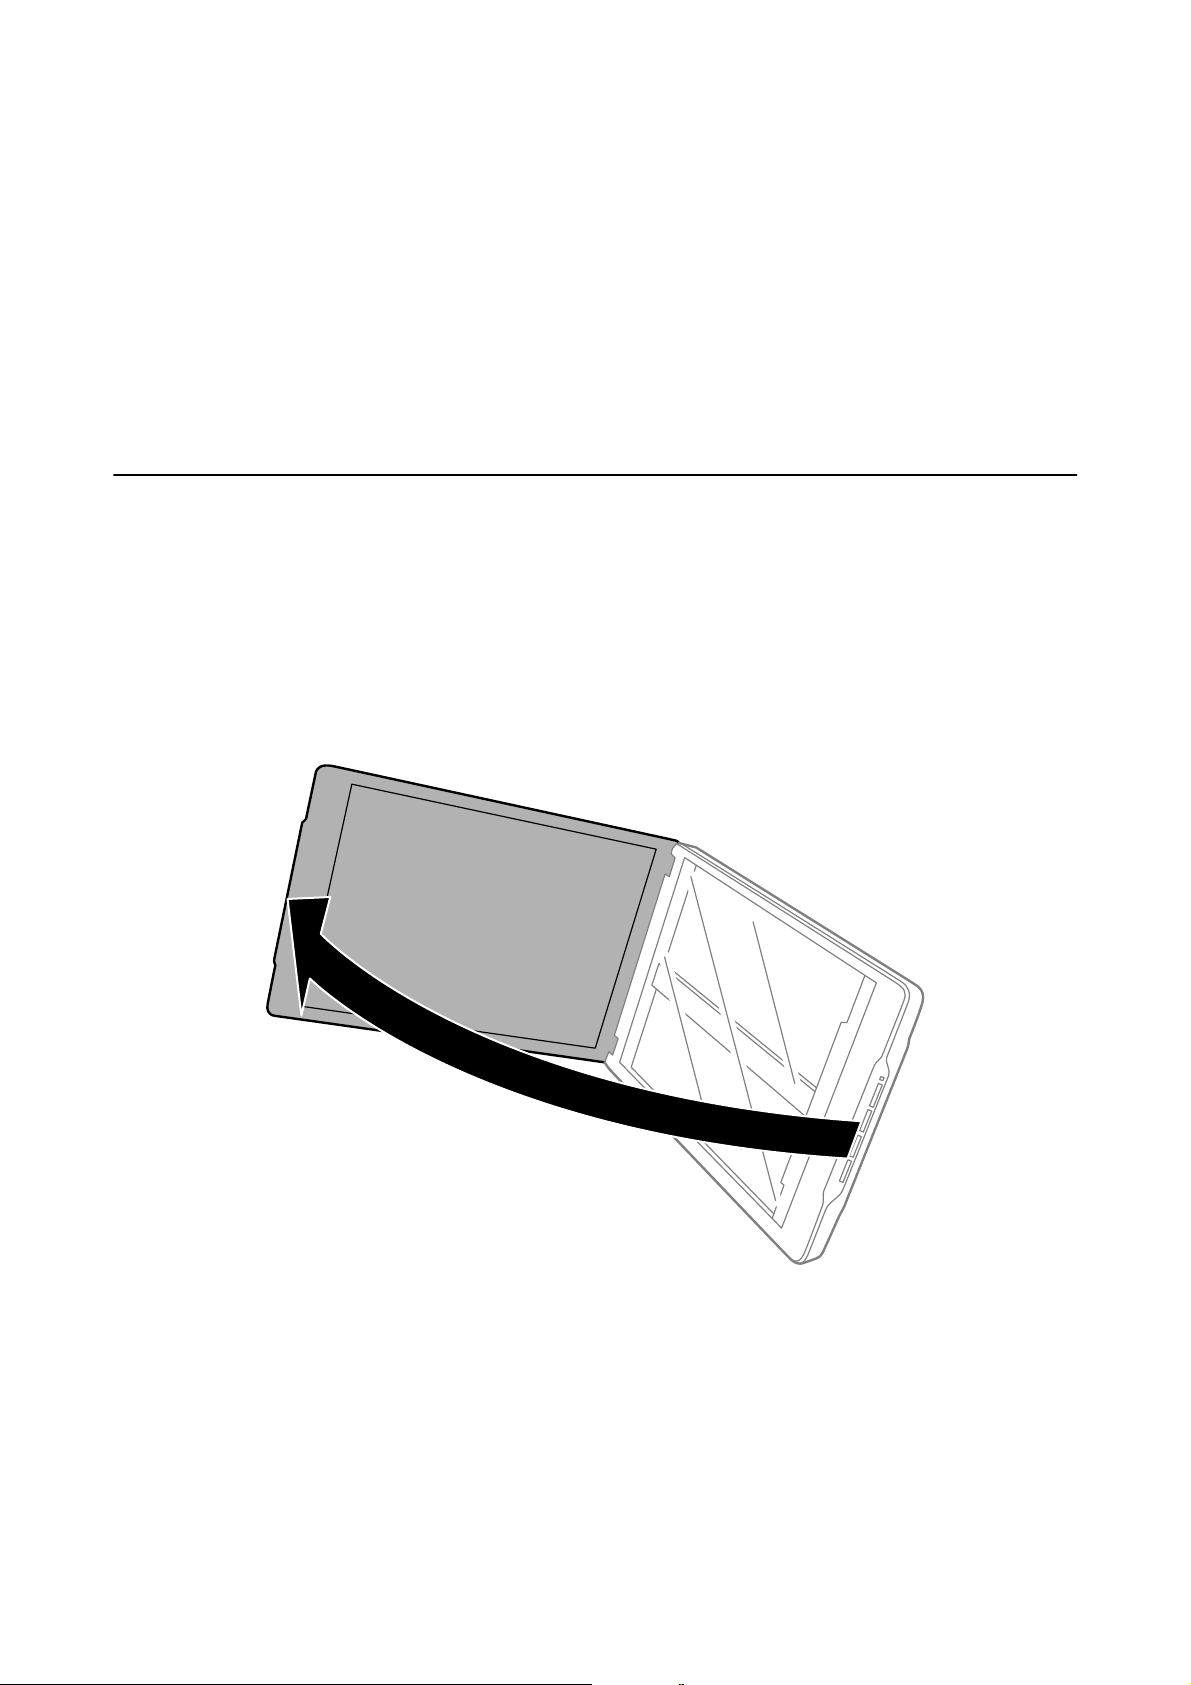
1. Поддерживая крышку сканера около петли в горизонтальном положении, поднимите ее строго вверх и
снимите со сканера.
17
Руководство пользователя
Размещение оригиналов
2. Расположите оригинал на стекле сканера лицевой стороной вниз.
Примечание:
При сканировании легким усилием прижмите документ, чтобы распрямить его.
3. После сканирования верните крышку сканера на место, выполнив действия по снятию в обратном
порядке; аккуратно надавите на крышку в области петли.
Соответствующая информация
& «Сканирование» на стр. 21
Размещение оригиналов в сканере, находящемся в
стоячем положении
Примечание:
❏ При сканировании сканер не следует подвергать вибрации или ударам.
❏ При размещении сканера в стоячем положении нельзя помещать в него большие или толстые документы.
1. Поднимите крышку сканера.
18
Руководство пользователя
Размещение оригиналов
2. Поместите документ или фотографию лицевой стороной на стекло сканера, чтобы верхний угол
стороны, которую следует отсканировать, прилегал к углу сканера рядом с отметкой в виде стрелки.
19
Руководство пользователя
Размещение оригиналов
Примечание:
❏ Края оригинала могут быть обрезаны примерно на 2,5 мм (0,1 дюйма) сверху и с боков, что обозначено
значениями
❏ При сканировании в режиме Автоматический режим или использовании предварительного просмотра
эскизов в другом режиме EPSON Scan края оригинала могут быть обрезаны приблизительно на 6.0 мм
(0.24 дюйма) сверху и с боков, что обозначено значениями
и B на следующем рисунке.
A
и B на следующем рисунке.
A
3. Осторожно закройте крышку, чтобы не сдвинуть документ. Поддерживайте крышку сканера при
сканировании, чтобы она не открылась.
Соответствующая информация
& «Сканирование» на стр. 21
20
Руководство пользователя
Сканирование
Сканирование
Сканирование с помощью кнопки сканера
Можно сканировать с помощью кнопки, расположенной на сканере. Это приводит к автоматическому
запуску программы сканирования по умолчанию, однако можно задать для кнопок запуск других
программ.
Примечание:
Убедитесь, что установлены приложения Epson Event Manager, Copy Utility, Easy Photo Scan и EPSON Scan, а
сканер подключен к компьютеру.
1. Разместите оригинал.
2. Нажмите на сканере одну из следующих кнопок.
Запустится указанное приложение.
❏ Кнопка
можно сканировать в PDF-файл несколько оригиналов.
❏ Кнопка
передавать их в облачную службу и т. д.
❏ Кнопка
подключенном к компьютеру.
❏ Кнопка
и назначение отсканированного файла на компьютере. Если эта кнопка нажата во время работы
EPSON Scan, сканирование запускается автоматически.
Соответствующая информация
& «Сканирование в PDF-файл» на стр. 44
& «Сканирование в облачную службу или другие назначения» на стр. 49
& «Работа с устройством в режиме копирования» на стр. 43
A открывает окно Скан. в PDF. Можно сканировать оригиналы в PDF-файл. Кроме того,
B запускает Easy Photo Scan. Можно пересылать изображения по электронной почте,
C запускает Copy Utility. Можно отсканировать оригинал и напечатать его на принтере,
D запускает EPSON Scan. Можно сканировать, выбрав режим сканирования, параметры
21
Руководство пользователя
Сканирование
& «Сканирование с помощью EPSON Scan» на стр. 23
& «Размещение оригиналов» на стр. 15
& «Сведения о приложении» на стр. 55
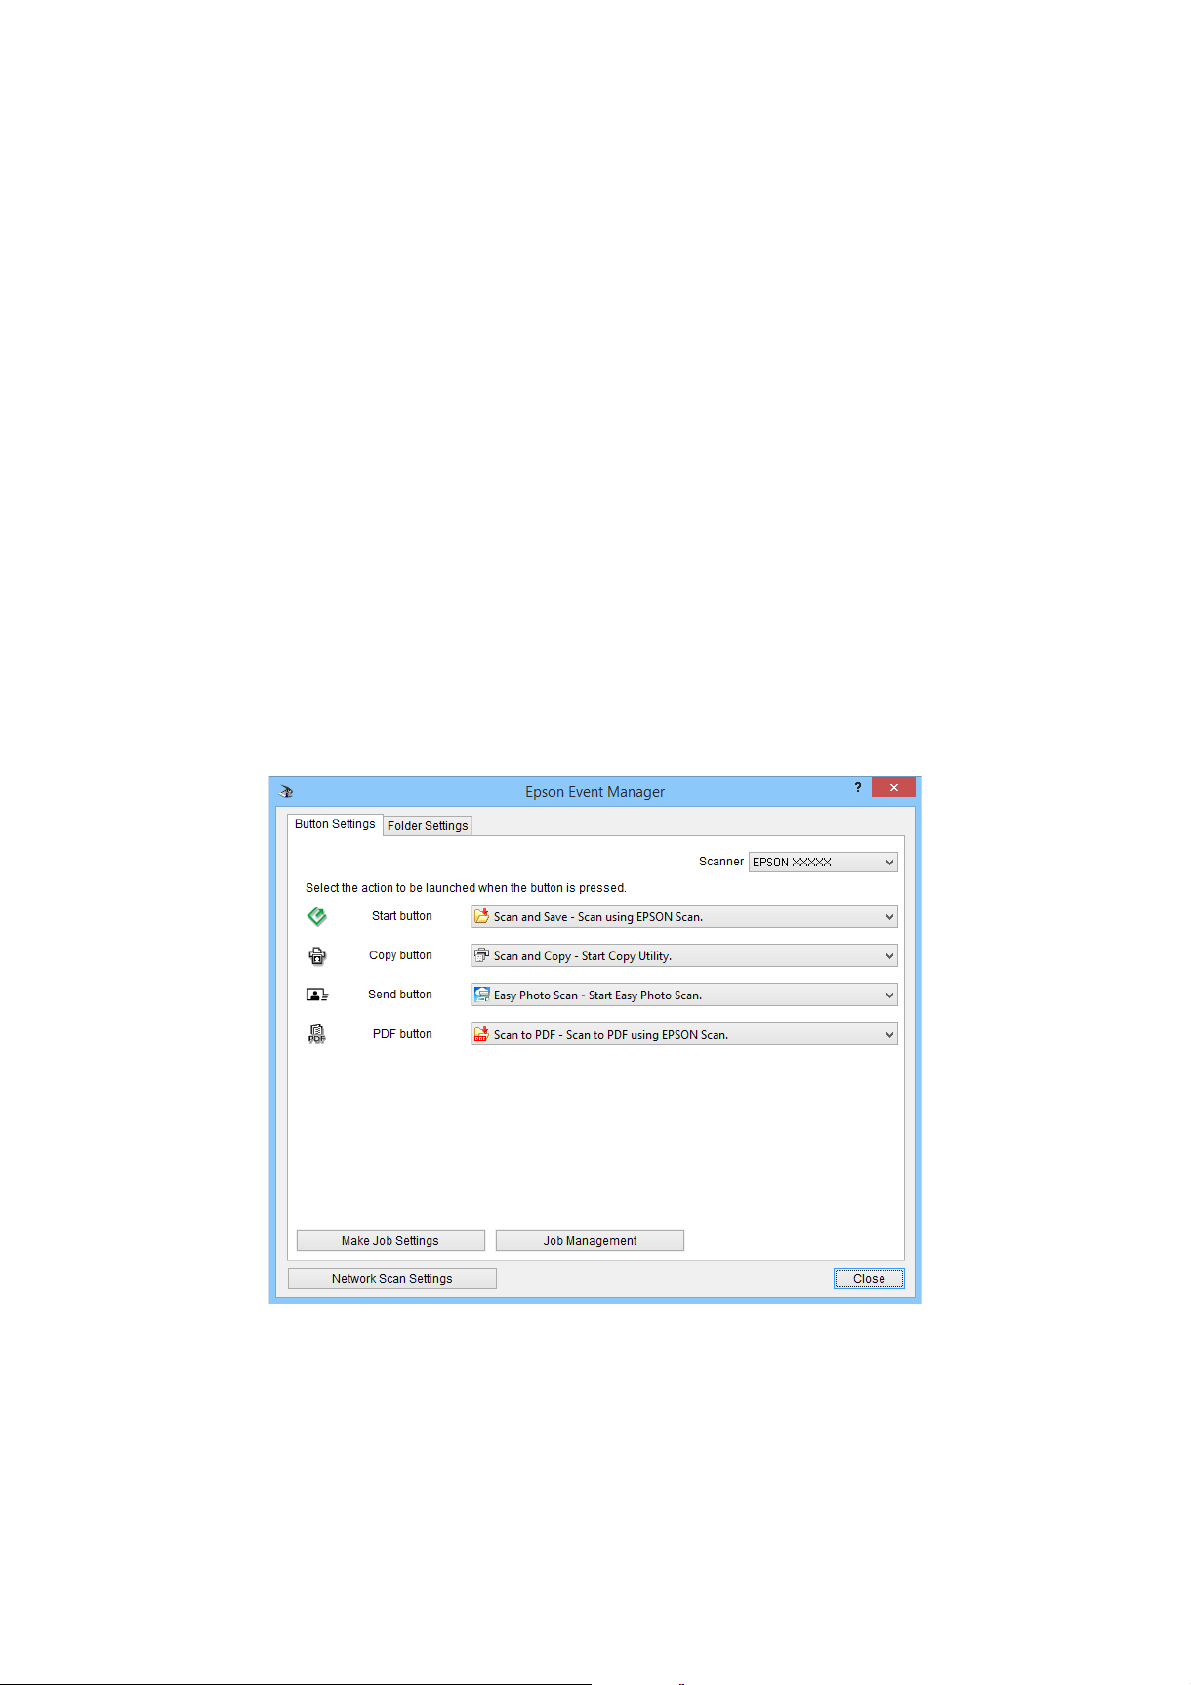
Изменение параметров кнопок сканера по умолчанию
С помощью Epson Event Manager можно просмотреть или изменить приложения и действия по умолчанию
для каждой кнопки сканера.
1. Запустите Epson Event Manager.
❏ Windows 8.1/Windows 8
Введите название приложения на чудо-кнопке «Поиск», затем выберите отображаемый значок.
❏ ОС, отличающиеся от Windows 8.1/Windows 8
Щелкните кнопку «Пуск» и выберите Все программы или Программы > Epson Soware > Event
Manager.
❏ Mac OS X
Выберите Finder > Перейти > Приложения > Epson
Отображается вкладка Свойства кнопки приложения Epson Event Manager.
Soware
> Event Manager.
2. В раскрывающемся списке рядом с названием кнопки выберите действие.
3.
Нажмите кнопку Закрыть, чтобы закрыть окно Epson Event Manager.
Примечание:
Выполните одно из следующих действий, если необходима помощь по использованию Epson Event Manager.
❏ В Windows: Щелкните ? в правом верхнем углу окна.
❏ В Mac OS X: Щелкните меню справки на панели меню, затем выберите Справка Epson Event Manager.
22

Руководство пользователя
Сканирование
Сканирование с помощью EPSON Scan
EPSON Scan позволяет контролировать все аспекты сканирования. Его можно использовать как отдельное
приложение сканирования или применять вместе с другим приложением сканирования, совместимым с
TWAIN. В этом разделе объясняются базовые процедуры сканирования с использованием EPSON Scan.
Дополнительные сведения о EPSON Scan см. в справке.
Запуск EPSON Scan
Выполните одно из следующих действия для запуска EPSON Scan.
❏ Запуск со сканера
Нажмите кнопку
❏ Windows 8.1/Windows 8
Введите название приложения на чудо-кнопке «Поиск», затем выберите отображаемый значок.
❏ ОС, отличающиеся от Windows 8.1/Windows 8
Щелкните кнопку «Пуск» и выберите Все программы или Программы > EPSON EPSON Scan > EPSON
Scan.
❏ Mac OS X
Выберите Finder > Перейти > Приложения > Epson
Окно EPSON Scan открывается автоматически.
Примечание:
❏ EPSON Scan не поддерживает функцию быстрого переключения пользователей в Mac OS X. Отключите
функцию быстрого переключения пользователей.
❏ Может понадобиться выбрать сканер, который следует использовать, в списке сканеров.
Соответствующая информация
& «Сканирование с помощью кнопки сканера» на стр. 21
& «Сведения о приложении» на стр. 55
на сканере.
Soware
> EPSON Scan.
Доступный режим EPSON Scan
EPSON Scan поддерживает несколько режимов сканирования.
❏ Автоматический режим — это наиболее простой режим сканирования без предварительного
просмотра изображения, в котором вам не нужно делать сложные настройки. Тип документа
автоматически определяется, а параметры сканирования оптимизируются EPSON Scan. Этот режим
идеально подходит для сканирования изображений без изменения их оригинального размера
и предварительного просмотра изображений перед сканированием. С помощью этого режима вы
можете восстановить поблекшие цвета или удалить дефекты. В EPSON Scan по умолчанию выбирается
этот режим.
❏ Режим Офисный режим позволяет легко настраивать параметры для сканирования текстовых
документов и проверять результаты настроек в окне предварительного просмотра изображения.
Можно также выбрать различные параметры настройки изображения и просмотреть отсканированное
изображение.
23

Руководство пользователя
Сканирование
❏ Режим Простой режим позволяет регулировать основные параметры изображений и проверять
результаты настроек в окне предварительного просмотра изображения. Этот режим можно
использовать, если необходимо просматривать изображения перед сканированием. Вы можете менять
размер изображения во время сканирования, задавать область сканирования и выполнять различные
настройки, включая восстановление цвета, удаление дефектов и коррекцию фона.
❏ В режиме Профессиональный режим вам доступно множество параметров, предоставляющих полный
контроль над процессом сканирования и проверкой результатов в окне предварительного просмотра
изображения. Работайте в этом режиме, если перед сканированием вы хотите просматривать
изображения и настраивать множество параметров, полностью контролируя процесс сканирования.
Вы можете настраивать резкость, выполнять цветокоррекцию и улучшать качество изображения,
используя все возможности, включая восстановление цвета и удаление дефектов.
Соответствующая информация
& «Запуск EPSON Scan» на стр. 23
& «Сканирование в режиме Автоматический режим» на стр. 26
& «Сканирование в режиме Офисный режим» на стр. 29
& «Сканирование в режиме Простой режим» на стр. 31
& «Сканирование в режиме Профессиональный режим» на стр. 34
24
Loading…
Код: 47814
13 430
рублей
Бесплатная доставка
по Красноярску
?
под заказ
(7-14 дней)
Новости интернет-магазина «Лаукар»:
Дополнительная информация в категории Сканер:
В интернет-магазине бытовой техники «Лаукар» Вы можете скачать инструкцию к товару Сканер Epson Perfection V19 совершенно бесплатно.
Все инструкции, представленные на сайте интернет-магазина бытовой техники «Лаукар», предоставляются производителем товара.
Перед началом использования товара рекомендуем Вам ознакомиться с инструкцией по применению.
Для того чтобы скачать инструкцию, Вам необходимо нажать на ссылку «скачать инструкцию», расположенную ниже, а в случае, если ссылки нет,
Вы можете попробовать обратиться к данной странице позднее,
возможно специалисты интернет-магазина бытовой техники «Лаукар» еще не успели загрузить для скачивания инструкцию к товару:
Сканер Epson Perfection V19.

Фирма-производитель оставляет за собой право на внесение изменений в конструкцию, дизайн и комплектацию товара: Сканер Epson Perfection V19. Пожалуйста, сверяйте информацию о товаре с информацией на
официальном сайте компании производителя.
Перейти к контенту
Сканеры Epson
- Размер инструкции: 1.34 Мб
- Формат файла: pdf
Если вы потеряли инструкцию от сканера Epson Perfection V19, можете скачать файл для просмотра на компьютере или печати.
Инструкция для сканера Epson Perfection V19 на русском языке. В руководстве описаны возможности и полезные функции, а также правила эксплуатации. Перед использованием внимательно ознакомьтесь с инструкцией.
Чтобы не читать всю инструкцию вы можете выполнить поиск по содержимому внутри инструкции и быстро найти необходимую информацию. Рекомендации по использованию помогут увеличить срок службы сканера Epson Perfection V19. Если у вас появилась проблема, то найдите раздел с описанием неисправностей и способами их решения. В нем указаны типичные поломки и способы их решения.
Downloads
Downloads
Recommended for You
Epson Product Setup (v5.0)
v.5.0
08-Oct-2024
2.42 MB
.exe
Additional Information:
Epson Product Setup contains everything you need to use your Epson product. This programme downloads and installs the latest drivers and software for your Epson product and where applicable may download network utilities and additional software. Please Note: To use this software your computer must have Internet access. Depending on the speed of your internet connection, this process may take a while. Once the software is downloaded, it will automatically begin to install. You will be guided (on-screen) through the process.
Download
Product Setup
Epson Software updater (v4.6.9.0)
v.4.6.9.0
06-May-2025
5.76 MB
.exe
Additional Information:
Epson Software Updater allows you to update Epson software as well as download 3rd party applications. Please Note: To use this updater, your Epson product must be turned on and connected to a computer with Internet access.
This latest version includes
— Feature improvements
Download
Epson Product Setup (v5.0)
v.5.0
08-Oct-2024
2.42 MB
.exe
Additional Information:
Epson Product Setup contains everything you need to use your Epson product. This programme downloads and installs the latest drivers and software for your Epson product and where applicable may download network utilities and additional software. Please Note: To use this software your computer must have Internet access. Depending on the speed of your internet connection, this process may take a while. Once the software is downloaded, it will automatically begin to install. You will be guided (on-screen) through the process.
Download
Drivers
EPSON Scan 2 (v6.6.60.0)
v.6.6.60.0
22-Jul-2022
63.47 MB
.exe
Additional Information:
EPSON Scan 2 directly controls all of the features of your EPSON scanner. With this software you can scan images in color, grayscale, or black and white and obtain professional quality results. This program is the standard cross-platform interface between your scanner and most applications. You can access it from any application that supports the TWAIN standard.
Download
EPSON Scan (v3.944)
v.3.944
02-Mar-2015
42.07 MB
.exe
EPSON Scan directly controls all of the features of your EPSON scanner. With this software you can scan images in color, grayscale, or black and white and obtain professional quality results. This program is the standard cross-platform interface between your scanner and most applications. You can access it from any application that supports the TWAIN standard.
Additional Information:
Fix following issue :
PDF file may be opened even if “Set a password to open the file” is set at security tab in EPSON PDF Plug-in Settings.
Download
Other Software
Event Manager (v3.11.82)
v.3.11.82
14-Nov-2024
30.17 MB
.exe
Event Manager launches File Manager or PageManager for EPSON automatically when you press the B&W Start or Color Start button on the control panel in Scan mode. You can select an application to be launched when pressing the B&W Start or Color Start button.
Additional Information:
This latest version includes
— Bug Fix
— Security update
Download
Event Manager (v3.11.74)
v.3.11.74
16-Mar-2023
21.85 MB
.exe
Additional Information:
Event Manager launches File Manager or PageManager for EPSON automatically when you press the B&W Start or Color Start button on the control panel in Scan mode. You can select an application to be launched when pressing the B&W Start or Color Start button.
This latest version includes
— Bug Fix
Download
-
Page 1
Perfection V19/V39 User’s Guide… -
Page 3: Table Of Contents
Starting a Scan from a Scanner Button………………24 Changing Default Scan Button Settings ………………26 Starting a Scan Using the Epson Scan Icon ……………… 27 Scanning with Document Capture Pro and Document Capture…………. 28 Starting a Scan from a Scanning Program………………31 Selecting Epson Scan Settings ………………….
-
Page 4
Uploading Scanned Images to Email ………………73 Saving Scanned Images to a Folder ………………74 Epson JPEG File Settings………………….75 Epson TIFF and Multi-TIFF File Settings ……………… 77 Restoring Photo Colors as You Scan ……………….. 78 Scanning to a SharePoint Server or Cloud Service …………… 78 Scanning Multi-Page Originals as Separate Files — Windows ………… -
Page 5
General Specifications ……………………106 Dimension Specifications ……………………. 106 Electrical Specifications ……………………107 Environmental Specifications ………………….107 USB Interface Specifications………………….107 Safety and Approvals Specifications ………………..108 Notices …………………………109 Important Safety Instructions………………….109 Default Delay Times for Power Management for Epson Products………… 110… -
Page 6
Restrictions on Copying ……………………110 Trademarks ……………………….111 Copyright Notice……………………..111 libTIFF Software Acknowledgment………………..112 A Note Concerning Responsible Use of Copyrighted Materials……….. 112 Copyright Attribution ……………………113… -
Page 7: Perfection V19/V39 User’s Guide
Perfection V19/V39 User’s Guide Welcome to the Perfection V19/V39 User’s Guide. For a printable PDF copy of this guide, click here.
-
Page 8: Scanner Basics
Scanner Basics See these sections to learn about the basic features of your scanner. Scanner Parts Scanner Buttons and Lights Using the Scanner Stand Scanner Parts Scanner cover…
-
Page 9
Document mat Scanner glass Carriage (beneath scanner glass) -
Page 10
USB port Scanner stand Parent topic: Scanner Basics… -
Page 11: Scanner Buttons And Lights
Scanner Buttons and Lights PDF button send button copy button start button The status light Parent topic: Scanner Basics Related references Scanner Light Status Using the Scanner Stand The scanner can be used in an upright position if surface space is limited.
-
Page 12
1. Stand the scanner upright. -
Page 13
2. Extend the scanner stand from the back of the scanner until it clicks into place. -
Page 14
3. Tilt the scanner until it rests on the scanner stand. -
Page 15
4. To put the scanner stand away, rotate it into the back of the scanner. Parent topic: Scanner Basics… -
Page 16: Placing Originals On The Scanner
Placing Originals on the Scanner Follow the instructions here to place your originals on the scanner. Caution: Do not place anything on top of your scanner or use its cover as a writing surface to avoid damaging it. Placing Originals on the Scanner Glass Placing Originals While Using the Scanner Stand Placing Thick Documents Placing Originals on the Scanner Glass…
-
Page 17
1. Open the scanner cover. -
Page 18
(20 mm) away from each other. Note: The edges of your original may be cropped by 0.1 inch (2.5 mm) from the left side and top edges. If you are scanning in Full Auto mode or using thumbnail preview in another mode in Epson… -
Page 19: Placing Originals While Using The Scanner Stand
Scan, the edges of your original may be cropped by about 0.24 inch (6 mm) from the top and side edges. Manually position your original away from the edges to prevent cropping. 3. Close the scanner cover gently to keep your original in place. Parent topic: Placing Originals on the Scanner Related tasks…
-
Page 20
1. Open the scanner cover. -
Page 21
Note: The edges of your original may be cropped by 0.1 inch (2.5 mm) from the left side and top edges. If you are scanning in Full Auto mode or using thumbnail preview in another mode in Epson… -
Page 22
Scan, the edges of your original may be cropped by about 0.24 inch (6 mm) from the top and side edges. 3. Close the scanner cover gently and hold it to keep your original in place. Parent topic: Placing Originals on the Scanner Related tasks Using the Scanner Stand… -
Page 23: Placing Thick Documents
Scanning in Full Auto Mode Placing Thick Documents If you are scanning a book or other thick document, you can remove the scanner cover. 1. Hold the scanner cover near the hinges and pull straight up, keeping the cover horizontal. 2.
-
Page 24: Scanning
After placing your original documents or photos on your product for scanning, start scanning using one of these methods. Starting a Scan from a Scanner Button Starting a Scan Using the Epson Scan Icon Scanning with Document Capture Pro and Document Capture Starting a Scan from a Scanning Program…
-
Page 25
Copy Utility so you can scan your original and print it on a printer connected to your computer start button starts Epson Scan so you can select your scan mode, settings, and scanned file destination on your computer The designated scan program starts. -
Page 26: Changing Default Scan Button Settings
Start > All Programs or Programs > Epson Software > Event Manager. • OS X: Open the Applications folder, click Epson Software, and click Event Manager. You see a window like this: 2. Change the program and action performed by each button as necessary.
-
Page 27: Starting A Scan Using The Epson Scan Icon
Starting a Scan from a Scanner Button Starting a Scan Using the Epson Scan Icon You can start the Epson Scan program to select scan settings, scan, and save the scanned image to a file. • Windows 8.x: Navigate to the Apps screen and select EPSON Scan under EPSON or EPSON Software.
-
Page 28: Scanning With Document Capture Pro And Document Capture
You see an Epson Scan window like this: Parent topic: Starting a Scan Scanning with Document Capture Pro and Document Capture When you scan with Document Capture Pro (Windows) or Document Capture (OS X), the program automatically saves your scanned file on your computer in the folder you specify. You can select…
-
Page 29
• Windows (other versions): Click or Start, and select All Programs or Programs. Select EPSON Software, then select Document Capture Pro. • OS X: Open the Applications folder, select the Epson Software folder, and select Document Capture. You see a window like this: 2. -
Page 30
Start Job button, and skip the rest of these steps. Note: If you selected Use EPSON Scan in the Scan menu under Scan Settings Screen, the Epson Scan main window opens instead of the Scan screen. 3. Select any displayed scan settings you want to use. -
Page 31: Starting A Scan From A Scanning Program
You see a preview of your scan in the Document Capture Pro (Windows) or Document Capture (OS X) window. Note: You may have to close the Epson Scan window to view your scan in the Document Capture Pro (Windows) or Document Capture (OS X) window.
-
Page 32
Note: In certain programs, you may need to select your product as the «source» first. If you see a Select Source option, choose it and select your product. You see an Epson Scan window like this: Note: In certain programs, you may see the program’s scan window instead of the Epson Scan window. Select scanning options as necessary. -
Page 33: Selecting Epson Scan Settings
Parent topic: Scanning Scan Modes Epson Scan provides a choice of scan modes with different levels of control over your settings. Full Auto Mode This mode automatically detects the type of content you are scanning, selects settings for it, and saves your scanned image.
-
Page 34: Selecting The Scan Mode
Scanning in Professional Mode Selecting the Scan Mode Select the Epson Scan mode you want to use from the Mode box in the upper right corner of the Epson Scan window: Parent topic: Selecting Epson Scan Settings Scanning in Full Auto Mode When you scan in Full Auto Mode, Epson Scan automatically saves your scanned file in JPEG format in your operating system’s Pictures or My Pictures folder, or opens it in your scanning program.
-
Page 35
You see this window:… -
Page 36
3. Click Scan. Epson Scan scans your original, and saves the file in the selected folder or opens it in your scanning program. If the file was saved directly to your computer, you see the file in the Windows Explorer or OS X Finder, where you can view and print the image, if desired. -
Page 37: Available Image Adjustments — Full Auto Mode
Scanning in Full Auto Mode Scanning in Home Mode When you scan in Home Mode, Epson Scan automatically saves your scanned file in JPEG format in your operating system’s Pictures or My Pictures folder, or opens it in your scanning program. You can select settings, preview, and change the scanned file settings as necessary.
-
Page 38
You see this window: 2. Select the Document Type setting that matches your original, such as Photograph or Text/Line Art. 3. Select the Image Type setting that matches your original. -
Page 39: Selecting A Scan Area — Home Mode
11. Change any of the necessary file save settings and click OK. Epson Scan scans your original, and saves the file in the selected folder or opens it in your scanning program. If the file was saved directly to your computer, you see the file in the Windows Explorer or OS X Finder, where you can view and print the image, if desired.
-
Page 40
You can also use the scan area to select specific Image Adjustments settings for a scanned image. Just be sure to click inside the scan area before selecting the settings. 1. Do one of the following to select your scan area in the Preview image: •… -
Page 41
• Normal preview: Click the Auto Locate icon to create a marquee (dotted line) on the preview image. 2. Do the following, as necessary, to work with the selected scan area: • If the marquee is correct, continue with the next step. •… -
Page 42: Available Image Adjustments — Home Mode
• To delete a marquee, click the marquee, then click the Delete Marquee icon. • Thumbnail preview: To change the preview style, click one of the Size icons. 3. Click inside the scan area and make any necessary settings in the Epson Scan window. Parent topic: Scanning in Home Mode Available Image Adjustments — Home Mode You can select these Image Adjustments options in Epson Scan Home Mode.
-
Page 43: Scanning In Office Mode
Scanning in Home Mode Scanning in Office Mode When you scan in Office Mode, Epson Scan automatically saves your scanned file in JPEG format in your operating system’s Pictures or My Pictures folder, or opens it in your scanning program. You can select settings, preview, and change the scanned file settings as necessary.
-
Page 44
You see this window: 2. Select the Image Type setting that matches your original. 3. Select the Document Source setting indicating where you placed your original. 4. Select the Size and Orientation settings that match your original. 5. Select the Resolution setting you want to use for your scan. -
Page 45: Selecting A Scan Area — Office Mode
10. Change any of the necessary file save settings and click OK. Epson Scan scans your original, and saves the file in the selected folder or opens it in your scanning program. If the file was saved directly to your computer, you see the file in the Windows Explorer or OS X Finder, where you can view and print the image, if desired.
-
Page 46
1. In the Preview window, click the Auto Locate icon to create a marquee (dotted line) on the preview image. 2. Do the following, as necessary, to work with the selected scan area: • If the marquee is correct, continue with the next step. •… -
Page 47: Available Image Adjustments — Office Mode
• To delete a marquee, click the marquee, then click the Delete Marquee icon. • To rotate your original in your scan, click one of the Rotate icons. 3. Click inside each scan area and make any necessary settings in the Epson Scan window. Parent topic: Scanning in Office Mode Available Image Adjustments — Office Mode You can select these Image Adjustments options in Epson Scan Office Mode.
-
Page 48: Scanning In Professional Mode
Scanning in Office Mode Scanning in Professional Mode When you scan in Professional Mode, Epson Scan automatically saves your scanned file in JPEG format in your operating system’s Pictures or My Pictures folder, or opens it in your scanning program.
-
Page 49
You see this window:… -
Page 50: Available Image Types — Professional Mode
12. Change any of the necessary file save settings and click OK. Epson Scan scans your original, and saves the file in the selected folder or opens it in your scanning program. If the file was saved directly to your computer, you see the file in the Windows Explorer or OS X Finder, where you can view and print the image, if desired.
-
Page 51: Available Image Adjustments — Professional Mode
Parent topic: Scanning in Professional Mode Available Image Adjustments — Professional Mode You can select these Adjustments options in Epson Scan Professional Mode. Not all adjustment settings may be available, depending on other settings you have chosen. Click the image adjustment icon to access additional settings.
-
Page 52
Descreening Removes the ripple pattern that might appear in subtly shaded image areas, such as skin tones. This option improves results when scanning magazines or newspapers. (The results of descreening do not appear in the preview image, only in your scanned image.) Color Restoration Restores the colors in faded photos automatically. -
Page 53: Selecting A Scan Size — Professional Mode
1. Click the Preview button to preview your image. 2. In the Epson Scan window, select the size you want your scanned image to be from the Target Size list.
-
Page 54
A marquee (dotted line) appears on your preview image proportioned for the size you selected. 3. Do the following, as necessary, to work with the selected scan area: • To move the marquee, click inside the scan area and drag the marquee where you want it. •… -
Page 55
4. To create a scanned image size that is not available in the Target Size list, click the Customize option. You see this window: 5. Name the custom size, enter the size, click Save, and click OK. Then adjust the marquee on the preview image. -
Page 56: Image Preview Guidelines
Epson Scan. Follow these guidelines to determine the resolution setting you need: • You will enlarge the image as you scan it. If you will enlarge the image using Epson Scan’s Target Size setting, you do not need to increase the Resolution setting.
-
Page 57
• You will scan the image at its original size but enlarge it later in an image-editing program. Increase Epson Scan’s Resolution setting in your scan. Increase the resolution by the same amount you will increase the image size to retain a high image quality. For example, if the resolution is 300 dpi (dots per inch) and you will double the image size later, change the Resolution setting to 600 dpi. -
Page 58: Selecting Scan File Settings
Epson Scan behaves when you scan and save files. The File Save Settings window may appear after you click Scan on the Epson Scan window. You may also be able to access the window by clicking the icon on the Epson Scan window.
-
Page 59: Available Scanned File Types And Optional Settings
A standard image file format for most OS X programs. PRINT Image Matching II (*.jpg or *.tif) File formats that include Epson PRINT Image Matching II data for enhanced quality and a wider color range (does not affect the way the image displays on the screen).
-
Page 60: Scanning Special Projects
Overwrite any files with the same name Select to overwrite previous files with the same names. Show this dialog box before next scan Select to have the File Save Settings window appear automatically before you scan (in certain Epson Scan modes). Open image folder after scanning Select to have Windows Explorer or OS X Finder automatically open to the folder where your scanned image is saved after scanning.
-
Page 61: Scanning Using Easy Photo Scan
You can use Easy Photo Scan to easily scan your originals, edit the scanned images, and upload them to Facebook or other online destinations. Note: With OS X, in addition to scanning with Image Capture, you can download and install Epson Scan scanning software. Epson Scan provides additional image adjustment and photo correction features for enhancing scanned images, and provides an interface for TWAIN-compliant OCR scanning software.
-
Page 62
You see a window like this: 3. Click the Scan icon. Your scanning program launches. 4. Click Scan in the window that appears to scan your original. The scanned image is displayed in the Easy Photo Scan window with an automatically generated name. -
Page 63: Uploading Scanned Images To Facebook
8. When you finish scanning, click one of the destination icons to upload the images. Note: You may need to click the arrow next to the icons in order to see all of them. The available icons may vary, depending on the software version you are using. Parent topic: Scanning to Online Destinations Using Easy Photo Scan Related tasks…
-
Page 64
You see a window like this: Note: If you have already configured a Facebook account in Easy Photo Scan, you can select the Setting Name or Destination Name for the account, click Login if necessary, and click Send to upload your images. 3. -
Page 65: Uploading Scanned Images To Picasa
10. Click Send to upload the images to your Facebook account, or click Cancel to cancel the operation. Parent topic: Scanning to Online Destinations Using Easy Photo Scan Related references Epson JPEG File Settings Related tasks Scanning Using Easy Photo Scan Uploading Scanned Images to Picasa You can configure a Picasa account for use with Easy Photo Scan and upload your scanned images.
-
Page 66
You see a window like this: Note: If you have already configured a Picasa account in Easy Photo Scan, you can select the Setting Name or Destination Name for the account, click Login if necessary, and click Send to upload your images. 3. -
Page 67: Uploading Scanned Images To Evernote
13. Click Send to upload the images to your Picasa account, or click Cancel to cancel the operation. Parent topic: Scanning to Online Destinations Using Easy Photo Scan Related references Epson JPEG File Settings Related tasks Scanning Using Easy Photo Scan Uploading Scanned Images to Evernote You can configure an Evernote account for use with Easy Photo Scan and upload your scanned images to it (Windows only).
-
Page 68
You see a window like this: Note: You must install Evernote before you can use it with Easy Photo Scan. Note: If you have already configured an Evernote account in Easy Photo Scan, you can select the Setting Name or Destination Name for the account and click Send to upload your images. 3. -
Page 69: Uploading Scanned Images To Sugarsync
8. Click Send to upload the images to your Evernote account, or click Cancel to cancel the operation. Parent topic: Scanning to Online Destinations Using Easy Photo Scan Related references Epson JPEG File Settings Related tasks Scanning Using Easy Photo Scan Uploading Scanned Images to SugarSync You can configure a SugarSync account for use with Easy Photo Scan and upload your scanned images.
-
Page 70
You see a window like this: Note: If you have already configured a SugarSync account in Easy Photo Scan, you can select the Setting Name or Destination Name for the account and click Send to upload your images. 3. Enter the account information in the E-Mail Address and Password fields. 4. -
Page 71: Uploading Scanned Images To A Web Folder
Parent topic: Scanning to Online Destinations Using Easy Photo Scan Related references Epson JPEG File Settings Epson TIFF and Multi-TIFF File Settings Related tasks Scanning Using Easy Photo Scan Uploading Scanned Images to a Web Folder You can upload your scanned images to a Web Folder (WebDAV) using Easy Photo Scan.
-
Page 72
You see a window like this: Note: If you have already configured a Web Folder account in Easy Photo Scan, you can select the Setting Name or Destination Name for the account and click Send to upload your pictures. 3. Enter the Web Folder URL in the Address field. 4. -
Page 73: Uploading Scanned Images To Email
Parent topic: Scanning to Online Destinations Using Easy Photo Scan Related references Epson JPEG File Settings Epson TIFF and Multi-TIFF File Settings Related tasks Scanning Using Easy Photo Scan Uploading Scanned Images to Email You can save your scanned images to a local network folder and send them by email using Easy Photo Scan.
-
Page 74: Saving Scanned Images To A Folder
Parent topic: Scanning to Online Destinations Using Easy Photo Scan Related references Epson JPEG File Settings Epson TIFF and Multi-TIFF File Settings Related tasks Scanning Using Easy Photo Scan Saving Scanned Images to a Folder You can save your scanned images to a local network folder using Easy Photo Scan.
-
Page 75: Epson Jpeg File Settings
Parent topic: Scanning to Online Destinations Using Easy Photo Scan Related references Epson JPEG File Settings Epson TIFF and Multi-TIFF File Settings Related tasks Scanning Using Easy Photo Scan Epson JPEG File Settings You can select from the following settings in the JPEG settings window in Easy Photo Scan.
-
Page 76
Note: The available settings may vary, depending on the operating system you are using. Setting Description Image Quality Options Specifies the compression level. The file size increases with higher quality. (unlabelled in OS X) Encoding Specifies the encoding method. Standard: Images are rendered from the top to the bottom when displayed on a web browser. -
Page 77: Epson Tiff And Multi-Tiff File Settings
Epson TIFF and Multi-TIFF File Settings You can select from the following settings in the TIFF settings window in Easy Photo Scan. Note: The available settings may vary, depending on the operating system you are using. Setting Description Byte Order Specifies the operating system where the scanned image will be used.
-
Page 78: Restoring Photo Colors As You Scan
9. Click Close to exit the Epson Scan window, if necessary. Epson Scan scans your original, and saves the color-restored file in the selected folder or opens it in your scanning program. If the file was saved directly to your computer, you see the file in the Windows Explorer or OS X Finder, where you can view and print the image, if desired.
-
Page 79
• OS X: Open the Applications folder, select the Epson Software folder, and select Document Capture. You see a window like this: 2. Click the Scan icon. 3. Select any displayed scan settings you want to use. Note: See the Help information in Document Capture Pro or Document Capture for details. -
Page 80: Scanning Multi-Page Originals As Separate Files — Windows
2. Do one of the following to start Document Capture Pro: • Windows 8.x: Navigate to the Apps screen and select Document Capture Pro. • Windows (other versions): Click or Start, and select All Programs or Programs. Select EPSON Software, then select Document Capture Pro.
-
Page 81
You see this window: 3. Click the Scan icon. 4. Select any displayed scan settings you want to use. Note: See the Help information in Document Capture Pro for details. 5. Click Scan. You see a preview of your scan in the Document Capture Pro window. 6. -
Page 82: Scanning Two Originals Onto One Sheet (Stitching Images) (Windows)
9. Select the method you used to separate the originals, select a folder name specification, and click 10. Select any additional settings and click OK or Send. Your originals are saved into separate files as specified. Parent topic: Scanning Special Projects Scanning Two Originals onto One Sheet (Stitching Images) (Windows) You can scan both sides of a double-sided or folded original with ArcSoft Scan-n-Stitch Deluxe (Perfection V39).
-
Page 83: Scanning To Pdf File (Scanner Button)
Scanning to a PDF File Using a Scanner Button You can scan to a PDF (Portable Document Format) file by pressing the PDF button on your scanner. You can select the following options as you scan to PDF: • Scan multiple pages to one PDF file •…
-
Page 84
You see this window: 4. Select the Image Type setting for the type of original you are scanning. 5. Select the Size, Orientation, and Resolution settings for your scan. 6. Select any of the available Image Adjustments settings. 7. Click File save settings. -
Page 85
You see this window: 8. To change any of the displayed PDF Image Format settings, click the Options button. -
Page 86
You see this window: 9. Select one of the following options on the General tab to indicate the number of PDF files you want to create: • To create one PDF file of all the scanned pages, select Create file with all pages. •… -
Page 87: Available Image Adjustments — Scan To Pdf Settings
• If you need to scan additional pages in a document, place additional pages on the product for scanning, click Scan, and repeat until you have scanned all the pages. When you are finished, click Finish. Epson Scan saves the files in the selected folder. Available Image Adjustments — Scan to PDF Settings Parent topic:…
-
Page 88: Using The Scanner As A Copier — Copy Utility
• Windows (other versions): Click or Start, and select All Programs or Programs. Select EPSON Software, then select Copy Utility. • OS X: Open the Applications folder, select the Epson Software folder, and select Copy Utility. • Press the copy button on the scanner.
-
Page 89
You see a window like this: 2. Click the Scan icon. -
Page 90
You see a window like this: Note: If you started the scan from a scanner button, the Epson Scan window opens automatically. If you have previously used Epson Scan, it may start in a different mode. 3. Select any scan settings you want to use. -
Page 91
You see a thumbnail of your scan in the Copy Utility window. You may need to click Close on the Epson Scan window to display the thumbnail. 5. If you would like to scan additional originals and add them to the current captured images, click Scan again. -
Page 92: Cleaning And Transporting Your Scanner
Cleaning and Transporting Your Scanner See these sections if you need to clean or transport your scanner. Cleaning Your Scanner Transporting Your Scanner Cleaning Your Scanner To keep your product working at its best, you should clean it several times a year. Caution: Do not use a hard brush, alcohol, or paint thinner to clean the product or you may damage it.
-
Page 93
1. Make sure the carriage is in the home position on the upper side of the scanner. If the carriage is not in the home position, turn on the scanner and wait until the carriage moves to the home position. 2. -
Page 94: Solving Problems
Solving Problems Check these sections for solutions to problems you may have using your product. Scanner Light Status Solving Scanning Problems Solving Scanned Image Quality Problems When to Uninstall Your Scanner Software Where to Get Help Scanner Light Status You can often diagnose problems with your scanner by checking the status light. Light The status light…
-
Page 95: Solving Scanning Problems
• Make sure your scanning software is installed correctly. • If the status light is still flashing, turn off the scanner, then turn it on again. If the error continues, the scanner may be malfunctioning. Contact Epson for support. The scanner is turned off. Parent topic:…
-
Page 96: Scanner Buttons Do Not Work As Expected
• If you are using OS X and have another scanner connected to your computer (including an all-in-one product), the scanner will not power up automatically. Start Epson Scan to turn on the scanner. Parent topic: Solving Scanning Problems Related tasks…
-
Page 97: Cannot Start Epson Scan
• If you connected the scanner using a USB cable, make sure it is connected directly to your computer or through only one USB hub. • Make sure you do not have multiple versions of Epson Scan installed. If you do, uninstall both versions and install one version.
-
Page 98: Cannot Scan Using Thumbnail Preview
If your scanned image consists only of a few dots, try these solutions: • Make sure you placed your original for scanning facing the correct way. • If you are scanning using the Epson Scan Black & White setting, adjust the Threshold setting and scan again.
-
Page 99: Line Of Dots Appears In All Scanned Images
• Do not move your original or your product during scanning. • Place it on a flat, stable surface that extends beyond the base of the product in all directions. • Adjust these Epson Scan settings (if available) and try scanning again: • Select the Unsharp Mask setting.
-
Page 100: Image Is Too Dark
• Auto Exposure • Brightness • Histogram Adjustment • Click Customize, then select the Color tab and adjust these Epson Scan settings (if available) • Display Gamma • Continuous Auto Exposure • Click Recommended Value to return the Auto Exposure Level setting to its default value.
-
Page 101: Scanned Image Colors Do Not Match Original Colors
Scan Area is Not Adjustable in Thumbnail Preview If you cannot adjust the scan area while viewing a Thumbnail preview in Epson Scan, try these solutions: • Create a scan area by drawing a marquee on your preview image and adjusting it as necessary.
-
Page 102: Scanned Image Edges Are Cropped
If characters in your scanned images are not recognized during OCR conversion, try these solutions: • Make sure your original is straight. • Adjust these Epson Scan settings (if available) and try scanning again: • Select Text Enhancement • Select the correct Image Type setting •…
-
Page 103: Uninstalling Scanner Software — Os X
Select the scanner software program and click Change/Remove. 4. Restart your computer, then see the Start Here sheet to re-install your software. Note: If you find that re-installing your scanner software does not solve a problem, contact Epson. Parent topic:…
-
Page 104: Where To Get Help
Purchase Supplies and Accessories You can purchase genuine Epson accessories at epson.com (U.S. sales) or epson.ca (Canadian sales). You can also purchase accessories from an Epson authorized reseller. To find the nearest one, call 800- GO-EPSON (800-463-7766). Parent topic: Solving Problems…
-
Page 105: Technical Specifications
(Fast user switching on OS X is not supported.) Interface Macintosh USB Note: Epson Scan does not support the UNIX File System (UFS) for OS X. Install Epson Scan on a disk or in a partition that does not use UFS.
-
Page 106: General Specifications
Parent topic: Technical Specifications General Specifications Scanner type Flatbed, color Photoelectric device Effective pixels 40800 × 56160 pixels at 4800 dpi Scanning area may be restricted if resolution setting is large. Document size Maximum: 8.5 × 11.7 inches (216 × 297 mm); US letter or A4 Scanning resolution 4800 dpi (main scan) 4800 dpi (sub scan)
-
Page 107: Electrical Specifications
Electrical Specifications Note: Check the label on the scanner for voltage information. Power supply USB bus power Rated input voltage DC 5 V Rated input current 500 mA Power consumption Operating: 2.5 W Ready mode: 1.1 W Power off mode: 0.0125 W Parent topic: Technical Specifications Environmental Specifications…
-
Page 108: Safety And Approvals Specifications
Parent topic: Technical Specifications Safety and Approvals Specifications United States EMC: FCC part 15 Subpart B class B Canada EMC: CAN/CSA-CEI/IEC CISPR 22 Class B Parent topic: Technical Specifications…
-
Page 109: Notices
Notices Check these sections for important notices about your scanner. Note: Epson offers a recycling program for end of life products. Please go to this site for information on how to return your products for proper disposal. Important Safety Instructions…
-
Page 110: Default Delay Times For Power Management For Epson Products
Parent topic: Notices Default Delay Times for Power Management for Epson Products This product will enter sleep mode after a period of nonuse. The time interval has been set at the factory to ensure that the product meets Energy Star standards of energy efficiency, and cannot be modified by the consumer.
-
Page 111: Trademarks
Seiko Epson Corporation. The information contained herein is designed only for use with this Epson product. Epson is not responsible for any use of this information as applied to other products.
-
Page 112: Libtiff Software Acknowledgment
Seiko Epson Corporation shall not be held liable for any damage resulting from electromagnetic interference that occurs from the use of any interface cables other than those designated as Epson approved Products by Seiko Epson Corporation. This information is subject to change without notice.
-
Page 113: Copyright Attribution
Copyright Attribution © 2015 Epson America, Inc. 1/15 CPD-42186 Parent topic: Copyright Notice…